
LED-DECKENLEUCHTE
Kurzanleitung
SMART LED CEILING
LIGHT
Quick start guide
PLAFONNIER À LED
Guide de démarrage rapide
LED-PLAFONDLAMP
Startgids
LAMPA SUFITOWA LED
Skrócona instrukcja obsługi
IAN 360060_2010
LED-DECKENLEUCHTE /
SMART LED CEILING LIGHT /
PLAFONNIER À LED

DE/AT/CH Kurzanleitung Seite 5
GB/IE Quick start guide Page 21
FR/BE Guide de démarrage rapide Page 37
NL/BE Startgids Pagina 53
PL Skrócona instrukcja obsługi Strona 69

Diese Kurzanleitung ist fester Bestandteil der Bedienungs-
anleitung. Sie dient dazu, dieses Produkt sofort in Betrieb nehmen zu
können. Lesen Sie vor der Verwendung die Bedienungs anleitung und
beachten Sie insbesondere die Sicherheitshinweise.
Um alle Funktionen des Produkts vollständig nachlesen zu können, wählen
Sie bitte den Link Bedienungsanleitung im App-Menü Ich aus. Sie
können die vollständige Bedienungsanleitung auch von der folgenden
Website herunterladen: http://www.lidl-service.com
Bewahren Sie diese Kurzanleitung an einem sicheren Ort auf. Händigen
Sie bei Weitergabe des Produkts an Dritte alle Unterlagen mit aus.
This quick start guide is a fixed part of the operating instructions,
which enables you to start up your product immediately. Read the
operating instructions before use, and pay particular attention to the
safety instructions.
In order to fully understand all functions of the product, please select the
User Manual link in the app’s Me tab. You may also download the
full operating instructions from this website: http://www.lidl-service.com
Keep this quick start guide in a safe place. When passing this product on
to third parties, be sure to include all documentation.
Ce petit guide de démarrage rapide fait partie intégrante du
mode d’emploi. Il sert à la mise en service immédiate de ce produit.
Lisez le mode d’emploi avant l’utilisation et respectez en particulier les
consignes de sécurité.
Pour pouvoir consulter toutes les fonctions du produit dans leur intégralité,
veuillez sélectionner le lien Moded’emploi dans le menu d’application
Moi. Vous pouvez également télécharger le mode d’emploi complet
sur le site Web suivant: http://www.lidl-service.com
Conservez ce petit guide de démarrage rapide dans un endroit sûr. Lors
de la remise de produit à des tiers, remettez-leur tous les documents.

Deze snelstartgids is een vast onderdeel van de
gebruiksaanwijzing. De gids dient ervoor om het product direct in gebruik
te kunnen nemen. Lees vóór het gebruik de gebruiksaanwijzing en neem
vooral de veiligheidstips in acht.
Kies de link Gebruiksaanwijzing in het menu Ik van de app
om alle functies van het product volledig te kunnen nalezen. U kunt de
volledige gebruiksaanwijzing ook downloaden van de volgende website:
http://www.lidl-service.com
Bewaar deze snelstartgids op een veilige plaats. Als u het product
doorgeeft aan een derde, doe dat dan ook met alle bijlagen.
Niniejsza skrócona instrukcja obsługi jest integralną częścią instrukcji
obsługi. Umożliwia natychmiastowe uruchomienie produktu. Przed
użyciem należy przeczytać instrukcję obsługi i zwrócić szczególną
uwagę na zawarte w niej instrukcje bezpieczeństwa.
Aby móc w pełni korzystać ze wszystkich funkcji produktu, wybierz łącze
Instrukcja obsługi w menu Ja aplikacji. Pełną instrukcję obsługi
można też pobrać z tej strony: http://www.lidl-service.com
Tę skróconą instrukcję obsługi należy przechowywać w bezpiecznym
miejscu. Przekazując produkt osobom trzecim należy przekazać wszystkie
dokumenty.

5DE/AT/CH
LED-DECKENLEUCHTE
Bestimmungs gemäßer Gebrauch ........... Seite 6
Lieferumfang ................................... Seite 6
Sie benötigen .................................. Seite 6
Teilebeschreibung ............................. Seite 7
Technische Daten .............................. Seite 9
Vor der Montage .............................. Seite 11
Inbetriebnahme (Fernbedienung) ........... Seite 11
Montage ........................................ Seite 12
Produkt und Mobil gerät koppeln ........... Seite 15
Fernbedienung und Mobil gerät koppeln ... Seite 16
Produkt vom Mobil gerät entkoppeln....... Seite 17
Produkt manuell zurücksetzen (Reset) ..... Seite 17
Entsorgung ..................................... Seite 18
Vereinfachte EU-Konformitäts erklärung ... Seite 20
V 2.0

6 DE/AT/CH
Bestimmungs-
gemäßer Gebrauch
Diese LED-Deckenleuchte
(nachfolgend „Produkt“ genannt)
dient zur Beleuchtung von
Innenräumen.
Geeignet Nicht geeignet
Privater
Gebrauch
Industrielle/gewerbliche
Zwecke
Einsatz in tropischen
Klimazonen
Jede andere Verwendung gilt als
unsachgemäß. Ansprüche aufgrund
unsachgemäßer Verwendung oder
aufgrund unbefugter Änderungen
am Produkt werden vom Garantie-
umfang nicht erfasst. Eine derartige
Verwendung erfolgt auf Ihre eigene
Gefahr.
Die Steuerung und
Einrichtung des Produkts
erfolgt über die App
Lidl Home.
Lieferumfang
1 Deckenleuchte
3 LED-Leuchten (GU10)
1 Fernbedienung
1 Wandhalterung
(Fernbedienung)
1 Batterie (CR2450)
4 Dübel (Halterungsschiene)
4 Schrauben (Halterungsschiene)
2 Dübel (Wandhalterung)
2 Schrauben (Wandhalterung)
2 Doppelseitige Klebebänder
(Wandhalterung)
1 Bohrschablone
1 Saugnapf
1 Kurzanleitung
1 Sicherheitshinweise
Sie benötigen
Gateway:
(Separat erhältlich
Bitte besuchen Sie die
Lidl-Website für weitere
Einzelheiten)
Router:
2,4 GHz,
IEEE 802.11b/g/n
Mobilgerät:
iOS 9.0 oder höher
Android 5.0 oder höher
Ø 5 mm
Ø 6 mm

7DE/AT/CH
Teilebeschreibung
A
[4][5][6]
HG07875B HG07875A /
HG07875C
[1]
[2]
[3]
[1] Deckenleuchte
[2] LED-Lampe
[3] Halterungsschiene
[4] Dübel (Halterungsschiene)
[5] Schrauben (Halterungsschiene)
[6] Saugnapf

8 DE/AT/CH
B
[7] [8] [] []
[][][][][][][] []
[9]
[7] Taste (Ein / Farb-
temperatur
umschalten:
warmweiß, mittleres
warmweiß, mittleres
kaltweiß, kaltweiß)
[8] Taste (Aus)
[9] LED
[] Doppelseitige Klebebänder
[] Wandhalterung
[] Dübel (Wandhalterung)
[] Schrauben (Wandhalterung)
[] Schraubenloch
[] Batteriefach
[] Batteriefachdeckel
[] Taste (Helligkeit
verringern)
[] Fernbedienung
[] Taste (Helligkeit erhöhen)
Nicht abgebildet:
[] Bohrschablone

9DE/AT/CH
Technische Daten
Modell HG07875A HG07875B HG07875C
Ausführung Schiene Rund Schiene
Farbe Weiß Weiß Schwarz
Basis-Abmessungen (mm) 460 x 90
(L x B)
200
(Ø)
460 x 90
(L x B)
Strahler (Ø) 55 mm
Betriebsspannung 230 V~, 50 Hz
Lampen sockel GU10 (x3)
Leuchtmittel LED, jeweils max. 5 W
Schutzklasse I
Fernbedienung
Modell HG06323
Betriebsspannung 1 x 3 V Lithium-Batterie (CR2450)
Kommunikationsprotokoll ZigBee 3.0
Empfangsreichweite ca. 70 m (freie Fläche)
Umgebungstemperatur +5 bis +35 °C
Frequenzbereich 2405 bis 2480 MHz
Max. Sendeleistung 13 dBm

10 DE/AT/CH
LED-Lampe
Modell HG07878A
Nennleistung 5 W
Energieeffizienzklasse A+
Betriebsspannung 230 V~, 50 Hz
Lichtstrom gesamt (6500 K) 350 lm (90° Kegel: 280 lm)
Abstrahlwinkel 38°
Betriebszeit 30000 h
Schaltzyklen (ein/aus) 100000
Farbtemperatur 2000 bis 6500 K
Aufwärmzeit (60 %) < 1 s = 60 % Leuchtkraft
Helligkeitssteuerung Das Produkt ist nur über die App oder die
Fernbedienung dimmbar.
Abmessungen (mm) (Ø x L) 50 x 55
Farbwiedergabeindex Ra≥ 95
Lampensockel GU10
Kommunikationsprotokoll ZigBee 3.0
Empfangsreichweite ca. 70 m (freie Fläche)
Umgebungstemperatur –10 bis +40 °C
Frequenzbereich 2405 bis 2480 MHz
Max. Sendeleistung 13 dBm

11DE/AT/CH
kWh/1000h
Y IJA
IE IA
A++
A+
A
B
C
D
E
A+
5
Detaillierte Informationen zur
Ökodesignrichtlinie (ErP) finden Sie
unter www.owim.com.
Vor der Montage
Wichtig: Installation nur durch
Personen mit einschlägigen
elektrotechnischen Kenntnissen und
Erfahrungen!
Sicherung entfernen oder
Leitungsschutzschalter im
Sicherungskasten ausschalten
(O-Stellung).
Spannungsfreiheit überprüfen
(Werkzeug: Spannungs prüfer).
Prüfen, ob das Montage material
für den Montage untergrund
geeignet ist.
Prüfen, ob der Montage unter-
grund zum Tragen des Produkts
geeignet ist.
Inbetriebnahme
(Fernbedienung)
Entfernen Sie vor der ersten
Verwendung den Isolierstreifen
aus dem Batteriefach [].

12 DE/AT/CH
Montage
C
HG07875B
HG07875A
HG07875C
Schrauben an Gehäuseseite
lösen.
Halterungsschiene [3]
entnehmen und gegen die
Decke halten.
Position der Bohr löcher
durch die Schraublöcher
der Halterungsschiene [3]
markieren.
Ca. 30 mm tiefe Löcher in
die markierten Stellen bohren
(Werkzeug: Steinbohrer,
Ø 6 mm).
Dübel [4] in Bohrlöcher
einsetzen.
Halterungsschiene [3] gegen
die Decke halten.
Halterungsschiene [3] mit
Schrauben [5] fixieren.

13DE/AT/CH
DHG07875B
HG07875A
HG07875C
4 Schrauben der Anschluss box lösen.
Deckel und Gummi dichtung entnehmen.
Kabel von außen durch Öffnung in der Anschluss box schieben.
Lüsterklemme mit Kabel adern verbinden. Lüster klemme:
L = spannungs führender Leiter
N = Null leiter
= Schutz leiter
Gummidichtung und Deckel mit 4 Schrauben auf Anschluss box
befestigen.

14 DE/AT/CH
E
HG07875A
HG07875C
HG07875B
Leuchtengehäuse auf
Halterungsschiene [3] setzen.
Leuchtengehäuse mit Schrauben
fixieren.
LED-Lampen [2] sind
vorinstalliert. Prüfen, ob
LED-Lampen ordnungsgemäß
installiert sind.
Leuchtköpfe ausrichten.
Leitungsschutzschalter im
Sicherungskasten einschalten
(I-Stellung).

15DE/AT/CH
Produkt und Mobil-
gerät koppeln
HINWEISE:
Die Android-Version der App
folgt den gleichen Prinzipien
wie die iOS-Version; es kann
zu Diskrepanzen zwischen den
beiden Plattformen kommen,
wie z. B. leicht unterschiedliche
Bildschirmbefehle oder Symbole.
Eine Aktualisierung der Firmware
kann zu Änderungen der
Funktionalität der App führen.
Eine aktualisierte
Bedienungsanleitung finden Sie
hier:
Reiter
{
Ich
}
:
{
Bedienungsanleitung
}
antippen.
Vorbereitung
App Lidl Home installieren
und Gateway einrichten
( Gate way-Bedienungs-
anleitung).
1. Lichtschalter ein.
LED-Lampen [2] flackern
langsam.
2. Bereit zur Kopplung.
3. App Lidl Home öffnen.
4. Reiter
{
Zuhause
}
:
antippen (weitere Geräte
hinzufügen).
5. Kategorie auswählen:
{
Beleuchtung
}
6. Auswählen: LED-Deckenleuchte
– iOS:
{
GU10 weiß
}
– Android:
{
GU10 weiß
}
7. Gateway auswählen.
Nur notwendig, falls Sie 2 oder
mehrere Gateways besitzen.

16 DE/AT/CH
8. App-Anweisungen folgen.
9. Verbindung wird hergestellt.
10. Produkt benennen: antippen
und Namen eingeben.
11. Einen Raum antippen, um
Standort des Produkts
festzulegen (ausgewählter Raum
wird grau hinterlegt).
Falls mehr als ein Produkt
angeschlossen sein sollte:
Sie können das Produkt
umbenennen und seinen
Standort definieren.
12.
{
Fertig
}
antippen.
13. Kopplung abgeschlossen.
14. Zum Home-Bildschirm wechseln:
{
<
}
antippen.
HINWEIS: Das Produkt
bietet 3 einzelne Lichtquellen,
daher sollten insgesamt 3 LEDs
gekoppelt werden.
– Option 1: Steuern Sie die
3 LEDs als Gruppe an: siehe
Abschnitt „Produktgruppe
erstellen”.
– Option 2: Steuern Sie jede
LED einzeln an.
Fernbedienung und
Mobil gerät koppeln
1. Schutzstreifen aus
Batteriefach [] ziehen.
2. Tasten [8] und [7] 5 s
lang gedrückt halten, bis LED [9]
blinkt.
3. Bereit zur Kopplung.
4. App Lidl Home öffnen.
5. Reiter
{
Zuhause
}
:
antippen (weitere Geräte
hinzufügen).
6. Kategorie auswählen:
{
Andere
}
7. Auswählen: Fernbedienung
– iOS:
{
Fernbedienung
}
– Android:
{
Fernbedienung
}
8. Gateway auswählen.
Nur notwendig, falls Sie 2 oder
mehrere Gateways besitzen.
9. App-Anweisungen folgen.
10. Verbindung wird hergestellt.

17DE/AT/CH
11. Produkt benennen: antippen
und Namen eingeben.
12. Einen Raum antippen, um
Standort des Produkts
festzulegen (ausgewählter Raum
wird grau hinterlegt).
13.
{
Fertig
}
antippen.
14. Kopplung abgeschlossen.
15. Zum Home-Bildschirm wechseln:
{
<
}
antippen.
Produkt vom Mobil-
gerät entkoppeln
1. App Lidl Home öffnen.
2. Reiter
{
Zuhause
}
:
Auswählen:
–
{
GU10 weiß
}
oder
–
{
Fernbedienung
}
3. antippen (oben rechts).
4.
{
Gerät entfernen
}
antippen.
Auswählen:
–
{
Trennen
}
oder
–
{
Trennen und Daten
löschen
}
( „Erweiterte Funktionen“
in der vollständigen
Bedienungsanleitung)
5.
{
Bestätigen
}
antippen.
Produkt manuell
zurücksetzen (Reset)
Lampen
1. Lichtschalter 3x ein/aus.
2. Lichtschalter ein.
Lampe flackert langsam =
Reset erfolgreich.
Fernbedienung
1. Tasten [8] und [7] 5 s
lang gedrückt halten.
2. LED [9] blinkt =
Reset erfolgreich.

18 DE/AT/CH
Diese Funktion setzt nur die
Daten zurück, die lokal im
Produkt gespeichert sind.
Falls Sie den Cloud-Speicher
ebenfalls zurücksetzen wollen,
führen Sie einen Reset über die
App durch (siehe „Erweiterte
Funktionen“,
{
Trennen und
Daten löschen
}
in der vollständigen
Bedienungsanleitung).
Falls das Produkt zuvor mit der
Fernbedienung gekoppelt wurde
(ohne Gateway/App):
Produkt entkoppeln = siehe
„Entkopplung von
Fernbedienung und Lampen
(ohne Gateway/App)“.
Entsorgung
Bevor Sie das Produkt an
jemanden weitergeben,
entsorgen oder dem Hersteller
zurückgeben, stellen Sie sicher,
dass alle Daten vom Produkt und
von der Cloud gelöscht wurden.
Beziehen Sie sich dazu auf das
folgende Kapitel der vollen
Bedienungsanleitung:
„Erweiterte Funktionen“,
Menüpunkt:
{
Trennen und Daten
loschen
}
Die Verpackung besteht aus
umweltfreundlichen Materialien,
die Sie über die örtlichen
Recyclingstellen entsorgen können.
Beachten Sie die
Kennzeichnung der
Verpackungsmaterialien
bei der Abfalltrennung,
diese sind gekennzeichnet
mit Abkürzungen (a)
und Nummern (b) mit
folgender Bedeutung:
1–7: Kunststoffe / 20–22:
Papier und Pappe /
80–98: Verbundstoffe.

19DE/AT/CH
Das Produkt und die
Verpackungsmaterialien
sind recycelbar, entsorgen
Sie diese getrennt für eine
bessere Abfallbehandlung.
Das Triman-Logo gilt nur
für Frankreich.
Möglichkeiten zur
Entsorgung des
ausgedienten Produkts
erfahren Sie bei Ihrer
Gemeinde- oder
Stadtverwaltung.
Werfen Sie Ihr Produkt,
wenn es ausgedient
hat, im Interesse des
Umweltschutzes nicht in
den Hausmüll, sondern
führen Sie es einer
fachgerechten Entsorgung
zu. Über Sammelstellen
und deren Öffnungszeiten
können Sie sich bei Ihrer
zuständigen Verwaltung
informieren.
Defekte oder verbrauchte
Batterien / Akkus müssen gemäß
Richtlinie 2006/66/EG und deren
Änderungen recycelt werden.
Geben Sie Batterien / Akkus
und / oder das Produkt über die
angebotenen Sammeleinrichtungen
zurück.
Umweltschäden
durch falsche
Entsorgung der
Batterien / Akkus!
Batterien / Akkus dürfen nicht über
den Hausmüll entsorgt werden.
Sie können giftige Schwermetalle
enthalten und unterliegen
der Sondermüllbehandlung.
Die chemischen Symbole der
Schwermetalle sind wie folgt:
Cd = Cadmium, Hg = Quecksilber,
Pb = Blei. Geben Sie deshalb
verbrauchte Batterien / Akkus bei
einer kommunalen Sammelstelle ab.

20 DE/AT/CH
Vereinfachte
EU-Konformitäts-
erklärung
Wir, OWIM GmbH & Co. KG,
Stiftsbergstraße 1, 74167 Neckarsulm,
DEUTSCHLAND, erklären in alleini-
ger Verantwortung, dass das Produkt
– LED-DECKENLEUCHTE
HG07875A, HG07875B,
HG07875C
– FERNBEDIENUNG
HG06323
den EU-Richtlinien 2014/53/EU,
2011/65/EU und 2009/125/EG
entspricht.
Den vollen Text der EU-Konformitäts-
erklärung finden Sie unter folgender
Internetadresse: www.owim.com

21GB/IE
SMART LED CEILING LIGHT
Intended use ................................... Page 22
Scope of delivery .............................. Page 22
You will need................................... Page 22
Description of parts............................ Page 23
Technical data .................................. Page 25
Before assembly............................... Page 27
Start-up (remote control) ..................... Page 27
Assembly ....................................... Page 28
Pairing product and mobile device.......... Page 31
Pairing remote control and mobile device . Page 32
Unpairing product from mobile device ..... Page 33
Resetting product manually.................. Page 33
Disposal......................................... Page 34
Simplified EU declaration of conformity .... Page 36

22 GB/IE
Intended use
This Smart LED ceiling light
(hereinafter called “product”) is
used for lighting of interiors.
Suitable Not suitable
Private use Industrial/
commercial
purposes
Use in tropical
climates
Any other use is considered
improper. Any claims resulting from
improper use or due to unauthorised
modification of the product will be
considered unwarranted. Any such
use is at your own risk.
The Lidl Home app is
required to control and set
up the product.
Scope of delivery
1 Ceiling light
3 LED luminaries (GU10)
1 Remote control
1 Wall bracket (remote control)
1 Battery (CR2450)
4 Dowels (mounting rail)
4 Screws (mounting rail)
2 Dowels (wall bracket)
2 Screws (wall bracket)
2 Double-sided adhesive tapes
(wall bracket)
1 Drill template
1 Suction cup
1 Quick start guide
1 Safety instructions
You will need
Gateway:
(Sold separately.
Please visit Lidl website
for further details)
Router:
2.4 GHz,
IEEE 802.11b/g/n
Mobile device:
iOS 9.0 or higher
Android 5.0 or higher
Ø 5 mm
Ø 6 mm

23GB/IE
Description of parts
A
[4][5][6]
HG07875B HG07875A /
HG07875C
[1]
[2]
[3]
[1] Ceiling light
[2] LED lamp
[3] Mounting rail
[4] Dowels (mounting rail)
[5] Screws (mounting rail)
[6] Suction cup

24 GB/IE
B
[7] [8] [] []
[][][][][][][] []
[9]
[7] button (On / Toggle
colour temperature:
warm white,
medium warm
white, medium cool
white, cool white)
[8] button (Off)
[9] LED
[] Double-sided adhesive tapes
[] Wall bracket
[] Dowels (wall bracket)
[] Screws (wall bracket)
[] Wall mounting hole
[] Battery compartment
[] Battery compartment cover
[] button (reduce brightness)
[] Remote control
[] button (increase
brightness)
Not illustrated:
[] Drill template

25GB/IE
Technical data
Model HG07875A HG07875B HG07875C
Type Rail Round Rail
Colour White White Black
Base measurements (mm) 460 x 90
(L x W)
200
(Ø)
460 x 90
(L x W)
Spot head (Ø) 55 mm
Operating voltage 230 V~, 50 Hz
Lamp socket GU10 (x3)
Luminary LED, max. 5 W each
Protection class I
Remote control
Model HG06323
Operating voltage 1 x 3 V Lithium battery (CR2450)
Communication protocol ZigBee 3.0
Reception range approx. 70 m (free area)
Ambient temperature +5 to +35 °C
Frequency band 2405 to 2480 MHz
Max. transmitted power 13 dBm

26 GB/IE
LED lamp
Model HG07878A
Rated wattage 5 W
Energy saving class A+
Operating voltage 230 V~, 50 Hz
Total luminous flux (6500 K) 350 lm (90° cone: 280 lm)
Beam angle 38°
Life 30000 h
Switching cycles (on/off) 100000
Colour temperature 2000 to 6500 K
Warm-up time (60 %) < 1 s = 60 % light
Brightness control The product is dimmable via the app or
the remote control only.
Measurements (mm) (Ø x L) 50 x 55
Colour rendering value Ra≥ 95
Lamp socket GU10
Communication protocol ZigBee 3.0
Reception range approx. 70 m (free area)
Ambient temperature –10 to +40 °C
Frequency band 2405 to 2480 MHz
Max. transmitted power 13 dBm

27GB/IE
kWh/1000h
Y IJA
IE IA
A++
A+
A
B
C
D
E
A+
5
Detailed information on the
Ecodesign Directive (ErP) can be
found at www.owim.com.
Before assembly
Important: The product must
only be installed by people with
relevant electrical knowledge and
experience!
Remove fuse or switch off the
circuit breaker in the fuse box
(position O).
Check that there is no voltage
(tool: voltage tester).
Check whether the mounting
material is suitable for the
mounting surface.
Check whether the mounting
surface is suitable for carrying
the product.
Start-up
(remote control)
Before first use, remove the
insulating strip from the battery
compartment [].

28 GB/IE
Assembly
C
HG07875B
HG07875A
HG07875C
Loosen screws on housing side.
Remove mounting rail [3] and
hold it against the ceiling.
Mark position of drill holes
through screw holes in the
mounting rail [3].
Drill holes with a depth of
approx. 30 mm into the marked
positions (tool: Ø 6 mm
masonry drill).
Insert dowels [4] into drilled
holes.
Hold mounting rail [3] against
ceiling.
Fix mounting rail [3] with
screws [5].

29GB/IE
DHG07875B
HG07875A
HG07875C
Loosen 4 screws of the connection box. Remove cover and rubber
seal.
Push the cable from outside through the opening in the connection
box.
Connect cable wires with terminal block. Terminal block: L = live
conductor, N = neutral conductor, = protective conductor.
Fasten rubber seal and cover to the connection box with 4 screws.

30 GB/IE
E
HG07875A
HG07875C
HG07875B
Place luminaire housing on
mounting rail [3].
Fix luminaire housing with
screws.
LED lamps [2] are pre-installed.
Check that LED lamps are
properly installed.
Align lamp heads.
Switch on circuit breaker in the
fuse box (position I).

31GB/IE
Pairing product and
mobile device
NOTES:
The Android version of the app
follows the same principles
as the iOS version; you might
encounter discrepancies
between the two platforms, such
as slightly different on-screen
commands or icons.
Updating the firmware might
result in changes to the app’s
functionality.
An updated instruction manual
can be found here:
{
Me
}
tab:
Tap
{
User Manual
}
.
Preparation
Install Lidl Home app and
setup Gateway
( Gateway instruction manual).
1. Light switch on.
LED lamps [2] flashing slowly.
2. Ready for pairing.
3. Open Lidl Home app.
4.
{
Home
}
tab:
Tap (add further devices).
5. Select category:
{
Lighting
}
6. Select: Smart LED ceiling light
– iOS:
{
White
}
– Android:
{
White
}
7. Select Gateway.
Only necessary, if you have 2 or
more Gateways.

32 GB/IE
8. Follow the app instructions.
9. Establishing connection.
10. Naming the product: Tap and
enter a name.
11. Tap one of the rooms to set
location of product (selected
room is grayed out).
If more than one product is
connected: You can rename the
product and define its location.
12. Tap
{
Done
}
.
13. Pairing completed.
14. Return to home screen:
Tap
{
<
}
.
NOTE: The product provides
3 individual light sources,
therefore a total of 3 LEDs
should be paired.
– Option 1: Control the 3 LEDs
as a group: see “Creating a
product group” section
– Option 2: Control each LED
individually.
Pairing remote
control and mobile
device
1. Pull protective strip out of battery
compartment [].
2. Press and hold [8] and
[7] for about 5 s until LED [9]
flashes.
3. Ready for pairing.
4. Open Lidl Home app.
5.
{
Home
}
tab:
Tap (add further devices).
6. Select category:
{
Others
{
7. Select: Remote control
– iOS:
{
Remote controller
}
– Android:
{
Remote controller
}
8. Select Gateway.
Only necessary, if you have 2 or
more Gateways.
9. Follow the app instructions.
10. Establishing connection.

33GB/IE
11. Naming the product: Tap and
enter a name.
12. Tap one of the rooms to set
location of product (selected
room is grayed out).
13. Tap
{
Done
}
.
14. Pairing completed.
15. Return to home screen:
Tap
{
<
}
.
Unpairing product
from mobile device
1. Open Lidl Home app.
2.
{
Home
}
tab:
Select:
–
{
White
}
or
–
{
Remote Controller
}
3. Tap (top right).
4. Tap
{
Remove Device
}
.
Select:
–
{
Disconnect
}
or
–
{
Disconnect and wipe
data
}
( “Additional functions” in
the full instruction manual)
5. Tap
{
Confirm
}
.
Resetting product
manually
Lamps
1. Light switch on/off 3 times.
2. Light switch on.
Lamp flashes slowly =
Reset successful.
Remote control
1. Press and hold [8] and
[7] buttons for 5 s.
2. LED [9] flashing =
Reset successful.

34 GB/IE
This function only resets the
data which is stored in the local
memory of the product. If you
want to reset the cloud memory
as well, perform a reset via the
app (see “Additional functions”,
{
Disconnect and wipe
data
}
in the full instruction
manual).
If you have previously paired
the product with the remote
control (without Gateway/App):
Unpairing the product = see
“Unpairing remote control from
lamps (without Gateway/App)”
Disposal
Before passing on, disposing of
or returning the product to the
manufacturer, make sure that all
data has been deleted from the
product and the cloud.
To do this, refer to the full
instruction manual’s chapter:
“Additional functions”, menu
point:
{
Disconnect and wipe
data
}
The packaging is made entirely of
recyclable materials, which you
may dispose of at local recycling
facilities.
Observe the marking of
the packaging materials
for waste separation,
which are marked with
abbreviations (a) and
numbers (b) with following
meaning: 1–7: plastics /
20–22: paper and
fibreboard / 80–98:
composite materials.

35GB/IE
The product and
packaging materials are
recyclable, dispose of it
separately for better waste
treatment.
The Triman logo is valid in
France only.
Contact your local refuse
disposal authority for more
details of how to dispose
of your worn-out product.
To help protect the
environment, please
dispose of the product
properly when it has
reached the end of its
useful life and not in
the household waste.
Information on collection
points and their opening
hours can be obtained
from your local authority.
Faulty or used batteries /
rechargeable batteries must be
recycled in accordance with
Directive 2006/66/EC and its
amendments. Please return the
batteries / rechargeable batteries
and / or the product to the available
collection points.
Environmental
damage through
incorrect disposal
of the batteries /
rechargeable
batteries!
Batteries / rechargeable batteries
may not be disposed of with the
usual domestic waste. They may
contain toxic heavy metals and
are subject to hazardous waste
treatment rules and regulations. The
chemical symbols for heavy metals
are as follows: Cd = cadmium,
Hg = mercury, Pb = lead. That is
why you should dispose of used
batteries / rechargeable batteries at
a local collection point.

36 GB/IE
Simplified
EU declaration
of conformity
Hereby, OWIM GmbH & Co. KG,
Stiftsbergstraße 1, 74167 Neckarsulm,
GERMANY declares that the
product
– SMART LED CEILING LIGHT
HG07875A, HG07875B,
HG07875C
– REMOTE CONTROL
HG06323
is in compliance with Directive
2014/53/EU, 2011/65/EU and
2009/125/EC.
The full text of the EU declaration
of conformity is available at
the following internet address:
www.owim.com

37FR/BE
PLAFONNIER À LED
Utilisation conforme aux prescriptions ..... Page 38
Contenu de l'emballage....................... Page 38
Vous avez besoin .............................. Page 38
Description des pièces......................... Page 39
Données techniques . . . . . . . . . . . . . . . . . . . . . . . . . . . Page 41
Avant le montage.............................. Page 43
Mise en service (télécommande) ............ Page 43
Montage ........................................ Page 44
Coupler le produit et l'appareil portable ... Page 47
Coupler la télécommande et l’appareil
portable......................................... Page 48
Découpler le produit de l’appareil
portable......................................... Page 49
Réinitialiser le produit manuellement
(Reset)........................................... Page 49
Mise au rebut................................... Page 50
Déclaration UE de conformité simplifiée.... Page 52

38 FR/BE
Utilisation conforme
aux prescriptions
Ce plafonnier à LED (ci-après
dénommé «produit») est un
éclairage pour l'intérieur de locaux.
Approprié
Non approprié
À usage
privé
À des fins industrielles/
commerciales
Utilisation dans des
zones climatiques
tropicales
Toute autre utilisation est considérée
comme inadéquate. Des recours à la
garantie en raison d'utilisation non
appropriée ou de modifications non
autorisées sur le produit sont exclus.
Une utilisation de ce genre se fait à
vos risques et périls.
La commande et la
configuration du produit
se font via l’application
Lidl Home.
Contenu de
l'emballage
1 Plafonnier
3 Ampoules LED (GU10)
1 Télécommande
1 Fixation murale (télécommande)
1 Pile (CR2450)
4 Chevilles (rail de support)
4 Vis (rail de support)
2 Chevilles (fixation murale)
2 Vis (fixation murale)
2 Rubans adhésifs double-face
(fixation murale)
1 Gabarit de perçage
1 Ventouse
1 Petit guide de démarrage rapide
1 Consignes de sécurité
Vous avez besoin
Passerelle:
(Disponible séparément.
Veuillez consulter le
siteweb Lidl pour d'autres
détails)
Routeur:
2,4 GHz,
IEEE 802.11b/g/n
Appareil portable:
iOS 9.0 ou supérieur
Android 5.0 ou supérieur
Ø 5 mm
Ø 6 mm

39FR/BE
Description des pièces
A
[4][5][6]
HG07875B HG07875A/
HG07875C
[1]
[2]
[3]
[1] Plafonnier
[2] Ampoule LED
[3] Rail de support
[4] Cheville (rail de support)
[5] Vis (rail de support)
[6] Ventouse

40 FR/BE
B
[7] [8] [] []
[][][][][][][] []
[9]
[7] Touche (marche/
température
de la couleur à
commuter: blanc
chaud, blanc chaud
moyen, blanc froid
moyen, blanc froid)
[8] Touche (arrêt)
[9] LED
[] Ruban adhésif double-face
[] Fixation murale
[] Cheville (fixation murale)
[] Vis (fixation murale)
[] Trou de perçage
[] Compartiment de la pile
[] Couvercle du compartiment de
la pile
[] Touche (diminuer la
luminosité)
[] Télécommande
[] Touche (augmenter la
luminosité)
Non illustré:
[] Gabarit de perçage

41FR/BE
Données techniques
Modèle HG07875A HG07875B HG07875C
Type Rail Rond Rail
Couleur Blanc Blanc Noir
Dimensions de base (mm) 460 x 90
(L x l)
200
(Ø)
460 x 90
(L x l)
Spot (Ø) 55 mm
Tension de fonctionnement 230 V∼, 50 Hz
Douille GU10 (x3)
Dispositif d’éclairage LED, 5 W max. chacune
Classe de protection I
Télécommande
Modèle HG06323
Tension de fonctionnement 1 pile de 3 V au lithium (CR2450)
Protocole de communication ZigBee 3.0
Portée de réception env.70 m (surface dégagée)
Température ambiante de +5 à +35 °C
Plage de fréquence 2405 à 2480 MHz
Puissance d'émission max. 13 dBm

42 FR/BE
Ampoule LED
Modèle HG07878A
Puissance nominale 5 W
Classe d’efficacité énergétique A+
Tension de fonctionnement 230 V∼, 50 Hz
Flux lumineux total (6500 K) 350 lm (cône de 90° : 280 lm)
Angle de rayonnement 38°
Durée de fonctionnement 30000 h
Cycles de commutation
(marche/arrêt) 100000
Température de la couleur de 2000 à 6500 K
Durée de préchauffage (60 %) < 1 s = 60 % luminance
Commande de la luminosité La luminosité du produit ne peut être
atténuée que via l’application ou la
télécommande.
Dimensions (mm) (Ø x L) 50 x 55
Indice de rendu des couleurs Ra≥ 95
Douille GU10
Protocole de communication ZigBee 3.0
Portée de réception env. 70 m (surface dégagée)
Température ambiante de –10 à +40 °C
Plage de fréquence 2405 à 2480 MHz
Puissance d'émission max. 13 dBm

43FR/BE
kWh/1000h
Y IJA
IE IA
A++
A+
A
B
C
D
E
A+
5
Des informations détaillées sur la
directive sur l'écoconception (ErP)
sont disponibles sur www.owim.com.
Avant le montage
Important: Installation seulement
par des personnes ayant des
connaissances électrotechniques et
l'expérience s’y rapportant!
Prière de retirer le fusible ou
couper le disjoncteur différentiel
dans la boîte à fusibles
(positionO).
Vérifiez l’absence de tension
(outil: Détecteur de tension).
Vérifier si les matériaux de
montage sont adaptés à la
surface de montage.
Vérifier si la surface de montage
convient au poids du produit.
Mise en service
(télécommande)
Avant la première utilisation,
enlevez la languette d'isolation
du compartiment de la pile [].

44 FR/BE
Montage
C
HG07875B
HG07875A
HG07875C
Desserrer les vis sur le côté du
boîtier.
Prendre le rail de support[3] et
le maintenir contre le plafond.
Marquer la position des trous
dans les trous des vis du rail de
support[3].
Percer des trous à env. 30mm
de profondeur aux endroits
marqués (outil: Foret pour
maçonnerie, Ø 6 mm).
Placer les chevilles [4] dans les
trous.
Maintenir le rail de support[3]
contre le plafond.
Fixez le rail de support [3] avec
les vis [5].

45FR/BE
DHG07875B
HG07875A
HG07875C
Desserrez 4vis du boîtier de jonction.
Retirer le couvercle et le joint en caoutchouc.
Pousser le câble de l'extérieur à travers l'ouverture de la boîte de
raccordement.
Relier les fils du câble dans le domino de raccordement. Domino:
L = conducteur sous tension
N = conducteur neutre
= conducteur de protection
Fixer le joint en caoutchouc et le couvercle avec 4vis sur la boîte de
raccordement.

46 FR/BE
E
HG07875A
HG07875C
HG07875B
Placer le boîtier de l’éclairage
sur le rail de support[3].
Fixer le boîtier de l’éclairage
avec des vis.
Les ampoules LED [2] sont
préinstallées. Prière de contrôler
si les ampoules LED sont
correctement installées.
Orienter les têtes des spots.
Activer le disjoncteur différentiel
dans la boîte à fusibles
(positionI).

47FR/BE
Coupler le produit et
l'appareil portable
REMARQUES:
La version Android de
l'application suit les mêmes
principes que la version iOS;
il peut y avoir des divergences
entre les deux plateformes, tels
que des commandes d'écran ou
symboles légèrement différents.
La mise à jour du micrologiciel
(Firmware) peut entraîner
des changements dans les
fonctionnalités de l'application.
Vous pouvez trouver un mode
d'emploi mis à jour ici:
Onglet
{
Moi
}
:
Tapez sur
{
Mode d'emploi
}
.
Préparation
Installer l'applicationLidl Home
et configurer la passerelle
( mode d’emploi de la
passerelle).
1. Interrupteur sur marche.
Les ampoules LED [2] scintillent
lentement.
2. Prêt pour le couplage.
3. Ouvrez l’application
Lidl Home.
4. Onglet
{
Chezmoi
}
:
Taper sur (ajouter d'autres
appareils).
5. Sélectionnez la catégorie:
{
Éclairage
}
6. Sélectionner: Plafonnier à LED
– iOS:
{
Blanc
}
– Android:
{
Blanc
}
7. Sélectionner la passerelle.
Nécessaire uniquement si vous
disposez de 2passerelles ou
plus.

48 FR/BE
8. Suivre les instructions de
l’application.
9. La connexion est établie.
10. Dénommer le produit: Tapez sur
et saisir le nom.
11. Tapez sur une pièce, afin de
déterminer la localisation du
produit (la pièce sélectionnée
est marquée en gris).
Si plus d'un produit doit être
connecté: Vous pouvez
renommer le produit et définir
son emplacement.
12. Tapez sur
{
Terminé
}
.
13. Couplage terminé.
14. Passer à l’écran d'accueil:
Tapez sur
{
<
}
.
REMARQUE: Le produit
offre 3sources d’éclairage
individuelles, donc 3LED
doivent être couplées ensemble.
– Option 1: Commandez les
3LED en tant que groupe:
voir le chapitre «Créer un
groupe de produits».
– Option 2: Commandez
chaque LED individuellement.
Coupler la
télécommande et
l’appareil portable
1. Vous devez enlever les
languettes de protection du
compartiment de la pile[].
2. Maintenir les touches [8]
et [7] enfoncées pendant
5 s jusqu'à ce que la LED [9]
clignote.
3. Prêt pour le couplage.
4. Ouvrez l’application
Lidl Home.
5. Onglet
{
Chezmoi
}
:
Taper sur (ajouter d'autres
appareils).
6. Sélectionnez la catégorie:
{
Divers
}
7. Sélectionner: Télécommande
– iOS:
{
Télécommande
}
– Android:
{
Télécommande
}
8. Sélectionner la passerelle.
Nécessaire uniquement si vous
disposez de 2passerelles ou
plus.

49FR/BE
9. Suivre les instructions de
l’application.
10. La connexion est établie.
11. Dénommer le produit: Tapez sur
et saisir le nom.
12. Tapez sur une pièce, afin de
déterminer la localisation du
produit (la pièce sélectionnée
est marquée en gris).
13. Tapez sur
{
Terminé
}
.
14. Couplage terminé.
15. Passer à l’écran d'accueil:
Tapez sur
{
<
}
.
Découpler le produit
de l’appareil
portable
1. Ouvrez l’application
Lidl Home.
2. Onglet
{
Chezmoi
}
:
Sélectionner:
–
{
Blanc
}
ou
–
{
Télécommande
}
3. Tapez sur (en haut à droite).
4. Tapez sur
{
Supprimer
l'appareil
}
.
Sélectionner:
–
{
Séparer
}
ou
–
{
Séparer et supprimer
toutes les données
}
( «Autres fonctions» dans le
mode d’emploi complet)
5. Tapez sur
{
Valider
}
.
Réinitialiser
le produit
manuellement
(Reset)
Ampoules
1. 3fois sur l’interrupteur marche/
arrêt.
2. Interrupteur sur marche.
L'ampoule clignote lentement =
Réinitialisation réussie.
Télécommande
1. Maintenir [8] et [7]
enfoncés pendant 5 s.
2. La LED [9] clignote=
Réinitialisation réussie.

50 FR/BE
Cette fonction réinitialise
uniquement les données qui sont
sauvegardées localement dans
le produit. Si vous souhaitez
également réinitialiser la
mémoire Cloud, effectuez une
réinitialisation via l’application
(voir «Autres fonctions»,
{
Séparer et supprimer
toutes les données
}
dans le
mode d’emploi complet).
Si le produit a été
précédemment couplé à la
télécommande (sans passerelle/
application):
Découpler le produit =
voir «Découplage de la
télécommande et des ampoules
(sans passerelle/application)».
Mise au rebut
Avant de transmettre le produit
à un tiers, de le mettre au
rebut pour recyclage ou de le
retourner au fabricant, assurez-
vous que toutes les données
du produit et du cloud sont
supprimées.
Pour cette opération, reportez-
vous au chapitre ci-dessous
inclus dans le mode d’emploi
complet:
«Autres fonctions» rubrique du
menu:
{
Séparer et supprimer
toutes les données
}
L’emballage se compose de matières
recyclables pouvant être mises au
rebut dans les déchetteries locales.
Veuillez respecter
l‘identification des
matériaux d‘emballage
pour le tri sélectif, ils
sont identifiés avec des
abbréviations (a) et
des chiffres (b) ayant la
signification suivante :
1–7 : plastiques / 20–
22 : papiers et cartons /
80–98 : matériaux
composite.

51FR/BE
Le produit et les matériaux
d’emballage sont
recyclables, mettez-les au
rebut séparément pour
un meilleur traitement des
déchets.
Le logo Triman n’est
valable qu’en France.
Votre mairie ou votre
municipalité vous
renseigneront sur les
possibilités de mise au
rebut des produits usagés.
Afin de contribuer
à la protection de
l’environnement, veuillez
ne pas jeter votre
produit usagé dans les
ordures ménagères, mais
éliminez-le de manière
appropriée. Pour obtenir
des renseignements
concernant les points
de collecte et leurs
horaires d’ouverture, vous
pouvez contacter votre
municipalité.
Les piles / piles rechargeables
défectueuses ou usagées doivent
être recyclées conformément à
la directive 2006/66/CE et ses
modifications. Les piles et / ou piles
rechargeables et / ou le produit
doivent être retournés dans les
centres de collecte proposés.
Pollution de
l’environnement
par la mise au rebut
incorrecte des piles /
piles rechargeables !
Les piles / piles rechargeables ne
doivent pas être mises au rebut
avec les ordures ménagères. Elles
peuvent contenir des métaux
lourds toxiques et doivent être
considérées comme des déchets
spéciaux. Les symboles chimiques
des métaux lourds sont les suivants :
Cd = cadmium, Hg = mercure,
Pb = plomb. Pour cette raison,
veuillez toujours déposer les piles /
piles rechargeables usagées
dans les conteneurs de recyclage
communaux.

52 FR/BE
Déclaration UE de
conformité simplifiée
Nous, OWIM GmbH & Co. KG,
Stiftsbergstraße 1, 74167 Neckarsulm,
ALLEMAGNE, déclarons sous notre
seule responsabilité que le produit
– PLAFONNIER À LED
HG07875A, HG07875B,
HG07875C
– TÉLÉCOMMANDE
HG06323
répond aux directives UE
2014/53/UE, 2011/65/UE et
2009/125/CE.
Le texte complet de la déclaration
UE de conformité est disponible
à l’adresse Internet suivante:
www.owim.com

53NL/BE
LED-PLAFONDLAMP
Beoogd gebruik ............................... Pagina 54
Leveringsomvang.............................. Pagina 54
U hebt nodig.................................... Pagina 54
Onderdelenbeschrijving ...................... Pagina 55
Technische gegevens .......................... Pagina 57
Voor installatie................................. Pagina 59
Ingebruikname (afstandsbediening) ....... Pagina 59
Installatie ....................................... Pagina 60
Product en mobiel apparaat koppelen . . . . . Pagina 63
Afstandsbediening en mobiel apparaat
koppelen........................................ Pagina 64
Product van het mobiele apparaat
loskoppelen .................................... Pagina 65
Product handmatig opnieuw instellen
(reset) ........................................... Pagina 65
Afvoer........................................... Pagina 66
Vereenvoudigde
EU-Conformiteitsverklaring .................. Pagina 68

54 NL/BE
Beoogd gebruik
Deze LED-plafondlamp (hierna
“product” te noemen) is
bestemd voor de verlichting van
binnenruimtes.
Geschikt Niet geschikt
PrivégebruikIndustriële/commerciële
doeleinden
Gebruik in tropische
klimaatzones
Elk ander gebruik wordt als
niet volgens de voorschriften
aangemerkt. De garantie dekt geen
claims op basis van onreglementair
gebruik of op basis van onbevoegde
wijzigingen aan het product.
Dergelijk gebruik vindt op eigen
risico plaats.
De besturing en installatie
van het product vindt plaats
via de app Lidl Home.
Leveringsomvang
1 Plafondlamp
3 LED-lampen (GU10)
1 Afstandsbediening
1 Wandhouder
(afstandsbediening)
1 Batterij (CR2450)
4 Pluggen (montagerail)
4 Schroeven (montagerail)
2 Pluggen (wandhouder)
2 Schroeven (wandhouder)
2 Dubbelzijdig plakband
(wandhouder)
1 Boorsjabloon
1 Zuignap
1 Snelstartgids
1 Veiligheidstips
U hebt nodig
Gateway:
(Apart verkrijgbaar. Ga
naar de Lidl-website voor
verdere bijzonderheden)
Router:
2,4 GHz,
IEEE 802.11b/g/n
Mobiel apparaat:
iOS 9.0 of hoger
Android 5.0 of hoger
Ø 5 mm
Ø 6mm

55NL/BE
Onderdelenbeschrijving
A
[4][5][6]
HG07875B HG07875A /
HG07875C
[1]
[2]
[3]
[1] Plafondlamp
[2] LED-lamp
[3] Montagerail
[4] Pluggen (montagerail)
[5] Schroeven (montagerail)
[6] Zuignap

56 NL/BE
B
[7] [8] [] []
[][][][][][][] []
[9]
[7] Knop (Aan/
kleurtemperatuur
omschakelen: warm
wit, middelmatig
warm wit,
middelmatig koel
wit, koel wit)
[8] Knop (uit)
[9] LED
[] Dubbelzijdig plakband
[] Muurbevestiging
[] Pluggen (wandhouder)
[] Schroeven (wandhouder)
[] Schroefgat
[] Batterijvak
[] Deksel batterijvak
[] Knop (lichtsterkte
verminderen)
[] Afstandsbediening
[] Knop (lichtsterkte
verhogen)
Niet afgebeeld:
[] Boorsjabloon

57NL/BE
Technische gegevens
Model HG07875A HG07875B HG07875C
Uitvoering Rail Rond Rail
Kleur Wit Wit Zwart
Basisafmetingen (mm) 460 x 90
(L x B)
200
(Ø)
460 x 90
(L x B)
Lamp (Ø) 55 mm
Bedrijfsspanning 230 V∼, 50 Hz
Lampvoet GU10 (3x)
Lamp LED, elk max. 5W
Veiligheidsklasse I
Afstandsbediening
Model HG06323
Bedrijfsspanning 1 x 3 V Lithiumbatterij (CR2450)
Communicatieprotocol ZigBee 3.0
Ontvangstbereik ca. 70 m (vrije ruimte)
Omgevingstemperatuur +5 tot +35 °C
Frequentiebereik 2405 tot 2480MHz
Max. zendvermogen 13 dBm

58 NL/BE
LED-lamp
Model HG07878A
Nominaal vermogen 5 W
Energie-efficiëntieklasse A+
Bedrijfsspanning 230 V∼, 50 Hz
Totale lichtstroom (6500 K) 350 lm (90° Kegel: 280 lm)
Straalhoek 38°
Gebruiksduur 30000 h
Schakelcycli (aan/uit) 100000
Kleurtemperatuur 2000 tot 6500 K
Opwarmtijd (60 %) < 1 s = 60 % lichtintensiteit
Lichtsterkteregeling Het product kan alleen worden gedimd
via de app of de afstandsbediening.
Afmetingen (mm) (Ø x L) 50 x 55
Kleurweergave-index Ra≥ 95
Lampvoet GU10
Communicatieprotocol ZigBee 3.0
Ontvangstbereik ca. 70 m (vrije ruimte)
Omgevingstemperatuur –10 tot +40 °C
Frequentiebereik 2405 tot 2480MHz
Max. zendvermogen 13dBm

59NL/BE
kWh/1000h
Y IJA
IE IA
A++
A+
A
B
C
D
E
A+
5
U kunt gedetailleerde informatie
over de richtlijn inzake ecologisch
ontwerp (ErP) vinden op
www.owim.com.
Voor installatie
Belangrijk: Laat installatie
uitsluitend uitvoeren door personen
met de daarvoor geschikte
elektrotechnische kennis en ervaring!
Verwijder de zekering of schakel
de automatische zekering in de
zekeringkast uit (standO).
Controleer de spanningsvrijheid
(gereedschap: spanningzoeker).
Controleer of het
montagemateriaal geschikt is
voor de montageondergrond.
Controleer of de
montageondergrond geschikt is
om het product te dragen.
Ingebruikname
(afstandsbediening)
Verwijder vóór het eerste
gebruik de isolatiestroken uit het
batterijvak [].

60 NL/BE
Installatie
C
HG07875B
HG07875A
HG07875C
Draai de schroeven aan de kant
van de behuizing los.
Verwijder de montagerail [3] en
houd hem tegen het plafond.
Markeer de positie van de
boorgaten door de schroefgaten
van de montagerail [3].
Boor gaten van ca. 30 mm diep
op de gemarkeerde plaatsen
(gereedschap: steenboor,
Ø 6 mm).
Steek de pluggen [4] in de
boorgaten.
Houd de montagerail [3] tegen
het plafond.
Zet de montagerail [3] met de
schroeven [5] vast.

61NL/BE
DHG07875B
HG07875A
HG07875C
Draai de 4schroeven van de aansluitdoos los.
Verwijder het deksel en de rubberen afdichting.
Schuif de kabel van buiten door de opening in de aansluitdoos.
Verbind het kroonsteentje met de kabeladers. Kroonsteentje:
L = fasedraad
N = nulleider
= aardedraad
Bevestig de rubberen afdichting en het deksel met de 4schroeven
op de aansluitdoos.

62 NL/BE
E
HG07875A
HG07875C
HG07875B
Plaats de lampbehuizingen op
de montagerail [3].
Zet de lampbehuizingen met de
schroeven vast.
De LED-lampen [2] zijn vooraf
geïnstalleerd. Controleer of
de LED-lampen volgens de
voorschriften zijn geïnstalleerd.
Richt de lampkopppen uit.
Schakel de automatische
zekering in de zekeringenkast in
(standI).

63NL/BE
Product en mobiel
apparaat koppelen
TIPS:
De Android-versie van de
app volgt hetzelfde principe
als de iOS-versie; er kunnen
zich discrepanties tussen de
beide platformen voordoen,
zoals licht verschillende
beeldschermopdrachten of
symbolen.
Het bijwerken van de firmware
kan wijzigingen in de
functionaliteit van de app tot
gevolg hebben.
U treft hier een bijgewerkte
gebruiksaanwijzing aan:
Tabblad
{
Ik
}
:
Tik op
{
Gebruiksaanwijzing
}
.
Voorbereiding
App Lidl Home en gateway
installeren
( gebruiksaanwijzing
gateway).
1. Lichtschakelaar aan.
De LED-lamp [2] flikkeren
langzaam.
2. Gereed om te koppelen.
3. Open de app Lidl Home.
4. Tabblad
{
Thuis
}
:
Tik op (meer apparaten
toevoegen).
5. Categorie kiezen:
{
Belichting
}
6. Kiezen: LED-plafondlamp
– iOS:
{
Wit
}
– Android:
{
Wit
}
7. Gateway kiezen.
Alleen noodzakelijk indien u
2of meer Gateways bezit.

64 NL/BE
8. Volg de aanwijzingen in de app.
9. De verbinding wordt tot stand
gebracht.
10. Product benoemen: Tik op en
voer de naam in.
11. Tik op een ruimte om de locatie
van het product vast te leggen
(de gekozen ruimte wordt in grijs
weergegeven).
Als er meer dan één product
aangesloten mocht zijn: U kunt
het product hernoemen en de
locatie hiervan definiëren.
12. Tik op
{
Gereed
}
.
13. Koppeling voltooid.
14. Wisselen naar startscherm:
Tik op
{
<
}
.
TIP: Het product biedt 3enkele
lichtbronnen, daarom moeten
in totaal 3LED’s worden
gekoppeld.
– Optie 1: Stuur de 3LED’s
aan als groep: zie paragraaf
“Productgroep aanmaken”.
– Optie 2: Stuur elke LED
afzonderlijk aan.
Afstandsbediening
en mobiel apparaat
koppelen
1. Trek de beschermstroken uit het
batterijvak [].
2. Houd de knoppen [8] en
[7] 5 sec lang ingedrukt totdat
de LED [9] knippert.
3. Gereed om te koppelen.
4. Open de app Lidl Home.
5. Tabblad
{
Thuis
}
:
Tik op (meer apparaten
toevoegen).
6. Categorie kiezen:
{
Overig
}
7. Kiezen: Afstandsbediening
– iOS:
{
Afstandsbediening
}
– Android:
{
Afstandsbediening
}
8. Gateway kiezen.
Alleen noodzakelijk indien u
2of meer Gateways bezit.
9. Volg de aanwijzingen in de app.
10. De verbinding wordt tot stand
gebracht.

65NL/BE
11. Product benoemen: Tik op en
voer de naam in.
12. Tik op een ruimte om de locatie
van het product vast te leggen
(de gekozen ruimte wordt in grijs
weergegeven).
13. Tik op
{
Gereed
}
.
14. Koppeling voltooid.
15. Wisselen naar startscherm:
Tik op
{
<
}
.
Product van het
mobiele apparaat
loskoppelen
1. Open de app Lidl Home.
2. Tabblad
{
Thuis
}
:
Kiezen:
–
{
Wit
}
of
–
{
Afstandsbediening
}
3. Tik op (rechtsboven).
4. Tik op
{
Apparaat
verwijderen
}
.
Kiezen:
–
{
Loskoppelen
}
of
–
{
Koppel los en wis alle
gegevens
}
( “Uitgebreide
functies” in de volledige
gebruiksaanwijzing)
5. Tik op
{
Bevestigen
}
.
Product handmatig
opnieuw instellen
(reset)
Lampen
1. Lichtschakelaar 3x aan/uit.
2. Lichtschakelaar aan.
Lamp flikkert langzaam =
Opnieuw instellen geslaagd.
Afstandsbediening
1. Houd knoppen [8] en [7]
5 sec lang ingedrukt.
2. LED [9] knippert =
Opnieuw instellen geslaagd.

66 NL/BE
Deze functie stelt alleen die
gegevens opnieuw in die lokaal
in het product zijn opgeslagen.
Als u de cloudopslag eveneens
wilt herstellen, voer het herstellen
dan uit via de app (zie
“Uitgebreide functies”,
{
Koppel
los en wis alle gegevens
}
in de volledige
gebruiksaanwijzing).
Indien het product eerder
met behulp van de
afstandsbediening is gekoppeld
(zonder Gateway/app):
Product loskoppelen =
zie “Loskoppelen van de
afstandsbediening en de lampen
(zonder Gateway/app)”.
Afvoer
Zorg ervoor dat alle gegevens
van het product en in de cloud
worden gewist, voordat u het
product doorgeeft aan iemand,
het verwijdert of het retourneert
aan de fabrikant.
Raadpleeg daarvoor
het hieronder vermelde
hoofdstuk van de volledige
gebruiksaanwijzing:
“Uitgebreide functies”,
menupunt:
{
Koppel los en wis alle
gegevens
}
De verpakking bestaat uit
milieuvriendelijke grondstoffen
die u via de plaatselijke
recyclingcontainers kunt afvoeren.
Neem de aanduiding van
de verpakkingsmaterialen
voor de afvalscheiding
in acht. Deze zijn
gemarkeerd met de
afkortingen (a) en
een cijfers (b) met de
volgende betekenis:
1–7: kunststoffen /
20–22: papier en
vezelplaten / 80–98:
composietmaterialen.

67NL/BE
Het product en de
verpakkingsmaterialen
zijn recyclebaar; verwijder
deze afzonderlijk voor een
betere afvalbehandeling.
Het Triman-logo geldt
alleen voor Frankrijk.
Informatie over de
mogelijkheden om het
uitgediende product na
gebruik te verwijderen,
verstrekt uw gemeentelijke
overheid.
Gooi het afgedankte
product omwille van
het milieu niet weg via
het huisvuil, maar geef
het af bij het daarvoor
bestemde depot of het
gemeentelijke milieupark.
Over afgifteplaatsen en
hun openingstijden kunt u
zich bij uw aangewezen
instantie informeren.
Defecte of verbruikte batterijen /
accu‘s moeten volgens de richtlijn
2006/66/EG en veranderingen
daarop worden gerecycled. Geef
batterijen / accu‘s en / of het
product af bij de daarvoor bestemde
verzamelstations.
Milieuschade door
foutieve verwijdering
van de batterijen /
accu‘s!
Batterijen / accu‘s mogen niet via
het huisvuil worden weggegooid.
Ze kunnen giftige zware metalen
bevatten en vallen onder het
chemisch afval. De chemische
symbolen van de zware metalen
zijn: Cd = cadmium, Hg = kwik,
Pb = lood. Geef verbruikte
batterijen / accu‘s daarom af bij een
gemeentelijk inzamelpunt.

68 NL/BE
Vereenvoudigde
EU-Conformiteitsver-
klaring
Wij, OWIM GmbH & Co. KG,
Stiftsbergstraße 1, 74167 Neckarsulm,
DUITSLAND, verklaren alleen
onder onze verantwoording, dat het
product
– LED-PLAFONDLAMP
HG07875A, HG07875B,
HG07875C
– AFSTANDSBEDIENING
HG06323
voldoen aan de EU-richtlijnen
2014/53/EU, 2011/65/EU en
2009/125/EG.
De volledige tekst van de
EU-conformiteitsverklaring is op het
volgende internetadres beschikbaar:
www.owim.com

69PL
LAMPA SUFITOWA LED
Używać zgodnie z przeznaczeniem........ Strona 70
Zakres dostawy .............................. Strona 70
Potrzebne będą............................... Strona 70
Opis części ..................................... Strona 71
Dane techniczne .............................. Strona 73
Przed montażem.............................. Strona 75
Uruchomienie (pilot zdalnego
sterowania) ................................... Strona 75
Montaż......................................... Strona 76
Parowanie produktu i urządzenia
przenośnego .................................. Strona 79
Parowanie pilota zdalnego sterowania
z urządzeniem przenośnym................. Strona 80
Usuwanie sparowania z urządzeniem
przenośnym ................................... Strona 81
Ręczne resetowanie produktu (Reset)..... Strona 81
Utylizacja ...................................... Strona 82
Deklaracja zgodności UE .................... Strona 84

70 PL
Używać zgodnie z
przeznaczeniem
Ta lampa sufitowa LED (zwana dalej
„produktem”) służy do oświetlania
wnętrz.
Nadaje się Nie nadaje się
Do użytku
prywatnego
Do celów
przemysłowych lub
handlowych
Do użytku w
tropikalnych strefach
klimatycznych
Każde inne użycie jest uważane za
niewłaściwe. Roszczenia z tytułu
niewłaściwego użytkowania lub z
powodu nieautoryzowanych zmian
produktu nie są objęte zakresem
gwarancji. Takie użytkowanie
podejmowane jest na własne
ryzyko.
Produkt jest sterowany i
konfigurowany za pomocą
aplikacji Lidl Home.
Zakres dostawy
1 Lampa sufitowa
3 Żarówki LED (GU10)
1 Pilot zdalnego sterowania
1 Uchwyt ścienny (pilota
zdalnego sterowania)
1 Bateria (CR2450)
4 Dyble (szyny montażowej)
4 Wkręty (szyny montażowej)
2 Dyble (uchwytu ściennego)
2 Wkręty (uchwytu ściennego)
2 Dwustronne taśmy
samoprzylepne (uchwytu
ściennego)
1 Szablon wiercenia
1 Przyssawka
1 Instrukcja skrócona
1 Instrukcje bezpieczeństwa
Potrzebne będą
Bramka sieciowa
Gateway:
(Dostępna oddzielnie,
więcej informacji na
stronie firmy Lidl)
Router:
2,4 GHz,
IEEE 802.11b/g/n
Urządzenie przenośne:
iOS9.0 lub nowszy
Android5.0 lub nowszy
Ø 5 mm
Ø 6 mm

71PL
Opis części
A
[4][5][6]
HG07875B HG07875A /
HG07875C
[1]
[2]
[3]
[1] Lampa sufitowa
[2] Żarówka LED
[3] Szyna montażowa
[4] Dybel (szyny montażowej)
[5] Wkręt (szyny montażowej)
[6] Przyssawka

72 PL
B
[7] [8] [] []
[][][][][][][] []
[9]
[7] Przycisk (Włączanie /
Przełączanie
temperatury
barwowej: ciepły
biały, średnio ciepły
biały, średnio zimny
biały, zimny biały)
[8] Przycisk (wyłączanie)
[9] Dioda LED
[] Dwustronne taśmy
samoprzylepne
[] Uchwyt ścienny
[] Dybel (uchwytu ściennego)
[] Wkręty (uchwytu ściennego)
[] Otwór na wkręt
[] Komora na baterie
[] Pokrywa komory baterii
[] Przycisk (zmniejszanie
jasności)
[] Pilot zdalnego sterowania
[] Przycisk (zwiększanie
jasności)
Niewidoczne:
[] Szablon wiercenia

73PL
Dane techniczne
Model HG07875A HG07875B HG07875C
Wykonanie Szyna Okrągły Szyna
Kolor Biały Biały Czarny
Wymiary podstawy (mm) 460 x 90
(dł. x szer.)
200
(średnica)
460 x 90
(dł. x szer.)
Reflektor (średnica) 55 mm
Napięcie pracy 230 V∼, 50 Hz
Oprawa lampy GU10 (x3)
Żarówka LED, każda o mocy maks. 5 W
Stopień ochrony I
Pilot zdalnego sterowania
Model HG06323
Napięcie pracy 1 x 3 V Bateria litowa (CR2450)
Protokół komunikacyjny ZigBee3.0
Zasięg odbioru ok.70 m (w obszarze niezabudowanym)
Temperatury otoczenia +5do+35 °C
Zakres częstotliwości 2405do2480 MHz
Maks. moc transmisji 13dBm

74 PL
Żarówka LED
Model HG07878A
Moc znamionowa 5 W
Klasa efektywności
energetycznej A+
Napięcie pracy 230 V∼, 50 Hz
Całkowity strumień świetlny
(6500K) 350 lm (stożek 90°: 280 lm)
Kąt wiązki 38°
Czas pracy 30000 h
Cykle przełączania (WŁ./WYŁ.) 100000
Temperatura barwowa 2000 do 6500 K
Czas rozgrzewania (60%) < 1 s = 60 % światła
Sterowanie jasnością Produkt można przyciemniać tylko za
pomocą aplikacji lub pilota zdalnego
sterowania.
Wymiary (mm) (Ø x D) 50 x 55
Wskaźnik oddawania barw Ra≥ 95
Oprawa lampy GU10
Protokół komunikacyjny ZigBee3.0
Zasięg odbioru ok. 70 m (w obszarze niezabudowanym)
Temperatury otoczenia –10do+40 °C
Zakres częstotliwości 2405do2480 MHz
Maks. moc transmisji 13dBm

75PL
kWh/1000h
Y IJA
IE IA
A++
A+
A
B
C
D
E
A+
5
Szczegółowe informacje o
dyrektywie w sprawie ekoprojektu
(ErP) można znaleźć na stronie
www.owim.com.
Przed montażem
Ważne: Instalacja powinna być
dokonywana wyłącznie przez osoby
posiadające odpowiednią wiedzę i
doświadczenie z zakresu elektroniki!
Wyjąć bezpiecznik lub
wyłączyć bezpiecznik w
skrzynce bezpieczników
(pozycjaO).
Sprawdzić brak napięcia
(narzędzie: Tester napięcia).
Sprawdzić, czy materiał
montażowy nadaje się
do wybranej powierzchni
montażowej.
Sprawdzić, czy powierzchnia
montażowa nadaje się do
zamontowania produktu.
Uruchomienie
(pilot zdalnego
sterowania)
Przed pierwszym użyciem wyjąć
pasek izolacyjny z komory na
baterie [].

76 PL
Montaż
C
HG07875B
HG07875A
HG07875C
Poluzować wkręty po stronie
obudowy.
Wyjąć szynę montażową [3] i
przyłożyć do sufitu.
Przez otwory na wkręty
w szynie montażowej [3]
zaznaczyć miejsca wiercenia
otworów.
W zaznaczonych miejscach
wywiercić otwory o głębokości
ok. 30mm (narzędzie: Wiertło
do betonu, Ø 6 mm).
Do wywierconych otworów
włożyć dyble [4].
Szynę montażową [3]
przyłożyć do sufitu.
Szynę montażową [3]
przykręcić wkrętami [5].

77PL
DHG07875B
HG07875A
HG07875C
Odkręcić 4śruby skrzynki przyłączeniowej.
Zdjąć pokrywę i gumową uszczelkę.
Przeciągnąć kabel od zewnątrz przez otwór w skrzynce
przyłączeniowej.
Przewody kabla podłączyć do łącznika świecznikowego. Łącznik
świecznikowy:
L = przewód pod napięciem
N = przewód zerowy
= przewód ochronny
Za pomocą 4wkrętów przykręcić gumową uszczelkę i pokrywę do
skrzynki przyłączeniowej.

78 PL
E
HG07875A
HG07875C
HG07875B
Obudowę lampy osadzić na
szynie montażowej [3].
Obudowę oprawy
przymocować za pomocą
wkrętów.
Żarówki LED [2] są wstępnie
zamontowane. Sprawdzić, czy
żarówki LED są prawidłowo
zamontowane.
Wyrównać korpusy lamp.
W skrzynce bezpiecznikowej
włączyć bezpiecznik
(położenie I).

79PL
Parowanie produktu
i urządzenia
przenośnego
RADY:
Wersja aplikacji na Androida
działa na takich samych
zasadach jak wersja dla
systemu iOS; mogą występować
rozbieżności między dwiema
platformami, takie jak np. nieco
inne polecenia lub symbole
ekranowe.
Aktualizacja oprogramowania
układowego może prowadzić
do zmian w funkcjonalności
aplikacji.
Zaktualizowaną instrukcję
obsługi można znaleźć tutaj:
Zakładka
{
Ja
}
:
Dotknij opcję
{
Instrukcja
obsługi
}
.
Przygotowanie
Zainstaluj aplikację
LidlHome i skonfiguruj
bramkę sieciową Gateway
( instrukcja obsługi bramki
sieciowej Gateway).
1. Włączyć światło.
Żarówki LED [2] zaczną powoli
migać.
2. Gotowość do parowania.
3. Otwórz aplikację Lidl Home.
4. Zakładka
{
Strona
główna
}
:
Dotknij (dodaj następne
urządzenie).
5. Wybierz kategorię:
{
Podświetlenie
}
6. Wybierz: Lampa sufitowa LED
– iOS:
{
Biały
}
– Android:
{
Biały
}
7. Wybierz bramkę sieciową
Gateway.
Tylko wtedy, gdy używane są
dwie bramki sieciowe Gateway
lub więcej.

80 PL
8. Postępuj zgodnie z instrukcjami
aplikacji.
9. Nastąpi nawiązanie połączenia.
10. Zredaguj nazwę produktu:
Dotknij ikonę i wpisz nazwę.
11. Dotknij jedno z miejsc, aby
określić lokalizację produktu
(wybrane pomieszczenie
zostanie zaznaczone kolorem
szarym).
Jeśli trzeba podłączyć więcej
niż jeden produkt: Można
zmienić nazwę produktu i
określić jego miejsce.
12. Dotknij
{
Gotowe
}
.
13. Parowanie jest zakończone.
14. Powrót do strony głównej:
Dotknij
{
<
}
.
RADA: Produkt oferuje
3indywidualne źródła światła,
dlatego łącznie należy
sparować 3diody LED.
– Opcja 1: Aktywacja 3diod
LED jako grupy: patrz
akapit „Tworzenie grupy
produktów”.
– Opcja 2: Indywidualne
sterowanie każdą diodą LED.
Parowanie pilota
zdalnego sterowania
z urządzeniem
przenośnym
1. Z komory na baterie [] wyjąć
pasek ochronny.
2. Przyciski [8] i [7] wciśnij
na 5 sekund, aż dioda LED [9]
zacznie migać.
3. Gotowość do parowania.
4. Otwórz aplikację Lidl Home.
5. Zakładka
{
Strona
główna
}
:
Dotknij (dodaj następne
urządzenie).
6. Wybierz kategorię:
{
Inne
}
7. Wybierz: Pilot zdalnego
sterowania
– iOS:
{
Pilot zdalnego
sterowania
}
– Android:
{
Pilot zdalnego
sterowania
}
8. Wybierz bramkę sieciową
Gateway.

81PL
Tylko wtedy, gdy używane są
dwie bramki sieciowe Gateway
lub więcej.
9. Postępuj zgodnie z instrukcjami
aplikacji.
10. Nastąpi nawiązanie połączenia.
11. Zredaguj nazwę produktu:
Dotknij ikonę i wpisz nazwę.
12. Dotknij jedno z miejsc, aby
określić lokalizację produktu
(wybrane pomieszczenie
zostanie zaznaczone kolorem
szarym).
13. Dotknij
{
Gotowe
}
.
14. Parowanie jest zakończone.
15. Powrót do strony głównej:
Dotknij
{
<
}
.
Usuwanie
sparowania z
urządzeniem
przenośnym
1. Otwórz aplikację Lidl Home.
2. Zakładka
{
Strona
główna
}
:
Wybierz:
–
{
Biały
}
lub
–
{
Pilot zdalnego
sterowania
}
3. Dotknij (u góry po prawej).
4. Dotknij
{
Usuń urządzenie
}
.
Wybierz:
–
{
Rozwiąż
}
albo
–
{
Rozwiąż i skasuj
wszystkie dane
}
( „Funkcje zaawansowane”
w pełnej instrukcji obsługi)
5. Dotknij
{
Potwierdź
}
.
Ręczne resetowanie
produktu (Reset)
Lampy
1. Trzy razy włączyć i wyłączyć
światło.
2. Włączyć światło.
Lampa miga powoli =
Resetowanie pomyślne.
Pilot zdalnego
sterowania
1. Przyciski [8] i [7] wcisnąć
na 5 sekund.
2. Dioda LED [9] miga =
Resetowanie powiodło się.

82 PL
Ta funkcja resetuje tylko dane
przechowywane lokalnie w
produkcie. Jeśli chcesz również
zresetować pamięć w chmurze,
należy to zrobić za pomocą
aplikacji (patrz „Funkcje
zaawansowane”,
{
Rozwiąż i
skasuj wszystkie dane
}
w
zasadniczej instrukcji obsługi).
Jeśli produkt był wcześniej
sparowany z pilotem (bez
bramki lub aplikacji):
Odłączyć produkt = patrz
„Odłączanie pilota i lamp (bez
bramki lub aplikacji)”.
Utylizacja
Przed przekazaniem produkt
innej osobie, pozbyciem lub
zwróceniem do producenta
należy upewnić się, że wszystkie
dane z produktu i chmury
zostały usunięte.
Aby to zrobić, należy zajrzeć
do następującego rozdziału w
pełnej instrukcji obsługi:
„Funkcje zaawansowane”, punkt
menu:
{
Rozwiąż i skasuj
wszystkie dane
}
Opakowanie wykonane jest
z materiałów przyjaznych dla
środowiska, które można przekazać
do utylizacji w lokalnym punkcie
przetwarzania surowców wtórnych.
Przy segregowaniu
odpadów prosimy
zwrócić uwagę na
oznakowanie materiałów
opakowaniowych,
oznaczone są one
skrótami (a) i numerami
(b) o następującym
znaczeniu: 1–7:
Tworzywa sztuczne /
20–22: Papier i tektura /
80–98: Materiały
kompozytowe.

83PL
Produkt i materiał
opakowania nadają
się do ponownego
przetworzenia, należy
je zutylizować osobno
w celu lepszego
przetworzenia odpadów.
Logo Triman jest ważne
tylko dla Francji.
Informacji na temat
możliwości utylizacji
wyeksploatowanego
produktu udziela urząd
gminy lub miasta.
Z uwagi na ochronę
środowiska nie
wyrzucać urządzenia po
zakończeniu eksploatacji
do odpadów domowych,
lecz prawidłowo
zutylizować. Informacji
o punktach zbiorczych i
ich godzinach otwarcia
udziela odpowiedni
urząd.
Uszkodzone lub zużyte baterie /
akumulatory muszą być poddane
recyklingowi zgodnie z dyrektywą
2006/66/WE i jej zmianami.
Oddać baterie / akumulatory i /
lub produkt w dostępnych punktach
zbiórki.
Niewłaściwa
utylizacja baterii /
akumulatorów
stwarza zagrożenie
dla środowiska
naturalnego!
Baterii / akumulatorów nie należy
wyrzucać razem z odpadami
domowymi. Mogą one zawierać
szkodliwe metale ciężkie i należy
je traktować jak odpady specjalne.
Symbole chemiczne metali ciężkich
są następujące: Cd = kadm,
Hg = rtęć, Pb = ołów. Dlatego też
zużyte baterie / akumulatory należy
przekazywać do komunalnych
punktów gromadzenia odpadów
niebezpiecznych.

84 PL
Deklaracja zgodności
UE
My, firma OWIM GmbH & Co. KG,
Stiftsbergstraße 1, 74167 Neckarsulm,
NIEMCY, oświadczamy na naszą
wyłączną odpowiedzialność, że
produkt
– LAMPA SUFITOWA LED
HG07875A, HG07875B,
HG07875C
– PILOT ZDALNEGO
STEROWANIA HG06323
jest zgodna z wytycznymi
2014/53/UE, 2011/65/UE i
2009/125/WE.
Pełny tekst deklaracji zgodności UE
można znaleźć pod następującym
adresem internetowym:
www.owim.com

IAN 360060_2010
OWIM GmbH & Co. KG
Stiftsbergstraße 1
74167 Neckarsulm
GERMANY
Model No.: HG07875A / HG07875B /
HG07875C / HG06323
Version: 07/2021
-
 1
1
-
 2
2
-
 3
3
-
 4
4
-
 5
5
-
 6
6
-
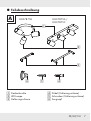 7
7
-
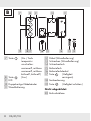 8
8
-
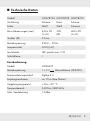 9
9
-
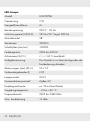 10
10
-
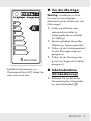 11
11
-
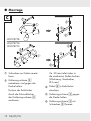 12
12
-
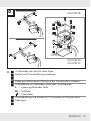 13
13
-
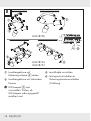 14
14
-
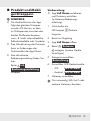 15
15
-
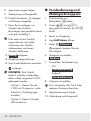 16
16
-
 17
17
-
 18
18
-
 19
19
-
 20
20
-
 21
21
-
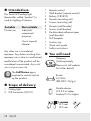 22
22
-
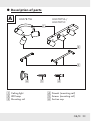 23
23
-
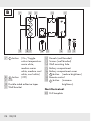 24
24
-
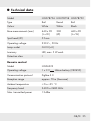 25
25
-
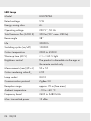 26
26
-
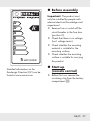 27
27
-
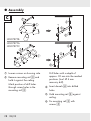 28
28
-
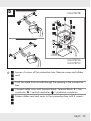 29
29
-
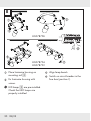 30
30
-
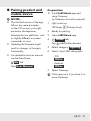 31
31
-
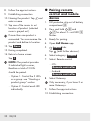 32
32
-
 33
33
-
 34
34
-
 35
35
-
 36
36
-
 37
37
-
 38
38
-
 39
39
-
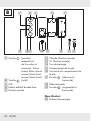 40
40
-
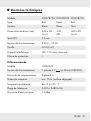 41
41
-
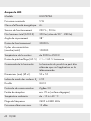 42
42
-
 43
43
-
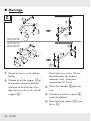 44
44
-
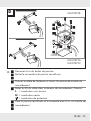 45
45
-
 46
46
-
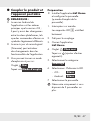 47
47
-
 48
48
-
 49
49
-
 50
50
-
 51
51
-
 52
52
-
 53
53
-
 54
54
-
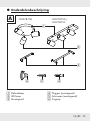 55
55
-
 56
56
-
 57
57
-
 58
58
-
 59
59
-
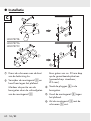 60
60
-
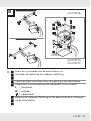 61
61
-
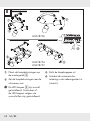 62
62
-
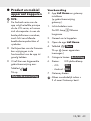 63
63
-
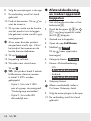 64
64
-
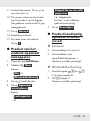 65
65
-
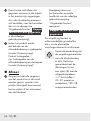 66
66
-
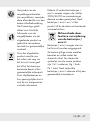 67
67
-
 68
68
-
 69
69
-
 70
70
-
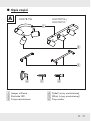 71
71
-
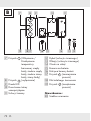 72
72
-
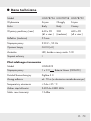 73
73
-
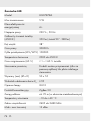 74
74
-
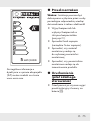 75
75
-
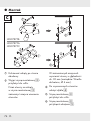 76
76
-
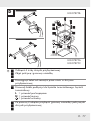 77
77
-
 78
78
-
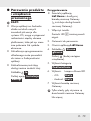 79
79
-
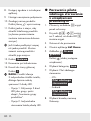 80
80
-
 81
81
-
 82
82
-
 83
83
-
 84
84
-
 85
85


in andere talen
- English: LIVARNO 360060 Owner's manual
- français: LIVARNO 360060 Le manuel du propriétaire
- Deutsch: LIVARNO 360060 Bedienungsanleitung
- polski: LIVARNO 360060 Instrukcja obsługi