
LED-WAND- / DECKENLEUCHTE
/ LED WALL OR
CEILING LIGHT / PLAFONNIER / APPLIQUE À LED
IAN 314982
LED-WAND- / DECKENLEUCHTE
Montage-, Bedienungs- und Sicherheitshinweise
LED WALL OR CEILING LIGHT
Assembly, operating and safety instructions
PLAFONNIER / APPLIQUE À LED
Instructions de montage, d‘utilisation et consignes de sécurité
LED-WAND- / PLAFONDLAMP
Montage-, bedienings- en veiligheidsinstructies
LED NÁSTĚNNÉ / STROPNÍ SVÍTIDLO
Pokyny k montáži, obsluze a bezpečnostní pokyny
LEDOWA LAMPA ŚCIENNA / SUFITOWA
Wskazówki montażu, obsługi i bezpieczeństwa
LED NÁSTENNÉ / STROPNÉ SVIETIDLO
Pokyny pre montáž, obsluhu a bezpečnostné pokyny

DE / AT / CH Montage-, Bedienungs- und Sicherheitshinweise Seite 5
GB / IE Assembly, operating and safety instructions Page 9
FR / BE Instructions de montage, d‘utilisation et consignes de sécurité Page 13
NL / BE Montage-, bedienings- en veiligheidsinstructies Pagina 17
PL Wskazówki montażu, obsługi i bezpieczeństwa Strona 21
CZ Pokyny k montáži, obsluze a bezpečnostní pokyny Strana 25
SK Pokyny pre montáž, obsluhu a bezpečnostné pokyny Strana 29

HG05024A
HG05024B
1
1
2
2
3
3
4
4
5
5
6
6
7
7
8
9
9


5 DE/AT/CH
Legende der verwendeten Piktogramme
LED-Lebensdauer Schutzklasse II
Gebrauch in geschlossenen Räumen Abstrahlwinkel 120 °
Wechselstrom Nicht dimmbar
LED-Wand-/Deckenleuchte
Einleitung
Wir beglückwünschen Sie zum Kauf Ihres neuen
Produkts. Sie haben sich damit für ein hochwertiges
Produkt entschieden. Die Bedienungsanleitung ist Teil
dieses Produkts. Sie enthält wichtige Hinweise für
Sicherheit, Gebrauch und Entsorgung. Machen Sie
sich vor der Benutzung des Produkts mit allen Bedien-
und Sicherheitshinweisen vertraut. Benutzen Sie das
Produkt nur wie beschrieben und für die angegebenen
Einsatzbereiche. Händigen Sie alle Unterlagen bei
Weitergabe des Produkts an Dritte mit aus.
Bestimmungsgemäße
Verwendung
Dieses Produkt ist ausschließlich zur Verwendung im
Innenbereich, in trockenen und geschlossenen Räumen
vorgesehen. Das Produkt ist nicht für den gewerblichen
Einsatz bestimmt.
Teilebeschreibung
1 Gummischlauch
2 Dübel
3 Leuchtenteller
4 LED-Treiber
5 Schraube
6 Leuchtenabdeckung
7 Klemmblock
8 Feststellhebel (nur HG05024B)
9 Anschlussleitung
Technische Daten
Betriebsspannung: 230 V ~, 50 Hz
Schutzklasse: II /
Nennleistung: ca. 13 W
Die LED kann nicht ersetzt werden.
Lieferumfang
HG05024A:
1 LED-Wand- / Deckenleuchte
3 Dübel
3 Schrauben
1 Gummischlauch
1 Montage- und Bedienungsanleitung
HG05024B:
1 LED-Wand- / Deckenleuchte
4 Dübel
4 Schrauben
1 Gummischlauch
1 Montage- und Bedienungsanleitung

6 DE/AT/CH
Sicherheit
Sicherheitshinweise
LESEN SIE DIE ANLEITUNG VOR DER VERWEN-
DUNG DES ARTIKELS! BEWAHREN SIE ALLE
SICHERHEITSHINWEISE UND ANWEISUNGEN
FÜR DIE ZUKUNFT AUF!
LEBENS- UND
UNFALLGEFAHR FÜR KLEIN-
KINDER UND KINDER! Lassen
Sie Kinder niemals unbeaufsichtigt mit dem Ver-
packungsmaterial. Es besteht Erstickungsgefahr
durch Verpackungsmaterial. Kinder unterschätzen
häufig die Gefahren. Halten Sie Kinder stets
vom Produkt fern.
Dieses Produkt ist kein Spielzeug, es gehört nicht
in Kinderhände. Kinder können die Gefahren,
die im Umgang mit dem Produkt entstehen, nicht
erkennen.
Dieses Produkt kann von Kindern ab 8 Jahren
und darüber sowie von Personen mit verringerten
physischen, sensorischen oder mentalen Fähig-
keiten oder Mangel an Erfahrung und Wissen
benutzt werden, wenn sie beaufsichtigt oder
bezüglich des sicheren Gebrauchs des Produkts
unterwiesen wurden und die daraus resultierenden
Gefahren verstehen. Kinder dürfen nicht mit dem
Produkt spielen. Reinigung und Benutzerwartung
dürfen nicht von Kindern ohne Beaufsichtigung
durchgeführt werden.
Das Produkt ist ausschließlich für den
Betrieb im Innenbereich, in trockenen
und geschlossenen Räumen geeignet.
Lassen Sie das Produkt oder Verpackungsmaterial
nicht achtlos liegen. Plastikfolien / -tüten, Styropor-
teile etc. könnten für Kinder zu einem gefährlichen
Spielzeug werden.
Vermeiden Sie Lebensgefahr
durch elektrischen Schlag!
Vergewissern Sie sich vor der Benutzung, dass die
vorhandene Netzspannung mit der benötigten
Betriebsspannung des Produkts übereinstimmt
(siehe „Technische Daten“).
Überprüfen Sie vor jedem Netz anschluss das
Produkt und das Netzanschlusskabel auf etwaige
Beschädigungen. Ein beschädigtes Produkt be-
deutet Lebensgefahr durch elektrischen Schlag.
Verwenden Sie das Produkt nicht, wenn Sie
irgendwelche Beschädigungen feststellen.
Wenden Sie sich bei Beschädigungen, Reparature
n
oder anderen Problemen am Produkt an eine
Elektrofachkraft.
Öffnen Sie niemals eines der elektrischen Betriebs-
mittel oder stecken irgendwelche Gegenstände
in dieselben. Derartige Eingriffe bedeuten Lebens-
gefahr durch elektrischen Schlag.
Vermeiden Sie unbedingt die Berührung des
Produkts mit Wasser oder anderen Flüssigkeiten.
Für die Montage wenden Sie sich im Zweifels-
fall an einen qualifizierten Elektriker.
Verwenden Sie dieses Produkt nicht für Dimmer
und elektrische Schalter. Es ist nicht für diese
Zwecke geeignet.
Benutzen Sie das Produkt niemals in unmittelbarer
Nähe einer Badewanne, einer Dusche oder
eines Schwimmbeckens.
Blicken Sie nicht in den direkten oder reflektierten
Strahl des Produkts.
Falls Sie der direkte oder reflektierte Strahl des
Produkts ins Auge trifft, schließen Sie die Augen
bewusst und bewegen Sie den Kopf sofort aus
dem Strahl.
Für die Deckenmontage haben wir Montage-
material beigelegt, das für übliches, festes Mauer-
werk geeignet ist.
Prüfen Sie vor der Montage, ob die mitgelieferten
Montagematerialien für die Beschaffenheit der
Wand bzw. Decke geeignet sind, an der Sie
das Produkt anbringen wollen.
Montieren Sie das Produkt so, dass es vor
Spritzwasser und Verschmutzung geschützt ist.
Die LEDs sind nicht austauschbar.
Sollten die LEDs am Ende ihrer Lebensdauer
ausfallen, muss das ganze Produkt ersetzt
werden.
Dieses Produkt darf nur mit dem eingebauten
LED-Vorschaltgerät verwendet werden.

7 DE/AT/CH
Vor der Inbetriebnahme
Hinweis: Entfernen Sie sämtliches Verpackungs-
material vom Produkt.
Montage
Hinweis: Für die Montage benötigen Sie eine
Bohrmaschine.
VORSICHT! VERLETZUNGSGEFAHR! Ziehen
Sie die Bedienungsanleitung Ihrer Bohrmaschine
hinzu.
Modell HG05024A (runde Form)
1. Drehen Sie die Sicherung heraus bzw. schalten
Sie den Sicherungsautomaten aus und sichern
Sie den Stromkreis gegen unbeabsichtigtes Ein-
schalten.
2. Stellen Sie mit einem Metallprüfgerät sicher, dass
sich in den Bohrbereichen keine Kabel oder
Rohrleitungen befinden.
3. Wählen Sie gegebenenfalls eine andere Stelle
für die Montage.
4. Nehmen Sie die Leuchtenabdeckung 6 vom
Leuchtenteller 3 ab, indem Sie die Leuchtenab-
deckung 6 gegen den Uhrzeigersinn drehen.
5. Markieren Sie die Bohrbereiche anhand der
Schraublöcher im Leuchtenteller 3.
6. Bohren Sie mit einem 6 mm-Steinbohrer an den
gekennzeichneten Positionen je ein ca. 30 mm
tiefes Loch.
7. Stecken Sie je einen Dübel 2 in die gebohrten
Löcher.
8. Führen Sie die Anschlussleitung 9 durch den
Gummischlauch 1 und das Loch des Leuchten-
tellers 3 und platzieren Sie den Leuchtenteller
3 an der Decke, sodass die Schraublöcher
deckungsgleich über den Bohrlöchern liegen.
9. Befestigen Sie den Leuchtenteller 3 mit den
Schrauben 5 an der Decke.
10. Lösen Sie die Schraube und öffnen Sie die
Abdeckkappe am LED-Treiber 4.
11. Klemmen Sie die Anschlussleitung 9 polrichtig
am Klemmblock 7 an und stülpen Sie den
Gummischlauch 1 ganz über die Anschluss-
leitung 9.
12. Schrauben Sie die Abdeckkappe mittels der
Schraube wieder am LED-Treiber 4 fest.
13. Befestigen Sie die Leuchtenabdeckung 6 am
Leuchtenteller 3, indem Sie die Leuchtenab-
deckung 6 im Uhrzeigersinn drehen.
14. Drehen Sie die Sicherung wieder herein bzw.
schalten Sie den Sicherungsautomaten ein.
Modell HG05024B (quadratische Form)
1. Drehen Sie die Sicherung heraus bzw. schalten
Sie den Sicherungsautomaten aus und sichern
Sie den Stromkreis gegen unbeabsichtigtes
Einschalten.
2. Stellen Sie mit einem Metallprüfgerät sicher, dass
sich in den Bohrbereichen keine Kabel oder
Rohrleitungen befinden.
3. Wählen Sie gegebenenfalls eine andere Stelle
für die Montage.
4. Nehmen Sie die Leuchtenabdeckung 6 vom
Leuchtenteller 3 ab, indem Sie den Feststellhe-
bel 8 öffnen.
5. Markieren Sie die Bohrbereiche anhand der
Schraublöcher im Leuchtenteller 3.
6. Bohren Sie mit einem 6 mm-Steinbohrer an den
gekennzeichneten Positionen je ein ca. 30 mm
tiefes Loch.
7. Stecken Sie je einen Dübel 2 in die gebohrten
Löcher.
8. Führen Sie die Anschlussleitung 9 durch den
Gummischlauch 1 und das Loch des Leuchten-
tellers 3 und platzieren Sie den Leuchtenteller
3 an der Decke, sodass die Schraublöcher
deckungsgleich über den Bohrlöchern liegen.
9. Schrauben Sie den Leuchtenteller 3 mit den
Schrauben 5 an die Decke.
10. Lösen Sie die Schraube und öffnen Sie die
Abdeckkappe am LED-Treiber 4.
11. Klemmen Sie die Anschlussleitung 9 polrichtig
am Klemmblock 7 an und stülpen Sie den
Gummischlauch 1 ganz über die Anschluss-
leitung 9.
12. Schrauben Sie die Abdeckkappe mittels der
Schraube wieder am LED-Treiber 4 fest.
13. Befestigen Sie die Leuchtenabdeckung 6 am
Leuchtenteller 3, indem Sie den Feststellhebel
8 schließen.
14. Drehen Sie die Sicherung wieder herein bzw.
schalten Sie den Sicherungsautomaten ein.

8 DE/AT/CH
Produkt ein- / ausschalten
Schalten Sie das Produkt mit dem Wandschalter
ein bzw. aus.
Wartung und Reinigung
Lassen Sie das Produkt vollständig abkühlen.
Benutzen Sie keine Lösungsmittel, Benzin o. ä.
Das Produkt würde hierbei Schaden nehmen.
LEBENSGEFAHR DURCH
ELEKTRISCHEN SCHLAG! Schalten Sie vor
allen Arbeiten an dem Produkt den Stromkreis
am Sicherungskasten aus oder entfernen Sie
die Schraubsicherungen im Sicherungskasten.
STROMSCHLAGGEFAHR!
Aus Gründen der elektrischen Sicherheit darf
das Produkt niemals mit Wasser oder anderen
Flüssigkeiten gereinigt oder gar in Wasser ge-
taucht werden.
Verwenden Sie zur Reinigung nur ein trockenes,
fusselfreies Tuch.
Richten Sie den LED-Strahl niemals auf reflektie-
rende Flächen, Menschen oder Tiere. Andernfalls
können Augenreizungen und / oder Blindheit
bei Mensch und Tier die Folgen sein. Bereits ein
schwacher LED-Strahl kann zu Augenschäden
führen.
Entsorgung
Die Verpackung besteht aus umweltfreundlichen
Materialien, die Sie über die örtlichen Recyclingstellen
entsorgen können.
b
a
Beachten Sie die Kennzeichnung der
Verpackungsmaterialien bei der Abfall-
trennung, diese sind gekennzeichnet mit
Abkürzungen (a) und Nummern (b) mit
folgender Bedeutung: 1–7: Kunststoffe /
20–22: Papier und Pappe / 80–98:
Verbundstoffe.
Das Produkt und die Verpackungs-
materialien sind recycelbar, entsorgen
Sie diese getrennt für eine bessere Ab-
fallbehandlung. Das Triman-Logo gilt nur
für Frankreich.
Möglichkeiten zur Entsorgung des aus-
gedienten Produkts erfahren Sie bei Ihrer
Gemeinde- oder Stadtverwaltung.
Werfen Sie Ihr Produkt, wenn es ausge-
dient hat, im Interesse des Umweltschutzes
nicht in den Hausmüll, sondern führen Sie
es einer fachgerechten Entsorgung zu.
Über Sammelstellen und deren Öffnungs-
zeiten können Sie sich bei Ihrer zuständigen
Verwaltung informieren.
Garantie
Das Produkt wurde nach strengen Qualitätsrichtlinien
sorgfältig produziert und vor Anlieferung gewissen-
haft geprüft. Im Falle von Mängeln dieses Produkts
stehen Ihnen gegen den Verkäufer des Produkts
gesetzliche Rechte zu. Diese gesetzlichen Rechte
werden durch unsere im Folgenden dargestellte
Garantie nicht eingeschränkt.
Sie erhalten auf dieses Produkt 3 Jahre Garantie ab
Kaufdatum. Die Garantiefrist beginnt mit dem Kauf-
datum. Bitte bewahren Sie den Original-Kassenbon
gut auf. Diese Unterlage wird als Nachweis für den
Kauf benötigt.
Tritt innerhalb von 3 Jahren ab dem Kaufdatum dieses
Produkts ein Material- oder Fabrikationsfehler auf,
wird das Produkt von uns – nach unserer Wahl – für
Sie kostenlos repariert oder ersetzt. Diese Garantie
verfällt, wenn das Produkt beschädigt, nicht sachge-
mäß benutzt oder gewartet wurde.
Die Garantieleistung gilt für Material- oder Fabrika-
tionsfehler. Diese Garantie erstreckt sich nicht auf
Produktteile, die normaler Abnutzung ausgesetzt
sind (z. B. Batterien) und daher als Verschleißteile
angesehen werden können oder Beschädigungen
an zerbrechlichen Teilen, z. B. Schalter, Akkus oder
die aus Glas gefertigt sind.

9 GB/IE
List of pictograms used
LED lifespan Protection Class II
Use indoors Beam angle 120 °
Alternating current Not dimmable
LED Wall Or Ceiling Light
Introduction
We congratulate you on the purchase of your new
product. You have chosen a high quality product.
The instructions for use are part of the product. They
contain important information concerning safety, use
and disposal. Before using the product, please famil-
iarise yourself with all of the safety information and
instructions for use. Only use the product as described
and for the specified applications. If you pass the
product on to anyone else, please ensure that you
also pass on all the documentation with it.
Intended use
This product is intended for indoor use in dry and
enclosed rooms only. The product is not intended
for commercial use.
Parts description
1 Rubber tube
2 Dowel
3 Base plate
4 LED driver
5 Screw
6 Light cover
7 Terminal block
8 Locking lever (HG05024B only)
9 Connection cable
Technical data
Operating voltage: 230 V ~, 50 Hz
Protection Class: II /
Nominal power: approx. 13 W
LED cannot be replaced
Scope of delivery
HG05024A:
1 LED Wall / Ceiling light
3 Dowels
3 Screws
1 Rubber tube
1 Assembly and operating instructions
HG05024B:
1 LED Wall / Ceiling light
4 Dowels
4 Screws
1 Rubber tube
1 Assembly and operating instructions

10 GB/IE
Safety
Safety instructions
READ THESE INSTRUCTIONS BEFORE USING
THE PRODUCT! PLEASE KEEP ALL SAFETY IN-
STRUCTIONS AND INSTRUCTIONS FOR USE
FOR FUTURE REFERENCE!
DANGER TO
LIFE AND RISK OF ACCIDENT
FOR INFANTS AND CHILDREN!
Never leave children unsupervised with the pack-
aging material. The packaging material represents
a danger of suffocation. Children frequently
underestimate the dangers. Please keep the
product out of the reach of children at all times.
This product is not a toy. Keep away from children.
Children are not able to understand the dangers
that can arise when handling this product.
This product may be used by children aged
8 years and up, as well as by persons with
reduced physical, sensory or mental capacities,
or lacking experience and / or knowledge, so
long as they are supervised or instructed in the
safe use of the product and understand the as-
sociated risks. Do not allow children to play with
the product. Cleaning and user maintenance
should not be performed by children without
supervision.
This product is solely suitable for use
in dry, closed indoor spaces.
Do not allow the product or the packaging
materials to lie around unattended. Plastic film
or bags, Styrofoam etc. can turn into dangerous
toys for children.
Avoid the danger of
death from electric shock!
Verify the existing mains voltage corresponds
to the required voltage of the product (see
“technical data”) before using it.
Always check the product and the mains supply
for damage before connecting it to the mains.
A damaged product represents the danger of
death from electric shock.
Do not use the product if you detect any damage.
In the event of damage, repairs or other problems
with the product, please consult an electrician.
Never open any of the components of the elec-
trical equipment or insert any objects into the
same components. This will pose a risk of fatal
injury from electric shock.
Never allow the product to come into contact
with water or other liquids.
For installation, please contact qualified electrician
if you have any doubt.
Do not use this product for dimmers or electronic
switches. It is not suitable for these purposes.
Never use the product in immediate vicinity of
a bath, shower or swimming pool.
Do not look directly into the light or its reflection.
If direct or reflected light strikes your eyes, close
them and immediately move your head out of
the light.
We have included assembly material for ceiling
mounting suitable for the usual firm masonry.
Before installation, check whether the included
mounting material is suitable for the wall or
ceiling on which you are aiming to mount the
product.
Fit the product in such a way to ensure it is
protected from damp and dirt.
The LEDs are not replaceable.
If the LEDs fail at the end of their lives, the entire
product must be replaced.
The product is only suited for use with the built-in
LED control gear.
Before use
Note: Remove all packaging materials from the
product.
Installation
Note: You will need an electric drill for the installation.
CAUTION! RISK OF INJURY! Please refer to
the operating instructions of your electric drill.

11 GB/IE
Model HG05024A (Round shape)
1. Unscrew the fuse and / or switch off the circuit
breaker and secure the circuit from accidental
starting.
2. Using a metal test instrument, ensure that there
are no cables or pipes in the drilling ranges.
3. If necessary, choose another place to install the
light.
4. Remove the light cover 6 from the base plate
3 by rotating the light cover 6 counterclock-
wise.
5. Mark the drilling ranges using the screw holes
in the base plate 3.
6. Using a 6 mm masonry drill, drill an approx.
30 mm deep hole into the marked positions.
7. Insert a dowel 2 into each drilled hole.
8. Guide the connection cable 9 through the
rubber tube 1 and the base plate 3 hole
and place the base plate 3 on the ceiling, so
that the screw holes are congruent with the drill
holes.
9. Fix the base plate 3 to the ceiling using the
screws 5.
10. Release the screw and open the cover cap on
the LED driver 4.
11. Connect the connection cable 9 with correct
polarity to the terminal block 7 and put the
rubber tube 1 completely over the connection
cable 9.
12. Screw the cover cap to the LED driver 4 again
using the screw.
13. Attach the light cover 6 to the base plate 3
by rotating the light cover 6 clockwise.
14. Screw the fuse on and / or switch the circuit
breaker on again.
Model HG05024B (Square shape)
1. Unscrew the fuse and / or switch off the circuit
breaker and secure the circuit from accidental
starting.
2. Using a metal test instrument ensure the there
are no cables or pipes in the drilling ranges.
3. If necessary, choose nother place to install the
light.
4. Remove the light cover 6 from the base plate
3 by rotating the locking lever 8 open.
5. Mark the drilling ranges using the screw holes
in the base plate 3.
6. Using a 6 mm masonry drill, drill an approx.
30 mm deep hole into the marked positions.
7. Insert the dowel 2 into each drill hole.
8. Guide the connection cable 9 through the
rubber tube 1 and the base plate 3 hole
and place the base plate 3 on the ceiling, so
that the screw holes are congruent with the drill
holes.
9. Screw the base plate 3 to the ceiling using
the screws 5.
10. Release the screw and open the cover cap on
the LED driver 4.
11. Connect the connection cable 9 with correct
polarity to the terminal block 7 and put the
rubber tube 1 completely over the connection
cable 9.
12. Screw the cover cap to the LED driver 4 again
using the screw.
13. Attach the light cover 6 to the base plate 3
by closing the locking lever 8.
14. Screw the fuse on and / or switch the circuit
breaker on again.
Switching the product on / off
Use the wall switch to switch the product on
and off.
Maintenance and cleaning
Allow the product to cool down completely.
Do not use solvents, benzene or similar sub-
stances. They could damage the product.
DANGER TO LIFE BY ELEC-
TRIC SHOCK! Before carrying out any tasks
on the product, switch off the electrical circuit at
the circuit breaker box or remove the fuse from
the fuse box.
RISK OF ELECTRIC SHOCK!
For electrical safety, never clean the product with
water or other liquids, or immerse it in water.
Only use a dry, lint-free cloth for cleaning.
Never aim the LED beam at reflective surfaces,
people or animals. Failure to observe this advice
may result in eye irritation and / or blindness in

12 GB/IE
humans and animals. Even a weak LED light
beam can cause eye damage.
Disposal
The packaging is made entirely of recyclable
materials, which you may dispose of at local
recycling facilities.
b
a
Observe the marking of the packaging
materials for waste separation, which are
marked with abbreviations (a) and numbers
(b) with following meaning: 1–7: plastics /
20–22: paper and fibreboard / 80–98:
composite materials.
The product and packaging materials
are recyclable, dispose of it separately
for better waste treatment. The Triman
logo is valid in France only.
Contact your local refuse disposal
authority for more details of how to
dispose of your worn-out product.
To help protect the environment, please
dispose of the product properly when it
has reached the end of its useful life and
not in the household waste. Information
on collection points and their opening
hours can be obtained from your local
authority.
Warranty
The product has been manufactured to strict quality
guidelines and meticulously examined before deli-
very. In the event of product defects you have legal
rights against the retailer of this product. Your legal
rights are not limited in any way by our warranty
detailed below.
The warranty for this product is 3 years from the
date of purchase. Should this product show any
fault in materials or manufacture within 3 years
from the date of purchase, we will repair or replace
it – at our choice – free of charge to you.
The warranty period begins on the date of purchase.
Please keep the original sales receipt in a safe loca-
tion. This document is required as your proof of
purchase. This warranty becomes void if the product
has been damaged, or used or maintained improperly.
The warranty applies to defects in material or manu-
facture. This warranty does not cover product parts
subject to normal wear, thus possibly considered
consumables (e.g. batteries) or for damage to fragile
parts, e.g. switches, rechargeable batteries or glass
parts.

13 FR/BE
Légende des pictogrammes utilisés
Durée de vie des LED Classe de protection II
Utilisation dans une pièce fermée Angle de rayonnement 120 °
Courant alternatif Intensité non réglable
Plafonnier / applique à LED
Introduction
Nous vous félicitons pour l‘achat de votre nouveau
produit. Vous avez opté pour un produit de grande
qualité. Le mode d‘emploi fait partie intégrante de
ce produit. Il contient des indications importantes pour
la sécurité, l’utilisation et la mise au rebut. Veuillez
lire consciencieusement toutes les indications d‘utili-
sation et de sécurité du produit. Ce produit doit uni-
quement être utilisé conformément aux instructions
et dans les domaines d‘application spécifiés. Lors
d‘une cession à tiers, veuillez également remettre
tous les documents.
Utilisation conforme
Ce produit est exclusivement conçu pour un usage
intérieur dans des locaux fermés et secs. Le produit
n’est pas destiné à une utilisation commerciale.
Descriptif des pièces
1 Tuyau en caoutchouc
2 Cheville
3 Support du luminaire
4 Pilote LED
5 Vis
6 Cache du luminaire
7 Bloc de serrage
8 Levier de verrouillage (uniquement HG05024B)
9 Câble de raccordement
Caractéristiques techniques
Tension de service: 230 V ~, 50 Hz
Classe de protection : II /
Puissance nominale: env. 13 W
La LED ne peut pas être remplacée.
Contenu de la livraison
HG05024A :
1 lampe LED murale / plafonnier LED
3 chevilles
3 vis
1 tuyau en caoutchouc
1 notice de montage et d‘utilisation
HG05024B :
1 lampe LED murale / plafonnier LED
4 chevilles
4 vis
1 tuyau en caoutchouc
1 notice de montage et d‘utilisation
Sécurité
Indications de sécurité
NOUS VOUS PRIONS DE LIRE ATTENTIVEMENT
LES INSTRUCTIONS AVANT TOUTE UTILISATION
DE L‘ARTICLE! CONSERVEZ TOUTES LES
CONSIGNES DE SÉCURITÉ ET L‘ENSEMBLE DES

14 FR/BE
INSTRUCTIONS AFIN DE POUVOIR LES CONSUL-
TER ULTÉRIEUREMENT!
DAN-
GER DE MORT ET RISQUE DE
BLESSURE POUR LES ENFANTS
ET LES ENFANTS EN BAS ÂGE! Ne jamais
laisser les enfants sans surveillance à proximité
de l’emballage. Il existe un risque d’étouffement
par le matériel d’emballage. Les enfants sous-
estiment souvent le danger. Toujours tenir l‘ap-
pareil à l‘écart des enfants.
Ce produit n‘est pas un jouet, il doit être tenu
hors de portée des enfants. Les enfants ne sont
pas conscients des dangers liés à la manipulation
du produit.
Ce produit peut être utilisé par des enfants âgés
de 8 ans et plus ainsi que par des personnes
ayant des capacités physiques, sensorielles ou
mentales réduites ou manquant d‘expérience ou
de connaissances, à la condition qu‘ils soient
surveillés ou s‘ils ont été informés de l‘utilisation
sûre du produit et s‘ils en comprennent les risques
liés à son utilisation. Les enfants ne doivent pas
jouer avec le produit. Le nettoyage et l‘entretien
du produit ne doivent pas être effectués par
des enfants laissés sans surveillance.
Ce produit est exclusivement conçu
pour un usage en intérieur, dans des
locaux fermés et secs.
Ne laissez pas le produit ou le matériel d‘em-
ballage traîner sans surveillance. Les films / les
sacs en plastique, les pièces en polystyrène,
etc. peuvent constituer des jouets dangereux
pour les enfants.
Prévention de risques mortels
par électrocution!
Avant l‘utilisation, vérifiez que la tension secteur
corresponde à la tension de service requise du
produit (voir „Caractéristiques techniques“).
Avant chaque branchement au secteur, contrôlez
le produit et le câble secteur afin de détecter
d‘éventuels endommagements. Un produit en-
dommagé implique un danger de mort par
électrocution.
Ne pas utiliser ce produit si vous constatez le
moindre dommage.
En cas de dommages et pour toute réparation
ou autres problèmes relatifs au produit, contac-
tez un électricien.
N‘ouvrez jamais les composants électriques et
n‘y insérez jamais d‘objets quelconques. De tel-
les interventions impliquent un danger de mort
par électrocution.
Évitez impérativement tout contact du produit
avec de l‘eau ou d‘autres liquides.
En cas de doute, adressez-vous à un électricien
qualifié.
N’utilisez pas ce produit pour des variateurs ni
des commutateurs électriques. Il n‘est pas adapté
à ces usages.
N‘utilisez jamais le produit à proximité immédi-
ate d‘une baignoire, d‘une douche ou d‘une
piscine.
Ne pas regarder dans le faisceau direct ou
réfléchi du produit.
Si le faisceau du produit vise directement ou in-
directement un œil, immédiatement fermer l‘oeil
et détourner la tête du faisceau.
Nous avons joint du matériel d‘installation ap-
proprié pour installer le plafonnier sur un mur
solide commun.
Veuillez vérifier avant le montage si le matériel
de fixation livré est bien adapté au type de mur /
plafond sur lequel vous souhaitez monter le pro-
duit.
Montez le produit de telle sorte qu‘il soit pro-
tégé des éclaboussures et des salissures.
Les LED ne peuvent pas être remplacées.
Si les LED arrivent en fin de vie, l‘ensemble du
produit doit alors être remplacé.
Ce produit peut uniquement être utilisé avec un
ballast à LED intégré.
Avant la mise en service
Remarque : Veuillez retirer tous les emballages
du produit.

15 FR/BE
Montage
Remarque : Une perceuse est requise pour le
montage.
ATTENTION! RISQUE DE BLESSURES ! Consul-
tez pour ceci le mode d‘emploi de votre perceuse.
Modèle HG05024A (forme ronde)
1. Enlevez le fusible ou coupez le disjoncteur, puis
protégez le circuit électrique contre une mise en
service involontaire.
2. Vérifiez avec un détecteur de métaux qu’aucun
câble ou tuyau ne se trouve dans les zones de
perçage.
3. Le cas échéant, choisissez un autre endroit pour
le montage.
4. Enlevez le cache du luminaire 6 du support
du luminaire 3 en faisant tourner le cache du
luminaire 6 dans le sens inverse des aiguilles
d‘une montre.
5. Marquez les endroits à percer à l‘aide des trous
de vis se trouvant dans le support du luminaire 3.
6. Percez un trou d’env. 30 mm avec un foret à
pierre de 6 mm aux endroits marqués.
7. Insérer une cheville 2 dans chaque trou percé.
8. Faites passer le câble de raccordement 9 dans
le tuyau en caoutchouc 1 et le trou du support
du luminaire 3 et placez le support du luminaire
3 au plafond de manière à ce que les trous
des vis recouvrent les trous de perçage.
9. Fixez le support du luminaire 3 au plafond à
l‘aide des vis 5.
10. Desserrez la vis et ouvrez le capot de protection
sur le pilote LED 4.
11. Serrez le câble de raccordement 9 au bloc
de serrage 7 en respectant la polarité et faites
glisser le tuyau en caoutchouc 1 au-dessus du
câble de raccordement 9.
12. Vissez à nouveau fermement le capot de pro-
tection au pilote LED 4 au moyen de la vis.
13. Replacez le cache du luminaire 6 sur le sup-
port du luminaire 3 en faisant tourner le cache
du luminaire 6 dans le sens des aiguilles d‘une
montre.
14. Remettez en place le fusible et actionnez le
disjoncteur.
Modèle HG05024B (forme carrée)
1. Enlevez le fusible ou coupez le disjoncteur, puis
protégez le circuit électrique contre une mise en
service involontaire.
2. Vérifiez avec un détecteur de métaux qu’aucun
câble ou tuyau ne se trouve dans les zones de
perçage.
3. Le cas échéant, choisissez un autre endroit pour
le montage.
4. Enlevez le cache du luminaire 6 du support
du luminaire 3 en ouvrant le levier de verrouil-
lage 8.
5. Marquez les endroits à percer à l‘aide des trous
de vis se trouvant dans le support du luminaire 3.
6. Percez un trou d’env. 30 mm avec un foret à
pierre de 6 mm aux endroits marqués.
7. Insérer une cheville 2 dans chaque trou percé.
8. Faites passer le câble de raccordement 9 dans
le tuyau en caoutchouc 1 et le trou du support
du luminaire 3 et placez le support du lumi-
naire 3 au plafond de manière à ce que les
trous des vis recouvrent les trous de perçage.
9. Vissez le support du luminaire 3 au plafond à
l‘aide des vis 5.
10. Desserrez la vis et ouvrez le capot de protection
sur le pilote LED 4.
11. Serrez le câble de raccordement 9 au bloc de
serrage 7 en respectant la polarité et faites
glisser le tuyau en caoutchouc 1 au-dessus du
câble de raccordement 9.
12. Vissez à nouveau fermement le capot de pro-
tection au pilote LED 4 au moyen de la vis.
13. Fixez le cache du luminaire 6 au support du
luminaire 3 en fermant le levier de verrouil-
lage 8.
14. Remettez en place le fusible et actionnez le
disjoncteur.
Allumer / éteindre le produit
Allumez / Éteignez le produit avec l‘interrupteur
mural.

16 FR/BE
Entretien et nettoyage
Laissez complètement refroidir le produit.
N‘utilisez aucun solvant, ni essence ou produit
similaire. Ces substances pourraient endommager
le produit.
DANGER DE MORT
PAR ÉLECTROCUTION! Avant tous travaux
sur le produit, coupez le circuit électrique au
niveau du disjoncteur de l‘armoire électrique ou
retirez les fusibles vissés dans la boîte à fusibles.
RISQUE D‘ÉLECTRO-
CUTION! Pour des raisons de sécurité électrique,
il est interdit de nettoyer le produit à l‘eau ou
avec d‘autres liquides ou encore de le plonger
dans de l‘eau.
Pour procéder au nettoyage, utilisez uniquement
un chiffon sec et non pelucheux.
N’orientez jamais le rayon LED sur des surfaces
réfléchissantes, des personnes ou des animaux.
Autrement, vous risquez d‘irriter les yeux et / ou
d‘aveugler les personnes ou les animaux. Un
rayon LED de faible intensité peut suffire à pro-
voquer des lésions oculaires.
Mise au rebut
L’emballage se compose de matières recyclables
pouvant être mises au rebut dans les déchetteries
locales.
b
a
Veuillez respecter l‘identification des
matériaux d‘emballage pour le tri sélectif,
ils sont identifiés avec des abbréviations
(a) et des chiffres (b) ayant la signification
suivante : 1–7 : plastiques / 20–22 :
papiers et cartons / 80–98 : matériaux
composite.
Le produit et les matériaux d’emballage
sont recyclables, mettez-les au rebut sé-
parément pour un meilleur traitement des
déchets. Le logo Triman n’est valable
qu’en France.
Votre mairie ou votre municipalité vous
renseigneront sur les possibilités de mise
au rebut des produits usagés.
Afin de contribuer à la protection de
l’environnement, veuillez ne pas jeter
votre produit usagé dans les ordures
ménagères, mais éliminez-le de manière
appropriée. Pour obtenir des renseigne-
ments concernant les points de collecte
et leurs horaires d’ouverture, vous pou-
vez contacter votre municipalité.
Garantie
Le produit a été fabriqué selon des critères de qualité
stricts et contrôlé consciencieusement avant sa livrai-
son. En cas de défaillance, vous êtes en droit de re-
tourner ce produit au vendeur. La présente garantie
ne constitue pas une restriction de vos droits légaux.
Ce produit bénéficie d‘une garantie de 3 ans à
compter de sa date d’achat. La durée de garantie
débute à la date d’achat. Veuillez conserver le ticket
de caisse original. Il fera office de preuve d’achat.
Si un problème matériel ou de fabrication devait
survenir dans 3 ans suivant la date d‘achat de ce
produit, nous assurons à notre discrétion la répara-
tion ou le remplacement du produit sans frais sup-
plémentaires. La garantie prend fin si le produit est
endommagé suite à une utilisation inappropriée ou
à un entretien défaillant.
La garantie couvre les vices matériels et de fabrication.
Cette garantie ne s’étend ni aux pièces du produit
soumises à une usure normale (p. ex. des piles) et qui,
par conséquent, peuvent être considérées comme
des pièces d’usure, ni aux dommages sur des com-
posants fragiles, comme des interrupteurs, des bat-
teries ou des éléments fabriqués en verre.

17 NL/BE
Legenda van de gebruikte pictogrammen
Led-levensduur Beschermingsklasse II
Gebruik in gesloten ruimtes Stralingshoek 120 °
Wisselstroom Niet dimbaar
LED-wand- / plafondlamp
Inleiding
Hartelijk gefeliciteerd met de aankoop van uw nieuwe
product. U heeft voor een hoogwaardig product
gekozen. De gebruiksaanwijzing is een deel van het
product. Deze bevat belangrijke aanwijzingen voor
veiligheid, gebruik en verwijdering. Maakt U zich
voor de ingebruikname van het product met alle be-
dienings- en veiligheidsvoorschriften vertrouwd. Ge-
bruik het product alleen zoals beschreven en voor
de aangegeven toepassingsgebieden. Overhandig
alle documenten bij doorgifte van het product aan
derden.
Correct gebruik
Dit product is uitsluitend bedoeld voor gebruik bin-
nenshuis, in droge en gesloten ruimtes. Het product
is niet bestemd voor commerciële doeleinden.
Beschrijving van de onderdelen
1 Rubberslang
2 Plug
3 Lampschotel
4 Led-driver
5 Schroef
6 Lampafdekking
7 Klemblokje
8 Vergrendeling (alleen HG05024B)
9 Aansluitkabel
Technische gegevens
Bedrijfsspanning: 230 V ~, 50 Hz
Beschermingsklasse: II /
Nominaal vermogen: ca. 13 W
De led kan niet worden vervangen.
Omvang van de levering
HG05024A:
1 led-wand- / plafondlamp
3 pluggen
3 schroeven
1 rubberslang
1 montage- en bedieningshandleiding
HG05024B:
1 led-wand- / plafondlamp
4 pluggen
4 schroeven
1 rubberslang
1 montage- en bedieningshandleiding
Veiligheid
Veiligheidsinstructies
LEES DE GEBRUIKSAANWIJZING ALSTUBLIEFT
DOOR VOORDAT U HET ARTIKEL GEBRUIKT!
BEWAAR ALLE VEILIGHEIDSINSTRUCTIES EN
AANWIJZINGEN OM DEZE EVENTUEEL LATER
TE KUNNEN RAADPLEGEN!

18 NL/BE
LE-
VENSGEVAAR EN GEVAAR
VOOR ONGEVALLEN BIJ
KLEUTERS EN KINDEREN! Laat kinderen
nooit zonder toezicht bij het verpakkingsmateri-
aal. Er bestaat gevaar voor verstikking door
verpakkingsmateriaal. Kinderen onderschatten
vaak de gevaren. Houd kinderen altijd uit de
buurt van het product.
Dit product is geen speelgoed, het hoort niet
thuis in kinderhanden. Kinderen zijn zich niet
bewust van de gevaren die ontstaan tijdens het
gebruik van het product.
Dit product kan door kinderen vanaf 8 jaar en
ouder alsmede door personen met verminderde
fysieke, sensorische of mentale vaardigheden of
een gebrek aan ervaring en kennis worden ge-
bruikt, als zij onder toezicht staan of geïnstrueerd
werden met betrekking tot het veilige gebruik
van het product en zij de hieruit voortvloeiende
gevaren begrijpen. Kinderen mogen niet met het
product spelen. Reiniging en onderhoud mogen
niet door kinderen zonder toezicht worden uit-
gevoerd.
Het product is uitsluitend bedoeld
voor gebruik binnenshuis, in droge
en gesloten ruimtes.
Laat het product of het verpakkingsmateriaal niet
achteloos liggen. Plastic folie / -zakken, stukken
piepschuim etc. kunnen voor kinderen een ge-
vaarlijk speelgoed vormen.
Vermijd levensgevaar door
elektrische schokken!
Overtuig u er vóór het gebruik van dat de
bestaande netspanning overeenkomt met de
vereiste bedrijfsspanning van het product (zie
„Technische gegevens“).
Controleer voor elke aansluiting op het stroomnet
het product en de aansluitkabel op eventuele
beschadigingen. Een beschadigd product ver-
oorzaakt levensgevaar door een elektrische
schok.
Gebruik het product niet als u enigerlei bescha-
digingen constateert.
Neem in geval van beschadigingen, reparaties
of andere problemen met het product contact
op met een elektricien.
Open nooit een van de elektrische componenten
en steek er geen voorwerpen in. Bij dergelijke
handelingen bestaat levensgevaar door een
elektrische schok.
Vermijd altijd het contact van het product met
water of andere vloeistoffen.
Als u bij de montage twijfelt, neem dan contact
op met een gekwalificeerde elektricien.
Gebruik dit product niet met dimmers en elektri-
sche schakelaars. Het is niet geschikt voor deze
doeleinden.
Gebruik het product nooit in de directe omge-
ving van een badkuip, douche of zwembad.
Kijk niet in de directe of gereflecteerde lichtstraal
van het product.
Indien u de directe of gereflecteerde lichtstraal
van het product in het oog krijgt, sluit dan bewust
uw ogen en beweeg het hoofd meteen uit de
lichtstraal.
Voor de plafondmontage hebben wij montage-
materiaal bijgevoegd dat geschikt is voor normaal,
vast muurwerk.
Controleer voor de montage of de meegeleverde
montagematerialen geschikt zijn voor de eigen-
schappen van de wand c.q. het plafond waar-
aan u het product wilt bevestigen.
Monteer het product zodanig dat het beschermd
is tegen spatwater en verontreiniging.
De leds kunnen niet worden vervangen.
Mochten de leds aan het einde van hun levens-
duur uitvallen, dient het gehele product te worden
vervangen.
Dit product mag alleen met de ingebouwde
led-driver worden gebruikt.
Voor de ingebruikname
Opmerking: verwijder al het verpakkingsmateriaal
van het product.

19 NL/BE
Montage
Opmerking: voor de montage heeft u een boor-
machine nodig.
VOORZICHTIG! LETSELGEVAAR! Raadpleeg
de gebruiksaanwijzing van uw boormachine.
Model HG05024A (ronde vorm)
1. Draai de zekering eruit of schakel de veiligheids-
automaat uit en beveilig het stroomcircuit tegen
onbedoeld inschakelen.
2. Controleer met een metaaldetectie-apparaat of
er zich in het gedeelte waar geboord wordt geen
leidingen of buizen bevinden.
3. Kies eventueel een andere plek voor de mon-
tage.
4. Neem de lampafdekking 6 van de lampschotel
3 af door de lampafdekking 6 tegen de klok
in te draaien.
5. Markeer de te boren gaten aan de hand van
de schroefgaten in de lampschotel 3.
6. Boor met een 6 mm steenboor telkens een ca.
30 mm diep gat op de gemarkeerde plekken.
7. Steek een plug 2 in elk van de geboorde
gaten.
8. Leid de aansluitkabel 9 door de rubberslang
1 en het gat van de lampschotel 3 en houd
de lampschotel 3 zodanig tegen het plafond
dat de schroefgaten gelijk liggen met de boor-
gaten.
9. Bevestig de lampschotel 3 met de schroeven
5 aan het plafond.
10. Draai de schroef los en open het afdekkapje
van de led-driver 4.
11. Bevestig de aansluitkabel 9 met de juiste po-
lariteit aan het klemblokje 7 en trek de rub-
berslang 1 helemaal over de aansluitkabel
9 heen.
12. Schroef het afdekkapje met de schroef weer op
de led-driver 4 vast.
13. Bevestig de lampafdekking 6 aan de lamp-
schotel 3 door de lampafdekking 6 met de
klok mee te draaien.
14. Draai de zekering weer vast of schakel de
veiligheidsautomaat in.
Model HG05024B (rechthoekige vorm)
1. Draai de zekering eruit of schakel de veiligheids-
automaat uit en beveilig het stroomcircuit tegen
onbedoeld inschakelen.
2. Controleer met een metaaldetectie-apparaat of
er zich in het gedeelte waar geboord wordt
geen leidingen of buizen bevinden.
3. Kies eventueel een andere plek voor de mon-
tage.
4. Haal de lampafdekking 6 van de lampschotel
3 af door de vergrendeling 8 te openen.
5. Markeer de te boren gaten aan de hand van
de schroefgaten in de lampschotel 3.
6. Boor met een 6 mm steenboor telkens een ca.
30 mm diep gat op de gemarkeerde plekken.
7. Steek een plug 2 in elk van de geboorde
gaten.
8. Leid de aansluitkabel 9 door de rubberslang
1 en het gat van de lampschotel 3 en houd
de lampschotel 3 zodanig tegen het plafond
dat de schroefgaten gelijk liggen met de boor-
gaten.
9. Schroef de lampschotel 3 met de schroeven
5 aan het plafond.
10. Draai de schroef los en open het afdekkapje
van de led-driver 4.
11. Bevestig de aansluitkabel 9 met de juiste po-
lariteit aan het klemblokje 7 en trek de rubber-
slang 1 helemaal over de aansluitkabel 9
heen.
12. Schroef het afdekkapje met de schroef weer op
de led-driver 4 vast.
13. Bevestig de lampafdekking 6 aan de lamp-
schotel 3 door de vergrendeling 8 te sluiten.
14. Draai de zekering weer vast of schakel de vei-
ligheidsautomaat in.
Product in- / uitschakelen
Schakel het product met de wandschakelaar in
resp. uit.

20 NL/BE
Onderhoud en reiniging
Laat het product volledig afkoelen.
Gebruik geen oplosmiddelen, benzine e.d. Het
product zal hierdoor beschadigd raken.
LEVENSGEVAAR
DOOR ELEKTRISCHE SCHOKKEN! Scha-
kel vóór alle werkzaamheden aan het product
het stroomcircuit in de zekeringkast uit of verwij-
der de schroefzekeringen in de zekeringkast.
KANS OP ELEK-
TRISCHE SCHOKKEN! Vanwege de elektrische
veiligheid mag het product nooit met water of
andere vloeistoffen worden gereinigd en zeker
niet in water worden ondergedompeld.
Gebruik voor de reiniging uitsluitend een droge,
pluisvrije doek.
Richt de LED-straal nooit op reflecterende opper-
vlakken, op mensen of op dieren. In het andere
geval bestaat gevaar voor oogletsel en / of
blindheid bij mens en dier. Reeds een zwakke
LED-straal kan tot oogletsel leiden.
Afvoer
De verpakking bestaat uit milieuvriendelijke grond-
stoffen die u via de plaatselijke recyclingcontainers
kunt afvoeren.
b
a
Neem de aanduiding van de verpak-
kingsmaterialen voor de afvalscheiding
in acht. Deze zijn gemarkeerd met de af-
kortingen (a) en een cijfers (b) met de
volgende betekenis: 1–7: kunststoffen /
20–22: papier en vezelplaten / 80–98:
composietmaterialen.
Het product en de verpakkingsmaterialen
zijn recyclebaar; verwijder deze afzon-
derlijk voor een betere afvalbehandeling.
Het Triman-logo geldt alleen voor Frankrijk.
Informatie over de mogelijkheden om het
uitgediende product na gebruik te ver-
wijderen, verstrekt uw gemeentelijke
overheid.
Gooi het afgedankte product omwille van
het milieu niet weg via het huisvuil, maar
geef het af bij het daarvoor bestemde
depot of het gemeentelijke milieupark.
Over afgifteplaatsen en hun openingstijden
kunt u zich bij uw aangewezen instantie
informeren.
Garantie
Het product wordt volgens strenge kwaliteitsrichtlijnen
zorgvuldig geproduceerd en voor levering grondig
getest. In geval van schade aan het product kunt u
rechtmatig beroep doen op de verkoper van het
product. Deze wettelijke rechten worden door onze
hierna vermelde garantie niet beperkt.
Op dit product verlenen wij 3 jaar garantie vanaf
aankoopdatum. De garantieperiode start op de
dag van aankoop. Bewaar de originele kassabon
alstublieft. Dit document is nodig als bewijs voor
aankoop.
Wanneer binnen 3 jaar na de aankoopdatum van
dit product een materiaal- of productiefout optreedt,
dan wordt het product door ons – naar onze keuze
– gratis voor u gerepareerd of vervangen. Deze
garantie komt te vervallen als het product bescha-
digd wordt, niet correct gebruikt of onderhouden
wordt.
De garantie geldt voor materiaal- en productiefouten.
Deze garantie is niet van toepassing op producton-
derdelen, die onderhevig zijn aan normale slijtage
en hierdoor als aan slijtage onderhevige onderdelen
gelden (bijv. batterijen) of voor beschadigingen
aan breekbare onderdelen, zoals bijv. schakelaars,
accu’s of dergelijke onderdelen, die gemaakt zijn
van glas.

21 PL
Legenda zastosowanych piktogramów
Żywotność diod LED Klasa ochrony II
Użycie w zamkniętych
pomieszczeniach Kąt świecenia 120 °
Prąd zmienny Bez możliwości ściemniania
Ledowa lampa ścienna / sufitowa
Wstęp
Gratulujemy Państwu zakupu nowego produktu. Tym
samym zdecydowali się Państwo na zakup produktu
wysokiej jakości. Instrukcja obsługi jest częścią tego
produktu. Zawiera ona ważne wskazówki dotyczące
bezpieczeństwa, użytkowania iutylizacji. Przed
pierwszym użyciem produktu należy zapoznać się
ze wszystkimi wskazówkami dotyczącymi obsługi
ibezpieczeństwa. Używać produktu wyłącznie
zgodnie zjego poniżej opisanym przeznaczeniem.
Wprzypadku przekazania produktu innej osobie
należy dołączyć do niego całą jego dokumentację.
Zastosowanie zgodne z
przeznaczeniem
Ten produkt przeznaczony jest wyłącznie do zasto-
sowania wewnątrz, w suchych oraz zamkniętych
pomieszczeniach. Produkt nie jest przeznaczony
do użytku komercyjnego.
Opis części
1 Wąż gumowy
2 Kołek
3 Obudowa lampy
4 Sterownik LED
5 Śruba
6 Osłona lampy
7 Blok zaciskowy
8 Dźwignia ustalająca (tylko HG05024B)
9 Przewód przyłączeniowy
Dane techniczne
Napięcie robocze: 230 V ~, 50 Hz
Klasa ochrony: II /
Moc znamionowa: ok. 13 W
Dioda LED jest niewymienna.
Zawartość
HG05024A:
1 lampa ścienna / sufitowa
3 kołki
3 śruby
1 wąż gumowy
1 instrukcja montażu i obsługi
HG05024B:
1 lampa ścienna / sufitowa
4 kołki
4 śruby
1 wąż gumowy
1 instrukcja montażu i obsługi

22 PL
Bezpieczeństwo
Wskazówki
bezpieczeństwa
PRZED UŻYCIEM ARTYKUŁU NALEŻY PRZECZY-
TAĆ INSTRUKCJĘ OBSŁUGI! PROSIMY O ZA-
CHOWANIE WSZYSTKICH WSKAZÓWEK
BEZPIECZEŃSTWA I INSTRUKCJI OBSŁUGI NA
PRZYSZŁOŚĆ!
NIEBEZPIE-
CZEŃSTWO UTRATY ŻYCIA I
ODNIESIENIA OBRAŻEŃ W
WYPADKU PRZEZ DZIECI! Nigdy nie po-
zostawiać dzieci bez nadzoru z materiałem
opakowania. Istnieje zagrożenie uduszeniem
spowodowane przez materiał opakowaniowy.
Dzieci często nie dostrzegają niebezpieczeństwa.
Dzieci nie powinny mieć dostępu do produktu.
Niniejszy produkt nie jest zabawką, nie powinien
znaleźć się w rękach dzieci. Dzieci nie są w
stanie rozpoznać ryzyka, jakie powstaje po-
przez obchodzenie się z produktem.
Niniejszy produkt może być używany przez
dzieci od lat 8 oraz przez osoby z obniżonymi
zdolnościami fizycznymi, sensorycznymi lub
mentalnymi lub brakiem doświadczenia i / lub
wiedzy, jeśli pozostają pod nadzorem lub zo-
stały pouczone w kwestii bezpiecznego użycia
produktu i rozumieją wynikające z niego zagro-
żenia. Dzieci nie mogą bawić się produktem.
Czyszczenie i konserwacja nie mogą być wy-
konywane przez dzieci bez nadzoru.
Produkt przeznaczony jest wyłącznie
do użytku w suchych i zamkniętych
pomieszczeniach.
Nie pozostawiać produktu i opakowania w
nieodpowiednich miejscach. Folie / torebki pla-
stikowe, elementy ze styropianu itp. mogą stać
się niebezpieczną zabawką dla dzieci.
Porażenie prądem elektrycznym
grozi śmiercią!
Przed użyciem upewnić się, że dostępne napięcie
sieciowe jest zgodne z wymaganym napięciem
roboczym produktu (patrz „Dane techniczne“).
Przed każdym podłączeniem do sieci należy
sprawdzić produkt oraz sieciowy kabel przyłą-
czeniowy pod kątem ewentualnych uszkodzeń.
Uszkodzony produkt oznacza zagrożenie ży-
cia wskutek porażenia prądem elektrycznym.
Nie używać produktu w razie wykrycia jakich-
kolwiek uszkodzeń.
W przypadku wystąpienia uszkodzeń, koniecz-
ności naprawy lub innych problemów z produk-
tem należy zwrócić się do wykwalifikowanego
elektryka.
Nigdy nie otwierać elementów elektrycznych i
nie wkładać do nich jakichkolwiek przedmio-
tów. Taka ingerencja oznacza zagrożenie ży-
cia poprzez porażenie prądem.
Bezwzględnie unikać styczności produktu z
wodą lub innymi cieczami.
W razie niepewności w celu montażu zwrócić
się do elektryka z odpowiednimi kwalifikacjami.
Tego produktu nie należy używać z regulatorem
jasności światła i wyłącznikami elektrycznymi.
Nie nadaje się do tych celów.
Nigdy nie używać produktu w bezpośrednim
pobliżu wanny, prysznica lub basenu.
Proszę nie kierować wzroku w kierunku bezpo-
średnich lub odbitych promieni produktu.
Jeśli bezpośredni lub odbity promień produktu
wpadnie do oka, należy świadomie zamknąć oko
i natychmiast odwrócić głowę od promienia.
W celu montażu na suficie załączono materiał
montażowy przeznaczony do mocnego muru.
Przed montażem należy sprawdzić, czy materiały
montażowe nadają się do konstrukcji ściany lub
sufitu, na których ma być zamontowana lampa.
Produkt zamontować w taki sposób, aby był
zabezpieczony przed pryskającą wodą i za-
nieczyszczeniami.
Wymiana diod LED jest niemożliwa.
Jeśli diody LED przestaną działać z powodu
zużycia, należy wymienić cały produkt.
Tego produktu można używać tylko z wbudo-
wanym statecznikiem LED.
Przed uruchomieniem
Wskazówka: Należy całkowicie usunąć materiał
opakowania z produktu.

23 PL
Montaż
Wskazówka: Do montażu potrzebna jest wiertarka.
OSTROŻNIE! NIEBEZPIECZEŃSTWO OBRA-
ŻEŃ CIAŁA! Zapoznać się z instrukcją obsługi
wiertarki.
Model HG05024A (kształt okrągły)
1. Wykręcić bezpiecznik lub wyłączyć wyłącznik
instalacyjny i zabezpieczyć obwód prądu przed
niezamierzonym włączeniem.
2. Przy użyciu wykrywacza metali upewnić się, czy
w miejscach wiercenia nie znajdują się żadne
kable ani przewody rurowe.
3. Ewentualnie wybrać inne miejsce do montażu.
4. Zdjąć osłonę lampy 6 z obudowy lampy 3,
przekręcając osłonę lampy 6 w kierunku
odwrotnym do ruchu wskazówek zegara.
5. Zaznaczyć obszary wiercenia na podstawie
otworów na śruby w obudowie lampy 3.
6. Wywiercić wiertłem do kamienia 6 mm na za-
znaczonych pozycjach po jednym ok. 30 mm
głębokim otworze.
7. W każdy otwór włożyć po jednym kołku 2.
8. Przeprowadzić przewód przyłączeniowy 9
przez wąż gumowy 1 i otwór obudowy lampy
3 i umieścić obudowę lampy 3 na suficie
tak, aby otwory na śruby pokrywały się z na-
wierconymi otworami.
9. Zamocować obudowę lampy 3 za pomocą
śrub 5 na suficie.
10. Poluzować śrubę o otworzyć osłonę przy ste-
rowniku LED 4.
11. Zacisnąć przewód przyłączeniowy 9 zgodnie
z biegunami na bloku zaciskowym 7 i całko-
wicie założyć wąż gumowy 1 na przewód
przyłączeniowy 9.
12. Ponownie przykręcić osłonę za pomocą śruby
przy sterowniku LED 4.
13. Zamocować osłonę lampy 6 na obudowie
lampy 3, przekręcając osłonę lampy 6 w
kierunku zgodnym z ruchem wskazówek zegara.
14. Ponownie wkręcić bezpiecznik lub włączyć
wyłącznik instalacyjny.
Model HG05024B (kształt kwadratowy)
1. Wykręcić bezpiecznik lub wyłączyć wyłącznik
instalacyjny i zabezpieczyć obwód prądu przed
niezamierzonym włączeniem.
2. Przy użyciu wykrywacza metali upewnić się, czy
w miejscach wiercenia nie znajdują się żadne
kable ani przewody rurowe.
3. Ewentualnie wybrać inne miejsce do montażu.
4. Zdjąć osłonę lampy 6 z obudowy lampy 3,
otwierając dźwignię ustalającą 8.
5. Zaznaczyć obszary wiercenia na podstawie
otworów na śruby w obudowie lampy 3.
6. Wywiercić wiertłem do kamienia 6 mm na za-
znaczonych pozycjach po jednym ok. 30 mm
głębokim otworze.
7. W każdy otwór włożyć po jednym kołku 2.
8. Przeprowadzić przewód przyłączeniowy 9
przez wąż gumowy 1 i otwór obudowy lampy
3 i umieścić obudowę lampy 3 na suficie
tak, aby otwory na śruby pokrywały się z na-
wierconymi otworami.
9. Przykręcić obudowę lampy 3 za pomocą śrub
5 na suficie.
10. Poluzować śrubę o otworzyć osłonę przy ste-
rowniku LED 4.
11. Zacisnąć przewód przyłączeniowy 9 zgodnie
z biegunami na bloku zaciskowym 7 i całko-
wicie założyć wąż gumowy 1 na przewód
przyłączeniowy 9.
12. Ponownie przykręcić osłonę za pomocą śruby
przy sterowniku LED 4.
13. Zamocować osłonę lampy 6 na obudowie
lampy 3, zamykając dźwignię ustalającą 8.
14. Ponownie wkręcić bezpiecznik lub włączyć
wyłącznik instalacyjny.
Włączanie/ Wyłączanie
produktu
Włączać lub wyłączać produkt przełącznikiem
na ścianie.

24 PL
Konserwacja i czyszczenie
Produkt musi się zupełnie ochłodzić.
Nie używać rozpuszczalników, benzyny itp.
Produkt może zostać przy tym uszkodzony.
ZAGROŻENIE DLA
ŻYCIA PRZEZ PORAŻENIE ELEKTRYCZNE!
Przed przystąpieniem do wykonywania wszel-
kich prac przy produkcie należy wyłączyć ob-
wód prądu w skrzynce bezpiecznikowej lub
wyjąć z niej bezpieczniki wkręcane.
NIEBEZPIECZEŃSTWO
PORAŻENIA PRĄDEM ELEKTRYCZNYM!
Ze względów bezpieczeństwa elektrycznego
produktu nigdy nie wolno czyścić wodą i innymi
płynami ani zanurzać go w wodzie.
Do czyszczenia należy używać wyłącznie
suchej, niestrzępiącej się szmatki.
Nigdy nie należy kierować promieni LED na
reflektujące powierzchnie, ludzi lub zwierzęta.
W przeciwnym razie konsekwencją tego mogą
być podrażnienia oczu oraz / lub ślepota u ludzi
i zwierząt. Nawet słaby promień LED może
spowodować uszkodzenie oczu.
Utylizacja
Opakowanie wykonane jest z materiałów przyja-
znych dla środowiska, które można przekazać do
utylizacji w lokalnym punkcie przetwarzania surow-
ców wtórnych.
b
a
Przy segregowaniu odpadów prosimy
zwrócić uwagę na oznakowanie mate-
riałów opakowaniowych, oznaczone są
one skrótami (a) i numerami (b) o nastę-
pującym znaczeniu: 1–7: Tworzywa
sztuczne / 20–22: Papier i tektura /
80–98: Materiały kompozytowe.
Produkt i materiał opakowania nadają
się do ponownego przetworzenia, na-
leży je zutylizować osobno w celu lep-
szego przetworzenia odpadów. Logo
Triman jest ważne tylko dla Francji.
Informacji na temat możliwości utylizacji
wyeksploatowanego produktu udziela
urząd gminy lub miasta.
Z uwagi na ochronę środowiska nie wy-
rzucać urządzenia po zakończeniu eks-
ploatacji do odpadów domowych, lecz
prawidłowo zutylizować. Informacji o
punktach zbiorczych i ich godzinach
otwarcia udziela odpowiedni urząd.
Gwarancja
Produkt wyprodukowano według wysokich standar-
dów jakości i poddano skrupulatnej kontroli przed
wysyłką. W przypadku wad produktu nabywcy
przysługują ustawowe prawa. Gwarancja nie ogra-
nicza ustawowych praw nabywcy produktu.
Produkt objęte jest 3 gwarancją, licząc od daty
zakupu. Gwarancja wygasa w razie zawinionego
przez użytkownika uszkodzenia produktu, niewła-
ściwego użycia lub konserwacji.
W przypadku wystąpienia w ciągu 3 lat od daty
zakupu wad materiałowych lub fabrycznych, doko-
nujemy – według własnej oceny – bezpłatnej na-
prawy lub wymiany produktu.
Świadczenie gwarancyjne obejmuje wady materia-
łowe i fabryczne. Gwarancja nie obejmuje części
produktu ulegających normalnemu zużyciu, uzna-
wanych za części zużywalne (np. baterie) oraz
uszkodzeń części łamliwych, np. przełączników,
akumulatorów lub wykonanych ze szkła.

25 CZ
Legenda použitých piktogramů
Životnost LED Ochranná třída II
Používání vuzavřených místnostech Úhel svícení 120°
Střídavý proud Nelze stmívat
LED nástěnné / stropní svítidlo
Úvod
Blahopřejeme Vám ke koupi nového výrobku. Roz-
hodli jste se pro kvalitní produkt. Návod kobsluze je
součástí tohoto výrobku. Obsahuje důležité pokyny
pro bezpečnost, použití a likvidaci. Před použitím
výrobku se seznamte se všemi pokyny k obsluze a
bezpečnostními pokyny. Používejte výrobek jen po-
psaným způsobem a na uvedených místech. Při pře-
dání výrobku třetí osobě předejte i všechny podklady.
Použití ke stanovenému účelu
Tento výrobek je určen jen kpoužití ve vnitřních
prostorách, vsuchých a uzavřených místnostech.
Výrobek není určen ke komerčnímu využívání.
Popis dílů
1 Gumová hadička
2 Hmoždinky
3 Deska svítidla
4 LED předřadník
5 Šroub
6 Kryt svítidla
7 Svorkovnice
8 Upevňovací páčka (pouze HG05024B)
9 Přívodní kabel
Technická data
Provozní napětí: 230 V ~, 50 Hz
Ochranná třída: II /
Jmenovitý výkon: cca 13 W
LED nelze vyměnit.
Obsah dodávky
HG05024A:
1 LED nástěnné / stropní svítidlo
3hmoždinky
3 šrouby
1 gumová hadička
1 návod k montáži a obsluze
HG05024B:
1 LED nástěnné/stropní svítidlo
4hmoždinky
4 šrouby
1 gumová hadička
1 návod k montáži a obsluze
Bezpečnost
Bezpečnostní pokyny
PŘED POUŽITÍM ARTIKLU SI NEJDŘÍVE PŘEČTĚ-
TE NÁVOD! USCHOVEJTE SI VŠECHNY BEZ-
PEČNOSTNÍ UPOZORNĚNÍ A INSTRUKCE PRO
BUDOUCNOST!

26 CZ
NEBEZPEČÍ
OHROŽENÍ ŽIVOTA A ZRANĚ-
NÍ MALÝCH A VĚTŠÍCH DĚTÍ!
Nenechávejte děti nikdy samotné s obalovým
materiálem. Hrozí jim nebezpečí udušení. Děti
nebezpečí často podceňují. Výrobek vždy chraňte
před dětmi.
Tento výrobek není hračka a nepatří do dětských
rukou. Děti nemohou při manipulaci svýrobkem
rozpoznat hrozící nebezpečí.
Tento výrobek mohou používat děti od 8 let,
osoby se sníženými fyzickými, smyslovými nebo
duševními schopnosti nebo snedostatečnými
zkušenostmi a znalostmi, jestliže budou pod
dohledem nebo byly poučeny obezpečném
používání výrobku a chápou nebezpečí, která
zjeho používání vyplývají. Svýrobkem si děti
nesmí hrát. Děti nesmí bez dohledu provádět
čištění ani uživatelskou údržbu výrobku.
Výrobek je určen výhradně kprovozu
ve vnitřních prostorách, vsuchých a
uzavřených místnostech.
Nenechávejte ležet výrobek nebo obalový ma-
teriál bez dohledu. Umělohmotné fólie, sáčky,
styroporové díly atd. mohou být pro děti nebez-
pečnou hračkou.
Zabraňte ohrožení života
elektrickým proudem!
Před použitím se ujistěte, že souhlasí dané síťové
napětí spotřebným provozním napětím pro
výrobek (viz „Technická data“).
Před každým připojením na přívod elektrického
proudu kontrolujte výrobek a připojovací síťový
kabel, jestli nejsou poškozené. Poškozený výro-
bek znamená nebezpečí ohrožení života zása-
hem elektrického proudu.
Výrobek nepoužívejte, jestliže jste zjistili nějaká
poškození.
Při poškozeních, opravách nebo jiných problé-
mech se obraťte na odborného elektrikáře.
Nikdy neotvírejte žádný zelektrických provozních
prostředků ani do nich nezavádějte jakékoli
předměty. Takové jednání představuje nebezpečí
života následkem zásahu elektrickým proudem.
Bezpodmínečně zamezte tomu, aby výrobek
přišel do styku svodou nebo s jinými kapalinami.
Kprovedení montáže kontaktujte vpřípadě
pochybností kvalifikovaného elektrikáře.
Nepoužívejte pro tento výrobek zařízení stmí-
vače ani elektrické spínače. Výrobek není určen
ktěmto účelům.
Nikdy nepoužívejte výrobek v blízkosti vany,
sprchy nebo bazénu.
Nedívejte se do přímého nebo do odrážejícího
se paprsku výrobku.
Vpřípadě, že přímý nebo odražený paprsek
výrobku zasáhne oko, zavřete vědomě oči a
okamžitě odvraťte hlavu zdosahu paprsku.
Kprovedení montáže na strop jsme přiložili
montážní materiál, který je vhodný pro běžné,
pevné zdivo.
Před montáží zkontrolujte, zda je dodaný mon-
tážní materiál vhodný kpřišroubování výrobku
kvaší konkrétní stěně nebo stropu.
Montujte výrobek tak, aby byl chráněn před
stříkající vodou a znečištěním.
LED nelze vyměnit.
Po výpadku nebo poškození LED musíte celý
výrobek vyměnit.
Tento výrobek smíte používat pouze svestavě-
ným předřadníkem LED.
Před uvedením do provozu
Upozornění: Odstraňte veškerý obalový materiál
zvýrobku.
Montáž
Upozornění: Kmontáži budete potřebovat vrtačku.
VAROVÁNÍ! NEBEZPEČÍ ZRANĚNÍ! Dodržujte
návod kobsluze vrtačky.
Model HG05024A (kulatý tvar)
1. Vypněte automatický jistič nebo odstraňte pojis-
tky a zajistěte elektrický obvod proti nechtěnému
zapnutí.
2. Pomocí vhodné zkoušečky zkontrolujte, zda ne-
jsou vmístech plánovaného vrtání pod povrchem
kabely nebo trubky.
3. Případně zvolte jiné místo kmontáži.

27 CZ
4. Sundejte kryt svítidla 6 zdesky 3 otočení
krytu svítidla 6 proti směru hodinových ručiček.
5. Označte si místa kvrtání otvorů pomocí otvorů
vdesce 3.
6. Vyvrtejte na označených místech vrtákem do
kamene oprůměru 6 mm otvory ohloubce
30 mm.
7. Vsaďte do vyvrtaných otvorů hmoždinky 2.
8. Protáhněte připojovací vodiče 9 gumovou
hadičkou 1 a otvorem vdesce 3 a umístěte
desku 3 na strop tak, aby otvory vyvrtané do
stropu lícovaly sotvory vdesce.
9. Přišroubujte desku 3 šrouby 5 ke stropu.
10. Povolte šroub a otevřete víčko na předřadníku
LED 4.
11. Upněte přívodní vodiče 9 se správnou polari-
tou do svorkovnice 7 a přetáhněte gumovou
hadičku 1 zcela přes přívodní vodiče 9.
12. Přišroubujte obět šroubem víčko kpředřadníku
LED 4.
13. Připevněte kryt svítidla 6 kdesce 3 otočením
krytu svítidla 6 ve směru hodinových ručiček.
14. Opět zapněte automatický jistič nebo nasaďte
pojistky.
Model HG05024B (hranatý tvar)
1. Vypněte automatický jistič nebo odstraňte pojistky
a zajistěte elektrický obvod proti nechtěnému
zapnutí.
2. Pomocí vhodné zkoušečky zkontrolujte, zda ne-
jsou vmístech plánovaného vrtání pod povrchem
kabely nebo trubky.
3. Případně zvolte jiné místo kmontáži.
4. Sundejte kryt svítidla 6 zdesky 3 povolením
upínací páčky 8.
5. Označte si místa kvrtání otvorů pomocí otvorů
vdesce 3.
6. Vyvrtejte na označených místech vrtákem do
kamene oprůměru 6 mm otvory ohloubce
30 mm.
7. Vsaďte do vyvrtaných otvorů hmoždinky 2.
8. Protáhněte připojovací vodiče 9 gumovou
hadičkou 1 a otvorem vdesce 3 a umístěte
desku 3 na strop tak, aby otvory vyvrtané do
stropu lícovaly sotvory vdesce.
9. Přišroubujte desku 3 šrouby 5 ke stropu.
10. Povolte šroub a otevřete víčko na předřadníku
LED 4.
11. Upněte přívodní vodiče 9 se správnou polari-
tou do svorkovnice 7 a přetáhněte gumovou
hadičku 1 zcela přes přívodní vodiče 9.
12. Přišroubujte obět šroubem víčko kpředřadníku
LED 4.
13. Připevněte kryt svítidla 6 kdesce 3 uzavřením
upínací páčky 8.
14. Opět zapněte automatický jistič nebo nasaďte
pojistky.
Zapínání a vypínání výrobku
Zapněte nebo vypněte výrobek nástěnným
vypínačem.
Údržba a čištění
Nechte výrobek úplně vychladnout.
Nepoužívejte žádná rozpouštědla, benzín
apod. Výrobek by se tím mohl poškodit.
NEBEZPEČÍ ŽIVOTA ZASA-
ŽENÍM ELEKTRICKÝM PROUDEM! Před
jakoukoliv činností na výrobku vypněte proudový
obvod vpojistkové skříňce nebo vyšroubujte
pojistky zpojistkové skříňky.
NEBEZPEČÍ ZASAŽENÍ
ELEKTRICKÝM PROUDEM!
Zdůvodů elektrické bezpečnosti se výrobek ni-
kdy nesmí omývat vodou nebo jinými kapalinami
nebo dokonce do vody ponořit.
K čištění používejte jen suchou utěrku nepouštějící
vlákna.
LED paprskem nikdy nemiřte přímo na plochy,
které ho odrážejí, osoby nebo zvířata. Jinak
mohou být důsledkem toho podráždění očí
a / nebo oslepnutí u člověka a zvířete. Už slabý
LED paprsek může způsobit poškození zraku.
Zlikvidování
Obal se skládá zekologických materiálů, které
můžete zlikvidovat prostřednictvím místních sběren
recyklovatelných materiálů.

28 CZ
b
a
Při třídění odpadu se řiďte podle ozna-
čení obalových materiálů zkratkami (a) a
čísly (b), s následujícím významem: 1–7:
umělé hmoty / 20–22: papír a lepenka /
80–98: složené látky.
Výrobek a obalové materiály jsou recy-
klovatelné, zlikvidujte je odděleně pro
lepší odstranění odpadu. Logo Triman
platí jen pro Francii.
O možnostech likvidace vysloužilých
zařízení se informujte u správy vaší obce
nebo města.
Vzájmu ochrany životního prostředí vy-
sloužilý výrobek nevyhazujte do domov-
ního odpadu, ale předejte k odborné
likvidaci. O sběrnách a jejich otevíracích
hodinách se můžete informovat u příslušné
správy města nebo obce.
Záruka
Výrobek byl vyroben s nejvyšší pečlivostí podle přís-
ných kvalitativních směrnic a před odesláním prošel
výstupní kontrolou. V případě závad máte možnost
uplatnění zákonných práv vůči prodejci. Vaše práva
ze zákona nejsou omezena naší níže uvedenou zá-
rukou.
Na tento artikl platí 3 záruka od data zakoupení.
Záruční lhůta začíná od data zakoupení. Uschovejte
si dobře originál pokladní stvrzenky. Tuto stvrzenku
budete potřebovat jako doklad o zakoupení.
Pokud se do 3 let od data zakoupení tohoto výrobku
vyskytne vada materiálu nebo výrobní vada, výrobek
Vám – dle našeho rozhodnutí – bezplatně opravíme
nebo vyměníme. Tato záruka zaniká, jestliže se vý-
robek poškodí, neodborně použil nebo neobdržel
pravidelnou údržbu.
Záruka platí na vady materiálu a výrobní vady. Tato
záruka se nevztahuje na díly výrobku podléhající
opotřebení (např. na baterie), dále na poškození
křehkých, choulostivých dílů, např. vypínačů, aku-
mulátorů nebo dílů zhotovených ze skla.

29 SK
Legenda použitých piktogramov
Životnosť LED Trieda ochrany II
Používanie v uzatvorených
miestnostiach Uhol vyžarovania 120°
Striedavý prúd Nestmievateľné
LED nástenné / stropné svietidlo
Úvod
Blahoželáme Vám ku kúpe Vášho nového výrobku.
Rozhodli ste sa pre veľmi kvalitný výrobok. Návod
na obsluhu je súčasťou tohto výrobku. Obsahuje
dôležité upozornenia týkajúce sa bezpečnosti, pou-
žívania a likvidácie. Skôr ako začnete výrobok pou-
žívať, oboznámte sa so všetkými pokynmi k obsluhe
a bezpečnosti. Výrobok používajte iba v súlade s
popisom a v uvedených oblastiach používania. V
prípade postúpenia výrobku ďalším osobám odo-
vzdajte aj všetky dokumenty patriace k výrobku.
Používanie v súlade
s určeným účelom
Tento výrobok je určený výhradne na používanie v
oblasti interiéru, v suchých a uzatvorených miest-
nostiach. Výrobok nie je určený na podnikateľské
účely.
Popis častí
1 Gumená hadička
2 Hmoždinka
3 Tanier svietidla
4 LED pohon
5 Skrutka
6 Kryt svietidla
7 Svorkovnica
8 Zaisťovacia páka (iba HG05024B)
9 Pripojovacie vedenie
Technické údaje
Prevádzkové napätie: 230 V ~, 50 Hz
Trieda ochrany: II /
Menovitý výkon: cca. 13 W
LED nie je možné vymeniť.
Obsah dodávky
HG05024A:
1 LED nástenné / stropné svietidlo
3 hmoždinky
3 skrutky
1 gumená hadička
1 návod na montáž a obsluhu
HG05024B:
1 LED nástenné / stropné svietidlo
4 hmoždinky
4 skrutky
1 gumená hadička
1 návod na montáž a obsluhu

30 SK
Bezpečnosť
Bezpečnostné
upozornenia
PRED POUŽITÍM VÝROBKU SI PREČÍTAJTE NÁVOD
NA POUŽÍVANIE! VŠETKY BEZPEČNOSTNÉ
UPOZORNENIA A POKYNY USCHOVAJTE PRE
NESKORŠIE POUŽITIE!
NEBEZPE-
ČENSTVO OHROZENIA ŽIVOTA
A NEBEZPEČENSTVO ÚRAZU
PRE MALÉ I STARŠIE DETI! Nikdy nenechá-
vajte deti bez dozoru s obalovým materiálom.
Existuje nebezpečenstvo zadusenia obalovým
materiálom. Deti často podceňujú nebezpečen-
stvo. Držte deti vždy v bezpečnej vzdialenosti
od výrobku.
Tento výrobok nie je na hranie, nepatrí do rúk
deťom. Deti nedokážu rozoznať nebezpečenstvá,
ktoré vznikajú pri manipulácii s výrobkom.
Tento výrobok môžu používať deti od 8 rokov,
ako aj osoby so zníženými psychickými, senzo-
rickými alebo duševnými schopnosťami alebo s
nedostatkom skúseností a vedomostí, ak sú pod
dozorom, alebo ak boli poučené ohľadom bez-
pečného používania výrobku, a ak porozumeli
nebezpečenstvám spojeným s jeho používaním.
Deti sa s výrobkom nesmú hrať. Čistenie a údržbu
nesmú vykonávať deti bez dozoru.
Výrobok je vhodný výlučne na pre-
vádzku v interiéri, v suchých a uzav-
retých priestoroch.
Produkt alebo obalový materiál nenechávajte
voľne ležať bez povšimnutia. Plastové fólie /
plastové vrecká, časti z penového polystyrénu
atď. by sa mohli stať nebezpečnou hračkou pre
deti.
Zabráňte nebezpečenstvu
ohrozenia života v dôsledku
zásahu elektrickým prúdom!
Pred používaním sa uistite, že sa prítomné sieťové
napätie zhoduje s potrebným prevádzkovým
napätím produktu (pozri „Technické údaje“).
Pred každým pripojením do siete skontrolujte
prípadné poškodenie produktu a sieťového kábla.
Poškodený výrobok predstavuje nebezpečenstvo
ohrozenia života v dôsledku zásahu elektrickým
prúdom.
Výrobok nepoužívajte, ak zistíte akékoľvek
poškodenia.
V prípade zistenia poškodení, potrebných opráv
alebo iných problémov s produktom sa obráťte
na kvalifikovaného elektrikára.
Nikdy neotvárajte žiadny z elektrických pre-
vádzkových prostriedkov, ani do nich nestrkajte
žiadne predmety. Takéto zásahy predstavujú
ohrozenie života v dôsledku zásahu elektrickým
prúdom.
Bezpodmienečne zabráňte kontaktu produktu s
vodou alebo inými kvapalinami.
V prípade neistoty sa pri montáži obráťte na
kvalifikovaného elektrikára.
Tento výrobok nepoužívajte pre tlmiče svetla a
elektronické spínače. Nie je vhodný na tieto
účely.
Výrobok nikdy nepoužívajte v bezprostrednej
blízkosti vane, sprchy alebo bazéna.
Nepozerajte sa do priameho alebo odrazeného
lúča výrobku.
Ak Vaše oči zasiahne priamy alebo odrazený
lúč výrobku, vedome zatvorte oči a ihneď otočte
hlavu preč od lúča.
Pre montáž na strop sme priložili montážny ma-
teriál, ktorý je vhodný pre bežné, pevné murivo.
Pred montážou skontrolujte, či je dodaný materiál
vhodný pre charakter steny príp. stropu, na
ktorý chcete upevniť výrobok.
Výrobok namontujte tak, aby bol chránený pred
striekajúcou vodou a znečistením.
LED diódy nie je možné vymeniť.
Ak LED na konci svojej životnosti vypadnú, je
potrebné vymeniť celý výrobok.
Tento výrobok smie byť používaný iba so zabu-
dovaným LED-predradníkom.
Pred uvedením do prevádzky
Poznámka: Odstráňte celý obalový materiál z
výrobku.

31 SK
Montáž
Upozornenie: Počas montáže budete potrebovať
vŕtačku.
OPATRNE! NEBEZPEČENSTVO PORANENIA!
Prečítajte si návod na obsluhu Vašej vŕtačky.
Model HG05024A (okrúhly tvar)
1. Vytočte poistku resp. vypnite automat na poistky
a zabezpečte prúdový obvod voči neúmyselnému
zapnutiu.
2. Pomocou detektora kovov sa uistite, že sa v ob-
lasti vŕtania nenachádzajú káble alebo potrubné
vedenia.
3. V prípade potreby vyberte iné miesto pre montáž.
4. Vyberte kryt svietidla 6 z taniera svietidla 3
tak, že kryt svietidla 6 vytočíte proti smeru
hodinových ručičiek.
5. Označte oblasti vŕtania pomocou otvorov pre
skrutky v tanieri svietidla 3.
6. Pomocou 6 mm vrtáka do kameňa vyvŕtajte na
označených miestach vždy cca. 30 mm hlboký
otvor.
7. Do vyvŕtaných otvorov vložte vždy jednu hmož-
dinku 2.
8. Preveďte prívodové vedenie 9 cez gumenú
hadičku 1 a otvor taniera svietidla 3 a umiest-
nite tanier svietidla 3 na strope tak, aby otvory
pre skrutky ležali presne na vyvŕtaných otvoroch.
9. Pevne prišróbujte tanier svietidla 3 pomocou
skrutiek 5 na strop.
10. Uvoľnite skrutku a otvorte snímateľný kryt na
LED pohone 4.
11. Upevnite pripojovacie vedenie 9 s ohľadom na
správnu polaritu na svorkovnici 7 a prevlečte
gumenú hadičku 1 kompletne cez prívodové
vedenie 9.
12. Pomocou skrutky opäť pevne prišróbujte sníma-
teľný kryt na LED pohon 4.
13. Upevnite kryt svietidla 6 na tanieri svietidla
3 tak, že kryt svietidla 6 zatočíte v smere
hodinových ručičiek.
14. Opäť zatočte poistku resp. zapnite automat na
poistky.
Model HG05024B (štvorcový tvar)
1. Vytočte poistku resp. vypnite automat na poistky
a zabezpečte prúdový obvod voči neúmysel-
nému zapnutiu.
2. Pomocou detektora kovov sa uistite, že sa v ob-
lasti vŕtania nenachádzajú káble alebo potrubné
vedenia.
3. V prípade potreby vyberte iné miesto pre montáž.
4. Vyberte kryt svietidla 6 z taniera svietidla 3
tak, že otvoríte zaisťovaciu páku 8.
5. Označte oblasti vŕtania pomocou otvorov pre
skrutky v tanieri svietidla 3.
6. Pomocou 6 mm vrtáka do kameňa vyvŕtajte na
označených miestach vždy cca. 30 mm hlboký
otvor.
7. Do vyvŕtaných otvorov vložte vždy jednu hmož-
dinku 2.
8. Preveďte prívodové vedenie 9 cez gumenú
hadičku 1 a otvor taniera svietidla 3 a umiest-
nite tanier svietidla 3 na strope tak, aby otvory
pre skrutky ležali presne na vyvŕtaných otvoroch.
9. Pevne prišróbujte tanier svietidla 3 pomocou
skrutiek 5 na strop.
10. Uvoľnite skrutku a otvorte snímateľný kryt na
LED pohone 4.
11. Upevnite pripojovacie vedenie 9 s ohľadom na
správnu polaritu na svorkovnici 7 a prevlečte
gumenú hadičku 1 kompletne cez prívodové
vedenie 9.
12. Pomocou skrutky opäť pevne prišróbujte sníma-
teľný kryt na LED pohon 4.
13. Upevnite kryt svietidla 6 na tanieri svietidla
3 tak, že zatvoríte zaisťovaciu páku 8.
14. Opäť zatočte poistku resp. zapnite automat na
poistky.
Zapnutie / Vypnutie výrobku
Zapnite resp. vypnite produkt prostredníctvom
nástenného za- /vypínača.
Údržba a čistenie
Výrobok nechajte úplne vychladnúť.
Nepoužívajte žiadne rozpúšťadlá, benzín a. i.
Výrobok by sa pritom poškodil.

32 SK
NEBEZPEČENSTVO
OHROZENIA ŽIVOTA V DÔSLEDKU
ZÁSAHU ELEKTRICKÝM PRÚDOM! Pred
akýmikoľvek prácami na výrobku vypnite prú-
dový obvod na poistkovej skrinke alebo vyberte
závitové poistky z poistkovej skrinky.
NEBEZPEČENSTVO
ZÁSAHU ELEKTRICKÝM PRÚDOM! Z dô-
vodu elektrickej bezpečnosti nesmiete výrobok
nikdy čistiť vodou alebo inými kvapalinami a v
žiadnom prípade ho nesmiete ponárať do vody.
Na čistenie používajte iba suchú handričku,
ktorá nepúšťa vlákna.
LED-lúč nikdy nemierte na reflektujúce plochy,
ľudí alebo zvieratá. Vopačnom prípade to môže
mať uľudí azvierat za následok podráždenie
očí a / alebo slepotu. Aj slabý LED-lúč môže
viesť k poškodeniu zraku.
Likvidácia
Obal pozostáva z ekologických materiálov, ktoré
môžete odovzdať na miestnych recyklačných zber-
ných miestach.
b
a
Všímajte si prosím označenie obalových
materiálov pre triedenie odpadu, sú ozna-
čené skratkami (a) a číslami (b) s nasle-
dujúcim významom: 1–7: Plasty / 20–22:
Papier a kartón / 80–98: Spojené látky.
Výrobok a obalové materiály sú recyklo-
vateľné, zlikvidujte ich oddelene pre lepšie
spracovanie odpadu. Triman-Logo platí
iba pre Francúzsko.
O možnostiach likvidácie opotrebova-
ného výrobku sa môžete informovať na
Vašej obecnej alebo mestskej správe.
Ak výrobok doslúžil, v záujme ochrany
životného prostredia ho neodhoďte do
domového odpadu, ale odovzdajte na
odbornú likvidáciu. Informácie o zber-
ných miestach a ich otváracích hodinách
získate na Vašej príslušnej správe.
Záruka
Tento výrobok bol dôkladne vyrobený podľa prísnych
akostných smerníc a pred dodaním svedomito testo-
vaný. V prípade nedostatkov tohto výrobku Vám pri-
náležia zákonné práva voči predajcovi produktu.
Tieto zákonné práva nie sú našou nižšie uvedenou
zárukou obmedzené.
Na tento produkt poskytujeme 3-ročnú záruku od
dátumu nákupu. Záručná doba začína plynúť dátu-
mom kúpy. Starostlivo si prosím uschovajte originálny
pokladničný lístok. Tento doklad je potrebný ako
dôkaz o kúpe.
Ak sa v rámci 3 rokov od dátumu nákupu tohto
výrobku vyskytne chyba materiálu alebo výrobná
chyba, výrobok Vám bezplatne opravíme alebo vy-
meníme – podľa nášho výberu. Táto záruka zaniká,
ak bol produkt poškodený, neodborne používaný
alebo neodborne udržiavaný.
Poskytnutie záruky sa vzťahuje na chyby materiálu
a výrobné chyby. Táto záruka sa nevzťahuje na časti
produktu, ktoré sú vystavené normálnemu opotrebo-
vaniu, a preto ich je možné považovať za opotrebo-
vateľné diely (napr. batérie) alebo na poškodenia
na rozbitných dieloch, napr. na spínači, akumuláto-
rových batériach alebo častiach, ktoré sú zhotovené
zo skla.

OWIM GmbH & Co. KG
Stiftsbergstraße 1
DE-74167 Neckarsulm
GERMANY
Model-No.: HG05024A / HG05024B
Version: 05 / 2019
Stand der Informationen · Last Information
Update · Version des informations · Stand
van de informatie · Stan informacji · Stav
informací · Stav informácií: 03 / 2019
Ident.-No.: HG05024A / B032019-8
IAN 314982
-
 1
1
-
 2
2
-
 3
3
-
 4
4
-
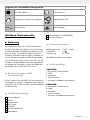 5
5
-
 6
6
-
 7
7
-
 8
8
-
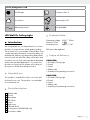 9
9
-
 10
10
-
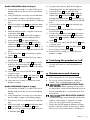 11
11
-
 12
12
-
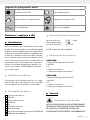 13
13
-
 14
14
-
 15
15
-
 16
16
-
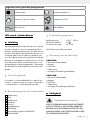 17
17
-
 18
18
-
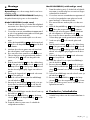 19
19
-
 20
20
-
 21
21
-
 22
22
-
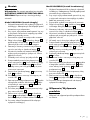 23
23
-
 24
24
-
 25
25
-
 26
26
-
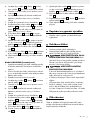 27
27
-
 28
28
-
 29
29
-
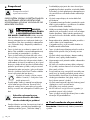 30
30
-
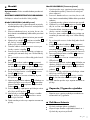 31
31
-
 32
32
-
 33
33


in andere talen
- français: LIVARNO 314982 Le manuel du propriétaire
- Deutsch: LIVARNO 314982 Bedienungsanleitung
- slovenčina: LIVARNO 314982 Návod na obsluhu
- polski: LIVARNO 314982 Instrukcja obsługi
