APRILIA RX 50 - 2007 Handleiding
- Categorie
- Motorfietsen
- Type
- Handleiding
Deze handleiding is ook geschikt voor

APRILIA WOULD LIKE TO THANK YOU
for choosing one of its products. We have compiled this booklet to provide a comprehensive overview of your vehicle's quality features. Please, read it
carefully before riding the vehicle for the first time. It contains information, tips and precautions for using your vehicle. It also describes features, details
and devices to assure you that you have made the right choice. We believe that if you follow our suggestions, you will soon get to know your new vehicle
well and that it will continue to give you satisfactory service for many years to come. This booklet is an integral part of the vehicle and must be handed
over to the new owner in the event of sale.
APRILIA WIL U BEDANKEN
omdat u één van haar producten heeft gekozen. Wij hebben deze handleiding opgesteld opdat u de kwaliteiten ervan ten volle kan waarderen. Wij
raden aan om deze handleiding geheel door te lezen, voordat u met het voertuig gaat rijden. Het bevat informatie, raadgevingen en waarschuwingen
in verband met het gebruik van uw voertuig; daarnaast zal u eigenschappen, bijzonderheden en handigheidjes ontdekken die u ervan zullen overtuigen
dat u een juiste keuze heeft gemaakt. Wij zijn er zeker van dat indien u hier rekening mee zal houden, u makkelijk zal wennen aan uw nieuw voertuig,
waar u lang naar volle tevredenheid gebruik van zal kunnen maken. Deze uitgave is een integrerend deel van het voertuig, en bij verkoop van dit laatste
moet het worden overhandigd aan de nieuwe eigenaar.
RX 50 - SX 50
Ed. 03 2009

The instructions in this booklet have been compiled primarily to offer a simple and clear guide to using the vehicle; it also describes routine maintenance
procedures and regular checks that should be carried out on the vehicle at an Aprilia Dealer or Authorised Workshop. This booklet also contains
instructions for simple repairs. Any operations not specifically described in this booklet require the use of special tools and/or particular technical
knowledge; for these operations, please take your vehicle to an Aprilia Dealer or Authorised Workshop.
De instructies in deze handleiding zijn voorbereid om vooral een eenvoudige en duidelijke leidraad te zijn voor het gebruik; men vindt eveneens de
handelingen van het klein onderhoud en van de periodieke controles die bij een Dealer of Erkende aprilia Garage moeten uitgevoerd worden. De
handleiding bevat tevens instructies voor een aantal eenvoudige herstellingen. De herstellingen die niet uitgebreid in deze uitgave zijn beschreven,
vereisen dat men over speciale gereedschappen en/of specifieke technische kennis beschikt; voor het uitvoeren van deze herstellingen raadt men aan
om zich te wenden tot een Dealer of Erkende aprilia Garage.
2

Personal safety
Failure to completely observe these instructions will
result in serious risk of personal injury.
Persoonlijke veiligheid
Indien deze voorschriften niet of niet volledig worden
opgevolgd, kan dit ernstig letsel aan personen tot ge-
volg hebben.
Safeguarding the environment
Sections marked with this symbol indicate the correct
use of the vehicle to prevent damaging the environ-
ment.
Bescherming van
Geeft het juiste gedrag aan dat u aan moet houden
zodat het gebruik van het voertuig geen schade aan-
richt aan de natuur.
Vehicle intactness
The incomplete or non-observance of these regula-
tions leads to the risk of serious damage to the vehicle
and sometimes even the invalidity of the guarantee.
Staat van het voertuig
Indien deze voorschriften niet of niet volledig worden
opgevolgd kan dit ernstige schade aan het voertuig,
en eventueel het vervallen van deze garantie tot ge-
volg hebben.
The symbols shown above are very important. They
are used to highlight those parts of the booklet that
should be read with particular care. As you can see,
each sign consists of a different graphic symbol, mak-
ing it quick and easy to locate the various topics.
Before starting the engine, read this booklet thorough-
ly and the "SAFE RIDING" section in particular. Your
safety as well as other's does not only depend on the
quickness of your reflexes and agility, but also on how
well you know your vehicle, the state of maintenance
of the vehicle itself and your knowledge of the rules
for SAFE RIDING. For your safety, get to know your
vehicle well so as to safely ride and master it in road
traffic IMPORTANT This booklet is an integral part of
the vehicle, and must be handed to the new owner in
the event of sale.
Bovengenoemde signalen zijn erg belangrijk. Ze heb-
ben namelijk tot doel om de delen van het boekje aan
te geven die u aandachtig door moet lezen. Zoals u
ziet, bestaat ieder teken uit een ander grafisch sym-
bool, zodat de bijbehorende onderwerpen meteen
duidelijk kunnen worden gevonden in de verschillen-
de delen. Vooraleer men de motor start, leest men
aandachtig deze handleiding, en vooral de paragraaf
"VEILIG RIJDEN". Uw veiligheid en die van anderen
hangt niet enkel af van uw reflexen en vlugheid, maar
ook van de kennis en de efficiëntie van het voertuig,
en van de kennis van de fundamentele regels voor het
VEILIG RIJDEN. We raden daarom aan om vertrouwd
te raken met het voertuig, zodat u zich veilig en be-
heersd kan bewegen in het verkeer. BELANGRIJK
Deze handleiding moet beschouwd worden als inte-
grerend deel van het voertuig, en moet worden over-
handigd bij de verkoop ervan.
3
Pagina wordt geladen...

INDEX
INDEX
VEHICLE......................................................................................... 7
Dashboard................................................................................... 8
Analogue instrument panel.......................................................... 9
Key switch.................................................................................... 11
Locking the steering wheel....................................................... 11
Releasing the steering wheel................................................... 12
Switch direction indicators........................................................... 12
Horn button.................................................................................. 13
Rear brake pedal......................................................................... 13
Throttle grip.................................................................................. 14
Front brake control....................................................................... 14
Gear pedal................................................................................... 15
Clutch control............................................................................... 16
Light on/of switch......................................................................... 16
Start-up button............................................................................. 17
Manual starter control.................................................................. 17
Fuel tank...................................................................................... 18
Opening the saddle.................................................................. 18
Keys............................................................................................. 19
Identification................................................................................. 20
USE................................................................................................. 21
Checks......................................................................................... 22
Tyre pressure............................................................................... 23
Running in.................................................................................... 24
Starting up the engine.................................................................. 27
Precautions.............................................................................. 28
Stopping the engine..................................................................... 29
Stand........................................................................................... 29
Suggestions to prevent theft........................................................ 30
Safe driving.................................................................................. 31
MAINTENANCE.............................................................................. 39
VOERTUING..................................................................................... 7
Legenda......................................................................................... 8
Analoog instrumentenpaneel......................................................... 9
Sleutelschakelaar........................................................................... 11
Inschakeling van het stuurslot.................................................... 11
Stuurslot ontgrendelen............................................................... 12
Schakelaar richtingaanwijzers....................................................... 12
Drukknop claxon............................................................................ 13
Achterrempedaal............................................................................ 13
Gascommando............................................................................... 14
Commando van de voorrem.......................................................... 14
Schakelpedaal............................................................................... 15
Commando van de koppeling........................................................ 16
Lichtschakelaar.............................................................................. 16
Startknop........................................................................................ 17
Commando van de manuele starter............................................... 17
Benzinetank................................................................................... 18
Opening van het zadel............................................................... 18
Sleutels.......................................................................................... 19
Identificatie..................................................................................... 20
GEBRUIK.......................................................................................... 21
Controles........................................................................................ 22
Bandenspanning............................................................................ 23
Inrijden........................................................................................... 24
Starten des motors......................................................................... 27
Voorzorgsmaatregelen............................................................... 28
Het stilleggen van de motor........................................................... 29
Standaard...................................................................................... 29
Tips tegen diefstal.......................................................................... 30
Het veilig rijden.............................................................................. 31
ONDERHOUD................................................................................... 39
5

Gearbox oil level.......................................................................... 40
Transmission chain...................................................................... 41
Tyres............................................................................................ 43
Spark plug dismantlement........................................................... 44
Air filter cleaning.......................................................................... 45
Cooling fluid level......................................................................... 47
Checking the brake oil level......................................................... 49
Braking system fluid top up...................................................... 51
Battery......................................................................................... 52
Use of a new battery................................................................ 53
Long periods of inactivity............................................................. 54
Fuses........................................................................................... 56
Front light group........................................................................... 57
Headlight adjustment............................................................... 59
Front direction indicators............................................................. 60
Rear optical unit........................................................................... 61
Rear turn indicators..................................................................... 63
Idle adjustment............................................................................ 63
Front and rear disc brake............................................................. 65
Transmissions.............................................................................. 66
Periods of inactivity...................................................................... 68
Cleaning the vehicle.................................................................... 70
TECHNICAL DATA......................................................................... 77
PROGRAMMED MAINTENANCE.................................................. 83
Scheduled maintenance table..................................................... 84
Oliepeil van de versnellingsbak..................................................... 40
Transmissieketting......................................................................... 41
Banden........................................................................................... 43
Demonteren van de bougie............................................................ 44
Reiniging van de luchtfilter............................................................. 45
Peil van de koelvloeistof................................................................ 47
Controle van het oliepeil van de remmen...................................... 49
Het bijvullen van vloeistof in de reminstallatie............................ 51
Accu............................................................................................... 52
Inwerkingstelling van een nieuwe accu...................................... 53
Lange stilstand............................................................................... 54
Zekeringen..................................................................................... 56
Voorste optische groep.................................................................. 57
Regeling van de koplamp........................................................... 59
Voorste richtingaanwijzers............................................................. 60
Achterste optische groep............................................................... 61
Achterste richtingaanwijzers.......................................................... 63
Regeling van het minimum toerental............................................. 63
Schijfrem vooraan en achteraan.................................................... 65
Transmissies.................................................................................. 66
Stilstand van het voertuig............................................................... 68
Reinigen van het voertuig.............................................................. 70
TECHNISCHE GEGEVENS.............................................................. 77
GEPLAND ONDERHOUD................................................................ 83
Tabel van het geprogrammeerd onderhoud.................................. 84
6

RX 50 - SX 50
Chap. 01
Vehicle
Hst. 01
Voertuing
7

01_01
Dashboard (01_01)
KEY:
1. Instrument panel
2. Light switch, horn and stop
3. Front brake lever
4. Throttle grip
5. Ignition lock
6. Clutch control
7. Front brake fluid reservoir
8. Mirror
9. Cold start lever control
Legenda (01_01)
LEGENDE:
1. Dashboard
2. Schakelaar van de lichten, akoesti-
sche melder en stop
3. Commando van de voorrem
4. Commando van de gashendel
5. Ontstekingsslot
6. Commando van de koppeling
7. Vloeistoftank van de voorrem
8. Spiegeltje
9. Commandohendel voor de koude start
8
1 Vehicle / 1 Voertuing

01_02
Analogue instrument panel
(01_02)
KEY:
1. Speedometer
2. Tachometer
3. High temperature warning light
4. Low oil warning light
5. Turn indicator warning light
6. High-beam warning light on
7. Low fuel warning light
8. Multifunction indicator
9. Mode Button
ODO Total distance travelled
CLOCK
TRIP Partial distance
SRV Distance for the next vehicle serv-
icing
Analoog instrumentenpaneel
(01_02)
LEGENDE:
1. Snelheidsmeter
2. Indicator van het toerental van de
motor
3. Indicatorlamp voor de excessieve
temperatuur
4. Controlelamp oliereserve
5. Controlelamp richtingaanwijzers
6. Controlelamp groot licht aan
7. Indicator brandstofreserve
8. Multifunctionele indicator
9. Toets Mode
ODO Totaal afgelegde afstand
KLOK
TRIP Partiële afstand
SRV Afstand tot de volgende service-
beurt
Functions:
WATER TEMPERATURE WARNING
LIGHT : RED, turns on if the coolant tem-
perature exceeds 105º C.
Functies :
CONTROLELAMP TEMPERATUUR
WATER : RODE kleur, licht op wanneer
de temperatuur van de koelvloeistof 105º
C overschrijdt.
9
1 Vehicle / 1 Voertuing

MIM. OIL LEVEL WARNING LIGHT :
RED, turns on when there is a 0.25 litre
oil reserve in the reservoir.
FUEL RESERVE ICON : turns on when
there is a 1.3 litre petrol reserve in the
tank.
Every time the key is activated, the in-
strument panel carries out a check (all the
segments are active for 3 seconds ).
Once the check is over, the instrument
panel displays the last function program-
med with the button.
Button operative mode . Push the button
for < 3 sec and the functions are dis-
played as follows:
ODOMETER_ TRIP _CLOCK_SERV-
ICE _ODOMETER
To reset the TRIP, press the button for >
3 sec once the function is displayed.
To set the clock (once the function is dis-
played):
- push the button for > 3 sec
- the hour flashes,
- hold down the button until the current
hour is displayed
- release the button
- the minutes flash
- hold down the button until the current
minutes are displayed
CONTROLELAMP MIN. OLIEPEIL :
RODE kleur, licht op wanneer in de tank
een oliereserve van 0,25 liter overblijft.
ICOON BRANDSTOFRESERVE : licht
op wanneer in de tank een brandstofre-
serve van 1,3 liter overblijft.
Bij elke activatie van de sleutel voert het
dashboard een check uit (alle segmenten
zijn actief voor 3 sec).
Na de check zal het dashboard de laatste
functie weergeven die werd ingesteld
door middel van de drukknop.
Werkingsmodaliteit van de drukknop.
door op de drukknop te drukken voor t<
3 sec, volgen de functies elkaar op op de
volgende manier:
HODOGRAM _ TRIP _KLOK _SERVICE
_HODOGRAM
Om de TRIP te resetten moet de druk-
knop voor t > 3 sec worden ingedrukt
wanneer de functie wordt weergegeven.
Om de klok te resetten, (wanneer de
functie wordt weergegeven):
- druk op de drukknop voor t > 3 sec
- de uren knipperen,
- druk op de drukknop tot het gewenste
uur wordt bereikt
- laat de drukknop los
- de minuten knipperen
10
1 Vehicle / 1 Voertuing

- release the button. - druk tot de gewenste minuten worden
bereikt
- laat de drukknop los
01_03
Key switch (01_03)
Key positions:
1. Ready to start-up position, steering
lock disengaged, key cannot be extrac-
ted.
2. Ignition disabled, extractable key,
steering lock disengaged.
3. Ignition disabled, extractable key,
steering lock engaged.
Sleutelschakelaar (01_03)
Plaats de sleutel:
1. Positie van de predispositie van de
start, stuurslot uitgeschakeld, sleutel niet
verwijderbaar.
2. Ontsteking geblokkeerd, sleutel ver-
wijderbaar, stuurslot uitgeschakeld.
3. Ontsteking geblokkeerd, sleutel ver-
wijderbaar, stuurslot ingeschakeld.
01_04
Locking the steering wheel
(01_04)
In order to lock the steering, turn the han-
dlebar fully to the left. Fully insert the key
and let it return to its original position, turn
it to «3» and take it out.
Inschakeling van het stuurslot
(01_04)
Om de stuurinrichting te blokkeren moet
het stuur volledig naar links gedraaid
worden. Druk op de sleutel en laat hem
los zodat hij naar zijn positie terugkeert,
draai hem in de positie «3» en verwijder
hem.
11
1 Vehicle / 1 Voertuing

01_05
Releasing the steering wheel
(01_05)
Insert the key and turn it clockwise.
Stuurslot ontgrendelen
(01_05)
Plaats de sleutel en draai hem in wijzers-
zin.
01_06
Switch direction indicators
(01_06)
To activate the left turn indicators, move
the lever«A» leftwards; to activate the
right turn indicators, move the lever right-
wards. The lever automatically goes back
to the central position and the indicators
remain on. Push the switch to turn them
off.
Schakelaar richtingaanwijzers
(01_06)
Om de linker knipperlichten in te schake-
len, moet het hendeltje «A» naar links
worden gedraaid; om de rechter knipper-
lichten in te schakelen, moet het hendel-
tje naar rechts gedraaid worden. Het
hendeltje keert automatisch terug naar
de centrale positie en de knipperlichten
blijven ingeschakeld. Om ze uit te scha-
kelen, moet op de schakelaar gedrukt
worden.
12
1 Vehicle / 1 Voertuing

01_07
Horn button (01_07)
Push «B» to sound the horn.
Drukknop claxon (01_07)
Druk op «B» om de claxon te activeren.
01_08
Rear brake pedal (01_08)
The rear brake control pedal «2» is
placed on the right hand side of the scoot-
er, at engine level. It must be activated
gradually with the toe-end. The rear and
front brakes must be used in combina-
tion, according to the needs, in order to
obtain a more efficient braking.
Also pay attention to the conditions of the
road! Particularly, to the conditions of as-
phalt and if it is wet or dirty with sand, oil,
etc.
Achterrempedaal (01_08)
Het pedaal van het commando van de
achterrem «2» bevindt zich op de rechter
kant van de bromfiets, dichtbij de motor.
Deze moet geleidelijk aan geactiveerd
worden met de punt van de voet. Combi-
neer de achterrem indien nodig met het
gebruik van de voorrem: op deze manier
is de remming doeltreffender.
Let op voor de staat van de weg! vooral
wanneer de weg geasfalteerd is, en nat
of vuil met kiezelsteen, olie, enz.
13
1 Vehicle / 1 Voertuing

01_09
Throttle grip (01_09)
Placed on the right side of the handlebar.
When the hand grip «B» is turned down-
wards, the carburettor valve opens.
Gascommando (01_09)
Dit bevindt zich op de rechter kant van het
stuur. Wanneer het handvat «B» naar be-
neden wordt gedraaid, gaat de carbura-
torklep open.
01_10
Front brake control (01_10)
The front brake lever «E» is placed on the
right hand side of the handlebar. Be par-
ticularly careful when using the front
brake. Use it gently and measure the
power progressively, according to sur-
face conditions, to avoid blocking the
wheel.
Commando van de voorrem
(01_10)
Het commando van de voorrem «E» be-
vindt zich op de rechter kant van het
stuur. Let vooral op bij het gebruik van de
voorrem, rem niet bruusk, doseer gelei-
delijk aan de kracht volgens de condities
van de ondergrond, en vermijdt om de
wielen te doen blokkeren.
14
1 Vehicle / 1 Voertuing

01_11
Gear pedal (01_11)
The gear pedal «1» is placed on the left
hand side of the engine. Activate it with
your foot to firmly engage the gear. After
the gear is shifted, take your foot off the
pedal and the pedal will automatically go
back to its initial position. Starting from
the neutral position, gears are engaged
as follows:
- 1st gear is engaged by pushing down
the pedal
- 2nd, 3rd, 4th, 5th and 6th gears are en-
gaged by pushing the pedal upwards.
For downshifting, push the pedal down.
CAUTION
THE GEAR PEDAL MUST BE OPER-
ATED BY RELEASING IT AFTER DIS-
ENGAGING THE CLUTCH AND UN-
TWISTING THE THROTTLE GRIP.
Schakelpedaal (01_11)
Het schakelpedaal «1» bevindt zich links
van de motor. Het wordt geactiveerd met
de voet, zodat de versnelling vastbera-
den wordt ingeschakeld. Na het schake-
len moet de voet van het pedaal verwij-
derd worden, en keert het pedaal
automatisch terug naar de beginpositie.
Te beginnen vanaf de vrij, worden de ver-
snellingen op de volgende manier gese-
lecteerd:
- Wanneer het pedaal naar beneden
wordt geduwd, wordt naar de 1e versnel-
ling geschakeld
- Wanneer het pedaal naar boven wordt
geduwd, wordt naar de 2e, 3e, 4e, 5e en
6e versneling geschakeld.
Om terug te schakelen moet het pedaal
naar beneden geduwd worden.
LET OP
HE SCHAKELPEDAAL MAG ENKEL
GEACTIVEERD WORDEN NADAT DE
KOPPELING ONTKOPPELD WERD,
EN NADAT DE GASHENDEL WERD
GELOST.
15
1 Vehicle / 1 Voertuing

01_12
Clutch control (01_12)
The clutch control lever «A» is placed on
the left hand side of the handlebar. When
it is pulled completely towards the han-
dlebar, the clutch is disengaged and the
engine transmission is released. If the
lever is released slowly, the clutch is en-
gaged coupling the engine to the trans-
mission and which, with a gear engaged,
will transmit the engine power to the rear
wheel through the gear.
Commando van de koppeling
(01_12)
De commandohendel van de koppeling
«A» bevindt zich op de linker kant van het
stuur. Wanneer de hendel volledig naar
het stuur wordt getrokken, wordt de kop-
peling ontkoppeld en wordt de transmis-
sie van de motor bevrijd. Wanneer de
hendel langzaam wordt losgelaten, wordt
de koppelng ingeschakeld die de motor
aan de transmissie koppelt, die met een
ingeschakelde versnelling de kracht van
de motor overbrengt naar het achterwiel
langs de versnellingsbak.
01_13
Light on/of switch (01_13)
The light switch «C» has two positions:
- Down, low-beam light
- Up, high-beam light
The lights come on automatically as soon
as the engine is started.
Lichtschakelaar (01_13)
De schakelaar van de lichten «C» heeft
twee posities:
- Omlaag, dimlicht
- Omhoog, groot licht
De lichten gaan automatisch aan wan-
neer de motor wordt gestart.
16
1 Vehicle / 1 Voertuing

01_14
Start-up button (01_14)
The start-up pedal «1» is located on the
right hand side of the engine. To start the
engine, just push the pedal backwards
with your foot.
CAUTION
MAKE SURE THE GEAR IS IN NEU-
TRAL BEFORE STARTING THE EN-
GINE.
Startknop (01_14)
Het startpedaal «1» bevindt zich rechts
van de motor. Om de motor te starten
moet het pedaal met de voet achteruit
geduwd worden.
LET OP
CONTROLEER OF DE VERSNEL-
LINGSBAK ZICH IN VRIJ BEVINDT,
VOORDAT DE MOTOR WORDT GE-
START.
01_15
Manual starter control (01_15)
The manual starter control «D» is located
on the left hand grip. It has two positions:
- Lever up: cold start
- Lever down: start-up in regular condi-
tions.
CAUTION
THE ONLY AIM OF THIS CONTROL IS
TO FACILITATE START-UP. USE IT
ONLY WHEN THE ENGINE IS COLD.
Commando van de manuele
starter (01_15)
Het commando van de manuele starter
«D» bevindt zich op het linker handvat.
Het heeft twee posities:
- Hendel omhoog: koude start
- Hendel omlaag: normale start
LET OP
DIT COMMANDO HEEFT ALS ENIG
DOEL OM DE START TE VERGEMAK-
KELIJKEN. GEBRUIK HET ENKEL
WANNER DE MOTOR KOUD STAAT.
17
1 Vehicle / 1 Voertuing

01_16
Fuel tank (01_16)
The fuel tank has a capacity for 7 litres
and a 1.30-litre reserve. To fill it up, insert
the key in the tank cover lock «1» and,
while turning it to the right, lift the cover.
CAUTION
USE UNLEADED PETROL ONLY.
Benzinetank (01_16)
De benzinetank heeft een capaciteit van
7 liter en een reserve van 1,30 liter. Om
te tanken moet de sleutel in het slot van
het tankdeksel «1» geplaatst worden, en
terwijl de sleutel naar rechts wordt ge-
draaid moet het deksel omhoog worden
gehoffen.
LET OP
GEBRUIK ENKEL LOODVRIJE BENZI-
NE.
01_17
Opening the saddle (01_17,
01_18)
To remove the saddle, insert the key in
the tank cover lock «1» and, while turning
it to the right, lift the cover. After that, re-
move the two fixing knobs from the sad-
dle «2».
The oil reservoir, the battery and the tool-
kit compartment are under the saddle.
Opening van het zadel (01_17,
01_18)
Om het zadel te demonteren moet de
sleutel in het slot van het tankdeksel
«1» geplaatst worden, en terwijl de sleu-
tel naar rechts wordt gedraaid moet het
deksel omhoog worden gehoffen. De-
monteer daarna de bevestigingsknoppen
van het zadel «2».
Onder het zadel bevinden zich de olie-
tank, de accu en de gereedschapsruimte.
18
1 Vehicle / 1 Voertuing

01_18
01_19
Keys (01_19)
Two keys are supplied together with the
scooter, both can be used either for the
ignition lock or the fuel tank cover.
The keys are accompanied by a tag
marked with the identification code to be
quoted when ordering duplicates.
WARNING
WE RECOMMEND KEEPING THE DU-
PLICATE KEY TOGETHER WITH ITS
TAG IN A SAFE PLACE AND NOT ON
THE SCOOTER.
Sleutels (01_19)
Bij het voertuig worden twee sleutels ge-
leverd, die onverschillig gebruikt kunnen
worden voor het ontstekingsslot en voor
het deksel van de brandstoftank.
Bij de sleutels wordt een naamplaatje ge-
leverd met het identificatienummer, dat
moet meegedeeld worden bij de aan-
vraag voor duplicaten.
WAARSCHUWING
ER WORDT AANGERADEN OM HET
DUPLICAAT VAN DE SLEUTEL SA-
MEN MET ZIJN NAAMPLAATJE NIET
OP HET VOERTUIG TE BEWAREN.
19
1 Vehicle / 1 Voertuing

01_20
01_21
Identification (01_20, 01_21)
The identification registration numbers
consist of a prefix followed by a number,
stamped on the chassis and on the en-
gine. They must be quoted when request-
ing spare parts. We recommend that you
check that the prefix and chassis number
stamped on the vehicle correspond with
those in the vehicle documents.
NOTE
ALTERING THE IDENTIFICATION
REGISTRATION NUMBERS MAY
LEAD TO SERIOUS PENAL SANC-
TIONS (IMPOUNDING OF THE SCOOT-
ER, ETC.).
Identificatie (01_20, 01_21)
De registratienummers voor de identifi-
catie bestaan uit een voorvoegsel dat ge-
drukt is op het frame en op de motor,
gevolgd door een nummer. Deze moeten
steeds meegedeeld worden wanneer re-
serveonderdelen moeten aangevraagd
worden. Er wordt aangeraden om de
overeenkomst te controleren van het
voorvoegsel en het framenummer op het
voertuig en diegene op de documenten
van het voertuig zelf.
N.B.
HET WIJZIGEN VAN DE REGISTRA-
TIENUMMERS VOOR DE IDENTIFICA-
TIE KAN LEIDEN TOT ERNSTIGE
STRAFRECHTELIJKE SANCTIES (IN-
BESLAGNEMING VAN HET VOER-
TUIG, ENZ.).
20
1 Vehicle / 1 Voertuing

RX 50 - SX 50
Chap. 02
Use
Hst. 02
Gebruik
21

Checks
Before starting up the scooter, check:
1. that the fuel and oil tanks are full.
2. that the crankcase oil level is correct.
3. that the transmission is in neutral po-
sition.
4. that the tyres are correctly inflated.
5. that the headlight, rear light and turn
indicators are in correct working order.
6. that the front and rear brakes are in
working order.
7. that the liquid level in the brake pump
tanks are correct.
8. that the transmission chain is tightened
and properly lubricated.
9. that the coolant level is correct.
SWITCH OFF THE ENGINE BEFORE
REFUELLING WITH PETROL. PETROL
IS HIGHLY INFLAMMABLE. DO NOT
LET PETROL SPILL FROM THE TANK
WHILE REFUELLING
Controles
Vooraleer het voertuig in werking wordt
gesteld, moet het volgende gecontro-
leerd worden:
1. of de tanks van de benzine en de olie
gevuld zijn.
2. of het oliepeil in de carter zich aan het
juiste peil bevindt.
3. of de versnellingsbak in vrij staat.
4. of de banden correct opgeblazen zijn.
5. de correcte werking van de lichten van
de koplamp, het achterlichtje en de rich-
tingaanwijzers.
6. de werking van de voor- en achterrem-
men
7. het vloeistofpeil in de tanks van de
rempompen.
8. of de transmissieketting in spanning is
en goed gesmeerd is.
9. het peil van de koelvloeistof.
VOORALEER MEN BENZINE TANKT,
MOET DE MOTOR UITGESCHAKELD
WORDEN. BENZINE IS UITERST ONT-
VLAMBAAR. MORS GEEN BENZINE
UIT DE TANK TIJDENS HET TANKEN.
22
2 Use / 2 Gebruik

Tyre pressure
A different pressure from the one indica-
ted may cause problems when riding the
vehicle. Therefore, we recommend
checking and correcting tyre pressure
frequently.
Bandenspanning
Een andere spanning dan wordt aange-
duid kan oorzaak zijn van defecten bij het
rijden met het voertuig. Daarom wordt
aangeraden om regelmatig de banden-
spanning te controleren, en ze eventueel
te corrigeren.
COLD INFLATION PRESSURE FOR FRONT TYRE
Sx front tyre pressure 1.7 kg/cm² - 170 kPa (rider only)
1.8 kg/cm² - 180 kPa (rider and
passenger)
Rx front tyre pressure 1.0 kg/cm² - 100 kPa (rider only)
1.1 kg/cm² - 110 kPa (rider and
passenger)
KOUDE BANDENSPANNING VAN DE VOORBAND
Spanning van het linker voorwiel 1,7 Kg/cm² - 170 kPa (enkel
bestuurder)
1,8 Kg/cm² - 180 kPa (bestuurder
met passagier)
Spanning van het rechter voorwiel 1,0 Kg/cm² - 100 kPa (enkel
bestuurder)
1,1 Kg/cm² - 110 kPa (bestuurder
met passagier)
COLD INFLATION PRESSURE FOR REAR TYRE
Rx rear tyre pressure 1.2 k/cm² - 120 kPa (rider only)
1.4 Kg/cm² - 140 kPa (rider and
passenger)
Sx rear tyre pressure 2.0 kg/cm² - 200 kPa (rider only)
KOUDE BANDENSPANNING VAN DE ACHTERBAND
Spanning van het rechter
achterwiel
1,2 Kg/cm² - 120 kPa (enkel
bestuurder)
1,4 Kg/cm² - 140 kPa (bestuurder
met passagier)
23
2 Use / 2 Gebruik
Pagina wordt geladen...
Pagina wordt geladen...
Pagina wordt geladen...

02_02
02_03
02_04
Starting up the engine (02_02,
02_03, 02_04)
- Ensure the gear is in neutral position.
- Position the throttle at 1/3 of the stroke.
- Insert the key on and turn it to position
«1».
- Step on the start up pedal.
- Repeat procedures if necessary.
- If the engine is cold, use the carburettor
starter «D». Do not activate the starter
when the engine is hot.
Starten des motors (02_02,
02_03, 02_04)
- Controleer of de versnellingsbak in zijn
vrij staat.
- Plaats het gashandvat aan 1/ 3 van de
slag.
- Plaats de sleutel in de schakelaar en
draai hem in positie «1».
- Handel op het startpedaal.
- Herhaal de handelingen indien nodig.
- Bij koude motor moet de starter van de
carburator «D» gebruikt worden. Activeer
de starter niet wanneer de motor warm
staat.
27
2 Use / 2 Gebruik
Pagina wordt geladen...

02_05
Stopping the engine (02_05)
To stop the engine, engage gear «1» in
neutral position and turn the key switch
anticlockwise.
Het stilleggen van de motor
(02_05)
Om de motor stil te leggen moet de ver-
snellingsbak «1» in vrij geplaatst worden,
en de sleutelschakelaar in tegenwijzers-
zin gedraaid worden.
Stand
To position the scooter on the stand, pro-
ceed as follows:
•
get off the scooter on the left
side
•
holding it firmly from the handle-
bar and the saddle, fully flip out
the stand with your right foot
•
tilt the scooter and rest the stand
on the ground
•
turn the handlebar fully to the left
•
make sure the scooter is stable
Standaard
Om het voertuig op de standaard te plaat-
sen, moet het volgende uitgevoerd wor-
den:
•
stap van het voertuig langs de
linker kant
•
hou het voertuig stevig vast aan
het stuur en het zadel, handel op
de standaard met de rechter
voet, en klap hem volledig uit
•
hel het voertuig tot de standaard
de grond raakt
•
plaats het stuur volledig naar
links
•
controleer de stabiliteit van het
voertuig
29
2 Use / 2 Gebruik

Suggestions to prevent theft
NEVER leave the ignition key in the lock
and always use the steering lock.
Park the scooter in a safe place such as
a garage or a place with guards.
Whenever possible, use the aprilia
"Body-Guard" armoured cable or an ad-
ditional antitheft device.
Make sure all vehicle documents are in
order and the road tax paid.
Write down your personal details and tel-
ephone number on this page to help iden-
tifying the owner in case of scooter
retrieval after a theft.
LAST NAME: .................................
NAME: .........................................
ADDRESS: ...................................
TELEPHONE No: ............................
IMPORTANT In many cases, stolen ve-
hicles can be identified through data in-
dicated in the use and maintenance
manual.
Tips tegen diefstal
Laat de ontstekingssleutel NOOIT achter
op het voertuig, en gebruik steeds het
stuurslot.
Parkeer het voertuig op een veilige
plaats, indien mogelijk in een garage of
een bewaakte plaats.
Gebruik wanneer mogelijk de speciale
gepantserde kabel "Body-Guard" van
aprilia, of een extra antidiefstalmechanis-
me.
Controleer of de documenten en de ver-
keersbelasting in orde zijn.
Schrijf uw gegevnes en telefoonnummer
op deze pagina, om de identificatie van
de eigenaar te vergemakkelijken in geval
van het terugvinden van het voertuig na
diefstal.
NAAM: ...................................
VOORNAAM: ..........................
ADRES: .................................
TELEFOONNUMMER: .................
BELANGRIJK In veel gevallen worden
gestolen voertuigen geïdentificeerd door
middel van de gegevens in het gebruiks-
en onderhoudsboekje.
30
2 Use / 2 Gebruik

02_06
02_07
02_08
Safe driving (02_06, 02_07,
02_08, 02_09, 02_10, 02_11,
02_12, 02_13, 02_14, 02_15,
02_16, 02_17)
MAIN SAFETY RULES
To ride the vehicle it is necessary to com-
ply with all legal requirements (driving
license, minimum driving age, psycho-
physical performance, insurance, taxes
and fees, registration, license plate, etc.).
You should practise using the vehicle in
traffic-free areas and/or private property
until you have become thoroughly ac-
quainted with the vehicle.
Driving under the influence of medica-
tion, alcohol and narcotic drugs or psy-
chotropic substances dramatically in-
creases the risk of accidents.
Do not ride your vehicle if you feel tired or
drowsy and always keep safe psycho-
physical riding conditions.
The main cause of motorcycle accidents
is users' inexperience.
NEVER lend the vehicle to beginners and
always make sure that the rider complies
with all necessary requirements for a safe
riding.
Strictly obey all national and local traffic
signs and rules.
Avoid any abrupt and dangerous
swerves for your own as well as others'
safety (for example: rearing up on the
Het veilig rijden (02_06, 02_07,
02_08, 02_09, 02_10, 02_11,
02_12, 02_13, 02_14, 02_15,
02_16, 02_17)
FUNDAMENTELE VEILIGHEIDSRE-
GELS
Om met het voertuig te rijden moet men
beschikken over alle door de wet voor-
ziene vereisten (rijbewijs, minimum leef-
tijd, psychofysische geschiktheid, verze-
kering, overheidsbelasting, registratie,
nummerplaat, enz.).
Men raadt aan om het voertuig gewoon
te raken in zones met weinig verkeer en/
of in private eigendommen.
Rijden onder invloed van medicijnen, al-
cohol, verdovende of psychotrope mid-
delen verhoogt aanzienlijk het risico op
ongevallen.
Men moet er zeker van zijn dat de psy-
chofysische condities geschikt zijn voor
het rijden, met vooral aandacht voor fysi-
sche moeheid of slaperigheid.
De meeste ongevallen zijn te wijten aan
het gebrek aan ervaring van de bestuur-
der.
Leen het voertuig NOOIT aan beginners,
en controleer in elk geval of de bestuur-
der in het bezit is van alle vereisten voor
het rijden.
31
2 Use / 2 Gebruik

back wheel, riding over the speed limit,
etc.). Besides, always assess and bear in
mind the road surface conditions, visibil-
ity, etc.
Do not knock obstacles that can damage
the vehicle or cause loss of control.
Do not ride on the course of the vehicle
in front just to improve your own speed.
CAUTION
ALWAYS RIDE WITH BOTH HANDS
ON THE HANDLEBAR AND FEET ON
THE FOOTRESTS (OR THE RIDER' S
FOOTRESTS) IN THE ADEQUATE RID-
ING POSITION.
Respecteer nauwkeurig de bewegwijze-
ring en het normenstelsel in verband met
het nationale en plaatselijk verkeer.
Vermijdt bruuske en gevaarlijke manoeu-
vres voor zichzelf en voor anderen (voor-
beeld: het steigeren, het niet naleven van
de snelheidslimieten, enz.), bovendien
moet men steeds rekening houden met
de condities van het wegdek, de zicht-
baarheid, enz.
Stoot niet tegen obstakels die schade
aan het voertuig of controleverlies over
het voertuig kunnen veroorzaken.
Blijf niet achter voertuigen rijden om de
eigen snelheid te verhogen.
LET OP
RIJ STEEDS MET BEIDE HANDEN OP
HET STUUR EN DE VOETEN OP HET
VOETENVLAK (OF OP DE VOETEN-
STEUNEN VAN DE BESTUURDER),
EN BEHOU EEN CORRECTE RIJPOSI-
TIE.
32
2 Use / 2 Gebruik

02_09
02_10
02_11
Never stand on your feet or stretch your-
self while riding.
The rider should always be attentive,
never get distracted or influenced by peo-
ple, things or actions (never smoke, eat,
drink, read, etc.) while riding.
Always use fuel and lubricants specific
for the vehicle, of the type recommended
in the "LUBRICANTS TABLE". Check
fuel, oil and coolant frequently for correct
level.
In case of an accident or after the vehicle
has fallen down or suffered a sudden
bump, make sure the control levers, pip-
ing, cables, brake circuit and main parts
of the vehicle have not been damaged.
If necessary, take the vehicle to an Offi-
cial aprilia Dealer to check especially the
frame, handlebar, suspensions, safety
components and any device the user
cannot assess without the aid of a spe-
cialist.
Report any malfunction to the engineers
and/or mechanics in order to facilitate
their work.
Never ride the vehicle if the damage jeop-
ardises safety.
Do not modify the position, angle or col-
our of: license plate, turn indicators, light-
ing devices and horn.
Any changes to the vehicle will void the
warranty.
Vermijdt absoluut om recht te staan op
het voertuig en om zich uit te rekken tij-
dens het rijden.
De bestuurder mag niet afgeleid zijn, zich
niet laten afleiden of niet laten beïnvloe-
den door personen, voorwerpen, acties
(niet eten, roken, drinken, lezen, enz.)
wanneer hij met het voertuig rijdt.
Gebruik de brandstof en specifieke
smeermiddelen voor het voertuig, van
het type dat men vindt in de "TABEL VAN
DE SMEERMIDDELEN", controleer her-
haaldelijk of de voorgeschreven peilen
van brandstof, olie en koelvloeistoffen
correct zijn.
Wanneer het voertuig een ongeval heeft
gehad, gevallen is of er werd tegen ge-
stoten, controleert men of de comman-
dohendels, de buizen, de kabels, de
reminstallatie en de fundamentele delen
niet zijn beschadigd.
Laat het voertuig eventueel controleren
bij een Officiële aprilia Dealer, door voor-
al aandacht te schenken voor het frame,
het stuur, de ophangingen, de veilig-
heidsonderdelen en mechanismen waar-
voor de gebruiker niet in staat is om hun
integriteit vast te stellen.
Meldt eender welke slechte werking om
de ingreep van techniekers en/of mecha-
niciens te bevorderen.
Rij absoluut niet met het voertuig wan-
neer de aangebrachte schade de veilig-
heid schaadt.
33
2 Use / 2 Gebruik

Any change introduced to the vehicle and
the removal of original parts may jeop-
ardise the vehicle performance and
therefore reduce safety or even render
the vehicle inappropriate for legal riding.
Comply with all national and local laws
and regulations on vehicle equipment.
In particular do not introduce technical
changes leading to improve performance
and under no circumstances alter the
original specifications of the vehicle.
Never race with vehicles.
Never ride off-road.
Wijzig absoluut niet de positie, de helling
of de kleur van: de nummerplaat, de rich-
tingaanwijzers, de verlichtingsmechanis-
men en de akoestische melders.
Wanneer men wijzigingen uitvoert aan
het voertuig, vervalt de garantie.
Elke eventuele aan het voertuig aange-
brachte wijziging en de verwijdering van
originele stukken, kan de prestaties van
het voertuig schaden, en dus het veilig-
heidsniveau schaden en het voertuig
zelfs illegaal maken.
Men raadt aan om zich steeds te houden
aan alle wetsvoorschriften en nationale
en plaatselijke reglementen in verband
met de uitrusting van het voertuig.
Men moet vooral vermijden om techni-
sche wijzigingen aan te brengen voor het
verhogen van de prestaties, of die alles-
zins de originele kenmerken van het
voertuig wijzigen.
Vermijdt absoluut om wedstrijden te hou-
den met de voertuigen.
Vermijdt om te crossen.
34
2 Use / 2 Gebruik

02_12
02_13
CLOTHING
Before riding off, remember to put on the
helmet and fasten it correctly. Make sure
it is a homologated model, that it is un-
damaged, of the right size and that the
visor is clean.
Wear appropriate protective clothes,
preferably light-coloured and/or in reflec-
tive material. In this way you will be easily
visible to other drivers, thus reducing the
risk of being hit, and you will be better
protected in case of falling.
Always wear tight-fitting clothes without
open cuffs; avoid hanging strings, belts or
ties; these or any other objects should not
interfere with a safe riding when getting
entangled with the riding elements or due
to a special movement.
Never carry in your pockets objects that
can be potentially dangerous in case of
fall, like: pointed objects such as keys,
pens, glass containers, etc. (the same
rule applies to passengers).
KLEDING
Vooraleer men gaat rijden denkt men er-
aan om steeds en correct de helm op te
zetten en vast te maken. Controleer of hij
gehomologeerd en integer is, of de maat
juist is en of het visier rein is.
Draag beschermende kleding, indien mo-
gelijk met een lichte en/of reflecterende
kleur. Op deze manier is men goed zicht-
baar voor andere weggebruikers en ver-
mindert men aanzienlijk het risico op
aanrijdingen, en is men beter beschermd
wanneer men valt.
De kleding moet goed aansluiten en de
uiteinden moeten gesloten zijn; koorden,
ceinturen en dassen mogen niet benge-
len; vermijdt dat deze of andere voorwer-
pen interfereren met het rijden, doordat
ze verstrengd raken met bewegende on-
derdelen of ander delen.
Hou geen voorwerpen bij zich, die moge-
lijk gevaarlijk zijn wanneer men valt, bij-
voorbeeld: puntige voorwerpen zoals
sleutels, pennen, glazen voorwerpen,
enz. (dit advies geldt eveneens voor de
eventuele passagier).
35
2 Use / 2 Gebruik

02_14
ACCESSORIES
User is personally responsible for the in-
stallation and use of the accessories.
While assembling accessories, make
sure that they do not cover the sound or
light alarm devices or affect their correct
functioning, do not limit the suspension
travel or the steering angle, do not ob-
struct control actuation or reduce the
ground clearance and inclination angle at
corners.
Do not use accessories that hinder ac-
cess to the controls as they may increase
the reaction time in case of an emergen-
cy.
Fairings and large windshields fitted to
the vehicle may cause aerodynamic
forces that affect the vehicle stability
while riding, mainly at high speeds.
Make sure the accessory is firm and se-
cured to the vehicle and that it does not
pose any risks while riding the vehicle.
Do not add or modify electrical equipment
that exceed the vehicle capacity as this
may result in a sudden stop or a danger-
ous lack of power required to keep the
sound and light alarm devices operative.
aprilia advises using original accesso-
ries (aprilia genuine accessories).
ACCESSOIRES
De gebruiker is verantwoordelijk voor de
keuze van de installatie en het gebruik
van de accessoires.
Men raadt aan tijdens de montage, dat
het accessoire de mechanismen van het
akoestisch en visief melden niet bedekt
en dus de functionaliteit ervan schaadt,
de werking van de ophangingen en de
hoek van sturing niet beperkt, de active-
ring van de commando´s niet hindert, en
de hoogte van de grond en de helhoek in
een bocht niet vermindert.
Vermijdt het gebruik van accessoires die
de toegang tot de commando´s hinderen,
en die dus de reactietijden bij nood kun-
nen verlengen.
De bekledingen en de windschermen
met grote afmetingen, die gemonteerd
zijn op het voertuig, kunnen aerodynami-
sche krachten veroorzaken die de stabi-
liteit van het voertuig tijdens het rijden
schaden, vooral bij hoge snelheden.
Controleer of het accessoire goed veran-
kerd is op het voertuig en dat het niet
gevaarlijk is tijdens het rijden.
Wijzig of voeg geen elektrische appara-
ten toe die het draagvermogen van het
voertuig overschrijden; op deze wijze zou
het voertuig onverwacht kunnen stilvallen
of zou er een gevaarlijke afwezigheid van
stroom kunnen zijn, die nodig is voor de
36
2 Use / 2 Gebruik

werking van de akoestische en visieve
meldingsmechanismen.
aprilia raadt het gebruik aan van origine-
le accessoires (aprilia genuine accesso-
ries).
02_15
02_16
LOADING
Do not overload your vehicle. Keep pack-
ages as close as possible to the vehicle
centre of gravity and distribute load even-
ly on both sides to minimise imbalance.
Check also that the load is firm and se-
cured to the vehicle, mainly for long trips.
Do not hang anything from your vehicle's
handlebars, mudguards or forks, such as
protruding, bulky, heavy and/or danger-
ous objects: this will slow the vehicle per-
formance when turning and will upset the
handling of your vehicle.
Do not carry packages that protrude from
vehicle sides as this may hit people or
objects and result in loss of control of your
vehicle.
Never carry packages that are not se-
curely fastened to the vehicle.
Do not carry packages that protrude from
the luggage rack or which cover any of
the sound and light alarm devices.
Never carry animals or small children on
the glove-box or the luggage rack.
Never exceed the maximum weight al-
lowed for each luggage rack.
BELASTING
Wees voorzichtig en matig bij het laden
van bagage. Men moet de bagage zo
dicht mogelijk bij het zwaartepunt van het
voertuig laden en uniform verdelen op de
twee kanten, om elke onbalans zo klein
mogelijk te houden. Controleer boven-
dien of de lading goed is verankerd op het
voertuig, vooral tijdens lange reizen.
Bevestig absoluut geen plaatsinnemen-
de, volumineuze, zware en/of gevaarlijke
voorwerpen aan het stuur, de spatborden
en de vorken: dit kan het voertuig vertra-
gen in bochten, en dus de handelbaar-
heid ervan schaden.
Plaats op de kanten van het voertuig
geen plaatsinnemende bagage, omdat
dit personen of obstakels zou kunnen
aanstoten, en dus controleverlies over
het voertuig zou kunnen veroorzaken.
Vervoer geen bagage die niet stevig is
bevestigd aan het voertuig.
Vervoer geen bagage die ver uit de ba-
gagedrager steekt, of die de akoestische
en visieve verlichtingsmechanismen be-
dekt.
37
2 Use / 2 Gebruik

02_17
Overloading the vehicle may result in lack
of stability and poor handling.
Vervoer geen dieren of kinderen op de
documentenhouder of bagagedrager.
Overschrijdt de maximum limiet van het
vervoerbare gewicht niet voor elke baga-
gedrager.
De overbelasting van het voertuig
schaadt de stabiliteit en de handelbaar-
heid.
38
2 Use / 2 Gebruik

RX 50 - SX 50
Chap. 03
Maintenance
Hst. 03
Onderhoud
39

03_01
Gearbox oil level (03_01,
03_02, 03_03)
Check the oil level at the time indicated in
the vehicle maintenance table. To do so,
make sure the vehicle is vertical, then
carefully loosen the control screws on the
engine right cover. Visually check that the
oil level reaches the threaded hole.
Should more oil be added, use only oil
with the same specifications as the one
present in the engine.
CAUTION
GEARBOX OIL IS TOXIC. DISPOSE IT
PROPERLY
Oliepeil van de
versnellingsbak (03_01,
03_02, 03_03)
Controleer het oliepeil aan de intervals
die worden aangeduid in de tabel van het
onderhoud van het voertuig. Om dit uit te
voeren moet het voertuig zich in verticale
positie bevinden; draai voorzichtig de
controlebout los die zich op het rechter
deksel van de motor bevindt. Controleer
visief of het oliepeil de geschroefdrade
boring bereikt. Wanneer olie moet toege-
voegd worden, mag enkel olie gebruikt
worden met dezelfde kenmerken van die-
gene die zich reeds in de motor bevindt.
LET OP
DE OLIE VAN DE VERSNELLINGSBAK
IS GIFTIG. VERWERK ZE OP GEPAS-
TE MANIER
03_02
Replacement:
Replace oil for the first time after 1.000
Km are covered and, successively, every
10.000 Km. Replacement must be made
with a warm engine. Once the filling cap
«1» is removed, unscrew also the drain-
age cap «3» on the crankcase central
section and the drainage cap «2» on the
cover on the right side of the same crank-
case and let the oil flow out. Tighten
again, close the drainage caps and refill
with 0.65 litres of oil. Once the operation
is complete, check the level and lock the
refilling cap. Use recommended oil only.
Vervanging:
Voer de eerste vervanging uit bij 1.000
Km en vervolgens elke 10.000 Km. De
vervanging moet uitgevoerd worden bij
warme motor. Verwijder de toevoerdop
«1» en draai die van de afvoer «3» los op
het centrale deel van de carter «2» en op
het rechter deksel van de carter zelf, en
laat alle olie uitstromen. Draai ze weer
vast, sluit de afvoerdoppen, en vul bij met
0,65 liter olie. Na deze handeling moet
het peil gecontroleerd worden en de toe-
voerdop geblokkeerd worden. Gebruik
enkel aanbevolen olie.
40
3 Maintenance / 3 Onderhoud

03_03
Recommended products
AGIP GEAR SYNTH SAE 75W-90
Gearbox oil
API GL4, GL5
Aanbeloven producten
AGIP GEAR SYNTH SAE 75W-90
Olie voor de versnellingsbak
API GL4, GL5
Transmission chain (03_04,
03_05, 03_06)
The chain life depends on its correct lu-
brication and adjustment. Any act of neg-
ligence or inattention in these procedures
may cause damages and wearing in the
pinion, chain and crown, seriously affect-
ing the vehicle performance.
Transmissieketting (03_04,
03_05, 03_06)
De levensuur van de ketting hangt af van
de correcte smering en de regeling. Na-
latigheid of verwaarlozing van deze han-
delingen kan schade en slijtage aan het
rondsel, de ketting en de kroon veroor-
zaken, zodat de prestaties van het voer-
tuig aanzienlijk worden geschaad.
CHECKING THE TRANSMISSION
CHAIN TENSION
Check the transmission chain tension pe-
riodically. The check must be made with
the vehicle unloaded and in vertical posi-
tion, and it must be repeated with the
wheel in different positions to avoid link
galling.
To check tension, move the chain at an
intermediate point between the crown
CONTROLE VAN DE SPANNING VAN
DE TRANSMISSIEKETTING
Controleer regelmatig de spanning van
de ketting. De controle moet uitgevoerd
worden wanneer het voertuig niet gela-
den is en verticaal is geplaatst, en moet
herhaald worden met het wiel in verschil-
lende posities om te controleren of er
schakels zijn die afslaan.
41
3 Maintenance / 3 Onderhoud

and the pinion. The chain backslash
should be between 30 and 45 mm.
Om de spanning te controlere moet de
ketting bewogen worden in een punt tus-
sen de kroon en het rondsel, en de spe-
ling moet zich tussen 30 en 45 mm
bevinden.
03_04
TENSION ADJUSTMENT
To keep the transmission chain clear-
ance within the right values, loosen nut
«A» of the wheel pin, screw the two ad-
justers «B» making the same number of
turns for the right as for the left adjuster,
so that the wheel is aligned. Once the
chain has been adjusted, tighten the
wheel axle nut to the specified torque
(70-80 Nm).
DO NOT ASSEMBLE A NEW CHAIN
WITH A WORN PINION OR CROWN,
OR VICE VERSA, SINCE NEW COM-
PONENTS WILL BE EASILY WORN.
REGELING VAN DE SPANNING
Om de correcte waarde van de speling
van de transmisieketting te behouden,
moet de moer «A» van de wielpin gelost
worden, en moet gehandeld worden op
de registers «B» door op te letten om het-
zelfde aantal draaien uit te voeren op het
linker en het rechter register, zodat het
wiel uitgelijnd blijkt. Na de registratie van
de ketting moet de moer van de wielas
gesloten worden aan het voorgeschre-
ven koppel (70-80 Nm).
MONTEER GEEN NIEUWE KETTING
MET VERSLETEN RONDSEL EN
KROON OF VICEVERSA, OMDAT DE
NIEUWE ONDERDELEN ZO VLUGGER
ZOUDEN VERSLIJTEN.
42
3 Maintenance / 3 Onderhoud

03_05
03_06
LUBRICATION
To lubricate the transmission chain, dis-
tribute grease in small quantities on the
spaces between rollers and links while
turning the wheel.
Use special oil for O-ring chains.
SMERING
Om de ketting te smeren moet de trans-
missieketting besproeid worden met klei-
ne hoeveelheden vet, tussen de rollen en
de schakels, door gelijktijdig het wiel te
doen draaien.
Gebruik specifieke olie voor kettingen
met O-ring.
03_07
Tyres (03_07)
Periodically check the inflation pressure
of each tyre.
Also check that the tyres do not show cuts
on the side or irregular tread wear; if this
occurs, go to an authorised workshop or
at least a workshop equipped for replace-
ment.
Banden (03_07)
Controleer regelmatig de spanning van
elke band.
Controleer ook of de banden geen sne-
den op de zijkanten of een onregelmatige
slijtage op het rijvlak vertonen; in dit geval
moet men zich wenden tot erkende ga-
rages, of die alleszins uitgerust zijn om de
vervanging uit te voeren.
43
3 Maintenance / 3 Onderhoud

THE TYRE PRESSURE SHOULD BE
CHECKED WHEN THE TYRES ARE
COLD. WRONG PRESSURE MAY
CAUSE NOT ONLY AN ABNORMAL
TYRE WEAR, BUT ALSO VEHICLE UN-
STEADINESS LEADING TO DANGER
WHEN RIDING. THE TYRE MUST BE
REPLACED WHEN THE TREAD REA-
CHES THE WEAR LIMITS REQUIRED
BY LAW.
DE BANDENSPANNING MOET GE-
CONTROLEERD WORDEN WANNEER
DE BANDEN KOUD STAAN. EEN FOU-
TE SPANNING VEROORZAAKT EEN
ABNORMALE SLIJTAGE VAN DE
BANDEN EN DOET HET VOERTUIG IN-
STABIEL WORDEN, MET CONSE-
QUENT GEVAAR TIJDENS HET RIJ-
DEN. DE BAND MOET VERVANGEN
WORDEN WANNEER HET RIJVLAK
DE SLIJTAGELIMIET BEREIKT DIE
WORDT VOORIEN DOOR DE VAN
KRACHT ZIJNDE NORMEN.
Spark plug dismantlement
(03_08)
Dismantle the spark plug periodically,
check electrodes and wear. Use a thick-
ness gauge and check that the distance
between electrodes is correct. Replace
spark plugs using the recommended
brands within the expiration dates indica-
ted in the vehicle maintenance table.
THE USE OF AN INAPPROPRIATE
SPARK PLUG MAY CAUSE SERIOUS
DAMAGE TO THE ENGINE.
Demonteren van de bougie
(03_08)
Demonteer regelmatig de bougie, en
controleer de elektroden en de slijtage.
Gebruik een diktemeter om te controle-
ren of de scheiding tussen de elektroden
correct is. Vervang de bougies met an-
dere van het aanbevolen merk, en dit op
de termijn die wordt aangeduid in de on-
derhoudstabel van het voertuig.
HET GEBRUIK VAN EEN ONGESCHIK-
TE BOUGIE KAN ERNSTIGE SCHADE
AAN DE MOTOR VEROORZAKEN.
44
3 Maintenance / 3 Onderhoud

Characteristic
RX SX spark plug and electrode gap
NGK BR8ES / 0.6÷0.7 mm
Technische kenmerken
Bougie en elektrodenafstand, rechts
en links
NGK BR8ES / 0,6÷0,7 mm
03_08
THE SPARK PLUG MUST BE RE-
MOVED WHEN THE MOTOR IS COLD.
THE USE OF SPARK PLUGS OF DIF-
FERENT THERMAL GRADE FROM
THAT REQUIRED OR WITH INAPPRO-
PRIATE THREADS MAY SERIOUSLY
DAMAGE THE ENGINE.
DE VERWIJDERING VAN DE BOUGIE
MOET UITGEVOERD WORDEN WAN-
NEER DE MOTOR KOUD STAAT. HET
GEBRUIK VAN BOUGIES MET EEN
ANDERE THERMISCHE GRAAD DAN
VOORGESCHREVEN OF MET ONGE-
SCHIKTE SCHROEFDRAAD, KAN DE
MOTOR ERNSTIG BESCHADIGEN.
03_09
Air filter cleaning (03_09,
03_10, 03_11)
Check filter for cleaning and condition ev-
ery 5000 km and every time the vehicle
is used off-road. Proceed as follows:
- Remove the saddle
- Remove the right fairing undoing the 2
fixing screws «A»
- Remove the 2 screws «B» indicated in
the figure
Reiniging van de luchtfilter
(03_09, 03_10, 03_11)
Controleer elke 5000 Km de staat en de
reinigingscondities van de filter, en elke
keer met het voertuig wordt gecrossd.
Handel als volgt:
- Verwijder het zadel.
- Verwijder de rechter zijplaat door te
handelen op de 2 bevestigingsbouten
«A»
- Verwijder de 2 bouten «B» die worden
aangeduid in de figuur
45
3 Maintenance / 3 Onderhoud

03_10
03_11
- Pull up the fairing «C» enough to gain
access to the filter
- Undo the 4 fixing screws in the air filter
housing and remove the air filter cover;
- Remove the filtering element;
- Wash the sponge in a bowl containing
filter oil, wringing it delicately several
times;
- When washing is over, press the filtering
element with your hands without squeez-
ing, let it drip and refit.
When refitting, be extremely careful to re-
position the sponge in the housing sup-
port so that the whole sealing lip perime-
ter is in contact with the sponge. Tighten
the 4 fixing screws of the filter cover, re-
membering that the 2 long screws are the
bottom ones.
IF THE FILTER IS OBSTRUCTED, THE
ADMISSION RESISTANCE WILL IN-
CREASE, LEADING TO POWER LOSS
AND HIGHER FUEL CONSUMPTION.
Recommended products
AGIP FILTER OIL
Oil for air filter sponge
- Verplaats de zijplaat «C» naar boven
zodat het mogelijk is om de filter te be-
reiken
- Draai de 4 bevestigingsbouten los van
de filterdoos, en verwijder het deksel van
de luchtfilter;
- Verwijder het filterend element;
- Was de spons in een recipiënt met olie
voor filters, en wring ze meerdere keren
voorzichtig uit;
- Na het wassen moet de spons uitge-
drukt worden tussen de handen zonder
ze uit te wringen, laat ze uitdruipen en
hermonteer ze.
Bij de hermontage moet aandacht ge-
schonken worden bij het herplaatsen van
de spons in haar zit op de doos, zodat de
dichtingslip de spons voor de hele omtrek
omvat. Draai de 4 bevestigingsbouten
van het filterdeksel weer vast, en de 2
langste bouten moeten onderaan ge-
bruikt worden.
WANNEER DE FILTER VERSTOPT IS,
ZAL DE INLAATWEERSTAND VERHO-
GEN, MET VERMOGENVERLIES EN
EEN VERHOGING VAN BRANDSTOF-
VERBRUIK ALS GEVOLG.
Aanbeloven producten
AGIP FILTER OIL
Olie voor filters in spons
46
3 Maintenance / 3 Onderhoud

- -
03_12
Cooling fluid level (03_12)
Every 1,000 km or after a long journey,
the coolant level must be checked with a
cold engine, the level must be between
the minimum «A» and the maximum
«B».
To replace the coolant, remove the ex-
pansion reservoir cap and disconnect the
hose from the radiator to the water pump
and empty it.
After having reinserted the coupling, refill
the circuit with coolant, through the ex-
pansion tank cap placed on the left side
of the scooter.
IN ORDER TO AVOID BURNS, DO NOT
UNSCREW THE EXPANSION TANK
CAP WHILE THE ENGINE IS STILL
HOT.
Recommended products
SPECIAL AGIP PERMANENT fluid
Coolant
Ready for use mixed biodegradable cool-
ant with "long life" technology and char-
acteristics (red). Freezing protection up
Peil van de koelvloeistof
(03_12)
Elke 1.000 km of na een lange reis moet
bij koude motor gecontroleerd worden of
het peil van de koelvloeistof zich tussen
het minimum peil «A» en het maximum
peil «B» bevindt.
Om de koelvloeistof te vervangen moe-
ten de dop van het expansievat en de mof
die de radiator aan de waterpomp ver-
bindt verwijderd worden, zodat alle vloei-
stof wordt afgevoerd.
Nadat de mof weer werd geplaatst, moet
het volledige circuit gevuld worden met
koelvloeistof vanaf de dop van het ex-
pansievat dat zich op de linker kant van
het voertuig bevindt.
OM BRANDWONDEN TE VERMIJDEN
MAG DE DOP VAN HET EXPANSIE-
VAT NIET LOSGEDRAAID WORDEN
WANNEER DE MOTOR NOG WARM
STAAT.
Aanbeloven producten
AGIP PERMANENT SPEZIAL
Koelvloeistof
47
3 Maintenance / 3 Onderhoud

to -40°C. In compliance with the CUNA
956-16 standard.
Biologisch afbreekbare koelvloeistof, ge-
bruiksklaar, met "long life" technologie en
kenmerken (rood). Verzekert een be-
scherming tegen vriestemperaturen tot
-40°. Beantwoordt aan de norm CUNA
956-16.
The cooling circuit approximate capacity
is 800 cc.
SYSTEM CHECK:
- Check the manifold conditions.
- If during scooter normal use the high
temperature indicator lights up, stop the
engine and wait so the coolant becomes
cool. After that, with cold engine, check
the coolant level and top up, if necessary.
Never take the expansion tank cap out
with the coolant at high temperature.
- To refill with coolant, the engine must be
cold.
De ruw geschatte capaciteit van het koel-
circuit is 800 cc.
CONTROLE VAN DE INSTALLATIE:
- Controleer de staat van de moffen.
- Wanneer tijdens het normale gebruik
van het voertuig de indicator van de ex-
cessieve temperatuur oplicht, moet de
motor stilgelegd worden en gewacht wor-
den tot de koelvloeistof afkoelt. Daarna
moet bij koude motor het peil van de koel-
vloeistof gecontroleerd worden, en even-
tueel bijgevuld worden. Verwijder de dop
van de tank nooit wanneer de tempera-
tuur van de koelvloeistof nog warm is.
- Om koelvloeistof bij te vullen moet de
motor koud staan.
The coolant should be replaced every 2
years. Take your scooter to an Aprilia
Authorised Workshop for replacement.
De vervanging van de koelvloeistof moet
elke 2 jaar uitgevoerd worden. Voor deze
handeling wendt men zich tot een Erken-
de Aprilia Garage.
48
3 Maintenance / 3 Onderhoud

03_13
03_14
Checking the brake oil level
(03_13, 03_14)
Brake fluid
Check the brake fluid reservoir level pe-
riodically. Fluid level should be at the up-
per margin of the inspection sight glass
as shown in the photograph. If necessa-
ry, refill it with the recommended hydraul-
ic fluid. Do not mix different types of
liquid. Do not operate the brake lever
when the reservoir is open or the highly
corrosive fluid can spill out. Make sure
that the water and the brake fluid do not
mix. Due to humidity absorption, it is ad-
visable to change the fluid every two
years.
TOP-UPS SHOULD ONLY BE CAR-
RIED OUT WITH DOT 4 CLASSIFIED
BRAKE FLUID.
DO NOT LET THE HIGHLY CORRO-
SIVE BRAKE FLUID CONTACT PAIN-
TED PARTS. SHOULD THIS OCCUR,
IMMEDIATELY WASH OFF WITH WA-
TER.
WARNING
THE BRAKE FLUID IS HYGROSCOP-
IC, IN OTHER WORDS, IT ABSORBS
HUMIDITY FROM THE SURROUNDING
AIR. IF THE HUMIDITY IN THE BRAKE
Controle van het oliepeil van
de remmen (03_13, 03_14)
Remvloeistof
Controleer regelmatig het peil in de tank
van de remvloeistof. Het vloeistofpeil
moet zich boven het inspectieglasje be-
vinden, zoals aangeduid op de foto. Vul
indien nodig bij met de aanbevolen hy-
draulische vloeistof. Meng geen verschil-
lende types van vloeistoffen. Wanneer de
tank open staat, mag niet gehandeld wor-
den op de remhendel omdat zo de erg
corrosieve vloeistof zou kunnen uitstro-
men. Let op om geen water te mengen
met de remvloeistof. Door de absorbe-
ring van vochtigheid wordt aangeraden
om de vloeistof elke twee jaar te vervan-
gen.
EVENTUELE BIJVULLINGEN MOGEN
ENKEL UITGEVOERD WORDEN MET
REMVLOEISTOFFEN MET DOT4
KLASSERING.
VERMIJDT DAT DE ERG CORROSIE-
VE REMVLOEISTOF IN CONTACT
KOMT MET DE GELAKTE DELEN.
WANNEER DIT TOCH GEBEURT,
MOETEN ZE ONMIDDELLIJK MET WA-
TER GEWASSEN WORDEN.
49
3 Maintenance / 3 Onderhoud
Pagina wordt geladen...

Braking system fluid top up
Air in the braking system.
If brake lever clearance becomes exces-
sive or the lever has an elastic behaviour,
purge air from the braking system.
Air purging.
Fit a transparent plastic pipe to the bleed
valve. Operate the brake lever, loosen
the bleed screw letting the fluid pour out;
tighten the bleed valve before the brake
lever reaches the end of the stroke; re-
lease the brake lever. Do this procedure
until all air in the calliper is purged. After
purging the air, top up the reservoir with
DOT 4 hydraulic fluid.
Recommended products
AGIP BRAKE 4
Brake fluid
As an alternative to the recommended
fluid, other fluids that meet or exceed the
specified requirements may be used.
SAE J1703, NHTSA 116 DOT 4, ISO
4925 Synthetic fluid
Het bijvullen van vloeistof in
de reminstallatie
Lucht in het remsysteem.
Wanneer de speling van de remhendel
excessief wordt, of de hendel is elastisch,
moet de ontluchting van het remsysteem
uitgevoerd worden.
Ontluchting.
Monteer een transparante plastic buis op
de ontluchtingsklep. Handel op de rem-
hendel en los de ontluchtingsbout zodat
de vloeistof kan uitstromen; sluit de ont-
luchtingsbout voordat de remhendel de
eindslag bereikt; laat de remhendel los.
Handel op dezelfde manier voor de ont-
luchting van de remtang. Na de ontluch-
ting moet de tank gevuld worden met
hydraulische vloeistof DOT 4.
Aanbeloven producten
AGIP BRAKE 4
remvloeistof
In plaats van de aanbevolen vloeistof kan
men vloeistoffen gebruiken met confor-
me of hogere prestaties dan de specifie-
ken. Synthetische vloeistof SAE J1703,
NHTSA 116 DOT 4, ISO 4925
51
3 Maintenance / 3 Onderhoud

03_15
Battery (03_15)
INSTRUCTIONS FOR BATTERY RE-
FRESH AFTER OPEN CIRCUIT STOR-
AGE
1. Checking voltage
Before installing the battery on the vehi-
cle check the open circuit voltage with a
normal tester.
•
If voltage is over 12.60V, the
battery can be installed without
any refresh.
•
If voltage is below 12.60V, a re-
fresh recharge is needed as ex-
plained in point 2.
2. Method with constant-voltage bat-
tery charger
•
Constant voltage charge equal
to 14.40÷14.70V
•
Initial charge current equal to
0.3÷0.5 of the battery rated ca-
pacity
•
Charge time: Recommended:
10÷12 h
Minimum: 6 h
Maximum: 24 h
3. Method with direct-current battery
charger
•
Charge current equal to 1/10 of
the battery rated capacity
•
Charge time: 5 h
Accu (03_15)
INSTRUCTIES VOOR DE VERFRIS-
SINGSLADING VOOR HET OPSLAAN
MET OPEN CIRUIT
1. Controle van de spanning
Voordat de accu op het voertuig wordt
geïnstalleerd, moet de spanning met
open circuit gecontroleerd worden met
een normale tester.
•
Wanneer de spanning meer dan
12,60V bedraagt, kan de accu
geïnstalleerd worden zonder
verfrissingslading.
•
Wanneer de spanning minder
dan 12,60V bedraagt, moet de
verfrissingslading uitgevoerd
worden zoals wordt uitgelegd in
punt 2.
2. Modaliteit van acculading met con-
stante spanning
•
Constante spanningslading ge-
lijk aan 14,40÷14,70V
•
Beginstroom van de lading gelijk
aan 0,3÷0,5 x Nominale capaci-
teit
•
Duur van de lading: Aanbevo-
len: 10÷12 h
Minimum 6 h
Maximum 24 h
3. Modaliteit van acculading met con-
stante stroom
52
3 Maintenance / 3 Onderhoud

WHEN THE BATTERY IS REALLY
FLAT (WELL BELOW 12.6V), IT MIGHT
OCCUR THAT A 5-HOUR RECHARGE
IS NOT ENOUGH TO ACHIEVE OPTI-
MAL PERFORMANCE.
IF THIS OCCURS, IT IS HOWEVER ES-
SENTIAL NOT TO EXCEED 8 HOURS
OF CONTINUOUS RECHARGING SO
AS NOT TO DAMAGE THE BATTERY.
•
Laadstroom gelijk aan 1/10 van
de nominale capaciteit van de
accu zelf
•
Duur van de lading: 5 h
WANNEER DE ACCU LEEG IS (VEEL
MINDER DAN 12,6V), KAN HET ZIJN
DAT 5 UREN VAN LADEN NIET VOL-
DOENDE ZIJN OM DE OPTIMALE
PRESTATIES TE BEREIKEN.
IN DEZE CONDITIES IS HET ALLES-
ZINS ABSOLUUT NOODZAKELIJK OM
NIET LANGER DAN 8 UREN CONS-
TANT TE LADEN, ZODAT DE ACCU
ZELF NIET ONHERSTELBAAR
WORDT BESCHADIGD.
Use of a new battery
To replace the battery, it must be done
using another with the same capacity and
voltage: 12V, 4Ah.
FOR A CORRECT EXHAUSTED BAT-
TERY DISPOSAL, IT IS ADVISABLE
TO HAVE IT REPLACED AT AN OFFI-
CIAL APRILIA SERVICE CENTRE.
BATTERIES CONTAIN, AMONG OTH-
Inwerkingstelling van een
nieuwe accu
Wanneer het nodig zou zijn om de accu
te vervangen, moet een andere met de-
zelfde spanning en capaciteit gemon-
teerd worden: 12V, 4Ah.
VOOR EEN CORRECTE VERWER-
KING VAN DE VERBRUIKTE ACCU,
WORDT AANGERADEN OM ZE TE LA-
53
3 Maintenance / 3 Onderhoud

ER SUBSTANCES, SULPHURIC ACID
SO, UNDER NO CIRCUMSTANCES,
THEY SHOULD BE DISPOSED OF
CONTAINERS FOR ORGANIC WASTE.
TEN VERVANGEN BIJ EEN OFFICIEEL
APRILIA SERVICECENTRUM. DE AC-
CU'S BEVATTEN, NAAST ANDERE
STOFFEN, ZWAVELZUUR, EN ZE MO-
GEN DUS IN GEEN GEVAL BIJ HET
ORGANISCH AFVAL GELOOSD WOR-
DEN.
Long periods of inactivity
Battery performance will decrease if the
vehicle is not used for a long time.
This is the result of the natural phenom-
enon of battery discharging: this may be
due to residual absorption by scooter
components with constant power con-
sumption.
Poor battery performance may also be
due to environmental conditions and the
cleanness of the poles.
In order to avoid start-up problems and/
or irreversible damage to the battery, fol-
low any of these steps:
•
At least once a month start up
the engine and keep it running
slightly above idle for 10-15 mi-
nutes. This keeps all the engine
components, as well as the bat-
tery, in good working order.
•
Store the vehicle with the bat-
tery removed. Have the battery
cleaned, charged fully and stor-
ed in a dry, ventilated place. Re-
Lange stilstand
In geval van een verlengde inactiviteit
van het voertuig, verminderen de presta-
ties van de accu.
Dit gebeurt omdat de accu zelf leegloopt
en door mogelijke overblijvende absor-
beringen van het voertuig, die te wijten
zijn aan onderdelen die constant gevoed
worden.
Het verminderen van de prestaties van
de accu is bovendien afhankelijk van de
weersomstandigheden en van de reini-
ging van de polen.
Om mogelijke moeilijkheden bij de start
en/of onomkeerbare beschadiging van
de accu te vermijden, moet volgens de
volgende modaliteiten gehandeld wor-
den:
•
Minstens eens per maand
moet de motor gestart worden
en aan een regime gehouden
worden dat iets boven het mini-
mum ligt, en dit voor 10-15 mi-
nuten. Op deze manier worden
54
3 Maintenance / 3 Onderhoud

charge at least once every two
months.
CAUTION
THE CHARGE MUST BE MADE WITH
A CURRENT EQUAL TO 1/10 OF THE
RATED CAPACITY OF THE BATTERY
AND FOR NOT LONGER THAN 8
HOURS TAKE YOUR SCOOTER TO AN
AUTHORISED APRILIA SERVICE
CENTRE TO CARRY OUT THIS OPER-
ATION SAFELY. WHEN REFITTING
THE BATTERY MAKE SURE THE
LEADS ARE CORRECTLY CONNEC-
TED TO THE TERMINALS.
IN ORDER TO AVOID DAMAGING THE
ELECTRIC SYSTEM, NEVER DISCON-
NECT THE WIRING WHILE THE EN-
GINE IS RUNNING. ELECTROLYTE
CONTAINS SULPHURIC ACID: AVOID
CONTACT WITH EYES, SKIN AND
CLOTHES. IN THE CASE OF CON-
TACT, RINSE WITH PLENTY OF WA-
TER AND CONSULT A DOCTOR. PAY
ATTENTION NOT TO TIP THE VEHI-
CLE EXCESSIVELY, IN ORDER TO
AVOID DANGEROUS LEAKAGE OF
BATTERY ELECTROLYTE.
de accu en alle onderdelen van
de motor efficiënt gehouden.
•
Verwijder de accu wanneer het
voertuig wordt gestald. De accu
moet rein en volledig opgeladen
zijn, en moet bewaard worden
op een droge en verluchte
plaats. Voer het laden minstens
om de twee maanden uit.
LET OP
HET OPLADEN MOET UITGEVOERD
WORDEN MET EEN STROOM DIE GE-
LIJK IS AAN 1/10 VAN DE NOMINALE
CAPACITEIT VAN DE ACCU ZELF, EN
VOOR MAXIMUM 8 UREN. VOOR DE-
ZE HANDELING WORDT AANGERA-
DEN OM ZICH TE WENDEN TOT EEN
ERKEND APRILIA SERVICECEN-
TRUM. CONTROLEER BIJ DE HER-
MONTAGE VAN DE ACCU OF DE
AANSLUITING VAN DE KLEMMEN OP
DE POLEN CORRECT WORDT UITGE-
VOERD.
OM SCHADE TE VERMIJDEN AAN DE
ELEKTRISCHE INSTALLATIE, MO-
GEN DE KABELS NOOIT LOSGE-
MAAKT WORDEN WANNEER DE MO-
TOR DRAAIT. HET ELEKTROLYT
BEVAT ZWAVELZUUR: VERMIJDT
HET CONTACT MET DE OGEN, DE
HUID EN DE DE KLEDING. IN GEVAL
VAN CONTACT MOET OVERVLOEDIG
GESPOELD WORDEN MET WATER,
55
3 Maintenance / 3 Onderhoud

EN ONMIDDELLIJK EEN ARTS GE-
RAADPLEEGD WORDEN LET BOVEN-
DIEN OP OM HET VOERTUIG NIET TE
VEEL TE HELLEN ZODAT HET ELEK-
TROLYT ZELF NIET UIT DE ACCU
KAN STROMEN.
03_16
Fuses (03_16)
The electrical system is protected by one
4 ampere fuse located in the fuse box
«A» on the battery positive lead under the
saddle. Before replacing a blown fuse,
find and solve the problem that caused it
to blow. Do not substitute the fuse with
any alternative form of conductor
Zekeringen (03_16)
De elektrische installatie wordt be-
schermd door een zekering van 4 ampè-
re, die zich in de zekeringenhouder «A»
op de positieve kabel van de accu onder
het zadel bevindt. Vooraleer de onder-
broken zekering wordt vervangen, moet
de schade die de smelting heeft veroor-
zaakt gezocht en geëlimineerd worden.
Probeer nooit om het circuit te sluiten met
ander materiaal dan een zekering.
BULBS
BULBS RX 50 SX 50
Rear tail light /stop light led led
Front tail bulb 2V x 3W 2V x 3W
Front/rear turn indicator bulbs 4 x 10W 4 x 10W
56
3 Maintenance / 3 Onderhoud

BULBS RX 50 SX 50
Low-/high-beam light bulb HS1 HS1
LAMPJES
LAMPJES RX 50 SX 50
Achterste positielicht / stoplicht met led met led
Lampje van het voorste positielicht 2 x 3W 2 x 3W
Lampjes van de voorste / achterste richtingaanwijzers 4 x 10W 4 x 10W
Lampje van het dimlicht/groot licht HS1 HS1
03_17
Front light group (03_17,
03_18, 03_19)
In the front headlight there are:
•
Two tail light bulbs «1».
•
One low-beam / high-beam light
bulb «2».
Voorste optische groep
(03_17, 03_18, 03_19)
In het voorlicht vindt men:
•
Twee lampjes van het positie-
licht «1».
•
Een lampje van het dimlicht /
groot licht «2».
57
3 Maintenance / 3 Onderhoud

03_18
03_19
To replace:
•
Rest the vehicle on its stand.
•
Undo the two upper screws.
•
Slide off the front cowl from the
mudguard seats.
Side light lamp «1»
•
Slide off the tail light bulb and
replace it with another of the
same type.
High/low beam light bulb«2»
•
Hold the bulb electrical connec-
tor «3», pull and disconnect it
from the bulb holder.
•
Slide off the cover «4» from the
parabole fitting and from the
bulb connectors.
•
Release the two ends of the re-
taining spring «5» located in the
bulb holder.
•
Extract the bulb from its fitting.
Upon refitting:
•
Fit a bulb of the same type ade-
quately.
•
Slide in the cover «4» in the bulb
connectors and the parabole fit-
ting.
•
Connect the bulb electrical con-
nector «3».
Voor de vervanging:
•
Plaats het voertuig op de stan-
daard.
•
Draai de twee bovenste bouten
los.
•
Verwijder het maskertje uit de
zittingen van het spatbord.
Lampje van het positielicht «1»
•
Verwijder het positielampje, en
vervang het met een van het-
zelfde type.
Lampje van het dimlicht / groot licht
«2»
•
Grijp de elektrische connector
van het lampje «3» vast, trek er
aan, en maak hem los van de
lamphouder.
•
Verwijder de kap «4» van de pa-
raboolzitting en de terminals van
het lampje.
•
Koppel de twee uiteinden van
de trekveer «5» los die zich op
de lamphouder bevindt.
•
Verwijder het lampje uit de zit-
ting.
Bij de hermontage:
•
Installeer op correcte wijze een
lampje van hetzelfde type.
•
Plaats de kap «4» correct in de
paraboolzitting en de terminals
van het lampje.
•
Verbind de elektrische connec-
tor van het lampje «3».
58
3 Maintenance / 3 Onderhoud

03_20
Headlight adjustment (03_20,
03_21)
NOTE
IN COMPLIANCE WITH LOCAL LEGAL
REQUIREMENTS, SPECIFIC PROCE-
DURES MUST BE FOLLOWED WHEN
CHECKING LIGHT BEAM ADJUST-
MENT.
Regeling van de koplamp
(03_20, 03_21)
N.B.
OP BASIS VAN WAT WORDT VOOR-
GESCHREVEN DOOR DE VAN
KRACHT ZIJNDE WETGEVING IN HET
LAND VAN GEBRUIK VAN HET VOER-
TUIG, MOETEN ER VOOR DE CON-
TROLE VAN DE RICHTING VAN DE
LICHTBUNDEL SPECIFIEKE PROCE-
DURES UITGEVOERD WORDEN.
03_21
For a quick check of the correct direction
of the front light beam:
•
Place the vehicle 10m away
from a vertical wall and make
sure the ground is level.
•
Turn on the low-beam light, sit
on the scooter and check that
the light beam projected to the
wall is a little below the headlight
horizontal straight line (about
9/10 of the total height).
To adjust the light beam:
•
Working from both sides, undo
screw «1».
•
Adjust the headlamp until the
desired position is obtained
•
Working from both sides, tighten
screw «1».
Voor een snelle controle van de correcte
richting van de voorste lichtbundel, han-
delt men als volgt:
•
Plaats het voertuig op tien meter
afstand van een verticale wand,
en controleer of de ondergrond
vlak is.
•
Ontsteek het dimlicht, ga op het
voertuig zitten, en controleer of
de lichtbundel die op de wand
wordt geprojecteerd zich iets
onder de horizontale lijn van de
koplamp bevindt (ongeveer 9/10
van de totale hoogte).
Voor het regelen van de lichtbundel:
•
Handel op beide kanten: draai
de bout «1» los.
•
Richt de koplamp tot de gewen-
ste positie wordt verkregen
59
3 Maintenance / 3 Onderhoud

•
Handel op beide kanten: sluit de
bout «1».
03_22
Front direction indicators
(03_22)
•
Rest the vehicle on its stand.
•
Loosen and remove the screw
(1).
•
Remove the glass (2).
•
Press the bulb (3) slightly and
turn it anticlockwise.
•
Pull the bulb (3) out of its fitting.
•
Insert a bulb of the same type
adequately.
WARNING
IF THE PARABOLE (4) STICKS OUT
OF ITS FITTING, INSERT IT AGAIN
PROPERLY.
Voorste richtingaanwijzers
(03_22)
•
Plaats het voertuig op de stan-
daard.
•
Draai de bout los (1) en verwij-
der ze.
•
Verwijder de lens (2).
•
Druk gematigd op het lampje
(3), en draai het in tegenwijzer-
zin.
•
Verwijder het lampje (3) uit de
zit.
•
Plaats op correcte wijze een
nieuw lampje van hetzelfde ty-
pe.
WAARSCHUWING
WANNEER DE PARABOOL (4) UIT
HAAR ZITTING KOMT, MOET ZE
WEER CORRECT GEPLAATST WOR-
DEN.
60
3 Maintenance / 3 Onderhoud

03_23
03_24
03_25
Rear optical unit (03_23,
03_24, 03_25, 03_26, 03_27)
Replace the whole light if a led burns out.
To replace the rear light follow these
steps:
- Remove the two side fairings undoing
the fixing screws «A»
- Remove the 2 screws «B»
- Remove the 2 screws «C» located in the
wheel compartment
- Slide the rear tail off the frame
- Remove the two nuts «D» fixing the
lights to the frame, which are located in
the wheel compartment
- Disconnect the connector «E» and re-
move the light
Achterste optische groep
(03_23, 03_24, 03_25, 03_26,
03_27)
Wanneer een led verbrandt, moet het vol-
ledige licht vervangen worden.
Om het achterlicht te vervangen moet als
volgt gehandeld worden:
- Verwijder de twee zijplaten door te han-
delen op de bouten «A»
- Verwijder de 2 bouten «B»
- Verwijder de 2 bouten «C» die zich in de
wielruimte bevinden
- Verwijder het achterstuk van het frame
- Verwijder de twee bevestigingsmoeren
«D» van het licht aan het frame, die zich
in de wielruimte bevinden
- Maak de connector «E» los en verwijder
het licht
61
3 Maintenance / 3 Onderhoud

03_26
03_27
62
3 Maintenance / 3 Onderhoud

03_28
Rear turn indicators (03_28)
•
Rest the vehicle on its stand.
•
Loosen and remove the screw
(1).
•
Remove the glass (2).
•
Press the bulb (3) slightly and
turn it anticlockwise.
•
Pull the bulb (3) out of its fitting.
•
Insert a bulb of the same type
adequately.
WARNING
IF THE PARABOLE (4) STICKS OUT
OF ITS FITTING, INSERT IT AGAIN
PROPERLY.
Achterste richtingaanwijzers
(03_28)
•
Plaats het voertuig op de stan-
daard.
•
Draai de bout los (1) en verwij-
der ze.
•
Verwijder de lens (2).
•
Druk gematigd op het lampje
(3), en draai het in tegenwijzer-
zin.
•
Verwijder het lampje (3) uit de
zit.
•
Plaats op correcte wijze een
nieuw lampje van hetzelfde ty-
pe.
WAARSCHUWING
WANNEER DE PARABOOL (4) UIT
HAAR ZITTING KOMT, MOET ZE
WEER CORRECT GEPLAATST WOR-
DEN.
03_29
Idle adjustment (03_29)
Carburettor
Trouble-free carburetion is the basis for a
good engine performance. The carburet-
tor is regulated in factory to perform the
best carburetion. Do not alter this adjust-
ment.
Adjusting the idle speed
Regeling van het minimum
toerental (03_29)
Carburator
Een probleemloze carburatie is de basis
voor een goed rendement van de motor.
De carburator wordt geregeld in de fa-
briek om de beste carburatie te leveren.
Wijzig deze regeling niet.
Regeling van het minimum toerental
63
3 Maintenance / 3 Onderhoud

This operation must be carried out with
hot engine, in neutral position and with no
acceleration.
Turn the idle speed set screw clockwise
and anticlockwise until the engine idle
speed stabilises at a point where the en-
gine works regularly, with no uncertainty
and is not over accelerated. For a more
accurate adjustment or any other carbu-
rettor adjustment, take your scooter to an
Aprilia Authorised Workshop.
WARNING
IT IS CONVENIENT TO MAKE A CAR-
BURETTOR CLEANING PERIODICAL-
LY WITH CLEAN PETROL AND PRES-
SURED AIR.
CAUTION
MAKE ALWAYS THE ENGINE IDLE
SPEED ADJUSTMENT WITH A HOT
ENGINE.
Deze handeling moet uitgevoerd worden
wanneer de motor warm staat, in vrij, en
zonder gas te geven.
Draai de regelbout van het minimum toe-
rental in wijzerszin of tegenwijzerszin tot
het minimum toerental stabiel wordt zo-
dat de motor regelmatig werkt, zonder
onzekerheden, en niet excessief ver-
sneld. Voor een preciezere regeling of
voor eender welke ander regeling van de
carburator, wendt men zich tot een Er-
kende Aprilia Garage.
WAARSCHUWING
HET IS GOED OM DE REINIGING VAN
DE CARBURATOR REGELMATIG UIT
TE VOEREN, DOOR GEBRUIK TE MA-
KEN VAN REINE BENZINE EN PERS-
LUCHT.
LET OP
VOER DE REGELING VAN HET MINI-
MUM TOERENTAL STEEDS UIT WAN-
NEER DE MOTOR WARM STAAT.
64
3 Maintenance / 3 Onderhoud

03_30
Front and rear disc brake
(03_30, 03_31, 03_32)
The disc brakes, compared to drum
brakes, have the following specifications
and advantages:
- The heat evacuation from friction surfa-
ces is very efficient, since discs turn with
direct air contact. This is the reason why
they always have a steady braking ca-
pacity, even when the brake is used re-
peatedly at high speed.
- No component of the disc brake is ex-
posed to deformation due to very high
temperatures.
- The pad change is simple and does not
require difficult procedures.
- Constant functioning of front and rear
brakes is ensured since, even in the case
discs are wet due to rain, the capacity to
recover braking power is excellent, due
to the specifications of extreme pressure
of the pads.
Schijfrem vooraan en
achteraan (03_30, 03_31,
03_32)
De remschijven hebben vergeleken met
trommelschijven de volgende kenmerken
en voordelen:
- De evacuatie van warmte van de wrij-
vingsoppervlakken is zeer doeltreffend,
omdat de schijven rechtstreeks in contact
met de lucht draaien. Daarom hebben ze
steeds een stabiele remcapaciteit, ook
wanneer ze herhaaldelijk worden ge-
bruikt bij hoge snelheden.
- Geen enkel onderdeel van de remschijf
is onderhevig aan vervormingen door de
hoge temperaturen.
- De vervanging van de pastilles is een-
voudig en vraagt niet om ingewikkelde
handelingen.
- Er wordt een constante werking van de
remmen verzekerd, ook wanneer de
schijven nat zijn door de regen, omdat de
recupereercapaciteit van de kracht van
de remmen uitstekend is door de extreme
drukkenmerken van de pastille.
65
3 Maintenance / 3 Onderhoud

03_31
03_32
Brake disc
The disc surface must be free of oil. Use
alcohol and a soft cloth for cleaning.
Brake pads:
Brake squealing may be due to the fol-
lowing causes:
- Incorrect brake functioning
- Brake pad wearing. Excessive wear
make the brakes squeal. When either
case occurs, take your scooter to an
Aprilia Authorised Workshop.
Hoses and Joints:
Check periodically that joints are not
worn and joint connections have no leak-
age.
Remschijf
Het oppervlak van de schijf moet olievrij
zijn. Gebruik alcohol en een rein doek
voor de reiniging.
Rempastilles:
Wanneer de rem giert, kan dit te wijten
zijn aan de volgende oorzaken:
- Niet correcte werking van de rem
- Slijtage van de rempastilles; een exces-
sieve slijtage doet de rem gieren. In beide
gevallen wendt men zich tot een Erken-
de Aprilia Garage.
Flexibele buizen en verbindingen:
Controleer regelmatig of de verbindingen
niet versleten zijn, en of de verbindingen
van de koppelingen niet lekken.
03_33
Transmissions (03_33, 03_34,
03_35, 03_36, 03_37)
THROTTLE GRIP
Check that the throttle grip turns freely
with the handlebar at the end of the stroke
at both sides. Check that the vacuum
hand grip stroke is 4 mm. If necessary,
adjust with the appropriate adjuster on
the throttle grip «A» after removing the
corresponding rubber cap.
Transmissies (03_33, 03_34,
03_35, 03_36, 03_37)
GASHENDEL
Controleer of het gascommando vrij
draait met het stuur tot de eindslag in bei-
de richtingen. Controleer of de lege slag
van het handvat 4 mm bedraagt. Indien
nodig regelt men de slag met het relatie-
ve register op het gascommando «A»,
66
3 Maintenance / 3 Onderhoud

03_34
03_35
03_36
CLUTCH
The handlebar clutch lever must a have
an 8 mm empty stroke, adjust it periodi-
cally with the adjuster «B» under the rub-
ber cap.
BRAKES
The front brake does not need adjust-
ment and the only maintenance opera-
tion is checking the liquid level in the
brake pump reservoir. The brake liquid
reservoirs have a sight glass «C» of
transparent material. With peephole «C»
complete, the level inside the reservoir
exceeds the Minimum; when the peep-
hole is partially full, the level has de-
creased to the Minimum; when it is
completely empty, the level is inferior to
the Minimum. Worn brake pads may
cause the decrease of the brake liquid
level. Should the level be below the min-
imum, the Customer is advised to contact
an Aprilia Authorised Workshop for a
thorough check of the braking system. If
you need to top up the level, follow the
steps listed below. For the front brake,
unscrew the 2 screws«D», lift the cover
of the brake liquid tank and introduce the
necessary liquid quantity, (liquid must al-
ways be over the minimum level ). For the
rear brake, remove the right side fairing
undoing the two screws «E» and remove
the reservoir cap «F» by turning it anti-
clockwise. Add the necessary quantity of
fluid (fluid must always be above the min-
imum level). Checking levels must be
nadat het relatieve rubberen kapje werd
verwijderd.
KOPPELING
De hendel van de koppeling van het stuur
moet een lege slag hebben van 8 mm;
regel ze regelmatig door middel van het
register «B» dat zich onder het rubberen
kapje bevindt.
REMMEN
De voorrem heeft geen enkele regeling
nodig, en de enige onderhoudshandeling
bestaat uit het controleren van het peil
van de vloeistof in de tank van de rem-
pomp. De tanks van de remvloeistof zijn
voorzien van een transparant kijkglasje
«C». Wanneer het kijkglasje «C» volledig
vol is, bevindt het peil in de tank zich bo-
ven het minimum; wanneer het kijkglasje
gedeeltelijk zichtbaar is, bevindt het peil
zich aan het minimum; wanneer het leeg
is, bevindt het peil zich onder het mini-
mum. Een verlaging van het peil van de
remvloeistof kan te wijten zijn aan de slij-
tage van de pastilles. Wanneer het peil
zich onder het minimum bevindt, wordt
aangeraden om zich te wenden tot een
Erkende Aprilia Garage, door een zorg-
vuldige controle te laten uitvoeren van
het remsysteem. Wanneer het peil moet
bijgevuld worden, moet als volgt gehan-
deld worden. Voor de voorrem moeten de
2 bouten «D» losgedraaid worden, het
deksel van de tank van de remvloeistof
opgehoffen worden, en de nodige hoe-
veelheid vloeistof ingevoerd worden (de
67
3 Maintenance / 3 Onderhoud

03_37
made with the tank in horizontal position,
without vehicle inclination.
vloeistof moet zich steeds boven het mi-
nimum peil bevinden). Voor de achterrem
moet de rechter zijplaat verwijderd «E»
worden, dop «F» van de tank losgedraaid
worden in tegenwijzerszin, en daarna de
nodige hoeveelheid vloeistof ingevoerd
worden (de vloeistof moet zich steeds bo-
ven het minimum peil bevinden). De con-
trole van de peilen moet uitgevoerd
worden met de tank in horizontale positie,
door het voertuig niet te veel te hellen.
Periods of inactivity
We recommend carrying out the following
operations:
1. General cleaning of the vehicle.
2. With the engine off and the piston in
the bottom dead centre position, remove
the spark plug, and pour 1 ÷ 2 cc.of the
recommended oil through the hole. Press
the engine start pedal 3 or 4 times letting
the engine perform a few revolutions,
then replace the spark plug.
3. Detach the cables from the battery to
the terminals, remove the battery and put
it on a cool and dry place.
4. Inflate the tyres and rest the scooter on
the front and rear stands so that the tyres
do not touch the ground.
Stilstand van het voertuig
Er wordt aangeraden om de volgende
handelingen uit te voeren:
1. De algemene reiniging van het voer-
tuig.
2. Met de motor stil en de zuiger aan het
onderste dode punt, monteert men de
bougie en voert men langs de boring 1 ÷
2 cc. olie voor de menger in. Activeer 3-4
keer het startpedaal van de motor zodat
hij enkele toeren kan draaien, en her-
monteer de bougie.
3. Maak de kabels van de accu los van
de klemmen, verwijder de accu en plaats
ze in een droge en koele plaats.
4. Blaas de banden op en plaats het voer-
tuig op de voorste en achterste stan-
daards, zodat de banden van de grond
zijn.
68
3 Maintenance / 3 Onderhoud
Pagina wordt geladen...

Cleaning the vehicle
In order to soften the dirt and mud de-
posited on the surfaces, use a low pres-
sure blast of water. Once softened, mud
and dirt must be removed with a soft
sponge for bodywork soaked in lots of
water and "shampoo" (2-4% of car sham-
poo in water). Then rinse abundantly with
water, and dry with a shammy cloth.
DETERGENTS POLLUTE WATER.
THEREFORE THE SCOOTER SHOULD
BE WASHED IN AN AREA EQUIPPED
FOR THE COLLECTION AND PURIFI-
CATION OF THE LIQUIDS USED.
NEVER WASH THE SCOOTER IN THE
SUN, ESPECIALLY DURING THE SUM-
MER WHEN THE BODYWORK IS
STILL HOT, AS THE SHAMPOO MAY
DRY BEFORE BEING RINSED OFF,
AND COULD DAMAGE THE PAINT-
WORK. NEVER USE RAGS SOAKED
IN PETROL OR DIESEL OIL TO CLEAN
THE PAINTED SURFACES OR PLAS-
TIC SURFACES, TO PREVENT THEM
LOSING THEIR SHINE AND MECHAN-
ICAL CHARACTERISTICS.
Reinigen van het voertuig
Om het vuil en de modder te weken die
zich hebben neergezet op de oppervlak-
ken, gebruikt men een lagedruk waters-
traal. Eens het vuil en de modder ge-
weekt zijn, moeten ze verwijderd worden
met een zachte spons voor carrosserie,
die doordrenkt is met veel water en
"shampoo" (2-4% shampoo in water).
Spoel vervolgens overvloedig met water
en droog af met een zeemvel.
REINIGINGSMIDDELEN VERVUILEN
HET WATER. DAAROM MOET HET
WASSEN VAN HET VOERTUIG UITGE-
VOERD WORDEN IN ZONES DIE UIT-
GERUST ZIJN VOOR DE VERZAME-
LING EN ZUIVERING VAN DE VLOEI-
STOFFEN DIE GEBRUIKT WORDEN
VOOR HET WASSEN ZELF.
HET WASSEN MAG NOOIT WORDEN
UITGEVOERD IN DE ZON, VOORAL
NIET IN DE ZOMER WANNEER DE
CARROSSERIE NOG WARM IS, OM-
DAT DE SHAMPOO DIE VÓÓR HET
SPOELEN OPDROOGT DE LAK KAN
BESCHADIGEN. GEBRUIK NOOIT
DOEKEN DIE DOORDRENKT ZIJN
MET BENZINE OF NAFTA VOOR HET
WASSEN VAN GELAKTE OF PLASTIC
70
3 Maintenance / 3 Onderhoud
Pagina wordt geladen...

IGNITION FAULTS
The spark plug do not release
sparks. Have H.V. checked by
specialised technician.
Check the electrodes, adjustment
at 0,5 - 0,6 mm. Clean the
electrodes with pure petrol and a
metallic brush. Check if there is any
fracture or crack in the isolating
spark plug and replace if
necessary. If the spark plug is in
good conditions, take your scooter
to an Aprilia Authorised
Workshop.
- Engine flooded. Accelerate and try to start, even
pushing, make the engine work at
idle and eliminate excessive fuel,
clean the spark plug or replace it.
Check the sealing of the flotation
gear valve pin.
ONREGELMATIGHEDEN BIJ DE ONTSTEKING
De bougie geeft geen vonken. Laat
de controle van de hoogspanning
uitvoeren door gespecialiseerd
personeel.
Controleer de elektroden, en regel
ze op 0,5 - 0,6 mm. Reinig de
elektroden met pure benzine en
een metalen borstel. Controleer of
de isolering van de bougie
gescheurd of stuk is, en vervang ze
indien nodig. Wanneer de bougie
zich in goede condities bevindt,
moet men zich wenden tot een
Erkende Aprilia Garage.
Verzopen motor Geef gas en probeer te starten, ook
door te duwen, doe de motor leeg
draaien en elimineer het teveel aan
benzine, reinig de bougie of
vervang ze. Controleer de dichting
van de huls van de klep van de
drijver.
HIGH FUEL CONSUMPTION
Air filter obstructed or dirty.
Clean or replace the filter.
HOOG VERBRUIK
Luchtfilter verstopt of vuil.
Reinig de filter of vervang hem.
LACK OF COMPRESSION
Spark plug adaptor with damaged
thread, loose head retainer, worn
piston rings.
Take your scooter to an Aprilia
Authorised Workshop.
WEINIG COMPRESSIE
Bougiezit met beschadigde
schroefdraad, bevestiging van de
kop gelost, elastische klemmen
van de zuiger versleten.
Zich wenden tot een Erkende
Aprilia Garage.
72
3 Maintenance / 3 Onderhoud

EXHAUST NOISE WEAKENING
Muffler obstructed Take your scooter to an Aprilia
Authorised Workshop.
VERZWAKKING VAN HET LAWAAI VAN DE UITLAAT
Verstopte uitlaat Zich wenden tot een Erkende
Aprilia Garage.
THE ENGINE TENDS TO STOP WITH MAXIMUM
ACCELERATION
Check that the throttle valve is not
dirty or rusted. Check that the
spark plug is not dirty or faulty, that
the fuel is supplied normally, the
washers are leak-tight.
Take your scooter to an Aprilia
Authorised Workshop.
DE MOTOR NEIGT STIL TE VALLEN WANNEER DE
GASHENDEL VOLLEDIG OPEN IS
Controleer of de gasklep niet vuil of
verroest is. Controleer of de bougie
niet vuil of defect is, of de brandstof
normaal aankomt, of de pakkingen
waterdicht zijn.
Zich wenden tot een Erkende
Aprilia Garage.
IRREGULAR ENGINE EXHAUST, BLASTS DURING
ACCELERATION OR SLOPES
Check that the throttle valve is not
dirty or rusted. Check that the
spark plug is not dirty or faulty, that
the fuel is supplied normally, the
washers are leak-tight.
Take your scooter to an Aprilia
Authorised Workshop.
ONREGELMATIGE UITLAATEMISSIE,
ONTPLOFFINGEN TIJDENS DE ACCELERATIE OF OP
HELLINGEN
Controleer of de gasklep niet vuil of
verroest is. Controleer of de bougie
niet vuil of defect is, of de brandstof
normaal aankomt, of de pakkingen
waterdicht zijn.
Zich wenden tot een Erkende
Aprilia Garage.
73
3 Maintenance / 3 Onderhoud

STARTER GRIP LOCKED IN POSITION OR ONLY
PARTIALLY OPEN
Unblock and lubricate it Take your scooter to an Aprilia
Authorised Workshop.
STARTERCOMMANDO GEBLOKKEERD IN POSITIE
OF NIET HELEMAAL OPEN
Deblokkeer en smeer het Zich wenden tot een Erkende
Aprilia Garage.
INSUFFICIENT BRAKING
Disk lubricity, worn pads. Wrong
brake adjustment. Air in the
braking system.
Take your scooter to an Aprilia
Authorised Workshop.
ONVOLDOENDE REMMING
Vettigheid van de schijf, versleten
pastilles. Foute regeling van de
rem. Aanwezigheid van lucht in de
reminstallatie.
Zich wenden tot een Erkende
Aprilia Garage.
FAULTY SUSPENSIONS
Oil leak, silent-block wearing at the
end of the stroke, wearing in shock
absorber retainers.
Take your scooter to an Aprilia
Authorised Workshop.
DEFECTE OPHANGINGEN
Olielekken, slijtage aan de silent-
blocks van de eindslag, slijtage op
de bevestigingen van de
schokdemper.
Zich wenden tot een Erkende
Aprilia Garage.
ENGINE DOES NOT ACCELERATE OR WORK
REGULARLY AT LOW RPM; NOISY ENGINE
FUNCTIONING
Engine does not accelerate or work
regularly at low rpm; noisy engine
Take your scooter to an Aprilia
Authorised Workshop.
DE MOTOR DRAAIT NIET OF WERKT ONREGELMATIG
AAN EEN LAAG REGIME; DE MOTOR MAAKT LAWAAI
De motor draait niet of werkt
onregelmatig aan een laag regime;
lawaaierige werking van de motor,
slechte werking van de koppeling,
Zich wenden tot een Erkende
Aprilia Garage.
74
3 Maintenance / 3 Onderhoud

functioning, clutch malfunctioning,
gear spontaneous
disengagement, malfunctioning of
controls or steering.
spontane ontkoppeling van de
versnellingen, defecte werking van
de commando's of de richting.
75
3 Maintenance / 3 Onderhoud

76
3 Maintenance / 3 Onderhoud
Pagina wordt geladen...
Pagina wordt geladen...

04_02
50 6M ENGINE TECHNICAL DATA
Engine 2-stroke single aluminium cylinder
with nickel and silicon carbide
coated bore.
Bore per stroke 39.86 x 40 mm
Cubic capacity 49 cm³
Compression ratio 11.5 :1
Cooling With coolant
TECHNISCHE GEGEVENS VAN DE MOTOR 50 6M
Motor Monocilindrisch 2-takt in
aluminium, met interne bekleding
in nikkel en siliciumcarbid.
Diameter per slag 39,86 x 40 mm
Cilinderinhoud 49 cm³
Compressieverhouding 11,5:1
Koeling Met koelvloeistof
79
4 Technical data / 4 Technische gegevens

Lubrication Thermal group: With oil for 2T
engines through variable pump
capacity
Transmission: gear reduction
units in oil bath for transmissions
Fuel Unleaded petrol
CARBURETTOR Dell'Orto PHVA-17.5 with manual
starter
Clutch Oil-coated multiple disk
Main transmission Ground gear units. Ratio: 21/78
Admission Reed valve direct to crankcase
Gear 6-speed transmission with selector
fork and drum distributor operated
by external control
Gears I Gear 11/34
II Gear 15/30
III Gear 18/27
VI Gear 20/24
V Gear 22/23
VI Gear 23/22
Secondary transmission Chain, 12.70 mm wheelbase and
sprocket 7.75 mm in diameter
Ratio: 11/53
Start-up electric
Smering Thermische groep: Met olie voor
2-taktmotoren door middel van
pomp met variabele capaciteit
Versnellingsbak: Met
raderwerken in oliebad voor
transmissies
Brandstof Loodvrije benzine
Carburator Dell'Orto PHVA-17,5 met manuale
starter
Koppeling Multischijf in oliebad
Primaire transmissie Met geslepen raderwerken.
Verhouding: 21/78
Inlaat Met lamellen, rechtstreeks naar de
carter
Versnellingsbak Met 6 versnellingen, met
schakelaar, vork en
distributietrommel die extern wordt
gecommandeerd
Versnellingen I Snelheid 11/34
II Snelheid 15/30
III Snelheid 18/27
IV Snelheid 20/24
V Snelheid 22/23
VI Snelheid 23/22
Secundaire transmissie Met ketting, steek 12,70 mm en
diameter van het dwarsliggertje
7,75 mm
80
4 Technical data / 4 Technische gegevens

Electrical system 12V
Ignition advance TDC: 1.2 mm
Spark plug NGK BR8 ES
Verhouding: 11/53
Start Elektrisch
Elektrische installatie Aan 12V
Voorontsteking BDP: 1,2 mm
Bougie NGK BR8 ES
RX SX 50 SCOOTER TECHNICAL DATA
CHASSIS
Delta Box
Front suspension: Hydraulic fork with stems 40 mm in
diameter.
REAR SUSPENSION Swinging arm with hydraulic
progressive shock absorber.
Front wheel brakes: Hydraulic disc brakes
Ø 260 mm (RX)
Ø 300 mm (SX)
Rear wheel brakes Ø 180 mm hydraulic disc brake
with hydraulic transmission
Front tyre: 90/90 x 21'' (RX)
100/80 x 17'' (SX)
Rear tyre: 110/80 x 18'' (RX)
130/70 x 17'' (SX)
Petrol tank 7 litres (of which 1.3 l is reserve)
TECHNISCHE GEGEVENS VAN HET VOERTUIG RX SX
50
Frame
Delta Box
Voorste ophanging: Hydraulische vork met stangen
diameter 40 mm.
Achterste ophanging Schommelend met progressieve
hydraulische schokdemper.
Remmen van het voorwiel: Met hydraulische schijf
Ø 260 mm (RX)
Ø 300 mm (SX)
Remmen van het achterwiel: Met hydraulische schijf Ø 180 mm,
met hydraulische transmissie
Voorste band: 90/90 x 21'' (RX)
100/80 x 17'' (SX)
Achterste band: 110/80 x 18'' (RX)
130/70 x 17'' (SX)
81
4 Technical data / 4 Technische gegevens
Pagina wordt geladen...
Pagina wordt geladen...

Scheduled maintenance table
Adequate maintenance is fundamental to
ensuring long-lasting, optimum operation
and performance of your vehicle.
For this purpose, aprilia offers a set of
checks and maintenance services (for
payment), which are included in the sum-
mary table shown on the following page.
Any minor faults should be reported with-
out delay to an Authorised aprilia Deal-
er or Sub-Dealer without waiting until the
next scheduled service to solve it.
All scheduled maintenance services
must be carried out as soon as the speci-
fied mileage is reached. Carrying out
scheduled services on time is essential to
ensure your warranty remains valid. For
further information regarding Warranty
procedures and ''Scheduled Mainte-
nance'', please refer to the ''Warranty
Booklet''.
Tabel van het
geprogrammeerd onderhoud
Een aangepast onderhoud is van door-
slaggevend belang voor een langere le-
vensduur van het voertuig in optimale
werkcondities met optimale prestaties.
Daarom heeft Moto Guzzi een serie van
controles en onderhoudshandelingen te-
gen betaling voorzien, die men vindt in
het samenvattend kader op de volgende
pagina. Het is goed om eventuele kleine
onregelmatigheden bij de werking onmid-
dellijk mee te delen aan een Officiële
aprilia Dealer of Verkoper zonder te
wachten, om ze te verhelpen, tot het uit-
voeren van de volgende servicebeurt.
Het is absoluut noodzakelijk om de ser-
vicebeurten uit te voeren wanner de voor-
ziene kilometerstand wordt bereikt. Een
stipte uitvoering van de servicebeurten is
noodzakelijk voor het correcte gebruik
van de garantie. Voor alle andere infor-
matie in verband met de toepassingswij-
zen van de Garantie en de uitvoering van
het "Geprogrammeerd Onderhoud",
raadpleegt men het "Garantieboekje".
EVERY 500 KM
Mixer oil level - check and top-up if necessary
ELKE 500 KM
Oliepeil van de menger - controleren en bijvullen, indien nodig
84
5 Programmed maintenance / 5 Gepland onderhoud

AFTER 1000 KM
Coolant - Check
Air filter - cleaning
Odometer gear - grease
Steering - check up
Brake control levers - Grease
Brake pads - check
Gearing chain - Grease
Gearing chain tension - check
Safety locks - check
Front fork - Check
Electrical system and battery - Check
Wheel - Check
Tyres pressure - Check
Fuel and oil hoses - Check
Vehicle and brake test - test drive
Spark plug / electrode gap - check
Carburettor - Adjustment
Clutch control lever - Adjustment
BIJ 1000 KM
Koelvloeistof - Controle
Luchtfilter - reiniging
Overbrenging van de kilometerteller - invetting
Stuurinrichting - controle
Commandohendels van de remmen - Invetting
Rempastilles - controle
Transmissieketting - Invetting
Spanning van de transmissieketting - Controle
Veiligheidsblokkeringen - controle
Voorvork - Controle
Elektrische installatie en accu - Controle
Wiel - Controle
Bandenspanning - Controle
Benzine- en oliebuizen - Controle
Test van het voertuig en reminstallatie - rijtest
Bougie / afstand van de elektroden - controle
Carburator - Regeling
Commandohendels van de koppeling - Regeling
85
5 Programmed maintenance / 5 Gepland onderhoud

AT 5,000; 25,000; 35,000; 55,000 KM
Coolant level - check
Air filter - cleaning
Brake control levers - Grease
Brake pads - check
Brake fluid level - check
Gearing chain - Grease
Gearing chain tension - check
Front fork - Check
Electrical system and battery - Check
Tyre condition and wear - Check
Tyres pressure - Check
Fuel and oil hoses - Check
Vehicle and brake test - test drive
Spark plug - replacement
Carburettor - Adjustment
Clutch control lever - Adjustment
Chain sliding roller - Grease
BIJ 5.000; 25.000; 35.000; 55.000 KM
Peil van de koelvloeistof - controle
Luchtfilter - reiniging
Commandohendels van de remmen - Invetting
Rempastilles - controle
Oliepeil van de remmen - controle
Transmissieketting - Invetting
Spanning van de transmissieketting - Controle
Voorvork - Controle
Elektrische installatie en accu - Controle
Conditie en slijtage van de banden - Controle
Bandenspanning - Controle
Benzine- en oliebuizen - Controle
Test van het voertuig en reminstallatie - rijtest
Bougie - vervanging
Carburator - Regeling
Commandohendels van de koppeling - Regeling
Rol voor het glijden van de ketting - Invetting
AT 10,000; 20,000; 40,000; 50,000 KM
Coolant - Check
BIJ 10.000; 20.000; 40.000; 50.000 KM
Koelvloeistof - Controle
86
5 Programmed maintenance / 5 Gepland onderhoud

Air filter - cleaning
Radiator - Cleaning
Odometer gear - grease
Steering - check up
Brake control levers - Grease
Brake pads - check
Flexible brake hoses - Check
Gearing chain - Grease
Gearing chain tension - Replacement
Safety locks - check
Front fork - Replacement
Rear shock absorber - Check
Electrical system and battery - Check
Headlight - adjustment
Tyre condition and wear - Check
Wheel - Check
Tyres pressure - Check
Oil filter - Replacement
Fuel and oil hoses - Replacement
Vehicle and brake test - test drive
Spark plug - replacement
Carburettor - Adjustment
Clutch control lever - Adjustment
Luchtfilter - reiniging
Radiator - Reiniging
Overbrenging van de kilometerteller - invetting
Stuurinrichting - controle
Commandohendels van de remmen - Invetting
Rempastilles - controle
Flexibele rembebuizing - Controle
Transmissieketting - Invetting
Spanning van de transmissieketting - Controle
Veiligheidsblokkeringen - controle
Voorvork - Vervanging
Achterste schokdemper - Controle
Elektrische installatie en accu - Controle
Koplamp - regeling
Conditie en slijtage van de banden - Controle
Wiel - Controle
Bandenspanning - Controle
Oliefilter - Vervanging
Benzine- en oliebuizen - Vervanging
Test van het voertuig en reminstallatie - rijtest
Bougie - vervanging
Carburator - Regeling
Commandohendels van de koppeling - Regeling
87
5 Programmed maintenance / 5 Gepland onderhoud

Chain sliding roller - Grease Rol voor het glijden van de ketting - Invetting
AT 15,000; 30,000; 45,000; 60,000 KM
Coolant level - check
Air filter - cleaning
Brake control levers - Grease
Brake pads - check
Brake fluid level - check
Gearing chain - Grease
Gearing chain tension - check
Front fork - Check
Electrical system and battery - Check
Tyre condition and wear - Check
Tyres pressure - Check
Fuel and oil hoses - Check
Vehicle and brake test - test drive
Spark plug - replacement
Carburettor - Adjustment
Clutch control lever - Adjustment
Cylinder head and cylinder - Cleaning
Complete piston - Replacement
BIJ 15.000; 30.000; 45.000;60.000 KM
Peil van de koelvloeistof - controle
Luchtfilter - reiniging
Commandohendels van de remmen - Invetting
Rempastilles - controle
Oliepeil van de remmen - controle
Transmissieketting - Invetting
Spanning van de transmissieketting - Controle
Voorvork - Controle
Elektrische installatie en accu - Controle
Conditie en slijtage van de banden - Controle
Bandenspanning - Controle
Benzine- en oliebuizen - Controle
Test van het voertuig en reminstallatie - rijtest
Bougie - vervanging
Carburator - Regeling
Commandohendels van de koppeling - Regeling
Kop en cilinder - Reiniging
Complete zuiger - Vervanging
88
5 Programmed maintenance / 5 Gepland onderhoud
Pagina wordt geladen...

Product Description Specifications
AGIP FILTER OIL Oil for air filter sponge -
TABEL MET AANBEVOLEN PRODUCTEN
Product Beschrijving Kenmerken
AGIP CITY TEC 2T Olie voor de menger Synthetische olie die voldoet aan de
specifieken API TC ++
AGIP GEAR 10W-40 Olie voor de versnellingsbak API GL-4
AGIP PERMANENT SPEZIAL Koelvloeistof Biologisch afbreekbare koelvloeistof,
gebruiksklaar, met "long life" technologie en
kenmerken (rood). Verzekert een bescherming
tegen vriestemperaturen tot -40°. Beantwoordt
aan de norm CUNA 956-16.
AGIP BRAKE 4 remvloeistof In plaats van de aanbevolen vloeistof kan men
vloeistoffen gebruiken met conforme of hogere
prestaties dan de specifieken. Synthetische
vloeistof SAE J1703, NHTSA 116 DOT 4, ISO
4925
AGIP GREASE 30 Vet voor de stuurinrichtingskussentjes, de
zitten van de pinnen en de achtervork
AGIP FILTER OIL Olie voor filters in spons -
90
5 Programmed maintenance / 5 Gepland onderhoud
Pagina wordt geladen...
Pagina wordt geladen...

TREFWOORDENREGISTER
A
ACCU: 52, 53
B
Banden: 43
Bandenspanning
: 23
BOUGIE: 44
C
Claxon: 13
G
Geprogrammeerd
onderhoud: 84
H
Het stilleggen van de motor:
29
I
Identificatie: 20
K
Koelvloeistof: 47
Koplamp: 59
Koppeling
: 16
L
Luchtfilter: 45
O
Onderhoud: 39, 83, 84
Optische groep: 57, 61
R
Richtingaanwijzers: 12, 60,
63
S
Schijfrem: 65
Sleutels: 19
Sleutelschakelaar
: 11
Standaard: 29
Stuurslot: 11, 12
T
Technische gegevens: 77
Z
Zadel: 18
Zekeringen: 56
93

THE VALUE OF SERVICE
As a result of continuous technical updates and specific mechanic training programs for aprilia products, only aprilia Official Network mechanics know this vehicle fully and have the special tools necessary
to carry out maintenance and repair operations correctly.
The reliability of the vehicle also depends on its mechanical state. Checking the vehicle before riding, its regular maintenance and using only Original aprilia Spare Parts are essential!
For information about the nearest Official Dealer and/or Service Centre, consult the Yellow Pages or search directly on the inset map in our Official Website:
www.aprilia.com
Only by requesting aprilia Original Spare Parts can you be sure of purchasing products that were developed and tested during the actual vehicle design stage. All aprilia Original Spare Parts undergo
quality control procedures to guarantee reliability and durability.
The descriptions and illustrations given in this publication are not binding; While the basic characteristics as described and illustrated in this booklet remain unchanged, aprilia reserves the right, at any
time and without being required to update this publication beforehand, to make any changes to components, parts or accessories, which it considers necessary to improve the product or which are
required for manufacturing or construction reasons.
Not all versions/models shown in this publication are available in all Countries. The availability of individual versions/models should be confirmed with the official aprilia sales network.
© Copyright 2009- aprilia. All rights reserved. Reproduction of this publication in whole or in part is prohibited. aprilia - After sales service.
The aprilia trademark is property of Piaggio & C. S.p.A.
DE WAARDE VAN DE ASSISTENTIE
Dankzij de voortdurende technische actualiseringen en de specifieke trainingsprogramma´s van de aprilia producten, kennen enkel de onderhoudsmonteurs van het Officiële Netwerk van aprilia grondig
dit voertuig, en beschikken ze over de nodige speciale uitrusting voor een correcte uitvoering van de handelingen van het onderhoud en de herstellingen.
De betrouwbaarheid van het voertuig hangt ook af van de mechanische condities van het voertuig. De controle vóór het rijden, het regelmatig onderhoud en het exclusief gebruik van de Originele
Reserveonderdelen van aprilia zijn essentiële factoren !
Voor informatie in verband met de dichtstbijzijnde Officiële dealer en/of Assistentiedienst, raadpleegt men de Gouden Gids of zoekt men rechtstreeks op de geografische kaart op onze Officiële Website:
www.aprilia.com
Enkel wanneer men Originele aprilia Reserveonderdelen aanvraagt, zal men een product krijgen dat reeds bestudeerd en getest werd tijdens de ontwerpfase van het voertuig. De Originele aprilia
Reserveonderdelen worden systematisch onderworpen aan kwaliteitscontroleprocedures om de volledige betrouwbaarheid en de duur ervan te garanderen.
De beschrijvingen en de illustraties in deze uitgave zijn niet bindend; aprilia houdt zich derhalve het recht voor om, met behoud van de essentiële eigenschappen van het model dat hierin is beschreven
en geïllustreerd, op elk moment wijzigingen aan te brengen aan de organen, de onderdelen of de levering van accessoires naar gelang zij dit nodig acht om het product te verbeteren, of om te voldoen
aan vereisten van constructieve of commerciële aard, zonder verplicht te zijn om tijdig deze uitgave bij te werken.
Niet alle versies in deze uitgave zijn in alle landen beschikbaar. De beschikbaarheid van de afzonderlijke versies moet gecontroleerd worden via het officiële verkoopsnetwerk van aprilia.

© Copyright 2009 - aprilia. Alle rechten voorbehouden. Het reproduceren van de inhoud, ook van delen hiervan, is verboden. aprilia - Dienst na verkoop.
Het merk aprilia is eigendom van Piaggio & C. S.p.A.
Documenttranscriptie
APRILIA WOULD LIKE TO THANK YOU for choosing one of its products. We have compiled this booklet to provide a comprehensive overview of your vehicle's quality features. Please, read it carefully before riding the vehicle for the first time. It contains information, tips and precautions for using your vehicle. It also describes features, details and devices to assure you that you have made the right choice. We believe that if you follow our suggestions, you will soon get to know your new vehicle well and that it will continue to give you satisfactory service for many years to come. This booklet is an integral part of the vehicle and must be handed over to the new owner in the event of sale. APRILIA WIL U BEDANKEN omdat u één van haar producten heeft gekozen. Wij hebben deze handleiding opgesteld opdat u de kwaliteiten ervan ten volle kan waarderen. Wij raden aan om deze handleiding geheel door te lezen, voordat u met het voertuig gaat rijden. Het bevat informatie, raadgevingen en waarschuwingen in verband met het gebruik van uw voertuig; daarnaast zal u eigenschappen, bijzonderheden en handigheidjes ontdekken die u ervan zullen overtuigen dat u een juiste keuze heeft gemaakt. Wij zijn er zeker van dat indien u hier rekening mee zal houden, u makkelijk zal wennen aan uw nieuw voertuig, waar u lang naar volle tevredenheid gebruik van zal kunnen maken. Deze uitgave is een integrerend deel van het voertuig, en bij verkoop van dit laatste moet het worden overhandigd aan de nieuwe eigenaar. RX 50 - SX 50 Ed. 03 2009 The instructions in this booklet have been compiled primarily to offer a simple and clear guide to using the vehicle; it also describes routine maintenance procedures and regular checks that should be carried out on the vehicle at an Aprilia Dealer or Authorised Workshop. This booklet also contains instructions for simple repairs. Any operations not specifically described in this booklet require the use of special tools and/or particular technical knowledge; for these operations, please take your vehicle to an Aprilia Dealer or Authorised Workshop. De instructies in deze handleiding zijn voorbereid om vooral een eenvoudige en duidelijke leidraad te zijn voor het gebruik; men vindt eveneens de handelingen van het klein onderhoud en van de periodieke controles die bij een Dealer of Erkende aprilia Garage moeten uitgevoerd worden. De handleiding bevat tevens instructies voor een aantal eenvoudige herstellingen. De herstellingen die niet uitgebreid in deze uitgave zijn beschreven, vereisen dat men over speciale gereedschappen en/of specifieke technische kennis beschikt; voor het uitvoeren van deze herstellingen raadt men aan om zich te wenden tot een Dealer of Erkende aprilia Garage. 2 Personal safety Persoonlijke veiligheid Failure to completely observe these instructions will result in serious risk of personal injury. Indien deze voorschriften niet of niet volledig worden opgevolgd, kan dit ernstig letsel aan personen tot gevolg hebben. Safeguarding the environment Bescherming van Sections marked with this symbol indicate the correct use of the vehicle to prevent damaging the environment. Geeft het juiste gedrag aan dat u aan moet houden zodat het gebruik van het voertuig geen schade aanricht aan de natuur. Vehicle intactness Staat van het voertuig The incomplete or non-observance of these regulations leads to the risk of serious damage to the vehicle and sometimes even the invalidity of the guarantee. Indien deze voorschriften niet of niet volledig worden opgevolgd kan dit ernstige schade aan het voertuig, en eventueel het vervallen van deze garantie tot gevolg hebben. The symbols shown above are very important. They are used to highlight those parts of the booklet that should be read with particular care. As you can see, each sign consists of a different graphic symbol, making it quick and easy to locate the various topics. Before starting the engine, read this booklet thoroughly and the "SAFE RIDING" section in particular. Your safety as well as other's does not only depend on the quickness of your reflexes and agility, but also on how well you know your vehicle, the state of maintenance of the vehicle itself and your knowledge of the rules for SAFE RIDING. For your safety, get to know your vehicle well so as to safely ride and master it in road traffic IMPORTANT This booklet is an integral part of the vehicle, and must be handed to the new owner in the event of sale. Bovengenoemde signalen zijn erg belangrijk. Ze hebben namelijk tot doel om de delen van het boekje aan te geven die u aandachtig door moet lezen. Zoals u ziet, bestaat ieder teken uit een ander grafisch symbool, zodat de bijbehorende onderwerpen meteen duidelijk kunnen worden gevonden in de verschillende delen. Vooraleer men de motor start, leest men aandachtig deze handleiding, en vooral de paragraaf "VEILIG RIJDEN". Uw veiligheid en die van anderen hangt niet enkel af van uw reflexen en vlugheid, maar ook van de kennis en de efficiëntie van het voertuig, en van de kennis van de fundamentele regels voor het VEILIG RIJDEN. We raden daarom aan om vertrouwd te raken met het voertuig, zodat u zich veilig en beheersd kan bewegen in het verkeer. BELANGRIJK Deze handleiding moet beschouwd worden als integrerend deel van het voertuig, en moet worden overhandigd bij de verkoop ervan. 3 INDEX INDEX VEHICLE......................................................................................... Dashboard................................................................................... Analogue instrument panel.......................................................... Key switch.................................................................................... Locking the steering wheel....................................................... Releasing the steering wheel................................................... Switch direction indicators........................................................... Horn button.................................................................................. Rear brake pedal......................................................................... Throttle grip.................................................................................. Front brake control....................................................................... Gear pedal................................................................................... Clutch control............................................................................... Light on/of switch......................................................................... Start-up button............................................................................. Manual starter control.................................................................. Fuel tank...................................................................................... Opening the saddle.................................................................. Keys............................................................................................. Identification................................................................................. USE................................................................................................. Checks......................................................................................... Tyre pressure............................................................................... Running in.................................................................................... Starting up the engine.................................................................. Precautions.............................................................................. Stopping the engine..................................................................... Stand........................................................................................... Suggestions to prevent theft........................................................ Safe driving.................................................................................. MAINTENANCE.............................................................................. 7 8 9 11 11 12 12 13 13 14 14 15 16 16 17 17 18 18 19 20 21 22 23 24 27 28 29 29 30 31 39 VOERTUING..................................................................................... Legenda......................................................................................... Analoog instrumentenpaneel......................................................... Sleutelschakelaar........................................................................... Inschakeling van het stuurslot.................................................... Stuurslot ontgrendelen............................................................... Schakelaar richtingaanwijzers....................................................... Drukknop claxon............................................................................ Achterrempedaal............................................................................ Gascommando............................................................................... Commando van de voorrem.......................................................... Schakelpedaal............................................................................... Commando van de koppeling........................................................ Lichtschakelaar.............................................................................. Startknop........................................................................................ Commando van de manuele starter............................................... Benzinetank................................................................................... Opening van het zadel............................................................... Sleutels.......................................................................................... Identificatie..................................................................................... GEBRUIK.......................................................................................... Controles........................................................................................ Bandenspanning............................................................................ Inrijden........................................................................................... Starten des motors......................................................................... Voorzorgsmaatregelen............................................................... Het stilleggen van de motor........................................................... Standaard...................................................................................... Tips tegen diefstal.......................................................................... Het veilig rijden.............................................................................. ONDERHOUD................................................................................... 5 7 8 9 11 11 12 12 13 13 14 14 15 16 16 17 17 18 18 19 20 21 22 23 24 27 28 29 29 30 31 39 Gearbox oil level.......................................................................... Transmission chain...................................................................... Tyres............................................................................................ Spark plug dismantlement........................................................... Air filter cleaning.......................................................................... Cooling fluid level......................................................................... Checking the brake oil level......................................................... Braking system fluid top up...................................................... Battery......................................................................................... Use of a new battery................................................................ Long periods of inactivity............................................................. Fuses........................................................................................... Front light group........................................................................... Headlight adjustment............................................................... Front direction indicators............................................................. Rear optical unit........................................................................... Rear turn indicators..................................................................... Idle adjustment............................................................................ Front and rear disc brake............................................................. Transmissions.............................................................................. Periods of inactivity...................................................................... Cleaning the vehicle.................................................................... TECHNICAL DATA......................................................................... PROGRAMMED MAINTENANCE.................................................. Scheduled maintenance table..................................................... 40 41 43 44 45 47 49 51 52 53 54 56 57 59 60 61 63 63 65 66 68 70 77 83 84 Oliepeil van de versnellingsbak..................................................... Transmissieketting......................................................................... Banden........................................................................................... Demonteren van de bougie............................................................ Reiniging van de luchtfilter............................................................. Peil van de koelvloeistof................................................................ Controle van het oliepeil van de remmen...................................... Het bijvullen van vloeistof in de reminstallatie............................ Accu............................................................................................... Inwerkingstelling van een nieuwe accu...................................... Lange stilstand............................................................................... Zekeringen..................................................................................... Voorste optische groep.................................................................. Regeling van de koplamp........................................................... Voorste richtingaanwijzers............................................................. Achterste optische groep............................................................... Achterste richtingaanwijzers.......................................................... Regeling van het minimum toerental............................................. Schijfrem vooraan en achteraan.................................................... Transmissies.................................................................................. Stilstand van het voertuig............................................................... Reinigen van het voertuig.............................................................. TECHNISCHE GEGEVENS.............................................................. GEPLAND ONDERHOUD................................................................ Tabel van het geprogrammeerd onderhoud.................................. 6 40 41 43 44 45 47 49 51 52 53 54 56 57 59 60 61 63 63 65 66 68 70 77 83 84 RX 50 - SX 50 Chap. 01 Vehicle Hst. 01 Voertuing 7 01_01 Dashboard (01_01) Legenda (01_01) KEY: LEGENDE: 1. Instrument panel 1. Dashboard 2. Light switch, horn and stop 2. Schakelaar van de lichten, akoestische melder en stop 3. Front brake lever 3. Commando van de voorrem 1 Vehicle / 1 Voertuing 4. Throttle grip 4. Commando van de gashendel 5. Ignition lock 5. Ontstekingsslot 6. Clutch control 7. Front brake fluid reservoir 6. Commando van de koppeling 7. Vloeistoftank van de voorrem 8. Mirror 9. Cold start lever control 8. Spiegeltje 9. Commandohendel voor de koude start 8 Analoog instrumentenpaneel (01_02) KEY: LEGENDE: 1. Speedometer 1. Snelheidsmeter 2. Tachometer 2. Indicator van het toerental van de motor 3. High temperature warning light 01_02 4. Low oil warning light 3. Indicatorlamp voor de excessieve temperatuur 5. Turn indicator warning light 4. Controlelamp oliereserve 6. High-beam warning light on 5. Controlelamp richtingaanwijzers 7. Low fuel warning light 6. Controlelamp groot licht aan 8. Multifunction indicator 7. Indicator brandstofreserve 9. Mode Button 8. Multifunctionele indicator ODO Total distance travelled 9. Toets Mode CLOCK ODO Totaal afgelegde afstand TRIP Partial distance KLOK SRV Distance for the next vehicle servicing TRIP Partiële afstand SRV Afstand tot de volgende servicebeurt Functions: Functies : WATER TEMPERATURE WARNING LIGHT : RED, turns on if the coolant temperature exceeds 105º C. CONTROLELAMP TEMPERATUUR WATER : RODE kleur, licht op wanneer de temperatuur van de koelvloeistof 105º C overschrijdt. 9 1 Vehicle / 1 Voertuing Analogue instrument panel (01_02) MIM. OIL LEVEL WARNING LIGHT : RED, turns on when there is a 0.25 litre oil reserve in the reservoir. CONTROLELAMP MIN. OLIEPEIL : RODE kleur, licht op wanneer in de tank een oliereserve van 0,25 liter overblijft. FUEL RESERVE ICON : turns on when there is a 1.3 litre petrol reserve in the tank. ICOON BRANDSTOFRESERVE : licht op wanneer in de tank een brandstofreserve van 1,3 liter overblijft. Every time the key is activated, the instrument panel carries out a check (all the segments are active for 3 seconds ). Bij elke activatie van de sleutel voert het dashboard een check uit (alle segmenten zijn actief voor 3 sec). Once the check is over, the instrument panel displays the last function programmed with the button. Na de check zal het dashboard de laatste functie weergeven die werd ingesteld door middel van de drukknop. Button operative mode . Push the button for < 3 sec and the functions are displayed as follows: Werkingsmodaliteit van de drukknop. door op de drukknop te drukken voor t< 3 sec, volgen de functies elkaar op op de volgende manier: ODOMETER_ TRIP _CLOCK_SERVICE _ODOMETER To reset the TRIP, press the button for > 3 sec once the function is displayed. 1 Vehicle / 1 Voertuing To set the clock (once the function is displayed): HODOGRAM _ TRIP _KLOK _SERVICE _HODOGRAM Om de TRIP te resetten moet de drukknop voor t > 3 sec worden ingedrukt wanneer de functie wordt weergegeven. - push the button for > 3 sec Om de klok te resetten, (wanneer de functie wordt weergegeven): - the hour flashes, - druk op de drukknop voor t > 3 sec - hold down the button until the current hour is displayed - de uren knipperen, - release the button - druk op de drukknop tot het gewenste uur wordt bereikt - the minutes flash - laat de drukknop los - hold down the button until the current minutes are displayed - de minuten knipperen 10 - druk tot de gewenste minuten worden bereikt - laat de drukknop los 01_03 Key switch (01_03) Sleutelschakelaar (01_03) Key positions: Plaats de sleutel: 1. Ready to start-up position, steering lock disengaged, key cannot be extracted. 1. Positie van de predispositie van de start, stuurslot uitgeschakeld, sleutel niet verwijderbaar. 2. Ignition disabled, extractable key, steering lock disengaged. 2. Ontsteking geblokkeerd, sleutel verwijderbaar, stuurslot uitgeschakeld. 3. Ignition disabled, extractable key, steering lock engaged. 3. Ontsteking geblokkeerd, sleutel verwijderbaar, stuurslot ingeschakeld. Locking the steering wheel (01_04) Inschakeling van het stuurslot (01_04) In order to lock the steering, turn the handlebar fully to the left. Fully insert the key and let it return to its original position, turn it to «3» and take it out. Om de stuurinrichting te blokkeren moet het stuur volledig naar links gedraaid worden. Druk op de sleutel en laat hem los zodat hij naar zijn positie terugkeert, draai hem in de positie «3» en verwijder hem. 01_04 11 1 Vehicle / 1 Voertuing - release the button. Releasing the steering wheel (01_05) Stuurslot ontgrendelen (01_05) Insert the key and turn it clockwise. Plaats de sleutel en draai hem in wijzerszin. Switch direction indicators (01_06) Schakelaar richtingaanwijzers (01_06) To activate the left turn indicators, move the lever«A» leftwards; to activate the right turn indicators, move the lever rightwards. The lever automatically goes back to the central position and the indicators remain on. Push the switch to turn them off. Om de linker knipperlichten in te schakelen, moet het hendeltje «A» naar links worden gedraaid; om de rechter knipperlichten in te schakelen, moet het hendeltje naar rechts gedraaid worden. Het hendeltje keert automatisch terug naar de centrale positie en de knipperlichten blijven ingeschakeld. Om ze uit te schakelen, moet op de schakelaar gedrukt worden. 01_05 1 Vehicle / 1 Voertuing 01_06 12 Drukknop claxon (01_07) Push «B» to sound the horn. Druk op «B» om de claxon te activeren. Rear brake pedal (01_08) Achterrempedaal (01_08) The rear brake control pedal «2» is placed on the right hand side of the scooter, at engine level. It must be activated gradually with the toe-end. The rear and front brakes must be used in combination, according to the needs, in order to obtain a more efficient braking. Het pedaal van het commando van de achterrem «2» bevindt zich op de rechter kant van de bromfiets, dichtbij de motor. Deze moet geleidelijk aan geactiveerd worden met de punt van de voet. Combineer de achterrem indien nodig met het gebruik van de voorrem: op deze manier is de remming doeltreffender. 01_07 01_08 Also pay attention to the conditions of the road! Particularly, to the conditions of asphalt and if it is wet or dirty with sand, oil, etc. 13 Let op voor de staat van de weg! vooral wanneer de weg geasfalteerd is, en nat of vuil met kiezelsteen, olie, enz. 1 Vehicle / 1 Voertuing Horn button (01_07) Throttle grip (01_09) Gascommando (01_09) Placed on the right side of the handlebar. When the hand grip «B» is turned downwards, the carburettor valve opens. Dit bevindt zich op de rechter kant van het stuur. Wanneer het handvat «B» naar beneden wordt gedraaid, gaat de carburatorklep open. Front brake control (01_10) Commando van de voorrem (01_10) 01_09 The front brake lever «E» is placed on the right hand side of the handlebar. Be particularly careful when using the front brake. Use it gently and measure the power progressively, according to surface conditions, to avoid blocking the wheel. 1 Vehicle / 1 Voertuing 01_10 14 Het commando van de voorrem «E» bevindt zich op de rechter kant van het stuur. Let vooral op bij het gebruik van de voorrem, rem niet bruusk, doseer geleidelijk aan de kracht volgens de condities van de ondergrond, en vermijdt om de wielen te doen blokkeren. Schakelpedaal (01_11) The gear pedal «1» is placed on the left hand side of the engine. Activate it with your foot to firmly engage the gear. After the gear is shifted, take your foot off the pedal and the pedal will automatically go back to its initial position. Starting from the neutral position, gears are engaged as follows: Het schakelpedaal «1» bevindt zich links van de motor. Het wordt geactiveerd met de voet, zodat de versnelling vastberaden wordt ingeschakeld. Na het schakelen moet de voet van het pedaal verwijderd worden, en keert het pedaal automatisch terug naar de beginpositie. Te beginnen vanaf de vrij, worden de versnellingen op de volgende manier geselecteerd: - 1st gear is engaged by pushing down the pedal - 2nd, 3rd, 4th, 5th and 6th gears are engaged by pushing the pedal upwards. For downshifting, push the pedal down. - Wanneer het pedaal naar beneden wordt geduwd, wordt naar de 1e versnelling geschakeld CAUTION - Wanneer het pedaal naar boven wordt geduwd, wordt naar de 2e, 3e, 4e, 5e en 6e versneling geschakeld. THE GEAR PEDAL MUST BE OPERATED BY RELEASING IT AFTER DISENGAGING THE CLUTCH AND UNTWISTING THE THROTTLE GRIP. Om terug te schakelen moet het pedaal naar beneden geduwd worden. LET OP HE SCHAKELPEDAAL MAG ENKEL GEACTIVEERD WORDEN NADAT DE KOPPELING ONTKOPPELD WERD, EN NADAT DE GASHENDEL WERD GELOST. 15 1 Vehicle / 1 Voertuing 01_11 Gear pedal (01_11) Clutch control (01_12) 01_12 The clutch control lever «A» is placed on the left hand side of the handlebar. When it is pulled completely towards the handlebar, the clutch is disengaged and the engine transmission is released. If the lever is released slowly, the clutch is engaged coupling the engine to the transmission and which, with a gear engaged, will transmit the engine power to the rear wheel through the gear. De commandohendel van de koppeling «A» bevindt zich op de linker kant van het stuur. Wanneer de hendel volledig naar het stuur wordt getrokken, wordt de koppeling ontkoppeld en wordt de transmissie van de motor bevrijd. Wanneer de hendel langzaam wordt losgelaten, wordt de koppelng ingeschakeld die de motor aan de transmissie koppelt, die met een ingeschakelde versnelling de kracht van de motor overbrengt naar het achterwiel langs de versnellingsbak. Light on/of switch (01_13) Lichtschakelaar (01_13) The light switch «C» has two positions: De schakelaar van de lichten «C» heeft twee posities: - Down, low-beam light - Up, high-beam light The lights come on automatically as soon as the engine is started. 1 Vehicle / 1 Voertuing Commando van de koppeling (01_12) 01_13 16 - Omlaag, dimlicht - Omhoog, groot licht De lichten gaan automatisch aan wanneer de motor wordt gestart. Startknop (01_14) The start-up pedal «1» is located on the right hand side of the engine. To start the engine, just push the pedal backwards with your foot. Het startpedaal «1» bevindt zich rechts van de motor. Om de motor te starten moet het pedaal met de voet achteruit geduwd worden. CAUTION LET OP MAKE SURE THE GEAR IS IN NEUTRAL BEFORE STARTING THE ENGINE. CONTROLEER OF DE VERSNELLINGSBAK ZICH IN VRIJ BEVINDT, VOORDAT DE MOTOR WORDT GESTART. Manual starter control (01_15) Commando van de manuele starter (01_15) The manual starter control «D» is located on the left hand grip. It has two positions: 01_15 - Lever up: cold start Het commando van de manuele starter «D» bevindt zich op het linker handvat. Het heeft twee posities: - Lever down: start-up in regular conditions. - Hendel omhoog: koude start CAUTION - Hendel omlaag: normale start THE ONLY AIM OF THIS CONTROL IS TO FACILITATE START-UP. USE IT ONLY WHEN THE ENGINE IS COLD. LET OP 17 DIT COMMANDO HEEFT ALS ENIG DOEL OM DE START TE VERGEMAKKELIJKEN. GEBRUIK HET ENKEL WANNER DE MOTOR KOUD STAAT. 1 Vehicle / 1 Voertuing 01_14 Start-up button (01_14) Fuel tank (01_16) Benzinetank (01_16) The fuel tank has a capacity for 7 litres and a 1.30-litre reserve. To fill it up, insert the key in the tank cover lock «1» and, while turning it to the right, lift the cover. De benzinetank heeft een capaciteit van 7 liter en een reserve van 1,30 liter. Om te tanken moet de sleutel in het slot van het tankdeksel «1» geplaatst worden, en terwijl de sleutel naar rechts wordt gedraaid moet het deksel omhoog worden gehoffen. CAUTION USE UNLEADED PETROL ONLY. LET OP 01_16 GEBRUIK ENKEL LOODVRIJE BENZINE. Opening the saddle (01_17, 01_18) Opening van het zadel (01_17, 01_18) To remove the saddle, insert the key in the tank cover lock «1» and, while turning it to the right, lift the cover. After that, remove the two fixing knobs from the saddle «2». Om het zadel te demonteren moet de sleutel in het slot van het tankdeksel «1» geplaatst worden, en terwijl de sleutel naar rechts wordt gedraaid moet het deksel omhoog worden gehoffen. Demonteer daarna de bevestigingsknoppen van het zadel «2». 1 Vehicle / 1 Voertuing The oil reservoir, the battery and the toolkit compartment are under the saddle. 01_17 Onder het zadel bevinden zich de olietank, de accu en de gereedschapsruimte. 18 1 Vehicle / 1 Voertuing 01_18 Keys (01_19) Sleutels (01_19) Two keys are supplied together with the scooter, both can be used either for the ignition lock or the fuel tank cover. Bij het voertuig worden twee sleutels geleverd, die onverschillig gebruikt kunnen worden voor het ontstekingsslot en voor het deksel van de brandstoftank. The keys are accompanied by a tag marked with the identification code to be quoted when ordering duplicates. WARNING 01_19 WE RECOMMEND KEEPING THE DUPLICATE KEY TOGETHER WITH ITS TAG IN A SAFE PLACE AND NOT ON THE SCOOTER. 19 Bij de sleutels wordt een naamplaatje geleverd met het identificatienummer, dat moet meegedeeld worden bij de aanvraag voor duplicaten. WAARSCHUWING ER WORDT AANGERADEN OM HET DUPLICAAT VAN DE SLEUTEL SAMEN MET ZIJN NAAMPLAATJE NIET OP HET VOERTUIG TE BEWAREN. 01_20 Identification (01_20, 01_21) Identificatie (01_20, 01_21) The identification registration numbers consist of a prefix followed by a number, stamped on the chassis and on the engine. They must be quoted when requesting spare parts. We recommend that you check that the prefix and chassis number stamped on the vehicle correspond with those in the vehicle documents. De registratienummers voor de identificatie bestaan uit een voorvoegsel dat gedrukt is op het frame en op de motor, gevolgd door een nummer. Deze moeten steeds meegedeeld worden wanneer reserveonderdelen moeten aangevraagd worden. Er wordt aangeraden om de overeenkomst te controleren van het voorvoegsel en het framenummer op het voertuig en diegene op de documenten van het voertuig zelf. NOTE ALTERING THE IDENTIFICATION REGISTRATION NUMBERS MAY LEAD TO SERIOUS PENAL SANCTIONS (IMPOUNDING OF THE SCOOTER, ETC.). 1 Vehicle / 1 Voertuing 01_21 20 N.B. HET WIJZIGEN VAN DE REGISTRATIENUMMERS VOOR DE IDENTIFICATIE KAN LEIDEN TOT ERNSTIGE STRAFRECHTELIJKE SANCTIES (INBESLAGNEMING VAN HET VOERTUIG, ENZ.). RX 50 - SX 50 Chap. 02 Use Hst. 02 Gebruik 21 Checks Controles Before starting up the scooter, check: Vooraleer het voertuig in werking wordt gesteld, moet het volgende gecontroleerd worden: 1. that the fuel and oil tanks are full. 2. that the crankcase oil level is correct. 3. that the transmission is in neutral position. 4. that the tyres are correctly inflated. 1. of de tanks van de benzine en de olie gevuld zijn. 2. of het oliepeil in de carter zich aan het juiste peil bevindt. 5. that the headlight, rear light and turn indicators are in correct working order. 3. of de versnellingsbak in vrij staat. 6. that the front and rear brakes are in working order. 5. de correcte werking van de lichten van de koplamp, het achterlichtje en de richtingaanwijzers. 7. that the liquid level in the brake pump tanks are correct. 8. that the transmission chain is tightened and properly lubricated. 9. that the coolant level is correct. 4. of de banden correct opgeblazen zijn. 6. de werking van de voor- en achterremmen 7. het vloeistofpeil in de tanks van de rempompen. 2 Use / 2 Gebruik 8. of de transmissieketting in spanning is en goed gesmeerd is. SWITCH OFF THE ENGINE BEFORE REFUELLING WITH PETROL. PETROL IS HIGHLY INFLAMMABLE. DO NOT LET PETROL SPILL FROM THE TANK WHILE REFUELLING 22 9. het peil van de koelvloeistof. VOORALEER MEN BENZINE TANKT, MOET DE MOTOR UITGESCHAKELD WORDEN. BENZINE IS UITERST ONTVLAMBAAR. MORS GEEN BENZINE UIT DE TANK TIJDENS HET TANKEN. Bandenspanning A different pressure from the one indicated may cause problems when riding the vehicle. Therefore, we recommend checking and correcting tyre pressure frequently. Een andere spanning dan wordt aangeduid kan oorzaak zijn van defecten bij het rijden met het voertuig. Daarom wordt aangeraden om regelmatig de bandenspanning te controleren, en ze eventueel te corrigeren. COLD INFLATION PRESSURE FOR FRONT TYRE Sx front tyre pressure 1.7 kg/cm² - 170 kPa (rider only) KOUDE BANDENSPANNING VAN DE VOORBAND Spanning van het linker voorwiel 1.8 kg/cm² - 180 kPa (rider and passenger) Rx front tyre pressure 1,7 Kg/cm² - 170 kPa (enkel bestuurder) 1,8 Kg/cm² - 180 kPa (bestuurder met passagier) 1.0 kg/cm² - 100 kPa (rider only) 1.1 kg/cm² - 110 kPa (rider and passenger) Spanning van het rechter voorwiel 1,0 Kg/cm² - 100 kPa (enkel bestuurder) 1,1 Kg/cm² - 110 kPa (bestuurder met passagier) COLD INFLATION PRESSURE FOR REAR TYRE Rx rear tyre pressure 1.2 k/cm² - 120 kPa (rider only) 1.4 Kg/cm² - 140 kPa (rider and passenger) Sx rear tyre pressure KOUDE BANDENSPANNING VAN DE ACHTERBAND Spanning van het rechter achterwiel 1,2 Kg/cm² - 120 kPa (enkel bestuurder) 1,4 Kg/cm² - 140 kPa (bestuurder met passagier) 2.0 kg/cm² - 200 kPa (rider only) 23 2 Use / 2 Gebruik Tyre pressure Starten des motors (02_02, 02_03, 02_04) - Ensure the gear is in neutral position. - Controleer of de versnellingsbak in zijn vrij staat. - Position the throttle at 1/3 of the stroke. - Insert the key on and turn it to position «1». 02_02 - Plaats het gashandvat aan 1/ 3 van de slag. - Step on the start up pedal. - Plaats de sleutel in de schakelaar en draai hem in positie «1». - Repeat procedures if necessary. - Handel op het startpedaal. - If the engine is cold, use the carburettor starter «D». Do not activate the starter when the engine is hot. - Herhaal de handelingen indien nodig. 02_03 02_04 27 - Bij koude motor moet de starter van de carburator «D» gebruikt worden. Activeer de starter niet wanneer de motor warm staat. 2 Use / 2 Gebruik Starting up the engine (02_02, 02_03, 02_04) To stop the engine, engage gear «1» in neutral position and turn the key switch anticlockwise. Het stilleggen van de motor (02_05) Om de motor stil te leggen moet de versnellingsbak «1» in vrij geplaatst worden, en de sleutelschakelaar in tegenwijzerszin gedraaid worden. 02_05 Stand Standaard To position the scooter on the stand, proceed as follows: Om het voertuig op de standaard te plaatsen, moet het volgende uitgevoerd worden: • • • • • get off the scooter on the left side holding it firmly from the handlebar and the saddle, fully flip out the stand with your right foot tilt the scooter and rest the stand on the ground turn the handlebar fully to the left make sure the scooter is stable • • • • • 29 stap van het voertuig langs de linker kant hou het voertuig stevig vast aan het stuur en het zadel, handel op de standaard met de rechter voet, en klap hem volledig uit hel het voertuig tot de standaard de grond raakt plaats het stuur volledig naar links controleer de stabiliteit van het voertuig 2 Use / 2 Gebruik Stopping the engine (02_05) Suggestions to prevent theft Tips tegen diefstal NEVER leave the ignition key in the lock and always use the steering lock. Park the scooter in a safe place such as a garage or a place with guards. Laat de ontstekingssleutel NOOIT achter op het voertuig, en gebruik steeds het stuurslot. Parkeer het voertuig op een veilige plaats, indien mogelijk in een garage of een bewaakte plaats. Whenever possible, use the aprilia "Body-Guard" armoured cable or an additional antitheft device. Make sure all vehicle documents are in order and the road tax paid. Write down your personal details and telephone number on this page to help identifying the owner in case of scooter retrieval after a theft. LAST NAME: ................................. NAME: ......................................... ADDRESS: ................................... TELEPHONE No: ............................ IMPORTANT In many cases, stolen vehicles can be identified through data indicated in the use and maintenance manual. Gebruik wanneer mogelijk de speciale gepantserde kabel "Body-Guard" van aprilia, of een extra antidiefstalmechanisme. Controleer of de documenten en de verkeersbelasting in orde zijn. Schrijf uw gegevnes en telefoonnummer op deze pagina, om de identificatie van de eigenaar te vergemakkelijken in geval van het terugvinden van het voertuig na diefstal. NAAM: ................................... VOORNAAM: .......................... ADRES: ................................. TELEFOONNUMMER: ................. 2 Use / 2 Gebruik BELANGRIJK In veel gevallen worden gestolen voertuigen geïdentificeerd door middel van de gegevens in het gebruiksen onderhoudsboekje. 30 Het veilig rijden (02_06, 02_07, 02_08, 02_09, 02_10, 02_11, 02_12, 02_13, 02_14, 02_15, 02_16, 02_17) MAIN SAFETY RULES FUNDAMENTELE GELS To ride the vehicle it is necessary to comply with all legal requirements (driving license, minimum driving age, psychophysical performance, insurance, taxes and fees, registration, license plate, etc.). You should practise using the vehicle in traffic-free areas and/or private property until you have become thoroughly acquainted with the vehicle. Driving under the influence of medication, alcohol and narcotic drugs or psychotropic substances dramatically increases the risk of accidents. 02_07 Do not ride your vehicle if you feel tired or drowsy and always keep safe psychophysical riding conditions. The main cause of motorcycle accidents is users' inexperience. NEVER lend the vehicle to beginners and always make sure that the rider complies with all necessary requirements for a safe riding. Strictly obey all national and local traffic signs and rules. 02_08 Avoid any abrupt and dangerous swerves for your own as well as others' safety (for example: rearing up on the 31 VEILIGHEIDSRE- Om met het voertuig te rijden moet men beschikken over alle door de wet voorziene vereisten (rijbewijs, minimum leeftijd, psychofysische geschiktheid, verzekering, overheidsbelasting, registratie, nummerplaat, enz.). Men raadt aan om het voertuig gewoon te raken in zones met weinig verkeer en/ of in private eigendommen. Rijden onder invloed van medicijnen, alcohol, verdovende of psychotrope middelen verhoogt aanzienlijk het risico op ongevallen. Men moet er zeker van zijn dat de psychofysische condities geschikt zijn voor het rijden, met vooral aandacht voor fysische moeheid of slaperigheid. De meeste ongevallen zijn te wijten aan het gebrek aan ervaring van de bestuurder. Leen het voertuig NOOIT aan beginners, en controleer in elk geval of de bestuurder in het bezit is van alle vereisten voor het rijden. 2 Use / 2 Gebruik 02_06 Safe driving (02_06, 02_07, 02_08, 02_09, 02_10, 02_11, 02_12, 02_13, 02_14, 02_15, 02_16, 02_17) back wheel, riding over the speed limit, etc.). Besides, always assess and bear in mind the road surface conditions, visibility, etc. Do not knock obstacles that can damage the vehicle or cause loss of control. Do not ride on the course of the vehicle in front just to improve your own speed. CAUTION Respecteer nauwkeurig de bewegwijzering en het normenstelsel in verband met het nationale en plaatselijk verkeer. Vermijdt bruuske en gevaarlijke manoeuvres voor zichzelf en voor anderen (voorbeeld: het steigeren, het niet naleven van de snelheidslimieten, enz.), bovendien moet men steeds rekening houden met de condities van het wegdek, de zichtbaarheid, enz. Stoot niet tegen obstakels die schade aan het voertuig of controleverlies over het voertuig kunnen veroorzaken. ALWAYS RIDE WITH BOTH HANDS ON THE HANDLEBAR AND FEET ON THE FOOTRESTS (OR THE RIDER' S FOOTRESTS) IN THE ADEQUATE RIDING POSITION. Blijf niet achter voertuigen rijden om de eigen snelheid te verhogen. LET OP 2 Use / 2 Gebruik RIJ STEEDS MET BEIDE HANDEN OP HET STUUR EN DE VOETEN OP HET VOETENVLAK (OF OP DE VOETENSTEUNEN VAN DE BESTUURDER), EN BEHOU EEN CORRECTE RIJPOSITIE. 32 The rider should always be attentive, never get distracted or influenced by people, things or actions (never smoke, eat, drink, read, etc.) while riding. 02_09 Always use fuel and lubricants specific for the vehicle, of the type recommended in the "LUBRICANTS TABLE". Check fuel, oil and coolant frequently for correct level. In case of an accident or after the vehicle has fallen down or suffered a sudden bump, make sure the control levers, piping, cables, brake circuit and main parts of the vehicle have not been damaged. 02_10 If necessary, take the vehicle to an Official aprilia Dealer to check especially the frame, handlebar, suspensions, safety components and any device the user cannot assess without the aid of a specialist. De bestuurder mag niet afgeleid zijn, zich niet laten afleiden of niet laten beïnvloeden door personen, voorwerpen, acties (niet eten, roken, drinken, lezen, enz.) wanneer hij met het voertuig rijdt. Gebruik de brandstof en specifieke smeermiddelen voor het voertuig, van het type dat men vindt in de "TABEL VAN DE SMEERMIDDELEN", controleer herhaaldelijk of de voorgeschreven peilen van brandstof, olie en koelvloeistoffen correct zijn. Wanneer het voertuig een ongeval heeft gehad, gevallen is of er werd tegen gestoten, controleert men of de commandohendels, de buizen, de kabels, de reminstallatie en de fundamentele delen niet zijn beschadigd. Never ride the vehicle if the damage jeopardises safety. Laat het voertuig eventueel controleren bij een Officiële aprilia Dealer, door vooral aandacht te schenken voor het frame, het stuur, de ophangingen, de veiligheidsonderdelen en mechanismen waarvoor de gebruiker niet in staat is om hun integriteit vast te stellen. Do not modify the position, angle or colour of: license plate, turn indicators, lighting devices and horn. Meldt eender welke slechte werking om de ingreep van techniekers en/of mechaniciens te bevorderen. Any changes to the vehicle will void the warranty. Rij absoluut niet met het voertuig wanneer de aangebrachte schade de veiligheid schaadt. Report any malfunction to the engineers and/or mechanics in order to facilitate their work. 02_11 Vermijdt absoluut om recht te staan op het voertuig en om zich uit te rekken tijdens het rijden. 33 2 Use / 2 Gebruik Never stand on your feet or stretch yourself while riding. Any change introduced to the vehicle and the removal of original parts may jeopardise the vehicle performance and therefore reduce safety or even render the vehicle inappropriate for legal riding. Comply with all national and local laws and regulations on vehicle equipment. In particular do not introduce technical changes leading to improve performance and under no circumstances alter the original specifications of the vehicle. Never race with vehicles. Never ride off-road. Wijzig absoluut niet de positie, de helling of de kleur van: de nummerplaat, de richtingaanwijzers, de verlichtingsmechanismen en de akoestische melders. Wanneer men wijzigingen uitvoert aan het voertuig, vervalt de garantie. Elke eventuele aan het voertuig aangebrachte wijziging en de verwijdering van originele stukken, kan de prestaties van het voertuig schaden, en dus het veiligheidsniveau schaden en het voertuig zelfs illegaal maken. Men raadt aan om zich steeds te houden aan alle wetsvoorschriften en nationale en plaatselijke reglementen in verband met de uitrusting van het voertuig. Men moet vooral vermijden om technische wijzigingen aan te brengen voor het verhogen van de prestaties, of die alleszins de originele kenmerken van het voertuig wijzigen. Vermijdt absoluut om wedstrijden te houden met de voertuigen. 2 Use / 2 Gebruik Vermijdt om te crossen. 34 KLEDING Before riding off, remember to put on the helmet and fasten it correctly. Make sure it is a homologated model, that it is undamaged, of the right size and that the visor is clean. Vooraleer men gaat rijden denkt men eraan om steeds en correct de helm op te zetten en vast te maken. Controleer of hij gehomologeerd en integer is, of de maat juist is en of het visier rein is. Wear appropriate protective clothes, preferably light-coloured and/or in reflective material. In this way you will be easily visible to other drivers, thus reducing the risk of being hit, and you will be better protected in case of falling. Draag beschermende kleding, indien mogelijk met een lichte en/of reflecterende kleur. Op deze manier is men goed zichtbaar voor andere weggebruikers en vermindert men aanzienlijk het risico op aanrijdingen, en is men beter beschermd wanneer men valt. Always wear tight-fitting clothes without open cuffs; avoid hanging strings, belts or ties; these or any other objects should not interfere with a safe riding when getting entangled with the riding elements or due to a special movement. 02_13 Never carry in your pockets objects that can be potentially dangerous in case of fall, like: pointed objects such as keys, pens, glass containers, etc. (the same rule applies to passengers). 35 De kleding moet goed aansluiten en de uiteinden moeten gesloten zijn; koorden, ceinturen en dassen mogen niet bengelen; vermijdt dat deze of andere voorwerpen interfereren met het rijden, doordat ze verstrengd raken met bewegende onderdelen of ander delen. Hou geen voorwerpen bij zich, die mogelijk gevaarlijk zijn wanneer men valt, bijvoorbeeld: puntige voorwerpen zoals sleutels, pennen, glazen voorwerpen, enz. (dit advies geldt eveneens voor de eventuele passagier). 2 Use / 2 Gebruik 02_12 CLOTHING 02_14 ACCESSORIES ACCESSOIRES User is personally responsible for the installation and use of the accessories. De gebruiker is verantwoordelijk voor de keuze van de installatie en het gebruik van de accessoires. While assembling accessories, make sure that they do not cover the sound or light alarm devices or affect their correct functioning, do not limit the suspension travel or the steering angle, do not obstruct control actuation or reduce the ground clearance and inclination angle at corners. Do not use accessories that hinder access to the controls as they may increase the reaction time in case of an emergency. Fairings and large windshields fitted to the vehicle may cause aerodynamic forces that affect the vehicle stability while riding, mainly at high speeds. 2 Use / 2 Gebruik Make sure the accessory is firm and secured to the vehicle and that it does not pose any risks while riding the vehicle. Do not add or modify electrical equipment that exceed the vehicle capacity as this may result in a sudden stop or a dangerous lack of power required to keep the sound and light alarm devices operative. aprilia advises using original accessories (aprilia genuine accessories). 36 Men raadt aan tijdens de montage, dat het accessoire de mechanismen van het akoestisch en visief melden niet bedekt en dus de functionaliteit ervan schaadt, de werking van de ophangingen en de hoek van sturing niet beperkt, de activering van de commando´s niet hindert, en de hoogte van de grond en de helhoek in een bocht niet vermindert. Vermijdt het gebruik van accessoires die de toegang tot de commando´s hinderen, en die dus de reactietijden bij nood kunnen verlengen. De bekledingen en de windschermen met grote afmetingen, die gemonteerd zijn op het voertuig, kunnen aerodynamische krachten veroorzaken die de stabiliteit van het voertuig tijdens het rijden schaden, vooral bij hoge snelheden. Controleer of het accessoire goed verankerd is op het voertuig en dat het niet gevaarlijk is tijdens het rijden. Wijzig of voeg geen elektrische apparaten toe die het draagvermogen van het voertuig overschrijden; op deze wijze zou het voertuig onverwacht kunnen stilvallen of zou er een gevaarlijke afwezigheid van stroom kunnen zijn, die nodig is voor de aprilia raadt het gebruik aan van originele accessoires (aprilia genuine accessories). 02_15 LOADING BELASTING Do not overload your vehicle. Keep packages as close as possible to the vehicle centre of gravity and distribute load evenly on both sides to minimise imbalance. Check also that the load is firm and secured to the vehicle, mainly for long trips. Wees voorzichtig en matig bij het laden van bagage. Men moet de bagage zo dicht mogelijk bij het zwaartepunt van het voertuig laden en uniform verdelen op de twee kanten, om elke onbalans zo klein mogelijk te houden. Controleer bovendien of de lading goed is verankerd op het voertuig, vooral tijdens lange reizen. Do not hang anything from your vehicle's handlebars, mudguards or forks, such as protruding, bulky, heavy and/or dangerous objects: this will slow the vehicle performance when turning and will upset the handling of your vehicle. Do not carry packages that protrude from vehicle sides as this may hit people or objects and result in loss of control of your vehicle. Never carry packages that are not securely fastened to the vehicle. 02_16 Bevestig absoluut geen plaatsinnemende, volumineuze, zware en/of gevaarlijke voorwerpen aan het stuur, de spatborden en de vorken: dit kan het voertuig vertragen in bochten, en dus de handelbaarheid ervan schaden. Plaats op de kanten van het voertuig geen plaatsinnemende bagage, omdat dit personen of obstakels zou kunnen aanstoten, en dus controleverlies over het voertuig zou kunnen veroorzaken. Do not carry packages that protrude from the luggage rack or which cover any of the sound and light alarm devices. Vervoer geen bagage die niet stevig is bevestigd aan het voertuig. Never carry animals or small children on the glove-box or the luggage rack. Vervoer geen bagage die ver uit de bagagedrager steekt, of die de akoestische en visieve verlichtingsmechanismen bedekt. Never exceed the maximum weight allowed for each luggage rack. 37 2 Use / 2 Gebruik werking van de akoestische en visieve meldingsmechanismen. Overloading the vehicle may result in lack of stability and poor handling. Vervoer geen dieren of kinderen op de documentenhouder of bagagedrager. Overschrijdt de maximum limiet van het vervoerbare gewicht niet voor elke bagagedrager. De overbelasting van het voertuig schaadt de stabiliteit en de handelbaarheid. 2 Use / 2 Gebruik 02_17 38 RX 50 - SX 50 Chap. 03 Maintenance Hst. 03 Onderhoud 39 Gearbox oil level (03_01, 03_02, 03_03) 03_01 Check the oil level at the time indicated in the vehicle maintenance table. To do so, make sure the vehicle is vertical, then carefully loosen the control screws on the engine right cover. Visually check that the oil level reaches the threaded hole. Should more oil be added, use only oil with the same specifications as the one present in the engine. CAUTION GEARBOX OIL IS TOXIC. DISPOSE IT PROPERLY Oliepeil van de versnellingsbak (03_01, 03_02, 03_03) Controleer het oliepeil aan de intervals die worden aangeduid in de tabel van het onderhoud van het voertuig. Om dit uit te voeren moet het voertuig zich in verticale positie bevinden; draai voorzichtig de controlebout los die zich op het rechter deksel van de motor bevindt. Controleer visief of het oliepeil de geschroefdrade boring bereikt. Wanneer olie moet toegevoegd worden, mag enkel olie gebruikt worden met dezelfde kenmerken van diegene die zich reeds in de motor bevindt. LET OP 3 Maintenance / 3 Onderhoud DE OLIE VAN DE VERSNELLINGSBAK IS GIFTIG. VERWERK ZE OP GEPASTE MANIER 03_02 Replacement: Vervanging: Replace oil for the first time after 1.000 Km are covered and, successively, every 10.000 Km. Replacement must be made with a warm engine. Once the filling cap «1» is removed, unscrew also the drainage cap «3» on the crankcase central section and the drainage cap «2» on the cover on the right side of the same crankcase and let the oil flow out. Tighten again, close the drainage caps and refill with 0.65 litres of oil. Once the operation is complete, check the level and lock the refilling cap. Use recommended oil only. Voer de eerste vervanging uit bij 1.000 Km en vervolgens elke 10.000 Km. De vervanging moet uitgevoerd worden bij warme motor. Verwijder de toevoerdop «1» en draai die van de afvoer «3» los op het centrale deel van de carter «2» en op het rechter deksel van de carter zelf, en laat alle olie uitstromen. Draai ze weer vast, sluit de afvoerdoppen, en vul bij met 0,65 liter olie. Na deze handeling moet het peil gecontroleerd worden en de toevoerdop geblokkeerd worden. Gebruik enkel aanbevolen olie. 40 Aanbeloven producten AGIP GEAR SYNTH SAE 75W-90 AGIP GEAR SYNTH SAE 75W-90 Gearbox oil API GL4, GL5 Olie voor de versnellingsbak API GL4, GL5 Transmission chain (03_04, 03_05, 03_06) Transmissieketting (03_04, 03_05, 03_06) The chain life depends on its correct lubrication and adjustment. Any act of negligence or inattention in these procedures may cause damages and wearing in the pinion, chain and crown, seriously affecting the vehicle performance. De levensuur van de ketting hangt af van de correcte smering en de regeling. Nalatigheid of verwaarlozing van deze handelingen kan schade en slijtage aan het rondsel, de ketting en de kroon veroorzaken, zodat de prestaties van het voertuig aanzienlijk worden geschaad. CHECKING THE CHAIN TENSION TRANSMISSION CONTROLE VAN DE SPANNING VAN DE TRANSMISSIEKETTING Check the transmission chain tension periodically. The check must be made with the vehicle unloaded and in vertical position, and it must be repeated with the wheel in different positions to avoid link galling. Controleer regelmatig de spanning van de ketting. De controle moet uitgevoerd worden wanneer het voertuig niet geladen is en verticaal is geplaatst, en moet herhaald worden met het wiel in verschillende posities om te controleren of er schakels zijn die afslaan. 03_03 To check tension, move the chain at an intermediate point between the crown 41 3 Maintenance / 3 Onderhoud Recommended products 3 Maintenance / 3 Onderhoud 03_04 and the pinion. The chain backslash should be between 30 and 45 mm. Om de spanning te controlere moet de ketting bewogen worden in een punt tussen de kroon en het rondsel, en de speling moet zich tussen 30 en 45 mm bevinden. TENSION ADJUSTMENT REGELING VAN DE SPANNING To keep the transmission chain clearance within the right values, loosen nut «A» of the wheel pin, screw the two adjusters «B» making the same number of turns for the right as for the left adjuster, so that the wheel is aligned. Once the chain has been adjusted, tighten the wheel axle nut to the specified torque (70-80 Nm). Om de correcte waarde van de speling van de transmisieketting te behouden, moet de moer «A» van de wielpin gelost worden, en moet gehandeld worden op de registers «B» door op te letten om hetzelfde aantal draaien uit te voeren op het linker en het rechter register, zodat het wiel uitgelijnd blijkt. Na de registratie van de ketting moet de moer van de wielas gesloten worden aan het voorgeschreven koppel (70-80 Nm). DO NOT ASSEMBLE A NEW CHAIN WITH A WORN PINION OR CROWN, OR VICE VERSA, SINCE NEW COMPONENTS WILL BE EASILY WORN. 42 MONTEER GEEN NIEUWE KETTING MET VERSLETEN RONDSEL EN KROON OF VICEVERSA, OMDAT DE NIEUWE ONDERDELEN ZO VLUGGER ZOUDEN VERSLIJTEN. SMERING To lubricate the transmission chain, distribute grease in small quantities on the spaces between rollers and links while turning the wheel. Om de ketting te smeren moet de transmissieketting besproeid worden met kleine hoeveelheden vet, tussen de rollen en de schakels, door gelijktijdig het wiel te doen draaien. Use special oil for O-ring chains. Gebruik specifieke olie voor kettingen met O-ring. 03_05 03_06 Tyres (03_07) Banden (03_07) Periodically check the inflation pressure of each tyre. Controleer regelmatig de spanning van elke band. Also check that the tyres do not show cuts on the side or irregular tread wear; if this occurs, go to an authorised workshop or at least a workshop equipped for replacement. Controleer ook of de banden geen sneden op de zijkanten of een onregelmatige slijtage op het rijvlak vertonen; in dit geval moet men zich wenden tot erkende garages, of die alleszins uitgerust zijn om de vervanging uit te voeren. 03_07 43 3 Maintenance / 3 Onderhoud LUBRICATION 3 Maintenance / 3 Onderhoud THE TYRE PRESSURE SHOULD BE CHECKED WHEN THE TYRES ARE COLD. WRONG PRESSURE MAY CAUSE NOT ONLY AN ABNORMAL TYRE WEAR, BUT ALSO VEHICLE UNSTEADINESS LEADING TO DANGER WHEN RIDING. THE TYRE MUST BE REPLACED WHEN THE TREAD REACHES THE WEAR LIMITS REQUIRED BY LAW. DE BANDENSPANNING MOET GECONTROLEERD WORDEN WANNEER DE BANDEN KOUD STAAN. EEN FOUTE SPANNING VEROORZAAKT EEN ABNORMALE SLIJTAGE VAN DE BANDEN EN DOET HET VOERTUIG INSTABIEL WORDEN, MET CONSEQUENT GEVAAR TIJDENS HET RIJDEN. DE BAND MOET VERVANGEN WORDEN WANNEER HET RIJVLAK DE SLIJTAGELIMIET BEREIKT DIE WORDT VOORIEN DOOR DE VAN KRACHT ZIJNDE NORMEN. Spark plug dismantlement (03_08) Demonteren van de bougie (03_08) Dismantle the spark plug periodically, check electrodes and wear. Use a thickness gauge and check that the distance between electrodes is correct. Replace spark plugs using the recommended brands within the expiration dates indicated in the vehicle maintenance table. Demonteer regelmatig de bougie, en controleer de elektroden en de slijtage. Gebruik een diktemeter om te controleren of de scheiding tussen de elektroden correct is. Vervang de bougies met andere van het aanbevolen merk, en dit op de termijn die wordt aangeduid in de onderhoudstabel van het voertuig. THE USE OF AN INAPPROPRIATE SPARK PLUG MAY CAUSE SERIOUS DAMAGE TO THE ENGINE. 44 HET GEBRUIK VAN EEN ONGESCHIKTE BOUGIE KAN ERNSTIGE SCHADE AAN DE MOTOR VEROORZAKEN. Technische kenmerken RX SX spark plug and electrode gap Bougie en elektrodenafstand, rechts en links NGK BR8ES / 0.6÷0.7 mm NGK BR8ES / 0,6÷0,7 mm THE SPARK PLUG MUST BE REMOVED WHEN THE MOTOR IS COLD. THE USE OF SPARK PLUGS OF DIFFERENT THERMAL GRADE FROM THAT REQUIRED OR WITH INAPPROPRIATE THREADS MAY SERIOUSLY DAMAGE THE ENGINE. DE VERWIJDERING VAN DE BOUGIE MOET UITGEVOERD WORDEN WANNEER DE MOTOR KOUD STAAT. HET GEBRUIK VAN BOUGIES MET EEN ANDERE THERMISCHE GRAAD DAN VOORGESCHREVEN OF MET ONGESCHIKTE SCHROEFDRAAD, KAN DE MOTOR ERNSTIG BESCHADIGEN. Air filter cleaning (03_09, 03_10, 03_11) Reiniging van de luchtfilter (03_09, 03_10, 03_11) Check filter for cleaning and condition every 5000 km and every time the vehicle is used off-road. Proceed as follows: Controleer elke 5000 Km de staat en de reinigingscondities van de filter, en elke keer met het voertuig wordt gecrossd. Handel als volgt: 03_08 - Remove the saddle - Remove the right fairing undoing the 2 fixing screws «A» 03_09 - Remove the 2 screws «B» indicated in the figure - Verwijder het zadel. - Verwijder de rechter zijplaat door te handelen op de 2 bevestigingsbouten «A» - Verwijder de 2 bouten «B» die worden aangeduid in de figuur 45 3 Maintenance / 3 Onderhoud Characteristic - Pull up the fairing «C» enough to gain access to the filter - Undo the 4 fixing screws in the air filter housing and remove the air filter cover; - Remove the filtering element; - Wash the sponge in a bowl containing filter oil, wringing it delicately several times; 03_10 - When washing is over, press the filtering element with your hands without squeezing, let it drip and refit. When refitting, be extremely careful to reposition the sponge in the housing support so that the whole sealing lip perimeter is in contact with the sponge. Tighten the 4 fixing screws of the filter cover, remembering that the 2 long screws are the bottom ones. 3 Maintenance / 3 Onderhoud 03_11 IF THE FILTER IS OBSTRUCTED, THE ADMISSION RESISTANCE WILL INCREASE, LEADING TO POWER LOSS AND HIGHER FUEL CONSUMPTION. Recommended products AGIP FILTER OIL Oil for air filter sponge - Verplaats de zijplaat «C» naar boven zodat het mogelijk is om de filter te bereiken - Draai de 4 bevestigingsbouten los van de filterdoos, en verwijder het deksel van de luchtfilter; - Verwijder het filterend element; - Was de spons in een recipiënt met olie voor filters, en wring ze meerdere keren voorzichtig uit; - Na het wassen moet de spons uitgedrukt worden tussen de handen zonder ze uit te wringen, laat ze uitdruipen en hermonteer ze. Bij de hermontage moet aandacht geschonken worden bij het herplaatsen van de spons in haar zit op de doos, zodat de dichtingslip de spons voor de hele omtrek omvat. Draai de 4 bevestigingsbouten van het filterdeksel weer vast, en de 2 langste bouten moeten onderaan gebruikt worden. WANNEER DE FILTER VERSTOPT IS, ZAL DE INLAATWEERSTAND VERHOGEN, MET VERMOGENVERLIES EN EEN VERHOGING VAN BRANDSTOFVERBRUIK ALS GEVOLG. Aanbeloven producten AGIP FILTER OIL Olie voor filters in spons 46 - Cooling fluid level (03_12) Peil van de koelvloeistof (03_12) Every 1,000 km or after a long journey, the coolant level must be checked with a cold engine, the level must be between the minimum «A» and the maximum «B». 03_12 To replace the coolant, remove the expansion reservoir cap and disconnect the hose from the radiator to the water pump and empty it. After having reinserted the coupling, refill the circuit with coolant, through the expansion tank cap placed on the left side of the scooter. IN ORDER TO AVOID BURNS, DO NOT UNSCREW THE EXPANSION TANK CAP WHILE THE ENGINE IS STILL HOT. Recommended products SPECIAL AGIP PERMANENT fluid Coolant Ready for use mixed biodegradable coolant with "long life" technology and characteristics (red). Freezing protection up Elke 1.000 km of na een lange reis moet bij koude motor gecontroleerd worden of het peil van de koelvloeistof zich tussen het minimum peil «A» en het maximum peil «B» bevindt. Om de koelvloeistof te vervangen moeten de dop van het expansievat en de mof die de radiator aan de waterpomp verbindt verwijderd worden, zodat alle vloeistof wordt afgevoerd. Nadat de mof weer werd geplaatst, moet het volledige circuit gevuld worden met koelvloeistof vanaf de dop van het expansievat dat zich op de linker kant van het voertuig bevindt. OM BRANDWONDEN TE VERMIJDEN MAG DE DOP VAN HET EXPANSIEVAT NIET LOSGEDRAAID WORDEN WANNEER DE MOTOR NOG WARM STAAT. Aanbeloven producten AGIP PERMANENT SPEZIAL Koelvloeistof 47 3 Maintenance / 3 Onderhoud - to -40°C. In compliance with the CUNA 956-16 standard. Biologisch afbreekbare koelvloeistof, gebruiksklaar, met "long life" technologie en kenmerken (rood). Verzekert een bescherming tegen vriestemperaturen tot -40°. Beantwoordt aan de norm CUNA 956-16. The cooling circuit approximate capacity is 800 cc. De ruw geschatte capaciteit van het koelcircuit is 800 cc. SYSTEM CHECK: CONTROLE VAN DE INSTALLATIE: - Check the manifold conditions. - Controleer de staat van de moffen. - If during scooter normal use the high temperature indicator lights up, stop the engine and wait so the coolant becomes cool. After that, with cold engine, check the coolant level and top up, if necessary. Never take the expansion tank cap out with the coolant at high temperature. - Wanneer tijdens het normale gebruik van het voertuig de indicator van de excessieve temperatuur oplicht, moet de motor stilgelegd worden en gewacht worden tot de koelvloeistof afkoelt. Daarna moet bij koude motor het peil van de koelvloeistof gecontroleerd worden, en eventueel bijgevuld worden. Verwijder de dop van de tank nooit wanneer de temperatuur van de koelvloeistof nog warm is. 3 Maintenance / 3 Onderhoud - To refill with coolant, the engine must be cold. - Om koelvloeistof bij te vullen moet de motor koud staan. The coolant should be replaced every 2 years. Take your scooter to an Aprilia Authorised Workshop for replacement. 48 De vervanging van de koelvloeistof moet elke 2 jaar uitgevoerd worden. Voor deze handeling wendt men zich tot een Erkende Aprilia Garage. Brake fluid 03_13 03_14 Controle van het oliepeil van de remmen (03_13, 03_14) Remvloeistof Check the brake fluid reservoir level periodically. Fluid level should be at the upper margin of the inspection sight glass as shown in the photograph. If necessary, refill it with the recommended hydraulic fluid. Do not mix different types of liquid. Do not operate the brake lever when the reservoir is open or the highly corrosive fluid can spill out. Make sure that the water and the brake fluid do not mix. Due to humidity absorption, it is advisable to change the fluid every two years. TOP-UPS SHOULD ONLY BE CARRIED OUT WITH DOT 4 CLASSIFIED BRAKE FLUID. DO NOT LET THE HIGHLY CORROSIVE BRAKE FLUID CONTACT PAINTED PARTS. SHOULD THIS OCCUR, IMMEDIATELY WASH OFF WITH WATER. WARNING THE BRAKE FLUID IS HYGROSCOPIC, IN OTHER WORDS, IT ABSORBS HUMIDITY FROM THE SURROUNDING AIR. IF THE HUMIDITY IN THE BRAKE 49 Controleer regelmatig het peil in de tank van de remvloeistof. Het vloeistofpeil moet zich boven het inspectieglasje bevinden, zoals aangeduid op de foto. Vul indien nodig bij met de aanbevolen hydraulische vloeistof. Meng geen verschillende types van vloeistoffen. Wanneer de tank open staat, mag niet gehandeld worden op de remhendel omdat zo de erg corrosieve vloeistof zou kunnen uitstromen. Let op om geen water te mengen met de remvloeistof. Door de absorbering van vochtigheid wordt aangeraden om de vloeistof elke twee jaar te vervangen. EVENTUELE BIJVULLINGEN MOGEN ENKEL UITGEVOERD WORDEN MET REMVLOEISTOFFEN MET DOT4 KLASSERING. VERMIJDT DAT DE ERG CORROSIEVE REMVLOEISTOF IN CONTACT KOMT MET DE GELAKTE DELEN. WANNEER DIT TOCH GEBEURT, MOETEN ZE ONMIDDELLIJK MET WATER GEWASSEN WORDEN. 3 Maintenance / 3 Onderhoud Checking the brake oil level (03_13, 03_14) Air in the braking system. If brake lever clearance becomes excessive or the lever has an elastic behaviour, purge air from the braking system. Air purging. Fit a transparent plastic pipe to the bleed valve. Operate the brake lever, loosen the bleed screw letting the fluid pour out; tighten the bleed valve before the brake lever reaches the end of the stroke; release the brake lever. Do this procedure until all air in the calliper is purged. After purging the air, top up the reservoir with DOT 4 hydraulic fluid. Recommended products AGIP BRAKE 4 Brake fluid As an alternative to the recommended fluid, other fluids that meet or exceed the specified requirements may be used. SAE J1703, NHTSA 116 DOT 4, ISO 4925 Synthetic fluid 51 Het bijvullen van vloeistof in de reminstallatie Lucht in het remsysteem. Wanneer de speling van de remhendel excessief wordt, of de hendel is elastisch, moet de ontluchting van het remsysteem uitgevoerd worden. Ontluchting. Monteer een transparante plastic buis op de ontluchtingsklep. Handel op de remhendel en los de ontluchtingsbout zodat de vloeistof kan uitstromen; sluit de ontluchtingsbout voordat de remhendel de eindslag bereikt; laat de remhendel los. Handel op dezelfde manier voor de ontluchting van de remtang. Na de ontluchting moet de tank gevuld worden met hydraulische vloeistof DOT 4. Aanbeloven producten AGIP BRAKE 4 remvloeistof In plaats van de aanbevolen vloeistof kan men vloeistoffen gebruiken met conforme of hogere prestaties dan de specifieken. Synthetische vloeistof SAE J1703, NHTSA 116 DOT 4, ISO 4925 3 Maintenance / 3 Onderhoud Braking system fluid top up Battery (03_15) Accu (03_15) INSTRUCTIONS FOR BATTERY REFRESH AFTER OPEN CIRCUIT STORAGE INSTRUCTIES VOOR DE VERFRISSINGSLADING VOOR HET OPSLAAN MET OPEN CIRUIT 1. Checking voltage Before installing the battery on the vehicle check the open circuit voltage with a normal tester. 03_15 • • If voltage is over 12.60V, the battery can be installed without any refresh. If voltage is below 12.60V, a refresh recharge is needed as explained in point 2. 2. Method with constant-voltage battery charger • 3 Maintenance / 3 Onderhoud • • Constant voltage charge equal to 14.40÷14.70V Initial charge current equal to 0.3÷0.5 of the battery rated capacity Charge time: Recommended: 10÷12 h Minimum: 6 h Maximum: 24 h • Voordat de accu op het voertuig wordt geïnstalleerd, moet de spanning met open circuit gecontroleerd worden met een normale tester. • • Charge current equal to 1/10 of the battery rated capacity Charge time: 5 h 52 Wanneer de spanning meer dan 12,60V bedraagt, kan de accu geïnstalleerd worden zonder verfrissingslading. Wanneer de spanning minder dan 12,60V bedraagt, moet de verfrissingslading uitgevoerd worden zoals wordt uitgelegd in punt 2. 2. Modaliteit van acculading met constante spanning • • • 3. Method with direct-current battery charger • 1. Controle van de spanning Constante spanningslading gelijk aan 14,40÷14,70V Beginstroom van de lading gelijk aan 0,3÷0,5 x Nominale capaciteit Duur van de lading: Aanbevolen: 10÷12 h Minimum 6 h Maximum 24 h 3. Modaliteit van acculading met constante stroom WHEN THE BATTERY IS REALLY FLAT (WELL BELOW 12.6V), IT MIGHT OCCUR THAT A 5-HOUR RECHARGE IS NOT ENOUGH TO ACHIEVE OPTIMAL PERFORMANCE. IF THIS OCCURS, IT IS HOWEVER ESSENTIAL NOT TO EXCEED 8 HOURS OF CONTINUOUS RECHARGING SO AS NOT TO DAMAGE THE BATTERY. • Laadstroom gelijk aan 1/10 van de nominale capaciteit van de accu zelf Duur van de lading: 5 h WANNEER DE ACCU LEEG IS (VEEL MINDER DAN 12,6V), KAN HET ZIJN DAT 5 UREN VAN LADEN NIET VOLDOENDE ZIJN OM DE OPTIMALE PRESTATIES TE BEREIKEN. IN DEZE CONDITIES IS HET ALLESZINS ABSOLUUT NOODZAKELIJK OM NIET LANGER DAN 8 UREN CONSTANT TE LADEN, ZODAT DE ACCU ZELF NIET ONHERSTELBAAR WORDT BESCHADIGD. Use of a new battery To replace the battery, it must be done using another with the same capacity and voltage: 12V, 4Ah. FOR A CORRECT EXHAUSTED BATTERY DISPOSAL, IT IS ADVISABLE TO HAVE IT REPLACED AT AN OFFICIAL APRILIA SERVICE CENTRE. BATTERIES CONTAIN, AMONG OTH53 Inwerkingstelling van een nieuwe accu Wanneer het nodig zou zijn om de accu te vervangen, moet een andere met dezelfde spanning en capaciteit gemonteerd worden: 12V, 4Ah. VOOR EEN CORRECTE VERWERKING VAN DE VERBRUIKTE ACCU, WORDT AANGERADEN OM ZE TE LA- 3 Maintenance / 3 Onderhoud • ER SUBSTANCES, SULPHURIC ACID SO, UNDER NO CIRCUMSTANCES, THEY SHOULD BE DISPOSED OF CONTAINERS FOR ORGANIC WASTE. TEN VERVANGEN BIJ EEN OFFICIEEL APRILIA SERVICECENTRUM. DE ACCU'S BEVATTEN, NAAST ANDERE STOFFEN, ZWAVELZUUR, EN ZE MOGEN DUS IN GEEN GEVAL BIJ HET ORGANISCH AFVAL GELOOSD WORDEN. Long periods of inactivity Lange stilstand Battery performance will decrease if the vehicle is not used for a long time. In geval van een verlengde inactiviteit van het voertuig, verminderen de prestaties van de accu. This is the result of the natural phenomenon of battery discharging: this may be due to residual absorption by scooter components with constant power consumption. 3 Maintenance / 3 Onderhoud Poor battery performance may also be due to environmental conditions and the cleanness of the poles. In order to avoid start-up problems and/ or irreversible damage to the battery, follow any of these steps: • • At least once a month start up the engine and keep it running slightly above idle for 10-15 minutes. This keeps all the engine components, as well as the battery, in good working order. Store the vehicle with the battery removed. Have the battery cleaned, charged fully and stored in a dry, ventilated place. Re54 Dit gebeurt omdat de accu zelf leegloopt en door mogelijke overblijvende absorberingen van het voertuig, die te wijten zijn aan onderdelen die constant gevoed worden. Het verminderen van de prestaties van de accu is bovendien afhankelijk van de weersomstandigheden en van de reiniging van de polen. Om mogelijke moeilijkheden bij de start en/of onomkeerbare beschadiging van de accu te vermijden, moet volgens de volgende modaliteiten gehandeld worden: • Minstens eens per maand moet de motor gestart worden en aan een regime gehouden worden dat iets boven het minimum ligt, en dit voor 10-15 minuten. Op deze manier worden CAUTION THE CHARGE MUST BE MADE WITH A CURRENT EQUAL TO 1/10 OF THE RATED CAPACITY OF THE BATTERY AND FOR NOT LONGER THAN 8 HOURS TAKE YOUR SCOOTER TO AN AUTHORISED APRILIA SERVICE CENTRE TO CARRY OUT THIS OPERATION SAFELY. WHEN REFITTING THE BATTERY MAKE SURE THE LEADS ARE CORRECTLY CONNECTED TO THE TERMINALS. IN ORDER TO AVOID DAMAGING THE ELECTRIC SYSTEM, NEVER DISCONNECT THE WIRING WHILE THE ENGINE IS RUNNING. ELECTROLYTE CONTAINS SULPHURIC ACID: AVOID CONTACT WITH EYES, SKIN AND CLOTHES. IN THE CASE OF CONTACT, RINSE WITH PLENTY OF WATER AND CONSULT A DOCTOR. PAY ATTENTION NOT TO TIP THE VEHICLE EXCESSIVELY, IN ORDER TO AVOID DANGEROUS LEAKAGE OF BATTERY ELECTROLYTE. 55 • de accu en alle onderdelen van de motor efficiënt gehouden. Verwijder de accu wanneer het voertuig wordt gestald. De accu moet rein en volledig opgeladen zijn, en moet bewaard worden op een droge en verluchte plaats. Voer het laden minstens om de twee maanden uit. LET OP HET OPLADEN MOET UITGEVOERD WORDEN MET EEN STROOM DIE GELIJK IS AAN 1/10 VAN DE NOMINALE CAPACITEIT VAN DE ACCU ZELF, EN VOOR MAXIMUM 8 UREN. VOOR DEZE HANDELING WORDT AANGERADEN OM ZICH TE WENDEN TOT EEN ERKEND APRILIA SERVICECENTRUM. CONTROLEER BIJ DE HERMONTAGE VAN DE ACCU OF DE AANSLUITING VAN DE KLEMMEN OP DE POLEN CORRECT WORDT UITGEVOERD. OM SCHADE TE VERMIJDEN AAN DE ELEKTRISCHE INSTALLATIE, MOGEN DE KABELS NOOIT LOSGEMAAKT WORDEN WANNEER DE MOTOR DRAAIT. HET ELEKTROLYT BEVAT ZWAVELZUUR: VERMIJDT HET CONTACT MET DE OGEN, DE HUID EN DE DE KLEDING. IN GEVAL VAN CONTACT MOET OVERVLOEDIG GESPOELD WORDEN MET WATER, 3 Maintenance / 3 Onderhoud charge at least once every two months. EN ONMIDDELLIJK EEN ARTS GERAADPLEEGD WORDEN LET BOVENDIEN OP OM HET VOERTUIG NIET TE VEEL TE HELLEN ZODAT HET ELEKTROLYT ZELF NIET UIT DE ACCU KAN STROMEN. Fuses (03_16) Zekeringen (03_16) The electrical system is protected by one 4 ampere fuse located in the fuse box «A» on the battery positive lead under the saddle. Before replacing a blown fuse, find and solve the problem that caused it to blow. Do not substitute the fuse with any alternative form of conductor De elektrische installatie wordt beschermd door een zekering van 4 ampère, die zich in de zekeringenhouder «A» op de positieve kabel van de accu onder het zadel bevindt. Vooraleer de onderbroken zekering wordt vervangen, moet de schade die de smelting heeft veroorzaakt gezocht en geëlimineerd worden. Probeer nooit om het circuit te sluiten met ander materiaal dan een zekering. 3 Maintenance / 3 Onderhoud 03_16 BULBS BULBS RX 50 SX 50 Rear tail light /stop light led led Front tail bulb 2V x 3W 2V x 3W Front/rear turn indicator bulbs 4 x 10W 4 x 10W 56 RX 50 SX 50 Low-/high-beam light bulb HS1 HS1 LAMPJES LAMPJES RX 50 SX 50 Achterste positielicht / stoplicht met led met led Lampje van het voorste positielicht 2 x 3W 2 x 3W Lampjes van de voorste / achterste richtingaanwijzers 4 x 10W 4 x 10W Lampje van het dimlicht/groot licht HS1 HS1 Front light group (03_17, 03_18, 03_19) Voorste optische groep (03_17, 03_18, 03_19) In the front headlight there are: In het voorlicht vindt men: • • Two tail light bulbs «1». One low-beam / high-beam light bulb «2». 03_17 57 • • Twee lampjes van het positielicht «1». Een lampje van het dimlicht / groot licht «2». 3 Maintenance / 3 Onderhoud BULBS To replace: • • • Voor de vervanging: Rest the vehicle on its stand. Undo the two upper screws. Slide off the front cowl from the mudguard seats. Side light lamp «1» • 03_18 Slide off the tail light bulb and replace it with another of the same type. • • • Lampje van het positielicht «1» • High/low beam light bulb«2» • • • • 3 Maintenance / 3 Onderhoud 03_19 Hold the bulb electrical connector «3», pull and disconnect it from the bulb holder. Slide off the cover «4» from the parabole fitting and from the bulb connectors. Release the two ends of the retaining spring «5» located in the bulb holder. Extract the bulb from its fitting. Upon refitting: • • • Fit a bulb of the same type adequately. Slide in the cover «4» in the bulb connectors and the parabole fitting. Connect the bulb electrical connector «3». Verwijder het positielampje, en vervang het met een van hetzelfde type. Lampje van het dimlicht / groot licht «2» • • • • Grijp de elektrische connector van het lampje «3» vast, trek er aan, en maak hem los van de lamphouder. Verwijder de kap «4» van de paraboolzitting en de terminals van het lampje. Koppel de twee uiteinden van de trekveer «5» los die zich op de lamphouder bevindt. Verwijder het lampje uit de zitting. Bij de hermontage: • • • 58 Plaats het voertuig op de standaard. Draai de twee bovenste bouten los. Verwijder het maskertje uit de zittingen van het spatbord. Installeer op correcte wijze een lampje van hetzelfde type. Plaats de kap «4» correct in de paraboolzitting en de terminals van het lampje. Verbind de elektrische connector van het lampje «3». Regeling van de koplamp (03_20, 03_21) NOTE N.B. IN COMPLIANCE WITH LOCAL LEGAL REQUIREMENTS, SPECIFIC PROCEDURES MUST BE FOLLOWED WHEN CHECKING LIGHT BEAM ADJUSTMENT. OP BASIS VAN WAT WORDT VOORGESCHREVEN DOOR DE VAN KRACHT ZIJNDE WETGEVING IN HET LAND VAN GEBRUIK VAN HET VOERTUIG, MOETEN ER VOOR DE CONTROLE VAN DE RICHTING VAN DE LICHTBUNDEL SPECIFIEKE PROCEDURES UITGEVOERD WORDEN. For a quick check of the correct direction of the front light beam: Voor een snelle controle van de correcte richting van de voorste lichtbundel, handelt men als volgt: 03_20 • • 03_21 Place the vehicle 10m away from a vertical wall and make sure the ground is level. Turn on the low-beam light, sit on the scooter and check that the light beam projected to the wall is a little below the headlight horizontal straight line (about 9/10 of the total height). • • To adjust the light beam: • • • Working from both sides, undo screw «1». Adjust the headlamp until the desired position is obtained Working from both sides, tighten screw «1». 59 Plaats het voertuig op tien meter afstand van een verticale wand, en controleer of de ondergrond vlak is. Ontsteek het dimlicht, ga op het voertuig zitten, en controleer of de lichtbundel die op de wand wordt geprojecteerd zich iets onder de horizontale lijn van de koplamp bevindt (ongeveer 9/10 van de totale hoogte). Voor het regelen van de lichtbundel: • • Handel op beide kanten: draai de bout «1» los. Richt de koplamp tot de gewenste positie wordt verkregen 3 Maintenance / 3 Onderhoud Headlight adjustment (03_20, 03_21) • Front direction indicators (03_22) • • • • • • Rest the vehicle on its stand. Loosen and remove the screw (1). Remove the glass (2). Press the bulb (3) slightly and turn it anticlockwise. Pull the bulb (3) out of its fitting. Insert a bulb of the same type adequately. WARNING 3 Maintenance / 3 Onderhoud Voorste richtingaanwijzers (03_22) • • • • • • IF THE PARABOLE (4) STICKS OUT OF ITS FITTING, INSERT IT AGAIN PROPERLY. Handel op beide kanten: sluit de bout «1». Plaats het voertuig op de standaard. Draai de bout los (1) en verwijder ze. Verwijder de lens (2). Druk gematigd op het lampje (3), en draai het in tegenwijzerzin. Verwijder het lampje (3) uit de zit. Plaats op correcte wijze een nieuw lampje van hetzelfde type. WAARSCHUWING WANNEER DE PARABOOL (4) UIT HAAR ZITTING KOMT, MOET ZE WEER CORRECT GEPLAATST WORDEN. 03_22 60 Replace the whole light if a led burns out. 03_23 Achterste optische groep (03_23, 03_24, 03_25, 03_26, 03_27) To replace the rear light follow these steps: Wanneer een led verbrandt, moet het volledige licht vervangen worden. - Remove the two side fairings undoing the fixing screws «A» Om het achterlicht te vervangen moet als volgt gehandeld worden: - Remove the 2 screws «B» - Verwijder de twee zijplaten door te handelen op de bouten «A» - Remove the 2 screws «C» located in the wheel compartment - Verwijder de 2 bouten «B» - Slide the rear tail off the frame - Verwijder de 2 bouten «C» die zich in de wielruimte bevinden - Remove the two nuts «D» fixing the lights to the frame, which are located in the wheel compartment - Verwijder het achterstuk van het frame - Disconnect the connector «E» and remove the light - Verwijder de twee bevestigingsmoeren «D» van het licht aan het frame, die zich in de wielruimte bevinden - Maak de connector «E» los en verwijder het licht 03_24 03_25 61 3 Maintenance / 3 Onderhoud Rear optical unit (03_23, 03_24, 03_25, 03_26, 03_27) 3 Maintenance / 3 Onderhoud 03_26 03_27 62 • • • • • • Rest the vehicle on its stand. Loosen and remove the screw (1). Remove the glass (2). Press the bulb (3) slightly and turn it anticlockwise. Pull the bulb (3) out of its fitting. Insert a bulb of the same type adequately. Achterste richtingaanwijzers (03_28) • • • • • WARNING IF THE PARABOLE (4) STICKS OUT OF ITS FITTING, INSERT IT AGAIN PROPERLY. • Plaats het voertuig op de standaard. Draai de bout los (1) en verwijder ze. Verwijder de lens (2). Druk gematigd op het lampje (3), en draai het in tegenwijzerzin. Verwijder het lampje (3) uit de zit. Plaats op correcte wijze een nieuw lampje van hetzelfde type. WAARSCHUWING WANNEER DE PARABOOL (4) UIT HAAR ZITTING KOMT, MOET ZE WEER CORRECT GEPLAATST WORDEN. 03_28 Idle adjustment (03_29) Carburettor Trouble-free carburetion is the basis for a good engine performance. The carburettor is regulated in factory to perform the best carburetion. Do not alter this adjustment. Adjusting the idle speed Regeling van het minimum toerental (03_29) Carburator Een probleemloze carburatie is de basis voor een goed rendement van de motor. De carburator wordt geregeld in de fabriek om de beste carburatie te leveren. Wijzig deze regeling niet. Regeling van het minimum toerental 03_29 63 3 Maintenance / 3 Onderhoud Rear turn indicators (03_28) This operation must be carried out with hot engine, in neutral position and with no acceleration. Deze handeling moet uitgevoerd worden wanneer de motor warm staat, in vrij, en zonder gas te geven. Turn the idle speed set screw clockwise and anticlockwise until the engine idle speed stabilises at a point where the engine works regularly, with no uncertainty and is not over accelerated. For a more accurate adjustment or any other carburettor adjustment, take your scooter to an Aprilia Authorised Workshop. Draai de regelbout van het minimum toerental in wijzerszin of tegenwijzerszin tot het minimum toerental stabiel wordt zodat de motor regelmatig werkt, zonder onzekerheden, en niet excessief versneld. Voor een preciezere regeling of voor eender welke ander regeling van de carburator, wendt men zich tot een Erkende Aprilia Garage. WARNING IT IS CONVENIENT TO MAKE A CARBURETTOR CLEANING PERIODICALLY WITH CLEAN PETROL AND PRESSURED AIR. CAUTION 3 Maintenance / 3 Onderhoud MAKE ALWAYS THE ENGINE IDLE SPEED ADJUSTMENT WITH A HOT ENGINE. 64 WAARSCHUWING HET IS GOED OM DE REINIGING VAN DE CARBURATOR REGELMATIG UIT TE VOEREN, DOOR GEBRUIK TE MAKEN VAN REINE BENZINE EN PERSLUCHT. LET OP VOER DE REGELING VAN HET MINIMUM TOERENTAL STEEDS UIT WANNEER DE MOTOR WARM STAAT. 03_30 The disc brakes, compared to drum brakes, have the following specifications and advantages: - The heat evacuation from friction surfaces is very efficient, since discs turn with direct air contact. This is the reason why they always have a steady braking capacity, even when the brake is used repeatedly at high speed. - No component of the disc brake is exposed to deformation due to very high temperatures. - The pad change is simple and does not require difficult procedures. - Constant functioning of front and rear brakes is ensured since, even in the case discs are wet due to rain, the capacity to recover braking power is excellent, due to the specifications of extreme pressure of the pads. 65 Schijfrem vooraan en achteraan (03_30, 03_31, 03_32) De remschijven hebben vergeleken met trommelschijven de volgende kenmerken en voordelen: - De evacuatie van warmte van de wrijvingsoppervlakken is zeer doeltreffend, omdat de schijven rechtstreeks in contact met de lucht draaien. Daarom hebben ze steeds een stabiele remcapaciteit, ook wanneer ze herhaaldelijk worden gebruikt bij hoge snelheden. - Geen enkel onderdeel van de remschijf is onderhevig aan vervormingen door de hoge temperaturen. - De vervanging van de pastilles is eenvoudig en vraagt niet om ingewikkelde handelingen. - Er wordt een constante werking van de remmen verzekerd, ook wanneer de schijven nat zijn door de regen, omdat de recupereercapaciteit van de kracht van de remmen uitstekend is door de extreme drukkenmerken van de pastille. 3 Maintenance / 3 Onderhoud Front and rear disc brake (03_30, 03_31, 03_32) Brake disc Remschijf The disc surface must be free of oil. Use alcohol and a soft cloth for cleaning. Het oppervlak van de schijf moet olievrij zijn. Gebruik alcohol en een rein doek voor de reiniging. Brake pads: Brake squealing may be due to the following causes: - Incorrect brake functioning 03_31 - Brake pad wearing. Excessive wear make the brakes squeal. When either case occurs, take your scooter to an Aprilia Authorised Workshop. Hoses and Joints: Check periodically that joints are not worn and joint connections have no leakage. Rempastilles: Wanneer de rem giert, kan dit te wijten zijn aan de volgende oorzaken: - Niet correcte werking van de rem - Slijtage van de rempastilles; een excessieve slijtage doet de rem gieren. In beide gevallen wendt men zich tot een Erkende Aprilia Garage. Flexibele buizen en verbindingen: Controleer regelmatig of de verbindingen niet versleten zijn, en of de verbindingen van de koppelingen niet lekken. 3 Maintenance / 3 Onderhoud 03_32 03_33 Transmissions (03_33, 03_34, 03_35, 03_36, 03_37) Transmissies (03_33, 03_34, 03_35, 03_36, 03_37) THROTTLE GRIP GASHENDEL Check that the throttle grip turns freely with the handlebar at the end of the stroke at both sides. Check that the vacuum hand grip stroke is 4 mm. If necessary, adjust with the appropriate adjuster on the throttle grip «A» after removing the corresponding rubber cap. Controleer of het gascommando vrij draait met het stuur tot de eindslag in beide richtingen. Controleer of de lege slag van het handvat 4 mm bedraagt. Indien nodig regelt men de slag met het relatieve register op het gascommando «A», 66 The handlebar clutch lever must a have an 8 mm empty stroke, adjust it periodically with the adjuster «B» under the rubber cap. BRAKES 03_34 03_35 03_36 The front brake does not need adjustment and the only maintenance operation is checking the liquid level in the brake pump reservoir. The brake liquid reservoirs have a sight glass «C» of transparent material. With peephole «C» complete, the level inside the reservoir exceeds the Minimum; when the peephole is partially full, the level has decreased to the Minimum; when it is completely empty, the level is inferior to the Minimum. Worn brake pads may cause the decrease of the brake liquid level. Should the level be below the minimum, the Customer is advised to contact an Aprilia Authorised Workshop for a thorough check of the braking system. If you need to top up the level, follow the steps listed below. For the front brake, unscrew the 2 screws«D», lift the cover of the brake liquid tank and introduce the necessary liquid quantity, (liquid must always be over the minimum level ). For the rear brake, remove the right side fairing undoing the two screws «E» and remove the reservoir cap «F» by turning it anticlockwise. Add the necessary quantity of fluid (fluid must always be above the minimum level). Checking levels must be 67 nadat het relatieve rubberen kapje werd verwijderd. KOPPELING De hendel van de koppeling van het stuur moet een lege slag hebben van 8 mm; regel ze regelmatig door middel van het register «B» dat zich onder het rubberen kapje bevindt. REMMEN De voorrem heeft geen enkele regeling nodig, en de enige onderhoudshandeling bestaat uit het controleren van het peil van de vloeistof in de tank van de rempomp. De tanks van de remvloeistof zijn voorzien van een transparant kijkglasje «C». Wanneer het kijkglasje «C» volledig vol is, bevindt het peil in de tank zich boven het minimum; wanneer het kijkglasje gedeeltelijk zichtbaar is, bevindt het peil zich aan het minimum; wanneer het leeg is, bevindt het peil zich onder het minimum. Een verlaging van het peil van de remvloeistof kan te wijten zijn aan de slijtage van de pastilles. Wanneer het peil zich onder het minimum bevindt, wordt aangeraden om zich te wenden tot een Erkende Aprilia Garage, door een zorgvuldige controle te laten uitvoeren van het remsysteem. Wanneer het peil moet bijgevuld worden, moet als volgt gehandeld worden. Voor de voorrem moeten de 2 bouten «D» losgedraaid worden, het deksel van de tank van de remvloeistof opgehoffen worden, en de nodige hoeveelheid vloeistof ingevoerd worden (de 3 Maintenance / 3 Onderhoud CLUTCH made with the tank in horizontal position, without vehicle inclination. vloeistof moet zich steeds boven het minimum peil bevinden). Voor de achterrem moet de rechter zijplaat verwijderd «E» worden, dop «F» van de tank losgedraaid worden in tegenwijzerszin, en daarna de nodige hoeveelheid vloeistof ingevoerd worden (de vloeistof moet zich steeds boven het minimum peil bevinden). De controle van de peilen moet uitgevoerd worden met de tank in horizontale positie, door het voertuig niet te veel te hellen. Periods of inactivity Stilstand van het voertuig We recommend carrying out the following operations: 1. General cleaning of the vehicle. Er wordt aangeraden om de volgende handelingen uit te voeren: 1. De algemene reiniging van het voertuig. 3 Maintenance / 3 Onderhoud 03_37 2. With the engine off and the piston in the bottom dead centre position, remove the spark plug, and pour 1 ÷ 2 cc.of the recommended oil through the hole. Press the engine start pedal 3 or 4 times letting the engine perform a few revolutions, then replace the spark plug. 3. Detach the cables from the battery to the terminals, remove the battery and put it on a cool and dry place. 4. Inflate the tyres and rest the scooter on the front and rear stands so that the tyres do not touch the ground. 68 2. Met de motor stil en de zuiger aan het onderste dode punt, monteert men de bougie en voert men langs de boring 1 ÷ 2 cc. olie voor de menger in. Activeer 3-4 keer het startpedaal van de motor zodat hij enkele toeren kan draaien, en hermonteer de bougie. 3. Maak de kabels van de accu los van de klemmen, verwijder de accu en plaats ze in een droge en koele plaats. 4. Blaas de banden op en plaats het voertuig op de voorste en achterste standaards, zodat de banden van de grond zijn. Cleaning the vehicle Reinigen van het voertuig In order to soften the dirt and mud deposited on the surfaces, use a low pressure blast of water. Once softened, mud and dirt must be removed with a soft sponge for bodywork soaked in lots of water and "shampoo" (2-4% of car shampoo in water). Then rinse abundantly with water, and dry with a shammy cloth. Om het vuil en de modder te weken die zich hebben neergezet op de oppervlakken, gebruikt men een lagedruk waterstraal. Eens het vuil en de modder geweekt zijn, moeten ze verwijderd worden met een zachte spons voor carrosserie, die doordrenkt is met veel water en "shampoo" (2-4% shampoo in water). Spoel vervolgens overvloedig met water en droog af met een zeemvel. 3 Maintenance / 3 Onderhoud DETERGENTS POLLUTE WATER. THEREFORE THE SCOOTER SHOULD BE WASHED IN AN AREA EQUIPPED FOR THE COLLECTION AND PURIFICATION OF THE LIQUIDS USED. NEVER WASH THE SCOOTER IN THE SUN, ESPECIALLY DURING THE SUMMER WHEN THE BODYWORK IS STILL HOT, AS THE SHAMPOO MAY DRY BEFORE BEING RINSED OFF, AND COULD DAMAGE THE PAINTWORK. NEVER USE RAGS SOAKED IN PETROL OR DIESEL OIL TO CLEAN THE PAINTED SURFACES OR PLASTIC SURFACES, TO PREVENT THEM LOSING THEIR SHINE AND MECHANICAL CHARACTERISTICS. 70 REINIGINGSMIDDELEN VERVUILEN HET WATER. DAAROM MOET HET WASSEN VAN HET VOERTUIG UITGEVOERD WORDEN IN ZONES DIE UITGERUST ZIJN VOOR DE VERZAMELING EN ZUIVERING VAN DE VLOEISTOFFEN DIE GEBRUIKT WORDEN VOOR HET WASSEN ZELF. HET WASSEN MAG NOOIT WORDEN UITGEVOERD IN DE ZON, VOORAL NIET IN DE ZOMER WANNEER DE CARROSSERIE NOG WARM IS, OMDAT DE SHAMPOO DIE VÓÓR HET SPOELEN OPDROOGT DE LAK KAN BESCHADIGEN. GEBRUIK NOOIT DOEKEN DIE DOORDRENKT ZIJN MET BENZINE OF NAFTA VOOR HET WASSEN VAN GELAKTE OF PLASTIC 3 Maintenance / 3 Onderhoud IGNITION FAULTS ONREGELMATIGHEDEN BIJ DE ONTSTEKING The spark plug do not release sparks. Have H.V. checked by specialised technician. Check the electrodes, adjustment at 0,5 - 0,6 mm. Clean the electrodes with pure petrol and a metallic brush. Check if there is any fracture or crack in the isolating spark plug and replace if necessary. If the spark plug is in good conditions, take your scooter to an Aprilia Authorised Workshop. De bougie geeft geen vonken. Laat de controle van de hoogspanning uitvoeren door gespecialiseerd personeel. Controleer de elektroden, en regel ze op 0,5 - 0,6 mm. Reinig de elektroden met pure benzine en een metalen borstel. Controleer of de isolering van de bougie gescheurd of stuk is, en vervang ze indien nodig. Wanneer de bougie zich in goede condities bevindt, moet men zich wenden tot een Erkende Aprilia Garage. - Engine flooded. Accelerate and try to start, even pushing, make the engine work at idle and eliminate excessive fuel, clean the spark plug or replace it. Check the sealing of the flotation gear valve pin. Verzopen motor Geef gas en probeer te starten, ook door te duwen, doe de motor leeg draaien en elimineer het teveel aan benzine, reinig de bougie of vervang ze. Controleer de dichting van de huls van de klep van de drijver. HIGH FUEL CONSUMPTION Air filter obstructed or dirty. HOOG VERBRUIK Luchtfilter verstopt of vuil. Clean or replace the filter. LACK OF COMPRESSION Reinig de filter of vervang hem. WEINIG COMPRESSIE Spark plug adaptor with damaged Take your scooter to an Aprilia thread, loose head retainer, worn Authorised Workshop. piston rings. Bougiezit met beschadigde schroefdraad, bevestiging van de kop gelost, elastische klemmen van de zuiger versleten. 72 Zich wenden tot een Erkende Aprilia Garage. Muffler obstructed Take your scooter to an Aprilia Authorised Workshop. THE ENGINE TENDS TO STOP WITH MAXIMUM ACCELERATION Check that the throttle valve is not Take your scooter to an Aprilia Authorised Workshop. dirty or rusted. Check that the spark plug is not dirty or faulty, that the fuel is supplied normally, the washers are leak-tight. IRREGULAR ENGINE EXHAUST, BLASTS DURING ACCELERATION OR SLOPES Check that the throttle valve is not Take your scooter to an Aprilia dirty or rusted. Check that the Authorised Workshop. spark plug is not dirty or faulty, that the fuel is supplied normally, the washers are leak-tight. VERZWAKKING VAN HET LAWAAI VAN DE UITLAAT Verstopte uitlaat Zich wenden tot een Erkende Aprilia Garage. DE MOTOR NEIGT STIL TE VALLEN WANNEER DE GASHENDEL VOLLEDIG OPEN IS Controleer of de gasklep niet vuil of Zich wenden tot een Erkende verroest is. Controleer of de bougie Aprilia Garage. niet vuil of defect is, of de brandstof normaal aankomt, of de pakkingen waterdicht zijn. ONREGELMATIGE UITLAATEMISSIE, ONTPLOFFINGEN TIJDENS DE ACCELERATIE OF OP HELLINGEN Controleer of de gasklep niet vuil of Zich wenden tot een Erkende verroest is. Controleer of de bougie Aprilia Garage. niet vuil of defect is, of de brandstof normaal aankomt, of de pakkingen waterdicht zijn. 73 3 Maintenance / 3 Onderhoud EXHAUST NOISE WEAKENING STARTER GRIP LOCKED IN POSITION OR ONLY PARTIALLY OPEN Unblock and lubricate it STARTERCOMMANDO GEBLOKKEERD IN POSITIE OF NIET HELEMAAL OPEN Take your scooter to an Aprilia Authorised Workshop. Deblokkeer en smeer het INSUFFICIENT BRAKING Disk lubricity, worn pads. Wrong brake adjustment. Air in the braking system. ONVOLDOENDE REMMING Vettigheid van de schijf, versleten Zich wenden tot een Erkende pastilles. Foute regeling van de Aprilia Garage. rem. Aanwezigheid van lucht in de reminstallatie. Take your scooter to an Aprilia Authorised Workshop. 3 Maintenance / 3 Onderhoud FAULTY SUSPENSIONS DEFECTE OPHANGINGEN Oil leak, silent-block wearing at the Take your scooter to an Aprilia end of the stroke, wearing in shock Authorised Workshop. absorber retainers. ENGINE DOES NOT ACCELERATE OR WORK REGULARLY AT LOW RPM; NOISY ENGINE FUNCTIONING Zich wenden tot een Erkende Aprilia Garage. Olielekken, slijtage aan de silent- Zich wenden tot een Erkende blocks van de eindslag, slijtage op Aprilia Garage. de bevestigingen van de schokdemper. DE MOTOR DRAAIT NIET OF WERKT ONREGELMATIG AAN EEN LAAG REGIME; DE MOTOR MAAKT LAWAAI De motor draait niet of werkt Zich wenden tot een Erkende onregelmatig aan een laag regime; Aprilia Garage. lawaaierige werking van de motor, slechte werking van de koppeling, Engine does not accelerate or work Take your scooter to an Aprilia regularly at low rpm; noisy engine Authorised Workshop. 74 spontane ontkoppeling van de versnellingen, defecte werking van de commando's of de richting. 75 3 Maintenance / 3 Onderhoud functioning, clutch malfunctioning, gear spontaneous disengagement, malfunctioning of controls or steering. 76 3 Maintenance / 3 Onderhoud 4 Technical data / 4 Technische gegevens 04_02 50 6M ENGINE TECHNICAL DATA TECHNISCHE GEGEVENS VAN DE MOTOR 50 6M Engine 2-stroke single aluminium cylinder with nickel and silicon carbide coated bore. Motor Monocilindrisch 2-takt in aluminium, met interne bekleding in nikkel en siliciumcarbid. Bore per stroke 39.86 x 40 mm Diameter per slag 39,86 x 40 mm Cubic capacity 49 cm³ Cilinderinhoud 49 cm³ Compression ratio 11.5 :1 Compressieverhouding 11,5:1 Cooling With coolant Koeling Met koelvloeistof 79 Lubrication Thermal group: With oil for 2T engines through variable pump capacity Smering 4 Technical data / 4 Technische gegevens Transmission: gear reduction units in oil bath for transmissions Fuel Unleaded petrol CARBURETTOR Dell'Orto PHVA-17.5 with manual starter Clutch Oil-coated multiple disk Main transmission Ground gear units. Ratio: 21/78 Admission Reed valve direct to crankcase Gear 6-speed transmission with selector fork and drum distributor operated by external control Gears I Gear 11/34 Versnellingsbak: raderwerken in oliebad transmissies III Gear 18/27 Met voor Brandstof Loodvrije benzine Carburator Dell'Orto PHVA-17,5 met manuale starter Koppeling Multischijf in oliebad Primaire transmissie Met geslepen raderwerken. Verhouding: 21/78 Inlaat Met lamellen, rechtstreeks naar de carter Versnellingsbak Met 6 versnellingen, met schakelaar, vork en distributietrommel die extern wordt gecommandeerd Versnellingen I Snelheid 11/34 II Gear 15/30 VI Gear 20/24 II Snelheid 15/30 V Gear 22/23 III Snelheid 18/27 VI Gear 23/22 Secondary transmission Thermische groep: Met olie voor 2-taktmotoren door middel van pomp met variabele capaciteit IV Snelheid 20/24 Chain, 12.70 mm wheelbase and sprocket 7.75 mm in diameter V Snelheid 22/23 VI Snelheid 23/22 Ratio: 11/53 Secundaire transmissie Start-up electric 80 Met ketting, steek 12,70 mm en diameter van het dwarsliggertje 7,75 mm 12V Ignition advance TDC: 1.2 mm Spark plug NGK BR8 ES RX SX 50 SCOOTER TECHNICAL DATA CHASSIS Delta Box Front suspension: Hydraulic fork with stems 40 mm in diameter. REAR SUSPENSION Front wheel brakes: Verhouding: 11/53 Start Elektrisch Elektrische installatie Aan 12V Voorontsteking BDP: 1,2 mm Bougie NGK BR8 ES TECHNISCHE GEGEVENS VAN HET VOERTUIG RX SX 50 Frame Delta Box Voorste ophanging: Swinging arm with hydraulic progressive shock absorber. Hydraulische vork met stangen diameter 40 mm. Achterste ophanging Hydraulic disc brakes Ø 260 mm (RX) Schommelend met progressieve hydraulische schokdemper. Remmen van het voorwiel: Met hydraulische schijf Ø 260 mm (RX) Ø 300 mm (SX) Ø 300 mm (SX) Rear wheel brakes Ø 180 mm hydraulic disc brake with hydraulic transmission Front tyre: 90/90 x 21'' (RX) 100/80 x 17'' (SX) Remmen van het achterwiel: Met hydraulische schijf Ø 180 mm, met hydraulische transmissie Voorste band: 90/90 x 21'' (RX) 100/80 x 17'' (SX) Rear tyre: 110/80 x 18'' (RX) 130/70 x 17'' (SX) Achterste band: 110/80 x 18'' (RX) 130/70 x 17'' (SX) Petrol tank 7 litres (of which 1.3 l is reserve) 81 4 Technical data / 4 Technische gegevens Electrical system Scheduled maintenance table Adequate maintenance is fundamental to ensuring long-lasting, optimum operation and performance of your vehicle. 5 Programmed maintenance / 5 Gepland onderhoud For this purpose, aprilia offers a set of checks and maintenance services (for payment), which are included in the summary table shown on the following page. Any minor faults should be reported without delay to an Authorised aprilia Dealer or Sub-Dealer without waiting until the next scheduled service to solve it. All scheduled maintenance services must be carried out as soon as the specified mileage is reached. Carrying out scheduled services on time is essential to ensure your warranty remains valid. For further information regarding Warranty procedures and ''Scheduled Maintenance'', please refer to the ''Warranty Booklet''. EVERY 500 KM Tabel van het geprogrammeerd onderhoud Een aangepast onderhoud is van doorslaggevend belang voor een langere levensduur van het voertuig in optimale werkcondities met optimale prestaties. Daarom heeft Moto Guzzi een serie van controles en onderhoudshandelingen tegen betaling voorzien, die men vindt in het samenvattend kader op de volgende pagina. Het is goed om eventuele kleine onregelmatigheden bij de werking onmiddellijk mee te delen aan een Officiële aprilia Dealer of Verkoper zonder te wachten, om ze te verhelpen, tot het uitvoeren van de volgende servicebeurt. Het is absoluut noodzakelijk om de servicebeurten uit te voeren wanner de voorziene kilometerstand wordt bereikt. Een stipte uitvoering van de servicebeurten is noodzakelijk voor het correcte gebruik van de garantie. Voor alle andere informatie in verband met de toepassingswijzen van de Garantie en de uitvoering van het "Geprogrammeerd Onderhoud", raadpleegt men het "Garantieboekje". ELKE 500 KM Mixer oil level - check and top-up if necessary Oliepeil van de menger - controleren en bijvullen, indien nodig 84 BIJ 1000 KM Coolant - Check Koelvloeistof - Controle Air filter - cleaning Luchtfilter - reiniging Odometer gear - grease Overbrenging van de kilometerteller - invetting Steering - check up Stuurinrichting - controle Brake control levers - Grease Commandohendels van de remmen - Invetting Brake pads - check Rempastilles - controle Gearing chain - Grease Transmissieketting - Invetting Gearing chain tension - check Spanning van de transmissieketting - Controle Safety locks - check Veiligheidsblokkeringen - controle Front fork - Check Voorvork - Controle Electrical system and battery - Check Elektrische installatie en accu - Controle Wheel - Check Wiel - Controle Tyres pressure - Check Bandenspanning - Controle Fuel and oil hoses - Check Benzine- en oliebuizen - Controle Vehicle and brake test - test drive Test van het voertuig en reminstallatie - rijtest Spark plug / electrode gap - check Bougie / afstand van de elektroden - controle Carburettor - Adjustment Carburator - Regeling Clutch control lever - Adjustment Commandohendels van de koppeling - Regeling 85 5 Programmed maintenance / 5 Gepland onderhoud AFTER 1000 KM 5 Programmed maintenance / 5 Gepland onderhoud AT 5,000; 25,000; 35,000; 55,000 KM BIJ 5.000; 25.000; 35.000; 55.000 KM Coolant level - check Peil van de koelvloeistof - controle Air filter - cleaning Luchtfilter - reiniging Brake control levers - Grease Commandohendels van de remmen - Invetting Brake pads - check Rempastilles - controle Brake fluid level - check Oliepeil van de remmen - controle Gearing chain - Grease Transmissieketting - Invetting Gearing chain tension - check Spanning van de transmissieketting - Controle Front fork - Check Voorvork - Controle Electrical system and battery - Check Elektrische installatie en accu - Controle Tyre condition and wear - Check Conditie en slijtage van de banden - Controle Tyres pressure - Check Bandenspanning - Controle Fuel and oil hoses - Check Benzine- en oliebuizen - Controle Vehicle and brake test - test drive Test van het voertuig en reminstallatie - rijtest Spark plug - replacement Bougie - vervanging Carburettor - Adjustment Carburator - Regeling Clutch control lever - Adjustment Commandohendels van de koppeling - Regeling Chain sliding roller - Grease Rol voor het glijden van de ketting - Invetting AT 10,000; 20,000; 40,000; 50,000 KM BIJ 10.000; 20.000; 40.000; 50.000 KM Coolant - Check Koelvloeistof - Controle 86 Luchtfilter - reiniging Radiator - Cleaning Radiator - Reiniging Odometer gear - grease Overbrenging van de kilometerteller - invetting Steering - check up Stuurinrichting - controle Brake control levers - Grease Commandohendels van de remmen - Invetting Brake pads - check Rempastilles - controle Flexible brake hoses - Check Flexibele rembebuizing - Controle Gearing chain - Grease Transmissieketting - Invetting Gearing chain tension - Replacement Spanning van de transmissieketting - Controle Safety locks - check Veiligheidsblokkeringen - controle Front fork - Replacement Voorvork - Vervanging Rear shock absorber - Check Achterste schokdemper - Controle Electrical system and battery - Check Elektrische installatie en accu - Controle Headlight - adjustment Koplamp - regeling Tyre condition and wear - Check Conditie en slijtage van de banden - Controle Wheel - Check Wiel - Controle Tyres pressure - Check Bandenspanning - Controle Oil filter - Replacement Oliefilter - Vervanging Fuel and oil hoses - Replacement Benzine- en oliebuizen - Vervanging Vehicle and brake test - test drive Test van het voertuig en reminstallatie - rijtest Spark plug - replacement Bougie - vervanging Carburettor - Adjustment Carburator - Regeling Clutch control lever - Adjustment Commandohendels van de koppeling - Regeling 87 5 Programmed maintenance / 5 Gepland onderhoud Air filter - cleaning Chain sliding roller - Grease Rol voor het glijden van de ketting - Invetting 5 Programmed maintenance / 5 Gepland onderhoud AT 15,000; 30,000; 45,000; 60,000 KM BIJ 15.000; 30.000; 45.000;60.000 KM Coolant level - check Peil van de koelvloeistof - controle Air filter - cleaning Luchtfilter - reiniging Brake control levers - Grease Commandohendels van de remmen - Invetting Brake pads - check Rempastilles - controle Brake fluid level - check Oliepeil van de remmen - controle Gearing chain - Grease Transmissieketting - Invetting Gearing chain tension - check Spanning van de transmissieketting - Controle Front fork - Check Voorvork - Controle Electrical system and battery - Check Elektrische installatie en accu - Controle Tyre condition and wear - Check Conditie en slijtage van de banden - Controle Tyres pressure - Check Bandenspanning - Controle Fuel and oil hoses - Check Benzine- en oliebuizen - Controle Vehicle and brake test - test drive Test van het voertuig en reminstallatie - rijtest Spark plug - replacement Bougie - vervanging Carburettor - Adjustment Carburator - Regeling Clutch control lever - Adjustment Commandohendels van de koppeling - Regeling Cylinder head and cylinder - Cleaning Kop en cilinder - Reiniging Complete piston - Replacement Complete zuiger - Vervanging 88 Product AGIP FILTER OIL Description Oil for air filter sponge Specifications - TABEL MET AANBEVOLEN PRODUCTEN 5 Programmed maintenance / 5 Gepland onderhoud Product Beschrijving Kenmerken AGIP CITY TEC 2T Olie voor de menger Synthetische olie die specifieken API TC ++ AGIP GEAR 10W-40 Olie voor de versnellingsbak API GL-4 AGIP PERMANENT SPEZIAL Koelvloeistof Biologisch afbreekbare koelvloeistof, gebruiksklaar, met "long life" technologie en kenmerken (rood). Verzekert een bescherming tegen vriestemperaturen tot -40°. Beantwoordt aan de norm CUNA 956-16. AGIP BRAKE 4 remvloeistof In plaats van de aanbevolen vloeistof kan men vloeistoffen gebruiken met conforme of hogere prestaties dan de specifieken. Synthetische vloeistof SAE J1703, NHTSA 116 DOT 4, ISO 4925 AGIP GREASE 30 Vet voor de stuurinrichtingskussentjes, de zitten van de pinnen en de achtervork AGIP FILTER OIL Olie voor filters in spons 90 - voldoet aan de TREFWOORDENREGISTER A I S ACCU: 52, 53 Identificatie: 20 B K Banden: 43 Bandenspanning: 23 BOUGIE: 44 Koelvloeistof: 47 Koplamp: 59 Koppeling: 16 Schijfrem: 65 Sleutels: 19 Sleutelschakelaar: 11 Standaard: 29 Stuurslot: 11, 12 T Technische gegevens: 77 C L Claxon: 13 Luchtfilter: 45 Z Zadel: 18 Zekeringen: 56 G O Geprogrammeerd onderhoud: 84 Onderhoud: 39, 83, 84 Optische groep: 57, 61 H R Het stilleggen van de motor: 29 Richtingaanwijzers: 12, 60, 63 93 THE VALUE OF SERVICE As a result of continuous technical updates and specific mechanic training programs for aprilia products, only aprilia Official Network mechanics know this vehicle fully and have the special tools necessary to carry out maintenance and repair operations correctly. The reliability of the vehicle also depends on its mechanical state. Checking the vehicle before riding, its regular maintenance and using only Original aprilia Spare Parts are essential! For information about the nearest Official Dealer and/or Service Centre, consult the Yellow Pages or search directly on the inset map in our Official Website: www.aprilia.com Only by requesting aprilia Original Spare Parts can you be sure of purchasing products that were developed and tested during the actual vehicle design stage. All aprilia Original Spare Parts undergo quality control procedures to guarantee reliability and durability. The descriptions and illustrations given in this publication are not binding; While the basic characteristics as described and illustrated in this booklet remain unchanged, aprilia reserves the right, at any time and without being required to update this publication beforehand, to make any changes to components, parts or accessories, which it considers necessary to improve the product or which are required for manufacturing or construction reasons. Not all versions/models shown in this publication are available in all Countries. The availability of individual versions/models should be confirmed with the official aprilia sales network. © Copyright 2009- aprilia. All rights reserved. Reproduction of this publication in whole or in part is prohibited. aprilia - After sales service. The aprilia trademark is property of Piaggio & C. S.p.A. DE WAARDE VAN DE ASSISTENTIE Dankzij de voortdurende technische actualiseringen en de specifieke trainingsprogramma´s van de aprilia producten, kennen enkel de onderhoudsmonteurs van het Officiële Netwerk van aprilia grondig dit voertuig, en beschikken ze over de nodige speciale uitrusting voor een correcte uitvoering van de handelingen van het onderhoud en de herstellingen. De betrouwbaarheid van het voertuig hangt ook af van de mechanische condities van het voertuig. De controle vóór het rijden, het regelmatig onderhoud en het exclusief gebruik van de Originele Reserveonderdelen van aprilia zijn essentiële factoren ! Voor informatie in verband met de dichtstbijzijnde Officiële dealer en/of Assistentiedienst, raadpleegt men de Gouden Gids of zoekt men rechtstreeks op de geografische kaart op onze Officiële Website: www.aprilia.com Enkel wanneer men Originele aprilia Reserveonderdelen aanvraagt, zal men een product krijgen dat reeds bestudeerd en getest werd tijdens de ontwerpfase van het voertuig. De Originele aprilia Reserveonderdelen worden systematisch onderworpen aan kwaliteitscontroleprocedures om de volledige betrouwbaarheid en de duur ervan te garanderen. De beschrijvingen en de illustraties in deze uitgave zijn niet bindend; aprilia houdt zich derhalve het recht voor om, met behoud van de essentiële eigenschappen van het model dat hierin is beschreven en geïllustreerd, op elk moment wijzigingen aan te brengen aan de organen, de onderdelen of de levering van accessoires naar gelang zij dit nodig acht om het product te verbeteren, of om te voldoen aan vereisten van constructieve of commerciële aard, zonder verplicht te zijn om tijdig deze uitgave bij te werken. Niet alle versies in deze uitgave zijn in alle landen beschikbaar. De beschikbaarheid van de afzonderlijke versies moet gecontroleerd worden via het officiële verkoopsnetwerk van aprilia. © Copyright 2009 - aprilia. Alle rechten voorbehouden. Het reproduceren van de inhoud, ook van delen hiervan, is verboden. aprilia - Dienst na verkoop. Het merk aprilia is eigendom van Piaggio & C. S.p.A.-
 1
1
-
 2
2
-
 3
3
-
 4
4
-
 5
5
-
 6
6
-
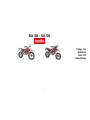 7
7
-
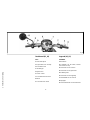 8
8
-
 9
9
-
 10
10
-
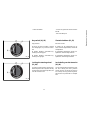 11
11
-
 12
12
-
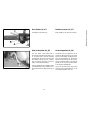 13
13
-
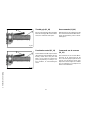 14
14
-
 15
15
-
 16
16
-
 17
17
-
 18
18
-
 19
19
-
 20
20
-
 21
21
-
 22
22
-
 23
23
-
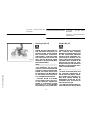 24
24
-
 25
25
-
 26
26
-
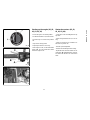 27
27
-
 28
28
-
 29
29
-
 30
30
-
 31
31
-
 32
32
-
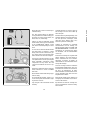 33
33
-
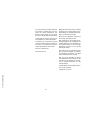 34
34
-
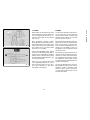 35
35
-
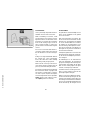 36
36
-
 37
37
-
 38
38
-
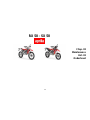 39
39
-
 40
40
-
 41
41
-
 42
42
-
 43
43
-
 44
44
-
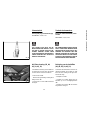 45
45
-
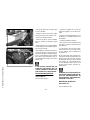 46
46
-
 47
47
-
 48
48
-
 49
49
-
 50
50
-
 51
51
-
 52
52
-
 53
53
-
 54
54
-
 55
55
-
 56
56
-
 57
57
-
 58
58
-
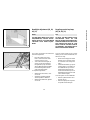 59
59
-
 60
60
-
 61
61
-
 62
62
-
 63
63
-
 64
64
-
 65
65
-
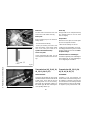 66
66
-
 67
67
-
 68
68
-
 69
69
-
 70
70
-
 71
71
-
 72
72
-
 73
73
-
 74
74
-
 75
75
-
 76
76
-
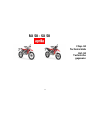 77
77
-
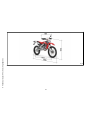 78
78
-
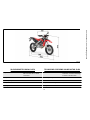 79
79
-
 80
80
-
 81
81
-
 82
82
-
 83
83
-
 84
84
-
 85
85
-
 86
86
-
 87
87
-
 88
88
-
 89
89
-
 90
90
-
 91
91
-
 92
92
-
 93
93
-
 94
94
-
 95
95


APRILIA RX 50 - 2007 Handleiding
- Categorie
- Motorfietsen
- Type
- Handleiding
- Deze handleiding is ook geschikt voor
in andere talen
- English: APRILIA RX 50 - 2007 User manual
Gerelateerde papieren
-
APRILIA SCARABEO 125 IE de handleiding
-
APRILIA scarabeo 125 i.e. Handleiding
-
-
-
-
-
-
-
-
APRILIA SX 50 - ANNEXE 639 Handleiding
Andere documenten
-
 Micro Mobility Sparrow XL de handleiding
-
 Micro Mobility Micro Merlin frein tambour Handleiding
-
MOTO GUZZI 1200 SPORT Handleiding
-
Peugeot TKR Handleiding
-
bluMill CD02-S Handleiding
-
Sencor Scooter ONE Handleiding
-
 Micro Explorer S Handleiding
-
-
-


