Auriol 4-LD4868 de handleiding
- Categorie
- Tafelklokken
- Type
- de handleiding
Deze handleiding is ook geschikt voor

IAN
289081
OS
FUNK
-
WETTERSTATION
/
RADIO
-
CONTROLLED WEATHER STATION /
STATION MÉTÉO RADIO
-
GUIDÉE
·
10/2017 · Art.-Nr.: 4-LD4868
FUNK-WETTERSTATION
Bedienungs- und Sicherheitshinweise
RADIO
-
CONTROLLED
WEATHER STATION
Usage and safety instructions
STATION MÉTÉO
RADIO-GUIDÉE
Utilisation et avertissements de sécurité
RADIOGRAFISCH
WEERSTATION
Gebruiksaanwijzing en veiligheidstips
BEZDRÁTOVÁ
METEOSTANICE
Návod k obsluze a bezpečnostní upozornění
ESTACIÓN METEOROLÓGICA
INALÁMBRICA
Indicaciones sobre su utilización y su seguridad
ESTAÇÃO METEOROLÓGICA SEM FIOS
Avisos de utilização e segurança

Bedienungs- und Sicherheitshinweise ................................................................................................... - 1 -
Usage and safety instructions .................................................................................................................................... - 11 -
Utilisation et avertissements de sécurité ......................................................................................................... - 21 -
Gebruiksaanwijzing en veiligheidstips .......................................................................................................... - 32 -
Návod k obsluze a bezpečnostní upozornění ......................................................................................................... - 42 -
Indicaciones sobre su utilización y su seguridad .................................................................................................... - 52 -
Avisos de utilização e segurança .............................................................................................................................. - 62 -

-
1
-
Bedienungs- und Sicherheitshinweise
Inhaltsverzeichnis
Inhaltsverzeichnis ...................................................................................................................................................................... - 1 -
Einleitung .................................................................................................................................................................................... - 2 -
Bestimmungsgemäße Verwendung ......................................................................................................................................... - 2 -
Lieferumfang .............................................................................................................................................................................. - 2 -
Technische Daten ...................................................................................................................................................................... - 2 -
Wetterstation ..................................................................................................................................................................... - 2 -
Außensensor ...................................................................................................................................................................... - 2 -
Allgemeine Sicherheitshinweise für Benutzer
Allgemeine Sicherheitshinweise für BenutzerAllgemeine Sicherheitshinweise für Benutzer
Allgemeine Sicherheitshinweise für Benutzer .................................................................................................................... - 2 -
Sicherheitshinweise zu den Batterien
Sicherheitshinweise zu den BatterienSicherheitshinweise zu den Batterien
Sicherheitshinweise zu den Batterien .................................................................................................................................. - 2 -
Die Wetterstation und den Außensensor sicher aufhängen oder stellen ............................................................................ - 3 -
Display und Bedienfelder ......................................................................................................................................................... - 3 -
Außensensor .............................................................................................................................................................................. - 4 -
Befestigung des Außensensors ................................................................................................................................................ - 5 -
Inbetriebnahme ......................................................................................................................................................................... - 5 -
Zeitzonenanpassung ................................................................................................................................................................ - 5 -
Empfangsstörung ....................................................................................................................................................................... - 5 -
Funkempfang neu starten ......................................................................................................................................................... - 5 -
Licht ............................................................................................................................................................................................. - 5 -
12/24-Stunden Zeitformat ...................................................................................................................................................... - 5 -
Temperatur ................................................................................................................................................................................. - 5 -
Schnelleinstellung ...................................................................................................................................................................... - 5 -
Grundeinstellung ....................................................................................................................................................................... - 6 -
Standorttabelle .......................................................................................................................................................................... - 6 -
Auf- und Untergangszeiten von Mond und Sonne ................................................................................................................ - 6 -
Mondphasen ............................................................................................................................................................................. - 7 -
Weckalarm ................................................................................................................................................................................ - 7 -
Schlummerfunktion (SNOOZE) ............................................................................................................................................... - 7 -
Wettervorhersage ..................................................................................................................................................................... - 7 -
Barometer .................................................................................................................................................................................. - 7 -
Luftdruck der vergangenen 12 Stunden ................................................................................................................................. - 8 -
Außensensor/Kanaleinstellung ............................................................................................................................................... - 8 -
Außentemperaturentwicklung .................................................................................................................................................. - 8 -
Raumluftfeuchtigkeit .................................................................................................................................................................. - 8 -
Maximal- und Minimalwerte ................................................................................................................................................... - 8 -
Batteriestandsanzeige .............................................................................................................................................................. - 8 -
Neustart (RESET) ....................................................................................................................................................................... - 8 -
Reinigungshinweis ..................................................................................................................................................................... - 9 -
Vereinfachte EU-Konformitätserklärung ................................................................................................................................. - 9 -
Entsorgung der Wetterstation .................................................................................................................................................. - 9 -
Entsorgung der Batterien .......................................................................................................................................................... - 9 -
Garantie der digi-tech gmbh ................................................................................................................................................... - 9 -
Garantiebedingungen .............................................................................................................................................................. - 9 -
Garantiezeit und gesetzliche Mängelansprüche .................................................................................................................. - 9 -
Garantieumfang ........................................................................................................................................................................ - 9 -
Abwicklung im Garantiefall ..................................................................................................................................................... - 9 -
Bestell-Service ......................................................................................................................................................................... - 10 -
Service...................................................................................................................................................................................... - 10 -
Lieferant .................................................................................................................................................................................... - 10 -

-
2
-
FUNK-WETTERSTATION
Einleitung
Herzlichen Glückwunsch zum Kauf Ihrer neuen Wetterstation. Sie haben sich damit für ein hochwertiges Gerät
entschieden. Die Bedienungsanleitung ist Bestandteil dieser Wetterstation. Sie enthält wichtige Hinweise für Sicherheit,
Gebrauch und Entsorgung. Machen Sie sich vor der Benutzung der Wetterstation mit allen Bedien- und
Sicherheitshinweisen vertraut. Benutzen Sie die Wetterstation nur wie beschrieben und für die angegebenen
Einsatzbereiche. Händigen Sie alle Unterlagen bei Weitergabe der Wetterstation an Dritte mit aus. Die Verpackung und
Bedienungsanleitung für spätere Rückfragen bitte aufbewahren.
Bestimmungsgemäße Verwendung
Die Wetterstation ist zur Zeitanzeige und zur Verwendung der beschriebenen Zusatzfunktionen geeignet. Jede andere
Verwendung oder Veränderung der Wetterstation gilt als nicht bestimmungsgemäß. Der Hersteller haftet nicht für
Schäden, die durch nicht bestimmungsgemäßen Gebrauch oder falsche Bedienung verursacht werden. Die Wetterstation
ist nicht für den gewerblichen Einsatz vorgesehen.
Lieferumfang
Hinweis: Bitte überprüfen Sie nach dem Kauf den Lieferumfang. Stellen Sie sicher, dass alle Teile vorhanden und nicht
defekt sind.
•
••
• Wetterstation
•
••
• 3 x Batterien 1,5 V AA R6/LR6
•
••
• Außensensor
•
••
• Halterung für Außensensor
•
••
• 2 x Batterien 1,5 V AAA R03/LR03
•
••
• Bedienungsanleitung
Technische Daten
Wetterstation
• Betriebstemperatur: 0 - 50 °C
• Temperaturanzeige: +/- 1 °C
• Batterien: 3 x 1,5 V AA R6/LR6
Außensensor
• Betriebstemperatur: -20 - 50 °C
• Temperaturanzeige: +/- 1 °C
• Reichweite: max. 100 m
• Übertragungsfrequenz: 433 MHZ
• Sendeleistung: 0,024 W
• Schutzart durch das Gehäuse (Außensensor): IPX4 (Spritzwasserschutz nach Norm IEC 60529)
• Batterien: 2 x 1,5 V AAA R03/LR03
- Kennzeichen für Gleichstrom
Allgemeine Sicherheitshinweise für Benutzer
WARNUNG ! VERLETZUNGSGEFAHR!
Dieses Gerät kann von Personen (einschließlich Kindern ab 8 Jahren) mit verringerten physischen, sensorischen oder
mentalen Fähigkeiten oder Mangel an Erfahrung und Wissen benutzt werden, wenn sie beaufsichtigt oder bezüglich des
sicheren Gebrauchs des Geräts unterwiesen wurden und die daraus resultierenden Gefahren verstehen. Kinder dürfen
nicht mit dem Gerät spielen. Reinigung und Benutzer-Wartung dürfen nicht von Kindern ohne Beaufsichtigung
durchgeführt werden. Halten Sie auch die Verpackungsfolien von Kindern fern. Es besteht Erstickungsgefahr.
Sicherheitshinweise zu den Batterien
WARNUNG !
GESUNDHEITSGEFAHR!
EXPLOSIONSGEFAHR!
Bewahren Sie Batterien für Kleinkinder unerreichbar auf. Wurde eine Batterie verschluckt, muss sofort medizinische Hilfe
in Anspruch genommen werden.
Batterien/Akkus müssen stets polrichtig eingelegt werden. Reinigen Sie Batterie- und Gerätekontakte zuvor bei Bedarf.
Versuchen Sie nicht, Batterien wieder aufzuladen, kurzzuschließen oder zu öffnen. Werfen Sie niemals Batterien ins
Feuer, da diese explodieren können. Wenn Sie das Gerät längere Zeit nicht benutzen, entnehmen Sie die Batterie und
verstauen Sie das Gerät an einem trockenen und staubfreien Ort. Bei unsachgemäßem Gebrauch der Batterie besteht
Explosions- und Auslaufgefahr.
Sollte die Batterie doch einmal ausgelaufen sein, vermeiden Sie Kontakt mit Haut, Augen und Schleimhäuten. Benutzen
Sie Handschuhe. Bei Kontakt mit Batteriesäure die betroffenen Stellen mit reichlich klarem Wasser spülen und umgehend
einen Arzt aufsuchen. Entfernen Sie erschöpfte Batterien umgehend aus dem Gerät, es besteht erhöhte Auslaufgefahr.

-
3
-
Die Wetterstation und den Außensensor sicher aufhängen oder stellen
Die Wetterstation und der Außensensor sind nicht für den Betrieb in Räumen mit hoher Luftfeuchtigkeit (z. B. Badezimmer)
ausgelegt. Achten Sie darauf, dass:
• der Sensor aufrecht steht oder hängt;
• immer eine ausreichende Belüftung gewährleistet ist (stellen Sie das Gerät nicht in Regale oder dorthin, wo Vorhänge
oder Möbel die Belüftungsschlitze verdecken und lassen Sie mindestens 10 cm Abstand zu allen Seiten);
• das Gerät beim Betrieb nicht auf einem dicken Teppich oder Bett aufgestellt wird und keine direkten Wärmequellen (z.
B. Heizungen) auf das Gerät wirken;
• kein direktes Sonnenlicht auf das Gerät trifft;
• der Kontakt mit Spritz- und Tropfwasser vermieden wird;
• das Gerät nicht in unmittelbarer Nähe von Magnetfeldern (z. B. Lautsprechern) hängt oder steht;
• keine Fremdkörper und Staub eindringen;
• Kerzen und andere offene Flammen zu jeder Zeit von dem Gerät ferngehalten werden müssen, um das Ausbreiten von
Feuer zu verhindern.
Display und Bedienfelder

-
4
-
Außensensor
1 Wettersymbol 22 Ausgewählter Kanal
2
Luftdruckbalken
23 Batteriestandsanzeige
3
Innentemperatur
24 Außentemperatur
4
Komfortsymbol
25 Luftdrucktendenz
5 Raumluftfeuchtigkeit 26 CHANNEL-Taste
6 Mondphase 27 HISTORY/WEATHER-Taste
7 Mondauf-/-untergang 28 °C/°F + -Taste
8 Standort 29 MAX/MIN - -Taste
9 Sonnenauf-/-untergang 30 RELATIVE/ABSOLUTE-Luftdruck-Taste
10 ALARM/ON/OFF-Taste 31 SUN/MOON-Taste
11 -/ -Taste 32 Aufhängevorrichtung (Wetterstation)
12 SNOOZE/LIGHT-Taste 33 RESET-Taste
13 Alarm-Symbol 34 Batteriefach (Wetterstation)
14 +/12/24-Taste 35 Standfuß zum Ausklappen (Wetterstation)
15 MODE-Taste 36 Kontroll-LED (Außensensor)
16 Datum (Monat, Tag, Wochentag) 37 Außentemperatur (Außensensor)
17 Zeit-Anzeige 38 Aufhängevorrichtung (Außensensor)
18 Funk-Anzeige 39 Kanalwahlschalter (Außensensor)
19 Luftdruck der letzten Stunden 40 Batteriefach (Außensensor)
20 relativer/absoluter Luftdruck 41 °C/°F-Taste (Außensensor)
21 Außentemperaturtendenz 42 Halterung für Außensensor
43 Signal des Außensensors

-
5
-
Befestigung des Außensensors
Die mitgelieferte Halterung 42
4242
42 für den Sensor ermöglicht unterschiedliche Befestigungsmöglichkeiten. Je nach Bedarf
kann der Außensensor gehängt oder gestellt werden.
Abbildung A zeigt 3 Vertiefungen, die der Sensor auf beiden Seiten besitzt. Der Sensor kann damit einfach an der
Halterung einrasten.
Abbildung B zeigt aus der Seitenansicht, wie die Halterung hinter dem Sensor befestigt ist.
Abbildung C zeigt die frontale Darstellung des Sensors mit der Halterung als Aufhängung von oben.
Abbildung D zeigt die frontale Darstellung des Sensors mit der Halterung als Standfuß von unten.
Abbildung E zeigt das Bedienfeld und das Batteriefach auf der Rückseite des Sensors.
Hinweis: Stellen oder hängen Sie den Außensensor immer aufrecht auf.
Inbetriebnahme
Ziehen Sie die Schutzfolie von der Wetterstation und dem Sensor ab. Öffnen Sie das Batteriefach des Außensensors 40
und legen Sie die mitgelieferten Batterien polrichtig ein. Die Kontrolllampe 36 leuchtet vorübergehend auf und die
Temperatur wird angezeigt. Schließen Sie das Batteriefach.
Öffnen Sie das Batteriefach der Wetterstation 34 und legen Sie die mitgelieferten Batterien polrichtig ein. Schließen Sie
das Batteriefach. Das Wettersymbol 1 blinkt und die Wetterstation empfängt nun das Signal des Außensensors. Dieser
Prozess kann einige Minuten in Anspruch nehmen. Bei erfolgreichem Empfang wird der gewählte Kanal 22 angezeigt
und die aktuelle Außentemperatur 24 erscheint. Die Wetterstation startet nach erfolgreichem Empfang des Außensensors
den Empfang des DCF77 Funksignals und der Funkturm 18 blinkt im Display neben der Uhrzeit. Dieser Vorgang kann 3-
10 Minuten dauern. Während des Empfangs sind alle Tasten außer der SNOOZE / LIGHT Taste 12 ohne Funktion.
Wenn der Empfang des Zeitsignals nach 10 Minuten erfolglos bleibt, stellen Sie die Zeit manuell ein. Die Wetterstation
wird um 04:00 Uhr und 05:00 Uhr einen neuen Empfangsversuch starten und die Zeit nach erfolgreichem
Signalempfang automatisch korrigieren.
Hinweis: Bitte bewegen Sie die Wetterstation und den Außensensor während des Empfangsvorgangs nicht.
Bei erfolgreichem Empfang erscheint der Funkturm 18 permanent und es stellen sich automatisch die korrekte Uhrzeit,
Datum, Wochentag, Auf- und Untergangszeiten von Sonne und Mond sowie die Mondphase ein. Während der
Sommerzeit erscheint DST auf dem Display neben dem Funkturm 18.
Zeitzonenanpassung
Befinden Sie sich in einem Land, in dem die aktuelle Uhrzeit trotz DCF-Signal abweicht, nutzen Sie die
Zeitzonenanpassung, um Ihr Gerät in einer anderen Zeitzone als der Standardeinstellung (UTC + 1 = Mitteleuropäische
Zeit) zu verwenden. Stellen Sie die Differenz in Stunden (z. B. -01) zur gewünschten Zeitzone ein. Drücken und halten Sie
die MODE-Taste 15 in der Normalzeitanzeige 3 Sekunden lang. Die Zeitzone blinkt und kann mit -/ -Taste 11 oder
+/12/24 -Taste 14 eingestellt werden. Drücken Sie die MODE-Taste 15, um die Einstellung zu bestätigen.
Führen Sie anschließend einen Neustart durch. Ihr Gerät empfängt weiterhin das DCF77-Funksignal, zeigt aber die
geänderte Uhrzeit (z. B. 1 Stunde weniger) an.
Empfangsstörung
Das DCF77 Funksignal wird aus der Nähe von Frankfurt am Main gesendet. Es kann bis zu ca. 1500 km im Radius um
Frankfurt am Main empfangen werden. Allerdings gibt es einige Störquellen, die den Empfang erheblich behindern
können. Falls Ihre Wetterstation das Funksignal nicht richtig empfängt, hängen oder stellen Sie die Wetterstation an
einem anderen Platz auf. Beachten Sie, dass es in der Nähe von Computer, Telefon, Radio und TV zu
elektromagnetischen Strahlungen kommen kann, die den Empfang des DCF77 Funksignals stören können. Weitere
Störquellen für den Empfang des Funksignals können starke Gebäudedämmungen (metallische Bauelemente), hohe
Berge oder atmosphärische Störungen sein. Ersetzen Sie ggf. die Batterien.
Funkempfang neu starten
Sie können manuell den Funkempfang neu starten, indem Sie die -/ -Taste 11 3 Sekunden gedrückt halten.
Licht
Drücken Sie die SNOOZE/LIGHT -Taste 12, um die Hintergrundbeleuchtung vorübergehend zu aktivieren.
12/24-Stunden Zeitformat
Drücken Sie die +/12/24 -Taste 14, um das 12- oder 24-Stunden Zeitformat zu wählen. Im 12-Stunden Zeitformat
erscheint auf dem Display vormittags AM und nachmittags PM.
Temperatur
Drücken Sie die °C/°F+ -Taste 28, um die Temperatur in Celsius (°C) oder Fahrenheit (°F) anzuzeigen.
Schnelleinstellung
Bei der Einstellung von numerischen Werten können Sie durch Drücken und Halten der Tasten die Schnelleinstellung
verwenden.
Legen Sie die Batterien zuerst in das Batteriefach des Außensensors 40 und dann erst in
das Batteriefach der Wetterstation 34 ein.

-
6
-
Grundeinstellung
Sie können folgende Einstellungen vornehmen: Zeitzone, Zeit, Datum, Sprache der Wochentagsanzeige und Standort.
Drücken und halten Sie die MODE-Taste 15 in der Normalzeitanzeige 3 Sekunden lang, die Zeitzone blinkt und kann
mit -/ -Taste 11 oder +/12/24 -Taste 14 eingestellt werden. Drücken Sie die MODE-Taste 15, um die Einstellung
zu bestätigen. Stellen Sie auf die gleiche Weise Stunden, Minuten, Sekunden, Jahr, Monat, Tag und die Sprache der
Wochentaganzeige (GE=deutsch, FR=französisch, ES=spanisch, IT=italienisch, NE=niederländisch, DA=dänisch,
RU=russisch, EN=englisch), das Land und den Standort (siehe Standorttabelle) ein. Wurde der Standort gewechselt,
dauert es einige Zeit, bis die Werte für die Auf- und Untergangszeiten von Mond und Sonne angezeigt werden.
Standorttabelle
Deutschland
GER
Ibiza
IBI
Glasgow
GLA
Eindhoven
EIN
Charleroi
CHA
Aachen
A
AC
La Coruña
LAC
London
LON
Enschede
ENS
Lüttich
LIE
Berlin
BER
León
LEO
Manchester
MAN
Groningen
GRO
Schweiz/
Liechtenstein
SWI
Düsseldorf
DUS
Las Palmas
LPA
Plymouth
PLY
Den Haag
DHA
Dresden
DRE
Madrid
MAD
Ungarn
HUN
Rotterdam
ROT
Basel
BAS
Erfurt
ERF
Málaga
MAL
Budapest
BUD
Portugal
POR
Bern
BER
Frankfurt
FRA
Palma de
Mallorca
PDM
Kroatien
CRO
Èvora
EVO
Chur
CHU
Flensburg
FLE
Zagreb
ZAG
Coimbra
COI
Genf
GEN
Freiburg
FRE
Salamanca
SAL
Italien
ITA
Faro
FAR
Locarno
LOC
Hannover
HAN
Sevilla
SEV
Ancona
ANC
Leiria
LEI
Luzern
LUC
Bremen
BRE
Valencia
VAL
Bari
BAI
Lissabon
LIS
St. Moritz
MOR
Hamburg
HAM
Zaragossa
ZAR
Bologna
BOL
Porto
POR
St. Gallen
GAL
Rostock
ROS
Frankreich
FRA
Cagliari
CAG
Polen
POL
Sitten
SIO
Stralsund
STR
Besançon
BES
Catania
CAT
Danzig
GDA
Vaduz
VAD
Köln
KOE
Biarritz
BIA
Florenz
FIR
Krakau
KRA
Zürich
ZUE
Kiel
KIE
Bordeaux
BOR
Foggia
FOG
Posen
POZ
Tschechien CZR
Kassel
KAS
Brest
BRE
Genua
GEN
Stettin
SZC
Leipzig
LEI
Cherbourg
CHE
Lecce
LEC
Warschau
WAR
Prag
PRA
München
MUE
Lyon
LYO
Messina
MES
Russland
RUS
Griechenland
GR
Magdeburg
MAG
Marseille
MAR
Mailand
MIL
St. Petersburg
PET
Athen
AT
Nürnberg
NUE
Monaco
MON
Neapel
NAP
Schweden
SWE
Zypern
CY
Regensburg
REG
Metz
MET
Palermo
PAL
Göteborg
GOT
Nikosia
NI
Stuttgart
STU
Nantes
NAN
Parma
PAR
Stockholm
STO
Rumänien
RO
Saarbrücken
SAA
Nizza
NIC
Perugia
PER
Slowakei
SLK
Bukarest
BU
Schwerin
SCH
Orléans
ORL
Rom
ROM
Bratislava
BRA
Bulgarien
BG
Dänemark
DAN
Paris
PAR
Turin
TOR
Slowenien
SLO
Sofia
SO
Aalborg
ALB
Perpignan
PER
Triest
TRI
Ljubljana
LJU
Aarhus
ARH
Lille
LIL
Venedig
VEN
Serbien
SRB
Kopenhagen
COP
Rouen
ROU
Verona
VER
Belgrad
BER
Odense
ODE
Straßbourg
STR
Ventimiglia
VTG
Österreich
AUS
Spanien/
Andorra
ESP
Toulouse
TOU
Irland
IRL
Graz
GRA
Finnland
FIN
Dublin
DUB
Innsbruck
INN
Alicante
ALI
Helsinki
HEL
Luxemburg
LUX
Linz
LIN
Andorra AND
Groß
-
britanien
GB Norwegen NOR
Salzburg SAL
Badajoz
BAD
Aberdeen
ABD
Bergen
BER
Wien
VIE
Bacelona
BAR
Belfast
BEL
Oslo
OSL
Belgien
BEL
Bilbao
BIL
Birmingham
BIR
Stavanger
STA
Antwerpen
ANT
Cádiz
CAD
Bristol
BRI
Niederlande
NET
Brügge
BRU
Còrdoba
COR
Edinburgh
EDI
Amsterdam
AMS
Brüssel
BRL
Auf- und Untergangszeiten von Mond und Sonne
Nachdem Sie Land und Ort eingegeben haben, berechnet Ihre Wetterstation die ungefähren Auf- und Untergangszeiten
von Sonne und Mond.
Hinweis: Die kalkulierten Zeiten dienen nur zur Orientierung. Abweichungen können z. B. durch das örtliche Gelände
oder das vorherrschende Wetter entstehen.
Nach Drücken der SUN/MOON-Taste 31 erscheinen vorübergehend die ungefähren Sonnenstunden für den jeweiligen
Tag. Wenn Sie die Auf- und Untergangszeiten eines anderen Standortes oder eines anderen Datums nachsehen wollen,
drücken und halten Sie 3 Sekunden die SUN/MOON-Taste 31. Das Länderkürzel blinkt und kann mit -/ -Taste 11
oder +/12/24 -Taste 14 eingestellt werden. Bestätigen Sie Ihre Eingabe mit Druck auf die SUN/MOON-Taste 31.
Stellen Sie auf gleiche Weise Stadt, Jahr, Monat und Tag ein, bestätigen Sie Ihre Eingabe jeweils durch Drücken der
SUN/MOON-Taste 31.

-
7
-
Mondphasen
Ihre Wetterstation ist mit einer Mondphasenanzeige ausgestattet. Die 8 Mondphasen sind:
Neumond
Vollmond
Zunehmender Mond
Abnehmender Mond
Halbmond (erstes Viertel)
Halbmond (letztes Viertel)
Zunehmender Halbmond
Abnehmender Halbmond
Weckalarm
Die Wetterstation verfügt über 2 separat einstellbare Weckzeiten.
Drücken Sie die MODE-Taste 15, um den Alarm1 oder und den Alarm 2 zu wählen. Es erscheint das jeweilige
Glockensymbol. Drücken und halten Sie bei angezeigtem Alarm 1 oder 2 die MODE-Taste 15, um in den
Einstellungsmodus zu wechseln. Auf dem Display blinken die Stunden. Stellen Sie die Stunden durch Druck auf -/ -
Taste 11 oder +/12/24 -Taste 14 ein und bestätigen Sie die Einstellung durch Druck auf die MODE Taste 15. Stellen
Sie auf die gleiche Weise die Minuten ein. Drücken Sie während der Anzeige des gewünschten Weckalarms die
ALARM/ON/OFF-Taste 10, um den Alarm zu aktivieren (on) oder deaktivieren (oF). Bei aktiviertem Alarm 1 erscheint
. Bei aktiviertem Alarm 2 erscheint . Wenn Sie innerhalb von 5 Sekunden keine Taste drücken, kehrt die
Wetterstation automatisch zur Normalanzeige zurück.
Schlummerfunktion (SNOOZE)
Drücken Sie bei Ertönen des Alarms die SNOOZE/LIGHT-Taste 12, um den Alarm vorübergehend zu deaktivieren. Im
Display blinkt das Glockensymbol. Nach 5 Minuten ertönt der Alarm erneut. Drücken Sie eine beliebige Taste außer
Taste 12, um den Alarm abzustellen.
Wettervorhersage
Hinweis: Die Wetterstation startet die Vorhersage etwa 6 Stunden nach der Eingabe des aktuellen Wetters.
Die Wettersymbole zeigen die Wettertendenz für die nächsten Stunden an und nicht das aktuelle Wetter. Sollte die
Vorhersage Ihrer Wetterstation nicht stimmen, können Sie die Anzeige anpassen, indem Sie die HISTORY/WEATHER-
Taste 27 für 3 Sekunden drücken und halten. Das Wettersymbol blinkt. Stellen Sie nun mit der °C/°F + -Taste 28 oder
der MAX/MIN- -Taste 29 das aktuelle Wetter ein. Drücken Sie zum Bestätigen die HISTORY/WEATHER-Taste 27.
Hinweis: Bei Schneefall stellen Sie Regen oder Wolkenbruch ein. Nach dem Bestätigen mit der HISTORY/WEATHER-
Taste 27, erscheint bei Außentemperaturen unter 0°C das Schneefallsymbol.
Sonnig
Wolkenbruch
Leicht bewölkt
Regen
Bewölkt
Starker Schneefall
Schneefall
Barometer
Ihre Wetterstation kann die Luftdruckentwicklung 25 anzeigen.
Luftdruck steigt
Luftdruck bleibt gleich
Luftdruck fällt
Sie können auch zwischen dem absoluten und relativen Luftdruck wählen, indem Sie die Relative/Absolute-Taste 30
drücken. Im Display erscheint Rel. oder Abs.
Hinweis: Der absolute Luftdruck wird durch die Wetterstation gemessen. Den relativen Luftdruck können Sie bei Ihrem
lokalen Wetterdienst abfragen und in die Wetterstation eingeben.

-
8
-
Sie können den relativen Luftdruck ändern, indem Sie die Relative/Absolute-Taste 30 drücken und für 3 Sekunden
halten. Der Luftdruckwert blinkt und kann mit °C/°F + -Taste 28 oder MAX/MIN- -Taste 29 eingestellt werden.
Bestätigen Sie Ihre Eingabe durch Drücken der Relative/Absolute-Taste 30.
Sie können zwischen dem Anzeigenformat Hektopascal (hPa) oder Inches of mercury (inHg) wählen, indem Sie die
°C/°F+ - Taste 28 ca. 3 Sekunden drücken und halten.
Luftdruck der vergangenen 12 Stunden
Drücken Sie die HISTORY/WEATHER-Taste 27, um die Luftdruckwerte der letzten 12 Stunden abzulesen.
0 – HR = gegenwärtiger Luftdruck
- 1 HR = Luftdruck eine Stunde früher
- 2 HR = Luftdruck zwei Stunden früher, usw.
Außensensor/Kanaleinstellung
Mit Ihrer Wetterstation können bis zu drei Außensensoren gleichzeitig verwendet werden. Öffnen Sie das Batteriefach
des Außensensors und stellen Sie den gewünschten Kanal (1-3) am Kanalwahlschalter 39 ein. Drücken und halten Sie
die CHANNEL-Taste 26 für 3 Sekunden, bis ein Signal ertönt. Die Wetterstation empfängt nun das Signal 43. Schließen
Sie die Abdeckung. Mit der °C/°F -Taste 41 können Sie zwischen °C-Celsius und °F-Fahrenheit wählen.
Hinweis: Der Außensensor muss in einem Umkreis von maximal 100 m ohne Hindernisse zur Wetterstation stehen.
Wenn Sie mehrere Außensensoren benutzen: Drücken Sie in der Normalzeitanzeige die CHANNEL-Taste 26, um
zwischen den Empfangskanälen zu wechseln. Das Rotationssymbol zeigt im Display 22 an, dass zwischen den
verschiedenen Empfangskanälen automatisch gewechselt wird.
Es werden nur Außensensoren angezeigt, die angesprochen werden. Drücken und halten Sie die CHANNEL -Taste 26,
um unbenutzte Kanäle zu entfernen. Wenn Sie einen weiteren Außensensor hinzufügen, erkennt die Wetterstation ihn
automatisch.
Außentemperaturentwicklung
Bei erfolgreichem Empfang der Daten des Außensensors, wird der Temperaturtrend 21 angezeigt.
Außentemperatur steigt
Außentemperatur bleibt gleich
Außentemperatur fällt
Raumluftfeuchtigkeit
Die aktuelle Raumluftfeuchtigkeit wird im Display 5 angezeigt. Die Komfortanzeige 4 zeigt die Luftfeuchtigkeit in 3
Kategorien an:
< 40 %
Trocken
40 – 60 %
Komfort
> 60 %
Feucht
< 20 °C
/
20 – 26°C
> 26 °C
/
Maximal- und Minimalwerte
Die maximale und minimale Temperatur und Luftfeuchtigkeit wird ab dem Einlegen der Batterien gespeichert.
Drücken Sie die Max/Min- -Taste 29 kurz, um die maximale MAX, minimale MIN und aktuelle Innentemperatur 3,
Außentemperatur 24 und Luftfeuchtigkeit 5 im Display abzulesen. Um die maximalen und minimalen Werte zu löschen,
drücken und halten Sie die Max/Min- -Taste 29 für ca. 3 Sekunden. Es ertönt ein Signalton, die Werte werden gelöscht
und ab dem Moment neu aufgezeichnet.
Batteriestandsanzeige
Wenn die Batterien zu schwach werden, um die Wetterstation, den Außensensor und die Datenübertragung in Betrieb zu
halten, erscheint die Batteriestandsanzeige 23 im Display. Die Batterien sollten schnellstmöglich in allen Geräten ersetzt
werden. Starten Sie die Wetterstation neu.
Neustart (RESET)
Drücken Sie die RESET-Taste 33, um die Wetterstation zurückzusetzen.

-
9
-
Reinigungshinweis
Reinigen Sie die Wetterstation und den Außensensor nur mit einem trockenen, fusselfreien Tuch, wie es z. B. zur
Reinigung von Brillengläsern verwendet wird.
Vereinfachte EU-Konformitätserklärung
Hiermit erklärt digi-tech gmbh, dass die Funk-Wetterstation 4-LD4868 den Richtlinien R&TTE 1999/5/EC und RED
2014/53/EU entspricht. Der vollständige Text der EU-Konformitätserklärung ist unter der folgenden Internetadresse
verfügbar: http://www.digi-tech-gmbh.com/ce/289081_WS.pdf
Entsorgung der Wetterstation
Dieses Gerät darf nicht im normalen Hausmüll entsorgt werden. Entsorgen Sie das Gerät über einen zugelassenen
Entsorgungsbetrieb oder über Ihre kommunale Entsorgungseinrichtung. Beachten Sie die aktuell geltenden
Vorschriften. Setzen Sie sich im Zweifelsfall mit Ihrer Entsorgungseinrichtung in Verbindung.
Entsorgung der Batterien
Bitte entsorgen Sie Ihre Batterien sachgerecht in extra hierfür aufgestellten Gefäßen im Handel. Batterien
gehören nicht in den Hausmüll. Entsorgen Sie Batterien bitte über einen zugelassenen Entsorgungsbetrieb oder
über Ihre kommunale Entsorgungseinrichtung. Beachten Sie die aktuell geltenden Vorschriften. Setzen Sie sich
im Zweifelsfall mit Ihrer Entsorgungseinrichtung in Verbindung.
Garantie der digi-tech gmbh
Sie erhalten auf diese Wetterstation 3 Jahre Garantie ab Kaufdatum. Im Falle von Mängeln dieser Wetterstation stehen
Ihnen gegen den Verkäufer des Produkts gesetzliche Rechte zu. Diese gesetzlichen Rechte werden durch unsere im
Folgenden dargestellte Garantie nicht eingeschränkt.
Garantiebedingungen
Die Garantiefrist beginnt mit dem Kaufdatum. Bitte bewahren Sie den Kassenbon gut auf. Diese Unterlage wird als
Nachweis für den Kauf benötigt. Tritt innerhalb von drei Jahren ab dem Kaufdatum dieser Wetterstation ein Material-
oder Fabrikationsfehler auf, wird die Wetterstation von uns – nach unserer Wahl – für Sie kostenlos repariert oder
ersetzt. Diese Garantieleistung setzt voraus, dass innerhalb der Drei-Jahres-Frist die defekte Wetterstation und der
Kaufbeleg (Kassenbon) vorgelegt und schriftlich kurz beschrieben wird, worin der Mangel besteht und wann er
aufgetreten ist. Wenn der Defekt von unserer Garantie gedeckt ist, erhalten Sie die reparierte oder eine neue
Wetterstation zurück. Mit Reparatur oder Austausch des Produkts beginnt kein neuer Garantiezeitraum.
Garantiezeit und gesetzliche Mängelansprüche
Die Garantiezeit wird durch die Gewährleistung nicht verlängert. Dies gilt auch für ersetzte und reparierte Teile. Eventuell
schon beim Kauf vorhandene Schäden und Mängel müssen sofort nach dem Auspacken gemeldet werden. Nach Ablauf
der Garantiezeit anfallende Reparaturen sind kostenpflichtig.
Garantieumfang
Die Wetterstation wurde nach strengen Qualitätsrichtlinien sorgfältig produziert und vor Anlieferung gewissenhaft
geprüft. Die Garantieleistung gilt für Material- oder Fabrikationsfehler. Diese Garantie erstreckt sich nicht auf
Produktteile, die normaler Abnutzung ausgesetzt sind und daher als Verschleißteile angesehen werden können oder für
Beschädigungen an zerbrechlichen Teilen, z. B. Schalter, Akkus oder die aus Glas gefertigt sind.
Diese Garantie verfällt, wenn die Wetterstation beschädigt, nicht sachgemäß benutzt oder gewartet wurde. Für eine
sachgemäße Benutzung der Wetterstation sind alle in der Bedienungsanleitung aufgeführten Anweisungen genau
einzuhalten. Verwendungszwecke und Handlungen, von denen in der Bedienungsanleitung abgeraten oder vor denen
gewarnt wird, sind unbedingt zu vermeiden.
Die Wetterstation ist lediglich für den privaten und nicht für den gewerblichen Gebrauch bestimmt. Bei missbräuchlicher
und unsachgemäßer Behandlung, Gewaltanwendung und bei Eingriffen, die nicht von unserer autorisierten Service-
Niederlassung vorgenommen wurden, erlischt die Garantie.
Abwicklung im Garantiefall
Um eine schnelle Bearbeitung Ihres Anliegens zu gewährleisten, folgen Sie bitte den folgenden Hinweisen:
• Bitte halten Sie für alle Anfragen den Kassenbon und die Artikelnummer (289081) als Nachweis für den Kauf bereit.
• Die Artikelnummer entnehmen Sie bitte dem Typenschild, einer Gravur, dem Titelblatt Ihrer Anleitung (unten links) oder
dem Aufkleber auf der Rück- oder Unterseite.
• Sollten Funktionsfehler oder sonstige Mängel auftreten, kontaktieren Sie zunächst die nachfolgende Serviceabteilung
telefonisch oder per E-Mail.
• Eine als defekt erfasste Wetterstation können Sie dann unter Beifügung des Kaufbelegs (Kassenbon) und der Angabe,
worin der Mangel besteht und wann er aufgetreten ist, für Sie portofrei an die Ihnen mitgeteilte Service-Anschrift
übersenden.
Auf www.lidl-service.com können Sie diese Anleitung und viele weitere Handbücher, Produktvideos und
Software herunterladen.

-
10
-
Bestell-Service
Weitere Außensensoren können Sie per Fax: +49(0)6198-5770-99 oder online: www.inter-quartz.de bestellen. Der
Preis für einen Sensor beträgt 5,- € zzgl. MwSt. und Versand.
Service
Name: Inter-Quartz GmbH
Str.: Valterweg 27A
Stadt: DE- 65817 Eppstein
Land: DEUTSCHLAND
E-Mail: support@inter-quartz.de
Telefon: +49 (0)6198 571825
00800 5515 6616
00800 5515 6616 00800 5515 6616
00800 5515 6616 00800 5515 6616
0800 563862 800 142 315
00800 5515 6616 00800 5515 6616
00800 5515 6616 00800 5515 6616
IAN
289081
Art.
-
Nr.:
4
-
LD4868
Lieferant
Bitte beachten Sie, dass die folgende Anschrift keine Serviceanschrift ist. Kontaktieren Sie zunächst die oben benannte
Servicestelle.
Name: digi-tech gmbh
Str.: Valterweg 27A
Stadt: DE-65817 Eppstein
Land: DEUTSCHLAND

-
11
-
Usage and safety instructions
Table of contents
Table of contents ..................................................................................................................................................................... - 11 -
Introduction .............................................................................................................................................................................. - 12 -
Intended use ............................................................................................................................................................................ - 12 -
Scope of delivery .................................................................................................................................................................... - 12 -
Specifications .......................................................................................................................................................................... - 12 -
Weather station ............................................................................................................................................................... - 12 -
Outdoor sensor ............................................................................................................................................................... - 12 -
Important safety information for users
Important safety information for usersImportant safety information for users
Important safety information for users .............................................................................................................................. - 12 -
Important safety information for the batteries
Important safety information for the batteriesImportant safety information for the batteries
Important safety information for the batteries ................................................................................................................. - 12 -
Securely placing or mounting the weather station and the outdoor sensor ...................................................................... - 13 -
Display and control panel ...................................................................................................................................................... - 13 -
Outdoor sensor ....................................................................................................................................................................... - 14 -
Mounting the outdoor sensor ................................................................................................................................................. - 15 -
Setup ........................................................................................................................................................................................ - 15 -
Time zone adjustment ............................................................................................................................................................. - 15 -
Reception problems ................................................................................................................................................................ - 15 -
Restarting radio signal reception ........................................................................................................................................... - 15 -
Light .......................................................................................................................................................................................... - 15 -
12/24-hour time format ........................................................................................................................................................ - 15 -
Temperature unit ..................................................................................................................................................................... - 15 -
Speed setting ........................................................................................................................................................................... - 15 -
Basic settings............................................................................................................................................................................ - 16 -
Location table .......................................................................................................................................................................... - 16 -
Sunrise, sunset, moonrise and moonset times ...................................................................................................................... - 16 -
Moon phase ............................................................................................................................................................................ - 17 -
Alarm ........................................................................................................................................................................................ - 17 -
Snooze ..................................................................................................................................................................................... - 17 -
Weather forecast .................................................................................................................................................................... - 17 -
Barometer ................................................................................................................................................................................ - 17 -
12-hour air pressure history ................................................................................................................................................... - 18 -
Outdoor sensor/channel setting ........................................................................................................................................... - 18 -
Outdoor temperature tendency ............................................................................................................................................. - 18 -
Indoor humidity ....................................................................................................................................................................... - 18 -
Maximum and minimum values ............................................................................................................................................. - 18 -
Battery level indicator ............................................................................................................................................................. - 18 -
Restart (RESET) ........................................................................................................................................................................ - 18 -
Cleaning instructions ............................................................................................................................................................... - 18 -
Simplified EU declaration of conformity ............................................................................................................................... - 19 -
Disposal of the electronic appliance ..................................................................................................................................... - 19 -
Disposal of the batteries ......................................................................................................................................................... - 19 -
digi-tech gmbh warranty ........................................................................................................................................................ - 19 -
Warranty conditions ............................................................................................................................................................... - 19 -
Warranty period and defects liability ................................................................................................................................... - 19 -
Scope of the warranty ............................................................................................................................................................ - 19 -
Warranty claim procedure .................................................................................................................................................... - 19 -
Order service ........................................................................................................................................................................... - 20 -
Service...................................................................................................................................................................................... - 20 -
Supplier .................................................................................................................................................................................... - 20 -

-
12
-
RADIO-CONTROLLED WEATHER STATION
Introduction
Congratulations on the purchase of your new weather station. You have chosen a high quality product. The instruction
manual is part of the product- it contains important information about safety, use and disposal. Read the manual with all
usage and safety notes before using the weather station. Only use the weather station in the intended way and for the
intended applications. If the weather station is given to someone else, include all documentation with the weather station.
Please keep the packaging and the instruction manual for future reference.
Intended use
This electronic appliance is intended for time display and the described additional features. Any other use or modification
of the electronic appliance does not comply with the intended uses. The manufacturer is not liable for damages caused
by improper use or misuse. The device is not intended for commercial use.
Scope of delivery
Please note: Check the scope of delivery after purchase. Please ensure that all parts are included and undamaged.
•
••
• Weather station
•
••
• 3 x battery 1.5 V AA R6/LR6
•
••
• Outdoor sensor
•
••
• Mount for outdoor sensor
•
••
• 2 x battery 1.5 V AAA R03/LR603
•
••
• Instruction manual
Specifications
Weather station
• Operating temperature 0 – 50 °C
• Temperature display: +/- 1 °C
• Battery: 3 x 1.5 V AA R6 / LR6
Outdoor sensor
• Operating temperature -20 – 50 °C
• Temperature display: +/- 1 °C
• Range: max. 100 m
• Frequency: 433 MHZ
• Transmission power: 0.024 W
• Protection offered by the case (outdoor sensor): IPX4 (Water resistant according to IEC norm 60529)
• Battery: 2 x 1,5 V AAA R03 / LR603
- Symbol for direct current
Important safety information for users
WARNING! RISK OF INJURY!
This device may be used by persons (including children over 8 years of age) with reduced physical, sensory or mental
abilities or lack of experience and knowledge, if they are supervised or instructed regarding the safe use of the device
and understand the dangers that may arise. Children may not play with the device. Cleaning and user maintenance of
the device may not be performed by children without supervision. Keep packaging films out of the hands of children.
There is a danger of suffocation.
Important safety information for the batteries
WARNING!
HEALTH HAZARD!
RISK OF EXPLOSION!
Keep batteries out of reach of small children. If a battery is swallowed, you must seek medical attention immediately.
Batteries/rechargeable batteries must always be inserted in the correct polarity. If necessary, clean the battery and
device contacts. Never attempt to recharge non-rechargeable batteries. Never short-circuit or attempt to open batteries.
Never throw batteries into fire as they may explode.
If the device will not be used for an extended time period, remove the battery and store the device in a dry and dust-free
area. Improper use of the battery can lead to explosion or leakage.
If the battery leaks, avoid contact with skin, eyes and mucous membranes. Use gloves. If you are exposed to battery
acid, rinse the affected areas with plenty of clean water and immediately seek medical attention. Remove discharged
batteries from the device as they present an increased risk of leakage.

-
13
-
Securely placing or mounting the weather station and the outdoor sensor
The weather station with outdoor sensor is not designed for operation in rooms with high humidity (i.e. bathroom). Make
sure that:
• the sensor hangs or stands upright;
• sufficient ventilation is always guaranteed (don’t place the device on shelves or where curtains or furniture block the
ventilation holes, and ensure that there are at least 10 cm of space on all sides);
• the device isn’t placed on a thick carpet or bed during operation, no direct heat sources (i.e. radiators) influence the
device;
• no direct sunlight reaches the device;
• contact with splashing or dripping water must be avoided (don’t place any items filled with liquids, i.e. vases, onto or
next to the device);
• the device doesn’t stand near magnetic fields (i.e. speakers);
• no foreign objects or dust penetrate the housing;
• candles and other open flames must be kept away from this product at all times to prevent the spread of fire
Display and control panel

-
14
-
Outdoor sensor
1 Weather icon 22 Selected channel
2
Air pressure bar
23 Battery indicator
3
Indoor temperature
24 Outdoor temperature
4
Comfort icon
25 Air pressure tendency
5 Indoor humidity 26 CHANNEL-button
6 Moon phase 27 HISTORY/WEATHER-button
7 Moonrise and Moonset 28 °C/°F + button
8 Location 29 MAX/MIN - -button
9 Sunrise and sunset 30 RELATIVE/ABSOLUTE-air pressure-button
10 ALARM/ON/OFF -button 31 SUN/MOON-button
11 -/ -button 32 Hole for wall mounting (Weather station)
12 SNOOZE/LIGHT-button 33 RESET-button
13 Alarm symbol 34 Battery compartment (Weather station)
14 +/12/24-button 35 Foldout stand (Weather station)
15 MODE-button 36 LED indicator (Outdoor sensor)
16 Date (month, day, day of the week) 37 Outdoor temperature / channel (Outdoor sensor)
17 Time display 38 Hole for wall mounting (Outdoor sensor)
18 Radio control indicator 39 Channel selection switch (Outdoor sensor)
19 Air pressure for previous hours 40 Battery compartment (Outdoor sensor)
20 Relative / absolute air pressure 41 °C/°F-button (Outdoor sensor)
21 Outdoor temperature tendency 42 Mount for outdoor sensor
43 Signal from the outdoor sensor

-
15
-
Mounting the outdoor sensor
Two different mounting options are possible with the included sensor mount 42
4242
42. The sensor can be placed on a flat
surface or mounted on a wall or ceiling.
Illustration A
Illustration AIllustration A
Illustration A shows the three indentations that are on each side of the sensor. The sensor can easily be clipped into the
mount using these indentations.
Illustration B
Illustration B Illustration B
Illustration B is a side view, which shows how the mount is attached behind the sensor.
Illustration C
Illustration C Illustration C
Illustration C shows a front view of the sensor with the mount used as a ceiling mount.
Illustration D
Illustration DIllustration D
Illustration D shows a front view of the sensor with the mount used as a stand.
Illustration E
Illustration EIllustration E
Illustration E shows the controls and the battery compartment on the backside of the sensor.
Please note:
Please note: Please note:
Please note: Always hang or stand the sensor upright.
Setup
Remove the protective film from the weather station and the outdoor sensor. Open the battery compartment of the
outdoor sensor 40 and insert the included batteries in the correct polarity. The LED indicator 36 will briefly light up and
the display will show the temperature. Close the battery compartment.
Open the battery compartment of the weather station 34 and insert the included batteries in the correct polarity. Close
the battery compartment. The weather symbol 1
11
1 blinks and the weather station receives the signal from the outdoor
sensor. This process may take several minutes to complete. If reception is successful, the selected channel 22 and the
current outdoor temperature 24 will appear. After successful reception of the signal for the outdoor sensor, the reception
of the DCF77 time signal will begin and the radio control indicator 18 will blink on the display next to the time. All buttons
except the SNOOZE / LIGHT button 12 are disabled during the reception process. If reception fails after 10 minutes,
please set the time manually. The weather station will reattempt reception at 04:00 and 05:00 and, if reception is
successful, will correct the set time.
Note: Please do not move the weather station or the sensor during the reception process.
If the reception attempt is successful, the radio control indicator 18 will appear permanently on the display and the
correct time, date, day of the week and the times of sunrise, sunset, moonrise and moonset will be set automatically. DST
will appear on the display next to the radio control indicator 18 during daylight saving time.
Time zone adjustment
If you are in a country, in which the clock displays the wrong time even though it can receive the time signal, please use
the time zone adjustment to use your weather station in a time zone other than the standard time zone (UTC+1 = Central
European Time). Set the difference in hours (- 01 for example) to the desired time zone.
In normal time display mode, press and hold the MODE
MODEMODE
MODE button 15
1515
15 for 3 seconds. The time zone will blink and can be set
by pressing the -/ -button 11 or the +/12/24 -button 14. Press the MODE-button 15, to confirm your setting.
Restart radio reception after changing this setting. Your weather station receives the DCF77 time signal but will show the
adjusted time (1 hour less for example).
Note: Always hang or place the sensor in an upright orientation.
Reception problems
The DCF77 radio signal is transmitted from a location near Frankfurt am Main and can be received within a radius of
approximately 1500 km around Frankfurt am Main. However, there are some obstacles and sources of interference,
which may substantially hinder reception. If your weather station does not correctly receive the DCF77 radio signal,
please hang or place the weather station in a different location at your site. Please note that devices such as computers,
telephones, radios and televisions may cause electromagnetic radiation which can interfere with the DCF77 signal
reception. Other possible detriments to reception are: strong building insulation (metal building materials), nearby
mountains or atmospheric interference. It may also be necessary to replace the batteries.
Restarting radio signal reception
Manually restart the radio signal reception by pressing and holding the -/ -button 11 for 3 seconds.
Light
Briefly activate the backlight by pressing the SNOOZE/LIGHT-button 12.
12/24-hour time format
Select the 12- or 24 hour time format by pressing the +/12/24 -button 14. AM will appear on the display in the
morning, PM in the afternoon if the 12-hour time format is selected.
Temperature unit
Select the temperature unit Celsius (°C) or Fahrenheit (°F) by pressing the °C/°F+ -button 28.
Speed setting
Press and hold buttons to use the speed setting feature when setting numerical values.
Insert batteries into the outdoor sensor 40 first and then insert batteries into the weather
station 34.

-
16
-
Basic settings
The following values can be set: Time zone, time, date, language of the day of the week display and location.
Press and hold the MODE-button 15 for 3 seconds while in normal time display mode. The time zone will blink and can
be set by pressing the -/ -button 11 or the +/12/24 -button 14. Press the MODE-button 15, to confirm your setting.
Set the hours, minutes, seconds, year, month, day, language of the day of the week display (GE=German, FR=French,
ES=Spanish, IT=Italian, NE=Dutch, DA=Danish, RU=Russian, EN=English), your country and your city (see location table)
in the same way. After changing the location, it will take some time for the weather station to update the times for sunrise,
sunset, moonrise and moonset.
Location table
Germany
GER
Ibiza
IBI
Glasgow
GLA
Eindhoven
EIN
Charleroi
CHA
Aachen
AAC
A Coruña
LAC
London
LON
Enschede
ENS
Liège
LIE
Berlin
BER
Leon
LEO
Manchester
MAN
Groningen
GRO
Switzerland/
Liechtenstein
SWI
Düsseldorf
DUS
Las Palmas
LPA
Plymouth
PLY
The Hague
DHA
Dresden
DRE
Madrid
MAD
Hungary
HUN
Rotterdam
ROT
Basel
BAS
Erfurt
ERF
Malaga
MAL
Budapest
BUD
Portugal
POR
Bern
BER
Frankfurt
FRA
Palma de
Mallorca
PDM
Croatia
CRO
Evora
EVO
Chur
CHU
Flensburg
FLE
Zagreb
ZAG
Coimbra
COI
Geneva
GEN
Freiburg
FRE
Salamanca
SAL
Italy
ITA
Faro
FAR
Locarno
LOC
Hanover
HAN
Seville
SEV
Ancona
ANC
Leiria
LEI
Lucerne
LUC
Bremen
BRE
Valencia
VAL
Bari
BAI
Lisbon
LIS
St. Moritz
MOR
Hamburg
HAM
Zaragoza
ZAR
Bologna
BOL
Porto
POR
St. Gallen
GAL
Rostock
ROS
France
FRA
Cagliari
CAG
Poland
POL
Sion
SIO
Stralsund
STR
Besancon
BES
Catania
CAT
Gdańsk
GDA
Vaduz
VAD
Cologne
KOE
Biarritz
BIA
Florence
FIR
Kraków
KRA
Zürich
ZUE
Kiel
KIE
Bordeaux
BOR
Foggia
FOG
Poznań
POZ
Czech
Republic
CZR
Kassel
KAS
Brest
BRE
Genoa
GEN
Szczecin
SZC
Leipzig
LEI
Cherbourg
CHE
Lecce
LEC
Warsaw
WAR
Prague
PRA
Munich
MUE
Lyon
LYO
Messina
MES
Russia
RUS
Greece
GR
Magdeburg
MAG
Marseille
MAR
Milan
MIL
St. Petersburg
PET
Athens
AT
Nuremberg
NUE
Monaco
MON
Naples
NAP
Sweden
SWE
Cyprus
CY
Regensburg
REG
Metz
MET
Palermo
PAL
Gothenburg
GOT
Nicosia
NI
Stuttgart
STU
Nantes
NAN
Parma
PAR
Stockholm
STO
Romania
RO
Saarbrücken
SAA
Nice
NIC
Perugia
PER
Slovakia
SLK
Bucharest
BU
Schwerin
SCH
Orléans
ORL
Rome
ROM
Bratislava
BRA
Bulgaria
BG
Denmark
DAN
Pairs
PAR
Turin
TOR
Slovenia
SLO
Sofia
SO
Albørg
ALB
Perpignan
PER
Trieste
TRI
Ljubljana
LJU
Arhus
ARH
Lille
LIL
Venice
VEN
Serbia
SRB
Copenhagen
COP
Rouen
ROU
Verona
VER
Belgrade
BER
Odense
ODE
Strasbourg
STR
Ventimiglia
VTG
Austria
AUS
Spain/
Andorra
ESP
Toulouse
TOU
Ireland
IRL
Graz
GRA
Finland
FIN
Dublin
DUB
Innsbruck
INN
Alicante
ALI
Helsinki
HEL
Luxemburg
LUX
Linz
LIN
Andorra AND
Great Britain
GB
Norway
NOR
Salzburg SAL
Badajoz
BAD
Aberdeen
ABD
Bergen
BER
Vienna
VIE
Barcelona
BAR
Belfast
BEL
Oslo
OSL
Belgium
BEL
Bilbao
BIL
Birmingham
BIR
Stavanger
STA
Antwerp
ANT
Cádiz
CAD
Bristol
BRI
Netherlands
NET
Bruges
BRU
Cordoba
COR
Edinburgh
EDI
Amsterdam
AMS
Brussels
BRL
Sunrise, sunset, moonrise and moonset times
After setting your country and city, the weather station will calculate the approximate times for sunrise, sunset, moonrise
and moonset.
Note: The calculated times are approximate. Differences can also result from your local terrain and weather.
Briefly display the approximate number of hours of sunlight for the current day by pressing SUN/MOON-button 31. If
you wish to see the sunrise or sunset times for another location or another date, press and hold the SUN/MOON
SUN/MOONSUN/MOON
SUN/MOON-button
31
3131
31 for 3 seconds. The country will blink and can be selected by pressing the -/ -button 11 or the +/12/24 -button 14.
Confirm your setting by pressing the SUN/MOON-button 31. Set the city, year, month and day in the same way and
confirm each setting by pressing the SUN/MOON-button 31.

-
17
-
Moon phase
Your weather station is equipped with a moon phase display. The 8 phases of the moon are:
New Moon
Full Moon
Waxing Crescent
Waning Gibbous
First Quarter
Third Quarter
Waxing Gibbous
Waning Crescent
Alarm
The weather station has 2 alarms, which can be set separately. Press the MODE-button 15 to select alarm 1 or alarm 2.
The corresponding alarm symbols will appear. When displaying alarm 1 or alarm 2, press and hold the MODE-button
15, to enter setting mode. The hours will blink on the display. Set the hours by pressing the -/ -button 11 or the
+/12/24 -button 14 and confirm your setting by pressing the MODE-Taste 15. Set the minutes in the same way. Press
the ALARM/ON/OFF-button while displaying the alarm you wish to activate. Press the AL/ON/OFF-button 10, to
activate (on) or deactivate (oF) the alarm. If alarm 1 is activated the symbol will appear. If alarm 2 is activate the
symbol will appear. If no button is pressed within 5 seconds, the weather station will return to normal time display
mode.
Snooze
Press the SNOOZE/LIGHT-button 12, to temporarily deactivate the alarm. The bell symbol will blink on the display. After
5 minutes the alarm will sound again. Press any button except button 12 to shut off the alarm.
Weather forecast
Note: The weather station will start the forecast approximately 6 hours after the current weather was entered.
The weather icons show a weather tendency for the next hours and not the current weather.
Should the forecast of your weather station be incorrect, you can adjust the display by pressing and holding the
HISTORY/WEATHER-button 27 for 3 seconds. The weather icon will blink. You can now select the correct weather icon
by pressing the °C/°F + -button 28 or the MAX/MIN- -button 29. Confirm your selection by pressing the
HISTORY/WEATHER-button 27.
Please note: Set rain or downpour if it is snowing. After confirming your setting by pressing the HISTORY/WEATHER-
button 27 the snow symbol will appear if the outdoor temperature is below 0°C.
Sunny
Downpour
Slightly cloudy
Rain
Cloudy
Heavy snowfall
Snow
Barometer
Your weather station can show the air pressure tendency 25.
Air pressure rising
Air pressure constant
Air pressure falling
You can also select absolute or relative air pressure by pressing the Relative/Absolute-button 30. Rel. or Abs. will
appear on the display.
Note: The weather station measures the absolute air pressure. Your local weather service can supply you with the
relative air pressure for your location, which you can input into the weather station.

-
18
-
To change the relative air pressure, press and hold the Relative/Absolute-button 30 for 3 seconds. The air pressure
value will blink on the display and can be set by pressing the °C/°F + -button 28 or MAX/MIN-button 29. Confirm your
setting by pressing the Relative/Absolute-button 30.
Select the air pressure unit Hectopascal (hPa) or Inches of mercury (inHg) by pressing and holding the °C/°F + -button
28 for 3 seconds.
12-hour air pressure history
Press the HISTORY/WEATHER-button 27 to view the air pressure history for the last 12 hours.
0 – HR = current air pressure
- 1 HR = air pressure 1 hour ago
-2 HR = air pressure 2 hours ago... and so on
Outdoor sensor/channel setting
You can use the weather station with up to 3 outdoor sensors at the same time. Open the battery compartment of the
outdoor sensor and select a channel (1-3) by using the channel switch 39. Press and hold the CHANNEL-button 26 for 3
seconds or until an audible signal sounds. The weather station will now attempt to receive the signal 43. Close the battery
compartment. Press the °C/°F-button 41 to select °C-Celsius or °F-Fahrenheit.
Note: The outdoor sensor must be within a maximum distance of 100 m of the weather station with no obstructions.
If you are using mutliple outdoor sensors: Press the CHANNEL-button 26 to select the reception channel.
The rotation symbol on the display at 22 indicates that the weather station is rotating through channels 1-3.
Only active outdoor sensors are displayed. Press and hold the CHANNEL-button 26 to remove unused channels. When
adding an additional outdoor sensor, the weather station will detect it automatically.
Outdoor temperature tendency
The temperature trend 21 is displayed upon successful reception from the outdoor sensor.
Outdoor temperature rising
Outdoor temperature constant
Outdoor temperature falling
Indoor humidity
The current indoor humidity is shown on the display at 5. The comfort icon 4 can show 3 levels of comfort:
< 40 %
DRY
40 – 60 %
COMFORT
> 60 %
HUMID
< 20 °C
/
20 – 26°C
> 26 °C
/
Maximum and minimum values
The maximum and minimum temperature and humidity are stored as soon as the batteries are inserted.
Briefly press the Max/Min- -button 29 to display the maximum MAX, minimum MIN and current indoor temperature 3,
outdoor temperature 24 and humidity 5 on the display. To delete the maximum and minimum values, press and hold the
Max/Min- -button 29 for 3 seconds. An audible signal will sound and the stored values will be deleted. The weather
station will immediately restart recording of the values.
Battery level indicator
If the batteries run too low to power the weather station, the outdoor sensor and signal transmission, the battery level
indicator 23 will appear on the display. Replace the batteries in all devices as soon as possible. Restart the weather
station.
Restart (RESET)
Press the RESET-button 33 to reset the weather station.
Cleaning instructions
Clean the product with a soft, dry and lint-free cloth. A glasses cleaning cloth is ideal.

-
19
-
Simplified EU declaration of conformity
Hereby, digi-tech gmbh declares that the radio equipment type radio-controlled weather station 4-LD4868 is in
compliance with Directives 1999/5/EU et 2014/53/EU. The full text of the EU declaration of conformity is available at
the following internet address: http://www.digi-tech-gmbh.com/ce/289081_WS.pdf
Disposal of the electronic appliance
This weather station may not be disposed of with normal household waste. Dispose of the unit at an approved
disposal facility or at your local recycling centre. Please observe the current rules and regulations when disposing
of the appliance. Contact the disposal system if in doubt.
Disposal of the batteries
Please dispose of your batteries properly in containers especially set up at retailers. Batteries do not belong in
household waste. Dispose of the batteries at an approved disposal facility or at your local recycling centre.
Contact the disposal system if in doubt
digi-tech gmbh warranty
This weather station includes a 3 year warranty starting on the day of purchase. In case of defects of this weather station
you have, by law, certain rights regarding the vendor of the weather station. These rights are not changed by the
warranty which is described in the following paragraphs.
Warranty conditions
The warranty duration starts on the date of purchase. Please keep the receipt in a safe place. The receipt is needed as a
proof of purchase. If a defect occurs in the weather station within 3 years, the weather station will be repaired or
replaced (according to our choice) free of charge. This warranty requires that, within the 3 year warranty period, the
weather station and the receipt can be made available to us along with a short written description of the defect and when
it occured. If the defect is covered by the warranty, you will receive the repaired weather station or a new weather
station. Repair or replacement does not cause the warranty period to restart.
Warranty period and defects liability
The warranty period is not increased by the defect liability. This also applies to repaired or replaced parts. If defects are
noticed at the time of purchase they must be reported immediately upon unpacking the item. Paid repair may be
available after the end of the warranty period.
Scope of the warranty
The weather station was manufactured according to strict quality guidelines and was carefully inspected before delivery.
The warranty does not include parts that experience normal wear and tear and can thus be seen as wear parts or fragile
parts that are damaged. Examples include Switches, Batteries or parts made of glass.
This warranty becomes void if the weather station is damaged, is not used in the recommended way or is improperly
repaired.
For proper use of the weather station all instructions in this manual must be adhered to exactly. Use of the weather station
in a way that is discouraged in the manual must be avoided.
The weather station not intended for commercial use. Abusive or improper use, excessive force and changes that are
made by non-authorized repair centers will void the warranty.
Warranty claim procedure
To ensure that your call is processed in a fast and efficient manner please note the following directions:
• Have your receipt (as proof of purchase) and the article number (289081) handy.
• The article number can be found on the type label, an engraving, the front page of the manual (bottom left) or a
sticker on the back side or bottom side of the case.
• In case defects occur, please first contact the service center (see below) by phone or email.
Visit www.lidl-service.com to download this and many other manuals, product videos and software.

-
20
-
Order service
Additional outside sensors can be ordered by fax +49(0)6198-5770-99 or online at www.inter-quartz.de. The price for
one sensor is 5.00 € excluding VAT and despatch.
Service
Name: Inter-Quartz GmbH
Street: Valterweg 27A
Town: DE-65817 Eppstein
Country: GERMANY
Email: support@inter-quartz.de
Telephone: +49 (0)6198 571825
00800 5515 6616
00800 5515 6616 00800 5515 6616
00800 5515 6616 00800 5515 6616
0800 563862 800 142 315
00800 5515 6616 00800 5515 6616
00800 5515 6616 00800 5515 6616
IAN
289081
Art.
-
Nr.:
4
-
LD4868
Supplier
Please note that the following address is not a service address.
Please first contact the service address (see above).
Name: digi-tech gmbh
Street: Valterweg 27A
Town: DE-65817 Eppstein
Country: GERMANY

-
21
-
Utilisation et avertissements de sécurité
Sommaire
Sommaire ................................................................................................................................................................................. - 21 -
Introduction .............................................................................................................................................................................. - 22 -
Utilisation conforme ................................................................................................................................................................ - 22 -
Contenu de l‘emballage ........................................................................................................................................................ - 22 -
Données techniques ................................................................................................................................................................ - 22 -
Station de base................................................................................................................................................................ - 22 -
Sonde extérieure ............................................................................................................................................................. - 22 -
Avertissements de sécurité pour les utilisateurs
Avertissements de sécurité pour les utilisateursAvertissements de sécurité pour les utilisateurs
Avertissements de sécurité pour les utilisateurs .............................................................................................................. - 22 -
Avertissements de sécurité pour les piles
Avertissements de sécurité pour les pilesAvertissements de sécurité pour les piles
Avertissements de sécurité pour les piles ......................................................................................................................... - 22 -
Accrochez ou posez votre station à un endroit sûr ............................................................................................................. - 23 -
Écran et panneau de commande .......................................................................................................................................... - 23 -
Sonde extérieure ..................................................................................................................................................................... - 24 -
Fixation du sonde extérieur .................................................................................................................................................... - 25 -
Mise en service........................................................................................................................................................................ - 25 -
Réglage du fuseau horaire..................................................................................................................................................... - 25 -
Perturbations dans la réception du signal radio .................................................................................................................. - 25 -
Réactiver la recherche du signal radio horaire ................................................................................................................... - 25 -
Rétroéclairage ......................................................................................................................................................................... - 25 -
Format horaire 12/24 ........................................................................................................................................................... - 25 -
Température............................................................................................................................................................................. - 25 -
Réglage rapide ....................................................................................................................................................................... - 26 -
Réglage de base ..................................................................................................................................................................... - 26 -
Tableau de villes/Localisation .............................................................................................................................................. - 26 -
Heures de lever et de coucher du soleil et de la lune ......................................................................................................... - 26 -
Les phases de la lune .............................................................................................................................................................. - 27 -
Alarme réveil ........................................................................................................................................................................... - 27 -
Répétition de l‘alarme (SNOOZE)........................................................................................................................................ - 27 -
Prévisions météo ...................................................................................................................................................................... - 27 -
Baromètre ................................................................................................................................................................................ - 27 -
Pression atmosphérique des 12 dernières heures ............................................................................................................... - 28 -
Sonde extérieure/Réglage du canal de transmission ........................................................................................................ - 28 -
Evolution de la température extérieure ................................................................................................................................. - 28 -
Hygrométrie intérieure ............................................................................................................................................................ - 28 -
Valeurs maximales et minimales ............................................................................................................................................ - 28 -
Indicateur de piles faibles ...................................................................................................................................................... - 28 -
Redémarrage (RESET) ............................................................................................................................................................ - 29 -
Conseils d‘entretien................................................................................................................................................................. - 29 -
Declaration UE de conform ite simplifiée ............................................................................................................................. - 29 -
Evacuation de l‘appareil ........................................................................................................................................................ - 29 -
Evacuation des piles ............................................................................................................................................................... - 29 -
Logo TRIMAN ......................................................................................................................................................................... - 29 -
Garantie de digi-tech gmbh .................................................................................................................................................. - 29 -
Conditions de garantie ........................................................................................................................................................... - 29 -
Durée de la garantie et recours légaux en cas de défauts ................................................................................................. - 29 -
Couverture de la garantie ...................................................................................................................................................... - 30 -
Procédure dans un cas de garantie ...................................................................................................................................... - 30 -
Service de commande pour sondes ...................................................................................................................................... - 31 -
Service Après Vente ................................................................................................................................................................ - 31 -
Fournisseur ............................................................................................................................................................................... - 31 -

-
22
-
STATION MÉTÉO RADIO-GUIDÉE
Introduction
Cher Client, merci de votre achat. Avec cette station météorologique radio-pilotée de haute qualité, vous avez fait un
bon choix. Le mode d’emploi est partie constituante de cet appareil. Il comporte des consignes importantes pour la
sécurité, l’utilisation et l’évacuation de votre appareil. Il convient de se familiariser avec toutes les instructions du mode
d’emploi avant de se servir de l’appareil. N’utilisez cet appareil que dans le cadre décrit et aux fins d’utilisation
prescrites dans le mode d’emploi. En cas de transmission de l’appareil à un tiers, veuillez lui remettre tous les documents
y relatifs. Veuillez SVP conserver emballage et mode d'emploi pour d'éventuelles demandes d'informations ultérieures
Utilisation conforme
Cette station météorologique a été conçue pour afficher l’heure et remplir les fonctions supplémentaires décrites dans le
mode d’emploi. Toute autre utilisation ou modification de cet appareil sera considérée comme non conforme. Le
fabricant ne pourra être tenu responsable d’un dommage causé par l’utilisation non conforme ou inappropriée de
l’appareil. Cette station météorologique n’est pas destinée à des fins d’utilisation commerciale.
Contenu de l‘emballage
Remarque: Veuillez SVP vérifier le contenu de l’emballage dès votre achat. Assurez-vous que toutes les pièces listées
ci-dessous sont bien présentes et en bon état.
•
••
• Station météorologique
•
••
• 3 x piles à 1,5 V AA R6/LR6
•
••
• Sonde extérieure
•
••
• Support pour sonde extérieur
•
••
• 2 x piles à 1,5 V AAA R03/LR03
•
••
• Mode d‘emploi
Données techniques
Station de base
• Température de service : 0 °C à 50 °C
• Affichage température : +/- 1 °C
• Piles : 3 x 1,5 V AA R6 / LR6
Sonde extérieure
• Température de service : -20 °C à 50 °C
• Affichage température : +/- 1 °C
• Portée : max. 100 m
• Fréquence : 433 MHZ
• Puissance d’émission : 0,024 W
• Mode de protection par boîtier (Sonde extérieure) :
IPX4 (Résistance aux éclaboussures conf. Norme IEC 60529)
• Piles : 2 x 1,5 V AAA R03/LR03
- Symbole pour courant continu
Avertissements de sécurité pour les utilisateurs
ATTENTION ! RISQUE DE BLESSURE !
Cet appareil peut être utilisé par des personnes dont les capacités physiques, sensorielles ou intellectuelles sont
restreintes ou limitées par un manque d’expérience ou de connaissances (les enfants à partir de 8 ans compris), si elles
ont été placées sous la surveillance d’une personne ou si elles ont reçu les instructions nécessaires à l’utilisation sûre de
cet appareil et si elles sont en mesure de comprendre les dangers possibles. Les enfants ne doivent pas jouer avec cet
appareil. Le nettoyage et l’entretien de l’appareil ne doivent pas être effectués par un enfant sans la surveillance d’un
adulte. Eloignez également les enfants des films d’emballage, il y a danger d’étouffement.
Avertissements de sécurité pour les piles
ATTENTION !
DANGEREUX POUR LA SANTÉ !
DANGER D’EXPLOSION !
Conservez vos piles hors de portée de jeunes enfants. En cas d’avalement d’une pile, il faut consulter un médecin
immédiatement. Les piles/accus doit être mis dans le bon sens (respect des polarités). Nettoyez les contacts des piles et
appareils avant. N’essayez pas de recharger des piles, de les court-circuiter ou de les ouvrir. Ne jetez jamais de piles
dans le feu car il y a danger d’explosion. Si vous n’utilisez pas cet appareil pendant un certain temps, retirez-en les piles
et conservez-le à un endroit sec et à l’abri de la poussière. En cas d‘utilisation mal appropriée des piles/accus, il y a
danger d’explosion et d’écoulement. Si une pile devait avoir coulé, évitez tout contact avec la peau, les yeux et les
muqueuses. Mettez des gants. En cas de contact avec l’acide des piles, rincez abondamment les parties touchées à l’eau
claire et consultez immédiatement un médecin. Des piles usées doivent être retirées immédiatement de l’appareil : danger
d’écoulement accru.

-
23
-
Accrochez ou posez votre station à un endroit sûr
Cet appareil (station de base et sonde extérieure) n‘a pas été conçu pour servir dans une pièce très humide (une salle de
bains, par ex.). Veuillez SVP veiller à ce que :
• la sonde soit posée ou suspendue debout ;
• à ce que la pièce où est utilisé l‘appareil soit toujours suffisamment aérée (ne le placez pas dans une étagère ou à un
endroit où des rideaux ou des meubles pourraient entraver la fonctionnalité des fentes d’aération, et prévoyez au
moins 10 cm d’écartement de tous côtés entre l‘appareil et tout autre objet;
• à ce que l’appareil en service ne soit pas posé sur un tapis épais ou un lit et à ce que celui-ci ne soit pas exposé à une
source de chaleur directe (un radiateur, par ex.);
• à ce que l‘appareil ne soit pas exposé au soleil direct;
• à le protéger de toutes nuisances éventuelles par éclaboussures ou gouttes d’eau;
• à l‘éloigner de tout champ magnétique éventuel (un haut-parleur, par ex.);
• à ce qu’il n’y ait aucune intrusion de corps étranger ou infiltration de poussière dans l‘appareil;
• à tenir l’appareil éloigné à tout moment de toute bougie ou autre flamme ouverte, afin d’empêcher la propagation
d’un incendie.
Écran et panneau de commande

-
24
-
Sonde extérieure
1 Icônes météo 22 Affichage du canal sélectionné
2
Colonnes de pression atmosphérique
23 Affichage piles failes
3
Température intérieure
24 Température extérieure
4
Icône confort thermique
25 Tendance pression atmosphérique
5 Hygrométrie intérieure 26 Touche CHANNEL
6 Phase lunaire 27 Touche HISTORY/WEATHER
7 Icône Lever/coucher de lune 28 Touche °C/°F +
8 Localisation/Ville 29 Touche MAX/MIN -
9 Icône Lever/coucher de soleil 30
Touche RELATIVE/ABSOLUTE (press. atmosph.)
10 Touche ALARM/ON/OFF 31 Touche SUN/MOON (soleil/lune)
11 Touche -/ 32 Dispositif d’accrochage (Station de base)
12 Touche SNOOZE/LIGHT 33 Touche RESET
13 Icône Alarme réveil 34 Compartiment à piles (Station de base)
14 Touche +/12/24 35 Pied à déplier de la station de base
15 Touche MODE 36 DEL de contrôle (sonde extérieur)
16 Date (Mois, Jour, Jour de la semaine) 37
Canal de transmission temp. extérieure
(sonde
extérieur)
17 Affichage Heure 38 Dispositif d‘accrochage (sonde extérieur)
18 Affichage signal radio horaire 39
Bouton sélection du canal de transmission
(sonde extérieur)
19 Pression atmosph.
des dernières heures
40 Compartiment à piles (sonde extérieur)
20 Pression atmosph. relative/absolue 41 Touche °C/°F (sonde extérieur)
21 Tendance température extérieure 42 Support pour sonde extérieur
43 Signal de la sonde

-
25
-
Fixation du sonde extérieur
Le support du sonde
42
4242
42 inclus dans la livraison offre diverses options de fixation. Le sonde extérieur peut se suspendre ou
se poser selon les besoins.
L’illustration A montre 3 rainures se trouvant des deux côtés du sonde. Ainsi, le sonde peut s’emboîter facilement dans le
support.
L’illustration B offre une vue latérale et montre comment le support est fixé au dos du sonde.
L’illustration C offre une vue frontale du sonde et du support lors d’une fixation en suspension.
L’illustration D offre une vue frontale du sonde et du support lors d’une fixation au sol sur le pied.
L’illustration E montre le panneau de commande et le logement de la batterie au dos du sonde.
Remarque : Placez le sonde extérieur uniquement en position verticale.
Mise en service
Retirez le film protecteur de la station de base et de la sonde extérieure. Ouvrez le compartiment à piles de la sonde
(40) et mettez-y les piles livrées avec l’appareil en en respectant les polarités. Le voyant de contrôle (36) s’allume
brièvement et la température s‘affiche sur l’écran de la sonde. Refermez le compartiment à piles. Ouvrez le compartiment
à piles de la station de base (34) et mettez-y les piles livrées avec l’appareil en en respectant les polarités. Refermez le
compartiment à piles. L’icône météo (1) clignote et la station météo reçoit alors le signal du sonde extérieur. Cette
procédure peut durer quelques minutes. Quand la connexion est établie, le canal sélectionné s’affiche (22) et la
température actuelle de la sonde apparaît (24). Cette procédure terminée, la station active la recherche du signal radio
horaire DCF77 et la tour radio clignote sur l’écran, à côté de l’affichage de l‘heure (18). Cette procédure peut prendre
3 à 10 mn. Pendant la recherché du signal radio horaire, aucune touche de la station n’est active, sauf la touche
SNOOZE / LIGHT (12). Si la recherche du signal radio ne devait pas aboutir au bout de 10 mn, mettez votre station à
l’heure manuellement. Celle-ci activera une nouvelle tentative de réception à 04:00 h et à 05:00 h et corrigera l’heure
automatiquement à la réception du signal.
Remarque: Prière de ne pas changer les appareils de place (ni la station ni la sonde) pendant une recherche.
Quand la recherche du signal radio a abouti, la tour radio (18) apparaît fixe sur l’écran de la station de base et toutes
ces données s’affichent automatiquement sur l’écran: l’heure actuelle, la date, le jour de la semaine, l’heure du lever et
du coucher du soleil et de la lune ainsi que la phase lunaire. Pendant l’heure d’été, la mention DST s’affiche à côté de la
tour radio (18).
Réglage du fuseau horaire
Si vous vous trouvez dans un pays dont l'heure actuelle diffère de l'heure du signal DCF77, modifiez le fuseau horaire.
Utilisez la fonction de réglage du fuseau horaire pour vous servir du station dans un autre pays/sous un autre fuseau
horaire que celui du format standard (UTC + 1 = Heure en Europe Centrale). Entrez la différence en heures (-01, par ex.)
entre le format standard et le fuseau horaire souhaité.
Dans l’affichage normal, appuyez sur la touche MODE (15) maintenez-la pendant 3 secondes. Le fuseau horaire
clignote et peut se régler avec la touche -/ (11) ou la touche +/12/24 (14). Appuyez sur la touche MODE (15)
pour confirmer le réglage.
Ensuite, réactivez la recherche du signal radio horaire. Votre station capte le signal radio horaire DCF77, mais n'affiche
pas l'heure corrigée voulue (1 heure de moins, par ex.)
Perturbations dans la réception du signal radio
Le signal radio horaire DCF77 est émis à partir de la région de Francfort sur le Main, celui-ci peut être capté dans un
rayon d’env. 1500 km autour de Francfort/M. Toutefois, certains facteurs peuvent perturber considérablement la
réception du signal. Au cas où votre base ne capterait pas bien le signal radio horaire, accrochez-la ou placez-la à un
autre endroit et tenez compte du fait que, à proximité d’un ordinateur, d’un poste de télephone, de radio ou de
télévision, votre station sera éventuellement exposée au rayonnement électromagnétique qui se dégage de ces appareils
et qui peut perturber la réception du signal DCF77. D’autres sources de perturbations possibles sont certains éléments
épais d’isolation utilisés dans le bâtiment (éléments de construction métalliques), montagnes élevées ou perturbations
atmosphériques. Procédez éventuellement à un changement de piles.
Réactiver la recherche du signal radio horaire
La recherche du signal radio horaire peut être réactivée manuellement par une pression prolongée (3 secondes) de la
touche -/ (11).
Rétroéclairage
Pour activer provisoirement le rétroéclairage de l’écran, appuyez sur la touche SNOOZE/LIGHT (12).
Format horaire 12/24
Pour choisir le format voulu (en 12 ou 24 heures), appuyez sur la touche +/12/24 (14). En mode de format en 12
heures, la mention AM s’affiche sur l’écran le matin et PM l’après-midi.
Température
Pour afficher la température en degrés Celsius ou en degrés Fahrenheit, appuyez sur °C/°F+ (28).
Activez d’abord la sonde extérieure (40), puis la station de base (34) en y mettant
respectivement des piles.

-
26
-
Réglage rapide
Pour accélérer l’entrée de valeurs numériques, appuyez sur les touches en les maintenant enfoncées.
Réglage de base
Ces paramètres sont réglables manuellement: fuseau horaire, heure, date, langue d’affichage du jour de la semaine et
localisation (votre ville). En mode d’affichage normal de l‘heure, appuyez sur la touche MODE (15) et maintenez-la
enfoncée 3 secondes, l’option d’entrée du fuseau horaire clignote, on réglera le fuseau horaire avec la touche -/
(11) ou la touche +/12/24 (14). Appuyez sur la touche MODE (15) pour confirmer vos données. On réglera de la
même manière: les heures, les minutes et les secondes, l‘année, le mois, le jour et la langue d’affichage du jour de la
semaine (GE=allemand, FR=français, ES=espagnol, IT=italien, NE=néerlandais, DA=danois, RU=russe, EN=anglais), le
pays et l’emplacement de service (voir le Tableau des villes plus bas). Si vous deviez changer de lieu, laissez un peu de
temps à votre station pour afficher les nouvelles heures de lever et de coucher de la lune et du soleil.
Tableau de villes/Localisation
Allemagne
G
ER
Ibiza
IBI
Glasgow
GLA
Eindhoven
EIN
Charleroi
CHA
Aachen
AAC
La Coruña
LAC
London
LON
Enschede
ENS
Lüttich
LIE
Berlin
BER
León
LEO
Manchester
MAN
Groningen
GRO
Suisse/
Liechtenstein
SWI
Düsseldorf
DUS
Las Palmas
LPA
Plymouth
PLY
Den Haag
DHA
Dresden
DRE
Madrid
MAD
Hongrie
HUN
Rotterdam
ROT
Basel
BAS
Erfurt
ERF
Málaga
MAL
Budapest
BUD
Portugal
POR
Bern
BER
Frankfurt
FRA
Palma
de
Mallorca
PDM
Croatie
CRO
Èvora
EVO
Chur
CHU
Flensburg
FLE
Zagreb
ZAG
Coimbra
COI
Genf
GEN
Freiburg
FRE
Salamanca
SAL
Italie
ITA
Faro
FAR
Locarno
LOC
Hannover
HAN
Sevilla
SEV
Ancona
ANC
Leiria
LEI
Luzern
LUC
Bremen
BRE
Valencia
VAL
Bari
BAI
Lisboa
LIS
St. Moritz
MOR
Hamburg
HAM
Zaragossa
ZAR
Bologna
BOL
Porto
POR
St. Gallen
GAL
Rostock
ROS
France
FRA
Cagliari
CAG
Pologne
POL
Sitten
SIO
Stralsund
STR
Besançon
BES
Catania
CAT
Danzig
GDA
Vaduz
VAD
Köln
KOE
Biarritz
BIA
Florenz
FIR
Krakau
KRA
Zürich
ZUE
Kiel
KIE
Bordeaux
BOR
Foggia
FOG
Posen
POZ
Tchéquie CZR
Kassel
KAS
Brest
BRE
Genua
GEN
Stettin
SZC
Leipzig
LEI
Cherbourg
CHE
Lecce
LEC
Warschau
WAR
Prag
PRA
München
MUE
Lyon
LYO
Messina
MES
Russie
RUS
Grèce
GR
Magdeburg
MAG
Marseille
MAR
Mailand
MIL
St. Petersburg
PET
Athen
AT
Nürnberg
NUE
Monaco
MON
Neapel
NAP
Suède
SWE
Chypre
CY
Regensburg
REG
Metz
MET
Palermo
PAL
Göteborg
GOT
Nikosia
NI
Stuttgart
STU
Nantes
NAN
Parma
PAR
Stockholm
STO
Roumanie
RO
Saarbrücken
SAA
Nice
NIC
Perugia
PER
Slovaquie
SLK
Bukarest
BU
Schwerin
SCH
Orléans
ORL
Roma
ROM
Bratislava
BRA
Bulgarie
BG
Danemark
DAN
Paris
PAR
Turin
TOR
Slovénie
SLO
Sofia
SO
Aalborg
ALB
Perpignan
PER
Triest
TRI
Ljubljana
LJU
Aarhus
ARH
Lille
LIL
Venedig
VEN
Serbie
SRB
Copenhagen
COP
Rouen
ROU
Verona
VER
Belgrad
BER
Odense
ODE
Strasbourg
STR
Ventimiglia
VTG
Autriche
AUS
Espagne/
Andorre
ESP
Toulouse
TOU
Irlande
IRL
Graz
GRA
Finlande
FIN
Dublin
DUB
Innsbruck
INN
Alicante
ALI
Helsinki
HEL
Luxemburg
LUX
Linz
LIN
Andorra AND
Grande
-
Bretagne
GB Norvège NOR
Salzburg SAL
Badajoz
BAD
Aberdeen
ABD
Bergen
BER
Wien
VIE
Bacelona
BAR
Belfast
BEL
Oslo
OSL
Belgique
BEL
Bilbao
BIL
Birmingham
BIR
Stavanger
STA
Antwerpen
ANT
Cádiz
CAD
Bristol
BRI
Pays
-
Bas
NET
Brügge
BRU
Còrdoba
COR
Edinburgh
EDI
Amsterdam
AMS
Brüssel
BRL
Heures de lever et de coucher du soleil et de la lune
Le réglage du pays et de l’emplacement (localisation) terminés, votre station de base calculera les heures
approximatives du lever et du coucher du soleil et de la lune à votre emplacement.
Remarque: Les horaires calculés ne sont que des valeurs d‘orientation. Des différences peuvent apparaître selon les
conditions de terrain et le temps qu’il fait là où vous êtes, par ex.
Pour afficher provisoirement le nombre approximatif d’heures d‘ensoleillement pour la journée actuelle, appuyez sur la
touche SUN/MOON (31). Lorsque vous souhaitez consulter les couchés et levés du soleil ou de la lune d’un autre
endroit ou à une autre date, appuyez la touche SUN/MOON (31) et maintenez-la pendant 3 secondes. L’option pays
se met à clignoter, le réglage est alors possible avec la touche -/ (11) ou la touche 12/24 + (14). Confirmez votre
donnée par une brève pression de la touche SUN/MOON (31).
On réglera de la même manière: la ville, l'année, le mois et le jour, appuyez sur la touche SUN/MOON (31) pour
confirmer vos données.

-
27
-
Les phases de la lune
Votre station météo est dotée d’un afficheur des phases lunaires. Les 8 phases lunaires s’affichent ainsi:
Nouvelle lune
Pleine lune
Premier Croissant
Lune gibbeuse
Demi-lune (Premier quartier)
Demi-lune (Dernier quartier)
Lune gibbeuse
Dernier croissant
Alarme réveil
Votre station météo dispose de deux alarmes réglables séparément.
Pour choisir une alarme réveil, Alarm 1 ou Alarm 2, appuyez sur la touche MODE (15). L’icône correspondante à
l’alarme choisie s’affiche sur l’écran, En mode d’affichage Alarm 1 ou Alarm 2, appuyez sur la touche MODE (15) et
maintenez enfoncé pour accéder au mode de réglage correspondant. Les heures de l’alarme choisie se mettent à
clignoter sur l’écran. Réglez les heures en appuyant sur -/ (11) ou sur +/12/24 (14) et confirmez en appuyant sur
MODE (15). Entrez les minutes de la même manière. Pour activer ou désactiver le signal sonore des alarmes, appuyez
sur la touche ALARM/ON/OFF (10) en mode d’affichage de l’alarme voulue, (on) s’affiche sur l’écran quand l’alarme
choisie est active, (oF) quand vous l’avez désactivée. Quand Alarm 1 est active s’affiche cette icône: , pour Alarm 2
s’affiche: . Votre station repasse automatiquement à l’affichage normal de l’heure au bout de 5 secondes sans
pression de touche.
Répétition de l‘alarme (SNOOZE)
Pour interrompre provisoirement le signal sonore d’une alarme, appuyez sur la touche SNOOZE/LIGHT (12) pendant
la sonnerie, la clochette affichée se met à clignoter sur l‘écran. La sonnerie reprend au bout de 5 mn. Pour la désactiver
et l’arrêter définitivement, appuyez sur n'importe quelle touche sauf la touche 12.
Prévisions météo
Remarque : La station météorologique débute les prévisions météo env. 6 heures après la saisie du temps actuel.
Les icônes météo indiquent une tendance météorologique pour les heures à venir et non le temps actuel.
Si une prévision ne devait pas correspondre au temps qu’il a fait plus tard, rectifiez l’affichage de l’icône météo en
appuyant sur la touche HISTORY/WEATHER (27) et en la maintenant enfoncée 3 secondes. L’icône météo clignote.
Choisissez alors l’icône correspondant à votre temps actuel en appuyant sur la touche °C/°F + (28) ou sur MAX/MIN-
(29). Pour confirmer, appuyez sur HISTORY/WEATHER (27).
Remarque : En cas de chute de neige, réglez sur pluie ou averse. En confirmant avec la touche HISTORY/WEATHER
(27) s’affiche l’icône de chute de neige par des températures au-dessous de 0 °C.
Ensoleillé
Pluie torrentielle
Légèrement nuageux
Pluvieux
Nuageux
Abondante chute de neige
Chute de neige
Baromètre
Votre station météo peut aussi afficher l’évolution de la pression atmosphérique (25).
Pression atmosphérique à la hausse
Pression atmosphérique constante
Pression atmosphérique à la baisse
On peut aussi au choix afficher la pression atmosphérique absolue ou relative; pour sélectionner le mode d’affichage
voulu, appuyez sur la touche Relative/Absolute- (30). Sur l’écran s’affiche Rel. ou Abs.

-
28
-
Remarque: Votre station mesure la pression atmosphérique absolue. Pour connaître la pression atmosphérique
relative de votre région, adressez-vous à votre service météorologique local.
Il est possible de corriger l’affichage de la pression atmosphérique relative en appuyant sur la touche Relative/Absolute
(30) et en la maintenant enfoncée 3 secondes. La valeur de la pression atmosphérique clignote et peut alors être rectifiée
à l’aide de la touche °C/°F + (28) ou de la touche MAX/MIN (29). Confirmez par pression de la touche
Relative/Absolute (30).
Pour choisir le format d'affichage de la pression atmosphérique en Hectopascal (hPa) ou en Inches of mercury (inHg),
appuyez sur °C/°F+ (28) et maintenez-la enfoncée 3 secondes.
Pression atmosphérique des 12 dernières heures
Appuyez sur la touche HISTORY/WEATHER (27) pour consulter les valeurs de pression atmosphérique des 12
dernières heures
0 – HR = Pression atmosphérique actuelle
- 1 HR = Pression atmosphérique 1 heure plus tôt
-2 HR = Pression atmosphérique 2 heures plus tôt, etc.
Sonde extérieure/Réglage du canal de transmission
Il est possible avec cet appareil d’utiliser trois sondes extérieures en même temps. Pour activer le canal de transmission
voulu (de 1 à 3), ouvrez le compartiment à piles de votre sonde et réglez avec le bouton de sélection (39). Appuyez
ensuite sur la touche CHANNEL (26) de votre station de base et maintenez enfoncé 3 secondes jusqu’au signal sonore,
votre station est réceptive au signal de la sonde (43). Refermez le couvercle de la sonde. On pourra choisir d’afficher la
température en degrés Celsius ou en degrés Fahrenheit (°C / °F) à l’aide de la touche (41).
Remarque: La sonde ne doit pas être placée à plus de 100 m de la station de base (pas d’obstacle).
Si vous utilisez plusieurs sondes extérieures: Pour passer de l’affichage d’un canal de réception à l’autre, appuyez sur la
touche CHANNEL de votre station de base (26) en mode d’affichage normal de l’heure. L’icône de rotation alors
affichée (22) indique le passage automatique d’un canal à l’autre. Seules les sondes connectées sont affichées. Pour
effacer des canaux non utilisés, appuyez sur la touche CHANNEL (26) et maintenez-la enfoncée. Si vous connectez une
sonde supplémentaire à votre station, celle-ci la reconnaîtra automatiquement.
Evolution de la température extérieure
La tendance de la température extérieure (21) s’affiche si la sonde extérieure est bien reçue par la station.
Température extérieure en hausse
Température extérieure constante
Température extérieure en baisse
Hygrométrie intérieure
La valeur hygrométrique intérieure actuelle s’affiche sur l’écran en pos. 5 (voir fig.). Le confort thermique en pos. 4
affiche l’humidité de l’air ambiant en 3 catégories:
< 40 %
AIR SEC
40 – 60 %
CONFORT
> 60 %
AIR HUMIDE
< 20 °C
/
20 – 26°C
> 26 °C
/
Valeurs maximales et minimales
Les valeurs maximales et minimales de température et d’hygométrie sont mémorisées dès la mise en service des appareils
(installation des piles).
Pour afficher et consulter les températures intérieures (3) et extérieures (24) maximales MAX ou minimales MIN ainsi que
les valeurs d’hygrométrie (5) actuelles, appuyez brièvement sur la touche Max/Min- (29). Pour effacer les valeurs
maximales et minimales, appuyez sur la touche Max/Min- (29) et maintenez enfoncé env. 3 secondes. Un signal sonore
se fait entendre, les valeurs sont effacées et votre station recommence à zéro pour mémoriser de nouvelles valeurs.
Indicateur de piles faibles
Quand les piles de vos appareils, station de base et sonde extérieure, sont devenues trop faibles pour assurer leur bon
fonctionnement et la transmission des données, l’indicateur de piles faibles s’affiche sur l’écran en pos. 23. Dans ce cas,
il faudra changer les piles des deux appareils rapidement. Redémarrez alors votre station météo.

-
29
-
Redémarrage (RESET)
Pour remettre les données votre base à zéro, appuyez sur la touche RESET (33).
Conseils d‘entretien
Nettoyez la station et les sondes en utilisant seulement un chiffon sec ne faisant pas de peluches, comme les chiffonnettes
utilisées pour l’entretien des verres de lunettes, par ex.
Declaration UE de conform ite simplifiée
Le soussigné, digi-tech gmbh, déclare que du type station météo radioguidée 4-LD4868 est conforme à les directives
1999/5/UE et 2014/53/EU. Le texte complet de la déclaration UE de conformité est disponible à l'adresse internet
suivante: http://www.digi-tech-gmbh.com/ce/289081_WS.pdf
Evacuation de l‘appareil
Cette station météorologique ne doit pas être jetée avec les ordures ménagères. Faîtes évacuer votre appareil par
une entreprise de traitement de déchets agréée ou évacuez-le dans votre déchèterie municipale. Respectez les
directives d’évacuation en vigueur. En cas de doute, demandez conseil auprès de votre déchèterie municipale.
Evacuation des piles
Evacuation adéquate des piles usagées dans les conteneurs mis à votre disposition dans les points de vente. Ne
jetez jamais de piles avec des ordures ménagères. Evacuez-les par l’intermédiaire d’un prestataire agréé ou
dans votre déchèterie municipale. Respectez les directives d’évacuation en vigueur. En cas de doute,
demandez conseil auprès de votre déchèterie municipale.
Logo TRIMAN
Ce produit est recyclable, il est soumis à un dispositif de responsabilité élargie du producteur et de collecte
séparée.
Garantie de digi-tech gmbh
Vous recevez une garantie de 3 ans à partir de la date d’achat de cet appareil. En cas de défauts sur cet appareil, vous
bénéficiez de recours légaux contre le vendeur du produit. Ces droits légaux ne sont pas limités par notre garantie
décrite ci-après.
Conditions de garantie
La période de garantie commence à partir de la date de l‘achat. Veuillez conserver soigneusement votre ticket de caisse
en original. Ce document est nécessaire comme preuve d‘achat. En cas de vice dû à un défaut de matériel ou de
fabrication révélé au cours de la période de garantie, soit pendant 3 ans à partir de la date de l‘achat, nous réparons ou
remplaçons – à notre choix – gratuitement votre produit défectueux. La prestation de garantie présuppose la restitution
du produit réclamé ainsi que la fourniture d’une preuve d’achat (ticket de caisse) pendant la période de garantie
convenue de 3 ans, accompagnée d’une courte description écrite du défaut avec indication de la date à laquelle celui-ci
s’est révélé. Si ce vice est couvert par la garantie du produit, nous vous renverrons ce produit réparé ou un produit neuf.
La période de garantie n’est pas prolongée par une réparation ou un échange.
Durée de la garantie et recours légaux en cas de défauts
La durée de la garantie n’est pas allongée suite à la prise en charge. Cela vaut aussi pour les pièces remplacées ou
réparées. Les dommages ou défauts éventuels apparus dès l’achat doivent être notifiés dès le déballage. Après
expiration de la durée de la garantie, les réparations sont payantes.
• Article L211-16 du Code de la consommation
Lorsque l‘acheteur demande au vendeur, pendant le cours de la garantie commerciale qui lui a été consentie lors de
l‘acquisition ou de la réparation d‘un bien meuble, une remise en état couverte par la garantie, toute période
d‘immobilisation d‘au moins sept jours vient s‘ajouter à la durée de la garantie qui restait à courir. Cette période
court à compter de la demande d‘intervention de l‘acheteur ou de la mise à disposition pour réparation du bien en
cause, si cette mise à disposition est postérieure à la demande d‘intervention.
• Indépendamment de la garantie commerciale souscrite, le vendeur reste tenu des défauts de conformité du bien et
des vices rédhibitoires dans les conditions prévues aux articles L211-4 à L211-13 du Code de la consommation et
aux articles 1641 à 1648 et 2232 du Code Civil.
• Article L211-4 du Code de la consommation
Le vendeur est tenu de livrer un bien conforme au contrat et répond des défauts de conformité existant lors de la
délivrance. Il répond également des défauts de conformité résultant de l‘emballage, des instructions de montage ou
de l‘installation lorsque celle-ci a été mise à sa charge par le contrat ou a été réalisée sous sa responsabilité.
• Article L211-5 du Code de la consommation
Pour être conforme au contrat, le bien doit :
1° Etre propre à l‘usage habituellement attendu d‘un bien semblable et, le cas échéant :
- correspondre à la description donnée par le vendeur et posséder les qualités que celui-ci a présentées à l‘acheteur
sous forme d‘échantillon ou de modèle ;
- présenter les qualités qu‘un acheteur peut légitimement attendre eu égard aux déclarations publiques faites par le
vendeur, par le producteur ou par son représentant, notamment dans la publicité ou l‘étiquetage ;

-
30
-
2° Ou présenter les caractéristiques définies d‘un commun accord par les parties ou être propre à tout usage
spécial recherché par l‘acheteur, porté à la connaissance du vendeur et que ce dernier a accepté.
• Article L211-12 du Code de la consommation
L‘action résultant du défaut de conformité se prescrit par deux ans à compter de la délivrance du bien.
• Article 1641 du Code civil
Le vendeur est tenu de la garantie à raison des défauts cachés de la chose vendue qui la rendent impropre à l‘usage
auquel on la destine, ou qui diminuent tellement cet usage que l‘acheteur ne l‘aurait pas acquise, ou n‘en aurait
donné qu‘un moindre prix, s‘il les avait connus.
• Article 1648 1er alinéa du Code civil
L‘action résultant des vices rédhibitoires doit être intentée par l‘acquéreur dans un délai de deux ans à compter de la
découverte du vice.
• Les pièces détachées indispensables à l’utilisation du produit sont disponibles pendant la durée de la garantie du
produit.
Couverture de la garantie
L’appareil a été fabriqué avec soin selon de strictes directives de qualité et a fait l’objet de tests scrupuleux avant
livraison. La garantie couvre les défauts de matériel ou de fabrication. Cette garantie ne s’étend pas aux pièces qui sont
soumises à une usure normale et qui peuvent donc être considérées comme des pièces d’usure ou pour les détériorations
sur les pièces fragiles, par ex. interrupteur, batteries ou les pièces qui sont en verre.
Cette garantie s’annule si l’appareil a été endommagé, utilisé ou entretenu de façon non-conforme. Pour une utilisation
conforme du produit, les consignes détaillées dans la notice d’utilisation doivent être respectées scrupuleusement. Des
utilisations ou des manipulations, qui ont fait l’objet de contre-indications ou bien de mises en garde dans la notice
d’utilisation, doivent être absolument évitées.
L’appareil est destiné uniquement à un usage privé et non à un usage commercial. En cas de manipulation abusive et
inadéquate, de recours à la force et d’interventions qui n’ont pas été effectuées par notre succursale « Service Après-
Vente », la garantie disparaît.
Procédure dans un cas de garantie
En vue de traiter votre demande le plus rapidement possible, nous vous prions de bien vouloir observer les instructions
suivantes:
• Tenez, pour toute demande, votre ticket de caisse et le numéro de l’article (289081) en tant que preuve de votre
achat à notre disposition.
• Vous trouverez le numéro de l’article sur une plaque d’identification, dans une mention gravée, dans le titre de votre
mode d’emploi (en bas à gauche) ou sur une étiquette au dos de l’article ou sous l’article.
• Si vous deviez constater un défaut de fonctionnement ou un vice quelconque, veuillez contacter d‘abord le SAV ci-
après mentionné par par téléphone ou en envoyant un courriel (mail).
Vous pourrez télécharger ce mode d’emploi et beaucoup d’autres manuels d’utilisation ainsi que des vidéos
produits et logiciels sur ce site internet : www.lidl-service.com

-
31
-
Service de commande pour sondes
Les autres sondes peuvent être commandées par fax: +49(0)6198-5770-99 ou sur notre site internet :
www.inter-quartz.de. Le prix d'une sonde est de 5,- € + TVA et frais de port.
Service Après Vente
Nom: Inter-Quartz GmbH
Rue: Valterweg 27A
Ville: DE-65817 Eppstein
Pays: ALLEMAGNE
Courriel/Mail: support@inter-quartz.de
Téléphone: +49 (0)6198 571825
00800 5515 6616
00800 5515 6616 00800 5515 6616
00800 5515 6616 00800 5515 6616
0800 563862 800 142 315
00800 5515 6616 00800 5515 6616
00800 5515 6616 00800 5515 6616
IAN
289081
Art.
-
Nr.:
4
-
LD4868
Fournisseur
Veuillez noter que l’adresse suivante n’est pas une adresse de SAV. Prière de contacter d’abord l’adresse indiquée plus
haut.
Nom: digi-tech gmbh
Rue: Valterweg 27A
Ville: DE-65817 Eppstein
Pays: ALLEMAGNE

-
32
-
Gebruiksaanwijzing en veiligheidstips
Inhoudsopgave
Inhoudsopgave ....................................................................................................................................................................... - 32 -
Introductie ................................................................................................................................................................................ - 33 -
Beoogd gebruik ...................................................................................................................................................................... - 33 -
Levering .................................................................................................................................................................................... - 33 -
Technische gegevens .............................................................................................................................................................. - 33 -
Weerstation ..................................................................................................................................................................... - 33 -
Buitensensor ..................................................................................................................................................................... - 33 -
Veiligheidsinformatie voor gebruiker
Veiligheidsinformatie voor gebruikerVeiligheidsinformatie voor gebruiker
Veiligheidsinformatie voor gebruiker ................................................................................................................................ - 33 -
Veiligheidsinformatie voor batterijen
Veiligheidsinformatie voor batterijenVeiligheidsinformatie voor batterijen
Veiligheidsinformatie voor batterijen ................................................................................................................................ - 33 -
Het weerstation en de buitensensor dient u veilig op te hangen of neer zetten ............................................................... - 34 -
Display en bedieningspanelen .............................................................................................................................................. - 34 -
Buitensensor ............................................................................................................................................................................. - 35 -
Bevestiging van de buitensensor ........................................................................................................................................... - 36 -
Ingebruikname ........................................................................................................................................................................ - 36 -
Aanpassing tijdzones.............................................................................................................................................................. - 36 -
Ontvangststoring ..................................................................................................................................................................... - 36 -
Tijd signaal opnieuw starten .................................................................................................................................................. - 36 -
Licht ........................................................................................................................................................................................... - 36 -
12/24-uurs tijdweergave ...................................................................................................................................................... - 36 -
Temperatuur ............................................................................................................................................................................. - 36 -
Snelle instelling ........................................................................................................................................................................ - 37 -
Basisinstelling ........................................................................................................................................................................... - 37 -
Locatie tabel ............................................................................................................................................................................ - 37 -
Op- en ondergangstijden van de maan en de zon ............................................................................................................ - 37 -
Maanfase ................................................................................................................................................................................ - 38 -
Wekalarm ................................................................................................................................................................................ - 38 -
Sluimerfunctie (SNOOZE) ..................................................................................................................................................... - 38 -
Weervoorspelling ................................................................................................................................................................... - 38 -
Barometer ................................................................................................................................................................................ - 38 -
Luchtdruk in de laatste 12 uur ................................................................................................................................................ - 39 -
Buitensensor /Kanaal instelling ............................................................................................................................................. - 39 -
Buitentemperatuur ontwikkeling ............................................................................................................................................ - 39 -
Luchtvochtigheid ...................................................................................................................................................................... - 39 -
Maximale- und minimale waarden ....................................................................................................................................... - 39 -
Batterijwissel ............................................................................................................................................................................ - 39 -
Herstart (RESET) ...................................................................................................................................................................... - 39 -
Schoonmaken .......................................................................................................................................................................... - 39 -
Vereenvoudigde EU-Conformiteitsverklaring....................................................................................................................... - 40 -
Het weerstation bij het afval doen ........................................................................................................................................ - 40 -
Afvalverwijdering van de batterijen ...................................................................................................................................... - 40 -
Garantie door digi-tech gmbh............................................................................................................................................... - 40 -
Garantievoorwaarden ........................................................................................................................................................... - 40 -
Garantieperiode en wettelijk geregelde aansprakelijkheid bij mangel............................................................................ - 40 -
Garantiedekking ..................................................................................................................................................................... - 40 -
Afhandeling in geval van garantie ........................................................................................................................................ - 40 -
Bestelservice ............................................................................................................................................................................ - 41 -
Klantenservice ......................................................................................................................................................................... - 41 -
Leverancier .............................................................................................................................................................................. - 41 -

-
33
-
RADIOGRAFISCH WEERSTATION
Introductie
Van harte gefeliciteerd met de aankoop van uw nieuwe weerstation. U hebt daarmee een hoogwaardig apparaat
gekozen. De handleiding vormt een onderdeel van dit weerstation. Hij bevat belangrijke informatie over veiligheid,
gebruik en verwijdering als afval. Maak u vertrouwd met alle bedienings- en veiligheidsinstructies voordat u het
weerstation gaat gebruiken. Gebruik het weerstation uitsluitend zoals beschreven en voor de aangegeven toepassingen.
Overhandig ook alle bijbehorende documenten wanneer u het weerstation aan iemand anders overdraagt. Gelieve aub
de verpakking en instructies bij te houden voor eventuele verzoeken voor extra informatie.
Beoogd gebruik
Het weerstation is geschikt om het weer af te lezen en de beschreven extra functies. Elk ander gebruik of wijziging van
het weerstation wordt als oneigenlijk beschouwd. De fabrikant is niet aansprakelijk voor schade veroorzaakt door
verkeerd gebruik of verkeerde bediening. Het weerstation is niet bestemd voor commercieel gebruik.
Levering
Aanwijzing: Controleer na aankoop of alle onderdelen aanwezig zijn en niet beschadigd.
•
••
• Weerstation
•
••
• 3 x Batterij 1,5 V AA R6/LR6
•
••
• Buitensensor
•
••
• Beugel voor sensor
•
••
• 2 x Batterij 1,5 V AAA R03/LR03
•
••
• Gebruiksaanwijzing
Technische gegevens
Weerstation
• Bedrijfstemperatuur 0 – 50 °C
• Temperatuur weergave: +/- 1 °C
• Batterij: 3 x 1,5 V AA R6 / LR6
Buitensensor
• Bedrijfstemperatuur -20 – 50 °C
• Temperatuur weergave: +/- 1 °C
• Ontvangst: max. 100 m
• Frequentie: 433 MHZ
• Zendvermogen: 0,024 W
• Beschermingsgraad (IP-Klasse) van de omkasting (buitensensor):
IPX4 (spatwaterbeveiliging volgens Norm IEC 60529)
• Batterij: 2 x 1,5 V AAA R03/LR03
- Symbool voor gelijkstroom
Veiligheidsinformatie voor gebruiker
WAARSCHUWING! KANS OP VERWONDINGEN!
Dit apparaat kan door personen (ook kinderen vanaf 8 jaar) met verminderde fysieke, sensorische of mentale
capaciteiten of met gebrek aan ervaring en kennis gebruikt worden, wanneer dat onder toezicht gebeurt of ze instructie
gekregen hebben hoe ze het apparaat moeten gebruiken en ze de gevaren begrijpen die voortkomen uit het gebruik.
Kinderen mogen niet spelen met het apparaat. Schoonmaken en gebruikersonderhoud mag door kinderen alleen onder
toezicht verricht worden. Houd de verpakkingsfolie uit de buurt van kinderen. Bij verkeerd gebruik ervan bestaat
verstikkingsgevaar.
Veiligheidsinformatie voor batterijen
WAARSCHUWING!
SCHADELIJK VOOR DE GEZONDHEID!
EXPLOSIEGEVAAR!
Bewaar batterijen buiten bereik van kleine kinderen. Na inslikken van een batterij meteen medische hulp inroepen.
Batterijen/accu's moeten altijd geplaatst worden met de polen in de juiste positie. Reinig de contactpunten van batterij en
apparaat van tevoren indien nodig. Probeer niet batterijen weer op te laden, kort te sluiten of te openen. Gooi nooit
batterijen in vuur! Ze kunnen exploderen. Gebruikt u het apparaat langere tijd niet, haal de batterijen er dan uit en
bewaar het apparaat op een droge en stofvrije plek. Bij verkeerd gebruik van de batterij bestaat gevaar voor
exploderen en lekken. Als de batterij gelekt heeft, contact met huid, ogen en slijmvliezen vermijden. Handschoenen
gebruiken. Bij contact met batterijzuur de aangedane plekken overvloedig afspoelen met schoon water en zo snel
mogelijk naar een arts gaan. Verwijder lege batterijen meteen uit het apparaat, er bestaat verhoogd gevaar voor lekken.

-
34
-
Het weerstation en de buitensensor dient u veilig op te hangen of neer zetten
Het weerstation en de buitensensor zijn niet geschikt voor ruimtes met een hoge luchtvochtigheid (bijvoorbeeld de
badkamer). Let erop, dat:
• de sensor rechtop staat of hangt;
• Voldoende ventilatie aanwezig is. Plaats het apparaat niet in een kast of daar waar gordijnen of meubels niet
voor voldoende ventilatie kunnen zorgen. Let erop dat op zijn minst 10 cm afstand is aan alle kanten.
• Het apparaat tijdens het gebruik niet op een dik tapijt of bed staat en geen directe warmtebronnen (bijvoorbeeld
verwarmingen) op het apparaat kunnen werken.
• De zon niet direct op het apparaat schijnt.
• Het contact met spatwater en druppels moet vermeden worden.
• Het apparaat niet in de buurt hangt of staat van magneetvelden (bijvoorbeeld luidsprekers).
• Er geen vreemde bestanddelen, onzuiverheden of stof in het apparaat komt.
• Er geen kaarsen en andere vlammen in de buurt van het apparaat zijn, om het uitbreiden van vuur te verhinderen.
Display en bedieningspanelen

-
35
-
Buitensensor
1 Weersymbool 22 Uitgezocht kanaal
2
Luchtdruk overzicht
23 Batterijsymbool
3
Binnentemperatuur
24 Buitentemperatuur
4
Smiley (Comfortabel)
symbool)(ComfortabelsymboolKomfortsymbol)
25 Luchtdruk voorspelling
5 Luchtvochtigheid 26 CHANNEL-toets
6 Maanfase 27 HISTORY/WEATHER-toets
7 Maanopkomst/-ondergang 28 °C/°F + -toets
8 Locatie 29 MAX/MIN - -toets
9 Zonsopgang/-ondergang 30 RELATIEVE/ABSOLUTE-luchtdruk-toets
10 ALARM/ON/OFF -toets 31 SUN/MOON-toets
11 -/ -toets 32 Ophangconstructie (Weerstation)
12 SNOOZE/LIGHT-toets 33 RESET-toets
13 Alarm-Symbool 34 Batterijvakje (Weerstation)
14 +/12/24-toets 35 Uitklapbaar voetstuk (Weerstation)
15 MODE-toets 36 Controle-LED (buitensensor)
16 Datum (maand, dag, dag van de week) 37 Buitentemperatuur/kanaal (buitensensor)
17 Tijdweergave 38 Ophangcontructie (buitensensor)
18 Ontvangstweergave 39 Kanaal keuzeschakelaar (buitensensor)
19 Luchtdruk van de laatste uren 40 Batterijvakje (buitensensor)
20 Relatieve/absolute luchtdruk 41 °C/°F-toets (buitensensor)
21
Buitentemperatuur voorspelling
42 Beugel voor sensor (buitensensor)
43 Signaal van de buitensensor

-
36
-
Bevestiging van de buitensensor
De meegeleverde beugel 42 voor de sensor maakt verschillende montage-opties mogelijk. Afhankelijk van de behoefte
kan de buitensensor opgehangen of geplaatst worden.
Afbeelding A toont 3 uitdiepingen voor boorgaten die de sensor aan beide kanten heeft. De sensor kan daarmee
eenvoudig aan de beugel geklikt en vastgezet worden.
Afbeelding B toont vanuit de zijkant hoe de beugel achter de sensor bevestigd is.
Afbeelding C toont de frontale weergave van de sensor met de beugel als ophanging van de bovenkant.
Afbeelding D toont de frontale weergave van de sensor met de beugel als vloerstandaard van de onderkant.
Afbeelding E toont het controlepaneel en het batterijvak aan de achterkant van de sensor.
Aanwijzing: zorg ervoor dat de buitensensor altijd rechtop hangt.
Ingebruikname
Verwijder de plasticfolie van het weerstation en van de sensor. Open het batterijvakje van de buitensensor 40 en plaats
de meegeleverde batterijen met de polen in de juiste richting. Het controllelampje 36 verlicht tijdelijk en de temperatuur
verschijnt. Sluit het batterijvakje.
Open het batterijvakje van het weerstation 34 en plaats de meegeleverde batterijen met de polen in de juiste richting.
Sluit het batterijvakje. Het weersymbool 1 knippert en het weerstation ontvangt nu het signaal van de buitensensor. Dit
kan een paar minuten duren. Als het ontvangst tot stand gekomen is verschijnt het uitgezochte kanaal 22 en de actuele
buitentemperatuur 24. Dit kan een paar minuten duren. Als het ontvangst tot stand gekomen is verschijnt het uitgezochte
kanaal 22 en de actuele buitentemperatuur 24. Zodra het signaal met de buitensensor succesvol tot stand gekomen is,
ontvangt het weerstation het DCF 77 tijdsignaal. Het ontvangstsymbool 18 knippert in het display naast de tijd. Dit kan
3 tot 10 minuten duren. Tijdens het zoeken naar het tijdsignaal kunnen geen andere toetsen, behalve de
SNOOZE/LIGHT toets 12 worden gebruikt. Als de ontvangst van het tijdsignaal na 10 minuten niet tot stand is
gekomen, kunt u de tijd handmatig instellen. Het weerstation zal om 04:00 en 05:00 uur opnieuw proberen het
tijdsignaal te ontvangen. Indien dit gelukt is zal hij automatisch de tijd corrigeren.
Aanwijzing: Tijdens het ontvangst van het DCF tijdsignaal, het weerstation en de buitensensor niet bewegen.
Zodra het weerstation het tijdsignaal succesvol ontvangen heeft verschijnt het DCF-torensymbooltje 18 blijvend en stelt
automatisch de juiste tijd, datum, dag van de week, op- en ondergangs tijden van de zon en de maan en de maanfase.
Tijdens de zomertijd verschijnt DST op het display naast het torensymbooltje 18.
Aanpassing tijdzones
Bevindt u zich in een land waar de actuele tijdsaanduiding ondanks het DCF-signaal afwijkt, gebruik dan de tijdzone
aanpassing. Gebruik de aanpassing van de tijdzone om uw weerstation in een andere tijdzone dan de standaard
instelling (UTC + 1 = centraal Europese tijd) te gebruiken. Geef het verschil in uren met de gewenste tijdzone in.
Druk en houd de MODE-toets 15 in de normale tijdsaanduiding 3 seconden lang ingedrukt. De tijdzone knippert en kan
met de -/ -toets 11 of de +/12/24 -toets 14 ingesteld worden. Druk op de MODE-toets 15 om de instelling te
bevestigen.
Start daarna de weerstation opnieuw. Uw weerstation ontvangt nog steeds het DCF77-radiosignaal, maar geeft een
aangepaste tijd weer (bv.1 uur vroeger).
Ontvangststoring
Het DCF77 tijdsignaal komt uit de buurt van Frankfurt am Main (Duitsland). Het tijdsignaal kan binnen een straal van
1500 km ontvangen worden. Er kunnen echter storingsbronnen zijn die het ontvangst belemmeren kunnen. Indien uw
weerstation het radioontvangst niet goed kan ontvangen, kunt u het nog eens proberen op een andere plaats. Let erop,
dat in de buurt van een computer, telefoon, radio of tv, stralingen kunnen zijn die het ontvangen van het DCF77
tijdsignaal kunnen storen. Verder storingsbronnen kunnen zijn, sterke gebouw dempingen (metale bouwelementen), hoge
bergen of atmosferische storingen. Indien nodig, vervang de batterijen.
Tijd signaal opnieuw starten
U kunt het tijdsignaal handmatig opnieuw starten, door de -/ -toets 11, 3 seconden in te drukken
Licht
Door op de SNOOZE/LIGHT -Taste 12 te drukken, kunt u de achtergrondverlichting tijdelijk activeren.
12/24-uurs tijdweergave
Druk op de +/12/24 -toets 14, om te kiezen voor de 12- of 24-uurs tijdweergave. In de 12-uurs tijdweergave verschijnt
op het display in de voormiddag AM en in de namiddag PM.
Temperatuur
Druk op de °C/°F+ -toets 28, om de temperatuur in Celsius (°C) of Fahrenheit (°F) te tonen.
Plaats als eerste de batterijen in de buitensensor 40 en daarna in het weerstation 34.

-
37
-
Snelle instelling
Bij de instelling van numerieke waarden kunt u gebruik maken van een snellere instelling door de toets ingedrukt te
houden.
Basisinstelling
U kunt de volgende instellingen maken: tijdzone, tijd, datum, taalkeus voor de weekdag en locatie.
De MODE-toets 15 3 seconden ingedrukt houden in de normale tijdweergave. De tijdzone knippert nu en kan met
de -/ -toets 11 of +/12/24 -toets 14 ingestelt worden. Druk op de MODE-toets 15, om de instelling te bevestigen.
Op deze manier kunt u ook de uren, de minuten, de seconden, het jaar, de maand, de dag en de taalkeus voor de
weekdag (GE=Duits, FR=Frans, ES=Spaans, IT=Italiaans, NE=Nederlands, DA=Deens, RU=Russisch, EN=Engels), het
land en de locatie (zie de locatie tabel) instellen. Indien u van locatie wisselt kan het einige tijd duren voor de waarden
van de op- en ondergangstijden van de maan en de zon verschijnen.
Locatie tabel
Duitsland
GER
Ibiza
IBI
Glasgow
GLA
Eindhoven
EIN
Charleroi
CHA
Aachen
AAC
La Coruña
LAC
Londen
LON
Enschede
ENS
Luik
LIE
Berlijn
BER
León
LEO
Manchester
MAN
Groningen
GRO
Zwitserland/
Liechtenstein
SWI
Dusseldorf
DUS
Las Palmas
LPA
Plymouth
PLY
Den Haag
DHA
Dresden
DRE
Madrid
MAD
Hongarije
HUN
Rotterdam
ROT
Basel
BAS
Erfurt
ERF
Málaga
MAL
Budapest
BUD
Portugal
POR
Bern
BER
Frankfurt
FRA
Palma de
Mallorca
PDM
Kroatië
CRO
Èvora
EVO
Chur
CHU
Flensburg
FLE
Zagreb
ZAG
Coimbra
COI
Genève
GEN
Freiburg
FRE
Salamanca
SAL
Italië
ITA
Faro
FAR
Locarno
LOC
Hannover
HAN
Sevilla
SEV
Ancona
ANC
Leiria
LEI
Luzern
LUC
Bremen
BRE
Valencia
VAL
Bari
BAI
Lissabon
LIS
St. Moritz
MOR
Hamburg
HAM
Zaragossa
ZAR
Bologna
BOL
Porto
POR
St. Gallen
GAL
Rostock
ROS
Frankrijk
FRA
Cagliari
CAG
Polen
POL
Sitten
SIO
Stralsund
STR
Besançon
BES
Catania
CAT
Danzig
GDA
Vaduz
VAD
Keulen
KOE
Biarritz
BIA
Florence
FIR
Krakau
KRA
Zurich
ZUE
Kiel
KIE
Bordeaux
BOR
Foggia
FOG
Posen
POZ
Tsjechië CZR
Kassel
KAS
Brest
BRE
Genua
GEN
Stettin
SZC
Leipzig
LEI
Cherbourg
CHE
Lecce
LEC
Warschau
WAR
Praag
PRA
München
MUE
Lyon
LYO
Messina
MES
Rusland
RUS
Griekenland
GR
Magdeburg
MAG
Marseille
MAR
Milaan
MIL
St. Petersburg
PET
Athene
AT
Nürnberg
NUE
Monaco
MON
Napels
NAP
Zweden
SWE
Cyprus
CY
Regensburg
REG
Metz
MET
Palermo
PAL
Göteborg
GOT
Nikosia
NI
Stuttgart
STU
Nantes
NAN
Parma
PAR
Stockholm
STO
Roemenië
RO
Saarbrücken
SAA
Nizza
NIC
Perugia
PER
Slowakije
SLK
Boekarest
BU
Schwerin
SCH
Orléans
ORL
Rome
ROM
Bratislava
BRA
Bulgarije
BG
Denemarken
DAN
Parijs
PAR
Turijn
TOR
Slovenië
SLO
Sofia
SO
Aalborg
ALB
Perpignan
PER
Trieste
TRI
Ljubljana
LJU
Aarhus
ARH
Lille
LIL
Venetië
VEN
Servië
SRB
Copenhagen
COP
Rouen
ROU
Verona
VER
Belgrado
BER
Odense
ODE
Straatsburg
STR
Ventimiglia
VTG
Oostenrijk
AUS
Spanje/
Andorra
ESP
Toulouse
TOU
Ierland
IRL
Graz
GRA
Finland
FIN
Dublin
DUB
Innsbruck
INN
Alicante
ALI
Helsinki
HEL
Luxemburg
LUX
Linz
LIN
Andorra AND
Groot
-
Brittannië
GB Noorwegen NOR
Salzburg SAL
Badajoz
BAD
Aberdeen
ABD
Bergen
BER
Wenen
VIE
Bacelona
BAR
Belfast
BEL
Oslo
OSL
België
BEL
Bilbao
BIL
Birmingham
BIR
Stavanger
STA
Antwerpen
ANT
Cádiz
CAD
Bristol
BRI
Nederland
NET
Brugge
BRU
Còrdoba
COR
Edinburgh
EDI
Amsterdam
AMS
Brussel
BRL
Op- en ondergangstijden van de maan en de zon
Nadat u het land en de plaats ingegeven heeft, berekend uw weerstation ongeveer de op- en ondergangstijden van de
zon en de maan.
Aanwijzing: De berekende tijden zijn richtwaarden Afwijkingen kunnen voorkomen door bijvoorbeeld de plaatselijke
bodemgesteldheid en de heersende weersomstandigheden in het gebied.
Na het indrukken van de SUN/MOON-toets 31, verschijnen tijdelijk de geschatte uren zonneschijn voor de dag.
Wanneer u de op- en ondergangstijden van een andere locatie of een andere datum wilt bekijken, drukt u 3 seconden
lang op de SUN/MOON-toets 31. Het land knippert nu en kan met de-/ -toets 11 of 12/24 + -toets 14 worden
ingestelt. Bevestig uw instelling door op de SUN/MOON-toets 31 te drukken. Op dezelfde manier kunt u ook de stad,
het jaar, de maand en de dag instellen. De instellingen kunt u bevestigen door op de SUN/MOON-toets 31 te drukken.

-
38
-
Maanfase
Uw weerstation is uitgerust met een maanfasen weergave. De 8 maanfasen zijn:
Nieuwe maan
Volle maan
Jonge maan
Afnemende maan
Eerste kwartier
Laatste kwartier
Wassende maan
Asgrauwe maan
Wekalarm
Het weerstation beschikt over 2 afzonderlijk instelbare wektijden. Druk op de MODE-toets 15 om te kiezen tussen het
Alarm 1 of Alarm 2. Het desbetreffende klok symbool verschijnt nu. De MODE-toets 15 ingedrukt houden zodat u de
wektijd kunt instellen. Op het display knipperen nu de uren. Deze kunt u instellen door op de -/ -toets 11 of +/12/24
-toets 14 te drukken. Instelling bevestigen door op de MODE toets 15 te drukken. Op dezelfde manier kunt u ook de
minuten instellen. Druk tijdens de weergave van het wekalarm de ALARM/ON/OFF -toets 10 Om het alarm te activeren
(on) of om het alarm te deactiveren (oF). Is het alarm 1 geactiveerd, verschijnt . Is het alarm 2 geactiveerd, verschijnt
. Indien u 5 seconden geen toets aanraakt, keert het weerstation automatisch terug naar de normale weergave.
Sluimerfunctie (SNOOZE)
Als het alarm afgaat drukt u op de SNOOZE/LIGHT-toets 12, om het alarm tijdelijk te deactiveren. In het display
knippert nu het klok-symbool. Na 5 minuten gaat het alarm opnieuw af. Het alarm kunt u uitzetten door op een
willekeurige toets, behalve toets 12 te drukken.
Weervoorspelling
Aanwijzing: het weerstation begint de voorspelling ongeveer 6 seconden na het ingeven van het actuele weer.
De weersymbolen geven de weervoorspelling voor de komende uren aan en niet het actuele weer.
Mocht de weersvoorspelling niet juist zijn, kunt u de vertoning aanpassen, indien u de HISTORY/WEATHER-toets 27
voor 3 seconden ingedrukt houdt. Het weersymbool knippert nu. Met de °C/°F + -toets 28 of de MAX/MIN-toets 29
kunt u het actuele weer instellen. Om dit te bevestigen drukt u op de HISTORY/WEATHER-toets 27.
Aanwijzing: Bij sneeuwval stelt u regen of stortbui in. Na bevestiging met de toets 27 HISTORY/WEATHER verschijnt
bij buitentemperaturen onder 0°C het sneeuwvalsymbool.
Zonnig
Hevige regen
Licht bewolkt
Regen
Bewolkt
Zware sneeuwval
Sneeuwval
Barometer
Uw weerstation kan de luchtdruk ontwikkeling 25 aangeven.
Stijgende luchtdruk
Luchtdruk blijft hetzelfde
Dalende luchtdruk
U kunt tussen de absolute en de relative luchtdruk kiezen, indien u op de Relatieve/Absolute-toets 30 drukt. In het
display verschijnt nu Rel. of Abs.
Aanwijzing: De absolute luchtdruk wordt gemeten door het weerstation. De relatieve luchtdruk kunt u bij uw lokale
weerdienst opvragen en ingeven in uw weerstation.
U kunt de relative luchtdruk veranderen, door de Relatieve/Absolute-toets 30, 3 seconden ingedrukt te houden. De
luchtdrukwaarde knippert nu en kan met de °C/°F + -toets 28 of MAX/MIN- -toets 29 ingestelt worden. Druk op de
Relatieve/Absolute-toets 30 om dit te bevestigen.

-
39
-
U kunt kiezen uit de weergaves hectopascal (hPa) of Inches of mercury (inHg) door de °C/°F+ - toets 28 ca. 3
seconden ingedrukt te houden.
Luchtdruk in de laatste 12 uur
Druk op HISTORY/WEATHER-toets 27, om de luchtdruk waardes van de laatste 12 uur te lezen.
0 – HR = Luchtdruk momenteel
- 1 HR = Luchtdruk een uur geleden
-2 HR = Luchtdruk, twee uren geleden etc.
Buitensensor /Kanaal instelling
Met uw weerstation kunt u tegelijk gebruik maken van drie buitensensors. Open het batterijvakje van uw buitensensor.
Kies het juiste kanaal (1-3) met de kanaal keuze schakelaar 39. De CHANNEL-toets 26, 3 seconden ingedrukt houden,
tot u een pieptoon hoort, het weerstation ontvangt nu het signaal 43. Sluit het deksel. Met de °C/°F+ - toets 41 kunt u
tussen °C-Celsius en °F-Fahrenheit kiezen.
Opmerking: De buitensensor moet in een straal van maximaal 100 meter zonder hindernissen van het weerstation
geplaatst worden.
Indien u meerdere buitensensors gebruikt, drukt u op de CHANNEL-toets 26 in de normale tijdweergave, om tussen de
ontvangstkanalen te wisselen. Het rotatie symbool zgeeft aan dat in het display 22, tussen de verschillende
ontvangstkanalen gewisseld wordt.
Er verschijnen alleen buitensensor die verbinding hebben. Door de CHANNEL-toets 26 ingedrukt te houden, kunt u de
kanalen verwijderen die niet gebruikt worden. De ontvangst van een nieuwe buitensensor vindt automatisch.
Buitentemperatuur ontwikkeling
De temperatuur trend 21 verschijnt nadat de buitensensor de gegevens succesvol ontvangen heeft.
Stijgende buitentemperatuur
Buitentemperatuur blijft hetzelfde
Dalende buitentemperatuur
Luchtvochtigheid
De actuele luchtvochtigheid wordt weergegeven in het display 5. De comfortabele weergave 4 geeft de luchtvochtigheid
in 3 categorien aan:
< 40 %
DROOG
40 – 60 %
COMFORTABEL
> 60 %
VOCHTIG
< 20 °C
/
20 – 26°C
> 26 °C
/
Maximale- und minimale waarden
Na het plaatsen van de batterijen worden de maximale en minimale temperaturen opgeslagen.
Druk kort op de Max/Min- -toets 29 om de maximale MAX, minimale MIN en actuele binnentemperatuur 3,
buitentemperatuur 24 en de luchtvochtigheid 5 in het display te kunnen lezen. Houd de Max/Min-toets 29, 3 seconden
ingedrukt om alle maximale en minimale gegevens te wissen. Er klinkt een pieptoon, de gegevens worden verwijderd en
vanaf dat moment opnieuw opgeslagen.
Batterijwissel
Als de batterijen te zwak worden, om het weerstation, de buitensensor en de gegevensoverdracht goed te laten
functioneren, verschijnt het batterijsymbool 23 in het display. De batterijen moeten zo snel mogelijk in alle apparaten
vervangen worden. Het weerstation moet nu opnieuw gestart worden.
Herstart (RESET)
Druk op de RESET-toets 33 om het weerstation te her-starten.
Schoonmaken
Reinig het weerstation en de buitensensor alleen met een droge, pluisvrije doek, zoals bijvoorbeeld bij het reinigen van
brillenglazen.

-
40
-
Vereenvoudigde EU-Conformiteitsverklaring
Hierbij verklaar ik, digi-tech gmbh, dat het type radioweerstation 4-LD4868 conform is met Richtlijn R&TTE 1999/5/EC
en RED 2014/53/EU.
De volledige tekst van de EU-conformiteitsverklaring kan worden geraadpleegd op het volgende internetadres:
http://www.digi-tech-gmbh.com/ce/289081_WS.pdf
Het weerstation bij het afval doen
Dit weerstation kan niet met het normale huisvuil worden weggegooid. Breng het weerstation naar een erkend
afvalverwerkingsbedrijf of de gemeentereiniging. Neem de op dat moment geldende voorschriften in acht.
Neem in geval van twijfel contact op met uw afvalverwijderingsbedrijf.
Afvalverwijdering van de batterijen
Deponeer de batterijen in de extra hiervoor opgestelde boxen e.d. Batterijen mogen niet in het gewone
huisvuil. De afvoer van batterijen mag alleen via een erkend vuilverwerkingsbedrijf of milieu instelling worden
doorgevoerd. Let ook op geldende voorschriften. In geval van twijfel contacteert u a.u.b. het betreffende bedrijf.
Garantie door digi-tech gmbh
U krijgt op dit weerstation 3 jaar garantie vanaf de datum van aankoop. In het geval dat dit weerstation gebreken
vertoont, kunt u tegenover de verkoper van het product aanspraak maken op uw wettelijke rechten. Deze wettelijke
rechten worden niet beïnvloed door onze hieronder weergegeven garantie.
Garantievoorwaarden
De garantieperiode begint op de datum van aankoop. Bewaar uw originele aankoopbon. Deze is nodig als bewijs van
aankoop. Treedt binnen drie jaar na de datum van aankoop van dit weerstation een materiaal- of fabrikagefout op, dan
wordt het weerstation door ons – naar eigen goeddunken - gratis gerepareerd of vervangen. Deze garantie vereist dat
binnen de periode van drie jaar het defecte weerstation en het bewijs van aankoop (kassabon) worden overlegd en er
schriftelijk kort wordt aangegeven waaruit het gebrek bestaat en wanneer het is opgetreden. Als het defect door onze
garantie wordt gedekt, krijgt u een gerepareerde of een nieuw weerstation terug. Met de reparatie of vervanging van het
product begint geen nieuwe garantieperiode.
Garantieperiode en wettelijk geregelde aansprakelijkheid bij mangel
De garantieperiode wordt door de garantieverlening niet verlengd. Dit geldt ook voor onderdelen die zijn gerepareerd
of vervangen. Eventuele beschadigingen en/of mangel die al gelijk na aankoop worden vastgesteld dienen meteen na
het uitpakken meegedeeld te worden. Na afloop van de garantieperiode vallen alle reparatiekosten onder de
betalingsplicht!
Garantiedekking
Het weerstation is zorgvuldig geproduceerd onder strikte kwaliteitsrichtlijnen en nauwkeurig gecontroleerd
voorafgaande aan aflevering. De garantie geldt voor materiaal- en fabricagefouten. Deze garantie dekt geen
productonderdelen die zijn blootgesteld aan normale slijtage en dus kunnen worden beschouwd als slijtende onderdelen
of voor schade aan kwetsbare onderdelen zoals schakelaars, batterijen of onderdelen van glas.
Deze garantie vervalt als het weerstation beschadigd is of niet goed gebruikt of onderhouden. Om een goed gebruik
van het weerstation te garanderen, moeten alle in de handleiding aangegeven instructies strikt worden opgevolgd.
Gebruiksdoeleinden en handelingen die worden afgeraden in de handleiding of waarvoor wordt gewaarschuwd,
moeten absoluut worden vermeden.
Het weerstation is uitsluitend bestemd voor privé-gebruik en niet voor commerciële doeleinden. Bij misbruik en oneigenlijk
gebruik, het gebruik van geweld of ingrepen die niet zijn uitgevoerd door onze bevoegde servicevestiging, vervalt de
garantie.
Afhandeling in geval van garantie
Om uw verzoek snel te kunnen behandelen, volgt u a.u.b. onderstaande aanwijzingen:
• Houdt voor alle aanvragen de kassabon en het artikelnummer (289081) als bewijs van aankoop bereid.
• Het artikelnummer vindt u op het typeplaatje, als gravering, op het titelblad van de handleiding (links beneden) of als
sticker op de achter- of onderkant.
• Bij niet functioneren en/of andere fouten, neemt u eerst contact op met de navolgende serviceafdeling; telefonisch
of per e-mail.
Op www.lidl-service.com kunt u dit (en andere) handboek, productvideos en software downloaden.

-
41
-
Bestelservice
U kunt nog extra buitensensoren bestellen per fax: +49(0)6198-5770-99 of online: www.inter-quartz.de. De prijs voor
een sensor bedraagt 5,- € excl. BTW en verzendkosten.
Klantenservice
Naam: Inter-Quartz GmbH
Str.: Valterweg 27A
Stad: DE-65817 Eppstein
Land: DUITSLAND
E-Mail: support@inter-quartz.de
Telefoon: +49 (0)6198 571825
00800 5515 6616
00800 5515 6616 00800 5515 6616
00800 5515 6616 00800 5515 6616
0800 563862 800 142 315
00800 5515 6616 00800 5515 6616
00800 5515 6616 00800 5515 6616
IAN
289081
Art.
-
Nr.:
4
-
LD4868
Leverancier
NB: het onderstaande adres is géén serviceadres, Neem eerst contact op met de bovengenoemde klantenservice!
Naam: digi-tech gmbh
Str.: Valterweg 27A
Stad: DE-65817 Eppstein
Land: DUITSLAND

-
42
-
Návod k obsluze a bezpečnostní upozornění
Obsah
Obsah ...................................................................................................................................................................................... - 42 -
Úvod ......................................................................................................................................................................................... - 43 -
Určení užívání .......................................................................................................................................................................... - 43 -
Obsah balení........................................................................................................................................................................... - 43 -
Technické údaje ...................................................................................................................................................................... - 43 -
Meteostanice ................................................................................................................................................................... - 43 -
Venkovní čidlo ................................................................................................................................................................. - 43 -
Bezpečností upozornění pro uživatele
Bezpečností upozornění pro uživateleBezpečností upozornění pro uživatele
Bezpečností upozornění pro uživatele ............................................................................................................................. - 43 -
Bezpečností upozornění pro baterie
Bezpečností upozornění pro baterieBezpečností upozornění pro baterie
Bezpečností upozornění pro baterie ................................................................................................................................ - 43 -
Meteostanici a venkovní čidlo bezpečně pověste nebo umístěte ...................................................................................... - 44 -
Displej a ovládací panely ...................................................................................................................................................... - 44 -
Venkovní čidlo ......................................................................................................................................................................... - 45 -
Upevnění venkovního čidla.................................................................................................................................................... - 46 -
Uvedení do provozu ............................................................................................................................................................... - 46 -
Upravení časové zóny............................................................................................................................................................ - 46 -
Rušení příjmu signálu .............................................................................................................................................................. - 46 -
Nový start příjmu rádiového signálu ..................................................................................................................................... - 46 -
Osvětlení .................................................................................................................................................................................. - 46 -
12/24 hodinový formát ........................................................................................................................................................ - 46 -
Teplota ..................................................................................................................................................................................... - 46 -
Rychlé nastavování ................................................................................................................................................................. - 46 -
Základní nastavení .................................................................................................................................................................. - 47 -
Přehled stanovišť...................................................................................................................................................................... - 47 -
Časy východu a západu Měsíce a Slunce .......................................................................................................................... - 47 -
Měsíční fáze ............................................................................................................................................................................ - 48 -
Budík ......................................................................................................................................................................................... - 48 -
Funkce opakovaného buzení (SNOOZE) ........................................................................................................................... - 48 -
Předpověď počasí ................................................................................................................................................................... - 48 -
Barometr .................................................................................................................................................................................. - 48 -
Tlak vzduchu uplynulých 12 hodin ....................................................................................................................................... - 49 -
Venkovní čidlo/nastavení kanálu ......................................................................................................................................... - 49 -
Vývoj venkovní teploty ............................................................................................................................................................ - 49 -
Vlhkost v interiéru .................................................................................................................................................................... - 49 -
Maximální a minimální hodnoty ............................................................................................................................................ - 49 -
Varovný ukazatel stavu baterie ............................................................................................................................................. - 49 -
Uvedení do původního stavu (RESET) .................................................................................................................................. - 49 -
Pokyny pro čištění ................................................................................................................................................................... - 49 -
Zjednodušené EU prohlášení o shodě .................................................................................................................................. - 49 -
Likvidace meteostanice ........................................................................................................................................................... - 50 -
Likvidace baterií ...................................................................................................................................................................... - 50 -
Záruka firmy digi-tech gmbh .................................................................................................................................................. - 50 -
Záruční podmínky ................................................................................................................................................................... - 50 -
Záruční lhůta a zákonný nárok při nedostatcích ................................................................................................................. - 50 -
Rozsah záruky ......................................................................................................................................................................... - 50 -
Postup v případě uplatnění záruky ........................................................................................................................................ - 50 -
Objednávková služba ............................................................................................................................................................ - 51 -
Servis ........................................................................................................................................................................................ - 51 -
Dodavatel ................................................................................................................................................................................ - 51 -

-
43
-
BEZDRÁTOVÁ METEOSTANICE
Úvod
Gratulujeme Vám ke koupi Vaší nové meteostanice. Rozhodli jste se pro kvalitní přístroj. Tento návod k obsluze je
součástí této meteostanice. Obsahuje důležitá upozornění o bezpečnosti, provozu a likvidaci. Před užíváním
meteostanice se seznamte se všemi upozorněními k obsluze a bezpečnosti. Meteostanici užívejte pouze podle popisu a
určení. Při přenechání meteostanice třetí osobě předejte dál i všechny doklady.
Obal a návod k obsluze, prosím, uschovejte pro případ další pot.
Určení užívání
Meteostanice je určena k použití jako ukazatel času a k popsaným doplňkovým funkcím. Jiné užití nebo úprava
meteostanice není v souladu s určením. Výrobce neručí za škody vzniklé nevhodným užíváním nebo špatnou obsluhou.
Meteostanice není určena pro průmyslové užití.
Obsah balení
Upozornění: Prosím, po zakoupení zkontrolujte obsah balení. Přesvědčte se, že jsou zabaleny všechny díly a že jsou
funkční.
• Meteostanice
• 3 x baterie 1,5 V AA R6/LR6
• Venkovní čidlo
• Držadlo pro venkovní čidlo
• 2 x baterie 1,5 V AAA R03/LR03
• Návod k obsluze
Technické údaje
Meteostanice
• Provozní teplota: 0 – 50 °C
• Ukazatel teploty: +/- 1 °C
• Baterie: 3 x 1,5 V AA R6 / LR6
Venkovní čidlo
• Provozní teplota: -20 – 50 °C
• Ukazatel teploty: +/- 1 °C
• Dosah: max. 100 m
• Frekvence: 433 MHZ
• Vysílací výkon: 0,024 W
• Stupeň ochrany krytem (venkovní senzor): IPX4 (chráněno proti stříkající vodě podle normy IEC 60529)
• Baterie: 2 x 1,5 V AAA R03/LR03
- Označení stejnosměrného proudu
Bezpečností upozornění pro uživatele
VAROVÁNÍ! NEBEZPEČÍ ZRANĚNÍ!
Toto zařízení může být používáno i osobami se sníženými fyzickými, smyslovými nebo duševními schopnostmi nebo bez
patřičných zkušeností a znalostí (včetně dětí starších než 8 let), pokud jsou pod dohledem nebo pokud byly poučeny o
bezpečném používání přístroje a jsou schopny pochopit z toho plynoucí rizika. Nedovolte dětem hrát si se spotřebičem.
Čištění a uživatelskou údržbu nesmí provádět děti bez dozoru. Obaly uchovávejte mimo dosah dětí. Hrozí nebezpečí
udušení.
Bezpečností upozornění pro baterie
VAROVÁNÍ!
ZDRAVOTNÍ NEBEZPEČÍ!
NEBEZPEČÍ VÝBUCHU!
Uchovávejte baterie mimo dosah dětí. Pokud dojde ke spolknutí baterie, je třeba ihned vyhledat lékařskou pomoc.
Baterie / akumulátory musí být vždy vloženy podle správné polarity. V případě potřeby předem vyčistěte kontakty
baterie i přístroje. Nepokoušejte se o dobíjení baterií, jejich zkratování nebo otvírání. Nikdy nevhazujte baterie do ohně,
neboť hrozí nebezpečí výbuchu. Nesprávné použítí baterie může způsobit výbuch a vytečení baterie.
V případě vytečení baterie zabraňte kontaktu s kůží, očima a sliznicemi. Používejte ochranné rukavice. V případě
kontaktu s kyselinou baterie opláchněte postižené místo čistou vodou a okamžitě vyhledejte lékaře.
Okamžitě vyjměte vybité baterie z přístroje, je zde zvýšené riziko vytečení.

-
44
-
Meteostanici a venkovní čidlo bezpečně pověste nebo umístěte
Meteostanice ani venkovní čidlo nejsou konstruovány na provoz v místnostech s vysokou vlhkostí vzduchu (např.
koupelna). Dbejte na to, aby:
• senzor svisle stál nebo visel;
• vždy bylo zajištěno dostatečné větrání (neumístěte přístroj do regálu nebo na místa, kde závěsy nebo nábytek
zakrývají větrací možnosti a nechte min. 10 cm odstup na všechny strany);
• přístroj při provozu nestál na tlustém koberci nebo na posteli a na přístroj nepůsobily žádné přímé tepelné zdroje
(např. topení);
• na přístroj nedopadaly žádné sluneční paprsky;
• na přístroj nekapala nebo nestříkala žádná kapalina;
• přístroj nestál nebo nevisel bezprostředně v oblasti působení magnetických polí (např. reproduktory);
• do přístroje nevnikla žádná cizí tělesa a prach;
• svíčky a jiný otevřený oheň nikdy nebyly v blízkosti přístroje, aby se tak zamezilo rozšíření požáru.
Displej a ovládací panely

-
45
-
Venkovní čidlo
1 Symbol počasí 22 Zvolený kanál
2
Pruh tlaku vzduchu
23 Ukazatel stavu baterie
3
Vnitřní teplota
24 Venkovní teplota
4
Symbol komfortnosti
25 Tendence tlaku vzduchu
5 Vlhkost v interiéru 26 Tlačítko CHANNEL
6 Měsíční fáze 27 Tlačítko HISTORY/WEATHER
7 Východ / západ Měsíce 28 Tlačítko °C/°F +
8 Stanoviště 29 Tlačítko MAX/MIN -
9 Východ / západ Slunce 30 Tlačítko tlaku vzduchu RELATIVE/ABSOLUTE
10 Tlačítko ALARM/ON/OFF 31 Tlačítko SUN/MOON
11
-/ Tlačítko -
32 Příprava na zavěšení (meteostanice)
12 Tlačítko SNOOZE/LIGHT 33 Tlačítko RESET
13 Symbol buzení 34 Prostor na baterie (meteostanice)
14 Tlačítko +/12/24 35 Stojan k vyklopení (meteostanice)
15 Tlačítko MODE 36 Kontrolní LED (venkovní čidlo)
16 Datum (měsíc, den, den v týdnu) 37 Vnější teplota/kanál (venkovní čidlo)
17 Ukazatel času 38 Příprava na zavěšení (venkovní čidlo)
18 Ukazatel rádiového signálu 39 Přepínač volby kanálu (venkovní čidlo)
19 Tlak vzduchu posledních hodin 40 Prostor na baterie (venkovní čidlo)
20 Relativní/absolutní tlak vzduchu 41 Tlačítko °C/°F (venkovní čidlo)
21 Tendence venkovní teploty 42 Držadlo pro senzor (venkovní čidlo)
43 Signál venkovního čidla

-
46
-
Upevnění venkovního čidla
Přiložené držadlo pro senzor 42 umožňuje různé způsoby upevnění. Podle potřeby může být venkovní čidlo zavěšeno
nebo postaveno.
Zobrazení A znázorňuje 3 prohlubně, které má senzor na obou stranách. Senzor se tak jednoduše upevní do držadla.
Zobrazení B znázorňuje pohled ze strany, jak se držadlo upevní za senzorem.
Zobrazení C znázorňuje čelní podobu senzoru s držadlem jako zavěšení shora.
Zobrazení D znázorňuje čelní podobu senzoru s držadlem jako stojanem zdola.
Zobrazení E znázorňuje ovládací pole a prostor na baterie na zadní straně senzoru.
Upozornění: Venkovní čidlo postavte nebo pověste vždy rovně.
Uvedení do provozu
Odstraňte z meteostanice a venkovního čidla ochrannou fólii. Otevřete na venkovním čidle 40 prostor na baterie a
vložte přibalené baterie podle vyznačené polarity. Kontrolní světlo 36 se dočasně rozsvítí a zobrazí se teplota. Prostor
na baterie uzavřete.
Otevřete na meteostanici prostor na baterie 34 a vložte přibalené baterie podle vyznačené polarity. Prostor na baterie
uzavřete. Symbol počasí 1 bliká a meteostanice přijímá signál venkovního čidla. Tento proces může trvat několik minut.
Při úspěšném příjmu signálu se zobrazí zvolený kanál 22 a aktuální venkovní teplota 24. Po úspěšném příjmu signálu
venkovního čidla začne Vaše meteostanice přijímat rádiový signál stanice DCF 77 a na displeji vedle času bliká ukazatel
příjmu rádiového signálu 18. Tento proces může trvat 3-10 minut. Během příjmu signálu nelze aktivovat žádná tlačítka
kromě SNOOZE / LIGHT 12. Pokud by příjem rádiového signálu nebyl po 10 minutách úspěšný, nastavte čas ručně.
Meteostanice bude pokus o příjem signálu opakovat ve 04:00 a v 05:00 hodin a čas po úspěšném přijetí signálu
automaticky upraví.
Upozornění: V průběhu přijímacího procesu s meteostanicí a venkovním čidlem, prosím, nehýbejte.
Po úspěšném přijetí signálu se ukazatel rádiového signálu 18 zobrazí trvale a automaticky se nastaví správný čas,
datum, den v týdnu, východ a západ Slunce i Měsíce stejně jako i měsíční fáze. Během letního času se vedle ukazatele
rádiového signálu 18 zobrazí DST.
Upravení časové zóny
Pokud se nacházíte v zemi, kde je aktuální čas i přes signál DCF odchylný, upravte časovou zónu pro užívání. Vašeho
meteostanice v jiné časové zóně než je standardní nastavení (UTC + 1 = středoevropský čas). Časovou zónu upravte
nastavením hodinového rozdílu (např. -01) k požadované časové zóně. Následně proveďte nový start příjmu rádiového
signálu.
Stiskněte a držte v běžném zobrazení času 3 vteřiny tlačítko MODE 15, časová zóna bliká a můžete ji nastavit tlačítkem
-/ 11 nebo tlačítkem +/12/24 (14). Nastavení potvrďte tlačítkem MODE 15.
Váš meteostanice nadále přijímá rádiem řízený signál DCF77, ukazuje ale pozměněný čas (např. o 1 hodinu méně).
Rušení příjmu signálu
Rádiový signál stanice DCF77 je vysílán z Frankfurtu nad Mohanem v Německu a může být přijímán v okruhu zhruba
1500 km. Jsou ovšem rušivé zdroje, které mohou příjem podstatně omezovat.
Pokud Vaše meteostanice rádiový signál nepřijímá správně, postavte nebo pověste ji na jiné místo a berte ohled na to, že
v blízkosti počítače, telefonu, rádia a televize mohou vznikat elektromagnetická záření, která mohou rušit příjem signálu
stanice DCF77. Dalšími rušivými zdroji pro příjem signálu mohou být silné izolace budov (kovové stavební materiály),
vysoké kopce nebo atmosférická rušení. Případně vyměňte baterie.
Nový start příjmu rádiového signálu
Nový start příjmu rádiového signálu můžete ručně vyvolat nebo zastavit držením tlačítka -/
11 po dobu 3 vteřin.
Osvětlení
Stiskněte tlačítko SNOOZE/LIGHT 12, abyste dočasně aktivovali osvětlení.
12/24 hodinový formát
Pro volbu 12- nebo 24-hodinového formátu stiskněte tlačítko +/12/24 14. Při 12-hodinovém formátu se dopoledne na
displeji zobrazí AM a odpoledne PM.
Teplota
Pro výběr měření teploty ve stupních Celsia (°C) nebo Fahrenheita (°F) zmáčkněte tlačítko °C/°F+ 28.
Rychlé nastavování
Při nastavení číselných hodnot můžete dlouhým stiskem a držením tlačítek využít rychlého nastavování.
Vložte baterie nejdříve do venkovního čidla 40 a teprve poté do meteostanice 34.

-
47
-
Základní nastavení
Můžete nastavit následující údaje: časová zóna, čas, datum, jazyk ukazatele dne v týdnu a stanoviště.
V normálním ukazateli času stiskněte a držte 3 vteřiny tlačítko MODE 15, časová zóna bliká a můžete ji nastavit
tlačítkem -/ 11 nebo +/12/24 14. Volbu potvrďte tlačítkem MODE 15. Stejným způsobem nastavte hodiny, minuty,
sekundy, rok, měsíc, den, jazyk ukazatele dne v týdnu (GE=německy, FR=francouzsky, ES=španělsky, IT=italsky,
NE=holandsky, DA=dánsky, RU=rusky, EN=anglicky), stát a stanoviště(viz Přehled stanovišť). Při změně stanoviště trvá
určitý čas, než se časy pro východ a západ Měsíce i Slunce zobrazí.
Přehled stanovišť
Německo
GER
Ibiza
IBI
Glasgow
GLA
Eindhoven
EIN
Charleroi
CHA
Cáchy
AAC
La Coruña
LAC
Londýn
LON
Enschede
ENS
Lutych
LIE
Berlín
BER
León
LEO
Manchester
MAN
Groningen
GRO
Švýcarsko/
Lichtenštejnsko
SWI
Düsseldorf
DUS
Las Palmas
LPA
Plymouth
PLY
Haag
DHA
Drážďany
DRE
Madrid
MAD
Maďarsko
HUN
Rotterdam
ROT
Basilej
BAS
Erfurt
ERF
Málaga
MAL
Budapešť
BUD
Portugalsko
POR
Bern
BER
Frankfurt
FRA
Palma de
Mallorca
PDM
Chorvatsko
CRO
Èvora
EVO
Chur
CHU
Flensburg
FLE
Záhřeb
ZAG
Coimbra
COI
Ženeva
GEN
Freiburg
FRE
Salamanca
SAL
Itálie
ITA
Faro
FAR
Locarno
LOC
Hannover
HAN
Sevilla
SEV
Ancona
ANC
Leiria
LEI
Lucern
LUC
Brémy
BRE
Valencie
VAL
Bari
BAI
Lisabon
LIS
St. Moritz
MOR
Hamburg
HAM
Zaragoza
ZAR
Bologna
BOL
Porto
POR
St. Gallen
GAL
Roztoky
ROS
Francie
FRA
Cagliari
CAG
Polsko
POL
Sion
SIO
Stralsund
STR
Besançon
BES
Catania
CAT
Gdaňsk
GDA
Vaduz
VAD
Kolín
KOE
Biarritz
BIA
Florencie
FIR
Krakov
KRA
Curych
ZUE
Kiel
KIE
Bordeaux
BOR
Foggia
FOG
Poznaň
POZ
Česko CZR
Kassel
KAS
Brest
BRE
Janov
GEN
Štětín
SZC
Lipsko
LEI
Cherbourg
CHE
Lecce
LEC
Varšava
WAR
Praha
PRA
Mnichov
MUE
Lyon
LYO
Messina
MES
Rusko
RUS
Řecko
GR
Magdeburg
MAG
Marseille
MAR
Milán
MIL
Petrohrad
PET
Atény
AT
Norimberk
NUE
Monako
MON
Neapol
NAP
Švédsko
SWE
Kypr
CY
Řezno
REG
Mety
MET
Palermo
PAL
Göteborg
GOT
Nikósie
NI
Stuttgart
STU
Nantes
NAN
Parma
PAR
Stockholm
STO
Rumunsko
RO
Saarbrücken
SAA
Nica
NIC
Perugia
PER
Slovensko
SLK
Bukurešť
BU
Schwerin
SCH
Orléans
ORL
Řím
ROM
Bratislava
BRA
Bulharsko
BG
Dánsko
DAN
Paříž
PAR
Turín
TOR
Slovinsko
SLO
Sofie
SO
Aalborg
ALB
Perpignan
PER
Terst
TRI
Lublaň
LJU
Aarhus
ARH
Lille
LIL
Benátky
VEN
Srbsko
SRB
Kodaň
COP
Rouen
ROU
Verona
VER
Bělehrad
BER
Odense
ODE
Štrasburk
STR
Ventimiglia
VTG
Rakousko
AUS
Španělsko/
Andorra
ESP
Toulouse
TOU
Irsko
IRL
Štýrský Hradec
GRA
Finsko
FIN
Dublin
DUB
Innsbruck
INN
Alicante
ALI
Helsinki
HEL
Lucemburk
LUX
Linec
LIN
Andorra AND
Velká
Británie
GB Norsko NOR
Salzburg SAL
Badajoz
BAD
Aberdeen
ABD
Bergen
BER
Vídeň
VIE
Barcelona
BAR
Belfast
BEL
Oslo
OSL
Belgie
BEL
Bilbao
BIL
Birmingham
BIR
Stavanger
STA
Antwerpy
ANT
Cádiz
CAD
Bristol
BRI
Holandsko
NET
Bruggy
BRU
Còrdoba
COR
Edinburgh
EDI
Amsterdam
AMS
Brusel
BRL
Časy východu a západu Měsíce a Slunce
Po zadání státu a stanoviště odhadne Vaše meteostanice přibližné časy východu a západu Slunce a Měsíce.
Upozornění: Odhadnuté časy jsou pouze orientační. Odchylky mohou vyplynout např. z místního terénu nebo z
převládajícího počasí.
Po stisknutí tlačítka SUN/MOON 31 se dočasně zobrazí přibližné sluneční hodiny pro příslušný den. Pro zobrazení
časů východu a západu jiného stanoviště nebo jiného data stiskněte a držte 3 vteřiny tlačítko SUN/MOON 31. Zkratka
státu bliká a můžete ji nastavit tlačítkem -/ 11 nebo 12/24 + 14. Stisknutím tlačítka SUN/MOON 31 Vaši volbu
potvrdíte. Stejným způsobem nastavte město, rok, měsíc a den, Vaši volbu potvrďte tlačítkem SUN/MOON 31.

-
48
-
Měsíční fáze
Vaše meteostanice je vybavena ukazatelem měsíčních fází. 8 měsíčních fází:
Nov
Úplněk
Dorůstající srpek
Couvající měsíc
První čtvrť
Poslední čtvrť
Dorůstající měsíc
Couvající srpek
Budík
Na meteostanici lze jednotlivě nastavit 2 časy buzení. Pro zvolení budíku 1 nebo budíku 2 stiskněte tlačítko MODE 15.
Na displeji se objeví příslušný symbol zvonku. Stiskněte a držte při zobrazeném budíku 1 nebo 2 tlačítko MODE 15,
abyste přešli do módu nastavení. Na displeji bliká hodina buzení. Zvolte hodinu zmáčknutím tlačítka -/ 11nebo
tlačítka +/12/24 14 a volbu potvrďte tlačítkem MODE 15. Stejným způsobem nastavte minuty. Abyste aktivovali (on)
nebo deaktivovali (oF) buzení, stiskněte při zobrazení požadovaného času buzení tlačítko ALARM/ON/OFF 10. Při
aktivovaném budíku 1 se na displeji objeví symbol . Při aktivovaném budíku 2 se objeví symbol . Pokud po dobu 5
vteřin nestisknete žádné tlačítko, vrátí se meteostanice automaticky do režimu normálního zobrazení.
Funkce opakovaného buzení (SNOOZE)
Při zaznění budíku stiskněte tlačítko SNOOZE/LIGHT 12, abyste funkci buzení dočasně deaktivovali, na displeji bliká
symbol zvonku. Budík se po 5 minutách opět rozezní. Stisknutím libovolného tlačítka kromě tlačítka 12 pro vypnutí budík.
Předpověď počasí
Upozornění: Meteostanice začne s předpovědí počasí zhruba 6 hodin po zadání aktuálního počasí.
Symboly počasí ukazují tendenci pro další hodiny, nikoliv aktuální počasí.
Pokud by předpověď Vaší meteostanice nesouhlasila, můžete stisknutím a držením tlačítka HISTORY/WEATHER 27 po
dobu 3 vteřin ukazatele upravit. Symbol počasí bliká. Aktuální počasí nastavte tlačítkem °C/°F + 28 nebo MAX/MIN-
29. Nastavení potvrďte tlačítkem HISTORY/WEATHER 27.
Upozornění: Při sněžení nastavte déšť nebo průtrž mračen. Po potvrzení tlačítkem HISTORY/WEATHER se při
venkovní teplotě pod 0°C zobrazí symbol sněžení.
jasno
zataženo
polojasno
déšť
oblačno
silné sněžení
sněžení
Barometr
Vaše meteostanice může zobrazit vývoj tlaku vzduchu 25.
Tlak vzduchu stoupá
Tlak vzduchu setrvává
Tlak vzduchu klesá
Stisknutím tlačítka Relative/Absolute 30 můžete měnit mezi absolutním a relativním tlakem vzduchu. Na displeji se objeví
Rel. nebo Abs.
Upozornění: Meteostanice měří absolutní tlak vzduchu. Relativní tlak vzduchu Vám může sdělit místní povětrnostní
služba a můžete jej do meteostanice zadat.
Relativní tlak vzduchu můžete změnit stisknutím a držením tlačítka Relative/Absolute 30 po dobu 3 vteřin. Tlak vzduchu
bliká a můžete jej nastavit tlačítkem °C/°F + 28 nebo MAX/MIN- 29. Vaši volbu potvrďte tlačítkem Relative/Absolute
30.

-
49
-
Stisknutím a držením tlačítka 28 °C/°F+ po dobu asi 3 vteřin můžete zvolit mezi zobrazením jednotek v hektopascalech
(hPa) nebo v palcích rtuti - inches of mercury (inHg).
Tlak vzduchu uplynulých 12 hodin
Pro odečtení hodnot tlaku vzduchu za posledních 12 hodin stiskněte tlačítko HISTORY/WEATHER 27.
0 – HR = současný tlak vzduchu
- 1 HR = tlak vzduchu o hodinu dříve
-2 HR = tlak vzduchu o 2 hodiny dříve, atd.
Venkovní čidlo/nastavení kanálu
S Vaší meteostanicí můžete zároveň využívat až 3 venkovní čidla. Otevřete na venkovním čidle prostor na baterie a
přepínačem volby kanálu 39 nastavte požadovaný kanál (1-3). Stiskněte a držte tlačítko CHANNEL 26 po dobu 3
vteřin, než se rození tón, meteostanice nyní přijímá signál 43. Krytku uzavřete. Tlačítkem 41 můžete volit mezi °C-Celsius
a °F-Fahrenheit.
Upozornění: Venkovní čidlo musí stát k meteostanici v okruhu maximálně 100 m bez překážek.
Pokud užíváte více venkovních čidel: pro přepnutí přijímacích kanálů stiskněte v normálním ukazateli času tlačítko
CHANNEL 26. Rotační symbol v displeji 22 ukazuje, že se automaticky mění různé přijímané kanály.
Zobrazí se pouze venkovní čidla, která budou v chodu. Pro odstranění neužívaných kanálů stiskněte a držte tlačítko
CHANNEL 26. Pokud přidáte další venkovní čidlo, meteostanice ho automaticky rozezná.
Vývoj venkovní teploty
Při úspěšném příjmu dat od venkovního čidla se zobrazí teplotní trend 21.
Venkovní teplota stoupá
Venkovní teplota setrvává
Venkovní teplota klesá
Vlhkost v interiéru
Aktuální vlhkost vzduchu se zobrazí na displeji 5. Symbol komfortnosti 4 ukazuje vlhkost vzduchu ve 3 kategoriích:
< 40 %
SUCHO
40 – 60 %
KOMFORTNĚ
> 60 %
VLHKO
< 20 °C
/
20 – 26°C
> 26 °C
/
Maximální a minimální hodnoty
Od vložení baterií se ukládají do paměti maximální a minimální hodnoty teploty a vlhkosti vzduchu.
Pro odečtení maximální MAX, minimální MIN a aktuální vnitřní teploty 3, vnější teploty 24 a vlhkosti vzduchu 5 na
displeji stiskněte krátce tlačítko MAX/MIN- 29. Pro vymazání maximálních a minimálních hodnot stiskněte a držte
tlačítko MAX/MIN- 29 po dobu 3 vteřin. Rozezní se signál, údaje se vymažou a začnou se od tohoto okamžiku nově
ukládat.
Varovný ukazatel stavu baterie
Když jsou baterie vybity na úroveň, kdy nemohou meteostanici, venkovní čidlo a přenos dat udržet v provozu, objeví se
na displeji varovný ukazatel stavu baterie 23. Baterie by pak měly být ve všech přístrojích co nejrychleji vyměněny.
Uveďte meteostanici znovu do provozu.
Uvedení do původního stavu (RESET)
Pro uvedení meteostanice do původního stavu stiskněte RESET 33.
Pokyny pro čištění
Čistěte meteostanici a venkovní čidlo pouze suchým hladkým hadříkem, který se hodí například na čistění brýlových skel.
Zjednodušené EU prohlášení o shodě
Tímto digi-tech-gmbh prohlašuje, že typ meteostanice 4-LD4868 je v souladu se směrnicí 1999/5/EG a 2014/53/EU.
Úplné znění EU prohlášení o shodě je k dispozici na této internetové adrese:
http://www.digi-tech-gmbh.com/ce/289081_WS.pdf

-
50
-
Likvidace meteostanice
Tato meteostanice nesmí být odstraněna s běžným domovním odpadem. Odevzdejte tuto meteostanici sběrně
oprávněné k likvidaci nebo komunální sběrně odpadu. Dbejte na dodržování aktuálních platných předpisů.
Pokud máte pochybnosti, poraďte se se sběrnou.
Likvidace baterií
Zlikvidujte, prosím, baterie řádně ve speciálních sběrných schránkách v obchodech. Baterie nepatří do
domovního odpadu. Baterie, prosím, odevzdejte sběrně oprávněné k likvidaci nebo komunální sběrně odpadu.
Dbejte na dodržování aktuálních platných předpisů. Pokud máte pochybnosti, poraďte se se sběrnou.
Záruka firmy digi-tech gmbh
Na tento přístroj poskytujeme záruku 3 roky od data zakoupení. V případě závady tohoto výrobku Vám vůči prodejci
samozřejmě přísluší zákonná práva. Tato zákonná práva nejsou naší následně zmiňovanou zárukou omezena.
Záruční podmínky
Záruční lhůta začíná dnem koupě. Prosím, pečlivě uschovejte originální účtenku. Tento doklad je potřebný jako důkaz
data zakoupení. Pokud se v průběhu tří let od data zakoupení tohoto výrobku vyskytnou závady materiálu nebo výrobní
vady, bude tento výrobek námi zdarma opraven nebo nahrazen – podle naší volby. Uplatnění záruky vyžaduje, aby byl
v tomto tříletém období předložen vadný přístroj a doklad o koupi (účtenka) a písemně bylo krátce uvedeno, o jakou
závadu se jedná a kdy vznikla. Pokud závada zakláda nárok k uznání záruky, obdržíte od nás opravený nebo nový
výrobek. Opravou nebo výměnou výrobku nezačíná běžet nová záruční lhůta.
Záruční lhůta a zákonný nárok při nedostatcích
Plněním garance se záruční lhůta neprodlouží. Toto platí i pro nahrazené nebo opravené díly. Případné škody a závady
existující již při koupi, musí být uplatněny ihned po vybalení. Opravy provedené po skončení záruční lhůty Vám budou
naúčtovány.
Rozsah záruky
Tento přístroj byl pečlivě vyroben podle přísných směrnic kvality a před dodáním důkladně ověřen. Záruka se vztahuje
na vady materiálu nebo výrobní vady. Tato záruka se nevztahuje na díly, které jsou vystaveny běžnému opotřebení a
mohou proto být považovány za opotřebovávané díly, nebo na poruchy na rozbitných dílech, např. vypínač, baterie
nebo díly, které jsou vyrobeny ze skla.
Tato záruka propadá, pokud je výrobek poškozen, nebyl řádně užíván nebo o něj bylo špatně pečováno. Pro řádné
užívání výrobku se musí přesně dodržovat všechna nařízení v návodu k obsluze. Vyvarujte se užití nebo zacházení, před
kterým je zrazováno nebo je před ním varováno v tomto návodu.
Tento výrobek je určen pouze pro soukromé a nikoliv průmyslové užívání. Při zneužití nebo neodborném zacházení, užití
násilí nebo při zákrocích, které nejsou provedeny naší autorizovanou servisní pobočkou, zaniká záruka.
Postup v případě uplatnění záruky
Abychom Vám mohli zaručit rychlé zpracování Vaší žádosti, dodržujte, prosím, následující pokyny:
• Prosím, připravte si pro všechny dotazy účtenku a číslo výrobku (IAN 289081) jako doklad o koupi.
• Číslo výrobku zjistíte na typovém štítku, rytině, na titulní stránce Vašeho návodu (dole vlevo) nebo na nálepce na zadní
nebo spodní straně výrobku.
• Pokud by se vyskytly funkční chyby nebo jiné závady, kontaktujte nejdříve telefonicky nebo e-mailem níže
zmíněnou servisní pobočku.
Na www.lidl-service.com si můžete stáhnout tuto i jiné příručky, videa o produktech nebo softwarové
programy.

-
51
-
Objednávková služba
Další venkovní senzory můžete objednat faxem na: +49(0)6198-5770-99 nebo online: www.inter-quartz.de. Cena
jednoho senzoru je 5,- € bez DPH a poštovného.
Servis
Název: Inter-Quartz GmbH
Ulice: Valterweg 27A
Město: DE-65817 Eppstein
Země: NĚMECKO
E-mail: support@inter-quartz.de
Telefon: +49 6198 571825
00800 5515 6616
00800 5515 6616 00800 5515 6616
00800 5515 6616 00800 5515 6616
0800 563862 800 142 315
00800 5515 6616 00800 5515 6616
00800 5515 6616 00800 5515 6616
IAN
289081
Art.
-
Nr.:
4
-
LD4868
Dodavatel
Upozorňujeme, že následující adresa není adresa servisního centra. Kontaktuje, prosím, výše zmíněné místo.
Název: digi-tech gmbh
Ulice: Valterweg 27A
Město: DE-65817 Eppstein
Země: NĚMECKO

-
52
-
Indicaciones sobre su utilización y su seguridad
Índice
Índice ........................................................................................................................................................................................ - 52 -
Introducción ............................................................................................................................................................................. - 53 -
Uso conforme a su propósito ................................................................................................................................................. - 53 -
Volumen de suministro ............................................................................................................................................................ - 53 -
Datos técnicos ......................................................................................................................................................................... - 53 -
Estación meteorológica .................................................................................................................................................. - 53 -
Sensor exterior ................................................................................................................................................................ - 53 -
Instrucciones de seguridad para el usuario
Instrucciones de seguridad para el usuarioInstrucciones de seguridad para el usuario
Instrucciones de seguridad para el usuario .................................................................................................................... - 53 -
Instrucciones de seguridad sobre las pilas
Instrucciones de seguridad sobre las pilasInstrucciones de seguridad sobre las pilas
Instrucciones de seguridad sobre las pilas...................................................................................................................... - 53 -
Coloque o cuelgue de forma segura la estación meteorológica y el sensor exterior ..................................................... - 54 -
Pantalla y paneles de mando ................................................................................................................................................ - 54 -
Sensor exterior ........................................................................................................................................................................ - 55 -
Colocación del sensor exterior.............................................................................................................................................. - 56 -
Puesta en funcionamiento ...................................................................................................................................................... - 56 -
Ajuste de la zona horaria ...................................................................................................................................................... - 56 -
Interferencias de recepción ................................................................................................................................................... - 56 -
Reinicio de la recepción de la señal de rediofrecuencia ................................................................................................... - 56 -
Luz ............................................................................................................................................................................................ - 56 -
Formato de 12/24-Horas ..................................................................................................................................................... - 56 -
Temperatura ............................................................................................................................................................................ - 56 -
Ajuste rápido ........................................................................................................................................................................... - 57 -
Ajuste básico ........................................................................................................................................................................... - 57 -
Tabla de ubicación ................................................................................................................................................................. - 57 -
Salida y Puesta de la luna y el sol......................................................................................................................................... - 57 -
Fases lunares ........................................................................................................................................................................... - 58 -
Alarma ..................................................................................................................................................................................... - 58 -
Función de dormitar (SNOOZE) ........................................................................................................................................... - 58 -
Pronóstico meteorológico ...................................................................................................................................................... - 58 -
Barómetro ................................................................................................................................................................................ - 58 -
Presión atmosférica de las 12 horas anteriores................................................................................................................... - 59 -
Sensor exterior/Ajuste del canal .......................................................................................................................................... - 59 -
Tendencia de la Temperatura exterior ................................................................................................................................. - 59 -
Humedad Interior .................................................................................................................................................................... - 59 -
Valores máximos y mínimos ................................................................................................................................................... - 59 -
Indicador del estado de la pila ............................................................................................................................................. - 59 -
Reinicialización (RESET) ......................................................................................................................................................... - 60 -
Indicación para la limpieza ................................................................................................................................................... - 60 -
Declaración UE de Conformidad Simplificada ................................................................................................................... - 60 -
Eliminación y reciclaje del aparato electrónico .................................................................................................................. - 60 -
Eliminación de las pilas .......................................................................................................................................................... - 60 -
Garantía de digi-tech gmbh .................................................................................................................................................. - 60 -
Condiciones de la garantía ................................................................................................................................................... - 60 -
Duración de la garantía y derecho de reclamación ........................................................................................................... - 60 -
Ámbito de la garantía ............................................................................................................................................................ - 60 -
Procedimiento en caso de garantía ...................................................................................................................................... - 60 -
Servicio-Pedidos ..................................................................................................................................................................... - 61 -
Servicio técnico ....................................................................................................................................................................... - 61 -
Proveedor ................................................................................................................................................................................ - 61 -

-
53
-
ESTACIÓN METEOROLÓGICA INALÁMBRICA
Introducción
Felicidades por la compra de su nuevo estación meteorológica radiocontrolada, un aparato de la mejor calidad. El
manual de instrucciones forma parte del reloj y contiene información relevante sobre aspectos de seguridad, uso y
eliminación. Familiarícese con las instrucciones de seguridad y manejo antes de utilizar el reloj y asegúrese de usarlo
siempre como se describe y para los fines indicados. En caso de ceder la estación meteorológica a terceros, entrégueles
también esta documentación. Por favor conserve el embalaje y el manual de instrucciones para futuras consultas.
Uso conforme a su propósito
El aparato está diseñado para indicar la fecha y la hora, así como para las funciones adicionales que aquí se detallan.
La utilización para cualquier otro propósito o la realización de modificaciones en el aparato no se consideran
adecuadas a sus propósitos. El fabricante no se hace responsable de los daños causados por una utilización no
adecuada a sus propósitos o por una utilización errónea. Este aparato no es apto para un uso de carácter comercial o
industrial.
Volumen de suministro
Indicación: Por favor controle luego de su compra el volumen de suministro. Asegúrese, que todas las piezas hayan
sido suministradas y no estén defectuosas.
•
••
• Estación meteorológica
•
••
• 3 x pilas 1,5 V AA R6/LR6
•
••
• Sensor exterior
•
••
• Soporte para el sensor exterior
•
••
• 2 x pilas 1,5 V AAA R03/LR03
•
••
• Manual de instrucciones
Datos técnicos
Estación meteorológica
• Temperatura de funcionamiento 0 - 50 °C
• Visualización de temperatura : +/- 1 °C
• Pilas: 3 x 1,5 V AA R6 / LR6
Sensor exterior
• Temperatura de funcionamiento -20 – 50 °C
• Visualización de temperatura: +/- 1 °C
• Alcance: max. 100 m
• Frecuencia de transmisión: 433 MHZ
• Potencia de transmisión: 0,024 W
• Tipo de protección mediante la carcasa (sensor exterior):
IPX4 (Protección contra salpicaduras de agua según norma IEC 60529)
• Pilas: 2 x 1,5 V AAA R03/LR03
- Señal distintiva de corriente continua
Instrucciones de seguridad para el usuario
ADVERTENCIA! PELIGRO DE LESIONES!
Este aparato puede ser usado por personas (incluídos niños a partir de los 8 años) con capacidades físicas, sensoriales
o mentales disminuídas o con falta de experiencia y conocimentos siempre que sean supervisionadas o hayan sido
instruídas sobre el uso seguro del aparato y hayan comprendido los peligros resultantes. Los niños no deben jugar con
el aparato. Los niños no deben limpiar o mantener el aparato sin supervisión. Mantenga las películas del embalaje fuera
del alcance de los niños. Hay riesgo de asfixia.
Instrucciones de seguridad sobre las pilas
ADVERTENCIA!
PELIGRO PARA LA SALUD!
PELIGRO DE EXPLOSIÓN!
Mantenga las pilas fuera del alcance de los niños pequeños. En caso de haber sido tragada una pila, deverá ser prestada
inmediatamente ayuda médica. Las pilas/baterías han de colocarse siempre teniendo en atención la polaridad correcta.
Siendo necesario, limpie primero los contactos de las pilas y del aparato. No intente cargar, provocar cortocircuito o abrir
las pilas. Nunca tire las pilas al fuego, porque podrían explotar. El uso inadequado de las pilas puede provocar explosión o
derrame. Si la pila ha derramado, evite el contacto con la piel, los ojos o las mucosas. Use guantes. En caso de contacto
con el ácido de la pila lave las partes afectadas con bastante água limpia y vaya a ver inmediatamente a un médico. Retire
inmediatamente las pilas gastadas del aparato, hay peligro elevado de derrame.

-
54
-
Coloque o cuelgue de forma segura la estación meteorológica y el sensor exterior
La
estación meteorológica y el sensor exterior no son adecuados para ser utilizados en habitaciones con alta humedad
del aire (por ej.: baños). Asegúrese de que:
• el sensor esté en posición vertical o colgado;
• siempre se procure de una ventilación aducuada (no coloque su aparato en estantes o lugares, donde cortinas o
muebles bloqueen las ranuras de ventilación y deje por lo menos 10 cm de distancia hacia todos los lados);
• mientras utilice su aparato no lo coloque sobre alfombras gruesas o sobre la cama y tampoco directamente cerca de
fuentes de calor que pueden dañarlo (por ej. calefacción);
• no le dé la luz del sol directamente;
• evite el contacto con salpicaduras y goteo de agua;
• el aparato no sea colocado o colgado inmediatamente cerca de campos electromagnéticos (por ej. altavoz);
• penetren polvo o cuerpos extraños;
• mantenga alejadas de su aparato velas y otras llamas abiertas en todo momento, para evitar la propagación del
fuego.
Pantalla y paneles de mando

-
55
-
Sensor exterior
1 Símbolo meteorológico 22 Canal seleccionado
2
Barras de presión de aire
23 Indicador del estado de la pila
3
Temperautra interior
24 Temperatura exterior
4
Símbolo del confort
25 Tendencia de la presión atmosférica
5 Humedad interna 26 Tecla CHANNEL
6 Fase lunar 27 Tecla HISTORY/WEATHER
7 Salida y puesta de la luna 28 Tecla °C/°F +
8 Ubicación 29 Tecla MAX/MIN-
9 Salida y puesta del sol 30 Tecla Presión RELATIVE/ABSOLUTE
10 Tecla ALARM/ON/OFF 31 Tecla SUN/MOON (sol/luna)
11
Tecla -/
32 Dispositivo para colgar (estación meteorológica)
12 Tecla SNOOZE/LIGHT 33 Tecla RESET
13 Símbolo de alarma 34
Compartimiento de la pila (estación
meteorológica)
14 Tecla +/12/24 35
Pie de base para desplegar (estación
meteorológica)
15 Tecla MODE 36 LED de control (sensor exterior)
16 Fecha (mes, día, día de la semana) 37 Sensor exterior/Canal (sensor exterior)
17 Visualización-hora 38 Dispositivo para colgar (sensor exterior)
18 Visualización-señal radiocontrolada 39
Interruptor para selección del canal (sensor
exterior)
19 Presión atmosférica de últimas horas 40 Compartimiento de la pila (sensor exterior)
20 Presión atmosférica relativa/absoluta 41 Tecla °C/°F (sensor exterior)
21 Tendencia temperatura exterior 42 Soporte para el sensor exterior
43 Señal del sensor exterior

-
56
-
Colocación del sensor exterior
El soporte incluído 42
4242
42, para el sensor permite diferentes posibilidades de montaje. Según sea necesario, puede colgar o
colocar parado el sensor exterior.
La figura A muestra 3 cavidades, que el sensor posee en ambos lados. A través de éstas, el sensor puede encajarse
fácilmente en el soporte.
Figura B muestra desde la vista lateral, como está sujetado el soporte por atrás del sensor.
Figura C muestra la vista frontal del sensor con el soporte como suspensión desde arriba.
Figura D muestra la vista frontal del sensor con el soporte como base desde abajo.
Figura E muestra el panel de mando y el compartimiento de la pila al reverso del sensor.
Información: Coloque o cuelgue siempre el sensor exterior en posición vertical.
Puesta en funcionamiento
Retire el folio protector de la estación meteorológica y del sensor. Abra el compartimiento de las pilas del sensor exterior
40 y coloque las pilas suministradas con la polaridad correcta. La lámpara de control 36 se ilumina momentáneamente
y la temperatura será mostrada. Cierre el compartimiento de las pilas.
Abra el compartimiento de las pilas de la estación meteorológica 34 y coloque las pilas suministradas con la polaridad
correcta. Cierre el compartimiento de las pilas. El símbolo meteorológico 1 parpadea y la estación meteorológica recibe
ahora la señal del sensor exterior. Este proceso puede tardar algunos minutos. Si la recepción de la señal fue exitosa,
será mostrado el canal elegido 22 y aparece la temperatura exterior actual 24. La estación meteorológica empieza,
luego de captar exitosamente al sensor exterior, con la recepción de la señal radiocontrolada DCF 77 y la torre de
radio 18 parpadea en la pantalla al lado de la hora. Este proceso puede durar de 3-10 minutos. Durante la recepción
están todas las teclas, con excepción de la tecla SNOOZE / LIGHT-12, fuera de funcionamiento. Si la recepción de la
señal horaria dentro de 10 minutos no es exitosa, ajuste la hora manualmente. La estación inicia a las 04:00 y 05:00
un nuevo intento de recepción y luego de una recepción exitosa de la señal corregirá automáticamente la hora.
Indicación: Por favor no mueva la estación meteorológica ni el sensor exterior durante el proceso de recepción.
Indicación: Por favor no mueva la estación meteorológica ni el sensor exterior durante el proceso de recepción.Indicación: Por favor no mueva la estación meteorológica ni el sensor exterior durante el proceso de recepción.
Indicación: Por favor no mueva la estación meteorológica ni el sensor exterior durante el proceso de recepción.
Si hay una recepción exitosa aparece la torre de radio 18 permanentemente y se ajustan automáticamente la correcta
hora, fecha, día de la semana, salida y puesta del sol y la luna, así como la fase lunar. Durante el horario de verano,
aparece DST en la pantalla al lado de la torre de radio 18.
Ajuste de la zona horaria
Se encuentra en un país en el que la hora actual difiere, a pesar de la señal DCF, utilice el ajuste de la zona horaria,
para usar su estación meteorológica en otra zona horaria diferente a la del ajuste standar (UTC + 1 = hora de Europa
Central). Ajuste la diferencia en horas (por. ej. -01) a la zona horaria deseada.
Presione y mantenga presionado el botón-MODE 15 por 3 segundos en la visualización normal de la hora, la zona
horaria parpadea y puede ser ajustada con el botón -/ 11 ó el botón +/12/24 14. Presione el botón-MODE
15, para confirmar su elección.
A continuación reinicie su estación meteorológica. Su estación meteorológica sigue recepcionando la señal de
radiodifusión DCF77, pero muestra la hora cambiada (por. ej. 1 hora menos).
Interferencias de recepción
La señal DCF77 es enviada de las proximidades de Fráncfort del Meno y puede ser recibida en un radio de hasta
aprox. 1500 km de Fráncfort del Meno. Pero, no obstante, hay algunas fuentes de interferencia que pueden
obstaculizar la recepción considerablemente . En caso su estación meteorológica no reciba correctamente la señal de
radiofrecuencia, cuelgue o coloque la estación meteorológica en otro lugar y tome en cuenta, que en la cercanía de
ordenadores, teléfonos, radio y televisión, pueden producirse radiacciones electromagnéticas, que pueden interferir la
recepción de la señal de radiofrecuencia DCF 77. Otras fuentes de interferencia de la recepción de la señal de
radiofrecuencia pueden ser las construcciones de aislamientos de los edificios (elementos de construcción metálicos),
montañas altas o interferencias atmosféricas. Cambie en caso sea necesario las pilas.
Reinicio de la recepción de la señal de rediofrecuencia
Usted puede reiniciar manualmente la recepción de la señal de radiofrecuencia, presionando durante 3 segundos la
tecla - 11
Luz
Presione la tecla SNOOZE/LIGHT -12, para activar brevemente la luz de fondo.
Formato de 12/24-Horas
Presione la Tecla +/12/24 - 14, para elegir el formato de 12- ó 24-horas. En el formato de 12-Horas aparece en la
pantalla por las mañanas AM y por las tardes PM.
Temperatura
Presione la tecla °C/°F+ - 28, para mostrar la temperatura en Celsius (°C) o Fahrenheit (°F).
Coloque primero las pilas en el sensor exterior 40 y luego recién en la estación
meteorológica 34.

-
57
-
Ajuste rápido
Para el ajuste de valores numéricos, puede Usted utilizar el ajuste rápido pulsando y manteniendo pulsadas las teclas.
Ajuste básico
Usted puede realizar los siguientes ajustes: zona horaria, hora, fecha, idioma de la visualización del día de la semana y
ubicación. Mantenga presionado por 3 segundos la tecla MODE- 15 en la visualización normal de la hora, la zona
horaria parpadea y puede ser ajustada presionando la tecla - 11 o la tecla +/12/24 - 14. Presione la tecla MODE-
15, para confirmar el ajuste. Ajuste de la misma manera horas, minutos, segundos, año, mes, día y el idioma de la
visualización del día de la semana (GE=alemán, FR=francés, ES=español, IT=italiano, NE=holandés, DA=danés,
RU=ruso, EN=inglés), el país y la ubicación (ver Tabla de ubicación). Si cambia la ubicación, demora algún tiempo
hasta que los valores de la salida y la puesta de la luna y el sol sean mostrados.
Tabla de ubicación
Alemania
GER
Ibiza
IBI
Glasgow
GLA
Eindhoven
EIN
Charleroi
CHA
Aachen
AAC
La Coruña
LAC
London
LON
Enschede
ENS
Lüttich
LIE
Berlin
BER
León
LEO
Manchester
MAN
Groningen
GRO
Suiza/
Liechtenstein
SWI
Düsseldorf
DUS
Las Palmas
LPA
Plymouth
PLY
Den Haag
DHA
Dresden
DRE
Madrid
MAD
Hungría
HUN
Rotterdam
ROT
Basel
BAS
Erfurt
ERF
Málaga
MAL
Budapest
BUD
Portugal
POR
Bern
BER
Frankfurt
FRA
Palma de
Mallorca
PDM
Croacia
CRO
Èvora
EVO
Chur
CHU
Flensburg
FLE
Zagreb
ZAG
Coimbra
COI
Genf
GEN
Freiburg
FRE
Salamanca
SAL
Italia
ITA
Faro
FAR
Locarno
LOC
Hannover
HAN
Sevilla
SEV
Ancona
ANC
Leiria
LEI
Luzern
LUC
Bremen
BRE
Valencia
VAL
Bari
BAI
Lissabon
LIS
St. Moritz
MOR
Hamburg
HAM
Zaragossa
ZAR
Bologna
BOL
Porto
POR
St. Gallen
GAL
Rostock
ROS
Francia
FRA
Cagliari
CAG
Polonia
POL
Sitten
SIO
Stralsund
STR
Besançon
BES
Catania
CAT
Danzig
GDA
Vaduz
VAD
Köln
KOE
Biarritz
BIA
Florenz
FIR
Krakau
KRA
Zürich
ZUE
Kiel
KIE
Bordeaux
BOR
Foggia
FOG
Posen
POZ
Chequia CZR
Kassel
KAS
Brest
BRE
Genua
GEN
Stettin
SZC
Leipzig
LEI
Cherbourg
CHE
Lecce
LEC
Warschau
WAR
Prag
PRA
München
MUE
Lyon
LYO
Messina
MES
Rusia
RUS
Grecia
GR
Magdeburg
MAG
Marseille
MAR
Mailand
MIL
St. Petersburg
PET
Athen
AT
Nürnberg
NUE
Monaco
MON
Neapel
NAP
Suecia
SWE
Chipre
CY
Regensburg
REG
Metz
MET
Palermo
PAL
Göteborg
GOT
Nikosia
NI
Stuttgart
STU
Nantes
NAN
Parma
PAR
Stockholm
STO
Rumania
RO
Saarbrücken
SAA
Nizza
NIC
Perugia
PER
Eslovaquia
SLK
Bukarest
BU
Schwerin
SCH
Orléans
ORL
Rom
ROM
Bratislava
BRA
Bulgaria
BG
Dinamarca
DAN
Paris
PAR
Turin
TOR
Eslovenia
SLO
Sofia
SO
Aalborg
ALB
Perpignan
PER
Triest
TRI
Ljubljana
LJU
Aarhus
ARH
Lille
LIL
Venedig
VEN
Serbia
SRB
Kopenhagen
COP
Rouen
ROU
Verona
VER
Belgrad
BER
Odense
ODE
Straßbourg
STR
Ventimiglia
VTG
Austria
AUS
España/
Andorra
ESP
Toulouse
TOU
Irlanda
IRL
Graz
GRA
Finlandia
FIN
Dublin
DUB
Innsbruck
INN
Alicante
ALI
Helsinki
HEL
Luxemburgo
LUX
Linz
LIN
Andorra AND
Gran
-
Britaña
GB
Noruega
NOR
Salzburg SAL
Badajoz
BAD
Aberdeen
ABD
Bergen
BER
Wien
VIE
Bacelona
BAR
Belfast
BEL
Oslo
OSL
Bélgica
BEL
Bilbao
BIL
Birmingham
BIR
Stavanger
STA
Antwerpen
ANT
Cádiz
CAD
Bristol
BRI
Países Bajos
NET
Brügge
BRU
Còrdoba
COR
Edinburgh
EDI
Amsterdam
AMS
Brüssel
BRL
Salida y Puesta de la luna y el sol
Luego de que haya intrucido el país y la ciudad, calcula su estación meteorológica la salida y puesta aproximada del
sol y la luna.
Indicación: Los tiempos calculados sólo son una orientación. Desviaciones pueden ocurrir por ej. por el terreno local
o el clima predominante
Luego de presionar la Tecla SUN/MOON- 31 aparecen temporalmente las horas de sol aproximadas para el día
correspondiente. Cuando Usted desee ver la salida o puesta del sol de otra ubicación o de otra fecha, presione y
mantenga presionado por 3 segundos el botón-SUN/MOON 31. El país parpadea y puede ser ajustado con la tecla
- 11 o la tecla +/12/24 - 14. Confirme su entrada presionando la tecla SUN/MOON- 31. Ajuste de la misma
manera ciudad, año, mes y día, confirme Usted la entrada presionando la tecla SUN/MOON- 31.

-
58
-
Fases lunares
Su estación meteorológica está provista de un indicador de las fases lunares. Las 8 fases lunares son:
Luna nueva
Luna llena
Luna creciente
Luna menguante
Luna media (primer cuarto)
Luna media (último cuarto)
Luna media creciente
Luna media menguante
Alarma
La estación meteorológica dispone de 2 tiempos de alarma programables individualmente.
Presione la tecla MODE- 15 para elegir la alarma 1 o la alarma 2. Aparece el símbolo de la campana
correspondiente. Mantenga presionado, mientras se muestran la alarma 1 ó 2, la tecla MODE- 15, para cambiar al
modo de ajuste. En la pantalla parpadean las horas. Ajuste las horas presionando la tecla - 11 o la tecla +/12/24 -
14 y confirme el ajuste presionando la tecla MODE -15. Ajuste de la misma manera los minutos. Presione durante la
visualización de la alarma deseada la tecla ALARM/ON/OFF - 10, para activar la alarma ON o desactivarla OFF.
Está activada la alarma 1 aparece . Está activada la alarma 2 aparece . Si no presiona ninguna tecla dentro de 5
segundos, regresa automáticamente la estación meteorológica a la visualización normal.
Función de dormitar (SNOOZE)
Presione al sonar la alarma la tecla SNOOZE/LIGHT- 12, para desactivarla temporalmente, en la pantalla parpadea
el símbolo de la campana. Luego de 5 minutos suena nuevamente la alarma. Presione cualquier tecla excepto el la tecla
12 para apagar la alarma.
Pronóstico meteorológico
Información: La estación meterológica comienza el pronóstico apróximadamente 6 horas después de ingresar el
clima actual.
Los símbolos meteorológicos muestran la tendencia del clima para las próximas horas y no el clima actual.
Si el pronóstico del tiempo no es correcto, puede adaptar la visualización presionando por 3 segundos la tecla
HISTORY/WEATHER- 27. El símbolo del clima parpadea. Ajuste ahora con la tecla °C/°F + - 28 o la tecla
MAX/MIN- - 29 el clima actual. Presione para confirmar la tecla HISTORY/WEATHER- 27.
Información: En caso de nevada introduzca lluvia o aguacero. Luego de confirmar con el botón-
HISTORY/WEATHER 27, aparece en la temperatura exterior bajo 0°C el símbolo de la nieve.
Soleado
Tormentoso
Parcialmente nublado
Luvia
Nublado
Fuerte Nevada
Nevada
Barómetro
Su estación puede mostrar la tendencia de la presión atmosférica 25.
Presión atmosférica aumenta
Presión atmosférica permanece constante
Presión atmosférica disminuye
Usted puede elegir también entre la presión atmosférica absoluta y relativa, presionando la tecla Relative/Absolute-
30. En la pantalla aparece Rel. o Abs.
Indicación:
La presión atmosférica absoluta será medida por la estación meteorológica. La presión atmosférica
relativa puede consultarla con su servicio meteorólogico local y registrarla en su estación meteorológica.

-
59
-
Usted puede cambiar la presión atmosférica relativa, presionando por 3 segundos la tecla Relative/Absolute- 30. El
valor de la presión atmosférica parpadea y puede ser ajustada con la tecla °C/°F + - 28 o la tecla MAX/MIN- - 29.
Confirme su ajuste presionando la tecla Relative/Absolute - 30.
Usted puede elegir entre el formato de visualización hectopascal (hPa) o pulgadas de mercurio (inHg), presionando y
manteniendo presionada por aprox. 3 segundos la tecla 28 °C/°F+ -.
Presión atmosférica de las 12 horas anteriores
Presione la tecla HISTORY/WEATHER- 27, para poder leer los valores de la presión atmosférica de las últimas 12
horas.
0 – HR = presión atmosférica actual
- 1 HR = presión atmosférica hace una hora
-2 HR = presión atmosférica hace dos horas, etc.
Sensor exterior/Ajuste del canal
Con su estación meteorológica pueden ser utilizados hasta tres sensores exteriores al mismo tiempo. Abra el
compartimiento de la pila de los sensores exteriores y ajuste el canal deseado (1-3) con el interruptor de selección de
canal 39. Presione por 3 segundos la tecla CHANNEL- 26, hasta que se emita una señal acústica, la estación
meteorológica recibe ahora la señal 43. Cierre la tapa. Con la tecla 41 puede elegir entre °C-Celsius y °F-Fahrenheit.
Indicación: El sensor exterior debe estar colocado en un radio de máx. 100 m a la estación meteorológica, sin
obstáculos.
Si utiliza varios sensores exteriores. Presione, en la visualización normal de la hora, la tecla CHANNEL- 26, para
cambiar entre los canales de recepción.
Presione 4 x la tecla CHANNEL - 26, los canales 1-3 serán mostrados alternativamente. El símbolo de rotación
muestra en la pantalla 22, que se cambiará automáticamente entre los diferentes canales de recepción.
Sólo serán mostrados los sensores exteriores, que han sido ajustados. Presione y mantenga presionado la tecla
CHANNEL - 26 para eliminar los canales no utilizados. Si agrega otro sensor exterior, la estación meteorológica lo
reconoce automáticamente.
Tendencia de la Temperatura exterior
Al recibir exitosamente los datos de los sensores exteriores, será mostrada la tendencia de la temperatura 21.
Temperatura exterior aumenta
Temperatura exterior permanece constante
Temperatura exterior disminuye
Humedad Interior
La humedad del aire actual será mostrada en la pantalla 5. El indicador de confort 4 muestra la humedad del aire en 3
categorías:
< 40 %
SECO
40 – 60 %
CONFORT
> 60 %
HUMEDO
< 20 °C
/
20 – 26°C
> 26 °C
/
Valores máximos y mínimos
La temperatura y humedad máxima y mínima será registrada inmediatamente al poner las pilas.
Presione brevemente la tecla Max/Min- - 29 para leer la temperatura interior máxima MAX, mínima MIN y actual 3, la
temperatura exterior 24 y la humedad 5, en la pantalla. Para borrar los valores máximos y mínimos, presione por 3
segundos la tecla Max/Min- - 29. Suena una señal acústica, los valores serán borrados y a partir de ese momento
registrados nuevamente.
Indicador del estado de la pila
Cuando las pilas estén demasiado débiles, para mantener en funcionamiento a la estación meteorológica, el sensor
exterior y la transmisión de datos, aparece en la pantalla el indicador del estado de la pila 23. Las pilas deberán ser
cambiadas lo más rápido posible en todos los aparatos. Inicie la estación nuevamente.

-
60
-
Reinicialización (RESET)
Presione la tecla RESET- 33 para reinicializar la estación.
Indicación para la limpieza
Limpie la estación meteorológica y los sensores exteriores sólo con un paño seco sin pelusas, como es utilizado por ej.
para limpiar las gafas.
Declaración UE de Conformidad Simplificada
Por la presente, digi-tech-gmbh declara que el tipo de estación meteorológica radiocontrolada 4-LD4868 es conforme
con las Directivas 1999/5/EG e 2014/53/UE.
El texto completo de la declaración UE de conformidad está disponible en la dirección Internet siguiente:
http://www.digi-tech-gmbh.com/ce/289081_WS.pdf
Eliminación y reciclaje del aparato electrónico
Este aparato electrónico no debe eliminarse con los residuos domésticos. Deseche el aparato utilizando un
servicio de reciclaje autorizado o el punto verde de su municipio. En caso de duda, consulte a su punto de
reciclaje.
Eliminación de las pilas
Por favor, deseche las pilas usadas de forma adecuada en los contendores existentes para tal fin en los
comercios. Las pilas no deben desecharse con los residuos domésticos. Deseche las pilas utilizando un servicio
de reciclaje autorizado o el punto verde de su municipio. Cumpla la normativa vigente a tal respecto. En caso
de duda, consulte con su punto de reciclaje.
Garantía de digi-tech gmbh
Con este aparato recibe Ud. una garantía con una validez de 3 años a partir de la fecha de la compra. En caso de
defectos de este producto le corresponden a Ud. derechos legalmente reconocidos frente al vendedor. Estos derechos
legalmente reconocidos no se ven limitados por la garantía que se expone a continuación.
Condiciones de la garantía
El período de garantía comienza con la fecha de la compra. Por favor, guarde cuidadosamente y a tal fin el ticket de
compra original. Este documento es necesario como prueba de la compra. Si en el transcurso de tres años contados a
partir de la fecha de la compra aparecieran en el producto defectos de material o de fabricación, se procederá (a
elección de digi-tech-gmbh) a la reparación o sustitución del mismo sin coste alguno para Ud. La prestación de esta
garantía se halla supeditada a la presentación, dentro del plazo de 3 años, del aparato defectuoso, de la prueba de la
compra (ticket de compra) y de una corta descripción por escrito del defecto y del momento de su aparición. En caso de
que nuestra garantía cubra el defecto, recibirá Ud. el producto reparado o uno nuevo. A la recepción del producto
reparado o de su sustituto nuevo no comenzará un nuevo período de garantía.
Duración de la garantía y derecho de reclamación
La duración de la garantía no se alarga tras la prestación del servicio garantizado, lo que se extiende también a piezas
reparadas o sustituidas. Los posibles daños ya existentes en el momento de la compra deberán ser notificados
inmediatamente después del desembalaje. Las reparaciones que se tengan que efectuar tras la finalización del período
de garantía deberán ser abonadas.
Ámbito de la garantía
El aparato ha sido fabricado cuidadosamente siguiendo pautas de calidad muy estrictas y superando un control de
calidad previo a su puesta en venta. Esta garantía se extiende solamente a defectos de material o de fabricación. Esta
garantía no se extiende a piezas componentes del instrumento sometidas a un proceso de desgaste normal y que por lo
tanto puedan ser consideradas como piezas consumibles, ni sobre desperfectos aparecidos en partes frágiles como por
ejemplo, botones, acumuladores o piezas compuestas de cristal. Esta garantía pierde su vigencia si el producto ha sido
dañado, utilizado incorrectamente o sometido a operaciones de mantenimiento incorrectas. Para una utilización
adecuada del producto deberán observarse estrictamente todas las indicaciones contenidas en el manual de
instrucciones. Deben evitarse necesariamente usos y manejos desaconsejados en el manual de instrucciones o de los
cuales se haya advertido en el mismo. El producto está indicado únicamente para su utilización a título particular y no
para un uso comercial o industrial. La garantía pierde su vigencia en caso de un mal o incorrecto uso del mismo, su
utilización de forma violenta o en caso de operaciones técnicas no efectuadas por alguno de nuestros servicios técnicos
autorizados.
Procedimiento en caso de garantía
Para garantizar un procedimiento rápido de su solicitud, siga por favor las siguientes instrucciones:
• Para cualquier comunicación, tenga a mano el ticket de compra y el código de artículo (IAN 289081), como prueba
de su compra.
• Encontrará el código del artículo bien en una placa indicativa del tipo de aparato, bien grabada en la carcasa, en la
portada del manual de instrucciones (parte inferior izda.) o en una pegatina en la parte trasera o inferior del aparato.
• En caso de aparecer defectos de funcionamiento, contacte primero por teléfono o mediante correo electrónico con
el departamento técnico abajo indicado.

-
61
-
En www.lidl-service.com pueden descargarse este y muchos otros manuales de instrucciones, videos de
productos y software.
Servicio-Pedidos
Sensores exteriores adicionales pueden ser pedidos por Fax: +49(0)6198-5770-99 o en línea: www.inter-quartz.de. El
precio de un Sensor es 5,- € más. IVA y gastos de envío.
Servicio técnico
Razón social: Inter-Quartz GmbH
Dirección.: Valterweg 27A
Localidad: DE-65817 Eppstein
País: ALEMANIA
Correo electrónico: support@inter-quartz.de
Teléfono: +49 (0)6198 571825
00800 5515 6616
00800 5515 6616 00800 5515 6616
00800 5515 6616 00800 5515 6616
0800 563862 800 142 315
00800 5515 6616 00800 5515 6616
00800 5515 6616 00800 5515 6616
IAN
289081
Art.
-
Nr.:
4
-
LD4868
Proveedor
Esta razón social no se corresponde con ningún servicio técnico. Contacte primero con la dirección de servicio arriba
indicada.
Razón social: digi-tech gmbh
Dirección.: Valterweg 27A
Localidad: DE-65817 Eppstein
País: ALEMANIA

-
62
-
Avisos de utilização e segurança
Índice
Índice ........................................................................................................................................................................................ - 62 -
Introdução ............................................................................................................................................................................... - 63 -
Utilização adequada ............................................................................................................................................................. - 63 -
Conteúdo ................................................................................................................................................................................. - 63 -
Dados técnicos ........................................................................................................................................................................ - 63 -
Estação meteorológica ................................................................................................................................................... - 63 -
Sensor exterior ................................................................................................................................................................ - 63 -
Avisos de segurança para os utilizadores
Avisos de segurança para os utilizadoresAvisos de segurança para os utilizadores
Avisos de segurança para os utilizadores....................................................................................................................... - 63 -
Avisos de segurança para pilhas
Avisos de segurança para pilhasAvisos de segurança para pilhas
Avisos de segurança para pilhas ...................................................................................................................................... - 63 -
A estação meteorológica e o sensor exterior devem ser pendurados ou posicionados de forma segura.................. - 64 -
Ecrã e painéis de controlo ..................................................................................................................................................... - 64 -
Sensor exterior ........................................................................................................................................................................ - 65 -
Fixação do sensor exterior .................................................................................................................................................... - 66 -
Funcionamento ........................................................................................................................................................................ - 66 -
Ajuste do fuso horário ............................................................................................................................................................ - 66 -
Interferências na receção do sinal de rádio ........................................................................................................................ - 66 -
Reiniciar a procura do sinal de rádio ................................................................................................................................... - 66 -
Luz ............................................................................................................................................................................................ - 66 -
Formato de hora 12/24 ........................................................................................................................................................ - 66 -
Temperatura ............................................................................................................................................................................ - 66 -
Acerto rápido .......................................................................................................................................................................... - 66 -
Acerto de base ........................................................................................................................................................................ - 67 -
Tabela de lugares ................................................................................................................................................................... - 67 -
Hora do nascer e do pôr do sol e da lua ............................................................................................................................ - 67 -
Fases da lua ............................................................................................................................................................................. - 68 -
Alarme ...................................................................................................................................................................................... - 68 -
Função dormitar (SNOOZE) ................................................................................................................................................. - 68 -
Previsão do tempo .................................................................................................................................................................. - 68 -
Barómetro ................................................................................................................................................................................ - 68 -
Pressão atmosférica das últimas 12 horas ........................................................................................................................... - 69 -
O sensor exterior/Acerto do canal ...................................................................................................................................... - 69 -
Evolução da temperatura exterior ........................................................................................................................................ - 69 -
Humidade do ar do interior ................................................................................................................................................... - 69 -
Valores máximos e mínimos ................................................................................................................................................... - 69 -
Indicador do estado das pilhas ............................................................................................................................................. - 69 -
Reinício (RESET) ...................................................................................................................................................................... - 69 -
Aviso de limpeza .................................................................................................................................................................... - 70 -
Declaração UE de Conformidade Simplificada .................................................................................................................. - 70 -
Eliminação do aparelho eléctrico ......................................................................................................................................... - 70 -
Eliminação das pilhas ............................................................................................................................................................. - 70 -
Garantia da empresa digi-tech gmbh .................................................................................................................................. - 70 -
Condições sobre a garantia .................................................................................................................................................. - 70 -
Período de garantia e direitos legais relativos a defeitos .................................................................................................. - 70 -
Extensão da garantia ............................................................................................................................................................. - 70 -
Procedimento no caso de garantia ....................................................................................................................................... - 70 -
Serviço de encomendas ......................................................................................................................................................... - 71 -
Serviço ..................................................................................................................................................................................... - 71 -
Fornecedor .............................................................................................................................................................................. - 71 -

-
63
-
ESTAÇÃO METEOROLÓGICA SEM FIOS
Introdução
Parabéns pela compra do seu novo estação meteorológica. Você decidiu-se por um aparelho de grande qualidade. O
manual de utilização faz parte deste estação meteorológica. Aqui encontrará avisos importantes referentes à
segurança, à utilização e ao descarte do relógio. Leia atentamente este manual antes de utilizar o estação
meteorológica. Use-o apenas como é descrito e só nos campos de aplicação indicados. Se vender o estação
meteorológica ou o entregar a outra pessoa, entregue-lhe também este manual. Guarde a embalagem e o manual de
instruções para posteriores pedidos ou perguntas.
Utilização adequada
O despertador destina-se à indicação da hora e ao uso das funções descritas neste manual. Qualquer outro uso ou
alteração do despertador é indevido. O fabricante não se responsabiliza por danos causados pelo uso indevido ou
pelo manuseamento incorrecto. O aparelho não se destina ao uso comercial.
Conteúdo
Aviso: Após a compra queira comprovar o conteúdo. Assegure-se de que a embalagem contém todas as peças e que
as mesmas não estão defeituosas.
•
••
• Estação meteorológica
•
••
• 3 x pilhas 1,5 V AA R6/LR6
•
••
• Sensor exterior
•
••
• Suporte para o sensor exterior
•
••
• 2 x pilhas 1,5 V AAA R03/LR03
•
••
• Manual de instruções
Dados técnicos
Estação meteorológica
• Campo de medição da temperatura 0-50°C
• precisão do termómetro: +/- 1 °C
• pilhas: 3 x 1,5 V AA R6/LR6
Sensor exterior
• Campo de medição da temperatura -20 - 50°C
• precisão do termómetro: +/- 1 °C
• alcance: máx. 100 m
• Frequência de transmissão: 433 MHZ
• Poder de emissão: 0,24 W
• Tipo de proteção proporcionado pela caixa (sensor exterior):
IPX4 (Proteção contra jorros de água segundo a Norma IEC 60529)
• pilhas: 2 x 1,5 V AAA R03/LR03
- Sinal de corrente contínua
Avisos de segurança para os utilizadores
AVISO! PERIGO DE DANOS!
Este aparelho pode ser usado por pessoas (incluídas crianças a partir dos 8 anos) com capacidades físicas , sensoriais
ou mentais diminuídas ou com falta de experiência e conhecimento desde que sejam supervisionadas ou tenham sido
instruídas sobre a utilização segura do aparelho e tenham entendido os perigos daí resultantes. As crianças não devem
brincar com o aparelho. As crianças não devem limpar ou fazer manutenção sem supervisão. Mantenha as películas da
embalagem fora do alcance das crianças. Há perigo de asfixia.
Avisos de segurança para pilhas
AVISO!
PERIGO PARA A SAÚDE!
PERIGO DE EXPLOSÃO!
Mantenha as pilhas fora do alcance de crianças pequenas. No caso de ter sido engolida uma pilha, deverá ser
prestada ajuda médica imediatamente.
As pilhas/baterías devem ser sempre colocadas tendo em conta a polaridade correcta. Sendo necessário, limpe
primeiro os contactos das pilhas e do aparelho. Não tente carregar, provocar curto-circuito ou abrir as pilhas. Nunca
deite pilhas ao fogo, pois elas podem explodir. A utilização indevida das pilhas pode causar explosão ou derrame das
mesmas. Se a pilha sofreu derrame, evite o contacto com a pele, os olhos ou as mucosas. Use luvas. Em caso de
contacto com o ácido da pilha lave as partes afectadas com bastante água limpa e procure imediatamente um médico.
Retire as pilhas gastas imediatamente do aparelho, há perigo elevado de derrame.

-
64
-
A estação meteorológica e o sensor exterior devem ser pendurados ou
posicionados de forma segura
A estação meteorológica e o sensor exterior não se adequam ao uso em divisões com humidade do ar elevada (por ex.
casa de banho). Preste atenção para que:
• O sensor esteja na posição vertical;
• seja assegurado um arejamento suficiente (não coloque o aparelho em móveis cujas ranhuras de ventilação estejam
tapadas por cortinas ou móveis e deixe um mínimo de 10 cm de distância para todos os lados);
• o aparelho, quando em funcionamento, não esteja colocado sobre um tapete grosso ou sobre uma cama e não
incidam nele fontes de calor diretas (por ex. aquecimentos);
• não incidam no aparelho raios solares diretos;
• se evite o contato com salpicaduras ou gotas de água;
• o aparelho não se encontre em proximidade direta de campos magnéticos (por ex. de altifalantes);
• não entrem nele corpos extranhos nem pó;
• velas e outras chamas abertas estejam sempre mantidas afastadas do aparelho para evitar o alastramento de fogo.
Ecrã e painéis de controlo

-
65
-
Sensor exterior
1 Símbolo do tempo 22 Canal escolhido
2
Barra de pressão atmosférica
23 Indicador de pilhas
3
Temperatura interior
24 Temperatura exterior
4
Símbolo de conforto
25 Tendência da pressão atmosférica
5 Humidade do ar do interior 26 Tecla CHANNEL
6 Fase lunar 27 Tecla HISTORY/WEATHER
7 Nascer e pôr da lua 28 Tecla °C/°F + -
8 Local 29 Tecla MAX/MIN
9 Nascer e pôr so sol 30 Tecla pressão atmosférica RELATIVE/ABSOLUTE
10 Tecla de ALARM/ON/OFF 31 Tecla SUN/MOON
11 Tecla -/ 32
Orifício para pendurar o aparelho (estação
meteorológica)
12 Tecla SNOOZE/LIGHT 33 Tecla RESET
13 Símbolo de alarme 34
Compartimento das pilhas (estação
meteorológica)
14 Tecla +/12/24 35 Suporte desdobrável (estação meteorológica)
15 Tecla MODE 36 LED de controlo (sensor exterior)
16 Data (mês, dia, dia da semana) 37 Canal de temperatura exterior (sensor exterior)
17 Indicador da hora 38
Orifício para pendurar o aparelho (sensor
exterior)
18 Indicador da torre de controlo 39
Interruptor para escolha do canal (sensor
exterior)
19 Pressão atmosférica das últimas horas 40 Compartimento das pilhas (sensor exterior)
20 Pressão atmosférica relativa/absoluta 41 Tecla °C/°F (sensor exterior)
21 Tendência da temperatura exterior 42 Suporte para o sensor exterior
43 Sinal do sensor exterior

-
66
-
Fixação do sensor exterior
O suporte 42
4242
42 incluído para o sensor possibilita diversas formas de fixação. Conforme for necessário, o sensor exterior
pode ser pendurado na parede ou posicionado na vertical.
A imagem A mostra as 3 cavidades que o sensor tem em ambos os lados. Com elas, pode encaixar o sensor no suporte.
A imagem B mostra, da perspectiva lateral, como o suporte está fixado na parte posterior do sensor.
A imagem C é a representação frontal do sensor com o sensor suspenso da parte de cima.
A imagem D é a representação frontal do sensor com o suporte na parte inferior do sensor.
A imagem E mostra o painel de controlo e o compartimento das pilhas da parte posterior do sensor.
Aviso: Pendure ou posicione o sensor exterior sempre na posição vertical.
Funcionamento
Retire a película protetora da estação meteorológica e do sensor. Abra o compartimento das pilhas do sensor exterior
40 e coloque as pilhas fornecidas tendo em conta a polaridade correta. A lâmpada de controlo 36 acende
temporariamente e aparece a temperatura. Feche o compartimento das pilhas. Abra o compartimento das pilhas da
estação meteorológica 34 e coloque as pilhas fornecidas tendo em conta a polaridade correta. Feche o compartimento
das pilhas. O símbolo de tempo 1 pisca e a estação meteorológica recebe agora o sinal do sensor exterior. Este
procedimento pode durar alguns minutos. Tendo recebido o sinal aparece o canal escolhido 22 bem como a
temperatura exterior actual 24. Após receber o sinal do sensor exterior, a estação meteorológica procura o sinal de
rádio DCF 77 e a torre de controlo 18 pisca no monitor junto da hora. Este procedimento pode durar de 3-10 minutos.
Durante a procura do sinal não pode utilizar nenhuma tecla à exceção da tecla SNOOZE / LIGHT 12. No caso de,
passados 10 minutos, a receção do sinal continuar a falhar, acerte a hora manualmente. A estação meteorológica
tentará procurar o sinal de novo às 04:00 e às 05:00 e corrigirá a hora automaticamente se a receção do sinal for bem
sucedida.
Aviso: Não mova a estação meteorológica nem o sensor exterior durante o procedimento de receção do sinal
Aviso: Não mova a estação meteorológica nem o sensor exterior durante o procedimento de receção do sinal Aviso: Não mova a estação meteorológica nem o sensor exterior durante o procedimento de receção do sinal
Aviso: Não mova a estação meteorológica nem o sensor exterior durante o procedimento de receção do sinal
de rádio.
de rádio.de rádio.
de rádio.
Ao ter recebido o sinal, a torre de controlo 18 aparece permanentemente e a hora, a data, o dia da semana, o nascer
e o pôr do sol e da lua, bem como as fases lunares corrigem-se automaticamente. Durante a hora de Verão aparece
DST no monitor junto da torre de controlo 18.
Ajuste do fuso horário
Se se encontrar num país no qual a hora actual não se acertar apesar do sinal DCF, utilize a adaptação do fuso horário
para usar o seu estação meteorológica num fuso horário diferente daquele do acerto de base (UTC + 1 = hora da
Europa Central). Introduza a diferença em horas em relação ao fuso horário desejado (p. ex. -01).
A partir do indicador normal de hora, carregue na tecla MODE -15 durante 3 segundos, o fuso horário pisca e pode
ser ajustado com as teclas -/ -11 ou +/12/24 -14. Carregue na tecla MODE -15 para confirmar o acerto.
Finalmente, proceda ao reinício do estação meteorológica. O estação meteorológica continua a receber o sinal de
rádio DCF77 mas indica a hora modificada por Si (por ex. 1 hora menos).
Interferências na receção do sinal de rádio
O sinal de rádio DCF77 é emitido próximo da cidade de Frankfurt am Main e pode ser captado até cerca de 1500 km
no raio em volta de Frankfurt am Main. No entanto, existem algumas interferências que podem prejudicar
consideravelmente a receção. Se a estação meteorológica não receber o sinal, coloque o seu aparelho em outro lugar
e tenha em atenção que perto do computador, telefone, rádio e televisão podem verificar-se radiações
electromagnéticas, que prejudicam a receção do sinal de rádio DCF77. Outras interferências para a receção podem
ser edifícios com materiais isoladores fortes (elementos metálicos), montanhas altas ou interferências atmosféricas. Se for
preciso troque as pilhas.
Reiniciar a procura do sinal de rádio
Pode reiniciar manualmente a procura do sinal de rádio carregando na tecla -/ 11 durante 3 segundos.
Luz
Carregue na tecla SNOOZE/LIGHT 12 para ligar temporariamente a iluminação de fundo.
Formato de hora 12/24
Carregue na tecla +/12/24 14 para escolher entre o formato de 12 ou de 24 horas. No formato de 12 horas aparece
no monitor AM durante a manhã e PM durante a tarde.
Temperatura
Carregue na tecla °C/°F 28 para obter a temperatura em graus Celsius (°C) ou Fahrenheit (°F).
Acerto rápido
Para introduzir valores numéricos pode utilizar o acerto rápido carregando na tecla -/ durante algum tempo.
Coloque primeiro as pilhas no sensor exterior 40 e só depois na estação meteorológica 34.

-
67
-
Acerto de base
Você pode proceder aos seguintes acertos: fuso horário, hora, data, idioma do indicador do dia da semana e local.
A partir do indicador de hora normal, carregue na tecla MODE 15 durante 3 segundos, o fuso horário pisca e pode ser
acertado com a a tecla -/ 11 ou +/12/24 14. Carregue em MODE 15 para confirmar o acerto. Proceda da mesma
maneira para acertar a hora, os minutos, os segundos, o ano, o mês, o dia e o idioma do indicador do dia da semana
(GE=alemão, FR=francês, ES=espanhol, IT=italiano, NE=neerlandês, DA=dinamarquês, RU=russo, EN=inglês), o país e
o local (veja tabela de lugares). Se mudar de local, pode demorar algum tempo até que os valores do nascer e do pôr
do sol e da lua se atualizem.
Tabela de lugares
Alemanha
GER
Ibiza
IBI
Glasgow
GLA
Eindhoven
EIN
Charleroi
CHA
Aachen
AAC
La Coruña
LAC
London
LON
Enschede
ENS
Lüttich
LIE
Berlim
BER
León
LEO
Manchester
MAN
Groningen
GRO
Suiça/
Liechtenstein
SWI
Düsseldorf
DUS
Las Palmas
LPA
Plymouth
PLY
Den Haag
DHA
Dresden
DRE
Madrid
MAD
Hungria
HUN
Rotterdam
ROT
Basel
BAS
Erfurt
ERF
Málaga
MAL
Budapeste
BUD
Portugal
POR
Berna
BER
Francoforte
FRA
Palma de
Mallorca
PDM
Croácia
CRO
Évora
EVO
Chur
CHU
Flensburgo
FLE
Zagreb
ZAG
Coimbra
COI
Genebra
GEN
Friburgo
FRE
Salamanca
SAL
Itália
ITA
Faro
FAR
Locarno
LOC
Hannover
HAN
Sevilha
SEV
Ancona
ANC
Leiria
LEI
Lucerna
LUC
Bremen
BRE
Valencia
VAL
Bari
BAI
Lisboa
LIS
St. Moritz
MOR
Hamburgo
HAM
Zaragoça
ZAR
Bolonha
BOL
Porto
POR
St. Gallen
GAL
Rostock
ROS
França
FRA
Cagliari
CAG
Polónia
POL
Sitten
SIO
Stralsund
STR
Besançon
BES
Catania
CAT
Danzig
GDA
Vaduz
VAD
Colónia
KOE
Biarritz
BIA
Florença
FIR
Cracóvia
KRA
Zurique
ZUE
Kiel
KIE
Bordeaux
BOR
Foggia
FOG
Posen
POZ
Rep. Checa CZR
Kassel
KAS
Brest
BRE
Genua
GEN
Stettin
SZC
Leipzig
LEI
Cherbourg
CHE
Lecce
LEC
Varsóvia
WAR
Praga
PRA
Munique
MUE
Lyon
LYO
Messina
MES
Rússia
RUS
Grécia
GR
Magdeburgo
MAG
Marseille
MAR
Milão
MIL
St. Petersburg
PET
Atenas
AT
Nurenberga
NUE
Mónaco
MON
Neapel
NAP
Suécia
SWE
Chipre
CY
Regensburgo
REG
Metz
MET
Palermo
PAL
Göteborg
GOT
Nicosia
NI
Estugarda
STU
Nantes
NAN
Parma
PAR
Stocolmo
STO
Roménia
RO
Saarbrücken
SAA
Nizza
NIC
Perugia
PER
Rep.
Eslováquia
SLK
Bucareste
BU
Schwerin
SCH
Orléans
ORL
Roma
ROM
Bratislava
BRA
Bulgária
BG
Dinamarca
DAN
Paris
PAR
Turin
TOR
Slovénia
SLO
Sofia
SO
Aalborg
ALB
Perpignan
PER
Trieste
TRI
Ljubljana
LJU
Aarhus
ARH
Lille
LIL
Veneza
VEN
Sérbia
SRB
Copenhaga
COP
Rouen
ROU
Verona
VER
Belgrado
BER
Odense
ODE
Strasburgo
STR
Ventimiglia
VTG
Áustria
AUS
Espanha/
Andorra
ESP
Toulouse
TOU
Irlanda
IRL
Graz
GRA
Finlândia
FIN
Dublin
DUB
Innsbruck
INN
Alicante
ALI
Helsinkia
HEL
Luxemburgo
LUX
Linz
LIN
Andorra AND
Grã
-
bretanha
GB
Noruega
NOR
Salzburgo SAL
Badajoz
BAD
Aberdeen
ABD
Bergen
BER
Viena
VIE
Barcelona
BAR
Belfast
BEL
Oslo
OSL
Bélgica
BEL
Bilbau
BIL
Birmingham
BIR
Stavanger
STA
Antuérpia
ANT
Cádiz
CAD
Bristol
BRI
Países Baixos
NET
Brügge
BRU
Córdoba
COR
Edinburgo
EDI
Amsterdão
AMS
Bruxelas
BRL
Hora do nascer e do pôr do sol e da lua
Depois de ter introduzido o país e o local, a sua estação calcula as horas aproximadas do nascer e do pôr do sol e da
lua.
Aviso: As horas calculadas servem apenas à orientação. Podem resultar diferenças devido ao terreno acidentado
que se encontre na proximidade ou ao clima em vigor no momento.
Ao carregar em SUN/MOON 31 aparecem temporariamente as horas aproximadas de sol para o dia respetivo. Se
quiser saber a hora do nascer e do pôr do sol de outro lugar ou de outra data, carregue durante 3 segundos a tecla
SUN/MOON - 31. O país pisca e poder ser acertado com a tecla -/ 11 ou 12/24 14. Confirme o acerto
carregando em SUN/MOON 31. Proceda da mesma maneira para acertar a cidade, o ano, o mês e o dia, e confirme
carregando em SUN/MOON 31.

-
68
-
Fases da lua
A sua estação possui um indicador das fases da lua. As 8 fases da lua são:
Lua nova
Lua cheia
Lua crescente
Lua minguante convexa
Quarto crescente (primeiro quarto)
Quarto minguante (último quarto)
Lua crescente convexa
Lua minguante côncava
Alarme
A estação meteorológica possui 2 horas de alarme separadas.
Carregue na tecla MODE 15 para escolher entre o Alarm1 ou o Alarm 2. Aparece o símbolo de sino respetivo.
Enquanto estiver no indicador de Alarm 1 ou 2 carregue na tecla MODE 15 para passar ao modo de acerto. A hora
pisca no monitor. Acerte a hora carregando na tecla -/ - 11 ou +/12/24 14 e confirme carregando em MODE 15.
Proceda do mesmo modo para acertar os minutos. Enquanto estiver no modo de alarme desejado, carregue na tecla
ALARM/ON/OFF -10 para ligar ON ou desligar OFF o alarme. Estando o Alarm 1 ligado, aparece o símbolo .
Estando o Alarm 2 ligado, aparece o símbolo . Se não carregar em nenhuma tecla durante mais de 5 segundos, a
estação meteorológica volta automaticamente ao indicador de hora normal.
Função dormitar (SNOOZE)
Ao soar o alarme, carregue na tecla SNOOZE/LIGHT 12 para desligar o alarme temporariamente, o símbolo de sino
pisca então no monitor. Passados 5 minutos o alarme volta a soar. Carregue qualquer tecla excepto o tecla 12 para
desligar o alarme.
Previsão do tempo
Aviso: Esta estação começa a previsão cerca de 6 horas após a introdução do tempo actual.
Os símbolos do tempo indicam a tendência do tempo para as próximas horas e não o tempo actual.
Se a previsão do tempo da sua estação não for correta, pode ajustar o indicador carregando na tecla
HISTORY/WEATHER 27 durante 3 segundos. O símbolo do tempo pisca. Ajuste o tempo actual carregando na tecla
°C/°F + 28 ou na tecla MAX/MIN 29. Confirme carregando em HISTORY/WEATHER 27.
Aviso: Se cair neve, introduza chuva ou aguaceiro. Após confirmar com a tecla HISTORY/WEATHER - 27 o símbolo
de neve aparece quando a temperatura exterior for inferior a 0°C.
Ensolarado
Aguaceiro
Ligeiramente nublado
Chuva
Nublado
Queda de neve forte
Queda de neve
Barómetro
A sua estação pode mostrar a evolução da pressão atmosférica 25.
A pressão atmosférica vai subir
A pressão atmosférica mantém-se
A pressão atmosférica vai baixar
Pode escolher entre a pressão atmosférica absoluta e relativa, carregando na tecla Relative/Absolute 30. No monitor
aprece Rel. ou Abs.
Aviso: A pressão atmosférica absoluta é medida pela estação meteorológica. Pode tomar conhecimento da pressão
atmosférica relativa junto do serviço de meteorologia local e introduzir o valor na sua estação.

-
69
-
Pode alterar a pressão atmosférica relativa carregando na tecla Relative/Absolute 30 durante 3 segundos. O valor da
pressão atmosférica pisca e pode ser ajustado carregando na tecla °C/°F + 28 ou MAX/MIN 29. Confirme o acerto
com a tecla Relative/Absolute 30.
Pode escolher entre o formato de indicador Hectopascal (hPa) ou Inches of mercury (inHg) carregando a tecla 28
°C/°F+ durante aproximadamente 3 segundos.
Pressão atmosférica das últimas 12 horas
Carregue na tecla HISTORY/WEATHER 27 para ler os valores da pressão atmosférica das últimas 12 horas.
0 – HR = pressão atmosférica actual
- 1 HR = pressão atmosférica uma hora antes
-2 HR = pressão atmosférica duas horas antes, etc.
O sensor exterior/Acerto do canal
Pode usar até três sensores exteriores em simultâneo com a sua estação. Abra o compartimento das pilhas e ajuste o
canal desejado (1-3) no interruptor de canal 39. Carregue na tecla CHANNEL 26 durante 3 segundos até soar um
sinal, a estação meteorológica recebe agora o sinal 43. Feche o compartimento das pilhas. Com a tecla 41 pode
escolher entre graus °C-Celsius e °F-Fahrenheit.
Aviso: O sensor exterior e a estação devem ter um afastamento que não ultrapasse um máximo de 100 m, sem
obstáculos.
Se utilizar vários sensores exteriores. Enquanto estiver no indicador de hora normal carregue na tecla CHANNEL 26
para escolher entre os canais de receção.
Carregue 4 x na tecla CHANNEL 26, e os canais 1-3 aparecem alternadamente. O símbolo de rotação indica no
monitor 22 que os varios canais aparecem alternadamente.
Só aparecem os sensores exteriores que tiverem sido ajustados.Carregue durante uns segundos na tecla CHANNEL 26
para retirar canais que não estejam a ser usados. Se juntar um sensor exterior adicional, a estação meteorológica
reconhece-o automaticamente.
Evolução da temperatura exterior
Quando o sinal do sensor exterior estiver a ser bem recebido, a tendência da temperatura exterior 21 é indicada como
segue.
temperatura exterior vai subir
temperatura exterior mantém-se
temperatura exterior vai baixar
Humidade do ar do interior
A humidade do ar do interior vem indicada no monitor 5. O indicador de conforto 4 indica a humidade do ar em 3
categorias:
< 40 %
SECO
40 – 60 %
COMFORTO
> 60 %
HÚMIDO
< 20 °C
/
20 – 26°C
> 26 °C
/
Valores máximos e mínimos
A temperatura e a humidade do ar máxima e mínima ficam gravadas a partir da colocação das pilhas.
Carregue na tecla Max/Min 29 para ler no monitor a temperatura de interior máxima MAX, minima MIN e actual 3, a
temperatura exterior 24 e a humidade do ar 5. Para apagar os valores máximos e mínimos carregue na tecla Max/Min
29 durante 3 segundos. Soa um sinal, os valores apagam-se e são gravados de novo a partir desse momento.
Indicador do estado das pilhas
Quando as pilhas começam a ficar demasiado fracas para manter o funcionamento da estação meteorológica , do
sensor exterior e da transmissão de dados, aparece o indicador de estado de pilhas 23 no monitor. As pilhas deverão
ser substituídas em todos os aparelhos o mais brevemente possível. Acerte a estação meteorológica de novo.
Reinício (RESET)
Carregue na tecla RESET 33 para colocar os valores da estação meteorológica em zero.

-
70
-
Aviso de limpeza
Limpe a estação meteorológica e o sensor exterior apenas com um pano seco e sem pêlos, como por ex. um pano de
limpeza de óculos.
Declaração UE de Conformidade Simplificada
O(a) abaixo assinado(a) digi-tech-gmbh declara que o presente tipo de estação meteorológica 4-LD4868 está em
conformidade com as Diretivas 1999/5/EG e 2014/53/UE.
O texto integral da declaração de conformidade está disponível no seguinte endereço de Internet:
http://www.digi-tech-gmbh.com/ce/289081_WS.pdf
Eliminação do aparelho eléctrico
Não deite este aparelho no lixo normal. Entregue-o num dos pontos de recolha de aparelhos eléctricos
autorizados ou na sua câmara municipal. Observe as regulamentações respectivas em vigor. Em caso de dúvida
contacte a sua câmara municipal.
Eliminação das pilhas
Deite as pilhas nos contentores existentes para o efeito („pilhões“). Não deite as pilhas no lixo normal.
Entregue-as num dos pontos de recolha autorizados ou na sua câmara municipal. Observe as
regulamentações respectivas em vigor. Em caso de dúvida contacte a sua câmara municipal.
Garantia da empresa digi-tech gmbh
Para este aparelho oferecemos uma garantia de 3 anos contados a partir data de compra. No caso de este aparelho
apresentar falhas ou defeitos Você tem direitos legais perante o vendedor do produto. Estes direitos legais não são
restringidos pela nossa garantia que descrevemos de seguida.
Condições sobre a garantia
O prazo de garantia começa a partir da data de compra. Guarde por isso o talão de compra original num sítio seguro.
Este documento é necessário como comprovativo da compra. Se, dentro do prazo de três anos contados a partir da
data de compra, o relógio de pulso apresentar algum defeito ou falha de material ou de fabrico o relógio será -
segundo o nosso critério - arranjado ou substituído a título gratuito. É condição prévia que, dentro do prazo de três
anos, apresente o relógio de pulso defeituoso bem como o comprovativo de compra (talão da caixa) e descreva por
escrito de que defeito se trata e quando surgiu o mesmo. Se a falha estiver coberta pela nossa garantia, receberá o
produto arranjado ou um produto novo. O período de garantia começa a contar de novo a partir do arranjo ou troca
do produto
Período de garantia e direitos legais relativos a defeitos
O período de garantia não será prolongado com a prestação de garantia. O mesmo se aplica aos componentes que
tenham sido arranjados ou substituídos. Os danos ou defeitos que sejam detectados no acto da compra deverão ser-nos
comunicados de imediato. Qualquer arranjo que tiver de ser feito passado o período de garantia terá de ser pago.
Extensão da garantia
O aparelho foi produzido cumprindo directivas de qualidade rigorosas e foi testado escrupulosamente antes da sua
entrega. A garantia extende-se a falhas ou defeitos de material ou de fabrico. Esta garantia não se extende a
componentes do produto que estejam sujeitos ao desgaste normal e que sejam, por isso, considerados como elementos
desgastáveis, nem a danos em componentes frágeis como interruptores, acumuladores de bateria ou que sejam feitos
de vidro.
A garantia deixa de ter aplicação sempre que o produto seja danificado ou não seja usado ou mantido devidamente.
Devem ser cumpridas todas as instruções para uma utilização adequada mencionadas neste manual. Deverão ser
evitadas as formas de uso que sejam desaconselhadas ou das quais se avise neste manual.
O produto destina-se exclusivamente ao uso privado e não ao uso comercial. A garantia deixa de aplicar-se em caso
de uso abusivo ou indevido, uso de violência ou interferências não autorizadas pelo nosso serviço autorizado.
Procedimento no caso de garantia
Para assegurar um procedimento rápido queira seguir os seguintes conselhos:
• No caso de ter reclamações ou perguntas tenha sempre à disposição o talão de compra e o número do artigo (IAN
289081) como comprovativos da compra.
• O número do artigo encontra-se no rótulo, gravado, no título do manual de instruções (parte inferior esquerda) ou na
etiqueta colada na parte de trás ou de baixo do aparelho.
• Se surgirem falhas nas funções ou outros defeitos contacte primeiro o departamento de serviço seguinte por
telefone ou por E-Mail.
Em www.lidl-service.com pode carregar este e muitos outros manuais de instruções, vídeos de produtos e
software.

-
71
-
Serviço de encomendas
Pode encomendar sensores adicionais por Fax: +49(0)6198-5770-99 ou online: www.inter-quartz.de. O preço de um
sensor é de 5,- € mais IVA e os custos de envio.
Serviço
Nome: Inter-Quartz GmbH
Str.: Valterweg 27A
Cidade: DE-65817 Eppstein
País: ALEMANHA
E-Mail: support@inter-quartz.de
Telefone: +49 (0)6198 571825
00800 5515 6616
00800 5515 6616 00800 5515 6616
00800 5515 6616 00800 5515 6616
0800 563862 800 142 315
00800 5515 6616 00800 5515 6616
00800 5515 6616 00800 5515 6616
IAN
289081
Art.
-
Nr.:
4
-
LD4
868
Fornecedor
Tenha em consideração que o endereço seguinte não é um endereço de serviço. Contacte primeiro o departamento de
serviço mencionado acima.
Nome: digi-tech gmbh
Rua: Valterweg 27A
Localidade: DE-65817 Eppstein
País: ALEMANHA

IAN
289081
digi-tech gmbh
Valterweg 27A
DE-65817 Eppstein
GERMANY
Stand der Informationen · Last information update · Version des informations · Laatste informatie ·
Stav informací · Actualización de las informaciones · Data das informações:
10/2017
Art.-Nr.: 4-LD4868
Documenttranscriptie
FUNK-WETTERSTATION / RADIO-CONTROLLED WEATHER STATION /STATION MÉTÉO RADIO-GUIDÉE · 10/2017 · Art.-Nr.: 4-LD4868 FUNK-WETTERSTATION RADIO-CONTROLLED WEATHER STATION Bedienungs- und Sicherheitshinweise Usage and safety instructions STATION MÉTÉO RADIO-GUIDÉE RADIOGRAFISCH WEERSTATION Utilisation et avertissements de sécurité Gebruiksaanwijzing en veiligheidstips BEZDRÁTOVÁ METEOSTANICE ESTACIÓN METEOROLÓGICA INALÁMBRICA Návod k obsluze a bezpečnostní upozornění Indicaciones sobre su utilización y su seguridad ESTAÇÃO METEOROLÓGICA SEM FIOS Avisos de utilização e segurança IAN 289081 OS Bedienungs- und Sicherheitshinweise ................................................................................................... - 1 Usage and safety instructions .................................................................................................................................... - 11 Utilisation et avertissements de sécurité......................................................................................................... - 21 Gebruiksaanwijzing en veiligheidstips .......................................................................................................... - 32 Návod k obsluze a bezpečnostní upozornění......................................................................................................... - 42 Indicaciones sobre su utilización y su seguridad .................................................................................................... - 52 Avisos de utilização e segurança .............................................................................................................................. - 62 - Bedienungs- und Sicherheitshinweise Inhaltsverzeichnis Inhaltsverzeichnis ...................................................................................................................................................................... - 1 Einleitung.................................................................................................................................................................................... - 2 Bestimmungsgemäße Verwendung ......................................................................................................................................... - 2 Lieferumfang .............................................................................................................................................................................. - 2 Technische Daten ...................................................................................................................................................................... - 2 Wetterstation ..................................................................................................................................................................... - 2 Außensensor ...................................................................................................................................................................... - 2 Allgemeine Sicherheitshinweise für Benutzer .................................................................................................................... - 2 Sicherheitshinweise zu den Batterien.................................................................................................................................. - 2 Die Wetterstation und den Außensensor sicher aufhängen oder stellen ............................................................................ - 3 Display und Bedienfelder ......................................................................................................................................................... - 3 Außensensor .............................................................................................................................................................................. - 4 Befestigung des Außensensors ................................................................................................................................................ - 5 Inbetriebnahme ......................................................................................................................................................................... - 5 Zeitzonenanpassung ................................................................................................................................................................ - 5 Empfangsstörung....................................................................................................................................................................... - 5 Funkempfang neu starten ......................................................................................................................................................... - 5 Licht ............................................................................................................................................................................................. - 5 12/24-Stunden Zeitformat...................................................................................................................................................... - 5 Temperatur................................................................................................................................................................................. - 5 Schnelleinstellung...................................................................................................................................................................... - 5 Grundeinstellung ....................................................................................................................................................................... - 6 Standorttabelle .......................................................................................................................................................................... - 6 Auf- und Untergangszeiten von Mond und Sonne................................................................................................................ - 6 Mondphasen ............................................................................................................................................................................. - 7 Weckalarm ................................................................................................................................................................................ - 7 Schlummerfunktion (SNOOZE) ............................................................................................................................................... - 7 Wettervorhersage ..................................................................................................................................................................... - 7 Barometer .................................................................................................................................................................................. - 7 Luftdruck der vergangenen 12 Stunden ................................................................................................................................. - 8 Außensensor/Kanaleinstellung ............................................................................................................................................... - 8 Außentemperaturentwicklung .................................................................................................................................................. - 8 Raumluftfeuchtigkeit .................................................................................................................................................................. - 8 Maximal- und Minimalwerte ................................................................................................................................................... - 8 Batteriestandsanzeige .............................................................................................................................................................. - 8 Neustart (RESET) ....................................................................................................................................................................... - 8 Reinigungshinweis ..................................................................................................................................................................... - 9 Vereinfachte EU-Konformitätserklärung ................................................................................................................................. - 9 Entsorgung der Wetterstation .................................................................................................................................................. - 9 Entsorgung der Batterien .......................................................................................................................................................... - 9 Garantie der digi-tech gmbh ................................................................................................................................................... - 9 Garantiebedingungen .............................................................................................................................................................. - 9 Garantiezeit und gesetzliche Mängelansprüche .................................................................................................................. - 9 Garantieumfang ........................................................................................................................................................................ - 9 Abwicklung im Garantiefall ..................................................................................................................................................... - 9 Bestell-Service ......................................................................................................................................................................... - 10 Service...................................................................................................................................................................................... - 10 Lieferant.................................................................................................................................................................................... - 10 - -1- FUNK-WETTERSTATION Einleitung Herzlichen Glückwunsch zum Kauf Ihrer neuen Wetterstation. Sie haben sich damit für ein hochwertiges Gerät entschieden. Die Bedienungsanleitung ist Bestandteil dieser Wetterstation. Sie enthält wichtige Hinweise für Sicherheit, Gebrauch und Entsorgung. Machen Sie sich vor der Benutzung der Wetterstation mit allen Bedien- und Sicherheitshinweisen vertraut. Benutzen Sie die Wetterstation nur wie beschrieben und für die angegebenen Einsatzbereiche. Händigen Sie alle Unterlagen bei Weitergabe der Wetterstation an Dritte mit aus. Die Verpackung und Bedienungsanleitung für spätere Rückfragen bitte aufbewahren. Bestimmungsgemäße Verwendung Die Wetterstation ist zur Zeitanzeige und zur Verwendung der beschriebenen Zusatzfunktionen geeignet. Jede andere Verwendung oder Veränderung der Wetterstation gilt als nicht bestimmungsgemäß. Der Hersteller haftet nicht für Schäden, die durch nicht bestimmungsgemäßen Gebrauch oder falsche Bedienung verursacht werden. Die Wetterstation ist nicht für den gewerblichen Einsatz vorgesehen. Lieferumfang Hinweis: Bitte überprüfen Sie nach dem Kauf den Lieferumfang. Stellen Sie sicher, dass alle Teile vorhanden und nicht defekt sind. • Wetterstation • 3 x Batterien 1,5 V AA R6/LR6 • Außensensor • Halterung für Außensensor • 2 x Batterien 1,5 V AAA R03/LR03 • Bedienungsanleitung Technische Daten Wetterstation • Betriebstemperatur: 0 - 50 °C • Temperaturanzeige: +/- 1 °C • Batterien: 3 x 1,5 V AA R6/LR6 Außensensor • Betriebstemperatur: -20 - 50 °C • Temperaturanzeige: +/- 1 °C • Reichweite: max. 100 m • Übertragungsfrequenz: 433 MHZ • Sendeleistung: 0,024 W • Schutzart durch das Gehäuse (Außensensor): IPX4 (Spritzwasserschutz nach Norm IEC 60529) • Batterien: 2 x 1,5 V AAA R03/LR03 - Kennzeichen für Gleichstrom Allgemeine Sicherheitshinweise für Benutzer WARNUNG ! VERLETZUNGSGEFAHR! Dieses Gerät kann von Personen (einschließlich Kindern ab 8 Jahren) mit verringerten physischen, sensorischen oder mentalen Fähigkeiten oder Mangel an Erfahrung und Wissen benutzt werden, wenn sie beaufsichtigt oder bezüglich des sicheren Gebrauchs des Geräts unterwiesen wurden und die daraus resultierenden Gefahren verstehen. Kinder dürfen nicht mit dem Gerät spielen. Reinigung und Benutzer-Wartung dürfen nicht von Kindern ohne Beaufsichtigung durchgeführt werden. Halten Sie auch die Verpackungsfolien von Kindern fern. Es besteht Erstickungsgefahr. Sicherheitshinweise zu den Batterien WARNUNG ! GESUNDHEITSGEFAHR! EXPLOSIONSGEFAHR! Bewahren Sie Batterien für Kleinkinder unerreichbar auf. Wurde eine Batterie verschluckt, muss sofort medizinische Hilfe in Anspruch genommen werden. Batterien/Akkus müssen stets polrichtig eingelegt werden. Reinigen Sie Batterie- und Gerätekontakte zuvor bei Bedarf. Versuchen Sie nicht, Batterien wieder aufzuladen, kurzzuschließen oder zu öffnen. Werfen Sie niemals Batterien ins Feuer, da diese explodieren können. Wenn Sie das Gerät längere Zeit nicht benutzen, entnehmen Sie die Batterie und verstauen Sie das Gerät an einem trockenen und staubfreien Ort. Bei unsachgemäßem Gebrauch der Batterie besteht Explosions- und Auslaufgefahr. Sollte die Batterie doch einmal ausgelaufen sein, vermeiden Sie Kontakt mit Haut, Augen und Schleimhäuten. Benutzen Sie Handschuhe. Bei Kontakt mit Batteriesäure die betroffenen Stellen mit reichlich klarem Wasser spülen und umgehend einen Arzt aufsuchen. Entfernen Sie erschöpfte Batterien umgehend aus dem Gerät, es besteht erhöhte Auslaufgefahr. -2- Die Wetterstation und den Außensensor sicher aufhängen oder stellen Die Wetterstation und der Außensensor sind nicht für den Betrieb in Räumen mit hoher Luftfeuchtigkeit (z. B. Badezimmer) ausgelegt. Achten Sie darauf, dass: • der Sensor aufrecht steht oder hängt; • immer eine ausreichende Belüftung gewährleistet ist (stellen Sie das Gerät nicht in Regale oder dorthin, wo Vorhänge oder Möbel die Belüftungsschlitze verdecken und lassen Sie mindestens 10 cm Abstand zu allen Seiten); • das Gerät beim Betrieb nicht auf einem dicken Teppich oder Bett aufgestellt wird und keine direkten Wärmequellen (z. B. Heizungen) auf das Gerät wirken; • kein direktes Sonnenlicht auf das Gerät trifft; • der Kontakt mit Spritz- und Tropfwasser vermieden wird; • das Gerät nicht in unmittelbarer Nähe von Magnetfeldern (z. B. Lautsprechern) hängt oder steht; • keine Fremdkörper und Staub eindringen; • Kerzen und andere offene Flammen zu jeder Zeit von dem Gerät ferngehalten werden müssen, um das Ausbreiten von Feuer zu verhindern. Display und Bedienfelder -3- Außensensor 1 Wettersymbol 22 Ausgewählter Kanal 2 Luftdruckbalken 23 Batteriestandsanzeige 3 Innentemperatur 24 Außentemperatur 4 Komfortsymbol 25 Luftdrucktendenz 5 Raumluftfeuchtigkeit 26 CHANNEL-Taste 6 Mondphase 27 HISTORY/WEATHER-Taste 7 Mondauf-/-untergang 28 °C/°F + -Taste 8 Standort 29 MAX/MIN - -Taste 9 Sonnenauf-/-untergang 30 RELATIVE/ABSOLUTE-Luftdruck-Taste 10 ALARM/ON/OFF-Taste 31 SUN/MOON-Taste 11 -/ 32 Aufhängevorrichtung (Wetterstation) 12 SNOOZE/LIGHT-Taste 33 RESET-Taste 13 Alarm-Symbol 34 Batteriefach (Wetterstation) 14 +/12/24-Taste 35 Standfuß zum Ausklappen (Wetterstation) 15 MODE-Taste 36 Kontroll-LED (Außensensor) 16 Datum (Monat, Tag, Wochentag) 37 Außentemperatur (Außensensor) 17 Zeit-Anzeige 38 Aufhängevorrichtung (Außensensor) 18 Funk-Anzeige 39 Kanalwahlschalter (Außensensor) 19 Luftdruck der letzten Stunden 40 Batteriefach (Außensensor) 20 relativer/absoluter Luftdruck 41 °C/°F-Taste (Außensensor) 21 Außentemperaturtendenz 42 Halterung für Außensensor 43 Signal des Außensensors -Taste -4- Befestigung des Außensensors Die mitgelieferte Halterung 42 für den Sensor ermöglicht unterschiedliche Befestigungsmöglichkeiten. Je nach Bedarf kann der Außensensor gehängt oder gestellt werden. Abbildung A zeigt 3 Vertiefungen, die der Sensor auf beiden Seiten besitzt. Der Sensor kann damit einfach an der Halterung einrasten. Abbildung B zeigt aus der Seitenansicht, wie die Halterung hinter dem Sensor befestigt ist. Abbildung C zeigt die frontale Darstellung des Sensors mit der Halterung als Aufhängung von oben. Abbildung D zeigt die frontale Darstellung des Sensors mit der Halterung als Standfuß von unten. Abbildung E zeigt das Bedienfeld und das Batteriefach auf der Rückseite des Sensors. Hinweis: Stellen oder hängen Sie den Außensensor immer aufrecht auf. Inbetriebnahme Legen Sie die Batterien zuerst in das Batteriefach des Außensensors 40 und dann erst in das Batteriefach der Wetterstation 34 ein. Ziehen Sie die Schutzfolie von der Wetterstation und dem Sensor ab. Öffnen Sie das Batteriefach des Außensensors 40 und legen Sie die mitgelieferten Batterien polrichtig ein. Die Kontrolllampe 36 leuchtet vorübergehend auf und die Temperatur wird angezeigt. Schließen Sie das Batteriefach. Öffnen Sie das Batteriefach der Wetterstation 34 und legen Sie die mitgelieferten Batterien polrichtig ein. Schließen Sie das Batteriefach. Das Wettersymbol 1 blinkt und die Wetterstation empfängt nun das Signal des Außensensors. Dieser Prozess kann einige Minuten in Anspruch nehmen. Bei erfolgreichem Empfang wird der gewählte Kanal 22 angezeigt und die aktuelle Außentemperatur 24 erscheint. Die Wetterstation startet nach erfolgreichem Empfang des Außensensors den Empfang des DCF77 Funksignals und der Funkturm 18 blinkt im Display neben der Uhrzeit. Dieser Vorgang kann 310 Minuten dauern. Während des Empfangs sind alle Tasten außer der SNOOZE / LIGHT Taste 12 ohne Funktion. Wenn der Empfang des Zeitsignals nach 10 Minuten erfolglos bleibt, stellen Sie die Zeit manuell ein. Die Wetterstation wird um 04:00 Uhr und 05:00 Uhr einen neuen Empfangsversuch starten und die Zeit nach erfolgreichem Signalempfang automatisch korrigieren. Hinweis: Bitte bewegen Sie die Wetterstation und den Außensensor während des Empfangsvorgangs nicht. Bei erfolgreichem Empfang erscheint der Funkturm 18 permanent und es stellen sich automatisch die korrekte Uhrzeit, Datum, Wochentag, Auf- und Untergangszeiten von Sonne und Mond sowie die Mondphase ein. Während der Sommerzeit erscheint DST auf dem Display neben dem Funkturm 18. Zeitzonenanpassung Befinden Sie sich in einem Land, in dem die aktuelle Uhrzeit trotz DCF-Signal abweicht, nutzen Sie die Zeitzonenanpassung, um Ihr Gerät in einer anderen Zeitzone als der Standardeinstellung (UTC + 1 = Mitteleuropäische Zeit) zu verwenden. Stellen Sie die Differenz in Stunden (z. B. -01) zur gewünschten Zeitzone ein. Drücken und halten Sie die MODE-Taste 15 in der Normalzeitanzeige 3 Sekunden lang. Die Zeitzone blinkt und kann mit -/ -Taste 11 oder +/12/24 -Taste 14 eingestellt werden. Drücken Sie die MODE-Taste 15, um die Einstellung zu bestätigen. Führen Sie anschließend einen Neustart durch. Ihr Gerät empfängt weiterhin das DCF77-Funksignal, zeigt aber die geänderte Uhrzeit (z. B. 1 Stunde weniger) an. Empfangsstörung Das DCF77 Funksignal wird aus der Nähe von Frankfurt am Main gesendet. Es kann bis zu ca. 1500 km im Radius um Frankfurt am Main empfangen werden. Allerdings gibt es einige Störquellen, die den Empfang erheblich behindern können. Falls Ihre Wetterstation das Funksignal nicht richtig empfängt, hängen oder stellen Sie die Wetterstation an einem anderen Platz auf. Beachten Sie, dass es in der Nähe von Computer, Telefon, Radio und TV zu elektromagnetischen Strahlungen kommen kann, die den Empfang des DCF77 Funksignals stören können. Weitere Störquellen für den Empfang des Funksignals können starke Gebäudedämmungen (metallische Bauelemente), hohe Berge oder atmosphärische Störungen sein. Ersetzen Sie ggf. die Batterien. Funkempfang neu starten Sie können manuell den Funkempfang neu starten, indem Sie die -/ -Taste 11 3 Sekunden gedrückt halten. Licht Drücken Sie die SNOOZE/LIGHT -Taste 12, um die Hintergrundbeleuchtung vorübergehend zu aktivieren. 12/24-Stunden Zeitformat Drücken Sie die +/12/24 -Taste 14, um das 12- oder 24-Stunden Zeitformat zu wählen. Im 12-Stunden Zeitformat erscheint auf dem Display vormittags AM und nachmittags PM. Temperatur Drücken Sie die °C/°F+ -Taste 28, um die Temperatur in Celsius (°C) oder Fahrenheit (°F) anzuzeigen. Schnelleinstellung Bei der Einstellung von numerischen Werten können Sie durch Drücken und Halten der Tasten die Schnelleinstellung verwenden. -5- Grundeinstellung Sie können folgende Einstellungen vornehmen: Zeitzone, Zeit, Datum, Sprache der Wochentagsanzeige und Standort. Drücken und halten Sie die MODE-Taste 15 in der Normalzeitanzeige 3 Sekunden lang, die Zeitzone blinkt und kann mit -/ -Taste 11 oder +/12/24 -Taste 14 eingestellt werden. Drücken Sie die MODE-Taste 15, um die Einstellung zu bestätigen. Stellen Sie auf die gleiche Weise Stunden, Minuten, Sekunden, Jahr, Monat, Tag und die Sprache der Wochentaganzeige (GE=deutsch, FR=französisch, ES=spanisch, IT=italienisch, NE=niederländisch, DA=dänisch, RU=russisch, EN=englisch), das Land und den Standort (siehe Standorttabelle) ein. Wurde der Standort gewechselt, dauert es einige Zeit, bis die Werte für die Auf- und Untergangszeiten von Mond und Sonne angezeigt werden. Standorttabelle Deutschland Aachen Berlin Düsseldorf Dresden Erfurt Frankfurt Flensburg Freiburg Hannover Bremen Hamburg Rostock Stralsund Köln Kiel Kassel Leipzig München Magdeburg Nürnberg Regensburg Stuttgart Saarbrücken Schwerin Dänemark Aalborg Aarhus Kopenhagen Odense Spanien/ Andorra Alicante Andorra Badajoz Bacelona Bilbao Cádiz Còrdoba GER AAC BER DUS DRE ERF FRA FLE FRE HAN BRE HAM ROS STR KOE KIE KAS LEI MUE MAG NUE REG STU SAA SCH DAN ALB ARH COP ODE Ibiza La Coruña León Las Palmas Madrid Málaga Palma de Mallorca Salamanca Sevilla Valencia Zaragossa Frankreich Besançon Biarritz Bordeaux Brest Cherbourg Lyon Marseille Monaco Metz Nantes Nizza Orléans Paris Perpignan Lille Rouen Straßbourg Toulouse ESP Finnland ALI Helsinki GroßAND britanien BAD Aberdeen BAR Belfast BIL Birmingham CAD Bristol COR Edinburgh IBI LAC LEO LPA MAD MAL PDM SAL SEV VAL ZAR FRA BES BIA BOR BRE CHE LYO MAR MON MET NAN NIC ORL PAR PER LIL ROU STR TOU FIN HEL Glasgow London Manchester Plymouth Ungarn Budapest Kroatien Zagreb Italien Ancona Bari Bologna Cagliari Catania Florenz Foggia Genua Lecce Messina Mailand Neapel Palermo Parma Perugia Rom Turin Triest Venedig Verona Ventimiglia Irland Dublin Luxemburg GLA LON MAN PLY HUN BUD CRO ZAG ITA ANC BAI BOL CAG CAT FIR FOG GEN LEC MES MIL NAP PAL PAR PER ROM TOR TRI VEN VER VTG IRL DUB LUX Eindhoven Enschede Groningen Den Haag Rotterdam Portugal Èvora Coimbra Faro Leiria Lissabon Porto Polen Danzig Krakau Posen Stettin Warschau Russland St. Petersburg Schweden Göteborg Stockholm Slowakei Bratislava Slowenien Ljubljana Serbien Belgrad Österreich Graz Innsbruck Linz GB Norwegen NOR Salzburg SAL ABD BEL BIR BRI EDI Bergen Oslo Stavanger Niederlande Amsterdam BER OSL STA NET AMS VIE BEL ANT BRU BRL Wien Belgien Antwerpen Brügge Brüssel EIN ENS GRO DHA ROT POR EVO COI FAR LEI LIS POR POL GDA KRA POZ SZC WAR RUS PET SWE GOT STO SLK BRA SLO LJU SRB BER AUS GRA INN LIN Charleroi Lüttich Schweiz/ Liechtenstein Basel Bern Chur Genf Locarno Luzern St. Moritz St. Gallen Sitten Vaduz Zürich CHA LIE SWI Tschechien CZR Prag Griechenland Athen Zypern Nikosia Rumänien Bukarest Bulgarien Sofia PRA GR AT CY NI RO BU BG SO BAS BER CHU GEN LOC LUC MOR GAL SIO VAD ZUE Auf- und Untergangszeiten von Mond und Sonne Nachdem Sie Land und Ort eingegeben haben, berechnet Ihre Wetterstation die ungefähren Auf- und Untergangszeiten von Sonne und Mond. Hinweis: Die kalkulierten Zeiten dienen nur zur Orientierung. Abweichungen können z. B. durch das örtliche Gelände oder das vorherrschende Wetter entstehen. Nach Drücken der SUN/MOON-Taste 31 erscheinen vorübergehend die ungefähren Sonnenstunden für den jeweiligen Tag. Wenn Sie die Auf- und Untergangszeiten eines anderen Standortes oder eines anderen Datums nachsehen wollen, drücken und halten Sie 3 Sekunden die SUN/MOON-Taste 31. Das Länderkürzel blinkt und kann mit -/ -Taste 11 oder +/12/24 -Taste 14 eingestellt werden. Bestätigen Sie Ihre Eingabe mit Druck auf die SUN/MOON-Taste 31. Stellen Sie auf gleiche Weise Stadt, Jahr, Monat und Tag ein, bestätigen Sie Ihre Eingabe jeweils durch Drücken der SUN/MOON-Taste 31. -6- Mondphasen Ihre Wetterstation ist mit einer Mondphasenanzeige ausgestattet. Die 8 Mondphasen sind: Neumond Vollmond Zunehmender Mond Abnehmender Mond Halbmond (erstes Viertel) Halbmond (letztes Viertel) Zunehmender Halbmond Abnehmender Halbmond Weckalarm Die Wetterstation verfügt über 2 separat einstellbare Weckzeiten. Drücken Sie die MODE-Taste 15, um den Alarm1 oder und den Alarm 2 zu wählen. Es erscheint das jeweilige Glockensymbol. Drücken und halten Sie bei angezeigtem Alarm 1 oder 2 die MODE-Taste 15, um in den Einstellungsmodus zu wechseln. Auf dem Display blinken die Stunden. Stellen Sie die Stunden durch Druck auf -/ Taste 11 oder +/12/24 -Taste 14 ein und bestätigen Sie die Einstellung durch Druck auf die MODE Taste 15. Stellen Sie auf die gleiche Weise die Minuten ein. Drücken Sie während der Anzeige des gewünschten Weckalarms die ALARM/ON/OFF-Taste 10, um den Alarm zu aktivieren (on) oder deaktivieren (oF). Bei aktiviertem Alarm 1 erscheint . Bei aktiviertem Alarm 2 erscheint . Wenn Sie innerhalb von 5 Sekunden keine Taste drücken, kehrt die Wetterstation automatisch zur Normalanzeige zurück. Schlummerfunktion (SNOOZE) Drücken Sie bei Ertönen des Alarms die SNOOZE/LIGHT-Taste 12, um den Alarm vorübergehend zu deaktivieren. Im Display blinkt das Glockensymbol. Nach 5 Minuten ertönt der Alarm erneut. Drücken Sie eine beliebige Taste außer Taste 12, um den Alarm abzustellen. Wettervorhersage Hinweis: Die Wetterstation startet die Vorhersage etwa 6 Stunden nach der Eingabe des aktuellen Wetters. Die Wettersymbole zeigen die Wettertendenz für die nächsten Stunden an und nicht das aktuelle Wetter. Sollte die Vorhersage Ihrer Wetterstation nicht stimmen, können Sie die Anzeige anpassen, indem Sie die HISTORY/WEATHERTaste 27 für 3 Sekunden drücken und halten. Das Wettersymbol blinkt. Stellen Sie nun mit der °C/°F + -Taste 28 oder der MAX/MIN- -Taste 29 das aktuelle Wetter ein. Drücken Sie zum Bestätigen die HISTORY/WEATHER-Taste 27. Hinweis: Bei Schneefall stellen Sie Regen oder Wolkenbruch ein. Nach dem Bestätigen mit der HISTORY/WEATHERTaste 27, erscheint bei Außentemperaturen unter 0°C das Schneefallsymbol. Sonnig Wolkenbruch Leicht bewölkt Regen Bewölkt Starker Schneefall Schneefall Barometer Ihre Wetterstation kann die Luftdruckentwicklung 25 anzeigen. Luftdruck steigt Luftdruck bleibt gleich Luftdruck fällt Sie können auch zwischen dem absoluten und relativen Luftdruck wählen, indem Sie die Relative/Absolute-Taste 30 drücken. Im Display erscheint Rel. oder Abs. Hinweis: Der absolute Luftdruck wird durch die Wetterstation gemessen. Den relativen Luftdruck können Sie bei Ihrem lokalen Wetterdienst abfragen und in die Wetterstation eingeben. -7- Sie können den relativen Luftdruck ändern, indem Sie die Relative/Absolute-Taste 30 drücken und für 3 Sekunden halten. Der Luftdruckwert blinkt und kann mit °C/°F + -Taste 28 oder MAX/MIN- -Taste 29 eingestellt werden. Bestätigen Sie Ihre Eingabe durch Drücken der Relative/Absolute-Taste 30. Sie können zwischen dem Anzeigenformat Hektopascal (hPa) oder Inches of mercury (inHg) wählen, indem Sie die °C/°F+ - Taste 28 ca. 3 Sekunden drücken und halten. Luftdruck der vergangenen 12 Stunden Drücken Sie die HISTORY/WEATHER-Taste 27, um die Luftdruckwerte der letzten 12 Stunden abzulesen. 0 – HR = gegenwärtiger Luftdruck - 1 HR = Luftdruck eine Stunde früher - 2 HR = Luftdruck zwei Stunden früher, usw. Außensensor/Kanaleinstellung Mit Ihrer Wetterstation können bis zu drei Außensensoren gleichzeitig verwendet werden. Öffnen Sie das Batteriefach des Außensensors und stellen Sie den gewünschten Kanal (1-3) am Kanalwahlschalter 39 ein. Drücken und halten Sie die CHANNEL-Taste 26 für 3 Sekunden, bis ein Signal ertönt. Die Wetterstation empfängt nun das Signal 43. Schließen Sie die Abdeckung. Mit der °C/°F -Taste 41 können Sie zwischen °C-Celsius und °F-Fahrenheit wählen. Hinweis: Der Außensensor muss in einem Umkreis von maximal 100 m ohne Hindernisse zur Wetterstation stehen. Wenn Sie mehrere Außensensoren benutzen: Drücken Sie in der Normalzeitanzeige die CHANNEL-Taste 26, um zwischen den Empfangskanälen zu wechseln. Das Rotationssymbol zeigt im Display 22 an, dass zwischen den verschiedenen Empfangskanälen automatisch gewechselt wird. Es werden nur Außensensoren angezeigt, die angesprochen werden. Drücken und halten Sie die CHANNEL -Taste 26, um unbenutzte Kanäle zu entfernen. Wenn Sie einen weiteren Außensensor hinzufügen, erkennt die Wetterstation ihn automatisch. Außentemperaturentwicklung Bei erfolgreichem Empfang der Daten des Außensensors, wird der Temperaturtrend 21 angezeigt. Außentemperatur steigt Außentemperatur bleibt gleich Außentemperatur fällt Raumluftfeuchtigkeit Die aktuelle Raumluftfeuchtigkeit wird im Display 5 angezeigt. Die Komfortanzeige 4 zeigt die Luftfeuchtigkeit in 3 Kategorien an: < 40 % Trocken < 20 °C 40 – 60 % Komfort > 60 % Feucht / 20 – 26°C > 26 °C / Maximal- und Minimalwerte Die maximale und minimale Temperatur und Luftfeuchtigkeit wird ab dem Einlegen der Batterien gespeichert. Drücken Sie die Max/Min- -Taste 29 kurz, um die maximale MAX, minimale MIN und aktuelle Innentemperatur 3, Außentemperatur 24 und Luftfeuchtigkeit 5 im Display abzulesen. Um die maximalen und minimalen Werte zu löschen, drücken und halten Sie die Max/Min- -Taste 29 für ca. 3 Sekunden. Es ertönt ein Signalton, die Werte werden gelöscht und ab dem Moment neu aufgezeichnet. Batteriestandsanzeige Wenn die Batterien zu schwach werden, um die Wetterstation, den Außensensor und die Datenübertragung in Betrieb zu halten, erscheint die Batteriestandsanzeige 23 im Display. Die Batterien sollten schnellstmöglich in allen Geräten ersetzt werden. Starten Sie die Wetterstation neu. Neustart (RESET) Drücken Sie die RESET-Taste 33, um die Wetterstation zurückzusetzen. -8- Reinigungshinweis Reinigen Sie die Wetterstation und den Außensensor nur mit einem trockenen, fusselfreien Tuch, wie es z. B. zur Reinigung von Brillengläsern verwendet wird. Vereinfachte EU-Konformitätserklärung Hiermit erklärt digi-tech gmbh, dass die Funk-Wetterstation 4-LD4868 den Richtlinien R&TTE 1999/5/EC und RED 2014/53/EU entspricht. Der vollständige Text der EU-Konformitätserklärung ist unter der folgenden Internetadresse verfügbar: http://www.digi-tech-gmbh.com/ce/289081_WS.pdf Entsorgung der Wetterstation Dieses Gerät darf nicht im normalen Hausmüll entsorgt werden. Entsorgen Sie das Gerät über einen zugelassenen Entsorgungsbetrieb oder über Ihre kommunale Entsorgungseinrichtung. Beachten Sie die aktuell geltenden Vorschriften. Setzen Sie sich im Zweifelsfall mit Ihrer Entsorgungseinrichtung in Verbindung. Entsorgung der Batterien Bitte entsorgen Sie Ihre Batterien sachgerecht in extra hierfür aufgestellten Gefäßen im Handel. Batterien gehören nicht in den Hausmüll. Entsorgen Sie Batterien bitte über einen zugelassenen Entsorgungsbetrieb oder über Ihre kommunale Entsorgungseinrichtung. Beachten Sie die aktuell geltenden Vorschriften. Setzen Sie sich im Zweifelsfall mit Ihrer Entsorgungseinrichtung in Verbindung. Garantie der digi-tech gmbh Sie erhalten auf diese Wetterstation 3 Jahre Garantie ab Kaufdatum. Im Falle von Mängeln dieser Wetterstation stehen Ihnen gegen den Verkäufer des Produkts gesetzliche Rechte zu. Diese gesetzlichen Rechte werden durch unsere im Folgenden dargestellte Garantie nicht eingeschränkt. Garantiebedingungen Die Garantiefrist beginnt mit dem Kaufdatum. Bitte bewahren Sie den Kassenbon gut auf. Diese Unterlage wird als Nachweis für den Kauf benötigt. Tritt innerhalb von drei Jahren ab dem Kaufdatum dieser Wetterstation ein Materialoder Fabrikationsfehler auf, wird die Wetterstation von uns – nach unserer Wahl – für Sie kostenlos repariert oder ersetzt. Diese Garantieleistung setzt voraus, dass innerhalb der Drei-Jahres-Frist die defekte Wetterstation und der Kaufbeleg (Kassenbon) vorgelegt und schriftlich kurz beschrieben wird, worin der Mangel besteht und wann er aufgetreten ist. Wenn der Defekt von unserer Garantie gedeckt ist, erhalten Sie die reparierte oder eine neue Wetterstation zurück. Mit Reparatur oder Austausch des Produkts beginnt kein neuer Garantiezeitraum. Garantiezeit und gesetzliche Mängelansprüche Die Garantiezeit wird durch die Gewährleistung nicht verlängert. Dies gilt auch für ersetzte und reparierte Teile. Eventuell schon beim Kauf vorhandene Schäden und Mängel müssen sofort nach dem Auspacken gemeldet werden. Nach Ablauf der Garantiezeit anfallende Reparaturen sind kostenpflichtig. Garantieumfang Die Wetterstation wurde nach strengen Qualitätsrichtlinien sorgfältig produziert und vor Anlieferung gewissenhaft geprüft. Die Garantieleistung gilt für Material- oder Fabrikationsfehler. Diese Garantie erstreckt sich nicht auf Produktteile, die normaler Abnutzung ausgesetzt sind und daher als Verschleißteile angesehen werden können oder für Beschädigungen an zerbrechlichen Teilen, z. B. Schalter, Akkus oder die aus Glas gefertigt sind. Diese Garantie verfällt, wenn die Wetterstation beschädigt, nicht sachgemäß benutzt oder gewartet wurde. Für eine sachgemäße Benutzung der Wetterstation sind alle in der Bedienungsanleitung aufgeführten Anweisungen genau einzuhalten. Verwendungszwecke und Handlungen, von denen in der Bedienungsanleitung abgeraten oder vor denen gewarnt wird, sind unbedingt zu vermeiden. Die Wetterstation ist lediglich für den privaten und nicht für den gewerblichen Gebrauch bestimmt. Bei missbräuchlicher und unsachgemäßer Behandlung, Gewaltanwendung und bei Eingriffen, die nicht von unserer autorisierten ServiceNiederlassung vorgenommen wurden, erlischt die Garantie. Abwicklung im Garantiefall Um eine schnelle Bearbeitung Ihres Anliegens zu gewährleisten, folgen Sie bitte den folgenden Hinweisen: • Bitte halten Sie für alle Anfragen den Kassenbon und die Artikelnummer (289081) als Nachweis für den Kauf bereit. • Die Artikelnummer entnehmen Sie bitte dem Typenschild, einer Gravur, dem Titelblatt Ihrer Anleitung (unten links) oder dem Aufkleber auf der Rück- oder Unterseite. • Sollten Funktionsfehler oder sonstige Mängel auftreten, kontaktieren Sie zunächst die nachfolgende Serviceabteilung telefonisch oder per E-Mail. • Eine als defekt erfasste Wetterstation können Sie dann unter Beifügung des Kaufbelegs (Kassenbon) und der Angabe, worin der Mangel besteht und wann er aufgetreten ist, für Sie portofrei an die Ihnen mitgeteilte Service-Anschrift übersenden. Auf www.lidl-service.com können Sie diese Anleitung und viele weitere Handbücher, Produktvideos und Software herunterladen. -9- Bestell-Service Weitere Außensensoren können Sie per Fax: +49(0)6198-5770-99 oder online: www.inter-quartz.de bestellen. Der Preis für einen Sensor beträgt 5,- € zzgl. MwSt. und Versand. Service Name: Inter-Quartz GmbH Str.: Valterweg 27A Stadt: DE- 65817 Eppstein Land: DEUTSCHLAND E-Mail: [email protected] Telefon: +49 (0)6198 571825 00800 5515 6616 00800 5515 6616 00800 5515 6616 00800 5515 6616 00800 5515 6616 0800 563862 800 142 315 00800 5515 6616 00800 5515 6616 00800 5515 6616 00800 5515 6616 IAN 289081 Art.-Nr.: 4-LD4868 Lieferant Bitte beachten Sie, dass die folgende Anschrift keine Serviceanschrift ist. Kontaktieren Sie zunächst die oben benannte Servicestelle. Name: digi-tech gmbh Str.: Valterweg 27A Stadt: DE-65817 Eppstein Land: DEUTSCHLAND - 10 - Usage and safety instructions Table of contents Table of contents ..................................................................................................................................................................... - 11 Introduction .............................................................................................................................................................................. - 12 Intended use ............................................................................................................................................................................ - 12 Scope of delivery .................................................................................................................................................................... - 12 Specifications .......................................................................................................................................................................... - 12 Weather station ............................................................................................................................................................... - 12 Outdoor sensor ............................................................................................................................................................... - 12 Important safety information for users .............................................................................................................................. - 12 Important safety information for the batteries ................................................................................................................. - 12 Securely placing or mounting the weather station and the outdoor sensor...................................................................... - 13 Display and control panel ...................................................................................................................................................... - 13 Outdoor sensor ....................................................................................................................................................................... - 14 Mounting the outdoor sensor................................................................................................................................................. - 15 Setup ........................................................................................................................................................................................ - 15 Time zone adjustment ............................................................................................................................................................. - 15 Reception problems ................................................................................................................................................................ - 15 Restarting radio signal reception........................................................................................................................................... - 15 Light .......................................................................................................................................................................................... - 15 12/24-hour time format ........................................................................................................................................................ - 15 Temperature unit ..................................................................................................................................................................... - 15 Speed setting ........................................................................................................................................................................... - 15 Basic settings............................................................................................................................................................................ - 16 Location table .......................................................................................................................................................................... - 16 Sunrise, sunset, moonrise and moonset times ...................................................................................................................... - 16 Moon phase ............................................................................................................................................................................ - 17 Alarm ........................................................................................................................................................................................ - 17 Snooze ..................................................................................................................................................................................... - 17 Weather forecast .................................................................................................................................................................... - 17 Barometer ................................................................................................................................................................................ - 17 12-hour air pressure history................................................................................................................................................... - 18 Outdoor sensor/channel setting ........................................................................................................................................... - 18 Outdoor temperature tendency ............................................................................................................................................. - 18 Indoor humidity ....................................................................................................................................................................... - 18 Maximum and minimum values ............................................................................................................................................. - 18 Battery level indicator ............................................................................................................................................................. - 18 Restart (RESET) ........................................................................................................................................................................ - 18 Cleaning instructions ............................................................................................................................................................... - 18 Simplified EU declaration of conformity ............................................................................................................................... - 19 Disposal of the electronic appliance..................................................................................................................................... - 19 Disposal of the batteries ......................................................................................................................................................... - 19 digi-tech gmbh warranty ........................................................................................................................................................ - 19 Warranty conditions ............................................................................................................................................................... - 19 Warranty period and defects liability ................................................................................................................................... - 19 Scope of the warranty ............................................................................................................................................................ - 19 Warranty claim procedure .................................................................................................................................................... - 19 Order service........................................................................................................................................................................... - 20 Service...................................................................................................................................................................................... - 20 Supplier .................................................................................................................................................................................... - 20 - - 11 - RADIO-CONTROLLED WEATHER STATION Introduction Congratulations on the purchase of your new weather station. You have chosen a high quality product. The instruction manual is part of the product- it contains important information about safety, use and disposal. Read the manual with all usage and safety notes before using the weather station. Only use the weather station in the intended way and for the intended applications. If the weather station is given to someone else, include all documentation with the weather station. Please keep the packaging and the instruction manual for future reference. Intended use This electronic appliance is intended for time display and the described additional features. Any other use or modification of the electronic appliance does not comply with the intended uses. The manufacturer is not liable for damages caused by improper use or misuse. The device is not intended for commercial use. Scope of delivery Please note: Check the scope of delivery after purchase. Please ensure that all parts are included and undamaged. • Weather station • 3 x battery 1.5 V AA R6/LR6 • Outdoor sensor • Mount for outdoor sensor • 2 x battery 1.5 V AAA R03/LR603 • Instruction manual Specifications Weather station • Operating temperature 0 – 50 °C • Temperature display: +/- 1 °C • Battery: 3 x 1.5 V AA R6 / LR6 Outdoor sensor • Operating temperature -20 – 50 °C • Temperature display: +/- 1 °C • Range: max. 100 m • Frequency: 433 MHZ • Transmission power: 0.024 W • Protection offered by the case (outdoor sensor): IPX4 (Water resistant according to IEC norm 60529) • Battery: 2 x 1,5 V AAA R03 / LR603 - Symbol for direct current Important safety information for users WARNING! RISK OF INJURY! This device may be used by persons (including children over 8 years of age) with reduced physical, sensory or mental abilities or lack of experience and knowledge, if they are supervised or instructed regarding the safe use of the device and understand the dangers that may arise. Children may not play with the device. Cleaning and user maintenance of the device may not be performed by children without supervision. Keep packaging films out of the hands of children. There is a danger of suffocation. Important safety information for the batteries WARNING! HEALTH HAZARD! RISK OF EXPLOSION! Keep batteries out of reach of small children. If a battery is swallowed, you must seek medical attention immediately. Batteries/rechargeable batteries must always be inserted in the correct polarity. If necessary, clean the battery and device contacts. Never attempt to recharge non-rechargeable batteries. Never short-circuit or attempt to open batteries. Never throw batteries into fire as they may explode. If the device will not be used for an extended time period, remove the battery and store the device in a dry and dust-free area. Improper use of the battery can lead to explosion or leakage. If the battery leaks, avoid contact with skin, eyes and mucous membranes. Use gloves. If you are exposed to battery acid, rinse the affected areas with plenty of clean water and immediately seek medical attention. Remove discharged batteries from the device as they present an increased risk of leakage. - 12 - Securely placing or mounting the weather station and the outdoor sensor The weather station with outdoor sensor is not designed for operation in rooms with high humidity (i.e. bathroom). Make sure that: • the sensor hangs or stands upright; • sufficient ventilation is always guaranteed (don’t place the device on shelves or where curtains or furniture block the ventilation holes, and ensure that there are at least 10 cm of space on all sides); • the device isn’t placed on a thick carpet or bed during operation, no direct heat sources (i.e. radiators) influence the device; • no direct sunlight reaches the device; • contact with splashing or dripping water must be avoided (don’t place any items filled with liquids, i.e. vases, onto or next to the device); • the device doesn’t stand near magnetic fields (i.e. speakers); • no foreign objects or dust penetrate the housing; • candles and other open flames must be kept away from this product at all times to prevent the spread of fire Display and control panel - 13 - Outdoor sensor 1 Weather icon 22 Selected channel 2 Air pressure bar 23 Battery indicator 3 Indoor temperature 24 Outdoor temperature 4 Comfort icon 25 Air pressure tendency 5 Indoor humidity 26 CHANNEL-button 6 Moon phase 27 HISTORY/WEATHER-button 7 Moonrise and Moonset 28 °C/°F + button 8 Location 29 MAX/MIN - -button 9 Sunrise and sunset 30 RELATIVE/ABSOLUTE-air pressure-button 10 ALARM/ON/OFF -button 31 SUN/MOON-button 11 -/ 32 Hole for wall mounting (Weather station) 12 SNOOZE/LIGHT-button 33 RESET-button 13 Alarm symbol 34 Battery compartment (Weather station) 14 +/12/24-button 35 Foldout stand (Weather station) 15 MODE-button 36 LED indicator (Outdoor sensor) 16 Date (month, day, day of the week) 37 Outdoor temperature / channel (Outdoor sensor) 17 Time display 38 Hole for wall mounting (Outdoor sensor) 18 Radio control indicator 39 Channel selection switch (Outdoor sensor) 19 Air pressure for previous hours 40 Battery compartment (Outdoor sensor) 20 Relative / absolute air pressure 41 °C/°F-button (Outdoor sensor) 21 Outdoor temperature tendency 42 Mount for outdoor sensor 43 Signal from the outdoor sensor -button - 14 - Mounting the outdoor sensor Two different mounting options are possible with the included sensor mount 42. 42 The sensor can be placed on a flat surface or mounted on a wall or ceiling. Illustration A shows the three indentations that are on each side of the sensor. The sensor can easily be clipped into the mount using these indentations. Illustration B is a side view, which shows how the mount is attached behind the sensor. Illustration C shows a front view of the sensor with the mount used as a ceiling mount. Illustration D shows a front view of the sensor with the mount used as a stand. Illustration E shows the controls and the battery compartment on the backside of the sensor. Please note: Always hang or stand the sensor upright. Setup Insert batteries into the outdoor sensor 40 first and then insert batteries into the weather station 34. Remove the protective film from the weather station and the outdoor sensor. Open the battery compartment of the outdoor sensor 40 and insert the included batteries in the correct polarity. The LED indicator 36 will briefly light up and the display will show the temperature. Close the battery compartment. Open the battery compartment of the weather station 34 and insert the included batteries in the correct polarity. Close the battery compartment. The weather symbol 1 blinks and the weather station receives the signal from the outdoor sensor. This process may take several minutes to complete. If reception is successful, the selected channel 22 and the current outdoor temperature 24 will appear. After successful reception of the signal for the outdoor sensor, the reception of the DCF77 time signal will begin and the radio control indicator 18 will blink on the display next to the time. All buttons except the SNOOZE / LIGHT button 12 are disabled during the reception process. If reception fails after 10 minutes, please set the time manually. The weather station will reattempt reception at 04:00 and 05:00 and, if reception is successful, will correct the set time. Note: Please do not move the weather station or the sensor during the reception process. If the reception attempt is successful, the radio control indicator 18 will appear permanently on the display and the correct time, date, day of the week and the times of sunrise, sunset, moonrise and moonset will be set automatically. DST will appear on the display next to the radio control indicator 18 during daylight saving time. Time zone adjustment If you are in a country, in which the clock displays the wrong time even though it can receive the time signal, please use the time zone adjustment to use your weather station in a time zone other than the standard time zone (UTC+1 = Central European Time). Set the difference in hours (- 01 for example) to the desired time zone. In normal time display mode, press and hold the MODE button 15 for 3 seconds. The time zone will blink and can be set by pressing the -/ -button 11 or the +/12/24 -button 14. Press the MODE-button 15, to confirm your setting. Restart radio reception after changing this setting. Your weather station receives the DCF77 time signal but will show the adjusted time (1 hour less for example). Note: Always hang or place the sensor in an upright orientation. Reception problems The DCF77 radio signal is transmitted from a location near Frankfurt am Main and can be received within a radius of approximately 1500 km around Frankfurt am Main. However, there are some obstacles and sources of interference, which may substantially hinder reception. If your weather station does not correctly receive the DCF77 radio signal, please hang or place the weather station in a different location at your site. Please note that devices such as computers, telephones, radios and televisions may cause electromagnetic radiation which can interfere with the DCF77 signal reception. Other possible detriments to reception are: strong building insulation (metal building materials), nearby mountains or atmospheric interference. It may also be necessary to replace the batteries. Restarting radio signal reception Manually restart the radio signal reception by pressing and holding the -/ -button 11 for 3 seconds. Light Briefly activate the backlight by pressing the SNOOZE/LIGHT-button 12. 12/24-hour time format Select the 12- or 24 hour time format by pressing the +/12/24 -button 14. AM will appear on the display in the morning, PM in the afternoon if the 12-hour time format is selected. Temperature unit Select the temperature unit Celsius (°C) or Fahrenheit (°F) by pressing the °C/°F+ -button 28. Speed setting Press and hold buttons to use the speed setting feature when setting numerical values. - 15 - Basic settings The following values can be set: Time zone, time, date, language of the day of the week display and location. Press and hold the MODE-button 15 for 3 seconds while in normal time display mode. The time zone will blink and can be set by pressing the -/ -button 11 or the +/12/24 -button 14. Press the MODE-button 15, to confirm your setting. Set the hours, minutes, seconds, year, month, day, language of the day of the week display (GE=German, FR=French, ES=Spanish, IT=Italian, NE=Dutch, DA=Danish, RU=Russian, EN=English), your country and your city (see location table) in the same way. After changing the location, it will take some time for the weather station to update the times for sunrise, sunset, moonrise and moonset. Location table Germany Aachen Berlin Düsseldorf Dresden Erfurt Frankfurt Flensburg Freiburg Hanover Bremen Hamburg Rostock Stralsund Cologne Kiel Kassel Leipzig Munich Magdeburg Nuremberg Regensburg Stuttgart Saarbrücken Schwerin Denmark Albørg Arhus Copenhagen Odense Spain/ Andorra Alicante Andorra Badajoz Barcelona Bilbao Cádiz Cordoba GER AAC BER DUS DRE ERF FRA FLE FRE HAN BRE HAM ROS STR KOE KIE KAS LEI MUE MAG NUE REG STU SAA SCH DAN ALB ARH COP ODE Ibiza IBI A Coruña LAC Leon LEO Las Palmas LPA Madrid MAD Malaga MAL Palma de PDM Mallorca Salamanca SAL Seville SEV Valencia VAL Zaragoza ZAR France FRA Besancon BES Biarritz BIA Bordeaux BOR Brest BRE Cherbourg CHE Lyon LYO Marseille MAR Monaco MON Metz MET Nantes NAN Nice NIC Orléans ORL Pairs PAR Perpignan PER Lille LIL Rouen ROU Strasbourg STR Toulouse TOU ESP Finland FIN ALI Helsinki HEL AND Great Britain GB BAD Aberdeen ABD BAR Belfast BEL BIL Birmingham BIR CAD Bristol BRI COR Edinburgh EDI Glasgow London Manchester Plymouth Hungary Budapest Croatia Zagreb Italy Ancona Bari Bologna Cagliari Catania Florence Foggia Genoa Lecce Messina Milan Naples Palermo Parma Perugia Rome Turin Trieste Venice Verona Ventimiglia Ireland Dublin Luxemburg Norway Bergen Oslo Stavanger Netherlands Amsterdam GLA LON MAN PLY HUN BUD CRO ZAG ITA ANC BAI BOL CAG CAT FIR FOG GEN LEC MES MIL NAP PAL PAR PER ROM TOR TRI VEN VER VTG IRL DUB LUX NOR BER OSL STA NET AMS Eindhoven Enschede Groningen The Hague Rotterdam Portugal Evora Coimbra Faro Leiria Lisbon Porto Poland Gdańsk Kraków Poznań Szczecin Warsaw Russia St. Petersburg Sweden Gothenburg Stockholm Slovakia Bratislava Slovenia Ljubljana Serbia Belgrade Austria Graz Innsbruck Linz Salzburg Vienna Belgium Antwerp Bruges Brussels EIN ENS GRO DHA ROT POR EVO COI FAR LEI LIS POR POL GDA KRA POZ SZC WAR RUS PET SWE GOT STO SLK BRA SLO LJU SRB BER AUS GRA INN LIN SAL VIE BEL ANT BRU BRL Charleroi CHA Liège LIE Switzerland/SWI Liechtenstein Basel BAS Bern BER Chur CHU Geneva GEN Locarno LOC Lucerne LUC St. Moritz MOR St. Gallen GAL Sion SIO Vaduz VAD Zürich ZUE Czech CZR Republic Prague PRA Greece GR Athens AT Cyprus CY Nicosia NI Romania RO Bucharest BU Bulgaria BG Sofia SO Sunrise, sunset, moonrise and moonset times After setting your country and city, the weather station will calculate the approximate times for sunrise, sunset, moonrise and moonset. Note: The calculated times are approximate. Differences can also result from your local terrain and weather. Briefly display the approximate number of hours of sunlight for the current day by pressing SUN/MOON-button 31. If you wish to see the sunrise or sunset times for another location or another date, press and hold the SUN/MOON-button SUN/MOON 31 for 3 seconds. The country will blink and can be selected by pressing the -/ -button 11 or the +/12/24 -button 14. Confirm your setting by pressing the SUN/MOON-button 31. Set the city, year, month and day in the same way and confirm each setting by pressing the SUN/MOON-button 31. - 16 - Moon phase Your weather station is equipped with a moon phase display. The 8 phases of the moon are: New Moon Full Moon Waxing Crescent Waning Gibbous First Quarter Third Quarter Waxing Gibbous Waning Crescent Alarm The weather station has 2 alarms, which can be set separately. Press the MODE-button 15 to select alarm 1 or alarm 2. The corresponding alarm symbols will appear. When displaying alarm 1 or alarm 2, press and hold the MODE-button 15, to enter setting mode. The hours will blink on the display. Set the hours by pressing the -/ -button 11 or the +/12/24 -button 14 and confirm your setting by pressing the MODE-Taste 15. Set the minutes in the same way. Press the ALARM/ON/OFF-button while displaying the alarm you wish to activate. Press the AL/ON/OFF-button 10, to activate (on) or deactivate (oF) the alarm. If alarm 1 is activated the symbol will appear. If alarm 2 is activate the symbol will appear. If no button is pressed within 5 seconds, the weather station will return to normal time display mode. Snooze Press the SNOOZE/LIGHT-button 12, to temporarily deactivate the alarm. The bell symbol will blink on the display. After 5 minutes the alarm will sound again. Press any button except button 12 to shut off the alarm. Weather forecast Note: The weather station will start the forecast approximately 6 hours after the current weather was entered. The weather icons show a weather tendency for the next hours and not the current weather. Should the forecast of your weather station be incorrect, you can adjust the display by pressing and holding the HISTORY/WEATHER-button 27 for 3 seconds. The weather icon will blink. You can now select the correct weather icon by pressing the °C/°F + -button 28 or the MAX/MIN- -button 29. Confirm your selection by pressing the HISTORY/WEATHER-button 27. Please note: Set rain or downpour if it is snowing. After confirming your setting by pressing the HISTORY/WEATHERbutton 27 the snow symbol will appear if the outdoor temperature is below 0°C. Sunny Downpour Slightly cloudy Rain Cloudy Heavy snowfall Snow Barometer Your weather station can show the air pressure tendency 25. Air pressure rising Air pressure constant Air pressure falling You can also select absolute or relative air pressure by pressing the Relative/Absolute-button 30. Rel. or Abs. will appear on the display. Note: The weather station measures the absolute air pressure. Your local weather service can supply you with the relative air pressure for your location, which you can input into the weather station. - 17 - To change the relative air pressure, press and hold the Relative/Absolute-button 30 for 3 seconds. The air pressure value will blink on the display and can be set by pressing the °C/°F + -button 28 or MAX/MIN-button 29. Confirm your setting by pressing the Relative/Absolute-button 30. Select the air pressure unit Hectopascal (hPa) or Inches of mercury (inHg) by pressing and holding the °C/°F + -button 28 for 3 seconds. 12-hour air pressure history Press the HISTORY/WEATHER-button 27 to view the air pressure history for the last 12 hours. 0 – HR = current air pressure - 1 HR = air pressure 1 hour ago -2 HR = air pressure 2 hours ago... and so on Outdoor sensor/channel setting You can use the weather station with up to 3 outdoor sensors at the same time. Open the battery compartment of the outdoor sensor and select a channel (1-3) by using the channel switch 39. Press and hold the CHANNEL-button 26 for 3 seconds or until an audible signal sounds. The weather station will now attempt to receive the signal 43. Close the battery compartment. Press the °C/°F-button 41 to select °C-Celsius or °F-Fahrenheit. Note: The outdoor sensor must be within a maximum distance of 100 m of the weather station with no obstructions. If you are using mutliple outdoor sensors: Press the CHANNEL-button 26 to select the reception channel. The rotation symbol on the display at 22 indicates that the weather station is rotating through channels 1-3. Only active outdoor sensors are displayed. Press and hold the CHANNEL-button 26 to remove unused channels. When adding an additional outdoor sensor, the weather station will detect it automatically. Outdoor temperature tendency The temperature trend 21 is displayed upon successful reception from the outdoor sensor. Outdoor temperature rising Outdoor temperature constant Outdoor temperature falling Indoor humidity The current indoor humidity is shown on the display at 5. The comfort icon 4 can show 3 levels of comfort: < 40 % DRY 40 – 60 % COMFORT < 20 °C > 60 % HUMID / 20 – 26°C > 26 °C / Maximum and minimum values The maximum and minimum temperature and humidity are stored as soon as the batteries are inserted. Briefly press the Max/Min- -button 29 to display the maximum MAX, minimum MIN and current indoor temperature 3, outdoor temperature 24 and humidity 5 on the display. To delete the maximum and minimum values, press and hold the Max/Min- -button 29 for 3 seconds. An audible signal will sound and the stored values will be deleted. The weather station will immediately restart recording of the values. Battery level indicator If the batteries run too low to power the weather station, the outdoor sensor and signal transmission, the battery level indicator 23 will appear on the display. Replace the batteries in all devices as soon as possible. Restart the weather station. Restart (RESET) Press the RESET-button 33 to reset the weather station. Cleaning instructions Clean the product with a soft, dry and lint-free cloth. A glasses cleaning cloth is ideal. - 18 - Simplified EU declaration of conformity Hereby, digi-tech gmbh declares that the radio equipment type radio-controlled weather station 4-LD4868 is in compliance with Directives 1999/5/EU et 2014/53/EU. The full text of the EU declaration of conformity is available at the following internet address: http://www.digi-tech-gmbh.com/ce/289081_WS.pdf Disposal of the electronic appliance This weather station may not be disposed of with normal household waste. Dispose of the unit at an approved disposal facility or at your local recycling centre. Please observe the current rules and regulations when disposing of the appliance. Contact the disposal system if in doubt. Disposal of the batteries Please dispose of your batteries properly in containers especially set up at retailers. Batteries do not belong in household waste. Dispose of the batteries at an approved disposal facility or at your local recycling centre. Contact the disposal system if in doubt digi-tech gmbh warranty This weather station includes a 3 year warranty starting on the day of purchase. In case of defects of this weather station you have, by law, certain rights regarding the vendor of the weather station. These rights are not changed by the warranty which is described in the following paragraphs. Warranty conditions The warranty duration starts on the date of purchase. Please keep the receipt in a safe place. The receipt is needed as a proof of purchase. If a defect occurs in the weather station within 3 years, the weather station will be repaired or replaced (according to our choice) free of charge. This warranty requires that, within the 3 year warranty period, the weather station and the receipt can be made available to us along with a short written description of the defect and when it occured. If the defect is covered by the warranty, you will receive the repaired weather station or a new weather station. Repair or replacement does not cause the warranty period to restart. Warranty period and defects liability The warranty period is not increased by the defect liability. This also applies to repaired or replaced parts. If defects are noticed at the time of purchase they must be reported immediately upon unpacking the item. Paid repair may be available after the end of the warranty period. Scope of the warranty The weather station was manufactured according to strict quality guidelines and was carefully inspected before delivery. The warranty does not include parts that experience normal wear and tear and can thus be seen as wear parts or fragile parts that are damaged. Examples include Switches, Batteries or parts made of glass. This warranty becomes void if the weather station is damaged, is not used in the recommended way or is improperly repaired. For proper use of the weather station all instructions in this manual must be adhered to exactly. Use of the weather station in a way that is discouraged in the manual must be avoided. The weather station not intended for commercial use. Abusive or improper use, excessive force and changes that are made by non-authorized repair centers will void the warranty. Warranty claim procedure To ensure that your call is processed in a fast and efficient manner please note the following directions: • Have your receipt (as proof of purchase) and the article number (289081) handy. • The article number can be found on the type label, an engraving, the front page of the manual (bottom left) or a sticker on the back side or bottom side of the case. • In case defects occur, please first contact the service center (see below) by phone or email. Visit www.lidl-service.com to download this and many other manuals, product videos and software. - 19 - Order service Additional outside sensors can be ordered by fax +49(0)6198-5770-99 or online at www.inter-quartz.de. The price for one sensor is 5.00 € excluding VAT and despatch. Service Name: Inter-Quartz GmbH Street: Valterweg 27A Town: DE-65817 Eppstein Country: GERMANY Email: [email protected] Telephone: +49 (0)6198 571825 00800 5515 6616 00800 5515 6616 00800 5515 6616 00800 5515 6616 00800 5515 6616 0800 563862 800 142 315 00800 5515 6616 00800 5515 6616 00800 5515 6616 00800 5515 6616 IAN 289081 Art.-Nr.: 4-LD4868 Supplier Please note that the following address is not a service address. Please first contact the service address (see above). Name: digi-tech gmbh Street: Valterweg 27A Town: DE-65817 Eppstein Country: GERMANY - 20 - Utilisation et avertissements de sécurité Sommaire Sommaire ................................................................................................................................................................................. - 21 Introduction .............................................................................................................................................................................. - 22 Utilisation conforme ................................................................................................................................................................ - 22 Contenu de l‘emballage ........................................................................................................................................................ - 22 Données techniques ................................................................................................................................................................ - 22 Station de base................................................................................................................................................................ - 22 Sonde extérieure ............................................................................................................................................................. - 22 Avertissements de sécurité pour les utilisateurs .............................................................................................................. - 22 Avertissements de sécurité pour les piles ......................................................................................................................... - 22 Accrochez ou posez votre station à un endroit sûr ............................................................................................................. - 23 Écran et panneau de commande .......................................................................................................................................... - 23 Sonde extérieure ..................................................................................................................................................................... - 24 Fixation du sonde extérieur .................................................................................................................................................... - 25 Mise en service........................................................................................................................................................................ - 25 Réglage du fuseau horaire..................................................................................................................................................... - 25 Perturbations dans la réception du signal radio .................................................................................................................. - 25 Réactiver la recherche du signal radio horaire ................................................................................................................... - 25 Rétroéclairage ......................................................................................................................................................................... - 25 Format horaire 12/24 ........................................................................................................................................................... - 25 Température............................................................................................................................................................................. - 25 Réglage rapide ....................................................................................................................................................................... - 26 Réglage de base ..................................................................................................................................................................... - 26 Tableau de villes/Localisation .............................................................................................................................................. - 26 Heures de lever et de coucher du soleil et de la lune ......................................................................................................... - 26 Les phases de la lune .............................................................................................................................................................. - 27 Alarme réveil ........................................................................................................................................................................... - 27 Répétition de l‘alarme (SNOOZE)........................................................................................................................................ - 27 Prévisions météo ...................................................................................................................................................................... - 27 Baromètre ................................................................................................................................................................................ - 27 Pression atmosphérique des 12 dernières heures ............................................................................................................... - 28 Sonde extérieure/Réglage du canal de transmission ........................................................................................................ - 28 Evolution de la température extérieure ................................................................................................................................. - 28 Hygrométrie intérieure............................................................................................................................................................ - 28 Valeurs maximales et minimales ............................................................................................................................................ - 28 Indicateur de piles faibles ...................................................................................................................................................... - 28 Redémarrage (RESET) ............................................................................................................................................................ - 29 Conseils d‘entretien................................................................................................................................................................. - 29 Declaration UE de conform ite simplifiée ............................................................................................................................. - 29 Evacuation de l‘appareil ........................................................................................................................................................ - 29 Evacuation des piles ............................................................................................................................................................... - 29 Logo TRIMAN ......................................................................................................................................................................... - 29 Garantie de digi-tech gmbh .................................................................................................................................................. - 29 Conditions de garantie ........................................................................................................................................................... - 29 Durée de la garantie et recours légaux en cas de défauts................................................................................................. - 29 Couverture de la garantie ...................................................................................................................................................... - 30 Procédure dans un cas de garantie ...................................................................................................................................... - 30 Service de commande pour sondes...................................................................................................................................... - 31 Service Après Vente................................................................................................................................................................ - 31 Fournisseur ............................................................................................................................................................................... - 31 - - 21 - STATION MÉTÉO RADIO-GUIDÉE Introduction Cher Client, merci de votre achat. Avec cette station météorologique radio-pilotée de haute qualité, vous avez fait un bon choix. Le mode d’emploi est partie constituante de cet appareil. Il comporte des consignes importantes pour la sécurité, l’utilisation et l’évacuation de votre appareil. Il convient de se familiariser avec toutes les instructions du mode d’emploi avant de se servir de l’appareil. N’utilisez cet appareil que dans le cadre décrit et aux fins d’utilisation prescrites dans le mode d’emploi. En cas de transmission de l’appareil à un tiers, veuillez lui remettre tous les documents y relatifs. Veuillez SVP conserver emballage et mode d'emploi pour d'éventuelles demandes d'informations ultérieures Utilisation conforme Cette station météorologique a été conçue pour afficher l’heure et remplir les fonctions supplémentaires décrites dans le mode d’emploi. Toute autre utilisation ou modification de cet appareil sera considérée comme non conforme. Le fabricant ne pourra être tenu responsable d’un dommage causé par l’utilisation non conforme ou inappropriée de l’appareil. Cette station météorologique n’est pas destinée à des fins d’utilisation commerciale. Contenu de l‘emballage Remarque: Veuillez SVP vérifier le contenu de l’emballage dès votre achat. Assurez-vous que toutes les pièces listées ci-dessous sont bien présentes et en bon état. • Station météorologique • 3 x piles à 1,5 V AA R6/LR6 • Sonde extérieure • Support pour sonde extérieur • 2 x piles à 1,5 V AAA R03/LR03 • Mode d‘emploi Données techniques Station de base • Température de service : 0 °C à 50 °C • Affichage température : +/- 1 °C • Piles : 3 x 1,5 V AA R6 / LR6 Sonde extérieure • Température de service : -20 °C à 50 °C • Affichage température : +/- 1 °C • Portée : max. 100 m • Fréquence : 433 MHZ • Puissance d’émission : 0,024 W • Mode de protection par boîtier (Sonde extérieure) : IPX4 (Résistance aux éclaboussures conf. Norme IEC 60529) • Piles : 2 x 1,5 V AAA R03/LR03 - Symbole pour courant continu Avertissements de sécurité pour les utilisateurs ATTENTION ! RISQUE DE BLESSURE ! Cet appareil peut être utilisé par des personnes dont les capacités physiques, sensorielles ou intellectuelles sont restreintes ou limitées par un manque d’expérience ou de connaissances (les enfants à partir de 8 ans compris), si elles ont été placées sous la surveillance d’une personne ou si elles ont reçu les instructions nécessaires à l’utilisation sûre de cet appareil et si elles sont en mesure de comprendre les dangers possibles. Les enfants ne doivent pas jouer avec cet appareil. Le nettoyage et l’entretien de l’appareil ne doivent pas être effectués par un enfant sans la surveillance d’un adulte. Eloignez également les enfants des films d’emballage, il y a danger d’étouffement. Avertissements de sécurité pour les piles ATTENTION ! DANGEREUX POUR LA SANTÉ ! DANGER D’EXPLOSION ! Conservez vos piles hors de portée de jeunes enfants. En cas d’avalement d’une pile, il faut consulter un médecin immédiatement. Les piles/accus doit être mis dans le bon sens (respect des polarités). Nettoyez les contacts des piles et appareils avant. N’essayez pas de recharger des piles, de les court-circuiter ou de les ouvrir. Ne jetez jamais de piles dans le feu car il y a danger d’explosion. Si vous n’utilisez pas cet appareil pendant un certain temps, retirez-en les piles et conservez-le à un endroit sec et à l’abri de la poussière. En cas d‘utilisation mal appropriée des piles/accus, il y a danger d’explosion et d’écoulement. Si une pile devait avoir coulé, évitez tout contact avec la peau, les yeux et les muqueuses. Mettez des gants. En cas de contact avec l’acide des piles, rincez abondamment les parties touchées à l’eau claire et consultez immédiatement un médecin. Des piles usées doivent être retirées immédiatement de l’appareil : danger d’écoulement accru. - 22 - Accrochez ou posez votre station à un endroit sûr Cet appareil (station de base et sonde extérieure) n‘a pas été conçu pour servir dans une pièce très humide (une salle de bains, par ex.). Veuillez SVP veiller à ce que : • la sonde soit posée ou suspendue debout ; • à ce que la pièce où est utilisé l‘appareil soit toujours suffisamment aérée (ne le placez pas dans une étagère ou à un endroit où des rideaux ou des meubles pourraient entraver la fonctionnalité des fentes d’aération, et prévoyez au moins 10 cm d’écartement de tous côtés entre l‘appareil et tout autre objet; • à ce que l’appareil en service ne soit pas posé sur un tapis épais ou un lit et à ce que celui-ci ne soit pas exposé à une source de chaleur directe (un radiateur, par ex.); • à ce que l‘appareil ne soit pas exposé au soleil direct; • à le protéger de toutes nuisances éventuelles par éclaboussures ou gouttes d’eau; • à l‘éloigner de tout champ magnétique éventuel (un haut-parleur, par ex.); • à ce qu’il n’y ait aucune intrusion de corps étranger ou infiltration de poussière dans l‘appareil; • à tenir l’appareil éloigné à tout moment de toute bougie ou autre flamme ouverte, afin d’empêcher la propagation d’un incendie. Écran et panneau de commande - 23 - Sonde extérieure 1 Icônes météo 22 Affichage du canal sélectionné 2 Colonnes de pression atmosphérique 23 Affichage piles failes 3 Température intérieure 24 Température extérieure 4 Icône confort thermique 25 Tendance pression atmosphérique 5 Hygrométrie intérieure 26 Touche CHANNEL 6 Phase lunaire 27 Touche HISTORY/WEATHER 7 Icône Lever/coucher de lune 28 Touche °C/°F + 8 Localisation/Ville 29 Touche MAX/MIN - 9 Icône Lever/coucher de soleil 30 Touche RELATIVE/ABSOLUTE (press. atmosph.) 10 Touche ALARM/ON/OFF 31 Touche SUN/MOON (soleil/lune) 11 Touche -/ 32 Dispositif d’accrochage (Station de base) 12 Touche SNOOZE/LIGHT 33 Touche RESET 13 Icône Alarme réveil 34 Compartiment à piles (Station de base) 14 Touche +/12/24 35 Pied à déplier de la station de base 15 Touche MODE 36 DEL de contrôle (sonde extérieur) 16 Date (Mois, Jour, Jour de la semaine) 37 17 Affichage Heure 38 18 Affichage signal radio horaire 39 19 Pression atmosph. des dernières heures 40 20 Pression atmosph. relative/absolue 41 Touche °C/°F (sonde extérieur) 21 Tendance température extérieure 42 Support pour sonde extérieur 43 Signal de la sonde - 24 - Canal de transmission temp. extérieure (sonde extérieur) Dispositif d‘accrochage (sonde extérieur) Bouton sélection du canal de transmission (sonde extérieur) Compartiment à piles (sonde extérieur) Fixation du sonde extérieur Le support du sonde 42 inclus dans la livraison offre diverses options de fixation. Le sonde extérieur peut se suspendre ou se poser selon les besoins. L’illustration A montre 3 rainures se trouvant des deux côtés du sonde. Ainsi, le sonde peut s’emboîter facilement dans le support. L’illustration B offre une vue latérale et montre comment le support est fixé au dos du sonde. L’illustration C offre une vue frontale du sonde et du support lors d’une fixation en suspension. L’illustration D offre une vue frontale du sonde et du support lors d’une fixation au sol sur le pied. L’illustration E montre le panneau de commande et le logement de la batterie au dos du sonde. Remarque : Placez le sonde extérieur uniquement en position verticale. Mise en service Activez d’abord la sonde extérieure (40), puis la station de base (34) en y mettant respectivement des piles. Retirez le film protecteur de la station de base et de la sonde extérieure. Ouvrez le compartiment à piles de la sonde (40) et mettez-y les piles livrées avec l’appareil en en respectant les polarités. Le voyant de contrôle (36) s’allume brièvement et la température s‘affiche sur l’écran de la sonde. Refermez le compartiment à piles. Ouvrez le compartiment à piles de la station de base (34) et mettez-y les piles livrées avec l’appareil en en respectant les polarités. Refermez le compartiment à piles. L’icône météo (1) clignote et la station météo reçoit alors le signal du sonde extérieur. Cette procédure peut durer quelques minutes. Quand la connexion est établie, le canal sélectionné s’affiche (22) et la température actuelle de la sonde apparaît (24). Cette procédure terminée, la station active la recherche du signal radio horaire DCF77 et la tour radio clignote sur l’écran, à côté de l’affichage de l‘heure (18). Cette procédure peut prendre 3 à 10 mn. Pendant la recherché du signal radio horaire, aucune touche de la station n’est active, sauf la touche SNOOZE / LIGHT (12). Si la recherche du signal radio ne devait pas aboutir au bout de 10 mn, mettez votre station à l’heure manuellement. Celle-ci activera une nouvelle tentative de réception à 04:00 h et à 05:00 h et corrigera l’heure automatiquement à la réception du signal. Remarque: Prière de ne pas changer les appareils de place (ni la station ni la sonde) pendant une recherche. Quand la recherche du signal radio a abouti, la tour radio (18) apparaît fixe sur l’écran de la station de base et toutes ces données s’affichent automatiquement sur l’écran: l’heure actuelle, la date, le jour de la semaine, l’heure du lever et du coucher du soleil et de la lune ainsi que la phase lunaire. Pendant l’heure d’été, la mention DST s’affiche à côté de la tour radio (18). Réglage du fuseau horaire Si vous vous trouvez dans un pays dont l'heure actuelle diffère de l'heure du signal DCF77, modifiez le fuseau horaire. Utilisez la fonction de réglage du fuseau horaire pour vous servir du station dans un autre pays/sous un autre fuseau horaire que celui du format standard (UTC + 1 = Heure en Europe Centrale). Entrez la différence en heures (-01, par ex.) entre le format standard et le fuseau horaire souhaité. Dans l’affichage normal, appuyez sur la touche MODE (15) maintenez-la pendant 3 secondes. Le fuseau horaire clignote et peut se régler avec la touche -/ (11) ou la touche +/12/24 (14). Appuyez sur la touche MODE (15) pour confirmer le réglage. Ensuite, réactivez la recherche du signal radio horaire. Votre station capte le signal radio horaire DCF77, mais n'affiche pas l'heure corrigée voulue (1 heure de moins, par ex.) Perturbations dans la réception du signal radio Le signal radio horaire DCF77 est émis à partir de la région de Francfort sur le Main, celui-ci peut être capté dans un rayon d’env. 1500 km autour de Francfort/M. Toutefois, certains facteurs peuvent perturber considérablement la réception du signal. Au cas où votre base ne capterait pas bien le signal radio horaire, accrochez-la ou placez-la à un autre endroit et tenez compte du fait que, à proximité d’un ordinateur, d’un poste de télephone, de radio ou de télévision, votre station sera éventuellement exposée au rayonnement électromagnétique qui se dégage de ces appareils et qui peut perturber la réception du signal DCF77. D’autres sources de perturbations possibles sont certains éléments épais d’isolation utilisés dans le bâtiment (éléments de construction métalliques), montagnes élevées ou perturbations atmosphériques. Procédez éventuellement à un changement de piles. Réactiver la recherche du signal radio horaire La recherche du signal radio horaire peut être réactivée manuellement par une pression prolongée (3 secondes) de la touche -/ (11). Rétroéclairage Pour activer provisoirement le rétroéclairage de l’écran, appuyez sur la touche SNOOZE/LIGHT (12). Format horaire 12/24 Pour choisir le format voulu (en 12 ou 24 heures), appuyez sur la touche +/12/24 (14). En mode de format en 12 heures, la mention AM s’affiche sur l’écran le matin et PM l’après-midi. Température Pour afficher la température en degrés Celsius ou en degrés Fahrenheit, appuyez sur °C/°F+ (28). - 25 - Réglage rapide Pour accélérer l’entrée de valeurs numériques, appuyez sur les touches en les maintenant enfoncées. Réglage de base Ces paramètres sont réglables manuellement: fuseau horaire, heure, date, langue d’affichage du jour de la semaine et localisation (votre ville). En mode d’affichage normal de l‘heure, appuyez sur la touche MODE (15) et maintenez-la enfoncée 3 secondes, l’option d’entrée du fuseau horaire clignote, on réglera le fuseau horaire avec la touche -/ (11) ou la touche +/12/24 (14). Appuyez sur la touche MODE (15) pour confirmer vos données. On réglera de la même manière: les heures, les minutes et les secondes, l‘année, le mois, le jour et la langue d’affichage du jour de la semaine (GE=allemand, FR=français, ES=espagnol, IT=italien, NE=néerlandais, DA=danois, RU=russe, EN=anglais), le pays et l’emplacement de service (voir le Tableau des villes plus bas). Si vous deviez changer de lieu, laissez un peu de temps à votre station pour afficher les nouvelles heures de lever et de coucher de la lune et du soleil. Tableau de villes/Localisation Allemagne Aachen Berlin Düsseldorf Dresden Erfurt Frankfurt Flensburg Freiburg Hannover Bremen Hamburg Rostock Stralsund Köln Kiel Kassel Leipzig München Magdeburg Nürnberg Regensburg Stuttgart Saarbrücken Schwerin Danemark Aalborg Aarhus Copenhagen Odense Espagne/ Andorre Alicante Andorra Badajoz Bacelona Bilbao Cádiz Còrdoba GER AAC BER DUS DRE ERF FRA FLE FRE HAN BRE HAM ROS STR KOE KIE KAS LEI MUE MAG NUE REG STU SAA SCH DAN ALB ARH COP ODE Ibiza La Coruña León Las Palmas Madrid Málaga Palma de Mallorca Salamanca Sevilla Valencia Zaragossa France Besançon Biarritz Bordeaux Brest Cherbourg Lyon Marseille Monaco Metz Nantes Nice Orléans Paris Perpignan Lille Rouen Strasbourg Toulouse ESP Finlande ALI Helsinki GrandeAND Bretagne BAD Aberdeen BAR Belfast BIL Birmingham CAD Bristol COR Edinburgh IBI LAC LEO LPA MAD MAL PDM SAL SEV VAL ZAR FRA BES BIA BOR BRE CHE LYO MAR MON MET NAN NIC ORL PAR PER LIL ROU STR TOU FIN HEL Glasgow London Manchester Plymouth Hongrie Budapest Croatie Zagreb Italie Ancona Bari Bologna Cagliari Catania Florenz Foggia Genua Lecce Messina Mailand Neapel Palermo Parma Perugia Roma Turin Triest Venedig Verona Ventimiglia Irlande Dublin Luxemburg GLA LON MAN PLY HUN BUD CRO ZAG ITA ANC BAI BOL CAG CAT FIR FOG GEN LEC MES MIL NAP PAL PAR PER ROM TOR TRI VEN VER VTG IRL DUB LUX Eindhoven Enschede Groningen Den Haag Rotterdam Portugal Èvora Coimbra Faro Leiria Lisboa Porto Pologne Danzig Krakau Posen Stettin Warschau Russie St. Petersburg Suède Göteborg Stockholm Slovaquie Bratislava Slovénie Ljubljana Serbie Belgrad Autriche Graz Innsbruck Linz GB Norvège NOR Salzburg SAL ABD BEL BIR BRI EDI Bergen Oslo Stavanger Pays-Bas Amsterdam BER OSL STA NET AMS VIE BEL ANT BRU BRL Wien Belgique Antwerpen Brügge Brüssel EIN ENS GRO DHA ROT POR EVO COI FAR LEI LIS POR POL GDA KRA POZ SZC WAR RUS PET SWE GOT STO SLK BRA SLO LJU SRB BER AUS GRA INN LIN Charleroi Lüttich Suisse/ Liechtenstein Basel Bern Chur Genf Locarno Luzern St. Moritz St. Gallen Sitten Vaduz Zürich CHA LIE SWI Tchéquie CZR Prag Grèce Athen Chypre Nikosia Roumanie Bukarest Bulgarie Sofia PRA GR AT CY NI RO BU BG SO BAS BER CHU GEN LOC LUC MOR GAL SIO VAD ZUE Heures de lever et de coucher du soleil et de la lune Le réglage du pays et de l’emplacement (localisation) terminés, votre station de base calculera les heures approximatives du lever et du coucher du soleil et de la lune à votre emplacement. Remarque: Les horaires calculés ne sont que des valeurs d‘orientation. Des différences peuvent apparaître selon les conditions de terrain et le temps qu’il fait là où vous êtes, par ex. Pour afficher provisoirement le nombre approximatif d’heures d‘ensoleillement pour la journée actuelle, appuyez sur la touche SUN/MOON (31). Lorsque vous souhaitez consulter les couchés et levés du soleil ou de la lune d’un autre endroit ou à une autre date, appuyez la touche SUN/MOON (31) et maintenez-la pendant 3 secondes. L’option pays se met à clignoter, le réglage est alors possible avec la touche -/ (11) ou la touche 12/24 + (14). Confirmez votre donnée par une brève pression de la touche SUN/MOON (31). On réglera de la même manière: la ville, l'année, le mois et le jour, appuyez sur la touche SUN/MOON (31) pour confirmer vos données. - 26 - Les phases de la lune Votre station météo est dotée d’un afficheur des phases lunaires. Les 8 phases lunaires s’affichent ainsi: Nouvelle lune Pleine lune Premier Croissant Lune gibbeuse Demi-lune (Premier quartier) Demi-lune (Dernier quartier) Lune gibbeuse Dernier croissant Alarme réveil Votre station météo dispose de deux alarmes réglables séparément. Pour choisir une alarme réveil, Alarm 1 ou Alarm 2, appuyez sur la touche MODE (15). L’icône correspondante à l’alarme choisie s’affiche sur l’écran, En mode d’affichage Alarm 1 ou Alarm 2, appuyez sur la touche MODE (15) et maintenez enfoncé pour accéder au mode de réglage correspondant. Les heures de l’alarme choisie se mettent à clignoter sur l’écran. Réglez les heures en appuyant sur -/ (11) ou sur +/12/24 (14) et confirmez en appuyant sur MODE (15). Entrez les minutes de la même manière. Pour activer ou désactiver le signal sonore des alarmes, appuyez sur la touche ALARM/ON/OFF (10) en mode d’affichage de l’alarme voulue, (on) s’affiche sur l’écran quand l’alarme choisie est active, (oF) quand vous l’avez désactivée. Quand Alarm 1 est active s’affiche cette icône: , pour Alarm 2 s’affiche: . Votre station repasse automatiquement à l’affichage normal de l’heure au bout de 5 secondes sans pression de touche. Répétition de l‘alarme (SNOOZE) Pour interrompre provisoirement le signal sonore d’une alarme, appuyez sur la touche SNOOZE/LIGHT (12) pendant la sonnerie, la clochette affichée se met à clignoter sur l‘écran. La sonnerie reprend au bout de 5 mn. Pour la désactiver et l’arrêter définitivement, appuyez sur n'importe quelle touche sauf la touche 12. Prévisions météo Remarque : La station météorologique débute les prévisions météo env. 6 heures après la saisie du temps actuel. Les icônes météo indiquent une tendance météorologique pour les heures à venir et non le temps actuel. Si une prévision ne devait pas correspondre au temps qu’il a fait plus tard, rectifiez l’affichage de l’icône météo en appuyant sur la touche HISTORY/WEATHER (27) et en la maintenant enfoncée 3 secondes. L’icône météo clignote. Choisissez alors l’icône correspondant à votre temps actuel en appuyant sur la touche °C/°F + (28) ou sur MAX/MIN(29). Pour confirmer, appuyez sur HISTORY/WEATHER (27). Remarque : En cas de chute de neige, réglez sur pluie ou averse. En confirmant avec la touche HISTORY/WEATHER (27) s’affiche l’icône de chute de neige par des températures au-dessous de 0 °C. Ensoleillé Pluie torrentielle Légèrement nuageux Pluvieux Nuageux Abondante chute de neige Chute de neige Baromètre Votre station météo peut aussi afficher l’évolution de la pression atmosphérique (25). Pression atmosphérique à la hausse Pression atmosphérique constante Pression atmosphérique à la baisse On peut aussi au choix afficher la pression atmosphérique absolue ou relative; pour sélectionner le mode d’affichage voulu, appuyez sur la touche Relative/Absolute- (30). Sur l’écran s’affiche Rel. ou Abs. - 27 - Remarque: Votre station mesure la pression atmosphérique absolue. Pour connaître la pression atmosphérique relative de votre région, adressez-vous à votre service météorologique local. Il est possible de corriger l’affichage de la pression atmosphérique relative en appuyant sur la touche Relative/Absolute (30) et en la maintenant enfoncée 3 secondes. La valeur de la pression atmosphérique clignote et peut alors être rectifiée à l’aide de la touche °C/°F + (28) ou de la touche MAX/MIN (29). Confirmez par pression de la touche Relative/Absolute (30). Pour choisir le format d'affichage de la pression atmosphérique en Hectopascal (hPa) ou en Inches of mercury (inHg), appuyez sur °C/°F+ (28) et maintenez-la enfoncée 3 secondes. Pression atmosphérique des 12 dernières heures Appuyez sur la touche HISTORY/WEATHER (27) pour consulter les valeurs de pression atmosphérique des 12 dernières heures 0 – HR = Pression atmosphérique actuelle - 1 HR = Pression atmosphérique 1 heure plus tôt -2 HR = Pression atmosphérique 2 heures plus tôt, etc. Sonde extérieure/Réglage du canal de transmission Il est possible avec cet appareil d’utiliser trois sondes extérieures en même temps. Pour activer le canal de transmission voulu (de 1 à 3), ouvrez le compartiment à piles de votre sonde et réglez avec le bouton de sélection (39). Appuyez ensuite sur la touche CHANNEL (26) de votre station de base et maintenez enfoncé 3 secondes jusqu’au signal sonore, votre station est réceptive au signal de la sonde (43). Refermez le couvercle de la sonde. On pourra choisir d’afficher la température en degrés Celsius ou en degrés Fahrenheit (°C / °F) à l’aide de la touche (41). Remarque: La sonde ne doit pas être placée à plus de 100 m de la station de base (pas d’obstacle). Si vous utilisez plusieurs sondes extérieures: Pour passer de l’affichage d’un canal de réception à l’autre, appuyez sur la touche CHANNEL de votre station de base (26) en mode d’affichage normal de l’heure. L’icône de rotation alors affichée (22) indique le passage automatique d’un canal à l’autre. Seules les sondes connectées sont affichées. Pour effacer des canaux non utilisés, appuyez sur la touche CHANNEL (26) et maintenez-la enfoncée. Si vous connectez une sonde supplémentaire à votre station, celle-ci la reconnaîtra automatiquement. Evolution de la température extérieure La tendance de la température extérieure (21) s’affiche si la sonde extérieure est bien reçue par la station. Température extérieure en hausse Température extérieure constante Température extérieure en baisse Hygrométrie intérieure La valeur hygrométrique intérieure actuelle s’affiche sur l’écran en pos. 5 (voir fig.). Le confort thermique en pos. 4 affiche l’humidité de l’air ambiant en 3 catégories: < 40 % AIR SEC < 20 °C 40 – 60 % CONFORT > 60 % AIR HUMIDE / 20 – 26°C > 26 °C / Valeurs maximales et minimales Les valeurs maximales et minimales de température et d’hygométrie sont mémorisées dès la mise en service des appareils (installation des piles). Pour afficher et consulter les températures intérieures (3) et extérieures (24) maximales MAX ou minimales MIN ainsi que les valeurs d’hygrométrie (5) actuelles, appuyez brièvement sur la touche Max/Min- (29). Pour effacer les valeurs maximales et minimales, appuyez sur la touche Max/Min- (29) et maintenez enfoncé env. 3 secondes. Un signal sonore se fait entendre, les valeurs sont effacées et votre station recommence à zéro pour mémoriser de nouvelles valeurs. Indicateur de piles faibles Quand les piles de vos appareils, station de base et sonde extérieure, sont devenues trop faibles pour assurer leur bon fonctionnement et la transmission des données, l’indicateur de piles faibles s’affiche sur l’écran en pos. 23. Dans ce cas, il faudra changer les piles des deux appareils rapidement. Redémarrez alors votre station météo. - 28 - Redémarrage (RESET) Pour remettre les données votre base à zéro, appuyez sur la touche RESET (33). Conseils d‘entretien Nettoyez la station et les sondes en utilisant seulement un chiffon sec ne faisant pas de peluches, comme les chiffonnettes utilisées pour l’entretien des verres de lunettes, par ex. Declaration UE de conform ite simplifiée Le soussigné, digi-tech gmbh, déclare que du type station météo radioguidée 4-LD4868 est conforme à les directives 1999/5/UE et 2014/53/EU. Le texte complet de la déclaration UE de conformité est disponible à l'adresse internet suivante: http://www.digi-tech-gmbh.com/ce/289081_WS.pdf Evacuation de l‘appareil Cette station météorologique ne doit pas être jetée avec les ordures ménagères. Faîtes évacuer votre appareil par une entreprise de traitement de déchets agréée ou évacuez-le dans votre déchèterie municipale. Respectez les directives d’évacuation en vigueur. En cas de doute, demandez conseil auprès de votre déchèterie municipale. Evacuation des piles Evacuation adéquate des piles usagées dans les conteneurs mis à votre disposition dans les points de vente. Ne jetez jamais de piles avec des ordures ménagères. Evacuez-les par l’intermédiaire d’un prestataire agréé ou dans votre déchèterie municipale. Respectez les directives d’évacuation en vigueur. En cas de doute, demandez conseil auprès de votre déchèterie municipale. Logo TRIMAN Ce produit est recyclable, il est soumis à un dispositif de responsabilité élargie du producteur et de collecte séparée. Garantie de digi-tech gmbh Vous recevez une garantie de 3 ans à partir de la date d’achat de cet appareil. En cas de défauts sur cet appareil, vous bénéficiez de recours légaux contre le vendeur du produit. Ces droits légaux ne sont pas limités par notre garantie décrite ci-après. Conditions de garantie La période de garantie commence à partir de la date de l‘achat. Veuillez conserver soigneusement votre ticket de caisse en original. Ce document est nécessaire comme preuve d‘achat. En cas de vice dû à un défaut de matériel ou de fabrication révélé au cours de la période de garantie, soit pendant 3 ans à partir de la date de l‘achat, nous réparons ou remplaçons – à notre choix – gratuitement votre produit défectueux. La prestation de garantie présuppose la restitution du produit réclamé ainsi que la fourniture d’une preuve d’achat (ticket de caisse) pendant la période de garantie convenue de 3 ans, accompagnée d’une courte description écrite du défaut avec indication de la date à laquelle celui-ci s’est révélé. Si ce vice est couvert par la garantie du produit, nous vous renverrons ce produit réparé ou un produit neuf. La période de garantie n’est pas prolongée par une réparation ou un échange. Durée de la garantie et recours légaux en cas de défauts La durée de la garantie n’est pas allongée suite à la prise en charge. Cela vaut aussi pour les pièces remplacées ou réparées. Les dommages ou défauts éventuels apparus dès l’achat doivent être notifiés dès le déballage. Après expiration de la durée de la garantie, les réparations sont payantes. • Article L211-16 du Code de la consommation Lorsque l‘acheteur demande au vendeur, pendant le cours de la garantie commerciale qui lui a été consentie lors de l‘acquisition ou de la réparation d‘un bien meuble, une remise en état couverte par la garantie, toute période d‘immobilisation d‘au moins sept jours vient s‘ajouter à la durée de la garantie qui restait à courir. Cette période court à compter de la demande d‘intervention de l‘acheteur ou de la mise à disposition pour réparation du bien en cause, si cette mise à disposition est postérieure à la demande d‘intervention. • Indépendamment de la garantie commerciale souscrite, le vendeur reste tenu des défauts de conformité du bien et des vices rédhibitoires dans les conditions prévues aux articles L211-4 à L211-13 du Code de la consommation et aux articles 1641 à 1648 et 2232 du Code Civil. • Article L211-4 du Code de la consommation Le vendeur est tenu de livrer un bien conforme au contrat et répond des défauts de conformité existant lors de la délivrance. Il répond également des défauts de conformité résultant de l‘emballage, des instructions de montage ou de l‘installation lorsque celle-ci a été mise à sa charge par le contrat ou a été réalisée sous sa responsabilité. • Article L211-5 du Code de la consommation Pour être conforme au contrat, le bien doit : 1° Etre propre à l‘usage habituellement attendu d‘un bien semblable et, le cas échéant : - correspondre à la description donnée par le vendeur et posséder les qualités que celui-ci a présentées à l‘acheteur sous forme d‘échantillon ou de modèle ; - présenter les qualités qu‘un acheteur peut légitimement attendre eu égard aux déclarations publiques faites par le vendeur, par le producteur ou par son représentant, notamment dans la publicité ou l‘étiquetage ; - 29 - 2° Ou présenter les caractéristiques définies d‘un commun accord par les parties ou être propre à tout usage spécial recherché par l‘acheteur, porté à la connaissance du vendeur et que ce dernier a accepté. • Article L211-12 du Code de la consommation L‘action résultant du défaut de conformité se prescrit par deux ans à compter de la délivrance du bien. • Article 1641 du Code civil Le vendeur est tenu de la garantie à raison des défauts cachés de la chose vendue qui la rendent impropre à l‘usage auquel on la destine, ou qui diminuent tellement cet usage que l‘acheteur ne l‘aurait pas acquise, ou n‘en aurait donné qu‘un moindre prix, s‘il les avait connus. • Article 1648 1er alinéa du Code civil L‘action résultant des vices rédhibitoires doit être intentée par l‘acquéreur dans un délai de deux ans à compter de la découverte du vice. • Les pièces détachées indispensables à l’utilisation du produit sont disponibles pendant la durée de la garantie du produit. Couverture de la garantie L’appareil a été fabriqué avec soin selon de strictes directives de qualité et a fait l’objet de tests scrupuleux avant livraison. La garantie couvre les défauts de matériel ou de fabrication. Cette garantie ne s’étend pas aux pièces qui sont soumises à une usure normale et qui peuvent donc être considérées comme des pièces d’usure ou pour les détériorations sur les pièces fragiles, par ex. interrupteur, batteries ou les pièces qui sont en verre. Cette garantie s’annule si l’appareil a été endommagé, utilisé ou entretenu de façon non-conforme. Pour une utilisation conforme du produit, les consignes détaillées dans la notice d’utilisation doivent être respectées scrupuleusement. Des utilisations ou des manipulations, qui ont fait l’objet de contre-indications ou bien de mises en garde dans la notice d’utilisation, doivent être absolument évitées. L’appareil est destiné uniquement à un usage privé et non à un usage commercial. En cas de manipulation abusive et inadéquate, de recours à la force et d’interventions qui n’ont pas été effectuées par notre succursale « Service AprèsVente », la garantie disparaît. Procédure dans un cas de garantie En vue de traiter votre demande le plus rapidement possible, nous vous prions de bien vouloir observer les instructions suivantes: • Tenez, pour toute demande, votre ticket de caisse et le numéro de l’article (289081) en tant que preuve de votre achat à notre disposition. • Vous trouverez le numéro de l’article sur une plaque d’identification, dans une mention gravée, dans le titre de votre mode d’emploi (en bas à gauche) ou sur une étiquette au dos de l’article ou sous l’article. • Si vous deviez constater un défaut de fonctionnement ou un vice quelconque, veuillez contacter d‘abord le SAV ciaprès mentionné par par téléphone ou en envoyant un courriel (mail). Vous pourrez télécharger ce mode d’emploi et beaucoup d’autres manuels d’utilisation ainsi que des vidéos produits et logiciels sur ce site internet : www.lidl-service.com - 30 - Service de commande pour sondes Les autres sondes peuvent être commandées par fax: +49(0)6198-5770-99 ou sur notre site internet : www.inter-quartz.de. Le prix d'une sonde est de 5,- € + TVA et frais de port. Service Après Vente Nom: Inter-Quartz GmbH Rue: Valterweg 27A Ville: DE-65817 Eppstein Pays: ALLEMAGNE Courriel/Mail: [email protected] Téléphone: +49 (0)6198 571825 00800 5515 6616 00800 5515 6616 00800 5515 6616 00800 5515 6616 00800 5515 6616 0800 563862 800 142 315 00800 5515 6616 00800 5515 6616 00800 5515 6616 00800 5515 6616 IAN 289081 Art.-Nr.: 4-LD4868 Fournisseur Veuillez noter que l’adresse suivante n’est pas une adresse de SAV. Prière de contacter d’abord l’adresse indiquée plus haut. Nom: digi-tech gmbh Rue: Valterweg 27A Ville: DE-65817 Eppstein Pays: ALLEMAGNE - 31 - Gebruiksaanwijzing en veiligheidstips Inhoudsopgave Inhoudsopgave ....................................................................................................................................................................... - 32 Introductie ................................................................................................................................................................................ - 33 Beoogd gebruik ...................................................................................................................................................................... - 33 Levering .................................................................................................................................................................................... - 33 Technische gegevens .............................................................................................................................................................. - 33 Weerstation ..................................................................................................................................................................... - 33 Buitensensor ..................................................................................................................................................................... - 33 Veiligheidsinformatie voor gebruiker ................................................................................................................................ - 33 Veiligheidsinformatie voor batterijen ................................................................................................................................ - 33 Het weerstation en de buitensensor dient u veilig op te hangen of neer zetten ............................................................... - 34 Display en bedieningspanelen .............................................................................................................................................. - 34 Buitensensor............................................................................................................................................................................. - 35 Bevestiging van de buitensensor ........................................................................................................................................... - 36 Ingebruikname ........................................................................................................................................................................ - 36 Aanpassing tijdzones.............................................................................................................................................................. - 36 Ontvangststoring ..................................................................................................................................................................... - 36 Tijd signaal opnieuw starten .................................................................................................................................................. - 36 Licht ........................................................................................................................................................................................... - 36 12/24-uurs tijdweergave...................................................................................................................................................... - 36 Temperatuur............................................................................................................................................................................. - 36 Snelle instelling ........................................................................................................................................................................ - 37 Basisinstelling........................................................................................................................................................................... - 37 Locatie tabel ............................................................................................................................................................................ - 37 Op- en ondergangstijden van de maan en de zon ............................................................................................................ - 37 Maanfase ................................................................................................................................................................................ - 38 Wekalarm ................................................................................................................................................................................ - 38 Sluimerfunctie (SNOOZE) ..................................................................................................................................................... - 38 Weervoorspelling ................................................................................................................................................................... - 38 Barometer ................................................................................................................................................................................ - 38 Luchtdruk in de laatste 12 uur................................................................................................................................................ - 39 Buitensensor /Kanaal instelling............................................................................................................................................. - 39 Buitentemperatuur ontwikkeling ............................................................................................................................................ - 39 Luchtvochtigheid...................................................................................................................................................................... - 39 Maximale- und minimale waarden....................................................................................................................................... - 39 Batterijwissel ............................................................................................................................................................................ - 39 Herstart (RESET) ...................................................................................................................................................................... - 39 Schoonmaken.......................................................................................................................................................................... - 39 Vereenvoudigde EU-Conformiteitsverklaring....................................................................................................................... - 40 Het weerstation bij het afval doen ........................................................................................................................................ - 40 Afvalverwijdering van de batterijen ...................................................................................................................................... - 40 Garantie door digi-tech gmbh............................................................................................................................................... - 40 Garantievoorwaarden ........................................................................................................................................................... - 40 Garantieperiode en wettelijk geregelde aansprakelijkheid bij mangel............................................................................ - 40 Garantiedekking ..................................................................................................................................................................... - 40 Afhandeling in geval van garantie........................................................................................................................................ - 40 Bestelservice ............................................................................................................................................................................ - 41 Klantenservice ......................................................................................................................................................................... - 41 Leverancier .............................................................................................................................................................................. - 41 - - 32 - RADIOGRAFISCH WEERSTATION Introductie Van harte gefeliciteerd met de aankoop van uw nieuwe weerstation. U hebt daarmee een hoogwaardig apparaat gekozen. De handleiding vormt een onderdeel van dit weerstation. Hij bevat belangrijke informatie over veiligheid, gebruik en verwijdering als afval. Maak u vertrouwd met alle bedienings- en veiligheidsinstructies voordat u het weerstation gaat gebruiken. Gebruik het weerstation uitsluitend zoals beschreven en voor de aangegeven toepassingen. Overhandig ook alle bijbehorende documenten wanneer u het weerstation aan iemand anders overdraagt. Gelieve aub de verpakking en instructies bij te houden voor eventuele verzoeken voor extra informatie. Beoogd gebruik Het weerstation is geschikt om het weer af te lezen en de beschreven extra functies. Elk ander gebruik of wijziging van het weerstation wordt als oneigenlijk beschouwd. De fabrikant is niet aansprakelijk voor schade veroorzaakt door verkeerd gebruik of verkeerde bediening. Het weerstation is niet bestemd voor commercieel gebruik. Levering Aanwijzing: Controleer na aankoop of alle onderdelen aanwezig zijn en niet beschadigd. • Weerstation • 3 x Batterij 1,5 V AA R6/LR6 • Buitensensor • Beugel voor sensor • 2 x Batterij 1,5 V AAA R03/LR03 • Gebruiksaanwijzing Technische gegevens Weerstation • Bedrijfstemperatuur 0 – 50 °C • Temperatuur weergave: +/- 1 °C • Batterij: 3 x 1,5 V AA R6 / LR6 Buitensensor • Bedrijfstemperatuur -20 – 50 °C • Temperatuur weergave: +/- 1 °C • Ontvangst: max. 100 m • Frequentie: 433 MHZ • Zendvermogen: 0,024 W • Beschermingsgraad (IP-Klasse) van de omkasting (buitensensor): IPX4 (spatwaterbeveiliging volgens Norm IEC 60529) • Batterij: 2 x 1,5 V AAA R03/LR03 - Symbool voor gelijkstroom Veiligheidsinformatie voor gebruiker WAARSCHUWING! KANS OP VERWONDINGEN! Dit apparaat kan door personen (ook kinderen vanaf 8 jaar) met verminderde fysieke, sensorische of mentale capaciteiten of met gebrek aan ervaring en kennis gebruikt worden, wanneer dat onder toezicht gebeurt of ze instructie gekregen hebben hoe ze het apparaat moeten gebruiken en ze de gevaren begrijpen die voortkomen uit het gebruik. Kinderen mogen niet spelen met het apparaat. Schoonmaken en gebruikersonderhoud mag door kinderen alleen onder toezicht verricht worden. Houd de verpakkingsfolie uit de buurt van kinderen. Bij verkeerd gebruik ervan bestaat verstikkingsgevaar. Veiligheidsinformatie voor batterijen SCHADELIJK VOOR DE GEZONDHEID! WAARSCHUWING! EXPLOSIEGEVAAR! Bewaar batterijen buiten bereik van kleine kinderen. Na inslikken van een batterij meteen medische hulp inroepen. Batterijen/accu's moeten altijd geplaatst worden met de polen in de juiste positie. Reinig de contactpunten van batterij en apparaat van tevoren indien nodig. Probeer niet batterijen weer op te laden, kort te sluiten of te openen. Gooi nooit batterijen in vuur! Ze kunnen exploderen. Gebruikt u het apparaat langere tijd niet, haal de batterijen er dan uit en bewaar het apparaat op een droge en stofvrije plek. Bij verkeerd gebruik van de batterij bestaat gevaar voor exploderen en lekken. Als de batterij gelekt heeft, contact met huid, ogen en slijmvliezen vermijden. Handschoenen gebruiken. Bij contact met batterijzuur de aangedane plekken overvloedig afspoelen met schoon water en zo snel mogelijk naar een arts gaan. Verwijder lege batterijen meteen uit het apparaat, er bestaat verhoogd gevaar voor lekken. - 33 - Het weerstation en de buitensensor dient u veilig op te hangen of neer zetten Het weerstation en de buitensensor zijn niet geschikt voor ruimtes met een hoge luchtvochtigheid (bijvoorbeeld de badkamer). Let erop, dat: • de sensor rechtop staat of hangt; • Voldoende ventilatie aanwezig is. Plaats het apparaat niet in een kast of daar waar gordijnen of meubels niet voor voldoende ventilatie kunnen zorgen. Let erop dat op zijn minst 10 cm afstand is aan alle kanten. • Het apparaat tijdens het gebruik niet op een dik tapijt of bed staat en geen directe warmtebronnen (bijvoorbeeld verwarmingen) op het apparaat kunnen werken. • De zon niet direct op het apparaat schijnt. • Het contact met spatwater en druppels moet vermeden worden. • Het apparaat niet in de buurt hangt of staat van magneetvelden (bijvoorbeeld luidsprekers). • Er geen vreemde bestanddelen, onzuiverheden of stof in het apparaat komt. • Er geen kaarsen en andere vlammen in de buurt van het apparaat zijn, om het uitbreiden van vuur te verhinderen. Display en bedieningspanelen - 34 - Buitensensor 1 Weersymbool 22 Uitgezocht kanaal 2 Luchtdruk overzicht 23 Batterijsymbool 3 Binnentemperatuur 24 Buitentemperatuur 4 25 Luchtdruk voorspelling 5 Smiley (Comfortabel) symbool)(ComfortabelsymboolKomfortsymbol) Luchtvochtigheid 26 CHANNEL-toets 6 Maanfase 27 HISTORY/WEATHER-toets 7 Maanopkomst/-ondergang 28 °C/°F + -toets 8 Locatie 29 MAX/MIN - -toets 9 Zonsopgang/-ondergang 30 RELATIEVE/ABSOLUTE-luchtdruk-toets 10 ALARM/ON/OFF -toets 31 SUN/MOON-toets 11 -/ 32 Ophangconstructie (Weerstation) 12 SNOOZE/LIGHT-toets 33 RESET-toets 13 Alarm-Symbool 34 Batterijvakje (Weerstation) 14 +/12/24-toets 35 Uitklapbaar voetstuk (Weerstation) 15 MODE-toets 36 Controle-LED (buitensensor) 16 Datum (maand, dag, dag van de week) 37 Buitentemperatuur/kanaal (buitensensor) 17 Tijdweergave 38 Ophangcontructie (buitensensor) 18 Ontvangstweergave 39 Kanaal keuzeschakelaar (buitensensor) 19 Luchtdruk van de laatste uren 40 Batterijvakje (buitensensor) 20 Relatieve/absolute luchtdruk Buitentemperatuur voorspelling 41 °C/°F-toets (buitensensor) 42 Beugel voor sensor (buitensensor) 43 Signaal van de buitensensor 21 -toets - 35 - Bevestiging van de buitensensor De meegeleverde beugel 42 voor de sensor maakt verschillende montage-opties mogelijk. Afhankelijk van de behoefte kan de buitensensor opgehangen of geplaatst worden. Afbeelding A toont 3 uitdiepingen voor boorgaten die de sensor aan beide kanten heeft. De sensor kan daarmee eenvoudig aan de beugel geklikt en vastgezet worden. Afbeelding B toont vanuit de zijkant hoe de beugel achter de sensor bevestigd is. Afbeelding C toont de frontale weergave van de sensor met de beugel als ophanging van de bovenkant. Afbeelding D toont de frontale weergave van de sensor met de beugel als vloerstandaard van de onderkant. Afbeelding E toont het controlepaneel en het batterijvak aan de achterkant van de sensor. Aanwijzing: zorg ervoor dat de buitensensor altijd rechtop hangt. Ingebruikname Plaats als eerste de batterijen in de buitensensor 40 en daarna in het weerstation 34. Verwijder de plasticfolie van het weerstation en van de sensor. Open het batterijvakje van de buitensensor 40 en plaats de meegeleverde batterijen met de polen in de juiste richting. Het controllelampje 36 verlicht tijdelijk en de temperatuur verschijnt. Sluit het batterijvakje. Open het batterijvakje van het weerstation 34 en plaats de meegeleverde batterijen met de polen in de juiste richting. Sluit het batterijvakje. Het weersymbool 1 knippert en het weerstation ontvangt nu het signaal van de buitensensor. Dit kan een paar minuten duren. Als het ontvangst tot stand gekomen is verschijnt het uitgezochte kanaal 22 en de actuele buitentemperatuur 24. Dit kan een paar minuten duren. Als het ontvangst tot stand gekomen is verschijnt het uitgezochte kanaal 22 en de actuele buitentemperatuur 24. Zodra het signaal met de buitensensor succesvol tot stand gekomen is, ontvangt het weerstation het DCF 77 tijdsignaal. Het ontvangstsymbool 18 knippert in het display naast de tijd. Dit kan 3 tot 10 minuten duren. Tijdens het zoeken naar het tijdsignaal kunnen geen andere toetsen, behalve de SNOOZE/LIGHT toets 12 worden gebruikt. Als de ontvangst van het tijdsignaal na 10 minuten niet tot stand is gekomen, kunt u de tijd handmatig instellen. Het weerstation zal om 04:00 en 05:00 uur opnieuw proberen het tijdsignaal te ontvangen. Indien dit gelukt is zal hij automatisch de tijd corrigeren. Aanwijzing: Tijdens het ontvangst van het DCF tijdsignaal, het weerstation en de buitensensor niet bewegen. Zodra het weerstation het tijdsignaal succesvol ontvangen heeft verschijnt het DCF-torensymbooltje 18 blijvend en stelt automatisch de juiste tijd, datum, dag van de week, op- en ondergangs tijden van de zon en de maan en de maanfase. Tijdens de zomertijd verschijnt DST op het display naast het torensymbooltje 18. Aanpassing tijdzones Bevindt u zich in een land waar de actuele tijdsaanduiding ondanks het DCF-signaal afwijkt, gebruik dan de tijdzone aanpassing. Gebruik de aanpassing van de tijdzone om uw weerstation in een andere tijdzone dan de standaard instelling (UTC + 1 = centraal Europese tijd) te gebruiken. Geef het verschil in uren met de gewenste tijdzone in. Druk en houd de MODE-toets 15 in de normale tijdsaanduiding 3 seconden lang ingedrukt. De tijdzone knippert en kan met de -/ -toets 11 of de +/12/24 -toets 14 ingesteld worden. Druk op de MODE-toets 15 om de instelling te bevestigen. Start daarna de weerstation opnieuw. Uw weerstation ontvangt nog steeds het DCF77-radiosignaal, maar geeft een aangepaste tijd weer (bv.1 uur vroeger). Ontvangststoring Het DCF77 tijdsignaal komt uit de buurt van Frankfurt am Main (Duitsland). Het tijdsignaal kan binnen een straal van 1500 km ontvangen worden. Er kunnen echter storingsbronnen zijn die het ontvangst belemmeren kunnen. Indien uw weerstation het radioontvangst niet goed kan ontvangen, kunt u het nog eens proberen op een andere plaats. Let erop, dat in de buurt van een computer, telefoon, radio of tv, stralingen kunnen zijn die het ontvangen van het DCF77 tijdsignaal kunnen storen. Verder storingsbronnen kunnen zijn, sterke gebouw dempingen (metale bouwelementen), hoge bergen of atmosferische storingen. Indien nodig, vervang de batterijen. Tijd signaal opnieuw starten U kunt het tijdsignaal handmatig opnieuw starten, door de -/ -toets 11, 3 seconden in te drukken Licht Door op de SNOOZE/LIGHT -Taste 12 te drukken, kunt u de achtergrondverlichting tijdelijk activeren. 12/24-uurs tijdweergave Druk op de +/12/24 -toets 14, om te kiezen voor de 12- of 24-uurs tijdweergave. In de 12-uurs tijdweergave verschijnt op het display in de voormiddag AM en in de namiddag PM. Temperatuur Druk op de °C/°F+ -toets 28, om de temperatuur in Celsius (°C) of Fahrenheit (°F) te tonen. - 36 - Snelle instelling Bij de instelling van numerieke waarden kunt u gebruik maken van een snellere instelling door de toets ingedrukt te houden. Basisinstelling U kunt de volgende instellingen maken: tijdzone, tijd, datum, taalkeus voor de weekdag en locatie. De MODE-toets 15 3 seconden ingedrukt houden in de normale tijdweergave. De tijdzone knippert nu en kan met de -/ -toets 11 of +/12/24 -toets 14 ingestelt worden. Druk op de MODE-toets 15, om de instelling te bevestigen. Op deze manier kunt u ook de uren, de minuten, de seconden, het jaar, de maand, de dag en de taalkeus voor de weekdag (GE=Duits, FR=Frans, ES=Spaans, IT=Italiaans, NE=Nederlands, DA=Deens, RU=Russisch, EN=Engels), het land en de locatie (zie de locatie tabel) instellen. Indien u van locatie wisselt kan het einige tijd duren voor de waarden van de op- en ondergangstijden van de maan en de zon verschijnen. Locatie tabel Duitsland GER Aachen AAC Berlijn BER Dusseldorf DUS Dresden DRE Erfurt ERF Frankfurt FRA Flensburg FLE Freiburg FRE Hannover HAN Bremen BRE Hamburg HAM Rostock ROS Stralsund STR Keulen KOE Kiel KIE Kassel KAS Leipzig LEI München MUE Magdeburg MAG Nürnberg NUE Regensburg REG Stuttgart STU Saarbrücken SAA Schwerin SCH Denemarken DAN Aalborg ALB Aarhus ARH Copenhagen COP Odense ODE Spanje/ ESP Andorra Alicante ALI IBI LAC LEO LPA MAD MAL PDM SAL SEV VAL ZAR FRA BES BIA BOR BRE CHE LYO MAR MON MET NAN NIC ORL PAR PER LIL ROU STR TOU FIN HEL Glasgow Londen Manchester Plymouth Hongarije Budapest Kroatië Zagreb Italië Ancona Bari Bologna Cagliari Catania Florence Foggia Genua Lecce Messina Milaan Napels Palermo Parma Perugia Rome Turijn Trieste Venetië Verona Ventimiglia Ierland Dublin Luxemburg Andorra GB Noorwegen NOR Salzburg SAL ABD BEL BIR BRI EDI Bergen Oslo Stavanger Nederland Amsterdam VIE BEL ANT BRU BRL Badajoz Bacelona Bilbao Cádiz Còrdoba Ibiza La Coruña León Las Palmas Madrid Málaga Palma de Mallorca Salamanca Sevilla Valencia Zaragossa Frankrijk Besançon Biarritz Bordeaux Brest Cherbourg Lyon Marseille Monaco Metz Nantes Nizza Orléans Parijs Perpignan Lille Rouen Straatsburg Toulouse Finland Helsinki GrootAND Brittannië BAD Aberdeen BAR Belfast BIL Birmingham CAD Bristol COR Edinburgh GLA LON MAN PLY HUN BUD CRO ZAG ITA ANC BAI BOL CAG CAT FIR FOG GEN LEC MES MIL NAP PAL PAR PER ROM TOR TRI VEN VER VTG IRL DUB LUX BER OSL STA NET AMS Eindhoven Enschede Groningen Den Haag Rotterdam Portugal Èvora Coimbra Faro Leiria Lissabon Porto Polen Danzig Krakau Posen Stettin Warschau Rusland St. Petersburg Zweden Göteborg Stockholm Slowakije Bratislava Slovenië Ljubljana Servië Belgrado Oostenrijk Graz Innsbruck Linz Wenen België Antwerpen Brugge Brussel EIN ENS GRO DHA ROT POR EVO COI FAR LEI LIS POR POL GDA KRA POZ SZC WAR RUS PET SWE GOT STO SLK BRA SLO LJU SRB BER AUS GRA INN LIN Charleroi CHA Luik LIE Zwitserland/SWI Liechtenstein Basel BAS Bern BER Chur CHU Genève GEN Locarno LOC Luzern LUC St. Moritz MOR St. Gallen GAL Sitten SIO Vaduz VAD Zurich ZUE Tsjechië CZR Praag Griekenland Athene Cyprus Nikosia Roemenië Boekarest Bulgarije Sofia PRA GR AT CY NI RO BU BG SO Op- en ondergangstijden van de maan en de zon Nadat u het land en de plaats ingegeven heeft, berekend uw weerstation ongeveer de op- en ondergangstijden van de zon en de maan. Aanwijzing: De berekende tijden zijn richtwaarden Afwijkingen kunnen voorkomen door bijvoorbeeld de plaatselijke bodemgesteldheid en de heersende weersomstandigheden in het gebied. Na het indrukken van de SUN/MOON-toets 31, verschijnen tijdelijk de geschatte uren zonneschijn voor de dag. Wanneer u de op- en ondergangstijden van een andere locatie of een andere datum wilt bekijken, drukt u 3 seconden lang op de SUN/MOON-toets 31. Het land knippert nu en kan met de-/ -toets 11 of 12/24 + -toets 14 worden ingestelt. Bevestig uw instelling door op de SUN/MOON-toets 31 te drukken. Op dezelfde manier kunt u ook de stad, het jaar, de maand en de dag instellen. De instellingen kunt u bevestigen door op de SUN/MOON-toets 31 te drukken. - 37 - Maanfase Uw weerstation is uitgerust met een maanfasen weergave. De 8 maanfasen zijn: Nieuwe maan Volle maan Jonge maan Afnemende maan Eerste kwartier Laatste kwartier Wassende maan Asgrauwe maan Wekalarm Het weerstation beschikt over 2 afzonderlijk instelbare wektijden. Druk op de MODE-toets 15 om te kiezen tussen het Alarm 1 of Alarm 2. Het desbetreffende klok symbool verschijnt nu. De MODE-toets 15 ingedrukt houden zodat u de wektijd kunt instellen. Op het display knipperen nu de uren. Deze kunt u instellen door op de -/ -toets 11 of +/12/24 -toets 14 te drukken. Instelling bevestigen door op de MODE toets 15 te drukken. Op dezelfde manier kunt u ook de minuten instellen. Druk tijdens de weergave van het wekalarm de ALARM/ON/OFF -toets 10 Om het alarm te activeren (on) of om het alarm te deactiveren (oF). Is het alarm 1 geactiveerd, verschijnt . Is het alarm 2 geactiveerd, verschijnt . Indien u 5 seconden geen toets aanraakt, keert het weerstation automatisch terug naar de normale weergave. Sluimerfunctie (SNOOZE) Als het alarm afgaat drukt u op de SNOOZE/LIGHT-toets 12, om het alarm tijdelijk te deactiveren. In het display knippert nu het klok-symbool. Na 5 minuten gaat het alarm opnieuw af. Het alarm kunt u uitzetten door op een willekeurige toets, behalve toets 12 te drukken. Weervoorspelling Aanwijzing: het weerstation begint de voorspelling ongeveer 6 seconden na het ingeven van het actuele weer. De weersymbolen geven de weervoorspelling voor de komende uren aan en niet het actuele weer. Mocht de weersvoorspelling niet juist zijn, kunt u de vertoning aanpassen, indien u de HISTORY/WEATHER-toets 27 voor 3 seconden ingedrukt houdt. Het weersymbool knippert nu. Met de °C/°F + -toets 28 of de MAX/MIN-toets 29 kunt u het actuele weer instellen. Om dit te bevestigen drukt u op de HISTORY/WEATHER-toets 27. Aanwijzing: Bij sneeuwval stelt u regen of stortbui in. Na bevestiging met de toets 27 HISTORY/WEATHER verschijnt bij buitentemperaturen onder 0°C het sneeuwvalsymbool. Zonnig Hevige regen Licht bewolkt Regen Bewolkt Zware sneeuwval Sneeuwval Barometer Uw weerstation kan de luchtdruk ontwikkeling 25 aangeven. Stijgende luchtdruk Luchtdruk blijft hetzelfde Dalende luchtdruk U kunt tussen de absolute en de relative luchtdruk kiezen, indien u op de Relatieve/Absolute-toets 30 drukt. In het display verschijnt nu Rel. of Abs. Aanwijzing: De absolute luchtdruk wordt gemeten door het weerstation. De relatieve luchtdruk kunt u bij uw lokale weerdienst opvragen en ingeven in uw weerstation. U kunt de relative luchtdruk veranderen, door de Relatieve/Absolute-toets 30, 3 seconden ingedrukt te houden. De luchtdrukwaarde knippert nu en kan met de °C/°F + -toets 28 of MAX/MIN- -toets 29 ingestelt worden. Druk op de Relatieve/Absolute-toets 30 om dit te bevestigen. - 38 - U kunt kiezen uit de weergaves hectopascal (hPa) of Inches of mercury (inHg) door de °C/°F+ - toets 28 ca. 3 seconden ingedrukt te houden. Luchtdruk in de laatste 12 uur Druk op HISTORY/WEATHER-toets 27, om de luchtdruk waardes van de laatste 12 uur te lezen. 0 – HR = Luchtdruk momenteel - 1 HR = Luchtdruk een uur geleden -2 HR = Luchtdruk, twee uren geleden etc. Buitensensor /Kanaal instelling Met uw weerstation kunt u tegelijk gebruik maken van drie buitensensors. Open het batterijvakje van uw buitensensor. Kies het juiste kanaal (1-3) met de kanaal keuze schakelaar 39. De CHANNEL-toets 26, 3 seconden ingedrukt houden, tot u een pieptoon hoort, het weerstation ontvangt nu het signaal 43. Sluit het deksel. Met de °C/°F+ - toets 41 kunt u tussen °C-Celsius en °F-Fahrenheit kiezen. Opmerking: De buitensensor moet in een straal van maximaal 100 meter zonder hindernissen van het weerstation geplaatst worden. Indien u meerdere buitensensors gebruikt, drukt u op de CHANNEL-toets 26 in de normale tijdweergave, om tussen de ontvangstkanalen te wisselen. Het rotatie symbool zgeeft aan dat in het display 22, tussen de verschillende ontvangstkanalen gewisseld wordt. Er verschijnen alleen buitensensor die verbinding hebben. Door de CHANNEL-toets 26 ingedrukt te houden, kunt u de kanalen verwijderen die niet gebruikt worden. De ontvangst van een nieuwe buitensensor vindt automatisch. Buitentemperatuur ontwikkeling De temperatuur trend 21 verschijnt nadat de buitensensor de gegevens succesvol ontvangen heeft. Stijgende buitentemperatuur Buitentemperatuur blijft hetzelfde Dalende buitentemperatuur Luchtvochtigheid De actuele luchtvochtigheid wordt weergegeven in het display 5. De comfortabele weergave 4 geeft de luchtvochtigheid in 3 categorien aan: < 40 % DROOG 40 – 60 % COMFORTABEL < 20 °C > 60 % VOCHTIG / 20 – 26°C > 26 °C / Maximale- und minimale waarden Na het plaatsen van de batterijen worden de maximale en minimale temperaturen opgeslagen. Druk kort op de Max/Min- -toets 29 om de maximale MAX, minimale MIN en actuele binnentemperatuur 3, buitentemperatuur 24 en de luchtvochtigheid 5 in het display te kunnen lezen. Houd de Max/Min-toets 29, 3 seconden ingedrukt om alle maximale en minimale gegevens te wissen. Er klinkt een pieptoon, de gegevens worden verwijderd en vanaf dat moment opnieuw opgeslagen. Batterijwissel Als de batterijen te zwak worden, om het weerstation, de buitensensor en de gegevensoverdracht goed te laten functioneren, verschijnt het batterijsymbool 23 in het display. De batterijen moeten zo snel mogelijk in alle apparaten vervangen worden. Het weerstation moet nu opnieuw gestart worden. Herstart (RESET) Druk op de RESET-toets 33 om het weerstation te her-starten. Schoonmaken Reinig het weerstation en de buitensensor alleen met een droge, pluisvrije doek, zoals bijvoorbeeld bij het reinigen van brillenglazen. - 39 - Vereenvoudigde EU-Conformiteitsverklaring Hierbij verklaar ik, digi-tech gmbh, dat het type radioweerstation 4-LD4868 conform is met Richtlijn R&TTE 1999/5/EC en RED 2014/53/EU. De volledige tekst van de EU-conformiteitsverklaring kan worden geraadpleegd op het volgende internetadres: http://www.digi-tech-gmbh.com/ce/289081_WS.pdf Het weerstation bij het afval doen Dit weerstation kan niet met het normale huisvuil worden weggegooid. Breng het weerstation naar een erkend afvalverwerkingsbedrijf of de gemeentereiniging. Neem de op dat moment geldende voorschriften in acht. Neem in geval van twijfel contact op met uw afvalverwijderingsbedrijf. Afvalverwijdering van de batterijen Deponeer de batterijen in de extra hiervoor opgestelde boxen e.d. Batterijen mogen niet in het gewone huisvuil. De afvoer van batterijen mag alleen via een erkend vuilverwerkingsbedrijf of milieu instelling worden doorgevoerd. Let ook op geldende voorschriften. In geval van twijfel contacteert u a.u.b. het betreffende bedrijf. Garantie door digi-tech gmbh U krijgt op dit weerstation 3 jaar garantie vanaf de datum van aankoop. In het geval dat dit weerstation gebreken vertoont, kunt u tegenover de verkoper van het product aanspraak maken op uw wettelijke rechten. Deze wettelijke rechten worden niet beïnvloed door onze hieronder weergegeven garantie. Garantievoorwaarden De garantieperiode begint op de datum van aankoop. Bewaar uw originele aankoopbon. Deze is nodig als bewijs van aankoop. Treedt binnen drie jaar na de datum van aankoop van dit weerstation een materiaal- of fabrikagefout op, dan wordt het weerstation door ons – naar eigen goeddunken - gratis gerepareerd of vervangen. Deze garantie vereist dat binnen de periode van drie jaar het defecte weerstation en het bewijs van aankoop (kassabon) worden overlegd en er schriftelijk kort wordt aangegeven waaruit het gebrek bestaat en wanneer het is opgetreden. Als het defect door onze garantie wordt gedekt, krijgt u een gerepareerde of een nieuw weerstation terug. Met de reparatie of vervanging van het product begint geen nieuwe garantieperiode. Garantieperiode en wettelijk geregelde aansprakelijkheid bij mangel De garantieperiode wordt door de garantieverlening niet verlengd. Dit geldt ook voor onderdelen die zijn gerepareerd of vervangen. Eventuele beschadigingen en/of mangel die al gelijk na aankoop worden vastgesteld dienen meteen na het uitpakken meegedeeld te worden. Na afloop van de garantieperiode vallen alle reparatiekosten onder de betalingsplicht! Garantiedekking Het weerstation is zorgvuldig geproduceerd onder strikte kwaliteitsrichtlijnen en nauwkeurig gecontroleerd voorafgaande aan aflevering. De garantie geldt voor materiaal- en fabricagefouten. Deze garantie dekt geen productonderdelen die zijn blootgesteld aan normale slijtage en dus kunnen worden beschouwd als slijtende onderdelen of voor schade aan kwetsbare onderdelen zoals schakelaars, batterijen of onderdelen van glas. Deze garantie vervalt als het weerstation beschadigd is of niet goed gebruikt of onderhouden. Om een goed gebruik van het weerstation te garanderen, moeten alle in de handleiding aangegeven instructies strikt worden opgevolgd. Gebruiksdoeleinden en handelingen die worden afgeraden in de handleiding of waarvoor wordt gewaarschuwd, moeten absoluut worden vermeden. Het weerstation is uitsluitend bestemd voor privé-gebruik en niet voor commerciële doeleinden. Bij misbruik en oneigenlijk gebruik, het gebruik van geweld of ingrepen die niet zijn uitgevoerd door onze bevoegde servicevestiging, vervalt de garantie. Afhandeling in geval van garantie Om uw verzoek snel te kunnen behandelen, volgt u a.u.b. onderstaande aanwijzingen: • Houdt voor alle aanvragen de kassabon en het artikelnummer (289081) als bewijs van aankoop bereid. • Het artikelnummer vindt u op het typeplaatje, als gravering, op het titelblad van de handleiding (links beneden) of als sticker op de achter- of onderkant. • Bij niet functioneren en/of andere fouten, neemt u eerst contact op met de navolgende serviceafdeling; telefonisch of per e-mail. Op www.lidl-service.com kunt u dit (en andere) handboek, productvideos en software downloaden. - 40 - Bestelservice U kunt nog extra buitensensoren bestellen per fax: +49(0)6198-5770-99 of online: www.inter-quartz.de. De prijs voor een sensor bedraagt 5,- € excl. BTW en verzendkosten. Klantenservice Naam: Inter-Quartz GmbH Str.: Valterweg 27A Stad: DE-65817 Eppstein Land: DUITSLAND E-Mail: [email protected] Telefoon: +49 (0)6198 571825 00800 5515 6616 00800 5515 6616 00800 5515 6616 00800 5515 6616 00800 5515 6616 0800 563862 800 142 315 00800 5515 6616 00800 5515 6616 00800 5515 6616 00800 5515 6616 IAN 289081 Art.-Nr.: 4-LD4868 Leverancier NB: het onderstaande adres is géén serviceadres, Neem eerst contact op met de bovengenoemde klantenservice! Naam: digi-tech gmbh Str.: Valterweg 27A Stad: DE-65817 Eppstein Land: DUITSLAND - 41 - Návod k obsluze a bezpečnostní upozornění Obsah Obsah ...................................................................................................................................................................................... - 42 Úvod ......................................................................................................................................................................................... - 43 Určení užívání.......................................................................................................................................................................... - 43 Obsah balení........................................................................................................................................................................... - 43 Technické údaje ...................................................................................................................................................................... - 43 Meteostanice ................................................................................................................................................................... - 43 Venkovní čidlo ................................................................................................................................................................. - 43 Bezpečností upozornění pro uživatele ............................................................................................................................. - 43 Bezpečností upozornění pro baterie ................................................................................................................................ - 43 Meteostanici a venkovní čidlo bezpečně pověste nebo umístěte...................................................................................... - 44 Displej a ovládací panely ...................................................................................................................................................... - 44 Venkovní čidlo ......................................................................................................................................................................... - 45 Upevnění venkovního čidla.................................................................................................................................................... - 46 Uvedení do provozu ............................................................................................................................................................... - 46 Upravení časové zóny............................................................................................................................................................ - 46 Rušení příjmu signálu .............................................................................................................................................................. - 46 Nový start příjmu rádiového signálu..................................................................................................................................... - 46 Osvětlení .................................................................................................................................................................................. - 46 12/24 hodinový formát ........................................................................................................................................................ - 46 Teplota ..................................................................................................................................................................................... - 46 Rychlé nastavování ................................................................................................................................................................. - 46 Základní nastavení .................................................................................................................................................................. - 47 Přehled stanovišť...................................................................................................................................................................... - 47 Časy východu a západu Měsíce a Slunce .......................................................................................................................... - 47 Měsíční fáze ............................................................................................................................................................................ - 48 Budík......................................................................................................................................................................................... - 48 Funkce opakovaného buzení (SNOOZE) ........................................................................................................................... - 48 Předpověď počasí ................................................................................................................................................................... - 48 Barometr .................................................................................................................................................................................. - 48 Tlak vzduchu uplynulých 12 hodin ....................................................................................................................................... - 49 Venkovní čidlo/nastavení kanálu ......................................................................................................................................... - 49 Vývoj venkovní teploty............................................................................................................................................................ - 49 Vlhkost v interiéru .................................................................................................................................................................... - 49 Maximální a minimální hodnoty ............................................................................................................................................ - 49 Varovný ukazatel stavu baterie ............................................................................................................................................. - 49 Uvedení do původního stavu (RESET) .................................................................................................................................. - 49 Pokyny pro čištění ................................................................................................................................................................... - 49 Zjednodušené EU prohlášení o shodě.................................................................................................................................. - 49 Likvidace meteostanice........................................................................................................................................................... - 50 Likvidace baterií ...................................................................................................................................................................... - 50 Záruka firmy digi-tech gmbh.................................................................................................................................................. - 50 Záruční podmínky ................................................................................................................................................................... - 50 Záruční lhůta a zákonný nárok při nedostatcích ................................................................................................................. - 50 Rozsah záruky ......................................................................................................................................................................... - 50 Postup v případě uplatnění záruky........................................................................................................................................ - 50 Objednávková služba ............................................................................................................................................................ - 51 Servis ........................................................................................................................................................................................ - 51 Dodavatel ................................................................................................................................................................................ - 51 - - 42 - BEZDRÁTOVÁ METEOSTANICE Úvod Gratulujeme Vám ke koupi Vaší nové meteostanice. Rozhodli jste se pro kvalitní přístroj. Tento návod k obsluze je součástí této meteostanice. Obsahuje důležitá upozornění o bezpečnosti, provozu a likvidaci. Před užíváním meteostanice se seznamte se všemi upozorněními k obsluze a bezpečnosti. Meteostanici užívejte pouze podle popisu a určení. Při přenechání meteostanice třetí osobě předejte dál i všechny doklady. Obal a návod k obsluze, prosím, uschovejte pro případ další pot. Určení užívání Meteostanice je určena k použití jako ukazatel času a k popsaným doplňkovým funkcím. Jiné užití nebo úprava meteostanice není v souladu s určením. Výrobce neručí za škody vzniklé nevhodným užíváním nebo špatnou obsluhou. Meteostanice není určena pro průmyslové užití. Obsah balení Upozornění: Prosím, po zakoupení zkontrolujte obsah balení. Přesvědčte se, že jsou zabaleny všechny díly a že jsou funkční. • Meteostanice • 3 x baterie 1,5 V AA R6/LR6 • Venkovní čidlo • Držadlo pro venkovní čidlo • 2 x baterie 1,5 V AAA R03/LR03 • Návod k obsluze Technické údaje Meteostanice • Provozní teplota: 0 – 50 °C • Ukazatel teploty: +/- 1 °C • Baterie: 3 x 1,5 V AA R6 / LR6 Venkovní čidlo • Provozní teplota: -20 – 50 °C • Ukazatel teploty: +/- 1 °C • Dosah: max. 100 m • Frekvence: 433 MHZ • Vysílací výkon: 0,024 W • Stupeň ochrany krytem (venkovní senzor): IPX4 (chráněno proti stříkající vodě podle normy IEC 60529) • Baterie: 2 x 1,5 V AAA R03/LR03 - Označení stejnosměrného proudu Bezpečností upozornění pro uživatele VAROVÁNÍ! NEBEZPEČÍ ZRANĚNÍ! Toto zařízení může být používáno i osobami se sníženými fyzickými, smyslovými nebo duševními schopnostmi nebo bez patřičných zkušeností a znalostí (včetně dětí starších než 8 let), pokud jsou pod dohledem nebo pokud byly poučeny o bezpečném používání přístroje a jsou schopny pochopit z toho plynoucí rizika. Nedovolte dětem hrát si se spotřebičem. Čištění a uživatelskou údržbu nesmí provádět děti bez dozoru. Obaly uchovávejte mimo dosah dětí. Hrozí nebezpečí udušení. Bezpečností upozornění pro baterie VAROVÁNÍ! ZDRAVOTNÍ NEBEZPEČÍ! NEBEZPEČÍ VÝBUCHU! Uchovávejte baterie mimo dosah dětí. Pokud dojde ke spolknutí baterie, je třeba ihned vyhledat lékařskou pomoc. Baterie / akumulátory musí být vždy vloženy podle správné polarity. V případě potřeby předem vyčistěte kontakty baterie i přístroje. Nepokoušejte se o dobíjení baterií, jejich zkratování nebo otvírání. Nikdy nevhazujte baterie do ohně, neboť hrozí nebezpečí výbuchu. Nesprávné použítí baterie může způsobit výbuch a vytečení baterie. V případě vytečení baterie zabraňte kontaktu s kůží, očima a sliznicemi. Používejte ochranné rukavice. V případě kontaktu s kyselinou baterie opláchněte postižené místo čistou vodou a okamžitě vyhledejte lékaře. Okamžitě vyjměte vybité baterie z přístroje, je zde zvýšené riziko vytečení. - 43 - Meteostanici a venkovní čidlo bezpečně pověste nebo umístěte Meteostanice ani venkovní čidlo nejsou konstruovány na provoz v místnostech s vysokou vlhkostí vzduchu (např. koupelna). Dbejte na to, aby: • senzor svisle stál nebo visel; • vždy bylo zajištěno dostatečné větrání (neumístěte přístroj do regálu nebo na místa, kde závěsy nebo nábytek zakrývají větrací možnosti a nechte min. 10 cm odstup na všechny strany); • přístroj při provozu nestál na tlustém koberci nebo na posteli a na přístroj nepůsobily žádné přímé tepelné zdroje (např. topení); • na přístroj nedopadaly žádné sluneční paprsky; • na přístroj nekapala nebo nestříkala žádná kapalina; • přístroj nestál nebo nevisel bezprostředně v oblasti působení magnetických polí (např. reproduktory); • do přístroje nevnikla žádná cizí tělesa a prach; • svíčky a jiný otevřený oheň nikdy nebyly v blízkosti přístroje, aby se tak zamezilo rozšíření požáru. Displej a ovládací panely - 44 - Venkovní čidlo 1 Symbol počasí 22 Zvolený kanál 2 Pruh tlaku vzduchu 23 Ukazatel stavu baterie 3 Vnitřní teplota 24 Venkovní teplota 4 Symbol komfortnosti 25 Tendence tlaku vzduchu 5 Vlhkost v interiéru 26 Tlačítko CHANNEL 6 Měsíční fáze 27 Tlačítko HISTORY/WEATHER 7 Východ / západ Měsíce 28 Tlačítko °C/°F + 8 Stanoviště 29 Tlačítko MAX/MIN - 9 Východ / západ Slunce 30 Tlačítko tlaku vzduchu RELATIVE/ABSOLUTE 10 Tlačítko ALARM/ON/OFF 31 Tlačítko SUN/MOON 11 -/ 32 Příprava na zavěšení (meteostanice) 12 Tlačítko SNOOZE/LIGHT 33 Tlačítko RESET 13 Symbol buzení 34 Prostor na baterie (meteostanice) 14 Tlačítko +/12/24 35 Stojan k vyklopení (meteostanice) 15 Tlačítko MODE 36 Kontrolní LED (venkovní čidlo) 16 Datum (měsíc, den, den v týdnu) 37 Vnější teplota/kanál (venkovní čidlo) 17 Ukazatel času 38 Příprava na zavěšení (venkovní čidlo) 18 Ukazatel rádiového signálu 39 Přepínač volby kanálu (venkovní čidlo) 19 Tlak vzduchu posledních hodin 40 Prostor na baterie (venkovní čidlo) 20 Relativní/absolutní tlak vzduchu 41 Tlačítko °C/°F (venkovní čidlo) 21 Tendence venkovní teploty 42 Držadlo pro senzor (venkovní čidlo) 43 Signál venkovního čidla Tlačítko - - 45 - Upevnění venkovního čidla Přiložené držadlo pro senzor 42 umožňuje různé způsoby upevnění. Podle potřeby může být venkovní čidlo zavěšeno nebo postaveno. Zobrazení A znázorňuje 3 prohlubně, které má senzor na obou stranách. Senzor se tak jednoduše upevní do držadla. Zobrazení B znázorňuje pohled ze strany, jak se držadlo upevní za senzorem. Zobrazení C znázorňuje čelní podobu senzoru s držadlem jako zavěšení shora. Zobrazení D znázorňuje čelní podobu senzoru s držadlem jako stojanem zdola. Zobrazení E znázorňuje ovládací pole a prostor na baterie na zadní straně senzoru. Upozornění: Venkovní čidlo postavte nebo pověste vždy rovně. Uvedení do provozu Vložte baterie nejdříve do venkovního čidla 40 a teprve poté do meteostanice 34. Odstraňte z meteostanice a venkovního čidla ochrannou fólii. Otevřete na venkovním čidle 40 prostor na baterie a vložte přibalené baterie podle vyznačené polarity. Kontrolní světlo 36 se dočasně rozsvítí a zobrazí se teplota. Prostor na baterie uzavřete. Otevřete na meteostanici prostor na baterie 34 a vložte přibalené baterie podle vyznačené polarity. Prostor na baterie uzavřete. Symbol počasí 1 bliká a meteostanice přijímá signál venkovního čidla. Tento proces může trvat několik minut. Při úspěšném příjmu signálu se zobrazí zvolený kanál 22 a aktuální venkovní teplota 24. Po úspěšném příjmu signálu venkovního čidla začne Vaše meteostanice přijímat rádiový signál stanice DCF 77 a na displeji vedle času bliká ukazatel příjmu rádiového signálu 18. Tento proces může trvat 3-10 minut. Během příjmu signálu nelze aktivovat žádná tlačítka kromě SNOOZE / LIGHT 12. Pokud by příjem rádiového signálu nebyl po 10 minutách úspěšný, nastavte čas ručně. Meteostanice bude pokus o příjem signálu opakovat ve 04:00 a v 05:00 hodin a čas po úspěšném přijetí signálu automaticky upraví. Upozornění: V průběhu přijímacího procesu s meteostanicí a venkovním čidlem, prosím, nehýbejte. Po úspěšném přijetí signálu se ukazatel rádiového signálu 18 zobrazí trvale a automaticky se nastaví správný čas, datum, den v týdnu, východ a západ Slunce i Měsíce stejně jako i měsíční fáze. Během letního času se vedle ukazatele rádiového signálu 18 zobrazí DST. Upravení časové zóny Pokud se nacházíte v zemi, kde je aktuální čas i přes signál DCF odchylný, upravte časovou zónu pro užívání. Vašeho meteostanice v jiné časové zóně než je standardní nastavení (UTC + 1 = středoevropský čas). Časovou zónu upravte nastavením hodinového rozdílu (např. -01) k požadované časové zóně. Následně proveďte nový start příjmu rádiového signálu. Stiskněte a držte v běžném zobrazení času 3 vteřiny tlačítko MODE 15, časová zóna bliká a můžete ji nastavit tlačítkem -/ 11 nebo tlačítkem +/12/24 (14). Nastavení potvrďte tlačítkem MODE 15. Váš meteostanice nadále přijímá rádiem řízený signál DCF77, ukazuje ale pozměněný čas (např. o 1 hodinu méně). Rušení příjmu signálu Rádiový signál stanice DCF77 je vysílán z Frankfurtu nad Mohanem v Německu a může být přijímán v okruhu zhruba 1500 km. Jsou ovšem rušivé zdroje, které mohou příjem podstatně omezovat. Pokud Vaše meteostanice rádiový signál nepřijímá správně, postavte nebo pověste ji na jiné místo a berte ohled na to, že v blízkosti počítače, telefonu, rádia a televize mohou vznikat elektromagnetická záření, která mohou rušit příjem signálu stanice DCF77. Dalšími rušivými zdroji pro příjem signálu mohou být silné izolace budov (kovové stavební materiály), vysoké kopce nebo atmosférická rušení. Případně vyměňte baterie. Nový start příjmu rádiového signálu Nový start příjmu rádiového signálu můžete ručně vyvolat nebo zastavit držením tlačítka -/ 11 po dobu 3 vteřin. Osvětlení Stiskněte tlačítko SNOOZE/LIGHT 12, abyste dočasně aktivovali osvětlení. 12/24 hodinový formát Pro volbu 12- nebo 24-hodinového formátu stiskněte tlačítko +/12/24 14. Při 12-hodinovém formátu se dopoledne na displeji zobrazí AM a odpoledne PM. Teplota Pro výběr měření teploty ve stupních Celsia (°C) nebo Fahrenheita (°F) zmáčkněte tlačítko °C/°F+ 28. Rychlé nastavování Při nastavení číselných hodnot můžete dlouhým stiskem a držením tlačítek využít rychlého nastavování. - 46 - Základní nastavení Můžete nastavit následující údaje: časová zóna, čas, datum, jazyk ukazatele dne v týdnu a stanoviště. V normálním ukazateli času stiskněte a držte 3 vteřiny tlačítko MODE 15, časová zóna bliká a můžete ji nastavit tlačítkem -/ 11 nebo +/12/24 14. Volbu potvrďte tlačítkem MODE 15. Stejným způsobem nastavte hodiny, minuty, sekundy, rok, měsíc, den, jazyk ukazatele dne v týdnu (GE=německy, FR=francouzsky, ES=španělsky, IT=italsky, NE=holandsky, DA=dánsky, RU=rusky, EN=anglicky), stát a stanoviště(viz Přehled stanovišť). Při změně stanoviště trvá určitý čas, než se časy pro východ a západ Měsíce i Slunce zobrazí. Přehled stanovišť Německo Cáchy Berlín Düsseldorf Drážďany Erfurt Frankfurt Flensburg Freiburg Hannover Brémy Hamburg Roztoky Stralsund Kolín Kiel Kassel Lipsko Mnichov Magdeburg Norimberk Řezno Stuttgart Saarbrücken Schwerin Dánsko Aalborg Aarhus Kodaň Odense Španělsko/ Andorra Alicante Andorra Badajoz Barcelona Bilbao Cádiz Còrdoba GER AAC BER DUS DRE ERF FRA FLE FRE HAN BRE HAM ROS STR KOE KIE KAS LEI MUE MAG NUE REG STU SAA SCH DAN ALB ARH COP ODE Ibiza La Coruña León Las Palmas Madrid Málaga Palma de Mallorca Salamanca Sevilla Valencie Zaragoza Francie Besançon Biarritz Bordeaux Brest Cherbourg Lyon Marseille Monako Mety Nantes Nica Orléans Paříž Perpignan Lille Rouen Štrasburk Toulouse ESP Finsko ALI Helsinki Velká AND Británie BAD Aberdeen BAR Belfast BIL Birmingham CAD Bristol COR Edinburgh IBI LAC LEO LPA MAD MAL PDM SAL SEV VAL ZAR FRA BES BIA BOR BRE CHE LYO MAR MON MET NAN NIC ORL PAR PER LIL ROU STR TOU FIN HEL Glasgow Londýn Manchester Plymouth Maďarsko Budapešť Chorvatsko Záhřeb Itálie Ancona Bari Bologna Cagliari Catania Florencie Foggia Janov Lecce Messina Milán Neapol Palermo Parma Perugia Řím Turín Terst Benátky Verona Ventimiglia Irsko Dublin Lucemburk GLA LON MAN PLY HUN BUD CRO ZAG ITA ANC BAI BOL CAG CAT FIR FOG GEN LEC MES MIL NAP PAL PAR PER ROM TOR TRI VEN VER VTG IRL DUB LUX Eindhoven Enschede Groningen Haag Rotterdam Portugalsko Èvora Coimbra Faro Leiria Lisabon Porto Polsko Gdaňsk Krakov Poznaň Štětín Varšava Rusko Petrohrad Švédsko Göteborg Stockholm Slovensko Bratislava Slovinsko Lublaň Srbsko Bělehrad Rakousko Štýrský Hradec Innsbruck Linec GB Norsko NOR Salzburg SAL ABD BEL BIR BRI EDI Bergen Oslo Stavanger Holandsko Amsterdam BER OSL STA NET AMS VIE BEL ANT BRU BRL Vídeň Belgie Antwerpy Bruggy Brusel EIN ENS GRO DHA ROT POR EVO COI FAR LEI LIS POR POL GDA KRA POZ SZC WAR RUS PET SWE GOT STO SLK BRA SLO LJU SRB BER AUS GRA INN LIN Charleroi Lutych Švýcarsko/ Lichtenštejnsko CHA LIE SWI Basilej Bern Chur Ženeva Locarno Lucern St. Moritz St. Gallen Sion Vaduz Curych BAS BER CHU GEN LOC LUC MOR GAL SIO VAD ZUE Česko CZR Praha Řecko Atény Kypr Nikósie Rumunsko Bukurešť Bulharsko Sofie PRA GR AT CY NI RO BU BG SO Časy východu a západu Měsíce a Slunce Po zadání státu a stanoviště odhadne Vaše meteostanice přibližné časy východu a západu Slunce a Měsíce. Upozornění: Odhadnuté časy jsou pouze orientační. Odchylky mohou vyplynout např. z místního terénu nebo z převládajícího počasí. Po stisknutí tlačítka SUN/MOON 31 se dočasně zobrazí přibližné sluneční hodiny pro příslušný den. Pro zobrazení časů východu a západu jiného stanoviště nebo jiného data stiskněte a držte 3 vteřiny tlačítko SUN/MOON 31. Zkratka státu bliká a můžete ji nastavit tlačítkem -/ 11 nebo 12/24 + 14. Stisknutím tlačítka SUN/MOON 31 Vaši volbu potvrdíte. Stejným způsobem nastavte město, rok, měsíc a den, Vaši volbu potvrďte tlačítkem SUN/MOON 31. - 47 - Měsíční fáze Vaše meteostanice je vybavena ukazatelem měsíčních fází. 8 měsíčních fází: Nov Úplněk Dorůstající srpek Couvající měsíc První čtvrť Poslední čtvrť Dorůstající měsíc Couvající srpek Budík Na meteostanici lze jednotlivě nastavit 2 časy buzení. Pro zvolení budíku 1 nebo budíku 2 stiskněte tlačítko MODE 15. Na displeji se objeví příslušný symbol zvonku. Stiskněte a držte při zobrazeném budíku 1 nebo 2 tlačítko MODE 15, abyste přešli do módu nastavení. Na displeji bliká hodina buzení. Zvolte hodinu zmáčknutím tlačítka -/ 11nebo tlačítka +/12/24 14 a volbu potvrďte tlačítkem MODE 15. Stejným způsobem nastavte minuty. Abyste aktivovali (on) nebo deaktivovali (oF) buzení, stiskněte při zobrazení požadovaného času buzení tlačítko ALARM/ON/OFF 10. Při aktivovaném budíku 1 se na displeji objeví symbol . Při aktivovaném budíku 2 se objeví symbol . Pokud po dobu 5 vteřin nestisknete žádné tlačítko, vrátí se meteostanice automaticky do režimu normálního zobrazení. Funkce opakovaného buzení (SNOOZE) Při zaznění budíku stiskněte tlačítko SNOOZE/LIGHT 12, abyste funkci buzení dočasně deaktivovali, na displeji bliká symbol zvonku. Budík se po 5 minutách opět rozezní. Stisknutím libovolného tlačítka kromě tlačítka 12 pro vypnutí budík. Předpověď počasí Upozornění: Meteostanice začne s předpovědí počasí zhruba 6 hodin po zadání aktuálního počasí. Symboly počasí ukazují tendenci pro další hodiny, nikoliv aktuální počasí. Pokud by předpověď Vaší meteostanice nesouhlasila, můžete stisknutím a držením tlačítka HISTORY/WEATHER 27 po dobu 3 vteřin ukazatele upravit. Symbol počasí bliká. Aktuální počasí nastavte tlačítkem °C/°F + 28 nebo MAX/MIN29. Nastavení potvrďte tlačítkem HISTORY/WEATHER 27. Upozornění: Při sněžení nastavte déšť nebo průtrž mračen. Po potvrzení tlačítkem HISTORY/WEATHER se při venkovní teplotě pod 0°C zobrazí symbol sněžení. jasno zataženo polojasno déšť oblačno silné sněžení sněžení Barometr Vaše meteostanice může zobrazit vývoj tlaku vzduchu 25. Tlak vzduchu stoupá Tlak vzduchu setrvává Tlak vzduchu klesá Stisknutím tlačítka Relative/Absolute 30 můžete měnit mezi absolutním a relativním tlakem vzduchu. Na displeji se objeví Rel. nebo Abs. Upozornění: Meteostanice měří absolutní tlak vzduchu. Relativní tlak vzduchu Vám může sdělit místní povětrnostní služba a můžete jej do meteostanice zadat. Relativní tlak vzduchu můžete změnit stisknutím a držením tlačítka Relative/Absolute 30 po dobu 3 vteřin. Tlak vzduchu bliká a můžete jej nastavit tlačítkem °C/°F + 28 nebo MAX/MIN- 29. Vaši volbu potvrďte tlačítkem Relative/Absolute 30. - 48 - Stisknutím a držením tlačítka 28 °C/°F+ po dobu asi 3 vteřin můžete zvolit mezi zobrazením jednotek v hektopascalech (hPa) nebo v palcích rtuti - inches of mercury (inHg). Tlak vzduchu uplynulých 12 hodin Pro odečtení hodnot tlaku vzduchu za posledních 12 hodin stiskněte tlačítko HISTORY/WEATHER 27. 0 – HR = současný tlak vzduchu - 1 HR = tlak vzduchu o hodinu dříve -2 HR = tlak vzduchu o 2 hodiny dříve, atd. Venkovní čidlo/nastavení kanálu S Vaší meteostanicí můžete zároveň využívat až 3 venkovní čidla. Otevřete na venkovním čidle prostor na baterie a přepínačem volby kanálu 39 nastavte požadovaný kanál (1-3). Stiskněte a držte tlačítko CHANNEL 26 po dobu 3 vteřin, než se rození tón, meteostanice nyní přijímá signál 43. Krytku uzavřete. Tlačítkem 41 můžete volit mezi °C-Celsius a °F-Fahrenheit. Upozornění: Venkovní čidlo musí stát k meteostanici v okruhu maximálně 100 m bez překážek. Pokud užíváte více venkovních čidel: pro přepnutí přijímacích kanálů stiskněte v normálním ukazateli času tlačítko CHANNEL 26. Rotační symbol v displeji 22 ukazuje, že se automaticky mění různé přijímané kanály. Zobrazí se pouze venkovní čidla, která budou v chodu. Pro odstranění neužívaných kanálů stiskněte a držte tlačítko CHANNEL 26. Pokud přidáte další venkovní čidlo, meteostanice ho automaticky rozezná. Vývoj venkovní teploty Při úspěšném příjmu dat od venkovního čidla se zobrazí teplotní trend 21. Venkovní teplota stoupá Venkovní teplota setrvává Venkovní teplota klesá Vlhkost v interiéru Aktuální vlhkost vzduchu se zobrazí na displeji 5. Symbol komfortnosti 4 ukazuje vlhkost vzduchu ve 3 kategoriích: < 40 % SUCHO 40 – 60 % KOMFORTNĚ < 20 °C > 60 % VLHKO / 20 – 26°C > 26 °C / Maximální a minimální hodnoty Od vložení baterií se ukládají do paměti maximální a minimální hodnoty teploty a vlhkosti vzduchu. Pro odečtení maximální MAX, minimální MIN a aktuální vnitřní teploty 3, vnější teploty 24 a vlhkosti vzduchu 5 na displeji stiskněte krátce tlačítko MAX/MIN- 29. Pro vymazání maximálních a minimálních hodnot stiskněte a držte tlačítko MAX/MIN- 29 po dobu 3 vteřin. Rozezní se signál, údaje se vymažou a začnou se od tohoto okamžiku nově ukládat. Varovný ukazatel stavu baterie Když jsou baterie vybity na úroveň, kdy nemohou meteostanici, venkovní čidlo a přenos dat udržet v provozu, objeví se na displeji varovný ukazatel stavu baterie 23. Baterie by pak měly být ve všech přístrojích co nejrychleji vyměněny. Uveďte meteostanici znovu do provozu. Uvedení do původního stavu (RESET) Pro uvedení meteostanice do původního stavu stiskněte RESET 33. Pokyny pro čištění Čistěte meteostanici a venkovní čidlo pouze suchým hladkým hadříkem, který se hodí například na čistění brýlových skel. Zjednodušené EU prohlášení o shodě Tímto digi-tech-gmbh prohlašuje, že typ meteostanice 4-LD4868 je v souladu se směrnicí 1999/5/EG a 2014/53/EU. Úplné znění EU prohlášení o shodě je k dispozici na této internetové adrese: http://www.digi-tech-gmbh.com/ce/289081_WS.pdf - 49 - Likvidace meteostanice Tato meteostanice nesmí být odstraněna s běžným domovním odpadem. Odevzdejte tuto meteostanici sběrně oprávněné k likvidaci nebo komunální sběrně odpadu. Dbejte na dodržování aktuálních platných předpisů. Pokud máte pochybnosti, poraďte se se sběrnou. Likvidace baterií Zlikvidujte, prosím, baterie řádně ve speciálních sběrných schránkách v obchodech. Baterie nepatří do domovního odpadu. Baterie, prosím, odevzdejte sběrně oprávněné k likvidaci nebo komunální sběrně odpadu. Dbejte na dodržování aktuálních platných předpisů. Pokud máte pochybnosti, poraďte se se sběrnou. Záruka firmy digi-tech gmbh Na tento přístroj poskytujeme záruku 3 roky od data zakoupení. V případě závady tohoto výrobku Vám vůči prodejci samozřejmě přísluší zákonná práva. Tato zákonná práva nejsou naší následně zmiňovanou zárukou omezena. Záruční podmínky Záruční lhůta začíná dnem koupě. Prosím, pečlivě uschovejte originální účtenku. Tento doklad je potřebný jako důkaz data zakoupení. Pokud se v průběhu tří let od data zakoupení tohoto výrobku vyskytnou závady materiálu nebo výrobní vady, bude tento výrobek námi zdarma opraven nebo nahrazen – podle naší volby. Uplatnění záruky vyžaduje, aby byl v tomto tříletém období předložen vadný přístroj a doklad o koupi (účtenka) a písemně bylo krátce uvedeno, o jakou závadu se jedná a kdy vznikla. Pokud závada zakláda nárok k uznání záruky, obdržíte od nás opravený nebo nový výrobek. Opravou nebo výměnou výrobku nezačíná běžet nová záruční lhůta. Záruční lhůta a zákonný nárok při nedostatcích Plněním garance se záruční lhůta neprodlouží. Toto platí i pro nahrazené nebo opravené díly. Případné škody a závady existující již při koupi, musí být uplatněny ihned po vybalení. Opravy provedené po skončení záruční lhůty Vám budou naúčtovány. Rozsah záruky Tento přístroj byl pečlivě vyroben podle přísných směrnic kvality a před dodáním důkladně ověřen. Záruka se vztahuje na vady materiálu nebo výrobní vady. Tato záruka se nevztahuje na díly, které jsou vystaveny běžnému opotřebení a mohou proto být považovány za opotřebovávané díly, nebo na poruchy na rozbitných dílech, např. vypínač, baterie nebo díly, které jsou vyrobeny ze skla. Tato záruka propadá, pokud je výrobek poškozen, nebyl řádně užíván nebo o něj bylo špatně pečováno. Pro řádné užívání výrobku se musí přesně dodržovat všechna nařízení v návodu k obsluze. Vyvarujte se užití nebo zacházení, před kterým je zrazováno nebo je před ním varováno v tomto návodu. Tento výrobek je určen pouze pro soukromé a nikoliv průmyslové užívání. Při zneužití nebo neodborném zacházení, užití násilí nebo při zákrocích, které nejsou provedeny naší autorizovanou servisní pobočkou, zaniká záruka. Postup v případě uplatnění záruky Abychom Vám mohli zaručit rychlé zpracování Vaší žádosti, dodržujte, prosím, následující pokyny: • Prosím, připravte si pro všechny dotazy účtenku a číslo výrobku (IAN 289081) jako doklad o koupi. • Číslo výrobku zjistíte na typovém štítku, rytině, na titulní stránce Vašeho návodu (dole vlevo) nebo na nálepce na zadní nebo spodní straně výrobku. • Pokud by se vyskytly funkční chyby nebo jiné závady, kontaktujte nejdříve telefonicky nebo e-mailem níže zmíněnou servisní pobočku. Na www.lidl-service.com si můžete stáhnout tuto i jiné příručky, videa o produktech nebo softwarové programy. - 50 - Objednávková služba Další venkovní senzory můžete objednat faxem na: +49(0)6198-5770-99 nebo online: www.inter-quartz.de. Cena jednoho senzoru je 5,- € bez DPH a poštovného. Servis Název: Inter-Quartz GmbH Ulice: Valterweg 27A Město: DE-65817 Eppstein Země: NĚMECKO E-mail: [email protected] Telefon: +49 6198 571825 00800 5515 6616 00800 5515 6616 00800 5515 6616 00800 5515 6616 00800 5515 6616 0800 563862 800 142 315 00800 5515 6616 00800 5515 6616 00800 5515 6616 00800 5515 6616 IAN 289081 Art.-Nr.: 4-LD4868 Dodavatel Upozorňujeme, že následující adresa není adresa servisního centra. Kontaktuje, prosím, výše zmíněné místo. Název: digi-tech gmbh Ulice: Valterweg 27A Město: DE-65817 Eppstein Země: NĚMECKO - 51 - Indicaciones sobre su utilización y su seguridad Índice Índice........................................................................................................................................................................................ - 52 Introducción ............................................................................................................................................................................. - 53 Uso conforme a su propósito................................................................................................................................................. - 53 Volumen de suministro ............................................................................................................................................................ - 53 Datos técnicos ......................................................................................................................................................................... - 53 Estación meteorológica .................................................................................................................................................. - 53 Sensor exterior ................................................................................................................................................................ - 53 Instrucciones de seguridad para el usuario .................................................................................................................... - 53 Instrucciones de seguridad sobre las pilas...................................................................................................................... - 53 pilas Coloque o cuelgue de forma segura la estación meteorológica y el sensor exterior..................................................... - 54 Pantalla y paneles de mando ................................................................................................................................................ - 54 Sensor exterior ........................................................................................................................................................................ - 55 Colocación del sensor exterior.............................................................................................................................................. - 56 Puesta en funcionamiento ...................................................................................................................................................... - 56 Ajuste de la zona horaria ...................................................................................................................................................... - 56 Interferencias de recepción ................................................................................................................................................... - 56 Reinicio de la recepción de la señal de rediofrecuencia ................................................................................................... - 56 Luz ............................................................................................................................................................................................ - 56 Formato de 12/24-Horas ..................................................................................................................................................... - 56 Temperatura ............................................................................................................................................................................ - 56 Ajuste rápido ........................................................................................................................................................................... - 57 Ajuste básico ........................................................................................................................................................................... - 57 Tabla de ubicación ................................................................................................................................................................. - 57 Salida y Puesta de la luna y el sol......................................................................................................................................... - 57 Fases lunares ........................................................................................................................................................................... - 58 Alarma ..................................................................................................................................................................................... - 58 Función de dormitar (SNOOZE) ........................................................................................................................................... - 58 Pronóstico meteorológico ...................................................................................................................................................... - 58 Barómetro ................................................................................................................................................................................ - 58 Presión atmosférica de las 12 horas anteriores................................................................................................................... - 59 Sensor exterior/Ajuste del canal .......................................................................................................................................... - 59 Tendencia de la Temperatura exterior ................................................................................................................................. - 59 Humedad Interior .................................................................................................................................................................... - 59 Valores máximos y mínimos ................................................................................................................................................... - 59 Indicador del estado de la pila ............................................................................................................................................. - 59 Reinicialización (RESET) ......................................................................................................................................................... - 60 Indicación para la limpieza ................................................................................................................................................... - 60 Declaración UE de Conformidad Simplificada ................................................................................................................... - 60 Eliminación y reciclaje del aparato electrónico .................................................................................................................. - 60 Eliminación de las pilas .......................................................................................................................................................... - 60 Garantía de digi-tech gmbh .................................................................................................................................................. - 60 Condiciones de la garantía ................................................................................................................................................... - 60 Duración de la garantía y derecho de reclamación........................................................................................................... - 60 Ámbito de la garantía ............................................................................................................................................................ - 60 Procedimiento en caso de garantía ...................................................................................................................................... - 60 Servicio-Pedidos ..................................................................................................................................................................... - 61 Servicio técnico ....................................................................................................................................................................... - 61 Proveedor ................................................................................................................................................................................ - 61 - - 52 - ESTACIÓN METEOROLÓGICA INALÁMBRICA Introducción Felicidades por la compra de su nuevo estación meteorológica radiocontrolada, un aparato de la mejor calidad. El manual de instrucciones forma parte del reloj y contiene información relevante sobre aspectos de seguridad, uso y eliminación. Familiarícese con las instrucciones de seguridad y manejo antes de utilizar el reloj y asegúrese de usarlo siempre como se describe y para los fines indicados. En caso de ceder la estación meteorológica a terceros, entrégueles también esta documentación. Por favor conserve el embalaje y el manual de instrucciones para futuras consultas. Uso conforme a su propósito El aparato está diseñado para indicar la fecha y la hora, así como para las funciones adicionales que aquí se detallan. La utilización para cualquier otro propósito o la realización de modificaciones en el aparato no se consideran adecuadas a sus propósitos. El fabricante no se hace responsable de los daños causados por una utilización no adecuada a sus propósitos o por una utilización errónea. Este aparato no es apto para un uso de carácter comercial o industrial. Volumen de suministro Indicación: Por favor controle luego de su compra el volumen de suministro. Asegúrese, que todas las piezas hayan sido suministradas y no estén defectuosas. • Estación meteorológica • 3 x pilas 1,5 V AA R6/LR6 • Sensor exterior • Soporte para el sensor exterior • 2 x pilas 1,5 V AAA R03/LR03 • Manual de instrucciones Datos técnicos Estación meteorológica • Temperatura de funcionamiento 0 - 50 °C • Visualización de temperatura : +/- 1 °C • Pilas: 3 x 1,5 V AA R6 / LR6 Sensor exterior • Temperatura de funcionamiento -20 – 50 °C • Visualización de temperatura: +/- 1 °C • Alcance: max. 100 m • Frecuencia de transmisión: 433 MHZ • Potencia de transmisión: 0,024 W • Tipo de protección mediante la carcasa (sensor exterior): IPX4 (Protección contra salpicaduras de agua según norma IEC 60529) • Pilas: 2 x 1,5 V AAA R03/LR03 - Señal distintiva de corriente continua Instrucciones de seguridad para el usuario ADVERTENCIA! PELIGRO DE LESIONES! Este aparato puede ser usado por personas (incluídos niños a partir de los 8 años) con capacidades físicas, sensoriales o mentales disminuídas o con falta de experiencia y conocimentos siempre que sean supervisionadas o hayan sido instruídas sobre el uso seguro del aparato y hayan comprendido los peligros resultantes. Los niños no deben jugar con el aparato. Los niños no deben limpiar o mantener el aparato sin supervisión. Mantenga las películas del embalaje fuera del alcance de los niños. Hay riesgo de asfixia. Instrucciones de seguridad sobre las pilas ADVERTENCIA! PELIGRO PARA LA SALUD! PELIGRO DE EXPLOSIÓN! Mantenga las pilas fuera del alcance de los niños pequeños. En caso de haber sido tragada una pila, deverá ser prestada inmediatamente ayuda médica. Las pilas/baterías han de colocarse siempre teniendo en atención la polaridad correcta. Siendo necesario, limpie primero los contactos de las pilas y del aparato. No intente cargar, provocar cortocircuito o abrir las pilas. Nunca tire las pilas al fuego, porque podrían explotar. El uso inadequado de las pilas puede provocar explosión o derrame. Si la pila ha derramado, evite el contacto con la piel, los ojos o las mucosas. Use guantes. En caso de contacto con el ácido de la pila lave las partes afectadas con bastante água limpia y vaya a ver inmediatamente a un médico. Retire inmediatamente las pilas gastadas del aparato, hay peligro elevado de derrame. - 53 - Coloque o cuelgue de forma segura la estación meteorológica y el sensor exterior La estación meteorológica y el sensor exterior no son adecuados para ser utilizados en habitaciones con alta humedad del aire (por ej.: baños). Asegúrese de que: • el sensor esté en posición vertical o colgado; • siempre se procure de una ventilación aducuada (no coloque su aparato en estantes o lugares, donde cortinas o muebles bloqueen las ranuras de ventilación y deje por lo menos 10 cm de distancia hacia todos los lados); • mientras utilice su aparato no lo coloque sobre alfombras gruesas o sobre la cama y tampoco directamente cerca de fuentes de calor que pueden dañarlo (por ej. calefacción); • no le dé la luz del sol directamente; • evite el contacto con salpicaduras y goteo de agua; • el aparato no sea colocado o colgado inmediatamente cerca de campos electromagnéticos (por ej. altavoz); • penetren polvo o cuerpos extraños; • mantenga alejadas de su aparato velas y otras llamas abiertas en todo momento, para evitar la propagación del fuego. Pantalla y paneles de mando - 54 - Sensor exterior 1 Símbolo meteorológico 22 Canal seleccionado 2 Barras de presión de aire 23 Indicador del estado de la pila 3 Temperautra interior 24 Temperatura exterior 4 Símbolo del confort 25 Tendencia de la presión atmosférica 5 Humedad interna 26 Tecla CHANNEL 6 Fase lunar 27 Tecla HISTORY/WEATHER 7 Salida y puesta de la luna 28 Tecla °C/°F + 8 Ubicación 29 Tecla MAX/MIN- 9 Salida y puesta del sol 30 Tecla Presión RELATIVE/ABSOLUTE 10 Tecla ALARM/ON/OFF 31 Tecla SUN/MOON (sol/luna) 11 Tecla -/ 32 Dispositivo para colgar (estación meteorológica) 12 Tecla SNOOZE/LIGHT 33 Tecla RESET 13 Símbolo de alarma 34 Compartimiento de la pila (estación meteorológica) 14 Tecla +/12/24 35 Pie de base para desplegar (estación meteorológica) 15 Tecla MODE 36 LED de control (sensor exterior) 16 Fecha (mes, día, día de la semana) 37 Sensor exterior/Canal (sensor exterior) 17 Visualización-hora 38 Dispositivo para colgar (sensor exterior) 39 Interruptor para selección del canal (sensor exterior) 18 Visualización-señal radiocontrolada 19 Presión atmosférica de últimas horas 40 Compartimiento de la pila (sensor exterior) 20 Presión atmosférica relativa/absoluta 41 Tecla °C/°F (sensor exterior) 21 Tendencia temperatura exterior 42 Soporte para el sensor exterior 43 Señal del sensor exterior - 55 - Colocación del sensor exterior El soporte incluído 42, 42 para el sensor permite diferentes posibilidades de montaje. Según sea necesario, puede colgar o colocar parado el sensor exterior. La figura A muestra 3 cavidades, que el sensor posee en ambos lados. A través de éstas, el sensor puede encajarse fácilmente en el soporte. Figura B muestra desde la vista lateral, como está sujetado el soporte por atrás del sensor. Figura C muestra la vista frontal del sensor con el soporte como suspensión desde arriba. Figura D muestra la vista frontal del sensor con el soporte como base desde abajo. Figura E muestra el panel de mando y el compartimiento de la pila al reverso del sensor. Información: Coloque o cuelgue siempre el sensor exterior en posición vertical. Puesta en funcionamiento Coloque primero las pilas en el sensor exterior 40 y luego recién en la estación meteorológica 34. Retire el folio protector de la estación meteorológica y del sensor. Abra el compartimiento de las pilas del sensor exterior 40 y coloque las pilas suministradas con la polaridad correcta. La lámpara de control 36 se ilumina momentáneamente y la temperatura será mostrada. Cierre el compartimiento de las pilas. Abra el compartimiento de las pilas de la estación meteorológica 34 y coloque las pilas suministradas con la polaridad correcta. Cierre el compartimiento de las pilas. El símbolo meteorológico 1 parpadea y la estación meteorológica recibe ahora la señal del sensor exterior. Este proceso puede tardar algunos minutos. Si la recepción de la señal fue exitosa, será mostrado el canal elegido 22 y aparece la temperatura exterior actual 24. La estación meteorológica empieza, luego de captar exitosamente al sensor exterior, con la recepción de la señal radiocontrolada DCF 77 y la torre de radio 18 parpadea en la pantalla al lado de la hora. Este proceso puede durar de 3-10 minutos. Durante la recepción están todas las teclas, con excepción de la tecla SNOOZE / LIGHT-12, fuera de funcionamiento. Si la recepción de la señal horaria dentro de 10 minutos no es exitosa, ajuste la hora manualmente. La estación inicia a las 04:00 y 05:00 un nuevo intento de recepción y luego de una recepción exitosa de la señal corregirá automáticamente la hora. Indicación: Por favor no mueva la estación meteorológica ni el sensor exterior durante el proceso de recepción. Si hay una recepción exitosa aparece la torre de radio 18 permanentemente y se ajustan automáticamente la correcta hora, fecha, día de la semana, salida y puesta del sol y la luna, así como la fase lunar. Durante el horario de verano, aparece DST en la pantalla al lado de la torre de radio 18. Ajuste de la zona horaria Se encuentra en un país en el que la hora actual difiere, a pesar de la señal DCF, utilice el ajuste de la zona horaria, para usar su estación meteorológica en otra zona horaria diferente a la del ajuste standar (UTC + 1 = hora de Europa Central). Ajuste la diferencia en horas (por. ej. -01) a la zona horaria deseada. Presione y mantenga presionado el botón-MODE 15 por 3 segundos en la visualización normal de la hora, la zona horaria parpadea y puede ser ajustada con el botón -/ 11 ó el botón +/12/24 14. Presione el botón-MODE 15, para confirmar su elección. A continuación reinicie su estación meteorológica. Su estación meteorológica sigue recepcionando la señal de radiodifusión DCF77, pero muestra la hora cambiada (por. ej. 1 hora menos). Interferencias de recepción La señal DCF77 es enviada de las proximidades de Fráncfort del Meno y puede ser recibida en un radio de hasta aprox. 1500 km de Fráncfort del Meno. Pero, no obstante, hay algunas fuentes de interferencia que pueden obstaculizar la recepción considerablemente . En caso su estación meteorológica no reciba correctamente la señal de radiofrecuencia, cuelgue o coloque la estación meteorológica en otro lugar y tome en cuenta, que en la cercanía de ordenadores, teléfonos, radio y televisión, pueden producirse radiacciones electromagnéticas, que pueden interferir la recepción de la señal de radiofrecuencia DCF 77. Otras fuentes de interferencia de la recepción de la señal de radiofrecuencia pueden ser las construcciones de aislamientos de los edificios (elementos de construcción metálicos), montañas altas o interferencias atmosféricas. Cambie en caso sea necesario las pilas. Reinicio de la recepción de la señal de rediofrecuencia Usted puede reiniciar manualmente la recepción de la señal de radiofrecuencia, presionando durante 3 segundos la tecla - 11 Luz Presione la tecla SNOOZE/LIGHT -12, para activar brevemente la luz de fondo. Formato de 12/24-Horas Presione la Tecla +/12/24 - 14, para elegir el formato de 12- ó 24-horas. En el formato de 12-Horas aparece en la pantalla por las mañanas AM y por las tardes PM. Temperatura Presione la tecla °C/°F+ - 28, para mostrar la temperatura en Celsius (°C) o Fahrenheit (°F). - 56 - Ajuste rápido Para el ajuste de valores numéricos, puede Usted utilizar el ajuste rápido pulsando y manteniendo pulsadas las teclas. Ajuste básico Usted puede realizar los siguientes ajustes: zona horaria, hora, fecha, idioma de la visualización del día de la semana y ubicación. Mantenga presionado por 3 segundos la tecla MODE- 15 en la visualización normal de la hora, la zona horaria parpadea y puede ser ajustada presionando la tecla - 11 o la tecla +/12/24 - 14. Presione la tecla MODE15, para confirmar el ajuste. Ajuste de la misma manera horas, minutos, segundos, año, mes, día y el idioma de la visualización del día de la semana (GE=alemán, FR=francés, ES=español, IT=italiano, NE=holandés, DA=danés, RU=ruso, EN=inglés), el país y la ubicación (ver Tabla de ubicación). Si cambia la ubicación, demora algún tiempo hasta que los valores de la salida y la puesta de la luna y el sol sean mostrados. Tabla de ubicación Alemania Aachen Berlin Düsseldorf Dresden Erfurt Frankfurt Flensburg Freiburg Hannover Bremen Hamburg Rostock Stralsund Köln Kiel Kassel Leipzig München Magdeburg Nürnberg Regensburg Stuttgart Saarbrücken Schwerin Dinamarca Aalborg Aarhus Kopenhagen Odense España/ Andorra Alicante Andorra Badajoz Bacelona Bilbao Cádiz Còrdoba GER AAC BER DUS DRE ERF FRA FLE FRE HAN BRE HAM ROS STR KOE KIE KAS LEI MUE MAG NUE REG STU SAA SCH DAN ALB ARH COP ODE Ibiza La Coruña León Las Palmas Madrid Málaga Palma de Mallorca Salamanca Sevilla Valencia Zaragossa Francia Besançon Biarritz Bordeaux Brest Cherbourg Lyon Marseille Monaco Metz Nantes Nizza Orléans Paris Perpignan Lille Rouen Straßbourg Toulouse ESP Finlandia ALI Helsinki AND Gran-Britaña BAD Aberdeen BAR Belfast BIL Birmingham CAD Bristol COR Edinburgh IBI LAC LEO LPA MAD MAL PDM SAL SEV VAL ZAR FRA BES BIA BOR BRE CHE LYO MAR MON MET NAN NIC ORL PAR PER LIL ROU STR TOU FIN HEL GB ABD BEL BIR BRI EDI Glasgow London Manchester Plymouth Hungría Budapest Croacia Zagreb Italia Ancona Bari Bologna Cagliari Catania Florenz Foggia Genua Lecce Messina Mailand Neapel Palermo Parma Perugia Rom Turin Triest Venedig Verona Ventimiglia Irlanda Dublin Luxemburgo Noruega Bergen Oslo Stavanger Países Bajos Amsterdam GLA LON MAN PLY HUN BUD CRO ZAG ITA ANC BAI BOL CAG CAT FIR FOG GEN LEC MES MIL NAP PAL PAR PER ROM TOR TRI VEN VER VTG IRL DUB LUX NOR BER OSL STA NET AMS Eindhoven Enschede Groningen Den Haag Rotterdam Portugal Èvora Coimbra Faro Leiria Lissabon Porto Polonia Danzig Krakau Posen Stettin Warschau Rusia St. Petersburg Suecia Göteborg Stockholm Eslovaquia Bratislava Eslovenia Ljubljana Serbia Belgrad Austria Graz Innsbruck Linz Salzburg Wien Bélgica Antwerpen Brügge Brüssel EIN ENS GRO DHA ROT POR EVO COI FAR LEI LIS POR POL GDA KRA POZ SZC WAR RUS PET SWE GOT STO SLK BRA SLO LJU SRB BER AUS GRA INN LIN SAL VIE BEL ANT BRU BRL Charleroi Lüttich Suiza/ Liechtenstein Basel Bern Chur Genf Locarno Luzern St. Moritz St. Gallen Sitten Vaduz Zürich CHA LIE SWI Chequia CZR Prag Grecia Athen Chipre Nikosia Rumania Bukarest Bulgaria Sofia PRA GR AT CY NI RO BU BG SO BAS BER CHU GEN LOC LUC MOR GAL SIO VAD ZUE Salida y Puesta de la luna y el sol Luego de que haya intrucido el país y la ciudad, calcula su estación meteorológica la salida y puesta aproximada del sol y la luna. Indicación: Los tiempos calculados sólo son una orientación. Desviaciones pueden ocurrir por ej. por el terreno local o el clima predominante Luego de presionar la Tecla SUN/MOON- 31 aparecen temporalmente las horas de sol aproximadas para el día correspondiente. Cuando Usted desee ver la salida o puesta del sol de otra ubicación o de otra fecha, presione y mantenga presionado por 3 segundos el botón-SUN/MOON 31. El país parpadea y puede ser ajustado con la tecla - 11 o la tecla +/12/24 - 14. Confirme su entrada presionando la tecla SUN/MOON- 31. Ajuste de la misma manera ciudad, año, mes y día, confirme Usted la entrada presionando la tecla SUN/MOON- 31. - 57 - Fases lunares Su estación meteorológica está provista de un indicador de las fases lunares. Las 8 fases lunares son: Luna nueva Luna llena Luna creciente Luna menguante Luna media (primer cuarto) Luna media (último cuarto) Luna media creciente Luna media menguante Alarma La estación meteorológica dispone de 2 tiempos de alarma programables individualmente. Presione la tecla MODE- 15 para elegir la alarma 1 o la alarma 2. Aparece el símbolo de la campana correspondiente. Mantenga presionado, mientras se muestran la alarma 1 ó 2, la tecla MODE- 15, para cambiar al modo de ajuste. En la pantalla parpadean las horas. Ajuste las horas presionando la tecla - 11 o la tecla +/12/24 14 y confirme el ajuste presionando la tecla MODE -15. Ajuste de la misma manera los minutos. Presione durante la visualización de la alarma deseada la tecla ALARM/ON/OFF - 10, para activar la alarma ON o desactivarla OFF. Está activada la alarma 1 aparece . Está activada la alarma 2 aparece . Si no presiona ninguna tecla dentro de 5 segundos, regresa automáticamente la estación meteorológica a la visualización normal. Función de dormitar (SNOOZE) Presione al sonar la alarma la tecla SNOOZE/LIGHT- 12, para desactivarla temporalmente, en la pantalla parpadea el símbolo de la campana. Luego de 5 minutos suena nuevamente la alarma. Presione cualquier tecla excepto el la tecla 12 para apagar la alarma. Pronóstico meteorológico Información: La estación meterológica comienza el pronóstico apróximadamente 6 horas después de ingresar el clima actual. Los símbolos meteorológicos muestran la tendencia del clima para las próximas horas y no el clima actual. Si el pronóstico del tiempo no es correcto, puede adaptar la visualización presionando por 3 segundos la tecla HISTORY/WEATHER- 27. El símbolo del clima parpadea. Ajuste ahora con la tecla °C/°F + - 28 o la tecla MAX/MIN- - 29 el clima actual. Presione para confirmar la tecla HISTORY/WEATHER- 27. Información: En caso de nevada introduzca lluvia o aguacero. Luego de confirmar con el botónHISTORY/WEATHER 27, aparece en la temperatura exterior bajo 0°C el símbolo de la nieve. Soleado Tormentoso Parcialmente nublado Luvia Nublado Fuerte Nevada Nevada Barómetro Su estación puede mostrar la tendencia de la presión atmosférica 25. Presión atmosférica aumenta Presión atmosférica permanece constante Presión atmosférica disminuye Usted puede elegir también entre la presión atmosférica absoluta y relativa, presionando la tecla Relative/Absolute30. En la pantalla aparece Rel. o Abs. Indicación: La presión atmosférica absoluta será medida por la estación meteorológica. La presión atmosférica relativa puede consultarla con su servicio meteorólogico local y registrarla en su estación meteorológica. - 58 - Usted puede cambiar la presión atmosférica relativa, presionando por 3 segundos la tecla Relative/Absolute- 30. El valor de la presión atmosférica parpadea y puede ser ajustada con la tecla °C/°F + - 28 o la tecla MAX/MIN- - 29. Confirme su ajuste presionando la tecla Relative/Absolute - 30. Usted puede elegir entre el formato de visualización hectopascal (hPa) o pulgadas de mercurio (inHg), presionando y manteniendo presionada por aprox. 3 segundos la tecla 28 °C/°F+ -. Presión atmosférica de las 12 horas anteriores Presione la tecla HISTORY/WEATHER- 27, para poder leer los valores de la presión atmosférica de las últimas 12 horas. 0 – HR = presión atmosférica actual - 1 HR = presión atmosférica hace una hora -2 HR = presión atmosférica hace dos horas, etc. Sensor exterior/Ajuste del canal Con su estación meteorológica pueden ser utilizados hasta tres sensores exteriores al mismo tiempo. Abra el compartimiento de la pila de los sensores exteriores y ajuste el canal deseado (1-3) con el interruptor de selección de canal 39. Presione por 3 segundos la tecla CHANNEL- 26, hasta que se emita una señal acústica, la estación meteorológica recibe ahora la señal 43. Cierre la tapa. Con la tecla 41 puede elegir entre °C-Celsius y °F-Fahrenheit. Indicación: El sensor exterior debe estar colocado en un radio de máx. 100 m a la estación meteorológica, sin obstáculos. Si utiliza varios sensores exteriores. Presione, en la visualización normal de la hora, la tecla CHANNEL- 26, para cambiar entre los canales de recepción. Presione 4 x la tecla CHANNEL - 26, los canales 1-3 serán mostrados alternativamente. El símbolo de rotación muestra en la pantalla 22, que se cambiará automáticamente entre los diferentes canales de recepción. Sólo serán mostrados los sensores exteriores, que han sido ajustados. Presione y mantenga presionado la tecla CHANNEL - 26 para eliminar los canales no utilizados. Si agrega otro sensor exterior, la estación meteorológica lo reconoce automáticamente. Tendencia de la Temperatura exterior Al recibir exitosamente los datos de los sensores exteriores, será mostrada la tendencia de la temperatura 21. Temperatura exterior aumenta Temperatura exterior permanece constante Temperatura exterior disminuye Humedad Interior La humedad del aire actual será mostrada en la pantalla 5. El indicador de confort 4 muestra la humedad del aire en 3 categorías: < 40 % SECO < 20 °C 40 – 60 % CONFORT > 60 % HUMEDO / 20 – 26°C > 26 °C / Valores máximos y mínimos La temperatura y humedad máxima y mínima será registrada inmediatamente al poner las pilas. Presione brevemente la tecla Max/Min- - 29 para leer la temperatura interior máxima MAX, mínima MIN y actual 3, la temperatura exterior 24 y la humedad 5, en la pantalla. Para borrar los valores máximos y mínimos, presione por 3 segundos la tecla Max/Min- - 29. Suena una señal acústica, los valores serán borrados y a partir de ese momento registrados nuevamente. Indicador del estado de la pila Cuando las pilas estén demasiado débiles, para mantener en funcionamiento a la estación meteorológica, el sensor exterior y la transmisión de datos, aparece en la pantalla el indicador del estado de la pila 23. Las pilas deberán ser cambiadas lo más rápido posible en todos los aparatos. Inicie la estación nuevamente. - 59 - Reinicialización (RESET) Presione la tecla RESET- 33 para reinicializar la estación. Indicación para la limpieza Limpie la estación meteorológica y los sensores exteriores sólo con un paño seco sin pelusas, como es utilizado por ej. para limpiar las gafas. Declaración UE de Conformidad Simplificada Por la presente, digi-tech-gmbh declara que el tipo de estación meteorológica radiocontrolada 4-LD4868 es conforme con las Directivas 1999/5/EG e 2014/53/UE. El texto completo de la declaración UE de conformidad está disponible en la dirección Internet siguiente: http://www.digi-tech-gmbh.com/ce/289081_WS.pdf Eliminación y reciclaje del aparato electrónico Este aparato electrónico no debe eliminarse con los residuos domésticos. Deseche el aparato utilizando un servicio de reciclaje autorizado o el punto verde de su municipio. En caso de duda, consulte a su punto de reciclaje. Eliminación de las pilas Por favor, deseche las pilas usadas de forma adecuada en los contendores existentes para tal fin en los comercios. Las pilas no deben desecharse con los residuos domésticos. Deseche las pilas utilizando un servicio de reciclaje autorizado o el punto verde de su municipio. Cumpla la normativa vigente a tal respecto. En caso de duda, consulte con su punto de reciclaje. Garantía de digi-tech gmbh Con este aparato recibe Ud. una garantía con una validez de 3 años a partir de la fecha de la compra. En caso de defectos de este producto le corresponden a Ud. derechos legalmente reconocidos frente al vendedor. Estos derechos legalmente reconocidos no se ven limitados por la garantía que se expone a continuación. Condiciones de la garantía El período de garantía comienza con la fecha de la compra. Por favor, guarde cuidadosamente y a tal fin el ticket de compra original. Este documento es necesario como prueba de la compra. Si en el transcurso de tres años contados a partir de la fecha de la compra aparecieran en el producto defectos de material o de fabricación, se procederá (a elección de digi-tech-gmbh) a la reparación o sustitución del mismo sin coste alguno para Ud. La prestación de esta garantía se halla supeditada a la presentación, dentro del plazo de 3 años, del aparato defectuoso, de la prueba de la compra (ticket de compra) y de una corta descripción por escrito del defecto y del momento de su aparición. En caso de que nuestra garantía cubra el defecto, recibirá Ud. el producto reparado o uno nuevo. A la recepción del producto reparado o de su sustituto nuevo no comenzará un nuevo período de garantía. Duración de la garantía y derecho de reclamación La duración de la garantía no se alarga tras la prestación del servicio garantizado, lo que se extiende también a piezas reparadas o sustituidas. Los posibles daños ya existentes en el momento de la compra deberán ser notificados inmediatamente después del desembalaje. Las reparaciones que se tengan que efectuar tras la finalización del período de garantía deberán ser abonadas. Ámbito de la garantía El aparato ha sido fabricado cuidadosamente siguiendo pautas de calidad muy estrictas y superando un control de calidad previo a su puesta en venta. Esta garantía se extiende solamente a defectos de material o de fabricación. Esta garantía no se extiende a piezas componentes del instrumento sometidas a un proceso de desgaste normal y que por lo tanto puedan ser consideradas como piezas consumibles, ni sobre desperfectos aparecidos en partes frágiles como por ejemplo, botones, acumuladores o piezas compuestas de cristal. Esta garantía pierde su vigencia si el producto ha sido dañado, utilizado incorrectamente o sometido a operaciones de mantenimiento incorrectas. Para una utilización adecuada del producto deberán observarse estrictamente todas las indicaciones contenidas en el manual de instrucciones. Deben evitarse necesariamente usos y manejos desaconsejados en el manual de instrucciones o de los cuales se haya advertido en el mismo. El producto está indicado únicamente para su utilización a título particular y no para un uso comercial o industrial. La garantía pierde su vigencia en caso de un mal o incorrecto uso del mismo, su utilización de forma violenta o en caso de operaciones técnicas no efectuadas por alguno de nuestros servicios técnicos autorizados. Procedimiento en caso de garantía Para garantizar un procedimiento rápido de su solicitud, siga por favor las siguientes instrucciones: • Para cualquier comunicación, tenga a mano el ticket de compra y el código de artículo (IAN 289081), como prueba de su compra. • Encontrará el código del artículo bien en una placa indicativa del tipo de aparato, bien grabada en la carcasa, en la portada del manual de instrucciones (parte inferior izda.) o en una pegatina en la parte trasera o inferior del aparato. • En caso de aparecer defectos de funcionamiento, contacte primero por teléfono o mediante correo electrónico con el departamento técnico abajo indicado. - 60 - En www.lidl-service.com pueden descargarse este y muchos otros manuales de instrucciones, videos de productos y software. Servicio-Pedidos Sensores exteriores adicionales pueden ser pedidos por Fax: +49(0)6198-5770-99 o en línea: www.inter-quartz.de. El precio de un Sensor es 5,- € más. IVA y gastos de envío. Servicio técnico Razón social: Inter-Quartz GmbH Dirección.: Valterweg 27A Localidad: DE-65817 Eppstein País: ALEMANIA Correo electrónico: [email protected] Teléfono: +49 (0)6198 571825 00800 5515 6616 00800 5515 6616 00800 5515 6616 00800 5515 6616 00800 5515 6616 0800 563862 800 142 315 00800 5515 6616 00800 5515 6616 00800 5515 6616 00800 5515 6616 IAN 289081 Art.-Nr.: 4-LD4868 Proveedor Esta razón social no se corresponde con ningún servicio técnico. Contacte primero con la dirección de servicio arriba indicada. Razón social: digi-tech gmbh Dirección.: Valterweg 27A Localidad: DE-65817 Eppstein País: ALEMANIA - 61 - Avisos de utilização e segurança Índice Índice........................................................................................................................................................................................ - 62 Introdução ............................................................................................................................................................................... - 63 Utilização adequada ............................................................................................................................................................. - 63 Conteúdo ................................................................................................................................................................................. - 63 Dados técnicos ........................................................................................................................................................................ - 63 Estação meteorológica................................................................................................................................................... - 63 Sensor exterior ................................................................................................................................................................ - 63 Avisos de segurança para os utilizadores....................................................................................................................... - 63 utilizadores Avisos de segurança para pilhas ...................................................................................................................................... - 63 A estação meteorológica e o sensor exterior devem ser pendurados ou posicionados de forma segura.................. - 64 Ecrã e painéis de controlo ..................................................................................................................................................... - 64 Sensor exterior ........................................................................................................................................................................ - 65 Fixação do sensor exterior .................................................................................................................................................... - 66 Funcionamento ........................................................................................................................................................................ - 66 Ajuste do fuso horário ............................................................................................................................................................ - 66 Interferências na receção do sinal de rádio ........................................................................................................................ - 66 Reiniciar a procura do sinal de rádio ................................................................................................................................... - 66 Luz ............................................................................................................................................................................................ - 66 Formato de hora 12/24........................................................................................................................................................ - 66 Temperatura ............................................................................................................................................................................ - 66 Acerto rápido .......................................................................................................................................................................... - 66 Acerto de base ........................................................................................................................................................................ - 67 Tabela de lugares ................................................................................................................................................................... - 67 Hora do nascer e do pôr do sol e da lua ............................................................................................................................ - 67 Fases da lua............................................................................................................................................................................. - 68 Alarme...................................................................................................................................................................................... - 68 Função dormitar (SNOOZE) ................................................................................................................................................. - 68 Previsão do tempo .................................................................................................................................................................. - 68 Barómetro ................................................................................................................................................................................ - 68 Pressão atmosférica das últimas 12 horas ........................................................................................................................... - 69 O sensor exterior/Acerto do canal ...................................................................................................................................... - 69 Evolução da temperatura exterior ........................................................................................................................................ - 69 Humidade do ar do interior ................................................................................................................................................... - 69 Valores máximos e mínimos................................................................................................................................................... - 69 Indicador do estado das pilhas............................................................................................................................................. - 69 Reinício (RESET) ...................................................................................................................................................................... - 69 Aviso de limpeza .................................................................................................................................................................... - 70 Declaração UE de Conformidade Simplificada.................................................................................................................. - 70 Eliminação do aparelho eléctrico ......................................................................................................................................... - 70 Eliminação das pilhas ............................................................................................................................................................. - 70 Garantia da empresa digi-tech gmbh .................................................................................................................................. - 70 Condições sobre a garantia .................................................................................................................................................. - 70 Período de garantia e direitos legais relativos a defeitos .................................................................................................. - 70 Extensão da garantia ............................................................................................................................................................. - 70 Procedimento no caso de garantia ....................................................................................................................................... - 70 Serviço de encomendas ......................................................................................................................................................... - 71 Serviço ..................................................................................................................................................................................... - 71 Fornecedor .............................................................................................................................................................................. - 71 - - 62 - ESTAÇÃO METEOROLÓGICA SEM FIOS Introdução Parabéns pela compra do seu novo estação meteorológica. Você decidiu-se por um aparelho de grande qualidade. O manual de utilização faz parte deste estação meteorológica. Aqui encontrará avisos importantes referentes à segurança, à utilização e ao descarte do relógio. Leia atentamente este manual antes de utilizar o estação meteorológica. Use-o apenas como é descrito e só nos campos de aplicação indicados. Se vender o estação meteorológica ou o entregar a outra pessoa, entregue-lhe também este manual. Guarde a embalagem e o manual de instruções para posteriores pedidos ou perguntas. Utilização adequada O despertador destina-se à indicação da hora e ao uso das funções descritas neste manual. Qualquer outro uso ou alteração do despertador é indevido. O fabricante não se responsabiliza por danos causados pelo uso indevido ou pelo manuseamento incorrecto. O aparelho não se destina ao uso comercial. Conteúdo Aviso: Após a compra queira comprovar o conteúdo. Assegure-se de que a embalagem contém todas as peças e que as mesmas não estão defeituosas. • • • • • • Estação meteorológica 3 x pilhas 1,5 V AA R6/LR6 Sensor exterior Suporte para o sensor exterior 2 x pilhas 1,5 V AAA R03/LR03 Manual de instruções Dados técnicos Estação meteorológica • Campo de medição da temperatura 0-50°C • precisão do termómetro: +/- 1 °C • pilhas: 3 x 1,5 V AA R6/LR6 Sensor exterior • Campo de medição da temperatura -20 - 50°C • precisão do termómetro: +/- 1 °C • alcance: máx. 100 m • Frequência de transmissão: 433 MHZ • Poder de emissão: 0,24 W • Tipo de proteção proporcionado pela caixa (sensor exterior): IPX4 (Proteção contra jorros de água segundo a Norma IEC 60529) • pilhas: 2 x 1,5 V AAA R03/LR03 - Sinal de corrente contínua Avisos de segurança para os utilizadores AVISO! PERIGO DE DANOS! Este aparelho pode ser usado por pessoas (incluídas crianças a partir dos 8 anos) com capacidades físicas , sensoriais ou mentais diminuídas ou com falta de experiência e conhecimento desde que sejam supervisionadas ou tenham sido instruídas sobre a utilização segura do aparelho e tenham entendido os perigos daí resultantes. As crianças não devem brincar com o aparelho. As crianças não devem limpar ou fazer manutenção sem supervisão. Mantenha as películas da embalagem fora do alcance das crianças. Há perigo de asfixia. Avisos de segurança para pilhas AVISO! PERIGO PARA A SAÚDE! PERIGO DE EXPLOSÃO! Mantenha as pilhas fora do alcance de crianças pequenas. No caso de ter sido engolida uma pilha, deverá ser prestada ajuda médica imediatamente. As pilhas/baterías devem ser sempre colocadas tendo em conta a polaridade correcta. Sendo necessário, limpe primeiro os contactos das pilhas e do aparelho. Não tente carregar, provocar curto-circuito ou abrir as pilhas. Nunca deite pilhas ao fogo, pois elas podem explodir. A utilização indevida das pilhas pode causar explosão ou derrame das mesmas. Se a pilha sofreu derrame, evite o contacto com a pele, os olhos ou as mucosas. Use luvas. Em caso de contacto com o ácido da pilha lave as partes afectadas com bastante água limpa e procure imediatamente um médico. Retire as pilhas gastas imediatamente do aparelho, há perigo elevado de derrame. - 63 - A estação meteorológica e o sensor exterior devem ser pendurados ou posicionados de forma segura A estação meteorológica e o sensor exterior não se adequam ao uso em divisões com humidade do ar elevada (por ex. casa de banho). Preste atenção para que: • O sensor esteja na posição vertical; • seja assegurado um arejamento suficiente (não coloque o aparelho em móveis cujas ranhuras de ventilação estejam tapadas por cortinas ou móveis e deixe um mínimo de 10 cm de distância para todos os lados); • o aparelho, quando em funcionamento, não esteja colocado sobre um tapete grosso ou sobre uma cama e não incidam nele fontes de calor diretas (por ex. aquecimentos); • não incidam no aparelho raios solares diretos; • se evite o contato com salpicaduras ou gotas de água; • o aparelho não se encontre em proximidade direta de campos magnéticos (por ex. de altifalantes); • não entrem nele corpos extranhos nem pó; • velas e outras chamas abertas estejam sempre mantidas afastadas do aparelho para evitar o alastramento de fogo. Ecrã e painéis de controlo - 64 - Sensor exterior 1 Símbolo do tempo 22 Canal escolhido 2 Barra de pressão atmosférica 23 Indicador de pilhas 3 Temperatura interior 24 Temperatura exterior 4 Símbolo de conforto 25 Tendência da pressão atmosférica 5 Humidade do ar do interior 26 Tecla CHANNEL 6 Fase lunar 27 Tecla HISTORY/WEATHER 7 Nascer e pôr da lua 28 Tecla °C/°F + - 8 Local 29 Tecla MAX/MIN 9 Nascer e pôr so sol 30 Tecla pressão atmosférica RELATIVE/ABSOLUTE 10 Tecla de ALARM/ON/OFF 31 Tecla SUN/MOON 11 Tecla -/ 32 Orifício para pendurar o aparelho (estação meteorológica) 12 Tecla SNOOZE/LIGHT 33 Tecla RESET 13 Símbolo de alarme 34 Compartimento das pilhas (estação meteorológica) 14 Tecla +/12/24 35 Suporte desdobrável (estação meteorológica) 15 Tecla MODE 36 LED de controlo (sensor exterior) 16 Data (mês, dia, dia da semana) 37 Canal de temperatura exterior (sensor exterior) 17 Indicador da hora 38 Orifício para pendurar o aparelho (sensor exterior) 18 Indicador da torre de controlo 39 Interruptor para escolha do canal (sensor exterior) 19 Pressão atmosférica das últimas horas 40 Compartimento das pilhas (sensor exterior) 20 Pressão atmosférica relativa/absoluta 41 Tecla °C/°F (sensor exterior) 21 Tendência da temperatura exterior 42 Suporte para o sensor exterior 43 Sinal do sensor exterior - 65 - Fixação do sensor exterior O suporte 42 incluído para o sensor possibilita diversas formas de fixação. Conforme for necessário, o sensor exterior pode ser pendurado na parede ou posicionado na vertical. A imagem A mostra as 3 cavidades que o sensor tem em ambos os lados. Com elas, pode encaixar o sensor no suporte. A imagem B mostra, da perspectiva lateral, como o suporte está fixado na parte posterior do sensor. A imagem C é a representação frontal do sensor com o sensor suspenso da parte de cima. A imagem D é a representação frontal do sensor com o suporte na parte inferior do sensor. A imagem E mostra o painel de controlo e o compartimento das pilhas da parte posterior do sensor. Aviso: Pendure ou posicione o sensor exterior sempre na posição vertical. Funcionamento Coloque primeiro as pilhas no sensor exterior 40 e só depois na estação meteorológica 34. Retire a película protetora da estação meteorológica e do sensor. Abra o compartimento das pilhas do sensor exterior 40 e coloque as pilhas fornecidas tendo em conta a polaridade correta. A lâmpada de controlo 36 acende temporariamente e aparece a temperatura. Feche o compartimento das pilhas. Abra o compartimento das pilhas da estação meteorológica 34 e coloque as pilhas fornecidas tendo em conta a polaridade correta. Feche o compartimento das pilhas. O símbolo de tempo 1 pisca e a estação meteorológica recebe agora o sinal do sensor exterior. Este procedimento pode durar alguns minutos. Tendo recebido o sinal aparece o canal escolhido 22 bem como a temperatura exterior actual 24. Após receber o sinal do sensor exterior, a estação meteorológica procura o sinal de rádio DCF 77 e a torre de controlo 18 pisca no monitor junto da hora. Este procedimento pode durar de 3-10 minutos. Durante a procura do sinal não pode utilizar nenhuma tecla à exceção da tecla SNOOZE / LIGHT 12. No caso de, passados 10 minutos, a receção do sinal continuar a falhar, acerte a hora manualmente. A estação meteorológica tentará procurar o sinal de novo às 04:00 e às 05:00 e corrigirá a hora automaticamente se a receção do sinal for bem sucedida. Aviso: Não mova a estação meteorológica nem o sensor exterior durante o procedimento de receção do sinal de rádio. Ao ter recebido o sinal, a torre de controlo 18 aparece permanentemente e a hora, a data, o dia da semana, o nascer e o pôr do sol e da lua, bem como as fases lunares corrigem-se automaticamente. Durante a hora de Verão aparece DST no monitor junto da torre de controlo 18. Ajuste do fuso horário Se se encontrar num país no qual a hora actual não se acertar apesar do sinal DCF, utilize a adaptação do fuso horário para usar o seu estação meteorológica num fuso horário diferente daquele do acerto de base (UTC + 1 = hora da Europa Central). Introduza a diferença em horas em relação ao fuso horário desejado (p. ex. -01). A partir do indicador normal de hora, carregue na tecla MODE -15 durante 3 segundos, o fuso horário pisca e pode ser ajustado com as teclas -/ -11 ou +/12/24 -14. Carregue na tecla MODE -15 para confirmar o acerto. Finalmente, proceda ao reinício do estação meteorológica. O estação meteorológica continua a receber o sinal de rádio DCF77 mas indica a hora modificada por Si (por ex. 1 hora menos). Interferências na receção do sinal de rádio O sinal de rádio DCF77 é emitido próximo da cidade de Frankfurt am Main e pode ser captado até cerca de 1500 km no raio em volta de Frankfurt am Main. No entanto, existem algumas interferências que podem prejudicar consideravelmente a receção. Se a estação meteorológica não receber o sinal, coloque o seu aparelho em outro lugar e tenha em atenção que perto do computador, telefone, rádio e televisão podem verificar-se radiações electromagnéticas, que prejudicam a receção do sinal de rádio DCF77. Outras interferências para a receção podem ser edifícios com materiais isoladores fortes (elementos metálicos), montanhas altas ou interferências atmosféricas. Se for preciso troque as pilhas. Reiniciar a procura do sinal de rádio Pode reiniciar manualmente a procura do sinal de rádio carregando na tecla -/ 11 durante 3 segundos. Luz Carregue na tecla SNOOZE/LIGHT 12 para ligar temporariamente a iluminação de fundo. Formato de hora 12/24 Carregue na tecla +/12/24 14 para escolher entre o formato de 12 ou de 24 horas. No formato de 12 horas aparece no monitor AM durante a manhã e PM durante a tarde. Temperatura Carregue na tecla °C/°F 28 para obter a temperatura em graus Celsius (°C) ou Fahrenheit (°F). Acerto rápido Para introduzir valores numéricos pode utilizar o acerto rápido carregando na tecla -/ - 66 - durante algum tempo. Acerto de base Você pode proceder aos seguintes acertos: fuso horário, hora, data, idioma do indicador do dia da semana e local. A partir do indicador de hora normal, carregue na tecla MODE 15 durante 3 segundos, o fuso horário pisca e pode ser acertado com a a tecla -/ 11 ou +/12/24 14. Carregue em MODE 15 para confirmar o acerto. Proceda da mesma maneira para acertar a hora, os minutos, os segundos, o ano, o mês, o dia e o idioma do indicador do dia da semana (GE=alemão, FR=francês, ES=espanhol, IT=italiano, NE=neerlandês, DA=dinamarquês, RU=russo, EN=inglês), o país e o local (veja tabela de lugares). Se mudar de local, pode demorar algum tempo até que os valores do nascer e do pôr do sol e da lua se atualizem. Tabela de lugares Alemanha Aachen Berlim Düsseldorf Dresden Erfurt Francoforte Flensburgo Friburgo Hannover Bremen Hamburgo Rostock Stralsund Colónia Kiel Kassel Leipzig Munique Magdeburgo Nurenberga Regensburgo Estugarda Saarbrücken Schwerin Dinamarca Aalborg Aarhus Copenhaga Odense Espanha/ Andorra Alicante Andorra Badajoz Barcelona Bilbau Cádiz Córdoba GER AAC BER DUS DRE ERF FRA FLE FRE HAN BRE HAM ROS STR KOE KIE KAS LEI MUE MAG NUE REG STU SAA Ibiza La Coruña León Las Palmas Madrid Málaga Palma de Mallorca Salamanca Sevilha Valencia Zaragoça França Besançon Biarritz Bordeaux Brest Cherbourg Lyon Marseille Mónaco Metz Nantes Nizza IBI LAC LEO LPA MAD MAL PDM Glasgow London Manchester Plymouth Hungria Budapeste Croácia Zagreb SAL Itália SEV Ancona VAL Bari ZAR Bolonha FRA Cagliari BES Catania BIA Florença BOR Foggia BRE Genua CHE Lecce LYO Messina MAR Milão MON Neapel MET Palermo NAN Parma NIC Perugia GLA LON MAN PLY HUN BUD CRO ZAG ITA ANC BAI BOL CAG CAT FIR FOG GEN LEC MES MIL NAP PAL PAR PER Eindhoven Enschede Groningen Den Haag Rotterdam Portugal Évora Coimbra Faro Leiria Lisboa Porto Polónia Danzig Cracóvia Posen Stettin Varsóvia Rússia St. Petersburg Suécia Göteborg Stocolmo Rep. Eslováquia SCH Orléans ORL Roma ROM Bratislava PAR Turin TOR Slovénia DAN Paris ALB Perpignan PER Trieste TRI Ljubljana ARH Lille LIL Veneza VEN Sérbia COP Rouen ROU Verona VER Belgrado ODE Strasburgo STR Ventimiglia VTG Áustria Toulouse TOU Irlanda Graz IRL ESP DUB Innsbruck Finlândia FIN Dublin ALI Helsinkia HEL Luxemburgo LUX Linz Noruega NOR Salzburgo AND Grã-bretanha GB BAD Aberdeen ABD Bergen BER Viena BAR Belfast BEL Oslo OSL Bélgica BIL Birmingham BIR Stavanger STA Antuérpia CAD Bristol BRI Países Baixos NET Brügge COR Edinburgo EDI Amsterdão AMS Bruxelas EIN ENS GRO DHA ROT POR EVO COI FAR LEI LIS POR POL GDA KRA POZ SZC WAR RUS PET SWE GOT STO SLK Charleroi Lüttich Suiça/ Liechtenstein Basel Berna Chur Genebra Locarno Lucerna St. Moritz St. Gallen Sitten Vaduz Zurique CHA LIE SWI Rep. Checa CZR Praga Grécia Atenas Chipre Nicosia Roménia Bucareste PRA GR AT CY NI RO BU BRA SLO LJU SRB BER AUS GRA INN LIN SAL VIE BEL ANT BRU BRL Bulgária Sofia BG SO BAS BER CHU GEN LOC LUC MOR GAL SIO VAD ZUE Hora do nascer e do pôr do sol e da lua Depois de ter introduzido o país e o local, a sua estação calcula as horas aproximadas do nascer e do pôr do sol e da lua. Aviso: As horas calculadas servem apenas à orientação. Podem resultar diferenças devido ao terreno acidentado que se encontre na proximidade ou ao clima em vigor no momento. Ao carregar em SUN/MOON 31 aparecem temporariamente as horas aproximadas de sol para o dia respetivo. Se quiser saber a hora do nascer e do pôr do sol de outro lugar ou de outra data, carregue durante 3 segundos a tecla SUN/MOON - 31. O país pisca e poder ser acertado com a tecla -/ 11 ou 12/24 14. Confirme o acerto carregando em SUN/MOON 31. Proceda da mesma maneira para acertar a cidade, o ano, o mês e o dia, e confirme carregando em SUN/MOON 31. - 67 - Fases da lua A sua estação possui um indicador das fases da lua. As 8 fases da lua são: Lua nova Lua cheia Lua crescente Lua minguante convexa Quarto crescente (primeiro quarto) Quarto minguante (último quarto) Lua crescente convexa Lua minguante côncava Alarme A estação meteorológica possui 2 horas de alarme separadas. Carregue na tecla MODE 15 para escolher entre o Alarm1 ou o Alarm 2. Aparece o símbolo de sino respetivo. Enquanto estiver no indicador de Alarm 1 ou 2 carregue na tecla MODE 15 para passar ao modo de acerto. A hora pisca no monitor. Acerte a hora carregando na tecla -/ - 11 ou +/12/24 14 e confirme carregando em MODE 15. Proceda do mesmo modo para acertar os minutos. Enquanto estiver no modo de alarme desejado, carregue na tecla ALARM/ON/OFF -10 para ligar ON ou desligar OFF o alarme. Estando o Alarm 1 ligado, aparece o símbolo . Estando o Alarm 2 ligado, aparece o símbolo . Se não carregar em nenhuma tecla durante mais de 5 segundos, a estação meteorológica volta automaticamente ao indicador de hora normal. Função dormitar (SNOOZE) Ao soar o alarme, carregue na tecla SNOOZE/LIGHT 12 para desligar o alarme temporariamente, o símbolo de sino pisca então no monitor. Passados 5 minutos o alarme volta a soar. Carregue qualquer tecla excepto o tecla 12 para desligar o alarme. Previsão do tempo Aviso: Esta estação começa a previsão cerca de 6 horas após a introdução do tempo actual. Os símbolos do tempo indicam a tendência do tempo para as próximas horas e não o tempo actual. Se a previsão do tempo da sua estação não for correta, pode ajustar o indicador carregando na tecla HISTORY/WEATHER 27 durante 3 segundos. O símbolo do tempo pisca. Ajuste o tempo actual carregando na tecla °C/°F + 28 ou na tecla MAX/MIN 29. Confirme carregando em HISTORY/WEATHER 27. Aviso: Se cair neve, introduza chuva ou aguaceiro. Após confirmar com a tecla HISTORY/WEATHER - 27 o símbolo de neve aparece quando a temperatura exterior for inferior a 0°C. Ensolarado Aguaceiro Ligeiramente nublado Chuva Nublado Queda de neve forte Queda de neve Barómetro A sua estação pode mostrar a evolução da pressão atmosférica 25. A pressão atmosférica vai subir A pressão atmosférica mantém-se A pressão atmosférica vai baixar Pode escolher entre a pressão atmosférica absoluta e relativa, carregando na tecla Relative/Absolute 30. No monitor aprece Rel. ou Abs. Aviso: A pressão atmosférica absoluta é medida pela estação meteorológica. Pode tomar conhecimento da pressão atmosférica relativa junto do serviço de meteorologia local e introduzir o valor na sua estação. - 68 - Pode alterar a pressão atmosférica relativa carregando na tecla Relative/Absolute 30 durante 3 segundos. O valor da pressão atmosférica pisca e pode ser ajustado carregando na tecla °C/°F + 28 ou MAX/MIN 29. Confirme o acerto com a tecla Relative/Absolute 30. Pode escolher entre o formato de indicador Hectopascal (hPa) ou Inches of mercury (inHg) carregando a tecla 28 °C/°F+ durante aproximadamente 3 segundos. Pressão atmosférica das últimas 12 horas Carregue na tecla HISTORY/WEATHER 27 para ler os valores da pressão atmosférica das últimas 12 horas. 0 – HR = pressão atmosférica actual - 1 HR = pressão atmosférica uma hora antes -2 HR = pressão atmosférica duas horas antes, etc. O sensor exterior/Acerto do canal Pode usar até três sensores exteriores em simultâneo com a sua estação. Abra o compartimento das pilhas e ajuste o canal desejado (1-3) no interruptor de canal 39. Carregue na tecla CHANNEL 26 durante 3 segundos até soar um sinal, a estação meteorológica recebe agora o sinal 43. Feche o compartimento das pilhas. Com a tecla 41 pode escolher entre graus °C-Celsius e °F-Fahrenheit. Aviso: O sensor exterior e a estação devem ter um afastamento que não ultrapasse um máximo de 100 m, sem obstáculos. Se utilizar vários sensores exteriores. Enquanto estiver no indicador de hora normal carregue na tecla CHANNEL 26 para escolher entre os canais de receção. Carregue 4 x na tecla CHANNEL 26, e os canais 1-3 aparecem alternadamente. O símbolo de rotação indica no monitor 22 que os varios canais aparecem alternadamente. Só aparecem os sensores exteriores que tiverem sido ajustados.Carregue durante uns segundos na tecla CHANNEL 26 para retirar canais que não estejam a ser usados. Se juntar um sensor exterior adicional, a estação meteorológica reconhece-o automaticamente. Evolução da temperatura exterior Quando o sinal do sensor exterior estiver a ser bem recebido, a tendência da temperatura exterior 21 é indicada como segue. temperatura exterior vai subir temperatura exterior mantém-se temperatura exterior vai baixar Humidade do ar do interior A humidade do ar do interior vem indicada no monitor 5. O indicador de conforto 4 indica a humidade do ar em 3 categorias: < 40 % SECO < 20 °C 40 – 60 % COMFORTO > 60 % HÚMIDO / 20 – 26°C > 26 °C / Valores máximos e mínimos A temperatura e a humidade do ar máxima e mínima ficam gravadas a partir da colocação das pilhas. Carregue na tecla Max/Min 29 para ler no monitor a temperatura de interior máxima MAX, minima MIN e actual 3, a temperatura exterior 24 e a humidade do ar 5. Para apagar os valores máximos e mínimos carregue na tecla Max/Min 29 durante 3 segundos. Soa um sinal, os valores apagam-se e são gravados de novo a partir desse momento. Indicador do estado das pilhas Quando as pilhas começam a ficar demasiado fracas para manter o funcionamento da estação meteorológica , do sensor exterior e da transmissão de dados, aparece o indicador de estado de pilhas 23 no monitor. As pilhas deverão ser substituídas em todos os aparelhos o mais brevemente possível. Acerte a estação meteorológica de novo. Reinício (RESET) Carregue na tecla RESET 33 para colocar os valores da estação meteorológica em zero. - 69 - Aviso de limpeza Limpe a estação meteorológica e o sensor exterior apenas com um pano seco e sem pêlos, como por ex. um pano de limpeza de óculos. Declaração UE de Conformidade Simplificada O(a) abaixo assinado(a) digi-tech-gmbh declara que o presente tipo de estação meteorológica 4-LD4868 está em conformidade com as Diretivas 1999/5/EG e 2014/53/UE. O texto integral da declaração de conformidade está disponível no seguinte endereço de Internet: http://www.digi-tech-gmbh.com/ce/289081_WS.pdf Eliminação do aparelho eléctrico Não deite este aparelho no lixo normal. Entregue-o num dos pontos de recolha de aparelhos eléctricos autorizados ou na sua câmara municipal. Observe as regulamentações respectivas em vigor. Em caso de dúvida contacte a sua câmara municipal. Eliminação das pilhas Deite as pilhas nos contentores existentes para o efeito („pilhões“). Não deite as pilhas no lixo normal. Entregue-as num dos pontos de recolha autorizados ou na sua câmara municipal. Observe as regulamentações respectivas em vigor. Em caso de dúvida contacte a sua câmara municipal. Garantia da empresa digi-tech gmbh Para este aparelho oferecemos uma garantia de 3 anos contados a partir data de compra. No caso de este aparelho apresentar falhas ou defeitos Você tem direitos legais perante o vendedor do produto. Estes direitos legais não são restringidos pela nossa garantia que descrevemos de seguida. Condições sobre a garantia O prazo de garantia começa a partir da data de compra. Guarde por isso o talão de compra original num sítio seguro. Este documento é necessário como comprovativo da compra. Se, dentro do prazo de três anos contados a partir da data de compra, o relógio de pulso apresentar algum defeito ou falha de material ou de fabrico o relógio será segundo o nosso critério - arranjado ou substituído a título gratuito. É condição prévia que, dentro do prazo de três anos, apresente o relógio de pulso defeituoso bem como o comprovativo de compra (talão da caixa) e descreva por escrito de que defeito se trata e quando surgiu o mesmo. Se a falha estiver coberta pela nossa garantia, receberá o produto arranjado ou um produto novo. O período de garantia começa a contar de novo a partir do arranjo ou troca do produto Período de garantia e direitos legais relativos a defeitos O período de garantia não será prolongado com a prestação de garantia. O mesmo se aplica aos componentes que tenham sido arranjados ou substituídos. Os danos ou defeitos que sejam detectados no acto da compra deverão ser-nos comunicados de imediato. Qualquer arranjo que tiver de ser feito passado o período de garantia terá de ser pago. Extensão da garantia O aparelho foi produzido cumprindo directivas de qualidade rigorosas e foi testado escrupulosamente antes da sua entrega. A garantia extende-se a falhas ou defeitos de material ou de fabrico. Esta garantia não se extende a componentes do produto que estejam sujeitos ao desgaste normal e que sejam, por isso, considerados como elementos desgastáveis, nem a danos em componentes frágeis como interruptores, acumuladores de bateria ou que sejam feitos de vidro. A garantia deixa de ter aplicação sempre que o produto seja danificado ou não seja usado ou mantido devidamente. Devem ser cumpridas todas as instruções para uma utilização adequada mencionadas neste manual. Deverão ser evitadas as formas de uso que sejam desaconselhadas ou das quais se avise neste manual. O produto destina-se exclusivamente ao uso privado e não ao uso comercial. A garantia deixa de aplicar-se em caso de uso abusivo ou indevido, uso de violência ou interferências não autorizadas pelo nosso serviço autorizado. Procedimento no caso de garantia Para assegurar um procedimento rápido queira seguir os seguintes conselhos: • No caso de ter reclamações ou perguntas tenha sempre à disposição o talão de compra e o número do artigo (IAN 289081) como comprovativos da compra. • O número do artigo encontra-se no rótulo, gravado, no título do manual de instruções (parte inferior esquerda) ou na etiqueta colada na parte de trás ou de baixo do aparelho. • Se surgirem falhas nas funções ou outros defeitos contacte primeiro o departamento de serviço seguinte por telefone ou por E-Mail. Em www.lidl-service.com pode carregar este e muitos outros manuais de instruções, vídeos de produtos e software. - 70 - Serviço de encomendas Pode encomendar sensores adicionais por Fax: +49(0)6198-5770-99 ou online: www.inter-quartz.de. O preço de um sensor é de 5,- € mais IVA e os custos de envio. Serviço Nome: Inter-Quartz GmbH Str.: Valterweg 27A Cidade: DE-65817 Eppstein País: ALEMANHA E-Mail: [email protected] Telefone: +49 (0)6198 571825 00800 5515 6616 00800 5515 6616 00800 5515 6616 00800 5515 6616 00800 5515 6616 0800 563862 800 142 315 00800 5515 6616 00800 5515 6616 00800 5515 6616 00800 5515 6616 IAN 289081 Art.-Nr.: 4-LD4868 Fornecedor Tenha em consideração que o endereço seguinte não é um endereço de serviço. Contacte primeiro o departamento de serviço mencionado acima. Nome: digi-tech gmbh Rua: Valterweg 27A Localidade: DE-65817 Eppstein País: ALEMANHA - 71 - digi-tech gmbh Valterweg 27A DE-65817 Eppstein GERMANY Stand der Informationen · Last information update · Version des informations · Laatste informatie · Stav informací · Actualización de las informaciones · Data das informações: 10/2017 Art.-Nr.: 4-LD4868 IAN 289081-
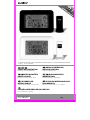 1
1
-
 2
2
-
 3
3
-
 4
4
-
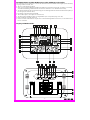 5
5
-
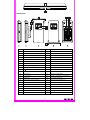 6
6
-
 7
7
-
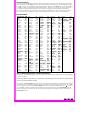 8
8
-
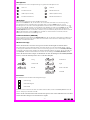 9
9
-
 10
10
-
 11
11
-
 12
12
-
 13
13
-
 14
14
-
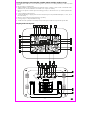 15
15
-
 16
16
-
 17
17
-
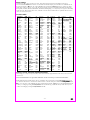 18
18
-
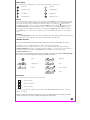 19
19
-
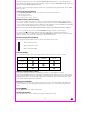 20
20
-
 21
21
-
 22
22
-
 23
23
-
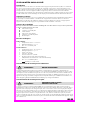 24
24
-
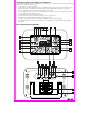 25
25
-
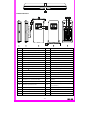 26
26
-
 27
27
-
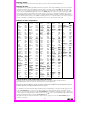 28
28
-
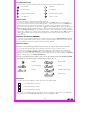 29
29
-
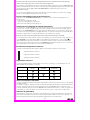 30
30
-
 31
31
-
 32
32
-
 33
33
-
 34
34
-
 35
35
-
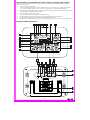 36
36
-
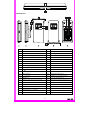 37
37
-
 38
38
-
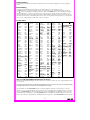 39
39
-
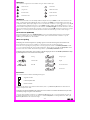 40
40
-
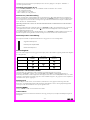 41
41
-
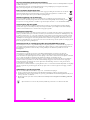 42
42
-
 43
43
-
 44
44
-
 45
45
-
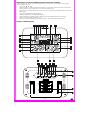 46
46
-
 47
47
-
 48
48
-
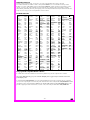 49
49
-
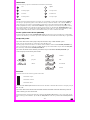 50
50
-
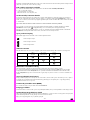 51
51
-
 52
52
-
 53
53
-
 54
54
-
 55
55
-
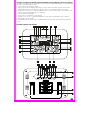 56
56
-
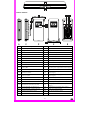 57
57
-
 58
58
-
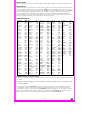 59
59
-
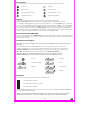 60
60
-
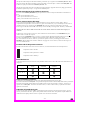 61
61
-
 62
62
-
 63
63
-
 64
64
-
 65
65
-
 66
66
-
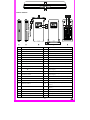 67
67
-
 68
68
-
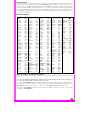 69
69
-
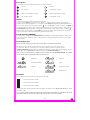 70
70
-
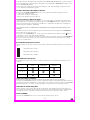 71
71
-
 72
72
-
 73
73
-
 74
74


Auriol 4-LD4868 de handleiding
- Categorie
- Tafelklokken
- Type
- de handleiding
- Deze handleiding is ook geschikt voor
in andere talen
- English: Auriol 4-LD4868 Owner's manual
- français: Auriol 4-LD4868 Le manuel du propriétaire
- español: Auriol 4-LD4868 El manual del propietario
- Deutsch: Auriol 4-LD4868 Bedienungsanleitung
- português: Auriol 4-LD4868 Manual do proprietário
- čeština: Auriol 4-LD4868 Návod k obsluze
Gerelateerde papieren
-
Auriol 4-LD5009 Usage And Safety Instructions
-
-
-
-
-
-
-
Andere documenten
-
Renkforce AOL-5052B de handleiding
-
-
Hama 00076044 de handleiding
-
Eurochron EFWS 302 de handleiding
-
Alecto WS-5300 Handleiding
-
Techno line WS 6750 de handleiding
-
Bresser 7007400 de handleiding
-
Emos E0389 Handleiding
-
-
ADE WS 1603 Operating Instructions Manual