Brigade BE-80XC (1623A)(1905)(1559)(1426)(2084) Installatie gids
- Categorie
- Beveiligingscamera's
- Type
- Installatie gids

ENGLISH
ESPANOL
ITALIANO
DEUTSCH
FRANCAIS
NEDERLANDS
BE-800C VEHICLE CCTV CAMERA
BE-800C CCTV-CAMERA VOERTUIG
CAMÉRA DE SURVEILLANCE AUTO BE-800C
BE-800C CCTV-KAMERA FÜR FAHRZEUGE
VIDEOCAMERA CCTV BE-800C PER I VEICOLI
CÁMARA BE-800C PARA SISTEMA CCTV DE VEHÍCULO
Issue 1 - December 2006
REVERSE IN SAFETY!
Brigade Electronics plc Brigade House The Mills Station Road
South Darenth Kent DA4 9BD UK
Sales Support Tel: +44 (0)870 774 1500 Fax: +44 (0)870 774 1502
e-mail: [email protected] www.brigade-electronics.com
ENGLISH
BE-800C VEHICLE CCTV CAMERA
INTRODUCTION
This BACKEYE Observation Camera has been
designed to provide years of trouble-free operation.
Please read this manual thoroughly. This manual
contains instructions to easy installation of the
camera. BACKEYE Observation systems are not
intended in any way to be a substitute for careful,
cautious, defensive driving or for the consistent
adherence to all applicable traffic laws and motor
safety regulations.
FEATURES
BE-800C CAMERA
• 290,000 pixel image sensor
• 0.1 Lux sensitivity
• Automatic electronic iris provides a clearer, more
consistent image in low and bright light
• Wide-angle lens provides a broad viewing area
(40°- 78° lens available).
• Durable, waterproof construction (to IP68)
• Built-in microphone for audio pick-up
• Sun Shield reduces sunlight on the lens
• Waterproof cable connection (IP68)
CONTENTS
1-Camera
1-Camera bracket
4-Attachment screws with washers (M4 x 15)
1-Sun Shield
BEFORE INSTALLATION
1. This camera operates 12 volts, supplied by the
monitor.
2. Please install the camera according to the
instructions in this manual.
3. Do not disassemble the camera. This voids the
warranty. Disassembling the camera will
compromise the waterproof seal.
INSTALLATION INSTRUCTIONS
1. Attach camera bracket to upper portion of vehicle.
Attachment point must be sturdy enough to
support camera and bracket.
2. Attach camera to bracket using bolts provided.
Adjust angle. (Use rear bumper and back of vehicle
as a reference point.)
3. Select mirror or normal camera image via a
magnetic switch as indicated in Fig. 1
CABLE (SUPPLIED SEPARATELY)
1. The camera-to-cable connection is waterproof.
The cable-to-monitor connection is not waterproof.
Be sure to orient the cable properly. The cylindrical
end attaches to the camera.
2. Do not run the cable over sharp edges or corners.
Do not kink the cable. Run in conduit if necessary.
Keep the cable away from hot and rotating parts.
3. Keep any excess cable away from hot or rotating
parts.
4. Secure the cable along its length with regularly
spaced cable ties.
WIRING CAMERA
1. Connect to monitor cable via waterproof 4 pin
connector.
2. Drill a 22mm - diameter hole into vehicle body near
the camera and bracket. Connect camera
connector to extension cable in vehicle. Push extra
cable into vehicle (be careful not to kink cable) and
fit grommet into hole. Apply sealant around
grommet to increase resistance to water
penetration.
3. ONLY PETROLEUM ROAD TANKERS: All electrical
equipment fitted to petroleum vehicles must be
fitted via the battery master switch and must be
isolated from the battery while the vehicles are
loading and unloading.
CAMERA FUNCTION AND
OPERATION
1. Waterproof microphone for audio pickup.
2. Mirror/Normal switch (waterproof) to change
camera image from a mirror view rear of vehicle
mounted.
CAUTION
1. DO NOT OPEN THE CAMERA CASE. This will
break the camera's waterproof seal. If evidence of
tampering is detected, the warranty will be
considered void.
2. Do not recommend mounting the camera near the
lower area of the vehicle (e.g. bumper). This
reduces the view of the camera and increases the
chance of physical damage to the camera.
3. Use only hexagonal screws and washers supplied
to mount the camera.
MAINTENANCE
Remove dust and dirt with a damp soft cloth.
Heavier dirt should be removed with a damp soft
cloth and mild detergent. Do not use strong cleaning
agents containing gasoline, thinner, benzene or
alcohol. These substances may damage the exterior
surface of the camera. Do not steam clean the
camera directly.
CAUTION
1. Before drilling, be sure no cable or wiring is on the
other side. Be sure drill a 22mm diameter hole
only.
2. Feed as much cable as possible into vehicle and
clamp securely. This reduces the possibility of it
being hooked or snagged.
3. Keep all cables away from HOT, ROTATING and
ELECTRICALLY NOISY components.
4. Do not twist camera cable and do not cut camera
pigtail or cable
SPECIFICATIONS
BE-800C Camera
Picture elements NTSC: 270,000 pixels
PAL: 320,000 pixels
Image size 1/3 inch CCD
Lens Focal length 2.9mm, Maximum
aperture F=2.0
Horizontal resolution 330TV lines
View Angles (D, H, V) 133°, 105.2°, 78.3°
Required illumination 0.1 Lux Minimum
Power supply 12Vdc
Power consumption 2.4W
Operating temperature -30oC to +70oC
Vibration 10g
Mechanical Shock 100g
Weight 0.4Kg
Dimensions (WxHxD)mm 69x43x61
DISCLAIMER
The use of the BE-850 BACKEYE Observation
Camera does not guarantee or promise that the user
will not be in an accident or otherwise not collide
with an object. BACKEYE Observation systems are
not intended in any way to be a substitute for careful
and cautious driving or for the consistent adherence
to all applicable traffic laws and motor safety
regulations.
NEDERLANDS
BE-800C CCTV-CAMERA VOERTUIG
INLEIDING
De BACKEYE Observatiecamera is ontworpen om
jarenlang een probleemloze werking te garanderen.
Gelieve deze handleiding grondig door te lezen. Deze
handleiding bevat instructies om de camera
eenvoudig te kunnen installeren. De BACKEYE
Observatiesystemen zijn op geen enkele wijze
bedoeld als vervanging voor aandachtig, voorzichtig
en defensief rijgedrag, of voor het voortdurend
respecteren van de toepasselijke verkeerswetten en
veiligheidsvoorschriften voor auto's.
KENMERKEN
BE-800C CAMERA
Beeldsensor met 290.000 pixels
0.1 Lux gevoeligheid
• Automatische elektronische iris, die een duidelijker
en consistenter beeld geeft bij weinig en bij veel
licht
• Groothoekobjectief voor een breed gezichtsveld
(40°- 78° lens beschikbaar).
• Duurzame, waterdichte constructie (volgens IP68)
• Ingebouwde microfoon voor het oppikken van
geluiden.
• Zonnescherm vermindert zonlicht op de lens
• Waterdichte kabelverbinding (IP68)
INHOUD
1-Camera
1-Camerahouder
4-Bevestigingsschroeven met sluitringen (M4 x 15)
1-Zonnescherm
VÓÓR DE INSTALLATIE
1. Deze camera werkt op 12 volt dat door het scherm
geleverd wordt.
2. Gelieve de camera volgens met de instructies in
deze handleiding te installeren.
3. De camera niet demonteren. Als dit toch gebeurt,
wordt de waarborg ongeldig. Het demonteren van
de camera brengt de waterdichte afsluiting in
gevaar.
INSTALLATIE-INSTRUCTIES
1. Bevestig de camerahouder aan de bovenkant van
het voertuig. Het bevestigingspunt moet stevig
genoeg zijn om de camera en de houder te
ondersteunen.
2. Bevestig de camera aan de houder met behulp van
de bijgeleverde bouten. Stel de hoek af. (Gebruik
de achterbumper en de achterkant van het
voertuig als referentiepunt).
3. Kies mirror (spiegel) of normaal camerabeeld via
een magnetische schakelaar, zoals aangegeven in
Afb. 1
KABEL (APART TE LEVEREN)
1. De verbinding tussen camera en kabel is
waterdicht. De verbinding tussen kabel en monitor
is niet waterdicht. Zorg ervoor dat u de kabel in de
juiste richting installeert. Het cilindervormige
uiteinde moet bevestigd worden aan de camera.
2. Zorg dat de kabel niet passeert over scherpe
randen of hoeken. Zorg ervoor dat de kabel niet
geknikt wordt. Voer het, indien nodig, door een
leiding.
Houd de kabel uit de buurt van hete en draaiende
onderdelen.
3. Hou alle overtollige kabels uit de buurt van hete en
draaiende onderdelen.
4. Maak de kabel op regelmatige afstanden over de
hele lengte met klemmen vast.
BEDRADING CAMERA
1. Sluit via een waterdichte 4-pins aansluiting op de
beeldschermkabel aan.
2. Boor een gat met een diameter van 22mm in het
lichaam van het voertuig, vlakbij de camera en de
houder. Sluit de cameraconnector aan op de
verlengkabel in het voertuig. Duw extra kabel in
het voertuig (wees voorzichtig dat u de kabel niet
knikt) en bevestig de doorvoerbuis in het gat.
Breng afdichtmiddel aan rond de doorvoerbuis om
de bestendigheid tegen waterindringing te
verhogen.
3. ALLEEN AARDOLIETANKWAGENS: Alle
elektrische apparatuur die op aardolievoertuigen is
gemonteerd moet via de hoofdschakelaar van de
batterij geplaatst worden en moet van de batterij
geïsoleerd worden wanneer de voertuigen in- en
uitgeladen worden.
CAMERA HEEFT;
1. Waterdichte microfoon voor geluidsopname.
2. Spiegel/Normale schakelaar (waterdicht) om het
camerabeeld van een aan de achterzijde van het
voertuig bevestigd spiegelbeeld te veranderen.
VOORZICHTIG
1. OPEN NOOIT DE CAMERAKAST. Hierdoor wordt
de waterdichte verzegeling van de camera
verbroken. Als een bewijs van onbevoegde montage
gedetecteerd wordt, wordt de waarborg als ongeldig
beschouwd.
2. Het wordt niet aanbevolen de camera vlakbij het
onderste gedeelte van het voertuig (bijv. bumper) te
monteren. Hierdoor wordt het zicht van de camera
beperkt en de kans op een fysieke beschadiging van
de camera verhoogt.
3. Gebruik alleen de meegeleverde zeskantschroeven
en sluitringen om de camera te bevestigen.
ONDERHOUD
Verwijder stof en vuil met een vochtige, zachte doek.
Zwaarder vuil moet verwijderd worden met een
vochtige, zachte doek en een lichte detergent.
Gebruik geen sterke reinigingsproducten met
benzine, verdunningsmiddel, benzeen of alcohol.
Deze stoffen kunnen het buitenoppervlak van de
camera beschadigen. De camera niet direct met
stoom reinigen.
VOORZICHTIG
1. Ga voor het boren na of er zich aan de andere
zijde geen kabels of draden bevinden. Zorg ervoor
dat u enkel een gat met een diameter van 22mm
boort.
2. Breng zoveel mogelijk kabel aan in het voertuig,
en klem deze stevig vast. Zo loopt u minder de
kans dat hij vastgehaakt wordt of achter iets blijft
hangen.
3. Houd alle kabels uit de buurt van HETE,
DRAAIENDE en DOOR ELEKTRISCHE RUIS
GESTOORDE bestanddelen.
4. De camerakabel nooit buigen en nooit het oogje of
de kabel van de camera doorsnijden.
SPECIFICATIES
BE-800C Camera
Beeldelementen NTSC: 270.000 pixels
PAL: 320.000 pixels
Beeldgrootte 1/3 Inch CCD
Brandpuntafstand 2.9 mm, Maximale
diafragmaopening F=2.0
Horizontale resolutie 330 TV lijnen
Gezichtshoeken (D, H, V) 133°, 105.2°, 78.3°
Vereiste verlichting Minimum 0,1 Lux
Voeding 12V DC
Stroomverbruik 2.4W
Bedrijfstemperatuur -30ºC tot +70ºC
Vibratie 10g
Mechanische schok 100g
Gewicht 0.4Kg
Afmetingen (BxHxD) mm 69x43x61
EXONERATIECLAUSULE
Het gebruik van de BE-850 BACKEYE
Observatiecamera houdt geen garantie of belofte in
dat de gebruiker niet bij een ongeval betrokken zal
raken of anders niet met een object zal botsen. De
BACKEYE Observatiesystemen zijn op geen enkele
wijze bedoeld als vervanging voor aandachtig,
voorzichtig en defensief rijgedrag, of voor het
voortdurend respecteren van de toepasselijke
verkeerswetten en veiligheidsvoorschriften voor
auto's.
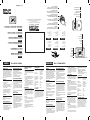
Fig.1
E
N
F
D
I
E
6 IR LEDs
6 IR LED's
6 DEL infrarouges
6 INFRAROT-LEDs
6 LED INFRAROSSI
6 LEDs IR
E
N
F
D
I
E
MICROPHONE
MICROFOON
MICROPHONE
MIKROFON
MICROFONO
MICRÓFONO
E
N
F
D
I
E
MAGNETIC SWITCH
MAGNETISCHE SCHAKELAAR
DETECTEUR MAGNETIQUE
MAGNETSCHALTER
INTERRUTTORE MAGNETICO
INTERRUPTOR MAGNÉTICO
ENGLISH
1 Video Output
2 N/C
3 Audio Output
4 Power DC 12V
5 Ground
NEDERLANDS
1 Video Output
2 N/C
3 Audio Output
4 Voeding DC 12V
5 Massa
FRANCAIS
1 Sortie vidéo
2 Non connectée
3 Sortie audio
4 Alimentation 12 Vcc
5 Recul (vert)
DEUTSCH
1 Videoausgang
2 N/C
3 Audioausgang
4 Netz DC 12V
5Erde
ITALIANO
1 Uscita video
2 N/C
3 Uscita audio
4 Alimentazione CC 12V
5 Terra
ESPANOL
1 Salida vídeo
2 N/C
3 Salida audio
4 Potencia DC 12V
5 Tierra
E
N
F
D
I
E
ATTACH THE SUPPLIED MOUNTING BRACKET TO VEHICLE.
ADJUST THE ANGLE OF THE CAMERA AND FASTEN THE
SCREW FIRMLY.
MONTEER DE MEEGELEVERDE MONTAGEBEUGEL OP HET
VOERTUIG. STEL DE CAMERAHOEK IN EN DRAAI DE
SCHROEF STEVIG AAN.
FIXER L'EQUERRE DE MONTAGE FOURNIE SUR LE
VEHICULE REGLER L'ANGLE DE LA CAMERA ET SERRER
SOLIDEMENT LES
BRINGEN SIE DIE MITGELIEFERTE HALTERUNG AM
FAHRZEUG AN. STELLEN SIE DEN KAMERAWINKEL EIN UND
ZIEHEN SIE DIE SCHRAUBEN FEST AN.
MONTARE LA STAFFA DI MONTAGGIO IN DOTAZIONE AL
VEICOLO. REGOLARE L'ANGOLAZIONE DELLA TELECAMERA
E SERRARE SALDAMENTE LA VITE.
INSTALAR EN EL VEHÍCULO LA ABRAZADERA DE MONTAJE
SUMINISTRADA. AJUSTAR EL ÁNGULO DE LA CÁMARA Y
APRETAR BIEN LOS TORNILLOS.
Pagina wordt geladen...
Documenttranscriptie
E INTERRUPTOR MAGNÉTICO I E Issue 1 - December 2006 INSTALAR EN EL VEHÍCULO LA ABRAZADERA DE MONTAJE SUMINISTRADA. AJUSTAR EL ÁNGULO DE LA CÁMARA Y APRETAR BIEN LOS TORNILLOS. INTERRUTTORE MAGNETICO D MAGNETSCHALTER MONTARE LA STAFFA DI MONTAGGIO IN DOTAZIONE AL VEICOLO. REGOLARE L'ANGOLAZIONE DELLA TELECAMERA E SERRARE SALDAMENTE LA VITE. I F DETECTEUR MAGNETIQUE ZIEHEN SIE DIE SCHRAUBEN FEST AN. N MAGNETISCHE SCHAKELAAR D FAHRZEUG AN. STELLEN SIE DEN KAMERAWINKEL EIN UND E MAGNETIC SWITCH BRINGEN SIE DIE MITGELIEFERTE HALTERUNG AM SOLIDEMENT LES F VEHICULE REGLER L'ANGLE DE LA CAMERA ET SERRER FIXER L'EQUERRE DE MONTAGE FOURNIE SUR LE VOERTUIG. STEL DE CAMERAHOEK IN EN DRAAI DE SCHROEF STEVIG AAN. Brigade Electronics plc Brigade House The Mills Station Road South Darenth Kent DA4 9BD UK Sales Support Tel: +44 (0)870 774 1500 Fax: +44 (0)870 774 1502 e-mail: [email protected] www.brigade-electronics.com N MONTEER DE MEEGELEVERDE MONTAGEBEUGEL OP HET REVERSE IN SAFETY! SCREW FIRMLY. CÁMARA BE-800C PARA SISTEMA CCTV DE VEHÍCULO E ADJUST THE ANGLE OF THE CAMERA AND FASTEN THE ATTACH THE SUPPLIED MOUNTING BRACKET TO VEHICLE. ESPANOL 1 2 3 4 5 DEUTSCH D 6 INFRAROT-LEDs ITALIANO Salida vídeo N/C Salida audio Potencia DC 12V Tierra VIDEOCAMERA CCTV BE-800C PER I VEICOLI ITALIANO BE-800C CCTV-KAMERA FÜR FAHRZEUGE ESPANOL F 6 DEL infrarouges 1 2 3 4 5 ENGLISH 1 2 3 4 5 NEDERLANDS Sortie vidéo Non connectée Sortie audio Alimentation 12 Vcc Recul (vert) CAMÉRA DE SURVEILLANCE AUTO BE-800C FRANCAIS FRANCAIS BE-800C CCTV-CAMERA VOERTUIG MICROFONO NEDERLANDS D MIKROFON F MICROPHONE BE-800C VEHICLE CCTV CAMERA N MICROFOON ENGLISH E MICROPHONE BEFORE INSTALLATION 1. This camera operates 12 volts, supplied by the monitor. 2. Please install the camera according to the instructions in this manual. 3. Do not disassemble the camera. This voids the warranty. Disassembling the camera will compromise the waterproof seal. 1. Connect to monitor cable via waterproof 4 pin connector. 2. Drill a 22mm - diameter hole into vehicle body near the camera and bracket. Connect camera connector to extension cable in vehicle. Push extra cable into vehicle (be careful not to kink cable) and fit grommet into hole. Apply sealant around grommet to increase resistance to water penetration. 3. ONLY PETROLEUM ROAD TANKERS: All electrical equipment fitted to petroleum vehicles must be fitted via the battery master switch and must be isolated from the battery while the vehicles are loading and unloading. CAMERA FUNCTION AND OPERATION 1. Waterproof microphone for audio pickup. 2. Mirror/Normal switch (waterproof) to change camera image from a mirror view rear of vehicle mounted. CAUTION 1. DO NOT OPEN THE CAMERA CASE. This will break the camera's waterproof seal. If evidence of tampering is detected, the warranty will be considered void. 2. Do not recommend mounting the camera near the lower area of the vehicle (e.g. bumper). This reduces the view of the camera and increases the chance of physical damage to the camera. 3. Use only hexagonal screws and washers supplied to mount the camera. MAINTENANCE Remove dust and dirt with a damp soft cloth. Heavier dirt should be removed with a damp soft cloth and mild detergent. Do not use strong cleaning agents containing gasoline, thinner, benzene or alcohol. These substances may damage the exterior surface of the camera. Do not steam clean the camera directly. CAUTION 1. Before drilling, be sure no cable or wiring is on the other side. Be sure drill a 22mm diameter hole only. 2. Feed as much cable as possible into vehicle and clamp securely. This reduces the possibility of it being hooked or snagged. 3. Keep all cables away from HOT, ROTATING and ELECTRICALLY NOISY components. 4. Do not twist camera cable and do not cut camera pigtail or cable SPECIFICATIONS BE-800C Camera Picture elements Image size Lens Focal length Horizontal resolution View Angles (D, H, V) Required illumination Power supply Power consumption Operating temperature Vibration Mechanical Shock Weight Dimensions (WxHxD)mm NTSC: 270,000 pixels PAL: 320,000 pixels 1/3 inch CCD 2.9mm, Maximum aperture F=2.0 330TV lines 133°, 105.2°, 78.3° 0.1 Lux Minimum 12Vdc 2.4W -30oC to +70oC 10g 100g 0.4Kg 69x43x61 DISCLAIMER The use of the BE-850 BACKEYE Observation Camera does not guarantee or promise that the user will not be in an accident or otherwise not collide with an object. BACKEYE Observation systems are not intended in any way to be a substitute for careful and cautious driving or for the consistent adherence to all applicable traffic laws and motor safety regulations. Fig.1 1-Camera 1-Camera bracket 4-Attachment screws with washers (M4 x 15) 1-Sun Shield WIRING CAMERA I DEUTSCH Video Output N/C Audio Output Voeding DC 12V Massa CONTENTS E MICRÓFONO 1 2 3 4 5 • 290,000 pixel image sensor • 0.1 Lux sensitivity • Automatic electronic iris provides a clearer, more consistent image in low and bright light • Wide-angle lens provides a broad viewing area (40°- 78° lens available). • Durable, waterproof construction (to IP68) • Built-in microphone for audio pick-up • Sun Shield reduces sunlight on the lens • Waterproof cable connection (IP68) 1. The camera-to-cable connection is waterproof. The cable-to-monitor connection is not waterproof. Be sure to orient the cable properly. The cylindrical end attaches to the camera. 2. Do not run the cable over sharp edges or corners. Do not kink the cable. Run in conduit if necessary. Keep the cable away from hot and rotating parts. 3. Keep any excess cable away from hot or rotating parts. 4. Secure the cable along its length with regularly spaced cable ties. E 6 IR LEDs Video Output N/C Audio Output Power DC 12V Ground BE-800C CAMERA CABLE (SUPPLIED SEPARATELY) N 6 IR LED's FEATURES 1. Attach camera bracket to upper portion of vehicle. Attachment point must be sturdy enough to support camera and bracket. 2. Attach camera to bracket using bolts provided. Adjust angle. (Use rear bumper and back of vehicle as a reference point.) 3. Select mirror or normal camera image via a magnetic switch as indicated in Fig. 1 6 LED INFRAROSSI 1 2 3 4 5 This BACKEYE Observation Camera has been designed to provide years of trouble-free operation. Please read this manual thoroughly. This manual contains instructions to easy installation of the camera. BACKEYE Observation systems are not intended in any way to be a substitute for careful, cautious, defensive driving or for the consistent adherence to all applicable traffic laws and motor safety regulations. INSTALLATION INSTRUCTIONS I Uscita video N/C Uscita audio Alimentazione CC 12V Terra NEDERLANDS BE-800C VEHICLE CCTV CAMERA INTRODUCTION E 6 LEDs IR 1 2 3 4 5 Videoausgang N/C Audioausgang Netz DC 12V Erde ENGLISH BE-800C CCTV-CAMERA VOERTUIG INLEIDING INSTALLATIE-INSTRUCTIES De BACKEYE Observatiecamera is ontworpen om jarenlang een probleemloze werking te garanderen. Gelieve deze handleiding grondig door te lezen. Deze handleiding bevat instructies om de camera eenvoudig te kunnen installeren. De BACKEYE Observatiesystemen zijn op geen enkele wijze bedoeld als vervanging voor aandachtig, voorzichtig en defensief rijgedrag, of voor het voortdurend respecteren van de toepasselijke verkeerswetten en veiligheidsvoorschriften voor auto's. KENMERKEN 1. Bevestig de camerahouder aan de bovenkant van het voertuig. Het bevestigingspunt moet stevig genoeg zijn om de camera en de houder te ondersteunen. 2. Bevestig de camera aan de houder met behulp van de bijgeleverde bouten. Stel de hoek af. (Gebruik de achterbumper en de achterkant van het voertuig als referentiepunt). 3. Kies mirror (spiegel) of normaal camerabeeld via een magnetische schakelaar, zoals aangegeven in Afb. 1 BE-800C CAMERA KABEL (APART TE LEVEREN) Beeldsensor met 290.000 pixels 0.1 Lux gevoeligheid • Automatische elektronische iris, die een duidelijker en consistenter beeld geeft bij weinig en bij veel licht • Groothoekobjectief voor een breed gezichtsveld (40°- 78° lens beschikbaar). • Duurzame, waterdichte constructie (volgens IP68) • Ingebouwde microfoon voor het oppikken van geluiden. • Zonnescherm vermindert zonlicht op de lens • Waterdichte kabelverbinding (IP68) 1. De verbinding tussen camera en kabel is waterdicht. De verbinding tussen kabel en monitor is niet waterdicht. Zorg ervoor dat u de kabel in de juiste richting installeert. Het cilindervormige uiteinde moet bevestigd worden aan de camera. 2. Zorg dat de kabel niet passeert over scherpe randen of hoeken. Zorg ervoor dat de kabel niet geknikt wordt. Voer het, indien nodig, door een leiding. Houd de kabel uit de buurt van hete en draaiende onderdelen. 3. Hou alle overtollige kabels uit de buurt van hete en draaiende onderdelen. 4. Maak de kabel op regelmatige afstanden over de hele lengte met klemmen vast. INHOUD 1-Camera 1-Camerahouder 4-Bevestigingsschroeven met sluitringen (M4 x 15) 1-Zonnescherm VÓÓR DE INSTALLATIE 1. Deze camera werkt op 12 volt dat door het scherm geleverd wordt. 2. Gelieve de camera volgens met de instructies in deze handleiding te installeren. 3. De camera niet demonteren. Als dit toch gebeurt, wordt de waarborg ongeldig. Het demonteren van de camera brengt de waterdichte afsluiting in gevaar. BEDRADING CAMERA 1. Sluit via een waterdichte 4-pins aansluiting op de beeldschermkabel aan. 2. Boor een gat met een diameter van 22mm in het lichaam van het voertuig, vlakbij de camera en de houder. Sluit de cameraconnector aan op de verlengkabel in het voertuig. Duw extra kabel in het voertuig (wees voorzichtig dat u de kabel niet knikt) en bevestig de doorvoerbuis in het gat. Breng afdichtmiddel aan rond de doorvoerbuis om de bestendigheid tegen waterindringing te verhogen. 3. ALLEEN AARDOLIETANKWAGENS: Alle elektrische apparatuur die op aardolievoertuigen is gemonteerd moet via de hoofdschakelaar van de batterij geplaatst worden en moet van de batterij geïsoleerd worden wanneer de voertuigen in- en uitgeladen worden. CAMERA HEEFT; 1. Waterdichte microfoon voor geluidsopname. 2. Spiegel/Normale schakelaar (waterdicht) om het camerabeeld van een aan de achterzijde van het voertuig bevestigd spiegelbeeld te veranderen. VOORZICHTIG 1. OPEN NOOIT DE CAMERAKAST. Hierdoor wordt de waterdichte verzegeling van de camera verbroken. Als een bewijs van onbevoegde montage gedetecteerd wordt, wordt de waarborg als ongeldig beschouwd. 2. Het wordt niet aanbevolen de camera vlakbij het onderste gedeelte van het voertuig (bijv. bumper) te monteren. Hierdoor wordt het zicht van de camera beperkt en de kans op een fysieke beschadiging van de camera verhoogt. 3. Gebruik alleen de meegeleverde zeskantschroeven en sluitringen om de camera te bevestigen. ONDERHOUD Verwijder stof en vuil met een vochtige, zachte doek. Zwaarder vuil moet verwijderd worden met een vochtige, zachte doek en een lichte detergent. Gebruik geen sterke reinigingsproducten met benzine, verdunningsmiddel, benzeen of alcohol. Deze stoffen kunnen het buitenoppervlak van de camera beschadigen. De camera niet direct met stoom reinigen. VOORZICHTIG 1. Ga voor het boren na of er zich aan de andere zijde geen kabels of draden bevinden. Zorg ervoor dat u enkel een gat met een diameter van 22mm boort. 2. Breng zoveel mogelijk kabel aan in het voertuig, en klem deze stevig vast. Zo loopt u minder de kans dat hij vastgehaakt wordt of achter iets blijft hangen. 3. Houd alle kabels uit de buurt van HETE, DRAAIENDE en DOOR ELEKTRISCHE RUIS GESTOORDE bestanddelen. 4. De camerakabel nooit buigen en nooit het oogje of de kabel van de camera doorsnijden. SPECIFICATIES BE-800C Camera Beeldelementen Beeldgrootte Brandpuntafstand Horizontale resolutie Gezichtshoeken (D, H, V) Vereiste verlichting Voeding Stroomverbruik Bedrijfstemperatuur Vibratie Mechanische schok Gewicht Afmetingen (BxHxD) mm NTSC: 270.000 pixels PAL: 320.000 pixels 1/3 Inch CCD 2.9 mm, Maximale diafragmaopening F=2.0 330 TV lijnen 133°, 105.2°, 78.3° Minimum 0,1 Lux 12V DC 2.4W -30ºC tot +70ºC 10g 100g 0.4Kg 69x43x61 EXONERATIECLAUSULE Het gebruik van de BE-850 BACKEYE Observatiecamera houdt geen garantie of belofte in dat de gebruiker niet bij een ongeval betrokken zal raken of anders niet met een object zal botsen. De BACKEYE Observatiesystemen zijn op geen enkele wijze bedoeld als vervanging voor aandachtig, voorzichtig en defensief rijgedrag, of voor het voortdurend respecteren van de toepasselijke verkeerswetten en veiligheidsvoorschriften voor auto's.-
 1
1
-
 2
2


Brigade BE-80XC (1623A)(1905)(1559)(1426)(2084) Installatie gids
- Categorie
- Beveiligingscamera's
- Type
- Installatie gids
in andere talen
- English: Brigade BE-80XC (1623A)(1905)(1559)(1426)(2084) Installation guide
- italiano: Brigade BE-80XC (1623A)(1905)(1559)(1426)(2084) Guida d'installazione
- français: Brigade BE-80XC (1623A)(1905)(1559)(1426)(2084) Guide d'installation
- español: Brigade BE-80XC (1623A)(1905)(1559)(1426)(2084) Guía de instalación
- Deutsch: Brigade BE-80XC (1623A)(1905)(1559)(1426)(2084) Installationsanleitung
Gerelateerde papieren
-
Brigade VBV-790C (2724) Installatie gids
-
-
-
-
-
-
-
-
-