Haier HW70-BP1439N Handleiding
- Categorie
- Wasmachines
- Type
- Handleiding
Deze handleiding is ook geschikt voor

GB
User manual
Washing machine
HW70-BP1439N

Thank You
GB
2
Legend
Warning – Important Safety information
General information and tips
Environmental information
Disposal
Help protect the environment and human health. Put
the packaging in applicable containers to recycle it.
Help to recycle waste of electrical and electronic ap-
pliances. Do not dispose appliances marked with this
symbol with the household waste. Return the product
to your local recycling facility or contact your municipal
Thank you for purchasing a Haier Product.
Please read these instructions carefully before using this appliance. The instructions con-
tain important information which will help you get the best out of the appliance and ensure
safe and proper installation, use and maintenance.
Keep this manual in a convenient place so you can always refer to it for the safe and proper
use of the appliance.
If you sell the appliance, give it away, or leave it behind when you move house, make sure
you also pass this manual so that the new owner can become familiar with the appliance
and safety warnings.
WARNING!
of it. Remove the door catch to prevent children and pets to get closed in the appliance.

GB
Content
3
1-Safety information ......................................................................................................................... 4
2-Product description ...................................................................................................................... 7
3-Control panel .................................................................................................................................. 8
4-Programmes .................................................................................................................................11
5-Consumption ................................................................................................................................12
6-Daily use .........................................................................................................................................13
7-Eco-friendly washing ..................................................................................................................18
8-Care and cleaning ........................................................................................................................19
9-Troubleshooting ...........................................................................................................................22
10-Installation ...................................................................................................................................25
11-Technical data .............................................................................................................................29
12-Customer service ......................................................................................................................30

1-Safety information
GB
4
-
ing safety hints!
WARNING!
▶ Make sure there is no transport damage.
▶ Make sure all transport bolts are removed.
▶ Remove all packaging and keep out of children´s reach.
▶ Handle the appliance always with at least two persons because it
is heavy.
Daily use
▶ This appliance can be used by children aged from 8 years and
above and persons with reduced physical, sensory or mental ca-
pabilities or lack of experience and knowledge if they have been
given supervision or instruction concerning use of the appliance
in a safe way and understand the hazards involved.
▶ Keep away children under 3 years of age from the appliance un-
less they are constantly supervised.
▶ Children shall not play with the appliance.
▶ Do not let children or pets come close to the appliance when the
door is open.
▶ Store washing agents out of reach of children.
▶ -
vent laundry from being entangled. If necessary, use an appropri-
ate bag or net.
▶ Do not touch or use the appliance when barefoot or with wet or
damp hands or feet.
▶ Do not cover or encase the appliance during operation or after-
wards to allow any moisture or dampness to evaporate.
▶ Do not place heavy objects or sources of heat or damp on top of
the appliance.
▶ Do not use or store flammable detergent or dry cleaning agent in
close vicinity to the appliance.
▶ Do not use any flammable sprays in close vicinity to the appliance.
▶ Do not wash any garments treated with solvents in the appliance
without having dried them previously in the air.

GB
1-Safety information
5
WARNING!
Daily use
▶ Do not remove or insert the plug in the presence of flammable
gas.
▶ Do not hot wash foamrubberorsponge-like materials.
▶ Do not wash any laundry which is polluted with flour.
▶ Do not open detergent drawer during any wash cycle.
▶ Do not touch the door during the washing process, it gets hot.
▶ Do not open the door if the water level is visibly over the porthole.
▶ Do not force the door to open. The door is tted with a self-lock
device and will open shortly after the washing procedure is ended.
▶
undertaking any routine maintenance and disconnect the appli-
ance from the electrical supply to save electricity and for safety.
▶ Hold the plug, notthecable,whenunpluggingtheappliance.
Maintenance / cleaning
▶ Make sure children are supervised if they carry out cleaning and
maintenance.
▶ Disconnect the appliance from the electrical supply before un-
dertaking any routine maintenance.
▶ Keep the lower part of the porthole clean and open door and de-
tergent drawer if appliance is not in use to prevent odours.
▶ Do not use water spray or steam to clean the appliance.
▶ Replace a damaged supply cord only by the manufacturer, its ser-
▶ Do not try to repair the appliance by yourself. In case of repair
please contact our customer service.
Installation
▶ The appliance should be placed in a well-ventilated place. Ensure
a location which allows opening the door fully.
▶ Never install the appliance outdoors in a damp place, or in an area
which may be prone to water leaks such as under or near a sink
unit. In the event of a water leak cut power supply and allow the
machine to dry naturally.

6DIHWLQIRPDWLRQ
WHGHGH
7KLV DSSOLDQFH LV LQWHQGHG IR DVKLQJ PDFKLQHDVKDEOH ODQ
GRQOQWLPHIROORWKHLQVWFWLRQVJLYHQRQWKHODEHORIHDFK
JDPHQWODEHO,WLVGHVLJQHGHFOVLYHOIRGRPHVWLFVHLQVLGHWKH
KRVH,WLVQRWLQWHQGHGIRFRPPHFLDORLQGVWLDOVH
Changesormodicationstothedevicearenotallowed.Unintended
VHPDFDVHKDDGVDQGORVVRIRIDOODDQWDQGOLDELOLWFODLPV
:511*
WDOODWLR
▶ ,QVWDOORVHWKHDSSOLDQFHRQOKHHWKHWHPSHDWHLVDERYH
r
▶ RQRWSODFHWKHDSSOLDQFHGLHFWORQDFDSHWRFORVHWRDDOO
RIQLWH
▶ RQRWLQVWDOOWKHDSSOLDQFHLQGLHFWVQOLJKWRLQWKHQHDRIKHDW
VRFHVHJVWRYHVKHDWHV
▶ 0DNH VH WKDW WKH HOHFWLFDO LQIRPDWLRQ RQ WKH DWLQJ SODWH
DJHHVLWKWKHSRHVSSO,ILWGRHVQRWFRQWDFWDQHOHFWL
FLDQ
▶ RQRWVHPOWLSOJDGDSWHVDQGHWHQVLRQFDEOHV
▶ 0DNHVHRQOWKHGHOLYHHGHOHFWLFFDEOHDQGKRVHVHWDHVHG
▶ 0DNHVHQRWWRGDPDJHWKHHOHFWLFFDEOHDQGWKHSOJ,IGDP
DJHGKDYHLWHSODFHGEDQHOHFWLFLDQ
▶ Useaseparateearthedsocketforthepowersupplywhichiseasy
DFFHVVLEOHDIWHLQVWDOODWLRQ7KHDSSOLDQFHPVWEHHDWKHG
▶ Makesurethehosejointsandconnectionsarermandthereis
QROHDNDJH

GB
2-Product description
7
2.1 Picture of appliance
2.2 Accessories
Check the accessories and literature in accordance with this list (Fig.2-3):
Inlet hose-
assembly
5 Blanking
plugs
Drain hose
bracket
User manual
Warranty-card
Note:
-
2-3
2x
2x
Noise
reduction pads
1. Detergent / Softener drawer
2. Programme selector
3. Worktop
4. Display
5. Rating plate
6.
7. Adjustable feet
1. Transportation bolts (T1-T4)
2. Back cover
3. Back cover screws (S1-S6)
4. Power cord
5. Water inlet valve
6. Drain hose
1400
rpm
Capacity
7kg
+++
A
Energy
Speed up
HW70-BP1439
Temp Speed Start/pauseExtra rinse DelaySte am
Cotton
Synthetics
Mix
Sportwear
Jeans
Baby clothes
Cotton+
Hygienic
Fast wash
Spin
Bed ding
Handwash
Delicate
Daily Wash
Quick 15”
Wool
2 3
5
6
7
41
T1
T2
T3
S1
S2
S6
S4
T4
1
2 3 4 5 6
S3
S5
2-1
2-2

3-Control panel
GB
8
1 “
2 Programme selector
3 Display
4 Detergent /Softener drawer
Press this button (Fig. 3-2) gently to switch on, the dis-
play is shining, the indicator of the “Start/Pause” button
is flashing. Press it again for about 2 seconds to switch
-
ter a while machine will shut down automatically.
3-2
3.2 Programme selector
By turning the knob (Fig. 3-3) one of 16 programmes
can be selected, related LED will light up, its default
settings will be displayed.
3.3 Display
The display (Fig. 3-4) shows following information:
▶ Washing time
▶ End time delay
▶ Error codes and service information
3-4
5 Function buttons
6 “Delay” button
7 “Start/Pause“ button
Note : Acoustic signal
In following cases, an acoustic signal is no sounds by default:
▶ when pressing a button
▶ when turning the programme selector
▶ at the end of programme
The acoustic signal can be selected if necessary ; see DAILY USE.
3-3
3-1
4

GB
3-Control panel
9
3.5 Function buttons
The function buttons (Fig. 3-6) enable additional op-
tions in the selected programme before programme
starts. The related indicators are displayed.
-
gramme, all options are disabled.
If a button has multiple options, the desired option can
be selected by pressing the button sequentially.
To delete the setting or to cancel the setting process,
press the function button until the desired LED lights
3-6
3.5.1-Function button “ Temp.“
Press this button (Fig. 3-7) to change the washing
temperature of the programme. If no value is illumi-
nated the water will not be heated.
In conjunction with the “Steam” button, the child lock
3.5.2-Function button “Speed”
Press this button (Fig. 3-8) to change or deselect the
spin of the programme. If no value is illuminated the
laundry will not spun.
Note: Factory settings
there is no special requirement default settings are recommended.
3.4 Detergent drawer
Open the drawer, three compartments can be
seen (Fig. 3-5):
Compartment 1 : Water inlet only, no detergent
Compartment 2 : Detergent for programme
Compartment : Softener, Conditioning agent etc.
The recommendation on the type of detergents is
suitable for the various washing temperatures, please
refer to the manual of detergent.
3-5
3.5.3-Function button “Steam“
3-7 3-8
Press this button (Fig. 3-9) to activate the steam function.When this function is activated
the default temperature is the maximum temperature of the programme selected.This
function can be activated only with the following programmes: Cotton, Synthetic, Mix,
Baby Care, Hygiene.When the function is activated the led above the button will light up.
Pushing again this button the function can be deactivated and the led above the button
willturnoff.Whenthefunctionisactivatedthetemperatureofthe programme cannot
be changed.
( )
3.5.1 3.5.2 3.5.3 3.5.4 3.5.5

3-Control panel
GB
10
3.5.4 Function button“Extra rinse“
Press this button (Fig. 3-10) to rinse the laundry more
intense with fresh water. This is recommended for
people with sensitive skin.
By pressing the button several times one to three ad
-
ditional cycles can be selected. They appear in the dis
-
play with P--1/P--2/P--3.
3.5.5 Function “Speed up“
This function saves time and energy. Preferable if laun-
dry is slightly soiled. Press simultaneously button
“Extra
rinse“ and ”Delay” (Fig. 3-11) for about 3 seconds
to activate the “Speed up” function;
SPEEd
uP
is dis
-
played. This function is not available in all programmes
(see PROGRAMMES).
3.7 “Start/Pause“ button
Press this button (Fig. 3-13) gently to start or inter
-
rupt the currently displayed programme. During pro
-
gramme setting and during programme run the LED
above the button is shining, or if interrupted blinking.
3.6 Function button “Delay”
Press this button (Fig. 3-12) to start the programme
with a delay. End time delay could be increased in steps
6:30 means
end of programme cycle will be in 6 hours and 30 minut-
es.Press “Start/Pause” button to activate delay. It is not
applicable to programme Spin,Eco 40-60.
Note: Liquid detergent
If using liquid detergent, it is not recommended to activate the end time delay.
3.8 Child lock
Press button “Temp.“ and ”Steam” (Fig. 3-14) for 3
seconds simultaneously to block all panel elements
against activation. For unlocking please press again
the two buttons.
The display shows (Fig. 3-15) if a button will be
pressed, when the child lock is activated. The change
is not running.
3-15
Extra rinse
3-10
Delay
Extra rinse
Speed up
3-11
Delay
3-12
Start/Pause
3-13
3-14
Temp
Speed Steam
Steam
3-9
If “Temp.” button is pushed the “Steam” function will be
deactivated.You can activate “Steam” function only bef-
ore to start any programme. You cannot activate “Steam”
-
function while the appliance is already executing a programme.
(add time to the original
programme time).

4-Programmes
11
1)
Relating to dry laundry.
2)
Choose 90 °C wash temperature only for special hygiene requirements. *: water will not heated (no
value is iluminated).
3)
Reduce detergent amount because programme duration is short.
Max. load Temperature Preset
spin speed
in rpm
Function
in kg
in °C
Preset
Steam
Extra rinse
Speed up
Programme
seletable
range 2 1 Fabric type
Cotton 7 * to 90 40
•
º
/
Cotton 1400
• • •
Synthetic 3.5 * to 60 40
•
º
/
Synthetics or
mixed fabric
1200
• • •
Mix * to 60 30
•
º
/
Lightly soiled
mixed-laundry
of cotton and
synthetics
1000
• • •
t
ent
Hygiene 90 90
•
º
/ Cotton 1000
• •
Eco 40-60
/
/
•
º
/ Cotton / /
Fast
3)
* to 40 40
•
º
/
Lightly soiled laun-
dry made of cot-
ton or synthetics
1000 /
•
/
Express
15min
3)
1 * to 40 *
•
º
/
Cotton / Syn-
thetics
1000 /
•
/
Underwear
* to 60 40
•
º
/
Underwear 1000
• •
t t
Delicate
* to 30 30
•
/ /
Delicate laundry
and silk
400
/
•
/
Cotton 20°C
20 20
•
º
/
Cotton
1400
/
•
Duvet
* to 40 40
•
/
Duvet
800
• •
Spin
/
/
/ / /
all fabrics
1000
/ / /
2)
Detergent compartment for:
1
Water inlet only, no deter-
gent
2
Detergent
Softener or care product
•
Yes,
º
Optional, / No
/
//
Wool * o 40 *
•
/ / 800
•
/
/
Machine-washa-
ble fabric made of
wool or with wool
cont
* o 90
40
•
º
/ Co ton/Synthetics 1000
•
•
•
Baby Care
2)
/
/ /
•
Sport * to 40 20
•
º
/ Sports wear 800
/
•
/
Jeans * to 60 30
•
º
/ Cotton 1000
/
• •
GB
7
3.5
3.5
3.5
7
7
3.5
3.5
3.5
7
1
1
1

5-Consumption
GB
12
Note: Auto Weight
The appliance is equipped with a loading recognition. At low loading, energy, water and
Scan QR code on energy label for energy consumption information.
Theactualenergyconsumptionmaydifferfromthedeclaredoneaccording to local
conditions.
EU1015/2010 program
Select Eco 40-60, press “speed” 10s, then adjust to 60°C/40°C with max. spin speed.
The standard 60°C and 40°C cotton programmes are suitable to clean normally soiled
cottonlaundry.Theyarethemostefficientprogrammesintermsof combined energy
and water consumption for cotton laundry.Actual water temperaturemaydifferfrom
declared cycle temperature.
washing time will be reduced automatically in some programs.The display shows AUtO.

GB
6-Daily use
13
6.3 Preparing laundry
▶ Sort out clothes according to fabric (cotton, syn-
thetics, wool or silk etc.) and to how dirty they are
(Fig. 6-3).Pay attention to the care labelling of w-
ashing labels.
▶ Separate white clothes from coloured ones.
they fade or run.
▶ Empty pockets (keys, coins, etc.) and remove
harder decorative objects (e.g. brooches).
▶ -
a wash bag to care for this delicate laundry (hand
or dry cleaning would be better).
▶ Close zippers, velco fastener and hooks, make
sure the buttons are sewn on tightly.
▶
hem, delicate underwear (Dessous) and small
items such as socks, belts, bras, etc. in a wash
bag.
▶ Unfold large pieces of fabric such as bed sheets,
bedspreads etc.
▶ Turn jeans and printed, decorated or color-inten-
sive textiles inside out; possibly wash separately.
6-3
6.1 Power supply
Connect the washing machine to a power supply
(220V to 240V~/50Hz; Fig. 6-1). Please refer also to
section INSTALLATION.
6.2 Water connection
▶ Before connecting check the cleanliness and clar-
ity of the water inlet.
▶ Turn on the tap (Fig.6-2).
Note: Tightness
Before use check for leakage in the joints between the tap and the inlet hose by turning
on the tap.
CAUTION!
Non-textile, as well as small, loose or sharp-edged items may cause malfunctions and
damage of clothes and appliance.
6-1 6-2

6-Daily use
GB
14
Care chart
Washing
Washable up to 95°C
normal process
Washable up to 60°C
normal process
Washable up to 60°C
mild process
Washable up to 40°C
normal process
Washable up to 40°C
mild process
Washable up to 40°C
very mild process
Washable up to 30°C
normal process
Washable up to 30°C
mild process
Washable up to 30°C
very mild process
Wash by hand
max. 40°C
Do not wash
Bleaching
Any bleaching allowed Only oxygen/
non -chlorine
Do not bleach
Drying
Tumble drying possible
normal temperature
Tumble drying possible
lower temperature
Do not tumble dry
Line drying Flat drying
Ironing
Iron at a maximum
temperature
up to 200 °C
Iron at a medial tem-
perature
up to 150°C
Iron at a low temper-
ature up to 110 °C;
without steam (steam
ironing may cause irre-
versible damage)
Do not iron
Professional Textile Care
Dry cleaning in tetra-
chloroethene
Dry cleaning in hy-
drocarbons
Do not dry clean
Professional wet clean Do not professional
wet clean
6.4 Loading the appliance
▶ Put in the laundry piece by piece.
▶
thumb for maximum load: Keep six inches between load and drum top.
▶ Close the door carefully. Make sure that no pieces of laundry are pinched.

GB
6-Daily use
15
6.5 Selecting detergent
▶ W
▶ Use only machine wash approved detergent.
▶ ergents, e.g. for synthetic and woolen fabric.
▶ Mind always detergent manufacturer recommendations.
▶ Do not use dry cleaning agents such as trichloroethylene and similar products.
Choose the best detergent
L = gel-/liquid detergent P = powder detergent O = optional
_
= no
If using liquid detergent, it is not recommended to activate the time delay.
We recommend by using:
▶ Laundry powder: 20°C to 90°C* (best use: 40-60°C)
▶ Color detergent: 20°C to 60°C (best use: 30-60°C)
▶ Wool/delicate detergent: 20°C to 30°C (best use:20-30°C)
* Choose 90 °C wash temperature only for special hygienic requirements.
15
Programme
Kind of detergent
Universal Colour Delicate Special Softener
Cotton L/P L/P - -
Synthetic L/P -
Mix L L/P - -
Underwear
Cotton 20°C -
Hygiene L/P L/P
Fast - -
Express 15 min L L - -
Sport - -
Baby Care
Delicate/silk - -
Jeans L L
Duvet - - L L/P
Wool - -
L/P L/P
L/P L/P
L/P L
- -
Eco 40-60
Spin
- -
-
-
-
L/P L/P -
-
L/P L/P
L/P L/P
L/P L/P
- -
- -
L/P L/P
- -

6-Daily use
GB
16
6.7 Switch on the appliance
(Fig. 6-5). The LED of the
„
Start/Pause“ button is flas-
hing.
6.6 Adding detergent
1. Slide out the detergent drawer.
2. Put the required chemicals into corresponding
compartments (Fig. 6-4).
3. Push back the drawer gently.
Note:
▶ Remove detergent residues before next wash cycle from the detergent drawer.
▶ Do not overuse detergent or softener.
▶ Please follow the instruction on the detergent package.
▶
▶ Concentrated liquid detergent should be diluted before adding into compartment 2.
▶ The best use of liquid detergent is by using a dosing ball, which is given with the laun-
dry into the washing machine.
▶ Do not use liquid detergent if “end time delay“ is selected.
▶ Carefully choose the programme settings according to the care symbols on all laun-
dry labels and according to the programme table.
6.8 Select a programme
To get the best washing results, select a programme
type.
Turn the programme knob (Fig. 6-6) to select the right
programme. Related programme LED lights up and
the default settings are displayed.
6.9 Add individual selections
Select required options and settings (Fig. 6-7); refer to
CONTROL PANEL.
Start/Pause
6-7
6-4
6-5 6-6
Note: Odour removal
amount of detergent in washing agent compartment (2) or special machine cleaner to
remove possibly corruptive residues.

GB
6-Daily use
17
1. At programme cycle end
EnD
is displayed.
2.
3. Remove laundry as soon as possible to go easy on it and to prevent more wrinkling.
4.
5. Unplug the power cord.
6. Open the door to prevent formation of moisture and odours. Let it open while not used.
6.13 Activate or deactivate the buzzer
The acoustic signal can be selected if necessary:
1. Switch on the appliance.
2. Select the SPIN programme.
To interrupt a running programme press gently “Start/Pause“. The LED above the button
is flashing. Press it again to resume operation.
To cancel a running programme and all its individual settings
1. Press “Start/Pause” button to interrupt the running programme.
2.
3.
4.
After closing th e program to restart the appliance,select a new programme and start it.
Press“On/Off”buttontoturnontheappliance,selectprogrammeSpin and then se-.
lect"noSpeed"(speedlightsareoff),startthemachinetodrain the water.
6.12 After washing
Note: Door lock
▶ For safety reasons the door is locked partially during the washing cycle. It is only pos-
sible to open the door at the end of the programme or after the programme was can-
celled correctly(seedescriptionabove).
▶ In case of high water level, high water temperature and during spinning it is not pos-
sible to open the door;
Loc
1-
is displayed.
Note: Standby mode / energy-saving mode
The switched on appliance will go into standby mode if it will not be activated within 2
This saves energy. To interrupt the standby mode push “Start/Pause“ button.
6.10 Start wash programme
Press “Start/Pause“ button (Fig. 6-8) to start. The LED
of the “Start/Pause“ button stops flashing and lights
up continuously.
Appliance operates according to present settings.
Changes are only possible by cancelling the programme.
6.11 Interrupt / cancel wash programme
6-8
3. Press the “Steam “button and “Extra rinse” button at the same time for about 3 sec-
onds. “
bEEP OFF
” will be displayed and the buzzer will be deactivated.
For activating the buzzer press these two buttons at the same time again. “
bEEP ON
”
will be displayed.

7-Eco-friendly washing
GB
18
Environmentally responsible use
▶ To achieve best use of energy, water, detergent and time you should use the recom-
mended maximum load size.
▶ Do not overload (hand width clearance above laundry).
▶ For slightly soiled laundry select the Express 15min programme.
▶ Apply exact dosages of each washing agent.
▶ Choose the lowest adequate washing temperature - modern detergents are ef-
▶ Raise default settings only due to heavy staining.
▶ Select maximum spinning speed if a domestic dryer is used.

GB
8-Care and cleaning
19
8.1 Cleaning the detergent drawer
Take always care there are no detergent residues.
Clean the drawer regularly (Fig. 8-1):
1. Pull out the drawer until it stops.
2. Press the release button and remove the drawer.
3. Flush the drawer with water until it is clean and
insert the drawer back in the appliance.
8.2 Cleaning the machine
▶ Unplug the machine during cleaning and mainte-
nance.
▶ Use a soft cloth with soap liquid to clean the ma-
chine case (Fig. 8-2) and rubber components.
▶ Do not use organic chemicals or corrosive sol-
vents.
Note: Hygiene
For regular maintenance we recommend to run programme HYGIENE with no load in
order to remove possible corruptive residues quarterly. Add a small amount of deter-
gent in washing agent compartment (2) or use a special machine cleaner.
To prevent blockage of water supply by solid substanc-
▶
supply.
▶ Unscrew the water inlet hose at the back (Fig.
8-3) of the appliance as well as on the tap.
▶
▶
8.4 Cleaning the drum
▶ Remove accidentally washed metal parts such as
pins, coins, etc. from the drum (Fig. 8-5) because
they cause rust stains and damage.
▶ Use a non-chloride cleaner for removing rust
stains. Observe the warning hints of the cleaning
agent manufacturer.
▶ Do not use any hard objects or steel wool for clean-
ing.
8-38-4
8-5
8-1
1
2
8-2

8-Care and cleaning
GB
20
1.
2. Open service flap. You can either use a coin or a
screwdriver (Fig. 8-9).
3. Provide a flat container to catch leach water
(Fig. 8-10). There could be bigger amounts!
4. Pull the drainhose out and hold its end above the
container (Fig. 8-10).
5. Take the sealing plug out of the drainhose (Fig.
8-10).
6. After complete drainage close drainhose and
push it back into the machine (Fig. 8-11).
7. Unscrew and remove counter clockwise the pump
8. Remove contaminants and dirt (Fig. 8-13).
8.5 Long periods of disuse
If the appliance is left idle for a longer period:
1. Pull out the electrical plug (Fig. 8-6).
2.
3. Open the door to prevent formation of moisture
and odours. Let door open while not used.
Before next usage check carefully power cord, water
inlet and drain hose. Make sure everything is properly
installed and without leakage.
WARNING!
hot! Before any action please ensure water has
cooled down.
Note: Hygiene
After long periods of disuse we recommended to run programme HYGIENE with no
load and small amount of detergent in washing agent compartment (2) or special ma-
chine cleaner to remove possibly corruptive residues.
for instanvce if the appliance:
▶ Doesn´t drain the water.
▶ Doesn´t spin.
▶ Cause unusual noise while running.
8-8 8-9
8-10 8-11
8-12 8-13
8-6 8-7

DHDQGFOHDQLQJ
8721
▶ Pumpltersealinghastobecleanandunhurt.Ifthelidisnotfulltightened,water
FDQHVFDSH
▶ Theltermustbeinplace,oritmayleadtoleakage.
Cleancarefullypumplter,e.g.usingrunningwater
)LJ
Rexitthoroughly(Fig.8-15).
Closeserviceflap.

9-Troubleshooting
GB
22
9.2 Troubleshooting with display code
Problem Cause Solution
•
Drainage error
•
• Check drain hose installation.
E2
• Lock error. • Shut the door properly.
E4
•
•
Drain hose is self-syphoning.
•
Make sure that tap is fully opened and water
pressure is normal.
•
Check drain hose installation.
E8
•
Water protective level error. • Contact the After sales service.
of a problem please check all shown possibilities and follow below instructions before you
contact an after sales service. See CUSTOMER SERVICE.
WARNING!
▶ Before maintenance, deactivate the appliance and disconnect the mains plug from
the mains socket.
▶
improper repairs can cause considerable consequential damages.
▶ A damaged power cable should only be replaced by the manufacturer, its service
9.1 Information codes
Following codes are displayed only for information referring to the washing cycle. No
measures must be performed.
Code Message
1:25
The remaining wash cycle time will be 1 hour and 25 minutes.
6:30
The remaining wash cycle time including chosen end-time delay will be 6 hours and 30 min-
utes.
P--1/2/3
1/2/3 additional rinses are choosen (see FUNCTION BUTTONS “Extra rinse“).
End
Function child lock is activated.
Loc
Door is closed because of high water level, high water temperature or spinning cy-
cle.
bEEP OFF
The buzzer is deactivated.
bEEP ON
The buzzer is activated.
SPEEd
CLR FLTR
up
Function “Speed up” is activated.
Water level not reached.
1-
cLrd

GB
9-Troubleshooting
23
Program Cause Solution
F3
• Temperature sensor error. • Contact the After sales service.
F4
• Heating error.
• Contact the After sales service.
F7
FA
• Motor error. • Contact the After sales service.
FC1
or FC2
• Abnormal communication error.
• Contact the After sales service.
UnB
• Unbalanced load error. • .murd eht ni daol yrdnual ecnalab dna kcehC
Reduce the load.
Problem Cause Solution
Washing machine fails
to operate.
• Programme is not yet started. • Check programme and start it.
• Door is not properly closed. • Close the door properly.
• Machine has not been switched on. • Switch the machine on.
• Power failure. • Check power supply.
• Child lock is activated. • Deactivate child lock.
Washing machine
water.
• No water. • Check water tap.
• Inlet hose is kinked. • Check inlet hose.
• •
• Water pressure is less than 0.03 MPa.
• Check water pressure.
• Door is not properly closed. • Close the door properly.
• Water supply failure. • Ensure the water supply.
Machine is draining
• Height of drain hose is below 80 cm.
• Make sure that drain hose is
properly installed.
• Drain hose end could reach into
water.
• Make sure the drain hose is not
in water.
Drainage failure. • Drain hose is blocked. • Unblock drain hose.
• •
• Drain hose end is higher than 100 cm
above floor level.
• Make sure that drain hose is
properly installed.
Strong vibration while
spinning.
• Not all transportation bolts have
been removed.
• Remove all transportation bolts
.
• Appliance has no solid position.
• Ensure solid ground and a levelled
position.
• Machine load is not correct. • Check load weight and balance.
Operation stops
before completing
wash cycle.
• Water or electric failure. • Check power and water supply.
Operation stops for
a period of time.
• Appliance displays error code. • Consider display codes.
• Problem due to load pattern. • Reduce or adjust load.
• Programme performs soaking cycle.
• Cancel programme and restart.
9.3 Troubleshooting without display code
FC0
Water level sensor error.• Contact the After sales service.•

9-Troubleshooting
GB
24
-
ance, disconnect the power supply and contact the customer service.
9.4 In case of power failure
The current programme and its setting will be saved.
When power supply is restored operation will be re-
sumed.
In case of power failure during programme run door
opening is mechanically blocked. If the laundry is to
be removed, the water level must not be visible in the
glass door. Danger of scalding!
▶ Lower the water level according to step 1 to 6 of
chapter CARE AN CLEANING (PUMP FILTER).
▶ Pull lever (A) beneath service flap (Fig. 9-1) until
door is unlocked by a gentle click.
▶ Fix all parts and close the service flap.
A
9-1
Note: Foam formation
If too much foam is inspected during spin cycle, motor stops and drain pump will be ac-
tivated for 90 seconds. If that elimination of foam fails up to 3 times, programme ends
without spinning.
Problem Cause Solution
Excessive foam floats
drum and/or deter-
gent drawer.
• Detergent is not a appropriate. • Check detergent recommen-
dations.
• Excessive use of detergent. • Reduce amount of detergent.
Automatic adjust-
ment of washing
time.
• Washing programme duration will
be adjusted.
• This is normal and doesn‘t af-
fect functionality.
Spinning fails. • Unbalance of laundry. • Check machine load and laun-
dry and run a spinning pro-
gramme again.
Unsatisfactory wash-
ing result.
• Degree of pollution does not agree
with selected programme.
• Select an other programme.
• Detergent quantitiy was not suf- • Choose the detergent accord-
ing to the degree of pollution
and according to manufacturer
•
Maximum load has been exceeded.
• Reduce loading.
•
Laundry was unevenly distributed
in the drum.
• Loose the laundry.
Washing powder
residues are on the
laundry.
•
Insoluble particles of detergent can
remain as white spots on the laun
-
dry.
•
Perform extra rinse.
•
Try to brush the points from the
dry laundry.
•
Choose an other detergent.
Laundry has grey
patches.
•
Caused by fats such as oils, creams
or ointments.
•
Pretreat the laundry with a spe
-
cial cleaner.

GB
10-Installation
25
10.1 Preparation
▶ Take the appliance out of the packaging.
▶ Remove all packaging material including polystyrene base, keep them out of childrens
reach. While opening the package, water drops may be seen on plastic bag and port-
hole. This normal phenomenon results from water tests in the factory.
Note: Packaging disposal
Keep all packaging materials out of children´s reach and dispose them in an environmen-
tally friendly manner.
10.2
(1) (2)
(3)
10-1
2x
2x
Noise resuction pads installation instructions
noise
reduction pads.
These are used for reducing noise. (Fig. 10-1)
3.
2. Lay the washing machine down to its side, porthole
pointing upwards, bottom side towards operator.
pads and remove the
double-sided adhesive protectivefilm;thenoiseredu-
ction pads under the washing machine cabinet as
sh-
own in Figure 10.1(3),two longer pads in position 1 and
3, two shorter pads in position 2 and 4. Finally set the
machine upright again.
1.
Warm tip:
Noise reduction pad is optional , could help to reduce
noise , please assemble it or not according to your
own demand.
10.3 Dismantle the transportation bolts
The transportation bolts are designed for clamping
anti-vibration components inside the appliance during
transportation to prevent inner damage.
1.
2.
Remove all 4 bolts on the rear side and take out
plastic spacers (Fig. 10-2)(Fig. 10-3).
Fill left holes with blanking plugs (Fig. 10-4)(Fig. 10-5).
10-2 10-3
10-510-4

10-Installation
GB
26
10.6 Drain water connection
Fix the water drain hose properly to the piping. The hose has to reach at one point a height
between 80 and 100 cm above the appliance bottom line! If possible keep always drain
WARNING!
▶ Use only the supplied hose set for the connection.
▶ Never reuse old hose sets!
▶ Only connect to cold water supply.
▶ Before connection, check whether the water is clean and clear.
10.5 Aligning the appliance
Adjust all feet (Fig. 10-6) to achieve a complete level
position. This will minimize vibrations and thus noise
during use. It will also reduce wear and tear. We recom-
mend to use a spirit level for adjustment. Floor should
be as stable and flat as possible.
1. Loose the locknut (1) by using a wrench.
2. Adjust the high by turning the foot (2).
3. Tighten locknut (1) against the housing.
10-6
Note: Keep in safe place
Keep the transportation bolts in a safe place for later use. Whenever the appliance is to
10.4 Moving the appliance
If the machine is to be moved to a distant location, replace the transportation bolts re-
moved before installation to prevent damage:
1. Remove the blanking plugs.
2. Remove the back cover.
3. Insert the plastic spacers and the transportation bolts.
4. Tighten the bolts with a spanner.
5. Replace the back cover.

GB
10-Installation
27
10.7 Fresh water connection
CAUTION!
▶ The drain hose should not be submerged in water and should be securely xed and
leak-free. If the drain hose is placed on the ground or if the pipe is at a height of less
than 80 cm, the washing machine will continuously drain while being lled (self-si-
phoning).
▶ Drain hose is not to be extended. If necessary contact after sales service.
Make sure that the gaskets are inserted.
1. Connect the water inlet hose with the angled
end to the appliance (Fig. 10-10). Tighten the
screw joint by hand.
2. The other end connect to a water tap with a
3/4“ thread (Fig. 10-11).
Note: Aqua-stop system:
Some models are equipped with an aqua-stop inlet hose (B).The aqua-stop system
protects against water damage by automatically cutting the fresh water supply in case
of a leaking hose. This is indicated by a red marker (C). The hose must be replaced.
10.6.3 Drain hose to sink connection
▶ The junction must lie above the siphon.
▶ A spigot connection is usually closed by a pad (A).
That must be removed to prevent any disfunc-
tion (Fig. 10-9).
▶ Secure the drain hose with a clamp.
10-9
10-11
10-10
Following connections are possible:
10.6.1 Drain hose to sink
▶ Hang the drain hose with the U-support over the
edge of a sink with adequate size (Fig. 10-7).
▶ -
ping.
10.6.2 Drain hose to waste water connection
▶ The internal diameter of the stand pipe with
vent-hole must be minimum 40 mm.
▶ Put the drain hose for approx. 80 mm in the
wastewater pipe.
▶
(Fig. 10-8).
10-7 10-8

10-Installation
GB
28
10.8 Electrical connection
Before each connection check if:
▶ Power supply, socket and fusing are appropriate to
the rating plate.
▶ The power socket is earthed and no multi-plug or
extension are used.
▶ The power plug and socket are strictly according.
▶ Only UK: The UK plug meets BS1363A standard.
Put the plug into the socket (Fig. 10-12).
WARNING!
▶
dry and leak free!
▶ Take care these parts are never to be crushed, kinked, or twisted.
▶ If the supply cord is damaged, it must be replaced by the service agent (see warranty
card) in order to avoid a hazard.
Note: Hygiene
-
nance run programme HYGIENE with no load and small amount of detergent in wash-
ing agent compartment (2) or with special machine cleaner to remove possibly corrup-
tive residues.
10-12

GB
11-Technical data
29
HW70-BP1439N
Voltage in V 220-240 V~/50Hz
Current in A 10
Max power in W 1900
Water pressure in MPa 0.03≤P≤1
Netto weight in kg 64
11.1 Additional technical data
11.3 Standards and Directives
This product meets the requirements of all applicable EC directives with the correspon-
ding harmonised standards, which provide for CE marking.
Note: The exact height of your washer is dependent on how far the feet are extended from
the base of the machine. The space where you install your washer needs to be at least
40mm wider and 20mm deeper than its dimensions.
TOP VIEWWallFRONT VIEW
B Overall width of product mm
A Overall height of product mm
C Overall depth of product
(To main control board size) mm
D Depth of door open mm
E Minimum door clearance
to adjacent wall mm
11.2 Product dimensions
850
595
460
960
400
HW70-BP1439N

GB
30
12-Customer service
We recommend our Haier Customer Service and the use of original spare parts.
▶ your local dealer.
▶
and FAQs and where you can activate the service claim.
To contact our Service, ensure that you have the following data available.
The information can be found on the rating plate.
Model ____________________ Serial No. _____________________
Also check the Warranty Card supplied with the product in case of warranty.
European Haier addresses
Country* Postal address Country* Postal address
Italy
Haier Europe Trading SRL
Via De Cristoforis, 12
21100 Verese
ITALY
France
Haier France SAS
3-5 rue des Graviers
92200 Neuilly sur Seine
FRANCE
Spain
Portugal
Haier Iberia SL
Pg. Garcia Faria, 49-51
08019 Barcelona
SPAIN
Belgium-FR
Belgium-NL
Netherlands
Luxembourg
Haier Benelux SA
Anderlecht
Route de Lennik 451
BELGIUM
Germany
Austria
Haier Deutschland GmbH
Konrad-Zuse-Platz 6
81829 München
GERMANY
Poland
Czechia
Hungary
Greece
Romania
Russia
Haier Poland Sp. zo.o.
Al. Jerozolimskie 181B
02-222 Warszawa
POLAND
United
Kingdom
Haier Appliances UK Co.Ltd.
One Crown Square
Church Street East
Woking, Surrey, GU21 6HR
UK
*For more information please refer to www.haier.com

GB
31


FR
Manuel d'utilisation
du lave-linge
HW70-BP1439N

1RVYRVUHPHUFLRQV
/JHQH
HLRHLPRUHGHFUL
*QUDLWVHWFRQVHLV
,QIRUPDWLRQVVUHQYLURQQHPHQW
0LVHDUHEW
RQWULEHDSURWHFWLRQGHHQYLURQQHPHQWHWGHD
VDQWKPDLQH9HLHPHWWUHHVHPEDDJHVDUH
EWGDQVHVHVSDFHVFRQIRUPHVSRUHUUHFFDJH
RQWULEH UHFFHU HV GFKHWV GDSSDUHLV HF
WULTHV HWHFWURQLTHV1H PHWWH SDV D UHEWHV
DSSDUHLV PDUTV GH FH VPERH DYHF HV GFKHWV
PQDJHUV9HLHGSRVHUDSSDUHLYRWUHVLQHGH
UHFFDJHRFDHRSUHQGUHFRQWDFWDYHFYRWUHEUHD
PQLFLSD
1RVRVUHPHUFLRQVDRLUDFHWQSURLWDLHU
9HLHLUHDWWHQWLYHPHQWFHVLQVWUFWLRQVDYDQWGWLLVHUDSSDUHLHVLQVWUFWLRQVVRQW
GHVLQIRUPDWLRQVWLHVYRVSHUPHWWDQWGHPLHHSRLWHUFHWDSSDUHLHWYRVDVVUHU
QHLQVWDDWLRQQHWLLVDWLRQHWQHQWUHWLHQVFULVVHWDGTDWV
9HLHELHQJDUGHUFHPDQHHWWRRUVYRVUIUHUSRUQHWLLVDWLRQVFULVHHW
DGTDWHGHDSSDUHL
6LYRVGHYHYHQGUHGRQQHURDEDQGRQQHUDSSDUHLSRUFDVHGHGPQDJHPHQW
assurez-vouségalementdelaissercemanuelanqueleprochainutilisateurpuissemaî
WULVHUDSSDUHLQRWDPPHQWHVUJHVGHVFULW
AVERTISSEMENT!
Risquedeblessureoud'asphyxie!
'EUDQFKHDSSDUHLGHWRWHDLPHQWDWLRQSULQFLSDHRSHHVFEHVSULPDLUHVHW
PHWWHHVDUHEW5HWLUHHYHUURGHDSRUWHSRUYLWHUTQHQIDQWRQDQLPD
GRPHVWLTHQHVRLWFRLQFGDQVDSSDUHL

6RPPDLUH
RQVLJQHVGHVFULW
'HVFULSWLRQGSURGLW
3DQQHDGHFRPPDQGH
3URJUDPPHV
RQVRPPDWLRQ
8WLLVDWLRQTRWLGLHQQH
/DYDJHFRRJLTH
(QWUHWLHQHWQHWWRDJH
'SDQQDJH
,QVWDDWLRQ
,QIRUPDWLRQVWHFKQLTHV
6HUYLFHFLHQWH

1-Consignes de sécurité
FR
4
Avant de mettre l'appareil en marche pour la première fois, veuillez
lire les consignes de sécurité ci-après!:
AVERTISSEMENT!
Avant la première utilisation
▶
▶ Retirez tous les boulons de transport.
▶ Retirez tous les emballages et tenez-les hors de portée des en-
fants.
▶ Il faut toujours au moins deux personnes pour la manipulation de
l'appareil car il est lourd.
Utilisation quotidienne
▶ Cet appareil peut être utilisé par des enfants âgés d'au minimum
8ans, ainsi que par des personnes avec des capacités physiques,
sensorielles ou mentales réduites ou sans expérience et connais-
sances, si elles sont supervisées ou ont été formées à l'utilisation sé-
curisée de l'appareil et comprennent les risques relatifs à son usage.
▶ Tenez les enfants de moins de 3ans hors de portée de l'appareil,
sauf s'ils sont en permanence surveillés.
▶ Les enfants ne doivent pas jouer avec l'appareil.
▶ Ne laissez pas un enfant ou un animal domestique s'approcher
de l'appareil lorsque la porte est ouverte.
▶ Tenez les produits de lavage hors de la portée des enfants.
▶ Remontez les fermetures à glissière, recousez les éléments mal
▶ Évitez de toucher ou d'utiliser l'appareil pieds nus ou lorsque vos
mains ou vos pieds sont mouillés ou humides.
▶ Évitez de couvrir l'appareil pendant qu'il fonctionne ou après utili-
sation, pour laisser l'humidité s'évaporer.
▶ Évitez de déposer des objets lourds ou des sources de chaleur ou
d'humidité sur l'appareil.
▶
des agents de nettoyage à sec à proximité de l'appareil.
▶ -
pareil.
▶ Évitez de laver des vêtements traités avec des solvants dans
l'appareil sans les avoir préalablement séchés à l'air.
▶ -
mables
prise

FR
1-Consignes de sécurité
5
AVERTISSEMENT!
Utilisation quotidienne
▶ Évitez de laver des matériaux du type caoutchouc ou éponge à
des températures élevées.
▶ Évitez d'ouvrir le bac à lessive pendant le cycle de lavage.
▶ Évitez de toucher la porte pendant le lavage, car elle devient
chaude.
▶ Évitez d'ouvrir la porte si l'eau est visible à travers le hublot.
▶ Évitez d'ouvrir la porte en la forçant. Elle est équipée d'un sys-
cycle de lavage.
▶ Arrêtez l'appareil après chaque programme de lavage et avant
d'entreprendre tout entretien, et débranchez l'appareil de l'ali-
de sécurité.
▶
Entretien et nettoyage
▶ Assurez-vous que les enfants sont sous surveillance lors du net-
toyage et de l’entretien.
▶ Débranchez l'appareil de l'alimentation électrique avant d'entre-
prendre tout entretien.
▶ Gardez la partie inférieure du hublot propre et évitez d'ouvrir la
porte et le bac à lessive lorsque l'appareil est en marche.
▶ N'utilisez pas un pulvérisateur d'eau ou nettoyant à vapeur pour
nettoyer l'appareil.
▶ Faites remplacer le cordon d'alimentation endommagé par le
-
▶ N'essayez pas de réparer vous-même l'appareil. En cas de répa-
ration, veuillez contacter notre service clientèle.
Installation
▶ Placez l'appareil dans un endroit bien ventilé. Choisissez un empla-
cement qui permet d'ouvrir complètement la porte.
▶ N’installez jamais l’appareil à l’extérieur dans un endroit humide, ou
dans un lieu qui serait sujet à des fuites d’eau, comme en dessous ou
à proximité d’un bloc-évier. En cas de fuite d’eau, coupez l’alimenta-
tion électrique et laissez le lave-linge sécher naturellement.
▶ Installez ou utilisez l’appareil uniquement dans des endroits où la
température est supérieureà5°C.
prise

RQVLJQHVGHVFULW
5
8WLLVDWLRQSUH
HW DSSDUHL HVW FRQ SRU H LQJH DYDEH D DYHLQJH QLTH
PHQW 6LYH FKDTHIRLV HVLQVWUFWLRQV IRUQLHV VU WLTHWWH
GHFKDTHYWHPHQW,HVWJDHPHQWFRQHFVLYHPHQWSRUQ
VDJHGRPHVWLTHLQWULHUGHDPDLVRQ,QHVWSDVGHVWLQQ
VDJHFRPPHUFLDRLQGVWULH
Aucune modication ou altération de cet appareil n'est autorisée.
7RWHWLLVDWLRQLQDGTDWHYRVHSRVHGHVULVTHVHWDSHUWHGH
WRVHVGURLWVGHJDUDQWLHHWGDFWLRQVHQUHVSRQVDELLW
AVERTISSEMENT!
,QVWDDWLRQ
▶ YLWHGHSDFHUDSSDUHLGLUHFWHPHQWVUQWDSLVRSUVGQ
PURGQPHEH
▶ 1LQVWDH SDV DSSDUHL HQ GLUHFWLRQ GHV UDRQV VRDLUHV R
SURLPLWGHVVRUFHVGHFKDHUSDUHHPSHHV FLVLQLUHV
chaue-eau).
▶ Vériez queles informations électriques sur la plaque signalé
WLTHVRQWFRQIRUPHVDLPHQWDWLRQHFWULTH6LFHQHVWSDV
HFDVYHLHFRQWDFWHUQHFWULFLHQ
▶ 1WLLVHSDVGHVDGDSWDWHUVPWLSULVHVHWGHVUDRQJHV
▶ VVUHYRVGWLLVHUQLTHPHQWHQVHPEHGHFRUGRQHF
triqueetdeexibled’arrivéed’eaulivré.
▶ VVUHYRVTHHFRUGRQGDLPHQWDWLRQHWDSULVHQHVRQWSDV
HQGRPPDJV6LVVRQWHQGRPPDJVYHLHHVIDLUHUHPSD
FHUSDUQHFWULFLHQ
▶ 3RU DLPHQWDWLRQ HFWULTH WLLVH QH SULVH DYHF PLVH D
terrediérente,facilementaccessibleaprèsl'installation.Mettez
DWHUUHFHWDSSDUHL
UniquementpourleRoyaume-Uni:HWDSSDUHLHVWTLSGQ
cordond’alimentationaveccheà3ls(miseàlaterre),répon
dantauxnormesdelapriseà3ls(miseàlaterre).Necoupezja
maisounedémontezjamaisletroisièmel(miseàlaterre).Une
IRLVDSSDUHLLQVWDDSULVHGRLWWUHDFFHVVLEH
▶ Assurez-vousquelesjointsetraccordsduexibled’arrivéed’eau
VRQWVHUUVHWTLQDSDVGHILWH

FR
2-Description du produit
7
2.1 Description de l’appareil
2.2 Accessoires
Tuyau d'arrivé
d'eau
5 Bouchons
obturateurs
Support de tuyau
de vidange
Manuel
d'utilisation
Carte de
garantie
Remarque:
-
2-3
Pads de
réduction de
bruit
2x
2x
1400
rpm
Capacity
7kg
+++
A
Energy
Speed up
HW70-BP1439
Temp Speed Start/pauseExtra rinse DelaySte am
Cotton
Synthetics
Mix
Sportwear
Jeans
Baby clothes
Cotton+
Hygienic
Fast wash
Spin
Bed ding
Handwash
Delicate
Daily Wash
Quick 15”
Wool
2 3
5
6
7
41
T1
T2
T3
S1
S2
S6
S4
T4
1
2 3 4 5 6
S3
S5
2-1
2-2
1.Bac à lessive/adoucissant
2.Sélecteur de programme
3.Plan de travail
4.Écran
5.Plaque signalétique
6.Volet d’entretien
7.Pieds ajustables
1.Boulons de transport (T1-T4)
2.Couvercle arrière
3.Vis du couvercle arrière (S1-S6)
4.Cordon d'alimentation
5.Vanne d'arrivée d'eau
6.Tuyau de vidange

3-Panneau de commande
FR
8
1 Bouton«Marche/Arrêt»
2 Sélecteur de programme
3 Écran
4 Bac à lessive/adoucissant
Appuyez sur ce bouton (Fig. 3-2) pour
mettre l’appareil en marche. L’écran s'allume et le
voyant du bouton “Start/Pause” (Départ/Pause)
clignote. Appuyez à nouveau pendant environ 2 se-
condes pour éteindre l'appareil. Si aucun élément du
panneau ou aucun programme n'est activé au bout
d'un moment, l'appareil s'éteint automatiquement.
3-2
3.2 Sélecteur de programme
Vous pouvez sélectionner l’un des 16programmes en
tournant le bouton (Fig. 3-3). La LED correspondant
3.3 Écran
▶ Durée du lavage
▶
▶ Codes d’erreur et informations sur l’entretien
3-4
5 Boutons de fonctions
6 Boutonde«Findifférée»
7 Bouton «Start/Pause»
Remarque:Signalsonore
Dans les cas suivants, un signal acoustique ne produit aucun son par défaut:
▶ lorsque vous appuyez sur un bouton;
▶ lorsque vous tournez le sélecteurdeprogramme;
▶
Le signal acoustique peut être sélectionné si nécessaire : voir la section UTILISATION
QUOTIDIENNE.
3-3
3-1
4

3.5.1 3.5.2 3.5.3 3.5.4 3.5.5
FR
3-Panneau de commande
9
3.5. Boutons de fonctions
Les boutons de fonctions (Fig.3-6) activent des options
supplémentaires du programme sélectionné avant
son démarrage. Les indicateurs correspondants s’af-
Toutes les fonctions se désactivent lorsque vous étei-
programme.
Si un bouton dispose de plusieurs options, vous pou-
vez sélectionner l’option souhaitée en appuyant de
manière séquentielle sur le bouton.
Pour supprimer le paramètre ou annuler le processus
de paramétrage, appuyez sur le bouton de fonction
jusqu’à ce que les voyants LED s’allument ou, dans le
cas d’une seule option, les voyants LED s’éteignent.
Start/Pause
3-6
3.5.1- Bouton de fonction«Temp.»
Appuyez sur ce bouton (Fig.3-7) pour changer la tem-
pérature de lavage du programme. Si aucune valeur ne
En combinaison avec le bouton «Vapeur», la fonction
de verrouillage enfant peut être activée/désactivée
(voir SÉCURITÉ ENFANTS).
3.5.2- Bouton de fonction«Tr/min »
Appuyez sur ce bouton (Fig.3-8) pour changer ou dé
-
sélectionner le programme d’essorage. Si aucune va
-
leur ne s’illumine, le linge ne sera pas essoré.
Remarque:Paramètres d'usine
-
cision les paramètres par défaut. En l'absence d'indications particulières, nous vous re-
commandons d'utiliser les paramètres par défaut.
3.4 Bac à lessive
Ouvrez le tiroir. Il contient trois compartiments
(Fig.3-5):
Compartiment 1: Arrivée d’eau uniquement, pas de
lessive
Compartiment2:Lessivepourprogramme
Compartiment : Adoucissant, agent de condi-
tionnement, etc.
3-5
3.5.3-Bouton de fonction«Vapeur»
Appuyez sur le bouton (Fig. 3-9) pour activer la fonction vapeur.
Quand cette fonction est activée, la température par défaut est la température
maximum du programme sélectionné.Cette fonction peut être activée uniqu-
ement sur les programmes suivants : Coton,Synthétique,Mixte,Bébé Coton,Hygiène.
Quand la fonction est activée, la LED au-dessus du bouton clignotera.
Appuyez encore sur ce bouton pour désactiver la fonction. La LED s’éteindra.
-
3-9
3-7 3-8
Temp.
Tr/min
Merci de vous référer à la bouteille de détergent pour
savoir si celui-ci convient aux températures de lavage.
Temp. Tr/min
Extra spoelen
Rinçage +
Startuitstel
Fin différée
Vapeur
Stoom
Vapeur
Stoom

3-Panneau de commande
FR
10
3.5.4 Bouton de fonction«Rinçage+»
Appuyez sur ce bouton (Fig. 3-10) pour rincer le linge
plus intensément avec de l’eau douce. Cette fonction
est recommandée pour les personnes à la peau sen
-
sible.
Vous pouvez sélectionner un à trois cycles en ap
-
l'écran avec l'extension P--1/P--2/P--3.
3.5.5Fonction«Speed up»
Cette fonction permet d’économiser du temps et de
l’énergie. Recommandée si le linge est légèrement
sale. Appuyez simultanément sur les boutons "Rin
secondes pour activer la fonction "Speed up ".L'indica
teur SPEED UP
pas disponible pour tous les programmes (voir PRO
GRAMMES).
3.7 Bouton«Start/Pause»
Appuyez légèrement sur ce bouton (Fig. 3-13) pour
démarrer ou arrêter le programme actuellement af-
pendant le réglage, l'exécution ou l'interruption sou-
daine du programme.
Appuyez sur ce bouton (Fig. 3-12) pour démarrer le
-
-
6: 30
le cycle du programme s’achève dans 6heures
et 30minutes Appuyez sur le bouton «Départ/Pause»
programme ESSORAGE ECO 40-60.
Remarque:Détergentliquide
3.8Sécuritéenfants
Appuyez simultanément sur le bouton « Temp. » et
«Vapeur» (Fig. 3-14) pendant 3secondes pour blo-
quer l’activation des éléments du panneau. Pour dé-
verrouiller, appuyez à nouveau sur les deux boutons.
(Fig. 3-15) si vous appuyez sur le
bouton, lorsque la sécurité enfants est activée. Aucun
changement ne s'opère.
3-15
3-10
Speed up
3-11
3-12
3-13
3-14
Quand la fonction est activée, la température ne peut pas être modifiée.
Si vous appuyez sur le bouton « temp », la fonction « Vapeur » sera désactivée.
Vous pouvez activer cette fonction uniquement avant de démarrer un des programmes
concernés. Vous ne pouvez pas lancer cette fonction si un programme est déjà en cours.
-
-
-
Bouton"Findifférée"
Extra spoelen
Rinçage +
Extra spoelen
Rinçage +
Startuitstel
Fin différée
Startuitstel
Fin différée
Start/Pause
Temp.
Vapeur
Stoom

FR
4-Programmes
11
Concernant le linge sec.
Choisissez 90 °C comme température de lavage uniquement pour des exigences hygiéniques par-
Réduisez la quantité de détergent parce que la durée du programme est courte.
Charge max. Température
Vitesse
d’es-
sorage
préré-
glée
en trs/
min
Fonction
en kg
en °C
Préréglage
Vapeur
Rinçage +
Speed up
Programme
plage
sélec-
tionna-
ble 2 1
Coton
40
•
º
/ Coton
Tissu synthétique ou
Mélange de linge en
Coton/Synthétique
Coton/Synthétique
Coton/Synthétique
Coton/Synthétique
Coton/Synthétique
Vêtements de sport
Tissu en laine ou à teneur
Linge délicat et soie
en laine lavable
en machine
Jeans
Coton
Tous les tissus
Coton
Coton
coton et synthétique
légèrement sale
mélangé
• • •
Synthé-
tique
40
•
º
/ 1200
• • •
Mix 30
•
º
/ 1000
• • •
Baby Care
40
•
º
/ 1000
• • •
Lingerie
40
•
º
/
1000
•
Coton 20°C 20
•
º
/
• •
•
Hygiénique
90
•
º
/
1000
• •
Rapide 40
•
º
/ 1000
•
Eco 40-60
/
•
º
/ /
20
•
º
/ 800
•
•
º
/ 1000
•
Délicat
30
•
/ 400
•
Jeans
30
•
º
/ 1000
•
•
Couette 40
•
/ / 800
• •
Essorage
/
/
/ / / 1000
Compartiment à détergent pour :
1
Arrivée d’eau uniquement,
pas de lessive
2
Lessive
Adoucissant ou produit
d’entretien
•
Oui,
º
En option, / No
Express
15 min
•
/
/
/ 800
•
Laine
Sport
1)
* à 90
* à 60
* à 60
* à 90
90
* à 60
20
/
* à 40
* à 40
* à 40
* à 40
* à 30
* à 60
* à 40
1400
1400
7
3.5
1
7
3.5
3.5
3.5
7
7
3.5
3.5
1
1
3.5
1
7

5-Consommation
FR
12
Remarque : Pesage automatique
L’appareil est équipé d’une option de détection de la charge. Lorsque la charge est faible,
l’énergie, l’eau et le temps de lavage sont réduits de manière automatique dans certains
programmes.L'écranafficheAUtO.
Scannez le QR code sur l'étiquette énergétique pour obtenir des informations sur la
consommation d'énergie.
Laconsommationd'énergieréellepeutdifférerdecelledéclarée en fonction des
conditions locales.
Programme EU1015 / 2010
Sélectionnez Eco 40-60, appuyez sur "Essorage" 10s, puis ajustez à 60 ° C / 40 ° C
avec essorage maximal. Les programmes coton standard à 60°C et 40°C conviennent
pour nettoyer les salissures normales.
Cesontlesprogrammeslesplusefficacesentermesdeconsommation combinée
d'énergie et d'eau pour le linge en coton. La température réelledel'eaupeutdifférer
de la température du cycle déclarée.

5
8WLLVDWLRQTRWLGLHQQH
3USDUDWLRQLQJH
▶ 7ULHHVYWHPHQWVHQIRQFWLRQGWLVVFRWRQ
synthétique, laineou soie)et de leur niveau de
saleté(Fig.6-3).Faitesattentionauxconsignes
GHQWUHWLHQGHVWLTHWWHVGHDYDJH
▶ 6SDUHHVYWHPHQWVEDQFVGHVYWHPHQWVGH
FRHU/DYHGDERUGHVWHWLHVGHFRHUD
mainpoursavoirs'ilssedécolorentous'abîment.
▶ Videzlespoches(clés,piècesdemonnaie,etc.)
HWUHWLUHHVREHWVGHGFRUDWLRQWUVGUVEUR
ches).
▶ 3RU HQWUHWLHQ GHV YWHPHQWV VDQV RUHWV
du linge délicat et les textiles nement tissés
FRPPHHVULGHDPHWWHHV GDQVQVDF GH
DYDJHHQHWWRDJHDPDLQRVHF HVWSV
indiqué).
▶ HUPHHVIHUPHWUHVJLVVLUHVHVDWWDFKHV
HW HV FURFKHWV YHFUR HWDVVUHYRV TH HV
ERWRQVVRQWVRLGHPHQWFRVV
▶ 3DFH HV YWHPHQWV VDQV RUHWV VRLGHV HV
sous-vêtementsdélicats(Dessous)etlespetits
DUWLFHVWHVTHHVFKDVVHWWHVHVFHLQWUHVHV
VRWLHQVJRUJHHWFGDQVQVDFGHDYDJH
▶ 'SLHHVJUDQGHVSLFHVGHWLVVWHHVTHHV
GUDSVGHLWHWHVFRYUHLWVHWF
▶ 5HWRUQHHVHDQVHWHVWLVVVLPSULPVGFR
résouauxcouleursvives;lavez-lesséparément
VLSRVVLEH
LPHQWDWLRQ
Raccordez le lave-linge à une alimentation (220 V à
240V~/50Hz;Fig.6-1).Veuillezégalementvousréfé
reràlasectionINSTALLATION.
5DFFRUHPHQWHD
▶ YDQWHUDFFRUGHPHQWDVVUHYRVGHDSURSUH
WHWGHDFDUWGGLVSRVLWLIGDUULYHGHD
▶ Ouvrezlerobinet(Fig.6-2).
5HParque:Étanchéité
Avantl'utilisation,vériezlaprésencedefuitessurlesjointsentrelerobinetetleexible
GDUULYHGHDHQRYUDQWHURELQHW
ATTENTION!
/HVDUWLFHVQRQWHWLHVGHVVHUUVRWUDQFKDQWVSHYHQWFDVHUGHV GVIRQFWLRQQH
PHQWVDLQVLTHQGRPPDJHUHVYWHPHQWVHWDSSDUHL

8WLLVDWLRQTRWLGLHQQH
7DEHDHQWUHWLHQ
/DDJH
7HPSUDWUHGHD
vagemaximale95°C
QRUPD
7HPSUDWUHGHD
vagemaximale60°C
QRUPD
7HPSUDWUHGHD
vagemaximale60°C
GR
7HPSUDWUHGHD
vagemaximale40°C
QRUPD
7HPSUDWUHGHD
vagemaximale40°C
GR
7HPSUDWUHGHD
vagemaximale40°C
WUVGR
7HPSUDWUHGHD
vagemaximale30°C
QRUPD
7HPSUDWUHGHD
vagemaximale30°C
GR
7HPSUDWUHGHD
vagemaximale30°C
WUVGR
7HPSUDWUHPDL
PDHGHDYDJHD
PDLQ
40°C
1HDYHSDV
%DQFLPHQW
JHQWVGHEDQFKL
PHQWDWRULVV
Oxygèneunique
PHQW
QRQFKRU
1WLLVHSDVGDJHQW
GHEDQFKLPHQW
6FDJH
6FKHLQJHDWRULV
WHPSUDWUHQRUPDH
6FKHLQJHDWRULV
WHPSUDWUHEDVVH
1HSDVVHSDVD
VFKHLQJH
6FKDJHVUFRUGH 6FKDJHSDW
5HSDVVDJH
5HSDVVDJHQH
WHPSUDWUHPDL
PDH
de200°C
5HSDVVDJH
QHWHPSUDWUH
PRHQQH
de150°C
5HSDVVDJH QH
WHPSUDWUH EDVVH
de110 °C ;sans va
SHU H UHSDVVDJH
DYDSHUSHWSURYR
THU GHVGRPPDJHV
irréversibles)
1HUHSDVVHSDV
QWUHWLHQSURIHVVLRQQHHVWHWLHV
1HWWRDJHVHFD
WWUDFRUWKQH
1HWWRDJHVHFD
KGURFDUEUHV
YLWHWRWQHWWRDJH
VHF
1HWWRDJHSURIHV
VLRQQHSDUYRLH
KPLGH
YLWHWRWQHW
WRDJHSURIHVVLRQQH
SDUYRLHKPLGH
DUJHPHQWHDSSDUHL
▶ ,QVUHHLQJHSLFHSDUSLFH
▶ Nesurchargezpasl'appareil.Notezlesdiérenteschargesmaximalesenfonction
desprogrammes!Règlegénéralepourlachargemaximale:Gardezunedistancede
VLSRFHVHQWUHDFKDUJHHWDSDUWLHVSULHUHGWDPERU
▶ HUPHELHQDSRUWHVVUHYRVTDFQHSLFHGHLQJHQHVWSLQFH

FR
6-Utilisation quotidienne
6.5 Sélection du détergent
▶ é et la performance du lavage dépendent de la qualité du détergent utilisé.
▶ Utilisez exclusivement un détergent homologué pour le lavage en machine.
▶ Le cas échéant, utilisez des détergents spéciaux (par exemple, pour les synthé-
tiques et les lainages.)
▶ Respectez les recommandations du fabricant du détergent.
▶ N'utilise
z pas d'agents de nettoyage à sec tels que le trichloréthylène ou tout autre
produit similaire.
Choisissez le détergent le mieux adapté
Programme
Type de détergent
Universel Couleur Délicat Spécial Adoucissant
Synthétique
Mix
Laine
Coton
Lingerie
Coton 20°C
Eco 40-60
Rapide
Express15min
Sport
Baby Care
Hygiénique
Délicat
Jeans
Couette
L=détergentliquideouengelP=détergent en poudreO=facultatif
_
=non
Voici nos recommandations:
▶ Détergent en poudre: 20°Cà90°C*(utilisationoptimale:40-60°C)
▶ Détergent couleur: 20°Cà60°C(utilisationoptimale:30-60°C)
▶ Détergent laine/vêtementdélicat: 20°Cà30°C(utilisationoptimale:20-30°C)
*Choisissez 90°C comme température de lavage uniquement pour des exigences hygié-
niques particulières.
Essorage
L/P L/P - -
L/P -
L L/P - -
-
L/P L/P
- -
L L - -
- -
- -
L L
- - L L/P
- -
L/P L/P
L/P L/P
L/P L
- -
-
-
-
-
-
L/P L/P -
-
L/ L/P
L/P L/P
L/P L/P
- -
- -
L/ L/P
- -

6-Utilisation quotidienne
FR
16
6.7 Mettez l’appareil en marche.
Appuyez sur le bouton «Marche/Arrêt» pour mettre
l’appareil en marche (Fig. 6-5). Le voyant LED du bou-
ton "Start/Pause “ clignote.
6.6 Ajout de détergent
1. Faites glisser le bac à lessive hors de son empla-
cement.
2. Ajoutez la quantité de détergent nécessaire dans
les compartiments respectifs (Fig. 6-4).
3. Repoussez doucement le bac.
Remarque:
▶ Retirez les résidus de détergent du bac à lessive avant le prochain cycle de lavage.
▶ N'utilisez pas trop de détergent ou d'adoucissant.
▶
▶ Remplissez toujours le détergent avant de lancer le cycle de lavage.
▶ Diluez le détergent liquide concentré avant de l’ajouter dans le compartiment2.
▶
le linge et mettez-la dans le lave-linge.
▶
▶ Choisissez avec soin les réglages du programme en fonction des symboles d'entre-
tien indiqués sur toutes les étiquettes de linge et selon le tableau de programme.
6.8 Sélection d’un programme
Pour obtenir des résultats optimaux lors du lavage,
sélectionnez un programme qui convient au degré de
salissure et au type de linge.
Tournez le bouton des programmes (Fig. 6-6) pour
sélectionner le programme adéquat. Le voyant LED
correspondant au programme sélectionné s’allume et
6.9 Ajout de sélections individuelles
Sélectionnez les options et les paramètres requis
(Fig. 6 ; reportez-vous à la section PANNEAU DE
COMMANDE.
Start/Pause
6-7
6-4
Remarque:Suppression des odeurs
Avant la première utilisation, nous vous recommandons de lancer le programme HYGIÉ-
NIQUE à vide et avec une petite quantité de détergent dans le compartiment du produit
de lavage (2) ou un nettoyant spécial machine pour éliminer les résidus potentielle-
ment gênants.
Speed up
6-7)
6-5 6-6
Temp. Tr/min
Extra spoelen
Rinçage +
Startuitstel
Fin différée
Vapeur
Stoom

FR
6-Utilisation quotidienne
17
1. EnD
2. La machine s’arrête automatiquement.
3. Retirez le linge le plus tôt possible pour le faire avec précaution et pour éviter autant
que possible qu’il ne se plisse davantage.
4. Fermez l’arrivée d’eau.
5. Débranchez la prise d'alimentation.
6. Ouvrez la porte pour éviter toute formation d’humidité et l’apparition d’odeurs. Lais-
sez-la ouverte lorsque vous n’utilisez pas la machine.
6.13 Activation ou désactivation de l’alarme
Vous pouvez désactiver le signal sonoreencasdebesoin:
1. Mettez l’appareil en marche.
2. Sélectionnez le programme Essorage .
3.
secondes environ.«
bEEP OFF
Pour activer l‘alarme, appuyez une nouvelle fois sur ces deux boutons simultanément.
«
bEEP ON
6.11 Interruption - annulation du progr
Pour interrompre un programme en cours, appuyez doucementsur«Départ/Pause».
Le voyant LED au dessus du bouton clignote. Appuyez à nouveau sur ce bouton pour
reprendre l’opération.
Pour annuler un programme en cours et tous ses paramètres individuels
1. Appuyez sur le bouton«Start/Pause»pourinterrompre le programme.
2. Appuyez sur le bouton «Marche/Arrêt» pendant 2 secondes environ pour arrêter
l’appareil.
3. Exécutez le programme ESSORAGE et sélectionnez « pas de vitesse » (tous les
voyants éteints) pour évacuer l’eau.
4. Sélectionnez un nouveau programme et démarrez-le.
6.12 Après le lavage
Remarque:Verrouillage de la porte
▶ Pour des raisons de sécurité, la porte du lave-linge est temporairement verrouillée
ou qu’après son annulation correcte (voir la description ci-dessus).
▶ En cas de niveau d’eau élevé ou de température d’eau élevée ou pendant l’essorage,
il est impossible d’ouvrir la porte;lesymbole Loc1-
Remarque:ModeVeille/Économiseur d'énergie
Une fois l’appareil mis en marche, il rentre en mode Veille si vous ne l’utilisez pas au bout de
-
nomiser l’énergie. Appuyez sur le bouton «Départ/Pause» pour désactiver le mode Veille.
6.10 Démarrage du programme de lavage
Appuyez sur le bouton « Start/Pause » (Fig. 6-8)
pour lancer le programme. Le voyant LED du bouton
"Start/Pause” s'allume continuellement
L'appareil fonctionne selon les réglages actuels. Pour
programme.
6-8
Vapeur Rinçage +
Start/Pause

7-Lavage écologique
FR
18
Utilisation respectueuse de l’environnement
▶ Pour une meilleure utilisation de l’énergie, de l’eau, du détergent et du temps, tenez-
vous en à la charge maximale recommandée.
▶ Ne surchargez pas l’appareil (à l’aide de la main, faites un dégagement en largeur au-
dessus du linge).
▶ Pour le linge légèrement sale, sélectionnez le programme Express 15 min.
▶ Mettez les doses exactes de chaque produit de lavage.
▶ Choisissez la température de lavage adéquate la plus basse - les détergents moder-
▶ Optimisez les paramètres par défaut uniquement pour les taches importantes.
▶ Sélectionnez la vitesse d’essorage maximale en cas d’utilisation d’un sèche-linge
domestique.

FR
8-Entretien et nettoyage
19
8.1 Nettoyage du bac à lessive
Veillez toujours à ce qu’il ne reste pas de résidus de
détergent. Nettoyez régulièrement le bac à lessive
(Fig.8-1):
1. Tirez le bac jusqu’à la bu tée.
2. Appuyez sur le bouton d’ouverture pour le retirer.
3. Nettoyez ensuite le bac avec de l’eau et remet-
tez-le en place dans l’appareil.
8.2 Nettoyage de la machine
▶ Débranchez la machine pendant le nettoyage et
l’entretien.
▶
pour nettoyer la machine (Fig.8-2) et les compo-
sants en caoutchouc.
▶ N’utilisez pas de produits chimiques organiques
ou de solvants corrosifs.
Remarque:Hygiène
Pour un entretien régulier, nous vous recommandons de lancer le programme HYGIÉ-
NE à vide pour éliminer les résidus potentiellement gênants tous les trois mois.
Ajoutez une petite quantité de détergent dans le compartiment du produit de lavage (2)
ou utilisez un nettoyant spécial machine
Pour éviter toute obstruction de l’alimentation en eau
par des matières solides telles que le calcaire, nettoyez
▶ Débranchez le cordon d’alimentation et fermez
l’arrivée d’eau.
▶
(Fig.8-3)del’appareil, ainsi que le robinet.
▶
(Fig.8-4).
▶
d’eau.
8.4 Nettoyage du tambour
▶ Retirez les pièces métalliques introduites acciden-
les épingles, les pièces de monnaie, etc., car
elles peuvent causer des taches de rouille et des
dommages.
▶ Utilisez un nettoyant sans chlorure pour éliminer
les taches de rouille. Respectez les consignes de
sécurité du fabricant de l’agent de nettoyage.
▶ N’utilisez pas d’objet dur ou de laine d’acier pour le
nettoyage.
8-38-4
8-5
8-1
1
2
8-2

8-Entretien et nettoyage
FR
20
1. Éteignez la machine et débranchez-la (Fig. 8-8).
2. Ouvrez le volet d’entretien. Vous pouvez utiliser
une pièce de monnaie ou un tournevis (Fig. 8-9).
3. Placez un récipient plat pour recueillir l’eau de vi-
dange (Fig. 8-10). La quantité d'eau pourrait être
plus importante que prévu!
4. Tirez le tuyau de vidange et maintenez-en l’extré-
mité au-dessus du récipient(Fig.8-10).
5. Retirez le bouton d’étanchéité du tuyau de vi-
dange(Fig.8-10).
6. Une fois la vidange terminée, fermez le tuyau de
vidange (Fig. 8-11) et remettez-le dans la ma-
chine.
7.
tournant dans le sens antihoraire(Fig.8-12).
8. Retirez les impuretés et la poussière (Fig. 8-13).
8.5 Périodes de non-utilisation prolongées
Si l’appareil n’est pas utilisé pendant une longue pé-
riode:
1.
2.
3. Ouvrez la porte pour éviter toute formation d’hu-
midité et l’apparition d’odeurs. Laissez la porte
ouverte lo rsque vous n’utilisez pas la machine.
cordon d’alimentation, l’arrivée d’eau et le tuyau de vi-
dange. Assurez-vous que tout est correctement ins-
tallé et qu’il n’y a pas de fuite.
AVERTISSEMENT!
pompe peut être très chaude! Avant toute interven-
tion, assurez-vous que l'eau a refroidi.
Remarque:Hygiène
Après une période de non-utilisation prolongée, nous vous recommandons de lancer le
programme HYGIÉNE à vide et avec une petite quantité de détergent dans le comparti-
ment du produit de lavage (2) ou un nettoyant spécial machine particulier pour éliminer
les résidus potentiellement gênants.
8.6 Filtre de la pompe
▶ nevidangepasl’eau;
▶ n’essorepas;
▶ émet un bruit inhabituel en cours de fonctionne-
ment.
8-8 8-9
8-10 8-11
8-12 8-13
8-6 8-7
prise

(QWUHWLHQHWQHWWRDJH
ATTENTION!
▶ Lebouchondultredelapompedoitêtrenettoyéetenbonétat.Silebouchon
QHVWSDVELHQVHUUHDSHWVFKDSSHU
▶ Leltredoitêtreenplace,sinonunefuitepeutseproduire.
Nettoyez soigneusementle ltre dela pompe à
l’eaucourante,parexemple(Fig.8-14).
Remontez-lesoigneusement(Fig.8-15).
HUPHHYRHWGHQWUHWLHQ

9-Dépannage
FR
22
Problème Cause Solution
CLR FLTR
• Erreur de vidange
•
• -
dange.
E2
• Verrouillage - erreur. • Fermez correctement la porte.
E4
• Le niveau d’eau n’a pas été atteint.
• Le tuyau de vidange s'auto-siphonne.
• Assurez-vous que le robinet est entièrement
ouvert et que la pression de l’eau est nor-
male.
•
Vous pouvez résoudre la plupart des problèmes qui pourraient survenir sans expertise
instructions ci-dessous avant de contacter un service après-vente. Voir SERVICE CLIEN-
TÈLE.
AVERTISSEMENT!
▶ Avant tout entretien, veuillez arrêter l’appareil et débranchez-le du secteur.
▶ Les appareils électriques doivent être entretenus uniquement par des experts en
électricité, car une mauvaise intervention pourrait causer des dommages con-
sidérables.
▶ Pour éviter tout risque, faites remplacer le cordon d’alimentation endommagé uni-
9.1 Codes d’informations
lavage. Aucune action ne doit être entreprise.
Code Message
1:25
Le temps restant du cycledelavageestévaluéà1heureet25minutes
6:30
-
féréeestévaluéà6heureset30minutes
P--1
/
2
/
3
1/2/3 Rinçages supplémentaires sélectionnés (voir BOUTONS DE FONCTION
„Rinçage +e“).
End
Le cycle de lavage est terminé. L'appareil s'éteint automatiquement.
La fonction Sécurité enfants est activée
LocI-
La porte est fermée à cause du niveau d’eau ou de température élevé ou du dérou-
lement de l’essorage.
bEEP OFF
L’avertisseur sonore est désactivé
bEEP ON
L’avertisseur sonore est activé
SPEEd
u
P
La fonction “Speed up” est activée.
cLrd

FR
9-Dépannage
23
Cause Solution
E8
• Niveau de sécurité de l’eau - erreur. • Contactez le service après-vente
F3
• Capteur de température - erreur. • Contactez le service après-vente.
F4
•
• Contactez le service après-vente.
F7
• Moteur - erreur. • Contactez le service après-vente.
FC1
ou
FC2
• Erreur de communication anor-
male
• Contactez le service après-vente.
UnB
• Charge déséquilibrée - erreur. •
tambour. Réduisez la charge de linge.
Problème Cause Solution
Le lave-linge ne fonc-
tionne pas.
• Le programme n’a pas encore dé-
marré.
• -
marrez-le.
• La porte n’est pas correctement
fermée.
• Fermez correctement la porte.
• La machine n’a pas été mise sous
tension
• Mettez la machine sous ten-
sion.
• Panne de courant. •
• Le Verrouillage enfant est activé. • Désactivez la sécurité enfants.
Le lave-linge ne se
remplit pas d'eau.
• Il n’y a pas d'eau. •
• • -
tion.
•
est bouché.
•
d’alimentation.
• La pression de l’eau est inférieure à
0,03MPa.
•
• La porte n’est pas correctement
fermée.
• Fermez correctement la porte.
• Coupure d’eau. •
La machine se vi-
dange pendant
qu’on y introduit de
l'eau.
• La hauteur du tuyau de vidange est in-
férieureà80cm.
• Assurez-vous que le tuyau de
vidange est correctement ins-
tallé.
• L’extrémité du tuyau de vidange
pourrait baigner dans l'eau.
•
n’est pas plongé dans l’eau.
Problème de vi-
dange.
• Le tuyau de vidange est obstrué. • Débouchez le tuyau de vidange.
• •
• L’extrémité du tuyau de vidange se
trouve à une hauteur supérieure à
100cmau-dessusdusol.
• Assurez-vous que le tuyau de
vidange est correctement ins-
tallé.
Problème
FA
Capteur de niveau d’eau-erreur
•
• Contactez le service après-vente

9-Dépannage
FR
24
Problème Cause Solution
Forte vibration pen-
dant l’essorage.
• Certains boulons de transport
n'ont pas été retirés.
• Retirez tous les boulons de trans-
port
.
• L’appareil n’est pas installé sur une
surface stable.
• Assurez-vous que l’appareil est
placé sur une surface stable et
plane.
• La charge de la machine n’est pas
correcte.
•
la charge.
L’opération s’arrête
de lavage.
• Coupure d'eau ou panne de cou-
rant.
• -
trique et l’alimentation en eau.
L’opération s’arrête
pendant un certain
temps.
• •
• Problème lié à la quantité de
linge chargé
• Réduisez ou ajustez la charge.
•
trempage
• Annulez le programme et redé-
marrez.
Une quantité exces-
dans le tambour et/ou
le tiroir à lessive.
• Le détergent n’est pas adapté. •
en matière de lessive.
• Quantité excessive de détergent. • Réduisez la quantité de lessive.
Ajustement auto-
matique du temps
de lavage.
• La durée du programme de lavage
est ajustée.
• Ce phénomène est normal et
-
ment.
Échec de l'essorage. • Mauvaise répartition du linge. •
et la répartition du linge, puis
relancez un programme d’es-
sorage.
Résultat de lavage in-
satisfaisant.
• Le degré de salissure ne corres-
pond pas au programme sélec-
tionné.
• Sélectionnez un autre pro-
gramme.
• -
sante.
• Choisissez le linge selon le de-
gré de salissure et selon les
• La charge maximale est dépassée. • Réduisez la charge.
• Le linge est inégalement réparti
dans le tambour.
• Détachez le linge.
Il existe des résidus
de lessive en
poudre sur le linge.
• Des particules insolubles de déter-
gent peuvent persister sous forme
de taches blanches sur le linge.
• Rincez à nouveau.
• Essayez de brosser les points
sur le linge sec.
• Choisissez un autre détergent.
Le linge contient
des taches grises
• provenant des graisses telles que
les huiles, les crèmes ou les on-
guents.
• Prétraitez le linge à l’aide d’un
nettoyant spécial.

FR
9-Dépannage
25
Si les messages d’erreur réapparaissent après les mesures prises, éteignez l’appareil, dé-
branchez-le et contactez le service clientèle.
9.4 En cas de panne de courant
Le programme en cours et ses paramètres seront en-
registrés. Lorsque l’alimentation électrique est réta-
blie, le fonctionnement reprend.
En cas de panne de courant pendant un programme,
l’ouverture de la porte se bloque mécaniquement. Si
vous devez retirer le linge, le niveau d’eau ne doit pas
être visible sur la porte en verre. - Risque de brûlure!
▶ Réduisez le niveau d’eau suivant l’étape 1 à 6 du
chapitre ENTRETIEN ET NETTOYAGE (FILTRE DE
LA POMPE).
▶ Tirez le levier (A) situé en dessous du volet d’entre-
tien (Fig.9-1) jusqu’à ce que la porte se déverrouille
en émettant un petit clic.
▶ Fixez toutes les pièces et fermez le volet d’entre-
tien.
A
9-1
Remarque:Formationdemousse
En cas de formation d’une quantité importante de mousse durant l’essorage, le moteur
s’arrête et la pompe de vidange est activée pendant 90secondes. Après 3échecs d’éli-
mination de la mousse, le programme s’achève sans essorage.
10.1 Préparation
▶ Sortez l'appareil de l'emballage.
▶ Retirez tous les matériaux d’emballage, y compris la base en polystyrène et tenez-les
hors de la portée des enfants. Lors de l’ouverture de l’emballage, vous pourriez voir
des gouttes d’eau sur le sac en plastique et le hublot. Ce phénomène normal résulte
Remarque:Miseaurebut des emballages
Tenez tous les emballages hors de portée des enfants et mettez-les au rebut dans le
respect de l'environnement.
10.2Instructionsrelativesàl’installationdestamponsanti-bruit
Conseil relatif à l'émission de chaleur :
Le tampon anti-bruit est facultatif mais peut aider à réduire le bruit, veuillez l'assembler
ou non selon votre besoin.

10-Installation
FR
26
10.3 Démontez les boulons de transport
composants anti-vibration à l’intérieur de l’appareil du-
1.
Retirez les 4 boulons à l’arrière, puis enlevez les
éléments
1. En ouvrant l’emballage thermo-rétractable, vous
y trouverez des tampons anti-bruit. Ceux-ci sont
utilisés pour réduire le bruit. (Fig. 10-1)
2. Inclinez la machine à laver sur le côté, hublot dirigé
vers le haut et partie inférieure de la machine vers
vous.
3.Retirezlestamponsanti-bruitainsiquelefilm
protecteur adhésif double face et les tampons
anti-bruit sous la carrosserie de la machine à laver
comme indiqué à la Figure 3 (deux tampons plus
longs en positions 1 et 3, deux tampons plus courts
en positions 2 et 4). Remettez la machine à l'endroit.
séparateurs en plastique (Fig. 10-2)
(Fig. 10-3).
2.
Fermez les trous de gauche avec des bouchons
obturateurs (Fig. 10-4)(Fig. 10-5).
10-1
Remarque:Conservez-les en lieu sûr
Conservez les boulons de transport dans un endroit sûr pour une utilisation ultérieure.
Chaque fois que vous souhaitez déplacer l’appareil, remontez d’abord les boulons.
10.4 Déplacement de l'appareil
Si vous souhaitez déplacer l’appareil sur une grande distance, remettez les boulons de
transport retirés avant l’installation pour éviter toutdommage:
1. Retirez les bouchons obturateurs.
2. Retirez le couvercle arrière.
3. Insérez les éléments séparateurs en plastique et les boulons de transport.
4. Serrez les boulons à l’aide d’une clé.
5. Replacez le couvercle arrière.
(1) (2)
(3)
2x
2x
10-2 10-3
10-510-4

FR
10-Installation
27
Les raccor
10.6.1 Tuyau de vidange à l’évier
▶ Suspendez le tuyau de vidange au rebord d’un
évier de taille adéquate, à l’aide du support en U
▶ Protégez convenablement le support en U
contre tout glissement.
10.6.2 Tuyau de vidange au raccordement d’évacua-
tion des eaux usées
▶ Le diamètre interne du
▶ Placez le tuyau de vidange à environ 80mm des conduits d'eaux usées.
▶ Fixez le support en U et attachez-le solidement
10.6 Raccordement de drainage
Fixez correctement le tuyau de vidange à la tuyauterie. Le tuyau doit atteindre en un point
une hauteur comprise entre 80 et 100cm au-dessus de la ligne inférieure de l'appareil!
AVERTISSEMENT!
▶ Utilisez uniquement l’ensemble de raccordement fourni pour le raccordement.
▶ Ne réutilisez jamais d’ensemble de raccor
▶ Raccordez l'appareil uniquement à une alimentation d’eau froide.
▶
10.5 Alignement de l’appareil
Réglez tous les pieds (Fig. pour obtenir un ni-
vellement complet. Cela réduira les vibrations et le
bruit pendant l’utilisation. de même que l’usure. Nous
recommandons d’utiliser un niveau à bulle pour le ré-
glage. Le sol doit être aussi stable et plat que possible.
1. Desserrez le contre-écr
2. Réglez la hauteur en t
3. Serrez le contre-écr contre le boîtier.
10-6
10-8
(Fig.10-8).
réservoirausol(tranquiliseur)avecletroud'aérationdoit
être au minimum de 40 mm.

10-Installation
FR
28
10.7 Raccordement d'eau douce
ATTENTION!
▶
et exempt de fuite. Si le tuyau de vidange est au sol, ou si le conduit est à une hauteur
de moins de 80cm, le lave-linge se vidange de manière continue lorsqu’on le remplit
(siphonnement automatique).
▶ Le tuyau de vidange n’est pas allongé. Au besoin, contactez le service après-vente.
Assurez-vous que les joints sont insérés.
1.
biseautée de l’appareil (Fig. 10-10). Resserrez
manuellement le joint à vis.
2. L’autre extrémité est raccordée à un robinet
Remarque:Système Aqua stop:
-
top protège contre les dommages causés par l’eau en coupant automatiquement l’ali-
10.6.3 Raccordement du tuyau de vidange à l’évier
▶ Le raccordement doit se situer au-dessus du si-
phon
▶ Un raccord à embout est habituellement fermé
par un bloc (A). Vous devez le retirer pour éviter
tout dysfonctionnement(Fig.
▶ Fixez le tuyau de vidange à l’aide d’une pince.
10-9
10-11
10-10
10-9).

FR
10-Installation
29
10.8 Raccordement électrique
▶ l'alimentation électrique, la prise et le fusible sont
les même que sur la plaque.
▶ la prise d’alimentation est mise à la terre et aucune
▶
parfaitement.
▶ Uniquement au Royaume-Uni : La prise pour le
Royaume-Uni est conforme à la norme BS1363A.
AVERTISSEMENT!
▶ Assurez-vous toujours que toutes les connexions (alimentation électrique, le tuyau
aucune fuite!
▶ Veillez à ce que ces pièces ne soient jamais piétinées, pliées ou tordues.
▶ Si le cordon d’alimentation est endommagé, faites-le remplacer par le fabricant (voir
Remarque:Hygiène
Après chaque installation ou une période d’inactivité prolongée, nous vous recomman-
dons, avant la première utilisation, de lancer le programme HYGIÉNE à vide et d’insérer
une petite quantité de détergent dans le compartiment du produit de lavage (2) ou
un nettoyant spécial machine pour éliminer les résidus potentiellement gênants.
10-12
prise
Branchez la prise d'alimentation à la prise murale (Fig. 10-12).

11-Informations techniques
FR
30
Tension en V 220-240V~/50Hz
Courant en A 10
Puissance maximale en W 00 91
Pression d’eau en MPa 0,03≤P≤1
Poids net en kg
11.1 Autres données techniques
11.3 Normes et directives
Ce produit répond aux exigences de toutes les directives CE applicables
ainsi que les nor-
mes harmonisées correspondantes, qui prévoient le marquage CE.
64
Remarque: La hauteur exacte de votre machine dépend de la distance des pieds par
rapportaucentredelamachine.L'espaceoùvousinstallezvotre machine doit être
d'au moins 40 mm plus large et 20 mm plus profond que ses dimensions.
VUE DE DESSUSMurVUE DE FACE
B largeur totale du produit mm
A hauteur totale du produit mm
C
profondeur totale du produit
mm
D
profondeur avec porte ouverte
mm
E
dégagement de porte minimum
mur adjacent mm
11.2 Product dimensions
850
595
460
960
400
HW70-BP1439N
HW70-BP1439N

FR
31
Nous vous recommandons notre service clients Haier et l’utilisation de pièces de re-
change d’origine.
Si vous avez un problème avec l’appareil, veuillez vous référer à la section DÉPANNAGE.
Si vous ne trouvez pas de solution, veuillez contacter
▶ votre vendeur local
▶ rendez-vous sur le site www.haier.com, dans la zone Service et support, vous trou-
verez des numéros de téléphone et une FAQ. Vous pourrez également contacter le
service de réclamation.
Pour contacter notre Service, rassurez-vous que les informations ci-après sont disponi-
bles.
Ces informations sont disponibles sur la plaque signalétique.
Modèle ____________________ N° de série _____________________
Pour des renseignements généraux concernant les entreprises, vous trouverez ci-jointes
nos adresses en Europe:
Adresses de Haier en Europe
Pays* Adresse postale Pays* Adresse postale
Italie
Haier Europe Trading S.R.L.
Via De Cristoforis, 12
21100 Verese
ITALIE
France
Haier France SAS
3-5 rue des
Graviers
92200 Neuilly sur
Seine
FRANCE
Espagne
Portugal
Haier Iberie SL
Pg. Garcia Faria, 49-51
08019 Barcelone
ESPAGNE
Belgique-FR
Belgique-NL
Pays-Bas
Luxembourg
Haier Bénélux SA
Anderlecht
Route de Lennik
451
BELGIQUE
Allemagne
Autriche
Haier Deutschland GmbH
Konrad-Zuse-Platz 6
81829 München
GERMANY
Pologne
République
Tchèque
Hongrie
Grèce
Roumanie
Russie
Haier Pologne Sp.
zo.o.
Al. Jerozolimskie
181B
02-222 Warszawa
POLOGNE
Royaume-Uni
Haier Appliances UK Co.Ltd.
One Crown Square
Church Street East
Woking, Surrey, GU21 6HR
Royaume-Uni
*Pour de plus amples informations, veuillez consulter le site www.haier.com
12-Service clientèle


NL
Gebruikshandleiding
Wasmachine
HW70-BP1439N

'DQN
/HJHGH
DDVFKLHODLNHHLOLKHLGVLIRPDWLH
OJHPHQHLQIRUPDWLHHQWLSV
0LOLHLQIRUPDWLH
9HUZLMGHULJ
+HOS KHW PLOLH HQ GH JHRQGKHLG WH EHVFKHUPHQ
3ODDWVGHYHUSDNNLQJLQGHJHVFKLNWHFRQWDLQHUVRPKHW
WHUHFFOHQ+HOSDIYDOYDQHOHNWULVFKHHQHOHNWURQLVFKH
DSSDUDWHQ UHFFOHQ *RRL DSSDUDWHQ GLH YRRULHQ LMQ
YDQGLWVPERROQLHWZHJPHWKLVKRGHOLMNDIYDO5H
WRUQHHUKHWSURGFWQDDUZORNDOHLQVWHOOLQJRIQHHP
FRQWDFWRSPHWZJHPHHQWHOLMNNDQWRRU
DNRRUZDDNRRSDGLWDLHUSURGFW
/HHVGHHKDQGOHLGLQJJURQGLJYRRUKHWDSSDUDDWLQJHEULNQHHPW'HKDQGOHLGLQJEHYDW
EHODQJULMNHLQIRUPDWLHGLHDOKHOSHQZDSSDUDDWRSWLPDDOWHJHEULNHQHQKHWYHLOLJHQ
FRUUHFWWHLQVWDOOHUHQJHEULNHQHQRQGHUKRGHQ
%HZDDUGHHKDQGOHLGLQJRGDWKHPVWHHGVNQWUDDGSOHJHQYRRUKHWYHLOLJHQFRUUHFW
JHEULNYDQKHWDSSDUDDW
OVKHWDSSDUDDWYHUNRRSWZHJVFKHQNWRIDFKWHUODDWZDQQHHUYHUKLVWPRHWGHH
KDQGOHLGLQJRRNPHHJHYHQRGDWGHQLHZHHLJHQDDUYHUWURZGNDQUDNHQPHWKHWDSSD
UDDWHQGHYHLOLJKHLGVZDDUVFKZLQJHQ
:56&8:,1*
LVLFRRSOHWVHOVRIHVWLNNL
2QWNRSSHOKHWDSSDUDDWYDQKHWQHWZHUN6QLMGKHWQHWVQRHUGRRUHQYHUZLMGHUKHW9HU
ZLMGHUGHVFKDUQLHUHQRPWHYHUPLMGHQGDWNLQGHUHQRIKLVGLHUHQLQKHWDSSDUDDWYDVW
JHNOHPGNQQHQUDNHQ

NL
Inhoud
3
1-Veiligheidsinformatie ................................................................................................................... 4
2-Productbeschrijving ..................................................................................................................... 7
3-Bedieningspaneel ......................................................................................................................... 8
4-Programma‘s ................................................................................................................................. 11
5-Verbruik ........................................................................................................................................... 12
6-Dagelijks gebruik ........................................................................................................................... 13
7-Milieuvriendelijk wassen .............................................................................................................. 18
8-Zorg en reiniging ........................................................................................................................... 19
9-Probleemoplossen ....................................................................................................................... 22
10-Installatie ...................................................................................................................................... 26
11-Technische gegevens ................................................................................................................ 30
12-Klantendienst .............................................................................................................................. 31

9HLOLJKHLGVLQIRUPDWLH
1/
9RRUKHWDSSDUDDWGHHHUVWHPDDOLVFKDNHOWPRHWKHWHLOLJ
KHLGVDGLHVOHH
:56&8:,1*
9RRUGHHHUVWHLJHEULNDPH
▶ =RUJHUYRRUGDWHUJHHQVFKDGHLVRSJHWUHGHQWLMGHQVKHWWUDQV
SRUW
▶ =RUJHUYRRUGDWDOOHWUDQVSRUWERWHQYHUZLMGHUGLMQ
▶ 9HUZLMGHUDOOHYHUSDNNLQJHQELWHQGHEUWYDQNLQGHUHQEHZD
UHQ
▶ +HWDSSDUDDWPRHWDOWLMGGRRUPLQLPPWZHHSHUVRQHQZRUGHQ
JHGUDJHQRPGDWKHWRZDDULV
DJHOLMNVJHEULN
▶ 'LWDSSDUDDWPDJZRUGHQJHEULNWGRRUNLQGHUHQYDQMDDUHQ
RGHUHQSHUVRQHQPHW HHQYHUPLQGHUGHIVLHNJHYRHOVPDWLJ
HQPHQWDDOYHUPRJHQRIHHQJHEUHNDDQHUYDULQJHQNHQQLVDOV
HRQGHUWRHLFKWVWDDQRILQVWUFWLHVNULMJHQPHWEHWUHNNLQJWRW
KHWYHLOLJHJHEULNYDQKHWDSSDUDDWHQGHEHWURNNHQULVLFRV
▶ +RGKHWDSSDUDDWLWGHEUWYDQNLQGHUHQMRQJHUGDQMDDURG
WHQLMHRQGHUFRQVWDQWWRHLFKWVWDDQ
▶ .LQGHUHQPRJHQQLHWVSHOHQPHWKHWDSSDUDDW
▶ /DDWNLQGHUHQRIKLVGLHUHQQLHWGLFKWELMKHWDSSDUDDWNRPHQDOV
GHGHUJHRSHQGLV
▶ %HZDDUDOOHZDVPLGGHOHQLWGHEUWYDQNLQGHUHQ
▶ 6OLWULWVVOLWLQJHQEHYHVWLJORVVHGUDGHQ HQOHWHURSGDWNOHLQH
LWHPVQLHWYHUVWULNWNQQHQUDNHQ,QGLHQQRRGDNHOLMNPRHWHHQ
DNRIQHWJHEULNHQ
▶ 8PDJQLHWRSKHWDSSDUDDWGUNNHQRIKHWJHEULNHQRSEORWH
YRHWHQRIPHWQDWWHRIYRFKWLJHKDQGHQRIYRHWHQ
▶ 8PDJKHWDSSDUDDWQLHWDIGHNNHQRIRPZLNNHOHQWLMGHQVGHZHU
NLQJRIDFKWHUDIRGDWHYHQWHHOYRFKWNDQYHUGDPSHQ
▶ 8PDJJHHQZDUHYRRUZHUSHQRIEURQQHQYDQZDUPWHRIYRFKW
ERYHQRSKHWDSSDUDDWSODDWVHQ
▶ *HEULNRIEHZDDUJHHQRQWYODPEDDUZDVPLGGHORIVWRPHULMUHL
QLJLQJVPLGGHOGLFKWELMKHWDSSDUDDW
▶ *HEULNJHHQRQWYODPEDDUVSUDVGLFKWELMKHWDSSDUDDW
▶ :DVJHHQNOHGLQJVWNNHQGLHEHKDQGHOGZHUGHQPHWRSORVPLG
GHOHQLQKHWDSSDUDDWRQGHUHYRRUDILQGHOFKWWHKHEEHQODWHQ
GURJHQ

1/
9HLOLJKHLGVLQIRUPDWLH
:56&8:,1*
DJHOLMNVJHEULN
▶ 8PDJGHVWHNNHUQLHWYHUZLMGHUHQRILQYRHUHQLQGHDDQZHLJKHLG
YDQRQWYODPEDDUJDV
▶ 8PDJ VFKLPUEEHURIVSRQVDFKWLJPDWHULDDO ZDVVHQ LQ KHHW
ZDWHU
▶ 8PDJJHHQZDVJRHGZDVVHQGDWYLOLVPHWEORHP
▶ 8PDJGHODGHPHWKHWZDVPLGGHOQLHWRSHQHQWLMGHQVHHQZDV
FFOV
▶ 'UNQLHW RS GH GHU WLMGHQV HHQZDVFFOV=HZRUGW QDPHOLMN
KHHW
▶ 8PDJGHGHUQLHWRSHQHQDOVKHWZDWHUQLYHDLFKWEDDULVGRRU
KHWNLMNYHQVWHU
▶ 8PDJGHGHUQLHWRSHQIRUFHUHQ'HGHULVLWJHUVWPHWHHQ
HOIJUHQGHOHQGPHFKDQLVPHHQHRSHQWNRUWDDQKHWHLQGHYDQ
GHZDVSURFHGUH
▶ 6FKDNHOKHWDSSDUDDWLWQDHONSURJUDPPDHQYRRUURWLQHRQ
GHUKRGVZHUNHQLWYRHUHQ9HUZLMGHUGHVWHNNHULWKHWVWRSFRQ
WDFWRPHOHNWULFLWHLWWHEHVSDUHQHQLWYHLOLJKHLGVRYHUZHJLQJHQ
▶ 8 PDJ QRRLW DDQ KHW QHWVQRHU WUHNNHQ RP GH VWHNNHU LW KHW
VWRSFRQWDFWWHYHUZLMGHUHQ
2GHUKRGUHLLJH
▶ =RUJHUYRRUGDWNLQGHUHQRQGHUWRHLFKWVWDDQDOVHKHWDSSD
UDDWUHLQLJHQRIRQGHUKRGHQ
▶ 9HUZLMGHU GH VWHNNHU LW KHW VWRSFRQWDFW YRRU RQGHUKRGV
ZHUNDDPKHGHQLWYRHUW
▶ +RGKHWRQGHUVWHGHHOYDQKHWNLMNYHQVWHUVFKRRQHQRSHQGH
GHUHQGHODGHPHWKHWZDVPLGGHODOVKHWDSSDUDDWQLHWLQJH
EULNLVRPJHUWMHVWHYRRUNRPHQ
▶ *HEULNJHHQZDWHUVSUDRIVWRRPRPKHWDSSDUDDWWHUHLQLJHQ
▶ OV KHW QHWVQRHU EHVFKDGLJG LV PRHW KHW ZRUGHQ YHUYDQJHQ
doorde fabrikant, zijnonderhoudsdienst of dergelijkgekwali
FHHUGHSHUVRQHQRPLHGHUULVLFRLWWHVOLWHQ
▶ 3UREHHUKHWDSSDUDDWQRRLWHOIWHUHSDUHUHQ1HHPFRQWDFWRS
PHWRQHNODQWHQGLHQVWRPUHSDUDWLHVWHODWHQLWYRHUHQ

9HLOLJKHLGVLQIRUPDWLH
1/
%HRRJGJHEULN
'LW DSSDUDDWLVHQNHOEHGRHOGYRRUZDVJRHGGDWLQGHZDVPDFKLQH
PDJZRUGHQJHZDVVHQ8PRHWDOWLMGGHLQVWUFWLHVYROJHQYHUPHOG
RSKHWHWLNHWYDQHONNOHGLQJVWN+HWLVLWVOLWHQGEHGRHOGYRRUJH
EULNELQQHQLQKLV+HWLVQLHWEHGRHOGYRRUFRPPHUFLHHORILQGVWUL
HHOJHEULN
:LMLJLQJHQDDQKHWDSSDUDDWLMQQLHWWRHJHODWHQ2QEHGRHOGJHEULN
NDQJHYDDUHQKHWYHUOLHVYDQGHJDUDQWLHHQDDQVSUDNHOLMNKHLGVFODLPV
EHWHNHQHQ
:56&8:,1*
,VWDOODWLH
▶ +HWDSSDUDDWPRHWLQHHQJRHGJHYHQWLOHHUGHORFDWLHZRUGHQJH
SODDWVW=RUJYRRUHHQORFDWLHGLHWRHODDWGHGHUYROOHGLJWHRSHQHQ
▶ ,QVWDOOHHUKHWDSSDUDDWQRRLWELWHQRSHHQYRFKWLJHORFDWLHRILQHHQ
ORFDWLHZDDUZDWHUOHNNHQNQQHQRSWUHGHQRDOVRQGHURIGLFKWELM
HHQZDVWDIHO,QKHWJHYDOYDQHHQZDWHUOHNPRHWGHHOHNWULVFKH
YRHGLQJORVNRSSHOHQHQGHPDFKLQHQDWUOLMNODWHQGURJHQ
▶ ,QVWDOOHHURIJHEULNKHWDSSDUDDWHQNHODOVGHWHPSHUDWUKRJHULV
GDQr&
▶ 3ODDWV KHWDSSDUDDW QLHWUHFKWVWUHHNVRS HHQ WDSLMWRIGLFKWELMHHQ
PURIPHEHOVWN
▶ 8PDJKHWDSSDUDDWQLHWLQVWDOOHUHQLQGLUHFWRQOLFKWRILQGHEUW
YDQZDUPWHEURQQHQELMYIRUQLHQYHUZDUPLQJ
▶ =RUJHUYRRUGDWGHHOHNWULVFKHLQIRUPDWLHRSKHWQDDPSODDWMHRYHU
HHQVWHPWPHWGHVWURRPWRHYRHU=RQLHWPRHWFRQWDFWRSQHPHQ
PHWHHQHOHNWULFLHQ
▶ *HEULNJHHQPOWLVWHNNHUDGDSWHUVRIYHUOHQJVQRHUHQ
▶ =RUJHUYRRUGDWHQNHOKHWJHOHYHUGHQHWVQRHUHQVODQJVHWZRUGHQ
JHEULNW
▶ =RUJHUYRRUGDWKHWQHWVQRHUHQGHVWHNNHUQLHWEHVFKDGLJGLMQ,Q
GLHQEHVFKDGLJGPRHWKHWZRUGHQYHUYDQJHQGRRUHHQHOHNWULFLHQ
▶ *HEULNHHQDIRQGHUOLMNHDDUGJHOHLGHUYRRUGHYRHGLQJGLHHHQYR
GLJWRHJDQNHOLMNPRHWLMQQDGHLQVWDOODWLH+HWDSSDUDDWPRHWJH
DDUGZRUGHQ
(NHORRUKHW9.+HWQHWVQRHUYDQKHWDSSDUDDWLVLWJHUVWPHW
HHQGULHSROLJHVWHNNHUDDUGLQJGLHSDVWLQHHQGULHSROLJHJHDDUGH
VWHNNHU6QLMGHGHUGHSLQDDUGLQJQRRLWZHJRIGHPRQWHHUHQLHW
'HVWHNNHUPRHWRRNQDGHLQVWDOODWLHWRHJDQNHOLMNLMQ
▶ =RUJHUYRRUGDWGHQDGHQHQGHYHUELQGLQJHQYDQGHVODQJVWHYLJLMQ
DDQJHEUDFKWHQGDWHUJHHQOHNNHQLMQ

NL
2-Productbeschrijving
7
2.1 Afbeelding van het apparaat
2.2 Accessoires
Controleer de accessoires en literatuur op basis van de onderstaande lijst (Afb. 2-3):
Ilaatslang-
montage
5 Afdicht-
pluggen
Afvoerslang
beugel
Gebruiks-
handleiding
Garantiekaart
Opmerking:
Omwille van technische wijzigingen en uiteenlopende modellen kunnen de illustraties in
de volgende hoofdstukken verschillen van uw model.
2-3
1
Wasmiddel/wasverzachter lade
2
Scherm
3
Werktop
4
Programma selectieschakelaar
5
Naamplaatje
7
6
Onderhoudsluik
Instelbare voetjes
1 Transportbouten (T1-T4)
2 Deksel achteraan
3 Schroeven deksel achteraan (S1-S6)
4 Netsnoer
5 Waterinlaatklep
6 Afvoerslang
Trillingdem-
perblokken
2x
2x
140 0
rpm
Capa city
7k g
+++
A
Energy
Speed up
HW70-BP1439
Temp Speed Start/pauseExtra rinse De laySteam
Cotton
Synthetics
Mix
Sportwear
Jeans
Baby clothes
Cotton+
Hygienic
Fast wash
Spin
Bedding
Ha ndwa sh
Delica te
Da ily Wash
Quick 15”
Wool
2 3
5
6
41
T1
T2
T3
S1
S2
S6
S4
T4
1
2 3 4 5 6
S3
S5
2-1
2-2
7

3-Bedieningspaneel
NL
8
1 “Knop Aan/Uit"
2 Programma selectiescha-
kelaar
3 Scherm
4 Wasmiddel/wasverzachter
lade
3.1 “Aan/Uit" knop
Druk zacht op de knop (Afb. 3-2) om in te schakelen. Het
scherm licht op, de indicator van de "Start/Pause" knop
begint te knipperen. Druk opnieuw op de knop geduren-
de ca. 2 seconden om uit te schakelen. Als er geen on-
derdeel van het paneel of programma wordt ingescha-
keld, zal de machine automatisch uitschakelen.
3.2 Programmaselectie
Met kan één van 16 programma's selecteren met de
knop (Afb. 3-3). Het LED-lampje van het programma
licht op en de standaardinstellingen worden weerge-
geven.
3.3 Scherm
Het scherm (Afb. 3-4) geeft de volgende informatie
weer:
▶ Wasduur
▶ Eindtijd startuitstel
▶ Foutcodes en onderhoudsinformatie
3-4
5 Functieknoppen
6 "Startuitstel" knop
7 “Start/Pause“ knop
Opmerking: Geluidssignaal
In de volgende gevallen geeft een akoestisch signaal standaard geen geluid:
▶ wanneer een knop wordt ingedrukt
▶ wanneer men aan de programma
selectieschakelaar draait
▶ aan het einde van een programma
Het geluidssignaal kan indien noodzakelijk worden gedeselecteerd; zie DAGELIJKS GE-
BRUIK.
3-2
3-1
4
3-3

NL
3-Bedieningspaneel
9
3.5 Functieknoppen
De functieknoppen (Afb. 3-6) schakel bijkomende
opties in voor het geselecteerde programma voor de
start van het programma. De betrokken indicatoren
worden weergegeven.
Als het apparaat wordt uitgeschakeld of een nieuw pro-
gramma ingesteld, worden alle opties uitgeschakeld.
Als een knop meerdere opties heeft, kan de gewenste
optie worden geselecteerd door de knop achtereen-
volgens in te drukken.
Om de instelling te verwijderen of de instellingproce-
dure te annuleren, drukt u op de functieknop tot de ge-
wenste LED-lampjes of - in het geval van slechts één
optie - het LED-lampje uitschakelt.
3.5.1-Functieknop "Temp.“
Druk op deze knop (Afb. 3-7) om de wastemperatuur
van het programma te wijzigen. Als er geen waarde
oplicht, wordt het water niet opgewarmd.
In combinatie met de “Vapeur/stoom”
knop kan de kinder-
slotfunctie in/uitgeschakeld worden (zie KINDER-
SLOT).
3.5.2-Functieknop "Tr/min“
Druk op deze knop (Afb. 3-8) om de toeren/minuut
van het programma te wijzigen of te deselecteren. Als
er geen waarde oplicht, wordt het wasgoed niet ge
-
zwierd.
Opmerking: Fabrieksinstellingen
-
ke standaardinstellingen. Als er geen speciale vereiste is, worden standaardinstellingen
aanbevolen.
3.4 Wasmiddel lade
Open de lade, er zijn drie compartimenten
zichtbaar (Afb. 3-5):
Compartiment 1: Enkel waterinlaat, geen wasmiddel
Compartiment 2: Oplosmiddel voor programma
Compartiment : Wasverzachter, conditioner, etc.
De aanbeveling van het type oplosmiddelen is geschikt
voor uiteenlopende wastemperaturen. Raadpleeg de
handleiding van het oplosmiddel.
3.5.3-Functieknop "Vapeur/stoom“
Druk op deze knop(Fig.3-9) om de stoomfunctie te activeren.
Wanneer deze functie is geactiveerd,is de standaard temperatuur de
3-9
3-5
maximum temperatuur van het geselecteer de programma.
Deze functie kan alleen worden geactiveerd met de volgende programma’s: Hygienisch,
Babykleding,Mix Synthetisch ,Katoen. Wanneer de functie is geactiveerd ,gaat het lampje
boven de knop branden. Als u nogmaals op deze knop drukt , kan de functie worden
gedeactiveerd en wordt het .
Start/Pause
3.5.1 3.5.2 3.5.3 3.5.4 3.5.5
Start/Pause
3-6
Temp. Tr/min
Extra spoelen
Rinçage +
Startuitstel
Fin différée
Vapeur
Stoom
Temp.
Tr/min
Vapeur
Stoom

3-Bedieningspaneel
NL
10
3.5.4-Functieknop "Extra spoelen“
Druk op deze knop (Afb. 3-10) om het wasgoed inten-
siever te spoelen met fris water. Dit wordt aanbevolen
voor personen met een gevoelige huid.
Door de knop meerdere malen in te drukken, kan men
één tot drie bijkomende cycli selecteren. Ze verschij-
nen op het scherm met P--1/P--2/P--3.
3.5.5-Functieknop "Speed up“
Deze functie bespaart tijd en energie. Bij voorkeur was-
goed dat licht vuil is. Druk gelijktijdig op de knop "Extra
spoelen.“ en ”Startuitstel” (Afb. 3-11) gedurende ca. 3
seconden om de "Speed up" functie in te schakelen;
SPEEd uP verschijnt. Deze functie is niet beschikbaar in
alle programma's (zie PROGRAMMA'S).
3.7 "Start/Pause“ knop
Druk zacht op deze knop (Fig. 3-13) om het momen-
teel weergegeven programma te starten of te on-
derbreken. Tijdens de instelling en uitvoering van het
programma licht het LED-lampje boven de knop op, of
indien onderbroken begint het te knipperen.
3.6 “Startuitstel“ knop
Druk op deze knop (Afb. 3-12) om het programma te
starten met startuitstel. Het eindtijd startuitstel kan
worden verhoogd in stappen van 30 minuten van 0,5-
24u. Bijvoorbeeld, scherm ui 6:30 betekent dat het
wasprogramma zal eindigen binnen 6 uur en 30 minu-
ten. Druk op de "Start/Pause" knop om het startuitstel
te starten. Dit is niet van toepassing op het ZWIEREN
Eco 40-60 programma.
Opmerking: Vloeibaar wasmiddel
Als u vloeibaar wasmiddel gebruikt, wordt het afgeraden het startuitstel in te schakelen.
3.8 Kinderslot
Druk gelijktijdig op de knop "Temp.“ en ”Vapeur/Stoom”
(Afb. 3-14) gedurende 3 seconden om alle onderdelen
van het paneel te blokkeren tegen inschakeling. Om
te ontgrendelen, drukt u opnieuw op beide knoppen.
Het scherm geeft weer (Afb. 3-15) als een knop
wordt ingedrukt wanneer het kinderslot ingeschakeld
is. De wijziging is niet actief.
3-15
3-10
3-11
3-12
3-13
lampje boven de knop uitgeschakeld. Wanneer de functie is geactiveerd ,kan de tempera-
tuur van het programma niet worden gewijzigd.Als de “Temp” -knop wordt ingedrukt ,
wordt de “Stoom”-functie gedeactiveerd.U kunt de “Stoom”-functie alleen activeren
voordat u een programma start. U kunt de “Stoom”-functie niet activeren terwijl het apparaat
al een programma uitvoert.
Extra spoelen
Rinçage +
Speed up
Extra spoelen
Rinçage +
Startuitstel
Fin différée
Startuitstel
Fin différée
Start/Pause
Temp.
Vapeur
Stoom

NL
4-Programma's
11
Met betrekking tot droog wasgoed.
1)
*: water wordt niet opgewarmd (er is geen waarde opgelicht).
2)
Kies 90 °C enkel als wastemperatuur voor hygiënische vereisten
3)
Verminder de hoeveelheid wasmiddel omdat het over een korte programmaduur gaat.
Charge max. Température
Vitesse
d’es-
sorage
préré-
glée
en trs/
min
Fonction
en kg
en °C
Préréglage
Vapeur
Rinçage +
Speed up
Programme
plage
sélec-
tionna-
ble 2 1
40
•
º
/
• • •
40
•
º
/ 1200
• • •
30
•
º
/ 1000
• • •
40
•
º
/ 1000
• • •
40
•
º
/
1000
•
20
•
º
/
• •
•
90
•
º
/
1000
• •
40
•
º
/ 1000
•
Eco 40-60
/
•
º
/ /
20
•
º
/ 800
•
•
º
/ 1000
•
30
•
/ 400
•
Jeans
30
•
º
/ 1000
•
•
40
•
/ / 800
• •
/
/
/ / / 1000
Compartiment à détergent pour :
1
Arrivée d’eau uniquement,
pas de lessive
2
Lessive
Adoucissant ou produit
d’entretien
•
Oui,
º
En option, / No
Express
15 min
•
/
/
/ 800
•
Sport
1)
* tot 90
* tot 60
* tot 60
* tot 90
90
* tot 60
20
/
* tot 40
* tot 40
* tot 40
* tot 40
* tot 30
* tot 60
* tot 40
1400
1400
7
3.5
1
7
3.5
3.5
3.5
7
7
3.5
3.5
1
1
3.5
1
7
Katoen
Synthetisch
Mix
Baby Care
Hygiënisch
Ondergoed
Katoen 20°C
Snel
3)
Wol
Delicaat
Dekbed
Zwieren
Katoen
Synthetische of ge-
Licht vuil gemengd
wasgoed van katoen
en synthetische
Machine wasbare
stof van wol of met
wol-inhoud
Katoen
Katoen
Katoen
Licht vuil wasgoed
van katoen of syn-
Katoen / Synthetisch
Katoen /
Sportkledij
Synthe-
tisch
D
elicaat
w
asgoed
en zijde
Jeans
Katoen
Katoen

5-Verbruik
NL
12
Scan QR-code op energielabel voor informatie over energieverbruik.
Het werkelijke energieverbruik kan verschillen van het aangegeven energieverbruik,
afhankelijk van de plaatselijke omstandigheden.
EU 1015/2010 programma
Selecteer Eco 40-60, druk op "Tr/min" 10s, en stel vervolgens in op 60 ° C / 40 ° C met
max. omwentellingsnelheid.
De standaard 60°C en 40°C katoenprogramma 's zijn geschikt om normaal vuil katoenen
en waterverbruik voor katoenen wasgoed. De gebruikte watertemperatuur kunnen ver-
schillen van de vermelde temperatuur van de cyclus.
Opmerking: Automatisch gewicht
Het apparaat is uitgerust met een lading herkenning. Met een kleine lading wordt de
ene
Het display toont AUtO.
rgie, het water en de wasduur automatisch verminderd in sommige programma's.

1/
'DJHOLMNVJHEULN
:DVJRHGRRUEHUHLGH
▶ 6RUWHHUGHNOHGLMQDDUJHODQJGHVWRINDWRHQVQ
WKHWLVFKZRORILMGHHQKRHYLOHLVIE
/HWRSGHRQGHUKRGVVPEROHQRSGHHWLNHWWHQ
▶ 6FKHLGZLWWHNOHGLMYDQJHNOHUGHNOHGLQJVWNNHQ
:DVJHNOHUGHWHWLHOHHUVWPHWGHKDQGRPWH
FRQWUROHUHQRIGHNOHUHQYHUEOHNHQRILWORSHQ
▶ 0DDNGHDNNHQ OHHJVOHWHOVPQWHQHWFHQ
YHUZLMGHUKDUGHUHGHFRUDWLHYHYRRUZHUSHQELMY
VSHOGHQ
▶ .OHGLQJVWNNHQRQGHURPHQGHOLFDDWZDVJRHG
enjngewoventextielzoalsjnegordijnenmoe
WHQ LQHHQ ZDVDN ZRUGHQ JHSODDWVW KDQGZDV
VHQRIGHVWRPHULMLMQEHWHUHRSWLHV
▶ 6OLW ULWVVOLWLQJHQ YHOFUR EHYHVWLJLQJHQ HQ KD
NHQRUJHUYRRUGDWGHNQRSSHQVWHYLJLMQDDQ
JHQDDLG
▶ 3ODDWV JHYRHOLJH LWHPV RDOV ZDVJRHG RQGHU
HHQVWHYLJHRRPGHOLFDDWRQGHUJRHGHQNOHLQH
LWHPV RDOV VRNNHQULHPHQ EHKDV HWF LQ HHQ
ZDVDN
▶ 2QWYRZJURWHVWNNHQZDVJRHGRDOVEHGGHQ
ODNHQVVSUHLHQHWF
▶ 'UDDL MHDQV JHGHFRUHHUGH RI NOHULQWHQVLHYH
WHWLHOELQQHQVWHELWHQZDVHPRJHOLMNDIRQ
GHUOLMN
9RHGLJ
6OLWGHZDVPDFKLQHDDQRSKHWHOHNWULVFKQHW9
WRW9a+ IE 5DDGSOHHJ RRN GHVHFWLH
,167//7,(
:DWHUHUELGLJ
▶ 9RRUGHYHUELQGLQJWRWVWDQGEUHQJWPRHWGH
VFKRRQKHLGHQKHOGHUKHLGYDQGHZDWHULQODDWFRQ
WUROHUHQ
▶ 'UDDLGHNUDDQRSHQIE
2SPHUNLJ6WUDNKHLG
9RRUJHEULNPRHWFRQWUROHUHQRSOHNNHQLQGHYHUELQGLQJHQWVVHQGHNUDDQHQGH
LQODDWVODQJGRRUGHNUDDQRSHQWHGUDDLHQ
23*(/(7
1LHWWHWLHOHQHQNOHLQHORVVHLWHPVRILWHPVPHWHHQVFKHUSHUDQGNQQHQGHIHFWHQ
YHURRUDNHQHQVFKDGHWRHEUHQJHQDDQGHNOHGLMHQKHWDSSDUDDW

'DJHOLMNVJHEULN
2GHUKRGVWDEHO
5HLLJH
:DVEDDUWRWr&
QRUPDDOSURFHV
:DVEDDUWRWr&
QRUPDDOSURFHV
:DVEDDUWRWr&
DFKWSURFHV
:DVEDDUWRWr&
QRUPDDOSURFHV
:DVEDDUWRWr&
DFKWSURFHV
:DVEDDUWRWr&
KHHODFKWSURFHV
:DVEDDUWRWr&
QRUPDDOSURFHV
:DVEDDUWRWr&
DFKWSURFHV
:DVEDDUWRWr&
KHHODFKWSURFHV
+DQGZDVVHQ
PDr&
1LHWZDVVHQ
%OHNH
%OHNHQWRHJHODWHQ (QNHOUVWRI
QLHWFKORRU
1LHWEOHNHQ
URJH
7URPPHOGURJHQ
PRJHOLMN
QRUPDOHWHPSHUDWU
7URPPHOGURJHQ
PRJHOLMN
ODJHUHWHPSHUDWU
1LHWWURPPHOGURJHQ
'URJHQDDQGHZDVOLMQ 3ODWGURJHQ
6WULMNH
6WULMNHQDDQHHQPDL
PPWHPSHUDWU
WRWr&
6WULMNHQDDQHHQ
JHPLGGHOGHWHPSH
UDWU
WRWr&
6WULMNHQDDQHHQODJH
WHPSHUDWU WRW
r& RQGHU VWRRP
VWRRPVWULMNHQ NDQ
R Q K H U UR H S H O L M N H
VFKDGHYHURRUDNHQ
1LHWVWULMNHQ
3URIHVVLRHOHWHWLHOHURUJLJ
6WRPHQLQWUHWUDFK
ORRUHWKHHQ
6WRPHQLQNRROZD
terstoen
1LHWVWRPHQ
3URIHVVLRQHHOQDW
UHLQLJHQ
1LHWSURIHVVLRQHHO
QDWUHLQLJHQ
HWDSSDUDDWODGH
▶ 3ODDWVKHWZDVJRHGVWNYRRUVWNLQGHWURPPHO
▶ 1LHWRYHUODGHQ/HWRSGHYHUVFKLOOHQGHPDLPPODGLQJQDDUJHODQJKHWSURJUDP
PD'HDOJHPHQHUHJHOYRRUGHPDLPDOHODGLQJ/DDWYLMIWLHQFHQWLPHWHUWVVHQGH
ODGLQJHQWURPPHO
▶ 6OLWKHWGHNVHOYRRULFKWLJ=RUJHUYRRUGDWHUJHHQZDVJRHGWVVHQGHGHUJH
NOHPGUDDNW

NL
6-Dagelijks gebruik
15
6.5 Het wasmiddel selecteren
▶ -
teit van het wasmiddel.
▶ Gebruik enkel wasmiddel dat is goedgekeurd voor machinewas.
▶ -
▶ Let altijd op de aanbevelingen van de wasmiddel fabrikant.
▶ Gebruik geen stoom reinigingsmiddelen zoals trichloroethyleen en gelijkaardige
producten.
Kies het beste wasmiddel
Programma
Type wasmiddel
Universeel Kleur Delicate Speciaal Wasverzachter
Katoen
L/P L/P - - o
Synthetisch
- L/P - - o
Mix L L/P - - o
Baby Care - - L/P L/P o
Hygiënisch L/P L/P - - o
Ondergoed - - L/P L/P o
Katoen 20°C L/P L/P - - o
Eco 40-60
L/P L/P - - o
Snel L/P L - - o
Express 15 min L L - - o
Sport
- - L/P L/P o
Wol - - L/P L/P o
Delicaat - - L/P L/P o
Jeans L L - - o
-
Dekbed - - L L/P
L = gel-/vloeibaar wasmiddel P = poeder wasmiddel O = optioneel
_
= nee
Als u vloeibaar wasmiddel gebruikt, wordt het afgeraden het startuitstel in te schakelen.
We raden aan de volgende producten te gebruiken:
▶ Waspoeder: 20°C tot 90°C* (optimaal gebruik: 40-60°C)
▶ Kleur wasmiddel: 20°C tot 60°C* (optimaal gebruik: 30-60°C)
▶ Wol/delicaat wasmiddel: 20°C tot 30°C* (= optimaal gebruik:)
* Kies 90 °C enkel als wastemperatuur voor hygiënische vereisten.
Zwieren
- - - - -

6-Dagelijks gebruik
NL
16
6.7 Het apparaat inschakelen
Druk op de "Aan-uit“ knop om het apparaat in te scha-
kelen (Afb. 6-5). Het LED-lampje van de "Start/Pause"
knop knippert.
6.6 Wasmiddel toevoegen
1. Open de wasmiddellade.
2. Plaats de vereiste chemicaliën in de overeen-
stemmende compartimenten (Afb. 6-4)
3. Duw de lade zachtjes in.
Opmerking:
▶ Verwijder wasmiddelresten voor de volgende wascyclus uit de wasmiddellade.
▶ Gebruik niet te veel wasmiddel of wasverzachter.
▶ Volg de instructie op de verpakking van het wasmiddel.
▶ Vul het wasmiddel altijd bij net voor het begin van de wascyclus.
▶ Geconcentreerd vloeibaar wasmiddel moet worden opgelost voor het wordt toege-
voegd aan compartiment 2.
▶ Het beste gebruik van vloeibaar wasmiddel is door een doseringbal te gebruiken die in
de wasmachine wordt geplaatst.
▶ Gebruik geen vloeibaar wasmiddel als "einde startuitstel" geselecteerd is.
▶ Kies de programma-instellingen zorgvuldig in overeenstemming met de onderhoud-
symbolen op alle etiketten in overeenstemming met de programmatabel.
6.8 Selecteer een programma
Voor een optimaal wasresultaat selecteert u een pro-
gramma dat past bij de graad van vervuiling en het
type wasgoed.
Draai aan de programmaknop (Afb. 6-6) om het cor-
recte programma te selecteren. Het relevante LE-
D-lampje licht op en de standaardinstellingen worden
weergegeven.
6.9 Individuele selecties toevoegen
Selecteer de vereiste opties en instellingen (Afb. 6-7);
raadpleeg BEDIENINGSPANEEL.
6-4
Opmerking: Geurtjes verwijdering
Voor het eerste gebruik raden we aan het programma DEKBED te gebruiken zonder la-
ding en met een kleine hoeveelheid wasmiddel in het wasmiddel compartiment (2) of
met speciale machinereiniger om mogelijke corrumperende resten te verwijderen.
Start/Pause
6-5 6-6
6-7
Speed up
Temp. Tr/min
Extra spoelen
Rinçage +
Startuitstel
Fin différée
Vapeur
Stoom

NL
6-Dagelijks gebruik
17
1. Aan het einde van het programma verschijnt EnD.
2. Het apparaat schakelt automatisch uit.
3. Verwijder het wasgoed zo snel mogelijk voor een goede zorg en om meer kreuken
te voorkomen.
4. Schakel de watertoevoer uit.
5. Ontkoppel het netsnoer.
6. Open de deur om de opbouw van vocht en geurtjes te voorkomen. Laat ze open
wanneer de machine niet in gebruik is.
6.13 De zoemer in- of uitschakelen
Het geluidssignaal kan indien noodzakelijk worden gedeselecteerd:
1. Het apparaat inschakelen.
2. Selecteer het ZWIEREN programma.
3. Druk gelijktijdig op de knop "Startuitstel/Findifférée" en "Extra spoelen/Rinçage +"
gedurende ca. 3 seconden. “
bEEP OFF
” verschijnt en de zoemer wordt uitgeschakeld.
Om de zoemer in te schakelen, drukt u opnieuw gelijktijdig op deze beide knoppen. “bEEP
ON” verschijnt.
6.11 Wasprogramma onderbreken - annuleren
Een actief programma onderbreken drukt u zacht op de "Start/Pause" knop. Het
LED-lampje boven de knop knippert. Druk opnieuw op de knop om het programma te
hervatten.
Om een actief programma en alle individuele instellingen te annuleren
1. Druk op de knop "Start/Pause" knop om het actieve programma te onderbreken.
2. Druk op de "Aan-uit" knop gedurende ca. 2 seconden om het apparaat uit te scha-
kelen.
3. Schakel het ZWIEREN programma in en selecteer "geen Snelheid" (alle lampjes zijn
uitgeschakeld) om het water te draineren.
4. Selecteer een nieuw programma en start het.
6.12 Na het wassen
Opmerking: Deurvergrendeling
▶ Uit veiligheidsoverwegingen wordt de deur gedeeltelijk vergrendeld tijdens de was-
cylus. Het is enkel mogelijk de deur te openen aan het einde van het programma of na
de annulering van het programma (zie bovenstaande beschrijving).
▶ In het geval van een hoog waterniveau, een hoge watertemperatuur en tijdens het
zwieren is het niet mogelijk de deur te openen; Loc
1-
verschijnt.
Opmerking: Stand-bymodus / energiebesparende modus
Het ingeschakelde apparaat schakelt over op de stand-bymodus als het niet wordt in-
geschakeld binnen 2 minuten voor de start van het programma of aan het einde van het
programma. Het scherm schakelt uit. Dit bespaart energie. Om de stand-bymodus te
onderbreken, drukt u op de "Start/Pause" knop.
6.10 Het wasprogramma starten
Druk op de “Start/Pause“ knop (Afb. 6-8) om het pro-
gramma te starten. Het LED-lampje van de "Start/
Pause" knop knipperen en brandt voortdurend
Het apparaat werkt in overeenstemming met de aan-
wezige instellingen. Wijzigingen zijn enkel mogelijk
door het programma te annuleren.
6-8
Start/Pause

7-Milieuvriendelijk wassen
NL
18
Milieuverantwoordelijk gebruik
▶ Voor een optimaal gebruik van energie, water, wasmiddel en de tijdsduur moet u de
aanbevolen maximum lading grootte gebruiken.
▶ Niet overladen (handbreedte tussenruimte boven wasgoed).
▶ Voor licht vervuild wasgoed selecteert u het Express 15 min programma.
▶ Gebruik exacte doseringen van elk wasmiddel.
▶ -
ënt onder 60°C.
▶ Verhoog de standaardinstellingen enkel als er veel vlekken zijn.
▶ Select max. zwiersnelheid als men een binnenlandse droogmachine gebruikt.

NL
8-Zorg en reiniging
19
8.1 De wasmiddellade reinigen
U moet altijd goed opletten of er geen wasmiddelres-
ten zijn. Reinig de lade regelmatig (Afb. 8-1):
1. Trek de lade uit tot ze stopt.
2. Druk op de vrijgave knop en verwijder de lade.
3. Spoel daarna de lade tot ze schoon is en plaats
de lade opnieuw in het apparaat.
8.2 De machine reinigen
▶ Verwijder de stekker uit het stopcontact tijdens
de reiniging en het onderhoud.
▶ Gebruik een zachte doek met vloeibare zeep om
de machine behuizing te reinigen (Afb. 8-2) en
rubberen onderdelen.
▶ Gebruik geen organische chemicaliën of schu-
rende oplosmiddelen.
Opmerking: Hygiëne
Voor regelmatig onderhoud raden we aan elke drie maanden het HYGIËNISCH uit te
voeren zonder lading om eventuele schadelijke resten te verwijderen. Voeg een kleine
hoeveelheid wasmiddel toe in het wasmiddelvak (2) - of gebruik een speciale machine-
reiniger
Om blokkeringen van de watertoevoerleiding door
-
▶ Ontkoppel het netsnoer en sluit de watertoe-
voer.
▶ Schroef de waterinlaatslang los aan de achterzij-
de (Afb. 8-3) van het apparaat en de kraan.
▶
8-4).
▶
8.4 De trommel reinigen
▶ Verwijder per ongeluk gewassen metalen onder-
delen zoals spelden, munten, etc. uit te trommel
(Afb. 8-5) omdat ze roestvlekken en schade ver-
oorzaken.
▶ Gebruik een chloorvrij reinigingsmiddel om roest-
vlekken te verwijderen. Observeer de waarschu-
wingen van de fabrikant van het reinigingsmiddel.
▶ Gebruik geen harde voorwerpen of staalwol voor
de reiniging.
8-5
8-2
8-3 8-4
8-1
1
2

=RUJHQUHLQLJLQJ
6FKDNHOGHPDFKLQHLWHQYHUZLMGHUGHVWHNNHULW
KHWVWRSFRQWDFWIE
2SHQGHVHUYLFHNOHS8NQWHHQPQWVWNRIHHQ
VFKURHYHQGUDDLHUJHEULNHQIE
*HEULNHHQYODNNHFRQWDLQHURPKHWLWORRJZDWHU
RSWHYDQJHQIE'LWNDQHHQJURWHKRH
YHHOKHLGZDWHULMQ
9HUZLMGHU GH DIYRHUVODQJ HQ KRG GH LWHLQGHQ
ERYHQGHFRQWDLQHUIE
9HUZLMGHU GH DIGLFKWLQJ VWRS LW GH DIYRHUVODQJ
IE
1DGDWDOKHWZDWHUJHGUDLQHHUGKHEWVOLWGH
DIYRHUVODQJ IE HQ EUHQJW H RSQLHZ
DDQLQGHPDFKLQH
6FKURHIGHVFKURHYHQORVHQYHUZLMGHUKHWSRPS
ltertegenwijzerzin(Afb.8-12).
9HUZLMGHUYHURQWUHLQLJLQJHQHQYLOIE
/DJHSHULRGHDLDFWLLWHLW
OV KHW DSSDUDDW QLHW ZRUGW JHEULNW JHGUHQGH HHQ
ODQJHSHULRGH
9HUZLMGHUGHVWHNNHUIE
6FKDNHOGHZDWHUWRHYRHULWIE
2SHQGHGHURPGHRSERZYDQYRFKWHQJHU
WMHVWHYRRUNRPHQ/DDWGHGHURSHQZDQQHHUGH
PDFKLQHQLHWLQJHEULNLV
9RRUKHWYROJHQGHJHEULNPRHWKHWQHWVQRHUZDWHU
LQYRHUOHLGLQJ HQ DIYRHUVODQJ RUJYOGLJ FRQWUROHUHQ
=RUJHUYRRUGDWDOOHVFRUUHFWJHQVWDOOHHUGLVHQGDWHU
JHHQOHNNHQLMQ
:56&8:,1*
Gevaar van brandwonden! Water in het pomplter
NDQ KHHO ZDUP ZRUGHQ 9RRU HHQ KDQGHOLQJ LW
YRHUWPRHWKHWZDWHUODWHQDINRHOHQ
2SPHUNLJJLH
OVGHPDFKLQHJHGUHQGHODQJHSHULRGHQQLHWZRUGWJHEULNWUDGHQZHDDQKHWSUR
JUDPPD+*,1,6&+WHJHEULNHQRQGHUODGLQJHQPHWHHQNOHLQHKRHYHHOKHLGZDV
PLGGHOLQKHWZDVPLGGHOFRPSDUWLPHQWRIPHWVSHFLDOHPDFKLQHUHLQLJHURPPRJHOLM
NHFRUUPSHUHQGHUHVWHQWHYHUZLMGHUHQ
8.6Pomplter
Reinighetlteréénmaalpermaandencontroleerhet
pomplterbijvoorbeeldalshetapparaat:
▶ JHHQZDWHUDIYRHUW
▶ QLHWZLHUW
▶ DEQRUPDDOODZDDLYHURRUDDNWWLMGHQVGHZHUNLQJ

=RUJHQUHLQLJLQJ
23*(/(7
▶ Deafdichtingvanhetpompltermoetschoonenonbeschadigdzijn.Alshetdek
VHOQLHWYROOHGLJDDQJHGUDDLGLVNDQZDWHURQWVQDSSHQ
▶ Hetltermoetaangebrachtzijn,zonietkandittotlekkenleiden.
Reinighetpomplterzorgvuldig,bijv.onderstro
PHQGZDWHUIE
%UHQJKHWRSQLHZVWHYLJDDQIE
6OLWGHVHUYLFHNOHS

9-Probleemoplossen
NL
22
9.2 Probleemoplossing met weergavecode
Probleem Oorzaak Oplossing
CLR FLTR
• Draineringsfout, water wordt niet volle-
dig afgevoerd binnen 6 minuten
•
• Controleer de installatie van de afvoer
slang.
-
E2
• Vergrendeling - fout. • Sluit de deur correct.
E4
• Het waterniveau niet bereikt na 8 minu-
ten.
• Afvoerslang blijft doorlopend overhe-
velen.
• Zorg ervoor dat de kraan volledig geopend is
en dat de waterdruk normaal is.
• Controleer de installatie van de afvoerslang.
het geval van een probleem moet u alle weergegeven mogelijkheden controleren en de
onderstaande instructies volgen voor u contact opneemt met de dienst na verkoop. Zie
KLANTENDIENST.
WAARSCHUWING!
▶ Voor ieder onderhoud moet u het apparaat uitschakelen en de stekker verwijderen
uit het stopcontact.
▶
worden onderhouden. Incorrecte reparaties kunnen aanzienlijke gevolgschade ver-
oorzaken.
▶ Als het netsnoer beschadigd is, moet het worden vervangen door de fabrikant, zijn
9.1 Informatiecodes
De volgende codes worden enkel weergegeven ter informatie met verwijzing naar de
wascyclus. Er hoeven geen maatregelen te worden uitgevoerd.
Code Bericht
1:25
De resterende wasduur is 1 uur en 25 minuten
6:30
De resterende wasduur, inclusief het gekozen eindtijd startuitstel, is 6 uur en 30
minuten
P--1/ 2/ 3
1/2/3 bijkomende spoelingen worden gekozen (zie FUNCTIEKNOPPEN "Extra
spoelen“).
End
De wascyclus is beëindigd. Het apparaat schakelt automatisch uit.
Kinderslotfunctie ingeschakeld
LocI-
Deur is gesloten omwille van het hoge waterniveau, hoge watertemperatuur of
zwiercyclus.
bEEP OFF
De zoemer wordt uitgeschakeld
bEEP On
De zoemer wordt ingeschakeld
SPEEd uP
Functie "Versnellen" wordt ingeschakeld
cLrd

1/
3UREOHHPRSORVVHQ
3UREOHHP 2RUDDN 2SORVVLJ
E8
• :DWHUEHVFKHUPLQJVQLYHDIRW • 1HHPFRQWDFWRSPHWGHNODQWHQGLHQVW
F3
• 7HPSHUDWUVHQVRUIRW • 1HHPFRQWDFWRSPHWGHNODQWHQGLHQVW
F4
• 9HUZDUPLQJVIRW
• 1HHPFRQWDFWRSPHWGHNODQWHQGLHQVW
F7
• 0RWRUIRW • 1HHPFRQWDFWRSPHWGHNODQWHQGLHQVW
FA
• :DWHUQLYHDVHQVRUIRW
• 1HHPFRQWDFWRSPHWGHNODQWHQGLHQVW
FC1RI
FC2
• EQRUPDOHFRPPQLFDWLHIRW
• 1HHPFRQWDFWRSPHWGHNODQWHQGLHQVW
UNB
• /DGLQJQLHWLQHYHQZLFKWIRW • &RQWUROHHUHQEUHQJGHODGLQJLQHYHQZLFKWLQ
GHWURPPHO9HUPLQGHUGHODGLQJ
3UREOHHP 2RUDDN 2SORVVLJ
:DVPDFKLQH ZHUNW
QLHW
• 3URJUDPPDLVQRJQLHWJHVWDUW • &RQWUROHHU KHW SURJUDPPD HQ
VWDUWKHW
• 'HULVQLHWFRUUHFWJHVORWHQ • 6OLWGHGHUFRUUHFW
• 0DFKLQHLVQLHWLQJHVFKDNHOG • 6FKDNHOGHPDFKLQHDDQ
• 6WURRPSDQQH • &RQWUROHHUGHYRHGLQJ
• .LQGHUVORWIQFWLHLQJHVFKDNHOG • 6FKDNHONLQGHUVORWLW
:DVPDFKLQH QLHW
JHYOGPHWZDWHU
• *HHQZDWHU • &RQWUROHHUGHZDWHUNUDDQ
• ,QODDWVODQJLVJHERJHQ • &RQWUROHHUGHLQODDWVODQJ
• Inlaatslanglterisgeblokkeerd. • 9HUZLMGHUGHEORNNHULQJLWKHW
inlaatslanglter.
• :DWHUGUNLVPLQGHUGDQ03D
• &RQWUROHHUGHZDWHUGUN
• 'HULVQLHWFRUUHFWJHVORWHQ • 6OLWGHGHUFRUUHFW
• :DWHUWRHYRHUGHIHFW • &RQWUROHHUGHZDWHUWRHYRHU
'H PDFKLQH GUDL
QHHUW WHUZLMO H
ZRUGWRSJHYOG
• 'HDIYRHUVODQJKDQJWODJHUGDQFP
• =RUJHUYRRUGDWGHDIYRHUVODQJ
FRUUHFWHJHQVWDOOHHUGLV
• +HWLWHLQGHYDQGHDIYRHUVODQJNDQ
LQKHWZDWHUKDQJHQ
• =RUJHUYRRUGDWGHDIYRHUVODQJ
QLHWLQKHWZDWHUKDQJW
)RWWLMGHQV GUDLQH
ULQJ
• IYRHUVODQJLVJHEORNNHHUG • 8PRHWGHEORNNHULQJYHUZLMGH
UHQLWGHDIYRHUVODQJ
• Hetpomplterisgeblokkeerd. • Reinigdepomplter.
• +HWLWHLQGHYDQGHDIYRHUVODQJLVKR
JHUGDQFPERYHQGHYORHU
• =RUJHUYRRUGDWGHDIYRHUVODQJ
FRUUHFWHJHQVWDOOHHUGLV
6WHUNHWULOOLQJHQWLMGHQV
KHWZLHUHQ
• 1LHW DOOH WUDQVSRUWERWHQ ZHUGHQ
YHUZLMGHUG
• 9HUZLMGHUDOOHWUDQVSRUWERWHQ
• +HWDSSDUDDWVWDDWQLHWRSHHQVWH
YLJHRQGHUJURQG
• =RUJYRRUHHQVWHYLJHRQGHUJURQG
HQHHQJHQLYHOOHHUGHSODDWVLQJ
• 'HODGLQJLQGHPDFKLQHLVQLHWFRU
UHFW
• &RQWUROHHUKHWJHZLFKWHQKHW
HYHQZLFKWYDQGHODGLQJ
3UREOHHPRSORVVHRGHUZHHUJDHFRGH

3UREOHHPRSORVVHQ
OVGHIRWEHULFKWHQRSQLHZYHUVFKLMQHQHOIVQDKHWQHPHQYDQPDDWUHJHOHQPRHW
KHWDSSDUDDWLWVFKDNHOHQGHYRHGLQJORVNRSSHOHQHQ1HHPFRQWDFWRSPHWGHNODQWHQ
GLHQVW
2SPHUNLJ6FKLPRUPLJ
OVHUWHYHHOVFKLPDDQZHLJLVWLMGHQVKHWZLHUHQVWRSWGHPRWRUHQGHGUDLQHHU
SRPSZRUGWJHGUHQGHVHFRQGHQLQJHVFKDNHOGOVGLHYHUZLMGHULQJYDQKHWVFKLP
QLHWJHVODDJGLVQDSRJLQJHQHLQGLJWKHWSURJUDPPDRQGHUZLHUHQ
3UREOHHP 2RUDDN 2SORVVLJ
'HZHUNLQJVWRSW
YRRUKHWHLQGHYDQ
GHZDVFFOV
• :DWHURIHOHNWULVFKHIRW • &RQWUROHHUGHVWURRPHQZD
WHUWRHYRHU
'H PDFKLQH VWRSW
JHGUHQGH HHQ EH
SDDOGHSHULRGH
• +HW DSSDUDDW JHHIW HHQ IRWFRGH
ZHHU
• 2YHUZHHJGHZHHUJDYHFRGHV
• 3UREOHHP RPZLOOH YDQ KHW ODGLQJ
SDWURRQ
• 9HUPLQGHU GH ODGLQJ RI SDV H
DDQ
• 3URJUDPPDYRHUWGHVSRHOFFOVLW
• QQOHHU KHW SURJUDPPD HQ
VWDUWKHWRSQLHZ
2YHUWROOLJVFKLPGULMIW
LQ GH WURPPHO HQRI
GHZDVPLGGHOODGH
• :DVPLGGHOLVQLHWJHVFKLNW • &RQWUROHHU GH ZDVPLGGHO DDQ
EHYHOLQJHQ
• 2YHUPDWLJJHEULNYDQZDVPLGGHO • 9HUPLQGHU GH KRHYHHOKHLG
ZDVPLGGHO
WRPDWLVFKH DDQ
SDVVLQJYDQGHZDV
GU
• :DVGUZRUGWDDQJHSDVW • 'LW LV QRUPDDO HQ KHHIW JHHQ
LPSDFWRSGHZHUNLQJ
=ZLHUHQPLVONW • :DVJRHGQLHWLQHYHQZLFKW • &RQWUROHHU GH ODGLQJ HQ KHW
ZDVJRHGHQODDW KHWZLHUSUR
JUDPPDRSQLHZGUDDLHQ
2QWRHUHLNHQG ZDVUH
VOWDDW
• *UDDG YDQ YHUYLOLQJ VWHPW QLHW
RYHUHHQ PHW KHW JHVHOHFWHHUGH
SURJUDPPD
• 6HOHFWHHU HHQ DQGHU SURJUDP
PD
• 2QYROGRHQGH ZDVPLGGHO DDQZH
LJ
• .LHVKHWZDVPLGGHOLQRYHUHHQ
VWHPPLQJ PHW GH JUDDG YDQ
vervuiling en de specicaties
YDQGHIDEULNDQW
• 0DLPPODGLQJLVRYHUVFKUHGHQ • 9HUPLQGHUGHODGLQJ
• :DVJRHG ZDV RQJHOLMNPDWLJ YHU
GHHOGLQGHWURPPHO
• %UHQJKHWZDVJRHGORVVHUDDQ
(ULMQZDVSRHGHU
UHVWHQDDQZHLJRS
KHWZDVJRHG
• 2QRSORVEDUH GHHOWMHV ZDVPLGGHO
NQQHQDOVZLWWHSQWMHVDFKWHUEOLM
YHQRSKHWZDVJRHG
• (WUDVSRHOHQLWYRHUHQ
• 3UREHHUGHSQWMHVZHJWHERU
VWHOHQYDQZGURJHZDVJRHG
• .LHVHHQDQGHUZDVPLGGHO
:DVJRHGKHHIWJULM
HYOHNNHQ
• 9HURRUDDNWGRRUYHWWHQRDOVROL
QFUPHVRIDOIMHV
• %HKDQGHO KHW ZDVJRHG YRRUDI
PHW HHQ VSHFLDDO UHLQLJLQJV
PLGGHO

NL
9-Probleemoplossen
25
9.4 In het geval van een stroompanne
Het huidige programma en de instelling worden opge-
slagen. Als de stroom hersteld is, kunt u de bewerking
hervatten.
In het geval van een stroompanne als de machine inge-
schakeld is, wordt het openen van de deur mechanisch
geblokkeerd. Als er wasgoed moet worden verwijderd,
mag het water niet zichtbaar zijn door de glazen deur.
- Gevaar van brandwonden!
▶ Laat het waterniveau zakken in overeenstemming
met stap 1 tot 6 van hoofdstuk ZORG EN REINI-
GING (POMPFILTER).
▶ Trek aan de hendel (A) onder de onderhoudsklep
(Afb. 9-1) tot de deur ontgrendeld is met een zach-
te klik.
▶ Bevestig
1. Wanneer u de krimpfolie verpakking opent, zult u een
aantal geluiddempende pads zien. Deze dienen om het
geluid te dempen. (Afb. 10-0)
2. Leg de wasmachine op de zijkant, met het kijkvenster
naar boven en de onderzijde naar de operator gericht.
3. Verwijder de geluiddempende pads en verwijder de
dubbelzijdige klevende beschermende folie; Plak de
geluiddempende pads onder de wasmachine zoals
weergegeven in Afbeelding 3 (twee langere pads in
positie 1 en 3 kortere pads in positie 2 en 4). Zet de
machine opnieuw recht.
alle onderdelen en sluit de onderhouds-
klep.
A
9-1
10-0
10.2
(1) (2)
(3)
Noise Resuction Pads Installation Instructions
Nuttige tip:
De geluiddempende pads zijn optioneel. Ze kunnen
helpen met het dempen van lawaai, maar u kunt zelf
beslissen of u ze al of niet wenst te installeren.
10.1. Voorbereiding
▶ Verwijder het apparaat uit de verpakking.
▶ Verwijder al het verpakkingsmateriaal, inclusief de polystyreen basis, houd ze buiten
het bereik van kinderen. Wanneer u de verpakking opent, kunnen waterdruppels zicht-
baar zijn op de plastic zak en het kijkvenster. Dit normale fenomeen is het resultaat van
watertests in de fabriek.
Opmerking: Weggooien van de verpakking
Houd alle verpakking buiten het bereik van kinderen en gooi ze weg op een milieuvrien-
delijke wijze.

10-Installatie
NL
10-Installatie
NL
26
10.3 Ontmantelt de transportbouten
Opmerking: Bewaren op een veilige locatie
Houd de transportbouten op een veilige plaats voor later gebruik. Als het apparaat moet
worden verplaatst, moet u eerst de bouten opnieuw monteren.
De transportbouten zijn ontworpen om trillingsdem-
pende onderdelen in het apparaat te klemmen tijdens
het transport om interne schade te voorkomen.
10-1 10-2
10-410-3
1. verwijder alle 4 bouten aan de achterkant en
verwijder de plastic afstandsstukken (Afb.10-1) (Afb.10-2)
2.Vul de linkergaten met afdichtpluggen (Afb.10-3) (Afb.10-4)

NL
10-Installatie
27
10.5 Het apparaat uitlijnen
Pas alle voetjes aan (Afb. 10-5) om een volledige hori-
zontale positie te bereiken. Dit herleidt de trillingen en
dus het lawaai tot een minimum tijdens het gebruik. Dit
vermindert ook de slijtage. We raden aan een waterpas
te gebruiken voor de bijstelling. De vloer moet zo sta-
biel en vlak mogelijk zijn.
1. Schroef de borgmoer (1) los met een sleutel.
2. Pas de hoogte aan door te draaien aan de voetjes
(2).
3. Draai de borgmoer (1) aan tegen de behuizing.
10-5
10.4 Het apparaat verplaatsen
Als de machine naar een verre locatie moet worden verplaatst, moet u de transportbou-
ten opnieuw aanbrengen die u hebt verwijderd voor de installatie om schade te vermijden:
1. Verwijder de afdichtpluggen.
2. Verwijder het deksel achteraan
3. Breng de plastic tussenringen en de transportbouten aan.
4. Draai de bouten aan met een sleutel.
5. Breng het deksel achteraan opnieuw aan.

10-Installatie
NL
28
OPGELET!
▶ De afvoerslang moet ondergedompeld zijn in water en ze moet beveiligd worden en
lekvrij zijn. Als de afvoerslang op de vloer wordt geplaatst of als de leiding op minder
dan 80 cm hoog wordt aangebracht, zal de wasmachine doorlopend blijven draineren
terwijl ze word opgevuld (zelf-overheveling).
▶ Afvoerslang mag niet worden verlengd. Indien noodzakelijk neemt u contact op met
de dienst na verkoop.
10.6.3 Afvoerslang naar wastafel aansluiting
▶ De verbinding moet boven de sifon
▶ Een tapkraanverbinding wordt gewoonlijk afge-
sloten met een dop (A). Deze moet worden ver-
wijderd om defecten te voorkomen (Afb. 10-8).
▶ Beveilig de afvoerslang met een klem.
10-8
De volgende verbindingen zijn mogelijk:
10.6.1 Afvoerslang naar wastafel
▶ Hang de afvoerslang met de U-steun over de
rand van een voldoende grootte wastafel (Afb.
10-6).
▶ Bescherm de U-steun voldoende tegen slippen.
10.6.2 Afvoerslang naar afvalwaterverbinding
▶ De interne diameter van de standpijp met venti-
latieopening moet minimum 40 mm zijn.
▶ Plaats de afvoerslang ca. 80 mm in de afvalwater-
leiding.
▶ Bevestig de U-steun en beveilig hem (Afb. 10-7).
10.6 Draineerwater verbinding
Bevestig de waterafvoerslang correct op de leidingen. De slang moet een punt bereiken
tussen 80 en 100 cm boven de onderste lijn van het apparaat! Indien mogelijk, moet u de
afvoerslang altijd bevestigd houden met de klep op de achterzijde van het apparaat.
WAARSCHUWING!
▶ Gebruik enkel het geleverde slangenset voor de aansluiting.
▶ U mag nooit oude slangensets opnieuw gebruiken!
▶ Uitsluitend aansluiten op een toevoer van koud water.
▶ U moet controleren of het water zuiver en helder is voor u de verbinding tot stand brengt.
10-6
10-7

NL
10-Installatie
29
10.8 Elektrische verbinding
Voor elke aansluiting moet u controleren of:
▶ het elektrisch net, stopcontact en de zekeringen
overeenstemmen met de informatie op het naam-
plaatje.
▶ het stopcontact geaard is en er geen multi-stekker
of verlengsnoer wordt gebruikt.
▶ de stekker en het stopcontact overeenstemmen.
▶ Enkel UK: De UK stekker voldoet aan de BS1363A
norm.
Voer de stekker in het stopcontact (Afb. 10-11).
WAARSCHUWING!
▶ Zorg er altijd voor dat alle verbindingen (voeding, afvoer- en zoetwaterslag) stevig zijn
aangebracht en dat ze droog zijn en geen lekken vertonen!
▶ Zorg ervoor dat deze onderdelen nooit worden samengedrukt, verwrongen of gebogen
▶ Als het netsnoer beschadigd is, moet het worden vervangen door de onderhouds-
agent (zie garantiekaart) om elk risico uit te sluiten. .
Opmerking: Hygiëne
Na elke installatie of als het apparaat gedurende lange perioden niet wordt gebruikt,
voor het eerste gebruik en voor regelmatige onderhoudswerken kunt u het programma
HYGIËNISCH gebruiken zonder lading en met een kleine hoeveelheid wasmiddel in het
wasmiddel compartiment (2) of met speciale machinereiniger om mogelijke corrumpe-
rende resten te verwijderen.
10-11
10.7 Zoetwater verbinding
Zorg ervoor dat de pakkingen ingevoegd zijn.
1. Verbind de waterinlaatslang met het gehoekte
uiteinde op het apparaat (Afb. 10-9). Schroef
de schroeven vast met de hand.
2. Het andere uiteinde wordt verbonden op een
waterkraan met een 3/4" draad (Afb. 10-10).
Opmerking: Aqua-stop-systeem:
Sommige modellen zijn uitgerust met een aqua-stop inlaatslang (B). het aqua-stop
systeem beschermt tegen waterschade door de watertoevoer automatisch af te slui-
ten als de slang lekken vertoont. Dit wordt aangegeven met een rode markering (C). De
slang moet worden vervangen.
10-10 10-9

11-Technische gegevens
NL
30
.
Voltage in V
Stroom in A
Max vermogen in W
Waterdruk in MPa
Nettogewicht in kg
11.1Bij komende technische gegevens
11.3 Normen en richtlijnen
Dit product stemt overeen met de vereisten van alle toepasselijke EU-richtlijnen met de
overeenstemmende geharmoniseerde normen die gelden voor de CE-markering.
HW70-BP1439N
220-240 V~/50Hz
10
1900
0.03≤P≤1
64
Merk op: De exacte hoogte van uw wasmachine is afhankelijk van hoe ver de voeten van
de basis van de machine.De ruimte waar u uw wasmachine installeert moet op zijn minst
40mm breder en 20mm dieper dan zijn afmetingen.
HW70-BP1439N
OMVANG VAN HET PRODUCT
B
Algehele breedte van het
product mm
A
Totale hoogte van het
product mm
C
Algehele diepte van het product
(Naar de grootte van de
hoofdbestuur ) mm
D Diepte van de deur open mm
E Minimale deuropening naar
aangrenzende muur mm
850
595
460
960
400
TOP VIEWMuur VOORZITTER
11.2 Omvang van het product

NL
31
We raden onze Haier klantendienst aan en het gebruik van originele reserveonderdelen.
Als u een probleem ondervindt met uw apparaat moet u eerst de sectie
PROBLEEMOPLOSSEN controleren.
Als u daar geen oplossing vindt, kunt u contact opnemen met
▶ uw lokale verdeler
▶ de Onderhoud & Ondersteuning zone op www.haier.com waar u telefoonnummers
en VGV kunt vinden en waar uw service claim kunt activeren.
Wanneer u contact opneemt met onze service moet u de volgende informatie bij de hand
hebben.
De informatie staat vermeld op het naamplaatje.
Model ____________________ Serienr. _____________________
Controleer ook het garantiekaartje dat wordt geleverd met het product met betrekking
tot de garantie.
Voor algemene zakelijke vragen vindt u hieronder onze adressen in Europa:
Europese Haier adressen
Land* Postadres Land* Postadres
Italië
Haier Europe Trading SRL
Via De Cristoforis, 12
21100 Verese
ITALIË
Frankrijk
Haier France SAS
3-5 rue des Graviers
92200 Neuilly sur Seine
FRANKRIJK
Spanje
Portugal
Haier Iberia SL
Pg. Garcia Faria, 49-51
08019 Barcelona
SPANJE
België-FR
België-NL
Nederland
Luxemburg
Haier Benelux SA
Anderlecht
Route de Lennik 451
BELGIË
Duitsland
Oostenrijk
Haier Deutschland GmbH
Hewlett-Packard-Str. 4
D-61352 Bad Homburg
DUITSLAND
Polen
Tsjechië
Hongarije
Griekenland
Roemenië
Rusland
Haier Poland Sp. zo.o.
Al. Jerozolimskie 181B
02-222 Warszawa
POLEN
Verenigd
Koninkrijk
Haier Appliances UK Co.Ltd.
One Crown Square
Church Street East
Woking, Surrey, GU21 6HR
UK
*Voor meer informatie verwijzen wij u naar www.haier.com
12-Klantendienst

0020509288G
Documenttranscriptie
User manual Washing machine HW70-BP1439N GB Thank You GB Thank you for purchasing a Haier Product. Please read these instructions carefully before using this appliance. The instructions contain important information which will help you get the best out of the appliance and ensure safe and proper installation, use and maintenance. Keep this manual in a convenient place so you can always refer to it for the safe and proper use of the appliance. If you sell the appliance, give it away, or leave it behind when you move house, make sure you also pass this manual so that the new owner can become familiar with the appliance and safety warnings. Legend Warning – Important Safety information General information and tips Environmental information Disposal Help protect the environment and human health. Put the packaging in applicable containers to recycle it. Help to recycle waste of electrical and electronic appliances. Do not dispose appliances marked with this symbol with the household waste. Return the product to your local recycling facility or contact your municipal WARNING! of it. Remove the door catch to prevent children and pets to get closed in the appliance. 2 GB Content 1-Safety information ......................................................................................................................... 4 2-Product description ...................................................................................................................... 7 3-Control panel .................................................................................................................................. 8 4-Programmes ................................................................................................................................. 11 5-Consumption ................................................................................................................................12 6-Daily use ......................................................................................................................................... 13 7-Eco-friendly washing .................................................................................................................. 18 8-Care and cleaning ........................................................................................................................19 9-Troubleshooting ........................................................................................................................... 22 10-Installation ................................................................................................................................... 25 11-Technical data ............................................................................................................................. 29 12-Customer service...................................................................................................................... 30 3 1-Safety information ing safety hints! GB - WARNING! ▶ Make sure there is no transport damage. ▶ Make sure all transport bolts are removed. ▶ Remove all packaging and keep out of children´s reach. ▶ Handle the appliance always with at least two persons because it is heavy. Daily use ▶ This appliance can be used by children aged from 8 years and above and persons with reduced physical, sensory or mental capabilities or lack of experience and knowledge if they have been given supervision or instruction concerning use of the appliance in a safe way and understand the hazards involved. ▶ Keep away children under 3 years of age from the appliance unless they are constantly supervised. ▶ Children shall not play with the appliance. ▶ Do not let children or pets come close to the appliance when the door is open. ▶ Store washing agents out of reach of children. ▶ vent laundry from being entangled. If necessary, use an appropriate bag or net. ▶ Do not touch or use the appliance when barefoot or with wet or damp hands or feet. ▶ Do not cover or encase the appliance during operation or afterwards to allow any moisture or dampness to evaporate. ▶ Do not place heavy objects or sources of heat or damp on top of the appliance. ▶ Do not use or store flammable detergent or dry cleaning agent in close vicinity to the appliance. ▶ Do not use any flammable sprays in close vicinity to the appliance. ▶ Do not wash any garments treated with solvents in the appliance without having dried them previously in the air. 4 1-Safety information GB WARNING! Daily use ▶ Do not remove or insert the plug in the presence of flammable gas. ▶ Do not hot wash foam rubber or sponge-like materials. ▶ Do not wash any laundry which is polluted with flour. ▶ Do not open detergent drawer during any wash cycle. ▶ Do not touch the door during the washing process, it gets hot. ▶ Do not open the door if the water level is visibly over the porthole. ▶ Do not force the door to open. The door is tted with a self-lock device and will open shortly after the washing procedure is ended. ▶ undertaking any routine maintenance and disconnect the appliance from the electrical supply to save electricity and for safety. ▶ Hold the plug, not the cable, when unplugging the appliance. Maintenance / cleaning ▶ Make sure children are supervised if they carry out cleaning and maintenance. ▶ Disconnect the appliance from the electrical supply before undertaking any routine maintenance. ▶ Keep the lower part of the porthole clean and open door and detergent drawer if appliance is not in use to prevent odours. ▶ Do not use water spray or steam to clean the appliance. ▶ Replace a damaged supply cord only by the manufacturer, its ser▶ Do not try to repair the appliance by yourself. In case of repair please contact our customer service. Installation ▶ The appliance should be placed in a well-ventilated place. Ensure a location which allows opening the door fully. ▶ Never install the appliance outdoors in a damp place, or in an area which may be prone to water leaks such as under or near a sink unit. In the event of a water leak cut power supply and allow the machine to dry naturally. 5 6DIHW LQIR PDWLRQ : 51 1* WDOODWLR ▶ ,QVWDOO R VH WKH DSSOLDQFH RQO KH H WKH WHPSH DW H LV DERYH r ▶ R QRW SODFH WKH DSSOLDQFH GL HFWO RQ D FD SHW R FORVH WR D DOO R I QLW H ▶ R QRW LQVWDOO WKH DSSOLDQFH LQ GL HFW V QOLJKW R LQ WKH QHD RI KHDW VR FHV H J VWRYHV KHDWH V ▶ 0DNH V H WKDW WKH HOHFW LFDO LQIR PDWLRQ RQ WKH DWLQJ SODWH DJ HHV LWK WKH SR H V SSO ,I LW GRHV QRW FRQWDFW DQ HOHFW L FLDQ ▶ R QRW VH P OWL SO J DGDSWH V DQG H WHQVLRQ FDEOHV ▶ 0DNH V H RQO WKH GHOLYH HG HOHFW LF FDEOH DQG KRVH VHW D H VHG ▶ 0DNH V H QRW WR GDPDJH WKH HOHFW LF FDEOH DQG WKH SO J ,I GDP DJHG KDYH LW HSODFHG E DQ HOHFW LFLDQ ▶ Use a separate earthed socket for the power supply which is easy DFFHVVLEOH DIWH LQVWDOODWLRQ 7KH DSSOLDQFH P VW EH HD WKHG ▶ Make sure the hose joints and connections are rm and there is QR OHDNDJH WH GHG H 7KLV DSSOLDQFH LV LQWHQGHG IR DVKLQJ PDFKLQH DVKDEOH OD Q G RQO Q WLPH IROOR WKH LQVW FWLRQV JLYHQ RQ WKH ODEHO RI HDFK JD PHQW ODEHO ,W LV GHVLJQHG H FO VLYHO IR GRPHVWLF VH LQVLGH WKH KR VH ,W LV QRW LQWHQGHG IR FRPPH FLDO R LQG VW LDO VH Changes or modi cations to the device are not allowed. Unintended VH PD FD VH KD D GV DQG ORVV RI RI DOO D DQW DQG OLDELOLW FODLPV 2-Product description GB Note: - 2.1 Picture of appliance 2-1 1 2-2 2 3 4 Cotton Synthetics Mi x Fa st wa sh Sportwea r Jean s 2 3 4 5 6 HW70-BP1439 Qui ck 1 5” Dai ly Wash Baby clothes Hygi enic 1 Wo ol Del icate Hand wash Bed ding C otton + Temp Speed Ste am Extra rinse Delay Start/pause A++ + Spin En erg y 7kg Cap a ci ty 1400 rp m Sp ee d up 5 T3 T1 T4 S1 S2 S6 S3 S5 T2 S4 6 7 1. 2. 3. 4. 5. 6. 7. Detergent / Softener drawer Programme selector Worktop Display Rating plate 1. 2. 3. 4. 5. 6. Transportation bolts (T1-T4) Back cover Back cover screws (S1-S6) Power cord Water inlet valve Drain hose Adjustable feet 2.2 Accessories Check the accessories and literature in accordance with this list (Fig.2-3): 2-3 2x 2x Inlet hose- 5 Blanking assembly plugs Drain hose Noise Warranty-card User manual reduction pads bracket 7 3-Control panel 3-1 GB 4 1 “ 3 Display 5 Function buttons 2 Programme selector 4 Detergent /Softener drawer 6 “Delay” button 7 “Start/Pause“ button Note : Acoustic signal In following cases, an acoustic signal is no sounds by default: ▶ at the end of programme ▶when pressing a button ▶when turning the programme selector The acoustic signal can be selected if necessary ; see DAILY USE. 3-2 Press this button (Fig. 3-2) gently to switch on, the display is shining, the indicator of the “Start/Pause” button is flashing. Press it again for about 2 seconds to switch ter a while machine will shut down automatically. 3-3 3.2 Programme selector By turning the knob (Fig. 3-3) one of 16 programmes can be selected, related LED will light up, its default settings will be displayed. 3-4 8 3.3 Display The display (Fig. 3-4) shows following information: ▶ Washing time ▶ End time delay ▶ Error codes and service information 3-Control panel GB 3.4 Detergent drawer 3-5 Open the drawer, three compartments can be seen (Fig. 3-5): Compartment 1 : Water inlet only, no detergent Compartment 2 : Detergent for programme Compartment : Softener, Conditioning agent etc. The recommendation on the type of detergents is suitable for the various washing temperatures, please refer to the manual of detergent. 3.5 Function buttons The function buttons (Fig. 3-6) enable additional options in the selected programme before programme starts. The related indicators are displayed. gramme, all options are disabled. If a button has multiple options, the desired option can be selected by pressing the button sequentially. To delete the setting or to cancel the setting process, press the function button until the desired LED lights 3-6 3.5.1 3.5.2 3.5.3 3.5.4 3.5.5 Note: Factory settings there is no special requirement default settings are recommended. 3.5.1-Function button “Temp.“ 3-7 3-8 Press this button (Fig. 3-7) to change the washing temperature of the programme. If no value is illuminated the water will not be heated. In conjunction with the “Steam” button, the child lock ( ) 3.5.2-Function button “Speed” Press this button (Fig. 3-8) to change or deselect the spin of the programme. If no value is illuminated the laundry will not spun. 3.5.3-Function button “Steam“ Press this button (Fig. 3-9) to activate the steam function.When this function is activated the default temperature is the maximum temperature of the programme selected.This function can be activated only with the following programmes: Cotton, Synthetic, Mix, Baby Care, Hygiene.When the function is activated the led above the button will light up. Pushing again this button the function can be deactivated and the led above the button will turn off.When the function is activated the temperature of the programme cannot be changed. 9 3-Control panel 3-9 If “Temp.” button is pushed the “Steam” function will be deactivated.You can activate “Steam” function only before to start any programme. You cannot activate “Steam” function while the appliance is already executing a programme. 3.5.4 Function button“Extra rinse“ Press this button (Fig. 3-10) to rinse the laundry more intense with fresh water. This is recommended for people with sensitive skin. By pressing the button several times one to three additional cycles can be selected. They appear in the display with P-1/P--2 /P--3. Steam 3-10 Extra rinse 3-11 Extra rinse GB Delay Speed up 3-12 Delay 3.5.5 Function “Speed up“ This function saves time and energy. Preferable if laundry is slightly soiled. Press simultaneously button “Extra rinse“ and ”Delay” (Fig. 3-11) for about 3 seconds to activate the “Speed up” function; SPEEduPis dis played. This function is not available in all programmes (see PROGRAMMES). 3.6 Function button “Delay” Press this button (Fig. 3-12) to start the programme with a delay. End time delay could be increased in steps (add time to the original programme time). 6:30means end of programme cycle will be in 6 hours and 30 minutes.Press “Start/Pause” button to activate delay. It is not applicable to programme Spin,Eco 40-60. Note: Liquid detergent If using liquid detergent, it is not recommended to activate the end time delay. 3.7 “Start/Pause“ button 3-13 Press this button (Fig. 3-13) gently to start or interrupt the currently displayed programme. During programme setting and during programme run the LED above the button is shining, or if interrupted blinking. Start/Pause 3-14 3-15 10 - Temp Speed Steam 3.8 Child lock Press button “Temp.“ and ”Steam” (Fig. 3-14) for 3 seconds simultaneously to block all panel elements against activation. For unlocking please press again the two buttons. The display shows (Fig. 3-15) if a button will be pressed, when the child lock is activated. The change is not running. 4-Programmes GB / No 2) 2 1 Fabric type • º • º / Cotton Synthetics or / mixed fabric Lightly soiled mixed-laundry / of cotton and synthetics 1400 7 * to 90 3.5 * to 60 40 7 * to 60 30 • º Baby Care 3.5 * t o 90 40 Hygiene 3.5 90 90 Underwear Cotton 20°C Eco 40-60 3.5 * to 60 40 7 7 20 / 20 / • • • • • Fast 3.5 * to 40 40 • º 1 * to 40 * 3.5 * to 40 20 * t o 40 * • º • º • / * to 30 30 • 30 • º • / Synthetic Mix 3) Express 15min Sport 3) Wool 1 Delicate 1 2) * to 60 40 in rpm Jeans 3.5 Duvet 1 * to 40 40 Spin 7 / / / º º º º º / / Speed up seletable range Programme Cotton in °C Preset Function spin speed Extra rinse in kg Temperature Steam Max. load Preset • Yes, º Optional, Detergent compartment for: 1 Water inlet only, no detergent 2 Detergent Softener or care product 1200 • • • • • • 1000 • • • / Cotton/Synthetics 1000 / Cotton 1000 / Underwear / Cotton / Cotton 1000 1400 / • • • • • / / • • / • • Lightly soiled laun/ dry made of cotton or synthetics / / / 1000 / • / / Cotton / Synthetics / Sports wear / Machine-washable fabric made of wool or with wool cont ent / Delicate laundry and silk 1000 / / 800 / 800 / • • • / 400 / • / / Cotton 1000 / / Duvet / all fabrics 800 / 1000 • • • • / / / / Relating to dry laundry. Choose 90 °C wash temperature only for special hygiene requirements. *: water will not heated (no value is iluminated). 3) Reduce detergent amount because programme duration is short. 1) 2) 11 5-Consumption GB Scan QR code on energy label for energy consumption information. The actual energy consumption may differ from the declared one according to local conditions. EU1015/2010 program Select Eco 40-60, press “speed” 10s, then adjust to 60°C/40°C with max. spin speed. The standard 60°C and 40°C cotton programmes are suitable to clean normally soiled cotton laundry.They are the most efficient programmes in terms of combined energy and water consumption for cotton laundry.Actual water temperature may differ from declared cycle temperature. Note: Auto Weight The appliance is equipped with a loading recognition. At low loading, energy, water and washing time will be reduced automatically in some programs.The display shows AUtO. 12 6-Daily use GB 6.1 Power supply 6-1 6-2 Connect the washing machine to a power supply (220V to 240V~/50Hz; Fig. 6-1). Please refer also to section INSTALLATION. 6.2 Water connection ▶ Before connecting check the cleanliness and clarity of the water inlet. ▶ Turn on the tap (Fig.6-2). Note: Tightness Before use check for leakage in the joints between the tap and the inlet hose by turning on the tap. 6.3 Preparing laundry 6-3 ▶ Sort out clothes according to fabric (cotton, synthetics, wool or silk etc.) and to how dirty they are (Fig. 6-3).Pay attention to the care labelling of washing labels. ▶ Separate white clothes from coloured ones. they fade or run. ▶ Empty pockets (keys, coins, etc.) and remove harder decorative objects (e.g. brooches). ▶ a wash bag to care for this delicate laundry (hand or dry cleaning would be better). ▶ Close zippers, velco fastener and hooks, make sure the buttons are sewn on tightly. ▶ hem, delicate underwear (Dessous) and small items such as socks, belts, bras, etc. in a wash bag. ▶ Unfold large pieces of fabric such as bed sheets, bedspreads etc. ▶ Turn jeans and printed, decorated or color-intensive textiles inside out; possibly wash separately. CAUTION! Non-textile, as well as small, loose or sharp-edged items may cause malfunctions and damage of clothes and appliance. 13 6-Daily use GB Care chart Washing Washable up to 95°C normal process Washable up to 60°C normal process Washable up to 60°C mild process Washable up to 40°C normal process Washable up to 40°C mild process Washable up to 40°C very mild process Washable up to 30°C normal process Washable up to 30°C mild process Washable up to 30°C very mild process Wash by hand max. 40°C Do not wash Bleaching Any bleaching allowed Only oxygen/ non -chlorine Do not bleach Tumble drying possible normal temperature Tumble drying possible lower temperature Do not tumble dry Line drying Flat drying Iron at a maximum Iron at a medial tem- Drying Ironing temperature up to 200 °C Iron at a low temper- perature up to 150°C ature up to 110 °C; without steam (steam ironing may cause irreversible damage) Dry cleaning in tetrachloroethene Dry cleaning in hydrocarbons Do not dry clean Professional wet clean Do not professional wet clean Do not iron Professional Textile Care 6.4 Loading the appliance ▶ Put in the laundry piece by piece. ▶ thumb for maximum load: Keep six inches between load and drum top. ▶ Close the door carefully. Make sure that no pieces of laundry are pinched. 14 6-Daily use GB 6.5 Selecting detergent ▶ ▶ ▶ ▶ ▶ W Use only machine wash approved detergent. ergents, e.g. for synthetic and woolen fabric. Mind always detergent manufacturer recommendations. Do not use dry cleaning agents such as trichloroethylene and similar products. Choose the best detergent Kind of detergent Programme Cotton Universal Colour Delicate Special L/P L/P - - Synthetic Mix L/P L Softener - L/P - - Baby Care - - L/P Hygiene L/P L/P - Underwear - - L/P L/P Cotton 20°C L/P L/P - - Eco 40-60 L/P L/P - - Fast L/P L - - Express 15 min L L - - Sport Wool - - L/P L/P L/P L/P Delicate/silk - - L/P L/P Jeans L L - - Duvet - - L L/P Spin - - - - L/P - L = gel-/liquid detergent P = powder detergent O = optional _ = no If using liquid detergent, it is not recommended to activate the time delay. We recommend by using: ▶ Laundry powder: 20°C to 90°C* (best use: 40-60°C) ▶ Color detergent: 20°C to 60°C (best use: 30-60°C) ▶ Wool/delicate detergent: 20°C to 30°C (best use:20-30°C) * Choose 90 °C wash temperature only for special hygienic requirements. 15 6-Daily use GB 6.6 Adding detergent 6-4 1. 2. 3. Slide out the detergent drawer. Put the required chemicals into corresponding compartments (Fig. 6-4). Push back the drawer gently. Note: ▶ Remove detergent residues before next wash cycle from the detergent drawer. ▶ Do not overuse detergent or softener. ▶ Please follow the instruction on the detergent package. ▶ ▶ Concentrated liquid detergent should be diluted before adding into compartment 2. ▶ The best use of liquid detergent is by using a dosing ball, which is given with the laundry into the washing machine. ▶ Do not use liquid detergent if “end time delay“ is selected. ▶ Carefully choose the programme settings according to the care symbols on all laundry labels and according to the programme table. 6-5 6-6 6.7 Switch on the appliance „ (Fig. 6-5). The LED of the Start/Pause“ button is flashing. 6.8 Select a programme To get the best washing results, select a programme type. Turn the programme knob (Fig. 6-6) to select the right programme. Related programme LED lights up and the default settings are displayed. Note: Odour removal amount of detergent in washing agent compartment (2) or special machine cleaner to remove possibly corruptive residues. 6-7 6.9 Add individual selections Start/Pause Select required options and settings (Fig. 6-7); refer to CONTROL PANEL. 16 6-Daily use GB 6.10 Start wash programme Press “Start/Pause“ button (Fig. 6-8) to start. The LED of the “Start/Pause“ button stops flashing and lights up continuously. Appliance operates according to present settings. Changes are only possible by cancelling the programme. 6-8 6.11 Interrupt / cancel wash programme To interrupt a running programme press gently “Start/Pause“. The LED above the button is flashing. Press it again to resume operation. To cancel a running programme and all its individual settings 1. Press “Start/Pause” button to interrupt the running programme. 2. 3. Press “On/Off” button to turn on the appliance,select programme Spin and then se-. lect "no Speed"(speed lights are off) ,start the machine to drain the water. 4. After closing th e program to restart the appliance,select a new programme and start it. 6.12 After washing Note: Door lock ▶ For safety reasons the door is locked partially during the washing cycle. It is only possible to open the door at the end of the programme or after the programme was cancelled correctly (see description above). ▶ In case of high water level, high water temperature and during spinning it is not possible to open the door; Loc 1-is displayed. 1. 2. 3. 4. 5. 6. At programme cycle end EnDis displayed. Remove laundry as soon as possible to go easy on it and to prevent more wrinkling. Unplug the power cord. Open the door to prevent formation of moisture and odours. Let it open while not used. Note: Standby mode / energy-saving mode The switched on appliance will go into standby mode if it will not be activated within 2 This saves energy. To interrupt the standby mode push “Start/Pause“ button. 6.13 Activate or deactivate the buzzer The acoustic signal can be selected if necessary: 1. Switch on the appliance. 2. Select the SPIN programme. 3. Press the “ Steam “button and “Extra rinse” button at the same time for about 3 seconds. “bEEP OFF” will be displayed and the buzzer will be deactivated. For activating the buzzer press these two buttons at the same time again. “bEEPON” will be displayed. 17 7-Eco-friendly washing GB Environmentally responsible use ▶ To achieve best use of energy, water, detergent and time you should use the recommended maximum load size. ▶ Do not overload (hand width clearance above laundry). ▶ For slightly soiled laundry select the Express 15min programme. ▶ Apply exact dosages of each washing agent. ▶ Choose the lowest adequate washing temperature - modern detergents are ef▶ Raise default settings only due to heavy staining. ▶ Select maximum spinning speed if a domestic dryer is used. 18 8-Care and cleaning GB 8.1 Cleaning the detergent drawer Take always care there are no detergent residues. Clean the drawer regularly (Fig. 8-1): 1. Pull out the drawer until it stops. 2. Press the release button and remove the drawer. 3. Flush the drawer with water until it is clean and insert the drawer back in the appliance. 2 8-1 1 8.2 Cleaning the machine 8-2 ▶ Unplug the machine during cleaning and maintenance. ▶ Use a soft cloth with soap liquid to clean the machine case (Fig. 8-2) and rubber components. ▶ Do not use organic chemicals or corrosive solvents. To prevent blockage of water supply by solid substanc- 8-4 8-3 ▶ supply. ▶ Unscrew the water inlet hose at the back (Fig. 8-3) of the appliance as well as on the tap. ▶ ▶ 8.4 Cleaning the drum ▶ Remove accidentally washed metal parts such as pins, coins, etc. from the drum (Fig. 8-5) because they cause rust stains and damage. ▶ Use a non-chloride cleaner for removing rust stains. Observe the warning hints of the cleaning agent manufacturer. ▶ Do not use any hard objects or steel wool for cleaning. 8-5 Note: Hygiene For regular maintenance we recommend to run programme HYGIENE with no load in order to remove possible corruptive residues quarterly. Add a small amount of detergent in washing agent compartment (2) or use a special machine cleaner. 19 8-Care and cleaning 8-6 8-7 GB 8.5 Long periods of disuse If the appliance is left idle for a longer period: 1. Pull out the electrical plug (Fig. 8-6). 2. 3. Open the door to prevent formation of moisture and odours. Let door open while not used. Before next usage check carefully power cord, water inlet and drain hose. Make sure everything is properly installed and without leakage. Note: Hygiene After long periods of disuse we recommended to run programme HYGIENE with no load and small amount of detergent in washing agent compartment (2) or special machine cleaner to remove possibly corruptive residues. 8-8 8-9 for instanvce if the appliance: ▶ Doesn´t drain the water. ▶ Doesn´t spin. ▶ Cause unusual noise while running. WARNING! 8-10 8-12 8-11 8-13 hot! Before any action please ensure water has cooled down. 1. 2. Open service flap. You can either use a coin or a screwdriver (Fig. 8-9). 3. Provide a flat container to catch leach water (Fig. 8-10). There could be bigger amounts! 4. Pull the drainhose out and hold its end above the container (Fig. 8-10). 5. Take the sealing plug out of the drainhose (Fig. 8-10). 6. After complete drainage close drainhose and push it back into the machine (Fig. 8-11). 7. Unscrew and remove counter clockwise the pump 8. Remove contaminants and dirt (Fig. 8-13). 20 D H DQG FOHDQLQJ Clean carefully pump lter, e.g. using running water )LJ Re x it thoroughly (Fig. 8-15). Close service flap. 87 21 ▶ Pump lter sealing has to be clean and unhurt. If the lid is not full tightened, water FDQ HVFDSH ▶ The lter must be in place, or it may lead to leakage. 9-Troubleshooting GB of a problem please check all shown possibilities and follow below instructions before you contact an after sales service. See CUSTOMER SERVICE. WARNING! ▶ Before maintenance, deactivate the appliance and disconnect the mains plug from the mains socket. ▶ improper repairs can cause considerable consequential damages. ▶ A damaged power cable should only be replaced by the manufacturer, its service 9.1 Information codes Following codes are displayed only for information referring to the washing cycle. No measures must be performed. Code Message 1:25 The remaining wash cycle time will be 1 hour and 25 minutes. 6:30 The remaining wash cycle time including chosen end-time delay will be 6 hours and 30 minutes. P-1/2/3 1/2/3 additional rinses are choosen (see FUNCTION BUTTONS “Extra rinse“). End cLrd Function child lock is activated. Loc 1 - Door is closed because of high water level, high water temperature or spinning cycle. bEEP OFF The buzzer is deactivated. bEEP ON The buzzer is activated. SPEEdup Function “Speed up” is activated. 9.2 Troubleshooting with display code Problem Cause CLR FLTR • Drainage error • • Check drain hose installation. E2 • Lock error. • Shut the door properly. E4 • Water level not reached. • Drain hose is self-syphoning. • Make sure that tap is fully opened and water pressure is normal. • Check drain hose installation. • Water protective level error. • Contact the After sales service. E8 22 Solution 9-Troubleshooting GB Program Cause Solution FA • Water level sensor error. • Contact the After sales service. F3 • Temperature sensor error. • Contact the After sales service. F4 • Heating error. • Contact the After sales service. F7 • Motor error. • Contact the After sales service. FC0 FC1 or FC2 • Abnormal communication error. • Contact the After sales service. UnB • Unbalanced load error. • Check and balance laundry load in the drum. Reduce the load. 9.3 Troubleshooting without display code Problem Cause Washing machine fails • Programme is not yet started. to operate. • Door is not properly closed. • Machine has not been switched on. • Power failure. • Child lock is activated. Washing machine • No water. • Inlet hose is kinked. water. • • Water pressure is less than 0.03 MPa. • Door is not properly closed. • Water supply failure. Machine is draining • Height of drain hose is below 80 cm. • Drainage failure. • • • Strong vibration while • spinning. • • • Solution • • • • • • • • • • • • Check programme and start it. Close the door properly. Switch the machine on. Check power supply. Deactivate child lock. Check water tap. Check inlet hose. Check water pressure. Close the door properly. Ensure the water supply. Make sure that drain hose is properly installed. Drain hose end could reach into • Make sure the drain hose is not water. in water. Drain hose is blocked. • Unblock drain hose. • Drain hose end is higher than 100 cm • Make sure that drain hose is above floor level. properly installed. Not all transportation bolts have • Remove all transportation bolts. been removed. Appliance has no solid position. • Ensure solid ground and a levelled position. Machine load is not correct. • Check load weight and balance. Water or electric failure. • Check power and water supply. Operation stops before completing wash cycle. Operation stops for • Appliance displays error code. a period of time. • Problem due to load pattern. • Programme performs soaking cycle. • Consider display codes. • Reduce or adjust load. • Cancel programme and restart. 23 9-Troubleshooting Problem Cause GB Solution Excessive foam floats • Detergent is not a appropriate. • drum and/or detergent drawer. • Excessive use of detergent. • Automatic adjust- • Washing programme duration will • ment of washing be adjusted. time. Spinning fails. • Unbalance of laundry. • Unsatisfactory wash- • ing result. • • • Washing powder residues are on the laundry. • Laundry has grey • patches. Check detergent recommendations. Reduce amount of detergent. This is normal and doesn‘t affect functionality. Check machine load and laundry and run a spinning programme again. Degree of pollution does not agree • Select an other programme. with selected programme. Detergent quantitiy was not suf- • Choose the detergent according to the degree of pollution and according to manufacturer Maximum load has been exceeded. Laundry was unevenly distributed • Reduce loading. in the drum. • Loose the laundry. Insoluble particles of detergent can • Perform extra rinse. remain as white spots on the laun- • Try to brush the points from the dry. dry laundry. • Choose an other detergent. Caused by fats such as oils, creams • Pretreat the laundry with a speor ointments. cial cleaner. Note: Foam formation If too much foam is inspected during spin cycle, motor stops and drain pump will be activated for 90 seconds. If that elimination of foam fails up to 3 times, programme ends without spinning. ance, disconnect the power supply and contact the customer service. 9-1 24 A - 9.4 In case of power failure The current programme and its setting will be saved. When power supply is restored operation will be resumed. In case of power failure during programme run door opening is mechanically blocked. If the laundry is to be removed, the water level must not be visible in the glass door. Danger of scalding! ▶ Lower the water level according to step 1 to 6 of chapter CARE AN CLEANING (PUMP FILTER). ▶ Pull lever (A) beneath service flap (Fig. 9-1) until door is unlocked by a gentle click. ▶ Fix all parts and close the service flap. 10-Installation GB 10.1 Preparation ▶ Take the appliance out of the packaging. ▶ Remove all packaging material including polystyrene base, keep them out of childrens reach. While opening the package, water drops may be seen on plastic bag and porthole. This normal phenomenon results from water tests in the factory. Note: Packaging disposal Keep all packaging materials out of children´s reach and dispose them in an environmentally friendly manner. 10.2 Noise resuction pads installation instructions 1. noise reduction pads. These are used for reducing noise. (Fig. 10-1) 2. Lay the washing machine down to its side, porthole pointing upwards, bottom side towards operator. pads and remove the 3. double-sided adhesive protective film; the noise reduction pads under the washing machine cabinet as shown in Figure 10.1(3),two longer pads in position 1 and 3, two shorter pads in position 2 and 4. Finally set the machine upright again. 10-1 (1) (2) 2x 2x (3) Warm tip: Noise reduction pad is optional , could help to reduce noise , please assemble it or not according to your own demand. 10.3 Dismantle the transportation bolts The transportation bolts are designed for clamping anti-vibration components inside the appliance during transportation to prevent inner damage. 1. Remove all 4 bolts on the rear side and take out plastic spacers (Fig. 10-2)(Fig. 10-3). 2. Fill left holes with blanking plugs (Fig. 10-4)(Fig. 10-5). 10-2 10-3 10-4 10-5 25 10-Installation GB Note: Keep in safe place Keep the transportation bolts in a safe place for later use. Whenever the appliance is to 10.4 Moving the appliance If the machine is to be moved to a distant location, replace the transportation bolts removed before installation to prevent damage: 1. Remove the blanking plugs. 2. Remove the back cover. 3. Insert the plastic spacers and the transportation bolts. 4. Tighten the bolts with a spanner. 5. Replace the back cover. 10.5 Aligning the appliance 10-6 Adjust all feet (Fig. 10-6) to achieve a complete level position. This will minimize vibrations and thus noise during use. It will also reduce wear and tear. We recommend to use a spirit level for adjustment. Floor should be as stable and flat as possible. 1. 2. 3. Loose the locknut (1) by using a wrench. Adjust the high by turning the foot (2). Tighten locknut (1) against the housing. 10.6 Drain water connection Fix the water drain hose properly to the piping. The hose has to reach at one point a height between 80 and 100 cm above the appliance bottom line! If possible keep always drain WARNING! ▶ Use only the supplied hose set for the connection. ▶ Never reuse old hose sets! ▶ Only connect to cold water supply. ▶ Before connection, check whether the water is clean and clear. 26 10-Installation GB 10-7 10-8 Following connections are possible: 10.6.1 Drain hose to sink ▶ Hang the drain hose with the U-support over the edge of a sink with adequate size (Fig. 10-7). ▶ ping. 10.6.2 Drain hose to waste water connection ▶ The internal diameter of the stand pipe with vent-hole must be minimum 40 mm. ▶ Put the drain hose for approx. 80 mm in the wastewater pipe. ▶ (Fig. 10-8). 10.6.3 Drain hose to sink connection ▶ The junction must lie above the siphon. ▶ A spigot connection is usually closed by a pad (A). That must be removed to prevent any disfunction (Fig. 10-9). ▶ Secure the drain hose with a clamp. 10-9 CAUTION! ▶ The drain hose should not be submerged in water and should be securely xed and leak-free. If the drain hose is placed on the ground or if the pipe is at a height of less than 80 cm, the washing machine will continuously drain while being lled (self-siphoning). ▶ Drain hose is not to be extended. If necessary contact after sales service. 10.7 Fresh water connection 10-10 10-11 Make sure that the gaskets are inserted. 1. 2. Connect the water inlet hose with the angled end to the appliance (Fig. 10-10).Tighten the screw joint by hand. The other end connect to a water tap with a 3/4“ thread (Fig. 10-11). Note: Aqua-stop system: Some models are equipped with an aqua-stop inlet hose (B).The aqua-stop system protects against water damage by automatically cutting the fresh water supply in case of a leaking hose. This is indicated by a red marker (C). The hose must be replaced. 27 10-Installation GB 10.8 Electrical connection 10-12 Before each connection check if: ▶ Power supply, socket and fusing are appropriate to the rating plate. ▶ The power socket is earthed and no multi-plug or extension are used. ▶ The power plug and socket are strictly according. ▶ Only UK: The UK plug meets BS1363A standard. Put the plug into the socket (Fig. 10-12). WARNING! ▶ dry and leak free! ▶ Take care these parts are never to be crushed, kinked, or twisted. ▶ If the supply cord is damaged, it must be replaced by the service agent (see warranty card) in order to avoid a hazard. Note: Hygiene nance run programme HYGIENE with no load and small amount of detergent in washing agent compartment (2) or with special machine cleaner to remove possibly corruptive residues. 28 11-Technical data GB 11.1 Additional technical data HW70-BP1439N Voltage in V 220-240 V~/50Hz Current in A 10 Max power in W 1900 Water pressure in MPa 0.03≤P ≤1 Netto weight in kg 64 11.2 Product dimensions FRONT VIEW Wall TOP VIEW HW70-BP1439N A Overall height of product mm 850 B Overall width of product mm 595 Overall depth of product (To main control board size) mm 460 C D Depth of door open mm 960 E Minimum door clearance to adjacent wall mm 400 Note: The exact height of your washer is dependent on how far the feet are extended from the base of the machine. The space where you install your washer needs to be at least 40mm wider and 20mm deeper than its dimensions. 11.3 Standards and Directives This product meets the requirements of all applicable EC directives with the corresponding harmonised standards, which provide for CE marking. 29 12-Customer service GB We recommend our Haier Customer Service and the use of original spare parts. ▶ your local dealer. ▶ and FAQs and where you can activate the service claim. To contact our Service, ensure that you have the following data available. The information can be found on the rating plate. Model ____________________ Serial No. _____________________ Also check the Warranty Card supplied with the product in case of warranty. European Haier addresses Country* Postal address Country* Haier Europe Trading SRL Via De Cristoforis, 12 Italy France 21100 Verese ITALY Haier Iberia SL Belgium-FR Spain Pg. Garcia Faria, 49-51 Belgium-NL Portugal 08019 Barcelona Netherlands SPAIN Luxembourg Haier Deutschland GmbH Germany Konrad-Zuse-Platz 6 Poland Austria 81829 München Czechia GERMANY Hungary Haier Appliances UK Co.Ltd. Greece One Crown Square Romania United Church Street East Russia Kingdom Woking, Surrey, GU21 6HR UK *For more information please refer to www.haier.com 30 Postal address Haier France SAS 3-5 rue des Graviers 92200 Neuilly sur Seine FRANCE Haier Benelux SA Anderlecht Route de Lennik 451 BELGIUM Haier Poland Sp. zo.o. Al. Jerozolimskie 181B 02-222 Warszawa POLAND GB 31 Manuel d'utilisation du lave-linge HW70-BP1439N FR 1R V YR V UHPHUFLRQV 1R V R V UHPHUFLRQV D RLU DF HW Q SUR LW DLHU 9H L H LUH DWWHQWLYHPHQW FHV LQVWU FWLRQV DYDQW G WL LVHU DSSDUHL HV LQVWU FWLRQV VRQW GHV LQIRUPDWLRQV WL HV YR V SHUPHWWDQW GH PLH H S RLWHU FHW DSSDUHL HW YR V DVV UHU QH LQVWD DWLRQ QH WL LVDWLRQ HW Q HQWUHWLHQ V F ULV V HW DG T DWV 9H L H ELHQ JDUGHU FH PDQ H HW WR R UV YR V U I UHU SR U QH WL LVDWLRQ V F ULV H HW DG T DWH GH DSSDUHL 6L YR V GHYH YHQGUH GRQQHU R DEDQGRQQHU DSSDUHL SR U FD VH GH G P QDJHPHQW assurez-vous également de laisser ce manuel a n que le prochain utilisateur puisse maî WULVHU DSSDUHL QRWDPPHQW HV U J HV GH V F ULW / JHQ H H LR H LP RU H GH F UL * Q UD LW V HW FRQVHL V ,QIRUPDWLRQV V U HQYLURQQHPHQW 0LVH D UHE W RQWULE H D SURWHFWLRQ GH HQYLURQQHPHQW HW GH D VDQW K PDLQH 9H L H PHWWUH HV HPED DJHV D UH E W GDQV HV HVSDFHV FRQIRUPHV SR U H U UHF F DJH RQWULE H UHF F HU HV G FKHWV G DSSDUHL V HF WULT HV HW HFWURQLT HV 1H PHWWH SDV D UHE W HV DSSDUHL V PDUT V GH FH V PER H DYHF HV G FKHWV P QDJHUV 9H L H G SRVHU DSSDUHL YRWUH VLQH GH UHF F DJH RFD H R SUHQGUH FRQWDFW DYHF YRWUH E UHD P QLFLSD AVERTISSEMENT ! Risque de blessure ou d'asphyxie ! ' EUDQFKH DSSDUHL GH WR WH D LPHQWDWLRQ SULQFLSD H R SH HV F E HV SULPDLUHV HW PHWWH HV D UHE W 5HWLUH H YHUUR GH D SRUWH SR U YLWHU T Q HQIDQW R Q DQLPD GRPHVWLT H QH VRLW FRLQF GDQV DSSDUHL 6RPPDLUH RQVLJQHV GH V F ULW 'HVFULSWLRQ G SURG LW 3DQQHD GH FRPPDQGH 3URJUDPPHV RQVRPPDWLRQ 8WL LVDWLRQ T RWLGLHQQH /DYDJH FR RJLT H (QWUHWLHQ HW QHWWR DJH ' SDQQDJH ,QVWD DWLRQ ,QIRUPDWLRQV WHFKQLT HV 6HUYLFH F LHQW H 1-Consignes de sécurité FR Avant de mettre l'appareil en marche pour la première fois, veuillez lire les consignes de sécurité ci-après ! : AVERTISSEMENT ! Avant la première utilisation ▶ ▶ Retirez tous les boulons de transport. ▶ Retirez tous les emballages et tenez-les hors de portée des enfants. ▶ Il faut toujours au moins deux personnes pour la manipulation de l'appareil car il est lourd. Utilisation quotidienne ▶ Cet appareil peut être utilisé par des enfants âgés d'au minimum 8 ans, ainsi que par des personnes avec des capacités physiques, sensorielles ou mentales réduites ou sans expérience et connaissances, si elles sont supervisées ou ont été formées à l'utilisation sécurisée de l'appareil et comprennent les risques relatifs à son usage. ▶ Tenez les enfants de moins de 3 ans hors de portée de l'appareil, sauf s'ils sont en permanence surveillés. ▶ Les enfants ne doivent pas jouer avec l'appareil. ▶ Ne laissez pas un enfant ou un animal domestique s'approcher de l'appareil lorsque la porte est ouverte. ▶ Tenez les produits de lavage hors de la portée des enfants. ▶ Remontez les fermetures à glissière, recousez les éléments mal 4 ▶ Évitez de toucher ou d'utiliser l'appareil pieds nus ou lorsque vos mains ou vos pieds sont mouillés ou humides. ▶ Évitez de couvrir l'appareil pendant qu'il fonctionne ou après utilisation, pour laisser l'humidité s'évaporer. ▶ Évitez de déposer des objets lourds ou des sources de chaleur ou d'humidité sur l'appareil. ▶ des agents de nettoyage à sec à proximité de l'appareil. ▶ pareil. ▶ Évitez de laver des vêtements traités avec des solvants dans l'appareil sans les avoir préalablement séchés à l'air. ▶ prise mables FR 1-Consignes de sécurité AVERTISSEMENT ! Utilisation quotidienne ▶ Évitez de laver des matériaux du type caoutchouc ou éponge à des températures élevées. ▶ Évitez d'ouvrir le bac à lessive pendant le cycle de lavage. ▶ Évitez de toucher la porte pendant le lavage, car elle devient chaude. ▶ Évitez d'ouvrir la porte si l'eau est visible à travers le hublot. ▶ Évitez d'ouvrir la porte en la forçant. Elle est équipée d'un syscycle de lavage. ▶ Arrêtez l'appareil après chaque programme de lavage et avant d'entreprendre tout entretien, et débranchez l'appareil de l'alide sécurité. ▶ prise Entretien et nettoyage ▶ Assurez-vous que les enfants sont sous surveillance lors du nettoyage et de l’entretien. ▶ Débranchez l'appareil de l'alimentation électrique avant d'entreprendre tout entretien. ▶ Gardez la partie inférieure du hublot propre et évitez d'ouvrir la porte et le bac à lessive lorsque l'appareil est en marche. ▶ N'utilisez pas un pulvérisateur d'eau ou nettoyant à vapeur pour nettoyer l'appareil. ▶ Faites remplacer le cordon d'alimentation endommagé par le ▶ N'essayez pas de réparer vous-même l'appareil. En cas de réparation, veuillez contacter notre service clientèle. Installation ▶ Placez l'appareil dans un endroit bien ventilé. Choisissez un emplacement qui permet d'ouvrir complètement la porte. ▶ N’installez jamais l’appareil à l’extérieur dans un endroit humide, ou dans un lieu qui serait sujet à des fuites d’eau, comme en dessous ou à proximité d’un bloc-évier. En cas de fuite d’eau, coupez l’alimentation électrique et laissez le lave-linge sécher naturellement. ▶ Installez ou utilisez l’appareil uniquement dans des endroits où la température est supérieure à 5 °C. 5 RQVLJQHV GH V F ULW 5 AVERTISSEMENT ! ,QVWD DWLRQ ▶ YLWH GH S DFHU DSSDUHL GLUHFWHPHQW V U Q WDSLV R SU V G Q P U R G Q PH E H ▶ 1 LQVWD H SDV DSSDUHL HQ GLUHFWLRQ GHV UD RQV VR DLUHV R SUR LPLW GHV VR UFHV GH FKD H U SDU H HPS H HV F LVLQL UHV chau e-eau). ▶ Véri ez que les informations électriques sur la plaque signalé WLT H VRQW FRQIRUPHV D LPHQWDWLRQ HFWULT H 6L FH Q HVW SDV H FDV YH L H FRQWDFWHU Q HFWULFLHQ ▶ 1 WL LVH SDV GHV DGDSWDWH UV P WLSULVHV HW GHV UD RQJHV ▶ VV UH YR V G WL LVHU QLT HPHQW HQVHPE H GH FRUGRQ HF trique et de exible d’arrivée d’eau livré. ▶ VV UH YR V T H H FRUGRQ G D LPHQWDWLRQ HW D SULVH QH VRQW SDV HQGRPPDJ V 6 L V VRQW HQGRPPDJ V YH L H HV IDLUH UHPS D FHU SDU Q HFWULFLHQ ▶ 3R U D LPHQWDWLRQ HFWULT H WL LVH QH SULVH DYHF PLVH D terre di érente, facilement accessible après l'installation. Mettez D WHUUH FHW DSSDUHL Uniquement pour le Royaume-Uni : HW DSSDUHL HVW T LS G Q cordon d’alimentation avec che à 3 ls (mise à la terre), répon dant aux normes de la prise à 3 ls (mise à la terre). Ne coupez ja mais ou ne démontez jamais le troisième l (mise à la terre). Une IRLV DSSDUHL LQVWD D SULVH GRLW WUH DFFHVVLE H ▶ Assurez-vous que les joints et raccords du exible d’arrivée d’eau VRQW VHUU V HW T L Q D SDV GH I LWH 8WL LVDWLRQ SU H HW DSSDUHL HVW FRQ SR U H LQJH DYDE H D DYH LQJH QLT H PHQW 6 LYH FKDT H IRLV HV LQVWU FWLRQV IR UQLHV V U WLT HWWH GH FKDT H Y WHPHQW , HVW JD HPHQW FRQ H F VLYHPHQW SR U Q VDJH GRPHVWLT H LQW ULH U GH D PDLVRQ , Q HVW SDV GHVWLQ Q VDJH FRPPHUFLD R LQG VWULH Aucune modi cation ou altération de cet appareil n'est autorisée. 7R WH WL LVDWLRQ LQDG T DWH YR V H SRVH GHV ULVT HV HW D SHUWH GH WR V HV GURLWV GH JDUDQWLH HW G DFWLRQV HQ UHVSRQVDEL LW 2-Description du produit FR Remarque : - 2.1 Description de l’appareil 2-1 1 2-2 2 3 4 Cotton Synthetics Mi x Baby clothes Hygi enic Sportwea r Jean s C otton + Fa st wa sh 1 2 3 4 5 6 HW70-BP1439 Qui ck 1 5” Dai ly Wash Wo ol Del icate Hand wash Bed ding Temp Speed Ste am Extra rinse Delay Start/pause A++ + Spin En erg y 7kg Cap a ci ty 1400 rp m Sp ee d up 5 T3 T1 T4 S1 S2 S6 S3 S5 T2 S4 6 7 1. Bacàl es s i v e/ adouci s s ant 2. Sél ect eurdepr ogr amme 3. Pl andet r av a i l 4. Écr an 5. Pl aques i gna l ét i que 6. Vol etd’ ent r et i en 7. Pi edsaj us t a bl es 1. Boul onsdet r ans por t( T1T4) 2. Couv er cl ea r r i èr e 3. Vi sduc ouv er cl ear r i èr e( S1S6) 4. Cor dond' a l i ment at i on 5. Vanned' a r r i v éed' eau 6. T uy audev i da nge 2.2 Accessoires 2-3 2x 2x Pads de Tuyau d'arrivé 5 Bouchons Support de tuyau réduction de Carte de garantie obturateurs de vidange bruit d'eau Manuel d'utilisation 7 3-Panneau de commande 3-1 FR 4 1 Bouton « Marche/Arrêt » 3 Écran 5 Boutons de fonctions 2 Sélecteur de programme 4 Bac à lessive/adoucissant 6 Bouton de « Fin différée » 7 Bouton « Start/Pause » Remarque : Signal sonore Dans les cas suivants, un signal acoustique ne produit aucun son par défaut: ▶lorsque vous appuyez sur un bouton ; ▶ ▶lorsque vous tournez le sélecteur de programme ; Le signal acoustique peut être sélectionné si nécessaire : voir la section UTILISATION QUOTIDIENNE. 3-2 3-3 Appuyez sur ce bouton (Fig. 3-2) pour mettre l’appareil en marche. L’écran s'allume et le voyant du bouton “Start/Pause” (Départ/Pause) clignote. Appuyez à nouveau pendant environ 2 secondes pour éteindre l'appareil. Si aucun élément du panneau ou aucun programme n'est activé au bout d'un moment, l'appareil s'éteint automatiquement. 3.2 Sélecteur de programme Vous pouvez sélectionner l’un des 16 programmes en tournant le bouton (Fig. 3-3). La LED correspondant 3-4 8 3.3 Écran ▶ Durée du lavage ▶ ▶ Codes d’erreur et informations sur l’entretien 3-Panneau de commande FR 3.4 Bac à lessive 3-5 Ouvrez le tiroir. Il contient trois compartiments (Fig. 3-5) : Compartiment 1: Arrivée d’eau uniquement, pas de lessive Compartiment 2: Lessive pour programme Compartiment : Adoucissant, agent de conditionnement, etc. Merci de vous référer à la bouteille de détergent pour savoir si celui-ci convient aux températures de lavage. 3.5. Boutons de fonctions Les boutons de fonctions (Fig. 3-6) activent des options supplémentaires du programme sélectionné avant son démarrage. Les indicateurs correspondants s’af- 3-6 Temp. Tr/min Vapeur Stoom Extra spoelen Rinçage + Startuitstel Fin différée Start/Pau Toutes les fonctions se désactivent lorsque vous éteiprogramme. 3.5.1 3.5.2 Si un bouton dispose de plusieurs options, vous pouvez sélectionner l’option souhaitée en appuyant de manière séquentielle sur le bouton. Pour supprimer le paramètre ou annuler le processus de paramétrage, appuyez sur le bouton de fonction jusqu’à ce que les voyants LED s’allument ou, dans le cas d’une seule option, les voyants LED s’éteignent. 3.5.3 3.5.4 3.5.5 Remarque : Paramètres d'usine cision les paramètres par défaut. En l'absence d'indications particulières, nous vous recommandons d'utiliser les paramètres par défaut. 3.5.1- Bouton de fonction « Temp. » 3-7 3-8 Appuyez sur ce bouton (Fig. 3-7) pour changer la température de lavage du programme. Si aucune valeur ne En combinaison avec le bouton « Vapeur », la fonction de verrouillage enfant peut être activée/désactivée (voir SÉCURITÉ ENFANTS). 3.5.2- Bouton de fonction « Tr/min » Appuyez sur ce bouton (Fig. 3-8) pour changer ou désélectionner le programme d’essorage. Si aucune valeur ne s’illumine, le linge ne sera pas essoré. Temp. Tr/min 3.5.3-Bouton de fonction « Vapeur » 3-9 Appuyez sur le bouton (Fig. 3-9) pour activer la fonction vapeur. Quand cette fonction est activée, la température par défaut est la température maximum du programme sélectionné.Cette fonction peut être activée uniquement sur les programmes suivants : Coton,Synthétique,Mixte,Bébé Coton,Hygiène. - clignotera. Quand la fonction est activée, la LED au-dessus du bouton Appuyez encore sur ce bouton pour désactiver la fonction. La LED s’éteindra. Vapeur Stoom 9 3-Panneau de commande FR Quand la fonction est activée, la température ne peut pas être modifiée. Si vous appuyez sur le bouton « temp », la fonction « Vapeur » sera désactivée. Vous pouvez activer cette fonction uniquement avant de démarrer un des programmes concernés. Vous ne pouvez pas lancer cette fonction si un programme est déjà en cours. 3.5.4 Bouton de fonction « Rinçage+ » 3-10 Appuyez sur ce bouton (Fig. 3-10) pour rincer le linge Extra spoelen plus intensément avec de l’eau douce. Cette fonction Rinçage + est recommandée pour les personnes à la peau sen sible. Vous pouvez sélectionner un à trois cycles en ap3-11 Extra spoelen Rinçage + Startuitstel Fin différée l'écran avec l'extension P-1 /P--2/P--3. 3.5.5 Fonction « Speed up » Cette fonction permet d’économiser du temps et de l’énergie. Recommandée si le linge est légèrement sale. Appuyez simultanément sur les boutons "Rin secondes pour activer la fonction "Speed up ".L'indicateur SPEEDUP pas disponible pour tous les programmes (voir PROGRAMMES). Speed up 3-12 Bouton "Fin différée" Appuyez sur ce bouton (Fig. 3-12) pour démarrer le Startuitstel Fin différée 6: 30le cycle du programme s’achève dans 6 heures et 30 minutes Appuyez sur le bouton « Départ/Pause » programme ESSORAGE ECO 40-60. Remarque : Détergent liquide 3.7 Bouton «Start/Pause » 3-13 Appuyez légèrement sur ce bouton (Fig. 3-13) pour démarrer ou arrêter le programme actuellement af- Start/Pause pendant le réglage, l'exécution ou l'interruption soudaine du programme. 3-14 3-15 10 Temp. Vapeur Stoom 3.8 Sécurité enfants Appuyez simultanément sur le bouton « Temp. » et «V apeu r» (Fig. 3-14) pendant 3 secondes pour bloquer l’activation des éléments du panneau. Pour déverrouiller, appuyez à nouveau sur les deux boutons. (Fig. 3-15) si vous appuyez sur le bouton, lorsque la sécurité enfants est activée. Aucun changement ne s'opère. 4-Programmes FR Compartiment à détergent pour : 1 Arrivée d’eau uniquement, pas de lessive 2 Lessive Adoucissant ou produit d’entretien • Oui, º En option, / No Charge max. Température * à 90 40 3.5 * à 60 40 7 * à 60 30 Baby Care 3.5 * à 90 Hygiénique 3.5 Lingerie Coton 20°C 3.5 Coton Synthétique Mix Eco 40-60 1400 • • • 1200 • • • 1000 • • • 40 • º / Coton/Synthétique 1000 • • • 90 90 1000 • • * à 60 40 • º / Coton/Synthétique • º / Coton/Synthétique 1000 • • 7 20 20 • º / Coton 1400 • • 7 / / • º / Coton / • º / Coton/Synthétique 1000 • • º / Coton/Synthétique 1000 • * à 40 1 * à 40 3.5 * à 40 1 * à 40 Délicat 1 * à 30 Jeans 3.5 Couette Essorage Express 15 min Sport Laine 1 • º / Coton Tissu synthétique ou • º / mélangé Mélange de linge en / coton et synthétique • º légèrement sale 3.5 Rapide 2 Speed up 7 Programme Rinçage + en °C plage sélectionnable Préréglage en kg Vapeur Vitesse Fonction d’essorage préréglée en trs/ min 1) 40 • 30 800 • º / Vêtements de sport Tissu en laine ou à teneur 800 • / / en laine lavable en machine 400 • / / Linge délicat et soie * à 60 30 • º / Jeans 1000 • • 1 * à 40 40 • / / Coton 800 • • 7 / / / / / Tous les tissus 1000 20 • • Concernant le linge sec. Choisissez 90 °C comme température de lavage uniquement pour des exigences hygiéniques parRéduisez la quantité de détergent parce que la durée du programme est courte. 11 5-Consommation FR Scannez le QR code sur l'étiquette énergétique pour obtenir des informations sur la consommation d'énergie. La consommation d'énergie réelle peut différer de celle déclarée en fonction des conditions locales. Programme EU1015 / 2010 Sélectionnez Eco 40-60, appuyez sur "Essorage" 10s, puis ajustez à 60 ° C / 40 ° C avec essorage maximal. Les programmes coton standard à 60°C et 40°C conviennent pour nettoyer les salissures normales. Ce sont les programmes les plus efficaces en termes de consommation combinée d'énergie et d'eau pour le linge en coton. La température réelle de l'eau peut différer de la température du cycle déclarée. Remarque : Pesage automatique L’appareil est équipé d’une option de détection de la charge. Lorsque la charge est faible, l’énergie, l’eau et le temps de lavage sont réduits de manière automatique dans certains programmes.L'écran affiche AUtO. 12 8WL LVDWLRQ T RWLGLHQQH 5 LPHQWDWLRQ Raccordez le lave-linge à une alimentation (220 V à 240 V~/50 Hz ; Fig. 6-1). Veuillez également vous réfé rer à la section INSTALLATION. 5DFFRU HPHQW HD ▶ YDQW H UDFFRUGHPHQW DVV UH YR V GH D SURSUH W HW GH D F DUW G GLVSRVLWLI G DUULY H G HD ▶ Ouvrez le robinet (Fig. 6-2). 5HParque : Étanchéité Avant l'utilisation, véri ez la présence de fuites sur les joints entre le robinet et le exible G DUULY H G HD HQ R YUDQW H URELQHW 3U SDUDWLRQ LQJH ▶ 7ULH HV Y WHPHQWV HQ IRQFWLRQ G WLVV FRWRQ synthétique, laine ou soie) et de leur niveau de saleté (Fig. 6-3). Faites attention aux consignes G HQWUHWLHQ GHV WLT HWWHV GH DYDJH ▶ 6 SDUH HV Y WHPHQWV E DQFV GHV Y WHPHQWV GH FR H U /DYH G DERUG HV WH WL HV GH FR H U D main pour savoir s'ils se décolorent ou s'abîment. ▶ Videz les poches (clés, pièces de monnaie, etc.) HW UHWLUH HV RE HWV GH G FRUDWLRQ WU V G UV EUR ches). ▶ 3R U HQWUHWLHQ GHV Y WHPHQWV VDQV R U HWV du linge délicat et les textiles nement tissés FRPPH HV ULGHD PHWWH HV GDQV Q VDF GH DYDJH H QHWWR DJH D PDLQ R VHF HVW S V indiqué). ▶ HUPH HV IHUPHW UHV J LVVL UHV HV DWWDFKHV HW HV FURFKHWV YH FUR HW DVV UH YR V T H HV ER WRQV VRQW VR LGHPHQW FR V V ▶ 3 DFH HV Y WHPHQWV VDQV R U HWV VR LGHV HV sous-vêtements délicats (Dessous) et les petits DUWLF HV WH V T H HV FKD VVHWWHV HV FHLQW UHV HV VR WLHQV JRUJH HWF GDQV Q VDF GH DYDJH ▶ ' S LH HV JUDQGHV SL FHV GH WLVV WH HV T H HV GUDSV GH LW HW HV FR YUH LWV HWF ▶ 5HWR UQH HV HDQV HW HV WLVV V LPSULP V G FR rés ou aux couleurs vives ; lavez-les séparément VL SRVVLE H ATTENTION ! /HV DUWLF HV QRQ WH WL HV GHVVHUU V R WUDQFKDQWV SH YHQW FD VHU GHV G VIRQFWLRQQH PHQWV DLQVL T HQGRPPDJHU HV Y WHPHQWV HW DSSDUHL 8WL LVDWLRQ T RWLGLHQQH 7DE HD HQWUHWLHQ /D DJH 7HPS UDW UH GH D vage maximale 95 °C QRUPD 7HPS UDW UH GH D vage maximale 60°C QRUPD 7HPS UDW UH GH D vage maximale 60 °C GR 7HPS UDW UH GH D vage maximale 40°C QRUPD 7HPS UDW UH GH D vage maximale 40°C GR 7HPS UDW UH GH D vage maximale 40 °C WU V GR 7HPS UDW UH GH D vage maximale 30°C QRUPD 7HPS UDW UH GH D vage maximale 30°C GR 7HPS UDW UH GH D vage maximale 30°C WU V GR 7HPS UDW UH PD L PD H GH DYDJH D PDLQ 40 °C 1H DYH SDV % DQF LPHQW JHQWV GH E DQFKL PHQW D WRULV V Oxygène unique PHQW QRQ FK RU 1 WL LVH SDV G DJHQW GH E DQFKLPHQW 6 FKH LQJH D WRULV WHPS UDW UH QRUPD H 6 FKH LQJH D WRULV WHPS UDW UH EDVVH 1H SDVVH SDV D V FKH LQJH 6 FKDJH V U FRUGH 6 FKDJH S DW 6 F DJH 5HSDVVDJH 5HSDVVDJH QH WHPS UDW UH PD L PD H de 200 °C 5HSDVVDJH QH WHPS UDW UH PR HQQH de 150 °C 1H UHSDVVH SDV 5HSDVVDJH QH WHPS UDW UH EDVVH de 110 °C ; sans va SH U H UHSDVVDJH D YDSH U SH W SURYR T HU GHV GRPPDJHV irréversibles) QWUHWLHQ SURIHVVLRQQH HV WH WL HV 1HWWR DJH VHF D W WUDF RU WK QH 1HWWR DJH VHF D K GURFDUE UHV 1HWWR DJH SURIHV VLRQQH SDU YRLH K PLGH YLWH WR W QHW WR DJH SURIHVVLRQQH SDU YRLH K PLGH YLWH WR W QHWWR DJH VHF DUJHPHQW H DSSDUHL ▶ ,QV UH H LQJH SL FH SDU SL FH ▶ Ne surchargez pas l'appareil. Notez les di érentes charges maximales en fonction des programmes ! Règle générale pour la charge maximale : Gardez une distance de VL SR FHV HQWUH D FKDUJH HW D SDUWLH V S ULH UH G WDPER U ▶ HUPH ELHQ D SRUWH VV UH YR V T D F QH SL FH GH LQJH Q HVW SLQF H 6-Utilisation quotidienne FR 6.5 Sélection du détergent ▶ é et la performance du lavage dépendent de la qualité du détergent utilisé. ▶ Utilisez exclusivement un détergent homologué pour le lavage en machine. ▶ Le cas échéant, utilisez des détergents spéciaux (par exemple, pour les synthétiques et les lainages.) ▶ Respectez les recommandations du fabricant du détergent. ▶ N'utilisez pas d'agents de nettoyage à sec tels que le trichloréthylène ou tout autre produit similaire. Choisissez le détergent le mieux adapté Type de détergent Programme Coton Universel L/P L/P Délicat - L/P Synthétique Mix Couleur L Spécial Adoucissant - L/P - - Baby Care - - L/ L/P Hygiénique L/P L/P - - Lingerie - - L/ L/P Coton 20°C L/P L/P - - Eco 40-60 L/P L/P - - Rapide L/P L - - Express 15 min L L - - Sport - - L/P L/P Laine - - L/P L/P Délicat - - L/P L/P Jeans L L - - Couette - - L L/P Essorage - - - - L = détergent liquide ou en gel P = détergent en poudre O = facultatif _ = non Voici nos recommandations : ▶ Détergent en poudre : 20 °C à 90 °C* (utilisation optimale : 40-60 °C) ▶ Détergent couleur : 20 °C à 60 °C (utilisation optimale : 30-60 °C) ▶ Détergent laine/vêtement délicat : 20 °C à 30 °C ( utilisation optimale :20-30 °C) * Choisissez 90 °C comme température de lavage uniquement pour des exigences hygiéniques particulières. 6-Utilisation quotidienne FR 6.6 Ajout de détergent 6-4 1. 2. 3. Faites glisser le bac à lessive hors de son emplacement. Ajoutez la quantité de détergent nécessaire dans les compartiments respectifs (Fig. 6-4). Repoussez doucement le bac. Remarque : ▶ Retirez les résidus de détergent du bac à lessive avant le prochain cycle de lavage. ▶ N'utilisez pas trop de détergent ou d'adoucissant. ▶ ▶ Remplissez toujours le détergent avant de lancer le cycle de lavage. ▶ Diluez le détergent liquide concentré avant de l’ajouter dans le compartiment 2. ▶ le linge et mettez-la dans le lave-linge. ▶ ▶ Choisissez avec soin les réglages du programme en fonction des symboles d'entretien indiqués sur toutes les étiquettes de linge et selon le tableau de programme. 6-5 6.7 Mettez l’appareil en marche. 6-6 Appuyez sur le bouton « Marche/Arrêt » pour mettre l’appareil en marche (Fig. 6-5). Le voyant LED du bouton "Start/Pause “ clignote. 6.8 Sélection d’un programme Pour obtenir des résultats optimaux lors du lavage, sélectionnez un programme qui convient au degré de salissure et au type de linge. Tournez le bouton des programmes (Fig. 6-6) pour sélectionner le programme adéquat. Le voyant LED correspondant au programme sélectionné s’allume et Remarque : Suppression des odeurs Avant la première utilisation, nous vous recommandons de lancer le programme HYGIÉNIQUE à vide et avec une petite quantité de détergent dans le compartiment du produit de lavage (2) ou un nettoyant spécial machine pour éliminer les résidus potentiellement gênants. 6.9 Ajout de sélections individuelles 6-7 Temp. Tr/min Vapeur Stoom Extra spoelen Rinçage + Speed up 16 Sélectionnez les options et les paramètres requis (Fig. 6-7) 6 ; reportez-vous à la section PANNEAU DE COMMANDE. Startuitstel Fin différée Start/Pause 6-Utilisation quotidienne FR 6.10 Démarrage du programme de lavage Appuyez sur le bouton « Start/Pause » (Fig. 6-8) pour lancer le programme. Le voyant LED du bouton "Start/Pause” s'allume continuellement L'appareil fonctionne selon les réglages actuels. Pour 6-8 Start/Pause programme. 6.11 Interruption - annulation du progr Pour interrompre un programme en cours, appuyez doucement sur « Départ/Pause ». Le voyant LED au dessus du bouton clignote. Appuyez à nouveau sur ce bouton pour reprendre l’opération. Pour annuler un programme en cours et tous ses paramètres individuels 1. Appuyez sur le bouton « Start/Pause » pour interrompre le programme. 2. Appuyez sur le bouton « Marche/Arrêt » pendant 2 secondes environ pour arrêter l’appareil. 3. Exécutez le programme ESSORAGE et sélectionnez « pas de vitesse » (tous les voyants éteints) pour évacuer l’eau. 4. Sélectionnez un nouveau programme et démarrez-le. 6.12 Après le lavage Remarque : Verrouillage de la porte ▶ Pour des raisons de sécurité, la porte du lave-linge est temporairement verrouillée ou qu’après son annulation correcte (voir la description ci-dessus). ▶ En cas de niveau d’eau élevé ou de température d’eau élevée ou pendant l’essorage, il est impossible d’ouvrir la porte ; le symbole Loc 11. EnD 2. La machine s’arrête automatiquement. 3. Retirez le linge le plus tôt possible pour le faire avec précaution et pour éviter autant que possible qu’il ne se plisse davantage. 4. Fermez l’arrivée d’eau. 5. Débranchez la prise d'alimentation. 6. Ouvrez la porte pour éviter toute formation d’humidité et l’apparition d’odeurs. Laissez-la ouverte lorsque vous n’utilisez pas la machine. Remarque : Mode Veille / Économiseur d'énergie Une fois l’appareil mis en marche, il rentre en mode Veille si vous ne l’utilisez pas au bout de nomiser l’énergie. Appuyez sur le bouton « Départ/Pause » pour désactiver le mode Veille. 6.13 Activation ou désactivation de l’alarme Vous pouvez désactiver le signal sonore en cas de besoin : 1. Mettez l’appareil en marche. 2. Sélectionnez le programme Essorage . 3. Vapeur Rinçage + secondes environ. « bEEP OFF Pour activer l‘alarme, appuyez une nouvelle fois sur ces deux boutons simultanément. « bEEP ON 17 7-Lavage écologique FR Utilisation respectueuse de l’environnement ▶ Pour une meilleure utilisation de l’énergie, de l’eau, du détergent et du temps, tenezvous en à la charge maximale recommandée. ▶ Ne surchargez pas l’appareil (à l’aide de la main, faites un dégagement en largeur audessus du linge). ▶ Pour le linge légèrement sale, sélectionnez le programme Express 15 min. ▶ Mettez les doses exactes de chaque produit de lavage. ▶ Choisissez la température de lavage adéquate la plus basse - les détergents moder▶ Optimisez les paramètres par défaut uniquement pour les taches importantes. ▶ Sélectionnez la vitesse d’essorage maximale en cas d’utilisation d’un sèche-linge domestique. 18 8-Entretien et nettoyage FR 8.1 Nettoyage du bac à lessive Veillez toujours à ce qu’il ne reste pas de résidus de détergent. Nettoyez régulièrement le bac à lessive (Fig. 8-1) : 1. Tirez le bac jusqu’à la bu tée. 2. Appuyez sur le bouton d’ouverture pour le retirer. 3. Nettoyez ensuite le bac avec de l’eau et remet tez-le en place dans l’appareil. 2 8-1 1 8.2 Nettoyage de la machine 8-2 ▶ Débranchez la machine pendant le nettoyage et l’entretien. ▶ pour nettoyer la machine (Fig. 8-2) et les composants en caoutchouc. ▶ N’utilisez pas de produits chimiques organiques ou de solvants corrosifs. Pour éviter toute obstruction de l’alimentation en eau par des matières solides telles que le calcaire, nettoyez 8-4 8-3 ▶ Débranchez le cordon d’alimentation et fermez l’arrivée d’eau. ▶ (Fig. 8-3) de l’appareil, ainsi que le robinet. ▶ (Fig. 8-4). ▶ d’eau. 8.4 Nettoyage du tambour ▶ Retirez les pièces métalliques introduites acciden- 8-5 les épingles, les pièces de monnaie, etc., car elles peuvent causer des taches de rouille et des dommages. ▶ Utilisez un nettoyant sans chlorure pour éliminer les taches de rouille. Respectez les consignes de sécurité du fabricant de l’agent de nettoyage. ▶ N’utilisez pas d’objet dur ou de laine d’acier pour le nettoyage. Remarque : Hygiène Pour un entretien régulier, nous vous recommandons de lancer le programme HYGIÉNE à vide pour éliminer les résidus potentiellement gênants tous les trois mois. Ajoutez une petite quantité de détergent dans le compartiment du produit de lavage (2) ou utilisez un nettoyant spécial machine 19 8-Entretien et nettoyage 8-6 8-7 FR 8.5 Périodes de non-utilisation prolongées Si l’appareil n’est pas utilisé pendant une longue période : prise 1. 2. 3. Ouvrez la porte pour éviter toute formation d’humidité et l’apparition d’odeurs. Laissez la porte ouverte lo rsque vous n’utilisez pas la machine. cordon d’alimentation, l’arrivée d’eau et le tuyau de vidange. Assurez-vous que tout est correctement installé et qu’il n’y a pas de fuite. Remarque : Hygiène Après une période de non-utilisation prolongée, nous vous recommandons de lancer le programme HYGIÉNE à vide et avec une petite quantité de détergent dans le compartiment du produit de lavage (2) ou un nettoyant spécial machine particulier pour éliminer les résidus potentiellement gênants. 8-8 8-9 8.6 Filtre de la pompe ▶ ne vidange pas l’eau ; ▶ n’essore pas ; ▶ émet un bruit inhabituel en cours de fonctionnement. 8-10 8-11 AVERTISSEMENT ! pompe peut être très chaude ! Avant toute intervention, assurez-vous que l'eau a refroidi. 8-12 20 8-13 1. Éteignez la machine et débranchez-la (Fig. 8-8). 2. Ouvrez le volet d’entretien. Vous pouvez utiliser une pièce de monnaie ou un tournevis (Fig. 8-9). 3. Placez un récipient plat pour recueillir l’eau de vidange (Fig. 8-10). La quantité d'eau pourrait être plus importante que prévu ! 4. Tirez le tuyau de vidange et maintenez-en l’extrémité au-dessus du récipient (Fig. 8-10). 5. Retirez le bouton d’étanchéité du tuyau de vidange (Fig. 8-10). 6. Une fois la vidange terminée, fermez le tuyau de vidange (Fig. 8-11) et remettez-le dans la machine. 7. tournant dans le sens antihoraire (Fig. 8-12). 8. Retirez les impuretés et la poussière (Fig. 8-13). (QWUHWLHQ HW QHWWR DJH Nettoyez soigneusement le ltre de la pompe à l’eau courante, par exemple (Fig. 8-14). Remontez-le soigneusement (Fig. 8-15). HUPH H YR HW G HQWUHWLHQ ATTENTION ! ▶ Le bouchon du ltre de la pompe doit être nettoyé et en bon état. Si le bouchon Q HVW SDV ELHQ VHUU HD SH W V FKDSSHU ▶ Le ltre doit être en place, sinon une fuite peut se produire. 9-Dépannage FR Vous pouvez résoudre la plupart des problèmes qui pourraient survenir sans expertise instructions ci-dessous avant de contacter un service après-vente. Voir SERVICE CLIENTÈLE. AVERTISSEMENT ! ▶ Avant tout entretien, veuillez arrêter l’appareil et débranchez-le du secteur. ▶ Les appareils électriques doivent être entretenus uniquement par des experts en électricité, car une mauvaise intervention pourrait causer des dommages considérables. ▶ Pour éviter tout risque, faites remplacer le cordon d’alimentation endommagé uni- 9.1 Codes d’informations lavage. Aucune action ne doit être entreprise. Code Message 1: 25 Le temps restant du cycle de lavage est évalué à 1 heure et 25 minutes 6: 30 P--1/2/3 1/2/3 Rinçages supplémentaires sélectionnés (voir BOUTONS DE FONCTION „Rinçage +e“). End Le cycle de lavage est terminé. L'appareil s'éteint automatiquement. cLrd La fonction Sécurité enfants est activée LocI- La porte est fermée à cause du niveau d’eau ou de température élevé ou du déroulement de l’essorage. bEEP OFF L’avertisseur sonore est désactivé bEEP ON L’avertisseur sonore est activé SPEEd uP La fonction “Speed up” est activée. Problème Cause Solution CLR FLTR • Erreur de vidange • • dange. - E2 • Verrouillage - erreur. • Fermez correctement la porte. E4 • Le niveau d’eau n’a pas été atteint. • Assurez-vous que le robinet est entièrement ouvert et que la pression de l’eau est normale. • • Le tuyau de vidange s'auto-siphonne. 22 - férée est évalué à 6 heures et 30 minutes 9-Dépannage FR Problème FA Cause • Capteur de niveau d’eau-erreur Solution • Contactez le service après-vente E8 • Niveau de sécurité de l’eau - erreur. • Contactez le service après-vente F3 • Capteur de température - erreur. • Contactez le service après-vente. F4 • • Contactez le service après-vente. F7 • Moteur - erreur. • Contactez le service après-vente. FC1 ou FC2 • Erreur de communication anor- • Contactez le service après-vente. male UnB • Charge déséquilibrée - erreur. • tambour. Réduisez la charge de linge. Problème Cause Le lave-linge ne fonc- • Le programme n’a pas encore détionne pas. marré. • La porte n’est pas correctement fermée. • La machine n’a pas été mise sous tension • Panne de courant. • Le Verrouillage enfant est activé. Le lave-linge ne se • Il n’y a pas d'eau. remplit pas d'eau. • • • • • La machine se vi- • dange pendant qu’on y introduit de l'eau. • Problème dange. de vi- • • • Solution • - marrez-le. • Fermez correctement la porte. • Mettez la machine sous tension. • • Désactivez la sécurité enfants. • • tion. • est bouché. d’alimentation. La pression de l’eau est inférieure à • 0,03 MPa. La porte n’est pas correctement • Fermez correctement la porte. fermée. Coupure d’eau. • La hauteur du tuyau de vidange est in- • Assurez-vous que le tuyau de férieure à 80 cm. vidange est correctement installé. L’extrémité du tuyau de vidange • pourrait baigner dans l'eau. n’est pas plongé dans l’eau. Le tuyau de vidange est obstrué. • Débouchez le tuyau de vidange. • L’extrémité du tuyau de vidange se • Assurez-vous que le tuyau de trouve à une hauteur supérieure à vidange est correctement ins100 cm au-dessus du sol. tallé. 23 9-Dépannage Problème Cause FR Solution Forte vibration pen- • Certains boulons de transport • Retirez tous les boulons de transdant l’essorage. n'ont pas été retirés. port. • L’appareil n’est pas installé sur une • Assurez-vous que l’appareil est surface stable. placé sur une surface stable et plane. • La charge de la machine n’est pas • correcte. la charge. L’opération s’arrête • Coupure d'eau ou panne de cou- • rant. trique et l’alimentation en eau. de lavage. L’opération s’arrête • • pendant un certain • Problème lié à la quantité de • Réduisez ou ajustez la charge. temps. linge chargé • • Annulez le programme et redétrempage marrez. Une quantité exces- • Le détergent n’est pas adapté. • en matière de lessive. dans le tambour et/ou • Quantité excessive de détergent. • Réduisez la quantité de lessive. le tiroir à lessive. Ajustement auto- • La durée du programme de lavage • Ce phénomène est normal et matique du temps est ajustée. de lavage. ment. Échec de l'essorage. • Mauvaise répartition du linge. • et la répartition du linge, puis relancez un programme d’essorage. Résultat de lavage in- • Le degré de salissure ne corres- • Sélectionnez un autre prosatisfaisant. pond pas au programme sélecgramme. tionné. • - • Choisissez le linge selon le desante. gré de salissure et selon les • La charge maximale est dépassée. • Réduisez la charge. • Le linge est inégalement réparti • Détachez le linge. dans le tambour. Il existe des résidus de lessive en poudre sur le linge. • Des particules insolubles de déter- • Rincez à nouveau. gent peuvent persister sous forme • Essayez de brosser les points de taches blanches sur le linge. sur le linge sec. • Choisissez un autre détergent. Le linge contient • provenant des graisses telles que • Prétraitez le linge à l’aide d’un des taches grises les huiles, les crèmes ou les onnettoyant spécial. guents. 24 9-Dépannage FR Remarque : Formation de mousse En cas de formation d’une quantité importante de mousse durant l’essorage, le moteur s’arrête et la pompe de vidange est activée pendant 90 secondes. Après 3 échecs d’élimination de la mousse, le programme s’achève sans essorage. Si les messages d’erreur réapparaissent après les mesures prises, éteignez l’appareil, débranchez-le et contactez le service clientèle. 9.4 En cas de panne de courant A 9-1 Le programme en cours et ses paramètres seront enregistrés. Lorsque l’alimentation électrique est rétablie, le fonctionnement reprend. En cas de panne de courant pendant un programme, l’ouverture de la porte se bloque mécaniquement. Si vous devez retirer le linge, le niveau d’eau ne doit pas être visible sur la porte en verre. - Risque de brûlure ! ▶ Réduisez le niveau d’eau suivant l’étape 1 à 6 du chapitre ENTRETIEN ET NETTOYAGE (FILTRE DE LA POMPE). ▶ Tirez le levier (A) situé en dessous du volet d’entretien (Fig. 9-1) jusqu’à ce que la porte se déverrouille en émettant un petit clic. ▶ Fixez toutes les pièces et fermez le volet d’entretien. 10.1 Préparation ▶ Sortez l'appareil de l'emballage. ▶ Retirez tous les matériaux d’emballage, y compris la base en polystyrène et tenez-les hors de la portée des enfants. Lors de l’ouverture de l’emballage, vous pourriez voir des gouttes d’eau sur le sac en plastique et le hublot. Ce phénomène normal résulte Remarque : Mise au rebut des emballages Tenez tous les emballages hors de portée des enfants et mettez-les au rebut dans le respect de l'environnement. 10.2 Instructions relatives à l’installation des tampons anti-bruit Conseil relatif à l'émission de chaleur : Le tampon anti-bruit est facultatif mais peut aider à réduire le bruit, veuillez l'assembler ou non selon votre besoin. 25 10-Installation FR 1. En ouvrant l’emballage thermo-rétractable, vous 10-1 y trouverez des tampons anti-bruit. Ceux-ci sont utilisés pour réduire le bruit. (Fig. 10-1) 2x 2. Inclinez la machine à laver sur le côté, hublot dirigé 2x vers le haut et partie inférieure de la machine vers vous. 3. Retirez les tampons anti-bruit ainsi que le film protecteur adhésif double face et les tampons anti-bruit sous la carrosserie de la machine à laver comme indiqué à la Figure 3 (deux tampons plus longs en positions 1 et 3, deux tampons plus courts en positions 2 et 4). Remettez la machine à l'endroit. 10-2 10-3 (1) (2) (3) 10.3 Démontez les boulons de transport composants anti-vibration à l’intérieur de l’appareil du- 10-4 10-5 1. Retirez les 4 boulons à l’arrière, puis enlevez les éléments séparateurs en plastique(Fig. 10-2) (Fig. 10-3). 2. Fermez les trous de gauche avec des bouchons obturateurs (Fig. 10-4)(Fig. 10-5). Remarque : Conservez-les en lieu sûr Conservez les boulons de transport dans un endroit sûr pour une utilisation ultérieure. Chaque fois que vous souhaitez déplacer l’appareil, remontez d’abord les boulons. 10.4 Déplacement de l'appareil Si vous souhaitez déplacer l’appareil sur une grande distance, remettez les boulons de transport retirés avant l’installation pour éviter tout dommage : 1. 2. 3. 4. 5. 26 Retirez les bouchons obturateurs. Retirez le couvercle arrière. Insérez les éléments séparateurs en plastique et les boulons de transport. Serrez les boulons à l’aide d’une clé. Replacez le couvercle arrière. 10-Installation FR 10.5 Alignement de l’appareil Réglez tous les pieds (Fig. pour obtenir un nivellement complet. Cela réduira les vibrations et le bruit pendant l’utilisation. de même que l’usure. Nous recommandons d’utiliser un niveau à bulle pour le réglage. Le sol doit être aussi stable et plat que possible. 1. 2. 3. 10-6 Desserrez le contre-écr Réglez la hauteur en t Serrez le contre-écr contre le boîtier. 10.6 Raccordement de drainage Fixez correctement le tuyau de vidange à la tuyauterie. Le tuyau doit atteindre en un point une hauteur comprise entre 80 et 100 cm au-dessus de la ligne inférieure de l'appareil ! AVERTISSEMENT ! ▶ Utilisez uniquement l’ensemble de raccordement fourni pour le raccordement. ▶ Ne réutilisez jamais d’ensemble de raccor ▶ Raccordez l'appareil uniquement à une alimentation d’eau froide. ▶ Les raccor 10.6.1 Tuyau de vidange à l’évier ▶ Suspendez le tuyau de vidange au rebord d’un évier de taille adéquate, à l’aide du support en U 10-8 ▶ Protégez convenablement le support en U contre tout glissement. 10.6.2 Tuyau de vidange au raccordement d’évacuation des eaux usées ▶ Le diamètre interne du réservoir au sol (tranquiliseur) avec le trou d'aération doit être au minimum de 40 mm. ▶ Placez le tuyau de vidange à environ 80 mm des conduits d'eaux usées. ▶ Fixez le support en U et attachez-le solidement (Fig. 10-8). 27 10-Installation FR 10.6.3 Raccordement du tuyau de vidange à l’évier ▶ Le raccordement doit se situer au-dessus du siphon ▶ Un raccord à embout est habituellement fermé par un bloc (A). Vous devez le retirer pour éviter tout dysfonctionnement (Fig. 10-9). ▶ Fixez le tuyau de vidange à l’aide d’une pince. 10-9 ATTENTION ! ▶ et exempt de fuite. Si le tuyau de vidange est au sol, ou si le conduit est à une hauteur de moins de 80 cm, le lave-linge se vidange de manière continue lorsqu’on le remplit (siphonnement automatique). ▶ Le tuyau de vidange n’est pas allongé. Au besoin, contactez le service après-vente. 10-10 10-11 10.7 Raccordement d'eau douce Assurez-vous que les joints sont insérés. 1. 2. biseautée de l’appareil (Fig. 10-10). Resserrez manuellement le joint à vis. L’autre extrémité est raccordée à un robinet Remarque : Système Aqua stop : top protège contre les dommages causés par l’eau en coupant automatiquement l’ali- 28 10-Installation FR 10.8 Raccordement électrique 10-12 ▶ l'alimentation électrique, la prise et le fusible sont les même que sur la plaque. ▶ la prise d’alimentation est mise à la terre et aucune ▶ prise parfaitement. ▶ Uniquement au Royaume-Uni : La prise pour le Royaume-Uni est conforme à la norme BS1363A. Branchez la prise d'alimentation à la prise murale (Fig. 10-12). AVERTISSEMENT ! ▶ Assurez-vous toujours que toutes les connexions (alimentation électrique, le tuyau aucune fuite ! ▶ Veillez à ce que ces pièces ne soient jamais piétinées, pliées ou tordues. ▶ Si le cordon d’alimentation est endommagé, faites-le remplacer par le fabricant (voir Remarque : Hygiène Après chaque installation ou une période d’inactivité prolongée, nous vous recommandons, avant la première utilisation, de lancer le programme HYGIÉNE à vide et d’insérer une petite quantité de détergent dans le compartiment du produit de lavage (2) ou un nettoyant spécial machine pour éliminer les résidus potentiellement gênants. 29 11-Informations techniques FR 11.1 Autres données techniques HW70-BP1439N Tension en V 220-240 V~/50 Hz Courant en A 10 Puissance maximale en W 1900 Pression d’eau en MPa 0,03≤P ≤1 Poids net en kg 64 11.2 Product dimensions VUE DE FACE Mur VUE DE DESSUS HW70-BP1439N A hauteur totale du produit mm 850 B largeur totale du produit mm 595 C profondeur totale du produit mm 460 D profondeur avec porte ouverte mm 960 E dégagement de porte minimum mur adjacent mm 400 Remarque: La hauteur exacte de votre machine dépend de la distance des pieds par rapport au centre de la machine. L'espace où vous installez votre machine doit être d'au moins 40 mm plus large et 20 mm plus profond que ses dimensions. 11.3 Normes et directives Ce produit répond aux exigences de toutes les directives CE applicables ainsi que les normes harmonisées correspondantes, qui prévoient le marquage CE. 30 12-Service clientèle FR Nous vous recommandons notre service clients Haier et l’utilisation de pièces de rechange d’origine. Si vous avez un problème avec l’appareil, veuillez vous référer à la section DÉPANNAGE. Si vous ne trouvez pas de solution, veuillez contacter ▶ votre vendeur local ▶ rendez-vous sur le site www.haier.com, dans la zone Service et support, vous trouverez des numéros de téléphone et une FAQ. Vous pourrez également contacter le service de réclamation. Pour contacter notre Service, rassurez-vous que les informations ci-après sont disponibles. Ces informations sont disponibles sur la plaque signalétique. Modèle ____________________ N° de série _____________________ Pour des renseignements généraux concernant les entreprises, vous trouverez ci-jointes nos adresses en Europe : Adresses de Haier en Europe Pays* Adresse postale Pays* Italie Haier Europe Trading S.R.L. Via De Cristoforis, 12 21100 Verese ITALIE France Espagne Portugal Haier Iberie SL Pg. Garcia Faria, 49-51 08019 Barcelone ESPAGNE Belgique-FR Belgique-NL Pays-Bas Luxembourg Adresse postale Haier France SAS 3-5 rue des Graviers 92200 Neuilly sur Seine FRANCE Haier Bénélux SA Anderlecht Route de Lennik 451 BELGIQUE Haier Deutschland GmbH Konrad-Zuse-Platz 6 Pologne Haier Pologne Sp. 81829 München République zo.o. GERMANY Tchèque Al. Jerozolimskie Hongrie Haier Appliances UK Co.Ltd. 181B Grèce One Crown Square 02-222 Warszawa Roumanie Royaume-Uni Church Street East POLOGNE Russie Woking, Surrey, GU21 6HR Royaume-Uni *Pour de plus amples informations, veuillez consulter le site www.haier.com Allemagne Autriche 31 Gebruikshandleiding Wasmachine HW70-BP1439N NL 'DQN D N RRU Z DD NRRS D GLW DLHU SURG FW /HHV GH H KDQGOHLGLQJ JURQGLJ YRRU KHW DSSDUDDW LQ JHEU LN QHHPW 'H KDQGOHLGLQJ EHYDW EHODQJULMNH LQIRUPDWLH GLH DO KHOSHQ Z DSSDUDDW RSWLPDDO WH JHEU LNHQ HQ KHW YHLOLJ HQ FRUUHFW WH LQVWDOOHUHQ JHEU LNHQ HQ RQGHUKR GHQ %HZDDU GH H KDQGOHLGLQJ RGDW KHP VWHHGV N QW UDDGSOHJHQ YRRU KHW YHLOLJ HQ FRUUHFW JHEU LN YDQ KHW DSSDUDDW OV KHW DSSDUDDW YHUNRRSW ZHJVFKHQNW RI DFKWHUODDW ZDQQHHU YHUK LVW PRHW GH H KDQGOHLGLQJ RRN PHHJHYHQ RGDW GH QLH ZH HLJHQDDU YHUWUR ZG NDQ UDNHQ PHW KHW DSSD UDDW HQ GH YHLOLJKHLGVZDDUVFK ZLQJHQ /HJH GH DD VFK L HOD L NH HLOL KHLGVL IR PDWLH OJHPHQH LQIRUPDWLH HQ WLSV 0LOLH LQIRUPDWLH 9HUZLMGHUL J +HOS KHW PLOLH HQ GH JH RQGKHLG WH EHVFKHUPHQ 3ODDWV GH YHUSDNNLQJ LQ GH JHVFKLNWH FRQWDLQHUV RP KHW WH UHF FOHQ +HOS DIYDO YDQ HOHNWULVFKH HQ HOHNWURQLVFKH DSSDUDWHQ UHF FOHQ *RRL DSSDUDWHQ GLH YRRU LHQ LMQ YDQ GLW V PERRO QLHW ZHJ PHW K LVKR GHOLMN DIYDO 5H WR UQHHU KHW SURG FW QDDU Z ORNDOH LQVWHOOLQJ RI QHHP FRQWDFW RS PHW Z JHPHHQWHOLMN NDQWRRU : 56& 8:,1* LVLFR RS OHWVHOV RI H VWLNNL 2QWNRSSHO KHW DSSDUDDW YDQ KHW QHWZHUN 6QLMG KHW QHWVQRHU GRRU HQ YHUZLMGHU KHW 9HU ZLMGHU GH VFKDUQLHUHQ RP WH YHUPLMGHQ GDW NLQGHUHQ RI K LVGLHUHQ LQ KHW DSSDUDDW YDVW JHNOHPG N QQHQ UDNHQ NL Inhoud 1-Veiligheidsinformatie................................................................................................................... 4 2-Productbeschrijving ..................................................................................................................... 7 3-Bedieningspaneel ......................................................................................................................... 8 4-Programma‘s ................................................................................................................................. 11 5-Verbruik ........................................................................................................................................... 12 6-Dagelijks gebruik ........................................................................................................................... 13 7-Milieuvriendelijk wassen .............................................................................................................. 18 8-Zorg en reiniging ........................................................................................................................... 19 9-Probleemoplossen ....................................................................................................................... 22 10-Installatie ...................................................................................................................................... 26 11-Technische gegevens ................................................................................................................ 30 12-Klantendienst .............................................................................................................................. 31 3 9HLOLJKHLGVLQIRUPDWLH 9RRU KHW DSSDUDDW GH HHUVWH PDDO L VFKDNHOW PRHW KHLGVDG LHV OH H : 1/ KHW HLOLJ 56& 8:,1* 9RRU GH HHUVWH L JHEU LN DPH ▶ =RUJ HUYRRU GDW HU JHHQ VFKDGH LV RSJHWUHGHQ WLMGHQV KHW WUDQV SRUW ▶ =RUJ HUYRRU GDW DOOH WUDQVSRUWER WHQ YHUZLMGHUG LMQ ▶ 9HUZLMGHU DOOH YHUSDNNLQJ HQ E LWHQ GH E UW YDQ NLQGHUHQ EHZD UHQ ▶ +HW DSSDUDDW PRHW DOWLMG GRRU PLQLP P WZHH SHUVRQHQ ZRUGHQ JHGUDJHQ RPGDW KHW R ZDDU LV DJHOLMNV JHEU LN ▶ 'LW DSSDUDDW PDJ ZRUGHQ JHEU LNW GRRU NLQGHUHQ YDQ MDDU HQ R GHU HQ SHUVRQHQ PHW HHQ YHUPLQGHUGH I VLHN JHYRHOVPDWLJ HQ PHQWDDO YHUPRJHQ RI HHQ JHEUHN DDQ HUYDULQJ HQ NHQQLV DOV H RQGHU WRH LFKW VWDDQ RI LQVWU FWLHV NULMJHQ PHW EHWUHNNLQJ WRW KHW YHLOLJH JHEU LN YDQ KHW DSSDUDDW HQ GH EHWURNNHQ ULVLFR V ▶ +R G KHW DSSDUDDW LW GH E UW YDQ NLQGHUHQ MRQJHU GDQ MDDU R G WHQ LM H RQGHU FRQVWDQW WRH LFKW VWDDQ ▶ .LQGHUHQ PRJHQ QLHW VSHOHQ PHW KHW DSSDUDDW ▶ /DDW NLQGHUHQ RI K LVGLHUHQ QLHW GLFKWELM KHW DSSDUDDW NRPHQ DOV GH GH U JHRSHQG LV ▶ %HZDDU DOOH ZDVPLGGHOHQ LW GH E UW YDQ NLQGHUHQ ▶ 6O LW ULWVVO LWLQJHQ EHYHVWLJ ORVVH GUDGHQ HQ OHW HURS GDW NOHLQH LWHPV QLHW YHUVWULNW N QQHQ UDNHQ ,QGLHQ QRRG DNHOLMN PRHW HHQ DN RI QHW JHEU LNHQ ▶ 8 PDJ QLHW RS KHW DSSDUDDW GU NNHQ RI KHW JHEU LNHQ RS EORWH YRHWHQ RI PHW QDWWH RI YRFKWLJH KDQGHQ RI YRHWHQ ▶ 8 PDJ KHW DSSDUDDW QLHW DIGHNNHQ RI RPZLNNHOHQ WLMGHQV GH ZHU NLQJ RI DFKWHUDI RGDW HYHQW HHO YRFKW NDQ YHUGDPSHQ ▶ 8 PDJ JHHQ ZDUH YRRUZHUSHQ RI EURQQHQ YDQ ZDUPWH RI YRFKW ERYHQRS KHW DSSDUDDW SODDWVHQ ▶ *HEU LN RI EHZDDU JHHQ RQWYODPEDDU ZDVPLGGHO RI VWRPHULM UHL QLJLQJVPLGGHO GLFKWELM KHW DSSDUDDW ▶ *HEU LN JHHQ RQWYODPEDDU VSUD V GLFKWELM KHW DSSDUDDW ▶ :DV JHHQ NOHGLQJVW NNHQ GLH EHKDQGHOG ZHUGHQ PHW RSORVPLG GHOHQ LQ KHW DSSDUDDW RQGHU H YRRUDI LQ GH O FKW WH KHEEHQ ODWHQ GURJHQ 9HLOLJKHLGVLQIRUPDWLH 1/ : 56& 8:,1* DJHOLMNV JHEU LN ▶ 8 PDJ GH VWHNNHU QLHW YHUZLMGHUHQ RI LQYRHUHQ LQ GH DDQZH LJKHLG YDQ RQWYODPEDDU JDV ▶ 8 PDJ VFK LPU EEHU RI VSRQVDFKWLJ PDWHULDDO ZDVVHQ LQ KHHW ZDWHU ▶ 8 PDJ JHHQ ZDVJRHG ZDVVHQ GDW Y LO LV PHW EORHP ▶ 8 PDJ GH ODGH PHW KHW ZDVPLGGHO QLHW RSHQHQ WLMGHQV HHQ ZDV F FO V ▶ 'U N QLHW RS GH GH U WLMGHQV HHQ ZDVF FO V =H ZRUGW QDPHOLMN KHHW ▶ 8 PDJ GH GH U QLHW RSHQHQ DOV KHW ZDWHUQLYHD LFKWEDDU LV GRRU KHW NLMNYHQVWHU ▶ 8 PDJ GH GH U QLHW RSHQ IRUFHUHQ 'H GH U LV LWJHU VW PHW HHQ HOIJUHQGHOHQG PHFKDQLVPH HQ H RSHQW NRUW DDQ KHW HLQGH YDQ GH ZDVSURFHG UH ▶ 6FKDNHO KHW DSSDUDDW LW QD HON SURJUDPPD HQ YRRU UR WLQH RQ GHUKR GVZHUNHQ LWYRHUHQ 9HUZLMGHU GH VWHNNHU LW KHW VWRSFRQ WDFW RP HOHNWULFLWHLW WH EHVSDUHQ HQ LW YHLOLJKHLGVRYHUZHJLQJHQ ▶ 8 PDJ QRRLW DDQ KHW QHWVQRHU WUHNNHQ RP GH VWHNNHU LW KHW VWRSFRQWDFW WH YHUZLMGHUHQ 2 GHUKR G UHL LJH ▶ =RUJ HUYRRU GDW NLQGHUHQ RQGHU WRH LFKW VWDDQ DOV H KHW DSSD UDDW UHLQLJHQ RI RQGHUKR GHQ ▶ 9HUZLMGHU GH VWHNNHU LW KHW VWRSFRQWDFW YRRU RQGHUKR GV ZHUN DDPKHGHQ LWYRHUW ▶ +R G KHW RQGHUVWH GHHO YDQ KHW NLMNYHQVWHU VFKRRQ HQ RSHQ GH GH U HQ GH ODGH PHW KHW ZDVPLGGHO DOV KHW DSSDUDDW QLHW LQ JH EU LN LV RP JH UWMHV WH YRRUNRPHQ ▶ *HEU LN JHHQ ZDWHUVSUD RI VWRRP RP KHW DSSDUDDW WH UHLQLJHQ ▶ OV KHW QHWVQRHU EHVFKDGLJG LV PRHW KHW ZRUGHQ YHUYDQJHQ door de fabrikant, zijn onderhoudsdienst of dergelijk gekwali FHHUGH SHUVRQHQ RP LHGHU ULVLFR LW WH VO LWHQ ▶ 3UREHHU KHW DSSDUDDW QRRLW HOI WH UHSDUHUHQ 1HHP FRQWDFW RS PHW RQ H NODQWHQGLHQVW RP UHSDUDWLHV WH ODWHQ LWYRHUHQ 9HLOLJKHLGVLQIRUPDWLH : 1/ 56& 8:,1* , VWDOODWLH ▶ +HW DSSDUDDW PRHW LQ HHQ JRHG JHYHQWLOHHUGH ORFDWLH ZRUGHQ JH SODDWVW =RUJ YRRU HHQ ORFDWLH GLH WRHODDW GH GH U YROOHGLJ WH RSHQHQ ▶ ,QVWDOOHHU KHW DSSDUDDW QRRLW E LWHQ RS HHQ YRFKWLJHORFDWLH RI LQHHQ ORFDWLH ZDDU ZDWHUOHNNHQ N QQHQ RSWUHGHQ RDOV RQGHU RI GLFKWELM HHQ ZDVWDIHO ,Q KHW JHYDO YDQ HHQ ZDWHUOHN PRHW GH HOHNWULVFKH YRHGLQJ ORVNRSSHOHQ HQ GH PDFKLQH QDW UOLMN ODWHQ GURJHQ ▶ ,QVWDOOHHU RI JHEU LN KHW DSSDUDDW HQNHO DOV GH WHPSHUDW U KRJHU LV GDQ r& ▶ 3ODDWV KHW DSSDUDDW QLHW UHFKWVWUHHNV RS HHQ WDSLMW RI GLFKWELM HHQ P U RI PH EHOVW N ▶ 8 PDJ KHW DSSDUDDW QLHW LQVWDOOHUHQ LQ GLUHFW RQOLFKW RI LQ GH E UW YDQ ZDUPWHEURQQHQ ELMY IRUQ L HQ YHUZDUPLQJ ▶ =RUJ HUYRRU GDW GH HOHNWULVFKH LQIRUPDWLH RS KHW QDDPSODDWMH RYHU HHQVWHPW PHW GH VWURRPWRHYRHU =R QLHW PRHW FRQWDFW RSQHPHQ PHW HHQ HOHNWULFLHQ ▶ *HEU LN JHHQ P OWL VWHNNHU DGDSWHUV RI YHUOHQJVQRHUHQ ▶ =RUJ HUYRRU GDW HQNHO KHW JHOHYHUGH QHWVQRHU HQ VODQJVHW ZRUGHQ JHEU LNW ▶ =RUJ HUYRRU GDW KHW QHWVQRHU HQ GH VWHNNHU QLHW EHVFKDGLJG LMQ ,Q GLHQ EHVFKDGLJG PRHW KHW ZRUGHQ YHUYDQJHQ GRRU HHQ HOHNWULFLHQ ▶ *HEU LN HHQ DI RQGHUOLMNH DDUGJHOHLGHU YRRU GH YRHGLQJ GLH HHQYR GLJ WRHJDQNHOLMN PRHW LMQ QD GH LQVWDOODWLH +HW DSSDUDDW PRHW JH DDUG ZRUGHQ ( NHO RRU KHW 9. +HW QHWVQRHU YDQ KHW DSSDUDDW LV LWJHU VW PHW HHQ GULHSROLJH VWHNNHU DDUGLQJ GLH SDVW LQ HHQ GULHSROLJH JHDDUGH VWHNNHU 6QLM GH GHUGH SLQ DDUGLQJ QRRLW ZHJ RI GHPRQWHHU H QLHW 'H VWHNNHU PRHW RRN QD GH LQVWDOODWLH WRHJDQNHOLMN LMQ ▶ =RUJ HUYRRU GDW GHQDGHQ HQ GHYHUELQGLQJHQ YDQ GH VODQJ VWHYLJ LMQ DDQJHEUDFKW HQ GDW HU JHHQ OHNNHQ LMQ %HRRJG JHEU LN 'LW DSSDUDDW LV HQNHO EHGRHOG YRRU ZDVJRHG GDW LQ GH ZDVPDFKLQH PDJ ZRUGHQ JHZDVVHQ 8 PRHW DOWLMG GH LQVWU FWLHV YROJHQ YHUPHOG RS KHW HWLNHW YDQ HON NOHGLQJVW N +HW LV LWVO LWHQG EHGRHOG YRRU JH EU LN ELQQHQ LQ K LV +HW LV QLHW EHGRHOG YRRU FRPPHUFLHHO RI LQG VWUL HHO JHEU LN :LM LJLQJHQ DDQ KHW DSSDUDDW LMQ QLHW WRHJHODWHQ 2QEHGRHOG JHEU LN NDQ JHYDDU HQ KHW YHUOLHV YDQ GH JDUDQWLH HQ DDQVSUDNHOLMNKHLGVFODLPV EHWHNHQHQ 2-Productbeschrijving NL Opmerking: Omwille van technische wijzigingen en uiteenlopende modellen kunnen de illustraties in de volgende hoofdstukken verschillen van uw model. 2.1 Afbeelding van het apparaat 2-1 1 2-2 2 3 4 Cotto n Syn th eti cs Mix Fast w ash 3 4 5 6 HW70-BP1439 Quick 15” Wool Hygie nic Sp ortwear 2 Da ily Wa sh Ba by cl othes Je ans 1 Del ica te Ha nd wa sh Bed ding Co tton+ Temp Speed Steam Extra rinse De lay Start/pause AEne+++ rg y Spin 7k g Ca pa c ti y 1400 rpm Spe ed u p 5 T3 T1 T4 S1 S2 S6 S3 S5 T2 S4 6 7 1 2 3 4 5 Wasmiddel/wasverzachter lade Scherm Werktop Programma selectieschakelaar Naamplaatje 1 2 3 4 5 6 6 Onderhoudsluik 7 Instelbare voetjes Transportbouten (T1-T4) Deksel achteraan Schroeven deksel achteraan (S1-S6) Netsnoer Waterinlaatklep Afvoerslang 2.2 Accessoires Controleer de accessoires en literatuur op basis van de onderstaande lijst (Afb. 2-3): 2-3 2x 2x Ilaatslangmontage 5 Afdichtpluggen Afvoerslang beugel Trillingdem- Garantiekaart Gebruikshandleiding perblokken 7 3-Bedieningspaneel 3-1 NL 4 1 “Knop Aan/Uit" 3 Scherm 2 Programma selectiescha- 4 Wasmiddel/wasverzachter kelaar lade 5 Functieknoppen 6 "Startuitstel" knop 7 “Start/Pause“ knop Opmerking: Geluidssignaal In de volgende gevallen geeft een akoestisch signaal standaard geen geluid: ▶aan het einde van een programma ▶wanneer een knop wordt ingedrukt ▶wanneer men aan de programma selectieschakelaar draait Het geluidssignaal kan indien noodzakelijk worden gedeselecteerd; zie DAGELIJKS GEBRUIK. 3-2 3.1 “Aan/Uit" knop Druk zacht op de knop (Afb. 3-2) om in te schakelen. Het scherm licht op, de indicator van de "Start/Pause" knop begint te knipperen. Druk opnieuw op de knop gedurende ca. 2 seconden om uit te schakelen. Als er geen onderdeel van het paneel of programma wordt ingeschakeld, zal de machine automatisch uitschakelen. 3-3 3.2 Programmaselectie Met kan één van 16 programma's selecteren met de knop (Afb. 3-3). Het LED-lampje van het programma licht op en de standaardinstellingen worden weergegeven. 3.3 Scherm 3-4 8 Het scherm (Afb. 3-4) geeft de volgende informatie weer: ▶ Wasduur ▶ Eindtijd startuitstel ▶ Foutcodes en onderhoudsinformatie 3-Bedieningspaneel NL 3.4 Wasmiddel lade 3-5 Open de lade, er zijn drie compartimenten zichtbaar (Afb. 3-5): Compartiment 1: Enkel waterinlaat, geen wasmiddel Compartiment 2: Oplosmiddel voor programma Compartiment : Wasverzachter, conditioner, etc. De aanbeveling van het type oplosmiddelen is geschikt voor uiteenlopende wastemperaturen. Raadpleeg de handleiding van het oplosmiddel. 3.5 Functieknoppen De functieknoppen (Afb. 3-6) schakel bijkomende opties in voor het geselecteerde programma voor de start van het programma. De betrokken indicatoren worden weergegeven. Als het apparaat wordt uitgeschakeld of een nieuw programma ingesteld, worden alle opties uitgeschakeld. Als een knop meerdere opties heeft, kan de gewenste optie worden geselecteerd door de knop achtereenvolgens in te drukken. Om de instelling te verwijderen of de instellingprocedure te annuleren, drukt u op de functieknop tot de gewenste LED-lampjes of - in het geval van slechts één optie - het LED-lampje uitschakelt. 3-6 Temp. Tr/min 3.5.1 3.5.2 Vapeur Stoom Extra spoelen Rinçage + Startuitstel Fin différée Start/Pau 3.5.3 3.5.4 3.5.5 Opmerking: Fabrieksinstellingen ke standaardinstellingen. Als er geen speciale vereiste is, worden standaardinstellingen aanbevolen. 3.5.1-Functieknop "Temp.“ Druk op deze knop (Afb. 3-7) om de wastemperatuur van het programma te wijzigen. Als er geen waarde oplicht, wordt het water niet opgewarmd. In combinatie met de “Vapeur/stoom”knop kan de kinderslotfunctie in/uitgeschakeld worden (zie KINDERSLOT). Temp. 3.5.2-Functieknop "Tr/min“ Druk op deze knop (Afb. 3-8) om de toeren/minuut van het programma te wijzigen of te deselecteren. Als er geen waarde oplicht, wordt het wasgoed niet gezwierd. 3-9 3.5.3-Functieknop "Vapeur/stoom“ Druk op deze knop(Fig.3-9) om de stoomfunctie te activeren. Wanneer deze functie is geactiveerd,is de standaard temperatuur de maximum temperatuur van het geselecteer de programma. Deze functie kan alleen worden geactiveerd met de volgende programma’s: Hygienisch, Babykleding,Mix Synthetisch ,Katoen. Wanneer de functie is geactiveerd ,gaat het lampje boven de knop branden. Als u nogmaals op deze knop drukt , kan de functie worden gedeactiveerd en wordt het . Tr/min Vapeur Stoom 9 3-Bedieningspaneel NL lampje boven de knop uitgeschakeld. Wanneer de functie is geactiveerd ,kan de temperatuur van het programma niet worden gewijzigd.Als de “Temp” -knop wordt ingedrukt , wordt de “Stoom”-functie gedeactiveerd.U kunt de “Stoom”-functie alleen activeren voordat u een programma start. U kunt de “Stoom”-functie niet activeren terwijl het apparaat al een programma uitvoert. 3-10 Extra spoelen Rinçage + 3-11 Extra spoelen Rinçage + Startuitstel Fin différée Speed up 3.5.4-Functieknop "Extra spoelen“ Druk op deze knop (Afb. 3-10) om het wasgoed intensiever te spoelen met fris water. Dit wordt aanbevolen voor personen met een gevoelige huid. Door de knop meerdere malen in te drukken, kan men één tot drie bijkomende cycli selecteren. Ze verschijnen op het scherm met P--1/P--2 / P-.3 3.5.5-Functieknop "Speed up“ Deze functie bespaart tijd en energie. Bij voorkeur wasgoed dat licht vuil is. Druk gelijktijdig op de knop "Extra spoelen.“ en ”Startuitstel” (Afb. 3-11) gedurende ca. 3 seconden om de "Speed up" functie in te schakelen; SPEEduPverschijnt. Deze functie is niet beschikbaar in alle programma's (zie PROGRAMMA'S). 3.6 “Startuitstel“ knop 3-12 Druk op deze knop (Afb. 3-12) om het programma te starten met startuitstel. Het eindtijd startuitstel kan worden verhoogd in stappen van 30 minuten van 0,524u. Bijvoorbeeld, scherm ui 6:30betekent dat het wasprogramma zal eindigen binnen 6 uur en 30 minuten. Druk op de "Start/Pause" knop om het startuitstel te starten. Dit is niet van toepassing op het ZWIEREN Eco 40-60 programma. Startuitstel Fin différée Opmerking: Vloeibaar wasmiddel Als u vloeibaar wasmiddel gebruikt, wordt het afgeraden het startuitstel in te schakelen. 3.7 "Start/Pause“ knop 3-13 Start/Pause Temp. 3-15 10 Vapeur Stoom Druk zacht op deze knop (Fig. 3-13) om het momenteel weergegeven programma te starten of te onderbreken. Tijdens de instelling en uitvoering van het programma licht het LED-lampje boven de knop op, of indien onderbroken begint het te knipperen. 3.8 Kinderslot Druk gelijktijdig op de knop "Temp.“ en ”Vapeur/Stoom” (Afb. 3-14) gedurende 3 seconden om alle onderdelen van het paneel te blokkeren tegen inschakeling. Om te ontgrendelen, drukt u opnieuw op beide knoppen. Het scherm geeft weer (Afb. 3-15) als een knop wordt ingedrukt wanneer het kinderslot ingeschakeld is. De wijziging is niet actief. 4-Programma's NL Compartiment à détergent pour : 1 Arrivée d’eau uniquement, pas de lessive 2 Lessive Adoucissant ou produit d’entretien • Oui, º En option, / No Charge max. Température Vitesse Fonction d’essorage préréglée en trs/ min Katoen 7 * tot 90 40 • º / Katoen 1400 • • • Synthetisch 3.5 * tot 60 40 • º / Synthetische of ge- 1200 • • • Mix 7 * tot 60 30 • º / Licht vuil gemengd wasgoed van katoen en synthetische 1000 • • • 40 • º / Machine wasbare stof van wol of met wol-inhoud 1000 • • • 90 Katoen 1000 • • 40 • º / • º / Katoen 1000 • • 20 • º / Katoen 1400 • • / • º / Katoen / 40 • º / Licht vuil wasgoed van katoen of syn- 1000 • • º / Katoen / Synthetisch 1000 • • º / Sportkledij 800 • • / / 800 • 400 • Baby Care 3.5 Hygiënisch 3.5 Ondergoed 3.5 Katoen 20°C 7 20 Eco 40-60 7 / * tot 90 90 * tot 60 1 Speed up 2 Programme Rinçage + en kg Vapeur en °C plage sélectionnable Préréglage 1) 3.5 * tot 40 1 * tot 40 3.5 * tot 40 Wol 1 * tot 40 Delicaat 1 * tot 30 30 • / / Katoen / Synthetisch Delicaat wasgoed en zijde 3.5 * tot 60 30 • º / Jeans 1000 • • Dekbed 1 * tot 40 40 • / / Katoen 800 • • Zwieren 7 / / / / / Snel 3) Express 15 min Sport Jeans 20 1000 *: water wordt niet opgewarmd (er is geen waarde opgelicht). Met betrekking tot droog wasgoed. 2) Kies 90 °C enkel als wastemperatuur voor hygiënische vereisten 3) Verminder de hoeveelheid wasmiddel omdat het over een korte programmaduur gaat. 1) 11 5-Verbruik NL Scan QR-code op energielabel voor informatie over energieverbruik. Het werkelijke energieverbruik kan verschillen van het aangegeven energieverbruik, afhankelijk van de plaatselijke omstandigheden. EU 1015/2010 programma Selecteer Eco 40-60, druk op "Tr/min" 10s, en stel vervolgens in op 60 ° C / 40 ° C met max. omwentellingsnelheid. De standaard 60°C en 40°C katoenprogramma 's zijn geschikt om normaal vuil katoenen en waterverbruik voor katoenen wasgoed. De gebruikte watertemperatuur kunnen verschillen van de vermelde temperatuur van de cyclus. Opmerking: Automatisch gewicht Het apparaat is uitgerust met een lading herkenning. Met een kleine lading wordt de energie, het water en de wasduur automatisch verminderd in sommige programma's. Het display toont AUtO. 12 'DJHOLMNV JHEU LN 1/ 9RHGL J 6O LW GH ZDVPDFKLQH DDQ RS KHW HOHNWULVFK QHW 9 WRW 9a + IE 5DDGSOHHJ RRN GH VHFWLH ,167 // 7,( :DWHU HUEL GL J ▶ 9RRU GH YHUELQGLQJ WRW VWDQG EUHQJW PRHW GH VFKRRQKHLG HQ KHOGHUKHLG YDQ GH ZDWHULQODDW FRQ WUROHUHQ ▶ 'UDDL GH NUDDQ RSHQ IE 2SPHUNL J 6WUDNKHLG 9RRU JHEU LN PRHW FRQWUROHUHQ RS OHNNHQ LQ GH YHUELQGLQJHQ W VVHQ GH NUDDQ HQ GH LQODDWVODQJ GRRU GH NUDDQ RSHQ WH GUDDLHQ :DVJRHG RRUEHUHLGH ▶ 6RUWHHU GH NOHGLM QDDUJHODQJ GH VWRI NDWRHQ V Q WKHWLVFK ZRO RI LMGH HQ KRH Y LO H LV IE /HW RS GH RQGHUKR GVV PEROHQ RS GH HWLNHWWHQ ▶ 6FKHLG ZLWWH NOHGLM YDQ JHNOH UGH NOHGLQJVW NNHQ :DV JHNOH UGH WH WLHO HHUVW PHW GH KDQG RP WH FRQWUROHUHQ RI GH NOH UHQ YHUEOHNHQ RI LWORSHQ ▶ 0DDN GH DNNHQ OHHJ VOH WHOV P QWHQ HWF HQ YHUZLMGHU KDUGHUH GHFRUDWLHYH YRRUZHUSHQ ELMY VSHOGHQ ▶ .OHGLQJVW NNHQ RQGHU RPHQ GHOLFDDW ZDVJRHG en jn gewoven textiel zoals jne gordijnen moe WHQ LQ HHQ ZDV DN ZRUGHQ JHSODDWVW KDQGZDV VHQ RI GH VWRPHULM LMQ EHWHUH RSWLHV ▶ 6O LW ULWVVO LWLQJHQ YHOFUR EHYHVWLJLQJHQ HQ KD NHQ RUJ HUYRRU GDW GH NQRSSHQ VWHYLJ LMQ DDQ JHQDDLG ▶ 3ODDWV JHYRHOLJH LWHPV RDOV ZDVJRHG RQGHU HHQ VWHYLJH RRP GHOLFDDW RQGHUJRHG HQ NOHLQH LWHPV RDOV VRNNHQ ULHPHQ EHKD V HWF LQ HHQ ZDV DN ▶ 2QWYR Z JURWH VW NNHQ ZDVJRHG RDOV EHGGHQ ODNHQV VSUHLHQ HWF ▶ 'UDDL MHDQV JHGHFRUHHUGH RI NOH U LQWHQVLHYH WH WLHO ELQQHQVWH E LWHQ ZDV H PRJHOLMN DI RQ GHUOLMN 23*(/(7 1LHW WH WLHOHQ HQ NOHLQH ORVVH LWHPV RI LWHPV PHW HHQ VFKHUSH UDQG N QQHQ GHIHFWHQ YHURRU DNHQ HQ VFKDGH WRHEUHQJHQ DDQ GH NOHGLM HQ KHW DSSDUDDW 'DJHOLMNV JHEU LN 2 GHUKR GVWDEHO 5HL LJH :DVEDDU WRW r& QRUPDDO SURFHV :DVEDDU WRW r& QRUPDDO SURFHV :DVEDDU WRW r& DFKW SURFHV :DVEDDU WRW r& QRUPDDO SURFHV :DVEDDU WRW r& DFKW SURFHV :DVEDDU WRW r& KHHO DFKW SURFHV :DVEDDU WRW r& QRUPDDO SURFHV :DVEDDU WRW r& DFKW SURFHV :DVEDDU WRW r& KHHO DFKW SURFHV +DQGZDVVHQ PD r& 1LHW ZDVVHQ %OHNHQ WRHJHODWHQ (QNHO UVWRI QLHW FKORRU 1LHW EOHNHQ 7URPPHOGURJHQ PRJHOLMN QRUPDOH WHPSHUDW 7URPPHOGURJHQ PRJHOLMN ODJHUH WHPSHUDW U 1LHW WURPPHOGURJHQ %OHNH URJH U 'URJHQ DDQ GH ZDVOLMQ 3ODW GURJHQ 6WULMNHQ DDQ HHQ PD L P P WHPSHUDW U WRW r& 6WULMNHQ DDQ HHQ JHPLGGHOGH WHPSH UDW U WRW r& 6WULMNHQ DDQ HHQ ODJH WHPSHUDW U WRW r& RQGHU VWRRP VWRRPVWULMNHQ NDQ RQ K H U UR H S H O L M NH VFKDGH YHURRU DNHQ 6WRPHQ LQ WUHWUDFK ORRUHWKHHQ 6WRPHQ LQ NRROZD tersto en 1LHW VWRPHQ 3URIHVVLRQHHO QDW UHLQLJHQ 1LHW SURIHVVLRQHHO QDW UHLQLJHQ 6WULMNH 1LHW VWULMNHQ 3URIHVVLR HOH WH WLHO HU RUJL J HW DSSDUDDW ODGH ▶ 3ODDWV KHW ZDVJRHG VW N YRRU VW N LQ GH WURPPHO ▶ 1LHW RYHUODGHQ /HW RS GH YHUVFKLOOHQGH PD LP P ODGLQJ QDDUJHODQJ KHW SURJUDP PD 'H DOJHPHQH UHJHO YRRU GH PD LPDOH ODGLQJ /DDW YLMIWLHQ FHQWLPHWHU W VVHQ GH ODGLQJ HQ WURPPHO ▶ 6O LW KHW GHNVHO YRRU LFKWLJ =RUJ HUYRRU GDW HU JHHQ ZDVJRHG W VVHQ GH GH U JH NOHPG UDDNW 6-Dagelijks gebruik NL 6.5 Het wasmiddel selecteren ▶ - teit van het wasmiddel. ▶ Gebruik enkel wasmiddel dat is goedgekeurd voor machinewas. ▶ - ▶ Let altijd op de aanbevelingen van de wasmiddel fabrikant. ▶ Gebruik geen stoom reinigingsmiddelen zoals trichloroethyleen en gelijkaardige producten. Kies het beste wasmiddel Type wasmiddel Universeel Kleur Delicate Speciaal Wasverzachter Katoen L/P L/P - - o Synthetisch - L/P - - o Mix L L/P - - o Baby Care - - L/P L/P o Hygiënisch L/P L/P - - o Ondergoed - - L/P L/P o Katoen 20°C L/P L/P - - o Eco 40-60 L/P L/P - - o Snel L/P L - - o Express 15 min L L - - o Sport - - L/P L/P o Wol - - L/P L/P o Delicaat - - L/P L/P o Jeans L L - - o Dekbed - - L L/P - Zwieren - - - - - Programma L = gel-/vloeibaar wasmiddel P = poeder wasmiddel O = optioneel _ = nee Als u vloeibaar wasmiddel gebruikt, wordt het afgeraden het startuitstel in te schakelen. We raden aan de volgende producten te gebruiken: ▶ Waspoeder: 20°C tot 90°C* (optimaal gebruik: 40-60°C) ▶ Kleur wasmiddel: 20°C tot 60°C* (optimaal gebruik: 30-60°C) ▶ Wol/delicaat wasmiddel: 20°C tot 30°C* (= optimaal gebruik:) * Kies 90 °C enkel als wastemperatuur voor hygiënische vereisten. 15 6-Dagelijks gebruik 6-4 NL 6.6 Wasmiddel toevoegen 1. 2. 3. Open de wasmiddellade. Plaats de vereiste chemicaliën in de overeenstemmende compartimenten (Afb. 6-4) Duw de lade zachtjes in. Opmerking: ▶ Verwijder wasmiddelresten voor de volgende wascyclus uit de wasmiddellade. ▶ Gebruik niet te veel wasmiddel of wasverzachter. ▶ Volg de instructie op de verpakking van het wasmiddel. ▶ Vul het wasmiddel altijd bij net voor het begin van de wascyclus. ▶ Geconcentreerd vloeibaar wasmiddel moet worden opgelost voor het wordt toegevoegd aan compartiment 2. ▶ Het beste gebruik van vloeibaar wasmiddel is door een doseringbal te gebruiken die in de wasmachine wordt geplaatst. ▶ Gebruik geen vloeibaar wasmiddel als "einde startuitstel" geselecteerd is. ▶ Kies de programma-instellingen zorgvuldig in overeenstemming met de onderhoudsymbolen op alle etiketten in overeenstemming met de programmatabel. 6.7 Het apparaat inschakelen 6-5 6-6 Druk op de "Aan-uit“ knop om het apparaat in te schakelen (Afb. 6-5). Het LED-lampje van de "Start/Pause" knop knippert. 6.8 Selecteer een programma Voor een optimaal wasresultaat selecteert u een programma dat past bij de graad van vervuiling en het type wasgoed. Draai aan de programmaknop (Afb. 6-6) om het correcte programma te selecteren. Het relevante LED-lampje licht op en de standaardinstellingen worden weergegeven. Opmerking: Geurtjes verwijdering Voor het eerste gebruik raden we aan het programma DEKBED te gebruiken zonder lading en met een kleine hoeveelheid wasmiddel in het wasmiddel compartiment (2) of met speciale machinereiniger om mogelijke corrumperende resten te verwijderen. 6-7 Temp. 6.9 Individuele selecties toevoegen Tr/min Vapeur Stoom Extra spoelen Rinçage + Startuitstel Fin différée Start/Pause Speed up 16 Selecteer de vereiste opties en instellingen (Afb. 6-7); raadpleeg BEDIENINGSPANEEL. 6-Dagelijks gebruik NL 6.10 Het wasprogramma starten Druk op de “Start/Pause“ knop (Afb. 6-8) om het programma te starten. Het LED-lampje van de "Start/ Pause" knop knipperen en brandt voortdurend Het apparaat werkt in overeenstemming met de aanwezige instellingen. Wijzigingen zijn enkel mogelijk door het programma te annuleren. 6-8 Start/Pause 6.11 Wasprogramma onderbreken - annuleren Een actief programma onderbreken drukt u zacht op de "Start/Pause" knop. Het LED-lampje boven de knop knippert. Druk opnieuw op de knop om het programma te hervatten. Om een actief programma en alle individuele instellingen te annuleren 1. Druk op de knop "Start/Pause" knop om het actieve programma te onderbreken. 2. Druk op de "Aan-uit" knop gedurende ca. 2 seconden om het apparaat uit te schakelen. 3. Schakel het ZWIEREN programma in en selecteer "geen Snelheid" (alle lampjes zijn uitgeschakeld) om het water te draineren. 4. Selecteer een nieuw programma en start het. 6.12 Na het wassen Opmerking: Deurvergrendeling ▶ Uit veiligheidsoverwegingen wordt de deur gedeeltelijk vergrendeld tijdens de wascylus. Het is enkel mogelijk de deur te openen aan het einde van het programma of na de annulering van het programma (zie bovenstaande beschrijving). ▶ In het geval van een hoog waterniveau, een hoge watertemperatuur en tijdens het zwieren is het niet mogelijk de deur te openen; Loc 1-verschijnt. 1. Aan het einde van het programma verschijnt EnD. 2. Het apparaat schakelt automatisch uit. 3. Verwijder het wasgoed zo snel mogelijk voor een goede zorg en om meer kreuken te voorkomen. 4. Schakel de watertoevoer uit. 5. Ontkoppel het netsnoer. 6. Open de deur om de opbouw van vocht en geurtjes te voorkomen. Laat ze open wanneer de machine niet in gebruik is. Opmerking: Stand-bymodus / energiebesparende modus Het ingeschakelde apparaat schakelt over op de stand-bymodus als het niet wordt ingeschakeld binnen 2 minuten voor de start van het programma of aan het einde van het programma. Het scherm schakelt uit. Dit bespaart energie. Om de stand-bymodus te onderbreken, drukt u op de "Start/Pause" knop. 6.13 De zoemer in- of uitschakelen Het geluidssignaal kan indien noodzakelijk worden gedeselecteerd: 1. Het apparaat inschakelen. 2. Selecteer het ZWIEREN programma. 3. Druk gelijktijdig op de knop "Startuitstel/Fin différée" en "Extra spoelen/Rinçage +" ” verschijnt en de zoemer wordt uitgeschakeld. gedurende ca. 3 seconden. “bEEP OFF Om de zoemer in te schakelen, drukt u opnieuw gelijktijdig op deze beide knoppen. “bEEP ON ” verschijnt. 17 7-Milieuvriendelijk wassen NL Milieuverantwoordelijk gebruik ▶ Voor een optimaal gebruik van energie, water, wasmiddel en de tijdsduur moet u de aanbevolen maximum lading grootte gebruiken. ▶ Niet overladen (handbreedte tussenruimte boven wasgoed). ▶ Voor licht vervuild wasgoed selecteert u het Express 15 min programma. ▶ Gebruik exacte doseringen van elk wasmiddel. ▶ ënt onder 60°C. ▶ Verhoog de standaardinstellingen enkel als er veel vlekken zijn. ▶ Select max. zwiersnelheid als men een binnenlandse droogmachine gebruikt. 18 8-Zorg en reiniging NL 8.1 De wasmiddellade reinigen 2 U moet altijd goed opletten of er geen wasmiddelresten zijn. Reinig de lade regelmatig (Afb. 8-1): 1. Trek de lade uit tot ze stopt. 2. Druk op de vrijgave knop en verwijder de lade. 3. Spoel daarna de lade tot ze schoon is en plaats de lade opnieuw in het apparaat. 8.2 De machine reinigen 1 ▶ Verwijder de stekker uit het stopcontact tijdens de reiniging en het onderhoud. ▶ Gebruik een zachte doek met vloeibare zeep om de machine behuizing te reinigen (Afb. 8-2) en rubberen onderdelen. ▶ Gebruik geen organische chemicaliën of schurende oplosmiddelen. Om blokkeringen van de watertoevoerleiding door - 8-1 8-2 8-3 8-4 ▶ Ontkoppel het netsnoer en sluit de watertoevoer. ▶ Schroef de waterinlaatslang los aan de achterzijde (Afb. 8-3) van het apparaat en de kraan. ▶ 8-4). ▶ 8.4 De trommel reinigen ▶ Verwijder per ongeluk gewassen metalen onderdelen zoals spelden, munten, etc. uit te trommel (Afb. 8-5) omdat ze roestvlekken en schade veroorzaken. ▶ Gebruik een chloorvrij reinigingsmiddel om roestvlekken te verwijderen. Observeer de waarschuwingen van de fabrikant van het reinigingsmiddel. ▶ Gebruik geen harde voorwerpen of staalwol voor de reiniging. 8-5 Opmerking: Hygiëne Voor regelmatig onderhoud raden we aan elke drie maanden het HYGIËNISCH uit te voeren zonder lading om eventuele schadelijke resten te verwijderen. Voeg een kleine hoeveelheid wasmiddel toe in het wasmiddelvak (2) - of gebruik een speciale machinereiniger 19 =RUJ HQ UHLQLJLQJ /D JH SHULRGH D L DFWL LWHLW OV KHW DSSDUDDW QLHW ZRUGW JHEU LNW JHG UHQGH HHQ ODQJH SHULRGH 9HUZLMGHU GH VWHNNHU IE 6FKDNHO GH ZDWHUWRHYRHU LW IE 2SHQ GH GH U RP GH RSER Z YDQ YRFKW HQ JH U WMHV WH YRRUNRPHQ /DDW GH GH U RSHQ ZDQQHHU GH PDFKLQH QLHW LQ JHEU LN LV 9RRU KHW YROJHQGH JHEU LN PRHW KHW QHWVQRHU ZDWHU LQYRHUOHLGLQJ HQ DIYRHUVODQJ RUJY OGLJ FRQWUROHUHQ =RUJ HUYRRU GDW DOOHV FRUUHFW JH QVWDOOHHUG LV HQ GDW HU JHHQ OHNNHQ LMQ 2SPHUNL J JL H OV GH PDFKLQH JHG UHQGH ODQJH SHULRGHQ QLHW ZRUGW JHEU LNW UDGHQ ZH DDQ KHW SUR JUDPPD + *, 1,6&+ WH JHEU LNHQ RQGHU ODGLQJ HQ PHW HHQ NOHLQH KRHYHHOKHLG ZDV PLGGHO LQ KHW ZDVPLGGHO FRPSDUWLPHQW RI PHW VSHFLDOH PDFKLQHUHLQLJHU RP PRJHOLM NH FRUU PSHUHQGH UHVWHQ WH YHUZLMGHUHQ 8.6 Pomp lter Reinig het lter één maal per maand en controleer het pomp lter bijvoorbeeld als het apparaat: ▶ JHHQ ZDWHU DIYRHUW ▶ QLHW ZLHUW ▶ DEQRUPDDO ODZDDL YHURRU DDNW WLMGHQV GH ZHUNLQJ : 56& 8:,1* Gevaar van brandwonden! Water in het pomp lter NDQ KHHO ZDUP ZRUGHQ 9RRU HHQ KDQGHOLQJ LW YRHUW PRHW KHW ZDWHU ODWHQ DINRHOHQ 6FKDNHO GH PDFKLQH LW HQ YHUZLMGHU GH VWHNNHU LW KHW VWRSFRQWDFW IE 2SHQ GH VHUYLFH NOHS 8 N QW HHQ P QWVW N RI HHQ VFKURHYHQGUDDLHU JHEU LNHQ IE *HEU LN HHQ YODNNH FRQWDLQHU RP KHW LWORRJZDWHU RS WH YDQJHQ IE 'LW NDQ HHQ JURWH KRH YHHOKHLG ZDWHU LMQ 9HUZLMGHU GH DIYRHUVODQJ HQ KR G GH LWHLQGHQ ERYHQ GH FRQWDLQHU IE 9HUZLMGHU GH DIGLFKWLQJ VWRS LW GH DIYRHUVODQJ IE 1DGDW DO KHW ZDWHU JHGUDLQHHUG KHEW VO LW GH DIYRHUVODQJ IE HQ EUHQJW H RSQLH Z DDQ LQ GH PDFKLQH 6FKURHI GH VFKURHYHQ ORV HQ YHUZLMGHU KHW SRPS lter tegen wijzerzin (Afb. 8-12). 9HUZLMGHU YHURQWUHLQLJLQJHQ HQ Y LO IE =RUJ HQ UHLQLJLQJ Reinig het pomp lter zorgvuldig, bijv. onder stro PHQG ZDWHU IE %UHQJ KHW RSQLH Z VWHYLJ DDQ IE 6O LW GH VHUYLFH NOHS 23*(/(7 ▶ De afdichting van het pomp lter moet schoon en onbeschadigd zijn. Als het dek VHO QLHW YROOHGLJ DDQJHGUDDLG LV NDQ ZDWHU RQWVQDSSHQ ▶ Het lter moet aangebracht zijn, zo niet kan dit tot lekken leiden. 9-Probleemoplossen NL het geval van een probleem moet u alle weergegeven mogelijkheden controleren en de onderstaande instructies volgen voor u contact opneemt met de dienst na verkoop. Zie KLANTENDIENST. WAARSCHUWING! ▶ Voor ieder onderhoud moet u het apparaat uitschakelen en de stekker verwijderen uit het stopcontact. ▶ worden onderhouden. Incorrecte reparaties kunnen aanzienlijke gevolgschade veroorzaken. ▶ Als het netsnoer beschadigd is, moet het worden vervangen door de fabrikant, zijn 9.1 Informatiecodes De volgende codes worden enkel weergegeven ter informatie met verwijzing naar de wascyclus. Er hoeven geen maatregelen te worden uitgevoerd. Code Bericht 1:25 De resterende wasduur is 1 uur en 25 minuten 6:30 De resterende wasduur, inclusief het gekozen eindtijd startuitstel, is 6 uur en 30 minuten P--1/ 2/ 3 1/2/3 bijkomende spoelingen worden gekozen (zie FUNCTIEKNOPPEN "Extra spoelen“). End De wascyclus is beëindigd. Het apparaat schakelt automatisch uit. cLrd Kinderslotfunctie ingeschakeld LocI- Deur is gesloten omwille van het hoge waterniveau, hoge watertemperatuur of zwiercyclus. bEEP OFF De zoemer wordt uitgeschakeld bEEP On De zoemer wordt ingeschakeld SPEEd uP Functie "Versnellen" wordt ingeschakeld 9.2 Probleemoplossing met weergavecode Probleem Oorzaak CLR FLTR • Draineringsfout, water wordt niet volle- • • Controleer de installatie van de afvoer dig afgevoerd binnen 6 minuten slang. • Vergrendeling - fout. • Sluit de deur correct. E2 E4 22 Oplossing • Het waterniveau niet bereikt na 8 minu- • Zorg ervoor dat de kraan volledig geopend is ten. en dat de waterdruk normaal is. • Afvoerslang blijft doorlopend overhe- • Controleer de installatie van de afvoerslang. velen. 3UREOHHPRSORVVHQ 1/ 3UREOHHP 2RU DDN 2SORVVL J E8 • :DWHU EHVFKHUPLQJVQLYHD F3 • 7HPSHUDW UVHQVRU IR W • 1HHP FRQWDFW RS PHW GH NODQWHQGLHQVW F4 • 9HUZDUPLQJVIR W • 1HHP FRQWDFW RS PHW GH NODQWHQGLHQVW F7 • 0RWRU IR W • 1HHP FRQWDFW RS PHW GH NODQWHQGLHQVW FA • :DWHUQLYHD VHQVRU IR W • 1HHP FRQWDFW RS PHW GH NODQWHQGLHQVW FC1 RI FC2 • • 1HHP FRQWDFW RS PHW GH NODQWHQGLHQVW UNB • /DGLQJ QLHW LQ HYHQZLFKW IR W EQRUPDOH FRPP QLFDWLHIR W 3UREOHHPRSORVVH 3UREOHHP :DVPDFKLQH QLHW IR W • 1HHP FRQWDFW RS PHW GH NODQWHQGLHQVW • &RQWUROHHU HQ EUHQJ GH ODGLQJ LQ HYHQZLFKW LQ GH WURPPHO 9HUPLQGHU GH ODGLQJ R GHU ZHHUJD HFRGH 2RU DDN ZHUNW • 3URJUDPPD LV QRJ QLHW JHVWDUW • • • • :DVPDFKLQH QLHW • JHY OG PHW ZDWHU • • • • • • 'H PDFKLQH GUDL QHHUW WHUZLMO H ZRUGW RSJHY OG • )R W WLMGHQV GUDLQH ULQJ • • • 6WHUNH WULOOLQJHQ WLMGHQV • KHW ZLHUHQ • • 2SORVVL J • &RQWUROHHU KHW SURJUDPPD HQ VWDUW KHW 'H U LV QLHW FRUUHFW JHVORWHQ • 6O LW GH GH U FRUUHFW 0DFKLQH LV QLHW LQJHVFKDNHOG • 6FKDNHO GH PDFKLQH DDQ 6WURRPSDQQH • &RQWUROHHU GH YRHGLQJ .LQGHUVORWI QFWLH LQJHVFKDNHOG • 6FKDNHO NLQGHUVORW LW *HHQ ZDWHU • &RQWUROHHU GH ZDWHUNUDDQ ,QODDWVODQJ LV JHERJHQ • &RQWUROHHU GH LQODDWVODQJ Inlaatslang lter is geblokkeerd. • 9HUZLMGHU GH EORNNHULQJ LW KHW inlaatslang lter. :DWHUGU N LV PLQGHU GDQ 03D • &RQWUROHHU GH ZDWHUGU N 'H U LV QLHW FRUUHFW JHVORWHQ • 6O LW GH GH U FRUUHFW :DWHUWRHYRHU GHIHFW • &RQWUROHHU GH ZDWHUWRHYRHU 'H DIYRHUVODQJ KDQJW ODJHU GDQ FP • =RUJ HUYRRU GDW GH DIYRHUVODQJ FRUUHFWH JH QVWDOOHHUG LV +HW LWHLQGH YDQ GH DIYRHUVODQJ NDQ • =RUJ HUYRRU GDW GH DIYRHUVODQJ LQ KHW ZDWHU KDQJHQ QLHW LQ KHW ZDWHU KDQJW IYRHUVODQJ LV JHEORNNHHUG • 8 PRHW GH EORNNHULQJ YHUZLMGH UHQ LW GH DIYRHUVODQJ Het pomp lter is geblokkeerd. • Reinig de pomp lter. +HW LWHLQGH YDQ GH DIYRHUVODQJ LV KR • =RUJ HUYRRU GDW GH DIYRHUVODQJ JHU GDQ FP ERYHQ GH YORHU FRUUHFWH JH QVWDOOHHUG LV 1LHW DOOH WUDQVSRUWER WHQ ZHUGHQ • 9HUZLMGHU DOOH WUDQVSRUWER WHQ YHUZLMGHUG +HW DSSDUDDW VWDDW QLHW RS HHQ VWH • =RUJ YRRU HHQ VWHYLJH RQGHUJURQG YLJH RQGHUJURQG HQ HHQ JHQLYHOOHHUGH SODDWVLQJ 'H ODGLQJ LQ GH PDFKLQH LV QLHW FRU • &RQWUROHHU KHW JHZLFKW HQ KHW UHFW HYHQZLFKW YDQ GH ODGLQJ 3UREOHHPRSORVVHQ 3UREOHHP 2RU DDN 2SORVVL J 'H ZHUNLQJ VWRSW • :DWHU RI HOHNWULVFKH IR W YRRU KHW HLQGH YDQ GH ZDVF FO V 'H PDFKLQH VWRSW • +HW DSSDUDDW JHHIW HHQ IR WFRGH JHG UHQGH HHQ EH ZHHU SDDOGH SHULRGH • 3UREOHHP RPZLOOH YDQ KHW ODGLQJ SDWURRQ • 3URJUDPPD YRHUW GH VSRHOF FO V LW 2YHUWROOLJ VFK LP GULMIW • :DVPLGGHO LV QLHW JHVFKLNW LQ GH WURPPHO HQ RI GH ZDVPLGGHOODGH • 2YHUPDWLJ JHEU LN YDQ ZDVPLGGHO WRPDWLVFKH DDQ SDVVLQJ YDQ GH ZDV G U =ZLHUHQ PLVO NW • :DVG 2QWRHUHLNHQG ZDVUH V OWDDW • • • :DVJRHG KHHIW JULM H YOHNNHQ • 2YHUZHHJ GH ZHHUJDYHFRGHV • 9HUPLQGHU GH ODGLQJ RI SDV H DDQ • QQ OHHU KHW SURJUDPPD HQ VWDUW KHW RSQLH Z • &RQWUROHHU GH ZDVPLGGHO DDQ EHYHOLQJHQ • 9HUPLQGHU GH KRHYHHOKHLG ZDVPLGGHO • 'LW LV QRUPDDO HQ KHHIW JHHQ LPSDFW RS GH ZHUNLQJ • :DVJRHG QLHW LQ HYHQZLFKW • (U LMQ ZDVSRHGHU UHVWHQ DDQZH LJ RS KHW ZDVJRHG U ZRUGW DDQJHSDVW • &RQWUROHHU GH VWURRP HQ ZD WHUWRHYRHU • &RQWUROHHU GH ODGLQJ HQ KHW ZDVJRHG HQ ODDW KHW ZLHUSUR JUDPPD RSQLH Z GUDDLHQ *UDDG YDQ YHUY LOLQJ VWHPW QLHW • 6HOHFWHHU HHQ DQGHU SURJUDP RYHUHHQ PHW KHW JHVHOHFWHHUGH PD SURJUDPPD 2QYROGRHQGH ZDVPLGGHO DDQZH • .LHV KHW ZDVPLGGHO LQ RYHUHHQ LJ VWHPPLQJ PHW GH JUDDG YDQ vervuiling en de speci caties YDQ GH IDEULNDQW 0D LP P ODGLQJ LV RYHUVFKUHGHQ • 9HUPLQGHU GH ODGLQJ :DVJRHG ZDV RQJHOLMNPDWLJ YHU • %UHQJ KHW ZDVJRHG ORVVHU DDQ GHHOG LQ GH WURPPHO • 2QRSORVEDUH GHHOWMHV ZDVPLGGHO • ( WUD VSRHOHQ LWYRHUHQ N QQHQ DOV ZLWWH S QWMHV DFKWHUEOLM • 3UREHHU GH S QWMHV ZHJ WH ERU YHQ RS KHW ZDVJRHG VWHOHQ YDQ Z GURJH ZDVJRHG • .LHV HHQ DQGHU ZDVPLGGHO • 9HURRU DDNW GRRU YHWWHQ RDOV ROL • %HKDQGHO KHW ZDVJRHG YRRUDI Q FU PHV RI DOIMHV PHW HHQ VSHFLDDO UHLQLJLQJV PLGGHO 2SPHUNL J 6FK LP RUPL J OV HU WH YHHO VFK LP DDQZH LJ LV WLMGHQV KHW ZLHUHQ VWRSW GH PRWRU HQ GH GUDLQHHU SRPS ZRUGW JHG UHQGH VHFRQGHQ LQJHVFKDNHOG OV GLH YHUZLMGHULQJ YDQ KHW VFK LP QLHW JHVODDJG LV QD SRJLQJHQ HLQGLJW KHW SURJUDPPD RQGHU ZLHUHQ OV GH IR WEHULFKWHQ RSQLH Z YHUVFKLMQHQ HOIV QD KHW QHPHQ YDQ PDDWUHJHOHQ PRHW KHW DSSDUDDW LWVFKDNHOHQ GH YRHGLQJ ORVNRSSHOHQ HQ 1HHP FRQWDFW RS PHW GH NODQWHQ GLHQVW 9-Probleemoplossen NL 9.4 In het geval van een stroompanne A 9-1 Het huidige programma en de instelling worden opgeslagen. Als de stroom hersteld is, kunt u de bewerking hervatten. In het geval van een stroompanne als de machine ingeschakeld is, wordt het openen van de deur mechanisch geblokkeerd. Als er wasgoed moet worden verwijderd, mag het water niet zichtbaar zijn door de glazen deur. - Gevaar van brandwonden! ▶ Laat het waterniveau zakken in overeenstemming met stap 1 tot 6 van hoofdstuk ZORG EN REINIGING (POMPFILTER). ▶ Trek aan de hendel (A) onder de onderhoudsklep (Afb. 9-1) tot de deur ontgrendeld is met een zachte klik. ▶ Bevestig alle onderdelen en sluit de onderhoudsklep. 10.1. Voorbereiding ▶ Verwijder het apparaat uit de verpakking. ▶ Verwijder al het verpakkingsmateriaal, inclusief de polystyreen basis, houd ze buiten het bereik van kinderen. Wanneer u de verpakking opent, kunnen waterdruppels zichtbaar zijn op de plastic zak en het kijkvenster. Dit normale fenomeen is het resultaat van watertests in de fabriek. Opmerking: Weggooien van de verpakking Houd alle verpakking buiten het bereik van kinderen en gooi ze weg op een milieuvriendelijke wijze. 10.2 Noise Resuction Pads Installation Instructions 1. Wanneer u de krimpfolie verpakking opent, zult u een aantal geluiddempende pads zien. Deze dienen om het geluid te dempen. (Afb. 10-0) 2. Leg de wasmachine op de zijkant, met het kijkvenster naar boven en de onderzijde naar de operator gericht. 3. Verwijder de geluiddempende pads en verwijder de dubbelzijdige klevende beschermende folie; Plak de geluiddempende pads onder de wasmachine zoals weergegeven in Afbeelding 3 (twee langere pads in positie 1 en 3 kortere pads in positie 2 en 4). Zet de machine opnieuw recht. Nuttige tip: De geluiddempende pads zijn optioneel. Ze kunnen helpen met het dempen van lawaai, maar u kunt zelf beslissen of u ze al of niet wenst te installeren. 10-0 (1) (2) (3) 25 10-Installatie NL 10.3 Ontmantelt de transportbouten 10-1 10-2 10-3 10-4 De transportbouten zijn ontworpen om trillingsdempende onderdelen in het apparaat te klemmen tijdens het transport om interne schade te voorkomen. 1. verwijder alle 4 bouten aan de achterkant en verwijder de plastic afstandsstukken (Afb.10-1) (Afb.10-2) 2.Vul de linkergaten met afdichtpluggen (Afb.10-3) (Afb.10-4) Opmerking: Bewaren op een veilige locatie Houd de transportbouten op een veilige plaats voor later gebruik. Als het apparaat moet worden verplaatst, moet u eerst de bouten opnieuw monteren. 26 10-Installatie NL 10.4 Het apparaat verplaatsen Als de machine naar een verre locatie moet worden verplaatst, moet u de transportbouten opnieuw aanbrengen die u hebt verwijderd voor de installatie om schade te vermijden: 1. 2. 3. 4. 5. Verwijder de afdichtpluggen. Verwijder het deksel achteraan Breng de plastic tussenringen en de transportbouten aan. Draai de bouten aan met een sleutel. Breng het deksel achteraan opnieuw aan. 10.5 Het apparaat uitlijnen 10-5 Pas alle voetjes aan (Afb. 10-5) om een volledige horizontale positie te bereiken. Dit herleidt de trillingen en dus het lawaai tot een minimum tijdens het gebruik. Dit vermindert ook de slijtage. We raden aan een waterpas te gebruiken voor de bijstelling. De vloer moet zo stabiel en vlak mogelijk zijn. 1. 2. 3. Schroef de borgmoer (1) los met een sleutel. Pas de hoogte aan door te draaien aan de voetjes (2). Draai de borgmoer (1) aan tegen de behuizing. 27 10-Installatie NL 10.6 Draineerwater verbinding Bevestig de waterafvoerslang correct op de leidingen. De slang moet een punt bereiken tussen 80 en 100 cm boven de onderste lijn van het apparaat! Indien mogelijk, moet u de afvoerslang altijd bevestigd houden met de klep op de achterzijde van het apparaat. WAARSCHUWING! ▶ Gebruik enkel het geleverde slangenset voor de aansluiting. ▶ U mag nooit oude slangensets opnieuw gebruiken! ▶ Uitsluitend aansluiten op een toevoer van koud water. ▶ U moet controleren of het water zuiver en helder is voor u de verbinding tot stand brengt. 10-6 10-7 De volgende verbindingen zijn mogelijk: 10.6.1 Afvoerslang naar wastafel ▶ Hang de afvoerslang met de U-steun over de rand van een voldoende grootte wastafel (Afb. 10-6). ▶ Bescherm de U-steun voldoende tegen slippen. 10.6.2 Afvoerslang naar afvalwaterverbinding ▶ De interne diameter van de standpijp met ventilatieopening moet minimum 40 mm zijn. ▶ Plaats de afvoerslang ca. 80 mm in de afvalwaterleiding. ▶ Bevestig de U-steun en beveilig hem (Afb. 10-7). 10.6.3 Afvoerslang naar wastafel aansluiting ▶ De verbinding moet boven de sifon ▶ Een tapkraanverbinding wordt gewoonlijk afgesloten met een dop (A). Deze moet worden verwijderd om defecten te voorkomen (Afb. 10-8). ▶ Beveilig de afvoerslang met een klem. 10-8 OPGELET! ▶ De afvoerslang moet ondergedompeld zijn in water en ze moet beveiligd worden en lekvrij zijn. Als de afvoerslang op de vloer wordt geplaatst of als de leiding op minder dan 80 cm hoog wordt aangebracht, zal de wasmachine doorlopend blijven draineren terwijl ze word opgevuld (zelf-overheveling). ▶ Afvoerslang mag niet worden verlengd. Indien noodzakelijk neemt u contact op met de dienst na verkoop. 28 10-Installatie NL 10.7 Zoetwater verbinding 10-10 10-9 Zorg ervoor dat de pakkingen ingevoegd zijn. 1. 2. Verbind de waterinlaatslang met het gehoekte uiteinde op het apparaat (Afb. 10-9). Schroef de schroeven vast met de hand. Het andere uiteinde wordt verbonden op een waterkraan met een 3/4" draad (Afb. 10-10). Opmerking: Aqua-stop-systeem: Sommige modellen zijn uitgerust met een aqua-stop inlaatslang (B). het aqua-stop systeem beschermt tegen waterschade door de watertoevoer automatisch af te sluiten als de slang lekken vertoont. Dit wordt aangegeven met een rode markering (C). De slang moet worden vervangen. 10.8 Elektrische verbinding Voor elke aansluiting moet u controleren of: ▶ het elektrisch net, stopcontact en de zekeringen overeenstemmen met de informatie op het naamplaatje. ▶ het stopcontact geaard is en er geen multi-stekker of verlengsnoer wordt gebruikt. ▶ de stekker en het stopcontact overeenstemmen. ▶ Enkel UK: De UK stekker voldoet aan de BS1363A norm. 10-11 Voer de stekker in het stopcontact (Afb. 10-11). WAARSCHUWING! ▶ Zorg er altijd voor dat alle verbindingen (voeding, afvoer- en zoetwaterslag) stevig zijn aangebracht en dat ze droog zijn en geen lekken vertonen! ▶ Zorg ervoor dat deze onderdelen nooit worden samengedrukt, verwrongen of gebogen ▶ Als het netsnoer beschadigd is, moet het worden vervangen door de onderhoudsagent (zie garantiekaart) om elk risico uit te sluiten. . Opmerking: Hygiëne Na elke installatie of als het apparaat gedurende lange perioden niet wordt gebruikt, voor het eerste gebruik en voor regelmatige onderhoudswerken kunt u het programma HYGIËNISCH gebruiken zonder lading en met een kleine hoeveelheid wasmiddel in het wasmiddel compartiment (2) of met speciale machinereiniger om mogelijke corrumperende resten te verwijderen. 29 11-Technische gegevens NL 11.1Bij komende technische gegevens HW70-BP1439N Voltage in V 220-240 V~/50Hz Stroom in A 10 Max vermogen in W 1900 Waterdruk in MPa 0.03≤P ≤1 Nettogewicht in kg 64 11.2 Omvang van het product VOORZITTER OMVANGVAN HETPRODUCT Muur TOP VIEW HW70-BP1439N A Totale hoogte van het product mm 850 B Algehele breedte van het product mm Algehele diepte van het product (Naar de grootte van de hoofdbestuur ) mm 595 D Diepte van de deur open mm 960 E Minimale deuropening naar aangrenzende muur mm 400 C 460 Merk op: De exacte hoogte van uw wasmachine is afhankelijk van hoe ver de voeten van de basis van de machine.De ruimte waar u uw wasmachine installeert moet op zijn minst 40mm breder en 20mm dieper dan zijn afmetingen. 11.3 Normen en richtlijnen Dit product stemt overeen met de vereisten van alle toepasselijke EU-richtlijnen met de overeenstemmende geharmoniseerde normen die gelden voor de CE-markering. 30 . 12-Klantendienst NL We raden onze Haier klantendienst aan en het gebruik van originele reserveonderdelen. Als u een probleem ondervindt met uw apparaat moet u eerst de sectie PROBLEEMOPLOSSEN controleren. Als u daar geen oplossing vindt, kunt u contact opnemen met ▶ uw lokale verdeler ▶ de Onderhoud & Ondersteuning zone op www.haier.com waar u telefoonnummers en VGV kunt vinden en waar uw service claim kunt activeren. Wanneer u contact opneemt met onze service moet u de volgende informatie bij de hand hebben. De informatie staat vermeld op het naamplaatje. Model ____________________ Serienr. _____________________ Controleer ook het garantiekaartje dat wordt geleverd met het product met betrekking tot de garantie. Voor algemene zakelijke vragen vindt u hieronder onze adressen in Europa: Europese Haier adressen Land* Postadres Land* Haier Europe Trading SRL Via De Cristoforis, 12 Italië Frankrijk 21100 Verese ITALIË Haier Iberia SL België-FR Spanje Pg. Garcia Faria, 49-51 België-NL Portugal 08019 Barcelona Nederland SPANJE Luxemburg Haier Deutschland GmbH Duitsland Hewlett-Packard-Str. 4 Polen Oostenrijk D-61352 Bad Homburg Tsjechië DUITSLAND Hongarije Haier Appliances UK Co.Ltd. Griekenland One Crown Square Roemenië Verenigd Church Street East Rusland Koninkrijk Woking, Surrey, GU21 6HR UK *Voor meer informatie verwijzen wij u naar www.haier.com Postadres Haier France SAS 3-5 rue des Graviers 92200 Neuilly sur Seine FRANKRIJK Haier Benelux SA Anderlecht Route de Lennik 451 BELGIË Haier Poland Sp. zo.o. Al. Jerozolimskie 181B 02-222 Warszawa POLEN 31 0020509288G-
 1
1
-
 2
2
-
 3
3
-
 4
4
-
 5
5
-
 6
6
-
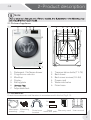 7
7
-
 8
8
-
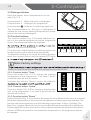 9
9
-
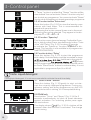 10
10
-
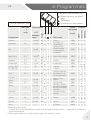 11
11
-
 12
12
-
 13
13
-
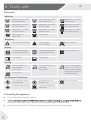 14
14
-
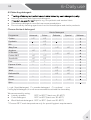 15
15
-
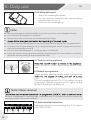 16
16
-
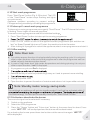 17
17
-
 18
18
-
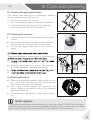 19
19
-
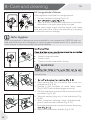 20
20
-
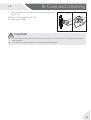 21
21
-
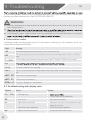 22
22
-
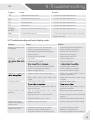 23
23
-
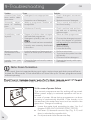 24
24
-
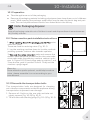 25
25
-
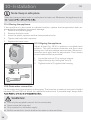 26
26
-
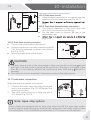 27
27
-
 28
28
-
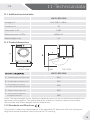 29
29
-
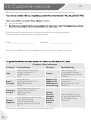 30
30
-
 31
31
-
 32
32
-
 33
33
-
 34
34
-
 35
35
-
 36
36
-
 37
37
-
 38
38
-
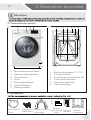 39
39
-
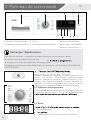 40
40
-
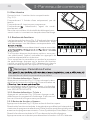 41
41
-
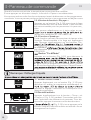 42
42
-
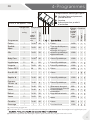 43
43
-
 44
44
-
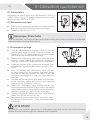 45
45
-
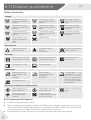 46
46
-
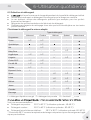 47
47
-
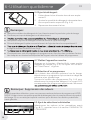 48
48
-
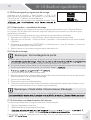 49
49
-
 50
50
-
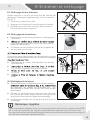 51
51
-
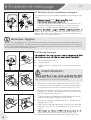 52
52
-
 53
53
-
 54
54
-
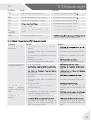 55
55
-
 56
56
-
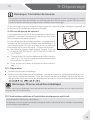 57
57
-
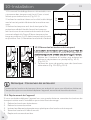 58
58
-
 59
59
-
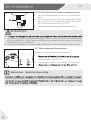 60
60
-
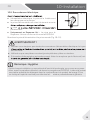 61
61
-
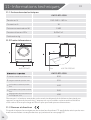 62
62
-
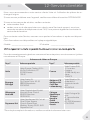 63
63
-
 64
64
-
 65
65
-
 66
66
-
 67
67
-
 68
68
-
 69
69
-
 70
70
-
 71
71
-
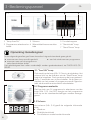 72
72
-
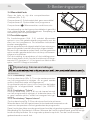 73
73
-
 74
74
-
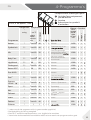 75
75
-
 76
76
-
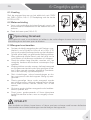 77
77
-
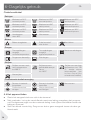 78
78
-
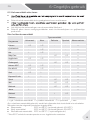 79
79
-
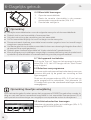 80
80
-
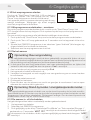 81
81
-
 82
82
-
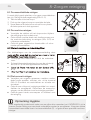 83
83
-
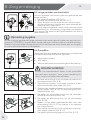 84
84
-
 85
85
-
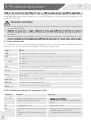 86
86
-
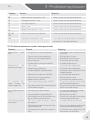 87
87
-
 88
88
-
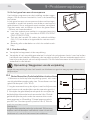 89
89
-
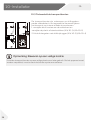 90
90
-
 91
91
-
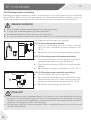 92
92
-
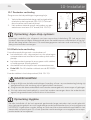 93
93
-
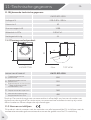 94
94
-
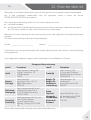 95
95
-
 96
96


Haier HW70-BP1439N Handleiding
- Categorie
- Wasmachines
- Type
- Handleiding
- Deze handleiding is ook geschikt voor
in andere talen
- English: Haier HW70-BP1439N User manual
- français: Haier HW70-BP1439N Manuel utilisateur
- Deutsch: Haier HW70-BP1439N Benutzerhandbuch
Gerelateerde papieren
-
Haier HW90-B14636N Handleiding
-
Haier HW90-BP14636N Handleiding
-
Haier HW90-BP14636 Handleiding
-
Haier HW80-BP16636 Handleiding
-
Haier HW90-B14636 Handleiding
-
Haier HW80-B14876N Handleiding
-
Haier HW80-BD1626 Handleiding
-
Haier HW80-B14266 Handleiding
-
Haier HWD90-BP14636N Handleiding
-