
EN
User manual
Washing machine
HW80-B14876N

Thank You
EN
2
Legend
Warning – Important Safety information
General information and tips
Environmental information
Disposal
Help protect the environment and human health. Put
the packaging in applicable containers to recycle it.
Help to recycle waste of electrical and electronic ap-
pliances. Do not dispose appliances marked with this
symbol with the household waste. Return the product
to your local recycling facility or contact your municipal
oce.
Thank you for purchasing a Haier Product.
Please read these instructions carefully before using this appliance. The instructions con-
tain important information which will help you get the best out of the appliance and ensure
safe and proper installation, use and maintenance.
Keep this manual in a convenient place so you can always refer to it for the safe and proper
use of the appliance.
If you sell the appliance, give it away, or leave it behind when you move house, make sure
you also pass this manual so that the new owner can become familiar with the appliance
and safety warnings.
WARNING!
Riskofinjuryorsuocation!
Disconnecttheappliancefromthemainssupply.Cutothemainscableanddispose
of it. Remove the door catch to prevent children and pets to get closed in the appliance.

EN
Content
3
1-Safety information ........................................................................................................................... 4
2-Product description ......................................................................................................................... 7
3-Control panel .................................................................................................................................... 8
4-Programmes ...................................................................................................................................12
5-Consumption ..................................................................................................................................13
6-Daily use ...........................................................................................................................................14
7-Eco-friendly washing ....................................................................................................................19
8-Care and cleaning ..........................................................................................................................20
9-Troubleshooting .............................................................................................................................23
10-Installation .....................................................................................................................................26
11-Technical data ...............................................................................................................................30
12-Customer service ........................................................................................................................31

1-Safety information
EN
4
Beforeswitchingontheapplianceforthersttimereadthefollow-
ing safety hints!:
WARNING!
Beforerstuse
▶ Make sure there is no transport damage.
▶ Make sure all transport bolts are removed.
▶ Remove all packaging and keep out of children´s reach.
▶ Handle the appliance always with at least two persons because it
is heavy.
Daily use
▶ This appliance can be used by children aged from 8 years and
above and persons with reduced physical, sensory or mental ca-
pabilities or lack of experience and knowledge if they have been
given supervision or instruction concerning use of the appliance
in a safe way and understand the hazards involved.
▶ Keep away children under 3 years of age from the appliance un-
less they are constantly supervised.
▶ Children shall not play with the appliance.
▶ Do not let children or pets come close to the appliance when the
door is open.
▶ Store washing agents out of reach of children.
▶ Pullupzips,xloosethreadsandtakecareforsmallitemstopre-
vent laundry from being entangled. If necessary, use an appropri-
ate bag or net.
▶ Do not touch or use the appliance when barefoot or with wet or
damp hands or feet.
▶ Do not cover or encase the appliance during operation or after-
wards to allow any moisture or dampness to evaporate.
▶ Do not place heavy objects or sources of heat or damp on top of
the appliance.
▶ Donotuseorstoreflammabledetergentordrycleaningagentin
close vicinity to the appliance.
▶ Donotuseanyflammablespraysinclosevicinitytotheappliance.
▶ Do not wash any garments treated with solvents in the appliance
without having dried them previously in the air.

EN
1-Safety information
5
WARNING!
Daily use
▶ Donotremoveorinsertthepluginthepresenceofflammable
gas
▶ Do not hot wash foam rubber or sponge-like materials.
▶ Donotwashanylaundrywhichispollutedwithflour.
▶ Do not open detergent drawer during any wash cycle.
▶ Do not touch the door during the washing process, it gets hot.
▶ Do not open the door if the water level is visibly over the porthole.
▶ Donotforcethedoortoopen.Thedooristtedwithaself-lock
device and will open shortly after the washing procedure is ended.
▶ Switchotheapplianceaftereachwashprogrammeandbefore
undertaking any routine maintenance and disconnect the appli-
ance from the electrical supply to save electricity and for safety.
▶ Hold the plug, not the cable, when unplugging the appliance.
Maintenance / cleaning
▶ Make sure children are supervised if they carry out cleaning and
maintenance.
▶ Disconnect the appliance from the electrical supply before un-
dertaking any routine maintenance.
▶ Keep the lower part of the porthole clean and open door and de-
tergent drawer if appliance is not in use to prevent odours.
▶ Do not use water spray or steam to clean the appliance.
▶ Replace a damaged supply cord only by the manufacturer, its ser-
viceagentorsimilarlyqualiedpersonsinordertoavoidahazard.
▶ Do not try to repair the appliance by yourself. In case of repair
please contact our customer service.
Installation
▶ The appliance should be placed in a well-ventilated place. Ensure
a location which allows opening the door fully.
▶ Never install the appliance outdoors in a damp place, or in an area
which may be prone to water leaks such as under or near a sink
unit. In the event of a water leak cut power supply and allow the
machine to dry naturally.

1-Safety information
EN
6
Intended use
This appliance is intended for washing machine-washable laun-
dry only. Anytime follow the instructions given on the label of each
garment label. It is designed exclusively for domestic use inside the
house. It is not intended for commercial or industrial use.
Changesormodicationstothedevicearenotallowed.Unintended
use may cause hazards and loss of of all warranty and liability claims.
WARNING!
Installation
▶ Install or use the appliance only where the temperature is above
5 °C.
▶ Do not place the appliance directly on a carpet, or close to a wall
or furniture.
▶ Do not install the appliance in direct sunlight or in the near of heat
sources(e.g. stoves, heaters).
▶ Make sure that the electrical information on the rating plate
agrees with the power supply. If it does not, contact an electri-
cian.
▶ Do not use multi-plug adapters and extension cables.
▶ Make sure only the delivered electric cable and hose set are used.
▶ Make sure not to damage the electric cable and the plug. If dam-
aged have it replaced by an electrician.
▶ Useaseparateearthedsocketforthepowersupplywhichiseasy
accessible after installation. The appliance must be earthed.
Only for UK:The appliance’s power cable is tted with 3-cord
(grounding)plugthattsastandard3-cord(grounded)socket.
Nevercutoordismountthethirdpin(grounding).Aftertheap-
pliance is installed, the plug should be accessible.
▶ Makesurethehosejointsandconnectionsarermandthereis
no leakage.

2.1 Picture of appliance
Front (Fig. 2-1): Rear side (Fig. 2-2):
2.2 Accessories
Check the accessories and literature in accordance with this list (Fig.2-3):
Note:
-
2-3
1 Detergent /
Softener drawer
2 Work top
3 Programme selector
4 Panel
5 Washer door
6 Service flap
7 Adjustable feet
1 Iron bar (I1 - I2)
2
Transportation bolts (T1-T4)
3
Rear wall reinforcement
4
Power cord
5
Water inlet valve
6
Drain hose
7
Rear
wall
reinforcement
screws
2-1
2-2
Inlet hose-
assembly
6 Blanking
plugs
Drain hose
bracket
User manual
Warranty
card
1 2 4 5 6 73
Noise reduc-
tion pads
2x
2x
7
EN
2-Product description
8 Door handle

3-Control panel
EN
8
3
Note : Acoustic signal
In following cases an acoustic signal sounds:
▶ when pressing a button
▶ when turning the programme selector
▶ at the end of programme
▶ in case of failures
The acoustic signal can be deselected if necessary ; see DAILY USE.
1 Detergent / Softener Drawer
2 Display
3 Programme selector
4
5 “Start/Pause“ button
6 Steam
7 Extra rinse
8 Speed
9 Temp.
10
3-2
11 Child lock
12 Delay
12 11
89
10
7 6 5
2 31
4
Function buttons
3.1 Detergent drawer
1
Compartment : Bleaching agent for cotton/syn-
thetic programme.
2
Compartment : Liquid detergent for programme
3
Compartment : Softener, Conditioning agent etc.
4
Compartment : Powder detergent for programme
Please refer to the information on detergent package
to obtain recommendation for using detergent in vari-
ous washing temperatures.
3.2 Display
If the appliance is on, display will light up the actual sta-
washing time, spin speed, temperature, etc. will appear
(Fig. 3-2).
3-1
HW100-B14876N

EN
3-Control panel
9
Programme status indication Programme cycle indication
Display for washing time, end time
delay as well as error codes and
service information.
Remaining opera-
tion time
Remaining delay
time
Rinse cycle
Wash cycle Spin/drainage cycle
Automatic weighing
Steam
Display symbols:
3.3 Program selector
By turning the knob (Fig. 3-3) one of 16 programmes
can be selected, its default settings will be displayed.
Press this button (Fig. 3-4) gently to switch on, the dis-
play is shining. Press it again for about 2 seconds to
-
vated after a while machine will shut down automatically.
3.5 “Start/Pause“ button
Touch this button (Fig. 3-5) gently to start or interrupt
the currently displayed programme.
HW120-B14876
3-3
3-4
Start/Pause
3-5

3-Control panel
EN
10
3.6 Function buttons
The function buttons (Fig. 3-6) enables additional op-
tions in the selected programme before program start.
The related indicators are displayed.
-
gram, all options are disabled.
If a button has multiple options, the desired option can
be selected by pressing the button sequentially.
To delete the setting or to cancel the setting process,
press the function button until the desired LED lights
Not all functions are available for all programmes (see
PROGRAMMES).
Note: Factory settings
there is no special requirement default settings are recommended.
3.6.1 Function button “Extra Rinse“
Press this button (Fig. 3-6-1) to rinse the laundry more
intense with fresh water. This is recommended for
people with sensitive skin.
By pressing the button several times one to three ad-
ditional cycles (display P1-P3) can be selected.
Differentprogrammehasdifferentextramaximum
rinsing times.
3.6.2 Function “Delay”
Press this button (Fig. 3-6-2) to start the program with
a delay. End time delay could be increased in steps of
means end of programme cycle will be in 6 hours and
30 minutes. Touch “Start/Pause” button to activate the
time delay.
The time delay must be longer than the programme run
time. Otherwise the programme will start immediately.
For deactivating the time delay; rotate programme se-
lector.
Note: Liquid detergent
If using liquid detergent, it is not recommended to activate the end time delay.
3-6
Extra
Rinse
3-6-1
Delay
3-6-2
If

EN
3-Control panel
11
Steam
3.6.3 Function “ “
Press the “ ” button (Fig.3-6-3) can choose dif-
ferent washing time. This function does not apply to
“Delicate”,”Self Clean” and “Spin/Drain” programs.
3.6.4 Function “Steam“
Press this button (Fig.3-6-4), the steam program can
be selected. When this program is selected, the de-
fault temperature is the max. temperature of this pro-
gram. You can select if you require this function when
programs “Cotton, Mix, Synthetic, Underwear, Baby Care,
Anti-allergy“ are used. When you select the program
“Steam“ the icon light up to warn you, the icon turns
the program, you can not change the temperature. If
you press the temperature button the program will be
canceled. Switch on the washing machine and select
this program. If the washing machine is working you
cannot select this program.
3.6.5 Function “Speed“
Press this button (Fig. 3-6-5) to change or deselect the
spin of the program If no value is illuminated the laundry
will not spun.
3.6.6 Function “Temp”
Press this button (Fig. 3-6-6) to change the washing
temperature of the programme.
3.6.7 Child lock
This option blocks all panel elements against activation.
After programme start press button “ ” and
”Delay” (Fig. 3-6-7) for 3 seconds simultaneously;
child
lock symbol is displayed. For unlocking press again
the two buttons.
Temp.
Speed
3-6-3
3-6-4
3-6-5
3-6-6
Delay
3-6-7

4-Programmes
EN
12
Max.
load
in kg
HW80
Temperature Preset
Spin
speed
in rpm
Function
Delay
Steam
Extra Rinse
i-time
in °C
Program Fabric typemax Preset
Cotton 90
2)
40
•
º
/
•
Cotton 1400
• • • •
Mix 8 60 30
•
º
/
•
Lightly soiled mixed
laundry of cotton and
synthetics.
1000
• • • •
Synthetic 4 60 40
•
º
/
•
Synthetics or mixed
fabric
1200
• • • •
Underwear 4 60 40
•
º
/
•
Cotton/Synthetic 1000
• • • •
Baby Care 4 90
2)
40
•
º
/
•
Cotton/Synthetic 1000
• • • •
Anti -all
ergy
4 90
2)
60
•
º
/
•
Cotton/Synthetic 1000
• • • •
Sport 2 40 20
•
º
/
•
Sports Wear 800
•
/
• •
Delicate 1 30 30
•
º
/
•
Silk 600
•
/
•
/
Duvet 2 40 40
•
/
•
800
•
/
• •
Express
15min
3)
1 40 *
•
º
/
•
Cotton/Synthetic 1000
•
/
• •
Hygienic 4 90
2)
90
2)
•
º
/
•
Cotton/Synthetic 1000
•
/
• •
Wool 1 40 *
•
º
/
•
Wollen fabrics 800
•
/
• •
Self Clean 0 90
2)
90
2)
º
/ /
/
/ / 600 / / / /
Spin/Drain / / / / / All fabrics 1000 / / / /
1)
Relating to dry laundry. *: Water is not heated up.
2)
Choose 90 °C wash temperature only for special hygienic requirements.
3)
Reduce detergent amount because programme duration is short.
1)
Detergent compartment for:
1
Bleaching agent
2
Liquid detergent
3
Softener, conditioning agent etc.
4
Powder detergent
•
Yes,
º
Optional, / No
Eco 40-6
Cotton 20
0
in °Cin °C
°C
8 90
2)
40
•
º
/
•
Cotton 1400
• • • •
8
•
º
/
•
Cotton
/
/
/
/
/
/
•
•
8
20 20
•
º
/
•
Cotton
•
º
/
•
Cotton 1400
/
•
/
/ Duvet

EN
5-Consumption
13
Note: Auto Weight
The appliance is equipped with a loading recognition. At low loading, energy, water and
washing time will be reduced automatically in some progr
ammes.
The display shows AUtO.
Scan QR code on energy label for energy consumption information.
Theactualenergyconsumptionmaydifferfromthedeclaredoneaccording to local
conditions.

6-Daily use
EN
14
6.3 Preparing laundry
▶ Sort out clothes according to fabric (cotton, syn-
thetics, wool or silk etc.) and to how dirty they are
(Fig. 6-3). Pay attention to the care labelling of
washing labels.
▶ Separate white clothes from coloured ones.
they fade or run.
▶ Empty pockets (keys, coins, etc.) and remove
harder decorative objects (e.g. brooches).
▶
into a wash bag to care for this delicate laundry
(hand or dry cleaning would be better).
▶ Close zippers, velco fastener and hooks, make
sure the buttons are sewn on tightly.
▶
hem, delicate underwear (Dessous) and small
items such as socks, belts, bras, etc. in a wash
bag.
▶ Unfold large pieces of fabric such as bed sheets,
bedspreads etc.
▶ Turn jeans and printed, decorated or color-inten-
sive textiles inside out; possibly wash separately.
6.1 Power supply
Connect the washing machine to a power supply
(220V to 240V~/50Hz; Fig. 6-1). Please refer also to
section Installtion.
6.2 Water connection
▶ Before connecting check the cleanliness and clar-
ity of the water inlet.
▶ Tun on the tap (Fig.6-2).
Note: Tightness
Before use check for leakage in the joints between the tap and the inlet hose by turning on
the tap.
CAUTION!
Non-textile, as well as small, loose or sharp-edged items may cause malfunctions and
damage of clothes and appliance.
6-3
6-1 6-2

EN
6-Daily use
15
Care chart
Washing
Washable up to 95°C
normal process
Washable up to 60°C
normal process
Washable up to 60°C
mild process
Washable up to 40°C
normal process
Washable up to 40°C
mild process
Washable up to 40°C
very mild process
Washable up to 30°C
normal process
Washable up to 30°C
mild process
Washable up to 30°C
very mild process
Wash by hand
max. 40°C
Do not wash
Bleaching
Any bleaching allowed Only oxygen/
non -chlorine
Do not bleach
Drying
Tumble drying possible
normal temperature
Tumble drying possible
lower temperature
Do not tumble dry
Line drying Flat drying
Ironing
Iron at a maximum
temperature
up to 200 °C
Iron at a medial tem-
perature
up to 150°C
Iron at a low temper-
ature up to 110 °C;
without steam (steam
ironing may cause irre-
versible damage)
Do not iron
Professional Textile Care
Dry cleaning in tetra-
chloroethene
Dry cleaning in hy-
drocarbons
Do not dry clean
Professional wet clean Do not professional
wet clean
6.4 Loading the appliance
▶ Put in the laundry piece by piece.
▶ Don‘toverload.Notethedierentmaximumloadaccordingtoprogrammes!Ruleof
thumb for maximum load: Keep six inches between load and drum top.
▶ Close the door carefully. Make sure that no pieces of laundry are pinched.

6-Daily use
EN
16
6.5 Selecting detergent
▶
▶ Use only machine wash approved detergent.
▶
▶ Mind always detergent manufacturer recommendations.
.
▶ Do not use dry cleaning agents such as trichloroethylene and similar products.
Choose the best detergent
Programme
Kind of detergent
Universal Colour Delicate Special Softener
L/P L/P - -
L L/P - -
L/P -
-
-
L = gel-/liquid detergent P = powder detergent O = optional
_
= no
If using liquid detergent, it is not recommended to activate the time delay.
We recomment by using:
▶ Laundry powder: 20°C to 90°C* (best use:: 40-60°C)
▶ Color detergent: 20°C to 60°C (best use: 30-60°C)
▶ Wool/delicate detergent: 20°C to 30°C (best use:20-30°C)
* Choose 90 °C wash temperature only for special hygienic requirements.
- -
L/P
L/P
Cotton
Mix
Synthetic
Underwear
Baby Care
Anti -all
ergy
Sport
Delicate
Duvet
Express 15min
Hygienic
Wool
Eco 40-6
Cotton 20
0
°C
Self Clean
Spin/Drain
-
-
L/P
L/P
-
-
L/P
L/P
-
-
L/P
L/P
-
- L/P
L/P
L L - -
-
- L/P
L/P
o
o
o
o
o
o
o
L/P L/P - - o
L/P L/P - - o
-
-
L/P
L
-
o
L/P L/P - - o
o
-
-
L/P
-
-
-
-
-
-
-
-
-
L/P
L/P
o

EN
6-Daily use
17
6.7 Switch on the appliance
(Fig. 6-7).
6.6 Adding detergent
1. Slide out the detergent drawer.
2. Put the required chemicals into corresponding
compartments (Fig. 6-6).
3. Push back the drawer gently.
Note:
▶ Remove detergent residues before next wash cycle from the detergent drawer.
▶ Do not overuse detergent or softener.
▶ Please follow the instruction on the detergent package.
▶
▶ Concentrated liquid detergent should be diluted before adding.
▶ Do not use liquid detergent if function “Delay“ is selected.
▶ Carefully choose the programme settings according to the care symbols on all laun-
dry labels and according to the programme table.
6.8 Select a programme
To get the best washing results, select a programme
type.
Turn the programme knob (Fig. 6-8) to select the right
programme. The default settings are displayed.
6.9 Add individual selections
Select required options and settings (Fig. 6-9); refer to
Control Panel.
Note: Odour removal
amount of detergent in washing agent compartment (2) or special machine cleaner to
remove possibly corruptive residues.
6-6
6-9
6-7
6-8

6-Daily use
EN
18
6.12 After washing
1. At programme cycle end END is displayed.
2.
3. Remove laundry as soon as possible to go easy on it and to prevent more wrinkling.
4.
5. Unplug the power cord.
6. Open the door to prevent formation of moisture and odours. Let it open while not used.
6.13 Activate or deactivate the buzzer
The acoustic signal can be deselected if necessary:
1. Switch on the appliance.
2. Select the Spin /Drain programme.
3. Press the “i-time “button and “Speed” button at the same time for about 3 seconds.
“bEEP OFF” will be displayed and the buzzer will be deactivated. For activating the buzzer
press these two buttons at the same time again. “bEEP ON” will be displayed.
6.11 Interrupt / cancel wash programme
To interrupt a running programme press gently “Start/Pause“. Press it again to resume
operation.
To cancel a running programme and all its individual settings:
1. Press “Start/Pause” button to interrupt the running programme.
Press this
2.
3. Run programme “Spin/drain” to drain the water.
4. Select a new programme and start it.
Note: Door lock
▶ For safety reasons the door is locked partially during the washing cycle. It is only pos-
sible to open the door at the end of the programme or after the programme was can-
celled correctly (see description above).
▶ In case of high water level, high water temperature and during spinning it is not pos-
sible to open the door; Lock is displayed.
Note: Standby mode / energy-saving mode
The switched on appliance will go into standby mode if it will not be activated within 2
minutes before starting the programme or at the end of programme. The display switch-
6.10 Start wash programme
Press “Start/Pause“ button (Fig. 6-10) to start; appli-
ance operates according to present settings. Changes
are only possible by cancelling the programme.
Start/Pause
6-10
button gently to switch on.

EN
7-Eco-friendly washing
19
Environmentallyresponsibleuse
▶ To achieve best use of energy, water, detergent and time you should use the recom-
mended maximum load size.
▶ Do not overload (hand width clearance above laundry).
▶ For slightly soiled laundry select the Quick Wash programme.
▶ Apply exact dosages of each washing agent.
▶ Choose the lowest adequate washing temperature - modern detergents are e-
ciently cleaning below 60°C.
▶ Raise default settings only due to heavy staining.
▶ Select max. spinning speed if a domestic dryer is used.

8-Care and cleaning
EN
20
8.1 Cleaning the detergent drawer
Take always care there are no detergent residues.
Clean the drawer regularly (Fig. 8-1):
1. Pull out the drawer until it stops.
2. Press the release button and remove the drawer.
3. Flush the drawer with water until it is clean and
insert the drawer back in the appliance.
8.2 Cleaning the machine
▶ Unplug the machine during cleaning and mainte-
nance.
▶ Use a soft cloth with soap liquid to clean the ma-
chine case (Fig. 8-2) and rubber components.
▶ Do not use organic chemicals or corrosive sol-
vents.
To prevent blockage of water supply by solid substanc-
▶
supply.
▶ Unscrew the water inlet hose at the back (Fig.
8-3) of the appliance as well as on the tap.
▶
▶
8.4 Cleaning the drum
▶ Remove accidentally washed metal parts such as
pins, coins, etc. from the drum (Fig. 8-5) because
they cause rust stains and damage.
▶ Use a non-chloride cleaner for removing rust
stains. Observe the warning hints of the cleaning
agent manufacturer.
▶ Do not use any hard objects or steel wool for clean-
ing.
8-1
8-5
8-3
8-4
HW70-BP12758
WoolR
Under-wear
Sport
Anti-allergy
Daily Wash
Baby Care
Self Clean
Spin/Drain
Express
15 min
Duvet
Cotton
Synthetic
Mix
Cotton+
Delicate
Hygienic
capacity
7kg
°C60
°C40
Underwear
Sport
Anti-allergy
Daily Wash
Synth etic
Mix
Baby Care Hygienic
Self Clean
Spin/Drain
Express15 min
Duvet
Delicate
Wool
Temp. SpeedD ela Sy t art/PauseExtra
Rinse
Cotton C otton+
HW120-B14876
Steam
8-2
1
2
Note: Self Clean
For regular maintenance, we recommend running the program Self Clean within 100
cycles to avoid possible corrosive residues. Add a small amount of detergent to the de-
tergent compartment (2) - or use a special machine cleaner.

EN
8-Care and cleaning
21
1. Turnoandunplugthemachine(Fig.8-8).
2. Openserviceflapattherightcornerofappliance
front (Fig. 8-9).
3. Provide a flat container to catch leach water
(Fig.8-10).Therecouldbebiggeramounts!
4. Pull the drainhose out and hold its end above the
container (Fig. 8-10).
5. Take the sealing plug out of the drainhose (Fig.
8-10).
6. After complete drainage close drainhose and
push it back into the machine (Fig. 8-11).
7. Unscrewandremovecounterclockwisethepump
lter(Fig.8-12).
8. Remove contaminants and dirt (Fig. 8-13).
8.5 Long periods of disuse
If the appliance is left idle for a longer period:
1. Pull out the electrical plug (Fig. 8-6).
2. Turnowatersupply(Fig.8-7).
3. Open the door to prevent formation of moisture
and odours. Let door open while not used.
Before next usage check carefully power cord, water
inlet and drain hose. Make sure everything is properly
installed and without leackage.
WARNING!
Scalding Risk! Water in the pump lter can be very
hot! Before any action please ensure water has
cooled down.
8.6Pumplter
Cleanthelteronceamonthandcheckthepumplter
for instanvce if the appliance:
▶ doesn´t drain the water.
▶ doesn´t spin.
▶ cause unusual noise while running.
8-6 8-7
8-10
8-11
8-12 8-13
8-8 8-9
Note: Self Clean
After long periods of disuse we recommended to run programme Self Clean with no
load and small amount of detergent in washing agent compartment (2) or special ma-
chine cleaner to remove possibly corruptive residues.

8-Care and cleaning
EN
22
CAUTION!
▶ Pumpltersealinghastobecleanandunhurt.Ifthelidisnotfulltightened,water
can escape.
▶ Theltermustbeinplace,oritmayleadtoleakage.
9. Cleancarefullypumplter,e.g.usingrunningwater
(Fig. 8-14).
10. Rexitthoroughly(Fig.8-15).
11. Closeserviceflap.
8-14 8-15

EN
9-Troubleshooting
23
of a problem please check all shown possibilities and follow below instructions before you
WARNING!
▶ Before maintenance, deactivate the appliance and disconnect the mains plug from
the mains socket.
▶
improper repairs can cause considerable consequential damages.
▶ A damaged power cable should only be replaced by the manufacturer, its service
9.1 Information codes
Following codes are displayed only for information referring to the washing cycle. No
measures must be performed.
Code Message
1:25
The remaining wash cycle time will be 1 hour and 25 minutes.
6:30
The remaining wash cycle time including chosen end-time delay will be 6 hours and 30 minutes
.
AUtO
Automatic load detection is working; only in some programs.
End
Lock-
Door is closed because of high water level, high water temperature or spinning cycle
.
bEEP OFF
The buzzer is deactivated.
bEEP ON
The buzzer is activated.
9.2 Troubleshooting with display code
Problem Cause Solution
• Drainage error.
•
• Check drain hose installation.
E2
• Lock error. • Shut the door properly.
E4
• Water level not reached after 12 minutes.
• Drain hose is self-syphoning.
• Make sure that tap is fully opened and water
pressure is normal.
• Check drain hose installation.
E8
• Water protective level er ror. • Contact the After sales service.
The function keys is closed. The programme changing is invalid.
CLR FLTR

9-Troubleshooting
EN
24
Problem Cause Solution
F3
Temperature sensor error. Contact the After sales service.
F4
Heating error.
Contact the After sales service.
F7
Motor - error. Contact the After sales service.
FA
Water level sensor error.
FC0, FC1 or
FC2
Abnormal communication error.
Contact the After sales service.
Unb
Unbalanced load error.
Check a .murd eht ni daol yrdnual ecnalab dn
Reduce the load.
9.3 Troubleshooting without display code
Problem Cause Solution
Washing machine
fails to operate.
Programme is not yet started.
Door is not properly closed.
Machine has not been switched on.
Power failure.
Child lock is activated.
Check programme and start it.
Close the door properly.
Switch the machine on.
Check power supply.
Deactivate child lock.
Washing machine
water.
No water.
Inlet hose is kinked.
Water pressure is less than 0.03
MPa.
Door is not properly closed.
Water supply failure.
Check water tap.
Check inlet hose.
Check water pressure.
Close the door properly.
Ensure the water supply.
Machine is draining Height of drain hose is below 80
cm.
Drain hose end could reach into
water.
Make sure that drain hose is
properly installed.
Make sure the drain hose is not
in water.
Drainage failure. Drain hose is blocked.
Drain hose end is higher than 100
cm above floor level.
Unblock drain hose.
Make sure that drain hose is
properly installed.
Strong vibration
while spinning.
Not all transportation bolts have
been removed.
Appliance has no solid position.
Machine load is not correct.
Remove all transportation
bolts.
Ensure solid ground and a ev-
elled position.
Check load weight and balance.
Operation stops
before completing
wash cycle.
Water or electric failure. Check power and water supply.
Operation stops for
a period of time.
Appliance displays error code.
Problem due to load pattern.
Programme performs soaking cycle
Consider display codes.
Reduce or adjust load.
Cancel programme and restart.
Contact the After sales service.

EN
9-Troubleshooting
25
Problem Cause Solution
Excessive foam
floatsdrumand/or
detergent drawer.
• Detergent is not a appropriate.
• Excessive use of detergent.
• Check detergent recommen-
dations.
• Reduce amount of detergent.
Automatic adjust-
ment of washing
time.
• Washing programme duration will
be adjusted.
• This is normal and doesn‘t af-
fect functionality.
Spinning fails. • Unbalanceoflaundry. • Check machine load and laun-
dry and run a spinning pro-
gramme again.
Unsatisfactory
washing result.
• Degree of pollution does not agree
with selected programme
• Detergent quantitiy was not suf-
cient.
• Maximum load has been excee-
ded.
• Laundry was unevenly distribu-
ted in the drum.
• Select an other programme.
• Choose the detergent acc.
to the degree of pollution
and acc. to manufacturer
specications.
• Reduce loading.
• Loose the laundry.
Washing powder
residues are on the
laundry.
• Insoluble particles of detergent can
remain as white spots on the laun-
dry.
• Perform extra rinse.
• Try to brush the points from the
dry laundry.
• Choose an other detergent.
Laundry has grey
patches.
• Caused by fats such as oils, creams
or ointments.
• Pretreat the laundry with a spe-
cial cleaner.
Shouldtheerrormessagesreappearevenafterthetakenmeasures,switchotheappli-
ance, disconnect the power supply and contact the customer service.
9.4 In case of power failure
The current programme and its setting will be saved.
When power supply is restored operation will be re-
sumed.
If a power failure cuts an operating wash programme
door opening is mechanically blocked. To get out any
laundry water level should not be seen in the glassy
porthole of thedoor. - Danger of burns!Water level
hastobeloweredasdescribedin“Pumplter“.Nottill
thenpulllever(A)beneathserviceflap(Fig.9-1)until
doorisunlockedbyagentleclick.Afterwardsrexall
parts.
9-1
Note: Foam formation
If too much foam is inspected during spin cycle, motor will run at low speed for 30s and
repeat at most 4 times. If the conditions are not met, continue to defoam, and the
motor will stop for 5min, 10min, and 15min in sequence. If the conditions are not met,
programme will end without spinning.

10-Installation
EN
26
10.1 Preparation
▶ Take the appliance out of the packaging.
▶
keep them out of childrens reach. While opening the package, water drops may be
seen on plastic bag and porthole. This normal phenomenon results from water tests
in the factory.
10.3 Dismantle the the transportation bolts
The transport protection on the rear side is designed
for clamping anti-vibration components inside the ap-
pliance during transportation to prevent inner damage.
All elements (I, R, S and T, Fig 10-2) must be removed
before use.
1. Remove all 4 bolts (T1 - T4) (Fig. 10-3).
Note: Packaging disposal
Keep all packaging materials out of children´s reach and dispose them in an environmen-
tally friendly manner.
10.2 OPTIONAL: Install noise reduction pads
1.
2.
3.
10.1
10-2
T1
T4
T3
T2
10-3
1.Whenopeningtheshrinkpackage,youwillfindfour
noise reduction pads.These are used for reducing
noise (Fig. 10.1).
2. Lay the washing machine down to its side, port-
hole pointing upwards, bottom side towards op-
3.
Take out the noise reduction pads and remove the
double-sidedadhesiveprotectivefilm Paste around
the bottom The noise reduction pads under the
washing machine cabinet as shown in Figure 3 (two
longer pads in position 1 and 3, two shorter pads in
position 2 and 4). Finally set the machine upright again.

EN
10-Installation
27
10.5 Aligning the appliance
Adjust all feet (Fig. 10-5) to achieve a complete level
position. This will minimize vibrations and thus noise
during use. It will also reduce wear and tear. We recom-
mend to use a spirit level for adjustment. Floor should
be as stable and flat as possible.
1. Loose the locknut (1) by using a wrench.
2. Adjust the high by turning the foot (2).
3. Tighten lock ut (1) against the housing.
10.4 Moving the appliance
If the machine is to be moved to a distant location, replace the transportation bolts removed
before installation to prevent damage: The assembly takes place in reverse order.
Note: Keep in safe place
Keep all parts of the transport protection in a safe place for later use. Whenever the ap-
10-4
2. Fill the 6 left holes with blanking plugs (Fig. 10-4).
10-5

10-Installation
EN
28
Following connections are possible:
10.6.1 Drain hose to sink
▶ HangthedrainhosewiththeU-supportoverthe
edge of a sink with adequate size (Fig. 10-6).
▶ Protect the U-support suciently against slip-
ping.
10.6.2 Drain hose to waste water connection
▶ The internal diameter of the stand pipe with
vent-hole must be minimum 40 mm.
▶ Put the drain hose for approx. 80 mm in the
wastewater pipe.
▶ Attach the U-support and secureit suciently
(Fig. 10-7).
CAUTION!
▶ Thedrainhoseshouldnotbesubmergedinwaterandshouldbesecurelyxedand
leak-free. If the drain hose is placed on the ground or if the pipe is at a height of less
than80cm,thewashingmachine willcontinuouslydrain whilebeing lled(self-si-
phoning).
▶ Drain hose is not to be extended. If necessary contact after sales service.
10.6.3 Drain hose to sink connection
▶ The junction must lie above the siphon
▶ A spigot connection is usually closed by a pad (A).
That must be removed to prevent any disfunc-
tion (Fig. 10-8).
▶ Secure the drain hose with a clamp.
10.6 Drain Water Connection
Fix the water drain hose properly to the piping. The hose has to reach at one point a height
between80and100cmabovetheappliancebottomline!Ifpossiblekeepalwaysdrain
hosexedtotheclipattheapplianceback.
WARNING!
▶ Useonlythesuppliedhosesetfortheconnection.
▶ Neverreuseoldhosesets!
▶ Only connect to cold water supply.
▶ Before connection, check whether the water is clean and clear.
10-6 10-7
10-8

EN
10-Installation
29
10.8 Electrical Connection
Before each connection check if:
▶ power supply, socket and fusing are appropriate to
the rating plate.
▶ the power socket is earthed and no multi-plug or
extension are used.
▶ the power plug and socket are strictly according.
▶ Only UK:TheUKplugmeetsBS1363Astandard.
Put the plug into the socket (Fig. 10-11).
WARNING!
▶ Ensurealwaysthatallconnections(powersupply,drainandfreshwaterhose)arerm,
dryandleackfree!
▶ Take care these parts are never to be crushed, kinked, or twisted
▶ If the supply cord is damaged, it must be replaced by the service agent (see warranty
card) in order to avoid a hazard. .
10-11
10.7 Fresh Water Connection
Make sure that the gaskets are inserted.
1. Connect the water inlet hose with the angled
end to the appliance (Fig. 10-9). Tighten the
screw joint by hand.
2. The other end connect to a water tap with a
" 3/4" thread (Fig. 10-10).
10-10
10-9

11-Technical data
EN
30
HW80- B 14 87 6 N
Voltage in V 220-240 V~/50Hz
Current in A 10
Max. power in W 2000
Water pressure in MPa 0.03≤P≤1
Netto weight in kg
72
11.1 Additional technical data
11.3 Standards and Directives
This product meets the requirements of all applicable EC directives with the correspon-
ding harmonised standards, which provide for CE marking.
Note: The exact height of your washer is dependent on how far the feet are extended from
the base of the machine. The space where you install your washer needs to be at least
40mm wider and 20mm deeper than its dimensions.
TOP VIEWWAL LFRONT VIEW
B Overall width of product mm
A Overall height of product mm
C Overall depth of product
(To main control board size) mm
D Depth of door open mm
E Minimum door clearance
to adjacent wall mm
11.2 Product dimensions
850
595
460
1050
300
HW80- B 14 87 6 N

EN
31
12-Customer service
We recommend our Haier Customer Service and the use of original spare parts.
Ifyouhaveaproblemwithyourappliance,pleaserstchecksectionTROUBLESHOOTING.
Ifyoucannotfndasolutionthere,pleasecontact:
▶ your local dealer or
▶ theService&Supportareaatwww.haier.comwhereyoucanndtelephonenumbers
and FAQs and where you can activate the service claim.
To contact our Service, ensure that you have the following data available.
The information can be found on the rating plate.
Model ____________________ Serial No. _____________________
Also check the Warranty Card supplied with the product in case of warranty.
ForgeneralbusinessenquiriespleasendbelowouraddressesinEurope:
European Haier addresses
Country* Postal address Country* Postal address
Italy
Haier Europe Trading SRL
Via De Cristoforis, 12
21100 Varese
ITALY
France
Spain
Portugal
Haier Iberia SL
Pg. Garcia Faria, 49-51
08019 Barcelona
SPAIN
Belgium-FR
Belgium-NL
Netherlands
Luxembourg
Haier Benelux SA
Anderlecht
Route de Lennik 451
BELGIUM
Germany
Austria
Haier Deutschland GmbH
Hewlett-Packard-Str. 4
D-61352 Bad Homburg
GERMANY
Poland
Czechia
Hungary
Greece
Romania
Russia
Haier Poland Sp. zo.o.
Al. Jerozolimskie 181B
02-222 Warszawa
POLAND
United
Kingdom
HaierAppliancesUKCo.Ltd.
One Crown Square
Church Street East
Woking,Surrey,GU216HR
UK
*For more information please refer to www.haier.com
Haier France SAS53
Boulevard Ornano –
Pleyad 393200
SaintDenis France


5
0HWLLWL
HLH
1

1RVYRVUHPHUFLRQV
HH
HLRHPRUHGHFUL
,QIRUPDWLRQVJQUDHVHWFRQVHLV
,QIRUPDWLRQVVUHQYLURQQHPHQW
0LVHDUHEW
RQWULEHUDSURWHFWLRQGHHQYLURQQHPHQWHWGHD
VDQWKPDLQH9HLHPHWWUHHVHPEDDJHVDUH
EW GDQV HV FRQWHQDQWV SUYV SRU HU UHFFDJH
RQWULEH UHFFHU HV GFKHWV GDSSDUHLV HF
WULTHV HWHFWURQLTHV9HLH QHSDVPHWWUHD
UHEWHVDSSDUHLVDDQWFHVPERHDYHFHVGFKHWV
PQDJHUV9HLHGSRVHUDSSDUHLYRWUHVLQHGH
UHFFDJHRFDHRSUHQGUHFRQWDFWDYHFYRWUHEUHD
PQLFLSD
1RVRVUHPHUFLRVDRLUDFHWSURLWDLHU
9HLHLUHDWWHQWLYHPHQWFHVLQVWUFWLRQVDYDQWGWLLVHUDSSDUHLHVLQVWUFWLRQVVRQW
GHVLQIRUPDWLRQVWLHVYRVSHUPHWWDQWGHPLHHSRLWHUFHWDSSDUHLHWYRVDVVUHU
QHLQVWDDWLRQQHWLLVDWLRQHWQHQWUHWLHQVFULVVHWDGTDWV
9HLHELHQJDUGHUFHPDQHHWWRRUVYRVUIUHUSRUQHWLLVDWLRQVFULVHHW
DGTDWHGHDSSDUHL
6LYRVGHYHYHQGUHGRQQHURDEDQGRQQHUDSSDUHLSRUFDVHGHGPQDJHPHQW
assurez-vouségalementdelaissercemanuelanqueleprochainutilisateurpuissemaî
WULVHUDSSDUHLQRWDPPHQWHVUJHVGHVFULW
AVERTISSEMENT!
Risquedeblessureoud'asphyxie!
'EUDQFKHDSSDUHLGHWRWHDLPHQWDWLRQSULQFLSDHRSHHVFEHVSULPDLUHVHW
PHWWHHVDUHEW5HWLUHHYHUURGHDSRUWHSRUYLWHUTQHQIDQWRQDQLPD
GRPHVWLTHQHVRLWFRLQFGDQVDSSDUHL

6RPPDLUH
RQVLJQHVGHVFULW
'HVFULSWLRQGSURGLW
3DQQHDGHFRPPDQGH
3URJUDPPHV
RQVRPPDWLRQ
8WLLVDWLRQTRWLGLHQQH
/DYDJHFRRJLTH
(QWUHWLHQHWQHWWRDJH
'SDQQDJH
,QVWDDWLRQ
,QIRUPDWLRQVWHFKQLTHV
6HUYLFHFLHQWH

RQVLJQHVGHVFULW
5
DWHPHWWUHDSSDUHLHPDUFHSRUDSUHPLUHIRLVHLH
lirelesconsignesdesécuritéci-après!:
AVERTISSEMENT!
DWDSUHPLUHWLLVDWLR
▶ Vériezqu'aucundommageliéautransportn'aétésubiparl'ap
SDUHL
▶ 5HWLUHWRVHVERRQVGHWUDQVSRUW
▶ 5HWLUHWRVHVHPEDDJHVHWWHQHHVKRUVGHSRUWHGHVHQ
IDQWV
▶ ,IDWWRRUVDPRLQVGHSHUVRQQHVSRUDPDQLSDWLRQGH
DSSDUHLFDULHVWRUG
8WLLVDWLRTRWLLHH
▶ HWDSSDUHLSHWWUHWLLVSDUGHVHQIDQWVJVGDPLQLPP
8ans,ainsiquepardespersonnesavecdescapacitésphysiques,
VHQVRULHHVRPHQWDHVUGLWHVRVDQVHSULHQFHHWFRQQDLV
VDQFHVVLHHVVRQWVSHUYLVHVRRQWWIRUPHVWLLVDWLRQ
VFULVHGHDSSDUHLHWFRPSUHQQHQWHVULVTHVUHDWLIV
▶ Tenezlesenfantsdemoinsde3anshorsdeportéedel'appareil,
VDIVLVVRQWHQSHUPDQHQFHVUYHLV
▶ /HVHQIDQWVQHGRLYHQWSDVRHUDYHFDSSDUHL
▶ 1HDLVVHSDVQHQIDQWRQDQLPDGRPHVWLTHVDSSURFKHU
GHDSSDUHLRUVTHDSRUWHHVWRYHUWH
▶ 7HQHHVSURGLWVGHDYDJHKRUVGHDSRUWHGHVHQIDQWV
▶ 5HPRQWHHVIHUPHWUHVJLVVLUHUHFRVHHVPHQWVPD
xésetfaitesattentionauxpetitsarticlespouréviterquelelinge
nes'emmêle.Sinécessaire,utilisezunsacouunletapproprié.
▶ YLWHGHWRFKHURGWLLVHUDSSDUHLSLHGVQVRRUVTHYRV
PDLQVRYRVSLHGVVRQWPRLVRKPLGHV
▶ YLWHGHFRYULUDSSDUHLSHQGDQWTLIRQFWLRQQHRDSUVWLL
VDWLRQSRUDLVVHUKPLGLWVYDSRUHU
▶ YLWHGHGSRVHUGHVREHWVRUGVRGHVVRUFHVGHFKDHUR
GKPLGLWVUDSSDUHL
▶ Évitez d'utiliser ou de conserver du détergent inammable ou
GHVDJHQWVGHQHWWRDJHVHFSURLPLWGHDSSDUHL
▶ Évitezd'utiliserunpulvérisateurinammableàproximitédel'ap
SDUHL
▶ YLWH GH DYHU GHV YWHPHQWV WUDLWV DYHF GHV VRYDQWV GDQV
DSSDUHLVDQVHVDYRLUSUDDEHPHQWVFKVDLU

5
RQVLJQHVGHVFULW
AVERTISSEMENT!
8WLLVDWLRTRWLLHH
▶ Évitezderetireroud'insérerlacheenprésencedegazinam
PDEHV
▶ YLWHGHDYHUGHVPDWULDGWSHFDRWFKRFRSRQJH
GHVWHPSUDWUHVHYHV
▶ YLWHGHDYHUWRWLQJHVDLSDUDIDULQH
▶ YLWHGRYULUHWLURLUHVVLYHSHQGDQWHFFHGHDYDJH
▶ YLWHGHWRFKHUDSRUWHSHQGDQWHDYDJHFDUHHHVWFKDGH
▶ YLWHGRYULUDSRUWHVLHDHVWYLVLEHWUDYHUVHKERW
▶ YLWHGRYULUDSRUWHHQDIRUDQW(HHVWTLSHGQVV
tèmedeverrouillageets'ouvrequelquesinstantsaprèslandu
FFHGHDYDJH
▶ UUWH DSSDUHLDSUV FKDTHSURJUDPPHGHDYDJH HW DYDQW
GHQWUHSUHQGUH WRW HQWUHWLHQ HW GEUDQFKH DSSDUHL GH DL
mentationélectriquepouréconomiserl'énergieetpourdesns
GHVFULW
▶ Tenezlacheetnonlecordonpourdébrancherl'appareil.
WUHWLHHWHWWRDH
▶ VVUHYRVTHHVHQIDQWVVRQWVRVVUYHLDQFHRUVGQHW
WRDJHHWHQWUHWLHQ
▶ 'EUDQFKHDSSDUHLGHDLPHQWDWLRQHFWULTHDYDQWGHQWUH
SUHQGUHWRWHQWUHWLHQ
▶ *DUGHDSDUWLHLQIULHUHGKERWSURSUHHWYLWHGRYULUD
porte et le tiroir à lessive lorsquel'appareil esten marche an
GYLWHUHVRGHUV
▶ 1WLLVHSDVQSYULVDWHUGHDRQHWWRDQWYDSHUSRU
QHWWRHUDSSDUHL
▶ DLWHV UHPSDFHU H FRUGRQ GDLPHQWDWLRQ HQGRPPDJ SDU H
fabricant,sonreprésentantoupardespersonnesqualiéesuni
quementand'évitertoutrisque.
▶ 1HVVDHSDVGHUSDUHUYRVPPHDSSDUHL(QFDVGHUSD
UDWLRQYHLHFRQWDFWHUQRWUHVHUYLFHFLHQWH
,VWDDWLR
▶ 3DFHDSSDUHLGDQVQHQGURLWELHQYHQWLKRLVLVVHQHP
SDFHPHQWTLSHUPHWGRYULUFRPSWHPHQWDSRUWH
▶ 1LQVWDHDPDLVDSSDUHLHWULHUGDQVQHQGURLWKPLGH
RGDQVQLHTLVHUDLWVHWGHVILWHVGHDFRPPHHQGHV
VRVRSURLPLWGQERFYLHU(QFDVGHILWHGHDFRSH
DLPHQWDWLRQHFWULTHHWDLVVHHDYHLQJHVFKHUQDWUHH
PHQW

RQVLJQHVGHVFULW
5
8WLLVDWLRSUH
HW DSSDUHL HVW FRQ SRU H LQJH DYDEH D DYHLQJH QLTH
PHQW 6LYH FKDTHIRLVHVLQVWUFWLRQV IRUQLHV VU WLTHWWH
GHFKDTHYWHPHQW,HVWJDHPHQWFRQHFVLYHPHQWSRUQ
VDJHGRPHVWLTHLQWULHUGHDPDLVRQ,QHVWSDVGHVWLQQ
VDJHFRPPHUFLDRLQGVWULH
Aucune modication ou altération de cet appareil n'est autorisée.
7RWHWLLVDWLRQLQDGTDWHYRVHSRVHGHVULVTHVHWDSHUWHGH
WRVHVGURLWVGHJDUDQWLHHWGHUHVSRQVDELLW
AVERTISSEMENT!
,VWDDWLR
▶ ,QVWDHRWLLVHDSSDUHLQLTHPHQWGDQVGHVHQGURLWVRD
températureestsupérieureà5°C.
▶ YLWHGHSDFHUDSSDUHLGLUHFWHPHQWVUQWDSLVRSUVGQ
PURGQPHEH
▶ 1LQVWDH SDV DSSDUHL HQ GLUHFWLRQ GHV UDRQV VRDLUHV R
SURLPLWGHVVRUFHVGHFKDHUSDU HHPSHHVFLVLQLUHV
chaue-eau).
▶ Vériez que les informations électriques sur la plaque signalé
WLTHVRQWFRQIRUPHVDLPHQWDWLRQHFWULTH6LFHQHVWSDV
HFDVYHLHFRQWDFWHUQHFWULFLHQ
▶ 1WLLVHGHVDGDSWDWHUVPWLSULVHVHWGHVUDRQJHV
▶ VVUHYRVGWLLVHUQLTHPHQWHQVHPEHGHFRUGRQHF
triqueetdeexibled’arrivéed’eaulivré.
▶ VVUHYRVTHHFRUGRQGDLPHQWDWLRQHWDSULVHQHVRQWSDV
HQGRPPDJV6LVVRQWHQGRPPDJVYHLHHVIDLUHUHPSD
FHUSDUQHFWULFLHQ
▶ 3RU DLPHQWDWLRQHFWULTH WLLVH QH SULVH DYHF PLVH D
terrediérente,facilementaccessibleaprèsl'installation.Mettez
DWHUUHFHWDSSDUHL
UniquementpourleRoyaume-Uni:HWDSSDUHLHVWTLSGQ
cordond’alimentationaveccheà3ls(miseàlaterre),répon
dantauxnormesdelapriseà3ls(miseàlaterre).Necoupez
jamaisounedémontez jamaisletroisièmel (miseàlaterre).
/RUVTHDSSDUHLHVWLQVWDDSULVHGRLWWUHDFFHVVLEH
▶ Assurez-vousquelesjointsetraccordsduexibled’arrivéed’eau
VRQWVHUUVHWTLQDSDVGHILWH

FR
2-Description du produit
7
2.1 Description de l’appareil
Partieavant(Fig.2-1): Côté arrière(Fig.2-2):
2.2 Accessoires
Remarque:
-
2-3
Underwear
Sport
Anti-allergy
Daily Wash
Synthetic
Mix
Baby Care Hygienic
Self Clean
Spin/Drain
Express15 min
Duvet
Delicate
Wool
Temp. SpeedDelay Start/PauseExtra
Rinse
Cotton Cotton+
HW80-B14876
Steam
8kg
1 adoucissant
2 Haut de travail
3 Écran
4 Sélecteur de pro-
gramme
5 Panneau
6 Volet d’entretien
7 Pieds ajustables
8 Poignées de la porte
1 Barre de fer (I1-I2)
2 Boulons de transport (T1-T4)
3 Renforcement de la paroi
arrière
4 Cordon d'alimentation
5 Vanne d'arrivée d'eau
6 Tuyau de vidange
7 Vis de renforcement de la paroi
arrière
2-1
2-2
Flexible
d’arrivée-d’eau
6 Bouchons
obturateurs
Support de
tuyau de
vidange
Manuel
d'utilisation
Garantie
garantie
1
6
8
7
3 5
1 2 4 5 6 73
42
Pads de
réduction de
bruit
2x
2x

HW80-B14876N
Sport
Synthetisch
Synthétique
Mix
Baby Care
Express 15 min
Eco 40-60
Temp. Tr/min
Startuitstel
Start/Pause
Extra spoelen
Rinçage +
Stoom
VapeurFin différée
Délicat
3-Panneau de commande
FR
8
3
Remarque:Signalsonore
Le signal sonore retentitdanslescassuivants:
▶ lorsque vous appuyez sur un bouton;
▶ lorsque vous tournez le sélecteur
de programme;
▶
▶ en cas de dysfonctionnement.
Vous pouvez désactiver le signal sonore en cas de besoin: voir la section UTILISATION
QUOTIDIENNE.
1 Tiroir à lessive / adoucissant
2 Écran
3 Sélecteur de programme
4 Bouton "Marche / Arrêt"
5 Bouton«Start/Pause
»
6 Vapeur
7 Rinçage +
8 Tr/min
9 Temp.
3-2
10
11 Verrouillage enfant
12
1211
89
10
7 6 5
2 31
4
Boutonsdefonction
3.1 Tiroiràlessive
1
Compartiment : Agent de blanchiment pour le
coton/programme « synthé-
tique».
2
Compartiment : Détergent liquide adapté au
programme
3
Compartiment : Adoucissant, agent de condi-
tionnement, etc.
4
Compartiment :Détergent en poudre adapté au
programme
Veuillez vous reporter aux informations sur l'emballage
du détergent pour obtenir des recommandations sur
lavage.
3.2 Écran
Si l’appareil est en marche, l’écran indique l'état réel
temps de lavage, à la vitesse d’essorage, à la tempéra-
3-1
Temp. Tr/min
Startuitstel
Start/Pause
Extra spoelen
Rinçage +
Stoom
VapeurFin différée
Temp. Tr/min
Startuitstel
Start/Pause
Extra spoelen
Rinçage +
Stoom
VapeurFin différée

FR
3-Panneau de commande
9
3.3 Sélecteur de programme
Vous pouvez sélectionner l’un des 16programmes en
tournant le bouton (Fig. 3-3). Le LED correspondant
Appuyez légèrement sur ce bouton (Fig. 3-4) pour
mettre l’appareil en marche ; l’écran s’allume. Ap-
puyez-le à nouveau pendant environ 2 secondes pour
éteindre l'appareil. Si aucun élément du panneau ou au-
cun programme n'est activé au bout d'un moment,
l'appareil s'éteint automatiquement.
3.5 Bouton«tart/Pause»
Touchez légèrement ce bouton (Fig. 3-13) pour dé-
a
s
mbols:
Indicationd'étatduprogramme
Indicationducycleduprogramme
Le panneau de cont
rôle est verrouillé
Affichagedutempsdelavage,du
reur et des informations de service
Temps de fonction
nement restant
Temps de retard
restant
Cycle de rinçage
Cycle de lavage
Cycle d'essorage / drainage
Pondération automatique
Vapeur
3-3
3-4
3-5
Sport
Synthetisch
Synthétique
Mix
Baby Care
Express 15 min
Eco 40-60
Délicat
Start/Pause
s

3DQQHDGHFRPPDQGH
RWRVHIRFWLRV
Lesboutonsdefonction(Fig.3-6)activentdesoptions
VSSPHQWDLUHVGSURJUDPPHVHFWLRQQDYDQWVRQ
démarrage.Lesindicateurscorrespondantss’achent
FUDQ
7RWHVHVIRQFWLRQVVHGVDFWLYHQWRUVTHYRVWHL
gnezl’appareiloulorsquevouscongurezunnouveau
SURJUDPPH
6LQERWRQGLVSRVHGHSVLHUVRSWLRQVYRVSR
YH VHFWLRQQHU RSWLRQ VRKDLWH HQ DSSDQW GH
PDQLUHVTHQWLHHVUHERWRQ
3RUVSSULPHUHSDUDPWUHRDQQHUHSURFHVVV
GH SDUDPWUDJH DSSH VU H ERWRQ GH IRQFWLRQ
VTFHTHHVYRDQWV/('VDPHQWRGDQVH
FDVGQHVHHRSWLRQHVYRDQWV/('VWHLJQHQW
7RWHVHVIRQFWLRQVQHVRQWSDVGLVSRQLEHVSRUWRV
lesprogrammes(voirPROGRAMMES).
Remarque:Paramètresd'usine
Pourobtenirdemeilleursrésultatsdanschaqueprogramme,Haierabiendénidespa
ramètresspéciquespardéfaut.S’iln’yapasd’exigencesparticulières,lesréglagespar
GIDWVRQWUHFRPPDQGV
3.6.1Boutondefonction«Rinçage+»
Appuyezsurcebouton(Fig.«3-6-1)pourrincerlelinge
SVLQWHQVPHQWDYHFGHHDGRFHHWWHIRQFWLRQ
HVWUHFRPPDQGHSRUHVSHUVRQQHVDSHDVHQ
VLEH
9RVSRYHVHFWLRQQHUQWURLVFFHVHQDSSDQW
VUHERWRQSVLHUVIRLV
3.6.2Fonction«Findiérée»
Appuyezsurcebouton (Fig. 3-6-2)pourdémarrerle
programmeavecunendiérée.Vouspouvezrepous
serlanduprogrammeparincrémentde30minutes,
de0,5à24h.Parexemple,sil‘écranache«6:30»,le
cycleduprogrammes’achèvedans6heureset30mi
nutes.Touchezlebouton«Départ/Pause»pouracti
verledélaidendiérée.
Ledélaichoisipourlandiéréeduprogrammedoit
WRRUV WUH VSULHU D WHPSV GH FFH G SUR
JUDPPH 6LQRQ H SURJUDPPH GPDUUH LPPGLDWH
PHQW
Pourdésactiverledélaidendiérée,tournezlesélec
WHUGHSURJUDPPH
Remarque:Détergentliquide
Sivousutilisezundétergentliquide,iln’estpasrecommandéd’activerlandiérée.
Temp. Tr/min
Startuitstel
Start/Pause
Extra spoelen
Rinçage +
Stoom
VapeurFin différée
Temp. Tr/min
Startuitstel
Start/Pause
Extra spoelen
Rinçage +
Stoom
VapeurFin différée
Extra spoelen
Rinçage +
Extra spoelen
Rinçage +
Startuitstel
Fin différée
Startuitstel
Fin différée

FR
3-Panneau de commande
11
3.6.3 Fonction “ “
Vous pouvez changer le temps de lavage en
touchant le bouton « » (Fig.3-6-3). Cette fonc-
tion ne s’applique pas aux programmes «Délicat»,
Auto-nettoyage»et« Essorage ».
3.6.4Fonction«Vapeur»
Appuyez sur cette touche (Fig.3-6-4), le programme de
vapeur peut être sélectionné. Lorsque cette fonction
est activée, la température par défaut est la tempéra-
ture maximale du programme sélectionné. Vous pou-
vez sélectionner si vous avez besoin de cette fonction
lorsque les programmes « Coton, Mixte, Synthétique,
Lingerie, Bébé Coton, Anti allergie» sont utilisés.
Lorsque vous sélectionnez le programme «Vapeur»,
l’icône s’allume pour vous avertir, l’icône s’éteint
lorsque le programme est annulé. Lorsque vous sélec-
la température. Si vous touchez le bouton de tempé-
rature, le programme sera annulé. Mettez le lave-linge
en marche et sélectionnez ce programme. Si l’appareil
ne fonctionne pas, vous ne pouvez pas sélectionner ce
programme.
3.6.5Fonction«
Tr
»
désélectionner le programme si aucune valeur n'est al-
lumée, le linge ne sera pas essoré.
3.6.6Fonction«Temp.»
Appuyez sur ce bouton (Fig.3-8) pour changer la tem-
pérature de lavage du programme.
3.6.7Sécuritéenfants
Cette option bloque tous les éléments du panneau
pour empêcher leur activation. Après le démarrage
de programme, appuyez simultanément sur les
boutons «
Pour déverrouiller, appuyez à nouveau sur les deux
boutons.
Temp.
3-6-3
3-6-4
3-6-5
3-6-6
3-6-7
Stoom
Vapeur
Stoom
Vapeur
Tr/minTr/min
/
m
in
Startuitstel
Fin différée
Startuitstel
Fin différée

4-Programmes
FR
12
Charge
max.
en kg
HW80
Température
d’es-
sorage
préréglée
en tr/min
Fonction
Findifférée
Vapeur
Rinçage +
i-time
en °C
Program-
me max. Préréglage
Coton
90
2)
90
2)
40
•
º
/
•
Coton 1400
• • • •
Mix
30
•
º
/
•
Mélange de linge en
coton et synthé-
tique légèrement
sale
1000
• • • •
Synthé-
tique
40
•
º
/
•
Tissu synthétique
ou mélangé
1200
• • • •
Lingerie
40
•
º
/
•
Coton/Synthétique 1000
• • • •
Baby Care
40
•
º
/
•
Coton/Synthétique 1000
• • • •
Anti aller-
gique
60
•
º
/
•
Coton/Synthétique 1000
• • • •
Sport 20
•
º
/
•
Vêtements de
sport
800
•
/
• •
•
º
/
•
/
20
•
º
/
•
1400
•
/
•
Couette
40
•
/
•
Tissus en coton 800
•
/
• •
Express
15 min
3)
*
•
º
/
•
Coton/Synthétique 1000
•
/
• •
Hygié-
nique
•
º
/
•
Coton/Synthétique 1000
•
/
• •
Laine
*
•
º
/
•
Tissus en laine 800
•
/
• •
Auto-
nettoyage
º
/ /
/
/ 600 / / / /
Essorage
/ / / / All tissus 1000 / / / /
1)
2)
Choisissez 90°C comme température de lavage uniquement pour des exigences hygiéniques particuli-
ères.
3)
Réduisez la quantité de détergent parce que la durée du programme est courte.
1)
Compartiment à détergentpour:
1
Agent de blanchiment
2
Détergent liquide
3
Adoucissant, agent de conditionne-
ment, etc.
4
Détergent en poudre
•
Oui,
º
En option, / No
Délicat 30
•
º
/
•
Soie 600
•
/
•
/
Eco 40-6
0
Coton 20°C
8
8
4
4
4
4
2
1
2
1
4
1
0
8
8
90
2)
60
60
60
90
2)
90
2)
40
30
40
40
90
2)
40
90
2)
/
90
2)
/
20
/
/
Coton
Coton
/
/ ///
•

FR
5-Consommation
13
Remarque:Pesageautomatique
L’appareil est équipé d’une option de détection de la charge. Lorsque la charge est faible,
l’énergie, l’eau et le temps de lavage sont réduits de manière automatique dans certains
.
Scannez le QR code sur l'étiquette énergétique pour obtenir des informations sur la
consommation d'énergie.
Laconsommationd'énergieréellepeutdifférerdecelledéclarée en fonction des
conditions locales.

8WLLVDWLRQTRWLGLHQQH
5
3USDUDWLRLH
▶ 7ULHHVYWHPHQWVHQIRQFWLRQGWLVVFRWRQ
synthétique,laineousoie)etdeleurniveaude
saleté(Fig.6-3).Faitesattentionauxconsignes
GHQWUHWLHQGHVWLTHWWHVGHDYDJH
▶ 6SDUHHVYWHPHQWVEDQFVGHVYWHPHQWVGH
FRHU/DYHGDERUGHVWHWLHVGHFRHUD
mainpoursavoirs'ilssedécolorentous'abîment.
▶ Videzlespoches(clés,piècesdemonnaie,etc.)
HWUHWLUHHVREHWVGHGFRUDWLRQWUVGUVEUR
ches).
▶ 3RU HQWUHWLHQ GHV YWHPHQWV VDQV RUHWV
du linge délicat et les textiles nement tissés
FRPPHHVULGHDPHWWHHVGDQVQVDF GH
DYDJHHQHWWRDJHDPDLQRVHFHVWSV
indiqué).
▶ HUPHHVIHUPHWUHVJLVVLUHVHVDWWDFKHV
HW HV FURFKHWV YHFUR HW DVVUHYRV TH HV
ERWRQVVRQWVRLGHPHQWFRVV
▶ 3DFH HV YWHPHQWV VDQV RUHWV VRLGHV HV
sous-vêtementsdélicats(Dessous)etlespetits
DUWLFHV WHV TH HV FKDVVHWWHV HV FHLQWUHV
HVVRWLHQJRUJHHWFGDQVQVDFGHDYDJH
▶ 'SLHHVJUDQGHVSLFHVGHWLVVWHHVTHHV
GUDSVGHLWHWHVFRYUHLWVHWF
▶ 5HWRUQHHVHDQVHWHVWLVVVLPSULPVGFR
résouauxcouleursvives;lavez-lesséparément
VLSRVVLEH
LPHWDWLR
Raccordez le lave-linge à une alimentation (220 V à
240V~/50Hz;Fig.6-1).Veuillezégalementvousréfé
reràlasectionINSTALLATION.
5DFFRUHPHWHD
▶ YDQWHUDFFRUGHPHQWDVVUHYRVGHDSURSUH
WHWGHDFDUWGGLVSRVLWLIGDUULYHGHD
▶ Ouvrezlerobinet(Fig.6-2).
5HParque:Étanchéité
Avantl'utilisation,vériezlaprésencedefuitessurlesjointsentrelerobinetetleexible
GDUULYHGHDHQRYUDQWHURELQHW
ATTENTION!
/HVDUWLFHVQRQWHWLHV GHVVHUUVRWUDQFKDQWVSHYHQWFDVHUGHVGVIRQFWLRQQH
PHQWVDLQVLTHQGRPPDJHUHVYWHPHQWVHWDSSDUHL

5
8WLLVDWLRQTRWLGLHQQH
7DEHDHWUHWLH
DDH
Lavablejusqu'à95°C
SURFHVVVQRUPD
Lavablejusqu'à60°C
SURFHVVVQRUPD
7HPSUDWUHGHD
vagemaximale60°C
GR
Lavablejusqu'à40°C
SURFHVVVQRUPD
7HPSUDWUHGHD
vagemaximale40°C
GR
7HPSUDWUHGHD
vagemaximale40°C
WUVGR
Lavablejusqu'à30°C
SURFHVVVQRUPD
7HPSUDWUHGHD
vagemaximale30°C
GR
7HPSUDWUHGHD
vagemaximale30°C
WUVGR
7HPSUDWUHPDLPDH
GHDYDJHDPDLQ
40°C
1HDYHSDV
DFLPHW
JHQWVGHEDQFKL
PHQWDWRULVV
Oxygèneunique
PHQWQRQFKRU
1WLLVHSDVGDJHQW
GHEDQFKLPHQW
6FDH
6FKDJHSDUFEWDJH
SRVVLEH
WHPSUDWUHQRUPDH
6FKDJHSDUFE
WDJHSRVVLEH
WHPSUDWUHIDLEH
1HSDVVHSDVD
VFKHLQJH
6FKDJHVUFRUGH 6FKDJHSDW
5HSDVVDH
5HSDVVDJHQHWHP
SUDWUHPDLPDHGH
200°C
5HSDVVDJH
QHWHPSUDWUH
PRHQQH
de150°C
5HSDVVDJH QH
WHPSUDWUHEDVVHGH
110 °C ; sans vapeur
H UHSDVVDJHDYD
SHU SHW SURYRTHU
GHV GRPPDJHV LUU
versibles)
1HUHSDVVHSDV
WUHWLHSURIHVVLRHHVWHWLHV
1HWWRDJHVHFD
WWUDFRUWKQH
1HWWRDJHVHFD
KGURFDUEUHV
YLWHWRWQHWWRDJH
VHF
1HWWRDJHSURIHVVLRQ
QHSDUYRLHKPLGH
YLWHWRWQHWWRDJH
SURIHVVLRQQHSDU
YRLHKPLGH
DUHPHWHDSSDUHL
▶ ,QVUHHLQJHSLFHSDUSLFH
▶ Nesurchargezpasl'appareil.Notezlesdiérenteschargesmaximalesenfonction
desprogrammes!Règlegénéralepourlachargemaximale:Gardezunedistancede
VLSRFHVHQWUHDFKDUJHHWDSDUWLHVSULHUHGWDPERU
▶ HUPHELHQDSRUWHVVUHYRVTDFQHSLFHGHLQJHQHVRLWSLQFH

6-Utilisation quotidienne
FR
16
6.5 Sélection du détergent
▶
▶ Utilisez exclusivement un détergent homologué pour le lavage en machine.
▶ Le cas échéant, utilisez des détergents spéciaux (par exemple, pour les synthé-
tiques et les lainages.)
▶ Respectez les recommandations du fabricant du détergent.
▶ N'utilisez pas d'agents de nettoyage à sec tels que le trichloréthylène ou tout autre
produit similaire.
Choisissez le détergent le mieux adapté
Programme
Type de détergent
Universel Couleur Délicat Spécial Adoucissant
Coton
Mixt
Synthétique
Lingerie
Anti allergie
Sport
Hygiénique
Laine
Auto- nettoyage
Essorage
L=détergentliquideouengelP=détergent en poudreO=facultatif
_
= non
Voici nos recommandations:
▶ Détergent en poudre: 20°Cà90°C*(utilisationoptimale:40-60°C)
▶ Détergent couleur: 20°Cà60°C(utilisationoptimale:30-60°C)
▶ Détergent laine/vêtementdélicat: 20°Cà30°C(=utilisationoptimale:)
* Choisissez 90°C comme température de lavage uniquement pour des exigences hygié-
niques particulières.
Baby Care
Délicat
Eco 40-60
Coton 20°C
Couette
Express
15 min
L/P L/P - -
L L/P - -
L/P -
-
-
- -
L/P
L/P-
-
L/P
L/P
-
-
L/P
L/P
-
-
L/P
L/P
-
- L/P
L/P
L L - -
-
- L/P
L/P
o
o
o
o
o
o
o
L/P L/P - - o
L/P L/P - - o
-
-
L/P
L
-
o
L/P L/P - - o
o
-
-
L/P
-
-
-
-
-
-
-
-
-
L/P
L/P
o

FR
6-Utilisation quotidienne
17
6.7 Mettez l’appareil en marche.
Appuyez sur le bouton «Marche/Arrêt» pour mettre
l’appareil en marche (Fig. 6-7).
6.6 Ajout de détergent
1. Faites glisser le tiroir à lessive hors de son empla-
cement.
2. Ajoutez la quantité de détergent nécessaire dans
les compartiments respectifs(Fig.6-6).
3. Repoussez doucement le tiroir.
Remarque:
▶ Retirez les résidus de détergent du tiroir à lessive avant le prochain cycle de lavage.
▶ N'utilisez pas trop de détergent ou d'adoucissant.
▶
▶ Remplissez toujours le détergent avant de lancer le cycle de lavage.
▶ Diluez le détergent liquide concentré avant de l'ajouter.
▶
▶ Sélectionnez avec soin les paramètres du programme en fonction des symboles
d'entretien indiqués sur toutes les étiquettes de linge et selon le tableau de pro-
gramme.
6.8 Sélection d’un programme
Pour obtenir des résultats optimaux lors du lavage,
sélectionnez un programme qui convient au degré de
saleté et au type de linge.
Tournez le bouton des programmes (Fig. 6-8) pour
sélectionner le programme adéquat. Le voyant LED
correspondant au programme sélectionné s’allume et
6.9 Ajout de sélections individuelles
Sélectionnez les options et les paramètres requis
(Fig. 6-9) ; reportez-vous à la section PANNEAU DE
COMMANDE.
6-7
6-8
Remarque:Suppression des odeurs
Avant la première utilisation, nous vous recommandons de lancer le programme HYGIÉ-
NIQUE à vide et avec une petite quantité de détergent dans le compartiment du produit
de lavage (2) ou le nettoyant spécial de machine pour éliminer les résidus potentielle-
ment gênants.
6-6
6-9
Sport
Synthetisch
Synthétique
Mix
Baby Care
Express 15 min
Eco 40-60
Délicat
Temp. Tr/min
Startuitstel
Start/Pause
Extra spoelen
Rinçage +
Stoom
VapeurFin différée
Temp. Tr/min
Startuitstel
Start/Pause
Extra spoelen
Rinçage +
Stoom
VapeurFin différée

8WLLVDWLRQTRWLGLHQQH
5
SUVHDDH
Àlanducycleduprogramme1's’ache.
/DPDFKLQHVDUUWHDWRPDWLTHPHQW
Retirezlelingeleplustôtpossiblepourlefaireavecprécautionetpouréviterautant
THSRVVLEHTLQHVHSLVVHGDYDQWDJH
HUPHDUULYHGHD
'EUDQFKHDSULVHGDLPHQWDWLRQ
Ouvrezlaportepourévitertouteformationd’humiditéetl’apparitiond’odeurs.Lais
VHDRYHUWHRUVTHYRVQWLLVHSDVDPDFKLQH
FWLDWLRRVDFWLDWLRHDDUPH
Vouspouvezdésactiverlesignalsonoreencasdebesoin:
Mettezl’appareilenmarche.
SélectionnezleprogrammeEssorage/Vidange.
3.Appuyezsimultanémentsurlesboutons«i-time»et«Essorage»pendant3secondes
environ.«bEEPOFF»s’acheetl’alarmesedésactive.Pouractiverl‘alarme,appuyezune
nouvellefoissurcesdeuxboutonssimultanément.«ALARMEACTIVÉE»s’ache.
,WHUUSWLRDDWLRSURUDPPHHDDH
Pourinterrompreunprogrammeencours,appuyezdoucementsur«Départ/Pause».Ap
SHQRYHDVUFHERWRQSRUUHSUHQGUHRSUDWLRQ
Pourannulerunprogrammeencoursettoussesparamètresindividuels:
Appuyezsurlebouton«Départ/Pause»pourinterrompreleprogramme.
Appuyezsurlebouton«Marche/Arrêt»pendant2secondesenvironpourarrêter
DSSDUHL
Lancezleprogramme«ESSORAGE»pourévacuerl’eau.
6HFWLRQQHQQRYHDSURJUDPPHHWGPDUUHH
Remarque:Verrouillagedelaporte
▶ 3RUGHVUDLVRQVGHVFULWDSRUWHGDYHLQJHHVWWHPSRUDLUHPHQWYHUURLH
pendantlescyclesdelavage.Vousnepouvezouvrirlaportequ’àlanduprogramme
ouqu’aprèssonannulationcorrecte(voirladescriptionci-dessus).
▶ (QFDVGHQLYHDGHDHYRGHWHPSUDWUHGHDHYHRSHQGDQWHVVRUDJH
ilestimpossibled’ouvrirlaporte;lesymboleRFNs’ache
Remarque:Modeveille/modeéconomiseurd'énergie
8QHIRLVDSSDUHLPLVHQPDUFKHLUHQWUHHQPRGH9HLHVLYRVQHWLLVHSDVDERW
de2minutesavantlelancementduprogrammeouàlandecelui-ci.L’écrans’éteint.
Cecipermetd’économiserl’énergie.Appuyezsurlebouton«Départ/Pause»pourdé
VDFWLYHUHPRGH9HLH
'PDUUDHSURUDPPHHDDH
Appuyez sur le bouton « Départ/Pause » (Fig. 6-10)
SRU GPDUUHU /DSSDUHL WLLVH HV SDUDPWUHV DF
tuels. Pour eectuer des modications, vous devez
DQQHUHSURJUDPPH
Start/PauseStart/Pause
Start/Pause

5
/DYDJHFRRJLTH
8WLLVDWLRUHVSHFWHVHHHLURHPHW
▶ 3RUQHPHLHUHWLLVDWLRQGHQHUJLHGHHDGGWHUJHQWHWGWHPSVWHQH
YRVHQDFKDUJHPDLPDHUHFRPPDQGH
▶ 1HVUFKDUJHSDVDSSDUHLDLGHGHDPDLQIDLWHVQGJDJHPHQWHQDUJHUD
dessusdulinge).
▶ 3RUHLQJHSDVWURSVDHVHFWLRQQHHSURJUDPPH/DYDJHUDSLGH
▶ Mettezlesdosesexactesdechaqueproduitdelavage.
▶ KRLVLVVH D WHPSUDWUH GH DYDJH DGTDWH D SVEDVVH HV GWHUJHQWV PR
dernesnettoientecacementendessousde60°C.
▶ Optimisezlesréglagespardéfautuniquementpourlestachesimportantes.
▶ 6HFWLRQQHDYLWHVVHGHVVRUDJHPDLPDHHQFDVGWLLVDWLRQGQVFKRLUGRPHV
WLTH

8-Entretien et nettoyage
FR
20
8.1 Nettoyage du tiroir à lessive
Veillez toujours à ce qu’il ne reste pas de résidus de dé-
tergent.
Nettoyez régulièrement le tiroiràlessive(Fig.8-1):
1. Tirez le tiroir jusqu’à la butée.
2. Appuyez sur le bouton d’ouverture pour le retirer.
3. Nettoyez ensuite le tiroir avec de l’eau et remet-
tez-le en place dans l’appareil.
8.2 Nettoyage de la machine
▶ Débranchez la machine pendant le nettoyage et
l’entretien.
▶
pour nettoyer la machine (Fig.8-2) et les compo-
sants en caoutchouc.
▶ N’utilisez pas de produits chimiques organiques
ou de solvants corrosifs.
Remarque:Auto-nettoyage
Pour un entretien régulier, nous recommandons d'exécuter le programme Auto-nettoyage
-
de détergent dans le compartiment à détergent (2) ou utilisez un nettoyant spécial
pour machine.
Pour éviter toute obstruction de l’alimentation en eau
par des matières solides telles que le calcaire, nettoyez
▶ Débranchez le cordon d’alimentation et fermez
l’arrivée d’eau.
▶
(Fig.8-3)del’appareil, ainsi que le robinet.
▶
(Fig.8-4).
▶
d’eau.
8.4 Nettoyage du tambour
▶ Retirez les pièces métalliques introduites acciden-
les épingles, les pièces de monnaie, etc., car elles
peuvent causer des taches de rouille et des dom-
mages.
▶ Utilisez un nettoyant sans chlorure pour éliminer
les taches de rouille. Respectez les consignes de
sécurité du fabricant de l’agent de nettoyage.
▶ N’utilisez pas d’objet dur ou de laine d’acier pour le
nettoyage.
8-1
8-5
8-3
8-4
HW70-BP12758
WoolR
Under-wear
Sport
Anti-allergy
Daily Wash
Baby Care
Self Clean
Spin/Drain
Express
15 min
Duvet
Cotton
Synthetic
Mix
Cotton+
Delicate
Hygienic
capacity
7kg
°C60
°C40
Underwear
Sport
Anti-allergy
Daily Wash
Synth etic
Mix
Baby Care Hygienic
Self Clean
Spin/Drain
Express15 min
Duvet
Delicate
Wool
Temp. SpeedD ela Sy t art/PauseExtra
Rinse
Cotton C otton+
HW120-B14876
Steam
8-2
1
2
té

FR
8-Entretien et nettoyage
21
1. Éteignez la machine et débranchez-la(Fig.8-8).
2. Ouvrez le volet d’entretien situé dans le coin avant
droit de l’appareil(Fig.8-9).
3. Placez un récipient plat pour recueillir l’eau de vi-
dange (Fig. 8-10). La quantité d'eau pourrait être
plus grande que prévu!
4. Tirez le tuyau de vidange et maintenez-en l’extré-
mité au-dessus du récipient(Fig.8-10).
5. Retirez le bouton d’étanchéité du tuyau de vi-
dange(Fig.8-10).
6. Une fois la vidange terminée, fermez le tuyau de vi-
dange et remettez-ledanslamachine(Fig.8-11).
7.
tournant dans le sens antihoraire(Fig.8-12).
8. Retirez les impuretés et la poussière(Fig.8-13).
8.5 Périodes de non-utilisation prolongées
Si l’appareil n’est pas utilisé pendant une longue pé-
riode:
1.
2.
3. Ouvrez la porte pour éviter toute formation d’hu-
midité et l’apparition d’odeurs. Laissez les portes
ouvertes lorsque vous n’utilisez pas la machine.
cordon d’alimentation, l’arrivée d’eau et le tuyau de vi-
dange. Assurez-vous que tout est correctement ins-
tallé et qu’il n’y a pas de fuite.
AVERTISSEMENT!
pompe peut être très chaude! Avant toute interven-
tion, assurez-vous que l'eau a refroidi.
Remarque:Auto-nettoyage
Après une période de non-utilisation prolongée, nous vous recommandons de lancer le
programme Auto-nettoyage à vide et avec une petite quantité de détergent dans le
compartiment du produit de lavage (2) ou un nettoyeur de machine particulier pour
éliminer les résidus potentiellement gênants.
8.6 Filtre de la pompe
▶ nevidangepasl’eau;
▶ n’essorepas;
▶ émet un bruit inhabituel en cours de fonctionne-
ment.
8-6
8-7
8-10
8-11
8-12
8-13
8-8 8-9

(QWUHWLHQHWQHWWRDJH
5
ATTENTION!
▶ Lebouchondultredelapompedoitêtrenettoyéetenbonétat.Silebouchon
QHVWSDVELHQVHUUHDSHWVFKDSSHU
▶ Leltredoitêtreenplace,sinonunefuitepeutseproduire.
Nettoyez soigneusementleltredela pompe à
l’eaucourante,parexemple(Fig.8-14).
Remontez-lesoigneusement(Fig.8-15).
HUPHHYRHWGHQWUHWLHQ

FR
9-Dépannage
23
Vous pouvez résoudre la plupart des problèmes qui pourraient survenir sans expertise
instructions ci-dessous avant de contacter un service après-vente. Voir SERVICE CLIEN-
TÈLE.
AVERTISSEMENT!
▶ Avant tout entretien, veuillez arrêter l’appareil et débranchez-le du secteur.
▶ Les appareils électriques doivent être entretenus uniquement par des experts en
électricité, parce qu'une mauvaise intervention pourrait causer des dommages
considérables.
▶ Pour éviter tout risque, faites remplacer le câble d’alimentation endommagé unique-
9.1 Codes d’informations
lavage. Aucune action ne doit être entreprise.
Code Message
1:25
Le temps restant du cycledelavageestévaluéà1heureet25minutes.
6:30
-
féréeestévaluéà6heureset30minutes.
.
AUTO
La détection automatique de la charge est activée, uniquement pour certains
programmes.
End
Le cycle de lavage est terminé. L'appareil s'éteint automatiquement.
Lock-
La porte est fermée à cause du niveau d’eau ou de température élevé ou du dé-
roulement de l’essorage
.
bEEP OFF L’avertisseur sonore est désactivé.
bEEP ON L’avertisseur sonore est activé.
La touche de fonction est fermée. Le changement de programme est invalide
Problème Cause Solution
• Erreur de de vidange, l’eau n’a pas été
entièrement évacuée après6minutes.
•
•
dange.
E2
• Verrouillage - erreur. • Fermez correctement la porte.
E4
• Le niveau d’eau n’a pas été at-
teint après 12 minutes.
• Le tuyau de vidange s'auto-siphonne.
• Assurez-vous que le robinet est entièrement
ouvert et que la pression de l’eau est nor
male.
•
E8
• Niveau de sécurité de l’eau - erreur. • Contactez le service après-vente.
CLR FLTR

9-Dépannage
FR
24
Problème Cause Solution
F3
• Capteur de température - erreur. • Contactez le service après-vente.
F4
•
• Contactez le service après-vente.
F7
• Moteur - erreur. • Contactez le service après-vente.
FA
• Erreur du capteur de niveau
d’eau.
• Contactez le service après-vente.
FC0, FC1 ou
FC2
• Erreur de communication anor-
male
• Contactez le service après-vente.
Unb
• Charge déséquilibrée - erreur.
•
tambour. Réduisez la charge de linge.
Problème Cause Solution
Le lave-linge ne
fonctionne pas.
• Le programme n’a pas encore dé-
marré.
• La porte n’est pas correctement
fermée.
• La machine n’a pas été mise sous
tension
• Panne de courant.
• Le Verrouillage enfant est activé.
• -
marrez-le.
• Fermez correctement la porte.
• Mettez la machine sous tension.
•
• Désactivez le verrouillage en-
fant.
Le lave-linge ne se
remplit pas d'eau.
• Il n’y a pas d'eau.
•
•
est bouché.
• La pression de l’eau est inférieure à
0,03MPa.
• La porte n’est pas correctement
fermée.
• Coupure d’eau.
•
•
d’eau.
•
d’arrivée d'eau.
•
• Fermez correctement la porte.
•
La machine se
vidange pendant
qu’on y introduit de
l'eau.
• La hauteur du tuyau de vidange est
inférieureà80cm.
• L’extrémité du tuyau de vidange
pourrait baigner dans l'eau.
• Assurez-vous que le tuyau de
vidange est correctement ins-
tallé.
•
n’est pas plongé dans l’eau.
Problème de vi-
dange.
• Le tuyau de vidange est obstrué.
•
• L’extrémité du tuyau de vidange se
trouve à une hauteur supérieure à
100cmau-dessusdusol.
• Débouchez le tuyau de vidange.
•
• Assurez-vous que le tuyau de
vidange est correctement ins-
tallé.
Forte vibration pen-
dant l’essorage.
• Certains boulons de transport n'ont
pas été retirés.
• L’appareil n’est pas instal-
lé sur une surface stable.
• La charge de la machine n’est pas
correcte.
• Retirez tous les boulons de
transport.
• Assurez-vous que l’appareil est
placé sur une surface stable et
plane.
•
la charge.
L’opération s’arrête
de lavage.
• Coupure d'eau ou panne de cou-
rant.
• -
trique et l’alimentation en eau.

FR
9-Dépannage
25
Problème Cause Solution
L’opération s’arrête
pendant un certain
temps.
•
• Problème dû au modèle de char-
gement.
•
trempage
•
• Réduisez ou ajustez la charge.
• Annulez le programme et redé-
marrez.
Une quantité ex-
cessive de mousse
-
bour et/ou le tiroir à
lessive.
• Le détergent n’est pas adapté.
• Quantité excessive de détergent.
•
en matière de lessive.
• Réduisez la quantité de lessive.
Ajustement auto-
matique du temps
de lavage.
• La durée du programme de lavage
est ajustée.
• Ce phénomène est normal et
-
ment.
Échec de l'essorage. • Mauvaise répartition du linge. •
et la répartition du linge, puis
relancez un programme d'es-
sorage.
Résultat de lavage
insatisfaisant.
• Le degré de salissure ne correspond
pas au programme sélectionné.
• La quantité de détergent était insuf-
• La charge maximale est dépas-
sée.
• Le linge est inégalement réparti
dans le tambour.
• Sélectionnez un autre pro-
gramme.
• Choisissez le linge selon le
degré de salissure et selon
-
cant.
• Réduisez la charge.
• Détachez le linge.
Il existe
des résidus de les-
sive en poudre
sur le linge.
• Des particules insolubles de dé-
tergent peuvent persister sous
forme de taches blanches sur le
lin- ge.
• Rincez à nouveau.
• Essayez de brosser les points
sur le linge sec.
• Choisissez un autre détergent.
Le linge contient
des taches
grises.
• provenant des graisses telles
que les huiles, les crèmes ou les
onguents.
• Prétraitez le linge à l’aide d’un
nettoyant spécial.
Remarque:Formationdemousse
Si trop de mousse apparait pendant le cycle d'essorage, le moteur tournera à basse vitesse
Si les messages d’erreur réapparaissent après les mesures prises, éteignez l’appareil, dé-
branchez-le et contactez le service clientèle.
9.4Encasdepannedecourant
Le programme en cours et ses paramètres seront en-
registrés. Lorsque l’alimentation électrique est rétablie,
le fonctionnement reprend.
Si une panne d’alimentation interrompt un programme
de lavage en cours, l’ouverture de porte se bloque méca-
niquement. Pour sortir le linge, le niveau d’eau ne doit pas
être visible à travers le hublot en verre de la porte. - Risque
de brûlures! Le niveau d’eau doit être réduit tel qu’indiqué
dans la section «Filtre de la pompe». Ensuite, tirez le le-
vier(A) situé en dessous du volet d’entretien (Fig. 9-1)
jusqu’à ce que la porte se déverrouille en émettant un petit
clic. Remontez ensuite toutes les pièces.
9-1
pendant 30 secondes et répéter au maximum 4 fois. Après cela, si trop de mousse a été
détectée, le moteur s'arrête pendant 5min, 10min et 15min en séquence.Si lea moteur ne
tourne toujours pas, le cycle de rotation s'arrêtera en affichant une erreur.

10-Installation
FR
26
10.1 Préparation
▶ Retirez l’appareil de l’emballage.
▶
polystyrène et gardez-les hors de la portée des enfants. Lors de l’ouverture de l’em-
ballage, vous pourriez voir des gouttes d’eau sur le sac en plastique et le hublot. Ce
10.3 Démontez les boulons de transport
La protection de transport à l'arrière est conçue pour
serrer les composants antivibrations à l'intérieur de
-
dommagement intérieur.Tous les éléments (I, R, S et T,
Fig 10-2) doivent être retirés avant utilisation.
Remarque:Miseaurebut des emballages
Tenez tous les emballages hors de portée des enfants et mettez-les au rebut dans le
respect de l'environnement.
10.2ENOPTION:Installationdespadsderéduction
de bruit
1.En ouvrant le sachet plastique contenant les accessoir-
es, vous trouverez quatre patins de réduction de bruit.
(Fig. 10.1)
2.Coucher le lave-linge sur l’arrière de façon à avoir le
hublot sur le dessus et le dessous de l’appareil face à la
personne qui opère.
3.Prenez les patins de réductions de bruit et retirer le
filmprotecteurduscotchdoubleface.Collezlespatins
souslamachinecommeillustréenfigure3(2pads
longs en position 1 et 3 et deux petits pads en position
2 et 4). Remettez la machine debout.
1.
2.
3.
10.1
10-2
T1
T4
T3
T2
10-3
1. Retirezles4boulons(T1-T4)(Fig.10-3).

FR
10-Installation
27
10.5 Alignement de l’appareil
Réglez tous les pieds (Fig.10 5) pour obtenir un nivel-
lement complet. Cela réduira les vibrations et le bruit
pendant l’utilisation. de même que l’usure. Nous re-
commandons d’utiliser un niveau à bulle pour le ré-
glage. Le sol doit être aussi stable et plat que possible.
1. Desserrez le contre-écrou (1) à l’aide d’une clé.
2. Réglez la hauteur en tournant le pied (2).
3. Serrez le contre-écrou (1) contre le boîtier
10.4 Déplacement de l'appareil
Si vous souhaitez déplacer l’appareil sur une grande distance, remettez les boulons de
transport retirés avant l’installation pour éviter tout dommage: L'assemblage se fait dans
l'ordre inverse.
Remarque:Conservez-les en lieu sûr
Conservez les protections de transport dans un endroit sûr pour une utilisation ulté-
rieure. Chaque fois que vous souhaitez déplacer l’appareil, réinstallez d’abord les pièces
de protection.
10-4
2. Fermezles6trous de gauche avec des bou-
chons obturateurs(Fig.10-4).
10-5
-

,QVWDDWLRQ
Lesraccordementssuivantssontpossibles:
7DHLDHLHU
▶ 6VSHQGH H WD GH YLGDQJH D UHERUG GQ
YLHUGHWDLHDGTDWHDLGHGVSSRUWHQ8
(fg.10-6).
▶ 3URWJH FRQYHQDEHPHQW H VSSRUW HQ 8
FRQWUHWRWJLVVHPHQW
7DHLDHDUDFFRUHPHWDFD
WLRHVHDVHV
▶ /H GLDPWUH LQWHUQH G UHJDUG DYHF YHQW GRLW
êtrede40mm.
▶ Placezletuyaudevidangeàenviron80mmdes
FRQGLWVGHDVHV
▶ LHHVSSRUWHQ8HWDWWDFKHHVRLGHPHQW
(Fig.10-7).
ATTENTION!
▶ Letuyaudevidangenedoitpasêtresubmergéparl’eau,etdoitêtrexésolidement
HWHHPSWGHILWH6LHWDGHYLGDQJHHVWDVRRVLDFDQDLVDWLRQHVWQH
hauteurdemoinsde80cm,lelave-lingesevidangedemanièrecontinuelorsqu’onle
remplit(syphonnementautomatique).
▶ /HWDGHYLGDQJHQHVWSDVDRQJEHVRLQFRQWDFWHHVHUYLFHDSUVYHQWH
5DFFRUHPHWWDHLDHLHU
▶ /HUDFFRUGHPHQWGRLWVHVLWHUDGHVVVGVL
SKRQ
▶ 8QUDFFRUGHPERW HVWKDELWHHPHQWIHUP
parunbloc(A).Vousdevezleretirerpouréviter
toutdysfonctionnement(fg.10-8).
▶ LHHWDGHYLGDQJHDLGHGQHSLQFH
5DFFRUHPHWHUDLDH
LHFRUUHFWHPHQWHWDGHYLGDQJHDWDWHULH/HWDGRLWDWWHLQGUHHQQSRLQW
unehauteurcompriseentre80et100cmau-dessusdelaligneinférieuredel'appareil!
Laisseztoujoursletuyaudevidangexéauclipàl'arrièredel'appareilsipossible.
AVERTISSEMENT!
▶ 8WLLVHQLTHPHQWHQVHPEHGHUDFFRUGHPHQWIRUQLSRUHUDFFRUGHPHQW
▶ Neréutilisezjamaisd’ensemblederaccordementusagé!
▶ 5DFFRUGHDSSDUHLQLTHPHQWQHDLPHQWDWLRQGHDIURLGH
▶ Avantleraccordement,vériezsil’eauestpropreetclaire.

,QVWDDWLRQ
UDFHPHWHFWULTH
Avantchaquebranchement,vériezsi:
▶ DLPHQWDWLRQHFWULTHDSULVHHWHIVLEHFRU
respondentàlaplaquesignalétique;
▶ DSULVHGDLPHQWDWLRQHVWPLVHDWHUUHHWDFQH
chemultipleourallongen’estutilisée;
▶ la che et la prise d’alimentation correspondent
SDUIDLWHPHQW
▶ Uniquement au Royaume-Uni : /D SULVH SRU H
5RDPH8QLHVWFRQIRUPHDQRUPH6
Branchezlafcheàlaprise(Fig.10-11).
AVERTISSEMENT!
▶ VVUHYRVWRRUVTHWRWHVHVFRQQHLRQVDLPHQWDWLRQHFWULTHHWD
d’évacuationetexibled’alimentationeneaupotable)sontsolides,sèchesetnepré
sententaucunefuite!
▶ 9HLHFHTHFHVSLFHVQHVRLHQWDPDLVSLWLQHVSLHVRWRUGHV
▶ 6LHFRUGRQGDLPHQWDWLRQHVWHQGRPPDJIDLWHVHUHPSDFHUSDUHIDEULFDQWYRLU
lacartedegarantie)and'évitertoutrisque..
5DFFRUHPHWHDRFH
VVUHYRVTHHVRLQWVVRQWLQVUV
Raccordezleexibled’arrivéed’eauàlapointe
biseautéedel’appareil(Fig.10-9).Resserrez
PDQHHPHQWHRLQWYLV
/DWUHHWUPLW HVWUDFFRUGH Q URELQHW
d’eauavecunfletagede3/4po(Fig.10-10).

11-Informations techniques
FR
30
Tension en V 220-240V~/50Hz
Courant en A 10
PuissancemaximaleenW 2000
Pressiond’eauenMPa 0,03≤P≤1
Poidsnet en kg
72
11.1 Autres données techniques
11.3 Normes et directives
Ce produit répond aux exigences de toutes les directives CE applicables ainsi que les nor-
mes harmonisées correspondantes, qui prévoientlemarquageCE.
Remarque: L a hauteur exacte de votre machine dé pend de la distance des pieds par
rapport au centre de la machine. L 'espace où vous installez votre machine doit ê tre
d'au moins 40 mm plus large et 20 mm plus profond que ses dimensions.
VUE DE DESMurE DE FACE
B
largeur totale du produit mm
A
hauteur totale du produit mm
C
mm
D
profondeur avec porte ouverteÿÿ
E Minimum door clearance
to adjacent wall mm
11.2 Product dimensions
VU
USS
profondeur totale du produit
mm
850
595
460
1050
300
HW80- B 14 87 6 N
HW80- B 14 87 6 N

FR
31
1RVYRVUHFRPPDQGRQVQRWUHVHUYLFHFLHQWV+DLHUHWWLLVDWLRQGHSLFHVGHUH
FKDQJHGRULJLQH
6LYRVDYHQSUREPHDYHFDSSDUHLYHLHYRVUIUHUDVHFWLRQ'311*(
6LYRVQHWURYHSDVGHVRWLRQYHLHFRQWDFWHU
▶ YRWUHYHQGHURFDR
▶ UHQGHYRVVUHVLWHKDLHUFRPGDQVDRQH6HUYLFHHWVSSRUWYRV
WURYHUHGHVQPURVGHWSKRQHHWQH49RVSRUUHJDHPHQW
FRQWDFWHUHVHUYLFHGHUFDPDWLRQ
3RUFRQWDFWHUQRWUH6HUYLFHUDVVUHYRVTHHVLQIRUPDWLRQVFLDSUVVRQWGLV
SRQLEHV
HVLQIRUPDWLRQVVRQWGLVSRQLEHVVUDSDTHVLJQDWLTH
Modèle____________________N°desérie_____________________
VériezégalementlaCartedegarantiefournieavecleproduitencasdegarantie.
3RUGHV UHQVHLJQHPHQWVJQUDFRQFHUQDQWHVHQWUHSULVHVYRVWURYHUHFL
jointesnosadressesenEurope:
GUHHGHLHUHURH
GUHHRH GUHHRH
LH
+DLHU(URSH7UDGLQJ65/
9LD'HULVWRIRULV
9DUHVH
,7/,(
UFH
+DLHUUDQFH66
UHGHV*UDYLHUV
1HLVU6HLQH
51(
H
RU
+DLHU,EHULH6/
3J*DUFLDDULD
DUFHRQH
(63*1(
HLTH
HLTH
HPERU
+DLHUQ6
QGHUHFKW
5RWHGH/HQQLN
(/*,48(
HPH
ULFKH
+DLHUHPDJQH*PE+
+HHWW3DFNDUG6WU
'DG+RPEUJ
ALLEMAGNE
RRH
ELTH
FKTH
RULH
*UFH
RPLH
LH
+DLHU3RRJQH6SRR
-HURRLPVNLH
DUVDD
POLOGNE
LHG
.LGRP
+DLHUSSLDQFHV8.
R/WG
OneCrownSquare
KUFK6WUHHW(DVW
RNLQJ6UUH*8
+5
5RDPH8QL
3RUGHSVDPSHVLQIRUPDWLRQVYHLHFRQVWHUHVLWHKDLHUFRP
6HUYLFHFLHQWH


1/
HHGHG
H
1

'DQN
/HHGH
DDVFKLHODLNHHLOLKHLGVLIRPDWLH
OJHPHQHLQIRUPDWLHHQWLSV
0LOLHLQIRUPDWLH
9HUZLMGHUL
+HOS KHW PLOLH HQ GH JHRQGKHLG WH EHVFKHUPHQ
3ODDWVGHYHUSDNNLQJLQGHJHVFKLNWHFRQWDLQHUVRPKHW
WHUHFFOHQ+HOSDIYDOYDQHOHNWULVFKHHQHOHNWURQLVFKH
DSSDUDWHQ UHFFOHQ *RRL DSSDUDWHQ GLH YRRULHQLMQ
YDQGLWVPERROQLHWZHJPHWKLVKRGHOLMNDIYDO5H
WRUQHHUKHWSURGFWQDDUZORNDOHLQVWHOOLQJRIQHHP
FRQWDFWRSPHWZJHPHHQWHOLMNNDQWRRU
DNRRUZDDNRRSDGLW+DLHUSURGFW
/HHVGHHKDQGOHLGLQJJURQGLJYRRUKHWDSSDUDDWLQJHEULNQHHPW'HKDQGOHLGLQJEHYDW
EHODQJULMNHLQIRUPDWLHGLHDOKHOSHQZDSSDUDDWRSWLPDDOWHJHEULNHQHQKHWYHLOLJHQ
FRUUHFWWHLQVWDOOHUHQJHEULNHQHQRQGHUKRGHQ
%HZDDUGHHKDQGOHLGLQJRGDWKHPVWHHGVNQWUDDGSOHJHQYRRUKHWYHLOLJHQFRUUHFW
JHEULNYDQKHWDSSDUDDW
OVKHWDSSDUDDWYHUNRRSWZHJVFKHQNWRIDFKWHUODDWZDQQHHUYHUKLVWPRHWGHH
KDQGOHLGLQJRRNPHHJHYHQRGDWGHQLHZHHLJHQDDUYHUWURZGNDQUDNHQPHWKHWDSSD
UDDWHQGHYHLOLJKHLGVZDDUVFKZLQJHQ
:56&+8:,1*
LVLFRRSOHWVHOVRIHVWLNNL
2QWNRSSHOKHWDSSDUDDWYDQKHWQHWZHUN6QLMGKHWQHWVQRHUGRRUHQYHUZLMGHUKHW9HU
ZLMGHUGHVFKDUQLHUHQRPWHYHUPLMGHQGDWNLQGHUHQRIKLVGLHUHQLQKHWDSSDUDDWYDVW
JHNOHPGNQQHQUDNHQ

,QKRG
9HLOLJKHLGVLQIRUPDWLH
3URGFWEHVFKULMYLQJ
%HGLHQLQJVSDQHHO
3URJUDPPDV
9HUEULN
'DJHOLMNVJHEULN
0LOLHYULHQGHOLMNZDVVHQ
=RUJHQUHLQLJLQJ
3UREOHHPRSORVVHQ
,QVWDOODWLH
7HFKQLVFKHJHJHYHQV
.ODQWHQGLHQVW

9HLOLJKHLGVLQIRUPDWLH
1/
9RRUKHWDSSDUDDWGHHHUVWHPDDOLVFKDNHOWPRHWKHWHLOL
KHLGVDGLHVOHH
:56&+8:,1*
9RRUGHHHUVWHLHEULNDPH
▶ =RUJHUYRRUGDWHUJHHQVFKDGHLVRSJHWUHGHQWLMGHQVKHWWUDQVSRUW
▶ =RUJHUYRRUGDWDOOHWUDQVSRUWERWHQYHUZLMGHUGLMQ
▶ 9HUZLMGHUDOOHYHUSDNNLQJHQELWHQGHEUWYDQNLQGHUHQEHZDUHQ
▶ +HWDSSDUDDWPRHWDOWLMGGRRUPLQLPPWZHHSHUVRQHQZRUGHQ
JHGUDJHQRPGDWKHWRZDDULV
DHOLMNVHEULN
▶ 'LWDSSDUDDWPDJZRUGHQJHEULNWGRRUNLQGHUHQYDQMDDUHQ
RGHUHQSHUVRQHQPHWHHQYHUPLQGHUGHIVLHNJHYRHOVPDWLJ
HQPHQWDDOYHUPRJHQRIHHQJHEUHNDDQHUYDULQJHQNHQQLVDOV
HRQGHUWRHLFKWVWDDQRILQVWUFWLHVNULMJHQPHWEHWUHNNLQJWRW
KHWYHLOLJHJHEULNYDQKHWDSSDUDDWHQGHEHWURNNHQULVLFRV
▶ +RGKHWDSSDUDDWLWGHEUWYDQNLQGHUHQMRQJHUGDQMDDURG
WHQLMHRQGHUFRQVWDQWWRHLFKWVWDDQ
▶ .LQGHUHQPRJHQQLHWVSHOHQPHWKHWDSSDUDDW
▶ /DDWNLQGHUHQRIKLVGLHUHQQLHWGLFKWELMKHWDSSDUDDWNRPHQDOV
GHGHUJHRSHQGLV
▶ %HZDDUDOOHZDVPLGGHOHQLWGHEUWYDQNLQGHUHQ
▶ 6OLWULWVVOLWLQJHQEHYHVWLJORVVHGUDGHQHQOHWHURSGDWNOHLQH
LWHPVQLHWYHUVWULNWNQQHQUDNHQ,QGLHQQRRGDNHOLMNPRHWHHQ
DNRIQHWJHEULNHQ
▶ 8PDJQLHWRSKHWDSSDUDDWGUNNHQRIKHWJHEULNHQRSEORWH
YRHWHQRIPHWQDWWHRIYRFKWLJHKDQGHQRIYRHWHQ
▶ 8PDJKHWDSSDUDDWQLHWDIGHNNHQRIRPZLNNHOHQWLMGHQVGHZHU
NLQJRIDFKWHUDIRGDWHYHQWHHOYRFKWNDQYHUGDPSHQ
▶ 8PDJJHHQZDUHYRRUZHUSHQRIEURQQHQYDQZDUPWHRIYRFKW
ERYHQRSKHWDSSDUDDWSODDWVHQ
▶ *HEULNRIEHZDDUJHHQRQWYODPEDDUZDVPLGGHORIVWRPHULMUHL
QLJLQJVPLGGHOGLFKWELMKHWDSSDUDDW
▶ *HEULNJHHQRQWYODPEDDUVSUDVGLFKWELMKHWDSSDUDDW
▶ :DVJHHQNOHGLQJVWNNHQGLHEHKDQGHOGZHUGHQPHWRSORVPLG
GHOHQLQKHWDSSDUDDWRQGHUHYRRUDILQGHOFKWWHKHEEHQODWHQ
GURJHQ

1/
9HLOLJKHLGVLQIRUPDWLH
:56&+8:,1*
DHOLMNVHEULN
▶ 8PDJGHVWHNNHUQLHWYHUZLMGHUHQRILQYRHUHQLQGHDDQZHLJKHLG
YDQRQWYODPEDDUJDV
▶ 8PDJVFKLPUEEHURIVSRQVDFKWLJPDWHULDDOZDVVHQLQKHHWZDWHU
▶ 8PDJJHHQZDVJRHGZDVVHQGDWYLOLVPHWEORHP
▶ 8PDJGHODGHPHWKHWZDVPLGGHOQLHWRSHQHQWLMGHQVHHQZDVFFOV
▶ 'UNQLHWRSGHGHUWLMGHQVHHQZDVFFOV=HZRUGWQDPHOLMNKHHW
▶ 8PDJGHGHUQLHWRSHQHQDOVKHWZDWHUQLYHDLFKWEDDULVGRRU
KHWNLMNYHQVWHU
▶ 8PDJGHGHUQLHWRSHQIRUFHUHQ'HGHULVLWJHUVWPHWHHQ
HOIJUHQGHOHQGPHFKDQLVPHHQHRSHQWNRUWDDQKHWHLQGHYDQ
GHZDVSURFHGUH
▶ 6FKDNHOKHWDSSDUDDWLWQDHONSURJUDPPDHQYRRUURWLQHRQ
GHUKRGVZHUNHQLWYRHUHQ9HUZLMGHUGHVWHNNHULWKHWVWRSFRQ
WDFWRPHOHNWULFLWHLWWHEHVSDUHQHQLWYHLOLJKHLGVRYHUZHJLQJHQ
▶ 8 PDJ QRRLW DDQ KHW QHWVQRHU WUHNNHQ RP GH VWHNNHU LW KHW
VWRSFRQWDFWWHYHUZLMGHUHQ
2GHUKRGUHLLH
▶ =RUJHUYRRUGDWNLQGHUHQRQGHUWRHLFKWVWDDQDOVHKHWDSSD
UDDWUHLQLJHQRIRQGHUKRGHQ
▶ 9HUZLMGHU GH VWHNNHU LW KHW VWRSFRQWDFW YRRU RQGHUKRGV
ZHUNDDPKHGHQLWYRHUW
▶ +RGKHWRQGHUVWHGHHOYDQKHWNLMNYHQVWHUVFKRRQHQRSHQGH
GHUHQGHODGHPHWKHWZDVPLGGHODOVKHWDSSDUDDWQLHWLQJH
EULNLVRPJHUWMHVWHYRRUNRPHQ
▶ *HEULNJHHQZDWHUVSUDRIVWRRPRPKHWDSSDUDDWWHUHLQLJHQ
▶ OV KHW QHWVQRHU EHVFKDGLJG LV PRHW KHW ZRUGHQ YHUYDQJHQ
doordefabrikant, zijnonderhoudsdienst of dergelijkgekwali
FHHUGHSHUVRQHQRPLHGHUULVLFRLWWHVOLWHQ
▶ 3UREHHUKHWDSSDUDDWQRRLWHOIWHUHSDUHUHQ1HHPFRQWDFWRS
PHWRQHNODQWHQGLHQVWRPUHSDUDWLHVWHODWHQLWYRHUHQ
,VWDOODWLH
▶ +HWDSSDUDDWPRHWLQHHQJRHGJHYHQWLOHHUGHORFDWLHZRUGHQJH
SODDWVW=RUJYRRUHHQORFDWLHGLHWRHODDWGHGHUYROOHGLJWHRSHQHQ

9HLOLJKHLGVLQIRUPDWLH
1/
HRRGHEULN
'LWDSSDUDDWLV HQNHOEHGRHOGYRRUZDVJRHG GDWLQGHZDVPDFKLQH
PDJZRUGHQJHZDVVHQ8PRHWDOWLMGGHLQVWUFWLHVYROJHQYHUPHOG
RSKHWHWLNHWYDQHONNOHGLQJVWN+HWLVLWVOLWHQGEHGRHOGYRRUJH
EULNELQQHQLQKLV+HWLVQLHWEHGRHOGYRRUFRPPHUFLHHORILQGV
WULHHOJHEULN
:LMLJLQJHQDDQKHWDSSDUDDWLMQQLHWWRHJHODWHQ2QEHGRHOGJHEULN
NDQJHYDDUHQKHWYHUOLHVYDQGHJDUDQWLHHQDDQVSUDNHOLMNKHLGVFODLPV
EHWHNHQHQ
:56&+8:,1*
,VWDOODWLH
▶ ,QVWDOOHHU KHW DSSDUDDW QRRLW ELWHQ RS HHQ YRFKWLJH ORFDWLH RI
LQHHQORFDWLHZDDUZDWHUOHNNHQNQQHQRSWUHGHQRDOVRQGHURI
GLFKWELMHHQZDVWDIHO,QKHWJHYDOYDQHHQZDWHUOHNPRHWGHHOHN
WULVFKHYRHGLQJORVNRSSHOHQHQGHPDFKLQHQDWUOLMNODWHQGURJHQ
▶ ,QVWDOOHHURIJHEULNKHWDSSDUDDWHQNHODOVGHWHPSHUDWUKRJHU
LVGDQr&
▶ 3ODDWVKHWDSSDUDDWQLHWUHFKWVWUHHNVRSHHQWDSLMWRIGLFKWELMHHQ
PURIPHEHOVWN
▶ 8PDJKHWDSSDUDDWQLHWLQVWDOOHUHQLQGLUHFWRQOLFKWRILQGHEUW
YDQZDUPWHEURQQHQELMYIRUQLHQYHUZDUPLQJ
▶ =RUJ HUYRRU GDW GH HOHNWULVFKH LQIRUPDWLH RS KHW QDDPSODDWMH
RYHUHHQVWHPWPHWGHVWURRPWRHYRHU=RQLHWPRHWFRQWDFW
RSQHPHQPHWHHQHOHNWULFLHQ
▶ *HEULNJHHQPOWLVWHNNHUDGDSWHUVRIYHUOHQJVQRHUHQ
▶ =RUJ HUYRRU GDW HQNHO KHW JHOHYHUGH QHWVQRHU HQ VODQJHQVHW
ZRUGHQJHEULNW
▶ =RUJHUYRRUGDWKHWQHWVQRHUHQGHVWHNNHUQLHWEHVFKDGLJGLMQ,Q
GLHQEHVFKDGLJGPRHWKHWZRUGHQYHUYDQJHQGRRUHHQHOHNWULFLHQ
▶ *HEULNHHQDIRQGHUOLMNHDDUGJHOHLGHUYRRUGHYRHGLQJGLHHHQ
YRGLJWRHJDQNHOLMNPRHWLMQQDGHLQVWDOODWLH+HWDSSDUDDWPRHW
JHDDUGZRUGHQ
(NHORRUKHW9.+HWQHWVQRHUYDQKHWDSSDUDDWLVLWJHUVW
PHW HHQGULHSROLJHVWHNNHUDDUGLQJGLHSDVWLQ HHQ GULHSROLJH
JHDDUGH VWHNNHU6QLM GH GHUGHSLQDDUGLQJ QRRLW ZHJRI GH
PRQWHHUHQLHW'HVWHNNHUPRHWRRNQDGHLQVWDOODWLHWRHJDQ
NHOLMNLMQ
▶ =RUJHUYRRUGDWGHQDGHQHQGHYHUELQGLQJHQYDQGHVODQJVWHYLJ
LMQDDQJHEUDFKWHQGDWHUJHHQOHNNHQLMQ

NL
2-Productbeschrijving
7
2.1 Afbeelding van het apparaat
Voorzijde (afb. 2-1): Achterzijde (afb. 2-2):
2.2 Accessoires
Controleer de accessoires en documenten op basis van de onderstaande lijst (afb. 2-3):
Opmerking:
Omwille van technische wijzigingen en uiteenlopende modellen kunnen de illustraties in
de volgende hoofdstukken verschillen van uw model.
2-3
Underwear
Sport
Anti-allergy
Daily Wash
Synthetic
Mix
Baby Care Hygienic
Self Clean
Spin/Drain
Express15 min
Duvet
Delicate
Wool
Temp. SpeedDelay Start/PauseExtra
Rinse
Cotton Cot ton+
HW80-B14876
Steam
8kg
1 Wasmiddel /
Wasverzachter lade
2 Werkblad
3 Scherm
4 Programma selec-
tieschakelaar
5 Paneel
6 Onderhoudsluik
7 Instelbare voetjes
8 Portier handvat
1 Metalen staaf (I1 - I2)
2 Transportbouten (T1-T4)
3 Versterking achterpaneel
4 Netsnoer
5 Waterinlaatklep
6 Afvoerslang
7 Schroeven versterking achter-
paneel
2-1
2-2
Aanvoers-
lang set
1)
6 Afdicht-
pluggen
Afvoerslang
beugel
Gebruikers-
handleiding
Garantie
kaart
1
6
8
7
3 5
1 2 4 5 6 73
42
Trillingdem-
perblokken
2x
2x

HW80-B14876N
Sport
Synthetisch
Synthétique
Mix
Baby Care
Express 15 min
Eco 40-60
Temp. Tr/min
Startuitstel
Start/Pause
Extra spoelen
Rinçage +
Stoom
VapeurFin différée
Délicat
Temp. Tr/min
Startuitstel
Start/Pause
Extra spoelen
Rinçage +
Stoom
VapeurFin différée
3-Bedieningspaneel
NL
8
3
Opmerking: Geluidssignaal
In de volgende situaties weerklinkt een geluidssignaal:
▶ wanneer een knop wordt ingedrukt
▶ wanneer men aan de programma
selectieknop draait
▶ aan het einde van een programma
▶ In het geval van storingen
Het geluidssignaal kan indien noodzakelijk worden gedeselecteerd; zie DAGELIJKS GEBRUIK.
1 Wasmiddel / Wasverzachterlade
2 Scherm
3 Programma selectieschakelaar
4 “Aan/Uit"-knop
5 “Start/Pause“-knop
6 Stoom
7 Extra spoelen
8 Tr/min
9 Temp.
10
11 Kinderslot
12 Startuitstel
1211
89
10
7 6 5
2 31
4
Functieknoppen
3.1 Wasmiddel lade
1
Bakje : Bleekmiddel voor katoen/synthetisch
programma.
2
Bakje : Vloeibaar wasmiddel voor programma
3
Bakje : Wasverzachter, conditioner, etc.
4
Bakje : Poeder wasmiddel voor programma
Raadpleeg aub de informatie op de verpakking om te
zien welke hoeveelheden wasmiddel worden aangera-
den bij verschillende temperaturen.
3.2 Scherm
Indien de machine aan staat, geeft het scherm de wer-
kelijke status aan op de verschillende delen ervan. In-
formatie zoals wastijden, centrifugesnelheid, tempe-
ratuur, enz. worden weergegeven (afb. 3-2).
3-1
3-2
Temp. Tr/min
Startuitstel
Start/Pause
Extra spoelen
Rinçage +
Stoom
VapeurFin différée

NL
3-Bedieningspaneel
9
Gebruikte symbolen:
3.3 Programmakeuze
Door de draaiknop (afb. 3.3) kan tussen de 16 program-
ma’s worden gekozen. De gemaakte keuze licht op en
de standaardinstellingen ervan worden weergegeven.
3.4 “Aan/Uit”-knop
Druk zacht op deze knop (afb. 3-4) om in te schakelen,
het scherm licht op. Houd de knop vervolgens ca. 2 se-
conden ingedrukt om uit te schakelen. Als er geen on-
derdeel van het paneel of programma wordt ingescha-
keld, zal de machine na enige tijd automatisch
uitschakelen.
3.5 "Start/Pause“-knop
Druk zacht op deze knop (afb. 3-13) om het weergege-
ven programma te starten of te onderbreken.
Displ
a
y
s
y
mbols:
Programmastatus indicatie Programmacyclus indicatie
Bedieningspaneel
is vergrendeld
Scherm voor wasduur, eindtijd
uitstel en foutcodes en onderhoud
sinformatie
Resterende werktijd
Resterende
uitstelduur
Spoelcyclus
Wascyclus
Zwier/draineercyclus
Automatische weging
Stoom
3-3
3-4
Start/Pause
3-5
Sport
Synthetisch
Synthétique
Mix
Baby Care
Express 15 min
Eco 40-60
Délicat

%HGLHQLQJVSDQHHO
)FWLHNRSSH
'H IQFWLHNQRSSHQ DIE VFKDNHOHQ ELMNRPHQGH
RSWLHVLQYRRUKHWJHVHOHFWHHUGHSURJUDPPDYRRUGH
VWDUW YDQ KHW SURJUDPPD 'H EHWURNNHQ LQGLFDWRUHQ
ZRUGHQZHHUJHJHYHQ
OVKHWDSSDUDDWZRUGWLWJHVFKDNHOGRIHHQQLHZSUR
JUDPPDLQJHVWHOGZRUGHQDOOHRSWLHVLWJHVFKDNHOG
OVHHQNQRSPHHUGHUHRSWLHVKHHIWNDQGHJHZHQVWH
RSWLH ZRUGHQJHVHOHFWHHUG GRRUGH NQRSDFKWHUHHQ
YROJHQVLQWHGUNNHQ
2P GH LQVWHOOLQJ WH YHUZLMGHUHQ RI GH LQVWHOOLQJHQ WH
DQQOHUHQGUNWRSGHIQFWLHNQRSWRWGHJHZHQVWH
/('ODPSMHVLWJDDQ
1LHWDOOHRSWLHVLMQEHVFKLNEDDUYRRUDOOHSURJUDPPDV
LH352*5006
2SPHUNL)DEULHNVLVWHOOLH
VoordebesteresultatenbijelkprogrammaheeftHaierspeciekeinstellingengepro
JUDPPHHUG'HHLQVWHOOLQJHQZRUGHQDDQJHUDGHQLQGLHQHUJHHQVSHFLDOHYHUHLVWHQLMQ
)FWLH(WUDVSRHOH
'UNRSGHHNQRSDIERPKHWZDVJRHGLQWHQ
VLHYHUWHVSRHOHQPHWVFKRRQZDWHU'LWZRUGWDDQEH
YROHQYRRUSHUVRQHQPHWHHQJHYRHOLJHKLG
'RRUGHNQRSPHHUGHUHPDOHQLQWHGUNNHQNDQPHQ
QWRWGULHELMNRPHQGHFFOLVHOHFWHUHQ
)FWLH6WDUWLWVWHO
'UNRSGHHNQRSDIERPKHWSURJUDPPDLW
JHVWHOGWHVWDUWHQ+HWLWVWHONDQZRUGHQYHUKRRJGLQ
VWDSSHQYDQPLQWHQYDQWRWU:DQQHHU
ELMYRRUEHHOG ZRUGW ZHHUJHJHYHQ EHWHNHQW GDW
GDWKHWZDVSURJUDPPDDOHLQGLJHQQDUHQPL
QWHQ'UNRSGH6WDUW3DHNQRSRPPHWLWVWHO
WHVWDUWHQ
'HKRHYHHOKHLGLWVWHOPRHWPHHULMQGDQGHGUYDQ
KHWZDVSURJUDPPDQGHUVDOKHWSURJUDPPDGLUHFW
VWDUWHQ
'UDDLDDQGHSURJUDPPDNQRSRPKHWLWVWHOWHGHDF
WLYHUHQ
2SPHUNL9ORHLEDDUZDVPLGGHO
OVYORHLEDDUZDVPLGGHOJHEULNWZRUGWKHWDIJHUDGHQKHWVWDUWLWVWHOLQWHVFKDNHOHQ
Extra spoelen
Rinçage +
Startuitstel
Fin différée
Temp. Tr/min
Startuitstel
Start/Pause
Extra spoelen
Rinçage +
Stoom
VapeurFin différée
Temp. Tr/min
Startuitstel
Start/Pause
Extra spoelen
Rinçage +
Stoom
VapeurFin différée

NL
3-Bedieningspaneel
11
3.6.3 Functie “ “
Druk op de knop “ ” (afb. 3-6-3) om een afwij-
kende programmaduur ter kiezen. Deze functie is niet
beschikbaar voor “Zelfreinigend” and“Delicaat”
“Zwieren” programma’s.
3.6.4 Functie “Stoom”
Met deze knop (afb. 3-6-4) kan het stoomprogramma
worden gekozen. Als deze functie ingeschakeld wordt,
is de standaardtemperatuur de maximale tempera-
tuur van het geselecteerde programma. Deze funxtie
kan worden gebruikt met de programma’s Katoen, Mix,
Synthetisch, Ondergoed, Baby Care en Anti-allergie.
Indien u “Stoom” selecteert zal het lampje gaan bran-
den om u te waarschuwen. Wanneer u deze functie
gebruikt, kunt u de temperatuur niet instellen. Deze
functie wordt uitgeschakeld wanneer u de temperatuur
aanpast. Zet de machine aan en selecteer dit program-
ma. Dit programma kan niet worden gekozen wanneer
de machine al in werking is.
3.6.5 Functie "Tr/min“
Druk op deze knop (afb. 3-6-5) om de centrifugesnel-
heid in te stellen. Indien er geen waarde wordt weerge-
geven, zal het wasgoed niet worden gecentrifugeerd.
3.6.6 Functie “Temp.”
Druk op deze knop (afb. 3-8) om de wastemperatuur
van het programma te wijzigen.
3.6.7 Kinderslot
Deze optie blokkeert alle paneelelementen tegen
activering. Druk 3 seconden tegelijkertijd op de
knoppen “ ” en “Startuitstel” (afb. 3-14) nadat
het programma is gestart; het kinderslot licht op op het
scherm. Herhaal dit om te ontgrendelen.
n
Stoom
Vapeur
Temp.
Tr/min
3-6-3
3-6-4
3-6-5
3-6-6
Startuitstel
Fin différée
3-6-7

4-Programma's
NL
12
Max.
lading
in kg
HW100/
HW80
Temperatuur Voorin-
stelling
centrifu-
geren tr/
min
in tpm
Functie
Startuitstel
Stoom
Extra spo-
elen
i-time
in °C
Program-
ma Vezeltypemax
Voorin-
stelling
Katoen 90
2)
40
•
º
/
•
Katoen
• • • •
Mix 60 30
•
º
/
•
Licht vuil gemengd
wasgoed van katoen
en synthetische
• • • •
Synthe-
tisch
60 40
•
º
/
•
Synthetische of
• • • •
Onder-
goed
60 40
•
º
/
•
Katoen/Synthetisch
• • • •
Baby Care
90
2)
40
•
º
/
•
Katoen/Synthetisch
• • • •
Anti-al-
lergie
90
2)
60
•
º
/
•
Katoen/Synthetisch
• • • •
Sport 40 20
•
º
/
•
Sportkledij
•
/
• •
•
º
/
•
/
Delicaat 30 30
•
º
/
•
Zijde
•
/
•
/
Dekbed 40 40
•
/
• •
/
• •
Express
15 min
3)
40 *
•
º
/
•
Katoen/Synthetisch
•
/
• •
Hygië-
nisch
90
2)
90
2)
•
º
/
•
Katoen/Synthetisch
•
/
• •
Wol 40 *
•
º
/
•
Wol
•
/
• •
Zelfreini-
gend
90
2)
90
2)
º
/ /
/
/ / / / /
Zwieren / / / / / / / / /
1)
Met betrekking tot droog wasgoed. *: Water is niet verwarmd.
2)
Kies 90 °C enkel als wastemperatuur voor hygiënische vereisten.
3)
Verminder de hoeveelheid wasmiddel omdat de programmaduur kort is.
1)
Oplosmiddel compartiment voor:
1
Bleekmiddel
2
Vloeibaar wasmiddel
3
Wasverzachter, Conditioner, enz.
4
Poeder wasmiddel
•
Ja,
º
Optioneel, / Neen
Eco 40-6
0
atoen20°CK
8
8
4
4
4
4
2
1
2
1
4
1
0
8
8
/
20
/
20
•
º
/
/
•
Katoen
Katoen
/
1400
1000
1200
1000
1000
1000
800
1400
800
1000
1000
800
600
1000
600
/
•
/ / /
• •
/

NL
5-Verbruik
13
Opmerking: Automatisch gewicht
Het apparaat is uitgerust met een lading herkenning. Met een kleine lading wordt de
energie, het water en de wasduur automatisch verminderd in sommige programma's.
Het scherm geeft weer.
Scan Q R -code op het energielabel voor informatie over energieverbruik.
Het werkelijke energieverbruik kan verschillen van het opgegeven verbruik naar lokale
omstandigheden.

'DJHOLMNVJHEULN
1/
:DVRHGRRUEHUHLGH
▶ 6RUWHHUGHNOHGLMQDDUJHODQJGHVWRINDWRHQVQ
WKHWLVFKZRORILMGHHQYLOKHLGDIE/HW
RSGHRQGHUKRGVVPEROHQRSGHHWLNHWWHQ
▶ 6FKHLGZLWWHNOHGLMYDQJHNOHUGHNOHGLQJVWNNHQ
:DVJHNOHUGHWHWLHOHHUVWPHWGHKDQGRPWH
FRQWUROHUHQRIGHNOHUHQYHUEOHNHQRILWORSHQ
▶ 0DDNGHDNNHQOHHJVOHWHOVPQWHQHWFHQ
YHUZLMGHUKDUGHUHGHFRUDWLHYHYRRUZHUSHQELMY
VSHOGHQ
▶ .OHGLQJVWNNHQ RQGHU RPHQ GHOLFDDW ZDV
goedenjngewoventextielzoalsjnegordijnen
PRHWHQLQHHQZDVDNZRUGHQJHSODDWVWKDQG
ZDVVHQRIGHVWRPHULMLMQEHWHUHRSWLHV
▶ 6OLW ULWVVOLWLQJHQ YHOFUR EHYHVWLJLQJHQ HQ KD
NHQRUJHUYRRUGDWGHNQRSSHQVWHYLJLMQDDQ
JHQDDLG
▶ 3ODDWV JHYRHOLJH LWHPV RDOV ZDVJRHG RQGHU
HHQVWHYLJHRRPGHOLFDDWRQGHUJRHGHQNOHLQH
LWHPV RDOV VRNNHQ ULHPHQEHKDV HWF LQ HHQ
ZDVDN
▶ 2QWYRZJURWHVWNNHQZDVJRHGRDOVEHGGHQ
JRHGVSUHLHQHWF
▶ 'UDDL MHDQV JHGHFRUHHUGH RI NOHULQWHQVLHYH
NOHGLQJELQQHQVWHELWHQOLHIVWDIRQGHUOLMNZDV
VHQ
9RHGL
6OLW GH ZDVPDFKLQH DDQ RS KHW OLFKWHW 9 WRW
9a+DIE 5DDGSOHHJRRN GHVHFWLH ,1
67//7,(
:DWHUHUELGL
▶ &RQWUROHHURIGHZDWHUWRHYRHUVFKRRQHQLQJRHGH
VWDDWLVYRRUGHZDWHUDDQYRHUVODQJDDQVOLW
▶ 'UDDLGHNUDDQRSHQDIE
2SPHUNL6WUDNKHLG
9RRUJHEULNPRHWFRQWUROHUHQRSOHNNHQLQGHYHUELQGLQJHQWVVHQGHNUDDQHQGH
LQODDWVODQJGRRUGHNUDDQRSHQWHGUDDLHQ
23*(/(7
1LHWWHWLHOHQNOHLQHORVVHYRRUZHUSHQRIYRRUZHUSHQPHWHHQVFKHUSHUDQGNQQHQ
GHIHFWHQYHURRUDNHQHQVFKDGHWRHEUHQJHQDDQRZHOGHNOHGLMDOVGHPDFKLQH

1/
'DJHOLMNVJHEULN
2GHUKRGVWDEHO
:DVVH
:DVEDDUWRWr&
QRUPDDOSURJUDPPD
:DVEDDUWRWr&
QRUPDDOSURJUDPPD
:DVEDDUWRWr&
GHOLFDDWSURJUDPPD
:DVEDDUWRWr&
QRUPDDOSURJUDPPD
:DVEDDUWRWr&
GHOLFDDWSURJUDPPD
:DVEDDUWRWr&
KHHOGHOLFDDWSUR
JUDPPD
:DVEDDUWRWr&
QRUPDDOSURJUDPPD
:DVEDDUWRWr&
GHOLFDDWSURJUDPPD
:DVEDDUWRWr&
KHHOGHOLFDDWSUR
JUDPPD
+DQGZDVVHQ
PDr&
1LHWZDVVHQ
OHNH
%OHNHQWRHJHVWDDQ (QNHOUVWRI
QLHWFKORRU
1LHWEOHNHQ
URH
7URPPHOGURJHQ
PRJHOLMNQRUPDOH
WHPSHUDWU
7URPPHOGURJHQ
PRJHOLMNODJHUHWHP
SHUDWU
1LHWWURPPHOGURJHQ
'URJHQDDQGHZDVOLMQ 3ODWGURJHQ
6WULMNH
6WULMNHQRSHHQPDL
PPWHPSHUDWUWRW
r&
6WULMNHQRSHHQJH
PLGGHOGHWHPSHUD
WUWRWr&
6WULMNHQRSHHQODJH
WHPSHUDWUWRW
r&RQGHUVWRRP
VWRRPVWULMNHQNDQ
RQKHUURHSHOLMNH
VFKDGHYHURRUDNHQ
1LHWVWULMNHQ
3URIHVVLRHOHWHWLHOHURUL
6WRPHQLQWUH
WUDFKORRUHWKHHQ
6WRPHQLQNRROZD
terstoen
1LHWVWRPHQ
3URIHVVLRQHHOQDW
UHLQLJHQ
1LHWSURIHVVLRQHHO
QDWUHLQLJHQ
+HWDSSDUDDWODGH
▶ 3ODDWVKHWZDVJRHGVWNYRRUVWNLQGHWURPPHO
▶ 1LHWRYHUODGHQ/HWRSGHYHUVFKLOOHQGHPDLPPODGLQJQDDUJHODQJKHWSURJUDP
PD'HDOJHPHQHUHJHOYRRUGHPDLPDOHODGLQJ/DDWYLMIWLHQFHQWLPHWHUWVVHQGH
ODGLQJHQWURPPHO
▶ 6OLWKHWGHNVHOYRRULFKWLJ=RUJHUYRRUGDWHUJHHQZDVJRHGWVVHQGHGHUJH
NOHPGUDDNW

6-Dagelijks gebruik
NL
16
6.5 Het wasmiddel selecteren
▶ -
teit van het wasmiddel.
▶ Gebruik enkel wasmiddel dat is goedgekeurd voor wasmachines.
▶ -
▶ Let altijd op de aanbevelingen van de wasmiddel fabrikant.
▶ Gebruik geen chemische reinigingsmiddelen zoals trichloroethyleen en gelijkaardi-
ge producten.
Kies het beste wasmiddel
Programma
Type wasmiddel
Universeel Kleur Delicaat Speciaal Wasverzachter
Katoen
Mix
Synthetisch
Ondergoed
Baby Care
Anti-allergie
Sport
Dekbed
Express 15 min
Hygiënisch
Wol
Zelfreinigend
Zwieren
L = gel-/vloeibaar wasmiddel P = poeder wasmiddel O = optioneel
_
= nee
Als u vloeibaar wasmiddel gebruikt, wordt het afgeraden het startuitstel in te schakelen.
We raden aan de volgende producten te gebruiken:
▶ Waspoeder: 20°C tot 90°C* (optimaal gebruik: 40-60°C)
▶ Kleur wasmiddel: 20°C tot 60°C* (optimaal gebruik: 30-60°C)
▶ Wol/delicaat wasmiddel: 20°C tot 30°C* (= optimaal gebruik:)
* Kies 90 °C enkel als wastemperatuur voor hygiënische vereisten.
Delicaat
Eco 40-6
0
atoen20°CK
L/P
L
-
-
-
-
-
-
L
-
L/P
L/P
-
L/P
-
-
-
L/P
L/P
L/P
--
-
-
-
L
-
L/P
L/P
-
L/P
-
-
-
-
-
-
L/P
L/P
L/P
L/P
L/P
-
L/P
-
-
L
-
-
-
L/P
-
-
-
L/P
L/P
L/P
L/P
L/P
-
L/P
-
-
L/P
-
L/P
-
L/P
o
o
o
o
o
o
o
o
o
-
o
o
o
-
-
o

NL
6-Dagelijks gebruik
17
6.7 Het apparaat inschakelen
Druk op de "Aan/uit“-knop om het apparaat in te scha-
kelen (afb. 6-7).
6.6 Wasmiddel toevoegen
1. Open de wasmiddellade.
2. Plaats de vereiste middelen in de overeenstem-
mende bakjes (afb. 6-6)
3. Sluit de lade zachtjes.
Opmerking:
▶ Verwijder wasmiddelresten vóór het volgende gebruik uit de wasmiddellade.
▶ Gebruik niet te veel wasmiddel of wasverzachter.
▶ Volg de instructie op de verpakking van het wasmiddel.
▶ Vul het wasmiddel altijd bij net voor het begin van de wascyclus.
▶ Geconcentreerd vloeibaar wasmiddel moet worden aangelengd met water voor het
wordt toegevoegd.
▶ Gebruik geen vloeibaar wasmiddel als "Startuitstel" is geselecteerd.
▶ Kies de programma-instellingen zorgvuldig in overeenstemming met de onder-
houdsymbolen op alle etiketten en met de programmatabel.
6.8 Selecteer een programma
Voor een optimaal wasresultaat selecteert u een pro-
gramma dat past bij de graad van vervuiling en het
type wasgoed.
Draai aan de programmaknop (afb. 6-8) om het ge-
wenste programma te selecteren. Het relevante
LED-lampje licht op en de standaardinstellingen wor-
den weergegeven.
6.9 Individuele selecties toevoegen
Selecteer de vereiste opties en instellingen (afb. 6-9);
raadpleeg BEDIENINGSPANEEL.
6-7 6-8
Opmerking: Geurtjes verwijdering
Voor het eerste gebruik raden we aan het programma HYGIËNISCH te gebruiken zonder
lading en met een kleine hoeveelheid wasmiddel in het wasmiddel compartiment (2) of
met speciale machinereiniger om mogelijke corrumperende resten te verwijderen.
6-6
Temp. Tr/min
Startuitstel
Start/Pause
Extra spoelen
Rinçage +
Stoom
VapeurFin différée
6-9
Sport
Synthetisch
Synthétique
Mix
Baby Care
Express 15 min
Eco 40-60
Délicat

6-Dagelijks gebruik
NL
18
6.12 Na het wassen
1. Aan het eind van het programma wordt END weergegeven.
2. Het apparaat schakelt automatisch uit.
3. Verwijder het wasgoed zo snel mogelijk voor een goede zorg en om meer kreuken
te voorkomen.
4. Schakel de watertoevoer uit.
5. Ontkoppel het netsnoer.
6. Open de deur om de opbouw van vocht en geurtjes te voorkomen. Laat ze open
wanneer de machine niet in gebruik is.
6.13 De zoemer in- of uitschakelen
Het geluidssignaal kan indien noodzakelijk worden gedeselecteerd:
1. Het apparaat inschakelen.
2. Selecteer het Centrifugeren/Pompen programma.
3. Druk gelijktijdig op de knop "i-time" en "Tr/min" gedurende ca. 3 seconden.
“BEEP OFF” verschijnt en de zoemer wordt uitgeschakeld. Om de zoemer in te schakelen
drukt u opnieuw gelijktijdig op deze beide knoppen. “BEEP ON” verschijnt.
6.11 Wasprogramma onderbreken - annuleren
Een actief programma onderbreken drukt u zacht op de "Start/Pause" knop. Druk op-
nieuw op de knop om het programma te hervatten.
Om een actief programma en alle individuele instellingen te annuleren
1. Druk op de knop "Start/Pause" knop om het actieve programma te onderbreken.
2. Druk op de "Aan-uit" knop gedurende ca. 2 seconden om het apparaat uit te scha-
kelen.
3. Kies het “Centrifuge”-programma om het water weg te pompen.
4. Selecteer een nieuw programma en start het.
Opmerking: Deurvergrendeling
▶ Uit veiligheidsoverwegingen wordt de deur gedeeltelijk vergrendeld tijdens de wascy-
clus. Het is enkel mogelijk de deur te openen aan het einde van het programma of na
de annulering van het programma (zie bovenstaande beschrijving).
▶ In het geval van een hoog waterniveau, een hoge watertemperatuur en tijdens het
centrifugeren is het niet mogelijk de deur te openen; Lock wordt weergegeven.
Opmerking: Stand-bymodus / energiebesparende modus
Het ingeschakelde apparaat schakelt over op de stand-bymodus als het niet wordt in-
geschakeld binnen 2 minuten voor de start van het programma of aan het einde van het
programma. Het scherm schakelt uit. Dit bespaart energie. Om de stand-bymodus te
onderbreken, drukt u op de "Start/Pauze"-knop.
6.10 Het wasprogramma starten
Druk op de “start/pauze”-knop om te starten; machi-
ne start volgens de gekozen instellingen. Wijzigingen
zijn enkel mogelijk door het programma te annuleren.
Start/Pause
6-10

1/
0LOLHYULHQGHOLMNZDVVHQ
0LOLHHUDWZRRUGHOLMNHEULN
▶ 9RRUHHQRSWLPDDOJHEULNYDQHQHUJLHZDWHUZDVPLGGHOHQGHWLMGVGUPRHWGH
DDQEHYROHQPDLPPODGLQJJURRWWHJHEULNHQ
▶ 1LHWRYHUODGHQKDQGEUHHGWHWVVHQULPWHERYHQZDVJRHG
▶ 9RRUOLFKWYHUYLOGZDVJRHGVHOHFWHHUWKHW4LFN:DVKSURJUDPPD
▶ *HEULNHDFWHGRVHULQJHQYDQHONZDVPLGGHO
▶ Kieshetlaagstegeschiktewastemperatuur-modernewasmiddelenreinigeneciënt
RQGHUr&
▶ 9HUKRRJGHVWDQGDDUGLQVWHOOLQJHQHQNHODOVHUYHHOYOHNNHQLMQ
▶ 6HOHFWPDZLHUVQHOKHLGDOVPHQHHQELQQHQODQGVHGURRJPDFKLQHJHEULNW

8-Zorg en reiniging
NL
20
8.1 De wasmiddellade reinigen
U moet altijd goed opletten of er geen wasmiddelres-
ten zijn. Reinig de lade regelmatig (afb. 8-1):
1. Trek de lade uit tot ze stopt.
2. Druk op de vrijgave knop en verwijder de lade.
3. Spoel daarna de lade tot ze schoon is en plaats
de lade opnieuw in het apparaat.
8.2 De machine reinigen
▶ Verwijder de stekker uit het stopcontact tijdens
de reiniging en het onderhoud.
▶ Gebruik een zachte doek met vloeibare zeep om
de machinebehuizing en rubberen onderdelen te
reinigen (afb. 8-2).
▶ Gebruik geen organische chemicaliën of schu-
rende oplosmiddelen.
Om blokkeringen van de watertoevoerleiding door
-
▶ Ontkoppel het netsnoer en sluit de watertoe-
voer.
▶ Maak de watertoevoerslang los aan de achterzij-
de (afb. 8-3) van het apparaat en de kraan.
▶
8-4).
▶
8.4 De trommel reinigen
▶ Verwijder per ongeluk gewassen metalen onder-
delen zoals spelden, munten, etc. uit de trommel
(afb. 8-5) omdat ze roestvlekken en schade ver-
oorzaken.
▶ Gebruik een chloorvrij reinigingsmiddel om roest-
vlekken te verwijderen. Observeer de waarschu-
wingen van de fabrikant van het reinigingsmiddel.
▶ Gebruik geen harde voorwerpen of staalwol voor
de reiniging.
Opmerking: Zelfreinigend
Voor regelmatig onderhoud raden we aan om minimaal 1 keer per 100 wasbeurten
het programma Zelfreinigend te gebruiken om mogelijke bijtende resten te verwijde-
ren. Voeg een kleine hoeveelheid wasmiddel toe in het wasmiddelvak (2) - of gebruik
een speciale machinereiniger.
8-1
8-5
8-3
8-4
HW70-BP12758
WoolR
Under-wear
Sport
Anti-allergy
Daily Wash
Baby Care
Self Clean
Spin/Drain
Express
15 min
Duvet
Cotton
Synthetic
Mix
Cotton+
Delicate
Hygienic
capacity
7kg
°C60
°C40
Underwear
Sport
Anti-allergy
Daily Wash
Synth etic
Mix
Baby Care Hygienic
Self Clean
Spin/Drain
Express15 min
Duvet
Delicate
Wool
Temp. SpeedD ela Sy t art/PauseExtra
Rinse
Cotton C otton+
HW120-B14876
Steam
8-2
1
2

NL
8-Zorg en reiniging
21
1. Schakel de machine uit en verwijder de stekker uit
het stopcontact (afb. 8-8).
2. Open de onderhoudsklep rechts aan de voorkant
3. Gebruik een vlakke container om het water op te
vangen (afb. 8-10). Dit kan een grote hoeveelheid
water zijn!
4. Verwijder de afvoerslang en houd de uiteinden
boven de container (afb. 8-10).
5. Verwijder de afdichtingsstop uit de afvoerslang
(afb. 8-10).
6. Nadat u al het water heeft afgevoerd, sluit u de af-
voerslang en sluit u deze opnieuw aan (afb. 8-11).
8.5 Lange perioden van inactiviteit
Als het apparaat niet wordt gebruikt gedurende een
lange periode:
1. Haal de stekker uit het stopcontact (afb. 8-6).
2. Draai de kraan dicht (afb. 8-7).
3. Open de deur om de opbouw van vocht en geur-
tjes te voorkomen. Laat de deur open wanneer de
machine niet in gebruik is.
Voor het volgende gebruik moet u het netsnoer, water
invoerleiding en afvoerslang zorgvuldig controleren.
Zorg ervoor dat alles correct geïnstalleerd is en dat er
geen lekken zijn.
WAARSCHUWING!
kan heel warm zijn! Voor u een handeling uitvoert,
moet u het water laten afkoelen.
Opmerking: Zelfreinigend
Als de machine gedurende lange perioden niet wordt gebruikt raden we aan het pro-
gramma Zelfreinigend te gebruiken zonder lading en met een kleine hoeveelheid was -
middel in het wasmiddel compartiment (2) of met speciale machinereiniger om mogelij-
ke schadelijke resten te verwijderen.
▶ geen water afvoert.
▶ niet zwiert.
▶ abnormaal lawaai veroorzaakt tijdens de werking.
8-6 8-7
8-10
8-11
8-8 8-9

=RUJHQUHLQLJLQJ
1/
23*(/(7
▶ Deafdichtingvanhetpompltermoetschoonenonbeschadigdzijn.Alshetdek
VHOQLHWYROOHGLJDDQJHGUDDLGLVNDQZDWHURQWVQDSSHQ
▶ Hetltermoetaangebrachtzijn,zonietkandittotlekkenleiden.
Schroefhetpompltertegendeklokinlosenver
ZLMGHUKHWDIE
9HUZLMGHUYHURQWUHLQLJLQJHQHQYLOIE
Reinighetpomplterzorgvuldig,bijv.onderstro
PHQGZDWHUDIE
%UHQJKHWRSQLHZVWHYLJDDQDIE
6OLWGHRQGHUKRGVNOHS

NL
9-Probleemoplossen
23
het geval van een probleem moet u alle weergegeven mogelijkheden controleren en de
onderstaande instructies volgen voor u contact opneemt met de dienst na verkoop. Zie
KLANTENDIENST.
WAARSCHUWING!
▶ Voor ieder onderhoud moet u het apparaat uitschakelen en de stekker verwijderen
uit het stopcontact.
▶
worden onderhouden. Incorrecte reparaties kunnen aanzienlijke gevolgschade ver-
oorzaken.
▶ Als het netsnoer beschadigd is, moet het worden vervangen door de fabrikant, zijn
9.1 Informatiecodes
De volgende codes worden enkel weergegeven ter informatie met verwijzing naar de
wascyclus. Er hoeven geen maatregelen te worden uitgevoerd.
Code Bericht
01:25
De resterende wasduur is 1 uur en 25 minuten.
06:30
De resterende duur van het wasprogramma, inclusief eventueel uitstel, is 6 uur
en 30 minuten
.
AUTO
Automatische detectie van lading is actief; enkel voor sommige program-
ma’s.
End
De wascyclus is beëindigd. Het apparaat schakelt automatisch uit.
Lock-
Deur is gesloten vanwege hoog waterniveau, hoge temperatuur of centrifu-
geerprogramma
.
bEEP OFF
De zoemer wordt uitgeschakeld.
bEEP ON
De zoemer wordt ingeschakeld.
9.2 Probleemoplossing met weergavecode
Probleem Oorzaak Oplossing
• Pompstoring, water wordt niet volledig
afgevoerd binnen 6 minuten.
•
• Controleer de installatie van de afvoer-
slang.
E2
• Vergrendeling - fout. • Sluit de deur correct.
E4
• Het waterniveau niet bereikt na 12 mi-
nuten.
• Afvoerslang blijft doorlopend overheve-
len.
• Zorg ervoor dat de kraan volledig geopend is
en dat de waterdruk normaal is.
• Controleer de installatie van de afvoerslang.
E8
• Water beschermingsniveau - fout. • Neem contact op met de klantendienst.
De functietoetsen zijn gesloten. Het wijzigen van het programma is ongeldig.
CLR FLTR

9-Probleemoplossen
NL
24
Probleem Oorzaak Oplossing
F3
• Temperatuursensor-storing. • Neem contact op met de klantendienst.
F4
• Verwarmings-storing.
• Neem contact op met de klantendienst.
F7
• Motorstoring. • Neem contact op met de klantendienst.
FA
• Waterniveausensorstoring. • Neem contact op met de klantendienst.
FC0, FC1 of
FC2
• Abnormale communicatiefout.
• Neem contact op met de klantendienst.
Unb
• Lading niet in evenwicht - fout.
• Controleer en verdeel het wasgoed in de
trommel. Verminder de lading.
9.3 Probleemoplossen zonder weergavecode
Probleem Oorzaak Oplossing
Wasmachine werkt
niet.
• Programma is nog niet gestart.
• Deur is niet correct gesloten.
• Machine is niet ingeschakeld.
• Stroomstoring.
• Kinderslotfunctie ingeschakeld.
• Controleer het programma en
start het.
• Sluit de deur correct.
• Zet de machine aan.
• Controleer de stroomstekker.
• Schakel kinderslot uit.
Wasmachine niet
gevuld met water.
• Geen water.
• Aanvoerslang is gebogen.
•
• Waterdruk is minder dan 0,03 MPa.
• Deur is niet correct gesloten.
• Watertoevoer defect.
• Controleer de waterkraan.
• Controleer de aanvoerslang.
• Verwijder de blokkering uit het
• Controleer de waterdruk.
• Sluit de deur correct.
• Controleer de watertoevoer.
De machine
draineert terwijl ze
wordt opgevuld.
• De afvoerslang hangt lager dan 80
cm.
• Het uiteinde van de afvoerslang kan
in het water hangen.
• Zorg ervoor dat de afvoerslang
correct is aangesloten.
• Zorg ervoor dat de afvoerslang
niet in het water hangt.
Fout tijdens draine-
ring.
• Afvoerslang is geblokkeerd.
•
• Het uiteinde van de afvoerslang is
hoger dan 100 cm boven de vloer.
• U moet de blokkering verwijde-
ren uit de afvoerslang.
•
• Zorg ervoor dat de afvoerslang
correct is aangesloten.
Sterke trillingen
tijdens het zwieren.
• Niet alle transportbouten werden
verwijderd.
• Het apparaat staat niet op
een stevige ondergrond.
• De lading in de machine is niet cor-
rect.
• Verwijder alle transportbouten
• Zorg voor een stevige onder-
grond en een genivelleerde
plaatsing
• Controleer het gewicht en het
evenwicht van de lading.
Programma stopt
voor het einde van
de wascyclus.
• Water of elektrische fout. • Controleer de stroom- en wa-
tertoevoer.

NL
9-Probleemoplossen
25
Probleem Oorzaak Oplossing
De machine stopt
gedurende een
bepaalde periode.
• Het apparaat geeft een foutcode
weer.
• Probleem omwille van het lading-
patroon.
• Programma voert de spoelcyclus
uit.
• Overweeg de weergavecodes.
• Verminder de lading of pas ze
aan.
• Annuleer het programma en
start het opnieuw.
Overtollig schuim
drijft in de trommel
en/of de wasmid-
dellade.
• Wasmiddel is niet geschikt.
• Overmatig gebruik van wasmiddel.
• Controleer de wasmiddel aan-
bevelingen.
• Verminder de hoeveelheid was-
middel.
Automatische
aanpassing van de
wasduur.
• Wasduur wordt aangepast. • Dit is normaal en heeft geen im-
pact op de werking.
Zwieren mislukt. • Wasgoed niet in evenwicht. • Controleer de lading en het
wasgoed en laat het centrifuge-
programma opnieuw draaien.
Ontoereikend was-
resultaat.
• Graad van vervuiling stemt niet
overeen met het geselecteerde
programma.
• Kwaliteit van het wasmiddel was
ontoereikend.
• Maximum lading is overschre-
den.
• Wasgoed was ongelijkmatig ver-
deeld in de trommel.
• Selecteer een ander program-
ma.
• Kies het wasmiddel in
overeenstemming met de
graad van vervuiling en de
-
kant.
• Verminder de lading.
• Breng het wasgoed losser
aan.
Er zijn wasmiddel-
resten
aanwezig op het
wasgoed.
• Onoplosbare deeltjes wasmiddel
kunnen als witte puntjes achterblij-
ven op het wasgoed.
• Extra spoelen uitvoeren.
• Probeer de puntjes weg te bor-
stelen van uw droge wasgoed.
• Kies een ander wasmiddel.
Wasgoed heeft
grijze
vlekken.
• Veroorzaakt door vetten zoals oli-
en, crèmes of zalfjes.
• Behandel het wasgoed vooraf
met een speciaal reinigingsmid-
del.
Opmerking: Schuimvorming
Als er te veel schuim wordt gedetecteerd tijdens het zwieren, zal de motor 30 secon-
Als de foutberichten opnieuw verschijnen, zelfs na het nemen van maatregelen, moet u het
apparaat uitschakelen, de voeding loskoppelen en Neem contact op met de klantendienst.
9.4 In het geval van een stroomstoring
Het huidige programma en de instelling worden opgesla-
gen. Als de stroom hersteld is, kunt u de bewerking her-
vatten.
Als een wasprogramma wordt onderbroken door een
stroomstoring is de deur mechanisch geblokkeerd. Om
het wasgoed uit de machine te verwijderen, mag u geen
water zien in het glazen kijkvenster van de deur. - Ge-
vaar voor brandwonden! Het waterniveau moet worden
de hendel (A) onder de onderhoudsklep (afb. 9-1) tot de
deur met een zachte klik wordt ontgrendeld. Breng daar-
na alle onderdelen opnieuw aan.
9-1
nog steeds te veel schuim gedetecteerd wordt, zal de motor stoppen met draaien
steeds schuim detecteren, zal de draaiende cyclus stoppen en een error op de display
den lang op een laag toerental draaien en dit maximaal 4 keer herhalen.Indien er hierna
gedurende 5 minuten dan 10 minuten en vervolgens 15 minuten.Mocht het hierna nog
weergeven.

10-Installatie
NL
26
10.1. Voorbereiding
▶ Verwijder het apparaat uit de verpakking.
▶ Verwijder al het verpakkingsmateriaal, inclusief de folie op de machine en de piep-
schuim basis, en houd die buiten het bereik van kinderen. Wanneer u de verpakking
opent, kunnen waterdruppels zichtbaar zijn op de plastic zak en het kijkvenster. Dit
normale fenomeen is het resultaat van watertests in de fabriek.
10.3 Verwijder de transportbouten
De transportbeveiliging aan de achterkant is ontwor-
pen om bepaalde delen binnenin de machine tijdens
transport te beschermen. Alle delen (I, R, S en , afb. 10-
2) moeten voor gebruik worden verwijderd.
1. Verwijder alle bouten (T1 - T4, afb. 10-3).
Opmerking: Weggooien van de verpakking
Houd alle verpakking buiten het bereik van kinderen en gooi ze weg op een milieuvrien-
delijke wijze.
10.2 OPTIONEEL: Breng trillingdemperblokken aan
1.Bij het openen van de vacuum verpakking vindt u vier
ruisonderdrukkers. Deze worden gebruikt om het geluid
te verminderen. (Afb. 10.1)
2.Leg de wasmachine naar beneden, met de deurope-
ning naar boven gericht, onderzijde naar uzelf toe gericht.
3.Neem de ruisonderdrukkers en verwijder de
dubbelzijdige zelfklevende plakband; Plaats het op
de onderzijde; De ruisonderdrukkers onder het
wasmachinekabinet zoals op afbeelding 3 getoond.
(twee langere ruisonderdrukkers in stand 1 en 3, twee
kortere ruisonderdrukkers in stand 2 en 4). Zet de
machine ten slotte weer rechtop.
1.
2.
3.
10.1
10-2
T1
T4
T3
T2
10-3

NL
10-Installatie
27
10.5 Het apparaat uitlijnen
Pas alle voetjes aan (afb. 10-5) om een volledige hori-
zontale positie te bereiken. Dit vermindert trillingen en
dus het lawaai tijdens het gebruik tot een minimum. Dit
vermindert ook de slijtage. We raden aan een waterpas
te gebruiken voor de afstelling. De vloer moet zo sta-
biel en vlak mogelijk zijn.
1. Schroef de borgmoer (1) los met een sleutel.
2. Pas de hoogte aan door te draaien aan de voetjes (2).
3. Draai de borgmoer (1) aan tegen de behuizing.
10.4 Het apparaat verplaatsen
Als de machine naar een verre locatie moet worden verplaatst, moet u de transportbou-
ten opnieuw aanbrengen om schade te vermijden: Breng ze aan in de omgekeerde volg-
orde.
Opmerking: Bewaren op een veilige plaats
Bewaar de transportbouten op een veilige plaats voor later gebruik. Als het apparaat
moet worden verplaatst, moet u eerst de transportbouten opnieuw monteren.
10-4
2. Vul de 6 openingen met afdichtpluggen (afb.
10-4).
10-5

,QVWDOODWLH
'HYROJHQGHYHUELQGLQJHQLMQPRJHOLMN
IRHUVODDDURRWVWHH
▶ +DQJ GH DIYRHUVODQJ PHW GH8EHJHORYHUGH
UDQGYDQHHQYROGRHQGHJURWHZDVWDIHODIE
▶ %HVFKHUPGH8EHJHOYROGRHQGHWHJHQVOLSSHQ
IRHUVODDDUDIDOZDWHUHUELGL
▶ 'HLQWHUQHGLDPHWHUYDQGHVWDQGSLMSPHWYHQWL
ODWLHRSHQLQJPRHWPLQLPPPPLMQ
▶ 3ODDWVGHDIYRHUVODQJFDPPLQGHDIYDOZDWHU
OHLGLQJ
▶ %HYHVWLJGH8EHJHOHQRUJGDWGHHQLHWNDQ
EHZHJHQDIE
23*(/(7
▶ 'HDIYRHUVODQJPRHWRQGHUJHGRPSHOGLMQLQZDWHUHQHPRHWEHYHLOLJGZRUGHQHQ
OHNYULMLMQOVGHDIYRHUVODQJRSGHYORHUZRUGWJHSODDWVWRIDOVGHOHLGLQJRSPLQGHU
GDQFPKRRJZRUGWDDQJHEUDFKWDOGHZDVPDFKLQHGRRUORSHQGEOLMYHQGUDLQHUHQ
WHUZLMOHZRUGRSJHYOGHOIRYHUKHYHOLQJ
▶ IYRHUVODQJPDJQLHWZRUGHQYHUOHQJG,QGLHQQRRGDNHOLMNQHHPWFRQWDFWRSPHW
GHGLHQVWQDYHUNRRS
IRHUVODDDUZDVWDIHODDVOLWL
▶ 'HYHUELQGLQJPRHWERYHQGHVLIRQ
▶ (HQ WDSNUDDQYHUELQGLQJ ZRUGW JHZRRQOLMN DIJH
VORWHQPHWHHQGRS'HHPRHWZRUGHQYHU
ZLMGHUG RP VOHFKW IQFWLRQHUHQ WH YRRUNRPHQ
DIE
▶ %HYHLOLJGHDIYRHUVODQJPHWHHQNOHP
UDLHHUZDWHUHUELGL
%HYHVWLJGHZDWHUDIYRHUVODQJFRUUHFWRSGHOHLGLQJHQ'HVODQJPRHWHHQSQWEHUHLNHQ
WVVHQHQFPERYHQGHRQGHUVWHOLMQYDQKHWDSSDUDDW,QGLHQPRJHOLMNPRHWGH
DIYRHUVODQJDOWLMGEHYHVWLJGKRGHQPHWGHNOHSRSGHDFKWHULMGHYDQKHWDSSDUDDW
:56&+8:,1*
▶ *HEULNHQNHOKHWJHOHYHUGHVODQJHQVHWYRRUGHDDQVOLWLQJ
▶ 8PDJQRRLWRGHVODQJHQVHWVRSQLHZJHEULNHQ
▶ 8LWVOLWHQGDDQVOLWHQRSHHQWRHYRHUYDQNRGZDWHU
▶ 8PRHWFRQWUROHUHQRIKHWZDWHULYHUHQKHOGHULVYRRUGHYHUELQGLQJWRWVWDQG
EUHQJW

,QVWDOODWLH
(OHNWULVFKHHUELGL
9RRUHONHDDQVOLWLQJPRHWFRQWUROHUHQRI
▶ KHW HOHNWULVFK QHW VWRSFRQWDFWHQ GHHNHULQJHQ
RYHUHHQVWHPPHQPHWGHLQIRUPDWLHRSKHWQDDP
SODDWMH
▶ KHWVWRSFRQWDFWJHDDUGLVHQHUJHHQPOWLVWHNNHU
RIYHUOHQJVQRHUZRUGWJHEULNW
▶ GHVWHNNHUHQKHWVWRSFRQWDFWRYHUHHQVWHPPHQ
▶ (NHO8.'H8.VWHNNHUYROGRHWDDQGH%6
QRUP
6WHHNGHVWHNNHULQKHWVWRSFRQWDFWDIE
:56&+8:,1*
▶ =RUJHUDOWLMGYRRUGDWDOOHYHUELQGLQJHQYRHGLQJDIYRHUHQRHWZDWHUVODJVWHYLJLMQ
DDQJHEUDFKWHQGDWHGURRJLMQHQJHHQOHNNHQYHUWRQHQ
▶ =RUJHUYRRUGDWGHHRQGHUGHOHQQRRLWZRUGHQVDPHQJHGUNWYHUZURQJHQRIJH
ERJHQ
▶ OVKHWQHWVQRHUEHVFKDGLJGLVPRHWKHWZRUGHQYHUYDQJHQGRRUGHRQGHUKRGV
DJHQWLHJDUDQWLHNDDUWRPHONULVLFRLWWHVOLWHQ
RHWZDWHUHUELGL
=RUJHUYRRUGDWGHSDNNLQJHQLQJHYRHJGLMQ
9HUELQGGHZDWHULQODDWVODQJPHWKHWJHKRHNWH
LWHLQGHRSKHWDSSDUDDWIE6FKURHI
GHVFKURHYHQYDVWPHWGHKDQG
+HWDQGHUHLWHLQGHZRUGWYHUERQGHQRSHHQ
ZDWHUNUDDQPHWHHQGUDDGIE

11-Technische gegevens
NL
30
HW80-B14876N
Tension en V 220-240V~/50Hz
Courant en A 10
PuissancemaximaleenW 2000
Pressiond’eauenMPa 0,03≤P≤1
Poidsnet en kg
72
11.1 Autres données techniques
11.3 Normes et directives
Ce produit répond aux exigences de toutes les directives CE applicables ainsi que les nor-
mes harmonisées correspondantes, qui prévoientlemarquageCE.
Remarque: L a hauteur exacte de votre machine dé pend de la distance des pieds par
rapport au centre de la machine. L 'espace où vous installez votre machine doit ê tre
d'au moins 40 mm plus large et 20 mm plus profond que ses dimensions.
VUE DE DESMurE DE FACE
B
largeur totale du produit mm
A
hauteur totale du produit mm
C
mm
D
profondeur avec porte ouverteÿÿ
E Minimum door clearance
to adjacent wall mm
11.2 Product dimensions
VU
USS
profondeur totale du produit
mm
850
595
460
1050
300
HW80- B 14 87 6 N

NL
31
.ODQWHQGLHQVW
:HUDGHQRQH+DLHUNODQWHQGLHQVWDDQHQKHWJHEULNYDQRULJLQHOHUHVHUYHRQGHUGHOHQ
OV HHQ SUREOHHP RQGHUYLQGW PHW Z DSSDUDDW PRHW HHUVW GH VHFWLH
352%/((023/266(1FRQWUROHUHQ
OVGDDUJHHQRSORVVLQJYLQGWNQWFRQWDFWRSQHPHQPHW
▶ ZORNDOHYHUNRSHURI
▶ GH2QGHUKRG2QGHUVWHQLQJRQHRSZZZKDLHUFRPZDDUWHOHIRRQQPPHUV
HQYHHOJHVWHOGHYUDJHQNQWYLQGHQHQZDDUZVHUYLFHFODLPNQWDFWLYHUHQ
:DQQHHUFRQWDFWRSQHHPWPHWRQHVHUYLFHPRHWGHYROJHQGHLQIRUPDWLHELMGHKDQG
KHEEHQ
'HLQIRUPDWLHVWDDWYHUPHOGRSKHWQDDPSODDWMH
0RGHOBBBBBBBBBBBBBBBBBBBB6HULHQUBBBBBBBBBBBBBBBBBBBBB
&RQWUROHHURRNKHWJDUDQWLHNDDUWMHGDWZRUGWJHOHYHUGPHWKHWSURGFWPHWEHWUHNNLQJ
WRWGHJDUDQWLH
9RRUDOJHPHQHDNHOLMNHYUDJHQYLQGWKLHURQGHURQHDGUHVVHQLQ(URSD
RSHVHDLHDGHVVH
DG RVWDGHV DG RVWDGHV
WDOL
+DLHU(URSH7UDGLQJ65/
9LD'H&ULVWRIRULV
9DUHVH
,7/,
DNLN
+DLHU)UDQFH66
UHGHV*UDYLHUV
1HLOOVU6HLQH
)51.5,-.
SDH
RWDO
+DLHU,EHULD6/
3J*DUFLD)DULD
%DUFHORQD
631-(
HOL
HOL
HGHODG
HPE
+DLHU%HQHO6
QGHUOHFKW
5RWHGH/HQQLN
%(/*,
LWVODG
RVWHLN
+DLHU'HWVFKODQG*PE+
+HZOHWW3DFNDUG6WU
'%DG+RPEUJ
'8,76/1'
ROH
VHFKL
RDLH
*LHNHODG
RHPHL
VODG
+DLHU3RODQG6SRR
O-HURROLPVNLH%
:DUVDZD
32/(1
HHLG
.RLNLN
+DLHUSSOLDQFHV8.&R/WG
2QH&URZQ6TDUH
&KUFK6WUHHW(DVW
:RNLQJ6UUH*8+5
8.
9RRUPHHULQIRUPDWLHYHUZLMHQZLMQDDUZZZKDLHUFRP

0020509288AP
Documenttranscriptie
User manual Washing machine HW80-B14876N EN Thank You EN Thank you for purchasing a Haier Product. Please read these instructions carefully before using this appliance. The instructions contain important information which will help you get the best out of the appliance and ensure safe and proper installation, use and maintenance. Keep this manual in a convenient place so you can always refer to it for the safe and proper use of the appliance. If you sell the appliance, give it away, or leave it behind when you move house, make sure you also pass this manual so that the new owner can become familiar with the appliance and safety warnings. Legend Warning – Important Safety information General information and tips Environmental information Disposal Help protect the environment and human health. Put the packaging in applicable containers to recycle it. Help to recycle waste of electrical and electronic appliances. Do not dispose appliances marked with this symbol with the household waste. Return the product to your local recycling facility or contact your municipal o ce. WARNING! Risk of injury or su ocation! Disconnect the appliance from the mains supply. Cut o the mains cable and dispose of it. Remove the door catch to prevent children and pets to get closed in the appliance. 2 EN Content 1-Safety information ........................................................................................................................... 4 2-Product description......................................................................................................................... 7 3-Control panel .................................................................................................................................... 8 4-Programmes ...................................................................................................................................12 5-Consumption ..................................................................................................................................13 6-Daily use ...........................................................................................................................................14 7-Eco-friendly washing ....................................................................................................................19 8-Care and cleaning ..........................................................................................................................20 9-Troubleshooting .............................................................................................................................23 10-Installation .....................................................................................................................................26 11-Technical data ...............................................................................................................................30 12-Customer service........................................................................................................................31 3 1-Safety information EN Before switching on the appliance for the rst time read the following safety hints!: WARNING! Before rst use ▶ Make sure there is no transport damage. ▶ Make sure all transport bolts are removed. ▶ Remove all packaging and keep out of children´s reach. ▶ Handle the appliance always with at least two persons because it is heavy. Daily use ▶ This appliance can be used by children aged from 8 years and above and persons with reduced physical, sensory or mental capabilities or lack of experience and knowledge if they have been given supervision or instruction concerning use of the appliance in a safe way and understand the hazards involved. ▶ Keep away children under 3 years of age from the appliance unless they are constantly supervised. ▶ Children shall not play with the appliance. ▶ Do not let children or pets come close to the appliance when the door is open. ▶ Store washing agents out of reach of children. ▶ Pull up zips, x loose threads and take care for small items to prevent laundry from being entangled. If necessary, use an appropriate bag or net. ▶ Do not touch or use the appliance when barefoot or with wet or damp hands or feet. ▶ Do not cover or encase the appliance during operation or afterwards to allow any moisture or dampness to evaporate. ▶ Do not place heavy objects or sources of heat or damp on top of the appliance. ▶ Do not use or store flammable detergent or dry cleaning agent in close vicinity to the appliance. ▶ Do not use any flammable sprays in close vicinity to the appliance. ▶ Do not wash any garments treated with solvents in the appliance without having dried them previously in the air. 4 1-Safety information EN WARNING! Daily use ▶ Do not remove or insert the plug in the presence of flammable gas ▶ Do not hot wash foam rubber or sponge-like materials. ▶ Do not wash any laundry which is polluted with flour. ▶ Do not open detergent drawer during any wash cycle. ▶ Do not touch the door during the washing process, it gets hot. ▶ Do not open the door if the water level is visibly over the porthole. ▶ Do not force the door to open. The door is tted with a self-lock device and will open shortly after the washing procedure is ended. ▶ Switch o the appliance after each wash programme and before undertaking any routine maintenance and disconnect the appliance from the electrical supply to save electricity and for safety. ▶ Hold the plug, not the cable, when unplugging the appliance. Maintenance / cleaning ▶ Make sure children are supervised if they carry out cleaning and maintenance. ▶ Disconnect the appliance from the electrical supply before undertaking any routine maintenance. ▶ Keep the lower part of the porthole clean and open door and detergent drawer if appliance is not in use to prevent odours. ▶ Do not use water spray or steam to clean the appliance. ▶ Replace a damaged supply cord only by the manufacturer, its service agent or similarly quali ed persons in order to avoid a hazard. ▶ Do not try to repair the appliance by yourself. In case of repair please contact our customer service. Installation ▶ The appliance should be placed in a well-ventilated place. Ensure a location which allows opening the door fully. ▶ Never install the appliance outdoors in a damp place, or in an area which may be prone to water leaks such as under or near a sink unit. In the event of a water leak cut power supply and allow the machine to dry naturally. 5 1-Safety information EN WARNING! Installation ▶ Install or use the appliance only where the temperature is above 5 °C. ▶ Do not place the appliance directly on a carpet, or close to a wall or furniture. ▶ Do not install the appliance in direct sunlight or in the near of heat sources(e.g. stoves, heaters). ▶ Make sure that the electrical information on the rating plate agrees with the power supply. If it does not, contact an electrician. ▶ Do not use multi-plug adapters and extension cables. ▶ Make sure only the delivered electric cable and hose set are used. ▶ Make sure not to damage the electric cable and the plug. If damaged have it replaced by an electrician. ▶ Use a separate earthed socket for the power supply which is easy accessible after installation. The appliance must be earthed. Only for UK: The appliance’s power cable is tted with 3-cord (grounding) plug that ts a standard 3-cord (grounded) socket. Never cut o or dismount the third pin (grounding). After the appliance is installed, the plug should be accessible. ▶ Make sure the hose joints and connections are rm and there is no leakage. Intended use This appliance is intended for washing machine-washable laundry only. Anytime follow the instructions given on the label of each garment label. It is designed exclusively for domestic use inside the house. It is not intended for commercial or industrial use. Changes or modi cations to the device are not allowed. Unintended use may cause hazards and loss of of all warranty and liability claims. 6 2-Product description EN Note: - 2.1 Picture of appliance Front (Fig. 2-1): Rear side (Fig. 2-2): 2-1 2-2 1 23 4 5 67 1 Iron bar (I1 - I2) 1 Detergent / Softener drawer 2 Work top 3 Programme selector 4 Panel 5 6 7 8 2 3 4 5 6 7 Washer door Service flap Adjustable feet Door handle Transportation bolts (T1-T4) Rear wall reinforcement Power cord Drain hose Water inlet valve Rear wall reinforcement screws 2.2 Accessories Check the accessories and literature in accordance with this list (Fig.2-3): 2-3 2x 2x Inlet hoseassembly 6 Blanking plugs Drain hose Noise reducbracket tion pads Warranty card User manual 7 3-Control panel 3 EN 1 2 3 HW100-B14876N 12 11 10 9 8 7 6 5 Function buttons 1 2 3 4 5 Detergent / Softener Drawer Display Programme selector 11 Child lock 12 Delay 6 Steam 7 Extra rinse 8 Speed 9 Temp. 10 “Start/Pause“ button 4 Note : Acoustic signal In following cases an acoustic signal sounds: ▶ when pressing a button ▶ when turning the programme selector ▶ at the end of programme ▶ in case of failures The acoustic signal can be deselected if necessary ; see DAILY USE. 3-1 3.1 Detergent drawer 1 Compartment 2 Compartment 3 Compartment 4 Compartment : Bleaching agent for cotton/synthetic programme. : Liquid detergent for programme : Softener, Conditioning agent etc. : Powder detergent for programme Please refer to the information on detergent package to obtain recommendation for using detergent in various washing temperatures. 3-2 3.2 Display If the appliance is on, display will light up the actual stawashing time, spin speed, temperature, etc. will appear (Fig. 3-2). 8 3-Control panel EN Display symbols: Programme status indication Programme cycle indication Remaining operation time Remaining delay time Display for washing time, end time delay as well as error codes and service information. Automatic weighing Wash cycle Rinse cycle Steam Spin/drainage cycle 3.3 Program selector By turning the knob (Fig. 3-3) one of 16 programmes can be selected, its default settings will be displayed. 3-3 HW120-B1 Press this button (Fig. 3-4) gently to switch on, the dis- 3-4 play is shining. Press it again for about 2 seconds to vated after a while machine will shut down automatically. 3.5 “Start/Pause“ button Touch this button (Fig. 3-5) gently to start or interrupt the currently displayed programme. 3-5 Start/Pause 9 3-Control panel EN 3.6 Function buttons 3-6 The function buttons (Fig. 3-6) enables additional options in the selected programme before program start. The related indicators are displayed. gram, all options are disabled. If a button has multiple options, the desired option can be selected by pressing the button sequentially. To delete the setting or to cancel the setting process, press the function button until the desired LED lights Not all functions are available for all programmes (see PROGRAMMES). Note: Factory settings there is no special requirement default settings are recommended. 3.6.1 Function button “Extra Rinse“ 3-6-1 Extra Rinse 3-6-2 Delay Press this button (Fig. 3-6-1) to rinse the laundry more intense with fresh water. This is recommended for people with sensitive skin. By pressing the button several times one to three additional cycles (display P1-P3) can be selected. Different programme has different extra maximum rinsing times. 3.6.2 Function “Delay” Press this button (Fig. 3-6-2) to start the program with a delay. End time delay could be increased in steps of means end of programme cycle will be in 6 hours and 30 minutes. Touch “Start/Pause” button to activate the time delay. The time delay must be longer than the programme run time. Otherwise the programme will start immediately. For deactivating the time delay; rotate programme selector. Note: Liquid detergent If using liquid detergent, it is not recommended to activate the end time delay. 10 If 3-Control panel EN 3.6.3 Function “ “ 3-6-3 Press the “ ” button (Fig.3-6-3) can choose different washing time. This function does not apply to “Delicate”,”Self Clean” and “Spin/Drain” programs. 3.6.4 Function “Steam“ Press this button (Fig.3-6-4), the steam program can be selected. When this program is selected, the default temperature is the max. temperature of this program. You can select if you require this function when programs “Cotton, Mix, Synthetic, Underwear, Baby Care, Anti-allergy“ are used. When you select the program “Steam“ the icon light up to warn you, the icon turns 3-6-4 Steam 3-6-5 the program, you can not change the temperature. If you press the temperature button the program will be canceled. Switch on the washing machine and select this program. If the washing machine is working you cannot select this program. Speed 3.6.5 Function “Speed“ Press this button (Fig. 3-6-5) to change or deselect the spin of the program If no value is illuminated the laundry will not spun. 3-6-6 3.6.6 Function “Temp” Temp. Press this button (Fig. 3-6-6) to change the washing temperature of the programme. 3-6-7 3.6.7 Child lock This option blocks all panel elements against activation. After programme start press button “ ” and ”Delay” (Fig. 3-6-7) for 3 seconds simultaneously; child lock symbol is displayed. For unlocking press again the two buttons. Delay 11 4-Programmes EN Detergent compartment for: Max. load / No Bleaching agent Liquid detergent Softener, conditioning agent etc. Powder detergent 1) Temperature in kg Preset Spin speed in °C in rpm Program Cotton HW80 8 max Preset 902) 40 Fabric type • º / • Mix 8 60 30 • º / • Synthetic 4 60 40 / Underwear 4 60 40 Baby Care 4 902) 40 Anti -allergy 4 902) 60 Delicate 1 30 30 Sport 2 40 20 Eco 40-60 8 / / Cotton 20 °C 8 20 20 Duvet 2 40 40 Express 15min3) 1 40 * Hygienic 4 902) 902) Wool 1 40 * • • • • • • • • • • • • Self Clean 0 902) 902) / / • • • • • • • • • • • • º Spin/Drain / º º º º º º º º / / / / / / / Cotton Lightly soiled mixed laundry of cotton and synthetics. Synthetics or mixed fabric 12 1400 •••• 1000 •••• 1200 •••• •••• •••• •••• • /• / • / •• Cotton/Synthetic 1000 Cotton/Synthetic 1000 Cotton/Synthetic 1000 Silk 600 Sports Wear 800 Cotton / Cotton 1400 Duvet 800 Cotton/Synthetic 1000 Cotton/Synthetic 1000 Wollen fabrics 800 / / • • • • • / •• •• •• •• •• / º º º / / / / / 600 / / / / / / / All fabrics 1000 / / / / / / / / / / Relating to dry laundry. *: Water is not heated up. 2) Choose 90 °C wash temperature only for special hygienic requirements. 3) Reduce detergent amount because programme duration is short. 1) Function Delay Steam Extra Rinse i-time • Yes, º Optional, 1 2 3 4 / / / 5-Consumption EN Scan QR code on energy label for energy consumption information. The actual energy consumption may differ from the declared one according to local conditions. Note: Auto Weight The appliance is equipped with a loading recognition. At low loading, energy, water and washing time will be reduced automatically in some programmes. The display shows AUtO. 13 6-Daily use 6-1 6-2 EN 6.1 Power supply Connect the washing machine to a power supply (220V to 240V~/50Hz; Fig. 6-1). Please refer also to section Installtion. 6.2 Water connection ▶ Before connecting check the cleanliness and clarity of the water inlet. ▶ Tun on the tap (Fig.6-2). Note: Tightness Before use check for leakage in the joints between the tap and the inlet hose by turning on the tap. 6.3 Preparing laundry 6-3 ▶ Sort out clothes according to fabric (cotton, synthetics, wool or silk etc.) and to how dirty they are (Fig. 6-3). Pay attention to the care labelling of washing labels. ▶ Separate white clothes from coloured ones. they fade or run. ▶ Empty pockets (keys, coins, etc.) and remove harder decorative objects (e.g. brooches). ▶ into a wash bag to care for this delicate laundry (hand or dry cleaning would be better). ▶ Close zippers, velco fastener and hooks, make sure the buttons are sewn on tightly. ▶ hem, delicate underwear (Dessous) and small items such as socks, belts, bras, etc. in a wash bag. ▶ Unfold large pieces of fabric such as bed sheets, bedspreads etc. ▶ Turn jeans and printed, decorated or color-intensive textiles inside out; possibly wash separately. CAUTION! Non-textile, as well as small, loose or sharp-edged items may cause malfunctions and damage of clothes and appliance. 14 6-Daily use EN Care chart Washing Washable up to 95°C normal process Washable up to 60°C normal process Washable up to 60°C mild process Washable up to 40°C normal process Washable up to 40°C mild process Washable up to 40°C very mild process Washable up to 30°C normal process Washable up to 30°C mild process Washable up to 30°C very mild process Wash by hand max. 40°C Do not wash Bleaching Any bleaching allowed Only oxygen/ non -chlorine Do not bleach Tumble drying possible normal temperature Tumble drying possible lower temperature Do not tumble dry Line drying Flat drying Iron at a maximum Iron at a medial tem- Drying Ironing temperature up to 200 °C I ron at a low temper- perature up to 150°C ature up to 110 °C; without steam (steam ironing may cause irreversible damage) Dry cleaning in tetrachloroethene Dry cleaning in hydrocarbons Do not dry clean Professional wet clean Do not professional wet clean Do not iron Professional Textile Care 6.4 Loading the appliance ▶ Put in the laundry piece by piece. ▶ Don‘t overload. Note the di erent maximum load according to programmes! Rule of thumb for maximum load: Keep six inches between load and drum top. ▶ Close the door carefully. Make sure that no pieces of laundry are pinched. 15 6-Daily use EN 6.5 Selecting detergent ▶ ▶ Use only machine wash approved detergent. ▶ . ▶ Mind always detergent manufacturer recommendations. ▶ Do not use dry cleaning agents such as trichloroethylene and similar products. Choose the best detergent Kind of detergent Programme Universal Colour Delicate Special Softener Cotton Mix L/P L/P - - o L L/P - - o Synthetic - L/P - - o Underwear - - L/P L/P Baby Care - L/P L/P Anti -allergy - o o - L/P L/P o Delicate - - L/P L/P o Sport - - L/P L/P o L/P L/P - - o L/P L/P - - o - - L L/P - L L - - o L/P L/P L/P o o Eco 40-60 Cotton 20 °C Duvet Express 15min Hygienic Wool - L/P - Self Clean - - - L/P - Spin/Drain - - - - - L = gel-/liquid detergent P = powder detergent O = optional _ = no If using liquid detergent, it is not recommended to activate the time delay. We recomment by using: ▶ Laundry powder: 20°C to 90°C* (best use:: 40-60°C) ▶ Color detergent: 20°C to 60°C (best use: 30-60°C) ▶ Wool/delicate detergent: 20°C to 30°C (best use:20-30°C) * Choose 90 °C wash temperature only for special hygienic requirements. 16 6-Daily use EN 6.6 Adding detergent 1. 2. 3. 6-6 Slide out the detergent drawer. Put the required chemicals into corresponding compartments (Fig. 6-6). Push back the drawer gently. Note: ▶ ▶ ▶ ▶ ▶ ▶ ▶ Remove detergent residues before next wash cycle from the detergent drawer. Do not overuse detergent or softener. Please follow the instruction on the detergent package. Concentrated liquid detergent should be diluted before adding. Do not use liquid detergent if function “Delay“ is selected. Carefully choose the programme settings according to the care symbols on all laundry labels and according to the programme table. 6.7 Switch on the appliance 6-7 (Fig. 6-7). 6.8 Select a programme To get the best washing results, select a programme 6-8 type. Turn the programme knob (Fig. 6-8) to select the right programme. The default settings are displayed. Note: Odour removal amount of detergent in washing agent compartment (2) or special machine cleaner to remove possibly corruptive residues. 6-9 6.9 Add individual selections Select required options and settings (Fig. 6-9); refer to Control Panel. 17 6-Daily use EN 6.10 Start wash programme 6-10 Start/Pause Press “Start/Pause“ button (Fig. 6-10) to start; appliance operates according to present settings. Changes are only possible by cancelling the programme. 6.11 Interrupt / cancel wash programme To interrupt a running programme press gently “Start/Pause“. Press it again to resume operation. To cancel a running programme and all its individual settings: 1. Press “Start/Pause” button to interrupt the running programme. 2. Press this button gently to switch on. 3. Run programme “Spin/drain” to drain the water. 4. Select a new programme and start it. Note: Door lock ▶ For safety reasons the door is locked partially during the washing cycle. It is only possible to open the door at the end of the programme or after the programme was cancelled correctly (see description above). ▶ In case of high water level, high water temperature and during spinning it is not possible to open the door; Lock is displayed. 6.12 After washing 1. 2. 3. 4. 5. 6. At programme cycle end END is displayed. Remove laundry as soon as possible to go easy on it and to prevent more wrinkling. Unplug the power cord. Open the door to prevent formation of moisture and odours. Let it open while not used. Note: Standby mode / energy-saving mode The switched on appliance will go into standby mode if it will not be activated within 2 minutes before starting the programme or at the end of programme. The display switch- 6.13 Activate or deactivate the buzzer The acoustic signal can be deselected if necessary: 1. Switch on the appliance. 2. Select the Spin /Drain programme. 3. Press the “i-time “button and “Speed” button at the same time for about 3 seconds. “bEEP OFF” will be displayed and the buzzer will be deactivated. For activating the buzzer press these two buttons at the same time again. “bEEP ON” will be displayed. 18 EN 7-Eco-friendly washing Environmentally responsible use ▶ To achieve best use of energy, water, detergent and time you should use the recommended maximum load size. ▶ Do not overload (hand width clearance above laundry). ▶ For slightly soiled laundry select the Quick Wash programme. ▶ Apply exact dosages of each washing agent. ▶ Choose the lowest adequate washing temperature - modern detergents are e ciently cleaning below 60°C. ▶ Raise default settings only due to heavy staining. ▶ Select max. spinning speed if a domestic dryer is used. 19 8-Care and cleaning 8-1 2 EN 8.1 Cleaning the detergent drawer Take always care there are no detergent residues. Clean the drawer regularly (Fig. 8-1): 1. Pull out the drawer until it stops. 2. Press the release button and remove the drawer. 3. Flush the drawer with water until it is clean and insert the drawer back in the appliance. 1 8-2 Co t o n Mi Coxt on Syn Mix thet ic Un Syntdh e et r-wic ea r Hyg Un derw i eni ear c An ti -a l le rg y Bab yC a re T em p. Spee d Ext ra Ri nse St e am Co t o n+ De li ca C ot to n+te H W1 20-B 14 876 D eDu lic atve et Hy giW enioo cl R Se lf Cl ea ln Woo Sp Daoilyrt Wash Sp i fn C /Dr in S el l eaan 7kg capa cit y Sp in /D rai n S t art /P a us e HW 70 -BP1 275 8 60° C 40° C 8-3 8.2 Cleaning the machine Exp res s 1D 5u ve mi tn E xpress Bab 15 y Ca mi n re Da ash Ant ili- y a lW ergy Spo rt De la y ▶ Unplug the machine during cleaning and maintenance. ▶ Use a soft cloth with soap liquid to clean the machine case (Fig. 8-2) and rubber components. ▶ Do not use organic chemicals or corrosive solvents. 8-4 To prevent blockage of water supply by solid substanc▶ supply. ▶ Unscrew the water inlet hose at the back (Fig. 8-3) of the appliance as well as on the tap. ▶ ▶ 8-5 8.4 Cleaning the drum ▶ Remove accidentally washed metal parts such as pins, coins, etc. from the drum (Fig. 8-5) because they cause rust stains and damage. ▶ Use a non-chloride cleaner for removing rust stains. Observe the warning hints of the cleaning agent manufacturer. ▶ Do not use any hard objects or steel wool for cleaning. Note: Self Clean For regular maintenance, we recommend running the program Self Clean within 100 cycles to avoid possible corrosive residues. Add a small amount of detergent to the detergent compartment (2) - or use a special machine cleaner. 20 8-Care and cleaning EN 8.5 Long periods of disuse If the appliance is left idle for a longer period: 1. Pull out the electrical plug (Fig. 8-6). 2. Turn o water supply (Fig. 8-7). 3. Open the door to prevent formation of moisture and odours. Let door open while not used. Before next usage check carefully power cord, water inlet and drain hose. Make sure everything is properly installed and without leackage. 8-6 8-7 Note: Self Clean After long periods of disuse we recommended to run programme Self Clean with no load and small amount of detergent in washing agent compartment (2) or special machine cleaner to remove possibly corruptive residues. 8.6 Pump lter 8-8 8-9 8-10 8-11 8-12 8-13 Clean the lter once a month and check the pump lter for instanvce if the appliance: ▶ doesn´t drain the water. ▶ doesn´t spin. ▶ cause unusual noise while running. WARNING! Scalding Risk! Water in the pump lter can be very hot! Before any action please ensure water has cooled down. 1. Turn o and unplug the machine (Fig. 8-8). 2. Open service flap at the right corner of appliance front (Fig. 8-9). 3. Provide a flat container to catch leach water (Fig. 8-10). There could be bigger amounts! 4. Pull the drainhose out and hold its end above the container (Fig. 8-10). 5. Take the sealing plug out of the drainhose (Fig. 8-10). 6. After complete drainage close drainhose and push it back into the machine (Fig. 8-11). 7. Unscrew and remove counter clockwise the pump lter (Fig. 8-12). 8. Remove contaminants and dirt (Fig. 8-13). 21 8-Care and cleaning 8-14 8-15 EN 9. Clean carefully pump lter, e.g. using running water (Fig. 8-14). 10. Re x it thoroughly (Fig. 8-15). 11. Close service flap. CAUTION! ▶ Pump lter sealing has to be clean and unhurt. If the lid is not full tightened, water can escape. ▶ The lter must be in place, or it may lead to leakage. 22 9-Troubleshooting EN of a problem please check all shown possibilities and follow below instructions before you WARNING! ▶ Before maintenance, deactivate the appliance and disconnect the mains plug from the mains socket. ▶ improper repairs can cause considerable consequential damages. ▶ A damaged power cable should only be replaced by the manufacturer, its service 9.1 Information codes Following codes are displayed only for information referring to the washing cycle. No measures must be performed. Code Message 1:25 The remaining wash cycle time will be 1 hour and 25 minutes. 6:30 The remaining wash cycle time including chosen end-time delay will be 6 hours and 30 minutes. AUtO Automatic load detection is working; only in some programs. End Lock- Door is closed because of high water level, high water temperature or spinning cycle. bEEP OFF The buzzer is deactivated. bEEP ON The buzzer is activated. The function keys is closed. The programme changing is invalid. 9.2 Troubleshooting with display code Problem Cause Solution • Drainage error. • • Check drain hose installation. E2 • Lock error. • Shut the door properly. E4 • Water level not reached after 12 minutes. • Make sure that tap is fully opened and water pressure is normal. • Drain hose is self-syphoning. • Check drain hose installation. E8 • Water protective level er ror. CLR FLTR • Contact the After sales service. 23 9-Troubleshooting Problem Cause EN Solution F3 Temperature sensor er ror. Contact the After sales service. F4 Heating error. Contact the After sales service. F7 Motor - error. Contact the After sales service. FA Water level sensor error. Contact the After sales service. FC0, FC1 or FC2 Abnormal communication error. Contact the After sales service. Unb Unbalanced load error. Check and balance laundry load in the drum. Reduce the load. 9.3 Troubleshooting without display code Problem Solution Washing machine fails to operate. Programme is not yet started. Door is not properly closed. Machine has not been switched on. Power failure. Child lock is activated. Check programme and start it. Close the door properly. Switch the machine on. Check power supply. Deactivate child lock. Washing machine No water. Inlet hose is kinked. Check water tap. Check inlet hose. Water pressure is less than 0.03 MPa. Door is not properly closed. Water supply failure. Check water pressure. Machine is draining Height of drain hose is below 80 cm. Drain hose end could reach into water. Make sure that drain hose is properly installed. Make sure the drain hose is not in water. Drainage failure. Drain hose is blocked. Unblock drain hose. Drain hose end is higher than 100 cm above floor level. Make sure that drain hose is properly installed. Not all transportation bolts have been removed. Appliance has no solid position. Machine load is not correct. Remove all transportation bolts. Ensure solid ground and a evelled position. Check load weight and balance. Operation stops before completing wash cycle. Water or electric failure. Check power and water supply. Operation stops for a period of time. Appliance displays error code. Problem due to load pattern. Programme performs soaking cycle Consider display codes. Reduce or adjust load. Cancel programme and restart. water. Strong vibration while spinning. 24 Cause Close the door properly. Ensure the water supply. 9-Troubleshooting EN Problem Cause Solution Excessive foam floats drum and/or detergent drawer. • Detergent is not a appropriate. • Check detergent recommendations. • Reduce amount of detergent. Automatic adjustment of washing time. • Washing programme duration will • This is normal and doesn‘t afbe adjusted. fect functionality. Spinning fails. • Unbalance of laundry. Unsatisfactory washing result. • Degree of pollution does not agree • Select an other programme. with selected programme • Choose the detergent acc. • Detergent quantitiy was not sufto the degree of pollution cient. and acc. to manufacturer • Excessive use of detergent. • Check machine load and laundry and run a spinning programme again. • Maximum load has been exceespeci cations. ded. • Reduce loading. • Laundry was unevenly distribu- • Loose the laundry. ted in the drum. Washing powder residues are on the laundry. • Insoluble particles of detergent can • Perform extra rinse. remain as white spots on the laun- • Try to brush the points from the dry. dry laundry. • Choose an other detergent. Laundry has grey patches. • Caused by fats such as oils, creams • Pretreat the laundry with a speor ointments. cial cleaner. Note: Foam formation If too much foam is inspected during spin cycle, motor will run at low speed for 30s and repeat at most 4 times. If the conditions are not met, continue to defoam, and the motor will stop for 5min, 10min, and 15min in sequence. If the conditions are not met, programme will end without spinning. Should the error messages reappear even after the taken measures, switch o the appliance, disconnect the power supply and contact the customer service. 9.4 In case of power failure The current programme and its setting will be saved. When power supply is restored operation will be resumed. If a power failure cuts an operating wash programme door opening is mechanically blocked. To get out any laundry water level should not be seen in the glassy porthole of the door. - Danger of burns! Water level has to be lowered as described in “Pump lter“. Not till then pull lever (A) beneath service flap (Fig. 9-1) until door is unlocked by a gentle click. Afterwards re x all parts. 9-1 25 10-Installation EN 10.1 Preparation ▶ Take the appliance out of the packaging. ▶ keep them out of childrens reach. While opening the package, water drops may be seen on plastic bag and porthole. This normal phenomenon results from water tests in the factory. Note: Packaging disposal Keep all packaging materials out of children´s reach and dispose them in an environmentally friendly manner. 2. 1. 10.1 10.2 OPTIONAL: Install noise reduction pads 1.When opening the shrink package,you will find four noise reduction pads.These are used for reducing noise (Fig. 10.1). 2. Lay the washing machine down to its side, porthole pointing upwards, bottom side towards op- 3. 3. Take out the noise reduction pads and remove the double-sided adhesive protective film Paste around the bottom The noise reduction pads under the washing machine cabinet as shown in Figure 3 (two longer pads in position 1 and 3, two shorter pads in position 2 and 4). Finally set the machine upright again. 10-2 10.3 Dismantle the the transportation bolts The transport protection on the rear side is designed for clamping anti-vibration components inside the appliance during transportation to prevent inner damage. All elements (I, R, S and T, Fig 10-2) must be removed before use. 10-3 T1 T2 T3 26 T4 1. Remove all 4 bolts (T1 - T4) (Fig. 10-3). 10-Installation EN 10-4 2. Fill the 6 left holes with blanking plugs (Fig. 10-4). Note: Keep in safe place Keep all parts of the transport protection in a safe place for later use. Whenever the ap- 10.4 Moving the appliance If the machine is to be moved to a distant location, replace the transportation bolts removed before installation to prevent damage: The assembly takes place in reverse order. 10.5 Aligning the appliance 10-5 Adjust all feet (Fig. 10-5) to achieve a complete level position. This will minimize vibrations and thus noise during use. It will also reduce wear and tear. We recommend to use a spirit level for adjustment. Floor should be as stable and flat as possible. 1. Loose the locknut (1) by using a wrench. 2. Adjust the high by turning the foot (2). 3. Tighten lock ut (1) against the housing. 27 10-Installation EN 10.6 Drain Water Connection Fix the water drain hose properly to the piping. The hose has to reach at one point a height between 80 and 100 cm above the appliance bottom line! If possible keep always drain hose xed to the clip at the appliance back. WARNING! ▶ ▶ ▶ ▶ Use only the supplied hose set for the connection. Never reuse old hose sets! Only connect to cold water supply. Before connection, check whether the water is clean and clear. 10-6 10-7 Following connections are possible: 10.6.1 Drain hose to sink ▶ Hang the drain hose with the U-support over the edge of a sink with adequate size (Fig. 10-6). ▶ Protect the U-support su ciently against slipping. 10.6.2 Drain hose to waste water connection ▶ The internal diameter of the stand pipe with vent-hole must be minimum 40 mm. ▶ Put the drain hose for approx. 80 mm in the wastewater pipe. ▶ Attach the U-support and secure it su ciently (Fig. 10-7). 10-8 10.6.3 Drain hose to sink connection ▶ The junction must lie above the siphon ▶ A spigot connection is usually closed by a pad (A). That must be removed to prevent any disfunction (Fig. 10-8). ▶ Secure the drain hose with a clamp. CAUTION! ▶ The drain hose should not be submerged in water and should be securely xed and leak-free. If the drain hose is placed on the ground or if the pipe is at a height of less than 80 cm, the washing machine will continuously drain while being lled (self-siphoning). ▶ Drain hose is not to be extended. If necessary contact after sales service. 28 10-Installation EN 10.7 Fresh Water Connection 10-9 10-10 Make sure that the gaskets are inserted. 1. 2. Connect the water inlet hose with the angled end to the appliance (Fig. 10-9). Tighten the screw joint by hand. The other end connect to a water tap with a " 3/4" thread (Fig. 10-10). 10.8 Electrical Connection Before each connection check if: ▶ power supply, socket and fusing are appropriate to the rating plate. ▶ the power socket is earthed and no multi-plug or extension are used. ▶ the power plug and socket are strictly according. ▶ Only UK: The UK plug meets BS1363A standard. 10-11 Put the plug into the socket (Fig. 10-11). WARNING! ▶ Ensure always that all connections (power supply, drain and fresh water hose) are rm, dry and leack free! ▶ Take care these parts are never to be crushed, kinked, or twisted ▶ If the supply cord is damaged, it must be replaced by the service agent (see warranty card) in order to avoid a hazard. . 29 11-Technical data EN 11.1 Additional technical data HW80- B14876N Voltage in V 220-240 V~/50Hz Current in A 10 Max. power in W Water pressure in MPa 2000 0.03≤P ≤1 72 Netto weight in kg 11.2 Product dimensions FRONT VIEW WALL TOP VIEW HW80- B14876N A Overall height of product mm 850 B Overall width of product mm 595 Overall depth of product (To main control board size) mm 460 C D Depth of door open mm 1050 E Minimum door clearance to adjacent wall mm 300 Note: The exact height of your washer is dependent on how far the feet are extended from the base of the machine. The space where you install your washer needs to be at least 40mm wider and 20mm deeper than its dimensions. 11.3 Standards and Directives This product meets the requirements of all applicable EC directives with the corresponding harmonised standards, which provide for CE marking. 30 12-Customer service EN We recommend our Haier Customer Service and the use of original spare parts. If you havea problem with your appliance, please rst check section TROUBLESHOOTING. If you cannot fnd a solution there, please contact: ▶ your local dealer or ▶ the Service & Support area at www.haier.com where you can nd telephone numbers and FAQs and where you can activate the service claim. To contact our Service, ensure that you have the following data available. The information can be found on the rating plate. Model ____________________ Serial No. _____________________ Also check the Warranty Card supplied with the product in case of warranty. For general business enquiries please nd below our addresses in Europe: European Haier addresses Country* Postal address Haier Europe Trading SRL Via De Cristoforis, 12 Italy 21100 Varese ITALY Country* France Haier Iberia SL Belgium-FR Pg. Garcia Faria, 49-51 Belgium-NL 08019 Barcelona Netherlands SPAIN Luxembourg Haier Deutschland GmbH Germany Hewlett-Packard-Str. 4 Poland Austria D-61352 Bad Homburg Czechia GERMANY Hungary Haier Appliances UK Co.Ltd. Greece One Crown Square Romania United Church Street East Russia Kingdom Woking, Surrey, GU21 6HR UK *For more information please refer to www.haier.com Spain Portugal Postal address Haier France SAS53 Boulevard Ornano – Pleyad 393200 SaintDenis France Haier Benelux SA Anderlecht Route de Lennik 451 BELGIUM Haier Poland Sp. zo.o. Al. Jerozolimskie 181B 02-222 Warszawa POLAND 31 0 H WL L WL H L H 1 5 1R V YR V UHPHUFLRQV 1R V R V UHPHUFLR V D RLU DF HW SUR LW DLHU 9H L H LUH DWWHQWLYHPHQW FHV LQVWU FWLRQV DYDQW G WL LVHU DSSDUHL HV LQVWU FWLRQV VRQW GHV LQIRUPDWLRQV WL HV YR V SHUPHWWDQW GH PLH H S RLWHU FHW DSSDUHL HW YR V DVV UHU QH LQVWD DWLRQ QH WL LVDWLRQ HW Q HQWUHWLHQ V F ULV V HW DG T DWV 9H L H ELHQ JDUGHU FH PDQ H HW WR R UV YR V U I UHU SR U QH WL LVDWLRQ V F ULV H HW DG T DWH GH DSSDUHL 6L YR V GHYH YHQGUH GRQQHU R DEDQGRQQHU DSSDUHL SR U FD VH GH G P QDJHPHQW assurez-vous également de laisser ce manuel a n que le prochain utilisateur puisse maî WULVHU DSSDUHL QRWDPPHQW HV U J HV GH V F ULW H H H LR H P RU H GH F UL ,QIRUPDWLRQV J Q UD HV HW FRQVHL V ,QIRUPDWLRQV V U HQYLURQQHPHQW 0LVH D UHE W RQWULE HU D SURWHFWLRQ GH HQYLURQQHPHQW HW GH D VDQW K PDLQH 9H L H PHWWUH HV HPED DJHV D UH E W GDQV HV FRQWHQDQWV SU Y V SR U H U UHF F DJH RQWULE H UHF F HU HV G FKHWV G DSSDUHL V HF WULT HV HW HFWURQLT HV 9H L H QH SDV PHWWUH D UHE W HV DSSDUHL V D DQW FH V PER H DYHF HV G FKHWV P QDJHUV 9H L H G SRVHU DSSDUHL YRWUH VLQH GH UHF F DJH RFD H R SUHQGUH FRQWDFW DYHF YRWUH E UHD P QLFLSD AVERTISSEMENT ! Risque de blessure ou d'asphyxie ! ' EUDQFKH DSSDUHL GH WR WH D LPHQWDWLRQ SULQFLSD H R SH HV F E HV SULPDLUHV HW PHWWH HV D UHE W 5HWLUH H YHUUR GH D SRUWH SR U YLWHU T Q HQIDQW R Q DQLPD GRPHVWLT H QH VRLW FRLQF GDQV DSSDUHL 6RPPDLUH RQVLJQHV GH V F ULW 'HVFULSWLRQ G SURG LW 3DQQHD GH FRPPDQGH 3URJUDPPHV RQVRPPDWLRQ 8WL LVDWLRQ T RWLGLHQQH /DYDJH FR RJLT H (QWUHWLHQ HW QHWWR DJH ' SDQQDJH ,QVWD DWLRQ ,QIRUPDWLRQV WHFKQLT HV 6HUYLFH F LHQW H RQVLJQHV GH V F ULW 5 D W H PHWWUH DSSDUHL H PDUF H SR U D SUHPL UH IRLV H L H lire les consignes de sécurité ci-après ! : AVERTISSEMENT ! D W D SUHPL UH WL LVDWLR ▶ Véri ez qu'aucun dommage lié au transport n'a été subi par l'ap SDUHL ▶ 5HWLUH WR V HV ER RQV GH WUDQVSRUW ▶ 5HWLUH WR V HV HPED DJHV HW WHQH HV KRUV GH SRUW H GHV HQ IDQWV ▶ , ID W WR R UV D PRLQV GH SHUVRQQHV SR U D PDQLS DWLRQ GH DSSDUHL FDU L HVW R UG 8WL LVDWLR T RWL LH H ▶ HW DSSDUHL SH W WUH WL LV SDU GHV HQIDQWV J V G D PLQLP P 8 ans, ainsi que par des personnes avec des capacités physiques, VHQVRULH HV R PHQWD HV U G LWHV R VDQV H S ULHQFH HW FRQQDLV VDQFHV VL H HV VRQW V SHUYLV HV R RQW W IRUP HV WL LVDWLRQ V F ULV H GH DSSDUHL HW FRPSUHQQHQW HV ULVT HV UH DWLIV ▶ Tenez les enfants de moins de 3 ans hors de portée de l'appareil, VD I V L V VRQW HQ SHUPDQHQFH V UYHL V ▶ /HV HQIDQWV QH GRLYHQW SDV R HU DYHF DSSDUHL ▶ 1H DLVVH SDV Q HQIDQW R Q DQLPD GRPHVWLT H V DSSURFKHU GH DSSDUHL RUVT H D SRUWH HVW R YHUWH ▶ 7HQH HV SURG LWV GH DYDJH KRUV GH D SRUW H GHV HQIDQWV ▶ 5HPRQWH HV IHUPHW UHV J LVVL UH UHFR VH HV PHQWV PD xés et faites attention aux petits articles pour éviter que le linge ne s'emmêle. Si nécessaire, utilisez un sac ou un let approprié. ▶ YLWH GH WR FKHU R G WL LVHU DSSDUHL SLHGV Q V R RUVT H YRV PDLQV R YRV SLHGV VRQW PR L V R K PLGHV ▶ YLWH GH FR YULU DSSDUHL SHQGDQW T L IRQFWLRQQH R DSU V WL L VDWLRQ SR U DLVVHU K PLGLW V YDSRUHU ▶ YLWH GH G SRVHU GHV RE HWV R UGV R GHV VR UFHV GH FKD H U R G K PLGLW V U DSSDUHL ▶ Évitez d'utiliser ou de conserver du détergent in ammable ou GHV DJHQWV GH QHWWR DJH VHF SUR LPLW GH DSSDUHL ▶ Évitez d'utiliser un pulvérisateur in ammable à proximité de l'ap SDUHL ▶ YLWH GH DYHU GHV Y WHPHQWV WUDLW V DYHF GHV VR YDQWV GDQV DSSDUHL VDQV HV DYRLU SU D DE HPHQW V FK V DLU RQVLJQHV GH V F ULW 5 AVERTISSEMENT ! 8WL LVDWLR T RWL LH H ▶ Évitez de retirer ou d'insérer la che en présence de gaz in am PDE HV ▶ YLWH GH DYHU GHV PDW ULD G W SH FDR WFKR F R SRQJH GHV WHPS UDW UHV HY HV ▶ YLWH GH DYHU WR W LQJH VD L SDU D IDULQH ▶ YLWH G R YULU H WLURLU HVVLYH SHQGDQW H F F H GH DYDJH ▶ YLWH GH WR FKHU D SRUWH SHQGDQW H DYDJH FDU H H HVW FKD GH ▶ YLWH G R YULU D SRUWH VL HD HVW YLVLE H WUDYHUV H K E RW ▶ YLWH G R YULU D SRUWH HQ D IRU DQW ( H HVW T LS H G Q V V tème de verrouillage et s'ouvre quelques instants après la n du F F H GH DYDJH ▶ UU WH DSSDUHL DSU V FKDT H SURJUDPPH GH DYDJH HW DYDQW G HQWUHSUHQGUH WR W HQWUHWLHQ HW G EUDQFKH DSSDUHL GH D L mentation électrique pour économiser l'énergie et pour des ns GH V F ULW ▶ Tenez la che et non le cordon pour débrancher l'appareil. WUHWLH HW HWWR D H ▶ VV UH YR V T H HV HQIDQWV VRQW VR V V UYHL DQFH RUV G QHW WR DJH HW HQWUHWLHQ ▶ ' EUDQFKH DSSDUHL GH D LPHQWDWLRQ HFWULT H DYDQW G HQWUH SUHQGUH WR W HQWUHWLHQ ▶ *DUGH D SDUWLH LQI ULH UH G K E RW SURSUH HW YLWH G R YULU D porte et le tiroir à lessive lorsque l'appareil est en marche a n G YLWHU HV RGH UV ▶ 1 WL LVH SDV Q S Y ULVDWH U G HD R QHWWR DQW YDSH U SR U QHWWR HU DSSDUHL ▶ DLWHV UHPS DFHU H FRUGRQ G D LPHQWDWLRQ HQGRPPDJ SDU H fabricant, son représentant ou par des personnes quali ées uni quement a n d'éviter tout risque. ▶ 1 HVVD H SDV GH U SDUHU YR V P PH DSSDUHL (Q FDV GH U SD UDWLRQ YH L H FRQWDFWHU QRWUH VHUYLFH F LHQW H , VWD DWLR ▶ 3 DFH DSSDUHL GDQV Q HQGURLW ELHQ YHQWL KRLVLVVH Q HP S DFHPHQW T L SHUPHW G R YULU FRPS WHPHQW D SRUWH ▶ 1 LQVWD H DPDLV DSSDUHL H W ULH U GDQV Q HQGURLW K PLGH R GDQV Q LH T L VHUDLW V HW GHV I LWHV G HD FRPPH HQ GHV VR V R SUR LPLW G Q E RF YLHU (Q FDV GH I LWH G HD FR SH D LPHQWDWLRQ HFWULT H HW DLVVH H DYH LQJH V FKHU QDW UH H PHQW RQVLJQHV GH V F ULW 5 AVERTISSEMENT ! , VWD DWLR ▶ ,QVWD H R WL LVH DSSDUHL QLT HPHQW GDQV GHV HQGURLWV R D température est supérieure à 5 °C. ▶ YLWH GH S DFHU DSSDUHL GLUHFWHPHQW V U Q WDSLV R SU V G Q P U R G Q PH E H ▶ 1 LQVWD H SDV DSSDUHL HQ GLUHFWLRQ GHV UD RQV VR DLUHV R SUR LPLW GHV VR UFHV GH FKD H U SDU H HPS H HV F LVLQL UHV chau e-eau). ▶ Véri ez que les informations électriques sur la plaque signalé WLT H VRQW FRQIRUPHV D LPHQWDWLRQ HFWULT H 6L FH Q HVW SDV H FDV YH L H FRQWDFWHU Q HFWULFLHQ ▶ 1 WL LVH GHV DGDSWDWH UV P WLSULVHV HW GHV UD RQJHV ▶ VV UH YR V G WL LVHU QLT HPHQW HQVHPE H GH FRUGRQ HF trique et de exible d’arrivée d’eau livré. ▶ VV UH YR V T H H FRUGRQ G D LPHQWDWLRQ HW D SULVH QH VRQW SDV HQGRPPDJ V 6 L V VRQW HQGRPPDJ V YH L H HV IDLUH UHPS D FHU SDU Q HFWULFLHQ ▶ 3R U D LPHQWDWLRQ HFWULT H WL LVH QH SULVH DYHF PLVH D terre di érente, facilement accessible après l'installation. Mettez D WHUUH FHW DSSDUHL Uniquement pour le Royaume-Uni: HW DSSDUHL HVW T LS G Q cordon d’alimentation avec che à 3 ls (mise à la terre), répon dant aux normes de la prise à 3 ls (mise à la terre). Ne coupez jamais ou ne démontez jamais le troisième l (mise à la terre). /RUVT H DSSDUHL HVW LQVWD D SULVH GRLW WUH DFFHVVLE H ▶ Assurez-vous que les joints et raccords du exible d’arrivée d’eau VRQW VHUU V HW T L Q D SDV GH I LWH 8WL LVDWLR SU H HW DSSDUHL HVW FRQ SR U H LQJH DYDE H D DYH LQJH QLT H PHQW 6 LYH FKDT H IRLV HV LQVWU FWLRQV IR UQLHV V U WLT HWWH GH FKDT H Y WHPHQW , HVW JD HPHQW FRQ H F VLYHPHQW SR U Q VDJH GRPHVWLT H LQW ULH U GH D PDLVRQ , Q HVW SDV GHVWLQ Q VDJH FRPPHUFLD R LQG VWULH Aucune modi cation ou altération de cet appareil n'est autorisée. 7R WH WL LVDWLRQ LQDG T DWH YR V H SRVH GHV ULVT HV HW D SHUWH GH WR V HV GURLWV GH JDUDQWLH HW GH UHVSRQVDEL LW 2-Description du produit FR Remarque : - 2.1 Description de l’appareil Partie avant (Fig. 2-1) : Côté arrière (Fig. 2-2) : 2-1 1 2 3 4 Cotton Ex press 15 min Hy gienic Wool Daily Was h Self Clean S port Speed Extra Ri nse Steam HW80-B 14876 Duv et Underwear B aby Care A nt i- allergy Tem p. 2-2 5 6 7 Delica te S ynt het ic Del ay 23 4 5 Cot ton+ Mi x 1 Spi n/Drain Start/Pause 8kg 8 6 7 1 2 3 4 adoucissant Haut de travail Écran Sélecteur de programme 5 6 7 8 Panneau Volet d’entretien Pieds ajustables Poignées de la porte 1 Barre de fer (I1-I2) 2 Boulons de transport (T1-T4) 3 Renforcement de la paroi arrière 4 Cordon d'alimentation 5 Vanne d'arrivée d'eau 6 Tuyau de vidange 7 Vis de renforcement de la paroi arrière 2.2 Accessoires 2-3 Flexible 6 Bouchons d’arrivée-d’eau obturateurs 2x 2x Support de Pads de tuyau de réduction de vidange bruit Garantie garantie Manuel d'utilisation 7 3-Panneau de commande 3 1 FR 2 3 Eco 40-60 HW80-B14876N Mix Synthetisch Synthétique Express 15 min Baby Care Délicat Sport Startuitstel Fin différée Temp. Tr/min Extra spoelen Stoom Rinçage + Vapeur Start/Pause 1211 10 9 8 7 6 5 Boutons de fonction 1 2 3 4 5 Tiroir à lessive / adoucissant Écran Sélecteur de programme Bouton "Marche / Arrêt" Bouton « Start/Pause» 6 7 8 9 Vapeur Rinçage + Tr/min Temp. 4 10 11 Verrouillage enfant 12 Remarque : Signal sonore Le signal sonore retentit dans les cas suivants : ▶lorsque vous appuyez sur un bouton ; ▶ ▶lorsque vous tournez le sélecteur ▶ en cas de dysfonctionnement. de programme ; Vous pouvez désactiver le signal sonore en cas de besoin : voir la section UTILISATION QUOTIDIENNE. 3.1 Tiroir à lessive 3-1 1 Compartiment 2 Compartiment programme 3 Compartiment tionnement, etc. 4 Compartiment programme 3-2 : Agent de blanchiment pour le coton/programme « synthétique ». : Détergent liquide adapté au : Adoucissant, agent de condi: Détergent en poudre adapté au Veuillez vous reporter aux informations sur l'emballage du détergent pour obtenir des recommandations sur lavage. 3.2 Écran Startuitstel Fin différée Temp. Tr/min Extra spoelen Stoom Start/Pause Rinçage + Vapeur Si l’appareil est en marche, l’écran indique l'état réel temps de lavage, à la vitesse d’essorage, à la tempéra- 8 3-Panneau de commande FR a s mbols: Indication d'état du programme Indication du cycle du programme Temps de fonction nement restant Temps de retard restant Affichage du temps de lavage, du reur et des informations de service Vapeur Pondération automatique Cycle de lavage Cycle de rinçage Cycle d'essorage / drainage Le panneau de cont rôle est verrouillé 3.3 Sélecteur de programme Vous pouvez sélectionner l’un des 16 programmes en tournant le bouton (Fig. 3-3). Le LED correspondant 3-3 Eco 40-60 Mix Synthetisch Synthétique Express 15 min Baby Care Délicat Sport 3-4 Appuyez légèrement sur ce bouton (Fig. 3-4) pour mettre l’appareil en marche ; l’écran s’allume. Appuyez-le à nouveau pendant environ 2 secondes pour éteindre l'appareil. Si aucun élément du panneau ou aucun programme n'est activé au bout d'un moment, l'appareil s'éteint automatiquement. 3.5 Bouton «start/Pause » Touchez légèrement ce bouton (Fig. 3-13) pour dé- 3-5 Start/Pause 9 3DQQHD GH FRPPDQGH R WR V H IR FWLR V Startuitstel Fin différée Temp. Tr/min Extra spoelen Stoom Rinçage + Vapeur Start/Pause Les boutons de fonction (Fig. 3-6) activent des options V SS PHQWDLUHV G SURJUDPPH V HFWLRQQ DYDQW VRQ démarrage. Les indicateurs correspondants s’a chent FUDQ 7R WHV HV IRQFWLRQV VH G VDFWLYHQW RUVT H YR V WHL gnez l’appareil ou lorsque vous con gurez un nouveau SURJUDPPH 6L Q ER WRQ GLVSRVH GH S VLH UV RSWLRQV YR V SR YH V HFWLRQQHU RSWLRQ VR KDLW H HQ DSS DQW GH PDQL UH V T HQWLH H V U H ER WRQ 3R U V SSULPHU H SDUDP WUH R DQQ HU H SURFHVV V GH SDUDP WUDJH DSS H V U H ER WRQ GH IRQFWLRQ VT FH T H HV YR DQWV /(' V D PHQW R GDQV H FDV G QH VH H RSWLRQ HV YR DQWV /(' V WHLJQHQW 7R WHV HV IRQFWLRQV QH VRQW SDV GLVSRQLE HV SR U WR V les programmes (voir PROGRAMMES). Remarque : Paramètres d'usine Pour obtenir de meilleurs résultats dans chaque programme, Haier a bien dé ni des pa ramètres spéci ques par défaut. S’il n’y a pas d’exigences particulières, les réglages par G ID W VRQW UHFRPPDQG V 3.6.1 Bouton de fonction « Rinçage+ » Extra spoelen Rinçage + Startuitstel Fin différée Appuyez sur ce bouton (Fig. «3-6-1) pour rincer le linge S V LQWHQV PHQW DYHF GH HD GR FH HWWH IRQFWLRQ HVW UHFRPPDQG H SR U HV SHUVRQQHV D SHD VHQ VLE H 9R V SR YH V HFWLRQQHU Q WURLV F F HV HQ DSS DQW V U H ER WRQ S VLH UV IRLV 3.6.2 Fonction « Fin di érée » Appuyez sur ce bouton (Fig. 3-6-2) pour démarrer le programme avec une n di érée. Vous pouvez repous ser la n du programme par incrément de 30 minutes, de 0,5 à 24 h. Par exemple, si l‘écran a che « 6 : 30 », le cycle du programme s’achève dans 6 heures et 30 mi nutes. Touchez le bouton « Départ/Pause » pour acti ver le délai de n di érée. Le délai choisi pour la n di érée du programme doit WR R UV WUH V S ULH U D WHPSV GH F F H G SUR JUDPPH 6LQRQ H SURJUDPPH G PDUUH LPP GLDWH PHQW Pour désactiver le délai de n di érée, tournez le sélec WH U GH SURJUDPPH Remarque : Détergent liquide Si vous utilisez un détergent liquide, il n’est pas recommandé d’activer la n di érée. 3-Panneau de commande FR 3.6.3 Fonction “ “ 3-6-3 Vous pouvez changer le temps de lavage en touchant le bouton « » (Fig. 3-6-3). Cette fonction ne s’applique pas aux programmes «Délicat», Auto-nettoyage » et « Essorage ». 3.6.4 Fonction « Vapeur » Appuyez sur cette touche (Fig.3-6-4), le programme de vapeur peut être sélectionné. Lorsque cette fonction est activée, la température par défaut est la température maximale du programme sélectionné. Vous pouvez sélectionner si vous avez besoin de cette fonction lorsque les programmes « Coton, Mixte, Synthétique, Lingerie, Bébé Coton, Anti allergie » sont utilisés. Lorsque vous sélectionnez le programme « Vapeur », l’icône s’allume pour vous avertir, l’icône s’éteint lorsque le programme est annulé. Lorsque vous sélecla température. Si vous touchez le bouton de température, le programme sera annulé. Mettez le lave-linge en marche et sélectionnez ce programme. Si l’appareil ne fonctionne pas, vous ne pouvez pas sélectionner ce programme. 3.6.5 Fonction « Tr/min» 3-6-4 Stoom Vapeur 3-6-5 Tr/min 3-6-6 Temp. désélectionner le programme si aucune valeur n'est allumée, le linge ne sera pas essoré. 3-6-7 3.6.6 Fonction « Temp. » Appuyez sur ce bouton (Fig. 3-8) pour changer la température de lavage du programme. 3.6.7 Sécurité enfants Cette option bloque tous les éléments du panneau pour empêcher leur activation. Après le démarrage de programme, appuyez simultanément sur les boutons « Startuitstel Fin différée Pour déverrouiller, appuyez à nouveau sur les deux boutons. 11 4-Programmes FR Compartiment à détergent pour : Température 1) en kg Programme Coton HW80 8 d’essorage préréglée en °C en tr/min max. Préréglage 902) 40 • º / • Mix 8 60 30 • º / • Synthétique 4 60 40 / Lingerie 4 60 40 Baby Care 4 902) 40 Anti allergique 4 902) 60 Délicat 1 30 30 Sport 2 40 20 Eco 40-60 8 / / Coton 20°C 8 20 20 Couette 2 40 40 Express 15 min 3) Hygiénique 1 40 * • • • • • • • • • • • • • • • • • • • • 4 902) 90 2) Laine 1 40 * Autonettoyage 0 902) 90 2) / / Essorage º º º º º º º º / / / / / / / / / º • º • º º / / / / / / / • • Coton Mélange de linge en coton et synthétique légèrement sale Tissu synthétique ou mélangé 1400 •• • • 1000 •• • • 1200 •• •• •• •• • / • / • • • • • • • • • • / / / / Coton/Synthétique 1000 Coton/Synthétique 1000 Coton/Synthétique 1000 Soie 600 Vêtements de sport 800 Coton / Coton 1400 Tissus en coton 800 Coton/Synthétique 1000 Coton/Synthétique 1000 Tissus en laine 800 / / / / All tissus Fonction i-time Charge max. 4 Rinçage + • Oui, º En option, / No Agent de blanchiment Détergent liquide Adoucissant, agent de conditionnement, etc. Détergent en poudre Fin différée Vapeur 1 2 3 • • • / • • / / / / / • • • • • • • • • • • 600 / / / / 1000 / / / / 1) Choisissez 90 °C comme température de lavage uniquement pour des exigences hygiéniques particulières. 3) Réduisez la quantité de détergent parce que la durée du programme est courte. 2) 12 FR 5-Consommation Scannez le QR code sur l'étiquette énergétique pour obtenir des informations sur la consommation d'énergie. La consommation d'énergie réelle peut différer de celle déclarée en fonction des conditions locales. Remarque : Pesage automatique L’appareil est équipé d’une option de détection de la charge. Lorsque la charge est faible, l’énergie, l’eau et le temps de lavage sont réduits de manière automatique dans certains . 13 8WL LVDWLRQ T RWLGLHQQH 5 LPH WDWLR Raccordez le lave-linge à une alimentation (220 V à 240 V~/50 Hz ; Fig. 6-1). Veuillez également vous réfé rer à la section INSTALLATION. 5DFFRU HPH W HD ▶ YDQW H UDFFRUGHPHQW DVV UH YR V GH D SURSUH W HW GH D F DUW G GLVSRVLWLI G DUULY H G HD ▶ Ouvrez le robinet (Fig. 6-2). 5HParque : Étanchéité Avant l'utilisation, véri ez la présence de fuites sur les joints entre le robinet et le exible G DUULY H G HD HQ R YUDQW H URELQHW 3U SDUDWLR L H ▶ 7ULH HV Y WHPHQWV HQ IRQFWLRQ G WLVV FRWRQ synthétique, laine ou soie) et de leur niveau de saleté (Fig. 6-3). Faites attention aux consignes G HQWUHWLHQ GHV WLT HWWHV GH DYDJH ▶ 6 SDUH HV Y WHPHQWV E DQFV GHV Y WHPHQWV GH FR H U /DYH G DERUG HV WH WL HV GH FR H U D main pour savoir s'ils se décolorent ou s'abîment. ▶ Videz les poches (clés, pièces de monnaie, etc.) HW UHWLUH HV RE HWV GH G FRUDWLRQ WU V G UV EUR ches). ▶ 3R U HQWUHWLHQ GHV Y WHPHQWV VDQV R U HWV du linge délicat et les textiles nement tissés FRPPH HV ULGHD PHWWH HV GDQV Q VDF GH DYDJH H QHWWR DJH D PDLQ R VHF HVW S V indiqué). ▶ HUPH HV IHUPHW UHV J LVVL UHV HV DWWDFKHV HW HV FURFKHWV YH FUR HW DVV UH YR V T H HV ER WRQV VRQW VR LGHPHQW FR V V ▶ 3 DFH HV Y WHPHQWV VDQV R U HWV VR LGHV HV sous-vêtements délicats (Dessous) et les petits DUWLF HV WH V T H HV FKD VVHWWHV HV FHLQW UHV HV VR WLHQ JRUJH HWF GDQV Q VDF GH DYDJH ▶ ' S LH HV JUDQGHV SL FHV GH WLVV WH HV T H HV GUDSV GH LW HW HV FR YUH LWV HWF ▶ 5HWR UQH HV HDQV HW HV WLVV V LPSULP V G FR rés ou aux couleurs vives ; lavez-les séparément VL SRVVLE H ATTENTION ! /HV DUWLF HV QRQ WH WL HV GHVVHUU V R WUDQFKDQWV SH YHQW FD VHU GHV G VIRQFWLRQQH PHQWV DLQVL T HQGRPPDJHU HV Y WHPHQWV HW DSSDUHL 8WL LVDWLRQ T RWLGLHQQH 5 7DE HD H WUHWLH D D H Lavable jusqu'à 95 ° C SURFHVV V QRUPD Lavable jusqu'à 60 ° C SURFHVV V QRUPD Lavable jusqu'à 40 ° C SURFHVV V QRUPD 7HPS UDW UH GH D vage maximale 40°C GR 7HPS UDW UH GH D vage maximale 60 °C GR 7HPS UDW UH GH D vage maximale 40 °C WU V GR Lavable jusqu'à 30 ° C SURFHVV V QRUPD 7HPS UDW UH GH D vage maximale 30°C GR 7HPS UDW UH GH D vage maximale 30°C WU V GR 7HPS UDW UH PD LPD H GH DYDJH D PDLQ 40 °C 1H DYH SDV D F LPH W JHQWV GH E DQFKL PHQW D WRULV V Oxygène unique PHQW QRQ FK RU 1 WL LVH SDV G DJHQW GH E DQFKLPHQW 6 FKDJH SDU F E WDJH SRVVLE H WHPS UDW UH QRUPD H 6 FKDJH SDU F E WDJH SRVVLE H WHPS UDW UH IDLE H 1H SDVVH SDV D V FKH LQJH 6 FKDJH V U FRUGH 6 FKDJH S DW 6 F D H 5HSDVVD H 5HSDVVDJH QH WHP S UDW UH PD LPD H GH 200 °C 5HSDVVDJH QH WHPS UDW UH PR HQQH de 150 °C 1H UHSDVVH SDV WUHWLH SURIHVVLR 5HSDVVDJH QH WHPS UDW UH EDVVH GH 110 °C ; sans vapeur H UHSDVVDJH D YD SH U SH W SURYRT HU GHV GRPPDJHV LUU versibles) H HV WH WL HV 1HWWR DJH VHF D W WUDF RU WK QH 1HWWR DJH SURIHVVLRQ QH SDU YRLH K PLGH 1HWWR DJH VHF D K GURFDUE UHV YLWH WR W QHWWR DJH SURIHVVLRQQH SDU YRLH K PLGH YLWH WR W QHWWR DJH VHF DU HPH W H DSSDUHL ▶ ,QV UH H LQJH SL FH SDU SL FH ▶ Ne surchargez pas l'appareil. Notez les di érentes charges maximales en fonction des programmes ! Règle générale pour la charge maximale : Gardez une distance de VL SR FHV HQWUH D FKDUJH HW D SDUWLH V S ULH UH G WDPER U ▶ HUPH ELHQ D SRUWH VV UH YR V T D F QH SL FH GH LQJH QH VRLW SLQF H 6-Utilisation quotidienne FR 6.5 Sélection du détergent ▶ ▶ Utilisez exclusivement un détergent homologué pour le lavage en machine. ▶ Le cas échéant, utilisez des détergents spéciaux (par exemple, pour les synthétiques et les lainages.) ▶ Respectez les recommandations du fabricant du détergent. ▶ N'utilisez pas d'agents de nettoyage à sec tels que le trichloréthylène ou tout autre produit similaire. Choisissez le détergent le mieux adapté Type de détergent Programme Universel Couleur Délicat Spécial Adoucissant Coton L/P L/P - - o Mixt L L/P - - o Synthétique - L/P - - o Lingerie - - L/P L/P Baby Care - L/P L/P Anti allergie - o o - L/P L/P o Délicat - - L/P L/P o Sport - - L/P L/P o Eco 40-60 L/P L/P - - o Coton 20°C L/P L/P - - o Couette - - L L/P - Express 15 min L L - - o L/P L/P L/P o o Hygiénique Laine - L/P - Auto-nettoyage - - - L/P - Essorage - - - - - L = détergent liquide ou en gel P = détergent en poudre O = facultatif _ = non Voici nos recommandations : ▶ Détergent en poudre : 20 °C à 90 °C* (utilisation optimale : 40-60 °C) ▶ Détergent couleur : 20 °C à 60 °C (utilisation optimale : 30-60 °C) ▶ Détergent laine/vêtement délicat : 20 °C à 30 °C (= utilisation optimale :) * Choisissez 90 °C comme température de lavage uniquement pour des exigences hygiéniques particulières. 16 6-Utilisation quotidienne FR 6.6 Ajout de détergent 1. 2. 3. 6-6 Faites glisser le tiroir à lessive hors de son emplacement. Ajoutez la quantité de détergent nécessaire dans les compartiments respectifs (Fig. 6-6). Repoussez doucement le tiroir. Remarque : ▶ ▶ ▶ ▶ ▶ ▶ ▶ Retirez les résidus de détergent du tiroir à lessive avant le prochain cycle de lavage. N'utilisez pas trop de détergent ou d'adoucissant. Remplissez toujours le détergent avant de lancer le cycle de lavage. Diluez le détergent liquide concentré avant de l'ajouter. Sélectionnez avec soin les paramètres du programme en fonction des symboles d'entretien indiqués sur toutes les étiquettes de linge et selon le tableau de programme. 6.7 Mettez l’appareil en marche. 6-8 6-7 Appuyez sur le bouton « Marche/Arrêt » pour mettre l’appareil en marche (Fig. 6-7). Eco 40-60 Mix Synthetisch Synthétique Express 15 min Baby Care 6.8 Sélection d’un programme Délicat Sport Pour obtenir des résultats optimaux lors du lavage, sélectionnez un programme qui convient au degré de saleté et au type de linge. Tournez le bouton des programmes (Fig. 6-8) pour sélectionner le programme adéquat. Le voyant LED correspondant au programme sélectionné s’allume et Remarque : Suppression des odeurs Avant la première utilisation, nous vous recommandons de lancer le programme HYGIÉNIQUE à vide et avec une petite quantité de détergent dans le compartiment du produit de lavage (2) ou le nettoyant spécial de machine pour éliminer les résidus potentiellement gênants. 6.9 Ajout de sélections individuelles Sélectionnez les options et les paramètres requis (Fig. 6-9) ; reportez-vous à la section PANNEAU DE COMMANDE. 6-9 Startuitstel Fin différée Temp. Tr/min Extra spoelen Stoom Rinçage + Vapeur Start/Pause 17 8WL LVDWLRQ T RWLGLHQQH ' PDUUD H SUR UDPPH H D D H Appuyez sur le bouton « Départ/Pause » (Fig. 6-10) SR U G PDUUHU / DSSDUHL WL LVH HV SDUDP WUHV DF tuels. Pour e ectuer des modi cations, vous devez DQQ HU H SURJUDPPH Start/Pause , WHUU SWLR 5 D DWLR SUR UDPPH H D D H Pour interrompre un programme en cours, appuyez doucement sur « Départ/Pause». Ap S H QR YHD V U FH ER WRQ SR U UHSUHQGUH RS UDWLRQ Pour annuler un programme en cours et tous ses paramètres individuels : Appuyez sur le bouton « Départ/Pause » pour interrompre le programme. Appuyez sur le bouton « Marche/Arrêt » pendant 2 secondes environ pour arrêter DSSDUHL Lancez le programme « ESSORAGE »pour évacuer l’eau. 6 HFWLRQQH Q QR YHD SURJUDPPH HW G PDUUH H Remarque : Verrouillage de la porte ▶ 3R U GHV UDLVRQV GH V F ULW D SRUWH G DYH LQJH HVW WHPSRUDLUHPHQW YHUUR L H pendant les cycles de lavage. Vous ne pouvez ouvrir la porte qu’à la n du programme ou qu’après son annulation correcte (voir la description ci-dessus). ▶ (Q FDV GH QLYHD G HD HY R GH WHPS UDW UH G HD HY H R SHQGDQW HVVRUDJH il est impossible d’ouvrir la porte ; le symbole RFN s’a che SU V H D D H À la n du cycle du programme 1' s’a che. /D PDFKLQH V DUU WH D WRPDWLT HPHQW Retirez le linge le plus tôt possible pour le faire avec précaution et pour éviter autant T H SRVVLE H T L QH VH S LVVH GDYDQWDJH HUPH DUULY H G HD ' EUDQFKH D SULVH G D LPHQWDWLRQ Ouvrez la porte pour éviter toute formation d’humidité et l’apparition d’odeurs. Lais VH D R YHUWH RUVT H YR V Q WL LVH SDV D PDFKLQH Remarque : Mode veille / mode économiseur d'énergie 8QH IRLV DSSDUHL PLV HQ PDUFKH L UHQWUH HQ PRGH 9HL H VL YR V QH WL LVH SDV D ER W de 2 minutes avant le lancement du programme ou à la n de celui-ci. L’écran s’éteint. Ceci permet d’économiser l’énergie. Appuyez sur le bouton « Départ/Pause » pour dé VDFWLYHU H PRGH 9HL H Start/Pause FWL DWLR R VDFWL DWLR H D DUPH Vous pouvez désactiver le signal sonore en cas de besoin : Mettez l’appareil en marche. Sélectionnez le programme Essorage / Vidange. 3. Appuyez simultanément sur les boutons « i-time » et « Essorage » pendant 3 secondes environ. « bEEP OFF » s’a che et l’alarme se désactive. Pour activer l‘alarme, appuyez une nouvelle fois sur ces deux boutons simultanément. « ALARME ACTIVÉE » s’a che. 5 /DYDJH FR RJLT H 8WL LVDWLR UHVSHFW H VH H H LUR HPH W ▶ 3R U QH PHL H UH WL LVDWLRQ GH QHUJLH GH HD G G WHUJHQW HW G WHPSV WHQH YR V HQ D FKDUJH PD LPD H UHFRPPDQG H ▶ 1H V UFKDUJH SDV DSSDUHL DLGH GH D PDLQ IDLWHV Q G JDJHPHQW HQ DUJH U D dessus du linge). ▶ 3R U H LQJH SDV WURS VD H V HFWLRQQH H SURJUDPPH /DYDJH UDSLGH ▶ Mettez les doses exactes de chaque produit de lavage. ▶ KRLVLVVH D WHPS UDW UH GH DYDJH DG T DWH D S V EDVVH HV G WHUJHQWV PR dernes nettoient e cacement en dessous de 60 °C. ▶ Optimisez les réglages par défaut uniquement pour les taches importantes. ▶ 6 HFWLRQQH D YLWHVVH G HVVRUDJH PD LPD H HQ FDV G WL LVDWLRQ G Q V FKRLU GRPHV WLT H 8-Entretien et nettoyage 8-1 8.1 Nettoyage du tiroir à lessive 2 Veillez toujours à ce qu’il ne reste pas de résidus de détergent. Nettoyez régulièrement le tiroir à lessive (Fig. 8-1) : 1. Tirez le tiroir jusqu’à la butée. 2. Appuyez sur le bouton d’ouverture pour le retirer. 3. Nettoyez ensuite le tiroir avec de l’eau et remettez-le en place dans l’appareil. 1 8.2 Nettoyage de la machine 8-2 Co t o n Mi Coxt on Syn Mix thet ic Un Syntdh e et r-wic ea r Hyg Un derw i eni ear c An ti -a l le rg y Bab yC a re T em p. 60° C Spee d Ext ra Rin se St e am ▶ Débranchez la machine pendant le nettoyage et l’entretien. ▶ pour nettoyer la machine (Fig. 8-2) et les composants en caoutchouc. ▶ N’utilisez pas de produits chimiques organiques ou de solvants corrosifs. Co t o n+ De li ca C ot to n+te H W1 20-B 14 876 D eDu lic atve et Exp res s 1D 5u ve mi tn E xpress Bab 15 y Ca mi n re Hy giW enioco l R Da ash Ant ili- y a lW ergy Se lf Cl ea ln Woo Sp Daoilyrt Wash Sp i fn C /Dr in S el l eaan Spo rt De la y 7kg capa cit y Sp in /D rai n S t art /P a us e HW 70 -BP1 275 8 40° C 8-3 FR 8-4 Pour éviter toute obstruction de l’alimentation en eau par des matières solides telles que le calcaire, nettoyez ▶ Débranchez le cordon d’alimentation et fermez l’arrivée d’eau. ▶ (Fig. 8-3) de l’appareil, ainsi que le robinet. ▶ (Fig. 8-4). ▶ d’eau. 8-5 8.4 Nettoyage du tambour ▶ Retirez les pièces métalliques introduites accidenles épingles, les pièces de monnaie, etc., car elles peuvent causer des taches de rouille et des dommages. ▶ Utilisez un nettoyant sans chlorure pour éliminer les taches de rouille. Respectez les consignes de sécurité du fabricant de l’agent de nettoyage. ▶ N’utilisez pas d’objet dur ou de laine d’acier pour le nettoyage. Remarque : Auto-nettoyage Pour un entretien régulier, nous recommandons d'exécuter le programme Auto-nettoyage - té de détergent dans le compartiment à détergent (2) ou utilisez un nettoyant spécial pour machine. 20 8-Entretien et nettoyage FR 8.5 Périodes de non-utilisation prolongées Si l’appareil n’est pas utilisé pendant une longue période : 1. 2. 3. Ouvrez la porte pour éviter toute formation d’humidité et l’apparition d’odeurs. Laissez les portes ouvertes lorsque vous n’utilisez pas la machine. 8-6 8-7 cordon d’alimentation, l’arrivée d’eau et le tuyau de vidange. Assurez-vous que tout est correctement installé et qu’il n’y a pas de fuite. Remarque : Auto-nettoyage Après une période de non-utilisation prolongée, nous vous recommandons de lancer le programme Auto-nettoyage à vide et avec une petite quantité de détergent dans le compartiment du produit de lavage (2) ou un nettoyeur de machine particulier pour éliminer les résidus potentiellement gênants. 8.6 Filtre de la pompe 8-8 8-9 8-10 8-11 8-12 8-13 ▶ ne vidange pas l’eau ; ▶ n’essore pas ; ▶ émet un bruit inhabituel en cours de fonctionnement. AVERTISSEMENT ! pompe peut être très chaude ! Avant toute intervention, assurez-vous que l'eau a refroidi. 1. Éteignez la machine et débranchez-la (Fig. 8-8). 2. Ouvrez le volet d’entretien situé dans le coin avant droit de l’appareil (Fig. 8-9). 3. Placez un récipient plat pour recueillir l’eau de vidange (Fig. 8-10). La quantité d'eau pourrait être plus grande que prévu ! 4. Tirez le tuyau de vidange et maintenez-en l’extrémité au-dessus du récipient (Fig. 8-10). 5. Retirez le bouton d’étanchéité du tuyau de vidange (Fig. 8-10). 6. Une fois la vidange terminée, fermez le tuyau de vidange et remettez-le dans la machine (Fig. 8-11). 7. tournant dans le sens antihoraire (Fig. 8-12). 8. Retirez les impuretés et la poussière (Fig. 8-13). 21 (QWUHWLHQ HW QHWWR DJH 5 Nettoyez soigneusement le ltre de la pompe à l’eau courante, par exemple (Fig. 8-14). Remontez-le soigneusement (Fig. 8-15). HUPH H YR HW G HQWUHWLHQ ATTENTION ! ▶ Le bouchon du ltre de la pompe doit être nettoyé et en bon état. Si le bouchon Q HVW SDV ELHQ VHUU HD SH W V FKDSSHU ▶ Le ltre doit être en place, sinon une fuite peut se produire. 9-Dépannage FR Vous pouvez résoudre la plupart des problèmes qui pourraient survenir sans expertise instructions ci-dessous avant de contacter un service après-vente. Voir SERVICE CLIENTÈLE. AVERTISSEMENT ! ▶ Avant tout entretien, veuillez arrêter l’appareil et débranchez-le du secteur. ▶ Les appareils électriques doivent être entretenus uniquement par des experts en électricité, parce qu'une mauvaise intervention pourrait causer des dommages considérables. ▶ Pour éviter tout risque, faites remplacer le câble d’alimentation endommagé unique- 9.1 Codes d’informations lavage. Aucune action ne doit être entreprise. Code Message 1 : 25 Le temps restant du cycle de lavage est évalué à 1 heure et 25 minutes. 6 : 30 férée est évalué à 6 heures et 30 minutes.. - AUTO La détection automatique de la charge est activée, uniquement pour certains programmes. End Le cycle de lavage est terminé. L'appareil s'éteint automatiquement. Lock- La porte est fermée à cause du niveau d’eau ou de température élevé ou du déroulement de l’essorage. bEEP OFF L’avertisseur sonore est désactivé. bEEP ON L’avertisseur sonore est activé. La touche de fonction est fermée. Le changement de programme est invalide Problème Cause Solution • CLR FLTR • Erreur de de vidange, l’eau n’a pas été • entièrement évacuée après 6 minutes. dange. E2 • Verrouillage - erreur. E4 • Le niveau d’eau n’a pas été at- • Assurez-vous que le robinet est entièrement ouvert et que la pression de l’eau est nor teint après 12 minutes. male. • • Le tuyau de vidange s'auto-siphonne. E8 • Niveau de sécurité de l’eau - erreur. • Fermez correctement la porte. • Contactez le service après-vente. 23 9-Dépannage FR Problème Cause Solution F3 • Capteur de température - erreur. • Contactez le service après-vente. F4 • • Contactez le service après-vente. F7 • Moteur - erreur. • Contactez le service après-vente. FA • Erreur du capteur de niveau • Contactez le service après-vente. d’eau. FC0, FC1 ou FC2 • Erreur de communication anor- • Contactez le service après-vente. male Unb • Charge déséquilibrée - erreur. • tambour. Réduisez la charge de linge. Problème Cause Solution Le lave-linge ne fonctionne pas. • Le programme n’a pas encore démarré. • La porte n’est pas correctement fermée. • La machine n’a pas été mise sous tension • Panne de courant. • Le Verrouillage enfant est activé. • Il n’y a pas d'eau. • • est bouché. • La pression de l’eau est inférieure à 0,03 MPa. • La porte n’est pas correctement fermée. • Coupure d’eau. • La hauteur du tuyau de vidange est inférieure à 80 cm. • L’extrémité du tuyau de vidange pourrait baigner dans l'eau. • Le lave-linge ne se remplit pas d'eau. La machine se vidange pendant qu’on y introduit de l'eau. Problème de vidange. • Le tuyau de vidange est obstrué. • • L’extrémité du tuyau de vidange se trouve à une hauteur supérieure à 100 cm au-dessus du sol. Forte vibration pen- • Certains boulons de transport n'ont dant l’essorage. pas été retirés. • L’appareil n’est pas installé sur une surface stable. L’opération s’arrête de lavage. 24 • La charge de la machine n’est pas correcte. • Coupure d'eau ou panne de courant. marrez-le. • Fermez correctement la porte. • Mettez la machine sous tension. • • Désactivez le verrouillage enfant. • • • • d’eau. d’arrivée d'eau. • Fermez correctement la porte. • • Assurez-vous que le tuyau de vidange est correctement installé. • n’est pas plongé dans l’eau. • Débouchez le tuyau de vidange. • • Assurez-vous que le tuyau de vidange est correctement installé. • Retirez tous les boulons de transport. • Assurez-vous que l’appareil est placé sur une surface stable et plane. • la charge. • trique et l’alimentation en eau. 9-Dépannage FR Problème Cause Solution L’opération s’arrête pendant un certain temps. • • Problème dû au modèle de chargement. • trempage • Le détergent n’est pas adapté. • • Réduisez ou ajustez la charge. • Annulez le programme et redémarrez. Une quantité excessive de mousse • Quantité excessive de détergent. bour et/ou le tiroir à lessive. Ajustement auto• La durée du programme de lavage matique du temps est ajustée. de lavage. Échec de l'essorage. • Mauvaise répartition du linge. Résultat de lavage insatisfaisant. • en matière de lessive. • Réduisez la quantité de lessive. • Ce phénomène est normal et ment. • et la répartition du linge, puis relancez un programme d'essorage. • Le degré de salissure ne correspond • Sélectionnez un autre propas au programme sélectionné. gramme. • La quantité de détergent était insuf- • Choisissez le linge selon le degré de salissure et selon • La charge maximale est dépascant. sée. • Le linge est inégalement réparti • Réduisez la charge. dans le tambour. • Détachez le linge. Il existe des résidus de lessive en poudre sur le linge. Le linge contient des taches grises. • Des particules insolubles de dé- • Rincez à nouveau. tergent peuvent persister sous • Essayez de brosser les points forme de taches blanches sur le sur le linge sec. lin- ge. • Choisissez un autre détergent. • provenant des graisses telles • Prétraitez le linge à l’aide d’un que les huiles, les crèmes ou les nettoyant spécial. onguents. Remarque : Formation de mousse Si trop de mousse apparait pendant le cycle d'essorage, le moteur tournera à basse vitesse pendant 30 secondes et répéter au maximum 4 fois. Après cela, si trop de mousse a été détectée, le moteur s'arrête pendant 5min, 10min et 15min en séquence.Si lea moteur ne tourne toujours pas, le cycle de rotation s'arrêtera en affichant une erreur. Si les messages d’erreur réapparaissent après les mesures prises, éteignez l’appareil, débranchez-le et contactez le service clientèle. 9.4 En cas de panne de courant Le programme en cours et ses paramètres seront enregistrés. Lorsque l’alimentation électrique est rétablie, le fonctionnement reprend. Si une panne d’alimentation interrompt un programme de lavage en cours, l’ouverture de porte se bloque mécaniquement. Pour sortir le linge, le niveau d’eau ne doit pas être visible à travers le hublot en verre de la porte. - Risque de brûlures ! Le niveau d’eau doit être réduit tel qu’indiqué dans la section « Filtre de la pompe ». Ensuite, tirez le levier(A) situé en dessous du volet d’entretien (Fig. 9-1) jusqu’à ce que la porte se déverrouille en émettant un petit clic. Remontez ensuite toutes les pièces. 9-1 25 10-Installation FR 10.1 Préparation ▶ Retirez l’appareil de l’emballage. ▶ polystyrène et gardez-les hors de la portée des enfants. Lors de l’ouverture de l’emballage, vous pourriez voir des gouttes d’eau sur le sac en plastique et le hublot. Ce Remarque : Mise au rebut des emballages Tenez tous les emballages hors de portée des enfants et mettez-les au rebut dans le respect de l'environnement. 2. 1. 10.1 3. 10-2 10.2 EN OPTION : Installation des pads de réduction de bruit 1.En ouvrant le sachet plastique contenant les accessoires, vous trouverez quatre patins de réduction de bruit. (Fig. 10.1) 2.Coucher le lave-linge sur l’arrière de façon à avoir le hublot sur le dessus et le dessous de l’appareil face à la personne qui opère. 3.Prenez les patins de réductions de bruit et retirer le film protecteur du scotch double face. Collez les patins sous la machine comme illustré en figure 3 (2 pads longs en position 1 et 3 et deux petits pads en position 2 et 4). Remettez la machine debout. 10.3 Démontez les boulons de transport La protection de transport à l'arrière est conçue pour serrer les composants antivibrations à l'intérieur de dommagement intérieur.Tous les éléments (I, R, S et T, Fig 10-2) doivent être retirés avant utilisation. 10-3 T1 T2 T3 26 T4 1. Retirez les 4 boulons (T1-T4) (Fig. 10-3). 10-Installation FR 10-4 2. Fermez les 6 trous de gauche avec des bouchons obturateurs (Fig. 10-4). Remarque : Conservez-les en lieu sûr Conservez les protections de transport dans un endroit sûr pour une utilisation ultérieure. Chaque fois que vous souhaitez déplacer l’appareil, réinstallez d’abord les pièces de protection. 10.4 Déplacement de l'appareil Si vous souhaitez déplacer l’appareil sur une grande distance, remettez les boulons de transport retirés avant l’installation pour éviter tout dommage : L'assemblage se fait dans l'ordre inverse. 10-5 10.5 Alignement de l’appareil Réglez tous les pieds (Fig. 10-5) pour obtenir un nivellement complet. Cela réduira les vibrations et le bruit pendant l’utilisation. de même que l’usure. Nous recommandons d’utiliser un niveau à bulle pour le réglage. Le sol doit être aussi stable et plat que possible. 1. Desserrez le contre-écrou (1) à l’aide d’une clé. 2. Réglez la hauteur en tournant le pied (2). 3. Serrez le contre-écrou (1) contre le boîtier 27 ,QVWD DWLRQ 5DFFRU HPH W H UDL D H L H FRUUHFWHPHQW H W D GH YLGDQJH D W D WHULH /H W D GRLW DWWHLQGUH HQ Q SRLQW une hauteur comprise entre 80 et 100 cm au-dessus de la ligne inférieure de l'appareil ! Laissez toujours le tuyau de vidange xé au clip à l'arrière de l'appareil si possible. AVERTISSEMENT ! ▶ ▶ ▶ ▶ 8WL LVH QLT HPHQW HQVHPE H GH UDFFRUGHPHQW IR UQL SR U H UDFFRUGHPHQW Ne réutilisez jamais d’ensemble de raccordement usagé ! 5DFFRUGH DSSDUHL QLT HPHQW QH D LPHQWDWLRQ G HD IURLGH Avant le raccordement, véri ez si l’eau est propre et claire. Les raccordements suivants sont possibles: 7 D H L D H LHU ▶ 6 VSHQGH H W D GH YLGDQJH D UHERUG G Q YLHU GH WDL H DG T DWH DLGH G V SSRUW HQ 8 (fg. 10-6). ▶ 3URW JH FRQYHQDE HPHQW H V SSRUW HQ 8 FRQWUH WR W J LVVHPHQW 7 D H L D H D UDFFRU HPH W DF D WLR HV HD V HV ▶ /H GLDP WUH LQWHUQH G UHJDUG DYHF YHQW GRLW être de 40 mm. ▶ Placez le tuyau de vidange à environ 80 mm des FRQG LWV G HD V HV ▶ L H H V SSRUW HQ 8 HW DWWDFKH H VR LGHPHQW (Fig. 10-7). 5DFFRU HPH W W D H L D H LHU ▶ /H UDFFRUGHPHQW GRLW VH VLW HU D GHVV V G VL SKRQ ▶ 8Q UDFFRUG HPER W HVW KDELW H HPHQW IHUP par un bloc (A). Vous devez le retirer pour éviter tout dysfonctionnement (fg. 10-8). ▶ L H H W D GH YLGDQJH DLGH G QH SLQFH ATTENTION ! ▶ Le tuyau de vidange ne doit pas être submergé par l’eau, et doit être xé solidement HW H HPSW GH I LWH 6L H W D GH YLGDQJH HVW D VR R VL D FDQD LVDWLRQ HVW QH hauteur de moins de 80 cm, le lave-linge se vidange de manière continue lorsqu’on le remplit (syphonnement automatique). ▶ /H W D GH YLGDQJH Q HVW SDV D RQJ EHVRLQ FRQWDFWH H VHUYLFH DSU V YHQWH ,QVWD DWLRQ 5DFFRU HPH W HD R FH VV UH YR V T H HV RLQWV VRQW LQV U V Raccordez le exible d’arrivée d’eau à la pointe biseautée de l’appareil (Fig. 10-9). Resserrez PDQ H HPHQW H RLQW YLV / D WUH H WU PLW HVW UDFFRUG H Q URELQHW d’eau avec un fletage de 3/4 po (Fig. 10-10). UD F HPH W HFWULT H Avant chaque branchement, véri ez si : ▶ D LPHQWDWLRQ HFWULT H D SULVH HW H I VLE H FRU respondent à la plaque signalétique ; ▶ D SULVH G D LPHQWDWLRQ HVW PLVH D WHUUH HW D F QH che multiple ou rallonge n’est utilisée ; ▶ la che et la prise d’alimentation correspondent SDUIDLWHPHQW ▶ Uniquement au Royaume-Uni : /D SULVH SR U H 5R D PH 8QL HVW FRQIRUPH D QRUPH 6 Branchez la fche à la prise (Fig. 10-11). AVERTISSEMENT ! ▶ VV UH YR V WR R UV T H WR WHV HV FRQQH LRQV D LPHQWDWLRQ HFWULT H H W D d’évacuation et exible d’alimentation en eau potable) sont solides, sèches et ne pré sentent aucune fuite ! ▶ 9HL H FH T H FHV SL FHV QH VRLHQW DPDLV SL WLQ HV S L HV R WRUG HV ▶ 6L H FRUGRQ G D LPHQWDWLRQ HVW HQGRPPDJ IDLWHV H UHPS DFHU SDU H IDEULFDQW YRLU la carte de garantie) a n d'éviter tout risque. . 11-Informations techniques FR 11.1 Autres données techniques HW80- B14876N Tension en V 220-240 V~/50 Hz Courant en A 10 Puissance maximale en W Pression d’eau en MPa 2000 0,03≤P ≤1 Poids net en kg 72 11.2 Product dimensions VUE DE FACE Mur VU E DE DESSUS HW80- B14876N A hauteur totale du produit mm 850 B largeur totale du produit mm 595 C profondeur totale du produit mm 460 D profondeur avec porte ouverteÿÿ mm 1050 E Minimum door clearance to adjacent wall mm 300 Remarque: La hauteur exacte de votre machine dépend de la distance des pieds par rapport au centre de la machine. L'espace oùvous installez votre machine doit être d'au moins 40 mm plus large et 20 mm plus profond que ses dimensions. 11.3 Normes et directives Ce produit répond aux exigences de toutes les directives CE applicables ainsi que les normes harmonisées correspondantes, qui prévoient le marquage CE. 30 6HUYLFH F LHQW H FR 1R V YR V UHFRPPDQGRQV QRWUH VHUYLFH F LHQWV +DLHU HW WL LVDWLRQ GH SL FHV GH UH FKDQJH G RULJLQH 6L YR V DYH Q SURE PH DYHF DSSDUHL YH L H YR V U I UHU D VHFWLRQ ' 3 11 *( 6L YR V QH WUR YH SDV GH VR WLRQ YH L H FRQWDFWHU ▶ YRWUH YHQGH U RFD R ▶ UHQGH YR V V U H VLWH KDLHU FRP GDQV D RQH 6HUYLFH HW V SSRUW YR V WUR YHUH GHV Q P URV GH W SKRQH HW QH 4 9R V SR UUH JD HPHQW FRQWDFWHU H VHUYLFH GH U F DPDWLRQ 3R U FRQWDFWHU QRWUH 6HUYLFH UDVV UH YR V T H HV LQIRUPDWLRQV FL DSU V VRQW GLV SRQLE HV HV LQIRUPDWLRQV VRQW GLVSRQLE HV V U D S DT H VLJQD WLT H Modèle ____________________ N° de série _____________________ Véri ez également la Carte de garantie fournie avec le produit en cas de garantie. 3R U GHV UHQVHLJQHPHQWV J Q UD jointes nos adresses en Europe : FRQFHUQDQW HV HQWUHSULVHV YR V WUR YHUH FL GUH H GH LHU H UR H GUH H R H +DLHU ( URSH 7UDGLQJ 65/ 9LD 'H ULVWRIRULV LH U FH 9DUHVH ,7 /,( +DLHU ,EHULH 6/ H LT H H 3J *DUFLD DULD H LT H RU DUFH RQH (63 *1( HPER U +DLHU HPDJQH *PE+ HP H +H HWW 3DFNDUG 6WU ULFKH ' DG +RPE UJ RR H ALLEMAGNE E LT H FK T H +DLHU SS LDQFHV 8. R ULH R /WG *U FH One Crown Square L HG R P LH K UFK 6WUHHW (DVW .L GRP LH RNLQJ 6 UUH *8 +5 5R D PH 8QL 3R U GH S V DPS HV LQIRUPDWLRQV YH L H FRQV WHU H VLWH GUH H R H +DLHU UDQFH 6 6 U H GHV *UDYLHUV 1H L V U 6HLQH 5 1 ( +DLHU Q 6 QGHU HFKW 5R WH GH /HQQLN (/*,48( +DLHU 3R RJQH 6S R R -HUR R LPVNLH DUV D D POLOGNE KDLHU FRP 31 H H GHG H 1 1/ 'DQN D N RRU Z DD NRRS D GLW +DLHU SURG FW /HHV GH H KDQGOHLGLQJ JURQGLJ YRRU KHW DSSDUDDW LQ JHEU LN QHHPW 'H KDQGOHLGLQJ EHYDW EHODQJULMNH LQIRUPDWLH GLH DO KHOSHQ Z DSSDUDDW RSWLPDDO WH JHEU LNHQ HQ KHW YHLOLJ HQ FRUUHFW WH LQVWDOOHUHQ JHEU LNHQ HQ RQGHUKR GHQ %HZDDU GH H KDQGOHLGLQJ RGDW KHP VWHHGV N QW UDDGSOHJHQ YRRU KHW YHLOLJ HQ FRUUHFW JHEU LN YDQ KHW DSSDUDDW OV KHW DSSDUDDW YHUNRRSW ZHJVFKHQNW RI DFKWHUODDW ZDQQHHU YHUK LVW PRHW GH H KDQGOHLGLQJ RRN PHHJHYHQ RGDW GH QLH ZH HLJHQDDU YHUWUR ZG NDQ UDNHQ PHW KHW DSSD UDDW HQ GH YHLOLJKHLGVZDDUVFK ZLQJHQ /H H GH DD VFK L HOD L NH HLOL KHLGVL IR PDWLH OJHPHQH LQIRUPDWLH HQ WLSV 0LOLH LQIRUPDWLH 9HUZLMGHUL +HOS KHW PLOLH HQ GH JH RQGKHLG WH EHVFKHUPHQ 3ODDWV GH YHUSDNNLQJ LQ GH JHVFKLNWH FRQWDLQHUV RP KHW WH UHF FOHQ +HOS DIYDO YDQ HOHNWULVFKH HQ HOHNWURQLVFKH DSSDUDWHQ UHF FOHQ *RRL DSSDUDWHQ GLH YRRU LHQ LMQ YDQ GLW V PERRO QLHW ZHJ PHW K LVKR GHOLMN DIYDO 5H WR UQHHU KHW SURG FW QDDU Z ORNDOH LQVWHOOLQJ RI QHHP FRQWDFW RS PHW Z JHPHHQWHOLMN NDQWRRU : 56&+8:,1* LVLFR RS OHWVHOV RI H VWLNNL 2QWNRSSHO KHW DSSDUDDW YDQ KHW QHWZHUN 6QLMG KHW QHWVQRHU GRRU HQ YHUZLMGHU KHW 9HU ZLMGHU GH VFKDUQLHUHQ RP WH YHUPLMGHQ GDW NLQGHUHQ RI K LVGLHUHQ LQ KHW DSSDUDDW YDVW JHNOHPG N QQHQ UDNHQ ,QKR G 9HLOLJKHLGVLQIRUPDWLH 3URG FWEHVFKULMYLQJ %HGLHQLQJVSDQHHO 3URJUDPPD V 9HUEU LN 'DJHOLMNV JHEU LN 0LOLH YULHQGHOLMN ZDVVHQ =RUJ HQ UHLQLJLQJ 3UREOHHPRSORVVHQ ,QVWDOODWLH 7HFKQLVFKH JHJHYHQV .ODQWHQGLHQVW 9HLOLJKHLGVLQIRUPDWLH 9RRU KHW DSSDUDDW GH HHUVWH PDDO L VFKDNHOW PRHW KHLGVDG LHV OH H : 1/ KHW HLOL 56&+8:,1* 9RRU GH HHUVWH L HEU LN DPH ▶ =RUJ HUYRRU GDW HU JHHQVFKDGH LV RSJHWUHGHQ WLMGHQV KHW WUDQVSRUW ▶ =RUJ HUYRRU GDW DOOH WUDQVSRUWER WHQ YHUZLMGHUG LMQ ▶ 9HUZLMGHU DOOH YHUSDNNLQJ HQ E LWHQ GH E UW YDQ NLQGHUHQ EHZDUHQ ▶ +HW DSSDUDDW PRHW DOWLMG GRRU PLQLP P WZHH SHUVRQHQ ZRUGHQ JHGUDJHQ RPGDW KHW R ZDDU LV D HOLMNV HEU LN ▶ 'LW DSSDUDDW PDJ ZRUGHQ JHEU LNW GRRU NLQGHUHQ YDQ MDDU HQ R GHU HQ SHUVRQHQ PHW HHQ YHUPLQGHUGH I VLHN JHYRHOVPDWLJ HQ PHQWDDO YHUPRJHQ RI HHQ JHEUHN DDQ HUYDULQJ HQ NHQQLV DOV H RQGHU WRH LFKW VWDDQ RI LQVWU FWLHV NULMJHQ PHW EHWUHNNLQJ WRW KHW YHLOLJH JHEU LN YDQ KHW DSSDUDDW HQ GH EHWURNNHQ ULVLFR V ▶ +R G KHW DSSDUDDW LW GH E UW YDQ NLQGHUHQ MRQJHU GDQ MDDU R G WHQ LM H RQGHU FRQVWDQW WRH LFKW VWDDQ ▶ .LQGHUHQ PRJHQ QLHW VSHOHQ PHW KHW DSSDUDDW ▶ /DDW NLQGHUHQ RI K LVGLHUHQ QLHW GLFKWELM KHW DSSDUDDW NRPHQ DOV GH GH U JHRSHQG LV ▶ %HZDDU DOOH ZDVPLGGHOHQ LW GH E UW YDQ NLQGHUHQ ▶ 6O LW ULWVVO LWLQJHQ EHYHVWLJ ORVVH GUDGHQ HQ OHW HURS GDW NOHLQH LWHPV QLHW YHUVWULNW N QQHQ UDNHQ ,QGLHQ QRRG DNHOLMN PRHW HHQ DN RI QHW JHEU LNHQ ▶ 8 PDJ QLHW RS KHW DSSDUDDW GU NNHQ RI KHW JHEU LNHQ RS EORWH YRHWHQ RI PHW QDWWH RI YRFKWLJH KDQGHQ RI YRHWHQ ▶ 8 PDJ KHW DSSDUDDW QLHW DIGHNNHQ RI RPZLNNHOHQ WLMGHQV GH ZHU NLQJ RI DFKWHUDI RGDW HYHQW HHO YRFKW NDQ YHUGDPSHQ ▶ 8 PDJ JHHQ ZDUH YRRUZHUSHQ RI EURQQHQ YDQ ZDUPWH RI YRFKW ERYHQRS KHW DSSDUDDW SODDWVHQ ▶ *HEU LN RI EHZDDU JHHQ RQWYODPEDDU ZDVPLGGHO RI VWRPHULM UHL QLJLQJVPLGGHO GLFKWELM KHW DSSDUDDW ▶ *HEU LN JHHQ RQWYODPEDDU VSUD V GLFKWELM KHW DSSDUDDW ▶ :DV JHHQ NOHGLQJVW NNHQ GLH EHKDQGHOG ZHUGHQ PHW RSORVPLG GHOHQ LQ KHW DSSDUDDW RQGHU H YRRUDI LQ GH O FKW WH KHEEHQ ODWHQ GURJHQ 9HLOLJKHLGVLQIRUPDWLH 1/ : 56&+8:,1* D HOLMNV HEU LN ▶ 8 PDJ GH VWHNNHU QLHW YHUZLMGHUHQ RI LQYRHUHQ LQ GH DDQZH LJKHLG YDQ RQWYODPEDDU JDV ▶ 8 PDJ VFK LPU EEHU RI VSRQVDFKWLJ PDWHULDDO ZDVVHQ LQ KHHW ZDWHU ▶ 8 PDJ JHHQ ZDVJRHG ZDVVHQ GDW Y LO LV PHW EORHP ▶ 8PDJGH ODGH PHWKHWZDVPLGGHO QLHWRSHQHQ WLMGHQVHHQZDVF FO V ▶ 'U N QLHW RS GH GH U WLMGHQV HHQ ZDVF FO V =H ZRUGW QDPHOLMN KHHW ▶ 8 PDJ GH GH U QLHW RSHQHQ DOV KHW ZDWHUQLYHD LFKWEDDU LV GRRU KHW NLMNYHQVWHU ▶ 8 PDJ GH GH U QLHW RSHQ IRUFHUHQ 'H GH U LV LWJHU VW PHW HHQ HOIJUHQGHOHQG PHFKDQLVPH HQ H RSHQW NRUW DDQ KHW HLQGH YDQ GH ZDVSURFHG UH ▶ 6FKDNHO KHW DSSDUDDW LW QD HON SURJUDPPD HQ YRRU UR WLQH RQ GHUKR GVZHUNHQ LWYRHUHQ 9HUZLMGHU GH VWHNNHU LW KHW VWRSFRQ WDFW RP HOHNWULFLWHLW WH EHVSDUHQ HQ LW YHLOLJKHLGVRYHUZHJLQJHQ ▶ 8 PDJ QRRLW DDQ KHW QHWVQRHU WUHNNHQ RP GH VWHNNHU LW KHW VWRSFRQWDFW WH YHUZLMGHUHQ 2 GHUKR G UHL L H ▶ =RUJ HUYRRU GDW NLQGHUHQ RQGHU WRH LFKW VWDDQ DOV H KHW DSSD UDDW UHLQLJHQ RI RQGHUKR GHQ ▶ 9HUZLMGHU GH VWHNNHU LW KHW VWRSFRQWDFW YRRU RQGHUKR GV ZHUN DDPKHGHQ LWYRHUW ▶ +R G KHW RQGHUVWH GHHO YDQ KHW NLMNYHQVWHU VFKRRQ HQ RSHQ GH GH U HQ GH ODGH PHW KHW ZDVPLGGHO DOV KHW DSSDUDDW QLHW LQ JH EU LN LV RP JH UWMHV WH YRRUNRPHQ ▶ *HEU LN JHHQ ZDWHUVSUD RI VWRRP RP KHW DSSDUDDW WH UHLQLJHQ ▶ OV KHW QHWVQRHU EHVFKDGLJG LV PRHW KHW ZRUGHQ YHUYDQJHQ door de fabrikant, zijn onderhoudsdienst of dergelijk gekwali FHHUGH SHUVRQHQ RP LHGHU ULVLFR LW WH VO LWHQ ▶ 3UREHHU KHW DSSDUDDW QRRLW HOI WH UHSDUHUHQ 1HHP FRQWDFW RS PHW RQ H NODQWHQGLHQVW RP UHSDUDWLHV WH ODWHQ LWYRHUHQ , VWDOODWLH ▶ +HW DSSDUDDW PRHW LQ HHQ JRHG JHYHQWLOHHUGH ORFDWLH ZRUGHQ JH SODDWVW =RUJ YRRU HHQ ORFDWLH GLH WRHODDW GH GH U YROOHGLJ WH RSHQHQ 9HLOLJKHLGVLQIRUPDWLH : 1/ 56&+8:,1* , VWDOODWLH ▶ ,QVWDOOHHU KHW DSSDUDDW QRRLW E LWHQ RS HHQ YRFKWLJH ORFDWLH RI LQ HHQ ORFDWLH ZDDU ZDWHUOHNNHQ N QQHQ RSWUHGHQ RDOV RQGHU RI GLFKWELM HHQ ZDVWDIHO ,Q KHW JHYDO YDQ HHQ ZDWHUOHN PRHW GH HOHN WULVFKH YRHGLQJ ORVNRSSHOHQ HQ GH PDFKLQH QDW UOLMN ODWHQ GURJHQ ▶ ,QVWDOOHHU RI JHEU LN KHW DSSDUDDW HQNHO DOV GH WHPSHUDW U KRJHU LV GDQ r& ▶ 3ODDWV KHW DSSDUDDW QLHW UHFKWVWUHHNV RS HHQ WDSLMW RI GLFKWELM HHQ P U RI PH EHOVW N ▶ 8 PDJ KHW DSSDUDDW QLHW LQVWDOOHUHQ LQ GLUHFW RQOLFKW RI LQ GH E UW YDQ ZDUPWHEURQQHQ ELMY IRUQ L HQ YHUZDUPLQJ ▶ =RUJ HUYRRU GDW GH HOHNWULVFKH LQIRUPDWLH RS KHW QDDPSODDWMH RYHUHHQVWHPW PHW GH VWURRPWRHYRHU =R QLHW PRHW FRQWDFW RSQHPHQ PHW HHQ HOHNWULFLHQ ▶ *HEU LN JHHQ P OWL VWHNNHU DGDSWHUV RI YHUOHQJVQRHUHQ ▶ =RUJ HUYRRU GDW HQNHO KHW JHOHYHUGH QHWVQRHU HQ VODQJHQVHW ZRUGHQ JHEU LNW ▶ =RUJ HUYRRU GDW KHW QHWVQRHU HQ GH VWHNNHU QLHW EHVFKDGLJG LMQ ,Q GLHQ EHVFKDGLJG PRHW KHW ZRUGHQ YHUYDQJHQ GRRU HHQ HOHNWULFLHQ ▶ *HEU LN HHQ DI RQGHUOLMNH DDUGJHOHLGHU YRRU GH YRHGLQJ GLH HHQ YR GLJ WRHJDQNHOLMN PRHW LMQ QD GH LQVWDOODWLH +HW DSSDUDDW PRHW JHDDUG ZRUGHQ ( NHO RRU KHW 9. +HW QHWVQRHU YDQ KHW DSSDUDDW LV LWJHU VW PHW HHQ GULHSROLJH VWHNNHU DDUGLQJ GLH SDVW LQ HHQ GULHSROLJH JHDDUGH VWHNNHU 6QLM GH GHUGH SLQ DDUGLQJ QRRLW ZHJ RI GH PRQWHHU H QLHW 'H VWHNNHU PRHW RRN QD GH LQVWDOODWLH WRHJDQ NHOLMN LMQ ▶ =RUJ HUYRRU GDW GH QDGHQ HQ GH YHUELQGLQJHQ YDQ GH VODQJ VWHYLJ LMQ DDQJHEUDFKW HQ GDW HU JHHQ OHNNHQ LMQ HRR G HEU LN 'LW DSSDUDDW LV HQNHO EHGRHOG YRRU ZDVJRHG GDW LQ GH ZDVPDFKLQH PDJ ZRUGHQ JHZDVVHQ 8 PRHW DOWLMG GH LQVWU FWLHV YROJHQ YHUPHOG RS KHW HWLNHW YDQ HON NOHGLQJVW N +HW LV LWVO LWHQG EHGRHOG YRRU JH EU LN ELQQHQ LQ K LV +HW LV QLHW EHGRHOG YRRU FRPPHUFLHHO RI LQG V WULHHO JHEU LN :LM LJLQJHQ DDQ KHW DSSDUDDW LMQ QLHW WRHJHODWHQ 2QEHGRHOG JHEU LN NDQ JHYDDU HQ KHW YHUOLHV YDQ GH JDUDQWLH HQ DDQVSUDNHOLMNKHLGVFODLPV EHWHNHQHQ 2-Productbeschrijving NL Opmerking: Omwille van technische wijzigingen en uiteenlopende modellen kunnen de illustraties in de volgende hoofdstukken verschillen van uw model. 2.1 Afbeelding van het apparaat Voorzijde (afb. 2-1): Achterzijde (afb. 2-2): 2-1 1 2 3 4 Cotton Ex press 15 min Hy gienic Wool Daily Was h Self Clean S port Speed Extra Ri nse Steam HW80-B 14876 Duv et Underwear B aby Care A nt i- allergy Tem p. 2-2 5 6 7 Delica te S ynt het ic Del ay 23 4 5 Cot ton+ Mi x 1 Spi n/Drain Start/Pause 8kg 8 6 7 1 Wasmiddel / Wasverzachter lade 2 Werkblad 3 Scherm 4 Programma selectieschakelaar 5 6 7 8 Paneel Onderhoudsluik Instelbare voetjes Portier handvat 1 2 3 4 5 6 7 Metalen staaf (I1 - I2) Transportbouten (T1-T4) Versterking achterpaneel Netsnoer Waterinlaatklep Afvoerslang Schroeven versterking achterpaneel 2.2 Accessoires Controleer de accessoires en documenten op basis van de onderstaande lijst (afb. 2-3): 2-3 2x 2x Aanvoerslang set1) 6 Afdichtpluggen Afvoerslang Trillingdembeugel perblokken Garantie kaart Gebruikershandleiding 7 3-Bedieningspaneel 3 1 NL 2 3 Eco 40-60 HW80-B14876N Mix Synthetisch Synthétique Express 15 min Baby Care Délicat Sport Startuitstel Fin différée Temp. Tr/min Extra spoelen Stoom Rinçage + Vapeur Start/Pause 1211 10 9 8 7 6 5 Functieknoppen 1 2 3 4 5 Wasmiddel / Wasverzachterlade Scherm Programma selectieschakelaar “Aan/Uit"-knop “Start/Pause“-knop 6 Stoom 7 Extra spoelen 8 Tr/min 9 Temp. 10 4 11 Kinderslot 12 Startuitstel Opmerking: Geluidssignaal In de volgende situaties weerklinkt een geluidssignaal: ▶aan het einde van een programma ▶ wanneer een knop wordt ingedrukt ▶In het geval van storingen ▶ wanneer men aan de programma selectieknop draait Het geluidssignaal kan indien noodzakelijk worden gedeselecteerd; zie DAGELIJKS GEBRUIK. 3.1 Wasmiddel lade 3-1 1 Bakje 2 Bakje 3 Bakje 4 Bakje : Bleekmiddel voor katoen/synthetisch programma. : Vloeibaar wasmiddel voor programma : Wasverzachter, conditioner, etc. : Poeder wasmiddel voor programma Raadpleeg aub de informatie op de verpakking om te zien welke hoeveelheden wasmiddel worden aangeraden bij verschillende temperaturen. 3-2 3.2 Scherm Indien de machine aan staat, geeft het scherm de werkelijke status aan op de verschillende delen ervan. Informatie zoals wastijden, centrifugesnelheid, temperatuur, enz. worden weergegeven (afb. 3-2). Startuitstel Fin différée 8 Temp. Tr/min Extra spoelen Stoom Rinçage + Vapeur Start/Pause 3-Bedieningspaneel NL Gebruikte symbolen: Display symbols: Programmastatus indicatie Programmacyclus indicatie Resterende werktijd Resterende uitstelduur Scherm voor wasduur, eindtijd uitstel en foutcodes en onderhoud sinformatie Automatische weging Wascyclus Spoelcyclus Stoom Zwier/draineercyclus Bedieningspaneel is vergrendeld 3.3 Programmakeuze Door de draaiknop (afb. 3.3) kan tussen de 16 programma’s worden gekozen. De gemaakte keuze licht op en de standaardinstellingen ervan worden weergegeven. 3-3 Eco 40-60 Mix Synthetisch Synthétique Express 15 min Baby Care Délicat Sport 3.4 “Aan/Uit”-knop 3-4 Druk zacht op deze knop (afb. 3-4) om in te schakelen, het scherm licht op. Houd de knop vervolgens ca. 2 seconden ingedrukt om uit te schakelen. Als er geen onderdeel van het paneel of programma wordt ingeschakeld, zal de machine na enige tijd automatisch uitschakelen. 3.5 "Start/Pause“-knop Druk zacht op deze knop (afb. 3-13) om het weergegeven programma te starten of te onderbreken. 3-5 Start/Pause 9 %HGLHQLQJVSDQHHO ) Startuitstel Fin différée Temp. Tr/min Extra spoelen Stoom Rinçage + Vapeur 2SPHUNL Start/Pause FWLHN RSSH 'H I QFWLHNQRSSHQ DIE VFKDNHOHQ ELMNRPHQGH RSWLHV LQ YRRU KHW JHVHOHFWHHUGH SURJUDPPD YRRU GH VWDUW YDQ KHW SURJUDPPD 'H EHWURNNHQ LQGLFDWRUHQ ZRUGHQ ZHHUJHJHYHQ OV KHW DSSDUDDW ZRUGW LWJHVFKDNHOG RI HHQ QLH Z SUR JUDPPD LQJHVWHOG ZRUGHQ DOOH RSWLHV LWJHVFKDNHOG OV HHQ NQRS PHHUGHUH RSWLHV KHHIW NDQ GH JHZHQVWH RSWLH ZRUGHQ JHVHOHFWHHUG GRRU GH NQRS DFKWHUHHQ YROJHQV LQ WH GU NNHQ 2P GH LQVWHOOLQJ WH YHUZLMGHUHQ RI GH LQVWHOOLQJHQ WH DQQ OHUHQ GU NW RS GH I QFWLHNQRS WRW GH JHZHQVWH /(' ODPSMHV LWJDDQ 1LHW DOOH RSWLHV LMQ EHVFKLNEDDU YRRU DOOH SURJUDPPD V LH 352*5 00 6 )DEULHNVL VWHOOL H Voor de beste resultaten bij elk programma heeft Haier speci eke instellingen gepro JUDPPHHUG 'H H LQVWHOOLQJHQ ZRUGHQ DDQJHUDGHQ LQGLHQ HU JHHQ VSHFLDOH YHUHLVWHQ LMQ ) Ext r aspoel en Ri nçage+ 'U N RS GH H NQRS DIE RP KHW ZDVJRHG LQWHQ VLHYHU WH VSRHOHQ PHW VFKRRQ ZDWHU 'LW ZRUGW DDQEH YROHQ YRRU SHUVRQHQ PHW HHQ JHYRHOLJH K LG 'RRU GH NQRS PHHUGHUH PDOHQ LQ WH GU NNHQ NDQ PHQ Q WRW GULH ELMNRPHQGH F FOL VHOHFWHUHQ ) St ar t ui t s t el Fi ndi f f ér ée 2SPHUNL FWLH ( WUD VSRHOH FWLH 6WDUW LWVWHO 'U N RS GH H NQRS DIE RP KHW SURJUDPPD LW JHVWHOG WH VWDUWHQ +HW LWVWHO NDQ ZRUGHQ YHUKRRJG LQ VWDSSHQ YDQ PLQ WHQ YDQ WRW U :DQQHHU ELMYRRUEHHOG ZRUGW ZHHUJHJHYHQ EHWHNHQW GDW GDW KHW ZDVSURJUDPPD DO HLQGLJHQ QD U HQ PL Q WHQ 'U N RS GH 6WDUW 3D H NQRS RP PHW LWVWHO WH VWDUWHQ 'H KRHYHHOKHLG LWVWHO PRHW PHHU LMQ GDQ GH G U YDQ KHW ZDVSURJUDPPD QGHUV DO KHW SURJUDPPD GLUHFW VWDUWHQ 'UDDL DDQ GH SURJUDPPDNQRS RP KHW LWVWHO WH GHDF WLYHUHQ 9ORHLEDDU ZDVPLGGHO OV YORHLEDDU ZDVPLGGHO JHEU LNW ZRUGW KHW DIJHUDGHQ KHW VWDUW LWVWHO LQ WH VFKDNHOHQ 3-Bedieningspaneel NL 3.6.3 Functie “ “ 3-6-3 Druk op de knop “ ” (afb. 3-6-3) om een afwijkende programmaduur ter kiezen. Deze functie is niet beschikbaar voor “Delicaat” “Zelfreinigend” and “Zwieren” programma’s. 3.6.4 Functie “Stoom” Met deze knop (afb. 3-6-4) kan het stoomprogramma worden gekozen. Als deze functie ingeschakeld wordt, is de standaardtemperatuur de maximale temperatuur van het geselecteerde programma. Deze funxtie kan worden gebruikt met de programma’s Katoen, Mix, Synthetisch, Ondergoed, Baby Care en Anti-allergie. Indien u “Stoom” selecteert zal het lampje gaan branden om u te waarschuwen. Wanneer u deze functie gebruikt, kunt u de temperatuur niet instellen. Deze functie wordt uitgeschakeld wanneer u de temperatuur aanpast. Zet de machine aan en selecteer dit programma. Dit programma kan niet worden gekozen wanneer de machine al in werking is. 3-6-4 n Stoom Vapeur 3-6-5 Tr/min 3.6.5 Functie "Tr/min“ Druk op deze knop (afb. 3-6-5) om de centrifugesnelheid in te stellen. Indien er geen waarde wordt weergegeven, zal het wasgoed niet worden gecentrifugeerd. 3.6.6 Functie “Temp.” 3-6-6 Temp. Druk op deze knop (afb. 3-8) om de wastemperatuur van het programma te wijzigen. 3-6-7 3.6.7 Kinderslot Deze optie blokkeert alle paneelelementen tegen activering. Druk 3 seconden tegelijkertijd op de knoppen “ ” en “Startuitstel” (afb. 3-14) nadat het programma is gestart; het kinderslot licht op op het scherm. Herhaal dit om te ontgrendelen. Startuitstel Fin différée 11 4-Programma's NL Oplosmiddel compartiment voor: • Ja, º Optioneel, / Neen Max. lading 1) Temperatuur in kg Programma Katoen Voorinstelling centrifugeren tr/ min in °C HW100/ HW80 8 max Voorinstelling 902) 40 Vezeltype • º / • Mix 8 60 30 • º / • Synthetisch Ondergoed 4 60 40 60 40 Baby Care 4 902) 40 Anti-allergie 4 902) 60 Delicaat 1 30 30 Sport 2 40 20 Eco 40-60 8 / / Katoen20°C 8 20 20 º º º º º º º º / 4 Dekbed 2 40 40 / / 1 40 * 902) 902) 1 40 * º º º / 4 • • • • • • • • • • • • • • • • • • • • • • • • 0 902) 902) / / / / / º / / / Express 15 min 3) Hygiënisch Wol Zelfreinigend Zwieren Bleekmiddel Vloeibaar wasmiddel Wasverzachter, Conditioner, enz. Poeder wasmiddel / / / / / / / / / / Katoen 1400 •• • • Licht vuil gemengd wasgoed van katoen en synthetische 1000 •• • • Synthetische of 1200 Katoen/Synthetisch 1000 Katoen/Synthetisch 1000 Katoen/Synthetisch 1000 Zijde 600 Sportkledij 800 •• •• •• •• •/ •/ 2) 12 • • • • • • • • • • / • Katoen / / / / / Katoen 1400 • • • • • / • • • • • • • • • • 800 / Katoen/Synthetisch 1000 Katoen/Synthetisch 1000 Wol 800 / 600 / / / / 1000 / / / / Met betrekking tot droog wasgoed. *: Water is niet verwarmd. Kies 90 °C enkel als wastemperatuur voor hygiënische vereisten. 3) Verminder de hoeveelheid wasmiddel omdat de programmaduur kort is. 1) in tpm Functie Startuitstel Stoom Extra spoelen i-time 1 2 3 4 / / / 5-Verbruik NL Scan Q R-code op het energielabel voor informatie over energieverbruik. Het werkelijke energieverbruik kan verschillen van het opgegeven verbruik naar lokale omstandigheden. Opmerking: Automatisch gewicht Het apparaat is uitgerust met een lading herkenning. Met een kleine lading wordt de energie, het water en de wasduur automatisch verminderd in sommige programma's. Het scherm geeft weer. 13 'DJHOLMNV JHEU LN 1/ 9RHGL 6O LW GH ZDVPDFKLQH DDQ RS KHW OLFKWHW 9 WRW 9a + DIE 5DDGSOHHJ RRN GH VHFWLH ,1 67 // 7,( :DWHU HUEL GL ▶ &RQWUROHHU RI GH ZDWHUWRHYRHU VFKRRQ HQ LQ JRHGH VWDDW LV YRRU GH ZDWHUDDQYRHUVODQJ DDQVO LW ▶ 'UDDL GH NUDDQ RSHQ DIE 2SPHUNL 6WUDNKHLG 9RRU JHEU LN PRHW FRQWUROHUHQ RS OHNNHQ LQ GH YHUELQGLQJHQ W VVHQ GH NUDDQ HQ GH LQODDWVODQJ GRRU GH NUDDQ RSHQ WH GUDDLHQ :DV RHG RRUEHUHLGH ▶ 6RUWHHU GH NOHGLM QDDUJHODQJ GH VWRI NDWRHQ V Q WKHWLVFK ZRO RI LMGH HQ Y LOKHLG DIE /HW RS GH RQGHUKR GVV PEROHQ RS GH HWLNHWWHQ ▶ 6FKHLG ZLWWH NOHGLM YDQ JHNOH UGH NOHGLQJVW NNHQ :DV JHNOH UGH WH WLHO HHUVW PHW GH KDQG RP WH FRQWUROHUHQ RI GH NOH UHQ YHUEOHNHQ RI LWORSHQ ▶ 0DDN GH DNNHQ OHHJ VOH WHOV P QWHQ HWF HQ YHUZLMGHU KDUGHUH GHFRUDWLHYH YRRUZHUSHQ ELMY VSHOGHQ ▶ .OHGLQJVW NNHQ RQGHU RPHQ GHOLFDDW ZDV goed en jn gewoven textiel zoals jne gordijnen PRHWHQ LQ HHQ ZDV DN ZRUGHQ JHSODDWVW KDQG ZDVVHQ RI GH VWRPHULM LMQ EHWHUH RSWLHV ▶ 6O LW ULWVVO LWLQJHQ YHOFUR EHYHVWLJLQJHQ HQ KD NHQ RUJ HUYRRU GDW GH NQRSSHQ VWHYLJ LMQ DDQ JHQDDLG ▶ 3ODDWV JHYRHOLJH LWHPV RDOV ZDVJRHG RQGHU HHQ VWHYLJH RRP GHOLFDDW RQGHUJRHG HQ NOHLQH LWHPV RDOV VRNNHQ ULHPHQ EHKD V HWF LQ HHQ ZDV DN ▶ 2QWYR Z JURWH VW NNHQ ZDVJRHG RDOV EHGGHQ JRHG VSUHLHQ HWF ▶ 'UDDL MHDQV JHGHFRUHHUGH RI NOH U LQWHQVLHYH NOHGLQJ ELQQHQVWHE LWHQ OLHIVW DI RQGHUOLMN ZDV VHQ 23*(/(7 1LHW WH WLHO HQ NOHLQH ORVVH YRRUZHUSHQ RI YRRUZHUSHQ PHW HHQ VFKHUSH UDQG N QQHQ GHIHFWHQ YHURRU DNHQ HQ VFKDGH WRHEUHQJHQ DDQ RZHO GH NOHGLM DOV GH PDFKLQH 'DJHOLMNV JHEU LN 1/ 2 GHUKR GVWDEHO :DVVH :DVEDDU WRW r& QRUPDDO SURJUDPPD :DVEDDU WRW r& QRUPDDO SURJUDPPD :DVEDDU WRW r& GHOLFDDW SURJUDPPD :DVEDDU WRW r& QRUPDDO SURJUDPPD :DVEDDU WRW r& GHOLFDDW SURJUDPPD :DVEDDU WRW r& KHHO GHOLFDDW SUR JUDPPD :DVEDDU WRW r& QRUPDDO SURJUDPPD :DVEDDU WRW r& GHOLFDDW SURJUDPPD :DVEDDU WRW r& KHHO GHOLFDDW SUR JUDPPD +DQGZDVVHQ PD r& 1LHW ZDVVHQ %OHNHQ WRHJHVWDDQ (QNHO UVWRI QLHW FKORRU 1LHW EOHNHQ 7URPPHOGURJHQ PRJHOLMN QRUPDOH WHPSHUDW U 7URPPHOGURJHQ PRJHOLMN ODJHUH WHP SHUDW U 1LHW WURPPHOGURJHQ 'URJHQ DDQ GH ZDVOLMQ 3ODW GURJHQ 6WULMNHQ RS HHQ PD L P P WHPSHUDW U WRW r& 6WULMNHQ RS HHQ JH PLGGHOGH WHPSHUD W U WRW r& 6WULMNHQ RS HHQ ODJH WHPSHUDW U WRW r& RQGHU VWRRP VWRRPVWULMNHQ NDQ RQKHUURHSHOLMNH VFKDGH YHURRU DNHQ 6WRPHQ LQ WUH WUDFKORRUHWKHHQ 6WRPHQ LQ NRROZD tersto en 1LHW VWRPHQ 3URIHVVLRQHHO QDW UHLQLJHQ 1LHW SURIHVVLRQHHO QDW UHLQLJHQ OHNH UR H 6WULMNH 1LHW VWULMNHQ 3URIHVVLR HOH WH WLHO HU RU L +HW DSSDUDDW ODGH ▶ 3ODDWV KHW ZDVJRHG VW N YRRU VW N LQ GH WURPPHO ▶ 1LHW RYHUODGHQ /HW RS GH YHUVFKLOOHQGH PD LP P ODGLQJ QDDUJHODQJ KHW SURJUDP PD 'H DOJHPHQH UHJHO YRRU GH PD LPDOH ODGLQJ /DDW YLMIWLHQ FHQWLPHWHU W VVHQ GH ODGLQJ HQ WURPPHO ▶ 6O LW KHW GHNVHO YRRU LFKWLJ =RUJ HUYRRU GDW HU JHHQ ZDVJRHG W VVHQ GH GH U JH NOHPG UDDNW 6-Dagelijks gebruik NL 6.5 Het wasmiddel selecteren ▶ - teit van het wasmiddel. ▶ Gebruik enkel wasmiddel dat is goedgekeurd voor wasmachines. ▶ - ▶ Let altijd op de aanbevelingen van de wasmiddel fabrikant. ▶ Gebruik geen chemische reinigingsmiddelen zoals trichloroethyleen en gelijkaardige producten. Kies het beste wasmiddel Type wasmiddel Programma Universeel Kleur Delicaat Speciaal Wasverzachter Katoen L/P L/P - - o Mix L L/P - - o Synthetisch - L/P - - o Ondergoed - - L/P L/P Baby Care - - L/P L/P o o Anti-allergie - - L/P L/P o Delicaat - - L/P L/P o Sport - - L/P L/P o L/P L/P - - o L/P L/P - - o Dekbed - - L L/P - Express 15 min L L - - o L/P L/P L/P o o Eco 40-60 Katoen20 °C Hygiënisch Wol - L/P - Zelfreinigend - - - L/P - Zwieren - - - - - L = gel-/vloeibaar wasmiddel P = poeder wasmiddel O = optioneel _ = nee Als u vloeibaar wasmiddel gebruikt, wordt het afgeraden het startuitstel in te schakelen. We raden aan de volgende producten te gebruiken: ▶ Waspoeder: 20°C tot 90°C* (optimaal gebruik: 40-60°C) ▶ Kleur wasmiddel: 20°C tot 60°C* (optimaal gebruik: 30-60°C) ▶ Wol/delicaat wasmiddel: 20°C tot 30°C* (= optimaal gebruik:) * Kies 90 °C enkel als wastemperatuur voor hygiënische vereisten. 16 6-Dagelijks gebruik NL 6.6 Wasmiddel toevoegen 1. 2. 3. 6-6 Open de wasmiddellade. Plaats de vereiste middelen in de overeenstemmende bakjes (afb. 6-6) Sluit de lade zachtjes. Opmerking: ▶ ▶ ▶ ▶ ▶ Verwijder wasmiddelresten vóór het volgende gebruik uit de wasmiddellade. Gebruik niet te veel wasmiddel of wasverzachter. Volg de instructie op de verpakking van het wasmiddel. Vul het wasmiddel altijd bij net voor het begin van de wascyclus. Geconcentreerd vloeibaar wasmiddel moet worden aangelengd met water voor het wordt toegevoegd. ▶ Gebruik geen vloeibaar wasmiddel als "Startuitstel" is geselecteerd. ▶ Kies de programma-instellingen zorgvuldig in overeenstemming met de onderhoudsymbolen op alle etiketten en met de programmatabel. 6.7 Het apparaat inschakelen 6-7 Druk op de "Aan/uit“-knop om het apparaat in te schakelen (afb. 6-7). 6-8 Eco 40-60 Mix Synthetisch Synthétique Express 15 min Baby Care Délicat Sport 6.8 Selecteer een programma Voor een optimaal wasresultaat selecteert u een programma dat past bij de graad van vervuiling en het type wasgoed. Draai aan de programmaknop (afb. 6-8) om het gewenste programma te selecteren. Het relevante LED-lampje licht op en de standaardinstellingen worden weergegeven. Opmerking: Geurtjes verwijdering Voor het eerste gebruik raden we aan het programma HYGIËNISCH te gebruiken zonder lading en met een kleine hoeveelheid wasmiddel in het wasmiddel compartiment (2) of met speciale machinereiniger om mogelijke corrumperende resten te verwijderen. 6.9 Individuele selecties toevoegen Selecteer de vereiste opties en instellingen (afb. 6-9); raadpleeg BEDIENINGSPANEEL. 6-9 Startuitstel Fin différée Temp. Tr/min Extra spoelen Stoom Rinçage + Vapeur Start/Pause 17 6-Dagelijks gebruik NL 6.10 Het wasprogramma starten 6-10 Start/Pause Druk op de “start/pauze”-knop om te starten; machine start volgens de gekozen instellingen. Wijzigingen zijn enkel mogelijk door het programma te annuleren. 6.11 Wasprogramma onderbreken - annuleren Een actief programma onderbreken drukt u zacht op de "Start/Pause" knop. Druk opnieuw op de knop om het programma te hervatten. Om een actief programma en alle individuele instellingen te annuleren 1. Druk op de knop "Start/Pause" knop om het actieve programma te onderbreken. 2. Druk op de "Aan-uit" knop gedurende ca. 2 seconden om het apparaat uit te schakelen. 3. Kies het “Centrifuge”-programma om het water weg te pompen. 4. Selecteer een nieuw programma en start het. Opmerking: Deurvergrendeling ▶ Uit veiligheidsoverwegingen wordt de deur gedeeltelijk vergrendeld tijdens de wascyclus. Het is enkel mogelijk de deur te openen aan het einde van het programma of na de annulering van het programma (zie bovenstaande beschrijving). ▶ In het geval van een hoog waterniveau, een hoge watertemperatuur en tijdens het centrifugeren is het niet mogelijk de deur te openen; Lock wordt weergegeven. 6.12 Na het wassen 1. Aan het eind van het programma wordt END weergegeven. 2. Het apparaat schakelt automatisch uit. 3. Verwijder het wasgoed zo snel mogelijk voor een goede zorg en om meer kreuken te voorkomen. 4. Schakel de watertoevoer uit. 5. Ontkoppel het netsnoer. 6. Open de deur om de opbouw van vocht en geurtjes te voorkomen. Laat ze open wanneer de machine niet in gebruik is. Opmerking: Stand-bymodus / energiebesparende modus Het ingeschakelde apparaat schakelt over op de stand-bymodus als het niet wordt ingeschakeld binnen 2 minuten voor de start van het programma of aan het einde van het programma. Het scherm schakelt uit. Dit bespaart energie. Om de stand-bymodus te onderbreken, drukt u op de "Start/Pauze"-knop. 6.13 De zoemer in- of uitschakelen Het geluidssignaal kan indien noodzakelijk worden gedeselecteerd: 1. Het apparaat inschakelen. 2. Selecteer het Centrifugeren/Pompen programma. 3. Druk gelijktijdig op de knop "i-time" en "Tr/min" gedurende ca. 3 seconden. “BEEP OFF” verschijnt en de zoemer wordt uitgeschakeld. Om de zoemer in te schakelen drukt u opnieuw gelijktijdig op deze beide knoppen. “BEEP ON” verschijnt. 18 0LOLH YULHQGHOLMNZDVVHQ 1/ 0LOLH HUD WZRRUGHOLMN HEU LN ▶ 9RRU HHQ RSWLPDDO JHEU LN YDQ HQHUJLH ZDWHU ZDVPLGGHO HQ GH WLMGVG U PRHW GH DDQEHYROHQ PD LP P ODGLQJ JURRWWH JHEU LNHQ ▶ 1LHW RYHUODGHQ KDQGEUHHGWH W VVHQU LPWH ERYHQ ZDVJRHG ▶ 9RRU OLFKW YHUY LOG ZDVJRHG VHOHFWHHUW KHW 4 LFN :DVK SURJUDPPD ▶ *HEU LN H DFWH GRVHULQJHQ YDQ HON ZDVPLGGHO ▶ Kies het laagste geschikte wastemperatuur - moderne wasmiddelen reinigen e ciënt RQGHU r& ▶ 9HUKRRJ GH VWDQGDDUGLQVWHOOLQJHQ HQNHO DOV HU YHHO YOHNNHQ LMQ ▶ 6HOHFW PD ZLHUVQHOKHLG DOV PHQ HHQ ELQQHQODQGVH GURRJPDFKLQH JHEU LNW 8-Zorg en reiniging 8-1 8.1 De wasmiddellade reinigen 2 U moet altijd goed opletten of er geen wasmiddelresten zijn. Reinig de lade regelmatig (afb. 8-1): 1. Trek de lade uit tot ze stopt. 2. Druk op de vrijgave knop en verwijder de lade. 3. Spoel daarna de lade tot ze schoon is en plaats de lade opnieuw in het apparaat. 1 8.2 De machine reinigen 8-2 Co t o n Mi Coxt on Syn Mix thet ic Un Syntdh e et r-wic ea r Hyg Un derw i eni ear c An ti -a l le rg y Bab yC a re T em p. 60° C Spee d Ext ra Rin se St e am ▶ Verwijder de stekker uit het stopcontact tijdens de reiniging en het onderhoud. ▶ Gebruik een zachte doek met vloeibare zeep om de machinebehuizing en rubberen onderdelen te reinigen (afb. 8-2). ▶ Gebruik geen organische chemicaliën of schurende oplosmiddelen. Co t o n+ De li ca C ot to n+te H W1 20-B 14 876 D eDu lic atve et Exp res s 1D 5u ve mi tn E xpress Bab 15 y Ca mi n re Hy giW enioo cl R Da ash Ant ili- y a lW ergy Se lf Cl ea ln Woo Sp Daoilyrt Wash Sp i fn C /Dr in S el l eaan Spo rt De la y 7kg capa cit y Sp in /D rai n S t art /P a us e HW 70 -BP1 275 8 40° C 8-3 NL 8-4 Om blokkeringen van de watertoevoerleiding door ▶ Ontkoppel het netsnoer en sluit de watertoevoer. ▶ Maak de watertoevoerslang los aan de achterzijde (afb. 8-3) van het apparaat en de kraan. ▶ 8-4). ▶ 8.4 De trommel reinigen 8-5 ▶ Verwijder per ongeluk gewassen metalen onderdelen zoals spelden, munten, etc. uit de trommel (afb. 8-5) omdat ze roestvlekken en schade veroorzaken. ▶ Gebruik een chloorvrij reinigingsmiddel om roestvlekken te verwijderen. Observeer de waarschuwingen van de fabrikant van het reinigingsmiddel. ▶ Gebruik geen harde voorwerpen of staalwol voor de reiniging. Opmerking: Zelfreinigend Voor regelmatig onderhoud raden we aan om minimaal 1 keer per 100 wasbeurten het programma Zelfreinigend te gebruiken om mogelijke bijtende resten te verwijderen. Voeg een kleine hoeveelheid wasmiddel toe in het wasmiddelvak (2) - of gebruik een speciale machinereiniger. 20 8-Zorg en reiniging NL 8.5 Lange perioden van inactiviteit Als het apparaat niet wordt gebruikt gedurende een lange periode: 1. Haal de stekker uit het stopcontact (afb. 8-6). 2. Draai de kraan dicht (afb. 8-7). 3. Open de deur om de opbouw van vocht en geurtjes te voorkomen. Laat de deur open wanneer de machine niet in gebruik is. Voor het volgende gebruik moet u het netsnoer, water invoerleiding en afvoerslang zorgvuldig controleren. Zorg ervoor dat alles correct geïnstalleerd is en dat er geen lekken zijn. 8-6 8-7 Opmerking: Zelfreinigend Als de machine gedurende lange perioden niet wordt gebruikt raden we aan het programma Zelfreinigend te gebruiken zonder lading en met een kleine hoeveelheid was middel in het wasmiddel compartiment (2) of met speciale machinereiniger om mogelijke schadelijke resten te verwijderen. 8-8 8-9 8-10 8-11 ▶ geen water afvoert. ▶ niet zwiert. ▶ abnormaal lawaai veroorzaakt tijdens de werking. WAARSCHUWING! kan heel warm zijn! Voor u een handeling uitvoert, moet u het water laten afkoelen. 1. Schakel de machine uit en verwijder de stekker uit het stopcontact (afb. 8-8). 2. Open de onderhoudsklep rechts aan de voorkant 3. Gebruik een vlakke container om het water op te vangen (afb. 8-10). Dit kan een grote hoeveelheid water zijn! 4. Verwijder de afvoerslang en houd de uiteinden boven de container (afb. 8-10). 5. Verwijder de afdichtingsstop uit de afvoerslang (afb. 8-10). 6. Nadat u al het water heeft afgevoerd, sluit u de afvoerslang en sluit u deze opnieuw aan (afb. 8-11). 21 =RUJ HQ UHLQLJLQJ 1/ Schroef het pomp lter tegen de klok in los en ver ZLMGHU KHW DIE 9HUZLMGHU YHURQWUHLQLJLQJHQ HQ Y LO IE Reinig het pomp lter zorgvuldig, bijv. onder stro PHQG ZDWHU DIE %UHQJ KHW RSQLH Z VWHYLJ DDQ DIE 6O LW GH RQGHUKR GVNOHS 23*(/(7 ▶ De afdichting van het pomp lter moet schoon en onbeschadigd zijn. Als het dek VHO QLHW YROOHGLJ DDQJHGUDDLG LV NDQ ZDWHU RQWVQDSSHQ ▶ Het lter moet aangebracht zijn, zo niet kan dit tot lekken leiden. 9-Probleemoplossen NL het geval van een probleem moet u alle weergegeven mogelijkheden controleren en de onderstaande instructies volgen voor u contact opneemt met de dienst na verkoop. Zie KLANTENDIENST. WAARSCHUWING! ▶ Voor ieder onderhoud moet u het apparaat uitschakelen en de stekker verwijderen uit het stopcontact. ▶ worden onderhouden. Incorrecte reparaties kunnen aanzienlijke gevolgschade veroorzaken. ▶ Als het netsnoer beschadigd is, moet het worden vervangen door de fabrikant, zijn 9.1 Informatiecodes De volgende codes worden enkel weergegeven ter informatie met verwijzing naar de wascyclus. Er hoeven geen maatregelen te worden uitgevoerd. Code Bericht 01:25 De resterende wasduur is 1 uur en 25 minuten. 06:30 De resterende duur van het wasprogramma, inclusief eventueel uitstel, is 6 uur en 30 minuten. Automatische detectie van lading is actief; enkel voor sommige programma’s. De wascyclus is beëindigd. Het apparaat schakelt automatisch uit. AUTO End LockbEEP OFF Deur is gesloten vanwege hoog waterniveau, hoge temperatuur of centrifugeerprogramma. De zoemer wordt uitgeschakeld. bEEP ON De zoemer wordt ingeschakeld. De functietoetsen zijn gesloten. Het wijzigen van het programma is ongeldig. 9.2 Probleemoplossing met weergavecode Probleem Oorzaak Oplossing CLR FLTR • Pompstoring, water wordt niet volledig •• Controleer de installatie van de afvoerafgevoerd binnen 6 minuten. slang. E2 • Vergrendeling - fout. E4 • Het waterniveau niet bereikt na 12 mi• Zorg ervoor dat de kraan volledig geopend is nuten. en dat de waterdruk normaal is. • Afvoerslang blijft doorlopend overheve• Controleer de installatie van de afvoerslang. len. E8 • Water beschermingsniveau - fout. • Sluit de deur correct. • Neem contact op met de klantendienst. 23 9-Probleemoplossen NL Probleem Oorzaak Oplossing F3 • Temperatuursensor-storing. • Neem contact op met de klantendienst. F4 • Verwarmings-storing. • Neem contact op met de klantendienst. F7 • Motorstoring. • Neem contact op met de klantendienst. FA • Waterniveausensorstoring. • Neem contact op met de klantendienst. FC0, FC1 of • Abnormale communicatiefout. FC2 • Neem contact op met de klantendienst. Unb • Controleer en verdeel het wasgoed in de trommel. Verminder de lading. • Lading niet in evenwicht - fout. 9.3 Probleemoplossen zonder weergavecode Probleem Oorzaak Oplossing Wasmachine werkt niet. • • • • • Programma is nog niet gestart. Deur is niet correct gesloten. Machine is niet ingeschakeld. Stroomstoring. Kinderslotfunctie ingeschakeld. Wasmachine niet gevuld met water. • • • • • • Geen water. Aanvoerslang is gebogen. • Controleer het programma en start het. • Sluit de deur correct. • Zet de machine aan. • Controleer de stroomstekker. • Schakel kinderslot uit. • Controleer de waterkraan. • Controleer de aanvoerslang. • Verwijder de blokkering uit het De machine draineert terwijl ze wordt opgevuld. • Fout tijdens drainering. • • • Sterke trillingen tijdens het zwieren. • • • • Programma stopt voor het einde van de wascyclus. 24 • Waterdruk is minder dan 0,03 MPa. Deur is niet correct gesloten. Watertoevoer defect. • Controleer de waterdruk. • Sluit de deur correct. • Controleer de watertoevoer. De afvoerslang hangt lager dan 80 • Zorg ervoor dat de afvoerslang cm. correct is aangesloten. Het uiteinde van de afvoerslang kan • Zorg ervoor dat de afvoerslang in het water hangen. niet in het water hangt. Afvoerslang is geblokkeerd. • U moet de blokkering verwijderen uit de afvoerslang. Het uiteinde van de afvoerslang is • hoger dan 100 cm boven de vloer. • Zorg ervoor dat de afvoerslang correct is aangesloten. Niet alle transportbouten werden • Verwijder alle transportbouten verwijderd. • Zorg voor een stevige onderHet apparaat staat niet op grond en een genivelleerde een stevige ondergrond. plaatsing • Controleer het gewicht en het De lading in de machine is niet corevenwicht van de lading. rect. Water of elektrische fout. • Controleer de stroom- en watertoevoer. 9-Probleemoplossen NL Probleem Oorzaak Oplossing De machine stopt gedurende een bepaalde periode. • Het apparaat geeft een foutcode weer. • Probleem omwille van het ladingpatroon. • Programma voert de spoelcyclus uit. • Wasmiddel is niet geschikt. • Overweeg de weergavecodes. • Verminder de lading of pas ze aan. • Annuleer het programma en start het opnieuw. Overtollig schuim drijft in de trommel en/of de wasmiddellade. Automatische aanpassing van de wasduur. Zwieren mislukt. Ontoereikend wasresultaat. • Overmatig gebruik van wasmiddel. • Wasduur wordt aangepast. • Controleer de wasmiddel aanbevelingen. • Verminder de hoeveelheid wasmiddel. • Dit is normaal en heeft geen impact op de werking. • Wasgoed niet in evenwicht. • Controleer de lading en het wasgoed en laat het centrifugeprogramma opnieuw draaien. • Graad van vervuiling stemt niet • Selecteer een ander programovereen met het geselecteerde ma. programma. • Kies het wasmiddel in • Kwaliteit van het wasmiddel was overeenstemming met de ontoereikend. graad van vervuiling en de • Maximum lading is overschrekant. den. • Wasgoed was ongelijkmatig ver- • Verminder de lading. deeld in de trommel. • Breng het wasgoed losser aan. Er zijn wasmiddelresten aanwezig op het wasgoed. Wasgoed heeft grijze vlekken. • Onoplosbare deeltjes wasmiddel • Extra spoelen uitvoeren. kunnen als witte puntjes achterblij- • Probeer de puntjes weg te borven op het wasgoed. stelen van uw droge wasgoed. • Kies een ander wasmiddel. • Veroorzaakt door vetten zoals oli- • Behandel het wasgoed vooraf en, crèmes of zalfjes. met een speciaal reinigingsmiddel. Opmerking: Schuimvorming Als er te veel schuim wordt gedetecteerd tijdens het zwieren, zal de motor 30 seconden lang op een laag toerental draaien en dit maximaal 4 keer herhalen.Indien er hierna nog steeds te veel schuim gedetecteerd wordt, zal de motor stoppen met draaien gedurende 5 minuten dan 10 minuten en vervolgens 15 minuten.Mocht het hierna nog steeds schuim detecteren, zal de draaiende cyclus stoppen en een error op de display weergeven. Als de foutberichten opnieuw verschijnen, zelfs na het nemen van maatregelen, moet u het apparaat uitschakelen, de voeding loskoppelen en Neem contact op met de klantendienst. 9.4 In het geval van een stroomstoring Het huidige programma en de instelling worden opgeslagen. Als de stroom hersteld is, kunt u de bewerking hervatten. Als een wasprogramma wordt onderbroken door een stroomstoring is de deur mechanisch geblokkeerd. Om het wasgoed uit de machine te verwijderen, mag u geen water zien in het glazen kijkvenster van de deur. - Gevaar voor brandwonden! Het waterniveau moet worden de hendel (A) onder de onderhoudsklep (afb. 9-1) tot de deur met een zachte klik wordt ontgrendeld. Breng daarna alle onderdelen opnieuw aan. 9-1 25 10-Installatie NL 10.1. Voorbereiding ▶ Verwijder het apparaat uit de verpakking. ▶ Verwijder al het verpakkingsmateriaal, inclusief de folie op de machine en de piepschuim basis, en houd die buiten het bereik van kinderen. Wanneer u de verpakking opent, kunnen waterdruppels zichtbaar zijn op de plastic zak en het kijkvenster. Dit normale fenomeen is het resultaat van watertests in de fabriek. Opmerking: Weggooien van de verpakking Houd alle verpakking buiten het bereik van kinderen en gooi ze weg op een milieuvriendelijke wijze. 2. 1. 10.1 3. 10-2 10.2 OPTIONEEL: Breng trillingdemperblokken aan 1.Bij het openen van de vacuum verpakking vindt u vier ruisonderdrukkers. Deze worden gebruikt om het geluid te verminderen. (Afb. 10.1) 2.Leg de wasmachine naar beneden, met de deuropening naar boven gericht, onderzijde naar uzelf toe gericht. 3.Neem de ruisonderdrukkers en verwijder de dubbelzijdige zelfklevende plakband; Plaats het op de onderzijde; De ruisonderdrukkers onder het wasmachinekabinet zoals op afbeelding 3 getoond. (twee langere ruisonderdrukkers in stand 1 en 3, twee kortere ruisonderdrukkers in stand 2 en 4). Zet de machine ten slotte weer rechtop. 10.3 Verwijder de transportbouten De transportbeveiliging aan de achterkant is ontworpen om bepaalde delen binnenin de machine tijdens transport te beschermen. Alle delen (I, R, S en , afb. 102) moeten voor gebruik worden verwijderd. 10-3 T1 T2 T3 26 T4 1. Verwijder alle bouten (T1 - T4, afb. 10-3). 10-Installatie NL 10-4 2. Vul de 6 openingen met afdichtpluggen (afb. 10-4). Opmerking: Bewaren op een veilige plaats Bewaar de transportbouten op een veilige plaats voor later gebruik. Als het apparaat moet worden verplaatst, moet u eerst de transportbouten opnieuw monteren. 10.4 Het apparaat verplaatsen Als de machine naar een verre locatie moet worden verplaatst, moet u de transportbouten opnieuw aanbrengen om schade te vermijden: Breng ze aan in de omgekeerde volgorde. 10-5 10.5 Het apparaat uitlijnen Pas alle voetjes aan (afb. 10-5) om een volledige horizontale positie te bereiken. Dit vermindert trillingen en dus het lawaai tijdens het gebruik tot een minimum. Dit vermindert ook de slijtage. We raden aan een waterpas te gebruiken voor de afstelling. De vloer moet zo stabiel en vlak mogelijk zijn. 1. Schroef de borgmoer (1) los met een sleutel. 2. Pas de hoogte aan door te draaien aan de voetjes (2). 3. Draai de borgmoer (1) aan tegen de behuizing. 27 ,QVWDOODWLH UDL HHUZDWHU HUEL GL %HYHVWLJ GH ZDWHUDIYRHUVODQJ FRUUHFW RS GH OHLGLQJHQ 'H VODQJ PRHW HHQ S QW EHUHLNHQ W VVHQ HQ FP ERYHQ GH RQGHUVWH OLMQ YDQ KHW DSSDUDDW ,QGLHQ PRJHOLMN PRHW GH DIYRHUVODQJ DOWLMG EHYHVWLJG KR GHQ PHW GH NOHS RS GH DFKWHU LMGH YDQ KHW DSSDUDDW : ▶ ▶ ▶ ▶ 56&+8:,1* *HEU LN HQNHO KHW JHOHYHUGH VODQJHQVHW YRRU GH DDQVO LWLQJ 8 PDJ QRRLW R GH VODQJHQVHWV RSQLH Z JHEU LNHQ 8LWVO LWHQG DDQVO LWHQ RS HHQ WRHYRHU YDQ NR G ZDWHU 8 PRHW FRQWUROHUHQ RI KHW ZDWHU LYHU HQ KHOGHU LV YRRU GH YHUELQGLQJ WRW VWDQG EUHQJW 'H YROJHQGH YHUELQGLQJHQ LMQ PRJHOLMN I RHUVOD DDU RRWVWHH ▶ +DQJ GH DIYRHUVODQJ PHW GH 8 EH JHO RYHU GH UDQG YDQ HHQ YROGRHQGH JURWH ZDVWDIHO DIE ▶ %HVFKHUP GH 8 EH JHO YROGRHQGH WHJHQ VOLSSHQ I RHUVOD DDU DI DOZDWHU HUEL GL ▶ 'H LQWHUQH GLDPHWHU YDQ GH VWDQGSLMS PHW YHQWL ODWLHRSHQLQJ PRHW PLQLP P PP LMQ ▶ 3ODDWV GH DIYRHUVODQJ FD PP LQ GH DIYDOZDWHU OHLGLQJ ▶ %HYHVWLJ GH 8 EH JHO HQ RUJ GDW GH H QLHW NDQ EHZHJHQ DIE I RHUVOD DDU ZDVWDIHO DD VO LWL ▶ 'H YHUELQGLQJ PRHW ERYHQ GH VLIRQ ▶ (HQ WDSNUDDQYHUELQGLQJ ZRUGW JHZRRQOLMN DIJH VORWHQ PHW HHQ GRS 'H H PRHW ZRUGHQ YHU ZLMGHUG RP VOHFKW I QFWLRQHUHQ WH YRRUNRPHQ DIE ▶ %HYHLOLJ GH DIYRHUVODQJ PHW HHQ NOHP 23*(/(7 ▶ 'H DIYRHUVODQJ PRHW RQGHUJHGRPSHOG LMQ LQ ZDWHU HQ H PRHW EHYHLOLJG ZRUGHQ HQ OHNYULM LMQ OV GH DIYRHUVODQJ RS GH YORHU ZRUGW JHSODDWVW RI DOV GH OHLGLQJ RS PLQGHU GDQ FP KRRJ ZRUGW DDQJHEUDFKW DO GH ZDVPDFKLQH GRRUORSHQG EOLMYHQ GUDLQHUHQ WHUZLMO H ZRUG RSJHY OG HOI RYHUKHYHOLQJ ▶ IYRHUVODQJ PDJ QLHW ZRUGHQ YHUOHQJG ,QGLHQ QRRG DNHOLMN QHHPW FRQWDFW RS PHW GH GLHQVW QD YHUNRRS ,QVWDOODWLH RHWZDWHU HUEL GL =RUJ HUYRRU GDW GH SDNNLQJHQ LQJHYRHJG LMQ 9HUELQG GH ZDWHULQODDWVODQJ PHW KHW JHKRHNWH LWHLQGH RS KHW DSSDUDDW IE 6FKURHI GH VFKURHYHQ YDVW PHW GH KDQG +HW DQGHUH LWHLQGH ZRUGW YHUERQGHQ RS HHQ ZDWHUNUDDQ PHW HHQ GUDDG IE (OHNWULVFKH HUEL GL 9RRU HONH DDQVO LWLQJ PRHW FRQWUROHUHQ RI ▶ KHW HOHNWULVFK QHW VWRSFRQWDFW HQ GH HNHULQJHQ RYHUHHQVWHPPHQ PHW GH LQIRUPDWLH RS KHW QDDP SODDWMH ▶ KHW VWRSFRQWDFW JHDDUG LV HQ HU JHHQ P OWL VWHNNHU RI YHUOHQJVQRHU ZRUGW JHEU LNW ▶ GH VWHNNHU HQ KHW VWRSFRQWDFW RYHUHHQVWHPPHQ ▶ ( NHO 8. 'H 8. VWHNNHU YROGRHW DDQ GH %6 QRUP 6WHHN GH VWHNNHU LQ KHW VWRSFRQWDFW DIE : 56&+8:,1* ▶ =RUJ HU DOWLMG YRRU GDW DOOH YHUELQGLQJHQ YRHGLQJ DIYRHU HQ RHWZDWHUVODJ VWHYLJ LMQ DDQJHEUDFKW HQ GDW H GURRJ LMQ HQ JHHQ OHNNHQ YHUWRQHQ ▶ =RUJ HUYRRU GDW GH H RQGHUGHOHQ QRRLW ZRUGHQ VDPHQJHGU NW YHUZURQJHQ RI JH ERJHQ ▶ OV KHW QHWVQRHU EHVFKDGLJG LV PRHW KHW ZRUGHQ YHUYDQJHQ GRRU GH RQGHUKR GV DJHQW LH JDUDQWLHNDDUW RP HON ULVLFR LW WH VO LWHQ 11-Technische gegevens NL 11.1 Autres données techniques HW80-B14876N Tension en V 220-240 V~/50 Hz Courant en A 10 Puissance maximale en W Pression d’eau en MPa 2000 0,03≤P ≤1 Poids net en kg 72 11.2 Product dimensions VUE DE FACE Mur VU E DE DESSUS HW80-B14876N A hauteur totale du produit mm 850 B largeur totale du produit mm 595 C profondeur totale du produit mm 460 D profondeur avec porte ouverteÿÿ mm 1050 E Minimum door clearance to adjacent wall mm 300 Remarque: La hauteur exacte de votre machine dépend de la distance des pieds par rapport au centre de la machine. L'espace oùvous installez votre machine doit être d'au moins 40 mm plus large et 20 mm plus profond que ses dimensions. 11.3 Normes et directives Ce produit répond aux exigences de toutes les directives CE applicables ainsi que les normes harmonisées correspondantes, qui prévoient le marquage CE. 30 NL .ODQWHQGLHQVW :H UDGHQ RQ H +DLHU NODQWHQGLHQVW DDQ HQ KHW JHEU LN YDQ RULJLQHOH UHVHUYHRQGHUGHOHQ OV HHQ SUREOHHP RQGHUYLQGW PHW Z DSSDUDDW PRHW HHUVW GH VHFWLH 352%/((023/266(1 FRQWUROHUHQ OV GDDU JHHQ RSORVVLQJ YLQGW N QW FRQWDFW RSQHPHQ PHW ▶ Z ORNDOH YHUNRSHU RI ▶ GH 2QGHUKR G 2QGHUVWH QLQJ RQH RS ZZZ KDLHU FRP ZDDU WHOHIRRQQ PPHUV HQ YHHOJHVWHOGH YUDJHQ N QW YLQGHQ HQ ZDDU Z VHUYLFH FODLP N QW DFWLYHUHQ :DQQHHU FRQWDFW RSQHHPW PHW RQ H VHUYLFH PRHW GH YROJHQGH LQIRUPDWLH ELM GH KDQG KHEEHQ 'H LQIRUPDWLH VWDDW YHUPHOG RS KHW QDDPSODDWMH 0RGHO BBBBBBBBBBBBBBBBBBBB 6HULHQU BBBBBBBBBBBBBBBBBBBBB &RQWUROHHU RRN KHW JDUDQWLHNDDUWMH GDW ZRUGW JHOHYHUG PHW KHW SURG FW PHW EHWUHNNLQJ WRW GH JDUDQWLH 9RRU DOJHPHQH DNHOLMNH YUDJHQ YLQGW KLHURQGHU RQ H DGUHVVHQ LQ ( URSD RSHVH DLH DG HVVH D G RVWDG HV D G +DLHU ( URSH 7UDGLQJ 65/ 9LD 'H &ULVWRIRULV WDOL D N LN 9DUHVH ,7 /, +DLHU ,EHULD 6/ HO L SD H 3J *DUFLD )DULD HO L R W DO %DUFHORQD HGH OD G 63 1-( HPE +DLHU 'H WVFKODQG *PE+ LWVOD G +HZOHWW 3DFNDUG 6WU ROH RVWH L N ' %DG +RPE UJ V HFKL '8,76/ 1' R D LH +DLHU SSOLDQFHV 8. &R /WG * LHNH OD G 2QH &URZQ 6T DUH RHPH L HH L G &K UFK 6WUHHW (DVW VOD G .R L N L N :RNLQJ 6 UUH *8 +5 8. 9RRU PHHU LQIRUPDWLH YHUZLM HQ ZLM QDDU ZZZ KDLHU FRP RVWDG HV +DLHU )UDQFH 6 6 U H GHV *UDYLHUV 1H LOO V U 6HLQH )5 1.5,-. +DLHU %HQHO 6 QGHUOHFKW 5R WH GH /HQQLN %(/*, +DLHU 3RODQG 6S R R O -HUR ROLPVNLH % :DUV DZD 32/(1 31 0020509288AP-
 1
1
-
 2
2
-
 3
3
-
 4
4
-
 5
5
-
 6
6
-
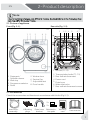 7
7
-
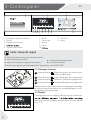 8
8
-
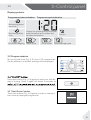 9
9
-
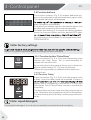 10
10
-
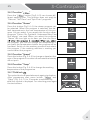 11
11
-
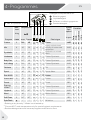 12
12
-
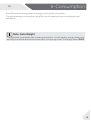 13
13
-
 14
14
-
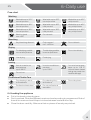 15
15
-
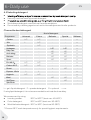 16
16
-
 17
17
-
 18
18
-
 19
19
-
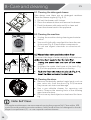 20
20
-
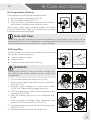 21
21
-
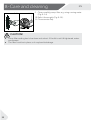 22
22
-
 23
23
-
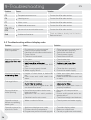 24
24
-
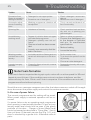 25
25
-
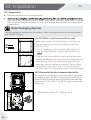 26
26
-
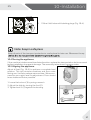 27
27
-
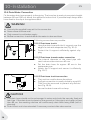 28
28
-
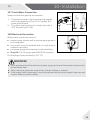 29
29
-
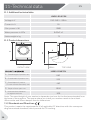 30
30
-
 31
31
-
 32
32
-
 33
33
-
 34
34
-
 35
35
-
 36
36
-
 37
37
-
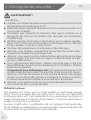 38
38
-
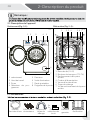 39
39
-
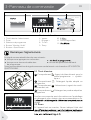 40
40
-
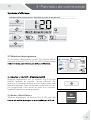 41
41
-
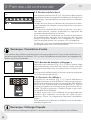 42
42
-
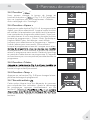 43
43
-
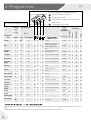 44
44
-
 45
45
-
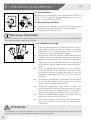 46
46
-
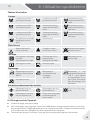 47
47
-
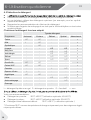 48
48
-
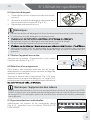 49
49
-
 50
50
-
 51
51
-
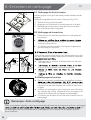 52
52
-
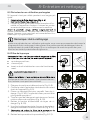 53
53
-
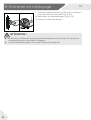 54
54
-
 55
55
-
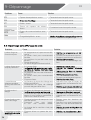 56
56
-
 57
57
-
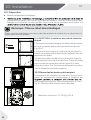 58
58
-
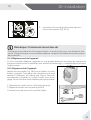 59
59
-
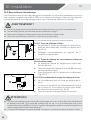 60
60
-
 61
61
-
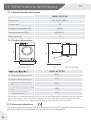 62
62
-
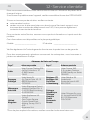 63
63
-
 64
64
-
 65
65
-
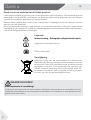 66
66
-
 67
67
-
 68
68
-
 69
69
-
 70
70
-
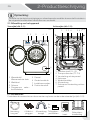 71
71
-
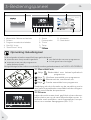 72
72
-
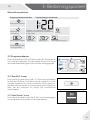 73
73
-
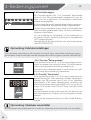 74
74
-
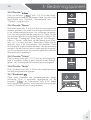 75
75
-
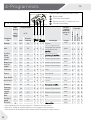 76
76
-
 77
77
-
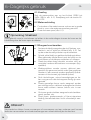 78
78
-
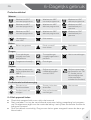 79
79
-
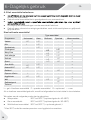 80
80
-
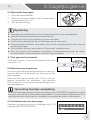 81
81
-
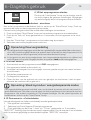 82
82
-
 83
83
-
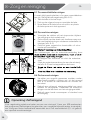 84
84
-
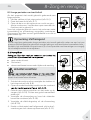 85
85
-
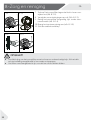 86
86
-
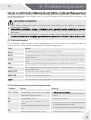 87
87
-
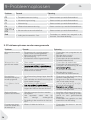 88
88
-
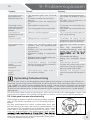 89
89
-
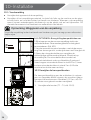 90
90
-
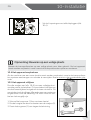 91
91
-
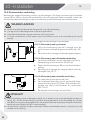 92
92
-
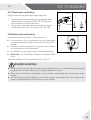 93
93
-
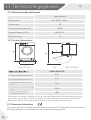 94
94
-
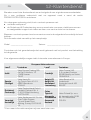 95
95
-
 96
96


in andere talen
- English: Haier HW80-B14876N User manual
- français: Haier HW80-B14876N Manuel utilisateur
- Deutsch: Haier HW80-B14876N Benutzerhandbuch