Pagina laadt ...

BELANGRIJKE WAARSCHUWINGEN WAT BETREFT HET GEBRUIK VAN HET VOERTUIG EN DE WETTELIJKE GARANTIE
De motoren Aprilia SXV werden geproduceerd, ontworpen en ontwikkeld voor sportief gebruik op een piste of om te crossen. Daarom moeten ze voldoen
aan reglementen en de categorieën die actueel in gebruik zijn door de belangrijkste internationale motorbonden.
Om een voortijdige slijtage en het eventueel stukgaan te vermijden, moeten de vooraf bepaalde handelingen die aangeduid worden in de tabel van het
onderhoud, in deze handleiding, absoluut noodzakelijk gerespecteerd worden. Door het respecteren van de intervals en de handelingen van het
onderhoud, uitgevoerd bij een dealer of erkende garage van Aprilia of bij de wedstrijd door een gekwalificeerd mechanicus, zullen de prestaties van
het voertuig behouden blijven en zal ernstige schade vermeden worden.
De motoren SXV worden niet opgevoerd geleverd, zodat ze in deze versie gehomologeerd zijn voor het gebruik op openbare wegen en gedekt zijn
door de wettelijke garantie op voorwaarde dat de intervals en de handelingen van het onderhoud nauwkeurig gerespecteerd worden, en dat ze uitgevoerd
worden bij een dealer of erkende garage van Aprilia, waar de servicebeurt genoteerd zal worden op het daarvoor bestemde garantieboekje.
Deze voertuigen zijn niet geschikt voor weggebruik: de verhoudingen van de versnellingsbak, de koelinstallatie, de setting van de ophangingen, de
reminstallatie en de kenmerken van de levering van de motor zijn geoptimaliseerd voor sportief gebruik, waar de omstandigheden en het type van
gebruik zeer verschillen van de omstandigheden die zich voordoen op openbare wegen. Hier volgen enkele voorbeelden, die niet gelden voor alle
gevallen, van enkele omstandigheden die de motor ernstig kunnen beschadigen: lang wachten bij een verkeerslicht, trajecten op snelwegen met de
motor steeds aan het maximum toerental of het rijden achter wagens.
Eender welke wijziging of geknoei aan het voertuig, en vooral voor het verhogen van de prestaties van de motor, maken dat het voertuig niet meer
gehomologeerd is voor gebruik op de openbare weg, maar dat het enkel gebruikt mag worden in georganiseerde wedstrijden en met goedkeuring van
de bevoegde instanties. Deze handelingen doen alle rechten op de wettelijke garantie vervallen. Voor uw veiligheid is het best dat enkel de originele
reserveonderdelen en accessoires van Aprilia gebruikt worden.
Aprilia kan niet aansprakelijk gesteld worden voor het gebruik van niet-originele onderdelen en voor de schade die hierdoor veroorzaakt wordt.
APRILIA WIL U BEDANKEN
omdat u één van haar producten heeft gekozen. Wij hebben deze handleiding opgesteld opdat u de kwaliteiten ervan ten volle kan waarderen. Wij
raden aan om deze handleiding geheel door te lezen, voordat u met het voertuig gaat rijden. Het bevat informatie, raadgevingen en waarschuwingen
in verband met het gebruik van uw voertuig; daarnaast zal u eigenschappen, bijzonderheden en handigheidjes ontdekken die u ervan zullen overtuigen
dat u een juiste keuze heeft gemaakt. Wij zijn er zeker van dat indien u hier rekening mee zal houden, u makkelijk zal wennen aan uw nieuw voertuig,
waar u lang naar volle tevredenheid gebruik van zal kunnen maken. Deze uitgave is een integrerend deel van het voertuig, en bij verkoop van dit laatste
moet het worden overhandigd aan de nieuwe eigenaar.
SXV 450-550
Ed. 03 2008
Pagina laadt ...

The instructions in this manual have been prepared to offer mainly a simple and clear guide to its use; This booklet also details routine maintenance
procedures and regular checks that should be carried out on the vehicle at an authorised aprilia Dealer or Workshop. The booklet also contains
instructions for simple repairs. Any operations not specifically described in this booklet require the use of special tools and/or particular technical
knowledge: for these operations, please take your vehicle to an authorised aprilia Dealer or Workshop.
De instructies in deze handleiding zijn voorbereid om vooral een eenvoudige en duidelijke leidraad te zijn voor het gebruik; men vindt eveneens de
handelingen van het klein onderhoud en van de periodieke controles die uitgevoerd moeten worden op het voertuig, bij een Dealer of Erkende aprilia
Garage. De handleiding bevat tevens instructies voor een aantal eenvoudige herstellingen. De herstellingen die niet uitgebreid in deze uitgave zijn
beschreven, vereisen dat men over speciale gereedschappen en/of specifieke technische kennis beschikt; voor het uitvoeren van deze herstellingen
raadt men aan om zich te wenden tot een Dealer of Erkende aprilia Garage.
4

Personal safety
Failure to completely observe these instructions will
result in serious risk of personal injury.
Persoonlijke veiligheid
Indien deze voorschriften niet of niet volledig worden
opgevolgd, kan dit ernstig letsel aan personen tot ge-
volg hebben.
Safeguarding the environment
Sections marked with this symbol indicate the correct
use of the vehicle to prevent damaging the environ-
ment.
Bescherming van
Geeft het juiste gedrag aan dat u aan moet houden
zodat het gebruik van het voertuig geen schade aan-
richt aan de natuur.
Vehicle intactness
The incomplete or non-observance of these regula-
tions leads to the risk of serious damage to the vehicle
and sometimes even the invalidity of the guarantee.
Staat van het voertuig
Indien deze voorschriften niet of niet volledig worden
opgevolgd kan dit ernstige schade aan het voertuig,
en eventueel het vervallen van deze garantie tot ge-
volg hebben.
The sings above are very important. They are used to
highlight those parts of the booklet that should be read
with particular care. As you can see, each sign con-
sists of a different graphic symbol, making it quick and
easy to locate the various topics. Before starting the
engine, read this manual carefully, particularly the
"SAFE RIDING" section. Your safety as well as other's
does not only depend on the quickness of your reflex-
es and agility, but also on how well you know your
vehicle, its efficiency and your knowledge of the rules
for SAFE RIDING. For your safety, get to know your
vehicle well so as to safely ride and master it in road
traffic IMPORTANT This booklet is an integral part of
the vehicle, and should the vehicle be sold, it must be
transferred to the new owner.
Bovengenoemde signalen zijn erg belangrijk. Ze heb-
ben namelijk tot doel om de delen van het boekje aan
te geven die u aandachtig door moet lezen. Zoals u
ziet, bestaat ieder teken uit een ander grafisch sym-
bool, zodat de bijbehorende onderwerpen meteen
duidelijk kunnen worden gevonden in de verschillen-
de delen. Vooraleer men de motor start, leest men
aandachtig deze handleiding, en vooral de paragraaf
"VEILIG RIJDEN". Uw veiligheid en die van anderen
hangt niet enkel af van uw reflexen en vlugheid, maar
ook van de kennis en de efficiëntie van het voertuig,
en van de kennis van de fundamentele regels voor het
VEILIG RIJDEN. We raden daarom aan om vertrouwd
te raken met het voertuig, zodat u zich veilig en be-
heersd kan bewegen in het verkeer. BELANGRIJK
Deze handleiding moet beschouwd worden als inte-
grerend deel van het voertuig, en moet worden over-
handigd bij de verkoop ervan.
5
Pagina laadt ...

INDEX
INDEX
GENERAL RULES.......................................................................... 9
Carbon monoxide..................................................................... 10
Fuel.......................................................................................... 10
Hot components....................................................................... 11
Coolant..................................................................................... 11
Used engine oil and gearbox oil............................................... 12
Brake and clutch fluid............................................................... 13
Battery hydrogen gas and electrolyte....................................... 14
Reporting of defects that affect safety...................................... 15
VEHICLE......................................................................................... 21
Arrangement of the main components......................................... 23
Dashboard................................................................................... 25
Analog instrument panel.............................................................. 26
Light unit...................................................................................... 26
Digital lcd display......................................................................... 30
Key switch.................................................................................... 35
Locking the steering wheel....................................................... 36
Horn button.................................................................................. 36
Switch direction indicators........................................................... 37
High/low beam selector............................................................... 37
Start-up button............................................................................. 38
Engine stop switch....................................................................... 38
Manual starter control.................................................................. 39
Opening the saddle.................................................................. 39
Identification................................................................................. 40
USE................................................................................................. 43
Checks......................................................................................... 44
Refuelling..................................................................................... 47
Rear shock absorbers adjustment............................................... 49
Front fork adjustment................................................................... 52
Running in.................................................................................... 55
ALGEMENE NORMEN..................................................................... 9
Koolmonoxide............................................................................. 10
Brandstof.................................................................................... 10
Warme onderdelen..................................................................... 11
Koelvloeistof............................................................................... 11
Gebruikte motorolie en koppelingsolie....................................... 12
Rem- en koppelingsvloeistof...................................................... 13
Elektrolyt en waterstofgas van de accu...................................... 14
Communicatie van de defecten die invloed hebben op de vei-
ligheid......................................................................................... 15
VOERTUING..................................................................................... 21
Plaats van de hoofdcomponenten................................................. 23
Legenda......................................................................................... 25
Analoog instrumentenpaneel......................................................... 26
Groep controlelampjes................................................................... 26
Digitaal display............................................................................... 30
Contactslot..................................................................................... 35
Stuurslot vergrendelen............................................................... 36
Drukknop claxon............................................................................ 36
Schakelaar richtingaanwijzers....................................................... 37
Lichtschakelaar.............................................................................. 37
Startknop........................................................................................ 38
Stopschakelaar motor.................................................................... 38
Commando van de manuele starter............................................... 39
Zadel openen............................................................................. 39
Identificatie..................................................................................... 40
GEBRUIK.......................................................................................... 43
Controles........................................................................................ 44
Tanken........................................................................................... 47
Regulering achterdempers............................................................. 49
Regulering voorvorken................................................................... 52
7

Starting up the engine.................................................................. 57
Difficult start up............................................................................ 59
Stopping the engine..................................................................... 61
Stand........................................................................................... 62
Safe driving.................................................................................. 63
Load............................................................................................. 68
MAINTENANCE.............................................................................. 69
Engine oil level............................................................................. 70
Engine oil change..................................................................... 73
Gearbox oil level.......................................................................... 75
Tyres............................................................................................ 78
Spark plug dismantlement........................................................... 80
Removing the air filter.................................................................. 85
Cooling fluid level......................................................................... 87
Checking the brake oil level......................................................... 91
Battery......................................................................................... 100
Fuses........................................................................................... 101
Lamps.......................................................................................... 104
Front light group........................................................................... 104
Headlight adjustment............................................................... 106
Front and rear disc brake............................................................. 107
Periods of inactivity...................................................................... 110
Cleaning the vehicle.................................................................... 112
Transport..................................................................................... 116
Transmission chain...................................................................... 116
Chain backlash check.............................................................. 117
Chain backlash adjustment...................................................... 118
Checking wear of chain, front and rear sprockets.................... 119
Chain lubrication and cleaning................................................. 120
TECHNICAL DATA......................................................................... 123
PROGRAMMED MAINTENANCE.................................................. 131
Scheduled maintenance table..................................................... 132
SPECIAL FITTINGS....................................................................... 155
Inrijden........................................................................................... 55
Starten des motors......................................................................... 57
Moeilijke start................................................................................. 59
Stoppen van de motor.................................................................... 61
Standaard...................................................................................... 62
Veilig rijden.................................................................................... 63
Lading............................................................................................ 68
ONDERHOUD................................................................................... 69
Peil motorolie................................................................................. 70
Vervanging van de motorolie...................................................... 73
Versnellingsbak oliepeil................................................................. 75
Banden........................................................................................... 78
Demonteren van de bougie............................................................ 80
Demonteren van het luchtfilter....................................................... 85
Peil koelvloeistof............................................................................ 87
Controle van het oliepeil van de remmen...................................... 91
Accu............................................................................................... 100
Zekeringen..................................................................................... 101
Lampjes......................................................................................... 104
Koplampset.................................................................................... 104
Afstellen van de koplamp........................................................... 106
Schijfrem voor en achter................................................................ 107
Stilstand van het voertuig............................................................... 110
Reinigen van het voertuig.............................................................. 112
Vervoer.......................................................................................... 116
Transmissieketting......................................................................... 116
Controle van de speling van de ketting...................................... 117
Regeling van de speling van de ketting...................................... 118
Controle van het gebruik van de ketting, het tandrad en kroon
................................................................................................... 119
Smering en reiniging van de ketting........................................... 120
TECHNISCHE GEGEVENS.............................................................. 123
GEPLAND ONDERHOUD................................................................ 131
Tabel gepland onderhoud.............................................................. 132
SPECIALE UITRUSTINGEN............................................................. 155
8

SXV 450-550
Chap. 01
General rules
Hst. 01
Algemene normen
9

Carbon monoxide
If you need to keep the engine running in
order to perform a procedure, please en-
sure that you do so in an open or very well
ventilated area. Never let the engine run
in an enclosed area. If you do work in an
enclosed area, make sure to use a
smoke-extraction system.
CAUTION
EXHAUST EMISSIONS CONTAIN
CARBON MONOXIDE, A POISONOUS
GAS WHICH CAN CAUSE LOSS OF
CONSCIOUSNESS AND EVEN
DEATH.
Koolmonoxide
Wanneer het nodig is om de motor te
doen werken om een handeling uit te
voeren, controleert men of dit in een open
ruimte of in een goed geventileerd lokaal
gebeurt. Laat de motor nooit werken in
een gesloten ruimte. Wanneer men in
een gesloten ruimte werkt, gebruikt men
een evacuatiesysteem voor de uitlaat-
gassen.
LET OP
DE UITLAATGASSEN BEVATTEN
KOOLMONOXIDE, EEN GIFTIG GAS
DAT BEWUSTELOOSHEID EN OOK
DE DOOD KAN VEROORZAKEN.
Fuel
CAUTION
FUEL USED TO POWER INTERNAL
COMBUSTION ENGINES IS HIGHLY
FLAMMABLE AND CAN BECOME EX-
PLOSIVE UNDER SPECIFIC CONDI-
TIONS. IT IS THEREFORE RECOM-
MENDED TO CARRY OUT REFUEL-
LING AND MAINTENANCE PROCE-
DURES IN A VENTILATED AREA WITH
THE ENGINE SWITCHED OFF. DO
NOT SMOKE DURING REFUELLING
Brandstof
LET OP
DE BRANDSTOF DIE WORDT GE-
BRUIKT VOOR DE AANDRIJVING VAN
DE ONTPLOFFINGSMOTOR IS UI-
TERST BRANDBAAR EN KAN EXPLO-
SIEF WORDEN IN BEPAALDE OM-
STANDIGHEDEN. VOER HET TANKEN
EN DE ONDERHOUDSHANDELINGEN
UIT IN EEN GEVENTILEERDE ZONE
EN MET DE MOTOR UIT. ROOK NIET
TIJDENS HET TANKEN EN IN DE NA-
10
1 General rules / 1 Algemene normen

AND NEAR FUEL VAPOURS, AVOID-
ING ANY CONTACT WITH NAKED
FLAMES, SPARKS OR OTHER SOUR-
CES WHICH MAY CAUSE THEM TO
IGNITE OR EXPLODE.
DO NOT DISPERSE FUEL IN THE EN-
VIRONMENT.
KEEP OUT OF THE REACH OF CHIL-
DREN
BIJHEID VAN BRANDSTOFDAMPEN,
EN VERMIJDT ABSOLUUT CONTACT
MET VRIJE VLAMMEN, VONKEN EN
EENDER WELKE ANDER BRON DIE
HET VLAM VATTEN OF EXPLODEREN
ERVAN KAN VEROORZAKEN.
LOOS DE BRANDSTOF NIET IN HET
MILIEU.
BUITEN BEREIK VAN KINDEREN
HOUDEN
Hot components
The engine and the exhaust system com-
ponents get very hot and remain in this
condition for a certain time interval after
the engine has been switched off. Before
handling these components, make sure
that you are wearing insulating gloves or
wait until the engine and the exhaust sys-
tem have cooled down.
Warme onderdelen
De motor en de onderelen van de uitlaat-
installatie worden zeer warm en blijven
warm voor een zekere periode, ook nadat
de motor wordt uitgezet. Vooraleer men
deze onderdelen hanteert, draagt men
isolerende handschoenen, of wacht men
tot de motor en de uitlaatinstallatie zijn
afgekoeld.
Coolant
The coolant contains ethylene glycol
which, under certain conditions, can be-
come flammable. When ethylene glycol
burns, it produces an invisible flame
which can nevertheless cause burns.
CAUTION
PAY ATTENTION NOT TO POUR
COOLANT ON HOT ENGINE OR EX-
Koelvloeistof
De koelvloeistof bevat ethyleenglycol,
wat in sommige omstandigheden ont-
vlambaar is. Wanneer het brandt, produ-
ceert ethylglycol onzichtbare vlammen,
die toch brandwonden veroorzaken.
LET OP
LET OP OM GEEN KOELVLOEISTOF
TE MORSEN OP DE HETE DELEN VAN
11
1 General rules / 1 Algemene normen
Pagina laadt ...
Pagina laadt ...
Pagina laadt ...

ICAL ADVICE IMMEDIATELY. THE
BATTERY RELEASES EXPLOSIVE
GASES; KEEP IT AWAY FROM
FLAMES, SPARKS, CIGARETTES OR
ANY OTHER HEAT SOURCES. EN-
SURE ADEQUATE VENTILATION
WHEN SERVICING OR RECHARGING
THE BATTERY.
KEEP OUT OF THE REACH OF CHIL-
DREN
BATTERY LIQUID IS CORROSIVE. DO
NOT POUR IT OR SPILL IT, PARTICU-
LARLY ON PLASTIC COMPONENTS.
ENSURE THAT THE ELECTROLYTIC
ACID IS COMPATIBLE WITH THE BAT-
TERY TO BE ACTIVATED.
SLIKT, MOET MEN VEEL WATER OF
MELK DRINKEN, DAARNA MAGNE-
SIUMMELK OF VEGETALE OLIE
DRINKEN, EN ONMIDDELLIJK EEN
ARTS RAADPLEGEN. DE ACCU VER-
SPREIDT EXPLOSIEVE GASSEN, EN
HET MOET DUS UIT DE BUURT WOR-
DEN GEHOUDEN VAN VLAMMEN,
VONKEN, SIGARETTEN EN EENDER
WELKE ANDERE WARMTEBRON.
VOORZIE EEN GEPASTE VERLUCH-
TING WANNEER MEN ONDERHOUD
OF HET OPLADEN VAN DE ACCU UIT-
VOERT.
BUITEN BEREIK VAN KINDEREN
HOUDEN
DE VLOEISTOF VAN DE ACCU IS
CORROSIEF. GIET ZE NIET UIT EN
VERSPREIDT ZE NIET, VOORAL NIET
OP DE PLASTIC DELEN. CONTRO-
LEER OF HET ELEKTROLYTZUUR
SPECIFIEK VOOR DE TE ACTIVEREN
ACCU IS.
Reporting of defects that
affect safety
GENERAL PRECAUTIONS AND IN-
FORMATION
When repairing, dismantling and reas-
sembling the vehicle follow the recom-
mendations reported below carefully.
Communicatie van de
defecten die invloed hebben
op de veiligheid
ALGEMENE VOORZORGSMAATRE-
GELEN EN INFORMATIE
Wanneer men de herstelling, de demon-
tage en hermontage van het voertuig uit-
voert, moet men zich nauwgezet aan het
volgende advies houden.
15
1 General rules / 1 Algemene normen

BEFORE DISASSEMBLING COMPO-
NENTS
•
Before dismantling compo-
nents, remove dirt, mud, dust
and foreign bodies from the ve-
hicle. Use the special tools de-
signed for this bike, as required.
COMPONENTS REMOVAL
•
Do not loosen and/or tighten
screws and nuts using pliers or
other tools other than the espe-
cially designed wrench.
•
Mark positions on all connection
joints (pipes, cables, etc.) before
separating them, and identify
them with distinctive symbols.
•
Each component needs to be
clearly marked in order to be
identified during assembly.
•
Clean and wash the removed
components carefully using a
low-flammability detergent.
•
Keep coupled parts together
since they have "adjusted" to
each other due to normal wear
and tear.
•
Some components must be
used together or replaced alto-
gether.
•
Keep away from heat sources.
VÓÓR DE DEMONTAGE VAN DE ON-
DERDELEN
•
Verwijder vuil, modder, stof en
vreemde voorwerpen van het
voertuig, vooraleer men de de-
montage van de onderdelen uit-
voert. Gebruik, waar voorzien,
de speciale gereedschappen
die voor dit voertuig ontworpen
werden.
DEMONTAGE VAN DE ONDERDELEN
•
Los en/of sluit de bouten en de
moeren niet door gebruik te ma-
ken van tangen of andere ge-
reedschappen, maar gebruik
steeds de speciale sleutel.
•
Merk de posities op alle verbin-
dingskoppelingen (buizen, ka-
bels, enz.) vooraleer men ze
scheidt, en identificeer ze met
verschillende onderscheidende
tekens.
•
Elk stuk moet duidelijk gemerkt
worden, zodat het tijdens de fa-
se van de installatie geïdentifi-
ceerd kan worden.
•
Reinig en was de gedemonteer-
de onderdelen zorgvuldig met
een reinigingsmiddel met lage
ontvlambaarheidsgraad.
•
Hou de onderling gekoppelde
delen bij elkaar, omdat het ene
bij het andere "past" als gevolg
van de normale slijtage.
•
Sommige onderdelen moeten
samen gebruikt worden of volle-
dig vervangen worden.
16
1 General rules / 1 Algemene normen

•
Hou ze ver weg van warmte-
bronnen.
REASSEMBLING COMPONENTS
CAUTION
BEARINGS MUST BE ABLE TO RO-
TATE FREELY, WITHOUT JAMMING
AND/OR NOISE, OTHERWISE THEY
NEED REPLACING.
HERMONTAGE VAN DE ONDERDE-
LEN
LET OP
DE KUSSENTJES MOETEN VRIJ
DRAAIEN, ZONDER WRIJVINGEN EN/
OF LAWAAI, ANDERS MOETEN ZE
VERVANGEN WORDEN.
•
Only use ORIGINAL APRILIA
SPARE PARTS.
•
Comply with lubricant and con-
sumables usage guidelines.
•
Lubricate parts (whenever pos-
sible) before reassembling
them.
•
When tightening nuts and
screws, start from the ones with
the largest section or from the
internal ones, moving diagonal-
ly. Tighten nuts and screws in
successive steps before apply-
ing the tightening torque.
•
Always replace self-locking
nuts, washers, sealing rings, cir-
clips, O-rings, split pins and
screws with new ones if their
tread is damaged.
•
When fitting bearings, make
sure to lubricate them well.
•
Check that each component is
fitted correctly.
•
After a repair or routine mainte-
nance procedure, carry out pre-
•
Gebruik enkel ORIGINELE RE-
SERVEONDERDELEN van
aprilia.
•
Gebruik de aanbevolen smeer-
middelen en verbruiksmateria-
len.
•
Smeer de delen (wanneer mo-
gelijk) vooraleer men ze mon-
teert.
•
Bij het sluiten van de bouten en
de moeren, begint men met die-
gene met de grootste diameter
of met de interne, door diago-
naal te werken. Voer het sluiten
uit met opeenvolgende passa-
ges, vooraleer men het sluitkop-
pel toepast.
•
Vervang steeds de zelfblokke-
rende moeren, de pakkingen, de
dichtingsringen, de elastische
ringen, de O-ringen (OR), de
splitpennen en de bouten met
andere nieuwe, wanneer ze
schade aan de schroefdraad
vertonen.
17
1 General rules / 1 Algemene normen

ride checks and test the vehicle
on private grounds or in an area
with low traffic density.
•
Clean all junction surfaces, oil
guard rims and washers before
refitting them. Smear a light lay-
er of lithium-based grease on
the oil guard rims. Reassemble
the oil guard and the bearings
with the brand or lot number fac-
ing outward (visible side).
•
Wanneer men de kussentjes
monteert, smeert men ze over-
vloedig.
•
Controleer of elk onderdeel cor-
rect gemonteerd is.
•
Na een herstellingshandeling of
periodiek onderhoud, voert men
de voorafgaande controles uit
en test men het voertuig in een
privé-zone of in een zone met
weinig verkeer.
•
Reinig alle koppelingsvlakken,
de randen van de oliekeerringen
en de pakkingen vóór de her-
montage. Breng een laagje vet
op basis van lithium aan op de
randen van de oliekeerringen.
Hermonteer de oliekeerringen
en de kussentjes met het merk
of het fabricatienummer naar de
buitenkant gericht (zichtbare
kant).
ELECTRIC CONNECTORS
Electric connectors must be disconnec-
ted as described below as non-compli-
ance with the procedure so described
causes irreparable damage to both the
connector and the cable harness:
Press the relevant safety hooks, if any.
•
Grip the two connectors and dis-
connect them by pulling them in
opposite directions.
•
If there are signs of dirt, rust, hu-
midity, etc., clean the connector
ELEKTRISCHE CONNECTORS
De elektrische connectors moeten als
volgt worden losgemaakt, het niet res-
pecteren van deze procedure leidt tot on-
herstelbare schade aan de connector en
aan de bekabeling:
Indien aanwezig, drukt men op de speci-
ale veiligheidskoppelingen.
•
Grijp de twee connectors vast
en verwijder ze, door de ene van
de andere in de tegenoverge-
stelde richting te trekken.
18
1 General rules / 1 Algemene normen

internal parts carefully using a
pressurised air jet.
•
Make sure that the cables are
correctly linked to the connector
internal terminal ends.
•
Then insert the two connectors
making sure that they couple
correctly (if the relevant hooks
are provided, you will hear them
"click" into place).
CAUTION
TO DISCONNECT THE TWO CONNEC-
TORS, DO NOT PULL THE CABLES.
NOTE
THE TWO CONNECTORS CONNECT
ONLY FROM ONE SIDE: CONNECT
THEM THE RIGHT WAY ROUND.
•
In aanwezigheid van vuil, roest,
vochtigheid, enz, reinigt men
zorgvuldig de binnenkant van de
connector, door gebruik te ma-
ken van een persluchtstraal.
•
Controleer of de kabels correct
vastgeklemd zijn aan de interne
terminals van de connectors.
•
Plaats vervolgens de twee con-
nectors, en controleer de cor-
recte koppeling (wanneer te-
genovergestelde koppelingen
aanwezig zijn, hoort men een ty-
pische "klik").
LET OP
TREK NIET AAN DE KABELS OM DE
TWEE CONNECTORS LOS TE MA-
KEN.
N.B.
DE TWEE CONNECTORS HEBBEN
SLECHTS ÉÉN PLAATSINGSZIN,
PLAATS ZE IN DE JUISTE ZIN OP DE
KOPPELING.
TIGHTENING TORQUE
CAUTION
DO NOT FORGET THAT THE TIGHT-
ENING TORQUE OF ALL FASTENING
ELEMENTS ON WHEELS, BRAKES,
WHEEL SPINDLES AND OTHER SUS-
PENSION COMPONENTS PLAY A KEY
ROLE IN ENSURING THE VEHICLE'S
SAFETY AND MUST COMPLY WITH
SPECIFIED VALUES. CHECK THE
SLUITKOPPELS
LET OP
VERGEET NIET DAT DE SLUITKOP-
PELS VAN ALLE BEVESTIGINGSELE-
MENTEN OP WIELEN, REMMEN,
WIELPINNEN EN ANDERE ONDERDE-
LEN VAN DE OPHANGINGEN EEN
FUNDAMENTELE ROL SPELEN VOOR
HET GARANDEREN VAN DE VEILIG-
HEID VAN HET VOERTUIG, EN DAT ZE
19
1 General rules / 1 Algemene normen
Pagina laadt ...

SXV 450-550
Chap. 02
Vehicle
Hst. 02
Voertuing
21
Pagina laadt ...

02_02
Arrangement of the main
components (02_01, 02_02)
LEGEND Ieft side
1. Left coolant radiator
2. Left rear-view mirror
3. Fuel tank cap
4. Fuel tank
5. Battery
6. Saddle
7. Rear light
Plaats van de
hoofdcomponenten (02_01,
02_02)
LEGENDE linker kant
1. Linker radiator koelvloeistof
2. Linker achteruitkijkspiegeltje
3. Dop van de brandstoftank
4. Brandstoftank
5. Accu
6. Zadel
23
2 Vehicle / 2 Voertuing

8. Rear fork
9. Transmission chain
10. Rear left side
11. Side stand
12. Driver's left footrest
13. Gear control lever
14. Main fuse holder (30A)
15. Left front side
7. Achterlicht
8. Achtervork
9. Transmissieketting
10. Linker zijplaatje achteraan
11. Laterale standaard
12. Linker voetensteun van de be-
stuurder
13. Commandohendel van de ver-
snellingsbak
14. Hoofdzekeringenhouder (30A)
15. Linker zijplaatje vooraan
Right side KEY
1. Right front side
2. Right coolant radiator
3. Coolant expansion tank cap
4. Right rear-view mirror
5. Air filter housing
6. Secondary fuse holder
7. Right rear side
8. Pump with rear brake fluid reser-
voir
9. Driver's right footrest
10. Rear brake control lever
LEGENDE rechter kant
1. Rechter zijplaatje vooraan
2. Rechter radiator koelvloeistof
3. Dop van het expansievat van de
koelvloeistof
4. Rechter achteruitkijkspiegel
5. Luchtfilterdoos
6. Secundaire zekeringdoos
7. Rechter zijplaatje achteraan
8. Pomp met vloeistoftank van de
achterrem
9. Rechter voetensteun van de be-
stuurder
10. Commandohendel van de achter-
rem
24
2 Vehicle / 2 Voertuing

02_03
Dashboard (02_03)
KEY
1. Left rear-view mirror
2. Clutch control lever
3. Instruments and gauges
4. Ignition switch - steering lock (ON
- OFF - LOCK)
5. Front brake lever
6. Right rear-view mirror
7. Throttle grip
Legenda (02_03)
Legende
1. Linker achteruitkijkspiegel
2. Commandohendel van de koppe-
ling
3. Instrumenten en indicatoren
4. Schakelaar van de ontsteking /
stuurslot (ON-OFF-LOCK)
5. Hendel van de voorrem
6. Rechter achteruitkijkspiegel
7. Gashandvat
25
2 Vehicle / 2 Voertuing

02_04
Analog instrument panel
(02_04)
KEY
1. MODE button
2. Neutral gear warning light
(green)
3. Engine oil pressure warning
light (red)
4. Engine control system warning
light
5. Multifunctional digital display
6. Low fuel warning light, (orange)
7. High-beam warning light, (blue)
8. Turn indicator warning light
(green)
9. Overrevving warning light
Analoog instrumentenpaneel
(02_04)
Legende
1. Drukknop MODE
2. Controlelamp van de versnelling
in vrij (groen)
3. Controlelamp van de druk van
de motorolie (rood)
4. Controlelamp van het controle-
systeem van de motor
5. Digitaal multifunctioneel display
6. Controlelamp van de brandstof-
reserve, (oranje)
7. Controlelamp van het groot licht,
(blauw)
8. Controlelamp van de richting-
aanwijzers (groen)
9. Controlelamp van het te hoog
toerental
Light unit
Turn indicator warning light
Flashes when the turning indication is ac-
tivated
Groep controlelampjes
Controlelamp van de richtingaanwij-
zers
Deze knippert wanneer het signaal in
functie is
Engine control system warning light
It comes on when the ignition switch is set
to ON and the engine in not switched on
and performs the warning light activation
test. If the warning light does not come on
Controlelamp van het controlesys-
teem van de motor
Deze licht op, elke keer men de ontste-
kingsschakelaar in ON plaatst, en de mo-
tor staat niet aan, door op deze manier
een werkingstest van de controlelamp uit
te voeren. Wanneer de controlelamp tij-
26
2 Vehicle / 2 Voertuing

at this stage, contact an Official aprilia
Dealer.
CAUTION
IF THE ENGINE CONTROL LIGHT «4»
STAYS ON AFTER START-UP OR
COMES ON DURING THE ENGINE'S
NORMAL FUNCTIONING, THIS
MEANS THAT THERE IS A FAULT IN
THE START-UP/IGNITION SYSTEM. IN
THIS EVENT, CONTACT AN OFFICIAL
APRILIA DEALER AS SOON AS POS-
SIBLE.
dens deze fase niet oplicht, wendt men
zich tot een Officiële aprilia Dealer.
LET OP
WANNEER DE CONTROLELAMP VAN
DE CONTROLE VAN DE MOTOR «4»
AANBLIJFT NA DE START, OF ZE
LICHT OP TIJDENS DE NORMALE
WERKING VAN DE MOTOR, WERD ER
EEN ONREGELMATIGHEID VASTGE-
STELD IN HET ONTSTEKINGS- / VOE-
DINGSSYSTEEM. IN DIT GEVAL
WENDT MEN ZICH ZO VLUG MOGE-
LIJK TOT EEN OFFICIËLE APRILIA
DEALER.
High-beam warning light
Comes on when the high beam light is
activated or the high beam light is flash-
ed.
Controlelamp van het groot licht
Deze licht op wanneer de lampen van de
grote lichten geactiveerd zijn, of wanneer
men de knippering van de grote lichten
activeert.
Low fuel warning light
Comes on when 2.2 ± 1 l (4 ± 1.8 in) of
fuel are left in the fuel tank.
Controlelamp van de brandstofreser-
ve
Deze licht op wanneer in de brandstof-
tank een hoevelheid brandstof overblijft
van 2,2 ± 1 liter (4 ± 1.8 in).
27
2 Vehicle / 2 Voertuing

CAUTION
AVOID DEPLETING THE FUEL RE-
SERVE AT ALL COSTS, OR YOU WILL
DAMAGE THE FUEL PUMP.
LET OP
VERMIJDT ABSOLUUT OM ZONDER
BRANDSTOFRESERVE TE VALLEN,
OMDAT ZO DE BRANDSTOFPOMP
WORDT BESCHADIGD.
Neutral gear switch warning light
Comes on when neutral is selected.
Controlelamp van de versnelling in vrij
Deze licht op wanneer de versnellings-
bak zich in de vrijpositie bevindt.
Engine oil pressure warning light
It comes on when the ignition switch is set
to ON and the engine in not switched on
and performs the warning light activation
test. If the warning light does not come on
at this stage, contact an Official aprilia
Dealer.
CAUTION
IF THE ENGINE OIL PRESSURE
WARNING LIGHT «3» STAYS ON AF-
TER START-UP OR COMES ON DUR-
ING THE ENGINE'S NORMAL OPERA-
TION, THIS MEANS THAT THE
ENGINE OIL PRESSURE IN THE CIR-
CUIT IS TOO LOW. IN THIS EVENT,
STOP THE ENGINE AT ONCE AND
CONTACT AN OFFICIAL APRILIA
DEALER.
Controlelamp van de oliedruk van de
motor
Deze licht op, elke keer men de ontste-
kingsschakelaar in ON plaatst, en de mo-
tor staat niet aan, door op deze manier
een werkingstest van de controlelamp uit
te voeren. Wanneer de controlelamp tij-
dens deze fase niet oplicht, wendt men
zich tot een Officiële aprilia Dealer.
LET OP
WANNEER DE CONTROLELAMP VAN
DE DRUK VAN DE MOTOROLIE «3»
AANBLIJFT NA DE START, OF ZE
LICHT OP TIJDENS DE NORMALE
WERKING VAN DE MOTOR, IS DE
DRUK VAN DE MOTOROLIE IN HET
CIRCUIT ONVOLDOENDE. IN DIT GE-
VAL LEGT MEN ONMIDDELLIJK DE
MOTOR STIL, EN WENDT MEN ZICH
28
2 Vehicle / 2 Voertuing

TOT EEN OFFICIËLE APRILIA DEA-
LER.
Overrevving warning light
It flashes when the activation threshold
(maximum rev. number) programmed by
the user is crossed.
Controlelamp van het te hoog toeren-
tal
Deze knippert wanneer de activatielimiet
(maximum toerental) wordt overschre-
den, die ingesteld is door de gebruiker.
Multifunctional digital display
Speedometer (km/h - MPH) Displays
driving speed in three digits and in real
time.
Odometer km/mi Displays the partial or
total number of kilometres/miles covered
Digitaal multifunctioneel display
Snelheidsmeter (km/h - MPH) Visuali-
seert de onmiddellijke rijsnelheid op 3
cijfers.
Kilometerteller / Mijlenteller Visuali-
seert het partieel of totaal aantal afgeleg-
de kilometers of mijlen
Rpm indicator (rpm)
Displays the number of engine's rpms.
CAUTION
DO NOT EXCEED THE ENGINE'S
MAXIMUM SPEED, (SEE RUNNING IN)
Toerenteller (toeren/min - tpm)
Duidt het toerental per minuut van de mo-
tor aan.
LET OP
OVERSCHRIJDT HET MAXIMUM VER-
MOGENSREGIME VAN DE MOTOR
NIET, RAADPLEEG (PROEFPERIODE)
Clock
Displays hours and minutes, depending
on the setting.
Battery voltage
Displays the battery charge status in Volt.
Klok
Visualiseert het uur en de minuten op ba-
sis van de voorinstellingen.
Accuspanning
Visualiseert de staat van lading van de
accu in Volt.
29
2 Vehicle / 2 Voertuing

Battery voltage Displays the battery's
charge status in Volt.
Accuspanning Visualiseert de staat van
de lading van de accu in Volt.
02_05
02_06
Digital lcd display (02_05,
02_06, 02_07, 02_08, 02_09,
02_10, 02_11, 02_12, 02_13,
02_14, 02_15, 02_16)
CONTROLS
1. MODE button Display and adjust (only
works when the vehicle is at a standstill).
Digitaal display (02_05, 02_06,
02_07, 02_08, 02_09, 02_10,
02_11, 02_12, 02_13, 02_14,
02_15, 02_16)
COMMANDO'S
1 Drukknop MODE; voor het visualiseren
en het regelen (werkt enkel wanneer het
voertuig stilstaat).
2 SCROLL button; Visualise and adjust
all functions except time.
By turning the ignition key in the «ON»
position, the following indicators are lit on
the instrument panel for 3 seconds:
•
All warning lights;
•
Backlighting;
•
All segments on the multifunc-
tional digital display.
2 Drukknop SCROLL; voor het visualise-
ren en het regelen van alle functies, be-
halve het uur.
Door de ontstekingssleutel in positie
«ON» te draaien, lichten deze op voor 3
seconden op het dashboard:
•
Alle controlelampen;
•
De retroverlichting;
•
Op het digitaal multifunctioneel
display alle segmenten.
Immediately after the initial check is per-
formed, the multifunctional display shows
the current battery charge status, then
the last values displayed on the active
screen before the vehicle was last switch-
ed off.
ODO
•
INSTANTANEOUS SPEED
(area A)
Na de beginceck zal het multifunctioneel
display onmiddellijk de huidige waarde
van de staat van de acculading aandui-
den, om daarna over te gaan naar de
visualisering van de gemeten grootten, in
verband met het scherm dat actief was bij
de laatste uitschakeling
HODO
30
2 Vehicle / 2 Voertuing

02_07
02_08
02_09
•
TOTAL ODOMETER (area B)
•
GRAPHIC RPM INDICATOR,
operational (area C)
•
ONMIDDELLIJKE SNELHEID
(zone A)
•
HODOGRAM TOTAAL (zone B)
•
GRAFISCHE TOERENTEL-
LER, werkend (zone C)
TRIP
The TRIP configuration displays partial
journey information.
To select the TRIP configuration, press
the MODE button when the vehicle is at
a standstill, whereas press the SCROLL
button when the vehicle is in motion: the
ODOMETER INDICATION goes from
TOTAL to PARTIAL.
TRIP
In de configuratie TRIP worden de parti-
ele gegevens van de reis getoond.
Om de configuratie TRIP te selecteren,
met de motor stil drukt men op de druk-
knop MODE, met de motor in beweging
drukt men op de drukknop SCROLL, de
aanduiding van de HODOGRAM TO-
TAAL gaat over naar PARTIEEL.
By pressing the MODE button again
when the vehicle is at a standstill or the
SCROLL button when it is in motion, the
PARTIAL ODOMETER indication is sub-
stituted by the AVERAGE SPEED (AVS)
recorded for the journey.
Door opnieuw op de drukknop MODE te
drukken met de motor uit, of met de druk-
knop SCROLL met de motor in bewe-
ging, wordt de aanduiding van de HO-
DOGRAM PARTIEEL vervangen met de
waarde van de GEMIDDELDE SNEL-
HEID (AVS), berekend tijdens de reis.
To reset the PARTIAL ODOMETER and
the relevant AVERAGE SPEED value
(AVS), press the MODE or the SCROLL
buttons for more than six seconds when
the vehicle is at a standstill. After this time
interval has elapsed, the value displayed
in area B are replaced by four horizontal
dashes. When the button is released, the
dashes are replaced by four noughts
(000.0).
Om de tellers van HODOGRAM PARTI-
EEL en de overeenkomstige waarde GE-
MIDDELDE SNELHEID (AVS) op nul te
stellen, drukt men met de motor stil voor
langer dan vijf seconden op de drukknop
MODE of op de drukknop SCROLL, hier-
na wordt op het display in zone B de
gevisualiseerde waarde vervangen door
vier horizontale streepjes. Nadat men de
drukknop loslaat, worden de streepjes
vervangen door vier nullen (000.0).
31
2 Vehicle / 2 Voertuing

02_10
02_11
02_12
TIME
With the AVERAGE SPEED (AVS)
screen displayed, you can access the
TIME function by pressing the MODE
button when the vehicle is at a standstill
or the SCROLL button when the vehicle
is in motion. If the current speed unit of
measurement is km/h, the time value is
displayed in the 24 hour format, while if
the unit is mph the time format is 12 hours
with an AM/PM indication.
UUR
Met het scherm van de GEMIDDELDE
SNELHEID (AVS) gevisualiseerd, en
door op de drukknop MODE te drukken
met de motor stil, of op drukknop
SCROLL met de motor in beweging, ver-
krijgt men de functie UUR. Wanneer de
huidige eenheid van de snelheid km/h is,
wordt het uur gevisualiseerd in het for-
maat van 24 uur, wanneer ze in mph is,
wordt het formaat van 12 uur gevisuali-
seerd, met daarnaast de aanduiding AM/
PM.
SETTING
•
Press MODE until the time digits
blink;
•
Each time the MODE button is
pressed, the time increases by
one unit. Hold down the button
to increase time units automati-
cally;
•
If you do not touch the control for
two seconds, the hour is set and
the clock switches to minute set-
ting;
REGELING
•
Druk op MODE tot de nummers
van het uur beginnen te knippe-
ren;
•
Bij elke druk op de drukknop
MODE vermeerdert de waarde-
eenheid van het uur met één,
door op de drukknop te blijven
drukken, gaat de waarde auto-
matisch verder;
•
Wanneer men voor twee secon-
den niets aanraakt, wordt de
waarde opgeslaan en gaat men
over naar de modaliteit van de
regeling van de minuten;
Follow the same procedure to set mi-
nutes and seconds. Memorise the new
values as before by not pressing any
keys for two seconds. If miles are the unit
measure, the AM and PM indications will
start to blink alternatively after the setting
Handel op analoge wijze voor het instel-
len van de minuten en de seconden, het
opslaan van het gegeven zal gebeuren
zoals eerder, wanneer men voor twee se-
conden niets aanraakt. Wanneer de
meeteenheid mijlen is, zullen na het ein-
32
2 Vehicle / 2 Voertuing

02_13
02_14
02_15
operation has been completed. When
you press MODE to select the correct in-
dication, this is linked to current time and
it changes automatically when the clock
goes from 12:59:59 to 13.
de van de regeling van het uur de para-
meters AM en PM beginnen te knipperen,
wanneer men op MODE drukt op het gel-
dige symbool, wordt het aan het uur ge-
koppeld, en wijzigt het wanneer de klok
overgaat van 12:59:59 naar 13.
RPM INDICATOR
From the TIME display it is possible to
access the LAP TIMER configuration by
pressing briefly on the SCROLL button.
The value is shown in the B area and is
also indicated graphically with a bar in the
C area of the display.
TOERENTELLER
Vanaf het scherm van de KLOK, drukt
men eventjes op de drukknop SCROLL,
en bereikt men de figuratie TOEREN-
TELLER, de waarde wordt aangeduid in
de zone B, deze waarde wordt ook weer-
gegeven door een grafische balk in zone
C van het display.
OVERREVVING SETTING
Standard overrevving values are normal-
ly already set in the multifunctional dis-
play. If you wish to set a lower value,
follow the steps outlined below when the
vehicle and the engine are at a standstill:
•
Press the MODE and SCROLL
buttons at the same time for
more than 5 seconds. Five
noughts (00000) will be dis-
played in the B area, with the
first nought blinking.
•
Each time the MODE button is
pressed, the value of the blink-
ing number is increased by one
unit.
INSTELLING VAN HET TOERENTAL
Het multifuncioneel display heeft normaal
gezien reeds de standaardwaarden van
het te hoog toerental ingesteld, wanneer
men de melding wil anticiperen, handelt
men als volgt met het voertuig en de mo-
tor stil:
•
Druk gelijtijdig op de drukknop-
pen MODE en SCROLL voor
langer dan 5 seconden. In zone
B verschijnen vijf nullen
(00000), waarvan de eerste
knippert.
•
Bij elke druk op de drukknop
MODE vermeerdert de knippe-
rende waarde met één.
Not touching the control for two seconds
causes the value to be memorised and
Wanneer men voor twee seconden niets
aanraakt, wordt de waarde opgeslagen,
33
2 Vehicle / 2 Voertuing

02_16
moves the system on to the adjustment
of the subsequent digit; Follow the same
procedure to set the second and third dig-
its. Memorise the new values as before,
by not activating any controls for two sec-
onds. The last two noughts cannot be
modified. If the value set is correct, i.e.
lower than the maximum overrevving val-
ue, you can be memorise it by holding the
SCROLL button down longer than two
seconds. If you go over the threshold val-
ue, the warning light «3» on the instru-
ment panel starts to blink until you go
below the threshold value again.
en gaat men over naar de modaliteit van
de regeling van het volgende cijfer. Han-
del op analoge wijze voor het instellen
van het tweede en derde cijfer, het op-
slaan van het gegeven zal gebeuren
zoals eerder, wanneer men voor twee se-
conden niets aanraakt. De laatste twee
nullen kunnen niet gewijzigd worden.
Wanneer het ingestelde nummer correct
blijkt, dus lager dan het maximum toe-
rental, wordt de waarde opgeslagen wan-
neer men voor langer dan twee seconden
op de drukknop SCROLL drukt. Bij het
overschrijden van de vastgestelde waar-
de, knippert de alarmcontrolelamp «3»
van het dashboard, tot men onder de li-
miet terugkeert.
BATTERY ICON
The battery icon comes on when the bat-
tery charge is too low. If it is displayed
during the vehicle's normal operation,
check the battery's charge status and re-
charge system. It is normal for the icon to
be displayed before and during start-up,
to then disappear once the engine has
started.
ICOON VAN DE ACCU
De icoon van de accu licht op wanneer de
acculading onvoldoende is, en wanneer
ze verschijnt tijdens de normale werking
van het voertuig, controleert men de staat
van de lading en het systeem voor het
opladen van de accu. Het is normaal dat
de icoon vóór en tijdens de start ver-
schijnt, om daarna uit te gaan wanneer
de motor gestart is.
34
2 Vehicle / 2 Voertuing

02_17
02_18
Key switch (02_17)
The ignition switch is located on the
headstock upper plate.
The vehicle is supplied with two keys
(one is the spare key).
The lights go off when the ignition switch
is set to «OFF».
NOTE
THE KEY ACTIVATES THE IGNITION
SWITCH/ STEERING LOCK.
NOTE
THE LIGHTS TURN ON AUTOMATI-
CALLY UPON THE ENGINE START-
UP.
Contactslot (02_17)
De ontstekingsschakelaar bevindt zich
op de bovenste plaat van de kop van het
stuur.
Bij het voertuig worden twee sleutels bij-
geleverd (één reservesleutel).
Het uitgaan van de lichten gebeurt wan-
neer de ontstekingsschakelaar op
«OFF» wordt geplaatst.
N.B.
DE SLEUTEL ACTIVEERT DE ONT-
STEKINGSSCHAKELAAR/HET
STUURSLOT.
N.B.
DE LICHTEN LICHTEN AUTOMA-
TISCH OP NA DE START VAN DE MO-
TOR.
LOCK: The steering is locked. It is not
possible to start the engine or switch on
the lights. The key can be extracted
OFF: The engine and lights cannot be set
to work. The key can be extracted .
ON: The engine can be started. The key
cannot be extracted.
LOCK: Het stuur is geblokkeerd. Het is
niet mogelijk om de motor te starten en
om de lichten te activeren. Het is mogelijk
om de sleutel te verwijderen.
OFF: De motor en de lichten kunnen niet
in werking worden gesteld. Het is moge-
lijk om de sleutel te verwijderen.
ON: De motor kan gestart worden. Het is
niet mogelijk om de sleutel te verwijde-
ren.
35
2 Vehicle / 2 Voertuing

Locking the steering wheel
(02_18)
To lock the steering:
• Turn the handlebar completely to the
left.
• Turn the key to «OFF».
• Push in the key and turn it anticlockwise
(to the left), steer the handlebar slowly
until the key is set to «LOCK».
• Remove the key.
Stuurslot vergrendelen
(02_18)
Om het stuur te blokkeren:
• Draai het stuur volledig naar links.
• Draai de sleutel in positie «OFF».
• Druk op de sleutel en draai hem in te-
genwijzerszin (naar links), stuur lang-
zaam tot de sleutel op «LOCK» wordt
geplaatst.
• Verwijder de sleutel.
02_19
Horn button (02_19)
To action the horn, press button «3».
Drukknop claxon (02_19)
Door op drukknop «3» te drukken, acti-
veert men de akoestische melder.
36
2 Vehicle / 2 Voertuing

02_20
Switch direction indicators
(02_20)
To indicate left turn, turn the switch «4»
to the left; to indicate right turn, turn the
switch «4» to the right. To deactivate the
turn indicator, press the «4» switch.
NOTE
ELECTRICAL COMPONENTS FUNC-
TION ONLY WHEN THE IGNITION KEY
IS SET TO "ON"
Schakelaar richtingaanwijzers
(02_20)
Verplaats schakelaar «4» naar links, om
aan te duiden dat men naar links draait;
Verplaats schakelaar «4» naar rechts,
om aan te duiden dat men naar rechts
draait; Druk op schakelaar «4» om de
richtingaanwijzer te desactiveren.
N.B.
DE ELEKTRISCHE ONDERDELEN
WERKEN ENKEL WANNEER DE ONT-
STEKINGSSCHAKELAAR ZICH IN PO-
SITIE «ON» BEVINDT
02_21
High/low beam selector
(02_21)
If the light switch «2» is set to the upper
position, this activates the high-beam
light; if it is set to the lower position, the
low-beam light is switched on. In case of
danger and/or emergency it is possible to
activate high-beam flashing using the
«1» button.
Lichtschakelaar (02_21)
Wanneer de omleider van de lichten «2»
zich in de bovenste positie bevindt, wordt
het groot licht geactiveerd; wanneer hij
zich in de onderste positie bevindt, wordt
het dimlicht geactiveerd. Met drukknop
«1» is het mogelijk om het knipperen van
het groot licht te activeren in geval van
gevaar of nood.
37
2 Vehicle / 2 Voertuing

02_22
Start-up button (02_22)
By pressing the starter button «2», the
starter motor makes the engine rotate.
Startknop (02_22)
Door op drukknop «2» te drukken, doet
het startmotortje de motor draaien.
02_23
Engine stop switch (02_23)
It acts as a safety or emergency switch.
With switch «1» set to «ON» is possible
to start the engine; by pressing it into the
«OFF» position, the engine stops.
CAUTION
DO NOT ACTIVATE THE ENGINE
STOP SWITCH WHILE RIDING THE
VEHICLE.
CAUTION
WITH THE ENGINE OFF AND THE IG-
NITION SWITCH SET TO «ON» THE
BATTERY MAY GET DISCHARGED.
Stopschakelaar motor (02_23)
Dit is een veiligheidsschakelaar of een
noodstopschakelaar. Met schakelaar
«1» in positie «ON», is het mogelijk om
de motor te starten; door er op te drukken
in positie «OFF», wordt de motor stilge-
legd.
LET OP
RAAK DE STOPSCHAKELAAR VAN
DE MOTOR NIET AAN TIJDENS HET
RIJDEN.
LET OP
MET DE MOTOR UIT EN DE ONTSTE-
KINGSSCHAKELAAR IN POSITIE
«ON», KAN DE ACCU ONTLADEN.
38
2 Vehicle / 2 Voertuing

CAUTION
WHEN THE VEHICLE IS NOT MOVING,
AFTER THE ENGINE HAS BEEN
STOPPED, SET THE IGNITION
SWITCH TO «OFF»
LET OP
WANNEER HET VOERTUIG STIL-
STAAT NADAT MEN DE MOTOR
HEEFT STILGELEGD, DRAAIT MEN
DE ONTSTEKINGSSCHAKELAAR IN
POSITIE «OFF».
02_24
Manual starter control (02_24)
If the engine is started without being
warmed up, the ECU cannot keep it run-
ning autonomously. In this case, use the
cold start «3» control.
Commando van de manuele
starter (02_24)
Wanneer men start met koude motor, is
de centrale niet in staat om de gestarte
motor autonoom te onderhouden. In dit
geval gebruikt men het commando van
de koude start «3».
02_25
Opening the saddle (02_25,
02_26)
•
Turn the fastening clip.
•
Push the saddle forwards.
Zadel openen (02_25, 02_26)
•
Draai aan de bevestigingsclip.
•
Duw het zadel naar voor.
•
Remove the saddle.
•
Verwijder het zadel.
39
2 Vehicle / 2 Voertuing

02_26
02_27
02_28
Identification (02_27, 02_28)
Write down the chassis and engine num-
ber in the specific space of this booklet.
The chassis number is handy when pur-
chasing spare parts.
CAUTION
ALTERING IDENTIFICATION NUM-
BERS IS AN OFFENCE WHICH CAN
RESULT IN SEVERE CRIMINAL AND
ADMINISTRATIVE CHARGES. PAR-
TICULARLY MODIFYING THE CHAS-
SIS NUMBER WILL IMMEDIATELY IN-
VALIDATE THE WARRANTY.
Identificatie (02_27, 02_28)
Het is goed om het framenummer en het
motornummer op de speciale plaats in dit
boekje te schrijven. Het framenummer
kan gebruikt worden voor het aanschaf-
fen van reserveonderdelen.
LET OP
HET WIJZIGEN VAN DE IDENTIFICA-
TIENUMMERS KAN LEIDEN TOT ZWA-
RE STRAFRECHTERLIJKE EN ADMI-
NISTRATIEVE SANCTIES; VOORAL
DE WIJZIGING VAN HET FRAMENUM-
MER VEROORZAAKT HET ONMID-
DELLIJKE VERVAL VAN DE GARAN-
TIE
ENGINE NUMBER MOTORNUMMER
Het nummer is gedrukt op het onderstel
van de motorcarter, op de linker kant.
40
2 Vehicle / 2 Voertuing

The engine number is printed on the base
of the left side engine crankcase.
Engine No. ....................
Motor nr....................
CHASSIS NUMBER
The chassis number is stamped on the
right side of the headstock.
Chassis No. ....................
FRAMENUMMER
Het framenummer is gedrukt op de kop
van het stuur, rechter kant.
Frame nr....................
41
2 Vehicle / 2 Voertuing
Pagina laadt ...

SXV 450-550
Chap. 03
Use
Hst. 03
Gebruik
43

Checks
CAUTION
BEFORE SETTING-OFF, ALWAYS
CARRY OUT A PRELIMINARY CHECK
OF THE VEHICLE, FOR CORRECT
AND SAFE OPERATION. FAILURE TO
DO SO MAY LEAD TO SEVERE PER-
SONAL INJURY OR VEHICLE DAM-
AGE. DO NOT HESITATE TO CON-
TACT AN OFFICIAL aprilia DEALER IF
YOU DO NOT UNDERSTAND HOW
SOME CONTROLS WORK OR IF MAL-
FUNCTIONING IS DETECTED OR SUS-
PECTED. CHECKS DO NOT TAKE
LONG AND RESULT IN SIGNIFICANT-
LY ENHANCED SAFETY.
Controles
LET OP
VÓÓR HET VERTREK VOERT MEN
STEEDS EEN VOORAFGAANDE CON-
TROLE UIT VAN HET VOERTUIG,
VOOR EEN CORRECTE EN VEILIGE
WERKING. HET NIET UITVOEREN
VAN DEZE HANDELINGEN KAN ERN-
STIGE LETSELS AAN UZELF OF
SCHADE AAN HET VOERTUIG VER-
OORZAKEN. AARZEL NIET OM ZICH
TE WENDEN TOT EEN OFFICIËLE
aprilia DEALER, WANNEER MEN
MERKT DAT ER ONREGELMATIGHE-
DEN ZIJN IN VERBAND MET ENKELE
COMMANDO'S OF IN VERBAND MET
DE WERKING. DE NODIGE TIJD VOOR
EEN CONTROLE IS UITERST BE-
PERKT, EN DE VEILIGHEID KOMT OP
DE EERSTE PLAATS.
PRE-RIDE CHECKS
Front and rear disc brake Check for proper operation. Check
brake lever empty travel and brake
fluid level. Check for leaks. Check
brake pads for wear. If necessary
top-up with brake fluid.
Throttle grip Check it functions smoothly and
that it can be fully opened and
VOORAFGAANDE CONTROLES
Voorste en achterste schijfrem Controleer de werking, de lege
loop van de commandohendels,
het peil van de vloeistof en
eventuele lekken. Controleer de
slijtage van de pastilles. Indien
nodig vult men remvloeistof bij.
44
3 Use / 3 Gebruik

closed at all steering positions.
Adjust and/or lubricate if
necessary.
Engine oil Check and/or top-up as required.
Wheels/tyres Check that tyres are in good
conditions. Check inflation
pressure, tyre wear and potential
damage.
Remove any possible strange
body that might be stuck in the
tread design.
Brake levers Check they function smoothly.
Lubricate the joints and adjust the
travel if necessary.
Clutch Check for proper operation. Check
clutch lever free play and fluid
level. Check for leaks. If needed,
top-up the fluid; the clutch must
work without gripping and/or
sliding.
Steering Check that the rotation is
homogeneous, smooth and there
are no signs of clearance or
slackness.
Side stand Check its operation. Check that
there is no friction when the side
stand is pulled up and down and
that the springs' tension makes it
snap back to its rest position.
Gashendel Controleer of ze zacht werken en
of men ze volledig kan openen en
sluiten, in alle posities van het
stuur. Registreer en/of smeer
indien nodig.
Motorolie Controleer en/of vul bij indien
nodig.
Wielen/banden Controleer de conditie van de
rijvlakken van de banden, de
spanning, de slijtage en eventuele
schade.
Verwijder eventueel aanwezige
vreemde voorwerpen uit de
kervingen van het rijvlak.
Remhendels Controleer of ze zacht werken.
Smeer de bewegingsplaatsen en
regel de loop indien nodig.
Koppeling Controleer de werking, de lege
loop van de commandohendel, het
peil van de vloeistof en eventuele
lekken. Indien nodig vult men
vloeistof bij; de koppeling moet
zonder rukken en/of slippen
werken.
Stuur Controleer of het draaien
homogeen en vloeiend, en zonder
speling of het lossen ervan
gebeurt.
45
3 Use / 3 Gebruik

Lubricate joints and couplings as
required.
Clamps Check that the clamping elements
are not loose.
Adjust or tighten them as required.
Drive chain Check it for clearance.
Fuel tank Check the coolant level and refill if
necessary.
Check the circuit for potential leaks
or obstructions.
Check that the tank cover closes
correctly.
Coolant The coolant level in the radiator
must be such as to cover the grids.
Engine stop switch (RUN - OFF) Check for its correct operation.
Lights, warning lights, horn, rear
stop light switch and electrical
devices
Check the correct operation of the
horn and lights. Replace the bulbs
or repair any malfunction.
Laterale standaard Controleer of ze werkt. Controleer
of er tijdens het in- en uitklappen
van de standaard geen wrijvingen
zijn, en of de spanning van de
veren hem weer in de normale
positie brengt. Smeer indien nodig
de koppelingen en de
bewegingsplaatsen.
Bevestigingselementen Controleer of de
bevestigingselementen niet gelost
zijn.
Registreer of sluit ze eventueel.
TRANSMISSIEKETTING Controleer de speling.
Brandstoftank Controleer het peil, en tank indien
nodig.
Controleer eventuele lekken of
afsluitingen van het circuit.
Controleer de correcte sluiting van
de brandstofdop.
Koelvloeistof Het peil in de radiator moet zodanig
zijn dat de platen van de radiator
bedekt zijn.
Schakelaar voor het stilleggen van
de motor (RUN - OFF)
Controleer de correcte werking.
Lichten, controlelampen,
akoestische melder, schakelaar
van het achterste stoplicht en
elektrische mechanismen
Controleer de correcte werking van
de akoestische en visieve
mechanismen. Vervang de
lampjes of grijp in bij defecten.
46
3 Use / 3 Gebruik

03_01
Refuelling (03_01)
Use premium unleaded petrol as per DIN
51 607, minimum octane rating of 95
(NORM) and 85 (NOMM).
To refuel:
•
unscrew and remove the fuel
tank cap «1».
•
Fill up the vehicle.
CAUTION
FUEL USED TO POWER INTERNAL
COMBUSTION ENGINES IS HIGHLY
FLAMMABLE AND CAN BECOME EX-
PLOSIVE UNDER SPECIFIC CONDI-
TIONS. IT IS THEREFORE RECOM-
MENDED TO CARRY OUT REFUEL-
LING AND MAINTENANCE PROCE-
DURES IN A VENTILATED AREA WITH
THE ENGINE SWITCHED OFF. DO
NOT SMOKE DURING REFUELLING
AND NEAR FUEL VAPOURS, AVOID-
ING ANY CONTACT WITH NAKED
FLAMES, SPARKS OR OTHER SOUR-
CES WHICH MAY CAUSE THEM TO
IGNITE OR EXPLODE.
DO NOT DISPERSE FUEL IN THE EN-
VIRONMENT.
KEEP OUT OF THE REACH OF CHIL-
DREN
Tanken (03_01)
Gebruik loodvrije superbenzine volgens
DIN 51 607, met een minimum octaan-
gehalte van 95 (N.O.R.M.) en 85
(N.O.M.M.).
Voor het tanken, handelt men als
volgt:
•
Draai de dop van de brandstof-
tank «1» los en verwijder hem.
•
Voer het tanken van benzine uit.
LET OP
DE BRANDSTOF DIE WORDT GE-
BRUIKT VOOR DE AANDRIJVING VAN
DE ONTPLOFFINGSMOTOR IS UI-
TERST BRANDBAAR EN KAN EXPLO-
SIEF WORDEN IN BEPAALDE OM-
STANDIGHEDEN. VOER HET TANKEN
EN DE ONDERHOUDSHANDELINGEN
UIT IN EEN GEVENTILEERDE ZONE
EN MET DE MOTOR UIT. ROOK NIET
TIJDENS HET TANKEN EN IN DE NA-
BIJHEID VAN BRANDSTOFDAMPEN,
EN VERMIJDT ABSOLUUT CONTACT
MET VRIJE VLAMMEN, VONKEN EN
EENDER WELKE ANDER BRON DIE
HET VLAM VATTEN OF EXPLODEREN
ERVAN KAN VEROORZAKEN.
LOOS DE BRANDSTOF NIET IN HET
MILIEU.
BUITEN BEREIK VAN KINDEREN
HOUDEN
47
3 Use / 3 Gebruik
Pagina laadt ...

03_02
03_03
03_04
Rear shock absorbers
adjustment (03_02, 03_03,
03_04, 03_05)
The rear suspension consists of a spring
and shock-absorber group, linked to the
frame via silent-block and the rear fork
levers. To adjust the setting, the shock
absorber has one set screw to adjust re-
bound damping, one set screw «2» to
adjust compression damping, a ring nut
for preloading adjustment of spring «3»
and a ring nut «4».
Regulering achterdempers
(03_02, 03_03, 03_04, 03_05)
De achterste ophanging bestaat uit een
groep veer-schokdemper, verbonden
door middel van een silent-block aan het
frame en hefsystemen aan de achter-
vork. Voor het regelen van de instelling is
de schokdemper voorzien van een bou-
tregister voor de regeling van de hydrau-
lische remming in extensie, een boutre-
gister «2» voor de regeling van de
hydraulische remming in compressie,
een moer voor de regeling van de voor-
belasting «3» en een blokkeermoer «4».
REAR SHOCK ABSORBER ADJUST-
MENT
The standard setting of the rear shock
absorber is adjusted so as to satisfy all
main high and low speed riding condi-
tions, both with reduced and full vehicle
load. It is at any rate possible to insert
personal settings, depending on vehicle
utilisation.
REGELING VAN DE ACHTERSTE
SCHOKDEMPER
De standaardinstelling van de achterste
schokdemper is zodanig geregeld om te
voldoen aan de meeste rijcondities aan
lage en hoge snelheid, en met weinig en
volle lading van het voertuig. Het is alles-
zins mogelijk om een aangepaste rege-
ling uit te voeren volgens het gebruik van
het voertuig.
CAUTION
TO COUNT THE NUMBER OF RELEA-
SES AND/OR REVOLUTIONS OF AD-
JUSTMENT SETTINGS (1 - 2) ALWAYS
START FROM THE MOST RIGID SET-
LET OP
VOOR HET TELLEN VAN HET AAN-
TAL KLIKKEN EN/OF DRAAIEN VAN
HET REGELREGISTER (1 - 2), VER-
TREKT MEN STEEDS VAN DE HARD-
49
3 Use / 3 Gebruik

03_05
TING (WHOLE CLOCKWISE ROTA-
TION OF THE SETTING). DO NOT
STRAIN THE ROTATION OF ADJUST-
MENT SETTINGS (1 . 2) BEYOND THE
END OF THE STROKE IN BOTH
SENSES, IN ORDER TO AVOID ANY
DAMAGE
STE INSTELLING (VOLLEDIGE ROTA-
TIE VAN HET REGISTER IN WIJZERS-
ZIN). FORCEER DE ROTATIE VAN HET
REGELREGISTER NIET (1 . 2), NAAST
DE EINDELOOP IN TWEE RICHTIN-
GEN, VOOR HET VERMIJDEN VAN
MOGELIJKE BESCHADIGINGEN
•
Using the relevant wrench, un-
screw the locking ring nut «4»
slightly.
•
Turn the adjustment ring nut
«3» to adjust preloading of the
«B» spring.
•
When the optimal adjustment
level has been achieved, screw
locking nut ring «4» completely.
•
Turn the «1» screw to rebound
damping.
•
Turn the «2» knob to adjust
compression damping (see ta-
ble).
CAUTION
SET SPRING PRELOAD AND RE-
BOUND DAMPING BASED ON THE
VEHICLE'S USAGE CONDITIONS. IF
YOU INCREASE THE SPRING PRE-
LOAD, YOU ALSO NEED TO IN-
CREASE REBOUND DAMPING, IN OR-
DER TO AVOID SUDDEN JERKS
WHEN RIDING. SHOULD YOU NEED
ANY ASSISTANCE, CONTACT AN
APRILIA OFFICIAL DEALER.
•
Gebruik de speciale sleutel, en
draai gematigd de blokkeer-
moer «4» los.
•
Handel op de regelmoer «3»
voor het regelen van de voorbe-
lasting van de veer «B».
•
Wanneer men de optimale in-
richtingscondities heeft bereikt,
sluit men de blokkeermoer «4»
volledig.
•
Handel op de bout «1» voor het
regelen van de hydraulische
remming in extensie van de
schokdemper.
•
Handel op de knop «2» voor het
regelen van de hydraulische
remming in compressie (raad-
pleeg de tabel).
LET OP
REGISTREER DE VOORBELASTING
VAN DE VEER EN DE HYDRAULISCHE
REMMING IN extensie VAN DE
SCHOKDEMPER, OP BASIS VAN DE
GEBRUIKSCONDITIES VAN HET
VOERTUIG. WANNEER MEN DE
50
3 Use / 3 Gebruik
Pagina laadt ...

MOTORWAYS WITH THESE SET-
TINGS IS STRICTLY FORBIDDEN.
VOOR SPORTIEF GEBRUIK UIT TE
VOEREN, EN OM MET HET VOERTUIG
VOORZIEN VAN DEZE INRICHTING TE
RIJDEN OP WEGEN EN AUTOSTRA-
DES.
STANDARD ADJUSTMENT OF SXV REAR
SUSPENSION
Shock absorber axial distance (A) 457 ± 1.5 mm (18 ± 0.06 in)
(preloaded) Spring (B) length 245 mm (9.6 in)
Rebound adjustment, screw (1) 13 click
Compression adjustment, screw
(2)
16 click
By-pass adjustment knob (6) Fully open (-)
STANDAARDREGELING VAN DE ACHTERSTE
OPHANGING SXV
Asafstand van de schokdemper
(A)
457 ± 1,5 mm (18 ± 0.06 in)
Lengte van de veer (voorbelast)
(B)
245 mm (9.6 in)
Regeling in extensie, bout (1) 13 klikken
Regeling in compressie, bout (2) 16 klikken
Registratieknop by-pass (6) Alles open (-)
03_06
Front fork adjustment (03_06,
03_07)
FRONT SUSPENSION
The front suspension consists of a hy-
draulic fork connected to the headstock
by means of two plates. To adjust the ve-
hicle setting, each fork stem is equipped
with an upper screw «1» to adjust re-
bound damping and with a lower screw
«2» to adjust compression damping.
FRONT FORK ADJUSTMENT
Regulering voorvorken
(03_06, 03_07)
VOORSTE OPHANGING
De voorste ophanging bestaat uit een hy-
draulische vork, verbonden door middel
van twee platen aan de stuurinrichtings-
kop Voor de instelling van de inrichting
van het voertuig, is elke stang van de vork
voorzien van een bovenste bout «1» voor
de regeling van de hydraulische regeling
in extensie, en een onderste bout «2»
52
3 Use / 3 Gebruik

03_07
CAUTION
DO NOT STRAIN THE ROTATION OF
SET SCREWS (1 . -2) BEYOND THE
END OF THE STROKE IN BOTH
SENSES, IN ORDER TO AVOID ANY
DAMAGE SET BOTH STEMS WITH
THE SAME SPRING PRELOAD AND
DAMPING TOLERANCES: RIDING
THE VEHICLE WITH A DIFFERENT AD-
JUSTMENT FOR THE TWO STEMS RE-
DUCES ITS STABILITY. IF YOU IN-
CREASE SPRING PRELOAD, YOU
ALSO NEED TO INCREASE REBOUND
DAMPING, IN ORDER TO AVOID SUD-
DEN JERKS WHILE RIDING.
voor de regeling van de hydraulische
remming in compressie.
REGELING VAN DE VOORVORK
LET OP
FORCEER DE ROTATIE VAN HET RE-
GELREGISTER NIET (1-2), NAAST DE
EINDELOOP IN TWEE RICHTINGEN,
VOOR HET VERMIJDEN VAN MOGE-
LIJKE BESCHADIGINGEN STEL BEI-
DE STANGEN IN MET DEZELFDE IJ-
KING VAN DE VOORBELASTING VAN
DE VEER EN DE HYDRAULISCHE
REMMING: WANNEER MEN MET HET
VOERTUIG RIJDT MET EEN VER-
SCHILLENDE INSTELLING VAN DE
STANGEN, VERMINDERT DIT DE STA-
BILITEIT VAN HET VOERTUIG. WAN-
NEER MEN DE VOORBELASTING
VAN DE VEER VERHOOGT, MOET
MEN OOK DE HYDRAULISCHE REM-
MING IN extensie VERHOGEN, OM
PLOTSELINGE STUITERINGEN TIJ-
DENS HET RIJDEN TE VERMIJDEN.
The standard setting of the front fork is
adjusted so as to satisfy all main high and
low speed riding conditions, both with re-
duced and full vehicle load. It is at any
rate possible to insert personal settings,
depending on vehicle usage.
Standard adjustment of SXV front sus-
pension:
•
Rebound damping adjustment,
screw «1»: open (**) 10 clicks
from fully closed (*);
De standaardinstelling van de voorste
schokdemper is zodanig geregeld om te
voldoen aan de meeste rijcondities aan
lage snelheid, en met weinig en met volle
lading van het voertuig. Het is alleszins
mogelijk om een aangepaste regeling uit
te voeren, volgens het gebruik van het
voertuig.
Standaardregeling van de voorste op-
hanging SXV:
53
3 Use / 3 Gebruik

•
Compression damping adjust-
ment, screw «2»: open (**) 10
clicks from fully closed (*) «H»;
•
Stem «A» protrusion (***) from
top plate (excluding cover): to
the rim.
(*)= Clockwise
(**)= Anticlockwise
(***)= Only use an Official aprilia Dealer
for this type of adjustment
CAUTION
TO COUNT THE NUMBER OF RELEA-
SES AND/OR REVOLUTIONS OF AD-
JUSTMENT SETTINGS (1 - -2) AL-
WAYS START FROM THE MOST RIGID
SETTING (WHOLE CLOCKWISE RO-
TATION OF THE SETTING).
CAUTION
SPORT SETTINGS MAY BE USED ON-
LY FOR OFFICIAL COMPETITIONS TO
BE CARRIED OUT ON TRACKS,
AWAY FROM NORMAL ROAD TRAF-
FIC AND WITH THE AUTHORISATION
OF THE RELEVANT AUTHORITIES.
USING SPORT SETTINGS AND RID-
ING THE VEHICLE ON ROADS AND
•
Hydraulische regeling in exten-
sie, bout «1»: vanaf alles geslo-
ten (*), openen (**) voor 10
klikken;
•
Hydraulische regeling in com-
pressie, bout «2»: vanaf alles
gesloten (*), «H» openen (**)
voor 10 klikken;
•
Uitsteking van de stangen
«A» (***) vanaf de bovenste
plaat (exclusief de dop): tot aan
de dop.
(*)= Wijzerszin
(**)= Tegenwijzerszin
(***)= Voor dit type van regeling wendt
men zich uitsluitend tot een Officiële apri-
lia Dealer
LET OP
VOOR HET TELLEN VAN HET AAN-
TAL KLIKKEN EN/OF DRAAIEN VAN
HET REGELREGISTER (1-2), VER-
TREKT MEN STEEDS VAN DE HARD-
STE INSTELLING (VOLLEDIGE ROTA-
TIE VAN HET REGISTER IN WIJZERS-
ZIN).
LET OP
DE REGELINGEN VOOR SPORTIEF
GEBRUIK MOGEN UITSLUITEND UIT-
GEVOERD WORDEN VOOR GEORGA-
NISEERDE WEDSTRIJDEN OF SPOR-
TIEVE EVENEMENTEN, DIE ALLES-
ZINS IN EEN GESLOTEN CIRCUIT
54
3 Use / 3 Gebruik

MOTORWAYS WITH THESE SET-
TINGS IS STRICTLY FORBIDDEN.
MOETEN GEREDEN WORDEN, NIET
IN HET VERKEER, EN MET TOESTEM-
MING VAN DE RECHTSBEVOEGDE
AUTORITEITEN. HET IS TEN STRENG-
STE VERBODEN OM REGELINGEN
VOOR SPORTIEF GEBRUIK UIT TE
VOEREN, EN OM MET HET VOERTUIG
VOORZIEN VAN DEZE INRICHTING TE
RIJDEN OP WEGEN EN AUTOSTRA-
DES.
Running in
Engine running-in is essential to preserv-
ing engine life and performance over
time. Twisty roads and gradients are ide-
al to run in engine, brakes and suspen-
sions effectively. Vary your driving speed
during the run-in. In this way, you allow
for the work of components to be "loaded"
and then "unloaded", thus cooling the en-
gine parts. Even if it is important to
"stretch" engine components during the
running-in, make sure not to strain them.
Follow the guidelines detailed below:
•
Do not twist the throttle grip
abruptly and completely when
the engine is working at a low
revs, either during or after run-
in.
•
for the first 3 operating hours, do
not exceed 50% of the throttle
grip travel and never go over
8000 rpm,
Inrijden
Het inrijden van de motor is fundamen-
teel voor het garanderen van de duur en
de correcte werking. Rij indien mogelijk
op wegen met veel bochten en/of hellin-
gen, waar de motor, de ophangingen en
de remmen worden onderworpen aan
een meer efficiëntere proefperiode. Wij-
zig de rijsnelheid tijdens de proefperiode.
Op deze manier kan men het werk van de
onderdelen "belasten" en vervolgens
"ontlasten", door de delen van de motor
af te koelen. Ook al is het belangrijk om
de onderdelen van de motor tijdens de
poefperiode te belasten, moet men op-
letten om niet te overdrijven.
Men moet zich houden aan de volgen-
de indicaties:
•
Versnel niet bruusk en volledig
wanneer de motor aan een laag
regime werkt, tijdens en na de
proefperiode.
•
voor de eerste 3 werkingsuren
mag de gashendel voor maxi-
55
3 Use / 3 Gebruik

•
for the next 12 hours, do not ex-
ceed 75% of the throttle grip
travel.
NOTE
EVEN AFTER THE RUNNING-IN PERI-
OD, AVOID RUNNING THE ENGINE TO
TOP SPEED, WHEN THE LIMITER
CUTS IN:
•
SXV 450 12000 rpm
•
SXV 550 11500 rpm
CAUTION
THE SPEED LIMITER WARNING
LIGHT (NOT THE ECU LIMITER) HAS A
FACTORY SETTING OF 8000 RPM.
mum 50% gedraaid worden, en
mogen de 8000 toeren/min
(rpm) niet overschreden wor-
den,
•
voor de volgende 12 uren mag
de gashendel voor maximum
75% gedraaid worden.
N.B.
OOK NA DE PROEFPERIODE MOET
MEN VERMIJDEN OM DE MOTOR TE
LATEN DRAAIEN AAN HET TOEREN-
AANTAL VAN DE INGREEP VAN DE
BEGRENZER:
•
SXV 450 12000 rpm (toeren/
min)
•
SXV 550 11500 rpm (toeren/
min)
LET OP
DE CONTROLELAMP VAN DE BE-
GRENZER (NIET DE BEGRENZER
VAN DE CENTRALE) IS IN PRODUC-
TIE INGESTELD OP 8000 TOEREN/
MIN.
56
3 Use / 3 Gebruik

03_08
03_09
03_10
Starting up the engine (03_08,
03_09, 03_10, 03_11, 03_12)
CAUTION
DO NOT INSERT OBJECTS IN THE
TOP FAIRING (BETWEEN THE HAN-
DLEBAR AND THE INSTRUMENT
PANEL), IN ORDER NOT TO OBSTA-
CLE THE HANDLEBAR'S ROTATION
AND THE INSTRUMENT PANEL'S VIS-
IBILITY.
CAUTION
BEFORE STARTING THE ENGINE,
READ THE ''SAFE RIDING'' SECTION
CAREFULLY.
Starten des motors (03_08,
03_09, 03_10, 03_11, 03_12)
LET OP
PLAATS GEEN VOORWERPEN IN HET
KAPJE (TUSSEN HET STUUR EN HET
DASHBOARD), OM GEEN VERHINDE-
RINGEN TE CREËREN VOOR DE RO-
TATIE VAN HET STUUR EN VOOR HET
ZICHT VAN HET DASHBOARD.
LET OP
VOORALEER MEN DE MOTOR
START, LEEST MEN AANDACHTIG DE
PARAGRAAF "HET VEILIG RIJDEN''.
•
Get onto the bike in riding posi-
tion.
•
Make sure that the stand has
been retracted completely.
•
Make sure that the light switch
«1» is set to
•
. Set the engine stop switch «2»
to RUN.
•
Turn the key to set the ignition
switch to «ON».
•
Ga op het voertuig zitten in de
rijpositie.
•
Controleer of de standaard vol-
ledig ingeklapt is.
•
Controleer of de schakelaar van
de lichten «1» zich in positie be-
vindt.
•
Plaats de schakelaar voor het
stilleggen van de motor «2» op
RUN.
•
Draai de sleutel en plaats de
ontstekingsschakelaar op
«ON».
At this stage: Op dit moment gebeurt het volgende:
57
3 Use / 3 Gebruik

03_11
03_12
•
the ignition screen is displayed
on the dashboard for tree sec-
onds.
•
All instrument panel lights come
on for three seconds.
•
Op het dashboard verschijnt het
scherm van de start voor drie
seconden.
•
Op het dashboard lichten alle
controlelampen op voor drie se-
conden.
•
Pull a brake lever to block at
least one of the wheels.
•
Fully action the clutch and en-
gage neutral [green (N) warning
light on].
CAUTION
DO NOT START THE ENGINE WHEN A
GEAR AND THE CLUTCH ARE EN-
GAGED.
CAUTION
IN ORDER TO AVOID EXCESSIVE
BATTERY CONSUMPTION, DO NOT
KEEP THE START-UP BUTTON ON
«3» FOR MORE THAN THREE SEC-
ONDS AT A TIME FOR FIVE SUCCES-
SIVE ATTEMPTS. IF THE ENGINE
DOES NOT START, WAIT FOR SOME
TIME TO ALLOW THE STARTER MO-
TOR TO COOL.
CAUTION
TO AVOID OVERLOADING THE
START-UP COMPONENTS, THE VEHI-
CLE ELECTRONIC CONTROL UNIT IN-
TERVENES IN CASE OF DIFFICULT
START-UP: THE STARTER MOTOR
CAN BE ACTIVATED FOR A MAXIMUM
OF 6 SECONDS, TIME AFTER WHICH
•
Blokkeer minstens één wiel,
door een remhendel te active-
ren.
•
Activeer de koppelingshendel
volledig en plaats de comman-
dohendel van de versnellings-
bak in vrij [groene controlelamp
(N) aan].
LET OP
START DE MOTOR NIET WANNEER
ER GESCHAKELD IS EN WANNEER
DE KOPPELING GEACTIVEERD IS
LET OP
OM EEN EXCESSIEF VERBRUIK VAN
BRANDSTOF TE VERMIJDEN, DRUKT
MEN NIET LANGER OP DE START-
KNOP «3» VOOR LANGER DAN DRIE
SECONDEN, VOOR VIJF OPEENVOL-
GENDE POGINGEN. WANNEER IN DIT
TIJDSINTERVAL DE MOTOR NIET
START, WACHT MEN ENKELE MINU-
TEN ZODAT DE STARTMOTOR KAN
AFKOELEN.
LET OP
OM DE STARTMECHANIEK NIET TE
OVERBELASTEN, GRIJPT DE ELEK-
TRONISCHE CENTRALE VAN HET
58
3 Use / 3 Gebruik

THE CONTROL UNIT DISABLES
START-UP FOR 10 SECONDS. ONLY
AFTER THIS TIME HAS ELAPSED,
YOU CAN ATTEMPT A NEW START-
UP. IN CASE OF EMERGENCY, THE
TIMER CAN BE RESET WITH A "KEY
OFF/KEY ON", AND THEN THE VEHI-
CLE CAN BE STARTED.
VOERTUIG IN IN GEVAL VAN EEN
MOEILIJKE START: DE STARTMO-
TOR KAN VOOR MAXIMUM 6 SECON-
DEN CONTINU GEACTIVEERD WOR-
DEN, WAARNA DE CENTRALE DE
START VOOR 10 SECONDEN ZAL
DESACTIVEREN; NA DEZE 10 SE-
CONDEN KAN EEN NIEUWE POGING
ONDERNOMEN WORDEN. IN NOOD-
GEVALLEN KAN DE TIMER OP NUL
GESTELD WORDEN, DOOR EEN KEY
OFF/KEY ON UIT TE VOEREN, EN KAN
DE START ONMIDDELLIJK UITGE-
VOERD WORDEN.
STARTING PROCEDURE WITH
WARMED-UP ENGINE
•
Press the starter button «3»
without opening the throttle and
release it as soon as the engine
starts.
STARTPROCEDURE BIJ WARME MO-
TOR
•
Druk op de startknop «3» zon-
der gas te geven, en laat hem
los zodra de motor start.
03_13
Difficult start up (03_13)
•
Rotate the throttle grip.
•
Press the cold-start button «4»
downwards.
•
Release the throttle control. The
control will be slightly acceler-
ated to allow the engine to run
during warm-up.
•
To disconnect the system, sim-
ply put the throttle control back
to its resting state.
Moeilijke start (03_13)
•
Draai aan het gashandvat.
•
Duw de toets van de koude start
«4» naar beneden.
•
Laat het gascommando los. Het
gascommando geeft toch een
klein beetje gas, zodat de motor
aanblijft tijdens de opwarming.
•
Om het systeem uit te schake-
len is het voldoende om het gas-
commando in de rustpositie te
brengen.
59
3 Use / 3 Gebruik
Pagina laadt ...
Pagina laadt ...

GA NIET OP HET VOERTUIG ZITTEN
WANNEER DE STANDAARD UITGE-
KLAPT IS.
To park the vehicle:
•
Select an appropriate parking
spot.
•
Stop the vehicle.
•
Set the engine stop switch «1»
to «OFF».
•
Turn the key and set the ignition
switch «2» to «OFF».
Voor het parkeren van het voertuig:
•
De parkeerzone kiezen.
•
Het voertuig stilleggen.
•
Plaats de schakelaar voor het
stilleggen van de motor «1» op
«OFF».
•
Draai de sleutel, en plaats de
ontstekingsschakelaar «2» op
«OFF».
•
Get off the vehicle.
•
Rest the vehicle on its stand.
•
Block the steering and take out
the key.
•
Stap van het voertuig af.
•
Plaats het voertuig op de stan-
daard.
•
Blokkeer de stuurinrichting en
verwijder de sleutel.
03_15
Stand (03_15)
To place the vehicle on the stand:
•
Grasp the left grip «1» and put
the right hand on the upper rear
part of the vehicle «2».
•
Push the side stand fully down
with your right foot «3».
•
With the stand fully extended,
lean the vehicle to the side until
the stand rests on the ground.
•
Turn the handlebar fully to the
left.
Standaard (03_15)
Voor het plaatsen van het voertuig op de
standaard:
•
Grijp het linker handvat «1» vast
en steun de rechter hand op het
achterste bovenste deel van het
voertuig «2».
•
Duw op de laterale standaard
«3» met de rechter voet, en klap
hem volledig uit.
•
Hou de standaard volledig uit-
geklapt, en hel het voertuig tot
de standaard de grond raakt.
62
3 Use / 3 Gebruik

CAUTION
MAKE SURE THE GROUND WHERE
YOU HAVE PARKED IS EMPTY, FIRM
AND LEVEL.
•
Draai het stuur volledig naar
links.
LET OP
CONTROLEER OF HET TERREIN VAN
DE PARKEERZONE VRIJ, VAST EN
VLAK IS.
03_16
03_17
Safe driving (03_16, 03_17,
03_18, 03_19, 03_20, 03_21,
03_22, 03_23, 03_24, 03_25,
03_26, 03_27)
MAIN SAFETY RULES
To ride the vehicle it is necessary to com-
ply with all legal requirements (driving
license, minimum driving age, psycho-
physical performance, insurance, taxes
and fees, registration, license plate, etc.).
You should practise using the vehicle in
traffic-free areas and/or private property
until you have become thoroughly ac-
quainted with the vehicle.
Driving under the influence of medica-
tion, alcohol and narcotic drugs or psy-
chotropic substances dramatically in-
creases the risk of accidents.
Do not ride your vehicle if you feel tired or
drowsy and always keep safe psycho-
physical riding conditions.
The main cause of motorcycle accidents
is users' inexperience.
Veilig rijden (03_16, 03_17,
03_18, 03_19, 03_20, 03_21,
03_22, 03_23, 03_24, 03_25,
03_26, 03_27)
FUNDAMENTELE VEILIGHEIDSRE-
GELS
Om met het voertuig te rijden moet men
beschikken over alle door de wet voor-
ziene vereisten (rijbewijs, minimum leef-
tijd, psychofysische geschiktheid, verze-
kering, overheidsbelasting, registratie,
nummerplaat, enz.).
Men raadt aan om het voertuig gewoon
te raken in zones met weinig verkeer en/
of in private eigendommen.
Rijden onder invloed van medicijnen, al-
cohol, verdovende of psychotrope mid-
delen verhoogt aanzienlijk het risico op
ongevallen.
Men moet er zeker van zijn dat de psy-
chofysische condities geschikt zijn voor
het rijden, met vooral aandacht voor fysi-
sche moeheid of slaperigheid.
63
3 Use / 3 Gebruik

03_18
03_19
03_20
NEVER lend the vehicle to beginners and
always make sure that the rider complies
with all necessary requirements for a safe
riding.
Strictly obey all national and local traffic
signs and rules.
Avoid any abrupt and dangerous
swerves for your own as well as others'
safety (for example: rearing up on the
back wheel, riding over the speed limit,
etc.). Besides, always assess and bear in
mind the road surface conditions, visibil-
ity, etc.
Do not knock obstacles that can damage
the vehicle or cause loss of control.
Do not ride on the course of the vehicle
in front just to improve your own speed.
CAUTION
ALWAYS RIDE WITH BOTH HANDS
ON THE HANDLEBAR AND FEET ON
THE FOOTRESTS (OR THE RIDER' S
FOOTRESTS) IN THE ADEQUATE RID-
ING POSITION.
De meeste ongevallen zijn te wijten aan
het gebrek aan ervaring van de bestuur-
der.
Leen het voertuig NOOIT aan beginners,
en controleer in elk geval of de bestuur-
der in het bezit is van alle vereisten voor
het rijden.
Respecteer nauwkeurig de bewegwijze-
ring en het normenstelsel in verband met
het nationale en plaatselijk verkeer.
Vermijdt bruuske en gevaarlijke manoeu-
vres voor zichzelf en voor anderen (voor-
beeld: het steigeren, het niet naleven van
de snelheidslimieten, enz.), bovendien
moet men steeds rekening houden met
de condities van het wegdek, de zicht-
baarheid, enz.
Stoot niet tegen obstakels die schade
aan het voertuig of controleverlies over
het voertuig kunnen veroorzaken.
Blijf niet achter voertuigen rijden om de
eigen snelheid te verhogen.
LET OP
RIJ STEEDS MET BEIDE HANDEN OP
HET STUUR EN DE VOETEN OP HET
VOETENVLAK (OF OP DE VOETEN-
STEUNEN VAN DE BESTUURDER),
EN BEHOU EEN CORRECTE RIJPOSI-
TIE.
64
3 Use / 3 Gebruik

03_21
03_22
03_23
Never stand on your feet or stretch your-
self while riding.
The rider should always be attentive,
never get distracted or influenced by peo-
ple, things or actions (never smoke, eat,
drink, read, etc.) while riding.
Always use fuel and lubricants specific
for the vehicle, of the type recommended
in the "LUBRICANTS TABLE". Check
fuel, oil and coolant frequently for correct
level.
In case of an accident or after the vehicle
has fallen down or suffered a sudden
bump, make sure the control levers, pip-
ing, cables, brake circuit and main parts
of the vehicle have not been damaged.
If necessary, take the vehicle to an Offi-
cial aprilia Dealer to check especially the
frame, handlebar, suspensions, safety
components and any device the user
cannot assess without the aid of a spe-
cialist.
Report any malfunction to the engineers
and/or mechanics in order to facilitate
their work.
Never ride the vehicle if the damage jeop-
ardises safety.
Do not modify the position, angle or col-
our of: license plate, turn indicators, light-
ing devices and horn.
Any changes to the vehicle will void the
warranty.
Vermijdt absoluut om recht te staan op
het voertuig en om zich uit te rekken tij-
dens het rijden.
De bestuurder mag niet afgeleid zijn, zich
niet laten afleiden of niet laten beïnvloe-
den door personen, voorwerpen, acties
(niet eten, roken, drinken, lezen, enz.)
wanneer hij met het voertuig rijdt.
Gebruik de brandstof en specifieke
smeermiddelen voor het voertuig, van
het type dat men vindt in de "TABEL VAN
DE SMEERMIDDELEN", controleer her-
haaldelijk of de voorgeschreven peilen
van brandstof, olie en koelvloeistoffen
correct zijn.
Wanneer het voertuig een ongeval heeft
gehad, gevallen is of er werd tegen ge-
stoten, controleert men of de comman-
dohendels, de buizen, de kabels, de
reminstallatie en de fundamentele delen
niet zijn beschadigd.
Laat het voertuig eventueel controleren
bij een Officiële aprilia Dealer, door voor-
al aandacht te schenken voor het frame,
het stuur, de ophangingen, de veilig-
heidsonderdelen en mechanismen waar-
voor de gebruiker niet in staat is om hun
integriteit vast te stellen.
Meldt eender welke slechte werking om
de ingreep van techniekers en/of mecha-
niciens te bevorderen.
Rij absoluut niet met het voertuig wan-
neer de aangebrachte schade de veilig-
heid schaadt.
65
3 Use / 3 Gebruik

03_24
03_25
03_26
Any change introduced to the vehicle and
the removal of original parts may jeop-
ardise the vehicle performance and
therefore reduce safety or even render
the vehicle inappropriate for legal riding.
Comply with all national and local laws
and regulations on vehicle equipment.
In particular do not introduce technical
changes leading to improve performance
and under no circumstances alter the
original specifications of the vehicle.
Never race with vehicles.
Never ride off-road.
Wijzig absoluut niet de positie, de helling
of de kleur van: de nummerplaat, de rich-
tingaanwijzers, de verlichtingsmechanis-
men en de akoestische melders.
Wanneer men wijzigingen uitvoert aan
het voertuig, vervalt de garantie.
Elke eventuele aan het voertuig aange-
brachte wijziging en de verwijdering van
originele stukken, kan de prestaties van
het voertuig schaden, en dus het veilig-
heidsniveau schaden en het voertuig
zelfs illegaal maken.
Men raadt aan om zich steeds te houden
aan alle wetsvoorschriften en nationale
en plaatselijke reglementen in verband
met de uitrusting van het voertuig.
Men moet vooral vermijden om techni-
sche wijzigingen aan te brengen voor het
verhogen van de prestaties, of die alles-
zins de originele kenmerken van het
voertuig wijzigen.
Vermijdt absoluut om wedstrijden te hou-
den met de voertuigen.
Vermijdt om te crossen.
CLOTHING
Before riding off, remember to put on the
helmet and fasten it correctly. Make sure
it is a homologated model, that it is un-
damaged, of the right size and that the
visor is clean.
Wear appropriate protective clothes,
preferably light-coloured and/or in reflec-
KLEDING
Vooraleer men gaat rijden denkt men er-
aan om steeds en correct de helm op te
zetten en vast te maken. Controleer of hij
gehomologeerd en integer is, of de maat
juist is en of het visier rein is.
Draag beschermende kleding, indien mo-
gelijk met een lichte en/of reflecterende
66
3 Use / 3 Gebruik

03_27
tive material. In this way you will be easily
visible to other drivers, thus reducing the
risk of being hit, and you will be better
protected in case of falling.
Always wear tight-fitting clothes without
open cuffs; avoid hanging strings, belts or
ties; these or any other objects should not
interfere with a safe riding when getting
entangled with the riding elements or due
to a special movement.
Never carry in your pockets objects that
can be potentially dangerous in case of
fall, like: pointed objects such as keys,
pens, glass containers, etc. (the same
rule applies to passengers).
kleur. Op deze manier is men goed zicht-
baar voor andere weggebruikers en ver-
mindert men aanzienlijk het risico op
aanrijdingen, en is men beter beschermd
wanneer men valt.
De kleding moet goed aansluiten en de
uiteinden moeten gesloten zijn; koorden,
ceinturen en dassen mogen niet benge-
len; vermijdt dat deze of andere voorwer-
pen interfereren met het rijden, doordat
ze verstrengd raken met bewegende on-
derdelen of ander delen.
Hou geen voorwerpen bij zich, die moge-
lijk gevaarlijk zijn wanneer men valt, bij-
voorbeeld: puntige voorwerpen zoals
sleutels, pennen, glazen voorwerpen,
enz. (dit advies geldt eveneens voor de
eventuele passagier).
ACCESSORIES
User is personally responsible for the in-
stallation and use of the accessories.
While assembling accessories, make
sure that they do not cover the sound or
light alarm devices or affect their correct
functioning, do not limit the suspension
travel or the steering angle, do not ob-
struct control actuation or reduce the
ground clearance and inclination angle at
corners.
Do not use accessories that hinder ac-
cess to the controls as they may increase
the reaction time in case of an emergen-
cy.
ACCESSOIRES
De gebruiker is verantwoordelijk voor de
keuze van de installatie en het gebruik
van de accessoires.
Men raadt aan tijdens de montage, dat
het accessoire de mechanismen van het
akoestisch en visief melden niet bedekt
en dus de functionaliteit ervan schaadt,
de werking van de ophangingen en de
hoek van sturing niet beperkt, de active-
ring van de commando´s niet hindert, en
de hoogte van de grond en de helhoek in
een bocht niet vermindert.
Vermijdt het gebruik van accessoires die
de toegang tot de commando´s hinderen,
67
3 Use / 3 Gebruik

Fairings and large windshields fitted to
the vehicle may cause aerodynamic
forces that affect the vehicle stability
while riding, mainly at high speeds.
Make sure the accessory is firm and se-
cured to the vehicle and that it does not
pose any risks while riding the vehicle.
Do not add or modify electrical equipment
that exceed the vehicle capacity as this
may result in a sudden stop or a danger-
ous lack of power required to keep the
sound and light alarm devices operative.
aprilia advises using original accesso-
ries (aprilia genuine accessories).
en die dus de reactietijden bij nood kun-
nen verlengen.
De bekledingen en de windschermen
met grote afmetingen, die gemonteerd
zijn op het voertuig, kunnen aerodynami-
sche krachten veroorzaken die de stabi-
liteit van het voertuig tijdens het rijden
schaden, vooral bij hoge snelheden.
Controleer of het accessoire goed veran-
kerd is op het voertuig en dat het niet
gevaarlijk is tijdens het rijden.
Wijzig of voeg geen elektrische appara-
ten toe die het draagvermogen van het
voertuig overschrijden; op deze wijze zou
het voertuig onverwacht kunnen stilvallen
of zou er een gevaarlijke afwezigheid van
stroom kunnen zijn, die nodig is voor de
werking van de akoestische en visieve
meldingsmechanismen.
aprilia raadt het gebruik aan van origine-
le accessoires (aprilia genuine accesso-
ries).
Load
NOTE
THE VEHICLE IS NOT SUITABLE FOR
TRANSPORTING LOADS OR LUG-
GAGE.
Lading
N.B.
HET VOERTUIG IS NIET GESCHIKT
OM LASTEN OF BAGAGE TE VER-
VOEREN.
68
3 Use / 3 Gebruik

SXV 450-550
Chap. 04
Maintenance
Hst. 04
Onderhoud
69
Pagina laadt ...
Pagina laadt ...

•
Hold the vehicle level with the
two wheels on the ground.
•
Check the oil level
using the relevant transparent dipstick
«1».
MAX = maximum level
MIN = minimum level
•
The correct oil level is near the
MAX mark.
•
Hou het voertuig verticaal met
de twee wielen op de grond.
•
Controleer het oliepeil langs het
speciale transparante buisje
«1».
MAX = maximum peil
MIN = minimum peil.
•
Het peil is correct wanneer het
ongeveer het MAX peil bereikt.
Top up as required:
CAUTION
IF YOU RIDE THE VEHICLE IN A
SPORTY FASHION, SOME OIL SPLAT-
TER MAY GET TO THE AIR FILTER
HOUSING THROUGH THE ENGINE
VENT.
CAUTION
DO NOT GO BEYOND THE MAX AND
BELOW THE MIN LEVEL MARKS TO
AVOID SEVERE ENGINE DAMAGE.
Indien nodig herstelt men het peil van de
motorolie:
LET OP
WANNEER MEN HET VOERTUIG
SPORTIEF GEBRUIKT MET EEN TE
HOOG OLIEPEIL, IS HET MOGELIJK
DAT ENKELE OLIESPATTEN DE FIL-
TERKIST BEREIKEN LANGS DE ONT-
LUCHTING VAN DE MOTOR.
LET OP
OVERSCHRIJDT DE MARKERING
«MAX» NIET EN LAAT HET NIET ON-
DER DE MARKERING «MIN» KOMEN,
OM GEEN ERNSTIGE SCHADE AAN
DE MOTOR TE VEROORZAKEN.
•
Unscrew and remove the filler
plug «2».
•
Top up the oil in the tank until
you reach the correct level.
•
Draai de toevoerdop «2» los, en
verwijder hem.
•
Herstel het juiste peil door de
tank bij te vullen.
72
4 Maintenance / 4 Onderhoud

CAUTION
DO NOT ADD ADDITIVES OR ANY
OTHER SUBSTANCES TO THE OIL.
WHEN USING A FUNNEL OR ANY
OTHER ELEMENT, MAKE SURE IT IS
PERFECTLY CLEAN.
NOTE
USE GOOD QUALITY LUBRICANTS.
LET OP
VOEG GEEN ADDITIEVEN OF ANDE-
RE STOFFEN TOE AAN DE OLIE.
WANNEER MEN EEN TRECHTER OF
IETS ANDERS GEBRUIKT, MOET DE-
ZE PERFECT REIN ZIJN.
N.B.
GEBRUIK OLIES VAN EEN GOEDE
KWALITEIT.
Engine oil change (04_03,
04_04, 04_05, 04_06)
•
Park the vehicle on firm and lev-
el ground.
•
Rest the vehicle on its stand.
Vervanging van de motorolie
(04_03, 04_04, 04_05, 04_06)
•
Plaats het voertuig op een vaste
en vlakke ondergrond.
•
Plaats het voertuig op de stan-
daard.
•
Stop the engine and let it cool off
so that the oil in the crankcase
flows down and cools as well.
•
Unscrew and take out the cap
(1).
•
Place a container to collect the
oil underneath the engine oil
drainage plug on the flywheel
side.
•
Unscrew and remove the oil
drainage plug (2) and then drain
all the engine oil .
•
Place a container to collect the
oil underneath the engine oil
drainage plug of the recovery
tank.
•
Leg de motor stil en laat hem af-
koelen, om de drainage van de
olie in de carter en de afkoeling
van de olie zelf toe te staan.
•
Draai de tankdop (1) los, en ver-
wijder hem.
•
Plaats een recipiënt onder de af-
voerdop van de motorolie aan
de kant van het vliegwiel.
•
Draai de afvoerdop van de olie
(2) los, verwijder hem, en laat
alle motorolie volledig uitstro-
men.
•
Plaats een recipiënt onder de af-
voerdop van de motorolie van
de recupereertank.
•
Draai de afvoerdop van de olie
(4) los, verwijder hem, en laat
73
4 Maintenance / 4 Onderhoud

•
Unscrew and remove the oil
drainage plug from the reservoir
(4) and drain all the engine oil.
alle motorolie volledig uitstro-
men.
•
Unscrew the engine oil filter cov-
er (2). Remove it with its gasket,
collect the OR.
•
Remove the engine oil filter.
•
Fit a new engine oil filter.
•
Screw the engine oil filter cover
(3).
•
Screw and tighten the oil drain-
age plug (2).
•
Screw and tighten the cap (4).
•
Pour approx. 1250 cm³ (76.3
cu.in) of engine oil through the
filler opening.
•
Screw and tighten the cap (1).
•
Start the engine and let it run for
several minutes. Stop the en-
gine and let it cool down.
•
Check engine oil level.
•
Draai het deksel van de motoro-
liefilter (2) los. Verwijder de pak-
king volledig, en recupereer de
O-ring.
•
Verwijder de van de motorolief-
ilter.
•
Installeer een nieuwe motoro-
liefilter.
•
Draai het deksel van de motoro-
liefilter (3) vast.
•
Draai de afvoerdop van de olie
(2) vast, en sluit hem.
•
Draai de dop (4) vast, en sluit
hem.
•
Voer het bijvullen uit langs de
vulboring, met ongeveer 1250
cc (76.3 cu.in) motorolie.
•
Draai de dop (1) vast, en sluit
hem.
•
Start het voertuig en laat het
voor enkele minuten draaien.
Zet hem af en laat hem afkoe-
len.
•
Voer de controle uit van het peil
van de motorolie.
74
4 Maintenance / 4 Onderhoud

04_07
04_08
04_09
Gearbox oil level (04_07,
04_08, 04_09, 04_10)
CAUTION
GEARBOX OIL LEVEL MUST BE
CHECKED WHEN THE ENGINE IS
WARM.
Versnellingsbak oliepeil
(04_07, 04_08, 04_09, 04_10)
LET OP
DE CONTROLE VAN HET OLIEPEIL
VAN DE VERSNELLINGSBAK MOET
UITGEVOERD WORDEN BIJ WARME
MOTOR.
•
Stop the engine.
•
Wait some minutes for the oil to
flow from the transmission to the
clutch.
•
Keep the vehicle upright with the
two wheels on the ground.
•
Remove the rear brake lever by
undoing the screw (1); collect
the washer.
•
Leg de motor stil.
•
Wacht enkele minuten zodat de
olie van de versnellingsbak naar
de koppeling kan lopen.
•
Hou het voertuig in verticale po-
sitie met de twee wielen op de
grond.
•
Verwijder de hendel van de ach-
terrem door de bout (1) los te
draaien, en recupereer de sluit-
ring.
•
Unscrew and remove the cap/
dipstick (2).
•
The oil level is correct when it is
close to the cap/dipstick (2)
opening.
•
Draai de inspectiedop (2) los, en
verwijder hem.
•
Het peil is correct wanneer de
olie de opening van de inspec-
tiedop (2) bijna bereikt.
If necessary:
•
Remove the filler cap (3).
•
Top-up with oil up to the cap/
dipstick (2) opening.
Indien nodig:
•
Verwijder de vuldop (3).
•
Vul olie bij tot de opening van de
inspectiedop (2) bereikt wordt.
75
4 Maintenance / 4 Onderhoud

04_10
CAUTION
DO NOT ADD ADDITIVES OR OTHER
SUBSTANCES TO THE LIQUID.
IF YOU USE A FUNNEL OR ANOTHER
IMPLEMENT, MAKE SURE THAT
THEY ARE PERFECTLY CLEAN.
LET OP
VOEG GEEN ADDITIEVEN OF ANDE-
RE STOFFEN TOE AAN DE VLOEI-
STOF.
WANNEER MEN EEN TRECHTER OF
IETS ANDERS GEBRUIKT, MOET DE-
ZE PERFECT REIN ZIJN.
•
Wait several minutes to allow
the oil to flow from the clutch to
the transmission. Then check
the oil level again.
REPLACEMENT
NOTE
TO ENSURE EASIER AND FULL OIL
DRAINAGE THE OIL MUST BE HOT
AND THEREFORE MORE FLUID.
•
Wacht enkele minuten zodat de
olie van de koppeling naar de
versnellingsbak kan lopen. Con-
troleer daarna opnieuw het olie-
peil.
VERVANGING
N.B.
VOOR EEN BETERE EN VOLLEDIGE
UITSTROMING, MOET DE OLIE WARM
ZIJN, EN DUS VLOEIBAARDER
•
Lower the oil pan guard.
•
Put an adequately sized con-
tainer near the drainage plug
«4».
•
Unscrew and remove the drain-
age plug«4».
•
Unscrew and remove the filler
cap «3».
•
Drain and let the oil drip into the
container for several minutes.
•
Check and, if needed, replace
the washers of drainage plug
«4».
•
Verlaag de carterbuffer
•
Plaats een recipiënt met ge-
schikte capacitiet onder de af-
voerdop «4».
•
Draai de afvoerdop «4» los, en
verwijder hem.
•
Draai de vuldop «3» los en ver-
wijder hem.
•
Laat de olie af en laat ze enkele
minuten uitdruipen in het recipi-
ënt.
76
4 Maintenance / 4 Onderhoud

•
Screw and tighten the drainage
plug «4» back on.
•
Remove the rear brake lever by
unscrewing the screw «1»,
keeping the washer.
•
Unscrew and remove the cap/
dipstick «2».
•
Top up with fresh oil until the
level reaches the cap/dipstick
hole mark «2».
•
Wait several minutes to allow
the oil to flow from the clutch to
the transmission.
•
Then check the oil level again.
•
Screw the filler cap «3» back on.
CAUTION
THE OIL FLOW FROM THE CLUTCH
TO THE TRANSMISSION AND FROM
THE TRANSMISSION TO THE CLUTCH
CAN BE PARTICULARLY SLOW
WHEN THE OIL OR ENGINE TEMPER-
ATURE IS LOW.
•
Controleer en vervang eventu-
eel de dichtingsrondellen van de
afvoerdop «4».
•
Draai de afvoerdop «4» vast en
sluit hem.
•
Verwijder de hendel van de ach-
terrem, door de bout «1» los te
draaien en de ring te recupere-
ren.
•
Draai de inspectiedop «2» los
en verwijder hem.
•
Voeg nieuwe olie toe, tot de bo-
ring van de inspectiedop
«2»wordt bereikt.
•
Wacht enkele minuten zodat de
olie van de koppeling naar de
versnellingsbak kan lopen.
•
Controleer daarna opnieuw het
oliepeil.
•
Sluit de vuldop «3».
LET OP
DE PASSAGE VAN DE OLIE VANAF
DE KOPPELING NAAR DE VERSNEL-
LINGSBAK EN VICEVERSA, KAN BIJ-
ZONDER TRAAG VERLOPEN WAN-
NEER DE OMGEVINGS-, OLIE- OF
MOTORTEMPERATUUR LAAG IS.
•
Reassemble the rear brake lev-
er, remembering to insert the
washer between the lever and
the crankcase, screwing the
screw «1» back on.
•
Hermonteer de hendel van de
achterrem, en denk er aan om
de ring tussen de hendel en de
carter te plaatsen, door de bout
«1» vast te draaien.
77
4 Maintenance / 4 Onderhoud
Pagina laadt ...
Pagina laadt ...

TERS MOET MEN VOORZICHTIG RIJ-
DEN. SMEER DE BANDEN NIET IN
MET ONGESCHIKTE VLOEISTOFFEN.
WANNEER DE BANDEN OUD ZIJN, EN
OOK AL ZIJN ZE NIET VERSLETEN,
KUNNEN ZE VERHARDEN EN DUS DE
WEGLIGGING NIET GARANDEREN. IN
DIT GEVAL VERVANGT MEN DE BAN-
DEN.
Minimum tread depth:
front and rear 2 mm (0.079 in) (USA 3 mm
- 0.118 in) and anyway not less than re-
quired by the regulations in force in the
country where the vehicle is used.
Minimum dieptelimiet van het rijvlak:
vooraan en achteraan 2 mm (0.079 in)
(USA 3 mm - 0.118 in) en alleszins niet
minder dan voorgeschreven door de van
kracht zijnde wetgeving van het land
waar het voertuig wordt gebruikt.
04_11
Spark plug dismantlement
(04_11, 04_12, 04_13)
At regular intervals, remove the spark
plug and clean off any carbon deposits or
replace as required.
CAUTION
ALWAYS REPLACE BOTH SPARK
PLUGS, EVEN IF ONLY ONE NEEDS
REPLACING.
Demonteren van de bougie
(04_11, 04_12, 04_13)
Demonteer periodiek de bougie, reinig ze
van koolstofafzettingen, en vervang ze
indien nodig.
LET OP
OOK WANNEER SLECHTS ÉÉN VAN
DE BOUGIES MOET VERVANGEN
WORDEN, VERVANGT MEN STEEDS
BEIDE BOUGIES.
80
4 Maintenance / 4 Onderhoud

04_12
04_13
In order to gain access to the spark plugs:
CAUTION
BEFORE CARRYING OUT THE FOL-
LOWING OPERATIONS AND IN OR-
DER TO AVOID BURNS, LEAVE THE
ENGINE AND MUFFLER TO COOL
OFF TO AMBIENT TEMPERATURE.
Om de bougies te bereiken:
LET OP
VOORALEER MEN DE VOLGENDE
HANDELINGEN UITVOERT, LAAT
MEN DE MOTOR EN DE UITLAAT AF-
KOELEN TOT DEZE DE OMGEVINGS-
TEMPERATUUR HEBBEN BEREIKT,
OM MOGELIJKE BRANDWONDEN TE
VERMIJDEN.
•
Place the vehicle on the stand.
NOTE
THE VEHICLE HAS A SPARK PLUG (2)
FOR EACH CYLINDER. THE FOLLOW-
ING STEPS RELATE TO JUST ONE
SPARK PLUG BUT APPLY TO BOTH.
•
Plaats het voertuig op de stan-
daard.
N.B.
HET VOERTUIG IS UITGERUST MET
EEN BOUGIE (2) PER CILINDER. DE
VOLGENDE HANDELINGEN ZIJN IN
VERBAND MET ÉÉN BOUGIE, MAAR
GELDEN VOOR BEIDE.
•
Remove the tube (1) of the
spark plug (2).
•
Clean off any trace of dirt from
the spark plug (2) base.
•
Insert the spanner supplied in
the tool kit into the hexagonal
head of the spark plug (2).
•
Unscrew the spark plug (2) and
remove it from its seat, making
•
Verwijder de pipet (1) van de
bougie (2).
•
Verwijder elk vuilspoor van de
basis van de bougie (2).
•
Plaats de sleutel die wordt bij-
geleverd bij de gereedschapskit
op de zeskantige zit van de bou-
gie (2).
81
4 Maintenance / 4 Onderhoud

sure no dust or dirt gets into the
cylinder.
Checking and cleaning:
CAUTION
THE ELECTRODES OF THE SPARK
PLUGS INSTALLED ON THIS VEHICLE
ARE PLATINUM ELECTRODES. DO
NOT USE METAL BRUSHES AND/OR
ABRASIVE PRODUCTS TO CLEAN
THE SPARK PLUGS. USE ONLY A
COMPRESSED AIR JET.
•
Draai de bougie (2) los en ver-
wijder ze uit de zit, en laat geen
stof of andere stoffen in de cilin-
der terechtkomen.
Voor de controle en de reiniging:
LET OP
DE ELEKTRODEN VAN DE BOUGIES
DIE OP DIT VOERTUIG GEMONTEERD
ZIJN, ZIJN VAN HET PLATINATYPE.
VOOR DE REINIGING MAG MEN GEEN
METALEN BORSTELS EN/OF ABRA-
SIEVE PRODUCTEN GEBRUIKEN,
MAAR ENKEL EEN PERSLUCHT-
STRAAL.
KEY:
central electrode (3);
insulator (4);
side electrode (5).
•
Check that the electrodes and
the insulator of the spark plug
(2) do not show signs of carbon
deposits and corrosion. If nec-
essary, clean them using a com-
pressed air jet.
Replace the spark (2) if its insulator is
cracked, the electrodes show signs of
corrosion or excessive deposits, or the
top of the central electrode gets rounded
(6).
LEGENDE:
centrale elektrode (3);
isolering (4);
laterale elektrode (5).
•
Controleer of de elektroden en
de isolering van de bougie (2)
geen koolstofresten of corrosie-
tekens vertonen, reinig ze even-
tueel met een persluchtstraal.
Wanneer de bougie (2) scheurtjes op de
isolering, corrosie op de elektroden, ex-
cessieve afzettingen vertoont, of de cen-
trale elektrode vertoont een afgerond
toppunt (6), moet de bougie vervangen
worden.
82
4 Maintenance / 4 Onderhoud
Pagina laadt ...

CAUTION
DO NOT ATTEMPT TO READJUST
THE ELECTRODE GAP.
ELEKTRODEN WEER OP MAAT TE
BRENGEN.
The gap between the electrodes should
be between 0.7 ÷ 0.8 mm (0.027 ÷ 0.031
in). Otherwise, replace the spark plug (2).
•
Make sure the washer is in good
conditions.
Installation:
•
Once the washer is fitted, screw
the spark plug (2) manually to
avoid damaging the thread.
•
Tighten using the spanner sup-
plied in the tool kit. Make each
spark plug (2) complete 1/2 of a
turn to compress the washer.
CAUTION
IT IS ESSENTIAL TO TIGHTEN THE
SPARK PLUG (2) PROPERLY. A
LOOSE SPARK PLUG MAY CAUSE
ENGINE OVERHEATING AND RESULT
IN SEVERE DAMAGE.
Locking torques (N*m)
Spark plug - M10x1.25
De afstand tussen de elektroden moet
0,7 ÷ 0,8 mm (0.027 ÷ 0.031 in) bedra-
gen, en wanneer deze verschilt, vervangt
men de bougie (2).
•
Controleer of de rondel zich in
goede condities bevindt.
Voor de installatie:
•
Met gemonteerde rondel draait
men de bougie (2) manueel vast
om te vermijden dat de schroef-
draad wordt beschadigd.
•
Sluit de bougies met behulp van
de bij de gereedschapskit bijge-
voegde sleutel, door elke bougie
(2) een 1/2 draai vast te draaien
om de rondel vast te drukken.
LET OP
DE BOUGIE (2) MOET GOED WORDEN
VASTGEDRAAID, OMDAT ANDERS
DE MOTOR KAN OVERVERHITTEN,
EN DUS ERNSTIG WORDT BESCHA-
DIGD.
Aandraaikoppels (N*m)
Bougie - M10x1.25
84
4 Maintenance / 4 Onderhoud

12 Nm (8.85 lbf ft) 12 Nm (8.85 lbf ft)
•
Position the spark plug tube (1)
correctly so that it does not get
detached due to engine vibra-
tions.
•
Plaats de pipet van de bougie
(1) correct, zodat deze niet los-
komt door de vibraties van de
motor.
04_14
04_15
Removing the air filter (04_14,
04_15)
•
Remove the saddle.
•
Raise the tank.
•
Release the air filter cover by
gripping and lifting the handles
from both sides.
•
Slide out the air filter housing
cover from behind, complete
with filter.
NOTE
WHEN REFITTING THE AIR FILTER,
ENSURE THAT ITS HOUSING IS PER-
FECTLY CLEAN. REMOVE ANY
TRACE OF DIRT THAT MAY HAVE EN-
TERED DURING REMOVAL. DURING
REASSEMBLY, MAKE SURE THAT
THE AIR VENTS ARE INSERTED COR-
RECTLY.
CAUTION
MAKE SURE THAT TANK'S THREAD
SEALER DOES COME INTO TOUCH
Demonteren van het luchtfilter
(04_14, 04_15)
•
Verwijder het zadel.
•
Hef de tank op.
•
Koppel het deksel van de filter-
kist los, door de handgrepen
langs beide kanten vast te grij-
pen, en het op te heffen.
•
Verwijder het deksel van de fil-
terkist, compleet met luchtfilter,
langs achter.
N.B.
BIJ DE HERMONTAGE LET MEN OP
DAT DE FILTERKIST PERFECT REIN
IS. VERWIJDER ELK SPOOR VAN
VUIL, ZODAT DIT ER NIET KAN INVAL-
LEN TIJDENS DE VERWIJDERING. BIJ
DE HERMONTAGE LET MEN OP
VOOR DE CORRECTE PLAATSING
VAN DE LUCHTINLATEN.
LET OP
LET OP DAT DE TREKDRAAD VAN DE
TANK VOOR GEEN ENKELE REDEN
85
4 Maintenance / 4 Onderhoud
Pagina laadt ...

04_16
04_17
Cooling fluid level (04_16,
04_17)
Do not use the vehicle if the coolant is
below the minimum level.
CAUTION
COOLANT IS TOXIC IF INGESTED;
CONTACT WITH EYES OR SKIN MAY
CAUSE IRRITATION. IN THE EVENT
OF CONTACT WITH EYES OR SKIN,
RINSE REPEATEDLY WITH ABUN-
DANT WATER AND SEEK MEDICAL
ADVICE. IF ACCIDENTALLY INGES-
TED, INDUCE VOMITING, RINSE
MOUTH AND THROAT WITH ABUN-
DANT WATER AND SEEK MEDICAL
ADVICE IMMEDIATELY.
Peil koelvloeistof (04_16,
04_17)
Gebruik het voertuig niet wanneer het
peil van de koelvloeistof zich onder het
minimum peil bevindt.
LET OP
DE KOELVLOEISTOF IS SCHADELIJK
WANNEER HET WORDT INGESLIKT;
HET CONTACT MET DE HUID EN DE
OGEN KAN IRRITATIES VEROORZA-
KEN. WANNEER DE VLOEISTOF IN
CONTACT ZOU KOMEN MET DE HUID
EN DE OGEN, SPOELT MEN LANG
MET VEEL WATER, EN RAADPLEEGT
MEN EEN ARTS. WANNEER HET
WORDT INGESLIKT, MOET MEN
OVERGEVEN, DE MOND EN DE KEEL
SPOELEN MET VEEL WATER, EN ON-
MIDDELLIJK EEN ARTS RAADPLE-
GEN.
Coolant solution is 50% water and 50%
antifreeze fluid.
This is the ideal mixture for most operat-
ing temperatures and provides good cor-
rosion protection.
It is advisable to use the same mixture
even in hot seasons as it is less prone to
evaporative loss and will minimise the
need for top-ups.
De oplossing van de koelvloeistof be-
staat uit 50% water en 50% antivries.
Dit mengsel is ideaal voor de meeste
werkingstemperaturen, en garandeert
een goede bescherming tegen corrosie.
Het is goed om herzelfde mengsel te ge-
bruiken tijdens het warme seizoen, om-
dat op deze manier verlies door verdam-
ping en het frequent bijvullen wordt
vermeden.
87
4 Maintenance / 4 Onderhoud

Less water evaporation means fewer
mineral salts depositing in the radiators,
which helps preserve the efficiency of the
cooling system.
Op deze manier verminderen de bezink-
sels van mineraalzouten, die in de radia-
tor door het verdampte water werden
gelaten, en verandert de efficiëntie van
de koelinstallatie niet.
When the temperature drops below zero
degrees centigrade, check the cooling
system frequently and add more anti-
freeze if needed (up to 60% max.).
Use distilled water in the coolant mixture
to avoid damaging the engine.
CAUTION
DO NOT REMOVE THE EXPANSION
TANK PLUG «1» WHEN THE ENGINE
IS HOT, SINCE COOLANT IS UNDER
PRESSURE AND VERY HOT. CON-
TACT WITH SKIN OR CLOTHES MAY
CAUSE SEVERE BURNS AND/OR IN-
JURIES.
Wanneer de buitentemperatuur zich on-
der het vriespunt bevindt, moet men het
koelcircuit frequent controleren, en voegt
men indien nodig een hogere concentra-
tie antivries toe (tot een maximum van
60%).
Voor de koeloplossing gebruikt men ge-
destilleerd water, om de motor niet te
beschadigen.
LET OP
VERWIJDER DOP «1» NIET VAN HET
EXPANSIEVAT WANNEER DE MOTOR
WARM STAAT, OMDAT DE KOEL-
VLOEISTOF ONDER DRUK STAAT EN
EEN HOGE TEMPERATUUR HEEFT.
BIJ CONTACT MET DE HUID OF DE
KLEDING KAN HET ERNSTIGE LET-
SELS/SCHADE VEROORZAKEN.
Check and top-up Controle en bijvullen
88
4 Maintenance / 4 Onderhoud

CAUTION
WAIT FOR THE ENGINE TO COOL
DOWN BEFORE CHECKING OR TOP-
PING-UP THE COOLANT LEVEL.
LET OP
VOER DE HANDELINGEN VAN DE
CONTROLE EN HET BIJVULLEN VAN
DE KOELVLOEISTOF UIT WANNEER
DE MOTOR KOUD STAAT.
•
Stop the engine and wait for it to
cool down.
•
Place the vehicle on firm and
level ground.
•
Keep the vehicle upright, with
both wheels on the ground.
•
Rotate the radiator cap «1» an-
ticlockwise until it clicks once.
•
Wait for several seconds to al-
low any pressure in the system
to be equalised.
•
Rotate the radiator cap «1»
again anticlockwise and remove
it.
•
Check that the liquid covers the
radiator plates completely.
•
Also check the level in the ex-
pansion tank (underneath the
engine sump cover) from the rel-
evant window.
•
The correct level should be be-
tween the MIN and MAX marks.
•
Leg de motor stil en wacht tot hij
afkoelt.
•
Plaats het voertuig op een vast
en vlak terrein.
•
Hou het voertuig verticaal met
de twee wielen op de grond.
•
Draai de radiatordop «1» in te-
genwijzerszin voor één klik.
•
Wacht enkele seconden, zodat
de ontluchting van eventueel
aanwezige druk in de installatie
kan plaatsvinden.
•
Draai de radiatordop «1» in te-
genwijzerszin, en verwijder
hem.
•
Controleer of de vloeistof de pla-
ten van de radiator volledig be-
dekt.
•
Controleer bovendien het peil in
het expansievat (onder het dek-
sel van de motorcarter) langs
het speciale venster.
•
Het peil moet zich tussen de
MIN en MAX referenties bevin-
den.
89
4 Maintenance / 4 Onderhoud

CAUTION
DO NOT ADD ADDITIVES OR OTHER
SUBSTANCES TO THE LIQUID.
IF YOU USE A FUNNEL OR ANOTHER
IMPLEMENT, MAKE SURE THAT
THEY ARE PERFECTLY CLEAN.
LET OP
VOEG GEEN ADDITIEVEN OF ANDE-
RE STOFFEN TOE AAN DE VLOEI-
STOF.
WANNEER MEN EEN TRECHTER OF
IETS ANDERS GEBRUIKT, MOET DE-
ZE PERFECT REIN ZIJN.
•
If required, top up with coolant
until the radiator plates are cov-
ered. Do not exceed this level,
otherwise the coolant will spill
during engine operation. If you
use a funnel, make sure it is per-
fectly clean.
•
Screw the radiator cap back
on«1».
CAUTION
IN THE EVENT OF EXCESSIVE COOL-
ANT CONSUMPTION, CHECK COOL-
ING SYSTEM FOR LEAKS.
HAVE ANY MALFUNCTIONS RE-
PAIRED BY AN aprilia Official Dealer.
•
Indien nodig vult men koelvloei-
stof bij, tot de platen van de ra-
diator volledig bedekt zijn. Over-
schrijdt dit peil niet, anders zal
de vloeistof tijdens de werking
van de motor uitstromen. Wan-
neer men een trechter of iets
anders gebruikt, moet deze per-
fect rein zijn.
•
Plaats de radiatordop «1» weer.
LET OP
IN GEVAL VAN EXCESIEF KOEL-
VLOEISTOFVERBRUIK, CONTRO-
LEERT MEN OF ER GEEN LEKKEN IN
HET CIRCUIT ZIJN.
VOOR DE HERSTELLING WENDT
MEN ZICH TOT EEN Officiële aprilia
Dealer.
90
4 Maintenance / 4 Onderhoud
Pagina laadt ...
Pagina laadt ...
Pagina laadt ...

CHECK THE BRAKES BEFORE EACH
RIDE.
REPLACE THE BRAKE FLUID AC-
CORDING TO THE SCHEDULED
MAINTENANCE TABLE.
USE THE BRAKE FLUID SPECIFIED IN
THE LUBRICANT CHART.
DEN GEHOUDEN; CONTROLEER ZE
VÓÓR ELKE REIS.
VOER DE VERVANGING VAN DE REM-
VLOEISTOF UIT OP BASIS VAN DE
TABEL VAN HET GEPROGRAM-
MEERD ONDERHOUD.
GEBRUIK DE SPECIFIEKE REM-
VLOEISTOF DIE WORDT AANGEDUID
IN DE TABEL VAN DE SMEERMIDDE-
LEN.
Brake fluid decreases gradually in the
reservoir as the brake pads wear down,
to compensate the wear automatically.
The front brake reservoir «1» is placed
near the front brake lever connection.
The rear brake fluid reservoir «2» is inte-
grated in the brake pump fastened to the
frame near the fork.
Met het verbruik van de wrijvingspastilles
vermindert het peil van de remvloeistof in
de tank, om automatisch de slijtage te
compenseren.
De vloeistoftank van de voorrem «1» be-
vindt zich nabij de koppeling van de hen-
del van de voorrem.
De vloestoftank van de achterrem «2» is
geïntegreerd in de rempomp die aan het
frame is bevestigd, op de rechter kant,
naast de vork.
Check the brake fluid level in the reser-
voirs before setting off.
CAUTION
DO NOT USE YOUR VEHICLE IF A
FLUID LEAK IN THE BRAKING CIR-
CUIT IS DETECTED.
Controleer vóór het vertrek het peil van
de remvloeistof in de tanks.
LET OP
GEBRUIK HET VOERTUIG NOOIT
WANNEER MEN EEN LEK OPMERKT
VAN DE REMINSTALLATIE.
94
4 Maintenance / 4 Onderhoud

Front brake
Checking
•
Hold the vehicle upright and
keep the handlebar straight.
•
Check that the fluid in the reser-
voir «1» is above the MIN. mark
MIN = minimum level
MAX = maximum level
If the fluid does not reach the MIN. mark
CAUTION
BRAKE LEVEL DECREASES GRADU-
ALLY AS BRAKE PADS WEAR DOWN.
Voorrem
Controle
•
Plaats het voertig verticaal en
hou het stuur recht.
•
Controleer of de vloeistof in de
tank «1» de MIN referentie over-
schrijdt.
MIN = minimum peil.
MAX = maximum peil
Wanneer de vloeistof niet minstens het
MIN bereikt.
LET OP
HET PEIL VAN DE VLOEISTOF VER-
MINDERT PROGRESSIEF MET DE
SLIJTAGE VAN DE PASTILLES.
•
Check the brake pads and discs
for wear
If the pads and/or the disc do not need
replacing, top up the fluid.
Topping up SXV
CAUTION
RISK OF BRAKE FLUID SPILLAGE.
DO NOT PULL THE FRONT BRAKE
LEVER WHEN THE SCREWS «3» ARE
LOOSE OR, PRIMARILY, WHEN THE
BRAKE FLUID RESERVOIR COVER
«4» IS REMOVED.
•
Controleer de slijtage van de
rempastilles en van de schijf.
Wanneer de pastilles en/of de schijf niet
moeten vervangen worden, voert men
het bijvullen uit.
Het bijvullen, SXV
LET OP
GEVAAR OP HET UITSTROMEN VAN
REMVLOEISTOF. ACTIVEER DE HEN-
DEL VAN DE VOORREM NIET WAN-
NEER DE BOUTEN «3» GELOST ZIJN,
OF VOORAL NIET WANNEER HET
DEKSEL VAN DE TANK VAN DE REM-
VLOEISTOF «4» VERWIJDERD IS.
95
4 Maintenance / 4 Onderhoud
Pagina laadt ...
Pagina laadt ...

MIN = minimum level
If the fluid does not reach the MIN. mark
CAUTION
BRAKE LEVEL DECREASES GRADU-
ALLY AS BRAKE PADS WEAR DOWN.
MIN = minimum peil.
Wanneer de vloeistof niet minstens het
MIN bereikt.
LET OP
HET PEIL VAN DE VLOEISTOF VER-
MINDERT PROGRESSIEF MET DE
SLIJTAGE VAN DE PASTILLES.
•
Check the brake pads and discs
for wear
If the pads and/or the disc do not need
replacing, top up the fluid.
Topping up
CAUTION
RISK OF BRAKE FLUID SPILLAGE.
DO NOT PULL THE FRONT BRAKE
LEVER WHEN THE SCREWS «9» ARE
LOOSE OR, PRIMARILY, WHEN THE
BRAKE FLUID RESERVOIR CAP «10»
IS REMOVED.
•
Controleer de slijtage van de
rempastilles en van de schijf.
Wanneer de pastilles en/of de schijf niet
moeten vervangen worden, voert men
het bijvullen uit.
Bijvulling
LET OP
GEVAAR OP HET UITSTROMEN VAN
REMVLOEISTOF. ACTIVEER DE HEN-
DEL VAN DE VOORREM NIET WAN-
NEER DE BOUTEN «9» GELOST ZIJN,
OF VOORAL NIET WANNEER HET
DEKSEL VAN DE TANK VAN DE REM-
VLOEISTOF «10» VERWIJDERD IS.
•
Using a wrench, unscrew the
two screws «9» of the brake fluid
reservoir «2».
CAUTION
AVOID PROLONGED AIR EXPOSURE
OF THE BRAKE FLUID. THE BRAKE
FLUID IS HYGROSCOPIC AND AB-
SORBS MOISTURE WHEN IS IN CON-
TACT WITH THE AIR. LEAVE THE
•
Gebruik een sleutel voor het los-
draaien van de twee bouten
«9» van de tank van de rem-
vloeistof «2».
LET OP
VERMIJDT DAT DE REMVLOEISTOF
LANG WORDT BLOOTGESTELD AAN
DE LUCHT. DE REMVLOEISTOF IS HY-
GROSCOPISCH, EN ABSORBEERT
98
4 Maintenance / 4 Onderhoud
Pagina laadt ...

IT IS ADVISABLE NOT TO TOP UP TO
THE MAX LEVEL MARK WHEN THE
BRAKE PADS ARE WORN BECAUSE
YOUR RISK SPILLING THE FLUID
WHEN CHANGING THE BRAKE PADS.
CHECK BRAKING EFFICIENCY.
WHEN THE BRAKE LEVER HAS EX-
CEEDING TRAVEL OR IF YOU NOTICE
A LOSS OF BREAKING, CONTACT AN
APRILIA OFFICIAL DEALER. THE
BRAKING SYSTEM MAY NEED
BLEEDING.
ZIJN. MEN RAADT AAN OM NIET BIJ
TE VULLEN TOT AAN HET MAX PEIL
WANNEER DE PASTILLES VERSLE-
TEN ZIJN, OMDAT DE VLOEISTOF
ZAL UITSTROMEN WANNEER DE
REMPASTILLES ZULLEN VERVAN-
GEN WORDEN.
CONTROLEER DE REMEFFICIËNTIE.
IN GEVAL VAN EEN EXCESSIEVE
LOOP VAN DE REMHENDEL OF VAN
VERLIES VAN EFFICIËNTIE VAN DE
REMINSTALLATIE, WENDT MEN ZICH
TOT EEN OFFICIËLE APRILIA DEA-
LER, OMDAT HET NODIG KAN ZIJN
OM EEN ONTLUCHTING UIT TE VOE-
REN VAN DE INSTALLATIE.
04_22
Battery (04_22, 04_23, 04_24)
•
Remove the saddle.
•
Unscrew and remove the nega-
tive wire fastening screw, keep-
ing the washer.
Accu (04_22, 04_23, 04_24)
•
Verwijder het zadel.
•
Draai de bevestigingsbout los,
verwijder ze van de negatieve
kabel, en recupereer de bout-
blokkering.
•
Unscrew and remove the nega-
tive wire fastening screw, keep-
ing the washer.
•
Draai de bevestigingsbout los,
verwijder ze van de positieve
kabel, en recupereer de bout-
blokkering.
•
Remove the battery.
•
Verwijder de accu.
100
4 Maintenance / 4 Onderhoud
Pagina laadt ...

04_26
04_27
04_28
CAUTION
IF A FUSE BLOWS OUT FREQUENT-
LY, THAT MAY BE DUE TO A SHORT
CIRCUIT OR OVERLOAD. IF THIS OC-
CURS, CONTACT AN Official aprilia
Dealer.
LET OP
WANNEER EEN ZEKERING FRE-
QUENT WORDT BESCHADIGD, IS ER
WAARSCHIJNLIJK EEN KORTSLUI-
TING OF EEN OVERBELASTING. IN
DIT GEVAL RAADPLEEGT MEN EEN
Officiële aprilia Dealer.
Checking the fuses is necessary when-
ever an electrical component fails to op-
erate or is malfunctioning or when the
engine does not start.
Check the auxiliary fuses first and then
the main 30A fuse.
To check:
•
Set the ignition switch to (OFF)
to avoid an accidental short cir-
cuit.
•
Remove the right side fairing by
undoing the two screws (1) and
slide if off from its seat.
Wanneer men het niet of onregelmatig
werken van een elektrisch onderdeel of
het niet starten van de motor opmerkt,
moet men de zekeringen controleren.
Controleer eerst de secundaire zekerin-
gen en vervolgens de hoofdzekering van
30A.
Voor de controle:
•
Plaats de ontstekingsschake-
laar op (OFF) om een toevallige
kortsluiting te vermijden.
•
Verwijder de zijplaat door de
twee bouten (1) los te draaien
en ze uit haar zit te verwijderen.
•
Lift the cover (2) of the auxiliary
fuse box.
•
Hef het deksel (2) van de secun-
daire zekeringendoos op.
•
Take out one fuse at a time and
check whether the filament (3) is
broken.
•
Verwijder de zekeringen één
voor één, en controleer of de
draad (3) onderbroken is.
•
Vooraleer men de zekering ver-
vangt, zoekt men indien moge-
102
4 Maintenance / 4 Onderhoud

04_29
•
Before replacing the fuse, find
and solve, if possible, the rea-
son that caused the problem.
•
If the fuse is damaged, replace
it with one of the same amper-
age.
NOTE
IF THE SPARE FUSE IS USED, SUP-
PLY ANOTHER OF THE SAME TYPE IN
THE CORRESPONDING FITTING.
lijk de oorzaak van het pro-
bleem.
•
Vervang de zekering indien be-
schadigd, met een andere met
dezelfde elektrische stroom-
sterkte.
N.B.
WANNEER MEN EEN RESERVEZEKE-
RING GEBRUIKT, PLAATST MEN EEN
GELIJKE IN DE SPECIALE ZIT.
•
Remove the left side cover, fol-
lowing the same procedure as
for the right side cover.
•
Follow the same steps descri-
bed above for the auxiliary fuses
also for the main fuses.
•
Verwijder het linker zijplaatje,
door op analoge wijze te han-
delen van het rechter zijplaatje.
•
Voer ook voor de hoofdzekerin-
gen de eerder beschreven han-
delingen van de secundaire ze-
keringen uit.
SECONDARY FUSES DISTRIBUTION
(1) 15A fuse ECU relay energising
(2) 15A fuse Taillights, indicators, horn,
instrument panel, stop light
(3) 7.5A fuse Front headlights
(4) 7.5A fuse ECU relay power
(5) 7.5A fuse Injector coils
(6) 7.5A fuse Electric fan
(7) 5A fuse Fuel pump
SCHIKKING VAN DE SECUNDAIRE ZEKERINGEN
(1) Zekering van 15A Opwekking van het relais van de
centrale
(2) Zekering van 15A Positielichten, richtingaanwijzers,
claxon, dashboard, stoplicht
(3) Zekering van 7,5A Voorste koplampen
(4) Zekering van 7,5A Vermogen van het relais van de
centrale
(5) Zekering van 7,5A Bobines van de injectors
(6) Zekering van 7,5A Elektroschroef
103
4 Maintenance / 4 Onderhoud

(7) Zekering van 5A Benzinepomp
NOTE
THREE FUSES ARE SPARE
FUSES«8».
N.B.
DRIE ZEKERINGEN ZIJN RESERVE-
ZEKERINGEN «8».
MAIN FUSES DISTRIBUTION
30A fuse Battery recharge (there is just one
fuse, the second one is spare).
SCHIKKING VAN DE HOOFDZEKERINGEN
Zekering van 30A Het opladen van de accu (er is
slechts één zekering, de tweede is
een reservezekering).
Lamps
NOTE
BEFORE CHANGING A BULB, CHECK
THE FUSES.
Lampjes
N.B.
VOORALEER MEN EEN LAMPJE VER-
VANGT, CONTROLEERT MEN DE ZE-
KERINGEN.
04_30
Front light group (04_30,
04_31, 04_32, 04_33, 04_34)
In the front headlight there are:
•
Two tail light bulbs «1».
•
One low-beam / high-beam light
bulb «2».
Koplampset (04_30, 04_31,
04_32, 04_33, 04_34)
Op het achterlicht vindt men:
•
Twee lampjes van het positie-
licht «1».
•
Een lampje van het dimlicht /
groot licht «2».
For replacement: Voor de vervanging:
104
4 Maintenance / 4 Onderhoud

04_31
04_32
04_33
•
Rest the vehicle on its stand.
•
Undo the two upper screws.
•
Slide off the front cowl from the
mudguard seats.
Side light lamp «1»
•
Slide off the tail light bulb and
replace it with another of the
same type.
High/low beam light bulb«2»
•
Hold the bulb electrical connec-
tor «3», pull and disconnect it
from the bulb holder.
•
Slide off the cover «4» from the
parabole fitting and from the
bulb connectors.
•
Release the two ends of the re-
taining spring «5» located in the
bulb holder.
•
Extract the bulb from its fitting.
When refitting the bulb:
•
Fit a bulb of the same type ade-
quately.
•
Slide in the cover «4» in the bulb
connectors and the parabole fit-
ting.
•
Connect the bulb electrical con-
nector «3».
•
Plaats het voertuig op de stan-
daard.
•
Draai de twee bovenste bouten
los.
•
Verwijder het maskertje van de
zitten van het spatbord.
Lampje van het positielicht «1»
•
Verwijder het positielampje, en
vervang het met één van het-
zelfde type.
Lampje van het dimlicht / groot licht
«2»
•
Grijp de elektrische connector
van het lampje «3» vast, trek er
aan, en maak hem los van de
lamphouder.
•
Verwijder de kap «4» van de pa-
raboolzit en de terminals van het
lampje.
•
Koppel de twee uiteinden van
de trekveer «5» los die zich op
de lamphouder bevindt.
•
Verwijder het lampje uit de zit.
Bij de hermontage:
•
Installeer op correcte wijze een
lampje van hetzelfde type.
•
Plaats de kap «4» correct in de
paraboolzit en de terminals van
het lampje.
•
Verbindt de elektrische connec-
tor van het lampje «3».
105
4 Maintenance / 4 Onderhoud

04_34
04_35
04_36
Headlight adjustment (04_35,
04_36)
NOTE
IN COMPLIANCE WITH LOCAL LEGAL
REQUIREMENTS, SPECIFIC PROCE-
DURES MUST BE FOLLOWED WHEN
CHECKING LIGHT BEAM ADJUST-
MENT.
Afstellen van de koplamp
(04_35, 04_36)
N.B.
OP BASIS VAN WAT WORDT VOOR-
GESCHREVEN DOOR DE VAN
KRACHT ZIJNDE WETGEVING IN HET
LAND VAN GEBRUIK VAN HET VOER-
TUIG, MOETEN ER VOOR DE CON-
TROLE VAN DE RICHTING VAN DE
LICHTBUNDEL SPECIFIEKE PROCE-
DURES AANGENOMEN WORDEN.
For a quick check of the correct direction
of the front light beam:
•
Place the vehicle 10m away
from a vertical wall and make
sure the ground is level.
•
Turn on the low-beam light, sit
on the scooter and check that
the light beam projected to the
wall is a little below the headlight
horizontal straight line (about
9/10 of the total height).
To adjust the light beam:
•
Working from both sides, undo
the screw «1».
•
Adjust the headlamp until the
desired position is obtained
•
Working from both sides, tighten
the screw «1».
Voor een snelle controle van de correcte
richting van de voorste lichtbundel, han-
delt men als volgt:
•
Plaats het voertuig op tien meter
afstand van een verticale wand,
en controleer of de ondergrond
vlak is.
•
Ontsteek het dimlicht, ga op het
voertuig zitten, en controleer of
de lichtbundel die op de wand
wordt geprojecteerd zich iets
onder de horizontale lijn van de
koplamp bevindt (ongeveer 9/10
van de totale hoogte).
Voor het regelen van de lichtbundel:
•
Handel op beide kanten: draai
de bout «1» los.
•
Richt de koplamp tot de gewen-
ste positie wordt verkregen
•
Handel op beide kanten: sluit de
bout «1».
106
4 Maintenance / 4 Onderhoud
Pagina laadt ...

04_40
The rear braking system is single disc
(right side).
The information provided below relates to
an individual braking system but is appli-
cable to both.
Brake fluid decreases gradually in the
reservoir (1-2) as the brake pads wear
down, to compensate the wear automat-
ically.
The front brake reservoir «1» is placed
near the front brake lever connection.
The rear brake fluid reservoir «2» is inte-
grated in the brake pump fastened to the
frame near the fork.
Het achterste remsysteem is met een en-
kele schijf (rechter kant).
De volgende informatie is in verband met
slechts één reminstallatie, maar geldt
voor beide.
Met het verbruik van de wrijvingspastilles
vermindert het peil van de remvloeistof in
de tank (1-2), om automatisch de slijtage
te compenseren.
De vloeistoftank van de voorrem «1» be-
vindt zich nabij de koppeling van de hen-
del van de voorrem. De vloestoftank van
de achterrem «2» is geïntegreerd in de
rempomp die aan het frame is bevestigd,
op de rechter kant, naast de vork.
Check the brake fluid level in the reser-
voirs «1» «2» and check brake pads for
wear before setting off.
Checking brake pads for wear
Controleer vóór het vertrek het peil van
de remvloeistof in de tanks «1» en «2»,
en de slijtage van de pastilles.
Controle van de slijtage van de pastil-
les
Disc brake pad wear depend on the use,
the riding style and the roads.
CAUTION
WEAR IS GREATER WHEN RIDING ON
DIRTY AND WET ROADS OR OF-
FERED.
De slijtage van de pastilles van de rem-
schijf hangt af van het gebruik, van het
rijgedrag en van het wegtype.
LET OP
ER IS MEER SLIJTAGE WANNEER
MEN OP STOFFIGE EN NATTE WE-
GEN RIJDT, EN CROSST.
108
4 Maintenance / 4 Onderhoud

To carry out a quick pad check:
•
Rest the vehicle on its stand.
Check the front brake calliper pads:
•
Visually inspect the area be-
tween brake disc and brake
pads looking from the bottom up
the rear end;
Checking the rear brake calliper pads:
•
Visually inspect the area be-
tween brake disc and brake
pads looking from the bottom up
the rear end;
NOTE
EXCESSIVE WEAR OF THE FRICTION
MATERIAL MAKES THE PAD METAL
SUPPORT GET INTO CONTACT WITH
THE DISC, WHICH RESULTS IN A
METALLIC NOISE AND SPARKS IN
THE CALLIPER; THEREFORE, BRAK-
ING EFFICIENCY AND DISC SAFETY
AND INTEGRITY ARE AT RISK.
Voor het uitvoeren van een snelle con-
trole van de slijtage van de pastilles:
•
Plaats het voertuig op de stan-
daard.
Controle van de pastilles van de voorste
remtang:
•
Voer een visieve controle uit
tussen de remtang en de pastil-
le, door te handelen langs bo-
ven achteraan;
Controle van de pastilles van de achter-
ste remtang:
•
Voer een visieve controle uit
tussen de remtang en de pastil-
le, door te handelen langs bo-
ven achteraan;
N.B.
EEN VERDER VERBRUIK VAN HET
WRIJVINGSMATERIAAL KAN HET
CONTACT VEROORZAKEN MET DE
METALEN STEUN VAN DE PASTIL-
LES MET DE SCHIJF, MET ALS GE-
VOLG LAWAAI VAN METAAL EN DE
TANG DIE VONKEN MAAKT; DE
DOELTREFFENDHEID VAN HET REM-
MEN, DE VEILIGHEID EN DE INTEGRI-
TEIT VAN DE SCHIJF WORDEN OP
DEZE MANIER GESCHAAD.
When the lining material of even just one
of the brake pads is worn down to nearly
1.5 mm (0.06 in) (or even if one of the
wear indicators is no longer visible), re-
place both brake pads.
Wanneer de dikte van het wrijvingsmate-
riaal (ook van slechts één pastille) ver-
minderd is tot ongeveer 1,5 mm (0.06 in)
(of ook wanneer slechts één van de slij-
109
4 Maintenance / 4 Onderhoud

CAUTION
TAKE YOUR SCOOTER TO AN Official
aprilia Dealer TO HAVE DISCS RE-
PLACED.
tage-indicators niet meer zichtbaar is),
vervangt men beide pastilles.
LET OP
VOOR DE VERVANGING MOET MEN
ZICH TOT EEN Officiële aprilia Dealer
WENDEN.
04_41
Periods of inactivity (04_41)
CAUTION
WHEN THE VEHICLE IS LEFT UN-
USED FOR OVER TWENTY DAYS, DIS-
CONNECT THE 30 A FUSE TO PRE-
VENT BATTERY DEGRADATION.
Stilstand van het voertuig
(04_41)
LET OP
WANNEER HET VOERTUIG INACTIEF
BLIJFT VOOR LANGER DAN TWINTIG
DAGEN, MAAKT MEN DE ZEKERING
VAN 30 A LOS OM TE VERMIJDEN
DAT DE ACCU VERVALT.
Take some measures to avoid the side
effects of not using the vehicle. Besides,
it is necessary to carry out general repairs
and checks before garaging the vehicle
as one can forget to do so afterwards.
Proceed as follows:
•
Remove the battery.
•
Wash and dry the scooter.
•
Polish the painted surfaces.
•
Inflate tyres.
•
Store the scooter in a cool, dry
place, not exposed to sun rays
and with minimum temperature
variations.
Men moet enkele voorzorgsmaatregelen
treffen om de effecten van het niet ge-
bruiken van het voertuig tegen te gaan.
Bovendien moet men de herstellingen en
de algemene controle vóór het opbergen
uitvoeren, anders kan men vergeten om
dit vervolgens uit te voeren.
Handel als volgt:
•
Verwijder de accu.
•
Was en droog het voertuig.
•
Breng was aan op de gelakte
oppervlakken.
•
Blaas de banden op.
110
4 Maintenance / 4 Onderhoud

•
Wrap and tie a plastic bag
around the exhaust pipe open-
ing to keep moisture out.
NOTE
PLACE A SUITABLE SUPPORT UN-
DER THE VEHICLE TO KEEP THE
WHEELS OFF THE GROUND.
•
Plaats het voertuig in een niet
verwarmd lokaal, zonder voch-
tigheid, beschermd tegen zon-
nestralen, en waar tempera-
tuursverschillen miniem zijn.
•
Plaats een plastic zakje op de
uitlaat en bindt dit vast, zodat er
geen vochtigheid in kan komen.
N.B.
PLAATS HET VOERTUIG ZODANIG
DAT BEIDE BANDEN VAN DE GROND
ZIJN, DOOR GEBRUIK TE MAKEN
VAN DE SPECIALE STEUNEN.
•
Cover the vehicle. Avoid using
plastic or waterproof materials.
•
Bedek het voertuig, maar met
geen plastic of ondoordringbaar
materiaal.
After storage
Uncover and clean the vehicle.
NOTE
TAKE THE PLASTIC BAGS OFF THE
EXHAUST PIPE OPENING.
NA HET OPBERGEN
Verwijder de bedekking en reinig het
voertuig.
N.B.
VERWIJDER DE PLASTIC ZAKJES
VAN DE TERMINALS VAN DE UIT-
LAAT.
•
Uncover the vehicle and clean it.
•
Check the battery for correct
charge and install it.
•
Refill the fuel tank.
•
Carry out the pre-ride checks.
•
Verwijder de bedekking en rei-
nig het voertuig.
•
Controleer de staat van lading
van de accu, en installeer ze.
•
Tank brandstof.
•
Voer de voorbereidende contro-
les uit.
111
4 Maintenance / 4 Onderhoud

CAUTION
TEST RIDE THE VEHICLE AT MODER-
ATE SPEED FOR A FEW KILOMETRES
IN AN AREA AWAY FROM TRAFFIC.
LET OP
VOER VOOR ENKELE KILOMETERS
EEN TESTRONDE UIT AAN EEN GE-
MATIGDE SNELHEID, IN EEN VER-
KEERSVRIJE ZONE.
Cleaning the vehicle
Clean the vehicle frequently if ex-
posed to adverse conditions, such as:
•
Air pollution (cities and industrial
areas).
•
Salinity and humidity in the at-
mosphere (seashore areas, hot
and wet weather).
•
Special ambient/seasonal con-
ditions (use of salt, anti-icing
chemical products on the roads
in winter).
•
Make sure to clean off any in-
dustrial residue and pollutant
deposits, tar stains, dead in-
sects, bird droppings, etc. from
the bodywork.
•
Avoid parking the vehicle under
trees. During some seasons,
resins, fruits or leaves contain-
ing aggressive chemical sub-
stances that may damage the
paintwork may fall from trees.
Reinigen van het voertuig
Reinig het voertuig regelmatig wan-
neer het wordt gebruikt in de volgende
zones of condities:
•
Atmosferische vervuiling (stad
en industriële zones).
•
Zoutgehalte en vochtigheid uit
de atmosfeer (zeegebieden,
warm en vochtig klimaat).
•
Speciale milieu/seizoenscondi-
ties (het gebruik van zout, che-
mische anti-ijsproducten op we-
gen in de winterperiode).
•
Vermijdt vooral dat er op de car-
rosserie afzettingen overblijven
van industriële en vervuilende
stoffen, teervlekken, dode in-
secten, uitwerpselen van vo-
gels, enz.
•
Parkeer het voertuig niet onder
bomen. In sommige seizoenen
kan er uit de bomen hars, fruit of
bladeren vallen die chemische
stoffen bevatten die schadelijk
zijn voor de lak.
112
4 Maintenance / 4 Onderhoud

CAUTION
BEFORE WASHING THE VEHICLE,
COVER THE ENGINE AIR INTAKES
AND THE EXHAUST PIPES.
CAUTION
AFTER CLEANING YOUR VEHICLE,
BRAKING EFFICIENCY MAY BE TEM-
PORARILY AFFECTED DUE TO THE
PRESENCE OF WATER ON THE FRIC-
TION SURFACES OF THE BRAKING
CIRCUIT. CALCULATE A LONGER
BRAKING DISTANCE IN ORDER TO
AVOID ACCIDENTS. BRAKE REPEAT-
EDLY TO RESTORE NORMAL OPER-
ATION. CARRY OUT THE PRE-RIDE
CHECKS.
LET OP
VOORALEER MEN HET VOERTUIG
WAST, DICHT MEN DE INLATEN VAN
DE AANZUIGLUCHT VAN DE MOTOR
EN DE UITLAATSLAGEN VAN DE UIT-
LAAT.
LET OP
NADAT MEN HET VOERTUIG HEEFT
GEWASSEN, KAN DE REMDOEL-
TREFFENDHEID TIJDELIJK MINDER
ZIJN DOOR DE AANWEZIGHEID VAN
WATER OP DE WRIJVINGSOPPER-
VLAKKEN VAN DE REMINSTALLATIE.
VOORZIE EEN LANGE REMAFSTAND
OM ONGELUKKEN TE VERMIJDEN.
ACTIVEER HERHAALDELIJK DE
REMMEN, OM DE NORMALE REM-
CONDITIES TE HERSTELLEN. VOER
DE VOORBEREIDENDE CONTROLES
UIT.
To clean off dirt and mud deposited from
painted surfaces, soften caked dirt with a
low-pressure water jet. Sponge off using
a car body sponge soaked in a car body
shampoo and water solution (2 ÷ 4%
parts of shampoo in water). Then rinse
with plenty of water, and dry with a cha-
mois leather. To clean the engine outer
parts, use degreasing detergent, brushes
Om het vuil en de modder te verwijderen
die zich hebben afgezet op de gelakte
oppervlakken, moet men een waterstraal
onder lage druk gebruiken, de vuile delen
zorgvuldig nat maken, en de modder en
het vuil verwijderen met een zachte
spons voor carrosseries die doordrenkt is
in veel water en shampoo (2 ÷ 4% delen
shampoo in water). Spoel vervolgens
113
4 Maintenance / 4 Onderhoud

and old cloths. Anodised or painted alu-
minium parts such as forks, rims, frame,
footrests etc. should be washed using
water and mild soap. Using aggressive
detergents may damage the surface
treatment of these components. Using
aggressive detergents may damage the
surface treatment of these components.
TO CLEAN THE HEADLIGHTS USE A
SPONGE SOAKED IN WATER AND
MILD DETERGENT, RUBBING THE
SURFACE GENTLY AND RINSING
FREQUENTLY WITH PLENTY OF WA-
TER. REMEMBER TO CLEAN THE VE-
HICLE CAREFULLY BEFORE ANY
POLISHING WITH SILICON WAX. DO
NOT POLISH MATT-PAINTED SURFA-
CES WITH POLISHING PASTE. THE
VEHICLE SHOULD NEVER BE WASH-
ED IN DIRECT SUNLIGHT, ESPECIAL-
LY DURING SUMMER, OR WITH THE
BODYWORK STILL HOT AS THE CAR
SHAMPOO CAN DAMAGE THE PAINT-
WORK IF IT DRIES BEFORE BEING
RINSED OFF.
CAUTION
DO NOT USE WATER (OR LIQUIDS)
AT TEMPERATURES OVER 40°C (104°
F) WHEN CLEANING PLASTIC PARTS
OF THE VEHICLE. DO NOT AIM HIGH
overvloedig met water en droog af met
een zeemvel. Om de externe delen van
de motor te reinigen, gebruikt men een
ontvettend reinigingsmiddel, kwasten en
doeken. De delen in elektrolytisch geoxi-
deerd of gelakt aluminium, zoals de vor-
ken, de velgen, het frame, de voeten-
steunen enz, moeten gewassen worden
met neutrale zeep en water. Het gebruik
van te agressieve reinigingsmiddelen
kan de oppervlaktebehandeling van deze
onderdelen aantasten. Het gebruik van te
agressieve reinigingsmiddelen kan de
oppervlaktebehandeling van deze onder-
delen aantasten.
VOOR DE REINIGING VAN DE LICH-
TEN GEBRUIKT MEN EEN SPONS DIE
WERD ONDERGEDOMPELD IN WA-
TER EN EEN NEUTRAAL REINIGINGS-
MIDDEL, DOOR ZACHTJES OP DE
OPPERVLAKKEN TE WRIJVEN EN
FREQUENT MET VEEL WATER TE
SPOELEN. MEN HERINNERT DAT HET
OPPOETSEN MET SILICONENWAS
UITGEVOERD MOET WORDEN NA-
DAT MEN HET VOERTUIG ZORGVUL-
DIG HEEFT GEWASSEN. POETS MAT-
TE LAKKEN NIET OP MET SCHUREN-
DE PASTA'S. HET WASSEN MAG
NOOIT WORDEN UITGEVOERD IN DE
ZON, VOORAL NIET IN DE ZOMER
WANNEER DE CARROSSERIE NOG
WARM IS, OMDAT DE SHAMPOO DIE
VÓÓR HET SPOELEN OPDROOGT DE
LAK KAN BESCHADIGEN.
114
4 Maintenance / 4 Onderhoud
Pagina laadt ...

Transport
During transport the vehicle must be well
secured in an upright position and first
gear must be engaged, to avoid fuel, oil
and coolant leaks.
IN CASE OF FAILURE, DO NOT HAVE
THE VEHICLE TOWED. ASK FOR
ROAD ASSISTANCE SERVICE.
Vervoer
Tijdens de verplaatsing moet het voertuig
in verticale positie blijven, goed veran-
kerd zijn en in de eerste versnelling ge-
plaatst worden, om eventuele lekken van
brandstof, olie en koelvloeistof te vermij-
den.
IN GEVAL VAN EEN DEFECT MAG
MEN HET VOERTUIG NIET SLEPEN,
MAAR MOET MEN EEN HULPDIENST
CONTACTEREN.
04_42
04_43
Transmission chain
SXV has an endless chain.
EXCESSIVE CHAIN SLACKENING
MAY CAUSE IT TO COME OFF THE
PINION, WHICH IN TURN COULD
CAUSE AN ACCIDENT OR SEVERE
DAMAGE TO THE VEHICLE. CHECK
THE CHAIN SLACK ON A REGULAR
BASIS AND ADJUST IT AS NECESSA-
RY. TO CHANGE THE CHAIN TAKE
YOUR VEHICLE TO AN Official aprilia
Dealer, WHO WILL PROVIDE ACCU-
RATE, PROMPT SERVICE.
Transmissieketting
De SXV heeft een ketting zonder eind.
EEN EXCESSIEVE LOSSING VAN DE
KETTING KAN ZE UIT HET RONDSEL
DOEN KOMEN, EN EEN ONGEVAL OF
ERNSTIGE SCHADE AAN HET VOER-
TUIG VEROORZAKEN. CONTROLEER
REGELMATIG DE SPELING, EN VOER
INDIEN NODIG DE REGELING UIT.
VOOR DE VERVANGING VAN DE KET-
TING WENDT MEN ZICH UITSLUI-
TEND TOT EEN Officiële aprilia Dealer,
DIE EEN SNELLE EN VERZORGDE
SERVICE ZAL GARANDEREN.
116
4 Maintenance / 4 Onderhoud

04_44
04_45
CAUTION
INCORRECTLY EFFECTED MAINTE-
NANCE MAY CAUSE EARLY WEAR
OF THE CHAIN AND OR DAMAGE THE
PINION AND/OR THE CROWN. PER-
FORM MAINTENANCE OPERATIONS
MORE FREQUENTLY IF YOU RIDE
THE VEHICLE IN EXTREME CONDI-
TIONS OR ON DUSTY AND OR MUDDY
ROADS.
LET OP
EEN NIET UITGEVOERD ONDER-
HOUD KAN VOORTIJDIGE SLIJTAGE
VAN DE KETTING VEROORZAKEN
EN/OF HET RONDSEL EN/OF DE
KROON BESCHADIGEN. VOER DE
ONDERHOUDSHANDELINGEN RE-
GELMATIGER UIT WANNEER HET
VOERTUIG IN STRENGE OMSTAN-
DIGHEDEN OF OP STOFFIGE EN/OF
MODDERIGE WEGEN WORDT GE-
BRUIKT.
Chain backlash check (04_42)
To check backslash:
•
Stop the engine.
•
Place the vehicle on the stand.
•
Engage neutral gear.
•
Check that vertical oscillation at
the middle point between pinion
and crown on the lower part of
the chain is of about 20 ÷ 25 mm
(0.79 ÷ 0.98 in).
•
Move the vehicle forward so as
to check vertical oscillation in
other positions too. The slack
should remain constant during
all wheel rotation phases.
If the slack is uniform, but higher or lower
than 20 ÷ 25 mm (0.79 ÷ 0.98 in), adjust
it as required.
Controle van de speling van de
ketting (04_42)
Voor de controle van de speling:
•
Leg de motor stil.
•
Plaats het voertuig op de stan-
daard.
•
Plaats de hendel van de ver-
snellingsbak in vrij.
•
Controleer of de verticale
schommeling, in een tussenlig-
gend punt tussen het rondsel en
de kroon in de onderste vertak-
king van de ketting, ongeveer 20
÷ 25 mm (0.79 ÷ 0.98 in) be-
draagt.
•
Verplaats het voertuig vooruit,
zodat de verticale schommeling
van de ketting ook in andere po-
sities wordt gecontroleerd; de
speling moet in alle fasen van de
117
4 Maintenance / 4 Onderhoud

CAUTION
IF THERE IS MORE CLEARANCE AT
SOME POSITIONS, THIS MEANS
THAT SOME CHAIN LINKS ARE FLAT-
TENED OR JAMMED. IN THIS EVENT,
CONSULT AN Official aprilia Dealer.
TO AVOID THE RISK OF SEIZURE, LU-
BRICATE THE CHAIN ON A REGULAR
BASIS.
rotatie van het wiel constant blij-
ven.
Wanneer de speling uniform is, maar
meer of minder dan 20 ÷ 25 mm (0.79 ÷
0.98 in) bedraagt, voert men de regeling
uit.
LET OP
WANNEER MEN IN SOMMIGE POSI-
TIES EEN HOGERE SPELING OP-
MERKT, ZIJN ER SAMENGEDRUKTE
OF AFGESLAGEN SCHAKELS, EN IN
DIT GEVAL WENDT MEN ZICH TOT
EEN Officiële aprilia Dealer.
OM TE VOORKOMEN DAT DE SCHA-
KELS KUNNEN AFSLAAN, SMEERT
MEN REGELMATIG DE KETTING.
Chain backlash adjustment
(04_43, 04_44)
If you need to adjust chain tension after
the check:
•
Rest the vehicle on its stand.
•
Loosen the nut (1) completely.
•
Loosen both lock nuts (4).
•
Actuate on the set screws (5)
and adjust the chain backlash
checking that the references (2
- 3) match on both sides of the
vehicle.
•
Tighten both lock nuts (4).
•
Tighten the nut (1).
•
Check chain clearance.
Regeling van de speling van
de ketting (04_43, 04_44)
Wanneer het na de controle nodig is om
de spanning van de ketting te regelen,
handelt men als volgt:
•
Plaats het voertuig op de stan-
daard.
•
Los de blokkeermoer (1) volle-
dig.
•
Los de twee tegenmoeren (4).
•
Handel op de registers (5) en re-
gel de speling van de ketting,
door langs beide kanten van het
voertuig te controleren of dezelf-
de referenties (2 - 3) overeen-
komen.
•
Sluit de twee tegenmoeren (4).
•
Sluit de moer (1).
118
4 Maintenance / 4 Onderhoud

NOTE
WHEEL CENTRING IS CARRIED OUT
USING THE IDENTIFIABLE FIXED
REFERENCES (2-3) INSIDE THE TEN-
SIONER PAD MOUNTS ON THE FORK
ARMS, IN FRONT OF THE WHEEL
BOLT.
Locking torques (N*m)
Tightening torque for wheel nut (1):
127 Nm (12.7 kgm)
•
Controleer de speling van de
ketting.
N.B.
VOOR HET CENTREREN VAN HET
WIEL ZIJN ER VASTE REFERENTIES
(2-3) VOORZIEN, DIE MEN IN DE ZIT-
TEN VAN DE SLEDEN VAN DE KET-
TINGSPANNER OP DE ARMEN VAN
DE VORK VINDT, VÓÓR DE WIELPIN.
Aandraaikoppels (N*m)
Sluitkoppel van de wielmoer (1)
127 Nm (12,7 kgm).
Checking wear of chain, front
and rear sprockets (04_45)
Also check the following parts and make
sure that the chain, pinion and crown do
not have:
•
Damaged rollers.
•
Loosened pins.
•
Dry, rusty, flattened or jammed
chain links.
•
Excessive wear.
•
Missing sealing rings.
•
Excessively worn or damaged
pinion or crown teeth.
CAUTION
IF THE CHAIN ROLLERS ARE DAM-
AGED, THE PINS ARE LOOSENED
AND/OR THE O-RINGS ARE MISSING
OR DAMAGED, THE WHOLE CHAIN
Controle van het gebruik van
de ketting, het tandrad en
kroon (04_45)
Controleer bovendien de volgende delen,
en controleer of de ketting, het rondsel en
de kroon geen:
•
Beschadigde rollen hebben.
•
Geloste pinnen hebben.
•
Droge, verroeste, samenge-
drukte of afgeslagen schakels
hebben.
•
Excessieve slijtage vertonen.
•
Ontbrekende dichtingsringen
hebben.
•
Excessief versleten of bescha-
digde rondsel- of kroontanden
hebben.
119
4 Maintenance / 4 Onderhoud
Pagina laadt ...
Pagina laadt ...

122
4 Maintenance / 4 Onderhoud
Pagina laadt ...

TECHNICAL DATA SXV 450 - SXV 550 (VEHICLE)
Max length 2165 mm (85.23 in)
Max width 815 mm (32.08 in)
Max height (including top fairing) 1170 mm (46.06 in)
Saddle height 880 mm (34.64 in)
Wheelbase 1470 mm (57.87 in)
Minimum ground clearance 270 mm (10.63 in)
Dry weight (for each fluid) 121,5 kg (267.86 lb)
Fuel tank capacity (including
reserve)
7.5 l (1.98 gal)
Fuel reserve 2.2 l (0.58 gal)
Engine oil capacity 1.3 l (0.34 gal)
Fork oil capacity 125 mm (4.92 in) of clearance (for
each stem, measured without
spring and under compression)
Coolant capacity 1.1 l (0.29 gal) (50% water + 50%
antifreeze solution with ethylene
glycol)
Seats 1
Chassis Steel perimeter frame and
aluminium upright
Front suspension hydraulic action telescopic fork, Ø
45 mm (Ø 1.77 in) stems
Front suspension travel 275 mm (10.83 in)
TECHNISCHE GEGEVENS RXV 450 - RXV 550
(VOERTUIG)
Max lengte 2165 mm (85.23 in)
Max breedte 815 mm (32.08 in)
Max hoogte (tot de kap) 1170 mm (46.06 in)
Hoogte tot het zadel 880 mm (34.64 in)
Asafstand 1470 mm (57.87 in)
Minimum vrije hoogte vanaf de
grond
270 mm (10.63 in)
Droog gewicht (van elke vloeistof) 121,5 kg (267.86 lb)
Capaciteit van de brandstoftank
(inclusief de reserve)
7,5 l (1.98 gal)
Brandstofreserve 2,2 l (0.58 gal)
Capaciteit van de motorolie 1,3 l (0.34 gal)
Capaciteit van de olie voor de vork 125 mm (4.92 in) lucht (gemeten
voor elke stang, zonder veer en
met stang in compressie)
Capaciteit van de koelvloeistof 1,1 l (0.29 gal) (50% water + 50%
antivries met ethyleenglycol)
Plaatsen 1
Frame Stijl in aluminium en raamwerk in
stalen buizen
124
5 Technical data / 5 Technische gegevens

Rear suspensions oscillating fork and adjustable
hydraulic single shock absorber
Rear wheel travel 252 mm (9.92 in) (usable)
Front brake disc - Ø 320 mm (Ø 12.60 in), with
hydraulic transmission
Rear brake disc - Ø 240 mm (Ø 9.45 in), with
hydraulic transmission
Wheel rims with spokes
Front wheel rim 3.50 x 17
Rear wheel rim 5.50 x 17
Front tyre 120/70 ZR17 (58W)
Rear tyre 180/55 ZR17 (73W)
Front tyre inflation pressure 180 kPa (1.8 bar)
Rear tyre inflation pressure 200 kPa (2.0 bar)
Voorste ophanging telescoopvork met hydraulische
werking, stangen Ø 45 mm (Ø 1.77
in)
Verplaatsing van de voorste
ophanging
275 mm (10.83 in)
Achterste ophanging schommelende vork en
hydraulische regelbare
monoschokdemper
Verplaatsing van het achterwiel 252 mm (9.92 in) (bruikbaar)
Voorrem met schijf - Ø 320 mm (Ø 12.60 in),
met hydraulische transmissie
Achterrem met schijf - Ø 240 mm (Ø 9.45 in),
met hydraulische transmissie
Wielvelgen met spaken
Velg van het voorwiel 3,50 x 17"
Velg van het achterwiel 5,50 x 17"
Voorste band 120/70 ZR17 (58W)
Achterste band 180/55 ZR17 (73W)
Spanning van de voorband 180 kPa (1.8 bar)
Spanning van de achterband 200 kPa (2.0 bar)
SXV 450 TECHNICAL DATA (ENGINE)
Version 45SX
ENGINE 4-stroke, twin-cylinder, 4 valves
per cylinder, single overhead
camshaft
TECHNISCHE GEGEVENS SXV 450 (MOTOR)
Model 45SX
MOTOR bicilindrisch 4-takt met 4 kleppen
per cilinder, monoas met nokken in
de kop
125
5 Technical data / 5 Technische gegevens

Cylinder quantity 2
Total engine capacity 449 cc (27.40 cu in)
Bore/stroke 76 mm / 49.5 mm (2.99 in / 1.95 in)
Compression ratio 13 ± 0.5
Ignition electronic
Engine revs at idle speed 1800 ÷ 2000 rpm
Clutch multiple-disc oil-bathed clutch
Lubrication system Separate twin-sump lubrication
system with external reservoir
AIR FILTER With dry cartridge filter
Cooling Fluid
Gearbox mechanical, 5 speeds with foot
lever on the left hand side of the
engine
Gear ratio Primary: 22/56 = 1 : 2.545
Final: 15/46 = 1: 3,067
1st 13/30 = 1: 2,307 (secondary)
1: 18,013 (total)
2nd 15/27 = 1 : 1.800 (secondary)
1: 14.050 (total)
3rd 16/23 = 1 : 1.437 (secondary)
1: 11.221 (total)
4th 20/23 = 1 : 1.150 (secondary)
1: 8.976 (total)
Aantal cilinders 2
Complessieve cilinderinhoud 449 cc (27.40 cu in)
Cilinderdiameterboring/loop 76 mm / 49,5 mm (2.99 in / 1.95 in)
Compresieverhouding 13 ± 0,5
START Elektrisch
Toerental van de motor bij het
minimumregime
1800 ÷ 2000 toeren/min (tpm)
Koppeling Multischijf in oliebad
Smeersysteem Dubbele gescheiden smering met
externe tank
LUCHTFILTER Met filterend droog patroon
Koeling Met vloeistof
VERSNELLINGSBAK mechanisch met 5 versnellingen
met pedaalcommando op de linker
kant van de motor
Transmissieverhouding Primaire: 22/56 = 1: 2,545
Eind: 15/46 = 1: 3,067
1° 13/30 = 1: 2,307 (secundarie)
1: 18,013 (totale)
2° 15/27= 1: 1,800 (secundaire)
1: 14,050 (totale)
3° 16/23= 1: 1,437 (secundaire)
1: 11,221 (totale)
4° 20/23= 1: 1,150 (secundaire)
126
5 Technical data / 5 Technische gegevens

5th 21/21 = 1 : 1.000 (secondary)
1: 7.806 (total)
Transmission chain endless (without master link) and
with sealed links
FUEL SUPPLY SYSTEM electronic injection
Mixer Ø 38 mm (1.49 in)
FUEL SUPPLY premium unleaded petrol,
minimum octane rating of 95
(NORM) and 85 (NOMM)
1: 8,976 (totale)
5° 21/21= 1: 1,000 (secundaire)
1: 7,806 (totale)
Transmissieketting zonder einde (zonder
koppelingsschakel) en met
verzegelde schakels
VOEDINGSSYSTEEM elektronische injectie
Diffusor Ø 38 mm (1.49 in)
VOEDING Loodvrije superbenzine, met een
minimum octaangehalte van 95
(N.O.R.M.) en 85 (N.O.M.M.).
SXV 550 TECHNICAL DATA (ENGINE)
Version 55SX
ENGINE 4-stroke, twin-cylinder, 4 valves
per cylinder, single overhead
camshaft
Cylinder quantity 2
Total engine capacity 553 cc (33.75 cu in)
Bore/stroke 80 mm / 55.0 mm (3.15 in / 2.16 in)
Compression ratio 12.5 ± 0.5
Ignition electronic
Engine revs at idle speed 1800 ÷ 2000 rpm
Clutch multiple-disc oil-bathed clutch
TECHNISCHE GEGEVENS SXV 550 (MOTOR)
Model 55SX
MOTOR bicilindrisch 4-takt met 4 kleppen
per cilinder, monoas met nokken in
de kop
Aantal cilinders 2
Complessieve cilinderinhoud 553 cc (33.75 cu in)
Cilinderdiameterboring/loop 80 mm / 55,0 mm (3.15 in / 2.16 in)
Compresieverhouding 12,5 ± 0,5
START Elektrisch
Toerental van de motor bij het
minimumregime
1800 ÷ 2000 toeren/min (tpm)
Koppeling Multischijf in oliebad
127
5 Technical data / 5 Technische gegevens

Lubrication system Separate twin-sump lubrication
system with external reservoir
AIR FILTER With dry cartridge filter
Cooling Fluid
Gearbox mechanical, 5 speeds with foot
lever on the left hand side of the
engine
Gear ratio Primary: 22/56 = 1 : 2.545
Final: 16/46 = 1 : 2.875
1st 13/30 = 1: 2,307 (secondary)
1: 16,888 (total)
2nd 15/27 = 1 : 1.800 (secondary)
1: 13.172 (total)
3rd 16/23 = 1 : 1.437 (secondary)
1: 10.519 (total)
4th 20/23 = 1 : 1.150 (secondary)
1: 8.415 (total)
5th 21/21 = 1 : 1.000 (secondary)
1: 7.318 (total)
Transmission chain endless (without master link) and
with sealed links
FUEL SUPPLY SYSTEM electronic injection
Mixer Ø 40 mm (1.57 in)
Smeersysteem Dubbele gescheiden smering met
externe tank
LUCHTFILTER Met filterend droog patroon
Koeling Met vloeistof
VERSNELLINGSBAK mechanisch met 5 versnellingen
met pedaalcommando op de linker
kant van de motor
Transmissieverhouding Primaire: 22/56 = 1: 2,545
Eind: 16/46= 1: 2,875
1° 13/30 = 1: 2,307 (secundaire)
1: 16,888 (totale)
2° 15/27= 1: 1,800 (secundaire)
1: 13,172 (totale)
3° 16/23= 1: 1,437 (secundaire)
1: 10,519 (totale)
4° 20/23= 1: 1,150 (secundaire)
1: 8,415 (totale)
5° 21/21= 1: 1,000 (secundaire)
1: 7,318 (totale)
Transmissieketting zonder einde (zonder
koppelingsschakel) en met
verzegelde schakels
VOEDINGSSYSTEEM elektronische injectie
Diffusor Ø 40 mm (1.57 in)
128
5 Technical data / 5 Technische gegevens

FUEL SUPPLY premium unleaded petrol,
minimum octane rating of 95
(NORM) and 85 (NOMM)
VOEDING Loodvrije superbenzine, met een
minimum octaangehalte van 95
(N.O.R.M.) en 85 (N.O.M.M.).
ELECTRICAL COMPONENTS
IGNITION Electronic ignition
Standard spark plug NGK CR8EB
Spark plug electrode gap 0.7 ± 0.8 mm (0.028 in ± 0.031 in)
Resistance 5 kΩ
BATTERY 12V- 6 Ah
Main fuse 30 A
Auxiliary fuses 5A; 15A; 20A
(Permanent-magnet) Generator 12V - 350W
Low-beam bulb 12V - 55W
High-beam bulb 12V - 60W
Front side light bulb 12V - 3W
Turn indicator bulb with micro-bulbs
License plate light bulb 12V - 5W
Tail light/stop light bulb LED
Instrument panel lighting bulb Led
Neutral gear warning light LED
Engine oil pressure warning light LED
ELEKTRISCHE ONDERDELEN
ONTSTEKING Elektronica
Standaardbougie NGK CR8EB
Elektrodenafstand van de bougies 0,7 - 0,8 mm (0.028 in - 0.031 in)
Weerstand 5 kΩ
ACCU 12V - 6Ah
Hoofdzekering 30 A
Secundaire zekeringen 5 A, 15 A, 20 A
Generator (met permanente
magneet)
12V - 350W
Lamp van het dimlicht 12V - 55W
Lamp van het groot licht 12V - 60W
Lamp van het voorste positielicht 12V - 3W
Lamp van het licht van de
richtingaanwijzers
Met microlampjes
Lamp van het nummerplaatlicht 12V - 5W
Lamp van het achterste
positielicht/stoplicht
Led
Lamp van de verlichting van het
dashboard
Led
129
5 Technical data / 5 Technische gegevens

Engine control system warning
light
LED
Low fuel warning light LED
High-beam warning light LED
Turn indicator warning light LED
Overrevving warning light LED
Controlelamp van de
versnellingsbak in vrij
Led
Controlelamp van de oliedruk van
de motor
Led
Controlelamp van het
controlesysteem van de motor
Led
Controlelamp van de
brandstofreserve
Led
Controlelamp van het groot licht Led
Controlelamp van de
richtingaanwijzers
Led
Controlelamp te hoog toerenaantal Led
130
5 Technical data / 5 Technische gegevens

SXV 450-550
Chap. 06
Programmed
maintenance
Hst. 06
Gepland onderhoud
131
Pagina laadt ...

Idle speed adjustment - Check
Gearbox oil - Change
Clutch control - Check and adjust
Coolant level in radiator and expansion tank - Check
Engine oil and engine oil filter - Change
Oil pipes - Check condition and position
Throttle cables - Adjustment
Cold-start key - Adjustment
Brake fluid level - Check
Brake pipes - Check condition and tightness
Brake system screws torque - Check
Light operation/direction
Electrical system operation - Check
Tyre condition and pressure - Check
Wheel bearings clearance - Check
Wheel spokes and rim coaxiality - Check tension
Tightening of wheel pin nuts and screws - Check
Engine mounting bolt torque - Check
Tightening of chassis screws and nuts - Check
Fork - Check for sealing and operation
Tightening of fork plates and feet screws - Check
Shock absorber pins tightening - Check
Shock absorber - Check for sealing and operation
Regeling van het minimum toerental - Controle
Olie van de versnellingsbak - Vervangen
Commando van de koppeling - Controle en registratie
Peil van de koelvloeistof van de radiator en het expansievat - Controle
Motorolie en filter van de motorolie - Vervanging
Bebuizing van de olie - Controle van de conditie, plaatsing
Gaskabels - Registratie
Toets voor de koude start - Registratie
Peil van de remvloeistof - Controle
Rembebuizing - Controle van de conditie en dichting
Sluiting van de bouten van de reminstallatie - Controle
Werking/richting van de lichten
Werking van de elektrische installatie - Controle
Conditie en spanning van de banden - Controle
Speling van de wielkussentjes - Controle
Spaken en coaxialiteit van de velgen - Controle van de spanning
Sluiting van de moeren en de bouten van de wielpinnen - Controle
Sluiting van de bevestigingsbouten van de motor - Controle
Sluiting van de moeren en de bouten van de wielen - Controle
Vork - Controle van de dichting en de werking
Sluiting van de bouten van de vorkplaten, vorkvoetjes - Controle
Sluiting van de pinnen van de schokdemper - Controle
Schokdemper - Controle van de dichting en de werking
133
6 Programmed maintenance / 6 Gepland onderhoud

Steering bearings - Check and adjust
Headstock dust guards - Cleaning
Drive chain - Tension
Sealed link, chain sprocket and chain guide - Check for wear
Chain - lubricate
Stuurinrichtingskussentjes - Controle en registratie
Stofkeerringen van de stuurinrichtingskop - Reiniging
Transmissieketting - Spanning
Verzegelde schakel, kettingkroon en kettingeleider - Controle van de
slijtage
Ketting - Smering
EVERY 3000 KM (1864 MILES)
Throttle body assembly bolt torque - check
Throttle bodies - Synchronisation
Air filter and filter case - Check and cleaning
Fuel lines - Check condition and position
Idle speed adjustment - Check
Gearbox oil - Change
Clutch springs - Check length
Clutch discs - Check for wear
Clutch control - Check and adjust
Coolant level in radiator and expansion tank - Check
System sealing - Check
Engine oil and engine oil filter - Change
Oil pipes - Check condition and position
Throttle cables - Adjustment
Cold-start key - Adjustment
ELKE 3000 KM (1864 MI)
Sluiting van de bouten van de vlindergroep - Controle
Vlinderrompen - Synchronisatie
Luchtfilter en filterkist - Controle en reiniging
Bebuizing van de benzine - Controle van de conditie, plaatsing
Regeling van het minimum toerental - Controle
Olie van de versnellingsbak - Vervangen
Veren van de koppeling - Controle van de lengte
Schijven van de koppeling - Controle van de slijtage
Commando van de koppeling - Controle en registratie
Peil van de koelvloeistof van de radiator en het expansievat - Controle
Dichting van de installatie - Controle
Motorolie en filter van de motorolie - Vervanging
Bebuizing van de olie - Controle van de conditie, plaatsing
Gaskabels - Registratie
Toets voor de koude start - Registratie
134
6 Programmed maintenance / 6 Gepland onderhoud

Brake fluid level - Check
Brake pipes - Check condition and tightness
Brake system screws torque - Check
Brake discs thickness - Check
Brake pad thickness - Check
Electrical contacts and switches - Treatment with contact activator spray
Battery connections - Greasing
Light operation/direction
Electrical system operation - Check
Exhaust system - Check for leaks and alignment
Tyre condition and pressure - Check
Wheel bearings - check
Wheel spokes and rim coaxiality - Check tension
Tightening of wheel pin nuts and screws - Check
Engine mounting bolt torque - Check
Tightening of chassis screws and nuts - Check
Fork dust guards - Cleaning
Fork struts - Bleed
Fork - Check for sealing and operation
Tightening of fork plates and feet screws - Check
Shock absorber pins tightening - Check
Shock absorber - Check for sealing and operation
Steering bearing clearance - Check
Peil van de remvloeistof - Controle
Rembebuizing - Controle van de conditie en dichting
Sluiting van de bouten van de reminstallatie - Controle
Dikte van de remschijven - Controle
Dikte van de pastilles - Controle
Elektrische contacten en schakelaars - Behandeling met
heractivatiespray
Aansluiting van de accu - Behandeling met vet
Werking/richting van de lichten
Werking van de elektrische installatie - Controle
Uitlaat - Controle van de dichting en de uitlijning
Conditie en spanning van de banden - Controle
Wielkussentjes - Controle
Spaken en coaxialiteit van de velgen - Controle van de spanning
Sluiting van de moeren en de bouten van de wielpinnen - Controle
Sluiting van de bevestigingsbouten van de motor - Controle
Sluiting van de moeren en de bouten van de wielen - Controle
Stofkeerringen van de vork - Reiniging
Benen van de vork - Ontluchting
Vork - Controle van de dichting en de werking
Sluiting van de bouten van de vorkplaten, vorkvoetjes - Controle
Sluiting van de pinnen van de schokdemper - Controle
Schokdemper - Controle van de dichting en de werking
135
6 Programmed maintenance / 6 Gepland onderhoud

Headstock dust guards - Cleaning
Drive chain - Tension
Sealed link, chain sprocket and chain guide - Check for wear
Steering bearings - Lubricate
Clutch lever pin - Lubricate
Throttle cables - Lubricate
Rider footrest bolts - Lubricate
Chain - lubricate
Rear suspension linkage system - Lubricate
Side stand bolt - Lubricate
Front wheel bolt and bearings - Lubricate
Rear fork bolt - Lubricate
Rear wheel bolt and bearings - Lubricate
Speling van de stuurinrichtingskussentjes - Controle
Stofkeerringen van de stuurinrichtingskop - Reiniging
Transmissieketting - Spanning
Verzegelde schakel, kettingkroon en kettingeleider - Controle van de
slijtage
Stuurinrichtingskussentjes - Smeren
Pin van de koppelingshendel - Smeren
Gaskabels - Smeren
Pinnen van de voetensteun van de bestuurder - Smeren
Ketting - Smering
Hefsystemen van de achterste ophanging - Smeren
Pin van de laterale standaard - Smeren
Pin en kussentjes van het voorwiel - Smeren
Pin van de achtervork - Smeren
Pin en kussentjes van het achterwiel - Smeren
EVERY 6000 KM (3728 MILES)
Paper air filter - Replacement
Spark plugs - Replacement
ELKE 6000 KM (3728 MI)
Luchtfilter van papier - Vervanging
Bougies - Vervanging
136
6 Programmed maintenance / 6 Gepland onderhoud

EVERY 9000 KM (5592 MILES)
Complete transmission - Check for wear
Pressure relief and non-return valve spring - Check
Cylinder liners - Check for wear
Connecting rods and main bushings - Check for wear
Start-up gears - Check for wear
Oil pump gears - Check
Head lubrication nozzles - Cleaning
Pistons and piston rings - Replacement
Piston pin - Check
Cam rockers - Radial check
Valve lifter - Check
Camshaft wear - Check
Camshaft bearings - Check
Valve seat sealing - Check
Valves - Check for wear
Valve clearance - Check and adjust
Valve guides - check for wear
Spring washers, caps, bowls - Check for wear
Chain tightener toothing - Check for wear
Valve springs - check length
Timing chain - Stretching measurement
ELKE 9000 KM (5592 MI)
Volledige versnellingsbak - Controle van de slijtage
Veer van de overdrukklep en de terugslagklep - Controle
Cilinderpijpen - Controle van de slijtage
Drijfstang- en bankkussenblokken - Controle van de slijtage
Raderwerken voor de start - Controle van de slijtage
Raderwerken van de oliepomp - Controle
Sproeiers voor de smering van de kop - Reiniging
Zuigers en elastische klemmen - Vervanging
Zuigerpen van de zuiger - Controle
Rollen van de balanceringen - Radiale controle
Kleplichter - Controle
Slijtage van de nokkenassen - Controle
Kussentjes van de nokkenassen - Controle
Dichting van de klepzitten - Controle
Kleppen - Controle van de slijtage
Kleppenspeling - Controle en registratie
Kleppengeleiders - Controle van de slijtage
Rondellen van de veerhouder, schijven, bekertjes - Controle van de
slijtage
Tanden van de kettingspanner - Controle van de slijtage
Veren van de kleppen - Controle van de lengte
Distributieketting - Meting van de verlenging
137
6 Programmed maintenance / 6 Gepland onderhoud

Drive chain sliders - Check for wear
Fuel pump - Check
Fork - Comprehensive maintenance
Fork oil - Replacement
Shock absorber - Comprehensive maintenance
Crankshaft and connecting rod bearing clearance - Check
Chain guide slider - Check for wear
Chain guide eye - Check for wear
Chain tightener roller - Check for wear
Chain tightener slider - Check for wear
Sleden van de transmissieketting - Controle van de slijtage
Benzinepomp - Controle
Vork - Volledig onderhoud
Olie van de vork - Vervanging
Schokdemper - Volledig onderhoud
Speling van de kussentjes van het drijfstangsysteem - Controle
Slede van de kettinggeleider - Controle van de slijtage
Oog van de kettinggeleider - Controle van de slijtage
Rol van de kettingspanner - Controle van de slijtage
Slede van de kettingspanner - Controle van de slijtage
EVERY YEAR
Brake fluid - Change
ELK JAAR
Remvloeistof - Vervangen
Periodic maintenance chart for scooters
in free version for hobby sports applica-
tions.
Kaart van het periodiek onderhoud voor
voertuigen in vrije versie voor sportief- en
hobbygebruik.
END OF RUN-IN PERIOD AND EVERY 3 HOURS OF OPERATION
Throttle body assembly bolt torque - check
Throttle bodies - Synchronisation
Air filter and filter case - Check and cleaning
EINDE VAN DE PROEFPERIODE, 3 UUR GEBRUIK
Sluiting van de bouten van de vlindergroep - Controle
Vlinderrompen - Synchronisatie
Luchtfilter en filterkist - Controle en reiniging
138
6 Programmed maintenance / 6 Gepland onderhoud

Fuel lines - Check condition and position
Idle speed adjustment - Check
Gearbox oil - Change
Clutch control - Check and adjust
Coolant level in radiator and expansion tank - Check
Engine oil and engine oil filter - Change
Oil pipes - Check condition and position
Throttle cables - Adjustment
Cold-start key - Adjustment
Brake fluid level - Check
Brake pipes - Check condition and tightness
Brake system screws torque - Check
Light operation/direction
Electrical system operation - Check
Tyre condition and pressure - Check
Wheel bearings clearance - Check
Wheel spokes and rim coaxiality - Check tension
Tightening of wheel pin nuts and screws - Check
Engine mounting bolt torque - Check
Tightening of chassis screws and nuts - Check
Fork - Check for sealing and operation
Tightening of fork plates and feet screws - Check
Shock absorber pins tightening - Check
Bebuizing van de benzine - Controle van de conditie, plaatsing
Regeling van het minimum toerental - Controle
Olie van de versnellingsbak - Vervangen
Commando van de koppeling - Controle en registratie
Peil van de koelvloeistof van de radiator en het expansievat - Controle
Motorolie en filter van de motorolie - Vervanging
Bebuizing van de olie - Controle van de conditie, plaatsing
Gaskabels - Registratie
Toets voor de koude start - Registratie
Peil van de remvloeistof - Controle
Rembebuizing - Controle van de conditie en dichting
Sluiting van de bouten van de reminstallatie - Controle
Werking/richting van de lichten
Werking van de elektrische installatie - Controle
Conditie en spanning van de banden - Controle
Speling van de wielkussentjes - Controle
Spaken en coaxialiteit van de velgen - Controle van de spanning
Sluiting van de moeren en de bouten van de wielpinnen - Controle
Sluiting van de bevestigingsbouten van de motor - Controle
Sluiting van de moeren en de bouten van de wielen - Controle
Vork - Controle van de dichting en de werking
Sluiting van de bouten van de vorkplaten, vorkvoetjes - Controle
Sluiting van de pinnen van de schokdemper - Controle
139
6 Programmed maintenance / 6 Gepland onderhoud

Shock absorber - Check for sealing and operation
Steering bearings - Check and adjust
Headstock dust guards - Cleaning
Drive chain - Tension
Sealed link, chain sprocket and chain guide - Check for wear
Chain - lubricate
Schokdemper - Controle van de dichting en de werking
Stuurinrichtingskussentjes - Controle en registratie
Stofkeerringen van de stuurinrichtingskop - Reiniging
Transmissieketting - Spanning
Verzegelde schakel, kettingkroon en kettingeleider - Controle van de
slijtage
Ketting - Smering
EVERY 15 HOURS OF OPERATION
Throttle body assembly bolt torque - check
Throttle bodies - Synchronisation
Air filter and filter case - Check and cleaning
Fuel lines - Check condition and position
Idle speed adjustment - Check
Gearbox oil - Change
Clutch springs - Check length
Clutch discs - Check for wear
Clutch control - Check and adjust
Coolant level in radiator and expansion tank - Check
System sealing - Check
Engine oil and engine oil filter - Change
Oil pipes - Check condition and position
Throttle cables - Adjustment
ELKE 15 GEBRUIKSUREN
Sluiting van de bouten van de vlindergroep - Controle
Vlinderrompen - Synchronisatie
Luchtfilter en filterkist - Controle en reiniging
Bebuizing van de benzine - Controle van de conditie, plaatsing
Regeling van het minimum toerental - Controle
Olie van de versnellingsbak - Vervangen
Veren van de koppeling - Controle van de lengte
Schijven van de koppeling - Controle van de slijtage
Commando van de koppeling - Controle en registratie
Peil van de koelvloeistof van de radiator en het expansievat - Controle
Dichting van de installatie - Controle
Motorolie en filter van de motorolie - Vervanging
Bebuizing van de olie - Controle van de conditie, plaatsing
Gaskabels - Registratie
140
6 Programmed maintenance / 6 Gepland onderhoud

Cold-start key - Adjustment
Brake fluid level - Check
Brake pipes - Check condition and tightness
Brake system screws torque - Check
Brake discs thickness - Check
Brake pad thickness - Check
Electrical contacts and switches - Treatment with contact activator spray
Battery connections - Greasing
Light operation/direction
Electrical system operation - Check
Exhaust system - Check for leaks and alignment
Tyre condition and pressure - Check
Wheel bearings - check
Wheel spokes and rim coaxiality - Check tension
Tightening of wheel pin nuts and screws - Check
Engine mounting bolt torque - Check
Tightening of chassis screws and nuts - Check
Fork dust guards - Cleaning
Fork struts - Bleed
Fork - Check for sealing and operation
Tightening of fork plates and feet screws - Check
Shock absorber pins tightening - Check
Shock absorber - Check for sealing and operation
Toets voor de koude start - Registratie
Peil van de remvloeistof - Controle
Rembebuizing - Controle van de conditie en dichting
Sluiting van de bouten van de reminstallatie - Controle
Dikte van de remschijven - Controle
Dikte van de pastilles - Controle
Elektrische contacten en schakelaars - Behandeling met
heractivatiespray
Aansluiting van de accu - Behandeling met vet
Werking/richting van de lichten
Werking van de elektrische installatie - Controle
Uitlaat - Controle van de dichting en de uitlijning
Conditie en spanning van de banden - Controle
Wielkussentjes - Controle
Spaken en coaxialiteit van de velgen - Controle van de spanning
Sluiting van de moeren en de bouten van de wielpinnen - Controle
Sluiting van de bevestigingsbouten van de motor - Controle
Sluiting van de moeren en de bouten van de wielen - Controle
Stofkeerringen van de vork - Reiniging
Benen van de vork - Ontluchting
Vork - Controle van de dichting en de werking
Sluiting van de bouten van de vorkplaten, vorkvoetjes - Controle
Sluiting van de pinnen van de schokdemper - Controle
141
6 Programmed maintenance / 6 Gepland onderhoud

Steering bearing clearance - Check
Headstock dust guards - Cleaning
Drive chain - Tension
Sealed link, chain sprocket and chain guide - Check for wear
Steering bearings - Lubricate
Clutch lever pin - Lubricate
Throttle cables - Lubricate
Rider footrest bolts - Lubricate
Chain - lubricate
Rear suspension linkage system - Lubricate
Side stand bolt - Lubricate
Front wheel bolt and bearings - Lubricate
Rear fork bolt - Lubricate
Rear wheel bolt and bearings - Lubricate
Schokdemper - Controle van de dichting en de werking
Speling van de stuurinrichtingskussentjes - Controle
Stofkeerringen van de stuurinrichtingskop - Reiniging
Transmissieketting - Spanning
Verzegelde schakel, kettingkroon en kettingeleider - Controle van de
slijtage
Stuurinrichtingskussentjes - Smeren
Pin van de koppelingshendel - Smeren
Gaskabels - Smeren
Pinnen van de voetensteun van de bestuurder - Smeren
Ketting - Smering
Hefsystemen van de achterste ophanging - Smeren
Pin van de laterale standaard - Smeren
Pin en kussentjes van het voorwiel - Smeren
Pin van de achtervork - Smeren
Pin en kussentjes van het achterwiel - Smeren
EVERY 60 HOURS OF OPERATION
Paper air filter - Replacement
Spark plugs - Replacement
ELKE 60 GEBRUIKSUREN
Luchtfilter van papier - Vervanging
Bougies - Vervanging
142
6 Programmed maintenance / 6 Gepland onderhoud

EVERY 90 HOURS OF OPERATION
Complete transmission - Check for wear
Pressure relief and non-return valve spring - Check
Cylinder liners - Check for wear
Connecting rods and main bushings - Check for wear
Start-up gears - Check for wear
Oil pump gears - Check
Head lubrication nozzles - Cleaning
Pistons and piston rings - Replacement
Piston pin - Check
Cam rockers - Radial check
Valve lifter - Check
Camshaft wear - Check
Camshaft bearings - Check
Valve seat sealing - Check
Valves - Check for wear
Valve clearance - Check and adjust
Valve guides - check for wear
Spring washers, caps, bowls - Check for wear
Chain tightener toothing - Check for wear
Valve springs - check length
Timing chain - Stretching measurement
ELKE 90 GEBRUIKSUREN
Volledige versnellingsbak - Controle van de slijtage
Veer van de overdrukklep en de terugslagklep - Controle
Cilinderpijpen - Controle van de slijtage
Drijfstang- en bankkussenblokken - Controle van de slijtage
Raderwerken voor de start - Controle van de slijtage
Raderwerken van de oliepomp - Controle
Sproeiers voor de smering van de kop - Reiniging
Zuigers en elastische klemmen - Vervanging
Zuigerpen van de zuiger - Controle
Rollen van de balanceringen - Radiale controle
Kleplichter - Controle
Slijtage van de nokkenassen - Controle
Kussentjes van de nokkenassen - Controle
Dichting van de klepzitten - Controle
Kleppen - Controle van de slijtage
Kleppenspeling - Controle en registratie
Kleppengeleiders - Controle van de slijtage
Rondellen van de veerhouder, schijven, bekertjes - Controle van de
slijtage
Tanden van de kettingspanner - Controle van de slijtage
Veren van de kleppen - Controle van de lengte
Distributieketting - Meting van de verlenging
143
6 Programmed maintenance / 6 Gepland onderhoud

Drive chain sliders - Check for wear
Fuel pump - Check
Fork - Comprehensive maintenance
Fork oil - Replacement
Shock absorber - Comprehensive maintenance
Crankshaft and connecting rod bearing clearance - Check
Chain guide slider - Check for wear
Chain guide eye - Check for wear
Chain tightener roller - Check for wear
Chain tightener slider - Check for wear
Sleden van de transmissieketting - Controle van de slijtage
Benzinepomp - Controle
Vork - Volledig onderhoud
Olie van de vork - Vervanging
Schokdemper - Volledig onderhoud
Speling van de kussentjes van het drijfstangsysteem - Controle
Slede van de kettinggeleider - Controle van de slijtage
Oog van de kettinggeleider - Controle van de slijtage
Rol van de kettingspanner - Controle van de slijtage
Slede van de kettingspanner - Controle van de slijtage
EVERY YEAR
Brake fluid - Change
ELK JAAR
Remvloeistof - Vervangen
Periodic maintenance chart for scooters
in free version for competitive sports ap-
plications.
Kaart van het periodiek onderhoud voor
voertuigen in vrije versie voor wedstrijd-
gebruik.
END OF RUN-IN PERIOD AND EVERY 3 HOURS OF OPERATION
Throttle body assembly bolt torque - check
Throttle bodies - Synchronisation
Air filter and filter case - Check and cleaning
EINDE VAN DE PROEFPERIODE, 3 UUR GEBRUIK
Sluiting van de bouten van de vlindergroep - Controle
Vlinderrompen - Synchronisatie
Luchtfilter en filterkist - Controle en reiniging
144
6 Programmed maintenance / 6 Gepland onderhoud

Fuel lines - Check condition and position
Idle speed adjustment - Check
Gearbox oil - Change
Clutch control - Check and adjust
Coolant level in radiator and expansion tank - Check
Engine oil and engine oil filter - Change
Oil pipes - Check condition and position
Throttle cables - Adjustment
Cold-start key - Adjustment
Brake fluid level - Check
Brake pipes - Check condition and tightness
Brake system screws torque - Check
Light operation/direction
Electrical system operation - Check
Tyre condition and pressure - Check
Wheel bearings clearance - Check
Wheel spokes and rim coaxiality - Check tension
Tightening of wheel pin nuts and screws - Check
Engine mounting bolt torque - Check
Tightening of chassis screws and nuts - Check
Fork - Check for sealing and operation
Tightening of fork plates and feet screws - Check
Shock absorber pins tightening - Check
Bebuizing van de benzine - Controle van de conditie, plaatsing
Regeling van het minimum toerental - Controle
Olie van de versnellingsbak - Vervangen
Commando van de koppeling - Controle en registratie
Peil van de koelvloeistof van de radiator en het expansievat - Controle
Motorolie en filter van de motorolie - Vervanging
Bebuizing van de olie - Controle van de conditie, plaatsing
Gaskabels - Registratie
Toets voor de koude start - Registratie
Peil van de remvloeistof - Controle
Rembebuizing - Controle van de conditie en dichting
Sluiting van de bouten van de reminstallatie - Controle
Werking/richting van de lichten
Werking van de elektrische installatie - Controle
Conditie en spanning van de banden - Controle
Speling van de wielkussentjes - Controle
Spaken en coaxialiteit van de velgen - Controle van de spanning
Sluiting van de moeren en de bouten van de wielpinnen - Controle
Sluiting van de bevestigingsbouten van de motor - Controle
Sluiting van de moeren en de bouten van de wielen - Controle
Vork - Controle van de dichting en de werking
Sluiting van de bouten van de vorkplaten, vorkvoetjes - Controle
Sluiting van de pinnen van de schokdemper - Controle
145
6 Programmed maintenance / 6 Gepland onderhoud

Shock absorber - Check for sealing and operation
Steering bearings - Check and adjust
Headstock dust guards - Cleaning
Drive chain - Tension
Sealed link, chain sprocket and chain guide - Check for wear
Chain - lubricate
Schokdemper - Controle van de dichting en de werking
Stuurinrichtingskussentjes - Controle en registratie
Stofkeerringen van de stuurinrichtingskop - Reiniging
Transmissieketting - Spanning
Verzegelde schakel, kettingkroon en kettingeleider - Controle van de
slijtage
Ketting - Smering
EVERY 15 HOURS OF OPERATION
Throttle body assembly bolt torque - check
Throttle bodies - Synchronisation
Air filter and filter case - Check and cleaning
Fuel lines - Check condition and position
Idle speed adjustment - Check
Gearbox oil - Change
Clutch springs - Check length
Clutch discs - Check for wear
Clutch control - Check and adjust
Coolant level in radiator and expansion tank - Check
System sealing - Check
Engine oil and engine oil filter - Change
Oil pipes - Check condition and position
Throttle cables - Adjustment
ELKE 15 GEBRUIKSUREN
Sluiting van de bouten van de vlindergroep - Controle
Vlinderrompen - Synchronisatie
Luchtfilter en filterkist - Controle en reiniging
Bebuizing van de benzine - Controle van de conditie, plaatsing
Regeling van het minimum toerental - Controle
Olie van de versnellingsbak - Vervangen
Veren van de koppeling - Controle van de lengte
Schijven van de koppeling - Controle van de slijtage
Commando van de koppeling - Controle en registratie
Peil van de koelvloeistof van de radiator en het expansievat - Controle
Dichting van de installatie - Controle
Motorolie en filter van de motorolie - Vervanging
Bebuizing van de olie - Controle van de conditie, plaatsing
Gaskabels - Registratie
146
6 Programmed maintenance / 6 Gepland onderhoud

Cold-start key - Adjustment
Brake fluid level - Check
Brake pipes - Check condition and tightness
Brake system screws torque - Check
Brake discs thickness - Check
Brake pad thickness - Check
Electrical contacts and switches - Treatment with contact activator spray
Battery connections - Greasing
Light operation/direction
Electrical system operation - Check
Exhaust system - Check for leaks and alignment
Tyre condition and pressure - Check
Wheel bearings - check
Wheel spokes and rim coaxiality - Check tension
Tightening of wheel pin nuts and screws - Check
Engine mounting bolt torque - Check
Tightening of chassis screws and nuts - Check
Fork dust guards - Cleaning
Fork struts - Bleed
Fork - Check for sealing and operation
Tightening of fork plates and feet screws - Check
Shock absorber pins tightening - Check
Shock absorber - Check for sealing and operation
Toets voor de koude start - Registratie
Peil van de remvloeistof - Controle
Rembebuizing - Controle van de conditie en dichting
Sluiting van de bouten van de reminstallatie - Controle
Dikte van de remschijven - Controle
Dikte van de pastilles - Controle
Elektrische contacten en schakelaars - Behandeling met
heractivatiespray
Aansluiting van de accu - Behandeling met vet
Werking/richting van de lichten
Werking van de elektrische installatie - Controle
Uitlaat - Controle van de dichting en de uitlijning
Conditie en spanning van de banden - Controle
Wielkussentjes - Controle
Spaken en coaxialiteit van de velgen - Controle van de spanning
Sluiting van de moeren en de bouten van de wielpinnen - Controle
Sluiting van de bevestigingsbouten van de motor - Controle
Sluiting van de moeren en de bouten van de wielen - Controle
Stofkeerringen van de vork - Reiniging
Benen van de vork - Ontluchting
Vork - Controle van de dichting en de werking
Sluiting van de bouten van de vorkplaten, vorkvoetjes - Controle
Sluiting van de pinnen van de schokdemper - Controle
147
6 Programmed maintenance / 6 Gepland onderhoud

Steering bearing clearance - Check
Headstock dust guards - Cleaning
Drive chain - Tension
Sealed link, chain sprocket and chain guide - Check for wear
Steering bearings - Lubricate
Clutch lever pin - Lubricate
Throttle cables - Lubricate
Rider footrest bolts - Lubricate
Chain - lubricate
Rear suspension linkage system - Lubricate
Side stand bolt - Lubricate
Front wheel bolt and bearings - Lubricate
Rear fork bolt - Lubricate
Rear wheel bolt and bearings - Lubricate
Schokdemper - Controle van de dichting en de werking
Speling van de stuurinrichtingskussentjes - Controle
Stofkeerringen van de stuurinrichtingskop - Reiniging
Transmissieketting - Spanning
Verzegelde schakel, kettingkroon en kettingeleider - Controle van de
slijtage
Stuurinrichtingskussentjes - Smeren
Pin van de koppelingshendel - Smeren
Gaskabels - Smeren
Pinnen van de voetensteun van de bestuurder - Smeren
Ketting - Smering
Hefsystemen van de achterste ophanging - Smeren
Pin van de laterale standaard - Smeren
Pin en kussentjes van het voorwiel - Smeren
Pin van de achtervork - Smeren
Pin en kussentjes van het achterwiel - Smeren
EVERY 30 HOURS OF OPERATION
Paper air filter - Replacement
Spark plugs - Replacement
ELKE 30 GEBRUIKSUREN
Luchtfilter van papier - Vervanging
Bougies - Vervanging
148
6 Programmed maintenance / 6 Gepland onderhoud

EVERY 75 HOURS OF OPERATION
Complete transmission - Check for wear
Pressure relief and non-return valve spring - Check
Cylinder liners - Check for wear
Connecting rods and main bushings - Check for wear
Start-up gears - Check for wear
Oil pump gears - Check
Head lubrication nozzles - Cleaning
Pistons and piston rings - Replacement
Piston pin - Check
Cam rockers - Radial check
Valve lifter - Check
Camshaft wear - Check
Camshaft bearings - Check
Valve seat sealing - Check
Valves - Check for wear
Valve clearance - Check and adjust
Valve guides - check for wear
Spring washers, caps, bowls - Check for wear
Chain tightener toothing - Check for wear
Valve springs - check length
Timing chain - Stretching measurement
ELKE 75 GEBRUIKSUREN
Volledige versnellingsbak - Controle van de slijtage
Veer van de overdrukklep en de terugslagklep - Controle
Cilinderpijpen - Controle van de slijtage
Drijfstang- en bankkussenblokken - Controle van de slijtage
Raderwerken voor de start - Controle van de slijtage
Raderwerken van de oliepomp - Controle
Sproeiers voor de smering van de kop - Reiniging
Zuigers en elastische klemmen - Vervanging
Zuigerpen van de zuiger - Controle
Rollen van de balanceringen - Radiale controle
Kleplichter - Controle
Slijtage van de nokkenassen - Controle
Kussentjes van de nokkenassen - Controle
Dichting van de klepzitten - Controle
Kleppen - Controle van de slijtage
Kleppenspeling - Controle en registratie
Kleppengeleiders - Controle van de slijtage
Rondellen van de veerhouder, schijven, bekertjes - Controle van de
slijtage
Tanden van de kettingspanner - Controle van de slijtage
Veren van de kleppen - Controle van de lengte
Distributieketting - Meting van de verlenging
149
6 Programmed maintenance / 6 Gepland onderhoud

Drive chain sliders - Check for wear
Fuel pump - Check
Fork - Comprehensive maintenance
Fork oil - Replacement
Shock absorber - Comprehensive maintenance
Crankshaft and connecting rod bearing clearance - Check
Chain guide slider - Check for wear
Chain guide eye - Check for wear
Chain tightener roller - Check for wear
Chain tightener slider - Check for wear
Sleden van de transmissieketting - Controle van de slijtage
Benzinepomp - Controle
Vork - Volledig onderhoud
Olie van de vork - Vervanging
Schokdemper - Volledig onderhoud
Speling van de kussentjes van het drijfstangsysteem - Controle
Slede van de kettinggeleider - Controle van de slijtage
Oog van de kettinggeleider - Controle van de slijtage
Rol van de kettingspanner - Controle van de slijtage
Slede van de kettingspanner - Controle van de slijtage
EVERY YEAR
Brake fluid - Change
ELK JAAR
Remvloeistof - Vervangen
CAUTION
IF THE VEHICLE IS USED FOR COM-
PETITIONS, CARRY OUT THE 15-
HOUR SERVICE AFTER EVERY RACE.
NOTE
- MAINTENANCE OPERATIONS BY
THE SPECIALISED APRILIA WORK-
SHOP DO NOT REPLACE DAILY
CHECKING BY THE RIDER!
- IF DISTORTIONS, DAMAGES OR
WEAR EXCEEDING THE TOLERATED
LET OP
WANNEER MEN HET VOERTUIG
COMPETITIEGERICHT GEBRUIKT,
MOET DE SERVICEBEURT VAN NA 15
GEBRUIKSUREN NA ELKE WED-
STRIJD WORDEN UITGEVOERD.
N.B.
- DE ONDERHOUDSHANDELINGEN
VAN DE GESPECIALISEERDE APRI-
LIA GARAGE VERVANGEN DE DAGE-
LIJKSE CONTROLE VAN DE BE-
STUURDER NIET!
150
6 Programmed maintenance / 6 Gepland onderhoud
Pagina laadt ...

Product Description Specifications
AGIP BRAKE 4 Brake fluid As an alternative to the recommended fluid,
other fluids that meet or exceed the required
specifications may be used. SAE J1703,
NHTSA 116 DOT 4, ISO 4925 Synthetic fluid
AGIP MP GREASE Grease for bearings, joints, couplings and
levers
Alternatively to the recommended product, use
top-branded grease for roller bearings, useful
temperature range: -30°C...+140°C (-22°F...
+284°F), drop point: 150°C...230°C (302°F...
446°F), high anticorrosive protection, good
water and rust resistance.
AGIP FORK 10W Fork oil SAE 10W
TABEL VAN DE AANBEVOLEN PRODUCTEN SXV 450 - 550
Product Beschrijving Kenmerken
AGIP RACING 4T 10W-60 Motorolie Gebruik merkolies met conforme of hogere
prestaties dan de specifieken CCMC G-4 A.P.I.
SG. SAE 10W-60
AGIP RACING 4T 10W-60 Olie van de versnellingsbak -
AGIP PERMANENT SPEZIAL Koelvloeistof Biologisch afbreekbare koelvloeistof,
gebruiksklaar, met "long life"-technologie en -
kenmerken (rood). Verzekert een bescherming
tegen vriestemperaturen tot -40° (-40°F).
Beantwoordt aan de norm CUNA 956-16.
AGIP BRAKE 4 remvloeistof In plaats van de aanbevolen vloeistof kan men
vloeistoffen gebruiken met conforme of hogere
prestaties dan de specifieken. Synthetische
vloeistof SAE J1703, NHTSA 116 DOT 4, ISO
4925
152
6 Programmed maintenance / 6 Gepland onderhoud

Product Beschrijving Kenmerken
AGIP MP GREASE Vet voor kussentjes, koppelingen,
knooppunten en hefsystemen
In plaats van het aanbevolen product, gebruikt
men merkvet voor draaiende kussentjes, met
bruikbaar temperatuursveld -30°C...+140°C
(-22°F...+284°F), druppelpunt 150°C...230°C
(302°F...446°F), hoge
anticorrosiebescherming, goede weerstand
tegen water en oxidatie.
AGIP FORK 10W Olie van de vork SAE 10W
153
6 Programmed maintenance / 6 Gepland onderhoud
Pagina laadt ...
Pagina laadt ...
Pagina laadt ...
Pagina laadt ...
Pagina laadt ...

TREFWOORDENREGISTER
A
ACCU: 14, 100
B
Banden: 78
BOUGIE: 80
Brandstof: 10
C
Claxon: 36
D
Display: 30
I
Identificatie: 40
K
Ketting: 117–120
Koelvloeistof: 11, 87
Koplamp: 106
L
Luchtfilter: 85
M
Motorolie: 12, 70, 73
O
Onderhoud: 69, 131, 132
R
Richtingaanwijzers: 37
S
Schijfrem: 107
Standaard: 62
Start: 59
Stuurslot: 36
T
Technische gegevens: 123
Z
Zadel: 39
Zekeringen: 101
159

THE VALUE OF SERVICE
Thanks to continuous technical updates and specific training programs on aprilia products, only aprilia Official Network mechanics know this vehicle fully and have the special tools necessary to carry
out maintenance and repair operations correctly.
The reliability of the vehicle also depends on its mechanical conditions. Checking the vehicle before riding, its regular maintenance and the use of Original aprilia Spare Parts only are essential factors!
For information about the nearest Official Dealer and/or Service Centre, consult the Yellow Pages or search directly on the inset map in our Official Website:
www.aprilia.com
Only aprilia Original Spare Parts ensure products already studied and tested during the vehicle design stage. All aprilia Original Spare Parts undergo quality control procedures to guarantee full reliability
and duration.
The descriptions and illustrations given in this publication are not binding; While the basic characteristics as described and illustrated in this manual remain unchanged, aprilia reserves the right, at any
time and without being required to update this publication beforehand, to make any changes to components, parts or accessories, which it considers necessary to improve the product or which are
required for manufacturing or construction reasons.
Not all versions/models shown in this publication are available in all Countries. The availability of individual versions/models should be confirmed with the official aprilia sales network.
© Copyright 2006- aprilia. All rights reserved. Reproduction of this publication in whole or in part is prohibited. aprilia - After sales service.
aprilia trademark is property of Piaggio & C. S.p.A.
DE WAARDE VAN DE ASSISTENTIE
Dankzij de voortdurende technische actualiseringen en de specifieke trainingsprogramma´s van de aprilia producten, kennen enkel de onderhoudsmonteurs van het Officiële Netwerk van aprilia
grondig dit voertuig, en beschikken ze over de nodige speciale uitrusting voor een correcte uitvoering van de handelingen van het onderhoud en de herstellingen.
De betrouwbaarheid van het voertuig hangt ook af van de mechanische condities van het voertuig. De controle vóór het rijden, het regelmatig onderhoud en het exclusief gebruik van de Originele
Reserveonderdelen van aprilia zijn essentiële factoren !
Voor informatie in verband met de dichtstbijzijnde Officiële dealer en/of Assisitentiedienst, raadpleegt men de Gouden Gids of zoekt men rechtstreeks op de geografische kaart op onze Officiële
Website:
www.aprilia.com
Enkel wanneer men Originele aprilia Reserveonderdelen aanvraagt, zal men een product verkrijgen dat reeds bestudeerd en getest werd tijdens de ontwerpfase van het voertuig. De Originele aprilia
Reserveonderdelen worden systematisch onderworpen aan kwaliteitscontroleprocedures, voor het garanderen van de volledige betrouwbaarheid en de duur.
De beschrijvingen en de illustraties in deze uitgave zijn niet bindend; Aprilia houdt zich derhalve het recht voor, behoudens de essentiële eigenschappen van het model dat hierin is beschreven en
geïllustreerd, op elk moment wijzigingen aan te brengen aan de organen of de onderdelen, of de levering van accessoires te actualiseren naar gelang zij dit nodig acht om het product te verbeteren, of
om te voldoen aan enige vereisten van constructieve of commerciële aard, zonder verplicht te zijn om tijdig deze uitgave bij te werken.
Niet alle versies in deze uitgave zijn in alle landen beschikbaar. De beschikbaarheid van de afzonderlijke versies moet gecontroleerd worden via het officiële verkoopsnetwerk van Aprilia.

© Copyright 2006- aprilia. Alle rechten voorbehouden. Het reproduceren van de inhoud, ook van delen hiervan, is verboden. aprilia - Dienst na verkoop.
Het merk Aprilia is eigendom van Piaggio & C. S.p.A.
Documenttranscriptie
BELANGRIJKE WAARSCHUWINGEN WAT BETREFT HET GEBRUIK VAN HET VOERTUIG EN DE WETTELIJKE GARANTIE De motoren Aprilia SXV werden geproduceerd, ontworpen en ontwikkeld voor sportief gebruik op een piste of om te crossen. Daarom moeten ze voldoen aan reglementen en de categorieën die actueel in gebruik zijn door de belangrijkste internationale motorbonden. Om een voortijdige slijtage en het eventueel stukgaan te vermijden, moeten de vooraf bepaalde handelingen die aangeduid worden in de tabel van het onderhoud, in deze handleiding, absoluut noodzakelijk gerespecteerd worden. Door het respecteren van de intervals en de handelingen van het onderhoud, uitgevoerd bij een dealer of erkende garage van Aprilia of bij de wedstrijd door een gekwalificeerd mechanicus, zullen de prestaties van het voertuig behouden blijven en zal ernstige schade vermeden worden. De motoren SXV worden niet opgevoerd geleverd, zodat ze in deze versie gehomologeerd zijn voor het gebruik op openbare wegen en gedekt zijn door de wettelijke garantie op voorwaarde dat de intervals en de handelingen van het onderhoud nauwkeurig gerespecteerd worden, en dat ze uitgevoerd worden bij een dealer of erkende garage van Aprilia, waar de servicebeurt genoteerd zal worden op het daarvoor bestemde garantieboekje. Deze voertuigen zijn niet geschikt voor weggebruik: de verhoudingen van de versnellingsbak, de koelinstallatie, de setting van de ophangingen, de reminstallatie en de kenmerken van de levering van de motor zijn geoptimaliseerd voor sportief gebruik, waar de omstandigheden en het type van gebruik zeer verschillen van de omstandigheden die zich voordoen op openbare wegen. Hier volgen enkele voorbeelden, die niet gelden voor alle gevallen, van enkele omstandigheden die de motor ernstig kunnen beschadigen: lang wachten bij een verkeerslicht, trajecten op snelwegen met de motor steeds aan het maximum toerental of het rijden achter wagens. Eender welke wijziging of geknoei aan het voertuig, en vooral voor het verhogen van de prestaties van de motor, maken dat het voertuig niet meer gehomologeerd is voor gebruik op de openbare weg, maar dat het enkel gebruikt mag worden in georganiseerde wedstrijden en met goedkeuring van de bevoegde instanties. Deze handelingen doen alle rechten op de wettelijke garantie vervallen. Voor uw veiligheid is het best dat enkel de originele reserveonderdelen en accessoires van Aprilia gebruikt worden. Aprilia kan niet aansprakelijk gesteld worden voor het gebruik van niet-originele onderdelen en voor de schade die hierdoor veroorzaakt wordt. APRILIA WIL U BEDANKEN omdat u één van haar producten heeft gekozen. Wij hebben deze handleiding opgesteld opdat u de kwaliteiten ervan ten volle kan waarderen. Wij raden aan om deze handleiding geheel door te lezen, voordat u met het voertuig gaat rijden. Het bevat informatie, raadgevingen en waarschuwingen in verband met het gebruik van uw voertuig; daarnaast zal u eigenschappen, bijzonderheden en handigheidjes ontdekken die u ervan zullen overtuigen dat u een juiste keuze heeft gemaakt. Wij zijn er zeker van dat indien u hier rekening mee zal houden, u makkelijk zal wennen aan uw nieuw voertuig, waar u lang naar volle tevredenheid gebruik van zal kunnen maken. Deze uitgave is een integrerend deel van het voertuig, en bij verkoop van dit laatste moet het worden overhandigd aan de nieuwe eigenaar. SXV 450-550 Ed. 03 2008 The instructions in this manual have been prepared to offer mainly a simple and clear guide to its use; This booklet also details routine maintenance procedures and regular checks that should be carried out on the vehicle at an authorised aprilia Dealer or Workshop. The booklet also contains instructions for simple repairs. Any operations not specifically described in this booklet require the use of special tools and/or particular technical knowledge: for these operations, please take your vehicle to an authorised aprilia Dealer or Workshop. De instructies in deze handleiding zijn voorbereid om vooral een eenvoudige en duidelijke leidraad te zijn voor het gebruik; men vindt eveneens de handelingen van het klein onderhoud en van de periodieke controles die uitgevoerd moeten worden op het voertuig, bij een Dealer of Erkende aprilia Garage. De handleiding bevat tevens instructies voor een aantal eenvoudige herstellingen. De herstellingen die niet uitgebreid in deze uitgave zijn beschreven, vereisen dat men over speciale gereedschappen en/of specifieke technische kennis beschikt; voor het uitvoeren van deze herstellingen raadt men aan om zich te wenden tot een Dealer of Erkende aprilia Garage. 4 Personal safety Persoonlijke veiligheid Failure to completely observe these instructions will result in serious risk of personal injury. Indien deze voorschriften niet of niet volledig worden opgevolgd, kan dit ernstig letsel aan personen tot gevolg hebben. Safeguarding the environment Bescherming van Sections marked with this symbol indicate the correct use of the vehicle to prevent damaging the environment. Geeft het juiste gedrag aan dat u aan moet houden zodat het gebruik van het voertuig geen schade aanricht aan de natuur. Vehicle intactness Staat van het voertuig The incomplete or non-observance of these regulations leads to the risk of serious damage to the vehicle and sometimes even the invalidity of the guarantee. Indien deze voorschriften niet of niet volledig worden opgevolgd kan dit ernstige schade aan het voertuig, en eventueel het vervallen van deze garantie tot gevolg hebben. The sings above are very important. They are used to highlight those parts of the booklet that should be read with particular care. As you can see, each sign consists of a different graphic symbol, making it quick and easy to locate the various topics. Before starting the engine, read this manual carefully, particularly the "SAFE RIDING" section. Your safety as well as other's does not only depend on the quickness of your reflexes and agility, but also on how well you know your vehicle, its efficiency and your knowledge of the rules for SAFE RIDING. For your safety, get to know your vehicle well so as to safely ride and master it in road traffic IMPORTANT This booklet is an integral part of the vehicle, and should the vehicle be sold, it must be transferred to the new owner. Bovengenoemde signalen zijn erg belangrijk. Ze hebben namelijk tot doel om de delen van het boekje aan te geven die u aandachtig door moet lezen. Zoals u ziet, bestaat ieder teken uit een ander grafisch symbool, zodat de bijbehorende onderwerpen meteen duidelijk kunnen worden gevonden in de verschillende delen. Vooraleer men de motor start, leest men aandachtig deze handleiding, en vooral de paragraaf "VEILIG RIJDEN". Uw veiligheid en die van anderen hangt niet enkel af van uw reflexen en vlugheid, maar ook van de kennis en de efficiëntie van het voertuig, en van de kennis van de fundamentele regels voor het VEILIG RIJDEN. We raden daarom aan om vertrouwd te raken met het voertuig, zodat u zich veilig en beheersd kan bewegen in het verkeer. BELANGRIJK Deze handleiding moet beschouwd worden als integrerend deel van het voertuig, en moet worden overhandigd bij de verkoop ervan. 5 INDEX INDEX GENERAL RULES.......................................................................... Carbon monoxide..................................................................... Fuel.......................................................................................... Hot components....................................................................... Coolant..................................................................................... Used engine oil and gearbox oil............................................... Brake and clutch fluid............................................................... Battery hydrogen gas and electrolyte....................................... Reporting of defects that affect safety...................................... VEHICLE......................................................................................... Arrangement of the main components......................................... Dashboard................................................................................... Analog instrument panel.............................................................. Light unit...................................................................................... Digital lcd display......................................................................... Key switch.................................................................................... Locking the steering wheel....................................................... Horn button.................................................................................. Switch direction indicators........................................................... High/low beam selector............................................................... Start-up button............................................................................. Engine stop switch....................................................................... Manual starter control.................................................................. Opening the saddle.................................................................. Identification................................................................................. USE................................................................................................. Checks......................................................................................... Refuelling..................................................................................... Rear shock absorbers adjustment............................................... Front fork adjustment................................................................... Running in.................................................................................... 9 10 10 11 11 12 13 14 15 21 23 25 26 26 30 35 36 36 37 37 38 38 39 39 40 43 44 47 49 52 55 ALGEMENE NORMEN..................................................................... Koolmonoxide............................................................................. Brandstof.................................................................................... Warme onderdelen..................................................................... Koelvloeistof............................................................................... Gebruikte motorolie en koppelingsolie....................................... Rem- en koppelingsvloeistof...................................................... Elektrolyt en waterstofgas van de accu...................................... Communicatie van de defecten die invloed hebben op de veiligheid......................................................................................... VOERTUING..................................................................................... Plaats van de hoofdcomponenten................................................. Legenda......................................................................................... Analoog instrumentenpaneel......................................................... Groep controlelampjes................................................................... Digitaal display............................................................................... Contactslot..................................................................................... Stuurslot vergrendelen............................................................... Drukknop claxon............................................................................ Schakelaar richtingaanwijzers....................................................... Lichtschakelaar.............................................................................. Startknop........................................................................................ Stopschakelaar motor.................................................................... Commando van de manuele starter............................................... Zadel openen............................................................................. Identificatie..................................................................................... GEBRUIK.......................................................................................... Controles........................................................................................ Tanken........................................................................................... Regulering achterdempers............................................................. Regulering voorvorken................................................................... 7 9 10 10 11 11 12 13 14 15 21 23 25 26 26 30 35 36 36 37 37 38 38 39 39 40 43 44 47 49 52 Starting up the engine.................................................................. 57 Difficult start up............................................................................ 59 Stopping the engine..................................................................... 61 Stand........................................................................................... 62 Safe driving.................................................................................. 63 Load............................................................................................. 68 MAINTENANCE.............................................................................. 69 Engine oil level............................................................................. 70 Engine oil change..................................................................... 73 Gearbox oil level.......................................................................... 75 Tyres............................................................................................ 78 Spark plug dismantlement........................................................... 80 Removing the air filter.................................................................. 85 Cooling fluid level......................................................................... 87 Checking the brake oil level......................................................... 91 Battery......................................................................................... 100 Fuses........................................................................................... 101 Lamps.......................................................................................... 104 Front light group........................................................................... 104 Headlight adjustment............................................................... 106 Front and rear disc brake............................................................. 107 Periods of inactivity...................................................................... 110 Cleaning the vehicle.................................................................... 112 Transport..................................................................................... 116 Transmission chain...................................................................... 116 Chain backlash check.............................................................. 117 Chain backlash adjustment...................................................... 118 Checking wear of chain, front and rear sprockets.................... 119 Chain lubrication and cleaning................................................. 120 TECHNICAL DATA......................................................................... 123 PROGRAMMED MAINTENANCE.................................................. 131 Scheduled maintenance table..................................................... 132 SPECIAL FITTINGS....................................................................... 155 Inrijden........................................................................................... 55 Starten des motors......................................................................... 57 Moeilijke start................................................................................. 59 Stoppen van de motor.................................................................... 61 Standaard...................................................................................... 62 Veilig rijden.................................................................................... 63 Lading............................................................................................ 68 ONDERHOUD................................................................................... 69 Peil motorolie................................................................................. 70 Vervanging van de motorolie...................................................... 73 Versnellingsbak oliepeil................................................................. 75 Banden........................................................................................... 78 Demonteren van de bougie............................................................ 80 Demonteren van het luchtfilter....................................................... 85 Peil koelvloeistof............................................................................ 87 Controle van het oliepeil van de remmen...................................... 91 Accu............................................................................................... 100 Zekeringen..................................................................................... 101 Lampjes......................................................................................... 104 Koplampset.................................................................................... 104 Afstellen van de koplamp........................................................... 106 Schijfrem voor en achter................................................................ 107 Stilstand van het voertuig............................................................... 110 Reinigen van het voertuig.............................................................. 112 Vervoer.......................................................................................... 116 Transmissieketting......................................................................... 116 Controle van de speling van de ketting...................................... 117 Regeling van de speling van de ketting...................................... 118 Controle van het gebruik van de ketting, het tandrad en kroon ................................................................................................... 119 Smering en reiniging van de ketting........................................... 120 TECHNISCHE GEGEVENS.............................................................. 123 GEPLAND ONDERHOUD................................................................ 131 Tabel gepland onderhoud.............................................................. 132 SPECIALE UITRUSTINGEN............................................................. 155 8 SXV 450-550 Chap. 01 General rules Hst. 01 Algemene normen 9 Carbon monoxide Koolmonoxide If you need to keep the engine running in order to perform a procedure, please ensure that you do so in an open or very well ventilated area. Never let the engine run in an enclosed area. If you do work in an enclosed area, make sure to use a smoke-extraction system. Wanneer het nodig is om de motor te doen werken om een handeling uit te voeren, controleert men of dit in een open ruimte of in een goed geventileerd lokaal gebeurt. Laat de motor nooit werken in een gesloten ruimte. Wanneer men in een gesloten ruimte werkt, gebruikt men een evacuatiesysteem voor de uitlaatgassen. CAUTION LET OP 1 General rules / 1 Algemene normen EXHAUST EMISSIONS CONTAIN CARBON MONOXIDE, A POISONOUS GAS WHICH CAN CAUSE LOSS OF CONSCIOUSNESS AND EVEN DEATH. DE UITLAATGASSEN BEVATTEN KOOLMONOXIDE, EEN GIFTIG GAS DAT BEWUSTELOOSHEID EN OOK DE DOOD KAN VEROORZAKEN. Fuel Brandstof CAUTION LET OP FUEL USED TO POWER INTERNAL COMBUSTION ENGINES IS HIGHLY FLAMMABLE AND CAN BECOME EXPLOSIVE UNDER SPECIFIC CONDITIONS. IT IS THEREFORE RECOMMENDED TO CARRY OUT REFUELLING AND MAINTENANCE PROCEDURES IN A VENTILATED AREA WITH THE ENGINE SWITCHED OFF. DO NOT SMOKE DURING REFUELLING DE BRANDSTOF DIE WORDT GEBRUIKT VOOR DE AANDRIJVING VAN DE ONTPLOFFINGSMOTOR IS UITERST BRANDBAAR EN KAN EXPLOSIEF WORDEN IN BEPAALDE OMSTANDIGHEDEN. VOER HET TANKEN EN DE ONDERHOUDSHANDELINGEN UIT IN EEN GEVENTILEERDE ZONE EN MET DE MOTOR UIT. ROOK NIET TIJDENS HET TANKEN EN IN DE NA- 10 DO NOT DISPERSE FUEL IN THE ENVIRONMENT. KEEP OUT OF THE REACH OF CHILDREN BIJHEID VAN BRANDSTOFDAMPEN, EN VERMIJDT ABSOLUUT CONTACT MET VRIJE VLAMMEN, VONKEN EN EENDER WELKE ANDER BRON DIE HET VLAM VATTEN OF EXPLODEREN ERVAN KAN VEROORZAKEN. LOOS DE BRANDSTOF NIET IN HET MILIEU. BUITEN BEREIK HOUDEN VAN KINDEREN Hot components Warme onderdelen The engine and the exhaust system components get very hot and remain in this condition for a certain time interval after the engine has been switched off. Before handling these components, make sure that you are wearing insulating gloves or wait until the engine and the exhaust system have cooled down. De motor en de onderelen van de uitlaatinstallatie worden zeer warm en blijven warm voor een zekere periode, ook nadat de motor wordt uitgezet. Vooraleer men deze onderdelen hanteert, draagt men isolerende handschoenen, of wacht men tot de motor en de uitlaatinstallatie zijn afgekoeld. Coolant Koelvloeistof The coolant contains ethylene glycol which, under certain conditions, can become flammable. When ethylene glycol burns, it produces an invisible flame which can nevertheless cause burns. De koelvloeistof bevat ethyleenglycol, wat in sommige omstandigheden ontvlambaar is. Wanneer het brandt, produceert ethylglycol onzichtbare vlammen, die toch brandwonden veroorzaken. CAUTION LET OP PAY ATTENTION NOT TO POUR COOLANT ON HOT ENGINE OR EX- LET OP OM GEEN KOELVLOEISTOF TE MORSEN OP DE HETE DELEN VAN 11 1 General rules / 1 Algemene normen AND NEAR FUEL VAPOURS, AVOIDING ANY CONTACT WITH NAKED FLAMES, SPARKS OR OTHER SOURCES WHICH MAY CAUSE THEM TO IGNITE OR EXPLODE. KEEP OUT OF THE REACH OF CHILDREN BATTERY LIQUID IS CORROSIVE. DO NOT POUR IT OR SPILL IT, PARTICULARLY ON PLASTIC COMPONENTS. ENSURE THAT THE ELECTROLYTIC ACID IS COMPATIBLE WITH THE BATTERY TO BE ACTIVATED. SLIKT, MOET MEN VEEL WATER OF MELK DRINKEN, DAARNA MAGNESIUMMELK OF VEGETALE OLIE DRINKEN, EN ONMIDDELLIJK EEN ARTS RAADPLEGEN. DE ACCU VERSPREIDT EXPLOSIEVE GASSEN, EN HET MOET DUS UIT DE BUURT WORDEN GEHOUDEN VAN VLAMMEN, VONKEN, SIGARETTEN EN EENDER WELKE ANDERE WARMTEBRON. VOORZIE EEN GEPASTE VERLUCHTING WANNEER MEN ONDERHOUD OF HET OPLADEN VAN DE ACCU UITVOERT. BUITEN BEREIK HOUDEN VAN KINDEREN DE VLOEISTOF VAN DE ACCU IS CORROSIEF. GIET ZE NIET UIT EN VERSPREIDT ZE NIET, VOORAL NIET OP DE PLASTIC DELEN. CONTROLEER OF HET ELEKTROLYTZUUR SPECIFIEK VOOR DE TE ACTIVEREN ACCU IS. Reporting of defects that affect safety GENERAL PRECAUTIONS AND INFORMATION When repairing, dismantling and reassembling the vehicle follow the recommendations reported below carefully. 15 Communicatie van de defecten die invloed hebben op de veiligheid ALGEMENE VOORZORGSMAATREGELEN EN INFORMATIE Wanneer men de herstelling, de demontage en hermontage van het voertuig uitvoert, moet men zich nauwgezet aan het volgende advies houden. 1 General rules / 1 Algemene normen ICAL ADVICE IMMEDIATELY. THE BATTERY RELEASES EXPLOSIVE GASES; KEEP IT AWAY FROM FLAMES, SPARKS, CIGARETTES OR ANY OTHER HEAT SOURCES. ENSURE ADEQUATE VENTILATION WHEN SERVICING OR RECHARGING THE BATTERY. BEFORE DISASSEMBLING COMPONENTS • Before dismantling components, remove dirt, mud, dust and foreign bodies from the vehicle. Use the special tools designed for this bike, as required. VÓÓR DE DEMONTAGE VAN DE ONDERDELEN • COMPONENTS REMOVAL • • 1 General rules / 1 Algemene normen • • • • • Do not loosen and/or tighten screws and nuts using pliers or other tools other than the especially designed wrench. Mark positions on all connection joints (pipes, cables, etc.) before separating them, and identify them with distinctive symbols. Each component needs to be clearly marked in order to be identified during assembly. Clean and wash the removed components carefully using a low-flammability detergent. Keep coupled parts together since they have "adjusted" to each other due to normal wear and tear. Some components must be used together or replaced altogether. Keep away from heat sources. DEMONTAGE VAN DE ONDERDELEN • • • • • • 16 Verwijder vuil, modder, stof en vreemde voorwerpen van het voertuig, vooraleer men de demontage van de onderdelen uitvoert. Gebruik, waar voorzien, de speciale gereedschappen die voor dit voertuig ontworpen werden. Los en/of sluit de bouten en de moeren niet door gebruik te maken van tangen of andere gereedschappen, maar gebruik steeds de speciale sleutel. Merk de posities op alle verbindingskoppelingen (buizen, kabels, enz.) vooraleer men ze scheidt, en identificeer ze met verschillende onderscheidende tekens. Elk stuk moet duidelijk gemerkt worden, zodat het tijdens de fase van de installatie geïdentificeerd kan worden. Reinig en was de gedemonteerde onderdelen zorgvuldig met een reinigingsmiddel met lage ontvlambaarheidsgraad. Hou de onderling gekoppelde delen bij elkaar, omdat het ene bij het andere "past" als gevolg van de normale slijtage. Sommige onderdelen moeten samen gebruikt worden of volledig vervangen worden. REASSEMBLING COMPONENTS CAUTION BEARINGS MUST BE ABLE TO ROTATE FREELY, WITHOUT JAMMING AND/OR NOISE, OTHERWISE THEY NEED REPLACING. • • • • • • • • Only use ORIGINAL APRILIA SPARE PARTS. Comply with lubricant and consumables usage guidelines. Lubricate parts (whenever possible) before reassembling them. When tightening nuts and screws, start from the ones with the largest section or from the internal ones, moving diagonally. Tighten nuts and screws in successive steps before applying the tightening torque. Always replace self-locking nuts, washers, sealing rings, circlips, O-rings, split pins and screws with new ones if their tread is damaged. When fitting bearings, make sure to lubricate them well. Check that each component is fitted correctly. After a repair or routine maintenance procedure, carry out pre17 Hou ze ver weg van warmtebronnen. HERMONTAGE VAN DE ONDERDELEN LET OP DE KUSSENTJES MOETEN VRIJ DRAAIEN, ZONDER WRIJVINGEN EN/ OF LAWAAI, ANDERS MOETEN ZE VERVANGEN WORDEN. • • • • • Gebruik enkel ORIGINELE RESERVEONDERDELEN van aprilia. Gebruik de aanbevolen smeermiddelen en verbruiksmaterialen. Smeer de delen (wanneer mogelijk) vooraleer men ze monteert. Bij het sluiten van de bouten en de moeren, begint men met diegene met de grootste diameter of met de interne, door diagonaal te werken. Voer het sluiten uit met opeenvolgende passages, vooraleer men het sluitkoppel toepast. Vervang steeds de zelfblokkerende moeren, de pakkingen, de dichtingsringen, de elastische ringen, de O-ringen (OR), de splitpennen en de bouten met andere nieuwe, wanneer ze schade aan de schroefdraad vertonen. 1 General rules / 1 Algemene normen • 1 General rules / 1 Algemene normen • ride checks and test the vehicle on private grounds or in an area with low traffic density. Clean all junction surfaces, oil guard rims and washers before refitting them. Smear a light layer of lithium-based grease on the oil guard rims. Reassemble the oil guard and the bearings with the brand or lot number facing outward (visible side). • • • • Wanneer men de kussentjes monteert, smeert men ze overvloedig. Controleer of elk onderdeel correct gemonteerd is. Na een herstellingshandeling of periodiek onderhoud, voert men de voorafgaande controles uit en test men het voertuig in een privé-zone of in een zone met weinig verkeer. Reinig alle koppelingsvlakken, de randen van de oliekeerringen en de pakkingen vóór de hermontage. Breng een laagje vet op basis van lithium aan op de randen van de oliekeerringen. Hermonteer de oliekeerringen en de kussentjes met het merk of het fabricatienummer naar de buitenkant gericht (zichtbare kant). ELECTRIC CONNECTORS ELEKTRISCHE CONNECTORS Electric connectors must be disconnected as described below as non-compliance with the procedure so described causes irreparable damage to both the connector and the cable harness: De elektrische connectors moeten als volgt worden losgemaakt, het niet respecteren van deze procedure leidt tot onherstelbare schade aan de connector en aan de bekabeling: Press the relevant safety hooks, if any. Indien aanwezig, drukt men op de speciale veiligheidskoppelingen. • • Grip the two connectors and disconnect them by pulling them in opposite directions. If there are signs of dirt, rust, humidity, etc., clean the connector 18 • Grijp de twee connectors vast en verwijder ze, door de ene van de andere in de tegenovergestelde richting te trekken. • • • • CAUTION TO DISCONNECT THE TWO CONNECTORS, DO NOT PULL THE CABLES. In aanwezigheid van vuil, roest, vochtigheid, enz, reinigt men zorgvuldig de binnenkant van de connector, door gebruik te maken van een persluchtstraal. Controleer of de kabels correct vastgeklemd zijn aan de interne terminals van de connectors. Plaats vervolgens de twee connectors, en controleer de correcte koppeling (wanneer tegenovergestelde koppelingen aanwezig zijn, hoort men een typische "klik"). NOTE LET OP THE TWO CONNECTORS CONNECT ONLY FROM ONE SIDE: CONNECT THEM THE RIGHT WAY ROUND. TREK NIET AAN DE KABELS OM DE TWEE CONNECTORS LOS TE MAKEN. N.B. DE TWEE CONNECTORS HEBBEN SLECHTS ÉÉN PLAATSINGSZIN, PLAATS ZE IN DE JUISTE ZIN OP DE KOPPELING. TIGHTENING TORQUE SLUITKOPPELS CAUTION LET OP DO NOT FORGET THAT THE TIGHTENING TORQUE OF ALL FASTENING ELEMENTS ON WHEELS, BRAKES, WHEEL SPINDLES AND OTHER SUSPENSION COMPONENTS PLAY A KEY ROLE IN ENSURING THE VEHICLE'S SAFETY AND MUST COMPLY WITH SPECIFIED VALUES. CHECK THE VERGEET NIET DAT DE SLUITKOPPELS VAN ALLE BEVESTIGINGSELEMENTEN OP WIELEN, REMMEN, WIELPINNEN EN ANDERE ONDERDELEN VAN DE OPHANGINGEN EEN FUNDAMENTELE ROL SPELEN VOOR HET GARANDEREN VAN DE VEILIGHEID VAN HET VOERTUIG, EN DAT ZE 19 1 General rules / 1 Algemene normen • internal parts carefully using a pressurised air jet. Make sure that the cables are correctly linked to the connector internal terminal ends. Then insert the two connectors making sure that they couple correctly (if the relevant hooks are provided, you will hear them "click" into place). SXV 450-550 Chap. 02 Vehicle Hst. 02 Voertuing 21 2 Vehicle / 2 Voertuing 02_02 Arrangement of the main components (02_01, 02_02) LEGEND Ieft side 1. 2. 3. 4. 5. 6. 7. Left coolant radiator Left rear-view mirror Fuel tank cap Fuel tank Battery Saddle Rear light 23 Plaats van de hoofdcomponenten (02_01, 02_02) LEGENDE linker kant 1. 2. 3. 4. 5. 6. Linker radiator koelvloeistof Linker achteruitkijkspiegeltje Dop van de brandstoftank Brandstoftank Accu Zadel 8. 9. 10. 11. 12. 13. 14. 15. Rear fork Transmission chain Rear left side Side stand Driver's left footrest Gear control lever Main fuse holder (30A) Left front side Right side KEY 7. 8. 9. 10. 11. 12. Achterlicht Achtervork Transmissieketting Linker zijplaatje achteraan Laterale standaard Linker voetensteun van de bestuurder 13. Commandohendel van de versnellingsbak 14. Hoofdzekeringenhouder (30A) 15. Linker zijplaatje vooraan LEGENDE rechter kant Right front side Right coolant radiator Coolant expansion tank cap Right rear-view mirror Air filter housing Secondary fuse holder Right rear side Pump with rear brake fluid reservoir 9. Driver's right footrest 10. Rear brake control lever 2 Vehicle / 2 Voertuing 1. 2. 3. 4. 5. 6. 7. 8. 24 1. Rechter zijplaatje vooraan 2. Rechter radiator koelvloeistof 3. Dop van het expansievat van de koelvloeistof 4. Rechter achteruitkijkspiegel 5. Luchtfilterdoos 6. Secundaire zekeringdoos 7. Rechter zijplaatje achteraan 8. Pomp met vloeistoftank van de achterrem 9. Rechter voetensteun van de bestuurder 10. Commandohendel van de achterrem 2 Vehicle / 2 Voertuing 02_03 Dashboard (02_03) Legenda (02_03) KEY Legende 1. 2. 3. 4. Left rear-view mirror Clutch control lever Instruments and gauges Ignition switch - steering lock (ON - OFF - LOCK) 5. Front brake lever 6. Right rear-view mirror 7. Throttle grip 25 1. Linker achteruitkijkspiegel 2. Commandohendel van de koppeling 3. Instrumenten en indicatoren 4. Schakelaar van de ontsteking / stuurslot (ON-OFF-LOCK) 5. Hendel van de voorrem 6. Rechter achteruitkijkspiegel 7. Gashandvat 02_04 Analog instrument panel (02_04) Analoog instrumentenpaneel (02_04) KEY Legende 1. MODE button 2. Neutral gear warning light (green) 3. Engine oil pressure warning light (red) 4. Engine control system warning light 5. Multifunctional digital display 6. Low fuel warning light, (orange) 7. High-beam warning light, (blue) 8. Turn indicator warning light (green) 9. Overrevving warning light Light unit Groep controlelampjes Turn indicator warning light Controlelamp van de richtingaanwijzers Flashes when the turning indication is activated 2 Vehicle / 2 Voertuing 1. Drukknop MODE 2. Controlelamp van de versnelling in vrij (groen) 3. Controlelamp van de druk van de motorolie (rood) 4. Controlelamp van het controlesysteem van de motor 5. Digitaal multifunctioneel display 6. Controlelamp van de brandstofreserve, (oranje) 7. Controlelamp van het groot licht, (blauw) 8. Controlelamp van de richtingaanwijzers (groen) 9. Controlelamp van het te hoog toerental Engine control system warning light It comes on when the ignition switch is set to ON and the engine in not switched on and performs the warning light activation test. If the warning light does not come on 26 Deze knippert wanneer het signaal in functie is Controlelamp van het controlesysteem van de motor Deze licht op, elke keer men de ontstekingsschakelaar in ON plaatst, en de motor staat niet aan, door op deze manier een werkingstest van de controlelamp uit te voeren. Wanneer de controlelamp tij- dens deze fase niet oplicht, wendt men zich tot een Officiële aprilia Dealer. CAUTION LET OP IF THE ENGINE CONTROL LIGHT «4» STAYS ON AFTER START-UP OR COMES ON DURING THE ENGINE'S NORMAL FUNCTIONING, THIS MEANS THAT THERE IS A FAULT IN THE START-UP/IGNITION SYSTEM. IN THIS EVENT, CONTACT AN OFFICIAL APRILIA DEALER AS SOON AS POSSIBLE. WANNEER DE CONTROLELAMP VAN DE CONTROLE VAN DE MOTOR «4» AANBLIJFT NA DE START, OF ZE LICHT OP TIJDENS DE NORMALE WERKING VAN DE MOTOR, WERD ER EEN ONREGELMATIGHEID VASTGESTELD IN HET ONTSTEKINGS- / VOEDINGSSYSTEEM. IN DIT GEVAL WENDT MEN ZICH ZO VLUG MOGELIJK TOT EEN OFFICIËLE APRILIA DEALER. High-beam warning light Controlelamp van het groot licht Comes on when the high beam light is activated or the high beam light is flashed. Deze licht op wanneer de lampen van de grote lichten geactiveerd zijn, of wanneer men de knippering van de grote lichten activeert. Low fuel warning light Controlelamp van de brandstofreserve Comes on when 2.2 ± 1 l (4 ± 1.8 in) of fuel are left in the fuel tank. 27 Deze licht op wanneer in de brandstoftank een hoevelheid brandstof overblijft van 2,2 ± 1 liter (4 ± 1.8 in). 2 Vehicle / 2 Voertuing at this stage, contact an Official aprilia Dealer. CAUTION LET OP AVOID DEPLETING THE FUEL RESERVE AT ALL COSTS, OR YOU WILL DAMAGE THE FUEL PUMP. VERMIJDT ABSOLUUT OM ZONDER BRANDSTOFRESERVE TE VALLEN, OMDAT ZO DE BRANDSTOFPOMP WORDT BESCHADIGD. Neutral gear switch warning light Comes on when neutral is selected. Controlelamp van de versnelling in vrij Deze licht op wanneer de versnellingsbak zich in de vrijpositie bevindt. Engine oil pressure warning light It comes on when the ignition switch is set to ON and the engine in not switched on and performs the warning light activation test. If the warning light does not come on at this stage, contact an Official aprilia Dealer. Controlelamp van de oliedruk van de motor Deze licht op, elke keer men de ontstekingsschakelaar in ON plaatst, en de motor staat niet aan, door op deze manier een werkingstest van de controlelamp uit te voeren. Wanneer de controlelamp tijdens deze fase niet oplicht, wendt men zich tot een Officiële aprilia Dealer. CAUTION 2 Vehicle / 2 Voertuing LET OP IF THE ENGINE OIL PRESSURE WARNING LIGHT «3» STAYS ON AFTER START-UP OR COMES ON DURING THE ENGINE'S NORMAL OPERATION, THIS MEANS THAT THE ENGINE OIL PRESSURE IN THE CIRCUIT IS TOO LOW. IN THIS EVENT, STOP THE ENGINE AT ONCE AND CONTACT AN OFFICIAL APRILIA DEALER. 28 WANNEER DE CONTROLELAMP VAN DE DRUK VAN DE MOTOROLIE «3» AANBLIJFT NA DE START, OF ZE LICHT OP TIJDENS DE NORMALE WERKING VAN DE MOTOR, IS DE DRUK VAN DE MOTOROLIE IN HET CIRCUIT ONVOLDOENDE. IN DIT GEVAL LEGT MEN ONMIDDELLIJK DE MOTOR STIL, EN WENDT MEN ZICH Overrevving warning light It flashes when the activation threshold (maximum rev. number) programmed by the user is crossed. Controlelamp van het te hoog toerental Deze knippert wanneer de activatielimiet (maximum toerental) wordt overschreden, die ingesteld is door de gebruiker. Multifunctional digital display Speedometer (km/h - MPH) Displays driving speed in three digits and in real time. Digitaal multifunctioneel display Snelheidsmeter (km/h - MPH) Visualiseert de onmiddellijke rijsnelheid op 3 cijfers. Odometer km/mi Displays the partial or total number of kilometres/miles covered Kilometerteller / Mijlenteller Visualiseert het partieel of totaal aantal afgelegde kilometers of mijlen Rpm indicator (rpm) Displays the number of engine's rpms. Toerenteller (toeren/min - tpm) Duidt het toerental per minuut van de motor aan. CAUTION DO NOT EXCEED THE ENGINE'S MAXIMUM SPEED, (SEE RUNNING IN) LET OP OVERSCHRIJDT HET MAXIMUM VERMOGENSREGIME VAN DE MOTOR NIET, RAADPLEEG (PROEFPERIODE) Clock Displays hours and minutes, depending on the setting. Klok Visualiseert het uur en de minuten op basis van de voorinstellingen. Battery voltage Accuspanning Displays the battery charge status in Volt. Visualiseert de staat van lading van de accu in Volt. 29 2 Vehicle / 2 Voertuing TOT EEN OFFICIËLE APRILIA DEALER. 02_05 Battery voltage Displays the battery's charge status in Volt. Accuspanning Visualiseert de staat van de lading van de accu in Volt. Digital lcd display (02_05, 02_06, 02_07, 02_08, 02_09, 02_10, 02_11, 02_12, 02_13, 02_14, 02_15, 02_16) Digitaal display (02_05, 02_06, 02_07, 02_08, 02_09, 02_10, 02_11, 02_12, 02_13, 02_14, 02_15, 02_16) CONTROLS 1. MODE button Display and adjust (only works when the vehicle is at a standstill). COMMANDO'S 1 Drukknop MODE; voor het visualiseren en het regelen (werkt enkel wanneer het voertuig stilstaat). 2 SCROLL button; Visualise and adjust all functions except time. 2 Drukknop SCROLL; voor het visualiseren en het regelen van alle functies, behalve het uur. By turning the ignition key in the «ON» position, the following indicators are lit on the instrument panel for 3 seconds: • • • All warning lights; Backlighting; All segments on the multifunctional digital display. 2 Vehicle / 2 Voertuing 02_06 Immediately after the initial check is performed, the multifunctional display shows the current battery charge status, then the last values displayed on the active screen before the vehicle was last switched off. ODO • INSTANTANEOUS SPEED (area A) 30 Door de ontstekingssleutel in positie «ON» te draaien, lichten deze op voor 3 seconden op het dashboard: • • • Alle controlelampen; De retroverlichting; Op het digitaal multifunctioneel display alle segmenten. Na de beginceck zal het multifunctioneel display onmiddellijk de huidige waarde van de staat van de acculading aanduiden, om daarna over te gaan naar de visualisering van de gemeten grootten, in verband met het scherm dat actief was bij de laatste uitschakeling HODO 02_07 02_08 02_09 TOTAL ODOMETER (area B) GRAPHIC RPM INDICATOR, operational (area C) • • • ONMIDDELLIJKE SNELHEID (zone A) HODOGRAM TOTAAL (zone B) GRAFISCHE TOERENTELLER, werkend (zone C) TRIP The TRIP configuration displays partial journey information. TRIP In de configuratie TRIP worden de partiele gegevens van de reis getoond. To select the TRIP configuration, press the MODE button when the vehicle is at a standstill, whereas press the SCROLL button when the vehicle is in motion: the ODOMETER INDICATION goes from TOTAL to PARTIAL. Om de configuratie TRIP te selecteren, met de motor stil drukt men op de drukknop MODE, met de motor in beweging drukt men op de drukknop SCROLL, de aanduiding van de HODOGRAM TOTAAL gaat over naar PARTIEEL. By pressing the MODE button again when the vehicle is at a standstill or the SCROLL button when it is in motion, the PARTIAL ODOMETER indication is substituted by the AVERAGE SPEED (AVS) recorded for the journey. Door opnieuw op de drukknop MODE te drukken met de motor uit, of met de drukknop SCROLL met de motor in beweging, wordt de aanduiding van de HODOGRAM PARTIEEL vervangen met de waarde van de GEMIDDELDE SNELHEID (AVS), berekend tijdens de reis. To reset the PARTIAL ODOMETER and the relevant AVERAGE SPEED value (AVS), press the MODE or the SCROLL buttons for more than six seconds when the vehicle is at a standstill. After this time interval has elapsed, the value displayed in area B are replaced by four horizontal dashes. When the button is released, the dashes are replaced by four noughts (000.0). Om de tellers van HODOGRAM PARTIEEL en de overeenkomstige waarde GEMIDDELDE SNELHEID (AVS) op nul te stellen, drukt men met de motor stil voor langer dan vijf seconden op de drukknop MODE of op de drukknop SCROLL, hierna wordt op het display in zone B de gevisualiseerde waarde vervangen door vier horizontale streepjes. Nadat men de drukknop loslaat, worden de streepjes vervangen door vier nullen (000.0). 31 2 Vehicle / 2 Voertuing • • 02_10 2 Vehicle / 2 Voertuing 02_11 02_12 TIME With the AVERAGE SPEED (AVS) screen displayed, you can access the TIME function by pressing the MODE button when the vehicle is at a standstill or the SCROLL button when the vehicle is in motion. If the current speed unit of measurement is km/h, the time value is displayed in the 24 hour format, while if the unit is mph the time format is 12 hours with an AM/PM indication. UUR Met het scherm van de GEMIDDELDE SNELHEID (AVS) gevisualiseerd, en door op de drukknop MODE te drukken met de motor stil, of op drukknop SCROLL met de motor in beweging, verkrijgt men de functie UUR. Wanneer de huidige eenheid van de snelheid km/h is, wordt het uur gevisualiseerd in het formaat van 24 uur, wanneer ze in mph is, wordt het formaat van 12 uur gevisualiseerd, met daarnaast de aanduiding AM/ PM. SETTING • Press MODE until the time digits blink; • Each time the MODE button is pressed, the time increases by one unit. Hold down the button to increase time units automatically; • If you do not touch the control for two seconds, the hour is set and the clock switches to minute setting; REGELING • Druk op MODE tot de nummers van het uur beginnen te knipperen; • Bij elke druk op de drukknop MODE vermeerdert de waardeeenheid van het uur met één, door op de drukknop te blijven drukken, gaat de waarde automatisch verder; • Wanneer men voor twee seconden niets aanraakt, wordt de waarde opgeslaan en gaat men over naar de modaliteit van de regeling van de minuten; Follow the same procedure to set minutes and seconds. Memorise the new values as before by not pressing any keys for two seconds. If miles are the unit measure, the AM and PM indications will start to blink alternatively after the setting Handel op analoge wijze voor het instellen van de minuten en de seconden, het opslaan van het gegeven zal gebeuren zoals eerder, wanneer men voor twee seconden niets aanraakt. Wanneer de meeteenheid mijlen is, zullen na het ein- 32 02_14 de van de regeling van het uur de parameters AM en PM beginnen te knipperen, wanneer men op MODE drukt op het geldige symbool, wordt het aan het uur gekoppeld, en wijzigt het wanneer de klok overgaat van 12:59:59 naar 13. RPM INDICATOR From the TIME display it is possible to access the LAP TIMER configuration by pressing briefly on the SCROLL button. The value is shown in the B area and is also indicated graphically with a bar in the C area of the display. TOERENTELLER Vanaf het scherm van de KLOK, drukt men eventjes op de drukknop SCROLL, en bereikt men de figuratie TOERENTELLER, de waarde wordt aangeduid in de zone B, deze waarde wordt ook weergegeven door een grafische balk in zone C van het display. OVERREVVING SETTING Standard overrevving values are normally already set in the multifunctional display. If you wish to set a lower value, follow the steps outlined below when the vehicle and the engine are at a standstill: INSTELLING VAN HET TOERENTAL Het multifuncioneel display heeft normaal gezien reeds de standaardwaarden van het te hoog toerental ingesteld, wanneer men de melding wil anticiperen, handelt men als volgt met het voertuig en de motor stil: • • Press the MODE and SCROLL buttons at the same time for more than 5 seconds. Five noughts (00000) will be displayed in the B area, with the first nought blinking. Each time the MODE button is pressed, the value of the blinking number is increased by one unit. • • Druk gelijtijdig op de drukknoppen MODE en SCROLL voor langer dan 5 seconden. In zone B verschijnen vijf nullen (00000), waarvan de eerste knippert. Bij elke druk op de drukknop MODE vermeerdert de knipperende waarde met één. 02_15 Not touching the control for two seconds causes the value to be memorised and 33 Wanneer men voor twee seconden niets aanraakt, wordt de waarde opgeslagen, 2 Vehicle / 2 Voertuing 02_13 operation has been completed. When you press MODE to select the correct indication, this is linked to current time and it changes automatically when the clock goes from 12:59:59 to 13. en gaat men over naar de modaliteit van de regeling van het volgende cijfer. Handel op analoge wijze voor het instellen van het tweede en derde cijfer, het opslaan van het gegeven zal gebeuren zoals eerder, wanneer men voor twee seconden niets aanraakt. De laatste twee nullen kunnen niet gewijzigd worden. Wanneer het ingestelde nummer correct blijkt, dus lager dan het maximum toerental, wordt de waarde opgeslagen wanneer men voor langer dan twee seconden op de drukknop SCROLL drukt. Bij het overschrijden van de vastgestelde waarde, knippert de alarmcontrolelamp «3» van het dashboard, tot men onder de limiet terugkeert. BATTERY ICON ICOON VAN DE ACCU The battery icon comes on when the battery charge is too low. If it is displayed during the vehicle's normal operation, check the battery's charge status and recharge system. It is normal for the icon to be displayed before and during start-up, to then disappear once the engine has started. De icoon van de accu licht op wanneer de acculading onvoldoende is, en wanneer ze verschijnt tijdens de normale werking van het voertuig, controleert men de staat van de lading en het systeem voor het opladen van de accu. Het is normaal dat de icoon vóór en tijdens de start verschijnt, om daarna uit te gaan wanneer de motor gestart is. 2 Vehicle / 2 Voertuing 02_16 moves the system on to the adjustment of the subsequent digit; Follow the same procedure to set the second and third digits. Memorise the new values as before, by not activating any controls for two seconds. The last two noughts cannot be modified. If the value set is correct, i.e. lower than the maximum overrevving value, you can be memorise it by holding the SCROLL button down longer than two seconds. If you go over the threshold value, the warning light «3» on the instrument panel starts to blink until you go below the threshold value again. 34 Contactslot (02_17) The ignition switch is located on the headstock upper plate. De ontstekingsschakelaar bevindt zich op de bovenste plaat van de kop van het stuur. The vehicle is supplied with two keys (one is the spare key). The lights go off when the ignition switch is set to «OFF». NOTE 02_17 Bij het voertuig worden twee sleutels bijgeleverd (één reservesleutel). Het uitgaan van de lichten gebeurt wanneer de ontstekingsschakelaar op «OFF» wordt geplaatst. THE KEY ACTIVATES THE IGNITION SWITCH/ STEERING LOCK. N.B. NOTE DE SLEUTEL ACTIVEERT DE ONTSTEKINGSSCHAKELAAR/HET STUURSLOT. THE LIGHTS TURN ON AUTOMATICALLY UPON THE ENGINE STARTUP. N.B. DE LICHTEN LICHTEN AUTOMATISCH OP NA DE START VAN DE MOTOR. 02_18 LOCK: The steering is locked. It is not possible to start the engine or switch on the lights. The key can be extracted OFF: The engine and lights cannot be set to work. The key can be extracted . ON: The engine can be started. The key cannot be extracted. LOCK: Het stuur is geblokkeerd. Het is niet mogelijk om de motor te starten en om de lichten te activeren. Het is mogelijk om de sleutel te verwijderen. OFF: De motor en de lichten kunnen niet in werking worden gesteld. Het is mogelijk om de sleutel te verwijderen. ON: De motor kan gestart worden. Het is niet mogelijk om de sleutel te verwijderen. 35 2 Vehicle / 2 Voertuing Key switch (02_17) Locking the steering wheel (02_18) Stuurslot vergrendelen (02_18) To lock the steering: Om het stuur te blokkeren: • Turn the handlebar completely to the left. • Draai het stuur volledig naar links. • Turn the key to «OFF». • Draai de sleutel in positie «OFF». • Push in the key and turn it anticlockwise (to the left), steer the handlebar slowly until the key is set to «LOCK». • Druk op de sleutel en draai hem in tegenwijzerszin (naar links), stuur langzaam tot de sleutel op «LOCK» wordt geplaatst. • Remove the key. • Verwijder de sleutel. Horn button (02_19) Drukknop claxon (02_19) To action the horn, press button «3». Door op drukknop «3» te drukken, activeert men de akoestische melder. 2 Vehicle / 2 Voertuing 02_19 36 Schakelaar richtingaanwijzers (02_20) To indicate left turn, turn the switch «4» to the left; to indicate right turn, turn the switch «4» to the right. To deactivate the turn indicator, press the «4» switch. Verplaats schakelaar «4» naar links, om aan te duiden dat men naar links draait; Verplaats schakelaar «4» naar rechts, om aan te duiden dat men naar rechts draait; Druk op schakelaar «4» om de richtingaanwijzer te desactiveren. NOTE 02_20 ELECTRICAL COMPONENTS FUNCTION ONLY WHEN THE IGNITION KEY IS SET TO "ON" N.B. High/low beam selector (02_21) Lichtschakelaar (02_21) If the light switch «2» is set to the upper position, this activates the high-beam light; if it is set to the lower position, the low-beam light is switched on. In case of danger and/or emergency it is possible to activate high-beam flashing using the «1» button. 02_21 37 DE ELEKTRISCHE ONDERDELEN WERKEN ENKEL WANNEER DE ONTSTEKINGSSCHAKELAAR ZICH IN POSITIE «ON» BEVINDT Wanneer de omleider van de lichten «2» zich in de bovenste positie bevindt, wordt het groot licht geactiveerd; wanneer hij zich in de onderste positie bevindt, wordt het dimlicht geactiveerd. Met drukknop «1» is het mogelijk om het knipperen van het groot licht te activeren in geval van gevaar of nood. 2 Vehicle / 2 Voertuing Switch direction indicators (02_20) Start-up button (02_22) Startknop (02_22) By pressing the starter button «2», the starter motor makes the engine rotate. Door op drukknop «2» te drukken, doet het startmotortje de motor draaien. Engine stop switch (02_23) Stopschakelaar motor (02_23) It acts as a safety or emergency switch. With switch «1» set to «ON» is possible to start the engine; by pressing it into the «OFF» position, the engine stops. Dit is een veiligheidsschakelaar of een noodstopschakelaar. Met schakelaar «1» in positie «ON», is het mogelijk om de motor te starten; door er op te drukken in positie «OFF», wordt de motor stilgelegd. 02_22 CAUTION LET OP 02_23 DO NOT ACTIVATE THE ENGINE STOP SWITCH WHILE RIDING THE VEHICLE. 2 Vehicle / 2 Voertuing CAUTION RAAK DE STOPSCHAKELAAR VAN DE MOTOR NIET AAN TIJDENS HET RIJDEN. LET OP WITH THE ENGINE OFF AND THE IGNITION SWITCH SET TO «ON» THE BATTERY MAY GET DISCHARGED. 38 MET DE MOTOR UIT EN DE ONTSTEKINGSSCHAKELAAR IN POSITIE «ON», KAN DE ACCU ONTLADEN. LET OP WHEN THE VEHICLE IS NOT MOVING, AFTER THE ENGINE HAS BEEN STOPPED, SET THE IGNITION SWITCH TO «OFF» WANNEER HET VOERTUIG STILSTAAT NADAT MEN DE MOTOR HEEFT STILGELEGD, DRAAIT MEN DE ONTSTEKINGSSCHAKELAAR IN POSITIE «OFF». Manual starter control (02_24) Commando van de manuele starter (02_24) If the engine is started without being warmed up, the ECU cannot keep it running autonomously. In this case, use the cold start «3» control. Wanneer men start met koude motor, is de centrale niet in staat om de gestarte motor autonoom te onderhouden. In dit geval gebruikt men het commando van de koude start «3». 02_24 Opening the saddle (02_25, 02_26) • • Turn the fastening clip. Push the saddle forwards. • Remove the saddle. 02_25 39 Zadel openen (02_25, 02_26) • • Draai aan de bevestigingsclip. Duw het zadel naar voor. • Verwijder het zadel. 2 Vehicle / 2 Voertuing CAUTION 02_26 Identification (02_27, 02_28) Identificatie (02_27, 02_28) Write down the chassis and engine number in the specific space of this booklet. The chassis number is handy when purchasing spare parts. Het is goed om het framenummer en het motornummer op de speciale plaats in dit boekje te schrijven. Het framenummer kan gebruikt worden voor het aanschaffen van reserveonderdelen. CAUTION LET OP 2 Vehicle / 2 Voertuing 02_27 02_28 ALTERING IDENTIFICATION NUMBERS IS AN OFFENCE WHICH CAN RESULT IN SEVERE CRIMINAL AND ADMINISTRATIVE CHARGES. PARTICULARLY MODIFYING THE CHASSIS NUMBER WILL IMMEDIATELY INVALIDATE THE WARRANTY. ENGINE NUMBER HET WIJZIGEN VAN DE IDENTIFICATIENUMMERS KAN LEIDEN TOT ZWARE STRAFRECHTERLIJKE EN ADMINISTRATIEVE SANCTIES; VOORAL DE WIJZIGING VAN HET FRAMENUMMER VEROORZAAKT HET ONMIDDELLIJKE VERVAL VAN DE GARANTIE MOTORNUMMER Het nummer is gedrukt op het onderstel van de motorcarter, op de linker kant. 40 Motor nr.................... Engine No. .................... CHASSIS NUMBER The chassis number is stamped on the right side of the headstock. FRAMENUMMER Het framenummer is gedrukt op de kop van het stuur, rechter kant. Chassis No. .................... Frame nr.................... 41 2 Vehicle / 2 Voertuing The engine number is printed on the base of the left side engine crankcase. SXV 450-550 Chap. 03 Use Hst. 03 Gebruik 43 Checks Controles CAUTION LET OP BEFORE SETTING-OFF, ALWAYS CARRY OUT A PRELIMINARY CHECK OF THE VEHICLE, FOR CORRECT AND SAFE OPERATION. FAILURE TO DO SO MAY LEAD TO SEVERE PERSONAL INJURY OR VEHICLE DAMAGE. DO NOT HESITATE TO CONTACT AN OFFICIAL aprilia DEALER IF YOU DO NOT UNDERSTAND HOW SOME CONTROLS WORK OR IF MALFUNCTIONING IS DETECTED OR SUSPECTED. CHECKS DO NOT TAKE LONG AND RESULT IN SIGNIFICANTLY ENHANCED SAFETY. VÓÓR HET VERTREK VOERT MEN STEEDS EEN VOORAFGAANDE CONTROLE UIT VAN HET VOERTUIG, VOOR EEN CORRECTE EN VEILIGE WERKING. HET NIET UITVOEREN VAN DEZE HANDELINGEN KAN ERNSTIGE LETSELS AAN UZELF OF SCHADE AAN HET VOERTUIG VEROORZAKEN. AARZEL NIET OM ZICH TE WENDEN TOT EEN OFFICIËLE aprilia DEALER, WANNEER MEN MERKT DAT ER ONREGELMATIGHEDEN ZIJN IN VERBAND MET ENKELE COMMANDO'S OF IN VERBAND MET DE WERKING. DE NODIGE TIJD VOOR EEN CONTROLE IS UITERST BEPERKT, EN DE VEILIGHEID KOMT OP DE EERSTE PLAATS. 3 Use / 3 Gebruik PRE-RIDE CHECKS Front and rear disc brake Check for proper operation. Check brake lever empty travel and brake fluid level. Check for leaks. Check brake pads for wear. If necessary top-up with brake fluid. Throttle grip Check it functions smoothly and that it can be fully opened and VOORAFGAANDE CONTROLES Voorste en achterste schijfrem 44 Controleer de werking, de lege loop van de commandohendels, het peil van de vloeistof en eventuele lekken. Controleer de slijtage van de pastilles. Indien nodig vult men remvloeistof bij. Engine oil Check and/or top-up as required. Wheels/tyres Check that tyres are in good conditions. Check inflation pressure, tyre wear and potential damage. Gashendel Controleer of ze zacht werken en of men ze volledig kan openen en sluiten, in alle posities van het stuur. Registreer en/of smeer indien nodig. Motorolie Controleer en/of vul bij indien nodig. Wielen/banden Controleer de conditie van de rijvlakken van de banden, de spanning, de slijtage en eventuele schade. Remove any possible strange body that might be stuck in the tread design. Brake levers Lubricate the joints and adjust the travel if necessary. Clutch Verwijder eventueel aanwezige vreemde voorwerpen uit de kervingen van het rijvlak. Check they function smoothly. Check for proper operation. Check clutch lever free play and fluid level. Check for leaks. If needed, top-up the fluid; the clutch must work without gripping and/or sliding. Steering Check that the rotation is homogeneous, smooth and there are no signs of clearance or slackness. Side stand Check its operation. Check that there is no friction when the side stand is pulled up and down and that the springs' tension makes it snap back to its rest position. Remhendels Controleer of ze zacht werken. Smeer de bewegingsplaatsen en regel de loop indien nodig. Koppeling Controleer de werking, de lege loop van de commandohendel, het peil van de vloeistof en eventuele lekken. Indien nodig vult men vloeistof bij; de koppeling moet zonder rukken en/of slippen werken. Stuur Controleer of het draaien homogeen en vloeiend, en zonder speling of het lossen ervan gebeurt. 45 3 Use / 3 Gebruik closed at all steering positions. Adjust and/or lubricate if necessary. Lubricate joints and couplings as required. Clamps Laterale standaard Controleer of ze werkt. Controleer of er tijdens het in- en uitklappen van de standaard geen wrijvingen zijn, en of de spanning van de veren hem weer in de normale positie brengt. Smeer indien nodig de koppelingen en de bewegingsplaatsen. Bevestigingselementen Controleer of de bevestigingselementen niet gelost zijn. Check that the clamping elements are not loose. Adjust or tighten them as required. Drive chain Check it for clearance. Fuel tank Check the coolant level and refill if necessary. Check the circuit for potential leaks or obstructions. Registreer of sluit ze eventueel. Check that the tank cover closes correctly. Coolant TRANSMISSIEKETTING Controleer de speling. Brandstoftank Controleer het peil, en tank indien nodig. The coolant level in the radiator must be such as to cover the grids. Check for its correct operation. Lights, warning lights, horn, rear stop light switch and electrical devices Check the correct operation of the horn and lights. Replace the bulbs or repair any malfunction. Controleer de correcte sluiting van de brandstofdop. Koelvloeistof Het peil in de radiator moet zodanig zijn dat de platen van de radiator bedekt zijn. Schakelaar voor het stilleggen van Controleer de correcte werking. de motor (RUN - OFF) 3 Use / 3 Gebruik Engine stop switch (RUN - OFF) Controleer eventuele lekken of afsluitingen van het circuit. Lichten, controlelampen, akoestische melder, schakelaar van het achterste stoplicht en elektrische mechanismen 46 Controleer de correcte werking van de akoestische en visieve mechanismen. Vervang de lampjes of grijp in bij defecten. Tanken (03_01) Use premium unleaded petrol as per DIN 51 607, minimum octane rating of 95 (NORM) and 85 (NOMM). Gebruik loodvrije superbenzine volgens DIN 51 607, met een minimum octaangehalte van 95 (N.O.R.M.) en 85 (N.O.M.M.). To refuel: • unscrew and remove the fuel tank cap «1». • Fill up the vehicle. 03_01 CAUTION Voor het tanken, handelt men als volgt: • Draai de dop van de brandstoftank «1» los en verwijder hem. • Voer het tanken van benzine uit. LET OP FUEL USED TO POWER INTERNAL COMBUSTION ENGINES IS HIGHLY FLAMMABLE AND CAN BECOME EXPLOSIVE UNDER SPECIFIC CONDITIONS. IT IS THEREFORE RECOMMENDED TO CARRY OUT REFUELLING AND MAINTENANCE PROCEDURES IN A VENTILATED AREA WITH THE ENGINE SWITCHED OFF. DO NOT SMOKE DURING REFUELLING AND NEAR FUEL VAPOURS, AVOIDING ANY CONTACT WITH NAKED FLAMES, SPARKS OR OTHER SOURCES WHICH MAY CAUSE THEM TO IGNITE OR EXPLODE. DO NOT DISPERSE FUEL IN THE ENVIRONMENT. DE BRANDSTOF DIE WORDT GEBRUIKT VOOR DE AANDRIJVING VAN DE ONTPLOFFINGSMOTOR IS UITERST BRANDBAAR EN KAN EXPLOSIEF WORDEN IN BEPAALDE OMSTANDIGHEDEN. VOER HET TANKEN EN DE ONDERHOUDSHANDELINGEN UIT IN EEN GEVENTILEERDE ZONE EN MET DE MOTOR UIT. ROOK NIET TIJDENS HET TANKEN EN IN DE NABIJHEID VAN BRANDSTOFDAMPEN, EN VERMIJDT ABSOLUUT CONTACT MET VRIJE VLAMMEN, VONKEN EN EENDER WELKE ANDER BRON DIE HET VLAM VATTEN OF EXPLODEREN ERVAN KAN VEROORZAKEN. KEEP OUT OF THE REACH OF CHILDREN LOOS DE BRANDSTOF NIET IN HET MILIEU. BUITEN BEREIK HOUDEN 47 VAN KINDEREN 3 Use / 3 Gebruik Refuelling (03_01) 03_02 03_03 03_04 Regulering achterdempers (03_02, 03_03, 03_04, 03_05) The rear suspension consists of a spring and shock-absorber group, linked to the frame via silent-block and the rear fork levers. To adjust the setting, the shock absorber has one set screw to adjust rebound damping, one set screw «2» to adjust compression damping, a ring nut for preloading adjustment of spring «3» and a ring nut «4». De achterste ophanging bestaat uit een groep veer-schokdemper, verbonden door middel van een silent-block aan het frame en hefsystemen aan de achtervork. Voor het regelen van de instelling is de schokdemper voorzien van een boutregister voor de regeling van de hydraulische remming in extensie, een boutregister «2» voor de regeling van de hydraulische remming in compressie, een moer voor de regeling van de voorbelasting «3» en een blokkeermoer «4». REAR SHOCK ABSORBER ADJUSTMENT REGELING VAN SCHOKDEMPER The standard setting of the rear shock absorber is adjusted so as to satisfy all main high and low speed riding conditions, both with reduced and full vehicle load. It is at any rate possible to insert personal settings, depending on vehicle utilisation. De standaardinstelling van de achterste schokdemper is zodanig geregeld om te voldoen aan de meeste rijcondities aan lage en hoge snelheid, en met weinig en volle lading van het voertuig. Het is alleszins mogelijk om een aangepaste regeling uit te voeren volgens het gebruik van het voertuig. CAUTION LET OP TO COUNT THE NUMBER OF RELEASES AND/OR REVOLUTIONS OF ADJUSTMENT SETTINGS (1 - 2) ALWAYS START FROM THE MOST RIGID SET- VOOR HET TELLEN VAN HET AANTAL KLIKKEN EN/OF DRAAIEN VAN HET REGELREGISTER (1 - 2), VERTREKT MEN STEEDS VAN DE HARD- 49 DE ACHTERSTE 3 Use / 3 Gebruik Rear shock absorbers adjustment (03_02, 03_03, 03_04, 03_05) TING (WHOLE CLOCKWISE ROTATION OF THE SETTING). DO NOT STRAIN THE ROTATION OF ADJUSTMENT SETTINGS (1 . 2) BEYOND THE END OF THE STROKE IN BOTH SENSES, IN ORDER TO AVOID ANY DAMAGE • 03_05 • • • • Using the relevant wrench, unscrew the locking ring nut «4» slightly. Turn the adjustment ring nut «3» to adjust preloading of the «B» spring. When the optimal adjustment level has been achieved, screw locking nut ring «4» completely. Turn the «1» screw to rebound damping. Turn the «2» knob to adjust compression damping (see table). 3 Use / 3 Gebruik CAUTION SET SPRING PRELOAD AND REBOUND DAMPING BASED ON THE VEHICLE'S USAGE CONDITIONS. IF YOU INCREASE THE SPRING PRELOAD, YOU ALSO NEED TO INCREASE REBOUND DAMPING, IN ORDER TO AVOID SUDDEN JERKS WHEN RIDING. SHOULD YOU NEED ANY ASSISTANCE, CONTACT AN APRILIA OFFICIAL DEALER. 50 STE INSTELLING (VOLLEDIGE ROTATIE VAN HET REGISTER IN WIJZERSZIN). FORCEER DE ROTATIE VAN HET REGELREGISTER NIET (1 . 2), NAAST DE EINDELOOP IN TWEE RICHTINGEN, VOOR HET VERMIJDEN VAN MOGELIJKE BESCHADIGINGEN • • • • • Gebruik de speciale sleutel, en draai gematigd de blokkeermoer «4» los. Handel op de regelmoer «3» voor het regelen van de voorbelasting van de veer «B». Wanneer men de optimale inrichtingscondities heeft bereikt, sluit men de blokkeermoer «4» volledig. Handel op de bout «1» voor het regelen van de hydraulische remming in extensie van de schokdemper. Handel op de knop «2» voor het regelen van de hydraulische remming in compressie (raadpleeg de tabel). LET OP REGISTREER DE VOORBELASTING VAN DE VEER EN DE HYDRAULISCHE REMMING IN extensie VAN DE SCHOKDEMPER, OP BASIS VAN DE GEBRUIKSCONDITIES VAN HET VOERTUIG. WANNEER MEN DE MOTORWAYS WITH THESE SETTINGS IS STRICTLY FORBIDDEN. STANDARD ADJUSTMENT OF SXV REAR SUSPENSION STANDAARDREGELING VAN DE ACHTERSTE OPHANGING SXV Shock absorber axial distance (A) 457 ± 1.5 mm (18 ± 0.06 in) 3 Use / 3 Gebruik VOOR SPORTIEF GEBRUIK UIT TE VOEREN, EN OM MET HET VOERTUIG VOORZIEN VAN DEZE INRICHTING TE RIJDEN OP WEGEN EN AUTOSTRADES. Asafstand van de schokdemper (A) 457 ± 1,5 mm (18 ± 0.06 in) (preloaded) Spring (B) length 245 mm (9.6 in) Rebound adjustment, screw (1) 13 click Lengte van de veer (voorbelast) (B) 245 mm (9.6 in) Compression adjustment, screw (2) 16 click Regeling in extensie, bout (1) 13 klikken By-pass adjustment knob (6) Fully open (-) Regeling in compressie, bout (2) 16 klikken Registratieknop by-pass (6) Alles open (-) 03_06 Front fork adjustment (03_06, 03_07) Regulering voorvorken (03_06, 03_07) FRONT SUSPENSION VOORSTE OPHANGING The front suspension consists of a hydraulic fork connected to the headstock by means of two plates. To adjust the vehicle setting, each fork stem is equipped with an upper screw «1» to adjust rebound damping and with a lower screw «2» to adjust compression damping. De voorste ophanging bestaat uit een hydraulische vork, verbonden door middel van twee platen aan de stuurinrichtingskop Voor de instelling van de inrichting van het voertuig, is elke stang van de vork voorzien van een bovenste bout «1» voor de regeling van de hydraulische regeling in extensie, en een onderste bout «2» FRONT FORK ADJUSTMENT 52 03_07 DO NOT STRAIN THE ROTATION OF SET SCREWS (1 . -2) BEYOND THE END OF THE STROKE IN BOTH SENSES, IN ORDER TO AVOID ANY DAMAGE SET BOTH STEMS WITH THE SAME SPRING PRELOAD AND DAMPING TOLERANCES: RIDING THE VEHICLE WITH A DIFFERENT ADJUSTMENT FOR THE TWO STEMS REDUCES ITS STABILITY. IF YOU INCREASE SPRING PRELOAD, YOU ALSO NEED TO INCREASE REBOUND DAMPING, IN ORDER TO AVOID SUDDEN JERKS WHILE RIDING. The standard setting of the front fork is adjusted so as to satisfy all main high and low speed riding conditions, both with reduced and full vehicle load. It is at any rate possible to insert personal settings, depending on vehicle usage. Standard adjustment of SXV front suspension: • Rebound damping adjustment, screw «1»: open (**) 10 clicks from fully closed (*); 53 voor de regeling van de hydraulische remming in compressie. REGELING VAN DE VOORVORK LET OP FORCEER DE ROTATIE VAN HET REGELREGISTER NIET (1-2), NAAST DE EINDELOOP IN TWEE RICHTINGEN, VOOR HET VERMIJDEN VAN MOGELIJKE BESCHADIGINGEN STEL BEIDE STANGEN IN MET DEZELFDE IJKING VAN DE VOORBELASTING VAN DE VEER EN DE HYDRAULISCHE REMMING: WANNEER MEN MET HET VOERTUIG RIJDT MET EEN VERSCHILLENDE INSTELLING VAN DE STANGEN, VERMINDERT DIT DE STABILITEIT VAN HET VOERTUIG. WANNEER MEN DE VOORBELASTING VAN DE VEER VERHOOGT, MOET MEN OOK DE HYDRAULISCHE REMMING IN extensie VERHOGEN, OM PLOTSELINGE STUITERINGEN TIJDENS HET RIJDEN TE VERMIJDEN. De standaardinstelling van de voorste schokdemper is zodanig geregeld om te voldoen aan de meeste rijcondities aan lage snelheid, en met weinig en met volle lading van het voertuig. Het is alleszins mogelijk om een aangepaste regeling uit te voeren, volgens het gebruik van het voertuig. Standaardregeling van de voorste ophanging SXV: 3 Use / 3 Gebruik CAUTION • • Compression damping adjustment, screw «2»: open (**) 10 clicks from fully closed (*) «H»; Stem «A» protrusion (***) from top plate (excluding cover): to the rim. • • (*)= Clockwise (**)= Anticlockwise (***)= Only use an Official aprilia Dealer for this type of adjustment CAUTION • Hydraulische regeling in extensie, bout «1»: vanaf alles gesloten (*), openen (**) voor 10 klikken; Hydraulische regeling in compressie, bout «2»: vanaf alles gesloten (*), «H» openen (**) voor 10 klikken; Uitsteking van de stangen «A» (***) vanaf de bovenste plaat (exclusief de dop): tot aan de dop. (*)= Wijzerszin TO COUNT THE NUMBER OF RELEASES AND/OR REVOLUTIONS OF ADJUSTMENT SETTINGS (1 - -2) ALWAYS START FROM THE MOST RIGID SETTING (WHOLE CLOCKWISE ROTATION OF THE SETTING). 3 Use / 3 Gebruik CAUTION SPORT SETTINGS MAY BE USED ONLY FOR OFFICIAL COMPETITIONS TO BE CARRIED OUT ON TRACKS, AWAY FROM NORMAL ROAD TRAFFIC AND WITH THE AUTHORISATION OF THE RELEVANT AUTHORITIES. USING SPORT SETTINGS AND RIDING THE VEHICLE ON ROADS AND (**)= Tegenwijzerszin (***)= Voor dit type van regeling wendt men zich uitsluitend tot een Officiële aprilia Dealer LET OP VOOR HET TELLEN VAN HET AANTAL KLIKKEN EN/OF DRAAIEN VAN HET REGELREGISTER (1-2), VERTREKT MEN STEEDS VAN DE HARDSTE INSTELLING (VOLLEDIGE ROTATIE VAN HET REGISTER IN WIJZERSZIN). LET OP DE REGELINGEN VOOR SPORTIEF GEBRUIK MOGEN UITSLUITEND UITGEVOERD WORDEN VOOR GEORGANISEERDE WEDSTRIJDEN OF SPORTIEVE EVENEMENTEN, DIE ALLESZINS IN EEN GESLOTEN CIRCUIT 54 MOETEN GEREDEN WORDEN, NIET IN HET VERKEER, EN MET TOESTEMMING VAN DE RECHTSBEVOEGDE AUTORITEITEN. HET IS TEN STRENGSTE VERBODEN OM REGELINGEN VOOR SPORTIEF GEBRUIK UIT TE VOEREN, EN OM MET HET VOERTUIG VOORZIEN VAN DEZE INRICHTING TE RIJDEN OP WEGEN EN AUTOSTRADES. Running in Inrijden Engine running-in is essential to preserving engine life and performance over time. Twisty roads and gradients are ideal to run in engine, brakes and suspensions effectively. Vary your driving speed during the run-in. In this way, you allow for the work of components to be "loaded" and then "unloaded", thus cooling the engine parts. Even if it is important to "stretch" engine components during the running-in, make sure not to strain them. Het inrijden van de motor is fundamenteel voor het garanderen van de duur en de correcte werking. Rij indien mogelijk op wegen met veel bochten en/of hellingen, waar de motor, de ophangingen en de remmen worden onderworpen aan een meer efficiëntere proefperiode. Wijzig de rijsnelheid tijdens de proefperiode. Op deze manier kan men het werk van de onderdelen "belasten" en vervolgens "ontlasten", door de delen van de motor af te koelen. Ook al is het belangrijk om de onderdelen van de motor tijdens de poefperiode te belasten, moet men opletten om niet te overdrijven. Follow the guidelines detailed below: • • Do not twist the throttle grip abruptly and completely when the engine is working at a low revs, either during or after runin. for the first 3 operating hours, do not exceed 50% of the throttle grip travel and never go over 8000 rpm, 55 Men moet zich houden aan de volgende indicaties: • • Versnel niet bruusk en volledig wanneer de motor aan een laag regime werkt, tijdens en na de proefperiode. voor de eerste 3 werkingsuren mag de gashendel voor maxi- 3 Use / 3 Gebruik MOTORWAYS WITH THESE SETTINGS IS STRICTLY FORBIDDEN. • for the next 12 hours, do not exceed 75% of the throttle grip travel. NOTE • EVEN AFTER THE RUNNING-IN PERIOD, AVOID RUNNING THE ENGINE TO TOP SPEED, WHEN THE LIMITER CUTS IN: • • SXV 450 12000 rpm SXV 550 11500 rpm CAUTION THE SPEED LIMITER WARNING LIGHT (NOT THE ECU LIMITER) HAS A FACTORY SETTING OF 8000 RPM. mum 50% gedraaid worden, en mogen de 8000 toeren/min (rpm) niet overschreden worden, voor de volgende 12 uren mag de gashendel voor maximum 75% gedraaid worden. N.B. OOK NA DE PROEFPERIODE MOET MEN VERMIJDEN OM DE MOTOR TE LATEN DRAAIEN AAN HET TOERENAANTAL VAN DE INGREEP VAN DE BEGRENZER: • • SXV 450 12000 rpm (toeren/ min) SXV 550 11500 rpm (toeren/ min) LET OP 3 Use / 3 Gebruik DE CONTROLELAMP VAN DE BEGRENZER (NIET DE BEGRENZER VAN DE CENTRALE) IS IN PRODUCTIE INGESTELD OP 8000 TOEREN/ MIN. 56 Starten des motors (03_08, 03_09, 03_10, 03_11, 03_12) CAUTION LET OP DO NOT INSERT OBJECTS IN THE TOP FAIRING (BETWEEN THE HANDLEBAR AND THE INSTRUMENT PANEL), IN ORDER NOT TO OBSTACLE THE HANDLEBAR'S ROTATION AND THE INSTRUMENT PANEL'S VISIBILITY. PLAATS GEEN VOORWERPEN IN HET KAPJE (TUSSEN HET STUUR EN HET DASHBOARD), OM GEEN VERHINDERINGEN TE CREËREN VOOR DE ROTATIE VAN HET STUUR EN VOOR HET ZICHT VAN HET DASHBOARD. CAUTION BEFORE STARTING THE ENGINE, READ THE ''SAFE RIDING'' SECTION CAREFULLY. 03_09 • • • • • Get onto the bike in riding position. Make sure that the stand has been retracted completely. Make sure that the light switch «1» is set to . Set the engine stop switch «2» to RUN. Turn the key to set the ignition switch to «ON». 03_10 At this stage: LET OP VOORALEER MEN DE MOTOR START, LEEST MEN AANDACHTIG DE PARAGRAAF "HET VEILIG RIJDEN''. • • • • • Ga op het voertuig zitten in de rijpositie. Controleer of de standaard volledig ingeklapt is. Controleer of de schakelaar van de lichten «1» zich in positie bevindt. Plaats de schakelaar voor het stilleggen van de motor «2» op RUN. Draai de sleutel en plaats de ontstekingsschakelaar op «ON». Op dit moment gebeurt het volgende: 57 3 Use / 3 Gebruik 03_08 Starting up the engine (03_08, 03_09, 03_10, 03_11, 03_12) • • • • 03_11 the ignition screen is displayed on the dashboard for tree seconds. All instrument panel lights come on for three seconds. • Pull a brake lever to block at least one of the wheels. Fully action the clutch and engage neutral [green (N) warning light on]. • CAUTION 03_12 • Blokkeer minstens één wiel, door een remhendel te activeren. Activeer de koppelingshendel volledig en plaats de commandohendel van de versnellingsbak in vrij [groene controlelamp (N) aan]. DO NOT START THE ENGINE WHEN A GEAR AND THE CLUTCH ARE ENGAGED. LET OP CAUTION START DE MOTOR NIET WANNEER ER GESCHAKELD IS EN WANNEER DE KOPPELING GEACTIVEERD IS IN ORDER TO AVOID EXCESSIVE BATTERY CONSUMPTION, DO NOT KEEP THE START-UP BUTTON ON «3» FOR MORE THAN THREE SECONDS AT A TIME FOR FIVE SUCCESSIVE ATTEMPTS. IF THE ENGINE DOES NOT START, WAIT FOR SOME TIME TO ALLOW THE STARTER MOTOR TO COOL. CAUTION 3 Use / 3 Gebruik • Op het dashboard verschijnt het scherm van de start voor drie seconden. Op het dashboard lichten alle controlelampen op voor drie seconden. TO AVOID OVERLOADING THE START-UP COMPONENTS, THE VEHICLE ELECTRONIC CONTROL UNIT INTERVENES IN CASE OF DIFFICULT START-UP: THE STARTER MOTOR CAN BE ACTIVATED FOR A MAXIMUM OF 6 SECONDS, TIME AFTER WHICH 58 LET OP OM EEN EXCESSIEF VERBRUIK VAN BRANDSTOF TE VERMIJDEN, DRUKT MEN NIET LANGER OP DE STARTKNOP «3» VOOR LANGER DAN DRIE SECONDEN, VOOR VIJF OPEENVOLGENDE POGINGEN. WANNEER IN DIT TIJDSINTERVAL DE MOTOR NIET START, WACHT MEN ENKELE MINUTEN ZODAT DE STARTMOTOR KAN AFKOELEN. LET OP OM DE STARTMECHANIEK NIET TE OVERBELASTEN, GRIJPT DE ELEKTRONISCHE CENTRALE VAN HET VOERTUIG IN IN GEVAL VAN EEN MOEILIJKE START: DE STARTMOTOR KAN VOOR MAXIMUM 6 SECONDEN CONTINU GEACTIVEERD WORDEN, WAARNA DE CENTRALE DE START VOOR 10 SECONDEN ZAL DESACTIVEREN; NA DEZE 10 SECONDEN KAN EEN NIEUWE POGING ONDERNOMEN WORDEN. IN NOODGEVALLEN KAN DE TIMER OP NUL GESTELD WORDEN, DOOR EEN KEY OFF/KEY ON UIT TE VOEREN, EN KAN DE START ONMIDDELLIJK UITGEVOERD WORDEN. STARTING PROCEDURE WARMED-UP ENGINE STARTPROCEDURE BIJ WARME MOTOR • WITH Press the starter button «3» without opening the throttle and release it as soon as the engine starts. Difficult start up (03_13) • • • • 03_13 Rotate the throttle grip. Press the cold-start button «4» downwards. Release the throttle control. The control will be slightly accelerated to allow the engine to run during warm-up. To disconnect the system, simply put the throttle control back to its resting state. 59 • Druk op de startknop «3» zonder gas te geven, en laat hem los zodra de motor start. Moeilijke start (03_13) • • • • Draai aan het gashandvat. Duw de toets van de koude start «4» naar beneden. Laat het gascommando los. Het gascommando geeft toch een klein beetje gas, zodat de motor aanblijft tijdens de opwarming. Om het systeem uit te schakelen is het voldoende om het gascommando in de rustpositie te brengen. 3 Use / 3 Gebruik THE CONTROL UNIT DISABLES START-UP FOR 10 SECONDS. ONLY AFTER THIS TIME HAS ELAPSED, YOU CAN ATTEMPT A NEW STARTUP. IN CASE OF EMERGENCY, THE TIMER CAN BE RESET WITH A "KEY OFF/KEY ON", AND THEN THE VEHICLE CAN BE STARTED. GA NIET OP HET VOERTUIG ZITTEN WANNEER DE STANDAARD UITGEKLAPT IS. To park the vehicle: • • • • 3 Use / 3 Gebruik • • • 03_15 Voor het parkeren van het voertuig: Select an appropriate parking spot. Stop the vehicle. Set the engine stop switch «1» to «OFF». Turn the key and set the ignition switch «2» to «OFF». • • • Get off the vehicle. Rest the vehicle on its stand. Block the steering and take out the key. • • • • De parkeerzone kiezen. Het voertuig stilleggen. Plaats de schakelaar voor het stilleggen van de motor «1» op «OFF». Draai de sleutel, en plaats de ontstekingsschakelaar «2» op «OFF». Stap van het voertuig af. Plaats het voertuig op de standaard. Blokkeer de stuurinrichting en verwijder de sleutel. Stand (03_15) Standaard (03_15) To place the vehicle on the stand: • Grasp the left grip «1» and put the right hand on the upper rear part of the vehicle «2». • Push the side stand fully down with your right foot «3». • With the stand fully extended, lean the vehicle to the side until the stand rests on the ground. • Turn the handlebar fully to the left. Voor het plaatsen van het voertuig op de standaard: • Grijp het linker handvat «1» vast en steun de rechter hand op het achterste bovenste deel van het voertuig «2». • Duw op de laterale standaard «3» met de rechter voet, en klap hem volledig uit. • Hou de standaard volledig uitgeklapt, en hel het voertuig tot de standaard de grond raakt. 62 03_16 MAKE SURE THE GROUND WHERE YOU HAVE PARKED IS EMPTY, FIRM AND LEVEL. LET OP Safe driving (03_16, 03_17, 03_18, 03_19, 03_20, 03_21, 03_22, 03_23, 03_24, 03_25, 03_26, 03_27) Veilig rijden (03_16, 03_17, 03_18, 03_19, 03_20, 03_21, 03_22, 03_23, 03_24, 03_25, 03_26, 03_27) MAIN SAFETY RULES FUNDAMENTELE GELS To ride the vehicle it is necessary to comply with all legal requirements (driving license, minimum driving age, psychophysical performance, insurance, taxes and fees, registration, license plate, etc.). You should practise using the vehicle in traffic-free areas and/or private property until you have become thoroughly acquainted with the vehicle. Driving under the influence of medication, alcohol and narcotic drugs or psychotropic substances dramatically increases the risk of accidents. 03_17 Draai het stuur volledig naar links. Do not ride your vehicle if you feel tired or drowsy and always keep safe psychophysical riding conditions. The main cause of motorcycle accidents is users' inexperience. 63 CONTROLEER OF HET TERREIN VAN DE PARKEERZONE VRIJ, VAST EN VLAK IS. VEILIGHEIDSRE- Om met het voertuig te rijden moet men beschikken over alle door de wet voorziene vereisten (rijbewijs, minimum leeftijd, psychofysische geschiktheid, verzekering, overheidsbelasting, registratie, nummerplaat, enz.). Men raadt aan om het voertuig gewoon te raken in zones met weinig verkeer en/ of in private eigendommen. Rijden onder invloed van medicijnen, alcohol, verdovende of psychotrope middelen verhoogt aanzienlijk het risico op ongevallen. Men moet er zeker van zijn dat de psychofysische condities geschikt zijn voor het rijden, met vooral aandacht voor fysische moeheid of slaperigheid. 3 Use / 3 Gebruik • CAUTION NEVER lend the vehicle to beginners and always make sure that the rider complies with all necessary requirements for a safe riding. Strictly obey all national and local traffic signs and rules. 03_18 Avoid any abrupt and dangerous swerves for your own as well as others' safety (for example: rearing up on the back wheel, riding over the speed limit, etc.). Besides, always assess and bear in mind the road surface conditions, visibility, etc. Do not knock obstacles that can damage the vehicle or cause loss of control. Do not ride on the course of the vehicle in front just to improve your own speed. Leen het voertuig NOOIT aan beginners, en controleer in elk geval of de bestuurder in het bezit is van alle vereisten voor het rijden. Respecteer nauwkeurig de bewegwijzering en het normenstelsel in verband met het nationale en plaatselijk verkeer. Vermijdt bruuske en gevaarlijke manoeuvres voor zichzelf en voor anderen (voorbeeld: het steigeren, het niet naleven van de snelheidslimieten, enz.), bovendien moet men steeds rekening houden met de condities van het wegdek, de zichtbaarheid, enz. Stoot niet tegen obstakels die schade aan het voertuig of controleverlies over het voertuig kunnen veroorzaken. CAUTION 03_19 ALWAYS RIDE WITH BOTH HANDS ON THE HANDLEBAR AND FEET ON THE FOOTRESTS (OR THE RIDER' S FOOTRESTS) IN THE ADEQUATE RIDING POSITION. 3 Use / 3 Gebruik De meeste ongevallen zijn te wijten aan het gebrek aan ervaring van de bestuurder. Blijf niet achter voertuigen rijden om de eigen snelheid te verhogen. LET OP RIJ STEEDS MET BEIDE HANDEN OP HET STUUR EN DE VOETEN OP HET VOETENVLAK (OF OP DE VOETENSTEUNEN VAN DE BESTUURDER), EN BEHOU EEN CORRECTE RIJPOSITIE. 03_20 64 The rider should always be attentive, never get distracted or influenced by people, things or actions (never smoke, eat, drink, read, etc.) while riding. 03_21 Always use fuel and lubricants specific for the vehicle, of the type recommended in the "LUBRICANTS TABLE". Check fuel, oil and coolant frequently for correct level. In case of an accident or after the vehicle has fallen down or suffered a sudden bump, make sure the control levers, piping, cables, brake circuit and main parts of the vehicle have not been damaged. 03_22 If necessary, take the vehicle to an Official aprilia Dealer to check especially the frame, handlebar, suspensions, safety components and any device the user cannot assess without the aid of a specialist. De bestuurder mag niet afgeleid zijn, zich niet laten afleiden of niet laten beïnvloeden door personen, voorwerpen, acties (niet eten, roken, drinken, lezen, enz.) wanneer hij met het voertuig rijdt. Gebruik de brandstof en specifieke smeermiddelen voor het voertuig, van het type dat men vindt in de "TABEL VAN DE SMEERMIDDELEN", controleer herhaaldelijk of de voorgeschreven peilen van brandstof, olie en koelvloeistoffen correct zijn. Wanneer het voertuig een ongeval heeft gehad, gevallen is of er werd tegen gestoten, controleert men of de commandohendels, de buizen, de kabels, de reminstallatie en de fundamentele delen niet zijn beschadigd. Never ride the vehicle if the damage jeopardises safety. Laat het voertuig eventueel controleren bij een Officiële aprilia Dealer, door vooral aandacht te schenken voor het frame, het stuur, de ophangingen, de veiligheidsonderdelen en mechanismen waarvoor de gebruiker niet in staat is om hun integriteit vast te stellen. Do not modify the position, angle or colour of: license plate, turn indicators, lighting devices and horn. Meldt eender welke slechte werking om de ingreep van techniekers en/of mechaniciens te bevorderen. Any changes to the vehicle will void the warranty. Rij absoluut niet met het voertuig wanneer de aangebrachte schade de veiligheid schaadt. Report any malfunction to the engineers and/or mechanics in order to facilitate their work. 03_23 Vermijdt absoluut om recht te staan op het voertuig en om zich uit te rekken tijdens het rijden. 65 3 Use / 3 Gebruik Never stand on your feet or stretch yourself while riding. Any change introduced to the vehicle and the removal of original parts may jeopardise the vehicle performance and therefore reduce safety or even render the vehicle inappropriate for legal riding. Comply with all national and local laws and regulations on vehicle equipment. 03_24 In particular do not introduce technical changes leading to improve performance and under no circumstances alter the original specifications of the vehicle. Never race with vehicles. Never ride off-road. Wijzig absoluut niet de positie, de helling of de kleur van: de nummerplaat, de richtingaanwijzers, de verlichtingsmechanismen en de akoestische melders. Wanneer men wijzigingen uitvoert aan het voertuig, vervalt de garantie. Elke eventuele aan het voertuig aangebrachte wijziging en de verwijdering van originele stukken, kan de prestaties van het voertuig schaden, en dus het veiligheidsniveau schaden en het voertuig zelfs illegaal maken. Men raadt aan om zich steeds te houden aan alle wetsvoorschriften en nationale en plaatselijke reglementen in verband met de uitrusting van het voertuig. Men moet vooral vermijden om technische wijzigingen aan te brengen voor het verhogen van de prestaties, of die alleszins de originele kenmerken van het voertuig wijzigen. 03_25 Vermijdt absoluut om wedstrijden te houden met de voertuigen. 3 Use / 3 Gebruik Vermijdt om te crossen. 03_26 CLOTHING KLEDING Before riding off, remember to put on the helmet and fasten it correctly. Make sure it is a homologated model, that it is undamaged, of the right size and that the visor is clean. Vooraleer men gaat rijden denkt men eraan om steeds en correct de helm op te zetten en vast te maken. Controleer of hij gehomologeerd en integer is, of de maat juist is en of het visier rein is. Wear appropriate protective clothes, preferably light-coloured and/or in reflec- Draag beschermende kleding, indien mogelijk met een lichte en/of reflecterende 66 Always wear tight-fitting clothes without open cuffs; avoid hanging strings, belts or ties; these or any other objects should not interfere with a safe riding when getting entangled with the riding elements or due to a special movement. 03_27 Never carry in your pockets objects that can be potentially dangerous in case of fall, like: pointed objects such as keys, pens, glass containers, etc. (the same rule applies to passengers). kleur. Op deze manier is men goed zichtbaar voor andere weggebruikers en vermindert men aanzienlijk het risico op aanrijdingen, en is men beter beschermd wanneer men valt. De kleding moet goed aansluiten en de uiteinden moeten gesloten zijn; koorden, ceinturen en dassen mogen niet bengelen; vermijdt dat deze of andere voorwerpen interfereren met het rijden, doordat ze verstrengd raken met bewegende onderdelen of ander delen. Hou geen voorwerpen bij zich, die mogelijk gevaarlijk zijn wanneer men valt, bijvoorbeeld: puntige voorwerpen zoals sleutels, pennen, glazen voorwerpen, enz. (dit advies geldt eveneens voor de eventuele passagier). ACCESSORIES ACCESSOIRES User is personally responsible for the installation and use of the accessories. De gebruiker is verantwoordelijk voor de keuze van de installatie en het gebruik van de accessoires. While assembling accessories, make sure that they do not cover the sound or light alarm devices or affect their correct functioning, do not limit the suspension travel or the steering angle, do not obstruct control actuation or reduce the ground clearance and inclination angle at corners. Do not use accessories that hinder access to the controls as they may increase the reaction time in case of an emergency. 67 Men raadt aan tijdens de montage, dat het accessoire de mechanismen van het akoestisch en visief melden niet bedekt en dus de functionaliteit ervan schaadt, de werking van de ophangingen en de hoek van sturing niet beperkt, de activering van de commando´s niet hindert, en de hoogte van de grond en de helhoek in een bocht niet vermindert. Vermijdt het gebruik van accessoires die de toegang tot de commando´s hinderen, 3 Use / 3 Gebruik tive material. In this way you will be easily visible to other drivers, thus reducing the risk of being hit, and you will be better protected in case of falling. Fairings and large windshields fitted to the vehicle may cause aerodynamic forces that affect the vehicle stability while riding, mainly at high speeds. Make sure the accessory is firm and secured to the vehicle and that it does not pose any risks while riding the vehicle. Do not add or modify electrical equipment that exceed the vehicle capacity as this may result in a sudden stop or a dangerous lack of power required to keep the sound and light alarm devices operative. aprilia advises using original accessories (aprilia genuine accessories). en die dus de reactietijden bij nood kunnen verlengen. De bekledingen en de windschermen met grote afmetingen, die gemonteerd zijn op het voertuig, kunnen aerodynamische krachten veroorzaken die de stabiliteit van het voertuig tijdens het rijden schaden, vooral bij hoge snelheden. Controleer of het accessoire goed verankerd is op het voertuig en dat het niet gevaarlijk is tijdens het rijden. Wijzig of voeg geen elektrische apparaten toe die het draagvermogen van het voertuig overschrijden; op deze wijze zou het voertuig onverwacht kunnen stilvallen of zou er een gevaarlijke afwezigheid van stroom kunnen zijn, die nodig is voor de werking van de akoestische en visieve meldingsmechanismen. 3 Use / 3 Gebruik aprilia raadt het gebruik aan van originele accessoires (aprilia genuine accessories). Load Lading NOTE N.B. THE VEHICLE IS NOT SUITABLE FOR TRANSPORTING LOADS OR LUGGAGE. HET VOERTUIG IS NIET GESCHIKT OM LASTEN OF BAGAGE TE VERVOEREN. 68 SXV 450-550 Chap. 04 Maintenance Hst. 04 Onderhoud 69 • • Hold the vehicle level with the two wheels on the ground. Check the oil level • • Hou het voertuig verticaal met de twee wielen op de grond. Controleer het oliepeil langs het speciale transparante buisje «1». using the relevant transparent dipstick «1». MAX = maximum level MAX = maximum peil MIN = minimum level MIN = minimum peil. • The correct oil level is near the MAX mark. Top up as required: CAUTION IF YOU RIDE THE VEHICLE IN A SPORTY FASHION, SOME OIL SPLATTER MAY GET TO THE AIR FILTER HOUSING THROUGH THE ENGINE VENT. CAUTION • Het peil is correct wanneer het ongeveer het MAX peil bereikt. Indien nodig herstelt men het peil van de motorolie: LET OP WANNEER MEN HET VOERTUIG SPORTIEF GEBRUIKT MET EEN TE HOOG OLIEPEIL, IS HET MOGELIJK DAT ENKELE OLIESPATTEN DE FILTERKIST BEREIKEN LANGS DE ONTLUCHTING VAN DE MOTOR. 4 Maintenance / 4 Onderhoud LET OP DO NOT GO BEYOND THE MAX AND BELOW THE MIN LEVEL MARKS TO AVOID SEVERE ENGINE DAMAGE. • • Unscrew and remove the filler plug «2». Top up the oil in the tank until you reach the correct level. 72 OVERSCHRIJDT DE MARKERING «MAX» NIET EN LAAT HET NIET ONDER DE MARKERING «MIN» KOMEN, OM GEEN ERNSTIGE SCHADE AAN DE MOTOR TE VEROORZAKEN. • • Draai de toevoerdop «2» los, en verwijder hem. Herstel het juiste peil door de tank bij te vullen. LET OP DO NOT ADD ADDITIVES OR ANY OTHER SUBSTANCES TO THE OIL. WHEN USING A FUNNEL OR ANY OTHER ELEMENT, MAKE SURE IT IS PERFECTLY CLEAN. VOEG GEEN ADDITIEVEN OF ANDERE STOFFEN TOE AAN DE OLIE. WANNEER MEN EEN TRECHTER OF IETS ANDERS GEBRUIKT, MOET DEZE PERFECT REIN ZIJN. NOTE N.B. USE GOOD QUALITY LUBRICANTS. GEBRUIK OLIES VAN EEN GOEDE KWALITEIT. Engine oil change (04_03, 04_04, 04_05, 04_06) Vervanging van de motorolie (04_03, 04_04, 04_05, 04_06) • • • • • • • Park the vehicle on firm and level ground. Rest the vehicle on its stand. • Stop the engine and let it cool off so that the oil in the crankcase flows down and cools as well. Unscrew and take out the cap (1). Place a container to collect the oil underneath the engine oil drainage plug on the flywheel side. Unscrew and remove the oil drainage plug (2) and then drain all the engine oil . Place a container to collect the oil underneath the engine oil drainage plug of the recovery tank. • 73 • • • • • • Plaats het voertuig op een vaste en vlakke ondergrond. Plaats het voertuig op de standaard. Leg de motor stil en laat hem afkoelen, om de drainage van de olie in de carter en de afkoeling van de olie zelf toe te staan. Draai de tankdop (1) los, en verwijder hem. Plaats een recipiënt onder de afvoerdop van de motorolie aan de kant van het vliegwiel. Draai de afvoerdop van de olie (2) los, verwijder hem, en laat alle motorolie volledig uitstromen. Plaats een recipiënt onder de afvoerdop van de motorolie van de recupereertank. Draai de afvoerdop van de olie (4) los, verwijder hem, en laat 4 Maintenance / 4 Onderhoud CAUTION • Unscrew and remove the oil drainage plug from the reservoir (4) and drain all the engine oil. • Unscrew the engine oil filter cover (2). Remove it with its gasket, collect the OR. Remove the engine oil filter. Fit a new engine oil filter. Screw the engine oil filter cover (3). Screw and tighten the oil drainage plug (2). Screw and tighten the cap (4). Pour approx. 1250 cm³ (76.3 cu.in) of engine oil through the filler opening. Screw and tighten the cap (1). Start the engine and let it run for several minutes. Stop the engine and let it cool down. Check engine oil level. • • • • • • • • • alle motorolie volledig uitstromen. • • • • • • • • 4 Maintenance / 4 Onderhoud • • 74 Draai het deksel van de motoroliefilter (2) los. Verwijder de pakking volledig, en recupereer de O-ring. Verwijder de van de motoroliefilter. Installeer een nieuwe motoroliefilter. Draai het deksel van de motoroliefilter (3) vast. Draai de afvoerdop van de olie (2) vast, en sluit hem. Draai de dop (4) vast, en sluit hem. Voer het bijvullen uit langs de vulboring, met ongeveer 1250 cc (76.3 cu.in) motorolie. Draai de dop (1) vast, en sluit hem. Start het voertuig en laat het voor enkele minuten draaien. Zet hem af en laat hem afkoelen. Voer de controle uit van het peil van de motorolie. Versnellingsbak oliepeil (04_07, 04_08, 04_09, 04_10) CAUTION LET OP GEARBOX OIL LEVEL MUST BE CHECKED WHEN THE ENGINE IS WARM. DE CONTROLE VAN HET OLIEPEIL VAN DE VERSNELLINGSBAK MOET UITGEVOERD WORDEN BIJ WARME MOTOR. • • • • Stop the engine. Wait some minutes for the oil to flow from the transmission to the clutch. Keep the vehicle upright with the two wheels on the ground. Remove the rear brake lever by undoing the screw (1); collect the washer. • • Unscrew and remove the cap/ dipstick (2). The oil level is correct when it is close to the cap/dipstick (2) opening. • • • 04_08 • • If necessary: 04_09 • • • Leg de motor stil. Wacht enkele minuten zodat de olie van de versnellingsbak naar de koppeling kan lopen. Hou het voertuig in verticale positie met de twee wielen op de grond. Verwijder de hendel van de achterrem door de bout (1) los te draaien, en recupereer de sluitring. Draai de inspectiedop (2) los, en verwijder hem. Het peil is correct wanneer de olie de opening van de inspectiedop (2) bijna bereikt. Indien nodig: Remove the filler cap (3). Top-up with oil up to the cap/ dipstick (2) opening. 75 • • Verwijder de vuldop (3). Vul olie bij tot de opening van de inspectiedop (2) bereikt wordt. 4 Maintenance / 4 Onderhoud 04_07 Gearbox oil level (04_07, 04_08, 04_09, 04_10) CAUTION LET OP DO NOT ADD ADDITIVES OR OTHER SUBSTANCES TO THE LIQUID. VOEG GEEN ADDITIEVEN OF ANDERE STOFFEN TOE AAN DE VLOEISTOF. IF YOU USE A FUNNEL OR ANOTHER IMPLEMENT, MAKE SURE THAT THEY ARE PERFECTLY CLEAN. 04_10 • Wait several minutes to allow the oil to flow from the clutch to the transmission. Then check the oil level again. WANNEER MEN EEN TRECHTER OF IETS ANDERS GEBRUIKT, MOET DEZE PERFECT REIN ZIJN. • REPLACEMENT VERVANGING NOTE 4 Maintenance / 4 Onderhoud TO ENSURE EASIER AND FULL OIL DRAINAGE THE OIL MUST BE HOT AND THEREFORE MORE FLUID. • • • • • • Wacht enkele minuten zodat de olie van de koppeling naar de versnellingsbak kan lopen. Controleer daarna opnieuw het oliepeil. Lower the oil pan guard. Put an adequately sized container near the drainage plug «4». Unscrew and remove the drainage plug«4». Unscrew and remove the filler cap «3». Drain and let the oil drip into the container for several minutes. Check and, if needed, replace the washers of drainage plug «4». 76 N.B. VOOR EEN BETERE EN VOLLEDIGE UITSTROMING, MOET DE OLIE WARM ZIJN, EN DUS VLOEIBAARDER • • • • • Verlaag de carterbuffer Plaats een recipiënt met geschikte capacitiet onder de afvoerdop «4». Draai de afvoerdop «4» los, en verwijder hem. Draai de vuldop «3» los en verwijder hem. Laat de olie af en laat ze enkele minuten uitdruipen in het recipiënt. • • • • • • Screw and tighten the drainage plug «4» back on. Remove the rear brake lever by unscrewing the screw «1», keeping the washer. Unscrew and remove the cap/ dipstick «2». Top up with fresh oil until the level reaches the cap/dipstick hole mark «2». Wait several minutes to allow the oil to flow from the clutch to the transmission. Then check the oil level again. Screw the filler cap «3» back on. • • • • • • CAUTION THE OIL FLOW FROM THE CLUTCH TO THE TRANSMISSION AND FROM THE TRANSMISSION TO THE CLUTCH CAN BE PARTICULARLY SLOW WHEN THE OIL OR ENGINE TEMPERATURE IS LOW. • Reassemble the rear brake lever, remembering to insert the washer between the lever and the crankcase, screwing the screw «1» back on. 77 • • Controleer en vervang eventueel de dichtingsrondellen van de afvoerdop «4». Draai de afvoerdop «4» vast en sluit hem. Verwijder de hendel van de achterrem, door de bout «1» los te draaien en de ring te recupereren. Draai de inspectiedop «2» los en verwijder hem. Voeg nieuwe olie toe, tot de boring van de inspectiedop «2»wordt bereikt. Wacht enkele minuten zodat de olie van de koppeling naar de versnellingsbak kan lopen. Controleer daarna opnieuw het oliepeil. Sluit de vuldop «3». LET OP DE PASSAGE VAN DE OLIE VANAF DE KOPPELING NAAR DE VERSNELLINGSBAK EN VICEVERSA, KAN BIJZONDER TRAAG VERLOPEN WANNEER DE OMGEVINGS-, OLIE- OF MOTORTEMPERATUUR LAAG IS. • Hermonteer de hendel van de achterrem, en denk er aan om de ring tussen de hendel en de carter te plaatsen, door de bout «1» vast te draaien. 4 Maintenance / 4 Onderhoud • 4 Maintenance / 4 Onderhoud TERS MOET MEN VOORZICHTIG RIJDEN. SMEER DE BANDEN NIET IN MET ONGESCHIKTE VLOEISTOFFEN. WANNEER DE BANDEN OUD ZIJN, EN OOK AL ZIJN ZE NIET VERSLETEN, KUNNEN ZE VERHARDEN EN DUS DE WEGLIGGING NIET GARANDEREN. IN DIT GEVAL VERVANGT MEN DE BANDEN. Minimum tread depth: Minimum dieptelimiet van het rijvlak: front and rear 2 mm (0.079 in) (USA 3 mm - 0.118 in) and anyway not less than required by the regulations in force in the country where the vehicle is used. vooraan en achteraan 2 mm (0.079 in) (USA 3 mm - 0.118 in) en alleszins niet minder dan voorgeschreven door de van kracht zijnde wetgeving van het land waar het voertuig wordt gebruikt. Spark plug dismantlement (04_11, 04_12, 04_13) Demonteren van de bougie (04_11, 04_12, 04_13) At regular intervals, remove the spark plug and clean off any carbon deposits or replace as required. Demonteer periodiek de bougie, reinig ze van koolstofafzettingen, en vervang ze indien nodig. CAUTION LET OP ALWAYS REPLACE BOTH SPARK PLUGS, EVEN IF ONLY ONE NEEDS REPLACING. OOK WANNEER SLECHTS ÉÉN VAN DE BOUGIES MOET VERVANGEN WORDEN, VERVANGT MEN STEEDS BEIDE BOUGIES. 04_11 80 Om de bougies te bereiken: CAUTION LET OP BEFORE CARRYING OUT THE FOLLOWING OPERATIONS AND IN ORDER TO AVOID BURNS, LEAVE THE ENGINE AND MUFFLER TO COOL OFF TO AMBIENT TEMPERATURE. VOORALEER MEN DE VOLGENDE HANDELINGEN UITVOERT, LAAT MEN DE MOTOR EN DE UITLAAT AFKOELEN TOT DEZE DE OMGEVINGSTEMPERATUUR HEBBEN BEREIKT, OM MOGELIJKE BRANDWONDEN TE VERMIJDEN. • Place the vehicle on the stand. • NOTE Plaats het voertuig op de standaard. N.B. 04_13 THE VEHICLE HAS A SPARK PLUG (2) FOR EACH CYLINDER. THE FOLLOWING STEPS RELATE TO JUST ONE SPARK PLUG BUT APPLY TO BOTH. • • • • Remove the tube (1) of the spark plug (2). Clean off any trace of dirt from the spark plug (2) base. Insert the spanner supplied in the tool kit into the hexagonal head of the spark plug (2). Unscrew the spark plug (2) and remove it from its seat, making 81 HET VOERTUIG IS UITGERUST MET EEN BOUGIE (2) PER CILINDER. DE VOLGENDE HANDELINGEN ZIJN IN VERBAND MET ÉÉN BOUGIE, MAAR GELDEN VOOR BEIDE. • • • Verwijder de pipet (1) van de bougie (2). Verwijder elk vuilspoor van de basis van de bougie (2). Plaats de sleutel die wordt bijgeleverd bij de gereedschapskit op de zeskantige zit van de bougie (2). 4 Maintenance / 4 Onderhoud 04_12 In order to gain access to the spark plugs: sure no dust or dirt gets into the cylinder. • Checking and cleaning: CAUTION Draai de bougie (2) los en verwijder ze uit de zit, en laat geen stof of andere stoffen in de cilinder terechtkomen. Voor de controle en de reiniging: LET OP 4 Maintenance / 4 Onderhoud THE ELECTRODES OF THE SPARK PLUGS INSTALLED ON THIS VEHICLE ARE PLATINUM ELECTRODES. DO NOT USE METAL BRUSHES AND/OR ABRASIVE PRODUCTS TO CLEAN THE SPARK PLUGS. USE ONLY A COMPRESSED AIR JET. DE ELEKTRODEN VAN DE BOUGIES DIE OP DIT VOERTUIG GEMONTEERD ZIJN, ZIJN VAN HET PLATINATYPE. VOOR DE REINIGING MAG MEN GEEN METALEN BORSTELS EN/OF ABRASIEVE PRODUCTEN GEBRUIKEN, MAAR ENKEL EEN PERSLUCHTSTRAAL. KEY: LEGENDE: central electrode (3); centrale elektrode (3); insulator (4); isolering (4); side electrode (5). laterale elektrode (5). • Check that the electrodes and the insulator of the spark plug (2) do not show signs of carbon deposits and corrosion. If necessary, clean them using a compressed air jet. Replace the spark (2) if its insulator is cracked, the electrodes show signs of corrosion or excessive deposits, or the top of the central electrode gets rounded (6). 82 • Controleer of de elektroden en de isolering van de bougie (2) geen koolstofresten of corrosietekens vertonen, reinig ze eventueel met een persluchtstraal. Wanneer de bougie (2) scheurtjes op de isolering, corrosie op de elektroden, excessieve afzettingen vertoont, of de centrale elektrode vertoont een afgerond toppunt (6), moet de bougie vervangen worden. CAUTION ELEKTRODEN WEER OP MAAT TE BRENGEN. DO NOT ATTEMPT TO READJUST THE ELECTRODE GAP. The gap between the electrodes should be between 0.7 ÷ 0.8 mm (0.027 ÷ 0.031 in). Otherwise, replace the spark plug (2). • Make sure the washer is in good conditions. De afstand tussen de elektroden moet 0,7 ÷ 0,8 mm (0.027 ÷ 0.031 in) bedragen, en wanneer deze verschilt, vervangt men de bougie (2). • Installation: • • Once the washer is fitted, screw the spark plug (2) manually to avoid damaging the thread. Tighten using the spanner supplied in the tool kit. Make each spark plug (2) complete 1/2 of a turn to compress the washer. 4 Maintenance / 4 Onderhoud CAUTION Controleer of de rondel zich in goede condities bevindt. Voor de installatie: • • Met gemonteerde rondel draait men de bougie (2) manueel vast om te vermijden dat de schroefdraad wordt beschadigd. Sluit de bougies met behulp van de bij de gereedschapskit bijgevoegde sleutel, door elke bougie (2) een 1/2 draai vast te draaien om de rondel vast te drukken. LET OP IT IS ESSENTIAL TO TIGHTEN THE SPARK PLUG (2) PROPERLY. A LOOSE SPARK PLUG MAY CAUSE ENGINE OVERHEATING AND RESULT IN SEVERE DAMAGE. Locking torques (N*m) Spark plug - M10x1.25 DE BOUGIE (2) MOET GOED WORDEN VASTGEDRAAID, OMDAT ANDERS DE MOTOR KAN OVERVERHITTEN, EN DUS ERNSTIG WORDT BESCHADIGD. Aandraaikoppels (N*m) Bougie - M10x1.25 84 • 12 Nm (8.85 lbf ft) Position the spark plug tube (1) correctly so that it does not get detached due to engine vibrations. Removing the air filter (04_14, 04_15) • • • • 04_14 Remove the saddle. Raise the tank. Release the air filter cover by gripping and lifting the handles from both sides. Slide out the air filter housing cover from behind, complete with filter. • Demonteren van het luchtfilter (04_14, 04_15) • • • • NOTE WHEN REFITTING THE AIR FILTER, ENSURE THAT ITS HOUSING IS PERFECTLY CLEAN. REMOVE ANY TRACE OF DIRT THAT MAY HAVE ENTERED DURING REMOVAL. DURING REASSEMBLY, MAKE SURE THAT THE AIR VENTS ARE INSERTED CORRECTLY. 04_15 CAUTION Plaats de pipet van de bougie (1) correct, zodat deze niet loskomt door de vibraties van de motor. Verwijder het zadel. Hef de tank op. Koppel het deksel van de filterkist los, door de handgrepen langs beide kanten vast te grijpen, en het op te heffen. Verwijder het deksel van de filterkist, compleet met luchtfilter, langs achter. N.B. BIJ DE HERMONTAGE LET MEN OP DAT DE FILTERKIST PERFECT REIN IS. VERWIJDER ELK SPOOR VAN VUIL, ZODAT DIT ER NIET KAN INVALLEN TIJDENS DE VERWIJDERING. BIJ DE HERMONTAGE LET MEN OP VOOR DE CORRECTE PLAATSING VAN DE LUCHTINLATEN. LET OP MAKE SURE THAT TANK'S THREAD SEALER DOES COME INTO TOUCH 85 LET OP DAT DE TREKDRAAD VAN DE TANK VOOR GEEN ENKELE REDEN 4 Maintenance / 4 Onderhoud 12 Nm (8.85 lbf ft) Peil koelvloeistof (04_16, 04_17) Do not use the vehicle if the coolant is below the minimum level. Gebruik het voertuig niet wanneer het peil van de koelvloeistof zich onder het minimum peil bevindt. CAUTION LET OP 04_16 COOLANT IS TOXIC IF INGESTED; CONTACT WITH EYES OR SKIN MAY CAUSE IRRITATION. IN THE EVENT OF CONTACT WITH EYES OR SKIN, RINSE REPEATEDLY WITH ABUNDANT WATER AND SEEK MEDICAL ADVICE. IF ACCIDENTALLY INGESTED, INDUCE VOMITING, RINSE MOUTH AND THROAT WITH ABUNDANT WATER AND SEEK MEDICAL ADVICE IMMEDIATELY. 04_17 DE KOELVLOEISTOF IS SCHADELIJK WANNEER HET WORDT INGESLIKT; HET CONTACT MET DE HUID EN DE OGEN KAN IRRITATIES VEROORZAKEN. WANNEER DE VLOEISTOF IN CONTACT ZOU KOMEN MET DE HUID EN DE OGEN, SPOELT MEN LANG MET VEEL WATER, EN RAADPLEEGT MEN EEN ARTS. WANNEER HET WORDT INGESLIKT, MOET MEN OVERGEVEN, DE MOND EN DE KEEL SPOELEN MET VEEL WATER, EN ONMIDDELLIJK EEN ARTS RAADPLEGEN. Coolant solution is 50% water and 50% antifreeze fluid. De oplossing van de koelvloeistof bestaat uit 50% water en 50% antivries. This is the ideal mixture for most operating temperatures and provides good corrosion protection. Dit mengsel is ideaal voor de meeste werkingstemperaturen, en garandeert een goede bescherming tegen corrosie. It is advisable to use the same mixture even in hot seasons as it is less prone to evaporative loss and will minimise the need for top-ups. Het is goed om herzelfde mengsel te gebruiken tijdens het warme seizoen, omdat op deze manier verlies door verdamping en het frequent bijvullen wordt vermeden. 87 4 Maintenance / 4 Onderhoud Cooling fluid level (04_16, 04_17) Less water evaporation means fewer mineral salts depositing in the radiators, which helps preserve the efficiency of the cooling system. Op deze manier verminderen de bezinksels van mineraalzouten, die in de radiator door het verdampte water werden gelaten, en verandert de efficiëntie van de koelinstallatie niet. When the temperature drops below zero degrees centigrade, check the cooling system frequently and add more antifreeze if needed (up to 60% max.). Wanneer de buitentemperatuur zich onder het vriespunt bevindt, moet men het koelcircuit frequent controleren, en voegt men indien nodig een hogere concentratie antivries toe (tot een maximum van 60%). Use distilled water in the coolant mixture to avoid damaging the engine. Voor de koeloplossing gebruikt men gedestilleerd water, om de motor niet te beschadigen. CAUTION 4 Maintenance / 4 Onderhoud LET OP DO NOT REMOVE THE EXPANSION TANK PLUG «1» WHEN THE ENGINE IS HOT, SINCE COOLANT IS UNDER PRESSURE AND VERY HOT. CONTACT WITH SKIN OR CLOTHES MAY CAUSE SEVERE BURNS AND/OR INJURIES. Check and top-up 88 VERWIJDER DOP «1» NIET VAN HET EXPANSIEVAT WANNEER DE MOTOR WARM STAAT, OMDAT DE KOELVLOEISTOF ONDER DRUK STAAT EN EEN HOGE TEMPERATUUR HEEFT. BIJ CONTACT MET DE HUID OF DE KLEDING KAN HET ERNSTIGE LETSELS/SCHADE VEROORZAKEN. Controle en bijvullen LET OP WAIT FOR THE ENGINE TO COOL DOWN BEFORE CHECKING OR TOPPING-UP THE COOLANT LEVEL. VOER DE HANDELINGEN VAN DE CONTROLE EN HET BIJVULLEN VAN DE KOELVLOEISTOF UIT WANNEER DE MOTOR KOUD STAAT. • • • • • • • • • Stop the engine and wait for it to cool down. Place the vehicle on firm and level ground. Keep the vehicle upright, with both wheels on the ground. Rotate the radiator cap «1» anticlockwise until it clicks once. Wait for several seconds to allow any pressure in the system to be equalised. Rotate the radiator cap «1» again anticlockwise and remove it. Check that the liquid covers the radiator plates completely. Also check the level in the expansion tank (underneath the engine sump cover) from the relevant window. The correct level should be between the MIN and MAX marks. 89 • • • • • • • • • Leg de motor stil en wacht tot hij afkoelt. Plaats het voertuig op een vast en vlak terrein. Hou het voertuig verticaal met de twee wielen op de grond. Draai de radiatordop «1» in tegenwijzerszin voor één klik. Wacht enkele seconden, zodat de ontluchting van eventueel aanwezige druk in de installatie kan plaatsvinden. Draai de radiatordop «1» in tegenwijzerszin, en verwijder hem. Controleer of de vloeistof de platen van de radiator volledig bedekt. Controleer bovendien het peil in het expansievat (onder het deksel van de motorcarter) langs het speciale venster. Het peil moet zich tussen de MIN en MAX referenties bevinden. 4 Maintenance / 4 Onderhoud CAUTION CAUTION LET OP DO NOT ADD ADDITIVES OR OTHER SUBSTANCES TO THE LIQUID. VOEG GEEN ADDITIEVEN OF ANDERE STOFFEN TOE AAN DE VLOEISTOF. IF YOU USE A FUNNEL OR ANOTHER IMPLEMENT, MAKE SURE THAT THEY ARE PERFECTLY CLEAN. • • If required, top up with coolant until the radiator plates are covered. Do not exceed this level, otherwise the coolant will spill during engine operation. If you use a funnel, make sure it is perfectly clean. Screw the radiator cap back on«1». 4 Maintenance / 4 Onderhoud CAUTION IN THE EVENT OF EXCESSIVE COOLANT CONSUMPTION, CHECK COOLING SYSTEM FOR LEAKS. HAVE ANY MALFUNCTIONS REPAIRED BY AN aprilia Official Dealer. WANNEER MEN EEN TRECHTER OF IETS ANDERS GEBRUIKT, MOET DEZE PERFECT REIN ZIJN. • • Indien nodig vult men koelvloeistof bij, tot de platen van de radiator volledig bedekt zijn. Overschrijdt dit peil niet, anders zal de vloeistof tijdens de werking van de motor uitstromen. Wanneer men een trechter of iets anders gebruikt, moet deze perfect rein zijn. Plaats de radiatordop «1» weer. LET OP IN GEVAL VAN EXCESIEF KOELVLOEISTOFVERBRUIK, CONTROLEERT MEN OF ER GEEN LEKKEN IN HET CIRCUIT ZIJN. VOOR DE HERSTELLING WENDT MEN ZICH TOT EEN Officiële aprilia Dealer. 90 CHECK THE BRAKES BEFORE EACH RIDE. DEN GEHOUDEN; CONTROLEER ZE VÓÓR ELKE REIS. REPLACE THE BRAKE FLUID ACCORDING TO THE SCHEDULED MAINTENANCE TABLE. VOER DE VERVANGING VAN DE REMVLOEISTOF UIT OP BASIS VAN DE TABEL VAN HET GEPROGRAMMEERD ONDERHOUD. USE THE BRAKE FLUID SPECIFIED IN THE LUBRICANT CHART. Brake fluid decreases gradually in the reservoir as the brake pads wear down, to compensate the wear automatically. The front brake reservoir «1» is placed near the front brake lever connection. 4 Maintenance / 4 Onderhoud The rear brake fluid reservoir «2» is integrated in the brake pump fastened to the frame near the fork. GEBRUIK DE SPECIFIEKE REMVLOEISTOF DIE WORDT AANGEDUID IN DE TABEL VAN DE SMEERMIDDELEN. Met het verbruik van de wrijvingspastilles vermindert het peil van de remvloeistof in de tank, om automatisch de slijtage te compenseren. De vloeistoftank van de voorrem «1» bevindt zich nabij de koppeling van de hendel van de voorrem. De vloestoftank van de achterrem «2» is geïntegreerd in de rempomp die aan het frame is bevestigd, op de rechter kant, naast de vork. Check the brake fluid level in the reservoirs before setting off. Controleer vóór het vertrek het peil van de remvloeistof in de tanks. CAUTION LET OP DO NOT USE YOUR VEHICLE IF A FLUID LEAK IN THE BRAKING CIRCUIT IS DETECTED. GEBRUIK HET VOERTUIG NOOIT WANNEER MEN EEN LEK OPMERKT VAN DE REMINSTALLATIE. 94 Voorrem Checking Controle • • Hold the vehicle upright and keep the handlebar straight. Check that the fluid in the reservoir «1» is above the MIN. mark • • MIN = minimum level MAX = maximum level If the fluid does not reach the MIN. mark Plaats het voertig verticaal en hou het stuur recht. Controleer of de vloeistof in de tank «1» de MIN referentie overschrijdt. MIN = minimum peil. MAX = maximum peil CAUTION Wanneer de vloeistof niet minstens het MIN bereikt. BRAKE LEVEL DECREASES GRADUALLY AS BRAKE PADS WEAR DOWN. LET OP HET PEIL VAN DE VLOEISTOF VERMINDERT PROGRESSIEF MET DE SLIJTAGE VAN DE PASTILLES. • Check the brake pads and discs for wear If the pads and/or the disc do not need replacing, top up the fluid. Topping up SXV • Controleer de slijtage van de rempastilles en van de schijf. Wanneer de pastilles en/of de schijf niet moeten vervangen worden, voert men het bijvullen uit. Het bijvullen, SXV CAUTION RISK OF BRAKE FLUID SPILLAGE. DO NOT PULL THE FRONT BRAKE LEVER WHEN THE SCREWS «3» ARE LOOSE OR, PRIMARILY, WHEN THE BRAKE FLUID RESERVOIR COVER «4» IS REMOVED. 95 LET OP GEVAAR OP HET UITSTROMEN VAN REMVLOEISTOF. ACTIVEER DE HENDEL VAN DE VOORREM NIET WANNEER DE BOUTEN «3» GELOST ZIJN, OF VOORAL NIET WANNEER HET DEKSEL VAN DE TANK VAN DE REMVLOEISTOF «4» VERWIJDERD IS. 4 Maintenance / 4 Onderhoud Front brake MIN = minimum level MIN = minimum peil. If the fluid does not reach the MIN. mark Wanneer de vloeistof niet minstens het MIN bereikt. CAUTION BRAKE LEVEL DECREASES GRADUALLY AS BRAKE PADS WEAR DOWN. • Check the brake pads and discs for wear If the pads and/or the disc do not need replacing, top up the fluid. Topping up RISK OF BRAKE FLUID SPILLAGE. DO NOT PULL THE FRONT BRAKE LEVER WHEN THE SCREWS «9» ARE LOOSE OR, PRIMARILY, WHEN THE BRAKE FLUID RESERVOIR CAP «10» IS REMOVED. 4 Maintenance / 4 Onderhoud HET PEIL VAN DE VLOEISTOF VERMINDERT PROGRESSIEF MET DE SLIJTAGE VAN DE PASTILLES. • Controleer de slijtage van de rempastilles en van de schijf. Wanneer de pastilles en/of de schijf niet moeten vervangen worden, voert men het bijvullen uit. Bijvulling CAUTION • LET OP Using a wrench, unscrew the two screws «9» of the brake fluid reservoir «2». CAUTION AVOID PROLONGED AIR EXPOSURE OF THE BRAKE FLUID. THE BRAKE FLUID IS HYGROSCOPIC AND ABSORBS MOISTURE WHEN IS IN CONTACT WITH THE AIR. LEAVE THE 98 LET OP GEVAAR OP HET UITSTROMEN VAN REMVLOEISTOF. ACTIVEER DE HENDEL VAN DE VOORREM NIET WANNEER DE BOUTEN «9» GELOST ZIJN, OF VOORAL NIET WANNEER HET DEKSEL VAN DE TANK VAN DE REMVLOEISTOF «10» VERWIJDERD IS. • Gebruik een sleutel voor het losdraaien van de twee bouten «9» van de tank van de remvloeistof «2». LET OP VERMIJDT DAT DE REMVLOEISTOF LANG WORDT BLOOTGESTELD AAN DE LUCHT. DE REMVLOEISTOF IS HYGROSCOPISCH, EN ABSORBEERT IT IS ADVISABLE NOT TO TOP UP TO THE MAX LEVEL MARK WHEN THE BRAKE PADS ARE WORN BECAUSE YOUR RISK SPILLING THE FLUID WHEN CHANGING THE BRAKE PADS. 4 Maintenance / 4 Onderhoud CHECK BRAKING EFFICIENCY. ZIJN. MEN RAADT AAN OM NIET BIJ TE VULLEN TOT AAN HET MAX PEIL WANNEER DE PASTILLES VERSLETEN ZIJN, OMDAT DE VLOEISTOF ZAL UITSTROMEN WANNEER DE REMPASTILLES ZULLEN VERVANGEN WORDEN. WHEN THE BRAKE LEVER HAS EXCEEDING TRAVEL OR IF YOU NOTICE A LOSS OF BREAKING, CONTACT AN APRILIA OFFICIAL DEALER. THE BRAKING SYSTEM MAY NEED BLEEDING. CONTROLEER DE REMEFFICIËNTIE. Battery (04_22, 04_23, 04_24) Accu (04_22, 04_23, 04_24) IN GEVAL VAN EEN EXCESSIEVE LOOP VAN DE REMHENDEL OF VAN VERLIES VAN EFFICIËNTIE VAN DE REMINSTALLATIE, WENDT MEN ZICH TOT EEN OFFICIËLE APRILIA DEALER, OMDAT HET NODIG KAN ZIJN OM EEN ONTLUCHTING UIT TE VOEREN VAN DE INSTALLATIE. • • Remove the saddle. Unscrew and remove the negative wire fastening screw, keeping the washer. • • Verwijder het zadel. Draai de bevestigingsbout los, verwijder ze van de negatieve kabel, en recupereer de boutblokkering. • Unscrew and remove the negative wire fastening screw, keeping the washer. • Draai de bevestigingsbout los, verwijder ze van de positieve kabel, en recupereer de boutblokkering. • Remove the battery. • Verwijder de accu. 04_22 100 CAUTION LET OP IF A FUSE BLOWS OUT FREQUENTLY, THAT MAY BE DUE TO A SHORT CIRCUIT OR OVERLOAD. IF THIS OCCURS, CONTACT AN Official aprilia Dealer. WANNEER EEN ZEKERING FREQUENT WORDT BESCHADIGD, IS ER WAARSCHIJNLIJK EEN KORTSLUITING OF EEN OVERBELASTING. IN DIT GEVAL RAADPLEEGT MEN EEN Officiële aprilia Dealer. Checking the fuses is necessary whenever an electrical component fails to operate or is malfunctioning or when the engine does not start. Wanneer men het niet of onregelmatig werken van een elektrisch onderdeel of het niet starten van de motor opmerkt, moet men de zekeringen controleren. Check the auxiliary fuses first and then the main 30A fuse. Controleer eerst de secundaire zekeringen en vervolgens de hoofdzekering van 30A. 04_26 To check: • 04_27 4 Maintenance / 4 Onderhoud • 04_28 Set the ignition switch to (OFF) to avoid an accidental short circuit. Remove the right side fairing by undoing the two screws (1) and slide if off from its seat. Voor de controle: • • Plaats de ontstekingsschakelaar op (OFF) om een toevallige kortsluiting te vermijden. Verwijder de zijplaat door de twee bouten (1) los te draaien en ze uit haar zit te verwijderen. • Lift the cover (2) of the auxiliary fuse box. • Hef het deksel (2) van de secundaire zekeringendoos op. • Take out one fuse at a time and check whether the filament (3) is broken. • Verwijder de zekeringen één voor één, en controleer of de draad (3) onderbroken is. Vooraleer men de zekering vervangt, zoekt men indien moge- 102 • • 04_29 Before replacing the fuse, find and solve, if possible, the reason that caused the problem. If the fuse is damaged, replace it with one of the same amperage. • lijk de oorzaak van het probleem. Vervang de zekering indien beschadigd, met een andere met dezelfde elektrische stroomsterkte. NOTE N.B. IF THE SPARE FUSE IS USED, SUPPLY ANOTHER OF THE SAME TYPE IN THE CORRESPONDING FITTING. WANNEER MEN EEN RESERVEZEKERING GEBRUIKT, PLAATST MEN EEN GELIJKE IN DE SPECIALE ZIT. • • Remove the left side cover, following the same procedure as for the right side cover. Follow the same steps described above for the auxiliary fuses also for the main fuses. SECONDARY FUSES DISTRIBUTION • • Verwijder het linker zijplaatje, door op analoge wijze te handelen van het rechter zijplaatje. Voer ook voor de hoofdzekeringen de eerder beschreven handelingen van de secundaire zekeringen uit. SCHIKKING VAN DE SECUNDAIRE ZEKERINGEN (1) 15A fuse ECU relay energising (1) Zekering van 15A (2) 15A fuse Taillights, indicators, horn, instrument panel, stop light Opwekking van het relais van de centrale (2) Zekering van 15A Positielichten, richtingaanwijzers, claxon, dashboard, stoplicht (3) Zekering van 7,5A Voorste koplampen (4) Zekering van 7,5A Vermogen van het relais van de centrale (3) 7.5A fuse Front headlights (4) 7.5A fuse ECU relay power (5) 7.5A fuse Injector coils (6) 7.5A fuse Electric fan (5) Zekering van 7,5A Bobines van de injectors (7) 5A fuse Fuel pump (6) Zekering van 7,5A Elektroschroef 103 4 Maintenance / 4 Onderhoud • (7) Zekering van 5A NOTE N.B. THREE FUSES FUSES«8». ARE MAIN FUSES DISTRIBUTION 4 Maintenance / 4 Onderhoud 30A fuse SPARE DRIE ZEKERINGEN ZIJN RESERVEZEKERINGEN «8». SCHIKKING VAN DE HOOFDZEKERINGEN Battery recharge (there is just one fuse, the second one is spare). Zekering van 30A Het opladen van de accu (er is slechts één zekering, de tweede is een reservezekering). Lamps Lampjes NOTE N.B. BEFORE CHANGING A BULB, CHECK THE FUSES. VOORALEER MEN EEN LAMPJE VERVANGT, CONTROLEERT MEN DE ZEKERINGEN. Front light group (04_30, 04_31, 04_32, 04_33, 04_34) Koplampset (04_30, 04_31, 04_32, 04_33, 04_34) In the front headlight there are: Op het achterlicht vindt men: • • 04_30 Benzinepomp Two tail light bulbs «1». One low-beam / high-beam light bulb «2». For replacement: • • Twee lampjes van het positielicht «1». Een lampje van het dimlicht / groot licht «2». Voor de vervanging: 104 Rest the vehicle on its stand. Undo the two upper screws. Slide off the front cowl from the mudguard seats. Side light lamp «1» • Slide off the tail light bulb and replace it with another of the same type. • • • Lampje van het positielicht «1» • High/low beam light bulb«2» 04_31 • • • • Hold the bulb electrical connector «3», pull and disconnect it from the bulb holder. Slide off the cover «4» from the parabole fitting and from the bulb connectors. Release the two ends of the retaining spring «5» located in the bulb holder. Extract the bulb from its fitting. When refitting the bulb: 04_32 • • • Fit a bulb of the same type adequately. Slide in the cover «4» in the bulb connectors and the parabole fitting. Connect the bulb electrical connector «3». 105 Verwijder het positielampje, en vervang het met één van hetzelfde type. Lampje van het dimlicht / groot licht «2» • • • • Grijp de elektrische connector van het lampje «3» vast, trek er aan, en maak hem los van de lamphouder. Verwijder de kap «4» van de paraboolzit en de terminals van het lampje. Koppel de twee uiteinden van de trekveer «5» los die zich op de lamphouder bevindt. Verwijder het lampje uit de zit. Bij de hermontage: • • • 04_33 Plaats het voertuig op de standaard. Draai de twee bovenste bouten los. Verwijder het maskertje van de zitten van het spatbord. Installeer op correcte wijze een lampje van hetzelfde type. Plaats de kap «4» correct in de paraboolzit en de terminals van het lampje. Verbindt de elektrische connector van het lampje «3». 4 Maintenance / 4 Onderhoud • • • Headlight adjustment (04_35, 04_36) Afstellen van de koplamp (04_35, 04_36) NOTE N.B. IN COMPLIANCE WITH LOCAL LEGAL REQUIREMENTS, SPECIFIC PROCEDURES MUST BE FOLLOWED WHEN CHECKING LIGHT BEAM ADJUSTMENT. OP BASIS VAN WAT WORDT VOORGESCHREVEN DOOR DE VAN KRACHT ZIJNDE WETGEVING IN HET LAND VAN GEBRUIK VAN HET VOERTUIG, MOETEN ER VOOR DE CONTROLE VAN DE RICHTING VAN DE LICHTBUNDEL SPECIFIEKE PROCEDURES AANGENOMEN WORDEN. For a quick check of the correct direction of the front light beam: Voor een snelle controle van de correcte richting van de voorste lichtbundel, handelt men als volgt: 04_34 • • 4 Maintenance / 4 Onderhoud 04_35 Place the vehicle 10m away from a vertical wall and make sure the ground is level. Turn on the low-beam light, sit on the scooter and check that the light beam projected to the wall is a little below the headlight horizontal straight line (about 9/10 of the total height). • • To adjust the light beam: • • • 04_36 Working from both sides, undo the screw «1». Adjust the headlamp until the desired position is obtained Working from both sides, tighten the screw «1». Voor het regelen van de lichtbundel: • • • 106 Plaats het voertuig op tien meter afstand van een verticale wand, en controleer of de ondergrond vlak is. Ontsteek het dimlicht, ga op het voertuig zitten, en controleer of de lichtbundel die op de wand wordt geprojecteerd zich iets onder de horizontale lijn van de koplamp bevindt (ongeveer 9/10 van de totale hoogte). Handel op beide kanten: draai de bout «1» los. Richt de koplamp tot de gewenste positie wordt verkregen Handel op beide kanten: sluit de bout «1». 4 Maintenance / 4 Onderhoud 04_40 The rear braking system is single disc (right side). Het achterste remsysteem is met een enkele schijf (rechter kant). The information provided below relates to an individual braking system but is applicable to both. De volgende informatie is in verband met slechts één reminstallatie, maar geldt voor beide. Brake fluid decreases gradually in the reservoir (1-2) as the brake pads wear down, to compensate the wear automatically. Met het verbruik van de wrijvingspastilles vermindert het peil van de remvloeistof in de tank (1-2), om automatisch de slijtage te compenseren. The front brake reservoir «1» is placed near the front brake lever connection. The rear brake fluid reservoir «2» is integrated in the brake pump fastened to the frame near the fork. De vloeistoftank van de voorrem «1» bevindt zich nabij de koppeling van de hendel van de voorrem. De vloestoftank van de achterrem «2» is geïntegreerd in de rempomp die aan het frame is bevestigd, op de rechter kant, naast de vork. Check the brake fluid level in the reservoirs «1» «2» and check brake pads for wear before setting off. Controleer vóór het vertrek het peil van de remvloeistof in de tanks «1» en «2», en de slijtage van de pastilles. Checking brake pads for wear Controle van de slijtage van de pastilles Disc brake pad wear depend on the use, the riding style and the roads. De slijtage van de pastilles van de remschijf hangt af van het gebruik, van het rijgedrag en van het wegtype. CAUTION LET OP WEAR IS GREATER WHEN RIDING ON DIRTY AND WET ROADS OR OFFERED. 108 ER IS MEER SLIJTAGE WANNEER MEN OP STOFFIGE EN NATTE WEGEN RIJDT, EN CROSST. • Rest the vehicle on its stand. Check the front brake calliper pads: • Visually inspect the area between brake disc and brake pads looking from the bottom up the rear end; Voor het uitvoeren van een snelle controle van de slijtage van de pastilles: • Controle van de pastilles van de voorste remtang: • Checking the rear brake calliper pads: • Visually inspect the area between brake disc and brake pads looking from the bottom up the rear end; NOTE EXCESSIVE WEAR OF THE FRICTION MATERIAL MAKES THE PAD METAL SUPPORT GET INTO CONTACT WITH THE DISC, WHICH RESULTS IN A METALLIC NOISE AND SPARKS IN THE CALLIPER; THEREFORE, BRAKING EFFICIENCY AND DISC SAFETY AND INTEGRITY ARE AT RISK. When the lining material of even just one of the brake pads is worn down to nearly 1.5 mm (0.06 in) (or even if one of the wear indicators is no longer visible), replace both brake pads. 109 Plaats het voertuig op de standaard. Voer een visieve controle uit tussen de remtang en de pastille, door te handelen langs boven achteraan; Controle van de pastilles van de achterste remtang: • Voer een visieve controle uit tussen de remtang en de pastille, door te handelen langs boven achteraan; N.B. EEN VERDER VERBRUIK VAN HET WRIJVINGSMATERIAAL KAN HET CONTACT VEROORZAKEN MET DE METALEN STEUN VAN DE PASTILLES MET DE SCHIJF, MET ALS GEVOLG LAWAAI VAN METAAL EN DE TANG DIE VONKEN MAAKT; DE DOELTREFFENDHEID VAN HET REMMEN, DE VEILIGHEID EN DE INTEGRITEIT VAN DE SCHIJF WORDEN OP DEZE MANIER GESCHAAD. Wanneer de dikte van het wrijvingsmateriaal (ook van slechts één pastille) verminderd is tot ongeveer 1,5 mm (0.06 in) (of ook wanneer slechts één van de slij- 4 Maintenance / 4 Onderhoud To carry out a quick pad check: CAUTION TAKE YOUR SCOOTER TO AN Official aprilia Dealer TO HAVE DISCS REPLACED. Periods of inactivity (04_41) CAUTION tage-indicators niet meer zichtbaar is), vervangt men beide pastilles. LET OP VOOR DE VERVANGING MOET MEN ZICH TOT EEN Officiële aprilia Dealer WENDEN. Stilstand van het voertuig (04_41) LET OP WHEN THE VEHICLE IS LEFT UNUSED FOR OVER TWENTY DAYS, DISCONNECT THE 30 A FUSE TO PREVENT BATTERY DEGRADATION. 4 Maintenance / 4 Onderhoud 04_41 Take some measures to avoid the side effects of not using the vehicle. Besides, it is necessary to carry out general repairs and checks before garaging the vehicle as one can forget to do so afterwards. Proceed as follows: • • • • • Remove the battery. Wash and dry the scooter. Polish the painted surfaces. Inflate tyres. Store the scooter in a cool, dry place, not exposed to sun rays and with minimum temperature variations. 110 WANNEER HET VOERTUIG INACTIEF BLIJFT VOOR LANGER DAN TWINTIG DAGEN, MAAKT MEN DE ZEKERING VAN 30 A LOS OM TE VERMIJDEN DAT DE ACCU VERVALT. Men moet enkele voorzorgsmaatregelen treffen om de effecten van het niet gebruiken van het voertuig tegen te gaan. Bovendien moet men de herstellingen en de algemene controle vóór het opbergen uitvoeren, anders kan men vergeten om dit vervolgens uit te voeren. Handel als volgt: • • • • Verwijder de accu. Was en droog het voertuig. Breng was aan op de gelakte oppervlakken. Blaas de banden op. Wrap and tie a plastic bag around the exhaust pipe opening to keep moisture out. • NOTE PLACE A SUITABLE SUPPORT UNDER THE VEHICLE TO KEEP THE WHEELS OFF THE GROUND. • Plaats het voertuig in een niet verwarmd lokaal, zonder vochtigheid, beschermd tegen zonnestralen, en waar temperatuursverschillen miniem zijn. Plaats een plastic zakje op de uitlaat en bindt dit vast, zodat er geen vochtigheid in kan komen. N.B. PLAATS HET VOERTUIG ZODANIG DAT BEIDE BANDEN VAN DE GROND ZIJN, DOOR GEBRUIK TE MAKEN VAN DE SPECIALE STEUNEN. • Cover the vehicle. Avoid using plastic or waterproof materials. After storage Uncover and clean the vehicle. NOTE TAKE THE PLASTIC BAGS OFF THE EXHAUST PIPE OPENING. • • • • Uncover the vehicle and clean it. Check the battery for correct charge and install it. Refill the fuel tank. Carry out the pre-ride checks. 111 • Bedek het voertuig, maar met geen plastic of ondoordringbaar materiaal. NA HET OPBERGEN Verwijder de bedekking en reinig het voertuig. N.B. VERWIJDER DE PLASTIC ZAKJES VAN DE TERMINALS VAN DE UITLAAT. • • • • Verwijder de bedekking en reinig het voertuig. Controleer de staat van lading van de accu, en installeer ze. Tank brandstof. Voer de voorbereidende controles uit. 4 Maintenance / 4 Onderhoud • 4 Maintenance / 4 Onderhoud CAUTION LET OP TEST RIDE THE VEHICLE AT MODERATE SPEED FOR A FEW KILOMETRES IN AN AREA AWAY FROM TRAFFIC. VOER VOOR ENKELE KILOMETERS EEN TESTRONDE UIT AAN EEN GEMATIGDE SNELHEID, IN EEN VERKEERSVRIJE ZONE. Cleaning the vehicle Reinigen van het voertuig Clean the vehicle frequently if exposed to adverse conditions, such as: • Air pollution (cities and industrial areas). • Salinity and humidity in the atmosphere (seashore areas, hot and wet weather). • Special ambient/seasonal conditions (use of salt, anti-icing chemical products on the roads in winter). • Make sure to clean off any industrial residue and pollutant deposits, tar stains, dead insects, bird droppings, etc. from the bodywork. • Avoid parking the vehicle under trees. During some seasons, resins, fruits or leaves containing aggressive chemical substances that may damage the paintwork may fall from trees. Reinig het voertuig regelmatig wanneer het wordt gebruikt in de volgende zones of condities: • Atmosferische vervuiling (stad en industriële zones). • Zoutgehalte en vochtigheid uit de atmosfeer (zeegebieden, warm en vochtig klimaat). • Speciale milieu/seizoenscondities (het gebruik van zout, chemische anti-ijsproducten op wegen in de winterperiode). • Vermijdt vooral dat er op de carrosserie afzettingen overblijven van industriële en vervuilende stoffen, teervlekken, dode insecten, uitwerpselen van vogels, enz. • Parkeer het voertuig niet onder bomen. In sommige seizoenen kan er uit de bomen hars, fruit of bladeren vallen die chemische stoffen bevatten die schadelijk zijn voor de lak. 112 LET OP BEFORE WASHING THE VEHICLE, COVER THE ENGINE AIR INTAKES AND THE EXHAUST PIPES. VOORALEER MEN HET VOERTUIG WAST, DICHT MEN DE INLATEN VAN DE AANZUIGLUCHT VAN DE MOTOR EN DE UITLAATSLAGEN VAN DE UITLAAT. CAUTION LET OP AFTER CLEANING YOUR VEHICLE, BRAKING EFFICIENCY MAY BE TEMPORARILY AFFECTED DUE TO THE PRESENCE OF WATER ON THE FRICTION SURFACES OF THE BRAKING CIRCUIT. CALCULATE A LONGER BRAKING DISTANCE IN ORDER TO AVOID ACCIDENTS. BRAKE REPEATEDLY TO RESTORE NORMAL OPERATION. CARRY OUT THE PRE-RIDE CHECKS. To clean off dirt and mud deposited from painted surfaces, soften caked dirt with a low-pressure water jet. Sponge off using a car body sponge soaked in a car body shampoo and water solution (2 ÷ 4% parts of shampoo in water). Then rinse with plenty of water, and dry with a chamois leather. To clean the engine outer parts, use degreasing detergent, brushes 113 NADAT MEN HET VOERTUIG HEEFT GEWASSEN, KAN DE REMDOELTREFFENDHEID TIJDELIJK MINDER ZIJN DOOR DE AANWEZIGHEID VAN WATER OP DE WRIJVINGSOPPERVLAKKEN VAN DE REMINSTALLATIE. VOORZIE EEN LANGE REMAFSTAND OM ONGELUKKEN TE VERMIJDEN. ACTIVEER HERHAALDELIJK DE REMMEN, OM DE NORMALE REMCONDITIES TE HERSTELLEN. VOER DE VOORBEREIDENDE CONTROLES UIT. Om het vuil en de modder te verwijderen die zich hebben afgezet op de gelakte oppervlakken, moet men een waterstraal onder lage druk gebruiken, de vuile delen zorgvuldig nat maken, en de modder en het vuil verwijderen met een zachte spons voor carrosseries die doordrenkt is in veel water en shampoo (2 ÷ 4% delen shampoo in water). Spoel vervolgens 4 Maintenance / 4 Onderhoud CAUTION 4 Maintenance / 4 Onderhoud and old cloths. Anodised or painted aluminium parts such as forks, rims, frame, footrests etc. should be washed using water and mild soap. Using aggressive detergents may damage the surface treatment of these components. Using aggressive detergents may damage the surface treatment of these components. TO CLEAN THE HEADLIGHTS USE A SPONGE SOAKED IN WATER AND MILD DETERGENT, RUBBING THE SURFACE GENTLY AND RINSING FREQUENTLY WITH PLENTY OF WATER. REMEMBER TO CLEAN THE VEHICLE CAREFULLY BEFORE ANY POLISHING WITH SILICON WAX. DO NOT POLISH MATT-PAINTED SURFACES WITH POLISHING PASTE. THE VEHICLE SHOULD NEVER BE WASHED IN DIRECT SUNLIGHT, ESPECIALLY DURING SUMMER, OR WITH THE BODYWORK STILL HOT AS THE CAR SHAMPOO CAN DAMAGE THE PAINTWORK IF IT DRIES BEFORE BEING RINSED OFF. CAUTION DO NOT USE WATER (OR LIQUIDS) AT TEMPERATURES OVER 40°C (104° F) WHEN CLEANING PLASTIC PARTS OF THE VEHICLE. DO NOT AIM HIGH 114 overvloedig met water en droog af met een zeemvel. Om de externe delen van de motor te reinigen, gebruikt men een ontvettend reinigingsmiddel, kwasten en doeken. De delen in elektrolytisch geoxideerd of gelakt aluminium, zoals de vorken, de velgen, het frame, de voetensteunen enz, moeten gewassen worden met neutrale zeep en water. Het gebruik van te agressieve reinigingsmiddelen kan de oppervlaktebehandeling van deze onderdelen aantasten. Het gebruik van te agressieve reinigingsmiddelen kan de oppervlaktebehandeling van deze onderdelen aantasten. VOOR DE REINIGING VAN DE LICHTEN GEBRUIKT MEN EEN SPONS DIE WERD ONDERGEDOMPELD IN WATER EN EEN NEUTRAAL REINIGINGSMIDDEL, DOOR ZACHTJES OP DE OPPERVLAKKEN TE WRIJVEN EN FREQUENT MET VEEL WATER TE SPOELEN. MEN HERINNERT DAT HET OPPOETSEN MET SILICONENWAS UITGEVOERD MOET WORDEN NADAT MEN HET VOERTUIG ZORGVULDIG HEEFT GEWASSEN. POETS MATTE LAKKEN NIET OP MET SCHURENDE PASTA'S. HET WASSEN MAG NOOIT WORDEN UITGEVOERD IN DE ZON, VOORAL NIET IN DE ZOMER WANNEER DE CARROSSERIE NOG WARM IS, OMDAT DE SHAMPOO DIE VÓÓR HET SPOELEN OPDROOGT DE LAK KAN BESCHADIGEN. Transport Vervoer During transport the vehicle must be well secured in an upright position and first gear must be engaged, to avoid fuel, oil and coolant leaks. Tijdens de verplaatsing moet het voertuig in verticale positie blijven, goed verankerd zijn en in de eerste versnelling geplaatst worden, om eventuele lekken van brandstof, olie en koelvloeistof te vermijden. 4 Maintenance / 4 Onderhoud IN CASE OF FAILURE, DO NOT HAVE THE VEHICLE TOWED. ASK FOR ROAD ASSISTANCE SERVICE. 04_42 IN GEVAL VAN EEN DEFECT MAG MEN HET VOERTUIG NIET SLEPEN, MAAR MOET MEN EEN HULPDIENST CONTACTEREN. Transmission chain Transmissieketting SXV has an endless chain. De SXV heeft een ketting zonder eind. EXCESSIVE CHAIN SLACKENING MAY CAUSE IT TO COME OFF THE PINION, WHICH IN TURN COULD CAUSE AN ACCIDENT OR SEVERE DAMAGE TO THE VEHICLE. CHECK THE CHAIN SLACK ON A REGULAR BASIS AND ADJUST IT AS NECESSARY. TO CHANGE THE CHAIN TAKE YOUR VEHICLE TO AN Official aprilia Dealer, WHO WILL PROVIDE ACCURATE, PROMPT SERVICE. EEN EXCESSIEVE LOSSING VAN DE KETTING KAN ZE UIT HET RONDSEL DOEN KOMEN, EN EEN ONGEVAL OF ERNSTIGE SCHADE AAN HET VOERTUIG VEROORZAKEN. CONTROLEER REGELMATIG DE SPELING, EN VOER INDIEN NODIG DE REGELING UIT. VOOR DE VERVANGING VAN DE KETTING WENDT MEN ZICH UITSLUITEND TOT EEN Officiële aprilia Dealer, DIE EEN SNELLE EN VERZORGDE SERVICE ZAL GARANDEREN. 04_43 116 LET OP INCORRECTLY EFFECTED MAINTENANCE MAY CAUSE EARLY WEAR OF THE CHAIN AND OR DAMAGE THE PINION AND/OR THE CROWN. PERFORM MAINTENANCE OPERATIONS MORE FREQUENTLY IF YOU RIDE THE VEHICLE IN EXTREME CONDITIONS OR ON DUSTY AND OR MUDDY ROADS. EEN NIET UITGEVOERD ONDERHOUD KAN VOORTIJDIGE SLIJTAGE VAN DE KETTING VEROORZAKEN EN/OF HET RONDSEL EN/OF DE KROON BESCHADIGEN. VOER DE ONDERHOUDSHANDELINGEN REGELMATIGER UIT WANNEER HET VOERTUIG IN STRENGE OMSTANDIGHEDEN OF OP STOFFIGE EN/OF MODDERIGE WEGEN WORDT GEBRUIKT. Chain backlash check (04_42) Controle van de speling van de ketting (04_42) To check backslash: 04_45 • • • • • Stop the engine. Place the vehicle on the stand. Engage neutral gear. Check that vertical oscillation at the middle point between pinion and crown on the lower part of the chain is of about 20 ÷ 25 mm (0.79 ÷ 0.98 in). Move the vehicle forward so as to check vertical oscillation in other positions too. The slack should remain constant during all wheel rotation phases. If the slack is uniform, but higher or lower than 20 ÷ 25 mm (0.79 ÷ 0.98 in), adjust it as required. 117 Voor de controle van de speling: • • • • • Leg de motor stil. Plaats het voertuig op de standaard. Plaats de hendel van de versnellingsbak in vrij. Controleer of de verticale schommeling, in een tussenliggend punt tussen het rondsel en de kroon in de onderste vertakking van de ketting, ongeveer 20 ÷ 25 mm (0.79 ÷ 0.98 in) bedraagt. Verplaats het voertuig vooruit, zodat de verticale schommeling van de ketting ook in andere posities wordt gecontroleerd; de speling moet in alle fasen van de 4 Maintenance / 4 Onderhoud 04_44 CAUTION CAUTION IF THERE IS MORE CLEARANCE AT SOME POSITIONS, THIS MEANS THAT SOME CHAIN LINKS ARE FLATTENED OR JAMMED. IN THIS EVENT, CONSULT AN Official aprilia Dealer. TO AVOID THE RISK OF SEIZURE, LUBRICATE THE CHAIN ON A REGULAR BASIS. rotatie van het wiel constant blijven. Wanneer de speling uniform is, maar meer of minder dan 20 ÷ 25 mm (0.79 ÷ 0.98 in) bedraagt, voert men de regeling uit. LET OP WANNEER MEN IN SOMMIGE POSITIES EEN HOGERE SPELING OPMERKT, ZIJN ER SAMENGEDRUKTE OF AFGESLAGEN SCHAKELS, EN IN DIT GEVAL WENDT MEN ZICH TOT EEN Officiële aprilia Dealer. 4 Maintenance / 4 Onderhoud OM TE VOORKOMEN DAT DE SCHAKELS KUNNEN AFSLAAN, SMEERT MEN REGELMATIG DE KETTING. Chain backlash adjustment (04_43, 04_44) Regeling van de speling van de ketting (04_43, 04_44) If you need to adjust chain tension after the check: • Rest the vehicle on its stand. • Loosen the nut (1) completely. • Loosen both lock nuts (4). • Actuate on the set screws (5) and adjust the chain backlash checking that the references (2 - 3) match on both sides of the vehicle. • Tighten both lock nuts (4). • Tighten the nut (1). • Check chain clearance. Wanneer het na de controle nodig is om de spanning van de ketting te regelen, handelt men als volgt: • Plaats het voertuig op de standaard. • Los de blokkeermoer (1) volledig. • Los de twee tegenmoeren (4). • Handel op de registers (5) en regel de speling van de ketting, door langs beide kanten van het voertuig te controleren of dezelfde referenties (2 - 3) overeenkomen. • Sluit de twee tegenmoeren (4). • Sluit de moer (1). 118 WHEEL CENTRING IS CARRIED OUT USING THE IDENTIFIABLE FIXED REFERENCES (2-3) INSIDE THE TENSIONER PAD MOUNTS ON THE FORK ARMS, IN FRONT OF THE WHEEL BOLT. Locking torques (N*m) Controleer de speling van de ketting. N.B. VOOR HET CENTREREN VAN HET WIEL ZIJN ER VASTE REFERENTIES (2-3) VOORZIEN, DIE MEN IN DE ZITTEN VAN DE SLEDEN VAN DE KETTINGSPANNER OP DE ARMEN VAN DE VORK VINDT, VÓÓR DE WIELPIN. Tightening torque for wheel nut (1): Aandraaikoppels (N*m) 127 Nm (12.7 kgm) Sluitkoppel van de wielmoer (1) 127 Nm (12,7 kgm). Checking wear of chain, front and rear sprockets (04_45) Also check the following parts and make sure that the chain, pinion and crown do not have: • • • • • • Damaged rollers. Loosened pins. Dry, rusty, flattened or jammed chain links. Excessive wear. Missing sealing rings. Excessively worn or damaged pinion or crown teeth. CAUTION Controle van het gebruik van de ketting, het tandrad en kroon (04_45) Controleer bovendien de volgende delen, en controleer of de ketting, het rondsel en de kroon geen: • • • • • • IF THE CHAIN ROLLERS ARE DAMAGED, THE PINS ARE LOOSENED AND/OR THE O-RINGS ARE MISSING OR DAMAGED, THE WHOLE CHAIN 119 Beschadigde rollen hebben. Geloste pinnen hebben. Droge, verroeste, samengedrukte of afgeslagen schakels hebben. Excessieve slijtage vertonen. Ontbrekende dichtingsringen hebben. Excessief versleten of beschadigde rondsel- of kroontanden hebben. 4 Maintenance / 4 Onderhoud • NOTE 122 4 Maintenance / 4 Onderhoud 5 Technical data / 5 Technische gegevens TECHNICAL DATA SXV 450 - SXV 550 (VEHICLE) TECHNISCHE GEGEVENS RXV 450 - RXV 550 (VOERTUIG) Max length 2165 mm (85.23 in) Max width 815 mm (32.08 in) Max height (including top fairing) 1170 mm (46.06 in) Saddle height 880 mm (34.64 in) Wheelbase 1470 mm (57.87 in) Minimum ground clearance 270 mm (10.63 in) Dry weight (for each fluid) 121,5 kg (267.86 lb) Fuel tank capacity (including reserve) 7.5 l (1.98 gal) Fuel reserve 2.2 l (0.58 gal) Engine oil capacity 1.3 l (0.34 gal) Fork oil capacity 125 mm (4.92 in) of clearance (for each stem, measured without spring and under compression) Coolant capacity 1.1 l (0.29 gal) (50% water + 50% antifreeze solution with ethylene glycol) Seats 1 Chassis Steel perimeter frame and aluminium upright Front suspension hydraulic action telescopic fork, Ø 45 mm (Ø 1.77 in) stems Front suspension travel 275 mm (10.83 in) Max lengte 2165 mm (85.23 in) Max breedte 815 mm (32.08 in) Max hoogte (tot de kap) 1170 mm (46.06 in) Hoogte tot het zadel 880 mm (34.64 in) Asafstand 1470 mm (57.87 in) Minimum vrije hoogte vanaf de grond 270 mm (10.63 in) Droog gewicht (van elke vloeistof) 121,5 kg (267.86 lb) Capaciteit van de brandstoftank (inclusief de reserve) 7,5 l (1.98 gal) Brandstofreserve 2,2 l (0.58 gal) Capaciteit van de motorolie 1,3 l (0.34 gal) Capaciteit van de olie voor de vork 125 mm (4.92 in) lucht (gemeten voor elke stang, zonder veer en met stang in compressie) Capaciteit van de koelvloeistof 1,1 l (0.29 gal) (50% water + 50% antivries met ethyleenglycol) Plaatsen 1 Frame Stijl in aluminium en raamwerk in stalen buizen 124 telescoopvork met hydraulische werking, stangen Ø 45 mm (Ø 1.77 in) Verplaatsing van de voorste ophanging 275 mm (10.83 in) Achterste ophanging schommelende vork en hydraulische regelbare monoschokdemper with spokes Verplaatsing van het achterwiel 252 mm (9.92 in) (bruikbaar) Front wheel rim 3.50 x 17 Voorrem Rear wheel rim 5.50 x 17 met schijf - Ø 320 mm (Ø 12.60 in), met hydraulische transmissie Front tyre 120/70 ZR17 (58W) Achterrem met schijf - Ø 240 mm (Ø 9.45 in), met hydraulische transmissie Rear tyre 180/55 ZR17 (73W) Wielvelgen met spaken Front tyre inflation pressure 180 kPa (1.8 bar) Velg van het voorwiel 3,50 x 17" Rear tyre inflation pressure 200 kPa (2.0 bar) Velg van het achterwiel 5,50 x 17" Voorste band 120/70 ZR17 (58W) Achterste band 180/55 ZR17 (73W) Spanning van de voorband 180 kPa (1.8 bar) Spanning van de achterband 200 kPa (2.0 bar) oscillating fork and adjustable hydraulic single shock absorber Rear wheel travel 252 mm (9.92 in) (usable) Front brake disc - Ø 320 mm (Ø 12.60 in), with hydraulic transmission Rear brake disc - Ø 240 mm (Ø 9.45 in), with hydraulic transmission Wheel rims SXV 450 TECHNICAL DATA (ENGINE) TECHNISCHE GEGEVENS SXV 450 (MOTOR) Version 45SX Model 45SX ENGINE 4-stroke, twin-cylinder, 4 valves per cylinder, single overhead camshaft MOTOR bicilindrisch 4-takt met 4 kleppen per cilinder, monoas met nokken in de kop 125 5 Technical data / 5 Technische gegevens Voorste ophanging Rear suspensions 5 Technical data / 5 Technische gegevens Cylinder quantity 2 Aantal cilinders 2 Total engine capacity 449 cc (27.40 cu in) Complessieve cilinderinhoud 449 cc (27.40 cu in) Bore/stroke 76 mm / 49.5 mm (2.99 in / 1.95 in) Cilinderdiameterboring/loop 76 mm / 49,5 mm (2.99 in / 1.95 in) Compression ratio 13 ± 0.5 Compresieverhouding 13 ± 0,5 Ignition electronic START Elektrisch Engine revs at idle speed 1800 ÷ 2000 rpm 1800 ÷ 2000 toeren/min (tpm) Clutch multiple-disc oil-bathed clutch Toerental van de motor bij het minimumregime Lubrication system Separate twin-sump lubrication system with external reservoir Koppeling Multischijf in oliebad Smeersysteem Dubbele gescheiden smering met externe tank LUCHTFILTER Met filterend droog patroon Koeling Met vloeistof VERSNELLINGSBAK mechanisch met 5 versnellingen met pedaalcommando op de linker kant van de motor Transmissieverhouding Primaire: 22/56 = 1: 2,545 AIR FILTER With dry cartridge filter Cooling Fluid Gearbox mechanical, 5 speeds with foot lever on the left hand side of the engine Gear ratio Primary: 22/56 = 1 : 2.545 Final: 15/46 = 1: 3,067 Eind: 15/46 = 1: 3,067 1st 2nd 3rd 4th 13/30 = 1: 2,307 (secondary) 1: 18,013 (total) 1° 13/30 = 1: 2,307 (secundarie) 1: 18,013 (totale) 15/27 = 1 : 1.800 (secondary) 1: 14.050 (total) 2° 15/27= 1: 1,800 (secundaire) 1: 14,050 (totale) 16/23 = 1 : 1.437 (secondary) 1: 11.221 (total) 3° 16/23= 1: 1,437 (secundaire) 1: 11,221 (totale) 20/23 = 1 : 1.150 (secondary) 1: 8.976 (total) 4° 20/23= 1: 1,150 (secundaire) 126 1: 8,976 (totale) 21/21 = 1 : 1.000 (secondary) 1: 7.806 (total) Transmission chain endless (without master link) and with sealed links FUEL SUPPLY SYSTEM electronic injection Mixer Ø 38 mm (1.49 in) FUEL SUPPLY premium unleaded petrol, minimum octane rating of 95 (NORM) and 85 (NOMM) 5° 21/21= 1: 1,000 (secundaire) 1: 7,806 (totale) Transmissieketting zonder einde (zonder koppelingsschakel) en met verzegelde schakels VOEDINGSSYSTEEM elektronische injectie Diffusor Ø 38 mm (1.49 in) VOEDING Loodvrije superbenzine, met een minimum octaangehalte van 95 (N.O.R.M.) en 85 (N.O.M.M.). SXV 550 TECHNICAL DATA (ENGINE) TECHNISCHE GEGEVENS SXV 550 (MOTOR) Version 55SX Model 55SX ENGINE 4-stroke, twin-cylinder, 4 valves per cylinder, single overhead camshaft MOTOR bicilindrisch 4-takt met 4 kleppen per cilinder, monoas met nokken in de kop Cylinder quantity 2 Aantal cilinders 2 Total engine capacity 553 cc (33.75 cu in) Complessieve cilinderinhoud 553 cc (33.75 cu in) Bore/stroke 80 mm / 55.0 mm (3.15 in / 2.16 in) Cilinderdiameterboring/loop 80 mm / 55,0 mm (3.15 in / 2.16 in) Compression ratio 12.5 ± 0.5 Compresieverhouding 12,5 ± 0,5 Ignition electronic START Elektrisch Engine revs at idle speed 1800 ÷ 2000 rpm 1800 ÷ 2000 toeren/min (tpm) Clutch multiple-disc oil-bathed clutch Toerental van de motor bij het minimumregime Koppeling Multischijf in oliebad 127 5 Technical data / 5 Technische gegevens 5th Lubrication system Separate twin-sump lubrication system with external reservoir Smeersysteem Dubbele gescheiden smering met externe tank AIR FILTER With dry cartridge filter LUCHTFILTER Met filterend droog patroon Cooling Fluid Koeling Met vloeistof Gearbox mechanical, 5 speeds with foot lever on the left hand side of the engine VERSNELLINGSBAK mechanisch met 5 versnellingen met pedaalcommando op de linker kant van de motor Gear ratio Primary: 22/56 = 1 : 2.545 Transmissieverhouding Primaire: 22/56 = 1: 2,545 5 Technical data / 5 Technische gegevens Final: 16/46 = 1 : 2.875 Eind: 16/46= 1: 2,875 1st 13/30 = 1: 2,307 (secondary) 1: 16,888 (total) 1° 13/30 = 1: 2,307 (secundaire) 1: 16,888 (totale) 2nd 15/27 = 1 : 1.800 (secondary) 1: 13.172 (total) 2° 15/27= 1: 1,800 (secundaire) 1: 13,172 (totale) 3rd 16/23 = 1 : 1.437 (secondary) 1: 10.519 (total) 3° 16/23= 1: 1,437 (secundaire) 1: 10,519 (totale) 4th 20/23 = 1 : 1.150 (secondary) 1: 8.415 (total) 4° 20/23= 1: 1,150 (secundaire) 1: 8,415 (totale) 5th 21/21 = 1 : 1.000 (secondary) 1: 7.318 (total) 5° 21/21= 1: 1,000 (secundaire) 1: 7,318 (totale) Transmission chain endless (without master link) and with sealed links Transmissieketting FUEL SUPPLY SYSTEM electronic injection zonder einde (zonder koppelingsschakel) en met verzegelde schakels Mixer Ø 40 mm (1.57 in) VOEDINGSSYSTEEM elektronische injectie Diffusor Ø 40 mm (1.57 in) 128 premium unleaded petrol, minimum octane rating of 95 (NORM) and 85 (NOMM) VOEDING ELECTRICAL COMPONENTS Loodvrije superbenzine, met een minimum octaangehalte van 95 (N.O.R.M.) en 85 (N.O.M.M.). ELEKTRISCHE ONDERDELEN IGNITION Electronic ignition ONTSTEKING Elektronica Standard spark plug NGK CR8EB Standaardbougie NGK CR8EB Spark plug electrode gap 0.7 ± 0.8 mm (0.028 in ± 0.031 in) Elektrodenafstand van de bougies 0,7 - 0,8 mm (0.028 in - 0.031 in) Resistance 5 kΩ Weerstand 5 kΩ BATTERY 12V- 6 Ah ACCU 12V - 6Ah Main fuse 30 A Hoofdzekering 30 A Auxiliary fuses 5A; 15A; 20A Secundaire zekeringen 5 A, 15 A, 20 A (Permanent-magnet) Generator 12V - 350W 12V - 350W Low-beam bulb 12V - 55W Generator (met permanente magneet) High-beam bulb 12V - 60W Lamp van het dimlicht 12V - 55W Front side light bulb 12V - 3W Lamp van het groot licht 12V - 60W Turn indicator bulb with micro-bulbs Lamp van het voorste positielicht 12V - 3W License plate light bulb 12V - 5W Lamp van het licht van de richtingaanwijzers Met microlampjes Tail light/stop light bulb LED Lamp van het nummerplaatlicht 12V - 5W Instrument panel lighting bulb Led Lamp van het achterste positielicht/stoplicht Led Neutral gear warning light LED LED Lamp van de verlichting van het dashboard Led Engine oil pressure warning light 129 5 Technical data / 5 Technische gegevens FUEL SUPPLY Engine control system warning light LED Controlelamp van de versnellingsbak in vrij Led Low fuel warning light LED Led High-beam warning light LED Controlelamp van de oliedruk van de motor Turn indicator warning light LED Controlelamp van het controlesysteem van de motor Led Overrevving warning light LED Controlelamp van de brandstofreserve Led Controlelamp van het groot licht Led Controlelamp van de richtingaanwijzers Led 5 Technical data / 5 Technische gegevens Controlelamp te hoog toerenaantal Led 130 SXV 450-550 Chap. 06 Programmed maintenance Hst. 06 Gepland onderhoud 131 Regeling van het minimum toerental - Controle Gearbox oil - Change Olie van de versnellingsbak - Vervangen Clutch control - Check and adjust Commando van de koppeling - Controle en registratie Coolant level in radiator and expansion tank - Check Peil van de koelvloeistof van de radiator en het expansievat - Controle Engine oil and engine oil filter - Change Motorolie en filter van de motorolie - Vervanging Oil pipes - Check condition and position Bebuizing van de olie - Controle van de conditie, plaatsing Throttle cables - Adjustment Gaskabels - Registratie Cold-start key - Adjustment Toets voor de koude start - Registratie Brake fluid level - Check Peil van de remvloeistof - Controle Brake pipes - Check condition and tightness Rembebuizing - Controle van de conditie en dichting Brake system screws torque - Check Sluiting van de bouten van de reminstallatie - Controle Light operation/direction Werking/richting van de lichten Electrical system operation - Check Werking van de elektrische installatie - Controle Tyre condition and pressure - Check Conditie en spanning van de banden - Controle Wheel bearings clearance - Check Speling van de wielkussentjes - Controle Wheel spokes and rim coaxiality - Check tension Spaken en coaxialiteit van de velgen - Controle van de spanning Tightening of wheel pin nuts and screws - Check Sluiting van de moeren en de bouten van de wielpinnen - Controle Engine mounting bolt torque - Check Sluiting van de bevestigingsbouten van de motor - Controle Tightening of chassis screws and nuts - Check Sluiting van de moeren en de bouten van de wielen - Controle Fork - Check for sealing and operation Vork - Controle van de dichting en de werking Tightening of fork plates and feet screws - Check Sluiting van de bouten van de vorkplaten, vorkvoetjes - Controle Shock absorber pins tightening - Check Sluiting van de pinnen van de schokdemper - Controle Shock absorber - Check for sealing and operation Schokdemper - Controle van de dichting en de werking 133 6 Programmed maintenance / 6 Gepland onderhoud Idle speed adjustment - Check Steering bearings - Check and adjust Stuurinrichtingskussentjes - Controle en registratie Headstock dust guards - Cleaning Stofkeerringen van de stuurinrichtingskop - Reiniging Drive chain - Tension Transmissieketting - Spanning Sealed link, chain sprocket and chain guide - Check for wear Verzegelde schakel, kettingkroon en kettingeleider - Controle van de slijtage Chain - lubricate Ketting - Smering 6 Programmed maintenance / 6 Gepland onderhoud EVERY 3000 KM (1864 MILES) ELKE 3000 KM (1864 MI) Throttle body assembly bolt torque - check Sluiting van de bouten van de vlindergroep - Controle Throttle bodies - Synchronisation Vlinderrompen - Synchronisatie Air filter and filter case - Check and cleaning Luchtfilter en filterkist - Controle en reiniging Fuel lines - Check condition and position Bebuizing van de benzine - Controle van de conditie, plaatsing Idle speed adjustment - Check Regeling van het minimum toerental - Controle Gearbox oil - Change Olie van de versnellingsbak - Vervangen Clutch springs - Check length Veren van de koppeling - Controle van de lengte Clutch discs - Check for wear Schijven van de koppeling - Controle van de slijtage Clutch control - Check and adjust Commando van de koppeling - Controle en registratie Coolant level in radiator and expansion tank - Check Peil van de koelvloeistof van de radiator en het expansievat - Controle System sealing - Check Dichting van de installatie - Controle Engine oil and engine oil filter - Change Motorolie en filter van de motorolie - Vervanging Oil pipes - Check condition and position Bebuizing van de olie - Controle van de conditie, plaatsing Throttle cables - Adjustment Gaskabels - Registratie Cold-start key - Adjustment Toets voor de koude start - Registratie 134 Peil van de remvloeistof - Controle Brake pipes - Check condition and tightness Rembebuizing - Controle van de conditie en dichting Brake system screws torque - Check Sluiting van de bouten van de reminstallatie - Controle Brake discs thickness - Check Dikte van de remschijven - Controle Brake pad thickness - Check Dikte van de pastilles - Controle Electrical contacts and switches - Treatment with contact activator spray Elektrische contacten en schakelaars - Behandeling met heractivatiespray Battery connections - Greasing Light operation/direction Electrical system operation - Check Exhaust system - Check for leaks and alignment Tyre condition and pressure - Check Wheel bearings - check Wheel spokes and rim coaxiality - Check tension Tightening of wheel pin nuts and screws - Check Engine mounting bolt torque - Check Tightening of chassis screws and nuts - Check Fork dust guards - Cleaning Fork struts - Bleed Fork - Check for sealing and operation Tightening of fork plates and feet screws - Check Shock absorber pins tightening - Check Shock absorber - Check for sealing and operation Steering bearing clearance - Check Aansluiting van de accu - Behandeling met vet Werking/richting van de lichten Werking van de elektrische installatie - Controle Uitlaat - Controle van de dichting en de uitlijning Conditie en spanning van de banden - Controle Wielkussentjes - Controle Spaken en coaxialiteit van de velgen - Controle van de spanning Sluiting van de moeren en de bouten van de wielpinnen - Controle Sluiting van de bevestigingsbouten van de motor - Controle Sluiting van de moeren en de bouten van de wielen - Controle Stofkeerringen van de vork - Reiniging Benen van de vork - Ontluchting Vork - Controle van de dichting en de werking Sluiting van de bouten van de vorkplaten, vorkvoetjes - Controle Sluiting van de pinnen van de schokdemper - Controle Schokdemper - Controle van de dichting en de werking 135 6 Programmed maintenance / 6 Gepland onderhoud Brake fluid level - Check Headstock dust guards - Cleaning Speling van de stuurinrichtingskussentjes - Controle Drive chain - Tension Stofkeerringen van de stuurinrichtingskop - Reiniging Sealed link, chain sprocket and chain guide - Check for wear Transmissieketting - Spanning Steering bearings - Lubricate Verzegelde schakel, kettingkroon en kettingeleider - Controle van de slijtage Clutch lever pin - Lubricate Throttle cables - Lubricate Rider footrest bolts - Lubricate Pin van de koppelingshendel - Smeren Gaskabels - Smeren Chain - lubricate Rear suspension linkage system - Lubricate 6 Programmed maintenance / 6 Gepland onderhoud Stuurinrichtingskussentjes - Smeren Side stand bolt - Lubricate Front wheel bolt and bearings - Lubricate Rear fork bolt - Lubricate Rear wheel bolt and bearings - Lubricate Pinnen van de voetensteun van de bestuurder - Smeren Ketting - Smering Hefsystemen van de achterste ophanging - Smeren Pin van de laterale standaard - Smeren Pin en kussentjes van het voorwiel - Smeren Pin van de achtervork - Smeren Pin en kussentjes van het achterwiel - Smeren EVERY 6000 KM (3728 MILES) ELKE 6000 KM (3728 MI) Paper air filter - Replacement Luchtfilter van papier - Vervanging Spark plugs - Replacement Bougies - Vervanging 136 ELKE 9000 KM (5592 MI) Complete transmission - Check for wear Volledige versnellingsbak - Controle van de slijtage Pressure relief and non-return valve spring - Check Veer van de overdrukklep en de terugslagklep - Controle Cylinder liners - Check for wear Cilinderpijpen - Controle van de slijtage Connecting rods and main bushings - Check for wear Drijfstang- en bankkussenblokken - Controle van de slijtage Start-up gears - Check for wear Raderwerken voor de start - Controle van de slijtage Oil pump gears - Check Raderwerken van de oliepomp - Controle Head lubrication nozzles - Cleaning Sproeiers voor de smering van de kop - Reiniging Pistons and piston rings - Replacement Zuigers en elastische klemmen - Vervanging Piston pin - Check Zuigerpen van de zuiger - Controle Cam rockers - Radial check Rollen van de balanceringen - Radiale controle Valve lifter - Check Kleplichter - Controle Camshaft wear - Check Slijtage van de nokkenassen - Controle Camshaft bearings - Check Kussentjes van de nokkenassen - Controle Valve seat sealing - Check Dichting van de klepzitten - Controle Valves - Check for wear Kleppen - Controle van de slijtage Valve clearance - Check and adjust Kleppenspeling - Controle en registratie Valve guides - check for wear Kleppengeleiders - Controle van de slijtage Spring washers, caps, bowls - Check for wear Rondellen van de veerhouder, schijven, bekertjes - Controle van de slijtage Chain tightener toothing - Check for wear Valve springs - check length Timing chain - Stretching measurement Tanden van de kettingspanner - Controle van de slijtage Veren van de kleppen - Controle van de lengte Distributieketting - Meting van de verlenging 137 6 Programmed maintenance / 6 Gepland onderhoud EVERY 9000 KM (5592 MILES) 6 Programmed maintenance / 6 Gepland onderhoud Drive chain sliders - Check for wear Sleden van de transmissieketting - Controle van de slijtage Fuel pump - Check Benzinepomp - Controle Fork - Comprehensive maintenance Vork - Volledig onderhoud Fork oil - Replacement Olie van de vork - Vervanging Shock absorber - Comprehensive maintenance Schokdemper - Volledig onderhoud Crankshaft and connecting rod bearing clearance - Check Speling van de kussentjes van het drijfstangsysteem - Controle Chain guide slider - Check for wear Slede van de kettinggeleider - Controle van de slijtage Chain guide eye - Check for wear Oog van de kettinggeleider - Controle van de slijtage Chain tightener roller - Check for wear Rol van de kettingspanner - Controle van de slijtage Chain tightener slider - Check for wear Slede van de kettingspanner - Controle van de slijtage EVERY YEAR ELK JAAR Brake fluid - Change Remvloeistof - Vervangen Periodic maintenance chart for scooters in free version for hobby sports applications. END OF RUN-IN PERIOD AND EVERY 3 HOURS OF OPERATION Kaart van het periodiek onderhoud voor voertuigen in vrije versie voor sportief- en hobbygebruik. EINDE VAN DE PROEFPERIODE, 3 UUR GEBRUIK Throttle body assembly bolt torque - check Sluiting van de bouten van de vlindergroep - Controle Throttle bodies - Synchronisation Vlinderrompen - Synchronisatie Air filter and filter case - Check and cleaning Luchtfilter en filterkist - Controle en reiniging 138 Bebuizing van de benzine - Controle van de conditie, plaatsing Idle speed adjustment - Check Regeling van het minimum toerental - Controle Gearbox oil - Change Olie van de versnellingsbak - Vervangen Clutch control - Check and adjust Commando van de koppeling - Controle en registratie Coolant level in radiator and expansion tank - Check Peil van de koelvloeistof van de radiator en het expansievat - Controle Engine oil and engine oil filter - Change Motorolie en filter van de motorolie - Vervanging Oil pipes - Check condition and position Bebuizing van de olie - Controle van de conditie, plaatsing Throttle cables - Adjustment Gaskabels - Registratie Cold-start key - Adjustment Toets voor de koude start - Registratie Brake fluid level - Check Peil van de remvloeistof - Controle Brake pipes - Check condition and tightness Rembebuizing - Controle van de conditie en dichting Brake system screws torque - Check Sluiting van de bouten van de reminstallatie - Controle Light operation/direction Werking/richting van de lichten Electrical system operation - Check Werking van de elektrische installatie - Controle Tyre condition and pressure - Check Conditie en spanning van de banden - Controle Wheel bearings clearance - Check Speling van de wielkussentjes - Controle Wheel spokes and rim coaxiality - Check tension Spaken en coaxialiteit van de velgen - Controle van de spanning Tightening of wheel pin nuts and screws - Check Sluiting van de moeren en de bouten van de wielpinnen - Controle Engine mounting bolt torque - Check Sluiting van de bevestigingsbouten van de motor - Controle Tightening of chassis screws and nuts - Check Sluiting van de moeren en de bouten van de wielen - Controle Fork - Check for sealing and operation Vork - Controle van de dichting en de werking Tightening of fork plates and feet screws - Check Sluiting van de bouten van de vorkplaten, vorkvoetjes - Controle Shock absorber pins tightening - Check Sluiting van de pinnen van de schokdemper - Controle 139 6 Programmed maintenance / 6 Gepland onderhoud Fuel lines - Check condition and position Shock absorber - Check for sealing and operation Schokdemper - Controle van de dichting en de werking Steering bearings - Check and adjust Stuurinrichtingskussentjes - Controle en registratie Headstock dust guards - Cleaning Stofkeerringen van de stuurinrichtingskop - Reiniging Drive chain - Tension Transmissieketting - Spanning Sealed link, chain sprocket and chain guide - Check for wear Verzegelde schakel, kettingkroon en kettingeleider - Controle van de slijtage Chain - lubricate Ketting - Smering 6 Programmed maintenance / 6 Gepland onderhoud EVERY 15 HOURS OF OPERATION ELKE 15 GEBRUIKSUREN Throttle body assembly bolt torque - check Sluiting van de bouten van de vlindergroep - Controle Throttle bodies - Synchronisation Vlinderrompen - Synchronisatie Air filter and filter case - Check and cleaning Luchtfilter en filterkist - Controle en reiniging Fuel lines - Check condition and position Bebuizing van de benzine - Controle van de conditie, plaatsing Idle speed adjustment - Check Regeling van het minimum toerental - Controle Gearbox oil - Change Olie van de versnellingsbak - Vervangen Clutch springs - Check length Veren van de koppeling - Controle van de lengte Clutch discs - Check for wear Schijven van de koppeling - Controle van de slijtage Clutch control - Check and adjust Commando van de koppeling - Controle en registratie Coolant level in radiator and expansion tank - Check Peil van de koelvloeistof van de radiator en het expansievat - Controle System sealing - Check Dichting van de installatie - Controle Engine oil and engine oil filter - Change Motorolie en filter van de motorolie - Vervanging Oil pipes - Check condition and position Bebuizing van de olie - Controle van de conditie, plaatsing Throttle cables - Adjustment Gaskabels - Registratie 140 Toets voor de koude start - Registratie Brake fluid level - Check Peil van de remvloeistof - Controle Brake pipes - Check condition and tightness Rembebuizing - Controle van de conditie en dichting Brake system screws torque - Check Sluiting van de bouten van de reminstallatie - Controle Brake discs thickness - Check Dikte van de remschijven - Controle Brake pad thickness - Check Dikte van de pastilles - Controle Electrical contacts and switches - Treatment with contact activator spray Elektrische contacten en schakelaars - Behandeling met heractivatiespray Battery connections - Greasing Light operation/direction Electrical system operation - Check Exhaust system - Check for leaks and alignment Tyre condition and pressure - Check Wheel bearings - check Wheel spokes and rim coaxiality - Check tension Tightening of wheel pin nuts and screws - Check Engine mounting bolt torque - Check Tightening of chassis screws and nuts - Check Fork dust guards - Cleaning Fork struts - Bleed Fork - Check for sealing and operation Tightening of fork plates and feet screws - Check Shock absorber pins tightening - Check Shock absorber - Check for sealing and operation Aansluiting van de accu - Behandeling met vet Werking/richting van de lichten Werking van de elektrische installatie - Controle Uitlaat - Controle van de dichting en de uitlijning Conditie en spanning van de banden - Controle Wielkussentjes - Controle Spaken en coaxialiteit van de velgen - Controle van de spanning Sluiting van de moeren en de bouten van de wielpinnen - Controle Sluiting van de bevestigingsbouten van de motor - Controle Sluiting van de moeren en de bouten van de wielen - Controle Stofkeerringen van de vork - Reiniging Benen van de vork - Ontluchting Vork - Controle van de dichting en de werking Sluiting van de bouten van de vorkplaten, vorkvoetjes - Controle Sluiting van de pinnen van de schokdemper - Controle 141 6 Programmed maintenance / 6 Gepland onderhoud Cold-start key - Adjustment Steering bearing clearance - Check Schokdemper - Controle van de dichting en de werking Headstock dust guards - Cleaning Speling van de stuurinrichtingskussentjes - Controle Drive chain - Tension Stofkeerringen van de stuurinrichtingskop - Reiniging Sealed link, chain sprocket and chain guide - Check for wear Transmissieketting - Spanning Steering bearings - Lubricate Verzegelde schakel, kettingkroon en kettingeleider - Controle van de slijtage Clutch lever pin - Lubricate Throttle cables - Lubricate Rider footrest bolts - Lubricate Pin van de koppelingshendel - Smeren Gaskabels - Smeren Chain - lubricate 6 Programmed maintenance / 6 Gepland onderhoud Stuurinrichtingskussentjes - Smeren Rear suspension linkage system - Lubricate Side stand bolt - Lubricate Front wheel bolt and bearings - Lubricate Rear fork bolt - Lubricate Rear wheel bolt and bearings - Lubricate Pinnen van de voetensteun van de bestuurder - Smeren Ketting - Smering Hefsystemen van de achterste ophanging - Smeren Pin van de laterale standaard - Smeren Pin en kussentjes van het voorwiel - Smeren Pin van de achtervork - Smeren Pin en kussentjes van het achterwiel - Smeren EVERY 60 HOURS OF OPERATION ELKE 60 GEBRUIKSUREN Paper air filter - Replacement Luchtfilter van papier - Vervanging Spark plugs - Replacement Bougies - Vervanging 142 ELKE 90 GEBRUIKSUREN Complete transmission - Check for wear Volledige versnellingsbak - Controle van de slijtage Pressure relief and non-return valve spring - Check Veer van de overdrukklep en de terugslagklep - Controle Cylinder liners - Check for wear Cilinderpijpen - Controle van de slijtage Connecting rods and main bushings - Check for wear Drijfstang- en bankkussenblokken - Controle van de slijtage Start-up gears - Check for wear Raderwerken voor de start - Controle van de slijtage Oil pump gears - Check Raderwerken van de oliepomp - Controle Head lubrication nozzles - Cleaning Sproeiers voor de smering van de kop - Reiniging Pistons and piston rings - Replacement Zuigers en elastische klemmen - Vervanging Piston pin - Check Zuigerpen van de zuiger - Controle Cam rockers - Radial check Rollen van de balanceringen - Radiale controle Valve lifter - Check Kleplichter - Controle Camshaft wear - Check Slijtage van de nokkenassen - Controle Camshaft bearings - Check Kussentjes van de nokkenassen - Controle Valve seat sealing - Check Dichting van de klepzitten - Controle Valves - Check for wear Kleppen - Controle van de slijtage Valve clearance - Check and adjust Kleppenspeling - Controle en registratie Valve guides - check for wear Kleppengeleiders - Controle van de slijtage Spring washers, caps, bowls - Check for wear Rondellen van de veerhouder, schijven, bekertjes - Controle van de slijtage Chain tightener toothing - Check for wear Valve springs - check length Timing chain - Stretching measurement Tanden van de kettingspanner - Controle van de slijtage Veren van de kleppen - Controle van de lengte Distributieketting - Meting van de verlenging 143 6 Programmed maintenance / 6 Gepland onderhoud EVERY 90 HOURS OF OPERATION 6 Programmed maintenance / 6 Gepland onderhoud Drive chain sliders - Check for wear Sleden van de transmissieketting - Controle van de slijtage Fuel pump - Check Benzinepomp - Controle Fork - Comprehensive maintenance Vork - Volledig onderhoud Fork oil - Replacement Olie van de vork - Vervanging Shock absorber - Comprehensive maintenance Schokdemper - Volledig onderhoud Crankshaft and connecting rod bearing clearance - Check Speling van de kussentjes van het drijfstangsysteem - Controle Chain guide slider - Check for wear Slede van de kettinggeleider - Controle van de slijtage Chain guide eye - Check for wear Oog van de kettinggeleider - Controle van de slijtage Chain tightener roller - Check for wear Rol van de kettingspanner - Controle van de slijtage Chain tightener slider - Check for wear Slede van de kettingspanner - Controle van de slijtage EVERY YEAR ELK JAAR Brake fluid - Change Remvloeistof - Vervangen Periodic maintenance chart for scooters in free version for competitive sports applications. END OF RUN-IN PERIOD AND EVERY 3 HOURS OF OPERATION Kaart van het periodiek onderhoud voor voertuigen in vrije versie voor wedstrijdgebruik. EINDE VAN DE PROEFPERIODE, 3 UUR GEBRUIK Throttle body assembly bolt torque - check Sluiting van de bouten van de vlindergroep - Controle Throttle bodies - Synchronisation Vlinderrompen - Synchronisatie Air filter and filter case - Check and cleaning Luchtfilter en filterkist - Controle en reiniging 144 Bebuizing van de benzine - Controle van de conditie, plaatsing Idle speed adjustment - Check Regeling van het minimum toerental - Controle Gearbox oil - Change Olie van de versnellingsbak - Vervangen Clutch control - Check and adjust Commando van de koppeling - Controle en registratie Coolant level in radiator and expansion tank - Check Peil van de koelvloeistof van de radiator en het expansievat - Controle Engine oil and engine oil filter - Change Motorolie en filter van de motorolie - Vervanging Oil pipes - Check condition and position Bebuizing van de olie - Controle van de conditie, plaatsing Throttle cables - Adjustment Gaskabels - Registratie Cold-start key - Adjustment Toets voor de koude start - Registratie Brake fluid level - Check Peil van de remvloeistof - Controle Brake pipes - Check condition and tightness Rembebuizing - Controle van de conditie en dichting Brake system screws torque - Check Sluiting van de bouten van de reminstallatie - Controle Light operation/direction Werking/richting van de lichten Electrical system operation - Check Werking van de elektrische installatie - Controle Tyre condition and pressure - Check Conditie en spanning van de banden - Controle Wheel bearings clearance - Check Speling van de wielkussentjes - Controle Wheel spokes and rim coaxiality - Check tension Spaken en coaxialiteit van de velgen - Controle van de spanning Tightening of wheel pin nuts and screws - Check Sluiting van de moeren en de bouten van de wielpinnen - Controle Engine mounting bolt torque - Check Sluiting van de bevestigingsbouten van de motor - Controle Tightening of chassis screws and nuts - Check Sluiting van de moeren en de bouten van de wielen - Controle Fork - Check for sealing and operation Vork - Controle van de dichting en de werking Tightening of fork plates and feet screws - Check Sluiting van de bouten van de vorkplaten, vorkvoetjes - Controle Shock absorber pins tightening - Check Sluiting van de pinnen van de schokdemper - Controle 145 6 Programmed maintenance / 6 Gepland onderhoud Fuel lines - Check condition and position Shock absorber - Check for sealing and operation Schokdemper - Controle van de dichting en de werking Steering bearings - Check and adjust Stuurinrichtingskussentjes - Controle en registratie Headstock dust guards - Cleaning Stofkeerringen van de stuurinrichtingskop - Reiniging Drive chain - Tension Transmissieketting - Spanning Sealed link, chain sprocket and chain guide - Check for wear Verzegelde schakel, kettingkroon en kettingeleider - Controle van de slijtage Chain - lubricate Ketting - Smering 6 Programmed maintenance / 6 Gepland onderhoud EVERY 15 HOURS OF OPERATION ELKE 15 GEBRUIKSUREN Throttle body assembly bolt torque - check Sluiting van de bouten van de vlindergroep - Controle Throttle bodies - Synchronisation Vlinderrompen - Synchronisatie Air filter and filter case - Check and cleaning Luchtfilter en filterkist - Controle en reiniging Fuel lines - Check condition and position Bebuizing van de benzine - Controle van de conditie, plaatsing Idle speed adjustment - Check Regeling van het minimum toerental - Controle Gearbox oil - Change Olie van de versnellingsbak - Vervangen Clutch springs - Check length Veren van de koppeling - Controle van de lengte Clutch discs - Check for wear Schijven van de koppeling - Controle van de slijtage Clutch control - Check and adjust Commando van de koppeling - Controle en registratie Coolant level in radiator and expansion tank - Check Peil van de koelvloeistof van de radiator en het expansievat - Controle System sealing - Check Dichting van de installatie - Controle Engine oil and engine oil filter - Change Motorolie en filter van de motorolie - Vervanging Oil pipes - Check condition and position Bebuizing van de olie - Controle van de conditie, plaatsing Throttle cables - Adjustment Gaskabels - Registratie 146 Toets voor de koude start - Registratie Brake fluid level - Check Peil van de remvloeistof - Controle Brake pipes - Check condition and tightness Rembebuizing - Controle van de conditie en dichting Brake system screws torque - Check Sluiting van de bouten van de reminstallatie - Controle Brake discs thickness - Check Dikte van de remschijven - Controle Brake pad thickness - Check Dikte van de pastilles - Controle Electrical contacts and switches - Treatment with contact activator spray Elektrische contacten en schakelaars - Behandeling met heractivatiespray Battery connections - Greasing Light operation/direction Electrical system operation - Check Exhaust system - Check for leaks and alignment Tyre condition and pressure - Check Wheel bearings - check Wheel spokes and rim coaxiality - Check tension Tightening of wheel pin nuts and screws - Check Engine mounting bolt torque - Check Tightening of chassis screws and nuts - Check Fork dust guards - Cleaning Fork struts - Bleed Fork - Check for sealing and operation Tightening of fork plates and feet screws - Check Shock absorber pins tightening - Check Shock absorber - Check for sealing and operation Aansluiting van de accu - Behandeling met vet Werking/richting van de lichten Werking van de elektrische installatie - Controle Uitlaat - Controle van de dichting en de uitlijning Conditie en spanning van de banden - Controle Wielkussentjes - Controle Spaken en coaxialiteit van de velgen - Controle van de spanning Sluiting van de moeren en de bouten van de wielpinnen - Controle Sluiting van de bevestigingsbouten van de motor - Controle Sluiting van de moeren en de bouten van de wielen - Controle Stofkeerringen van de vork - Reiniging Benen van de vork - Ontluchting Vork - Controle van de dichting en de werking Sluiting van de bouten van de vorkplaten, vorkvoetjes - Controle Sluiting van de pinnen van de schokdemper - Controle 147 6 Programmed maintenance / 6 Gepland onderhoud Cold-start key - Adjustment Steering bearing clearance - Check Schokdemper - Controle van de dichting en de werking Headstock dust guards - Cleaning Speling van de stuurinrichtingskussentjes - Controle Drive chain - Tension Stofkeerringen van de stuurinrichtingskop - Reiniging Sealed link, chain sprocket and chain guide - Check for wear Transmissieketting - Spanning Steering bearings - Lubricate Verzegelde schakel, kettingkroon en kettingeleider - Controle van de slijtage Clutch lever pin - Lubricate Throttle cables - Lubricate Rider footrest bolts - Lubricate Pin van de koppelingshendel - Smeren Gaskabels - Smeren Chain - lubricate 6 Programmed maintenance / 6 Gepland onderhoud Stuurinrichtingskussentjes - Smeren Rear suspension linkage system - Lubricate Side stand bolt - Lubricate Front wheel bolt and bearings - Lubricate Rear fork bolt - Lubricate Rear wheel bolt and bearings - Lubricate Pinnen van de voetensteun van de bestuurder - Smeren Ketting - Smering Hefsystemen van de achterste ophanging - Smeren Pin van de laterale standaard - Smeren Pin en kussentjes van het voorwiel - Smeren Pin van de achtervork - Smeren Pin en kussentjes van het achterwiel - Smeren EVERY 30 HOURS OF OPERATION ELKE 30 GEBRUIKSUREN Paper air filter - Replacement Luchtfilter van papier - Vervanging Spark plugs - Replacement Bougies - Vervanging 148 ELKE 75 GEBRUIKSUREN Complete transmission - Check for wear Volledige versnellingsbak - Controle van de slijtage Pressure relief and non-return valve spring - Check Veer van de overdrukklep en de terugslagklep - Controle Cylinder liners - Check for wear Cilinderpijpen - Controle van de slijtage Connecting rods and main bushings - Check for wear Drijfstang- en bankkussenblokken - Controle van de slijtage Start-up gears - Check for wear Raderwerken voor de start - Controle van de slijtage Oil pump gears - Check Raderwerken van de oliepomp - Controle Head lubrication nozzles - Cleaning Sproeiers voor de smering van de kop - Reiniging Pistons and piston rings - Replacement Zuigers en elastische klemmen - Vervanging Piston pin - Check Zuigerpen van de zuiger - Controle Cam rockers - Radial check Rollen van de balanceringen - Radiale controle Valve lifter - Check Kleplichter - Controle Camshaft wear - Check Slijtage van de nokkenassen - Controle Camshaft bearings - Check Kussentjes van de nokkenassen - Controle Valve seat sealing - Check Dichting van de klepzitten - Controle Valves - Check for wear Kleppen - Controle van de slijtage Valve clearance - Check and adjust Kleppenspeling - Controle en registratie Valve guides - check for wear Kleppengeleiders - Controle van de slijtage Spring washers, caps, bowls - Check for wear Rondellen van de veerhouder, schijven, bekertjes - Controle van de slijtage Chain tightener toothing - Check for wear Valve springs - check length Timing chain - Stretching measurement Tanden van de kettingspanner - Controle van de slijtage Veren van de kleppen - Controle van de lengte Distributieketting - Meting van de verlenging 149 6 Programmed maintenance / 6 Gepland onderhoud EVERY 75 HOURS OF OPERATION 6 Programmed maintenance / 6 Gepland onderhoud Drive chain sliders - Check for wear Sleden van de transmissieketting - Controle van de slijtage Fuel pump - Check Benzinepomp - Controle Fork - Comprehensive maintenance Vork - Volledig onderhoud Fork oil - Replacement Olie van de vork - Vervanging Shock absorber - Comprehensive maintenance Schokdemper - Volledig onderhoud Crankshaft and connecting rod bearing clearance - Check Speling van de kussentjes van het drijfstangsysteem - Controle Chain guide slider - Check for wear Slede van de kettinggeleider - Controle van de slijtage Chain guide eye - Check for wear Oog van de kettinggeleider - Controle van de slijtage Chain tightener roller - Check for wear Rol van de kettingspanner - Controle van de slijtage Chain tightener slider - Check for wear Slede van de kettingspanner - Controle van de slijtage EVERY YEAR ELK JAAR Brake fluid - Change Remvloeistof - Vervangen CAUTION LET OP IF THE VEHICLE IS USED FOR COMPETITIONS, CARRY OUT THE 15HOUR SERVICE AFTER EVERY RACE. WANNEER MEN HET VOERTUIG COMPETITIEGERICHT GEBRUIKT, MOET DE SERVICEBEURT VAN NA 15 GEBRUIKSUREN NA ELKE WEDSTRIJD WORDEN UITGEVOERD. NOTE - MAINTENANCE OPERATIONS BY THE SPECIALISED APRILIA WORKSHOP DO NOT REPLACE DAILY CHECKING BY THE RIDER! - IF DISTORTIONS, DAMAGES OR WEAR EXCEEDING THE TOLERATED 150 N.B. - DE ONDERHOUDSHANDELINGEN VAN DE GESPECIALISEERDE APRILIA GARAGE VERVANGEN DE DAGELIJKSE CONTROLE VAN DE BESTUURDER NIET! 6 Programmed maintenance / 6 Gepland onderhoud Product Description Specifications AGIP BRAKE 4 Brake fluid As an alternative to the recommended fluid, other fluids that meet or exceed the required specifications may be used. SAE J1703, NHTSA 116 DOT 4, ISO 4925 Synthetic fluid AGIP MP GREASE Grease for bearings, joints, couplings and levers Alternatively to the recommended product, use top-branded grease for roller bearings, useful temperature range: -30°C...+140°C (-22°F... +284°F), drop point: 150°C...230°C (302°F... 446°F), high anticorrosive protection, good water and rust resistance. AGIP FORK 10W Fork oil SAE 10W TABEL VAN DE AANBEVOLEN PRODUCTEN SXV 450 - 550 Product Beschrijving Kenmerken AGIP RACING 4T 10W-60 Motorolie Gebruik merkolies met conforme of hogere prestaties dan de specifieken CCMC G-4 A.P.I. SG. SAE 10W-60 AGIP RACING 4T 10W-60 Olie van de versnellingsbak - AGIP PERMANENT SPEZIAL Koelvloeistof Biologisch afbreekbare koelvloeistof, gebruiksklaar, met "long life"-technologie en kenmerken (rood). Verzekert een bescherming tegen vriestemperaturen tot -40° (-40°F). Beantwoordt aan de norm CUNA 956-16. AGIP BRAKE 4 remvloeistof In plaats van de aanbevolen vloeistof kan men vloeistoffen gebruiken met conforme of hogere prestaties dan de specifieken. Synthetische vloeistof SAE J1703, NHTSA 116 DOT 4, ISO 4925 152 Beschrijving Kenmerken AGIP MP GREASE Vet voor kussentjes, koppelingen, knooppunten en hefsystemen In plaats van het aanbevolen product, gebruikt men merkvet voor draaiende kussentjes, met bruikbaar temperatuursveld -30°C...+140°C (-22°F...+284°F), druppelpunt 150°C...230°C (302°F...446°F), hoge anticorrosiebescherming, goede weerstand tegen water en oxidatie. AGIP FORK 10W Olie van de vork SAE 10W 153 6 Programmed maintenance / 6 Gepland onderhoud Product TREFWOORDENREGISTER A K S ACCU: 14, 100 Ketting: 117–120 Koelvloeistof: 11, 87 Koplamp: 106 Schijfrem: 107 Standaard: 62 Start: 59 Stuurslot: 36 B Banden: 78 BOUGIE: 80 Brandstof: 10 L T Luchtfilter: 85 Technische gegevens: 123 C M Claxon: 36 Motorolie: 12, 70, 73 Z Zadel: 39 Zekeringen: 101 D O Display: 30 Onderhoud: 69, 131, 132 I R Identificatie: 40 Richtingaanwijzers: 37 159 THE VALUE OF SERVICE Thanks to continuous technical updates and specific training programs on aprilia products, only aprilia Official Network mechanics know this vehicle fully and have the special tools necessary to carry out maintenance and repair operations correctly. The reliability of the vehicle also depends on its mechanical conditions. Checking the vehicle before riding, its regular maintenance and the use of Original aprilia Spare Parts only are essential factors! For information about the nearest Official Dealer and/or Service Centre, consult the Yellow Pages or search directly on the inset map in our Official Website: www.aprilia.com Only aprilia Original Spare Parts ensure products already studied and tested during the vehicle design stage. All aprilia Original Spare Parts undergo quality control procedures to guarantee full reliability and duration. The descriptions and illustrations given in this publication are not binding; While the basic characteristics as described and illustrated in this manual remain unchanged, aprilia reserves the right, at any time and without being required to update this publication beforehand, to make any changes to components, parts or accessories, which it considers necessary to improve the product or which are required for manufacturing or construction reasons. Not all versions/models shown in this publication are available in all Countries. The availability of individual versions/models should be confirmed with the official aprilia sales network. © Copyright 2006- aprilia. All rights reserved. Reproduction of this publication in whole or in part is prohibited. aprilia - After sales service. aprilia trademark is property of Piaggio & C. S.p.A. DE WAARDE VAN DE ASSISTENTIE Dankzij de voortdurende technische actualiseringen en de specifieke trainingsprogramma´s van de aprilia producten, kennen enkel de onderhoudsmonteurs van het Officiële Netwerk van aprilia grondig dit voertuig, en beschikken ze over de nodige speciale uitrusting voor een correcte uitvoering van de handelingen van het onderhoud en de herstellingen. De betrouwbaarheid van het voertuig hangt ook af van de mechanische condities van het voertuig. De controle vóór het rijden, het regelmatig onderhoud en het exclusief gebruik van de Originele Reserveonderdelen van aprilia zijn essentiële factoren ! Voor informatie in verband met de dichtstbijzijnde Officiële dealer en/of Assisitentiedienst, raadpleegt men de Gouden Gids of zoekt men rechtstreeks op de geografische kaart op onze Officiële Website: www.aprilia.com Enkel wanneer men Originele aprilia Reserveonderdelen aanvraagt, zal men een product verkrijgen dat reeds bestudeerd en getest werd tijdens de ontwerpfase van het voertuig. De Originele aprilia Reserveonderdelen worden systematisch onderworpen aan kwaliteitscontroleprocedures, voor het garanderen van de volledige betrouwbaarheid en de duur. De beschrijvingen en de illustraties in deze uitgave zijn niet bindend; Aprilia houdt zich derhalve het recht voor, behoudens de essentiële eigenschappen van het model dat hierin is beschreven en geïllustreerd, op elk moment wijzigingen aan te brengen aan de organen of de onderdelen, of de levering van accessoires te actualiseren naar gelang zij dit nodig acht om het product te verbeteren, of om te voldoen aan enige vereisten van constructieve of commerciële aard, zonder verplicht te zijn om tijdig deze uitgave bij te werken. Niet alle versies in deze uitgave zijn in alle landen beschikbaar. De beschikbaarheid van de afzonderlijke versies moet gecontroleerd worden via het officiële verkoopsnetwerk van Aprilia. © Copyright 2006- aprilia. Alle rechten voorbehouden. Het reproduceren van de inhoud, ook van delen hiervan, is verboden. aprilia - Dienst na verkoop. Het merk Aprilia is eigendom van Piaggio & C. S.p.A.-
 1
1
-
 2
2
-
 3
3
-
 4
4
-
 5
5
-
 6
6
-
 7
7
-
 8
8
-
 9
9
-
 10
10
-
 11
11
-
 12
12
-
 13
13
-
 14
14
-
 15
15
-
 16
16
-
 17
17
-
 18
18
-
 19
19
-
 20
20
-
 21
21
-
 22
22
-
 23
23
-
 24
24
-
 25
25
-
 26
26
-
 27
27
-
 28
28
-
 29
29
-
 30
30
-
 31
31
-
 32
32
-
 33
33
-
 34
34
-
 35
35
-
 36
36
-
 37
37
-
 38
38
-
 39
39
-
 40
40
-
 41
41
-
 42
42
-
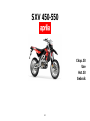 43
43
-
 44
44
-
 45
45
-
 46
46
-
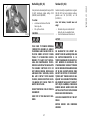 47
47
-
 48
48
-
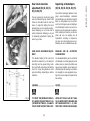 49
49
-
 50
50
-
 51
51
-
 52
52
-
 53
53
-
 54
54
-
 55
55
-
 56
56
-
 57
57
-
 58
58
-
 59
59
-
 60
60
-
 61
61
-
 62
62
-
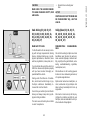 63
63
-
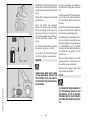 64
64
-
 65
65
-
 66
66
-
 67
67
-
 68
68
-
 69
69
-
 70
70
-
 71
71
-
 72
72
-
 73
73
-
 74
74
-
 75
75
-
 76
76
-
 77
77
-
 78
78
-
 79
79
-
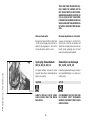 80
80
-
 81
81
-
 82
82
-
 83
83
-
 84
84
-
 85
85
-
 86
86
-
 87
87
-
 88
88
-
 89
89
-
 90
90
-
 91
91
-
 92
92
-
 93
93
-
 94
94
-
 95
95
-
 96
96
-
 97
97
-
 98
98
-
 99
99
-
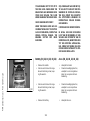 100
100
-
 101
101
-
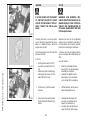 102
102
-
 103
103
-
 104
104
-
 105
105
-
 106
106
-
 107
107
-
 108
108
-
 109
109
-
 110
110
-
 111
111
-
 112
112
-
 113
113
-
 114
114
-
 115
115
-
 116
116
-
 117
117
-
 118
118
-
 119
119
-
 120
120
-
 121
121
-
 122
122
-
 123
123
-
 124
124
-
 125
125
-
 126
126
-
 127
127
-
 128
128
-
 129
129
-
 130
130
-
 131
131
-
 132
132
-
 133
133
-
 134
134
-
 135
135
-
 136
136
-
 137
137
-
 138
138
-
 139
139
-
 140
140
-
 141
141
-
 142
142
-
 143
143
-
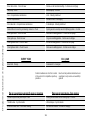 144
144
-
 145
145
-
 146
146
-
 147
147
-
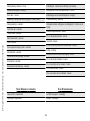 148
148
-
 149
149
-
 150
150
-
 151
151
-
 152
152
-
 153
153
-
 154
154
-
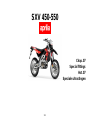 155
155
-
 156
156
-
 157
157
-
 158
158
-
 159
159
-
 160
160
-
 161
161


APRILIA SXV 550 Handleiding
- Categorie
- Motorfietsen
- Type
- Handleiding
in andere talen
- English: APRILIA SXV 550 User manual
Gerelateerde artikelen
-
APRILIA RS 125 - 02-2010 Handleiding
-
-
-
-
-
APRILIA SX 50 - ANNEXE 639 Handleiding
-
-
-
-

