

G
C
E
11
F
H
D
A
11
3A
4
3
2
3B
67-81
5
10
512 9
B
M

ITALIANO
ACCESSORI
A. Tubi prolunga
B. Spazzola batti tappeti
C. Spazzola aspiraliquidi
D. Tubo flessibile con innesto
E. Spazzola piccola
F. Lancia pulizia angoli/batti scopa
G. Sacco raccogli polvere
H. Spazzola a pennello
M. Raccordo brevettato “FLEXO”
La POLTI S.p.A. si riserva la facoltà di introdurre le
modifiche tecniche e costruttive che riterrà neces-
sarie, senza obblighi di preavviso.
LEGENDA
1. Interruttore acceso/spento con spia
2. Maniglia per trasporto
3. Coperchio filtro plissettato
3a. Leva apertura coperchio filtro plissetato
3b. Filtro plissettato (nota: linea tratteggiata)
4. Ganci chiusura apparecchio
5. Avvolgicavo
6. Coperchio con gruppo motore
7. Griglia copri filtro uscita aria
8. Filtro uscita aria
9. Serbatoio rifiuti
10. Porta accessori
11. Ruote piroettanti
12. Cavo alimentazione
160
Questo apparecchio é conforme alla direttiva EC 89/336 modifica-
ta dalla 93/68 (EMC) e alla direttiva 73/23 modificata dalla 93/68
(bassa tensione).

ITALIANO
UU
UU
SS
SS
OO
OO
CC
CC
OO
OO
RR
RR
RR
RR
EE
EE
TT
TT
TT
TT
OO
OO
DD
DD
EE
EE
LL
LL
PP
PP
RR
RR
OO
OO
DD
DD
OO
OO
TT
TT
TT
TT
OO
OO
Questo apparecchio è destinato all'uso come aspiratore di
liquidi e di solidi secondo le descrizioni ed istruzioni riportate
in questo manuale.
PP
PP
RR
RR
EE
EE
PP
PP
AA
AA
RR
RR
AA
AA
ZZ
ZZ
II
II
OO
OO
NN
NN
EE
EE
AA
AA
LL
LL
LL
LL
''
''
UU
UU
SS
SS
OO
OO
• Prima di utilizzare l'aspirapolvere, procedere al montaggio
delle ruote piroettanti (11) (Fig.1).
• Inserire la bocca aspirazione del tubo flessibile con innesto
(D) nell'apparecchio (Fig. 2) fino ad agganciare il dente (I).
• Collegare i tubi prolunga (A) e innestarli al tubo flessibile (D).
• Scegliere l'accessorio idoneo al tipo di aspirazione e
innestarlo ai tubi prolunga (Fig.3).
AA
AA
SS
SS
PP
PP
II
II
RR
RR
AA
AA
ZZ
ZZ
II
II
OO
OO
NN
NN
EE
EE
AA
AA
SS
SS
EE
EE
CC
CC
CC
CC
OO
OO
• Aspirare lo sporco fine asciutto con il sacco raccogli
polvere (G) montato, onde garantire una maggior
efficienza del sistema filtrante (Fig.5).
• Preparare l'apparecchio come riportato nel capitolo
PREPARAZIONE PER L' USO.
• Tirare verso l'esterno le labbra delle chiusure (4) e
contemporaneamente sollevare il coperchio con gruppo
motore (6) verso l'alto (Fig. 6).
• Posizionare il sacco raccogli polvere (G) infilando la flangia
nei due perni (L) come indicato in Fig. 5A
• Collocare il coperchio gruppo motore (6) al serbatoio
rifiuti (9) e richiudere, facendoli agganciare tramite le due
labbra chiusura (4).
• Svolgere il cavo alimentazione (12) e collegarlo ad una
presa di corrente idonea.
• Premere l'interruttore (1) e iniziare l'aspirazione.
NOTA: I frammenti di sporco asciutto possono essere
aspirati anche senza sacco raccogli polvere (G).
AA
AA
SS
SS
PP
PP
II
II
RR
RR
AA
AA
ZZ
ZZ
II
II
OO
OO
NN
NN
EE
EE
LL
LL
II
II
QQ
QQ
UU
UU
II
II
DD
DD
II
II
• Attenzione! Prima di aspirare liquidi rimuovere il sacchetto
come illustrato nei primi due punti del capitolo Manu-
tenzione generale (Sostituzione sacco raccogli polvere).
• Preparare l'apparecchio come riportato nel capitolo
PREPARAZIONE PER L' USO, quindi svolgere il cavo alimen-
tazione (12) e collegarlo ad una presa di corrente idonea.
• Premere l'interruttore (1) e iniziare l'aspirazione (Fig. 4).
• Al termine dell'aspirazione dei liquidi controllare il
galleggiante come riportato nel capitolo manutenzione
generale (Controllo galleggiante).
Fig. 1
Fig. 2
Fig. 3
Fig. 4
Fig. 5
Fig. 5A
I
L
L

ITALIANO
MM
MM
AA
AA
NN
NN
UU
UU
TT
TT
EE
EE
NN
NN
ZZ
ZZ
II
II
OO
OO
NN
NN
EE
EE
GG
GG
EE
EE
NN
NN
EE
EE
RR
RR
AA
AA
LL
LL
EE
EE
Prima di qualsiasi tipo di manutenzione accertarsi che il
cavo di alimentazione non sia collegato alla rete elettrica.
CC
CC
oo
oo
nn
nn
tt
tt
rr
rr
oo
oo
ll
ll
ll
ll
oo
oo
dd
dd
ee
ee
ll
ll
gg
gg
aa
aa
ll
ll
ll
ll
ee
ee
gg
gg
gg
gg
ii
ii
aa
aa
nn
nn
tt
tt
ee
ee
• Dopo l'aspirazione di liquidi è consigliabile procedere allo
svuotamento del serbatoio rifiuti (9).
• Tirare verso l'esterno le due labbra chiusura (4) e
contemporaneamente sollevare il coperchio con gruppo
motore (6). (Fig. 6)
• Vuotare il serbatoio rifiuti (9) dal liquido aspirato.
• Controllare che il galleggiante (M) non sia sporco o che
non abbia degli impedimenti, in tal caso provvedere alla
pulizia (Fig. 7).
SS
SS
oo
oo
ss
ss
tt
tt
ii
ii
tt
tt
uu
uu
zz
zz
ii
ii
oo
oo
nn
nn
ee
ee
ss
ss
aa
aa
cc
cc
cc
cc
oo
oo
rr
rr
aa
aa
cc
cc
cc
cc
oo
oo
gg
gg
ll
ll
ii
ii
pp
pp
oo
oo
ll
ll
vv
vv
ee
ee
rr
rr
ee
ee
La resa dell’apparecchio è in funzione del livello di riempimento
del sacco. Quando si avverte un sensibile calo dell’aspirazione
è necessario procedere alla sostituzione del sacco.
• Tirare verso l'esterno le due labbra chiusura (4), e
contemporaneamente sollevare il coperchio con gruppo
motore (6) (Fig. 6).
• Rimuovere dai due perni (L) il sacco raccogli polvere (G).
• Sostituirlo con uno nuovo riposizionandolo come spiegato
nel paragrafo ASPIRAZIONE A SECCO.
• Richiudere effettuando le operazioni inverse.
PP
PP
uu
uu
ll
ll
ii
ii
zz
zz
ii
ii
aa
aa
oo
oo
ss
ss
oo
oo
ss
ss
tt
tt
ii
ii
tt
tt
uu
uu
zz
zz
ii
ii
oo
oo
nn
nn
ee
ee
dd
dd
ee
ee
ll
ll
ff
ff
ii
ii
ll
ll
tt
tt
rr
rr
oo
oo
pp
pp
ll
ll
ii
ii
ss
ss
ss
ss
ee
ee
tt
tt
tt
tt
aa
aa
tt
tt
oo
oo
Si consiglia la pulizia del filtro ogni 2 cambi del sacco
raccoglipolvere o svuotamento del serbatoio rifiuti. Si
raccomanda la sostituzione ogni 5 cambi del sacco o
svuotamento del serbatoio rifiuti.
• Premere la leva apertura coperchio porta filtro plissettato
(3a) tirando poi il coperchio verso l'alto, in questo modo
il coperchio filtro plissettato (3) si sgancerà
dall'apparecchio (Fig. 8).
• Estrarre il filtro plissettato (3b) (Fig. 9).
• Batterlo e nel caso in cui lo sporco dovesse persistere
lavare il filtro sotto l'acqua corrente e quindi lasciarlo
asciugare (Fig. 10).
• Se il filtro è danneggiato, ossia la plissettatura rimane
visibilmente irregolare, procedere alla sostituzione onde
evitare danni al motore.
Fig. 6
Fig. 7
Fig. 8
Fig. 9
Fig. 10
M

ITALIANO
Fig. 11
PP
PP
uu
uu
ll
ll
ii
ii
zz
zz
ii
ii
aa
aa
oo
oo
ss
ss
oo
oo
ss
ss
tt
tt
ii
ii
tt
tt
uu
uu
zz
zz
ii
ii
oo
oo
nn
nn
ee
ee
dd
dd
ee
ee
ll
ll
ff
ff
ii
ii
ll
ll
tt
tt
rr
rr
oo
oo
uu
uu
ss
ss
cc
cc
ii
ii
tt
tt
aa
aa
aa
aa
rr
rr
ii
ii
aa
aa
• Premere la leva della griglia chiusura filtro uscita aria (7)
(Fig. 11).
• Asportare il filtro, batterlo ,e se è il caso, lavarlo con
acqua ed asciugarlo.
• Riposizionare correttamente il filtro nella sua sede
appoggiandolo con la parte bianca.
• Nel caso in cui il filtro uscita aria fosse danneggiato, ossia
presenta delle lacerazioni, procedere alla sostituzione.
RR
RR
II
II
CC
CC
EE
EE
RR
RR
CC
CC
AA
AA
GG
GG
UU
UU
AA
AA
SS
SS
TT
TT
II
II
Inconveniente Causa Rimedio
L'aspiratore si spegne ma
la spia dell' interruttore
rimane accesa.
La potenza di aspirazione
si riduce.
Fuoriuscita di polvere
durante l'aspirazione.
Fuoriuscita di acqua
durante l'aspirazione
liquidi.
Il livello liquidi nel
serbatoio è troppo alto.
Filtro plissettato,
bocchetta, tubo flessibile
di aspirazione o tubo
rigido di aspirazione sono
otturati.
Sacco raccoglipolvere o
serbatoio rifiuti è pieno.
Manca o è stato collocato
male il filtro plissettato.
Il tubo flessibile di
aspirazione non è
collegato correttamente.
Manca, è stato collocato
male o è danneggiato il
filtro plissettato.
Galleggiante bloccato
dallo sporco.
Interruttore a galleggiante
guasto.
Premere l'interruttore (1),
scollegare il cavo
alimentazione dalla rete
elettrica e vuotare il
serbatoio.
Pulire il filtro ed asportare
eventuali ostruzioni nei
condotti.
Sostituire il sacco
raccoglipolvere, o vuotare
il serbatoio rifiuti.
Collocare correttamente il
filtro piano plissettato.
Collegare correttamente il
tubo flessibile di
aspirazione.
Collocare correttamente o
cambiare il filtro plisettato
Fare controllare dal
Centro Assistenza
Autorizzato Polti

ITALIANO
UU
UU
SS
SS
OO
OO
DD
DD
EE
EE
LL
LL
LL
LL
OO
OO
SS
SS
NN
NN
OO
OO
DD
DD
OO
OO
SS
SS
AA
AA
LL
LL
VV
VV
AA
AA
SS
SS
CC
CC
HH
HH
II
II
EE
EE
NN
NN
AA
AA
FF
FF
LL
LL
EE
EE
XX
XX
OO
OO
((
((
MM
MM
))
))
• Questo particolare snodo (brevetto esclusivo POLTI)
consente di raggiungere i punti più difficili senza dover-
si chinare.
• Inserire lo snodo flexo tra i due tubi di prolunga tenendo
la tacca sulla parte posteriore dei tubi.
• Per cambiare l’inclinazione ruotare il cursore (Y) di mez-
zo giro. Si scopre così l’articolazione che permetterà di
variare l’inclinazione di lavoro dei tubi (Fig. 12).
• Finite le operazioni riportate lo snodo in posizione originale, ruotando per bloccare la
posizione.
AA
AA
VV
VV
VV
VV
EE
EE
RR
RR
TT
TT
EE
EE
NN
NN
ZZ
ZZ
EE
EE
Attenzione! Non usare l'apparecchio senza aver letto le istruzioni per l'uso.
• In caso di guasto o mal funzionamento, non tentare mai di smontare l'apparecchio ma
rivolgersi al Centro di Assistenza Autorizzato più vicino.
• L'impianto elettrico a cui è collegato l'apparecchio dovrà essere realizzato in conformità
alle leggi vigenti.
• L'apparecchio non deve essere utilizzato da bambini o da personale non addestrato all' uso.
• Per non compromettere la sicurezza dell'apparecchio, utilizzare solo parti di ricambio
e accessori originali, approvati dal costruttore.
• Non utilizzare l'apparecchio se il cavo di alimentazione o altre parti importanti
dell'apparecchio sono danneggiate.
• Non afferrare mai la spina di alimentazione con le mani bagnate.
• Non aspirare acidi e solventi non diluiti che potrebbero causare seri danni ai materiali
dell'apparecchio e soprattutto non aspirare mai liquidi esplosivi, gas infiammabili,
polveri esplosive, benzine, vernici, olio combustibile, che a contatto con le parti interne
dell'apparecchio potrebbero causare esplosioni.
• E' vietato l'uso dell'apparecchio in ambienti in cui sussiste il pericolo di esplosioni.
• Non aspirare oggetti in fiamme o incandescenti, come tizzoni, cenere, ed altri materiali
in fase di conbustione.
• Se durante l'aspirazione dovesse esserci una fuoriuscita di liquido o di schiuma
spegnere immediatamente l'apparecchio e apportare le manutenzioni necessarie.
• La pulizia dell'apparecchio non dovra' essere fatta con la canna dell'acqua o con un
getto ad alta pressione, ma utilizzare un panno umido.
• Spegnere sempre l’apparecchio e togliere la spina dalla presa prima di procedere alla
manutenzione.
Fig. 12
Y

ITALIANO
GG
GG
AA
AA
RR
RR
AA
AA
NN
NN
ZZ
ZZ
II
II
AA
AA
POLTI VAC 160 è garantita 1 anno dalla data di acquisto contro i difetti di fabbricazione
e i vizi dei materiali. La garanzia non è valida se il guasto è causato da un impiego impro-
prio. In caso di guasto o malfunzionamento, contattare immediatamente il Centro Assi-
stenza autorizzato più vicino. Eventuali manomissioni dell’apparecchio da parte di perso-
nale non autorizzato invalideranno automaticamente la garanzia.
• La Polti S.p.A. declina tutte le responsabilità in caso di incidenti derivanti da
un utilizzo di POLTI VAC 160 non conforme alle presenti istruzioni d’uso.
AA
AA
TT
TT
TT
TT
EE
EE
NN
NN
ZZ
ZZ
II
II
OO
OO
NN
NN
EE
EE
• L’apparecchio è costruito secondo le norme vigenti per il riciclaggio.
• Si raccomanda di non gettare nei rifiuti domestici i materiali di imballaggio protettivi
per il trasporto, ma consegnarli ai relativi centri di raccolta.
• I Filtri ed i sacchi raccoglipolvere sono in vendita presso i centri assistenza tecnica auto-
rizzati e presso i migliori negozi di elettrodomestici.
• Raccomandiamo di usare solo ricambi originali.
UU
UU
FF
FF
FF
FF
II
II
CC
CC
II
II
OO
OO
SS
SS
EE
EE
RR
RR
VV
VV
II
II
ZZ
ZZ
II
II
OO
OO
CC
CC
LL
LL
II
II
EE
EE
NN
NN
TT
TT
II
II
Chiamando questo numero verde al solo costo di uno scatto,
potrà ordinare i sacchi raccoglipolvere di ricambio e riceverli
direttamente a casa sua tramite il servizio postale.
Chiamando questo numero i nostri incaricati saranno a disposi-
zione per rispondere alle Vostre domande e fornirVi tutte le indi-
cazioni utili per sfruttare al meglio le qualità dei prodotti POLTI.
R
824148800
012363800

ESPAÑOL
ACCESORIOS
A. Tubos prolongación
B. Boquilla limpia alfombras
C. Boquilla aspiración líquidos
D. Tubo flexible con conexión
E. Boquilla pequeña
F. Lanza limpieza de ángulos/batidora
G. Saco recoge polvo
H. Cepillo para polvo
M;. Racord patentado “Flexo”
POLTI S.p.A se reserva el derecho de introducir las
modificaciones técnicas y constructivas que consi-
dere necesarias, sin obligación de preaviso.
LEYENDA
1. Interruptor encendido/apagado
con piloto indicador
2. Asa para el transporte
3. Tapa filtro plegado
3a. Leva apertura tapa filtro plegado
3b. Filtro plegado (nota: línea señalizada)
4. Ganchos cierre aparato
5. Recogecable
6. Tapa con grupo motor
7. Parrilla cubre-filtro salida aire
8. Filtro salida aire
9. Depósito para suciedad
10. Porta accesorios
11. Ruedas poliuretano
12. Cable alimentación eléctrica
160
ESTE APARATO ES CONFORME A LA NORMATIVA DE LA EC 89/336
MODIFICADA EL 93/68 (EMC) Y A LA NORMATIVA 73/23 MODIFICADA
EL 93/68 (baja tensión).

ESPAÑOL
AA
AA
DD
DD
VV
VV
EE
EE
RR
RR
TT
TT
EE
EE
NN
NN
CC
CC
II
II
AA
AA
¡ Atención! No utilizar el aparato sin haber leído antes las instrucciones de uso.
• En caso de avería o mal funcionamiento no intentar nunca desmontar el aparato.
Dirigirse al Servicio de Asistencia Técnica Autorizada mas cercano.
• La instalación eléctrica a la que se conecte el aparato deberá estar realizada de
conformidad con las leyes vigentes.
• El aparato no debe ser utilizado por niños o personas no adiestradas en su utilización.
• Para no comprometer la seguridad del aparato utilizar solo recambios y accesorios
originales homologados por el fabricante.
• No utilizar el aparato si el cable de alimentación u otras partes importantes del aparato
están dañadas.
• No tocar nunca el enchufe de conexión del aparato con las manos mojadas.
• No aspirar ácidos ni disolventes ya que se pueden causar serios daños a los materiales
del aspirador y sobre todo no aspirar nunca líquidos ni productos explosivos, gas
inflamable, gasolina, barnices, aceite combustible ó productos similares que en
contacto con las partes internas del aparato podrían causar una explosión.
• Está prohibido el uso del aparato en ambientes en los que exista peligro de explosiones
o deflagraciones.
• No aspirar objetos en llamas o incandescentes como brasas, cenizas u otros materiales
en fase de combustión.
• Este aparato no es idóneo para la aspiración de polvo, partículas o materiales
peligrosos para la salud.
• Si durante la utilización del aspirador ocurriese una salida súbita de líquido o de espuma
desconectar inmediatamente el aparato y efectuar la manutención necesaria.
• La limpieza del aparato no deberá efectuarse con chorros de agua o con agua a alta
presión.
UU
UU
SS
SS
OO
OO
CC
CC
OO
OO
RR
RR
RR
RR
EE
EE
CC
CC
TT
TT
OO
OO
DD
DD
EE
EE
LL
LL
PP
PP
RR
RR
OO
OO
DD
DD
UU
UU
CC
CC
TT
TT
OO
OO
El uso de este aparato esta destinado al de aspirador de líquidos y sólidos según las
instrucciones indicadas en este manual.

ESPAÑOL
PP
PP
RR
RR
EE
EE
PP
PP
AA
AA
RR
RR
AA
AA
CC
CC
II
II
ÓÓ
ÓÓ
NN
NN
PP
PP
AA
AA
RR
RR
AA
AA
LL
LL
AA
AA
UU
UU
TT
TT
II
II
LL
LL
II
II
ZZ
ZZ
AA
AA
CC
CC
II
II
ÓÓ
ÓÓ
NN
NN
• Antes de utilizar el aspirador proceder al montaje de las
ruedas de poliuretano (11) (Fig.1).
• Insertar la boca de aspiración del tubo flexible con conexión
(D) en el aparato (Fig. 2) hasta enganchar el diente (I)
• Conectar los tubos de prolongación (A) y empalmarlos en
el tubo flexible (D).
• Escoger el accesorio idóneo para el tipo de aspiración a
realizar y empalmarlo a los tubos de prolongación (Fig. 3).
AA
AA
SS
SS
PP
PP
II
II
RR
RR
AA
AA
CC
CC
II
II
ÓÓ
ÓÓ
NN
NN
EE
EE
NN
NN
SS
SS
EE
EE
CC
CC
OO
OO
• Aspirar la suciedad fina y seca preferiblemente con el
saco recogepolvo (G) montado (Fig. 5).
• Preparar el aparato tal como se indica en el capítulo de
PREPARACIÓN PARA LA UTILIZACIÓN.
• Tirar hacia fuera del gancho de cierre del aparato (4) y al
mismo tiempo llevar la tapa con el grupo motor (6) hacia
arriba (Fig. 6).
• Colocar el saco recoge polvo (G) introduciendo la parte
más rígida en los dos pernos (L) tal como se indica en
la Fig 5a.
• Colocar la tapa con el grupo motor (6) en el depósito para
la suciedad (9) y cerrarla, haciéndola enganchar sobre los
ganchos de cierre (4)
• Desenrollar el cable de alimentación (12) y conectarlo en
una toma de corriente adecuada.
• Pulsar el interruptor (1) e iniciar la aspiración.
NOTA: Los fragmentos de suciedad seca pueden ser
aspirados también sin el saco recogepolvo.
AA
AA
SS
SS
PP
PP
II
II
RR
RR
AA
AA
CC
CC
II
II
ÓÓ
ÓÓ
NN
NN
DD
DD
EE
EE
LL
LL
ÍÍ
ÍÍ
QQ
QQ
UU
UU
II
II
DD
DD
OO
OO
SS
SS
• ¡Atención! Antes de aspirar líquidos mover el saco tal como
se indica en los dos primeros puntos del capítulo
"Mantenimiento General" (sustitucíon del saco recogepolvo)
• Preparar el aparato tal como se indica en el capítulo de
PREPARACIÓN PARA LA UTILIZACIÓN, después
desenrollar el cable de alimentación (12) y conectarlo en
una toma de corriente adecuada.
• Pulsar el interruptor (1) e iniciar la aspiración (Fig. 4).
• Al finalizar la aspiración de líquidos controlar el flotador
tal como está indicado en el capítulo "Mantenimiento
General" (control del flotador).
Fig. 1
Fig. 2
Fig. 3
Fig. 4
Fig. 5
Fig. 5A
I
L
L

ESPAÑOLESPAÑOL
MM
MM
AA
AA
NN
NN
TT
TT
EE
EE
NN
NN
II
II
MM
MM
II
II
EE
EE
NN
NN
TT
TT
OO
OO
GG
GG
EE
EE
NN
NN
EE
EE
RR
RR
AA
AA
LL
LL
Antes de efectuar cualquier operación de mantenimiento
cerciorarse de que el cable de alimentación no esté
conectado a la red eléctrica.
CC
CC
oo
oo
nn
nn
tt
tt
rr
rr
oo
oo
ll
ll
dd
dd
ee
ee
ll
ll
ff
ff
ll
ll
oo
oo
tt
tt
aa
aa
dd
dd
oo
oo
rr
rr
• Después de la aspiración de líquidos es aconsejable
proceder al vaciado del depósito de suciedad (9).
• Tirar hacia el exterior de los dos labios de cierre (4) y al
mismo tiempo levantar la tapa con el grupo motor (6)
(Fig. 6)
• Vaciar el depósito (9) del líquido aspirado.
• Controlar que el flotador (M) no este sucio o que no tenga
nada que le impida actuar correctamente y en su caso
proceder a limpiarlo (Fig. 7).
SS
SS
uu
uu
ss
ss
tt
tt
ii
ii
tt
tt
uu
uu
cc
cc
ii
ii
óó
óó
nn
nn
dd
dd
ee
ee
ll
ll
ss
ss
aa
aa
cc
cc
oo
oo
rr
rr
ee
ee
cc
cc
oo
oo
gg
gg
ee
ee
pp
pp
oo
oo
ll
ll
vv
vv
oo
oo
• Tirar hacía el exterior de los labios de cierre (4) y al mismo
tiempo levantar la tapa con el grupo motor (6) (Fig. 6).
• Extraer de los dos pernos (L) el saco recoge polvo (G)
• Sustituirlo por uno nuevo reposicionándolo tal como se
explica en el apartado ASPIRACIÓN EN SECO.
• Volver a cerrar repitiendo la operación a la inversa.
SS
SS
uu
uu
ss
ss
tt
tt
ii
ii
tt
tt
uu
uu
cc
cc
ii
ii
óó
óó
nn
nn
dd
dd
ee
ee
ll
ll
ff
ff
ii
ii
ll
ll
tt
tt
rr
rr
oo
oo
pp
pp
ll
ll
ee
ee
gg
gg
aa
aa
dd
dd
oo
oo
• Presionar la leva de apertura de la cubierta porta filtro
plegado (3a) tirando luego hacia arriba, de este modo la
cubierta del filtro plegado (3) se desenganchará del aparato
(Fig. 8).
• Extraer el filtro plegado (3b) (Fig. 9)
• Sacudirlo para limpiarlo de suciedad. En el caso de que
la suciedad sea persistente lavarlo con agua corriente y
después dejarlo secar (Fig. 10). Si el agua no fuese
suficiente proceder a la sustitución del mismo.
• Si el filtro estuviese dañado proceder inmediatamente a
la sustitución a fin de evitar posibles daños al motor.
SS
SS
uu
uu
ss
ss
tt
tt
ii
ii
tt
tt
uu
uu
cc
cc
ii
ii
óó
óó
nn
nn
dd
dd
ee
ee
ll
ll
ff
ff
ii
ii
ll
ll
tt
tt
rr
rr
oo
oo
dd
dd
ee
ee
ss
ss
aa
aa
ll
ll
ii
ii
dd
dd
aa
aa
dd
dd
ee
ee
aa
aa
ii
ii
rr
rr
ee
ee
• Presionar la leva de la parrilla de cierre del filtro de salida
de aire (7) (Fig.11).
• Sacar el filtro, sacudirlo y si es necesario lavarlo con
agua y secarlo.
• Reposicionar correctamente el filtro en su lugar
apoyándolo con la parte blanca.
• En el caso de que el filtro estuviese dañado proceder a
su sustitución.
Fig. 6
Fig. 7
Fig. 8
Fig. 9
Fig. 10
Fig. 11
M

ESPAÑOL
II
II
NN
NN
VV
VV
EE
EE
SS
SS
TT
TT
II
II
GG
GG
AA
AA
CC
CC
II
II
ÓÓ
ÓÓ
NN
NN
DD
DD
EE
EE
AA
AA
VV
VV
EE
EE
RR
RR
ÍÍ
ÍÍ
AA
AA
SS
SS
Problema Causa Solución
El aspirador se
desconecta pero el
indicador luminoso
permanece encendido.
La potencia de aspiración
se reduce.
Salida de polvo al exterior
mientras se aspira.
Salida de agua al exterior
mientras se aspiran
líquidos
El nivel de líquido en el
depósito es demasiado
alto.
Filtro, boca de entrada,
tubo flexible de aspiración
o tubo rígido de aspiración
están obturados.
Saco recoge polvo o
depósito de desperdicios
está lleno.
Falta o está mal colocado
el filtro plegado.
El tubo flexible de
aspiración no está
correctamente colocado.
Falta, está mal colocado
ó está dañado el filtro
plegado
Flotador bloqueado por la
suciedad.
Interruptor del flotador
averiado.
Presionar el interruptor
(1), desconectar el cable
de alimentación de la red
eléctrica y vaciar el
depósito.
Limpiar el filtro y
eventualmente retirar
las posible obstrucciones
de los consuctos
Sustituir el saco recoge
polvo ó vaciar el depósito
de desperdicios si esta
lleno.
Colocar correctamente el
filtro plano plegado.
Colocar correctamente el
tubo flexible de
aspiración.
Colocar correctamente o
cambiar el filtro plegado
Hacer verificar el aparato
en un Servicio de
Asistencia Técnica
autorizado Polti.

UU
UU
SS
SS
OO
OO
DD
DD
EE
EE
LL
LL
AA
AA
AA
AA
RR
RR
TT
TT
II
II
CC
CC
UU
UU
LL
LL
AA
AA
CC
CC
II
II
ÓÓ
ÓÓ
NN
NN
SS
SS
AA
AA
LL
LL
VV
VV
AA
AA
--
--
EE
EE
SS
SS
PP
PP
AA
AA
LL
LL
DD
DD
AA
AA
SS
SS
""
""
FF
FF
LL
LL
EE
EE
XX
XX
OO
OO
""
""
((
((
MM
MM
))
))
• Esta particular articulación - patente exclusiva Polti -
permite alcanzar hasta los puntos más difíciles sin tener
que inclinarse.
• Introducir la articulación flexo entre los dos tubos de
prolongación teniendo la graduación sobre la parte
posterior de los tubos.
• Para cambiar la inclinación girar el cursor (Y) de medio
giro.
Se descubre así la articulación que permitirá variar la inclinación de trabajo de los
tubos (fig. 12).
• Finalizada la operación volver a colocar la articulación en su posición original, cubrirla
con el cursor y girarlo para bloquear la posición.
ESPAÑOL
GG
GG
AA
AA
RR
RR
AA
AA
NN
NN
TT
TT
ÍÍ
ÍÍ
AA
AA
POLTI VAC 160 está garantizada por un año desde la fecha de compra contra defectos
de fabricación y faltas de los materiales. La garantía no es válida si la avería ha sido cau-
sada por un uso inadecuado. En caso de avería o mal funcionamiento, hay que ponerse
en contacto inmediatamente con el Centro de Asistencia autorizado más cercano. Los
eventuales desperfectos del aparato causados por personal no autorizado invalidarán
automáticamente la garantía.
POLTI S.P.A. declina toda responsabilidad en caso de accidentes derivados de una
utilización de POLTI VAC 160 no conforme a las presentes instrucciones de uso.
II
II
MM
MM
PP
PP
OO
OO
RR
RR
TT
TT
AA
AA
NN
NN
TT
TT
EE
EE
El aparato está construido según las normas vigentes para el reciclaje.
Se recomienda no tirar los embalajes protectores del transporte junto con los desechos
domésticos, sino entregarlos a los centros de recogida correspondientes.
Fig. 12
Y

FRANÇAIS
ACCESSOIRES
A. Tube rallonge
B. Brosse à tapis
C. Brosse à liquides
D. Tube flexible
E. Petite brosse
F. Suceur
G. Sachet à poussières
H. Brosse à meubles
M. Raccord articulé breveté “Flexo”
La Société POLTI se réserve la faculté d’introduire
toutes modifications techniques qui s’avéreraient
nécessaires sans aucun préavis.
LEGENDE
1. Interrupteur marche/arrêt
2. Poignée de transport
3. Couvercle du filtre à plis plats
3a. Levier d'ouverture du capot du filtre à
plis plats
3b. Filtre à plis plats (partie hachurée)
4. Verrouillage de l'appareil
5. Rallonge électrique
6. Couvercle groupe moteur
7. Grille couvrant le filtre de sortie d'air
8. Filtre de sortie d'air
9. Réservoir à souillures
10. Porte-accessoires
11. Roulettes pivotantes
12. Câble d'alimentation
160
CET APPAREIL EST CONFORME A LA DIRECTIVE CE 89/336
MODIFIEE 93/68 (CEM) ET A LA DIRECTIVE 73/23 MODIFIEE 93/68
(BASSE TENSION)

FRANÇAIS
CC
CC
OO
OO
NN
NN
SS
SS
II
II
GG
GG
NN
NN
EE
EE
SS
SS
II
II
MM
MM
PP
PP
OO
OO
RR
RR
TT
TT
AA
AA
NN
NN
TT
TT
EE
EE
SS
SS
Attention ! N'utilisez pas cet appareil sans avoir lu les instructions d'utilisation.
• En cas de dommage ou de mauvais fonctionnement, ne tentez jamais de démonter
l'appareil mais rendez vous au Centre d'Assistance Technique Agréé POLTI le plus
proche.
• Le circuit électrique auquel est branché l'appareil doit être en conformité avec les lois
en vigueur.
• L'appareil ne doit être utilisé ni par les enfants ni par les personnes n'en connaissant
pas le fonctionnement.
• Pour une question de sécurité, n'utilisez que des accessoires et pièces de rechange
d'origine, approuvés par le constructeur.
• N'utilisez pas l'appareil si le câble d'alimentation ou une autre partie importante de
l'appareil est endommagée.
• Ne branchez jamais l'appareil avec les mains mouillées.
• N'aspirez jamais ni acides ou solvants non dilués qui pourraient endommager gravement
l'appareil, ni liquides explosifs, gaz inflammables, poussières explosives, benzine,
vernis, huile combustible, qui au contact des parties internes de l'appareil pourraient
causer des explosions.
• Evitez d'utiliser l'appareil dans des endroits dangereux avec risque d'explosion.
• N'aspirez jamais des objets en flamme ou incandescents, comme les cendres et autres
matériaux en phase de combustion.
• Cet appareil n'est pas conçu pour aspirer les poussières dangereuses pour la santé.
• Si durant l'aspiration une fuite de liquide ou de mousse se produit, éteignez
immédiatement l'appareil et apportez-le au Centre d'Assistance Technique Agréé POLTI
le plus proche.
• Le nettoyage de l'appareil ne doit être effectué ni avec un tuyau d'arrosage ni avec un
jet haute pression.
UU
UU
TT
TT
II
II
LL
LL
II
II
SS
SS
AA
AA
TT
TT
II
II
OO
OO
NN
NN
DD
DD
UU
UU
PP
PP
RR
RR
OO
OO
DD
DD
UU
UU
II
II
TT
TT
Cet appareil est destiné à l'aspiration de liquides et solides et son utilisation doit être
conforme aux instructions reportées dans ce manuel.

FRANÇAIS
PP
PP
RR
RR
EE
EE
PP
PP
AA
AA
RR
RR
AA
AA
TT
TT
II
II
OO
OO
NN
NN
DD
DD
EE
EE
LL
LL
''
''
AA
AA
PP
PP
PP
PP
AA
AA
RR
RR
EE
EE
II
II
LL
LL
• Avant d'utiliser l'aspirateur, montez les roulettes
pivotantes (11) (fig. 1).
• Insérez la bouche d'aspiration dans le tube flexible (D) de
l'appareil (fig. 2) jusqu'au blocage (I).
• Reliez les tubes rallonge (A) et accordez-les au tube
flexible (D).
• Choisissez l'accessoire adapté au type d'aspiration voulu
et fixez-le aux tubes rallonge (fig. 3).
AA
AA
SS
SS
PP
PP
II
II
RR
RR
AA
AA
TT
TT
II
II
OO
OO
NN
NN
AA
AA
SS
SS
EE
EE
CC
CC
• Aspirez la saleté de préférence après avoir installé le
sachet-filtre en papier (G)(fig. 5).
• Préparez l'appareil comme indiqué dans le paragraphe
PREPARATION DE L'APPAREIL.
• Tirez vers l'extérieur les lèvres des fermeture (4), et
soulevez le couvercle et le groupe moteur (6) vers le haut
en même temps (fig. 6).
• Positionnez le sachet-filtre en papier (G) en enfilant la bride
dans les deux chevilles (L) comme indiqué en Fig. 5a.
• Placez le couvercle du groupe moteur (6) sur le réservoir
à souillures (9) et refermez, en les bloquant entre les deux
lèvres de fermeture (4).
• Déroulez le câble d'alimentation (12) et branchez-le à
une prise correctement alimentée.
• Enclenchez l'interrupteur (1) et commencez l'aspiration.
NOTA: Des fragments de saleté secs peuvent être aspirés
sans sachet-filtre en papier (G).
AA
AA
SS
SS
PP
PP
II
II
RR
RR
AA
AA
TT
TT
II
II
OO
OO
NN
NN
DD
DD
EE
EE
LL
LL
II
II
QQ
QQ
UU
UU
II
II
DD
DD
EE
EE
SS
SS
• Attention: Avant d'aspirer les liquides, enlever le sac
comme indiqué dans les deux premiers points du chapitre
"Entretien général".
• Préparez l'appareil comme indiqué dans le paragraphe
PREPARARTION DE L'APPAREIL, puis déroulez le câble
d'alimentation (12) et branchez-le à une prise adaptée.
• Actionnez l'interrupteur (1) et commencez l'aspiration
(fig. 4).
• A la fin de l'aspiration des liquides, contrôler le flotteur
comme indiqué dans le chapitre "Entretien général".
Fig. 1
Fig. 2
Fig. 3
Fig. 4
Fig. 5
Fig. 5A
I
L
L

FRANÇAIS
MM
MM
AA
AA
NN
NN
UU
UU
TT
TT
EE
EE
NN
NN
TT
TT
II
II
OO
OO
NN
NN
GG
GG
EE
EE
NN
NN
EE
EE
RR
RR
AA
AA
LL
LL
EE
EE
Avant de procéder à quelque manutention que ce soit,
assurez-vous que le câble d'alimentation soit débranché du
circuit électrique.
CC
CC
oo
oo
nn
nn
tt
tt
rr
rr
ôô
ôô
ll
ll
ee
ee
dd
dd
uu
uu
ff
ff
ll
ll
oo
oo
tt
tt
tt
tt
ee
ee
uu
uu
rr
rr
• Après l'aspiration de liquides, il est conseillé de retirer le
réservoir à souillures (9).
• Tirez vers l'extérieur les deux lèvres de fermeture (4), et
soulevez le couvercle avec le groupe moteur (6) en même
temps (fig. 6).
• Videz le réservoir à souillures (9)
• Assurez-vous que le flotteur (M) ne soit pas sale et qu'il
ne soit pas bloqué, sinon procédez au nettoyage (fig. 7).
RR
RR
ee
ee
mm
mm
pp
pp
ll
ll
aa
aa
cc
cc
ee
ee
mm
mm
ee
ee
nn
nn
tt
tt
dd
dd
uu
uu
ss
ss
aa
aa
cc
cc
àà
àà
pp
pp
oo
oo
uu
uu
ss
ss
ss
ss
ii
ii
èè
èè
rr
rr
ee
ee
• Tirez vers l'extérieur les deux lèvres de fermeture (4), et
soulever le groupe moteur en même temps (6) (fig. 6).
• Détacher le sac à poussière (G) des deux chevilles (L).
• Remplacez-le par un sachet neuf comme indiqué au
paragraphe ASPIRATION A SEC.
• Refermez la machine en opérant à l'inverse.
RR
RR
ee
ee
pp
pp
ll
ll
aa
aa
cc
cc
ee
ee
mm
mm
ee
ee
nn
nn
tt
tt
dd
dd
uu
uu
ff
ff
ii
ii
ll
ll
tt
tt
rr
rr
ee
ee
aa
aa
pp
pp
ll
ll
ii
ii
ss
ss
pp
pp
ll
ll
aa
aa
tt
tt
ss
ss
• Actionnez le levier d'ouverture du capot du porte filtre à plis
plats (3a) en le tirant vers le haut, de cette manière le
capot du porte filtre (3) se détachera de l'appareil (fig. 8).
• Extraire le filtre à plis plats (3b) (fig. 9).
• Tapez-le et si la saleté reste collée, lavez le filtre à l'eau
du robinet et laissez-le sécher (fig. 10). Si l'eau ne suffit
pas à le nettoyer, remplacez-le.
• Si le filtre est endommagé, remplacez-le immédiatement,
pour éviter d'endommager le moteur.
RR
RR
ee
ee
mm
mm
pp
pp
ll
ll
aa
aa
cc
cc
ee
ee
mm
mm
ee
ee
nn
nn
tt
tt
dd
dd
uu
uu
ff
ff
ii
ii
ll
ll
tt
tt
rr
rr
ee
ee
dd
dd
ee
ee
ss
ss
oo
oo
rr
rr
tt
tt
ii
ii
ee
ee
dd
dd
’’
’’
aa
aa
ii
ii
rr
rr
• Appuyez sur le levier de la grille de fermeture du filtre de
sortie d'air (7) (fig. 11).
• Retirez le filtre , tapez-le, et si nécessaire lavez-le et
séchez-le.
• Remettez le filtre correctement à sa place en l'appuyant
sur la partie blanche.
• Si le filtre d'air est endommagé, remplacez-le.
Fig. 6
Fig. 7
Fig. 8
Fig. 9
Fig. 10
Fig. 11
M

FRANÇAIS
EE
EE
NN
NN
CC
CC
AA
AA
SS
SS
DD
DD
EE
EE
DD
DD
YY
YY
SS
SS
FF
FF
OO
OO
NN
NN
CC
CC
TT
TT
II
II
OO
OO
NN
NN
NN
NN
EE
EE
MM
MM
EE
EE
NN
NN
TT
TT
Dysfonctionnement Cause Solution
L'aspirateur s'éteint mais
le témoin de l'interrupteur
reste allumé
La puissance d'aspiration
se réduit
Echappements de
poussière pendant
l'aspiration
Fuites d'eau en phase
d'aspiration de liquides.
Le niveau de liquide dans
le réservoir est trop haut
Filtre à plis plats, petit
bec, tube flexible
d'aspiration ou tube rigide
d'aspiration bouchés.
Sac à poussières ou
réservoir à souillures
plein.
Le filtre à plis plats est
absent ou mal placé
Le tube flexible
d'aspiration n'est pas
branché correctement.
Le filtre à plis plats est
absent ou n'est pas en
position
Flotteur bloqué par la
saleté.
Interrupteur de flotteur
endommagé.
Appuyer sur l'interrupteur
(1), débranchez le câble
d'alimentation du circuit
électrique et retirez le
réservoir.
Nettoyez le filtre et
éliminez les éventuelles
souillures qui pourraient,
à terme, obstruer les
conduits.
Remplacez le sac à
poussières, ou videz le
réservoir à souillures
Insérez correctement ou
changez le filtre à plis plats.
Branchez correctement le
tube flexible d'aspiration.
Insérez correctement ou
changez le filtre à plis
plats.
Faire contrôler votre
appareil par le Centre
d'Assistance Technique
Agréé POLTI le plus
proche.

FRANÇAIS
GG
GG
AA
AA
RR
RR
AA
AA
NN
NN
TT
TT
II
II
EE
EE
POLTI VAC 160 est garanti pendant 1 an à compter de la date d’achat contre tous défauts
de fabrication. Les pannes dues à l’entartrage ou à une mauvaise utilisation du produit sont
exclues de la garantie. En cas de panne, ne pas essayer de démonter l’appareil mais
contacter le point SAV le plus proche.
La garantie est uniquement valable si vous avez renvoyé la carte de garantie entièrement
remplie. La garantie ne pourra s’appliquer que sur présentation de la facture originale
d’achat indiquant la date d’achat de l’appareil.
AA
AA
TT
TT
TT
TT
EE
EE
NN
NN
TT
TT
II
II
OO
OO
NN
NN
La Société POLTI et ses distributeurs déclinent toutes responsabilités pour tout accident
dû à une utilisation de POLTI VAC 160 qui ne correspond pas aux conditions d’emploi
ci-dessus.
UU
UU
TT
TT
II
II
LL
LL
II
II
SS
SS
AA
AA
TT
TT
II
II
OO
OO
NN
NN
DD
DD
UU
UU
RR
RR
AA
AA
CC
CC
CC
CC
OO
OO
RR
RR
DD
DD
AA
AA
RR
RR
TT
TT
II
II
CC
CC
UU
UU
LL
LL
EE
EE
PP
PP
RR
RR
OO
OO
TT
TT
EE
EE
GG
GG
EE
EE
DD
DD
OO
OO
SS
SS
FF
FF
LL
LL
EE
EE
XX
XX
OO
OO
((
((
MM
MM
))
))
• Ce raccord exclusif est un nouveau brevet développé par
la société POLTI et permet d’atteindre les endroits les
plus difficiles d’accès sans avoir à se baisser.
• Le “FLEXO” s’insère entre les deux tubes rallonge en
tenant les clips sur la partie postérieure des tubes.
• Pour changer d’inclinaison, tournez le curseur (Y) à
moitié.
De cette manière l’articulation permet de moduler l’inclinaison des tubes (fig. 12).
• Pour remettre le raccord articulé en position de base, tournez le curseur pour bloquer
sa position.
Fig. 12
Y

DEUTSCH
ZUBEHÖR
A. Verlängerungsrohre
B. Bürste für Teppichreinigung
C. Bürste für Flüßigkeitabsaugung
D. Saugschlauch
E. Kleine Bürste
F. Lanze für die Reinigung von
Ecken
G. Staubtüte
H. Möbelpinsel
M. „Flexo” patentiertes Anschlußstück
Modelländerung in Ausstattung, technischen Daten
und Zubehör vorbehalten. Technische und
Herstellungsdaten können von POLTI S.p.A. ohne
Vorankündigung geändert werden, wenn sich dies
als nützlich erweisen sollte.
LEGENDE
1. Ein- und Ausschalter mit Kontrollampe
2. Tragegriff
3. Faltenfilterdeckel
3a. Öffnungshebel des Faltenfilterdeckels
3b. Faltenfilter (s. Strichlinie)
4. Verschlußhaken
5. Kabelaufwicklung
6. Deckel mit Motorgehäuse
7. Verschlußgitter des Abluftfilters
8. Abluftfilter
9. Schmutzbehälter
10. Zubehörträger
11. Lenkrollen
12. Anschlußkabel
160
CE Dieses Gerät entspricht der EC-Direktive 89/336, die von der 93/68
(EMC) verändert wurde, und der Direktive 73/23, die von der 93/68
(Niederspannung) verändert wurde.

DEUTSCH
HH
HH
II
II
NN
NN
WW
WW
EE
EE
II
II
SS
SS
EE
EE
Vorsicht! Vor einer Inbetriebnahme des Geräts unbedingt die Gebrauch-
sanweisung lesen.
• Im Falle von Defekten oder Fehlfunktionen versuchen Sie unter keinen Umständen, das
Gerät auseinanderzunehmen, sondern wenden Sie sich an einen Servicehändler in Ihrer
Nähe.
• Die für die Stromzufuhr des Geräts erforderliche Elektroanlage hat den gesetzlichen
Normen zu entsprechen.
• Das Gerät darf weder von Kindern noch von unfachmännischen Personen in Betrieb
genommen werden.
• Um die Sicherheit dieses Geräts gewährleisten zu können, sollten Sie ausschließlich vom
Hersteller genehmigte original Ersatz- oder Zubehörteile verwenden.
• Vermeiden Sie eine Inbetriebnahme des Geräts bei defekten Stromkabeln oder bei
Defekten an anderen wichtigen Geräteteilen.
• Der Stecker darf nicht mit nassen Händen ergriffen werden.
• Vermeiden Sie die Absaugung von unverdünnten Säuren oder Lösemitteln, die schwere
Schaden an den Gerätestoffen verursachen würden. Insbesondere dürfen keine
Sprengflüßigkeit, Zündgas, Sprengpulver, Benzin, Lack und Brennöl aufgesaugt werden,
die in Kotakt mit den Innenteilen des Geräts Explosionen verursachen könnten.
• Die Verwendung des Geräts in explosionsgefährlichem Raum ist verboten.
• Vermeiden Sie die Absaugung von Flamm- oder Glutgegenständen, wie Holzstück,
Asche und anderen Verbrennungsstoffen.
• Dieses Gerät ist nicht für die Absaugung von gesundheitsgefährlichen Pulvern gedacht.
• Im Fall von Flüssigkeit- oder Schaumausgang während der Absaugung, schalten Sie bitte
unmittelbar das Gerät aus und führen Sie die notwendige Instandhaltung durch.
• Die Gerätsreinigung soll nicht direkt unter dem Wasserrohr oder durch
Hochdruckwasserstrahl erfolgen.
DD
DD
AA
AA
SS
SS
GG
GG
EE
EE
RR
RR
ÄÄ
ÄÄ
TT
TT
RR
RR
II
II
CC
CC
HH
HH
TT
TT
II
II
GG
GG
VV
VV
EE
EE
RR
RR
WW
WW
EE
EE
NN
NN
DD
DD
EE
EE
NN
NN
Dieses Gerät ist bestimmt zur Verwendung als Naß- und Trockensauger entsprechend den
in dieser Bedienungsanleitung gegebenen Beschreibungen und Sicherheitshinweisen.

DEUTSCH
DD
DD
EE
EE
NN
NN
SS
SS
AA
AA
UU
UU
GG
GG
EE
EE
RR
RR
BB
BB
EE
EE
TT
TT
RR
RR
II
II
EE
EE
BB
BB
SS
SS
BB
BB
EE
EE
RR
RR
EE
EE
II
II
TT
TT
MM
MM
AA
AA
CC
CC
HH
HH
EE
EE
NN
NN
• Vor der Verwendung bauen Sie bitte die Lenkrollen (11) an.
• Absaugungsöffnung des Steckschlauchs (D) in das Gerät
bis zum Anschluß mit dem Zahn (I) einstecken (Bild 2).
• Verlängerungsrohre (A) anschließen und sie am Schlauch
(D) einrasten.
• Das geeignete Zubehör für die Absaugung auswählen und
am Verlängerungsrohr einrasten (Bild 3).
TT
TT
RR
RR
OO
OO
CC
CC
KK
KK
EE
EE
NN
NN
SS
SS
AA
AA
UU
UU
GG
GG
EE
EE
NN
NN
• Feinen, trockenen Schmutz saugen Sie am besten mit
eingesetzter Staubtüte (G) (Bild 5).
• Gerät vorbereiten wie im Abschnitt DEN SAUGER
BETRIEBSBEREIT MACHEN angegeben.
• Verschlußhaken (4) nach außen ziehen und danach den
Deckel mit Motorgehäuse (6) nach oben ziehen (Bild 6).
• Flansch in die zwei Bolzen (L) hineinstecken und Staubtüte
einsetzen, wie im Bild 5a. ersichtlich.
• Das Motorgehäuse (6) auf den Schmutzbehälter (9)
setzen und durch die zwei Verschlußhaken verschließen.
• Anschlußkabel (12) abwickeln und an einer geeigneten
Steckdose anschießen.
• Ein-/Ausschalter (1) drücken und Absaugung einleiten.
WICHTIG: Groben Schmutz können Sie auch ohne
Staubtüte (G) aufsaugen.
NN
NN
AA
AA
SS
SS
SS
SS
SS
SS
AA
AA
UU
UU
GG
GG
EE
EE
NN
NN
• Wichtig! Vor der Absaugung von Flüssigkeiten
Schmutzbehälter entleeren, wie im Abschnitt "Allgemeine
Instandhaltung" Punkt 1 und 2 (Staubtüte austauschen)
dargestellt.
• Gerät vorbereiten wie im Abschnit DEN SAUGER
BETRIEBSBEREIT MACHEN angegeben. Anschlußkabel
(12) abwickeln und an einer geeigneten Steckdose
anschließen.
• Ein-/Ausschalter (1) drücken und Absaugung einleiten
(Bild 4).
• Nach der Absaugung von Flüssigkeiten überprüfen Sie
den Schwimmer, wie im Abschnitt "Allgemeine
Instandhaltung" (Schwimmer prüfen) dargestellt.
Bild 1
Bild 2
Bild 3
Bild 4
Bild 5
Bild 5A
I
L
L

DEUTSCH
AA
AA
LL
LL
LL
LL
GG
GG
EE
EE
MM
MM
EE
EE
II
II
NN
NN
EE
EE
II
II
NN
NN
SS
SS
TT
TT
AA
AA
NN
NN
DD
DD
HH
HH
AA
AA
LL
LL
TT
TT
UU
UU
NN
NN
GG
GG
Vor der Instandhaltung versichern Sie sich, daß das
Anschlußkabel nicht mit dem elektrischen Netz verbunden ist.
SS
SS
cc
cc
hh
hh
ww
ww
ii
ii
mm
mm
mm
mm
ee
ee
rr
rr
pp
pp
rr
rr
üü
üü
ff
ff
ee
ee
nn
nn
• Nach der Absaugung von Flüssigkeiten Schmutzbehälter
(9) entleeren.
• Die zwei Verschlußhaken (4) nach außen ziehen und
danach den Deckel mit Motorgehäuse (6) abheben (Bild 6).
• Schmutzbehälter (9) von abgesaugter Flüssigkeit
entleeren.
• Prüfen Sie, daß der Schwimmer (M) nicht schmutzig ist
und kein Hindernis hat, in diesem Fall muß er gereinigt
werden (Bild 7).
SS
SS
tt
tt
aa
aa
uu
uu
bb
bb
tt
tt
üü
üü
tt
tt
ee
ee
aa
aa
uu
uu
ss
ss
tt
tt
aa
aa
uu
uu
ss
ss
cc
cc
hh
hh
ee
ee
nn
nn
• Die zwei Verschlußhaken (4) nach außen ziehen und
danach den Deckel mit Motorgehäuse (6) abheben (Bild 6).
• Staubtüte (G) von den zwei Bolzen (L) entfernen.
• Staubtüte mit einer neuen austauschen und in die
Halterung setzen, wie im Abschnitt TROCKENSAUGEN
angegeben.
• Umgekehrt vorangehen und Deckel wieder schließen.
FF
FF
aa
aa
ll
ll
tt
tt
ee
ee
nn
nn
ff
ff
ii
ii
ll
ll
tt
tt
ee
ee
rr
rr
aa
aa
uu
uu
ss
ss
tt
tt
aa
aa
uu
uu
ss
ss
cc
cc
hh
hh
ee
ee
nn
nn
• Öffnungshebel des Faltenfilterdeckels (3a) drücken und
nach oben ziehen, so daß sich der Deckel des Faltenfilters
(3) vom Gerät aushakt (Bild 8).
• Faltenfilter (3b) herausnehmen (Bild 9).
• Faltenfilter ausschlagen und, wenn noch Schmutz übrig
bleibt, den Filter unter fließendem Wasser ausspülen und
trocknen lassen (Bild 10). Sollte die Wasserreinigung
nicht ausreichen, dann muß er ausgetauscht werden.
• Wenn der Faltenfilter beschädigt ist, sollten Sie ihn sofort
wechseln, da der Motor sonst Schaden nehmen kann.
AA
AA
bb
bb
ll
ll
uu
uu
ff
ff
tt
tt
ff
ff
ii
ii
ll
ll
tt
tt
ee
ee
rr
rr
aa
aa
uu
uu
ss
ss
tt
tt
aa
aa
uu
uu
ss
ss
cc
cc
hh
hh
ee
ee
nn
nn
• Gitterhebel des Abluftfilter (7) drücken (Bild 11)
• Filter entfernen, ausschlagen und bei Bedarf mit Wasser
ausspülen und trocknen.
• Filter auf der weißen Seite richtig in seine Halterung
wieder einsetzen.
• Wenn der Abluftfilter beschädigt ist, sollten Sie ihn sofort
wechseln.
Bild 6
Bild 7
Bild 8
Bild 9
Bild 10
Bild 11
M

DEUTSCH
SS
SS
TT
TT
ÖÖ
ÖÖ
RR
RR
UU
UU
NN
NN
GG
GG
EE
EE
NN
NN
SS
SS
EE
EE
LL
LL
BB
BB
SS
SS
TT
TT
BB
BB
EE
EE
HH
HH
EE
EE
BB
BB
EE
EE
NN
NN
Störung Ursache Behebung
Sauger schaltet ab,
Kontrollampe bleibt jedoch
eingeschaltet.
Saugkraft läßt nach.
Staub tritt beim Saugen
aus.
Beim Naßsaugen:
Wasser tritt aus.
Zu viel Flüssigkeit in dem
Behälter.
Faltenfilter, Düse,
Saugschlauch oder
Saugrohr verstopft.
Staubtüte oder
Schmutzbehälter voll.
Faltenfilter fehlt oder ist
nicht richtig eingesetzt.
Saugschlauch ist nicht
richtig angeschlossen.
Faltenfilter fehlt, ist nicht
richtig eingesetzt oder
defekt.
Schwimmer verklemmt.
Schwimmerschalter
defekt.
Ein-/Ausschalter (1)
drücken, Anschlußkabel
vom Netz nehmen und
Behälter entleeren.
Filter ausspülen und
mögliche
Rohrverstopfungen
entfernen.
Staubtüte wechseln, oder
Schmutzbehälter
entleeren.
Faltenfilter richtig
einsetzen.
Saugschlauch richtig
anschließen.
Faltenfilter richtig
einsetzen oder
austauschen.
Vom Polti Servicehändler
überprüfen lassen.

DEUTSCH
GG
GG
AA
AA
RR
RR
AA
AA
NN
NN
TT
TT
II
II
EE
EE
Polti gewährt Ihnen 12 Monate Garantie auf das Gerät ab Verkaufsdatum. Mit dem
bestätigten Kaufdatum (Rechnung) umfaßt die Garantie alle Ansprüche aufgrund von
Verarbeitungs- oder Materialfehlern. Ausgenommen sind Schäden, die durch
unsachgemäße Handhabung sowie Abnutzung und natürlichen Verschleiß entstehen.
Ebenfalls werden Folgeschäden durch diese Garantie nicht erfäßt. Bei Beanstandungen
bitten wir, das Gerät dem Händler zu geben oder an die nächstgelegene Polti-
Kundendienststelle zu senden.
GG
GG
EE
EE
BB
BB
RR
RR
AA
AA
UU
UU
CC
CC
HH
HH
DD
DD
EE
EE
SS
SS
„„
„„
FF
FF
LL
LL
EE
EE
XX
XX
OO
OO
””
””
RR
RR
ÜÜ
ÜÜ
CC
CC
KK
KK
EE
EE
NN
NN
SS
SS
CC
CC
HH
HH
UU
UU
TT
TT
ZZ
ZZ
GG
GG
EE
EE
LL
LL
EE
EE
NN
NN
KK
KK
((
((
MM
MM
))
))
• Dieses spezielle Gelenk - exklusives Polti Patent -
ermöglicht die Reinigung an den schwierigsten Stellen,
ohne sich zu bücken.
• Setzen sie das Flexo Gelenk zwischen die 2
Verlängerungsrohre, wobei der Regler auf der
Hinterseite der Rohre liegt. Das Gelenk erleichtert die
Reinigung schwer zugänglicher, tiefliegender Stellen.
• Um das Flexo-Gelenk zu aktivieren drehen Sie die
Arretierung Um eine halbe Umdrehung (Bild 12).
• Führen Sie die Arretierung über das Gelenk zurück und drehen diese Umdrehung um
das Gelenk wieder zu fixieren.
Bild 12
Y

ENGLISH
ACCESSORIES
A. Extension tubes
B. Carpet sweeper
C. Liquid aspiration brush
D. Flexible hose with junction
E. Small brush
F. Lance for cleaning corners/skirting boards
G. Dust bag
H. Duster Brush
M. “Flexo” patented elbow
Polti S.p.A. reserves the right to change
equipment or accessory specification without
prior notice.
KEY
1. On/off switch with indicator light
2. Carrying handle
3. Pleated filter cover
3a. Opening lever of the pleated filter cover
3b. Pleated filter (note: dashed line)
4. Closing latches
5. Cable-winder
6. Cover with motor group
7. Cover grill for air outlet filter
8. Air outlet filter
9. Waste container
10. Accessories storage
11. Pivoting wheels
12. Power supply cable
160
This unit conforms with EC-directives 89/336 as amended by 93/68
(EMC) and 73/23 as amended by 93/68 (low voltage).

ENGLISH
PP
PP
RR
RR
EE
EE
CC
CC
AA
AA
UU
UU
TT
TT
II
II
OO
OO
NN
NN
SS
SS
Attention! Do not use the appliance without reading the instructions.
• In case of damage or malfunction do not attempt to disassemble the appliance but
contact the nearest authorised Polti Service Centre.
• The mains the appliance is connected to must conform with regulations.
• The appliance must not be used by children or by any others who may not know how
to operate it .
• In order not to compromize the safety of the appliance, only use original spare parts
and accessories, approved by the manufacturer.
• Do not use the appliance if the supply cable or other important parts of the unit are
damaged.
• Never touch the plug with wet hands.
• Do not suck up undiluted acids or solvents that may cause serious damage to the
appliance materials and especially do not suck up explosive liquids, inflammable gases,
explosive powders, benzines, paints, fuel oil, which may cause bursts if they come in
contact with the internal parts of the appliance.
• You must not use the appliance in environments where there is danger of bursting.
• Do not suck up objects in flames or incandescent such as embers, ash and other
materials while burning.
• This appliance is not suitable for the aspiration of any powders which are harmful to
health.
• Should there be a liquid or foam leak during aspiration, immediately switch off the
appliance and carry out the necessary maintenance.
• Cleaning of the appliance must not be done with a water hose or high pressure hose.
CC
CC
OO
OO
RR
RR
RR
RR
EE
EE
CC
CC
TT
TT
UU
UU
SS
SS
EE
EE
OO
OO
FF
FF
TT
TT
HH
HH
EE
EE
PP
PP
RR
RR
OO
OO
DD
DD
UU
UU
CC
CC
TT
TT
This appliance is intended for use as an aspirator for liquids or solids according to the
descriptions and instructions in this manual.

ENGLISH
PP
PP
RR
RR
EE
EE
PP
PP
AA
AA
RR
RR
AA
AA
TT
TT
II
II
OO
OO
NN
NN
FF
FF
OO
OO
RR
RR
UU
UU
SS
SS
EE
EE
• Before using the vacuum cleaner, fit the pivoting wheels
(11) (fig. 1)
• Insert the suction hose with junction (D) in the appliance
(fig. 2) until the clutch engages (I).
• Join the extension tubes (A) and attach them to the
flexible hose (D).
• Choose the required accessory and attach it to the
extension tubes (fig. 3).
FF
FF
OO
OO
RR
RR
DD
DD
RR
RR
YY
YY
--
--
VV
VV
AA
AA
CC
CC
UU
UU
UU
UU
MM
MM
II
II
NN
NN
GG
GG
• Vacuum dry dirt preferably with the dust bag (G) fitted
(fig. 5).
• Prepare the appliance as described in the PREPARATION
FOR USE paragraph.
• Pull the closing latches (4) outwards and at the same time
lift the cover with motor group (6) upwards (fig. 6)
• Position the dust bag (G) by inserting the flange in the two
pins (L) as shown in fig. 5a
• Place the cover with motor group (6) on the waste
container (9) and close it with the two closing latches (4).
• Unwind the supply cable (12) and connect it to the mains.
• Push the switch (1) and start vacuum cleaning.
NOTE: Small pieces of dry dirt can be vacuumed even
without dust bag (G).
FF
FF
OO
OO
RR
RR
LL
LL
II
II
QQ
QQ
UU
UU
II
II
DD
DD
VV
VV
AA
AA
CC
CC
UU
UU
UU
UU
MM
MM
II
II
NN
NN
GG
GG
• Prepare the appliance as described in the PREPARATION
FOR USE paragraph, then unwind the supply cable (12)
and connect it to the mains.
• Push the switch (1) and start the vacuum cleaning (fig. 4).
• DO NOT VACUUM LIQUIDS WITH THE DUST BAG FITTED.
• After vacuuming cleaning liquids, check the float as
described in the General maintenance (control of the
float) paragraph.
Fig. 1
Fig. 2
Fig. 3
Fig. 4
Fig. 5
Fig. 5A
I
L
L

ENGLISH
GG
GG
EE
EE
NN
NN
EE
EE
RR
RR
AA
AA
LL
LL
MM
MM
AA
AA
II
II
NN
NN
TT
TT
EE
EE
NN
NN
AA
AA
NN
NN
CC
CC
EE
EE
Before maintenance, make sure that the supply cable is not
connected to the mains.
CC
CC
oo
oo
nn
nn
tt
tt
rr
rr
oo
oo
ll
ll
oo
oo
ff
ff
tt
tt
hh
hh
ee
ee
ff
ff
ll
ll
oo
oo
aa
aa
tt
tt
• After vacuum cleaning liquids, it is suggested to empty
the waste container (9).
• Pull the two closing latches (4) outwards and at the same
time lift the cover with motor group (6) (fig. 6)
• Empty the sucked up liquid from the waste container (9).
• Check that the float (M) is not dirty and that it has no
obstructions, if necessary clean before operating (fig. 7).
RR
RR
ee
ee
pp
pp
ll
ll
aa
aa
cc
cc
ii
ii
nn
nn
gg
gg
tt
tt
hh
hh
ee
ee
dd
dd
uu
uu
ss
ss
tt
tt
bb
bb
aa
aa
gg
gg
• Pull the two closing latches (4) outwards and in the
meantime lift the cover with motor group (6) (fig. 6).
• Remove the dust bag (G) from the two pins (L)
• Replace it with a new one by fitting it as explained in the
DRY-VACUUMING paragraph.
• Close by making the reverse operation.
RR
RR
ee
ee
pp
pp
ll
ll
aa
aa
cc
cc
ii
ii
nn
nn
gg
gg
tt
tt
hh
hh
ee
ee
pp
pp
ll
ll
ee
ee
aa
aa
tt
tt
ee
ee
dd
dd
ff
ff
ii
ii
ll
ll
tt
tt
ee
ee
rr
rr
• Push the opening lever of the pleated filter cover (3a) and
then pull it upwards. In this way the pleated filter cover
(3) will unhook from the appliance (fig. 8).
• Lift out the pleated filter (3b) (fig. 9)
• Knock it and if the dirt is not easily removed, wash the
filter under running water and leave it to dry (fig. 10).
If water does not clean it, replace the filter.
• If the filter is damaged, replace it immediately so as to
avoid damage to the motor.
RR
RR
ee
ee
pp
pp
ll
ll
aa
aa
cc
cc
ii
ii
nn
nn
gg
gg
tt
tt
hh
hh
ee
ee
cc
cc
oo
oo
vv
vv
ee
ee
rr
rr
gg
gg
rr
rr
ii
ii
ll
ll
ll
ll
ff
ff
oo
oo
rr
rr
aa
aa
ii
ii
rr
rr
oo
oo
uu
uu
tt
tt
ll
ll
ee
ee
tt
tt
ff
ff
ii
ii
ll
ll
tt
tt
ee
ee
rr
rr
• Push the lever of the cover grill for air outlet filter (7)
(fig. 11).
• Take out the filter, knock it, wash it with water and leave
to dry.
• Put the filter back in its correct position by leaning it with
the white side inside the filter grill facing outwards.
• If the air outlet filter is damaged, replace it.
Fig. 6
Fig. 7
Fig. 8
Fig. 9
Fig. 10
Fig. 11
M

ENGLISH
TT
TT
RR
RR
OO
OO
UU
UU
BB
BB
LL
LL
EE
EE
SS
SS
HH
HH
OO
OO
OO
OO
TT
TT
II
II
NN
NN
GG
GG
Trouble Cause Solution
The vacuum cleaner
switches off but the
indicator light is on
The aspiration power
decreases
Dust leakage during
vacuum cleaning
Water leak during the
liquid vacuuming
The liquid level in the
container is too high
Pleated filter, nozzle,
flexible hose or rigid
suction tube are
obstructed.
The dust bag or the litter
container is full.
The pleated filter is
missing or it has been
wrongly placed
The suction flexible hose
is not correctly
connected
The pleated filter is
missing, it has been
wrongly placed or it is
damaged.
The float is blocked by
the dirt.
The float switch is broken
Push the switch (1),
disconnect the supply
cable from the mains and
empty the container.
Clean the filter and take
out further obstructions in
the tubes
Replace the dust bag or
empty the waste
container
Place the flat pleated filter
correctly
Connect the flexible hose
correctly
Place the pleated filter
correctly or change it
Have it checked by the
Authorized Service
Centre.

ENGLISH
GG
GG
UU
UU
AA
AA
RR
RR
AA
AA
NN
NN
TT
TT
EE
EE
EE
EE
The POLTI VAC 160 is guaranteed to the original purchaser for one year from purchase
date against manufacturing or raw material defects. The guarantee is not valid if the
appliance has been misused in any way. Unauthorised alterations or repairs to the machine
will automatically invalidate this guarantee.
• Polti declines liability for any damage or accident derived from any use of
POLTI VAC 160 which is not in conformity with the instructions contained in
this booklet.
UU
UU
SS
SS
II
II
NN
NN
GG
GG
TT
TT
HH
HH
EE
EE
BB
BB
AA
AA
CC
CC
KK
KK
--
--
SS
SS
AA
AA
VV
VV
II
II
NN
NN
GG
GG
""
""
FF
FF
LL
LL
EE
EE
XX
XX
OO
OO
""
""
JJ
JJ
OO
OO
II
II
NN
NN
TT
TT
((
((
MM
MM
))
))
• This special joint - Polti exclusive patent - allows to reach
the most difficult points without bending down.
• Insert the Flexo joint between the two extension tubes
keeping the indentations on the back part of the tubes.
• To change the angle, turn the slide ring half way round.
This way the joint is showing and it will allow to change
the angle of operation of the tubes fig. 12.
• When the operations are over, put the joint back in its original position, cover it with
the slide ring and turn it to lock into position.
Fig. 12
Y

NEDERLANDS
TOEBEHOREN
A. Verlengstukken
B. Borstel voor tapijten
C. Borstel voor vloeistoffen
D. Slang met ingang
E. Kleine borstel
F. Hoek lans en borstel
G. Stofzak
H. Meubel borstel
M. Gepatenteerde “Flexo” aansluiting
De firma POLTI S.p.A. behoudt zich het recht voor om
zonder kennisgeving vooraf technische wijzigingen
of wijzigingen aan de constructie aan te brengen die
POLTI nodig acht.
GEBRUIKSAANWIJZING STOFZUIGER
1. Aan/uit schakelaar met lampje
2. Vervoerhandgreep
3. Bescherming filter
3a. Opening bescherming filter
3b. Filter (behandelde lijn)
4. Sluiting apparaat
5. Oprolsnoer
6. Motor bescherming
7. Rooster op filter voor lucht uitgang
8. Filter voor lucht uitgang
9. Opberg stof
10. Toebehoren houder
11. Zwenkwielen
12. Snoer
160
DIT APPARAAT IS OVEREENKOMSTIG MET DE RICHTLIJN EC 89/336
GEWIJZIGD DOOR 93/68 (EMC) EN MET DE RICHTLIJN 73/23 GEWIJ-
ZIGD DOOR 93/68 (LAGE SPANNING).

NEDERLANDS
WW
WW
AA
AA
AA
AA
RR
RR
SS
SS
CC
CC
HH
HH
UU
UU
WW
WW
II
II
NN
NN
GG
GG
OPGELET ! Lees voordat u het apparaat gebruikt, deze instructies door.
• Wanneer het apparaat stuk is of slecht werkt, probeer het dan niet te demonteren, maar
ga naar de dichtstbijzijnde officiële technische centrum.
• Controleer of de netspanning overeenkomt met het apparaat en of het stopcontact
geaard is, volgens de wetgeving.
• Laat het apparaat niet gebruiken door kinderen of door personen die niet weten hoe
het werkt.
• Voor veiligheidsredenen, uitsluitend originele onderdelen van Polti gebruiken.
• Het apparaat niet gebruiken in geval van beschadiging van de snoer of van andere
belangrijke onderdelen.
• Nooit het stopcontact of de snoer aanraken met vochtige handen.
• Nooit zuur of soldeervloeistof zuigen om de beschadiging van het apparaat te
voorkomen. Nooit gevaarlijke stoffen zuigen als gas, benzine, vernis, olie die in kontakt
met onderdelen komen en die de oorzaak van explosie kunnen zijn.
• Nooit het apparaat gebruiken in plaatsen waar men een risiko van explosie loopt.
• Nooit vlammen of warme stukken zuigen als as of de resten van het haardvuur.
• Het apparaat is niet geschikt voor het zuigen van stoffen schadelijk voor de gezondheid.
• Bij vloeistof- of schuimverlies gedurende het gebruik moet het apparaat direkt
uitgeschakelt zijn en het nodige gedaan worden.
• Het apparaat nooit onderdompelen in water of met een hogedruk reiniger proberen te
reinigen.
GG
GG
EE
EE
BB
BB
RR
RR
UU
UU
II
II
KK
KK
VV
VV
AA
AA
NN
NN
HH
HH
EE
EE
TT
TT
AA
AA
PP
PP
PP
PP
AA
AA
RR
RR
AA
AA
AA
AA
TT
TT
Dit apparaat is geschikt voor het zuigen van vloeistoffen en stoffen als beschreven in deze
gebruiksaanwijzing.

NEDERLANDS
VV
VV
OO
OO
OO
OO
RR
RR
BB
BB
EE
EE
RR
RR
EE
EE
II
II
DD
DD
II
II
NN
NN
GG
GG
VV
VV
AA
AA
NN
NN
HH
HH
EE
EE
TT
TT
GG
GG
EE
EE
BB
BB
RR
RR
UU
UU
II
II
KK
KK
• voor het gebruiken, de zwenkwielen (11) monteren (fig. 1)
• de slang met ingang (D) in het apparaat aansluiten
(fig. 2) voor de verbinding (I).
• de verlengstukken (A) monteren en op de slang (D)
aansluiten.
• de geschikte toebehoren kiezen en op de verlengstuk
aansluiten (fig. 3).
SS
SS
TT
TT
OO
OO
FF
FF
FF
FF
EE
EE
NN
NN
ZZ
ZZ
UU
UU
II
II
GG
GG
EE
EE
NN
NN
• fijne stof bij voorkeur met de stofzak (G) zuigen (fig. 5).
• starten als beschreven in de voorbereiding van het
gebruik.
• de randen van de sluiting (4) naar buiten trekken, en te
samen de bescherming met motor (6) naar boven trekken
(fig. 6).
• de stofzak (g) plaatsen door het introduceren in de twee
schijven (L) als op fig. (5a).
• de bescherming met motor (6) verbinden met stofopberg
(9) en sluiten langs de randen van de sluiting (4)
• de snoer (12) los maken en op het stopcontact verbinden.
• de knop (1) drukken en starten.
• de droge elementen mogen opgezogen zijn zelfs zonder
stofzak (G).
Nota: Droge vuile resten mogen afgezogen worden ook
zonder stofzak (G).
VV
VV
LL
LL
OO
OO
EE
EE
II
II
SS
SS
TT
TT
OO
OO
FF
FF
ZZ
ZZ
UU
UU
II
II
GG
GG
EE
EE
NN
NN
• OPGELET! Voor het zuigen van vloeistof moet het zakje
verwiijdert worden als beschreven in de eerste twee
punten van "Algemeen Onderhoud" (verwijderen stofzak).
• starten als beschreven in de voorbereiding van het
gebruik, dan de snoer (12) losmaken en verbinden op een
geschikte stopcontact.
• op de schakelaar (1) duwen en starten (fig. 4).
• Na het zuigen van vloeistof moeten de randen van de
opening gecontroleerd worden als beschreven in
"Algemeen onderhoud". (Randen controle).
Fig. 1
Fig. 2
Fig. 3
Fig. 4
Fig. 5
Fig. 5A
I
L
L

NEDERLANDS
AA
AA
LL
LL
GG
GG
EE
EE
MM
MM
EE
EE
NN
NN
EE
EE
HH
HH
AA
AA
NN
NN
DD
DD
LL
LL
EE
EE
II
II
DD
DD
II
II
NN
NN
GG
GG
Alvorens onderhoud te plegen, haalt u de stekker uit het
stopcontact.
CC
CC
oo
oo
nn
nn
tt
tt
rr
rr
oo
oo
ll
ll
ee
ee
vv
vv
aa
aa
nn
nn
dd
dd
ee
ee
bb
bb
uu
uu
ii
ii
zz
zz
ee
ee
nn
nn
• na het zuigen van vloeistof is het raadzaam het reservoir
(9) leeg te maken.
• de randen van de sluiting (4) naar buiten trekken en te
samen de bescherming met motor (6) naar boven trekken
(fig.6).
• het reservoir (9) leeg maken.
• controleren dat de buizen (M) proper zijn en zonder los
elementen en eventueel reinigen (fig.7).
SS
SS
tt
tt
oo
oo
ff
ff
zz
zz
aa
aa
kk
kk
vv
vv
ee
ee
rr
rr
aa
aa
nn
nn
dd
dd
ee
ee
rr
rr
ee
ee
nn
nn
• de randen van de sluiting (4) naar buiten trekken en te
samen de bescherming met motor (6) naar boven trekken
(fig.6).
• van de twee schijven (L), de stofzak (g) verwijderen.
• door een nieuw vervangen volgens uitleg vermeld bij
"stoffen zuigen".
• sluiten volgens tegenovergestelde procedure.
VV
VV
ee
ee
rr
rr
vv
vv
aa
aa
nn
nn
gg
gg
ii
ii
nn
nn
gg
gg
vv
vv
aa
aa
nn
nn
hh
hh
ee
ee
tt
tt
ff
ff
ii
ii
ll
ll
tt
tt
ee
ee
rr
rr
• eerst duwen op de opening van het deksel op het filter
(3a), dan naar boven trekken om het deksel (3a) los te
maken (fig.8).
• het filter (3b) verwijderen (fig.9).
• het filter wordt droog of onder het water gereinigd, dan
het laten drogen (fig10). Als het vuil blijt, het filter moet
vervangd worden.
• als het filter beschadigd is, moet u het onmiddelijk
vervangen, om schade aan motor te voorkomen.
VV
VV
ee
ee
rr
rr
vv
vv
aa
aa
nn
nn
gg
gg
ii
ii
nn
nn
gg
gg
vv
vv
aa
aa
nn
nn
hh
hh
ee
ee
tt
tt
ff
ff
ii
ii
ll
ll
tt
tt
ee
ee
rr
rr
ll
ll
uu
uu
cc
cc
hh
hh
tt
tt
uu
uu
ii
ii
tt
tt
gg
gg
aa
aa
nn
nn
gg
gg
• op de opening van het rooster van het filter lucht uitgang
(7) duwen (fig. 11)
• het filter verwijderen en reinigen met een slag of met
water dan laten drogen.
• het filter weer goed in zijn opberg terugplaatsen met de
witte stuk onder.
• als het filter beschadigd is, moet u het vervangen.
Fig. 6
Fig. 7
Fig. 8
Fig. 9
Fig. 10
Fig. 11
M

NEDERLANDS
PP
PP
RR
RR
OO
OO
BB
BB
LL
LL
EE
EE
MM
MM
EE
EE
NN
NN
EE
EE
NN
NN
OO
OO
PP
PP
LL
LL
OO
OO
SS
SS
SS
SS
II
II
NN
NN
GG
GG
EE
EE
NN
NN
Probleem Ooorzaak Oplossingen
De stofzuiger stopt maar
het lampje blijft branden.
De zuigkracht daalt.
Stofverlies gedurende het
zuigen
Vloeistofverlies gedurende
het zuigen.
Het waterniveau in het
reservoir is te hoog.
Opstopping bij het filter,
buizen, slang of
verlengstukken.
Stofzak of stofopberg zijn
vol.
Het filter mist of is slecht
geplaatst.
De slang is slecht
verbonden.
Het filter mist of is slecht
geplaatst of is
beschadigd.
Opstopping bij de buizen
door het vuil.
Schakelaar is defekt.
Op de schakelaar (1)
duwen, de stekker uit het
stopcontact halen en het
reservoir leeg maken.
Het filter reinigen en de
buizen leeg van eventuele
opstoppingen maken.
Stofzak vervangen of
stofopberg leeg maken.
Het filter goed plaatsen.
De slang goed verbinden.
Het filter goed plaatsen of
vervangen.
Laten controleren door
een Polti technische
dienst.

NEDERLANDS
GG
GG
AA
AA
RR
RR
AA
AA
NN
NN
TT
TT
II
II
EE
EE
De POLTI VAC 160 heeft een garantie van 1 jaar tegen fabricage- en materiaalfouten,
ingaande op de datum van aankoop. De garantie geldt niet wanneer de schade is
veroorzaakt door oneigenlijk gebruik. Wanneer het apparaat stuk is of slecht werkt, neem
dan onmiddellijk contact op met het dichtstbijzijnde officiële technisch centrum. Wanneer
het apparaat eventueel wordt beschadigd door onbevoegd personeel, vervalt de garantie
onmiddellijk.
• De firma POLTI S.p.A. wijst iedere aansprakelijkheid van de hand voor
incidenten die zijn ontstaan doordat de POLTI VAC 160 niet conform de
gebruiksaanwijzing is gebruikt.
BB
BB
EE
EE
LL
LL
AA
AA
NN
NN
GG
GG
RR
RR
II
II
JJ
JJ
KK
KK
Het apparaat is gefabriceerd volgens de huidige recyclingnormen. We raden u aan het
verpakkingsmateriaal voor bescherming tijdens het transport, niet bij het huisvuil te zetten,
maar het bij het desbetreffende inzamelpunt af te geven.
GG
GG
EE
EE
BB
BB
RR
RR
UU
UU
II
II
KK
KK
VV
VV
AA
AA
NN
NN
DD
DD
EE
EE
««
««
RR
RR
UU
UU
GG
GG
--
--
SS
SS
AA
AA
VV
VV
EE
EE
»»
»»
««
««
FF
FF
LL
LL
EE
EE
XX
XX
OO
OO
»»
»»
AA
AA
AA
AA
NN
NN
SS
SS
LL
LL
UU
UU
II
II
TT
TT
II
II
NN
NN
GG
GG
((
((
MM
MM
))
))
• Met de door Polti gepatenteerde «flexo» aansluiting,
bereikt U de moeilijkste punten zonder te moeten
bukken.
• De aansluiting «flexo» moet tussen de twee
verlengstukken geplaatst worden, met de knop aan de
achterkant van de verlengstukken.
• Om de stand te veranderen moet U de cursor (Y)
gewoon draaien. Met de beweegstuk open mag de
stand van de verlengstukken (fig. 12) verandert worden.
• De aansluiting weer berschermen met de cursor en draaien met de wijzers mee om
de stand vast te houden.
Fig. 12
Y
Documenttranscriptie
1 7-8 6 3B 5 10 12 5 9 2 3 A 11 3A 4 D H F 11 B E C M G ITALIANO 160 1. 2. 3. 3a. 3b. 4. 5. 6. 7. 8. 9. 10. 11. 12. LEGENDA Interruttore acceso/spento con spia Maniglia per trasporto Coperchio filtro plissettato Leva apertura coperchio filtro plissetato Filtro plissettato (nota: linea tratteggiata) Ganci chiusura apparecchio Avvolgicavo Coperchio con gruppo motore Griglia copri filtro uscita aria Filtro uscita aria Serbatoio rifiuti Porta accessori Ruote piroettanti Cavo alimentazione A. B. C. D. E. F. G. H. M. ACCESSORI Tubi prolunga Spazzola batti tappeti Spazzola aspiraliquidi Tubo flessibile con innesto Spazzola piccola Lancia pulizia angoli/batti scopa Sacco raccogli polvere Spazzola a pennello Raccordo brevettato “FLEXO” La POLTI S.p.A. si riserva la facoltà di introdurre le modifiche tecniche e costruttive che riterrà necessarie, senza obblighi di preavviso. Questo apparecchio é conforme alla direttiva EC 89/336 modificata dalla 93/68 (EMC) e alla direttiva 73/23 modificata dalla 93/68 (bassa tensione). ITALIANO USO CORRETTO DEL PRODOTTO Fig. 1 Questo apparecchio è destinato all'uso come aspiratore di liquidi e di solidi secondo le descrizioni ed istruzioni riportate in questo manuale. P R E PA R A Z I O N E A L L ' U S O • Prima di utilizzare l'aspirapolvere, procedere al montaggio delle ruote piroettanti (11) (Fig.1). • Inserire la bocca aspirazione del tubo flessibile con innesto (D) nell'apparecchio (Fig. 2) fino ad agganciare il dente (I). • Collegare i tubi prolunga (A) e innestarli al tubo flessibile (D). • Scegliere l'accessorio idoneo al tipo di aspirazione e innestarlo ai tubi prolunga (Fig.3). ASPIRAZIONE A SECCO • Aspirare lo sporco fine asciutto con il sacco raccogli polvere (G) montato, onde garantire una maggior efficienza del sistema filtrante (Fig.5). • Preparare l'apparecchio come riportato nel capitolo PREPARAZIONE PER L' USO. • Tirare verso l'esterno le labbra delle chiusure (4) e contemporaneamente sollevare il coperchio con gruppo motore (6) verso l'alto (Fig. 6). • Posizionare il sacco raccogli polvere (G) infilando la flangia nei due perni (L) come indicato in Fig. 5A • Collocare il coperchio gruppo motore (6) al serbatoio rifiuti (9) e richiudere, facendoli agganciare tramite le due labbra chiusura (4). • Svolgere il cavo alimentazione (12) e collegarlo ad una presa di corrente idonea. • Premere l'interruttore (1) e iniziare l'aspirazione. NOTA: I frammenti di sporco asciutto possono essere aspirati anche senza sacco raccogli polvere (G). ASPIRAZIONE LIQUIDI • Attenzione! Prima di aspirare liquidi rimuovere il sacchetto come illustrato nei primi due punti del capitolo Manutenzione generale (Sostituzione sacco raccogli polvere). • Preparare l'apparecchio come riportato nel capitolo PREPARAZIONE PER L' USO, quindi svolgere il cavo alimentazione (12) e collegarlo ad una presa di corrente idonea. • Premere l'interruttore (1) e iniziare l'aspirazione (Fig. 4). • Al termine dell'aspirazione dei liquidi controllare il galleggiante come riportato nel capitolo manutenzione generale (Controllo galleggiante). Fig. 2 I Fig. 3 Fig. 4 Fig. 5 L Fig. 5A L ITALIANO MANUTENZIONE GENERALE Fig. 6 Prima di qualsiasi tipo di manutenzione accertarsi che il cavo di alimentazione non sia collegato alla rete elettrica. Controllo del galleggiante • Dopo l'aspirazione di liquidi è consigliabile procedere allo svuotamento del serbatoio rifiuti (9). • Tirare verso l'esterno le due labbra chiusura (4) e contemporaneamente sollevare il coperchio con gruppo motore (6). (Fig. 6) • Vuotare il serbatoio rifiuti (9) dal liquido aspirato. • Controllare che il galleggiante (M) non sia sporco o che non abbia degli impedimenti, in tal caso provvedere alla pulizia (Fig. 7). Sostituzione sacco raccogli polvere La resa dell’apparecchio è in funzione del livello di riempimento del sacco. Quando si avverte un sensibile calo dell’aspirazione è necessario procedere alla sostituzione del sacco. • Tirare verso l'esterno le due labbra chiusura (4), e contemporaneamente sollevare il coperchio con gruppo motore (6) (Fig. 6). • Rimuovere dai due perni (L) il sacco raccogli polvere (G). • Sostituirlo con uno nuovo riposizionandolo come spiegato nel paragrafo ASPIRAZIONE A SECCO. • Richiudere effettuando le operazioni inverse. Pulizia o sostituzione del filtro plissettato Si consiglia la pulizia del filtro ogni 2 cambi del sacco raccoglipolvere o svuotamento del serbatoio rifiuti. Si raccomanda la sostituzione ogni 5 cambi del sacco o svuotamento del serbatoio rifiuti. • Premere la leva apertura coperchio porta filtro plissettato (3a) tirando poi il coperchio verso l'alto, in questo modo il coperchio filtro plissettato (3) si sgancerà dall'apparecchio (Fig. 8). • Estrarre il filtro plissettato (3b) (Fig. 9). • Batterlo e nel caso in cui lo sporco dovesse persistere lavare il filtro sotto l'acqua corrente e quindi lasciarlo asciugare (Fig. 10). • Se il filtro è danneggiato, ossia la plissettatura rimane visibilmente irregolare, procedere alla sostituzione onde evitare danni al motore. Fig. 7 M Fig. 8 Fig. 9 Fig. 10 ITALIANO Pulizia o sostituzione del filtro uscita aria • Premere la leva della griglia chiusura filtro uscita aria (7) (Fig. 11). • Asportare il filtro, batterlo ,e se è il caso, lavarlo con acqua ed asciugarlo. • Riposizionare correttamente il filtro nella sua sede appoggiandolo con la parte bianca. • Nel caso in cui il filtro uscita aria fosse danneggiato, ossia presenta delle lacerazioni, procedere alla sostituzione. Fig. 11 RICERCA GUASTI Inconveniente Causa Rimedio L'aspiratore si spegne ma la spia dell' interruttore rimane accesa. Il livello liquidi nel serbatoio è troppo alto. Premere l'interruttore (1), scollegare il cavo alimentazione dalla rete elettrica e vuotare il serbatoio. La potenza di aspirazione si riduce. Filtro plissettato, bocchetta, tubo flessibile di aspirazione o tubo rigido di aspirazione sono otturati. Pulire il filtro ed asportare eventuali ostruzioni nei condotti. Sacco raccoglipolvere o serbatoio rifiuti è pieno. Sostituire il sacco raccoglipolvere, o vuotare il serbatoio rifiuti. Manca o è stato collocato male il filtro plissettato. Collocare correttamente il filtro piano plissettato. Il tubo flessibile di aspirazione non è collegato correttamente. Collegare correttamente il tubo flessibile di aspirazione. Manca, è stato collocato male o è danneggiato il filtro plissettato. Collocare correttamente o cambiare il filtro plisettato Galleggiante bloccato dallo sporco. Fare controllare dal Centro Assistenza Autorizzato Polti Fuoriuscita di polvere durante l'aspirazione. Fuoriuscita di acqua durante l'aspirazione liquidi. Interruttore a galleggiante guasto. ITALIANO U S O D E L L O S N O D O S A LVA S C H I E N A F L E X O ( M ) • Questo particolare snodo (brevetto esclusivo POLTI) Fig. 12 consente di raggiungere i punti più difficili senza doverY si chinare. • Inserire lo snodo flexo tra i due tubi di prolunga tenendo la tacca sulla parte posteriore dei tubi. • Per cambiare l’inclinazione ruotare il cursore (Y) di mezzo giro. Si scopre così l’articolazione che permetterà di variare l’inclinazione di lavoro dei tubi (Fig. 12). • Finite le operazioni riportate lo snodo in posizione originale, ruotando per bloccare la posizione. AV V E R T E N Z E Attenzione! Non usare l'apparecchio senza aver letto le istruzioni per l'uso. • In caso di guasto o mal funzionamento, non tentare mai di smontare l'apparecchio ma rivolgersi al Centro di Assistenza Autorizzato più vicino. • L'impianto elettrico a cui è collegato l'apparecchio dovrà essere realizzato in conformità alle leggi vigenti. • L'apparecchio non deve essere utilizzato da bambini o da personale non addestrato all' uso. • Per non compromettere la sicurezza dell'apparecchio, utilizzare solo parti di ricambio e accessori originali, approvati dal costruttore. • Non utilizzare l'apparecchio se il cavo di alimentazione o altre parti importanti dell'apparecchio sono danneggiate. • Non afferrare mai la spina di alimentazione con le mani bagnate. • Non aspirare acidi e solventi non diluiti che potrebbero causare seri danni ai materiali dell'apparecchio e soprattutto non aspirare mai liquidi esplosivi, gas infiammabili, polveri esplosive, benzine, vernici, olio combustibile, che a contatto con le parti interne dell'apparecchio potrebbero causare esplosioni. • E' vietato l'uso dell'apparecchio in ambienti in cui sussiste il pericolo di esplosioni. • Non aspirare oggetti in fiamme o incandescenti, come tizzoni, cenere, ed altri materiali in fase di conbustione. • Se durante l'aspirazione dovesse esserci una fuoriuscita di liquido o di schiuma spegnere immediatamente l'apparecchio e apportare le manutenzioni necessarie. • La pulizia dell'apparecchio non dovra' essere fatta con la canna dell'acqua o con un getto ad alta pressione, ma utilizzare un panno umido. • Spegnere sempre l’apparecchio e togliere la spina dalla presa prima di procedere alla manutenzione. ITALIANO GARANZIA POLTI VAC 160 è garantita 1 anno dalla data di acquisto contro i difetti di fabbricazione e i vizi dei materiali. La garanzia non è valida se il guasto è causato da un impiego improprio. In caso di guasto o malfunzionamento, contattare immediatamente il Centro Assistenza autorizzato più vicino. Eventuali manomissioni dell’apparecchio da parte di personale non autorizzato invalideranno automaticamente la garanzia. • La Polti S.p.A. declina tutte le responsabilità in caso di incidenti derivanti da un utilizzo di POLTI VAC 160 non conforme alle presenti istruzioni d’uso. AT T E N Z I O N E • L’apparecchio è costruito secondo le norme vigenti per il riciclaggio. • Si raccomanda di non gettare nei rifiuti domestici i materiali di imballaggio protettivi per il trasporto, ma consegnarli ai relativi centri di raccolta. • I Filtri ed i sacchi raccoglipolvere sono in vendita presso i centri assistenza tecnica autorizzati e presso i migliori negozi di elettrodomestici. • Raccomandiamo di usare solo ricambi originali. R UFFICIO SERVIZIO CLIENTI Chiamando questo numero verde al solo costo di uno scatto, 800 012363 potrà ordinare i sacchi raccoglipolvere di ricambio e riceverli direttamente a casa sua tramite il servizio postale. Chiamando questo numero i nostri incaricati saranno a disposi- 800 824148 zione per rispondere alle Vostre domande e fornirVi tutte le indicazioni utili per sfruttare al meglio le qualità dei prodotti POLTI. ESPAÑOL 160 LEYENDA 1. Interruptor encendido/apagado con piloto indicador 2. Asa para el transporte 3. Tapa filtro plegado 3a. Leva apertura tapa filtro plegado 3b. Filtro plegado (nota: línea señalizada) 4. Ganchos cierre aparato 5. Recogecable 6. Tapa con grupo motor 7. Parrilla cubre-filtro salida aire 8. Filtro salida aire 9. Depósito para suciedad 10. Porta accesorios 11. Ruedas poliuretano 12. Cable alimentación eléctrica A. B. C. D. E. F. G. H. M;. ACCESORIOS Tubos prolongación Boquilla limpia alfombras Boquilla aspiración líquidos Tubo flexible con conexión Boquilla pequeña Lanza limpieza de ángulos/batidora Saco recoge polvo Cepillo para polvo Racord patentado “Flexo” POLTI S.p.A se reserva el derecho de introducir las modificaciones técnicas y constructivas que considere necesarias, sin obligación de preaviso. ESTE APARATO ES CONFORME A LA NORMATIVA DE LA EC 89/336 MODIFICADA EL 93/68 (EMC) Y A LA NORMATIVA 73/23 MODIFICADA EL 93/68 (baja tensión). ESPAÑOL ADVERTENCIA ¡ Atención! No utilizar el aparato sin haber leído antes las instrucciones de uso. • En caso de avería o mal funcionamiento no intentar nunca desmontar el aparato. Dirigirse al Servicio de Asistencia Técnica Autorizada mas cercano. • La instalación eléctrica a la que se conecte el aparato deberá estar realizada de conformidad con las leyes vigentes. • El aparato no debe ser utilizado por niños o personas no adiestradas en su utilización. • Para no comprometer la seguridad del aparato utilizar solo recambios y accesorios originales homologados por el fabricante. • No utilizar el aparato si el cable de alimentación u otras partes importantes del aparato están dañadas. • No tocar nunca el enchufe de conexión del aparato con las manos mojadas. • No aspirar ácidos ni disolventes ya que se pueden causar serios daños a los materiales del aspirador y sobre todo no aspirar nunca líquidos ni productos explosivos, gas inflamable, gasolina, barnices, aceite combustible ó productos similares que en contacto con las partes internas del aparato podrían causar una explosión. • Está prohibido el uso del aparato en ambientes en los que exista peligro de explosiones o deflagraciones. • No aspirar objetos en llamas o incandescentes como brasas, cenizas u otros materiales en fase de combustión. • Este aparato no es idóneo para la aspiración de polvo, partículas o materiales peligrosos para la salud. • Si durante la utilización del aspirador ocurriese una salida súbita de líquido o de espuma desconectar inmediatamente el aparato y efectuar la manutención necesaria. • La limpieza del aparato no deberá efectuarse con chorros de agua o con agua a alta presión. USO CORRECTO DEL PRODUCTO El uso de este aparato esta destinado al de aspirador de líquidos y sólidos según las instrucciones indicadas en este manual. ESPAÑOL P R E PA R A C I Ó N PA R A L A U T I L I Z A C I Ó N • Antes de utilizar el aspirador proceder al montaje de las ruedas de poliuretano (11) (Fig.1). • Insertar la boca de aspiración del tubo flexible con conexión (D) en el aparato (Fig. 2) hasta enganchar el diente (I) • Conectar los tubos de prolongación (A) y empalmarlos en el tubo flexible (D). • Escoger el accesorio idóneo para el tipo de aspiración a realizar y empalmarlo a los tubos de prolongación (Fig. 3). Fig. 1 Fig. 2 ASPIRACIÓN EN SECO • Aspirar la suciedad fina y seca preferiblemente con el saco recogepolvo (G) montado (Fig. 5). • Preparar el aparato tal como se indica en el capítulo de PREPARACIÓN PARA LA UTILIZACIÓN. • Tirar hacia fuera del gancho de cierre del aparato (4) y al mismo tiempo llevar la tapa con el grupo motor (6) hacia arriba (Fig. 6). • Colocar el saco recoge polvo (G) introduciendo la parte más rígida en los dos pernos (L) tal como se indica en la Fig 5a. • Colocar la tapa con el grupo motor (6) en el depósito para la suciedad (9) y cerrarla, haciéndola enganchar sobre los ganchos de cierre (4) • Desenrollar el cable de alimentación (12) y conectarlo en una toma de corriente adecuada. • Pulsar el interruptor (1) e iniciar la aspiración. NOTA: Los fragmentos de suciedad seca pueden ser aspirados también sin el saco recogepolvo. I Fig. 3 Fig. 4 Fig. 5 ASPIRACIÓN DE LÍQUIDOS • ¡Atención! Antes de aspirar líquidos mover el saco tal como se indica en los dos primeros puntos del capítulo "Mantenimiento General" (sustitucíon del saco recogepolvo) • Preparar el aparato tal como se indica en el capítulo de PREPARACIÓN PARA LA UTILIZACIÓN, después desenrollar el cable de alimentación (12) y conectarlo en una toma de corriente adecuada. • Pulsar el interruptor (1) e iniciar la aspiración (Fig. 4). • Al finalizar la aspiración de líquidos controlar el flotador tal como está indicado en el capítulo "Mantenimiento General" (control del flotador). L Fig. 5A L ESPAÑOL MANTENIMIENTO GENERAL Fig. 6 Antes de efectuar cualquier operación de mantenimiento cerciorarse de que el cable de alimentación no esté conectado a la red eléctrica. Control del flotador • Después de la aspiración de líquidos es aconsejable proceder al vaciado del depósito de suciedad (9). • Tirar hacia el exterior de los dos labios de cierre (4) y al mismo tiempo levantar la tapa con el grupo motor (6) (Fig. 6) • Vaciar el depósito (9) del líquido aspirado. • Controlar que el flotador (M) no este sucio o que no tenga nada que le impida actuar correctamente y en su caso proceder a limpiarlo (Fig. 7). Fig. 7 M Fig. 8 Sustitución del saco recoge polvo • Tirar hacía el exterior de los labios de cierre (4) y al mismo tiempo levantar la tapa con el grupo motor (6) (Fig. 6). • Extraer de los dos pernos (L) el saco recoge polvo (G) • Sustituirlo por uno nuevo reposicionándolo tal como se explica en el apartado ASPIRACIÓN EN SECO. • Volver a cerrar repitiendo la operación a la inversa. Fig. 9 Sustitución del filtro plegado • Presionar la leva de apertura de la cubierta porta filtro plegado (3a) tirando luego hacia arriba, de este modo la cubierta del filtro plegado (3) se desenganchará del aparato (Fig. 8). • Extraer el filtro plegado (3b) (Fig. 9) • Sacudirlo para limpiarlo de suciedad. En el caso de que la suciedad sea persistente lavarlo con agua corriente y después dejarlo secar (Fig. 10). Si el agua no fuese suficiente proceder a la sustitución del mismo. • Si el filtro estuviese dañado proceder inmediatamente a la sustitución a fin de evitar posibles daños al motor. Sustitución del filtro de salida de aire • Presionar la leva de la parrilla de cierre del filtro de salida de aire (7) (Fig.11). • Sacar el filtro, sacudirlo y si es necesario lavarlo con agua y secarlo. • Reposicionar correctamente el filtro en su lugar apoyándolo con la parte blanca. • En el caso de que el filtro estuviese dañado proceder a su sustitución. Fig. 10 Fig. 11 ESPAÑOL I N V E S T I G A C I Ó N D E AV E R Í A S Problema Causa Solución El aspirador se desconecta pero el indicador luminoso permanece encendido. El nivel de líquido en el depósito es demasiado alto. Presionar el interruptor (1), desconectar el cable de alimentación de la red eléctrica y vaciar el depósito. La potencia de aspiración se reduce. Filtro, boca de entrada, tubo flexible de aspiración o tubo rígido de aspiración están obturados. Limpiar el filtro y eventualmente retirar las posible obstrucciones de los consuctos Saco recoge polvo o depósito de desperdicios está lleno. Sustituir el saco recoge polvo ó vaciar el depósito de desperdicios si esta lleno. Falta o está mal colocado el filtro plegado. Colocar correctamente el filtro plano plegado. El tubo flexible de aspiración no está correctamente colocado. Colocar correctamente el tubo flexible de aspiración. Falta, está mal colocado ó está dañado el filtro plegado Colocar correctamente o cambiar el filtro plegado Flotador bloqueado por la suciedad. Hacer verificar el aparato en un Servicio de Asistencia Técnica autorizado Polti. Salida de polvo al exterior mientras se aspira. Salida de agua al exterior mientras se aspiran líquidos Interruptor del flotador averiado. ESPAÑOL GARANTÍA POLTI VAC 160 está garantizada por un año desde la fecha de compra contra defectos de fabricación y faltas de los materiales. La garantía no es válida si la avería ha sido causada por un uso inadecuado. En caso de avería o mal funcionamiento, hay que ponerse en contacto inmediatamente con el Centro de Asistencia autorizado más cercano. Los eventuales desperfectos del aparato causados por personal no autorizado invalidarán automáticamente la garantía. POLTI S.P.A. declina toda responsabilidad en caso de accidentes derivados de una utilización de POLTI VAC 160 no conforme a las presentes instrucciones de uso. I M P O R TA N T E El aparato está construido según las normas vigentes para el reciclaje. Se recomienda no tirar los embalajes protectores del transporte junto con los desechos domésticos, sino entregarlos a los centros de recogida correspondientes. U S O D E L A A R T I C U L A C I Ó N S A LVA - E S PA L D A S " F L E X O " ( M ) • Esta particular articulación - patente exclusiva Polti - Fig. 12 permite alcanzar hasta los puntos más difíciles sin tener Y que inclinarse. • Introducir la articulación flexo entre los dos tubos de prolongación teniendo la graduación sobre la parte posterior de los tubos. • Para cambiar la inclinación girar el cursor (Y) de medio giro. Se descubre así la articulación que permitirá variar la inclinación de trabajo de los tubos (fig. 12). • Finalizada la operación volver a colocar la articulación en su posición original, cubrirla con el cursor y girarlo para bloquear la posición. FRANÇAIS 160 1. 2. 3. 3a. 3b. 4. 5. 6. 7. 8. 9. 10. 11. 12. LEGENDE Interrupteur marche/arrêt Poignée de transport Couvercle du filtre à plis plats Levier d'ouverture du capot du filtre à plis plats Filtre à plis plats (partie hachurée) Verrouillage de l'appareil Rallonge électrique Couvercle groupe moteur Grille couvrant le filtre de sortie d'air Filtre de sortie d'air Réservoir à souillures Porte-accessoires Roulettes pivotantes Câble d'alimentation A. B. C. D. E. F. G. H. M. ACCESSOIRES Tube rallonge Brosse à tapis Brosse à liquides Tube flexible Petite brosse Suceur Sachet à poussières Brosse à meubles Raccord articulé breveté “Flexo” La Société POLTI se réserve la faculté d’introduire toutes modifications techniques qui s’avéreraient nécessaires sans aucun préavis. CET APPAREIL EST CONFORME A LA DIRECTIVE CE 89/336 MODIFIEE 93/68 (CEM) ET A LA DIRECTIVE 73/23 MODIFIEE 93/68 (BASSE TENSION) FRANÇAIS C O N S I G N E S I M P O R TA N T E S Attention ! N'utilisez pas cet appareil sans avoir lu les instructions d'utilisation. • En cas de dommage ou de mauvais fonctionnement, ne tentez jamais de démonter l'appareil mais rendez vous au Centre d'Assistance Technique Agréé POLTI le plus proche. • Le circuit électrique auquel est branché l'appareil doit être en conformité avec les lois en vigueur. • L'appareil ne doit être utilisé ni par les enfants ni par les personnes n'en connaissant pas le fonctionnement. • Pour une question de sécurité, n'utilisez que des accessoires et pièces de rechange d'origine, approuvés par le constructeur. • N'utilisez pas l'appareil si le câble d'alimentation ou une autre partie importante de l'appareil est endommagée. • Ne branchez jamais l'appareil avec les mains mouillées. • N'aspirez jamais ni acides ou solvants non dilués qui pourraient endommager gravement l'appareil, ni liquides explosifs, gaz inflammables, poussières explosives, benzine, vernis, huile combustible, qui au contact des parties internes de l'appareil pourraient causer des explosions. • Evitez d'utiliser l'appareil dans des endroits dangereux avec risque d'explosion. • N'aspirez jamais des objets en flamme ou incandescents, comme les cendres et autres matériaux en phase de combustion. • Cet appareil n'est pas conçu pour aspirer les poussières dangereuses pour la santé. • Si durant l'aspiration une fuite de liquide ou de mousse se produit, éteignez immédiatement l'appareil et apportez-le au Centre d'Assistance Technique Agréé POLTI le plus proche. • Le nettoyage de l'appareil ne doit être effectué ni avec un tuyau d'arrosage ni avec un jet haute pression. U T I L I S AT I O N D U P R O D U I T Cet appareil est destiné à l'aspiration de liquides et solides et son utilisation doit être conforme aux instructions reportées dans ce manuel. FRANÇAIS P R E PA R AT I O N D E L ' A P PA R E I L • Avant d'utiliser l'aspirateur, montez les roulettes pivotantes (11) (fig. 1). • Insérez la bouche d'aspiration dans le tube flexible (D) de l'appareil (fig. 2) jusqu'au blocage (I). • Reliez les tubes rallonge (A) et accordez-les au tube flexible (D). • Choisissez l'accessoire adapté au type d'aspiration voulu et fixez-le aux tubes rallonge (fig. 3). Fig. 1 Fig. 2 A S P I R AT I O N A S E C • Aspirez la saleté de préférence après avoir installé le sachet-filtre en papier (G)(fig. 5). • Préparez l'appareil comme indiqué dans le paragraphe PREPARATION DE L'APPAREIL. • Tirez vers l'extérieur les lèvres des fermeture (4), et soulevez le couvercle et le groupe moteur (6) vers le haut en même temps (fig. 6). • Positionnez le sachet-filtre en papier (G) en enfilant la bride dans les deux chevilles (L) comme indiqué en Fig. 5a. • Placez le couvercle du groupe moteur (6) sur le réservoir à souillures (9) et refermez, en les bloquant entre les deux lèvres de fermeture (4). • Déroulez le câble d'alimentation (12) et branchez-le à une prise correctement alimentée. • Enclenchez l'interrupteur (1) et commencez l'aspiration. NOTA: Des fragments de saleté secs peuvent être aspirés sans sachet-filtre en papier (G). I Fig. 3 Fig. 4 Fig. 5 A S P I R AT I O N D E L I Q U I D E S • Attention: Avant d'aspirer les liquides, enlever le sac comme indiqué dans les deux premiers points du chapitre "Entretien général". • Préparez l'appareil comme indiqué dans le paragraphe PREPARARTION DE L'APPAREIL, puis déroulez le câble d'alimentation (12) et branchez-le à une prise adaptée. • Actionnez l'interrupteur (1) et commencez l'aspiration (fig. 4). • A la fin de l'aspiration des liquides, contrôler le flotteur comme indiqué dans le chapitre "Entretien général". L Fig. 5A L FRANÇAIS MANUTENTION GENERALE Fig. 6 Avant de procéder à quelque manutention que ce soit, assurez-vous que le câble d'alimentation soit débranché du circuit électrique. Contrôle du flotteur • Après l'aspiration de liquides, il est conseillé de retirer le réservoir à souillures (9). • Tirez vers l'extérieur les deux lèvres de fermeture (4), et soulevez le couvercle avec le groupe moteur (6) en même temps (fig. 6). • Videz le réservoir à souillures (9) • Assurez-vous que le flotteur (M) ne soit pas sale et qu'il ne soit pas bloqué, sinon procédez au nettoyage (fig. 7). Remplacement du sac à poussière • Tirez vers l'extérieur les deux lèvres de fermeture (4), et soulever le groupe moteur en même temps (6) (fig. 6). • Détacher le sac à poussière (G) des deux chevilles (L). • Remplacez-le par un sachet neuf comme indiqué au paragraphe ASPIRATION A SEC. • Refermez la machine en opérant à l'inverse. Replacement du filtre a plis plats • Actionnez le levier d'ouverture du capot du porte filtre à plis plats (3a) en le tirant vers le haut, de cette manière le capot du porte filtre (3) se détachera de l'appareil (fig. 8). • Extraire le filtre à plis plats (3b) (fig. 9). • Tapez-le et si la saleté reste collée, lavez le filtre à l'eau du robinet et laissez-le sécher (fig. 10). Si l'eau ne suffit pas à le nettoyer, remplacez-le. • Si le filtre est endommagé, remplacez-le immédiatement, pour éviter d'endommager le moteur. Remplacement du filtre de sortie d’air • Appuyez sur le levier de la grille de fermeture du filtre de sortie d'air (7) (fig. 11). • Retirez le filtre , tapez-le, et si nécessaire lavez-le et séchez-le. • Remettez le filtre correctement à sa place en l'appuyant sur la partie blanche. • Si le filtre d'air est endommagé, remplacez-le. Fig. 7 M Fig. 8 Fig. 9 Fig. 10 Fig. 11 FRANÇAIS EN CAS DE DYSFONCTIONNEMENT Dysfonctionnement Cause Solution L'aspirateur s'éteint mais le témoin de l'interrupteur reste allumé Le niveau de liquide dans le réservoir est trop haut Appuyer sur l'interrupteur (1), débranchez le câble d'alimentation du circuit électrique et retirez le réservoir. La puissance d'aspiration se réduit Filtre à plis plats, petit bec, tube flexible d'aspiration ou tube rigide d'aspiration bouchés. Nettoyez le filtre et éliminez les éventuelles souillures qui pourraient, à terme, obstruer les conduits. Sac à poussières ou réservoir à souillures plein. Remplacez le sac à poussières, ou videz le réservoir à souillures Le filtre à plis plats est absent ou mal placé Insérez correctement ou changez le filtre à plis plats. Le tube flexible d'aspiration n'est pas branché correctement. Branchez correctement le tube flexible d'aspiration. Le filtre à plis plats est absent ou n'est pas en position Insérez correctement ou changez le filtre à plis plats. Flotteur bloqué par la saleté. Faire contrôler votre appareil par le Centre d'Assistance Technique Agréé POLTI le plus proche. Echappements de poussière pendant l'aspiration Fuites d'eau en phase d'aspiration de liquides. Interrupteur de flotteur endommagé. FRANÇAIS GARANTIE POLTI VAC 160 est garanti pendant 1 an à compter de la date d’achat contre tous défauts de fabrication. Les pannes dues à l’entartrage ou à une mauvaise utilisation du produit sont exclues de la garantie. En cas de panne, ne pas essayer de démonter l’appareil mais contacter le point SAV le plus proche. La garantie est uniquement valable si vous avez renvoyé la carte de garantie entièrement remplie. La garantie ne pourra s’appliquer que sur présentation de la facture originale d’achat indiquant la date d’achat de l’appareil. AT T E N T I O N La Société POLTI et ses distributeurs déclinent toutes responsabilités pour tout accident dû à une utilisation de POLTI VAC 160 qui ne correspond pas aux conditions d’emploi ci-dessus. U T I L I S AT I O N D U R A C C O R D A R T I C U L E P R O T E G E DOS FLEXO (M) • Ce raccord exclusif est un nouveau brevet développé par Fig. 12 la société POLTI et permet d’atteindre les endroits les Y plus difficiles d’accès sans avoir à se baisser. • Le “FLEXO” s’insère entre les deux tubes rallonge en tenant les clips sur la partie postérieure des tubes. • Pour changer d’inclinaison, tournez le curseur (Y) à moitié. De cette manière l’articulation permet de moduler l’inclinaison des tubes (fig. 12). • Pour remettre le raccord articulé en position de base, tournez le curseur pour bloquer sa position. DEUTSCH 160 1. 2. 3. 3a. 3b. 4. 5. 6. 7. 8. 9. 10. 11. 12. LEGENDE Ein- und Ausschalter mit Kontrollampe Tragegriff Faltenfilterdeckel Öffnungshebel des Faltenfilterdeckels Faltenfilter (s. Strichlinie) Verschlußhaken Kabelaufwicklung Deckel mit Motorgehäuse Verschlußgitter des Abluftfilters Abluftfilter Schmutzbehälter Zubehörträger Lenkrollen Anschlußkabel A. B. C. D. E. F. G. H. M. ZUBEHÖR Verlängerungsrohre Bürste für Teppichreinigung Bürste für Flüßigkeitabsaugung Saugschlauch Kleine Bürste Lanze für die Reinigung von Ecken Staubtüte Möbelpinsel „Flexo” patentiertes Anschlußstück Modelländerung in Ausstattung, technischen Daten und Zubehör vorbehalten. Technische und Herstellungsdaten können von POLTI S.p.A. ohne Vorankündigung geändert werden, wenn sich dies als nützlich erweisen sollte. CE Dieses Gerät entspricht der EC-Direktive 89/336, die von der 93/68 (EMC) verändert wurde, und der Direktive 73/23, die von der 93/68 (Niederspannung) verändert wurde. DEUTSCH HINWEISE Vorsicht! Vor einer Inbetriebnahme des Geräts unbedingt die Gebrauchsanweisung lesen. • Im Falle von Defekten oder Fehlfunktionen versuchen Sie unter keinen Umständen, das Gerät auseinanderzunehmen, sondern wenden Sie sich an einen Servicehändler in Ihrer Nähe. • Die für die Stromzufuhr des Geräts erforderliche Elektroanlage hat den gesetzlichen Normen zu entsprechen. • Das Gerät darf weder von Kindern noch von unfachmännischen Personen in Betrieb genommen werden. • Um die Sicherheit dieses Geräts gewährleisten zu können, sollten Sie ausschließlich vom Hersteller genehmigte original Ersatz- oder Zubehörteile verwenden. • Vermeiden Sie eine Inbetriebnahme des Geräts bei defekten Stromkabeln oder bei Defekten an anderen wichtigen Geräteteilen. • Der Stecker darf nicht mit nassen Händen ergriffen werden. • Vermeiden Sie die Absaugung von unverdünnten Säuren oder Lösemitteln, die schwere Schaden an den Gerätestoffen verursachen würden. Insbesondere dürfen keine Sprengflüßigkeit, Zündgas, Sprengpulver, Benzin, Lack und Brennöl aufgesaugt werden, die in Kotakt mit den Innenteilen des Geräts Explosionen verursachen könnten. • Die Verwendung des Geräts in explosionsgefährlichem Raum ist verboten. • Vermeiden Sie die Absaugung von Flamm- oder Glutgegenständen, wie Holzstück, Asche und anderen Verbrennungsstoffen. • Dieses Gerät ist nicht für die Absaugung von gesundheitsgefährlichen Pulvern gedacht. • Im Fall von Flüssigkeit- oder Schaumausgang während der Absaugung, schalten Sie bitte unmittelbar das Gerät aus und führen Sie die notwendige Instandhaltung durch. • Die Gerätsreinigung soll nicht direkt unter dem Wasserrohr oder durch Hochdruckwasserstrahl erfolgen. DAS GERÄT RICHTIG VERWENDEN Dieses Gerät ist bestimmt zur Verwendung als Naß- und Trockensauger entsprechend den in dieser Bedienungsanleitung gegebenen Beschreibungen und Sicherheitshinweisen. DEUTSCH DEN SAUGER BETRIEBSBEREIT MACHEN • Vor der Verwendung bauen Sie bitte die Lenkrollen (11) an. • Absaugungsöffnung des Steckschlauchs (D) in das Gerät bis zum Anschluß mit dem Zahn (I) einstecken (Bild 2). • Verlängerungsrohre (A) anschließen und sie am Schlauch (D) einrasten. • Das geeignete Zubehör für die Absaugung auswählen und am Verlängerungsrohr einrasten (Bild 3). Bild 1 Bild 2 TROCKENSAUGEN • Feinen, trockenen Schmutz saugen Sie am besten mit eingesetzter Staubtüte (G) (Bild 5). • Gerät vorbereiten wie im Abschnitt DEN SAUGER BETRIEBSBEREIT MACHEN angegeben. • Verschlußhaken (4) nach außen ziehen und danach den Deckel mit Motorgehäuse (6) nach oben ziehen (Bild 6). • Flansch in die zwei Bolzen (L) hineinstecken und Staubtüte einsetzen, wie im Bild 5a. ersichtlich. • Das Motorgehäuse (6) auf den Schmutzbehälter (9) setzen und durch die zwei Verschlußhaken verschließen. • Anschlußkabel (12) abwickeln und an einer geeigneten Steckdose anschießen. • Ein-/Ausschalter (1) drücken und Absaugung einleiten. WICHTIG: Groben Schmutz können Sie auch ohne Staubtüte (G) aufsaugen. NASSSAUGEN • Wichtig! Vor der Absaugung von Flüssigkeiten Schmutzbehälter entleeren, wie im Abschnitt "Allgemeine Instandhaltung" Punkt 1 und 2 (Staubtüte austauschen) dargestellt. • Gerät vorbereiten wie im Abschnit DEN SAUGER BETRIEBSBEREIT MACHEN angegeben. Anschlußkabel (12) abwickeln und an einer geeigneten Steckdose anschließen. • Ein-/Ausschalter (1) drücken und Absaugung einleiten (Bild 4). • Nach der Absaugung von Flüssigkeiten überprüfen Sie den Schwimmer, wie im Abschnitt "Allgemeine Instandhaltung" (Schwimmer prüfen) dargestellt. I Bild 3 Bild 4 Bild 5 L Bild 5A L DEUTSCH A L L G E M E I N E I N S TA N D H A LT U N G Bild 6 Vor der Instandhaltung versichern Sie sich, daß das Anschlußkabel nicht mit dem elektrischen Netz verbunden ist. Schwimmer prüfen • Nach der Absaugung von Flüssigkeiten Schmutzbehälter (9) entleeren. • Die zwei Verschlußhaken (4) nach außen ziehen und danach den Deckel mit Motorgehäuse (6) abheben (Bild 6). • Schmutzbehälter (9) von abgesaugter Flüssigkeit entleeren. • Prüfen Sie, daß der Schwimmer (M) nicht schmutzig ist und kein Hindernis hat, in diesem Fall muß er gereinigt werden (Bild 7). Bild 7 M Bild 8 Staubtüte austauschen • Die zwei Verschlußhaken (4) nach außen ziehen und danach den Deckel mit Motorgehäuse (6) abheben (Bild 6). • Staubtüte (G) von den zwei Bolzen (L) entfernen. • Staubtüte mit einer neuen austauschen und in die Halterung setzen, wie im Abschnitt TROCKENSAUGEN angegeben. • Umgekehrt vorangehen und Deckel wieder schließen. Faltenfilter austauschen • Öffnungshebel des Faltenfilterdeckels (3a) drücken und nach oben ziehen, so daß sich der Deckel des Faltenfilters (3) vom Gerät aushakt (Bild 8). • Faltenfilter (3b) herausnehmen (Bild 9). • Faltenfilter ausschlagen und, wenn noch Schmutz übrig bleibt, den Filter unter fließendem Wasser ausspülen und trocknen lassen (Bild 10). Sollte die Wasserreinigung nicht ausreichen, dann muß er ausgetauscht werden. • Wenn der Faltenfilter beschädigt ist, sollten Sie ihn sofort wechseln, da der Motor sonst Schaden nehmen kann. Abluftfilter austauschen • Gitterhebel des Abluftfilter (7) drücken (Bild 11) • Filter entfernen, ausschlagen und bei Bedarf mit Wasser ausspülen und trocknen. • Filter auf der weißen Seite richtig in seine Halterung wieder einsetzen. • Wenn der Abluftfilter beschädigt ist, sollten Sie ihn sofort wechseln. Bild 9 Bild 10 Bild 11 DEUTSCH S TÖRUNGEN SELBST BEHEBEN Störung Ursache Behebung Sauger schaltet ab, Kontrollampe bleibt jedoch eingeschaltet. Zu viel Flüssigkeit in dem Behälter. Ein-/Ausschalter (1) drücken, Anschlußkabel vom Netz nehmen und Behälter entleeren. Saugkraft läßt nach. Faltenfilter, Düse, Saugschlauch oder Saugrohr verstopft. Filter ausspülen und mögliche Rohrverstopfungen entfernen. Staubtüte oder Schmutzbehälter voll. Staubtüte wechseln, oder Schmutzbehälter entleeren. Faltenfilter fehlt oder ist nicht richtig eingesetzt. Faltenfilter richtig einsetzen. Saugschlauch ist nicht richtig angeschlossen. Saugschlauch richtig anschließen. Faltenfilter fehlt, ist nicht richtig eingesetzt oder defekt. Faltenfilter richtig einsetzen oder austauschen. Schwimmer verklemmt. Vom Polti Servicehändler überprüfen lassen. Staub tritt beim Saugen aus. Beim Naßsaugen: Wasser tritt aus. Schwimmerschalter defekt. DEUTSCH GARANTIE Polti gewährt Ihnen 12 Monate Garantie auf das Gerät ab Verkaufsdatum. Mit dem bestätigten Kaufdatum (Rechnung) umfaßt die Garantie alle Ansprüche aufgrund von Verarbeitungs- oder Materialfehlern. Ausgenommen sind Schäden, die durch unsachgemäße Handhabung sowie Abnutzung und natürlichen Verschleiß entstehen. Ebenfalls werden Folgeschäden durch diese Garantie nicht erfäßt. Bei Beanstandungen bitten wir, das Gerät dem Händler zu geben oder an die nächstgelegene PoltiKundendienststelle zu senden. GEBRAUCH DES „FLEXO” RÜCKENSCHUTZGELENK (M) • Dieses spezielle Gelenk - exklusives Polti Patent - Bild 12 ermöglicht die Reinigung an den schwierigsten Stellen, Y ohne sich zu bücken. • Setzen sie das Flexo Gelenk zwischen die 2 Verlängerungsrohre, wobei der Regler auf der Hinterseite der Rohre liegt. Das Gelenk erleichtert die Reinigung schwer zugänglicher, tiefliegender Stellen. • Um das Flexo-Gelenk zu aktivieren drehen Sie die Arretierung Um eine halbe Umdrehung (Bild 12). • Führen Sie die Arretierung über das Gelenk zurück und drehen diese Umdrehung um das Gelenk wieder zu fixieren. ENGLISH 160 1. 2. 3. 3a. 3b. 4. 5. 6. 7. 8. 9. 10. 11. 12. KEY On/off switch with indicator light Carrying handle Pleated filter cover Opening lever of the pleated filter cover Pleated filter (note: dashed line) Closing latches Cable-winder Cover with motor group Cover grill for air outlet filter Air outlet filter Waste container Accessories storage Pivoting wheels Power supply cable A. B. C. D. E. F. G. H. M. ACCESSORIES Extension tubes Carpet sweeper Liquid aspiration brush Flexible hose with junction Small brush Lance for cleaning corners/skirting boards Dust bag Duster Brush “Flexo” patented elbow Polti S.p.A. reserves the right to change equipment or accessory specification without prior notice. This unit conforms with EC-directives 89/336 as amended by 93/68 (EMC) and 73/23 as amended by 93/68 (low voltage). ENGLISH PRECAUTIONS Attention! Do not use the appliance without reading the instructions. • In case of damage or malfunction do not attempt to disassemble the appliance but contact the nearest authorised Polti Service Centre. • The mains the appliance is connected to must conform with regulations. • The appliance must not be used by children or by any others who may not know how to operate it . • In order not to compromize the safety of the appliance, only use original spare parts and accessories, approved by the manufacturer. • Do not use the appliance if the supply cable or other important parts of the unit are damaged. • Never touch the plug with wet hands. • Do not suck up undiluted acids or solvents that may cause serious damage to the appliance materials and especially do not suck up explosive liquids, inflammable gases, explosive powders, benzines, paints, fuel oil, which may cause bursts if they come in contact with the internal parts of the appliance. • You must not use the appliance in environments where there is danger of bursting. • Do not suck up objects in flames or incandescent such as embers, ash and other materials while burning. • This appliance is not suitable for the aspiration of any powders which are harmful to health. • Should there be a liquid or foam leak during aspiration, immediately switch off the appliance and carry out the necessary maintenance. • Cleaning of the appliance must not be done with a water hose or high pressure hose. CORRECT USE OF THE PRODUCT This appliance is intended for use as an aspirator for liquids or solids according to the descriptions and instructions in this manual. ENGLISH P R E PA R AT I O N F O R U S E • Before using the vacuum cleaner, fit the pivoting wheels (11) (fig. 1) • Insert the suction hose with junction (D) in the appliance (fig. 2) until the clutch engages (I). • Join the extension tubes (A) and attach them to the flexible hose (D). • Choose the required accessory and attach it to the extension tubes (fig. 3). Fig. 1 Fig. 2 I F O R D R Y - VA C U U M I N G • Vacuum dry dirt preferably with the dust bag (G) fitted (fig. 5). • Prepare the appliance as described in the PREPARATION FOR USE paragraph. • Pull the closing latches (4) outwards and at the same time lift the cover with motor group (6) upwards (fig. 6) • Position the dust bag (G) by inserting the flange in the two pins (L) as shown in fig. 5a • Place the cover with motor group (6) on the waste container (9) and close it with the two closing latches (4). • Unwind the supply cable (12) and connect it to the mains. • Push the switch (1) and start vacuum cleaning. NOTE: Small pieces of dry dirt can be vacuumed even without dust bag (G). Fig. 3 Fig. 4 Fig. 5 F O R L I Q U I D VA C U U M I N G L • Prepare the appliance as described in the PREPARATION FOR USE paragraph, then unwind the supply cable (12) and connect it to the mains. • Push the switch (1) and start the vacuum cleaning (fig. 4). • DO NOT VACUUM LIQUIDS WITH THE DUST BAG FITTED. • After vacuuming cleaning liquids, check the float as described in the General maintenance (control of the float) paragraph. Fig. 5A L ENGLISH GENERAL MAINTENANCE Fig. 6 Before maintenance, make sure that the supply cable is not connected to the mains. Control of the float • After vacuum cleaning liquids, it is suggested to empty the waste container (9). • Pull the two closing latches (4) outwards and at the same time lift the cover with motor group (6) (fig. 6) • Empty the sucked up liquid from the waste container (9). • Check that the float (M) is not dirty and that it has no obstructions, if necessary clean before operating (fig. 7). Replacing the dust bag • Pull the two closing latches (4) outwards and in the meantime lift the cover with motor group (6) (fig. 6). • Remove the dust bag (G) from the two pins (L) • Replace it with a new one by fitting it as explained in the DRY-VACUUMING paragraph. • Close by making the reverse operation. Replacing the pleated filter • Push the opening lever of the pleated filter cover (3a) and then pull it upwards. In this way the pleated filter cover (3) will unhook from the appliance (fig. 8). • Lift out the pleated filter (3b) (fig. 9) • Knock it and if the dirt is not easily removed, wash the filter under running water and leave it to dry (fig. 10). If water does not clean it, replace the filter. • If the filter is damaged, replace it immediately so as to avoid damage to the motor. Replacing the cover grill for air outlet filter • Push the lever of the cover grill for air outlet filter (7) (fig. 11). • Take out the filter, knock it, wash it with water and leave to dry. • Put the filter back in its correct position by leaning it with the white side inside the filter grill facing outwards. • If the air outlet filter is damaged, replace it. Fig. 7 M Fig. 8 Fig. 9 Fig. 10 Fig. 11 ENGLISH TROUBLESHOOTING Trouble Cause Solution The vacuum cleaner switches off but the indicator light is on The liquid level in the container is too high Push the switch (1), disconnect the supply cable from the mains and empty the container. The aspiration power decreases Pleated filter, nozzle, flexible hose or rigid suction tube are obstructed. Clean the filter and take out further obstructions in the tubes The dust bag or the litter container is full. Replace the dust bag or empty the waste container The pleated filter is missing or it has been wrongly placed Place the flat pleated filter correctly The suction flexible hose is not correctly connected Connect the flexible hose correctly The pleated filter is missing, it has been wrongly placed or it is damaged. Place the pleated filter correctly or change it The float is blocked by the dirt. Have it checked by the Authorized Service Centre. Dust leakage during vacuum cleaning Water leak during the liquid vacuuming The float switch is broken ENGLISH GUARANTEE The POLTI VAC 160 is guaranteed to the original purchaser for one year from purchase date against manufacturing or raw material defects. The guarantee is not valid if the appliance has been misused in any way. Unauthorised alterations or repairs to the machine will automatically invalidate this guarantee. • Polti declines liability for any damage or accident derived from any use of POLTI VAC 160 which is not in conformity with the instructions contained in this booklet. U S I N G T H E B A C K - S AV I N G " F L E X O " J O I N T ( M ) • This special joint - Polti exclusive patent - allows to reach Fig. 12 the most difficult points without bending down. Y • Insert the Flexo joint between the two extension tubes keeping the indentations on the back part of the tubes. • To change the angle, turn the slide ring half way round. This way the joint is showing and it will allow to change the angle of operation of the tubes fig. 12. • When the operations are over, put the joint back in its original position, cover it with the slide ring and turn it to lock into position. NEDERLANDS 160 1. 2. 3. 3a. 3b. 4. 5. 6. 7. 8. 9. 10. 11. 12. GEBRUIKSAANWIJZING STOFZUIGER Aan/uit schakelaar met lampje Vervoerhandgreep Bescherming filter Opening bescherming filter Filter (behandelde lijn) Sluiting apparaat Oprolsnoer Motor bescherming Rooster op filter voor lucht uitgang Filter voor lucht uitgang Opberg stof Toebehoren houder Zwenkwielen Snoer A. B. C. D. E. F. G. H. M. TOEBEHOREN Verlengstukken Borstel voor tapijten Borstel voor vloeistoffen Slang met ingang Kleine borstel Hoek lans en borstel Stofzak Meubel borstel Gepatenteerde “Flexo” aansluiting De firma POLTI S.p.A. behoudt zich het recht voor om zonder kennisgeving vooraf technische wijzigingen of wijzigingen aan de constructie aan te brengen die POLTI nodig acht. DIT APPARAAT IS OVEREENKOMSTIG MET DE RICHTLIJN EC 89/336 GEWIJZIGD DOOR 93/68 (EMC) EN MET DE RICHTLIJN 73/23 GEWIJZIGD DOOR 93/68 (LAGE SPANNING). NEDERLANDS WA A R S C H U W I N G OPGELET ! Lees voordat u het apparaat gebruikt, deze instructies door. • Wanneer het apparaat stuk is of slecht werkt, probeer het dan niet te demonteren, maar ga naar de dichtstbijzijnde officiële technische centrum. • Controleer of de netspanning overeenkomt met het apparaat en of het stopcontact geaard is, volgens de wetgeving. • Laat het apparaat niet gebruiken door kinderen of door personen die niet weten hoe het werkt. • Voor veiligheidsredenen, uitsluitend originele onderdelen van Polti gebruiken. • Het apparaat niet gebruiken in geval van beschadiging van de snoer of van andere belangrijke onderdelen. • Nooit het stopcontact of de snoer aanraken met vochtige handen. • Nooit zuur of soldeervloeistof zuigen om de beschadiging van het apparaat te voorkomen. Nooit gevaarlijke stoffen zuigen als gas, benzine, vernis, olie die in kontakt met onderdelen komen en die de oorzaak van explosie kunnen zijn. • Nooit het apparaat gebruiken in plaatsen waar men een risiko van explosie loopt. • Nooit vlammen of warme stukken zuigen als as of de resten van het haardvuur. • Het apparaat is niet geschikt voor het zuigen van stoffen schadelijk voor de gezondheid. • Bij vloeistof- of schuimverlies gedurende het gebruik moet het apparaat direkt uitgeschakelt zijn en het nodige gedaan worden. • Het apparaat nooit onderdompelen in water of met een hogedruk reiniger proberen te reinigen. G E B R U I K VA N H E T A P PA R A AT Dit apparaat is geschikt voor het zuigen van vloeistoffen en stoffen als beschreven in deze gebruiksaanwijzing. NEDERLANDS V O O R B E R E I D I N G VA N H E T G E B R U I K • voor het gebruiken, de zwenkwielen (11) monteren (fig. 1) • de slang met ingang (D) in het apparaat aansluiten (fig. 2) voor de verbinding (I). • de verlengstukken (A) monteren en op de slang (D) aansluiten. • de geschikte toebehoren kiezen en op de verlengstuk aansluiten (fig. 3). Fig. 1 Fig. 2 STOFFEN ZUIGEN • fijne stof bij voorkeur met de stofzak (G) zuigen (fig. 5). • starten als beschreven in de voorbereiding van het gebruik. • de randen van de sluiting (4) naar buiten trekken, en te samen de bescherming met motor (6) naar boven trekken (fig. 6). • de stofzak (g) plaatsen door het introduceren in de twee schijven (L) als op fig. (5a). • de bescherming met motor (6) verbinden met stofopberg (9) en sluiten langs de randen van de sluiting (4) • de snoer (12) los maken en op het stopcontact verbinden. • de knop (1) drukken en starten. • de droge elementen mogen opgezogen zijn zelfs zonder stofzak (G). Nota: Droge vuile resten mogen afgezogen worden ook zonder stofzak (G). I Fig. 3 Fig. 4 Fig. 5 VLOEISTOF ZUIGEN • OPGELET! Voor het zuigen van vloeistof moet het zakje verwiijdert worden als beschreven in de eerste twee punten van "Algemeen Onderhoud" (verwijderen stofzak). • starten als beschreven in de voorbereiding van het gebruik, dan de snoer (12) losmaken en verbinden op een geschikte stopcontact. • op de schakelaar (1) duwen en starten (fig. 4). • Na het zuigen van vloeistof moeten de randen van de opening gecontroleerd worden als beschreven in "Algemeen onderhoud". (Randen controle). L Fig. 5A L NEDERLANDS ALGEMENE HANDLEIDING Fig. 6 Alvorens onderhoud te plegen, haalt u de stekker uit het stopcontact. Controle van de buizen • na het zuigen van vloeistof is het raadzaam het reservoir (9) leeg te maken. • de randen van de sluiting (4) naar buiten trekken en te samen de bescherming met motor (6) naar boven trekken (fig.6). • het reservoir (9) leeg maken. • controleren dat de buizen (M) proper zijn en zonder los elementen en eventueel reinigen (fig.7). Stofzak veranderen • de randen van de sluiting (4) naar buiten trekken en te samen de bescherming met motor (6) naar boven trekken (fig.6). • van de twee schijven (L), de stofzak (g) verwijderen. • door een nieuw vervangen volgens uitleg vermeld bij "stoffen zuigen". • sluiten volgens tegenovergestelde procedure. Vervanging van het filter • eerst duwen op de opening van het deksel op het filter (3a), dan naar boven trekken om het deksel (3a) los te maken (fig.8). • het filter (3b) verwijderen (fig.9). • het filter wordt droog of onder het water gereinigd, dan het laten drogen (fig10). Als het vuil blijt, het filter moet vervangd worden. • als het filter beschadigd is, moet u het onmiddelijk vervangen, om schade aan motor te voorkomen. Vervanging van het filter lucht uitgang • op de opening van het rooster van het filter lucht uitgang (7) duwen (fig. 11) • het filter verwijderen en reinigen met een slag of met water dan laten drogen. • het filter weer goed in zijn opberg terugplaatsen met de witte stuk onder. • als het filter beschadigd is, moet u het vervangen. Fig. 7 M Fig. 8 Fig. 9 Fig. 10 Fig. 11 NEDERLANDS PROBLEMEN EN OPLOSSINGEN Probleem Ooorzaak Oplossingen De stofzuiger stopt maar het lampje blijft branden. Het waterniveau in het reservoir is te hoog. Op de schakelaar (1) duwen, de stekker uit het stopcontact halen en het reservoir leeg maken. De zuigkracht daalt. Opstopping bij het filter, buizen, slang of verlengstukken. Het filter reinigen en de buizen leeg van eventuele opstoppingen maken. Stofzak of stofopberg zijn vol. Stofzak vervangen of stofopberg leeg maken. Het filter mist of is slecht geplaatst. Het filter goed plaatsen. De slang is slecht verbonden. De slang goed verbinden. Het filter mist of is slecht geplaatst of is beschadigd. Het filter goed plaatsen of vervangen. Opstopping bij de buizen door het vuil. Laten controleren door een Polti technische dienst. Stofverlies gedurende het zuigen Vloeistofverlies gedurende het zuigen. Schakelaar is defekt. NEDERLANDS GARANTIE De POLTI VAC 160 heeft een garantie van 1 jaar tegen fabricage- en materiaalfouten, ingaande op de datum van aankoop. De garantie geldt niet wanneer de schade is veroorzaakt door oneigenlijk gebruik. Wanneer het apparaat stuk is of slecht werkt, neem dan onmiddellijk contact op met het dichtstbijzijnde officiële technisch centrum. Wanneer het apparaat eventueel wordt beschadigd door onbevoegd personeel, vervalt de garantie onmiddellijk. • De firma POLTI S.p.A. wijst iedere aansprakelijkheid van de hand voor incidenten die zijn ontstaan doordat de POLTI VAC 160 niet conform de gebruiksaanwijzing is gebruikt. BELANGRIJK Het apparaat is gefabriceerd volgens de huidige recyclingnormen. We raden u aan het verpakkingsmateriaal voor bescherming tijdens het transport, niet bij het huisvuil te zetten, maar het bij het desbetreffende inzamelpunt af te geven. G E B R U I K VA N D E « R U G - S AV E » « F L E X O » A A N S L U I T I N G ( M ) • Met de door Polti gepatenteerde «flexo» aansluiting, Fig. 12 bereikt U de moeilijkste punten zonder te moeten Y bukken. • De aansluiting «flexo» moet tussen de twee verlengstukken geplaatst worden, met de knop aan de achterkant van de verlengstukken. • Om de stand te veranderen moet U de cursor (Y) gewoon draaien. Met de beweegstuk open mag de stand van de verlengstukken (fig. 12) verandert worden. • De aansluiting weer berschermen met de cursor en draaien met de wijzers mee om de stand vast te houden.-
 1
1
-
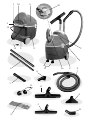 2
2
-
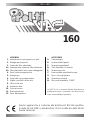 3
3
-
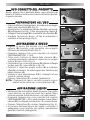 4
4
-
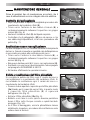 5
5
-
 6
6
-
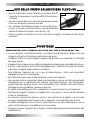 7
7
-
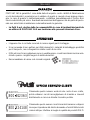 8
8
-
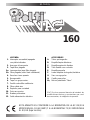 9
9
-
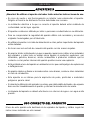 10
10
-
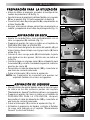 11
11
-
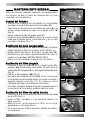 12
12
-
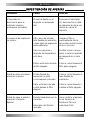 13
13
-
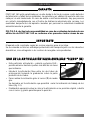 14
14
-
 15
15
-
 16
16
-
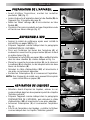 17
17
-
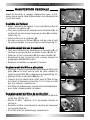 18
18
-
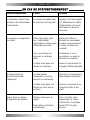 19
19
-
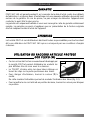 20
20
-
 21
21
-
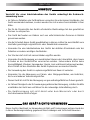 22
22
-
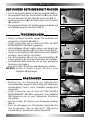 23
23
-
 24
24
-
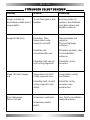 25
25
-
 26
26
-
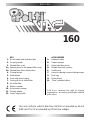 27
27
-
 28
28
-
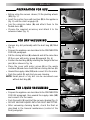 29
29
-
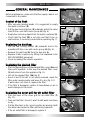 30
30
-
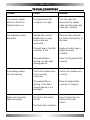 31
31
-
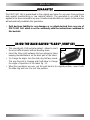 32
32
-
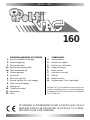 33
33
-
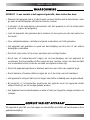 34
34
-
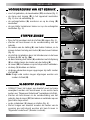 35
35
-
 36
36
-
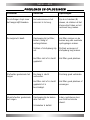 37
37
-
 38
38


in andere talen
- English: Polti VAC 160 Owner's manual
- italiano: Polti VAC 160 Manuale del proprietario
- français: Polti VAC 160 Le manuel du propriétaire
- español: Polti VAC 160 El manual del propietario
- Deutsch: Polti VAC 160 Bedienungsanleitung
Gerelateerde papieren
Andere documenten
-
Comet CVP 130 PEM Handleiding
-
Parkside PAS 1200 C2 Translation Of The Original Instructions
-
Kärcher 2601 de handleiding
-
Beta 1871M Handleiding
-
DeWalt D27902M Handleiding
-
DeWalt DC27902 T 1 de handleiding
-
Kärcher WD 7.700 P Specificatie
-
Flex S47 de handleiding
-
-
DeWalt D 27901 de handleiding