
1/110505919033 E
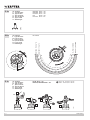
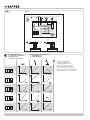
de Stellantrieb
fr Servomoteur
en Actuator
it Servomotore
es Servomotor
sv Ställdon
nl Servomotor
de Montagevorschrift
fr Instruction de montage
en Fitting instructions
it Istruzioni di montaggio
es Instrucciones de montaje
sv Monteringanvisning
nl Montagevoorschrift
de Installationsanweisung für die Fachkraft / Monteur
fr Conseils d‘installation pour le spécialiste / monteur
en Guidelinesforthetechnician/tter
it Informazioni per il personale specializzato di montaggio
es Instrucciones para el especialista del ramo / montador
sv Installationsinstruktion för installatör / montör
nl Installatietip voor de vakman / monteur
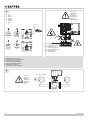
Y07552
M
Y07544
18,5
6057
M10356b
a
90
c
b
230
F132 F132-5 F132-6 F132-7
s24 (1x)
s14 (1x)
s17 (1x)
s24 (1x)
s19 (1x)
s24 (1x)
s8 (1x)
s24 (1x)
s6 s6 s6 s2.5, s6
T15 T15 T15
3 3 3
1 1 1
1 1
>
150
mm
>
150 mm
B10432a
1.1
61811B
IP66
EN 60529
a54501B
1.2
Vorsicht
Attention
Caution
Attenzione
Attención
Observer
Let
Type
1AB
EN 60730
5-85%RH
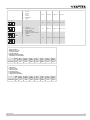
AVM 234S F132
VQ. /BQ. /VU. /BU. /VUP.
AVM 234S F132-5
V6. /B6. DN15…50
VXD/VXE, BXD/BXE
AVM 234S F132-6
V6. /B6. DN65…150
VXD/VXE, BXD/BXE
AVM 234S F132-7
VDL Flansch. DN100
Type a b c
AVM 234S F132 64 289 44
AVM 234S F132-5 58 289 38
AVM 234S F132-6
78 382 60
AVM 234SF132-7 64 292 44
Y07545
EN 60730
Software
A
III

2/11 0505919033 E
max.
max.
2
4
3
max.
1
a64501B
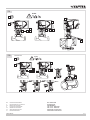
2.1c
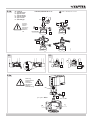
de Ventiltyp
fr Type de vanne
en Type of valve
it Tipo di valvola
es Tipo de válvula
sv Typ av ventil
nl Afsluitertype
V6./B6. DN15…150
VXD/VXE, BXD/BXE DN65…150
DN15…50: M10; M
A
= 15 Nm
DN65…150: M16; M
A
= 50 Nm
2.1a
de Ventiltyp
fr Type de vanne
en Type of valve
it Tipo di valvola
es Tipo de válvula
sv Typ av ventil
nl Afsluitertype
VQD/BQD DN65…100
VQE/BQE DN65…150
VUG/BUG DN15…150
VUP DN40…150
VUS/BUS DN15...150
4
.
0
3
.
8
3
.
6
3
.
4
3
.
2
3
.
0
2
.
8
2
.
6
2
.
4
2
.
2
2
.
0
1
.
8
1
.
6
1
.
4
1
.
2
1
.
0
0
.
8
DN100 H m = 90 m
3
/h
DN100
m = 70 m
3
/h
DN100 H m = 90 m
3
/h
DN100
m = 70 m
3
/h
69.6
90.9
68.4
89.0
67.2
87.1
61.5
77.5
56.3
70.5
64.3
82.3
25.2
30.8
29.1
35.4
33.0
39.9
22.5
27.6
14.8
18.2
17.3
21.3
19.8
24.4
51.1
64.0
46.2
55.7
37.1
43.7
41.2
47.4
2.1b
de Ventiltyp
fr Type de vanne
en Type of valve
it Tipo di valvola
es Tipo de válvula
sv Typ av ventil
nl Afsluitertype
VDL DN100

3/110505919033 E
B10435
~0
2.2
1
2
click
B10437a
2.3
p
2
p
1
M=10 Nm
A
2
1
Warnung
Avertissement
Warning
Avvertenza
Advertencia
Warning
Waarschuwing
p
1
p
1
= p
2
= 0 bar
2.4a
max.
max.
max.
0378263 001
b31501B
2
4
3
1
5
6
2.1d
DN15…50: M10; M
A
= 15 Nm
de Ventiltyp
fr Type de vanne
en Type of valve
it Tipo di valvola
es Tipo de válvula
sv Typ av ventil
nl Afsluitertype
VXD/VXE, BXD/BXE DN15…50
Vorsicht
Attention
Caution
Attenzione
Attención
Observer
Let

4/11 0505919033 E
1
3
1
4
5
8
6 7
9
2
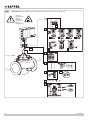
Initialisierung
M
A
= 10 Nm
1 2 3
V
˜
6
5
4
click
p
1
p
1
= p
2
= 0 bar
p
2
4
2.4b
Warnung
Avertissement
Warning
Avvertenza
Advertencia
Warning
Waarschuwing
AVM 234S F132-7, VDL Flansch DN100, Frese Optima Compact & Siemens VPF44.. DN100-200

5/110505919033 E
a93401B
click
2
1
OK
4
Auto
Manual
2.5
1 /s
max.
b04401B
3.1
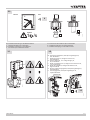
de Installationsanweisung für die Elektrofachkraft
fr Notice d‘installation pour l‘électricien
en Installation instructions for the electrician
it Informazioni per l‘installatore elettrico
es Instrucciones de instalación para el electricista
sv Installationsinstruktion för behörig elektriker
nl Installatie aanwijzing voor de elektromonteur
0386263 002
B10441a
2
1
3.2
3.3
de Verschmutzungsgrad III, Überspannungskategorie III,
nach EN 60730
fr Degré de pollution III, catégorie surtension III,
selon EN 60730
en Pollution degree III, over voltage category III,
as per EN 60730
it Grado di insudiciamento III, categoria di sovratensione III,
a norme EN 60730
es Grado de suciedad III, Categoria de altatensión III,
según EN 60730
sv Grad av nedsmutsningsgrad III, Överspänningskategori III,
enligt EN 60730
nl Vervuilingsgraad III, Overspanningskategorie III,
volgens EN 60730
55
°C
-10
131
°F
14
60
°C
-10
140
°F
14
120
°C
0
248
°F
32
110
°C
0
231
°F
32

6/11 0505919033 E
a78501A
3pt
y=4...20mA
yo=0...10V
y=0...10V
24 V~/=
Continuous
2a1
2pt
3u
3i
44
24 V~/=
44
3i
3u1
2b2a
C
M
On
Off
S1 S2 S3 S4
S1; S2 = Drivetime
S3; S4 = Characteristic
0%
100%
2b
2a
0V
10V
10V
3u3u
44
0V
10V
0V
0V
10V
0%
0%
100%
100%
4mA
20mA
20mA
3i
4mA
Spindle
2b
2a1
3u
3i
44
24 V~/=
2b
EN 61558-2-6
24 V~
3.3
24V ~/=
Y07552
M
M
Y01852
de Gilt nur für stetig Modus
fr S‘applique uniquement au
mode de régulation continue
en Applies for continuous mode only
it Vale solo per modo „continuo“
es Se aplica sólo para modo continuo
sv Gäller endast för kontinuerlig reglering
nl Geldt uitsluitend voor continu modus
1 2 3 4
On
Off
1 2 3 4
On
Off
stroke
x
2
1 2 3 4
On
Off
stroke
Signal
stroke
Signal
lin
1 2 3 4
On
Off
stroke
stroke
1 2 3 4
On
Off
stroke
Signal
lin
de Schalterkodierung
fr Codage de commutation
en Swith coding
it Codicadiintervento
es Codicacióndeconmutación
sv Kodomkopplare
nl Schakelcodering

7/110505919033 E
de Standard-Durchussrate
fr Débit standard
en Standardowrate
it Portata standard
es Caudal estándar
sv Standardödeshastighet
nl Standaard stroomsnelheid
DN H
100
[mm]
Dp
max
[kPa]
Dp
s
[kPa]
F
min
[N]
F
max
[N]
V
min
[m
3
/h]
V
max
[m
3
/h]
VDL100F501 100 40 600 600 1100 3000 12.2 69.6
de Hub
fr Course
en Stroke
it Corsa
es Carrera
sv Slaglängd
nl Slag
1 mm 20 mm 40 mm 43 mm
1 2 3 4
On
Off
de Laufzeit
fr Temps de march
en Running time
it Tempo di marcia
es Tiempo de funcionamiento
sv Löptid
nl Looptijd
2 s 40 s ± 1 80 s ± 4 86 s ± 4.5
1 2 3 4
On
Off
4 s 80 s ± 4 160 s ± 4 172 s ± 4.5
1 2 3 4
On
Off
1 2 3 4
On
Off
6 s 120 s ± 4 240 s ± 8 258 s ± 4.5
de HoheDurchussrate
fr Débit élevé
en Highowrate
it Portata elevata
es Caudal elevado
sv Högödeshastighet
nl Hoogte stroomsnelheid
DN H
100
[mm]
Dp
max
[kPa]
Dp
s
[kPa]
F
min
[N]
F
max
[N]
V
min
[m
3
/h]
V
max
[m
3
/h]
VDL100F501H 100 40 600 600 1100 3000 14.8 90.9

8/11 0505919033 E
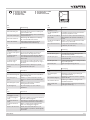
de Initialisierung
fr Initialisation
en Initialisation
it Inicialización
es Inizializzazione
sv Initialiseringsstart
nl Initialisatie met
B10445
4
de
Automatisch
WenndasStellgerätdasersteMalunterSpannunggesetztwird,ndet
die automatische Ankopplung mit dem Ventil und im stetigen Betrieb
eine Initialisierung statt. Während diesem Vorgang blinken beide LEDs
am Antrieb rot.
1. Die Spindel fährt aus, bis an den mechanischen Anschlag des
Stellantriebes.
2. Von dieser Stellung aus wird die Spindel bis zum mechanischen
Anschlag des Stellantriebes eingezogen.
3. Die Initialisierung ist beendet. Die Spindel fährt in die entsprechende
Position des Steuersignals.
Manuell
Im stetigen Betrieb kann die Initialisierung bei Bedarf jederzeit manuell
ausgelöst werden.
• Die Handkurbel innerhalb von 4 Sekunden zwei Mal hintereinander
auf- und zuklappen (siehe Bild). Die Initialisierung beginnt.
• Durch erneutes Aufklappen der Handkurbel kann die Initialisierung
abgebrochen werden.
fr
Automatique
Lors de la première mise sous tension de l‘appareil de réglage, l‘appareil
est automatiquement couplé à la vanne et initialisé en fonctionnement
continu. Pendant ce processus, les deux LED du servomoteur clignotent
en rouge.
1. La tige de la vanne sort jusqu‘en butée mécanique du servomoteur.
2. À partir de cette position, la tige rentre de nouveau jusqu‘en butée
mécanique du servomoteur.
3. L‘initialisation étant terminée, l‘appareil de réglage adapte la position
qui correspond au signal de commande.
Manuelle
Si nécessaire, l‘initialisation peut être déclenchée manuellement à tout
moment en fonctionnement continu.
• Pour déclencher la procédure d‘initialisation, relever et rabattre la
manivelle 2 fois dans l‘espace de 4 secondes.
• Pour interrompre l‘initialisation, relever à nouveau la manivelle.
en
Automatic
Whenpowerisappliedtotheregulatingunitforthersttime,automatic
coupling with the valve takes place and in continuous operation,
initialisation takes place. During this process, both LEDs on the actuator
ashred.
1. The spindle extends until it reaches the mechanical stop of the
actuator.
2. From this position, the spindle retracts until it reaches the mechanical
stop of the actuator.
3. Initialisation is complete. The regulating unit moves to the position
dictated by the control signal.
Manual
In continuous operation, initialisation can always be triggered manually if
necessary.
• Fold out and fold back the crank handle twice within 4 seconds (see
diagram). Initialisation begins.
• The initialisation can be aborted by folding out the crank handle again.
it
Automatico
Laprimavoltaincuil’attuatorevienecollegatoallatensione,siverica
l’accoppiamento automatico con la valvola e in funzionamento continuo
una inizializzazione. Durante questo processo sull’attuatore lampeggiano
entrambi i LED rossi.
1. Ilmandrinofuoriescenoallabattutameccanicadell’attuatore.
2. Daquestaposizione,ilmandrinovieneinseritonoallabattuta
meccanica dell’attuatore.
3. L‘inizializzazione è terminata. Il servomotore si porta nella posizione
corrispondente al segnale di comando.
Manovella
All’occorrenza nel funzionamento continuo, l’inizializzazione può essere
avviata manualmente in ogni momento.
• Aprire e chiudere due volte di seguito entro 4 secondi la manovella
(vederegura).L‘inizializzazionecomincia.
• Aprendo di nuovo la manovella si può interrompere l‘inizializzazione.
es
Automático
La primera vez que el servomando se encuentra bajo tensión, tiene lugar
el acoplamiento automático con la válvula y, en funcionamiento continuo,
un proceso de inicialización. Durante este proceso, los dos LED del
actuador parpadean en rojo.
1. El husillo se extrae hasta el tope mecánico del servomotor.
2. Desde esta posición, el husillo se retrae hasta el tope mecánico del
servomotor.
3. Terminó la inicialización. El órgano de regulación avanza a la posición
indicada por la señal de mando.
Manual
En funcionamiento continuo, el proceso de inicialización se puede poner
en marcha manualmente en cualquier momento en caso necesario.
• Abrir y cerrar la manivela dos veces seguidas y dentro de 4 segundos
(véaselagura).Comienzalainicialización.
• Abriendo nuevamente la manivela puede interrumpirse la
inicialización.
sv
Automatiska
När strömmen till drivdonet slås på för första gången, ansluts det
automatiskt till ventilen och initieras i kontinuerlig drift. Under denna
process blinkar båda lysdioder på drivningen rött.
1. Spindeln körs ut till ställdonets mekaniska anslag.
2. Från detta läge dras spindeln in till ställdonets mekaniska anslag.
3. Initieringen är avslutad. Ställdonet ställer sig i det läge som anges av
styrsignalen.
Manuellt
I kontinuerlig drift kan initieringen, vid behov, när som helst påbörjas
manuellt.
• Genom att trycka ned manöverhandtaget 2 gånger inom 4 sekunder
öppna- och stängläget (se bild). Initieringen startar.
• Genom att trycka ned manöverhandtaget igen så kan initieringen
avbrytas.
nl
Automatisch
Als het regeltoestel voor de eerste keer onder spanning wordt gezet,
vindt de automatische koppeling aan de afsluiter en in continubedrijf
een initialisatie plaats. Tijdens dit proces knipperen beide leds op de
aandrijving rood.
1. Spindeln körs ut till ställdonets mekaniska anslag.
2. Från detta läge dras spindeln in till ställdonets mekaniska anslag.De
initialisatie is beëindigd. Het corrigerend orgaan gaat in de stand staan
die door het besturingssignaal is aangegeven.
Handmatig
In continubedrijf kan de initialisatie desgewenst ook handmatig worden
geactiveerd.
• De handkruk tweemaal achtereenvolgens binnen 4 seconden open- en
dichtklappen (zie afbeelding). De initialisatie begint.
• Door de handkruk opnieuw open te klappen kan de initialisatie worden
onderbroken.

9/110505919033 E
de Funktion der LEDs
fr Function des LEDs
en LED functions
it Funzioni di LED
es Functiones de los LEDs
sv LED funktioner
nl Funktie van de LEDs
B10446
LED Info
de
LED Beschreibung
Beide LEDs blinken rot. Initialisierung
Eine LED blinkt grün.
Antrieb führt einen Hub aus in Richtung der
grün blinkenden LED.
Eine LED leuchtet grün.
Antrieb in Ruhestellung. Letzte Laufrichtung
entsprechend LED.
Eine LED leuchtet rot.
Blockierung oder Endposition in Richtung
der rot leuchtenden LED erreicht.
Keine LED leuchtet.
Keine Spannungsversorgung oder im
3-Punkt-Modus keine Ansteuerung.
fr
LED Description
Les deux témoins LED
clignotent en rouge.
Initialisation
Un témoin LED clignote
en vert.
Le servomoteur effectue une course en
direction de la LED clignotant en vert.
Un témoin LED est
allumé en vert.
Servomoteur en position de repos, dernier
sens de déplacement correspondant au
témoin LED.
Un témoin LED est
allumé en rouge.
Leblocageoulapositiondendecourse
en direction de la LED clignotant en rouge a
été atteint.
Aucun témoin LED n‘est
allumé.
Pas d‘alimentation électrique ou pas de
commande en mode 3 pts.
en
LED Description
BothLEDsashred. Initialisation
OneLEDashesgreen. The actuator performs a stroke towards the
greenashingLED.
One LED lights up
green.
Actuator is in the home position; the last
direction of operation is in accordance with
LED.
One LED lights up red. Jamming or end position towards the
ashingredLEDreached.
No LED lights up. No power supply or (in 3-pt. mode) no
modulation.
it
LED Descrizione
Entrambi i LED
lampeggiano in rosso.
Inizializzazione
Un LED lampeggia in
verde.
L’attuatore esegue una corsa nella direzione
del LED verde lampeggiante.
Un LED si illumina in
verde.
Servomotore in posizione di riposo, ultima
corsa in direzione del LED corrispondente.
Un LED si illumina in
rosso.
Bloccooposizionenaleindirezionedel
LED rosso lampeggiante raggiunti.
Nessun LED illuminato. Niente tensione di alimentazione o, nel
funzionamento a 3 posizioni, niente segnale
di comando.
es
LED Descripción
Ambos LEDs
parpadean en rojo.
inicialización
Un LED parpadea en
verde.
El actuador ejecuta una carrera en dirección
al LED que parpadea en verde.
Un LED se enciende de
color verde.
El servomotor está en posición de fábrica, la
última dirección de operación coincide con
el LED.
Un LED se enciende de
color rojo.
BloqueooposiciónnalendirecciónalLED
que luce en rojo alcanzado.
No se enciende el LED. No hay tensión de alimentación o no hay
modulación (en modo 3-pt.).
sv
LED Beskrivning
Båda LED blinkar rödt. Initialisering
En LED blinkar grönt. Drivningen utför ett slag i riktning mot den
grönt blinkande lysdioden.
En LED lyser grönt. Ställdonet står still. Senaste riktning med
motsvarande LED.
En LED lyser rödt. Blockering eller slutposition i riktning mot den
rött lysande lysdioden.
Ingen LED lyser. Ingen spänningsmatning (plint 21).
nl
LED Beschrijving
Beide LEDs knipperen
rood.
Initialisatie
Eén LED knippert
groen.
Aandrijving voert een slag uit richting de
groen knipperende led.
Eén LED brandt groen.
Aandrijving in rustpositie, laatste looprichting
volgens de LED.
Eén LED brandt rood.
Blokkering of eindpositie richting de rood
brandende led bereikt.
Geen enkele LED
brandt.
Geen spanningsvoorziening of in de 3-punts-
modus geen aansturing.

10/11 0505919033 E
5
B10448a
de Isolationsgrenze
fr Limite de l‘isolation
en Insulation limit
it Limite di isolamento
es Limite de aislamiento
sv Isoleringsgäns
nl Isolatiegrens
Warnung
Avertissement
Warning
Avvertenza
Advertencia
Warning
Waarschuwing
de zu
fr fermé
en closed
it chiuso
es cerrado
sv stängd
nl dicht
0313815 001
VQD / VQE / VUG
BQD / BQE /
BUG / BUS
VUPVDL Flansch
VUS
bar
bar
p
1
= p
2
= 0 bar
p
1
p
2
6
de Deinstallationsanweisung
fr Instructions pour de démontage
en De-installation instructions
it Istruzioni di disinstallazione
es Instrucción de desinstalación
sv Isärtagningsinstruktion
nl Instructie voor het verwijderen
Vorsicht
Attention
Caution
Attenzione
Attención
Observer
Let

11/110505919033 E
de Dokument aufbewahren
fr Ce document est à conserver
en Retain this document
it Conservare il documento
es Guardar el documento
sv Spara dokumenationen
nl Document bewaren
© Fr. Sauter AG
Im Surinam 55
CH-4058 Basel
Tel. +41 61 - 695 55 55
Fax +41 61 - 695 55 10
www.sauter-controls.com
2
4
3
1
5
3
4
5
33
1 /s
max.
b91501B
6
7
7.1
AVM 234S F132-7
2
4
3
1
5
3
4
5
3
3
1 /s
max.
6
1098
7
12
11
7.2
Documenttranscriptie
Installationsanweisung für die Fachkraft / Monteur Conseils d‘installation pour le spécialiste / monteur Guidelines for the technician / fitter Informazioni per il personale specializzato di montaggio Instrucciones para el especialista del ramo / montador Installationsinstruktion för installatör / montör Installatietip voor de vakman / monteur Software Type 18,5 1AB A IP66 EN 60730 EN 60730 EN 60529 57 AVM 234S F132-6 V6. /B6. DN65…150 VXD/VXE, BXD/BXE AVM 234S F132-5 AVM 234S F132-7 V6. /B6. DN15…50 VXD/VXE, BXD/BXE III VDL Flansch. DN100 M 1.1 230 60 AVM 234S F132 VQ. /BQ. /VU. /BU. /VUP. Y07552 de fr en it es sv nl 5-85%RH Montagevorschrift Instruction de montage Fitting instructions Istruzioni di montaggio Instrucciones de montaje Monteringanvisning Montagevoorschrift B11816 de fr en it es sv nl Y07544 Stellantrieb Servomoteur Actuator Servomotore Servomotor Ställdon Servomotor Y07545 de fr en it es sv nl b > 150 mm c a b c AVM 234S F132 64 289 44 AVM 234S F132-5 58 289 38 AVM 234S F132-6 78 382 60 AVM 234SF132-7 64 292 44 B10432a Type 1.2 F132 F132-5 F132-6 F132-7 s24 (1x) s14 (1x) s17 (1x) s24 (1x) s19 (1x) s24 (1x) s8 (1x) s24 (1x) s6 s6 s6 s2.5, s6 T15 T15 T15 3 3 3 1 1 1 1 0505919033 E 90 1 Vorsicht Attention Caution Attenzione Attención Observer Let B10545a a M10356b > 150 mm 1/11 Ventiltyp Type de vanne Type of valve Tipo di valvola Tipo de válvula Typ av ventil Afsluitertype VQD/BQD VQE/BQE VUG/BUG VUP VUS/BUS de fr en it es sv nl Ventiltyp Type de vanne Type of valve Tipo di valvola Tipo de válvula Typ av ventil Afsluitertype VDL DN100 DN65…100 DN65…150 DN15…150 DN40…150 DN15...150 V6./B6. DN15…150 VXD/VXE, BXD/BXE DN65…150 47.4 37.1 43.7 39.9 21.3 4 24. 19. .6 22 .1 18.2 14.8 0. 8 .5 55.7 41.2 33.0 27 61 .3 64.0 1 4 6.2 .2 25 .8 .3 82 51. 2.0 2 .6 2.4 2.2 6 .5 1. 3 64 Ventiltyp Type de vanne Type of valve Tipo di valvola Tipo de válvula Typ av ventil Afsluitertype 2 .8 56 1. 1.8 29 30 3.4 4 1.2 3.6 67.2 87.1 .5 de fr en it es sv nl 3 .0 .3 70 8 1.0 3.8 68.4 89.0 77 17.3 4.0 69.6 90.9 .2 .5 2.1c DN100 H m = 90 m3/h DN100 m = 70 m3/h DN100 m = 70 m3/h 2.1b de fr en it es sv nl DN100 H m = 90 m3/h 2.1a .4 35 DN15…50: M10; MA = 15 Nm DN65…150: M16; MA = 50 Nm 1 max. 3 max. 4 B10546a 2 max. 2/11 0505919033 E 2.1d de fr en it es sv nl Ventiltyp Type de vanne Type of valve Tipo di valvola Tipo de válvula Typ av ventil Afsluitertype VXD/VXE, BXD/BXE DN15…50 DN15…50: M10; MA = 15 Nm 3 max. Vorsicht Attention Caution Attenzione Attención Observer Let 4 max. 1 0378263 001 2 5 max. B10513b 6 2.2 2.3 1 B10435 ~0 click B10437a 2 2.4a Warnung Avertissement Warning Avvertenza Advertencia Warning Waarschuwing 2 p1 = p2 = 0 bar p1 0505919033 E 1 MA = 10 Nm p2 3/11 2.4b AVM 234S F132-7, VDL Flansch DN100, Frese Optima Compact & Siemens VPF44.. DN100-200 Warnung Avertissement Warning Avvertenza Advertencia Warning Waarschuwing 3 MA = 10 Nm 1 4 1 2 4 3 click 2 5 1 6 Ṽ p1 = p2 = 0 bar p2 5 p1 6 8 7 Initialisierung 4 9 4/11 0505919033 E 2.5 Manual Auto 4 2 1 /s de fr en it click 1 Installationsanweisung für die Elektrofachkraft Notice d‘installation pour l‘électricien Installation instructions for the electrician Informazioni per l‘installatore elettrico OK B10439a max. es Instrucciones de instalación para el electricista sv Installationsinstruktion för behörig elektriker nl Installatie aanwijzing voor de elektromonteur 3.2 3.1 55 °C -10 131 °F 14 60 °C -10 140 °F 14 de Verschmutzungsgrad III, Überspannungskategorie III, nach EN 60730 fr Degré de pollution III, catégorie surtension III, selon EN 60730 en Pollution degree III, over voltage category III, as per EN 60730 it Grado di insudiciamento III, categoria di sovratensione III, a norme EN 60730 es Grado de suciedad III, Categoria de altatensión III, según EN 60730 sv Grad av nedsmutsningsgrad III, Överspänningskategori III, enligt EN 60730 nl Vervuilingsgraad III, Overspanningskategorie III, volgens EN 60730 0386263 002 120 °C 0 248 °F 32 110 °C 0 231 °F 32 B10440b 1 3.3 B10441a 2 0505919033 E 5/11 3.3 24V ~/= Continuous 24 V~/= EN 61558-2-6 y=0...10V 1 2a 2b 24 V~ 3u y=4...20mA 3i yo=0...10V 44 C 3u 3i 44 0% 0V 4mA 0V S1 S2 S3 S4 On Off M 2a 100% 10V 20mA 10V 2b 0% 10V 20mA 0V 100% 0V 4mA 10V Spindle 0% S1; S2 = Drivetime S3; S4 = Characteristic 100% 2pt 3pt 24 V~/= 1 2a 2b 3u 3i 44 de fr en it Schalterkodierung Codage de commutation Swith coding Codifica di intervento 1 2a 2b 3u 3i 44 A10587a 24 V~/= es Codificación de conmutación sv Kodomkopplare nl Schakelcodering M de fr Y01852 Y07552 M en it es sv nl 1 2 3 4 On Off Gilt nur für stetig Modus S‘applique uniquement au mode de régulation continue Applies for continuous mode only Vale solo per modo „continuo“ Se aplica sólo para modo continuo Gäller endast för kontinuerlig reglering Geldt uitsluitend voor continu modus 1 2 3 4 x2 On Off stroke stroke 1 2 3 4 On lin Off stroke Signal stroke Signal 1 2 3 4 On Off stroke 1 2 3 4 On lin Off stroke 6/11 Signal 0505919033 E de fr en it es sv nl Hub Course Stroke Corsa Carrera Slaglängd Slag 1 mm 20 mm 40 mm 43 mm 2s 40 s ± 1 80 s ± 4 86 s ± 4.5 4s 80 s ± 4 160 s ± 4 172 s ± 4.5 6s 120 s ± 4 240 s ± 8 258 s ± 4.5 1 2 3 4 On Off 1 2 3 4 de fr en it es sv nl On Off 1 2 3 4 On Off Laufzeit Temps de march Running time Tempo di marcia Tiempo de funcionamiento Löptid Looptijd 1 2 3 4 On Off de fr en it es sv nl Standard-Durchflussrate Débit standard Standard flow rate Portata standard Caudal estándar Standard flödeshastighet Standaard stroomsnelheid VDL100F501 de fr en it es sv nl DN H100 [mm] Dpmax [kPa] Dps [kPa] Fmin [N] Fmax [N] Vmin [m3/h] Vmax [m3/h] 100 40 600 600 1100 3000 12.2 69.6 H100 [mm] Dpmax [kPa] Dps [kPa] Fmin [N] Fmax [N] Vmin [m3/h] Vmax [m3/h] 40 600 600 1100 3000 14.8 90.9 Hohe Durchflussrate Débit élevé High flow rate Portata elevata Caudal elevado Hög flödeshastighet Hoogte stroomsnelheid DN VDL100F501H 100 0505919033 E 7/11 de fr en it Initialisierung Initialisation Initialisation Inicialización es Inizializzazione sv Initialiseringsstart nl Initialisatie met B10445 4 de Manovella Automatisch All’occorrenza nel funzionamento continuo, l’inizializzazione può essere avviata manualmente in ogni momento. • Aprire e chiudere due volte di seguito entro 4 secondi la manovella (vedere figura). L‘inizializzazione comincia. • Aprendo di nuovo la manovella si può interrompere l‘inizializzazione. Wenn das Stellgerät das erste Mal unter Spannung gesetzt wird, findet die automatische Ankopplung mit dem Ventil und im stetigen Betrieb eine Initialisierung statt. Während diesem Vorgang blinken beide LEDs am Antrieb rot. 1. Die Spindel fährt aus, bis an den mechanischen Anschlag des Stellantriebes. 2. Von dieser Stellung aus wird die Spindel bis zum mechanischen Anschlag des Stellantriebes eingezogen. 3. Die Initialisierung ist beendet. Die Spindel fährt in die entsprechende Position des Steuersignals. Manuell Im stetigen Betrieb kann die Initialisierung bei Bedarf jederzeit manuell ausgelöst werden. • Die Handkurbel innerhalb von 4 Sekunden zwei Mal hintereinander auf- und zuklappen (siehe Bild). Die Initialisierung beginnt. • Durch erneutes Aufklappen der Handkurbel kann die Initialisierung abgebrochen werden. fr Automatique Lors de la première mise sous tension de l‘appareil de réglage, l‘appareil est automatiquement couplé à la vanne et initialisé en fonctionnement continu. Pendant ce processus, les deux LED du servomoteur clignotent en rouge. 1. La tige de la vanne sort jusqu‘en butée mécanique du servomoteur. 2. À partir de cette position, la tige rentre de nouveau jusqu‘en butée mécanique du servomoteur. 3. L‘initialisation étant terminée, l‘appareil de réglage adapte la position qui correspond au signal de commande. Manuelle Si nécessaire, l‘initialisation peut être déclenchée manuellement à tout moment en fonctionnement continu. • Pour déclencher la procédure d‘initialisation, relever et rabattre la manivelle 2 fois dans l‘espace de 4 secondes. • Pour interrompre l‘initialisation, relever à nouveau la manivelle. en Automatic When power is applied to the regulating unit for the first time, automatic coupling with the valve takes place and in continuous operation, initialisation takes place. During this process, both LEDs on the actuator flash red. 1. The spindle extends until it reaches the mechanical stop of the actuator. 2. From this position, the spindle retracts until it reaches the mechanical stop of the actuator. 3. Initialisation is complete. The regulating unit moves to the position dictated by the control signal. Manual In continuous operation, initialisation can always be triggered manually if necessary. • Fold out and fold back the crank handle twice within 4 seconds (see diagram). Initialisation begins. • The initialisation can be aborted by folding out the crank handle again. it Automatico La prima volta in cui l’attuatore viene collegato alla tensione, si verifica l’accoppiamento automatico con la valvola e in funzionamento continuo una inizializzazione. Durante questo processo sull’attuatore lampeggiano entrambi i LED rossi. 1. Il mandrino fuoriesce fino alla battuta meccanica dell’attuatore. 2. Da questa posizione, il mandrino viene inserito fino alla battuta meccanica dell’attuatore. 3. L‘inizializzazione è terminata. Il servomotore si porta nella posizione corrispondente al segnale di comando. 8/11 es Automático La primera vez que el servomando se encuentra bajo tensión, tiene lugar el acoplamiento automático con la válvula y, en funcionamiento continuo, un proceso de inicialización. Durante este proceso, los dos LED del actuador parpadean en rojo. 1. El husillo se extrae hasta el tope mecánico del servomotor. 2. Desde esta posición, el husillo se retrae hasta el tope mecánico del servomotor. 3. Terminó la inicialización. El órgano de regulación avanza a la posición indicada por la señal de mando. Manual En funcionamiento continuo, el proceso de inicialización se puede poner en marcha manualmente en cualquier momento en caso necesario. • Abrir y cerrar la manivela dos veces seguidas y dentro de 4 segundos (véase la figura). Comienza la inicialización. • Abriendo nuevamente la manivela puede interrumpirse la inicialización. sv Automatiska När strömmen till drivdonet slås på för första gången, ansluts det automatiskt till ventilen och initieras i kontinuerlig drift. Under denna process blinkar båda lysdioder på drivningen rött. 1. Spindeln körs ut till ställdonets mekaniska anslag. 2. Från detta läge dras spindeln in till ställdonets mekaniska anslag. 3. Initieringen är avslutad. Ställdonet ställer sig i det läge som anges av styrsignalen. Manuellt I kontinuerlig drift kan initieringen, vid behov, när som helst påbörjas manuellt. • Genom att trycka ned manöverhandtaget 2 gånger inom 4 sekunder öppna- och stängläget (se bild). Initieringen startar. • Genom att trycka ned manöverhandtaget igen så kan initieringen avbrytas. nl Automatisch Als het regeltoestel voor de eerste keer onder spanning wordt gezet, vindt de automatische koppeling aan de afsluiter en in continubedrijf een initialisatie plaats. Tijdens dit proces knipperen beide leds op de aandrijving rood. 1. Spindeln körs ut till ställdonets mekaniska anslag. 2. Från detta läge dras spindeln in till ställdonets mekaniska anslag.De initialisatie is beëindigd. Het corrigerend orgaan gaat in de stand staan die door het besturingssignaal is aangegeven. Handmatig In continubedrijf kan de initialisatie desgewenst ook handmatig worden geactiveerd. • De handkruk tweemaal achtereenvolgens binnen 4 seconden open- en dichtklappen (zie afbeelding). De initialisatie begint. • Door de handkruk opnieuw open te klappen kan de initialisatie worden onderbroken. 0505919033 E Funktion der LEDs Function des LEDs LED functions Funzioni di LED es Functiones de los LEDs sv LED funktioner nl Funktie van de LEDs LED Info B10446 de fr en it de es LED Beschreibung LED Descripción Beide LEDs blinken rot. Initialisierung Ambos LEDs parpadean en rojo. inicialización Eine LED blinkt grün. Antrieb führt einen Hub aus in Richtung der grün blinkenden LED. El actuador ejecuta una carrera en dirección al LED que parpadea en verde. Eine LED leuchtet grün. Antrieb in Ruhestellung. Letzte Laufrichtung entsprechend LED. Un LED parpadea en verde. Eine LED leuchtet rot. Blockierung oder Endposition in Richtung der rot leuchtenden LED erreicht. Un LED se enciende de color verde. El servomotor está en posición de fábrica, la última dirección de operación coincide con el LED. Keine LED leuchtet. Keine Spannungsversorgung oder im 3-Punkt-Modus keine Ansteuerung. Un LED se enciende de color rojo. Bloqueo o posición final en dirección al LED que luce en rojo alcanzado. No se enciende el LED. No hay tensión de alimentación o no hay modulación (en modo 3-pt.). fr LED Description Les deux témoins LED clignotent en rouge. Initialisation Un témoin LED clignote en vert. Le servomoteur effectue une course en direction de la LED clignotant en vert. Un témoin LED est allumé en vert. Servomoteur en position de repos, dernier sens de déplacement correspondant au témoin LED. Un témoin LED est allumé en rouge. Le blocage ou la position de fin de course en direction de la LED clignotant en rouge a été atteint. Aucun témoin LED n‘est allumé. Pas d‘alimentation électrique ou pas de commande en mode 3 pts. sv LED Beskrivning Båda LED blinkar rödt. Initialisering En LED blinkar grönt. Drivningen utför ett slag i riktning mot den grönt blinkande lysdioden. En LED lyser grönt. Ställdonet står still. Senaste riktning med motsvarande LED. En LED lyser rödt. Blockering eller slutposition i riktning mot den rött lysande lysdioden. Ingen LED lyser. Ingen spänningsmatning (plint 21). nl en LED Beschrijving LED Description Beide LEDs knipperen rood. Initialisatie Both LEDs flash red. Initialisation One LED flashes green. The actuator performs a stroke towards the green flashing LED. Eén LED knippert groen. Aandrijving voert een slag uit richting de groen knipperende led. One LED lights up green. Actuator is in the home position; the last direction of operation is in accordance with LED. Eén LED brandt groen. Aandrijving in rustpositie, laatste looprichting volgens de LED. Eén LED brandt rood. Blokkering of eindpositie richting de rood brandende led bereikt. Geen enkele LED brandt. Geen spanningsvoorziening of in de 3-puntsmodus geen aansturing. One LED lights up red. Jamming or end position towards the flashing red LED reached. No LED lights up. No power supply or (in 3-pt. mode) no modulation. it LED Descrizione Entrambi i LED lampeggiano in rosso. Inizializzazione Un LED lampeggia in verde. L’attuatore esegue una corsa nella direzione del LED verde lampeggiante. Un LED si illumina in verde. Servomotore in posizione di riposo, ultima corsa in direzione del LED corrispondente. Un LED si illumina in rosso. Blocco o posizione finale in direzione del LED rosso lampeggiante raggiunti. Nessun LED illuminato. Niente tensione di alimentazione o, nel funzionamento a 3 posizioni, niente segnale di comando. 0505919033 E 9/11 5 de fr en it es sv nl Warnung Avertissement Warning Avvertenza Advertencia Warning Waarschuwing zu fermé closed chiuso cerrado stängd dicht 0313815 001 VDL Flansch VUS de fr en it es sv nl BQD / BQE / BUG / BUS de fr en it es sv nl VUP Isolationsgrenze Limite de l‘isolation Insulation limit Limite di isolamento Limite de aislamiento Isoleringsgäns Isolatiegrens B10448a VQD / VQE / VUG Deinstallationsanweisung Instructions pour de démontage De-installation instructions Istruzioni di disinstallazione Instrucción de desinstalación Isärtagningsinstruktion Instructie voor het verwijderen 6 Vorsicht Attention Caution Attenzione Attención Observer Let 10/11 p1 = p2 = 0 bar p1 bar p2 bar 0505919033 E 7.1 max. 1 /s 1 7 5 2 4 3 3 3 4 5 3 B10519b 6 7.2 AVM 234S F132-7 max. 1 /s 1 5 2 12 4 3 3 4 3 3 5 6 7 8 de fr en it es sv nl Dokument aufbewahren Ce document est à conserver Retain this document Conservare il documento Guardar el documento Spara dokumenationen Document bewaren 0505919033 E 9 11 10 © Fr. Sauter AG Im Surinam 55 CH-4058 Basel Tel. +41 61 - 695 55 55 Fax +41 61 - 695 55 10 www.sauter-controls.com [email protected] 11/11-
 1
1
-
 2
2
-
 3
3
-
 4
4
-
 5
5
-
 6
6
-
 7
7
-
 8
8
-
 9
9
-
 10
10
-
 11
11


in andere talen
- English: sauter BQD
- italiano: sauter BQD
- français: sauter BQD
- español: sauter BQD
- Deutsch: sauter BQD
- svenska: sauter BQD
Gerelateerde papieren
-
sauter BQD Assembly Instructions
-
-
sauter BUG Assembly Instructions
-
-
-
-
sauter BUD Assembly Instructions
-
-
-
sauter AVM 322-R Assembly Instructions