
DE Montage- und Bedienungsanleitung 2
EN Installation and operating instructions 22
ES Instrucciones de montaje y uso 42
FR Notice de montage et d‘utilisation 12
IT Manuale di funzionamento e montaggio 32
NL Montage- en bedieningshandleiding 52
OSYRION® Spot

32
Inhaltsverzeichnis
Herzlich willkommen 3
Optionales Zubehör 3
Technische Daten 3
Sicherheitshinweise 4
Geräteübersicht / Lieferumfang 6
Spots laden 7
Batteriewechsel an der Fernbedienung 7
Montage und Inbetriebnahme 8
Gebrauch 8
Kopplung weiterer Spots 9
Was tun wenn… 10
Gewährleistung 10
EG-Konformitätserklärung 11
Entsorgung 11
Herzlich willkommen
Herzlichen Glückwunsch zum Kauf Ihrer neuen Schirmbeleuchtung
OSYRION Spot. Sie haben ein hochwertiges Produkt erworben. Diese
Anleitung ist Bestandteil dieses Produktes. Sie enthält wichtige Informa-
tionen zur Sicherheit, Verwendung und Entsorgung für Anwender des
Produktes. Bitte machen Sie sich mit allen aufgeführten Informationen
vertraut, bevor Sie das Produkt verwenden. Das Produkt darf nur wie
hierin beschrieben und für die angegebenen Anwendungsszenarien
verwendet werden. Bei ordnungsgemässer Verwendung und Pege,
wird Ihnen das OSYRION Spot jahrelang gute Dienste leisten.
Optionales Zubehör
Das OSYRION Spot kann mit weiteren Sets des OSYRION Spots ergänzt
werden. Die zusätzlichen Spots können zur bestehenden Fernbedienung
hinzugefügt werden bis zu einem Maximum von 8 Spots.
Folgende Sets können als Erweiterung eingesetzt werden:
• OSYRION Spot 2er Set
• OSYRION Spot 4er Set
Verwendete Warnworte
!GEFAHR Unmittelbar gefährliche Situation, die zum Tod oder
schweren Verletzungen führen kann.
!VORSICHT Potenziell gefährliche Situation, die zu kleineren bis
mittelschweren Verletzungen führen kann.
!HINWEIS Eine Situation, die zu Sachbeschädigungen führen kann.
Das Produkt dient als Schirmbeleuchtung. Das Produkt darf nur in privaten
Haushalten, in der Gastronomie und Hotellerie, oder in einem vergleichba-
ren Umfeld eingesetzt werden. Das Produkt darf nur gemäss dieser Mon-
tage- und Bedienungsanleitung verwendet werden. Jegliche andere als in
dieser Montage- und Bedienungsanleitung beschriebene Verwendung gilt
als nicht bestimmungsgemässe Verwendung. Änderungen im Zuge des
technischen Fortschritts bleiben vorbehalten. In dieser Anleitung wird das
OSYRION Spot auch als «Produkt» oder «Zubehör» bezeichnet.
Bestimmungsgemässe Verwendung
Akkutyp Li-Ion
Grösse ø10 cm
Batterie CR 2032
Spezikationen 3.7 V, 2.5 Ah, 9.25 Wh
Ladeanschluss USB-C (5V / 1A)
Farbtemperatur 2‘700 K
Maximale Helligkeit 400 Lumen (pro Spot)
Beleuchtungsdauer bei empfohlener Helligkeit 4 h
Beleuchtungsdauer bei maximaler Helligkeit 2 h
Ladezeit bis voll 4 h
IP-Schutzgrad IP54
Betriebstemperatur beim Laden 0 - 35 °C
Betriebstemperatur beim Entladen -10 - 35 °C
Technische Daten
Spots
Fernbedienung
Betriebsfrequenzband 2400 - 2483.5 MHz
Sendeleistung ≤ 10 mW

54
Sicherheitshinweise
LESEN SIE ALLE SICHERHEITSANWEISUNGEN SORG-
FÄLTIG DURCH UND STELLEN SIE SICHER, DASS SIE SIE
VERSTEHEN.
•
Alle Anweisungen befolgen, um Unfälle, Feuer, Explosio-
nen, Stromschläge oder andere Gefahren zu vermeiden,
welche Sachschäden verursachen und/oder zu schweren
oder tödlichen Verletzungen führen können.
•
Sicherstellen, dass jede Person die das Produkt verwendet,
diese Warnungen und Anweisungen gelesen hat und befolgt.
• Alle Sicherheitshinweise und Anweisungen für die Zukunft
aufheben. Sie müssen nachfolgenden Benutzern des Pro-
dukts weitergegeben werden.
• Der Hersteller haftet nicht für materielle Schäden oder Ver-
letzungen, die durch falsche Handhabung oder Nichteinhal-
tung der Sicherheitshinweise entstanden sind. In solchen
Fällen wird die Gewährleistung ungültig.
• Kinder dürfen nicht mit dem Produkt spielen.
• !GEFAHR Kinder immer von Verpackungsmaterial fern-
halten - dieses stellt eine Erstickungsgefahr dar. Kinder
unterschätzen Gefahren. Dieses Produkt ist kein Spielzeug.
• Kinder ab 8 Jahren und Personen mit eingeschränkten
physischen, sensorischen oder geistigen Fähigkeiten, man-
gelnder Erfahrung und Kenntnisse dürfen das Produkt nur
gebrauchen, wenn sie von einer für ihre Sicherheit zustän-
digen Person beaufsichtigt werden oder ihnen der sichere
Gebrauch des Gerätes gezeigt wurde und sie die damit
verbundenen Gefahren verstanden haben. Reinigungs- und
Wartungsarbeiten dürfen nicht von Kindern ohne Beauf-
sichtigung durchgeführt werden.
• Das Produkt nicht fallen oder anschlagen lassen.
• Nur Originalzubehör / Ersatzteile verwenden.
• Veränderungen am Produkt und technische Modizierun-
gen sind nicht zulässig.
• Zubehör regelmässig auf übermässigen Verschleiss und
Beschädigungen überprüfen. Werden Mängel festgestellt,
diese vor dem weiteren Gebrauch beheben lassen.
• Netzanschluss: Die Spannung muss den Angaben auf dem
Typenschild des Ladegerätes entsprechen.
• Reparaturen am Ladegerät/Spot nur durch eine Fachkraft.
Spot nicht öffnen. Durch nicht fachgerechte Reparaturen
können erhebliche Gefahren für den Benutzer entstehen.
• Ladegerät nie in der Nähe von Wasser (Badewannen,
Waschbecken, etc.) benutzen. Nicht Regen / Feuchtigkeit
aussetzen.
• Sollte das Ladegerät/Spot ins Wasser fallen, vor dem Her-
ausnehmen Netzstecker ziehen. Das Gerät muss vor dem
nächsten Einsatz von einer Fachkraft überprüft werden.
• Einzelne Spots vor Erstgebrauch vollständig (ca. 4h) laden.
•
Bei längerem Nichtgebrauch / nach 6 Monaten / vor dem
Verstauen Spots laden. Tiefentladung unbedingt vermeiden.
• Kinder und Tiere dürfen nicht mit dem Ladegerät oder
Spot spielen.
• Bei Rauchentwicklung Gerät sofort ausschalten/Netzste-
cker ziehen.
• Bei abnormalen Geräuschen, Gerüchen, Überhitzung,
Rauch oder auslaufender Flüssigkeit, Spot sofort aus-
schalten, Netzstecker ziehen, Spot vom Ladegerät entfer-
nen und ins Freie bringen.
• Auslaufende Flüssigkeiten nicht berühren/schlucken. Bei
Kontakt mit Haut/Kleidung sofort mit Seife einschäumen
und mit viel Wasser spülen. Bei verschlucken oder Kontakt
mit Augen, sofort Toxikologisches Institut kontaktieren.
• Verwenden oder laden Sie niemals geschwollene, undich-
te oder beschädigte Spots. Wenn Ihr Spot abnormal ist,
wenden Sie sich an eine Fachkraft.
•
Magnet von magnetischen Datenträgern (Kreditkarten,
etc...) und anderen empndlichen Geräten fernhalten.
•
Magnet von Herzschrittmachern fernhalten, es
kann die Funktion des Herzschrittmachers
beeinträchtigen.

76
Geräteübersicht / Lieferumfang
1 × 2fach USB-Ladegerät (2 ×*)
2 × USB-C Kabel (4 ×*)
1 × Fernbedienung
Ein-/Ausschalter
Ladebuchse USB-C
1 ×
Gebrauchsanweisung
2 × LED Licht (4 ×*)
Magnet
8 × Gummiringe (16 ×*)
2 × Adapterplatte (4 ×*)
• Verwenden Sie das mitgelieferte USB-Ladegerät oder ein handelsübli-
ches USB-Ladegerät für das Laden des OSYRION Spot.
• Bei Rauchentwicklung Gerät sofort ausschalten/Netzstecker ziehen.
• Bei abnormalen Geräuschen, Gerüchen, Überhitzung, Rauch oder
auslaufender Flüssigkeit, Spot sofort ausschalten, Netzstecker ziehen,
Spot vom Ladegerät entfernen und ins Freie bringen.
Spots laden
1
Netzstecker des Ladegerätes an ge-
eigneter Steckdose einstecken. Die
Netzspannung muss den Angaben
auf dem Typenschild entsprechen.
!
• Batterien immer ausser Reichweite von Kindern aufbewahren. Sollte
eine Batterie verschluckt werden, unverzüglich einen Arzt aufsuchen.
• Bei falschem Einsatz besteht Explosionsgefahr.
• Batterien beim Lagern oder entsorgen immer verpacken, um Ent-
ladung, Entzündung oder Beschädigung zu vermeiden.
• Batterien immer fachgerecht gemäss gültigem Gesetz entsorgen.
Batteriewechsel an der Fernbedienung
1. Ladegerät anschliessen
2. Ladegerät einstecken
Abdeckung öffnen
1
Abdeckung vorsichtig entriegeln.
!
4er-Set
*
Batterie ersetzen, Abdeckung schliessen
2
Batterietyp CR 2032 verwenden und auf
korrekte Polung achten!
!
1.1
1.2
58 mm
51 mm
39 mm
- TEAKWOOD
- CASTELLO
®
Pro
- AMBIENTE Nova
- AURA
- ALU-SMART
- ALU-TWIST
- PIAZZINO
- SUNGWING
®
Casa
- FORTINO
®
Riviera
- FORTANO
®
- SOMBRANO
®
S+
- FORTERO
®
- FORTELLO
®
LED
- ALEXO
®
- PENDALEX
®
P+
am Laden
voll
Vor Erstgebrauch Folie entfernen
!
CR 2032

98
2
Gebrauch
Montage und Inbetriebnahme
Kopplung weiterer Spots
Verpackungsmaterial sachgerecht
entsorgen und von Kindern fernhalten.
Defektes Material nicht in Betrieb nehmen.
Im Falle von Schäden unverzüglich den
Transportdienstleister informieren.
!
1. Schirm öffnen gemäss
separater Anleitung
2.
Spot (mit Knopf auf Rückseite) einschalten
3. Spots anbringen
Spots montieren
1
1. Spots entfernen
2.
An einem trockenen Ort aufbewahren.
3. Schirm schliessen gemäss
separater Anleitung
2. Licht einschalten / verstellen
Taste drücken (Starthelligkeit 50%)
Taste mehrfach drücken, jeder
Tastendruck verändert die Helligkeit:
50% > 70% > 100% > 10% > 30%
.
3. Licht ausschalten
Taste eine Sekunde gedrückt halten.
Spots demontieren
3
Die Adapterplatten können bei
Nichtverwendung der Beleuchtung
am Schirm montiert bleiben.
!
Spots gegebenenfalls laden
!
Adapterplatte und Spot nur an Orten
montieren, welche weder mit dem
Schirm noch mit dem Stoff kollidieren.
!
Einzelne Spots vor Erstgebrauch
vollständig (ca. 4h) laden.
!
Fernbedienung bleibt im Kopplungs-
modus für 2 Minuten oder bis die Taste
gedrückt wird. Schritt 3 wiederholen
für jedes weitere OSYRION Spot.
OSYRION Spot können immer nur mit
einer Fernbedienung gekoppelt sein.
!
Maximal 8 Spots pro Fernbedienung.
!
1. Spots auspacken
2. Lieferumfang prüfen (Seite 6)
3.
Passendes Gummiband wählen (Seite 6)
4. Adapterplatte an geeigneter Stelle
am Schirmgestell positionieren.
Direkte / indirekte Beleuchtung wählen
5. Gummiband spannen
Montage am geöffneten Schirm
1
1
gedrückt halten
drücken
1 Sek. gedrückt halten
gedrückt halten
drücken
1. Licht steuern
Zum Steuern der Funktionen die Taste
mehrfach antippen oder gedrückt halten.
direkt
indirekt
1.4
1.2
1.3
1.3
1.3
1.1
2.2
2.3
1.2
1.4
1.5
1. Fernbedienung vorbereiten
Taste 5 Sekunden gedrückt halten
(Kontrolleuchte blinkt)
2. Spot vorbereiten
Taste 5 Sekunden gedrückt halten
(Spot blinkt)
3. Kopplung erfolgreich
Spot leuchtet kontinuierlich
4. Kopplung überprüfen
Taste mehrfach drücken, jeder
Tastendruck verändert die Helligkeit
Nach 72 Stunden Nichtgebrauch
geht der Spot automatisch in den
Schlafmodus. Spot am Knopf auf der
Rückseite einschalten.
!

1110
Was tun wenn…
Problem Lösungsansätze
Spot reagiert nicht
auf Fernbedienung Spot vollständig laden. Spot am Knopf auf
der Rückseite einschalten.
Batterie der Fernbedienung wechseln.
Spot reagiert immer
noch nicht Lampe und Fernbedienung erneut koppeln
gemäss Seite 9.
Adapterplatte ist lose
am Schirm
Kleinerer Gummiring verwenden.
Schirm lässt sich
nicht schliessen
Spot vor dem Schliessen entfernen. Adap-
terplatte nur an Orten montieren, welche
nicht mit dem Schirm kollidieren können.
Entsorgung
Dieses Symbol auf dem Produkt, den Zubehörteilen oder auf
der Verpackung zeigt an, dass das Produkt nicht als unsortierter
Hausmüll behandelt werden darf, sondern separat entsorgt
werden muss. Entsorgen Sie das Produkt an einer dafür vorge-
sehenen Sammelstelle für Recycling. Die Entsorgung von elek-
trischen und elektronischen Geräten innerhalb der EU und in anderen
europäischen Ländern erfolgt über Sammelstellen, die über Systeme zur
getrennten Sammlung von Elektro- und Elektronikgeräten verfügen.
Mit der korrekten Entsorgung des Produkts helfen Sie, mögliche Ge-
fahren für die Umwelt und die Gesundheit zu vermeiden, die durch eine
unsachgemässe Behandlung von Altgeräten verursacht werden können.
Die Wiederverwertung von Materialien trägt zur Erhaltung der natür-
lichen Ressourcen bei. Entsorgen Sie daher keine alten elektrischen und
elektronischen Geräte mit dem unsortierten Hausmüll.
Die Verpackung ist aus umweltfreundlichen Materialien hergestellt, die
in Ihren lokalen Recyclingeinrichtungen entsorgt werden können. Mit
der korrekten Entsorgung der Verpackungen und Verpackungsabfälle
helfen Sie, mögliche Gefahren für die Umwelt und die Gesundheit zu ver-
meiden. Das Produkt besteht aus Metall und synthetischen Teilen. Eine
Entsorgung zum Ende der Lebensdauer muss im Rahmen der regionalen
Umwelt- und Abfallvorschriften erfolgen.
Gewährleistung
Nehmen Sie immer zuerst mit ihrem GLATZ Partner Kontakt auf, bevor
Sie das Produkt einsenden. Die Gewährleistung auf das Zubehör beträgt
24 Monate ab Kaufdatum. Die Gewährleistung erlischt in folgenden
Fällen:
• Äussere Gewalteinwirkung
• Unsachgemässe Bedienung und Wartung des Zubehörs
• Beschädigungen durch höhere Gewalt
Eine unsachgemässe Positionierung der Adapterplatte und somit des
OSYRION Spot kann zu Stoffbeschädigungen führen. Vergewissern Sie
sich, dass die gewählte Position keine Kollision mit dem Schirmgestell
oder dem Stoff verursacht. OSYRION Spot muss vor dem Schliessen
des Sonnenschirmes entfernt werden, da es sonst herunterfällt.
EG-Konformitätserklärung
Wir, Glatz AG, Neuhofstrasse 12, CH-8500 Frauenfeld, erklären hiermit,
dass dieses Produkt den Richtlinien der Europäischen Gemeinschaft
entspricht. Die jeweils gültigen Konformitätserklärungen nden Sie in
unserem Downloadbereich auf www.glatz.com.

1312
Sommaire
Bienvenue 13
Accessoires en option 13
Caractéristiques techniques 13
Consignes de sécurité 14
Schéma de l’appareil / Contenu de la livraison 16
Chargement des spots 17
Remplacement des piles de la télécommande 17
Montage et mise en service 18
Utilisation 18
Couplage des spots additionnels 19
Que faire si… 20
Garantie 20
Déclaration de conformité européenne CE 21
Élimination du produit 21
Bienvenue
Félicitations pour l’achat de votre nouvel éclairage de parasol OSYRION
Spot. Vous venez de faire l’acquisition d’un produit de haute qualité!
Le présent mode d’emploi fait partie intégrante de celui-ci. Il contient
d’importantes informations pour l’utilisateur, qui concernent la sécurité,
l’utilisation et l’élimination de ce produit. Avant de l’utiliser, veuillez bien
vous familiariser avec toutes les informations qui gurent dans ce mode
d’emploi. Ce produit doit impérativement être utilisé comme décrit dans
celui-ci et ce, uniquement pour les scénarios d’utilisation indiqués. Si
vous l’utilisez correctement et en prenez soin, votre OSYRION Spot vous
rendra de bons et loyaux services durant de longues années!
Accessoires en option
Le OSYRION Spot peut être complété par des sets additionnels
de OSYRION Spot. Les spots additionnels peuvent être ajoutés à la
télécommande existante jusqu’à un maximum de 8 spots.
Les sets suivants peuvent être utilisés comme extensions:
• OSYRION Spot Set of 2
• OSYRION Spot Set of 4
Messages d’avertissement utilisés:
DANGER! Situation à risque direct pouvant entrainer la mort ou de
graves blessures.
ATTENTION! Situation à risque potentiel pouvant entrainer des bles
sures légères à moyennement graves.
INDICATION Situation pouvant entrainer des dégâts matériels.
IMPORTANTE!
Ce produit sert d’éclairage de parasol. Il est réservé à un usage privé ainsi
qu’à un usage dans le secteur de la restauration/de l’hôtellerie ou dans des
environnements comparables. Ce produit doit impérativement être utilisé
comme indiqué dans le présent notice de montage et d‘utilisation Toute autre
utilisation sera considérée comme non conforme. Nous nous réservons par
ailleurs le droit d’apporter des modications an d’intégrer les nouvelles
avancées technologiques. Dans la présente notice, le OSYRION Spot est
également désigné par les termes «produit» et «accessoire».
Conformité d’utilisation Type de batterie Li-Ion
Spécications
Connexion de charge 3.7 V, 2.5 Ah, 9.25 Wh
USB-C (5V / 1A)
Température de couleur 2 700 K
Luminosité maximale 400 lumens (par spot)
Durée d’éclairage pour la luminosité recommandée
4 h
Durée d‘éclairage pour la luminosité maximale 2 h
Charge complète 4 h
Degré de protection IP IP54
Courant maximal de rechargement 1 A
Température de service pendant le rechargement
0 - 35 °C
-10 - 35 °C
Température de service pendant le déchargement
Caractéristiques techniques
Taille ø10 cm
Batterie CR 2032
Spots
Télécommande
Bande de fréquence de fonctionnement 2400 - 2483.5 MHz
Puissance d‘émission ≤ 10 mW

1514
Consignes de sécurité
LISEZ ATTENTIVEMENT TOUTES LES CONSIGNES DE SÉCURITÉ
CI-DESSOUS ET ASSUREZ-VOUS DE LES AVOIR BIEN COMPRISES.
• Respecter toutes les consignes an d’éviter les accidents,
incendies, explosions, électrocutions et autres dangers
susceptibles de provoquer des dommages matériels et/ou
des blessures graves, voire mortelles.
• S’assurer que tout utilisateur du produit a lu et respecte
les avertissements et les consignes.
• Conservez ce notice de montage et d‘utilisation pour l’avenir. Il
doit être transmis aux utilisateurs ultérieurs du produit.
• Le fabricant décline toute responsabilité pour les préjudices
matériels ou corporels résultant d’une mauvaise manipulation ou
du non-respect des consignes de sécurité. La garantie est alors
caduque.
• Il est interdit aux enfants de jouer avec le produit.
•
DANGER! Pour éviter tout risque de suffocation, les matériaux
d’emballage doivent rester hors de portée des enfants. Les enfants
tendent à sous-estimer les dangers. Ce produit n’est pas un jouet!
• Les enfants âgés de 8 ans et plus et les personnes ayant des dé-
ciences physiques, sensorielles ou mentales, ou qui ne ossèdent
pas l’expérience et la connaissance nécessaires, ne doivent
utiliser le produit que s’ils sont supervisés ou que des instruc-
tions leur ont été données par une personne responsable de leur
sécurité pour l’utilisation de l’appareil et après en avoir compris
les dangers. Les opérations de nettoyage et de maintenance ne
doivent pas être effectuées par des enfants sans surveillance.
• Ce produit doit être soit placé sur un socle sufsamment lourd,
soit être solidement ancré dans le sol au moyen d’un manchon
approprié.
• Ne pas faire tomber ni heurter le produit.
• Utiliser exclusivement des accessoires et des pièces de rechange
d’origine.
• Les modications et adaptations techniques du produit ne
sont pas autorisées.
• Vérier régulièrement que l’accessoires ne présentent aucun
signe d’endommagement ou d’usure excessive. Si des défauts
sont constatés, les solutionner avant réutilisation.
• Après avoir démonté le parasol, toujours le ranger en position
couchée.
• Raccordement au courant de secteur : la tension du courant de
secteur doit correspondre à celle indiquée sur la plaque signalé-
tique du chargeur.
•
Toute réparation du spot et/ou de son chargeur doit être effectuée
par un technicien qualié. Ne jamais ouvrir le spot. Toute réparation
non effectuée par un technicien qualié peut entrainer d‘énormes
risques pour l’utilisateur.
• Ne jamais utiliser le chargeur à proximité d’un point d’eau (bai-
gnoire, lavabo, etc.) ; ne pas exposer à la pluie/à l’humidité.
•
Si le chargeur et le spot tombent dans de l’eau : débrancher
le câble de raccordement avant de les sortir de l’eau. L’appa-
reil ne pourra être réutilisé qu’après avoir été vérié par un
technicien qualié.
• Avant la première utilisation, chargez complètement les diffé-
rents spots (environ 4h).
• Rechargez les spots si vous n’avez pas été utilisé pendant une
longue période / après 6 mois / avant de les ranger. Évitez à
tout prix les décharges profondes.
• Ne pas laisser des enfants ou des animaux de compagnie jouer
avec le chargeur ou le spot.
• Si l’appareil dégage la fumée : immédiatement le mettre à l’ar-
rêt/débrancher son câble secteur
• S’il y a des bruits anormaux, des odeurs, une surchauffe, un
dégagement de fumée ou une fuite de liquide : immédiatement
mettre le spot à l’arrêt, débrancher le câble de raccordement
au courant secteur, retirer la pile du chargeur et la mettre de-
hors, à l’air libre.
• Si du liquide s‘échappe, ne pas le toucher/l‘ingérer. En cas
de contact avec la peau/les vêtements, nettoyer au savon en
faisant bien mousser puis rincer avec beaucoup d’eau. En cas
d’ingestion ou de contact avec les yeux : contacter immédiate-
ment l’institut de toxicologie.
• Ne jamais utiliser ni recharger un spot bombée, non-étanche
ou endommagée. Si le spot est défectueuse, veuillez vous
adresser à un technicien qualié.
• Éloignez l’aimant des supports de données magnétiques
(cartes de crédit, etc...) et autres appareils sensibles.
•
Gardez l‘aimant à éloigné des stimulateurs cardiaques,
il peut affecter le fonctionnement du stimulateur.

1716
Schéma de l’appareil / Contenu de la livraison
1 × Chargeur USB à 2 voies (2 ×*)
2 × Câble USB-C (4 ×*)
1 × Télécommande
Interrupteur Marche/Arrêt
Ladebuchse USB-C
1 × Mode d’emploi
2 × Lumière LED (4 ×*)
Aimant
8 × Bandes élastiques (16 ×*)
2 × Plaque de support (4 ×*)
• Utilisez le chargeur USB fourni ou un chargeur USB disponible dans le
commerce pour charger OSYRION Spot.
• Si l’appareil dégage la fumée : immédiatement le mettre à l’arrêt/dé-
brancher le câble de raccordement au courant de secteur.
• S’il y a des bruits anormaux, des odeurs, une surchauffe, un dégage-
ment de fumée ou une fuite de liquide : immédiatement mettre le spot
à l’arrêt, débrancher le câble de raccordement au courant secteur,
retirer le spot du chargeur et la mettre dehors, à l’air libre.
Chargement des spots
1
Brancher le chargeur sur une prise
de courant adéquate. La tension du
courant de secteur doit corres-
pondre à celle indiquée sur la plaque
signalétique du chargeur de batterie.
!
•
Toujours bien veiller à ce que les piles soient hors de portée d’enfants. Pour
le cas où une pile serait ingérée, consulter immédiatement un médecin.
• Risque d’explosion en cas d’insertion non conforme.
•
Toujours bien emballer les piles avant de les ranger ou de les éliminer. Cela,
an d’éviter tout risque de décharge, d’inammation ou d’endommagement.
•
Toujours éliminer les piles correctement, n respectant la législation en vigueur.
Remplacement des piles de la télécommande
1. Raccordement du chargeur
2. Branchement du chargeur
Ouvrir le couvercle
1
Débloquer le cache en procédant
délicatement.
!
Set of 4
*
Remplacer les piles, Fermer le couvercle
2
Utiliser des piles CR 2032 et les
installer dans le bon sens (polarité).
!
1.1
1.2
58 mm
51 mm
39 mm
- TEAKWOOD
- CASTELLO
®
Pro
- AMBIENTE Nova
- AURA
- ALU-SMART
- ALU-TWIST
- PIAZZINO
- SUNGWING
®
Casa
- FORTINO
®
Riviera
- FORTANO
®
- SOMBRANO
®
S+
- FORTERO
®
- FORTELLO
®
LED
- ALEXO
®
- PENDALEX
®
P+
au chargement
complet
Retirer la feuille avant la première
utilisation
!
CR 2032

1918
2
Utilisation
Montage et mise en service
Évacuer l’emballage de manière
conforme, en le mettant hors de portée
d’enfants. Ne pas mettre cet appareil
en service s’il est défectueux. Si la mar-
chandise livrée est abîmée, en informer
immédiatement le transporteur.
!
1. Ouvrez le parasol en fonction de
instructions séparées
2.
Allumer le spot (avec le bouton à l’arrière)
3. Monter les spots
Montage des spots
1
Après 72 heures de non-utilisation,
le Spot se met automatiquement en
mode veille. Allumez le Spot à l‘aide du
bouton situé à l‘arrière.
!
2. Allumer / régler la lumière
Appuyez sur la touche
(luminosité de départ 50%)
Appuyez plusieurs fois sur le touche,Chaque
pression sur le bouton modie la luminosité:
50% > 70% > 100% > 10% > 30%.
3. Éteindre la lumière
Appuyez sur la touche et maintenez-la
enfoncée pendant une seconde.
Montez la plaque d‘adaptation et le spot
uniquement à des endroits qui n‘entrent
pas en collision avec le parasol ou le tissu.
!
1.
Déballer les spots.
2.
Vérier le contenu de la livraison (page 16)
3.
Choisissez un élastique adapté (page 16).
4.
Positionnez la plaque d‘adaptation à un
endroit approprié sur le cadre du parasol.
Sélectionnez l‘éclairage direct / indirect
5.
Serrez l‘élastique
Montage sur le parasol ouvert
1
1. Contrôler la lumière
Pour piloter ces fonctions: tapoter sur les touches
correspondantes ou appuyer longuement dessus.
direct
indirect
1.4
1.3
1.5 Couplage des spots additionnels
1. Enlever les spots
2.
Conserver dans un endroit sec.
3. Fermez le parasol en suivant les
instructions séparées.
Démonter les spots
3
Les plaques de support peuvent
rester montées sur le parasol
lorsque l‘éclairage n‘est pas utilisé.
!
Chargez les spots si nécessaire
!
Chargez complètement les spots
individuels (4h environ) avant leur
premier usage.
!
La télécommande reste en mode
de couplage pendant 2 minutes ou
jusqu‘à ce que vous appuyiez sur
le bouton . Répétez le point 3 pour
chaque OSYRION Spot additionnel.
OSYRION Spot ne peuvent être
couplés qu‘avec une seule télécom-
mande à la fois.
!
Maximum 8 spots par télécommande.
!
1
maintenir enfoncé
maintenir enfoncé
appuyez
1.3
1.1
1.2
1.4
1. Préparer la télécommande
Maintenez la touche enfoncée pendant
5 secondes (Lampe de contrôle clignote).
2. Préparer le spot
Maintenez la touche enfoncée pendant
5 secondes (le spot clignote).
3. Couplage réussi
Le spot s‘allume en continu
4. Vérier le couplage.
Appuyez sur la touche plusieurs fois,
chaque pression change la luminosité.
appuyez
1 sec. maintenir enfoncé
1.2
1.3
2.2
2.3

2120
Élimination
Ce pictogramme présent sur le produit proprement dit, les ac-
cessoires ou l’emballage indique que le produit ne doit pas être
jeté avec les ordures ménagères, mais séparément.
Aussi devez-vous le déposer dans une déchetterie pratiquant
le tri sélectif. En UE et dans d’autres pays européens, la mise au
rebut des appareils électriques et électroniques est effectuée dans des
déchetteries équipées de systèmes de tri sélectif.
En mettant le produit au rebut conformément à ces règles, et non en
vous débarrassant des appareils usagés de manière négligente, vous
contribuez à préserver l’environnement et la santé. La revalorisation
des matériaux contribue à la préservation des ressources naturelles. En
conséquence, évitez de déposer les appareils électriques et électro-
niques usagés avec les déchets ménagers non triés.
L’emballage est fabriqué dans des matériaux écologiques et vous pouvez
le déposer à votre déchetterie habituelle pour qu’il soit recyclé. En
mettant les emballages au rebut conformément à ces règles, et non en
vous en débarrassant de manière négligente, vous contribuez à préserver
l’environnement et la santé. Le produit comprend des pièces métalliques
et synthétiques. La mise au rebut en n de vie doit être effectuée confor-
mément aux ordonnances régionales concernant l’environnement et les
déchets.
Déclaration de conformité européenne (CE)
Nous, Glatz AG, Neuhofstrasse 12, CH-8500 Frauenfeld, déclarons ici que
ce produit est conforme aux directives de la Communauté Européenne.
Les déclarations de conformité correspondantes sont disponibles dans
l’espace « téléchargements » de notre site www.glatz.com.
Que faire lorsque...
Problème Solutions possibles
Le spot ne répond pas
à la télécommande Chargez complètement le Spot. Allumez
Spot à l‘aide du bouton situé à l‘arrière.
Changez la pile de la télécommande.
Spot ne répond
pas encore Couplez à nouveau le Spot et la télécom-
mande conformément à la page 19.
La plaque de support
est lâche sur le parasol.
Utilisez une bande élastique plus petit.
Le parasol ne
se ferme pas
Enlevez les spots avant de le fermer. Ne
montez la plaque d‘adaptation qu‘à des end-
roits qui ne peuvent pas entrer en collision
avec le parasol ou le tissu.
Garantie
Avant de renvoyer le produit, contactez votre partenaire GLATZ. Les
accessoires est garanti 24 mois à compter de la date d’achat. La garantie
est caduque dans les cas suivants:
• Brutalité
• Utilisation et entretien des accessoires non conformes.
• Dommages dus à des manipulations sans précautions
Un mauvais positionnement de la plaque d’adaptation et donc de
l'OSYRION Spot peut entraîner des dommages au tissu. Assurez-vous
que la position sélectionnée ne provoque pas de collision avec le cadre
du parasol ou le tissu. l'OSYRION Spot doit être enlevée avant de fermer
le parasol, sinon il tombera.

2322
Table of Contents
Welcome 23
Optional accessories 23
Technical data 23
Safety information 24
Device overview / Included in delivery 26
Charging the spots 27
Changing the battery in the remote control 27
Assembly and commissioning 28
Use 28
Pairing of additional spots 29
What to do if… 30
Warranty 30
EU Declaration of Conformity 31
Disposal 31
Welcome
Congratulations on the purchase of your new OSYRION Spot umbrella
lamp. You have purchased a high quality parasol. These instructions
forms part of this product. It contains important safety, usage and
disposal information for users of the product. Please familiarise yourself
with all the information listed before using the product. The product may
only be used as described herein and for the use scenarios stated. If you
continue to use it and care for it properly, your OSYRION Spot parasol
will serve you well for many years to come.
Optional accessories
The OSYRION Spot can be supplemented with additional sets of the
OSYRION Spot. The additional spots can be added to the existing remote
control up to a maximum of 8 spots.
The following sets can be used as an extension:
• OSYRION Spot 2er Set
• OSYRION Spot Set of 4
Warning words used
!DANGEROUS Immediately dangerous situation which can result in
death or severe injuries.
!CAUTION Potentially dangerous situation which can result in minor
or moderate injuries.
!NOTICE A situation that can lead to property damage.
The product serves as an umbrella lighting. The product may only be used in
private households, in the catering and hotel sector or in a comparable environ-
ment. The product may only be used in accordance with these installation and
operating instructions. Any use other than the uses described in these installa-
tion and operating instructions shall be considered improper use. We reserve
the right to make modications due to technical advances. In these instructions
the OSYRION Spot may also be referred to as ‘the product’ or ‘accessory’.
Intended use
Specications
Charging port 3.7 V, 2.5 Ah, 9.25 Wh
USB-C (5V / 1A)
Colour temperature 2,700 K
Maximum brightness 400 lumens (per spot)
Illumination duration at recommended brightness
4 h
Illumination duration at maximum brightness 2 h
Charging time to full charge 4 h
IP protection class IP54
Li-Ion
ø10 cm
Battery type
Size
Operating temperature during charging 0 - 35 °C
Operating temperature when discharging -10 - 35 °C
Technical data
Battery CR 2032
Spots
Remote
Operating frequency band 2400 - 2483.5 MHz
Transmitting power ≤ 10 mW

2524
Safety information
READ ALL THE SAFETY INFORMATION CAREFULLY AND
MAKE SURE THAT YOU UNDERSTAND THEM.
• Follow all the instructions to avoid accidents, re, explo-
sions, electric shock or other hazards that could cause
property damage and / or severe or fatal injuries.
• Ensure that each person using the product has read and
observes these warnings and instructions.
• Keep these installation and operating instructions for the
future. It must be passed on to subsequent users of the
product.
• The manufacturer is not liable for material damages or
injuries caused by incorrect use or the failure to observe
the safety instructions. The warranty becomes invalid in
such cases.
• Children must not play with the product.
• !DANGER Always keep children away from packaging
material - this constitutes a choking hazard. Children
underestimate risks. This product is not a toy.
• Children aged 8 years or over and persons with reduced
physical, sensory or mental capabilities, lack of experi-
ence or knowledge may only use the appliance if they are
supervised by a person who is responsible for their safety
or if they have been shown how to use the appliance
safely and they have understood the risks inherent in its
use. Cleaning and maintenance tasks may not be carried
out by children without supervision.
• Do not allow the product to fall or knock against anything.
• Only use original accessories / spare parts.
• Product and technical modications are not permitted.
• Check accessories regularly to be sure that no undue
wear and tear or damage has occurred. If defects are
found, have them repaired before further use.
• Mains connection: The voltage must correspond to the
specications on the rating plate of the charger.
•
Repairs to the charger / spot should only be carried out by
a qualied technician. Do not open the spot. Unprofessional
repairs can entail serious risk to the user.
• Never use the charger near water (bathtubs, wash basin,
etc.). Do not expose to rain or moisture.
• If the charger/spot falls into water, before removing it
rst pull out the mains plug. The device must be checked
by a qualied technician before being used again.
• Charge individual spots completely (approx. 4 h) before
rst use.
•
Charge spots after longer periods of non-use / after 6
months / before storing. Avoid deep discharging at all costs.
• Children and animals must not be allowed to play with
the spot or the charger.
• If smoke appears, switch off the unit immediately and pull
out the plug.
• In case of abnormal noises, smells, overheating, smoke
or leaking liquid, switch off the spot immediately, discon-
nect the mains plug, remove the spot from the charger
and bring it into the open air.
• Do not touch or swallow leaking liquids. If contact with
skin/clothing occurs, lather immediately with soap and
rinse with plenty of water. If the liquid is swallowed or
comes into contact with the eyes, contact a toxicological
institute immediately.
• Never use or charge swollen, leaking or damaged spots.
If your spot is abnormal in any way, please contact a
technician.
•
Keep magnet away from magnetic data carriers (credit
cards, etc...) and other sensitive devices.
•
Keep magnet away from pacemakers, it may
affect the function of the pacemaker.

2726
Device overview / Included in delivery
1 × 2-way USB charger (2 ×*)
2 × USB-C cable (4 ×*)
1 × Remote control
On/off switch
USB-C charging port
1 × Instruction manual
2 × LED light (4 ×*)
Magnet
8 × Rubber bands (16 ×*)
2 × Adapter plate (4 ×*)
• Use the supplied USB charger or a commercially available USB char-
ger to charge the OSYRION Spot.
• If smoke appears, switch off the unit immediately and pull out the plug.
• In case of abnormal noises, smells, overheating, smoke or leaking
liquid, switch off the spot immediately, disconnect the mains plug,
remove the spot from the charger and bring it into the open air.
Charging the spots
1
Connect the mains plug of the
charger to a suitable socket. The
mains voltage must correspond to
the value on the rating plate.
!
• Always keep batteries out of the reach of children. If a battery is swal-
lowed, a doctor should be consulted immediately.
• Incorrect usage creates a risk of explosion.
• Always wrap batteries during storage or disposal to avoid discharge,
ignition or damage.
•
Always dispose of batteries properly in accordance with applicable laws.
Changing the battery in the remote control
1. Connecting the charger
2. Plug in the charger
Open cover
1
Unlock cover carefully.
!
Set of 4
*
Replace battery, Close cover
2
Use battery type CR 2032 and
ensure correct polarity!
!
1.1
1.2
58 mm
51 mm
39 mm
- TEAKWOOD
- CASTELLO
®
Pro
- AMBIENTE Nova
- AURA
- ALU-SMART
- ALU-TWIST
- PIAZZINO
- SUNGWING
®
Casa
- FORTINO
®
Riviera
- FORTANO
®
- SOMBRANO
®
S+
- FORTERO
®
- FORTELLO
®
LED
- ALEXO
®
- PENDALEX
®
P+
loading
full
Remove foil before rst use
!
CR 2032

2928
2
Use
Assembly and commissioning
Dispose of packaging materials properly
and keep away from children.
Do not install defective material.
In case of damage, please inform the
transport service provider immediately.
!
1. Open shade according to
separate instructions
2.
Switch on spot (with the button on the back)
3. Mount spots
Mounting the spots
1
After 72 hours of non-use, the spot
will automatically go into sleep mode.
Switch on the spotlight using the
button on the back.
!
2.
Switch on the light / Adjust brightness
Press button (start brightness 50%)
Press key several times, each Each press
of the button changes the brightness:
50% > 70% > 100% > 10% > 30%
.
3. Switch off the light
Press and hold the key for one second.
Mount adapter plate and spot only at
locations that do not collide with either
the shade or the fabric.
!
1. Unpack spots
2. Check scope of delivery (page 26)
3. Select suitable rubber band (page 26)
4. Position adapter plate at suitable
place on sunshade frame
Select direct / indirect lighting
5. Tighten rubber band
Mounting on the open sunshade
1
1. Control the light
To control the functions, tap the buttons
several times or keep them pressed down.
direct
indirect
1.4
1.3
1.5 Pairing of additional spots
1. Remove the spots
2.
Store in a dry place
3. Close the sunshade according to
the separate instruction manual
Dismantling the spots
3
The adapter plates can remain
mounted on the sunshade when
the lighting is not in use.
!
Load the spots if necessary
!
Charge single spots completely
(approx. 4h) before rst use.
!
The remote control remains in pairing
mode for 2 minutes or until the button
is pressed. Repeat step 3 for each
additional OSYRION Spot.
OSYRION Spot can only be paired
with one remote control at a time.
!
Maximum 8 spots per remote control.
!
1
press and hold
press and hold
press
1.3
1.1
1.2
1.4
1. Prepare the remote control
Press and hold the button for 5 seconds
(control lamp ashes)
2. Prepare the spot
Press and hold the button for 5 seconds
(spot ashes)
3. Pairing successful
The Spot shines continuously
4. Check the pairing
Press the button several times, each
button press changes the brightness
press
press and hold 1 sec.
1.2
1.3
2.2
2.3

3130
Disposal
This symbol on the product, accessories or packaging indicates
that the product must not be treated as unsorted domestic
waste but must be disposed of separately. Dispose of the
product at a designated recycling collection point. The disposal
of electrical and electronic equipment within the EU and in other
European countries is carried out through collection points that have sys-
tems for the separate collection of electrical and electronic equipment.
By disposing of the product correctly, you will help to avoid possible
environmental and health hazards that may be caused by improper
treatment of waste equipment. Recycling materials helps to conserve
natural resources. So please do not dispose of old electrical or electronic
equipment with unsorted domestic waste.
The packaging is made of environmentally friendly materials that can be
disposed of at your local recycling facilities. By disposing of the product
correctly, you will help to avoid possible environmental and health
hazards. The product is made of metal and synthetic parts. End-of-life
disposal must be carried out in accordance with regional environmental
and waste regulations.
EC Conformity declaration
We, Glatz AG, Neuhofstrasse 12, CH-8500 Frauenfeld, SWITZERLAND,
hereby declare that this product complies with the directives of the Euro-
pean Community. The applicable declarations of conformity can be found
on our Download area at www.glatz.com.
What do you have to do if…
Problem
Solution approaches
Spot does not respond
to remote control Charge the Spot completely. Switch the
Spot on using the button on the back.
Change the battery of the remote control.
Spot does still
not respond Pair the lamp and the remote control again
according to page 29.
The adapter plate is
loose on the sunshade
Use a smaller rubber band.
Sunshade will
not close
Remove the Spot before closing the parasol.
Mount the adapter plate only in places that
cannot collide with the parasol.
Warranty
Please contact your GLATZ partner before returning the product.
The warranty on the accessories lasts for 24 months from the date
of purchase. The warranty expires in the following cases:
• External application of excessive force
• Inappropriate operation or maintenance of the accessories
• Damage arising from force majeure
Improper positioning of the adapter plate and thus the OSYRION Spot
may result in fabric damage. Make sure that the selected position does
not cause a collision with the parasol frame or fabric. OSYRION Spot
must be removed before closing the parasol, otherwise it will fall down.

3332
Indice
Benvenuti 33
Accessori opzionali 33
Dati tecnici 33
Avvertenze di sicurezza 34
Panoramica del dispositivo / Ambito di consegna 36
Ricarica Spot 37
Sostituzione delle batterie del telecomando 37
Montaggio e attivazione 38
Uso 38
Accoppiamento di spots aggiuntivi 39
Cosa fare se… 40
Garanzia 40
Dichiarazione di conformità CE 41
Smaltimento 41
Benvenuti
Congratulazioni per l’acquisto della vostra nuova illuminazione per om-
brelloni OSYRION Spot. Si tratta di un prodotto di alta qualità. Il manuale
accompagna il prodotto e contiene importanti informazioni per gli utenti
sulla sicurezza, l’utilizzo e lo smaltimento. Prima di utilizzare il prodotto,
leggere tutte le informazioni contenute nel manuale. Il prodotto deve
essere utilizzato solo come qui descritto e nelle situazioni applicative indi-
cate. Seguendo accuratamente le indicazioni d’uso e cura del prodotto,
l’OSYRION Spot funzionerà alla perfezione per molti anni.
Accessori opzionali
L’OSYRION Spot può essere completato con ulteriori set di OSYRION
Spot. Gli spot aggiuntivi possono essere aggiunti al telecomando esisten-
te no a un massimo di 8 spot.
I seguenti set possono essere usati come estensioni:
• OSYRION Spot Set di 2
• OSYRION Spot Set di 4
Terminologia di avvertenza utilizzata
!PERICOLO Situazione di rischio diretto che può causare lesioni
gravi, anche mortali.
!ATTENZIONE Situazione di rischio potenziale che può causare
lesioni medio-lievi.
!SEGNALAZIONE
Una situazione che può causare danni alle cose.
Il prodotto serve come illuminazione del parasole. L’utilizzo del prodotto è
consentito solo presso abitazioni private e in ambito alberghiero e della risto-
razione, oppure in ambiti simili. L’apparecchio deve essere utilizzato soltanto
conformemente agli manuale di funzionamento e montaggio. Ogni utilizzo
diverso da quanto previsto nel presente manuale di funzionamento e mon-
taggio, è considerato non conforme. Sono fatte salve le modiche dovute ai
progressi tecnologici. Nelle presenti istruzioni d’uso, l’ombrellone OSYRION
Spot viene denito anche “prodotto” o “accessorio”.
Utilizzo conforme
Tipo di batteria
Grandezza nominale Li-Ion
ø10 cm
Speciche
Porta di ricarica 3.7 V, 2.5 Ah, 9.25 Wh
USB-C (5V / 1A)
Temperatura di colore 2.700 K
Luminosità massima 400 Lumen (per Spot)
Durata della lampadina con la luminosità consigliata
4 h
Durata della lampadina con la luminosità massima
2 h
Tempo per la ricarica completa 4 h
Grado di protezione IP IP54
Temperatura di esercizio durante la ricarica 0 - 35 °C
Temperatura di esercizio durante la scarica -10 - 35 °C
Dati tecnici
Batteria CR 2032
Spots
Telecomando
Banda di frequenza operativa 2400 - 2483.5 MHz
Potenza di emissione ≤ 10 mW

3534
Avvertenze di sicurezza
LEGGERE ATTENTAMENTE TUTTE LE AVVERTENZE DI
SICUREZZA E ASSICURARSI DI AVERLE COMPRESE.
• Osservare tutte le indicazioni, in modo da evitare incidenti,
incendi, esplosioni, scosse elettriche o altri pericoli, causa
a loro volta di danni materiali e/o lesioni gravi, anche morta-
li.
• Vericare che ogni persona che utilizza il prodotto abbia
letto e osservi le avvertenze e le istruzioni per l’uso fornite.
• Conservare questo manuale di funzionamento e montag-
gio per il futuro. Deve essere trasmesso agli utenti succes-
sivi del prodotto.
• Il produttore declina ogni responsabilità per danni materiali
o lesioni riconducibili a un errato utilizzo o all’inosservan-
za delle indicazioni di sicurezza. In questi casi la garanzia
legale perde validità.
• I bambini non devono giocare con il prodotto.
• !PERICOLO Tenere i bambini lontani dai materiali d’im-
ballaggio: pericolo di soffocamento. I bambini non sono in
grado di riconoscere adeguatamente i potenziali pericoli.
Questo prodotto non è un giocattolo.
• L’utilizzo dell’apparecchio è previsto da parte di bambini
a partire dagli 8 anni e da persone con ridotte capacità
siche, sensoriali o mentali o con esperienza e conoscen-
za inadeguate, solo con supervisione o istruzione iniziale
sull’utilizzo dell’apparecchio da parte di chi è responsabile
della loro sicurezza e a fronte di illustrazione degli eventuali
pericoli collegati. Gli interventi di pulizia e manutenzione
non possono essere svolti da bambini senza sorveglianza.
• Non far cadere o urtare il prodotto.
• Usare solo accessori e ricambi originali.
• Non è consentito modicare il prodotto o apportare modi-
che tecniche.
• Vericare regolarmente la presenza di usura eccessiva o
di danni negli accessori. Correggere eventuali anomalie,
prima del riutilizzo.
• Allacciamento alla rete: la tensione deve corrispondere
alle indicazioni riportate sulla targhetta del caricatore.
• Eventuali riparazioni al caricabatterie o allo spot devono
essere eseguite esclusivamente da un tecnico specializ-
zato.Non aprire le spot. Le riparazioni eseguite da persone
non competenti possono causare pericoli gravi all’utente.
• Non utilizzare il caricabatterie vicino all‘acqua (vasche da
bagno, lavandini, ecc.). Non esporre a pioggia o umidità.
• Se il caricabatterie o le spot dovessero cadere in acqua,
scollegare la spina dalla rete prima di estrarli. Far visio-
nare il dispositivo da un tecnico specializzato prima di
riutilizzarlo.
• Eseguire una ricarica completa prima del primo utilizzo
(ca. 4 h).
•
Se non utilizzato per un periodo di tempo più lungo / dopo
6 mesi / caricare i punti prima di riporli. Evitare la scarica
profonda a tutti i costi.
• Bambini e animali non devono giocare con le spot o con il
caricatore.
• In caso di formazione di fumo, disattivare immediata-
mente il dispositivo o scollegare la spina dalla rete.
• In caso di rumori o odori anomali, surriscaldamento, fumo
o fuoriuscita di liquido, disattivare subito le spot, scolle-
gare le spina dalla rete, rimuovere le spot dal caricatore e
collocarla all‘esterno.
•
Non toccare o ingoiare i liquidi fuoriusciti. In caso di contat-
to con la pelle o con gli abiti, lavare con sapone e sciacqua-
re con abbondante acqua. In caso di ingestione o contatto
con gli occhi, contattare subito un centro antiveleni.
• Non utilizzare né ricaricare spot rigone, non ermetiche
o danneggiate. Se le spot presenta un aspetto anomalo,
rivolgersi a un tecnico specializzato.
•
Tenere il magnete lontano dai supporti di dati magnetici
(carte di credito, ecc...) e da altri dispositivi sensibili.
•
Tenere il magnete lontano dai pacemaker, può
inuenzare il funzionamento del pacemaker.

3736
Panoramica del dispositivo / Ambito di consegna
1 × Caricatore USB a 2 vie (2 ×*)
2 × Cavo USB-C (4 ×*)
1 × Telecomando
Interruttore ON/OFF
Presa di ricarica USB-C
1 × Istruzioni per l‘uso
2 × Luce LED (4 ×*)
Magnete
8 × Elastici (16 ×*)
2 × Piastra dell‘adattatore
(4 ×*)
• Utilizzare il caricatore USB in dotazione o un caricatore USB disponibile
in commercio per caricare l’OSYRION Spot.
• In caso di formazione di fumo, disattivare immediatamente il dispositi-
vo o scollegare la spina dalla rete.
• In caso di rumori o odori anomali, surriscaldamento, fumo o fuoriuscita
di liquido, disattivare subito il spot, scollegare le spina dalla rete, rimuo-
vere il spot dal caricatore e collocarla all‘esterno.
Ricarica Spot
1
Inserire la spina nella presa di rete
appropriata. La tensione deve corri-
spondere alle indicazioni riportate
sulla targhetta.
!
• Conservare le batterie lontano dalla portata dei bambini. In caso di
ingestione della batteria, consultare immediatamente un medico.
• Pericolo di esplosione, in caso di utilizzo non corretto.
• Imballare sempre le batterie per conservarle o smaltirle, onde evitare
che si carichino, incendino o danneggino.
• Smaltire sempre le batterie conformemente alle leggi vigenti.
Sostituzione delle batterie del telecomando
1. Collegare il caricatore
2. Collegare il caricabatterie alla rete
Aprire il coperchio
1
Sganciare con attenzione il coperchio.
!
Set di 4
*
Sostituire le batterie, Chiudere coperchio
2
Utilizzare batterie di tipo CR 2032 e
rispettare la polarità corretta!
!
1.1
1.2
58 mm
51 mm
39 mm
- TEAKWOOD
- CASTELLO
®
Pro
- AMBIENTE Nova
- AURA
- ALU-SMART
- ALU-TWIST
- PIAZZINO
- SUNGWING
®
Casa
- FORTINO
®
Riviera
- FORTANO
®
- SOMBRANO
®
S+
- FORTERO
®
- FORTELLO
®
LED
- ALEXO
®
- PENDALEX
®
P+
al carico
completo
Rimuovere la pellicola prima del
primo utilizzo
!
CR 2032

3938
2
Uso
Montaggio e attivazione
Smaltire adeguatamente il materiale di
imballaggio e tenerlo fuori dalla portata
dei bambini. Non utilizzare il prodotto se
è difettoso. In caso di danni, informare
immediatamente il trasportatore
!
1. Aprire il parasole secondo
istruzioni separate
2.
Accendere il spot (con pulsante sul retro
)
3. Montare il spots
Montaggio degli spot
1
Dopo 72 ore di non utilizzo, lo Spot va
automaticamente in modalità sleep.
Accendere lo Spot usando il pulsante
sul retro.
!
2. Accendere la luce /
Regolazione della luminosità
Premere il pulsante (inizio luminosità 50%)
Premere il pulsante più volte, ogni Ogni
pressione del pulsante cambia la luminosità:
50% > 70% > 100% > 10% > 30%.
3. Spegnere la luce
Tenere premuto il tasto per un secondo.
Montare la piastra di adattamento e lo
spot solo in punti che non collidono né
con l‘ombra né con il tessuto.
!
1. Disimballare le spots
2.
Controllare la portata della consegna (pagina 36)
3. Selezionare un elastico adatto (pagina 36)
4. Posizionare la piastra di adattamento in un
posto adatto sul telaio del parasole
Selezionare l’illuminazione diretta/indiretta
5. Stringere l’elastico
Montaggio sull’ombrellone aperto
1
1. Controllo della luce
Premere ripetutamente o tenere pre-
muti i pulsanti per inserire le funzioni.
diretta
indiretta
1.4
1.3
1.5 Accoppiamento di spots aggiuntivi
1. Rimuovere le spots
2.
Conservare in un luogo asciutto.
3. Chiudere il parasole secondo
istruzioni separate
Smontaggio degli spot
3
Le piastre dell‘ adattatore possono
rimanere montate sul parasole
quando l‘illuminazione non è in uso.
!
Ricaricare gli spot se necessario
!
Ricaricare gli spot individuali comple-
tamente (circa 4 ore) prima di utilizzarli
per la prima volta.
!
Il telecomando rimane in modalità di
pairing per 2 minuti o nché non viene
premuto il tasto. Ripetere il passo 3
per ogni ulteriore OSYRION Spot.
OSYRION Spot possono essere
accoppiati con un solo telecomando
alla volta.
!
Massimo 8 spot per telecomando.
!
1
tenere premuto
tenere premuto
premere
1.3
1.1
1.2
1.4
1. Preparare il telecomando
Tenere premuto per 5 secondi (la luce
di controllo lampeggia).
2. Preparare degli spot
Tenere premuto per 5 secondi
(il spot lampeggia)
3. Pairing riuscito
Lo spot si accende continuamente
4. Controllare il pairing
Premere il tasto più volte, ogni
pressione cambia la luminosità
premere
tenere premuto 1 sec.
1.2
1.3
2.2
2.3

4140
Smaltimento
Questo simbolo apposto sul prodotto, sugli accessori o sull’im-
ballo indica che questi non devono essere smaltiti nella raccolta
domestica indifferenziata, bensì separatamente. Smaltire il pro-
dotto presso un apposito centro di raccolta per il riciclo. Lo smal-
timento di apparecchi elettrici ed elettronici all’interno dell’UE e
in altri Paesi europei avviene presso centri di raccolta che dispongono di
sistemi per la relativa raccolta differenziata.
Il corretto smaltimento del prodotto contribuisce a evitare i potenziali
rischi per l’ambiente e la salute che possono derivare da una gestione
impropria di apparecchiature obsolete. Il riutilizzo dei materiali contri-
buisce al mantenimento delle risorse naturali. Pertanto, non smaltire le
apparecchiature elettriche ed elettroniche obsolete nei riuti domestici
indifferenziati.
L’imballo è realizzato con materiali ecosostenibili che possono essere
smaltiti nelle attrezzature di riciclo locali. Il corretto smaltimento degli
imballaggi e dei residui di imballaggio, contribuisce a evitare i rischi per
l’ambiente e la salute. Il prodotto è costituito di metallo e parti in plastica.
Lo smaltimento a ne vita deve avvenire conformemente alle prescrizioni
regionali ambientali e in materia di riuti.
Dichiarazione di conformità CE
Glatz AG, Neuhofstrasse 12, CH-8500 Frauenfeld, dichiara con la presen-
te che il prodotto è conforme alle direttive dell'Unione Europea. Le dichia-
razioni di conformità valide sono disponibili nel area Download sul sito
www.glatz.com.
Cosa fare se …
Problema Rimedio
Lo spot non risponde
al telecomando Caricare completamente lo Spot. Accende-
re Spot utilizzando il pulsante sul retro.
Cambiare la batteria del telecomando.
Spot continua a
non rispondere Accoppiare di nuovo lo spot e il telecomando
secondo la pagina 39.
La piastra dell‘ adattatore
è allentata sul parasole
Utilizzare un elastici più piccolo.
Il parasole non
si chiude
Rimuovere Spot prima della chiusura. Montare
la piastra dell‘ adattatore solo in luoghi che
non possono collidere con il parasole.
Garanzia
Prima di spedire il prodotto, contattare il proprio rivenditore GLATZ. La
garanzia sugli accessori è valida per 24 mesi dalla data di acquisto. La
garanzia decade nei seguenti casi:
• Atti violenti esterni
• Utilizzo e manutenzione degli accessori impropri
• Danni per cause di forza maggiore
Il posizionamento improprio della piastra dell’ adattatore e quindi dell’
OSYRION Spot può portare al danneggiamento del tessuto. Assicurarsi
che la posizione selezionata non causi una collisione con il telaio del para-
sole o il tessuto. L’OSYRION Spot deve essere rimosso prima di chiudere
l’ombrellone, altrimenti cadrà.

4342
Índice de contenido
Bienvenidos 43
Accesorios opcionales 43
Datos técnicos 43
Indicaciones de seguridad 44
Visión general del aparato / Alcance de las entregas 46
Carga de los spots 47
Cambio de pilas del control remoto 47
Montaje y puesta en servicio 48
Uso 48
Emparejamiento de spots adicionales 49
Qué hacer cuándo… 50
Garantía 50
Declaración de conformidad CE 51
Eliminación 51
Bienvenidos
Enhorabuena por la compra de su nuevo luces para sombrillas OSYRION
Spot. Ha adquirido un producto de alta calidad. Estas instrucciones son
parte integrante del producto. Incluyen información importante relativa a
la seguridad, la utilización y la eliminación del producto para los usuarios.
Debe familiarizarse con toda la información facilitada antes de utilizar el
producto. El producto solo se puede utilizar como se describe y en los
escenarios de uso indicados. Si realiza un uso y un mantenimiento ade-
cuados, podrá disfrutar durante muchos años de OSYRION Spot.
Accesorios opcionales
El OSYRION Spot se puede complementar con juegos adicionales de
OSYRION Spots. Los puntos adicionales se pueden añadir al mando a
distancia existente hasta un máximo de 8 puntos.
Los siguientes conjuntos pueden utilizarse como extensiones:
- OSYRION Spot Juego de 2
- OSYRION Spot Juego de 4
Símbolos empleados
!PELIGRO de situación peligrosa inminente, que puede provocar la
muerte o lesiones graves.
!PRECAUCIÓN por situación potencialmente peligrosa, que puede
provocar lesiones leves o de gravedad media.
!ATENCIÓN por una situación que puede provocar daños materiales.
El producto sirve como iluminación de la sombrilla. El producto solo se pue-
de emplear en viviendas particulares, en la restauración y en la hostelería,
o en un entorno comparable. El producto solo se puede usar conforme a
las presentes instrucciones de montaje y uso. Todos los demás usos no
descritos en las presentes instrucciones de montaje y uso tendrán conside-
ración de utilización no conforme a su nalidad. Nos reservamos el derecho
a realizar modicaciones como consecuencia de los adelantos técnicos.
En las presentes instrucciones, OSYRION Spot también se denomina el
“producto” o la “accesorio”.
Utilización conforme a su nalidad
Tipo de batería
Tamaño Li-Ion
ø10 cm
Especicaciones
Puerto de carga 3.7 V, 2.5 Ah, 9.25 Wh
USB-C (5V / 1A)
Temperatura de color 2.700 K
Luminosidad máxima 400 Lumen (para Spot)
Duración de la iluminación con la luminosidad recomendada 4 h
Duración de la iluminación con la luminosidad máxima 2 h
Tiempo de carga total 4 h
Clase de protección IP IP54
Temperatura de servicio durante la carga 0 - 35 °C
Temperatura de servicio durante la descarga -10 - 35 °C
Datos técnicos
Batería CR 2032
Spots
Fernbedienung
Banda de frecuencia operativa 2400 - 2483.5 MHz
Potencia de emisión ≤ 10 mW

4544
Indicaciones de seguridad
LEA ATENTAMENTE TODAS LAS INDICACIONES DE SEGURI-
DAD Y ASEGÚRESE DE COMPRENDERLAS.
• Seguir todas las instrucciones para evitar accidentes, incen-
dios, explosiones, descargas eléctricas u otros peligros que
puedan provocar daños materiales y/o lesiones graves o
mortales.
• Asegurarse de que todas las personas que usen el producto
hayan leído y sigan estas advertencias e instrucciones.
• Guarde estas instrucciones de montaje y uso para el futuro.
Debe transmitirse a los usuarios posteriores del producto..
• El fabricante no se hace responsable de daños materiales o
lesiones que se produzcan por una manipulación errónea o
por el incumplimiento de las indicaciones de seguridad. En
tales casos, la garantía se extingue.
• Los niños no deben jugar con el producto.
• !PELIGRO Mantener a los niños siempre alejados del material
de embalaje, puesto que entraña peligro de asxia. Los niños
subestiman los peligros. Este producto no es un juguete.
• Los niños mayores de 8 años y las personas con capacidades
físicas, sensoriales o psíquicas limitadas, con poca experien-
cia y conocimientos, solo pueden utilizar el producto bajo la
supervisión de una persona responsable de su seguridad o si
han recibido instrucciones acerca del uso seguro del producto
y han comprendido los peligros a ello asociados. Las tareas de
limpieza y mantenimiento no deben ser realizadas por niños
sin supervisión.
• No dejar que el producto se caiga o golpee.
• Utilizar solo piezas de repuesto/accesorios originales.
• No está permitido realizar cambios en el producto ni modica-
ciones técnicas.
• Periódicamente se debe comprobar que los accesorios no
presenten un desgaste excesivo ni daños. Si se detectan
defectos, deben subsanarse antes de continuar usando el
producto.
• Conexión a la red: La tensión se debe corresponder con las
indicaciones de la placa de tipo del cargador.
• Las reparaciones del cargador/del spot deben ser realizadas
únicamente por personal especializado. No abrir los spots. Las
reparaciones no adecuadas pueden suponer peligros consi-
derables para el usuario.
• Nunca utilizar el cargador cerca del agua (bañeras, lavabos,
etc.). No exponer a la lluvia / humedad.
• Si el cargador/el spot se cayeran al agua, deberá desen-
chufarse antes de extraerlo del agua. El aparato deberá ser
revisado por un especialista antes de su siguiente uso.
• Cargue los spots por completo (aprox. 4 h) antes de utili-
zarlos por primera vez..
•
Si no se utilizan durante un periodo de tiempo prolongado /
después de 6 meses / cargue los puntos antes de guardar-
los. Evite a toda costa las descargas profundas.
• Los niños y los animales no deben jugar con el spot
o el cargador.
• En caso de que se forme humo, apagar de inmediato el
aparato / desenchufarlo.
•
Si se producen ruidos u olores poco habituales, sobrecalen-
tamiento, humo o se derrama líquido, apagar de inmediato el
spot, desenchufarla, retirarla del cargador y llevarla al aire libre.
•
No tocar ni ingerir los líquidos derramados. En caso de con-
tacto con la piel/ropa, aplicar de inmediato jabón y enjuagar
con agua abundante. En caso de ingestión o contacto con los
ojos, contactar de inmediato con el Instituto de Toxicología.
• No utilizar ni cargar spots hinchadas, con fugas o dañadas.
Si el spot presenta un funcionamiento anormal, dirigirse a un
especialista.
•
Mantenga el imán alejado de los soportes de datos ma-
gnéticos (tarjetas de crédito, etc...) y otros dispositivos
sensibles.
•
Mantenga el imán alejado de los marcapasos, ya
que puede afectar a su funcionamiento.

4746
Visión general del aparato / Alcance de las entregas
1 × Cargador USB de 2 vías (2 ×*)
2 × Cable USB-C (4 ×*)
1 × Control
Interruptor ON/OFF
Toma de carga USB-C
1 × Instrucciones de uso
2 × Luz LED (4 ×*)
Imán
8 × Gomas elásticas (16 ×*)
2 × Placa adaptadora (4 ×*)
• Utilice el cargador USB suministrado o un cargador USB disponible en
el mercado para cargar el OSYRION Spot.
•
En caso de que se forme humo, apagar de inmediato el aparato / desenchufarlo.
• Si se producen ruidos u olores poco habituales, sobrecalentamiento,
humo o se derrama líquido, apagar de inmediato el spot, desenchufar-
la, retirarla del cargador y llevarla al aire libre.
Carga de los spots
1
Enchufar el conector del cargador a
una toma de pared adecuada. La ten-
sión de red se debe corresponder con
las indicaciones de la placa de tipo.
!
• Las pilas se deben guardar siempre fuera del alcance de los niños. En
caso de ingestión de una pila, acudir inmediatamente al médico.
• En caso de utilización incorrecta, existe peligro de explosión.
• Las pilas se deben envolver siempre al guardarlas o desecharlas para
evitar la descarga, inamación o daños.
•
Desechar siempre las pilas debidamente conforme a la normativa vigente.
Cambio de pilas del control remoto
1. Conectar el cargador
2. Enchufar el cargador
Abrir la tapa
1
desbloquear cuidadosamente la tapa.
!
Juego de 4
*
Sustituir la pila, Cerrar la tapa
2
Utilizar el tipo de pilas CR 2032 y
tener en cuenta la polaridad correcta.
!
1.1
1.2
58 mm
51 mm
39 mm
- TEAKWOOD
- CASTELLO
®
Pro
- AMBIENTE Nova
- AURA
- ALU-SMART
- ALU-TWIST
- PIAZZINO
- SUNGWING
®
Casa
- FORTINO
®
Riviera
- FORTANO
®
- SOMBRANO
®
S+
- FORTERO
®
- FORTELLO
®
LED
- ALEXO
®
- PENDALEX
®
P+
está cargando
completo
Retirar la lámina antes del primer uso
!
CR 2032

4948
2
Uso
Montaje y puesta en servicio
Desechar el material de embalaje de forma
adecuada y mantenerlo alejado de los niños.
Los materiales defectuosos no se deben po-
ner en servicio. En el caso de daños, se debe
informar inmediatamente al transportista.
!
1. Abra la sombrilla de acuerdo
con las instrucciones separadas.
2. Encender el spot
3. Montar las spots
Montaje de los spots
1
Después de 72 horas sin uso, el Spot
pasa automáticamente al modo de
reposo. Enciende el Spot con el
botón de la parte trasera.
!
2. Encender la luz / Ajustar el brillo
Pulse el botón (brillo inicial del 50%)
Pulse el botón varias veces, cada
una de ellas Cada vez que se pulsa el
botón, cambia la luminosidad:
50% > 70% > 100% > 10% > 30%
.
3. Apagando la luz
Mantenga pulsado el botón durante un segundo.
Monte la placa adaptadora y el spot sólo
en lugares que no choquen ni con la
sombra ni con la tela.
!
1. Desembalar los spots
2.
Compruebe el alcance de la entrega (página 46)
3.
Selecciona una goma elástica adecuada (página 46)
4. coloque la placa adaptadora en un lugar
adecuado del marco de la sombrilla
Seleccione la iluminación directa / indirecta
5. Apriete la banda elástica
Montaje en el parasol abierto
1
1. Controla la luz
Para controlar las funciones, pulsar los boto-
nes varias veces o mantenerlos pulsados.
directo
indirecto
1.4
1.3
1.5 Emparejamiento de spots adicionales
1. Retirar las spots
2.
Mantener en un lugar seco
3. Cierre la sombrilla de acuerdo
con las instrucciones separadas.
Desmontando en los spots
3
Las placas adaptadoras pueden
permanecer montadas en el sombrilla
cuando no se utiliza la iluminación.
!
Cargar las
spots
si es necesario
!
Cargue las spots individuales comple-
tamente (aprox. 4h) antes de utilizarlos
por primera vez.
!
El control remoto permanece en modo de
emparejamiento durante 2 minutos o has-
ta que se pulse el botón. Repita el paso
3 para cada OSYRION Spot adicional.
OSYRION Spot sólo pueden emparejarse
con un control remoto a la vez.
!
Máximo 8 spots por control.
!
1
mantener pulsado
mantener pulsado
pulse
1.3
1.1
1.2
1.4
1. Preparar el control
Mantenga pulsado durante 5 segundos
(la lámpara de control parpadea)
2. Preparar las spots
Mantenga pulsado durante 5 segundos
(Spot parpadea)
3. Emparejamiento con éxito
El spot se ilumina continuamente
4. Comprobar el emparejamiento
Pulse el botón varias veces, cada
pulsación cambia el brillo
pulse
mantener pulsado 1 seg.
1.2
1.3
2.2
2.3

5150
Eliminación
Este símbolo en el producto, los accesorios o el embalaje indica
que el producto no se puede tratar como residuo doméstico sin
clasicar, sino que se debe desechar por separado. Deseche
el producto en uno de los puntos de recogida previstos para su
reciclaje. La eliminación de aparatos eléctricos y electrónicos
dentro de la UE y en otros países europeos se realiza a través de puntos
de recogida que cuentan con sistemas para la recogida separada de
aparatos eléctricos y electrónicos.
Mediante la eliminación correcta del producto ayuda a evitar posibles
riesgos para el medioambiente y la salud, que pueden producirse como
consecuencia de una manipulación incorrecta de aparatos usados. El
reaprovechamiento de materiales contribuye a la conservación de los
recursos naturales. Por consiguiente, no deseche los aparatos eléctricos
y electrónicos usados con los residuos domésticos sin clasicar.
El embalaje se ha fabricado con materiales respetuosos con el medioam-
biente, que se pueden desechar en sus plantas locales de reciclaje. Me-
diante la correcta eliminación de embalajes y residuos de embalaje, ayuda
a evitar posibles riesgos para el medioambiente y la salud. El producto se
compone de metal y piezas sintéticas. La eliminación al nalizar su vida útil
se debe realizar de conformidad con la normativa regional en materia de
medioambiente y residuos.
Declaración de conformidad CE
Nosotros, Glatz AG, con domicilio en Neuhofstrasse 12, CH-8500 Frauen-
feld, por la presente declaramos que este producto cumple las directivas
de la Comunidad Europea. Se pueden consultar las declaraciones de
conformidad vigentes en cada caso en nuestro área de descarga en
www.glatz.com.
Qué hacer, cuando...
Problema Posibles soluciones
Spot no responde
al control Carga completamente el Spot. Enciende el
Spot con el botón de la parte trasera.
Cambie la pila del control
Spot sigue sin
responder Empareje de nuevo el Spot y el control
según la página 49.
La placa adaptadora está
suelta en el sombrilla
Utilice una goma elástica más pequeña.
El sombrilla no
se cierra
Retire el Spot antes de cerrar. Monte la
placa adaptadora sólo en lugares que no
puedan colisionar con la sombrilla.
Garantía
Póngase siempre en contacto con su socio de GLATZ antes de enviar
el producto. La garantía de los accesorios es de 24 meses a partir de la
fecha de compra. La garantía se extingue en los supuestos siguientes:
• Aplicación de fuerza externa
• Manejo y mantenimiento inadecuados de los accesorios
• Daños por fuerza mayor
La colocación incorrecta de la placa adaptadora y, por tanto, del
OSYRION Spot, puede provocar daños en el tejido. Asegúrese de que
la posición seleccionada no provoque una colisión con el marco de la
sombrilla o la tela. El OSYRION Spot debe ser retirado antes de cerrar la
sombrilla, de lo contrario se caerá.

5352
Inhoudsopgave
Hartelijk welkom 53
Optionele accessoires 53
Technische specicaties 53
Veiligheidsvoorschriften 54
Productoverzicht / Omvang van de levering 56
Laden van de spots 57
Batterij vervangen op de afstandsbediening 57
Installatie en inbedrijfstelling 58
Gebruik 58
Koppeling van extra spots 59
Wat te doen als… 60
Garantie 60
EG-conformiteitsverklaring 61
Verwijdering 61
Hartelijk welkom
Hartelijk gefeliciteerd met de aankoop van uw nieuwe parasol verlich-
ting OSYRION Spot. U heeft een hoogwaardige parasol aangeschaft.
Deze handleiding maakt deel uit van dit product. Het bevat belangrijke
informatie betreffende de veiligheid, het gebruik en het afvoeren voor
de gebruiker van het product. Maakt u zich vertrouwd met alle vermelde
informatie voordat u het product gaat gebruiken. Het product mag
uitsluitend worden gebruikt als beschreven en voor de aangegeven
toepassingsbereiken. Als u het gebruik en het onderhoud in acht neemt,
zal de OSYRION Spot u jarenlang goede diensten bewijzen.
Optionele accessoires
De OSYRION Spot kan worden aangevuld met extra sets OSYRION
Spots. De extra spots kunnen aan de bestaande afstandsbediening
worden toegevoegd tot een maximum van 8 spots.
De volgende sets kunnen als uitbreiding worden gebruikt:
• OSYRION Spot Set van 2
• OSYRION Spot Set van 4
Gebruikte symbolen
!GEVAAR een direct gevaarlijke situatie die tot dodelijk of ernstig
letsel kan leiden.
!VOORZICHTIG een potentieel gevaarlijke situatie die tot licht of
gemiddeld letsel kan leiden.
!AANWIJZING een situatie die tot materiële schade kan leiden.
Het product dient als parasolverlichting. Het product mag uitsluitend in parti-
culiere huishoudens, restaurants en hotels of in een vergelijkbare omgeving
worden gebruikt. Het product mag uitsluitend worden gebruikt overeen-
komstig deze montage- en bedieningshandleiding. Een ander als hier in deze
montage- en bedieningshandleiding beschreven toepassing geldt als niet
conform de voorschriften. Wijzigingen in de zin van technische vooruitgang
voorbehouden. In deze handleiding wordt de OSYRION Spot ook als «pro-
duct» of «accessoire» aangeduid.
Gebruik conform de voorschriften
Baterij type
Afmetingen Li-Ion
ø10 cm
Specicaties
Laadpoort 3.7 V, 2.5 Ah, 9.25 Wh
USB-C (5V / 1A)
Kleurtemperatuur 2.700 K
Maximale helderheid 400 lumen (per spot)
Illuminatie duur bij de aanbevolen helderheid 4 h
Duur illuminatie bij maximale helderheid 2 h
Oplaadtijd tot volledig 4 h
IP-Bescherming IP54
Operationele temperatuur bij laden 0 - 35 °C
Operationele temperatuur bij ontladen -10 - 35 °C
Technische specicaties
Spots
Batterij CR 2032
Afstandsbediening
Bedrijfsfrequentieband 2400 - 2483.5 MHz
Uitzending vermogen ≤ 10 mW

5554
Veiligheidsvoorschriften
LEES ALLE VEILIGHEIDSVOORSCHRIFTEN ZORGVULDIG
DOOR EN STEL ZEKER DAT U ZE BEGRIJPT.
• Alle aanwijzingen in acht nemen om ongevallen, brand,
explosies, elektrische schokken of andere gevaren te
vermijden, die materiële schade kunnen veroorzaken en/
of tot ernstig of dodelijk letsel kunnen leiden.
• Let op dat elke persoon die dit product gebruikt, deze
waarschuwingen heeft gelezen en opvolgt.
• Bewaar deze montage- en bedieningshandleiding voor de
toekomst. Het moet worden doorgegeven aan volgende
gebruikers van het product.
• De fabrikant kan niet aansprakelijk worden gesteld voor
materiële schade of letsel, die door onjuiste bediening of het
niet in acht nemen van de veiligheidsinstructies zijn ontstaan.
In dergelijke gevallen vervalt de garantie.
• Kinderen mogen niet met het product spelen.
• !GEVAAR Kinderen altijd uit de buurt houden van
verpakkingsmaterialen om verstikkingsgevaar te voorko-
men. Kinderen onderschatten gevaren. Dit product is geen
speelgoed.
• Kinderen vanaf 8 jaar en personen met fysieke, sensorische
of verstandelijke beperkingen of met een gebrek aan erva-
ring en/of kennis, mogen het product uitsluitend gebruiken
als zij onder toezicht staan van een voor hun veiligheid
verantwoordelijke persoon, of van hem of haar instructies
krijgen hoe het apparaat veilig moet worden gebruikt en de
hieraan verbonden gevaren hebben begrepen. Reinigings-
en onderhoudswerkzaamheden mogen niet door kinderen
zonder toezicht uitgevoerd worden.
• Het product niet laten vallen of laten aanslaan.
•
Uitsluitend originele accessoires/reserveonderdelen ge-
bruiken.
• Wijzigingen aan het product en technische modicaties zijn
niet toegestaan.
• Accessoire regelmatig op overmatige slijtage en beschadi-
gingen controleren. Als er defecten worden gevonden, laat
deze dan verhelpen alvorens verder te gebruiken.
• Stroomvoorziening: De spanning wordt aangegeven op het
typeplaatje van de lader.
•
Reparaties aan de lader/spot alleen door een specialist. Spot
niet openen Ondeskundige herstellingen kunnen tot aanzien-
lijke gevaren voor de gebruiker leiden.
• Nooit de lader in de buurt van water (badkuipen, wasta-
fels, enz.) gebruiken. Niet blootstellen aan regen of vocht.
• Zou de batterijlader/spot in het water vallen, trek eerst de
stekker uit. De apparatuur moet worden gecontroleerd
door een specialist voor het volgende gebruik.
• Laad afzonderlijke spots vóór het eerste gebruik volledig
op (ca. 4 uur).
•
Indien niet gebruikt voor een langere periode / na 6 ma-
anden / laad spots op alvorens ze op te bergen. Vermijd
diepontlading ten koste van alles.
•
Kinderen en dieren mogen niet spelen met de spot/lader.
• Als er rook komt uit de machine onmiddellijk uitschakelen/
stekker uithalen.
• Deactiveren bij abnormaal geluid, geur, oververhitting,
rook of vloeistof uit de spot; trek de batterijlader onmid-
dellijk uit apparaat brengen en breng in de open lucht.
• Gemorste vloeistoffen niet aanraken/slikken. Bij contact
met de huid/kleding onmidelijk met zeep wassen en
spoelen met veel water. Neem onmiddelijk contact op
bij slikken of contact met de ogen met een Toxicologisch
Instituut.
• Gebruik of verplaats nooit opgezwollen, lekkende of be-
schadigde spots. Als de spot abnormaal is, raadpleeg een
specialist.
•
Houd de magneet uit de buurt van magnetische gege-
vensdragers (creditcards, enz...) en andere gevoelige
apparatuur.
•
Houd magneet uit de buurt van pacemakers, het
kan de werking van de pacemaker beïnvloeden.

5756
Productoverzicht / Omvang van de levering
1 × 2-weg USB lader (2 ×*)
2 × USB-C Kabel (4 ×*)
1 × Afstandsbediening
Aan/uit knop
USB-C oplaadcontactdoos
1 × Instructies
2 × LED Licht (4 ×*)
Magneet
8 × Elastiekjes (16 ×*)
2 × Adapterplaat (4 ×*)
• Gebruik de meegeleverde USB-lader of een in de handel verkrijgbare
USB-lader om de OSYRION Spot op te laden.
•
Als er rook komt, de machine onmiddellijk uitschakelen/stekker uithalen.
• Bij abnormaal geluid, geur, oververhitting, rook of vloeistof uit de spot,
onmiddellijk de batterijlader uittrekken en verwijderen in open lucht.
Laden van de spots
1
Steek de stekker van de lader
op een geschikte connector. De
netspanning dient te voldoen aan de
bepalingen op het typeplaatje.
!
• Batterijen altijd buiten het bereik van kinderen houden. Raadpleeg onmid-
dellijk een arts als een batterij wordt ingeslikt.
• Bij verkeerd gebruik os er kans op explosiegevaar.
• Batterijen bij opslag of verwijderen altijd verpakken om ontlading, ontbran-
ding of beschadiging te voorkomen.
•
Verwijder batterijen altijd op de juiste manier en volgens de geldige wetgeving.
Batterij vervangen op de afstandsbediening
1. Lader verbinden
2. Lader insteken
Deksel openen
1
deksel voorzichtig ontgrendelen
!
Set van 4
*
Batterij vervangen, Deksel sluiten
2
Gebruik het type batterij CR 2032 en let
op de juiste polariteit!
!
1.1
1.2
58 mm
51 mm
39 mm
- TEAKWOOD
- CASTELLO
®
Pro
- AMBIENTE Nova
- AURA
- ALU-SMART
- ALU-TWIST
- PIAZZINO
- SUNGWING
®
Casa
- FORTINO
®
Riviera
- FORTANO
®
- SOMBRANO
®
S+
- FORTERO
®
- FORTELLO
®
LED
- ALEXO
®
- PENDALEX
®
P+
laden
vol
Verwijder de folie voor het eerste gebruik
!
CR 2032

5958
2
Gebruik
Installatie en inbedrijfstelling
Gooi verpakkingsmateriaal weg en houd
buiten bereik van kinderen.
Defect materiaal niet in bedrijf nemen.
In geval van schade onmiddellijk de
vervoerder op de hoogte stellen.
!
1. Open de parasol volgens de
afzonderlijke instructies.
2.
Zet de spot aan (met knop op de achterkant)
3. Monteer de spots
Montage van de spots
1
Nadat de Spot 72 uur niet is gebruikt,
gaat hij automatisch in de slaapstand.
Zet de Spot aan met de knop op de
achterkant.
!
2. Doe het licht aan /
Instellen van de helderheid
Druk op de knop (starthelderheid 50%)
Druk verschillende keren op de
toets, telkens Elke druk op de knop
verandert de helderheid:
50% > 70% > 100% > 10% > 30%.
3. Uitschakelen van het licht
Houd de toets gedurende één seconde ingedrukt.
Monteer de adapterplaat en de spot
alleen op plaatsen die niet botsen met de
lampenkap of de stof.
!
1.
De spots uitpakken
2
.
De leveringsomvang controleren (bladzijde 56)
3.
Kies een geschikt elastiekje (bladzijde 56).
4.
Plaats de adapterplaat op een geschikte
plaats op het frame van het zonnescherm
Selecteer directe / indirecte verlichting
5.
Trek het elastiekje aan
Montage op de open parasol
1
1. Bedien het licht
Voor het besturen van de functies, de knoppen
meerdere keren aantikken of ingedrukt houden.
directe
indirecte
1.4
1.3
1.5 Koppeling van extra spots
1. Verwijder de spots
2.
Op een droge plaats bewaren
3. Sluit de parasol volgens de
afzonderlijke instructies.
Ontmanteling van de spots
3
De adapterplaatjes kunnen op de
parasol gemonteerd blijven wanneer
de verlichting niet in gebruik is.
!
Spots gegebenenfalls laden
!
Laad de individuele spots volledig
op (ca. 4 uur) voordat u ze voor het
eerst gebruikt.
!
De afstandsbediening blijft in de koppe-
lingsmodus gedurende 2 minuten of tot-
dat op de knop wordt gedrukt. Herhaal
stap 3 voor elke extra OSYRION Spot.
OSYRION spots kunnen slechts met
één afstandsbediening tegelijk worden
gekoppeld.
!
Maximaal 8 spots per afstandsbediening.
!
1
ingedrukt houden
ingedrukt houden
drukken
1.3
1.1
1.2
1.4
1. Afstandsbediening voorbereiden
Houd de knop gedurende 5 seconden
ingedrukt (controlelampje knippert)
2. Spot voorbereiden
Houd de knop gedurende 5 seconden
ingedrukt (spot knippert)
3. Koppeling succesvol
Spot licht continu op
4. Koppeling controleren
Druk verschillende keren op de toets,
elke druk verandert de helderheid
drukken
ingedrukt houden 1 sec.
1.2
1.3
2.2
2.3

6160
Verwijdering
Dit symbool op het product, de accessoires of op de verpak-
king geeft aan dat het product niet als ongesorteerd huisvuil
mag worden beschouwd en moet daarom afzonderlijk worden
afgevoerd. Breng het product naar een hiertoe bestemd
inzamelingsstation voor recycling. Het afvoeren van elektrische
en elektronische apparatuur binnen de EU en in andere Europese landen
vindt plaats bij inzamelingsstations die over systemen voor gescheiden
inzameling van elektrische en elektronische apparaten beschikken.
Met de juiste afvoer van het product draagt u bij om mogelijke gevaren
voor het milieu en de gezondheid te vermijden, die door een ondeskun-
dige behandeling van oude apparatuur kunnen worden veroorzaakt. Het
recyclen van materialen draagt bij aan het behoud van natuurlijke ressour-
ces. Voer daarom geen oude elektrische of elektronische apparaten af in
het ongesorteerde huisvuil.
De verpakking is van milieuvriendelijk materiaal vervaardigd die kan
worden afgevoerd bij uw plaatselijke recyclingsvoorzieningen. Met het
juist afvoeren van de verpakkingen en verpakkingsafval draagt u bij om
mogelijke gevaren voor het milieu en de gezondheid te vermijden. Het
product bestaat uit metaal en synthetische onderdelen. Het afvoeren
aan het einde van de levensduur moet conform de regionale milieu- en
afvalvoorschriften plaatsvinden.
EG-conformiteitsverklaring
Wij van, Glatz AG, Neuhofstrasse 12, CH-8500 Frauenfeld, verklaren
hiermee, dat dit product voldoet aan de richtlijnen van de Europese
Gemeenschap. De momenteel geldige conformiteitsverklaringen vindt u
bij ons downloadgebied op www.glatz.com.
Wat te doen als ...
Probleem Oplossingen
Spot reageert niet op
de afstandsbediening
Laad de Spot volledig op. Zet Spot aan met de
knop op de achterkant.
Vervang de batterij van de afstandsbediening.
Spot reageert nog
steeds niet Koppel Spot en afstandsbediening opni-
euw volgens pagina 59.
Adapterplaat zit los
op het scherm
Gebruik een kleinere elastieken ring.
Scherm gaat
niet dicht
Verwijder Spot voor het sluiten. Monteer de
adapterplaat alleen op plaatsen die niet met
de parasol kunnen botsen.
Garantie
Neem altijd eerst contact op met uw GLATZ dealer, voordat u het product
terugzendt. De garantie bedraagt 24 maanden vanaf de aankoopdatum.
De garantie vervalt in de volgende omstandigheden:
• Geweld van buitenaf
• Onjuiste bediening en onderhoud van de accessoires
• Beschadiging door force majeure
Onjuiste plaatsing van de adapterplaat en dus van de OSYRION Spot kan
leiden tot beschadiging van het doek. Zorg ervoor dat de geselecteer-
de positie geen botsing veroorzaakt met het schermkader of de stof.
De OSYRION Spot moet worden verwijderd voordat u de parasol sluit,
anders valt hij naar beneden.

GLATZ AG
Neuhofstrasse 12
CH-8500 Frauenfeld
GLATZ France SARL
411 Allée des Noisetiers
F-69760 Limonest
glatz.com
OSYRION® Spot
-
 1
1
-
 2
2
-
 3
3
-
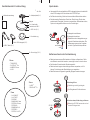 4
4
-
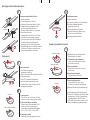 5
5
-
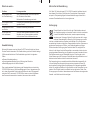 6
6
-
 7
7
-
 8
8
-
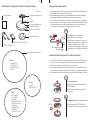 9
9
-
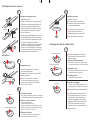 10
10
-
 11
11
-
 12
12
-
 13
13
-
 14
14
-
 15
15
-
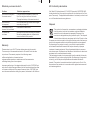 16
16
-
 17
17
-
 18
18
-
 19
19
-
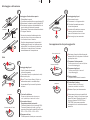 20
20
-
 21
21
-
 22
22
-
 23
23
-
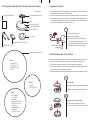 24
24
-
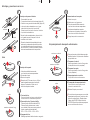 25
25
-
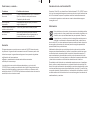 26
26
-
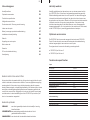 27
27
-
 28
28
-
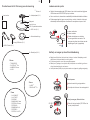 29
29
-
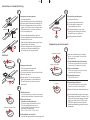 30
30
-
 31
31
-
 32
32


in andere talen
- français: Glatz OSYRION Spot Manuel utilisateur
- español: Glatz OSYRION Spot Manual de usuario
- Deutsch: Glatz OSYRION Spot Benutzerhandbuch
Gerelateerde papieren


Andere documenten
-
CHAUVET DJ GigBAR Move + ILS Handleiding
-
CAME MR8701 Handleiding
-
NOVISTAR Pack Pack Combo Lumière de handleiding
-
-
 ABK innovent PSH0905WS User's Manual & Installation Manual
-
 HQ Power VDPLDJBAR6 Handleiding
-
Laserliner ThermoCamera Connect de handleiding
-
HellermannTyton SpotClip-II de handleiding
-
 HQ Power PAR BATTEN Handleiding


