
C
A B
D E
H
F
G I
NOTICE ROBOT EVEREST/CUISINE COMPANION
le 19/06/2014
NOT 16
Couteau hachoir MélangeurBatteurCouteau pétrin/concasseurPanier vapeurBouchon
F
G
“clic”
9
8
10.1
5
6
2
1
a
b
MAX
MIN
7
Couteau hachoir MélangeurBatteurCouteau pétrin/concasseurPanier vapeurBouchon
Mixer des soupes
Mixer des compotes
Hacher les légumes
Hacher de la viande
Hacher du poisson
Pétrir les pâtes à pain
blanc
Pétrir les pâtes brisées,
sablées, pains spéciaux
Pétrir les pâtes levées
(brioche, kouglof…)
Mélanger les pâtes légères
(cake…)
Pulvériser les fruits à coques
Hacher les produits durs
Piler la glace
Pâte à crêpes, gaufres
Il mélange les Plats cuisinés sans abimer les ingrédients,
Très utile pour les phases de rissolage en amont des préparations (risottos, soupes).
Cuisson vapeur de légumes,
de poissons ou de viandes
Soupes avec morceaux
Bouchon de régulation d’extraction de vapeur
Blancs en neige
Mayonnaises,
Crèmes fouettées
Rissolés
Mijotés
Risottos
Ratatouilles, Chutneys, Légumineuses (réglages : voir livret recettes)
N’utilisez pas cet accessoire pour hacher des produits durs, utilisez le couteau pétrin/concasseur F4.
5min
45min
15s
30s
15s
40s
3min
9 max
F3
F4
F5
E1
F2
F1
22min
500g
3L
1Kg
1Kg
1Kg
1Kg
3L
1,5Kg
5/10min
2/5min
2min 30s
2min 30s
à
1min
1min
1Kg
1Kg
1,2Kg
0,8Kg
0,6Kg
1min 0,6Kg
1min 1,5L
3min
20/40min 1Kg
3L
6 à 10
1min 30s
2min
7
max
0,5L
1/20min
1L
40s
3min
max
1L
1L
1/16min
1min
à
à
Sauces, crèmes
Ecrasé de pommes de terre
Polenta
A
B
C4
C5
B6
H
B
C
C6 C7
B5
B1
B2
B3
B4
C3C2C1
F1
F2
F3
F4
F0
F5
ab
maxi (a) = cuisson vapeur.
mini (b) = Risotto, crèmes dessert, sauces…
D3
D2
D1
D6
D
I
D4(x2)
E3
E2
E1
E
E4
D5
D4(x2)
4.2
4.3
4.1
3
2
D3
D4
3
1
1
D4
D5
22
2
1
12
D2
3
1
13
D3
D4
!!
D6
14
11
D5
D3
15
10.2
FR
NL
DE
IT
ES
PT
EN
®

C
A B
D E
H
F
G I
NOTICE ROBOT EVEREST/CUISINE COMPANION
le 19/06/2014
NOT 16
Couteau hachoir MélangeurBatteurCouteau pétrin/concasseurPanier vapeurBouchon
F
G
“clic”
9
8
10.1
5
6
2
1
a
b
MAX
MIN
7
Couteau hachoir MélangeurBatteurCouteau pétrin/concasseurPanier vapeurBouchon
Mixer des soupes
Mixer des compotes
Hacher les légumes
Hacher de la viande
Hacher du poisson
Pétrir les pâtes à pain
blanc
Pétrir les pâtes brisées,
sablées, pains spéciaux
Pétrir les pâtes levées
(brioche, kouglof…)
Mélanger les pâtes légères
(cake…)
Pulvériser les fruits à coques
Hacher les produits durs
Piler la glace
Pâte à crêpes, gaufres
Il mélange les Plats cuisinés sans abimer les ingrédients,
Très utile pour les phases de rissolage en amont des préparations (risottos, soupes).
Cuisson vapeur de légumes,
de poissons ou de viandes
Soupes avec morceaux
Bouchon de régulation d’extraction de vapeur
Blancs en neige
Mayonnaises,
Crèmes fouettées
Rissolés
Mijotés
Risottos
Ratatouilles, Chutneys, Légumineuses (réglages : voir livret recettes)
N’utilisez pas cet accessoire pour hacher des produits durs, utilisez le couteau pétrin/concasseur F4.
5min
45min
15s
30s
15s
40s
3min
9 max
F3
F4
F5
E1
F2
F1
22min
500g
3L
1Kg
1Kg
1Kg
1Kg
3L
1,5Kg
5/10min
2/5min
2min 30s
2min 30s
à
1min
1min
1Kg
1Kg
1,2Kg
0,8Kg
0,6Kg
1min 0,6Kg
1min 1,5L
3min
20/40min 1Kg
3L
6 à 10
1min 30s
2min
7
max
0,5L
1/20min
1L
40s
3min
max
1L
1L
1/16min
1min
à
à
Sauces, crèmes
Ecrasé de pommes de terre
Polenta
A
B
C4
C5
B6
H
B
C
C6 C7
B5
B1
B2
B3
B4
C3C2C1
F1
F2
F3
F4
F0
F5
ab
maxi (a) = cuisson vapeur.
mini (b) = Risotto, crèmes dessert, sauces…
D3
D2
D1
D6
D
I
D4(x2)
E3
E2
E1
E
E4
D5
D4(x2)
4.2
4.3
4.1
3
2
D3
D4
3
1
1
D4
D5
22
2
1
12
D2
3
1
13
D3
D4
!!
D6
14
11
D5
D3
15
10.2
C
A B
D E
H
F
G I
NOTICE ROBOT EVEREST/CUISINE COMPANION
le 19/06/2014
NOT 16
Couteau hachoir MélangeurBatteurCouteau pétrin/concasseurPanier vapeurBouchon
F
G
“clic”
9
8
10.1
5
6
2
1
a
b
MAX
MIN
7
Couteau hachoir MélangeurBatteurCouteau pétrin/concasseurPanier vapeurBouchon
Mixer des soupes
Mixer des compotes
Hacher les légumes
Hacher de la viande
Hacher du poisson
Pétrir les pâtes à pain
blanc
Pétrir les pâtes brisées,
sablées, pains spéciaux
Pétrir les pâtes levées
(brioche, kouglof…)
Mélanger les pâtes légères
(cake…)
Pulvériser les fruits à coques
Hacher les produits durs
Piler la glace
Pâte à crêpes, gaufres
Il mélange les Plats cuisinés sans abimer les ingrédients,
Très utile pour les phases de rissolage en amont des préparations (risottos, soupes).
Cuisson vapeur de légumes,
de poissons ou de viandes
Soupes avec morceaux
Bouchon de régulation d’extraction de vapeur
Blancs en neige
Mayonnaises,
Crèmes fouettées
Rissolés
Mijotés
Risottos
Ratatouilles, Chutneys, Légumineuses (réglages : voir livret recettes)
N’utilisez pas cet accessoire pour hacher des produits durs, utilisez le couteau pétrin/concasseur F4.
5min
45min
15s
30s
15s
40s
3min
9 max
F3
F4
F5
E1
F2
F1
22min
500g
3L
1Kg
1Kg
1Kg
1Kg
3L
1,5Kg
5/10min
2/5min
2min 30s
2min 30s
à
1min
1min
1Kg
1Kg
1,2Kg
0,8Kg
0,6Kg
1min 0,6Kg
1min 1,5L
3min
20/40min 1Kg
3L
6 à 10
1min 30s
2min
7
max
0,5L
1/20min
1L
40s
3min
max
1L
1L
1/16min
1min
à
à
Sauces, crèmes
Ecrasé de pommes de terre
Polenta
A
B
C4
C5
B6
H
B
C
C6 C7
B5
B1
B2
B3
B4
C3C2C1
F1
F2
F3
F4
F0
F5
ab
maxi (a) = cuisson vapeur.
mini (b) = Risotto, crèmes dessert, sauces…
D3
D2
D1
D6
D
I
D4(x2)
E3
E2
E1
E
E4
D5
D4(x2)
4.2
4.3
4.1
3
2
D3
D4
3
1
1
D4
D5
22
2
1
12
D2
3
1
13
D3
D4
!!
D6
14
11
D5
D3
15
10.2

C
A B
D E
H
F
G I
NOTICE ROBOT EVEREST/CUISINE COMPANION
le 19/06/2014
NOT 16
Couteau hachoir MélangeurBatteurCouteau pétrin/concasseurPanier vapeurBouchon
F
G
“clic”
9
8
10.1
5
6
2
1
a
b
MAX
MIN
7
Couteau hachoir MélangeurBatteurCouteau pétrin/concasseurPanier vapeurBouchon
Mixer des soupes
Mixer des compotes
Hacher les légumes
Hacher de la viande
Hacher du poisson
Pétrir les pâtes à pain
blanc
Pétrir les pâtes brisées,
sablées, pains spéciaux
Pétrir les pâtes levées
(brioche, kouglof…)
Mélanger les pâtes légères
(cake…)
Pulvériser les fruits à coques
Hacher les produits durs
Piler la glace
Pâte à crêpes, gaufres
Il mélange les Plats cuisinés sans abimer les ingrédients,
Très utile pour les phases de rissolage en amont des préparations (risottos, soupes).
Cuisson vapeur de légumes,
de poissons ou de viandes
Soupes avec morceaux
Bouchon de régulation d’extraction de vapeur
Blancs en neige
Mayonnaises,
Crèmes fouettées
Rissolés
Mijotés
Risottos
Ratatouilles, Chutneys, Légumineuses (réglages : voir livret recettes)
N’utilisez pas cet accessoire pour hacher des produits durs, utilisez le couteau pétrin/concasseur F4.
5min
45min
15s
30s
15s
40s
3min
9 max
F3
F4
F5
E1
F2
F1
22min
500g
3L
1Kg
1Kg
1Kg
1Kg
3L
1,5Kg
5/10min
2/5min
2min 30s
2min 30s
à
1min
1min
1Kg
1Kg
1,2Kg
0,8Kg
0,6Kg
1min 0,6Kg
1min 1,5L
3min
20/40min 1Kg
3L
6 à 10
1min 30s
2min
7
max
0,5L
1/20min
1L
40s
3min
max
1L
1L
1/16min
1min
à
à
Sauces, crèmes
Ecrasé de pommes de terre
Polenta
A
B
C4
C5
B6
H
B
C
C6 C7
B5
B1
B2
B3
B4
C3C2C1
F1
F2
F3
F4
F0
F5
ab
maxi (a) = cuisson vapeur.
mini (b) = Risotto, crèmes dessert, sauces…
D3
D2
D1
D6
D
I
D4(x2)
E3
E2
E1
E
E4
D5
D4(x2)
4.2
4.3
4.1
3
2
D3
D4
3
1
1
D4
D5
22
2
1
12
D2
3
1
13
D3
D4
!!
D6
14
11
D5
D3
15
10.2
C
A B
D E
H
F
G I
NOTICE ROBOT EVEREST/CUISINE COMPANION
le 19/06/2014
NOT 16
Couteau hachoir MélangeurBatteurCouteau pétrin/concasseurPanier vapeurBouchon
F
G
“clic”
9
8
10.1
5
6
2
1
a
b
MAX
MIN
7
Couteau hachoir MélangeurBatteurCouteau pétrin/concasseurPanier vapeurBouchon
Mixer des soupes
Mixer des compotes
Hacher les légumes
Hacher de la viande
Hacher du poisson
Pétrir les pâtes à pain
blanc
Pétrir les pâtes brisées,
sablées, pains spéciaux
Pétrir les pâtes levées
(brioche, kouglof…)
Mélanger les pâtes légères
(cake…)
Pulvériser les fruits à coques
Hacher les produits durs
Piler la glace
Pâte à crêpes, gaufres
Il mélange les Plats cuisinés sans abimer les ingrédients,
Très utile pour les phases de rissolage en amont des préparations (risottos, soupes).
Cuisson vapeur de légumes,
de poissons ou de viandes
Soupes avec morceaux
Bouchon de régulation d’extraction de vapeur
Blancs en neige
Mayonnaises,
Crèmes fouettées
Rissolés
Mijotés
Risottos
Ratatouilles, Chutneys, Légumineuses (réglages : voir livret recettes)
N’utilisez pas cet accessoire pour hacher des produits durs, utilisez le couteau pétrin/concasseur F4.
5min
45min
15s
30s
15s
40s
3min
9 max
F3
F4
F5
E1
F2
F1
22min
500g
3L
1Kg
1Kg
1Kg
1Kg
3L
1,5Kg
5/10min
2/5min
2min 30s
2min 30s
à
1min
1min
1Kg
1Kg
1,2Kg
0,8Kg
0,6Kg
1min 0,6Kg
1min 1,5L
3min
20/40min 1Kg
3L
6 à 10
1min 30s
2min
7
max
0,5L
1/20min
1L
40s
3min
max
1L
1L
1/16min
1min
à
à
Sauces, crèmes
Ecrasé de pommes de terre
Polenta
A
B
C4
C5
B6
H
B
C
C6 C7
B5
B1
B2
B3
B4
C3C2C1
F1
F2
F3
F4
F0
F5
ab
maxi (a) = cuisson vapeur.
mini (b) = Risotto, crèmes dessert, sauces…
D3
D2
D1
D6
D
I
D4(x2)
E3
E2
E1
E
E4
D5
D4(x2)
4.2
4.3
4.1
3
2
D3
D4
3
1
1
D4
D5
22
2
1
12
D2
3
1
13
D3
D4
!!
D6
14
11
D5
D3
15
10.2

C
A B
D E
H
F
G I
NOTICE ROBOT EVEREST/CUISINE COMPANION
le 19/06/2014
NOT 16
Couteau hachoir MélangeurBatteurCouteau pétrin/concasseurPanier vapeurBouchon
F
G
“clic”
9
8
10.1
5
6
2
1
a
b
MAX
MIN
7
Couteau hachoir MélangeurBatteurCouteau pétrin/concasseurPanier vapeurBouchon
Mixer des soupes
Mixer des compotes
Hacher les légumes
Hacher de la viande
Hacher du poisson
Pétrir les pâtes à pain
blanc
Pétrir les pâtes brisées,
sablées, pains spéciaux
Pétrir les pâtes levées
(brioche, kouglof…)
Mélanger les pâtes légères
(cake…)
Pulvériser les fruits à coques
Hacher les produits durs
Piler la glace
Pâte à crêpes, gaufres
Il mélange les Plats cuisinés sans abimer les ingrédients,
Très utile pour les phases de rissolage en amont des préparations (risottos, soupes).
Cuisson vapeur de légumes,
de poissons ou de viandes
Soupes avec morceaux
Bouchon de régulation d’extraction de vapeur
Blancs en neige
Mayonnaises,
Crèmes fouettées
Rissolés
Mijotés
Risottos
Ratatouilles, Chutneys, Légumineuses (réglages : voir livret recettes)
N’utilisez pas cet accessoire pour hacher des produits durs, utilisez le couteau pétrin/concasseur F4.
5min
45min
15s
30s
15s
40s
3min
9 max
F3
F4
F5
E1
F2
F1
22min
500g
3L
1Kg
1Kg
1Kg
1Kg
3L
1,5Kg
5/10min
2/5min
2min 30s
2min 30s
à
1min
1min
1Kg
1Kg
1,2Kg
0,8Kg
0,6Kg
1min 0,6Kg
1min 1,5L
3min
20/40min 1Kg
3L
6 à 10
1min 30s
2min
7
max
0,5L
1/20min
1L
40s
3min
max
1L
1L
1/16min
1min
à
à
Sauces, crèmes
Ecrasé de pommes de terre
Polenta
A
B
C4
C5
B6
H
B
C
C6 C7
B5
B1
B2
B3
B4
C3C2C1
F1
F2
F3
F4
F0
F5
ab
maxi (a) = cuisson vapeur.
mini (b) = Risotto, crèmes dessert, sauces…
D3
D2
D1
D6
D
I
D4(x2)
E3
E2
E1
E
E4
D5
D4(x2)
4.2
4.3
4.1
3
2
D3
D4
3
1
1
D4
D5
22
2
1
12
D2
3
1
13
D3
D4
!!
D6
14
11
D5
D3
15
10.2
C
A B
D E
H
F
G I
NOTICE ROBOT EVEREST/CUISINE COMPANION
le 19/06/2014
NOT 16
Couteau hachoir MélangeurBatteurCouteau pétrin/concasseurPanier vapeurBouchon
F
G
“clic”
9
8
10.1
5
6
2
1
a
b
MAX
MIN
7
Couteau hachoir MélangeurBatteurCouteau pétrin/concasseurPanier vapeurBouchon
Mixer des soupes
Mixer des compotes
Hacher les légumes
Hacher de la viande
Hacher du poisson
Pétrir les pâtes à pain
blanc
Pétrir les pâtes brisées,
sablées, pains spéciaux
Pétrir les pâtes levées
(brioche, kouglof…)
Mélanger les pâtes légères
(cake…)
Pulvériser les fruits à coques
Hacher les produits durs
Piler la glace
Pâte à crêpes, gaufres
Il mélange les Plats cuisinés sans abimer les ingrédients,
Très utile pour les phases de rissolage en amont des préparations (risottos, soupes).
Cuisson vapeur de légumes,
de poissons ou de viandes
Soupes avec morceaux
Bouchon de régulation d’extraction de vapeur
Blancs en neige
Mayonnaises,
Crèmes fouettées
Rissolés
Mijotés
Risottos
Ratatouilles, Chutneys, Légumineuses (réglages : voir livret recettes)
N’utilisez pas cet accessoire pour hacher des produits durs, utilisez le couteau pétrin/concasseur F4.
5min
45min
15s
30s
15s
40s
3min
9 max
F3
F4
F5
E1
F2
F1
22min
500g
3L
1Kg
1Kg
1Kg
1Kg
3L
1,5Kg
5/10min
2/5min
2min 30s
2min 30s
à
1min
1min
1Kg
1Kg
1,2Kg
0,8Kg
0,6Kg
1min 0,6Kg
1min 1,5L
3min
20/40min 1Kg
3L
6 à 10
1min 30s
2min
7
max
0,5L
1/20min
1L
40s
3min
max
1L
1L
1/16min
1min
à
à
Sauces, crèmes
Ecrasé de pommes de terre
Polenta
A
B
C4
C5
B6
H
B
C
C6 C7
B5
B1
B2
B3
B4
C3C2C1
F1
F2
F3
F4
F0
F5
ab
maxi (a) = cuisson vapeur.
mini (b) = Risotto, crèmes dessert, sauces…
D3
D2
D1
D6
D
I
D4(x2)
E3
E2
E1
E
E4
D5
D4(x2)
4.2
4.3
4.1
3
2
D3
D4
3
1
1
D4
D5
22
2
1
12
D2
3
1
13
D3
D4
!!
D6
14
11
D5
D3
15
10.2

C
A B
D E
H
F
G I
NOTICE ROBOT EVEREST/CUISINE COMPANION
le 19/06/2014
NOT 16
Couteau hachoir MélangeurBatteurCouteau pétrin/concasseurPanier vapeurBouchon
F
G
“clic”
9
8
10.1
5
6
2
1
a
b
MAX
MIN
7
Couteau hachoir MélangeurBatteurCouteau pétrin/concasseurPanier vapeurBouchon
Mixer des soupes
Mixer des compotes
Hacher les légumes
Hacher de la viande
Hacher du poisson
Pétrir les pâtes à pain
blanc
Pétrir les pâtes brisées,
sablées, pains spéciaux
Pétrir les pâtes levées
(brioche, kouglof…)
Mélanger les pâtes légères
(cake…)
Pulvériser les fruits à coques
Hacher les produits durs
Piler la glace
Pâte à crêpes, gaufres
Il mélange les Plats cuisinés sans abimer les ingrédients,
Très utile pour les phases de rissolage en amont des préparations (risottos, soupes).
Cuisson vapeur de légumes,
de poissons ou de viandes
Soupes avec morceaux
Bouchon de régulation d’extraction de vapeur
Blancs en neige
Mayonnaises,
Crèmes fouettées
Rissolés
Mijotés
Risottos
Ratatouilles, Chutneys, Légumineuses (réglages : voir livret recettes)
N’utilisez pas cet accessoire pour hacher des produits durs, utilisez le couteau pétrin/concasseur F4.
5min
45min
15s
30s
15s
40s
3min
9 max
F3
F4
F5
E1
F2
F1
22min
500g
3L
1Kg
1Kg
1Kg
1Kg
3L
1,5Kg
5/10min
2/5min
2min 30s
2min 30s
à
1min
1min
1Kg
1Kg
1,2Kg
0,8Kg
0,6Kg
1min 0,6Kg
1min 1,5L
3min
20/40min 1Kg
3L
6 à 10
1min 30s
2min
7
max
0,5L
1/20min
1L
40s
3min
max
1L
1L
1/16min
1min
à
à
Sauces, crèmes
Ecrasé de pommes de terre
Polenta
A
B
C4
C5
B6
H
B
C
C6 C7
B5
B1
B2
B3
B4
C3C2C1
F1
F2
F3
F4
F0
F5
ab
maxi (a) = cuisson vapeur.
mini (b) = Risotto, crèmes dessert, sauces…
D3
D2
D1
D6
D
I
D4(x2)
E3
E2
E1
E
E4
D5
D4(x2)
4.2
4.3
4.1
3
2
D3
D4
3
1
1
D4
D5
22
2
1
12
D2
3
1
13
D3
D4
!!
D6
14
11
D5
D3
15
10.2

2
1
3
17
18a
50°C
5
18b
10s
19
1
1
1
1
9
9
9
9
9
9
16
19

1
FR
1
FR
Vis-à-vis de la sécurité de la per-
sonne
• Lisez attentivement le mode d’emploi
avant la première utilisation de votre ap-
pareil et conservez-le : une utilisation non
conforme au mode d’emploi dégagerait le
fabricant de toute responsabilité.
• Toujours déconnecter l’appareil de
l’alimentation si on le laisse sans sur-
veillance et avant montage, démontage
ou nettoyage. Ne pas laisser les enfants
utiliser l’appareil sans surveillance.
• Cet appareil ne doit pas être utilisé par
les enfants. Conserver l’appareil et son
câble hors de portée des enfants.
• Cet appareil n’est pas prévu pour être
utilisé par des personnes (y compris
les enfants) dont les capacités phy
-
siques, sensorielles ou mentales sont
réduites ou des personnes dénuées
d’expérience ou de connaissance, sauf
si elles ont pu bénéficier, par l’inter-
médiaire d’une personne responsable
de leur sécurité, d’une surveillance ou
d’instructions préalables concernant
l’utilisation de l’appareil. Il convient
de surveiller les enfants pour s’assurer
qu’ils ne jouent pas avec l’appareil.
• Maintenez votre appareil hors de portée
des enfants.
• Lors de l’utilisation de
l’appareil, certaines pièces
atteignent des tempéra-
tures élevées (paroi inox
du bol, et du bouchon, entraîneur com-
mun amovible, parties transparentes du
couvercle pièces métalliques sous le bol,
accessoire fond xl panier). Elles peuvent
occasionner des brûlures. Manipulez l’ap-
pareil par les pièces plastiques froides
(poignées, bloc moteur). Le témoin lu-
mineux de chauffe rouge indique qu’il y
a un risque de brûlure.
• La température des surfaces accessibles
peut être élevée lorsque l’appareil est
en fonctionnement.
• L’ appareil n’est pas destiné à être mis
en fonctionnement au moyen d’une mi-
nuterie extérieure ou par un système de
commande à distance séparé.
• N’utilisez pas votre appareil s’il ne
fonctionne pas correctement, s’il a été
endommagé ou si le câble d’alimen
-
tation ou la prise sont endommagés.
Afin d’éviter tout danger, faites obliga-
toirement remplacer le cordon par un
centre service agréé (voir liste dans le
livret service).
• L’appareil ne doit pas être immergé.
Ne passez pas le bloc moteur (A) sous
l’eau courante.
• Cet appareil est exclusivement destiné
à un usage domestique à l’intérieur de
la maison et à une altitude inférieure
à 2000 m. Le fabricant décline toute
responsabilité et se réserve le droit de
résilier la garantie en cas d’utilisation
commerciale ou inadaptée, ou de non
CONSIGNES DE SÉCURITÉ :

2
FR
2
FR
respect des consignes.
• Cet appareil n’a pas été conçu pour être
utilisé dans les cas suivants qui ne sont
pas couverts par la garantie :
- zone de travail de cuisine dans les
magasins, bureaux et autres environ-
nements de type travail.
- des coins cuisine réservés au person-
nel dans des magasins, bureaux et
autres environnements profession-
nels.
- des fermes.
- l’utilisation par les clients des hôtels,
motels et autres environnements à
caractère résidentiel.
- des environnements du type
chambres d’hôtes.
AVERTISSEMENT : Votre
appareil émet de la
vapeur qui peut occa-
sionner des brûlures.
Manipulez avec précaution le cou-
vercle et le bouchon (utilisez si
nécessaire un gant, une manique,
etc). Manipulez le bouchon par sa
partie centrale.
• Ne faites pas fonctionner l’appareil
si le joint n’est pas positionné sur
le porte joint, si le porte joint n’est
pas assemblé dans le couvercle. Il est
impératif de faire fonctionner l’appa-
reil avec le bouchon positionné dans
l’orifice du couvercle (sauf en cas
d’information spécifique recette).
AVERTISSEMENT : At
-
tention aux risques
de blessure en cas de
mauvaise utilisation de
l’appareil.
Prenez des précautions avec les lames
du couteau hachoir ultrablade (F1) et
du couteau pour pétrir/concasser (F4)
lorsque vous les nettoyez et lorsque
vous videz le bol, elles sont extrême-
ment coupantes.
Rangez le couteau hachoir ultrablade
(F1) dans le bol après chaque utili
-
sation.
Soyez vigilant si un liquide chaud est
versé dans le préparateur culinaire
dans la mesure où il peut être éjecté
de l’appareil en raison d’une ébullition
soudaine.
AVERTISSEMENT : Soyez prudent lors
de la manipulation de votre appareil
(nettoyage, remplissage et versage)
: évitez tout débordement de liquide
sur les connecteurs.
AVERTISSEMENT : Certains aliments
comportant une peau superficielle
(saucisses entières, langue, volaille...)
ou de gros morceaux de viande peuvent
générer des éclaboussures en empri
-
sonnant des liquides bouillants. C’est
pourquoi nous vous conseillons de les
piquer avant cuisson à l’aide d’un cou-
teau ou d’une fourchette.

3
FR
3
FR
AVERTISSEMENT : La surface de l’élé-
ment chauffant présente une chaleur
résiduelle après utilisation.
Assurez vous de ne toucher que
les poignées de votre produit (gâ-
chettes D2, poignée du couvercle E2
et du bouchon E1) pendant la chauffe
et jusqu’au refroidissement complet.
Reportez-vous au mode d’emploi pour
le réglage des vitesses et le temps de
fonctionnement de chaque accessoire et
de chaque programme.
Reportez-vous au mode d’emploi pour
l’assemblage et le montage des acces-
soires sur l’appareil.
Reportez-vous au mode d’emploi pour
le nettoyage et l’entretien de votre
appareil.
Toujours suivre les instructions de net-
toyage pour nettoyer votre appareil:
• Débranchez l’appareil.
• Ne pas nettoyer l’appareil chaud.
• Nettoyez avec un chiffon ou une
éponge humide.
• Ne jamais mettre l’appareil dans l’eau
ou sous l’eau courante.
MARCHES EUROPEENS SEULEMENT :
• Conservez l’appareil et son câble hors
de portée des enfants âgés de moins
de 8 ans.
Les enfants ne doivent pas utiliser
l’appareil comme un jouet.
• Cet appareil peut être utilisé par des
personnes dont les capacités phy
-
siques, sensorielles ou mentales sont
réduites ou dont l’expérience ou les
connaissances ne sont pas suffisantes,
à condition qu’ils bénéficient d’une
surveillance ou qu’ils aient reçu des
instructions quant à l’utilisation de
l’appareil en toute sécurité et en com
-
prennent bien les dangers potentiels.
• Cet appareil peut être utilisé par
des enfants âgés d’au moins 8 ans,
à condition qu’ils bénéficient d’une
surveillance ou qu’ils aient reçu des
instructions quant à l’utilisation de
l’appareil en toute sécurité et qu’ils
comprennent bien les dangers encou-
rus. Le nettoyage et l’entretien par
l’utilisateur ne doivent pas être effec
-
tués par des enfants sans surveillance,
à moins qu’ils ne soient âgés de plus
de 8 ans et qu’ils soient sous la sur
-
veillance d’un adulte.
Vis-à-vis du raccordement électrique
• L’appareil doit être branché sur une prise
de courant électrique reliée à la terre.
• L’appareil est conçu pour fonctionner
uniquement en courant alternatif. Vé-
rifiez que la tension d’alimentation
indiquée sur la plaque signalétique de
l’appareil corresponde bien à celle de
votre installation électrique.
• Toute erreur de branchement annule
la garantie.
• Ne tirez jamais sur le câble d’alimenta-
tion pour débrancher l’appareil.
• Ne mettez pas l’appareil, le câble d’ali-

4
FR
4
FR
mentation, ou la prise dans du liquide,
à proximité ou en contact avec les par
-
ties chaudes de l’appareil, près d’une
source de chaleur ou sur un angle vif.
Vis-à-vis d’une mauvaise utilisation
• Ne touchez pas au couvercle avant
l’arrêt complet de l’appareil (touche
stop), attendez que les aliments
mixés ne tournent plus.
• Versez toujours les ingrédients solides
en premier dans le bol avant d’ajouter
des ingrédients liquides (Cf. Fig. 10),
sans dépasser le repère MAX gravé à
l’intérieur du bol (Cf. Fig. 10). Si le
bol est trop rempli, de l’eau bouillante
peut-être éjectée.
• Attention dans le cadre du programme
cuisson vapeur, respectez le niveau de
0.7 litre d’eau (Cf. Fig. 3.2).
• Ne placez jamais vos doigts ou tout
objet dans le bol pendant le fonction
-
nement de l’appareil.
• N’utilisez pas le bol comme récipient
(conservation, congélation, stérilisa
-
tion).
• Placez l’appareil sur un plan de travail
stable, résistant à la chaleur, propre
et sec.
• Ne placez pas l’appareil près d’un mur
ou d’un placard, la vapeur produite
pouvant endommager les éléments.
• Ne placez pas votre appareil près d’une
source de chaleur en fonctionnement
(plaque de cuisson, appareil élec-
tro-ménager, etc…).
• Ne couvrez pas votre couvercle avec
un torchon ou autre, ne cherchez pas
à boucher l’orifice du couvercle, utilisez
le bouchon régulateur de vapeur.
• Ne laissez pas pendre vos cheveux, un
foulard, une cravate,… au dessus du bol
pendant le fonctionnement de l’appareil.
• Ne passez jamais les accessoires dans
un four à micro ondes.
• N’utilisez pas l’appareil en plein air.
• Ne dépassez jamais la quantité maxi-
mum indiquée dans la notice.
• Rangez l’appareil lorsqu’il est refroidi.
• Ne placez pas le bol au congélateur
pour le refroidir, utilisez le réfrigéra-
teur.
SAV
• Pour votre sécurité, n’utilisez pas d’ac
-
cessoires ou de pièces de rechange,
autres que ceux fournis par les centres
de service après-vente agréés.
• Toute intervention autre que le net
-
toyage et l’entretien usuel par le
client doit être effectuée par un centre
service agréé.
• Consultez le tableau “ Si votre appareil
ne fonctionne pas, que faire ? ” à la fin
du mode d’emploi.

5
FR
5
FR
En parcourant cette notice , vous découvrirez des conseils d’utilisation qui vous feront
entrevoir le potentiel de votre appareil : préparation de soupes, de mijotés, de cuissons
vapeur, de pâtes.
DESCRIPTION DE L’APPAREIL :
A Bloc moteur
B Tableau de commandes
B1 : sélecteur de vitesse
B2 : sélecteur de température de
cuisson et/ou témoin lumineux
de chauffe
B3 : sélecteur de durée de
fonctionnement/appairage
B4 : touches de sélection de
programmes automatiques
B5 : bouton START/STOP/RESET
B6 : sélecteur + / -
C Ecran LCD
C1 : affichage témoin de connexion
C2 : affichage programme vapeur
C3 : affichage de l’étape en cours
dans le pas à pas de la recette.
C4 : affichage témoin de sécurité
C5 : affichage vitesse
C6 : affichage température
C7 : affichage temps
D Ensemble Bol
D1 : bol inox
D2 : gâchettes
D3 : entraîneur commun amovible
D4 : joint d’étanchéité (x2)
D5 : accessoire fond xl
D6: bague de verrouillage entraîneur
E Ensemble couvercle
E1 : bouchon régulateur vapeur
E2 : couvercle
E3 : porte joint
E4 : joint étanchéité
F Accessoires :
F0 : boîte rangement accessoires
F1 : couteau hachoir ultrablade
F2 : mélangeur
F3 : batteur
F4 : couteau pour pétrir / concasser
F5 : panier vapeur
G Spatule
H Interrupteur 0/1 pour couper l’alimentation
électrique de votre appareil
I Brosse de nettoyage
DONNÉES TECHNIQUES DE L’APPAREIL :
Puissance : 1550W (1000W : résistance chauffante / 550W : moteur )
Plage de température : de 30° à 150°C
réglable par pas de 5°C.
Plage de durée de fonctionnement : de 5 secondes à 2 heures
réglable par pas de 5 secondes mini à 1 minute maxi.
Nombre de vitesses : 13 - 2 vitesses intermittentes :
vitesse 1 ( 5s On / 20s Off ).
vitesse 2 ( 10s On / 10s Off ).
- 10 vitesses continues progressives
(vitesses 3 à 12).
- 1 vitesse intermittente max (vitesse 13).
*La marque et les logos Bluetooth
®
sont des marques déposées par Bluetooth SIG, Inc. et leur utilisation par le Groupe SEB a fait l’objet d’une
autorisation.
Google Play et Android sont des marques de Google Inc.
Apple et le logo Apple sont des marques d’Apple Inc., déposées aux États-Unis et d’autres pays. App Store est une marque de service d’Apple Inc.

6
FR
6
FR
VOTRE APPAREIL
Vous disposez avec votre appareil des accessoires suivants :
Ces accessoires sont également pourvus de zones de préhension pour en faciliter la manipulation
lors de leur utilisation au cours d’une préparation.
Couteau hachoir
Mixer des soupes
3min 3L
Mixer des compotes 40s 1Kg
Hacher les légumes 15s 1Kg
Hacher de la viande 30s 1Kg
Hacher du poisson 15s 1Kg
N’utilisez pas cet accessoire pour hacher des produits durs, utilisez le couteau pétrin/concasseur F4.
Mélangeur
Il mélange les Plats cuisinés sans abimer les ingrédients,
Très utile pour les phases de rissolage en amont des préparations (risottos, soupes).
Rissolés 5min 500g
Mijotés 45min 3L
Risottos 22min 1,5Kg
Ratatouilles, Chutneys, Légumineuses (réglages : voir livret recettes)
Batteur
9 max
Blancs en neige 5/10min
7
max
Mayonnaises, Crèmes
fouettées
2/5min 0,5L
Sauces, Crèmes
à
1/20min 1L
Ecrasé de pommes de terre
à
1min 1L
Polenta
à
1/16min 1L
Couteau pétrin/concasseur
Pétrir les pâtes à pain blanc 2min 30s 1,2Kg
Pétrir les pâtes brisées,
sablées, pains spéciaux
2min 30s 1Kg
Pétrir les pâtes levées
(brioche, kouglof…)
1min 30s
2 min
0,8Kg
Mélanger les pâtes légères
(cake…)
40 s
3min
1Kg
Pulvériser les fruits à coques
1min 0,6Kg
Hacher les produits durs
1min 0,6Kg
Piler la glace
1min
6 à 10
Pâte à crêpes, gaufres
1min 1,5L
Panier
vapeur
Cuisson vapeur de légumes,
de poissons ou de viandes
20/40min 1Kg
Soupes avec morceaux
3min 3L
Bouchon
Bouchon de régulation d’extraction de vapeur
maxi (a) = cuisson vapeur.
mini (b) = Risotto, crèmes dessert, sauces…
Fond XL
Accessoire fond XL
Rissolage et cuisson sans couvercle
Augmentation de la surface de cuisson pour vos grosses pièces de viandes ou poissons.

7
FR
7
FR
Votre appareil i-Companion xl propose un
fonctionnement « connecté » mais peut
également fonctionner « non connecté ». De plus
il possède deux modes de fonctionnement : le mode
programme automatique et le mode manuel.
• Mode programme automatique :
Vitesse, température de cuisson et durée sont
préprogrammées pour réaliser des soupes, des
mijotés, des cuissons vapeur et des pâtes en
automatique.
• Mode manuel :
Réglages personnalisés des paramètres vitesse,
température de cuisson et durée pour une
utilisation selon votre convenance.
Utilisation avec ou sans couvercle
Température de
30° à 130°C
Température de
135° à 150°C
- Lorsque vous avez sélectionné une température
entre 135° et 150°, vous devez utiliser votre
appareil sans couvercle. Si le couvercle est
positionné sur le bol, un cadenas s’affichera sur
l’écran LCD, vous invitant à le déverrouiller.
- Dès l’ajout des aliments, remuez-les à l’aide de la
spatule et renouvelez l’opération régulièrement,
afin d’éviter que le fond du bol ne se tâche, (Cf
paragraphe nettoyage).
- Si vous choisissez d’utiliser l’appareil avec son
couvercle, la température de cuisson sera alors de
130° maximum.
VOTRE APPAREIL EST ÉQUIPÉ D’UNE SÉCURITÉ DE
VERROUILLAGE DU COUVERCLE
Le couvercle est sécurisé à chaque démarrage de
l’appareil. Cette sécurité empêche l’ouverture du
couvercle pendant la réalisation d’une recette
(Cf.
Fig.17). Ne tentez pas de forcer sur le couvercle
lorsqu’il est verrouillé. Cette sécurité se débloque à
chaque arrêt de l’appareil. Si vous avez sélectionné
une température supérieure ou égale à 50°C et une
vitesse supérieure ou égale à 5, un décompte de 10
secondes apparaît alors sur l’ecran LCD du tableau de
commandes.
(Cf.Fig.18). L’ouverture du couvercle ne
sera possible qu’à la fin du décompte.
MISE EN PLACE DU BOL, DE SES ACCESSOIRES ET
DE L’ENSEMBLE COUVERCLE
• Avant la première utilisation, nettoyez tous les
éléments (D, E, F, G) à l’eau chaude savonneuse,
mais pas le bloc moteur (A). Votre bol (D) est
équipé d’un entraîneur démontable (D3) pour
faciliter le nettoyage.
• Assurez-vous que tout emballage soit retiré avant
utilisation, notamment la protection située entre
le bol (D) et le bloc moteur (A).
• Placez le joint d’étanchéité (E4) sur le porte
joint (E3) (Cf. Fig. 1), clipsez l’ensemble sur le
couvercle (E2) (Cf. Fig 2).
• Positionnez le joint d’étanchéité (D4) sur
l’entraîneur commun (D3). Verrouillez
l’ensemble sur le fond du bol avec la bague de
verrouillage (D6) (Cf. Fig. 3). Si vous utilisez le
mode cuisson sans couvercle, positionnez le joint
d’etancheite (D4) sur l’accessoire fond xl (D5).
Verrouillez l’ensemble sur le fond du bol avec la
bague de verrouillage (D6) (Cf. Fig. 3).
• Positionnez l’accessoire choisi dans le bol :
- les accessoires (F1, F2, F3, ou F4) sur l’entraîneur
commun au fond du bol (Cf. Fig. 4.1),
- en cas de cuisson vapeur, le panier vapeur (F5)
à l’intérieur du bol, (Cf. Fig. 4.3 ), en ayant pris
soin au préalable de remplir la cuve de 0.7l de
préparation liquide (eau, sauce…) (Cf. Fig. 4.2 ).
• Incorporez les ingrédients à l’intérieur du bol ou
du panier vapeur.
• Positionnez le couvercle sur le bol (D) en alignant
les deux triangles (Cf. Fig. 5), verrouillez le
couvercle sans appuyer en le tournant dans le
sens de la flèche (Cf. Fig. 6).
Positionnez le bouchon régulateur de vapeur
(E1) sur le couvercle, 2 positions sont possibles
(Cf. Fig. 7):
La position « mini » permet de laisser
échapper un maximum de
condensation et ainsi obtenir des
plats ou des sauces avec une meilleure
consistance (Risotto, crèmes dessert , sauces,
etc...).
La position « maxi » permet de
gagner un maximum de chaleur et
de vapeur dans le bol pour toutes les
cuissons à la vapeur (soupes, etc...).
Cette position évite également les
éclaboussures pendant le mixage.
• Positionnez le bol (D) sur le bloc moteur (A)
jusqu’à entendre un “ clic ” (Cf. Fig. 8).
• L’appareil démarre uniquement si le bol et le
couvercle sont correctement positionnés et
verrouillés sur le bloc moteur.
F1 F2
F3 F4
F5
F1 F2
F3 F4
En cas de mauvais positionnement ou de
mauvais verrouillage de l’un ou de l’autre
(Cf. Fig. 10.1 et 10.2), le logo
se met à
clignoter lorsque l’on active une fonction.

8
FR
8
FR
Sélection paramètres personnalisés :
Sélection de la vitesse moteur.
2 vitesses intermittentes et 10
vitesses continues progressives.
Vitesse intermittente max (V13).
Sélection de la température de
cuisson.
De 30° à 150°C.
Témoin lumineux de chauffe :
il s’allume au démarrage de la
cuisson et s’éteint lorsque la
température à l’intérieur du bol
passe en dessous des 50°C.
Sélection de la durée de
fonctionnement.
De 5s à 2 heures.
Appairage 1ère connexion
Conseil d’utilisation :
Votre appareil est équipé d’un micro processeur qui contrôle et analyse sa stabilité. En cas
d’instabilité, la vitesse de rotation du moteur sera automatiquement réduite, si cette instabilité
persiste, le moteur sera arrêté et un “ STOP ” s’affichera sur votre écran.
• Vérifiez que la quantité d’ingrédients ne soit pas trop importante et que la vitesse utilisée soit
adaptée.
• Vérifiez que vous utilisez l’accessoire recommandé.
• Puis redémarrez votre appareil normalement.
Augmentation de la vitesse,
de la température de cuisson
et de la durée.
Diminution de la vitesse, de
la température de cuisson et
de la durée.
Ce bouton a 3 fonctions :
- “ Validation ” du choix de
votre programme automatique
ou de vos paramètres
choisis dans le cadre d’une
utilisation manuelle (vitesse,
température de cuisson,
temps).
- “ Pause ” au cours d’une
utilisation, une fois que
l’appareil est lancé.
- “ Réinitialisation ” des
paramètres sélectionnés de
l’appareil par une pression de
2 secondes.
- “Validation de l’étape” dans
le pas à pas des recettes.

9
FR
9
FR
PREPARATION DE L’INSTALLATION
Retrouvez la liste des modèles de Smartphones et Tablettes compatibles avec i-Companion sur
www.moulinex.com
INSTALLER I-COMPANION XL
Ce qu’il faut pour procéder à l’installation de i-Companion xl :
• L’application Companion téléchargeable gratuitement sur App Store (iPhone/iPad) et Google Play
(Android)
• Une connexion Bluetooth fournie par votre Smartphone ou votre tablette Bluetooth
®
Smart 4.0:
i-Companion xl se connecte à votre Smartphone/tablette via une connexion sans fil autonome
• Le Smartphone/tablette doit se trouver à proximité i-Companion xl (La portée de la connexion varie
en fonction de la configuration du logement).
• Une prise de courant pour brancher i-Companion xl : i-Companion xl est connecté avec votre
Smartphone/tablette uniquement lorsqu’il est branché au secteur.
PREMIERE CONNEXION I-COMPANION XL EN MODE CONNECTE
Téléchargement de l ’application
Pour commencer, téléchargez l’application sur votre Smartphone/tablette en vous connectant à l’App
Store pour iOS ou à Google Play pour Android.
Lorsque vous avez téléchargé l’application, en quelques minutes et sans création de compte, vous
pourrez réaliser vos premières recettes avec i-Companion xl. (50 recettes vous sont proposées sans
création de votre compte).
La création de votre compte sur l’application vous permettra d’accéder à l’intégralité du contenu pour
varier vos menus.
UTILISATION EN MODE CONNECTE
Mise sous tension de votre appareil
Fréquence : 2,40GHz. Puissance maximum transmise : 7,7dBm
Votre appareil est équipé d’un interrupteur 0/1. Basculez cet interrupteur sur 1. (Cf. Fig. 9).
L’écran LCD affiche tous les paramètres à « 0 ».
En mode connecté, l’affichage de l’écran LCD i-Companion xl est bleu.
A propos de Bluetooth® Smart
La technologie Bluetooth
®
Smart 4.0 (ou Bluetooth Low Energy) permet une communication sans
fil entre une application et un appareil tout en consommant très peu d’énergie.

10
FR
10
FR
Mise sous tension de i-Companion xl
Votre appareil est équipé d’un interrupteur 0/1 (H). Basculez cet interrupteur sur 1 (Cf. Fig. 9).
Activation du Bluetooth
Veuillez vous rapprocher de i-Companion xl et vérifier que le Bluetooth de votre Smartphone/tablette
est bien activé.
Lancement de l’application
Lancez l’application Companion en cliquant sur l’icône « Companion ».
Appairage
Qu’appelle-t-on l’appairage ?
Lors de la première connexion, l’application que vous avez téléchargée sur votre Smartphone/tablette
et i-Companion xl se détecteront automatiquement et rapidement, à condition de bien suivre les
étapes suivantes.
Si vous le désirez, vous pouvez appairer jusqu’à 10 appareils à i-Companion xl.
Pour cela, procédez à l’appairage de chaque appareil indépendamment.(Cf. appairage).
Néanmoins un seul appareil peut être connecté simultanément.
• Acceptez les cookies, qui permettent d’améliorer l’application en recueillant vos préférences d’utilisations.
• Sélectionnez votre appareil
xl

11
FR
11
FR
• Lorsque l’application le demande, faites un appui long (4 secondes) sur le bouton Timer (B3) de
i-Companion xl.
Le témoin de connexion (C1) clignote pendant 30 secondes au maximum, période durant laquelle
i-Companion xl se connecte à votre Smartphone/tablette.
• Acceptez la demande d’appairage qui apparait sur votre Smartphone/tablette ou accédez au centre
de notification pour accepter l’appairage.
Le témoin de connexion (C1) fixe indique que la connexion est établie.
NB : Lorsque l’appairage est effectué, i-Companion xl reconnaitra automatiquement votre
Smartphone/tablette lors des connexions futures. Vous n’aurez pas besoin de renouveler cette
étape d’appairage
La connexion a réussi
Votre i-Companion xl est désormais connecté avec votre Smartphone/tablette. L’icone, ci-dessus, vous
indique que la connexion est établie

12
FR
12
FR
La connexion a échoué
L’icône, ci-dessus, vous indique que la connexion n’ a pas été établie.
Veuillez renouveler les opérations suivantes :
• Approchez vous de i-Companion xl.
• Vérifiez que i-Companion xl est bien branché sur le secteur et que la prise fonctionne correctement.
• Vérifier que votre Smartphone/tablette est compatible (Cf. liste de compatibilité sur www.moulinex.
com).
• Vérifiez que le Bluetooth de votre Smartphone/tablette est activé.
• Recommencez les étapes d’appairage et consultez la FAQ (questions fréquentes).
Si le problème persiste assurez-vous que votre Smartphone/tablette est compatible
Si vous utilisez un appareil Android, assurez-vous que celui-ci fait partie des modèles compatibles (Cf.
liste de compatibilité sur www.moulinex.com).
• Accédez au menu de l’application pour découvrir notre gamme de recettes.
En mode connecté, au cours d’une recette pas à pas,
le premier reset met fin à l’étape, le second reset met
fin à la recette.
FAQ : QUESTIONS FREQUENTES
A quel endroit placer i-Companion xl :
• Placez i-Companion xl sur une surface plane stable.
• Pour obtenir une connexion optimale entre i-Companion xl et votre Smartphone/tablette, il est recommandé
d’effectuer toutes les manipulations nécessitant une connexion à une distance raisonnable.
• La présence du témoin de connexion fixe (C1) vous garantit que vos appareils sont connectés.
• Si la connexion est interrompue (le symbole de la connexion est barré), veuillez vous rapprocher
i-Companion xl pour retrouver la connexion.
Que se passe-t-il si la connexion est interrompue au cours d’une recette ?
Si la connexion entre i-Companion xl et votre Smartphone/tablette est interrompue au cours d’une recette,
la synchronisation entre les deux appareils se fera automatiquement dès que la connexion sera rétablie.
Vous pourrez reprendre la progression de votre recette, à l’étape à laquelle vous vous trouviez, lors de la
perte de connexion.
Puis-je utiliser i-Companion xl sans l’application ?
Votre appareil peut être utilisé sans l’application. (Cf. Mise en service en mode non connecté).
Pour cela se référer au paragraphe utilisation de l’appareil.
Néanmoins, seule l’application vous permettra de profiter des nombreux avantages du produit connecté.
I-Companion xl peut-il être utilisé avec plusieurs Smartphones ou tablettes ?
Si vous le désirez, vous pouvez jumeler plusieurs appareils à i-Companion xl. Pour cela, procédez au jumelage
de chaque appareil indépendamment.(Cf. appairage).
Néanmoins un seul appareil peut être connecté simultanément.

13
FR
13
FR
UTILISATION EN MODE NON CONNECTE
Pâtes (liste des sous programmes) Soupes (liste des sous
programmes)
Slow cook (liste des sous
programmes)
Cuisson vapeur (liste des
sous programmes)
UTILISATION DU TABLEAU DE COMMANDE (B)
Sélection d’un programme automatique :
Mise sous tension de votre appareil
Votre appareil est équipé d’un interrupteur 0/1. Basculez cet interrupteur sur 1.
L’écran LCD affiche tous les paramètres à « 0 ». (Cf. Fig. 9).
En mode non connecté, l’affichage de l’écran LCD i-Companion xl est blanc.
MODE PROGRAMME AUTOMATIQUE
1- Appuyez sur le programme de
votre choix (B4). Un point
lumineux apparaît au dessus
du programme sélectionné.
Des appuis successifs
permettent de faire défiler les
différents sous programmes.
2- Les paramètres pré-programmés
peuvent être modifiés le temps
d’une recette (selon la recette
choisie, les ingrédients, les
quantités préparées). Appuyez
sur le sélecteur température de
cuisson (B2) ou le sélecteur
temps (B3), le paramètre
choisi clignote à l’écran (C6-
C7).
3- Réglez le(s) paramètre(s) à
l’aide du sélecteur +/- (B6).
4- Lorsque vous avez fini de
modifier tous vos paramètres,
appuyez sur le bouton
“ start ” (B5) pour démarrer
le programme. Lorsque votre
appareil utilise le mode
cuisson, le témoin lumineux
rouge s’allume pour vous
informer que la cuisson a
démarré.
5- Lorsque le programme est terminé, l’appareil
émet 3 bips.
6- A la fin des programmes soupes, slow cook
P2 et P3, cuisson vapeur, l’appareil passe
automatiquement en maintien au chaud pendant
45 minutes pour conserver la préparation prête
à être consommée. En programme slow cook P2
et P3 et en mode manuel, le moteur de l’appareil
fonctionne à une vitesse spécifique, dans le but
de préserver la préparation et d’éviter que celle-ci
n’adhère au fond du bol. Pour stopper le maintien
au chaud, il suffit d’appuyer sur le bouton “ stop ”
(B5). Si vous ouvrez le couvercle, appuyez sur les
gâchettes (D2) ou retirez le bol, le maintien au
chaud sera automatiquement arrêté.
Le Bluetooth de mon téléphone doit -il être activé en continu ?
Le Bluetooth doit être activé pour synchroniser l’application et i-Companion xl.

14
FR
14
FR
A la fin du pétrissage des programmes pâte P1 et P2,
l’appareil passe en mode “ levée de la pâte ” à 30°C
pendant 40 minutes pour donner un meilleur volume
à vos pâtes. Si vous ouvrez le couvercle, appuyez
sur les gâchettes (D2) ou retirez le bol, l’appareil
passe en mode pause, vous avez la possibilité de le
relancer en appuyant de nouveau sur “ start ”.
Si vous souhaitez stopper ce mode, appuyez pendant
2 secondes sur le bouton “ stop ”.
7- Appuyez sur les gâchettes (D2) puis soulevez
l’ensemble bol (D) (Cf. Fig. 12).
En mode connecté, lorsque le programme
automatique est lancé, vous avez la possibilité
d’arrêter l’appareil à tout moment en appuyant sur
le bouton “ stop ”. Le programme automatique est
alors en mode pause, vous avez la possibilité de le
relancer en appuyant de nouveau sur “ start ”. Si
vous vous êtes trompé de programme et si vous
voulez annuler, appuyez pendant 2 secondes sur
le bouton “ stop ”.
DÉCOUVREZ LES PROGRAMMES AUTOMATIQUES PROPOSÉS :
Soupe P1 Soupe P2 Slow cook P1 Slow cook P2 Slow cook P3
Programmes
automatiques
Vitesse
“ par défaut ”
(ajustable)
10 Pulses et V12
pendant
2 min.
V7 à V10
pendant 30s
V3 V1 V2
Température
“ par défaut ”
(ajustable)
100°C
(90°C
à 100°C)
100°C
(90°C
à 100°C)
130°C
(non
ajustable)
95°C
(80°C
à 100°C)
95°C
(80°C
à 100°C)
Temps
“ par défaut ”
(ajustable)
40 min
(20min
à 60 min)
45 min
(20 min
à 60 min)
5 min
(2 min
à 15 min)
45 min
(10 min
à 2h)
20 min
(10 min
à 2h)
Maintien au chaud
“par défaut”
en fin de programme
45 min 45 min 45 min 45 min
Vitesse moteur en
maintien au chaud
5s ON en V3
/ 20s OFF
10s ON en V3 /
10s OFF
Certaines recettes peuvent provoquer des débordements intempestifs, en raison de l’apparition
de bulles, en particulier lors de l’utilisation de légumes congelés. Dans ce cas, il vous appartient
de réduire les volumes en conséquence.

15
FR
15
FR
Cuisson
Vapeur P1
Cuisson
Vapeur P2
Pâte P1 Pâte P2 Pâte P3
Programmes
automatiques
Vitesse
“ par défaut ”
(ajustable)
V5 pendant
2 min 30s
V5 pendant
1 min 30s puis V6
pendant 2 min
V3 pendant
40s puis V9
pendant 3 min
Température
“ par défaut ”
(ajustable)
100°C
(non
ajustable)
100°C
(non
ajustable)
Temps
“ par défaut ”
(ajustable)
30 min
(1 min
à 60 min)
35 min
(1 min
à 60 min)
2 min 30s
(30s à
2 min 30s)
3 min 30s
(30s à 3 min 30s)
3 min 40s
(1 min 40s
à 3 min 40s)
Maintien au chaud «par
défaut»
en fin de programme
45 min 45 min
Vitesse moteur en
maintien au chaud
Levée de la pâte
30° “par défaut”
en fin de programme
40 min 40 min
UTILISATION DU PANIER VAPEUR INTERNE
Les temps de cuisson sont donnés à titre
indicatif, ils permettent dans la plupart des cas
une cuisson satisfaisante.
Néanmoins, certaines conditions vont influer sur
le temps de cuisson :
- la taille des légumes (coupés ou non-coupés)
- la quantité des ingrédients dans le panier
- la variété des légumes, leur maturité
- la quantité d’eau dans le bol, qui doit
correspondre à la graduation (0.7L).
Bien penser à utiliser le bouchon vapeur dans le
sens “maxi” (a).
Si la cuisson est insuffisante, vous pouvez ajouter
un temps de cuisson supplémentaire.
Temps de cuisson vapeur
Ingrédients Quantités (max) Temps de cuisson estimé
Programme vapeur
préconisé
Courgettes 800 g 20 min P1
Panais 800 g 25 min P1
Blancs de poireaux 800 g 25 min P1
Brocolis 500 g 20 min P1
Poissons 600 g (avec papier cuisson) 15 min P1
Pommes de terre 1 kg 30 min P2
Carottes 1 kg 30 min P2
Haricots verts 800 g 30 min P2
Viandes blanches 600 g (avec papier cuisson) 20 min P2
Certaines recettes peuvent provoquer des débordements intempestifs, en raison de l’apparition
de bulles, en particulier lors de l’utilisation de légumes congelés. Dans ce cas, il vous appartient
de réduire les volumes en conséquence.

16
FR
16
FR
• L’appareil ne doit pas être immergé.
Ne passez pas le bloc moteur (A)
sous l’eau courante.
Une fois l’utilisation terminée, débranchez
l’appareil.
• Nettoyez immédiatement votre bol après
utilisation.
• Appuyez sur les gâchettes (D2) puis soulevez
l’ensemble bol (D).
• Placez le bol sur une surface plane.
• Déverrouillez le couvercle en le tournant d’un
quart de tour dans le sens des aiguilles d’une
montre. Retirez le couvercle avec précaution.
• Prenez des précautions avec les lames du cou-
teau hachoir ultrablade (F1) et du couteau
pour pétrir/concasser (F4) lorsque vous les
nettoyez et lorsque vous videz le bol, elles
sont extrêmement coupantes.
• Lorsque les pièces sont refroidies :
- démontez l’entraîneur commun (D3), le joint
(D4), la bague de verrouillage (D6) (Cf. Fig. 13).
- nettoyez le bol (D), l’entraîneur commun
(D3), le joint (D4), la bague de verrouillage
(D6), les accessoires (F1), (F2), (F3), (F4),
(F5), le bouchon régulateur de vapeur (E1),
le couvercle (E2) , le joint d’étanchéité (E4)
et le porte joint (E3), à l’aide d’une éponge
et d’eau chaude savonneuse.
• Rincez ces différents éléments sous l’eau cou-
rante.
• En cas d’encrassement prononcé, laissez tremper
pendant plusieurs heures avec de l’eau addi-
tionnée de liquide vaisselle et grattez si besoin
NETTOYAGE DE L’ APPAREIL
MODE MANUEL
1- Appuyez directement sur le
sélecteur représentant le para-
mètre que vous avez choisi de
régler, c’est-à-dire le sélecteur
vitesse (B1) ou le sélecteur
température de cuisson (B2)
ou le sélecteur temps (B3),
le paramètre choisi clignote à
l’écran (C5-C6-C7).
2- Ensuite réglez le(s) paramètre(s)
à l’aide du sélecteur +/- (B6).
Pour des raisons de sécurité,
il n’est pas possible de régler
une température sans régler un
temps de cuisson.
3- Lorsque vous avez fini de régler
tous vos paramètres, appuyez sur
le bouton “ start ” (B5).
Lorsque votre appareil utilise le
mode cuisson, le témoin lumi-
neux rouge s’allume pour vous
informer que la cuisson a démarré. Lorsque la pro-
grammation est lancée, vous avez la possibilité
d’arrêter l’appareil à tout moment en appuyant sur
le bouton “ stop ” (B5).
La programmation est alors en mode pause, vous avez
la possibilité de la relancer en appuyant de nouveau
sur “ start ”. Si vous vous êtes trompé de program-
mation et si vous voulez annuler, appuyez pendant
2 secondes sur le bouton “ stop ”.
4- Lorsque la programmation est terminée, l’appareil
émet 3 bips.
5- Appuyez sur les gâchettes (D2) puis soulevez
l’ensemble bol (D) (Cf. Fig. 12).
VOTRE APPAREIL EST EQUIPÉ D’UN BOUCHON
FOND PLAT
Le bouchon fond plat permet de libérer de la place
dans le bol pour cuire ou rissoler sans être gêné par
l’entraineur (Cf. Fig. 15).
CUISSON SANS COUVERCLE
Vous pouvez rissoler des aliments dans votre bol sans
le couvercle tout en remuant et surveillant la cuisson.
(Cf. Fig. 16). Pour ce mode de cuisson vous devez
obligatoirement sélectionner une température allant
de 135°C à 150°C. Réglez votre durée de fonction-
nement (jusqu’à 20 min).
La fonction CUISSON SANS COUVERCLE n’est pas
adaptée au confitures et aux préparations à base
de lait (risque de débordements).

17
FR
17
FR
Votre appareil est
équipé, de série, de
protections électro-
niques du moteur
afin d’en garantir sa
longévité. Cette sécu-
rité électronique vous
garantit contre toute
utilisation anormale ; ainsi votre moteur est
parfaitement protégé.
Dans certaines conditions d’utilisation très sé-
vères, ne respectant pas les recommandations de
la notice (Cf. paragraphe “MISE EN SERVICE” :
quantités éventuellement trop importantes et/ou
une utilisation anormalement longue et / ou un
enchainement de recettes trop rapprochées), la
protection électronique se déclenche pour préser-
ver le moteur ; dans ce cas, l’appareil s’arrête et
un affichage “SECU” apparait dans l’écran LCD du
tableau de commande pour indiquer que l’appareil
n’est momentanément plus opérationnel.
Si “SECU” s’affiche sur votre tableau de com-
mandes et que votre appareil s’arrête, procédez
comme suit :
• Laissez votre appareil branché et l’interrupteur
0/1 sur la position 1 “ON” (H).
• Référez-vous aux recommandations de la notice
pour réadapter votre préparation (Cf. paragraphe
“MISE EN SERVICE” : quantités d’ingrédients /
temps de la recette / température / type ac-
cessoires).
• Attendez une demi-heure pour que le moteur
refroidisse.
• Réinitialisez l’appareil en appuyant 2 secondes
sur le bouton “Start / Stop / Reset” (B5).
Votre appareil est de nouveau totalement apte
à l’emploi
Le service consommateur reste à votre disposition
pour toute question (voir coordonnées dans livret
de garantie).
IMPORTANT : MISE EN SECURITE DE L’APPAREIL (“SECU”)
avec la spatule (G) ou bien avec le coté grattoir
d’une éponge.
• En cas d’entartrage du bol, vous pouvez utiliser
le coté grattoir d’une éponge imbibée si néces-
saire de vinaigre blanc.
• Pour nettoyer le bloc moteur (A), utilisez un
chiffon humide. Séchez-le soigneusement.
• Pour vous faciliter le nettoyage, sachez que
le bol, l’ensemble couvercle et les accessoires
passent au lave vaisselle à l’exception de l’en-
traîneur commun (D3 et D4) et de la bague de
verrouillage (D6) (Cf. Fig. 14).
• Les accessoires, l’entraineur commun amovible
et les éléments du couvercle, peuvent se colorer
légèrement avec certains ingrédients comme le
curry, le jus de carottes, etc… ; cela ne repré-
sente aucun danger pour votre santé, ni pour le
fonctionnement de votre appareil. Pour éviter
cela, nettoyez les éléments rapidement après
l’usage.
• Avant de réutiliser votre ensemble bol (D),
assurez-vous que les contacts électriques sous
le bol sont toujours propres et secs.
• Afin de préserver l’aspect et la longévité du
couvercle de votre appareil, lavez-le à la main.
N’utilisez pas le côté abrasif de l’éponge afin
d’éviter les rayures.
• Pour ne pas altérer les matériaux du bol (D),
veillez à respecter les consignes d’utilisation
de votre lave-vaisselle, ne pas augmenter les
doses de sel ou de produits pour lave-vaisselle.

18
FR
18
FR
SI VOTRE APPAREIL NE FONCTIONNE PAS, QUE FAIRE ?
PROBLÈMES CAUSES SOLUTIONS
Cuisson insuffisante
Les temps de cuisson sont donnés à titre
indicatif, ils permettent dans la plupart
des cas une cuisson satisfaisante.
Néanmoins, certaines conditions vont
influer sur le temps de cuisson :
- la taille des aliments (coupés ou non
coupés)
- la quantité des ingrédients
- la variété des légumes, leur maturité
- si les ingrédients sont surgelés ou
non ....
Ajouter un temps de cuisson supplémentaire
en utilisant le sélecteur de durée de
fonctionnement (B4).
Réduisez la taille des morceaux.
Bouchon vapeur mal positionné ou
absent
Positionnez le bouchon vapeur dans le sens
« maxi vapeur » vers vous, cette position
permet de gagner un maximum de chaleur
dans le bol pour toutes les cuissons (soupes,
cuisson à la vapeur, etc.).
Cette position évite également les
éclaboussures pendant le mixage.
La position “mini vapeur” permet de laisser
échapper un maximum de condensation et
ainsi obtenir des plats ou des sauces avec une
meilleure consistance (Risotto, crèmes
dessert, sauces, etc.)
Cuisson vapeur
insatisfaisante
Quantité inadaptée d’eau dans le bol.
Morceaux trop gros.
La quantité d’eau dans le bol doit
correspondre à la graduation (0.7L).
Vous pouvez aussi utiliser le mode manuel en
sélectionnant la température de 120°C et le
temps de cuisson selon la quantité et le type
d’ingrédients.
Réduisez la taille des morceaux.
Difficultés pour réussir
certaines recettes
Recettes inadaptées
Vos recettes, personnelles ou prises sur
Internet peuvent ne pas être adaptées à votre
appareil et à ses accessoires (quantités, temps
de cuisson, durée, accessoires inadaptés) :
avant de commencer votre recette, assurez
vous que vous respectez les consignes
d’utilisation indiquées dans ce mode d’emploi.
L’appareil ne
fonctionne pas.
La prise n’est pas branchée. Branchez l’appareil sur une prise.
L’interrupteur (H) est en position 0. Basculez l’interrupteur en position 1.
Le bol ou le couvercle ne sont
pas correctement positionnés ou
verrouillés.
Vérifiez que le bol ou le couvercle sont bien
positionnés et verrouillés suivant les schémas
de la notice.
Le couvercle ne se
verrouille pas.
Le couvercle n’est pas complet.
Vérifiez que le joint est correctement assemblé
sur le porte joint et que le porte joint est
correctement assemblé sur le couvercle.
Vibrations excessives.
L’appareil n’est pas posé sur une surface
plane, l’appareil n’est pas stable.
Placez l’appareil sur une surface plane.
Volume d’ingrédients trop important. Réduisez la quantité d’ingrédients traités.
Erreur d’accessoires. Vérifiez que vous utilisez l’accessoire préconisé.

19
FR
19
FR
PROBLÈMES CAUSES SOLUTIONS
Léger bruit en
fonctionnement
L’entraineur de votre appareil peut
emettre un bruit en fonctionnement
à vitesse réduite ou avec certains
ingrédients (riz…)
C’est un phénomène passager, qui n’a pas
de conséquence sur la durée de vie de votre
appareil. Il s’estompera ou disparaîtra après
quelques usages et nettoyages de l’entraineur
commun amovible (reportez-vous au
paragraphe «Nettoyage de l’appareil»).
Bruit excessif en
fonctionnement
Utilisation d’un mauvais accessoire
Veillez à utiliser un accessoire adéquat (ex
: n’utilisez pas le batteur F3 pour pétrir ou
mélanger des pâtes, utilisez le couteau F4)
. Pour cela reportez-vous aux préconisations
des recettes et aux consignes d’utilisation
indiquées dans ce mode d’emploi.
Fuite par le couvercle.
Volume d’ingrédients trop important. Réduisez la quantité d’ingrédients traités.
Le couvercle n’est pas bien
positionné ou verrouillé.
Verrouillez correctement le couvercle sur
le bol.
Le joint d’étanchéité
n’est pas présent.
Positionnez le joint d’etancheite sur le
porte-joint et clipsez l’ensemble sur le
couvercle.
Le joint d’étanchéité est coupé,
détérioré.
Changez le joint, contactez un centre
service agréé.
Erreur d’accessoires.
Vérifiez que vous utilisez l’accessoire
préconisé.
Fuite par l’entraîneur du bol
ou par l’accessoire fond xl.
Le joint n’est pas bien positionné. Positionnez correctement le joint.
Le joint est détérioré. Contactez un centre service agréé.
La bague de verrouillage (D6) est
mal verrouillée.
Vérrouillez correctement la bague (D6).
Les lames ne tournent
pas facilement.
Morceaux d’aliments trop gros
ou trop durs.
Réduisez la taille ou la quantité d’ingrédients
traités.
Ajoutez du liquide.
Odeur moteur.
A la première utilisation de l’appareil,
ou bien en cas de surcharge moteur
provoquée par une quantité
d’ingrédients trop importante ou des
morceaux trop durs ou trop gros.
Laissez refroidir le moteur (environ
30 minutes) et réduisez la quantité
d’ingrédients dans le bol.
Affichage “ STOP ”.
L’appareil a détecté des vibrations
trop importantes et s’est placé en
position de sécurité.
Vérifiez que vous êtes à la vitesse
préconisée ou que vous utilisez l’accessoire
recommandé.
Affichage “ SECU ”.
Surcharge moteur provoquée par
une quantité d’ingrédients trop
importante ou des morceaux trop
durs ou trop gros ou une succession
de recettes sans suffisamment de
temps de refroidissement.
Laissez refroidir le moteur (environ
30 minutes) et réduisez la quantité
d’ingrédients dans le bol.
Affichage “ SECU ” + témoin
lumineux rouge clignote.
Surchauffe capteurs de température. Contactez un centre agréé.
Affichage “ Err1 ”
+ témoin lumineux rouge
clignote.
La résistance chauffante
ne fonctionne pas.
Vérifiez que les broches d’alimentations
sous le bol ne sont pas encrassées. Si c’est
le cas, nettoyez-les et réessayez.
Si cela ne fonctionne toujours pas,
contactez un centre agréé.
Affichage “ Err2 ”. Défaut électronique. Contactez un centre agréé.

20
FR
20
FR
PROBLÈMES CAUSES SOLUTIONS
Affichage “ Err3 ”. Défaut vitesse. Contactez un centre agréé.
Affichage “ Err4 ”.
Défaut communication avec carte
électronique chopper.
Contactez un centre agréé.
Affichage “ Err8 ” Défaut capteur sécurité de verrouillage. Contactez un centre agréé.
Affichage “ ntc1 ”
+ témoin lumineux rouge
clignote.
Le capteur 1 de température
ne fonctionne plus.
Contactez un centre agréé.
Affichage “ ntc2 ”
+ témoin lumineux rouge
clignote.
Le capteur 2 de température
ne fonctionne plus.
Contactez un centre agréé.
Affichage du témoin de
sécurité (C4)
Mauvais verrouillage du bol ou du
couvercle
Avant de mettre en fonction l’appareil,
vérifiez si le bol est correctement verrouillé
sur le bloc moteur et si le couvercle est
correctement verrouillé sur le bol. Si le
problème persiste, contactez un centre agréé.
Le couvercle est verrouillé sur le bol
en mode « cuisson sans couvercle »
Déverrouiller le couvercle avant de lancer
le programme de cuisson. Si le problème
persiste, contactez un centre agréé.
La sécurité de verrouillage
du couvercle est restée
active (tige sortie) et elle
ne permet pas de verrouiller
le couvercle.
L’appareil a été éteint en-cours de
recette en basculant l’interrupteur
I/O sur O ou simplement débranché
en-cours de recette.
Il suffit de basculer l’interrupteur I/O
sur I pour réinitialiser le robot et donc
la sécurité de verrouillage du couvercle,
la tige va automatiquement reprendre sa
position d’origine, vous pouvez maintenant
verrouiller le couvercle.
Problème de connexion Reportez-vous au guide de l’application.
Votre appareil ne fonctionne toujours pas ?
Adressez-vous à un centre service agréé (voir la liste dans le livret service).
• Elimination des matériaux d’emballage et de l’appareil
L’emballage comprend exclusivement des matériaux sans danger pour l’environnement, pouvant
être jetés conformément aux dispositions de recyclage en vigueur.
Pour la mise au rebut de l’appareil, se renseigner auprès du service approprié de votre commune.
• Produits électroniques ou produits électriques en fin de vie :
Participons à la protection de l’environnement !
Votre appareil contient de nombreux matériaux valorisables ou recyclables.
Confiez celui-ci dans un point de collecte pour que son traitement soit effectué.
RECYCLAGE
*La marque et les logos Bluetooth
®
sont des marques déposées par Bluetooth SIG, Inc. et leur utilisation par le Groupe SEB a fait l’objet d’une autorisation.
Google Play et Android sont des marques de Google Inc.
Apple et le logo Apple sont des marques d’Apple Inc., déposées aux États-Unis et d’autres pays. App Store est une marque de service d’Apple Inc.
LEXIQUE
Appairer : Action de grouper ou associer deux appareils.
Cette action s’effectue lors de la première connexion entre votre Smartphone ou tablette avec i-Companion xl.
Synchroniser : Action de mise à jour des informations. L’application et i-Companion xl se synchronisent afin d’échanger les
informations lorsqu’ils sont connectés.
Connecter : Etablir une liaison entre l’application (Smartphone/tablette) et l’appareil (i-Companion xl). Cette action est
indispensable pour la synchronisation.
Cookies : Ce sont les informations d’utilisation envoyées à Moulinex pour améliorer l’application.

21
NL
21
NL
Ten aanzien van de persoonlijke
veiligheid
• Lees de gebruiksaanwijzing
aandachtig voor het eerste gebruik
en bewaar ze zorgvuldig: Niet-
naleving ontheft de fabrikant van alle
aansprakelijkheid.
• Trek de stekker van het apparaat
uit het stopcontact wanneer u het
apparaat zonder toezicht laat en
voordat u het monteert, demonteert,
of schoonmaakt. Laat kinderen
dit apparaat niet zonder toezicht
gebruiken.
• Bewaar dit apparaat en het snoer
buiten het bereik van kinderen.
• Dit apparaat mag niet worden
gebruikt door personen (of kinderen)
met verminderde, fysieke, zintuiglijke
of mentale capaciteiten, of personen
die te weinig ervaring of kennis
hebben tenzij ze onder de supervisie
staan van een persoon die voor hen
verantwoordelijk is of als ze genoeg
richtlijnen gekregen hebben om het
apparaat correct te hanteren.
Er moet toezicht op kinderen zijn,
zodat zij niet met het apparaat
kunnen spelen.
• Houd uw apparaat buiten het bereik
van kinderen.
• Tijdens de werking van
het apparaat kunnen er
bepaalde onderdelen zeer
warm worden (RVS-wand
van de kom, afneembare aandrijving,
transparante delen van het deksel,
metalen delen onder de kom,
Accessoire bodem XL mand). Ze kunnen
brandwonden veroorzaken. Houd het
apparaat vast aan de koude, plastic
onderdelen (handvatten, motorblok).
Het rode controlelampje geeft aan dat
er gevaar voor verbranding bestaat.
• De toegankelijke oppervlakken van
het apparaat kunnen zeer warm
worden tijdens het gebruik.
• Het apparaat is niet ontworpen
om met een externe timer of
afstandsbediening te worden
bestuurd.
• Gebruik uw apparaat niet als het niet
correct werkt of als het apparaat, het
netsnoer of de stekker is beschadigd.
Om gevaarlijke situaties te voorkomen,
dient u het netsnoer door een erkend
service center te laten vervangen (zie
bijgevoegde lijst).
• Houd het apparaat nooit onder de
kraan. Houd het motorblok (A) niet
onder stromend water.
• Dit apparaat is uitsluitend geschikt
voor huishoudelijk gebruik
binnenshuis en op een hoogte van
VEILIGHEIDSVOORSCHRIFTEN:

22
NL
22
NL
minder dan 2000 m. De fabrikant
is niet verantwoordelijk en behoudt
zich het recht voor de garantie te
annuleren in geval van commercieel
of oneigenlijk gebruik of niet-
naleving van de instructies.
• Dit apparaat is niet bedoeld voor
gebruik in huishoudelijke of analoge
toepassingen (gebruik dat niet onder
de garantie valt) zoals
- in keukens van winkels, kantoren en
andere werkomgevingen.
- in personeelskeukens van
winkels, kantoren en andere
werkomgevingen.
- door de gasten van hotels, motels
of andere verblijfsvormen.
• Uw apparaat geeft hete stoom af
die brandwonden kan veroorzaken.
Ga voorzichtig om met het deksel en
de dop (gebruik indien
nodig een handschoen,
een pannenlap ... ).
Houd de dop vast aan
het middelste gedeelte.
• Gebruik het apparaat nooit wanneer
de afdichtingsring zich niet op de
afdichtingshouder bevindt of als
de afdichtingshouder niet in het
deksel is aangebracht. U moet de
dop op de opening in het deksel
plaatsen voor gebruik (tenzij
anders vermeld in het recept).
WAARSCHUWING : let op
voor verwondingen door
slecht gebruik van het
apparaat.
Wees voorzichtig wanneer u
de messen van het
ultrablade
hakmes
(F1) en van het
mes
om te kneden/hakken
(F4)
schoonmaakt en de kom leegt. De
messen zijn zeer scherp.
Berg het ultrablade hakmes (F1) op
in de kom na elk gebruik.
Wees voorzichtig wanneer u een
warme vloeistof in de keukenmachine
giet. De vloeistof kan uit het
apparaat spuiten wanneer haar
kookpunt wordt bereikt.
WAARSCHUWING: Ga voorzichtig te
werk als u het apparaat hanteert
(reinigen, vullen en uitgieten): zorg
ervoor dat er geen vloeistof op de
contacten terechtkomt.
WAARSCHUWING: Sommige
levensmiddelen voorzien van een
vel ( zoals volledige worsten,
rundertong, gevogelte,…) of grote
stukken vlees kunnen het opspatten
van de kokende vloeistof binnenin
veroorzaken. Wij raden u dus aan om
ze van tevoren met een mes of vork
te doorprikken.
WAARSCHUWING: Het oppervlak van

23
NL
23
NL
het verwarmingselement blijft na
gebruik nog even warm.
Raak tijdens het opwarmen en tot
alles volledig is afgekoeld enkel
de handgrepen van uw product aan
(trekkers D2, handgreep van het deksel
E2 en van de stoomregeldop E1) .
Raadpleeg de gebruiksaanwijzing
voor het instellen van de
werkingssnelheid en -tijd van elk
accessoire en elk programma.
Raadpleeg de gebruiksaanwijzing
voor het monteren en demonteren
van de accessoires op het apparaat.
Raadpleeg de gebruiksaanwijzing
voor het reinigen en onderhouden
van uw apparaat.
Volg voor de reiniging van
uw apparaat steeds de
reinigingsinstructies:
• Het apparaat uitschakelen.
• Niet reinigen als het apparaat
nog warm is.
• Reinigen met een vochtige doek
of spons.
• Het apparaat nooit in water
onderdompelen of onder
stromend water houden.
UITSLUITEND VOOR DE EUROPESE
MARKT:
• Bewaar het apparaat en het snoer
buiten het bereik van kinderen jonger
dan 8 jaar.
Kinderen mogen niet met het
apparaat spelen.
• Dit apparaat mag worden gebruikt
door personen met verminderde
fysieke, mentale of zintuiglijke
capaciteiten of personen die te
weinig ervaring of kennis hebben
als ze onder toezicht staan of als ze
richtlijnen hebben gekregen om het
apparaat veilig te kunnen hanteren
en de risico’s kennen.
• Dit apparaat mag worden gebruikt
door kinderen vanaf 8 jaar als
ze onder toezicht staan of als ze
richtlijnen hebben gekregen om het
apparaat veilig te kunnen hanteren
en de risico’s kennen. De reinigings-
en onderhoudswerkzaamheden
mogen niet door kinderen zonder
toezicht worden uitgevoerd tenzij
ze ouder zijn dan 8 jaar en onder
toezicht staan van een volwassene.
Ten aanzien van de elektrische
aansluiting
• U moet de stekker van het apparaat
in een geaard stopcontact steken.
•
Het apparaat is uitsluitend geschikt om
op wisselstroom te werken.
Controleer
of de voedingsspanning op de
gegevensplaat van het apparaat
overeenkomt met de spanning van
uw elektrische installatie.
• Als u het apparaat niet correct
aansluit, vervalt de garantie.
• Trek nooit aan het snoer om de
stekker van het apparaat uit het
stopcontact te trekken.

24
NL
24
NL
• Dompel het apparaat, het netsnoer of de
stekker niet in vloeistof en laat ze niet
in de buurt of in contact komen met
de warme onderdelen van het apparaat,
warmtebronnen of scherpe hoeken.
Ten aanzien van een slecht gebruik
• Raak het deksel niet aan voordat
het apparaat volledig tot stilstand
is gekomen (‘stop’-knop), wacht
tot de gemixte ingrediënten tot
stilstand zijn gekomen.
• Doe altijd eerst de vaste ingrediënten
in de kom en voeg daarna de vloeibare
ingrediënten toe (Cf. Fig. 10).
Respecteer altijd de aanduiding
MAX aan de binnenkant van de kom
(Cf. Fig. 10). Als de kom te vol is,
kan er kokend water uit spuiten.
• Let op. Respecteer het niveau van
0,7 liter water dat wordt aangegeven
in het stoomkookprogramma
(Cf. Fig. 3.2).
• Steek nooit uw vingers of andere
voorwerpen in de kom wanneer het
apparaat in werking is.
• Gebruik de kom niet om ingrediënten
te bewaren, in te vriezen, te
steriliseren…
• Zet het apparaat op een stabiel,
hittebestendig, schoon en droog
werkvlak.
• Zet het apparaat niet naast een muur
of kast: de geproduceerde stoom kan
de elementen beschadigen.
• Plaats uw apparaat niet in de buurt
van een ingeschakelde warmtebron
(kookplaat, huishoudapparaat ...).
• Bedek uw deksel niet met een doek of
een ander voorwerp, stop de opening
in het deksel niet dicht, gebruik de
stoomregelknop.
• Zorg ervoor dat er geen lang haar,
sjaals, stropdassen ... boven de kom
hangen wanneer het apparaat in
werking is.
• Plaats de accessoires nooit in de
magnetron.
• Het apparaat niet in de open lucht
gebruiken.
• Overschrijd nooit de maximale
hoeveelheid die wordt aangegeven in
de gebruiksaanwijzing.
• Berg het apparaat op wanneer het is
afgekoeld.
• Plaats de kom niet in de diepvriezer
om hem af te koelen, gebruik de
koelkast.
SAV
• Voor uw eigen veiligheid dient u geen
andere accessoires of onderdelen te
gebruiken dan die door de erkende
service centers worden geleverd.
• Elke handeling anders dan gewone
onderhouds- of schoonmaakwerk
-
zaamheden dient door een erkend
service center te worden uitgevoerd.
• Raadpleeg de tabel “Uw apparaat
werkt niet. Wat nu? ” aan het einde
van de gebruiksaanwijzing.

25
NL
25
NL
Bij het doorlezen van deze handleiding vindt u gebruiksadviezen die u alle mogelijkheden
van het apparaat tonen: het klaarmaken van soepen en stoofschotels, stoombereiding, het
maken van beslag.
BESCHRIJVING VAN HET APPARAAT:
A Motorblok
B Bedieningspaneel
B1: Snelheidsschakelaar
B2: temperatuurschakelaar en/of
controlelampje verwarming
B3: schakelaar bereidingsduur/koppeling
B4: keuzetoetsen automatische
programma’s
B5 : knop START/STOP/RESET
B6: schakelaar + / -
C LCD-scherm
C1: weergave controlelampje
verbinding
C2: weergave stoomprogramma
C3: weergave stap van recept.
C4: weergave veiligheidslampje
C5: weergave snelheid
C6: weergave temperatuur
C7: weergave tijd
D Kom
D1: roestvrijstalen kom
D2: trekkers
D3: afneembare aandrijfas
D4: afdichtingsring (X2)
D5: Accessoire bodem XL
D6: vergrendelingsring
E Deksel
E1: stoomregeldop
E2: deksel
E3: afdichtingsring
E4: afdichtingsring
F Accessoires:
F0: opbergdoos voor accessoires
F1: ultrablade hakmes
F2: menger
F3: garde
F4: mes om te kneden/hakken
F5: stoommand
G Spatel
H ‘0/1’-schakelaar om de stroomtoevoer af te
sluiten
I Schoonmaakborstel
TECHNISCHE GEGEVENS VAN HET APPARAAT:
Vermogen: 1550W (1000W : verwarmingsweerstand / 550W : motor )
Temperatuurbereik: van 30° tot 150°C
regelbaar per 5°C.
Werkingsduurbereik: van 5 s tot 2 uur
regelbaar per 5 s min en 1 min max.
Aantal snelheden: 13 - 2 intermitterende snelheden:
snelheid 1 ( 5 s On / 20 s Off ).
snelheid 2 ( 10 s On / 10 s Off ).
- 10 continue, progressieve snelheden
(snelheden 3 tot 12).
- 1 maximumsnelheid met onderbrekingen (snelheid 13).
- *Het merk en de logo’s van Bluetooth
®
zijn gedeponeerde merken van Bluetooth SIG, Inc.; de SEB-groep heeft toestemming deze te gebruiken.
- Google Play en Android zijn merken van Google Inc.
- Apple en het Apple-logo zijn merken van Apple Inc., die zijn gedeponeerd in de Verenigde Staten en in andere landen. App Store is een servicemerk
van Apple Inc.

26
NL
26
NL
OVER JE I-COMPANION XL
Je i-Companion xl beschikt over de volgende accessoires:
Deze accessoires zijn eveneens voorzien van handgrepen zodat u ze gemakkelijker kunt vasthouden
tijdens het koken.
HAKMES
Soepen mixen
3min 3L
Compotes mixen 40s 1Kg
Groenten hakken 15s 1Kg
Vlees hakken 30s 1Kg
Vis hakken 15s 1Kg
Gebruik dit accessoire niet om harde producten fijn te hakken, gebruik het kneed-/hakmes F4.
MENGER
Mengt de Bereide schotels zonder de ingrediënten te beschadigen,
Zeer nuttig voor de bruinbakfase van bepaalde gerechten (risotto, soepen).
Braadschotels 5min 500g
Stoofschotels 45min 3L
Risotto 22min 1,5Kg
Ratatouille, Chutneys, Peulvruchten (Instellingen: zie kookboek)
GARDE
9 max
Eiwitten 5/10min
7
max
Mayonaise, Slagroom 2/5min 0,5L
Sauzen, crèmes
tot
1/20min 1L
Aardappelpuree
tot
1min 1L
Polenta
tot
1/16min 1L
MES OM TE KNEDEN/HAKKEN
Witbrooddeeg kneden 2min 30s 1,2Kg
Kruimeldeeg, zout deeg,
speciaal brooddeeg kneden
2min 30s 1Kg
Het gistdeeg kneden
(brioche, kouglof…)
1min 30s
2 min
0,8Kg
Licht deeg mengen
(cake…)
40 s
3min
1Kg
Noten verpulveren
Harde ingrediënten hakken
1min 0,6Kg
Hakken van harde producten
1min 0,6Kg
Ijs crushen
1min
6 tot 10
Pannenkoekenbeslag,
wafelbeslag
1min 1,5L
STOOMMAND
Stoombereidingen van
groenten, vis of vlees
20/40min 1Kg
Soepen met stukjes
3min 3L
DOP
Stoomregeldop
- Maxi (a) = stoomkoken.
- Mini (b) = risotto, roomdesserts, sauzen enz.
bodem XL
Accessoire bodem XL
Bruin bakken en braden zonder deksel
Vergroting van het bakoppervlak voor uw grote stukken vlees of vis.

27
NL
27
NL
Het apparaat speciaal ontworpen voor ‘verbonden’
gebruik, maar kan ook ‘niet-verbonden’ worden
gebruikt. Bovendien zijn er twee werkstanden:
automatisch programma en handbediening.
• Modus automatisch programma:
de snelheid, bereidingstemperatuur en
duur zijn voorgeprogrammeerd voor het
automatisch bereiden van soepen, stoofschotels,
stoomgerechten en beslag.
• Handbediening:
zelf de snelheid, temperatuur en bereidingstijd
instellen, zodat het apparaat precies werkt zoals
jij dat wilt.
Gebruik met of zonder deksel
Temperatuur van
30 tot 130 °C
Temperatuur van
135 tot 150 °C
- Als u een temperatuur tussen 135 °C en 150 °C
hebt geselecteerd, moet u uw apparaat gebruiken
zonder deksel. Als het deksel op de kom staat, wordt
een hangslot weergegeven op het LCD-scherm, met
de uitnodiging om hem te ontgrendelen.
- Zodra u de voedingsmiddelen hebt toegevoegd,
roert u ze om met behulp van de spatel en herhaalt
u de bewerking regelmatig, om te voorkomen
dat de bodem van de kom vlekkerig wordt. (cf.
reinigingsparagraaf).
- Als u ervoor kiest om het apparaat te gebruiken
met deksel, mag de baktemperatuur maximaal 130
°C bedragen.
UW APPARAAT IS UITGERUST MET EEN
DEKSELVERGRENDELING
Het deksel wordt bij elke inschakeling van het
apparaat vergrendeld. Deze beveiliging belet het
openen van het deksel tijdens het bereiden van
een recept (Zie Afb.17). Oefen geen druk op
het deksel uit wanneer het vergrendeld is.
Het deksel wordt opnieuw ontgrendeld zodra het
apparaat stopt met werken. Als u een temperatuur
hoger dan of gelijk aan 50°C en een snelheid hoger
dan of gelijk aan 5 hebt geselecteerd, worden er
eerst 10 seconden op het LCD-scherm van het
bedieningspaneel afgeteld. (Zie Afb.18). U kunt
het deksel pas openen eenmaal het aftellen is
beëindigd.
PLAATSING VAN DE KOM, DE ACCESSOIRES EN HET
DEKSEL
• Reinig voor het eerste gebruik alle onderdelen
(D, E, F, G) met warm zeepsop, maar niet het
motorblok (A). De kom (D) beschikt over een
demonteerbare koppeling (D3), waardoor deze
gemakkelijk te reinigen is
• Zorg ervoor dat je alle verpakkingsmaterialen
verwijdert voordat je het apparaat voor het eerst
gebruikt, met name de bescherming tussen de kom
(D) en het motorblok (A).
• Breng de afdichtingsring (E4) aan op de
afdichtingshouder (E3) (Zie Afb. 1) en klem het
geheel vast op het deksel (E2) (Zie Afb. 3).
• Plaats de pakking (D4) op de gemeenschappelijke
koppeling (D3). Vergrendel het geheel op de
bodem van de kom met de vergrendelingsring
(D6) (zie Fig. 2). Als u de bakmodus zonder
deksel gebruikt, breng de afdichting (D4) aan op
het Accessoire bodem XL (D5). Maak het geheel
vast aan de onderkant van de kom met behulp van
de vastzetring (D6) (Zie Afb. 3).
• Plaats het accessoire van je keuze in de kom:
- de accessoires (F1, F2, F3 of F4) op de
gemeenschappelijke koppeling onderin de kom
(zie Fig. 4.1),
- om te stomen het stoommandje (F5) in de kom
(zie Fig. 4.3 ), nadat de kom vooraf is gevuld met
0,7 l vloeistof (water, saus…) (zie Fig. 4.2 ).
• Doe de ingrediënten in de kom of het stoommandje.
• Plaats het deksel op de kom (D) met de twee
driehoeken in lijn (zie Fig. 5), vergrendel het
deksel zonder erop te drukken door het in de
richting van de pijl te draaien (zie Fig. 6).
Plaats de stoomregelknop (E1) op het deksel. Er zijn
2 mogelijke standen (zie Fig. 7):
Met de “mini” kunt u een maximale
hoeveelheid condensatie laten
ontsnappen, waardoor uw gerechten
of sauzen een betere consistentie
krijgen (risotto, roomdesserts, sauzen enz.).
Met de “maxi” maakt u voor al uw
stoomgerechten (soepen enz.)
optimaal gebruik van warmte en
stoom in de kom.
Dankzij deze stand vermijdt u ook spatten
tijdens het mixen.
• Plaats de kom (D) op het motorblok (A). tot u
‘klik’ hoort (Cf. Fig. 8).
• Het apparaat werkt alleen als de kom en het
deksel correct zijn geplaatst en zijn vergrendeld
op het motorblok.
Wanneer één van beide onderdelen
niet correct is geplaatst of vergrendeld
(Cf. Fig. 10.1 en 10.2), begint het logo
te knipperen wanneer we een functie
activeren.
F1 F2
F3 F4
F5
F1 F2
F3 F4

28
NL
28
NL
Gebruikstip:
Uw apparaat is voorzien van een microprocessor die de stabiliteit analyseert en controleert. Bij
instabiliteit wordt de rotatiesnelheid van de motor automatisch verlaagd, als de instabiliteit blijft
voortduren, wordt de motor gestopt en verschijnt er ‘STOP’ op uw scherm.
• Controleer of de hoeveelheden van de ingrediënten niet te groot zijn en of de gebruikte snelheid
de geschikte is.
• Controleer of u het correcte accessoire gebruikt.
• Zet uw apparaat opnieuw aan.
Keuze van de gepersonaliseerde parameters:
Keuze van de motorsnelheid.
2 intermitterende snelheden en 10
continue, progressieve snelheden.
Maximumsnelheid met
onderbrekingen (snelheid 13).
Keuze van de kooktemperatuur.
Van 30° tot 150°C
Verwarmingscontrolelampje:
dit lampje licht op wanneer de
bereiding start en dooft wanneer
de temperatuur in de kom onder
de 50°C zakt.
Keuze van de kooktijd.
van 5 s tot 2 uur.
Koppeling bij 1e verbinding.
Verhoging van de snelheid,
de kooktemperatuur en -tijd.
Verlaging van de snelheid,
de kooktemperatuur en -tijd.
Deze knop heeft 3 functies:
- “Bevestiging” van de
keuze van het automatische
programma of van de
parameters die je hebt
gekozen bij handbediening
(snelheid, temperatuur,
tijd).
- “ Pauze ” tijdens gebruik,
wanneer het apparaat is
gestart.
- “ Reset ” van de
geselecteerde parameters
door de knop 2 seconden in
te drukken.
- “Bevestiging van de stap”
in het recept.

29
NL
29
NL
GEBRUIK IN VERBINDING MET EEN SMARTPHONE OF TABLET
VOORBEREIDING VAN DE INSTALLATIE
Raadpleeg de lijst met smartphones en tablets die met i-Companion compatibel zijn op
www.moulinex.com
(lijst van compatibele modellen www.moulinex.com)
I-COMPANION XL INSTALLEREN
Om i-Companion xl te installeren is het volgende nodig:
• De Companion-app, die gratis kan worden gedownload van de App Store (iPhone/iPad) en Google Play
(Android)
• Een Bluetooth® Smart 4.0-verbinding vanuit je smartphone of tablet: i-Companion xl maakt verbinding
met je smartphone/tablet via een autonome draadloze verbinding
• De smartphone/tablet moet zich dicht bij de ’i-Companion xl bevinden (De afstand waarover de verbinding
kan worden gelegd, varieert afhankelijk van de woning).
• Een stopcontact om de i-Companion xl op aan te sluiten: de i-Companion xl kan alleen verbinding maken
met je smartphone of tablet wanneer hij op de elektriciteit is aangesloten.
DE I-COMPANION XL VOOR HET EERST VERBINDEN
Downloaden van de app
Download eerst de app op je smartphone/tablet door verbinding te maken met de App Store voor iOS
of Google Play voor Android.
Het downloaden kost maar een paar minuten en je hoeft geen account aan te maken. Als de app is
gedownload, kan je je eerste recepten maken met de i-Companion xl. (Als je geen account aanmaakt,
krijg je 50 recepten).
Wanneer je een account hebt aangemaakt op de app, krijg je toegang tot alle inhoud voor een
maximale variatie in je menu’s.
Inschakeling van het apparaat
Frequentie: 2,40GHz. Maximaal uitgezonden vermogen: 7,7dBm
Je apparaat heeft een 0/1-schakelaar. Zet deze op 1. (zie Fig. 9).
Op het lcd-scherm staan alle parameters op ‘0’.
Wanneer het apparaat verbonden is met een smartphone of tablet, is het lcd-scherm van de
i-Companion xl blauw.
Over Bluetooth® Smart
De Bluetooth® Smart 4.0-technologie (Bluetooth Low Energy) maakt draadloze communicatie
tussen een app en een apparaat mogelijk waarbij maar heel weinig energie wordt verbruikt.
iPhone 4S of nieuwer
iPad 3 / iPad mini of hoger
Vanaf iOS 9 en de volgenden.
Van Android 4.4 en de volgenden.

30
NL
30
NL
De i-Companion xl aanzetten
Je apparaat heeft een 0/1-schakelaar (H). Zet deze op 1 (zie Fig. 9).
Activering van Bluetooth
Ga dicht bij de i-Companion xl staan en controleer of de Bluetooth van je smartphone/tablet is
ingeschakeld.
De app starten
Start de Companion-appe door te klikken op het pictogram “Companion”.
Koppeling
Wat wordt verstaan onder koppeling?
De eerste keer zullen de app die je hebt gedownload op de smartphone of tablet en de i-Companion xl
elkaar automatisch en snel vinden, als je de volgende stappen uitvoert.
Je kunt tot wel 10 apparaten koppelen aan je i-Companion xl.
Daartoe moet je voor elk apparaat apart de koppeling uitvoeren.
Er kan echter maar één apparaat tegelijkertijd met de i-Companion xl zijn verbonden.
• Accepteer cookies; daarmee werkt de app beter, omdat hij je gebruiksvoorkeuren kan ophalen.
• Selecteer je apparaat.

31
NL
31
NL
• Druk, wanneer de app daarom vraagt, lang (4 seconden op de knop Timer (B3) van de
i-Companion xl.
Het controlelampje verbinding (C1) gaat maximaal 30 seconden knipperen. In die tijd wordt
de verbinding tot stand gebracht tussen de i-Companion xl en je Smartphone/tablet.
• Accepteer het koppelingsverzoek dat op je Smartphone/tablet verschijnt of ga naar het
notificatiecentrum om de koppeling te accepteren.
Het controlelampje verbinding (C1) gaat ononderbroken branden om aan te geven dat de verbinding
tot stand is gebracht.
NB : Nadat de koppeling is uitgevoerd, zal de i-Companion xl bij toekomstige verbindingen je
smartphone/tablet automatisch herkennen. Je hoeft deze koppeling dus niet opnieuw uit te voeren.
De verbinding is geslaagd
Je i-Companion xl is nu verbonden met je Smartphone/tablet. Het icoontje hierboven geeft aan dat
de verbinding tot stand is gebracht

32
NL
32
NL
De verbinding is mislukt
Het icoontje hierboven geeft aan dat de verbinding niet tot stand is gebracht.
Voer de volgende handelingen uit:
• Ga dicht bij de i-Companion xl staan.
• Controleer of de stekker van de i-Companion xl in het stopcontact zit en of het stopcontact in orde is.
• Controleer of je smartphone/tablet compatibel is (zie de lijst van compatibele apparaten op www.
moulinex.com).
• Controleer of de Bluetooth van je smartphone/tablet is ingeschakeld.
• Voer de koppelingsprocedure opnieuw uit en raadpleeg de FAQ (veelgestelde vragen).
Als het probleem aanhoudt, ga dan nog eens na of je smartphone/tablet compatibel is.
Als je een Android-apparaat gebruikt, controleer dan of deze op de lijst van compatibele modellen
staat (de lijst van compatibele apparaten op www.moulinex.com).
• Ga naar het menu van de app voor onze recepten.
Bij gebruik in verbinding wordt bij een stap-
voorstaprecept met de eerste reset de stap beëindigd
en met de tweede reset het hele recept.
FAQ : VEELGESTELDE VRAGEN
Waar moet ik de i-Companion xl plaatsen?
• Plaats de i-Companion xl op een stabiele, vlakke ondergrond.
• Voor een optimale verbinding tussen de i-Companion xl en je smartphone/tablet, raden wij aan alle
handelingen waarvoor een verbinding nodig is, op een niet al te grote afstand te verrichten.
• Als het controlelampje verbinding (C1) ononderbroken brandt, weet je zeker dat de apparaten zijn verbonden.
• Wanneer de verbinding wordt onderbroken (he verbindingssymbool is doorgestreept), ga dan dichter
bij de i-Companion xl staan om de verbinding te herstellen.
Wat gebeurt er als de verbinding wordt verbroken tijdens het bereiden van een recept?
Als de verbinding tussen de i-Companion xl en je smartphone/tablet tijdens het bereiden van een recept
wordt onderbroken, worden de twee apparaten automatisch gesynchroniseerd zodra de verbinding wordt
hersteld.
Je kunt dan verdergaan met de bereiding van je recept vanaf de stap waar je was toen de vebinding
werd verbroken.
Kan ik de i-Companion xl gebruiken zonder de app?
Het apparaat kan worden gebruikt zonder de app. (Zie Ingebruikname zonder verbinding).
Raadpleeg daarvoor het gedeelte over het gebruik van het apparaat.
Alleen met de app kan je echter profiteren van de vele voordelen van het gebruik met verbinding.
Kan de i-Companion xl worden gebruikt met verscheidene smartphones of tablets?
Als je wilt, kan je verscheidene apparaten koppelen aan de i-Companion xl. Daartoe moet je voor elk
apparaat apart de koppeling uitvoeren. (zie Koppeling)
Er kan echter maar één apparaat tegelijkertijd met de i-Companion xl zijn verbonden.

33
NL
33
NL
GEBRUIK ZONDER VERBINDING
Beslag (lijst van subprogramma’s) Soepen (lijst van
subprogramma’s)
Stoofschotels (lijst van
subprogramma’s)
Stomen (lijst van
subprogramma’s)
GEBRUIK VAN HET BEDIENINGSPANEEL (B)
Een automatisch programma selecteren:
Inschakeling van het apparaat
Je apparaat heeft een 0/1-schakelaar. Zet deze op 1.
Op het lcd-scherm staan alle parameters op ‘0’. (Zie Fig. 9).
Wanneer de i-Companion xl niet is verbonden, is het lcd-scherm wit.
AUTOMATISCHE MODUS
1- Druk op het progamma van je
keuze (B4). Er verschijnt een
lichtend puntje boven het
geselecteerde programma. Door
herhaald drukken loop je door
de lijst van subprogramma’s
heen.
2- De voorgeprogrammeerde
parameters kunnen worden
gewijzigd tijdens de
bereiding van een recept
(in functie van het gekozen
recept, de ingrediënten en
de hoeveelheden). Druk
op de keuzeschakelaar
bereidingstemperatuur (B2) of
de tijdkeuzeschakelaar (B3);
de gekozen parameter knipper
op het scherm (C6-C7).
3- Regel de parameter(s)
met behulp van de ‘+/-’-
schakelaar (B6).
4- Wanneer u al uw parameters
heeft gewijzigd, drukt u op
de ‘start’-knop (B5) om
het programma te starten.
Wanneer uw apparaat in
werking is getreden, licht
het rode controlelampje
op om aan te geven dat de
bereiding is gestart.
5- Wanneer het programma stopt, klinken er 3
pieptonen.
6- Aan het einde van de programma’s soepen,
stoofschotels P2 en P3 en stomen gaat
het apparaat automatisch over op de
warmhoudfunctie gedurende 45 minuten,
zodat het gerecht serveerklaar blijft. Bij
de programma’s stoofschotels P2 en P3 en
bij handbediening werkt de motor van het
apparaat op een specifieke snelheid om te
zorgen dat het gerecht de goede substantie
houdt en niet blijft plakken op de bodem
van de kom. Om de warmhoudfunctie uit te
schakelen, drukt u eenvoudigweg op de knop
‘stop’ (B5). Als je het deksel opent, op de
trekkers (D2) drukt of de kom verwijdert,
Moet de Bluetooth van mijn telefoon continu zijn ingeschakeld?
De Bluetooth moet zijn ingeschakeld om de app met de i-Companion xl te synchroniseren.

34
NL
34
NL
Tijdens bepaalde bereidingen worden luchtbelletjes gevormd en kan de kom overlopen.
Wees vooral voorzichtig als u diepvriesgroenten gebruikt. Gebruik kleinere hoeveelheden om
overlopen te voorkomen.
schakelt de warmhoudfunctie automatisch uit.
Wanneer de programma’s voor stoven P2 en P3
en het bereiden van sauzen en roomdesserts zijn
afgelopen, blijft de motor draaien tijdens het war-
mhouden om te vermijden dat de bereiding aan
de bodem van de kom blijft kleven.
Na de kneedfase van de deegprogramma’s P1
en P2, schakelt het apparaat over naar de
“rijsmodus” op 30°C om uw deeg meer volume
te geven. Deze fase duurt 40 minuten. Als u
het deksel opent, op de trekkers (D2) drukt of
de kom verwijdert, schakelt het apparaat over
naar de “pauzemodus”. Druk opnieuw op ‘start’
om de bereiding voort te zetten.
Houd de ‘stop’-knop 2 seconden ingedrukt om
deze modus uit te schakelen.
7- Druk op de trekkers (D2) en verwijder de kom
(D) (Cf. Fig. 12).
Wanneer je een automatisch programma gebruikt
bij verbinding met je smartphone of tablet, kan
je het apparaat op ieder moment uitschakelen
door een druk op de knop ‘stop’.Het automatische
programma schakelt over naar de pauzemodus.
Druk opnieuw op ‘start’ om de bereiding voort
te zetten. Als u het verkeerde programma heeft
gekozen en u het programma wilt annuleren,
houdt u de ‘stop’-knop 2 seconden ingedrukt-.
ONTDEK DE VOORGESTELDE, AUTOMATISCHE PROGRAMMA’S:
Soep P1 Soep P2
Stoofschotel
P1
Stoofschotel
P2
Stoofschotel
P3
Automatische
programma’s
Snelheid
“standaard”
(instelbaar)
10 x pulse et
V12 gedurende
2 min.
V7 tot V10
gedurende
30 sec.
V3 V1 V2
Standaard
temperatuur
(instelbaar)
100°C
(90°C
tot 100°C)
100°C
(90°C
tot 100°C)
130°C
(niet instel-
baar)
95°C
(80°C
tot 100°C)
95°C
(80°C
tot 100°C)
Tijd
“standaard”
(instelbaar)
40 min
(20min
tot 60 min)
45 min
(20 min
tot 60 min)
5 min
(2 min
tot 15 min)
45 min
(10 min
tot 2h)
20 min
(10 min
tot 2h)
“Standaard”-duur voor
warmhouden na afloop van
het programma
45 min 45 min 45 min 45 min
Motortoerental tijdens het
warmhouden
5s ON in V3 /
20s OFF
10s ON in V3 /
10s OFF

35
NL
35
NL
Bereiding
stoom P1
Bereiding
stoom P2
Deeg P1 Deeg P2 Deeg P3
Automatische
programma’s
Snelheid
“standaard”
(instelbaar)
V5 gedurende
2 min 30 s
V5 gedurende
1 min. 30 sec.
vervolgens v6
gedurende 2 min.
V3 gedurende
40 sec.
vervolgens V9
gedurende 3 min.
Standaard
temperatuur
(instelbaar)
100°C
(niet
instelbaar)
100°C
(niet
instelbaar)
Tijd
“standaard”
(instelbaar)
30 min
(1 min
tot 60 min)
35 min
(1 min
tot 60 min)
2 min 30 s
(30 s tot
2 min 30 s)
3 min 30 s
(30 s tot
3 min 30 s)
3 min 40 s
(1 min 40 s
tot 3 min 40 s)
«Standaard»-duur voor
warmhouden na afloop
van het programma
45 min 45 min
Motortoerental tijdens
het warmhouden
Laat het deeg
‘standaard’ 30° rijzen
op het einde van het
programma
40 min. 40 min.
GEBRUIK VAN HET STOOMMANDJE
De kooktijden zijn ter indicatie gegeven, ze
bieden doorgaans voldoende tijd voor een
geslaagde bereiding.
Toch zullen bepaalde omstandigheden de kooktijd
beïnvloeden:
- de grootte van de groenten (gesneden of niet
gesneden)
- de hoeveelheid ingrediënten in het mandje
- de variëteit van de groenten, hun rijpheid
- de hoeveelheid water in de kom, die moet
overeenstemmen met de graadverdeling (0,7 l).
Vergeet niet om de stoomregeldop naar u toe te
draaien tot in de hoge (a).
Als de kooktijd onvoldoende blijkt, kunt u nog
wat extra tijd toevoegen.
Kooktijd stomen
Ingrediënten Hoeveelheden (max.) Geschatte kooktijd
Aanbevolen
stoomprogramma
Courgettes 800 g 20 min P1
Pastinaak 800 g 25 min P1
Preiwit 800 g 25 min P1
Broccoli 500 g 20 min P1
Vis 600 g (met bakpapier) 15 min P1
Aardappelen 1 kg 30 min P2
Wortelen 1 kg 30 min P2
Prinsessenbonen 800 g 30 min P2
Wit vlees 600 g (met bakpapier) 20 min P2
Bepaalde recepten kunnen omwille van bellenvorming tot overstroming van de ingrediënten
leiden, in het bijzonder wanneer bevroren groente wordt gebruikt. Als dit zich voordoet, doe
minder ingrediënten in de kom.

36
NL
36
NL
HANDMATIGE MODUS
1- Druk op de schakelaar van de
parameter die u wilt instellen
(de snelheidsschakelaar (B1),
de temperatuurschakelaar
(B2) of de tijdschakelaar
(B3). De gekozen parameter
knippert op het scherm (C5-
C6-C7).
2- Regel vervolgens de
parameter(s) met behulp van
de ‘+/-’- schakelaar (B6). Om
veiligheidsredenen kunt u de
temperatuur niet regelen
zonder eerst een kooktijd in
te stellen.
3- Wanneer u al uw parameters
heeft ingesteld, drukt u
op de ‘start’-knop (B5).
Wanneer uw apparaat in
werking is getreden, licht het
rode controlelampje op om
aan te geven dat de bereiding is gestart. Wanneer
het programma is gestart, kunt u het op elk
moment onderbreken door op de ‘stop’-knop te
drukken (B5).
Het programma schakelt over naar de pauzemodus
Druk opnieuw op ‘start’ om de bereiding voort
te zetten. Als u het verkeerde programma heeft
gekozen en u het programma wilt annuleren,
houdt u de ‘stop’-knop 2 seconden ingedrukt-.
4- Wanneer het programma stopt, klinken er 3
pieptonen.
5- Druk op de trekkers (D2) en verwijder de kom
(D) (Cf. Fig. 12).
UW APPARAAT IS UITGERUST MET EEN PLATTE
BODEMDOP
De platte bodemdop maakt het mogelijk om meer
ruimte in de kom vrij te maken zodat u zonder
hinder van de aandrijving kunt bakken of braden
(Zie Afb. 15).
BAKKEN ZONDER DEKSEL
U kunt levensmiddelen in uw kom bakken zonder
het deksel te gebruiken om ze op elk moment te
kunnen roeren en controleren. (Zie. Afb. 16).
Voor deze bakmodus dient u een temperatuur
tussen 135°C en 150°C in te stellen. Stel uw
gewenste baktijd in (tot 20 min).
De functie BAKKEN ZONDER DEKSEL is niet
geschikt voor confituren en voor bereidingen op
basis van melk (risico op overkoken).
•
Houd het apparaat nooit onder
de kraan. Houd het motorblok
(A) niet onder stromend water.
Trek de stekker van het apparaat uit het
stopcontact na gebruik.
• Maak de kom onmiddellijk schoon na gebruik.
• Druk op de trekkers (D2) en verwijder de kom
(D).
• Zet de kom op een vlak werkblad.
• Draai het deksel een kwartslag in wijzerzin
om het te ontgrendelen. Verwijder het deksel
voorzichtig.
• Wees voorzichtig wanneer u de messen van
het ultrablade hakmes (F1) en van het mes
om te kneden/hakken (F4) schoonmaakt en
de kom leegt. De messen zijn zeer scherp.
• Wanneer de onderdelen zijn afgekoeld:
- demonteert u de aandrijfas (D3), de
afdichtingsring (D4) en de vergrendelingsring
(D6) (Cf. Fig. 13).
- maakt u de kom (D), de aandrijfas (D3), de
afdichtingsring (D4), de vergrendelingsring
(D6), de accessoires (F1), (F2), (F3),
(F4), (F5), de stoomregelknop (E1), het
deksel (E2), afdichtingsring (E4) en de
afdichtingsring (E3) schoon met een spons
en warm zeepwater.
• Spoel de verschillende elementen onder
stromend water.
• Als het apparaat zeer vuil is, laat u het
HET APPARAAT SCHOONMAKEN

37
NL
37
NL
onderdeel enkele uren in zeepwater weken en
krabt u het, indien nodig, met een spatel (G)
of met een schuursponsje schoon.
• Bij kalkaanslag kunt u een schuurspons
gebruiken, eventueel gedrenkt in azijn.
• Gebruik een vochtige doek om het motorblok
(A) schoon te maken. Droog het daarna
zorgvuldig af.
• De kom, het deksel en de accessoires zijn
vaatwasbestendig. De aandrijfas (D3 en D4)
en de vergrendelingsring (D6) mogen niet in de
vaatwasser worden schoongemaakt (Cf. Fig. 14).
• De accessoires, de afneembare aandrijfas en
de elementen van het deksel kunnen licht
verkleuren als u bepaalde ingrediënten gebruikt
zoals curry, wortelsap… De verkleuring is niet
schadelijk voor uw gezondheid en heeft geen
invloed op de werking van uw apparaat. Maak
de elementen snel schoon na gebruik om dit te
voorkomen.
• Controleer voordat u uw komset (D) opnieuw
gebruikt altijd of de elektrische contacten onder
de kom schoon en droog zijn.
• Om het deksel van uw apparaat lang te kunnen
gebruiken en in goede staat te houden, kunt u
het het beste met de hand afwassen. Om krassen
te vermijden, kunt u beter geen schuursponsje
gebruiken.
• Om de materialen van de kom (D), niet aan te
tasten, houd rekening met de gebruiksaanwij-
zingen van uw vaatwasmachine en gebruik geen
hogere dosis zout of vaatwasmiddel dan wat is
aanbevolen.
BELANGRIJK - AANVULLING OP DE HANDLEIDING VOOR DE BEVEILIGING
AN HET APPARAAT (“SECU”)
De motor van uw apparaat
is standaard elektronisch
beveiligd, om ervoor te
zorgen dat u het zo lang
mogelijk kan gebruiken.
Dankzij deze elektro-
nische beveiliging bent u
beschermd tegen afwijkend gebruik van het appa-
raat; op die manier is de motor perfect beveiligd.
In bepaalde buitengewone gebruiksoms-
tandigheden, wanneer de richtlijnen van de
gebruikshandleiding niet worden gevolgd (zie
hiervoor ook de paragraaf “EERSTE GEBRUIK”: bi-
jvoorbeeld als er te grote hoeveelheden worden
gebruikt en/of het apparaat ongewoon lang moet
functioneren en/of de recepten te snel na elkaar
worden gekozen), treedt er een elektronische be-
veiliging in werking om de motor te sparen. In
dat geval wordt het apparaat uitgeschakeld en
verschijnt de melding “SECU” op het lcd-scherm
van het bedieningspaneel om aan te geven dat
het apparaat tijdelijk niet kan worden gebruikt.
Als uw apparaat wordt uitgeschakeld en u de mel-
ding “SECU” ziet op het bedieningspaneel, neem
dan onderstaande stappen:
• Zorg ervoor dat uw apparaat ingeschakeld blijft,
druk niet op de “0/1”-schakelaar.
• Raadpleeg de richtlijnen van de gebruikshan-
dleiding om uw bereiding aan te passen (zie
de paragraaf “EERSTE GEBRUIK”: hoeveelheid
ingrediënten/bereidingstijd/temperatuur/type
accessoires).
• Wacht een half uur om de motor te laten af-
koelen.
• Voer een reset uit van het apparaat door 2
seconden de knop “Start/Stop/Reset” (B5)
ingedrukt te houden.
Uw apparaat is nu opnieuw helemaal klaar voor
gebruik.
Met mogelijke vragen kan u terecht bij de klanten-
dienst (Bekijk de details in het garantieboekje).

38
NL
38
NL
UW APPARAAT WERKT NIET. WAT NU?
PROBLEMEN OORZAKEN OPLOSSINGEN
Problemen bij stomen.
Stoomregeldop slecht
gepositioneerd.
Draai de stoomknop naar u toe op
de stoomstand «maxi». Met deze
stoomstand kunt u voor al uw
stoomgerechten (soepen enz.) opti-
maal gebruikmaken van warmte en
stoom in de kom,waardoor er dus
meer stoom in de kom blijft, wat
efficiënter is om te koken.
Met de positie «mini stoomstand»
kunt u voor alle stoombereidingen
(soepen enz.) een maximale hoe-
veelheid warmte en stoom in de
kom bereiken. Met deze positie ver-
mijdt u ook dat de bereiding tijdens
het mixen gaat spatten.
Met de positie «veel stoom» kunt u
een maximale hoeveelheid conden-
satie laten ontsnappen en dus
gerechten of sauzen met een betere
consistentie verkrijgen (risotto,
roomdesserts, sauzen enz.).
Onvoldoende kooktijd.
De kooktijden zijn ter indicatie
gegeven, ze bieden doorgaans
voldoende tijd voor een geslaagde
bereiding.
Toch zullen bepaalde omstandighe-
den de kooktijd beïnvloeden:
- de grootte van de groenten
(gesneden of niet gesneden)
- de hoeveelheid ingrediënten in
het mandje
- de variëteit van de groenten, hun
rijpheid
- de hoeveelheid water in de kom,
die moet overeenstemmen met de
graadverdeling (0,7 l).
- Als de kooktijd onvoldoende blijkt,
kunt u nog wat tijdtoevoegen.
U kunt de manuele modus ook ge-
bruiken door de temperatuur van
130 °C en de kooktijd te kiezen op
basis van de hoeveelheid en
het type ingrediënten.
Het apparaat werkt niet.
De stekker zit niet in het
stopcontact.
Steek de stekker van het apparaat
in het stopcontact.
De schakelaar (H) staat in de stand 0. Schuif de schakelaar naar stand 1.
De kom of het deksel zijn niet
correct geplaatst of vergrendeld.
Controleer of de kom en het deksel
correct zijn geplaatst en vergren-
deld volgens de schema’s in de
gebruiksaanwijzing.

39
NL
39
NL
PROBLEMEN OORZAKEN OPLOSSINGEN
Overmatige trillingen.
Het apparaat staat niet op een
vlakke en stabiele ondergrond.
Zet het apparaat op een vlakke
ondergrond.
De hoeveelheid ingrediënten is te
groot.
Verminder de hoeveelheid
ingrediënten.
Storing accessoires. Controleer of u het correcte
accessoire gebruikt.
Het deksel lekt.
De hoeveelheid ingrediënten is te
groot.
Verminder de hoeveelheid
ingrediënten.
Het deksel is niet correct geplaatst
of vergrendeld.
Vergrendel het deksel correct op
de kom.
De afdichtingsring is niet geplaatst. Breng de afdichting juist aan op
het deksel.
De afdichtingsring is gebarsten of
versleten.
Vervang de afdichtingsring. Neem
contact op met een erkend service.
Storing accessoires. Controleer of u het correcte
accessoire gebruikt.
De aandrijfas van de kom lekt of
met behulp van het Accessoire
bodem XL.
De afdichtingsring is niet correct
geplaatst.
Plaats de afdichtingsring goed.
De afdichtingsring is versleten. Neem contact op met een Erkend
Center.
De vergrendelingsring (D6) is niet
goed vergrendeld.
Vergrendel de ring goed (D6).
De messen draaien niet vrij rond. De stukjes zijn te groot of te hard. Maak kleinere stukjes of verminder de
hoeveelheden. Voeg vloeistof toe.
Motorgeur. Tijdens het eerste gebruik of wanneer
de motor wordt overbelast door een
te grote hoeveelheid ingrediënten of
te harde of te grote stukjes.
Laat de motor afkoelen (ongeveer
30 minuten) en doe een kleinere
hoeveelheid ingrediënten in de
kom.
‘STOP’ verschijnt op het scherm. Het apparaat heeft trillingen
gedetecteerd en is overgeschakeld
naar de veiligheidsstand.
Controleer of u de aanbevolen
snelheid en het aanbevolen acces-
soire gebruikt.
‘SECU’ verschijnt op het scherm. Overbelaste motor veroorzaakt door
een te grote hoeveelheid ingrediënten,
te harde of te grote stukken of een te
snelle opeenvolging van bereidingen
zonder voldoende afkoelingstijd
Laat de motor afkoelen (ongeveer
30 minuten) en doe een kleinere
hoeveelheid ingrediënten in de
kom.
‘SECU’ verschijnt op het scherm +
rode controlelampje knippert.
Oververhitting van de
temperatuursensoren.
Neem contact op met een erkend
center.
‘Err1’ verschijnt op het scherm.
+ rode controlelampje knippert.
De verwarmingsweerstand werkt
niet.
Zorg ervoor dat de voedingspinnen
onder de kom niet verzadigd zijn.
Maak ze schoon als ze verzadigd
zijn en probeer opnieuw.
Als het probleem zich blijft
voordoen, neemt u contact op met
een erkend center.
‘Err2’ verschijnt op het scherm.
Elektronische storing. Neem contact op met een erkend
center.
‘Err3’ verschijnt op het scherm.
Storing snelheid. Neem contact op met een erkend
center.
‘Err4’ verschijnt op het scherm.
Storing communicatie met de elek-
tronische kaart - chopper.
Neem contact op met een erkend
center.

40
NL
40
NL
Uw apparaat werkt nog steeds niet?
Ga naar een erkend service center (zie bijgevoegde lijst).
• Vernietiging van de verpakking en het apparaat
De verpakking bestaat voor 100% uit milieuvriendelijk materiaal dat in overeenstemming
met de bepalingen omtrent afvalverwerking kan worden vernietigd.
Breng het apparaat naar een gemeentelijk afvalinzamelpunt.
• Elektrisch of elektronisch product aan het eind van de levenscyclus:
Bescherm het milieu!
Uw apparaat bevat verschillende materialen die geschikt zijn voor terugwinning of
recycling.
Breng het apparaat naar een afvalinzamelpunt voor een correcte verwerking.
AFVALVERWERKING
- *Het merk en de logo’s van Bluetooth
®
zijn gedeponeerde merken van Bluetooth SIG, Inc.; de SEB-groep heeft toestemming deze te gebruiken.
- Google Play en Android zijn merken van Google Inc.
- Apple en het Apple-logo zijn merken van Apple Inc., die zijn gedeponeerd in de Verenigde Staten en in andere landen. App Store is een servicemerk
van Apple Inc.
WOORDENLIJST
Koppelen: de handeling van het elkaar laten herkennen van twee apparaten.
Dit moet eenmalig gebeuren wanneer je voor het eerst een verbinding tot stand brengt tussen je smartphone of tablet en de
i-Companion xl.
Synchroniseren: de handeling van het bijwerken van informatie. De synchronisatie tussen de app en de i-Companion xl vindt
plaats wanneer ze met elkaar worden verbonden.
Verbinden: een verbinding tot stand brengen tussen de app (smartphone/tablet) en het apparaat (i-Companion xl) Voor de
synchronisatie is een verbinding vereist.
Cookies: Gebruiksinformatie die naar Moulinex wordt gestuurd om de app te verbeteren.
PROBLEMEN OORZAKEN OPLOSSINGEN
Weergave van “Err8” Defecte vergrendelingssensor.
Neem contact op met een erkend
servicecentrum.
‘Ntc1’ verschijnt op het scherm.
+ rode controlelampje knippert.
De temperatuursensor 1 werkt niet
meer.
Neem contact op met een erkend
center.
‘Ntc2’ verschijnt op het scherm.
+ rode controlelampje knippert.
De temperatuursensor 2 werkt niet
meer.
Neem contact op met een erkend
center.
Weergave van veiligheidslampje
(C4)
Slechte vergrendeling van de kom
of het deksel
Alvorens het apparaat te active-
ren, dient u te controleren of de
kom correct vergrendeld is op de
motorblok en of het deksel correct
vergrendeld is op de kom. Als het
probleem blijft aanhouden, neem u
contact op met een erkend centrum.
Het deksel is vergrendeld op de
kom in de modus ‘bakken zonder
deksel’
Ontgrendel het deksel alvorens het
bakprogramma te starten. Als het
probleem blijft aanhouden, neemt u
contact op met een erkend centrum.
De beveiliging van de vergrendeling
van het deksel blijft actief (stang
naar buiten), waardoor het deksel
niet kan vergrendeld worden.
Het apparaat werd uitgescha-
keld tijdens het recept door de
I/O-schakelaar op O te zetten of
door eenvoudigweg de stekker uit
te trekken tijdens het recept.
Het volstaat om de I/O-schakelaar
op I te zetten om de robot te re-
setten en bijgevolg de beveiliging
van de vergrendeling van het dek-
sel. De stang neemt automatisch
terug de aanvangspositie in en u
kunt het deksel nu vergrendelen.
Verbindingsprobleem
Raadpleeg de handleiding voor de
app.

41
DE
41
DE
Hinsichtlich der Personensicherheit
• Lesen Sie diese Bedienungsanleitung
vor der ersten Verwendung des Geräts
aufmerksam durch und bewahren Sie
diese gut auf: Die unsachgemäße
Verwendung entbindet den Hersteller
von jeglicher Haftung.
• Für Montage-, Demontage- und
Reinigungszwecke bzw., wenn Sie
das Gerät unbeaufsichtigt lassen,
sollten Sie dieses immer von der
Stromversorgung trennen. Kinder
dürfen das Gerät nur unter Aufsicht
durch Erwachsene verwenden.
• Dieses Gerät darf nicht von Kindern
verwendet werden. Bewahren Sie
das Gerät und dessen Stromkabel
außerhalb der Reichweite von Kindern
auf.
• Dieses Gerät ist nicht zur Verwendung
durch Personen (einschließlich
Kindern) mit eingeschränkten
körperlichen, sensorischen oder
mentalen Fähigkeiten oder durch
Personen ohne entsprechende
Erfahrung oder Kenntnisse vorgesehen,
es sei denn, diese werden von
einer Person, die für ihre Sicherheit
verantwortlich ist, beaufsichtigt oder
haben von dieser zuvor Anweisungen
zum Gebrauch des Geräts erhalten.
Es empfiehlt sich, die Kinder zu
beaufsichtigen, um sicherzustellen,
dass sie nicht mit dem Gerät spielen.
• Stellen Sie das Gerät außerhalb der
Reichweite von Kindern auf.
• Während des Betriebs des Gerätes
werden bestimmte Bestandteile
heiß (Wand des
Edelstahlbehälters und
Verschlusses, abnehmbare
Mitnehmer, transparente
Teile des Deckels und des
Dosierverschlusses, Metallteile unter
dem Behälter, Zubehör Boden XL
Korb). Diese können Verbrennungen
verursachen. Fassen Sie das Gerät
an den kalten Kunststoffteilen
an (Griffe, Motorblock). Die rote
Aufheizkontrollleuchte weist auf
Verbrennungsgefahr hin.
• Die zugänglichen Teile des Geräts
können sehr heiß werden, wenn dieses
in Betrieb ist.
• Dieses Gerät darf nicht über eine
externe Schaltuhr oder eine separate
Fernsteuerung betrieben werden.
• Benutzen Sie das Gerät nicht, wenn
es nicht richtig funktioniert, wenn
es beschädigt wurde oder wenn das
Stromkabel oder der Stecker beschädigt
sind. Aus Sicherheitsgründen darf das
Kabel nur von einem autorisierten
Kundendienstzentrum ausgetauscht
werden (siehe Liste im Serviceheft).
• Das Gerät darf nicht in Wasser getaucht
werden. Halten Sie den Motorblock
(A) niemals unter fließendes Wasser.
• Dieses Gerät dient ausschließlich
der Zubereitung von Speisen in
geschlossenen Räumen und in
Höhenlagen unter 2000 m. Der
Hersteller übernimmt weder Garantie
noch Haftung für den Fall einer
gewerblichen, unsachgemäßen
oder nicht den Angaben der
SICHERHEITSHINWEISE:

42
DE
42
DE
Bedienungsanleitung entsprechenden
Nutzung des Gerätes.
• Dieses Gerät ist nicht für folgende
haushaltsübliche Anwendungen
vorgesehen (wird nicht von der
Garantie abgedeckt), wie zum Beispiel:
- In Kochnischen in Geschäften, Büros
oder anderen Arbeitsumgebungen.
- In Teeküchen für das Personal in
Geschäften, Büros oder anderen
Arbeitsumgebungen.
- In landwirtschaftlichen Betrieben.
- Für Hotel- und Motelkunden,
bzw. in sonstigen derartigen
Unterbringungen,
- In Gästezimmern o. Ä.
• Während des Betriebs
entsteht Dampf,
der Verbrennungen
verursachen kann.
Gehen Sie mit Deckel
und Dosierverschluss vorsichtig um
(verwenden Sie bei Bedarf einen
Handschuh, Topflappen usw.).
Fassen Sie den Dosierverschluss
an seinem Mittelteil an.
• Schalten Sie das Gerät nicht ein,
wenn die Dichtung nicht auf der
Dichtungshalterung sitzt und/oder
wenn die Dichtungshalterung nicht
im Deckel befestigt ist.
ACHTUNG: Bei
unsachgemäßer
Verwendung des
Geräts besteht
Verletzungsgefahr. Gehen
Sie vorsichtig mit den Messern des
Ultrablade-Hackmessers (F1) und
des Knet-/Mahlmessers (F4) um,
wenn Sie diese reinigen und wenn Sie
den Behälter leeren. Diese sind sehr
scharf.
Verstauen Sie das Ultrablade-
Hackmesser (F1) nach jedem
Gebrauch im Behälter.
Seien Sie vorsichtig, wenn Sie
heiße Flüssigkeiten in das
Küchengerät geben; diese können
bei Siedetemperaturen aus dem Gerät
spritzen.
WARNHINWEIS: Seien Sie bei der
Bedienung Ihres Gerätes stets
vorsichtig (bei Reinigung, Befüllen
und Ausgießen): Vermeiden
Sie jegliches Überlaufen von
Flüssigkeiten auf den Stecker.
WARNHINWEIS: Manche Lebensmittel
mit einer Haut (Würstchen, Zunge,
Geflügel …) oder große Fleischstücke
können durch das Einschließen
kochender Flüssigkeiten platzen. Wir
empfehlen Ihnen aus diesem Grund,
diese Lebensmittel vor dem Garen
mit einem Messer oder einer Gabel
anzustechen.
WARNHINWEIS: Die Oberfläche des
Heizelements gibt auch nach dem
Gebrauch Restwärme ab.
Achten Sie darauf, dass Sie die
Griffe Ihres Produktes während des
Heizvorgangs und bevor das Gerät nicht
komplett abgekühlt ist, nicht anfassen
(Griff mit Drücker D2, Griff für den
Deckel E2 und Dampfregler E1).
Lesen Sie die Gebrauchsanweisung
durch, um Informationen über
den richtigen Umgang mit der
Geschwindigkeitsregulierung und den

43
DE
43
DE
Funktionszeiten von jedem Zubehör und
jedem Programm zu erhalten.
Lesen Sie die Gebrauchsanweisung, um
Informationen über den Aufbau und das
Anbringen des Zubehörs am Gerät zu
erhalten.
Lesen Sie die Gebrauchsanweisung, um
Informationen über die Reinigung und
Wartung des Gerätes zu erhalten.
Befolgen Sie bei der Reinigung des
Gerätes die Reinigungsanweisungen:
• Ziehen Sie den Stecker aus der
Steckdose.
• Reinigen Sie das Gerät nicht, wenn es
noch heiß ist.
• Reinigen Sie es mit einem feuchten
Tuch oder Schwamm.
• Tauchen Sie das Gerät niemals in
Wasser und halten Sie es nicht unter
fließendes Wasser.
NUR FÜR DEN EUROPÄISCHEN MARKT:
• Bewahren Sie das Gerät und dessen
Kabel außerhalb der Reichweite von
Kindern unter 8 Jahren auf.
Es ist untersagt, Kinder mit dem Gerät
spielen zu lassen.
• Dieses Gerät kann von Personen
mit eingeschränkten physischen,
sensorischen oder mentalen
Fähigkeiten oder mit mangelnden
Erfahrungen bzw. Kenntnissen
verwendet werden, sofern diese
beaufsichtigt werden oder zuvor eine
adäquate Unterweisung bezüglich
der sicheren Verwendung des Gerätes
erhalten haben und sich der möglichen
Risiken bewusst sind.
• Dieses Gerät kann von Kindern ab
8 Jahren verwendet werden, sofern
diese beaufsichtigt werden oder
zuvor eine adäquate Unterweisung
bezüglich der sicheren Verwendung
des Gerätes erhalten haben und sich
der möglichen Risiken bewusst sind.
Reinigung und Pflege dürfen nur von
Kindern durchgeführt werden, wenn
diese älter als 8 Jahre sind und dabei
von einem Erwachsenen beaufsichtigt
werden.
Hinsichtlich des elektrischen
Anschlusses
• Das Gerät muss an eine geerdete
Steckdose angeschlossen werden.
• Das Gerät ist ausschließlich für den
Betrieb mit Wechselstrom ausgelegt.
Bitte stellen Sie sicher, dass die
Netzspannung mit der auf dem
Typenschild des Gerätes angegebenen
Spannung übereinstimmt.
• Jeglicher Anschlussfehler führt zum
Verlust des Garantieanspruchs.
• Trennen Sie das Gerät nie von der
Stromversorgung, indem Sie am Kabel
ziehen.
• Lassen Sie das Gerät, das Stromkabel
oder den Stecker niemals in die
Nähe von oder in Berührung mit
Flüssigkeiten, heißen Geräteteilen,
einer Wärmequelle oder einer scharfen
Kante kommen.
Hinsichtlich eines falschen
Gebrauches
• Berühren Sie den Deckel nicht,
bevor sich das Gerät vollständig im
Stillstand befindet (Stopptaste);

44
DE
44
DE
warten Sie, bis sich die gemixten
Zutaten nicht mehr in Bewegung
befinden.
• Geben Sie immer zuerst die festen
Zutaten in den Behälter und fügen
Sie erst dann die flüssigen Zutaten
hinzu (siehe Abb. 10), ohne jedoch
die Höchstmarke zu überschreiten,
die auf der Innenseite des Behälters
gekennzeichnet ist. Wenn der Behälter
zu voll ist, kann kochendes Wasser
herausspritzen.
• Achten Sie beim Dampfgaren darauf,
dass das Wasservolumen von 0,7
Liter nicht überschritten wird
(siehe Abb. 3.2) (außer im Falle
anderslautender Angaben im Rezept).
• Halten Sie niemals Ihre Finger oder
sonstige Gegenstände in den Behälter,
wenn das Gerät in Betrieb ist.
• Benutzen Sie den Behälter nicht zum
Tiefgefrieren oder Sterilisieren.
• Verwenden Sie Ihr Gerät nur auf einer
stabilen, hitzebeständigen, sauberen
und trockenen Arbeitsfläche.
• Stellen Sie das Gerät nicht in der Nähe
von empfindlichen Gegenständen,
einer Wand oder in einem Schrank
auf: Der austretende Dampf könnte
Schäden verursachen.
• Stellen Sie Ihr Gerät nicht in
die Nähe einer eingeschalteten
Wärmequelle (Kochplatte, elektrisches
Haushaltsgerät, usw.).
• Bedecken Sie den Deckel nicht mit
einem Lappen o. ä., und versuchen Sie
nicht die Öffnung für den Deckel zu
verstopfen; verwenden Sie dazu den
Dampfregler.
• Vermeiden Sie es, Ihre Haare, Schals,
Krawatten usw. über das sich im
Betrieb befindende Gerät zu halten.
• Die Zubehörteile dürfen nicht in den
Mikrowellenherd gegeben werden.
• Verwenden Sie das Gerät nicht im
Freien.
• Die in der Bedienungsanleitung
angegebene Höchstmenge darf
keinesfalls überschritten werden.
• Reinigen oder verstauen Sie das Gerät
erst in abgekühltem Zustand.
• Stellen Sie den Behälter zum Abkühlen
nicht ins Gefrierfach, sondern in den
Kühlschrank.
Kundendienst
• Reinigen oder verwenden Sie zu Ihrer
eigenen Sicherheit nur für Ihr Gerät
geeignete und bei einem autorisierten
Kundendienst erworbene Zubehör- und
Ersatzteile.
• Außer den üblichen Reinigungs- und
Instandhaltungsarbeiten, welche
der Kunde selbst durchführen kann,
muss jeder weitere Eingriff von einem
autorisierten Kundendienstzentrum
durchgeführt werden.
• Siehe Tabelle „Was tun, wenn Ihr
Gerät nicht funktioniert?“ am Ende
der Bedienungsanleitung.

45
DE
45
DE
Beim Durchlesen dieser Bedienungsanleitung erhalten Sie Tipps für die vielfältigen
Verwendungsmöglichkeiten Ihres Geräts - die Zubereitung von Suppen, Schmorgerichten
und Pasta oder das Dampfgaren.
BESCHREIBUNG DES GERÄTES:
A Motorblock
B Bedienfeld
B1: Geschwindigkeitsregler
B2: Temperaturschalter für
den Garprozess und/oder
Aufheizkontrollleuchte
B3: Schalter Betriebsdauer/Peering
B4: Wahltasten Automatikprogramme
B5: Taste START/STOP/RESET
B6: Schalter „+“ / „-“
C LCD-Display
C1: Anzeige
Verbindungskontrollleuchte
C2: Anzeige Dampfgarprogramm
C3: Anzeige des aktuellen Schritts in
der detaillierten Rezeptanleitung
C4: Anzeige Sicherheitskontrollleuchte
C5: Anzeige Geschwindigkeit
C6: Anzeige Temperatur
C7: Anzeige Zeit
D Mixaufsatz
D1: Edelstahlbehälter
D2: Griff mit Drücker
D3: Abnehmbare Mitnehmer
D4: Dichtungsring (x2)
D5: Zubehör Boden XL
D6: Sicherungsring für den Antrieb
E Deckeleinheit
E1: Dampfregler
E2: Deckel
E3: Dichtungsring
E4: Dichtungsring
F Zubehörteile:
F0: Zubehördose
F1: Ultrablade-Hackmesser
F2: Mischer
F3: Rührer
F4: Knet-/Mahlmesser
F5: Dampfkorb
G Küchenspachtel
H Schalter 0/1 zum Abschalten der
Stromversorgung Ihres Geräts
I Reinigungsbürste
TECHNISCHE GERÄTEDATEN:
Leistung: 1550 W (1000 W: Heizelement / 550 W: Motor )
Temperaturbereich: von 30 °C bis 150 °C;
erhöhbar in Stufen von 5 °C.
Betriebsdauer: 5 Sekunden bis 2 Stunden
erhöhbar in Stufen von min. 5 Sekunden und max. 1 Minute.
Anzahl der Geschwindigkeiten: 13 - 2 Intervall Geschwindigkeitsstufen:
Geschwindigkeit 1 (5 s On / 20 s Off).
Geschwindigkeit 2 (10 s On / 10 s Off).
- 10 progressive Geschwindigkeitsstufen
(Geschwindigkeiten 3 bis 12).
- 1 Intervallbetrieb bei maximaler Geschwindigkeit (V13)
-*Die Marke und Logos Bluetooth® sind eingetragene Marken der Bluetooth SIG, Inc. Ihre Verwendung durch die SEB-Gruppe wurde vorab
genehmigt.
- Google Play und Android sind eingetragene Marken der Google Inc.
- Apple und das Apple-Logo sind in den Vereinigten Staaten und anderen Ländern eingetragene Marken der Apple Inc. App Store ist eine
Dienstleistermarke der Apple Inc.

46
DE
46
DE
IHR GERÄT
Ihr Gerät bietet folgendes Zubehör:
Diese Zubehörteile verfügen ebenfalls über Greifflächen, um die Handhabung bei deren Verwendung
während der Zubereitung zu erleichtern.
Hackmesser
Suppenmixer
3min 3L
Kompottmixer 40s 1Kg
Gemüse zerkleinern 15s 1Kg
Fleisch zerkleinern 30s 1Kg
Fisch zerkleinern 15s 1Kg
Verwenden Sie dieses Zubehörteil nicht, um harte Zutaten zu zerkleinern, verwenden Sie dafür das Knet-/Mahlmesser F4.
Mischer
Er mischt gekochte Gerichte, ohne die Zutaten zu beeinträchtigen;
äußerst nützlich zur Zubereitung von progressiv aufzukochenden Gerichten (Risottos, Suppen).
Rissolen 5min 500g
Schmortopf 45min 3L
Risottos 22min 1,5Kg
Ratatouilles, Chutneys, Hülsenfrüchte (Einstellungen: siehe Rezeptbuch)
Rührer
9 max
Eiweiß 5/10min
7
max
Mayonnaisen,
Schlagsahne
2/5min 0,5L
Soßen, Cremes
bis
1/20min 1L
Kartoffelbrei
bis
1min 1L
Polenta
bis
1/16min 1L
Knet- und Mahlmesser
Kneten von Nudeln und
Weißbrotteig
2min 30s 1,2Kg
Kneten von Biskuitteig,
Brandteig und Spezialbroten
2min 30s 1Kg
Kneten von Hefeteigen
(Brioche, Napfkuchen)
1min 30s
2 min
0,8Kg
Lockere Teigmassen
mischen (Sandkuchen)
40 s
3min
1Kg
Schalenfrüchte fein mahlen
1min 0,6Kg
Zerkleinern von harten
Produkten
1min 0,6Kg
Zerstoßen von Eis
1min
6 bis 10
Pfannkuchen-, Waffelteig
1min 1,5L
Panier
vapeur
Dampfgaren von Gemüse,
Fisch oder Fleisch
20/40min 1Kg
Suppe mit Stückchen
3min 3L
Deckel
Dampfreglerverschluss
Maxi (a) = Dampfgaren
Mini (b) = Risotto, Dessertcremes, Saucen…
Boden XL
Zubehör Boden XL
Rösten und Garen ohne Deckel
Vergrößerung der Garfläche für große Fleisch- oder Fischstücke.

47
DE
47
DE
Der i-Companion xl kann sowohl im verbundenen
als auch im nicht verbundenen Modus betrieben
werden. Ebenso bietet er zwei Betriebsmodi: das
Automatikprogramm und den manuellen Modus.
• Betrieb mit Automatikprogramm:
Geschwindigkeit, Gartemperatur und Dauer sind
voreingestellt, um die Zubereitung von Suppen,
Schmorgerichten und Pasta oder das Dampfgaren
im Automatikbetrieb zu ermöglichen.
• Manueller Betrieb:
Geschwindigkeit, Gartemperatur und Dauer können
individuell eingestellt werden, um die Zubereitung
Ihren persönlichen Wünschen anzupassen.
Verwendung mit oder ohne Deckel
Temperatur von
30 bis 130°C
Temperatur von
135 bis 150°C
- Wenn Sie eine Temperatur zwischen 135°C und
150°C ausgewählt haben, müssen Sie Ihr Gerät
ohne Deckel verwenden. Falls der Deckel auf
dem Behälter sitzt, wird auf dem LCD-Display ein
Vorhängeschloss angezeigt, das zum Entriegeln des
Deckels auffordert.
- Nach dem Hinzufügen der Zutaten müssen diese
regelmäßig mit dem Spatel umgerührt werden,
damit der Inhalt am Boden des Behälters nicht
anbrennt (siehe Abschnitt Reinigung).
- Wenn Sie das Gerät mit Deckel verwenden, darf die
Gartemperatur 130°C nicht übersteigen.
IHR GERÄT IST MIT EINER
SICHERHEITSVERRIEGELUNG DES DECKELS
AUSGESTATTET
Der Deckel wird bei jeder Inbetriebnahme des Geräts
gesichert. Diese Sicherung verhindert ein Öffnen
des Deckels während der Rezeptzubereitung (siehe
Abb. 17). Versuchen Sie nicht, den Deckel mit
Gewalt zu öffnen, wenn er verriegelt ist. Die
Sicherung wird jedes Mal, wenn das Gerät angehalten
wird, freigegeben. Wenn Sie eine Temperatur von
mindestens 50 °C und eine Geschwindigkeit von
mindestens 5 wählen, wird auf dem LCD-Display
des Bedienfeldes eine Restzeit von 10 Sekunden
angezeigt. (Siehe Abb. 18). Der Deckel lässt sich
erst nach Ablauf der eingestellten Zeitdauer öffnen.
ANBRINGEN DES BEHÄLTERS, DER ZUBEHÖRTEILE
UND DER DECKELEINHEIT
• Reinigen Sie vor dem ersten Gebrauch mit Ausnahme
des Motorblocks (A) alle Zubehörteile (D, E, F, G)
mit warmem Seifenwasser. Ihr Behälter (D) ist
mit einem Achszapfen ausgestattet (D3), der zur
leichten Reinigung abgenommen werden kann.
• Stellen Sie vor dem Gebrauch sicher, dass das
gesamte Verpackungsmaterial entfernt wurde,
insbesondere der Schutz zwischen Behälter (D)
und Motorblock (A).
• Setzen Sie die Verschlussdichtung (E4) auf die
Dichtungshalterung (E3) (s. Abb. 1), lassen
Sie die Einheit auf dem Deckel (E2) einrasten
(s. Abb. 2).
• Legen Sie den Dichtungsring (D4) auf den
gemeinsamen Achszapfen (D3). Verriegeln
Sie die Einheit am Boden des Behälters, indem
Sie den Verriegelungsring (D6) verwenden
(siehe Abb. 3). Wenn Sie den Kochmodus ohne
Deckel verwenden, setzen Sie den Dichtungsring
(D4) auf das Zubehör Boden XL (D5). Befestigen
Sie die Einheit unten im Behälter mittels des
Sicherungsrings (D6) (siehe Abb. 3).
• Positionieren Sie das gewünschte Zubehör auf
dem Boden:
- das Zubehör (F1, F2, F3, oder F4) auf dem
gemeinsamen Achszapfen am Behälterboden
(siehe Abb. 4.1),
- beim Dampfgaren den Dampfkorb (F5) im
Behälter (siehe Abb. 4.3), nachdem zuvor der
Behälter mit 0,7 l Flüssigkeit (Wasser, Sauce…)
befüllt wurde (siehe Abb. 4.2).
• Geben Sie die Zutaten in den Behälter oder den
Dampfkorb.
• Setzen Sie den Deckel auf den Behälter
(D) und ordnen Sie die beiden Dreiecke
gegenüberliegend an (siehe Abb. 5), verriegeln
Sie dann ohne Druckausübung den Deckel durch
Drehen in Pfeilrichtung (siehe Abb. 6).
Positionieren Sie den Dampfregler (E1) auf dem
Deckel, 2 Positionen sind möglich (siehe Abb. 7):
Bei der Einstellung „Mini“ kann am
meisten Kondensflüssigkeit
entweichen, wodurch Sie Speisen oder
Saucen mit einer besseren Konsistenz
erhalten (Risotto, Dessertcremes, Saucen etc...).
Bei der Einstellung „Maxi“ kann am
meisten Hitze und Dampf im Behälter
gehalten werden, für das Dampfgaren
F1 F2
F3 F4
F5
F1 F2
F3 F4

48
DE
48
DE
verschiedenster Speisen (Suppen etc...).
Mit dieser Einstellung werden Spritzer während
des Mixvorganges verhindert.
• Positionieren Sie den Behälter (D) so auf
den Motorblock (A), dass beim Einrasten ein
Klickgeräusch ertönt (siehe Abb. 8).
• Das Gerät lässt sich nur dann einschalten, wenn
Behälter und Deckel richtig angeordnet und auf
dem Motorblock verriegelt sind.
Bei falscher Anordnung oder schlechter
Verriegelung von einem der beiden
(siehe Abb. 10.1 und 10.2), beginnt die
Sicherheitskontrollleuchte
zu blinken,
sobald eine Funktion aktiviert wird.
Auswahl der
Motorgeschwindigkeit 2
Intervall Geschwindigkeitsstufen
und 10 progressive
Geschwindigkeitsstufen.
Intervallbetrieb bei maximaler
Geschwindigkeit (V13)
Auswahl der Kochtemperatur.
Von 30 °C bis 150 °C
Aufheizkontrollleuchte: Sie
leuchtet beim Start des
Kochvorganges auf und erlischt,
sobald die Temperatur im Inneren
des Behälters auf unter 50 °C
abgesunken ist.
Auswahl der Betriebsdauer.
5 Sekunden bis 2 Stunden.
Peering bei erster Verbindung
Erhöhung der
Geschwindigkeit, der Dauer
und der Temperatur
Verringerung der
Geschwindigkeit, der Dauer
und der Temperatur.
Taste mit 3 Funktionen:
- „Bestätigen“ des gewählten
Automatikprogramms oder,
im manuellen Modus,
der gewählten Parameter
(Geschwindigkeit,
Gartemperatur, Zeit).
- „Pause“ während eines
Gebrauchs, wenn das Gerät
gestartet wurde.
- „Zurücksetzen“ der
ausgewählten Einstellungen,
indem die Taste zwei
Sekunden lang gedrückt
wird.
- „Bestätigen des Schritts“
in der detaillierten
Rezeptanleitung.
Gebrauchstipps:
Ihr Gerät ist mit einem Mikroprozessor ausgestattet, der dessen Stabilität kontrolliert und analysiert.
Im Falle der Instabilität wird die Geschwindigkeit des Motors automatisch verringert. Falls das
Problem anhält, wird der Motor angehalten und auf dem Bildschirm wird „STOPP“ angezeigt.
• Überprüfen Sie, ob die Menge der Zutaten nicht zu groß ist, und ob die Geschwindigkeit korrekt
ausgewählt wurde.
• Überprüfen Sie, ob Sie das empfohlene Zubehör verwenden.
• Starten Sie Ihr Gerät anschließend neu.
VERWENDUNG DES BEDIENFELDES (B)
Auswahl eines automatischen Programms:

49
DE
49
DE
VORBEREITUNG DER INSTALLATION
Die Liste der mit i-Companion kompatiblen Smartphone- und Tablet-Modelle finden Sie auf
www.moulinex.com
(Liste der kompatiblen Modelle www.moulinex.com)
I-COMPANION XL-INSTALLATION
Was brauche ich für die i-Companion xl-Installation?
• Die Companion-Anwendung - kostenloser Download im App Store (iPhone/iPad) und auf Google
Play (Android).
• Eine Bluetooth-Verbindung mit Ihrem Smartphone oder Tablet Bluetooth® Smart 4.0: Der
i-Companion xl verbindet sich mit Ihrem Smartphone/Tablet, ohne dass ein Kabel benötigt wird.
• Das Smartphone/Tablet muss sich in der Nähe des i-Companion xl befinden (die Reichweite der
Verbindung variiert mit den räumlichen Gegebenheiten).
• Eine Steckdose für den Anschluss des i-Companion xl: Nur bei bestehender Stromversorgung
verbindet sich der i-Companion xl mit Ihrem Smartphone/Tablet.
Zu Bluetooth® Smart
Mit der Bluetooth® Smart 4.0-Technologie (oder Bluetooth Low Energy) ist eine kabellose
Verbindung zwischen einer Anwendung und einem Gerät bei sehr geringem Stromverbrauch möglich.
ERSTE VERBINDUNG DES I-COMPANION XL IM VERBUNDENEN MODUS
Download der Anwendung
Laden Sie zunächst die Anwendung auf Ihr Smartphone/Tablet herunter. Gehen Sie hierfür in den App
Store für iOS oder auf Google Play für Android.
Haben Sie die Anwendung heruntergeladen, können Sie mit dem i-Companion xl in nur wenigen
Minuten und ohne Erstellen eines Kontos Ihre ersten Speisen zubereiten (zur Auswahl stehen
50 Rezepte, ohne dass Sie ein Konto einrichten müssen).
Haben Sie Ihr Konto in der Anwendung erstellt, steht Ihnen der gesamte Inhalt zur Verfügung, um
unterschiedlichste Menüs kreieren zu können.
Einschalten Ihres Geräts
Frequenz: 2,40 GHz. Maximale Übertragungsleistung: 7,7 dBm
Ihr Gerät ist mit einem Ein-/Aus-Schalter ausgestattet. Stellen Sie diesen Schalter auf „1“ (siehe Abb. 9).
Auf dem LCD-Display werden sämtliche Parameter mit „0“ angezeigt.
Im verbundenen Modus leuchtet das LCD-Display des i-Companion xl blau.
INBETRIEBNAHME IM VERBUNDENEN MODUS
iPhone 4S oder neuer
iPad 3 / iPad mini oder später
Von iOS 9 und die Folgende.
Ab Android 4.4 und die Folgende

50
DE
50
DE
Einschalten des i-Companion xl
Ihr Gerät ist mit einem Ein-/Aus-Schalter (H) ausgestattet. Stellen Sie diesen Schalter auf „1“ (siehe Abb. 9).
Aktivieren der Bluetooth-Verbindung
Nähern Sie sich dem i-Companion xl und stellen Sie sicher, dass die Bluetooth-Verbindung Ihres
Smartphones/Tablets aktiviert ist.
Starten der Anwendung
Starten Sie die Companion-Anwendung, indem Sie auf das Icon „Companion“ klicken.
Peering
Was bedeutet Peering?
Bei der ersten Verbindung erkennen sich die von Ihnen auf Ihr Smartphone/Tablet heruntergeladene
Anwendung und der i-Companion xl schnell und automatisch, sofern Sie die nachstehenden Schritte
korrekt befolgen.
Wenn Sie möchten, können Sie den i-Companion xl mit bis zu 10 Geräten verknüpfen.
Verknüpfen Sie hierfür jedes Gerät einzeln (siehe Peering).
Zeitgleich kann jedoch immer nur ein Gerät verbunden sein.
• Lassen Sie Cookies zu. Indem Cookies Ihre Nutzereinstellungen erfassen, tragen sie zur Verbesserung
der Anwendung bei.
• Wählen Sie Ihr Gerät aus.

51
DE
51
DE
• Verlangt die Anwendung dies, halten Sie die Timer-Taste (B3) des i-Companion xl 4 Sekunden
lang gedrückt.
Die Verbindungskontrollleuchte (C1) blinkt über einen Zeitraum von maximal 30 Sekunden.
In dieser Zeit verbindet sich der i-Companion xl mit Ihrem Smartphone/Tablet.
• Bestätigen Sie die Peering-Anfrage, die auf Ihrem Smartphone/Tablet angezeigt wird, oder gehen
Sie in das Nachrichtencenter, um das Peering zu bestätigen.
Leuchtet die Verbindungskontrollleuchte (C1) permanent, ist die Verbindung hergestellt.
Anmerkung: Nach erfolgtem Peering erkennt der i-Companion xl bei späteren Verbindungen Ihr
Smartphone/Tablet automatisch. Sie müssen den Peering-Vorgang nicht wiederholen.
Die Verbindung wurde hergestellt.
Ihr i-Companion xl ist jetzt mit Ihrem Smartphone/Tablet verbunden. Das vorstehende Icon gibt an,
dass die Verbindung hergestellt wurde.
Die Verbindung konnte nicht hergestellt werden.
Das vorstehende Icon gibt an, dass die Verbindung nicht hergestellt wurde.

52
DE
52
DE
Wiederholen Sie die nachfolgenden Schritte:
• Nähern Sie sich dem i-Companion xl.
• Stellen Sie sicher, dass der i-Companion xl an den Strom angeschlossen ist und die Steckdose
einwandfrei funktioniert.
• Stellen Sie sicher, dass Ihr Smartphone/Tablet kompatibel ist (siehe Kompatibilitätsliste auf www.
moulinex.com).
• Stellen Sie sicher, dass die Bluetooth-Verbindung Ihres Smartphones/Tablets aktiviert ist.
• Wiederholen Sie das Peering und lesen Sie die FAQ (häufig gestellte Fragen).
Besteht das Problem weiter, stellen Sie sicher, dass Ihr Smartphone/Tablet kompatibel ist.
Wenn Sie ein Android-Gerät verwenden, stellen Sie sicher, dass es sich um ein kompatibles Modell
handelt (siehe Kompatibilitätsliste auf www.moulinex.com).
• Im Menü der Anwendung können Sie unsere gesamte Rezeptauswahl entdecken.
Im verbundenen Modus wird bei einem Garprozess
mit detaillierter Rezeptanleitung der aktuelle Schritt
durch einmaliges Drücken der Reset-Taste beendet.
Ein erneutes Drücken der Reset-Taste beendet den
Garprozess.
FAQ: HÄUFIG GESTELLTE FRAGEN
Welcher Platz ist für den i-Companion xl geeignet?
• Stellen Sie den i-Companion xl auf eine ebene und stabile Oberfläche.
• Um zwischen dem i-Companion xl und Ihrem Smartphone/Tablet eine optimale Verbindung zu
gewährleisten, wird empfohlen, jedwede Bedienung, die einer Verbindung bedarf, in angemessener
Entfernung vorzunehmen.
• Leuchtet die Verbindungskontrollleuchte (C1) permanent, sind Ihre Geräte verbunden.
• Wurde die Verbindung unterbrochen (das Symbol der Verbindung ist durchgestrichen), nähern Sie
sich Ihrem i-Companion xl, um die Verbindung wiederherzustellen.
Was geschieht, wenn die Verbindung während eines Garprozesses unterbrochen wird?
Wurde die Verbindung zwischen dem i-Companion xl und Ihrem Smartphone/Tablet während eines
Garprozesses unterbrochen, werden beide Geräte automatisch synchronisiert, sobald die Verbindung
wiederhergestellt ist. Sie können dann mit dem Schritt des Garprozesses fortführen, der zum Zeitpunkt
der Unterbrechung der Verbindung durchgeführt wurde.
Kann ich den i-Companion xl auch ohne die Anwendung nutzen?
Ihr Gerät kann auch ohne Anwendung genutzt werden (siehe Inbetriebnahme im nicht verbundenen Modus).
Lesen Sie hierzu den Abschnitt „Gebrauch des Geräts“.
Von den zahlreichen Vorteilen des verbundenen Produkts können Sie aber nur mit der Anwendung profitieren.
Kann der i-Companion xl mit mehreren Smartphones oder Tablets genutzt werden?
Wenn Sie möchten, können Sie den i-Companion xl mit mehreren Geräten verknüpfen. Hierzu
verknüpfen Sie jedes Gerät einzeln (siehe Peering).
Zeitgleich kann jedoch immer nur ein Gerät verbunden sein.
Muss die Bluetooth-Verbindung meines Smartphones ständig aktiviert sein?
Die Bluetooth-Verbindung muss aktiviert sein, um die Anwendung und den i-Companion xl zu synchronisieren.

53
DE
53
DE
INBETRIEBNAHME IM NICHT VERBUNDENEN MODUS
Pasta (Liste der Unterprogramme) Suppen (Liste der
Unterprogramme)
Schmorgerichte (Liste der
Unterprogramme)
Dampfgaren (Liste der
Unterprogramme)
VERWENDUNG DES BEDIENFELDES (B)
Wahl eines Automatikprogramms:
Einschalten Ihres Geräts
Ihr Gerät ist mit einem Ein-/Aus-Schalter ausgestattet. Stellen Sie diesen Schalter auf „1“.
Auf dem LCD-Display werden sämtliche Parameter mit „0“ angezeigt (siehe Abb. 9).
Im nicht verbundenen Modus leuchtet das LCD-Display des i-Companion xl weiß.
AUTOMATISCHER PROGRAMMBETRIEB
1- Wählen Sie das gewünschte
Programm (B4). Über dem
gewählten Programm leuchtet
eine LED. Durch wiederholtes
Drücken können die
verschiedenen Unterprogramme
aufgerufen werden.
2- Die vorprogrammierten Einstel
-
lungen, beispielsweise die Dauer,
können (je nach ausgewähltem
Rezept bzw. je nach Zutaten oder
zubereiteten Mengen) geändert
werden. Drücken Sie den Tem
-
peraturschalter (B2) oder den
Zeitschalter (B3). Der gewählte
Parameter blinkt im Display (C6-
C7).
3- Stellen Sie diese Einstellung(-en)
mittels des „+/-“-Reglers ein
(B6).
4- Nachdem Sie alle Einstellungen
vorgenommen haben, drücken
Sie auf die „Start“-Taste
(B5)
, um das Programm zu
starten. Wenn sich Ihr Gerät im
Kochmodus befindet, leuchtet
die rote Kontrollleuchte auf, um Ihnen anzuzeigen,
dass der Kochvorgang begonnen hat.
5- Drei Pieptöne signalisieren das Ende der Zubereitung.
6- Nach Abschluss der Programme für die Zubereitung
von Suppen, der Schmorgerichte P2 und P3 oder
das Dampfgaren schaltet das Gerät automatisch
auf die 45-minütige Warmhaltefunktion, um die
Speise verzehrbereit zu halten. Im Programm für
die „Schmorgerichte“ P2 und P3 und im manuellen
Modus läuft der Motor des Geräts mit einer bestimm-
ten Geschwindigkeit. Dadurch werden die Speisen
schonend zubereitet und es wird vermieden, dass sie
am Boden des Behälters festkleben. Zum Abschalten
der Warmhaltefunktion genügt es, die Stop-Taste
(B5) zu drücken. Wenn Sie den Deckel öffnen,
die Drücker (D2) betätigen oder den Behälter ab
-
nehmen, wird die Warmhaltefunktion automatisch
ausgeschaltet.

54
DE
54
DE
Einige Rezepte können aufgrund des Auftretens von Blasenbildungen besonders stark
überkochen, vor allem bei der Verwendung von tiefgefrorenem Gemüse. In diesem Fall müssen
Sie die Mengen entsprechend verringern.
ENTDECKEN SIE DIE VORGESCHLAGENEN AUTOMATISCHEN PROGRAMME:
Suppe P1 Suppe P2
Schmortopf P1 Schmortopf P2 Schmortopf P3
Automatische
Programme
„Standardgeschwindigkeit“
(einstellbar)
10 Mal drücken
und 2 min V12
30 s V7 bis V10 V3 V1 V2
„Standardtemperatur”
(einstellbar)
100 °C
(90 °C
bis 100 °C)
100 °C
(90 °C
bis 100 °C)
130 °C
(nicht einstell-
bar)
95 °C
(80 °C
bis 100 °C)
95 °C
(80 °C
bis 100 °C)
„Standarddauer“
(einstellbar)
40 min
(20 min
bis 60 min)
45 min
(20 min
bis 60 min)
5 min
(2 min
bis 15 min)
45 min
(10 min
bis 2 Stunden)
20 min
(10 min
bis 2 Stunden)
Warmhalten als „Standard“
am Ende eines Programms
45 min 45 min 45 min 45 min
Motorgeschwindigkeit
während des Warmhaltens
5 s ON bei G3 /
20 s OFF
10 s ON bei G3 /
10 s OFF
Am Ende des Knetvorgangs der Teigwaren-Programme
P1 und P2 geht das Gerät in den Modus „Teig aufgehen
lassen” über; hierbei beträgt die Temperatur während
40 Minuten 30°C und erlaubt es dadurch, Ihrem Teig
ein größeres Volumen zu verleihen. Wenn Sie den
Deckel öffnen, auf die Griffe
(D2)
drücken oder den
Behälter entfernen, wird die Pause-Funktion des Geräts
aktiviert. Um mit der Zubereitung fortzufahren, müssen
Sie auf die „Start“-Taste drücken. Wenn Sie diesen
Modus abschalten wollen, drücken Sie 2 Sekunden lang
auf die „Stopp“-Taste.
7- Drücken Sie auf die Griffe (D2), und heben Sie den
gesamten Behälter hoch (D) (siehe Abb. 12).
Wurde das Automatikprogramm im verbundenen
Modus gestartet, haben Sie jederzeit die Möglichkeit,
das Gerät durch Drücken der Stop-Taste anzuhalten.
Dadurch wird das automatische Programm in den
Pause-Modus gesetzt. Sie können mit der Zubereitung
fortfahren, indem Sie auf die „Start“-Taste drücken.
Wenn Sie versehentlich das falsche Programm
ausgewählt haben oder wenn Sie es abbrechen
möchten, halten Sie 2 Sekunden lang die Taste
„Stopp“ gedrückt.

55
DE
55
DE
VERWENDUNG DES INNEREN DAMPFKORBS
Die Garzeiten sind Richtwerte und sind in der
Regel ausreichend.
Verschiedene Bedingungen können die Garzeit
dennoch beeinflussen:
- Größe des Gemüses (geschnitten oder nicht
geschnitten)
- Menge der Zutaten im Behälter
- Gemüsevielfalt und Reifegrad
- Menge an Wasser im Behälter, die der Messskala
entsprechen muss (0,7 l)
Achten Sie darauf, den Dampfverschluss so
einzusetzen, dass die Markierung „maxi“ (a) zu
Ihnen hinzeigt
Wenn der Dampf nicht ausreicht, können Sie eine
zusätzliche Garzeit einstellen.
Dauer des Dampfgarens
Zutaten Mengen (max) Geschätzte Kochdauer
Empfehlung für
Dampfprogramm
Zucchini 800 g 20 min P1
Pastinake 800 g 25 min P1
Lauch (weißer Teil) 800 g 25 min P1
Brokkoli 500 g 20 min P1
Fisch 600 g (mit Backpapier) 15 min P1
Kartoffeln 1 kg 30 min P2
Karotten 1 kg 30 min P2
Grüne Bohnen 800 g 30 min P2
Helles Fleisch 600 g (mit Backpapier) 20 min P2
Dampf-
garen P1
Dampf-
garen P2
Teig P1 Teig P2 Teig P3
Automatische
Programme
„Standardgeschwin-
digkeit“
(einstellbar)
V5 während
2 min 30 s
1 min 30 s V5,
dann 2 min V6
40 s V3,
dann 3 min V9
„Standardtemperatur”
(einstellbar)
100 °C
(nicht
einstellbar)
100 °C
(nicht
einstellbar)
„Standarddauer“
(einstellbar)
30 min
(1 min
bis 60 min)
35 min
(1 min
bis 60 min)
2 min 30 s
(30 s bis
2 min 30 s)
3 min 30 s
(30s bis
3 min 30 s)
3 min 40 s
(1 min 40 s
bis 3 min 40 s)
Warmhalten als
„Standard“ am Ende
eines Programms
45 min 45 min
Motorgeschwindigkeit
während des
Warmhaltens
Gehen des Teigs
Voreinstellung 30° am
Ende des Programms
40 min 40 min
Bei einigen Rezepten kann der Inhalt aufgrund von Blasenbildungen besonders stark überkochen,
vor allem bei der Verwendung von tiefgefrorenem Gemüse. In diesem Fall müssen Sie die
Mengen entsprechend verringern.

56
DE
56
DE
• Das Gerät darf nicht in Wasser
getaucht werden. Halten Sie den
Motorblock (A) niemals unter
fließendes Wasser.
Nach Abschluss des Programms ziehen Sie den
Stecker des Gerätes aus der Steckdose.
• Reinigen Sie den Behälter sofort nach der
Verwendung.
• Drücken Sie auf die Griffe (D2), und heben Sie
den gesamten Behälter hoch (D).
• Stellen Sie den Behälter auf eine ebene Fläche.
• Entriegeln Sie den Deckel, indem Sie ihn
eine Vierteldrehung im Uhrzeigersinn drehen.
Nehmen Sie den Deckel vorsichtig ab.
• Gehen Sie vorsichtig mit den Messern des
geschliffenen Ultrablade-Hackmessers (F1)
und des Knet-/Mahlmessers (F4) um, wenn
Sie sie reinigen und wenn Sie den Behälter
leeren. Diese sind sehr scharf.
• Wenn die Teile abgekühlt sind:
- Entfernen Sie den Antrieb (D3), die Dichtung
(D4), den Sicherungsring (D6) (siehe
Abb. Fig. 13).
- Reinigen Sie den Behälter (D), den
Antrieb (D3), die Dichtung (D4), und den
Dichtungsring (D4), den Sicherungsring (D6),
die Zubehörteile (F1), (F2), (F3), (F4),
(F5), den Dampfreglerverschluss (E1),
den Deckel (E2), Dichtungsring (E4) den
Dichtungsring (E3), mit einem Schwamm und
warmem Seifenwasser.
REINIGUNG DES GERÄTS
1- Drücken Sie auf die
Auswahltaste der Einstellung,
die Sie ändern möchten: den
Geschwindigkeitsregler (B1)
oder den Gartemperaturregler
(B2) oder den Zeitregler
(B3). Daraufhin blinkt der
ausgewählte Parameter auf
der Anzeige auf (C5- C6-C7).
2- Stellen Sie diese Einstel-
lung (-en) mittels des
„+/-“-Reglers ein (B6). Aus
Sicherheitsgründen ist es
nicht möglich, eine Änderung
der Temperatur vorzunehmen,
ohne eine Kochzeit einzu-
stellen.
3- Nachdem Sie alle
Einstellungen vorgenommen
haben, drücken Sie auf die
„Start“-Taste (B5). Wenn
sich Ihr Gerät im Kochmodus
befindet, leuchtet die rote
Kontrollleuchte auf, um Ihnen anzuzeigen,
dass der Kochvorgang begonnen hat. Wurde
das Programm gestartet, haben Sie jederzeit
die Möglichkeit, das Gerät durch Drücken der
„Stopp“-Taste anzuhalten (B5).
In diesem Fall wird das Programm auf Pause
geschaltet, zum Fortfahren drücken Sie einfach
erneut auf die „Start“-Taste. Wenn Sie versehentlich
das falsche Programm ausgewählt haben oder wenn
Sie es abbrechen möchten, halten Sie 2 Sekunden
lang die Taste „Stopp“ gedrückt.
4- Drei Pieptöne signalisieren das Ende der
Zubereitung.
5- Drücken Sie auf die Griffe (D2), und heben Sie den
gesamten Behälter hoch (D) (siehe Abb. 12).
IHR GERÄT IST MIT EINER ABDECKUNG FÜR EINEN
FLACHEN BODEN AUSGESTATTET
Mit der Abdeckung für einen flachen Boden kann
in der Schüssel Platz gewonnen werden, um zu
kochen oder zu braten, ohne dabei durch den
Antrieb behindert zu werden (siehe Abb. 15).
KOCHEN OHNE DECKEL
Sie können Lebensmittel in der Schüssel ohne Deckel
braten und dabei umrühren und den Kochvorgang
beaufsichtigen. (Siehe Abb. 16).
Für diese Garmethode müssen Sie unbedingt eine
Temperatur im Bereich von 135 °C bis 150 °C wählen.
Stellen Sie die Betriebszeit ein (bis zu 20 Min).
Die Funktion GAREN OHNE DECKEL ist nicht für
Konfitüren und Zubereitungen mit Milch geeignet
(Inhalt kann überkochen).
MANUELLER BETRIEB:

57
DE
57
DE
WICHTIG - ERGÄNZUNG DER ANLEITUNG ZUR SICHERUNG DES GERÄTES („SECU“)
Ihr Gerät ist serienmäßig
mit elektronischen Motor-
schutzfunktionen ausge-
stattet, um seine
Langlebigkeit zu gewähr-
leisten. Diese elektronische
Sicherung schützt Sie vor
jeglicher anormaler Verwendung. So ist Ihr Motor
perfekt geschützt.
Unter bestimmten Bedingungen, bei einer sehr in-
tensiven Verwendung, bei der die Empfehlungen
der Anleitung nicht berücksichtigt werden (vgl. Ab-
schnitt „Inbetriebnahme“: mögliche Überladung
und/oder ungewöhnlich lange Verwendung und/
oder zu kurze Aneinanderreihung von Zubereitun-
gen) wird der elektronische Schutz ausgelöst, um
den Motor zu schützen. In diesem Fall schaltet sich
das Gerät aus und es erscheint die Anzeige „SECU“
auf dem LCD-Display des Bedienfeldes, um anzuzei-
gen, dass das Gerät momentan nicht mehr einsatz-
bereit ist.
Wenn „SECU“ auf Ihrem Bedienfeld erscheint
und sich Ihr Gerät abschaltet, gehen Sie folgen-
dermaßen vor:
• Lassen Sie Ihr Gerät eingeschaltet, betätigen Sie
nicht den Schalter „0/1“ (H).
• Orientieren Sie sich an den Empfehlungen in
der Anleitung, um Ihre Einstellungen wieder an-
zupassen (vgl. Abschnitt „INBETRIEBNAHME“:
Menge der Zutaten/Zubereitungszeit/Temperatur/
Zubehör).
• Warten Sie eine halbe Stunde, damit sich der
Motor wieder abkühlt.
• Starten Sie Ihr Gerät neu, indem Sie 2 Sekunden
lang den Knopf „Start/Stop/Reset“ drücken (B5).
Ihr Gerät ist wieder vollständig einsatzbereit.
Der Kundendienst steht Ihnen bei sämtlichen Fra-
gen zur Verfügung (weitere Informationen im Ga-
rantieheft).
• Spülen Sie die einzelnen Bestandteile unter
fließendem Wasser.
• Bei starker Verschmutzung mehrere Stunden in
Wasser mit Spülmittel einweichen lassen und,
falls nötig, mit dem Küchenspachtel (G) oder
einem Topfkratzer abkratzen.
• Wenn der Behälter verkalkt ist, können Sie
einen Topfkratzer verwenden und diesen, falls
nötig, in weißen Essig tränken.
• Reinigen Sie den Motorblock (A) mit einem
feuchten Tuch. Trocknen Sie ihn sorgfältig ab.
• Um Ihnen die Reinigung zu erleichtern, können
Sie den Behälter, die Deckeleinheit und die
Zubehörteile in der Spülmaschine reinigen. Dies
gilt nicht für den Antrieb (D3 und D4) und den
Sicherungsring (D6) (siehe Abb. 14).
• Bei der Zubereitung mit Zutaten wie Curry u. Ä.,
bzw. bei der Zubereitung von Karottensaft, usw.
können sich die Zubehörteile, der abnehmbare
Antrieb und die Deckel leicht verfärben;
dies beeinträchtigt jedoch keinesfalls Ihre
Gesundheit oder die korrekte Funktionsweise
Ihres Geräts. Reinigen Sie aus diesem Grund die
Teile umgehend nach der Verwendung.
• Bevor Sie den kompletten Behälter (D) wieder
verwenden, stellen Sie stets sicher, dass die
elektrischen Kontakte unter dem Behälter
sauber und trocken sind.
• Um das Aussehen und die Lebensdauer des
Deckels Ihres Gerätes zu schützen, waschen
Sie ihn manuell ab. Benutzen Sie nicht die
scheuernde Seite des Schwamms, um Kratzer
zu vermeiden.
• Um das Material der Schüssel nicht
zu beeinträchtigen (D), sollten
Sie die Gebrauchsanweisung Ihrer
Spülmaschine beachten, die Salz- bzw.
Geschirrspülreinigermengen nicht erhöhen.

58
DE
58
DE
WAS TUN, WENN IHR GERÄT NICHT FUNKTIONIERT?
PROBLEME URSACHEN LÖSUNGEN
Probleme beim Dampfgaren.
Der Dampfregulierungsschalter ist
falsch eingestellt.
Positionieren Sie den Einsatz mit
„Dampf maxi“ in Ihre Richtung;
mit dieser Einstellung erhalten
Sie maximale Hitze im Behälter
zum Dampfgaren verschiedenster
Speisen (Suppen etc.), somit ist
mehr Dampf im Behälter und das
Garen ist effektiver.
Die Einstellung „Dampf mini»
erzeugt maximale Wärme und Dampf
im Behälter für alle Dampfgar-
vorgänge (Suppen, etc.). Mit dieser
Einstellung werden Spritzer während
des Mixvorganges verhindert.
Die Einstellung „viel Dampf»
lässt eine maximale Menge an
Kondenswasser entweichen und
ermöglicht die ideale Konsistenz der
Gerichte oder Saucen (Risotto, Des-
sertcremes, Saucen etc.).
Unzureichende Garzeit.
Die Garzeiten sind Richtwerte und
sind in der Regel ausreichend.
Verschiedene Bedingungen können
die Garzeit dennoch beeinflussen:
- Größe des Gemüses (geschnitten
oder nicht geschnitten)
- Menge der Zutaten im Behälter
- Gemüsevielfalt und Reifegrad
- Menge an Wasser im Behälter, die
der Messskala entsprechen muss
(0,7 l)
Wenn der Dampf nicht ausreicht,
können Sie eine zusätzliche Garzeit
einstellen.
Sie können außerdem den manuellen
Modus auswählen und die Temperatur
130 °C, sowie je nach Art und Menge
der Zutaten die entsprechende Garzeit
einstellen.
Das Gerät funktioniert nicht.
Der Netzstecker ist nicht angeschlossen. Schließen Sie das Gerät an eine
Steckdose an.
Der Schalter (H) befindet sich in der
Position 0.
Stellen Sie den Schalter auf die Position 1.
Der Behälter oder der Deckel sind nicht
richtig angeordnet oder eingerastet.
Prüfen Sie, ob der Behälter und der
Deckel gemäß den Abbildungen in der
Bedienungs-
anleitung aufgesetzt und eingerastet
sind.

59
DE
59
DE
PROBLEME URSACHEN LÖSUNGEN
Extrem starke Vibrationen.
Das Gerät steht nicht auf einer ebenen
Fläche; das Gerät ist nicht stabil.
Stellen Sie das Gerät auf eine ebene Fläche.
Eine zu große Menge an Zutaten. Verringern Sie die Menge der verarbeiteten
Zutaten.
Zubehörteile-Defekt. Überprüfen Sie, ob Sie das empfohlene
Zubehör verwenden.
Der Deckel leckt.
Eine zu große Menge an Zutaten. Verringern Sie die Menge der verarbeiteten
Zutaten.
Der Deckel ist nicht richtig aufgesetzt
oder eingerastet.
Schließen Sie den Deckel
ordnungsgemäß auf dem Behälter.
Der Dichtungsring ist nicht vorhanden. Legen Sie die Dichtung auf den Deckel.
Der Dichtungsring ist durchgetrennt oder
beschädigt.
Wechseln Sie die Dichtung oder
kontaktieren Sie ein zugelassenes
Kundendienstzentrum.
Zubehörteile-Defekt. Überprüfen Sie, ob Sie das empfohlene
Zubehör verwenden.
Der Behälterantrieb leckt oder
durch das Zubehör Boden XL.
Die Dichtung wurde nicht korrekt
eingesetzt.
Positionieren Sie die Dichtung korrekt.
Die Dichtung ist beschädigt. Kontaktieren Sie ein zugelassenes
Kundendienstzentrum.
Der Sicherungsring (D6) wurde
unzureichend befestigt.
Befestigen Sie den Ring korrekt (D6).
Die Messer drehen sich schwer. Zu große oder zu harte Stücke. Verringern Sie die Größe oder Menge
der verarbeiteten Zutaten. Flüssigkeit
hinzufügen.
Motorgeruch. Bei der ersten Verwendung des Geräts oder
bei Überlastung des Motors aufgrund einer
zu großen Menge an Zutaten oder zu harter
oder zu großer Stücke.
Lassen Sie den Motor abkühlen (etwa
30 Minuten) und verringern Sie die Menge
der Zutaten im Behälter.
„STOP” wird angezeigt. Das Gerät vibriert zu stark und wurde in
die Sicherheitsposition gesetzt.
Überprüfen Sie, ob die empfohlene
Geschwindigkeit eingehalten wurde bzw., ob
Sie das empfohlene Zubehörteil verwenden.
„SECU“ wird angezeigt. Überlastung des Motors aufgrund einer zu
großen Menge an Zutaten oder zu harter
oder zu großer Stücke. Oder aufgrund von
nah aufeinanderfolgenden Zubereitungen
ohne ausreichende Abkühlzeiten.
Lassen Sie den Motor abkühlen (etwa
30 Minuten) und verringern Sie die Menge
der Zutaten im Behälter.
„SECU“ wird angezeigt + rote
LED blinkt.
Überhitzung der Temperaturfühler.
Kontaktieren Sie ein zugelassenes
Kundendienstzentrum.
„Err1“ wird angezeigt
+ rote LED blinkt.
Das Heizelement funktioniert nicht. Überprüfen Sie, ob die Anschlussstifte für die
Stromversorgung unter dem
Behälter nicht verschmutzt sind. Wenn dies
der Fall ist, reinigen Sie diese und versuchen
Sie es erneut.
Wenn das Problem trotzdem weiterhin
besteht, kontaktieren Sie bitte ein
zugelassenes Kundendienstzentrum.
„Err2“ wird angezeigt. Elektronischer Defekt. Kontaktieren Sie ein zugelassenes
Kundendienstzentrum.
„Err3“ wird angezeigt. Geschwindigkeitsfehler. Kontaktieren Sie ein zugelassenes
Kundendienstzentrum.

60
DE
60
DE
PROBLEME URSACHEN LÖSUNGEN
„Err4“ wird angezeigt. Kommunikationsfehler mit der elektro-
nischen Karte. Zerhacker.
Kontaktieren Sie ein zugelassenes
Kundendienstzentrum.
Anzeige „Err8“ Sensorfehler Sicherheitsverriegelung
Wenden Sie sich an ein zugelassenes
Kundendienstzentrum.
„ntc1“ wird angezeigt
+ rote LED blinkt.
Der Temperaturfühler 1 funktioniert
nicht mehr.
Kontaktieren Sie ein zugelassenes
Kundendienstzentrum.
„ntc2“ wird angezeigt
+ rote LED blinkt.
Der Temperaturfühler 2 funktioniert
nicht mehr.
Kontaktieren Sie ein zugelassenes
Kundendienstzentrum.
Anzeige der Sicherheitskontrollleuchte
(C4)
Behälter oder Deckel nicht richtig
verriegelt
Überprüfen Sie vor der Inbetriebnahme
des Geräts die richtige Verriegelung
des Behälters auf dem Motorblock und
des Deckels auf dem Behälter. Falls das
Problem weiterbesteht, kontaktieren Sie
ein zugelassenes Kundendienstzentrum.
Der Deckel ist im Modus „Garen ohne
Deckel“ auf dem Behälter verriegelt.
Vor dem Start des Garprogramms den
Deckel entriegeln. Falls das Problem
weiterbesteht, kontaktieren Sie ein zu-
gelassenes Kundendienstzentrum.
Die Verriegelungssicherung des Deckels
ist noch aktiviert (Stift außen) und
gestattet das Verriegeln des Deckels
nicht.
Das Gerät wurde im Verlauf eines
Rezepts durch Betätigen des I/O-Schal-
ters oder durch Ziehen des Netzsteckers
ausgeschaltet.
Um die Küchenmaschine und damit die
Verriegelungssicherung des Deckels
zurückzusetzen, wird der I/O-Schalter
auf „I“ gestellt. Der Stift geht automa
-
tisch in seine Ausgangsstellung zurück
und der Deckel kann nun verriegelt
werden.
Verbindungsproblem Sehen Sie in der Bedienungsanleitung
der Anwendung nach.
Ihr Gerät funktioniert immer noch nicht?
Wenden Sie sich an ein zugelassenes Kundendienstzentrum (siehe Liste im Serviceheft).
• Entsorgung des Gerätes und der Verpackungsmaterialien
Die Verpackung besteht ausschließlich aus umweltfreundlichen Materialien, die nach den
geltenden Recycling-Bestimmungen entsorgt werden können.
Für die Entsorgung des Gerätes informieren Sie sich bitte bei den zuständigen Stellen Ihrer
Gemeinde.
• Entsorgung elektrischer und elektronischer Geräte:
Denken Sie an den Schutz der Umwelt!
Ihr Gerät enthält zahlreiche wiederverwertbare oder recyclebare Materialien.
Bringen Sie das Gerät zur Entsorgung zu einer Sammelstelle ihrer Stadt oder Gemeinde.
RECYCLING
*La marque et les logos Bluetooth
®
sont des marques déposées par Bluetooth SIG, Inc. et leur utilisation par le Groupe SEB a fait l’objet d’une
autorisation.
Google Play et Android sont des marques de Google Inc.
Apple et le logo Apple sont des marques d’Apple Inc., déposées aux États-Unis et d’autres pays. App Store est une marque de service d’Apple Inc.
WÖRTERBUCH
Peering: Zwei Geräte werden zusammengeschlossen oder verknüpft.
Das Peering erfolgt, wenn Ihr Smartphone oder Tablet zum ersten Mal mit dem i-Companion xl verbunden wird.
Synchronisieren: Informationen werden aktualisiert. Anwendung und i-Companion xl werden synchronisiert, um im verbundenen
Modus Informationen austauschen zu können.
Verbinden: Zwischen der Anwendung (auf dem Smartphone/Tablet) und dem Gerät (i-Companion xl) wird eine Verbindung
hergestellt. Für die Synchronisierung ist eine Verbindung zwingend erforderlich.
Cookies: Cookies sind Nutzerinformationen, die an Moulinex gesendet werden, um die Anwendung zu verbessern.

61
IT
61
IT
Per la sicurezza della persona
• Leggere attentamente le istruzioni per
l’uso prima di utilizzare l’apparecchio
per la prima volta e conservarle: un
utilizzo non conforme alle istruzioni
per l’uso solleva il produttore da
qualsiasi responsabilità.
• Scollegare sempre l’apparecchio
dall’alimentazione se viene lasciato
incustodito e prima del montaggio,
dello smontaggio o della pulizia. Non
consentire ai bambini di utilizzare
l’apparecchio senza sorveglianza.
• L’uso di questo apparecchio è vietato ai
bambini. Tenere l’apparecchio e il cavo
fuori della portata dei bambini.
• Si sconsiglia l’utilizzo del presente
apparecchio da parte di persone
(bambini compresi) con capacità
fisiche, sensoriali o mentali ridotte,
o da persone prive di esperienza o
di conoscenza, se non in presenza di
figure responsabili della loro sicurezza,
che possano monitorarle ed istruirle
preventivamente all’uso. Sorvegliare i
bambini per evitare che giochino con
l’apparecchio.
• Tenere l’apparecchio fuori della portata
dei bambini.
• Quando l’apparecchio è in
funzione, alcune parti rag-
giungono temperature
elevate (pareti in acciaio
inox del recipiente e del tappo, attacco
comune removibile, parti trasparenti del
coperchio, parti metalliche sotto il reci
-
piente, accessorio fondo XL cestello).
Possono provocare scottature. Maneg-
giare l’apparecchio toccando solo le parti
fredde in plastica (impugnature, blocco
motore). La spia luminosa che segnala il
riscaldamento, di colore rosso, indica il
rischio di scottature.
• La temperatura delle superfici
accessibili può essere elevata quando
l’apparecchio è in funzione.
• Questo apparecchio non è predisposto
per essere messo in funzione mediante
un timer esterno o un sistema di
comando a distanza separato.
• Non utilizzare l’apparecchio nel caso
in cui non funzioni correttamente,
sia stato danneggiato o qualora il
cavo di alimentazione o la presa
risultino danneggiati. Per evitare
qualsiasi tipo di rischio, richiedere
obbligatoriamente la sostituzione
del cavo presso un centro assistenza
autorizzato (consultare l’elenco nelle
istruzioni per l’uso).
• Questo apparecchio non deve essere
immerso in acqua. Non mettere mai
il blocco motore (A) sotto l’acqua
corrente.
• L’apparecchio è destinato al solo uso
domestico, all’interno dell’abitazione
e ad altitudini inferiori ai 2000 m. Il
fabbricante declina ogni responsabilità
NORME DI SICUREZZA

62
IT
62
IT
e si riserva il diritto di annullare la
garanzia in caso di un uso commerciale
o improprio del dispositivo, o del
mancato rispetto delle istruzioni.
• Questo apparecchio non è destinato
ad essere utilizzato in applicazioni
domestiche e simili come:
- in angoli cottura riservati al
personale nei negozi, negli uffici e
in altri ambienti professionali,
- in angoli cucina riservati al
personale di punti vendita, uffici e
altri ambienti professionali;
- nelle fattorie/agriturismi;
- da parte dei clienti di alberghi,
motel e altre strutture a carattere
residenziale;
- in ambienti di tipo B&B.
• L’apparecchio emette
vapore, che può
provocare scottature.
Maneggiare con
attenzione il coperchio e il tappo (se
necessario servirsi di un guanto, una
presina, ecc.). Maneggiare il tappo
impugnandolo nella parte centrale.
• Non mettere in funzione l’apparecchio
se la guarnizione non è installata
sul porta-guarnizione, e se il porta-
guarnizione non è assemblato
nel coperchio. È tassativamente
obbligatorio utilizzare l’apparecchio
con il tappo inserito nell’apposito
alloggiamento del coperchio (tranne
in caso di indicazioni specifiche per
la ricetta).
AVVERTENZA Prestare
attenzione ai rischi di
infortunio in caso di
cattivo utilizzo
dell’apparecchio.
Prendere le dovute precauzioni
nel maneggiare le lame affilate
della mezzaluna (F1) e del coltello
seghettato (F4) durante la pulizia e
lo svuotamento del recipiente: sono
estremamente taglienti.
Riporre il coltello tritatutto
Ultrablade (F1) nel contenitore
dopo ogni utilizzo.
Prestare particolare attenzione
nel caso vengano versati nel robot
da cucina liquidi caldi: potrebbero
fuoriuscire dall’apparecchio
in seguito ad un’ebollizione
improvvisa.
AVVERTENZA Procedere con cautela
nel manipolare l’apparecchio (pulizia,
riempimento e versamento): evitare
qualunque traboccamento del liquido
sui connettori.
AVVERTENZA Alcuni alimenti dotati
di rivestimento superficiale (salsicce
intere, lingua, pollame…) o grandi
pezzi di carne possono generare
schizzi a causa dei liquidi bollenti
trattenuti. Pertanto, si raccomanda
di forarli prima della cottura con un
coltello o una forchetta.

63
IT
63
IT
AVVERTENZA La superficie della
resistenza rimane ancora calda dopo
l’uso.
Assicurarsi di toccare solo le
impugnature del prodotto (levette
D2, impugnatura del coperchio E2 e
del tappo E1) durante il riscaldamento
e fino al raffreddamento completo.
Fare riferimento alle istruzioni d’uso
per regolare la velocità e i tempi di
funzionamento di ciascun accessorio e
di ciascun programma.
Fare riferimento alle istruzioni d’uso
per l’assemblaggio e il montaggio degli
accessori sull’apparecchio.
Fare riferimento alle istruzioni d’uso per
la pulizia e la manutenzione
dell’apparecchio.
Seguire sempre le istruzioni per la
pulizia dell’apparecchio:
• Scollegare l’apparecchio.
•
Non pulire l’apparecchio quando è
ancora caldo.
• Pulire con un panno o una spugna
umida.
• Non immergere né mettere sotto
l’acqua corrente l’apparecchio
SOLO MERCATI EUROPEI:
• Tenere l’apparecchio e il cavo fuori
dalla portata dei bambini di età
inferiore agli 8 anni. I bambini non
devono utilizzare l’apparecchio come
un giocattolo.
• Questo apparecchio può essere
utilizzato da persone le cui capacità
fisiche, sensoriali o mentali siano
ridotte o la cui esperienza o
conoscenza non siano sufficienti,
a condizione che ricevano una
supervisione o che abbiano ricevuto
istruzioni in merito ad un uso sicuro
dell’apparecchio e ne comprendano
correttamente i potenziali pericoli.
• Questo apparecchio può essere
utilizzato da bambini di almeno 8 anni
d’età, a condizione che ricevano una
supervisione o che abbiano ricevuto
istruzioni in merito ad un uso sicuro
dell’apparecchio e ne comprendano
correttamente i potenziali pericoli. La
pulizia e il mantenimento spettanti
all’utente non devono essere eseguiti
da bambini senza supervisione, a
meno che non abbiano più di 8 anni
e siano sotto la supervisione di un
adulto.
Collegamento elettrico
• Collegare sempre l’apparecchio a una
presa di corrente dotata di messa a terra.
• L’apparecchio è progettato per
funzionare esclusivamente a corrente
alternata. Verificare che la tensione di
alimentazione indicata sulla targhetta
dell’apparecchio corrisponda a quella
dell’impianto elettrico di casa.
• Eventuali errori di collegamento
annullano la garanzia.
• Non tirare mai il cavo d’alimentazione
per scollegare l’apparecchio dalla

64
IT
64
IT
presa di corrente.
• Non immergere in liquidi l’apparecchio,
il cavo di alimentazione o la presa, non
collocarli in prossimità o a contatto
con le parti calde dell’apparecchio
e tenerli lontani da fonti di calore e
spigoli vivi.
Cattivo utilizzo
• Non toccare il coperchio prima del
completo arresto dell’apparecchio
(tasto stop): attendere che gli
alimenti in lavorazione abbiano
smesso di girare.
• Nel recipiente, versare sempre gli
ingredienti solidi prima di aggiungere
quelli liquidi (cfr. fig. 10) e non
oltrepassare il livello massimo previsto,
segnalato con un’incisione all’interno
del recipiente (cfr. fig. 10). Se il
recipiente è troppo pieno, è possibile
che fuoriesca acqua bollente.
• Attenzione: durante il programma di
cottura al vapore, rispettare il livello
di 0,7 l d’acqua (cfr. fig. 3.2).
• Non appoggiare mai le dita o qualsiasi
altro oggetto nel recipiente durante il
funzionamento dell’apparecchio.
• Non utilizzare il recipiente come
contenitore (per conservare,
congelare, sterilizzare).
• Posizionare l’apparecchio su un piano
di lavoro stabile, resistente al calore,
pulito e asciutto.
• Non posizionare l’apparecchio vicino
a pareti o armadi: il vapore prodotto
potrebbe danneggarli.
• Non posizionare l’apparecchio vicino a
fonti di calore in funzione (piastre di
cottura, elettrodomestici, ecc.).
• Non coprire il coperchio con canovacci
o altro e non cercare di otturare
la sua cavità: utilizzare il tappo di
regolazione del vapore apposito.
• Mentre l’apparecchio è in funzione,
non avvicinarsi con capelli, sciarpe,
cravatte o simili sopra il recipiente.
• Non mettere gli accessori nel forno a
microonde.
• Non utilizzare l’apparecchio all’aperto.
• Non superare mai le quantità massime
indicate nelle istruzioni.
• Riporre l’apparecchio solo una volta
che si è raffreddato completamente.
• Per raffreddare il recipiente, non usare
il congelatore ma il frigorifero.
Servizio post-vendita
• Per la propria sicurezza, non utilizzare
accessori o parti di ricambio diverse
da quelle fornite dai centri di servizio
post-vendita autorizzati.
• Eventuali interventi diversi dalla
pulizia e dalle normali operazioni di
manutenzione spettanti all’utente
devono essere svolti da un centro
assistenza autorizzato.
• Consultare la tabella “Cosa fare se
l’apparecchio non funziona?” riportata
al termine delle istruzioni per l’uso.

65
IT
65
IT
Le presenti istruzioni contengono consigli d’uso che consentiranno di scoprire le funzionalità
di questo apparecchio: preparazione di zuppe, cottura lenta, cottura a vapore, impasti.
DESCRIZIONE DELL’APPARECCHIO
A Blocco motore
B Quadro dei comandi
B1 : selettore di velocità
B2: selettore della temperatura
di cottura e/o spia luminosa
riscaldamento
B3: selettore della durata di
funzionamento/tasto per
connessione dispositivo
B4: tasti di selezione dei programmi
automatici
B5: tasto START/STOP/RESET
B6: selettore + / -
C Display LCD
C1 : visualizzazione spia di connessione
C2: visualizzazione programma vapore
C3: visualizzazione dello step in corso
C4: visualizzazione spia di sicurezza
C5: visualizzazione velocità
C6: visualizzazione temperatura
C7: visualizzazione tempo
D Insieme recipiente
D1 : Recipiente inox
D2 : Levette
D3 : Cilindro guida comune removibile
D4 : Guarnizione (x2)
D5 : Accessorio fondo XL
D6 : Anello di chiusura del cilindro
E Gruppo coperchio
E1 : Tappo di regolazione del vapore
E2 : Coperchio
E3 : Guarnizione
E4 : Guarnizione
F Accessori
F0 : contenitore per accessori
F1 : Mezzaluna ultrablade
F2 : Miscelatore
F3 : Sbattitore
F4 : Lama per impasto/frantumazione
F5 : Cestello a vapore
G Spatola
H
Interruttore 0/1 per interrompere
l’alimentazione elettrica dell’apparecchio
I Spazzola per la pulizia
DATI TECNICI DELL’APPARECCHIO
Potenza : 1550W (1000W : Resistenza riscaldante/550 W: Motore)
Range di temperatura : Da 30° a 150℃
regolabile per incrementi di 5°C
Durata di funzionamento : Da 5 secondi a 2 ore,
regolabile per incrementi di 5 sec minimo a 1 min massimo.
Numero delle velocità: 13 - 2 velocità intermittenti:
velocità 1 (5 sec acceso/20 sec spento).
velocità 2 (10 sec acceso/10 sec spento).
- 10 velocità continue progressive
(velocità da 3 a 12).
- 1 velocità intermittente max (velocità 13).
- *Il marchio e i loghi Bluetooth® sono marchi depositati da Bluetooth SIG, Inc. e il loro utilizzo da parte del Gruppo SEB è stato autorizzato.
- Google Play e Android sono marchi di Google Inc.
- Apple e il logo Apple sono marchi di Apple Inc., depositati negli Stati Uniti e in altri paesi. App Store è un marchio di servizio di Apple Inc.

66
IT
66
IT
IL VOSTRO APPARECCHIO
Con questo apparecchio avete a disposizione i seguenti accessori:
Questi accessori sono anche dotati di zone di impugnatura apposite, per facilitarne il
maneggiamento durante l’uso e la preparazione delle ricette.
Coltello tritatutto
Miscelare zuppe
3min 3L
Miscelare composte 40s 1Kg
Tritare le verdure 15s 1Kg
Tritare la carne 30s 1Kg
Tritare il pesce 15s 1Kg
Non utilizzare questo accessorio per tagliare prodotti duri; utilizzare il coltello impastatore / le lame per tritare F4.
Miscelatore
Lavora i piatti cucinati senza rovinarne gli ingredienti,
Molto utile per le fasi di rosolatura a fuoco lento iniziali di alcune preparazioni (risotti, zuppe).
Rosolatura 5min 500g
Cottura a fuoco lento 45min 3L
Risotti 22min 1,5Kg
Ratatouille, chutney, legumi (Impostazioni: vedi ricettario)
Sbattitore
9 max
Albumi montati a neve 5/10min
7
max
Maionese,
panna montata
2/5min 0,5L
Salse, creme
Da
a
1/20min 1L
Patate schiacciate
Da
a
1min 1L
Polenta
Da a
1/16min 1L
Lama impastatrice/frantumatrice
Impasto di pane bianco 2min 30s 1,2Kg
Impasto di pasta brisé,
sablé, pani speciali
2min 30s 1Kg
Impasto di lieviti
(brioche, ciambelle)
1min 30s
2 min
0,8Kg
Lavorazione di impasti
(torte soffici)
40 s
3min
1Kg
Polverizzazione di frutti a
guscio
1min 0,6Kg
Tritatura di prodotti duri
1min 0,6Kg
Pestatura del ghiaccio
1min
6 a 10
Pastella per crêpe, gaufre
1min 1,5L
Cestello
a vapore
Cottura a vapore di verdure,
pesce o carne
20/40min 1Kg
Zuppe con pezzetti
3min 3L
Tappo
Tappo di regolazione dell’estrazione del vapore
Massimo (a) = cottura a vapore.
Minimo (b) = risotto, crema pasticcera, salse …
Fondo XL
Accessorio fondo XL
Rosolatura e cottura senza coperchio
Aumento della superficie di cottura per grossi pezzi di carne o pesce.

67
IT
67
IT
Il vostro apparecchio i-Companion xl propone un
funzionamento “connesso”, ma può anche essere
utilizzato in modalità “ non connessa “. Inoltre
dispone di due modalità di funzionamento:
la modalità con programma automatico e la
modalità manuale.
• Modalità programma automatico:
velocità, temperatura di cottura e durata sono
programmate per realizzare automaticamente
zuppe, cotture lente, cotture a vapore e impasti.
• Modalità manuale:
Regolazioni personalizzate dei parametri
velocità, temperatura di cottura e durata per
un utilizzo in base alle proprie esigenze.
Utilizzo con o senza coperchio
Temperatura da
30 a 130°C
Temperatura da
135 a 150°C
- Dopo aver impostato una temperatura tra 135°C
e 150°C, è necessario utilizzare l’apparecchio
senza coperchio. Se il coperchio è posizionato
sul recipiente, sul display apparirà il simbolo del
lucchetto, a indicare che è necessario rimuoverlo.
- Dopo aver aggiunto gli alimenti, mescolarli con
la spatola regolarmente per evitare di macchiare
il fondo del recipiente (consultare il paragrafo
«Pulizia»).
- Se si desidera utilizzare l’apparecchio con il
coperchio, la temperatura di cottura non deve
superare i 130°C.
QUESTO APPARECCHIO È DOTATO DI UN
SISTEMA DI BLOCCAGGIO DI SICUREZZA DEL
COPERCHIO
Il coperchio viene bloccato a ogni avvio
dell’apparecchio. Il sistema di sicurezza impedisce
l’apertura del coperchio durante la preparazione
di una ricetta (Fig. 17). Non tentare di forzare
il coperchio quando è bloccato. Il sistema di
sicurezza si sblocca a ogni arresto dell’apparecchio.
Se è stata selezionata una temperatura superiore o
pari a 50°C e una velocità superiore o pari a 5, sul
display del pannello di controllo apparirà un conto
alla rovescia di 10 secondi (Fig. 18).
L’apertura del coperchio sarà possibile
esclusivamente al termine del conto alla rovescia.
INSERIMENTO DEL VASO, DEGLI ACCESSORI E
DEL GRUPPO COPERCHIO
• Al primo utilizzo lavare tutti gli elementi (D,
E, F, G) con acqua calda e detersivo per
piatti, ad esclusione del blocco motore (A). Il
vaso (D) è dotato di un elemento trascinatore
smontabile (D3) per facilitare la pulizia.
• Prima dell’uso accertarsi di aver rimosso tutte
le parti dell’imballaggio, in particolare la
protezione situata tra il vaso (D) e il blocco
motore (A).
• Posizionare la guarnizione (E4) sul porta-
guarnizione (E3) (Fig. 1) e fissare l’insieme
sul coperchio (E2) (Fig. 2).
• Posizionare la guarnizione (D4) sull’elemento
trascinatore comune (D3). Bloccare il gruppo
sul fondo del vaso con l’anello di bloccaggio
(D6) (v. Fig. 3). Per la modalità di cottura
senza coperchio, posizionare la guarnizione
(D4) sull’accessorio fondo XL (D5). Fissare
l’insieme sul fondo del recipiente con l’anello
di bloccaggio (D6) (Fig. 3).
• Posizionare l’accessorio prescelto nel vaso:
- gli accessori (F1, F2, F3, o F4) sull’elemento
trascinatore comune sul fondo del vaso
(v. Fig. 4.1),
- in caso di cottura a vapore, il cestello vapore
(F5) all’interno del vaso, (v. Fig. 4.3),
avendo cura di riempire precedentemente
la vaschetta con 0,7 l di preparato liquido
(acqua, salsa…) (v. Fig. 4.2).
• Incorporare gli ingredienti all’interno del vaso
o del cestello vapore.
• Posizionare il coperchio sul vaso (D) allineando
i due triangoli (v. Fig. 5), bloccare il coperchio
senza premere ruotandolo nel senso della
freccia (v. Fig. 6).
Posizionare il tappo regolatore del vapore (E1)
sul coperchio, sono possibili 2 posizioni
(v. Fig. 7):
La posizione “minimo” permette di
rilasciare la condensa massima e di
ottenere anche dei piatti o delle
salse dalla consistenza migliore (ri-
sotto, creme per dolci, salse, ecc.).
La posizione “massimo” permette
di raggiungere il calore e il vapore
massimo nella pentola, per tutte le
cotture a vapore (zuppe, ecc.).
Tale posizione evita allo stesso modo gli
F1 F2
F3 F4
F5
F1 F2
F3 F4

68
IT
68
IT
schizzi durante il mescolamento.
• Posizionare il recipiente (D) sul blocco
motore (A): si deve udire un “click” sonoro
(cfr. fig. 8).
• L’apparecchio parte solo se il recipiente e il
coperchio sono correttamente posizionati e
fissati sul blocco motore.
In caso di posizionamento errato o di
un cattivo fissaggio di uno o dell’altro
elemento (cfr. fig. 10.1 e 10.2), il logo
si mette a lampeggiare quando si tenta di
attivare una funzione.
Selezione delle impostazioni personalizzate
Selezione della velocità del motore.
2 velocità intermittenti e 10 velocità
continue progressive.
Velocità intermittente max (V13).
Selezione della temperatura di
cottura.
Da 30° a 150℃.
Spia luminosa di riscaldamento:
Si accende all’avvio della cottura
e si spegne quando la temperatura
interna del recipiente scende al di
sotto dei 50°C.
Selezione della durata di
funzionamento.
Da 5 secondi a 2 ore.
Prima connessione: tenere
premuto per l’accoppiamento tra
I-Companion gourmet e
smartphone/tablet
Aumento della velocità,
della temperatura di cottura
e della durata.
Diminuzione della velocità,
della temperatura di cottura
e della durata.
Questo pulsante ha 3 funzioni:
- “Convalida” della scelta del
programma automatico o
dei parametri selezionati nel
quadro di un utilizzo manuale
(velocità, temperatura di
cottura, tempo).
- “Pausa” nel corso di un
utilizzo una volta che
l’apparecchio è partito.
- “Reset” dei parametri
selezionati dell’apparecchio
con una pressione di 2
secondi.
- “Convalida della fase” nelle
ricette step by step.
Consigli di utilizzo
L’apparecchio è dotato di un microprocessore che controlla e analizza la sua stabilità. In caso di
instabilità, la velocità di rotazione del motore si riduce automaticamente. Se l’instabilità persiste,
il motore si arresta e sullo schermo appare l’indicazione “STOP”.
• Verificare che la quantità degli ingredienti non sia eccessiva e che la velocità utilizzata sia idonea
alla preparazione.
• Controllare che l’accessorio in uso sia quello raccomandato.
• Quindi, far ripartire normalmente l’apparecchio.

69
IT
69
IT
PREPARAZIONE DELL’INSTALLAZIONE
L’elenco dei modelli di smartphone e tablet compatibili con i-Companion è disponibile su
www.moulinex.com
(elenco dei modelli compatibili www.moulinex.com)
INSTALLAZIONE DELL’ I-COMPANION XL
Requisiti per l’installazione di i-Companion xl:
• L’applicazione Companion scaricabile gratuitamente su App Store (iPhone/iPad) e Google Play
(Android)
• Una connessione Bluetooth fornita dal vostro smartphone o tablet Bluetooth® Smart 4.0:
i-Companion xl si collega al vostro smartphone/tablet tramite una connessione autonoma senza fili
• Lo smartphone/tablet deve trovarsi in prossimità dell’ i-Companion xl (la portata della connessione
varia in funzione della configurazione dello slot).
• Una presa elettrica per il collegamento dell’ i-Companion xl: i-Companion xl si connette al vostro
smartphone/tablet solo quando è collegato alla rete elettrica.
Informazioni su Bluetooth® Smart
La tecnologia Bluetooth® Smart 4.0 (o Bluetooth Low Energy) permette una comunicazione senza
fili tra un’applicazione e un apparecchio consumando pochissima energia.
PRIMA CONNESSIONE DELL’ I-COMPANION XL IN MODALITÀ CONNESSA
Download dell ’applicazione
Per cominciare, scaricate l’applicazione sul vostro smartphone/tablet collegandovi all’App Store per
iOS o a Google Play per Android.
Una volta scaricata l’applicazione, in pochi minuti e senza creare un account, potrete realizzare le
prime ricette con i-Companion xl. (300 ricette proposte senza la creazione di un account personale).
La creazione di un account sull’applicazione vi permetterà di accedere a tutti i contenuti per variare
i vostri menu.
Accensione dell’apparecchio
Frequenza: 2,40 GHz. Potenza massima trasmessa: 7,7 dBm
L’apparecchio è dotato di un interruttore 0/1. Spostare l’interruttore su 1. (v. Fig. 9).
Il display LCD visualizza tutti i parametri a “0”.
In modalità connessa, la visualizzazione del display LCD dell’ i-Companion xl è blu.
UTILIZZO IN MODALITÀ CONNESSA
iPhone 4S o più recente
iPad 3 / iPad mini o successiva
Da iOS 9 e il seguente.
Da Android 4.4 e il seguente.

70
IT
70
IT
Accensione dell’i-Companion xl
L’apparecchio è dotato di un interruttore 0/1 (H). Spostare l’interruttore su 1 (v. Fig. 9).
Attivazione del Bluetooth
Avvicinatevi all’i-Companion xl e verificate che il Bluetooth del vostro smartphone/tablet sia attivo.
Avvio dell’applicazione
Avviate l’applicazione Companion cliccando sull’icona “ Companion “.
Accoppiamento
Cosa significa accoppiamento?
Al momento della prima connessione, l’applicazione precedentemente scaricata sullo smartphone/
tablet e l’i-Companion xl si rilevano automaticamente e rapidamente, a condizione che vengano
seguite le fasi sottoindicate.
Se lo desiderate potete accoppiare fino a 10 dispositivi con i-Companion xl.
A tale scopo dovrete procedere singolarmente all’accoppiamento di ciascun dispositivo
(v. accoppiamento).
Tuttavia è possibile connettere un solo dispositivo alla volta.
• Accettare i cookie: permettono di migliorare l’applicazione raccogliendo le vostre preferenze d’uso.
• Selezionare il proprio dispositivo

71
IT
71
IT
• Quando l’applicazione lo richiede, esercitare una pressione prolungata (4 secondi) sul tasto Timer
(B3) dell’i-Companion xl.
La spia di connessione (C1) lampeggia per 30 secondi al massimo, durante i quali l’i-
Companion xl si connette allo smartphone/tablet.
• Accettare la richiesta di accoppiamento che appare sullo smartphone/tablet o accedere al menu delle
notifiche per accettare l’accoppiamento.
La spia di connessione (C1) fissa indica che la connessione è stata stabilita.
NB: Una volta effettuato l’accoppiamento, l’i-Companion xl riconoscerà automaticamente lo
smartphone/tablet in occasione delle connessioni future. Non sarà più necessario ripetere questa
fase di accoppiamento
Connessione riuscita
L’i-Companion xl ora è connesso allo smartphone/tablet. L’icona raffigurata indica che la connessione
è stata stabilita

72
IT
72
IT
Connessione non riuscita
L’icona raffigurata indica che la connessione non è stata stabilita
Ripetere le seguenti operazioni:
• Avvicinarsi all’i-Companion xl.
• Verificare che l’i-Companion xl sia correttamente collegato alla rete elettrica e che la presa funzioni
correttamente.
• Verificare che lo smartphone/tablet sia compatibile (v. lista di compatibilità su www.moulinex.com).
• Verificare che il Bluetooth dello smartphone/tablet sia attivo.
• Ripetere le fasi di accoppiamento e consultare le FAQ (domande frequenti).
Se il problema persiste, accertarsi che lo smartphone/tablet sia compatibile
Se si utilizza un dispositivo Android, accertarsi che sia incluso nei modelli compatibili (v. lista di
compatibilità su www.moulinex.com).
• Accedere al menu dell’applicazione per scoprire la nostra gamma di ricette.
In modalità connessa, durante una ricetta step by
step, il primo reset conclude la fase e il secondo reset
conclude la ricetta.
FAQ: DOMANDE FREQUENTI
Dove collocare l’i-Companion xl:
• Collocare l’i-Companion xl su una superficie piana e stabile.
• Per ottenere una connessione ottimale tra l’i-Companion xl e lo smartphone/tablet, è consigliabile eseguire
tutte le operazioni che richiedono la connessione a una distanza ragionevole.
• La presenza della spia di connessione fissa (C1) garantisce che gli apparecchi sono connessi.
• Se la connessione si interrompe (il simbolo della connessione è barrato) bisogna ridurre la distanza
dall’i-Companion xl per ripristinarla.
Cosa succede se la connessione si interrompe durante una ricetta?
Se la connessione tra l’i-Companion xl e lo smartphone/tablet si interrompe durante una ricetta, la
sincronizzazione tra i due apparecchi sarà eseguita automaticamente non appena la connessione sarà
ripristinata. Si potrà riprendere l’esecuzione della ricetta dalla fase in cui si è interrotta al momento della
perdita di connessione.
Posso utilizzare l’i-Companion xl senza l’applicazione?
L’apparecchio può essere usato senza l’applicazione. (V. Messa in funzione in modalità non connessa).
A tale scopo consultare il paragrafo “Utilizzo dell’apparecchio”.
Tuttavia, solo l’applicazione permette di usufruire dei tanti vantaggi del prodotto connesso.
I-Companion xl può essere utilizzato con più smartphone o tablet?
Se lo desiderate potete accoppiare vari dispositivi all’i-Companion xl. A tale scopo dovete procedere
singolarmente all’accoppiamento di ciascun dispositivo (v. accoppiamento).
Tuttavia è possibile connettere un solo apparecchio alla volta.

73
IT
73
IT
Il Bluetooth del mio telefono deve essere sempre attivo?
Il Bluetooth deve essere attivo per sincronizzare l’applicazione e l’i-Companion xl.
UTILIZZO IN MODALITÀ NON CONNESSA
Impasti (lista dei sub programmi) Zuppe (lista dei sub
programmi)
Cottura lenta (lista dei sub
programmi)
Cottura a vapore (lista dei
sub programmi)
UTILIZZO DEL PANNELLO COMANDI (B)
Selezione di un programma automatico:
Accensione dell’apparecchio
L’apparecchio è dotato di un interruttore 0/1. Spostare l’interruttore su 1.
Il display LCD visualizza tutti i parametri a “ 0 “. (V. Fig. 9).
In modalità non connessa, la visualizzazione del display LCD dell’i-Companion xl è bianca.
PROGRAMMI AUTOMATICI
1- Premere il programma
prescelto (B4). Un punto
luminoso appare al di sopra
del programma selezionato.
Le pressioni successive
permettono di scorrere i vari
sub programmi.
2-
Le impostazioni preprogrammate
possono essere modificate
per una sola ricetta (in base
ricetta scelta, gli ingredienti,
le quantità). Premere il
selettore della temperatura
di cottura (B2) o il selettore
del tempo (B3), il parametro
prescelto lampeggia sullo
schermo (C6-C7).
3- Regolare i parametri
servendosi del selettore +/-
(B6).
4- Una volta modificati tutti
i parametri, premere il
pulsante “start” (B5) per
avviare il programma. Quando
l’apparecchio è in modalità
cottura, la spia luminosa
rossa si accende per segnalare
che la cottura è iniziata.
5- Quando il programma è terminato, l’apparecchio
emette 3 bip.
6- Al termine dei programmi zuppe, cottura lenta
P2 e P3, cottura a vapore, l’apparecchio passa
automaticamente alla modalità di manteni-
mento al caldo per 45 minuti, in modo che la
pietanza preparata rimanga pronta per essere
consumata. Nel programma cottura lenta P2 e
P3 e in modalità manuale, il motore dell’appa-
recchio funziona a una velocità specifica allo
scopo di preservare la pietanza preparata e
di evitare che aderisca al fondo del vaso. Per
arrestare il mantenimento al caldo è sufficiente
premere il tasto “stop” (B5). Se si apre il
coperchio, si premono le levette (D2) o si
rimuove il vaso, il mantenimento al caldo si
arresta automaticamente.

74
IT
74
IT
Alcune ricette possono provocare fuoriuscite improvvise causate dalla comparsa di bolle, in
particolare nel caso della cottura di verdure congelate. In questo caso, ridurre i volumi di
conseguenza.
ALLA SCOPERTA DEI PROGRAMMI AUTOMATICI
Zuppa P1 Zuppa P2
Cottura a fuoco
P1
Cottura a fuoco
P2
Cottura a fuoco
P3
Programmi
automaticioci
Velocità preimpostata
(regolabile)
10 impulsi e V12
per 2 min
Da V7 a V10 per
30 sec
V3 V1 V2
Temperatura preimpostata
(regolabile)
100°C
(da 90°C a
100°C)
100°C
(da 90°C a
100°C)
130°C
(non
regolabile)
95°C
(da 80°C
a 100°C)
95°C
(da 80°C
a 100°C)
Tempo preimpostato
(regolabile)
40 min
(da 20min
a 60 min)
45 min
(da 20 min
a 60 min)
5 min
(da 2 min
a 15 min)
45 min
(da 10 min
a 2h)
20 min
(da 10 min
a 2h)
Funzione di tenuta in
caldo “predefinita” al
termine del programma
45 min 45 min 45 min 45 min
Velocità motore nella
tenuta in caldo
5s On in V3
/ 20s OFF
10s ON in V3 /
10s OFF
Alla fine dei programmi per le salse, per la
cottura a fuoco lento P2 e P3 e per la crema
pasticcera e durante la tenuta in caldo, il mo-
tore continua a girare al fine di evitare che
il preparato aderisca al fondo della pentola.
Al termine della lavorazione dell’impasto nei
programmi impasto P1 e P2, l’apparecchio
passa in modalità “lievitazione dell’impasto”
a 30°C per 40 minuti, per dare un migliore
volume al preparato. Aprendo il coperchio,
premere sulle levette (D2) o estrarre il reci-
piente: l’apparecchio passa in modalità pausa e
può essere riavviato premendo nuovamente su
“start”. Se si desidera arrestare questa moda-
lità, premere per 2 secondi sul pulsante “stop”.
7- Premere sulle levette (D2) e sollevare il gruppo
del recipiente (D) (cfr. fig. 12).
In modalità connessa, una volta avviato il pro-
gramma automatico, è possibile fermare l’appa-
recchio in qualsiasi momento premendo il tasto
“stop”. Il programma automatico è quindi in
modalità pausa: è possibile riavviarlo premendo
nuovamente su “start”. Se il programma scelto non
è corretto e si desidera annullare, premere per 2
secondi sul pulsante “stop”.

75
IT
75
IT
UTILIZZO DEL CESTELLO VAPORE INTERNO
I tempi di cottura forniti hanno un valore indi-
cativo, permettendo una cottura soddisfacente
nella maggior parte dei casi.
Alcune condizioni influenzano, tuttavia, i tempi
di cottura :
- la grandezza delle verdure (tagliate o meno)
- la quantità degli ingredienti nel cestello
- la varietà delle verdure e quanto sono mature
- la quantità d’acqua nella pentola, che corris-
ponde alla graduazione (0,7L).
Prestare attenzione all’utilizzo del tappo
vapore nel senso “massimo” (a) rivolto
verso di voi.
Nel caso in cui la cottura non sia sufficiente, è
possibile aggiungere un tempo di cottura sup-
plementare.
Tempi di cottura al vapore
Ingredienti Quantità (max) Tempi di cottura stimati
Programma vapore
raccomandato
Zucchine 800 g 20 min P1
Pastinaca 800 g 25 min P1
Porri (parte bianca) 800 g 25 min P1
Broccoli 500 g 20 min P1
Pesce 600 g
(con carta alimentare adatta alla cottura)
15 min P1
Patate 1 kg 30 min P2
Carote 1 kg 30 min P2
Fagiolini 800 g 30 min P2
Carni bianche 600 g
(con carta alimentare adatta alla cottura)
20 min P2
Cottura al
vapore P1
Cottura al
vapore P2
Impasto P1 Impasto P2 Impasto P3
Programmi
automatici
Velocità preimpostata
(regolabile)
V5 per 2,5 min
V5 per 1 min 30 sec,
quindi V6
per 2 min
V3 per 40 sec,
quindi V9
per 3 min
Temperatura
preimpostata
(regolabile)
100°C
(non
regolabile)
100°C
(non
regolabile)
Tempo
preimpostato
(regolabile)
30 min
(da 1 min a 60
min)
35 min
(da 1 min a 60
min)
2,5 min
(da 30s a
2 min 30s)
3,5 min
(da 30s a 3 min
30s)
3 min 40s
(da 1 min 40s
à 3 min 40s)
Funzione di tenuta
in caldo «predefinita» al
termine del programma
45 min 45 min
Velocità motore nella
tenuta in caldo
Lievitazione dell’impasto
a 30° «predefinita» al
termine del programma
40 min 40 min
Alcune ricette possono provocare fuoriuscite improvvise a causa della formazione di bolle, in
particolare durante l’uso di verdure surgelate. In tal caso, ridurre il volume degli ingredienti.

76
IT
76
IT
MODALITÀ MANUALE
1 - Premere direttamente sul
selettore del parametro
che si è scelto di regolare,
ovvero quello della velocità
(B1), quello del selettore
della temperatura di cottura
(B2) o sul selettore del tempo (B3): il parametro
scelto lampeggia sullo schermo (C5-C6-C7).
2 - Regolare i parametri serven-
dosi del selettore +/- (B6).
Per sicurezza, non è possi-
bile regolare la temperatura
senza regolare i tempi di
cottura.
3 - Quando si è terminata la
modifica di tutti i parametri,
premere il pulsante “avvio”
(B5). Quando l’apparecchio
è in modalità cottura, la
spia
luminosa rossa si accende per segnalare che
la cottura è iniziata. Quando viene avviato il
programma, l’apparecchio può essere arrestato
in qualsiasi momento premendo sul pulsante
“stop”(B5).
Il programma è quindi in pausa: è possibile
riavviarlo premendo nuovamente su “start”. Se il
programma
scelto non è corretto e si desidera annullare,
premere per 2 secondi sul pulsante “stop”.
4 - Quando il programma è terminato,
l’apparecchio emette 3 bip.
5 - Premere sulle levette (D2) e sollevare il
gruppo del recipiente (D) (cfr. fig. 12).
L’APPARECCHIO È DOTATO DI UN TAPPO FONDO
PIATTO
Il tappo fondo piatto permette di liberare spazio
nel recipiente per cuocere o rosolare senza
l’ostacolo del perno di trasmissione (Fig. 15).
COTTURA SENZA COPERCHIO
È possibile rosolare gli alimenti nel recipiente
senza coperchio mescolandoli e sorvegliando la
cottura (Fig. 16).
Per questa modalità di cottura è obbligatorio
selezionare una temperatura compresa tra 135°C
e 150°C. Impostare la durata di funzionamento
(fino a 20 minuti).
La funzione COTTURA SENZA COPERCHIO non è
adatta alle confettura e alle preparazione a base
di latte (rischio di fuoriuscite).
• Questo apparecchio non deve
essere immerso in acqua. Non
mettere mai il blocco motore (A)
sotto l’acqua corrente.
Una volta terminato l’uso dell’apparecchio,
scollegarlo.
• Pulire immediatamente il recipiente dopo l’uso.
•
Premere sulle levette (D2) e sollevare il gruppo
del recipiente (D).
• Posizionare il recipiente su una superficie
piana.
• Sbloccare il coperchio ruotandolo di un quarto
di giro in senso orario. Rimuovere il coperchio
con attenzione!
• Prendere le dovute precauzioni nel maneggiare
le lame affilate della mezzaluna (F1) e del
coltello seghettato (F4) durante la pulizia e lo
svuotamento del recipiente: sono estremamente
taglienti.
• Una volta che gli elementi si sono raffreddati:
- smontare il cilindro guida comune (D3), la
guarnizione ’(D4) e l’anello di fissaggio (D6)
(cfr. fig. 13).
- pulire il recipiente (D), il cilindro guida
comune (D3) e la guarnizione (D4), e l’anello
di fissaggio (D6), gli accessori (F1) (F2)
(F3) (F4) (F5), il tappo di regolazione del
vapore (E1), il coperchio (E2), guarnizione
(E4) e la guarnizione (E3) con una spugna e
acqua calda e sapone.
• Sciacquare gli elementi sotto l’acqua corrente.
• In caso di incrostazioni pronunciate, lasciare in
immersione per diverse ore in acqua e detersivo
per i piatti; se necessario, grattare con la
spatola (G) o con il lato ruvido di una spugna.
• In caso di calcare sul recipiente, utilizzare
la parte ruvida di una spugna imbevuta, se
PULIZIA DELL’APPARECCHIO

77
IT
77
IT
necessario, nell’aceto bianco.
• Per pulire il blocco motore (A), utilizzare un
panno umido. Asciugarlo con cura.
• Per facilitare la pulizia, il recipiente, il gruppo
coperchio e gli accessori possono essere lavati
in lavastoviglie. Non possono invece essere
messi in lavastoviglie il cilindro comune (D3 e
D4) e l’anello di fissaggio (D6) (cfr. fig. 14).
• Gli accessori, il cilindro comune removibile e gli
elementi del coperchio, con certi ingredienti
potrebbero colorarsi leggermente, come con il
curry, il succo di carote e simili. Questo non
costituisce un pericolo per la salute, né per
il buon funzionamento dell’apparecchio. Per
evitare colorazioni, pulire gli elementi subito
dopo l’uso.
• Prima di riutilizzare il gruppo contenitore (D),
controllare che i contatti elettrici sotto la pen-
tola siano sempre puliti e asciutti.
• Per preservare l’aspetto e la longevità del co-
perchio dell’apparecchio, lavarlo a mano. Non
usare il lato abrasivo della spugna per evitare
di graffiarlo.
• Per non alterare i materiali del recipiente (D),
rispettare le istruzioni per l’uso della propria
lavastoviglie senza aumentare le dosi di sale
o detersivo.
ISTRUZIONI D’USO SULLA MESSA IN SICUREZZA DELL’APPARECCHIO ( “ SECU “ )
L’apparecchio è dotato,
di serie, di protezioni
elettroniche del motore
per garantire la sua du-
rata. Questa sicurezza
elettronica garantisce
contro qualsiasi utilizzo
anomalo; in tal modo il motore è perfettamente
protetto.
In determinate condizioni di utilizzo molto dure,
che non rispettano le raccomandazioni delle
istruzioni d’uso (Cfr. paragrafo “ AVVIAMENTO “ :
quantità eventualmente molto importanti e/o un
utilizzo anormalmente lungo e /o una sequenza
di ricette molto vicine), la protezione elettronica
si attiva per preservare il motore; in questo caso,
l’apparecchio si arresta e visualizza “ SECU “ sullo
schermo LCD del quadro di controllo per indicare
che l’apparecchio non è momentaneamente più
operativol.
Se si visualizza “ SECU “ sul quadro di co-
mando e l’apparecchio si arresta, procedere
nel seguente modo:
• Lasciare l’apparecchio in funzione, non
attivare l’interruttore “ 0/1 “(H).
• Fare riferimento alle raccomandazioni delle
istruzioni d’uso per riadattare la preparazione
(Cfr. paragrafo “ AVVIAMENTO “ : quantità di
ingredienti / tempo della ricetta/temperatura/
tipo accessori)
• Attendere mezz’ora affinché il motore si raf-
freddi.
• Reimpostare l’apparecchio premendo 2 secondi
sul pulsante “ Start /Stop/Reset “ (B5).
L’apparecchio è di nuovo completamente pronto
all’uso.
Il servizio consumatori è disponibile per qual-
siasi domanda (maggiori dettagli nel libretto di
garanzia).

78
IT
78
IT
COSA FARE SE L’APPARECCHIO NON FUNZIONA?
PROBLEMA CAUSE SOLUZIONI
Difficoltà per la cottura a vapore.
Tappo di regolazione del vapore po-
sizionato non correttamente.
Posizionare il tappo vapore nel
senso «vapore massimo» rivolto
verso di voi, tale posizione
consente di avere un massimo di
calore nella pentola per tutte le
cottura a vapore (zuppe, ecc.),
dunque un vapore maggiore
nella pentola per una cottura più
efficace.
La posizione «vapore minimo»
permette di raggiungere il calore
e il vapore massimo nella pen-
tola, per tutte le cotture a vapore
(zuppe, ecc.). Tale posizione evita
allo stesso modo gli schizzi d’acqua
durante il mescolamento.
La posizione «vapore grande»
permette di rilasciare la condensa
massima e di ottenere anche
dei piatti o delle salse dalla
consistenza migliore (risotto, creme
per dolci, salse, ecc.)
Tempi di cottura insufficiente
I tempi di cottura forniti hanno un
valore indicativo, permettendo una
cottura soddisfacente nella maggior
parte dei casi.
Alcune condizioni influenzano, tut-
tavia, i tempi di cottura:
- la grandezza delle verdure (ta-
gliate o meno)
- la quantità degli ingredienti nel
cestello
- la varietà delle verdure e quanto
sono mature
- la quantità d’acqua nella pentola,
che corrisponde alla graduazione
(0,7L).
Nel caso in cui la cottura non sia
sufficiente, è possibile aggiungere
un tempo di cottura
supplementare.
È possibile, inoltre, utilizzare la
modalità manuale selezionando la
temperatura di 130°C e i tempi di
cottura secondo la quantità e
il tipo d’ingredienti.
L’apparecchio non funziona.
La presa non è collegata.
Collegare l’apparecchio a una presa
di corrente.
L’interruttore (H) è in posizione 0. Portare l’interruttore in posizione 1.
Il recipiente o il coperchio non
sono correttamente posizionati o
fissati.
Verificare che il recipiente o il
coperchio siano correttamente
posizionati e bloccati come
descritto nelle illustrazioni delle
istruzioni.

79
IT
79
IT
PROBLEMA CAUSE SOLUZIONI
Vibrazioni eccessive.
L’apparecchio non è posizionato su
una superficie piana, non è stabile.
Posizionare l’apparecchio su una
superficie piana.
Un volume di ingredienti eccessivo.
Ridurre la quantità degli ingredienti in
preparazione.
Errore nella scelta degli accessori.
Controllare che l’accessorio in uso sia
quello raccomandato.
Fuoriuscite dal coperchio.
Un volume di ingredienti eccessivo.
Ridurre la quantità degli ingredienti in
preparazione.
Il coperchio non è ben posizionato
o fissato.
Fissare correttamente il coperchio sulla
ciotola.
Manca la guarnizione.
Posizionare la guarnizione sul
coperchio.
La guarnizione è tagliata,
deteriorata.
Cambiare la guarnizione, contattare un
centro assistenza autorizzato.
Errore nella scelta degli accessori.
Controllare che l’accessorio in uso sia
quello raccomandato.
Fuoriuscita dal cilindro
del recipiente o con l’accesso-
rio fondo XL.
La guarnizione non è ben posizionata.
Posizionare correttamente la
guarnizione.
La guarnizione è tagliata,
deteriorata.
Contattare un centro assistenza
autorizzato.
L’anello di fissaggio (D6) è fissato
male.
Fissare correttamente l’anello (D6).
Le lame non girano facilmente.
Pezzetti di ingredienti troppo grossi
o troppo duri.
Ridurre la dimensione o la quantità
degli ingredienti in preparazione.
Aggiungere del liquido.
Il motore emette odori.
Al primo utilizzo dell’apparecchio,
oppure in caso di sovraccarico del
motore provocato da una quantità
d’ingredienti troppo eccessiva o da
pezzi troppo duri o troppo grandi.
Fare raffreddare il motore (circa
30 minuti) e ridurre la quantità degli
ingredienti nel recipiente.
Indicazione “STOP”.
L’apparecchio ha rivelato vibrazioni
troppo forti ed è passato il posizione
di sicurezza.
Controllare che l’apparecchio sia alla
velocità indicata o che l’accessorio in
uso sia quello raccomandato.
Indicazione “SECU”.
Sovraccarico del motore provocato da
una quantità d’ingredienti eccessiva
o da pezzi troppo duri o troppo
grandi o una successione
di ricette, senza i sufficienti tempi di
raffreddamento.
Fare raffreddare il motore (circa
30 minuti) e ridurre la quantità degli
ingredienti nel recipiente.
Indicazione “SECU” + spia rossa
luminosa lampeggiante
Sovraccarico dei rilevatori di
temperatura.
Contattare un centro assistenza
autorizzato.
Indicazione “Err1” + spia rossa
luminosa lampeggiante
La resistenza di riscaldamento non
funziona.
Verificare che le spazzole d’alimenta-
zione sotto il recipiente non siano ri-
coperte di grasso. In caso affermativo,
pulirle e riprovare.
Se il problema persiste, contattare un
centro di assistenza autorizzato.
Indicazione “Err2”. Guasto elettronico. Contattare un centro assistenza
autorizzato.
Indicazione “Err3”. Guasto velocità. Contattare un centro assistenza
autorizzato.
Indicazione “Err4”. Guasto di comunicazione con la carta
elettronica chopper.
Contattare un centro assistenza
autorizzato.

80
IT
80
IT
PROBLEMA CAUSE OLUZIONI
Sul display appare «Err8»
Malfunzionamento sensore sicurezza
di bloccaggio.
Contattare un centro di assistenza
autorizzato.
Indicazione “ntc1” + spia rossa lu-
minosa lampeggiante.
Il rilevatore di temperatura 1 ha
smesso di funzionare.
Contattare un centro assistenza
autorizzato.
Indicazione “ntc2” + spia rossa lu-
minosa lampeggiante.
Il rilevatore di temperatura 2 ha
smesso di funzionare.
Contattare un centro assistenza
autorizzato.
Accensione del simbolo di
sicurezza(C4)
Chiusura non corretta del recipiente
o del coperchio.
Prima di mettere in funzione l’appa-
recchio, verificare che il recipiente
sia bloccato correttamente sul
blocco motore e che il coperchio
sia bloccato correttamente sul
recipiente. Se il problema persiste,
contattare un centro di assistenza
autorizzato.
Il coperchio è bloccato sul reci-
piente in modalità «cottura senza
coperchio».
Rimuovere il coperchio prima di
avviare il programma di cottura. Se
il problema persiste, contattare un
centro di assistenza autorizzato.
Il dispositivo di bloccaggio del
coperchio è rimasto attivo (asticella
sollevata), impedendo la chiusura
del coperchio.
L’apparecchio è stato scollegato
dalla rete elettrica o è stato spento
tramite l’interruttore durante una
ricetta.
Portare l’interruttore in posizione
«I» per riavviare l’apparecchio e ri-
pristinare il dispositivo di bloccag-
gio del coperchio; l’asticella tornerà
nella posizione originale, consen-
tendo la chiusura del coperchio.
Problema di connessione
Fare riferimento alla guida dell’ap-
plicazione.
• Eliminazione dei materiali di imballaggio e dell’apparecchio
L’imballaggio si compone esclusivamente di materiali non dannosi per l’ambiente che
possono essere smaltiti conformemente alle disposizioni in vigore in materia di riciclaggio.
Per lo smaltimento dell’apparecchio rivolgersi presso il centro servizi apposito della propria
zona.
• Prodotti elettrici o elettronici da smaltire
Contribuiamo alla salvaguardia dell’ambiente!
Questo apparecchio è composto da diversi materiali che possono essere smaltiti o
riciclati.
Per lo maltimento rivolgersi ad un centro per la raccolta differenziata.
L’apparecchio continua a non funzionare?
Rivolgersi ad un centro di assistenza autorizzato (consultare l’elenco nel libretto di istruzioni).
RICICLAGGIO
- *Il marchio e i loghi Bluetooth® sono marchi depositati da Bluetooth SIG, Inc. e il loro utilizzo da parte del Gruppo SEB è stato autorizzato.
- Google Play e Android sono marchi di Google Inc.
- Apple e il logo Apple sono marchi di Apple Inc., depositati negli Stati Uniti e in altri paesi. App Store è un marchio di servizio di Apple Inc.
GLOSSARIO
Accoppiare: azione che consiste nel raggruppare o associare due apparecchi.
Questa azione si effettua al momento della prima connessione tra lo smartphone o tablet e l’i-Companion xl.
Sincronizzare: azione che consiste nell’aggiornamento delle informazioni. L’applicazione e l’i-Companion xl si sincronizzano per
scambiare informazioni quando sono connessi.
Connettere: stabilire un collegamento tra l’applicazione (smartphone/tablet) e l’apparecchio (i-Companion xl). Questa azione è
indispensabile per la sincronizzazione.
Cookie: informazioni sull’utilizzo che vengono inviate a Moulinex per migliorare l’applicazione.

81
ES
81
ES
Con respecto a la seguridad de la
persona
• Lea atentamente las instrucciones
de uso antes de utilizar por primera
vez el aparato y guárdelas: un uso
no conforme con las instrucciones
de uso eximiría al fabricante de
cualquier responsabilidad.
• Desconecte siempre el aparato de
la corriente eléctrica si se deja sin
supervisión o antes de montarlo/
desmontarlo o limpiarlo. No permita
que los niños utilicen el aparato sin
la supervisión de un adulto.
• Los niños no deben utilizar el
aparato. Mantenga el aparato y el
cable de alimentación fuera del
alcance de los niños.
• Este aparato no está diseñado para
ser utilizado por personas (incluidos
los niños) cuyas capacidades
físicas, sensoriales o mentales sean
reducidas, o por personas con falta
de experiencia o de conocimientos,
salvo si estas están vigiladas
por una persona responsable de
su seguridad o si han recibido
instrucciones relativas al uso del
aparato.
Se recomienda vigilar a los niños para
asegurarse de que no juegan con el
aparato.
• Mantenga el aparato fuera del
alcance de los niños.
• Cuando se utiliza el
aparato, algunas de sus
partes pueden alcanzar
temperaturas elevadas
(tapón y pared del bol de acero
inoxidable, el eje de transmisión
desmontable, las partes transparentes
de la tapa, las piezas metálicas
debajo del bol, accesorio con fondo
XL la cesta). Estas piezas pueden
provocar quemaduras. Manipule el
aparato por las piezas de plástico que
están frías (asas, bloque motor). El
testigo luminoso de calentamiento de
color rojo indica que existe riesgo de
quemadura.
• La temperatura de las superficies
accesibles puede aumentar cuando
el aparato esté en funcionamiento.
• El aparato no debe ponerse en
marcha mediante un temporizador
exterior ni por un sistema de mando
a distancia externo.
• No utilice el aparato si este no
funciona correctamente, si está
dañado o si el cable de alimentación
o el enchufe están dañados. Para
evitar cualquier peligro, lleve el cable
a un centro de servicio autorizado
para que lo cambien (consulte la
CONSEJOS DE SEGURIDAD

82
ES
82
ES
lista en el cuaderno de servicio).
• No sumerja el aparato. No pase el
bloque motor (A) por debajo del
agua corriente.
• Este aparato se destina únicamente
a un uso doméstico en el hogar y
a una altitud inferior a 2000 m.
El fabricante declina cualquier
responsabilidad y se reserva el
derecho a rescindir la garantía
en caso de un uso comercial o
inadaptado, o de no respetar las
consignas.
• Este aparato no está diseñado
para ser utilizado en aplicaciones
domésticas y similares (uso no
cubierto por la garantía) tales como
- zona de trabajo de cocina en
almacenes, oficinas y otros
entornos profesionales,
- zonas de cocina reservadas para el
personal de almacenes, oficinas y
otros entornos profesionales,
- granjas,
- uso por parte de clientes de
hoteles, moteles y otros entornos
con carácter residencial.
- lugares como habitaciones de
huéspedes.
• Su aparato emite vapor que puede
provocar quemaduras.
Manipule con precaución la
tapa y el tapón (si es
necesario, utilice un
guante, una manopla, etc.). Manipule el
tapón por su parte central.
• No ponga en marcha el aparato sin la
junta colocada en el portajunta o si el
portajunta no estuviera montado en
la tapa. Resulta imperativo utilizar el
aparato con el tapón colocado en el
orificio de la tapa (salvo en caso de
información específica de la receta).
• Atención: corre el riesgo
de sufrir heridas si utiliza
incorrectamente el aparato.
Tenga cuidado con las
hojas de la cuchilla picadora (F1) y de
la cuchilla de sierra (F4) a la hora de
limpiarlas y a la hora de vaciar el bol,
están sumamente afiladas.
Guarde la cuchilla picadora Ultrablade
(F1) en el bol después de cada uso.
Debe vigilar si vierte un líquido
caliente en el robot de cocina, ya que
puede salir del aparato debido a una
ebullición repentina.
ADVERTENCIA: Tenga cuidado al
manipular el aparato (limpieza, llenado
y vertido): evite salpicar el líquido en
los conectores.
ADVERTENCIA: algunos alimentos
que contienen una piel superficial
(salchichas enteras, lengua, pollo,
etc.) o los trozos grandes de carne
pueden provocar salpicaduras al
llenarse de líquidos hirviendo. Por
ello, le recomendamos que los pinche
con un cuchillo o un tenedor antes de
cocinarlos.

83
ES
83
ES
ADVERTENCIA: La superficie del
elemento calefactor presenta un calor
residual después del uso.
Asegúrese de no tocar más que las asas
de su producto (pulsador D2, asa de la
tapa E2 y el tapón E1) mientras calienta
y hasta su completo enfriamiento.
Consulte el manual de instrucciones
para ajustar la velocidad y el tiempo de
funcionamiento de cada accesorio y cada
programa.
Consulte el manual de instrucciones
para saber cómo ensamblar y montar los
accesorios en el aparato
Consulte el manual de instrucciones
para saber cómo limpiar y mantener el
aparato.
Siga siempre las instrucciones de limpieza
para limpiar el aparato:
• Desenchufe el aparato.
• No limpie el aparato en caliente.
• Limpie el aparato con un paño o una
esponja húmeda.
• Nunca sumerja el aparato en agua ni
bajo el agua corriente
SOLO MERCADOS EUROPEOS
• Mantenga el aparato y su cable
fuera del alcance de los niños de
menos de 8 años.
Los niños no deben utilizar el aparato
como un juguete.
• Este aparato puede ser utilizado por
personas con capacidades físicas,
sensoriales o mentales reducidas o
cuya experiencia o conocimientos
no sean suficientes, siempre que
sean vigiladas o que hayan recibido
instrucciones relativas al uso seguro
del aparato y que comprendan bien
los posibles peligros.
• Este aparato puede ser utilizado por
niños de al menos 8 años siempre que
sean vigilados o que hayan recibido
instrucciones relativas al uso seguro
del aparato y que comprendan bien
los peligros implicados. La limpieza
y el mantenimiento no los han de
llevar a cabo niños sin vigilancia,
salvo que tengan 8 años como
mínimo y estén supervisados por
un adulto.
Con respecto a la conexión
eléctrica
• El aparato debe enchufarse a una
toma conectada a tierra.
• Este aparato está diseñado para
funcionar únicamente con corriente
alterna. Asegúrese de que la tensión
de alimentación señalada en la
placa indicadora del aparato se
corresponde efectivamente con la
de la instalación eléctrica.
• Cualquier error en la conexión
anulará la garantía.
• No tire nunca del cable de
alimentación para desconectarlo.
• El aparato, el cable de alimentación
o el enchufe no deben colocarse
cerca de piezas calientes del
aparato, fuentes de calor o ángulos

84
ES
84
ES
pronunciados, ni en contacto con
los mismos.
Con respecto a un uso incorrecto
• No toque la tapa antes de que
el aparato se haya detenido
completamente (botón «stop»),
espere a que los alimentos
mezclados dejen de girar.
• Vierta siempre los ingredientes
sólidos en primer lugar en el bol
antes de añadir los ingredientes
líquidos (consulte la Fig. 10), sin
sobrepasar la marca MAX grabada
en el interior del bol (consulte la
Fig. 10). Si el bol está demasiado
lleno, el agua hirviendo puede
salirse de él.
• En el programa de cocción al vapor,
respete el nivel de 0,7 litros de
agua (consulte la Fig. 3.2).
• No introduzca nunca los dedos
ni ningún otro objeto en el bol
mientras el aparato se encuentre en
funcionamiento.
• No utilice el bol como recipiente
(conservación, congelación,
esterilización).
• Coloque el aparato en un lugar
estable, resistente al calor, limpio
y seco.
• No coloque el aparato cerca
de un muro o de un mueble: el
vapor generado puede dañar los
elementos.
• No coloque el aparato cerca de una
fuente de calor en funcionamiento
(placa de cocción, aparato
electrodoméstico, etc.).
• No cubra su tapa con paños ni nada
similar, no intente tapar el orificio
de la tapa, utilice el tapón regulador
de vapor.
• No permita que haya cabello
largo, bufandas o corbatas que
queden colgando por encima del
bol mientras el aparato esté en
funcionamiento.
• No introduzca nunca los accesorios
en un microondas.
• No utilice el aparato al aire libre.
• No sobrepase nunca la cantidad
máxima indicada en las
instrucciones.
• Guarde el aparato cuando se haya
enfriado.
• No introduzca el bol en el congelador
para enfriarlo; utilice el frigorífico.
Servicio posventa
• Para su seguridad, no utilice
accesorios ni piezas de recambio
distintos a los suministrados por
los centros de servicio posventa
autorizados.
• Cualquier intervención por parte
del cliente diferente de la limpieza
y el mantenimiento deberá llevarse
a cabo en un centro de servicio
autorizado.
• Consulte el cuadro «¿Qué hacer si
su aparato no funciona?» al final de
las instrucciones de uso.

85
ES
85
ES
A través de estas instrucciones, descubrirá consejos de utilización que le permitirán hacerse
una idea de las posibilidades que le ofrece su aparato: preparación de sopas, guisos,
cocciones al vapor y pasta.
DESCRIPCIÓN DEL APARATO
A Bloque motor
B Cuadro de mandos
B1 : selector de velocidad
B2: selector de temperatura de
cocción y/o testigo luminoso de
calentamiento
B3: selector de duración de
funcionamiento/emparejamiento
B4: teclas de selección de programas
automáticos
B5: botón START/STOP/RESET
B6: selector + / -
C Pantalla LCD
C1: indicador estado de conexión
C2: indicador del programa de vapor
C3: indicador de la etapa en curso de
la receta paso por paso.
C4: indicador de testigo de seguridad
C5: indicador de velocidad
C6: indicador de temperatura
C7: indicador de tiempo
D Conjunto del bol
D1 : bol de acero inoxidable
D2 : gatillos
D3 : accionador común móvil
D4 : junta de estanqueidad (x2)
D5 : accesorio con fondo XL
D6 : anillo de bloqueo del accionador
E Conjunto tapa
E1 : tapón regulador de vapor
E2 : tapa
E3 : junta de estanqueidad
E4 : junta de estanqueidad
F Accesorios
F0 : Compartimento para accesorios
F1 : cuchilla picadora ultrablade
F2 : mezcladora
F3 : batidora
F4 : cuchilla para amasar/triturar
F5 : cesta para cocción al vapor
G Espátula
H
Interruptor 0/1 para interrumpir la
alimentación eléctrica del aparato
I Cepillo de limpieza
DATOS TÉCNICOS DEL APARATO
Potencia : 1550 W (1000 W: resistencia de calentamiento/550 W: motor)
Intervalo de temperaturas : de 30 °C a 150 °C
ajustable a intervalos de 5 °C.
Intervalo de tiempo de 5 segundos a 2 horas
del funcionamiento : ajustable a intervalos de 5 segundos (mínimo) a 1 minuto
(máximo).
Número de velocidades: 13 - 2 velocidades intermitentes:
velocidad 1 (5 s On / 20 s Off).
velocidad 2 (10 s On / 10 s Off).
- 10 velocidades continuas progresivas (velocidades 3 a 12).
- 1 velocidad intermitente máx. (velocidad 13).
- *La marca y los logotipos de Bluetooth® son marcas depositadas por Bluetooth SIG, Inc. y su utilización por el Grupo SEB está sujeta a una
autorización.
- Google Play y Android son marcas de Google Inc.
- Apple y el logotipo de Apple son marcas de Apple Inc., depositadas en los Estados Unidos y en otros países. App Store es una marca de servicio
de Apple Inc.

86
ES
86
ES
SU APARATO
Su aparato dispone de los siguientes accesrios:
Estos accesorios están igualmente provistos de zonas para asirlos y así facilitar su manipulación
durante su uso.
Cuchilla picadora
Mezclar sopas
3min 3L
Mezclar compotas 40s 1Kg
Picar verduras 15s 1Kg
Picar carne 30s 1Kg
Picar pescado 15s 1Kg
No utilice este accesorio para picar productos duros. Utilice la cuchilla amasadora/trituradora F4.
Mezcladora
Mezcla los platos cocinados sin estropear los ingredientes,
Muy útil para las fases de dorado previas a las preparaciones (risottos, sopas).
Platos con fase dorado 5min 500g
Estofados 45min 3L
Risottos 22min 1,5Kg
Salteados, Salsas (Ajustes: ver libro de recetas)
Batidora
9 max
Claras a punto de nieve 5/10min
7
max
Mayonesas, Nata batida 2/5min 0,5L
Salsas, cremas
à
1/20min 1L
Puré de patatas
à
1min 1L
Polenta
à
1/16min 1L
Cuchilla para amasar/triturar
Amasar las masas de pan
blanco
2min 30s 1,2Kg
Amasar las masas quebradas,
pastafloras, panes especiales
2min 30s 1Kg
Amasar las masas de
levadura (bollos)
1min 30s
2 min
0,8Kg
Mezclar las masas ligeras
(bizcocho).
40 s
3min
1Kg
Pulverizar las frutas con
cáscara
1min 0,6Kg
Picar los productos duros
1min 0,6Kg
Picar hielo
1min
6 à 10
Masa de crepes, gofres
1min 1,5L
Cesta para
cocción al vapor
Cocciones al vapor de
legumbres, pescados o carnes
20/40min 1Kg
Sopas con tropezones ó trozos
3min 3L
Bouchon
Tapón de regulación de extracción de vapor
Máx. (a) = cocción al vapor.
Mín. (b) = risotto, natillas, salsas, etc.
Fondo XL
Accesorio con fondo XL
Dorado y cocinado sin tapa
Aumento de la superficie de cocinado para sus piezas grandes de carne o pescado.

87
ES
87
ES
Su aparato i-Companion xl propone un
funcionamiento «conectado» pero también puede
funcionar « sin conexión ». Además, posee dos
modos de funcionamiento: el modo de programa
automático y el modo manual.
• Modo de programa automático:
La velocidad, la temperatura de la cocción y la
duración están previamente programadas para
preparar sopas, guisos, cocciones al vapor y
pasta de forma automática.
• Modo manual:
Regulación personalizada de los parámetros de
velocidad, temperatura de la cocción y duración
para un uso según sus necesidades.
Uso con o sin tapa
Temperatura de
30 a 130 °C
Temperatura de
135 a 150 °C
- Cuando haya seleccionado una temperatura de
entre 135 °C y 150 °C, deberá utilizar el aparato
sin tapa. Si la tapa estuviera colocada sobre el
bol, se mostrará un candado en la pantalla de LCD
invitándole a desbloquearla.
- En cuanto añada los alimentos, remuévalos con
la ayuda de la espátula y repita la operación
periódicamente para evitar que se manche el fondo
del bol (véase el apartado Limpieza).
- Si elige utilizar el aparato con su tapa, la
temperatura de cocinado sera entonces de 130 °C
como máximo.
EL APARATO ESTÁ DOTADO DE UN BLOQUEO DE
SEGURIDAD DE LA TAPA
La tapa se cierra de forma segura cada vez que
se pone en marcha el aparato. Este sistema de
seguridad evita que la tapa se abra durante la
elaboración de una receta. (ver Fig. 17). No
intente forzar la taza cuando está bloqueada.
Este sistema de seguridad se desbloquea cada
vez que se detiene el aparato. Si ha seleccionado
una temperatura igual o superior a 50 °C y una
velocidad igual o superior a 5, aparecerá una cuenta
atrás de 10 segundos en la pantalla LCD del panel
de control. (ver Fig.18). La tapa solo se podrá abrir
una vez haya finalizado la cuenta atrás.
COLOCACIÓN DEL VASO, DE SUS ACCESORIOS Y
DEL CONJUNTO DE LA TAPA
• Antes del primer uso, limpie todos los elementos
(D, E, F, G) con agua caliente y jabón, pero no
el bloque motor (A). Su vaso (D) está equipado
con un mecanismo desmontable (D3) para
facilitar la limpieza.
• Asegúrese de que ha retirado cualquier embalaje
antes del uso, en particular la protección situada
entre el vaso (D) y el bloque motor (A).
• Coloque la junta de estanqueidad (E4) sobre el
portajunta (E3) (véase la Fig. 1) y enganche el
conjunto sobre la tapa (E2) (véase la Fig 2).
• Coloque la junta de estanqueidad (D4) en el
mecanismo común (D3). Acople el conjunto en
el fondo del vaso con el anillo de bloqueo (D6)
(véase la fig. 3). Si utiliza el modo de cocción
sin tapa, coloque la junta de estanqueidad (D4)
sobre el accesorio con fondo XL (D5). Bloquee
el conjunto sobre el fondo del bol con el anillo
de bloqueo (D6) (ver Fig. 3).
• Coloque el accesorio escogido en el vaso:
- los accesorios (F1, F2, F3, o F4) en el
mecanismo común en el fondo del vaso
(véase la fig. 4.1),
- en caso de cocción al vapor, el cestillo para
vapor (F5) en el interior del vaso, (véase la
fig. 4.3 ), procurando antes llenar el recipiente
de 0,7 l con la preparación líquida (agua,
salsa…) (véase la fig. 4.2 ).
• Añada los ingredientes en el interior del vaso o
del cestillo para vapor.
• Coloque la tapa sobre el vaso (D) alineandolos
dos triángulos (véase la fig. 5), acople la tapa,
sin presionar, girándola en el sentido de la
flecha (véase la fig. 6).
Coloque el tapón regulador de vapor (E1) sobre la
tapa, son posibles 2 posiciones (véase la fig. 7):
La posición «mín.» permite dejar
escapar un máximo de condensación y
así obtener platos o salsas con una
mayor consistencia (risotto, natillas,
salsas, etc.).
La posición «máx.» permite obtener
un máximo de calor y vapor en el
recipiente para todas las cocciones al
vapor (sopas, etc.).
Esta posición también evita salpicaduras
durante la mezcla.
F1 F2
F3 F4
F5
F1 F2
F3 F4

88
ES
88
ES
• Coloque el bol (D) sobre el bloque del motor (A)
hasta oír un «clic» (consulte la Fig. 8).
• El aparato arranca únicamente si el bol y la tapa
están correctamente colocados y bloqueados
sobre el bloque motor.
En caso de que uno de ellos esté colocado
o bloqueado incorrectamente (consulte la
Fig. 10.1 y la Fig. 10.2), el logo empieza
a parpadear cuando se activa una función.
Selección de parámetros personalizados:
Selección de la velocidad del motor.
2 velocidades intermitentes y 10
velocidades continuas progresivas.
Velocidad intermitente máx. (V13).
Selección de la temperatura de
cocción.
De 30 °C a 150 °C.
Testigo luminoso de calentamiento:
Se enciende al iniciarse la cocción y
se apaga cuando la temperatura en
el interior del bol baja a menos de
50 °C.
Selección del tiempo del
funcionamiento.
De 5 segundos a 2 horas.
Emparejamiento 1ª conexión
Aumento de la velocidad, de
la temperatura de cocción y
del tiempo.
Disminución de la velocidad,
de la temperatura de cocción
y del tiempo.
Este botón tiene 3 funciones:
- “Validación” de la elección
de su programa automático
o de sus parámetros
escogidos en el marco de
un uso manual (velocidad,
temperatura de la cocción,
tiempo).
- “Pause” durante el uso, una
vez que se activa el aparato.
- “Reinicialización” de los
parámetros seleccionados
del aparato mediante una
presión de 2 segundos.
- “Validación de la etapa”
en la receta paso a paso.
Consejos de uso:
Su aparato está equipado con un microprocesador que controla y analiza su estabilidad. En caso de
inestabilidad, la velocidad de rotación del motor se reducirá automáticamente. Si esta inestabilidad
persiste, el motor se detendrá y aparecerá la palabra «STOP» en la pantalla.
• Compruebe que la cantidad de ingredientes no sea excesiva y que la velocidad esté adaptada.
• Compruebe que está utilizando el accesorio recomendado.
• A continuación, reinicie el aparato de la forma habitual.

89
ES
89
ES
PREPARACIÓN DE LA INSTALACIÓN
Podrá encontrar la lista de modelos de smartphones y tabletas compatibles con i-Companion
en www.moulinex.com
(lista de modelos compatibles www.moulinex.com)
INSTALE I-COMPANION XL
Qué hace falta para proceder a la instalación de i-Companion xl:
• La aplicación Companion puede descargarse gratuitamente en App Store (iPhone/iPad) y Google
Play (Android)
• Una conexión Bluetooth proporcionada por su Smartphone o su tableta Bluetooth® Smart 4.0:
i-Companion xl se conecta a su Smartphone/tableta mediante una conexión sin cable autónomo
• El Smartphone/la tableta debe encontrarse cerca de i-Companion xl (el alcance de la conexión varía
dependiendo de la configuración del emplazamiento).
• Una toma de corriente para enchufar i-Companion xl: i-Companion xl está conectado con su
Smartphone/tableta únicamente cuando está enchufado al sector.
Qué es el Bluetooth® Smart?
La tecnología Bluetooth® Smart 4.0 (o Bluetooth Low Energy) permite una comunicación sin cable
entre una aplicación y un aparato consumiendo la mínima cantidad de energía.
PRIMERA CONEXIÓN DE I-COMPANION XL EN MODO CONECTADO
Descarga de la aplicación
Para comenzar, descargue la aplicación en su Smartphone/tableta conectándose a la App Store para
iOS o a Google Play para Android.
Cuando haya descargado la aplicación, en unos minutos y sin crear una cuenta, podrá preparar sus
primeras recetas con i-Companion xl. (Se sugieren 50 recetas sin crear una cuenta).
La creación de su cuenta en la aplicación le permitirá acceder al contenido íntegro para modificar
sus menús.
UTILIZACIÓN EN MODO CONECTADO
iPhone 4S o más reciente
iPad 3 / iPad mini o más tarde
Desde iOS 9 y las siguientes.
A partir de Android 4.4 y las siguientes
Conexión de su aparato
Frecuencia: 2,40 GHz. Potencia máxima transmitida: 7,7 dBm
Su aparato está equipado con un interruptor 0/1. Haga girar este interruptor en 1. (véase la fig. 9).
Puede visualizar todos los parámetros en la pantalla LCD.
En modo conectado, el indicador de la pantalla LCD de i-Companion xl es azul.

90
ES
90
ES
Conexión de i-Companion xl
Su aparato está equipado con un interruptor 0/1 (H). Haga girar en interruptor en 1 (Cf. Fig. 9).
Activación del Bluetooth
Consulte i-Companion xl y verifique que el Bluetooth de su Smartphone/tableta está bien activado.
Activación de la aplicación.
Active la aplicación Companion haciendo clic en el icono « Companion ».
Emparejamiento
¿A qué llamamos emparejamiento?
Durante la primera conexión, la aplicación que se ha descargado en su Smartphone/tableta e
i-Companion xl se detectarán automática y rápidamente, a condición de que siga de manera correcta
las siguientes etapas.
Si lo desea, puede sincronizar hasta 10 aparatos en i-Companion xl.
Para ello, proceda al emparejamiento de cada aparato de manera independiente. (Véase el
emparejamiento).
No obstante, puede conectarse simultáneamente un único aparato.
• Acepte las cookies, que permiten mejorar la aplicación recopilando sus preferencias de uso.
• Seleccione su aparato.

91
ES
91
ES
• Cuando la aplicación lo solicite, mantenga pulsado (4 segundos) el botón Timer (B3) de
i-Companion xl.
El testigo de conexión (C1) parpadeará durante 30 segundos como máximo, periodo durante
el cual i-Companion xl se conectará a su Smartphone/tableta.
• Acepte la solicitud de emparejamiento que aparece en su Smartphone/tableta o acceda al centro de
notificación para aceptar el emparejamiento.
El testigo de conexión (C1) fijo indica que se ha establecido la conexión.
NB : Cuando se haya efectuado el emparejamiento, i-Companion xl reconocerá automáticamente
su Smartphone/tableta durante futuras conexiones. No tendrá que renovar esta etapa de
emparejamiento
Conexión realizada correctamente
Su i-Companion xl está conectado de ahora en adelante a su Smartphone/tableta. El icono más arriba
le indica que se ha establecido la conexión.

92
ES
92
ES
Ha fallado la conexión
El icono más arriba le indica que no se ha establecido la conexión
Renueve las siguientes operaciones:
• Consulte i-Companion xl.
• Verifique que i-Companion xl está bien enchufado en el sector y que la toma funciona correctamente.
• Verifique que su Smartphone/tableta es compatible (véase la lista de compatibilidad en
www.moulinex.com).
• Verifique que el Bluetooth de su Smartphone/tableta está activado.
• Reinicie las etapas de emparejamiento y consulte las FAQ (preguntas frecuentes).
Si persiste el problema, asegúrese de que su Smartphone/tableta es compatible
Si utiliza un aparato Android, asegúrese de que este se incluye en los modelos compatibles (véase la
lista de compatibilidad en www.moulinex.com).
• Acceda al menú de aplicación para descubrir nuestra gama de recetas.
En modo conectado, durante una receta paso a paso,
el primer reinicio pondrá fin a la etapa, el segundo
reinicio pondrá fin a la receta.
FAQ: PREGUNTAS FRECUENTES
¿En qué lugar se coloca i-Companion xl?:
• Coloque i-Companion xl sobre una superficie plana y estable.
• Para obtener una conexión óptima entre i-Companion xl y su Smartphone/tableta, se recomienda efectuar
todas las manipulaciones que precisen de una conexión a una distancia razonable.
• La presencia del testigo de conexión fijo (C1) le garantiza que sus aparatos estén conectados.
• Si se interrumpe la conexión (el símbolo de la conexión aparece tachado), consulte i-Companion xl para
recuperar la conexión.
¿Qué ocurre si se interrumpe la conexión durante una receta?
Si se interrumpe la conexión entre i-Companion xl y su Smartphone/tableta durante una receta, la
sincronización entre los dos aparatos se realizará automáticamente en cuanto se restablezca la conexión.
Podrá retomar el desarrollo de su receta en la etapa en que se encontraba cuando se perdió la conexión.
¿Puedo utilizar i-Companion xl sin la aplicación?
Su aparato puede utilizarse sin la aplicación. (Véase la puesta en marcha en modo no conectado).
Con eses fin, consulte el funcionamiento del aparto.
No obstante, solo la aplicación le permitirá disfrutar de numerosas ventajas del producto conectado.
¿Puede utilizarse I-Companion xl con varios Smartphones o tabletas?
Si lo desea, puede sincronizar varios aparatos en i-Companion xl. Para ello, proceda a la sincronización de
cada aparato de manera independiente. (Véase el emparejamiento).
No obstante, puede conectarse simultáneamente un único aparato.

93
ES
93
ES
¿Debe activarse el Bluetooth de mi teléfono de manera continua?
El Bluetooth debe activarse para sincronizar la aplicación e i-Companion xl.
UTILIZACIÓN EN MODO NO CONECTADO
MODO DE PROGRAMA AUTOMÁTICO
1- Pulse en el programa de su
elección (B4). Aparecerá un
punto luminoso por encima
del programa seleccionado.
Pulsaciones sucesivas
permiten ir pasando por los
diferentes programas.
2- Los parámetros preprogramados
pueden modificarse mientras
se elabora una receta (en
función de la receta elegida, los
ingredientes y las cantidades
preparadas). Pulse en el
selector de temperatura de la
cocción (B2) o el selector de
tiempo (B3), el parámetro
escogido parpadeará en la
pantalla (C6-C7).
3- Ajuste el (los) parámetro(s)
con el selector +/- (B6).
4- Cuando haya terminado de
modificar todos sus parámetros,
pulse el botón «start» (B5)
para iniciar el programa. Cuando
su aparato utiliza el modo de
cocción, el testigo luminoso
rojo se enciende para informarle de que la
cocción se ha iniciado.
5- Cuando el programa termina, el aparato emite
3 pitidos.
6- Al finalizar los programas de sopas, guisos P2
y P3, cocción al vapor, el aparato cambiará
automáticamente a la función de manteni-
miento de calor durante 45 minutos para
que la preparación se mantenga lista para su
consumo. En el programa de guisos P2 y P3
y en el modo manual, el motor del aparato
funcionará a una velocidad específica, con el
fin de preservar la elaboración y evitar que
no se adhiera al fondo del vaso. Para parar la
función de mantenimiento de calor, bastará con
pulsar el botón “stop” (B5). Si abre la tapa, la
función de mantenimiento de calor se detendrá
automáticamente al presionar los gatillos (D2)
o al retirar el vaso.
Pasta (lista de subprogramas) Sopas (lista de
subprogramas)
Guisos (lista de subprogramas) Cocción al vapor (lista de
subprogramas)
UTILIZACIÓN DEL PANEL DE CONTROL (B)
Selección de un programa automático:
Conexión de su aparato
Su aparato está equipado con un interruptor 0/1. Haga girar este interruptor en 1.
La pantalla LCD visualiza todos los parámetros hasta « 0 ». (Véase la fig. 9).
En modo no conectado, el indicador de la pantalla LCD de i-Companion xl es blanco.

94
ES
94
ES
Durante la elaboración de algunas recetas pueden producirse desbordamientos por la aparición
de burbujas, especialmente cuando se utilizan verduras congeladas. En ese caso, deberá reducir
los volúmenes en consecuencia.
DESCUBRA LOS PROGRAMAS AUTOMÁTICOS QUE SE PROPONEN:
Sopa P1 Sopa P2
Cocción lenta
P1
Cocción lenta
P2
Cocción lenta
P3
Programas
automáticos
Velocidad «por
defecto» (ajustable)
10 pulsos y V12
durante
2 minutos
V7 a V10 durante
30 segundos
V3 V1 V2
Temperatura «por defecto»
(ajustable)
100 °C
(de 90 °C a
100 °C)
100 °C
(de 90 °C a
100 °C)
130 °C (no
ajustable)
95 °C
(de 80 °C a
100 °C)
95 °C
(de 80 °C a
100 °C)
Tiempo «por defecto»
(ajustable)
40 min
(de 20 min a
60 min)
45 min
(de 20 min a 60
min)
5 min
(de 2 min a 15
min)
45 min
(de 10 min a
2 h)
20 min
(de 10 min a
2 h)
Conservación en caliente
«por defecto» al finalizar
el programa
45 min 45 min 45 min 45 min
Velocidad del motor
durante la conservación en
caliente
5 s ON en V3
/ 20 s OFF
10 s ON en V3 /
10 s OFF
Cuando terminan los programas de salsas, co-
cido a fuego lento P2 y P3 y natillas, mientras
se conserva en caliente, el motor continua gi-
rando para evitar que la preparación se pegue
en el fondo del recipiente.
Al final del amasado de los programas de masa
P1 y P2, el aparato pasa al modo «subida de la
masa» a 30 °C durante 40 minutos para dar un
mejor volumen a sus masas. Si abre la tapa, pul-
se los gatillos (D2) o retire el bol, el aparato
pasa al modo de pausa, tiene la posibilidad de
reiniciarlo pulsando de nuevo «start».
Si desea detener este modo, pulse durante 2
segundos el botón «stop».
7- Pulse los gatillos (D2) y después levante el
conjunto del bol (D) (consulte la Fig. 12).
En modo conectado, cuando el programa automáti-
co se haya iniciado, siempre tendrá la posibilidad
de detener el aparato pulsando el botón “stop”. El
programa automático está entonces en modo de
pausa, tiene la posibilidad de reiniciarlo pulsando
de nuevo «start». Si se equivoca de programa
y quiere anularlo, pulse durante 2 segundos el
botón «stop».

95
ES
95
ES
UTILIZACIÓN DEL CESTILLO PARA VAPOR INTERNO
Los tiempos de cocción se facilitan a título
indicativo. En la mayoría de los casos, siguiendo
estos tiempos la cocción será satisfactoria.
Sin embargo, algunas condiciones van a influir en
el tiempo de cocción:
- El tamaño de las verduras (troceadas o no
troceadas)
- La cantidad de ingredientes en la cesta
- La variedad de verduras, su grado de maduración
- La cantidad de agua en el bol, que debe
corresponder a la graduación (0,7L).
Recuerde utilizar correctamente el tapón de
vapor en el sentido posición «máx.» (a)
hacia usted.
Si la cocción es insuficiente, puede añadir un
tiempo de cocción adicional.
Tiempo de cocción al vapor
Ingredientes Cantidades (máx.)
Tiempo de cocción
estimado
Programa de vapor
recomendado
Calabacines 800 g 20 min P1
Chirivía 800 g 25 min P1
Partes blancas de puerro 800 g 25 min P1
Brócoli 500 g 20 min P1
Pescados 600 g (con papel de horno) 15 min P1
Patatas 1 kg 30 min P2
Zanahorias 1 kg 30 min P2
Judías verdes 800 g 30 min P2
Carne blanca 600 g (con papel de horno) 20 min P2
Cocción al
vapor P1
Cocción al
vapor P2
Masa P1 Masa P2 Masa P3
Programas
automáticos
Velocidad «por de-
fecto» (ajustable)
V5 durante
2 minuto y
30 segundos
V5 durante 1 minuto
y 30 segundos y
luego V6 durante
2 minutos
V3 durante
40 segundos y
luego V9 durante
3 minutos
Temperatura «por de-
fecto» (ajustable)
100 °C (no
ajustable)
100 °C (no
ajustable)
Tiempo «por defecto»
(ajustable)
30 min
(de 1
min a 60 min)
35 min
(de 1
min a 60 min)
2 min 30 s (de 30
s a 2 min 30 s)
3 min 30 s
(de 30 s a
3 min 30 s)
3 min 40 s
(de
1 min 40 s a
3 min 40 s)
Conservación en
caliente «por defecto»
al finalizar el programa
45 min 45 min
Velocidad del motor
durante la conservación
en caliente
Retirada de la pasta
30° «de forma
predeterminada » al
final del programa
40 min 40 min
Algunas recetas pueden provocar desbordamientos repentinos, debido a la aparición de
burbujas, especialmente cuando se utilizan verduras congeladas. En dicho caso, deberá reducir
las cantidades según sea necesario.

96
ES
96
ES
• No sumerja el aparato. No pase
el bloque motor (A) por debajo
del agua corriente.
Una vez termine de usar el aparato,
desenchúfelo.
• Limpie inmediatamente su bol después de usarlo.
• Pulse los gatillos (D2) y después levante el
conjunto del bol (D).
• Coloque el bol sobre una superficie plana.
• Desbloquee la tapa girándola un cuarto de
vuelta en el sentido de las agujas del reloj.
Retire la tapa con precaución.
• Tenga cuidado con las hojas de la cuchilla
picadora ultrablade (F1) y de la cuchilla para
amasar/triturar (F4) a la hora de limpiarlas y
a la hora de vaciar el bol, están sumamente
afiladas.
• Una vez las piezas se hayan enfriado:
- desmonte el accionador común (D3), la junta
(D4), el anillo de bloqueo (D6) (consulte la
Fig. 13).
- limpie el bol (D), el accionador común (D3),
la junta (D4), el anillo de bloqueo (D6),
los accesorios (F1), (F2), (F3), (F4), (F5),
el tapón regulador de vapor (E1), la tapa
(E2), junta de estanqueidad (E4) la junta de
LIMPIEZA DEL APARATO
MODO MANUAL
1 - Pulse directamente el
selector del parámetro que
desee ajustar, es decir, el
selector de velocidad (B1),
el selector de temperatura
de cocción (B2) o el
selector de tiempo (B3), el
parámetro elegido parpadea
en la pantalla (C5-C6-C7).
2 - A continuación, ajuste el (los)
parámetro(s) con el selector
+/- (B6). Por motivos de se-
guridad, no es posible ajustar
una temperatura sin ajustar
un tiempo de cocción.
3 - Cuando haya terminado de
ajustar todos sus parámetros,
pulse el botón «start» (B5).
Cuando su aparato utiliza el
modo de cocción, el testigo
luminoso rojo se enciende
para informarle de que la
cocción se ha iniciado.
Cuando se inicia la
programación, tiene la
posibilidad de detener el
aparato en cualquier
momento pulsando el botón
«stop» (B5).
La programación está entonces en modo pausa,
tiene la posibilidad de reiniciarla pulsando de
nuevo «start». Si se equivoca de programación
y quiere anularla, pulse durante 2 segundos el
botón «stop».
4- Cuando la programación termina, el aparato
emite 3 pitidos.
5- Pulse los gatillos
(D2) y después levante el
conjunto del bol (D) (consulte la Fig. 12).
EL APARATO ESTÁ DOTADO DE UN TAPÓN DE
FONDO PLANO
El tapón de fondo plano permite sacarlo de su
posición en el bol para cocer o dorar sin que
moleste el arrastre (ver Fig. 15).
COCCIÓN SIN TAPA
Puede dorar los alimentos dentro del bol sin
la tapa removiéndolo todo y supervisando la
cocción (ver Fig. 16).
Para este modo de cocción, deberá seleccionar
obligatoriamente una temperatura de entre 135
°C y 150 °C. Ajuste el tiempo de funcionamiento
(hasta 20 min.)
La función de COCINADO SIN TAPA no es adecuada
para confituras y preparados a base de leche
(riesgo de desbordamiento).

97
ES
97
ES
Su aparato viene equi-
pado de serie con protec-
ciones electrónicas del
motor para garantizar su
longevidad. Esa seguridad
electrónica está garanti-
zada contra cualquier utili-
zación anormal; así su motor está perfectamente
protegido.
En algunas condiciones de utilización extremas,
en las que no se respeten las recomendaciones
de la nota (véase el apartado “PUESTA EN SER-
VICIO”: cantidades finalmente demasiado impor-
tantes y/o una utilización anormalmente larga
y/o un encadenamiento de recetas demasiado
seguidas), la protección electrónica se activa
para preservar el motor; en ese caso, el aparato
se detiene y aparece en la pantalla LCD del panel
de mando el mensaje “SECU”, para indicar que el
aparato ya no está momentáneamente operativo.
Si aparece el mensaje “SECU” en el panel de
mando y el aparato se detiene, proceda de la
siguiente manera:
• Deje conectado el aparato, no active el inter-
ruptor “0/1”
(H).
• Consulte las recomendaciones de la nota para
volver a adaptar su preparación (véase el apar-
tado “PUESTA EN SERVICIO”: cantidades de in-
gredientes/tiempo de la receta / temperatura
/ tipo de accesorios).
• Espere media hora para que el motor se enfríe.
• Vuelva a iniciar el aparato pulsando 2 segundos
el botón “Start /Stop/Reset” (B5).
Su aparato es totalmente apto para volver a ser
utilizado.
El servicio al consumidor queda a su disposición
para cualquier pregunta (see details in the gua-
rantee booklet).
SEGURIDAD DEL APARATO (“SECU”)
estanqueidad (E3), con una esponja y agua
caliente jabonosa.
• Aclare estos elementos con agua corriente.
• Si los elementos están muy sucios, déjelos
en remojo varias horas en agua con líquido
lavavajillas y, si es necesario, raspe con la
espátula (G) o con el lado áspero de una esponja.
• Si el bol tiene depósitos de cal, puede utilizar
un estropajo mojada en vinagre blanco si
necesario.
• Para limpiar el bloque motor (A) utilice un
paño humedecido. Séquelo cuidadosamente.
• Para facilitarle la limpieza, tenga en cuenta que
el bol, el conjunto de la tapa y los accesorios
pueden lavarse en el lavavajillas, a excepción
del accionador común (D3 y D4) y de su anillo
de bloqueo (D6) (consulte la Fig. 14).
• Los accesorios, el accionador común móvil y los
elementos de la tapa pueden tomar un ligero
color con ciertos ingredientes como el curry, el
zumo de zanahorias, etc.; esto no supone ningún
peligro para su salud ni para el funcionamiento de
su aparato. Para evitar esto, limpie los elementos
rápidamente después de su uso.
• Antes de utilizar su conjunto del bol (D) ase-
gúrese de que los contactos eléctricos de debajo
del bol estén siempre limpios y secos.
• Para mantener el aspecto y la vida útil de la
tapa de su aparato, lávela a mano. No utilice el
lado abrasivo del estropajo para evitar arañazos.
• Para no dañar los materiales del bol (D), respete
las instrucciones de uso de su lavavajillas, no
aumente las dosis de sal ni de productos para
lavavajillas.

98
ES
98
ES
¿QUÉ HACER SI SU APARATO NO FUNCIONA?
PROBLEMAS CAUSAS SOLUCIONES
Dificultades para cocinar al vapor.
Tapón regulador de vapor mal
posicionado
Coloque el tapón regulador de vapor
con la posición «mucho vapor»
hacia usted, esta posición permite
obtener un máximo de calor en el
bol para todas las cocciones a vapor
(sopas, etc.), cuanto más vapor hay
en el bol, más eficaz es la cocción.
La posición «mín. vapor» permite
conseguir más calor y vapor en
el bol para todas las cocciones al
vapor (sopas, etc.). Esta posición
también evita salpicaduras durante
la mezcla.
- La posición «mucho vapor»
permite que salga la máxima
condensación y obtener así platos
o salsas con una mejor consistencia
(risotto, cremas de postre, salsas,
etc.).
Tiempo de cocción insuficiente
Los tiempos de cocción se facilitan
a título indicativo. En la mayoría de
los casos, siguiendo estos tiempos
la cocción será satisfactoria.
Sin embargo, algunas condiciones
van a influir en el tiempo de
cocción:
- El tamaño de las verduras
(troceadas o no troceadas)
- La cantidad de ingredientes en
la cesta
- La variedad de verduras, su grado
de maduración
- La cantidad de agua en el bol, que
debe corresponder a la graduación
(0,7L).
Si la cocción es insuficiente, puede
añadir un tiempo de cocción
adicional.
También puede utilizar el
modo manual seleccionando la
temperatura de 130º C y el tiempo
de cocción según la cantidad y
el tipo de ingredientes.
El aparato no funciona.
El enchufe no está conectado.
Enchufe el aparato a una toma.
El interruptor
(H)
está en posición 0.
Gire el interruptor a la posición 1.
El bol o la tapa no están
correctamente colocados o
bloqueados.
Compruebe que el bol y la tapa
están bien colocados y bloqueados
de acuerdo con los esquemas de las
instrucciones.

99
ES
99
ES
PROBLEMAS CAUSAS SOLUCIONES
Exceso de vibración.
El aparato no está colocado sobre
una superficie plana, el aparato no
tiene estabilidad.
Coloque el aparato sobre una
superficie plana.
Volumen de ingredientes excesivo.
Reduzca la cantidad de ingredientes
tratados.
Accesorios erróneos.
Compruebe que está utilizando el
accesorio recomendado.
Fuga a través de la tapa.
Volumen de ingredientes excesivo.
Reduzca la cantidad de ingredientes
tratados.
La tapa no está bien colocada o
bloqueada.
Bloquee correctamente la tapa
sobre el bol.
La junta de estanqueidad no está
presente.
Coloque la junta de estanqueidad
sobre la tapa.
La junta de estanqueidad está rota,
deteriorada.
Cambie la junta, póngase
en contacto con un servicio
autorizado.
Accesorios erróneos.
Compruebe que está utilizando el
accesorio recomendado.
Fuga a través del accionador del
bol o mediante el accesorio con
fondo XL.
La junta no se encuentra
correctamente colocada.
Coloque correctamente la junta.
La junta está deteriorada.
Póngase en contacto con un centro
autorizado.
El anillo de bloqueo (D6) está mal
bloqueado.
Bloquee correctamente el anillo
(D6).
Las cuchillas no giran con facilidad.
Trozos de alimentos demasiado
grandes o demasiado duros.
Reduzca el tamaño o la cantidad de
ingredientes tratados.
Añada líquido.
Olor procedente del motor.
Cuando se utiliza por primera vez
el aparato, o en caso de sobrecarga
del motor provocada por una
cantidad excesiva de ingredientes o
trozos demasiado duros o demasiado
grandes.
Deje enfriar el motor (unos 30
minutos) y reduzca la cantidad de
ingredientes en el bol.
Indicador «STOP».
El aparato ha detectado un exceso
de vibración y se ha puesto en
modo de seguridad.
Vérifiez que vous êtes à la vitesse
préconisée ou que vous utilisez
l’accessoire recommandé.
Indicador «SECU».
Sobrecarga del motor provocada
por una cantidad excesiva de
ingredientes o por trozos demasiado
duros o demasiado grandes,o una
sucesión de recetas sin un tiempo
suficiente de refrigeración.
Deje enfriar el motor (unos 30
minutos) y reduzca la cantidad de
ingredientes en el bol.
Indicador «SECU» + testigo
luminoso rojo parpadea.
Recalentamiento de los sensores de
temperatura.
Póngase en contacto con un centro
autorizado.
Indicador «Err1» + testigo luminoso
rojo parpadea.
La resistencia de calentamiento no
funciona.
Compruebe que las clavijas de ali-
mentación que se encuentran debajo
del bol no estén sucias. Si lo están,
límpielas y vuelva a intentarlo.
Si esto no funciona, póngase en
contacto con un centro autorizado.
Indicador «Err2». Defecto electrónico. Póngase en contacto con un centro
autorizado.

100
ES
100
ES
¿Su aparato sigue sin funcionar?
Diríjase a un servicio técnico autorizado (ver lista en el folleto de servicio).
• Eliminación de los materiales de embalaje del aparato
El embalaje incluye exclusivamente materiales sin riesgo para el medio ambiente, que se
pueden desechar de conformidad con las disposiciones de reciclaje vigentes.
Para desechar el aparato, infórmese en el servicio técnico autorizado de su comunidad.
• Fin de la vida útil de un producto electrónico o eléctrico:
¡Colaboremos con la protección del medio ambiente!
Su aparato contiene un gran número de materiales aprovechables o reciclables.
O deposítelo en un punto de recogida para que se lleve a cabo su tratamiento.
RECICLAJE
- *La marca y los logotipos de Bluetooth® son marcas depositadas por Bluetooth SIG, Inc. y su utilización por el Grupo SEB está sujeta a una
autorización.
- Google Play y Android son marcas de Google Inc.
- Apple y el logotipo de Apple son marcas de Apple Inc., depositadas en los Estados Unidos y en otros países. App Store es una marca de servicio
de Apple Inc.
LÉXICO
Emparejar: Acción de agrupar o asociar dos aparatos.
Esta acción se efectuará durante la primera conexión entre su Smartphone o tableta con i-Companion xl.
Sincronizar: Acción de actualizar la información. La aplicación e i-Companion xl se sincronizan con el fin de intercambiar
información mientras están conectados.
Conectar: Establecer una conexión entre la aplicación (Smartphone/tableta) y el aparato (i-Companion xl). Esta acción es
indispensable para la sincronización.
Cookies: Son los datos de utilización enviados a Moulinex para mejorar la aplicación.
PROBLEMAS CAUSAS SOLUCIONES
Indicador «Err3». Defecto de velocidad. Póngase en contacto con un centro
autorizado.
Indicador «Err4». Fallo de comunicación con tarjeta
electrónica chopper.
Póngase en contacto con un centro
autorizado.
Mensaje en la pantalla «Err8»
Error del sensor de bloqueo de
seguridad.
Contacte con un centro autorizado.
Indicador «ntc1» + testigo
luminoso rojo parpadea.
El sensor 1 de temperatura
no funciona.
Póngase en contacto con un centro
autorizado.
Indicador «ntc2» + testigo
luminoso rojo parpadea.
El sensor 2 de temperatura
no funciona.
Póngase en contacto con un centro
autorizado.
Presentación del indicador de
seguridad (C4)
Bloqueo inadecuado del bol o de
la tapa
Antes de poner en funcionamiento
el aparato, verifique si el bol está
bloqueado correctamente sobre
el bloque motor y si la tapa está
bloqueada correctamente sobre el bol.
Si el problema persiste, póngase en
contacto con un centro autorizado.
La tapa está bloqueada sobre el bol
en modo de «cocinado sin tapa»
Desbloquee la tapa antes de iniciar
el programa de cocinado. Si el pro-
blema persiste, póngase en contacto
con un centro autorizado.
La seguridad de bloqueo de la tapa
se ha quedado activa (vástago de
salida) y no permite desbloquear
la tapa.
El aparato se ha apagado durante
la receta basculando el interruptor
I/O a la posición O o simplemente
se ha desenchufado durante la
receta.
Bastará con bascular el interruptor
I/O a la posición I para reinicializar el
robot y, consiguientemente, la seguri-
dad de bloqueo de la tapa; el vástago
recuperará automáticamente su posi-
ción original y podrá bloquear la tapa
Problema de conexión Consulte la guía de la aplicación.

101
PT
101
PT
Segurança do utilizador
• Leia atentamente o manual de instruções
antes da primeira utilização do aparelho
e guarde-o para futuras utilizações:
uma utilização não conforme ao manual
de instruções liberta o fabricante de
qualquer responsabilidade.
• Desligue sempre o aparelho da corrente
sempre que o deixar sem vigilância
e antes de proceder à montagem,
desmontagem ou limpeza. Não deixe
as crianças utilizarem o aparelho sem
vigilância.
• Este aparelho não deve ser utilizado
por crianças. Mantenha o aparelho e o
cabo de alimentação fora do alcance de
crianças.
• Este aparelho não pode ser utilizado
por pessoas (incluindo crianças) cujas
capacidades físicas, sensoriais ou mentais
são reduzidas, ou por pessoas sem
experiência ou conhecimentos, exceto se
estas tiverem recebido instruções prévias
relativamente à utilização do aparelho
ou forem supervisionadas por uma
pessoa responsável pela sua segurança.
É conveniente vigiar as crianças para
garantir que elas não brincam com o
aparelho.
•
Mantenha o aparelho fora do alcance das
crianças.
• Durante a utilização do
aparelho, algumas peças
atingem temperaturas
elevadas (parede de inox do
recipiente e da tampa, acionador comum
amovível, partes transparentes da tampa,
peças metálicas por baixo do recipiente,
acessório fundo xl cesto). Estas peças
podem provocar queimaduras. Manuseie o
aparelho pelas partes plásticas frias
(pegas, bloco do motor). O indicador
luminoso vermelho de aquecimento indica
que existe risco de queimadura.
• A temperatura das superfícies
acessíveis pode ser elevada durante o
funcionamento do aparelho.
• O aparelho não se destina a ser
colocado em funcionamento por meio
de um regulador externo ou através de
um sistema de comando à distância
independente.
• Não utilize o aparelho se este não
funcionar corretamente, estiver danificado
ou se o cabo de alimentação ou a ficha
estiverem danificados. Por forma a evitar
qualquer tipo de perigo, o cabo deve ser
obrigatoriamente substituído por um
Serviço de Assistência Técnica autorizado
(consultar lista no folheto).
• Não deve imergir o aparelho em
líquidos. Não coloque o bloco do
motor (A) sob água corrente.
INSTRUÇÕES DE SEGURANÇA

102
PT
102
PT
• Este aparelho destina-se
exclusivamente a um uso doméstico
no interior de sua casa e a uma altitude
inferior a 2000 m. O fabricante
declina qualquer responsabilidade
e reserva-se o direito de anular
a garantia em caso de utilização
comercial ou inadequada, ou de
desrespeito pelas instruções.
• Este aparelho não se destina a ser
utilizado em aplicações domésticas e
similares (utilizações não abrangidas
pela garantia), tais como:
- zonas utilizadas como cozinha em
lojas, escritórios e outros ambientes
de trabalho;
- em cozinhas pequenas reservadas
a funcionários de lojas, escritórios e
outros ambientes profissionais;
- em quintas;
- utilização por clientes de hotéis,
motéis ou outros ambientes de
carácter residencial;
- em ambientes tipo quarto de
hóspedes.
• O aparelho liberta vapor que pode
provocar queimaduras.
Manuseie com precaução
a tampa e a tampa
reguladora de vapor (se
necessário, utilize uma luva, uma
pega de cozinha, etc). Manuseie a
tampa reguladora de vapor pela sua
parte central.
• Não utilize o aparelho se a
junta não estiver posicionada
no vedante ou se o vedante não
estiver montado na tampa. É
imperativo colocar o aparelho
em funcionamento com a tampa
reguladora de vapor posicionada
no orifício da tampa (salvo em
caso de indicação específica na
receita).
• AVISO: Atenção aos
riscos de ferimentos
no caso de utilização
incorreta do aparelho.
Tenha cuidado com as lâminas
picadoras (F1) e as lâminas do
acessório triturador (F4) quando as
lava e quando esvazia a taça, dado
que são extremamente afiadas.
Coloque a lâmina picadora
Ultrablade (F1) dentro da taça após
cada utilização.
Tome atenção se deitar um líquido
quente na taça, pois este pode ser
projetado do aparelho devido a uma
ebulição repentina.
AVISO: Deve utilizar o seu aparelho
com precaução (limpeza, enchimento
e esvaziamento): evite derramar
líquidos sobre os conectores.
AVISO: Alguns alimentos com pele
superficial (salsichas inteiras,
língua, aves…) ou grandes pedaços
de carne podem dar origem a

103
PT
103
PT
esguichos ao prender líquidos a
ferver. É por isso que aconselhamos
a picá-los com uma faca ou garfo
antes da confeção.
AVISO: A superfície do elemento de
aquecimento preserva algum calor
residual após a utilização.
Certifique-se de que toca apenas
nas pegas da taça (molas D2, pega
da tampa E2 e da tampa reguladora
de vapor E1) durante o aquecimento
e até ao arrefecimento completo.
Consulte as indicações de ajuste das
velocidades e tempo de funcionamento
de cada acessório e de cada programa
nas Instruções de Utilização.
Consulte as indicações de montagem e
a colocação dos acessórios
no aparelho nas Instruções de
Utilização.
Consulte as indicações de limpeza
e manutenção do seu aparelho nas
Instruções de Utilização.
Deve sempre seguir as instruções de
limpeza para limpar o aparelho:
• Desligar o aparelho.
• Não limpar o aparelho se estiver
quente.
• Limpar com um pano ou uma esponja
húmida.
• Nunca colocar o aparelho dentro de
água, nem passá-lo por água corrente.
APENAS MERCADOS EUROPEUS:
• Conservar o aparelho e o cabo de
alimentação fora do alcance de
crianças com menos de 8 anos de
idade.
Não permita que as crianças utilizem
o aparelho como um brinquedo.
• Este aparelho pode ser utilizado
por pessoas com capacidades
físicas, sensoriais ou mentais
reduzidas ou com pouca experiência
ou conhecimentos, desde que
supervisionadas ou que tenham
recebido instruções quanto à
utilização do aparelho em total
segurança e compreendam bem os
potenciais perigos.
• Este aparelho pode ser utilizado por
crianças com mais de 8 anos de idade,
desde que sejam supervisionadas
ou que tenham recebido instruções
relativamente à utilização segura
do aparelho e compreendam os
riscos envolvidos. A limpeza e a
manutenção do mesmo por parte do
utilizador não devem ser realizadas
por crianças sem vigilância, a menos
que tenham mais de 8 anos e sejam
supervisionadas por um adulto.
Ligação elétrica
• O aparelho deve ser ligado a uma
tomada elétrica com ligação de
terra.
• Este aparelho foi concebido para
funcionar apenas em corrente
alterna. Verifique se a tensão
elétrica indicada na placa sinalética
do aparelho corresponde à da sua

104
PT
104
PT
instalação elétrica.
• Os erros de ligação anulam a garantia.
• Nunca puxe pelo cabo de alimentação
para desligar o aparelho.
• Não coloque o aparelho, o cabo de
alimentação ou a tomada em líquidos,
perto de ou em contacto com partes
quentes do aparelho, perto de uma
fonte de calor ou em cantos agudos.
Utilização incorreta
•
Não toque na tampa enquanto o
aparelho não parar completamente
(botão stop), aguarde até os
alimentos triturados não rodarem
mais.
• Deite sempre os ingredientes sólidos
em primeiro lugar na taça antes de
adicionar os ingredientes líquidos
(ver Fig. 10), sem exceder a marca
“MAX” gravada no interior da taça
(ver Fig. 10). Se a taça estiver
demasiado cheia, a água a ferver
pode ser projetada.
• Quando estiver a utilizar a cozedura
a vapor, tenha o cuidado de
respeitar o nível de 0,7 litro de
água (ver Fig. 3.2).
• Nunca coloque os seus dedos ou
qualquer outro objeto dentro da taça
durante o funcionamento do aparelho.
• Não utilize a taça como recipiente
de conservação, congelação ou
esterilização.
• Coloque o aparelho em cima de
uma bancada de trabalho estável,
resistente ao calor, limpa e seca.
• Não coloque o aparelho junto de uma
parede ou armário: o vapor produzido
pode danificar os materiais.
• Não coloque o aparelho próximo
de uma fonte de calor em
funcionamento (placa de cozinha,
eletrodoméstico, etc.).
• Não tape a tampa com um pano ou
qualquer outro objeto, não tape o
orifício da tampa, utilize a tampa
reguladora de vapor.
• Não deixe o cabelo, lenços, gravatas,
etc. pendurados por cima da taça
durante a utilização do aparelho.
• Não coloque os acessórios num
micro-ondas.
• Não utilize o aparelho ao ar livre.
• Nunca exceda a quantidade máxima
indicada no folheto.
• Guarde o aparelho apenas após ter
arrefecido.
• Não coloque a taça no congelador
para a arrefecer, utilize um
frigorífico.
Serviço Pós Venda
• Para sua segurança, não utilize
outros acessórios ou peças de
substituição para além dos
fornecidos pelos Serviços de
Assistência Técnica autorizados.
• Qualquer intervenção para além da
limpeza e manutenção habituais
realizadas pelo cliente deve
ser efetuada por um Serviço de
Assistência Técnica autorizado.
• Consulte a tabela “O que fazer se o
aparelho não funcionar?” na última
página do folheto de instruções.

105
PT
105
PT
Ao ler estas instruções, irá descobrir conselhos de utilização que lhe permitirão conhecer
todo o potencial do seu aparelho: preparação de sopas, refogados, cozedura a vapor, massa.
DESCRIÇÃO DO APARELHO
A Bloco do motor
B Painel de comandos
B1 : seletor de velocidade
B2 : seletor da temperatura da
cozedura e/ou indicador
luminoso de aquecimento
B3 : seletor do tempo de
funcionamento/emparelhamento
B4 : teclas de seleção de programas
automáticos
B5 : botão START/STOP/RESET
B6 : seletor + / -
C Ecrã LCD
C1 : indicador de ligação
C2 : exibição do programa de vapor
C3 : exibição da etapa em curso na
receita passo a passo.
C4 : indicador de segurança
C5 : exibição da velocidade
C6 : exibição da temperatura
C7 : exibição do tempo
D Conjunto da taça
D1 : taça inox
D2 : molas
D3 : eixo comum amovível
D4 : junta vedante (x2)
D5 : acessório fundo xl
D6 : anel de bloqueio do eixo
E Conjunto da tampa
E1 : tampa reguladora de vapor
E2 : tampa
E3 : junta vedante
E4 : junta vedante
F Acessórios
F0 : caixa de arrumação de acessórios
F1 : lâmina picadora “ultrablade“
F2 : acessório misturador
F3 : acessório batedor
F4 : lâmina para amassar / triturar
F5 : cesto de cozedura a vapor
G Espátula
H
Interruptor 0/1 para Ligar/Desligar o aparelho
I Escova de limpeza
DADOS TÉCNICOS DO APARELHO:
Potência: 1550 W (1000 W: resistência de aquecimento /
550W: motor)
Intervalo de temperatura: de 30° a 150°C
regulável em intervalos de 5°C.
Intervalo de tempo de funcionamento: de 5s a 2 horas, regulável em intervalos de 5s
no mínimo a 1 minuto no máximo.
Número de velocidades: 13 - 2 velocidades intermitentes:
velocidade 1 (5s Ligado / 20s Desligado).
velocidade 2 (10s Ligado / 10s Desligado).
- 10 velocidades contínuas progressivas
(velocidades 3 a 12).
- 1 velocidade intermitente máx. (velocidade 13).
- *A marca e os logótipos Bluetooth
®
são marcas registadas pela Bluetooth SIG, Inc. e a sua utilização pelo Grupo SEB foi sujeita a autorização.
- A Google Play e Android são marcas da Google Inc.
- A Apple e o logótipo Apple são marcas da Apple Inc., registadas nos Estados Unidos e noutros países. A App Store é uma marca de serviço da Apple Inc.

106
PT
106
PT
O SEU APARELHO
O seu aparelho é fornecido com os seguintes acessórios:
Estes acessórios foram concebidos com zona de preensão para facilitar a sua manipulação durante a
utilização
Lâmina picadora
Triturar sopas
3min 3L
Triturar compotas 40s 1Kg
Picar legumes 15s 1Kg
Picar carne 30s 1Kg
Picar peixe 15s 1Kg
Não utilize este acessório para cortar produtos duros, utilize a lâmina picadora/trituradora F4.
Acessório misturador
Mistura os pratos cozinhados sem desfazer os ingredientes.
Muito útil para as fases de refogado das preparações (risottos, sopas).
Refogados 5min 500g
Cozedura lenta 45min 3L
Risottos 22min 1,5Kg
Guisado de legumes (Ratatouille), Chutneys, Leguminosas (Configurações: ver
livro de receitas)
Acessório batedor
9 max
Claras em castelo 5/10min
7
max
Maionese, chantilly 2/5min 0,5L
Molhos, cremes
à
1/20min 1L
Puré de batata
à
1min 1L
Polenta
à
1/16min 1L
Lâmina para amassar/triturar
Amassar massas de pão branco 2min 30s 1,2Kg
Amassar massas quebradas,
areadas, pão especial
2min 30s 1Kg
Amassar massas levedadas
(brioche, kouglof)
1min 30s
2 min
0,8Kg
Misturar massas leves (bolo)
40 s
3min
1Kg
Triturar frutos com casca
1min 0,6Kg
Picar alimentos rijos
1min 0,6Kg
Picar gelo
1min
6 à 10
Massa de crepes, waffles
1min 1,5L
Cesto de
cozedura a vapor
Cozedura a vapor de legumes,
peixes ou carnes
20/40min 1Kg
Sopas com pedaços
3min 3L
Tampa
reguladora
de vapor
Tampa reguladora de vapor
Máx. (a) = cozedura a vapor.
Mín. (b) = Risotto, sobremesas, molhos…
Fundo XL
Acessório fundo XL
Refogar e cozer sem tampa
Aumento da superfície de cozedura para as peças grandes de carne ou peixe.

107
PT
107
PT
O seu aparelho i-Companion xl pode funcionar
«conectado» mas também «não conectado». Além
disso, possui dois modos de funcionamento: o
modo de programa automático e o modo manual.
• Modo de programa automático:
A velocidade, temperatura de cozedura e o tempo
são pré-programados para fazer sopas, refogados,
cozer a vapor e cozer massa em modo automático.
• Modo manual:
Ajustes personalizados dos parâmetros de
velocidade, temperatura de cozedura e duração
para utilizar conforme mais lhe convém.
Utilização com ou sem tampa
Temperatura de
30 a 130°C
Temperatura de
135° à 150°C
- Quando tiver selecionado uma temperatura entre
135 e 150°C, deve utilizar o seu aparelho sem
tampa. Se a tampa estiver colocada na taça, será
exibido um cadeado no ecrã LCD, convidando-a a
desbloquear.
- Depois de adicionar os alimentos, mexa-os com a
ajuda da espátula e repita a operação regularmente
para evitar que o fundo da taça pegue (ver
parágrafo sobre limpeza).
- Se escolher utilizar o aparelho com a tampa, a
temperatura de cozedura será então de 130°C no
máximo.
O SEU APARELHO ESTÁ EQUIPADO COM UMA
SEGURANÇA DE BLOQUEIO DA COBERTURA
A cobertura fica protegida quando o aparelho
arranca. Esta proteção impede a abertura da
cobertura durante a realização de uma receita (ver
Fig.17). Não tente forçar a cobertura quando ela
estiver bloqueada. Esta proteção desbloqueia-se
quando o aparelho para. Se selecionou uma
temperatura superior ou igual a 50°C e uma
velocidade superior ou igual a 5, uma contagem
de 10 segundos surge no ecrã LCD do painel de
comandos. (ver Fig.18). Não é possível abrir a
cobertura até ao fim da contagem.
COLOCAÇÃO DA TAÇA, DOS RESPETIVOS
ACESSÓRIOS E DO CONJUNTO DA TAMPA
• Antes da primeira utilização, limpe todos os
elementos (D, E, F, G) com água quente e
detergente para a loiça, à exceção do bloco
motor (A) a taça (D) vem equipada com um
eixo acionador desmontável (D3) para facilitar
a limpeza.
• Certifique-se de que retira todas as embalagens
antes da utilização, em particular a proteção
situada entre a taça (D) e o bloco motor (A).
• Coloque a junta de impermeabilidade (E4) no
vedante (E3) (consulte a Imagem 1), encaixe o
conjunto na tampa (E2) (consulte a Imagem 2).
• Coloque o anel vedante (D4) sobre o eixo
acionador comum (D3). Encaixe o conjunto
no fundo da taça com o anel de bloqueio (D6)
(ver Fig. 3). Se utiliza o modo de cozedura sem
cobertura, coloque a junta de estanqueidade
(D4) sobre o acessório fundo xl (D5). Bloqueie
o conjunto sobre o fundo da taça com o anel de
bloqueio (D6) (ver Fig. 3).
• Coloque o acessório escolhido na taça:
- os acessórios (F1, F2, F3, ou F4) no eixo
acionador comum no fundo da taça (ver
Fig. 4.1),
- para a cozedura a vapor, coloque o cesto de
vapor (F5) dentro da taça, (ver Fig. 4.3), e
deite 0,7l com um preparado líquido na taça
(água, molho, etc.) (ver Fig. 4.2).
• Coloque os ingredientes dentro da taça ou do
cesto de vapor.
• Posicione a tampa na taça (D) alinhando os dois
triângulos (ver Fig. 5), bloqueie a tampa sem
pressionar, rodando-a no sentido da seta (ver Fig. 6).
Posicione a tampa reguladora de vapor (E1) sobre
a tampa, com 2 posições possíveis (ver Fig. 7):
A posição «mín.» permite deixar sair
um máximo de condensação e obter
assim pratos ou molhos com uma mel-
hor consistência (Risotto, sobremesas,
molhos, etc.).
A posição «máx.» permite alcançar o
máximo calor e vapor na taça para
todas as cozeduras a vapor (sopas,
etc.).
Esta posição evita igualmente salpicos
durante a trituração.
• Posicione a taça (D) por cima do bloco do motor
(A) até ouvir um “clic” (ver Fig. 8).
• O aparelho só começa a funcionar quando a taça
e a tampa estão corretamente posicionadas e
bloqueadas sobre o bloco do motor.
Em caso de posicionamento ou bloqueio
incorreto de uma ou de outra (ver Fig. 10.1
e 10.2), o símbolo
começa a piscar assim
que se ativa uma função.
F1 F2
F3 F4
F5
F1 F2
F3 F4

108
PT
108
PT
Seleção de parâmetros personalizados:
Seleção da velocidade do motor.
2 velocidades intermitentes e 10
velocidades contínuas progressivas.
Velocidade intermitente máx. (V13).
Seleção da temperatura de cozedura.
De 30° a 150°C.
Indicador luminoso de aquecimento:
acende no início da cozedura e
desliga quando a temperatura no
interior da taça desce abaixo dos
50°C.
Seleção do tempo de funcionamento.
De 5s a 2 horas.
Emparelhamento primeira ligação
Aumento da velocidade, da
temperatura e do tempo de
cozedura.
Diminuição da velocidade,
da temperatura e do tempo
de cozedura.
Este botão dispõe de 3 funções:
- «Validação» da escolha do
seu programa automático ou
dos seus parâmetros escolhidos
no âmbito de uma utilização
manual (velocidade, temperatura
de cozedura, duração).
- «Pausa» durante uma
utilização, depois de colocar o
aparelho em funcionamento.
- «Reinicialização» dos
parâmetros selecionados do
aparelho premindo durante 2
segundos.
- «Validação da etapa» nas
receitas passo a passo.
Conselho de utilização:
O seu aparelho está equipado com um micro-processador que controla e analisa a sua estabilidade.
Em caso de instabilidade, a velocidade de rotação do motor será automaticamente reduzida. Se esta
instabilidade persistir, o motor pára e aparece “STOP” no ecrã.
• Verifique se a quantidade de ingredientes não é excessiva e se a velocidade utilizada está
adaptada em conformidade.
• Verifique se está a utilizar o acessório recomendado.
• Em seguida, reinicie normalmente o aparelho.

109
PT
109
PT
UTILIZAÇÃO EM MODO LIGADO
PREPARAÇÃO DA INSTALAÇÃO
Encontre a lista de modelos de Smartphones e tablets compatíveis com o i-Companion em
www.moulinex.com
(lista de modelos compatíveis www.moulinex.com)
INSTALAR A I-COMPANION XL
O que necessita para instalar a i-Companion xl:
• A aplicação Companion, disponível para download gratuito na App Store (iPhone/iPad) e no Google
Play (Android)
• Ligação Bluetooth fornecida pelo Smartphone ou tablet Bluetooth® Smart 4.0: a i-Companion xl
liga-se ao seu Smartphone/tablet através de uma ligação sem fios autónoma
• O Smartphone/tablet tem de estar próximo da i-Companion xl (o alcance da ligação varia consoante
a configuração da casa).
• Tomada elétrica para ligar a i-Companion xl: a i-Companion xl liga-se ao seu Smartphone/tablet
apenas quando está ligado à rede elétrica.
PRIMEIRA LIGAÇÃO DA I-COMPANION XL EM MODO CONECTADO
Download da aplicação
Em primeiro lugar, faça o download da aplicação no seu Smartphone/tablet entrando na App Store
para iOS ou no Google Play para Android.
Depois de efetuar o download da aplicação, em poucos minutos e sem criar conta, pode realizar as
suas primeiras receitas com a i-Companion xl (são propostas 50 receitas sem criação de conta).
A criação da sua conta na aplicação permitir-lhe-á aceder à totalidade do conteúdo para que possa
variar a sua ementa.
iPhone 4S ou mais recente
iPad 3 / iPad mini ou mais tarde
A partir de iOS 9 e o seguinte.
De Android 4.4 e o seguente.
Ligar o aparelho à corrente
Frequência: 2.40GHz. Potência máxima transmitida: 7,7dBm
O seu aparelho está equipado com um interruptor 0/1. Coloque-o na posição 1 (ver Fig. 9).
O ecrã LCD apresenta todos os parâmetros em «0».
Em modo ligado, o LCD da i-Companion xl fica azul.
Acerca de Bluetooth® Smart
A tecnologia Bluetooth
®
Smart 4.0 (ou Bluetooth Low Energy) permite uma comunicação sem fios
entre uma aplicação e um aparelho consumindo um mínimo de energia.

110
PT
110
PT
Ligar a i-Companion xl à corrente elétrica
O seu aparelho está equipado com interruptor 0/1 (H). Coloque o interruptor na posição 1 (ver Fig. 9).
Ativação do Bluetooth
Aproxime-se da i-Companion xl e certifique-se de que o Bluetooth do seu Smartphone/tablet está
devidamente ativado.
Iniciar a aplicação
Inicie a aplicação Companion clicando no ícone «Companion».
Emparelhamento
O que é o emparelhamento?
Quando conecta o aparelho pela primeira vez, a aplicação que instalou no Smartphone/tablet e a
i-Companion xl detetam-se automática e rapidamente, desde que cumpra as seguintes instruções.
Caso pretenda, pode emparelhar até 10 aparelhos à i-Companion xl.
Para tal, deve emparelhar cada um desses aparelhos individualmente (ver emparelhamento).
No entanto, apenas um aparelho pode ser conectado em simultâneo.
• Aceite os cookies que permitem melhorar a aplicação recolhendo as suas preferências de utilização.
• Selecione o seu aparelho

111
PT
111
PT
• Quando solicitado pela aplicação, prima e mantenha (durante 4 segundos) o botão Timer (B3)
da i-Companion xl.
O indicador de ligação (C1) pisca durante 30 segundos, durante os quais a i-Companion xl se
liga ao seu Smartphone/tablet.
• Aceite o pedido de emparelhamento que aparece no seu Smartphone/tablet ou aceda ao centro de
notificação para aceitar o emparelhamento.
O indicador de ligação (C1) fixo indica que a ligação foi estabelecida.
Nota: Depois de efetuado o emparelhamento, a i-Companion xl reconhecerá automaticamente
o seu Smartphone/tablet nas futuras conexões. Não necessitará de renovar esta página de
emparelhamento.
A conexão foi bem-sucedida.
A sua i-Companion xl encontra-se agora conectada ao seu Smartphone/tablet. O ícone acima indica
que a conexão foi estabelecida.

112
PT
112
PT
A conexão falhou.
O ícone acima indica que a conexão não foi estabelecida.
Volte a efetuar as seguintes operações:
• Aproxime-se da sua i-Companion xl.
• Certifique-se de que está devidamente ligado à corrente e de que a tomada funciona corretamente.
• Certifique-se de que o seu Smartphone/tablet é compatível (ver lista de compatibilidade em
www.moulinex.com).
• Certifique-se de que o Bluetooth do seu Smartphone/tablet está ativo.
• Repita as operações de emparelhamento e consulte a secção de perguntas frequentes.
Se o problema persistir, certifique-se de que o seu Smartphone/tablet é compatível.
Se utilizar um aparelho Android, certifique-se de que faz parte dos modelos compatíveis (ver lista de
compatibilidade em www.moulinex.com).
• Aceda ao menu da aplicação para descobrir a nossa gama de receitas.
No modo conectado, durante uma receita passo a
passo, a primeira reinicialização fecha a etapa e a
segunda reinicialização fecha a receita.
PERGUNTAS FREQUENTES
Onde colocar a i-Companion xl:
• Coloque a i-Companion xl sobre uma superfície plana e estável.
• Para conseguir uma conexão otimizada entre a i-Companion xl e o seu Smartphone/tablet, recomenda-se
que efetue todas as manipulações que exijam uma conexão a uma distância razoável.
• A presença do indicador de conexão fixo (C1) garante que os aparelhos estão conectados.
• Se a conexão for interrompida (com o símbolo da conexão barrado), aproxime-se da i-Companion xl para
restabelecer a conexão.
O que acontece se a conexão for interrompida durante uma receita?
Se a conexão entre a i-Companion xl e o seu Smartphone/tablet for interrompida durante uma receita, a
sincronização entre os dois aparelhos far-se-á de forma automática assim que for restabelecida a conexão.
Poderá voltar à receita, na etapa em que se encontrava quando a conexão caiu.
Posso utilizar a i-Companion xl sem a aplicação?
O seu aparelho pode ser usado sem a aplicação. (ver Colocação em funcionamento em modo desconectada).
Para tal, consulte o parágrafo referente à utilização do aparelho.
No entanto, apenas a aplicação lhe permitirá desfrutar das inúmeras vantagens do produto conectado.
A i-Companion xl pode ser utilizada com vários Smartphones ou tablets?
Caso pretenda, pode emparelhar vários aparelhos à i-Companion xl. Para tal, deve emparelhar cada um desses
aparelhos individualmente (ver Emparelhamento).
No entanto, apenas um aparelho pode ser conectado em simultâneo.

113
PT
113
PT
UTILIZAÇÃO EM MODO DESLIGADO
Massas (lista de subprogramas) Sopas (lista de
subprogramas)
Cozedura lenta (lista de
subprogramas)
Cozedura a vapor (lista dos
subprogramas)
UTILIZAÇÃO DO PAINEL DE COMANDO (B)
Seleção de um programa automático:
Ligar o aparelho à corrente
O seu aparelho está equipado com interruptor 0/1. Coloque-o na posição 1.
O ecrã LCD apresenta todos os parâmetros em «0». (ver Fig. 9).
Em modo desligado, o LCD da i-Companion xl acende a branco.
MODO DE PROGRAMA AUTOMÁTICO
1- Prima o programa que
pretende abrir (B4). Aparece
um ponto luminoso por cima
do programa selecionado.
Ao premir várias vezes,
poderá percorrer os vários
subprogramas.
2- Os parâmetros pré-
programados podem ser
modificados para uma
receita (consoante a receita
escolhida, os ingredientes,
as quantidades preparadas).
Prima o seletor de
temperatura de cozedura
(B2) ou o seletor de tempo
(B3). O parâmetro escolhido
pisca no ecrã (C6-C7).
3- Regule o(s) parâmetro(s) com
a ajuda do selector +/- (B6).
4- Quando tiver terminado
de modificar todos os
parâmetros, prima o botão
“start” (B5) para iniciar o
programa. Quando o aparelho
está em modo de cozedura, o
indicador luminoso vermelho acende para o
informar que a cozedura teve início.
5- Quando o programa termina, o aparelho emite
3 bips.
6- No fim dos programas de sopa, refogados P2 e
P3, cozedura a vapor, o aparelho passa auto-
maticamente para a função de manter quente
durante 45 minutos, para manter a preparação
pronta a ser consumida. No programa para re-
fogados P2 e P3 no modo manual, o motor do
aparelho funciona a uma velocidade específica,
com vista a preservar a preparação e a evitar
que os alimentos se peguem no fundo da taça.
Para parar a função de manter quente, basta
premir o botão «stop» (B5). Se abrir a tampa,
pressione as molas (D2) ou retire a taça. A fun-
ção de manter quente para automaticamente.
No fim dos programas de massa P1 e P2, o
O Bluetooth do meu telefone tem de estar constantemente ativo?
O Bluetooth tem de estar ativo para sincronizar a aplicação e a i-Companion xl.

114
PT
114
PT
Algumas receitas podem transbordar devido ao aparecimento de bolhas, particularmente aquando
da utilização de legumes congelados. Neste caso, deve reduzir os volumes em conformidade.
DESCUBRA OS PROGRAMAS AUTOMÁTICOS PROPOSTOS:
Sopa P1 Sopa P2
Cozedura lenta
P1
Cozedura lenta
P2
Cozedura lenta
P3
Programas automáticos
Velocidade «por
defeito» (ajustável)
10 voltas e V12
durante 2 min.
V7 à V10
durante 30 s.
V3 V1 V2
Temperatura “por defeito”
(ajustável)
100°C (90°C a
100°C)
100°C (90°C a
100°C)
130°C (não
ajustável)
95°C (80°C a
100°C)
95°C (80°C a
100°C)
Tempo “por defeito”
(ajustável)
40 min (20min a
60 min)
45 min (20 min
a 60 min)
5 min (2 min a
15 min)
45 min (10 min
a 2h)
20 min (10 min
a 2h)
Função manter quente
«por defeito» no fim do
programa
45 min 45 min 45 min 45 min
Velocidade do motor
durante a fase da função
manter quente
5s ON na V3
/ 20s OFF
10s ON na V3 /
10s OFF
aparelho passa para o modo de “levedura da
massa” a 30°C, durante 40 minutos, para le-
vedar as suas massas. Se abrir a tampa, premir
os gatilhos (D2) ou retirar a taça, o aparelho
passa para o modo de poupança de energia, e
tem a possibilidade de o voltar a ligar premin-
do novamente em “start”.
Se pretender parar este modo, prima durante
2 segundos o botão “stop” .
7- Prima os gatilhos (D2) e retire o conjunto da
taça (D) (ver Fig. 12).
Em modo conectado, quando o programa
automático é iniciado, pode parar o aparelho
em qualquer altura premindo o botão «stop».
O programa automático está agora no modo de
poupança de energia e tem a possibilidade de o
voltar a ligar premindo novamente em “start”.
Se se enganou no programa e pretende anular,
prima durante 2 segundos no botão “stop”.

115
PT
115
PT
UTILIZAÇÃO DO CESTO DE VAPOR
Os tempos de cozedura são fornecidos a título
indicativo, permitindo, na maior parte dos casos,
uma cozedura satisfatória.
No entanto, determinadas condições irão in-
fluenciar o tempo de cozedura:
- a dimensão dos legumes (cortados ou inteiros)
- a quantidade de ingredientes no cesto
- a variedade de legumes, a sua maturidade
- a quantidade de água na taça, que deve corres-
ponder à graduação (0.7L).
Utilizar a tampa reguladora de vapor com «máx.»
(a) virado para si.
Se a cozedura for insuficiente, pode acrescentar
um tempo de cozedura suplementar.
Tempo de cozedura a vapor
Ingredientes Quantidades (máx)
Tempo de cozedura
estimado
Programa de vapor
recomendado
Curgetes 800 g 20 min P1
Cherovia 800 g 25 min P1
Alho francês (parte branca) 800 g 25 min P1
Brócolos 500 g 20 min P1
Peixes 600 g (avec papier cuisson) 15 min P1
Batatas 1 kg 30 min P2
Cenouras 1 kg 30 min P2
Feijão-verde 800 g 30 min P2
Carnes brancas 600 g (avec papier cuisson) 20 min P2
Cozedura a
vapor P1
Cozedura a
vapor P2
Massa P1 Massa P2 Massa P3
Programas
automáticos
Velocidade “por defeito”
(ajustável)
V5 durante
2 min. e 30 s.
V5 durante
1 min. e 30 s., depois
V6 durante 2 min.
V3 durante 40 s.,
depois
V9 durante 3 min.
Temperatura “por
defeito” (ajustável)
100°C (não
ajustável)
100°C (não
ajustável)
Tempo “por defeito”
(ajustável)
30 min (1 min
a 60 min)
35 min (1 min
a 60 min)
2 min 30 s
(30 s a 2 min
30 s)
durante 2 min
3 min 30 s (30 s a
3 min 30 s)
3 min 40 s
(1 min 40 s a 3
min 40 s)
Função Manter Quente
«por defeito» no fim do
programa
45 min 45 min
Velocidade do motor
durante a fase da
Função Manter Quente
Levedar a massa 30°
”por defeito” no fim do
programa
40 min 40 min
Algumas receitas podem provocar derramamentos intempestivos, devido ao aparecimento de
bolhas, em particular quando se utilizam legumes congelados. Neste caso, deve reduzir os
volumes em conformidade.

116
PT
116
PT
MODO MANUAL
1- Prima diretamente o seletor
que representa o parâmetro
que pretende regular, ou
seja, o seletor de velocidade
(B1) ou o seletor de
temperatura de cozedura
(B2) ou o seletor de tempo
(B3); o parâmetro escolhido
pisca no ecrã (C5-C6-C7).
2- Em seguida, regule o(s)
parâmetro(s) com a ajuda do
seletor +/- (B6). Por razões
de segurança, não é possível
regular uma temperatura
sem regular um tempo de
cozedura.
3- Assim que tiver terminado de
regular todos os parâmetros
que pretende, prima o
botão “start” (B5). Quando
o aparelho está a utilizar
o modo de cozedura, o
indicador luminoso vermelho
acende para o informar que
a cozedura tem início. Assim
que o programa tem início,
tem a possibilidade de parar
o aparelho em qualquer
momento premindo o botão
“stop” (B5).
O programa está agora no modo de poupança
de energia, e tem a possibilidade de o reiniciar
premindo novamente em “start “. Se se enganou
no programa e pretende anular, prima durante 2
segundos no botão “stop”.
4- Assim que o programa termina, o aparelho
emite 3 bips.
5- Prima os gatilhos (D2) e, em seguida, retire o
conjunto da taça (D) (ver Fig. 12).
O SEU APARELHO ESTÁ EQUIPADO COM UMA
TAMPA FUNDA PLANA
A tampa funda plana permite libertar espaço na
taça para cozer ou dourar sem ser incomodado
pelo dispositivo (ver Fig. 15).
COZEDURA SEM COBERTURA
Pode dourar os alimentos na sua taça sem a
cobertura mexendo e supervisionando a cozedura.
(ver Fig. 16).
Para este modo de cozedura, deve selecionar
obrigatoriamente uma temperatura entre 135°C
a 150°C. Regule a duração do funcionamento
(até 20 min).
A função COZEDURA EM TAMPA não está adaptada
às compotas e às preparações à base de leite
(risco de derramamento).
• O aparelho não deve ser
mergulhado em líquidos. Não
passe o bloco do motor (A) por
água corrente.
Quando terminar de utilizar o aparelho,
desligue-o da corrente.
• Limpar imediatamente a cuba após a utilização.
• Prima os gatilhos (D2) e, em seguida, retire o
conjunto da taça (D).
• Coloque a taça numa superfície plana.
• Desenrosque a tampa rodando-a um quarto
de volta no sentido dos ponteiros do relógio.
Retire a tampa com cuidado.
• Tenha cuidado com a lâmina picadora
« ultrablade » (F1) e com a lâmina para
amassar/triturar (F4) quando as está a
limpar e quando esvazia a taça, pois são
extremamente afiadas.
• Quando as peças tiverem arrefecido:
- desmonte o eixo comum (D3), a junta (D4), o
anel de bloqueio (D6) (ver Fig. 13).
- limpe a cuba (D), o eixo comum
(D3), a junta
(D4), o anel de bloqueio (D6), os acessórios
(F1), (F2), (F3), (F4), (F5), a tampa reguladora
LIMPEZA DO APARELHO

117
PT
117
PT
de vapor (E1), a tampa (E2), junta vedante (E4)
e a junta vedante (E3), com a ajuda de uma
esponja, água morna e detergente para a loiça.
• Enxague estes elementos com água corrente.
• Em caso de sujidade acentuada, deixe de
molho durante várias horas dentro de água com
detergente da loiça e, se necessário, raspe com
a espátula (G) ou com o lado de esfregar da
esponja.
• Em caso de incrustação de calcário na taça,
pode utilizar o lado de esfregar da esponja
embebida, se necessário, em vinagre branco.
• Para limpar o bloco do motor (A), utilize um
pano húmido. Seque-o cuidadosamente.
• Para facilitar a limpeza, saiba que a taça, o
conjunto da tampa e os acessórios podem
ser colocados na máquina da lavar loiça, à
excepção do eixo comum (D3 e D4) e do anel
de bloqueio (D6) (ver Fig. 14).
• Os acessórios, o eixo accionador comum
amovível e os elementos da tampa, podem ficar
ligeiramente manchados com determinados
ingredientes como o caril, o sumo de cenouras,
etc.; não representa qualquer perigo para a sua
saúde, nem para o funcionamento do aparelho.
Para evitar que tal ocorra, limpe os elementos
rapidamente após cada utilização.
• Antes de reutilizar o conjunto da taça (D),
certifique-se de que os contactos elétricos
debaixo da taça estão sempre limpos e secos.
• De modo a preservar o aspeto e longevidade
do corpo do seu aparelho, lave-o à mão. Não
utilize o lado abrasivo da esponja, de modo a
evitar riscos.
• Para não alterar os materiais da taça (D), res-
peite os conselhos de utilização da sua máquina
de lavar a loiça, não aumente as doses de sal ou
de produtos para a máquina da loiça.
O seu aparelho está
equipado, de série, com
proteções eletrónicas do
motor por forma a garan-
tir a sua longevidade.
Esta segurança eletrónica
protege-o contra qualquer
utilização anormal; desta forma, o seu motor
fica totalmente protegido.
Em determinadas condições de utilização muito
severas, que não respeitem as recomendações do
manual de instruções (ver capítulo “COLOCAÇÃO
EM FUNCIONAMENTO”: quantidades eventual-
mente demasiado grandes e/ou uma utilização
anormalmente longa e/ou um encadeamento de
receitas pouco espaçadas ), a proteção eletrónica
é ativada para preservar o motor; neste caso,
o aparelho desliga-se e aparece um indicador
“SECU” no ecrã LCD do painel de controlo para
indicar que o aparelho deixou momentaneamente
de funcionar.
Caso o indicador “SECU” apareça no seu pai-
nel de controlo e o seu aparelho se desligue,
proceda da seguinte forma:
• Deixe o seu aparelho ligado à corrente, e não
prima o interruptor “0/1” (H).
• Consulte as recomendações do manual de ins-
truções para readaptar a sua preparação (ver
capítulo “COLOCAÇÃO EM FUNCIONAMENTO”:
quantidades de ingredientes/tempo da receita/
temperatura/tipo de acessórios).
• Aguarde cerca de meia hora para que o motor
arrefeça.
• Reinicie o aparelho premindo durante 2 segun-
dos o botão “Start/Stop/Reset” (B5).
O seu aparelho está novamente pronto para ser
utilizado.
O Centro de Contacto do Consumidor está à sua
disposição para qualquer questão (Ver contactos
no folheto da garantia).
INSTRUÇÕES SOBRE A SEGURANÇA DO APARELHO (“SECU”)

118
PT
118
PT
O QUE FAZER SE O APARELHO NÃO FUNCIONAR?
PROBLEMAS CAUSAS SOLUÇÕES
Dificuldades na cozedura a vapor.
Tampa reguladora de vapor
mal posicionada
Posicione a tampa do vapor no
sentido «máx. vapor» virada para
si, esta posição permite alcançar o
máximo calor na taça para todas as
cozeduras a vapor (sopas, etc.).
Esta posição evita igualmente
salpicos durante a trituração.
A posição «vapor mín.» permite
deixar sair um máximo de conden-
sação e obter assim pratos ou mol-
hos com uma melhor consistência
(Risotto, sobremesas, molhos, etc.).
Tempo de cozedura insuficiente
Os tempos de cozedura são forne-
cidos a título indicativo, permi-
tindo, na maior parte dos casos,
uma cozedura satisfatória.
No entanto, determinadas condi-
ções irão influenciar o tempo de
cozedura:
- a dimensão dos legumes (cortados
ou inteiros)
- a quantidade de ingredientes no
cesto
- a variedade de legumes, a sua
maturidade
- a quantidade de água na taça que
corresponde à graduação (0.7L).
Se a cozedura for insuficiente, pode
acrescentar um tempo de cozedura
suplementar.
Pode também utilizar o modo ma-
nual, selecionando a temperatura
de 130°C e o tempo de cozedura de
acordo com a quantidade e
o tipo de ingredientes.
O aparelho não funciona.
A ficha não está ligada.
Ligue o aparelho à tomada.
O interruptor
(H)
está na posição 0.
Coloque o interruptor na posição 1.
A taça ou a tampa não estão correta-
mente posicionadas ou encaixadas.
Verifique se a taça ou a tampa
estão bem posicionadas e en-
caixadas seguindo os esquemas do
folheto.
Vibrações excessivas.
O aparelho não está colocado sobre
uma superfície plana e, por isso, não
está estável.
Utilize o aparelho sobre uma
superfície plana.
Volume de ingredientes excessivo.
Reduza a quantidade de ingredientes
a preparar.
Erro de acessórios.
Verifique se está a utilizar o acessório
recomendado.

119
PT
119
PT
Fuga pela tampa.
Volume de ingredientes excessivo.
Reduza a quantidade de ingredientes
a preparar.
A tampa não está bem posicionada ou
encaixada.
Encaixe corretamente a tampa na
taça.
A junta vedante não está presente.
Coloque a junta de impermeabili-
dade sobre a cobertura.
A junta vedante está cortada,
deteriorada.
Substitua a junta. Contacte um Ser-
viço de Assistência Autorizado.
Erro de acessórios.
Verifique se está a utilizar o
acessório recomendado.
Fuga pelo eixo da taça ou pelo
acessório fundo xl.
A junta não está bem posicionada.
Posicione corretamente a junta.
A junta está deteriorada.
Contacte um Serviço de Assistência
Autorizado.
O anel de bloqueio
(D6)
está mal
encaixado.
Encaixe corretamente o anel (D6).
As lâminas não rodam facilmente.
Pedaços de alimentos demasiado
grandes ou demasiado rijos.
Diminua o tamanho ou a quanti-
dade dos ingredientes a preparar.
Adicione líquido.
Odor vindo do motor.
Aquando da primeira utilização do
aparelho, ou em caso de sobrecarga
do motor provocado por uma
quantidade significativa de ingre
-
dientes ou por pedaços demasiado
rijos ou demasiado grandes.
Deixe arrefecer o motor (cerca de
30 minutos) e reduza a quantidade
de ingredientes na taça.
Exibição de «STOP».
O aparelho detetou vibrações signi-
ficativas e passou para o modo de
segurança.
Verifique se está a utilizar a veloci-
dade ou o acessório recomendado.
Exibição de «SECU».
Sobrecarga do motor provocado por
uma quantidade significativa de in
-
gredientes ou por pedaços demasiado
rijos ou demasiado grandes ou uma
sucessão de receitas sem tempo de
arrefecimento suficiente.
Deixe arrefecer o motor (cerca de
30 minutos) e reduza a quantidade
de ingredientes na taça.
Exibição «SECU» + indicador lumi-
noso vermelho a piscar.
Sobreaquecimento dos sensores de
temperatura.
Contacte um Serviço de Assistência
Autorizado.
Exibição «Err1» + indicador lumi-
noso vermelho a piscar.
A resistência de aquecimento não
funciona.
Verifique se os pinos de alimenta-
ção, localizados por baixo da taça,
não estão sujos. Se for este o caso,
limpe-os e experimente novamente.
Se continuar a não funcionar,
contacte um Serviço de Assistência
Autorizado.
Exibição de «Err2». Avaria eléctrica.
Contacte um Serviço de Assistência
Autorizado.
Exibição de «Err3». Problema de velocidade.
Contacte um Serviço de Assistência
Autorizado.
Exibição de «Err4».
Problema de comunicação com a
placa elétronica.
Contacte um Serviço de Assistência
Autorizado.
PROBLEMAS CAUSAS SOLUÇÕES

120
PT
120
PT
PROBLEMAS CAUSAS SOLUÇÕES
Indicação «Err8»
Defeito captador de segurança de
bloqueio.
Contacte um centro autorizado.
Exibição «ntc1» + indicador
luminoso vermelho a piscar.
O sensor 1 de temperatura não
funciona.
Contacte um Serviço de Assistência
Autorizado.
Exibição «ntc2» + indicador
luminoso vermelho a piscar.
O sensor 2 de temperatura não
funciona.
Contacte um Serviço de Assistência
Autorizado.
Visualização do indicador de segu-
rança (C4)
Bloqueio deficiente da taça ou da
tampa
Antes de colocar o aparelho em
funcionamento, verifique se a taça
está bloqueada corretamente no
bloco do motor e se a tampa está
bloqueada corretamente na taça. Se
o problema persistir, contacte um
centro autorizado.
A tampa está bloqueada na taça em
modo “cozedura em tampa”
Desbloquear a tampa antes de
lançar o programa de cozedura. Se
o problema persistir, contacte um
centro autorizado.
A segurança de bloqueio da tampa
permanece ativa (haste saliente) e
ela não permite bloquear a tampa.
O aparelho foi desligado durante
a receita, girando o interrutor I/O
para O ou cortando simplesmente a
corrente durante a receita.
Basta girar o interrutor I/O para
reiniciar o robot e, portanto, a
segurança de bloqueio da tampa, a
haste vai retomar automaticamente
a sua posição original, pode agora
bloquear a tampa.
Problema de ligação Consulte o guia da aplicação.
O seu aparelho continua a não funcionar?
Contacte um Serviço de Assistência Técnica autorizado (consultar lista no folheto).
• Eliminação dos materiais de embalagem e do aparelho.
A embalagem é composta exclusivamente por materiais que não representam qualquer
perigo para o ambiente, que podem ser eliminados em conformidade com as disposições de
reciclagem em vigor.
Para a eliminação do aparelho, informe-se junto do serviço adequado da sua freguesia.
• Produtos eletrónicos e elétricos em fim de vida:
Proteção do ambiente em primeiro lugar!
O seu aparelho contém inúmeros materiais que podem ser recuperados ou reciclados.
Entregue-o num ponto de recolha para possibilitar o seu tratamento.
RECICLAGEM
- *A marca e os logótipos Bluetooth
®
são marcas registadas pela Bluetooth SIG, Inc. e a sua utilização pelo Grupo SEB foi sujeita a autorização.
- A Google Play e Android são marcas da Google Inc.
- A Apple e o logótipo Apple são marcas da Apple Inc., registadas nos Estados Unidos e noutros países. A App Store é uma marca de serviço da Apple Inc.
GLOSSÁRIO
Emparelhar: ação de agrupar ou associar dois aparelhos.
Esta ação efetua-se durante a primeira conexão entre o seu Smartphone ou tablet e a i-Companion xl.
Sincronizar: ação de atualização da informação. A aplicação e a i-Companion xl sincronizam-se para trocar informações quando
estão ligados.
Ligar: estabelecer uma ligação entre a aplicação (Smartphone/tablet) e o aparelho (i-Companion xl). Esta ação é indispensável
para a sincronização.
Cookies: são informações de utilização enviadas à Moulinex para melhorar a aplicação.

121
EN
121
EN
Personal safety
• Read the instructions for use
carefully before using your appliance
for the first time and keep them in
a safe place. The manufacturer shall
not accept any liability in the event
of any use that does not comply with
the instructions.
• Always disconnect the appliance
from the power supply if you are
to leave it unattended and before
assembly, dismantling or cleaning.
Do not allow children to use the
appliance without supervision.
• This appliance should not be used by
children. Keep the appliance and its
power cable out of reach of children.
• This appliance is not intended for
use by persons (including children)
with reduced physical, sensory
or mental capabilities, or lack of
experience and knowledge, unless
they have been given supervision
or instruction concerning use of the
appliance by a person responsible for
their safety.
Children should be supervised to
ensure that they do not play with
the appliance.
• Keep your appliance out of reach of
children.
• When the product is in
use, some parts become
hot (stainless steel wall
of the bowl and stopper,
removable spindle, clear parts of the
lid, metal parts under the bowl, XL
bottom accessory basket). They can
cause burns. Handle the appliance by
the cool plastic parts (handles, motor
unit). The red heating indicator light
shows that there is a risk of burning.
• The temperature of the accessible
surfaces may be high when the
appliance is in operation.
• The appliance is not intended to be
operated using an external timer or
by a separate remote control system.
• Do not use your appliance if it is not
working properly, if it is damaged
or if the power cable or plug is
damaged. To avoid any danger have
the power cable replaced by an
approved service centre (see list in
the guarantee booklet).
• The appliance should not be
immersed in water. Never put the
motor unit (A) under running water.
• This appliance is designed for
indoor household use only and
at an altitude below 2000 m. The
SAFETY INSTRUCTIONS:

122
EN
122
EN
manufacturer shall not accept any
liability and reserves the right to
cancel the guarantee in the event
of commercial or inappropriate use
or failure to follow the instructions.
• This appliance is intended for indoor,
domestic household use only. It is not
intended to be used in the following
applications and the guarantee will
not apply for:
- Staff kitchen areas in shops,
offices and other working
environments.
- In kitchen areas reserved for
staff in shops, offices and other
professional environments.
- On farms.
- Use by clients of hotels, motels
and other residential
environments.
- in guest room
environments.
• Your appliance gives off steam
which can cause burns. Handle
the lid and the cap with caution
(use oven gloves, a potholder, etc.
if necessary). Handle the cap by
its central section.
• Do not operate the appliance if
the seal is not positioned on the
seal carrier, or if the seal carrier
is not assembled in the lid. It is
essential to operate the appliance
with the cap positioned in the
hole in the lid (unless specifically
otherwise stated in the recipe).
WARNING: Be aware of
the risk of injury in the
event of incorrect use of
the appliance.
Take care with the knives of the
Ultrablade knife (F1) and the
kneading/grinding & crushing blade
(F4) when you are cleaning them
and when you empty the bowl, they
are extremely sharp. Be careful
if a hot liquid is poured into the
food processor because it could be
ejected from the appliance due to it
suddenly boiling.
Place the Ultrablade chopper blade
(F1) in the bowl after use.
WARNING: Be careful to avoid any
spillage on the connector during
cleaning, filling or pouring.
WARNING: Some foods that have an
outer skin (whole sausages, tongue,
poultry, etc.) or large pieces of
meat may produce spatters as they
trap boiling liquids. We therefore
recommend piercing them with a
knife or a folk prior to cooking.
WARNING: The heating element
surface is subjected to residual
heat after use.
- Be sure to touch only the handles
of your appliance (locks D2,
handle of the lid E2 and handle
of the cap E1) during heating and
until complete cooling down.

123
EN
123
EN
• Refer to the instructions for
setting the operating times and
speed settings of each accessory
and each program.
• Refer to the instructions
for assembly and mounting
accessories to the appliance.
• Refer to the instructions for
cleaning and maintenance of your
appliance.
• Always follow the cleaning
instructions on how to clean your
appliance :
- Unplug the appliance.
- Do not clean the appliance while
hot.
-
Clean with a damp cloth or
sponge.
- Never immerse the appliance in
water or put it under running
water.
EUROPEAN MARKETS ONLY:
• Keep the appliance and its lead out
of reach of children under 8 years
of age.
Children should not use the
appliance as a toy.
• This appliance may be used by
persons with reduced physical,
sensory or mental capabilities or
whose experience or knowledge is
insufficient, as long as they have
the benefit of supervision or they
have received instructions regarding
safe use of the appliance and they
understand its potential dangers.
• This appliance may be used by
children of at least 8 years of age,
as long as they are supervised and
have been given instructions about
using the appliance safely and are
fully aware of the dangers involved.
Cleaning and maintenance by the
user should not be carried out by
children without supervision unless
they are at least 8 years of age and
are supervised by an adult.
Connection to the power supply
• The appliance should be plugged in
to an earthed electrical socket.
• The appliance is designed to work
with alternating current only.
Check that the supply voltage
indicated on the rating plate of the
appliance corresponds to that of
your electrical installation.
• Any connection error will negate
the guarantee.
• Never pull on the power lead to
unplug the appliance.
• Do not immerse the appliance,
power cord or plug in any liquid.
• The power cord must never be left
near or in contact with the hot parts
of your appliance, near a source of
heat or on a sharp edge.

124
EN
124
EN
Incorrect use
• Do not touch the lid before the
appliance comes to a complete stop
(stop button); wait until the food
being mixed is no longer rotating.
• Always pour the solid ingredients
into the bowl first before adding the
liquid ingredients (See Fig. 10),
without exceeding the MAX limit
marked inside the bowl (See
Fig. 10). If the bowl is too full,
boiling liquid may be ejected.
• Please note, in the steam cooking
program, do not exceed 0.7 litres
water (See Fig. 3.2).
• Never put your fingers or any
other object in the bowl while the
appliance is in operation.
• Do not use the bowl as container
(storage, freezing, sterilisation).
• Place the appliance on a stable
flat, heat-resistant, clean and dry
surface.
• Do not place the appliance near
a wall or a cupboard: the steam
produced may damage them.
• Do not place your appliance near
a heat source in operation (hob,
household appliance, etc.).
• Do not cover the lid with a dishcloth
or other item, do not attempt to
block the hole in the lid, use the
steam regulator cap.
• Never allow long hair, scarves, etc.
to hang over the accessories while
in operation.
• Never put the accessories, bowl and
lid in a microwave.
• Do not use the appliance outdoors.
• Never exceed the maximum quantity
indicated in the instructions.
• Store the appliance when it has
cooled down.
• Do not place the bowl in the freezer
to cool it; use the refrigerator.
After-sales Service
• For your own safety, do not use
accessories or spare parts other
than those provided by the approved
after-sales centres.
• Any intervention other than
cleaning and usual maintenance by
the customer must be carried out by
an approved service centre.
• Consult the table “What to do if
your appliance does not work” at
the end of the instruction manual.

125
EN
125
EN
On reading this instruction manual, you will find recommendations for use, which will help
you to see the potential of your appliance: preparation of soups, stews, steamed
dishes and desserts.
APPLIANCE DESCRIPTION:
A Motor unit
B Control panel
B1: speed selector
B2: cooking temperature selector and/or
heat indicator light
B3: operating duration/pairing selector
B4: automatic program selection buttons
B5: START/STOP/RESET button
B6: + / - selector
C LCD screen
C1: connection indicator display
C2: steam program display
C3: current step display in the step-by-step
recipes
C4: safety indicator display
C5: speed display
C6: temperature display
C7: time display
D Bowl assembly
D1: stainless steel bowl
D2: locks (located under handles)
D3: detachable spindle
D4: bowl seal (X2)
D5: XL base accessory
D6: spindle locking ring
E Lid assembly
E1: steam regulator cap/stopper
E2: lid
E3: lid seal
E4: lid seal
F Accessories:
F0 : accessory storage box
F1: ultrablade chopping knife
F2: mixer
F3: whisk
F4: knife for kneading/grinding blade
F5: steam basket
G Spatula
H On/Off switch 0/1 switches off the power
supply to your appliance
I Cleaning brush
APPLIANCE TECHNICAL DATA:
Power: 1550W (1000W: heating element / 550W: motor)
Temperature range: 30° to 150°C
adjustable in steps of 5°C.
Operating duration range: 5 sec to 2 hours
adjustable in steps of 5 sec min to 1 min max.
Number of speeds: 13 - 2 intermittent speeds:
speed 1 (5 sec On / 20 sec Off).
speed 2 (10 sec On / 10 sec Off).
- 10 progressive continuous speeds
(speeds 3 to 12).
- 1 max intermittent speed (speed 13).
- *The Bluetooth
®
brand and logos are registered brands of Bluetooth SIG, Inc. and their use by the SEB Group has been officially authorised.
- Google Play and Android are Google Inc. brands.
- Apple and the Apple logo are Apple Inc. brands, registered in the USA and other countries. App Store is an Apple Inc. service mark.

126
EN
126
EN
YOUR APPLIANCE
Your appliance comes with the following accessories:
These accessories are also fitted with gripping areas to facilitate easier handling.
Ultrablade knife
Mixing soups
3min 3L
Mixing fruit purees 40s 1Kg
Chopping vegetables 15s 1Kg
Chopping meat 30s 1Kg
Chopping fish 15s 1Kg
Do not use this accessory to chop hard products, use the F4 kneading blade/crusher.
Mixer
It mixes Cooked dishes without damaging the ingredients
Very useful for browning phases before preparations (risottos, soups).
Browned dishes 5min 500g
Stews 45min 3L
Risottos 22min 1.5Kg
Ratatouille, Chutney, Pulses (settings: check the recipe booklet)
Whisk
9 max
Whisking egg whites, 5/10min
7
max
Mayonnaise,
Whipped cream, meringues
2/5min 0.5L
Sauces, creams
to
1/20min 1L
Mashed potato
to
1min 1L
Polenta
to
1/16min 1L
Kneading/grinding knife
Kneading white bread dough 2min 30s 1.2Kg
Kneading short crust pastry,
biscuit dough, special bread
2min 30s 1Kg
Kneading rich dough
(brioche, kugelhopf. etc.)
1min 30s
2 min
0.8Kg
Mixing light batters (cake
mixture, etc.)
40 s
3min
1Kg
Grinding nuts
1min 0.6Kg
Grinding hard texture foods
1min 0.6Kg
Crushing ice
1min
6 to 10
Pancake batter, waffle batter
1min 1.5L
Steam
basket
Steam cooking vegetables,
fish or meat
20/40min 1Kg
Soup with chunks
3min 3L
Cap/
Stopper
Cap/Stopper for regulating steam extraction
- High setting (a) = steam cooking.
- Low setting (b) = risotto, creamy puddings, sauces, etc.
Base XL
XL base accessory
Lidless browning and cooking
Larger cooking surface for your large pieces of meat or fish.

127
EN
127
EN
Your i-Companion xl appliance can operate in
‘connected’ mode, and also in ‘unconnected’ mode.
It also has two operating modes: automatic program
mode and manual mode.
• Automatic program mode:
the speed, cooking temperature and cooking time
are pre-programed to make soups, stews, steamed
dishes and pastries automatically.
• Manual mode:
you can personalise the settings for speed, cooking
temperature and cooking time as you wish.
Use with or without the lid
Temperature from
30 to 130°C
Temperature from
135 to 150°C
- When you have selected a temperature between
135°C and 150°C, you must use your appliance
without the lid. If the lid is positioned on the
bowl, a lock will be displayed on the LCD screen,
prompting you to unlock it.
- Once you have added the food items, stir them
using the spatula and regularly repeat the
operation to prevent the formation of stains on the
bottom of the bowl. (See “Cleaning” paragraph).
- If you choose to use the appliance with its lid
in place, the maximum cooking temperature shall
then be 130°C.
YOUR APPLIANCE IS EQUIPPED WITH SAFETY-
LOCKING LID
The lid is secure each time the appliance starts.
This security feature prevents the lid from opening
when preparing a recipe
(See Fig.17). Do not attempt
to force the lid when it is locked. This security lock
is released each time that the appliance stops. If
you have selected a temperature greater than or
equal to 50°C and a speed greater than or equal to
5, a countdown of 10 seconds then appears on the
control-panel ‘s LCD display. (See Fig.18). It will only
be possible to open it at the end of the countdown.
FITTING THE BOWL, ACCESSORIES AND LID
ASSEMBLY
• Before using your appliance for the first time, clean
all the parts (D, E, F, G) in warm soapy water,
except for the motor unit (A). Your bowl (D) has
a removable drive (D3) to make cleaning easier.
• Make sure that all the packaging has been removed
before use, especially the protection between the
bowl (D) and the motor unit (A).
• Place the seal (E4) on the seal carrier (E3) (see
Fig. 1) and clip the assembly on the lid (E2) (see
Fig 2).
• Position the gasket (D4) on the shared drive
(D3). Lock the assembly to the bottom of the
bowl with the locking ring (D6) (see Fig. 3).
If you use the cooking mode without the lid,
position the seal (D4) on the xl bottom accessory
(D5). Lock the entire appliance to the bottom of
the bowl with the locking ring (D6) (see Fig. 3).
• Position the chosen accessory in the bowl:
- the accessories (F1, F2, F3, or F4) on the shared
drive at the bottom of the bowl (see Fig. 4.1),
- for steam cooking, the steam basket (F5) inside
the bowl, (see Fig. 4.3 ), taking care to first fill
the 0.7l basin with a liquid (water, sauce, etc.)
(see Fig. 4.2 ).
• Add the ingredients to the inside of the bowl or
steam basket.
• Position the lid on the bowl (D) by aligning the
two triangles (see Fig. 5), lock the lid without
pressing by turning it in the direction of the arrow
(see Fig. 6).
Position the steam regulator cap (E1) on the lid.
There are 2 possible positions (see Fig. 7):
The low setting allows a maximum
amount of condensation to be
released and therefore it is re-
commended to prepare dishes and
sauces with a better consistency
(risotto, creamy puddings, sauces, etc.).
The high setting allows a maximum
amount of heat and steam to build
up in the bowl for all types of steam
cooking (soups, etc.).
This setting also prevents splashing during
mixing.
• Position the bowl (D) on the motor unit (A)
until you hear a “click” (See Fig. 8).
• The appliance only starts up if the bowl and
the lid are correctly positioned and locked on
the motor unit.
In the event of incorrect positioning of the
bowl or incorrect locking of the lid (See
Fig. 10.1 and 10.2), the logo
starts to
flash when a function is activated.
F1 F2
F3 F4
F5
F1 F2
F3 F4

128
EN
128
EN
Tips for use:
Your appliance is fitted with a microprocessor that controls and analyses its stability. In the event
of instability, the motor rotation speed will be automatically reduced, if this instability continues,
the motor will be stopped and “STOP” will be displayed on the screen.
• Check that the quantity of ingredients is not too large and that the speed used is the correct one.
• Check that you are using the recommended accessory.
• Then restart your appliance normally.
Selecting custom settings:
Selecting the motor speed.
2 intermittent speeds (Speed 1 &
2) and 10 continuous progressive
speeds (Speed 3 to 12)
Max intermittent speed (S13).
Selecting cooking speed.
From 30° to 150°C.
Heating indicator light: lights up
when cooking starts and switches
off when the temperature inside
the bowl falls to below 50°C.
Selecting operating time.
From 5 sec to 2 hours.
1st connection pairing
Increase speed, cooking
temperature and duration.
Decrease speed, cooking
temperature and duration.
This button has 3 functions:
- ‘Validation’ of your
automatic program
selection or the settings
you have chosen in
manual mode (speed,
cooking temperature,
time).
- ‘Pause’ when operating,
once the appliance has
been started.
- ‘Reset’ of the appliance
settings, selected by
pressing and holding for
2 seconds.
- ‘Validation of step’ in
step-by step recipes.

129
EN
129
EN
USE IN CONNECTED MODE
PREPARING TO INSTALL
Go to www.moulinex.com to find the list of Smartphone and Tablet models that are
compatible with i-Companion
INSTALL I-COMPANION XL
What you need to install i-Companion xl:
• The Companion app, which can be downloaded for free from App Store (iPhone/iPad) and Google
Play (Android)
• A Bluetooth connection supplied by your Bluetooth® Smart 4.0 smartphone or tablet: i-Companion xl
connects to your smartphone/tablet via a stand-alone wireless connection
• The smartphone/tablet must be close to the i-Companion xl (the connection range varies, depending
on the layout of the home).
• A power point for plugging in the i-Companion xl : i-Companion xl is only connected to your
smartphone/tablet when it is plugged in to the power supply.
About Bluetooth® Smart
Bluetooth® Smart 4.0 technology (or Bluetooth Low Energy) makes it possible to communicate
wirelessly between an app and a device with very low energy consumption.
FIRST CONNECTION OF I-COMPANION XL IN CONNECTED MODE
Downloading the app
To start, download the app onto your smartphone/tablet by connecting to App Store for iOS or Google
Play for Android.
Once you have downloaded the app, you will be able to make your first recipes with i-Companion xl
within just a few minutes, without creating an account. (50 recipes are available to you without
creating an account).
If you create an account on the app you will be able to access all the content, and vary your menus.
Powering up your appliance
Frequency: 2.40 GHz. Maximum transmitted output: 7.7 dBm
Your appliance has an on/off switch marked 0/1. Switch it to 1. (See Fig. 9).
The LCD screen will display all the settings as ‘0’.
In connected mode, the i-Companion xl LCD screen is blue.
iPhone 4S or newer
iPad 3 / iPad mini or later
From iOS 9 and following ones.
From Android 4.4 and following ones.

130
EN
130
EN
Powering up the i-Companion xl
Your appliance has an on/off switch marked 0/1 (H). Switch this to 1 (see Fig. 9).
Bluetooth activation
Move close to the i-Companion xl and check that Bluetooth is activated on your smartphone/tablet.
Launching the app
Launch the Companion app by clicking on the ‘Companion’ icon.
Pairing
What is pairing?
On first connection, the app you have downloaded onto your smartphone/tablet and i-Companion xl
will automatically and quickly detect each other, provided you follow the steps below.
If you wish, you can pair up to 10 devices with i-Companion xl.
To do this, pair each device separately. (See pairing).
However, only one device may be connected at a time.
• Accept the cookies, which will improve the app by collecting your usage preferences.
• Select your device

131
EN
131
EN
• When requested by the app, press and hold the Timer button (B3) on the i-Companion xl (for
4 seconds).
The connection indicator (C1) will blink for a maximum of 30 seconds, while the i-Companion xl
connects to your smartphone/tablet.
• Accept the pairing request displayed on your smartphone/tablet or access the notification centre to accept
the pairing.
When the connection indicator (C1) is constantly lit it indicates that the connection has been
established.
NB : When the pairing has been carried out, i-Companion xl will automatically recognise your
smartphone/tablet when you next connect. You will not have to carry out this pairing step again.
The connection has been successful
Your i-Companion xl is now connected to your smartphone/tablet. The icon above shows you that the
connection has been established.

132
EN
132
EN
The connection has failed
The icon above shows you that the connection has not been established.
Please repeat the following operations:
• Move close to i-Companion xl.
• Check that i-Companion xl is properly plugged into the socket and that the plug is working properly.
• Check that your smartphone/tablet is compatible (see compatibility list at www.moulinex.com).
• Check that Bluetooth is activated on your smartphone/tablet.
• Start the pairing steps again, and consult the FAQs (frequently asked questions).
If there is still a problem, make sure that your smartphone/tablet is compatible
If you are using an Android device, make sure that it is one of the compatible models (see compatibility
list at www.moulinex.com).
• Access the app menu to see our range of recipes.
In connected mode, during a step-by-step recipe, the
first reset ends the step, and the second reset ends
the recipe.
FAQs: FREQUENTLY ASKED QUESTIONS
Where should I put i-Companion xl?
• Put i-Companion xl on a flat, stable, heat resistant work surface.
• For the best connection between i-Companion xl and your smartphone/tablet, we recommend you make
any changes required to ensure the connection is at a reasonable distance.
• If the connection indicator (C1) is constantly lit, this shows that your devices are connected.
• If the connection is lost (the connection symbol is shown crossed out), move closer to i-Companion xl to
re-establish the connection.
What happens if the connection is lost during a recipe?
If the connection between i-Companion xl and your smartphone/tablet is lost during a recipe, the two
devices will be automatically synchronised as soon as the connection is re-established. You will be able to
carry on with your recipe from the step you were on when the connection was lost.
Can I use i-Companion xl without the app?
Your appliance may be used without the app. (See first use in unconnected mode).
For this, please refer to the ‘use of the appliance’ paragraph.
However, only the app will enable you to benefit from the many advantages of the connected product.
Can i-Companion xl be used with more than one smartphone or tablet?
If you wish, you can pair several devices with i-Companion xl. To do this, pair each device separately. (See
pairing).
However, only one device may be connected at a time.
Must the Bluetooth on my phone by constantly activated?
Bluetooth must be activated in order to synchronise the app with i-Companion xl.

133
EN
133
EN
Must the Bluetooth on my phone by constantly activated?
Bluetooth must be activated in order to synchronise the app with i-Companion xl.
Must the Bluetooth on my phone by constantly activated?
Bluetooth must be activated in order to synchronise the app with i-Companion xl.
USE IN UNCONNECTED MODE
Pastries (list of sub-programs) Soups (list of sub-programs)
Stews (list of sub-programs) Steamed dishes (list of sub-
programs)
USING THE CONTROL PANEL (B)
Selecting an automatic program:
Powering up your appliance
Your appliance has an on/off switch marked 0/1. Switch it to 1.
The LCD screen will display all the settings as ‘0’. (See Fig. 9).
In unconnected mode, the i-Companion xl LCD screen is white.
AUTOMATIC PROGRAM MODE
1- Press the program you wish
to use (B4). A bright dot will
appear above the program you
have selected. Each time you
press again, the various sub-
programs will be shown, one
after the other.
2- The pre-programed settings
can be modified for the time
of a recipe (depending on the
chosen recipe, ingredients and
quantities prepared). Press the
cooking temperature selector
(B2) or the time selector
(B3): the chosen setting will
flash on the screen (C6-C7).
3- Adjust the setting(s) using
the +/- selector (B6).
4- When you have finished
modifying all your settings,
press the “start” button (B5)
to start the program. When
your appliance is using cooking
mode, the red indicator light
(B3) lights up to inform you
that cooking has started.
5- When the program has ended, the appliance
sounds 3 beeps.
6- At the end of the soups, P2 and P3 slow cook
and steam cooking programs, the appliance
will automatically switch to keep-warm mode
for 45 minutes to keep your meal hot until it
is ready to serve. On slow cook programs P2
and P3 and in manual mode, the appliance’s
motor operates at a specific speed, to keep
the food in good condition and prevent it
from sticking to the bottom of the bowl. To
stop the keep-warm mode, just press the ‘stop’
button (B5). The keep-warm mode will stop
automatically if you open the lid, press the
triggers (D2) or remove the bowl.

134
EN
134
EN
Some recipes may cause unexpected overflow due to the formation of bubbles, particularly when
using frozen vegetables. In this case, you should reduce the volumes accordingly.
DISCOVER THE AUTOMATIC PROGRAMS AVAILABLE:
Soup P1 Soup P2 Stew P1 Stew P2 Stew P3
Automatic
programs
«Default»
speed
(adjustable)
10 pulses and
S12 for 2 min
S7 to S10 for
30 s
Speed 3 Speed 1 Speed 2
«Default»
temperature
(adjustable)
100°C
(90°C
to 100°C)
100°C
(90°C
to 100°C)
130°C
(non-
adjustable)
95°C
(80°C
to 100°C)
95°C
(80°C
to 100°C)
Time
speed
(adjustable)
40 min
(20min
to 60 min)
45 min
(20 min
to 60 min)
5 min
(2 min
to 15 min)
45 min
(10 min
to 2hr)
20 min
(10 min
to 2hr)
Keep warm ‘default
function’ at the end
of the program
45 min 45 min 45 min 45 min
Motor speed at
keep-warm level
5s ON
at Speed 3
/ 20s OFF
10s ON
at Speed 3
/ 10s OFF
At the end of kneading in the pastry programs
P1 and P2, the appliance changes to “dough
rising” mode at 30°C for 40 minutes for your
dough to prove. If you open the lid, press the
locks (D2) or remove the bowl, the appliance
changes to pause mode and you have the
possibility of restarting it by pressing “start”
again.
If you wish to stop this mode, press and hold
the “stop” button for 2 seconds.
7- Press the locks (D2) and then remove the
bowl assembly (D) (See Fig. 12).
In connected mode, after the automatic program
has started, you can stop the appliance at any
time by pressing the ‘stop’ button. The automatic
program is then in pause mode, you have the
possibility of restarting by pressing the “start”
button again. If you have chosen the wrong
program and if you want to cancel it, press and
hold the “stop” button for 2 seconds.

135
EN
135
EN
Steam cooking time (for fresh ingredients)
Ingredients Quantities (max) Estimated cooking times
Recommended steam
program
Courgettes (sliced) 800 g 20 min P1
Parsnips (sliced or cubed)
800 g 25 min P1
White part of the leek 800 g 25 min P1
Broccoli (florets) 500 g 20 min P1
Fish (thick fillets or
steaks)
600 g
(with baking parchment)
15 min P1
Potatoes (small whole new)
1 kg 30 min P2
Carrots (sliced) 1 kg 30 min P2
Green beans 800 g 30 min P2
White meat (chicken
breast fillets)
600 g
(with baking parchment)
20 min P2
Some recipes may cause the water to overflow due to the formation of bubbles, particularly when
using frozen vegetables. In this case, you need to reduce the volumes accordingly.
Steamed
dishes P1
Steamed
dishes P2
Pastry P1 Pastry P2 Pastry P3
Automatic
programs
«Default»
speed
(adjustable)
S5 for
2 min 30 s
S5 for 1 min 30 s
then S6 for 2 min
S3 for 40 s then S9
for 3 min
«Default»
temperature
(adjustable)
100°C
(non-
adjustable)
100°C
(non-
adjustable)
Time
speed
(adjustable)
30 min
(1 min
to 60 min)
35 min
(1 min
to 60 min)
2 min 30 sec
(30 sec to
2 min 30sec)
3 min 30 sec
(30 sec to
3 min 30 sec)
3 min 40 sec
(1 min 40 sec
to 3 min 40 sec)
Keep warm ‘default
function’ at the end
of the program
45 min 45 min
Motor speed at
keep-warm level
“Default” dough rising
mode at 30°C at the end
of the program
40 min 40 min
USING THE INTERNAL STEAM BASKET
Cooking times are for information purposes
only; in most cases the food will be properly
cooked.
However, certain conditions may affect the
cooking time:
- size of the vegetables (cut or uncut)
- quantity of ingredients in the basket
- type of vegetables, their ripeness
- quantity of water in the bowl, which corre-
sponds to the measurement (0.7l).
Remember to use the steam cap with “maxi”
(a) facing towards you.
If the food is not properly cooked, you can set
an additional cooking time.

136
EN
136
EN
• The appliance should not be immersed. Never
put the motor unit (A) under running water.
Once you have finished using it, disconnect
the appliance.
• Clean the bowl immediately after use to avoid
staining.
• Press the locks (D2) then lift the bowl
assembly (D).
• Place the bowl on a flat surface.
• Unlock the lid by rotating one quarter of a turn
clockwise. Carefully remove the lid.
• Take care with the knives of the ultrablade
knife (F1) and the kneading / grinding knife
(F4) when you are cleaning them and when
you empty the bowl, they are extremely sharp.
• When the parts have cooled down:
- dismantle the common spindle (D3), the seal
(D4) and the locking ring (D6) (See Fig. 13).
- clean the bowl (D), the common spindle
(D3), the seal (D4), the locking ring (D6),
the accessories (F1), (F2), (F3), (F4), (F5),
the steam regulator cap (E1), the lid (E2),
the seal (E3) ,and lid seal (E4) using a
sponge and some soapy water.
• Rinse these different parts under running water.
• For baked-on food, let the bowl soak for several
hours in water and dishwashing detergent and
scrape, if necessary, with a spatula (G) or with
the abrasive side of a sponge.
• If there is a build up of limescale in the bowl,
use a damp sponge and, if necessary, white
vinegar.
• To clean the motor unit (A), use a damp cloth.
Dry carefully.
CLEANING YOUR APPLIANCE
MANUAL MODE
1- Press directly on the button
for the setting you want
to adjust, i.e. the speed
selector (B1) or the cooking
temperature selector (B2) or
the time selector (B3), the
chosen parameter flashes
on the screen (C5-C6-C7).
2- Then adjust the setting(s)
using the +/- selector (B6).
For safety reasons, it is not
possible to set a temperature
without setting a cooking
time.
3- When you have finished
entering all your settings,
press the “start” button
(B5). When your appliance is
using cooking mode, the red
indicator light, lights up to
inform you that cooking has
started. When the program
has started, you have the
possibility of stopping the
appliance at any time by
pressing the “stop” button
(B5).
The program is then in pause mode and you
have the possibility of restarting by pressing
“start” again. If you have chosen the wrong
program and if you want to cancel it, press and
hold the “stop” button for 2 seconds.
4- When the program has ended, the appliance
sounds 3 beeps.
5- Press the locks (D2) and then remove the
bowl assembly (D) (See Fig. 12).
YOUR APPLIANCE IS EQUIPPED WITH A FLAT-
BASED CAP
The flat-based cap lets you free-up space in the
bowl for cooking or browning without being
hindered by the guide(see Fig. 15).
COOKING WITHOUT THE LID
You can brown foods in your bowl without the lid
while stirring and monitoring the cooking. (See
Fig. 16).
For this method of cooking you must select a
temperature ranging from 135°C to 150°C. Set
the operating time (up to 20 min).
The COOKING WITHOUT A LID mode is not suitable
for making jams and milk-based preparations
(risk of overflowing).

137
EN
137
EN
• To help you with cleaning, the bowl, lid
assembly and accessories are dishwasher safe,
with the exception of the common spindle
(D3 and D4) and its locking ring (D6)
(See Fig. 14).
• The accessories, the detachable common
spindle and the parts of the lid may become
slightly discoloured with certain ingredients
such as curry, carrot juice, etc; this does not
represent any danger for your health or for
the operation of your appliance. To avoid this,
clean these parts immediately after use.
• Before using your bowl set (D), make sure that
the electrical contacts under the bowl are clean
and dry.
• To preserve the appearance and service life of
the lid of your appliance, hand wash it. Do not
use the abrasive side of the sponge to avoid
scratches.
• To not adversely affect the materials of the
bowl (D), ensure that you follow your dishwas-
her’s instructions for use, do not increase doses
of salt or dishwasher products.
Your appliance is equipped,
as standard, with electronic
motor protection to gua-
rantee its longevity. This
electronic security safe-
guards against incorrect
use; in this way, the motor
is properly protected.
In cases of extreme use which disregard the
recommendations in the instructions (see para-
graph ‘FIRST USE’: potentially excessively large
quantities and/or abnormally long use and/or
preparing different recipes at short intervals),
the electronic protection will be triggered to pre-
serve the motor; in this case, the appliance will
stop functioning and the message ‘SECU’ will be
displayed on the LCD screen of the control panel
to indicate that the appliance is temporarily out
of service.
If ‘SECU’ is displayed on the control panel and
your appliance stops working, proceed accor-
dingly:
• Leave your appliance plugged in, do not press
the ‘0/1’ switch (H).
• Please refer to the recommendations in the
instructions and readapt your use of the ap-
pliance (see paragraph ‘FIRST USE’: amount of
ingredients/recipe preparation time/tempera-
ture/type of accessories).
• Allow the motor to cool down for half an hour.
• Restart the appliance by clicking on the ‘Start /
Stop/Reset’ button for two seconds (B5).
Your appliance is now ready to be used again.
For further information, customer service de-
partment is at your disposal (see details in the
guarantee booklet).
IMPORTANT - ‘MAKING YOUR APPLIANCE SECURE’ INSTRUCTIONS ( ‘SECU’ )

138
EN
138
EN
IMPORTANT - ‘MAKING YOUR APPLIANCE SECURE’ INSTRUCTIONS ( ‘SECU’ )
WHAT TO DO IF YOUR APPLIANCE DOES NOT WORK
PROBLEMS CAUSES SOLUTIONS
Problems when steam
cooking.
The steam regulator cap is not properly
attached.
Set the steam cap to ‘high steam’ (turn
towards you); this setting allows a
maximum amount of steam to build up in
the bowl for all types of steam cooking
(soups, etc.), so there will be more steam
in the bowl and the cooking process will
be more efficient.
The ‘low steam’ position allows a maximum
amount of heat and steam to be dispersed
into the bowl for all steam cooking
(soups, etc.). This position also helps to
avoid splashing during cooking.
The ‘high steam’ position allows a
maximum amount of condensation to
escape and results in dishes or sauces
with a better consistency (risotto, cream
desserts, sauces, etc.).
Insufficient cooking time
Cooking times are for information purposes only;
in most cases it ensures that the food is properly
cooked.
However, certain conditions may affect the
cooking time:
- size of the vegetables (cut or uncut)
- quantity of ingredients in the basket
- type of vegetables, their ripeness
- quantity of water in the bowl, which
corresponds to the measurement (0.7l).
If the food is not properly cooked, you can set an
additional cooking time.
You can also use the manual mode by selecting
a temperature of 130°C and the cooking
time according to the quantity and type of
ingredients.
The appliance does not
work.
It is not plugged in.
Plug the appliance into an electrical
socket.
The switch (H) is in position 0. Move the switch to position 1.
The bowl or the lid are not correctly
positioned or locked.
Check that the bowl or the lid are correc-
tly positioned and locked according to the
diagrams in the instruction manual.
Excessive vibration.
The appliance is not positioned on a
flat surface, the appliance is not stable.
Place the appliance on a flat surface.
Volume of ingredients too high.
Reduce the quantity of ingredients pro-
cessed.
Accessory error.
Check that you are using the recom-
mended accessory.

139
EN
139
EN
PROBLEMS CAUSES SOLUTIONS
Leak through lid.
Volume of ingredients too high.
Reduce the quantity of ingredients
processed.
The lid is incorrectly positioned or locked. Lock the lid correctly on the bowl.
The lid seal is not present. Position the seal on the lid.
The seal is cut or damaged.
Change the seal, contact an approved
service centre.
Accessory error.
Check that you are using the recom-
mended accessory.
Leak through the bowl
spindle or by the XL bot-
tom accessory.
The bowl seal is not correctly positioned. Position the seal correctly.
The bowl seal is damaged. Contact an approved service centre.
The locking ring (D6) is not locked correctly. Lock the ring correctly (D6).
The blades do not rotate
easily.
Pieces of food that are too big or too
hard are blocking it from rotating.
Reduce the size or quantity of the
ingredients processed. Add some liquid.
Smell from motor.
On using the appliance for the first time, or
in the event of overload of the motor caused
by too large a quantity of ingredients or by
pieces that are too hard or too big.
Allow the motor to cool down (about
30 minutes) and reduce the number of
ingredients in the bowl.
“STOP” is displayed.
The appliance has detected too many
vibrations and has changed to the safety
mode.
Check that you are using the right speed
and that you are using the recommended
accessory.
“SECU” is displayed.
Motor overload caused by too many in-
gredients or pieces which are too hard or
too large or overuse without sufficient
cooling down time.
Allow the motor to cool down (about
30 minutes) and reduce the number of
ingredients in the bowl.
“SECU” is displayed + red
indicator light is flashing.
Overheating of temperature sensors. Contact an approved service centre.
“Err1” is displayed.
+ red indicator light is
flashing.
The heating element is not working.
Check that the power pins under the bowl
are not clogged with food. If this is the
case, clean them and try again.
If that still does not work, contact an
approved service centre.
“Err2” is displayed. Electronic fault. Contact an approved service centre.
“Err3” is displayed. Speed fault. Contact an approved service centre.
“Err4” is displayed.
Communication fault with chopper
electronic card.
Contact an approved service centre.
Displays «Err8» Default security sensor lock. Contact an approved service centre.
“ntc1” is displayed.
+ red indicator light is
flashing.
Temperature sensor 1 is no longer
working.
Contact an approved service centre.
“ntc2” is displayed.
+ red indicator light is
flashing.
Temperature sensor 2 is no longer
working.
Contact an approved service centre.

140
EN
140
EN
PROBLEMS CAUSES SOLUTIONS
Safety indicator display
(C4)
Improper locking of the bowl or lid
Prior to operating the appliance, check
that the bowl is properly locked on the
motor unit and that the lid is properly
locked on the bowl. If the problem per-
sists, contact an authorised centre.
The lid is locked on the bowl in the
“cooking without a lid” mode
Unlock the lid prior to launching the
cooking program. If the problem persists,
contact an authorised centre.
The safety lock on the
lid remained active (rod
extended) and prevents
the lid from locking.
The appliance was turned off as a recipe
was in progress by toggling the I/O
switch to the “O” position or was simply
unplugged as a recipe was in progress.
Simply toggle the I/O switch to the “I”
position to reset the food processor,
along with the safety lock on the lid; the
rod will automatically return to its origi-
nal position. You may now lock the lid.
Connection problem See the app guide
Is your appliance still not working?
Contact an approved service centre (see list in service booklet).
• Elimination of packaging and appliance materials.
The packaging exclusively contains materials that are not dangerous to the environment,
which can be disposed of in accordance with the recycling regulations in force.
To dispose of your appliance, ask the appropriate department of your local authority.
• End-of-life electronic or electrical appliances:
Environmental protection first!
Your appliance contains numerous materials that can be recovered or recycled.
Take it to a collection point for processing.
RECYCLING
- *The Bluetooth
®
brand and logos are registered brands of Bluetooth SIG, Inc. and their use by the SEB Group has been officially authorised.
- Google Play and Android are Google Inc. brands.
- Apple and the Apple logo are Apple Inc. brands, registered in the USA and other countries. App Store is an Apple Inc. service mark.
GLOSSARY
Pairing: grouping or associating two devices.
This is carried out when your smartphone or tablet first connects with i-Companion xl.
Synchronising: updating of information. The app and i-Companion xl synchronise with each other to exchange information when
they are connected.
Connecting: establishing a link between the app (smartphone/tablet) and the appliance (i-Companion xl). Connecting is vital
for synchronisation.
Cookies: usage information sent to Moulinex to improve the app.

ARGENTINA 0800-122-2732
2 años
2 years
GROUPE SEB ARGENTINA S.A.
Billinghurst 1833 3°
C1425DTK
Capital Federal Buenos Aires
ՀԱՅԱՍՏԱՆ
ARMENIA
010 55-76-07 2 տարի 2 years
«SEB Ուկրանիա խումբ» ընկերություն
Խարկովի խճուղի, 201-203, 3-րդ հարկ
Կիեվ, 02121 Ուկրաինա
2 տարի
AUSTRALIA
1300307824 1 year
Groupe SEB Australia
PO Box 404
North Ryde, NSW, 1670
ÖSTERREICH
AUSTRIA
01 890 3476
2 Jahre
2 years
GROUPE SEB DEUTSCHLAND GmbH
Theodor-Stern-Kai 1
60596 Frankfurt
نيرحبلا
BAHRAIN
17291537 1 year
www.moulinex-me.com
БЕЛАРУСЬ
BELARUS
017 2239290
2 years
BELGIQUE BELGIE
BELGIUM
070 23 31 59
2 ans
2 jaar
2 years
GROUPE SEB BELGIUM SA NV
25 avenue de l'Espérance - ZI
6220 Fleurus
BOSNA I HERCEGOVINA
033 551 220
2 godine
2 years
SEB Developpement
BRASIL
BRAZIL
11 2915-4400
1 ano
1 year
Seb Comercial gAv Jornalista Roberto Marinho, 85, 19º andar
БЪЛГАРИЯ
BULGARIA
0700 10 330
2 years
CANADA
1-800-418-3325
1 an
1 year
Groupe SEB Canada Inc.
36 Newmill Gate, Unit 2
Scarborough, ON M1V 0E2
CHILE 02 2 884 46 06
2 años
2 years
GROUPE SEB CHILE Comercial Ltda Av. Providencia,
2331, piso 5, oficina 501 Santiago
COLOMBIA
018000520022
2 años
2 years
GROUPE SEB COLOMBIA
Apartado Aereo 172, Kilometro 1
Via Zipaquira, Cajica Cundinamarca
HRVATSKA
CROATIA
01 30 15 294
2 godine
2 years
SEB mku & p d.o.o.
Sarajevska 29, 10000 Zagreb
ČESKÁ REPUBLIKA
CZECH REPUBLIC
731 010 111
2 roky
2 years
Futurama Business Park (budova A)
Sokolovská 651/136a
186 00 Praha 8
DANMARK
DENMARK
44 66 31 55
2 år
2 years
GROUPE SEB NORDIC AS
Tempovej 27 2750 Ballerup
رصم
EGYPT
16622
1year
:
:
EESTI
ESTONIA
668 1286
2 aastat
2 years
Groupe SEB Polska Sp. z o.o.
ul. Inflancka 4C
00-189 Warsaw
SUOMI
FINLAND
09 8946 150
2 vuotta
2 years
Groupe SEB Finland OY
Pakkalankuja 6 01510 Vantaa
FRANCE Continentale +
Guadeloupe, Martinique,
Réunion, St-Martin
09 74 50 10 14
2 ans
2 years
GROUPE SEB France
Service Consommateur Moulinex
112 Ch. Moulin Carron, TSA 92002
69134 ECULLY Cedex
MOULINEX INTERNATIONAL GUARANTEE: COUNTRY LIST
SMALL HOUSEHOLD APPLIANCES
www.moulinex.com
DEUTSCHLAND
GERMANY
0212 387 400
2 Jahre
2 years
GROUPE SEB DEUTSCHLAND GmbH
Theodor-Stern-Kai 1
60596 Frankfurt
ELLADA
GREECE
2106371251
2 χρόνια
2 years
SEB GROUPE ΕΛΛΑΔΟΣ Α.Ε.
Καβαλιεράτου 7
Τ.Κ. 145 64 Κ. Κηφισιά
香港
HONG KONG
8130 8998 1 year
SEB ASIA Ltd.
9/F, South Block, Skyway House
3 Sham Mong Road, Tai Kok Tsui, Kowloon Hong-Kong
MAGYARORSZÁG
HUNGARY
06 1 801 8434
2 év
2 years
GROUPE SEB CENTRAL-EUROPE Kft.
2040 Budaörs, Puskás Tivadar út 14
INDONESIA +62 21 5793 7007 1 year
GROUPE SEB INDONESIA (Representative office)
Sudirman Plaza, Plaza Marein 8th Floor
JL Jendral Sudirman Kav 76-78,
Jakarta 12910, Indonesia
ITALIA
ITALY
1 99 207 892
2 anni
2 years
GROUPE SEB ITALIA S.p.A.
Via Montefeltro, 4
20156 Milano
日本
JAPAN
0570-077772
1年
1 year
株式会社グループセブジャパン
〒144-0042
東京都大田区羽田旭町11-1
羽田クロノゲート事務棟5F
JORDAN
4629700 1 year
www.moulinex-me.com
KAZAKHSTAN
727 378 39 39
2 жыл
2 years
ЖАҚ «Группа СЕБ- Восток»
125171, Мәскеу, Ленинградское шоссесі,16А, 3 үйі
한국어
KOREA
080-733-7878 1 year
(유)그룹 세브 코리아 서울특별시 종로구 종로1길 50,
더케이트윈타워 B동 14층 03142
KUWAIT
24834787 1 year
www.moulinex-me.com
LATVJA
LATVIA
6 616 3403
2 gadi
2 years
Groupe SEB Polska Sp. z o.o.
Gdański Business Center II D
ul. Inflancka 4C
00-189 Warsaw
LEBANON
1364392 Ext: 189-182 1 year
www.moulinex-me.com
LIETUVA
LITHUANIA
5 214 0057
2 metai
2 years
Groupe SEB Polska Sp. z o.o.
Gdański Business Center II D
ul. Inflancka 4C
00-189 Warsaw
LUXEMBOURG
0032 70 23 31 59
2 ans
2 years
GROUPE SEB BELGIUM SA NV
25 avenue de l'Espérance - ZI
6220 Fleurus
MACEDONIA
(02) 20 50 319
2 години
2 years
Груп Себ България ЕООД
бул. България 58 С, ет 9, офис 30
1680 София
MALAYSIA 603 7802 3000 2 years
GROUPE SEB MALAYSIA SDN. BHD
Unit No. 402-403, Level 4, Uptown 2,
No. 2, Jalan SS21/37, Damansara Uptown, 47400, Petaling
Jaya, Selangor D.E Malaysia
MEXICO (55) 52839354
1 año
1 year
Calle Boulevard Miguel de Cervantes Saavedra Número 169,
en la Colonia Ampliación Granada, Ciudad de México (antes
Distrito Federal), C.P. 11520
MOLDOVA
22 224035
2 роки
2 years
ТОВ «Груп СЕБ Україна»
02121, Харьківське шосе, 201-203, 3 поверх, Київ, Україна

NEDERLAND
The Netherlands
0318 58 24 24
2 jaar
2 years
GROUPE SEB NEDERLAND B.V.
De Schutterij 27
3905 PK Veenendaal
NEW ZEALAND
0800 700 711 1 year
GROUPE SEB NEW ZEALAND
PO Box 17 – 298, Greenlane, 1546 Auckland New Zealand
NORGE
NORWAY
22 96 39 30
2 år
2 years
GROUPE SEB NORWAY AS
Lilleakerveien 6d, plan 5 0283, Oslo
OMAN
80075000 1 year
www.moulinex-me.com
POLSKA
POLAND
801 300 420
koszt jak za połączenie
lokalne
2 lata
2 years
Groupe SEB Polska Sp. z o.o.
Gdański Business Center II D
ul. Inflancka 4C
00-189 Warsaw
PORTUGAL 808 284 735
2 anos
2 years
GROUPE SEB IBÉRICA SA
Urb. da Matinha
Rua Projectada à Rua 3
Bloco1 - 3° B/D 1950 - 327 Lisboa
QATAR
44600002 1 year
www.moulinex-me.com
REPUBLIC OF IRELAND 01 677 4003
2 years
GROUPE SEB IRELAND
Unit B3 Aerodrome Business Park, College Road, Rathcoole,
Co. Dublin
ROMANIA
0 21 316 87 84
2 ani
2 years
GROUPE SEB ROMÂNIA
Str. Ermil Pangratti nr. 13
011881 Bucureşti
RUSSIA
495 213 32 29
2 года
2 years
ЗАО «Группа СЕБ-Восток»,
125171, Москва, Ленинградское шоссе, д. 16А, стр. 3
SAUDI ARABIA
920023701 2 years
www.moulinex-me.com
SRBIJA
SERBIA
060 0 732 000
2 godine
2 years
SEB Developpement
Đorđa Stanojevića 11b
11070 Novi Beograd
SINGAPORE 6550 8900 2 years
GROUPE SEB (Singapore) Pte. Ltd.
3A International Business Park
#12-04/05, ICON@IBP
Singapore 609935
SLOVENSKO
SLOVAKIA
232 199 930
2 roky
2 years
GROUPE SEB Slovensko, spol. s r.o.
Cesta na Senec 2/A
821 04 Bratislava
SLOVENIJA
SLOVENIA
02 234 94 90
2 leti
2 years
GROUPE SEB Slovensko, spol. s r.o.
Cesta na Senec 2/A
821 04 Bratislava
ESPAÑA
SPAIN
933 06 37 58
2 años
2 years
GROUPE SEB IBÉRICA S.A.
C/ Almogàvers, 119-123, Complejo Ecourban, 08018
Barcelona
SVERIGE
SWEDEN
08 629 25 00
2 år
2 years
Tefal Sverige, Löfströms allé 5, 172 66 Sundbyberg
SUISSE SCHWEIZ
SWITZERLAND
044 837 18 40
2 ans
2 Jahre
2 years
GROUPE SEB SCHWEIZ GmbH
Thurgauerstrasse 105
8152 Glattpark
ประเทศไทย
THAILAND
02 765 6565 2 years
GROUPE SEB THAILAND
2034/66 Italthai Tower, 14th Floor, n° 14-02,
New Phetchburi Road,
Bangkapi, Huaykwang, Bangkok, 10320
TÜRKIYE
TURKEY
444 40 50
2 YIL
2 years
GROUPE SEB ISTANBUL AS
Dereboyu Cd. Bilim Sk. Sun Plaza No:5 K:2 Maslak 34398
Istanbul
UAE
8002272 1 Year
www.moulinex-me.com
UKRAINE
044 300 13 04
2 роки
2 years
ТОВ «Груп СЕБ Україна»
02121, Харківське шосе, 201-203, 3 поверх, Київ, Україна
UNITED KINGDOM 0345 602 1454
2 years
GROUPE SEB UK LTD
Riverside House, Riverside Walk
Windsor, Berkshire, SL4 1NA
U.S.A. 800-395-8325 1 year
GROUPE SEB USA
2121 Eden Road Millville, NJ 08332
VIETNAM
1800-555521
1 năm
1 year
Vietnam Fan Joint Stock Company
25 Nguyen Thi Nho Str, Ward 9, Tan Binh Dist, HCM city
www.moulinex.com
10/04/2018
MOULINEX INTERNATIONAL GUARANTEE
Date of purchase / Date d’achat / Fecha de compra / Købsdato / Ostopäivä / Kjøpsdato / Inköpsdatum / Ostukuupäev / Pirkuma datums / Įsigijimo data / Data
zakupu / Datum izročitve blaga / Datum kupovine / Vásárlás dátuma / Data achiziţiei / Дата на закупуване / Дата продажу / Վաճառքի օր. / Дата продажи /
Сатылған күні / 購入日 /
/ 구입일자 / Датум на купување :
Product reference / Référence produit / Referencia del producto / Referencenummer / Tuotenumero / Artikkelnummer /Produktreferens / Toote viitenumber /
Produkta atsauces numurs / Gaminio numeris / Referencja produktu / Oznaka proizvoda / Tip aparata / Készülék típusa / Cod produs / Модел / Модель /
Մոդել. / Модель / Үлгісі / 製品リファレンス番号 /
/ 제품명 / Податоци за производот:
Retailer name and address / Nom et adresse du revendeur / Nombre y dirección del minorista / Forhandler navn & adresse / Jälleenmyyjän nimi ja osoite /
Forhandler navn og adresse / Återförsäljarens namn och adress / Müüja kauplus ja aadress / Veikala nosaukums un adrese / Parduotuvės pavadinimas ir adresas /
Nazwa i adres sprzedawcy / Naziv i adresa prodajnog mjesta / Naziv in naslov trgovine / Forgalmazó neve és címe / Numele şi adresa vânzătorului / Търговки
обект / Назва та адреса продавця / Կազմակերպության անվանում և հասցե. / Название и адрес продавца / Сатушының атауы мен мекен-жайы /
販売店名、住所 /
/
/ 소매점 이름과 주소 / Име и адреса на продавач :
Distributor stamp / Cachet / Sello del distribuidor / Forhandler stempel / Jälleenmyyjän leima / Forhandler stempel / Återförsäljarens stämpel / Tempel /
Zīmogs / Antspaudas / Pieczęć sprzedawcy / Pečat distributera / Pečat trgovine / Forgalmazó pecsétje / Ştampila vânzătorului / Печат на търговския обект /
Печатка продавця / Կնիք. / Печать продавца / Сатушының мөрі / 販売店印 / /
/ 소매점 직인 / Печат на дистрибутер :

p. 1 - 20
p. 21 - 40
p. 41 - 60
p. 61 - 80
p. 81 - 100
p. 101 - 120
p. 121 - 140
FR
NL
DE
IT
ES
PT
EN
8020002001-03
-
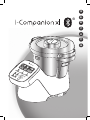 1
1
-
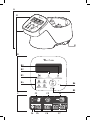 2
2
-
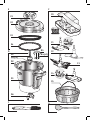 3
3
-
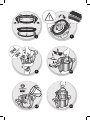 4
4
-
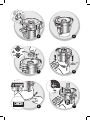 5
5
-
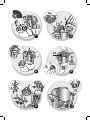 6
6
-
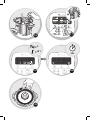 7
7
-
 8
8
-
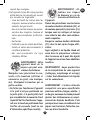 9
9
-
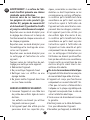 10
10
-
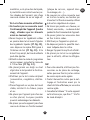 11
11
-
 12
12
-
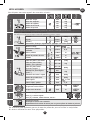 13
13
-
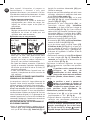 14
14
-
 15
15
-
 16
16
-
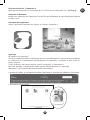 17
17
-
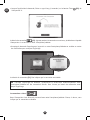 18
18
-
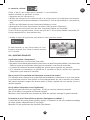 19
19
-
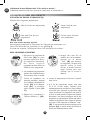 20
20
-
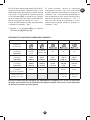 21
21
-
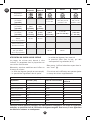 22
22
-
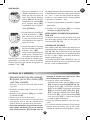 23
23
-
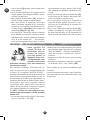 24
24
-
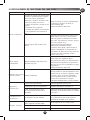 25
25
-
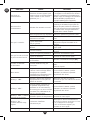 26
26
-
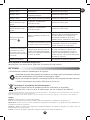 27
27
-
 28
28
-
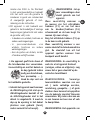 29
29
-
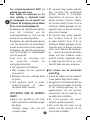 30
30
-
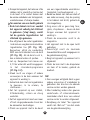 31
31
-
 32
32
-
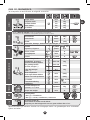 33
33
-
 34
34
-
 35
35
-
 36
36
-
 37
37
-
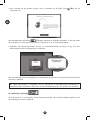 38
38
-
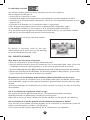 39
39
-
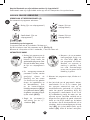 40
40
-
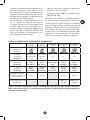 41
41
-
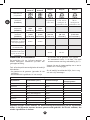 42
42
-
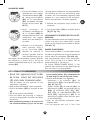 43
43
-
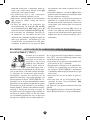 44
44
-
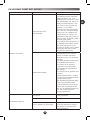 45
45
-
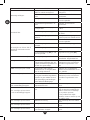 46
46
-
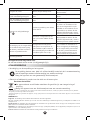 47
47
-
 48
48
-
 49
49
-
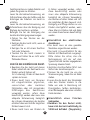 50
50
-
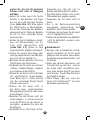 51
51
-
 52
52
-
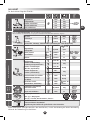 53
53
-
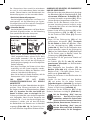 54
54
-
 55
55
-
 56
56
-
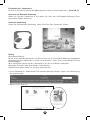 57
57
-
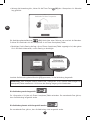 58
58
-
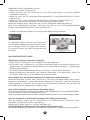 59
59
-
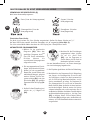 60
60
-
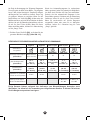 61
61
-
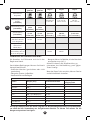 62
62
-
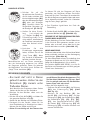 63
63
-
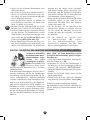 64
64
-
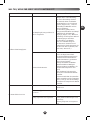 65
65
-
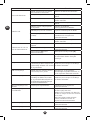 66
66
-
 67
67
-
 68
68
-
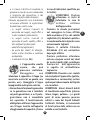 69
69
-
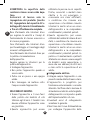 70
70
-
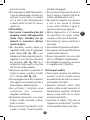 71
71
-
 72
72
-
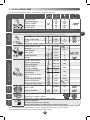 73
73
-
 74
74
-
 75
75
-
 76
76
-
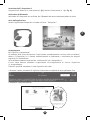 77
77
-
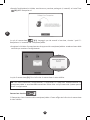 78
78
-
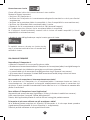 79
79
-
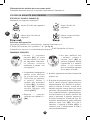 80
80
-
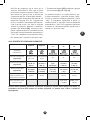 81
81
-
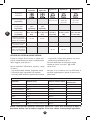 82
82
-
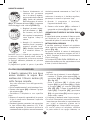 83
83
-
 84
84
-
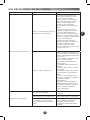 85
85
-
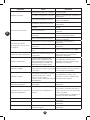 86
86
-
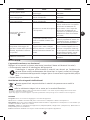 87
87
-
 88
88
-
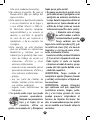 89
89
-
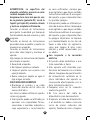 90
90
-
 91
91
-
 92
92
-
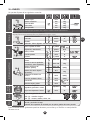 93
93
-
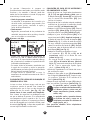 94
94
-
 95
95
-
 96
96
-
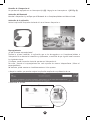 97
97
-
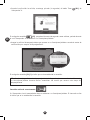 98
98
-
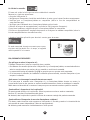 99
99
-
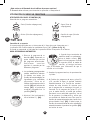 100
100
-
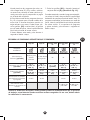 101
101
-
 102
102
-
 103
103
-
 104
104
-
 105
105
-
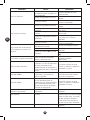 106
106
-
 107
107
-
 108
108
-
 109
109
-
 110
110
-
 111
111
-
 112
112
-
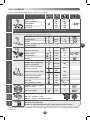 113
113
-
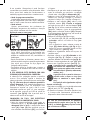 114
114
-
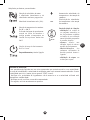 115
115
-
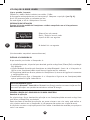 116
116
-
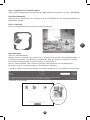 117
117
-
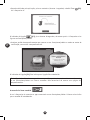 118
118
-
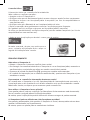 119
119
-
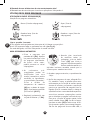 120
120
-
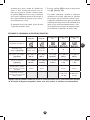 121
121
-
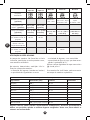 122
122
-
 123
123
-
 124
124
-
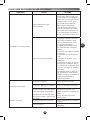 125
125
-
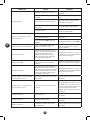 126
126
-
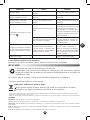 127
127
-
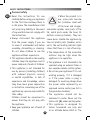 128
128
-
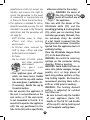 129
129
-
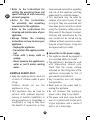 130
130
-
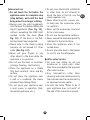 131
131
-
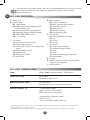 132
132
-
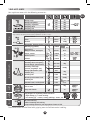 133
133
-
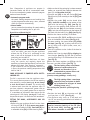 134
134
-
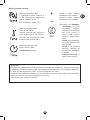 135
135
-
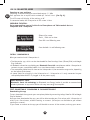 136
136
-
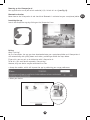 137
137
-
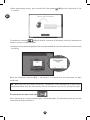 138
138
-
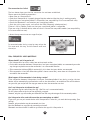 139
139
-
 140
140
-
 141
141
-
 142
142
-
 143
143
-
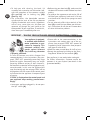 144
144
-
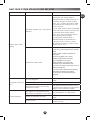 145
145
-
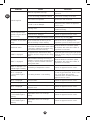 146
146
-
 147
147
-
 148
148
-
 149
149
-
 150
150
-
 151
151
-
 152
152


Moulinex I-COMPAGNON XL YY4270 de handleiding
- Type
- de handleiding
- Deze handleiding is ook geschikt voor
in andere talen
- italiano: Moulinex I-COMPAGNON XL YY4270 Manuale del proprietario
- français: Moulinex I-COMPAGNON XL YY4270 Le manuel du propriétaire
- español: Moulinex I-COMPAGNON XL YY4270 El manual del propietario
- Deutsch: Moulinex I-COMPAGNON XL YY4270 Bedienungsanleitung
- português: Moulinex I-COMPAGNON XL YY4270 Manual do proprietário
Gerelateerde papieren
-
Moulinex COMPANION XL YY4525FG de handleiding
-
-
Moulinex HF934510 Handleiding
-
-
-
-
-
-
-