
FR
NL
EN
DE
IT
PT
ES
i-companion touch xlXL
RU
FR - Selon modèle
NL - Afhankelijk van het model
EN - Depending on model
DE - Je nach Modell
IT - A seconda del modello
PT - Consoante o modelo
ES - Dependiendo del modelo
RU - ʼnŮŧũůŸůųŵŸŹůŵŹųŵūŬŲů

A
B
G
B
B1
B2
B5
B4
B6
B3
* *
* *
FR
- * Icones visibles seulement lorsqu’ils vous seront utiles pour l’utilisation de votre appareil.
NL
- * Iconen zijn alleen zichtbaar wanneer ze van belang zijn voor het gebruik van uw apparaat.
EN
- * Icons are visible only when they are useful for operating your appliance.
DE
- * Symbole sind nur sichtbar, wenn sie Ihnen bei der Verwendung Ihres Geräts nützlich sein
werden.
IT
- * Icone visibili solo quando servono per l’uso dell’apparecchio.
PT
- * Ícones apenas visíveis quando úteis para a utilização do aparelho.
ES
- * Los iconos son visibles solo cuando resulten útiles para el uso de su aparato.
RU
-
Значки * отображаются только в том случае, если они необходимы для работы с прибором.
E
F
E1
E2
E3
E4
E0
E5
C3
C2
C1
C5
C*
H
C4
D3
D2
D1
D*
D4
FR - Selon modèle, NL - Afhankelijk van het model, EN - Depending on model, DE - Je nach Modell, IT - seconda del modello, PT - Consoante o modelo,
ES - Dependiendo del modelo, RU - ʼnŮŧũůŸůųŵŸŹůŵŹųŵūŬŲů

4.2 4.3
4.1
3
2
C3
C4
1
3
22
* *
* *
* *
“clic”
9
8
10.1
5
2
1
a
b
MAX
MIN
7
6
* *
*
* *
FR - Selon modèle, NL - Afhankelijk van het model, EN - Depending on model, DE - Je nach Modell, IT - seconda del modello, PT - Consoante o
modelo, ES - Dependiendo del modelo, RU - ʼnŮŧũůŸůųŵŸŹůŵŹųŵūŬŲů
FR - Selon modèle, NL - Afhankelijk van het model, EN - Depending on model, DE - Je nach Modell, IT - seconda del modello, PT - Consoante o
modelo, ES - Dependiendo del modelo, RU - ʼnŮŧũůŸůųŵŸŹůŵŹųŵūŬŲů

2
1
12
C2
1
13
C3
C4
!! C5
14
11
C3
15
10.2
2
* *
* *
**
**
FR - Selon modèle, NL - Afhankelijk van het model, EN - Depending on model, DE - Je nach Modell, IT - seconda del modello, PT - Consoante o
modelo, ES - Dependiendo del modelo, RU - ʼnŮŧũůŸůųŵŸŹůŵŹųŵūŬŲů
19
1
1
1
1
9
9
9
9
9
9
16 17
FR - Selon modèle, NL - Afhankelijk van het model, EN - Depending on model, DE - Je nach Modell, IT - seconda del modello, PT - Consoante o
modelo, ES - Dependiendo del modelo, RU - В зависимости от модели

1 2
FRFR
Vis-à-vis de la sécurité de la
personne
• Lisez attentivement le mode d’emploi
avant la première utilisation de votre
appareil et conservez-le : une utilisation
non conforme au mode d’emploi dégagerait
le fabricant de toute responsabilité.
• Toujours déconnecter l’appareil de
l’alimentation si on le laisse sans
surveillance et avant montage, démontage
ou nettoyage. Ne pas laisser les enfants
utiliser l’appareil sans surveillance.
• Cet appareil ne doit pas être utilisé par
les enfants. Conserver l’appareil et son
câble hors de portée des enfants.
• Cet appareil n’est pas prévu pour être
utilisé par des personnes (y compris les
enfants) dont les capacités physiques,
sensorielles ou mentales sont réduites
ou des personnes dénuées d’experience
ou de connaissance, sauf si elles ont
pu bénéficier, par l’intermediaire d’une
personne responsable de leur sécurité,
d’une surveillance ou d’instructions
préalables concernant l’utilisation de
l’appareil. Il convient de surveiller les
enfants pour s’assurer qu’ils ne jouent
pas avec l’appareil.
• Maintenez votre appareil hors de portée
des enfants.
• Lors de l’utilisation de
l’appareil, certaines pièces
a t t e i g n e n t d e s
températures élevées
(paroi inox du bol et du bouchon,
entraîneur commun amovible, parties
transparentes du couvercle, pièces
métalliques sous le bol, panier). Elles
peuvent occasionner des brûlures.
Manipulez l’appareil par les pièces
plastiques froides (poignées, bloc
moteur).
• La température des surfaces accessibles
peut être élevée lorsque l’appareil est en
fonctionnement.
• L’ appareil n’est pas destiné à être
mis en fonctionnement au moyen d’une
minuterie extérieure ou par un système
de commande à distance séparé.
• N’utilisez pas votre appareil s’il ne
fonctionne pas correctement, s’il a été
endommagé ou si le câble d’alimentation
ou la prise sont endommagés. Afin d’éviter
tout danger, faites obligatoirement
remplacer le cordon par un centre service
agréé (voir liste dans le livret service).
• L’appareil ne doit pas être immergé.
Ne passez pas le bloc moteur (A) sous
l’eau courante.
• Cet appareil est exclusivement destiné
à un usage domestique à l’intérieur de
la maison et à une altitude inférieure
à 2000 m. Le fabricant décline toute
responsabilité et se réserve le droit de
résilier la garantie en cas d’utilisation
commerciale ou inadaptée, ou de non
respect des consignes.
CONSIGNES DE SÉCURITÉ :
• Cet appareil n’a pas été conçu pour être
utilisé dans les cas suivants qui ne sont
pas couverts par la garantie :
- zone de travail de cuisine dans
les magasins, bureaux et autres
environnements de type travail.
- des coins cuisine réservés au personnel
dans des magasins, bureaux et autres
environnements professionnels.
- des fermes.
- l’utilisation par les clients des hôtels,
motels et autres environnements à
caractère résidentiel.
- des environnements du type chambres
d’hôtes.
AVERTISSEMENT :
Votre appareil émet
de la vapeur qui peut
occasionner des brûlures.
Manipulez avec précaution le couvercle
et le bouchon (utilisez si nécessaire un
gant, une manique, etc). Manipulez le
bouchon par sa partie centrale.
• Ne faites pas fonctionner l’appareil
si le joint n’est pas positionné sur
le porte joint, si le porte joint n’est
pas assemblé dans le couvercle. Il
est impératif de faire fonctionner
l’appareil avec le bouchon positionné
dans l’orifice du couvercle (sauf
en cas d’information spécifique
recette).
AVERTISSEMENT :
Attention aux risques
de blessure en cas de
mauvaise utilisation de
l’appareil.
Prenez des précautions avec les lames
du couteau hachoir ultrablade (E1)
et du couteau pour pétrir/concasser
(E4) lorsque vous les nettoyez et
lorsque vous videz le bol, elles sont
extrêmement coupantes.
Rangez le couteau hachoir ultrablade
(E1) dans le bol après chaque
utilisation.
Soyez vigilant si un liquide chaud est
versé dans le préparateur culinaire
dans la mesure où il peut être éjecté
de l’appareil en raison d’une ébullition
soudaine.
AVERTISSEMENT : Soyez prudent lors
de la manipulation de votre appareil
(nettoyage, remplissage et versage) :
évitez tout débordement de liquide sur
les connecteurs.
AVERTISSEMENT : Certains aliments
comportant une peau superficielle
(saucisses entières, langue, volaille...)
ou de gros morceaux de viande
peuvent générer des éclaboussures en
emprisonnant des liquides bouillants.
C’est pourquoi nous vous conseillons
de les piquer avant cuisson à l’aide
d’un couteau ou d’une fourchette.

3 4
FRFR
AVERTISSEMENT : La surface de
l’élément chauffant présente une
chaleur résiduelle après utilisation.
Assurez vous de ne toucher que les
poignées de votre produit (gâchettes
C2, poignée du couvercle D2 et du
bouchon D1) pendant la chauffe et
jusqu’au refroidissement complet.
Reportez-vous au mode d’emploi pour
le réglage des vitesses et le temps de
fonctionnement de chaque accessoire et
de chaque programme.
Reportez-vous au mode d’emploi
pour l’assemblage et le montage des
accessoires sur l’appareil.
Reportez-vous au mode d’emploi pour
le nettoyage et l’entretien de votre
appareil.
Toujours suivre les instructions de
nettoyage pour nettoyer votre appareil:
• Débranchez l’appareil.
• Ne pas nettoyer l’appareil chaud.
• Nettoyez avec un chiffon ou une
éponge humide.
• Ne jamais mettre l’appareil dans l’eau
ou sous l’eau courante.
MARCHES EUROPEENS SEULEMENT :
• Conservez l’appareil et son câble hors
de portée des enfants âgés de moins
de 8 ans. Les enfants ne doivent pas
utiliser l’appareil comme un jouet.
• Cet appareil peut être utilisé par
des personnes dont les capacités
physiques, sensorielles ou mentales
sont réduites ou dont l’expérience
ou les connaissances ne sont pas
suffisantes, à condition qu’ils
bénéficient d’une surveillance ou qu’ils
aient reçu des instructions quant à
l’utilisation de l’appareil en toute
sécurité et en comprennent bien les
dangers potentiels.
• Cet appareil peut être utilisé par
des enfants âgés d’au moins 8 ans,
à condition qu’ils bénéficient d’une
surveillance ou qu’ils aient reçu des
instructions quant à l’utilisation
de l’appareil en toute sécurité et
qu’ils comprennent bien les dangers
encourus. Le nettoyage et l’entretien
par l’utilisateur ne doivent pas
être effectués par des enfants sans
surveillance, à moins qu’ils ne soient
âgés de plus de 8 ans et qu’ils soient
sous la surveillance d’un adulte.
Vis-à-vis du raccordement électrique
• L’appareil doit être branché sur une
prise de courant électrique reliée à la
terre.
• L’appareil est conçu pour fonctionner
uniquement en courant alternatif.
Vérifiez que la tension d’alimentation
indiquée sur la plaque signalétique de
l’appareil corresponde bien à celle de
votre installation électrique.
• Toute erreur de branchement annule
la garantie.
• Ne tirez jamais sur le câble
d’alimentation pour débrancher
l’appareil.
• Ne mettez pas l’appareil, le câble
d’alimentation, ou la prise dans du liquide,
à proximité ou en contact avec les parties
chaudes de l’appareil, près d’une source
de chaleur ou sur un angle vif.
Vis-à-vis d’une mauvaise utilisation
• Ne touchez pas au couvercle avant
l’arrêt complet de l’appareil (touche
stop), attendez que les aliments mixés
ne tournent plus.
• Versez toujours les ingrédients solides
en premier dans le bol avant d’ajouter
des ingrédients liquides (Cf. Fig. 11),
sans dépasser le repère MAX gravé à
l’intérieur du bol (Cf. FIG. 11). Si le
bol est trop rempli, de l’eau bouillante
peut-être éjectée.
• Attention dans le cadre du programme
cuisson vapeur, respectez le niveau de
0.7 litre d’eau (Cf. Fig. 4.2).
• Ne placez jamais vos doigts ou
tout objet dans le bol pendant le
fonctionnement de l’appareil.
• N’utilisez pas le bol comme récipient
(conservation, congélation,
stérilisation).
• Placez l’appareil sur un plan de travail
stable, résistant à la chaleur, propre
et sec.
• Ne placez pas l’appareil près d’un mur
ou d’un placard, la vapeur produite
pouvant endommager les éléments.
• Ne placez pas votre appareil près d’une
source de chaleur en fonctionnement
(plaque de cuisson, appareil électro-
ménager, etc…).
• Ne couvrez pas votre couvercle avec
un torchon ou autre, ne cherchez pas
à boucher l’orifice du couvercle, utilisez
le bouchon régulateur de vapeur.
• Ne laissez pas pendre vos cheveux,
un foulard, une cravate,… au dessus
du bol pendant le fonctionnement de
l’appareil.
• Ne passez jamais les accessoires dans
un four à micro ondes.
• N’utilisez pas l’appareil en plein air.
• Ne dépassez jamais la quantité
maximum indiquée dans la notice.
• Rangez l’appareil lorsqu’il est refroidi.
• Ne placez pas le bol au congélateur
pour le refroidir, utilisez le réfrigérateur.
• Ne placer pas la spatule plus de 20
minute à 150°C dans l’huile.
SAV
• Pour votre sécurité, n’utilisez pas
d’accessoires ou de pièces de rechange,
autres que ceux fournis par les centres
de service après-vente agréés.
• Toute intervention autre que le
nettoyage et l’entretien usuel par le
client doit être effectuée par un centre
service agréé.
• Consultez le tableau “ Si votre appareil
ne fonctionne pas, que faire ? ” à la fin
du mode d’emploi.

5 6
FRFR En parcourant cette notice , vous découvrirez des conseils d’utilisation qui vous feront
entrevoir le potentiel de votre appareil : préparation de soupes, de mijotés, de cuissons
vapeur, de pâtes.
DESCRIPTION DE L’APPAREIL :
A Bloc moteur
B Touches Tactiles*
B1: Annuler
B2 : Balance (selon modèle)
B3 : START/STOP
B4 : Vidéo
B5 : Paramètres
B6 : Ecran tactile
C Ensemble Bol
C1 : Bol inox
C2 : Gâchettes
C3 : Entraineur commun amovible
C4 : Joint d’étanchéité
C5 : Bague de verrouillage entraineur
D Ensemble Couvercle
D1 : Bouchon régulateur de vapeur
D2 : Couvercle
D3 : Porte joint
D4 : Joint d’étanchéité
E Accessoires
E0 : Boîte rangement accessoire
E1 : Couteau hachoir ultrablade
E2 : Mélangeur
E3 : Batteur
E4 : Couteau pour pétrir / Concasser
E5 : Panier vapeur
F Spatule
G Interrupteur 0/I pour couper l’alimentation
électrique de votre appareil
H Brosse de nettoyage
DONNÉES TECHNIQUES DE L’APPAREIL :
Puissance : 1550W (1000W : résistance chauffante / 550W : moteur )
Plage de température : de 30° à 150°C
réglable par pas de 5°C.
Plage de durée de fonctionnement : de 5 secondes à 2 heures
réglable par pas de 5 secondes mini à 1 minute maxi.
Nombre de vitesses : 13 - 2 vitesses intermittentes :
vitesse 1 ( 5s On / 20s Off ).
vitesse 2 ( 10s On / 10s Off ).
- 10 vitesses continues progressives
(vitesses 3 à 12).
- 1 vitesse intermittente max (vitesse 13).
Fréquence : 2412 – 2484 MHz
Puissance maximum transmise : 20 dBm
Mode veille :
L’appareil se met en veille au bout de 15 minutes d’inactivité.
Pour le rallumer, appuyez sur une des touches tactiles
(B1 à B5)
Consommation en mode(s) veille quand le produit
connecté : 0.2 Wh
VOTRE APPAREIL
Vous disposez avec votre appareil des accessoires suivants :
Ces accessoires sont également pourvus de zones de préhension pour en faciliter la manipulation
lors de leur utilisation au cours d’une préparation.
Couteau hachoir
E1 Mixer des soupes
3min 3L
Mixer des compotes 40s 1Kg
Hacher les légumes 15s 0,6Kg
Hacher de la viande 30s 1Kg
Hacher du poisson 15s 1Kg
N’utilisez pas cet accessoire pour hacher des produits durs, utilisez le couteau pétrin/concasseur E4.
Mélangeur
Il mélange les Plats cuisinés sans abimer les ingrédients,
Très utile pour les phases de rissolage en amont des préparations (risottos, soupes).
E2 Rissolés 5min 500g
Mijotés 45min 3L
Risottos 22min 1,5Kg
Ratatouilles, Chutneys, Légumineuses (réglages : voir livret recettes)
Batteur
9 max
E3
Blancs en neige 5/10min 8
max
Mayonnaises, Crèmes
fouettées 2/5min 0,5L
Sauces, Crèmes à 1/20min 1L
Ecrasé de pommes de terre à 1min 1L
Polenta à 1/16min 1L
Couteau pétrin/concasseur
E4
Pétrir les pâtes à pain blanc 2min 30s 1,2Kg
Pétrir les pâtes brisées,
sablées, pains spéciaux 2min 30s 1Kg
Pétrir les pâtes levées
(brioche, kouglof…)
1min 30s
2 min 0,8Kg
Mélanger les pâtes légères
(cake…)
40 s
3min 1Kg
Pulvériser les fruits à
coques 1min 0,6Kg
Hacher les produits durs 1min 0,6Kg
Piler la glace 1min 6 à 10
Pâte à crêpes, gaufres 1min 1,5L
Bouchon
D1
Bouchon de régulation d’extraction de vapeur
maxi (a) = cuisson vapeur.
mini (b) = Risotto, crèmes dessert, sauces…
La position « mini » permet de laisser échapper un maximum de
condensation et ainsi obtenir des plats ou des sauces avec une
meilleure consistance (Risotto, crèmes dessert , sauces, etc.).
La position « maxi » permet de gagner un maximum de chaleur et
de vapeur dans le bol pour toutes les cuissons à la vapeur (soupes, etc.).
Cette position évite également les éclaboussures pendant le mixage.
*selon modèle
* Google Play et Android sont des marques de Google Inc.
Apple et le logo Apple sont des marques d’Apple Inc., déposées aux États-Unis et d’autres pays. App Store est une marque de service d’Apple Inc.
* Icones visibles seulement lorsqu’ils vous seront utiles pour l’utilisation de votre appareil.

7 8
FRFR MISE EN PLACE DU BOL, DE SES ACCESSOIRES ET
DE L’ENSEMBLE COUVERCLE
• Avant la première utilisation, nettoyez tous
les éléments (C, D, E, F, H) à l’eau chaude
savonneuse, mais pas le bloc moteur (A). Votre
bol (C) est équipé d’un entraîneur démontable
(C3) pour faciliter le nettoyage.
• Assurez-vous que tout emballage soit retiré
avant utilisation, notamment la protection
située entre le bol (C) et le bloc moteur (A).
• Placez le joint d’étanchéité (D3) sur le porte
joint (D4) (Cf. Fig. 1), clipsez l’ensemble sur
le couvercle (D2) (Cf. Fig 2).
• Positionnez le joint d’étanchéité (C4)
sur l’entraîneur commun (C3). Verrouillez
l’ensemble sur le fond du bol avec la bague de
verrouillage (C5) (Cf. Fig. 3). Si vous utilisez
le mode cuisson sans couvercle, positionnez
le joint d’étanchéité (C4) sur l’entraîneur
commun (C3). Verrouillez l’ensemble sur le
fond du bol avec la bague de verrouillage (C5)
(Cf. Fig. 3).
• Positionnez l’accessoire choisi dans le bol :
- les accessoires (E1, E2, E3, ou E4) sur
l’entraîneur commun au fond du bol (Cf.
Fig. 4.1),
- en cas de cuisson vapeur, le panier vapeur (E5)
à l’intérieur du bol, (Cf. Fig. 4.3 ), en ayant
pris soin au préalable de remplir la cuve de 0.7l
de préparation liquide (eau, sauce…) (Cf. Fig.
4.2 ).
• Incorporez les ingrédients à l’intérieur du bol
ou du panier vapeur.
Positionnez le couvercle sur le bol (C) en alignant
les deux triangles (Cf. Fig. 5), verrouillez le
couvercle sans appuyer en le tournant dans le
sens de la flèche (Cf. Fig. 6).
• Positionnez le bouchon régulateur de vapeur
(D1) sur le couvercle, 3 positions sont
possibles (Cf. Fig. 7)
• Positionnez le bol (C) sur le bloc moteur (A)
jusqu’à entendre un “ clic ” (Cf. Fig. 8).
L’appareil démarre uniquement si le bol et le
couvercle sont correctement positionnés et
verrouillés sur le bloc moteur.
En cas de mauvais positionnement ou de
mauvais verrouillage de l’un ou de l’autre
(Cf. Fig. 10.1 et 10.2), un message de
sécurité apparaît à l’écran.
VOTRE APPAREIL EST ÉQUIPÉ D’UNE SÉCURITÉ DE
VERROUILLAGE DU COUVERCLE
Le couvercle est sécurisé à chaque démarrage de
l’appareil. Cette sécurité empêche l’ouverture du
couvercle pendant la réalisation d’une recette. Ne
tentez pas de forcer sur le couvercle lorsqu’il est
verrouillé. Cette sécurité se débloque à chaque
arrêt de l’appareil. Si vous avez sélectionné une
température supérieure ou égale à 50°C et une
vitesse supérieure ou égale à 5, un décompte de
10 secondes apparaît alors sur l’écran du tableau
de commandes. L’ouverture du couvercle ne sera
possible qu’à la fin du décompte.
Panier
vapeur
Les temps de cuisson du panier vapeur sont donnés à titre indicatif, ils permettent dans la
plupart des cas une cuisson satisfaisante. Néanmois, certaines conditions vont influencer sur
le temps de cuisson : taille des légumes (coupés ou non-coupés) / quantité d’ingrédients dans
le panier / variété et maturité des légumes / quantité d’eau dans le bol, qui doit correspondre
à la graduation (0.7L). Bien penser à utiliser le bouchon vapeur dans le sens “max” (a). Si la
cuisson est insuffisante, vous pouvez ajouter un temps de cuisson supplémentaire.
E5
Cuisson vapeur de légumes,
de poissons ou de viandes 20/40min 1Kg
Soupes avec morceaux 3min 3L
P1 - Courgettes 20min 800 g
P1 - Panais 25min 800 g
P1 - Blancs de poireaux 25min 800 g
P1 - Brocolis 20min 500 g
P1 - Poissons 15min
600 g (avec
papier cuisson)
P2 - Pommes de terre 30min 1 kg
P2 - Carottes 30min 1 kg
P2 - Haricots verts 30min 800 g
P2 - Viandes blanches 20min
600 g (avec
papier cuisson)
Entraîneur commun
C3
Vous pouvez rissoler des aliments dans votre bol sans le couvercle tout en
remuant et surveillant la cuisson.
La fonction CUISSON SANS COUVERCLE n’est pas adaptée aux confitures et aux
préparations à base de lait (risque de débordements)
UTILISATION JUSQU’À 130°C UTILISATION DE
135°C A 150°C
Cuisson avec ou sans
couvercle
couvercle fermé Couvercle ouvert
uniquement
Accessoires
Tous les accessoires avec
l’entraîneur commun Uniquement
l’entraîneur
commun
C3
Vitesse Oui Non
Temps maximum
- Si la température est
inférieure ou égale à 100°C : 2h
- Si la température est comprise
entre 100°C et 130°C : 1h
-Si la température
est supérieure ou
égale à 135°C :
20min
!! Ne pas enlever l’entraîneur commun juste après l’avoir utilisé. Versez de
l’eau dans le bol vide afin de le refroidir.

9
10
FRFR
1. PREMIERE UTILISATION
i-Companion touch xl est un robot cuiseur intelligent qui vous aide à cuisiner et réussir tous vos repas.
Il vous propose des centaines de recettes gratuites disponibles en quelques clics.
Grâce à son écran tactile intuitif et interactif, vous pouvez préparer des recettes variées en un temps
record.
i-Companion touch xl prend soin de la préparation, du mixage et de la cuisson de vos ingrédients. Il
vous guidera pas à pas dans toutes les étapes de vos recettes.
Laissez vous guider, c’est rapide et facile !
Mettez en route votre i-Companion touch xl à l’aide de l’interrupteur 0/I (Cf. Fig. 9) puis laissez-vous
guider par les instructions qui s’afficheront sur l’écran. Tout au long de ces étapes, le logo vous
permet d’obtenir de l’aide concernant l’étape à réaliser. Une FAQ (foire aux questions) est également
disponible sur le site (www.moulinex.be pour la Belgique)
Des vidéos tutoriels sont également disponibles pour la mise en route de votre appareil :
http://bit.ly/priseenmaincompanion
• Paramètres nationaux
Lors de votre première utilisation, vous allez accéder aux réglages des paramètres nationaux.
1 sélectionnez votre pays 2 sélectionnez votre langue
Une fois ces deux étapes réalisées un écran de bienvenue s’affichera.
I-COMPANION TOUCH XL :
MON ASSISTANT POUR LA CUISINE DE TOUS LES JOURS
Les boutons de commandes ci-dessous s’allumeront lorsqu’ils pourront être utilisés :
Le bouton central a 11 fonctions.
Elles varient en fonction des
étapes à suivre (start, pause, étape
suivante, valider, terminer…)
Lorsqu’une vidéo en rapport avec la
recette en cours de réalisation est
disponible, vous pourrez la lire en
cliquant sur ce bouton.
Annuler/Retour en arrière
Paramètres (modifications de paramètres,
connexion Wifi, ingrédients d’une recette …)
Utilisation de la balance connectée *
• Connexion internet
Maintenant vous pouvez connecter votre i Companion touch xl à votre réseau internet. Vous avez le
choix de réaliser cette étape dès maintenant en sélectionnant « Maintenant » ou bien plus tard en
sélectionnant « Plus tard ».
Vous pourrez réaliser cette étape ultérieurement en vous rendant depuis votre écran d’accueil dans les
paramètres de votre i Companion touch xl.
Une connexion internet est nécessaire pour utiliser les fonctions suivantes :
accès à toutes les recettes Companion, mes carnets de recettes, dans mon frigo, photos et vidéos dans
les pas à pas de vos recettes et les mises à jour du produit.
Pour connecter votre i Companion touch xl au réseau internet vous devez :
- Choisir votre réseau (Vous n’arrivez pas à y accéder ? Allez dans «Paramètres» puis «Paramètres
Wi-Fi» puis «Activer le Wi-Fi»)
- Saisir le mot de passe de votre connexion Wi-Fi
- Un écran « Connexion en cours » s’ouvrira pendant le chargement de la connexion. Cette étape peut
prendre quelques minutes.
- Un écran « Félicitations ! » vous confirmera que la connexion est réussie
- Enfin, il vous faudra choisir votre fuseau horaire
Signification des indicateurs de connexion wifi :
Le produit n’est pas connecté au wifi
Le produit est en cours de connexion au wifi
Le produit est connecté au wifi
Des vidéos explicatives pour connecter votre i-Companion touch xl au wifi sont disponibles sur le site
http://bit.ly/priseenmaincompanion
• Association application
L’application Companion vous permet d’avoir un œil sur votre i-Companion touch xl sans être obligé
de rester à côté. Vous pouvez l’associer à votre smartphone ou à votre tablette. Ceci vous permettra
aussi d’avoir accès à vos recettes partout où que vous soyez.
Veuillez vérifier que le Wifi de votre smartphone/tablette est bien connecté à internet (Wifi/4G/3G…)
Il est nécessaire de brancher votre i-Companion touch xl sur une prise de courant.
Vous pourrez réaliser cette étape ultérieurement en vous rendant depuis votre écran d’accueil dans les
paramètres de votre i Companion touch xl.
Une association avec votre smartphone/ tablette est nécessaire pour utiliser les fonctionnalités suivantes:
mes carnets de recettes, suivi à distance de l’avancement de la recette depuis le smartphone, envoi
d’une recette depuis votre smartphone/tablette vers votre i-Companion touch xl
Pour plus d’information concernant les Cookies rendez-vous sur la FAQ du site Moulinex :
https://www.moulinex.fr/faq/product/csp/8010000781

11
12
FRFR - Appareils Compatibles :
Retrouvez la liste des modèles de Smartphones et Tablettes compatibles avec i-Companion touch
xl sur www.moulinex.com
- Téléchargement de l’application :
Télécharger l’application Companion. Téléchargeable gratuitement depuis l’App Store (iPhone/iPad)
et Google Play (Android).
- Association du compte :
Depuis votre application Companion sur smartphone/tablette, sélectionnez le produit i-Companion touch xl
puis créez un compte ou connectez-vous à votre compte si vous en avez déjà un.
Votre appareil va générer un code d’association (il s’affichera sur votre écran B6) que vous devrez saisir sur
votre application Companion.
Si vous souhaitez associer plusieurs smartphone/tablettes à votre i-Companion touch xl, il faut que chacune
des applications soient connectées au même compte utilisateur Companion.
Ma 1ère recette
Lors de votre 1ère utilisation, votre i-Companion touch xl vous proposera de réaliser une 1ère recette pour
prendre en main votre appareil. En sélectionnant « Ma 1ère recette » vous pourrez suivre un pas à pas qui
vous guidera tout au long de la recette.
Cette recette disparaitra de votre écran d’accueil une fois réalisée ou bien après 10 utilisations de votre
i-Companion touch xl.
2. FONCTIONNALITES DU PRODUIT
Votre appareil i-Companion touch xl propose un fonctionnement « connecté » mais peut également
fonctionner en mode « non connecté ». De plus il possède de nombreuses fonctionnalités pour vous
permettre de vous inspirer tous les jours et de réussir toutes vos recettes ! En utilisation « non connecté »
310 recettes sont disponibles, en utilisation « connecté » vous aurez accès à des centaines de recettes !
• Recherche d’une recette
Depuis l’écran d’accueil, vous pouvez rechercher des recettes à
l’aide du bouton « Recherche » La recherche peut se faire
par plats ou bien par ingrédients. Des filtres sont également
disponibles pour affiner votre recherche.
• Bibliothèque de recettes
Depuis l’écran d’accueil, vous pouvez accéder à la fonction
« Bibliothèque de recettes ». Cette fonction vous permet de retrouver l’ensemble des recettes disponible sur
la communauté Companion.
En mode non connecté vous retrouverez sur l’écran d’accueil de la fonction une sélection de fiches recettes
pré-enregistrées sur votre i-Companion Touch XL. Vous pourrez lancer le pas à pas directement depuis l’une
de ces fiches recettes.
Vous pouvez également rechercher une recette sur la communauté en cliquant sur l’icone « recherche »
Pour cela, il vous suffit de saisir un plat ou un ingrédient dans la barre de recherche puis de cliquer sur OK.
Il est possible d’affiner votre recherche en ajoutant des filtres (Type de plat, Temps de préparation et origine
de la recette).
• Carnets de recettes (Disponible seulement avec la connexion Wifi)
Depuis l’écran d’accueil, vous pouvez accéder à la fonction « Mes carnets recettes ». Cette fonction
vous permet de retrouver l’ensemble des recettes que vous avez préalablement enregistré en tant que
favoris via l’application Companion sur votre smartphone/tablette.
Afin de pouvoir utiliser cette fonctionnalité il vous faudra télécharger l’application Companion et créer
un compte. Vous pourrez créer et modifier vos carnets de recettes sur votre smartphone/ tablette puis
les retrouver sur votre i-Companion touch xl connecté en Wifi. Une fois votre i-Companion touch xl
connecté en wifi, vos carnets de recettes se synchroniseront automatiquement entre votre appareil et
votre smartphone/tablette à chaque fois que vous réaliserez une recette.
• Dans mon frigo (Disponible seulement avec la connexion Wifi)
Depuis l’écran d’accueil, vous pouvez accéder à la fonction « Dans mon frigo ». Cette fonction vous
permet de rechercher une recette en fonction des ingrédients de votre choix.
Pour trouver une idée recette, cliquez sur la fonction « Dans mon frigo » puis ajoutez vos ingrédients.
Pour chacun d’eux vous pourrez y indiquer les quantités à l’aide de la balance connectée. Cliquez
ensuite sur « Rechercher », il vous sera alors proposé une liste de recettes répondant aux paramètres
saisis.

13 14
FRFR
PROGRAMMES
Votre appareil possède 14 programmes automatiques pré-enregistrés :
1. Sélectionnez le programme de votre choix.
2. Les paramètres pré-programmés peuvent
être modifiés (selon la recette choisie, les
ingrédients, les quantités préparées). Régler
la température de cuisson, le temps et la
vitesse avec les boutons – et +
3. Lorsque vous avez fini de modifier tous vos
paramètres, appuyez sur le bouton “ start ”
(B3) pour démarrer le programme.
4. Lorsque le programme est terminé, l’appareil
émet des bips.
5. A la fin des programmes Velouté, Mouliné,
Mijoté, Risotto, Sauce, Dessert, Vapeur
Douce et Vapeur Intense, l’appareil passe
automatiquement en maintien au chaud
pendant 45 minutes pour conserver la
préparation prête à être consommée. En
programme Mijoté, Sauce, Dessert et en
mode manuel, le moteur de l’appareil
fonctionne à une vitesse spécifique, dans le
but de préserver la préparation et d’éviter que
celle-ci n’adhère au fond du bol. Pour stopper
le maintien au chaud, il suffit d’appuyer
sur le bouton “ Terminé ” (B3). A la fin du
pétrissage des programmes Pain et Brioche,
l’appareil passe en mode “ levée de la pâte
” à 30°C pendant 40 minutes pour donner
un meilleur volume à vos pâtes. Lorsque que
vous ouvrez le couvercle ou enlevez le bol
de sa base lorsqu’un programme est en cours
celui-ci se termine. Si vous souhaitez stopper
ce mode, appuyez sur le bouton «paramètres»
puis «réinitialiser».
6. Lorsque le programme automatique est lancé,
vous avez la possibilité d’arrêter l’appareil
à tout moment en appuyant sur le bouton
“stop”. Le programme automatique est alors
en mode pause, vous avez la possibilité de le
relancer en appuyant de nouveau sur “start”.
Si vous vous êtes trompé de programme et si
vous voulez annuler, appuyez sur le bouton
«Annuler/retour en arrière».
7. Un programme « Réchauffer » vous permet
de réchauffer votre préparation en 20min
(ajustable de 5 à 60min).
8. Un programme « rinçage » vous permet de
nettoyer votre bol facilement. Lancer le
programme en ayant préalablement rempli
votre bol de 0,7l d’eau et d’une goutte de
liquide vaisselle.
Programme
sauce
Programmes
mijoté
Programmes
soupe
Programmes
vapeur
Programme
pâte
Programme
dessert
Programmes
complémentaires
Sauce Rissolé
Mijoté
Risotto
Velouté
Mouliné
Vapeur douce
Vapeur intense
Pain
Brioche
Cake
Dessert Réchauffer
Rinçage
DÉCOUVREZ LES PROGRAMMES AUTOMATIQUES PROPOSÉS
Programmes
automatiques
Sauce Velouté Mouliné Rissolé Mijoté Risotto
Vitesse
« par défaut »
(ajustable)
V6
De V2 à V8
10 Pulses et
V12 pendant
2 min
V7 à V10
pendant 30s V3 V1 V2
Température
« par défaut »
(ajustable)
70°
(50°C à
100°C)
100°
(90°C à
100°C)
100°
(90°C à 100°C)
130°C
non ajustable
95°
(80°C à 100°C)
95°
(80°C à 100°C)
Temps
« par défaut »
(ajustable)
8min
(5min à
40min)
40 min
(20min à
60 min)
45 min
(20 min à
60 min)
5 min
(2 min à
15 min)
45 min
(10 min à 2h )
20 min
(10 min à 2h)
Maintien au chaud
« par défaut » en
fin de programme
45 min 45 min 45 min 45 min 45 min
Exemple
recettes
Sauce
hollandaise
Soupe de
potiron
Mouliné de
légumes
Etuvée de
légumes
Bœuf
bourguignon Risotto
Accessoires
compatibles
Certaines recettes peuvent provoquer des débordements intempestifs, en raison de l’apparition
de bulles, en particulier lors de l’utilisation de légumes congelés. Dans ce cas, il vous appartient
de réduire les volumes en conséquence.

15
16
FRFR • Mode Manuel
Vous pouvez personnaliser les paramètres vitesse, température et durée de cuisson de votre i-Companion
touch xl pour adapter vos propres recettes.
Depuis l’écran d’accueil, vous pouvez accéder à la fonction «Mode Manuel».
Sélection de la vitesse moteur.
2 vitesses intermittentes, 10 vitesses continues progressives et 1 vitesse
intermittente max (V13).
Sélection de la température de cuisson.
De 30°C à 150°C.
Sélection de la durée de fonctionnement.
De 5 secondes à 2 heures.
Augmentation de la vitesse, de la température de cuisson et de la durée.
Diminution de la vitesse, de la température de cuisson et de la durée.
Conseil d’utilisation :
Votre appareil est équipé d’un micro processeur qui contrôle et analyse sa stabilité. En cas
d’instabilité, la vitesse de rotation du moteur sera automatiquement réduite, si cette instabilité
persiste, le moteur sera arrêté et et un message de sécurité s’affichera sur votre écran.
• Vérifiez que la quantité d’ingrédients ne soit pas trop importante et que la vitesse utilisée soit
adaptée.
• Vérifiez que vous utilisez l’accessoire recommandé.
• Puis redémarrez votre appareil normalement.
Programmes
automatiques
Vapeur
douce
Vapeur
intense Pain Brioche Cake Dessert Réchauffer Rinçage
Vitesse
« par défaut »
(ajustable)
V5 pendant
2 min 30s
V5 pendant
1 min 30s
puis V6
pendant
2 min
V3 pendant
40s puis V9
pendant
3 min
V4
(De V2 à
V8)
V2
(De V2 à
V6)
V8
(De V5 à
V8)
Température
« par défaut »
(ajustable)
100°C
(non
ajustable)
100°C
(non
ajustable)
90°C
(50°C à
110°C)
90°C
(70°C à
100°C)
80°C
(non
ajustable)
Temps
« par défaut »
(ajustable)
30min
(1min à
60min)
35min
(1min à
60min)
2min30
(30sec à
2min30)
3min30s
(30sec à
3min30s)
3min40
(1min40 à
3min40)
15 min
(5min à
60min)
20 min
(5min à
60min)
5 min
(1min à
10min)
Maintien au chaud
« par défaut » en
fin de programme
45 min 45 min 45 min
Levée de la
pâte 30° «par
défaut » en fin de
programme
40 min 40 min
Exemple
recettes
Foie gras à
la vapeur
Purée de
carottes
vapeur
Pain Brioche Cake aux
fruits
Crème
pâtissière
0,7l d’eau
+ 1 goutte
de produit
vaisselle
Accessoires
compatibles

17
18
FRFR • Paramètres
Depuis l’écran d’accueil, vous pouvez accéder à la fonction «Paramètres».
Cette fonction vous permet de mettre à jour vos données enregistrées au moment de la mise en route de
votre i-Companion touch xl.
Vous pourrez également connecter votre appareil au Wifi ou associer votre application si vous ne l’aviez pas
fait lors de la mise en route de votre appareil.
• Balance connectée *
- Association de l’accessoire balance connectée à votre i Companion touch xl :
Pour les balances fournies avec votre i Companion XL, l’association est déjà effectuée, vous n’avez
aucune action à faire.
Pour les balances achetées séparément rendez-vous dans les paramètres de votre produits, puis cliquez
sur « Mes accessoires »
sép
sép
. Enfin indiquez que vous avez une balance. Votre balance est maintenant
associée.
- Utilisation de l’accessoire balance connectée
Lorsque le bouton balance connectée s’allume sur votre i-Companion touch xl cela signifie que
vous pouvez peser vos ingrédients dans le cadre de la réalisation d’une recette.
Pour cela appuyer sur le logo balance puis posez sur votre accessoire balance les ingrédients que
vous souhaitez peser.
!! La balance se met en veille au bout de 30 secondes d’inactivité. Pour la rallumer, appuyez sur OK.
3 utilisations possibles de la balance :
- Pesage de préparation : vous pouvez peser tous vos ingrédients en amont de la réalisation de votre
recette.
- Pesage au cours d’une recette : vous pouvez peser vos ingrédients au cours de votre recette au début
de chaque nouvelle étape.
- Pesage Dans mon frigo : choisissez un ou plusieurs ingrédients dans votre frigo et sélectionnez-les
dans votre application Companion grâce à la barre de recherche. Appuyer sur le logo balance de votre
i-Companion touch xl, puis poser vos ingrédients sur votre accessoire balance : une liste de recettes
vous est proposée en fonction des quantités pesées.
• Mise à jour
Afin que les fonctionnalités de votre produit restent dans un état de fonctionnement optimal, votre
produit est amené à vous proposer des mises à jour. Pour cela une fenêtre s’affichera sur l’écran et
vous proposera d’accepter ou non l’installation de la dernière mise à jour disponible. Cliquez alors sur
accepter et laisser votre i-Companion touch xl se mettre à jour.
Vous pouvez utiliser votre i-Companion touch xl en mode non connecté. Les fonctions ci-dessous sont
disponibles en mode non connecté :
• Bibliothèque de recettes
Retrouvez toutes les informations concernant la bibliothèque de recettes en page 12.
La bibliothèque de recettes met à votre disposition 310 recettes.
• Programmes
Retrouvez toutes les informations concernant l’utilisation des programmes automatiques en page 13.
• Mode manuel
Retrouvez toutes les informations concernant l’utilisation du mode manuel en page 16.
* Selon modèle
UTILISATION EN MODE NON CONNECTÉ
•Nettoyez immédiatement votre
bol après utilisation. L’appareil ne
doit pas être immergé. Ne passez
pas le bloc moteur (A) sous l’eau
courante.
Une fois l’utilisation terminée, débranchez
l’appareil.
Nettoyage de votre bol après utilisation :
• Appuyez sur les gâchettes (C2) puis soulevez
l’ensemble bol (C).
• Placez le bol sur une surface plane.
• Déverrouillez le couvercle en le tournant d’un
quart de tour dans le sens des aiguilles d’une
montre. Retirez le couvercle avec précaution.
• Prenez des précautions avec les lames du
couteau hachoir ultrablade (E1) et du couteau
pour pétrir/concasser (E4) lorsque vous les
nettoyez et lorsque vous videz le bol, elles sont
extrêmement coupantes.
• Lorsque les pièces sont refroidies :
- démontez l’entraîneur commun (C3), le joint (C4),
la bague de verrouillage (C5) (Cf. Fig. 13).
- nettoyez le bol (C), l’entraîneur commun (C3),
le joint (C4), la bague de verrouillage (C5), les
accessoires (E1), (E2), (E3), (E4), (E5), le bouchon
régulateur de vapeur (D1), le couvercle (D2) , le
joint d’étanchéité (D4) et le porte joint (D3), à
l’aide d’une éponge et d’eau chaude savonneuse.
• Rincez ces différents éléments sous l’eau courante.
• En cas d’encrassement prononcé, laissez tremper
pendant plusieurs heures avec de l’eau additionnée
de liquide vaisselle et grattez si besoin avec la
spatule (F) ou bien avec le côté grattoir d’une
éponge.
• En cas d’entartrage du bol, vous pouvez utiliser
le côté grattoir d’une éponge imbibée si nécessaire
de vinaigre blanc.
• Afin de préserver l’aspect et la longévité de l’écran
en verre. Nettoyez-le à l’éponge sans utiliser le
côté abrasif afin d’éviter les rayures.
NETTOYAGE DE L’APPAREIL

19
20
FRFR • Pour nettoyer le bloc moteur (A), utilisez un
chiffon humide. Séchez-le soigneusement.
• Pour vous faciliter le nettoyage, sachez que le bol,
l’ensemble couvercle et les accessoires passent au
lave vaisselle à l’exception de l’entraîneur commun
(C3 et C4) et de la bague de verrouillage (C5) (Cf.
Fig. 14).
• Les accessoires, l’entraineur commun amovible
et les éléments du couvercle, peuvent se colorer
légèrement avec certains ingrédients comme le curry,
le jus de carottes, etc… ; cela ne représente aucun
danger pour votre santé, ni pour le fonctionnement
de votre appareil. Pour éviter cela, nettoyez les
éléments rapidement après l’usage.
• Avant de réutiliser votre ensemble bol (C), assurez-
vous que les contacts électriques sous le bol sont
toujours propres et secs.
• Afin de préserver l’aspect et la longévité du
couvercle de votre appareil, lavez-le à la main.
N’utilisez pas le côté abrasif de l’éponge afin d’éviter
les rayures.
• Pour ne pas altérer les matériaux du bol (C), veillez
à respecter les consignes d’utilisation de votre lave-
vaisselle, ne pas augmenter les doses de sel ou de
produits pour lave-vaisselle.
Votre appareil est équipé, de série, de
protections électroniques du moteur afin
d’en garantir sa longévité. Cette sécurité
électronique vous garantit contre toute utilisa-
tion anormale ; ainsi votre moteur est
parfaitement protégé.
Dans certaines conditions d’utilisation très sévères,
ne respectant pas les recommandations de la notice
(Cf. tableau “VOTRE APPAREIL” : quantités éven-
tuellement trop importantes et/ou une utilisation
anormalement longue et / ou un enchainement
de recettes trop rapprochées), la protection élec-
tronique se déclenche pour préserver le moteur ;
dans ce cas, l’appareil s’arrête et « un message de
sécurité » apparait sur l’écran pour indiquer que
l’appareil n’est momentanément plus opérationnel.
Si « un message de sécurité » s’affiche sur votre
écran et que votre appareil s’arrête, procédez
comme suit :
• Laissez votre appareil branché et l’interrupteur
0/I sur la position 1 “ON” (G).
• Référez-vous aux recommandations sur votre
écran pour réadapter votre préparation (Cf. ta-
bleau “VOTRE APPAREIL” : quantités d’ingrédients
/ temps de la recette / température / type acces-
soires).
Le service consommateur reste à votre disposition
pour toute question (voir coordonnées dans livret
de garantie).
IMPORTANT : MISE EN SECURITE DE L’APPAREIL
SI VOTRE APPAREIL NE FONCTIONNE PAS, QUE FAIRE ?
PROBLÈMES CAUSES SOLUTIONS
Cuisson insuffisante
Les temps de cuisson sont donnés
à titre indicatif, ils permettent
dans la plupart des cas une cuisson
satisfaisante.
Néanmoins, certaines conditions vont
influer sur le temps de cuisson :
- la taille des aliments (coupés ou
non coupés)
- la quantité des ingrédients
- la variété des légumes, leur maturité
- si les ingrédients sont surgelés ou
non ....
Ajouter du temps de cuisson en appuyant sur
la touche + sur l’écran (B6).
Réduisez la taille des morceaux.
Bouchon vapeur mal positionné ou
absent
Positionnez le bouchon vapeur sur la position
«max», cette position permet de gagner un
maximum de chaleur dans le bol pour toutes
les cuissons (soupes, cuisson à la vapeur,
etc.).
Cette position évite également les
éclaboussures pendant le mixage.
La position “mini vapeur” permet de laisser
échapper un maximum de condensation et ainsi
obtenir des plats ou des sauces avec une
meilleure consistance (Risotto, crèmes dessert,
sauces, etc.)
Cuisson vapeur
insatisfaisante
Quantité inadaptée d’eau dans le bol.
Morceaux trop gros.
La quantité d’eau dans le bol doit correspondre
à la graduation (0.7L).
Vous pouvez aussi utiliser le mode manuel en
sélectionnant la température de 120°C et le
temps de cuisson selon la quantité et le type
d’ingrédients.
Réduisez la taille des morceaux.
Difficultés pour réussir
certaines recettes Recettes inadaptées
Vos recettes, personnelles ou prises sur Internet
peuvent ne pas être adaptées à votre appareil
et à ses accessoires (quantités, temps de
cuisson, durée, accessoires inadaptés) : avant
de commencer votre recette, assurez vous
que vous respectez les consignes d’utilisation
indiquées dans ce mode d’emploi.
L’appareil ne
fonctionne pas.
La prise n’est pas branchée. Branchez l’appareil sur une prise.
Mon écran B6 reste noir /
Votre appareil est en « veille »
Appuyez sur une des touches tactiles (B1 à
B5)
L’interrupteur (G) est en position 0. Basculez l’interrupteur en position 1.
Le bol ou le couvercle ne sont
pas correctement positionnés ou
verrouillés.
Vérifiez que le bol ou le couvercle sont bien
positionnés et verrouillés suivant les schémas
de la notice.
Le couvercle ne se
verrouille pas. Le couvercle n’est pas complet.
Vérifiez que le joint est correctement assemblé
sur le porte joint et que le porte joint est
correctement assemblé sur le couvercle.

21
22
FRFR PROBLÈMES CAUSES SOLUTIONS
Vibrations excessives.
L’appareil n’est pas posé sur une
surface plane, l’appareil n’est pas
stable.
Placez l’appareil sur une surface plane.
Volume d’ingrédients trop
important. Réduisez la quantité d’ingrédients traités.
Erreur d’accessoires. Vérifiez que vous utilisez l’accessoire préconisé.
Léger bruit en
fonctionnement
L’entraineur de votre appareil peut
emettre un bruit en fonctionnement
à vitesse réduite ou avec certains
ingrédients (riz…)
C’est un phénomène passager, qui n’a pas
de conséquence sur la durée de vie de votre
appareil. Il s’estompera ou disparaîtra après
quelques usages et nettoyages de l’entraineur
commun amovible (reportez-vous au paragraphe
«Nettoyage de l’appareil»).
Bruit excessif en
fonctionnement Utilisation d’un mauvais accessoire
Veillez à utiliser un accessoire adéquat (ex
: n’utilisez pas le batteur E3 pour pétrir ou
mélanger des pâtes, utilisez le couteau E4) .
Pour cela reportez-vous aux préconisations des
recettes et aux consignes d’utilisation indiquées
dans ce mode d’emploi.
Fuite par le couvercle.
Volume d’ingrédients trop important. Réduisez la quantité d’ingrédients traités.
Le couvercle n’est pas bien
positionné ou verrouillé.
Verrouillez correctement le couvercle sur le
bol.
Le joint d’étanchéité
n’est pas présent.
Positionnez le joint d’étanchéité sur le porte-
joint et clipsez l’ensemble sur le couvercle.
Le joint d’étanchéité est coupé,
détérioré.
Changez le joint, contactez un centre service
agréé.
Erreur d’accessoires. Vérifiez que vous utilisez l’accessoire
préconisé.
Fuite par l’entraîneur du bol.
Le joint n’est pas bien positionné. Positionnez correctement le joint.
Le joint est détérioré. Contactez un centre service agréé.
La bague de verrouillage (C5) est
mal verrouillée. Verrouillez correctement la bague (C5).
Les lames ne tournent
pas facilement.
Morceaux d’aliments trop gros
ou trop durs.
Réduisez la taille ou la quantité d’ingrédients
traités.
Ajoutez du liquide.
Odeur moteur.
A la première utilisation de l’appareil,
ou bien en cas de surcharge moteur
provoquée par une quantité
d’ingrédients trop importante ou des
morceaux trop durs ou trop gros.
Laissez refroidir le moteur (environ 30
minutes) et réduisez la quantité d’ingrédients
dans le bol.
Affichage message
sécurité
hage
hage
hage
hage
mes
mes
mes
mes
Mauvais verrouillage du bol ou du
couvercle
Avant de mettre en fonction l’appareil, vérifiez
si le bol est correctement verrouillé sur le bloc
moteur et si le couvercle est correctement
verrouillé sur le bol. Si le problème persiste,
contactez un centre agréé.
Le couvercle est verrouillé sur le bol
en mode « cuisson sans couvercle »
Déverrouiller le couvercle avant de lancer
le programme de cuisson. Si le problème
persiste, contactez un centre agréé.
PROBLÈMES CAUSES SOLUTIONS
La sécurité de verrouillage
du couvercle est restée
active (tige sortie) et elle
ne permet pas de verrouiller
le couvercle.
L’appareil a été éteint en-cours de
recette en basculant l’interrupteur
I/O sur O ou simplement débranché
en-cours de recette.
Il suffit de basculer l’interrupteur I/O sur I
pour réinitialiser le robot et donc la sécurité
de verrouillage du couvercle, la tige va
automatiquement reprendre sa position
d’origine, vous pouvez maintenant verrouiller
le couvercle.
Message d’erreur SECU Rotor bloqué Videz le bol, laissez le refroidir et
réessayez. Si le problème persiste,
contactez le service après vente.
Message d’erreur ERR39 Surchauffe bol Il a besoin d’une petite pause… Laissez
refroidir le bol. Si le problème persiste,
contactez le service après vente
Message d’erreur SECU Surchauffe moteur Laissez refroidir le robot 30min et
diminuez la quantité dans le bol.
Message d’erreur SECU Instabilité du robot Le robot s’est arrêté car il a détecté une
instabilité. Essayez de diminuer la
quantité dans le bol
ERR21, ERR22 Votre companion a eu un coup
de chaud... Veuillez débrancher votre appareil et
contacter le service après vente
ERR 31 Verrouillage du couvercle
impossible Veuillez contacter le service après vente
ERR35 Votre companion est dans les
choux...
Il a besoin d’une petite pause...
Débranchez et rebranchez votre appareil.
Si le problème persiste, contactez votre
centre SAV.
ERR37, ERR03, ERR01
Votre companion est dans les choux...
Veuillez contacter le service après vente
ERR23 Votre companion a eu un gros
coup de chaud… Veuillez contacter le service après vente
ERR02, ERR30 Problème de connexion
Votre Companion n’arrive pas à
communiquer en wifi… Débranchez et
rebranchez votre appareil. Si le problème
persiste, contactez votre centre SAV.
Affichage Le produit n’est pas connecté au wifi Vérifiez votre réseau wifi ou Débranchez et
rebranchez votre appareil. Si le problème
persiste, contactez votre centre SAV.
Affichage Le produit est en cours de
connexion au wifi Patientez jusqu’à l’affichage du logo
UI-1, UI-3 Votre produit a du mal à charger
certaines données en wifi
Si le problème est récurrent le signal
wifi que vous recevez est peut-être trop
faible. Vous pouvez essayer de rapprocher
votre produit et votre box ou installer un
répéteur wifi à proximité de votre produit
pour améliorer la qualité du signal wifi.
UI-2, UI-4, UI-5, UI-6 Votre produit a du mal à récupérer
certaines données locales ou wifi
Si votre produit n’est pas connecté vous
pouvez essayer de le connecter et de lancer
une synchronisation des données. Si votre
produit est connecté essayez d’améliorer la
qualité du signal (voir ligne précédente)
Un message d’erreur
s’affiche à l’écran
ERR34
La résistance chauffante ne
fonctionne pas.
Vérifiez que les broches d’alimentations sous
le bol ne sont pas encrassées. Si c’est le cas,
nettoyez-les et réessayez.
Si cela ne fonctionne toujours pas, contactez
un centre agréé.

23
FR Votre appareil ne fonctionne toujours pas ?
Adressez-vous à un centre de service agréé (voir la liste dans le livret service).
• Elimination des matériaux d’emballage et de l’appareil
L’emballage comprend exclusivement des matériaux sans danger pour l’environnement, pouvant
être jetés conformément aux dispositions de recyclage en vigueur.
Pour la mise au rebut de l’appareil, se renseigner auprès du service approprié de votre commune.
• Produits électroniques ou produits électriques en fin de vie :
Participons à la protection de l’environnement !
Votre appareil contient de nombreux matériaux valorisables ou recyclables.
Confiez celui-ci dans un point de collecte pour que son traitement soit effectué.
RECYCLAGE
*La marque et les logos Bluetooth® sont des marques déposées par Bluetooth SIG, Inc. et leur utilisation par le Groupe SEB a fait l’objet d’une autorisation.
Google Play et Android sont des marques de Google Inc.
Apple et le logo Apple sont des marques d’Apple Inc., déposées aux États-Unis et d’autres pays. App Store est une marque de service d’Apple Inc.
LEXIQUE
Appairer : Action de grouper ou associer deux appareils.
Cette action s’effectue lors de la première connexion entre votre Smartphone ou tablette avec i-Companion touch xl.
Synchroniser : Action de mise à jour des informations. L’application et i-Companion touch xl se synchronisent afin d’échanger
les informations lorsqu’ils sont connectés.
Connecter : Etablir une liaison entre l’application (Smartphone/tablette) et l’appareil (i-Companion touch xl). Cette action est
indispensable pour la synchronisation.
Cookies : Ce sont les informations d’utilisation envoyées à Moulinex pour améliorer l’application.

24 25
NLNL
Inzake de veiligheid van personen
• Lees deze gebruiksaanwijzing
aandachtig door voordat u uw apparaat
voor de eerste keer gebruikt en bewaar
hem voor latere raadpleging. De
fabrikant is niet aansprakelijk voor
schade of letsel door verkeerd gebruik.
• Haal altijd de stekker uit het
stopcontact als u het apparaat zonder
toezicht achterlaat en voordat u het
apparaat in elkaar zet, uit elkaar haalt of
reinigt. Kinderen mogen het apparaat
niet gebruiken wanneer er geen
toezicht is.
• Kinderen mogen dit apparaat niet
gebruiken. Houd het apparaat en snoer
uit de buurt van kinderen.
• Dit apparaat kan niet worden gebruikt
door personen (waaronder kinderen)
met beperkte fysieke, zintuiglijke
mentale vermogens, of die een gebrek
hebben aan ervaring en kennis, tenzij
ze onder toezicht staan of instructies
hebben gekregen over de werking van
het apparaat door een persoon die
verantwoordelijk is voor hun veiligheid.
Houd toezicht op kinderen om ervoor
te zorgen dat ze niet met het apparaat
spelen.
• Het apparaat uit de buurt van
kinderen houden.
• Bij gebruik van het
a p p a r aa t b e re i k e n
bepaalde onderdelen
ho g e te mp e r at u r e n
(roestvrijstalen wand van de kom en de
d op, a f ne e m b a r e aa n d r i j f a s ,
transparante delen van het deksel,
metalen delen onder de kom, mand).
D e z e ku nn e n b ra n dw o n de n
veroorzaken. Houd het apparaat bij de
koude kunststof delen vast (handgrepen,
motorblok).
• De temperatuur van de bereikbare
oppervlakken kan hoog oplopen als
het apparaat in werking is.
• Het apparaat is niet bestemd voor
gebruik met een externe timer
of een afzonderlijk systeem voor
afstandsbediening.
• Gebruik uw apparaat niet als het
niet goed werkt, beschadigd is of het
netsnoer of de stekker beschadigd is.
Om gevaarlijke situaties te voorkomen
moet het snoer worden vervangen door
een erkende dienstverlener (zie de lijst
in het serviceboekje).
• Dompel het apparaat nooit onder.
Houd het motorblok (A) niet onder
stromend water.
• Dit apparaat is alleen geschikt voor
een huishoudelijk gebruik en op een
hoogte lager dan 2000 m. De fabrikant
aanvaardt geen enkele aansprakelijkheid
en behoudt zich het recht voor om de
garantie te beëindigen in geval van een
commercieel of ongepast gebruik of het
negeren van de voorschrien.
VEILIGHEIDSVOORSCHRIFTEN:
• Dit apparaat is niet bestemd voor
gebruik in de volgende gevallen, deze
vallen niet onder de garantie:
- keukens in winkels, kantoren en
andere werkruimten.
- kantines voor personeel in winkels,
kantoren en andere werkruimten.
- boerderijen.
- gebruik door gasten in hotels, motels
en andere residentiële omgevingen.
- bed & breakfasts.
WAARSCHUWING:
Uw apparaat geeft stoom
af die brandwonden kan
veroorzaken.
Ga voorzichtig om met het deksel en
de dop (gebruik indien nodig een
ovenwant, pannenlap, etc.). Houd de
dop vast aan het middelste gedeelte.
• Gebruik het apparaat niet als
de afdichtingsring niet op de
afdichtingsringhouder en de
afdichtingsringhouder niet op
het deksel is geplaatst. Gebruik
het apparaat alleen als de dop
in de opening van het deksel is
geplaatst (behalve in geval van
specifieke recepten).
WAARSCHUWING:
Er is risico op letsel
wanneer het apparaat
op een verkeerde
manier wordt gebruikt.
Wees voorzichtig wanneer u de
messen van het ultrablade-hakmes
(E1) en het mes voor kneden/
vermalen (E4) schoonmaakt en
wanneer u de kom leegt. De messen
zijn zeer scherp.
Berg het ultrablade-hakmes (E1) na
elk gebruik in de kom op.
Wees voorzichtig wanneer u een
warme vloeistof in de keukenmachine
giet. De vloeistof kan uit het
apparaat opspatten wanneer het
kookpunt wordt bereikt.
WAARSCHUWING: Wees voorzichtig
met uw apparaat bij het reinigen,
vullen en uitgieten. Voorkom dat
er vloeistof op de aansluiting
terechtkomt.
WA AR SC HU WI N G : S o m m i g e
voedingsmiddelen met een velletje
(hele worst, tong, gevogelte, ...)
of grote stukken vlees kunnen uit
elkaar spatten doordat ze kokende
vloeistoffen opnemen. Daarom raden
wij u aan om er voor het bakken een
aantal gaatjes in te prikken met
behulp van een mes of een vork.
WAARSCHUWING: Het oppervlak van
het verwarmingselement heeft na
gebruik nog een restwarmte.

26 27
NLNL
Zorg ervoor dat u tijdens het
verwarmen en tot het moment dat
het apparaat volledig is afgekoeld,
alleen de handgrepen van uw product
aanraakt (trekker C2, handgreep van
het deksel D2 en dop D1).
Raadpleeg de gebruiksaanwijzing voor
de snelheidsstand en de werkingstijd
van elk accessoire en programma.
Raadpleeg de gebruiksaanwijzing
voor het in elkaar zetten en
monteren van de accessoires op het
apparaat.
Raadpleeg de gebruiksaanwijzing
voor het reinigen en onderhouden
van het apparaat.
Volg altijd de reinigingsinstructies
voor het reinigen van uw apparaat:
• Haal de stekker uit het stopcontact.
• Reinig het apparaat niet als het nog
warm is.
• Maak het apparaat schoon met een
vochtige doek of spons.
• Dompel het apparaat nooit in water
en reinig het nooit onder de kraan.
UITSLUITEND VOOR DE EUROPESE
MARKT:
• Houd het apparaat en het snoer altijd
uit de buurt van kinderen jonger dan
8 jaar. Kinderen mogen het apparaat
niet als speelgoed gebruiken.
• Dit apparaat kan worden gebruikt
door personen met beperkte fysieke,
zintuiglijke of mentale vermogens,
of die een gebrek hebben aan
ervaring en kennis, als ze onder
toezicht staan of instructies hebben
gekregen over het veilig gebruik van
het apparaat en de gevaren die het
gebruik van het apparaat met zich
meebrengt begrijpen.
• Dit apparaat kan worden gebruikt
door kinderen vanaf 8 jaar, als ze
onder toezicht staan of instructies
hebben gekregen over het veilig
gebruik van het apparaat en de
gevaren die het gebruik van het
apparaat met zich meebrengt
begrijpen. Kinderen jonger dan 8
jaar en zonder toezicht van een
volwassene mogen het apparaat niet
schoonmaken of onderhouden.
Inzake de elektrische aansluiting
• Sluit het apparaat alleen aan op een
geaard stopcontact.
• Het apparaat is alleen ontworpen
om te werken op wisselstroom.
Controleer of de spanning dat op
het typeplaatje van het apparaat
is vermeld, overeenstemt met de
netspanning van uw woning.
• Een verkeerde aansluiting maakt de
garantie ongeldig.
• Haal de stekker nooit uit het
stopcontact door aan het snoer te
trekken.
• Dompel het apparaat, het snoer of
de stekker nooit in water en laat ze
niet in de buurt hangen van of in
aanraking komen met de warme
delen van het apparaat. Leg ze
tevens niet nabij een warmtebron of
op een scherpe rand.
Inzake een verkeerd gebruik
• Raak het deksel niet aan voordat
het apparaat volledig tot stilstand
is gekomen (stopknop), wacht tot
de gemixte ingrediënten niet meer
draaien.
• Doe altijd eerst de vaste ingrediënten
in de kom alvorens vloeistoffen toe
te voegen (zie afb. 11) en zorg dat
de MAX-markering in de kom (zie
afb. 11) niet wordt overschreden.
Kokend water kan uit de kom spatten
als deze te veel is gevuld.
• Let op. Respecteer het niveau van
0,7 liter dat wordt aangegeven in
het stoomkookprogramma (zie afb.
4.2).
• Stop nooit uw vingers of een ander
voorwerp in de kom wanneer het
apparaat in werking is.
• Gebruik de kom niet om ingrediënten
in te bewaren, in te vriezen of te
steriliseren.
• Plaats het apparaat op een stabiel,
warmtebestendig, schoon en droog
oppervlak.
• Plaats het apparaat niet in de
buurt van een muur of kast: de
geproduceerde stoom kan onderdelen
beschadigen.
• Plaats uw apparaat niet in de buurt van
een werkende warmtebron (kookplaat,
huishoudelijke apparaten, enz.).
• Dek het deksel niet af met een doek
of ander voorwerp, stop de opening
in het deksel niet dicht, gebruik de
stoomregeldop.
• Laat geen haar, sjaal of stropdas,
etc. boven de kom hangen wanneer
het apparaat in werking is.
• Plaats accessoires nooit in de
magnetron.
• Gebruik het apparaat niet in de open
lucht.
• Overschrijd nooit de maximum
h o e v e e l h e i d d i e i n d e
gebruiksaanwijzing is aangegeven.
• Berg het apparaat op wanneer het
is afgekoeld.
• Plaats de kom niet in de diepvries
om hem af te laten koelen, maar zet
hem in de koelkast.
• Laat de spatel niet langer dan 20
minuten in olie van 150 °C staan.
SERVICECENTRUM
• Voor uw veiligheid dient u alleen
accessoires of reserveonderdelen
te gebruiken die door een erkend
servicecentrum worden geleverd.
• Elke tussenkomst, met uitzondering
van de reiniging en het regelmatige
onderhoud van het apparaat, moet
door een erkend servicecentrum
worden uitgevoerd.
• Raadpleeg de tabel 'Uw apparaat
werkt niet. Wat nu?' aan het einde
van de gebruiksaanwijzing.

28 29
NLNL In deze handleiding vindt u enkele gebruikstips om optimaal van de mogelijkheden van
uw apparaat gebruik te maken: soepen, stoofgerechten, stoomgerechten en deeg bereiden.
BESCHRIJVING VAN HET APPARAAT:
A Motorblok
B Bedieningspaneel*
B1: Annuleren
B2: Weegschaal (afhankelijk van
het model)
B3: START/STOP
B4: Video
B5: Instellingen
B6: Touchscreen
C Kom
C1: Roestvrijstalen kom
C2: Trekkers
C3: Afneembare aandrijfas
C4: Afdichtingsring
C5: Vergrendelingsring
D Deksel
D1: Stoomregeldop
D2: Deksel
D3: Afdichtingsringhouder
D4: Afdichtingsring
E Accessoires
E0: Opbergvak accessoires
E1: Ultrablade-hakmes
E2: Menger
E3: Klopper
E4: Mes voor kneden/vermalen
E5: Stoommand
F Spatel
G 0/I-schakelaar om de stroomtoevoer af te
sluiten
H Schoonmaakborstel
TECHNISCHE GEGEVENS VAN HET APPARAAT:
Vermogen: 1550 W (1000 W: verwarmingsweerstand / 550 W: motor)
Temperatuurbereik: van 30° tot 150°C
met stappen van 5°C aan te passen.
Bedrijfstijdbereik: van 5 seconden tot 2 uur
met stappen van minimaal 5 seconden tot maximaal
1 minuut aan te passen.
Aantal snelheden: 13 - 2 snelheden met tussenpozen:
Snelheid 1 (5 sec. ON / 20 sec. OFF).
Snelheid 2 (10 sec. ON / 10 sec. OFF).
- 10 continue, progressieve snelheden
(snelheden 3 tot 12).
- 1 maximale snelheid met tussenpozen (snelheid 13).
Frequentie: 2412 – 2484 MHz
Maximaal overgebracht vermogen: 20 dBm.
Stand-bystand: Het toestel wordt na 15 minuten inactiviteit in de stand-
bystand gezet.
Druk op een van de knoppen op het bedieningspaneel om
hem weer aan te zetten.
(B1 tot B5)
Stroomverbruik in stand-bymodus wanneer het product is
aangesloten: 0,2 Wh
* Google Play en Android zijn merken van Google Inc.
Apple en het Apple-logo zijn merken van Apple Inc. die in de VS en andere landen zijn gedeponeerd. App Store is een handelsmerk van Apple Inc.
* Iconen zijn alleen zichtbaar wanneer ze van belang zijn voor het gebruik van uw apparaat.
UW APPARAAT
Bij uw apparaat zitten de volgende accessoires:
Deze accessoires zijn voorzien van handgrepen zodat u ze gemakkelijker kunt vasthouden tijdens
het koken.
Hakmes
E1 Soep maken
3 min. 3 l
Compotes maken 40 sec. 1 kg
Groenten snijden 15 sec. 0,6 kg
Vlees snijden 30 sec. 1 kg
Vis snijden 15 sec. 1 kg
Gebruik dit accessoire niet om harde producten te hakken. Gebruik hiervoor het mes voor kneden/vermalen E4.
Menger
Dit accessoire mengt bereide gerechten zonder de ingrediënten te beschadigen,
Zeer nuttig voor het opbakken van ingrediënten voor verdere bereiding (risotto, soepen).
E2 Rissole 5 min. 500 g
Stoofgerecht 45 min. 3 l
Risotto 22 min. 1,5 kg
Ratatouille, chutney, peulvruchten (instellingen: zie receptenboekje)
Klopper
9 max
E3
Stijfgeklopt eiwit 5/10
min.
8
max.
Mayonaise, geklopte slagroom 2/5
min. 0,5 l
Saus, room à 1/20
min. 1 l
Aardappelpuree à 1 min. 1 l
Polenta à 1/16
min. 1 l
E4
Deeg voor witbrood kneden 2,5 min. 1,2 kg
Hartig of kruimeldeeg kneden 2,5 min. 1 kg
Gistdeeg kneden
(brioche, tulband, enz.)
1,5 min.
2 min. 0,8 kg
Licht deeg mengen (cake,
enz.)
40 sec.
3 min. 1 kg
Noten verpulveren 1 min. 0,6 kg
Harde ingrediënten hakken 1 min. 0,6 kg
IJs schaven 1 min. 6 à 10
Wafel-, crêpebeslag 1 min. 1,5 l
Dop
D1
Stoomregeldop
maxi (a) = stoomkoken.
mini (b) = risotto, nagerechten, sauzen, enz.
Dankzij de 'mini-stand' kan een maximale hoeveelheid
stoom ontsnappen en krijgen gerechten en sauzen
een betere consistentie (risotto, nagerechten, sauzen, enz.).
Dankzij de 'maxi-stand' blijft er een maximale hoeveelheid warmte
en stoom in de kom voor tijdens het stoomkoken (soepen, enz.).
Deze stand voorkomt ook spatten tijdens het mengen.
Mes voor kneden/vermalen
* Afhankelijk van
het model

30 31
NLNL
Stoom
mand
De bereidingstijden voor de stoommand zijn ter indicatie en zijn in de meeste gevallen
voldoende voor een goed resultaat. Bepaalde zaken kunnen de bereidingstijd beïnvloeden: de
grootte van de groenten (wel of niet gesneden), de hoeveelheid ingrediënten in de mand, de
soorten groenten, de rijpheid van de groenten, de hoeveelheid water in de kom, die moet zijn
afgestemd op de schaalverdeling (0,7 l). Onthoud om de stoomregeldop in de 'maxi-stand' (a)
te gebruiken. Als de bereidingstijd niet voldoende is, kunt u deze verlengen.
E5
Stoomkoken van groente,
vis of vlees
20/40
min. 1 kg
Gevulde soep 3 min. 3 l
P1 - Courgette 20 min. 800 g
P1 - Pastinaak 25 min. 800 g
P1 - Prei (witte gedeelte) 25 min. 800 g
P1 - Broccoli 20 min. 500 g
P1 - Vis 15 min.
600 g (met
bakpapier)
P2 - Aardappel 30 min. 1 kg
P2 - Wortel 30 min. 1 kg
P2 - Sperziebonen 30 min. 800 g
P2 - Wit vlees 20 min.
600 g (met
bakpapier)
Afneembare
aandrijfas
C3
U kunt de ingrediënten in de kom braden zonder het deksel, wanneer u blijft
roeren en de bereiding in de gaten houdt.
De functie BEREIDING ZONDER DEKSEL is niet geschikt voor de bereiding van
jam of melkproducten (risico op overlopen)
TE GEBRUIKEN TOT 130°C. TE GEBRUIKEN VAN
135°C TOT 150°C.
Bereiding met of zonder
deksel
sluit het deksel Alleen open deksel
Accessoires
Alle accessoires met
drijfas Alleen met de
drijfas
C3
Snelheid Ja Nee
Maximale tijd
- Als de temperatuur lager dan
of gelijk aan 100°C is: 2 uur
- Als de temperatuur tussen de
100°C en 130°C ligt: 1 uur
- Als de
temperatuur hoger
dan of gelijk aan
135°C is: 20 min.
!! Verwijder de afneembare aandrijfas niet onmiddellijk na gebruik. Giet water
in de lege kom om deze af te koelen.
MONTAGE VAN DE KOM, DE ACCESSOIRES EN HET
DEKSEL
• Reinig alle onderdelen (C, D, E, F, H), behalve
het motorblok (A), vóór het eerste gebruik
met warm zeepwater. De kom (C) is voorzien
van een afneembare drijfas (C3) voor een
eenvoudige reiniging.
• Zorg ervoor dat verpakkingsmateriaal vóór
gebruik is verwijderd, met name de bescherming
tussen de kom (C) en het motorblok (A).
• Plaats de afdichtingsring (D3) op de
afdichtingsringhouder (D4) (zie afb. 1), klik
het geheel op het deksel (D2) (zie afb. 2).
• Plaats de afdichtingsring (C4) op de aandrijfas
(C3). Vergrendel het geheel op de bodem van
de kom met de vergrendelingsring (C5) (zie
afb. 3). Als u de modus bereiding zonder deksel
gebruikt, plaats dan de afdichtingsring (C4)
op het afneembare aandrijfas (C3). Vergrendel
het geheel op de bodem van de kom met de
vergrendelingsring (C5) (zie afb. 3).
• Plaats het gekozen accessoire in de kom:
- de accessoires (E1, E2, E3 of E4) op de
aandrijfas op de bodem van de kom (zie afb.
4.1) ,
- bij stoomkoken, de stoommand (E5) in de kom
(zie afb. 4.3), waarbij de kom vooraf met 0,7 l
vloeistof (water, saus, enz.) is gevuld (zie afb.
4.2).
• Doe de ingrediënten in de kom of de
stoommand.
Plaats het deksel op de kom (C) en zorg ervoor
dat de twee driehoeken op één lijn staan (zie
afb. 5). Draai het deksel in de richting van de
pijl om het deksel te vergrendelen zonder erop te
duwen (zie afb. 6).
• Plaats de stoomregeldop (D1) op het deksel, er
zijn 3 standen mogelijk (zie afb. 7)
• Plaats de kom (C) op het motorblok (A) tot u
een klik hoort (zie afb. 8.).
Het apparaat werkt alleen als de kom en het
deksel correct op het motorblok zijn geplaatst en
zijn vergrendeld.
In geval van een verkeerde plaatsing of
slechte vergrendeling (zie afb. 10.1 en
10.2) verschijnt er op het scherm een
veiligheidsbericht.
UW APPARAAT IS VOORZIEN VAN EEN VEILIGE
VERGRENDELING VAN HET DEKSEL
Het deksel wordt vergrendeld zodra het apparaat
wordt gestart. Deze beveiliging zorgt ervoor
dat het deksel tijdens de bereiding niet kan
worden geopend. Probeer het deksel niet open
te maken als het vergrendeld is. Het deksel wordt
ontgrendeld zodra het apparaat wordt gestopt.
Als u een temperatuur van 50°C of hoger en een
snelheid van 5 of meer hebt gekozen, wordt op
het scherm van het bedieningspaneel van 10
seconden naar 0 afgeteld. Het deksel kan pas
worden geopend wanneer de teller op 0 staat.

32
33
NLNL
1. EERSTE GEBRUIK
i-Companion touch xl is een intelligente keukenmachine waarmee u heerlijke gerechten kunt bereiden.
Hij biedt u honderden gratis recepten, die u in enkele klikken kunt raadplegen.
Dankzij het intuïtieve en interactieve touchscreen kunt u in recordtijd gevarieerde recepten bereiden.
i-Companion touch xl zorgt voor de voorbereiding, menging en bereiding van uw ingrediënten.
Hij leidt u stap voor stap door het recept heen.
Laat u meevoeren en ontdek zelf hoe u snel en eenvoudig smaakvolle gerechten op tafel zet!
Zet uw i-Companion touch xl aan met behulp van de 0/I-schakelaar (zie afb. 9) en volg vervolgens
de instructies die op het scherm worden weergegeven. Gedurende de verschillende stappen kunt u
door middel van het logo hulp krijgen bij de te nemen stap. Een FAQ (veelgestelde vragen) is
beschikbaar op de website www.moulinex.be
Er zijn ook tutorials beschikbaar voor het inschakelen van uw apparaat:
http://bit.ly/neemdecontroleoveruwcompanion
• Nationale instellingen
Bij het eerste gebruik krijgt u toegang tot de nationale instellingen.
1 selecteer uw land 2 selecteer uw taal
Zodra deze twee stappen zijn voltooid, verschijnt er een welkomstscherm.
I-COMPANION TOUCH XL:
MIJN KEUKENASSISTENT VOOR IEDERE DAG
De volgende bedieningsknoppen lichten op wanneer ze gebruikt kunnen worden:
De algemene knop heeft 11
functies. Deze variëren afhankelijk
van de te volgen stappen (start,
pauze, volgende stap, bevestigen,
afsluiten...)
Als er een video beschikbaar is voor
het recept dat op dat moment wordt
bereid, kunt u deze bekijken door op
deze knop te klikken.
Annuleren/terugkeren
Instellingen (wijzigingen van
instellingen, wifiverbinding,
ingrediënten van een recept …)
Gebruik van de slimme weegschaal *
• Internetverbinding
Nu kunt u uw i Companion touch xl verbinden met internet. U kunt ervoor kiezen deze stap nu uit te
voeren door 'nu' te kiezen. Als u de stap later wilt uitvoeren, selecteert u 'later'.
U kunt deze stap op een later moment uitvoeren door via het beginscherm naar de instellingen van
uw i Companion touch xl te gaan.
Voor de volgende functies is een internetverbinding noodzakelijk:
toegang tot alle recepten van Companion, mijn receptenboekje, in mijn koelkast, foto's en video's met
de stappen van uw recepten en updates van het product.
Om uw i Companion touch xl met internet te verbinden doet u het volgende:
- Kies uw netwerk (Lukt het niet uw netwerk te vinden? Ga naar 'instellingen', dan naar 'wifi' en
vervolgens naar 'wifi activeren')
- Voer het wachtwoord van uw wifiverbinding in
- Op het scherm verschijnt 'Verbinding maken'. Deze stap kan enkele minuten in beslag nemen.
- Wanneer u op het scherm de melding 'Gefeliciteerd' ziet staan, is het gelukt verbinding te maken
- Tot slot moet u uw tijdzone kiezen
g '
g '
g '
g '
Betekenis van de wifi-indicatoren:
Het product is niet verbonden met wifi
Het product is verbinding aan het maken met wifi
Het product is verbonden met wifi
Instructievideo's over het verbinden van uw i-Companion touch xl met wifi vindt u op http://bit.ly/
neemdecontroleoveruwcompanion
• Koppeling met de app
Dankzij de Companion-app kunt u uw i-Companion touch xl in de gaten houden zonder dat u verplicht
bent om erbij in de buurt te blijven. U kunt het apparaat aan uw smartphone of tablet koppelen. Zo
hebt u overal, waar u ook bent, toegang tot uw recepten.
Controleer of uw smartphone/tablet met wifi of internet is verbonden (wifi/4G/3G, enz.)
U moet uw i-Companion touch xl op een stopcontact aansluiten.
U kunt deze stap op een later moment uitvoeren door via het beginscherm naar de instellingen van
uw i Companion touch xl te gaan.
Voor de volgende functies is een koppeling met uw smartphone/tablet noodzakelijk:
mijn receptenboekjes, bereiding van een gerecht op afstand via een smartphone volgen, een recept
van uw smartphone/tablet naar uw i-Companion touch xl sturen

34
35
NLNL - Compatibele apparaten:
Bekijk de lijst met smartphones en tablets die compatibel zijn met de i-Companion touch xl op www.
moulinex.com
- App downloaden:
Download de Companion-app. Gratis te downloaden in de App Store (iPhone/iPad) en via Google Play
(Android).
Downloaden in
de App Store
ANDROID-APP VIA
- Account aanmaken:
In de Companion-app op uw smartphone/tablet selecteert u de i-Companion touch xl en maakt u een
account aan of meldt u zich aan als u al een account hebt.
Uw apparaat maakt een speciale code aan (deze wordt op het scherm (B6) weergegeven) die u moet
invoeren in uw Companion-app.
Als u meerdere smartphones/tablets aan uw i-Companion xl wilt koppelen, moet elk van de apparaten
aan hetzelfde Companion-gebruikersaccount zijn gekoppeld.
Mijn eerste recept
Bij het eerste gebruik zal uw i-Companion touch xl voorstellen een eerste recept te maken, zodat u
het apparaat kunt leren kennen. Door 'Mijn eerste recept' te selecteren kunt u het recept stap voor
stap volgen.
Het recept verdwijnt van het beginscherm zodra u het eenmaal hebt bereid of wanneer u uw
i-Companion touch xl 10 keer hebt gebruikt.
2. FUNCTIES VAN HET PRODUCT
Uw i-Companion touch xl kan worden verbonden, maar werkt ook als het apparaat niet is verbonden.
Bovendien beschikt het apparaat over talloze functies waaruit u iedere dag inspiratie kunt opdoen en
waarmee u heerlijke gerechten kunt bereiden! Als het apparaat niet is verbonden, zijn er 310 recepten
beschikbaar. Als het apparaat wel is verbonden, hebt u toegang tot honderden recepten!
• Een recept zoeken
In het beginscherm kunt u recepten zoeken met behulp
van de knop 'Zoeken' . U kunt zoeken op gerecht
of ingrediënt. Er zijn ook filters beschikbaar om uw
zoekopdracht te verfijnen.
• Receptenbibliotheek
Via het beginscherm hebt u toegang tot de functie
'Receptenbibliotheek'. Met deze functie hebt u toegang tot alle recepten van de Companion-community.
Wanneer het apparaat niet is verbonden, vindt u in het beginscherm van de bibliotheek een selectie
vooraf ingestelde recepten voor uw i-Companion Touch XL. U kunt de stapsgewijze instructies starten
via een van de recepten.
U kunt ook een recept in de community zoeken door op het pictogram 'zoeken’ te klikken.
Hiervoor hoeft u alleen een gerecht of ingrediënt in de zoekbalk in te voeren en op OK te klikken.
U kunt uw zoekopdracht verfijnen door filters toe te voegen (soort gerecht, bereidingstijd en
oorsprong van het recept).
• Receptenboekjes (alleen beschikbaar met een wifiverbinding)
Via het beginscherm hebt u toegang tot de functie 'Mijn receptenboekjes'. Met deze functie hebt
u toegang tot alle recepten die eerder als favoriet hebt opgeslagen via de Companion-app op uw
smartphone/tablet.
Om van deze functie gebruik te kunnen maken, moet u de Companion-app downloaden en een
account aanmaken. U kunt uw receptenboekje op uw smartphone/tablet aanmaken en wijzigen, en
de recepten vervolgens raadplegen via uw i-Companion touch xl als deze verbonden is met wifi.
Zodra uw i-Companion touch xl met wifi is verbonden, worden uw receptenboekjes automatisch
gesynchroniseerd tussen uw apparaat en uw smartphone/tablet wanneer u een recept maakt.
• In mijn koelkast (alleen beschikbaar met een wifiverbinding)
Via het beginscherm hebt u toegang tot de functie 'In mijn koelkast'. Met deze functie kunt u een
recept zoeken op basis van de ingrediënten van uw keuze.
Klik op de functie 'In mijn koelkast' en voeg maximaal 2 ingrediënten toe om recepten te zoeken. Voor
elk recept kunt u de hoeveelheden aangeven met behulp van de slimme weegschaal. Klik vervolgens
op 'Zoeken'. U krijgt nu recepten te zien die aan uw wensen voldoen.

36 37
NLNL
PROGRAMMA'S
Uw apparaat heeft 14 vooraf ingestelde automatische programma's:
1. Selecteer het programma van uw keuze.
2. Vooraf geprogrammeerde instellingen kunnen
worden gewijzigd (afhankelijk van het gekozen
recept, de ingrediënten, de hoeveelheden).
Stel de temperatuur, de tijd en de snelheid in
met de knoppen – en +
3. Als u klaar bent met het wijzigen van al de
instellingen, druk dan op de knop 'start' (B3)
om het programma te starten.
4. Zodra het programma is voltooid, piept het
toestel drie keer.
5. Na afloop van de programma's Velouté,
Gepureerde soep, Stoofgerecht, Risotto,
Saus, Dessert, Weinig stoom en Veel stoom
houdt het apparaat de bereiding automatisch
45 minuten warm, zodat het klaar is om te
serveren. Bij de programma's Stoofgerecht,
Saus, Dessert en de handmatige modus werkt
de motor van het apparaat met een specifieke
snelheid om de bereiding te behouden en te
voorkomen dat de bereiding aan de bodem van
de kom gaat plakken. Om het warm houden
te stoppen drukt u op de knop 'voltooid'
(B3). Aan het einde van programma's Brood
en Brioche waarbij het deeg wordt gekneed,
schakelt het apparaat over op de stand 'deeg
laten rijzen' gedurende 40 minuten bij 30°C
om uw deegwaren een groter volume te geven.
Wanneer u het deksel opent of de kom van de
onderkant haalt wanneer er een programma
aanstaat, wordt het programma gestopt. Als u
deze modus wilt stoppen, druk dan op de knop
'instellingen' en 'resetten'.
6. Wanneer het automatische programma
aanstaat, kunt u het apparaat op elk moment
uitschakelen door op de knop 'stop' te
drukken. Het automatische programma wordt
dan gepauzeerd. U kunt het programma
opnieuw starten door nogmaals op 'start' te
drukken. Als u het verkeerde programma hebt
gekozen en deze wilt annuleren, druk dan op
de knop 'Annuleren/terugkeren'.
7. Met een programma 'Opwarmen' kunt u
uw voorbereiding in 20 min. opwarmen
(aanpasbaar van 5 tot 60 min.).
8. Met een programma 'Spoelen' kunt u uw kom
eenvoudig reinigen. Start het programma
nadat u uw kom met 0,7 l water en een
druppel afwasmiddel hebt gevuld.
Programma
saus
Programma
Gesudderd
Programma
soep
Programma
stomen
Programma
deeg
Programma
dessert
Overige
programma's
Saus Gestoofd
Gesudderd
Risotto
Gladde soep
Dikkere soep
Voorzichtig
stomen
Krachtig
stomen
Brood
Brioche
Cake
Dessert Opwarmen
Reinigen
ONTDEK DE AUTOMATISCHE PROGRAMMA'S
Automatische
programma‘s
Saus Gladde soep Dikkere soep Gestoofd Gesudderd Risotto
Snelheid
'standaard'
(aanpasbaar)
S6
van S2 tot S8
10 pulses
en S12
gedurende 2
min.
S7 tot S10
gedurende 30
sec.
S3 S1 S2
Temperatuur
'standaard'
(aanpasbaar)
70°
(50°C tot
100°C)
100°
(90°C tot
100°C)
100°
(90°C tot
100°C)
130°C
niet aanpasbaar
95°
(80°C tot
100°C)
95°
(80°C tot
100°C)
Tijd
'standaard'
(aanpasbaar)
8 min.
(5 min. tot 40
min.)
40 min.
(20 min. tot
60 min.)
45 min.
(20 min. tot
60 min.)
5 min.
(2 min. tot
15 min.)
45 min.
(10 min. tot 2
uur)
20 min.
(10 min. tot 2
uur)
Warm houden
'standaard' na
afloop van het
programma
45 min. 45 min. 45 min. 45 min. 45 min.
Voorbeeld-
recepten Hollandaisesaus Pompoensoep Gepureerde
groentesoep
Gestoofde
groenten
Bœuf
bourguignon Risotto
Compatibele
accessoires
Bepaalde recepten kunnen omwille van bellenvorming tot overstroming van de ingrediënten
leiden, in het bijzonder wanneer bevroren groenten worden gebruikt. Als dit zich voordoet, doe
minder ingrediënten in de kom.

38
39
NLNL
Automatische
programma's
Voorzichtig
stomen
Krachtig
stomen Brood Brioche Cake Dessert Opwarmen Reinigen
Snelheid
'standaard'
(aanpasbaar)
S5
gedurende
2,5 min.
S5
gedurende
1,5 min.
daarna S6
gedurende
2 min.
S3 gedurende
40 sec.
daarna S9
gedurende 3
min.
S4
(van S2
tot S8)
S2
(van S2 tot
S6)
S8
(van S5 tot
S8)
Temperatuur
'standaard'
(aanpasbaar)
100°C
(niet
aanpasbaar)
100°C
(niet
aanpasbaar)
90°C
(50°C tot
110°C)
90°C
(70°C tot
100°C)
80°C
(niet
aanpasbaar)
Tijd
'standaard'
(aanpasbaar)
30 min.
(1 min. tot
60 min.)
35 min.
(1min. tot
60min.)
2,5 min.
(30 sec. tot
2,5 min.)
3,5 min.
(30 sec. tot
3,5 min.)
3 min. 40
sec.
(1 min. 40
sec. tot 3
min. 40 sec.)
15 min. (5
min. tot
60 min.)
20 min. (5
min. tot 60
min.)
5 min.
(1min. tot
10 min.)
Warm houden
'standaard' na
afloop van het
programma
45 min. 45 min. 45 min.
Deeg laten
rijzen op 30°
'standaard' na
afloop van het
programma
40 min. 40 min.
Voorbeeld-
recepten
Gestoomde
lever
Puree van
gestoomde
wortels
Brood Brioche Vruchtencake Banketbak-
kersroom
0,7 l water
+ 1 druppel
afwasmiddel
Compatibele
accessoires
• Handmatige modus
U kunt de instellingen voor de snelheid, temperatuur en bereidingstijd van uw i-Companion touch xl
aanpassen voor uw eigen recepten.
Via het beginscherm hebt u toegang tot de functie 'Handmatige modus'.
Motorsnelheid bepalen.
2 snelheden met tussenpozen, 10 continue, progressieve snelheden en 1
maximale snelheid met tussenpozen (S13).
Temperatuur bepalen.
Van 30°C tot 150°C.
Werkingsduur bepalen.
Van 5 seconden tot 2 uur.
De snelheid, de temperatuur en de duur verhogen.
De snelheid, de temperatuur en de duur verlagen.
Gebruikstips:
Uw apparaat is voorzien van een microprocessor die de stabiliteit controleert en analyseert. In geval
van instabiliteit wordt de draaisnelheid van de motor automatisch verlaagd. Als deze instabiliteit
aanhoudt, wordt de motor gestopt en verschijnt een veiligheidsbericht op uw scherm.
• Controleer of de hoeveelheden van de ingrediënten niet te groot zijn en of de gebruikte snelheid
de geschikte is.
• Controleer of u het aanbevolen accessoire gebruikt.
• Zet uw apparaat opnieuw aan.

40
41
NLNL • Instellingen
Via het beginscherm hebt u toegang tot de functie 'Instellingen'.
Met deze functie kunt u de gegevens bijwerken die zijn opgeslagen bij het eerste gebruik van uw
i-Companion touch xl.
U kunt uw apparaat ook met wifi of de app verbinden als u dit niet hebt gedaan bij het inschakelen
van uw apparaat.
• Slimme weegschaal*
- De slimme weegschaal aan uw i Companion touch xl koppelen:
De weegschalen die u bij uw i Companion XL zitten, zijn al gekoppeld waardoor u niets hoeft te doen.
Voor afzonderlijk gekochte weegschalen gaat u naar de instellingen van uw product en klikt u
vervolgens op 'Mijn accessoires'
gsc
gsc
. Geef aan dat u een weegschaal hebt. Uw weegschaal is nu
gekoppeld.
- Gebruik van de slimme weegschaal
Wanneer de knop 'slimme weegschaal' op uw i-Companion touch xl gaat branden, betekent dit dat
u de ingrediënten voor een bepaald recept kunt wegen.
Druk op het weegschaalpictogram en leg de ingrediënten die u wilt wegen vervolgens op uw
weegschaal.
!! De weegschaal wordt na 30 seconden inactiviteit in de stand-bystand gezet. Druk op OK om hem
opnieuw aan te zetten.
3 functies van de weegschaal:
- Wegen vooraf: u kunt al uw ingrediënten wegen voordat u uw recept gaat maken.
- Wegen tijdens de bereiding: u kunt uw ingrediënten tijdens de bereiding van een gerecht, voor iedere
nieuwe stap, wegen.
- Wegen zonder bereiding: kies een of meerdere ingrediënten in uw koelkast en selecteer deze in uw
Companion-app dankzij de zoekbalk. Druk op het weegschaalpictogram op uw i-Companion touch xl
en leg uw ingrediënten op uw weegschaal. U krijgt nu een lijst met recepten te zien die aansluiten
bij de gewogen hoeveelheden.
• Bijwerken
Om ervoor te zorgen dat de functies van uw product optimaal blijven functioneren, geeft uw product
het aan wanneer er een update is. Er verschijnt dan een venster op het scherm met de vraag of u
de meest recente update wilt installeren. Klik op accepteren en i-Companion touch xl zal worden
bijgewerkt.
* Afhankelijk
van het model
U kunt uw i-Companion touch xl ook gebruiken wanneer deze niet is verbonden. De functies hieronder
zijn beschikbaar in de niet-verbonden modus:
• Receptenbibliotheek
Bekijk alle informatie over de receptenbibliotheek op pagina 12.
In de receptenbibliotheek staan 310 recepten.
• Programma's
Bekijk alle informatie over het gebruik van de automatische programma’s op pagina 13.
• Handmatige modus
Bekijk alle informatie over het gebruik van de handmatige modus op pagina 16.
GEBRUIK IN DE NIET-VERBONDEN MODUS
•Reinig de kom na gebruik
onmiddellijk. Dompel het
apparaat nooit onder. Houd
het motorblok (A) niet onder
stromend water.
Trek de stekker van het apparaat na gebruik uit
het stopcontact.
Reiniging van de kom na gebruik:
• Druk op de trekkers (C2) en verwijder de kom (C).
• Plaats de kom op een vlakke ondergrond.
• Ontgrendel het deksel door het met de klok mee
een kwartslag te draaien. Verwijder het deksel er
voorzichtig.
• Wees voorzichtig wanneer u de messen
van het ultrablade-hakmes (E1) en het mes
voor kneden/vermalen (E4) schoonmaakt en
wanneer u de kom leegt. De messen zijn zeer
scherp.
• Wanneer de onderdelen zijn afgekoeld:
- demonteer de aandrijfas (C3), de afdichtingsring
(C4) en de vergrendelingsring (C5) (zie afb. 13).
- reinig de kom (C), de aandrijfas (C3), de
afdichtingsring (C4), de vergrendelingsring
(C5), de accessoires (E1), (E2), (E3), (E4), (E5),
de stoomregeldop (D1), het deksel (D2) , de
afdichtingsringhouder (D4) en de afdichtingsring
(D3) met behulp van een spons en warm zeepwater.
• Spoel deze onderdelen onder stromend water af.
• Als de onderdelen zeer vuil zijn, laat ze dan
enkele uren in zeepwater weken en krab ze indien
nodig met een spatel (F) of schuurspons schoon.
• Bij kalkaanslag in de kom kunt u een schuurspons
gebruiken die indien nodig met witte azijn is
doordrenkt.
• Om het uiterlijk en de levensduur van het glazen
scherm te beschermen, reinigt u het met de zachte
kant van een spons om krassen te voorkomen.
HET APPARAAT REINIGEN

42
43
NLNL • Gebruik een vochtige doek voor het reinigen
van het motorblok (A). Droog het zorgvuldig af.
• De reiniging van de kom, het deksel en de
accessoires is eenvoudig doordat deze in de
afwasmachine mogen, met uitzondering van de
aandrijfas (C3 en C4) en de vergrendelingsring
(C5) (zie afb. 14).
• De accessoires, de aandrijfas en de onderdelen
van het deksel kunnen licht verkleuren als u
bepaalde ingrediënten gebruikt zoals curry,
wortelsap enz. Dit is niet schadelijk voor uw
gezondheid of voor de werking van het apparaat.
Om dit te voorkomen moet u de onderdelen na
gebruik snel reinigen.
• Alvorens de kom (C) opnieuw te gebruiken, moet
u ervoor zorgen dat de elektrische onderdelen
onder op de kom schoon en droog zijn.
• Voor een langdurig mooi uiterlijk en lange
levensduur van het deksel van uw apparaat, was
het met de hand. Gebruik nooit een schuursponsje
om krassen te vermijden.
• Om het materiaal van de kom (C) niet
te beschadigen, moet u zich aan de
gebruiksaanwijzing van de vaatwasser houden
en de dosering van zout of afwasmiddel niet
verhogen.
Uw apparaat is standaard voorzien van
elektronische bescherming van de
motor om de levensduur ervan te garan-
deren. Deze elektronische beveiliging
beschermt tegen abnormaal gebruik; zo wordt
uw motor perfect beschermd.
Onder bepaalde ernstige gebruiksomstandighe-
den die niet in overeenstemming zijn met de
aanbevelingen in de handleiding (zie tabel 'UW
APPARAAT': te grote hoeveelheden en/of abnor-
maal lange gebruiksperiode en/of de bereiding van
te veel recepten achter elkaar) treedt de elektro-
nische bescherming in werking om de motor te
beschermen; in dat geval stopt het apparaat en
verschijnt op het scherm een veiligheidsbericht
om aan te geven dat het apparaat tijdelijk niet
meer operationeel is.
Ga als volgt te werk als er een 'veiligheidsbericht'
op uw scherm verschijnt en het apparaat wordt
uitgeschakeld:
• Laat de stekker in het stopcontact zitten en de
0/I-schakelaar in stand 1 'ON' (G) staan.
• Volg de aanbevelingen op uw scherm om uw
voorbereiding aan te passen (zie tabel 'UW AP-
PARAAT': hoeveelheid ingrediënten/bereidingstijd
van het recept/temperatuur/type accessoire).
De klantenservice staat tot uw beschikking voor
alle vragen (zie contactgegevens in garantie-
boekje).
BELANGRIJK: BEVEILIGING VAN HET APPARAAT
UW APPARAAT WERKT NIET. WAT NU?
PROBLEMEN OORZAKEN OPLOSSINGEN
Bereiding niet gaar
De bereidingstijden zijn ter indicatie
en zijn in de meeste gevallen
voldoende voor een goed resultaat.
Toch zijn er bepaalde factoren die de
bereidingstijd kunnen beïnvloeden:
- de grootte van de ingrediënten (al
dan niet gesneden)
- de hoeveelheid ingrediënten
- de soorten groenten, de rijpheid
van de groenten
- of de ingrediënten bevroren zijn
Verleng de bereidingstijd door op de toets + op
het scherm te drukken (B6).
Snijd de ingrediënten in kleinere stukken.
Stoomregeldop verkeerd aangebracht
of afwezig
Plaats de stoomregeldop in de stand 'max',
zodat een maximale warmte in de kom kan
worden verkregen. Dit kan bij alle bereidingen
(soepen, stoomkoken, enz.).
Deze stand voorkomt ook spatten tijdens het
mengen.
Dankzij de 'mini-stand' kan een maximale
hoeveelheid stoom ontsnappen en krijgen
gerechten en sauzen
een betere consistentie (risotto, nagerechten,
sauzen, enz.).
Onvoldoende stoom
Verkeerde hoeveelheid water in de
kom.
Te grote stukken.
De hoeveelheid water in de kom moet 0,7
l zijn. U kunt ook de handmatige modus
gebruiken door de temperatuur op 120°C
in te stellen en de bereidingstijd te kiezen,
afhankelijk van de hoeveelheid en het type
ingrediënten. Snijd de ingrediënten in
kleinere stukken.
Moeilijkheden bij de
bereiding van bepaalde
recepten
Ongeschikte recepten
Uw persoonlijke recepten of recepten die
u op internet hebt gevonden, zijn mogelijk
niet geschikt voor uw apparaat en de
accessoires (hoeveelheid, bereidingstijd,
ongeschikte accessoires): zorg ervoor dat u
zich aan de gebruiksvoorschriften van deze
gebruiksaanwijzing houdt alvorens met uw
recept te beginnen.
Het apparaat werkt
niet.
De stekker zit niet in het stopcontact. Steek de stekker in het stopcontact.
Mijn B6-scherm blijft zwart/
Uw apparaat staat in de stand-
bystand
Druk op een van de toetsen op het
bedieningspaneel (B1 tot B5)
De schakelaar (G) staat in stand 0. Zet de schakelaar in stand 1.
De kom of het deksel is niet correct
geplaatst of vergrendeld.
Controleer of de kom en het deksel correct
zijn geplaatst volgens de aanwijzingen in de
handleiding en zijn vergrendeld.
Het deksel kan niet
worden vergrendeld. Het deksel is niet compleet.
Controleer of de afdichtingsring correct op de
afdichtingsringhouder is geplaatst en of de
afdichtingsringhouder correct op het deksel is
gemonteerd.

44
45
NLNL PROBLEMEN OORZAKEN OPLOSSINGEN
Te veel trillingen.
Het apparaat staat niet op een
vlakke ondergrond en is niet stabiel. Plaats het apparaat op een vlakke ondergrond.
De hoeveelheid ingrediënten is te
groot. Verminder de hoeveelheid ingrediënten.
Storing accessoires. Controleer of u het correcte accessoire
gebruikt.
Zacht geluid tijdens het
gebruik
De aandrijfas van uw apparaat
kan geluid maken bij minder
hoge snelheden of met bepaalde
ingrediënten (rijst, enz.)
Dit is een voorbijgaand verschijnsel dat geen
gevolgen heeft voor de levensduur van uw
apparaat. Het zal verminderen of verdwijnen
nadat u de aandrijfas een paar keer hebt
gebruikt en gereinigd (zie de paragraaf 'Het
apparaat reinigen').
Hard geluid tijdens het
gebruik Gebruik van een verkeerd accessoire
Zorg ervoor dat u een geschikt accessoire
gebruikt (bijv.: gebruik geen klopper E3 om
deeg te kneden of te mengen, maar gebruik
het mes E4). Zie hiervoor de stappen in het
recept en de aanwijzingen voor het gebruik die
in deze gebruiksaanwijzing worden gegeven.
Lekkage via het deksel.
De hoeveelheid ingrediënten is te
groot. Verminder de hoeveelheid ingrediënten.
Het deksel is niet correct
geplaatst of vergrendeld. Vergrendel het deksel correct op de kom.
De afdichtingsring
is niet aanwezig.
Plaats de afdichtingsring op de
afdichtingsringhouder en klik het geheel op
het deksel.
De afdichtingsring is gebarsten of
beschadigd.
Vervang de afdichtingsring en neem contact op
met een erkend servicecentrum.
Storing accessoires. Controleer of u het correcte accessoire
gebruikt.
Lekkage via de aandrijfas
van de kom.
De afdichtingsring is niet correct
geplaatst. Plaats de afdichtingsring op de juiste wijze.
De afdichtingsring is beschadigd. Neem contact op met een erkend servicecen-
trum.
De vergrendelingsring (C5) is niet
goed vergrendeld. Vergrendel de ring goed (C5).
De messen draaien niet
goed.
De stukken zijn te groot
of te hard.
Maak de stukken kleine of verminder de
hoeveelheid ingrediënten.
Voeg vloeistof toe.
Motorgeur.
Bij het eerste gebruik van het
apparaat of wanneer de motor
wordt overbelast door een te grote
hoeveelheid ingrediënten
of te harde of te grote stukken.
Laat de motor afkoelen (ongeveer 30 minuten)
en verminder de hoeveelheid ingrediënten in
de kom.
Weergave veiligheidsbericht
Weer
Weer
Weer
Weer
Weer
Weer
Slechte vergrendeling van de kom of
het deksel
Controleer, alvorens het apparaat aan te
zetten, of de kom correct op het motorblok
is geplaatst en vergrendeld en of het
deksel correct op de kom is geplaatst en
vergrendeld. Neem contact op met een erkend
servicecentrum als het probleem zich blijft
voordoen.
Het deksel is op de kom geplaatst
en vergrendeld in stand 'bereiding
zonder deksel'
Ontgrendel het deksel alvorens het programma
te starten. Neem contact op met een erkend
servicecentrum als het probleem zich blijft
voordoen.
PROBLEMEN OORZAKEN OPLOSSINGEN
De beveiliging van de
vergrendeling van het
deksel is actief gebleven
(pen steekt uit) en zorgt
ervoor dat het deksel niet
kan worden vergrendeld.
Het apparaat is tijdens de
bereiding uitgeschakeld doordat
de I/0-schakelaar op 0 is gezet
of doordat de stekker tijdens de
bereiding uit het stopcontact is
gehaald.
Het volstaat om de I/0-schakelaar op I te
zetten om de keukenmachine weer aan te
zetten en de beveiliging van de vergrendeling
van het deksel in te schakelen. De pen komt
weer in de oorspronkelijke stand te staan en u
kunt het deksel nu vergrendelen.
Foutmelding SECU Rotor geblokkeerd
Leeg de kom, laat afkoelen en
probeer het opnieuw. Indien het probleem zich
blijft voordoen,
neem dan contact op met de service na
verkoop.
Foutmelding ERR39 Kom oververhit
Hij heeft een korte pauze nodig... Laat
de kom afkoelen. Indien het probleem zich
blijft voordoen,
neem dan contact op met de service na
verkoop.
Foutmelding SECU Motor oververhit Laat de keukenmachine 30 min. afkoelen en
verminder de hoeveelheid in de kom.
Foutmelding SECU Instabiliteit van de keukenmachine De keukenmachine is gestopt omdat hij niet
stabiel staat. Verminder de
hoeveelheid in de kom
ERR34, ERR21, ERR22 Uw Companion heeft het
te warm... Haal de stekker uit het stopcontact en
neem contact op met de service na verkoop.
ERR 31 Deksel kan niet worden vergrendeld Neem contact op met de service na verkoop.
ERR35 Uw Companion ziet het even
niet meer zitten...
Hij heeft een korte pauze nodig...
Haal de stekker uit het stopcontact en steek
hem er vervolgens weer in.
Neem contact op met de service na verkoop,
als het probleem zich blijft voordoen.
ERR37, ERR03, ERR01
Uw Companion ziet het even niet
meer zitten...
Neem contact op met de service na verkoop.
ERR23 Uw Companion is
oververhit … Neem contact op met de service na verkoop.
ERR02, ERR30 Verbindingsprobleem
Uw Companion slaagt er niet in
verbinding te maken met wifi... Haal de
stekker uit het stopcontact
en steek hem er vervolgens weer in. Als het
probleem zich blijft voordoen,
neem dan contact op met de service na
verkoop.
Weergave Het product is niet verbonden met
wifi
Controleer uw wifiverbinding of haal de
stekker uit het stopcontact en steek hem er
vervolgens weer in. Neem contact op met de
service na verkoop als het probleem zich blijft
voordoen.
Weergave Het product is verbinding aan het
maken met wifi Wacht tot het logo wordt weergegeve
UI-1, UI-3 Uw product kan bepaalde
wifigegevens niet ophalen.
Als het probleem zich blijft voordoen, kan het
wifisignaal te zwak zijn. U kunt proberen uw
product dichter bij de router te zetten of een
wifiversterker in de buurt van uw product te
plaatsen om de kwaliteit van het wifisignaal
te verbeteren.
UI-2, UI-4, UI-5, UI-6 Uw product kan bepaalde lokale of
wifigegevens niet ophalen.
Als uw product niet is verbonden, kunt u
proberen het te verbinden en de synchronisatie
van de gegevens te starten. Als uw product is
verbonden, kunt u proberen de kwaliteit van
het signaal te verbeteren (zie de vorige regel)

46
NL Werkt het apparaat nog steeds niet?
Neem contact op met een erkend servicecentrum (zie de lijst in het serviceboekje).
• Vernietiging van de verpakking en het apparaat
De verpakking bestaat alleen uit materialen die ongevaarlijk voor het milieu zijn en
overeenkomstig de geldende bepalingen betreffende recycling kunnen worden vernietigd.
Neem contact op met uw gemeente voordat u uw apparaat weggooit.
• Elektronische of elektrische producten aan het einde van de levenscyclus:
Bescherm het milieu!
Uw apparaat bevat vele materialen die voor recycling/hergebruik geschikt zijn.
Niet in de vuilnisbak gooien of naar een stortplaats brengen, maar naar een door uw ge-
meente opgezet centraal inzamelpunt brengen.
RECYCLING
* Het merk en de Bluetooth®-logo's zijn gedeponeerde merken van Bluetooth GIS, Inc. en voor het gebruik ervan door de Groupe SEB is een
vergunning verleend.
Google Play en Android zijn merken van Google Inc.
Apple en het Apple-logo zijn merken van Apple Inc. die in de VS en andere landen zijn gedeponeerd. App Store is een handelsmerk van Apple Inc.
WOORDENLIJST
Koppelen: Het samenvoegen of koppelen van twee apparaten.
Dit gebeurt wanneer u uw smartphone of tablet en i-Companion touch xl de eerste keer met elkaar verbindt.
Synchroniseren: Het bijwerken van informatie. De app en i-Companion touch xl worden gesynchroniseerd om
informatie te kunnen uitwisselen wanneer ze gekoppeld zijn.
Koppelen: Een verbinding tot stand brengen tussen de app (smartphone/tablet) en het apparaat (i-Companion touch xl). Dit is
noodzakelijk voor de synchronisatie.
Cookies: Dit zijn gebruiksgegevens die aan Moulinex worden verstrekt om de app te verbeteren.

47
EN
Personal safety
• Read the instruction manual carefully
before using your appliance for the first
time and keep them in a safe place.
The manufacturer shall not accept any
liability in the event of any use that
does not comply with the instructions.
• Always disconnect the appliance from
the power supply if you are to leave
it unattended and before assembling,
disassembling and cleaning. Do
not let children use the appliance
unsupervised.
• This appliance should not be used by
children. Keep the appliance and its
cord out of reach of children.
• This appliance is not intended for
use by persons (including children)
with reduced physical, sensory
or mental capabilities, or lack of
experience and knowledge, unless
they have been given supervision
or instruction concerning use of the
appliance by a person responsiblefor
their safety. Children should be
supervised to ensure that they do not
play withthe appliance.
• Keep your appliance out of reach of
children.
• When using your
appliance, some parts
will become very hot
(stainless steel sections
of the bowl and cap, detachable
spindle, transparent parts of the lid,
metal parts under the bowl, basket).
This may lead to burns. Handle the
appliance using its non-conducting
plastic parts (handles, motor unit).
• Accessible surfaces may heat up
when the appliance is in operation.
• The appliance is not designed to be
switched on using an external timer
or a separate remote control system.
• Do not use your appliance if it is
not working properly, if it has been
damaged, or if the power cord or plug is
damaged. To avoid any risk of hazards,
the power cord must be replaced at an
authorised service centre (see list in
the service booklet).
• The appliance must not be immersed
in water. Do not place the motor unit
(A) under running water.
• Your machine is exclusively intended
for interior use in domestic settings,
at an altitude less than 2000 m. The
manufacturer accepts no liability
and reserves the right to void the
warranty in the event of commercial or
inappropriate use, or if the instructions
have not been followed.
SAFETY INSTRUCTIONS:

48 49
ENEN
• This appliance has not been designed
for use in the following cases, which
are not covered by the warranty:
- Kitchen work areas in shops, offices
and other working environments.
- Kitchenettes used by employees in
shops, offices and other professional
environments.
- On farms;
- Use by guests in hotels, motels and
other residential environments;
- In bed and breakfast environments.
WARNING:
Your appliance releases
steam which can cause
burns.
Handle the lid with caution by its
handles or cap (using gloves or a
pot-holder). Handle the cap using
the central part.
• Do not operate the appliance if
the seal is not correctly positioned
in the seal holder and/or if the
seal is not correctly positioned
on the lid. The appliance must be
operated with the cap inserted
into the lid opening (except where
there are specific instructions for
a recipe).
WARNING:
Injuries may occur if
the appliance is used
incorrectly.
Take care with the
sharp edges of the Ultrablade knife
(E1) and the kneading/grinding
blade (E4) when cleaning them and
when emptying the bowl—they are
extremely sharp.
Store the Ultrablade knife (E1) in
the bowl after each use.
• Be careful when pouring hot liquid
into the food processor; this may
be released from the appliance
due to sudden boiling.
WARNING: Take care when handling
your appliance (cleaning, filling and
pouring): Ensure that no liquid is
spilled onto the connectors.
WARNING: Some foods with a skin
(whole sausages, tongue, poultry,
etc.) or large pieces of meat can
spit when boiling liquids become
trapped. We therefore advise you
to prick them before cooking using
a knife or fork.
WARNING: The surface of the heating
element retains residual heat after
use.
When your appliance is heating
up and until it has cooled down
completely, ensure that you only
touch the handles (locks C2, lid
handle D2 and lid cap D1).
• Refer to the instruction manual to
set the speeds and operating times
for each accessory and for each
programme.
Refer to the instruction manual for
details on assembling and fitting the
accessories to the appliance.
Refer to the instruction manual for
details on cleaning and maintaining
your appliance.
Always follow the cleaning
instructions when cleaning your
appliance:
• Unplug the appliance.
• Do not clean the appliance when it
is hot.
• Clean with a damp cloth or sponge.
• Do not put the appliance in water or
under running water.
EUROPEAN MARKETS ONLY:
• Keep the appliance and its cord out
of reach of children under 8 years
of age. Children should not use the
appliance as a toy.
• This appliance may be used by
persons with reduced physical,
sensory or mental capabilities, or
whose experience or knowledge
is not sufficient, provided they
are supervised or have received
instructions to use the appliance
safely and provided they understand
the dangers.
• This appliance can be used by
children aged 8 years or over,
provided they are supervised or they
have received instructions on how
to use the appliance in total safety
and provided they fully understand
the dangers related to the appliance.
Cleaning and maintenance of the
appliance should not be performed
by children without supervision,
unless they are 8 years of age or
older and under the supervision of
an adult.
Electrical connection
• The appliance must be connected to
an earthed electrical socket.
• The appliance is designed to operate
on alternating current only. Check
that your mains voltage matches the
voltage indicated on the appliance's
identification plate.
• Any connection errors will void the
warranty.
• Do not pull on the cord to unplug
the appliance.
• Do not place the appliance, power
cord or plug in water. Do not place
the power cord or plug near to or in
contact with the heat-conducting
parts of the appliance, near a heat
source or on a sharp edge.
Incorrect use
• Do not touch the lid until the
appliance has completely stopped
(stop key); wait until the food being
mixed has stopped moving.

50 51
ENEN
• Always add solid ingredients into
the bowl first before adding liquid
ingredients (see Fig. 11); do not
exceed the MAX marker on the inside
of the bowl (see Fig. 11). If the
bowl is too full, boiling water may
escape.
• Note: During the Steam cooking
programme, ensure that you add
0.7 litres of water (see Fig. 4.2).
• Do not place your fingers or any
other objects in the bowl while the
appliance is in operation.
• Do not use the bowl as a container
(for storage, freezing, sterilisation).
• Place the appliance on a stable,
heat-resistant, clean and dry work
surface.
• Do not place the appliance near walls
or cabinets, as the steam produced
may cause damage.
• Do not place your appliance near
a heat source that is in operation
(hob, electric household appliance,
etc.).
• Do not cover the lid with a cloth
or other object and do not try to
plug the lid opening—always use
the steam regulator cap.
• Do not allow your hair, scarf, tie,
etc. to hang over the bowl while the
appliance is in operation.
• Do not put accessories into the
microwave.
• Do not use the appliance outdoors.
• Do not exceed the maximum quantity
indicated in the instructions.
• Store the appliance after it has
cooled down.
• Do not place the bowl into the
freezer to cool—always use the
refrigerator.
• Do not leave the spatula in oil at
150°C for longer than 20 minutes.
AFTER-SALES SERVICE
• For your safety, do not use
accessories or spare parts other than
those provided by authorised after-
sales service centres.
• Any operation other than cleaning
or routine maintenance should be
performed by an approved service
centre.
• Refer to the table "What to do if your
appliance does not work " at the end
of the instruction manual.
This leaflet contains some tips for making the most of your appliance: preparing soups,
stews, steamed dishes and doughs/pastry.
APPLIANCE DESCRIPTION:
A Motor unit
B Touch keys*
B1: Cancel
B2: Scales (depending on model)
B3: START/STOP
B4: Video
B5: Settings
B6: Touch screen
C Bowl assembly
C1: Stainless steel bowl
C2: Locks
C3: Detachable spindle
C4: Sealing ring
C5: Spindle locking ring
D Lid assembly
D1: Cap/Stopper for regulating steam
extraction
D2: Lid
D3: Seal holder
D4: Sealing ring
E Accessories
E0: Accessory storage box
E1: Ultrablade knife
E2: Mixer
E3: Whisk
E4: Kneading/grinding blade
E5: Steam basket
F Spatula
G 0/I switch for switching off the power
supply to your appliance
H Cleaning brush
TECHNICAL DATA FOR THE APPLIANCE:
Power: 1550 W (1000 W: Heating resistor/550 W: motor)
Temperature range: 30° to 150°C
Adjustable in 5°C increments.
Range of operating time: 5 seconds to 2 hours
Adjustable in increments of 5 seconds min. to 1 minute max.
Number of speeds: 13 - 2 intermittent speeds:
Speed 1 (5 secs On/20 secs Off).
Speed 2 (10 secs On/10 secs Off).
- 10 continuous progressive speeds
(speeds 3 to 12).
- 1 max intermittent speed (speed 13).
Frequency: 2412–2484 MHz
Maximum transmitted power: 20 dBm
Standby mode: The appliance goes into standby mode after 15 minutes of
inactivity.
To turn the machine back on, press one of the touch keys
(B1 to B5)
Power consumption in standby mode(s) when the product
is connected : 0.2 Wh
* Google Play and Android are trademarks of Google Inc.
Apple and the Apple logo are trademarks of Apple Inc., registered in the U.S. and in other countries. App Store is a service mark of Apple Inc.
* Icons are visible only when they are useful for operating your appliance.

52 53
ENEN YOUR APPLIANCE
The following accessories are provided with your appliance:
These accessories also feature gripping areas to make them easier to use during recipe preparation.
Chopper blade
E1 Mixing soups
3 min 3 L
Mixing fruit purées 40 secs 1 kg
Chopping vegetables 15 secs 0.6 kg
Chopping meat 30 secs 1 kg
Chopping fish 15 secs 1 kg
Do not use this accessory to chop hard ingredients; use the E4 kneading/grinding blade.
Mixer
This mixes cooked foods without damaging the ingredients.
This is very useful for browning stages early on during recipe preparation (risottos, soups).
E2 Browned dishes 5 min 500 g
Stews 45 min 3 L
Risottos 22 min 1.5 kg
Ratatouille, chutneys, pulses (for settings: see recipe booklet)
Whisk
9 max
E3 Whisked egg white 5/10 min 8
max
Mayonnaise, whipped cream 2/5 min 0.5 L
Sauces, creams to 1/20 min 1 L
Mashed potatoes to 1 min 1 L
Polenta to 1/16 min 1 L
Kneading/grinding blade
E4
Kneading white bread
dough
2 min
30 secs 1.2 kg
Kneading short crust pastry,
biscuit dough, speciality
bread
2 min
30 secs 1 kg
Kneading rich dough
(brioche, kugelhopf, etc.)
1 min
30 secs
2 min
0.8 kg
Mixing light batters (cakes,
etc.)
40 secs
3 min 1 kg
Grinding nuts 1 min 0.6 kg
Grinding hard ingredients 1 min 0.6 kg
Crushing ice 1 min 6 to
10
Pancake batter, waffle batter 1 min 1.5 L
Cap/Stopper
D1
Cap/Stopper for regulating steam extraction
Max (a) = steam cooking.
Min (b) = Risotto, egg custard desserts, sauces, etc.
The "min" position allows the maximum amount of
condensation to escape, giving dishes or sauces a
better consistency (risotto, egg custard desserts, sauces, etc.).
The "max" position retains the maximum amount of heat and
steam in the bowl for all cooking functions using steam (soups, etc.).
This position also prevents splashing when mixing.
Steam
basket
The cooking times for the steam basket are provided as a guide—in most cases they are a
reliable indicator of cooking times. However, certain factors will impact cooking times: the
size of vegetables (cut or uncut)/quantity of ingredients in the basket/variety and ripeness
of vegetables/amount of water in the bowl, which must correspond to the markings (0.7 L).
Ensure that the steam regulator cap is turned in the "max" direction (a). If the food is not
sufficiently cooked, you can add extra cooking time.
E5
Steaming vegetables, fish
or meat 20/40 min 1 kg
Chunky soups 3 min 3 L
P1 – Courgettes 20 min 800 g
P1 – Parsnips 25 min 800 g
P1 – White part of the leek 25 min 800 g
P1 – Broccoli 20 min 500 g
P1 – Fish 15 min
600 g (incl.
baking paper)
P2 – Potatoes 30 min 1 kg
P2 – Carrots 30 min 1 kg
P2 – Green beans 30 min 800 g
P2 – White meat 20 min
600 g (incl.
baking paper)
Detachable spindle
C3
You can brown food in the bowl without the lid on, allowing you to stir the food
and monitor the cooking process.
The COOKING WITHOUT LID function is not suitable for jams or milk-based
mixtures (risk of spillage)
OPERATION UP TO 130°C OPERATION FROM
135°C TO 150°C
Cooking with or without
the lid
Lid Close Open lid only
Accessories
All accessories for use with
the spindle
Only detachable
spindle
C3
Speed Yes No
Maximum time
- If the temperature is lower
than or equal to 100°C: 2 hr
- If the temperature is between
100°C and 130°C: 1 hr
- If the temperature
is higher than or
equal to 135°C:
20 min
!! Do not remove the detachable spindle immediately after using it. Pour water
into the empty bowl to cool it down.
* Depending on
model

54
55
ENEN INSTALLING THE BOWL, ACCESSORIES AND LID
ASSEMBLY
• Before first use, clean all parts (C, D, E, F,
H) in warm water using washing-up liquid;
however, do not clean not the motor unit (A).
Your bowl (C) is fitted with a spindle (C3) that
is removable to facilitate cleaning.
• Ensure that all packaging is removed before
use—in particular the protection between the
bowl (C) and the motor unit (A).
• Insert the sealing ring (D3) into the seal holder
(D4)(see Fig. 1), clip the assembly onto the
lid (D2) (see Fig. 2).
• Position the sealing ring (C4) on the spindle
(C3). Lock the assembly on the bowl base using
the locking ring (C5) (see Fig. 3). If you are
using the cooking without a lid mode, position
the sealing ring (C4) on the detachable
spindle (C3). Lock the assembly on the bowl
base using the locking ring (C5) (see Fig. 3).
• Position the selected accessory in the bowl:
- Place the accessories (E1, E2, E3 or E4)
on the spindle at the bottom of the bowl
(see Fig. 4.1);
- For steaming, place the steaming basket (E5)
inside the bowl, (see Fig. 4.3), having filled
the bowl beforehand with 0.7 L of cooking
liquid (water, sauce, etc.) (see Fig. 4.2).
• Place the ingredients inside the bowl or steam
basket.
Place the lid on the bowl (C), aligning the two
triangles (see Fig. 5); lock the cover, without
forcing it, by turning it in the direction of the
arrow (see Fig. 6).
• Place the steam regulator cap (D1) onto the
lid; there are three possible positions (see
Fig. 7).
• Position the bowl (C) on the motor unit (A)
until you hear a "click" (see Fig. 8).
The appliance will only start if the bowl and the
lid are correctly positioned and locked on the
motor unit.
If one or both of the components have been
incorrectly positioned or locked (see Fig.
10.1 and 10.2), a safety warning will appear
on the screen.
2),
2),
2),
YOUR APPLIANCE IS EQUIPPED WITH A LID
LOCKING SAFETY FEATURE
The lid is locked each time the appliance is
in operation. This prevents the lid from being
opened while a recipe is being prepared. Do
not attempt to force the lid open when it is
locked. This safety feature is deactivated each
time the appliance stops. If you have selected
a temperature of 50°C or higher and a speed of
5 or higher, a ten-second countdown will appear
on the control panel display. It is only possible
to open the lid once the countdown has ended.
1. FIRST-TIME USE
i-Companion Touch XL is a smart food processor that helps you make every meal a success. It offers
hundreds of free recipes, available in just a few taps.
With its intuitive, interactive touch screen, it lets you prepare a range of dishes in record time.
i-Companion Touch XL takes care of preparing, mixing and cooking your ingredients. It guides you
step-by-step through all stages of the recipes.
Follow the steps—it couldn't be easier!
Turn on your i-Companion Touch XL using the 0/I switch (see Fig. 9) and follow the instructions that
appear on the screen. Throughout each of the steps, the icon offers help with how to carry out
each step. A FAQ page is also available at www.moulinex.fr
Video tutorials are also available to help you get started with your appliance:
http://bit.ly/priseenmaincompanion
• Country-specific settings
The first time you use the appliance, you will access the country-specific settings.
1 Select your country 2 select your language
Once these two steps have been completed, a welcome screen will be displayed.
I-COMPANION TOUCH XL:
YOUR ASSISTANT FOR EVERYDAY COOKING
The following control keys will light up when they are available for use:
The centre key has 11 functions.
These functions vary depending
on the steps to be followed (start,
pause, next step, confirm, stop,
etc.)
If a video is available for the recipe
being prepared, you can play it by
tapping this key.
Cancel/Go back
Settings (changes to settings, WiFi
connection, recipe ingredients, etc.)
Using the connected scales*

56
57
ENEN • Internet connection
You can now connect your i-Companion Touch XL to your home Internet. You can complete this step
now by selecting "Now" or later on by selecting "Later".
You can perform this step later by accessing the settings for your i-Companion Touch XL from the
home screen.
An Internet connection is required to use the following features:
access to all Companion recipes, "My recipe books", "In my fridge", photos and videos as part of the
step-by-step guide for your recipes, product updates.
To connect your i-Companion Touch XL to the Internet, you must perform the following steps:
- Select your network (Can't access your network? Go to "Settings" then "WiFi Settings" then "Turn
on WiFi")
- Enter the password for your WiFi connection
- A "Connection in progress" screen will open while the connection is loading. This step may take a
few minutes.
- A "Congratulations!" screen will confirm that the connection has been established successfully
- Lastly, you will need to select your time zone
he he
What the WiFi connection indicators mean:
The product is not connected to WiFi.
The product is connecting to WiFi.
The product is connected to WiFi.
How-to videos for connecting your i-Companion Touch XL to your WiFi are available here:
http://bit.ly/priseenmaincompanion
• Linking the app
The Companion app lets you to keep an eye on your i-Companion Touch XL without needing to stay
close to it. You can link the appliance to your smartphone or tablet. This also lets you access your
recipes, wherever you are.
Please check that your smartphone/tablet WiFi function is connected to the Internet (WiFi/4G/3G,
etc.)
The i-Companion Touch XL must be plugged into a power outlet.
You can perform this step later by accessing the settings for your i-Companion Touch XL from the
home screen.
Linking to your smartphone/tablet is required for use of the following features:
"My recipe books", remote recipe progress tracking using a smartphone, sending recipes from your
smartphone/tablet to your i-Companion Touch XL
- Compatible devices:
A list of smartphone and tablet models that are compatible with i-Companion Touch XL can be found
at www.moulinex.com
- Downloading the app:
Download the Companion app. Downloadable for free from the App Store (iPhone/iPad) and Google
Play (Android).
Download from
the App Store
ANDROID APP ON
- Linking your account:
From the Companion app on your smartphone/tablet, select the i-Companion Touch XL product and
create an account, or sign in to your account if you already have one.
Your appliance will generate a code (the will appear on screen B6) that you will need to enter in your
Companion app.
If you want to link multiple smartphones/tablets with your i-Companion Touch XL, each app must be
connected to the same Companion user account.
My First recipe
When using the appliance for the first time, your i-Companion Touch XL will offer you the chance to
make a first recipe for you to get to grips with the appliance. Selecting "My First recipe" will provide
you with step-by-step instructions to guide you through the recipe.
This recipe will disappear from your home screen once it has been used, or after you have used your
i-Companion Touch XL ten times.
2. PRODUCT FEATURES
Your i-Companion Touch XL appliance has the option of being operated in "online" mode, but can also
be operated when in "offline" mode. It's also packed with features to help inspire you every day and
make every meal a success! 310 recipes are available in "offline" mode, while in "online" mode you
have access to hundreds of recipes!

58
59
ENEN
PROGRAMMES
Your appliance has 14 pre-stored automatic programmes:
1. Select the programme of your choice.
2. The pre-programmed settings can be modified
(depending on the chosen recipe, ingredients
and quantities prepared). Set the cooking
temperature, time and speed using the - and
+ keys
3. When you have finished changing your
settings, press the start key (B3) to start the
programme.
4. When the programme is complete, the
appliance beeps three times.
5. At the end of the Smooth Soup, Coarse
Texture Soup, Stew, Risotto, Sauce, Dessert,
Gentle Steam and High Steam programmes,
the appliance automatically switches to Keep
Warm mode for 45 minutes, during which time
the food is ready to serve. During the Stew,
Sauce, Dessert programmes and in manual
mode, the motor of the appliance operates
at a particular speed for the purpose of
preserving the consistency of the food mixture
and preventing it from sticking to the bottom
of the bowl. To end the keep warm function,
simply press the "Finished" key (B3). When
the Bread and Brioche programmes have
finished kneading, the appliance switches to
"dough rising" mode at 30°C for 40 minutes
to give the dough more volume. If the lid is
opened or the bowl is removed from its base
when a programme is running, the programme
will end. To stop this function, press the
"Settings" key and select "Reset".
6. When an automatic programme has started,
you have the option of stopping the machine
at any time by pressing the "Stop" key. The
automatic programme is then paused; you
can restart it by pressing "Start". If you have
entered the wrong programme and wish to
cancel, press the "Cancel/Go back" button.
7. The "Reheat" programme lets you reheat
cooked food in 20 min (adjustable from 5 to
60 min).
8. The "Rinse" programme helps you clean the
bowl more easily. Fill the bowl with 0.7 L of
water and one drop of washing-up liquid and
start the programme.
Sauce
programme
Stew
programmes
Soup
programmes
Steam
programmes
Dough
programme
Dessert
programme
Additional
programmes
Sauce Browned dish
Stew
Risotto
Smooth Soup
Soup With a
Coarse Texture
Gentle steam
High steam
Bread
Brioche
Cake
Dessert Reheat
Rinse
• Recipe search
From the home screen, you can search for recipes using the
"Search" key . You can search by the name of the recipe,
or by ingredients. Filters are also available for refining your
search.
• Recipe library
From the home screen, you can access the "Recipe library"
function. This function lets you access all recipes available in the Companion community.
In "offline" mode, a selection of pre-loaded recipe cards can be found on the home screen for each
function on your i-Companion Touch XL. You can start the step-by-step guidance directly from one
of these recipe cards.
You can also search for a recipe on the community by tapping the "Search" icon
To do this, simply type a dish or ingredient into the search bar and tap OK.
You can refine your search by adding filters (type of dish, preparation time and recipe origin).
• Recipe books (only available with WiFi connection)
You can access the "My recipe books" function from the home screen. This feature lets you find all
recipes you have previously saved as favourites via the Companion app on your smartphone/tablet.
To use this feature you will need to download the Companion app and create an account. You can
create and edit your recipe books on your smartphone/tablet and access them on your i-Companion
Touch XL when it is connected to WiFi. Once your i-Companion Touch XL is connected via WiFi, your
recipe books will automatically sync between your appliance and smartphone/tablet each time you
make a recipe.
• In my fridge (only available with WiFi connection)
You can access the "In my fridge" function from the home screen. This function lets you search for a
recipe using ingredients of your choice.
To find a recipe idea, tap on the "In my fridge" function and then add up to two ingredients. For each
ingredient, you can enter the quantities using the connected scales. Then tap "Search" and a list of
recipes will be displayed that match the settings you entered.

60 61
ENEN FIND OUT MORE ABOUT THE AUTOMATIC PROGRAMMES AVAILABLE
Automatic
programmes
Sauce Smooth Soup Soup With a
Coarse Texture Browned dish Stew Risotto
"Default" speed
(adjustable)
V6
From V2 to V8
10 pulses
and V12 for
2 min.
V7 to V10 for
30 secs V3 V1 V2
"Default"
temperature
(adjustable)
70°
(50°C to
100°C)
100°
(90°C to
100°C)
100°
(90°C to
100°C)
130°C
Not adjustable
95°
(80°C to
100°C)
95°
(80°C to
100°C)
"Default"
temperature
(adjustable)
8 min
(5 min to
40 min)
40 min
(20 min to
60 min)
45 min
(20 min to
60 min)
5 min
(2 min to
15 min)
45 min
(10 min to
2 hr)
20 min
(10 min to
2 hr)
"Default"
"Keep warm"
function at the end
of the programme
45 min 45 min 45 min 45 min 45 min
Example
recipes
Hollandaise
sauce Pumpkin soup Coarse
vegetable soup
Steamed
vegetables
Beef
bourguignon Risotto
Compatible
accessories
Some recipes can cause unexpected overflow due to the formation of bubbles, especially when
using frozen vegetables. In this case, you will need to reduce volumes accordingly.
Automatic
programmes
Gentle
steam
High
steam Bread Brioche Cake Dessert Reheat Rinse
"Default"
speed
(adjustable)
V5 for
2 min
30 secs
V5 for
1 min
30 secs,
then V6
for 2 min.
V3 for
40 secs,
then V9
for 3 min.
V4
(from V2 to
V8)
V2
(from V2 to
V6)
V8
(from V5 to
V8)
"Default"
temperature
(adjustable)
100°C
(not
adjustable)
100°C
(not
adjustable)
90°C
(50°C to
110°C)
90°C
(70°C to
100°C)
80°C
(not
adjustable)
"Default"
temperature
(adjustable)
30 min
(1 min to
60 min)
35 min
(1 min to
60 min)
2 min
30 secs
(30 secs
to 2 min
30 secs)
3 min
30 secs
(30 secs
to 3 min
30 secs)
30 min
40 secs
(1 min
40 secs
to 3 min
40 secs)
15 min
(5 min to
60 min)
20 min
(5 min to
60 min)
5 min
(1 min to
10 min)
"Default"
"Keep warm"
function at
the end of the
programme
45 min 45 min 45 min
"Default" 30°C
dough rising
function at
the end of the
programme
40 min 40 min
Example
recipes
Steamed
foie gras
Steamed
carrot
purée
Bread Brioche Fruit cake Pastry
cream
0.7 L of
water +
1 drop of
washing-up
liquid
Compatible
accessories

62
63
ENEN • Manual mode
You can customise the speed, temperature and cooking time settings of your i-Companion Touch XL
for your own recipes.
You can access the "Manual mode" function from the home screen.
Selection of motor speed.
2 intermittent speeds, 10 progressive continuous speeds and 1 max. intermittent
speed (V13).
Selection of cooking temperature.
From 30°C to 150°C.
Selection of operating time.
From 5 seconds to 2 hours.
Increased speed, cooking temperature and time.
Reduced speed, cooking temperature and time.
Instructions for use:
Your appliance is equipped with a microprocessor that controls and monitors its stability. In cases
of instability, the motor rotation speed will be reduced automatically; if this instability continues,
the motor will stop and a safety message will be displayed on your screen.
• Check that there are not too many ingredients and that the selected speed is appropriate.
• Check that you are using the recommended accessory.
• Then restart your appliance as normal.
• Settings
You can access the "Settings" function from the home screen.
This function allows you to update the data stored during your first use of your i-Companion Touch XL.
You can also connect your appliance to WiFi or link it to the app if you did not do so when you first
used your appliance.
• Connected scales*
- Linking the connected scales accessory to your i-Companion Touch XL:
Where scales are supplied with your i-Companion Touch XL, this has already been linked to the
appliance; you do not need to do anything further.
For scales that have purchased separately, go to your product settings and tap "My accessories".
Lastly, select that you have a scales accessory. Your scales accessory is now linked.
- Using the connected scales accessory
When the connected scales key lights up on your i-Companion Touch XL, you can weigh your
ingredients during the recipe preparation process.
To do this, press the scales icon and place the ingredients to be weighed on your scales accessory.
!! The scales enter into standby mode after 30 seconds of inactivity. To turn it back on, press OK.
There are three possible uses for the scales:
- Weighing during preparation: You can weigh all of your ingredients before starting your recipe.
- Weighing throughout a recipe: You can weigh your ingredients while making your recipe, at the
beginning of each new step.
- Free weighing: Choose one or more ingredients from your fridge and select them in your Companion
app using the search bar. Press the scales logo on your i-Companion Touch XL, then place your
ingredients on the scales accessory: You can then access a list of recipes for your weighed quantities.
• Updates
To ensure that the product features function optimally, your product will offer you the option of
performing updates. To do this, a window will appear on the screen and will prompt you to accept/
not accept the installation of the latest available update. Tap accept and your i-Companion Touch XL
will perform the update.
*Depending on
model

64
65
ENEN
You can use your i-Companion Touch XL when in offline mode. The below functions are available in
offline mode:
• Recipe library
Detailed information on the Recipe library can be found on page 12.
The Recipe library gives you access to 310 recipes.
• Programmes
Detailed information on the use of automatic programmes can be found on page 13.
• Manual mode
Detailed information on the use of Manual mode can be found on page 16.
OFFLINE MODE
•Clean the bowl immediately after
use. The appliance must not be
immersed in water. Do not place
the motor unit (A) under running
water.
After use, unplug the appliance.
Cleaning your bowl after use:
• Press on the locks (C2) and lift the bowl
assembly (C).
• Place the bowl on a flat surface.
• Unlock the lid by turning it a quarter of a turn in
a clockwise direction. Remove the lid carefully.
• Take care with the sharp edges of the
Ultrablade knife (E1) and the kneading/
grinding blade (E4) when cleaning them and
when emptying the bowl—they are extremely
sharp.
• When the parts have cooled down:
- Remove the spindle (C3), the seal (C4) and the
locking ring (C5) (see Fig. 13).
- Clean the bowl (C), spindle (C3), seal (C4),
locking ring (C5), accessories (E1), (E2), (E3),
(E4), (E5), steam regulator cap (D1), lid (D2),
sealing ring (D4) and seal holder (D3), using a
sponge and warm, soapy water.
• Rinse each of the parts under running water.
• For food stuck in the bowl, soak for several hours
with water with added washing-up liquid and
scrape off any residue where required using the
spatula (F) or with the rough side of a sponge.
• In cases of limescale in the bowl, use the rough
side of a sponge, soaked in white vinegar if
necessary.
• To maintain the appearance and lifespan of the
glass screen, clean it using a sponge—do not
use the abrasive side in order to avoid scratches.
CLEANING THE APPLIANCE
• Use a damp cloth to clean the motor unit (A).
Dry off thoroughly.
• For easier cleaning, please note that the bowl,
lid assembly and accessories are dishwasher-safe,
with the exception of the spindle (C3 and C4) and
the locking ring (C5) (see Fig. 14).
• The accessories, detachable spindle and lid
components may become slightly discoloured
when certain ingredients are used, (curry, carrot
juice, etc.). This does not pose a risk to your
health and will not affect the operation of
your appliance. To avoid this, clean these parts
immediately after use.
• Before reusing your bowl assembly (C), always
ensure that the electrical contacts under the bowl
are clean and dry.
• To maintain the appearance and lifespan of the
lid of your appliance, wash it by hand. Do not
use the abrasive side of sponges, as this could
lead to scratches.
• To avoid damaging the bowl (C), ensure that
you follow the operating instructions for your
dishwasher; do not increase the amount of salt
or dishwasher product.
Your appliance is equipped, as standard,
with electronic motor protection devices
to ensure a long lifespan. This elec-
tronic security system safeguards the motor
against abnormal use, meaning your motor is
completely protected.
Under certain, very extreme operating conditions
that do not comply with the recommendations
contained in the manual (see "YOUR APPLIANCE"
table: volumes potentially too big and/or unusu-
ally long operating time and/or not enough time
allowed between recipes), the electronic pro-
tection system will be triggered to protect the
motor; in this case, the appliance will stop and
a "security message" will appear on the screen
to indicate that the appliance has temporarily
stopped working.
If a "security message" appears on your screen
and your appliance stops operating, proceed as
follows:
• Leave your appliance plugged in and the 0/I
switch in position 1 "ON" (G).
• Refer to the on-screen recommendations to
modify your programme settings (see "YOUR AP-
PLIANCE" table for ingredient quantities/cooking
time/temperature/accessory type).
Our Customer service department is available in
case of any questions (see contact information in
the warranty booklet).
IMPORTANT: APPLIANCE ENTERING SECURITY MODE

66
67
ENEN WHAT TO DO IF YOUR APPLIANCE DOES NOT WORK
PROBLEMS CAUSES SOLUTIONS
Food is insufficiently
cooked
The cooking times provided are
intended as a guide—in most cases
they are a reliable indicator of
cooking times.
However, certain factors will impact
cooking times:
- the size of the ingredients food (cut
or not cut)
- the volume of ingredients
- the variety and ripeness of
vegetables
- whether the ingredients are frozen,
etc.
Add cooking time by pressing the + key on the
display (B6).
Use smaller volumes of ingredients.
Steam regulator cap not correctly
positioned or not in place
Position the steam regulator cap in the "max"
position, this position retains the maximum
amount of heat in the bowl for all cooking
functions (soups, steaming, etc.).
This position also prevents splashing when
mixing.
The "low steam setting" position allows the
maximum amount of condensation to escape,
giving dishes or sauces a
better consistency (risotto, egg custard
desserts, sauces, etc.).
Steamed food is
insufficiently cooked
Incorrect amount of water in the
bowl.
Volume of ingredients too high.
The quantity of water in the bowl must
correspond to the markings (0.7 L).
You can also use manual mode by selecting
a temperature of 120°C and a cooking time
depending on the quantity and type of
ingredients.
Use smaller volumes of ingredients.
Difficulties when
making certain recipes Unsuitable recipes
Your recipes—whether personal or found on
the Internet—may not be suitable for your
appliance and its accessories (quantities,
cooking times, cooking time, unsuitable
accessories): Before starting your recipe,
ensure that you are following the operating
instructions in this instruction manual.
The appliance does
not operate.
It is not plugged in. Plug the appliance into a power socket.
My B6 screen is still black/
Your appliance is in "standby" mode Press one of the touch keys (B1 to B5)
The switch (G) is in position 0. Move the switch to position 1.
The bowl or lid is not positioned or
locked correctly.
Check that the bowl or lid is correctly
positioned and locked in accordance with the
diagrams in the manual.
The lid does not lock. The lid is not correctly assembled.
Check that the seal is correctly assembled on
the seal holder and that the seal holder is
correctly assembled on the lid.
PROBLEMS CAUSES SOLUTIONS
Excessive vibration.
The appliance is not placed on a
flat surface; the appliance is not
stable.
Place the appliance on a flat surface.
Volume of ingredients is too large. Reduce the amount of ingredients.
Wrong accessory. Check that you are using the recommended
accessory.
Faint noise during
operation
The spindle for your appliance
may emit a sound when operating
at reduced speed or with certain
ingredients (rice, etc.)
This happens only temporarily and does not
affect the service life of your appliance. The
sound will diminish or disappear with use
of the appliance and after the detachable
spindle has been cleaned a few times (see
"Cleaning the appliance").
Loud noise during operation Using the wrong accessory
Ensure that you are using the appropriate
attachment (e.g. do not use the whisk E3 to
knead or mix dough; use blade E4) . For more
information, refer to the recommendations in
the recipe and to the operating instructions
in this instruction manual.
Leakage via the cover.
Volume of ingredients is too large. Reduce the amount of ingredients.
The lid is not correctly
positioned or locked. Lock the lid securely onto the bowl.
The sealing ring
is not in place.
Position the sealing ring on the seal holder
and clip the assembly onto the lid.
The sealing ring is broken or
damaged.
Change the seal—contact an authorised
service centre.
Wrong accessory. Check that you are using the recommended
accessory.
Leakage from the bowl
spindle.
The seal is not in the right position. Position the seal correctly.
The seal is damaged. Contact an approved service centre.
The locking ring (C5) is not cor-
rectly locked. Lock the ring (C5) correctly.
The blades have difficulty
rotating.
The pieces of food are too big
or too hard.
Reduce the size or volume of ingredients.
Add liquid.
Smell coming from the
motor.
This may occur the first time you
use the appliance, or if there is
overloading due to the volume
of ingredients being too big or
pieces of food being too hard or
too large.
Allow the motor to cool down (around
30 minutes) and reduce the volume of
ingredients in the bowl.
Security message
display
rity
rity
rity
mes
mes
mes
mes
mes
mes
mes
Bowl or lid is incorrectly locked
in place
Before switching on the appliance, check
that the bowl is correctly locked on the
motor unit and that the lid is correctly
locked on the bowl. If the problem persists,
contact an authorised service centre.
The lid is locked on the bowl
during the "Cooking without lid"
function
Unlock the lid before you begin the cooking
programme. If the problem persists, contact
an authorised service centre.

68 69
ENEN Is your appliance still not working?
Contact an approved service centre (see the list in the service booklet).
• Disposing of the packaging and the appliance
The packaging is made up of environmentally-safe materials and can therefore be disposed
of in accordance with the recycling measures in force in your area.
To dispose of the appliance, check with the appropriate service in your area.
• Electronic or electrical products at the end of their service life:
Think of the environment!
Your appliance contains many recoverable or recyclable materials.
Leave it at a collection point for processing.
RECYCLING
*The Bluetooth® trademark and logos are registered trademarks of Bluetooth SIG, Inc. and their use by the SEB Group has been authorised.
Google Play and Android are trademarks of Google Inc.
Apple and the Apple logo are trademarks of Apple Inc., registered in the U.S. and in other countries. App Store is a service mark of Apple Inc.
GLOSSARY
Pair: The act of grouping or linking two appliances.
This happens the first time that you connect your smartphone or tablet with the i-Companion Touch XL.
Synchronise: The act of updating information. The app synchronises with the i-Companion Touch XL in order to exchange
information when they are connected.
Connect: Establishing a link between the app (smartphone/tablet) and the appliance (i-Companion Touch XL). This is required for
synchronisation to take place.
Cookies: This is the usage information sent to Moulinex to improve the app.
PROBLEMS CAUSES SOLUTIONS
The lid locking safety
feature is still activated
(rod extended), meaning
that the lid cannot be
locked in position.
The appliance got switched off
during operation by knocking
the I/O switch, or it was simply
unplugged during operation.
Simply switch the I/O switch to I to reset
the machine and the lid locking safety
appliance; the rod will automatically return
to its original position and you can now lock
the lid.
SECU error message The rotor will not rotate Empty the bowl, let it cool down and
try again. If the problem persists,
contact the after-sales service.
Error message ERR39 Bowl overheating
Discontinue operation for a short period.
Allow
the bowl to cool down. If the problem
persists,
contact your after-sales service
SECU error message Motor overheating Allow the machine to cool for 30 min and
reduce the amount of food in the bowl.
SECU error message Machine is unstable
The machine has stopped because it has
detected an
instability. Try decreasing the
volume of food in the bowl
ERR34, ERR21, ERR22 Your companion has become
overheated. Please unplug your appliance and
contact the after-sales service
ERR31 The lid cannot be locked. Please contact the after-sales service.
ERR35 Your appliance is struggling
to operate.
Discontinue operation for a short period.
Unplug your appliance and plug it back in.
If the problem persists, contact your
after-sales centre.
ERR37, ERR03, ERR01
Your appliance is struggling to
operate.
Please contact the after-sales service.
ERR23 Your i-Companion has
overheated. Please contact the after-sales service.
ERR02, ERR30 Connection problem
Your appliance is not able to
communicate over WiFi. Unplug
your appliance and plug it back in. If the
problem
persists, contact your after-sales service
centre.
Display The product is not connected to
WiFi.
Check your WiFi network or unplug your
appliance, the plug it back in. If the
problem persists, contact your after-sales
service centre.
Display The product is connecting to WiFi. Wait for the logo to be displayed.
UI-1, UI-3 Your product is having trouble
loading certain data over WiFi.
If the problem is recurring, your WiFi signal
may be too weak. Try moving your appliance
closer to your router or install a WiFi
extender close to your product to improve
the quality of the WiFi signal.
UI-2, UI-4, UI-5, UI-6 Your appliance is having trouble
retrieving certain local data or
WiFi data
If your appliance is not connected,
try connecting it and initiating data
synchronisation. If your appliance is
connected, try to improve the signal quality
(see cell above)

70 71
DEDE
Hinweise zur Personensicherheit
• Bedienungsanleitung sorgfältig
vor dem ersten Gebrauch Ihres
Geräts durchlesen und aufbewahren:
Ein unsachgemäßer Gebrauch
und die Nichtbeachtung der
Bedienungsanleitung befreit den
Hersteller von jeder Haftung.
• Ziehen Sie stets den Stecker des
Gerätes, wenn Sie es unbeaufsichtigt
lassen und vor dem Montieren, Zerlegen
oder Reinigen.
• Lassen Sie Kinder das Gerät nur unter
Aufsicht benutzen. Dieses Gerät darf
nicht von Kindern benutzt werden.
Bewahren Sie das Gerät und sein Kabel
für Kinder unzugänglich auf.
• Dieses Gerät ist nicht dazu bestimmt,
von Personen (einschließlich Kindern)
benutzt zu werden, deren körperliche,
sensorische oder mentale Fähigkeiten
eingeschränkt sind, oder von
Personen, denen es an Erfahrung und
Kenntnis mangelt; es sei denn, sie
werden von einer für ihre Sicherheit
verantwortlichen Person in den
Gebrauch des Gerätes unterwiesen
und beaufsichtigt. Es empfiehlt sich,
Kinder zu beaufsichtigen, um sich zu
vergewissern, dass sie nicht mit dem
Gerät spielen.
• Bewahren Sie Ihr Gerät außerhalb der
Reichweite von Kindern auf.
• Bei der Verwendung des
Geräts erreichen einige
Teile hohe Temperaturen
(Edelstahl-Gehäusewand
vo n Be hä l te r un d
V e r s c h l u s s , a b n e h m b a r e r
Antriebszapfen, transparente Teile des
Deckels, Metallteile unter dem
Behälter, Korb). Sie können
Verbrennungen verursachen. Fassen Sie
das Gerät an den Kunststoffteilen an
(Griffe, Motorblock).
• Die Temperatur der freiliegenden
Flächen kann während des Betriebs
des Geräts erhöht sein.
• Dieses Gerät ist nicht für den Betrieb
über eine externe Zeitschaltuhr oder
ein separates Fernsteuerungssystem
vorgesehen.
• Verwenden Sie das Gerät nicht,
wenn es nicht ordnungsgemäß
funktioniert, wenn es beschädigt
wurde oder wenn das Netzkabel oder
die Steckdose beschädigt sind. Um
Gefahren zu vermeiden, muss das Kabel
unbedingt durch ein autorisiertes
Kundendienstzentrum ersetzt werden
(siehe Liste im Service-Handbuch).
• Das Gerät darf nicht in Wasser
getaucht werden. Den Motorblock (A)
nicht unter fließendes Wasser halten.
• Dieses Gerät ist nur für den
Privatgebrauch in geschlossenen
Wohnräumen und für den Betrieb auf
einer Höhe unter 2.000 m vorgesehen.
Bei gewerblicher oder unsachgemäßer
Benutzung oder bei Nichtbeachtung
der Hinweise übernimmt der Hersteller
keine Haftung und behält sich das
Recht vor, die Garantie für ungültig
zu erklären.
SICHERHEITSHINWEISE:
• Dieses Gerät sollte nicht in den
folgenden Situationen benutzt werden,
die nicht von der Garantie abgedeckt
werden:
- K ü c h e n - A r b e i t s f l ä c h e n i n
Geschäften, Büros und anderen
Arbeitsumgebungen;
- Küchenecken für das Personal in
Geschäften, Büros und anderen
betrieblichen Umgebungen;
- Bauernhöfe;
- Nutzung durch die Gäste von
Hotels, Motels und anderen
Wohnumgebungen;
- Gästezimmer.
WARNUNG:
Ihr Gerät erzeugt Dampf,
der Verbrennungen
verursachen kann.
Seien Sie vorsichtig, wenn Sie den
Deckel und den Verschluss anfassen.
(Benutzen Sie gegebenenfalls einen
Handschuh, Topflappen usw.) Fassen
Sie den Verschluss an der Mitte an.
• Schalten Sie das Gerät nur
ein, wenn der Dichtungsring
auf dem Dichtungsträger und
der Dichtungsträger im Deckel
eingesetzt ist. Das Gerät muss
unbedingt mit dem Verschluss in
der Öffnung des Deckels betrieben
werden (außer bei spezifischen
Rezeptinformationen).
WARNUNG:
V o r s i c h t - b e i
u n s a c h g e m ä ß e r
B e n u t z u n g d e s
G e r ä t e s b e s t e h t
Verletzungsgefahr.
Gehen Sie vorsichtig mit den
Messern des Ultrablade-Hackmessers
(F1) und des Knet-/Mahlmessers
(E4) um, wenn Sie diese reinigen
und wenn Sie den Behälter leeren.
Diese sind sehr scharf.
Bewahren Sie das Ultrablade-
Hackmesser (E1) nach jedem
Gebrauch im Behälter auf.
• Seien Sie vorsichtig, wenn heiße
Flüssigkeit in die Küchenmaschine
gegeben wurde, da diese aus dem
Gerät spritzen kann, wenn sie
plötzlich aufkocht.
WARNUNG: Handhaben Sie Ihr Gerät
mit Vorsicht (Reinigung, Befüllen
und Entleeren): Vergießen Sie keine
Flüssigkeit über den Anschlüssen.
WARNUNG: Einige Lebensmittel
mit oberflächlicher Haut (ganze
Würstchen, Zunge, Geflügel...) oder
große Fleischstücke können durch
das Aufkochen Spritzer erzeugen.
Deshalb empfehlen wir Ihnen, diese
vor dem Kochen mit einem Messer
oder einer Gabel einzustechen.

72 73
DEDE
WARNUNG: Die Oberfläche des
Heizelements weist nach der
Verwendung eine Restwärme auf.
Achten Sie darauf, dass Sie
während des Aufheizens und bis
zur vollständigen Kühlung nur die
Griffe Ihres Produkts (C2-Griff mit
Drücker, D2-Griff des Deckels und
D1-Verschluss) berühren.
Lesen Sie die Bedienungsanleitung,
um mehr über das Einstellen der
Geschwindigkeitsstufen und die
Funktionsdauer jedes Zubehörteils und
jedes Programms zu erfahren.
Lesen Sie die Bedienungsanleitung,
um mehr über die Montage und das
Befestigen von Zubehör an Ihrem
Gerät zu erfahren.
Lesen Sie die Bedienungsanleitung,
um mehr über die Reinigung und
Pflege Ihres Gerätes zu erfahren.
Folgen Sie zum Reinigen Ihres
Gerätes immer den entsprechenden
Anleitungen:
• Ziehen Sie den Netzstecker des
Geräts.
• Reinigen Sie das Gerät nicht, wenn
es noch heiß ist.
• Reinigen Sie das Gerät mit einem
feuchten Tuch oder Schwamm.
• Halten Sie das Gerät nicht ins Wasser
oder unter laufendes Wasser.
NUR EUROPÄISCHE MÄRKTE :
• Bewahren Sie das Gerät und Kabel
außer Reichweite von Kindern unter
8 Jahren auf. Kinder dürfen das
Gerät nicht als Spielzeug benutzen.
• Dieses Gerät kann von Personen
mit eingeschränkten körperlichen,
sensorischen oder mentalen
Fähigkeiten oder Personen, denen
es an Erfahrung und Kenntnis
mangelt, benutzt werden, sofern
sie beaufsichtigt werden oder in
die sichere Benutzung des Gerätes
unterwiesen wurden und die
möglichen Gefahren verstehen.
• Dieses Gerät kann von Kindern
ab 8 Jahren benutzt werden,
sofern sie beaufsichtigt werden
oder in die sichere Benutzung des
Gerätes unterwiesen wurden und
die damit verbundenen Gefahren
verstehen. Die Reinigung und die
vom Benutzer durchzuführende
Wartung dürfen nicht von Kindern
durchgeführt werden; es sei denn,
sie sind mindestens 8 Jahre alt und
werden von einem Erwachsenen
beaufsichtigt.
Hinweise zum elektrischen Anschluss
• Das Gerät muss mit einer geerdeten
Netzsteckdose verbunden werden.
• Das Gerät ist ausschließlich für
den Betrieb mit Wechselstrom
vorgesehen. Überprüfen Sie,
dass die auf dem Typenschild
angegebene Versorgungsspannung
der elektrischen Spannung Ihrer
Elektroinstallation entspricht.
• Jeder Fehler beim Anschließen an
das Stromnetz setzt die Garantie
außer Kraft.
• Ziehen Sie niemals am Stromkabel,
um den Stecker des Gerätes aus der
Steckdose zu entfernen.
• Tauchen Sie das Gerät, das Stromkabel
oder den Stecker niemals in Flüssigkeit.
Legen Sie das Stromkabel nie in die
Nähe der heißen Teile Ihres Gerätes.
Halten Sie es von Wärmequellen oder
scharfen Kanten fern.
Hinweise zum Fehlgebrauch
• Berühren Sie nicht die Abdeckung,
bevor Sie das Gerät vollständig
ausschalten (Stopp-Taste), und warten
Sie, bis sich das Mischgut nicht mehr
dreht.
• Gießen Sie die festen Zutaten immer
zuerst in den Behälter, bevor Sie
flüssige Zutaten hinzufügen (siehe
Abb. 11), ohne die Markierung
MAX zu überschreiten, die auf der
Innenseite des Behälters eingraviert
ist (siehe Abb. 11). Wenn der
Behälter zu voll ist, kann kochendes
Wasser herausspritzen.
• Vorsicht! Beachten Sie beim
Dampfgaren den Wasserstand von
0,7 Liter (siehe Abb. 4.2).
• Stecken Sie unter keinen Umständen
Ihre Finger oder andere Objekte in
den Behälter, während das Gerät in
Betrieb ist.
• Verwenden Sie den Behälter nicht
zur Vorratshaltung (Aufbewahrung,
Einfrieren, Sterilisieren).
• Stellen Sie das Gerät auf eine feste
Arbeitsfläche, die hitzebeständig,
sauber und trocken ist.
• Stellen Sie das Gerät nicht in der Nähe
einer Wand oder eines Wandschranks
auf, da der entstehende Dampf die
Elemente beschädigen kann.
• Stellen Sie das Gerät nicht in
der Nähe einer funktionierenden
Wärmequelle (Backblech, elektrisches
Haushaltsgerät usw.) auf.
• Bedecken Sie Ihren Deckel nicht
mit einem Geschirrtuch oder einem
anderen Lappen, versuchen Sie
nicht, die Öffnung für den Deckel
zu verstopfen, verwenden Sie dazu
den Dampfregler.
• Lassen Sie nicht Ihre Haare, ein
Halstuch, eine Krawatte, ... während
des Betriebs des Gerätes über dem
Behälter hängen.
• Stellen Sie dieses Zubehör niemals
in einen Mikrowellenofen.
• Benutzen Sie das Gerät nicht im
Freien.
• Überschreiten Sie nicht die in der
Bedienungsanleitung angegebene
Höchstmenge.
• Räumen Sie das Gerät erst weg, wenn
es sich abgekühlt hat.
• Stellen Sie den Behälter nicht in den
Gefrierschrank, um ihn zu kühlen,
verwenden Sie den Kühlschrank.
• Den Spatel nicht länger als 20
Minuten bei 150 °C in das Öl geben.
KUNDENDIENST
• Verwenden Sie aus Sicherheitsgründen
nur Zubehör oder Ersatzteile, die von
zugelassenen Kundendienstzentren
geliefert werden.
• Alle Eingriffe, mit Ausnahme
der Reinigung und der üblichen
vom Benutzer durchzuführenden
Wartungsarbeiten, müssen von einem
autorisierten Kundendienstzentrum
vorgenommen werden.
• Siehe Tabelle „Was tun, wenn Ihr
Gerät nicht funktioniert? “ am Ende
der Bedienungsanleitung.

74 75
DEDE In diesem Handbuch erhalten Sie Tipps für die vielfältigen Verwendungsmöglichkeiten
Ihres Geräts - die Zubereitung von Suppen, Schmorgerichten, das Dampfgaren und
Teigzubereitungen.
BESCHREIBUNG DES GERÄTES:
A Motorblock
B Touch-Tasten*
B1: Abbrechen
B2: Waage (je nach Modell)
B3: START/STOPP
B4: Video
B5: Einstellungen
B6: Touchscreen
C Behälter
C1: Edelstahlbehälter
C2: Griff mit Drücker
C3: Antriebswelle
C4: Dichtungsring
C5: Sicherungsring für den Antrieb
D Deckeleinheit
D1: Dampfregler
D2: Deckel
D3: Dichtungsträger
D4: Dichtungsring
E Zubehör
E0: Aufbewahrungsbox Zubehörteile
E1: Ultrablade-Hackmesser
E2: Misch-/Rühraufsatz
E3: Schlag-/Rühraufsatz
E4: Knet-/Mahlmesser
E5: Dampfgareinsatz
F Spatel
G Schalter 0/I zum Abschalten der
Stromversorgung Ihres Geräts
H Reinigungsbürste
TECHNISCHE DATEN DES GERÄTS:
Leistung: 1550 W (1000 W: Heizwiderstand / 550 W: Motor)
Temperaturbereich: 30 °C bis 150 °C
einstellbar in Stufen von 5 °C.
Betriebsdauerbereich: von 5 Sekunden bis 2 Stunden
einstellbar in Schritten von min. 5 Sekunden bis max. 1 Minute.
Anzahl der Geschwindigkeiten: 13 - 2 intermittierende Geschwindigkeitsstufen:
Geschwindigkeit 1 ( 5s On / 20s Off ).
Geschwindigkeit 2 ( 10s On / 10s Off ).
- 10 progressive Geschwindigkeitsstufen
(Geschwindigkeiten 3 bis 12).
-
1 max. intermittierende Geschwindigkeit (Geschwindigkeit 13).
Frequenz: 2412 – 2484 MHz
Maximale übertragene Leistung: 20 dBm
Standby-Modus: Das Gerät schaltet sich nach 15 Minuten Inaktivität in den
Standby-Modus.
Drücken Sie zum erneuten Einschalten eine der Touch-Tasten
(B1 bis B5)
Stromverbrauch im Standby-Modus, wenn das Gerät
angeschlossen ist: 0,2 Wh
* Google Play und Android sind Marken von Google Inc.
Apple und das Apple Logo sind Marken der Apple Inc., die in den Vereinigten Staaten und weiteren Ländern eingetragen sind. App Store ist eine
Dienstleistungsmarke von Apple Inc.
* Symbole sind nur sichtbar, wenn sie Ihnen bei der Verwendung Ihres Geräts nützlich sein werden.
IHR GERÄT
Mit dem Gerät erhalten Sie das folgende Zubehör:
Diese Zubehörteile sind auch mit Greifflächen versehen, um die Handhabung bei deren
Verwendung während der Zubereitung zu erleichtern.
Hackmesser
E1 Suppenmixer
3 min 3 L
Kompottmixer 40 s 1 kg
Gemüse zerkleinern 15 s 0,6 kg
Fleisch zerkleinern 30 s 1 kg
Fisch zerkleinern 15 s 1 kg
Zerkleinern Sie mit diesem Zubehör keine harten Produkte, benutzen Sie das Knet- und Mahlmesser E4.
Misch-/Rühraufsatz
Es mischt die gekochten Gerichte, ohne die Zutaten zu beeinträchtigen.
Äußerst nützlich zur Zubereitung von progressiv aufzukochenden Gerichten (Risottos, Suppen).
E2 Bräunen/Rösten 5 min 500 g
Schmorgerichte 45 min 3 L
Risottos 22 min 1,5 kg
Ratatouilles, Chutneys, Hülsenfrüchte (Einstellungen: Siehe Rezeptbuch)
Schlag-/Rühraufsatz
9 max
E3 Eiweiß 5/10 min 8
max
Mayonnaise, Schlagsahne 2/5 min 0,5 L
Saucen, Cremes bis 1/20 min 1 L
Kartoffelpüree bis 1 min 1 L
Polenta bis 1/16 min 1 L
Knet-/ Mahlmesser
E4
Kneten von Nudeln und
Weißbrotteig 2 min + 30 s 1,2 kg
Kneten von Mürbeteig und
besonderen Brotteigen 2 min + 30 s 1 kg
Kneten von Hefeteigen
(Brioche, Napfkuchen…) 1 min + 30 s
2 min 0,8 kg
Lockere Teigmassen
mischen (Sandkuchen…) 40 s
3 min 1 kg
Zermahlen von
Schalenfrüchten 1 min 0,6 kg
Zerkleinern von harten
Produkten 1 min 0,6 kg
Zerstoßen von Eis 1 min 6 bis
10
Pfannkuchen-, Waffelteig 1 min 1,5 L
Verschluss
D1
Dampfreglerverschluss
maxi (a) =Dampfgaren.
mini (b) = Risotto, Dessertcremes, Saucen…
Die Einstellung „mini“ lässt eine maximale Menge an Kondenswasser
entweichen und ermöglicht so die Zubereitung von
Speisen oder Saucen mit einer ausgeprägteren Konsistenz (Risotto,
Dessertcremes, Saucen usw.).
Bei der Einstellung „maxi“ kann sich die höchstmögliche Menge an Hitze
und Dampf im Behälter sammeln, für alle Dampfgarvorgänge (Suppen usw.).
Mit dieser Einstellung verhindern Sie auch Spritzer während des
Mixvorgangs.
* Je nach Modell

76 77
DEDE
Dampf-
einsatz
Die Garzeiten des Dampfeinsatzes sind Richtwerte; in der Regel sind sie ausreichend, um
zufriedenstellende Garergebnisse zu erhalten. Verschiedene Bedingungen können die Garzeit
dennoch beeinflussen: Größe des Gemüses (geschnitten oder nicht geschnitten) / Menge der
Zutaten im Behälter / Gemüsesorte und Reifegrad / Menge an Wasser im Behälter, die der
Messskala entsprechen muss (0,7 L). Achten Sie darauf, dass der Dampfverschluss in der Richtung
„max“ (a) verwendet wird. Wenn der Dampf nicht ausreicht, können Sie eine zusätzliche Garzeit
einstellen.
E5
Dampfgaren von
Gemüse, Fisch oder
Fleisch
20/40
min 1 kg
Suppen mit Stücken 3 min 3 L
P1 - Zucchini 20 min 800 g
P1 - Pastinake 25 min 800 g
P1 - Lauch (weißer
Teil)
25 min 800 g
P1 - Brokkoli 20 min 500 g
P1 - Fisch 15 min
600 g (mit Backpapier)
P2 - Kartoffeln 30 min 1 kg
P2 - Karotten 30 min 1 kg
P2 - grüne Bohnen 30 min 800 g
P2 - helles Fleisch 20 min
600 g (mit Backpapier)
Antriebswelle
C3
Sie können Lebensmittel im Behälter ohne Deckel zubereiten, während Sie den
Vorgang unter Rühren überwachen.
Die Funktion „KOCHEN OHNE DECKEL“ ist nicht für Marmeladen und
Zubereitungen auf Milchbasis geeignet (Gefahr von Überlaufen)
BENUTZUNG BIS 130 °C BENUTZUNG VON
135 °C BIS 150 °C
Mit oder ohne Deckel
kochen
geschlossener Deckel Nur mit
geöffnetem Deckel
Zubehörteile
Alle Zubehörteile zum Aufsetzen auf der
Antriebswelle
Nur das
Antriebswelle
C3
Geschwindigkeit Ja
• Wenn die Temperatur unter oder
gleich 100 °C liegt: 2 h
• Wenn die Temperatur zwischen
100 °C und 130 °C liegt: 1 h
Nein
Maximale Garzeit
• Wenn die
Temperatur über
oder gleich 135 °C
liegt: 20 min
!! Entfernen Sie die Antriebswelle nicht unmittelbar nach Gebrauch. Giessen Sie
Wasser in die leere Schüssel, um diese herunterzukühlen.
ANBRINGEN DES BEHÄLTERS, DER
ZUBEHÖRTEILE UND DER DECKELEINHEIT
• Reinigen Sie vor dem ersten Gebrauch alle
Bestandteile (C, D, E, F, H) mit heißem
Seifenwasser, mit Ausnahme des Motorblocks
(A). Ihr Behälter (C) ist mit einem
abnehmbaren Antrieb (C3) ausgestattet, um
die Reinigung zu erleichtern.
• Stellen Sie sicher, dass alle Verpackungen vor
dem Gebrauch entfernt wurden, insbesondere
die Schutzverpackung zwischen dem Behälter
(C) und der Motorblock (A).
• Setzten Sie den Dichtungsring (D3) auf den
Dichtungsträger (D4) (siehe Abb. 1), und
klipsen Sie die gesamte Einheit auf den Deckel
(D2) (siehe Abb. 2).
• Setzen Sie den Dichtungsring (C4) auf den
Antrieb (C3). Befestigen Sie die Einheit unten
im Behälter mittels des Sicherungsrings (C5)
(siehe Abb. 3). Wenn Sie den Kochmodus
ohne Deckel verwenden, befestigen Sie den
Dichtungsring (C4) auf der Antriebswelle
(C3). Befestigen Sie die Einheit unten im
Behälter mittels des Sicherungsrings (C5)
(siehe Abb. 3).
•
Setzen Sie das gewünschte Zubehör in den
Behälter:
- die Zubehörteile (E1, E2, E3 oder E4) auf den
Antrieb unten in den Behälter (siehe Abb. 4.1),
- beim Dampfgaren den Dampfeinsatz (E5) in das
Behälterinnere, (siehe Abb. 4.3 ), zuvor muss
dieser mit 0,7 L Flüssigkeit aufgefüllt werden
(Wasser, Sauce...) (siehe Abb. 4.2 ).
• Geben Sie die Zutaten in den Behälter oder den
Dampfeinsatz.
Setzen Sie den Deckel auf den Behälter (C),
indem Sie die beiden Dreiecke gegenüberliegend
anordnen (siehe. Abb. 5), verschließen Sie dann
ohne Druckausübung den Deckel durch Drehen in
Pfeilrichtung (siehe Abb. 6).
• Setzen Sie die Dampfreglerverschluss (D1) auf
den Deckel, drei Positionen sind möglich (siehe
Abb. 7)
• Stellen Sie den Behälter (C) auf den Motorblock
(A), bis ein Klicken zu hören ist (siehe Abb. 8).
Das Gerät startet nur, wenn der Behälter und
der Deckel richtig positioniert und auf dem
Motorblock verriegelt sind.
Bei falscher Positionierung oder schlechter
Verriegelung (siehe Abb. 10.1 und 10.2)
wird eine Sicherheitsmeldung auf dem
Bildschirm angezeigt.
IHR GERÄT IST MIT EINER
SICHERHEITSVERRIEGELUNG DES DECKELS
AUSGESTATTET
Der Deckel ist bei jedem Einschalten des Geräts
gesichert. Diese Sicherheit verhindert, dass der
Deckel während der Zubereitung geöffnet wird.
Versuchen Sie nicht, den Deckel gewaltsam
zu öffnen, wenn er verriegelt ist. Diese
Sicherheit wird bei jeder Abschaltung des Geräts
freigegeben. Wenn Sie eine Temperatur von 50
°C oder mehr und eine Geschwindigkeit von 5
oder mehr gewählt haben, wird im Bedienfeld
ein Countdown von 10 Sekunden angezeigt. Das
Öffnen des Deckels ist erst nach Abschluss der
Zählung möglich.

78
79
DEDE
1. ERSTE VERWENDUNG
i-Companion Touch XL ist eine intelligente Küchenmaschine, die Ihnen dabei hilft, Ihre Mahlzeiten
gelingsicher zuzubereiten. Sie bietet Ihnen Hunderte von kostenlosen Rezepten mit nur wenigen
Klicks.
Mit dem intuitiven, interaktiven Touchscreen können Sie in Rekordzeit abwechslungsreiche Rezepte
zubereiten.
i-Companion Touch XL kümmert sich um die Zubereitung, das Mixen und das Kochen Ihrer Zutaten. Er
führt Sie Schritt für Schritt durch alle Etappen Ihrer Rezepte.
Lassen Sie sich leiten, es ist schnell und einfach!
Starten Sie Ihren i-Companion Touch XL mit dem 0/I-Schalter (vgl. Abb. 9) lassen Sie sich dann durch
die Anweisungen führen, die auf dem Bildschirm angezeigt werden. Während dieser Schritte können
Sie mithilfe des Logos Unterstützung bei der Umsetzung erhalten. Häufig gestellte Fragen (FAQ)
finden Sie auch unter www.moulinex.ch
Tutorials für die ersten Schritte mit Ihrem Gerät sind ebenfalls verfügbar:
https://bit.ly/3omwUvo
• nationale Einstellungen
Bei der ersten Verwendung können Sie auf die Ländereinstellungen zugreifen.
1 wählen Sie Ihr Land aus 2 wählen Sie Ihre Sprache aus
Nach Abschluss dieser beiden Schritte wird ein Begrüßungsbildschirm angezeigt.
I-COMPANION TOUCH XL:
MEIN ASSISTENT FÜR DIE TÄGLICHE KÜCHE
Die folgenden Bedientasten werden angezeigt, wenn sie verwendet werden können:
Die mittlere Taste hat 11
Funktionen. Sie variieren je nach
den Schritten (Start, Pause,
nächster Schritt, bestätigen,
beenden...)
Wenn ein Video zu dem Rezept
verfügbar ist, das gerade zubereitet
wird, können Sie es durch
Klicken auf diese Schaltfläche
wiedergeben.
Abbrechen/Zurück
Einstellungen (Einstellungen ändern,
WLAN-Verbindung, Rezeptbestandteile …)
Verwenden der angeschlossenen
Waage *
• Internet-Verbindung
Jetzt können Sie Ihren i-Companion Touch XL mit Ihrem Internet-Netzwerk verbinden. Sie haben
die Wahl, diesen Schritt jetzt durch Auswahl von „jetzt“ oder später durch Auswahl von „später“
durchzuführen.
Sie können diesen Schritt später in den Einstellungen Ihres i-Companion Touch XL vom Startbildschirm
aus durchführen.
Für die Nutzung der folgenden Funktionen ist eine Internetverbindung erforderlich:
Zugriff auf alle Companion Rezepte, meine Rezepthefte, in meinem Kühlschrank, Fotos und Videos in
den Schritt-für-Schritt-Anleitungen Ihrer Rezepte und Produkt-Updates.
Um den i-Companion Touch XL mit dem Internet-Netzwerk zu verbinden, müssen Sie:
- Ihr Netzwerk wählen (Sie können nicht darauf zugreifen? Gehen Sie zu „Einstellungen“, dann zu
„WLAN-Einstellungen“ und dann zu „WLAN aktivieren“).
- Das Passwort für Ihre WLAN-Verbindung eingeben
n“)
n“)
n“)
n“)
n“)
n“)
n“)
n“)n“)n“)n“)n“)n“)n“)
- Während die Verbindung geladen wird, wird ein Bildschirm mit der Meldung „aktuelle Verbindung“
geöffnet. Dieser Schritt kann einige Minuten dauern.
- Ein Bildschirm „Glückwunsch“ bestätigt Ihnen, dass die Anmeldung erfolgreich war
- Zum Schluss müssen Sie Ihre Zeitzone wählen
en,en,
Bedeutung der WLAN-Verbindungsanzeigen:
Das Produkt ist nicht mit dem WLAN verbunden
Das Produkt wird mit dem WLAN verbunden
Das Produkt ist mit dem WLAN verbunden
Erläuterungen zum Anschließen des i-Companion Touch XL an das WLAN finden Sie unter
https://bit.ly/3omwUvo
• Mit der App verbinden
Mit der Companion App können Sie Ihren i-Companion Touch XL im Auge behalten, ohne daneben
stehen bleiben zu müssen. Sie können ihn mit Ihrem Smartphone oder Tablet verbinden. So haben Sie
auch überall Zugriff auf Ihre Rezepte.
Bitte überprüfen Sie, ob das WLAN Ihres Smartphones/Tablets mit dem Internet verbunden ist
(WLAN/4G/3G…).
Sie müssen den i-Companion Touch XL an eine Steckdose anschließen.
Sie können diesen Schritt später in den Einstellungen Ihres i-Companion Touch XL vom Startbildschirm
aus durchführen.
Zur Nutzung der folgenden Funktionen ist eine Verbindung mit Ihrem Smartphone/Tablet erforderlich:
Meine Rezepthefte, Fernverfolgung der Rezeptentwicklung vom Smartphone, senden eines Rezepts von
Ihrem Smartphone/Tablet an Ihren i-Companion Touch XL.

80
81
DEDE - Kompatible Geräte:
Eine Liste der i-Companion Touch XL fähigen Smartphone- und Tablet-Modelle finden Sie auf
www.moulinex.ch
- App-Download:
Laden Sie die Companion App herunter. Kostenloser Download aus dem App Store (iPhone/iPad) und
Google Play (Android).
Herunterladen im
App Store
ANDROID APP AUF
- Kontoverbindung:
Wählen Sie aus Ihrer Companion App auf dem Smartphone/Tablet das Produkt i-Companion Touch
XL aus, und erstellen Sie ein Konto, oder melden Sie sich bei Ihrem Konto an, wenn Sie bereits ein
Konto haben.
Ihr Gerät generiert einen Zuordnungscode (er wird auf dem Bildschirm B6 angezeigt), den Sie in Ihrer
Companion App eingeben müssen.
Wenn Sie mehrere Smartphones/Tablets mit Ihrem i-Companion Touch XL verbinden möchten, müssen
alle Anwendungen mit demselben Companion-Benutzerkonto verbunden sein.
Mein erstes Rezept
Bei der ersten Verwendung bietet Ihnen der i-Companion Touch XL ein erstes Rezept an, um Ihr Gerät
in Gebrauch zu nehmen. Durch Auswahl von „mein erstes Rezept“ können Sie einer Schritt-für-Schritt-
Anleitung durch das Rezept folgen.
Dieses Rezept wird nach der Durchführung oder nach 10 Anwendungen Ihres i-Companion Touch XL
von Ihrem Startbildschirm verschwinden.
2. FUNKTIONEN DES GERÄTS
Ihre i-Companion Touch XL Küchenmaschine verfügt über eine „vernetzte“ Funktion, kann aber auch
im „nicht vernetzten“ Modus betrieben werden. Darüber hinaus verfügt es über zahlreiche Funktionen,
mit denen Sie sich jeden Tag inspirieren lassen und Ihre Rezepte erfolgreich umsetzen können! Bei
Verwendung von „nicht vernetzt“ stehen 310 Rezepte zur Verfügung, bei "vernetzter“ Nutzung haben
Sie Zugriff auf hunderte von Rezepten!
• Suche nach einem Rezept
Auf dem Startbildschirm können Sie mit der Schaltfläche
„suchen“ nach Rezepten suchen . Die Suche kann nach
Gerichten oder Zutaten erfolgen. Es stehen auch Filter zur
Verfügung, mit denen Sie Ihre Suche verfeinern können.
• Rezeptbibliothek
Auf dem Startbildschirm können Sie auf die Funktion
„Rezeptbibliothek“ zugreifen. Mit dieser Funktion steht Ihnen die gesamte Rezeptsammlung der
Companion-Community zur Verfügung.
Im nicht vernetzten Modus befindet sich auf dem Startbildschirm der Funktion eine Auswahl von
Rezeptblättern, die auf dem i-Companion Touch XL vorab gespeichert wurden Sie können die Schritt-
für-Schritt-Anleitung direkt von einem dieser Rezeptblätter starten.
Sie können auch nach einem Rezept in der Community suchen, indem Sie auf das Symbol „suchen“
klicken
Dazu geben Sie einfach ein Gericht oder eine Zutat in die Suchleiste ein und klicken dann auf OK.
Sie können Ihre Suche verfeinern, indem Sie Filter hinzufügen (Art des Gerichts, Vorbereitungszeit
und Bewertung).
• Rezepthefte (nur mit WLAN-Verbindung verfügbar)
Auf dem Startbildschirm können Sie auf die Funktion „meine Rezepthefte“ zugreifen. Mit dieser
Funktion können Sie alle Rezepte, die Sie zuvor über die Companion App als Favoriten gespeichert
haben, auf Ihrem Smartphone/Tablet wiederfinden.
Um diese Funktion nutzen zu können, müssen Sie die Companion App herunterladen und ein Konto
erstellen. Sie können Ihre Rezepthefte auf Ihrem Smartphone/Tablet erstellen und bearbeiten und
dann auf Ihrem WLAN-fähigen i-Companion Touch XL wiederfinden. Sobald Ihr i-Companion Touch
XL über WLAN verbunden ist, werden Ihre Rezepthefte automatisch zwischen Ihrem Gerät und Ihrem
Smartphone/Tablet synchronisiert, sobald Sie ein Rezept finden.
• In meinem Kühlschrank (nur mit WLAN-Verbindung verfügbar)
Auf dem Startbildschirm können Sie auf die Funktion „in meinem Kühlschrank“ zugreifen. Mit dieser
Funktion können Sie nach einem Rezept suchen, das auf den Zutaten Ihrer Wahl basiert.
Um eine Rezeptidee zu finden, klicken Sie auf die Funktion „In meinem Kühlschrank“ und fügen Sie
dann bis zu zwei Zutaten hinzu. Für diese Zutaten können Sie die Mengen mit Hilfe der angeschlossenen
Waage angeben. Klicken Sie dann auf „Suchen“, dann wird Ihnen eine Liste von Rezepten angeboten,
die den eingegebenen Einstellungen entsprechen.

82 83
DEDE
PROGRAMME
Ihr Gerät verfügt über 14 voraufgezeichnete Automatikprogramme:
1. Wählen Sie das gewünschte Programm aus.
2. Vorprogrammierte Einstellungen können
geändert werden (je nach gewähltem Rezept,
Zutaten, vorbereitete Mengen). Stellen Sie
mit den Tasten – und + die Kochstufe, die Zeit
und die Geschwindigkeit ein
3. Wenn Sie alle Einstellungen geändert haben,
drücken Sie die Taste „Start“ (B3), um das
Programm zu starten.
4. Wenn das Programm beendet ist, gibt das
Gerät drei Signaltöne aus.
5. Am Ende der Programme Cremesuppe, Grob
gemixte Suppe, Schmor- und Eintopfgerichte,
Risotto, Sauce, Dessert, schonender Dampf
und intensiver Dampf schaltet das Gerät
automatisch für 45 Minuten in Warmhaltezeit
um, um die Zubereitung verzehrfertig
zu halten. Im Programm Schmor- und
Eintopfgerichte, Sauce, Dessert und im
Handbetrieb läuft der Motor des Geräts
mit einer bestimmten Drehzahl, um die
Zubereitung zu erhalten und zu verhindern,
dass sie am Boden des Behälters haftet.
Um den Warmhaltevorgang zu stoppen,
drücken Sie einfach die Taste „Fertig“ (B3).
Nach dem Kneten der Programme Brot und
Sandkuchen wechselt das Gerät 40 Minuten
lang in den Modus „Teig heben“ bei 30 °C,
um Ihren Teigwaren ein besseres Volumen
zu verleihen. Wenn Sie den Deckel öffnen
oder den Behälter aus dem Sockel nehmen,
wird ein Programm beendet. Wenn Sie diesen
Modus anhalten möchten, drücken Sie die
Taste „Einstellungen“ und dann die Taste
„Zurücksetzen“.
6. Wenn das automatische Programm gestartet
wird, können Sie das Gerät jederzeit durch
Drücken der Stopp-Taste ausschalten. Das
automatische Programm befindet sich dann im
Pausenmodus. Sie können es erneut starten,
indem Sie erneut die Taste „Start“ drücken.
Wenn Sie ein Programm fälschlicherweise
ausgewählt haben und abbrechen möchten,
drücken Sie die Taste „Abbrechen/Zurück“.
7. Mit dem Programm „Aufwärmen“ können Sie
Ihre Zubereitung in 20 Minuten aufwärmen
(einstellbar von 5 bis 60 min).
8. Mit dem Spülprogramm können Sie Ihren
Behälter ganz einfach reinigen. Starten Sie
das Programm, indem Sie Ihren Behälter
zuvor mit 0,7 L Wasser und einem Tropfen
Spülmittel gefüllt haben.
Programm
Sauce
Programme
Schmorgerichte
Programme
Suppen
Dampf-
programme
Teig-
programm
Dessert-
programm
Ergänzende
Programme
Sauce Bräunen/Rösten
Schmor- und
Eintopfgerichte
Risotto
Cremesuppe
Grob gemixte
Suppe
Schonender
Dampf
Intensiver
Dampf
Brot
Brioche
Sandkuchen
Dessert Aufwärmen
Spülen
ENTDECKEN SIE DIE AUTOMATISCHEN PROGRAMME
Automatische
Programme
Sauce Cremesuppe Grob gemixte
Suppe
Bräunen/
Rösten
Schmor- und
Eintopfgerichte Risotto
Geschwindigkeit
„Standard“
(einstellbar)
V6
Von V2 bis V8
10 Impulse
und V12
während 2
min
V7 bis V10
während 30 s V3 V1 V2
Temperatur
„Standard“
(einstellbar)
70 °C
(50 °C bis
100 °C)
100 °C
(90 °C bis
100 °C)
100 °C
(90°C bis
100 °C)
130 °C
nicht
einstellbar
95 °C
(80 °C bis
100 °C)
95 °C
(80°C bis
100 °C)
Zeit
„Standard“
(einstellbar)
8 min
(5 min bis 40
min)
40 min
(20 min bis
60 min)
45 min
(20 min bis
60 min)
5 min
(2 min bis
15 min)
45 min
(10 min bis 2 h)
20 min
(10 min bis
2 h)
Warmhalten
„Standard“ am Ende
des Programms
45 min 45 min 45 min 45 min 45 min
Beispiel
Rezepte
Sauce
Hollandaise Kürbissuppe Gemüsesuppe Gedünstetes
Gemüse
Bœuf
bourguignon Risotto
Kompatibles
Zubehör
Bei manchen Rezepten kann es durch Blasenbildung zum Überlaufen kommen, insbesondere bei
der Verwendung von tiefgefrorenem Gemüse. In diesem Fall müssen Sie die Mengen entsprechend
reduzieren.

84
85
DEDE
Automatische
Programme
Schonender
Dampf
Intensiver
Dampf Brot Brioche Sandkuchen Dessert Aufwärmen Spülen
Geschwindigkeit
„Standard“
(einstellbar)
V5
während
2 min +
30 s
V5 während
1 min 30 s
und dann
V6
Für 2 min
V3 während
40 s dann
V9
Für 3 min
V4
(Von V2
bis V8)
V2
(Von V2 bis
V6)
V8
(Von V5 bis
V8)
Temperatur
„Standard“
(einstellbar)
100 °C
(nicht
einstellbar)
100 °C
(nicht
einstellbar)
90 °C
(50 °C bis
110 °C)
90 °C
(70 °C bis
100 °C)
80 °C
(nicht
einstellbar)
Zeit
„Standard“
(einstellbar)
30 min
(1 min bis
60 min)
35 min
(1 min bis 60
min)
2min30
(30 s bis
2min30)
3 min 30 s
(30 s bis 3
min 30 s)
3min40
(1min40 bis
3min40)
15 min (5
min bis
60 min)
20 min (5
min bis 60
min)
5 min (1
min bis 10
min)
Warmhalten
„Standard“
am Ende des
Programms
45 min 45 min 45 min
„Standardmäßig“
30 °C am Ende
des Programms
zum Aufgehen
des Teigs
40 min 40 min
Beispiel
Rezepte
Foie gras,
gedämpft
Gedämpftes
Karottenpüree Brot Brioche Obstkuchen Kondi-
torcreme
0,7 L Wasser
+ 1 Tropfen
Spülmittel
Kompatibles
Zubehör
• Manueller Modus
Sie können die Einstellungen für Geschwindigkeit, Temperatur und Garzeit Ihres i-Companion Touch
XL ändern, um an Ihre eigenen Rezepte anzupassen.
Auf dem Startbildschirm können Sie die Funktion „manueller Modus“ aufrufen.
Auswahl der Motorgeschwindigkeit.
Zwei intermittierende Geschwindigkeiten, zehn stufenlose Geschwindigkeiten
und eine max. intermittierende Geschwindigkeit (V13).
Auswahl der Gartemperatur.
Von 30 °C bis 150 °C
Auswahl der Betriebsdauer.
Von 5 Sekunden bis 2 Stunden.
Erhöhen der Geschwindigkeit, der Dauer und der Temperatur.
Verringern der Geschwindigkeit, der Dauer und der Temperatur.
Anwendungshinweis:
Ihr Gerät ist mit einem Mikroprozessor ausgestattet, der seine Standsicherheit überwacht und
analysiert. Wenn das Gerät nicht standsicher ist, wird automatisch die Rotationsgeschwindigkeit
des Motors reduziert. Falls dadurch die Standsicherheit nicht wiederhergestellt wird, wird der Motor
gestoppt und auf Ihrem Display wird ein Sicherheitshinweis angezeigt.
• Vergewissern Sie sich, dass sich nicht zu viele Zutaten im Behälter befinden und dass Sie die
entsprechende Geschwindigkeitsstufe gewählt haben.
• Vergewissern Sie sich, dass Sie das empfohlene Zubehör verwenden.
• Starten Sie dann Ihr Gerät wie üblich.

86
87
DEDE
Sie können den i-Companion Touch XL im nicht vernetzten Modus verwenden. Die unten angeführten
Funktionen sind im nicht vernetzten Modus verfügbar:
• Rezeptbibliothek
Alle Informationen zur Rezeptbibliothek finden Sie auf Seite 81.
Die Rezeptbibliothek stellt Ihnen 310 Rezepte zur Verfügung.
• Programme
Alle Informationen zur Verwendung von automatischen Programmen finden Sie auf Seite 82.
• Manueller Modus
Alle Informationen zur Verwendung des manuellen Modus finden Sie auf Seite 85.
VERWENDUNG IM NICHT VERNETZTEN MODUS
•Reinigen Sie Ihre Schüssel sofort
nach Gebrauch. Das Gerät darf
nicht in Wasser getaucht werden.
Den Motorblock (A) nicht unter
fließendes Wasser halten.
Ziehen Sie nach dem Gebrauch den Netzstecker
aus der Steckdose.
Reinigen Sie den Behälter nach dem Gebrauch:
• Drücken Sie auf die Griffe (C2), und heben Sie
den Behälter (C) an.
• Stellen Sie den Behälter auf eine ebene
Arbeitsfläche.
• Entriegeln Sie den Deckel, indem Sie ihn
eine Vierteldrehung im Uhrzeigersinn drehen.
Nehmen Sie den Deckel vorsichtig ab.
•Gehen Sie vorsichtig mit den Messern des
Ultrablade-Hackmessers (F1) und des
Knet-/Mahlmessers (E4) um, wenn Sie diese
reinigen und wenn Sie den Behälter leeren.
Diese sind sehr scharf.
• Wenn die Teile abgekühlt sind:
- Entfernen Sie den Antrieb (C3), die Dichtung
(C4), den Sicherungsring (C5) (siehe Abb. 13).
- Reinigen Sie den Behälter (C), den Antrieb (C3),
die Dichtung (C4), den Sicherungsring (C5),
das Zubehör (E1), (E2), (E3), (E4), (E5), den
Dampfregler (D1), den Deckel (D2), die Dichtung
(D4) und die Dichtungsträger (D3) mit einem
Schwamm und warmem Seifenwasser.
• Spülen Sie diese verschiedenen Elemente unter
fließendem Wasser ab.
Bei starker Verschmutzung mehrere Stunden in
Wasser mit Spülmittel einweichen lassen und,
falls nötig, mit dem Spatel (F) oder der rauen
Seite eines Topfreinigers abkratzen.
• Bei Verkalkung des Behälters können Sie die
Schaber-Seite eines Schwamms verwenden, der
gegebenenfalls mit Haushaltsessig befeuchtet
ist.
• Um das Aussehen und die Langlebigkeit des
Glasbildschirms zu erhalten. Reinigen Sie ihn
mit dem Schwamm, ohne die Schleifseite zu
verwenden, um Kratzer zu vermeiden.
REINIGUNG DES GERÄTS
• Einstellungen
Auf dem Startbildschirm können Sie auf die Funktion „Einstellungen“ zugreifen.
Mit dieser Funktion können Sie Ihre gespeicherten Daten zum Zeitpunkt der Inbetriebnahme Ihres
i-Companion Touch XL aktualisieren.
Sie können Ihr Gerät auch mit dem WLAN oder Ihrer App verbinden, wenn Sie dies nicht beim ersten
Einsatz des Geräts getan haben.
• Angeschlossene Waage *
- Verbindung mit der Waage, die mit Ihrem i Companion Touch XL verbunden ist:
Bei Waagen, die mit Ihrem i-Companion XL geliefert werden, ist die Verbindung bereits erfolgt, Sie
müssen keine Maßnahmen ergreifen.
Für Waagen, die separat gekauft werden, gehen Sie zu den Produkteinstellungen und klicken Sie
dann auf „Mein Zubehör“
gek
gek
gek
. Dann geben Sie an, dass Sie eine Waage haben. Ihre Waage ist jetzt
verbunden.
- Verwendung des angeschlossenen Waage
Wenn die Taste „Waage angeschlossen“ auf Ihrem i-Companion Touch XL aufleuchtet, können Sie
Ihre Zutaten im Rahmen eines Rezepts wiegen.
Drücken Sie dazu auf das Waage-Logo und legen Sie dann auf Ihre Waage die Zutaten, die Sie
wiegen möchten.
!! Die Waage wird nach 30 Sekunden Inaktivität in den Standby-Modus versetzt. Um sie wieder
einzuschalten, drücken Sie OK.
Drei mögliche Verwendungen der Waage:
- Wiegen der Zutaten: Sie können alle Ihre Zutaten vor der Herstellung Ihres Rezeptes wiegen.
- Wiegen während eines Rezeptes: Sie können Ihre Zutaten während Ihres Rezeptes zu Beginn jeder
neuen Phase wiegen.
- freies Wiegen: Wählen Sie eine oder mehrere Zutaten aus Ihrem Kühlschrank und wählen Sie sie in
Ihrer Companion App über die Suchleiste aus. Drücken Sie auf das Waage-Logo Ihres i-Companion
Touch XL, und legen Sie dann Ihre Zutaten auf Ihre Waage: Je nach Gewicht erhalten Sie eine
Rezeptliste.
• Update
Damit die Funktionen Ihres Produkts in einem optimalen Betriebszustand bleiben, wird Ihr Produkt
dazu gebracht, Ihnen Updates anzubieten. Dazu wird auf dem Bildschirm ein Fenster angezeigt, in
dem Sie die Installation des zuletzt verfügbaren Updates akzeptieren oder nicht akzeptieren können.
Klicken Sie dann auf akzeptieren und lassen Sie Ihren i-Companion Touch XL aktualisieren.
* Je nach Modell

88
89
DEDE WAS IST ZU TUN, WENN IHR GERÄT NICHT FUNKTIONIERT?
PROBLEME URSACHEN LÖSUNGEN
Zutaten nicht
ausreichend gegart
Die Garzeiten sind Richtwerte; in
der Regel sind sie ausreichend, um
zufriedenstellende Garergebnisse zu
erhalten.
Verschiedene Bedingungen können
die Garzeit dennoch beeinflussen:
- Größe der Zutaten (geschnitten
oder nicht geschnitten)
- Menge der Zutaten
- Gemüsesorten und Reifegrad
- tiefgefrorene oder frische
Zutaten...
Verlängern Sie die Garzeit, indem Sie die Taste +
auf dem Display (B6) drücken.
Größe der Zutaten verringern.
Dampfverschluss nicht oder nicht
korrekt aufgesetzt
Positionieren Sie den Dampfverschluss auf
„max“; mit dieser Einstellung erhalten Sie
maximale Hitze im Behälter für unterschiedliche
Zubereitungen (Suppen, Dampfgaren usw.).
Mit dieser Einstellung verhindern Sie auch
Spritzer während des Mixvorgangs.
Die Einstellung „Dampf mini“ lässt eine maximale
Menge an Kondenswasser entweichen und
ermöglicht so die Zubereitung von Speisen oder
Saucen für bessere Konsistenz (Risotto, Dessert
Cremes, Saucen usw.)
Unzureichende
Dampfgarung
Wassermenge im Behälter nicht
passend.
Zutaten zu groß geschnitten.
Die Menge an Wasser im Behälter, die der
Messskala entsprechen muss (0,7 L).
Sie können außerdem den manuellen Modus
auswählen. Stellen Sie die Temperatur hierzu auf
120 °C ein und wählen Sie die für die Menge und
Art der Zutaten benötigte Garzeit ein.
Größe der Zutaten verringern.
Schwierigkeiten bei der
Zubereitung einzelner
Rezepte Unpassende Rezeptangaben
Ihre persönlichen oder im Internet gefundenen
Rezepte können möglicherweise nicht für Ihr
Gerät und Zubehör (Mengen, Garzeit, Dauer,
ungeeignetes Zubehör) geeignet sein: Bevor Sie
mit Ihrem Rezept beginnen, stellen Sie sicher,
dass Sie die in dieser Bedienungsanleitung
angegebenen Gebrauchsanweisungen befolgen.
Gerät funktioniert
nicht.
Der Netzstecker ist nicht
angeschlossen. Schließen Sie das Gerät an eine Steckdose an.
Mein B6-Display bleibt schwarz,
das Gerät befindet sich im Standby-
Modus Drücken Sie eine der Touch-Tasten (B1 bis B5)
Der Schalter (G) befindet sich in der
Position 0. Stellen Sie den Schalter auf die Position 1.
Der Behälter oder der Deckel sind
nicht ordnungsgemäß ausgerichtet
oder verriegelt.
Vergewissern Sie sich, dass der Behälter bzw. der
Deckel wie in den Abbildung in diesem Handbuch
korrekt positioniert und eingerastet sind.
Deckel schließt nicht
korrekt. Deckel ist nicht vollständig.
Vergewissern Sie sich, dass die Dichtung
ordnungsgemäß auf dem Dichtungsring
zusammengesetzt ist und dass der
Dichtungsträger korrekt auf dem Deckel aufliegt.
• Zum Reinigen des Motorblocks (A) ein feuchtes
Tuch verwenden. Trocknen Sie ihn gründlich.
• Um Ihnen die Reinigung zu erleichtern, können
Sie den Behälter, die Deckeleinheit und die
Zubehörteile in der Spülmaschine reinigen. Dies
gilt nicht für den Antrieb (C3 und C4) und den
Sicherheitsring (C5) (siehe Abb. 14).
• Zubehörteile, abnehmbarer Antriebszapfen und
Deckelelemente können sich leicht mit bestimmten
Zutaten wie Curry, Karottensaft usw. färben;
dies stellt keine Gefahr für Ihre Gesundheit oder
für den Betrieb Ihres Geräts dar. Um dies zu
vermeiden, reinigen Sie die Elemente zügig nach
dem Gebrauch.
Bevor Sie den Behälter (C) erneut verwenden,
stellen Sie stets sicher, dass die elektrischen
Kontakte unter dem Behälter sauber und trocken
sind.
• Damit das Erscheinungsbild und die
Langlebigkeit des Deckels Ihres Geräts erhalten
bleibt, waschen Sie ihn manuell ab. Benutzen
Sie nicht die scheuernde Seite des Schwamms,
um Kratzer zu vermeiden.
• Um das Material des Behälters (C) nicht zu
verändern, achten Sie darauf, dass Sie die
Gebrauchsanweisungen Ihres Geschirrspülers
beachten, und achten Sie darauf, dass Sie keine
Mengen Salz oder Geschirrspülmittel erhöhen.
Ihr Gerät ist serienmäßig mit einem
elektronischen Motorschutz versehen,
um eine lange Lebensdauer zu gewähr-
l e i s t e n . D i e s e e l e k t r o n i s c h e
Sicherheitsvorrichtung schützt Sie vor jeder
unsachgemäßen Verwendung; Ihr Motor ist
somit rundum geschützt.
Unter bestimmten sehr strengen Verwen-
dungsbedingungen, die den Empfehlungen der
Packungsbeilage nicht entsprechen (siehe Tabelle
„IHR GERÄT“: Möglicherweise zu große Mengen
und/oder ungewöhnlich lange Verwendung und/
oder zu schnell aufeinanderfolgende Rezepte),
wird der elektronische Schutz ausgelöst, um den
Motor zu schützen. In diesem Fall schaltet sich
das Gerät aus, und auf dem Display erscheint eine
„Sicherheitsmeldung“, um anzuzeigen, dass das
Gerät vorübergehend nicht mehr betriebsbereit ist.
Wenn auf dem Bildschirm „Sicherheitsmeldung“
angezeigt wird und das Gerät heruntergefahren
wird, gehen Sie wie folgt vor:
• Trennen Sie Ihr Gerät nicht von der Stromquelle.
Lassen Sie den Schalter 0/I auf 1 „ON“ (G)
stehen.
• Halten Sie sich an die Empfehlungen auf Ihrem
Bildschirm, um Ihre Zubereitung anzupassen
(siehe Tabelle „IHR GERÄT“: Zutatenmengen/
Rezeptzeit/Temperatur/Zubehörtyp).
Für Fragen steht Ihnen der Kundendienst zur
Verfügung (siehe Kontaktinformationen im
Garantieheft).
WICHTIG: SICHERUNG DES GERÄTS

90
91
DEDE PROBLEME URSACHEN LÖSUNGEN
Übermäßige Vibrationen.
Das Gerät steht nicht auf einer
ebenen Fläche; das Gerät steht
nicht stabil. Stellen Sie das Gerät auf eine ebene Arbeitsfläche.
Zu große Menge an Zutaten. Verringern Sie die Menge der zuzubereitenden
Zutaten.
Zubehörfehler. Vergewissern Sie sich, dass Sie das vorgesehene
Zubehör verwenden.
Leise Betriebsgeräusche
Der Antrieb Ihres Geräts kann
bei reduzierter Geschwindigkeit
oder bei der Zubereitung
einiger Zutaten (z. B. Reis) ein
Geräusch erzeugen.
Hierbei handelt es sich um ein vorübergehendes
Phänomen, das sich in keiner Weise auf die
Lebensdauer Ihres Geräts auswirkt. Nachdem das
Gerät einige Male verwendet und der abnehmbare
Antriebszapfen gereinigt wurde, werden sich die
Geräusche verringern oder verschwinden (siehe
Abschnitt „Reinigung des Geräts“).
Sehr starke
Betriebsgeräusche Verwendung eines unpassenden
Zubehörteils
Achten Sie darauf, dass passende Zubehör zu
verwenden (Beispiel: zum Kneten oder Verrühren
von Teig, Messer F4 anstelle des Rührers F3
verwenden). Beachten Sie hierzu die Angaben
in den Rezepten sowie die in diesem Handbuch
enthalten Bedienhinweise.
Der Deckel leckt.
Zu große Menge an Zutaten. Verringern Sie die Menge der zuzubereitenden
Zutaten.
Der Deckel ist nicht richtig
aufgesetzt oder eingerastet. Schließen Sie den Deckel ordnungsgemäß auf dem
Behälter.
Der Dichtungsring
ist nicht angebracht.
Legen Sie den Dichtungsring auf den
Dichtungsträger und verbinden Sie beide Teile mit
dem Deckel.
Der Dichtungsring ist
durchtrennt
oder beschädigt.
Wechseln Sie die Dichtung; kontaktieren
Sie gegebenenfalls ein zugelassenes
Kundendienstzentrum.
Zubehörfehler. Vergewissern Sie sich, dass Sie das vorgesehene
Zubehör verwenden.
Leckage durch den
Antrieb.
Die Dichtung wurde nicht kor-
rekt eingesetzt. Positionieren Sie die Dichtung richtig.
Die Dichtung ist beschädigt. Kontaktieren Sie ein zugelassenes Kundendienst-
zentrum.
Der Dichtungsring (C5) wurde
unzureichend befestigt. Befestigen Sie den Dichtungsring (C5) richtig.
Die Messerklingen drehen
sich schwer. Lebensmittel zu groß
oder zu hart. Verringern Sie die Größe oder Menge der zu
verarbeitenden Zutaten. Flüssigkeit hinzufügen.
Motorgeruch.
Bei der ersten Verwendung
des Geräts oder bei einer
Motorüberlastung aufgrund
einer zu hohen Menge an
Zutaten, oder Zutaten, die zu
hart oder zu groß sind.
Lassen Sie den Motor abkühlen (etwa 30 Minuten)
und verringern Sie die Menge der Zutaten im
Behälter.
Anzeige
Sicherheitsmeldung
Behälter oder Deckel nicht
korrekt verschlossen
Bevor Sie das Gerät in Gebrauch nehmen,
vergewissern Sie sich, dass der Behälter korrekt auf
dem Motorblock eingerastet ist und dass der Deckel
richtig auf dem Behälter aufgesetzt wurde. Falls
das Problem weiterhin besteht, kontaktieren Sie
ein zugelassenes Kundendienstzentrum.
Im Betriebsmodus „Garen
ohne Deckel“ befindet sich
der Deckel dennoch auf dem
Behälter.
Deckel entriegeln, bevor Sie das Garprogramm
starten. Falls das Problem weiterhin
besteht, kontaktieren Sie ein zugelassenes
Kundendienstzentrum.
PROBLEME URSACHEN LÖSUNGEN
Die Sicherheitsverriegelung
des Deckels ist noch
aktiviert (Verschlussstange),
weshalb der Deckel nicht
ordnungsgemäß verschlossen
werden kann.
Das Gerät wurde bei laufender
Zubereitung ausgeschaltet, indem der
Schalter I/O auf O gestellt wurde oder
der Netzstecker während dem Betrieb
gezogen wurde.
Stellen Sie den Schalter I/O einfach auf
I. Die Küchenmaschine wird mitsamt der
Sicherheitsverriegelung des Deckels neu
gestartet und die Stange nimmt wieder ihre
Ausgangsposition ein. Nun können Sie den Deckel
entriegeln.
SECU-Fehlermeldung Rotor blockiert
Entleeren Sie den Behälter, lassen Sie ihn
abkühlen und versuchen Sie es erneut. Wenn das
Problem weiterhin besteht, wenden Sie sich an
den Kundendienst.
Fehlermeldung ERR39 Überhitzter Behälter
Ihre Küchenmaschine braucht eine kleine Pause...
Lassen Sie den Behälter abkühlen. Wenn das
Problem weiterhin besteht, wenden Sie sich an
den Kundendienst
SECU-Fehlermeldung Motor überhitzt Lassen Sie die Küchenmaschine 30 min abkühlen und
verringern Sie die Menge im Behälter.
SECU-Fehlermeldung Instabilität der Küchenmaschine Die Küchenmaschine stoppte, weil sie eine
Instabilität erkannt hat. Versuchen Sie, die Menge
im Behälter zu verringern
ERR34, ERR21, ERR22 Ihr Companion hatte einen
Hitzschlag... Trennen Sie das Gerät vom Netz und
wenden Sie sich an den Kundendienst
ERR 31 Deckelverriegelung nicht möglich Bitte wenden Sie sich an den Kundendienst
ERR35 Ihr Companion ist
am Ende...
Ihre Küchenmaschine braucht eine kleine Pause...
Trennen Sie das Gerät vom Strom und schließen
Sie es wieder an. Wenn das Problem weiterhin
besteht, wenden Sie sich an Ihren Kundendienst.
ERR37, ERR03, ERR01 Ihr Companion ist am Ende... Bitte wenden Sie sich an den Kundendienst
ERR23 Ihr Companion hatte einen
ernstzunehmenden
Hitzschlag... Bitte wenden Sie sich an den Kundendienst
ERR02, ERR30 Verbindungsproblem
Ihre Küchenmaschine kann nicht über WLAN
kommunizieren. Trennen Sie das Gerät und
schließen Sie es wieder an. Wenn das Problem
weiterhin besteht, wen Sie sich an Ihren
Kundendienst.
Anzeige Das Produkt ist nicht mit dem WLAN
verbunden
Überprüfen Sie Ihr WLAN-Netzwerk, oder trennen
Sie das Gerät und schließen Sie es wieder an. Falls
das Problem weiterhin besteht, kontaktieren Sie
Ihren Kundendienst.
Anzeige Das Produkt wird mit dem WLAN
verbunden Warten Sie, bis das Logo angezeigt wird
UI-1, UI-3 Ihr Produkt hat Schwierigkeiten,
bestimmte Daten über WLAN zu laden
Wenn das Problem wiederholt auftritt, ist das
empfangene WLAN-Signal möglicherweise zu
schwach. Sie können versuchen, Ihr Produkt näher
an den WLAN-Router zu bringen oder einen WLAN-
Repeater in der Nähe Ihres Produkts installieren,
um die Qualität des WLAN-Signals zu verbessern.
UI-2, UI-4, UI-5, UI-6 Ihr Produkt hat Probleme mit der
Wiederherstellung bestimmter lokaler
oder WLAN-Daten
Wenn Ihr Produkt nicht verbunden ist, können
Sie versuchen, es anzuschließen und eine
Datensynchronisierung zu starten. Wenn Ihr Produkt
angeschlossen ist, versuchen Sie, die Signalqualität
zu verbessern (siehe vorherige Zeile)

92
DE Ihr Gerät funktioniert immer noch nicht?
Wenden Sie sich an ein autorisiertes Service-Center (siehe Liste im Service-Handbuch).
• Entfernen des Verpackungsmaterials und des Geräts
Die Verpackung besteht ausschließlich aus umweltfreundlichen Materialien, die entsprechend
der geltenden Recycling-Vorschriften entsorgt werden können.
Zur Entsorgung des Geräts wenden Sie sich bitte an Ihren kommunalen Ansprechpartner.
• Elektronische Produkte oder elektrische Produkte am Ende der Lebensdauer:
Denken Sie an die Umwelt!
Ihr Gerät enthält zahlreiche wertvolle und wiederverwertbare Rohstoffe.
Geben Sie es deshalb bitte bei einer Sammelstelle ab, damit es richtig weiterverarbeitet wird.
RECYCLING
Die Bluetooth® Marke und die Logos sind Warenzeichen der Bluetooth SIG, Inc. und ihre Verwendung durch die Groupe SEB erfolgt mit Genehmigung.
Google Play und Android sind Marken von Google Inc.
Apple und das Apple Logo sind Marken der Apple Inc., die in den Vereinigten Staaten und weiteren Ländern eingetragen sind. App Store ist eine
Dienstleistungsmarke von Apple Inc.
LEXIKON
Paaren: Aktion zum Gruppieren oder verknüpfen von zwei Geräten.
Diese Aktion wird durchgeführt, wenn Sie Ihr Smartphone oder Tablet zum ersten Mal mit dem i-Companion Touch XL verbinden.
Synchronisieren: Aktion zum Aktualisieren von Informationen. Die App und der i-Companion Touch XL werden zum Austausch
synchronisiert die Informationen, wenn sie miteinander verbunden sind.
Verbinden: Stellen Sie eine Verbindung zwischen der App (Smartphone/Tablet) und dem Gerät (i-Companion Touch xl) her. Diese
Aktion ist für die Synchronisierung unerlässlich.
Cookies: Dies sind die an Moulinex übermittelten Verwendungsinformationen zur Verbesserung der App.

93
IT
Per la sicurezza personale
• Leggere attentamente il manuale di
istruzioni prima di usare l'apparecchio
per la prima volta e conservarlo: un
utilizzo non conforme alle istruzioni
solleva il costruttore da ogni
responsabilità.
• Scollegare sempre l'apparecchio
dalla presa di corrente se lasciato
incustodito e prima del montaggio,
dello smontaggio o della pulizia. Non
consentire ai bambini di utilizzare
l'apparecchio senza sorveglianza.
• Questo apparecchio non deve essere
utilizzato dai bambini. Conservare
l'apparecchio e il suo cavo fuori dalla
portata dei bambini.
• Questo apparecchio non deve
essere usato da persone (compresi
i bambini) con ridotte capacità
fisiche, sensoriali o mentali o prive di
esperienza o conoscenza, a meno che
non siano sorvegliate o siano state
istruite sull'uso dell'apparecchio da
una persona responsabile della loro
sicurezza. Si raccomanda di sorvegliare
i bambini per assicurarsi che non
giochino con l'apparecchio.
• Mantenere l'apparecchio fuori dalla
portata dei bambini.
• D u r a n t e l ' u s o
dell'apparecchio, alcune
pa rt i ra gg i ungo no
temperature elevate
(pareti in acciaio inox del recipiente e
del tappo, perno comune removibile,
parti trasparenti del coperchio, parti
metalliche sotto il recipiente, cestello).
Fare attenzione al rischio di ustioni.
Maneg giare l'apparecchio tramite le
parti in plastica fredde (impugnature,
blocco motore).
• La temperatura delle superfici
accessibili può essere elevata quando
l'apparecchio è in funzione.
• L'apparecchio non è progettato per
essere attivato tramite timer esterni o
telecomandi separati.
• Non usare l'apparecchio se non
funziona correttamente, se ha subito
danni o se il cavo di alimentazione o la
presa sono danneggiati. Per motivi di
sicurezza, affidare la sostituzione del
cavo di alimentazione esclusivamente
a un centro di assistenza autorizzato
(consultare l'elenco nell'opuscolo
dedicato all'assistenza).
• L'apparecchio non deve essere
immerso in liquidi. Non mettere
il blocco motore (A) sotto l'acqua
corrente.
• L'apparecchio è destinato
esclusivamente all'uso domestico in
interni e a un'altitudine inferiore a
2000 m. Il costruttore declina ogni
responsabilità e si riserva il diritto
di porre fine alla garanzia in caso di
uso commerciale o inadeguato o del
mancato rispetto delle istruzioni.
NORME DI SICUREZZA:

94 95
ITIT
• Questo apparecchio non è destinato
a essere utilizzato nei seguenti ambiti,
pena l'annullamento della garanzia:
- aree cucina di negozi, uffici e altri
ambienti lavorativi;
- cucine riservate al personale di
negozi, uffici o altri ambienti
professionali;
- aziende agricole;
- da parte dei clienti di alberghi,
motel e altre strutture a carattere
residenziale;
- camere in affitto e altri ambienti
analoghi.
AVVERTENZA!
L'apparecchio emette
del vapore che potrebbe
causare ustioni.
Maneggiare con attenzione il
coperchio e il tappo (se necessario,
utilizzare guanti o presine).
Maneggiare il tappo attraverso la
parte centrale.
• Non mettere in funzione
l'apparecchio se la guarnizione
non è installata sul porta-
guarnizione e il porta-guarnizione
non è assemblato nel coperchio.
È tassativamente obbligatorio
utilizzare l'apparecchio con il
tappo inserito nell'apposito
alloggiamento del coperchio
(tranne in caso di indicazioni
specifiche per la ricetta).
AVVERTENZA!
Attenzione al rischio
di lesioni in caso
di u s o i m proprio
dell'apparecchio.
Prendere le dovute precauzioni
nel maneggiare la lama tritatutto
ultrablade (E1) e la lama per
impastare/macinare (E4) durante
la pulizia e lo svuotamento
del recipiente, poiché sono
estremamente taglienti.
Riporre la lama tritatutto ultrablade
(E1) nel contenitore dopo ogni
utilizzo.
Prestare particolare attenzione nel
caso vengano versati nel robot da
cucina liquidi caldi: potrebbero
fuoriuscire dall'apparecchio in
seguito a un'ebollizione improvvisa.
AVVERTENZA! Procedere con cautela
nel maneggiare l'apparecchio
(pulizia, riempimento, versamento):
evitare qualsiasi fuoriuscita di
liquido sui connettori.
AVVERTENZA! Alcuni alimenti dotati
di rivestimento superficiale (salsicce
intere, lingua, pollame…) o grandi
pezzi di carne possono generare
schizzi a causa dei liquidi bollenti
trattenuti. Pertanto, si raccomanda
di forarli prima della cottura con un
coltello o una forchetta.
AVVERTENZA! La superficie
dell'elemento riscaldante è soggetta
a calore residuo dopo l'uso.
Assicurarsi di toccare solo
le impugnature del prodotto
(levette C2, impugnatura del
coperchio D2 e del tappo D1)
durante il riscaldamento e fino al
raffreddamento completo.
Fare riferimento alle istruzioni d'uso
per regolare la velocità e i tempi di
funzionamento di ciascun accessorio
e di ciascun programma.
Fare riferimento alle istruzioni d'uso
per l'assemblaggio e il montaggio
degli accessori sull'apparecchio.
Fare riferimento alle istruzioni d'uso
per la pulizia e la manutenzione
dell'apparecchio.
Seguire sempre le istruzioni per la
pulizia dell'apparecchio:
• Scollegare l'apparecchio dalla presa
di corrente.
• Non pulire l'apparecchio quando è
caldo.
• Pulire con un panno o una spugna
umida.
• Non collocare mai l'apparecchio in
acqua o sotto l'acqua corrente.
SOLO MERCATI EUROPEI:
• Conservare l'apparecchio e il suo cavo
fuori dalla portata dei bambini di età
inferiore a 8 anni. I bambini non
devono giocare con l'apparecchio.
• Questo apparecchio può essere
utilizzato da persone con ridotte
capacità fisiche, sensoriali o mentali
o da persone senza esperienza o
conoscenza solo se supervisionate
o i s t rui t e su l l’us o sicuro
dell’apparecchio e se comprendono
i rischi correlati.
• Questo apparecchio può essere usato
da bambini di età superiore a 8 anni
solo se supervisionati o istruiti
sull'uso sicuro dell'apparecchio e se
comprendono i rischi correlati. Le
operazioni di pulizia e manutenzione
ordinaria non devono essere
effettuate da bambini senza
sorveglianza a meno che non
abbiano almeno 8 anni e siano
supervisionati.
Collegamento elettrico
• Collegare sempre l'apparecchio a una
presa di corrente dotata di messa a
terra.
• L'apparecchio è progettato per
funzionare esclusivamente a
corrente alternata. Verificare che la
tensione di alimentazione indicata
sulla targhetta dell'apparecchio
corrisponda a quella dell'impianto
elettrico di casa.
• Qualsiasi errore nel collegamento
elettrico comporta l'annullamento
della garanzia.
• Non tirare mai il cavo di alimentazione
per scollegare l'apparecchio dalla
presa di corrente.

96 97
ITIT Le presenti istruzioni contengono consigli d'uso che consentiranno di scoprire le
funzionalità di questo apparecchio: preparazione di zuppe, cottura lenta, cottura a vapore,
impasti.
DESCRIZIONE DELL'APPARECCHIO:
A Blocco motore
B Pulsanti touchscreen*
B1: Annullare
B2: Bilancia (a seconda del modello)
B3: START/STOP
B4: Video
B5: Impostazioni
B6: Display touchscreen
C Insieme recipiente
C1: Recipiente inox
C2: Levette
C3: Perno comune removibile
C4: Guarnizione
C5: Anello di bloccaggio del cilindro
D Insieme coperchio
D1: Tappo di regolazione del vapore
D2: Coperchio
D3: Porta-guarnizione
D4: Guarnizione
E Accessori
E0: Contenitore per accessori
E1: Lama tritatutto ultrablade
E2: Miscelatore
E3: Sbattitore
E4: Lama per impastare/macinare
S5: Cestello a vapore
F Spatola
G Interruttore 0/I per interrompere
l'alimentazione elettrica dell'apparecchio
H Spazzola per la pulizia
DATI TECNICI DELL'APPARECCHIO
Potenza: 1550W (1000W: resistenza riscaldante / 550W: motore)
Intervallo di temperatura: Da 30° a 150°C
regolabile per incrementi di 5°C.
Durata di funzionamento: Da 5 secondi a 2 ore,
regolabile per incrementi di 5 secondi minimo a 1 minuto
massimo.
Numero delle velocità: 13 - 2 velocità intermittenti:
velocità 1 (5 sec acceso/20 sec spento).
velocità 2 (10 sec acceso/10 sec spento).
- 10 velocità continuative progressive
(velocità da 3 a 12).
- 1 velocità massima intermittente (velocità 13).
Frequenza: 2412 - 2484 MHz
Potenza massima trasmessa: 20 dBm
Modalità stand-by:
L'apparecchio si mette in stand-by dopo 15 minuti di inattività.
Per riaccenderlo, premere uno dei tasti touchscreen (B1-B5)
Consumo energetico in modalità Standby quando il
prodotto è collegato: 0,2 Wh
* Google Play e Android sono marchi di Google Inc.
Apple e il logo Apple sono marchi di Apple Inc., depositati negli Stati Uniti e in altri paesi. APP Store è un marchio di servizi di Apple Inc.
* Icone visibili solo quando servono per l'uso dell'apparecchio.
• No n im mergere in l iquid i
l' a p p a re c c h io, i l c a vo di
alimentazione o la presa, e tenerli
lo nt a n i da l le par t i ca lde
dell'apparecchio, da fonti di calore
o spigoli vivi.
Uso improprio
• Non toccare il coperchio prima del
completo arresto dell'apparecchio
(tasto stop): attendere che gli
alimenti in lavorazione abbiano
smesso di girare.
• Nel recipiente, versare sempre
gli ingredienti solidi prima
di aggiungere quelli liquidi
(cfr. fig. 11) e non oltrepassare il
livello massimo previsto, segnalato
con un'incisione all'interno del
recipiente (cfr. fig. 11). Se il
recipiente è troppo pieno, è possibile
che fuoriesca acqua bollente.
• Attenzione: durante il programma di
cottura al vapore, rispettare il livello
di 0,7 litri d'acqua (cfr. fig. 4.2).
• Non appoggiare mai le dita o qualsiasi
altro oggetto nel recipiente durante
il funzionamento dell'apparecchio.
• Non usare il recipiente come
contenitore (per conservare,
congelare, sterilizzare).
• Posizionare l'apparecchio su un piano
di lavoro stabile, resistente al calore,
pulito e asciutto.
• Non posizionare l'apparecchio vicino
a pareti o armadi: il vapore prodotto
potrebbe danneggiarli.
• Non posizionare l'apparecchio vicino
a fonti di calore in funzione (piastre
di cottura, elettrodomestici, ecc.).
• Non coprire il coperchio con
canovacci o altro e non cercare di
otturare la sua cavità: utilizzare
il tappo di regolazione del vapore
apposito.
• Mentre l'apparecchio è in funzione,
non avvicinarsi con capelli, sciarpe,
cravatte o simili sopra il recipiente.
• Non mettere gli accessori nel forno
a microonde.
• Non utilizzare l'apparecchio
all'aperto.
• Non superare mai le quantità massime
indicate nelle istruzioni.
• Riporre l'apparecchio solo una volta
che si è raffreddato completamente.
• Per raffreddare il recipiente, non
usare il congelatore ma il frigorifero.
• Non mettere la spatola in olio per
più di 20 minuti a 150°C.
Centro di assistenza
• Per la propria sicurezza, non utilizzare
accessori o parti di ricambio diverse
da quelle fornite dai centri di servizio
post-vendita autorizzati.
• Eventuali interventi diversi dalla
pulizia e dalle normali operazioni di
manutenzione spettanti all'utente
devono essere svolti da un centro
assistenza autorizzato.
• Consultare la tabella "Cosa fare
se l'apparecchio non funziona?"
riportata al termine delle istruzioni
per l'uso.

98 99
ITIT L'APPARECCHIO
Questo apparecchio viene fornito con gli accessori elencati di seguito.
Questi accessori sono anche dotati di zone di impugnatura apposite, per facilitarne il
maneggiamento durante l'uso e la preparazione delle ricette.
Lama tritatutto
E1 Miscelare zuppe
3 min 3 L
Miscelare composte 40 sec 1 Kg
Tritare verdura 15 sec 0,6 Kg
Tritare carne 30 sec 1 Kg
Tritare pesce 15 sec 1 Kg
Non usare questo accessorio per tritare prodotti duri; usare la lama per impastare/macinare E4.
Miscelatore
Lavora i piatti cucinati senza rovinare gli ingredienti.
Molto utile per le fasi di rosolatura a fuoco lento iniziali di alcune preparazioni (risotti, zuppe).
E2 Rosolatura 5 min 500 g
Cottura a fuoco lento 45 min 3 L
Risotti 22 min 1,5 Kg
Ratatouille, chutney, legumi (impostazioni: vedere ricettario)
Sbattitore
9 max
E3 Albumi montati a neve 5/10 min 8
max
Maionese, panna
montata 2/5 min 0,5 L
Salse, creme Da a 1/20 min 1 L
Patate schiacciate Da a 1 min 1 L
Polenta Da a 1/16 min 1 L
E4
Impasto di pane bianco 2 min 30 sec 1,2 Kg
Impasto di pasta brisé,
sablé, pani speciali 2 min 30 sec 1 Kg
Impasto di lieviti
(brioche, ciambelle…)
1 min 30 sec
2 min 0,8 Kg
Lavorazione di impasti
(torte soffici…)
40 sec
3 min 1 Kg
Polverizzazione di
frutta a guscio 1 min 0,6 Kg
Tritatura di prodotti
duri 1 min 0,6 Kg
Pestatura del ghiaccio 1 min Da 6 a
10
Pastella per crêpe,
gaufre 1 min 1,5 L
Tappo
D1
Tappo di regolazione dell'estrazione del vapore
Massimo (a) = cottura a vapore.
Minimo (b) = risotto, crema pasticcera, salse…
La posizione "minimo" permette alla condensa di fuoriuscire per ottenere
piatti o salse con una migliore consistenza (risotti, crema pasticcera,
salse, ecc.).
La posizione "massimo" permette di trattenere il calore e il vapore
all'interno del recipiente, ideale per tutte le cotture a vapore (zuppe, ecc.).
Questa posizione evita inoltre gli schizzi durante la miscelatura.
Lama per impastare/macinare
* A seconda del
modello
Cestello
a vapore
I tempi di cottura del cestello a vapore sono dati a titolo indicativo; garantiscono una cottura
soddisfacente nella maggior parte dei casi. Tuttavia, alcune condizioni possono influire sui
tempi di cottura: dimensione delle verdure (tagliate o non tagliate) / quantità di ingredienti
nel cestello / varietà e maturità delle verdure / quantità d'acqua nel recipiente, che deve
arrivare alla tacca (0,7 L). Ricordarsi di utilizzare il tappo vapore in posizione "massimo" (a).
Se la cottura non è ultimata, si può aggiungere un ulteriore tempo di cottura.
E5
Cottura a vapore di
verdura, pesce o carne
20/40
min 1 Kg
Zuppa in pezzi 3 min 3 L
P1 - Zucchine 20 min 800 g
P1 - Pastinaca 25 min 800 g
P1 - Porri (parte bianca) 25 min 800 g
P1 - Broccoli 20 min 500 g
P1 - Pesce 15 min
600 g (con
carta da forno)
P2 - Patate 30 min 1 Kg
P2 - Carote 30 min 1 Kg
P2 - Fagiolini 30 min 800 g
P2 - Carni bianche 20 min
600 g (con
carta da forno)
Perno comune
removibile
C3
Si possono far rosolare gli alimenti nel recipiente senza coperchio, mescolando e
controllando la cottura.
La funzione COTTURA SENZA COPERCHIO non è adatta alle confetture e alle
preparazioni a base di latte (rischio di fuoriuscite)
TEMPERATURE FINO A 130°C TEMPERATURE DA
135°C A 150°C
Cottura con o senza
coperchio
Coperchio chiuso Solo coperchio
aperto
Accessori
Tutti gli accessori con il perno
Solo Perno comune
C3
Velocità Sì No
Tempo massimo
- Se la temperatura è inferiore o
uguale a 100°C: 2 ore
- Se la temperatura è compresa
tra 100°C e 130°C: 1 ora
- Se la temperatura
è superiore o
uguale a 135°C:
20 min
!! Non rimuovere il perno comune immediatamente dopo l’uso. Versare dell’acqua
nel recipiente vuoto per farlo raffreddare.

100
101
ITIT
1. PRIMO UTILIZZO
i-Companion touch xl è un robot da cucina intelligente che aiuta a cucinare e preparare piatti.
Propone centinaia di ricette gratuite disponibili in pochi clic.
Grazie al suo display touchscreen intuitivo e interattivo, consente di preparare diverse ricette in
tempi record.
i-Companion touch xl si occupa della preparazione, della miscelatura e della cottura degli ingredienti.
Fornisce una guida passo dopo passo attraverso tutte le fasi delle ricette.
Lasciarsi guidare è rapido e facile!
Accendere i-Companion touch xl con l'interruttore 0/I (cfr. fig. 9) e seguire le istruzioni che compaiono
sul display. Per l'intera durata di questi passaggi, il logo consente di ottenere assistenza per la fase
da realizzare. La sezione FAQ (domande frequenti) è consultabile sul sito www.moulinex.it
Sono inoltre disponibili dei video tutorial per l'accensione dell'apparecchio:
http://bit.ly/Guidaallutilizzo
• Impostazioni del paese
Al primo utilizzo, si accede alle impostazioni del paese.
1 selezionare il paese 2 selezionare la lingua
Una volta effettuati questi due passaggi, comparirà una schermata di benvenuto.
I-COMPANION TOUCH XL:
IL MIO ASSISTENTE QUOTIDIANO IN CUCINA
I pulsanti di comando sotto indicati si accendono quando possono essere utilizzati:
Il pulsante centrale ha 11 funzioni.
Esse variano a seconda dei
passaggi da seguire (start, pausa,
passaggio successivo, confermare,
terminare…)
Quando è disponibile un video
relativo alla ricetta in corso
di realizzazione, è possibile
riprodurlo cliccando su questo
pulsante.
Annullare/ripristinare
Impostazioni (modifica delle
impostazioni, connessione Wi-Fi,
ingredienti di una ricetta…)
Utilizzo della bilancia connessa*
INSTALLAZIONE DEL RECIPIENTE, DEI SUOI
ACCESSORI E DELL'INSIEME COPERCHIO
• Prima del primo utilizzo, lavare tutte le parti
(C, D, E, F, H) con acqua calda e detersivo,
tranne il blocco motore (A). Il recipiente (C)
è munito di un perno smontabile (C3) per
facilitare la pulizia.
• Accertarsi che tutti gli imballaggi siano rimossi
prima dell'uso, compresa la protezione tra il
recipiente (C) e il blocco motore (A).
• Posizionare la guarnizione (D3) sul porta-
guarnizione (D4) (cfr. fig. 1) e fissare
l'insieme sul coperchio (D2) (cfr. fig. 2).
• Posizionare la guarnizione (C4) sul perno
comune (C3). Bloccare l'insieme sul fondo
del recipiente con l'anello di bloccaggio (C5)
(cfr. fig. 3). Per la modalità di cottura senza
coperchio, posizionare la guarnizione (C4)
sul perno comune (C3). Bloccare l'insieme sul
fondo del recipiente con l'anello di bloccaggio
(C5) (cfr. fig. 3).
• Posizionare l'accessorio prescelto nel recipiente:
- gli accessori (E1, E2, E3 o E4) sul perno
comune sul fondo del recipiente (cfr. fig. 4.1),
- in caso di cottura a vapore, il cestello vapore
(E5) all'interno del recipiente (cfr. fig. 4.3),
avendo cura di riempire il recipiente con 0,7
litri di preparazione liquida (acqua, salsa…)
(cfr. fig. 4.2).
• Incorporare gli ingredienti all'interno del
recipiente o del cestello vapore.
Posizionare il coperchio sul recipiente (C)
allineando i due triangoli (cfr. fig. 5), bloccare
il coperchio senza premere ruotandolo nel senso
della freccia (cfr. fig. 6).
• Posizionare il tappo di regolazione del vapore
(D1) sul coperchio, sono possibili 3 posizioni
(cfr. fig. 7).
• Posizionare il recipiente (C) sul blocco motore
(A) fino a udire un "clic" (cfr. fig. 8).
L'apparecchio entra in funzione solo se il
recipiente e il coperchio sono correttamente
posizionati e fissati sul blocco motore.
In caso di errato posizionamento o
bloccaggio di uno degli elementi o di
entrambi (cfr. fig. 10.1 e 10.2), sul display
comparirà un messaggio di sicurezza.
pla
pla
pla
L'APPARECCHIO È DOTATO DI UN SISTEMA DI
BLOCCAGGIO DI SICUREZZA DEL COPERCHIO
Il coperchio viene bloccato ad ogni avvio
dell'apparecchio. Il sistema di sicurezza impedisce
l'apertura del coperchio durante la preparazione
di una ricetta. Non tentare di forzare il coperchio
quando è bloccato. Il sistema di sicurezza si
sblocca a ogni arresto dell'apparecchio. Se è stata
selezionata una temperatura pari o superiore a
50°C e una velocità pari o superiore a 5, sul
display del pannello di controllo apparirà un
conto alla rovescia di 10 secondi. L'apertura
del coperchio sarà possibile esclusivamente al
termine del conto alla rovescia.

102
103
ITIT - Dispositivi compatibili:
È possibile consultare l'elenco dei modelli di smartphone e tablet compatibili con i-Companion touch
xl su www.moulinex.com
- Download dell'applicazione:
Scaricare l'applicazione Companion. Scaricabile gratuitamente dall'App Store (iPhone/iPad) e da
Google Play (Android).
Scarica su
App Store
APP ANDROID SU
- Collegamento dell'account:
Dall'applicazione Companion su smartphone/tablet, selezionare il prodotto i-Companion touch xl,
quindi creare un account o collegarsi al proprio account se se ne possiede già uno.
L'apparecchio genererà un codice di collegamento (comparirà sul display B6) che dovrà essere inserito
all'interno dell'applicazione Companion.
Se si desidera collegare diversi smartphone/tablet all'i-Companion touch xl, ciascuna delle applicazioni
deve essere collegata allo stesso account utente Companion.
La mia prima ricetta
Al primo utilizzo, l'i-Companion touch xl proporrà di realizzare una prima ricetta per imparare a usare
l'apparecchio. Selezionando "La mia prima ricetta", è possibile seguire una guida step by step per
tutto il corso della ricetta.
Questa ricetta scomparirà dalla schermata iniziale una volta realizzata o dopo 10 utilizzi dell'i-
Companion touch xl.
2. FUNZIONI DEL PRODOTTO
L'apparecchio i-Companion touch xl propone un funzionamento "connesso" ma può anche funzionare
in modalità "non connessa". Inoltre, grazie alle sue molteplici funzioni, è una fonte di ispirazione
quotidiana e un aiuto nella preparazione di tutte le ricette! In modalità "non connessa" sono
disponibili 310 ricette, in modalità "connessa" è possibile avere accesso a centinaia di ricette!
• Connessione a Internet
Ora è possibile collegare i-Companion touch xl alla rete Internet. Questo passaggio può essere
effettuato subito selezionando "Adesso" o in seguito selezionando "Più tardi".
Per effettuarlo in un secondo momento, basta andare sulle impostazioni dalla schermata iniziale
dell'i-Companion touch xl.
È necessario connettersi a Internet per utilizzare le seguenti funzioni:
accesso a tutte le ricette Companion, i miei ricettari, nel mio frigo, foto e video delle ricette step by
step e aggiornamenti dei prodotti.
Per collegare l'i-Companion touch xl alla rete Internet occorre:
- Scegliere la rete (se non si riesce ad accedere, andare su "Impostazioni", quindi su "Impostazioni
Wi-Fi" e poi su "Attivare Wi-Fi")
- Inserire la password della rete Wi-Fi
- Durante il caricamento della connessione apparirà sullo schermo "Connessione in corso". Questo
passaggio può richiedere alcuni minuti.
- Sul display comparirà la scritta "Congratulazioni!" a conferma che la connessione è avvenuta con
successo
ay
- Infine, scegliere il fuso orario
Significato degli indicatori di connessione Wi-Fi:
Il prodotto non è connesso al Wi-Fi
Il prodotto è in corso di connessione al Wi-Fi
Il prodotto è collegato al Wi-Fi
Sul sito http://bit.ly/Guidaallutilizzo sono disponibili dei video esplicativi su come connettere l'i-
Companion touch xl al Wi-Fi
• Collegamento applicazione
L'applicazione Companion permette di tenere d'occhio l'i-Companion touch xl senza dovergli restare
accanto. Può essere accoppiata allo smartphone o al tablet. In questo modo, sarà possibile accedere
alle ricette da qualunque posto.
Si prega di verificare che il Wi-Fi dello smartphone/tablet sia connesso a Internet (Wi-Fi/4G/3G…)
È necessario collegare l'i-Companion touch xl a una presa di corrente.
Per effettuarlo in un secondo momento, basta andare sulle impostazioni dalla schermata iniziale
dell'i-Companion touch xl.
È necessario collegare all’applicazione lo smartphone/tablet per utilizzare le seguenti funzioni:
i miei ricettari, monitoraggio a distanza dell'avanzamento della ricetta dallo smartphone, invio di una
ricetta dallo smartphone/tablet all'i-Companion touch xl.

104
105
ITIT
PROGRAMMI
L'apparecchio dispone di 14 programmi automatici preregistrati:
1. Selezionare il programma di propria scelta.
2. Le impostazioni preprogrammate possono
essere modificate (a seconda della ricetta
scelta, degli ingredienti, dei quantitativi
preparati). Regolare la temperatura di cottura,
il tempo e la velocità con i pulsanti – e +
3. Al termine della modifica delle impostazioni,
premere il pulsante "start" (B3) per avviare il
programma.
4. Al termine del programma, l'apparecchio
emetterà 3 segnali acustici.
5. Al termine dei programmi Zuppa vellutata,
Zuppa densa Cottura lenta, Risotto, Salse,
Dessert, Vapore basso e Vapore alto,
l'apparecchio passerà automaticamente in
modalità mantenimento al caldo per 45
minuti, in modo che la pietanza preparata
rimanga pronta per essere consumata. Con i
programmi Cottura lenta, Salse e Dessert e in
modalità manuale, il motore dell'apparecchio
funziona ad una velocità specifica per
preservare la preparazione ed evitare che
si attacchi al fondo del recipiente. Per
interrompere il mantenimento al caldo, è
sufficiente premere il pulsante "stop" (B3).
Al termine della lavorazione dell'impasto
nei programmi Pane e Brioche, l'apparecchio
passa in modalità "lievitazione dell'impasto"
a 30°C per 40 minuti per dare un migliore
volume al preparato. Se si apre il coperchio
o si estrae il recipiente dalla sua base mentre
un programma è in esecuzione, il programma
si arresta. Se si desidera interrompere questa
modalità, premere il pulsante "Impostazioni"
e poi "Ripristinare".
6. Una volta avviato il programma automatico,
è possibile fermare l'apparecchio in qualsiasi
momento premendo il tasto "stop". Il
programma automatico è quindi in modalità
pausa: è possibile riavviarlo premendo
nuovamente su "start". Se il programma scelto
non è corretto e si desidera annullare, premere
il pulsante "Annullare/ripristinare".
7. Il programma "Riscaldamento" consente
di riscaldare la preparazione in 20 minuti
(regolabile da 5 a 60 minuti).
8. Il programma "Risciacquo" consente di pulire
facilmente il recipiente. Avviare il programma
dopo aver riempito il recipiente con 0,7 litri
di acqua e una goccia di detersivo per piatti.
Programma
Salse
Programmi
Cottura lenta
Programmi
Zuppe
Programmi a
Vapore
Programmi
Impasti
Programma
Dessert
Programmi
Complementari
Salse Rosolatura
Cottura lenta
Risotto
Zuppa
vellutata
Zuppa densa
Vapore basso
Vapore alto
Pane
Brioche
Torta
Dessert Riscaldamento
Risciacquo
• Ricerca di una ricetta
Dalla schermata iniziale si possono cercare delle ricette con
il pulsante "Ricerca" La ricerca può essere effettuata
per piatti o ingredienti. Per affinare la ricerca si possono
applicare dei filtri.
• Libreria di ricette
Dalla schermata iniziale si può accedere alla funzione
"Libreria di ricette". Questa funzione permette di ritrovare tutte le ricette disponibili nella community
Companion.
In modalità non connessa, nella schermata iniziale della funzione è possibile trovare una selezione
di ricette preregistrate sull'i-Companion touch xl. Si può avviare la guida step by step direttamente
da una di queste ricette.
Si può anche cercare una ricetta nella community cliccando sull'icona "ricerca"
A tal fine, basta selezionare un piatto o un ingrediente nella barra di ricerca e cliccare su OK.
È possibile affinare la ricerca aggiungendo dei filtri (tipo di piatto, tempo di preparazione e origine
della ricetta).
• Ricettari (disponibile solo con connessione Wi-Fi)
Dalla schermata iniziale si può accedere alla funzione "I miei ricettari". Questa funzione permette
di ritrovare tutte le ricette precedentemente salvate tra i preferiti tramite l'applicazione Companion
sullo smartphone/tablet.
Per poter utilizzare questa funzione è necessario scaricare l'applicazione Companion e creare un
account. È possibile creare e modificare i ricettari sullo smartphone/tablet e poi ritrovarli sull'i-
Companion touch xl connesso al Wi-Fi. Una volta che l'i-Companion touch xl è connesso al Wi-Fi, i
ricettari si sincronizzeranno automaticamente tra l'apparecchio e lo smartphone/tablet ogni volta che
verrà realizzata una ricetta.
• Nel mio frigo (disponibile solo con connessione Wi-Fi)
Dalla schermata iniziale si può accedere alla funzione "Nel mio frigo". Questa funzione consente di
cercare una ricetta in funzione degli ingredienti a disposizione.
Per trovare un'idea di ricetta, cliccare sulla funzione "Nel mio frigo" e aggiungere fino a 2 ingredienti.
Per ciascun ingrediente è possibile indicare il quantitativo mediante la bilancia connessa. Cliccare
quindi su "Cercare": verrà proposto un elenco di ricette che rispondono ai parametri inseriti.

106 107
ITIT
Programmi
automatici
Vapore
basso
Vapore
alto Pane Brioche Torta Dessert
Riscaldamento
Risciacquo
Velocità
programmata
(regolabile)
V5 per
2 min
30 sec
V5 per
1 min 30
sec poi V6
per 2 min
V3 per
40 sec
poi V9
per 3 min
V4
(da V2 a
V8)
V2
(da V2 a V6)
V8
(da V5 a
V8)
Temperatura
programmata
(regolabile)
100°C
(non
regolabile)
100°C
(non
regolabile)
90°C
(da 50°C a
110°C)
90°C
(da 70°C a
100°C)
80°C
(non
regolabile)
Tempo
programmato
(regolabile)
30 min
(da 1 min
a 60 min)
35 min
(da 1 min
a 60 min)
2 min 30
(da 30 sec
a 2 min
30)
3 min 30
(da 30 sec
a 3 min
30)
3 min 40
(da 1 min
40 a 3 min
40)
15 min
(da 5 min
a 60 min)
20 min (da 5
min a 60 min)
5 min (da
1 min a 10
min)
Mantenimento al
caldo
predefinito al
termine del
programma
45 min 45 min 45 min
Lievitazione
predefinita
dell'impasto a
30° al termine
del programma
40 min 40 min
Esempio
ricette
Foie gras al
vapore
Purea di
carote al
vapore
Pane Brioche Torta alla
frutta
Crema
pasticcera
0,7 L di
acqua + 1
goccia di
detersivo per
piatti
Accessori
compatibili
ALLA SCOPERTA DEI PROGRAMMI AUTOMATICI PROPOSTI
Programmi
automatici
Salse Zuppa
vellutata Zuppa densa Rosolatura Cottura lenta Risotto
Velocità
preimpostata
(regolabile)
V6
Da V2 a V8
10 impulsi
e V12 per 2
minuti
Da V7 a V10 per
30 sec V3 V1 V2
Temperatura
preimpostata
(regolabile)
70°
(da 50°C a
100°C)
100°
(da 90°C a
100°C)
100°
(da 90°C a
100°C)
130°C
non regolabile
95°
(da 80°C a
100°C)
95°
(da 80°C a
100°C)
Tempo
preimpostato
(regolabile)
8 min
(da 5 a 40
min)
40 min
(da 20 min a
60 min)
45 min
(da 20 min a
60 min)
5 min
(da 2 min a
15 min)
45 min
(da 10 min a
2 h)
20 min
(da 10 min a
2 h)
Mantenimento al
caldo
predefinito al
termine del
programma
45 min 45 min 45 min 45 min 45 min
Esempio
ricette Salsa olandese Vellutata di
zucca
Passato di
verdure Verdure stufate Stufato di carne Risotto
Accessori
compatibili
Alcune ricette possono provocare fuoriuscite impreviste a causa della formazione di bolle, in
particolare durante la cottura di verdura surgelata. In tal caso, è necessario ridurne il volume.

108
109
ITIT • Modalità manuale
È possibile personalizzare le impostazioni di velocità, temperatura e durata di cottura dell'i-Companion
touch xl per adattarle alle ricette.
Dalla schermata iniziale è possibile accedere alla funzione "Modalità manuale".
Selezione della velocità del motore.
2 velocità intermittenti, 10 velocità continuative progressive e 1 velocità
massima intermittente (V13).
Selezione della temperatura di cottura.
Da 30°C a 150°C.
Selezione della durata di funzionamento.
Da 5 secondi a 2 ore.
Aumento della velocità, della temperatura e della durata.
Diminuzione della velocità, della temperatura e della durata.
Suggerimenti per l'uso:
L'apparecchio è dotato di un microprocessore che ne controlla e ne analizza la stabilità. In caso di
instabilità, la velocità di rotazione del motore si ridurrà automaticamente; se l'instabilità persiste,
il motore si arresterà e sul display apparirà un messaggio di sicurezza.
• Verificare che la quantità di ingredienti non sia eccessiva e che la velocità impostata sia adeguata.
• Verificare di aver usato l'accessorio raccomandato.
• Quindi riavviare l'apparecchio normalmente.
• Impostazioni
Dalla schermata iniziale è possibile accedere alla funzione "Impostazioni".
Questa funzione permette di aggiornare i dati registrati al momento dell'accensione dell'i-Companion
touch xl.
È anche possibile connettere l'apparecchio al Wi-Fi o accoppiare l'applicazione se non è ancora stato
fatto al momento dell'accensione dell'apparecchio.
• Bilancia connessa*
- Collegamento dell'accessorio bilancia connessa all'i-Companion touch xl:
Per le bilance fornite con l'i-Companion xl, il collegamento è già stato effettuato, non è necessario
intraprendere alcuna azione.
Per le bilance acquistate separatamente, andare alle impostazioni del prodotto e cliccare su "I miei
accessori"
acq
acq
. Infine, indicare che si possiede una bilancia. La bilancia è ora collegata.
- Utilizzo dell'accessorio bilancia connessa
Quando il pulsante bilancia connessa si accende sull'i-Companion touch xl, significa che si possono
pesare gli ingredienti nel quadro della realizzazione di una ricetta.
A tal fine, premere sul logo bilancia e quindi appoggiare sull'accessorio bilancia gli ingredienti
che si desidera pesare.
!! La bilancia si mette in stand-by dopo 30 secondi di inattività. Per riaccenderla, premere OK.
3 possibili usi della bilancia:
- Pesata di preparazione: è possibile pesare tutti gli ingredienti prima della realizzazione della ricetta.
- Pesata durante la ricetta: è possibile pesare gli ingredienti nel corso di una ricetta all'inizio di ogni
nuovo passaggio.
- Pesata libera: è possibile scegliere uno o più ingredienti del frigo e selezionarli all'interno
dell'applicazione Companion grazie alla barra di ricerca. Premere sul logo bilancia dell'i-Companion
touch xl, quindi posizionare gli ingredienti sull'accessorio bilancia: verrà proposto un elenco di
ricette in base alle quantità pesate.
• Aggiornamento
Al fine di mantenere le funzionalità del prodotto in condizioni di funzionamento ottimali, l'apparecchio
offre la possibilità di effettuare aggiornamenti. A tal fine, sullo schermo apparirà una finestra che
inviterà ad accettare o rifiutare l'installazione dell'ultimo aggiornamento disponibile. Cliccare su
accettare e lasciare che l'i-Companion touch xl si aggiorni.
*A seconda del
modello

110
111
ITIT
L'i-Companion touch xl può essere utilizzato in modalità non connessa. Le funzioni di seguito elencate
sono disponibili in modalità non connessa:
• Libreria di ricette
Tutte le informazioni sulla libreria delle ricette sono disponibili a pagina 12.
La libreria delle ricette mette a disposizione 310 ricette.
• Programmi
Tutte le informazioni sull'utilizzo dei programmi automatici sono disponibili a pagina 13.
• Modalità manuale
Tutte le informazioni sull'utilizzo della modalità manuale sono disponibili a pagina 16.
• Ricettari
È possibile salvare le ricette nei preferiti per ritrovarle più facilmente e realizzarle in modalità non
connessa.
UTILIZZO IN MODALITÀ NON CONNESSA
•Pulire immediatamente il
recipiente dopo l'uso. Questo
apparecchio non deve essere
immerso in acqua. Non mettere
il blocco motore (A) sotto l'acqua
corrente.
Una volta terminato l'uso dell'apparecchio,
scollegarlo.
Pulizia del recipiente dopo l'uso:
• Premere sulle levette (C2) e sollevare l'insieme
recipiente (C).
• Posizionare l'apparecchio su una superficie
piana.
• Sbloccare il coperchio ruotandolo di un quarto
di giro in senso orario. Rimuovere il coperchio
con attenzione.
• Prendere le dovute precauzioni nel maneggiare
la lama tritatutto ultrablade (E1) e la lama per
impastare/macinare (E4) durante la pulizia e
lo svuotamento del recipiente, poiché sono
estremamente taglienti.
• Una volta che gli elementi si sono raffreddati:
- smontare il perno comune (C3), la guarnizione
(C4), l'anello di bloccaggio (C5) (cfr. fig. 13).
- pulire il recipiente (C), il perno comune (C3), la
guarnizione (C4) l'anello di bloccaggio (C5), gli
accessori (E1), (E2), (E3), (E4), (E5), il tappo di
regolazione del vapore (D1), il coperchio (D2), la
guarnizione (D4) e il porta-guarnizione (D3), con
una spugna e acqua calda e detersivo.
• Sciacquare gli elementi sotto l'acqua corrente.
• In caso di incrostazioni pronunciate, lasciare in
immersione per diverse ore in acqua e detersivo
per piatti; se necessario, grattare con la spatola
(F) o con il lato ruvido di una spugna.
• In caso di calcare sul recipiente, utilizzare
la parte ruvida di una spugna imbevuta, se
necessario, nell'aceto bianco.
• Per preservare l'aspetto e la longevità del display
in vetro, lavarlo senza usare il lato abrasivo della
spugna per evitare di graffiarlo.
PULIZIA DELL'APPARECCHIO
• Per pulire il blocco motore (A), utilizzare un
panno umido. Asciugarlo con cura.
• Per facilitare la pulizia, il recipiente, l'insieme
coperchio e gli accessori possono essere lavati in
lavastoviglie. Non possono invece essere messi in
lavastoviglie il perno comune (C3 e C4) e l'anello
di bloccaggio (C5) (cfr. fig. 14).
• Gli accessori, il perno comune removibile e
gli elementi del coperchio, con certi ingredienti
potrebbero colorarsi leggermente, come con
il curry, il succo di carote e simili. Questo non
costituisce un pericolo per la salute, né per il
buon funzionamento dell'apparecchio. Per evitare
colorazioni, pulire gli elementi subito dopo l'uso.
• Prima di riutilizzare l'insieme recipiente
(C), controllare che i contatti elettrici sotto il
recipiente siano sempre puliti e asciutti.
• Per preservare l'aspetto e la durata
dell'apparecchio, lavarlo a mano. Non usare il lato
abrasivo della spugna per evitare i graffi.
• Per non alterare i materiali del recipiente (C),
rispettare le istruzioni per l'uso della propria
lavastoviglie senza aumentare le dosi di sale o
detersivo.
Il motore dell'apparecchio è protetto da
un dispositivo elettronico di sicurezza
che ne garantisce la longevità. Questo
dispositivo protegge contro eventuali malfun-
zionamenti; così il motore è perfettamente
protetto.
In determinate condizioni di utilizzo parti-
colarmente intense, che non rispettano le
raccomandazioni delle istruzioni d'uso (cfr. tabella
"L'APPARECCHIO": quantità molto importanti e/o
un utilizzo troppo lungo e/o una serie di ricette
troppo ravvicinate), la protezione elettronica si
attiva per preservare il motore; in questo caso,
l'apparecchio si arresta e appare un “messaggio
di sicurezza” sul display per indicare che l'appa-
recchio non è momentaneamente più operativo.
Se si visualizza un “messaggio di sicurezza” sul
display e l'apparecchio si arresta, procedere nel
seguente modo:
• Lasciare l'apparecchio collegato alla presa di
corrente e con l'interruttore 0/I in posizione 1
"ON" (G).
• Fare riferimento alle raccomandazioni sul di-
splay per riadattare la preparazione (cfr. tabella
"L'APPARECCHIO": quantità di ingredienti / tempo
della ricetta / temperatura / tipo di accessori).
Il servizio consumatori è disponibile per qual-
siasi domanda (maggiori dettagli nel libretto di
garanzia).
IMPORTANTE! MESSA IN SICUREZZA DELL'APPARECCHIO

112
113
ITIT COSA FARE SE L'APPARECCHIO NON FUNZIONA?
PROBLEMI CAUSE SOLUZIONI
Cottura insufficiente
I tempi di cottura sono dati a titolo
indicativo; garantiscono una cottura
soddisfacente nella maggior parte dei
casi.
Tuttavia, alcune condizioni possono
influire sui tempi di cottura:
- la dimensione degli alimenti
(tagliati o non tagliati)
- la quantità di ingredienti
- la varietà degli ortaggi e la loro
maturità
- se gli ingredienti sono surgelati o
meno...
Aumentare il tempo di cottura premendo il
tasto + sul display (B6).
Ridurre le dimensioni dei pezzi.
Tappo vapore assente o posizionato
scorrettamente
Posizionare il tappo vapore nel senso
"massimo"; tale posizione permette di avere un
massimo di calore all'interno del recipiente per
tutte le cotture (zuppe, cottura a vapore, ecc.).
Questa posizione evita inoltre gli schizzi
durante la miscelatura.
La posizione "vapore minimo" permette alla
condensa di fuoriuscire per ottenere piatti e
salse con una migliore consistenza (risotti,
crema pasticcera, salse, ecc.)
Cottura a vapore
insoddisfacente
Quantità d'acqua non corretta nel
recipiente.
Pezzi troppo grandi.
La quantità d'acqua nel recipiente deve
corrispondere alla graduazione (0,7 L).
Si può anche usare la modalità manuale
selezionando la temperatura di 120°C e il
tempo di cottura in funzione della quantità e
del tipo di ingredienti.
Ridurre le dimensioni dei pezzi.
Difficoltà nel realizzare
alcune ricette Ricette non adatte
Le ricette, personali o prese da Internet,
possono non essere adatte all'apparecchio
e ai suoi accessori (quantità, tempo di
cottura, durata, accessori inadeguati): prima
di iniziare la ricetta, assicurarsi di seguire
le istruzioni per l'uso indicate nel presente
manuale.
L'apparecchio non
funziona.
La presa non è collegata alla corrente. Collegare l'apparecchio a una presa di corrente.
Lo schermo B6 rimane nero /
L'apparecchio è in stand-by
Premere uno dei pulsanti touchscreen (da B1
a B5)
L'interruttore (G) è in posizione 0. Impostare l'interruttore in posizione 1.
Il recipiente o il coperchio non sono
posizionati o bloccati correttamente.
Verificare che il recipiente o il coperchio siano
posizionati e bloccati correttamente seguendo
gli schemi del manuale di istruzioni.
Il coperchio non si
blocca.
Il coperchio non è installato
correttamente.
Verificare che la guarnizione sia correttamente
installata sul porta-guarnizione e che il porta-
guarnizione sia correttamente installato sul
coperchio.
PROBLEMI CAUSE SOLUZIONI
Vibrazioni eccessive.
L'apparecchio non è posizionato su
una superficie piana, non è stabile.
Posizione l'apparecchio su una superficie
piana.
Volume di ingredienti eccessivo. Ridurre la quantità di ingredienti in
preparazione.
Errore nella scelta degli accessori. Controllare che l'accessorio in uso sia quello
raccomandato.
Lieve rumore durante il
funzionamento
Il perno dell'apparecchio può
emettere un rumore durante il
funzionamento a velocità ridotta
o con alcuni ingredienti, come ad
esempio il riso.
Si tratta di un fenomeno passeggero, che
non ha alcuna conseguenza sulla durata di
vita dell'apparecchio. Diminuirà o scomparirà
dopo alcuni utilizzi e pulizie del perno
comune removibile (si veda a tal proposito il
paragrafo "Pulizia dell'apparecchio").
Rumore eccessivo durante il
funzionamento Utilizzo di un accessorio sbagliato
Assicurarsi di utilizzare l'accessorio adatto (ad
es. non usare lo sbattitore E3 per impastare
o miscelare un preparato, usare la lama E4).
A tal fine si prega di fare riferimento alle
raccomandazioni delle ricette e alle istruzioni
per l'uso indicate nel presente manuale.
Fuoriuscite dal coperchio.
Volume di ingredienti eccessivo. Ridurre la quantità di ingredienti in
preparazione.
Il coperchio non è ben
posizionato o bloccato.
Fissare correttamente il coperchio sul
recipiente.
Manca
la guarnizione.
Posizionare la guarnizione sul porta-
guarnizione e fissare l'insieme sul coperchio.
La guarnizione è tagliata,
deteriorata.
Cambiare la guarnizione, contattare un centro
assistenza autorizzato.
Errore nella scelta degli accessori. Controllare che l'accessorio in uso sia quello
raccomandato.
Fuoriuscite dal perno del
recipiente.
La guarnizione non è posizionata
correttamente. Posizionare correttamente la guarnizione.
La guarnizione è deteriorata. Contattare un centro di assistenza autoriz-
zato.
L'anello di bloccaggio (C5) è fis-
sato male. Fissare correttamente l'anello (C5).
Le lame non girano
facilmente.
Pezzi di alimenti troppo grossi
o troppo duri.
Ridurre la dimensione o la quantità degli
ingredienti in preparazione.
Aggiungere del liquido.
Il motore emette odori.
Al primo utilizzo dell'apparecchio,
oppure in caso di sovraccarico del
motore provocato da una quantità
di ingredienti eccessiva o da pezzi
troppo duri o troppo grandi.
Lasciare raffreddare il motore (circa 30
minuti) e ridurre la quantità di ingredienti nel
recipiente.
Visualizzazione messaggio
di sicurezza
Recipiente o coperchio bloccati in
modo scorretto
Prima di mettere in funzione l'apparecchio,
controllare che il recipiente sia correttamente
fissato sul blocco motore e che il coperchio
sia correttamente fissato sul recipiente. Se
il problema persiste, contattare un centro
autorizzato.
Il coperchio è bloccato sul
recipiente in modalità "cottura
senza coperchio"
Sbloccare il coperchio prima di avviare
il programma di cottura. Se il problema
persiste, contattare un centro autorizzato.

114 115
ITIT L'apparecchio non funziona comunque correttamente?
Rivolgersi a un centro di assistenza autorizzato (consultare l'elenco nel libretto di istruzioni).
• Smaltimento dei materiali di imballaggio e dell'apparecchio
L'imballaggio è costituito esclusivamente da materiali innocui per l'ambiente, che possono
essere smaltiti conformemente alle disposizioni locali in merito al riciclaggio.
Per informazioni sullo smaltimento dell'apparecchio, contattare gli uffici comunali preposti.
• Prodotti elettrici o elettronici da smaltire:
Contribuiamo alla salvaguardia dell'ambiente!
Questo apparecchio contiene diversi materiali valorizzabili o riciclabili.
Consegnare l'apparecchio presso un centro di raccolta affinché sia smaltito correttamente.
SMALTIMENTO
Il marchio e i loghi Bluetooth® sono marchi depositati da Bluetooth SIG, Inc. e il loro utilizzo da parte del Gruppo SEB è stato autorizzato.
Google Play e Android sono marchi di Google Inc.
Apple e il logo Apple sono marchi di Apple Inc., depositati negli Stati Uniti e in altri paesi. APP Store è un marchio di servizi di Apple Inc.
GLOSSARIO
Accoppiare: azione che consiste nel raggruppare o associare due apparecchi.
Questa azione si effettua al momento della prima connessione tra lo smartphone o il tablet e l'i-Companion touch xl.
Sincronizzare: azione che consiste nell'aggiornamento delle informazioni. L'applicazione e l'i-Companion touch xl si sincronizzano
per scambiare informazioni quando sono connessi.
Connettere: stabilire un collegamento tra l'applicazione (smartphone/tablet) e l'apparecchio (i-Companion touch xl). Questa
azione è indispensabile per la sincronizzazione.
Cookie: informazioni sull'utilizzo che vengono inviate a Moulinex per migliorare l'applicazione.
PROBLEMI CAUSE SOLUZIONI
Il sistema di bloccaggio
del coperchio è rimasto
attivo (asticella sollevata),
impedendo la chiusura del
coperchio.
L'apparecchio è stato scollegato
dalla rete elettrica o è stato spento
spostando l'interruttore I/O su O
nel corso di una ricetta.
Portare l'interruttore in posizione I per
riavviare l'apparecchio e ripristinare il
sistema di bloccaggio del coperchio;
l'asticella tornerà automaticamente nella
posizione originale, consentendo la chiusura
del coperchio.
Messaggio di errore SECU Rotore bloccato Svuotare il recipiente, lasciarlo raffreddare e
riprovare. Se il problema persiste,
contattare il centro di assistenza.
Messaggio di errore ERR39 Surriscaldamento del recipiente
Interrompere l’attività per un breve periodo...
Lasciare raffreddare il recipiente. Se il
problema persiste, contattare il centro di
assistenza
Messaggio di errore SECU Surriscaldamento del motore Lasciare raffreddare il robot per 30 minuti e
ridurre la quantità di alimenti all'interno del
recipiente.
Messaggio di errore SECU Instabilità del robot Il robot si è fermato perché ha individuato
un'instabilità. Cercare di ridurre la
quantità di alimenti all'interno del recipiente
ERR34, ERR21, ERR22 Il Companion si è surriscaldato. Scollegare l'apparecchio dalla presa di
corrente e
contattare il centro di assistenza
ERR 31 Impossibilità di bloccare il
coperchio Contattare il centro di assistenza
ERR35 L’apparecchio sta avendo difficoltà
a funzionare.
Interrompere l’attività per un breve periodo...
Scollegare e ricollegare l'apparecchio.
Se il problema persiste, contattare il
centro di assistenza.
ERR37, ERR03, ERR01
L’apparecchio sta avendo difficoltà a
funzionare.
Contattare il centro di assistenza
ERR23 Il Companion si è surriscaldato. Contattare il centro di assistenza
ERR02, ERR30 Problema di connessione
Il Companion non riesce a
connettersi al Wi-Fi… Scollegare e
ricollegare l'apparecchio. Se il problema
persiste, contattare il centro di assistenza.
Visualizzazione Il prodotto non è connesso al Wi-Fi Controllare la rete Wi-Fi o scollegare e
ricollegare l'apparecchio. Se il problema
persiste, contattare il centro di assistenza.
Visualizzazione Il prodotto è in corso di
connessione al Wi-Fi
Attendere fino alla visualizzazione del logo
UI-1, UI-3 Il prodotto ha difficoltà a caricare
alcuni dati tramite Wi-Fi
Se il problema è ricorrente, è probabile che
il segnale Wi-Fi sia troppo debole. Cercare di
avvicinare il prodotto al modem o installare
un ripetitore Wi-Fi vicino al prodotto per
migliorare la qualità del segnale Wi-Fi.
UI-2, UI-4, UI-5, UI-6 Il prodotto ha difficoltà a
recuperare alcuni dati locali o
tramite Wi-Fi
Se il prodotto non è connesso, cercare di
connetterlo e di avviare una sincronizzazione
dei dati. Se il prodotto è connesso, cercare
di migliorare la qualità del segnale (cfr. riga
precedente)

116 117
PTPT
Segurança do utilizador
• Leia com atenção o manual de
utilização antes da primeira utilização
do seu aparelho e guarde-o para
futuras consultas: o fabricante não
se responsabiliza por uma utilização
que não esteja em conformidade com
o manual de utilização.
• Desligue sempre o aparelho da
alimentação se o deixar sem supervisão
e antes da montagem, desmontagem
ou limpeza. Não deixe que crianças
usem o aparelho sem supervisão.
• Este aparelho não deve ser utilizado
por crianças. Mantenha o aparelho e o
cabo de alimentação fora do alcance
de crianças.
• Este aparelho não pode ser utilizado
por pessoas (incluindo crianças)
cujas capacidades físicas, sensoriais
ou mentais sejam reduzidas, ou por
pessoas com falta de experiência ou
conhecimento, exceto se estas tiverem
a ajuda de uma pessoa responsável pela
segurança, supervisão, ou instruções
acerca da utilização do aparelho.
Convém vigiar as crianças, de modo a
certificar-se de que não brincam com
o aparelho.
• Mantenha o aparelho fora do alcance
das crianças.
• Aquando da utilização
do aparelho, algumas
p e ç a s a t i n g e m
temperaturas elevadas
(parede de inox do recipiente e da
tampa, eixo comum amovível, partes
transparentes da tampa, peças
metálicas por baixo do recipiente,
cesto). Estas peças podem dar origem
a queimaduras. Manuseie o aparelho
através das peças de plástico frias
(pegas, bloco do motor).
• A temperatura das superfícies
acessíveis pode ser elevada durante o
funcionamento do aparelho.
• O aparelho não se destina a ser ligado
através de um temporizador exterior
ou sistema de controlo à distância em
separado.
• Não utilize o aparelho se este
não funcionar corretamente, estiver
danificado ou se o cabo de alimentação
ou a ficha estiverem danificados.
De modo a evitar qualquer perigo,
contacte um Serviço de Assistência
Técnica autorizado (consulte a lista no
folheto de serviço) para que o cabo
seja substituído.
• Não coloque o aparelho dentro de
água. Não passe o bloco do motor (A)
por água corrente.
• Este a p a relho de s t i na- s e
exclusivamente a uma utilização
doméstica dentro de casa e a uma
altitude inferior a 2000 m. O fabricante
não se responsabiliza e reserva o
direito de anular a garantia no caso
de utilização comercial ou inadequada,
ou no caso de desrespeito pelas
instruções.
INSTRUÇÕES DE SEGURANÇA:
• Este aparelho não foi criado para ser
utilizado nos seguintes casos, que não
estão abrangidos pela garantia:
- zonas utilizadas como cozinha em
lojas, escritórios e outros ambientes
de trabalho,
- espaços de refeição reservados ao
pessoal em lojas, escritórios e outros
ambientes profissionais,
- quintas,
- a utilização por clientes de hotéis,
pensões e outros ambientes com
caráter residencial,
- ambientes do tipo quartos de
hóspedes.
AVISO:
O seu aparelho liberta
vapor que pode dar
origem a queimaduras.
Manuseie com cuidado a tampa e a
tampa reguladora de vapor (se for
necessário, utilize luvas, pegas de
tecido, etc.). Manuseie a tampa
reguladora de vapor pela parte
central.
• Não utilize o aparelho se a junta
não estiver posicionada no suporte
da junta, se o suporte da junta
não estiver montado na tampa.
É obrigatório ligar o aparelho
com a tampa reguladora de vapor
posicionada no orifício da tampa
(exceto no caso de informação
específica da receita).
AVISO:
Atenção aos riscos de
ferimentos no caso
de má utilização do
aparelho.
Tome as devidas precauções com
as lâminas picadoras (E1) e as
lâminas do acessório triturador
(E4) ao limpá-las e quando
esvaziar o recipiente dado que são
extremamente afiadas.
Guarde a lâmina picadora ultrablade
(E1) dentro da taça após cada
utilização.
Tome atenção se deitar um líquido
quente na taça, pois este pode ser
projetado do aparelho devido a uma
ebulição repentina.
AVISO: Tenha cuidado durante
o m a n u s e a m e n t o d o s e u
aparelho (limpeza, enchimento
e esvaziamento): evite derramar
líquidos sobre os conetores.
AVISO: Alguns alimentos com pele
superficial (salsichas inteiras,
língua, aves, etc.) ou pedaços de
carne grandes podem gerar salpicos
ao reter líquidos em ebulição. É por
este motivo que aconselhamos a
picá-los antes de cozinhar com uma
faca ou garfo.
AVISO: A superfície do elemento de
aquecimento preserva algum calor
residual após a utilização.

118 119
PTPT
Certifique-se de que só toca nas
pegas da taça (molas C2, pega da
tampa D2 e da tampa reguladora de
vapor D1) durante o aquecimento e
até arrefecer por completo.
Consulte o manual de utilização para a
regulação das velocidades e do tempo
de funcionamento de cada acessório e
de cada programa.
Consulte o manual de utilização
para proceder à montagem e
desmontagem dos acessórios no
aparelho.
Consulte o manual de utilização para
proceder à limpeza e manutenção do
seu aparelho.
Siga sempre as instruções de limpeza
para limpar o seu aparelho:
• Desligue o aparelho.
• Não limpe o aparelho enquanto
estiver.
• Limpe com um pano ou uma esponja
húmida.
• Nunca coloque o aparelho dentro de
água ou debaixo de água corrente.
APENAS PARA OS MERCADOS
EUROPEUS:
• Mantenha o aparelho e o respetivo
cabo de alimentação fora do alcance
de crianças com idade inferior a 8
anos. As crianças não devem brincar
com o aparelho.
• Este aparelho pode ser utilizado
por pessoas cujas capacidades
físicas, sensoriais ou mentais sejam
reduzidas, ou por pessoas com falta
de experiência ou conhecimento,
se estas forem supervisionadas ou
receberem instruções relativas à
utilização do aparelho com toda a
segurança e compreendam todos os
potenciais perigos.
• Este aparelho pode ser utilizado por
crianças com, pelo menos, 8 anos, se
forem corretamente supervisionadas
ou se lhes forem dadas instruções
relativas à utilização do aparelho
co m to da a s e gura nça, e
compreendam os riscos envolvidos. A
limpeza e manutenção por parte do
utilizador não devem ser efetuadas
por crianças sem supervisão, a não
ser que tenham mais de 8 anos de
idade e sejam supervisionadas por
um adulto.
Relativamente à ligação elétrica
• O aparelho deve ser ligado a uma
tomada com ligação à terra.
• O aparelho foi criado para funcionar
apenas com corrente alternada.
Certifique-se de que a tensão da
alimentação indicada na placa
das especificações do aparelho
corresponde à da sua instalação
elétrica.
• Qualquer erro de ligação anula a
garantia.
• Nunca puxe pelo cabo de alimentação
para desligar o aparelho.
• Não coloque o aparelho, o cabo de
alimentação ou a ficha em líquidos,
perto ou em contacto com as partes
quentes do seu aparelho, perto de
uma fonte de calor ou num canto
afiado.
Relativamente a uma utilização
incorreta
• Não toque na tampa até o aparelho
parar por completo (tecla stop),
aguarde até que a mistura de
alimentos tenha parado de girar.
• Coloque sempre os ingredientes
sólidos em primeiro lugar na taça
antes de adicionar ingredientes
líquidos (ver Fig. 11), sem
ultrapassar a marca MAX gravada no
interior da taça (ver FIG. 11). Se a
taça estiver demasiado cheia, a água
a ferver pode ser projetada.
• Atenção: no programa de cozedura a
vapor, respeite o nível de 0,7 litros
de água (ver Fig. 4.2).
• Nunca insira os dedos ou qualquer
outro objeto dentro da taça durante
o funcionamento do aparelho.
• Não utilize a taça como recipiente
(conservação, congelação ou
esterilização).
• Coloque o aparelho numa bancada de
trabalho estável, resistente ao calor,
limpa e seca.
• Não coloque o aparelho perto de
uma parede ou de um armário: o
vapor produzido pode danificar os
elementos.
• Não coloque o seu aparelho
perto de uma fonte de calor
durante o funcionamento (fogão,
eletrodoméstico, etc.).
• Não tape a tampa com um pano ou
qualquer outro objeto, não tente
tapar o orifício da tampa, utilize o
tampão regulador de vapor.
• Não deixe o cabelo, lenço, gravata,
etc., suspenso por cima da taça
durante o funcionamento do
aparelho.
• Nunca coloque os acessórios ao
micro-ondas.
• Não utilize o aparelho ao ar livre.
• Nunca ultrapasse a quantidade
máxima indicada no manual.
• Guarde o aparelho quando este tiver
arrefecido.
• Não coloque a taça no congelador
para a arrefecer, opte pelo frigorífico.
• Não coloque a espátula dentro de
óleo durante mais de 20 minutos a
150 °C.
Serviço pós-venda
• Para a sua segurança, utilize apenas
acessórios ou peças sobresselentes
fornecidos pelos Serviços de
Assistência Técnica autorizados.
• Qualquer intervenção para além da
limpeza e manutenção habitual por
parte do cliente deve ser efetuada
por um Serviço de Assitência Técnica
autorizado.
• Consulte a tabela "Se o seu aparelho
deixar de funcionar, o que fazer?" no
final do manual de utilização.

120 121
PTPT Ao ler estas instruções, irá descobrir conselhos sobre como utilizar o aparelho que lhe
permitirão conhecer todo o potencial do seu aparelho: preparação de sopas, refrogados,
cozedura a vapor, massas.
DESCRIÇÃO DO APARELHO:
A Bloco do motor
B Teclas táteis*
B1: Cancelar
B2: Balança (consoante o modelo)
B3: START/STOP
B4: Vídeo
B5: Parâmetros
B6: Ecrã tátil
C Conjunto da taça
C1: Taça inox
C2: Molas
C3: Eixo comum amovível
C4: Junta vedante
C5: Anel de bloqueio do eixo
D Conjunto da tampa
D1: Tampa reguladora de vapor
D2: Tampa
D3: Suporte da junta
D4: Junta vedante
E Acessórios
E0: Caixa de arrumação de acessórios
E1: Lâmina picadora
E2: Acessório misturador
E3: Acessório batedor
E4: Lâmina para amassar/triturar
E5: Cesto de cozedura a vapor
F Espátula
G Interruptor 0/I para cortar a alimentação
elétrica do seu aparelho
H Escova de limpeza
DADOS TÉCNICOS DO APARELHO:
Potência: 1550 W (1000 W: resistência de aquecimento/550 W: motor )
Intervalo de temperaturas: de 30 ° a 150 °C
ajustável por incrementos de 5 °C.
Intervalo de tempo de de 5 segundos a 2 horas
funcionamento: ajustável por incrementos de 5 segundos no mínimo a 1
minuto no máximo.
Número de velocidades: 13 - 2 velocidades intermitentes:
velocidade 1 (5 seg. On/20 seg. Off).
velocidade 2 (10 seg. On/10 seg. Off).
- 10 velocidades contínuas progressivas
(velocidades 3 a 12).
- 1 velocidade intermitente no máximo (velocidade 13).
Frequência: 2412 – 2484 MHz
Potência máxima transmitida: 20 dBm
Modo de poupança de O aparelho entra no modo de poupança de energia
energia (standby): (standby) após 15 minutos de inatividade.
Para voltar a ligá-lo, pressione uma das teclas táteis
(B1 a B5)
Consumo de energia no(s) modo(s) de poupança de energia
(standby) quando o produto está ligado: 0,2 Wh
* Google Play e Android são marcas comerciais da Google Inc.
Apple e o logótipo Apple são marcas comerciais da Apple Inc. registadas nos Estados Unidos e noutros países. App Store é uma marca de serviço
da Apple Inc.
* Ícones apenas visíveis quando úteis para a utilização do aparelho.
O SEU APARELHO
Os seguintes acessórios estão disponíveis com o seu aparelho:
Estes acessórios estão também equipados com zonas de aderência para facilitar o seu
manuseamento durante a utilização no decorrer de uma preparação.
Lâmina picadora
E1 Triturar sopas
3 min. 3 l
Confecionar compotas 40 seg. 1 kg
Picar legumes 15 seg. 0,6 kg
Picar carne 30 seg. 1 kg
Picar peixe 15 seg. 1 kg
Não utilize este acessório para cortar produtos duros. Utilize antes a lâmina de amassar/triturar E4.
Acessório misturador
Mistura os pratos cozinhados sem desfazer os ingredientes,
Extremamente útil para as fases de refogado que antecedem as preparações (risottos, sopas).
E2 Refogados 5 min. 500 g
Cozeduras lentas 45 min. 3 l
Risottos 22 min. 1,5 kg
"Ratatouilles", chutneys, leguminosas (configurações: consultar folheto de receitas)
Batedeira
9 max
E3 Claras em castelo 5/10 min. 8
max.
Maionese, chantilly 2/5 min. 0,5 l
Molhos, cremes a 1/20 min. 1 l
Puré de batata a 1 min. 1 l
Polenta a 1/16 min. 1 l
E4
Amassar massas de pão
branco 2 min. 30 seg. 1,2 kg
Amassar massas
quebradas, areadas, pães
especiais
2 min. 30 seg. 1 kg
Amassar massas levedadas
(brioche, "kouglof", etc.)
1 min. 30 seg.
2 min. 0,8 kg
Misturar massas leves
(bolos, etc.)
40 seg.
3 min. 1 kg
Triturar frutos com casca 1 min. 0,6 kg
Picar alimentos duros 1 min. 0,6 kg
Picar gelo 1 min. 6 a
10
Massa de crepes, "waffles" 1 min. 1,5 l
Tampa reguladora
de vapor
D1
Tampa reguladora de vapor
maxi (a) = cozedura a vapor.
mini (b) = risotto, sobremesas, molhos, etc.
A posição "mini" permite libertar um máximo de
condensação e obter pratos ou molhos com uma
melhor consistência (risotto, sobremesas, molhos, etc.).
A posição "maxi" permite reter o máximo de calor e
vapor na taça para todas as cozeduras a vapor (sopas, etc.).
Esta posição evita também os salpicos durante a mistura.
Lâmina de amassar/triturar
* Consoante
o modelo

122 123
PTPT
Cesto de
cozedura a vapor
Os tempos de cozedura do cesto de cozedura a de vapor são dados a título indicativo. Na maioria dos
casos, permitem uma cozedura satisfatória. Não obstante, determinadas condições influenciam o tempo
de cozedura: tamanho dos legumes (cortados ou não)/quantidade de ingredientes no cesto/variedade e
maturação dos legumes/quantidade de água na taça, que deve corresponder à graduação (0,7 l). Não
se esqueça de utilizar a tampa reguladora de vapor no sentido "max" (a). Se a cozedura for insuficiente,
pode adicionar um tempo de cozedura suplementar.
E5
Confeção a vapor de legumes,
peixes ou carnes
20/40
min. 1 kg
Sopas com pedaços 3 min. 3 l
P1 – Curgetes 20 min. 800 g
P1 – Pastinaca 25 min. 800 g
P1 – Partes brancas de alhos
franceses
25 min. 800 g
P1 – Brócolos 20 min. 500 g
P1 – Peixes 15 min.
600 g (com
papel vegetal)
P2 – Batatas 30 min. 1 kg
P2 – Cenouras 30 min. 1 kg
P2 – Feijão verde 30 min. 800 g
P2 – Carnes brancas 20 min.
600 g (com
papel vegetal)
Eixo comum
amovível
C3
Pode refogar alimentos no seu recipiente sem a tampa colocada enquanto mexe
e supervisiona a confeção.
A função COZEDURA SEM TAMPA não é adequada para doces de fruta e
preparações à base de leite (risco de transbordo).
UTILIZAÇÃO ATÉ 130 °C UTILIZAÇÃO 135 °C
A 150 °C
Confeção com e sem
tampa
Tampa fechada Apenas tampa
aberta
Acessórios
Todos os acessórios com o
acionador Apenas eixo comum
C3
Velocidade Sim Não
Tempo máximo
• Se a temperatura for inferior
ou igual a 100 °C: 2 h
- Se a temperatura variar entre
100 °C e 130 °C: 1 h
• Se a temperatura
for superior ou
igual a 135 °C: 20
min.
!!! Não retire o eixo comum logo após a utilização. Deite água na taça vazia
para o arrefecer.
COLOCAÇÃO DA TAÇA, DOS RESPETIVOS
ACESSÓRIOS E DO CONJUNTO DA TAMPA
• Antes da primeira utilização, limpe todos os
elementos (C, D, E, F, H) com água quente e
detergente para a loiça, à exceção do o bloco
do motor (A). A taça (C) vem equipada com
um eixo comum desmontável (C3) para facilitar
a limpeza.
• Certifique-se de que retira todas as embalagens
antes da utilização, sobretudo a proteção
situada entre a taça (C) e o bloco do motor
(A).
• Coloque a junta vedante (D3) no suporte da
junta (D4) (ver Fig. 1), encaixe o conjunto à
tampa (D2) (ver Fig. 2).
• Coloque o anel vedante (C4) no eixo comum
(C3). Bloqueie o conjunto no fundo da taça
com o anel de bloqueio (C5) (ver Fig. 3).
Caso utilize o modo de cozedura sem
tampa, posicione a junta vedante (C4) no
eixo comum (C3). Bloqueie o conjunto no
fundo da taça com o anel de bloqueio (C5)
(ver Fig. 3).
• Posicione o acessório escolhido na taça:
- os acessórios (E1, E2, E3, ou E4) no eixo
acionador comum no fundo da taça (ver
Fig. 4.1),
- no caso de cozedura a vapor, o cesto de vapor
(E5) no interior da taça, (ver Fig. 4.3 ),
tendo tido o cuidado de encher previamente
a cuba de 0,7 l de preparação líquida (água,
molho, etc.) (ver Fig. 4.2 ).
• Coloque os ingredientes no interior da taça ou
no cesto de cozedura a vapor.
Posicione a tampa na taça (C) alinhando os dois
triângulos (ver Fig. 5), bloqueie a tampa sem
carregar e rode no sentido indicado pela seta
(ver Fig. 6).
• Posicione a tampa reguladora de vapor (D1) na
tampa, sendo possíveis 3 posições (ver Fig. 7)
• Posicione a taça (C) no bloco do motor (A) até
ouvir um clique (ver Fig. 8).
O aparelho só começa a funcionar se a taça e
a tampa estiverem corretamente posicionados e
bloqueados no bloco do motor.
Em caso de posicionamento incorreto ou
bloqueio incorreto de um ou outro (ver Fig.
10.1 e 10.2), aparece no ecrã uma
mensagem de segurança.
O SEU APARELHO ESTÁ EQUIPADO COM UM
DISPOSITIVO DE SEGURANÇA DE BLOQUEIO DA
TAMPA
A tampa fecha-se de forma segura a cada
arranque do aparelho. Este dispositivo de
segurança impede a abertura da tampa durante
a execução de uma receita. Não tente abri-la
à força enquanto estiver bloqueada. Este
dispositivo de segurança desbloqueia-se sempre
que o aparelho é desligado. Caso tenha escolhido
uma temperatura igual ou superior a 50 °C e
uma velocidade superior ou igual a 5, aparecerá
no ecrã do painel de controlo uma contagem
decrescente de 10 segundos. A tampa só pode
ser aberta depois de terminada a contagem
decrescente.

124
125
PTPT
1. PRIMEIRA UTILIZAÇÃO
A i-Companion touch xl é um robot de cozinha inteligente que o ajuda a cozinhar e a fazer de todas
as suas refeições um sucesso. Oferece centenas de receitas gratuitas disponíveis em poucos cliques.
Graças ao seu ecrã tátil intuitivo e interativo, pode preparar várias receitas em tempo recorde.
A i-Companion touch xl encarrega-se da preparação, mistura e cozedura dos seus ingredientes. Irá
guiá-lo passo a passo através de todas as etapas das suas receitas.
Deixe-se guiar, é rápido e fácil!
Ligue a sua i-Companion touch xl no botão 0/I (ver Fig. 9) e deixe-se guiar pelas instruções que serão
apresentadas no ecrã. Ao longo destas etapas, o logótipo permite-lhe obter ajuda relativa à etapa
a ser executada. Uma secção FAQ (Frequently Asked Questions – perguntas mais frequentes) também
está disponível no site www.moulinex.pt
Estão também disponíveis vídeos tutoriais para o ajudar a começar a utilizar o seu aparelho:
http://bit.ly/guiarapidocompaniontouch
• Parâmetros nacionais
No momento da primeira utilização, terá acesso às definições dos parâmetros nacionais.
1 selecione o seu país 2 selecione o seu idioma
I-COMPANION TOUCH XL:
O MEU ASSISTENTE PARA A COZINHA DIÁRIA
Os botões de controlo abaixo acender-se-ão quando puderem ser utilizados:
O botão central tem 11 funções.
Variam de acordo com as etapas
a seguir (início, pausa, etapa
seguinte, validar, terminar, etc.).
Quando um vídeo relacionado com a
receita em curso estiver disponível,
poderá reproduzi-lo clicando neste
botão.
Cancelar/retroceder
Parâmetros (modificações de
parâmetros, ligação Wi-Fi, ingredientes
de uma receita, etc.)
Utilização da balança conectada *
Uma vez concluídas estas duas etapas, será apresentado um ecrã de boas-vindas.
• Ligação à Internet
Agora pode ligar a sua i Companion touch xl à sua rede de Internet. Dispõe da possibilidade de realizar
esta etapa logo na altura selecionando "Agora" ou mais tarde, selecionando "Mais tarde".
Pode realizar esta etapa posteriormente acedendo ao ecrã inicial nos parâmetros da sua i Companion
touch xl.
É necessária uma ligação à Internet para utilizar as seguintes funções:
acesso a todas as receitas Companion, os meus livros de receitas, no meu frigorífico, fotos e vídeos
nos passos a passos das suas receitas e atualizações do produto.
Para ligar a sua i Companion touch xl à rede da Internet, deve:
- Escolher a sua rede (Não consegue aceder à rede? Vá a "Parâmetros", "Parâmetros Wi-Fi" e, de
seguida, "Ativar o Wi-Fi").
- Introduzir a palavra-passe da sua ligação Wi-Fi
- Abre-se um ecrã "Ligação a ser estabelecida" enquanto a ligação está a ser carregada. Esta etapa
pode demorar alguns minutos.
- Um ecrã "Parabéns!" confirmará que a ligação foi estabelecida com êxito
- Por último, terá de escolher o seu fuso horário
foi
tab
Significado dos indicadores de ligação Wi-Fi:
O produto não está ligado ao Wi-Fi
O produto está a ser ligado ao Wi-Fi
O produto está ligado ao Wi-Fi
Estão disponíveis vídeos explicativos para ligar a i-Companion touch xl ao Wi-Fi no site
http://bit.ly/guiarapidocompaniontouch
• Associação de aplicação
A aplicação Companion permite-lhe vigiar a sua i-Companion touch xl sem ter de ficar obrigatoriamente
ao lado dela. Pode associá-la ao seu smartphone ou ao seu tablet. Isto também lhe permitirá aceder
às suas receitas onde quer que esteja.
Verifique se o Wi-Fi do seu smartphone/tablet está corretamente ligado à Internet (Wi-Fi/4G/3G…)
É necessário ligar a i-Companion touch xl a uma tomada elétrica.
Pode realizar esta etapa posteriormente acedendo ao ecrã inicial nos parâmetros da i Companion
touch xl.
É necessária uma associação com o seu smartphone/tablet para utilizar as seguintes funcionalidades:
os meus livros de receitas, seguimento à distância do progresso da receita a partir do smartphone,
envio de uma receita do seu smartphone/tablet para a i-Companion touch xl

126
127
PTPT - Aparelhos compatíveis:
Consulte a lista dos modelos de smartphones e tablets compatíveis com a i-Companion touch xl em
www.moulinex.com
- Transferência da aplicação:
Descarregue a aplicação Companion. Download gratuito da App Store (iPhone/iPad) e Google Play
(Android).
Descarregar na
App Store
APP ANDROID EM
- Associação da conta:
A partir da sua aplicação Companion no smartphone/tablet, selecione o produto i-Companion touch
xl e, de seguida, crie uma conta ou inicie sessão na sua conta, se já tiver uma.
O seu aparelho irá gerar um código de associação (será exibido no seu ecrã B6) que terá de introduzir
na sua aplicação Companion.
Se pretender associar vários smartphones/tablets à sua i-Companion touch xl, cada aplicação deve
estar ligada à mesma conta de utilizador da Companion.
A minha primeira receita
Durante a primeira utilização, a i-Companion touch xl irá oferecer-lhe uma primeira receita para
assumir o controlo do seu aparelho. Ao selecionar "A minha primeira receita", poderá seguir um guia
passo a passo ao longo da receita.
Esta receita desaparecerá do seu ecrã inicial assim que a tiver completado ou após 10 utilizações da
i-Companion touch xl.
2. FUNCIONALIDADES DO PRODUTO
O seu aparelho i-Companion touch xl oferece um funcionamento "conectado”, mas também pode
funcionar em modo ”não conectado”. Além disso, tem muitas funcionalidades para o ajudar a
inspirar-se todos os dias e a ter sucesso em todas as suas receitas! Na utilização ”não conectado”
estão disponíveis 310 receitas, na utilização “conectado” terá acesso a centenas de receitas!
• Pesquisar de uma receita
A partir do ecrã inicial, pode pesquisar receitas usando
o botão "Pesquisa" . Pode pesquisar por prato ou por
ingredientes. Estão também disponíveis filtros para refinar
a sua pesquisa.
• Biblioteca de receitas
A partir do ecrã inicial, pode aceder à função "Biblioteca de
receitas". Esta função permite-lhe encontrar todas as receitas disponíveis na comunidade Companion.
No modo não conectado, encontrará no ecrã inicial da função uma seleção de receitas integradas na
sua i-Companion Touch XL. Poderá iniciar o processo passo a passo diretamente a partir de uma destas
fichas de receitas.
Também pode pesquisar uma receita na comunidade, clicando no ícone de "pesquisa"
Para tal, basta introduzir um prato ou um ingrediente na barra de pesquisa e clicar em OK.
É possível refinar a sua pesquisa adicionando filtros (tipo de prato, tempo de preparação e origem
da receita).
• Cadernos de receitas (Disponível apenas com ligação Wi-Fi)
A partir do ecrã inicial, pode aceder à função "Os meus cadernos de receitas". Esta função permite-lhe
consultar todas as receitas que guardou anteriormente como favoritas através da aplicação Companion
no seu smartphone/tablet.
Para poder utilizar esta funcionalidade terá de descarregar a aplicação Companion e criar uma conta.
Poderá criar e editar os seus cadernos de receitas no smartphone/tablet e, posteriormente, consultá-
los na i-Companion touch xl ligada por Wi-Fi. Assim que a i-Companion touch xl estiver ligada à
rede Wi-Fi, os seus cadernos de receitas irão sincronizar-se automaticamente entre o aparelho e o
smartphone/tablet de cada vez que realizar uma receita.
• No meu frigorífico (disponível apenas com ligação Wi-Fi)
A partir do ecrã inicial, pode aceder à função "No meu frigorífico". Esta função permite-lhe pesquisar
uma receita com base nos ingredientes da sua escolha.
Para encontrar uma ideia de receita, clique na função "No meu frigorífico" e adicione até 2 ingredientes.
Para cada um deles, poderá indicar as quantidades utilizando a balança conectada. Depois clique em
"Pesquisar" e ser-lhe-á apresentada uma lista de receitas que correspondem aos parâmetros que
introduziu.

128 129
PTPT
PROGRAMAS
O seu aparelho tem 14 programas automáticos pré-gravados:
1. Selecione o programa à sua escolha.
2. Os parâmetros pré-programados podem
ser modificados (dependendo da receita
escolhida, dos ingredientes, das quantidades
preparadas). Ajuste a temperatura, o tempo e
a velocidade de confeção com os botões – e +
3. Quando definir todos os seus parâmetros,
pressione o botão "start" (B3) para iniciar o
programa.
4. Quando o programa chegar ao fim, o aparelho
emite 3 avisos sonoros.
5. No final dos programas Sopa Cremosa, Sopa
Passada, Cozedura Lenta, Risotto, Molho,
Sobremesa, Vapor Suave e Vapor Intenso,
o aparelho passa automaticamente para a
manutenção do calor durante 45 minutos de
modo a manter o preparado pronto a servir. No
programa Cozedura Lenta, Molho, Sobremesa e
no modo manual, o motor do aparelho funciona
a uma velocidade específica para preservar
a preparação e evitar que esta se agarre ao
fundo da taça. Para terminar a opção manter
quente, basta pressionar o botão “STOP”
(B3). No final dos programas Pão e Brioche, o
aparelho muda para o modo "levedar a massa"
a 30 °C, durante 40 minutos, para conferir
um melhor volume às suas massas. Quando se
abre a tampa ou se retira a taça da respetiva
base enquanto um programa está em curso,
este termina. Se pretender suspender este
modo, pressione o botão "parâmetros" e, de
seguida, "reinicializar".
6. Quando o programa automático é iniciado,
pode parar o aparelho em qualquer altura,
pressionando o botão "stop". O programa
automático entra, então, no modo de pausa e
tem a possibilidade de o reiniciar pressionando
novamente "start". Se introduziu o programa
errado e pretende cancelar, pressione o botão
"Cancelar/retroceder".
7. O programa "Aquecer" permite-lhe aquecer a
sua preparação em 20 minutos (ajustável de
5 a 60 minutos).
8. O programa "Lavagem" permite-lhe limpar
facilmente a taça. Inicie o programa enchendo
previamente a taça com 0,7 l de água e uma
gota de detergente da loiça.
Programa
molhos
Programas
Cozedura
lenta
Programas
sopa
Programas
vapor
Programa
massa
Programa
sobremesa
Programas
complementares
Molho Refogados
Cozedura lenta
Risottos
Aveludadas
Com pedaços
Vapor de baixa
pressão
Vapor de alta
pressão
Pães
Brioches
Bolos
Sobremesa Aquecer
Enxaguar
DESCUBRA OS PROGRAMAS AUTOMÁTICOS OFERECIDOS
Programas
automáticos
Molhos Aveludadas Com pedaços Refogados Cozedura lenta Risottos
Velocidade
"predefinida"
(ajustável)
V6
De V2 a V8
10 impulsos e
V12 durante
2 min.
V7 a V10
durante 30 seg. V3 V1 V2
Temperatura
"predefinida"
(ajustável)
70°
(50 °C a 100
°C)
100°
(90 °C a 100
°C)
100°
(90 °C a 100
°C)
130 °C
não ajustável
95°
(80 °C a 100
°C)
95°
(80 °C a 100
°C)
Tempo
"predefinida"
(ajustável)
8 min.
(5 min. a 40
min.)
40 min.
(20 min. a
60 min.)
45 min.
(20 min. a
60 min.)
5 min.
(2 min. a
15 min.)
45 min.
(10 min. a 2 h)
20 min.
(10 min. a 2 h)
Manutenção do
calor
"predefinida" no
fim do programa
45 min. 45 min. 45 min. 45 min. 45 min.
Exemplo
receitas
Molho
holandês
Sopa de
abóbora
Sopa passada
de legumes
Legumes ao
vapor
Bife à
borgonhesa Risoto
Acessórios
compatíveis
Algumas receitas podem provocar transbordos inesperados, devido ao aparecimento de espuma,
especialmente durante a utilização de legumes congelados. Neste caso, tem de reduzir os
volumes.

130
131
PTPT
Programas
automáticos
Vapor
de baixa
pressão
Vapor
de alta
pressão Pães Brioches Bolos Sobremesa Aquecer Enxaguar
Velocidade
"predefinida"
(ajustável)
V5 durante
2 min. 30
seg.
V5 durante
1 min. 30
seg. e, de
seguida, V6
durante
2 min.
V3 durante
40 seg. e,
de seguida,
V9
durante
3 min.
V4
(de V2 a
V8)
V2
(de V2 a
V6)
V8
(de V5 a
V8)
Temperatura
"predefinida"
(ajustável)
100 °C
(não
ajustável)
100 °C
(não
ajustável)
90 °C
(50 °C a
110 °C)
90 °C
(70 °C a
100 °C)
80 °C
(não
ajustável)
Tempo
"predefinida"
(ajustável)
30 min.
(1 min. a
60 min.)
35 min.
(1 min. a
60 min.)
2 min. 30
(30 seg. a
2 min. 30)
3 min. 30
seg.
(30 seg. a
3 min. 30
seg.)
3 min. 40
(1 min. 40
a 3 min.
40)
15 min. (5
min. a 60
min.)
20 min. (5
min. a 60
min.)
5 min. (1
min. a 10
min.)
Manutenção do
calor
"predefinida" no
fim do programa
45 min. 45 min. 45 min.
Levedar a
massa a 30 °C
"predefinido" no
fim do programa
40 min. 40 min.
Exemplo
receitas
"Foie gras"
ao vapor
Puré de
cenouras ao
vapor
Pão Brioche Bolo de
frutas
Creme de
pasteleiro
0,7 l de água
+ 1 gota de
detergente
da loiça
Acessórios
compatíveis
• Modo manual
Pode personalizar os parâmetros velocidade, a temperatura e a duração da cozedura da i-Companion
touch xl para adaptar as suas próprias receitas.
A partir do ecrã inicial, pode aceder à função "Modo manual".
Seleção da velocidade do motor.
2 velocidades intermitentes, 10 velocidades contínuas progressivas e 1 velocidade
intermitente máx. (V13).
Seleção da temperatura de cozedura.
De 30 °C a 150 °C.
Seleção da duração de funcionamento.
De 5 segundos a 2 horas.
Aumento da velocidade, da temperatura de cozedura e da duração.
Diminuição da velocidade, da temperatura de cozedura e da duração.
Conselho de utilização:
O seu aparelho está equipado com um microprocessador que controla e analisa a sua estabilidade.
No caso de instabilidade, a velocidade de rotação do motor será reduzida automaticamente. Se esta
instabilidade persistir, o motor para e uma mensagem de segurança aparece no ecrã.
• Certifique-se de que a quantidade de ingredientes não é demasiada e que a velocidade utilizada
é a adequada.
• Certifique-se de que utiliza o acessório recomendado.
• De seguida, volte a iniciar normalmente o seu aparelho.

132
133
PTPT • Parâmetros
A partir do ecrã inicial, pode aceder à função "Parâmetros".
Esta função permite-lhe atualizar os dados guardados quando liga a i-Companion touch xl.
Também poderá ligar o aparelho ao Wi-Fi ou associar a sua aplicação se não o tiver feito quando ligou
o seu aparelho.
• Balança conectada *
- Associação do acessório de balança conectada à i Companion touch xl:
Para as balanças fornecidas com a i Companion XL, a associação já está feita, pelo que não tem de
realizar qualquer ação.
No caso das balanças adquiridas em separado, aceda aos parâmetros do seu aparelho e clique em
"Os meus acessórios"
adq
adq
adqadq
. Por último, indique que tem uma balança. A sua balança está, agora,
associada.
- Utilização do acessório de balança conectada
Quando o botão da balança conectada se acende na i-Companion touch xl, isso significa que pode
pesar os ingredientes enquanto realiza uma receita.
Para tal, pressione o logótipo da balança e, de seguida, coloque os ingredientes que pretende pesar
no seu acessório da balança.
!!! A balança entra no modo de espera após 30 minutos de inatividade. Para voltar a ligá-la, pressione
o botão OK.
3 utilizações possíveis da balança:
- Pesagem da preparação: pode pesar todos os seus ingredientes antes de fazer a sua receita.
- Pesagem durante uma receita: pode pesar os seus ingredientes durante a sua receita no início de
cada nova etapa.
- Pesagem livre: escolha um ou mais ingredientes no seu frigorífico e selecione-os na sua aplicação
Companion utilizando a barra de pesquisa. Pressione o logótipo da balança da i-Companion touch xl,
depois coloque os seus ingredientes no acessório de balança: é-lhe apresentada uma lista de receitas
de acordo com as quantidades pesadas.
• Atualização
Para manter as funcionalidades do seu aparelho em ótimas condições de funcionamento, o aparelho
irá oferecer-lhe atualizações. Para tal, aparecerá no ecrã uma janela que lhe oferece a possibilidade
de aceitar ou recusar a instalação da última atualização disponível. Clique, então, em aceitar e deixe
a i-Companion touch xl ser atualizada.
* Consoante o modelo
Pode utilizar a i-Companion touch xl no modo não conectado. As funções abaixo estão disponíveis:
• Biblioteca de receitas
Consulte todas as informações sobre a biblioteca de receitas na página 12.
A biblioteca de receitas coloca 310 receitas à sua disposição.
• Programas
Consulte todas as informações sobre a utilização dos programas automáticos na página 13.
• Modo manual
Consulte todas as informações sobre a utilização do modo manual na página 16.
UTILIZAÇÃO NO MODO NÃO CONECTADO
•Limpe a taça imediatamente
após a utilização. Não coloque
o aparelho dentro de água. Não
coloque o bloco do motor (A) por
baixo de água corrente.
Quando terminar de utilizar o aparelho,
desligue-o da corrente.
Limpeza da taça após a utilização:
• Prima as molas (C2) e, de seguida, levante o
conjunto da taça (C).
• Coloque a taça numa superfície plana.
• Desbloqueie a tampa rodando-a um quarto de
volta no sentido dos ponteiros do relógio. Retire
a taça com cuidado.
• Tenha cuidado com a lâmina picadora
ultrablade (E1) com a lâmina para amassar/
triturar (E4) quando as está a limpar e quando
esvazia a taça, pois são extremanete afiadas.
• Quando as peças tiverem arrefecido:
- desmonte o eixo comum (C3), a junta (C4), o
anel de bloqueio (C5) (ver Fig. 13).
- limpe a taça (C), o eixo comum (C3), a junta
(C4) o anel de bloqueio (C5), os acessórios (E1),
(E2), (E3), (E4), (E5), a tampa reguladora de vapor
(D1), a tampa (D2) , a junta vedante (D4) e o
suporte da junta (D3), utilizando uma esponja e
água quente com detergente para a loiça.
• Lave estes diferentes elementos debaixo de água
corrente.
• No caso de sujidade acentuada, deixe-os
de molho durante várias horas em água com
detergente da loiça e, se necessário, raspe com
a espátula (F) ou com o lado abrasivo de uma
esponja.
• No caso de acumulação de calcário na taça, pode
utilizar o lado abrasivo de uma esponja embebida,
se necessário, em vinagre branco.
• Para preservar o aspeto e a longevidade da
superfície de vidro: limpe-a com a esponja sem
utilizar o lado abrasivo para evitar riscos.
LIMPEZA DO APARELHO

134
135
PTPT • Para limpar o bloco do motor (A), utilize um
pano húmido. Seque-o com cuidado.
• Para facilitar a limpeza, tenha em conta que a
taça, o conjunto da tampa e os acessórios podem
ser colocados na máquina de lavar loiça, exceto
o eixo comum (C3 e C4) e o anel de bloqueio (C5)
(ver Fig. 14).
• Os acessórios, o eixo acionador comum amovível
e os elementos da tampa podem ficar ligeiramente
manchados com determinados ingredientes, como
caril, sumo de cenoura, etc.; isto não representa
qualquer perigo para a sua saúde ou para o
funcionamento do seu aparelho. Para evitar esta
situação, limpe rapidamente os elementos após
a utilização.
• Antes de reutilizar o conjunto da taça (C),
certifique-se de que os contactos elétricos debaixo
da taça estão sempre limpos e secos.
• De modo a preservar o aspeto e a longevidade
da tampa do aparelho, lave-a à mão. Não utilize o
lado abrasivo da esponja, de modo a evitar riscos.
• Para não alterar os materiais da taça (C), respeite
as instruções de utilização da sua máquina de
lavar loiça e não aumente as doses de sal ou de
produtos para a máquina de lavar loiça.
O seu aparelho está equipado de série
com proteções eletrónicas do motor, de
modo a garantir a sua longevidade. Esta
segurança eletrónica garante a proteção contra
qualquer utilização anormal. Assim, o seu
motor fica perfeitamente protegido.
Em determinadas condições de utilização muito
exigentes, quando não se respeitam as recomen-
dações do manual (ver tabela “O SEU APARELHO”:
quantidades eventualmente demasiado grandes e/
ou uma utilização anormalmente prolongada e/
ou uma sequência de receitas demasiado próxi-
mas), a proteção eletrónica é acionada desliga-se
preservar o motor; neste caso, o aparelho para
e é apresentada "uma mensagem de segurança"
no ecrã para indicar que, momentaneamente, o
aparelho deixou de estar operacional.
Se aparecer uma "mensagem de segurança" no
ecrã e o aparelho se desligar, proceda da seguinte
forma:
• Deixe o aparelho ligado e o interruptor 0/I na
posição 1 "ON" (G).
• Consulte as recomendações no ecrã para rea-
daptar a sua preparação (ver tabela "O SEU
APARELHO": quantidades de ingredientes/tempo
da receita/temperatura/tipo de acessórios).
O Centro de Contacto do Consumidor permanece à
sua disposição para quaisquer questões (consultar
dados de contacto no folheto de garantia).
IMPORTANTE: INSTRUÇÕES SOBRE A SEGURANÇA DO APARELHO
SE O SEU APARELHO DEIXAR DE FUNCIONAR, O QUE FAZER?
PROBLEMAS CAUSAS SOLUÇÕES
Cozedura insuficiente
Os tempos de cozedura são dados
a título indicativo. Na maioria dos
casos, eles permitem uma cozedura
satisfatória.
Não obstante, determinadas condições
influenciam o tempo de confeção:
- o tamanho dos alimentos (cortados
ou não)
- a quantidade dos ingredientes
- a variedade dos legumes e a sua
maturação
- se os ingredientes estão ou não
congelados…
Adicione o tempo de cozedura pressionando a
tecla + no ecrã (B6).
Reduza o tamanho dos pedaços.
Tampa reguladora de vapor mal
posicionada ou em falta
Coloque a tampa reguladora vapor na posição
"max": esta posição permite-lhe obter o
máximo calor na taça para todas as cozeduras
(sopas, cozedura a vapor, etc.).
Esta posição evita também os salpicos durante
a mistura.
A posição "mini vapor" permite deixar sair o
máximo de condensação e, deste modo, obter
pratos ou molhos com uma melhor consistência
(risottos, sobremesas, molhos, etc.).
Cozedura a vapor
insatisfatória
Quantidade inadequada de água na
taça.
Pedaços demasiado grandes.
A quantidade de água na taça deve
corresponder à graduação (0,7 l).
Também pode utilizar o modo manual
selecionando a temperatura de 120 °C
e o tempo de cozedura de acordo com a
quantidade e tipo de ingredientes.
Reduza o tamanho dos pedaços.
Dificuldades em obter
sucesso em algumas
receitas
Receitas inadequadas
As suas receitas, pessoais ou tiradas da
Internet, podem não ser adequadas ao
aparelho e respetivos acessórios (quantidades,
tempo de cozedura, duração, acessórios
inadequados): antes de iniciar a sua receita,
certifique-se de que respeita as instruções
de utilização fornecidas neste manual de
utilização.
O aparelho não
funciona.
A ficha não está ligada à tomada. Ligue o aparelho a uma tomada.
O meu ecrã B6 permanece a preto/
O seu aparelho está em "espera" Pressione uma das teclas táteis (B1 a B5)
O interruptor (G) está na posição 0. Coloque o interruptor na posição 1.
A taça ou a tampa não estão
corretamente posicionadas ou
encaixadas.
Certifique-se de que A taça ou a tampa estão
devidamente posicionadas ou encaixadas de
acordo com os diagramas do manual.
A tampa não fica
bloqueada. A tampa não está completa.
Certifique-se de que a junta está corretamente
instalada no suporte da junta e se o suporte da
junta está corretamente instalado na tampa.

136
137
PTPT PROBLEMAS CAUSAS SOLUÇÕES
Vibrações excessivas.
O aparelho não está colocado numa
superfície plana, o aparelho não
está estável.
Coloque o aparelho numa superfície plana.
Volume de ingredientes demasiado
elevado.
Reduza a quantidade de ingredientes
transformados.
Erro de acessórios. Certifique-se de que utiliza o acessório
indicado.
Ruído ligeiro durante o
funcionamento
O acionador do seu aparelho pode
emitir um ruído quando funciona
a baixa velocidade ou com
determinados ingredientes (arroz,
etc.).
Este é um fenómeno temporário e não tem
qualquer efeito sobre a duração útil do seu
aparelho. Desvanecer-se-á ou desaparecerá
após algumas utilizações e limpeza do
acionador comum amovível (consulte a secção
"Limpeza do aparelho").
Ruído excessivo durante o
funcionamento Utilização do acessório errado
Certifique-se de que utiliza um acessório
adequado (por exemplo, não utilize o
acessório batedor E3 para amassar ou
misturar massas, opte pela lâmina E4).
Para o efeito, consulte as recomendações
das receitas e as instruções de utilização
fornecidas neste manual de utilização.
Fuga através da tampa.
Volume de ingredientes demasiado
elevado.
Reduza a quantidade de ingredientes
transformados.
A tampa não está corretamente
posicionada ou bloqueada. Bloqueie corretamente a tampa na taça.
A junta estanque
não está presente.
Posicione a junta estanque no suporte da
junta e prenda o conjunto à tampa.
A junta estanque está cortada,
deteriorada.
Mude a junta, contacte um dos Serviços de
Assistência Técnica autorizado.
Erro de acessórios. Certifique-se de que utiliza o acessório
indicado.
Fuga através do eixo acio-
nador da taça
A junta não está devidamente po-
sicionada. Posicione corretamente a junta.
A junta está deteriorada. Contacte um Serviço de Assistência Técnica
autorizado.
O anel de bloqueio (C5) está incor-
retamente bloqueado. Bloqueie corretamente o anel (C5).
As lâminas não rodam
com facilidade.
Pedaços de alimentos demasiado
grandes
ou demasiado duros.
Reduza o tamanho ou a quantidade de
ingredientes transformados.
Adicione líquido.
Odor do motor.
Aquando da primeira utilização do
aparelho, ou em caso de sobrecarga
do motor causada por uma
quantidade demasiado elevada de
ingredientes ou pedaços demasiado
duros ou grandes.
Deixe o motor arrefecer (cerca de 30 minutos)
e reduza a quantidade de ingredientes no
recipiente.
Apresentação de mensagem
de segurança
de
de
de
de
Bloqueio incorreto da taça ou da
tampa
Antes de ligar o aparelho, certifique-se de
que o recipiente está corretamente bloqueado
no bloco do motor e que a tampa está
corretamente bloqueada no recipiente. No
caso de persistência do problema, contacte
um centro autorizado.
A tampa está bloqueada no
recipiente no modo de "cozedura
sem tampa"
Desbloqueie a tampa antes de iniciar
o programa de confeção. No caso de
persistência do problema, contacte um centro
autorizado.
PROBLEMAS CAUSAS SOLUÇÕES
O dispositivo de segurança
de bloqueio da tampa
permaneceu ativo (haste
saída) e não permite que a
tampa seja bloqueada.
O aparelho foi desligado no decurso
de uma receita com a colocação do
interruptor I/O em O, ou desligou-se
simplesmente no decurso de uma
receita.
Basta colocar o interruptor I/O em I para
reinicializar o robô e, por conseguinte, o
dispositivo de segurança de bloqueio da tampa,
a haste voltará automaticamente para a posição
original, agora pode bloquear a tampa.
Mensagem de erro SECU Rotor bloqueado
Esvazie a taça e deixe-a arrefecer e
tente novamente. No caso de persistência do
problema,
contacte o um Serviço de Assistência Técnica
autorizado.
Mensagem de erro ERR39 Sobreaquecimento da taça
A taça precisa de uma pequena pausa… Deixe
a taça arrefecer. No caso de persistência do
problema,
contacte o um Serviço de Assistência Técnica
autorizado.
Mensagem de erro SECU Sobreaquecimento do motor Deixe o robot arrefecer durante 30 min. e
diminua a quantidade na taça.
Mensagem de erro SECU Instabilidade do robot A robô parou porque detetou uma
instabilidade. Tente diminuir a
quantidade na taça.
ERR34, ERR21, ERR22 A Companion sofreu um golpe
de calor…
Desligue o seu aparelho e
contacte o um Serviço de Assistência Técnica
autorizado.
ERR 31 Bloqueio impossível da tampa Contacte o um Serviço de Assistência Técnica
autorizado.
ERR35 A Companion está com
dificuldades…
A Companion precisa de uma pequena pausa…
Desligue e volte a ligar o aparelho.
No caso de persistência do problema, contacte o
centro de um Serviço de Assistência Técnica
autorizado.
ERR37, ERR03, ERR01 A Companion está com
dificuldades… Contacte um Serviço de Assistência Técnica
autorizado.
ERR23 A Companion sofreu um enorme
golpe de calor… Contacte um Serviço de Assistência Técnica
autorizado.
ERR02, ERR30 Problema de ligação
A Companion não consegue
comunicar por Wi-Fi… desligue e
volte a ligar o seu aparelho. No caso de
persistência
do problema, contacte o seu um Serviço de
Assistência Técnica autorizado.
Apresentação de O aparelho não está ligado ao Wi-Fi
Verifique a sua rede de Wi-Fi ou desligue e volte
a ligar o seu aparelho. No caso de persistência
do problema, contacte o seu um Serviço de
Assistência Técnica autorizado.
Apresentação de O aparelho está a ser ligado ao Wi-Fi Aguarde até o logótipo ser apresentado
UI-1, UI-3 O aparelho tem dificuldade em
carregar determinados dados por
Wi-Fi
Se o problema for recorrente, é possível que o
sinal de Wi-Fi que recebe seja demasiado fraco.
Pode tentar aproximar o aparelho e o router ou
instalar um repetidor de Wi-Fi perto do aparelho
para melhorar a qualidade do sinal de Wi-Fi.
UI-2, UI-4, UI-5, UI-6 O aparelho tem dificuldade em
recuperar determinados dados locais
ou por Wi-Fi
Se o aparelho não estiver ligado, pode tentar
ligá-lo e iniciar uma sincronização dos dados.
Se o aparelho estiver ligado, tente melhorar a
qualidade do sinal (ver linha anterior).

138
PT O seu aparelho continua sem funcionar?
Dirija-se a um dos Serviços de Assistência Técnica autorizado (consulte a lista no folheto de
assistência).
• Eliminação dos materiais de embalamento e do aparelho
A embalagem inclui exclusivamente materiais que não são perigosos para o ambiente,
podendo ser eliminados de acordo com as disposições de reciclagem em vigor.
Para eliminar o aparelho, informe-se junto das autoridades adequadas do local onde reside.
• Produtos eletrónicos ou produtos elétricos no final da sua vida útil:
Participe na proteção do ambiente!
O seu aparelho contém vários materiais valorizáveis ou recicláveis.
Entregue-o num ponto de recolha para possibilitar o seu tratamento.
RECICLAGEM
*A marca e os logótipos Bluetooth
®
são marcas comerciais registadas da Bluetooth SIG, Inc. e a sua utilização por parte do Grupo SEB é feita sob autorização.
Google Play e Android são marcas comerciais da Google Inc.
Apple e o logótipo Apple são marcas comerciais da Apple Inc. registadas nos Estados Unidos e noutros países. App Store é uma marca de serviço da Apple Inc.
LÉXICO
Emparelhar: Ação de agrupar ou associar dois aparelhos.
Esta ação é realizada na primeira vez que liga o seu smartphone ou tablet à i-Companion touch xl.
Sincronizar: Ação para atualizar informações. A aplicação e a i-Companion touch xl são sincronizadas para trocar
informações quando estão ligadas.
Ligar: Estabelecer uma ligação entre a aplicação (smartphone/tablet) e o aparelho (i-Companion touch xl). Esta ação é essencial
para a sincronização.
Cookies: Estas são informações de utilização enviadas à Moulinex para melhorar a aplicação.

139
ES
Con respecto a la seguridad de la
persona
• Lea atentamente las instrucciones
de uso antes de utilizar por primera
vez el aparato y guárdelas: un uso
no conforme con las instrucciones de
uso eximiría al fabricante de cualquier
responsabilidad.
• Desconecte siempre el aparato de
la corriente eléctrica si se deja sin
supervisión o antes de montarlo/
desmontarlo o limpiarlo. No permita
que los niños utilicen el aparato sin
la supervisión de un adulto.
• Los niños no deben utilizar el
aparato. Mantenga el aparato y el cable
de alimentación fuera del alcance de
los niños.
Este aparato no éstas diseñado para
ser utilizado por personas (incluidos
los niños) cuyas capacidades físicas,
sensoriales o mentales sean reducidas,
o por personas con falta de experiencia
o de conocimientos, salvo si estas están
vigiladas por una persona responsable
de su seguridad o si han recibido
instrucciones relativas al uso del aparato.
Se recomienda vigilar a los niños para
asegurarse de que no jueguen con el
aparato.
• Mantenga el aparato fuera del
alcance de los niños.
• Durante el uso del
aparato, algunas piezas
alcanzan temperaturas
e l e v a d a s ( e l
recubrimiento de acero inoxidable del
vaso, el eje de transmisión
desmontable, las partes transparentes
de la tapa y del tapón, las piezas
metálicas bajo el vaso, y la cesta).
Estas piezas pueden provocar
quemaduras. Manipule el aparato por
las piezas de plástico que estén frías
(asas, bloque motor).
• La temperatura de las superficies
accesibles puede aumentar cuando el
aparato esté en funcionamiento.
• El aparato no debe ponerse en
marcha mediante un temporizador
exterior ni por un sistema de mando a
distancia externo.
• No utilice el aparato si no funciona
correctamente, si está dañado o si el
cable de alimentación o el enchufe
están dañados. Para evitar cualquier
peligro, lleve el cable a un centro
de servicio autorizado para que lo
cambien (consulte la lista en el manual
de servicio técnico).
• No sumerja el aparato. No pase el
bloque motor (A) por debajo del agua
corriente.
• Este aparato se destina únicamente a
un uso doméstico en el hogar y a una
altitud inferior a 2000 m. El fabricante
declina cualquier responsabilidad y
se reserva el derecho a rescindir la
garantía en caso de un uso comercial
o inadaptado, o de no respetar las
consignas.
CONSEJOS DE SEGURIDAD:

140 141
ESES
Asegúrese de tocar solamente las
asas de su producto (pulsadores C2,
asa de la tapa D2 y el tapón D1)
durante el calentamiento y hasta
que se haya enfriado por completo.
Consulte el manual de instrucciones
para ajustar la velocidad y el tiempo
de funcionamiento de cada accesorio
y cada programa.
Consulte el manual de instrucciones
para saber cómo ensamblar y montar
los accesorios en el aparato.
Consulte el manual de instrucciones
para saber cómo limpiar y mantener
el aparato.
Siga siempre las instrucciones de
limpieza para limpiar su aparato:
• Desenchufe el aparato.
• No limpie el aparato en caliente.
• Limpie el aparato con un paño o una
esponja húmeda.
• Nunca sumerja el aparato en agua ni
bajo el agua corriente.
SOLO PARA LOS MERCADOS
EUROPEOS:
• Mantenga el aparato y su cable fuera
del alcance de los niños menores de
8 años. Los niños no deben utilizar
el aparato como un juguete.
• Este aparato puede ser utilizado por
personas con capacidades físicas,
sensoriales o mentales reducidas o
cuya experiencia o conocimientos
no sean suficientes, siempre que
sean vigiladas o que hayan recibido
instrucciones relativas al uso seguro
del aparato y que comprendan bien
los posibles peligros.
• Este aparato puede ser utilizado por
niños mayores de 8 años siempre
que estén vigilados o hayan recibido
instrucciones relativas al uso seguro
del aparato y entiendan bien los
peligros que conlleva. La limpieza
y el mantenimiento por parte del
usuario no deberán ser efectuados
por niños, a menos que sean mayores
de 8 años y estén supervisados por
un adulto.
Con respecto a la conexión eléctrica
• El aparato debe enchufarse a una
toma de corriente con puesta a
tierra.
• El aparato está diseñado para
funcionar únicamente con corriente
alterna. Asegúrese de que la tensión
de alimentación señalada en la
placa indicadora del aparato se
corresponde efectivamente con la de
la instalación eléctrica de su hogar.
• Cualquier error en la conexión
anulará la garantía.
• No tire nunca del cable de
alimentación para desenchufar el
aparato.
• No sumerja el aparato, el cable de
alimentación ni el enchufe en líquido.
No deje nunca el cable de alimentación
cerca o en contacto con las partes
calientes del aparato, cerca de una
fuente de calor o de un ángulo
cortante.
• Este aparato no está diseñado para
ser utilizado en los siguientes casos
(no cubiertos por la garantía):
- zona de trabajo de cocina en
almacenes, oficinas y otros entornos
profesionales,
- zonas de cocina reservadas para el
personal de almacenes, oficinas y
otros entornos profesionales,
- granjas,
- uso por parte de clientes de hoteles,
moteles y otros entornos con carácter
residencial,
- lugares como habitaciones de
huéspedes.
ADVERTENCIA:
Su aparato emite vapor
que puede provocar
quemaduras.
Manipule con precaución la tapa y
el tapón (si es necesario, utilice
un guante, una manopla, etc.).
Manipule el tapón por su parte
central.
• No ponga e l aparato en
funcionamiento si la junta no
está colocada sobre su soporte, si
dicho soporte no está montado en
la tapa. Resulta imperativo utilizar
el aparato con el tapón colocado
en el orificio de la tapa (salvo en
caso de información específica de
la receta).
ADVERTENCIA:
Atención: corre el riesgo
de sufrir heridas si
utiliza incorrectamente
el aparato.
Tenga cuidado con las hojas de la
cuchilla picadora Ultrablade (E1) y
de la cuchilla amasadora/trituradora
(E4) a la hora de limpiarlas y a
la hora de vaciar el bol, están
sumamente afiladas.
Guarde la cuchilla picadora
Ultrablade (E1) en el bol después
de cada uso.
Tenga cuidado si vierte un líquido
caliente en el robot de cocina, ya
que puede salir del aparato debido
a una ebullición repentina.
ADVERTENCIA: Tenga cuidado
a l m a n i p u l a r e l a p a r a t o
(limpieza, llenado y vertido):
evite salpicar el líquido en
los conectores.
ADVERTENCIA: Algunos alimentos
con piel superficial (salchichas
enteras, lengua, aves de corral, etc.)
o trozos grandes de carne pueden
provocar salpicaduras de líquidos
hirviendo. Por ello, le recomendamos
que los pique antes de su cocción
con un cuchillo o un tenedor.
ADVERTENCIA: La superficie el
elemento calefactor presenta un
calor residual después de su uso.

142 143
ESES Al leer estas instrucciones descubrirá consejos de uso que le harán entrever el potencial de
su aparato: preparación de sopas, cocción lenta, platos al vapor y pasta.
DESCRIPCIÓN DEL APARATO:
A Bloque motor
B Teclas*
B1: Cancelar
B2: Balanza (según modelo)
B3: START/STOP
B4: Vídeo
B5: Ajustes
B6: Pantalla táctil
C Conjunto del bol
C1: Bol de acero inoxidable
C2: Gatillos
C3: Eje de transmisión desmontable
C4: Junta de estanqueidad
C5: Anillo de bloqueo del eje de
transmisión
D Conjunto de tapa
D1: Tapón regulador de vapor
D2: Tapa
D3: Soporte de junta
D4: Junta de estanqueidad
E Accesorios
E0: Caja para guardar accesorios
E1: Cuchilla picadora Ultrablade
E2: Mezcladora
E3: Batidora
E4: Cuchilla amasadora/trituradora
E5: Cesta para cocción al vapor
F Espátula
G Interruptor 0/I para interrumpir la
alimentación eléctrica del aparato
H Cepillo de limpieza
DATOS TÉCNICOS DEL APARATO:
Potencia: 1550 W (1000 W: resistencia térmica / 550 W: motor)
Rango de temperaturas: de 30° a 150 °C
ajustable a intervalos de 5 °C.
Intervalo de tiempo de de 5 segundos a 2 horas
funcionamiento: ajustable a intervalos de 5 segundos (mínimo) a 1 minuto
(máximo).
Número de velocidades: 13 - 2 velocidades intermitentes:
velocidad 1 (5 s On / 20 s Off).
velocidad 2 (10 s On / 10 s Off).
- 10 velocidades continuas progresivas
(velocidades 3 a 12).
- 1 velocidad intermitente máx. (velocidad 13).
Frecuencia: 2412 – 2484 MHz
Transmisión máxima de potencia: 20 dBm
Modo de espera: El aparato se pone en modo de espera al cabo de 15
minutos de inactividad.
Para volver a encenderlo, pulse una de las teclas
(B1 a B5)
Consumo de potencia en modo de suspensión cuando el
producto está conectado: 0,2 Wh
* Google Play y Android son marcas de Google Inc.
Apple y el logotipo de Apple son marcas de Apple Inc. registradas en Estados Unidos y en otros países. App Store es una marca de servicio de Apple Inc.
* Los iconos son visibles solo cuando resulten útiles para el uso de su aparato.
Con respecto a un uso incorrecto
• No toque la tapa antes de que
el aparato se haya detenido por
completo (botón «stop»), espere a
que los alimentos mezclados dejen
de girar.
• Vierta siempre los ingredientes sólidos
en primer lugar en el bol antes de
añadir los ingredientes líquidos
(véase la Fig. 11), sin sobrepasar la
marca MAX grabada en el interior del
bol (véase la Fig. 11). Si el bol está
demasiado lleno, podría saltar agua
hirviendo.
• Tenga cuidado durante el programa
de cocción al vapor, respete el nivel
de 0,7 litros de agua (véase la
Fig. 4.2).
• No introduzca nunca los dedos
ni ningún otro objeto en el bol
cuando el aparato se encuentre en
funcionamiento.
• No use el bol como recipiente
para otros usos (conservación,
congelación, esterilización de
alimentos).
• Coloque el aparato sobre un lugar
estable, resistente al calor, limpio
y seco.
• Nunca coloque el aparato cerca de
una pared o un armario; el vapor
que se genera podría dañar los
elementos.
• No coloque el aparato cerca de una
fuente de calor en funcionamiento
(placa de cocción, electrodoméstico,
etc.).
• No cubra la tapa con paños o similar,
no intente taponar el orificio de la
tapa, utilice el tapón regulador de
vapor.
• No permita que haya cabello largo,
bufandas o corbatas que queden
colgando por encima del bol mientras
el aparato esté en funcionamiento.
• No introduzca nunca los accesorios
en un microondas.
• No utilice el aparato al aire libre.
• No sobrepase nunca la cantidad
máxima indicada en las instrucciones.
• Guarde el aparato cuando se haya
enfriado.
• No coloque nunca el bol en el
congelador para enfriarlo, utilice el
frigorífico.
• No coloque la espátula más de
20 minutos a 150 °C en aceite.
Servicio posventa
• Para su seguridad, no utilice
accesorios ni piezas de recambio
distintos a los suministrados por
los centros de servicio posventa
autorizados.
• Cualquier intervención por parte
del cliente diferente de la limpieza
y el mantenimiento deberá llevarse
a cabo en un centro de servicio
autorizado.
• Consulte el cuadro «¿Qué hacer si su
aparato no funciona?» al final de las
instrucciones de uso.

144 145
ESES
Cesta de
cocción al vapor
Los tiempos de cocción de la cesta de cocción al vapor se indican a título informativo; y
permiten, en la mayoría de los casos, una cocción satisfactoria. Sin embargo, determinadas
condiciones influirán en el tiempo de cocción: el tamaño de las verduras (cortadas o no) /
la cantidad de ingredientes en la cesta / la variedad y madurez de las verduras / la cantidad
de agua en el recipiente, que debe corresponder a la graduación (0,7 l). Recuerde usar el
tapón de vapor en la dirección «máx.» (a). Si la cocción es insuficiente, puede añadir más
tiempo de cocción.
E5
Cocción al vapor de
verduras, pescado o carne
20/40
min 1 kg
Sopas con tropezones 3 min 3 l
P1 - Calabacines 20 min 800 g
P1 - Chirivías 25 min 800 g
P1 - Troncos de puerros
25 min 800 g
P1 - Brócoli 20 min 500 g
P1 - Pescado 15 min
600 g (con papel de horno)
P2 - Patatas 30 min 1 kg
P2 - Zanahorias 30 min 1 kg
P2 - Judías verdes 30 min 800 g
P2 - Carne blanca 20 min
600 g (con papel de horno)
Eje de transmisión desmontable
C3
Puede dorar alimentos en el bol sin la tapa mientras remueve y vigila la cocción.
COCCIÓN SIN TAPA no resulta adecuada para las confituras y los preparados a
base de leche (riesgo de desbordamiento)
USO HASTA 130 °C USO DE 135 °C A 150 °C
Cocción con
o sin tapa
Tapa cerrada Solo con la tapa abierta
Accesorios
Todos los accesorios con el eje
de transmisión desmontable
Solo el eje de transmisión
desmontable
C3
Velocidad Sí No
Tiempo
máximo
- Si la temperatura es inferior o
igual a 100 °C: 2 h
- Si la temperatura está comprendida
entre 100 °C y 130 °C: 1 h
- Si la temperatura es
inferior o igual a 135 °C:
20 min
!! No retire el eje de transmisión desmontable inmediatamente después de su
uso. Vierta agua en el recipiente vacío para enfriarlo.
SU APARATO
El aparato cuenta con los siguientes accesorios:
Estos accesorios también están provistos de zonas de agarre para facilitar su manipulación
mientras se utilizan para la preparación de alimentos.
Cuchilla picadora
E1 Mezclar sopas
3 min 3 l
Mezclar compotas 40 s 1 kg
Picar verduras 15 s 0,6 kg
Picar carne 30 s 1 kg
Picar pescado 15 s 1 kg
No utilice este accesorio para picar ingredientes duros. Utilice la cuchilla amasadora/trituradora E4.
Mezcladora
Mezcla los platos cocinados sin estropear los ingredientes.
Resulta muy útil para las fases de dorado previas a las preparaciones (risottos, sopas).
E2 Platos que requieren dorar 5 min 500 g
Cocción a fuego lento 45 min 3 l
Risottos 22 min 1,5 kg
Pisto, chutney, legumbres (ajustes: véase el libro de recetas)
Batidora
9 max
E3 Claras a punto de nieve 5/10 min 8
máx.
Mayonesas, nata montada 2/5 min 0,5 l
Salsas y cremas a 1/20 min 1 l
Puré de patatas a 1 min 1 l
Polenta a 1/16 min 1 l
E4
Amasar masas de pan blanco 2 min 30 s 1,2 kg
Amasar masa quebrada,
pastafloras, panes especiales
2 min 30 s 1 kg
Amasar masas de levadura
(brioche, kouglof, etc.)
1 min 30 s
2 min 0,8 kg
Mezclar masas ligeras
(bizcocho, etc.)
40 s
3 min 1 kg
Pulverizar frutos con cáscara
1 min 0,6 kg
Picar productos duros 1 min 0,6 kg
Picar hielo 1 min 6 a
10
Masa de crepes, gofres 1 min 1,5 l
Tapón
Tapón de regulación de extracción de vapor
máx. (a) = cocción al vapor.
mín. (b) = risotto, natillas, salsas, etc.
La posición «mín.» permite dejar escapar un máximo de condensación y,
de esta forma, se consigue que los platos o salsas tengan una
mejor consistencia (risotto, natillas, salsas, etc.).
La posición «máx.» permite obtener un máximo de calor y
de vapor dentro del bol para todo lo que cocine al vapor (sopas, etc.)
Esta posición también evita las salpicaduras durante la mezcla.
Cuchilla amasadora/trituradora
* Dependiendo
del modelo
D1

146
147
ESES
1. PRIMER USO
i-Companion touch xl es un robot de cocina inteligente que le ayudará a cocinar todos sus platos con
éxito. Ofrece cientos de recetas gratuitas a las que puede acceder en pocos pasos.
Gracias a su pantalla táctil intuitiva e interactiva, puede preparar recetas variadas en un tiempo
récord.
i-Companion touch xl se encarga de preparar, mezclar y cocinar los ingredientes. Le guiará paso a paso
en todas las etapas de sus recetas.
¡Déjese guiar de una forma rápida y sencilla!
Ponga en marcha su i-Companion touch xl con el interruptor 0/I (véase la Fig. 9) y, a continuación,
siga las instrucciones que se mostrarán en la pantalla. A lo largo de estas etapas, el icono le
permite obtener ayuda en relación con el paso que debe realizar. También dispone de una sección de
preguntas frecuentes en el sitio web www.moulinex.es
También dispone de vídeos tutoriales para la puesta en marcha de su aparato
http://bit.ly/guíarápidadeusode companiontouch
• Ajustes para su país
Cuando utilice el aparato por primera vez, podrá acceder a la configuración de los ajustes de su país.
1 seleccione su país 2 seleccione su idioma
Una vez realizados estos dos pasos, aparecerá una pantalla de bienvenida.
I-COMPANION TOUCH XL:
MI AYUDANTE EN LA COCINA, TODOS LOS DÍAS
Los siguientes botones de control se encenderán cuando se puedan utilizar:
El botón central tiene 11 funciones.
Estas varían dependiendo de los
pasos a seguir (inicio, pausa,
siguiente etapa, validar, finalizar,
etc.)
Cuando esté disponible un vídeo
relacionado con la receta que esté
preparando, podrá verlo haciendo
clic en este botón.
Cancelar/Retroceder
Ajustes (modificaciones de ajustes,
conexión Wi-Fi, ingredientes de una
receta, etc.)
Utilización de la balanza conectada
*
COLOCACIÓN DEL BOL, SUS ACCESORIOS Y EL
CONJUNTO DE LA TAPA
• Antes de utilizarlos por primera vez, limpie
todos los elementos (C, D, E, F, H) con agua
caliente y jabón, salvo el bloque motor (A). Su
bol (C) está equipado del eje de transmisión
desmontable (C3) para facilitar la limpieza.
• Asegúrese de retirar todo el embalaje antes de
utilizar el aparato, en particular la protección
situada entre el bol (C) y el bloque motor (A).
• Coloque la junta de estanqueidad (D3)sobre
su soporte (D4) (véase la Fig. 1) y bloquee el
conjunto sobre la tapa (D2) (véase la Fig. 2).
• Coloque la junta de estanqueidad (C4) sobre el
eje de transmisión desmontable (C3). Bloquee
el conjunto sobre el fondo del bol con el anillo
de bloqueo (C5) (véase la Fig. 3). Si utiliza el
modo de cocción sin tapa, coloque la junta de
estanqueidad (C4)sobre el eje de transmisión
desmontable (C3). Bloquee el conjunto sobre
el fondo del bol con el anillo de bloqueo (C5)
(véase la Fig. 3).
• Coloque el accesorio seleccionado en el bol:
- los accesorios (E1, E2, E3 o E4) sobre el eje
de transmisión desmontable en el fondo del bol
(véase la Fig. 4.1),
- en caso de cocción al vapor, la cesta para vapor
(E5) en el interior del bol, (véase la Fig. 4.3),
habiendo rellenado previamente el recipiente
con 0,7 l de preparado líquido (agua, salsa,
etc.) (véase la Fig. 4.2).
• Introduzca los ingredientes en el bol o en la
cesta para cocción al vapor.
Coloque la tapa sobre el bol (C) alineando los dos
triángulos (véase la Fig. 5), bloquee la tapa sin
presionar y girándola en el sentido de la flecha
(véase la Fig. 6).
• Coloque el tapón regulador de vapor (D1) sobre
la tapa; hay 3 posiciones posibles (véase la
Fig. 7)
• Coloque le bol (C) sobre el bloque motor (A)
hasta que oiga un «clic» (véase la Fig. 8).
El aparato arranca únicamente si el bol y la tapa
están correctamente colocados y bloqueados
sobre el bloque motor.
En caso de una instalación o un bloqueo
incorrectos (véanse las Fig. 10.1 y 10.2),
aparecerá un mensaje de seguridad en la
pantalla.
SU APARATO ESTÁ EQUIPADO CON UN
MECANISMO DE BLOQUEO DE SEGURIDAD DE
LA TAPA
La tapa está protegida cada vez que se pone en
marcha el aparato. Este mecanismo de seguridad
impide la apertura de la tapa mientras se está
cocinando una receta. No intente forzar la tapa
cuando se encuentre bloqueada. Este mecanismo
de seguridad se desbloqueará cada vez que
el aparato se detenga. Si ha seleccionado una
temperatura igual o superior a 50 °C y una
velocidad igual o superior a 5, aparecerá una
cuenta atrás de 10 segundos en la pantalla del
panel de control. La tapa solo se podrá abrir
cuando finalice la cuenta atrás.

148
149
ESES - Dispositivos compatibles:
Obtenga la lista de los modelos de smartphones y tabletas compatibles con i-Companion touch xl en
www.moulinex.com
- Descarga de la aplicación:
Descargar la aplicación Companion. Se puede descargar de forma gratuita desde la App Store (iPhone/
iPad) y Google Play (Android).
Descargar en
la App Store
APLICACIÓN ANDROID EN
- Asociación de la cuenta:
Desde la aplicación Companion de su smartphone o tableta, seleccione el producto i-Companion touch
xl y luego cree una cuenta o entre en su cuenta si ya tiene una.
Su aparato va a generar un código de asociación (aparecerá en la pantalla B6) que deberá introducir
en la aplicación Companion.
Si desea asociar varios smartphones o tabletas a su i-Companion touch xl, cada una de las aplicaciones
debe estar conectada a la misma cuenta de usuario de Companion.
Mi primera receta
La primera vez que utilice i-Companion touch xl, se le propondrá realizar una primera receta para
que empiece a familiarizarse con el aparato. Si selecciona «Mi primera receta», puede seguir las
indicaciones paso por paso que le guiarán a lo largo de la receta.
Esta receta desaparecerá de su pantalla principal cuando haya terminado o después de haber utilizado
i-Companion touch xl diez veces.
2. FUNCIONES DEL PRODUCTO
Su aparato i-Companion touch xl ofrece un funcionamiento «conectado», pero también puede
funcionar en modo «sin conexión». Además, posee muchas prestaciones que le permiten encontrar la
inspiración día tras día y que todas sus recetas salgan perfectas. En el modo «sin conexión» hay 310
recetas, mientras que en el modo «conectado» tiene cientos a su disposición.
• Conexión a Internet
Ahora puede conectar su i-Companion touch xl a su red de Internet. Puede decidir si desea realizar
este paso ahora seleccionando la opción «Ahora» o después, seleccionando «Más tarde».
Este paso se puede efectuar más adelante accediendo desde la pantalla principal a los ajustes de su
i-Companion touch xl.
Se necesita una conexión a Internet para utilizar las siguientes funciones:
Acceso a todas las recetas de Companion, a las funciones Mis libros de recetas, En mi frigorífico,
fotografías y vídeos en las instrucciones paso a paso de sus recetas y actualizaciones del producto.
Para conectar su i-Companion touch xl a la red de Internet, debe hacer lo siguiente:
- Seleccionar la red (¿No consigue acceder a ella? Vaya a «Ajustes», «Ajustes de Wi-Fi» y después
entre en «Activar el Wi-Fi»).
- Introducir la contraseña de la conexión Wi-Fi .
- Se abrirá la pantalla «Conexión en curso» mientras se carga la conexión. Este paso puede durar unos
minutos.
- Una pantalla con el mensaje «¡Enhorabuena!» confirmará que la conexión se ha establecido
correctamente .
- Por último tendrá que seleccionar su franja horaria .
Significado de los indicadores de conexión Wi-Fi:
El producto no está conectado a la red Wi-Fi.
El producto se está conectando a la red Wi-Fi.
El producto está conectado a la red Wi-Fi.
Dispone de vídeos explicativos para la conexión de su i-Companion touch xl a la red Wi-Fi en el sitio
web http://bit.ly/guíarápidadeusode companiontouch
• Asociación a la aplicación
La aplicación Companion le permite vigilar su i-Companion touch xl sin tener que estar a su lado.
Puede asociarlo a su smartphone o tableta. De esta forma también podrá acceder a sus recetas desde
cualquier lugar.
Asegúrese de que la red Wi-Fi de su smartphone o tableta esté bien conectada a Internet (Wi-
Fi/4G/3G, etc.).
Es necesario que su i-Companion touch xl esté enchufado a una toma de corriente.
Este paso se puede efectuar más adelante accediendo desde la pantalla principal a los ajustes de su
i-Companion touch xl.
Se requiere la asociación a su smartphone o tableta para poder utilizar las siguientes funciones:
mis libros de recetas, seguimiento a distancia del progreso de la receta desde el smartphone, envío de
una receta desde el smartphone o tableta a su i-Companion touch xl

150
151
ESES
PROGRAMAS
Su aparato tiene 14 programas automáticos grabados:
1. Seleccione el programa que desee.
2. Los ajustes preprogramados pueden
modificarse (según la receta elegida, los
ingredientes, las cantidades preparadas).
Ajuste la temperatura de cocción, el tiempo y
la velocidad con los botones - y +.
3. Cuando haya terminado de modificar todos
los ajustes, pulse el botón «Start» (B3) para
iniciar el programa.
4. Una vez finalizado el programa, el aparato
emite tres señales acústicas.
5. Al final de los programas Crema, Molido,
Cocción a fuego lento, Risotto, Salsa, Postre,
Vapor suave y Vapor intenso, el aparato pasa
automáticamente al modo de conservación
del calor durante 45 minutos para mantener
la preparación lista para consumir. En el
programa de Cocción a fuego lento, Salsa,
Postre y en el modo manual, el motor del
aparato funciona a una velocidad específica
con el fin de preservar la preparación y evitar
que esta se adhiera al fondo del bol. Para
detener el modo de conservación del calor,
solo hay que pulsar el botón «Finalizado»
(B3). Al final del amasado de los programas
Pan y Brioche, el aparato pasa al modo «Subida
de la masa» a 30 °C durante 40 minutos para
aumentar el volumen de las masas. Al abrir la
tapa o retirar el bol de su base mientras se
está ejecutando un programa, este termina.
Si desea detener este modo, pulse el botón
«Ajustes» y después «Reiniciar».
6. Una vez iniciado el programa automático,
puede detener el aparato en cualquier
momento pulsando la tecla «Stop». El programa
automático se encuentra entonces en modo
de pausa; tiene entonces la posibilidad de
reactivarlo pulsando de nuevo «Start». Si se
equivoca de programa y desea cancelar, pulse
el botón «Cancelar/Retroceder».
7. El programa «Calentar» le permite calentar su
preparación en 20 minutos (tiempo regulable
de 5 a 60 minutos).
8. El programa «Lavado» le permite limpiar el
bol fácilmente. Ponga en marcha el programa
llenando previamente el bol con 0,7 l de agua
y una gota de líquido lavavajillas.
Programa
Salsa
Programas
Estofar
Programas
Sopa
Programas
Vapor
Programa
Masa
Programa
Postre
Programas
complementarios
Salsa Rehogar
Estofar
Arroz
Crema
Con trocitos
Vapor suave
Vapor fuerte
Pan
Brioche
Bizcocho
Postre Recalentar
Limpieza
• Búsqueda de una receta
Desde la pantalla principal, puede buscar recetas por medio
del botón «Búsqueda» . La búsqueda se puede hacer por
platos o por ingredientes. También dispone de filtros para
acotar la búsqueda.
• Recetario
Desde la pantalla principal, puede acceder a la función
«Recetario». Esta función le permite acceder a todas las recetas disponibles en la comunidad
Companion.
En el modo sin conexión, encontrará en la pantalla principal de la función una selección de fichas de
recetas grabadas en su i-Companion touch xl. Puede iniciar las instrucciones paso a paso directamente
desde una de estas fichas de recetas.
También puede buscar una receta en la comunidad haciendo clic en el icono «Búsqueda» .
Para ello, basta con introducir un plato o un ingrediente en la barra de búsqueda y pulsar «OK».
Puede acotar la búsqueda añadiendo filtros (tipo de plato, tiempo de preparación y origen de la
receta).
• Libros de recetas (Disponible solamente con conexión Wi-Fi)
Desde la pantalla principal, puede acceder a la función «Mis libros de recetas». Esta función le permite
recuperar todas las recetas que ha grabado anteriormente como favoritas con la aplicación Companion
en su smartphone o tableta.
Para poder usar esta función, tendrá que descargar la aplicación Companion y crear una cuenta.
Puede crear y modificar sus libros de recetas en su smartphone y luego acceder a ellos en su i-Companion
touch xl conectado mediante Wi-Fi. Una vez que su i-Companion touch xl esté conectado a la red
Wi-Fi, sus libros de recetas se sincronizarán automáticamente entre su aparato y su smartphone o
tableta cada vez que prepare una receta.
• En mi frigorífico (Disponible solamente con conexión Wi-Fi)
Desde la pantalla principal, puede acceder a la función «En mi frigorífico». Esta función le permite
buscar una receta según los ingredientes que elija.
Para encontrar una idea de receta, haga clic en la función «En mi frigorífico» y añada hasta dos
ingredientes. Para cada uno de ellos podrá indicar las cantidades por medio de la balanza conectada. A
continuación, haga clic en «Buscar»; se le ofrecerá una lista de recetas que se ajusten a los parámetros
que ha introducido.

152 153
ESES
Programas
automáticos
Vapor
suave
Vapor
fuerte Pan Brioche Bizcocho Postre
Recalentar
Limpieza
Velocidad
«por defecto»
(ajustable)
V5 durante
2 min 30 s
V5 durante
1 min 30 s
y después
V6
durante
2 min
V3 durante
40 s y
después V9
durante
3 min
V4
(De V2 a
V8)
V2
(De V2 a
V6)
V8
(De V5 a
V8)
Temperatura
«por defecto»
(ajustable)
100 °C
(no
ajustable)
100 °C
(no
ajustable)
90 °C
(50 °C a
110°C)
90 °C
(70°C a
100 °C)
80°C
(no
ajustable)
Tiempo
«por defecto»
(ajustable)
30min
(1 min a
60 min)
35min
(1 min a
60 min)
2 min 30 s
(30 s a 2
min 30 s)
3 min 30 s
(30 s a 3
min 30 s)
3 min 40 s
(1 min 40
s a 3 min
40 s)
15 min
(5 min a
60 min)
20 min
(5 min a
60 min)
5 min
(1 min a
10 min)
Conservación
del calor
«por defecto»
al finalizar el
programa
45 min 45 min 45 min
Subida de la
masa a 30 °C
«por defecto»
al finalizar el
programa
40 min 40 min
Ejemplo
recetas
Foie gras
al vapor
Puré de
zanahorias
al vapor
Pan Brioche Pastel de
frutas
Crema
pastelera
0,7 l de agua
+ 1 gota de
lavavajillas
Accesorios
compatibles
DESCUBRA LOS PROGRAMAS AUTOMÁTICOS DISPONIBLES
Programas
automáticos
Salsa Crema Con trocitos Rehogar Estofar Arroz
Velocidad
«por defecto»
(ajustable)
V6
De V2 a V8
10
pulsaciones y
V12 durante
2 min
De V7 a V10
durante 30 s V3 V1 V2
Temperatura
«por defecto»
(ajustable)
70°
(50 °C a 100
°C)
100°
(90 °C a 100
°C)
100°
(90 °C a 100
°C)
130 °C
no ajustable
95°
(80 °C a 100
°C)
95°
(80 °C a 100
°C)
Tiempo
«por defecto»
(ajustable)
8min
(5 min a 40
min)
40 min
(20 min a
60 min)
45 min
(20 min a
60 min)
5 min
(2 min a
15 min)
45 min
(10 min a 2 h)
20 min
(10 min a 2 h)
Conservación del
calor
«por defecto»
al finalizar el
programa
45 min 45 min 45 min 45 min 45 min
Ejemplo
recetas
Salsa
holandesa
Sopa de
calabaza
Verduras
picadas
Estofado de
verduras Ragú de ternera Risotto clásico
Accesorios
compatibles
Durante la elaboración de algunas recetas pueden producirse desbordamientos por la aparición
de burbujas, especialmente cuando se utilizan verduras congeladas. En ese caso, deberá reducir
los volúmenes en consecuencia.

154
155
ESES • Modo manual
Puede personalizar los ajustes de velocidad, temperatura y duración de la cocción de su i-Companion
touch xl para adaptarlos a sus propias recetas.
Desde la pantalla principal, puede acceder a la función «Modo manual».
Selección de la velocidad del motor
Dos velocidades intermitentes, diez velocidades continuas progresivas y una
velocidad intermitente máxima (V13).
Selección de la temperatura de cocción.
De 30 °C a 150 °C.
Selección del tiempo de funcionamiento.
De 5 segundos a 2 horas.
Aumento de velocidad, temperatura de cocción o tiempo.
Reducción de velocidad, temperatura de cocción o tiempo.
Consejo de uso:
Su aparato está equipado con un microprocesador que controla y analiza su estabilidad. En caso de
inestabilidad, la velocidad de rotación del motor se reducirá automáticamente. Si esta inestabilidad
persiste, el motor se detendrá y aparecerá un mensaje de seguridad en la pantalla.
• Asegúrese de que la cantidad de ingredientes no sea excesiva y que la velocidad utilizada sea
adecuada.
• Asegúrese de que utiliza el accesorio recomendado.
• A continuación, reinicie el aparato de la forma habitual.
• Ajustes
Desde la pantalla principal, puede acceder a la función «Ajustes».
Esta función le permite actualizar los datos que se guardaron en el momento de poner en marcha su
i-Companion touch xl.
También puede conectar su aparato a la red Wi-Fi o asociar la aplicación si no lo hizo al poner en
marcha el aparato.
• Balanza conectada *
- Asociación del accesorio de balanza conectada a su i-Companion touch xl:
Con respecto a las balanzas que se proporcionan con su i-Companion touch xl, la asociación ya está
realizada, no tiene que hacer nada.
En el caso de las balanzas que se adquieren por separado, acceda a la sección de ajustes de su
producto y haga clic en «Mis accesorios»
qui
n p
n p
n p
. Por último, indique que tiene una balanza. La balanza
queda asociada.
- Utilización del accesorio de balanza conectada
Cuando el botón de balanza conectada se enciende en su i-Companion touch xl, esto significa que
puede pesar sus ingredientes para realizar una receta.
Para ello, pulse el icono de balanza y después ponga en el accesorio de balanza los ingredientes
que desea pesar.
!! La balanza se pone en modo de espera al cabo de 30 segundos de inactividad. Para volver a
encenderla, pulse «OK».
Tres usos posibles de la balanza:
- Pesaje de preparación: puede pesar todos sus ingredientes antes de realizar la receta.
- Pesaje durante la receta: puede pesar los ingredientes mientras prepara la receta al comienzo de
cada nuevo paso.
- Pesaje libre: elija uno o varios ingredientes que haya en su frigorífico y después selecciónelos en
la aplicación Companion con la barra de búsqueda. Pulse el icono de balanza de su i-Companion
touch xl y después coloque sus ingredientes en el accesorio de balanza: se le presentará una lista
de recetas según las cantidades pesadas.
• Actualización
Para que las prestaciones de su producto se mantengan en un estado óptimo de funcionamiento, se
le ofrecerán actualizaciones. Para ello, aparecerá una ventana en la pantalla y le preguntará si acepta
o no que se instale la actualización más reciente disponible. Haga clic en Aceptar y deje que su
i-Companion touch xl se actualice.
* Dependiendo del modelo

156
157
ESES
Puede utilizar su i-Companion touch xl en modo sin conexión. Las funciones que se indican a
continuación están disponibles en el modo sin conexión:
• Recetario
Acceda a toda la información sobre el recetario en la página 12.
El recetario pone a su disposición 310 recetas.
• Programas
Acceda a toda la información sobre el uso de programas automáticos en la página 13.
• Modo manual
Acceda a toda la información sobre el uso del modo manual en la página 16.
UTILIZACIÓN EN EL MODO SIN CONEXIÓN
•Limpie inmediatamente el bol
después de usarlo. El aparato
no debe sumergirse. No pase el
bloque motor (A) por debajo del
agua corriente.
Cuando haya terminado de usarlo, desenchufe
el aparato.
Limpieza del bol después de su uso:
• Presione los gatillos (C2) y luego levante el
conjunto del bol (C).
• Coloque el bol sobre una superficie plana.
• Desbloquee la tapa girándola un cuarto de vuelta
en el sentido de las agujas del reloj. Retire la tapa
con precaución.
• Tenga cuidado con las hojas de la cuchilla
picadora Ultrablade (E1) y la cuchilla
amasadora/trituradora (E4) al limpiarlas y al
vaciar el bol; cortan muy fácilmente.
• Cuando las piezas se hayan enfriado:
- desmonte el eje de transmisión desmontable
(C3), la junta (C4) y el anillo de bloqueo (C5)
(véase la Fig. 13).
- limpie el bol (C), el eje de transmisión
desmontable (C3), la junta (C4), el anillo de cierre
(C5), los accesorios (E1), (E2), (E3), (E4), (E5),
el tapón regulador (D1), la tapa (D2), la junta de
estanqueidad (D4) y el soporte de junta (D3) con
una esponja y agua caliente jabonosa.
• Aclare los diferentes elementos con agua
corriente.
• En el caso de que la suciedad sea abundante,
déjelos a remojo durante varias horas con agua
mezclada con líquido lavavajillas y frote si
es necesario con la espátula (F) o con el lado
abrasivo de una esponja.
• Si hay suciedad incrustada en el bol, puede
utilizar el lado abrasivo de una esponja empapado
si es necesario en vinagre blanco.
• Para conservar el aspecto y la vida útil de la
pantalla de cristal, límpiela con la esponja sin
utilizar el raspador; de esta forma evitará que se
produzcan arañazos.
LIMPIEZA DEL APARATO
• Para limpiar el bloque motor (A) utilice un paño
húmedo. Séquelo con cuidado.
• Para facilitar la limpieza, tenga en cuenta que
el bol, la tapa y los accesorios se pueden lavar
en el lavavajillas, con la excepción del eje de
transmisión desmontable (C3 y C4) y el anillo de
bloqueo (C5) (véase la Fig. 14).
• Los accesorios, el eje de transmisión
desmontable y los elementos de la tapa pueden
colorearse ligeramente con ciertos ingredientes,
como el curry, el zumo de zanahorias, etc. Esto
no supone ningún peligro para su salud ni para
el funcionamiento de su aparato. Para evitarlo,
limpie los elementos rápidamente después de
usarlos.
• Antes de reutilizar el conjunto del bol (C),
asegúrese de que los contactos eléctricos situados
debajo del bol estén siempre limpios y secos.
• Lave la tapa del aparato a mano a fin de
preservar su aspecto y longevidad. No utilice el
lado abrasivo de la esponja para evitar arañazos.
• Para no alterar los materiales del bol (C),
asegúrese de respetar las instrucciones de uso de
su lavavajillas, no aumentar la dosis de sal o de
los productos para el lavavajillas.
Su aparato viene equipado de serie con
protecciones electrónicas del motor
para garantizar una larga vida útil. Dicha
seguridad electrónica le protege contra cual-
quier uso anómalo; de esta forma, su motor
está perfectamente protegido.
En determinadas condiciones de uso muy exigentes
en las que no se respeten las recomendaciones
indicadas en el manual (véase la tabla «SU APA-
RATO»: cantidades que pueden ser excesivas, o
una utilización anormalmente prolongada, o una
sucesión de recetas sin pausa), la protección elec-
trónica se desactiva para preservar el motor; en
ese caso, el aparato se detendrá y se mostrará un
mensaje de seguridad en la pantalla para indicar
que el aparato ha dejado de funcionar provisio-
nalmente.
Si en la pantalla aparece un «mensaje de segu-
ridad» y la unidad se detiene, haga lo siguiente:
• Deje el aparato enchufado y con el interruptor
0/I en la posición 1 «ON» (Encendido) (G).
• Consulte las recomendaciones que aparecen en
la pantalla para readaptar la preparación (véase la
tabla «SU APARATO»: cantidades de ingredientes
/ tiempo de la receta / temperatura / tipo de
accesorios).
El servicio de atención al consumidor estará a
su disposición para cualquier pregunta (los datos
figuran en la libreta de garantía).
NOTA IMPORTANTE: SEGURIDAD DEL APARATO

158
159
ESES QUÉ HACER SI SU APARATO NO FUNCIONA COMO ES DEBIDO
PROBLEMAS CAUSAS SOLUCIONES
Cocción insuficiente
Los tiempos de cocción se indican
a título informativo; y permiten, en
la mayoría de los casos, una cocción
satisfactoria.
Sin embargo, algunas condiciones
influirán en el tiempo de cocción:
- el tamaño de los alimentos
(cortados o sin cortar)
- la cantidad de ingredientes
- la variedad de verduras, su estado
de madurez
- si los ingredientes están congelados
o no, etc.
Añada tiempo de cocción pulsando la tecla +
en la pantalla (B6).
Haga trozos más pequeños.
El tapón de vapor no está bien puesto
o no está colocado
Coloque el tapón de vapor en la posición
«máx.»; esta posición permite obtener el
máximo de calor en el bol para todos los tipos
de cocción (sopas, cocción al vapor, etc.).
Esta posición también evita las salpicaduras
durante la mezcla.
La posición «mín. vapor» permite dejar escapar
un máximo de condensación y, de esta forma,
se consigue que los platos o salsas tengan una
mejor consistencia (risotto, natillas, salsas,
etc.).
Cocción al vapor
insatisfactoria
Cantidad de agua inadecuada en el
bol.
Trozos demasiado grandes.
La cantidad de agua en el bol debe
corresponder a la graduación (0,7 l).
También puede utilizar el modo manual
seleccionando la temperatura de 120 °C y el
tiempo de cocción según la cantidad y el tipo
de ingredientes.
Haga trozos más pequeños.
D i f i c u l t a d e s
pa ra c o n s eg u ir
determinadas recetas
Recetas inadecuadas
Sus recetas, propias o las que obtiene en
Internet, podrían no ser adecuadas para
su aparato y los accesorios del mismo
(cantidades, tiempo de cocción, duración,
accesorios inadecuados): antes de comenzar
a preparar una receta, asegúrese de que sigue
las instrucciones de uso que se indican en este
manual de instrucciones.
El aparato no
funciona.
El aparato no está enchufado. Enchufe el aparato a una toma de corriente.
Mi pantalla B6 permanece negra /
Su aparato está en «modo de espera» Pulse una de las teclas (B1 a B5)
El interruptor (G) está en la posición
0. Ponga el interruptor en la posición 1.
El bol o la tapa no están
correctamente colocados o
bloqueados.
Asegúrese de que el bol o la tapa estén bien
colocados y cerrados según se indica en las
ilustraciones del manual.
La tapa no se bloquea. La tapa no está completa.
Compruebe que la junta esté correctamente
instalada en el soporte de junta y que este
último esté correctamente instalado en la
tapa.
PROBLEMAS CAUSAS SOLUCIONES
Vibraciones excesivas.
El aparato no está colocado sobre una
superficie plana, el aparato no es estable
.
Coloque el aparato sobre una superficie
plana.
El volumen de ingredientes es
demasiado grande.
Reduzca la cantidad de ingredientes
utilizados.
Error de los accesorios. Asegúrese de que utiliza el accesorio
recomendado.
Ruido leve durante el
funcionamiento
El eje de transmisión de su aparato
puede emitir ruido de funcionamiento
a velocidad reducida o con
determinados ingredientes (por
ejemplo, arroz).
Es una circunstancia puntual que no
tiene consecuencias para la vida útil de
su aparato. Se atenuará o desaparecerá
después de varios usos y limpiezas del eje
de transmisión desmontable (consulte el
apartado «Limpieza del aparato»).
Ruido excesivo durante el
funcionamiento Utilización de un accesorio incorrecto
Asegúrese de utilizar un accesorio adecuado
(por ejemplo, no utilice el batidor E3 para
amasar o mezclar masas, utilice en su
lugar la cuchilla E4). Para ello, consulte
las recomendaciones de las recetas y las
instrucciones de uso que se indican en este
manual de instrucciones.
Fuga a través de la tapa.
El volumen de ingredientes es
demasiado grande. Reduzca la cantidad de ingredientes
utilizados.
La tapa no está bien
colocada o bloqueada. Bloquee correctamente la tapa en el bol.
La junta de estanquidad
no está presente.
Coloque la junta de estanqueidad en el
soporte de junta y acople el conjunto a la
tapa.
La junta de estanqueidad está
cortada,
deteriorada.
Cambie la junta, póngase en contacto con
un centro de servicio autorizado.
Error de los accesorios. Asegúrese de que utiliza el accesorio
recomendado.
Fuga a través del eje de
transmisión desmontable
del bol.
La junta no está bien colocada. Coloque correctamente la junta.
La junta está deteriorada. Contacte con un centro de servicio técnico
autorizado.
El anillo de bloqueo (C5) está mal
bloqueado. Bloquee correctamente el anillo (C5).
Las hojas no giran
con facilidad.
Trozos de alimentos demasiado
grandes
o demasiado duros.
Reduzca el tamaño o la cantidad de los
ingredientes utilizados.
Añada líquido.
Olor a motor.
Al utilizar el aparato por primera
vez, o bien en caso de sobrecarga de
motor causada por una cantidad
de ingredientes excesiva o por unos
trozos demasiado duros o demasiado
grandes.
Deje que se enfríe el motor (unos 30
minutos) y reduzca la cantidad de
ingredientes que hay en el bol.
Se muestra un mensaje
de seguridad
n m
n m
n m
n m
n m
n m
n m
n m
Cierre defectuoso del bol o de la tapa
Antes de poner en funcionamiento el aparato,
compruebe si el bol está correctamente
bloqueado en el bloque motor y si la tapa
está correctamente bloqueada en el bol. Si el
problema persiste, póngase en contacto con
un centro de servicio autorizado.
La tapa está bloqueada en el bol en
modo «cocción sin tapa»
Desbloquee la tapa antes de iniciar el
programa de cocción. Si el problema
persiste, póngase en contacto con un centro
de servicio autorizado.

160 161
ESES ¿Su aparato sigue sin funcionar?
Diríjase a un centro de servicio autorizado (consulte la lista en el manual de servicio técnico).
• Desecho de los materiales del embalaje y del aparato
El embalaje incluye únicamente materiales que no son perjudiciales para el medio ambiente
y que pueden desecharse conforme a las disposiciones vigentes en materia de reciclaje.
Para desechar el aparato, consulte a la empresa de recogida de basuras de su municipio.
• Productos electrónicos o eléctricos al final de su vida útil:
¡Juntos podemos contribuir a proteger el medio ambiente!
Su aparato incluye numerosos materiales recuperables o reciclables.
Llévelo a un centro de recogida selectiva para que sea tratado adecuadamente.
RECICLAJE
*La marca y los logotipos de Bluetooth
®
son marcas registradas de Bluetooth SIG, Inc. y su uso por parte del Grupo SEB ha recibido una autorización.
Google Play y Android son marcas de Google Inc.
Apple y el logotipo de Apple son marcas de Apple Inc. registradas en Estados Unidos y en otros países. App Store es una marca de servicio de Apple Inc.
GLOSARIO
Emparejar: acción consistente en agrupar o asociar dos aparatos.
Esta acción se realiza durante la primera conexión entre su smartphone o tableta e i-Companion touch xl.
Sincronizar: acción consistente en actualizar información. La aplicación e i-Companion touch xl se sincronizan para intercambiar
información cuando están conectados.
Conectar: establecer un enlace entre la aplicación (smartphone/tableta) y el aparato (i-Companion touch xl). Esta acción es
indispensable para la sincronización.
Cookies: información de uso que se envía a Moulinex para mejorar la aplicación.
PROBLEMAS CAUSAS SOLUCIONES
La seguridad de bloqueo
de la tapa se ha mantenido
activa (varilla salida) y no
permite bloquear la tapa.
El aparato se ha apagado durante
la receta al mover el interruptor
I/O a la posición O, o simplemente
se ha desconectado durante la
receta.
Para reiniciar el robot y, por tanto,
restablecer la seguridad de bloqueo de la
tapa, basta con mover el interruptor I/O a la
posición I; la varilla regresa automáticamente
a su posición original. Ahora puede bloquear
la tapa.
Mensaje de error de
seguridad Rotor bloqueado
Vacíe el bol, deje que se enfríe e
inténtelo de nuevo. Si el problema persiste,
póngase en contacto con el servicio
posventa.
Mensaje de error ERR39 Sobrecalentamiento del bol
Se necesita una pausa… Deje
que se enfríe el bol. Si el problema persiste,
póngase en contacto con el servicio
posventa.
Mensaje de error de
seguridad Sobrecalentamiento del motor Deje que se enfríe el robot durante 30 min y
reduzca la cantidad de ingredientes en el bol.
Mensaje de error de
seguridad Inestabilidad del robot
El robot se ha detenido porque ha detectado
una
inestabilidad. Pruebe a reducir la
cantidad de ingredientes en el bol
ERR34, ERR21, ERR22 Su Companion ha estado expuesto
a demasiado
calor...
Desenchufe el aparato y
póngase en contacto con el servicio
posventa.
ERR 31 Imposible bloquear la tapa Póngase en contacto con el servicio
posventa.
ERR35 Su Companion no está en
condiciones...
Necesita una pequeña pausa...
Desenchufe y vuelva a enchufar el aparato.
Si el problema persiste, póngase en contacto
con su
centro de atención posventa.
ERR37, ERR03, ERR01
Su Companion no está en
condiciones...
Póngase en contacto con el servicio
posventa.
ERR23 Su Companion ha estado expuesto
a mucho
calor...
Póngase en contacto con el servicio
posventa.
ERR02, ERR30 Problema de conexión
Su Companion no consigue
comunicarse por Wi-Fi... Desenchúfelo y
vuelva a enchufarlo. Si el problema
persiste, póngase en contacto con el centro
de atención posventa.
Símbolo El producto no está conectado a la
red Wi-Fi.
Compruebe su red Wi-Fi o desenchufe y
vuelva a enchufar el aparato. Si el problema
persiste, póngase en contacto con el centro
de atención posventa.
Símbolo El producto se está conectando a la
red Wi-Fi. Espere hasta que aparezca el icono
UI-1, UI-3 Su producto tiene dificultades para
cargar algunos datos en Wi-Fi
Si el problema se repite, significa que la
señal Wi-Fi que recibe puede ser demasiado
débil. Puede probar a aproximar el aparato y
el router o instalar un repetidor Wi-Fi cerca
del aparato para mejorar la calidad de la
señal.
UI-2, UI-4, UI-5, UI-6 Su producto tiene dificultades para
recuperar algunos datos locales o
en la red Wi-Fi
Si su producto no está conectado, puede
intentar conectarlo e iniciar una sincronización
de datos. Si su producto está conectado,
intente mejorar la calidad de la señal (véase la
línea anterior).

RURU
162 163
ŒůžŴŧƆŨŬŮŵŶŧŸŴŵŸŹƃ
ȧŖŬŷŬūŶŬŷũƂųůŸŶŵŲƃŮŵũŧŴůŬų
ŶŷůŨŵŷŧ ũŴůųŧŹŬŲƃŴŵ ŶŷŵžŹůŹŬ
ůŴŸŹŷźűŽůƅ Ŷŵ ƄűŸŶŲźŧŹŧŽůů ů
żŷŧŴůŹŬ ŬŬ ũ ŨŬŮŵŶŧŸŴŵų ųŬŸŹŬ
ŔŬŸŵŨŲƅūŬŴůŬ ůŴŸŹŷźűŽůŰ Ŷŷů
ůŸŶŵŲƃ ŮŵũŧŴů ů ŵŸũŵŨ ŵŭūŧŬ Ź
ŶŷŵůŮũŵūůŹŬŲƆ ŵŹ űŧűŵŰŲůŨŵ
ŵŹũŬŹŸŹũŬŴŴŵŸŹů
ȧʼnŸŬŪūŧŵŹŸŵŬūůŴƆŰŹŬŶŷůŨŵŷŵŹ
ůŸŹŵžŴůűŧŶůŹŧŴůƆŬŸŲůŵŸŹŧũŲƆŬŹŬ
ŬŪŵŨŬŮŶŷůŸųŵŹŷŧŧŹŧűŭŬŶŬŷŬū
ŸŨŵŷűŵŰŷŧŮŨŵŷűŵŰůŲůŵžůŸŹűŵŰ
ŔŬŶŵŮũŵŲƆŰŹŬūŬŹƆųŶŵŲƃŮŵũŧŹƃŸƆ
ŶŷůŨŵŷŵųŨŬŮŶŷůŸųŵŹŷŧ
ȧŋŧŴŴƂŰŶŷůŨŵŷŴŬŶŷŬūŴŧŮŴŧžŬŴ
ūŲƆůŸŶŵŲƃŮŵũŧŴůƆūŬŹƃųůŜŷŧŴůŹŬ
ŶŷůŨŵŷůűŧŨŬŲƃũŴŬūŵŸŹźŶŴŵųūŲƆ
ūŬŹŬŰųŬŸŹŬ
ȧ ŤűŸŶŲźŧŹŧŽůƆŶŷůŨŵŷŧŲůŽŧųů
ũűŲƅžŧƆūŬŹŬŰŸŵŪŷŧŴůžŬŴŴƂųů
ŻůŮůžŬŸűůųů ŸŬŴŸŵŷŴƂųů ůŲů
źųŸŹũŬŴŴƂųů ŸŶŵŸŵŨŴŵŸŹƆųů ŧ
ŹŧűŭŬŲůŽŧųůűŵŹŵŷƂŬŴŬŵŨŲŧūŧƅŹ
ūŵŸŹŧŹŵžŴƂųŵŶƂŹŵųůŮŴŧŴůƆųů
ūŵŶźŸűŧŬŹŸƆŹŵŲƃűŵŶŷůźŸŲŵũůůžŹŵ
ŵŴůŴŧżŵūƆŹŸƆŶŵūŴŧŨŲƅūŬŴůŬų
ůŲů ŨƂŲů ŵŨźžŬŴƂ ŶŷŧũůŲŧų
ůŸŶŵŲƃŮŵũŧŴůƆ ŶŷůŨŵŷŧ ŲůŽŵų
ŵŹũŬŹŸŹũŬŴŴƂųŮŧůżŨŬŮŵŶŧŸŴŵŸŹƃ
ŔŬ ŶŵŮũŵŲƆŰŹŬ ūŬŹƆų ůŪŷŧŹƃ Ÿ
ŶŷůŨŵŷŵų
ȧŜŷŧŴůŹŬŶŷůŨŵŷũŴŬūŵŸŹźŶŴŵų
ūŲƆūŬŹŬŰųŬŸŹŬ
ȧ ŖŷůůŸŶŵŲƃŮŵũŧŴůů
ŶŷůŨŵŷŧ ŴŬűŵŹŵŷƂŬ
ū Ŭ Ź ŧ Ų ů Ÿ ů Ų ƃ Ŵ ŵ
ŴŧŪŷŬũŧƅŹŸƆ ŸŬűŽůů
žŧſů ů ŷŬŪźŲ ƆŹŵŷŧ Ŷŧŷŧ ůŮ
ŴŬŷŭŧũŬƅƀŬŰŸŹŧŲůŸƁŬųŴƂŰũŧŲ
ŶŷůũŵūŧŶŷŵŮŷŧžŴƂŬžŧŸŹůűŷƂſűů
ųŬŹŧŲŲůžŬŸűůŬūŬŹŧŲůŶŵūžŧſŬŰ
űŵŷŮůŴŧ ŤŹŵ ųŵŭŬŹ ŶŷůũŬŸŹů ű
ŵŭŵŪŧųŖŷůƄűŸŶŲźŧŹŧŽůůŶŷůŨŵŷŧ
ŶŷůűŧŸŧŰŹŬŸƃ ű ůŮŵŲůŷŵũŧŴŴƂų
ŶŲŧŸŹůűŵũƂų žŧŸŹƆų ŷźžűŧų
ŶŷůũŵūŴŵųźŨŲŵűź
ȧ ʼnŵ ũŷŬųƆ ŷŧŨŵŹƂ ŶŷůŨŵŷŧ
ŵŹűŷƂŹƂŬ ŶŵũŬŷżŴŵŸŹů ųŵŪźŹ
ŸůŲƃŴŵŴŧŪŷŬũŧŹƃŸƆ
ȧŤŹŵŹŶŷůŨŵŷŴŬŶŷŬūŴŧŮŴŧžŬŴūŲƆ
źŶŷŧũŲŬŴůƆŶŵŸŷŬūŸŹũŵųũŴŬſŴŬŪŵ
ŹŧŰųŬŷŧůŲůŴŬŮŧũůŸůųŵŰŸůŸŹŬųƂ
ūůŸŹŧŴŽůŵŴŴŵŪŵźŶŷŧũŲŬŴůƆ
ȧŔŬůŸŶŵŲƃٟۏŬŶŷůŨŵŷũŸŲźžŧŬ
ŴŬůŸŶŷŧũŴŵŸŹůůŲůŶŵũŷŬŭūŬŴůƆ
ŧŹŧűŭŬŶŷůŴŧŲůžůůŶŵũŷŬŭūŬŴůŰ
űŧŨŬŲƆ ůŲů ũůŲűů ŶůŹŧŴůƆ ʼnŵ
ůŮŨŬŭŧŴůŬ ŵŶŧŸŴŵŸŹů űŧŨŬŲƃ
ŶůŹŧŴůƆŴŬŵŨżŵūůųŵ ŮŧųŬŴůŹƃũ
ŧũŹŵŷůŮŵũŧŴŴŵųŸŬŷũůŸŴŵųŽŬŴŹŷŬ
ŸųŸŶůŸŵűũŸŬŷũůŸŴŵŰűŴůŭűŬ
ȧŎŧŶŷŬƀŧŬŹŸƆŶŵŪŷźŭŧŹƃŶŷůŨŵŷ
ũũŵūźŔŬŶŵųŬƀŧŰŹŬŶŷůũŵūŴŵŰ
ŨŲŵű$ŶŵūŶŷŵŹŵžŴźƅũŵūź
ȧŋŧŴŴƂŰ ŶŷůŨŵŷ ŶŷŬūŴŧŮŴŧžŬŴ
ůŸűŲƅžůŹŬŲƃŴŵūŲƆůŸŶŵŲƃŮŵũŧŴůƆ
ũūŵųŧſŴůżŶŵųŬƀŬŴůƆżŴŧũƂŸŵŹŬ
ŏŔŘřŗŚőŝŏŏŖŕřŌŜŔŏőŌňŌŎŕŖŇŘŔŕŘřŏ
ųŬŴŬŬbųŖŷŵůŮũŵūůŹŬŲƃŴŬ
ŴŬŸŬŹŵŹũŬŹŸŹũŬŴŴŵŸŹůůŵŸŹŧũŲƆŬŹ
Ůŧ ŸŵŨŵŰ Ŷŷŧũŵ ŧŴŴźŲůŷŵũŧŹƃ
ŪŧŷŧŴŹůƅũŸŲźžŧŬűŵųųŬŷžŬŸűŵŪŵ
ůŲůŴŬŴŧūŲŬŭŧƀŬŪŵůŸŶŵŲƃŮŵũŧŴůƆ
ŧŹŧűŭŬ ũ ŸŲźžŧŬ ŴŬŸŵŨŲƅūŬŴůƆ
ůŴŸŹŷźűŽůŰ
ȧ ŖŷůŨŵŷ ŴŬ ŶŷŬūŴŧŮŴŧžŬŴ ūŲƆ
ůŸŶŵŲƃŮŵũŧŴůƆ ũ ŸŲŬūźƅƀůż
ŸŲźžŧƆż Ŵŧ űŵŹŵŷƂŬŪŧŷŧŴŹůƆ ŴŬ
ŷŧŸŶŷŵŸŹŷŧŴƆŬŹŸƆ
ũ űźżŵŴŴƂż ŮŵŴŧż ųŧŪŧŮůŴŵũ
ŵŻů Ÿŵ ũ ů ūŷź Ū ůż ŷ ŧ Ũŵ ž ůż
ŶŵųŬƀŬŴůƆż
ũűŵųŴŧŹŧżŵŹūƂżŧūŲƆŶŬŷŸŵŴŧŲŧ
ũ ųŧŪŧŮůŴŧż ŵŻůŸŧż ů ūŷźŪůż
ŶŷŵŻŬŸŸůŵŴŧŲƃŴƂżŶŵųŬƀŬŴůƆż
ŴŧŻŬŷųŧż
ŶŵŸŹŵƆŲƃŽŧųů ŵŹŬŲŬŰ ųŵŹŬŲŬŰ
ů ůŴƂż űŵųųŬŷžŬŸűůż ŭůŲƂż
ŶŵųŬƀŬŴůŰ
ũųůŴůŪŵŸŹůŴůŽŧż
ŖŗŌŋŚŖŗŌōŋŌŔŏŌ
ŖŷůŨŵŷ ũƂŶźŸűŧŬŹ
Ŷŧŷ űŵŹŵŷƂŰ ųŵŭŬŹ
ũƂŮũŧŹƃŵŭŵŪů
ŕŨŷ ŧƀŧŰŹŬŸƃ Ÿ űŷ ƂſűŵŰ Ÿ
ŵŸŹŵŷŵŭŴŵŸŹƃƅ ũŮƆũ Ůŧ ŷźžűů
ůŲůŷŬŪźŲƆŹŵŷŶŧŷŧũŶŬŷžŧŹűŧż
ůŲůŸŶŵųŵƀƃƅŶŷůżũŧŹűůŖŷů
ŵŨŷŧƀŬŴůůŸűŷƂſűŵŰūŬŷŭůŹŬŸƃ
ŮŧŬŬŽŬŴŹŷŧŲƃŴźƅžŧŸŹƃ
ȧŔŬ ũűŲƅžŧŰŹŬ ŶŷůŨŵŷ ŬŸŲů
ź Ŷ Ų ŵ Ź Ŵ ů Ź ŬŲ ƃ ź Ÿ Ź ŧ Ŵ ŵ ũ Ų Ŭ Ŵ
ŴŬŶŷŧũůŲƃŴŵũūŬŷŭŧŹŬŲŬůůŲů
ŬŸŲůźŶŲŵŹŴůŹŬŲƃŴŬŶŷŧũůŲƃŴŵ
źŸŹŧŴŵũŲŬŴ ũ űŷƂſűŬ ŋŲƆ
űŵŷŷŬűŹŴŵŰ ŷŧŨŵŹƂ ŶŷůŨŵŷŧ
ŷŬŪźŲƆŹŵŷ Ŷŧŷŧ ūŵŲŭŬŴ ŨƂŹƃ
źŸŹŧŴŵũŲŬŴũŵŹũŬŷŸŹůŬűŷƂſűů
Ůŧ ůŸűŲƅžŬŴůŬų ŹŬż ŸŲźžŧŬũ
űŵŪūŧ ŸźƀŬŸŹũźƅŹ ŵŸŵŨƂŬ
ůŴŸŹŷźűŽůů ŶŵŶŷůŪŵŹŵũŲŬŴůƅ
ŷŬŽŬŶŹŧ
ŖŗŌŋŚŖŗŌōŋŌŔŏŌ
Ŕ Ŭ Ŷ ŷ ŧ ũ ů Ų ƃ Ŵ ŵ Ŭ
ů Ÿ Ŷ ŵ Ų ƃ Ů ŵ ũ ŧ Ŵ ů Ŭ
Ŷ ŷ ů Ũ ŵ ŷ ŧ ų ŵ ŭ Ŭ Ź
ŶŷůũŬŸŹůűŹŷŧũųŧų
ŕžůƀŧŰŹŬŴŵŭūŲƆůŮųŬŲƃžŬŴůƆ
8OWUDEODGH ( ů ŴŧŸŧūűź ūŲƆ
ŮŧųŬſůũŧŴůƆůŮųŬŲƃžŬŴůƆ (
ŧŹŧűŭŬůŮũŲŬűŧŰŹŬŶŷŵūźűŹƂůŮ
žŧſů Ÿ ŵŸŹŵŷŵŭŴŵŸŹƃƅ ŲŬŮũůƆ
ŴŵŭŬŰŵžŬŴƃŵŸŹŷƂŬ
ʼn Ÿ Ŭ Ūū ŧ ż ŷ ŧ Ŵ ů Ź Ŭ Ŵ ŵ ŭ ū Ų Ɔ
ůŮųŬŲƃžŬŴůƆ8OWUDEODGH(ũžŧſŬ
ŶŵŸŲŬůŸŶŵŲƃŮŵũŧŴůƆ
ȧňźūƃŹŬŵŸŹŵŷŵŭŴƂŶŷůŴŧŲůũŧŴůů
ŪŵŷƆžŬŰ ŭůūűŵŸŹů ũ źųŴƂŰ
űźżŵŴŴƂŰ űŵųŨŧŰŴ ŶŵŸűŵŲƃűź
ůŮŮŧ ŷŬŮűŵŪŵ ŮŧűůŶŧŴůƆ ŵŴŧ
ųŵŭŬŹũƂŲůŹƃŸƆůŮŶŷůŨŵŷŧ

RURU
164 165
ŖŗŌŋŚŖŗŌōŋŌŔŏŌŘŵŨŲƅūŧŰŹŬ
ŵŸŹŵŷŵŭŴŵŸŹƃ Ŷŷů ŵŨŷŧƀŬŴůů Ÿ
ŶŷůŨŵŷŵųŵžůŸŹűŧŮŧŶŵŲŴŬŴůŬů
ŴŧŲůũŧŴůŬŖŵųŴůŹŬŴŧŷŧŮƁŬųƂ
ŴŬūŵŲŭŴŧŶŵŶŧūŧŹƃŭůūűŵŸŹƃ
ŖŗŌŋŚŖŗŌōŋŌŔŏŌ ŔŬűŵŹŵŷƂŬ
ŶŷŵūźűŹƂ ũ ŵŨŵŲŵžűŬ ŸŵŸůŸűů
ƆŮƂűŶŹůŽŧůűŷźŶŴƂŬűźŸűůųƆŸŧ
ųŵŪźŹŶŷŵůŮũŵūůŹƃŨŷƂŮŪůůŮŮŧ
ŮŧűůŶŧŴůƆũŴźŹŷŬŴŴůżŭůūűŵŸŹŬŰ
ŖŵƄŹŵųźŷŬűŵųŬŴūźŬŹŸƆŶŷŵűŵŲŵŹƃ
ůżŶŬŷŬūŶŷůŪŵŹŵũŲŬŴůŬųŴŵŭŵų
ůŲůũůŲűŵŰ
ŖŗŌŋŚŖŗŌōŋŌŔŏŌŖŵũŬŷżŴŵŸŹƃ
ŴŧŪŷŬũŧŹŬ Ų ƃ Ŵ ŵ Ū ŵ Ƅ Ų Ŭ ų Ŭ Ŵ Ź ŧ
ŸŵżŷŧŴƆŬŹŵŸŹŧŹŵžŴŵŬŹŬŶŲŵŶŵŸŲŬ
ůŸŶŵŲƃŮŵũŧŴůƆ
ʼnŵũŷŬųƆŴŧŪŷŬũŧŶŷůŨŵŷŧůūŵ
ŶŵŲŴŵŪŵŵŸŹƂũŧŴůƆūŬŷŭůŹŬŬŪŵ
ŹŵŲƃűŵ Ůŧ ŷźžűů ŻůűŸŧŹŵŷƂ&
ŷźžűŧűŷƂſűů'ůŷŬŪźŲƆŹŵŷŶŧŷŧ
'
ȧ ŖŵŷƆūŵű ũƂŨŵŷŧ ŸűŵŷŵŸŹů
ů ũŷŬųŬŴů ŷŧŨŵŹƂ ūŲƆ ũŸŬż
ŧűŸŬŸŸźŧŷŵũůŶŷŵŪŷŧųųŶŷůũŬūŬŴ
ũůŴŸŹŷźűŽůůŶŵƄűŸŶŲźŧŹŧŽůů
ŖŵūŷŵŨŴƂŬŸũŬūŬŴůƆŵŸŨŵŷűŬů
źŸŹŧŴŵũűŬŧűŸŬŸŸźŧŷŵũŶŷůũŬūŬŴƂ
ũůŴŸŹŷźűŽůůŶŵƄűŸŶŲźŧŹŧŽůů
ŖŵūŷŵŨŴƂŬ ŸũŬūŬŴůƆ ŵ žůŸŹűŬ
ů ŵ Ũ ŸŲ ź ŭ ůũ ŧ Ŵ ů ů Ŷ ŷ ů Ũŵ ŷ ŧ
ŶŷůũŬūŬŴƂ ũ ůŴŸŹŷźűŽůů Ŷŵ
ƄűŸŶŲźŧŹŧŽůů
ŖŷůŵžůŸŹűŬŶŷůŨŵŷŧŸŲŬūźŰŹŬ
ůŴŸŹŷźűŽůƆų
ȧ ŕ Ź Ÿŵ Ŭ ū ů Ŵ ů Ź Ŭ Ŷ ŷ ů Ũ ŵ ŷ ŵ Ź
ƄŲŬűŹŷŵŸŬŹů
ȧʼnƂŶŵŲŴƆŰŹŬ ŵžůŸŹűź ŶŷůŨŵŷŧ
ŹŵŲƃűŵŶŵŸŲŬŬŪŵŵŸŹƂũŧŴůƆ
ȧŋŲƆŵžůŸŹűůůŸŶŵŲƃٟۏŬũŲŧŭŴźƅ
ŹűŧŴƃůŲůŪźŨűź
ȧŔŬŸŹŧũƃŹŬŶŷůŨŵŷũũŵūźůŲůŶŵū
ŸŹŷźƅũŵūƂ
řŕŒţőŕ ŋŒŦ ŌʼnŗŕŖŌŐŘőŏŜ
ŗŢŔőŕʼn
ȧŜŷŧŴůŹŬŶŷůŨŵŷůűŧŨŬŲƃŶůŹŧŴůƆ
ũųŬŸŹŬŴŬūŵŸŹźŶŴŵųūŲƆūŬŹŬŰ
ųŲŧūſŬ b ŲŬŹ ŔŬ ŶŵŮũŵŲƆŰŹŬ
ūŬŹƆųůŪŷŧŹƃŸŶŷůŨŵŷŵų
ȧŤűŸŶŲźŧŹŧŽůƆ ŶŷůŨŵŷŧŲůŽŧųů
ŸŵŪŷŧŴůžŬŴŴƂųůŻůŮůžŬŸűůųů
ŸŬŴŸŵŷŴƂųů ůŲů źųŸŹũŬŴŴƂųů
ŸŶŵŸŵŨŴŵŸŹƆųůŧŹŧűŭŬŲůŽŧųů
űŵŹŵŷƂŬŴŬŵŨŲŧūŧƅŹūŵŸŹŧŹŵžŴƂų
ŵŶƂŹŵųůŮŴŧŴůƆųůūŵŶźŸűŧŬŹŸƆ
ŹŵŲƃűŵ Ŷŷů źŸŲŵũůů žŹŵ ŵŴů
ŴŧżŵūƆŹŸƆ Ŷŵū ŴŧŨŲƅūŬŴůŬų
ůŲů ŶŵŲźžůŲů ůŴŸŹŷźűŽůů Ŷŵ
ŨŬŮŵŶŧŸŴŵųź ůŸŶŵŲƃŮŵũŧŴůƅ
ŶŷůŨŵŷŧůŵŸŵŮŴŧƅŹũŵŮųŵŭŴźƅ
ŵŶŧŸŴŵŸŹƃ
ȧŋ ŧ Ŵ Ŵ Ƃ Ű Ŷ ŷ ů Ũ ŵ ŷ ų ŵ ŭ Ŭ Ź
ůŸŶŵŲƃŮŵũŧŹƃŸƆūŬŹƃųůŸŹŧŷſŬ
ŲŬŹ Ŷŷů źŸŲŵũůů žŹŵ ŵŴů
ŴŧżŵūƆŹŸƆ Ŷŵū ŶŷůŸųŵŹŷŵų
ůŲ ů ŶŵŲ ź žů Ų ů ů Ŵ ŸŹ ŷźű Ž ůů
Ŷŵ ƄűŸŶŲźŧŹŧŽůů ŶŷůŨŵŷŧ ũ
ŶŵŲŴŵų ŵŨƁŬųŬ ů ŶŵŲŴŵŸŹƃƅ
ŵŸŵŮŴŧƅŹ ŷůŸűů ŸũƆŮŧŴŴƂŬ Ÿ
ůŸŶŵŲƃŮŵũŧŴůŬųŶŷůŨŵŷŧŋŬŹů
ŴŬ ūŵŲŭŴƂ ũƂŶŵŲŴƆŹƃ ŵžůŸŹűź
ů ŹŬżŴůžŬŸűŵŬ ŵŨŸŲźŭůũŧŴůŬ
ŶŷůŨŵŷŧŨŬŮŶŷůŸųŵŹŷŧŬŸŲůŵŴů
ŴŬŸŹŧŷſŬŲŬŹůŴŬŴŧżŵūƆŹŸƆ
ŶŵūŶŷůŸųŵŹŷŵųũŮŷŵŸŲƂż
ŖŵūűŲƅžŬŴůŬűƄŲŬűŹŷŵŸŬŹů
ȧŖŷůŨŵŷūŵŲŭŬŴŨƂŹƃŶŵūűŲƅžŬŴ
ű ŮŧŮŬųŲŬŴŴŵŰ ƄŲŬűŹŷůžŬŸűŵŰ
ŷŵŮŬŹűŬ
ȧŖŷůŨŵŷ ŶŷŬūŴŧŮŴŧžŬŴ ŹŵŲƃűŵ
ūŲƆŷŧŨŵŹƂũŸŬŹůŶŬŷŬųŬŴŴŵŪŵ
ŹŵűŧŚŨŬūůŹŬŸƃžŹŵŴŧŶŷƆŭŬŴůŬ
ƄŲŬű Ź ŷ ŵŸŬ Źů Ÿŵ ŵŹ ũ ŬŹŸŹ ũ źŬŹ
ŴŧŶŷƆŭŬŴůƅ źűŧŮŧŴŴŵųź Ŵŧ
ůūŬŴŹůŻůűŧŽůŵŴŴŵŰ ŹŧŨŲůžűŬ
ŶŷůŨŵŷŧ
ȧŔŬŶŷŧũůŲƃŴŵŬ ŶŵūűŲƅžŬŴůŬ
ŶŷůŨŵŷŧűƄŲŬűŹŷŵŸŬŹůŶŷůũŵūůŹ
űŶŵŹŬŷŬŪŧŷŧŴŹůů
ȧŔŬ ŹƆŴůŹŬ Ůŧ űŧŨŬŲƃ ŶůŹŧŴůƆ
ūŲƆ ŵŹűŲƅžŬŴůƆ ŶŷůŨŵŷŧ ŵŹ
ƄŲŬűŹŷŵŸŬŹů
ȧŔŬ ŶŵŪŷźŭŧŰŹŬ ŶŷůŨŵŷ űŧŨŬŲƃ
ŶůŹŧŴůƆůŲůƄŲŬűŹŷŵũůŲűźũũŵūź
ŔŬŷŧŮųŬƀŧŰŹŬűŧŨŬŲƃŶůŹŧŴůƆ
ůŲůũůŲűźũŨŲůŮůůŲůũűŵŴŹŧűŹŬ
Ÿ ŹŬŶŲŵŶŷŵũŵūƆƀůųů žŧŸŹƆųů
ŶŷůŨŵŷŧ ŷƆūŵų Ÿ ůŸŹŵžŴůűŵų
ŹŬŶŲŧůŲůŴŧŵŸŹŷƂżűŷŧƆż
ŔŬŶŷŧũůŲƃŴŵŬůŸŶŵŲƃŮŵũŧŴůŬ
ȧŔŬ ŶŷůűŧŸŧŰŹŬŸƃ ű űŷƂſűŬ
ū ŵ Ŷ ŵ Ų Ŵ ŵ Ū ŵ Ŷ ŷ Ŭ ű ŷ ŧ ƀ Ŭ Ŵ ů Ɔ
ŷ ŧ Ũ ŵ Ź Ƃ Ŷ ŷ ů Ũ ŵ ŷ ŧ ű Ŵ ŵ Ŷ ű ŧ
m ŘŹ ŵ Ŷ } ū ŵ ŭ ū ů Ź Ŭ Ÿ ƃ Ŷ ŵ ű ŧ
ŶŬŷŬųŬſůũŧŬųƂŬůŴŪŷŬūůŬŴŹƂ
ŶŬŷŬŸŹŧŴźŹūũůŪŧŹƃŸƆ
ȧŖŬŷŬū ūŵŨŧũŲŬŴůŬų ŭůūűůż
ůŴŪŷŬūůŬŴŹŵũ ũŸŬŪūŧ ŸŴŧžŧŲŧ
ūŵŨŧũŲƆŰŹŬ ũ žŧſź ŹũŬŷūƂŬ
ůŴŪŷŬūůŬŴŹƂ Ÿų ŷůŸb ŴŬ
ŶŷŬũƂſŧŰŹŬŵŹųŬŹűźm0$;}Ŵŧ
ũŴźŹŷŬŴŴŬŰ ŸŹŵŷŵŴŬ žŧſů Ÿų
ŷůŸbŌŸŲůžŧſŧŶŬŷŬŶŵŲŴŬŴŧ
űůŶƆƀŧƆũŵūŧųŵŭŬŹũƂŲůŹƃŸƆ
ȧŖ ŷ ů ų Ŭ ž ŧ Ŵ ů Ŭ ʼn ŵ ũ ŷ Ŭ ų Ɔ
Ŷ ŷ ů Ū ŵ Ź ŵ ũ Ų Ŭ Ŵ ů Ɔ Ŵ ŧ Ŷ ŧ ŷ ź
ŴŬŵŨżŵūůųŵūŵŨŧũůŹƃbŲůŹŷŧ
ũŵūƂŸųŷůŸb
ȧʼnŵ ũŷŬųƆ ŷŧŨŵŹƂ ŶŷůŨŵŷŧ ŴŬ
ŵŶźŸűŧŰŹŬ ŶŧŲƃŽƂ ůŲů ūŷźŪůŬ
ŶŷŬūųŬŹƂũžŧſź
ȧŔŬůŸŶŵŲƃٟۏŬžŧſźũűŧžŬŸŹũŬ
űŵŴŹŬŰŴŬŷŧ ūŲƆ żŷŧŴŬŴůƆ
ŮŧųŵŷŵŮűůŸŹŬŷůŲůŮŧŽůů
ȧŚŸŹŧŴŵũůŹŬŶŷůŨŵŷŴŧźŸŹŵŰžůũźƅ
žůŸŹźƅ Ÿźżźƅ ů ŭŧŷŵŶŷŵžŴźƅ
ŷŧŨŵžźƅŶŵũŬŷżŴŵŸŹƃ
ȧŔŬźŸŹŧŴŧũŲůũŧŰŹŬŶŷůŨŵŷŷƆūŵų
ŸŵŸŹŬŴŵŰůŲůſűŧŻŵųŶŵŸűŵŲƃűź
ũƂŷŧŨŧŹƂũŧŬųƂŰŶŧŷųŵŭŬŹůż
ŶŵũŷŬūůŹƃ
ȧŔŬźŸŹŧŴŧũŲůũŧŰŹŬŶŷůŨŵŷŷƆūŵų
Ÿ ŷŧŨŵŹŧƅƀůų ůŸŹŵžŴůűŵų
ŹŬ Ŷ Ųŧ ũ ŧ ŷŵžŴ ŵ Ű ŶŧŴ ŬŲƃƅ
Ƅ Ų Ŭ ű Ź ŷ ů ž Ŭ Ÿ ű ů ų Ũ Ƃ Ź ŵ ũ Ƃ ų
ŶŷůŨŵŷŵųůŹbū
ȧŔŬ ŴŧűŷƂũŧŰŹŬűŷƂſűźŹűŧŴƃƅ
ůŲů ūŷźŪůų ŶŷŬūųŬŹŵų ů ŴŬ

RURU
166 167
ʼnƄŹŵŰŨŷŵſƅŷŬŸŵūŬŷŭŧŹŸƆŸŵũŬŹƂŶŵůŸŶŵŲƃŮŵũŧŴůƅŶŷůŨŵŷŧŶŷůŪŵŹŵũŲŬŴůŬ
ŸźŶŵũŷŧŪźŨŲƅūŴŧŶŧŷźŹŬŸŹŧũƂŶŬžűů
ŕŖŏŘŇŔŏŌŖŗŏňŕŗŇ
AŖŷůũŵūŴŵŰŨŲŵű
BŘŬŴŸŵŷŴƂŬűŲŧũůſů
%ŵŹųŬŴŧ
%ũŬŸƂũŮŧũůŸůųŵŸŹůŵŹųŵūŬŲů
B3(ŘřŇŗřŘřŕ Ŗ
%ũůūŬŵ
B5ŴŧŸŹŷŵŰűů
B6ŸŬŴŸŵŷŴƂŰƄűŷŧŴ
&ňŲŵűžŧſů
&žŧſŧůŮŴŬŷŭŧũŬƅƀŬŰŸŹŧŲů
&ŻůűŸŧŹŵŷƂ
&ŸƁŬųŴƂŰũŧŲŶŷůũŵūŧ
&źŶŲŵŹŴůŹŬŲƃŴŵŬűŵŲƃŽŵ
&ŸŹŵŶŵŷŴŵŬűŵŲƃŽŵũŧŲŧŶŷůũŵūŧ
'ňŲŵűűŷƂſűů
'ŷŬŪźŲƆŹŵŷŶŧŷŧ
'űŷƂſűŧ
'ūŬŷŭŧŹŬŲƃźŶŲŵŹŴůŹŬŲƆ
'źŶŲŵŹŴůŹŬŲƃŴŵŬűŵŲƃŽŵ
(ŇűŸŬŸŸźŧŷƂ
(őŵŴŹŬŰŴŬŷūŲƆżŷŧŴŬŴůƆŧűŸŬŸŸźŧŷŵũ
(ŴŵŭūŲƆůŮųŬŲƃžŬŴůƆ
(ųůűŸŬŷ
(ŴŧŸŧūűŧūŲƆũŮŨůũŧŴůƆ
(ŴŧŸŧūűŧūŲƆŮŧųŬſůũŧŴůƆ
ůŮųŬŲƃžŬŴůƆ
(ŶŧŷŵũŧƆűŵŷŮůŴŧ
FŒŵŶŧŹűŧ
GŖŬŷŬűŲƅžŧŹŬŲƃ,ūŲƆŵŹűŲƅžŬŴůƆ
ŶůŹŧŴůƆŶŷůŨŵŷŧ
HŠŬŹűŧūŲƆŵžůŸŹűů
řŌŜŔŏŞŌŘőŏŌŜŇŗŇőřŌŗŏŘřŏőŏŖŗŏňŕŗŇ
œŵƀŴŵŸŹƃ
bʼnŹbʼnŹŴŧŪŷŬũŧŹŬŲƃŴƂŰƄŲŬųŬŴŹbʼnŹūũůŪŧŹŬŲƃ
ŋůŧŶŧŮŵŴŹŬųŶŬŷŧŹźŷ ŵŹr&ūŵr&
ŗŬŪźŲůŷźŬŹŸƆŸſŧŪŵųr&
ŋůŧŶŧŮŵŴũŷŬųŬŴůŷŧŨŵŹƂ ŵŹbŸŬűźŴūūŵbžŧŸŵũ
ŗŬŪźŲůŷźŬŹŸƆŸſŧŪŵųbŸŬűźŴūųůŴůųźųūŵbųůŴųŧűŸůųźų
őŵŲůžŬŸŹũŵŸűŵŷŵŸŹŬŰ bŸűŵŷŵŸŹůŶŷŬŷƂũůŸŹŵŪŵŷŬŭůųŧ
ŸűŵŷŵŸŹƃbŸũűŲbŸũƂűŲ
ŸűŵŷŵŸŹƃbŸũűŲbŸũƂűŲ
bŶŵŸŲŬūŵũŧŹŬŲƃŴƂżŸűŵŷŵŸŹŬŰũŴŬŶŷŬŷƂũŴŵų
ŷŬŭůųŬŸűŵŷŵŸŹůŵŹūŵ
ųŧűŸŸűŵŷŵŸŹƃŶŷŬŷƂũůŸŹŵŪŵŷŬŭůųŧŸűŵŷŵŸŹƃ
ŞŧŸŹŵŹŧ ȝbœŊŽ
ųŧűŸůųŧŲƃŴŧƆŶŬŷŬūŧũŧŬųŧƆ
ųŵƀŴŵŸŹƃ būňų
ŗŬŭůųŵŭůūŧŴůƆ ŶŵŸŲŬbųůŴźŹŨŬŮūŬŰŸŹũůƆŶŷůŨŵŷŶŬŷŬżŵūůŹũ
ŷŬŭůųŵŭůūŧŴůƆ
ŞŹŵŨƂŸŴŵũŧũűŲƅžůŹƃŶŷůŨŵŷŴŧŭųůŹŬŵūŴźůŮ
ŸŬŴŸŵŷŴƂżűŲŧũůſ
%ȝ%
ŤŴŬŷŪŵŶŵŹŷŬŨŲŬŴůŬũŷŬŭůųŬŵŭůūŧŴůƆŶŷůŨŵŷ
ŶŵūűŲƅžŬŴűŸŬŹůbʼnŹž
ŎŴŧžűůŵŹŵŨŷŧŭŧƅŹŸƆŹŵŲƃűŵũŹŵųŸŲźžŧŬŬŸŲůŵŴůŴŬŵŨżŵūůųƂūŲƆŷŧŨŵŹƂŸŶŷůŨŵŷŵų
ŶƂŹŧŰŹŬŸƃŮŧűŷƂŹƃ ŵŹũŬŷŸŹůŬũ
űŷƂſűŬȞ ũŸŬŪūŧ ůŸŶŵŲƃٟۏŬ
űŵŲŶŧžŵűŷŬŪźŲƆŹŵŷŧŶŧŷŧ
ȧʼnŵũŷŬųƆŷŧŨŵŹƂŶŷůŨŵŷŧŸŲŬūůŹŬ
Ůŧ ŹŬų žŹŵŨƂ ũŵŲŵŸƂ ſŧŷŻ
ŪŧŲŸŹźűůŹbū ŴŬ ŴŧũůŸŧŲůŴŧū
žŧſŬŰ
ȧŔŬ ŶŵųŬƀŧŰŹŬ ŧűŸŬŸŸźŧŷƂ ũ
ųůűŷŵũŵŲŴŵũźƅŶŬžƃ
ȧŔŬ ůŸŶŵŲƃٟۏŬ ŶŷůŨŵŷ Ŵŧ
ŵŹűŷƂŹŵųũŵŮūźżŬ
ȧŔŬ ŶŷŬũƂſŧŰŹŬ ųŧűŸůųŧŲƃŴŵŬ
űŵŲůžŬŸŹũŵŶŷŵūźűŹŵũźűŧŮŧŴŴŵŬ
ũůŴŸŹŷźűŽůƆż
ȧŚŨůŷŧŰŹŬ ŶŷůŨŵŷ Ŵŧ żŷŧŴŬŴůŬ
ŶŵŸŲŬŵŸŹƂũŧŴůƆ
ȧŔ Ŭ Ŷ ŵ ų Ŭ ƀ ŧ Ű Ź Ŭ ž ŧ ſ ź ũ
ųŵŷŵŮůŲƃŴźƅ űŧųŬŷź ūŲƆ ŬŬ
ŵ żŲ ŧ ŭ ū Ŭ Ŵ ů Ɔ ů Ÿ Ŷ ŵ Ų ƃ Ů ź Ű Ź Ŭ
żŵŲŵūůŲƃŴźƅűŧųŬŷź
ȧŔŬŵŸŹŧũŲƆŰŹŬŲŵŶŧŹűźũ ųŧŸŲŬ
ŶŷůŹŬųŶŬŷŧŹźŷŬr&ūŵŲƃſŬ
bųůŴźŹ
ŖŕŘŒŌŖŗŕŋŇōŔŕŌŕňŘŒŚōŏʼnŇŔŏŌ
ȧʼnŽŬŲƆżŸŵŨŸŹũŬŴŴŵŰŨŬŮŵŶŧŸŴŵŸŹů
ŴŬ ůŸŶŵŲƃٟۏŬ ŧűŸŬŸŸźŧŷƂ
ŮŧŶŧ Ÿ Ŵ ƂŬ ž ŧ ŸŹ ů ŵŹŲů ž Ŵ ƂŬ
ŵŹ ŹŬż žŹŵ ŶŷŬūŵŸŹŧũŲƆƅŹŸƆ
ũ ŧũŹŵŷůŮŵũŧŴŴƂż ŽŬŴŹŷŧż
ŶŵŸŲŬŶŷŵūŧŭŴŵŪŵŵŨŸŲźŭůũŧŴůƆ
ȧŒƅŨƂŬŵŶŬŷŧŽůůűŷŵųŬŵžůŸŹűů
ůŲů ŶŲŧŴŵũŵŪŵ ŹŬżŴůžŬŸűŵŪŵ
ŵ Ũ Ÿ Ų ź ŭ ů ũ ŧ Ŵ ů Ɔ ū ŵ Ų ŭ Ŵ Ƃ
ũƂŶŵŲŴƆŹƃŸƆũŧũŹŵŷůŮŵũŧŴŴŵų
ŸŬŷũůŸŴŵųŽŬŴŹŷŬ
ȧŘų ŹŧŨŲůŽź mŞŹŵ ūŬŲŧŹƃ ŬŸŲů
ŶŷůŨŵŷ ŴŬ ŷŧŨŵŹŧŬŹ} ũ űŵŴŽŬ
ůŴŸŹŷźűŽůůŶŵƄűŸŶŲźŧŹŧŽůů
*RRJOH3OD\ů$QGURLGƆũŲƆƅŹŸƆŹŵũŧŷŴƂųůŮŴŧűŧųů*RRJOH,QF
$SSOHůŲŵŪŵŹůŶ$SSOHƆũŲƆƅŹŸƆŹŵũŧŷŴƂųůŮŴŧűŧųů$SSOH,QFŮŧŷŬŪůŸŹŷůŷŵũŧŴŴƂųůũŘşŇůūŷźŪůżŸŹŷŧŴŧż$SS6WRUHƆũŲƆŬŹŸƆŮŴŧűŵų
ŵŨŸŲźŭůũŧŴůƆűŵųŶŧŴůů$SSOH,QF

RURU
168 169
ʼnŇşŖŗŏňŕŗ
ʼnűŵųŶŲŬűŹŶŵŸŹŧũűůŶŷůŨŵŷŧũżŵūƆŹŸŲŬūźƅƀůŬŧűŸŬŸŸźŧŷƂ
ŤŹůŧűŸŬŸŸźŧŷƂŹŧűŭŬůųŬƅŹŮŵŴƂŮŧżũŧŹŧűŵŹŵŷƂŬŵŨŲŬŪžŧƅŹůżůŸŶŵŲƃŮŵũŧŴůŬũŵũŷŬųƆ
ŶŷůŪŵŹŵũŲŬŴůƆŷŬŽŬŶŹŧ
E1
ultrablade
ŘųŬſůũŧŴůŬŶŷůŶŷůŪŵŹŵũŲŬŴůůŸźŶŵũ
bųůŴ bŲ
ŘųŬſůũŧŴůŬŻŷźűŹŵũƂżŶƅŷŬ bŸŬű bűŪ
ŏŮųŬŲƃžŬŴůŬŵũŵƀŬŰ bŸŬű bűŪ
ŏŮųŬŲƃžŬŴůŬųƆŸŧ bŸŬű bűŪ
ŏŮųŬŲƃžŬŴůŬŷƂŨƂ bŸŬű bűŪ
bŔŬůŸŶŵŲƃٟۏŬƄŹŵŹŧűŸŬŸŸźŧŷūŲƆůŮųŬŲƃžŬŴůƆŹũŬŷūƂżŶŷŵūźűŹŵũůŸŶŵŲƃٟۏŬŴŧŸŧūűźūŲƆŮŧųŬſůũŧŴůƆůŮųŬŲƃžŬŴůƆ(
ŘųŬſůũŧŴůŬŶŷůŪŵŹŵũŲŬŴŴƂżŨŲƅūŨŬŮŶŵũŷŬŭūŬŴůƆůŴŪŷŬūůŬŴŹŵũ
ŖŷŬűŷŧŸŴŵŶŵūżŵūůŹūŲƆŵŨŭŧŷůũŧŴůƆũŴŧžŧŲŬŶŷůŪŵŹŵũŲŬŴůƆŷůŮŵŹŹŵŸźŶƂ
E2 ŕŨŭŧŷŬŴŴƂŬŨŲƅūŧ bųůŴ bŪ
řźſŬŴƂŬŨŲƅūŧ bųůŴ bŲ
ŗůŮŵŹŹŵ bųůŴ bűŪ
ŗŧŹŧŹźŰžŧŹŴůŨŲƅūŧůŮŨŵŨŵũƂżŴŧŸŹŷŵŰűůŸųŨźűŲŬŹŸŷŬŽŬŶŹŧųů
9 max
E3 ʼnŮŨůũŧŴůŬƆůžŴƂżŨŬŲűŵũ bųůŴ œŧűŸ
8
œŧŰŵŴŬŮũŮŨůŹƂŬŸŲůũűů bųůŴ bŲ
ŘŵźŸƂűŷŬųƂ - bųůŴ bŲ
őŧŷŹŵŻŬŲƃŴŵŬŶƅŷŬ - bųůŴ bŲ
ŖŵŲŬŴŹŧ - bųůŴ bŲ
E4
ŎŧųŬſůũŧŴůŬŹŬŸŹŧūŲƆŨŬŲŵŪŵ
żŲŬŨŧ
bųůŴ
bŸŬű bűŪ
ŎŧųŬſůũŧŴůŬŶŬŸŵžŴŵŪŵŹŬŸŹŧ
ŨůŸűũůŹŴŵŪŵŹŬŸŹŧŹŬŸŹŧūŲƆ
ŸŶŬŽůŧŲƃŴƂżŸŵŷŹŵũżŲŬŨŧ
bųůŴ
bŸŬű bűŪ
ŎŧųŬſůũŧŴůŬŸūŵŨŴŵŪŵŹŬŸŹŧ
ŨŷůŵſƃŷŵŭūŬŸŹũŬŴŸűůŰűŬűŸ
ůŶŷ
bųůŴ
bŸŬű
bųůŴ
bűŪ
ŘųŬſůũŧŴůŬŭůūűŵŪŵŹŬŸŹŧŸŲŬŪűŵŰ
ŹŬűŸŹźŷŵŰŸųŬŸƃūŲƆűŬűŸŵũůŹbū
bŸŬű
bųůŴ bűŪ
ŏŮųŬŲƃžŬŴůŬŵŷŬżŵũ bųůŴ bűŪ
ŏŮųŬŲƃžŬŴůŬŹũŬŷūƂż
ůŴŪŷŬūůŬŴŹŵũ bųůŴ bűŪ
ŋŷŵŨŲŬŴůŬŲƃūŧ bųůŴ 6 to
10
řŬŸŹŵūŲƆŨŲůŴŵũŹŬŸŹŵūŲƆũŧŻŬŲƃ
bųůŴ 1.5 Ų
ŷŬŪźŲƆŹŵŷŶŧŷŧ
ŗŬŪźŲƆŹŵŷŶŧŷŧ
0D[D ŶŷůŪŵŹŵũŲŬŴůŬŴŧŶŧŷź
0LQE ŷůŮŵŹŹŵƆůžŴƂŰŮŧũŧŷŴŵŰūŬŸŬŷŹŸŵźŸƂůŹbū
ŖŵŲŵŭŬŴůŬmPLQ}ŶŵŮũŵŲƆŬŹ
ŵŹũŵūůŹƃųŧűŸůųŧŲƃŴŵŬűŵŲůžŬŸŹũŵŶŧŷŧŵŨŬŸŶŬžůũŧƆ
ŵŶŹůųŧŲƃŴźƅűŵŴŸůŸŹŬŴŽůƅŨŲƅūůŸŵźŸŵũŷůŮŵŹŹŵƆůžŴƂŰŮŧũŧŷŴŵŰūŬŸŬŷŹŸŵźŸƂůŹbū
ʼnŶŵŲŵŭŬŴůůmPD[}ųŧűŸůųźųŸŵżŷŧŴƆŬŹŸƆųŧűŸůųŧŲƃŴŵŬűŵŲůžŬŸŹũŵŹŬŶŲŧů
ŶŧŷŧũžŧſŬūŲƆũŸŬżŷŬŭůųŵũŶŷůŪŵŹŵũŲŬŴůƆŸůŸŶŵŲƃŮŵũŧŴůŬųŶŧŷŧŸźŶƂůŹbū
ŤŹŧŴŧŸŹŷŵŰűŧŹŧűŭŬŶŵŮũŵŲƆŬŹŴŬūŵŶźŸűŧŹƃŷŧŮŨŷƂŮŪůũŧŴůƆũŵũŷŬųƆŸųŬſůũŧŴůƆ
ʼnŮŧũůŸůųŵŸŹů
ŵŹųŵūŬŲů
ŔŵŭūŲƆůŮųŬŲƃžŬŴůƆœůűŸŬŷ
ŔŧŸŧūűŧūŲƆũŮŨůũŧŴůƆ
ŔŧŸŧūűŧūŲƆŮŧųŬſůũŧŴůƆůŮųŬŲƃžŬŴůƆ
ŖŧŷŵũŧƆ
űŵŷŮůŴŧ
ŚűŧŮŧŴŴŵŬũŷŬųƆŶŷůŪŵŹŵũŲŬŴůƆũŶŧŷŵũŵŰűŵŷŮůŴŬƆũŲƆŬŹŸƆŵŷůŬŴŹůŷŵųbȞũŨŵŲƃſůŴŸŹũŬ
ŸŲźžŧŬũŵŴŵƆũŲƆŬŹŸƆŴŧūŬŭŴƂųůŴūůűŧŹŵŷŵųũŷŬųŬŴůŶŷůŪŵŹŵũŲŬŴůƆŕūŴŧűŵŴŧũŷŬųƆ
ŶŷůŪŵŹŵũŲŬŴůƆũŲůƆƅŹŵŶŷŬūŬŲŬŴŴƂŬŻŧűŹŵŷƂŷŧŮųŬŷŵũŵƀŬŰŴŧŷŬŮŧŴŴƂżůŲůŽŬŲƂż
űŵŲůžŬŸŹũŵůŴŪŷŬūůŬŴŹŵũũűŵŷŮůŴŬŸŵŷŹůŸŹŬŶŬŴƃŸŵŮŷŬũŧŴůƆŵũŵƀŬŰűŵŲůžŬŸŹũŵũŵūƂ
ũžŧſŬūŵŲŭŴŵŸŵŵŹũŬŹŸŹũŵũŧŹƃŵŹųŬŹűŬbŲŚŨŬūůŹŬŸƃžŹŵŷŬŪźŲƆŹŵŷŶŧŷŧŶŵũŬŷŴźŹ
ũ ŴŧŶŷŧũŲŬŴůů mPD[} D ŌŸŲů ŶŷŵūźűŹƂ ŴŬ ŶŷůŪŵŹŵũŲŬŴƂ ūŵŲŭŴƂų ŵŨŷŧŮŵų ųŵŭŴŵ
ūŵŨŧũůŹƃũŷŬųƆŶŷůŪŵŹŵũŲŬŴůƆ
E5
ŖŷůŪŵŹŵũŲŬŴůŬŴŧŶŧŷź
ŵũŵƀŬŰŷƂŨƂůŲůųƆŸŧ bųůŴ bűŪ
ŘźŶƂ
bųůŴ bŲ
3ȞŽźűůŴů bųůŴ bŪ
3ȞŶŧŸŹŬŷŴŧű bųůŴ bŪ
3ȞŨŬŲŧƆžŧŸŹƃŲźűŧŶŵŷŬƆ bųůŴ bŪ
3ȞŨŷŵűűŵŲů bųůŴ bŪ
3ȞŷƂŨŧ bųůŴ
bŪũűŲƅžŧƆ
ŨźųŧŪźūŲƆũƂŶŬžűů
3ȞűŧŷŹŵŻŬŲƃ bųůŴ bűŪ
3Ȟųŵŷűŵũƃ bųůŴ bűŪ
3ȞŸŹŷźžűŵũŧƆŻŧŸŵŲƃ bųůŴ bŪ
3ȞŨŬŲŵŬųƆŸŵ bųůŴ
bŪũűŲƅžŧƆ
ŨźųŧŪźūŲƆũƂŶŬžűů
ŸƁŬųŴƂŰũŧŲŶŷůũŵūŧ
C3
ʼnžŧſŬųŵŭŴŵŶŵūŷźųƆŴůŹƃŶŷŵūźűŹƂŨŬŮűŷƂſűůžŹŵŶŵŮũŵŲůŹŶŵųŬſůũŧŹƃůż
ůűŵŴŹŷŵŲůŷŵũŧŹƃŶŷŵŽŬŸŸŶŷůŪŵŹŵũŲŬŴůƆ
śźŴűŽůƆŖŗŏŊŕřŕʼnŒŌŔŏŦňŌŎőŗŢşőŏŴŬŶŵūżŵūůŹūŲƆŶŷůŪŵŹŵũŲŬŴůƆ
ūŭŬųŵũůųŵŲŵžŴƂżŨŲƅūŸźƀŬŸŹũźŬŹŷůŸűŹŵŪŵžŹŵŸŵūŬŷŭůųŵŬŴŧžŴŬŹ
ŶŬŷŬŲůũŧŹƃŸƆžŬŷŬŮűŷŧƆ
œŇőŘŏœŇŒţŔŇŦ
řŌœŖŌŗŇřŚŗŇr&
řŌœŖŌŗŇřŚŗŇŕř
r&ŋŕr&
ŖŷůŪŵŹŵũŲŬŴůŬŸűŷƂſűŵŰ
ůŲůŨŬŮŴŬŬ
őŷƂſűŧŮŧűŷƂŹŧ őŷƂſűŧũŸŬŪūŧ
ŵŹűŷƂŹŧ
ŇűŸŬŸŸźŧŷƂ
ʼnŸŬŶŷůŴŧūŲŬŭŴŵŸŹůūŲƆůŸŶŵŲƃŮŵũŧŴůƆ
ŸũŧŲŵųŶŷůũŵūŧ
řŵŲƃűŵŧűŸŬŸŸźŧŷūŲƆ
ŘƁŬųŴƂŰũŧŲ
Ŷŷůũŵūŧ
C3
ŘűŵŷŵŸŹů ŋŧ ŔŬŹ
œŧűŸůųŧŲƃŴŵŬũŷŬųƆ
ŌŸŲůŹŬųŶŬŷŧŹźŷŧŴůŭŬůŲů
ŷŧũŴŧr&bž
ŌŸŲůŹŬųŶŬŷŧŹźŷŧŴŧżŵūůŹŸƆũ
ūůŧŶŧŮŵŴŬŵŹr&ūŵr&bž
ŌŸŲůŹŬųŶŬŷŧŹźŷŧ
ũƂſŬůŲůŷŧũŴŧr&
bųůŴ
ŔŬŸŴůųŧŰŹŬŸƁŬųŴƂŰũŧŲŶŷůũŵūŧŸŷŧŮźŶŵŸŲŬŬŪŵůŸŶŵŲƃŮŵũŧŴůƆŔŧŲŬŰŹŬ
ũŵūźũŶźŸŹźƅžŧſźžŹŵŨƂŵŴŵŸŹƂŲ
D1

RU
RU
170 171
ŚŘřŇŔŕʼnőŇŞŇşŏŇőŘŌŘŘŚŇŗŕʼnŏ ňŒŕőŇ
őŗŢşőŏ
ȧŖŬŷŬū ŶŬŷũƂų ůŸŶŵŲƃŮŵũŧŴůŬų ŵžůŸŹůŹŬ
ũŸŬ ūŬŹŧŲů & ' ( ) + ũ ŹŬŶŲŵŰ ũŵūŬ Ÿ
ūŵŨŧũŲŬŴůŬų ųŵƅƀŬŪŵ ŸŷŬūŸŹũŧ űŷŵųŬ
ŶŷůũŵūŴŵŪŵŨŲŵűŧ$Şŧſŧ&ŵŸŴŧƀŬŴŧ
ũŧŲŵų Ŷŷůũŵūŧ& űŵŹŵŷƂŰ ųŵŭŴŵ ŸŴƆŹƃ
ūŲƆŵŨŲŬŪžŬŴůƆŵžůŸŹűů
ȧŖŬŷŬū ůŸŶŵŲƃŮŵũŧŴůŬų ŸŴůųůŹŬ ũŸƅ
źŶŧűŵũűź ũ ŵŸŵŨŬŴŴŵŸŹů ŮŧƀůŹŴƂŰ
ųŧŹŬŷůŧŲŷŧŸŶŵŲŵŭŬŴŴƂŰųŬŭūźžŧſŬŰ&
ůŶŷůũŵūŴƂųŨŲŵűŵų$
ȧʼnŸŹŧũƃŹŬ źŶŲŵŹŴůŹŬŲƃŴŵŬ űŵŲƃŽŵ ' ũ
ūŬŷŭŧŹŬŲƃ źŶŲŵŹŴůŹŬŲƆ ' Ÿų ŷůŸb
ŮŧűŷŬŶůŹŬŨŲŵűŴŧűŷƂſűŬ'ŸųŷůŸb
ȧŗŧŸŶŵŲŵŭůŹŬ źŶŲŵŹŴůŹŬŲƃŴŵŬ űŵŲƃŽŵ &
Ŵŧ ũŧŲźŶŷůũŵūŧ & ŎŧŻůűŸůŷźŰŹŬ ŨŲŵű
ŴŧŵŸŴŵũŧŴůůžŧſůŸŶŵųŵƀƃƅŸŹŵŶŵŷŴŵŪŵ
űŵŲƃŽŧ&ŸųŷůŸbŖŷůůŸŶŵŲƃŮŵũŧŴůů
ŷŬŭůųŧ ŶŷůŪŵŹŵũŲŬŴůƆ ŨŬŮ űŷƂſűů
źŸŹŧŴŵũůŹŬźŶŲŵŹŴůŹŬŲƃŴŵŬűŵŲƃŽŵ&Ŵŧ
ŘƁŬųŴƂŰũŧŲŶŷůũŵūŧ& ŎŧŻůűŸůŷźŰŹŬ
ŨŲŵű Ŵŧ ŵŸŴŵũŧŴůů žŧſů Ÿ Ŷŵųŵƀƃƅ
ŸŹŵŶŵŷŴŵŪŵűŵŲƃŽŧ&ŸųŷůŸb
ȧŗŧŸŶŵŲŵŭůŹŬũƂŨŷŧŴŴƂŰŧűŸŬŸŸźŧŷũžŧſŬ
źűŧŮŧŴŴƂųŴůŭŬŵŨŷŧŮŵų
źŸŹŧŴŵũůŹŬ ŧűŸŬŸŸźŧŷƂ (((ůŲů(
Ŵŧ ũŧŲ Ŷŷůũŵūŧ ũ ŴůŭŴŬŰ žŧŸŹůžŧſůŸų
ŷůŸb
ūŲƆ ŶŷůŪŵŹŵũŲŬŴůƆ Ŵŧ Ŷŧŷź ŶŵųŬŸŹůŹŬ
ŶŧŷŵũźƅűŵŷŮůŴź(ũžŧſźŸųŷůŸb
ŶŷŬūũŧŷůŹŬŲƃŴŵ ŮŧŶŵŲŴůũ žŧſź b Ų
ŭůūűŵŸŹůũŵūŧŸŵźŸůŹūŸųŷůŸb
ȧŖŵųŬŸŹůŹŬ ůŴŪŷŬūůŬŴŹƂ ũ žŧſź ůŲů
ŶŧŷŵũźƅűŵŷŮůŴź
ŚŸŹŧŴŵũůŹŬ űŷƂſűź Ŵŧ žŧſź & ŸŵũųŬŸŹůũ
ūũŧŹŷŬźŪŵŲƃŴůűŧŸųŷůŸb ŮŧŻůűŸůŷźŰŹŬ
űŷƂſűźŴŬ ŶŷůŲŧŪŧƆźŸůŲůŰŶŵũŬŷŴźũŬŬũ
ŴŧŶŷŧũŲŬŴůůŸŹŷŬŲűůŸųŷůŸb
ȧŚŸŹŧŴŵũůŹŬŷŬŪźŲƆŹŵŷŶŧŷŧ'ŴŧűŷƂſűź
ũŵŮųŵŭŴƂŹŷůŶŵŲŵŭŬŴůƆŸųŷůŸb
ȧŚŸŹŧŴŵũůŹŬžŧſź&ŴŧŶŷůũŵūŴŵŰŨŲŵű$
ūŵƀŬŲžűŧŸųŷůŸb
ŖŷůŨŵŷ ŴŧžůŴŧŬŹ ŷŧŨŵŹŧŹƃ ŹŵŲƃűŵ ũ Źŵų
ŸŲźžŧŬ ŬŸŲů žŧſŧ ů űŷƂſűŧ ŶŷŧũůŲƃŴŵ
ŷŧŸŶŵŲŵŭŬŴƂ ů ŮŧŻůűŸůŷŵũŧŴƂ Ŵŧ
ŶŷůũŵūŴŵųŨŲŵűŬ
ŌŸŲů ŵūůŴ ůŲů ŵŨŧ űŵųŶŵŴŬŴŹŧ ŨƂŲů
ŴŬŶŷŧũůŲƃŴŵźŸŹŧŴŵũŲŬŴƂůŲůŮŧŻůűŸůŷŵũŧŴƂ
Ÿų ŷůŸb ů Ŵŧ ƄűŷŧŴŬ ŶŵƆũůŹŸƆ
ŶŷŬūźŶŷŬŭūŬŴůŬ
őŗŢşőŇŕŘŔŇŠŌŔŇ
ŖŗŌŋŕŜŗŇŔŏřŌŒţŔŢœŎŇœőŕœ
őŷƂſűŧŨŲŵűůŷźŬŹŸƆŶŷůűŧŭūŵųũűŲƅžŬŴůů
ŶŷůŨŵŷŧ ŤŹŵ ŶŷŬūŵŹũŷŧƀŧŬŹ ŵŹűŷƂŹůŬ
űŷƂſűů ũŵ ũŷŬųƆ ŶŷůŪŵŹŵũŲŬŴůƆ ŔŬ
ŶƂŹŧŰŹŬŸƃ ŶŷůųŬŴƆŹƃ ŸůŲź žŹŵŨƂ ŵŹűŷƂŹƃ
ŮŧŨŲŵűůŷŵũŧŴŴźƅ űŷƂſűźŋŧŴŴŧƆ ŻźŴűŽůƆ
ŨŬŮŵŶŧŸŴŵŸŹů ŵŹűŲƅžŧŬŹŸƆ űŧŭūƂŰ ŷŧŮ
ŶŵŸŲŬ ŵŸŹŧŴŵũűů ŶŷůŨŵŷŧ ŌŸŲů ũƂŨŷŧŴŧ
ŹŬųŶŬŷŧŹźŷŧ r& ůŲů ũƂſŬ ů ŸűŵŷŵŸŹƃ
ůŲů ũƂſŬ Ŵŧ ūůŸŶŲŬŬ ŶŧŴŬŲů źŶŷŧũŲŬŴůƆ
ŶŵƆũůŹŸƆ ūŬŸƆŹůŸŬűźŴūŴƂŰ ŵŨŷŧŹŴƂŰ
ŵŹŸžŬŹőŷƂſűźųŵŭŴŵŵŹűŷƂŹƃŹŵŲƃűŵŶŵŸŲŬ
ŮŧũŬŷſŬŴůƆŵŨŷŧŹŴŵŪŵŵŹŸžŬŹŧ
ŖŌŗʼnŕŌŏŘŖŕŒţŎŕʼnŇŔŏŌ
L&RPSDQLRQ7RXFK;/bȞƄŹŵźųŴƂŰűźżŵŴŴƂŰűŵųŨŧŰŴűŵŹŵŷƂŰŶŵųŵŭŬŹũŧųűŧŭūƂŰūŬŴƃ
źūůũŲƆŹƃŨŲůŮűůżűźŲůŴŧŷŴƂųůſŬūŬũŷŧųůʼnŴŬųŶŷŬūŸŹŧũŲŬŴƂŸŵŹŴůŨŬŸŶŲŧŹŴƂżŷŬŽŬŶŹŵũ
ūŵŸŹźŶŴƂżũŸŬŪŵŮŧŴŬŸűŵŲƃűŵűŧŸŧŴůŰ
ňŲŧŪŵūŧŷƆůŴŹźůŹůũŴŵŶŵŴƆŹŴŵųźůŴŹŬŷŧűŹůũŴŵųźŸŬŴŸŵŷŴŵųźƄűŷŧŴźũƂŸųŵŭŬŹŬŪŵŹŵũůŹƃ
ŷŧŮŴŵŵŨŷŧŮŴƂŬŨŲƅūŧŮŧŷŬűŵŷūŴŵŬũŷŬųƆ
L&RPSDQLRQ7RXFK;/ŶŵŮŧŨŵŹůŹŸƆŵŶŵūŪŵŹŵũűŬŸųŬſůũŧŴůůůŶŷůŪŵŹŵũŲŬŴůůůŴŪŷŬūůŬŴŹŵũ
ŕŴŸŵūŬŷŭůŹŶŵſŧŪŵũƂŬůŴŸŹŷźűŽůůŶŵũŸŬųƄŹŧŶŧųŶŷůŪŵŹŵũŲŬŴůƆŨŲƅū
ŘŲŬūźŰŹŬůŴŸŹŷźűŽůƆųbȞƄŹŵƄŲŬųŬŴŹŧŷŴŵ
ʼnűŲƅžůŹŬL&RPSDQLRQ7RXFK;/ŸŶŵųŵƀƃƅŶŬŷŬűŲƅžŧŹŬŲƆ,ŸųŷůŸbůŸŲŬūźŰŹŬůŴŸŹŷźűŽůƆų
ŴŧƄűŷŧŴŬ Ŕŧ ũŸŬżƄŹŧŶŧż ŮŴŧžűůŸŵūŬŷŭŧŹ ůŴŸŹŷźűŽůůŶŵ ũƂŶŵŲŴŬŴůƅ űŧŭūŵŪŵſŧŪŧ
ŘŹŷŧŴůŽŧžŧŸŹŵŮŧūŧũŧŬųƂżũŵŶŷŵŸŵũŹŧűŭŬūŵŸŹźŶŴŧŶŵŧūŷŬŸźZZZPRXOLQH[UX
řŧűŭŬũƂųŵŭŬŹŬŵŮŴŧűŵųůŹƃŸƆŸũůūŬŵŷźűŵũŵūŸŹũŧųůűŵŹŵŷƂŬŶŵųŵŪźŹũŧųŴŧžŧŹƃŷŧŨŵŹź
ŸŶŷůŨŵŷŵų
KWWSELWO\SULVHHQPDLQFRPSDQLRQb
ȧŔŧŸŹŷŵŰűůūŲƆűŵŴűŷŬŹŴŵŰŸŹŷŧŴƂ
ŖŷůŶŬŷũŵųůŸŶŵŲƃŮŵũŧŴůůŶŷůŨŵŷŧũƂŶŵŲźžůŹŬūŵŸŹźŶűŴŧŸŹŷŵŰűŧųūŲƆũŧſŬŰŸŹŷŧŴƂ
ʼnƂŨŬŷůŹŬŸŹŷŧŴź ʼnƂŨŬŷůŹŬƆŮƂű
ŖŵŸŲŬŮŧũŬŷſŬŴůƆƄŹůżūũźżƄŹŧŶŵũŵŹŵŨŷŧŮůŹŸƆƄűŷŧŴŶŷůũŬŹŸŹũůƆ
I&203$1,21728&+;/
ʼnŇşŖŕœŕŠŔŏőŋŒŦŌōŌŋŔŌʼnŔŕŊŕŖŗŏŊŕřŕʼnŒŌŔŏŦŖŏŠŏ
ŘŲŬūźƅƀůŬűŲŧũůſůźŶŷŧũŲŬŴůƆŮŧŪŵŷŧƅŹŸƆűŵŪūŧŵŴůūŵŸŹźŶŴƂūŲƆůŸŶŵŲƃŮŵũŧŴůƆ
ŝŬŴŹŷŧŲƃŴŧƆűŲŧũůſŧũƂŶŵŲŴƆŬŹ
b ŻźŴűŽůŰ ŤŹů ŻźŴűŽůů
ŷŧŮŲůžŧƅŹŸƆ ũ ŮŧũůŸůųŵŸŹů
ŵŹ ũƂŶŵŲŴƆŬųƂż ūŬŰŸŹũůŰ
ŮŧŶźŸű ŶŧźŮŧ ŸŲŬūźƅƀůŰ ſŧŪ
ŶŵūŹũŬŷŭūŬŴůŬ ŵŸŹŧŴŵũűŧ ů
Źbū
ŌŸŲůūŲƆŷŬŽŬŶŹŧūŵŸŹźŶŴŵũůūŬŵ
ŬŪŵųŵŭŴŵũŵŸŶŷŵůŮũŬŸŹůŴŧŭŧũ
ƄŹźűŲŧũůſź
ŕŹųŬŴŧũŵŮũŷŧŹ
ŔŧŸŹŷŵŰűů ůŮųŬŴŬŴůŬ ŴŧŸŹŷŵŬű
ŶŵūűŲƅžŬŴůŬ :L)L ŸŵŸŹŧũ
ŷŬŽŬŶŹŵũůŹbū
ŏŸŶŵŲƃŮŵũŧŴůŬ ŶŵūűŲƅžŬŴŴƂż
ũŬŸŵũ

RU
RU
172 173
ȧŖŵūűŲƅžŬŴůŬűŏŴŹŬŷŴŬŹź
řŬŶŬŷƃųŵŭŴŵŶŵūűŲƅžůŹƃŶŷůŨŵŷL&RPSDQLRQ7RXFK;/űūŵųŧſŴŬųźŏŴŹŬŷŴŬŹźʼnƂųŵŭŬŹŬ
ũƂŶŵŲŴůŹƃƄŹŵŹſŧŪŸŬŰžŧŸũƂŨŷŧũm1RZ}ŘŬŰžŧŸůŲůŶŵŮūŴŬŬũƂŨŷŧũm/DWHU}ŖŵŮŭŬ
ŤŹŵŹſŧŪųŵŭŴŵũƂŶŵŲŴůŹƃŶŵŮŭŬŵŹűŷƂũŴŧŸŹŷŵŰűůL&RPSDQLRQ7RXFK;/ŴŧŪŲŧũŴŵųƄűŷŧŴŬ
ŋŲƆůŸŶŵŲƃŮŵũŧŴůƆŸŲŬūźƅƀůżŻźŴűŽůŰŹŷŬŨźŬŹŸƆŶŵūűŲƅžŬŴůŬűŏŴŹŬŷŴŬŹź
ŋŵŸŹźŶ űŵ ũŸŬų ŷŬŽŬŶŹŧų &RPSDQLRQ mœŵů ŷŬŽŬŶŹƂ} mʼn żŵŲŵūůŲƃŴůűŬ} ŻŵŹŵŪŷŧŻůƆų ů
ũůūŬŵŮŧŶůŸƆųũŶŵſŧŪŵũŵųŷźűŵũŵūŸŹũŬŶŵŷŬŽŬŶŹŧųůŵŨŴŵũŲŬŴůƆųŶŷŵūźűŹŵũ
ŋŲƆ ŶŵūűŲƅžŬŴůƆ ŶŷůŨŵŷŧ L&RPSDQLRQ 7RXFK ;/ ű ŏŴŹŬŷŴŬŹź ŴŬŵŨżŵūůųŵ ũƂŶŵŲŴůŹƃ
ŸŲŬūźƅƀůŬūŬŰŸŹũůƆ
ʼnƂŨŬŷůŹŬŸŬŹƃŔŬźūŧŬŹŸƆŶŵŲźžůŹƃūŵŸŹźŶűŸŬŹů"ŖŬŷŬŰūůŹŬũųŬŴƅm6HWWLQJV}ŔŧŸŹŷŵŰűů
m:L)L6HWWLQJV}ŔŧŸŹŷŵŰűů:L)LŮŧŹŬųm7XUQRQ:L)L}ʼnűŲƅžůŹƃ:L)L
ʼnũŬūůŹŬŶŧŷŵŲƃūŲƆŶŵūűŲƅžŬŴůƆ:L)L
ʼnŵ ũŷŬųƆ ŮŧŪŷźŮűů ŸŵŬūůŴŬŴůƆ ŵŹűŷŵŬŹŸƆ ƄűŷŧŴ m&RQQHFWLRQ LQ SURJUHVV} ʼnƂŶŵŲŴƆŬŹŸƆ
ŶŵūűŲƅžŬŴůŬŤŹŵŹſŧŪųŵŭŬŹŮŧŴƆŹƃŴŬŸűŵŲƃűŵųůŴźŹ
ŔŧƄűŷŧŴŬŶŵƆũůŹŸƆŶŵūŹũŬŷŭūŬŴůŬźŸŶŬſŴŵŪŵźŸŹŧŴŵũŲŬŴůƆŸŵŬūůŴŬŴůƆ
řŬŶŬŷƃũŧųŶŵŹŷŬŨźŬŹŸƆũƂŨŷŧŹƃžŧŸŵũŵŰŶŵƆŸ
ŵŪŵŵŪŵŵŪŵźŸ
źŸ
źŸ
źŸ
źŸ
źŸ
źŸ
źŸ
źŸ
źŸ
źŸźŸźŸźŸŹŧŴŹŧŴŹŧŴŹŧŴ
ŎŴŧžŬŴůŬůŴūůűŧŹŵŷŵũŶŵūűŲƅžŬŴůƆ:L)L
ŖŷůŨŵŷŴŬŶŵūűŲƅžŬŴűŸŬŹů:L)L
ŖŷůŨŵŷŶŵūűŲƅžŧŬŹŸƆűŸŬŹů:L)L
ŖŷůŨŵŷŶŵūűŲƅžŬŴűŸŬŹů:L)L
ʼnůūŬŵůŴŸŹŷźűŽůůŶŵŶŵūűŲƅžŬŴůƅL&RPSDQLRQ7RXFK;/űŸŬŹů:L)LūŵŸŹźŶŴƂŶŵŧūŷŬŸź
KWWSELWO\SULVHHQPDLQFRPSDQLRQ
ȧŖŵūűŲƅžŬŴůŬŶŷůŲŵŭŬŴůƆ
ŖŷůŲŵŭŬŴůŬ &RPSDQLRQ ŶŵŮũŵŲƆŬŹ ŸŲŬūůŹƃ Ůŧ ŷŧŨŵŹŵŰ L&RPSDQLRQ 7RXFK ;/ ŨŬŮ
ŴŬŵŨżŵūůųŵŸŹůŴŧżŵūůŹƃŸƆ ŷƆūŵųŖŷůŨŵŷųŵŭŴŵŶŵūűŲƅžůŹƃűŸųŧŷŹŻŵŴźůŲůŶŲŧŴſŬŹź
ŤŹŵŹŧűŭŬŶŵŮũŵŲƆŬŹŶŵŲźžůŹƃūŵŸŹźŶűŷŬŽŬŶŹŧųůŮŲƅŨŵŪŵųŬŸŹŧ
ŚŨŬūůŹŬŸƃžŹŵ ŻźŴűŽůƆ:L)LŸųŧŷŹŻŵŴŧŶŲŧŴſŬŹŧũűŲƅžŬŴŧŧŹŧűŭŬ ŬŸŹƃŶŵūűŲƅžŬŴůŬ ű
ŏŴŹŬŷŴŬŹź:L)L**ůŹbū
ŖŷůŨŵŷL&RPSDQLRQ7RXFK;/ūŵŲŭŬŴŨƂŹƃŶŵūűŲƅžŬŴűƄŲŬűŹŷůžŬŸűŵŰŷŵŮŬŹűŬ
ŤŹŵŹſŧŪųŵŭŴŵũƂŶŵŲŴůŹƃŶŵŮŭŬŵŹűŷƂũŴŧŸŹŷŵŰűůL&RPSDQLRQ7RXFK;/ŴŧŪŲŧũŴŵųƄűŷŧŴŬ
ŋŲƆůŸŶŵŲƃŮŵũŧŴůƆŸŲŬūźƅƀůżŻźŴűŽůŰŹŷŬŨźŬŹŸƆŶŵūűŲƅžŬŴůŬűŸųŧŷŹŻŵŴźŶŲŧŴſŬŹź
mœŵůűźŲůŴŧŷŴƂŬűŴůŪů}źūŧŲŬŴŴŵŬŵŹŸŲŬŭůũŧŴůŬżŵūŧũƂŶŵŲŴŬŴůƆŷŬŽŬŶŹŵũŸŶŵųŵƀƃƅ
ŸųŧŷŹŻŵŴŧŵŹŶŷŧũűŧŷŬŽŬŶŹŵũŸŵŸųŧŷŹŻŵŴŧŶŲŧŴſŬŹŧŴŧŶŷůŨŵŷL&RPSDQLRQ7RXFK;/
ŘŵũųŬŸŹůųƂŬźŸŹŷŵŰŸŹũŧ
ŘŶůŸŵűųŵūŬŲŬŰŸųŧŷŹŻŵŴŵũůŶŲŧŴſŬŹŵũŸŵũųŬŸŹůųƂżŸL&RPSDQLRQ7RXFK;/ųŵŭŴŵŴŧŰŹů
ŴŧŸŧŰŹŬZZZPRXOLQH[FRP
ŎŧŪŷźŮűŧŶŷůŲŵŭŬŴůƆ
ŎŧŪŷźŮůŹŬŶŷůŲŵŭŬŴůŬ&RPSDQLRQœŵŭŴŵŨŬŸŶŲŧŹŴŵŮŧŪŷźŮůŹƃůŮ$SS6WRUHL3KRQHL3DGů
*RRJOH3OD\$QGURLG
Download from
the App Store
ANDROID APP ON
ŘũƆŮƂũŧŴůŬźžŬŹŴŵŰŮŧŶůŸů
ʼnŶŷůŲŵŭŬŴůů&RPSDQLRQŴŧŸųŧŷŹŻŵŴŬŶŲŧŴſŬŹŬũƂŨŬŷůŹŬŶŷŵūźűŹL&RPSDQLRQ7RXFK;/ů
ŸŵŮūŧŰŹŬźžŬŹŴźƅŮŧŶůŸƃůŲůũŵŰūůŹŬũźžŬŹŴźƅŮŧŶůŸƃŬŸŲůŵŴŧźũŧŸźŭŬŬŸŹƃ
ŖŷůŨŵŷŸŵŮūŧŸŹűŵūŶŵƆũůŹŸƆŴŧƄűŷŧŴŬ%űŵŹŵŷƂŰŴŬŵŨżŵūůųŵŨźūŬŹũũŬŸŹůũŶŷůŲŵŭŬŴůů
&RPSDQLRQ
ŌŸŲůũƂżŵŹůŹŬŸũƆŮŧŹƃŴŬŸűŵŲƃűŵŸųŧŷŹŻŵŴŵũŶŲŧŴſŬŹŵũŸL&RPSDQLRQ7RXFK;/űŧŭūŵŬ
ŶŷůŲŵŭŬŴůŬūŵŲŭŴŵŨƂŹƃŶŵūűŲƅžŬŴŵűŵūŴŵŰźžŬŹŴŵŰŮŧŶůŸů&RPSDQLRQb
œŵŰŶŬŷũƂŰŷŬŽŬŶŹ
ŖŷůŶŬŷũŵų ůŸŶŵŲƃŮŵũŧŴůůŶŷůŨŵŷŧL&RPSDQLRQ7RXFK;/ŶŷŬūŵŸŹŧũůŹũŧųũŵŮųŵŭŴŵŸŹƃ
ŸŵŮūŧŹƃ ŶŬŷũƂŰ ŷŬŽŬŶŹ žŹŵŨƂ ŶŵŲźžůŹƃ ŷŬűŵųŬŴūŧŽůů Ŷŵ ůŸŶŵŲƃŮŵũŧŴůƅ ŶŷůŨŵŷŧ Ŗŷů
ũƂŨŵŷŬŶŧŷŧųŬŹŷŧm0\)LUVWUHFLSH}œŵŰŶŬŷũƂŰŷŬŽŬŶŹũƂŶŵŲźžůŹŬŶŵſŧŪŵũƂŬůŴŸŹŷźűŽůů
ŶŵŶŷůŪŵŹŵũŲŬŴůƅŨŲƅūŧ
ŤŹŵŹŷŬŽŬŶŹůŸžŬŮŴŬŹŸŪŲŧũŴŵŪŵƄűŷŧŴŧŶŵŸŲŬŹŵŪŵűŧűŵŴŨźūŬŹůŸŶŵŲƃŮŵũŧŴůŲůŶŵŸŲŬūŬŸƆŹů
ŶŵŶƂŹŵűůŸŶŵŲƃŮŵũŧŴůƆL&RPSDQLRQ7RXFK;/
ŜŇŗŇőřŌŗŏŘřŏőŏŖŗŕŋŚőřŇ
ŖŷůŨŵŷ L&RPSDQLRQ 7RXFK ;/ ųŵŭŬŹ ŷŧŨŵŹŧŹƃ ũ ŵŴŲŧŰŴ ů ŧũŹŵŴŵųŴŵų ŷŬŭůųŬ ŖŷůŨŵŷ
ŵŸŴŧƀŬŴ ųŴŵŭŬŸŹũŵų ŻźŴűŽůŰ űŵŹŵŷƂŬ ŨźūźŹ űŧŭūƂŰ ūŬŴƃ ũūŵżŴŵũŲƆŹƃ ũŧŸ ů ŶŵųŵŪźŹ
ŶŷŬũŷŧŹůŹƃűŧŭūŵŬŨŲƅūŵũŶŷŵůŮũŬūŬŴůŬůŸűźŸŸŹũŧbŷŬŽŬŶŹŵũūŵŸŹźŶŴƂũŧũŹŵŴŵųŴŵų
ŷŬŭůųŬŧũmŵŴŲŧŰŴ}ŷŬŭůųŬũƂŶŵŲźžŧŬŹŬūŵŸŹźŶűŸŵŹŴƆųŷŬŽŬŶŹŵũ

RU
RU
174 175
ȧŖŵůŸűŷŬŽŬŶŹŵũ
ŔŧŪŲŧũŴŵųƄűŷŧŴŬųŵŭŴŵũƂŶŵŲŴůŹƃŶŵůŸűŷŬŽŬŶŹŵũ
Ÿ Ŷŵųŵƀƃƅ űŲŧũůſů mŖŵůŸű} ŖŵůŸű ųŵŭŴŵ
ũƂŶŵŲŴƆŹƃŶŵŴŧŮũŧŴůƅŷŬŽŬŶŹŧůŲůŶŵůŴŪŷŬūůŬŴŹŧų
řŧűŭŬūŵŸŹźŶŴƂŻůŲƃŹŷƂūŲƆźŹŵžŴŬŴůƆŶŵůŸűŧ
ȧňůŨŲůŵŹŬűŧŷŬŽŬŶŹŵũ
ŔŧŪŲŧũŴŵųƄűŷŧŴŬųŵŭŴŵŶŵŲźžůŹƃūŵŸŹźŶűŻźŴűŽůů
mňůŨŲůŵŹŬűŧŷŬŽŬŶŹŵũ}ŤŹŧŻźŴűŽůƆŶŵŮũŵŲƆŬŹŶŵŲźžůŹƃūŵŸŹźŶűŵũŸŬųŷŬŽŬŶŹŧųūŵŸŹźŶŴƂų
ũŸŵŵŨƀŬŸŹũŬ&RPSDQLRQ
ʼnŧũŹŵŴŵųŴŵųŷŬŭůųŬŴŧŪŲŧũŴŵųƄűŷŧŴŬūŲƆűŧŭūŵŰŻźŴűŽůůL&RPSDQLRQ7RXFK;/ųŵŭŴŵ
ŴŧŰŹůŶŷŬūũŧŷůŹŬŲƃŴŵŮŧŪŷźŭŬŴŴƂŬűŧŷŹŵžűůŸŷŬŽŬŶŹŧųůŖŵſŧŪŵũŵŬŷźűŵũŵūŸŹũŵųŵŭŴŵ
ŮŧŶźŸŹůŹƃŴŬŶŵŸŷŬūŸŹũŬŴŴŵŸŵūŴŵŰůŮűŧŷŹŵžŬűŸŷŬŽŬŶŹŧųů
ʼnƂŹŧűŭŬųŵŭŬŹŬŴŧŰŹůŷŬŽŬŶŹũŸŵŵŨƀŬŸŹũŬűŵŸŴźũſůŸƃŮŴŧžűŧmŖŵůŸű}
ŋŲƆƄŹŵŪŵŶŷŵŸŹŵũũŬūůŹŬŴŧŮũŧŴůŬŨŲƅūŧůŲůůŴŪŷŬūůŬŴŹŧũŸŹŷŵűźŶŵůŸűŧůŴŧŭųůŹŬ2.
ʼnƂųŵŭŬŹŬźŹŵžŴůŹƃŶŧŷŧųŬŹŷƂŶŵůŸűŧūŵŨŧũůũŻůŲƃŹŷƂŹůŶŨŲƅūŧũŷŬųƆŶŷůŪŵŹŵũŲŬŴůƆ
ůŴŧŽůŵŴŧŲƃŴŧƆűźżŴƆ
ȧőŴůŪůŷŬŽŬŶŹŵũūŵŸŹźŶŴƂŹŵŲƃűŵŶŷůŶŵūűŲƅžŬŴůůŶŵ:L)L
ŋŵŸŹźŶűŻźŴűŽůůmœŵůŷŬŽŬŶŹƂ}ųŵŭŴŵŶŵŲźžůŹƃŸŪŲŧũŴŵŪŵƄűŷŧŴŧŤŹŧŻźŴűŽůƆŶŵŮũŵŲƆŬŹ
ŴŧŰŹů ũŸŬ ŷŬŽŬŶŹƂ űŵŹŵŷƂŬ ũƂ ŷŧŴŬŬ ŸŵżŷŧŴůŲů ũ űŧžŬŸŹũŬ ůŮŨŷŧŴŴƂż Ÿ Ŷŵųŵƀƃƅ
ŶŷůŲŵŭŬŴůƆ&RPSDQLRQŴŧŸųŧŷŹŻŵŴŬŶŲŧŴſŬŹŬ
ŋŲƆůŸŶŵŲƃŮŵũŧŴůƆƄŹŵŰŻźŴűŽůůŴŬŵŨżŵūůųŵŮŧŪŷźŮůŹƃŶŷůŲŵŭŬŴůŬ&RPSDQLRQůŸŵŮūŧŹƃ
źžŬŹŴźƅŮŧŶůŸƃʼnƂųŵŭŬŹŬŸŵŮūŧũŧŹƃůŷŬūŧűŹůŷŵũŧŹƃűŵŲŲŬűŽůůŷŬŽŬŶŹŵũŴŧŸųŧŷŹŻŵŴŬ
ŶŲŧŴſŬŹŬůŶŵŲźžŧŹƃűŴůųūŵŸŹźŶŴŧŶŷůŨŵŷŬL&RPSDQLRQ7RXFK;/ŶŷůŶŵūűŲƅžŬŴůů ű
ŸŬŹů:L)LŖŵŸŲŬŶŵūűŲƅžŬŴůƆŶŷůŨŵŷŧL&RPSDQLRQ7RXFK;/žŬŷŬŮ:L)LũŧſůűŵŲŲŬűŽůů
ŨźūźŹŧũŹŵųŧŹůžŬŸűůŸůŴżŷŵŴůŮůŷŵũŧŹƃŸƆŸŶŷůŨŵŷŵųůŸųŧŷŹŻŵŴŵųŶŲŧŴſŬŹŵųŶŷůűŧŭūŵų
ŶŷůŪŵŹŵũŲŬŴůůŷŬŽŬŶŹŧ
ȧʼnżŵŲŵūůŲƃŴůűŬūŵŸŹźŶŴŵŹŵŲƃűŵŶŷůŴŧŲůžůůŶŵūűŲƅžŬŴůƆ:L)L
ŋŵŸŹźŶ ű ŻźŴűŽůů mʼn żŵŲŵūůŲƃŴůűŬ} ųŵŭŴŵ ŶŵŲźžůŹƃ Ÿ ŪŲŧũŴŵŪŵ ƄűŷŧŴŧ ŤŹŧ ŻźŴűŽůƆ
ŶŵŮũŵŲƆŬŹũƂŶŵŲŴƆŹƃŶŵůŸűŷŬŽŬŶŹŧŸůŸŶŵŲƃŮŵũŧŴůŬųũƂŨŷŧŴŴƂżůŴŪŷŬūůŬŴŹŵũ
ŞŹŵŨƂ ŴŧŰŹů ŷŬŽŬŶŹ űŵŸŴůŹŬŸƃ ŻźŴűŽůů mʼn żŵŲŵūůŲƃŴůűŬ} ŧ ŮŧŹŬų ūŵŨŧũƃŹŬ ūŵ ūũźż
ůŴŪŷŬūůŬŴŹŵũŋŲƆűŧŭūŵŪŵůŴŪŷŬūůŬŴŹŧųŵŭŴŵźűŧŮŧŹƃűŵŲůžŬŸŹũŵŸŶŵųŵƀƃƅŶŵūűŲƅžŬŴŴƂż
ũŬŸŵũ ŎŧŹŬų ŴŧŭųůŹŬ mŖŵůŸű} žŹŵŨƂ ŵŹŵŨŷŧŮůŹƃ ŸŶůŸŵű ŷŬŽŬŶŹŵũ ŸŵŵŹũŬŹŸŹũźƅƀůż
ũũŬūŬŴŴƂųŴŧŸŹŷŵŰűŧų
ŖŗŕŊŗŇœœŢ
ʼnŶŷůŨŵŷŬůųŬŬŹŸƆbŶŷŬūũŧŷůŹŬŲƃŴŵŸŵżŷŧŴŬŴŴƂżŧũŹŵųŧŹůžŬŸűůżŶŷŵŪŷŧųų
ʼnƂŨŬŷůŹŬŴźŭŴźƅŶŷŵŪŷŧųųź
ŖŷŬūũŧŷůŹŬŲƃŴŵ ŮŧŶŷŵŪŷŧųųůŷŵũŧŴŴƂŬ
ŴŧŸŹŷŵŰűůųŵŭŴŵůŮųŬŴůŹƃũŮŧũůŸůųŵŸŹů
ŵŹ ũƂŨŷŧŴŴŵŪŵ ŷŬŽŬŶŹŧ ůŴŪŷŬūůŬŴŹŵũ ů
űŵŲůžŬŸŹũŧ ŶŵūŪŵŹŵũŲŬŴŴƂż ŶŷŵūźűŹŵũ
ŚŸŹŧŴŵũůŹŬŹŬųŶŬŷŧŹźŷźũŷŬųƆůŸűŵŷŵŸŹƃ
ŶŷůŪŵŹŵũŲŬŴůƆŸŶŵųŵƀƃƅűŴŵŶŵűů
ŖŵŮŧũŬŷſŬŴůůůŮųŬŴŬŴůƆũŸŬżŴŧŸŹŷŵŬű
ŴŧŭųůŹŬűŴŵŶűźŮŧŶźŸűŧ%žŹŵŨƂŴŧžŧŹƃ
ũƂŶŵŲŴŬŴůŬŶŷŵŪŷŧųųƂ
Ŗŵ ŵűŵŴžŧŴůů ŶŷŵŪŷŧųųƂŷŧŮūŧŸŹŸƆŹŷů
ŮũźűŵũƂżŸůŪŴŧŲŧ
Ŗŵ ŵűŵŴžŧŴůů ŷŧŨŵŹƂ ŷŬŭůųŵũ űŷŬų
ŸźŶ ŸźŶ ŹźſŬŴůŬ ŷůŮŵŹŹŵ ŸŵźŸ ūŬŸŬŷŹ
ūŬŲůűŧŹŴƂŰ Ŷŧŷ ů ŸůŲƃŴƂŰ Ŷŧŷ ŶŷůŨŵŷ
ŧũŹŵųŧŹůžŬŸűů ŶŬŷŬűŲƅžŧŬŹŸƆ ũ ŷŬŭůų
ŶŵūūŬŷŭŧŴůƆŹŬŶŲŧŴŧbųůŴźŹʼnŹŬžŬŴůŬ
ƄŹŵŪŵũŷŬųŬŴůŶŷŵūźűŹƂŪŵŹŵũƂűŶŵūŧžŬ
ʼnŵũŷŬųƆŷŧŨŵŹƂŶŷŵŪŷŧųųŹźſŬŴůŬŸŵźŸ
ūŬŸŬŷŹ ů ũ ŷźžŴŵų ŷŬŭůųŬ ūũůŪŧŹŬŲƃ
ŶŷůŨŵŷŧ ŷŧŨŵŹŧŬŹ Ŵŧ ŵŶŷŬūŬŲŬŴŴŵŰ
ŸűŵŷŵŸŹůžŹŵŨƂŸŵżŷŧŴůŹƃűŵŴŸůŸŹŬŴŽůƅ
ŶůƀŬũŵŰ ŸųŬŸů ů ŶŷŬūŵŹũŷŧŹůŹƃ ŬŬ
ŶŷůŲůŶŧŴůŬűŴůŭŴŬŰžŧŸŹůžŧſůŞŹŵŨƂ
ŮŧũŬŷſůŹƃŷŧŨŵŹźŻźŴűŽůůŶŵūūŬŷŭŧŴůƆ
ŹŬųŶŬŷŧŹźŷƂ ŶŷŵŸŹŵ ŴŧŭųůŹŬ űŴŵŶűź
mŊŵŹŵũŵ} % ŖŵŸŲŬ ŮŧũŬŷſŬŴůƆ
ŮŧųŬſůũŧŴůƆŹŬŸŹŧũŶŷŵŪŷŧųųŧżmŜŲŬŨ}ů
mňŷůŵſƃ}ŶŷůŨŵŷŶŬŷŬűŲƅžŧŬŹŸƆũŷŬŭůų
mřŬŸŹŵ} ŹŬųŶŬŷŧŹźŷŧr&ŴŧbųůŴźŹ
žŹŵŨƂ ŹŬŸŹŵ ŶŵūŴƆŲŵŸƃ ŌŸŲů űŷƂſűŧ
ŵŹűŷƂŹŧ ůŲů žŧſŧ ŸŴƆŹŧ Ÿ ŵŸŴŵũŧŴůƆ ũŵ
ũŷŬųƆũƂŶŵŲŴŬŴůƆŶŷŵŪŷŧųųƂŶŷŵŪŷŧųųŧ
ŨźūŬŹ ŮŧũŬŷſŬŴŧ ŞŹŵŨƂ ŵŹűŲƅžůŹƃ ƄŹź
ŻźŴűŽůƅŴŧŭųůŹŬűŴŵŶűźmŔŧŸŹŷŵŰűů}ů
ũƂŨŬŷůŹŬm5HVHW}ŘŨŷŵŸ
Ŗŵ ŸŲŬ Ů ŧŶź Ÿűŧ ŧũŹŵųŧ Źůž ŬŸűŵŰ
ŶŷŵŪŷŧųųƂ ųŵŭŴŵ ũ ŲƅŨŵŬ ũŷŬųƆ
ŵŸŹŧŴŵũůŹƃŷŧŨŵŹźŶŷůŨŵŷŧŴŧŭŧũűŴŵŶűź
mŘŹŵŶ} ŇũŹŵųŧŹůžŬŸűŧƆ ŶŷŵŪŷŧųųŧ
Ŷŷ ůŵŸŹŧ ŴŧũŲ ůũŧ ŬŹŸƆ ŬŬ ų ŵŭŴ ŵ
ũŵŮŵŨŴŵũůŹƃ ŶŵũŹŵŷŴŵ Ŵŧŭŧũ űŴŵŶűź
mŘŹŧŷŹ} ŌŸŲů ũƂ ũƂŨŷŧŲů ŴŬũŬŷŴźƅ
ŶŷŵŪŷŧųųźůżŵŹůŹŬŵŹųŬŴůŹƃŬŬŴŧŭųůŹŬ
űŴŵŶűźmŕŹųŬŴŧũŵŮũŷŧŹ}
ŖŷŵŪŷŧųųŧ mŗŧŮŵŪŷŬũ} ŶŵŮũŵŲƆŬŹ
ŷŧŮŵŪŷŬŹƃ ŪŵŹŵũźƅ Ŷůƀź Ůŧ b ųůŴźŹ
ũŷŬųƆŷŬŪźŲůŷźŬŹŸƆũūůŧŶŧŮŵŴŬŵŹbūŵ
bųůŴźŹ
ŖŷŵŪŷŧųųŧ mŖŷŵųƂũűŧ} ŵŨŲŬŪžŧŬŹ
ŵžůŸŹűźžŧſůŔŧŲŬŰŹŬũžŧſźbŲũŵūƂ
ūŵŨŧũƃŹŬŵūŴźűŧŶŲƅųŵƅƀŬŪŵŸŷŬūŸŹũŧů
ŮŧŶźŸŹůŹŬŶŷŵŪŷŧųųź
ŖŷŵŪŷŧųųŧ
ŶŷůŪŵŹŵũŲŬŴůƆ
ŸŵźŸŧ
ŖŷŵŪŷŧųųƂ
ŹźſŬŴůƆ
ŖŷŵŪŷŧųųƂ
ŶŷůŪŵŹŵũŲŬŴůƆ
ŸźŶŵũ
ŖŷŵŪŷŧųųƂ
ŶŷůŪŵŹŵũŲŬŴůƆ
ŴŧŶŧŷź
ŖŷŵŪŷŧųųŧ
ŶŷůŪŵŹŵũŲŬŴůƆ
ŹŬŸŹŧ
ŋŬŸŬŷŹŴŧƆ
ŶŷŵŪŷŧųųŧ
ŋŵŶŵŲŴůŹŬŲƃŴƂŬ
ŶŷŵŪŷŧųųƂ
ŘŵźŸ ŕŨŭŧŷůũŧŴůŬ
řźſŬŴůŬ
ŗůŮŵŹŹŵ
őŷŬųŸźŶ
ŘźŶ
ŋŬŲůűŧŹŴƂŰŶŧŷ
ŘůŲƃŴƂŰŶŧŷ
ŜŲŬŨ
ňŷůŵſƃ
ʼnƂŶŬžűŧ
ŋŬŸŬŷŹ ŗŧŮŵŪŷŬũ
ŖŷŵųƂũűŧ

RURU
176 177
ŚŎŔŇŐřŌňŕŒţşŌŕŋŕŘřŚŖŔŢŜŇʼnřŕœŇřŏŞŌŘőŏŜŖŗŕŊŗŇœœŇŜ
ŇũŹŵųŧŹůžŬŸűůŬ
ŶŷŵŪŷŧųųƂ
ŘŵźŸ őŷŬųŸźŶ ŘźŶ ŕŨŭŧŷůũŧŴůŬ řźſŬŴůŬ ŗůŮŵŹŹŵ
ŘűŵŷŵŸŹƃŶŵ
źųŵŲžŧŴůƅ
ŷŬŪźŲůŷźŬŹŸƆ
9
9bȝb9
bůųŶźŲƃŸŵũ
ůŸűŵŷŵŸŹƃ
9ũŹŬžŬŴůŬ
bųůŴ
9bȝb9ũ
ŹŬžŬŴůŬbŸŬű 9 V1 9
řŬųŶŬŷŧŹźŷŧŶŵ
źųŵŲžŧŴůƅ
ŷŬŪźŲůŷźŬŹŸƆ
r
ŵŹr&ūŵ
r&
r
ŵŹr&ūŵ
r&
r
ŵŹr&ūŵ
r&
r&
ŔŬŷŬŪźŲůŷźŬŹŸƆ
r
ŵŹr&ūŵ
r&
r
ŵŹr&ūŵ
r&
řŬųŶŬŷŧŹźŷŧŶŵ
źųŵŲžŧŴůƅ
ŷŬŪźŲůŷźŬŹŸƆ
bųůŴ
ŵŹbųůŴūŵ
bųůŴ
bųůŴ
ŵŹbųůŴūŵ
bųůŴ
bųůŴ
ŵŹbųůŴūŵ
bųůŴ
bųůŴ
ŵŹbųůŴūŵ
bųůŴ
bųůŴ
ŵŹbųůŴūŵ
bž
bųůŴ
ŵŹbųůŴūŵ
bž
śźŴűŽůƆŶŵūŵŪŷŬũŧ
ŶŵźųŵŲžŧŴůƅ
ŶŵŵűŵŴžŧŴůů
ŶŷŵŪŷŧųųƂ
bųůŴ bųůŴ bųůŴ bųůŴ bųůŴ
ŖŷůųŬŷ
ŷŬŽŬŶŹŵũ
ŊŵŲŲŧŴūŸűůŰ
ŸŵźŸ
řƂűũŬŴŴƂŰ
ŸźŶ ŕũŵƀŴŵŰŸźŶ ŕũŵƀůŴŧŶŧŷź ŊŵũƆūůŴŧŶŵ
ŨźŷŪźŴūŸűů ŗůŮŵŹŹŵ
ŘŵũųŬŸŹůųƂŬ
ŧűŸŬŸŸźŧŷƂ
ʼnŶŷŵŽŬŸŸŬŶŷůŪŵŹŵũŲŬŴůƆŴŬűŵŹŵŷƂżŨŲƅūŸŵūŬŷŭůųŵŬųŵŭŬŹŴŬŵŭůūŧŴŴŵŶŬŷŬŲůŹƃŸƆ
žŬŷŬŮ űŷŧƆ ůŮŮŧ ŵŨŷŧŮŵũŧŴůƆ ŶźŮƂŷƃűŵũ ŵŸŵŨŬŴŴŵ Ŷŷů ůŸŶŵŲƃŮŵũŧŴůů ŮŧųŵŷŵŭŬŴŴƂż
ŵũŵƀŬŰʼnƄŹŵųŸŲźžŧŬŴŬŵŨżŵūůųŵŸŵŵŹũŬŹŸŹũźƅƀůųŵŨŷŧŮŵųźųŬŴƃſůŹƃŵŨƁŬųƂ
ŇũŹŵųŧŹůžŬŸűůŬ
ŶŷŵŪŷŧųųƂ
ŋŬŲůűŧŹŴƂŰ
Ŷŧŷ ŘůŲƃŴƂŰŶŧŷ ŜŲŬŨ ňŷůŵſƃ ʼnƂŶŬžűŧ ŋŬŸŬŷŹ ŗŧŮŵŪŷŬũ ŖŷŵųƂũűŧ
ŘűŵŷŵŸŹƃ
ŶŵźųŵŲžŧŴůƅ
ŷŬŪźŲůŷźŬŹŸƆ
9ũŹŬžŬŴůŬ
bųůŴbŸŬű
9ũŹŬžŬŴůŬ
bųůŴbŸŬű
ŮŧŹŬų9
ũŹŬžŬŴůŬ
bųůŴ
9ũ
ŹŬžŬŴůŬ
bŸŬű
ŮŧŹŬų9
ũŹŬžŬŴůŬ
bųůŴ
9
9bȝb9
9
9bȝb9
9
9bȝb9
řŬųŶŬŷŧŹźŷŧ
ŶŵźųŵŲžŧŴůƅ
ŷŬŪźŲůŷźŬŹŸƆ
r&
ŴŬ
ŷŬŪźŲůŷźŬŹŸƆ
r&
ŴŬ
ŷŬŪźŲůŷźŬŹŸƆ
r&
ŵŹr&ūŵ
r&
r&
ŵŹr&ūŵ
r&
r&
ŴŬ
ŷŬŪźŲůŷźŬŹŸƆ
řŬųŶŬŷŧŹźŷŧ
ŶŵźųŵŲžŧŴůƅ
ŷŬŪźŲůŷźŬŹŸƆ
bųůŴ
ŵŹbųůŴūŵ
bųůŴ
bųůŴ
ŵŹbųůŴūŵ
bųůŴ
bųůŴbŸŬű
ŵŹbŸŬű
ūŵbųůŴ
bŸŬű
bųůŴbŸŬű
ŵŹbŸŬű
ūŵbųůŴ
bŸŬű
bųůŴ
bŸŬű
ŵŹbųůŴ
bŸŬű
ūŵbųůŴ
bŸŬű
bųůŴŵŹ
bųůŴūŵ
bųůŴ
bųůŴŵŹ
bųůŴūŵ
bųůŴ
bųůŴŵŹ
bųůŴūŵ
bųůŴ
śźŴűŽůƆ
ŶŵūŵŪŷŬũŧ
ŶŵźųŵŲžŧŴůƅ
ŶŵŵűŵŴžŧŴůů
ŶŷŵŪŷŧųųƂ
bųůŴ bųůŴ bųůŴ
śźŴűŽůƆŶŵūƁŬųŧ
ŹŬŸŹŧŶŷůr&
ũűŲƅžŧŬŹŸƆŶŵ
źųŵŲžŧŴůƅũ
űŵŴŽŬŶŷŵŪŷŧųųƂ
bųůŴ bųůŴ
ŖŷůųŬŷ
ŷŬŽŬŶŹŵũ
śźŧŪŷŧŴŧ
Ŷŧŷź
ŖƅŷŬůŮ
ųŵŷűŵũůŴŧ
Ŷŧŷź
ŜŲŬŨ ňŷůŵſƃ śŷźűŹŵũƂŰ
ŹŵŷŹ
őŷŬųūŲƆ
ũƂŶŬžűů
bŲũŵūƂ
bűŧŶŲƆ
ŭůūűŵŸŹůūŲƆ
ųƂŹƃƆŶŵŸźūƂ
ŘŵũųŬŸŹůųƂŬ
ŧűŸŬŸŸźŧŷƂ

RU
RU
178 179
ȧŗźžŴŵŰŷŬŭůų
ʼnƂųŵŭŬŹŬŴŧŸŹŷŵůŹƃŸűŵŷŵŸŹƃŹŬųŶŬŷŧŹźŷźůũŷŬųƆŶŷůŪŵŹŵũŲŬŴůƆŴŧL&RPSDQLRQ7RXFK;/
ūŲƆŶŷůŪŵŹŵũŲŬŴůƆŸũŵůżŸŵŨŸŹũŬŴŴƂżŷŬŽŬŶŹŵũ
ŋŵŸŹźŶűŻźŴűŽůůmŗźžŴŵŰŷŬŭůų}ųŵŭŴŵŶŵŲźžůŹƃŸŪŲŧũŴŵŪŵƄűŷŧŴŧ
ʼnƂŨŵŷžŧŸŹŵŹƂũŷŧƀŬŴůƆūũůŪŧŹŬŲƆ
bŶŷŬŷƂũůŸŹƂżŷŬŭůųŧbŴŬŶŷŬŷƂũŴƂżŸűŵŷŵŸŹŬŰůbųŧűŸŶŷŬŷƂũůŸŹŧƆ
ŸűŵŷŵŸŹƃ9
ʼnƂŨŵŷŹŬųŶŬŷŧŹźŷƂŶŷůŪŵŹŵũŲŬŴůƆ
ŕŹr&ūŵr&
ʼnƂŨŵŷũŷŬųŬŴůŷŧŨŵŹƂ
ŕŹbŸŬűźŴūūŵbžŧŸŵũ
ŚũŬŲůžŬŴůŬŸűŵŷŵŸŹůŹŬųŶŬŷŧŹźŷƂůŶŷŵūŵŲŭůŹŬŲƃŴŵŸŹůŶŷůŪŵŹŵũŲŬŴůƆ
ŚųŬŴƃſŬŴůŬ ŸűŵŷŵŸŹů ŹŬųŶŬŷŧŹźŷƂ ů ŶŷŵūŵŲŭůŹŬŲƃŴŵŸŹů
ŶŷůŪŵŹŵũŲŬŴůƆ
ŏŴŸŹŷźűŽůůŶŵƄűŸŶŲźŧŹŧŽůů
ŖŷůŨŵŷŵŸŴŧƀŬŴųůűŷŵŶŷŵŽŬŸŸŵŷŵųűŵŹŵŷƂŰűŵŴŹŷŵŲůŷźŬŹůŧŴŧŲůŮůŷźŬŹŸŹŧŨůŲƃŴŵŸŹƃ
ŷŧŨŵŹƂ ŌŸŲů ŷŧŨŵŹŧ ŴŬŸŹŧŨůŲƃŴŧ ŸűŵŷŵŸŹƃ ũŷŧƀŬŴůƆ ūũůŪŧŹŬŲƆ ŨźūŬŹ ŧũŹŵųŧŹůžŬŸűů
ŸŴůŭŬŴŧ ŬŸŲů ŷŧŨŵŹŧ ŵŸŹŧŬŹŸƆ ŴŬŸŹŧŨůŲƃŴŵŰūũůŪŧŹŬŲƃ ŨźūŬŹ ŵŸŹŧŴŵũŲŬŴ ŧ Ŵŧ ƄűŷŧŴŬ
ŵŹŵŨŷŧŮůŹŸƆŶŷŬūźŶŷŬŭūŬŴůŬ
ȧŚŨŬūůŹŬŸƃžŹŵűŵŲůžŬŸŹũŵůŴŪŷŬūůŬŴŹŵũŴŬŸŲůſűŵųũŬŲůűŵůžŹŵũƂŨŷŧŴŴŧƆŸűŵŷŵŸŹƃ
ŸŵŵŹũŬŹŸŹũźŬŹŹŷŬŨŵũŧŴůƆų
ȧźŨŬūůŹŬŸƃžŹŵůŸŶŵŲƃŮźŬŹŸƆŷŬűŵųŬŴūŵũŧŴŴƂŰŧűŸŬŸŸźŧŷ
ȧŎŧŹŬųŶŬŷŬŮŧŶźŸŹůŹŬŶŷůŨŵŷũŵŨƂžŴŵųŷŬŭůųŬ
ȧŔŧŸŹŷŵŰűů
ŋŵŸŹźŶűŻźŴűŽůůmŔŧŸŹŷŵŰűů}ųŵŭŴŵŶŵŲźžůŹƃŸŪŲŧũŴŵŪŵƄűŷŧŴŧ
ŤŹŧ ŻźŴűŽůƆ ŶŵŮũŵŲƆŬŹ ŵŨŴŵũŲƆŹƃ ūŧŴŴƂŬ ŸŵżŷŧŴŬŴŴƂŬ Ŷŷů ŶŬŷũŵų ůŸŶŵŲƃŮŵũŧŴůů
L&RPSDQLRQ7RXFK;/
őŷŵųŬŹŵŪŵųŵŭŴŵŶŵūűŲƅžůŹƃŶŷůŨŵŷűŸŬŹů:L)LůŲůŶŵūűŲƅžůŹƃŬŪŵűŶŷůŲŵŭŬŴůƅŬŸŲů
ũƂŴŬŸūŬŲŧŲůƄŹŵŪŵũŶŬŷũƂŰŷŧŮ
ȧŖŵūűŲƅžŬŴŴƂŬũŬŸƂ
ŖŵūűŲƅžŬŴůŬũŬŸŵũűL&RPSDQLRQ7RXFK;/
ŌŸŲůũŬŸƂŶŵŸŹŧũŲƆƅŹŸƆŸL&RPSDQLRQ7RXFK;/ŵŴůźŭŬŶŵūűŲƅžŬŴƂűŶŷůŨŵŷźūŧŲƃŴŬŰſůŬ
ūŬŰŸŹũůƆŴŬŹŷŬŨźƅŹŸƆ
ŋŲƆ ũŬŸŵũ ŶŷůŵŨŷŬŹŬŴŴƂż ŵŹūŬŲƃŴŵ ŶŬŷŬŰūůŹŬ ű ŴŧŸŹŷŵŰűŧų ŶŷůŨŵŷŧ ů ũƂŨŬŷůŹŬ m0\
DFFHVVRULHV}œŵůŧűŸŬŸŸźŧŷƂ
ūŬŲūŬŲūŬŲ
ʼnƂŨŬŷůŹŬũŧſůũŬŸƂřŬŶŬŷƃũŬŸƂŶŵūűŲƅžŬŴƂ
ŏŸŶŵŲƃŮŵũŧŴůŬŶŵūűŲƅžŬŴŴƂżũŬŸŵũ
őŵŪūŧŴŧ ŶŷůŨŵŷŬL&RPSDQLRQ7RXFK;/ŮŧŪŵŷůŹŸƆűŴŵŶűŧŶŵūűŲƅžŬŴŴƂżũŬŸŵũųŵŭŴŵ
ũŮũŬŸůŹƃůŴŪŷŬūůŬŴŹƂũŶŷŵŽŬŸŸŬŶŷůŪŵŹŵũŲŬŴůƆŷŬŽŬŶŹŧ
ŋŲƆƄŹŵŪŵŴŧŭųůŹŬŴŧŮŴŧžŵűũŬŸŵũ ůŶŵųŬŸŹůŹŬŴŧũŬŸƂůŴŪŷŬūůŬŴŹƂűŵŹŵŷƂŬŴŬŵŨżŵūůųŵ
ũŮũŬŸůŹƃ
ʼnŬŸƂŶŬŷŬżŵūƆŹũŷŬŭůųŵŭůūŧŴůƆŶŵŸŲŬbŸŬűźŴūŨŬŮūŬŰŸŹũůƆŞŹŵŨƂŸŴŵũŧũűŲƅžůŹƃ
ůżŴŧŭųůŹŬ2.
ŘźƀŬŸŹũźŬŹŹŷůũŵŮųŵŭŴƂżũŧŷůŧŴŹŧůŸŶŵŲƃŮŵũŧŴůƆũŬŸŵũ
ʼnŮũŬſůũŧŴůŬ ũŵ ũŷŬųƆ ŶŵūŪŵŹŵũűů ű ŶŷůŪŵŹŵũŲŬŴůƅ ŖŬŷŬū ŹŬų űŧű ŶŷůŸŹźŶůŹƃ ű
ŶŷůŪŵŹŵũŲŬŴůƅŨŲƅūŧųŵŭŴŵũŮũŬŸůŹƃũŸŬůŴŪŷŬūůŬŴŹƂ
ʼnŮũŬſůũŧŴůŬũżŵūŬŶŷůŪŵŹŵũŲŬŴůƆŷŬŽŬŶŹŧʼnƂųŵŭŬŹŬũŮũŬſůũŧŹƃůŴŪŷŬūůŬŴŹƂũŵũŷŬųƆ
ŶŷůŪŵŹŵũŲŬŴůƆŷŬŽŬŶŹŧũŴŧžŧŲŬűŧŭūŵŪŵŴŵũŵŪŵƄŹŧŶŧ
ŘũŵŨŵūŴŵŬ ũŮũŬſůũŧŴůŬʼnƂŨŬŷůŹŬŵūůŴůŲů ŴŬŸűŵŲƃűŵ ůŴŪŷŬūůŬŴŹŵũ ůŮ żŵŲŵūůŲƃŴůűŧ
ůũƂŨŬŷůŹŬůżũŶŷůŲŵŭŬŴůů&RPSDQLRQŸŶŵųŵƀƃƅŶŧŴŬŲůŶŵůŸűŧŔŧŭųůŹŬŴŧŲŵŪŵŹůŶ
ũŬŸŵũŴŧL&RPSDQLRQ7RXFK;/ŮŧŹŬųŶŵųŬŸŹůŹŬůŴŪŷŬūůŬŴŹƂŴŧũŬŸƂŖŵŸŲŬƄŹŵŪŵųŵŭŴŵ
ŶŵŲźžůŹƃūŵŸŹźŶűŸŶůŸűźŷŬŽŬŶŹŵũūŲƆůųŬƅƀŬŪŵŸƆűŵŲůžŬŸŹũŧŶŷŵūźűŹŵũ
ȧŕŨŴŵũŲŬŴůƆ
ŋŲƆ ŵŨŬŸŶŬžŬŴůƆ ŵŶŹůųŧŲƃŴŵŰ ŷŧŨŵŹƂ ŶŷůŸźŹŸŹũźŬŹ ŻźŴűŽůƆ źŸŹŧŴŵũűů ŵŨŴŵũŲŬŴůŰ ŋŲƆ
ƄŹŵŪŵ Ŵŧ ƄűŷŧŴŬ ŶŵƆũůŹŸƆ ŵűŴŵ Ÿ ŶŷŬūŲŵŭŬŴůŬų ŶŷůŴƆŹƃŵŹųŬŴůŹƃ źŸŹŧŴŵũűź ŶŵŸŲŬūŴŬŪŵ
ūŵŸŹźŶŴŵŪŵŵŨŴŵũŲŬŴůƆŔŧŭųůŹŬŶŷůŴƆŹƃůL&RPSDQLRQ7RXFK;/źŸŹŧŴŵũůŹŵŨŴŵũŲŬŴůŬ
ʼn ŮŧũůŸůųŵŸŹů
ŵŹųŵūŬŲů

RU
RU
180 181
ʼnƂųŵŭŬŹŬůŸŶŵŲƃŮŵũŧŹƃL&RPSDQLRQ7RXFK;/ũŧũŹŵŴŵųŴŵųŷŬŭůųŬʼnŧũŹŵŴŵųŴŵųŷŬŭůųŬ
ūŵŸŹźŶŴƂŸŲŬūźƅƀůŬŻźŴűŽůů
ȧňůŨŲůŵŹŬűŧŷŬŽŬŶŹŵũ
ŖŵūŷŵŨŴźƅůŴŻŵŷųŧŽůƅŵŨůŨŲůŵŹŬűŬŷŬŽŬŶŹŵũŸųŴŧŸŹŷb
ňůŨŲůŵŹŬűŧŷŬŽŬŶŹŵũŶŷŬūŵŸŹŧũŲƆŬŹūŵŸŹźŶűbŷŬŽŬŶŹŧų
ȧŖŷŵŪŷŧųųƂ
ŖŵūŷŵŨŴźƅůŴŻŵŷųŧŽůƅŵŨůŸŶŵŲƃŮŵũŧŴůůŧũŹŵųŧŹůžŬŸűůżŶŷŵŪŷŧųųŸųŴŧŸŹŷb
ȧŗźžŴŵŰŷŬŭůų
ŖŵūŷŵŨŴźƅůŴŻŵŷųŧŽůƅŵŨůŸŶŵŲƃŮŵũŧŴůůŷźžŴŵŪŵŷŬŭůųŧŸųŴŧŸŹŷb
ŇʼnřŕŔŕœŔŢŐŗŌōŏœ
•œ ŵ Ű Ź Ŭ ž ŧ ſ ź Ÿ ŷ ŧ Ů ź
Ŷ ŵ Ÿ Ų Ŭ ů Ÿ Ŷ ŵ Ų ƃ Ů ŵ ũ ŧ Ŵ ů Ɔ
Ŏŧ Ŷ ŷ Ŭ ƀ ŧ Ŭ ŹŸ Ɔ Ŷ ŵŪ ŷź ŭ ŧ Ź ƃ
ŶŷůŨŵŷũũŵūźŔŬŶŵųŬƀŧŰŹŬ
ŶŷůũŵūŴŵŰ ŨŲŵű $ Ŷŵū
ŶŷŵŹŵžŴźƅũŵūź
ŖŵŸŲŬůŸŶŵŲƃŮŵũŧŴůƆŵŹűŲƅžŧŰŹŬŶŷůŨŵŷ
ŵŹƄŲŬűŹŷŵŸŬŹů
ŕžůŸŹűŧžŧſůŶŵŸŲŬůŸŶŵŲƃŮŵũŧŴůƆ
ȧŔŧŭųůŹŬŴŧŻůűŸŧŹŵŷƂ&ŮŧŹŬųŶŵūŴůųůŹŬ
ŨŲŵűžŧſů&
ȧŚŸŹŧŴŵũůŹŬžŧſźŴŧŷŵũŴźƅŶŵũŬŷżŴŵŸŹƃ
ȧŗŧŮŨŲŵűůŷźŰŹŬ űŷƂſűź ŶŵũŬŷŴźũ ŬŬ Ŵŧ
žŬŹũŬŷŹƃ ŵŨŵŷŵŹŧ Ŷŵ žŧŸŵũŵŰ ŸŹŷŬŲűŬ
ŕŸŹŵŷŵŭŴŵŸŴůųůŹŬűŷƂſűź
ȧŕžůƀŧŰŹŬŴŵŭūŲƆůŮųŬŲƃžŬŴůƆ8OWUDEODGH
( ů ŴŧŸŧūűź ūŲƆ ŮŧųŬſůũŧŴůƆ
ůŮųŬŲƃžŬŴůƆ ( ŧ ŹŧűŭŬ ůŮũŲŬűŧŰŹŬ
ŶŷŵūźűŹƂůŮžŧſůŸŵŸŹŵŷŵŭŴŵŸŹƃƅŲŬŮũůƆ
ŴŵŭŬŰŵžŬŴƃŵŸŹŷƂŬ
ȧőŵŪūŧūŬŹŧŲůŵŸŹƂŴźŹũƂŶŵŲŴůŹŬźűŧŮŧŴŴƂŬ
ŴůŭŬūŬŰŸŹũůƆ
ŘŴůųůŹŬũŧŲŶŷůũŵūŧ&źŶŲŵŹŴůŹŬŲƃ&
ůŸŹŵŶŵŷŴŵŬűŵŲƃŽŵ&ŸųŷůŸb
ŕžůŸŹůŹŬ žŧſź & ũŧŲ Ŷŷůũŵūŧ &
źŶŲŵŹŴůŹŬŲƃ & ŸŹŵŶŵŷŴŵŬ űŵŲƃŽŵ &
ŶŷůŴŧūŲŬŭŴŵŸŹů ( ( ( ( (
űŵŲŶŧžŵűŷŬŪźŲƆŹŵŷŧŶŧŷŧ'űŷƂſűź'
źŶŲŵŹŴůŹŬŲƃŴŵŬűŵŲƃŽŵ ' ů ūŬŷŭŧŹŬŲƃ
źŶŲŵŹŴůŹŬŲƆ'ŸŶŵųŵƀƃƅŪźŨűůůŹŬŶŲŵŰ
ųƂŲƃŴŵŰũŵūƂ
ȧŖŷŵųŵŰŹŬũŸŬūŬŹŧŲůŶŷŵŹŵžŴŵŰũŵūŵŰ
ȧŌŸŲůŶŷŵūźűŹƂŶŷůŲůŶŲůűžŧſŬŮŧųŵžůŹŬ
ŬŬ ũ ŹŬžŬŴůŬ ŴŬŸűŵŲƃűůż žŧŸŵũ ũ ũŵūŬ Ÿ
ūŵŨŧũŲŬŴůŬų ųŵƅƀŬŪŵ ŸŷŬūŸŹũŧ ů Ŷŷů
ŴŬŵŨżŵūůųŵŸŹůźūŧŲůŹŬŵŸŹŧŹűůŸŶŵųŵƀƃƅ
ŲŵŶŧŹűů)ůŲůŧŨŷŧŮůũŴŵŰŸŹŵŷŵŴƂŪźŨűů
ȧʼn ŸŲźžŧŬ ŵŨŷŧŮŵũŧŴůƆ ŴŧűůŶů ũ žŧſŬ
ůŸŶŵŲƃٟۏŬ ŧŨŷŧŮůũŴźƅ ŸŹŵŷŵŴź ŪźŨűů
ŸųŵžŬŴŴźƅ ŨŬŲƂų źűŸźŸŵų ŬŸŲů ƄŹŵ
ŴŬŵŨżŵūůųŵ
ȧŋŲƆźżŵūŧŮŧŸŹŬűŲƆŴŴƂųƄűŷŧŴŵųŵžůƀŧŰŹŬ
ŬŪŵ ŪźŨűŵŰ ŴŬ ůŸŶŵŲƃٟۏŬ ŧŨŷŧŮůũŴźƅ
ŸŹŵŷŵŴźũŵůŮŨŬŭŧŴůŬŽŧŷŧŶůŴ
ŕŞŏŘřőŇŖŗŏňŕŗŇ
ȧ ŋŲƆ ŵžůŸŹűů ŶŷůũŵūŴŵŪŵ ŨŲŵűŧ $
ůŸŶŵŲƃٟۏŬ ũŲŧŭŴźƅ ŹűŧŴƃ řƀŧŹŬŲƃŴŵ
ũƂŸźſůŹŬ
ȧŋŲƆŵŨŲŬŪžŬŴůƆŵžůŸŹűůžŧſźŨŲŵűűŷƂſűů
ůŧűŸŬŸŸźŧŷƂųŵŭŴŵųƂŹƃũŶŵŸźūŵųŵŬžŴŵŰ
ųŧſůŴŬ Ůŧ ůŸűŲƅžŬŴůŬų ũŧŲŧ Ŷŷůũŵūŧ
&ů&ůŸŹŵŶŵŷŴŵŪŵűŵŲƃŽŧ&ŸųŷůŸb
ȧŖŷůůŸŶŵŲƃŮŵũŧŴůůŴŬűŵŹŵŷƂżůŴŪŷŬūůŬŴŹŵũ
űŧŷŷůųŵŷűŵũŴƂŰ Ÿŵű ůŹbū ŧűŸŬŸŸźŧŷƂ
ŸƁŬųŴƂŰũŧŲŶŷůũŵūŧůžŧŸŹůűŷƂſűůųŵŪźŹ
ŸŲŬŪűŧ ŵűŷŧŸůŹƃŸƆ ŤŹŵ ŴŬ ŶŷŬūŸŹŧũŲƆŬŹ
ŵŶŧŸŴŵŸŹůūŲƆŮūŵŷŵũƃƆůŴŬũŲůƆŬŹŴŧŷŧŨŵŹź
ŶŷůŨŵŷŧŞŹŵŨƂƄŹŵŪŵŴŬŶŷŵůŮŵſŲŵŵžůƀŧŰŹŬ
ƄŹůūŬŹŧŲůŸŷŧŮźŶŵŸŲŬůŸŶŵŲƃŮŵũŧŴůƆ
ȧ ŖŬŷŬū ůŸŶŵŲƃŮŵũŧŴůŬų ŨŲŵűŧ žŧſů &
źŨŬūůŹŬŸƃžŹŵƄŲŬűŹŷůžŬŸűůŬűŵŴŹŧűŹƂŶŵū
žŧſŬŰžůŸŹƂŬůŸźżůŬ
ȧ ŋŲƆ ŶŵūūŬŷŭŧŴůƆ ũŴŬſŴŬŪŵ ũůūŧ ů
ŶŷŵūŲŬŴůƆŸŷŵűŧŸŲźŭŨƂűŷƂſűůŶŷůŨŵŷŧ
ųŵŰŹŬŬŬ ũŷźžŴźƅŔŬůŸŶŵŲƃٟۏŬŪźŨűůŸ
ŧŨŷŧŮůũŴƂųŶŵűŷƂŹůŬųŹŧűűŧűƄŹŵųŵŭŬŹ
ŶŷůũŬŸŹůűŶŵƆũŲŬŴůƅŽŧŷŧŶůŴ
ȧʼnŵůŮŨŬŭŧŴůŬŶŵũŷŬŭūŬŴůƆžŧſů&ŸŲŬūźŰŹŬ
ůŴŸŹŷźűŽůƆųŶŵƄűŸŶŲźŧŹŧŽůůŶŵŸźūŵųŵŬžŴŵŰ
ųŧſůŴƂŴŬźũŬŲůžůũŧŰŹŬűŵŲůžŬŸŹũŵŸŵŲů
ůŲůŸŷŬūŸŹũŧūŲƆŶŵŸźūŵųŵŬžŴƂżųŧſůŴ
ŖŷůŨŵŷũŸŹŧŴūŧŷŹŴŵŰűŵųŶŲŬűŹŧŽůů
ŵŸŴŧƀŬŴƄŲŬűŹŷŵŴŴŵŰŮŧƀůŹŵŰūũůŪŧ
Ź Ŭ Ų Ɔ Ū ŧ ŷ ŧ Ŵ Ź ů ŷ ź ƅ ƀ Ŭ Ű
ŶŷŵūŵŲŭůŹŬŲƃŴƂŰŸŷŵűŬŪŵŸŲźŭŨƂŤŹŧƄŲŬű
ŹŷŵŴŴŧƆ ŸůŸŹŬųŧ ŨŬŮŵŶŧŸŴŵŸŹů ŵŨŬŷŬŪŧŬŹ
ūũůŪŧŹŬŲƃŵŹŴŬŴŵŷųŧŲƃŴŵŪŵůŸŶŵŲƃŮŵũŧŴůƆ
žŹŵŵŮŴŧžŧŬŹŶŵŲŴźƅŮŧƀůŹźūũůŪŧŹŬŲƆ
ŖŷůŵŶŷŬūŬŲŬŴŴƂżƄűŸŹŷŬųŧŲƃŴƂżźŸŲŵũůƆż
ƄűŸŶŲźŧŹŧŽůůŴŬŸŵŵŹũŬŹŸŹũźƅƀůżŷŬűŵųŬŴ
ūŧŽůƆų ŶŷůũŬūŬŴŴƂų ũ ŷźűŵũŵūŸŹũŬ Ÿų
ŹŧŨŲůŽźmʼnŇşŖŗŏňŕŗ}ŸŲůſűŵųŨŵŲƃſŵŰ
ŵŨƁŬų ůůŲů ŴŬŵŨƂžŴŵ ŶŷŵūŵŲŭůŹŬŲƃŴŵŬ
ũŷŬųƆŷŧŨŵŹƂůůŲůŴŬūŵŸŹŧŹŵžŴƂŰŶŬŷŬŷƂũ
ųŬŭūźŶŷŵŪŷŧųųŧųůŶŷůŪŵŹŵũŲŬŴůƆŸŷŧŨŧŹƂ
ũŧŬŹƄŲŬűŹŷŵŴŴŧƆŸůŸŹŬųŧŮŧƀůŹƂūũůŪŧŹŬŲƆʼn
ƄŹŵųŸŲźžŧŬŶŷůŨŵŷŵŸŹŧŴŵũůŹŸƆůŴŧƄűŷŧŴŬ
ŶŵƆũůŹŸƆŶŷŬūźŶŷŬŭūŬŴůŬźűŧŮƂũŧƅƀŬŬŴŧ
ŹŵžŹŵŶŷůŨŵŷũŷŬųŬŴŴŵŶŬŷŬŸŹŧŲŷŧŨŵŹŧŹƃ
ŌŸŲůŴŧƄűŷŧŴŬŵŹŵŨŷŧŭŧŬŹŸƆŶŷŬūźŶŷŬŭūŬ
ŴůŬůŶŷůŨŵŷŶŬŷŬŸŹŧŬŹŷŧŨŵŹŧŹƃũƂŶŵŲŴůŹŬ
ŸŲŬūźƅƀůŬūŬŰŸŹũůƆ
ȧ ŕŸŹŧũƃŹŬ ŶŷůŨŵŷ ŶŵūűŲƅžŬŴŴƂų űƄŲŬű
ŹŷŵŸŬŹůŧŶŬŷŬűŲƅžŧŹŬŲƃ,ŶŬŷŬũŬūůŹŬũ
ŶŵŲŵŭŬŴůŬmʼnűŲ}*
ȧŋŲƆůŮųŬŴŬŴůƆŴŧŸŹŷŵŬűŶŷŵŪŷŧųųƂŸŲŬ
ūźŰŹŬŷŬűŵųŬŴūŧŽůƆųŴŧƄűŷŧŴŬŸųŷŧŮūŬŲ
mʼnŇşŖŗŏňŕŗ}ūŲƆŶŵŲźžŬŴůƆůŴŻŵŷųŧŽůůŵ
űŵŲůžŬŸŹũŬůŴŪŷŬūůŬŴŹŵũũŷŬųŬŴůŶŷůŪŵŹŵũ
ŲŬŴůƆŹŬųŶŬŷŧŹźŷŬŹůŶŬŧűŸŬŸŸźŧŷŵũ
ʼnŸŲźžŧŬũŵŮŴůűŴŵũŬŴůƆũŵŶŷŵŸŵũŵŨŷŧƀŧŰ
ŹŬŸƃ ũ Ŵŧſ ŵŹūŬŲ ŵŨŸŲźŭůũŧŴůƆ űŲůŬŴŹŵũ
űŵŴŹŧűŹŴŧƆůŴŻŵŷųŧŽůƆŶŷůũŬūŬŴŧũŪŧŷŧŴ
ŹůŰŴŵųŹŧŲŵŴŬ
ʼnŇōŔŕŖŌŗŌŜŕŋŖŗŏňŕŗŇʼnŗŌōŏœňŌŎŕŖŇŘŔŕŘřŏ

RU
RU
182 183
ŞřŕŋŌŒŇřţŌŘŒŏŖŗŏňŕŗŔŌŗŇňŕřŇŌř
ŖŗŕňŒŌœŢ ŖŗŏŞŏŔŢ ŘŖŕŘŕňŢŚŘřŗŇŔŌŔŏŦ
ŖŷŵūźűŹƂ ŴŬ ūŵ
űŵŴŽŧŶŷůŪŵŹŵũŲŬŴƂ
ŚűŧŮŧŴŴŵŬũŷŬųƆŶŷůŪŵŹŵũŲŬŴůƆ
ƆũŲƆŬŹŸƆŵŷůŬŴŹůŷŵųbȞũ
ŨŵŲƃſůŴŸŹũŬŸŲźžŧŬũŵŴŵƆũŲƆŬŹŸƆ
ŴŧūŬŭŴƂųůŴūůűŧŹŵŷŵųũŷŬųŬŴů
ŶŷůŪŵŹŵũŲŬŴůƆ
ŕūŴŧűŵŴŬűŵŹŵŷƂŬŻŧűŹŵŷƂũŲůƆƅŹ
ŴŧũŷŬųƆŶŷůŪŵŹŵũŲŬŴůƆ
ŷŧŮųŬŷůŴŪŷŬūůŬŴŹŵũ
ŴŧŷŬŮŧŴŴƂżůŲůŽŬŲƂż
ŵŨƁŬųůŴŪŷŬūůŬŴŹŵũ
ŷŧŮŴŵŵŨŷŧŮůŬůŸŶŬŲŵŸŹƃŵũŵƀŬŰ
ŸŵŸŹŵƆŴůŬůŴŪŷŬūůŬŴŹŵũ
ŴŧŶŷůųŬŷŮŧųŵŷŵŮűŧůŶŷ
ŋŵŨŧũƃŹŬũŷŬųƆŶŷůŪŵŹŵũŲŬŴůƆŴŧŭŧũ
űŴŵŶűźŴŧūůŸŶŲŬŬ%
ŏŸŶŵŲƃٟۏŬųŬŴƃſŬŬűŵŲůžŬŸŹũŵ
ůŴŪŷŬūůŬŴŹŵũ
őŵŲŶŧžŵűŷŬŪźŲƆŹŵŷŧŶŧŷŧ
źŸŹŧŴŵũŲŬŴŴŬŶŷŧũůŲƃŴŵůŲůŴŬ
źŸŹŧŴŵũŲŬŴ
ŚŸŹŧŴŵũůŹŬűŵŲŶŧžŵűŷŬŪźŲƆŹŵŷŧŶŧŷŧ
ũŶŵŲŵŭŬŴůŬmPD[}ųŧűŸůųźųũ
ƄŹŵųŶŵŲŵŭŬŴůůŨźūŬŹźūŬŷŭůũŧŹƃŸƆ
ųŧűŸůųŧŲƃŴŵŬűŵŲůžŬŸŹũŵŹŬŶŲŧũŬųűŵŸŹů
ūŲƆũŸŬżŷŬŭůųŵũŶŷůŪŵŹŵũŲŬŴůƆŸźŶƂ
ŶŷůŪŵŹŵũŲŬŴůŬŴŧŶŧŷźůŹbū
ŤŹŧŴŧŸŹŷŵŰűŧŹŧűŭŬŶŷŬūŵŹũŷŧƀŧŬŹ
ŷŧŮŨŷƂŮŪůũŧŴůŬũŵũŷŬųƆŸųŬſůũŧŴůƆ
ŚŸŹŧŴŵũűŧŸŲŧŨŵŰŶŵūŧžůŶŧŷŧŶŵŮũŵŲƆŬŹ
ũƂŸũŵŨŵŭūŧŹƃųŧűŸůųŧŲƃŴŵŬűŵŲůžŬŸŹũŵ
űŵŴūŬŴŸŧŹŧŶŵƄŹŵųźŸŬŬŶŵųŵƀƃƅ
ŷŬűŵųŬŴūźŬŹŸƆŪŵŹŵũůŹƃŨŲƅūŧůŸŵźŸƂ
ūŲƆŶŵŲźžŬŴůƆŨŵŲŬŬŵūŴŵŷŵūŴŵŰ
űŵŴŸůŸŹŬŴŽůůŷůŮŵŹŹŵūŬŸŬŷŹƂŸŮŧũŧŷŴƂų
űŷŬųŵųŸŵźŸƂůŹbū
ŖŷŵūźűŹƂŴŧ
ŶŧŷźŴŬūŵűŵŴŽŧ
ŶŷůŪŵŹŵũŲŬŴƂ
ŔŬŶŷŧũůŲƃŴŵŬűŵŲůžŬŸŹũŵũŵūƂũ
žŧſŬ
ŘŲůſűŵųŨŵŲƃſŵŰŵŨƁŬų
ůŴŪŷŬūůŬŴŹŵũ
őŵŲůžŬŸŹũŵũŵūƂũžŧſŬūŵŲŭŴŵ
ŸŵŵŹũŬŹŸŹũŵũŧŹƃųŧŷűůŷŵũűŬbŲ
œŵŭŴŵŹŧűŭŬůŸŶŵŲƃŮŵũŧŹƃŷźžŴŵŰ
ŷŬŭůųũƂŨŷŧũŹŬųŶŬŷŧŹźŷźr&ů
ũŷŬųƆŶŷůŪŵŹŵũŲŬŴůƆũŸŵŵŹũŬŹŸŹũůůŸ
űŵŲůžŬŸŹũŵųůŹůŶŵųůŴŪŷŬūůŬŴŹŵũ
ŏŸŶŵŲƃٟۏŬųŬŴƃſŬŬűŵŲůžŬŸŹũŵ
ůŴŪŷŬūůŬŴŹŵũ
řŷźūŴŵŸŹůŶŷů
ŶŷůŪŵŹŵũŲŬŴůů
ŵŶŷŬūŬŲŬŴŴƂż
ŷŬŽŬŶŹŵũ
ŏŸŶŵŲƃŮźŬųƂŬŷŬŽŬŶŹƂŴŬ
ŶŵūżŵūƆŹ
ʼnŧſůŷŬŽŬŶŹƂůŲůŷŬŽŬŶŹƂůŮŏŴŹŬŷŴŬŹŧ
ųŵŪźŹŴŬŶŵūżŵūůŹƃūŲƆūŧŴŴŵŪŵŶŷůŨŵŷŧ
ůŬŪŵŧűŸŬŸŸźŧŷŵũűŵŲůžŬŸŹũŵŶŷŵūźűŹŵũ
ũŷŬųƆůŶŷŵūŵŲŭůŹŬŲƃŴŵŸŹƃŶŷůŪŵŹŵũŲŬŴůƆ
ŴŬŶŵūżŵūƆƀůŬŧűŸŬŸŸźŧŷƂŖŬŷŬū
ŴŧžŧŲŵųŶŷůŪŵŹŵũŲŬŴůƆźŨŬūůŹŬŸƃžŹŵũƂ
ŸŲŬūźŬŹŬůŴŸŹŷźűŽůƆųŶŵƄűŸŶŲźŧŹŧŽůů
ŶŷůũŬūŬŴŴƂųũūŧŴŴŵųŷźűŵũŵūŸŹũŬ
ŖŷůŨŵŷŴŬŷŧŨŵŹŧŬŹ
ŖŷůŨŵŷŴŬŶŵūűŲƅžŬŴű
ƄŲŬűŹŷŵŸŬŹů ŖŵūűŲƅžůŹŬŶŷůŨŵŷűŷŵŮŬŹűŬƄŲŬűŹŷŵŸŬŹů
ŤűŷŧŴ%ŶŵŶŷŬŭŴŬųźžŬŷŴƂŰ
ŶŷůŨŵŷŴŧżŵūůŹŸƆũŷŬŭůųŬ
ŵŭůūŧŴůƆ
ŔŧŭųůŹŬŵūŴźůŮŸŬŴŸŵŷŴƂżűŲŧũůſ
%bȝb%
ŖŬŷŬűŲƅžŧŹŬŲƃ*ŴŧżŵūůŹŸƆũ
ŶŵŲŵŭŬŴůům}
ŚŸŹŧŴŵũůŹŬŶŬŷŬűŲƅžŧŹŬŲƃũŶŵŲŵŭŬŴůŬ
m}
ŞŧſŧůŲůűŷƂſűŧŷŧŸŶŵŲŵŭŬŴŧ
ůŲůŮŧŻůűŸůŷŵũŧŴŧŴŬŶŷŧũůŲƃŴŵ
ŚŨŬūůŹŬŸƃžŹŵžŧſŧůŲůűŷƂſűŧ
ŷŧŸŶŵŲŵŭŬŴƂŶŷŧũůŲƃŴŵůŮŧŻůűŸůŷŵũŧŴƂ
ũŸŵŵŹũŬŹŸŹũůůŸŷůŸźŴűŧųůũŷźűŵũŵūŸŹũŬ
őŷƂſűŧŴŬ
ŻůűŸůŷźŬŹŸƆ őŷƂſűŧŴŬŶŷŧũůŲƃŴŵŸŵŨŷŧŴŧ
ŚŨŬūůŹŬŸƃžŹŵźŶŲŵŹŴůŹŬŲƃŶŷŧũůŲƃŴŵ
źŸŹŧŴŵũŲŬŴũūŬŷŭŧŹŬŲŬźŶŲŵŹŴůŹŬŲƆů
žŹŵūŬŷŭŧŹŬŲƃźŶŲŵŹŴůŹŬŲƆŶŷŧũůŲƃŴŵ
ũŸŹŧũŲŬŴũűŷƂſűź
ŖŗŕňŒŌœŢ ŖŗŏŞŏŔŢ ŘŖŕŘŕňŢŚŘřŗŇŔŌŔŏŦ
ŞŷŬŮųŬŷŴƂŬũůŨŷŧŽůů
ŖŷůŨŵŷŴŬźŸŹŧŴŵũŲŬŴŴŧ
ŶŲŵŸűŵŰŶŵũŬŷżŴŵŸŹůŶŷůŨŵŷ
ŴŧżŵūůŹŸƆũŴŬźŸŹŵŰžůũŵų
ŶŵŲŵŭŬŴůů
ŚŸŹŧŴŵũůŹŬŶŷůŨŵŷŴŧŷŵũŴźƅ
ŶŵũŬŷżŴŵŸŹƃ
ŘŲůſűŵųŨŵŲƃſŵŰŵŨƁŬų
ůŴŪŷŬūůŬŴŹŵũ ŚųŬŴƃſůŹŬűŵŲůžŬŸŹũŵůŴŪŷŬūůŬŴŹŵũ
ŔŬũŬŷŴƂŰŧűŸŬŸŸźŧŷ ŚŨŬūůŹŬŸƃžŹŵůŸŶŵŲƃŮźŬŹŸƆ
ŷŬűŵųŬŴūŵũŧŴŴƂŰŧűŸŬŸŸźŧŷ
ŘŲŧŨƂŰſźųũŵũŷŬųƆ
ŷŧŨŵŹƂ
ʼnŧŲŶŷůũŵūŧŶŷůŨŵŷŧųŵŭŬŹ
ůŮūŧũŧŹƃſźųŶŷůŷŧŨŵŹŬŴŧ
ŶŵŴůŭŬŴŴŵŰŸűŵŷŵŸŹůůŲůŶŷů
ůŸŶŵŲƃŮŵũŧŴůůŴŬűŵŹŵŷƂż
ůŴŪŷŬūůŬŴŹŵũŷůŸůŹbū
ŤŹŵũŷŬųŬŴŴŵŬƆũŲŬŴůŬűŵŹŵŷŵŬŴŬ
ũŲůƆŬŹŴŧŸŷŵűŸŲźŭŨƂŶŷůŨŵŷŧŎũźű
źųŬŴƃſůŹŸƆůŲůůŸžŬŮŴŬŹŶŵųŬŷŬ
ůŸŶŵŲƃŮŵũŧŴůƆŶŷůŨŵŷŧŧŹŧűŭŬŶŵŸŲŬ
ŴŬŸűŵŲƃűůżŵžůŸŹŵűŸƁŬųŴŵŪŵũŧŲŧ
ŶŷůũŵūŧŸųŷŧŮūŬŲmŕžůŸŹűŧŶŷůŨŵŷŧ}
ŞŷŬŮųŬŷŴƂŰſźųũŵ
ũŷŬųƆŷŧŨŵŹƂ
ŏŸŶŵŲƃŮŵũŧŴůŬŴŬŶŵūżŵūƆƀŬŪŵ
ŧűŸŬŸŸźŧŷŧ
ŚŨŬūůŹŬŸƃžŹŵůŸŶŵŲƃŮźŬŹŸƆ
ŸŵŵŹũŬŹŸŹũźƅƀŧƆŴŧŸŧūűŧŴŧŶŷůųŬŷ
ŴŬůŸŶŵŲƃٟۏŬŴŧŸŧūűźūŲƆũŮŨůũŧŴůƆ
(ūŲƆŮŧųŬſůũŧŴůƆůŲůŸųŬſůũŧŴůƆ
ŹŬŸŹŧůŸŶŵŲƃٟۏŬŴŧŸŧūűźūŲƆ
ŮŧųŬſůũŧŴůƆůŮųŬŲƃžŬŴůƆ(ŋŲƆ
ŶŵŲźžŬŴůƆŴŬŵŨżŵūůųŵŰůŴŻŵŷųŧŽůů
ŶŵƄŹŵųźũŵŶŷŵŸźŸųŷŬűŵųŬŴūŧŽůůũ
ŷŬŽŬŶŹŧżůůŴŸŹŷźűŽůƆżŶŵƄűŸŶŲźŧŹŧŽůů
ŶŷůũŬūŬŴŴƂżũūŧŴŴŵųŷźűŵũŵūŸŹũŬ
ŚŹŬžűŧžŬŷŬŮűŷƂſűź
ŘŲůſűŵųŨŵŲƃſŵŰŵŨƁŬų
ůŴŪŷŬūůŬŴŹŵũ ŚųŬŴƃſůŹŬűŵŲůžŬŸŹũŵůŴŪŷŬūůŬŴŹŵũ
őŷƂſűŧŴŬŶŷŧũůŲƃŴŵ
źŸŹŧŴŵũŲŬŴŧůŲůŮŧŻůűŸůŷŵũŧŴŧ
ŚŸŹŧŴŵũůŹŬűŷƂſűźŴŧžŧſźŴŧūŲŬŭŧƀůų
ŵŨŷŧŮŵų
ŚŶŲŵŹŴůŹŬŲƃŴŵŬűŵŲƃŽŵ
ŴŬŴŧųŬŸŹŬ
ŚŸŹŧŴŵũůŹŬźŶŲŵŹŴůŹŬŲƃŴŵŬűŵŲƃŽŵŴŧ
ūŬŷŭŧŹŬŲƃźŶŲŵŹŴůŹŬŲƆůŮŧűŷŬŶůŹŬŨŲŵű
ŴŧűŷƂſűŬ
ŚŶŲŵŹŴůŹŬŲƃŴŵŬűŵŲƃŽŵŸŲŵųŧŴŵ
ůŲůŶŵũŷŬŭūŬŴŵ
ŎŧųŬŴůŹŬźŶŲŵŹŴůŹŬŲƃŵŨŷŧŹůŹŬŸƃũ
ŧũŹŵŷůŮŵũŧŴŴƂŰŸŬŷũůŸŴƂŰŽŬŴŹŷ
ŔŬũŬŷŴƂŰŧűŸŬŸŸźŧŷ ŚŨŬūůŹŬŸƃžŹŵůŸŶŵŲƃŮźŬŹŸƆ
ŷŬűŵųŬŴūŵũŧŴŴƂŰŧűŸŬŸŸźŧŷ
ŚŹŬžűŧůŮũŧŲŧŶŷůũŵūŧ
žŧſů
ŚŶŲŵŹŴůŹŬŲƃŴŧżŵūůŹŸƆũŴŬŶŷŧ
ũůŲƃŴŵųŶŵŲŵŭŬŴůů
ŚŸŹŧŴŵũůŹŬźŶŲŵŹŴůŹŬŲƃūŵŲŭŴƂų
ŵŨŷŧŮŵų
ŚŶŲŵŹŴůŹŬŲƃŶŵũŷŬŭūŬŴ ŕŨŷŧŹůŹŬŸƃũŧũŹŵŷůŮŵũŧŴŴƂŰŸŬŷũůŸŴƂŰ
ŽŬŴŹŷ
ŘŹŵŶŵŷŴŵŬűŵŲƃŽŵ&ŴŬŶŷŧ
ũůŲƃŴŵŮŧŻůűŸůŷŵũŧŴŵ ŖŷŧũůŲƃŴŵŮŧŻůűŸůŷźŰŹŬűŵŲƃŽŵ&
ŖŲŵżŵũŷŧƀŧƅŹŸƆ
Ŵŵŭů
őźŸűůŶŷŵūźűŹŵũŸŲůſűŵų
űŷźŶŴƂŬůŲůŹũŬŷūƂŬ
ŚųŬŴƃſůŹŬŷŧŮųŬŷůŲůŵŨƁŬų
ŵŨŷŧŨŧŹƂũŧŬųƂżůŴŪŷŬūůŬŴŹŵũ
ŋŵŨŧũƃŹŬŭůūűŵŸŹƃ
ŎŧŶŧżŵŹūũůŪŧŹŬŲƆ
ŤŹŵųŵŭŬŹŶŷŵůŮŵŰŹůŶŷů
ŶŬŷũŵųůŸŶŵŲƃŮŵũŧŴůůŶŷůŨŵŷŧ
ůŲůũŸŲźžŧŬŶŬŷŬŪŷźŮűůůŮŮŧ
ŵŨƁŬųŧůŴŪŷŬūůŬŴŹŵũŸŲůſűŵų
űŷźŶŴƂŬůŲůŸŲůſűŵųŹũŬŷūƂŬ
ůŴŪŷŬūůŬŴŹƂ
ŕŸŹŧũƃŹŬūũůŪŧŹŬŲƃŵŸŹƂŹƃŶŷůųŬŷŴŵ
ŴŧbųůŴźŹůźųŬŴƃſůŹŬŵŨƁŬų
ůŴŪŷŬūůŬŴŹŵũũžŧſŬ
ŕŹŵŨŷŧŭŬŴůŬ
ŶŷŬūźŶŷŬŭūŬŴůƆ
ŞŧſŧůŲůűŷƂſűŧŴŬŶŷŧũůŲƃŴŵ
ŮŧŻůűŸůŷŵũŧŴƂ
ŖŬŷŬūůŸŶŵŲƃŮŵũŧŴůŬųŶŷůŨŵŷŧ
źŨŬūůŹŬŸƃžŹŵžŧſŧŮŧŻůűŸůŷŵũŧŴŧ
ŴŧŶŷůũŵūŴŵųŨŲŵűŬūŵŲŭŴƂų
ŵŨŷŧŮŵųŧűŷƂſűŧūŵŲŭŴƂųŵŨŷŧŮŵų
ŮŧŻůűŸůŷŵũŧŴŧŴŧžŧſŬŌŸŲů
ŶŷŵŨŲŬųŧŴŬźŸŹŷŧŴŬŴŧŵŨŷŧŹůŹŬŸƃũ
ŧũŹŵŷůŮŵũŧŴŴƂŰŸŬŷũůŸŴƂŰŽŬŴŹŷ
őŷƂſűŧźŸŹŧŴŵũŲŬŴŧŴŧžŧſŬ
ũŵũŷŬųƆŷŧŨŵŹƂŷŬŭůųŧ
ŶŷůŪŵŹŵũŲŬŴůƆŨŬŮűŷƂſűů
ŗŧŮŨŲŵűůŷźŰŹŬűŷƂſűźŶŬŷŬūŮŧŶźŸűŵų
ŶŷŵŪŷŧųųƂŶŷůŪŵŹŵũŲŬŴůƆŌŸŲů
ŶŷŵŨŲŬųŧŴŬźŸŹŷŧŴŬŴŧŵŨŷŧŹůŹŬŸƃũ
ŧũŹŵŷůŮŵũŧŴŴƂŰŸŬŷũůŸŴƂŰŽŬŴŹŷ

RURU
184 185
ŖŷůŨŵŷŶŵŶŷŬŭŴŬųźŴŬŷŧŨŵŹŧŬŹ"
ŕŨŷŧŹůŹŬŸƃũŧũŹŵŷůŮŵũŧŴŴƂŰŸŬŷũůŸŴƂŰŽŬŴŹŷŸųůŴŸŹŷźűŽůƅŶŵŵŨŸŲźŭůũŧŴůƅ
ȧŚŹůŲůŮŧŽůƆźŶŧűŵũűůůŶŷůŨŵŷŧ
ŚŶŧűŵũűŧŸŵŸŹŵůŹůŮųŧŹŬŷůŧŲŵũűŵŹŵŷƂŬŴŬŶŷŬūŸŹŧũŲƆƅŹŵŶŧŸŴŵŸŹůūŲƆŵűŷźŭŧƅƀŬŰ
ŸŷŬūƂůŶŵƄŹŵųźųŵŭŬŹŨƂŹƃźŹůŲůŮůŷŵũŧŴŧũŸŵŵŹũŬŹŸŹũůůŸŶŷŧũůŲŧųůźŹůŲůŮŧŽůů
ūŬŰŸŹũźƅƀůųůũũŧſŬųŷŬŪůŵŴŬ
ŋŲƆźŹůŲůŮŧŽůůŶŷůŨŵŷŧŵŨŷŧŹůŹŬŸƃũŸŵŵŹũŬŹŸŹũźƅƀůŬŸŲźŭŨƂŶŵųŬŸŹźŭůŹŬŲƃŸŹũŧ
ȧŤŲŬűŹŷŵŴŴƂŬůŲůƄŲŬűŹŷůžŬŸűůŬůŮūŬŲůƆũűŵŴŽŬŸŷŵűŧůżŸŲźŭŨƂ
ŖŵųŴůŹŬŵŨŵűŷźŭŧƅƀŬŰŸŷŬūŬ
ŋŧŴŴƂŰ ŶŷůŨŵŷ ŸŵūŬŷŭůŹ ųŧŹŬŷůŧŲƂ űŵŹŵŷƂŬ ųŵŪźŹ ŨƂŹƃ ŶŬŷŬŷŧŨŵŹŧŴƂ ůŲů
ůŸŶŵŲƃŮŵũŧŴƂŶŵũŹŵŷŴŵ
ŖŬŷŬūŧŰŹŬŬŪŵũŶźŴűŹŸŨŵŷŧūŲƆŶŬŷŬŷŧŨŵŹűů
ŚřŏŒŏŎŇŝŏŦ
řŵũŧŷŴƂŰŮŴŧűůŲŵŪŵŹůŶƂ%OXHWRRWKpƆũŲƆƅŹŸƆŮŧŷŬŪůŸŹŷůŷŵũŧŴŴƂųůŹŵũŧŷŴƂųůŮŴŧűŧųů%OXHWRRWK6,*,QFůżůŸŶŵŲƃŮŵũŧŴůŬűŵųŶŧŴůŬŰ
6(%*URXSŷŧŮŷŬſŬŴŵ
*RRJOH3OD\ů$QGURLGƆũŲƆƅŹŸƆŹŵũŧŷŴƂųůŮŴŧűŧųůűŵųŶŧŴůů*RRJOH,QF
$SSOHůŲŵŪŵŹůŶ$SSOHƆũŲƆƅŹŸƆŹŵũŧŷŴƂųůŮŴŧűŧųů$SSOH,QFŮŧŷŬŪůŸŹŷůŷŵũŧŴŴƂųůũŘşŇůūŷźŪůżŸŹŷŧŴŧż$SS6WRUHƆũŲƆŬŹŸƆŮŴŧűŵų
ŵŨŸŲźŭůũŧŴůƆűŵųŶŧŴůů$SSOH,QF
ŊŒŕŘŘŇŗŏŐ
ŘũƆŮƂũŧŴůŬŶŷŵŽŬŸŸŪŷźŶŶůŷŵũűůůŲůŶŵūűŲƅžŬŴůƆūũźżŶŷůŨŵŷŵũ
ŖŷŵůŸżŵūůŹŶŷůŶŬŷũŵųŶŵūűŲƅžŬŴůůŸųŧŷŹŻŵŴŧůŲůŶŲŧŴſŬŹŧűL&RPSDQLRQ7RXFK;/
ŘůŴżŷŵŴůŮŧŽůƆŶŷŵŽŬŸŸŵŨŴŵũŲŬŴůƆůŴŻŵŷųŧŽůůŖŷůŲŵŭŬŴůŬŸůŴżŷŵŴůŮůŷźŬŹŸƆŸL&RPSDQLRQ7RXFK;/ūŲƆŵŨųŬŴŧ
ūŧŴŴƂųů
ŶŷůŶŵūűŲƅžŬŴůů
ŖŵūűŲƅžŬŴůŬźŸŹŧŴŵũűŧŸũƆŮůųŬŭūźŶŷůŲŵŭŬŴůŬųŸųŧŷŹŻŵŴŵųŶŲŧŴſŬŹŵųůŶŷůŨŵŷŵųL&RPSDQLRQ7RXFK;/ŤŹŵ
ūŬŰŸŹũůŬŴŬŵŨżŵūůųŵūŲƆũƂŶŵŲŴŬŴůƆŸůŴżŷŵŴůŮŧŽůů
śŧŰŲƂFRRNLHƄŹŵůŴŻŵŷųŧŽůƆŵŨůŸŶŵŲƃŮŵũŧŴůůŵŹŶŷŧũŲŬŴŴŧƆũ0RXOLQH[ūŲƆźŲźžſŬŴůƆŷŧŨŵŹƂŶŷůŲŵŭŬŴůƆ
ŖŗŕňŒŌœŢ ŖŗŏŞŏŔŢ ŘŖŕŘŕňŢŚŘřŗŇŔŌŔŏŦ
ŖŷŬūŵżŷŧŴůŹŬŲƃŴƂŰ
ŮŧųŵűŴŧűŷƂſűŬ
ŵŸŹŧŬŹŸƆŧűŹůũŴƂų
ŸŹŬŷŭŬŴƃũƂūũůŴźŹů
ŶŷŬŶƆŹŸŹũźŬŹŨŲŵűůŷŵũűŬ
űŷƂſűů
ʼnŵũŷŬųƆŷŧŨŵŹƂŶŷůŨŵŷ
ŨƂŲũƂűŲƅžŬŴŸŶŵųŵƀƃƅ
ŶŬŷŬűŲƅžŧŹŬŲƆ,2ůŲůſŴźŷ
ŨƂŲŵŹűŲƅžŬŴůŮŷŵŮŬŹűů
ŶůŹŧŴůƆ
ŖŷŵŸŹŵŶŬŷŬũŬūůŹŬŶŬŷŬűŲƅžŧŹŬŲƃ
,2ũŶŵŲŵŭŬŴůŬ,žŹŵŨƂũƂŶŵŲŴůŹƃ
ŸŨŷŵŸŴŧŸŹŷŵŬűůŷŧŮŨŲŵűůŷŵũŧŹƃ
ŶŷŬūŵżŷŧŴůŹŬŲƃŴƂŰŮŧųŵűŴŧűŷƂſűŬ
ŸŹŬŷŭŬŴƃŧũŹŵųŧŹůžŬŸűůũŬŷŴŬŹŸƆũ
ůŸżŵūŴŵŬŶŵŲŵŭŬŴůŬŹŬŶŬŷƃųŵŭŴŵ
ŮŧŨŲŵűůŷŵũŧŹƃűŷƂſűź
ŘŵŵŨƀŬŴůŬŵŨŵſůŨűŬ
m6(&8} ŗŵŹŵŷŴŬũŷŧƀŧŬŹŸƆ
ŚŨŬŷůŹŬůŴŪŷŬūůŬŴŹƂůŮžŧſůūŧŰŹŬ
ŬŰŵŸŹƂŹƃůŶŵũŹŵŷůŹŬŶŵŶƂŹűźŌŸŲů
ŶŷŵŨŲŬųŧŴŬźŸŹŷŧŴŬŴŧ
ŵŨŷŧŹůŹŬŸƃũŸŲźŭŨźŶŵŸŲŬŶŷŵūŧŭŴŵŪŵ
ŵŨŸŲźŭůũŧŴůƆ
ŘŵŵŨƀŬŴůŬŵŨŵſůŨűŬ
(55 ŖŬŷŬŪŷŬũžŧſů
ŔŧűŵŷŵŹűŵŬũŷŬųƆŶŷŬűŷŧŹůŹŬŷŧŨŵŹź
ŋŧŰŹŬžŧſŬŵŸŹƂŹƃŌŸŲůŶŷŵŨŲŬųŧ
ŴŬźŸŹŷŧŴŬŴŧŵŨŷŧŹůŹŬŸƃũŸŲźŭŨź
ŶŵŸŲŬŶŷŵūŧŭŴŵŪŵŵŨŸŲźŭůũŧŴůƆ
ŘŵŵŨƀŬŴůŬŵŨŵſůŨűŬ
m6(&8} ŖŬŷŬŪŷŬũūũůŪŧŹŬŲƆ
ŋŧŰŹŬŶŷůŨŵŷźŵŸŹƂŹƃũŹŬžŬŴůŬbųůŴźŹ
ůźųŬŴƃſůŹŬűŵŲůžŬŸŹũŵůŴŪŷŬūůŬŴŹŵũũ
žŧſŬ
ŘŵŵŨƀŬŴůŬŵŨŵſůŨűŬ
m6(&8} ŖŷůŨŵŷŷŧŨŵŹŧŬŹŴŬŸŹŧŨůŲƃŴŵ
ŖŷůŨŵŷŵŸŹŧŴŵũŲŬŴůŮŮŧ
ŴŬŸŹŧŨůŲƃŴŵŰŷŧŨŵŹƂŖŵŶŷŵŨźŰŹŬ
źųŬŴƃſůŹƃŵŨƁŬųŶŷŵūźűŹŵũũžŧſŬ
(55(55(55 ŖŷůŨŵŷ
ŶŬŷŬŪŷŬŲŸƆ
ŕŹűŲƅžůŹŬŶŷůŨŵŷŵŹŸŬŹůů
ŵŨŷŧŹůŹŬŸƃũŸŲźŭŨźŶŵŸŲŬŶŷŵūŧŭŴŵŪŵ
ŵŨŸŲźŭůũŧŴůƆ
(55 ŔŬũŵŮųŵŭŴŵŮŧŨŲŵűůŷŵũŧŹƃ
űŷƂſűź
ŕŨŷŧŹůŹŬŸƃũŸŲźŭŨźŶŵŸŲŬŶŷŵūŧŭŴŵŪŵ
ŵŨŸŲźŭůũŧŴůƆ
(55 ŖŷůŨŵŷŷŧŨŵŹŧŬŹ
ŸŹŷźūŵų
ŔŧűŵŷŵŹűŵŬũŷŬųƆŶŷŬűŷŧŹůŹŬŷŧŨŵŹź
ŕŹűŲƅžůŹŬŶŷůŨŵŷŵŹƄŲŬűŹŷŵŸŬŹůů
ŶŵūűŲƅžůŹŬŬŪŵŸŴŵũŧ
ŌŸŲůŶŷŵŨŲŬųŧŴŬźŸŹŷŧŴŬŴŧŵŨŷŧŹůŹŬŸƃũ
ŽŬŴŹŷŶŵŸŲŬŶŷŵūŧŭŴŵŪŵŵŨŸŲźŭůũŧŴůƆ
(55(55(55
ŖŷůŨŵŷŷŧŨŵŹŧŬŹŸŹŷźūŵų
ŕŨŷŧŹůŹŬŸƃũŸŲźŭŨźŶŵŸŲŬŶŷŵūŧŭŴŵŪŵ
ŵŨŸŲźŭůũŧŴůƆ
(55 L&RPSDQLRQŶŬŷŬŪŷŬŲŸƆ ŕŨŷŧŹůŹŬŸƃũŸŲźŭŨźŶŵŸŲŬŶŷŵūŧŭŴŵŪŵ
ŵŨŸŲźŭůũŧŴůƆ
(55(55 ŖŷŵŨŲŬųŧŸŶŵūűŲƅžŬŴůŬų
ŖŷůŨŵŷŴŬųŵŭŬŹũƂŶŵŲŴůŹƃ
ŶŵūűŲƅžŬŴůŬŶŵŸŬŹů:L)LŕŹűŲƅžůŹŬ
ŬŪŵŵŹƄŲŬűŹŷŵŸŬŹůůŶŵūűŲƅžůŹŬŸŴŵũŧ
ŌŸŲůŶŷŵŨŲŬųŧŴŬźŸŹŷŧŴŬŴŧŵŨŷŧŹůŹŬŸƃũ
ŽŬŴŹŷŶŵŸŲŬŶŷŵūŧŭŴŵŪŵŵŨŸŲźŭůũŧŴůƆ
ŤűŷŧŴ ŖŷůŨŵŷŴŬŶŵūűŲƅžŬŴűŸŬŹů
:L)L
ŖŷŵũŬŷƃŹŬŸŬŹƃ:L)LůŲů
ŵŹűŲƅžůŹŬŶŷůŨŵŷŵŹŸŬŹůŶŵūűŲƅžůŹŬŬŪŵ
ŸŴŵũŧŌŸŲůŶŷŵŨŲŬųŧŴŬźŸŹŷŧŴŬŴŧ
ŵŨŷŧŹůŹŬŸƃũŽŬŴŹŷŶŵŸŲŬŶŷŵūŧŭŴŵŪŵ
ŵŨŸŲźŭůũŧŴůƆ
ŤűŷŧŴ
ŖŷůŨŵŷŶŵūűŲƅžŧŬŹŸƆűŸŬŹů:L)L
ŋŵŭūůŹŬŸƃŶŵƆũŲŬŴůƆŲŵŪŵŹůŶŧ
8,8,
ŖŷůŨŵŷŴŬųŵŭŬŹŮŧŪŷźŮůŹƃ
ŵŶŷŬūŬŲŬŴŴƂŬūŧŴŴƂŬŶŵŸŬŹů
:L)L
ŌŸŲůŶŷŵŨŲŬųŧŶŵũŹŵŷƆŬŹŸƆũŵŮųŵŭŴŵ
ŸůŪŴŧŲ:L)LŸŲůſűŵųŸŲŧŨƂŰŞŹŵŨƂ
źŲźžſůŹƃűŧžŬŸŹũŵŸůŪŴŧŲŧ:L)L
ŶŵŶŷŵŨźŰŹŬŶŬŷŬųŬŸŹůŹƃŶŷůŨŵŷŨŲůŭŬ
űŷŵźŹŬŷźůŲůźŸŹŧŴŵũůŹƃŶŵũŹŵŷůŹŬŲƃ
ŸůŪŴŧŲŧ:L)LŷƆūŵųŸŶŷůŨŵŷŵų
8,8,8,8,
ŖŷůŨŵŷźŴŬźūŧŬŹŸƆŶŵŲźžůŹƃ
ŵŶŷŬūŬŲŬŴŴƂŬŲŵűŧŲƃŴƂŬ
ūŧŴŴƂŬůŲůūŧŴŴƂŬ:L)L
ŌŸŲůŶŷůŨŵŷŴŬŶŵūűŲƅžŬŴ
ŶŵŶŷŵŨźŰŹŬŶŵūűŲƅžůŹƃŬŪŵůŮŧŶźŸŹůŹƃ
ŸůŴżŷŵŴůŮŧŽůƅūŧŴŴƂżŌŸŲůŶŷůŨŵŷ
ŶŵūűŲƅžŬŴŶŵŶŷŵŨźŰŹŬźŲźžſůŹƃűŧžŬŸŹũŵ
ŸůŪŴŧŲŧŸųƆžŬŰűźũƂſŬ

p. 1 - 23
p. 24 - 46
p. 47 - 69
p. 70 - 92
p. 93 - 115
p. 116 - 138
p. 139 - 161
p. 162 - 185
FR
NL
EN
DE
IT
PT
ES
8020007193-02
RU
-
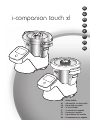 1
1
-
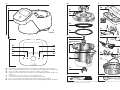 2
2
-
 3
3
-
 4
4
-
 5
5
-
 6
6
-
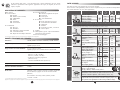 7
7
-
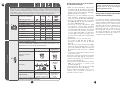 8
8
-
 9
9
-
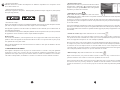 10
10
-
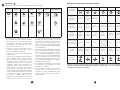 11
11
-
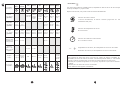 12
12
-
 13
13
-
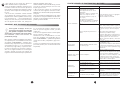 14
14
-
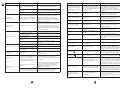 15
15
-
 16
16
-
 17
17
-
 18
18
-
 19
19
-
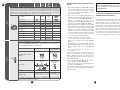 20
20
-
 21
21
-
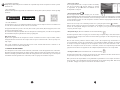 22
22
-
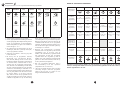 23
23
-
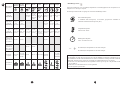 24
24
-
 25
25
-
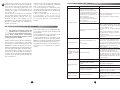 26
26
-
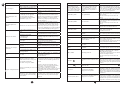 27
27
-
 28
28
-
 29
29
-
 30
30
-
 31
31
-
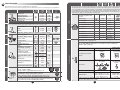 32
32
-
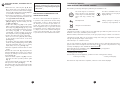 33
33
-
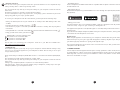 34
34
-
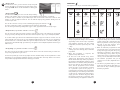 35
35
-
 36
36
-
 37
37
-
 38
38
-
 39
39
-
 40
40
-
 41
41
-
 42
42
-
 43
43
-
 44
44
-
 45
45
-
 46
46
-
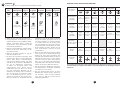 47
47
-
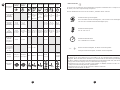 48
48
-
 49
49
-
 50
50
-
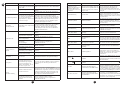 51
51
-
 52
52
-
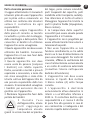 53
53
-
 54
54
-
 55
55
-
 56
56
-
 57
57
-
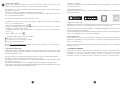 58
58
-
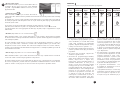 59
59
-
 60
60
-
 61
61
-
 62
62
-
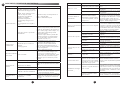 63
63
-
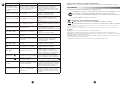 64
64
-
 65
65
-
 66
66
-
 67
67
-
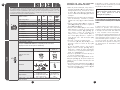 68
68
-
 69
69
-
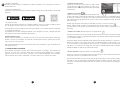 70
70
-
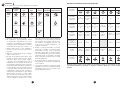 71
71
-
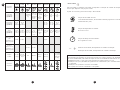 72
72
-
 73
73
-
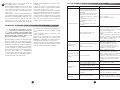 74
74
-
 75
75
-
 76
76
-
 77
77
-
 78
78
-
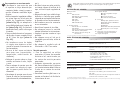 79
79
-
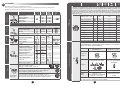 80
80
-
 81
81
-
 82
82
-
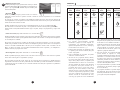 83
83
-
 84
84
-
 85
85
-
 86
86
-
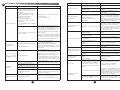 87
87
-
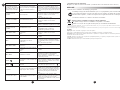 88
88
-
 89
89
-
 90
90
-
 91
91
-
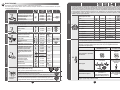 92
92
-
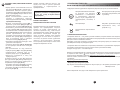 93
93
-
 94
94
-
 95
95
-
 96
96
-
 97
97
-
 98
98
-
 99
99
-
 100
100
-
 101
101


in andere talen
- italiano: Moulinex HF934510 Istruzioni per l'uso
- français: Moulinex HF934510 Mode d'emploi
- español: Moulinex HF934510 Instrucciones de operación
- Deutsch: Moulinex HF934510 Bedienungsanleitung
- português: Moulinex HF934510 Instruções de operação
Gerelateerde papieren
-
Moulinex I-COMPAGNON XL YY4270 de handleiding
-
-
-
-
-
-
-
-