
EN12941:1998
+A2:2008 TH3/2 P R SL
RESPIRATORY PROTECTION
See instruction manual f or protection levels.
EN352-1:2002
HEARING PROTECTION
Only in conjunction with 18-524 earmuffs.
EN166:2001 CLASS 1B
EYE & FACE PROTECTION
EN379:2003+A1:2009
and EN175:1997
WELDING EYE PROTECTION
EN812:2012
HEAD PROTECTION
Only in conjunction with 15-850 Bump Cap.
AS/NZS 1716:2012
BMP# 714303
RESPIRATORY PROTECTION
AS/NZS 1338.1:2012
BMP# 714305
WELDING EYE PROTECTION
AS/NZS 1337.1:2010
BMP# 714304
EYE & FACE PROTECTION
BSI Certified Product
PRODUCT CERTIFICATION
GVS-RPB.COM
Employers: Read this manual and the flow control device instruction manual and
carry out the employer responsibilities (page 8).
Product users: Read this manual and the flow control device instruction manual and
follow the product user safety instructions (page 10).
Manuals are regularly updated. Make sure this manual is available to all users for reference.
Current version of manual and other languages: gvs-rpb.com/industrial/resources
Instruction Manual
Z4® Welding Respirator
Z4® UI CE R7
English P.2
Nederlands P.37

2
Z4®
CONTENTS
RPB® Safety LLC is an ISO9001 certified company.
EXPLANATION OF SIGNAL WORDS AND SYMBOLS 2
INTRODUCTION 4
IMPORTANT SAFETY INFORMATION
PROTECTION PROVIDED AND LIMITATIONS 4
RESPIRATORY COMPONENT DIAGRAM 7
AIR SOURCE 8
EMPLOYER RESPONSIBILITIES 8
PRODUCT USER SAFETY INSTRUCTIONS 10
RESPIRATOR SETUP AND CARE 13
DONNING AND DOFFING 30
STORAGE 31
PARTS AND ACCESSORIES 32
WARRANTY AND LIABILITY STATEMENT 36
NEDERLANDS 37
The following signal word and safety symbols are used in this manual and product labeling:
WARNING indicates a hazardous situation that, if not avoided, could
result in death or serious injury.
DANGER Indicates a hazardous situation that, if not avoided, will result
in death or serious injury.
Read the Instruction Manual.
Additional copies of RPB® manuals can be found at gvs-rpb.com.
EXPLANATION OF SIGNAL WORDS AND SYMBOLS
WARNING
DANGER
CERTIFIED BY:
CE: BSI Group The Netherlands B.V. (NB2797), Say Building, John M. Keynesplein 9, 1066 EP,
Amsterdam, NL
UKCA: BSI Group (AB0086), Kitemark Court, Knowhill, Milton Keynes MK5 8PP, United Kingdom

3
RPB® SAFETY - GLOBAL HEADQUARTERS
2807 Samoset Rd, Royal Oak, MI 48073, USA.
T: 1-866-494-4599 F: 1-866-494-4509 E: sales@gvs.com
RPB® SAFETY - APAC
3 Robin Mann Place, Christchurch Airport, Christchurch 8053, New Zealand
T: +64-3-357-1761 F: +64-3-357-1763 E: sales@gvs.com
GVS S.p.A. - EMEA
Via Roma 50, 40069 Zona Industriale BO, Italy
T: +39 0516176391 E: [email protected]
GVS Filter Technology UK Ltd.
Vickers Industrial Estate, Mellishaw Ln, Morecambe LA3 3EN, UK
T: +44 (0)1524 847600 E: [email protected]
gvs-rpb.com
Copyright ©2022 RPB IP, LLC. All rights reserved. All materials contained on this website
are protected by United States copyright law and may not be reproduced, distributed,
transmitted, displayed, published or broadcast without the prior written permission of RPB IP,
LLC. You may not alter or remove any trademark, copyright or other notice from copies of the
content.
All trademarks, service marks, and logos used in this publication, both registered and
unregistered, are the trademarks, service marks, or logos of their respective owners. All
rights in the RPB Intellectual Property contained in this publication, including copyright,
trademarks, service marks, trade secret, and patent rights are reserved. RPB Intellectual
Property means any patent, patented articles, patent applications, designs, industrial designs,
copyrights, software, source code, database rights, moral rights, inventions, techniques,
technical data, trade secrets, know-how, brands, trademarks, trade names, slogans, logos,
and any other common law and proprietary rights, whether registered or unregistered
anywhere in the world, that are owned by, developed in whole or in part by, or licensed by
RPB IP, LLC.
For technical assistance contact our Customer Service Department at 1-866-494-4599 or
email: sales@gvs.com
Form #: 7.20.554
Rev: 7

4
Z4®
RESPIRATION
The RPB Z4 is approved as in the categories as follows:
Powered Air
The RPB Z4 Respirator is approved to EN 12941:1998 +A1: 2003 +A2: 2008 TH2 (15-721)
and TH2 (15-711) when properly fitted and used with all required components, including the
Breathing Tube Assembly and the RPB PX5® or the RPB PX4 AIR® Powered Air Purifying
Respirator. As such, it significantly reduces, but does not completely eliminate, the breathing
of contaminates by the respirator wearer. Specific protection depends on the filter selected for
use in the RPB PX5 or the RPB PX4 AIR PAPR (see PX5 or the PX4 AIR Instruction Manual).
PROTECTION PROVIDED AND LIMITATIONS
Improper selection, fit, use, or maintenance of this product can result in
injury; life threatening delayed lung, skin or eye disease; or death.
This product is intended for occupational use in accordance with applicable standards or
regulations for your location, industry, and activity (see Employer Responsibilities, page 8).
Familiarity with standards and regulations related to the use of this protective equipment is
recommended, even if they do not directly apply to you. If self-employed or if used in a non-
occupational setting, refer to Employer Responsibilities and Product User Safety Instructions. Go
to gvs-rpb.com/industrial/important-safety-information for helpful links to standards and other
content.
EMPLOYERS: Read this manual and the air supply device Instruction Manual and carry out the
Employer Responsibilities (page 8).
PRODUCT USERS: Read this manual and the air supply device Instruction Manual and follow the
Product User Safety Instructions (page 10).
CHECK WEBSITE FOR UPDATES. Product manuals are regularly updated.
Visit gvs-rpb.com/industrial/resources for the most recent version of this manual before using the
product.
IMPORTANT SAFETY INFORMATION
WARNING
INTRODUCTION
The Z4 Weld Visor is a respirator for applications where there is a need for protection from
airborne contaminants, and eye/face protection; such as welding and grinding. Additionally,
the Vision-Link™ light attachment is available to provide light to the work area. Quiet-Slim™
behind-the-neck style earmuffs must be worn along with the Z4 Weld Visor.
This product must be inspected and maintained in accordance with this instruction manual at
all times.
See PROTECTION PROVIDED AND LIMITATIONS (page 4) for details.

5
HAZARD LIMITATIONS
The RPB Z4 Respirator is NOT FOR USE IF:
In atmospheres immediately dangerous to life or health (IDLH)
Wearer cannot escape without the aid of the respirator.
Atmosphere contains less than 21% ±1% oxygen.
In abrasive blasting applications.
For protection against hazardous gases (e.g., carbon monoxide).
Contaminants are in excess of regulations or recommendations.
Contaminants or contaminant concentrations are unknown.
Work area is poorly ventilated.
The temperature is outside the range of 14°F to 140°F (-10°C to +60°C).
Used with systems including electrical parts that are not suitable for use when a flammable
or explosive atmosphere is present - PX5, PX4 AIR, or Vision-Link .
FACE AND EYES:
The Z4 Face Shield with Safety Lens meets EN 166:2001 (AS/NZS 1337.1:2010)
requirements and is designed for grinding, and other industrial applications. It does not
provide complete eye and face protection against severe impact and penetration and is not
a substitute for good safety practices and engineering controls.
The Z4 Welding Visor with Impact Lens and Auto-Darkening Welding Protection Filter
(ADF) is manufactured according to EN 379:2003 (AS/NZS 1337.1:2010) requirements
PX5 FILTERS
180 L/MIN SPEED 1
180 L/MIN SPEED 2
180 L/MIN SPEED 3
03-892-P
>10 hours
>7 hours
>6 hours
03-893-A2
>5 hours
>4 hours
>4 hours
03-894-ABE
>5 hours
>4 hours
>4 hours
03-895-ABEK
>5 hours
>4 hours
>4 hours
PX4 AIR FILTERS
180 L/MIN SPEED 1
180 L/MIN SPEED 2
180 L/MIN SPEED 3
03-985
>9 hours
>7 hours
>6 hours
03-995
>4 hours
-
-
PAPR MODEL DEVICE
CLASSIFICATION
EN 12941
APPARATUS
MODEL
NOMINAL
PROTECTION
FACTOR
PX5 TH2 Z4 Shoulder Cape 50
PX5 TH2 Z4 Face Seal 50
PX4 Air TH3 Z4 Shoulder Cape 50
PX4 Air TH3 Z4 Face Seal 50
Head-top Classifications
Manufacturer Minimum Designed Flow

6
Z4®
and is designed to protect the operator’s face and head against sparks and hazardous
ultraviolet and infrared rays emitted during the welding process. See “Auto-Darkening
Welding Protection Filter” (page 28) for information about ADF capabilities and use. Use an
approved RPB welding face seal or cape for adequate protection from sparks, debris, and
light flashes.
The Z4 is not designed or tested to provide protection against molten metals or corrosive
liquids.
Note: the Z4 does not completely protect against the potential transfer of impact to glasses
worn underneath the Visor.
HEAD:
The Z4 does NOT meet the EN 397:2012+A1:2012 (AS/NZS 1801:1997) requirements for
physical head protection as a hard hat. Ensure the helmet is adjusted to properly fit the
user by adjusting the head harness.
The Z4 does meet the EN 812:2012 the requirements for bump cap head protection when
equipped with the 15-850 Bump Cap.
HEARING:
This respirator includes a pair of 18-524 Slimline Earmuffs to meet EN 352-1:2002. The
earmuffs are an integral part of the respirator. Please follow the user instructions when
fitting the earmuffs to ensure proper wear, fit and protection levels.
WELDING:
This product is tested and certified to EN 175:1997.
PPE REGULATION:
The Z4 conforms to the PPE Regulation (EU) 2016/425. Regulation 2016/425 on PPE as
brought into UK Law and amended.
The Declaration of Conformity for CE and UKCA can be found at gvs-rpb.com/industrial/
resources
See the Storage section for information on packaging and protection required for
transportation.
PROTECTION PROVIDED AND LIMITATIONS CONTINUED
WARNING
The earmuffs must be worn while using the Z4 respirator.

7
FIGURE 1.1
1. RESPIRATOR
HELMET ASSEMBLY
2. BREATHING TUBE
ASSEMBLY
3. AIR SUPPLY
PAPR
RESPIRATOR COMPONENT DIAGRAM - PAPR
CAUTIONS AND LIMITATIONS
POWERED AIR
A. Not for use in atmospheres containing
less than 21% ±1% oxygen.
B. Not for use in atmospheres immediately
dangerous to life or health.
C. Do not exceed maximum use
concentrations established by regulatory
standards.
F. Do not use Powered Air-Purifying
Respirators if airflow is less than
180lpm (6 cfm).
H. Follow established cartridge and canister
change schedules or observe ESLI to
ensure that cartridge and canisters are
replaced before breakthrough occurs.
I. Contains electrical parts that may cause
an ignition in flammable or explosive
atmospheres.
J. Failure to properly use and maintain this
product could result in injury or death.
L. Follow the manufacturer’s User’s
Instructions for changing cartridges,
canister and/or filters.
M. All approved respirators shall be
selected, fitted, used and maintained in
accordance with applicable regulations.
N. Never substitute, modify, add or omit
parts. Use only exact replacement parts
in the configuration as specified by the
manufacturer.
O. Refer to User Instructions, and/or
maintenance manuals for information
on use and maintenance of these
respirators.
P. The Z4 is not evaluated as a respirator
for use as a surgical mask.
The RPB Z4 is one component of the three main components that constitute a powered air
purifying respirator. (Note the PX5 has been used in the diagram as an example.)

8
Z4®
Powered Air
Check that the contaminated area is within the limits of use for a Powered Air Purifying
Respirator and determine the type of contamination. Once the contamination level has
been confirmed you can then determine the filter cartridge to be used for the application,
to make sure that you are sufficiently protected. Make sure that the area is well ventilated
and that regular air samples are taken to confirm the atmosphere stays within the levels
recommended by local governing bodies. Follow the PX5 or the PX4 AIR PAPR Instruction
Manual for more details.
EMPLOYER RESPONSIBILITIES
Your specific responsibilities may vary by location and industry, but in general RPB expects that
employers will:
Follow all applicable standards and regulations for your location, industry, and activity.
Depending on your location and industry, a number of standards and regulations may apply
to your selection and use of respirators and other personal protective equipment. These may
include such things as federal, local, or military standards and regulations and consensus
standards. There are also requirements specific to particular contaminants, e.g. silica (see
gvs-rpb.com for more information), asbestos, organic pathogens, etc. Know which requirements
apply to your location and industry.
Have appropriate safety programs in place.
Have and follow:
A workplace safety program.
A written respiratory protection program in accordance with applicable standards and
regulations.
In accordance with the above,
Perform a hazard analysis and select appropriate equipment for each activity. A
hazard analysis should be performed by a qualified person. Controls should be in
place as appropriate and a qualified person should determine what kind of respiratory,
face and eye, head, and hearing protection is appropriate for the intended activities
and environments of use. (For example, select a respirator appropriate to the specific
airborne hazards, with consideration of workplace and user factors and with an Assigned
Protection Factor (APF) that meets or exceeds the required level for employee protection,
select welding face and eye protection appropriate to the type of welding to be done, etc.)
As applicable, check your workplace safety program, respiratory protection program, and
standards and regulations for your activity or industry for related protection requirements,
and see this manual (Protection Provided and Limitations, page 4) and the PX5 or the
PX4 AIR PAPR Instruction Manual for product specifications.
AIR SOURCE

9
Be sure employees are medically qualified to use a respirator.
Have a qualified physician or other licensed health care professional (PLHCP) perform
medical evaluations using a medical questionnaire or an initial medical examination per
government regulations where required.
Train employees in the Z4’s use, maintenance, and limitations.
Appoint a qualified individual who is knowledgable about the RPB Z4 per government
regulations where required to provide training:
Qualifications of the Respirator Trainer. Anyone providing respirator training shall:
a) be knowledgable in the application and use of the respirator(s);
b) have practical knowledge in the selection and use of respirator(s) and work practices
at the site;
c) have an understanding of the site’s respirator program; and
d) be knowledgable of applicable regulations.
Train each Z4 user in the product’s use, application, inspection, maintenance, storage, fitting,
and limitations in accordance with the content of this Instruction Manual and the approved
air supply device Instruction Manual and standards or regulatory requirements. Ensure that
each intended user reads both of these manuals.
Ensure that equipment is properly set up, used, and maintained.
Make sure that equipment is properly set up, inspected, fitted, used, and maintained,
including selection of the appropriate air filter cartridge and, when applicable, welding
filter shade adjustments, for the application.
Measure and monitor airborne contaminants in the work area.
Measure and monitor airborne contaminant levels in the work area in accordance with
applicable requirements. Make sure work area is well ventilated.
If you have any questions, contact RPB.
Call Customer Service Department at:
Tel.: 1-866-494-4599
Email: sales@gvs.com
Web: gvs-rpb.com

10
Z4®
PRODUCT USER SAFETY INSTRUCTIONS
BEFORE INITIAL USE - BE TRAINED AND MEDICALLY QUALIFIED
Do not use this respirator until you have read this manual and the PX5 or the PX4 AIR PAPR
Instruction Manual (additional copies available at gvs-rpb.com) and been trained in the respirator’s
use, maintenance, and limitations by a qualified individual (appointed by your employer) who is
knowledgable about the RPB Z4 Respirator.
Do not wear this respirator until you have passed a medical evaluation using a medical
questionnaire or an initial medical examination by a qualified physician or other licensed health
care professional (PLHCP).
Allergens: No known common allergens are used in this product.
Some materials could cause an allergic reaction in susceptible individuals. If you have a known
allergy or develop irritation, inform your employer. Irritation may occur from lack of cleaning.
Following all cleaning and care instructions provided in the instruction manuals for this and any
other RPB products you are using.
MAKE SURE THE SYSTEM IS READY FOR USE
Make sure you have a complete system. Verify that you have all required components for the Z4
to serve as a complete approved respirator:
Respirator Helmet Assembly (Z4)
Breathing Tube Assembly
PX5 or the PX4 AIR PAPR
See Respirator Component Diagram (page 7). The RPB Z4 is only approved to be used with the
RPB PX5 or the RPB PX4 AIR PAPR. Use only authentic RPB brand parts and components
that are part of the approved respirator assembly. Using incomplete or inappropriate equipment,
including the use of counterfeit or non-RPB parts, can result in inadequate protection and will void
the approval of the entire respirator. Do not modify or alter any part of this product.
Inspect all components daily for signs of damage or wear and tear that may reduce the level of
protection originally provided. Remove any damaged component or product, including any visor
that has been subject to impact, from service until repaired or replaced. Scratched or damaged
safety lenses or other components should be replaced with genuine RPB® brand replacement
parts. When safety and impact lenses are replaced, make sure to remove any additional
protective film from both sides of the lens. If the film is left in place, it could affect the optical
clarity of the lens and cause eye strain. Inspect the inside of the respirator for respirable dust or
other foreign objects. Keep the inside of the respirator clean at all times.
Make sure that the helmet is correctly assembled in the configuration that suits your application.
Never use the respirator without all lenses in place. This includes the Safety Lens, Impact Lens,
the ADF, and the rear ADF Lens. These lenses, when installed properly, are part of the respiratory
seal to prevent toxic or hazardous gases, liquids or dust from entering the helmet. An incomplete
or improperly installed lens system could provide inadequate impact and respiratory protection.
See Respirator Setup and Care (page 13). See Donning (page 30) for fit information.

11
VERIFY THAT YOU HAVE THE APPROPRIATE EQUIPMENT FOR YOUR ACTIVITY
Verify that the Z4 provides appropriate protection for your activity. As applicable, check your
workplace safety program, respiratory protection program, and standards and regulations for your
activity or industry. (See PROTECTION PROVIDED AND LIMITATIONS, page 4.)
BEFORE DONNING THE Z4:
Verify airborne contaminants are within recommended limits for respirator use:
Determine the type and level of contamination. Verify that airborne contaminant
concentrations do not exceed those allowed by applicable regulations and
recommendations for powered air purifying respirators.
Select the correct filter cartridge for the contamination and application:
PAPR: Once the contamination level has been confirmed, determine the correct filter
cartridge to be used for the application, to make sure that you are sufficiently protected.
Follow the PX5 or the PX4 AIR PAPR Instruction Manual.
Make sure the area is ventilated and monitored:
Make sure that the area is well ventilated and that regular air samples are taken to
confirm the atmosphere stays within the levels recommended by governing bodies.
If you have any questions, ask your employer.
DO NOT ENTER THE WORK AREA if any of the following conditions exist:
Atmosphere is immediately dangerous to life or health.
You cannot escape without the aid of the respirator.
Atmosphere contains less than 21% ±1% oxygen.
When used with systems including electrical parts that are not suitable for use when a
flammable or explosive atmosphere is present - PX5, PX4 AIR, VISION-LINK
Contaminants are in excess of regulations or recommendations.
Contaminants or contaminant concentrations are unknown.
Work area is poorly ventilated.
The temperature is outside the range of -10°C to +60°C (14°F to 140°F).
The work area is a confined space (unless proper measures are taken for confined space
welding).
LEAVE THE WORK AREA IMMEDIATELY IF:
Any product component becomes damaged
Vision is impaired
Airflow stops or slows down, or alarm sounds. Do not use Powered Air Purifying Respirators if
airflow is less than 180 slpm.
Breathing becomes difficult
You become dizzy, nauseous, too hot, too cold, or ill
Your eyes, nose, or skin become irritated
You taste, smell, or see contaminants inside the helmet
You have any other reason to suspect that the respirator is not providing adequate protection

12
Z4®
PRODUCT CARE
Never place the helmet on hot surfaces. Do not apply paints, solvents, adhesives or self-adhesive
labels except as instructed by RPB. Product may be adversely affected by certain chemicals.
See the “Respirator Setup and Care” section for cleaning and disinfecting instructions.
INSTRUCTIONS FOR SPECIFIC USES OR ENVIRONMENTS
Welding
See Respirator Setup and Care (page 13) and ADF Operation (page 25) for important safety-
related use and care information. Check the prescribed shade level for your welding application
and adjust your auto-darkening filter accordingly (see table with recommended shade levels,
page 28). Never place the auto-darkening welding filter (ADF) on hot surfaces. Do not expose the
ADF to liquids and protect it from dirt. See ADF storage, maintenance, and cleaning information
(page 26).
Make sure the helmet completely blocks any accidental light. Make sure light can only enter the
front of the helmet through the viewing area of the auto-darkening welding filter.
Confined Spaces
Follow all procedures for confined space entry, operation, and exit as defined in applicable
regulations and standards.
Welding in Confined Spaces
Welding in a confined space can present an atmospheric hazard due to the generation of
contaminants and displacement of oxygen. Do not use the Z4 in confined spaces if the oxygen
concentration will be reduced below 21% ±1%.
Check local standards for confined space procedures.
Do not use the Z4 for welding without the Auto Darkening
Protection Filter in place. Do not weld with only the grinding lens. Improper use may
cause blindness or other permanent eye damage.
WARNING
PRODUCT USER SAFETY INSTRUCTIONS CONTINUED

13
RESPIRATOR SETUP AND CARE
Screw the breathing tube (04-837) onto
the threaded air intake on the side of the Z4
Weld Visor and screw the breathing tube in
completely without over tightening.
Insert the bayonet end of the breathing tube
into the outlet of the PAPR and twist it in
until it is secure.
FOR USE WITH RPB PX5 OR THE PX4 AIR
PAPR - SEE THE PX5 OR THE PX4 AIR
INSTRUCTION MANUAL
When the Z4 Respirator is being used in
conjunction with the RPB PX5 or the PX4
AIR PAPR, please refer to the RPB PX5 or
the PX4 AIR PAPR Instruction Manual for
set up and use of the assembly.
Note: The RPB PX5 and the PX4 AIR
are Powered Air Purifying Respirators,
therefore care must be taken when
selecting the correct filter for the application
the respirator will be used in.
BREATHING TUBE
FIGURE 2.1
FIGURE 2.3
POWERED AIR
Optionally, the breathing tube can be
passed through the loop on the back of the
face seal/cape to keep it centered and out
of the way.
FIGURE 2.2

14
Z4®
Place the green ADF Retainer back over the
Impacts Lens by inserting the bottom guides
and rotating in until the clips are securely
snapped in place.
To replace the Impact Lens, lift up the Weld
Visor, unlatch the green ADF Retainer from
the Face Shield by pushing the tabs apart
and pushing forward.
Insert a new Impact Lens by removing
the protective film on both sides and then
squeezing it from the sides to insert it under
the side tabs on the Weld Visor.
Remove the Impact Lens by squeezing the
lens to remove it from the tabs on the sides.
IMPACT LENS REPLACEMENT
FIGURE 3.1 FIGURE 3.2
FIGURE 3.3 FIGURE 3.4
RESPIRATOR SETUP AND CARE CONTINUED

15
Follow steps 3.1 and 3.2 remove the ADF
Retainer and the Impact Lens.
Press the down on the clip at the bottom of
the ADF so that the ADF can slide out.
ADF LENS REPLACEMENT AND CLEANING
FIGURE 4.1 FIGURE 4.2
Once removed, the ADF can be cleaned
with a soft tissue or a cloth soaked in mild
detergent (or alcohol).
FIGURE 4.3
To replace the Rear ADF Lens, slide the lens
out and replace it with a new one.
FIGURE 4.4

16
Z4®
MAGNIFYING LENS
To install the magnifying lens for welding,
slide the lens up into the brackets at an
angle until it is securely in the brackets.
With the screws supplied, screw the left
lens bracket into place by tightening the
screws firmly without over tightening. Then
screw in the right bracket.
FIGURE 5.2FIGURE 5.1
Place the cleaned or new ADF Lens into
the Weld Visor with the solar panel towards
the bottom and clip it in. Then replace the
Impact Lens and reattach the green ADF
Retainer.
FIGURE 4.5
Place the green ADF Retainer back over the
Impacts Lens by inserting the bottom guides
and rotating in until the clips are securely
snapped in place.
FIGURE 4.6
RESPIRATOR SETUP AND CARE CONTINUED

17
To install a fixed shade lens into the frame,
slide the lens into the long tab at an angle
from the back. Then rotate the lens down
until it securely clips into the frame. To
remove the lens, un-clip the bottom edge
and slide out.
FIGURE 5.3
INSTALL/REPLACE FIXED SHADE WELDING LENS
The fixed shade lens and frame can be used in place of the ADF for welding and other
applications requiring light filtering. Choose an appropriate shade lens depending on the
application. Install the lens frame with a lens installed into the Z4 the same way as installing
an ADF. Do not use the Z4 without and ADF or a fixed shade lens in place.
FIGURE 5.4
The inner protective lens can be placed into
the frame after the fixed shade lens to help
protect the inner surface when the weld
visor is lifted up to grind welds, etc.

18
Z4®
From the inside of the Weld Visor, unclip
and rotate the side windows to the outside.
FIGURE 6.2
SIDE WINDOW REPLACEMENT
From the outside of the Weld Visor, rotate
in the replacement side windows, making
sure they are fully pressed in with no light
showing around the edges.
FIGURE 6.3
To replace the side windows, lift up the weld
visor, unlatch the green ADF Retainer from
the Face Shield by pushing the tabs apart
and pushing forward.
FIGURE 6.1
Place the green ADF Retainer back over the
Impacts Lens by inserting the bottom guides
and rotating in until the clips are securely
snapped in place.
FIGURE 6.4
RESPIRATOR SETUP AND CARE CONTINUED
There are two sets of side windows. One set is shade 5 tinted. The other set is solid gray to
block light and distractions from the sides.

19
Place the new Weld Visor onto the Face
Shield. Screw in the screws to attach the
springs on the Weld Visor onto the Face
Visor. Then place the Adjustment Washer,
Mounting Bracket, and the Pivot Nut on the
inside of the Face Shield. Secure them by
tightening the Adjustment Knob onto the
outside of the Weld Visor. Be sure to use the
Adjustable Pivot Nut on the right side.
Turn the green adjustment knobs counter-
clockwise to loosen until they are able to be
removed.
Remove the screw that attaches the spring
to the grinding visor on each side. Remove
the Weld Visor by sliding each side off of
the Face Shield.
When the adjustment knobs are removed,
the head harness, brackets, and
components can be removed.
WELD VISOR REPLACEMENT
FIGURE 7.1
FIGURE 7.2
FIGURE 7.3

20
Z4®
Lift up the Weld Visor. Using a coin or an
hex key, twist the green knobs that secure
the Safety Lens to remove them and then
remove the lens.
Remove the protective film from the inside
of the lens. Place the lens against the seal
and insert the knobs into the slots and twist
them to lock into place, securing the Safety
Lens. Remove the protective film from the
outside of the Safety Lens.
SAFETY LENS REPLACEMENT
FIGURE 8.1 FIGURE 8.2
To adjust the top straps on the head
harness, push the two straps together to
tighten.
To loosen the top straps, unclip the end tabs
from over the strap. Then pull the straps
apart to the desired notch. Then clip the
tabs back over the strap to hold it securely.
HEAD HARNESS ADJUSTMENT
FIGURE 9.1 FIGURE 9.2
RESPIRATOR SETUP AND CARE CONTINUED

21
The head harness can also be adjusted
with the ratchet adjuster on the back of the
headband. Turn the knob to tighten and
loosen the headband.
The head harness can also be move
forwards and backwards within the Weld
Visor. 1. Pull the tab on sides out. 2. Slide
the head harness forward or backward to
find the most comfortable position.
1.
2.
2.
FIGURE 9.3 FIGURE 9.4
Attach the Bump Cap to the side mounts on
the connection points that were used for the
top straps.
Remove the top straps from the side
mounts.
FIGURE 9.5 FIGURE 9.6
BUMP CAP INSTALL
Install the Bump Cap Head Harness Assembly into the Z4 making sure it is completely inside
of the face seal or shoulder cape so that the positive pressure zone is not interrupted.

22
Z4®
To adjust the angle of the Weld Visor to the
wearers face, loosen the adjustment knobs,
without removing them, on the outside of
the Weld Visor.
Rotate the visor to the desired angle using
the notches on the right side adjustment
bracket from the inside of the Z4.
WELD VISOR ANGLE ADJUSTMENT
Once the angle is adjusted, tighten the
adjustment knobs back up to secure the
visor in place.
FIGURE 10.1
FIGURE 10.2
FIGURE 10.3
RESPIRATOR SETUP AND CARE CONTINUED

23
Place the brow pad onto the inside of the
front strap of the head harness. Fold the top
and bottom over and secure the hook and
loop tabs. The brow pad can be cleaned and
disinfected by washing with warm water
and mild detergent, rinse and let air dry.
BROW PAD REPLACEMENT, CLEANING AND
DISINFECTING
FIGURE 11.1
Clean and disinfect the shell of the weld
visor with a disinfecting wipe or mild house
hold cleaner and a soft cloth. Be sure not to
get the ADF Lens wet.
FIGURE 12.1
WELD VISOR CLEANING AND DISINFECTING

24
Z4®
Insert the tab on the left side of the face seal
band into the slot underneath the air intake.
Press together the hook and loop over the
air intake to seal them together.
FACE SEAL INSTALLATION
Loosen the right side adjustment knob. 1.
Pull the adjustment nut on the inside off of
the adjustment notch and slide the face seal
band onto the notch. Push the adjustment
nut back onto the desired angle notch
and retighten the adjustment knob on the
outside.
FIGURE 13.1
FIGURE 13.2
In the center of the visor, insert the screw
through the hole in the face seal band, the
front clip, and into the screw hole in the
visor. Press together the hook and loop on
the band and on the inside of the face shield
to insure a good seal.
FIGURE 13.3 FIGURE 13.4
Loosen the left side adjustment knob and
attach the two holes in the face seal over
the bosses under the bracket. Tighten the
adjustment knob back up.
1
RESPIRATOR SETUP AND CARE CONTINUED

25
Line up the center of the top part of the face
seal and the face shield and attach the hook
and loop along the edge. Press together
firmly to insure a good seal.
CLEANING AND DISINFECTING
The cape and face seals can be cleaned
and disinfected by washing in a washing
machine or with warm water and mild
detergent, rinse thoroughly and let air dry.
FIGURE 13.5
AUTO-DARKENING WELDING PROTECTION FILTER
OPERATION
RPB auto-darkening welding filters operate
on the basis of a liquid crystal light shutter
that protects the welder’s eyes against
intense visible light emitted during the
welding process. In combination with the
permanent passive IR/UV filter, it protects
against hazardous infrared (IR) and
ultraviolet (UV) light. The protection against
harmful radiation is present regardless of
the shade level or potential malfunction of
the filter, beyond the darkest shade number
marked on each specific model.
RPB auto-darkening welding filters are
manufactured according to ANSI/ISEA
Z87.1, EN 379 requirements and are CE
certified. They are not intended to be used
as a protection against impacts, flying
particles, molten metals, corrosive liquids
or hazardous gases.
Replace potentially malfunctioned or
damaged auto-darkening welding filters
(check that the auto-darkening filter turns
dark if you strike the welding arc).
USAGE
An auto-darkening welding filter built into
a Respirator is considered to be Personal
Protection Equipment (PPE) protecting the
eyes, face, ears and neck against direct
and indirect hazardous light of the welding
arc. There should be no tension on the ADF
Lens caused by the Z4 visor, as it could
cause severe damage to the filter. Make
sure that solar cells and photo-sensors are
not covered by any part of the helmet, as
this could prevent the proper operation of
the filter.
FIELD OF APPLICATION
RPB Auto darkening filters are suitable
for all types of electro-welding: covered
electrodes, MIG/MAG, TIG/WIG, plasma
welding, and cutting, except for gas welding
and laser welding.
FUNCTIONS
RPB filters are supplied ready for use.
Check the degree of required protection for
specific welding procedure and select the

26
Z4®
AUTO-DARKENING WELDING PROTECTION FILTER CONT’D
recommended shade, light sensitivity as
well as opening time delay.
SHADE ADJUSTMENT
Our model enables shade adjustment range
from 9 to 13. It can be adjusted by the knob
»Shade« which is located on the filter.
ADJUSTMENT OF SENSITIVITY
Most welding applications can be
performed with welding light sensitivity
set to maximum. The maximum sensitivity
level is appropriate for low welding current
work, TIG, or special applications. The
welding light sensitivity has to be reduced
only in some specific surrounding lighting
conditions in order to avoid unwanted
triggering. As a simple rule for optimum
performance, it is recommended to set
sensitivity to the maximum at the beginning
and then gradually reduce it, until the filter
reacts only to the welding light flashes
and without annoying spurious triggering
due to ambient light conditions (direct
sun, intensive artificial light, neighboring
welder’s arcs etc.)
OPENING TIME DELAY ADJUSTMENT:
The opening time delay can be adjusted
from 0.15 to 1.0 seconds. It is recommended
to use a shorter delay with spot welding
applications and a longer delay with
applications using higher currents and
longer welding intervals. Longer delay can
also be used for low current TIG welding
in order to prevent the filter opening when
the light path to the sensors is temporarily
obstructed by a hand, torch, etc.
STORAGE
When not in use the Auto-Darkening Filter
should be stored in a dry place within the
temperature range of -4°F (-20°C) to +157°F
(70°C). Prolonged exposure to temperatures
above 113°F (45°C) may decrease the
battery lifetime of the auto-darkening
welding filter.
It is recommended to keep the solar cells
of the auto-darkening welding filter in the
dark or not exposed to light during storage
in order to maintain power down mode. This
can be achieved by simply placing the filter
face down on a storage shelf.
MAINTENANCE AND CLEANING
It is always necessary to keep the
solar cells and the light sensors of the
auto-darkening welding filter free of dust
and spatters: cleaning can be done with
a soft tissue or a cloth soaked in mild
detergent (or alcohol).
Never use aggressive solvents such as
acetone. RPB filters should always be
protected from both sides by protection
screens, which should also be only cleaned
with a soft tissue or cloth. If protection
screens are in any way damaged, they must
be immediately replaced.
PRODUCT CARE
Never place the ADF Lens or helmet on
hot surfaces. Do not apply paints, solvents,
adhesives or self-adhesive labels except
as instructed by RPB. This product may be
adversely affected by certain chemicals. Do
not expose the ADF to liquids and protect it
from dirt. Make sure the helmet completely
blocks any accidental light. Make sure light
can only enter the front of the helmet through
the viewing area of the auto-darkening
welding filter.
See the “Setup and Care” section for more
specific cleaning instructions.

27
The marking on the ADF indicates:
3 / 9-13 RPB 1 / 1 / 1 / 2 / EN379
Light Shade
Dark Shade Range
Manufacturer
Optical Class
Diffusion of light class
Homogeneity
Angular dependence
Number of the Standard
WARRANTY
The warranty period of RPB Z4 Weld Visor
ADF is three years. Failure to follow these
instructions may invalidate the warranty. RPB
does not accept responsibility for any issues,
which may arise from applications other than
welding.
MARKINGS
SETTINGS
Shade level: The shade level can be
selected between 9 and 13 by rotating the
shade level knob.
Sensitivity: With the sensitivity knob the
light sensitivity is adjusted according to
the welding arc and the ambient light.
The middle position corresponds to the
recommended sensitivity setting in a
standard situation.
Opening delay. The opening delay
switch, behind the battery cover, allows
the opening delay to be set from dark to
light. It is adjustable between 0.15 or 1.0
second. The Twilight position corresponds
to the recommended delay in a standard
situation.
CHANGE THE BATTERIES
The automatic welding filter has replaceable
lithium button cell batteries, type CR2032.
The batteries must be replaced when the LED
on the cartridge f lashes.
1. Carefully remove battery cover.
2. Remove batteries and dispose of in ac-
cordance with the national regulations
for special waste.
3. Use type CR2032 batteries as depicted.
4. Carefully remount battery cover.
If the automatic welding filter does not darken
when the welding arc is ignited, please
check battery polarity. To check whether the
batteries still have sufficient power, hold the
shade cartridge against a bright lamp. If the
LED flashes, the batteries are empty and
must be replaced immediately. If the shade
cartridge does not operate correctly in spite
of correct battery replacement, it must be
declared unusable and must be replaced.
SLEEP MODE
The automatic welding filter has an automatic
switch-off function, which increases the
service life. If no light falls on the solar
cells for a period of approx. 15 minutes,
the cartridge automatically switches off.
To reactivate the automatic welding filter,
the solar cells must be briefly exposed to
daylight. If the cartridge cannot be reactivated
or does not darken when the welding arc is
ignited, it must be regarded as non-functional
and replaced.
EXPECTED LIFETIME
The automatic welding filter has no expiration
date. The product can be used as long as
no visible or invisible damage or functional
problems occur.

28
Z4®
RECOMMENDED SHADE LEVELS FOR VARIOUS WELDING
APPLICATIONS Figure 14.1
TROUBLESHOOTING
Shade automatic welding filter does not
darken:
Adjust sensitivity
Clean sensors and clean or change the
impact lens of the helmet shell
Check flow of light to the sensors
Replace batteries
AUTO-DARKENING WELDING PROTECTION FILTER CONT’D
ADF flickers:
Adjust sensitivity
Replace batteries
Poor vision:
Clean or change the impact lens of the
helmet shell and automatic welding filter
Adapt shade level to welding procedure
Increase amount of ambient light
Welding Process 1.5 6 10 15 30 40 60 70 100 125 150 175 200 225 250 300 350 400 450 500 600
MMA 8 9 10 11 12 13 14*
MAG 8 9 10 11 12 13
TIG 8 9 10 11 12 13
MIG heavy
metals 9 10 11 12 13 14*
MIG light metals
Stainless, AIum. 10 11 12 13 14*
Plasma Cutting 9 10 11 12 13
Micro Plasma
Welding 4 5 6 7 8 9 10 11 12
Current Amperes
According to the perception of the welder it is possible to use the next higher or lower shade-
number.
*Shade 14 not achieved with this ADF.

29
DESCRIPTION OF RPB FILTER FEATURES Figure 14.2
TECHNICAL DATA Figure 14.3
1. Solar Cells
2. Photo-sensors (Photo diodes)
3. Filter housing
IR - Detection
1.
2.
2.
3.
SETTING SHADE LEVEL
functions and settings
Choose Shade Number (SL 9-13)
Choose Sensitivity
SETTING SENSITIVITY
12
Fast
CR2032CR2032
Delay
Twi lig ht
Sensitivity
9/3
Shade
3/9-13 RPB 1/1/1/2 EN379
AS/NZS 1338.1
ANSI Z87 RPB W3/W9-13
compl. with CSA Z94.3
4.
5.
6.
7.
4. Liquid crystal shutter viewing area
5. Shade adjustment
6. Sensitivity adjustment
7. Opening time delay adjustment
Model RPB ADF
Viewing Area 2.66 x 3.89 in.
(67.6 x 98.8 mm)
ADF overall dimensions 4.49 x 4.57 x 0.47 in.
(114 x 116.2 x 11.9 mm)
Weight 4.59oz (130g)
Open state shade 3 (Bright Mode)
Closed state shade 9-13 (Dark Mode)
Switching time from light to dark 0.1 ms (23°C / 73°F)
0.1 ms (55°C / 131°F)
Switching time from dark to light 0.15s / 1.0s
UV / IR protection Maximum protection in light and
dark modes
Operating temperature 23 °F – 131 °F (-5 °C – 55 °C)
Storage temperature -4°F – 157°F (-20°C – 70°C)
Power Supply Solar cells, 2 pcs. replaceable 3V LI
batteries (CR2032)
Classification in accordance with
EN379
Optical class = 1
Scattered light = 1
Homogeneity = 1
Viewing angle dependence = 2
Standard EN379:2003+A1:2009
Certifications CE, ANSI, compliance with CSA

30
Z4®
DONNING YOUR HELMET
Once you have completed the set up, you are ready to fit your RPB Z4 Respirator. First, put on
the slimline earmuffs, with the neckband going around the back of the neck and making sure
the pads seal all of the way around the ears. Wearing earmuffs is required while using the Z4.
Next, check inside the helmet to ensure that it is free of dust, dirt or contaminants. Then open
the bottom of the cape or face seal, with the air flowing from the air source, put the respirator
onto your head. Pull the cape down or make sure the face seal is sealing around your face/
neck, then tighten the head harness ratchet to fit. Make sure the visor is securely latched.
DOFFING YOUR HELMET
When you have finished working, keep the respirator on with air flowing into the helmet until
you have left the contaminated area.
DONNING AND DOFFING
Always check the interior of the respirator for contaminants
before donning. Always don and doff the helmet while outside the work area, keeping
the interior of the helmet clean and free of contaminants. Not doing these steps could
expose you to hazardous materials and contaminants that could impair the function of the
respirator. Determine if your company should establish a pre-doffing cleaning program if
contaminants on the outside may be dangerous.
WARNING
Put on the 16-524 RPB Quiet-Slim Ear
Defenders with the neckband going around
the back of the neck and making sure the
pads seal all of the way around the ears.
Secure the over-head band with the hook
and loop strap.
FIGURE 15.2
FIGURE 15.1
DONNING YOUR HELMET WITH EARMUFFS
After checking inside the helmet for dust
and debris, pull the Z4 on over the earmuffs.
Make sure the earmuffs and neck-band are
completely within the sealed area of the
face seal or cape.
Refer to the Quiet-Slim Ear Defenders Instruction Manual for more details.

31
After use, clean the respirator according to your company’s cleaning program or the
directions in this manual. Then let it dry, and store the respirator by hanging it up in a clean,
dry place, away from the work area. Before storing the respirator for an extended period
of time, clean the unit following the cleaning instructions in this instruction manual. It is
recommended to store or transport the respirator in a container or storage bag. Store in a cool
dry place between -10°C to +45°C (14°F to 113°F) <90%rh. PX5 and the PX4 AIR may need to
be stored separately, refer to the PX5 orthe PX4 AIR Instruction manual for specific storage
instructions.
After use: Long term storage or transport:
STORAGE
FIGURE 16.2
FIGURE 16.1
PRODUCT CARE INSTRUCTIONS
It is recommended to establish a regular cleaning schedule for the padding and capes to
ensure good hygiene.
Capes and face seals: Hand wash only with mild detergent and warm water. Hang to dry.
Do not launder in a washing machine or dryer. If laundered in a washer or dryer, product life
will be reduced and warranty voided.
Padding: Hand wash only with mild detergent and warm water. Lay flat to dry.
Make sure all components are dry before use. Inspect for wear and tear and replace if
damaged or excessively worn.

32
Z4®
PARTS AND ACCESSORIES
FIGURE 17.1
1
2
3
4
56
78
Use only exact, authentic RPB replacement parts (marked with the
RPB logo and part number), and only in the specified configuration. Using incomplete or
inappropriate equipment, including the use of counterfeit or non-RPB parts, can result in
inadequate protection and will void the approval of the entire respirator assembly.
WARNING
Item No. Description Part No.
1 Weld Visor Assembly - includes 16-672 and 15-821 15-812
2 ADF Retainer 16-672
3 ADF Filter 16-871
4 Side Window Blockers - Solid Gray (Pair) 15-821
Side Window Shade 5 (Pair) 15-821-5
5 Impact Lens (10 pack) 16-872
6 ADF Rear Lens (10 pack) 16-873
7 Magnifying Lens Holders (Pair) 16-875
8 Magnifying lens - x 1 13-072-1
Magnifying lens - x 1.5 13-072-1.5
Magnifying lens - x 2 13-072-2
Magnifying lens - x 2.5 13-072-2.5
9 Fixed Shade Lens Frame 16-877
10 Fixed Shade 5 Welding Lens 16-877-5
Fixed Shade 8 Welding Lens 16-877-8
Fixed Shade 9 Welding Lens 16-877-9
Fixed Shade 10 Welding Lens 16-877-10
Fixed Shade 11 Welding Lens 16-877-11
Fixed Shade 12 Welding Lens 16-877-12
11 Fixed Shade Rear Protective Lens 16-878
WELD VISOR
910 11

33
1
2
34
5
Item No. Description Part No.
1 Face Shield 15-811
2 Safety Lens (10 Pack) 15-878
3 Safety Lens Bayonet (Pair) 15-832
4 Air Intake Assembly with Screws 15-851-1
5 Front Cape Clip Cover 15-831
FIGURE 17.2
FACE SHIELD
FIGURE 17.3
ACCESSORIES
Item No. Description Part No.
1 FR Face Seal (TH2) 15-711
2 FR Shoulder Cape (TH3) 15-721
3 Front Cap Clip - Vision-Link Mount 15-839
4 Vision-Link Light 16-901
12
3
4

34
Z4®
Item No. Description Part No.
1 Head Harness Assembly (Includes 16-530) 15-840
2 Head Harness Straps (Front and Top Straps with Brow Pad) 15-841
3 Bump Cap and Front Strap with Comfort Pad and Brow Pad 15-850
4 Bump Cap Replacement with Comfort Pad 15-855
5 Ratchet Assembly 16-530
6 Brow Pad 16-526
7 Side Mounts (Pair) 15-842
8 Head Harness Bracket and Adjustment System 15-830
9 Quiet-Slim Ear Defenders 18-524
10 Quiet-Slim Ear Defenders with Side Mounts (Pair) 18-525
FIGURE 17.4
HEAD HARNESS AND EARMUFFS
1
8
5
6
9
PARTS AND ACCESSORIES CONTINUED
7
34
2

35
8
6
9
PAPR PARTS AND ACCESSORIES
FIGURE 17.5
27
3
1
Item No. Description Part No.
1 PX5 PAPR and Belt 03-801-FR-G
2 PAPR Breathing Tube 04-831
3 PAPR Flow Meter 03-819
4 FR Backpack Assembly 03-822-FR
5 Short Breathing Tube for Backpack Assembly 04-841
6 PX4 AIR PAPR and Belt 03-901-FR-G
7 Breathing Tube for PX4 AIR PAPR 04-837
8 Flow Meter PX4 AIR 04-091
9 FR 2” Belt for PX4 and PX5 07-765-FR
10 FR Breathing Tube Cover 04-854
11 FR Breathing Tube Cover for backpack 04-874
4
5
10
11

36
Z4®
WARRANTY
RPB® warrants that its Products will be free from defects in materials and workmanship for one (1)
year, subject to the terms of this limited warranty. The Products are sold only for commercial use,
and no consumer warranties apply to the Products. This limited warranty is for the benefit of the
original Product purchaser, and cannot be transferred or assigned. This is the sole and exclusive
warranty provided by RPB®, and ALL CONDITIONS AND IMPLIED WARRANTIES (INCLUDING
ANY WARRANTY OF MERCHANTABILITY OR FITNESS FOR A PARTICULAR PURPOSE)
ARE EXCLUDED AND DISCLAIMED FROM WARRANTY COVERAGE. RPB’s® limited warranty
coverage does not apply to damage resulting from accident, improper use or misuse of the
Products, wear and tear resulting from the normal use of the Products, or the failure to properly
maintain the Products.
RPB’s® limited warranty coverage runs from the original date of purchase of the Products, and
applies only to warranted defects which first manifest themselves and are reported to RPB® within
the warranty period. RPB® retains the right to determine to its reasonable satisfaction whether
any claimed defect is covered by this limited warranty.
If a warranted defect occurs, RPB® will repair or replace the defective Product (or a component
of the Product), in its sole discretion. This “repair or replacement” remedy is the sole and
exclusive remedy under this limited warranty, and under no circumstances shall RPB’s® liability
under this limited warranty exceed the original purchase price for the Products (or the applicable
component). RPB® has no responsibility for incidental or consequential damages, including loss
of use, maintenance and other costs, and ALL INCIDENTAL AND CONSEQUENTIAL DAMAGES
ARE EXCLUDED AND DISCLAIMED from this limited warranty. Contact RPB® to obtain warranty
service. Proof of purchase must be provided to obtain warranty service. All costs of returning the
Products to RPB® for warranty service must be paid by the purchaser.
RPB® reserves the right to improve its Products through changes in design or materials without
being obligated to purchasers of previously manufactured Products.
LIABILITY
RPB® Safety cannot accept any liability of whatsoever nature arising directly or indirectly from
the use or misuse of RPB® Safety products, including purposes that the products are not designed
for. RPB® Safety is not liable for damage, loss or expense resulting from the failure to give advice
or information or the giving of incorrect advice or information, whether or not due to RPB®
Safety’s negligence or that of its employees, agents or subcontractors.

37
UITLEG VAN SIGNAALWOORDEN EN SYMBOLEN
De volgende signaalwoorden en veiligheidssymbolen worden in deze handleiding en op de
productetiketten gebruikt:
WAARSCHUWING geeft een gevaarlijke situatie aan
die, als deze niet wordt vermeden, kan resulteren in
overlijden of ernstig letsel.
GEVAAR geeft een gevaarlijke situatie aan die, als deze niet wordt
vermeden, kan resulteren in overlijden of ernstig letsel.
Lees de Gebruiksaanwijzing.
Extra exemplaren van RPB® handleidingen kunnen gevonden worden op
gvs-rpb.com.
RPB® Safety LLC is een ISO9001 gecertificeerd bedrijf.
GECERTIFICEERD DOOR:
CE: BSI Group The Netherlands B.V. (NB2797), Say Building, John M. Keynesplein 9, 1066 EP,
Amsterdam, NL
UKCA: BSI Group (AB0086), Kitemark Court, Knowhill, Milton Keynes MK5 8PP, United Kingdom
NEDERLANDS
Raadpleeg de paginanummers van Z4® CE Engels Gebruiksaanwijzing voor afbeeldingen en
diagrammen.
WAARSCHUWING
GEVAAR
RPB® SAFETY - GLOBAL HEADQUARTERS
2807 Samoset Rd, Royal Oak, MI 48073, USA
T: 1-866-494-4599 F: 1-866-494-4509 E: sales@gvs.com
RPB® SAFETY - APAC
3 Robin Mann Place, Christchurch Airport, Christchurch 8053, New Zealand
T: +64-3-357-1761 F: +64-3-357-1763 E: sales@gvs.com
GVS S.p.A. - EMEA
Via Roma 50, 40069 Zona Industriale BO, Italy
T: +39 0516176391 E: [email protected]
GVS Filter Technology UK Ltd.
Vickers Industrial Estate, Mellishaw Ln, Morecambe LA3 3EN, UK
T: +44 (0)1524 847600 E: [email protected]
gvs-rpb.com
Copyright ©2022 RPB IP, LLC. Alle rechten voorbehouden. Alle inhoud op deze
website is beschermd door de Amerikaanse auteursrechtwetgeving en mag niet worden
gereproduceerd, gedistribueerd, overgedragen, weergegeven, gepubliceerd of uitgezonden
zonder de voorafgaande schriftelijke toestemming van RPB IP, LLC. U mag geen
handelsmerk, auteursrecht of andere kennisgeving van kopieën van de inhoud wijzigen of
verwijderen.

38
Z4®
BELANGRIJKE VEILIGHEIDSINFORMATIE
Onjuiste selectie, pasvorm, gebruik of onderhoud van
dit product kan tot letsel leiden; levensbedreigende
vertraagde long-, huid- of oogziekte; of de dood. Dit product is bedoeld voor beroepsmatig
gebruik in overeenstemming met de geldende normen of voorschriften voor uw locatie, branche
en werkzaamheid (zie Verantwoordelijkheden van de Werkgever, pagina 41). Bekendheid met
normen en voorschriften met betrekking tot het gebruik van deze beschermende uitrusting
wordt aanbevolen, ook als deze niet rechtstreeks op u van toepassing zijn. Raadpleeg de
Verantwoordelijkheden van de Werkgever en de Veiligheidsinstructies voor de Gebruiker indien u
als zelfstandige werkt of indien u deze producten gebruikt in een niet-beroepsmatige omgeving.
Ga naar gvs-rpb.com/industrial/important-safety-information voor nuttige links naar CE- normen
en andere inhoud.
WERKGEVERS: Lees deze handleiding en de Gebruiksaanwijzing van het Ademluchttoestel en
voer de Verantwoordelijkheden van de Werkgever uit (pagina 41).
PRODUCTGEBRUIKERS: Lees deze handleiding en de Gebruiksaanwijzing van het
Ademluchttoestel en volg de Veiligheidsinstructies voor de Gebruiker op (pagina 43).
KIJK OP DE WEBSITE VOOR UPDATES. Producthandleidingen worden regelmatig bijgewerkt.
Ga naar gvs-rpb.com/industrial/resources voor de meest recente versie van deze handleiding voor
gebruik van het product.
Alle handelsmerken, servicemerken en logo’s die in deze publicatie worden gebruikt, zowel
geregistreerd als niet-geregistreerd, zijn de handelsmerken, servicemerken of logo’s van hun
respectieve eigenaars. Alle rechten op het intellectuele eigendom van RPB in deze publicatie,
inclusief auteursrecht, handelsmerken, dienstmerken, bedrijfsgeheimen en octrooirechten,
zijn voorbehouden. RPB Intellectueel Eigendom omvat elk octrooi, gepatenteerde artikelen,
octrooiaanvragen, ontwerpen, industriële ontwerpen, auteursrechten, software, broncode,
databaserechten, morele rechten, uitvindingen, technieken, technische gegevens,
handelsgeheimen, knowhow, merken, handelsmerken, handelsnamen, slogans, logo’s en
ander gemeen recht en eigendomsrechten, al dan niet geregistreerd, die in het bezit zijn van,
geheel of gedeeltelijk zijn ontwikkeld door of in licentie zijn gegeven door RPB IP, LLC.
Neem voor technische ondersteuning contact op met onze Klantenservice: 1-866-494-4599
of e-mail: sales@gvs.com
Formulier #: 7. 2 0 . 5 5 4
Herziening: 7
WAARSCHUWING
INTRODUCTIE
De Z4 Laskap is een ademhalingstoestel voor toepassingen waarbij bescherming tegen
verontreinigingen in de lucht en bescherming van de ogen/het gezicht nodig is; zoals lassen
en slijpen. Bovendien is het Vision-Link™ Licht beschikbaar om het werkgebied te verlichten.
Platte, ‘in de nek’ oorbeschermers kunnen ook samen met het Z4 Laskap worden gedragen.
Dit product moet te allen tijde worden geïnspecteerd en onderhouden in overeenstemming
met deze gebruiksaanwijzing.
Zie BESCHERMING EN BEPERKINGEN (pagina 39) voor meer informatie.

39
BESCHERMING EN BEPERKINGEN
ADEMHALING
De RPB Z4 is gekeurd als type C ademhalingstoestel in de volgende categorieën:
Motoraangedreven Lucht
Het RPB Z4 Ademhalingstoestel is gekeurd volgens EN 12941:1998 +A1: 2003 +A2:
2008 TH3, indien correct gemonteerd en gebruikt met alle benodigde onderdelen,
inclusief de Ademhalingsslang en het RPB PX5 of de RPB PX4 AIR Motoraangedreven
Luchtzuiverend Ademhalingstoestel. Als zodanig vermindert deze significant de hoeveelheid
verontreiniging die door de gebruiker wordt ingeademd, al wordt het inademen hiervan
niet volledig geëlimineerd. Specifieke bescherming is afhankelijk van de filter die is
geselecteerd voor gebruik in de RPB PX5 of de RPB PX4 AIR PAPR (zie de PX5 of de PX4 AIR
Gebruiksaanwijzing).
Minimale afgestelde flow van fabrikant
PX5 FILTERS
180 L/MIN SNELHEID 1
180 L/MIN SNELHEID 2
180 L/MIN SNELHEID 3
03-892-P
>10 uur
>7 uur
>6 uur
03-893-A2
>5 uur
>4 uur
>4 uur
03-894-ABE
>5 uur
>4 uur
>4 uur
03-895-ABEK
>5 uur
>4 uur
>4 uur
PX4 AIR FILTERS
180 L/MIN SNELHEID 1
180 L/MIN SNELHEID 2
180 L/MIN SNELHEID 3
03-985
10-13 uur
7-10 uur
6-8 uur
03-995
>4 uur
-
-
Head-top classificaties
PAPR-MOEDEL EUROPESE
APPARAATCLASSIFICATIE
EN 12941
TOESTEL MODEL NOMINALE
PROTECTIE
FACTOR
PX5 TH2 Z4 Schouder-Cape 50
PX5 TH2 Z4 Gelaatsafdichting 50
PX4 Air TH3 Z4 Schouder-Cape 50
PX4 Air TH3 Z4 Gelaatsafdichting 50
WAARSCHUWING
Het RPB Z4 Ademhalingstoestel is NIET VOOR GEBRUIK geschikt als:
De atmosfeer onmiddelijk gevaar levert voor leven of gezondheid.
De drager niet kan ontsnappen zonder hulp van het ademhalingstoestel.
Het percentage zuurstof in de omgeving lager ligt dan 21% ±1%.
Bij straaltoepassingen.
Bescherming tegen gevaarlijke gassen (bijv. koolmonoxide).
Het verontreinigingsniveau hoger ligt dan de voorschriften of aanbevelingen.
Het soort verontreiniging of de concentratie van verontreiniging onbekend is.
De werkplaats slecht geventileerd is.
De temperatuur buiten het bereik van -10°C tot +60°C (14°F to 140°F) valt.

40
Z4®
Er een ontvlambare of explosieve atmosfeer aanwezig is bij gebruik van systemen
met elektrische onderdelen die niet intrinsiek veilig zijn, zoals de PX5, PX4 AIR en de
Vision-Link.
GEZICHT EN OGEN:
Het Z4 Gelaatsscherm met Veiligheidsvizier is gekeurd comform EN 166:2001 (AS/NZS
1337.1:2010) standaarden en is ontworpen voor slijpen, en andere industriële toepassingen.
Het biedt geen volledige bescherming van de ogen en het gelaat tegen zware impact en
penetratie en is geen vervanging voor goede veiligheidspraktijken en technische controles.
Het Z4 Laskap met Impactbestendig Vizier en Auto-Verduisterende Lasruit (ADF) is
vervaardigd volgens de EN 379:2003 (AS / NZS 1337.1: 2010) -vereisten en is ontworpen
om het gezicht en het hoofd van de gebruiker te beschermen tegen vonken en gevaarlijke
ultraviolette stralen en infraroodstralen die worden uitgezonden tijdens het lasproces.
(Zie “Auto-Verduisterende Lasruit” pagina 49) voor informatie over ADF-mogelijkheden
en gebruik. Gebruik een goedgekeurde RPB gelaatsafdichting of cape voor voldoende
bescherming tegen vonken, vuil en lichtflitsen.
De Z4 is niet ontworpen of getest om bescherming te bieden tegen gesmolten metalen of
bijtende vloeistoffen.
Let op: De Z4 beschermt niet tegen de mogelijke overdracht van impact op een bril die
onder de vizier wordt gedragen.
HOOFD:
De Z4 voldoet niet aan de EN 397:2012+A1:2012 (AS/NZS 1801:1997) vereisten voor
fysieke hoofdbescherming als een veiligheidshelm of kap. Zorg ervoor dat de kap zo is
afgesteld dat deze goed op de gebruiker past door de hoofdband aan te passen.
De Z4 voldoet wel aan de EN 812:2012 de eisen voor stootpet hoofdbescherming indien
uitgerust met de 15-850 Stootpet.
GEHOOR:
Dit ademhalingstoestel bevat een paar 18-524 Slimline oorbeschermers voldoet
wel aan de EN 352-1:2002. De oorbeschermers zijn een integraal onderdeel van
het ademhalingstoestel en moeten worden gedragen tijdens het gebruik van het Z4
ademhalingstoestel. Volg de gebruiksaanwijzing bij het passen van de oorkappen om te
zorgen voor de juiste pasvorm en bescherming.
LASSEN:
Dit product is getest en gecertificeerd volgens EN 175: 1997.
PBM REGLEMENT:
De Z4 voldoet aan de PBM-Verordening (EU) 2016/425. Verordening 2016/425 betreffende
persoonlijke beschermingsmiddelen zoals opgenomen in de Britse wetgeving en gewijzigd.
De Conformiteitsverklaring voor CE en UKCA kan gevonden worden op
gvs-rpb.com/industrial/resources
De gehoorbeschermers moeten worden gedragen
tijdens het gebruik van het Z4-ademhalingstoestel.
WAARSCHUWING

41
DIAGRAM VAN ADEMHALINGSCOMPONENTEN - PAPR
De RPB Z4 is een onderdeel van de drie hoofdcomponenten die samen een aangedreven
luchtzuiverend ademhalingsapparaat vormen. (Let op: de PX5 is in het diagram als voorbeeld
gebruikt.)
AFBEELDING 1.1 OP PAGINA 6
1. Kap van het ademhalingstoestel
2. Ademhalingsslang
3. Luchttoevoer PX5 of de PX4 AIR
VOORZORGSMAATREGELEN EN BEPERKINGEN
A. Niet voor gebruik als de omgeving minder dan 21% ±1% zuurstof bevat.
B. Niet voor gebruik in atmosferen die onmiddelijk gevaar leveren voor het leven of de
gezondheid.
C. Overschrijd geen maximumconcentraties die zijn vastgesteld door wettelijke normen.
F. Gebruik geen Motoraangedreven Luchtzuiverend Ademhalingstoestel als de luchttoevoer
lager is dan 180 lpm (6.4 cfm) voor kappen en/of helmen.
H. Volg vastgelegde patroon en huls-vervangingsschema’s om ervoor te zorgen dat patroon en
hulzen worden vervangen voordat er doorslag plaatsvindt.
I. Bevat elektrische onderdelen die een vonk kunnen creëren in een ontvlambare of explosieve
omgeving.
J. Als dit product niet op de juiste manier wordt gebruikt en onderhouden, kan dit letsel of de
dood tot gevolg hebben.
L. Volg de instructies van de fabrikant voor het vervangen van patronen, hulzen en/of filters.
M. Alle goedgekeurde ademhalingstoestellen moeten worden geselecteerd, gepast, gebruikt en
onderhouden in overeenstemming met de geldende voorschriften.
N. Vervang nooit onderdelen, pas ze niet aan en laat ze niet weg. Gebruik alleen exacte
vervangende onderdelen die door de fabrikant zijn aangegeven.
O. Raadpleeg de gebruiksaanwijzing en/of onderhoudshandleidingen voor informatie over
gebruik en onderhoud van deze ademhalingstoestellen.
P. De Z4 is niet geëvalueerd voor gebruik als een chirurgisch masker.
LUCHTBRON
MOTORAANGEDREVEN LUCHT
Controleer of het verontreinigde gebied binnen de gebruikslimieten voor een
Motoraangedreven Luchtzuiverend Ademhalingstoestel ligt en bepaal het soort
verontreiniging. Nadat het verontreinigingssniveau is bevestigd, kunt u vervolgens het
filterpatroon kiezen dat voor de toepassing moet worden gebruikt, om voor voldoende
bescherming te zorgen. Zorg ervoor dat het gebied goed geventileerd is en dat er regelmatig
luchtmonsters worden genomen om te bevestigen dat de atmosfeer binnen de niveaus blijft
die worden aanbevolen door de lokale bestuursorganen. Volg de Gebruiksaanwijzing van de
PX5® of de PX4 AIR® PAPR voor meer informatie.
Zie de sectie Opslag voor informatie over verpakking en bescherming die nodig is voor
transport.

42
Z4®
VERANTWOORDELIJKHEDEN VAN DE WERKGEVER
Uw specifieke verantwoordelijkheden kunnen verschillen per locatie en branche, maar over het
algemeen verwacht RPB dat werkgevers:
Alle geldende normen en voorschriften voor uw locatie, branche en werkzaamheid
opvolgen. Afhankelijk van uw locatie en branche, kunnen een aantal normen en voorschriften
van toepassing zijn op uw selectie en gebruik van ademhalingstoestellen en andere
persoonlijke beschermende uitrusting. Deze kunnen bijvoorbeeld nationale, lokale of militaire
normen en voorschriften en standaarden en consensus normen omvatten. Er zijn ook vereisten
specifiek voor bepaalde verontreinigingen, b.v. silica (zie gvs-rpb.com voor meer informatie),
asbest, organische ziekteverwekkers, enz. Weet welke eisen van toepassing zijn op uw locatie
en branche.
Zorg voor geschikte veiligheidsprogramma’s.
Heb en volg:
Een veiligheidsprogramma voor de werkplek.
Een geschreven programma voor ademhalingsbescherming in overeenstemming met
de van toepassing zijnde normen en voorschriften.
In overeenstemming met bovenstaande,
Voer een gevarenanalyse uit en selecteer gepaste uitrusting voor elke werkzaamheid.
Een bevoegd persoon moet een gevarenanalyse uitvoeren. Er moeten waar nodig
controles plaatsvinden en een gekwalificeerd persoon moet bepalen welk soort
ademhalings, gezichts-, oog-, hoofd- en gehoorbescherming geschikt zijn voor de
beoogde werkzaamheden en gebruiksomstandigheden. (Kies bijvoorbeeld een
ademhalingstoestel dat geschikt is voor de specifieke luchtverontreinigingen, rekening
houdend met de werkplek en de gebruiker en met een Toegekende Protectie Factor (TPF)
die aan de vereiste norm voor werknemersbescherming voldoet of dit overtreft, selecteer
gezichts- en oogbescherming voor lassen passend bij het type laswerk, enz.)
Indien van toepassing, controleer uw veiligheidsprogramma op de werkplek, het
programma voor ademhalingsbescherming en de normen en voorschriften voor uw
werkzaamheid of branche voor gerelateerde beschermingsvereisten en raadpleeg deze
handleiding (Bescherming en Beperkingen, pagina 39) en de Gebruiksaanwijzing van de
PX5 of de PX4 AIR PAPR voor productspecificaties.
Zorg ervoor dat werknemers medisch gekeurd zijn om een ademhalingstoestel te
gebruiken. Laat een gekwalificeerde arts of andere bevoegde zorgverlener waar nodig
medische evaluaties uitvoeren met behulp van een medische vragenlijst of een standaard
medisch onderzoek per overheidsregelgeving.
Train medewerkers in het gebruik, onderhoud en de beperkingen van de Z4.
Benoem een gekwalificeerd persoon met voldoende kennis over de RPB Z4 per
overheidsregelgeving om waar nodig training te geven:
Kwalificaties van de Ademhalingstoestel-Trainer. Iedereen die training voor het
ademhalingstoestel verzorgt, moet:
a) goed geïnformeerd zijn over de toepassing en het gebruik van de
ademhalingstoestellen;

43
b) praktische kennis toepassen bij de selectie en het gebruik van ademhalingstoestellen
en werkmethoden op de werkplek;
c) inzicht hebben in het programma voor ademhalingstoestellen van de werkplek; en
d) kennis hebben van geldende regels.
Train elke Z4-gebruiker voor het gebruik, de toepassing, de inspectie, het onderhoud, de
opslag, de pasvorm en de beperkingen van het product in overeenstemming met de inhoud
van deze Gebruiksaanwijzing en de handleiding van de gekeurde Ademluchttoestel en
de standaard- of regelgevingsvereisten. Zorg ervoor dat iedere beoogde gebruiker beide
handleidingen leest.
Zorg ervoor dat de uitrusting correct is gemonteerd, gebruikt en onderhouden.
Zorg ervoor dat de uitrusting correct is gemonteerd, geïnspecteerd, gepast, gebruikt en
onderhouden, inclusief selectie van het juiste luchtfilterpatroon en, indien van toepassing,
verduisteringsinstelling van de lasruit, voor de toepassing.
Meet en controleer de luchtverontreiniging op de werkplaats. Meet en controleer de
niveaus van luchtverontreiniging op de werkplaats in overeenstemming met de geldende
voorschriften. Zorg ervoor dat de werkplaats goed geventileerd is.
Neem voor vragen contact op met RPB.
Bel de klantenservice:
Tel.: 1-866-494-4599
E-mail: sales@gvs.com
Web: gvs-rpb.com
VEILIGHEIDSINSTRUCTIES VOOR DE GEBRUIKER
VÓÓR HET EERSTE GEBRUIK - TRAINING EN MEDISCHE KWALIFICATIE
Gebruik dit apparaat niet totdat u deze handleiding en de Gebruiksaanwijzing van de PX5 of
de PX4 AIR PAPR heeft gelezen (extra exemplaren beschikbaar op gvs-rpb.com) en getraind
bent in het gebruik, het onderhoud en de beperkingen van het ademhalingstoestel door
een gekwalificeerd persoon (benoemd door uw werkgever) die kennis heeft van het RPB Z4
Ademhalingstoestel.
Draag dit ademhalingstoestel pas als u bent geslaagd voor een medische evaluatie met een
medische vragenlijst of een eerste medisch onderzoek door een gekwalificeerde arts of een
andere bevoegde zorgverlener.
Allergenen: Er zijn in dit product geen bekende of veel voorkomende allergenen gebruikt.
Sommige materialen kunnen een allergische reactie veroorzaken bij personen die daarvoor
gevoelig zijn. Als u allergisch bent of een irritatie ontwikkelt, licht dan uw werkgever in.
Irritatie kan optreden als gevolg van een gebrek aan reiniging. Volg alle reinigings- en
onderhoudsinstructies in de handleidingen voor dit en alle andere RPB-producten die u gebruikt.
CONTROLEER OF HET SYSTEEM GEBRUIKSKLAAR IS
Zorg dat u een compleet systeem heeft. Controleer of u alle benodigde onderdelen heeft zodat de
Z4 functioneert als een volledig en gekeurd ademhalingstoestel:

44
Z4®
Luchtkap (Z4)
Ademhalingsslang
PX5 of de PX4 AIR PAPR
(Zie het Diagram van Ademhalingscomponenten pagina 40-41). De RPB Z4 is alleen goedgekeurd
voor gebruik met de RPB PX5 of de PX4 AIR PAPR. Gebruik alleen authentieke RPB-
merkonderdelen en -componenten die deel uitmaken van het gekeurde ademhalingstoestel. Het
gebruik van onvolledige of ongeschikte onderdelen, waaronder het gebruik van nagemaakte of
niet-RPB-onderdelen, kan leiden tot onvoldoende bescherming en maakt de keuring van het
volledige ademhalingsstoestel nietig. Pas geen enkel deel van dit product aan, en verander niets.
Inspecteer alle componenten dagelijks op tekenen van beschadiging of slijtage die het
beschermingsniveau dat oorspronkelijk werd geleverd kunnen verminderen. Verwijder elk
beschadigd onderdeel of product, inclusief elk vizier, voor service, reparatie of vervanging.
Gekraste of beschadigde veiligheidsvizieren of andere componenten moeten worden vervangen
door originele RPB-vervangingsonderdelen. Wanneer veiligheidsvizieren en impactvizieren
worden vervangen, verwijder eventueel extra beschermfolie aan beide zijden van de ruit. Als de
folie niet verwijderd wordt, kan dit de helderheid van de ruit beïnvloeden en oogvermoeidheid
veroorzaken. Inspecteer de binnenkant van het ademhalingstoestel op respirabel stof of andere
vreemde voorwerpen. Houd de binnenkant van het ademhalingstoestel altijd schoon.
Zorg ervoor dat de kap correct is gemonteerd in de configuratie die bij uw toepassing past.
Gebruik het ademhalingstoestel nooit zonder dat alle vizieren op hun plaats zitten. Dit omvat
het Veiligheidsvizier, Impactvizier, de ADF en de binnenste ADF Ruit. Deze vizieren, indien op
de juiste manier geïnstalleerd, maken deel uit van de ademhalingsafdichting om te voorkomen
dat giftige of gevaarlijke gassen, vloeistoffen of stof de kap binnendringen. Onvolledig of onjuist
geïnstalleerde vizieren kunnen onvoldoende bescherming en ademhalingsbescherming bieden.
Raadpleeg Montage en Onderhoud van het Ademhalingstoestel (pagina 46). Zie Donning (pagina
53) voor informatie over de pasvorm.
CONTROLEER OF DE UITRUSTING GESCHIKT IS VOOR UW WERKZAAMHEID
Controleer of de Z4 de juiste bescherming biedt voor uw werkzaamheid. Controleer, indien van
toepassing, uw veiligheidsprogramma op de werkplek, programma voor ademhalingsbescherming
en de normen en voorschriften voor uw werkzaamheid of branche. (Zie BESCHERMING EN
BEPERKINGEN, pagina 39.)
ALVORENS DE Z4® AAN TE TREKKEN:
Controleer of verontreinigingen in de lucht binnen de aanbevolen limieten voor gebruik van
ademhalingstoestellen vallen:
Bepaal het soort en niveau van vervuiling. Controleer of de concentraties van
verontreinigingen in de lucht niet groter zijn dan toegestaan door de geldende
voorschriften en aanbevelingen voor motoraangedreven luchtzuiverende
ademhalingstoestellen.
Selecteer de juiste filterpatroon voor de verontreiniging en voor de toepassing:
PAPR: Nadat het verontreinigingsniveau is bevestigd, bepaalt u het juiste filterpatroon
voor de toepassing, om te zorgen dat u voldoende beschermd bent. Volg de
Gebruiksaanwijzing van de PX5 of de PX4 AIR PAPR.

45
Zorg dat het gebied geventileerd en gecontroleerd wordt:
Zorg ervoor dat het gebied goed geventileerd is en dat er regelmatig luchtmonsters
genomen worden om te bevestigen dat de atmosfeer binnen de aanbevolen niveaus
van bestuursorganen blijft.
Als u vragen heeft, stel deze aan uw werkgever.
BETREED DE WERKPLEK NIET als één van de volgende omstandigheden zich voordoet:
De atmosfeer levert direct gevaar voor het leven of de gezondheid.
De drager kan niet ontsnappen zonder hulp van het ademhalingstoestel.
Het percentage zuurstof in de omgeving ligt lager dan 21% ±1%.
In een ontvlambare of explosieve atmosfeer bij gebruik van systemen met elektrische
onderdelen die niet intrinsiek veilig zijn, zoals de PX5, PX4 AIR, en de Vision-Link.
Het verontreinigingsniveau ligt hoger dan de voorschriften of aanbevelingen.
Het soort verontreiniging of de concentratie van verontreiniging is onbekend.
De werkplaats is slecht geventileerd.
De temperatuur valt buiten het bereik van -10°C tot +60°C (14°F tot 140°F).
De werkplaats een besloten ruimte is (tenzij de juiste maatregelen worden genomen voor
besloten ruimtes).
VERLAAT DE WERKLPAATS ONMIDDELLIJK INDIEN:
Een component van het product beschadigd raakt.
Het gezichtsvermogen is aangetast.
Luchttoevoer stopt of vertraagt, of het alarm af gaat. Gebruik Motoraangedreven
Luchtzuiverende Ademhalingstoestellen niet als de luchttoevoer minder is dan 180 slpm.
Ademen moeilijk wordt.
U duizelig, misselijk, te heet, te koud of ziek bent.
Uw ogen, neus of huid geïrriteerd raken.
U verontreinigingen in de kap proeft, ruikt of ziet.
U een andere reden heeft om te vermoeden dat het ademhalingstoestel niet voldoende
bescherming biedt.
ONDERHOUD
Plaats de PX5 of de PX4 AIR nooit op hete oppervlakken. Breng geen verf, oplosmiddelen,
kleefstoffen of zelfklevende etiketten aan, tenzij aan de hand van instructies van RPB. Bepaalde
chemicaliën kunnen schadelijk zijn voor dit product.
Zie het gedeelte “Inspectie en Reiniging” voor specifieke reinigingsinstructies.
INSTRUCTIES VOOR SPECIFIEKE TOEPASSINGEN OF OMGEVINGEN
Lassen
Raadpleeg Montage en Onderhoud van het Ademhalingstoestel (pagina 46) en ADF-Werking
(pagina 49) voor belangrijke veiligheidsgerelateerde gebruiks- en onderhoudsinformatie.
Controleer het voorgeschreven verduisteringsniveau voor uw lastoepassing en pas uw
Auto-Verduisterende Lasruit (ADF) dienovereenkomstig aan (zie de tabel met aanbevolen
verduisteringsniveaus, pagina 52). Plaats de Auto-Verduisterende Lasruit (ADF) nooit op hete
oppervlakken. Stel de ADF niet bloot aan vloeistoffen en bescherm deze tegen vuil. Zie Informatie
over opslag, onderhoud en reiniging van de ADF (pagina 49).

46
Z4®
MONTAGE EN ONDERHOUD
ADEMHALINGSSLANG
AFBEELDING 2.1 OP PAGINA 13
Schroef de ademhalingsslang (04-837)
op de luchtinlaat met schroefdraad aan
de zijkant van de Z4 Laskap en schroef de
ademhalingsslang volledig in zonder te
strak aan te draaien.
AFBEELDING 2.2 OP PAGINA 13
Optioneel kan de beademingsbuis
door de lus aan de achterkant van de
gelaatsafdichting / cape worden geleid om
deze gecentreerd en uit de weg te houden.
MOTORAANGEDREVEN LUCHT
AFBEELDING 2.3 OP PAGINA 13
Schroef de ademhalingsslang (04-837)
Steek het bajonet-uiteinde van de
ademhalingsslang in de uitlaat van de PX5
of de PX4 AIR PAPR en schroef deze vast.
VOOR GEBRUIK MET RPB PX5 OF DE RPB
PX4 AIR PAPR - ZIE DE PX5 OF DE PX4
AIR GEBRUIKSAANWIJZING
Wanneer het Z4 Ademhalingstoestel wordt
gebruikt in combinatie met de RPB PX5
of de RPB PX4 AIR PAPR, raadpleeg de
gebruiksaanwijzing van de RPB PX5 of
de RPB PX4 AIR PAPR voor montage en
gebruik.
Let op: De RPB PX5 of de PX4 AIR is
een motoraangedreven luchtzuiverend
ademhalingstoestel, daarom moet u
voorzichtig zijn bij het selecteren van de
juiste filter voor de toepassing van het
ademhalingstoestel.
IMPACTBESTENDIG VIZIER VERVANGEN
AFBEELDING 3.1 OP PAGINA 14
Om het Impactbestendige Vizier te
vervangen, til de Laskap op, ontgrendel de
groene ADF-houder van het gelaatsscherm
door de lipjes uit elkaar te duwen en naar
voren te duwen.
AFBEELDING 3.2 OP PAGINA 14
Verwijder het Impactbestendige Vizier door
de ruit samen te knijpen om deze uit de
lipjes aan de zijkanten te verwijderen.
AFBEELDING 3.3 OP PAGINA 14
Plaats een nieuw Impactbestendig Vizier
door de beschermfolie aan beide zijden te
verwijderen en de ruit vervolgens aan de
zijkanten in te drukken om deze onder de
lipjes aan de zijkanten van het Lasvizier te
plaatsen.
AFBEELDING 3.4 OP PAGINA 14
Plaats de groene ADF-houder terug over het
Impactbestendige Vizier door de onderste
Zorg ervoor dat de kap onbedoeld licht volledig blokkeert. Zorg ervoor dat er alleen licht via de
voorzijde van de kap kan binnendringen, via het zichtveld van de auto-verduisterende lasruit.
Besloten Ruimten
Volg alle procedures voor het betreden, bedienen en verlaten zoals gedefinieerd in geldende
voorschriften en normen.
Lassen in Besloten Ruimten
Lassen in een besloten ruimte kan een atmosferisch gevaar opleveren vanwege het ontstaan van
verontreinigingen en de verplaatsing van zuurstof. Gebruik de Z4 niet in besloten ruimten als de
zuurstofconcentratie lager is dan 21% ±1%.
Controleer de lokale normen voor procedures voor besloten ruimten.
Gebruik de Z4 niet om te lassen zonder dat de
Automatisch Verduisterende Lasruit op zijn plaats zit. Las niet met enkel de slijpruit.
Incorrect gebruik kan blindheid of andere blijvende oogschade veroorzaken.
WAARSCHUWING

47
geleiders te plaatsen en deze te roteren
totdat de clips stevig op hun plaats klikken.
VERVANGEN EN REINIGEN VAN ADF
RUIT
AFBEELDING 4.1 OP PAGINA 15
Volg stappen 3.1 en 3.2 verwijder de ADF-
houder en het Impactbestendige Vizier.
AFBEELDING 4.2 OP PAGINA 15
Druk op de clip aan de onderkant van de
ADF om de ADF uit de houder te schuiven.
AFBEELDING 4.3 OP PAGINA 15
Eenmaal verwijderd, kan de ADF worden
gereinigd met een zacht doekje met een
mild reinigingsmiddel (of alcohol).
AFBEELDING 4.4 OP PAGINA 15
Om de Binnenste ADF Ruit te vervangen,
schuift u de ruit eruit en vervangt u deze
met een nieuwe.
AFBEELDING 4.5 OP PAGINA 16
Plaats de gereinigde of nieuwe ADF
Ruit in de Laskap met het zonnepaneel
naar beneden en klik het vast. Vervang
vervolgens het Impactbestendige Vizier en
sluit de groene ADF-houder opnieuw aan.
AFBEELDING 4.6 OP PAGINA 16
Plaats de groene ADF-houder terug over het
Impactbestendige Vizier door de onderste
geleiders te plaatsen en naar binnen te
roteren totdat de clips stevig op hun plaats
zijn geklikt.
VERGROOTGLAS
AFBEELDING 5.1 OP PAGINA 16
Zet de linker beugel van het lasvergrootglas
vast met de meegeleverde schroeven, door
deze stevig aan te draaien zonder ze te
strak aan te draaien. Schroef vervolgens de
rechter beugel vast.
AFBEELDING 5.2 OP PAGINA 16
Om het vergrootglas te installeren voor
lastoepassingen, schuift u de lens schuin in
de beugels tot deze stevig vast zit.
PLAATS / VERVANG VASTE
LASSCHADUWLENS
De vaste schaduwlens en het frame
kunnen worden gebruikt in plaats van de
ADF voor lassen en andere toepassingen
die lichtfiltering vereisen. Kies een
geschikte schaduwlens, afhankelijk van de
toepassing. Installeer het lensframe met
een lens geïnstalleerd in de Z4® op dezelfde
manier als het installeren van een ADF.
Gebruik de Z4® niet zonder ADF of een lens
met vaste schaduw.
AFBEELDING 5.3 OP PAGINA 17
Schuif de lens onder een hoek vanaf
de achterkant in het lange lipje om een
lens met vaste schaduw in het frame
te installeren. Draai vervolgens de lens
omlaag totdat deze stevig in het frame klikt.
Om de lens te verwijderen, maakt u de
onderkant los en schuift u deze naar buiten.
AFBEELDING 5.4 OP PAGINA 17
De binnenste beschermende lens kan in
het frame worden geplaatst na de lens met
vaste schaduw om het binnenoppervlak te
beschermen wanneer het lasvizier wordt
opgetild om lassen te slijpen, enz.
ZIJRUIT VERVANGEN
AFBEELDING 6.1 OP PAGINA 18
Om de zijruiten te vervangen, tilt u de
Laskap op, ontgrendelt u de groene ADF-
houder van het Gelaatsscherm door de
lipjes uit elkaar te duwen en naar voren te
duwen.
AFBEELDING 6.2 OP PAGINA 18
Vanaf de binnenkant van de Laskap, klik de
zijruiten los en roteer ze naar buiten.
AFBEELDING 6.3 OP PAGINA 18
Vanaf de buitenkant van de Laskap, roteer
de zijruiten naar binnen, en zorg ervoor dat
ze volledig worden vastgedrukt zonder dat
er nog licht langs de randen binnenkomt.
AFBEELDING 6.4 OP PAGINA 18
Plaats de groene ADF-houder terug over het
Impactbestendige vizier door de onderste
geleiders te plaatsen en de rest naar binnen
te roteren totdat de clips stevig op hun
plaats klikken.
Er zijn twee sets zijruiten. Een set is tint 5
getint. De andere set is effen grijs om licht
en afleiding van de zijkanten te blokkeren.

48
Z4®
LASVIZIER VERVANGEN
AFBEELDING 7.1 OP PAGINA 19
Draai de groene afstelknoppen tegen
de klok in om ze los te maken zodat ze
kunnen worden verwijderd.
AFBEELDING 7.2 OP PAGINA 19
Wanneer de afstelknoppen zijn verwijderd,
kunnen de hoofdband, de beugels en de
onderdelen worden verwijderd.
AFBEELDING 7.3 OP PAGINA 19
Verwijder de schroef waarmee de veer aan
elke zijde aan het slijpvizier is bevestigd.
Verwijder het Lasvizier door beide kanten
van het Gelaatsscherm af te schuiven.
Plaats het nieuwe Lasvizier op het
Gelaatsscherm. Draai de schroeven
vast om de veren van het Lasvizier
op het Gezichtsvizier te bevestigen.
Plaats vervolgens de Afstelring, de
Bevestigingsbeugel en de Draaimoer aan
de binnenzijde van het Gelaatsscherm.
Zet ze vast door de Afstelknop aan de
buitenzijde van het Lasfilter vast te
draaien. Zorg ervoor dat u de Verstelbare
Draaimoer aan de rechterkant gebruikt.
VEILIGHEIDSVIZIER VERVANGEN
AFBEELDING 8.1 OP PAGINA 20
Til de Laskap op. Gebruik een munt of
inbussleutel om de groene knoppen
waarmee het Veiligheidsvizier is bevestigd
los te draaien en verwijder vervolgens de
ruit.
AFBEELDING 8.2 OP PAGINA 20
Verwijder de beschermfolie van de
binnenkant van de ruit Plaats de ruit tegen
de afdichting en plaats de knoppen in de
sleuven en draai ze om ze op hun plaats te
vergrendelen, waarbij het Veiligheidsvizier
wordt bevestigd. Verwijder de
beschermfolie van de buitenkant van het
veiligheidsvizier.
AANPASSING HOOFDBAND
AFBEELDING 9.1 OP PAGINA 20
Om de bovenste banden van het
hoofdbandenstel af te stellen, duw de twee
banden naar elkaar toe om vast te zetten.
AFBEELDING 9.2 OP PAGINA 20
Om de bovenste banden losser te maken,
klik de uiteinden van de banden los, trek
de banden vervolgens uit elkaar. Klik de
lipjes vervolgens terug over de band als
deze in de gewenste positie staat, en zet
deze zo stevig vast.
AFBEELDING 9.3 OP PAGINA 21
De hoofdbanden kunnen ook worden
afgesteld met het spanmechanisme op de
achterkant van de hoofdband. Draai aan de
knop om de hoofdband strakker of losser
te maken.
AFBEELDING 9.4 OP PAGINA 21
Het hoofdbandenstel kan ook naar voren
en naar achteren in de Laskap schuiven.
1. Trek het lipje aan de zijkanten naar
buiten. 2. Schuif het hoofdbandenstel
naar voren of naar achteren om de meest
comfortabele positie te vinden.
BUMP CAP INSTALLEREN
AFBEELDING 9.5 OP PAGINA 21
Verwijder de bovenste banden van de
zijsteunen.
AFBEELDING 9.6 OP PAGINA 21
Bevestig de stootdop aan de zijsteunen op
de verbindingspunten die werden gebruikt
voor de bovenste banden.
Installeer de stootkap
hoofdharnasconstructie in de Z4 en
zorg ervoor dat deze volledig binnen de
gelaatsafdichting of schoudercape zit,
zodat de positieve drukzone niet wordt
onderbroken. De stootkap die wordt
gebruikt met de Quiet-Slim oorkappen.
AANPASSEN HOEK LASVIZIER
AFBEELDING 10.1 OP PAGINA 22
Om de hoek van het Lasvizier aan het
gezicht van de drager aan te passen, draait
u de afstelknoppen los, zonder deze te
verwijderen, aan de buitenkant van het
Lasvizier.
AFBEELDING 10.2 OP PAGINA 22
Draai het vizier naar de gewenste hoek
met behulp van de inkepingen aan de
rechterkant van de verstelbeugel aan de

49
AUTOMATISCH VERDUISTERENDE LASRUIT (ADF)
WERKING
RPB automatisch verduisterende lasruiten
werken op basis van een vloeibare-
kristallen lichtsluiter die de ogen van
de lasser beschermt tegen intens fel
licht tijdens het lasproces. In combinatie
met de permanente passieve IR/UV-
filter beschermt deze tegen gevaarlijk
infrarood (IR) en ultraviolet (UV) licht.
De bescherming tegen schadelijke
straling is aanwezig, ongeacht het
verduisteringsniveau of een potentiëel
defect van de filter, voorbij de hoogste
verduisteringsfactor die op elk specifiek
model is aangegeven.
RPB automatisch verduisterende lasruiten
zijn vervaardigd volgens de ANSI/
ISEA Z87.1, EN 379 vereisten en zijn
CE-gecertificeerd. Ze zijn niet bedoeld
om te worden gebruikt als bescherming
tegen schokken, rondvliegende deeltjes,
gesmolten metalen, bijtende vloeistoffen of
gevaarlijke gassen.
binnenkant van de Z4.
AFBEELDING 10.3 OP PAGINA 22
Nadat de hoek is afgesteld, draait u de
afstelknoppen weer aan om het vizier op
zijn plaats te zetten.
WENKBROUWPANEEL VERVANGEN
AFBEELDING 11.1 OP PAGINA 23
Plaats het wenkbrouwpaneel op
de binnenkant van de voorste band
van het hoofdbandenstel. Vouw de
boven- en onderkant om en maak
de klittenbandsluitingen vast. Het
voorhoofdkussen kan worden gereinigd en
gedesinfecteerd door het te wassen met
warm water en een mild reinigingsmiddel,
af te spoelen en aan de lucht te laten
drogen.
LASVIZIER REINIGEN
AFBEELDING 12.1 OP PAGINA 23
Reinig de huls van het lasvizier met een
desinfecterend doekje of een zacht doekje
met een milde reiniger. Zorg ervoor dat de
ADF-Ruit niet nat wordt.
INSTALLATIE GELAATSAFDICHTING
AFBEELDING 13.1 OP PAGINA 24
Draai de linker afstelknop los en bevestig
de twee gaten in de gelaatsafdichting over
de nokken onder de beugel. Draai de
afstelknop weer vast.
AFBEELDING 13.2 OP PAGINA 24
Steek het lipje aan de linkerkant van de
gelaatsafdichting in de gleuf onder de
luchtinlaat. Druk de haak en lus over de
luchtinlaat samen om deze aan elkaar te
verbinden.
AFBEELDING 13.3 OP PAGINA 24
Draai de rechter afstelknop los. 1. Haal
de afstelmoer van de binnenkant van
de inkeping af en schuif de band van de
gelaatsafdichting in de inkeping. Zet de
afstelmoer terug op de gewenste inkeping
voor de gewenste hoek en draai de
afstelknop aan de buitenkant weer vast.
AFBEELDING 13.4 OP PAGINA 24
Steek de schroef in het midden
van het vizier door het gat in de
gelaatsafdichting,door de voorste clip, en
in het schroefgat in het vizier. Druk de haak
en lus op de band samen en doe dit ook
aan de binnenkant van het gelaatsschild
om een goede afdichting te verzekeren.
AFBEELDING 13.5 OP PAGINA 22
Leg het midden van het bovenste gedeelte
van de gelaatsafdichting over het midden
van het gelaatsscherm en bevestig de haak
en lus langs de rand. Druk stevig op elkaar
om een goede afdichting te verzekeren.
REINIGING EN DESINFECTIE
De cape- en gezichtsafdichtingen kunnen
worden gereinigd en gedesinfecteerd door
ze in een wasmachine of met warm water
en een mild reinigingsmiddel te wassen,
grondig te spoelen en aan de lucht te laten
drogen.

50
Z4®
Vervang potentieel defecte of
beschadigde automatisch verduisterende
lasruiten (controleer of de automatisch
verduisterende lasruit donker wordt als u de
lasboog raakt).
GEBRUIK
Een automatisch verduisterende lasruit dat
in een Ademhalingstoestel is ingebouwd,
wordt beschouwd als persoonlijke
beschermingsmiddel (PBM) dat de ogen,
het gezicht, de oren en de nek beschermen
tegen direct en indirect gevaarlijk licht
van de lasboog. In het geval dat u alleen
een lasruit zonder de kap heeft gekocht,
selecteer dan een kap die is ontworpen
om te worden gebruikt in combinatie met
een automatisch verduisterende lasruit.
De lasruit moet op de juiste manier in deze
kap kunnen worden bevestigd, inclusief de
binnenste en buitenste beschermruiten.
Er mag geen spanning op de ADF-Lasruit
worden veroorzaakt door het Z4-vizier,
omdat dit ernstige schade aan de lasruit kan
veroorzaken. Zorg ervoor dat zonnecellen
en fotosensoren niet door de kap of een
deel van de kap worden bedekt, omdat
dit het functioneren van de lasruit zou
kunnen belemmeren. Als een van deze
omstandigheden zich voordoet, is de lasruit
mogelijk niet geschikt voor gebruik.
TOEPASSINGSGEBIED
RPB Auto-verduisterende Lasruiten zijn
geschikt voor alle soorten elektro-lassen:
beklede elektroden, MIG/MAG, TIG/WIG,
plasmalassen en snijden, maar niet voor
gaslassen en laserlassen.
FUNCTIES
RPB Lasruiten worden klaar voor gebruik
geleverd. Controleer de mate van vereiste
bescherming voor specifieke lasprocedures
en selecteer de aanbevolen verduistering,
lichtgevoeligheid en vertragingstijd.
VERDUISTERINGSINSTELLING
Ons model heeft een bereik in
verduisteringsinstellingen van 9 tot 13. Pas
verduistering aan met de knop »Shade« die
zich op de ruit bevindt.
LICHTGEVOELIGHEID
De meeste lastoepassingen kunnen worden
uitgevoerd met de lichtgevoeligheid op
maximaal. De maximale lichtgevoeligheid
is geschikt voor lage lasstroom, TIG of
speciale toepassingen. De lichtgevoeligheid
moet alleen worden verlaagd in bepaalde
specifieke omgevingslichtomstandigheden
om ongewenste activering te voorkomen.
Als een eenvoudige regel voor optimaal
presteren, is het raadzaam om de
gevoeligheid op maximum in te stellen
aan het begin en vervolgens geleidelijk
af te bouwen tot de filter van de lasruit
alleen reageert op het laslicht en zonder
vervelende valse activering vanwege
omgevingslicht (direct zonlicht, intensief
kunstlicht, dichtbijzijnde lasbogen etc.)
VERTRAGINGSTIJD:
De vertragingstijd kan worden aangepast
van 0,15 tot 1,0 seconde. Het wordt
aanbevolen om een kortere vertraging
te gebruiken bij puntlastoepassingen en
een langere vertraging bij toepassingen
met hogere stroomsterktes en langere
lasintervallen. Langere vertraging kan ook
worden gebruikt voor TIG-lassen met lage
lasstroom om te voorkomen dat de filter van
de lasruit open gaat wanneer het licht naar
de sensoren tijdelijk wordt geblokkeerd door
een hand, fakkel, enz.
OPSLAG
Wanneer de Auto-verduisterende Lasruit
niet in gebruik is, dient deze op een droge
plaats te worden bewaard binnen het
temperatuurbereik van -20°C tot 70°C.
Langdurige blootstelling aan temperaturen
boven 45°C kan de levensduur van de
batterij van de Automatisch Verduisterende
Lasruit verminderen.
Het wordt aanbevolen om de zonnecellen
van de automatisch verduisterende lasruit
in het donker te houden of niet te belichten
tijdens opslag om de stroomuitval-modus
te behouden. Deze kan worden bereikt door
de filter eenvoudig met de voorkant naar
beneden op een opslagplank te plaatsen.

51
ONDERHOUD EN REINIGING
Het is altijd nodig om de zonnecellen en de
lichtsensoren van de auto-verduisterende
lasruit vrij te houden van stof en spatten:
Reinigen kan worden gedaan met een
zacht doekje gedrenkt in een mild
reinigingsmiddel (of alcohol).
Gebruik nooit agressieve oplosmiddelen
zoals aceton. RPB-lasruiten moeten altijd
beschermd worden van beide kanten
door beschermruiten, die ook alleen
met een zachte doek mogen worden
schoongemaakt. Als de beschermruiten
op enigerlei wijze zijn beschadigd, moeten
deze onmiddellijk worden vervangen.
MARKERINGEN
GARANTIE
De garantieperiode van het RPB ADF is drie
jaar. Het niet naleven van deze instructies
kan de garantie ongeldig maken. RPB
aanvaardt geen verantwoordelijkheid
voor eventuele problemen die kunnen
voortvloeien uit andere toepassingen dan
lassen.
INSTELLINGEN
Verduisteringsniveau: Het
verduisteringsniveau kan tussen 9
en 13 ingesteld worden door aan de
verduisteringsniveau-knop te draaien.
Lichtgevoeligheid: Gebaseerd op de
lasboog en het omgevingslicht kan de
lichtgevoeligheid aangepast worden
met de daarvoor bestemde knop . De
middelste stand komt overeen met de
aanbevolen lichtgevoeligheidsinstelling
in een standaardsituatie.
Vertragingstijd. Met de schakelaar
achter het klepje van de batterij, kan
de vertragingstijd worden ingesteld
van donker naar licht. Dit is instelbaar
tussen 0,15 of 1,0 seconde. De “Twilight”
positie komt overeen met de aanbevolen
vertraging in een standaardsituatie.
VERVANG DE BATTERIJEN
De automatische lasruit heeft vervangbare
lithiumknoopcelbatterijen, type CR2032. De
batterijen moeten worden vervangen wanneer
de LED op het patroon knippert.
1. Verwijder voorzichtig het klepje van de
batterij.
2. Verwijder de batterijen en gooi ze weg
in overeenstemming met de nationale
voorschriften voor speciaal afval.
3. Gebruik CR2032-batterijen, zoals
afgebeeld.
4. Plaats het klepje van de batterij voor-
zichtig terug.
Als de automatische lasruit niet verduistert
wanneer de lasboog wordt ontstoken,
controleer dan de polariteit van de batterij.
Houd het verduisteringspatroon op voor een
felle lamp om te controleren of de batterijen
nog voldoende vermogen hebben. Als de LED
knippert, zijn de batterijen leeg en moeten
ze onmiddellijk worden vervangen. Als het
verduisteringspatroon ondanks het correct
vervangen van de batterijen niet goed werkt,
moet deze onbruikbaar worden verklaard en
worden vervangen.
SLAAPSTAND
De automatisch verduisterende lasruit heeft
een automatische uitschakelfunctie, die de
levensduur verlengt. Als er gedurende een
periode van ca. 15 minuten geen licht op
De code op de ADF geeft aan:
3 / 9-13 RPB 1 / 1 / 1 / 2 / EN379
Lichte verduistering
Bereik van verduisteringsinstellingen
Fabrikant
Optische klasse
Klasse van lichtverstrooiing
Homogeniteit
Hoekafhankelijkheid
Verwijzing naar de Norm

52
Z4®
AAN- EN UITTREKKEN
Controleer altijd de binnenkant van het
ademhalingstoestel op verontreinigingen voor het aantrekken. Doe de kap altijd af als u
zich buiten het werkgebied bevindt, houd de binnenkant van de kap schoon en vrij van
verontreinigingen. Als u deze stappen niet uitvoert, kunt u worden blootgesteld aan
gevaarlijke materialen en verontreinigingen die de werking van het ademhalingstoestel
kunnen aantasten. Bepaal of uw bedrijf een programma moet ontwikkelen om de kap te
reinigen vóór het uittrekken, als verontreinigingen aan de buitenkant van de kap gevaar
kunnen leveren.
WAARSCHUWING
de zonnecellen valt, schakelt het patroon
zichzelf automatisch uit. Om de automatisch
verduisterende lasruit te reactiveren, moeten
de zonnecellen kort worden blootgesteld
aan daglicht. Als het patroon niet opnieuw
kan worden geactiveerd of niet verduistert
wanneer de lasboog wordt ontstoken, moet
deze als kapot worden beschouwd en worden
vervangen.
VERWACHTE LEVENSDUUR
De automatisch verduisterende lasruit heeft
geen gebruikstermijn. Het product kan
worden gebruikt zolang er geen zichtbare of
onzichtbare schade of functionele problemen
optreden.
PROBLEMEN OPLOSSEN
Automatisch verduisterende lasruit verduistert
niet:
Pas lichtgevoeligheid aan
Reinig sensoren en reinig of vervang het
impactbestige vizier van de laskap
Controleer de lichtstroom naar de
sensoren
Vervang batterijen
ADF knippert:
Pas lichtgevoeligheid aan
Vervang batterijen
Slecht zicht:
Reinig of vervang het impactbestendige
vizier van de laskap en de automatisch
verduisterende lasruit
Pas het verduisteringsniveau aan de
lasprocedure aan
Verhoog de hoeveelheid omgevingslicht
AANGERADEN
VERDUISTERINGSNIVEAUS
VOOR VERSCHILLENDE
LASTOEPASSINGEN
AFBEELDING 14.1 OP PAGINA 28
Stroom In Ampères
Lasproces
BMBE (Lassen met Beklede Elektrode)
MAG (Metaal Actief Gas)
TIG (Wolfraam Inert Gas)
MIG Zware Metalen
MIG lichte metalen - Roestvrij, Aluminum
Plasmasnijden
Micro plasmalassen
*Verduisteringsniveau 14 valt niet binnen het
bereik van deze ADF.
Naar inschatting van de lasser is het
mogelijk om een verduisteringsgraad
hoger of lager te gebruiken.
BESCHRIJVING VAN DE
FUNCTIES VAN DE RPB
LASRUIT
AFBEELDING 14.2 OP PAGINA 29
1. Zonnecellen
2. Fotosensoren (Fotodioden)
3. Behuizing Lasruit
4. Zichtveld van de vloeibare kristallen
5. Verduisteringsinstelling
6. Gevoeligheidsinstelling
7. Instelling Vertragingstijd

53
DE KAP AANDOEN
Nadat u klaar bent met de montage, bent u klaar om uw RPB Z4 Ademhalingstoestel aan te
doen. Ten eerste, trek de slimline oorbeschermers aan, met de nekband rond de achterkant
van de nek en zorg ervoor dat de oorkussens helemaal rond de oren afdichten. Het dragen
van oorbeschermers is vereist tijdens het gebruik van de Z4. Controleer vervolgens of de kap
of deze vrij is van stof, vuil of verontreinigingen. Open vervolgens de onderkant van de cape
of gelaatsafdichting, doe de kap op het hoofd terwijl er lucht uit de luchtbron stroomt. Trek de
cape naar beneden of zorg ervoor dat de gelaatsafdichting rondom uw gezicht/hals afdicht,
en draai vervolgens de ratel van de hoofdband vast om passend te maken. Zorg ervoor dat
het vizier stevig is vergrendeld.
DE KAP UITTREKKEN
Wanneer u klaar bent met werken, verlaat de werkplaats met het ademhalingstoestel aan
terwijl er nog lucht in de kap stroomt.
HELM MET OORBESCHERMERS AANTREKKEN
AFBEELDING 15.1 OP PAGINA 27
Trek de 16-524 RPB Quiet-Slim Oorbeschermers aan met de nekband rond de achterkant
van de nek en zorg ervoor dat de kussens helemaal rondom de oren aansluiten. Maak de
bovenband vast met de klittenband.
Model RPB ADF
Gezichtsveld 2.66 x 3.89 inch
(67.6 x 98.8 mm)
ADF algemene afmetingen 4.49 x 4.57 x 0.47 inch
(114 x 116.2 x 11.9 mm)
Gewicht 4.59ons (130g)
Verduistering in open stand 3 (Heldere Stand)
Verduistering in gesloten stand 9-13 (Donkere Stand)
Schakeltijd van licht naar donker 0.1 ms (23°C / 73°F)
0.1 ms (55°C / 131°F)
Schakeltijd donker naar licht 0.15s / 1.0s
UV/IR-bescherming Maximale bescherming in heldere en
donkere stand
Bedrijfstemperatuur 23 °F – 131 °F (-5 °C – 55 °C)
Opslag temperatuur -4°F – 157°F (-20°C – 70°C)
Stroomtoevoer Zonnecellen, 2 stuks vervangbare 3V
Li batterijen (CR2032)
Classificatie overeenkomstig EN379 Optische klasse = 1
Strooilicht = 1
homogeniteit = 1
Hoekafhankelijkheid= 2
Standaard EN379:2003+A1:2009
Certificering CE, ANSI, in naleving van CSA
TECHNISCHE GEGEVENS
AFBEELDING 14.3 OP PAGINA 29

54
Z4®
AFBEELDING 15.2 OP PAGINA 27
Na de binnenkant van de kap op stof en vuil te controleren, trek de Z4 over de oorbescher-
mers. Zorg ervoor dat de oorbeschermers en nekband zich volledig binnen het afgesloten
gedeelte van de gelaatsafdichting of cape bevinden.
Raadpleeg de gebruiksaanwijzing van de Quiet-Slim Gehoorbeschermers voor meer
informatie.
OPSLAG
Reinig het ademhalingstoestel na gebruik volgens het reinigingsprogramma van uw bedrijf
of de aanwijzingen in deze handleiding. Laat het drogen en berg het ademhalingstoestel
op door het op te hangen op een schone, droge plaats, weg van het werkgebied. Voordat
u het ademhalingstoestel voor langere tijd opbergt, zorg dat het toestel volgens de
reinigingsinstructies in deze gebruiksaanwijzing is gereinigd. Het wordt aanbevolen om het
ademhalingstoestel in een container of opbergtas op te bergen of te vervoeren. Bewaren
op een koele en droge plaats tussen -10°C to +45°C (14°F to 113°F) <90%rh. PX5 en de
PX4 AIR moet mogelijk afzonderlijk worden opgeslagen, raadpleeg de PX5 of de PX4 AIR
gebruiksaanwijzing voor specifieke instructies betreft opslag.
Na gebruik: AFBEELDING 16.1 OP PAGINA 28
Lange termijn opslag of transport: AFBEELDING 16.2 OP PAGINA 28
PRODUCTONDERHOUD
Voor een goede hygiëne is het raadzaam de voering en de capes regelmatig te reinigen.
Capes en gelaatsafdichtingen alleen met de hand wassen met een mild wasmiddel en
warm water. Ophangen om te drogen. Niet in wasmachine of droger doen. Een wasmachine
of droger zal de levensduur van het product verkorten en de garantie zal vervallen.
Voering: Alleen met de hand wassen met een mild wasmiddel en warm water. Plat
neerleggen om te drogen.
Zorg ervoor dat alle onderdelen droog zijn voor gebruik. Controleer op slijtage en vervang
indien beschadigd of zwaar versleten.
ONDERDELEN EN ACCESSOIRES
LASVIZIER AFBEELDING 17.1 OP PAGINA 29
Item Nummer Beschrijving Onderdeel Nummer
1 Lasvizier - inclusief 16-672 en 15-821 15-812 15-812
2 ADF Houder 16-672
3 ADF Lasruit 16-871
4 Zijruit-Schermen - Grijs (Paar) 15-821
Zijruit Scherm 5 (Paar) 15-821-5
5 Impactbestendig Vizier (10 stuks) 16-872
6 ADF Binnenruit (10 stuks) 16-873
7 Vergrootglas-houders (Paar) 16-875
8 Vergrootglas - x 1 13-072-1
Vergrootglas - x 1.5 13-072-1.5

55
Vergrootglas - x 2 13-072-2
Vergrootglas - x 2.5 13-072-2.5
9 Frame met gefixeerde lampenlens 16-877
10 Vaste schaduw 5 laslens 16-877-5
Vaste schaduw 8 laslens 16-877-8
Vaste schaduw 9 laslens 16-877-9
Vaste schaduw 10 laslens 16-877-10
Vaste schaduw 11 laslens 16-877-11
Vaste schaduw 12 laslens 16-877-12
11 Vaste schaduw achter beschermende lens 16-878
GELAATSSCHERM AFBEELDING 17.2 OP PAGINA 30
Item Nummer Beschrijving Onderdeel Nummer
1 Gelaatsscherm 15-811
2 Veiligheidsvizier (10 Stuks) 15-878
3 Veiligheidsvizier Bayonet (Paar) 15-832
4 Luchtinlaat met schroeven 15-851-1
5 Voorste Cape Clip Huls 15-831
ACCESSOIRES AFBEELDING 17.3 OP PAGINA 30
Item Nummer Beschrijving Onderdeel Nummer
1 FR Gelaatsafdichting (TH2) 15-711
2 FR Schouder-Cape (TH3) 15-721
3 Voorzijde Cape Clip - Vision-Link Montuur 15-839
4 Vision-Link Licht 16-901
HOOFDBAND EN OORBESCHERMERS AFBEELDING 17.4 OP PAGINA 31
Item Nummer Beschrijving Onderdeel Nummer
1 Hoofdbandenstel (Inclusief 16-530) 15-840
2 Hoofdbandenstel (voor- en bovenbanden met wenkbrouwpaneel) 15-841
3 Stootdop en riem aan de voorkant
met comfortpad en wenkbrouwpaneel 15-850
4 Stootkap vervangen met comfortkussen 15-855
5 Ratelmechanisme 16-530
6 Wenkbrouwpaneel 16-526
7 Zijsteunen (paar) 15-842
8 Hoofdband-beugel en Aanpassingssysteem 15-830
9 Quiet-Slim Oorbeschermers 18-524
10 Quiet-Slim Oorbeschermers met Zijsteunen (paar) 18-525
REGELAARS AFBEELDING 17.5 OP PAGINA 31
Item Nummer Beschrijving Onderdeel Nummer
1 PX5 PAPR en riem 03-801-FR-G
2 Ademhalingsslang voor PAPR 04-831
3 Toevoer-Tester PAPR 03-819
4 Brandvertragend Rugzakmontage 03-822-FR

56
Z4®
5 Ademhalingsslang Rugzakmontage 04-841
6 PX4 AIR PAPR en riem 03-901-FR-G
7 Ademhalingsslang voor PX4 AIR PAPR 04-837
8 Toevoer-Tester PX4 AIR 04-091
9 Brandvertragend 5 cm (2 Inch) Riem voor PX4 en PX5 07-765-FR
10 FR Ademhalingsslang omslag 04-854
11 FR Ademhalingsslang omslag voor Rugzak 04-874
Gebruik alleen exacte, authentieke RPB-
vervangingsonderdelen (gemarkeerd met het RPB-logo en onderdeelnummer) en alleen in
de aangegeven opstelling. Gebruik van onvolledige of ongeschikte uitrusting, waaronder
het gebruik van nagemaakte of niet-RPB-onderdelen, kan resulteren in onvoldoende
bescherming en maakt de keuring van het volledige ademhalingstoestel nietig.
WAARSCHUWING

57
BEPERKTE GARANTIE
RPB® garandeert dat haar Producten gedurende één (1) jaar vrij zijn van materiaal- en
fabricagefouten, met inachtneming van de voorwaarden van deze beperkte garantie.
De Producten worden alleen verkocht voor commercieel gebruik en er zijn geen
consumentengaranties van toepassing op de Producten. Deze beperkte garantie komt ten goede
aan de oorspronkelijke koper van het Product en kan niet worden overgedragen of toegewezen.
Dit is de enige en exclusieve garantie die door RPB® wordt geboden en ALLE VOORWAARDEN
EN STILZWIJGENDE GARANTIES (INCLUSIEF ELKE GARANTIE VAN VERKOOPBAARHEID OF
GESCHIKTHEID VOOR EEN BEPAALD DOEL) WORDEN UITGESLOTEN EN UITGESLOTEN VAN
DE GARANTIEDEKKING. De beperkte garantiedekking van RPB® is niet van toepassing op schade
die voortvloeit uit een ongeval, oneigenlijk gebruik of verkeerd gebruik van de Producten, slijtage
als gevolg van het normale gebruik van de Producten of het niet correct onderhouden van de
Producten.
De beperkte garantiedekking van RPB® geldt vanaf de oorspronkelijke aankoopdatum van de
Producten en is alleen van toepassing op gebreken die zich voor het eerst manifesteren en die
binnen de garantieperiode aan RPB® worden gemeld. RPB® behoudt het recht om naar redelijke
tevredenheid te bepalen of een geclaimd defect onder deze beperkte garantie valt.
Als er defect optreedt dat onder de garantie valt, zal RPB® naar eigen goeddunken het defecte
Product (of een onderdeel van het product) repareren of vervangen. Deze ‘reparatie of vervanging’
oplossing is de enige en exclusieve remedie onder deze beperkte garantie en de aansprakelijkheid
van RPB® onder deze beperkte garantie zal onder geen enkele omstandigheid de oorspronkelijke
aankoopprijs voor de Producten (of het toepasselijke onderdeel) overschrijden. RPB® is niet
verantwoordelijk voor incidentele of gevolgschade, inclusief gebruiksderving, onderhoud en
andere kosten, en ALLE INCIDENTELE EN GEVOLGSCHADE ZIJN UITGESLOTEN EN NIET
ERKEND door deze beperkte garantie. Neem contact op met RPB® voor garantieservice. Een
bewijs van aankoop moet worden verstrekt om garantieservice te krijgen. Alle kosten van het
terugzenden van de Producten naar RPB® voor garantieservice moeten door de koper worden
betaald.
RPB® behoudt zich het recht voor om haar producten te verbeteren door wijzigingen in ontwerp
of materialen aan te brengen zonder verplichtingen te hebben jegens kopers van eerder
gefabriceerde Producten.
AANSPRAKELIJKHEID
RPB® Safety kan geen enkele aansprakelijkheid aanvaarden van welke aard dan ook die direct of
indirect voortvloeit uit het gebruik of misbruik van RPB® Safety-producten, inclusief doeleinden
waarvoor de producten niet zijn ontworpen. RPB® Safety is niet aansprakelijk voor schade, verlies
of kosten als gevolg van het niet geven van advies of informatie of het geven van onjuist advies of
informatie, al dan niet vanwege nalatigheid van RPB® Safety of die van zijn werknemers, agenten
of onderaannemers.

58
Z4®
NOTES
...................................................................................................................................
...................................................................................................................................
...................................................................................................................................
...................................................................................................................................
...................................................................................................................................
...................................................................................................................................
...................................................................................................................................
...................................................................................................................................
...................................................................................................................................
...................................................................................................................................
...................................................................................................................................
...................................................................................................................................
...................................................................................................................................
...................................................................................................................................
...................................................................................................................................
...................................................................................................................................
...................................................................................................................................
...................................................................................................................................
...................................................................................................................................
...................................................................................................................................

59
NOTES
...................................................................................................................................
...................................................................................................................................
...................................................................................................................................
...................................................................................................................................
...................................................................................................................................
...................................................................................................................................
...................................................................................................................................
...................................................................................................................................
...................................................................................................................................
...................................................................................................................................
...................................................................................................................................
...................................................................................................................................
...................................................................................................................................
...................................................................................................................................
...................................................................................................................................
...................................................................................................................................
...................................................................................................................................
...................................................................................................................................
...................................................................................................................................
...................................................................................................................................

OTHER PRODUCTS
COMMUNICATION
The world’s most advance in-helmet
communication system for Z-Link® and
T-Link ®. The RPB® Comms-Link™ system
allows you to communicate without
interrupting your work. The in-helmet
headset and microphone connect to most
professional radios.
VISION
The RPB® Vision-Link™ is an intuitive and
unobtrusive helmet lighting system for the
Z4®, Z-Link® and T-Link®. It easily attaches
to the helmet, providing bright light
wherever you look, advancing your safety,
and increasing your productivity.
MAN-58
RPB® PX5® PAPR
The RPB PX5 is a compact and versatile
PAPR that changes the way people
experience clean filtered air across
multiple industries – from medical and
chemical settings, to the profoundly harsh
environments of foundries. Boasting a sleek
lightweight design, the PX5 contours to
the users back, evenly distributing weight
through its vertical mounting. With simple
considered edges, curves and sealed
housing unit, the PX5 is certified to meet
IP65 in use for ease of decontamination.
gvs-rpb.com│1-866-494-4599
-
 1
1
-
 2
2
-
 3
3
-
 4
4
-
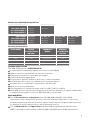 5
5
-
 6
6
-
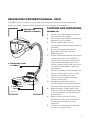 7
7
-
 8
8
-
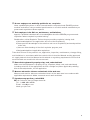 9
9
-
 10
10
-
 11
11
-
 12
12
-
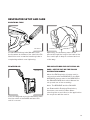 13
13
-
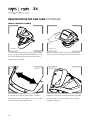 14
14
-
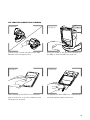 15
15
-
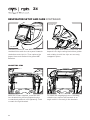 16
16
-
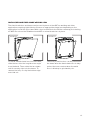 17
17
-
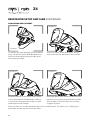 18
18
-
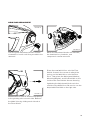 19
19
-
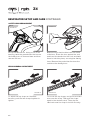 20
20
-
 21
21
-
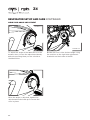 22
22
-
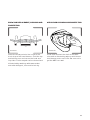 23
23
-
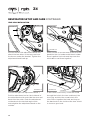 24
24
-
 25
25
-
 26
26
-
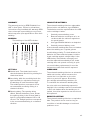 27
27
-
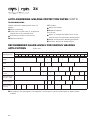 28
28
-
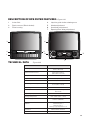 29
29
-
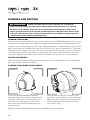 30
30
-
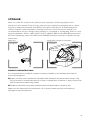 31
31
-
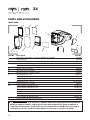 32
32
-
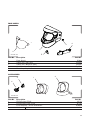 33
33
-
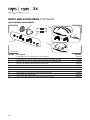 34
34
-
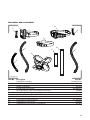 35
35
-
 36
36
-
 37
37
-
 38
38
-
 39
39
-
 40
40
-
 41
41
-
 42
42
-
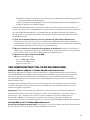 43
43
-
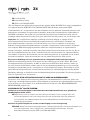 44
44
-
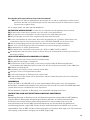 45
45
-
 46
46
-
 47
47
-
 48
48
-
 49
49
-
 50
50
-
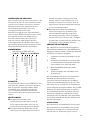 51
51
-
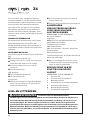 52
52
-
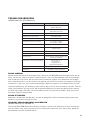 53
53
-
 54
54
-
 55
55
-
 56
56
-
 57
57
-
 58
58
-
 59
59
-
 60
60


