
English P. 2
Nederlands P. 26
Español P. 37
Deutsch P. 49
Français P. 60
Italiano P. 72
Polskie P. 83
EN12941:1998 +A2:2008
TH3 P R SL
RESPIRATORY PROTECTION
EN352-1:2002
HEARING PROTECTION
Only in conjunction with 18 -524 earmuffs.
EN166:2001 CLASS 1F3
EYE & FACE PROTECTION
Not all configurations conform to this standard.
Please visit gvs-rpb.c om for more details.
AS/NZS 1716:2012
BMP# 714303
RESPIRATORY PROTECTION
AS/NZS 1337.1:2010
BMP# 714304
EYE & FACE PROTECTION
Not all configurations conform to this standard.
Please visit gvs-rpb.c om for more details.
GVS-RPB.COM
Employers: Read this manual and the flow control device instruction manual and
carry out the employer responsibilities (page 7).
Product users: Read this manual and the flow control device instruction manual and
follow the product user safety instructions (page 9).
Manuals are regularly updated. Make sure this manual is available to all users for reference.
Current version of manual and other languages: gvs-rpb.com/healthcare/resources
Instruction Manual
T200™ Respirator
T200™ CE UI R2

2
T200™
EXPLANATION OF SIGNAL WORDS AND SYMBOLS 2
INTRODUCTION 4
IMPORTANT SAFETY INFORMATION
PROTECTION PROVIDED AND LIMITATIONS 4
RESPIRATORY COMPONENT DIAGRAM - CAUTIONS & LIMITATIONS 6
AIR SOURCE, FITTINGS, AND PRESSURE 7
EMPLOYER RESPONSIBILITIES 7
PRODUCT USER SAFETY INSTRUCTIONS 9
RESPIRATOR SETUP AND CARE 12
DONNING AND DOFFING 19
STORAGE 21
PARTS AND ACCESSORIES 22
WARRANTY AND LIABILITY STATEMENT 25
CONTENTS
RPB® Safety LLC is an ISO9001 certified company.
EXPLANATION OF SIGNAL WORDS AND SYMBOLS
The following signal word and safety symbols are used in this manual and product labeling:
WARNING indicates a hazardous situation that, if not avoided, could
result in death or serious injury.
DANGER Indicates a hazardous situation that, if not avoided, will result
in death or serious injury.
Read the Instruction Manual.
Additional copies of RPB® manuals can be found at gvs-rpb.com.
WARNING
DANGER
CERTIFIED BY:
CE: BSI Group The Netherlands B.V. (NB2797), Say Building, John M. Keynesplein 9, 1066 EP,
Amsterdam, NL
UKCA: BSI Group (AB0086), Kitemark Court, Knowhill, Milton Keynes MK5 8PP, United Kingdom

3
RPB® SAFETY - GLOBAL HEADQUARTERS
2807 Samoset Rd, Royal Oak, MI 48073, USA
T: 1-866-494-4599 F: 1-866-494-4509 E: sales@gvs.com
RPB® SAFETY - APAC
3 Robin Mann Place, Christchurch Airport, Christchurch 8053, New Zealand
T: +64-3-357-1761 F: +64-3-357-1763 E: sales@gvs.com
GVS S.p.A. - EMEA
Via Roma 50, 40069 Zona Industriale BO, Italy
T: +39 0516176391 E: [email protected]
GVS Filter Technology UK Ltd.
Vickers Industrial Estate, Mellishaw Ln, Morecambe LA3 3EN, UK
T: +44 (0)1524 847600 E: [email protected]
gvs-rpb.com
Copyright ©2022 RPB IP, LLC. All rights reserved. All materials contained on this website
are protected by United States copyright law and may not be reproduced, distributed,
transmitted, displayed, published or broadcast without the prior written permission of RPB IP,
LLC. You may not alter or remove any trademark, copyright or other notice from copies of the
content.
All trademarks, service marks, and logos used in this publication, both registered and
unregistered, are the trademarks, service marks, or logos of their respective owners. All
rights in the RPB Intellectual Property contained in this publication, including copyright,
trademarks, service marks, trade secret, and patent rights are reserved. RPB Intellectual
Property means any patent, patented articles, patent applications, designs, industrial designs,
copyrights, software, source code, database rights, moral rights, inventions, techniques,
technical data, trade secrets, know-how, brands, trademarks, trade names, slogans, logos,
and any other common law and proprietary rights, whether registered or unregistered
anywhere in the world, that are owned by, developed in whole or in part by, or licensed by
RPB IP, LLC.
For technical assistance contact our Customer Service Department at 1-866-494-4599 or
email: sales@gvs.com
Form #: 7.20.506
Rev: 2

4
T200™
RESPIRATION
The RPB T200 is approved in the categories as follows:
Powered Air
The RPB T200 Respirator, when properly fitted and used with all required components,
including the Breathing Tube Assembly and the RPB® PX5® Powered Air Purifying Respirator,
is approved to EN 12941:1998 +A1: 2003 +A2: 2008 TH3 P R SL as a powered air purifying
respirator. The T200 significantly reduces, but does not completely eliminate, the breathing
of contaminates by the respirator wearer. Specific protection depends on the filter selected for
use in the RPB PX5 PAPR (see PX5 Instruction Manual).
PROTECTION PROVIDED AND LIMITATIONS
Improper selection, fit, use, or maintenance of this product can result
in transfer of illness, injury, life threatening delayed lung, skin or eye
disease, or death. This product is intended for occupational use in accordance with applicable
standards or regulations for your location, industry, and activity (see Employer Responsibilities,
page 7). Familiarity with standards and regulations related to the use of this protective equipment
is recommended, even if they do not directly apply to you. If self-employed or if used in a non-
occupational setting, refer to Employer Responsibilities and Product User Safety Instructions. Go
to gvs-rpb.com/healthcare/important-safety-information for helpful links to CE standards and
other content.
EMPLOYERS: Read this manual and the air supply device Instruction Manual and carry out the
Employer Responsibilities (page 7).
PRODUCT USERS: Read this manual and the air supply device Instruction Manual and follow the
Product User Safety Instructions (page 9).
CHECK WEBSITE FOR UPDATES. Product manuals are regularly updated.
Visit gvs-rpb.com/healthcare/resources for the most recent version of this manual before using
the product.
IMPORTANT SAFETY INFORMATION
WARNING
The T200™ is a multiuse respirator designed for a range of different applications where
there is a need to be protected from airborne contaminants. With an optional bump cap for
head protection, and three hood options available, the T200 can used in both industrial and
healthcare settings. For increased hearing protection, optional Quiet-Slim™ Ear Defender
earmuff system can be installed.
This product must be inspected and maintained in accordance with this instruction manual at
all times.
See PROTECTION PROVIDED AND LIMITATIONS (page 4) for details.
INTRODUCTION

5
HAZARD LIMITATIONS
The RPB T200 Respirator is NOT FOR USE if:
In atmospheres immediately dangerous to life or health (IDLH).
Wearer cannot escape without the aid of the respirator.
Atmosphere contains less than 21% ±1% oxygen.
In abrasive blasting applications.
For protection against hazardous gases (e.g., carbon monoxide).
Contaminants are in excess of regulations or recommendations.
Contaminants or contaminant concentrations are unknown.
Work area is poorly ventilated.
The temperature is outside the range of -10°C to +60°C (14°F to 140°F).
A flammable or explosive atmosphere is present when used with systems including
electrical parts that are not intrinsically safe, such as the PX5 PAPR.
FACE AND EYES
The T200 with Standard Lens does meet EN 166:2001 1F3 (AS/NZS 1337.1:2010) face
shield requirements.
The T200 is not designed or tested to provide protection against molten metals or
corrosive liquids.
Note: Safety glasses may be required to be worn depending on the job hazard analysis.
The T200 does not provide protection against the transfer of impact to both safety and
prescription lens glasses worn underneath the hood. It does not provide complete eye and
face protection against severe impact and penetration. It is not a suitable substitute for
good safety practices and engineering controls.
HEAD
The T200, when equipped with the bump cap provides minimal head protection and does
not meet EN 812:2012 requirements. It does not meet the EN 397:2012+A1:2012 (AS/NZS
1801:1997) requirements.
HEARING
The Quiet-Slim™ Ear Defender system provides a Noise Reduction Rating (NRR) of 21 and a
SNR of 28 to meet EN 352-1 requirements. Refer to the Quiet-Slim instruction manual to
ensure proper installation and fit .
Other hearing protection, such as earplugs or ear defenders, must be properly fitted and
worn where noise levels exceed the permissible exposure levels.
PPE REGULATION
The T200 conforms to the PPE Regulation (EU) 2016/425. Regulation 2016/425 on PPE
as brought into UK Law and amended.
The Declaration of Conformity can be found at gvs-rpb.com/healthcare/resources
See the Storage section for information on packaging and protection required for
transportation.

6
T200™
Figure 1.1
1. RESPIRATOR
HOOD
ASSEMBLY
2. BREATHING
TUBE
ASSEMBLY
3. AIR SUPPLY PAPR
RESPIRATOR COMPONENT DIAGRAM - PAPR
CAUTIONS AND LIMITATIONS
POWERED AIR
A. Not for use in atmospheres containing
less than 21% ±1% oxygen.
B. Not for use in atmospheres immediately
dangerous to life or health.
C. Do not exceed maximum use
concentrations established by regulatory
standards.
F. Do not use powered air-purifying
respirators if airflow is less than 170 lpm
(6 cfm) for hoods and/or helmets.
H. Follow established cartridge and canister
change schedules or observe ESLI to
ensure that cartridge and canisters are
replaced before breakthrough occurs.
I. Contains electrical parts that may cause
an ignition in flammable or explosive
atmospheres.
J. Failure to properly use and maintain this
product could result in injury or death.
L. Follow the manufacturer’s User’s
Instructions for changing cartridges,
canister and/or filters.
M. All approved respirators shall be
selected, fitted, used and maintained in
accordance with applicable regulations.
N. Never substitute, modify, add or omit
parts. Use only exact replacement parts
in the configuration as specified by the
manufacturer.
O. Refer to user’s instructions, and/or
maintenance manuals for information
on use and maintenance of these
respirators.
P. This respirator is not evaluated as a
surgical mask.
The RPB T200 Powered Air Purifying Respirator consists of 3 main components. All
3 components must be present and properly assembled to constitute a complete
EN12941:1998 +A1: 2003 +A2: 2008 (AS/NZS 1716) as power air purifying respirator.

7
AIR SOURCE, FITTINGS, AND PRESSURE
AIR SOURCE
Powered Air
Check that the contaminated area is within the limits of use for a Powered Air Purifying
Respirator and determine the type of contamination. Once the contamination level has
been confirmed you can then determine the filter cartridge to be used for the application,
to make sure that you are sufficiently protected. Make sure that the area is well ventilated
and that regular air samples are taken to confirm the atmosphere stays within the levels
recommended by the governing bodies. Follow the PX5 PAPR Instruction Manual for more
details.
Manufacturer Minimum designed Flow
EMPLOYER RESPONSIBILITIES
Your specific responsibilities may vary by location and industry, but in general RPB expects that
employers will:
Follow all applicable standards and regulations for your location, industry, and activity.
Depending on your location and industry, a number of standards and regulations may apply
to your selection and use of respirators and other personal protective equipment. These may
include such things as national, local, or military standards and regulations and consensus
standards such as CE and AS/NZS. There are also requirements specific to particular
contaminants, e.g. silica (see gvs-rpb.com/healthcare/important-safety-information for more
information), asbestos, organic pathogens, etc. Know which requirements apply to your
location and industry.
Have appropriate safety programs in place.
Have and follow:
A workplace safety program.
A written respiratory protection program in accordance with applicable standards and
regulations.
In accordance with the above,
Perform a hazard analysis and select appropriate equipment for each activity.
A hazard analysis should be performed by a qualified person. Controls should be in
place as appropriate and a qualified person should determine what kind of respiratory,
face, eye, head, and hearing protection are appropriate for the intended environments.
(For example, select a respirator appropriate to the specific airborne hazards, with
consideration of workplace and user factors and with an Assigned Protection Factor (APF)
that meets or exceeds the required level for employee protection.)
FILTER
180 L/MIN SPEED 1
180 L/MIN SPEED 2
180 L/MIN SPEED 3
03-892-P
>10 hours
>7 hours
>6 hours
03-893-A2
>5 hours
>4 hours
>4 hours
03-894-ABE
>5 hours
>4 hours
>4 hours
03-895-ABEK
>5 hours
>4 hours
>4 hours

8
T200™
Check your workplace safety program, respiratory protection program, and standards
and regulations for your industry for related protection requirements. See this manual
(Protection Provided and Limitations, page 4) and the PX5 PAPR Instruction Manual for
product specifications.
Be sure employees are medically qualified to use a respirator.
Have a qualified physician or other licensed health care professional (PLHCP) perform
medical evaluations using a medical questionnaire or an initial medical examination.
Train employees in the T200’s use, maintenance, and limitations.
Appoint a qualified individual who is knowledgable about the RPB T200 to provide
training:
Qualifications of the Respirator Trainer. Anyone providing respirator training shall:
a) be knowledgable in the application and use of the respirator(s);
b) have practical knowledge in the selection and use of respirator(s) and work practices
at the site;
c) have an understanding of the site’s respirator program; and
d) be knowledgable of applicable regulations.
Train each T200 user in the product’s use, application, inspection, maintenance, storage,
fitting, and limitations in accordance with the content of this Instruction Manual and the
approved air supply device Instruction Manual and standard or regulatory requirements.
Ensure that each intended user reads both these manuals. Contact RPB for training
assistance.
Ensure that equipment is properly set up, used, and maintained.
Make sure that equipment is properly set up, inspected, fitted, used, and maintained,
including selection of the appropriate air filter cartridge for the application.
Measure and monitor airborne contaminants in the work area.
Measure and monitor airborne contaminant levels in the work area in accordance with
applicable requirements. Make sure work area is well ventilated.
If you have any questions, contact RPB.
Contact the Customer Service Department at:
Tel: 1-866-494-4599
Email: sales@gvs.com
Web: gvs-rpb.com
EMPLOYER RESPONSIBILITIES

9
PRODUCT USER SAFETY INSTRUCTIONS
BEFORE INITIAL USE - BE TRAINED AND MEDICALLY QUALIFIED
Do not use this respirator until you have read this manual and the PX5 PAPR Instruction Manual
(additional copies available at gvs-rpb.com) and been trained in the respirator’s use, maintenance,
and limitations by a knowledgeable individual (appointed by your employer) who is knowledgable
about the RPB T200 Respirator.
Do not wear this respirator until you have passed a medical evaluation using a medical
questionnaire or an initial medical examination by a qualified physician or other licensed health
care professional (PLHCP).
Allergens: No known common allergens are used in this product.
Some materials could cause an allergic reaction in susceptible individuals. If you have a known
allergy or develop irritation, inform your employer. Follow all cleaning and care instructions
provided in the instruction manuals for this and any other RPB products you are using.
MAKE SURE THE SYSTEM IS READY FOR USE
Make sure you have a complete system. Verify that you have all required components for the
T200 to serve as a complete approved respirator:
Respirator Hood Assembly (T200 or T-Link)
Breathing Tube Assembly
Flow Control Device (PX5 PAPR)
See Respirator Component Diagram (page 6). The RPB T200 is only approved to be used with
the RPB PX5 PAPR. Use only authentic RPB brand parts and components that are part of the
approved respirator assembly. Using incomplete or inappropriate equipment, including the use of
counterfeit or non-RPB parts, can result in inadequate protection and will void the approval of the
entire respirator. Do not modify or alter any part of this product.
Inspect all components daily for signs of damage or wear and tear that may reduce the level of
protection originally provided. Remove any damaged component or product, including any hood
or helmet that has been subject to impact, from service until repaired or replaced. Scratched or
damaged lenses or other components should be replaced with genuine RPB brand replacement
parts. When the hood is replaced, make sure to remove any additional protective film from both
sides of the lens. If the film is left in place, it could affect the optical clarity of the lens and cause
eye strain. Inspect the inside of the respirator for respirable dust or other foreign objects. Keep the
inside of the respirator clean at all times.
Make sure that the helmet is correctly assembled in the configuration that suits your application.
An incomplete or improperly installed hood could provide inadequate impact and respiratory
protection. See Respirator Setup and Care (page 12) See Donning (page 19) for fit information.
VERIFY THAT YOU HAVE THE APPROPRIATE EQUIPMENT FOR YOUR ACTIVITY
Verify that the T200 provides appropriate protection for your activity. As applicable, check your
workplace safety program, respiratory protection program, standards, and regulations for your
activity or industry. (See PROTECTION PROVIDED AND LIMITATIONS, page 4.)

10
T200™
BEFORE DONNING THE T200®:
Verify airborne contaminants are within recommended limits for respirator use:
Determine the type and level of contamination. Verify that airborne contaminant
concentrations do not exceed those allowed by applicable regulations and
recommendations for powered air purifying respirators or supplied air respirators.
Filtering the breathing air:
PAPR: Once the contamination level has been confirmed, determine the correct filter
cartridge to be used for the application, to make sure that you are sufficiently protected.
Follow the PX5 PAPR Instruction Manual.
Ventilation and monitoring:
Make sure that the area is well ventilated and that regular air samples are taken to
confirm the atmosphere stays within the levels recommended by the governing bodies.
If you have any questions, ask your employer.
DO NOT ENTER THE WORK AREA if any of the following conditions exist:
Atmosphere is immediately dangerous to life or health.
You cannot escape without the aid of the respirator.
Atmosphere contains less than 21% ±1% oxygen.
A flammable or explosive atmosphere is present when used with systems including
electrical parts that are not intrinsically safe, PX5.
Contaminants are in excess of regulations or recommendations.
Contaminants or contaminant concentrations are unknown.
Work area is poorly ventilated.
The temperature is outside the range of -10°C to +60°C (14°F to 140°F).
LEAVE THE WORK AREA IMMEDIATELY IF:
Any product component becomes damaged.
Vision becomes impaired.
Airflow stops or slows down, or alarm sounds. Do not use Powered Air Purifying Respirators if
airflow is less than 170 lpm (6 cfm).
Breathing becomes difficult.
You become dizzy, nauseous, too hot, too cold, or ill.
Your eyes, nose, or skin become irritated.
The work area is a confined space (unless proper measures are taken for confined spaces).
You taste, smell, or see contaminants inside the helmet.
You have any other reason to suspect that the respirator is not providing adequate protection .
PRODUCT CARE
Never place the hood on hot surfaces. Do not apply paints, solvents, adhesives or self-adhesive
labels except as instructed by RPB. This product may be adversely affected by certain chemicals.
See the “Respirator Setup and Care” section (page 12) for more specific cleaning instructions.
PRODUCT USER SAFETY INSTRUCTIONS CONTINUED

11
INSTRUCTIONS FOR SPECIFIC USES OR ENVIRONMENTS
Confined Spaces
If this respirator is used in confined spaces, ensure the area is well ventilated and that all
contaminant concentrations are below those recommended for this respirator. Follow all
procedures for confined space entry, operation, and exit as defined in applicable regulations and
standards.

12
T200™
RESPIRATOR SETUP AND CARE
HEAD HARNESS WITH TOP STRAPS ASSEMBLY AND ADJUSTMENT
The head harness can be adjusted with
the ratchet adjuster on the back of the
headband. Turn the knob to tighten and
loosen the headband.
FIGURE 2.4
Attach the front band to the head harness
brackets. 1. Slide the ends into the channel
on the brackets. 2. Hook the keyhole over
the peg in the inside of the bracket. Adjust
to fit.
FIGURE 2.1
Attach the top straps to the head harness
brackets with the rounded side towards the
head. Hook the hole in the straps under the
tab on the head harness bracket. Then push
the slot on the straps over the top clip on
the head harness bracket.
FIGURE 2.2
Align the ratchet assembly so that the RPB
logo on the inside pad is up right. Attach the
ratchet assembly to the holes in the head
harness brackets by (1) sliding the tab on
the end of the ratchet band over the hole in
the bracket from the inside. 2. Then snap
the clip of the ratchet into the hole on the
bracket.
FIGURE 2.3

13
To make the head harness straps smaller,
push the two straps together to tighten.
To make the top straps bigger, 1. unclip the
end tabs from over the strap. 2. Then pull
the straps apart to the desired notch. Then
clip the tabs back over the strap to hold it
securely.
FIGURE 2.5 FIGURE 2.6
1
2
To remove, pull strap away from the
bracket, unhook from the bottom and lift
upwards.
FIGURE 3.1
Attach the bump cap to same mounting
locations that the straps were removed
from. Hook the hole in the bump cap under
the tab on the head harness bracket. Then
rotate the bump cap mounting hole over the
top clip on the head harness bracket.
FIGURE 3.2
BUMP CAP ASSEMBLY

14
T200™
Align the head harness bracket with the
lens mount, lift back tab and push towards
the front until at desired position, making
sure the tab is secured in the desired
position slot. Repeat for the other side.
Adjust the lens mounts using the finger tab
to position them forward or back on the
mounts. This will bring the lens of the hood
closer or farther away from the face.
1
2
FIGURE 4.1 FIGURE 4.2
ATTACHING THE LENS MOUNTS
1. Line up the alignment arrows. 2. Slide
the wings of the duct assembly into the
“W” shaped slot on the side clips until the
middle clip securely snaps over the cross
section of the wing.
1
12
2
FIGURE 5.1
ATTACHING THE AIR DUCT
RESPIRATOR SETUP AND CARE CONTINUED
Duct assembly attached to lens mount.
FIGURE 5.2
NOTE: BUMP CAP ASSEMBLY SHOWN IN FIGURES 4.1-6.5. ALL HEAD HARNESS AND AIR
DUCT SETUP INSTRUCTIONS APPLY TO BOTH BUMP CAP (15-850) AND TOP STRAPS
(15-841) VERSIONS.

15
Insert the head suspension or bump cap
assembly into the hood.
PLACING THE HEAD SUSPENSION/BUMP CAP AIR DUCT INTO THE HOOD
FIGURE 6.1 FIGURE 6.2
Insert the threaded inlet of the air duct into
the black rubber seal on the back of the
hood. Starting from the bottom side, stretch
the rubber seal over the retaining rib behind
the threaded section.
1
1
22
FIGURE 6.3
Line up the tabs of the lens with the clips on
the sides of the lens mount.
- Hook point 1 under point 1 as pictured.
- Snap point 2 over point 2 as pictured.
Insert the attachment clip through the slot
on the head harness bracket.
FIGURE 6.4

16
T200™
Adjust the airflow director up or down so
that the air flows either towards the lens or
towards the face.
FIGURE 6.5
Make sure the flat seal is on the breathing
tube coupler. Insert the bayonet end of the
breathing tube into the outlet of the PX5®
PAPR and complete a half turn clockwise
until it is secure.
FOR USE WITH RPB® PX5® - SEE THE PAPR
USER MANUAL
When the T200 Respirator is being used
in conjunction with the RPB® PX5® PAPR,
please refer to the RPB® PX5® Instruction
Manual for set up and use of the assembly.
Note: The RPB® PX5® is a Powered Air
Purifying Respirator, therefore care must be
taken when selecting the correct filter for
the application the respirator will be used
in.
FIGURE 8.1
POWERED AIR
Make sure the o-ring is on the threaded
inlet. Attach the breathing tube to the inlet
by turning clockwise. Do not over tighten.
Hold the hood to prevent it from twisting as
the breathing tube is tightened.
O-RING
FIGURE 7.1
ATTACH THE BREATHING TUBE
RESPIRATOR SETUP AND CARE CONTINUED

17
CLEAR-VISION CASSETTE LENSES
Peel off the backing of the cassette lenses.
Apply the cassette to the outside of the lens
sewn into the hood.
Use the pre-folded tabs to remove each
lens as needed.
FIGURE 10.1 FIGURE 10.2
Put on the 18-524 RPB® Quiet-Slim
earmuffs with the neckband around the
back of the neck, making sure the pads
seal completely around the ears. Secure
the over-head band with the hook and loop
strap. Don the hood after putting on the
earmuffs.
Refer to the Quiet-Slim earmuff Instruction
Manual for more details.
FIGURE 9.2
STETHOSCOPE OR EARMUFF USE
The hood has been designed for the users
ears to be exposed so a stethoscope may
be used without compromising the users
breathing air quality.
FIGURE 9.1

18
T200™
The bump cap pad is attached to the inside
of the bump cap with hook and loop dots.
Peel the pad out of the helmet. The pad can
be washed with mild detergent or replaced.
Remove the head harness or bump cap duct
assembly from the hood by unclipping the
lens on both sides and pulling the threaded
inlet out of the rubber seal on the back.
CLEANING THE T200® AND THE BUMP CAP PAD
FIGURE 12.1
FIGURE 12.2
Clean the head harness or bump cap and the duct assembly with hot water and mild
detergent. Allow to dry before placing back inside of a hood.
To remove the brow pad, undo the hook
and loop connections. Clean it with mild
detergent or replace it with a new one.
Place the new or cleaned brow pad onto the
inside of the front strap of the head harness.
Fold the top and bottom over and secure the
hook and loop tabs.
BROW PAD REPLACEMENT AND CLEANING
FIGURE 11.1 FIGURE 11.2
RESPIRATOR SETUP AND CARE CONTINUED

19
DONNING YOUR HOOD
Once you have completed the set up, you are ready to fit your RPB T200 Respirator. Firstly
check inside the hood and head harness assembly to ensure that it is free of dust, dirt or
contaminants. Ensure the air source is turned on and is flowing. Then open the bottom of the
hood, put the respirator onto your head, pull the hood down, adjust the head harness ratchet
to fit. Make sure it is sealed with the elastic cord. The seal is designed to sit above the ratchet
to allow easy adjustment, but the remainder of the head harness and duct should be fully
inside of the hood.
If using a neck seal hood, ensure the neck seal is sealing all of the way around the neck with
adjustable elastic cord. Tuck the inner bib in under your coveralls or other outer garment. Pull
the outer bib down over your shoulders and make sure it is laying flat on your chest and back
so that it does not get in the way of your work.
DONNING AND DOFFING
Open the bottom of the hood with the
air flowing from the air source, put the
respirator onto your head. Make sure the
hood is centered on your head.
Pull the hood down and tighten the head
harness ratchet to fit. Make sure that the
adjustable elastic cord is sealing around
under the chin, up the cheeks, over the ears
and around the back of the head.
FIGURE 13.1 FIGURE 13.2
T200 FACE SEAL HOODS
Always check the interior of the respirator for contaminants before
donning. Always don and doff the helmet while outside the work area, keeping the interior
of the hood clean and free of contaminants. Not doing these steps could expose you to
hazardous materials, and contaminants that could impair the function of the respirator.
WARNING

20
T200™
Tuck the inner bib into the collar of your
shirt, coveralls, or protective gear to prevent
contaminants from entering the hood. Pull
the outer bib down.
Fasten the flow control device belt around
your waist and over your hips.
FIGURE 14.3 FIGURE 14.4
With the air source turned on and flowing,
open the bottom of the hood, put the
respirator onto your head. Make sure the
hood is centered on your head.
Pull the hood down, adjust the head
harness ratchet to fit, and make sure the
neck seal is sealing around your neck,
making sure the elastic is cinched securely.
FIGURE 14.1 FIGURE 14.2
T-LINK NECK SEAL HOODS
DONNING AND DOFFING CONTINUED
DOFFING YOUR HOOD
When you have finished working, keep the respirator on with air flowing into the hood until
you have left the contaminated area. Depending on the contaminants, it may be advisable to
clean the exterior of the hood and your work garments in a decontamination shower before
removing the respirator. A workplace cleaning program may be necessary.

21
Before storing the respirator, clean the unit following the cleaning instructions in this
instruction manual. After use, store the respirator by hanging it up in a clean, dry place, away
from the work area. If the T200 isn’t going to be used for a longer period of time, store in a
container or a bag. Store in a cool dry place between -10°C to +45°C (14°F to 113°F) <90%RH.
PX5® may need to be stored separately, refer to the PX5® Instruction manual for specific
storage instructions.
After use: Long term storage:
STORAGE
FIGURE 15.1 FIGURE 15.2
INSPECTION
If the hood or the breathing tube are contaminated or show excessive wear, dispose of the
hood or breathing tube according to federal and local regulations. Keep the head harness or
bump cap/duct assembly and breathing tube for future use if they are in good condition.
PRODUCT CARE INSTRUCTIONS
Hoods are intended to be disposable. If washing is needed, hand wash only. It is recommended
to establish a regular cleaning schedule for the padding to ensure good hygiene. It is
recommended to establish a regular cleaning schedule for the padding and capes to ensure
good hygiene.
Hoods and face seals: Hand wash only with mild detergent and warm water. Hang to dry.
Do not launder in a washing machine or dryer. If laundered in a washer or dryer, product life
will be reduced and warranty voided.
Padding: Hand wash only with mild detergent and warm water. Lay flat to dry.
Make sure all components are dry before use. Inspect for wear and tear and replace if
damaged or excessively worn.

22
T200™
PARTS AND ACCESSORIES
FIGURE 16.1
4
6
1
9
15
5
11,12
8
14
10
23
7
13
16
17

23
PARTS LIST
Item Number Description Part Number
1 T200 Tychem® 2000 - Face Seal Hood 17-722
2 T200 Tychem® 2000 - Shoulder Length Hood Internal Face Seal 17-732
3 T-Link Tychem® 2000 - Full Hood w/Neck Seal 17-712
T-Link Tychem® 4000 - Full Hood w/Neck Seal, Sealed Seams 17-713
T-Link Tychem® 4000 - Extra Long Full Hood w/Neck Seal,
Sealed Seams, Safety Lens 17-713-SX
4 Air Duct Assembly (15-861) with lens mounts (17-513)
(Not for sale) 15-860
Air Duct Assembly (15-860) with 15-841, 16-530 15-870
5 Head Harness Assembly 15-841
6 Bump Cap Harness Assembly 15-850
7 Head Harness Ratchet Assembly 16-530
8 Head Harness Brow Pad 16-526
9 Lens Mounts (Pair) 17-513
10 T200 Clear-Vision Casette Lens (1 cassette of 7 lenses) (Pack of 10)
- for face seal hoods (short lens) 17-811
11 T-Link Clear-Vision Casette Lens (1 cassette of 7 lenses) (Pack of 10)
- for full length hoods (long lens) 17-817
12 T-Link Peel-Off Lenses (Pack of 25)
- for full length hoods (long lens) 17-815
13 Quiet-Slim Helmet Earmuffs 18-524
14 Quiet-Slim Helmet Earmuffs with harness mounts (pair) 18-525
15 Harness Mounts (Pair) 15-842
16 Tychem® Breathing Tube Cover 04-852
Clear Plastic Breathing Tube Cover (pack of 10) 04-856
17 Tychem® Breathing Tube Cover for backpack 04-872
Use only exact, authentic RPB® replacement parts (marked with
the RPB® logo and part number), and only in the specified configuration. Using incomplete
or inappropriate equipment, including the use of counterfeit or non-RPB® parts, can result
in inadequate protection and will void the approval of the entire respirator assembly.
WARNING

24
T200™
4
PAPR PARTS AND ACCESSORIES
FIGURE 16.2
2
3
1
Item Number Description Part Number
1 PX5® PAPR and Belt 03-801
2 PAPR Breathing Tube 04-831
3 PAPR Flow Meter 03-819
4 2” Belt 07-765
Easy Clean 2” Belt 07-765-DC
5 Easy Clean Backpack Assembly 03-822-DC
6 Short Breathing Tube for Backpack Assembly 04-841
5
6

25
LIMITED WARRANTY
RPB® warrants that its Products will be free from defects in materials and workmanship for one (1)
year, subject to the terms of this limited warranty. The Products are sold only for commercial use,
and no consumer warranties apply to the Products. This limited warranty is for the benefit of the
original Product purchaser, and cannot be transferred or assigned. This is the sole and exclusive
warranty provided by RPB®, and ALL CONDITIONS AND IMPLIED WARRANTIES (INCLUDING
ANY WARRANTY OF MERCHANTABILITY OR FITNESS FOR A PARTICULAR PURPOSE)
ARE EXCLUDED AND DISCLAIMED FROM WARRANTY COVERAGE. RPB’s® limited warranty
coverage does not apply to damage resulting from accident, improper use or misuse of the
Products, wear and tear resulting from the normal use of the Products, or the failure to properly
maintain the Products.
RPB’s® limited warranty coverage runs from the original date of purchase of the Products, and
applies only to warranted defects which first manifest themselves and are reported to RPB® within
the warranty period. RPB® retains the right to determine to its reasonable satisfaction whether
any claimed defect is covered by this limited warranty.
If a warranted defect occurs, RPB® will repair or replace the defective Product (or a component
of the Product), in its sole discretion. This “repair or replacement” remedy is the sole and
exclusive remedy under this limited warranty, and under no circumstances shall RPB’s® liability
under this limited warranty exceed the original purchase price for the Products (or the applicable
component). RPB® has no responsibility for incidental or consequential damages, including loss
of use, maintenance and other costs, and ALL INCIDENTAL AND CONSEQUENTIAL DAMAGES
ARE EXCLUDED AND DISCLAIMED from this limited warranty. Contact RPB® to obtain warranty
service. Proof of purchase must be provided to obtain warranty service. All costs of returning the
Products to RPB® for warranty service must be paid by the purchaser.
RPB® reserves the right to improve its Products through changes in design or materials without
being obligated to purchasers of previously manufactured Products.
LIABILITY
RPB® Safety cannot accept any liability of whatsoever nature arising directly or indirectly from
the use or misuse of RPB® Safety products, including purposes that the products are not designed
for. RPB® Safety is not liable for damage, loss or expense resulting from the failure to give advice
or information or the giving of incorrect advice or information, whether or not due to RPB®
Safety’s negligence or that of its employees, agents or subcontractors.

26
T200™
RPB® SAFETY - GLOBAL HEADQUARTERS
2807 Samoset Rd, Royal Oak, MI 48073, USA
T: 1-866-494-4599 F: 1-866-494-4509 E: sales@gvs.com
RPB® SAFETY - APAC
3 Robin Mann Place, Christchurch Airport, Christchurch 8053, New Zealand
T: +64-3-357-1761 F: +64-3-357-1763 E: sales@gvs.com
GVS S.p.A. - EMEA
Via Roma 50, 40069 Zona Industriale BO, Italy
T: +39 0516176391 E: sales@gvs.com
GVS Filter Technology UK Ltd.
Vickers Industrial Estate, Mellishaw Ln, Morecambe LA3 3EN, UK
T: +44 (0)1524 847600 E: sales@gvs.com
gvs-rpb.com
Copyright ©2022 RPB IP, LLC. Alle rechten voorbehouden. Alle inhoud op deze website is beschermd
door de Amerikaanse auteursrechtwetgeving en mag niet worden gereproduceerd, gedistribueerd,
overgedragen, weergegeven, gepubliceerd of uitgezonden zonder de voorafgaande schriftelijke
toestemming van RPB IP, LLC. U mag geen handelsmerk, auteursrecht of andere kennisgeving van
kopieën van de inhoud wijzigen of verwijderen.
Alle handelsmerken, servicemerken en logo’s die in deze publicatie worden gebruikt, zowel geregistreerd
als niet-geregistreerd, zijn de handelsmerken, servicemerken of logo’s van hun respectieve eigenaars. Alle
rechten op het intellectuele eigendom van RPB in deze publicatie, inclusief auteursrecht, handelsmerken,
dienstmerken, bedrijfsgeheimen en octrooirechten, zijn voorbehouden. RPB Intellectueel Eigendom omvat
elk octrooi, gepatenteerde artikelen, octrooiaanvragen, ontwerpen, industriële ontwerpen, auteursrechten,
software, broncode, databaserechten, morele rechten, uitvindingen, technieken, technische gegevens,
handelsgeheimen, knowhow, merken, handelsmerken, handelsnamen, slogans, logo’s en ander gemeen
recht en eigendomsrechten, al dan niet geregistreerd, die in het bezit zijn van, geheel of gedeeltelijk zijn
ontwikkeld door of in licentie zijn gegeven door RPB IP, LLC.
NEDERLANDS
Raadpleeg de paginanummers van T200 CE Engels Gebruiksaanwijzing voor afbeeldingen en
diagrammen.
UITLEG VAN SIGNAALWOORDEN EN SYMBOLEN
De volgende signaalwoorden en veiligheidssymbolen worden in deze handleiding en op de productetiketten
gebruikt:
WAARSCHUWING geeft een gevaarlijke situatie aan die, als deze
niet wordt vermeden, kan resulteren in overlijden of ernstig letsel.
GEVAAR geeft een gevaarlijke situatie aan die, als deze niet wordt vermeden, kan
resulteren in overlijden of ernstig letsel.
Lees de Gebruiksaanwijzing.
Extra exemplaren van RPB® handleidingen kunnen gevonden worden op gvs-rpb.
com.
RPB® Safety LLC is een ISO9001 gecertificeerd bedrijf.
GECERTIFICEERD DOOR:
CE: BSI Group The Netherlands B.V. (NB2797), Say Building, John M. Keynesplein 9, 1066 EP, Amsterdam, NL
UKCA: BSI Group (AB0086), Kitemark Court, Knowhill, Milton Keynes MK5 8PP, United Kingdom
WAARSCHUWING
GEVAAR

27
INTRODUCTIE
De T200 is een multifuctioneel ademhalingstoestel ontworpen voor een aantal verschillende
toepassingen waar bescherming tegen vervuilende stoffen in de lucht nodig is. Met een optionele stootpet
voor hoofdbescherming en keuze uit drie beschikbare kappen kan de T200 zowel in de industrie als in
de gezondheidszorg gebruikt worden. De optionele Quiet-Slim™ Oorbeschermers kunnen geïnstalleerd
worden voor extra gehoorbescherming.
Dit product moet te allen tijde worden geïnspecteerd en onderhouden in overeenstemming met deze
gebruiksaanwijzing.
Zie BESCHERMING EN BEPERKINGEN voor meer informatie.
Neem voor technische ondersteuning contact op met onze Klantenservice: 1-866-494-4599 of e-mail:
sales@gvs.com
Formulier #: 7. 2 0 . 5 0 6
Herziening: 2
BELANGRIJKE VEILIGHEIDSINFORMATIE
Onjuiste selectie, pasvorm, gebruik of onderhoud van dit product
kan tot letsel leiden; levensbedreigende vertraagde long-,
huid- of oogziekte; of de dood. Dit product is bedoeld voor beroepsmatig gebruik in overeenstemming met
de geldende normen of voorschriften voor uw locatie, branche en werkzaamheid (zie Verantwoordelijkheden
van de Werkgever). Bekendheid met normen en voorschriften met betrekking tot het gebruik van deze
beschermende uitrusting wordt aanbevolen, ook als deze niet rechtstreeks op u van toepassing zijn. Raadpleeg
de Verantwoordelijkheden van de Werkgever en de Veiligheidsinstructies voor de Gebruiker indien u als
zelfstandige werkt of indien u deze producten gebruikt in een niet-beroepsmatige omgeving. Ga naar gvs-rpb.
com/healthcare/important-safety-information voor nuttige links naar CE- normen en andere inhoud.
WERKGEVERS: Lees deze handleiding en de Gebruiksaanwijzing van het Ademluchttoestel en voer de
Verantwoordelijkheden van de Werkgever uit.
PRODUCTGEBRUIKERS: Lees deze handleiding en de Gebruiksaanwijzing van het Ademluchttoestel en volg de
Veiligheidsinstructies voor de Gebruiker op.
KIJK OP DE WEBSITE VOOR UPDATES. Producthandleidingen worden regelmatig bijgewerkt.
Ga naar gvs-rpb.com/healthcare/resources for de meest recente versie van deze handleiding voordat u het
product gebruikt.
WAARSCHUWING
BESCHERMING EN BEPERKINGEN
ADEMHALING
De RPB T200 is gekeurd in de volgende categorie:
Motoraangedreven Lucht
Het RPB T200 Ademhalingstoestel, indien correct gemonteerd en gebruikt met alle benodigde onderdelen,
inclusief de Ademhalingsslang en het RPB® PX5® Motoraangedreven Luchtzuiverende Ademhalingstoestel
(PAPR), is een Motoraangedreven Luchtzuiverend Ademhalingstoestel dat is EN 12941: 1998 + A1: 2003 +
A2: 2008 TH3 P R SL gekeurd, met een Nominale Beschermingsfactor van 500. Als zodanig vermindert deze
significant de hoeveelheid vervuiling die door de gebruiker wordt ingeademd, al wordt het inademen hiervan
niet volledig geëlimineerd. Specifieke bescherming hangt af van de geselecteerde filter voor gebruik met de
RPB PX5 PAPR (zie de PX5 Gebruiksaanwijzing)
WAARSCHUWING
Het RPB T200 Ademhalingstoestel is NIET VOOR GEBRUIK geschikt als:
De atmosfeer onmiddelijk gevaar levert voor leven of gezondheid.
De drager niet kan ontsnappen zonder hulp van het ademhalingstoestel.
Het percentage zuurstof in de omgeving lager ligt dan 21% ±1%.
Bij straalwerkzaamheden.

28
T200™
Bescherming tegen gevaarlijke gassen (bijv. koolmonoxide).
Het verontreinigingsniveau hoger ligt dan de voorschriften of aanbevelingen.
Het soort verontreiniging of de concentratie van verontreiniging onbekend is.
De werkplaats slecht geventileerd is.
De temperatuur buiten het bereik van -10°C tot +60°C (14°F to 140°F) valt.
Er een ontvlambare of explosieve atmosfeer aanwezig is bij gebruik van systemen met elektrische
onderdelen die niet intrinsiek veilig zijn, PX5 PAPR.
GEZICHT EN OGEN:
De T200 met Standaard Vizier voldoet aan de eisen van EN 166:2002 1F3 (AS/NZS 1337.1:2010) voor
gezichtsbescherming.
De T200 is niet ontworpen of getest om bescherming te bieden tegen gesmolten metalen of bijtende
vloeistoffen.
Let op: Afhankelijk van de taakgevarenanalyse moet mogelijk een veiligheidsbril worden gedragen. De T200
beschermt niet tegen de mogelijke overdracht van impact op een bril die onder de kap wordt gedragen. Het
biedt geen volledige bescherming van de ogen en het gelaat tegen ernstige impact en penetratie en is geen
vervanging voor goede veiligheidspraktijken en technische maatregelen.
HOOFD:
Wanneer de T200 is uitgerust met de stootpet, biedt deze minimale hoofdbescherming niet aan de eisen
van EN 812:2012. Deze configuratie voldoet niet aan de eisen van EN 397:2012+A1:2012 (AS/NZS
1801:1997).
GEHOOR:
In combinatie met de T200 biedt de Quiet-Slim Gehoorbescherming een Dempingswaarde (NRR) van
21 en een SNR van 28 aan de eisen van EN 352-1. Raadpleeg de Quiet-Slim gebruiksaanwijzing voor
correcte installatie en pasvorm.
Andere gehoorbescherming, zoals oordoppen, moeten correct worden aangebracht en worden
gedragen wanneer het geluidsniveau de toegestane blootstellingsniveaus overschrijdt.
PBM REGLEMENT
De T200 voldoet aan de PBM-Verordening (EU) 2016/425. Verordening 2016/425 betreffende persoonlijke
beschermingsmiddelen zoals opgenomen in de Britse wetgeving en gewijzigd.
De Conformiteitsverklaring voor CE en UKCA kan gevonden worden op gvs-rpb.com/healthcare/resources
Zie de sectie Opslag voor informatie over verpakking en bescherming die nodig is voor transport.
DIAGRAM VAN ADEMHALINGSCOMPONENTEN - PAPR
Het RPB T200 Ademhalingstoestel bestaat uit 3 hoofdcomponenten, zoals te zien in Afbeelding 1.1. Alle 3 de
componenten moeten aanwezig zijn en correct gemonteerd zijn om een compleet gekeurd motoraangedreven
luchtzuiverend ademhalingstoestel te vormen, conform EN12941:1998 +A1: 2003 +A2: 2008 (AS/NZS 1716).
AFBEELDING 1.1 OP PAGINA 6
1. Luchtkap
2. Ademhalingsslang
3. Luchttoevoer PX5
VOORZORGSMAATREGELEN EN BEPERKINGEN
MOTORAANGEDREVEN LUCHT
A. Niet voor gebruik als de omgeving minder dan 21% ±1% zuurstof bevat.
B. Niet voor gebruik in atmosferen die onmiddelijk gevaar leveren voor het leven of de gezondheid.
C. Overschrijd geen maximumconcentraties die zijn vastgesteld door wettelijke normen.
F. Gebruik geen Motoraangedreven Luchtzuiverend Ademhalingstoestel als de luchttoevoer lager is dan of
170 lpm (6 cfm) voor kappen en/of helmen.
H. Volg vastgelegde patroon en huls-vervangingsschema’s om ervoor te zorgen dat patroon en hulzen
worden vervangen voordat er doorslag plaatsvindt.

29
I. Bevat elektrische onderdelen die een vonk kunnen creëren in een ontvlambare of explosieve omgeving.
J. Als dit product niet op de juiste manier wordt gebruikt en onderhouden, kan dit letsel of de dood tot
gevolg hebben.
L. Volg de instructies van de fabrikant voor het vervangen van patronen, hulzen en/of filters.
M. Alle goedgekeurde ademhalingstoestellen moeten worden geselecteerd, gepast, gebruikt en
onderhouden in overeenstemming met de geldende voorschriften.
N. Vervang nooit onderdelen, pas ze niet aan en laat ze niet weg. Gebruik alleen exacte vervangende
onderdelen die door de fabrikant zijn aangegeven.
O. Raadpleeg de gebruiksaanwijzing en/of onderhoudshandleidingen voor informatie over gebruik en
onderhoud van deze ademhalingstoestellen.
P. De T200 is niet geëvalueerd voor gebruik als een chirurgisch masker.
LUCHTBRON, FITTINGEN EN DRUK
LUCHTBRON
Motoraangedreven Lucht
Controleer of het verontreinigde gebied binnen de gebruikslimieten voor een Motoraangedreven Luchtzuiverend
Ademhalingstoestel ligt en bepaal het soort verontreiniging. Nadat het verontreinigingssniveau is bevestigd,
kunt u vervolgens het filterpatroon kiezen dat voor de toepassing moet worden gebruikt, om voor voldoende
bescherming te zorgen. Zorg ervoor dat het gebied goed geventileerd is en dat er regelmatig luchtmonsters
worden genomen om te bevestigen dat de atmosfeer binnen de niveaus blijft die worden aanbevolen door de
lokale bestuursorganen. Volg de gebruiksaanwijzing van de PX5 PAPR voor meer informatie.
Minimale afgestelde flow van de fabrikant
VERANTWOORDELIJKHEDEN VAN DE WERKGEVER
Uw specifieke verantwoordelijkheden kunnen verschillen per locatie en branche, maar over het algemeen
verwacht RPB® dat werkgevers:
Alle geldende normen en voorschriften voor uw locatie, branche en werkzaamheid opvolgen.
Afhankelijk van uw locatie en branche, kunnen een aantal normen en voorschriften van toepassing zijn op
uw selectie en gebruik van ademhalingstoestellen en andere persoonlijke beschermende uitrusting. Deze
kunnen bijvoorbeeld nationale, lokale of militaire normen en voorschriften en standaarden zoals EN en AN/
NZS omvatten. Er zijn ook vereisten specifiek voor bepaalde verontreinigingen, b.v. silica (zie gvs-rpb.com/
healthcare/important-safety-information voor meer informatie), asbest, organische ziekteverwekkers, enz.
Weet welke eisen van toepassing zijn op uw locatie en branche.
Zorg voor geschikte veiligheidsprogramma’s.
Heb en volg:
Een veiligheidsprogramma voor de werkplek.
Een geschreven programma voor ademhalingsbescherming in overeenstemming met de van
toepassing zijnde normen en voorschriften.
In overeenstemming met bovenstaande,
Voer een gevarenanalyse uit en selecteer gepaste uitrusting voor elke werkzaamheid. Een bevoegd
persoon moet een gevarenanalyse uitvoeren. Er moeten waar nodig controles plaatsvinden en
een gekwalificeerd persoon moet bepalen welk soort ademhalings, gezichts-, oog-, hoofd- en
gehoorbescherming geschikt zijn voor de beoogde werkzaamheden en gebruiksomstandigheden.
(Kies bijvoorbeeld een ademhalingstoestel dat geschikt is voor de specifieke gevaarlijke
luchtverontreinigingen, rekening houdend met de werkplek en de gebruiker en met een Toegekende
Protectie Factor (TPF) die aan de vereiste norm voor werknemersbescherming voldoet of dit overtreft.)
FILTER
180 L/MIN SNELHEID 1
180 L/MIN SNELHEID 2
180 L/MIN SNELHEID 3
03-892-P
>10 uur
>7 uur
>6 uur
03-893-A2
>5 uur
>4 uur
>4 uur
03-894-ABE
>5 uur
>4 uur
>4 uur
03-895-ABEK
>5 uur
>4 uur
>4 uur

30
T200™
Indien van toepassing, controleer uw veiligheidsprogramma op de werkplek, het programma voor
ademhalingsbescherming en de normen en voorschriften voor uw werkzaamheid of branche voor
gerelateerde beschermingsvereisten en raadpleeg deze handleiding (Bescherming en Beperkingen,
pagina 38) en de Gebruiksaanwijzing van de PX5 PAPR of de regelaar voor productspecificaties.
Zorg ervoor dat werknemers medisch gekeurd zijn om een ademhalingstoestel te gebruiken.
Laat een gekwalificeerde arts of andere bevoegde zorgverlener medische evaluaties uitvoeren met
behulp van een medische vragenlijst of een standaard medisch onderzoek.
Train medewerkers in het gebruik, onderhoud en de beperkingen van de T200.
Benoem een gekwalificeerd persoon met voldoende kennis over de RPB T200 om training te geven:
Kwalificaties van de Ademhalingstoestel-Trainer. Iedereen die training voor het ademhalingstoestel
verzorgt, moet:
a) goed geïnformeerd zijn over de toepassing en het gebruik van de ademhalingstoestellen;
b) praktische kennis toepassen bij de selectie en het gebruik van ademhalingstoestellen en
werkmethoden op de werkplek;
c) inzicht hebben in het programma voor ademhalingstoestellen van de werkplek; en
d) kennis hebben van geldende regels.
Train elke T200-gebruiker voor het gebruik, de toepassing, de inspectie, het onderhoud, de
opslag, de pasvorm en de beperkingen van het product in overeenstemming met de inhoud
van deze gebruiksaanwijzing en de handleiding van de gekeurde regelaar en de standaard- of
regelgevingsvereisten. Zorg ervoor dat iedere beoogde gebruiker beide handleidingen leest.
Zorg ervoor dat de uitrusting correct is gemonteerd, gebruikt en onderhouden.
Zorg ervoor dat de uitrusting correct is gemonteerd, geïnspecteerd, gepast, gebruikt en onderhouden,
inclusief selectie van het juiste luchtfilterpatroon en, indien van toepassing, lasfilter met
tintaanpassingen voor de toepassing.
Meet en controleer de luchtverontreiniging op de werkplaats.
Meet en controleer de niveaus van luchtverontreiniging op de werkplaats in overeenstemming met de
geldende voorschriften. Zorg ervoor dat de werkplaats goed geventileerd is.
Neem voor vragen contact op met RPB®.
Bel de klantenservice:
Tel: 1-866-494-4599
Email: sales@gvs.com
Web: gvs-rpb.com
VEILIGHEIDSINSTRUCTIES VOOR DE GEBRUIKER
VÓÓR HET EERSTE GEBRUIK - TRAINING EN MEDISCHE KWALIFICATIE
Gebruik dit ademhalingstoestel niet totdat u deze handleiding en de Gebruiksaanwijzing van de PX5 PAPR of
de regelaar heeft gelezen (extra exemplaren beschikbaar op gvs-rpb.com) en getraind bent in het gebruik, het
onderhoud en de beperkingen van het ademhalingstoestel door een gekwalificeerd persoon (benoemd door uw
werkgever) die kennis heeft van het RPB T200 Ademhalingstoestel.
Draag dit ademhalingstoestel pas als u bent geslaagd voor een medische evaluatie met een medische
vragenlijst of een eerste medisch onderzoek door een gekwalificeerde arts of een andere bevoegde zorgverlener.
Allergenen: Er zijn in dit product geen bekende of veel voorkomende allergenen gebruikt.
Sommige materialen kunnen een allergische reactie veroorzaken bij personen die daarvoor gevoelig zijn. Als
u allergisch bent of een irritatie ontwikkelt, licht dan uw werkgever in. Irritatie kan optreden als gevolg van een
gebrek aan reiniging. Volg alle reinigings- en onderhoudsinstructies in de handleidingen voor dit en alle andere
RPB-producten die u gebruikt.
CONTROLEER OF HET SYSTEEM GEBRUIKSKLAAR IS
Zorg dat u een compleet systeem heeft.
Controleer of u alle benodigde onderdelen heeft zodat de T200 functioneert als een volledig en gekeurd

31
ademhalingstoestel:
Luchtkap (T200 of T-LINK)
Ademhalingsslang
Stroomregeling apparaat (PX5 PAPR)
Zie het Diagram; Componenten van het Ademhalingstoestel (pagina 6/40). De RPB T200 is alleen goedgekeurd
voor gebruik met de RPB PX5 PAPR. Gebruik alleen authentieke RPB-merkonderdelen en -componenten die
deel uitmaken van het gekeurde ademhalingstoestel. Het gebruik van onvolledige of ongeschikte onderdelen,
waaronder het gebruik van nagemaakte of niet-RPB-onderdelen, kan leiden tot onvoldoende bescherming en
maakt de keuring van het volledige ademhalingsstoestel nietig. Pas geen enkel deel van dit product aan, en
verander niets.
Inspecteer alle componenten dagelijks op tekenen van beschadiging of slijtage die het beschermingsniveau
dat oorspronkelijk werd geleverd kunnen verminderen. Verwijder elk beschadigd onderdeel of product
voor service, reparatie of vervanging, inclusief als kap of vizier is blootgesteld aan impact. Gekraste of
beschadigde veiligheidsvizieren of andere componenten moeten worden vervangen door originele RPB-
vervangingsonderdelen. Wanneer veiligheidsvizieren en impactbestendige vizieren worden vervangen, moet
u eventuele extra beschermfolie aan weerzijden van de ruit verwijderen. Als de folie blijft zitten, kan dit de
optische helderheid van het vizier beïnvloeden en oogvermoeidheid veroorzaken. Inspecteer de binnenkant
van het ademhalingstoestel op inadembaar stof of andere vreemde voorwerpen. Houd de binnenkant van het
ademhalingstoestel altijd schoon.
Zorg ervoor dat de kap correct is gemonteerd op de manier die bij uw toepassing past. Een onvolledig of onjuist
geïnstalleerde kap kan onvoldoende bescherming tegen impact en ademhalingsbescherming bieden. Raadpleeg
Montage en Onderhoud (pagina 47). Zie Aantrekken (pagina 49) voor informatie over de pasvorm.
CONTROLEER OF DE UITRUSTING GESCHIKT IS VOOR UW WERKZAAMHEID
Controleer of de T200 de juiste bescherming biedt voor uw werkzaamheid. Controleer, indien van toepassing,
uw veiligheidsprogramma op de werkplek, programma voor ademhalingsbescherming en de normen en
voorschriften voor uw werkzaamheid of branche. (Zie BESCHERMING EN BEPERKINGEN, pagina 38.)
ALVORENS DE T200 AAN TE TREKKEN:
Controleer of verontreinigingen in de lucht binnen de aanbevolen limieten voor gebruik van
ademhalingstoestellen vallen:
Bepaal het soort en niveau van vervuiling. Controleer of de concentraties van verontreinigingen
in de lucht niet groter zijn dan toegestaan door de geldende voorschriften en aanbevelingen voor
motoraangedreven luchtzuiverende ademhalingstoestellen en ademhalingstoestellen met ademlucht.
De ademlucht filteren:
PAPR (Motoraangedreven Luchtzuiverend Ademhalingstoestel): Nadat het verontreinigingsniveau
is bevestigd, bepaalt u het juiste filterpatroon voor de toepassing, om te zorgen dat u voldoende
beschermd bent. Volg de Gebruiksaanwijzing van de PX5.
Zorg dat het gebied geventileerd en gecontroleerd wordt:
Zorg ervoor dat het gebied goed geventileerd is en dat er regelmatig luchtmonsters genomen worden
om te bevestigen dat de atmosfeer binnen de door bestuursorganen aanbevolen niveaus blijft.
Als u vragen heeft, stel deze aan uw werkgever.
BETREED DE WERKPLEK NIET als één van de volgende omstandigheden zich voordoet:
De atmosfeer levert direct gevaar voor het leven of de gezondheid.
De drager kan niet ontsnappen zonder hulp van het ademhalingstoestel.
Het percentage zuurstof in de omgeving ligt lager dan 21% ±1%.
In een ontvlambare of explosieve atmosfeer bij gebruik van systemen met elektrische onderdelen die niet
intrinsiek veilig zijn, PX5.
Het verontreinigingsniveau ligt hoger dan de voorschriften of aanbevelingen.
Het soort verontreiniging of de concentratie van verontreiniging is onbekend.
De werkplaats is slecht geventileerd.

32
T200™
De temperatuur valt buiten het bereik van -10°C tot + 60°C (14°F tot 140°F).
VERLAAT DE WERKLPAATS ONMIDDELLIJK INDIEN:
Een component van het product beschadigd raakt.
Het gezichtsvermogen is aangetast.
Luchttoevoer stopt of vertraagt, of het alarm af gaat. Gebruik Motoraangedreven Luchtzuiverende
Ademhalingstoestellen niet als de luchttoevoer minder is dan 170 slpm (6 cfm).
Ademen moeilijk wordt.
U duizelig, misselijk, te heet, te koud of ziek bent.
Uw ogen, neus of huid geïrriteerd raken.
De werkplaats een besloten ruimte is (tenzij de juiste maatregelen worden genomen voor besloten ruimtes).
U verontreinigingen in de kap proeft, ruikt of ziet.
U een andere reden heeft om te vermoeden dat het ademhalingstoestel niet voldoende bescherming biedt.
ONDERHOUD
Plaats de kap nooit op hete oppervlakken. Breng geen verf, oplosmiddelen, kleefstoffen of zelfklevende
etiketten aan, tenzij aan de hand van instructies van RPB. Bepaalde chemicaliën kunnen schadelijk zijn voor dit
product.
Zie het gedeelte “Montage en Gebruik van Ademhalingstoestel” voor specifieke reinigingsinstructies.
INSTRUCTIES VOOR SPECIFIEKE TOEPASSINGEN OF OMGEVINGEN
Besloten Ruimten
Indien dit ademhalingstoestel wordt gebruikt in besloten ruimten, zorg ervoor dat de ruimte goed geventileerd
is en dat alle concentraties van verontreinigingen lager liggen dan de aanbevolen concentraties voor dit toestel.
Volg alle procedures voor het betreden, bedienen en verlaten van besloten ruimten zoals gedefinieerd in
geldende voorschriften en normen.
ADEMHALINGSTOESTEL - MONTAGE EN ONDERHOUD
HOOFDBANDENSTEL MET BOVENSTE BANDEN -
MONTAGE EN AANPASSEN
AFBEELDING 2.1 OP PAGINA 12
Bevestig de voorste band aan de hoofdband-
beugels. 1. Schuif de uiteinden in de gleuf op de
beugels. 2. Haak het gaatje over de pin die aan de
binnenkant van de beugel zit. Maak passend.
AFBEELDING 2.2 OP PAGINA 12
Bevestig de bovenste banden aan de hoofdband-
beugels met de afgeronde zijde naar het hoofd
gericht. Haak het gaatje van de banden onder het
lipje op de hoofdband-beugels. Duw de gleuf van
de banden vervolgens vast op de bovenste clip
van de hoofdband-beugel.
AFBEELDING 2.3 OP PAGINA 12
Zet het ratelmechanisme zo dat het RPB-logo op
het binnenpaneel goed zichtbaar is. Bevestig het
ratelmechanisme aan de gaten in de hoofdband-
beugels door (1) het lipje aan het uiteinde van het
ratelmechanisme van binnenuit over het gat in
de beugel te plaatsen, (2) vervolgens de clip van
het ratelmechanisme in het gat in de beugel vast
te klikken.
AFBEELDING 2.4 OP PAGINA 12
Het hoofdbandenstel kan versteld worden met het
spanmechanisme achterop de hoofdband. Draai
aan de knop om de hoofdband strakker of losser
te maken.
AFBEELDING 2.5 OP PAGINA 13
Duw de twee banden van het hoofdbandenstel
naar elkaar toe om ze strakker te maken.
AFBEELDING 2.6 OP PAGINA 13
Om de bovenste banden losser te maken, 1. 1.
Maak de lipjes die de banden vastzetten los. 2.
Trek vervolgens de banden uit elkaar tot aan de
gewenste inkeping. Klik vervolgens de lipjes weer
over de band heen om deze stevig vast te zetten.
STOOTPET - MONTAGE
AFBEELDING 3.1 OP PAGINA 13
Om te verwijderen, maak de band aan de
onderkant los en trek deze omhoog, weg van de
beugel.
AFBEELDING 3.2 OP PAGINA 13
Bevestig de stootpet op dezelfde punten waar
de banden bevestigd waren. Haak het gat in de
stootpet onder het lipje op de hoofdband-beugel.
Plaats vervolgens het montagegat van de stootpet
over de bovenste clip op de hoofdband-beugel.
DE VIZIERHOUDERS BEVESTIGEN
AFBEELDING 4.1 OP PAGINA 14
Zet de hoofdband-beugel en de vizierhouder

33
LET OP: IN FIGUREN 4.1-6.5 WORDT DE MONTAGE VAN DE STOOTPET GETOOND. ALLE INSTRUCTIES
VOOR DE MONTAGE VAN HET HOOFDBANDENSTEL EN DE LUCHTINLAAT ZIJN VAN TOEPASSING OP
ZOWEL DE STOOTPET (15-850) ALS DE VERSIES MET BOVENSTE BANDEN (15-841).
op één lijn met elkaar. Til het achterste lipje op
en duw het naar voren tot het in de gewenste
positie staat; zorg ervoor dat het lipje goed in de
gewenste sleuf vastzit. Herhaal aan de andere
kant.
AFBEELDING 4.2 OP PAGINA 14
Gebruik het lipje om de vizierhouder naar voren of
naar achteren te schuiven. Dat zal het vizier van
de kap dichterbij of verder weg van het gezicht
brengen.
DE LUCHTINLAAT BEVESTIGEN
AFBEELDING 5.1 OP PAGINA 14
1. Zet de pijltjes met elkaar op lijn. 2. Schuif de
vleugels van de luchtinlaat in de “W” -vormige
sleuf op de zijclips totdat de middelste clip stevig
over de dwarsdoorsnede van de vleugel klikt.
AFBEELDING 5.2 OP PAGINA 14
Luchtinlaat aan de vizierhouder bevestigd.
DE LUCHTINLAAT VAN DE STOOTPET/
HOOFDVERING IN DE KAP PLAATSEN
AFBEELDING 6.1 OP PAGINA 15
Plaats de hoofdvering of stootpet in de kap.
AFBEELDING 6.2 OP PAGINA 15
Steek de inlaat met schroefdraad in de zwarte
rubberen afdichting aan de achterkant van de
kap. Trek de rubberen afdichting over de ribbel die
achter het schroefdraadgedeelte zit, begin vanaf
de onderkant.
AFBEELDING 6.3 OP PAGINA 15
Zet de lipjes van het vizier op lijn met de clips aan
de zijkanten van de vizierhouder.
- Haak punt 1 onder punt 1 zoals afgebeeld.
- Klik punt 2 over punt 2 zoals afgebeeld.
AFBEELDING 6.4 OP PAGINA 15
Steek de bevestigingsclip door de gleuf op de
beugel van het hoofdtuig.
AFBEELDING 6.5 OP PAGINA 16
Pas de richting van de luchttoevoer naar boven
of naar beneden aan zodat de lucht ofwel richting
het vizier of richting het gezicht stroomt.
VERBIND DE ADEMHALINGSSLANG
AFBEELDING 7.1 OP PAGINA 16
Zorg ervoor dat de o-ring op de inlaat met
schroefdraad zit. Bevestig de ademhalingsslang
aan de inlaat door deze rechtsom te draaien.
Niet te strak aandraaien. Houd de kap vast om
te voorkomen dat deze meedraait wanneer de
ademhalingsslang wordt vastgedraaid.
MOTORAANGEDREVEN LUCHT
AFBEELDING 8.1 OP PAGINA 16
Zorg ervoor dat de platte pakking op de
koppeling van de ademhalingsslang zit. Steek het
bajonetuiteinde van de ademhalingsslang in de
uitlaat van de PX5 PAPR en draai deze een halve
slag rechtsom totdat deze vastzit.
VOOR GEBRUIK MET RPB PX5 - ZIE DE
GEBRUIKSAANWIJZING VOOR PAPR
Als het T200 Ademhalingstoestel in combinatie met
de RPB PX5 PAPR wordt gebruikt, raadpleeg dan
de Gebruiksaanwijzing van de RPB PX5 voor de
instructies over montage en gebruik van het toestel.
Let op: De RPB PX5 is een Motoraangedreven
Luchtzuiverend Ademhalingstoestels (PAPR),
daarom moet u voorzichtig zijn bij het selecteren van
het juiste filter afhankelijk van de toepassing van het
ademhalingstoestel.
GEBRUIK VAN STETHOSCOOP OF
OORBESCHERMERS
AFBEELDING 9.1 OP PAGINA 17
De kap is zo ontworpen dat de oren van de
gebruiker zijn blootgesteld, zodat een stethoscoop
kan worden gebruikt zonder de kwaliteit van de
ademlucht van de gebruiker in gevaar te brengen.
AFBEELDING 9.2 OP PAGINA 17
Zet de 18-524 RPB Quiet-Slim oorbeschermers
op met de nekband om de achterkant van de
nek; zorg ervoor dat de oorkussens volledig rond
de oren sluiten. Maak de hoofdband vast met
het klittenband. Zet de kap pas op nadat u de
oorbeschermers heeft opgezet.
Raadpleeg de Gebruiksaanwijzing van de Quiet-
Slim oorbeschermers voor meer informatie.
HELDER-ZICHT VIZIEREN
AFBEELDING 10.1 OP PAGINA 17
Haal de achterkant van de vizieren af en breng de
vizieren aan op de buitenkant van het vizier dat in
de kap genaaid is.
AFBEELDING 10.2 OP PAGINA 17
Gebruik de omgevouwen lipjes om elk vizier naar
behoefte te verwijderen.

34
T200™
WENKBROUWPANEEL VERVANGEN EN REINIGEN
AFBEELDING 11.1 OP PAGINA 18
Maak het klittenband los om het
wenkbrouwpaneel te verwijderen. Maak het
paneel met een mild schoonmaakmiddel schoon
of vervang het met een nieuw paneel.
AFBEELDING 11.2 OP PAGINA 18
Plaats het nieuwe of schoongemaakte
wenkbrauwpaneel aan de binnenkant van de
voorste band van het hoofdbandenstel. Vouw de
boven- en onderkant om en zet ze vast met het
klittenband.
REINIGING VAN DE T200 EN HET PANEEL VAN DE
STOOTPET
AFBEELDING 12.1 OP PAGINA 18
Verwijder het hoofdbandenstel of de stootpet met
AAN- EN UITTREKKEN
DE KAP AANDOEN
Nadat u klaar bent met de montage, bent u klaar om het RPB T200 Ademhalingstoestel aan te doen.
Controleer eerst in de kap en het hoofdbandenstel of deze vrij zijn van stof, vuil of verontreinigingen. Zorg
dat de luchtbron aanstaat en dat er lucht uit stroomt. Open vervolgens de onderkant van de kap, zet de
luchtkap op uw hoofd, trek de kap naar beneden, draai de spanband van het hoofdbandenstel aan om
deze passend te maken. Zorg dat de kap goed afsluit met de elastieke halsafdichting. De afdichting is
ontworpen om boven het spanmechanisme te vallen om eventuele aanpassingen te vergemakkelijken,
maar de rest van het hoofdbandenstel en de luchtinlaat moeten volledig in de kap zitten.
Als u een kap met halsafdichting gebruikt, zorg er dan voor dat het elastiek van de halsafdichting rondom
de hele nek goed afsluit. Stop de binnenste kraag onder de overall of ander kledingstuk. Trek de buitenste
kraag omlaag over de schouders en zorg ervoor dat deze plat op de borst en rug ligt, zodat deze het werk
niet hindert.
luchtinlaat uit de kap door eerst het vizier aan
beide kanten los te maken en dan de inlaat met
schroefdraad uit de rubberen afdichting aan de
achterkant van de kap te trekken.
AFBEELDING 12.2 OP PAGINA 18
Het paneel van de stootpet is met klittenband aan
de binnenkant van de stootpet bevestigd. Trek
het paneel uit de stootpet. Het paneel kan ofwel
gewassen worden met een mild reinigingsmiddel
of het kan worden vervangen.
Reinig het hoofdbandenstel of de stootpet
met luchtinlaat met warm water en een mild
reinigingsmiddel. Laat goed drogen voordat u het
weer in de kap plaatst.
Controleer altijd de binnenzijde van het ademhalingstoestel
op verontreinigingen voordat u deze aantrekt. Neem de kap altijd af als u zich buiten de werkplaats
bevindt, houd de binnenkant van de kap schoon en vrij van verontreinigingen. Als u deze stappen
niet uitvoert, kunt u worden blootgesteld aan gevaarlijke materialen en verontreinigingen die het
functioneren van het ademhalingstoestel nadelig kunnen beïnvloeden.
WAARSCHUWING
T200 KAP MET GEZICHTSAFDICHTING
AFBEELDING 13.1 OP PAGINA 19
Open de onderkant van de kap terwijl er lucht uit
de luchtbron stroomt, en plaats de luchtkap op
het hoofd. Zorg ervoor dat u de kap gecentreerd
op uw hoofd plaatst.
AFBEELDING 13.2 OP PAGINA 19
Trek de kap naar beneden, draai aan het
spanmechanisme van de hoofdband om passend
te maken. Zorg ervoor dat de aanpasbare
elastieke afdichting onder de kin, bij de wangen,
over de oren en langs de achterkant van uw hoofd
goed afsluit.
T-LINK KAP MET HALSAFDICHTING
AFBEELDING 14.1 OP PAGINA 20
Open de onderkant van de kap terwijl er lucht uit
de luchtbron stroomt, en plaats de luchtkap op het
hoofd. Zorg ervoor dat u de kap gecentreerd op uw
hoofd plaatst.
AFBEELDING 14.12 OP PAGINA 20
Trek de kap naar beneden, draai de ratel van de
hoofdband vast om passend te maken, zorg ervoor
dat de halsafdichting rondom de nek goed afsluit, en
zorg ervoor dat het elastiek stevig vastzit.
AFBEELDING 14.3 OP PAGINA 20
Steek de binnenste kraag in de hals van uw shirt,
overall of beschermende kleding om te voorkomen

35
dat verontreinigingen in de kapkunnen komen. Trek
de buitenste kraag naar beneden.
DE KAP UITTREKKEN
Wanneer u klaar bent met werken, verlaat de werkplaats met het ademhalingstoestel aan terwijl er nog lucht
in de kap stroomt. Afhankelijk van de verontreinigingen, kan het raadzaam zijn om de buitenkant van de kap
en uw werkkleding te reinigen voordat u het ademhalingstoestel verwijdert. Een reinigingsprogramma op de
werkplek kan nodig zijn.
INSPECTIE
Als de kap vervuild is of overmatige slijtage vertoont, moet u de kap weggooien zoals voorgeschreven in
de federale en plaatselijke voorschriften. Bewaar de kap, ademhalingsslang en andere onderdelen voor
toekomstig gebruik als deze zich in een goede staat bevinden.
OPSLAG
Voordat u het ademhalingstoestel opbergt, zorg dat het toestel volgens de reinigingsinstructies in deze gebruiks-
aanwijzing is gereinigd. Zorg ervoor dat het schoon is, zowel aan de binnenkant als de buitenkant. Bewaar na
gebruik het ademhalingstoestel door het op te hangen op een schone, droge plaats, weg van het werkgebied.
Berg de T200 op in een container of opbergtas als deze voor een langere periode niet gebruikt wordt, of voor
transport. Bewaren op een koele en droge plaats tussen -10°C en + 45°C (90°C) <90% rv. PX5® moet mogelijk
afzonderlijk worden opgeslagen, raadpleeg de PX5® Gebruiksaanwijzing voor specifieke instructies betreft
opslag.
Na gebruik: Lange termijn opslag of transport:
AFBEELDING 15.1 OP PAGINA 21 AFBEELDING 15.2 OP PAGINA 21
ONDERHOUD
Kappen zijn bedoeld voor eenmalig gebruik. Als wassen nodig is, alleen met de hand wassen. Voor een goede
hygiëne is het raadzaam de voering en de capes regelmatig te reinigen.
Kappen alleen met de hand wassen met een mild wasmiddel en warm water. Ophangen om te drogen.
Niet in wasmachine of droger doen. Een wasmachine of droger zal de levensduur van het product
verkorten en de garantie zal vervallen.
Voering: Alleen met de hand wassen met een mild wasmiddel en warm water. Plat neerleggen om te
drogen.
Zorg ervoor dat alle onderdelen droog zijn voor gebruik. Controleer op slijtage en vervang indien
beschadigd of zwaar versleten.
AFBEELDING 14.4 OP PAGINA 20
Bevestig de riem van de regelaar rond uw middel
op de heup.
ONDERDELEN EN ACCESSOIRES
AFBEELDING 16.1 OP PAGINA 22
LIJST MET ONDERDELEN
Item Nummer Beschrijving Onderdeel Nummer
1 T200 Tychem® 2000 - Gelaatsafdichting 17-722
2 T200 Tychem® 2000
- Kap op schouderlengte met Interne Gelaatsafdichting 17-732
3 T-Link Tychem® 2000 - Volledige Kap met Halsafdichting 17-712
T-Link Tychem® 4000 - Volledige Kap met Halsafdichting,
Afgedichte Naden 17-713
T-Link Tychem® 4000 - Extra Lange Volledige Kap met
Halsafdichting, Afgedichte Naden, Veiligheidsvizier 17-713-SX
4 Luchtinlaat (15-861) met vizierhouders (17-513) (Niet te koop) 15-860
Luchtinlaat (15-860) met 15-841, 16-530 15-870
5 Hoofdbandenstel 15-841
6 Bandenstel voor de Stootpet 15-850

36
T200™
7 Spanmechanisme voor het Hoofdbandenstel 16-530
8 Wenkbrouwpaneel voor het Hoofdbandenstel 16-526
9 Vizierhouders (paar) 17-513
10 T200 Helder-Zicht Vizier (1 cassette van 7 ruiten) (Pakket van 10)
- voor Kappen met Gelaatsafdichting (korte ruit) 17-811
11 T-Link Helder-Zicht Vizier (1 cassette van 7 ruiten) (Pakket van 10)
- voor volledige kappen (lange ruit) 17-817
12 T-Link Wegwerp-vizieren (Pakket van 25)
- voor volledige kappen (lange ruit) 17-815
13 Quiet-Slim Oorbeschermers 18-524
14 Quiet-Slim Oorbeschermers met zijsteunen 18-525
15 Zijsteunen 15-842
16 Tychem® Ademhalingsslang omslag 04-852
Clear Plastic Ademhalingsslang omslag (Pakket van 10) 04-856
17 Tychem® Ademhalingsslang omslag voor Rugzak 04-872
PAPR ONDERDELEN EN ACCESSOIRES
AFBEELDING 16.2 OP PAGINA 24
Item Nummer Beschrijving Onderdeel Nummer
1 PX5 PAPR en riem 03-801
2 Ademhalingsslang voor PAPR 04-831
3 Toevoer-Tester PAPR 03-819
4 5 cm (2 Inch) Riem 07-765
5 cm (2 Inch) Riem - Makkelijk Schoon 07-765-DC
5 Bandenstel voor de Rugzak - Makkelijk Schoon 03-822-DC
6 Ademhalingsslang voor de Rugzak 04-841
Gebruik alleen exacte, authentieke RPB®-
vervangingsonderdelen (gemarkeerd met het RPB®-logo en onderdeelnummer) en alleen in de
aangegeven opstelling. Gebruik van onvolledige of ongeschikte uitrusting, waaronder het gebruik van
nagemaakte of niet-RPB®-onderdelen, kan resulteren in onvoldoende bescherming en maakt de keuring
van het volledige ademhalingstoestel nietig.
WAARSCHUWING
BEPERKTE GARANTIE
RPB® garandeert dat haar Producten gedurende één (1) jaar vrij zijn van materiaal- en fabricagefouten, met
inachtneming van de voorwaarden van deze beperkte garantie. De Producten worden alleen verkocht voor
commercieel gebruik en er zijn geen consumentengaranties van toepassing op de Producten. Deze beperkte
garantie komt ten goede aan de oorspronkelijke koper van het Product en kan niet worden overgedragen of
toegewezen. Dit is de enige en exclusieve garantie die door RPB® wordt geboden en ALLE VOORWAARDEN EN
STILZWIJGENDE GARANTIES (INCLUSIEF ELKE GARANTIE VAN VERKOOPBAARHEID OF GESCHIKTHEID
VOOR EEN BEPAALD DOEL) WORDEN UITGESLOTEN EN UITGESLOTEN VAN DE GARANTIEDEKKING. De
beperkte garantiedekking van RPB® is niet van toepassing op schade die voortvloeit uit een ongeval, oneigenlijk
gebruik of verkeerd gebruik van de Producten, slijtage als gevolg van het normale gebruik van de Producten of
het niet correct onderhouden van de Producten.
De beperkte garantiedekking van RPB® geldt vanaf de oorspronkelijke aankoopdatum van de Producten en is
alleen van toepassing op gebreken die zich voor het eerst manifesteren en die binnen de garantieperiode aan
RPB® worden gemeld. RPB® behoudt het recht om naar redelijke tevredenheid te bepalen of een geclaimd
defect onder deze beperkte garantie valt.
Als er defect optreedt dat onder de garantie valt, zal RPB® naar eigen goeddunken het defecte Product (of
een onderdeel van het product) repareren of vervangen. Deze ‘reparatie of vervanging’ oplossing is de enige
en exclusieve remedie onder deze beperkte garantie en de aansprakelijkheid van RPB® onder deze beperkte

37
garantie zal onder geen enkele omstandigheid de oorspronkelijke aankoopprijs voor de Producten (of het
toepasselijke onderdeel) overschrijden. RPB® is niet verantwoordelijk voor incidentele of gevolgschade,
inclusief gebruiksderving, onderhoud en andere kosten, en ALLE INCIDENTELE EN GEVOLGSCHADE
ZIJN UITGESLOTEN EN NIET ERKEND door deze beperkte garantie. Neem contact op met RPB® voor
garantieservice. Een bewijs van aankoop moet worden verstrekt om garantieservice te krijgen. Alle kosten van
het terugzenden van de Producten naar RPB® voor garantieservice moeten door de koper worden betaald.
RPB® behoudt zich het recht voor om haar producten te verbeteren door wijzigingen in ontwerp of materialen
aan te brengen zonder verplichtingen te hebben jegens kopers van eerder gefabriceerde Producten.
AANSPRAKELIJKHEID
RPB® Safety kan geen enkele aansprakelijkheid aanvaarden van welke aard dan ook die direct of indirect
voortvloeit uit het gebruik of misbruik van RPB® Safety-producten, inclusief doeleinden waarvoor de producten
niet zijn ontworpen. RPB® Safety is niet aansprakelijk voor schade, verlies of kosten als gevolg van het niet
geven van advies of informatie of het geven van onjuist advies of informatie, al dan niet vanwege nalatigheid
van RPB® Safety of die van zijn werknemers, agenten of onderaannemers.
ESPAÑOL
Consulte los números de página del Manual de instrucciones en inglés de T200™ para obtener imágenes y
diagramas.
EXPLICACIÓN DE PALABRAS DE ADVERTENCIA Y SÍMBOLOS
Las siguientes palabras de advertencia y símbolos de seguridad se utilizan en este manual y en la etiqueta del
producto:
ADVERTENCIA indica una situación peligrosa que, de no evitarse, puede
causar lesiones graves o la muerte
PELIGRO indica una situación peligrosa que, de no evitarse, causará lesiones graves
o la muerte
Lea el Manual de Instrucciones.
Se pueden encontrar copias adicionales de los manuales de RPB® en gvs-rpb.com.
PROBADO Y CERTIFICADO POR:
CE: BSI Group The Netherlands B.V. (NB2797), Say Building, John M. Keynesplein 9, 1066 EP, Amsterdam, NL
UKCA: BSI Group (AB0086), Kitemark Court, Knowhill, Milton Keynes MK5 8PP, United Kingdom
RPB® Safety LLC es una empresa certificada ISO9001.
ADVERTENCIA
PELIGRO
INTRODUCCIÓN
El T200 es un respirador multiusos diseñado para una variedad de aplicaciones diferentes en las que es
necesario protegerse de los contaminantes del aire. Con una gorra de protección opcional para protección de
la cabeza y tres opciones de capucha disponibles, el T200 se puede usar tanto en entornos industriales como
de atención médica. Para una mayor protección auditiva, se puede instalar el sistema opcional de orejeras
Quiet-Slim™ Ear Defender.
Este producto debe ser inspeccionado y mantenido en todo momento de acuerdo con este manual de
instrucciones.
Consulte la sección de PROTECCIÓN PROPORCIONADA Y LIMITACIONES para más detalles.

38
T200™
RPB® SAFETY - GLOBAL HEADQUARTERS
2807 Samoset Rd, Royal Oak, MI 48073, USA.
T: 1-866-494-4599 F: 1-866-494-4509 E: sales@gvs.com
RPB® SAFETY - APAC
3 Robin Mann Place, Christchurch Airport, Christchurch 8053, New Zealand
T: +64-3-357-1761 F: +64-3-357-1763 E: sales@gvs.com
GVS S.p.A. - EMEA
Via Roma 50, 40069 Zona Industriale BO, Italy
T: +39 0516176391 E: sales@gvs.com
GVS Filter Technology UK Ltd.
Vickers Industrial Estate, Mellishaw Ln, Morecambe LA3 3EN, UK
T: +44 (0)1524 847600 E: sales@gvs.com
gvs-rpb.com
Copyright ©2022 RPB IP, LLC. Todos los derechos reservados. Todos los materiales contenidos en
este sitio web están protegidos por las leyes de derechos de autor de los Estados Unidos y no pueden
reproducirse, distribuirse, transmitirse, exhibirse, publicarse ni difundirse sin el permiso previo por escrito
de RPB IP, LLC. No puede alterar ni eliminar ninguna marca registrada, derecho de autor u otro aviso de
las copias del contenido.
Todas las marcas comerciales, marcas de servicio y logotipos utilizados en esta publicación, tanto
registradas como no registradas, son marcas comerciales, marcas de servicio o logotipos de sus
respectivos propietarios. Todos los derechos sobre la Propiedad Intelectual de RPB contenidos en
esta publicación, incluidos los derechos de autor, marcas comerciales, marcas de servicio, secretos
comerciales y derechos de patente están reservados. Propiedad Intelectual de RPB significa cualquier
patente, artículos patentados, solicitudes de patente, diseños, diseños industriales, derechos de autor,
software, código fuente, derechos de base de datos, derechos morales, invenciones, técnicas, datos
técnicos, secretos comerciales, pericia, marcas, marcas registradas, nombres comerciales, slogans,
logotipos y cualquier otra ley común y derechos de propiedad, ya sean registrados o no registrados en
parte del mundo, que sean propiedad de, desarrollados en su totalidad o en parte por, o con licencia de
RPB IP, LLC.
Para obtener asistencia técnica, comuníquese con nuestro Departamento de Servicio al Cliente al 1-866-
494-4599 o envíe un correo electrónico a: sales@gvs.com
Formulario #: 7.20.506 Rev: 2
INFORMACIÓN IMPORTANTE DE SEGURIDAD
La selección, ajuste, uso o mantenimiento incorrectos de este producto
pueden causar lesiones; enfermedad pulmonar, cutánea u ocular
potencialmente mortal o la muerte. Este producto está diseñado para uso ocupacional de acuerdo con las
normas o regulaciones aplicables a su ubicación, industria y actividad (consulte Responsabilidades del
Empleador). Se recomienda estar familiarizado con las normas y regulaciones relacionadas con el uso de este
equipo de protección, incluso si no se aplican directamente a usted. Si trabaja por cuenta propia o si se usa en
un entorno no profesional, consulte las Responsabilidades del Empleador y las Instrucciones de Seguridad para
el Usuario del Producto. Visite gvs-rpb.com/healthcare/important-safety-information para obtener enlaces útiles
a los estándares CE y otros contenidos.
EMPLEADOR: Lea este manual y el Manual de Instrucciones del dispositivo de suministro de aire y cumpla con
las Responsabilidades del Empleador.
USUARIO DEL PRODUCTO: Lea este manual y el Manual de Instrucciones del dispositivo de suministro de aire
y siga las Instrucciones de Seguridad para el Usuario del Producto.
CONSULTE EL SITIO WEB PARA LAS ACTUALIZACIONES. Los manuales de los productos se actualizan
periódicamente. Visite gvs-rpb.com/healthcare/resources para obtener la versión más reciente de este manual
antes de usar el producto.
ADVERTENCIA

39
PROTECCIÓN PROPORCIONADA Y LIMITACIONES
RESPIRACIÓN
El RPB T200 está aprobado en la categoría siguiente:
Aire Impulsado por dispositivo motorizado
El Respirador RPB T200, cuando se ajusta y se usa correctamente con todos los componentes
requeridos, incluido el Ensamble del Tubo de Respiración y el Respirador Purificador de Aire Impulsado
03-801 RPB PX5, es un respirador purificador de aire impulsado aprobado por EN 12941: 1998 + A1:
2003 + A2: 2008 TH3 PR SL. Como tal, reduce significativamente, pero no elimina completamente, la
respiración de contaminantes por parte del usuario del respirador. La protección específica depende del
filtro seleccionado para su uso en el RPB PX5 PAPR (consulte el Manual de Instrucciones del PX5).
LIMITACIONES DE PELIGRO
El Respirador RPB T200 NO SE UTILIZA si:
El Respirador RPB T200 NO SE UTILIZA si:
En ambientes inmediatamente peligrosos para la vida o la salud (IDLH).
El usuario no puede escapar sin la ayuda del respirador.
La atmósfera contiene menos de 21% ±1% de oxígeno.
En aplicaciones de chorro abrasivo.
Para protección contra gases peligrosos (por ejemplo, monóxido de carbono).
Los contaminantes exceden de las regulaciones o recomendaciones.
Los contaminantes o las concentraciones de contaminantes son desconocidos.
El área de trabajo está mal ventilada.
La temperatura está fuera del rango de -10°C a +60°C (14°F a 140°F).
Si existe una atmósfera inflamable o explosiva cuando se usa con sistemas que incluyen partes
eléctricas que no son intrínsecamente seguras, como PX5.
CARA Y OJOS:
El T200 con Lente Estándar no cumple con los requisitos de protección facial EN 166: 2002 (AS / NZS
1 3 3 7.1 : 2 0 1 0 )
El T200 no está diseñado ni probado para brindar protección contra metales fundidos o líquidos
corrosivos.
Nota: Es posible que sea necesario usar gafas de seguridad según el análisis de riesgos del trabajo.
El T200 no protege contra la posible transferencia de impacto a las gafas que se usan debajo de
la capucha. No proporciona protección completa para los ojos y la cara contra impactos severos y
penetraciones, y no sustituye las buenas prácticas de seguridad y los controles de ingeniería.
CABEZA:
El T200, cuando está equipado con una gorra de protección, proporciona una protección mínima para la
cabeza y no cumple con los requisitos de EN 812. No cumple con los requisitos de EN 397: 2012 + A1:
2012 (AS / NZS 1801: 1997).
AUDICIÓN:
El sistema de defensa auditiva Quiet-Slim proporciona una reducción de ruido (NRR) con una
clasificación de 21 y una SNR de 28 y cumple con los requisitos de EN 352-1. Consulte el manual de
instrucciones de Quiet-Slim para asegurar que la instalación y el ajuste sean los correctos.
Otras protecciones auditivas, como tapones para los oídos o protectores auditivos, deben colocarse y
usarse correctamente cuando los niveles de ruido excedan los niveles de exposición permitidos.
REGULACIÓN PPE
El T200 cumple con la Regulación EPI (UE) 2016/425. Regulación 2016/425 sobre EPI incorporada a
la Ley del Reino Unido y modificada.
La Declaración de Conformidad se puede encontrar en gvs-rpb.com/healthcare/resources
Consulte la sección de Almacenamiento para obtener información sobre el embalaje y la protección
requerida para el transporte.

40
T200™
DIAGRAMA DE COMPONENTES DEL RESPIRADOR - PAPR
El respirador RPB T200 consta de 3 componentes principales, como se muestra en la Figura 1.1. Los
3 componentes deben estar presentes y correctamente ensamblados para constituir un respirador
purificador de aire impulsado completo y aprobado según EN12941:1998 +A1: 2003 +A2: 2008.
FIGURA 1.1 EN PAGINA 6
1. Ensamble del casco de respirador
2. Ensamble del tubo respiratorio
3. Suministro de aire papr
PRECAUCIONES Y LIMITACIONES
AIRE IMPULSADO POR DISPOSITIVO MOTORIZADO
A. No debe usarse en atmósferas que contengan menos de 21% ±1% por ciento de oxígeno.
B. No debe utilizarse en ambientes inmediatamente peligrosos para la vida o la salud.
C. No exceder las concentraciones máximas de uso establecidas por los estándares regulatorios.
F. No use Respiradores Purificadores de Aire Impulsado si el flujo de aire es inferior 170 lpm (6 cfm) para
capuchas y/o cascos.
H. Siga los programas de cambio de envases metálicos y cartuchos establecidos y cumpla con ESLI
para asegurarse de que los cartuchos y envases metálicos se reemplacen antes de que ocurra una
penetración.
I. No usar partes eléctricas que puedan causar una ignición en atmósferas inflamables o explosivas.
J. Si no usa y mantiene este producto adecuadamente, podría sufrir lesiones o la muerte.
L. Siga las Instrucciones del Usuario del fabricante para cambiar cartuchos, recipientes metálicos y/o filtros.
M. Todos los respiradores aprobados deben ser seleccionados, ajustados, usados y mantenidos de acuerdo
con el gobierno local y otras regulaciones aplicables.
N. Nunca sustituya, modifique, agregue u omita piezas. Use solo piezas de repuesto exactas en la
configuración especificada por el fabricante.
O. Consulte las instrucciones del usuario y/o los manuales de mantenimiento para obtener información
sobre el uso y mantenimiento de estos respiradores.
P. El RPB T200 no se evalúa como un respirador para uso como mascarilla quirúrgica.
FUENTE DE AIRE, ACCESORIOS, Y PRESIÓN
FUENTE DE AIRE
Aire Impulsado
Verifique que el área contaminada esté dentro de los límites de uso para un Respirador Purificador
de Aire Impulsado y determine el tipo de contaminación. Una vez que se haya confirmado el nivel de
contaminación, puede determinar el cartucho de filtro que se utilizará para la aplicación, para asegurarse
de que esté lo suficientemente protegido. Asegúrese de que el área esté bien ventilada y de que se
tomen muestras regulares de aire para confirmar que la atmósfera se mantiene dentro de los niveles
recomendados por los órganos rectores. Siga el Manual de Instrucciones del PX5 PAPR para obtener más
detalles.
Caudal mínimo diseñado por el fabricante
FILTRO
180 L/MIN VELOCIDAD 1
180 L/MIN VELOCIDAD 2
180 L/MIN VELOCIDAD 3
03-892-P
>10 horas
>7 horas
>6 horas
03-893-A2
>5 horas
>4 horas
>4 horas
03-894-ABE
>5 horas
>4 horas
>4 horas
03-895-ABEK
>5 horas
>4 horas
>4 horas
RESPONSABILIDADES DEL EMPLEADOR
Sus responsabilidades específicas pueden variar según la ubicación y la industria, pero en general RPB espera
que un empleador:
Siga todas las normas y regulaciones aplicables para su ubicación, industria y actividad. Dependiendo de
su ubicación e industria, es posible que se apliquen una serie de estándares y regulaciones a su selección

41
y uso de respiradores y otros equipos de protección personal. Estos pueden incluir cosas como estándares
y reglamentos federales, locales o militares y estándares de consenso como EN y AN/NZS. También hay
requisitos específicos para contaminantes particulares, por ej. Sílice (consulte gvs-rpb.com/healthcare/
important-safety-information para obtener más información), asbestos, patógenos orgánicos, etc. Conozca
qué requisitos se aplican a su ubicación e industria.
Tenga programas de seguridad apropiados en el lugar de trabajo.
Prepare y siga:
Un programa de seguridad laboral.
Un programa escrito de protección respiratoria de acuerdo con las normas y regulaciones
aplicables.
De acuerdo con lo anterior,
Realice un análisis de riesgos y seleccione el equipo apropiado para cada actividad.
Un análisis de riesgos debe ser realizado por una persona calificada. Los controles deben estar
en su lugar según sea apropiado y una persona calificada debe determinar qué tipo de protección
respiratoria, facial y ocular, para la cabeza y para los oídos es adecuada para las actividades
previstas y los entornos de uso. (Por ejemplo, seleccione un respirador apropiado para los peligros
específicos del aire, teniendo en cuenta los factores del lugar de trabajo y del usuario y con un Factor
de Protección Asignado (APF) que cumple o supera el nivel requerido para la protección de los
empleados).
Según corresponda, verifique su programa de seguridad del sitio de trabajo, el programa de protección
respiratoria y los estándares y regulaciones para su actividad o industria para conocer los requisitos
de protección relacionados, y consultar este manual (Protección Provista y Limitaciones) y el Manual
de Instrucciones del PX5 PAPR o del dispositivo de control de flujo para obtener información sobre las
especificaciones del producto.
Asegúrese de que los empleados estén médicamente calificados para usar un respirador.
Haga que un médico calificado u otro profesional de la salud con licencia (PLHCP) realice
evaluaciones médicas mediante un cuestionario médico o un examen médico inicial.
Capacite a los empleados en el uso, mantenimiento y limitaciones del T200.
Designe a una persona calificada que tenga conocimiento sobre el RPB T200 para que brinde
capacitación:
Calificaciones del Entrenador de Respiradores. Cualquier persona que provea entrenamiento con
respiradores deberá:
a) tener conocimientos sobre la aplicación y el uso del respirador(es);
b) tener conocimientos prácticos en la selección y uso del respirador(es) y en prácticas de trabajo
en el sitio;
c) tener un entendimiento del programa de respiradores del sitio; y
d) conocer los reglamentos aplicables.
Capacite a cada usuario de T2000 en el uso, la aplicación, la inspección, el mantenimiento, el
almacenamiento, el ajuste y las limitaciones del producto de acuerdo con el contenido de este Manual
de Instrucciones y el manual de instrucciones del dispositivo de control de flujo aprobado y los requisitos
estándar o reglamentarios. Asegúrese de que cada usuario previsto lea ambos manuales.
Cerciórese de que el equipo sea correctamente configurado, usado y mantenido.
Asegúrese de que el equipo esté correctamente configurado, inspeccionado, instalado, usado y
mantenido, incluida la selección del cartucho de filtro de aire adecuado y, cuando corresponda, los
ajustes de la pantalla del filtro de soldadura para su aplicación de trabajo.
Mida y vigile los contaminantes del aire en el área de trabajo.
Mida y monitoree los niveles de contaminantes en el aire en el área de trabajo de acuerdo con los
requisitos aplicables. Asegúrese de que el área de trabajo esté bien ventilada.

42
T200™
Si tiene alguna pregunta, contacte a RPB.
Llame al Departamento de Servicio al Cliente:
Tel: 1-866-494-4599
E-mail: sa[email protected]m
Web: gvs-rpb.com
INSTRUCCIONES DE SEGURIDAD PARA EL USUARIO DEL PRODUCTO
ANTES DEL USO INICIAL: OBTENGA EL ENTRENAMIENTO ADECUADO Y LA CALIFICACIÓN MÉDICA
NECESARIA
No use este respirador hasta que haya leído este manual y el Manual de instrucciones del PX5 PAPR o del
dispositivo de control de flujo (copias adicionales disponibles en gvs-rpb.com) y hasta que haya recibido
capacitación sobre el uso, el mantenimiento y las limitaciones del respirador por parte de una persona
calificada (designada por su empleador) que sea conocedora del Respirador RPB T200.
No use este respirador hasta que haya pasado una evaluación médica utilizando un cuestionario médico o un
examen médico inicial por parte de un médico calificado u otro profesional de la salud con licencia (PLHCP).
Alergógenos: No se utilizan alergógenos comunes conocidos en este producto.
Algunos materiales podrían causar una reacción alérgica en individuos susceptibles. Si tiene una alergia
conocida o desarrolla irritación, informe a su empleador. La irritación puede ocurrir por falta de limpieza. Siga
todas las instrucciones de limpieza y cuidado proporcionadas en los manuales de instrucciones para este y
cualquier otro producto RPB que esté utilizando.
ASEGÚRESE DE QUE EL SISTEMA ESTÉ LISTO PARA SU USO
Asegúrese de tener un sistema completo. Verifique que tenga todos los componentes necesarios para que el
T200 sirva como un respirador completo aprobado:
Ensamble de la Capucha del Respirador (T200 o T-LINK)
Ensamble del Tubo de Respiración
Dispositivo de Control de Flujo (PX5 PAPR)
Consulte el Diagrama de Componentes del Respirador. El RPB T200 solo está aprobado para ser utilizado
con el RPB PX5. Utilice únicamente piezas y componentes auténticos de la marca RPB que forman parte del
ensamble de un respirador aprobado. El uso de equipo incompleto o inapropiado, incluido el uso de piezas
falsificadas o que no sean de RPB, puede resultar en una protección inadecuada y anulará la aprobación de
todo el respirador. No modifique ni altere ninguna parte de este producto.
Inspeccione todos los componentes diariamente en busca de signos de daño o desgaste que puedan reducir el
nivel de protección originalmente provisto. Retire cualquier componente o producto dañado, incluido cualquier
casco o visor que haya sido objeto de impacto, desde el servicio hasta su reparación o reemplazo. Las lentes de
seguridad u otros componentes rayados o dañados deben reemplazarse con piezas de repuesto genuinas de la
marca RPB. Cuando se reemplacen las lentes de seguridad y de impacto, asegúrese de quitar cualquier película
protectora adicional de ambos lados de la lente. Si la película se deja en su lugar, podría afectar la claridad
óptica de la lente y causar fatiga visual. Inspeccione el interior del respirador en busca de polvo respirable u
otros objetos extraños. Mantenga el interior del respirador limpio en todo momento.
Asegúrese de que el casco esté correctamente ensamblado en la configuración que se adapta a su aplicación.
Una capucha protectora incompleta o instalada incorrectamente podría proporcionar una protección respiratoria
y de impacto inadecuada. Consulte ‘Preparación y Cuidado del Respirador’ Consulte ‘Colocarse y Quitarse El
Equipo’ para obtener información sobre el ajuste.
VERIFIQUE QUE TENGA EL EQUIPO ADECUADO PARA SU ACTIVIDAD
Verifique que el T200 proporcione la protección adecuada para su actividad. Según corresponda, verifique
el programa de seguridad en su lugar de trabajo, el programa de protección respiratoria y los estándares y
regulaciones para su actividad o industria. (Ver Protección Proporcionada Y Limitaciones).
ANTES DE COLOCARSE EL EQUIPO T200:
Verifique que los contaminantes en el aire estén dentro de los límites recomendados para el uso del respirador:
Determine el tipo y nivel de contaminación. Verifique que las concentraciones de contaminantes

43
en el aire no excedan las permitidas por las regulaciones y recomendaciones aplicables para los
respiradores purificadores de aire motorizados a baterías o los respiradores con suministro de
aire.
Filtrado del aire respirable:
PAPR: Una vez que se haya confirmado el nivel de contaminación, determine el cartucho de filtro
correcto que se utilizará para su uso específico, para asegurarse de que está lo suficientemente
protegido. Siga el Manual de Instrucciones de PX5 PAPR.
Asegúrese de que el área esté ventilada y monitoreada:
Asegúrese de que el área esté bien ventilada y de que se tomen muestras de aire regulares para
confirmar que la atmósfera se mantiene dentro de los niveles recomendados por los órganos
rectores.
Si tiene alguna pregunta, pregúntele a su empleador.
NO INGRESE AL ÁREA DE TRABAJO si existe alguna de las siguientes condiciones:
El ambiente es inmediatamente peligroso para la vida o la salud.
No puedes escapar sin la ayuda del respirador.
El ambiente contiene menos de 21% ±1% de oxígeno.
Existe una atmósfera inflamable o explosiva cuando se usa con sistemas que incluyen partes eléctricas
que no son intrínsecamente seguras, como: PX5.
Los contaminantes exceden las regulaciones o recomendaciones.
Los contaminantes o concentraciones de contaminantes son desconocidos.
El área de trabajo está mal ventilada.
La temperatura está fuera del rango de -10°C a +60°C (14°F a 140° F).
ABANDONE EL ÁREA DE TRABAJO INMEDIATAMENTE SI:
Cualquier componente del producto se daña.
Su visión se deteriora.
El flujo de aire se detiene o disminuye, o suena la alarma. No use Respiradores Purificadores de Aire
Impulsado si el flujo de aire es inferior a 170 lpm (6 cfm).
La respiración se vuelve difícil.
Usted se siente mareado, con náuseas, demasiado caliente, demasiado frío o enfermo.
Sus ojos, nariz o piel se irritan.
El área de trabajo es un espacio confinado (a menos que se tomen las medidas adecuadas para
espacios confinados).
Usted saborea, huele o ve contaminantes dentro del casco.
Usted tiene cualquier otra razón para sospechar que el respirador no está brindando la protección
adecuada.
CUIDADO DEL PRODUCTO
Nunca coloque el casco sobre superficies calientes. No aplique pinturas, disolventes, adhesivos o etiquetas
autoadhesivas, excepto las permitidas por RPB. Este producto puede verse afectado negativamente por ciertos
químicos. Limpie con un detergente suave y un paño suave o una toallita desinfectante.
Consulte la sección “Preparación y Cuidado de Respirador” para obtener instrucciones de limpieza más
específicas.
INSTRUCCIONES PARA USOS ESPECÍFICOS O AMBIENTES
Espacios Confinados
Si este respirador se usa en espacios confinados, asegúrese de que el área esté bien ventilada y que todas
las concentraciones de contaminantes estén por debajo de las recomendadas para este respirador. Siga todos
los procedimientos para la entrada, la operación y la salida de espacios confinados según se define en los
reglamentos y normas aplicables.

44
T200™
MONTAJE Y AJUSTE DEL ARNÉS DE CABEZA CON
CORREAS SUPERIORES
FIGURA 2.1 EN LA PAGINA 12
Fije la banda delantera a los soportes del arnés
para la cabeza. 1. Deslice los extremos en el
canal de los soportes. 2. Enganche el ojo de la
cerradura en la clavija en el interior del soporte.
Ajuste para hacerla encajar.
FIGURA 2.2 EN LA PAGINA 12
Fije las correas superiores a los soportes del
arnés para la cabeza con el lado redondeado
hacia la cabeza. Enganche el orificio de las
correas debajo de la lengüeta del soporte del
arnés para la cabeza. Luego empuje la ranura de
las correas sobre el clip superior en el soporte del
arnés para la cabeza.
FIGURA 2.3 EN LA PAGINA 12
Alinee el ensamble del trinquete de modo que el
logotipo de RPB en la almohadilla interior quede
hacia arriba. Coloque el ensamble del trinquete
en los orificios de los soportes del arnés de
cabeza (1) deslizando la lengüeta del extremo de
la banda del trinquete sobre el orificio del soporte
desde el interior. 2. Luego coloque el clip del
trinquete en el orificio del soporte.
FIGURA 2.4 EN LA PAGINA 12
El arnés de cabeza se puede ajustar con el
ajustador del trinquete en la parte posterior de la
banda de la cabeza. Gire la perilla para apretar y
aflojar la banda.
FIGURA 2.5 EN LA PAGINA 13
Para hacer que las correas del arnés para la
cabeza sean más pequeñas, junte las dos correas
para ajustarlas.
FIGURA 2.6 EN LA PAGINA 13
Para agrandar las correas superiores, 1.
desenganche las lengüetas de los extremos
de encima de la correa. 2. Luego, separe las
correas hasta la muesca deseada. Luego, vuelva
a colocar las lengüetas sobre la correa para
sujetarla de forma segura.
ENSAMBLE DE GORRA
FIGURA 3.1 EN LA PAGINA 13
Para quitarla, tire de la correa para separarla del
soporte, desenganche desde la parte inferior y
levántela.
FIGURA 3.2 EN LA PAGINA 13
Coloque la gorra en las mismas ubicaciones
de montaje de las que se quitaron las correas.
PREPARACIÓN Y CUIDADO DE RESPIRADOR
Enganche el orificio de la gorra debajo de la
lengüeta del soporte del arnés para la cabeza.
Luego, gire el orificio de montaje de la gorra sobre
el clip superior en el soporte del arnés de cabeza.
COLOCACIÓN DE LOS SOPORTES DE LA LENTE
FIGURA 4.1 EN LA PAGINA 14
Alinee el soporte del arnés de la cabeza con la
montura de la lente, levante la lengüeta trasera y
empuje hacia el frente hasta la posición deseada,
asegurándose de que la lengüeta esté ajustada
en la ranura de la posición deseada. Repita por el
otro lado.
FIGURA 4.2 EN LA PAGINA 14
Ajuste los soportes de la lente con la lengüeta
para el dedo para colocarlos hacia adelante
o hacia atrás en los soportes. Esto acercará o
alejará la lente de la capucha del rostro.
COLOCACIÓN DEL CONDUCTO DE AIRE
FIGURA 5.1 EN LA PAGINA 14
1. Alinee las flechas de alineación. 2. Deslice las
alas del ensamble del conducto en la ranura en
forma de “W” en los clips laterales hasta que el
clip del medio encaje firmemente sobre la sección
transversal del ala.
FIGURA 5.2 EN LA PAGINA 14
Ensamble del conducto unido a la montura de la
lente.
COLOCACIÓN DEL CONDUCTO DE AIRE DE LA
SUSPENSIÓN PARA CABEZA O DE LA GORRA DE
PROTECCIÓN EN LA CAPUCHA
FIGURA 6.1 EN LA PAGINA 15
Inserte el ensamble de suspensión de la cabeza
o del conjunto de la gorra de protección en la
capucha
FIGURA 6.2 EN LA PAGINA 15
Inserte la entrada roscada del conducto de aire en
el sello de goma negro en la parte posterior de la
capucha. Comenzando por el lado inferior, estire
el sello de goma sobre la nervadura de retención
detrás de la sección roscada.
FIGURA 6.3 EN LA PAGINA 15
Alinee las lengüetas de la lente con los clips a los
lados de la montura de la lente.
- Enganche el punto 1 debajo del punto 1 como se
muestra en la imagen.
- Encaje el punto 2 sobre el punto 2 como se
muestra en la imagen.
FIGURA 6.4 EN LA PAGINA 15
Inserte la tira de fijación e insértela a través de

45
NOTA: EL CONJUNTO DE LA TAPA PROTECTORA SE MUESTRA EN LAS FIGURAS 4.1-6.5. TODAS LAS
INSTRUCCIONES DE CONFIGURACIÓN DEL ARNÉS PARA LA CABEZA Y DEL CONDUCTO DE AIRE
SE APLICAN TANTO A LA GORRA DE PROTECCIÓN (15-850) COMO A LAS CORREAS SUPERIORES
VERSIONES (15-841).
la ranura del soporte del arnés para la cabeza.
Asegure los extremos juntos presionando
firmemente.
FIGURA 6.5 EN LA PAGINA 16
Ajuste el director de flujo de aire hacia arriba o
hacia abajo para que el aire fluya hacia la lente o
hacia la cara.
CONECTE EL TUBO DE RESPIRACIÓN
FIGURA 7.1 EN LA PAGINA 16
Asegúrese de que la junta tórica (o-ring)) esté en
la entrada roscada. Conecte el tubo de respiración
a la entrada girando en el sentido de las agujas
del reloj. No apriete demasiado. Sostenga la
capucha para evitar que gire mientras se aprieta
el tubo de respiración.
AIRE IMPULSADO
FIGURA 8.1 EN LA PAGINA 16
Asegúrese de que el sello plano esté en el
acoplador del tubo de respiración. Inserte el
extremo de bayoneta del tubo de respiración en
la salida del PX5 PAPR y complete media vuelta
en el sentido de las agujas del reloj hasta que esté
seguro.
PARA USAR CON RPB PX5 - CONSULTE EL
MANUAL DEL USUARIO DE PAPR
Cuando se utilice el respirador T200 junto
con el RPB PX5 PAPR, consulte el Manual de
Instrucciones del Usuario del RPB PX5 para
configurar y utilizar este ensamble.
Nota: El RPB PX5 es un Respirador Purificador
de Aire Impulsado por Motor, por lo tanto, se debe
tener cuidado al seleccionar el filtro correcto para
la aplicación en la que se utilizará el respirador.
USO DE ESTETOSCOPIO U OREJERAS
FIGURA 9.1 EN LA PAGINA 17
La capucha ha sido diseñada para que los
oídos de los usuarios queden expuestos, de
modo que se pueda utilizar un estetoscopio sin
comprometer la calidad del aire que respira.
FIGURA 9.2 EN LA PAGINA 17
Póngase las orejeras 18-524 RPB Quiet-Slim
con la banda para el cuello alrededor de la parte
posterior del cuello, asegurándose de que las
almohadillas sellen completamente alrededor
de las orejas. Asegure la banda superior con la
correa de velcro. Colóquese la capucha después
de ponerse las orejeras.
Consulte el Manual de instrucciones de las
orejeras Quiet-Slim para obtener más detalles.
LENTES CLEAR-VISION CASSETTE
FIGURA 10.1 EN LA PAGINA 17
Despegue la parte trasera del casete de las
lentes. Aplique el casete a la parte exterior de la
lente cosida en la capucha.
FIGURA 10.2 EN LA PAGINA 17
Utilice las lengüetas que vienen ya plegadas para
quitar cada lente según sea necesario.
REEMPLAZO Y LIMPIEZA DE LA ALMOHADILLA
PARA LA FRENTE
FIGURA 11.1 EN LA PAGINA 18
Para quitar la almohadilla para la frente,
despegue las conexiones de velcro. Límpielo
con un detergente suave o reemplácelo por uno
nuevo.
FIGURA 11.2 EN LA PAGINA 18
Coloque la almohadilla para la frente nueva o
limpia en el interior de la correa delantera del
arnés para la cabeza. Doble las partes superior e
inferior y asegure las lengüetas de velcro.
LIMPIEZA DEL T200 Y DE LA ALMOHADILLA DE
LA GORRA DE PROTECCIÓN (BUMP CAP)
FIGURA 12.1 EN LA PAGINA 18
Retire de la capucha el arnés para la cabeza o el
ensamble del conducto de la gorra de protección
desenganchando la lente en ambos lados y
tirando de la entrada roscada hacia afuera del
sello de goma en la parte posterior.
FIGURA 12.2 EN LA PAGINA 18
La almohadilla de la gorra de protección está
unida al interior de la gorra con puntos de velcro.
Retire la almohadilla del casco. La almohadilla
puede lavarse con un detergente suave o
reemplazarse.
Limpie el arnés de la cabeza o la gorra de
protección y el ensamble del conducto con agua
caliente y un detergente suave. Deje secar antes
de volver a colocarlo dentro de una capucha.

46
T200™
COLOCARSE Y QUITARSE EL EQUIPO
COLOCACIÓN DE LA CAPUCHA
Una vez que haya completado la configuración, estará listo para instalar su respirador RPB T200.
Primero, revise el interior de la capucha y el ensamble del arnés de la cabeza para asegurarse de que esté
libre de polvo, suciedad o contaminantes. Asegúrese de que la fuente de aire esté encendida y fluyendo.
Luego abra la parte inferior de la capucha, colóquese el respirador en la cabeza, baje la capucha y ajuste
el trinquete del arnés de cabeza para que encaje. Asegúrate de que esté sellado con el cordón elástico. El
sello está diseñado para asentarse sobre el trinquete para permitir un fácil ajuste, pero el resto del arnés
de cabeza y el conducto deben estar completamente dentro de la capucha.
Si utiliza una capucha con sello de cuello, asegúrese de que el sello de cuello selle todo alrededor del
cuello con un cordón elástico ajustable. Meta el babero interior debajo de su overol u otra prenda exterior.
Tire del babero exterior hacia abajo sobre sus hombros y asegúrese de que quede plano sobre su pecho y
espalda para que no se interponga en su trabajo.
T200 CAPUCHA CON SELLO FACIAL
FIGURA 13.1 EN LA PAGINA 19
Abra la parte inferior de la capucha con el aire
fluyendo desde la fuente de aire, colóquese el
respirador en la cabeza. Asegúrese de que la
capucha esté centrada en su cabeza.
FIGURA 13.2 EN LA PAGINA 19
Baje la capucha y apriete el trinquete del arnés
de cabeza para que encaje. Asegúrese de que
el cordón elástico ajustable se selle alrededor
de la barbilla, las mejillas, las orejas y la parte
posterior de la cabeza.
T-LINK CAPUCHAS CON SELLO DE CUELLO
FIGURA 14.1 EN LA PAGINA 20
Con el aire fluyendo, abra la parte inferior de la
capucha y colóquese el respirador en la cabeza.
Asegúrese de que la capucha esté centrada en
su cabeza.
FIGURA 14.2 EN LA PAGINA 20
Baje la capucha, apriete el trinquete del arnés
para la cabeza para que encaje y asegúrese de
que el sello del cuello se selle alrededor de su
cuello, cerciorándose de que el elástico esté bien
ajustado.
FIGURA 14.3 EN LA PAGINA 20
Meta el babero interior en el cuello de su camisa,
overol o equipo de protección para evitar que
entren contaminantes en la capucha. Hale hacia
abajo el babero exterior.
FIGURA 14.4 EN LA PAGINA 20
Ajuste y asgure el cinturón del dispositivo de
control de flujo alrededor de su cintura sobre la
cadera.
Siempre revise el interior del respirador en busca de contaminantes
antes de ponérselo. Siempre póngase y quítese el casco cuando esté fuera del área de trabajo,
manteniendo el interior del casco limpio y libre de contaminantes. No seguir estos pasos podría
exponerlo a materiales peligrosos y a contaminantes que podrían afectar la función del respirador.
ADVERTENCIA
QUITARSE EL CASCO
Cuando haya terminado de trabajar, mantenga el respirador encendido con aire fluyendo hacia el casco
hasta que haya abandonado el área contaminada. Dependiendo de los contaminantes, puede ser acon-
sejable limpiar el exterior de la capucha y su ropa de trabajo antes de quitarse el respirador. Puede ser
necesario un programa de limpieza del lugar de trabajo.
INSPECCIÓN
Si la capucha está contaminada o muestra un desgaste excesivo, deséchela de acuerdo con las
regulaciones federales y locales. Guarde la capucha, el tubo de respiración y otras piezas para uso futuro
si están en buenas condiciones.
ALMACENAMIENTO
Antes de guardar el respirador, limpie la unidad siguiendo las instrucciones de limpieza que aparecen en
este manual de instrucciones. Asegúrese de que esté limpio, tanto por dentro como por fuera. Después de
usarlo, guarde el respirador colgándolo en un lugar limpio y seco, lejos del área de trabajo. Si el T200 no
se va a usar por un período de tiempo más largo o para el transporte, almacénelo en un contenedor o en

47
PIEZAS Y ACCESORIOS FIGURA 16.1 EN LA PAGINA 22
LISTA DE PIEZAS
Número de Artículo Descripción Número de Pieza
1 T200 Tychem® 2000 - Sello Facial 17-722
2 T200 Tychem® 2000 - Longitud del Hombro con Sello Facial Internal 17-732
3 T-Link Tychem® 2000 - Capucha Completa con Sello de Cuello 17-712
T-Link Tychem® 4000 - Capucha Completa con Sello de Cuello y
Costuras Selladas 17-713
T-Link Tychem® 4000 - Capucha Completa Extra Larga con
Sello de Cuello, Costuras Selladas y Lentes de Seguridad 17-713-SX
4 Ensamble de Conducto de Aire (15-861)
con Monturas para Lentes (17-513) (No para la venta) 15-860
5 Ensamble de Arnés de Cabeza con Almohadilla
para la Frente del Arnés de Cabeza 15-841
6 Ensamble de Arnés de Gorra de Protección con Almohadilla
para la Frente del Arnés de Cabeza 15-850
7 Ensamble de Trinquete del Arnés de Cabeza 16-530
8 Almohadilla para la Frente del Arnés de Cabeza 16-526
9 Monturas de Lentes (par) 17-513
10 T200 Casete de Lentes Clear-Vision (1 casete de 7 lentes) (paquete de 10)
- para capuchas de sellado facial (lente corta) 17-811
11 T-Link Casette de Lentes Clear-Vision (1 casete de 7 lentes) (paquete de 10)
- para capuchas de longitud completa (lente larga) 17-817
12 T-Link Lentes Removibles (paquete de 25)
- para capuchas de longitud completa (lente larga) 17-815
13 Orejeras Quiet-Slim 18-524
14 Orejeras Quiet-Slim con soportes laterales (par) 18-525
15 Soportes laterales (par) 15-842
16 Cubierta del tubo respiratorio - Tychem® 04-852
Cubierta del tubo respiratorio - Plástico transparente (paquete de 10) 04-856
17 Cubierta del tubo respiratorio para mochila - Tychem® 04-872
PIEZAS Y ACCESORIOS FIGURA 16.2 EN LA PAGINA 24
Item Number Description Part Number
1 PX5 PAPR and Belt 03-801
2 Breathing Tube for PX5 PAPR 04-831
3 Flow Meter PX5 PAPR 03-819
una bolsa. Almacene en un lugar fresco y seco entre -10°C y +45°C (14°F a 113°F) <90% RH. Es posible
que PX5 deba almacenarse por separado; consulte el Manual de Instrucciones de PX5 para obtener
instrucciones de almacenamiento específicas.
Después de su uso: FIGURA 15.1 EN LA PAGINA 21
Almacenamiento a largo plazo o transporte: FIGURA 15.2 EN LA PAGINA 21
Las capuchas están diseñadas para ser desechables. Si es necesario lavar, lavar a mano solamente.
Se recomienda establecer un horario de limpieza regular para el acolchado para garantizar una buena
higiene.
Campanas: Lavar a mano solo con detergente suave y agua tibia. Colgar para secar. No lavar en
lavadora o secadora. Si se lava en una lavadora o secadora, la vida útil del producto se reducirá y la
garantía quedará anulada.
Acolchado: Lavar a mano solo con detergente suave y agua tibia. Para establecer planos seco.
Asegúrese de que todos los componentes estén secos antes de usar. Inspeccione por desgaste y
reemplácelo si está dañado o excesivamente desgastado.

48
T200™
4 2” Belt 07-765
2” Belt - Easy Clean 07-765-DC
5 Backpack Harness - Easy Clean 03-822-DC
6 Breathing Tube for Backpack 04-841
Use solo piezas de repuesto RPB auténticas y exactas (marcadas
con el logotipo y el número de pieza de RPB) y solo en la configuración especificada. El uso de equipo
incompleto o inadecuado, incluido el uso de piezas falsificadas o que no sean de RPB, puede resultar
en una protección inadecuada y anulará la aprobación de todo el ensamble del respirador.
ADVERTENCIA
LIMITACIÓN DE LA GARANTÍA
RPB® garantiza que sus productos estarán libres de defectos en materiales y mano de obra durante un (1) año,
sujetos a los términos de esta garantía limitada. Los Productos se venden solo para uso comercial y las garan-
tías del consumidor no son aplicables a los Productos. Esta garantía limitada es para el beneficio del comprador
original del Producto y no puede transferirse ni cederse. Esta es la única y exclusiva garantía brindada por
RPB® Y TODAS LAS CONDICIONES Y GARANTÍAS IMPLÍCITAS (INCLUIDAS LAS GARANTÍAS DE COMER-
CIABILIDAD O IDONEIDAD PARA UN PROPÓSITO DETERMINADO) ESTÁN EXCLUIDAS Y NO SE OTORGAN
EN LA COBERTURA DE LA GARANTÍA. La cobertura de la garantía limitada de RPB® no es aplicable a los
daños resultantes de un accidente, del uso inapropiado o del uso indebido de los Productos, del uso o desgaste
que surgen como resultado del uso normal de los Productos o de la falta de mantenimiento adecuado de los
Productos.
La cobertura de la garantía limitada de RPB® se extiende desde la fecha original de compra de los Productos,
y se aplica solo a defectos garantizados que se manifiestan por primera vez y se notifican a RPB® dentro
del período de garantía. RPB® se reserva el derecho de determinar de manera razonable si cualquier defecto
reclamado está cubierto por esta garantía limitada.
Si se produce un defecto cubierto por la garantía, RPB® reparará o reemplazará el Producto defectuoso (o un
componente del Producto), a su exclusivo criterio. Este remedio de “reparación o reemplazo” es el único y
exclusivo remedio bajo esta garantía limitada, y en ningún caso la responsabilidad de RPB® bajo esta garantía
limitada excederá el precio de compra original de los Productos (o del componente correspondiente). RPB®
no tiene responsabilidad por daños incidentales o consecuenciales, incluyendo la pérdida de uso, la pérdida
por mantenimiento y otros costos, y TODOS LOS DAÑOS INCIDENTALES Y CONSECUENCIALES ESTÁN
EXCLUIDOS Y DENEGADOS bajo los términos de esta garantía limitada. Póngase en contacto con RPB® para
obtener servicio de garantía. Se debe proporcionar un comprobante de compra para obtener el servicio de
garantía. Todos los costos de devolver los Productos a RPB® para el servicio de garantía deben ser pagados por
el comprador.
RPB® se reserva el derecho de mejorar sus Productos a través de cambios en el diseño o los materiales sin que
ello constituya obligación alguna frente a los compradores de los productos previamente fabricados.
RESPONSABILIDAD
RPB® Safety no puede aceptar ninguna responsabilidad de ninguna naturaleza que surja directa o
indirectamente del uso o uso indebido de los productos RPB® Safety, incluyendo los usos para los propósitos
para los cuales los productos no han sido diseñados. RPB® Safety no se hace responsable de los daños,
pérdidas o gastos que resulten de la falta de asesoramiento o información o de dar consejos erróneos o
información incorrecta, ya sea debido a la negligencia de RPB® Safety o de sus empleados, agentes o
subcontratistas.

49
DEUTSCH
Abbildungen und Diagramme finden Sie auf den Seiten der T200™ Bedienungsanleitung.
ERLÄUTERUNG DER SIGNALWÖRTER UND SYMBOLE
In diesem Handbuch und bei der Produktmarkierung werden die folgenden Signalworte und Sicherheitssymbole
verwendet:
ACHTUNG weist auf eine Gefährdungssituation hin, die zu schweren oder
tödlichen Verletzungen führen könnte, wenn sie nicht vermieden wird.
GEFAHR weist auf eine Gefährdungssituation hin, die zu schweren oder
tödlichen. Verletzungen führen wird, wenn sie nicht vermieden wird.
Lesen Sie die Bedienungsanleitung.
Zusätzliche Kopien der RPB Handbücher finden Sie unter gvs-rpb.com.
ZERTIFIZIERT DURCH:
CE: BSI Group The Netherlands B.V. (NB2797), Say Building, John M. Keynesplein 9, 1066 EP, Amsterdam, NL
UKCA: BSI Group (AB0086), Kitemark Court, Knowhill, Milton Keynes MK5 8PP, United Kingdom
RPB® Safety LLC ist ein ISO 9001 zertifiziertes Unternehmen.
RPB® SAFETY - GLOBAL HEADQUARTERS
2807 Samoset Rd, Royal Oak, MI 48073, USA
T: 1-866-494-4599 F: 1-866-494-4509 E: sales@gvs.com
RPB® SAFETY - APAC
3 Robin Mann Place, Christchurch Airport, Christchurch 8053, New Zealand
T: +64-3-357-1761 F: +64-3-357-1763 E: sales@gvs.com
GVS S.p.A. - EMEA
Via Roma 50, 40069 Zona Industriale BO, Italy
T: +39 0516176391 E: sales@gvs.com
GVS Filter Technology UK Ltd.
Vickers Industrial Estate, Mellishaw Ln, Morecambe LA3 3EN, UK
T: +44 (0)1524 847600 E: sales@gvs.com
gvs-rpb.com
Copyright ©2022 RPB IP, LLC. Alle Rechte vorbehalten. Alle auf dieser Website enthaltenen Materialien
unterliegen dem Urheberrecht der Vereinigten Staaten und dürfen ohne die vorherige schriftliche
Genehmigung von RPB IP, LLC. nicht reproduziert, verteilt, übertragen, dargestellt, veröffentlicht oder
verbreitet werden. Es ist Ihnen untersagt, Markenzeichen, Urheberrechte oder andere Vermerke von
Kopien der Inhalte zu verändern oder zu entfernen.
Alle in dieser Veröffentlichung verwendeten Markenzeichen, Handelsmarken für Dienstleistungen und
Logos, sowohl eingetragene als auch nicht eingetragene, sind die Markenzeichen, Handelsmarken für
Dienstleistungen oder Logos der jeweiligen Eigentümer. Alle Rechte auf das geistige Eigentum von RPB,
VORWORT
Das T200 ist als Mehrzweck-Beatmungsgerät für eine Reihe verschiedener Anwendungen konzipiert, bei
denen die Notwendigkeit für Schutz vor Luftverunreinigungen besteht. Mit einer optionalen Anstoßkappe
für den Kopfschutz und drei verfügbaren Hauben-Varianten kann das T200 sowohl in der Industrie als
auch im Gesundheitswesen eingesetzt werden. Für einen erweiterten Gehörschutz kann das optionale
Kapselgehörschutz-System Quiet-Slim™ Ear Defender eingesetzt werden.
Dieses Produkt muss immer gemäß dieser Bedienungsanleitung geprüft und gewartet werden.
Siehe GEWÄHRTER SCHUTZ UND EINSCHRÄNKUNGEN für weitere Einzelheiten.
ACHTUNG
GEFAHR

50
T200™
GEWÄHRTER SCHUTZ UND EINSCHRÄNKUNGEN
ATMUNG
Das RPB T200 ist in den folgenden Kategorien zugelassen:
Gebläseunterstützung
Das RPB T200 Beatmungsgerät ist bei korrekter Montage und Nutzung mit allen notwendigen
Komponenten, einschließlich der Atemschlauch-Baugruppe und des 03-801 RPB PX5 Powered Air
Purifying Respirator (PAPR - Gebläseunterstütztes Luftreinigungsatemgerät) ein gem. EN 12941: 1998
+ A1: 2003 + A2: 2008 TH3 P R SL zugelassenes PAPR. Als solches reduziert es erheblich, aber nicht
vollständig, die Einatmung von Schadstoffen durch den Träger des Beatmungsgerätes. Besonderer
Schutz hängt von dem Filter ab, der für die Nutzung im RPB PX5 PAPR (siehe PX5-Bedienungsanleitung)
ausgewählt wurde.
GEFÄHRDUNGSEINSCHRÄNKUNGEN
Das RPB T200 Beatmungsgerät darf NICHT GENUTZT WERDEN:
In Umgebungen, die eine unmittelbare Gefahr für Leben oder Gesundheit darstellen.
Der Träger kann nicht ohne die Hilfe des Beatmungsgerätes entfliehen.
Die Atmosphäre enthält weniger als 21% ±1% Sauerstoff.
Bei Sandstrahlanwendungen.
Zum Schutz vor gefährlichen Gasen (z. B. Kohlenmonoxid).
Die Schadstoffe liegen über Vorschriften oder Empfehlungen.
Schadstoffe oder Schadstoffkonzentrationen sind unbekannt.
Der Arbeitsbereich ist schlecht belüftet.
Die Temperatur liegt außerhalb des Bereiches von -10°C bis +60°C (14°F bis +140°F).
WICHTIGE SICHERHEITSHINWEISE
Falsche Auswahl, Sitz, Verwendung oder Wartung dieses Produktes kann zu
Verletzungen führen, lebensbedrohlicher verzögerter Lungen-, Haut- oder
Augenerkrankung oder Tod. Dieses Produkt ist für den berufsmäßigen Einsatz in Übereinstimmung mit
geltenden Normen oder Vorschriften für Ihren Standort, Ihre Branche und Tätigkeit vorgesehen (siehe Pflichten
des Arbeitgebers). Die Vertrautheit mit den Normen und Vorschriften in Bezug auf die Verwendung dieser
Schutzausrüstung wird empfohlen, selbst wenn sie nicht direkt auf Sie zutreffen. Bei Selbständigkeit oder in
einem nicht-berufsmäßigen Umfeld, berufen Sie sich auf Pflichten des Arbeitgebers und Sicherheitshinweise
für Produktanwender. Besuchen Sie gvs-rpb.com/healthcare/important-safety-information für nützliche Links zu
CE-Normen und weiteren Inhalten.
ARBEITGEBER: Lesen Sie dieses Handbuch und die Bedienungsanleitung des Luftversorgungsgerätes und
führen Sie die Pflichten des Arbeitgebers aus.
PRODUKTANWENDER: Lesen Sie dieses Handbuch und die Bedienungsanleitung des Luftversorgungsgerätes
und befolgen Sie die Sicherheitshinweise für Produktanwender.
BESUCHEN SIE DIE WEBSITE FÜR UPDATES. Produkthandbücher werden regelmäßig aktualisiert.
Besuchen Sie vor Verwendung des Produkts gvs-rpb.com/healthcare/resources für die neueste Version dieses
Handbuchs.
einschließlich Urheberrecht, Markenzeichen, Handelsmarken für Dienstleistungen, Betriebsgeheimnis
und Patentrechte sind vorbehalten. RPB Geistiges Eigentum bedeutet jegliches Patent, patentierte
Gegenstände, Patentanmeldungen, Entwürfe, Produktdesigns, Urheberrechte, Software, Quellcode,
Datenbankrechte, Urheberpersönlichkeitsrechte, Erfindungen, Techniken, technische Daten,
Geschäftsgeheimnisse, Fachwissen, Marken, Warenzeichen, Handelsnamen, Slogans, Logos und alle
anderen Gewohnheits- und Eigentumsrechte, ob irgendwo in der Welt registriert oder nicht, die sich im
Besitz von RPB IP, LLC befinden, oder von RPB IP, LLC ganz oder teilweise entwickelt oder lizensiert sind.
Wenden Sie sich für technische Unterstützung an unsere Kundenbetreuung unter +1-866-494-4599 oder
per E-Mail: sa[email protected]m
Formular #: 7.20.506 RevÄnderung #: 2
ACHTUNG

51
In einer brennbaren oder explosiven Atmosphäre bei der Nutzung mit Systemen einschließlich
elektrischer Teile, die nicht eigensicher sind, wie z. B. das PX5 PAPR.
GESICHT UND AUGEN:
Das T200 mit Standardscheiben erfüllt die Anforderungen für Gesichtsschutz gem. EN 166:2001 1F3
(AS/NZS 1337.1:2010).
Das T200 wurde nicht entwickelt oder getestet, um Schutz vor flüssigen Metallen oder ätzenden
Flüssigkeiten zu bieten.
Hinweis: Abhängig von der Arbeitsgefährdungsanalyse kann das Tragen von Sicherheitsbrillen
erforderlich sein. Das T200 schützt nicht vollständig gegen die mögliche Schlagübertragung auf Brillen,
die unter der Haube getragen werden. Er bietet keinen vollständigen Augen- und Gesichtsschutz gegen
massiven Stoß und Durchdringung und ist kein Ersatz für gute Sicherheitspraktiken und technische
Kontrollen.
KOPF:
Ausgestattet mit der Anstoßkappe bietet das T200 einen Mindestkopfschutz entspricht nicht den
Anforderungen gem. EN 812. Es entspricht nicht den Anforderungen gem. EN 397:2012+A1:2012 (AS/
NZS 1801:1997).
GEHÖR:
Das System Quiet-Slim™ Ear Defender bietet ein Noise Reduction Rating (NRR) von 21 und ein Single
Number Rating (SNR) von 28 entspricht den Anforderungen gem. EN 352-1. Beziehen Sie sich auf die
Bedienungsanleitung des Quiet-Slim, um die korrekte Montage und Anpassung sicherzustellen.
Anderer Gehörschutz, wie z. B. Ohrstöpsel oder Kapselgehörschutz, muss ordnungsgemäß eingesetzt
und getragen werden, wo Lärmpegel die zulässigen Belastungsgrenzen überschreiten.
PSA-VERORDNUNG
Das T200 entspricht der PSA-Verordnung (EU) 2016/425. Verordnung 2016/425 über PSA, wie sie in
das britische Recht aufgenommen und geändert wurde.
Die Konformitätserklärung für CE und UKCA finden Sie auf gvs-rpb.com/healthcare/resources/
Im Abschnitt „Lagerung“ finden Sie Informationen über für den Transport erforderliche Verpackung und
Schutz.
KOMPONENTENSCHAUBILD DES BEATMUNGSGERÄTES - PAPR
Das RPB T200 Beatmungsgerät besteht aus drei Hauptkomponenten, wie in Abbildung 1.1 dargestellt.
Alle 3 Komponenten müssen vorhanden und korrekt zusammengebaut sein, um ein vollständiges gem.
EN12941:1998 +A1: 2003 +A2: 2008 zugelassenes gebläseunterstütztes Luftreinigungsatemgerät
darzustellen.
ABBILDUNG 1.1 SEITE 6
1. Baugruppe der Haube des Beatmungsgerätes
2. Baugruppe Atemschlauch
3. Luftversorgung PAPR
VORSICHTSHINWEISE UND ANWENDUNGSGRENZEN
GEBLÄSEUNTERSTÜTZUNG
A. Nicht für die Nutzung in Umgebungen geeignet, die weniger als 21% ±1% Sauerstoff enthalten.
B. Nicht für die Nutzung in Umgebungen geeignet, die eine unmittelbare Gefahr für Leben oder Gesundheit
darstellen.
C. Überschreiten Sie nicht durch behördliche Normen festgelegte maximale Einsatzkonzentrationen.
F. Nutzen Sie keine gebläseunterstützten Luftreinigungsatemgeräte, wenn der Luftstrom für Hauben und/
oder Helme weniger als 170 lpm (sechs cfm) beträgt.
H. Befolgen Sie eingeführte Austauschpläne für Patronen und Kartuschen oder beobachten Sie ESLI (End-
of-Service-Life Indicator), um sicherzustellen, dass die Patrone und Kartuschen ersetzt werden, bevor es
zum Durchbruch kommt.
I. Enthält elektrische Teile, die eine Entflammung in entzündlichen oder explosionsgefährdeten

52
T200™
PFLICHTEN DES ARBEITGEBERS
Ihre spezifischen Pflichten können je nach Standort und Branche variieren, aber im Allgemeinen erwartet RPB,
dass Arbeitgeber:
Alle geltenden Normen und Vorschriften für Ihren Standort, Ihre Branche und Tätigkeit erfüllen.
Abhängig von Ihrem Standort und Ihrer Branche können eine Reihe von Normen und Vorschriften für Ihre
Auswahl und Verwendung von Beatmungsgeräten und sonstiger persönlicher Schutzausrüstung gelten. Dazu
können solche Dinge wie Bundes-, Kommunal- oder Militärnormen und -vorschriften sowie Konsensnormen
gehören, wie z.B. EN und AN/NZS. Es gibt auch für bestimmte Schadstoffe spezifische Bestimmungen, wie
z.B. Kieselsäure (siehe gvs-rpb.com/healthcare/important-safety-information/ für weitere Informationen),
Asbest, organische Krankheitserreger, usw. Seien Sie sich darüber im Klaren, welche Anforderungen für Ihren
Standort und Ihre Branche gelten.
Angemessene Sicherheitsprogramme eingeführt haben.
Führen Sie ein und befolgen Sie:
Ein Arbeitsplatz-Sicherheitsprogramm.
Ein schriftliches Atemschutz-Programm in Übereinstimmung mit geltenden Normen und
Vorschriften.
Im Einklang mit dem zuvor Dargestellten:
Führen Sie für jede Tätigkeit eine Gefahrenanalyse durch und wählen Sie eine angemessene
Ausrüstung aus. Eine Gefahrenanalyse sollte von einer qualifizierten Person durchgeführt werden.
Wie jeweils anwendbar, sollten Kontrollen eingeführt sein, und eine qualifizierte Person sollte
festlegen, welche Art von Atem-, Gesichts- und Augen-, Kopf- und Gehörschutz für die beabsichtigten
Tätigkeiten und Einsatzumgebungen angemessen ist. (Wählen Sie z. B. ein Beatmungsgerät, welches
für Luftgefährdungen angemessen ist, unter Berücksichtigung von Arbeitsplatz und Benutzerfaktoren
Atmosphären verursachen können.
J. Die falsche Nutzung und Wartung dieses Produktes kann zu Verletzung oder Tod führen.
L. Befolgen Sie die Benutzeranweisungen des Herstellers zum Austausch von Patronen, Kartuschen und/
oder Filtern.
M. Alle zugelassenen Beatmungsgeräte müssen im Einklang mit anwendbaren Bestimmungen ausgewählt,
ausgestattet, genutzt und gewartet werden.
N. Ersetzen, modifizieren Sie niemals Teile, fügen Sie niemals welche hinzu oder lassen welche weg.
Nutzen Sie ausschließlich exakt die Ersatzteile in der Konfiguration, wie sie vom Hersteller angegeben
werden.
O. Sehen Sie für Informationen über die Nutzung und Wartung dieser Beatmungsgeräte in den
Bedienungsanleitungen und/oder den Wartungsanweisungen nach.
P. Das T200 ist nicht als ein Beatmungsgerät zum Einsatz als chirurgische Maske getestet worden.
LUFTQUELLE, ANSCHLÜSSE UND DRUCK
LUFTQUELLE
Gebläseunterstützung
Überprüfen Sie, dass der schadstoffbelastete Bereich innerhalb der Grenzen für die Nutzung
eines Gebläseunterstützten Atemschutzsystems (PAPR) liegt und bestimmen Sie die Art der
Schadstoffbelastung. Sobald der Verschmutzungsgrad bestätigt worden ist, können Sie die für die
Anwendung zu nutzende Filterpatrone bestimmen, um sicherzustellen, dass Sie ausreichend geschützt
sind. Stellen Sie sicher, dass der Bereich gut belüftet ist und regelmäßig Luftproben entnommen werden,
um zu bestätigen, dass die Atmosphäre innerhalb der behördlich empfohlenen Grenzen bleibt. Beachten
Sie für weitere Informationen die Bedienungsanleitung des PX5 PAPR.
Hersteller vorgesehene Mindestdurchfluss
FILTER
180 L/MIN GESCHWINDIGKEIT 1
180 L/MIN GESCHWINDIGKEIT 2
180 L/MIN GESCHWINDIGKEIT 3
03-892-P
>10 Stunden
>7 Stunden
>6 Stunden
03-893-A2
>5 Stunden
>4 Stunden
>4 Stunden
03-894-ABE
>5 Stunden
>4 Stunden
>4 Stunden
03-895-ABEK
>5 Stunden
>4 Stunden
>4 Stunden

53
und mit einem Nominalen Schutzfaktor, der den erforderlichen Grad für Arbeitnehmerschutz erfüllt
oder übertrifft.
Überprüfen Sie Ihr Arbeitsplatz-Sicherheitsprogramm, Atemschutz-Programm und Normen und
Vorschriften für Ihre Tätigkeit oder Branche für die damit verbundenen Schutzanforderungen und
beachten Sie dieses Handbuch (Gewährter Schutz und Einschränkungen) und die Bedienungsanleitung
des PX5 PAPR oder Strömungswächters für Produktspezifikationen.
Stellen Sie sicher, dass Angestellte für die Nutzung eines Beatmungsgerätes medizinisch
tauglich sind. Lassen Sie einen qualifizierten Arzt oder eine andere staatlich anerkannte Fachkraft
im Gesundheitswesen medizinische Begutachtungen mithilfe eines medizinischen Fragebogens oder
einer ärztlichen Eingangsuntersuchung durchführen.
Schulen Sie die Angestellten in der Nutzung, Wartung und den Einschränkungen des T200.
Benennen Sie eine qualifizierte Person, die sachkundig über den RPB T200 ist, um Schulung
durchzuführen:
Qualifikationen des Ausbilders für das Beatmungsgerät. Jeder, der Schulung am Beatmungsgerät
durchführt, muss:
a) sachkundig in der Anwendung und Nutzung des(r) Beatmungsgeräte(s) sein;
b) über praktische Kenntnisse in der Auswahl und Einsatz des(r) Beatmungsgeräte(s) und
Arbeitsabläufe auf der Baustelle verfügen;
c) das Beatmungsgeräteprogramm der Baustelle verstehen;
d) die geltenden Vorschriften kennen.
Schulen Sie jeden T200 Nutzer in Einsatz, Anwendung, Prüfung, Wartung, Lagerung, Montage
und Beschränkungen des Produktes gemäß den Inhalten dieser Bedienungsanleitung und der
Bedienungsanleitung des zertifizierten Strömungswächters und den Normen oder behördlichen
Bestimmungen. Stellen Sie sicher, dass jeder vorgesehene Benutzer beide dieser Handbücher liest.
Stellen Sie sicher, dass die Ausrüstung ordnungsgemäß aufgebaut ist, eingesetzt und gewartet
wird. Stellen Sie sicher, dass die Ausrüstung ordnungsgemäß eingerichtet, überprüft, ausgestattet,
verwendet und gewartet ist, einschließlich der Auswahl der für die Anwendung geeigneten
Luftfilterpatrone.
Messen und überwachen Sie den Schadstoffanteil der Luft im Arbeitsbereich.
Messen und überwachen Sie den Schadstoffanteil der Luft im Arbeitsbereich im Einklang mit
maßgeblichen Bestimmungen. Stellen Sie sicher, dass der Arbeitsbereich gut belüftet ist.
Wenn Sie Fragen haben, wenden Sie sich an RPB.
Kontaktieren Sie die Kundendienstabteilung unter:
Tel: 1-866-494-4599
E-mail: sa[email protected]m
Internet: gvs-rpb.com
SICHERHEITSHINWEISE FÜR PRODUKTANWENDER
VOR DEM ERSTEN GEBRAUCH - SEIEN SIE GESCHULT UND MEDIZINISCH TAUGLICH
Verwenden Sie dieses Beatmungsgerät nicht, bevor Sie dieses Handbuch und die Bedienungsanleitung des PX5
PAPR oder des Strömungswächters gelesen haben (zusätzliche Kopien verfügbar unter www.rpbsafety.com)
und von einer (von Ihrem Arbeitgeber nominierten) qualifizierten Person, die über Kenntnisse über das RPB
T200 Beatmungsgerät verfügt, in Nutzung, Wartung und Einschränkungen des Beatmungsgerätes geschult
worden sind.
Tragen Sie dieses Atemgerät nicht, bevor Sie eine medizinische Begutachtung mithilfe eines medizinischen
Fragebogens oder einer ärztlichen Eingangsuntersuchung durch einen qualifizierten Arzt oder eine andere
staatlich anerkannte Fachkraft im Gesundheitswesen bestanden haben.
Allergene: In diesem Produkt werden keine bekannten allgemeinen Allergene verwendet.
Manche Materialien könnten bei empfindlichen Personen eine allergische Reaktion hervorrufen. Wenn Sie

54
T200™
eine bekannte Allergie haben oder Reizungen auftreten, informieren Sie Ihren Arbeitgeber. Reizungen können
infolge mangelhafter Reinigung auftreten. Befolgen Sie alle Reinigungs- und Pflegeanweisungen, die in den
Bedienungsanleitungen für dieses und andere von Ihnen verwendeten RPB-Produkten aufgezeigt werden.
STELLEN SIE SICHER, DASS DAS SYSTEM BETRIEBSBEREIT IST
Vergewissern Sie sich, dass Sie über ein vollständiges System verfügen. Kontrollieren Sie, dass Sie alle
erforderlichen Bauteile haben, damit das T200 als ein vollständiges, zertifiziertes Beatmungsgerät dient:
Baugruppe der Haube des Beatmungsgerätes (T200 oder T-LINK)
Atemschlauch-baugruppe
Strömungswächter (PX5 PAPR)
Siehe Komponentenschaubild des Beatmungsgerätes. Das RPB T200 ist nur für die Verwendung mit dem RPB
PX5 PAPR. Nutzen sie ausschließlich Teile und Komponenten von RPB, die zu der zertifizierten Baugruppe
des Beatmungsgerätes gehören. Die Nutzung unvollständiger oder ungeeigneter Ausrüstung, einschließlich
der Verwendung von gefälschten oder nicht-RPB Teilen, kann zu mangelhaftem Schutz führen und lässt die
Zulassung des gesamten Beatmungsgerätes erlöschen. Modifizieren oder verändern Sie keine Teile dieses
Produktes.
Überprüfen Sie täglich alle Bauteile auf Anzeichen von Beschädigung oder Verschleiß, welche die ursprünglich
gewährte Schutzklasse verringern können. Nehmen Sie jegliches beschädigte Bauteil oder Produkt,
einschließlich jedes Helmes oder Visiers, das Schlägen ausgesetzt war, aus der Nutzung bis es repariert oder
ersetzt worden ist. Zerkratzte oder beschädigte Sicherheitsscheiben oder andere Bauteile sollten mit originalen
Ersatzteilen der Marke RPB ersetzt werden. Wenn Sicherheits- und schlagfeste Scheiben ausgetauscht werden,
stellen Sie sicher, dass jegliche zusätzliche Schutzfolie von beiden Seiten der Scheibe entfernt wird. Wenn die
Folie belassen wird, könnte es die optische Klarheit der Scheibe beeinträchtigen und eine Überanstrengung der
Augen verursachen. Überprüfen Sie das Innere des Beatmungsgerätes auf Feinstaub oder andere Fremdkörper.
Halten Sie das Innere des Beatmungsgerätes stets sauber.
Stellen Sie sicher, dass der Helm ordnungsgemäß in der Konfiguration montiert ist, die zu Ihrer Anwendung
passt. Eine unvollständige oder falsch eingesetzte Haube könnte unzureichenden Atemschutz oder Schutz vor
Schlageinwirkung bieten. Siehe Aufbau und Wartung des Beatmungsgerätes. Siehe Anlegen für Informationen
zum Anpassen.
STELLEN SIE SICHER, DASS SIE DIE PASSENDE AUSRÜSTUNG FÜR IHRE TÄTIGKEIT HABEN
Stellen Sie sicher, dass das T200 den angemessenen Schutz für Ihre Tätigkeit bietet. Soweit anwendbar,
überprüfen Sie Ihr Arbeitsplatz-Sicherheitsprogramm, Atemschutz-Programm und Normen und Vorschriften für
Ihre Tätigkeit oder Branche. (Siehe GEWÄHRTER SCHUTZ UND EINSCHRÄNKUNGEN.)
VOR DEM ANLEGEN DES T200:
Überprüfen Sie, dass der Schadstoffanteil der Luft innerhalb der empfohlenen Grenzen für den Einsatz des
Beatmungsgerätes liegt:
Bestimmen Sie Art und Grad der Verschmutzung. Stellen Sie sicher, dass die Schadstoff-
Konzentrationen in der Luft die durch anwendbare Bestimmungen und Empfehlungen für
gebläseunterstützte Luftreinigungsatemgeräte oder umluftunabhängige Beatmungsgeräte
erlaubten nicht überschreiten. Befolgen Sie die Bedienungsanleitung des PX5 PAPR.
Filterung der Atemluft:
PAPR: Sobald der Verschmutzungsgrad bestätigt worden ist, können Sie anschließend die für
die Anwendung zu nutzende Filterpatrone bestimmen, um sicherzustellen, dass Sie ausreichend
geschützt sind.
Stellen Sie sicher, dass der Bereich belüftet und überwacht ist:
Stellen Sie sicher, dass der Bereich gut belüftet ist und regelmäßig Luftproben entnommen
werden, um zu bestätigen, dass die Atmosphäre innerhalb der behördlich empfohlenen Grenzen
bleibt.
Wenden Sie sich bei jeglichen Fragen an Ihren Arbeitgeber.

55
AUFBAU UND WARTUNG DES BEATMUNGSGERÄTES
MONTAGE UND EINSTELLUNG DES
KOPFGESCHIRRS MIT OBEREN RIEMEN
ABBILDUNG 2.1 SEITE 12
Befestigen Sie das vordere Band an den
Halterungen des Kopfgeschirrs. 1. Schieben Sie
die Enden in die Führung auf den Halterungen. 2.
Haken Sie die schlüssellochförmige Aussparung
über den Stift im Inneren der Halterung. Stellen
Sie alles passend ein.
ABBILDUNG 2.2 SEITE 12
Befestigen Sie die oberen Riemen an den
Halterungen des Kopfgeschirrs, wobei die
abgerundete Seite zum Kopf zeigt. Haken Sie
das Loch in den Riemen unter die Lasche auf der
Halterung des Kopfgeschirrs. Drücken Sie dann
den Schlitz auf den Riemen über den oberen Clip
auf der Kopfgeschirr-Halterung.
ABBILDUNG 2.3 SEITE 12
Richten Sie die Ratscheneinheit so aus, dass
das RPB-Logo auf der Innenseite des Polsters
aufrecht steht. Befestigen Sie die Ratscheneinheit
an den Löchern in den Halterungen des
Kopfgeschirrs, indem Sie (1) die Lasche am Ende
des Ratschenbandes von innen über das Loch
in der Halterung führen. 2. Dann lassen Sie den
Clip der Ratsche in das Loch auf der Halterung
einschnappen.
ABBILDUNG 2.4 SEITE 12
Das Kopfgeschirr kann mit dem Ratschenknopf
auf der Rückseite des Kopfbandes angepasst
BETRETEN SIE DEN ARBEITSBEREICH NICHT wenn eine der folgenden Bedingungen vorherrscht:
Die Atmosphäre stellt eine unmittelbare Gefahr für Leben oder Gesundheit dar.
Sie können nicht ohne die Hilfe des Beatmungsgerätes entfliehen.
Die Atmosphäre enthält weniger als 21% ±1% Sauerstoff.
In einer brennbaren oder explosiven Atmosphäre bei der Nutzung mit Systemen einschließlich
elektrischer Teile, die nicht eigensicher sind, wie dem PX5.
Die Schadstoffe liegen über Vorschriften oder Empfehlungen.
Schadstoffe oder Schadstoffkonzentrationen sind unbekannt.
Der Arbeitsbereich ist schlecht belüftet.
Die Temperatur liegt außerhalb des Bereiches von -10°C bis +60°C (14°F bis +140°F).
VERLASSEN SIE SOFORT DEN ARBEITSBEREICH, FALLS:
Irgendein Produktbauteil beschädigt wird.
Die Sicht beeinträchtigt ist.
Der Luftstrom stoppt oder verlangsamt oder der Alarm ertönt. Nutzen Sie keine Gebläseunterstützten
Luftreinigungsatemgeräte, wenn der Luftstrom weniger als 170 slpm (6 cfm) beträgt.
Das Atmen schwer fällt.
Ihnen schwindlig, übel, zu heiß, zu kalt wird oder Sie krank werden.
Ihre Augen, Nase oder Haut gereizt werden.
Der Arbeitsbereich ist ein geschlossener Raum (sofern keine geeigneten Maßnahmen für geschlossene
Räumen ergriffen werden).
Sie im Inneren des Helmes Verunreinigungen schmecken, riechen oder sehen.
Sie irgendeinen anderen Grund haben, anzunehmen, dass das Beatmungsgerät keinen ausreichenden
Schutz bietet..
PRODUKTPFLEGE
Legen Sie die Haube niemals auf heiße Oberflächen. Tragen Sie keine Farben, Lösungsmittel, Klebstoffe oder
Selbstklebe-Etiketten auf, mit Ausnahme wie von RPB angewiesen. Dieses Produkt kann durch bestimmte
Chemikalien negativ beeinträchtigt werden.
Siehe Abschnitt „Aufbau und Wartung des Beatmungsgerätes“ für detailliertere Reinigungsanweisungen.
ANWEISUNGEN FÜR BESTIMMTE VERWENDUNGSZWECKE ODER UMGEBUNGEN
Geschlossene Räume
Wenn dieses Beatmungsgerät in geschlossenen Räumen verwendet wird, stellen Sie sicher, dass der
Bereich gut belüftet ist und dass alle Schadstoff-Konzentrationen unterhalb der Empfehlungen für dieses
Beatmungsgerät liegen. Befolgen Sie alle Verfahren für den Eintritt und Arbeit in, sowie Austritt aus
geschlossenen Räumen gemäß den geltenden Vorschriften und Normen.

56
T200™
werden. Drehen Sie den Knopf, um das Kopfband
zu straffen und zu lösen.
ABBILDUNG 2.5 SEITE 13
Um die Riemen des Kopfgeschirrs zu verkleinern,
drücken Sie die beiden Riemen zum Straffen
zusammen.
ABBILDUNG 2.6 SEITE 13
Um die oberen Riemen größer zu machen, lösen
Sie 1. die Endlaschen über dem Riemen. 2. Ziehen
Sie anschließend die Riemen bis zur gewünschten
Kerbe auseinander. Dann führen Sie die Laschen
wieder über das Band, um es zu sichern.
MONTAGE DER ANSTOSSKAPPE
ABBILDUNG 3.1 SEITE 13
Zur Demontage ziehen Sie den Riemen von der
Halterung ab, haken von der Unterseite aus und
heben ihn nach oben.
ABBILDUNG 3.2 SEITE 13
Befestigen Sie die Anstoßkappe an denselben
Befestigungsstellen, von denen die Riemen
entfernt wurden. Haken Sie das Loch in der
Anstoßkappe unter die Lasche auf der Halterung
des Kopfgeschirrs. Drehen Sie dann das
Befestigungsloch der Anstoßkappe über den
oberen Clip auf der Kopfgeschirr-Halterung.
MONTAGE DER SCHEIBENHALTERUNGEN
ABBILDUNG 4.1 SEITE 14
Richten Sie die Kopfgeschirrhalterung mit der
Scheibenhalterung aus, heben Sie die hintere
Lasche an und drücken bis zur gewünschten
Position nach vorne. Achten Sie darauf, dass
die Lasche im gewünschten Positionsschlitz
gesichert ist. Wiederholen Sie dies für die andere
Seite.
ABBILDUNG 4.2 SEITE 14
Verstellen Sie die Scheibenhalterungen mithilfe
der Fingerlasche, um sie auf den Halterungen
vor oder zurück zu schieben. Dadurch wird die
Scheibe der Haube näher oder weiter weg vom
Gesicht positioniert.
ANBRINGUNG DES LUFTEINLASSES
ABBILDUNG 5.1 SEITE 14
1. Richten Sie die Orientierungspfeile aus. 2.
Schieben Sie die Flügel der Lufteinlass-Einheit
in die „W“-förmige Aufnahme auf die Seitenclips,
bis der mittlere Clip sicher über das Querprofil des
Flügels einrastet.
ABBILDUNG 5.2 SEITE 14
Lufteinlass-Einheit, die an der Scheibenhalterung
befestigt ist.
EINSETZEN DES LUFTEINLASSES VON KOPFGE-
SCHIRR/ANSTOSSKAPPE IN DIE HAUBE
ABBILDUNG 6.1 SEITE 15
Setzen sie die Kopfgeschirr- oder Anstoßkappen-
Einheit in die Haube ein.
ABBILDUNG 6.2 SEITE 15
Führen Sie den Gewindeeintritt des Lufteinlasses
in die schwarze Gummidichtung auf der Rückseite
der Haube ein. Von der Unterseite aus beginnend,
spannen Sie die Gummidichtung über die
Haltelamelle hinter dem Gewindeteil.
ABBILDUNG 6.3 SEITE 15
Richten Sie die Laschen der Scheibe mit den Clips
an den Seiten der Scheibenhalterung aus.
- Haken Sie Punkt 1 unter Punkt 1, wie abgebildet.
- Rasten Sie Punkt 2 über Punkt 2 ein, wie
abgebildet.
ABBILDUNG 6.4 SEITE 15
Führen Sie den Befestigungsstreifen ein und
durch den Schlitz an der Kopfgeschirrhalterung.
Verbinden Sie die Enden, indem Sie fest
zusammendrücken.
ABBILDUNG 6.5 SEITE 15
Justieren Sie den Luftstromregler hoch oder
runter, so dass die Luft entweder zur Scheibe oder
zum Gesicht strömt.
ANSCHLUSS DES ATEMSCHLAUCHES
ABBILDUNG 7.1 SEITE 16
Stellen Sie sicher, dass sich der O-Ring auf dem
Gewindeeinlass befindet. Verbinden Sie den
Atemschlauch mit dem Einlass durch Drehen im
Uhrzeigersinn. Nicht überdrehen. Halten Sie die
Haube, um zu verhindern, dass sie sich verdreht,
wenn der Atemschlauch festgezogen wird.
GEBLÄSEUNTERSTÜTZUNG
ABBILDUNG 8.1 SEITE 16
Stellen Sie sicher, dass sich die Flachdichtung auf
der Atemschlauch-Kupplung befindet. Führen Sie
die Bajonettkupplung des Atemschlauches in die
Austrittsöffnung des PX5 PAPR ein und vollenden
HINWEIS: MONTAGE DER ANSTOSSKAPPE WIRD IN ABBILDUNGEN 4.1. - 6.5. GEZEIGT ALLE
MONTAGEANWEISUNGEN FÜR KOPFGESCHIRR UND LUFTEINLASS GELTEN SOWOHL FÜR DIE
VARIANTE MIT ANSTOSSKAPPE (15-850) ALS AUCH MIT OBEREN RIEMEN.

57
ANLEGEN UND ABLEGEN
ANLEGEN IHRER HAUBE
Sobald Sie die Montage abgeschlossen haben, können Sie Ihr RPB T200 Beatmungsgerät anlegen.
Prüfen Sie zunächst das Innere der Haube und des kompletten Kopfgeschirrs, um sicherzustellen, dass sie
frei von Staub, Schmutz oder Verunreinigungen sind. Stellen Sie sicher, dass die Luftquelle eingeschaltet
ist und funktioniert. Öffnen Sie anschließend die Unterseite der Haube, setzen Sie das Beatmungsgerät
auf Ihren Kopf, ziehen Sie die Haube nach unten, und stellen Sie die Ratsche des Kopfgeschirrs passgenau
ein. Stellen Sie sicher, dass es mit der elastischen Schnur abgedichtet ist. Die Dichtung ist so konzipiert,
dass sie über der Ratsche sitzt, um eine einfache Einstellung zu ermöglichen, aber der Rest des
Kopfgeschirrs und des Lufteinlasses sollte vollständig innerhalb der Haube sein.
Wenn Sie eine Haube mit Nackenabdichtung verwenden, stellen Sie sicher, dass die Nackenabdichtung
vollständig um den Hals herum mit der verstellbaren elastischen Schnur abdichtet. Stecken Sie den
Sie eine halbe Drehung im Uhrzeigersinn bis er
festsitzt.
FÜR DIE VERWENDUNG MIT RPB PX5 - SCHAUEN
SIE IM BENUTZERHANDBUCH DES PAPR NACH
Wenn das T200 Beatmungsgerät in Verbindung
mit dem RPB PX5 PAPR verwendet wird, lesen
Sie bitte für Aufbau und Nutzung des Bausatzes
im RPB PX5 Handbuch nach.
Hinweis: Das RPB PX5 ist ein
Gebläseunterstütztes Atemschutzsystem; daher
muss auf die Auswahl des richtigen Filters für
die Anwendung geachtet werden, für die das
Beatmungsgerät vorgesehen ist.
VERWENDUNG VON STETHOSKOP ODER KAP-
SELGEHÖRSCHÜTZER
ABBILDUNG 9.1 SEITE 17
Die Kapuze wurde so konzipiert, dass die
Ohren des Benutzers frei liegen. Somit kann
ein Stethoskop verwendet werden, ohne
die Atemluftqualität für den Benutzer zu
beeinträchtigen.
ABBILDUNG 9.2 SEITE 17
Setzen sie die 18-524 RPB Quiet-Slim-
kapselgehörschützer auf, wobei das nackenband
um den nacken liegt. Vergewissern sie sich, dass
die polster rund um die ohren abdichten. Sichern
sie den kopfbügel mit dem klettverschluss.
Setzen sie die kapuze nach dem anlegen der
gehörschützer auf.
Beachten sie für weitere informationen
die bedienungsanleitung der Quiet-Slim-
kapselgehörschützer.
KLARSICHT-KASSETTENSCHEIBEN
ABBILDUNG 10.1 SEITE 17
Ziehen Sie den Schutz der Kassettenscheiben ab.
Bringen Sie die Scheiben an der Außenseite der in
die Haube eingenähten Sichtscheibe an.
ABBILDUNG 10.2 SEITE 17
Nutzen Sie die vorgefalteten Laschen, um je nach
Bedarf jede einzelne Scheibe zu entfernen.
AUSTAUSCH UND REINIGUNG DES
STIRNPOLSTERS
ABBILDUNG 11.1 SEITE 18
Um das Stirnpolster zu entfernen, öffnen Sie die
Klettverschlussverbindungen. Reinigen Sie es mit
einem milden Reinigungsmittel oder ersetzen Sie
es durch ein neues.
ABBILDUNG 11.2 SEITE 18
Legen Sie das neue oder gereinigte Stirnpolster
auf die Innenseite des Stirnriemens des
Kopfgeschirrs. Falten Sie den oberen und
unteren Teil darüber und befestigen Sie die
Klettverschlüsse.
REINIGUNG DES T200 UND DES
ANSTOSSKAPPENPOLSTERS
ABBILDUNG 12.1 SEITE 18
Demontieren Sie die Kopfgeschirr- oder
Anstoßkappen-Einheit aus der Haube, indem Sie
die Scheibe an beiden Seiten abklemmen und den
Gewindeeinlass aus der Gummidichtung an der
Rückseite ziehen.
ABBILDUNG 12.2 SEITE 18
Das Polster der Anstoßkappe ist mit
Klettverschluss an der Innenseite der
Anstoßkappe befestigt. Ziehen Sie das Polster
aus dem Helm. Das Polster kann mit einem
milden Reinigungsmittel gewaschen oder
ausgetauscht werden.
Reinigen Sie das Kopfgeschirr oder die
Anstoßkappe und die Lufteinlass-Einheit mit
heißem Wasser und mildem Reinigungsmittel.
Lassen Sie alles trocknen, bevor es wieder in die
Haube eingesetzt wird.

58
T200™
T200 HAUBEN MIT GESICHTSABDICHTUNG
ABBILDUNG 13.1 SEITE 19
Öffnen Sie die Unterseite der Haube während
Luft von der Luftquelle strömt; setzen Sie das
Beatmungsgerät auf Ihren Kopf. Stellen Sie
sicher, dass die Haube auf Ihrem Kopf zentriert ist.
ABBILDUNG 13.2 SEITE 19
Ziehen Sie die Haube nach unten, und ziehen Sie
den Ratschenknopf des Kopfgeschirrs passend
fest. Stellen Sie sicher, dass die verstellbare
elastische Schnur überall unter dem Kinn,
entlang den Wangen, oberhalb der Ohren und um
den Hinterkopf herum abdichtet.
T-LINK HAUBEN MIT NACKENABDICHTUNG
ABBILDUNG 14.1 SEITE 20
Während die Luft zuströmt, öffnen Sie
die Unterseite der Haube und setzen das
Beatmungsgerät auf Ihren Kopf. Stellen Sie
sicher, dass die Haube auf Ihrem Kopf zentriert ist.
ABLEGEN IHRES HELMES
Wenn Sie die Arbeit beendet haben, behalten Sie das Beatmungsgerät mit in den Helm zuströmender Luft
auf, bis Sie den schadstoffbelasteten Bereich verlassen haben. Abhängig von den Verunreinigungen kann
es ratsam sein, das Äußere des Helmes und Ihre Arbeitskleidung zu reinigen, bevor Sie das Beatmungs-
gerät ablegen. Es kann ein Reinigungsprogramm für den Arbeitsplatz erforderlich sein.
ÜBERPRÜFUNG
Wenn die Haube verschmutzt ist oder übermäßigen Verschleiß zeigt, entsorgen Sie die Haube gem. der
Bundes- und kommunalen Vorschriften. Heben Sie den Helm, Atemschlauch und andere Teile für eine
spätere Verwendung auf, wenn sie sich in einem guten Zustand befinden.
LAGERUNG
Bevor Sie das Beatmungsgerät lagern, reinigen Sie das Gerät gemäß den Anweisungen in dieser
Bedienungsanleitung. Achten Sie darauf, dass es sowohl innen als auch außen sauber ist. Lagern
Sie nach der Nutzung das Beatmungsgerät, indem Sie es an einem sauberen, trockenen Ort abseits
des Arbeitsbereiches aufhängen. Wenn das T200 für einen längeren Zeitraum nicht eingesetzt oder
transportiert wird, lagern Sie es in einem Behältnis oder einer Tasche. Lagern Sie es an einem kühlen,
trockenen Platz zwischen -10°C bis +45°C (14°F bis 113°F) <90% rF. Das PX5 muss ggf. gesondert gelagert
werden; beziehen Sie sich für besondere Lagerungsanweisungen auf die Bedienungsanleitung des PX5.
Nach der Nutzung: ABBILDUNG 15.1 SEITE 21
Langzeitlagerung oder Transport: ABBILDUNG 15.2 SEITE 21
Hauben sind als Einwegartikel gedacht. Wenn Waschen erforderlich ist, nur Handwäsche. Es wird
empfohlen, für die Polsterung einen regelmäßigen Reinigungsplan aufzustellen, um eine gute Hygiene zu
gewährleisten.
ABBILDUNG 14.2 SEITE 20
Ziehen Sie die Haube nach unten, ziehen
Sie den Ratschenknopf des Kopfgeschirrs
passend fest und vergewissern Sie sich, dass
die Halsmanschette um Ihren Hals abdichtet,
indem Sie sicherstellen, dass der Gummizug
festgezogen ist.
ABBILDUNG 14.3 SEITE 20
Stecken Sie den inneren Brustlatz in den Kragen
Ihres Hemdes, Overalls oder Schutzausrüstung,
um zu verhindern, dass Schadstoffe in die Haube
eindringen. Ziehen Sie den äußeren Brustlatz
herunter.
ABBILDUNG 14.4 SEITE 20
Befestigen Sie den Gürtel mit dem
Strömungswächter um Ihre Taille über der Hüfte.
Überprüfen Sie vor dem Anlegen stets das Innere des Beatmungsgerätes
auf Verunreinigungen. Legen Sie den Helm stets außerhalb des Arbeitsbereichs an und ab, um
das Innere des Helmes sauber und frei von Verunreinigungen zu halten. Die Missachtung dieser
Schritte könnte Sie gefährlichen Stoffen und Verunreinigungen aussetzen, welche die Funktion des
Beatmungsgerätes beeinträchtigen könnten.
ACHTUNG
inneren Latz unter Ihren Overall oder andere Oberbekleidung. Ziehen Sie den Außenlatz über Ihre
Schultern und vergewissern Sie sich, dass er flach an Ihrer Brust und Ihrem Rücken anliegt, damit er Sie
nicht bei der Arbeit behindert.

59
TEILE UND ZUBEHÖR ABBILDUNG 16.1 SEITE 22
TEILELISTE
Objektnummer Beschreibung Teilenummer
1 T200 Tychem® 2000 - Gesichtsdichtungshaube 17-722
2 T200 Tychem® 2000 - Schulterlange Kapuze mit innerer Gesichtsdichtung 17-732
3 T-Link Tychem® 2000 - Vollhaube mit Nackenabdichtung 17-712
T-Link Tychem® 4000 - Vollhaube mit Nackenabdichtung,
versiegelten Nähten 17-713
T-Link Tychem® 4000 - Extra lange Vollhaube mit Nackenabdichtung,
versiegelten Nähten, Sicherheitsscheiben 17-713-SX
4 Lufteinlasseinheit (15-861) - mit Scheibenhalterungen (17-513)
(Nicht zu verkaufen) 15-860
5 Baugruppe Kopfgeschirr mit Stirnpolster für Kopfgeschirr 15-841
6 Baugruppe Anstoßkappen-Geschirr mit Stirnpolster für Kopfgeschirr 15-850
7 Ratscheneinheit des Kopfgeschirrs 16-530
8 Stirnpolster für Kopfgeschirr 16-526
9 Scheibenhalterungen (Paar) 17-513
10 T200 Klarsicht-Kassettenscheiben (1 Kassette mit 7 Scheiben) (10er Packung)
- für Hauben mit Gesichtsabdichtung (kurze Scheibe) 17-811
11 T-Link Klarsicht-Kassettenscheiben (1 Kassette mit 7 Scheiben) (10er Packung)
- für Hauben in voller Länge (lange Scheibe) 17-817
12 T-Link Abziehscheiben (25er Packung)
- für Hauben in voller Länge (lange Scheibe) 17-815
13 Quiet-Slim Kapselgehörschützer 18-524
14 Quiet-Slim Kapselgehörschützer mit Seitenhalterungen (Paar) 18-525
15 Seitenhalterungen (Paar) 15-842
16 Atemschlauchabdeckung -Tychem® 04-852
Atemschlauchabdeckung -Durchsichtiger Kunststoff (Packung mit 10) 04-856
17 Atemschlauchabdeckung für Rucksack - Tychem® 04-872
PAPR TEILE UND ZUBEHÖR ABBILDUNG16.2 SEITE 24
Objektnummer Beschreibung Teilenummer
1 PX5 PAPR und Gürtel 03-801
2 Atemschlauch für PX5 PAPR 04-831
3 Strömungsmesser PX5 PAPR 03-819
4 2” Gürtel 07-765
2” Gürtel - Pflegeleicht 07-765-DC
5 Rucksack-Geschirr - Pflegeleicht 03-822-DC
6 Atemschlauch für Rucksack 04-841
Hauben: Handwäsche nur mit Feinwaschmittel und warmem Wasser. Zum Trocknen aufhängen. Nicht
in Waschmaschine oder Trockner waschen. Beim Waschen in einer Waschmaschine oder einem
Trockner verkürzt sich die Produktlebensdauer und die Garantie erlischt.
Polsterung: Handwäsche nur mit Feinwaschmittel und warmem Wasser. Zum Trocknen flach hinlegen.
Stellen Sie vor der Verwendung sicher, dass alle Komponenten trocken sind. Auf Abnutzung prüfen und
bei Beschädigung oder übermäßigem Verschleiß ersetzen.
Verwenden Sie ausschließlich passende, authentische RPB Ersatzteile
(gekennzeichnet mit dem RPB Logo und Teilenummer), und nur in der angegebenen Konfiguration.
Die Nutzung unvollständiger oder ungeeigneter Ausrüstung, einschließlich der Verwendung von
gefälschten oder nicht-RPB Teilen, kann zu mangelhaftem Schutz führen und lässt die NIOSH
Zulassung der gesamten Baugruppe Beatmungsgerät erlöschen.
ACHTUNG

60
T200™
FRANÇAIS
Reportez-vous aux numéros de page du manuel d’instructions en anglais T200™ CE pour obtenir des images et
des schémas.
EXPLICATION DES MOTS ET SYMBOLES DE SIGNALISATION
Les mots et les symboles de sécurité suivants sont utilisés dans ce manuel et sur l’étiquetage du produit :
AVERTISSEMENT indique une situation dangereuse qui, si elle
n’est pas évitée, pourrait engendrer des blessures graves ou la
mort.
DANGER indiqueune situation dangereuse qui, si elle n’est pasévitée, engen-
drera des blessures graves ou la mort.
Veuillez lire le manuel d’utilisation.
Des copies supplémentaires des manuels RPB® sont disponibles sur
gvs-rpb.com.
AVERTISSEMENT
BESCHRÄNKTE GARANTIE
RPB® garantiert, dass deren Produkte ein (1) Jahr lang frei von Beschädigungen in Material und
Verarbeitung sind, vorbehaltlich der Bedingungen dieser beschränkten Garantie. Die Produkte werden
nur für den gewerblichen Einsatz verkauft und es gelten für die Produkte keine Verbrauchergarantien.
Diese beschränkte Garantie gilt nur für den Erstkäufer des Produktes und kann nicht übertragen oder
abgetreten werden. Dies ist die einzige und ausschließliche von RPB® gewährleistete Garantie und ALLE
BEDINGUNGEN UND STILLSCHWEIGENDE GEWÄHRLEISTUNGEN (EINSCHLIESSLICH JEGLICHER
GARANTIE DER MARKTGÄNGIGKEIT ODER EIGNUNG FÜR EINEN BESTIMMTEN ZWECK) SIND VON DER
GEWÄHRLEISTUNG AUSGESCHLOSSEN UND WERDEN ABGELEHNT. Die beschränkte Gewährleistung
von RPB® gilt nicht für Schäden, die aus Unfall, unsachgemäßem Gebrauch oder Missbrauch der Produkte,
Verschleiß infolge der üblichen Nutzung der Produkte oder dem Versäumnis der richtigen Produktwartung
resultieren.
Die beschränkte Gewährleistung von RPB® beginnt mit dem ursprünglichen Kaufdatum der Produkte und gilt
nur für zugesicherte Mängel, die innerhalb des Garantiezeitraums auftreten und an RPB® gemeldet werden.
RPB® behält sich das Recht vor, zur eigenen angemessenen Zufriedenheit zu ermitteln, ob behauptete Mängel
von dieser beschränkten Garantie abgedeckt sind.
Wenn ein berechtigter Defekt auftritt, repariert oder ersetzt RPB® nach eigenem Ermessen das fehlerhafte
Produkt (oder ein Bauteil des Produktes). Diese Abhilfe durch „Reparatur oder Ersatz“ ist die einzige und
ausschließliche Mängelbeseitigung gemäß dieser beschränkten Garantie, und unter keinen Umständen wird die
Haftung von RPB® gemäß dieser beschränkten Garantie den ursprünglichen Kaufpreis für die Produkte (oder
das maßgebliche Bauteil) übersteigen. RPB® übernimmt keine Verantwortung für Neben- oder Folgeschäden,
einschließlich Nutzenausfall, Wartung und andere Kosten und ALLE NEBEN- UND FOLGESCHÄDEN SIND von
dieser beschränkten Garantie AUSGESCHLOSSEN UND WERDEN ABGELEHNT. Kontaktieren Sie RPB®, um
Garantieleistungen zu erhalten. Für die Garantieleistung muss ein Kaufnachweis vorgelegt werden. Alle Kosten
für die Rücksendung der Produkte an RPB® für Garantieleistungen müssen vom Käufer getragen werden.
RPB® behält sich das Recht zur Verbesserung seiner Produkte durch Änderungen im Design oder der
Materialien vor, ohne den Käufern zuvor hergestellter Produkte verpflichtet zu sein.
HAFTUNG
RPB® Safety kann keinerlei Haftung für jegliche Eventualitäten übernehmen, die direkt oder indirekt aus dem
Gebrauch oder Missbrauch von RPB® Safety Produkten erwachsen, einschließlich von Zwecken, für welche die
Produkte nicht ausgelegt sind. RPB® Safety haftet nicht für Schäden, Verluste oder Unkosten, die das Resultat
mangelnder Ratschläge oder Informationen oder falscher Ratschläge oder Informationen sind, unabhängig
davon, ob dies auf Fahrlässigkeit von RPB® Safety oder deren Angestellten, Vertretern oder Subunternehmer
basiert oder nicht.
DANGER

61
INTRODUCTION
Le T200 est un respirateur polyvalent conçu pour des activités variées nécessitant une protection
contre des contaminants aériens. Avec ses options de casquette antichoc et ses trois modèles de capot
disponibles, le T200 peut aussi bien être utilisé dans un environnement industriel que médical. Pour une
protection auditive renforcée, le système optionnel de protection auditive Quiet-Slim™ peut être installé.
Ce produit doit toujours être inspecté et entretenu conformément à ce manuel d’utilisation.
Voir PROTECTION FOURNIE ET RESTRICTIONS pour plus d‘informations.
RPB® SAFETY - GLOBAL HEADQUARTERS
2807 Samoset Rd, Royal Oak, MI 48073, USA
T: 1-866-494-4599 F: 1-866-494-4509 E: sales@gvs.com
RPB® SAFETY - APAC
3 Robin Mann Place, Christchurch Airport, Christchurch 8053, New Zealand
T: +64-3-357-1761 F: +64-3-357-1763 E: sales@gvs.com
GVS S.p.A. - EMEA
Via Roma 50, 40069 Zona Industriale BO, Italy
T: +39 0516176391 E: sales@gvs.com
GVS Filter Technology UK Ltd.
Vickers Industrial Estate, Mellishaw Ln, Morecambe LA3 3EN, UK
T: +44 (0)1524 847600 E: sales@gvs.com
gvs-rpb.com
Copyright ©2022 RPB IP, LLC. Tous droits réservés. Tout le contenu de ce site internet est protégé par
la loi sur les droits d‘auteur des États-Unis et ne peut être reproduit, distribué, transmis, affiché, publié
ou diffusé sans l‘autorisation écrite préalable de RPB IP, LLC. Il vous est interdit d‘altérer ou de retirer les
marques déposées, les droits d‘auteur ou mentions de propriété des copies du contenu.
Toutes les marques déposées, marques de services et les logos utilisés dans cette publication,
enregistrés ou non-enregistrés, sont les marques déposées, les marques de services ou les logos de leurs
propriétaires respectifs. Tous les droits de propriété intellectuelle RPB contenus dans cette publication,
y compris les droits d‘auteur, marques déposées, marques de services, secrets industriels et brevets
sont réservés. La propriété intellectuelle RPB désigne tout(e) brevet, objet breveté, application brevetée,
conception, conception industrielle, droit d‘auteur, logiciel, code source, droit de base de données,
droit moral, invention, technique, donnée technique, secret industriel, savoir-faire, marque, marque
déposée, nom commercial, slogan, logo et tout autre droit commun et droit de propriété, enregistré ou
non-enregistré dans quelque pays que ce soit, appartenant à, développé en intégralité ou en partie par, ou
agréé par RPB IP, LLC.
Pour de l‘assistance technique, contactez notre service client au 1-866-494-4599 ou par
e-mail : sales@gvs.com
Formulaire n°: 7.20.506 Rév n°: 2
CERTIFICATION PAR:
CE: BSI Group The Netherlands B.V. (NB2797), Say Building, John M. Keynesplein 9, 1066 EP, Amsterdam, NL
UKCA: BSI Group (AB0086), Kitemark Court, Knowhill, Milton Keynes MK5 8PP, United Kingdom
RPB® Safety LLC est une entreprise certifiée ISO9001.

62
T200™
PROTECTION FOURNIE ET RESTRICTIONS
RESPIRATION
Le T200 de RPB est approuvé dans les catégories suivantes :
Adduction d‘air actionnée par un moteur
Le respirateur T200 de RPB est un respirateur purifiant actionné par un moteur, homologué EN 12941:
1998 + A1: 2003 + A2: 2008 TH3 P R SL lorsqu’il est correctement ajusté et utilisé avec tous les
composants requis, incluant l’assemblage du tube respiratoire et le respirateur purifiant actionné
par un moteur PX5 de RPB. Dans cette configuration, il réduit considérablement, mais n’élimine pas
complètement, la respiration de contaminants par le porteur du respirateur. La protection spécifique
dépend du filtre sélectionné pour être utilisé avec le PX5 PAPR de RPB (voir le manuel d’utilisation du
PX5).
DANGERS ET RESTRICTIONS
Le respirateur T200 de RPB NE DOIT PAS ÊTRE UTILISÉ dans les cas suivants :
Dans des atmosphères présentant un danger immédiat pour la vie ou la santé.
Lorsque le porteur ne peut pas s‘échapper sans l‘aide du respirateur.
Dans des atmosphères contenant moins de 21% ±1% d‘oxygène.
Dans des activités de projections abrasives.
En tant que protection contre des gaz dangereux (ex : monoxyde de carbone).
Lorsque les niveaux de contaminants dépassent les réglementations ou les recommandations.
Lorsque les niveaux ou les concentrations des contaminants sont inconnus.
Dans une zone mal ventilée.
Lorsque la température est en-dehors de la plage de -10°C à +60°C (14°F à 140°F).
Une atmosphère inflammable ou explosive est présente lorsqu‘il est utilisé avec des systèmes
comportant des pièces dépourvues de sécurité intrinsèque, comme le PX5 PAPR.
LE VISAGE ET LES YEUX :
Le T200 avec lunette standard répond aux exigences EN 166:2001 1F3 (AS/NZS 1337.1:2010) pour la
protection du visage.
Le T200 n‘a pas été conçu ou testé pour fournir une protection contre les métaux fondus ou les liquides
corrosifs.
Remarque : Le port de lunettes de sécurité pourrait être requis en fonction de l‘analyse du risque de la
tâche. Le T200 ne protège pas d‘un éventuel transfert d‘impact sur les lunettes portées en-dessous
du capot. Il n‘assure pas une protection complète des yeux et du visage contre des impacts et des
INFORMATIONS DE SÉCURITÉ IMPORTANTES
La sélection, l‘installation, l‘utilisation ou l‘entretien
inapproprié de ce produit peut engendrer des blessures ; des
maladiespulmonaires différées menaçant le pronostic vital, des maladies de la peau ou des yeux ; ou la mort.
Ce produit a été conçu pour une utilisation professionnelle, conformément aux normes et règlementations
applicables à votre localité, secteur et activité (voir Responsabilités de l‘employeur). Il est recommandé de bien
connaitre les normes et les règlementations associées à l‘utilisation de cet équipement de protection, même
si elles ne vous concernent pas directement.Si vous êtes un travailleur indépendant ou si l‘appareil est utilisé
dans un cadre non-professionnel,veuillez vous référer aux Responsabilités de l‘employeur et aux Instructions de
sécurité pour l‘utilisateur du produit. Rendez-vous surgvs-rpb.com/healthcare/important-safety-information où
vous trouverez des liens utiles vers les normes CE et d‘autrescontenus.
EMPLOYEURS : Veuillez lire ce manuel et les instructions du dispositif d‘approvisionnement en air et assumer
les Responsabilités de l‘employeur.
UTILISATEURS DU PRODUIT: Veuillez lire ce manuel et les instructions du dispositif d‘approvisionnement en air
et suivre les Instructions de sécurité pour l‘utilisateur du produit.
CONSULTEZ LE SITE WEB POUR LES MISES À JOUR. Les manuels de produits sont mis à jour régulièrement.
Visitez le site gvs-rpb.com/healthcare/resources pour obtenir la version la plus récente de ce manuel avant
d’utiliser le produit.
AVERTISSEMENT

63
pénétrations sévères, et ne remplace pas des pratiques de sécurité ainsi que des contrôles techniques
appropriés.
LA TÊTE:
Le T200 fournit une protection minimale de la tête lorsqu’il est équipé de la casquette antichoc et
ne répond aux exigences de EN 812. Il ne répond pas aux exigences EN 397:2012+A1:2012 (AS/NZS
1801:1997) dans cette configuration.
PROTECTION AUDITIVE:
Le système de protection auditive Quiet-Slim fournit un taux de réduction du bruit (TRB) de 21 et un RSB
de 28 et répond aux exigences de EN 352-1. Veuillez vous référer au manuel d’utilisation du Quiet-Slim
pour des consignes d’installation et d’ajustement appropriées.
D’autres protections auditives, comme des bouchons d’oreilles ou un casque anti-bruit, doivent être
portées et ajustées correctement lorsque les niveaux sonores dépassent les niveaux autorisés.
RÉGLEMENTATION EN MATIÈRE D‘EPI
Le T200 est conforme au règlement 2016/425 (UE) sur les EPI. Règlement 2016/425 sur les EPI tel que
transposé dans la législation britannique et modifié.
La déclaration de conformité pour CE et UKCA est accessible sur gvs-rpb.com/healthcare/resources/
Voir la section Stockage pour des informations sur le conditionnement et les protections requises pour
le transport.
SCHÉMA DES COMPOSANTS RESPIRATOIRES - PAPR
Le respirateur T200 de RPB est constitué de 3 composants principaux, comme indiqué sur l‘Image 1.1.
Ces 3 composants doivent tous être présents et assemblés correctement, afin de constituer un respirateur
complet homologué EN12941:1998 +A1: 2003 +A2: 2008 en tant que respirateur purifiant motorisé à
adduction d‘air.
IMAGE 1.1 À LA PAGE 6
1. Assemblage du casque du respirateur
2. Assemblage du tube respiratoire
3. Alimentation en air PAPR
AVERTISSEMENTS ET RESTRICTIONS
ADDUCTION D‘AIR ACTIONNÉE PAR UN MOTEUR
A. Ne pas utiliser dans des atmosphères contenant moins de 21% ±1% d’oxygène.
B. Ne pas utiliser dans des atmosphères présentant un danger immédiat pour la vie ou la santé.
C. Ne pas dépasser les concentrations maximales d‘emploi fixées par les normes règlementaires.
F. Ne pas utiliser de respirateur purifiant à adduction d‘air si le débit de l‘air est inférieur à 170 lpm (6 cfm)
avec un capot et/ou un casque.
H. Suivre les programmes établis pour le remplacement de la cartouche et du récipient ou surveiller
l‘indicateur de fin de service pour vous assurer de remplacer la cartouche et les récipients avant qu‘une
panne ne se produise.
I. Contient des pièces électriques pouvant provoquer un départ de feu dans des atmosphères inflammables
ou explosives.
J. Ne pas utiliser ni entretenir ce produit correctement pourrait causer des blessures ou entrainer la mort.
L. Suivre les instructions du manuel d‘utilisation pour remplacer les cartouches, les boitiers et/ou les filtres.
M. Tous les appareils approuvés devront être sélectionnés, ajustés, utilisés et entretenus conformément aux
règlementations applicables.
N. Ne jamais remplacer, modifier, ajouter ou omettre de pièces. Utiliser uniquement les pièces de rechange
exactes selon la configuration spécifiée par le fabricant.
O. Consulter le manuel d‘utilisation et/ou d‘entretien pour obtenir des informations sur l‘utilisation et
l‘entretien de ces respirateurs.
P. Le T200 n‘a pas été évalué pour être utilisé en tant que masque chirurgical.

64
T200™
SOURCE D‘AIR, RACCORDS ET PRESSION
SOURCE D‘AIR
Adduction d‘air actionnée par un moteur
Vérifiez que la zone contaminée est dans les limites d‘utilisation d‘un respirateur purifiant actionné
par un moteur et déterminez le type de contamination. Une fois le niveau de contamination confirmé,
vous pouvez sélectionner la cartouche de filtre adaptée à votre utilisation pour vous assurer d‘être
suffisamment protégé. Assurez-vous que la zone est bien ventilée et que des échantillons d‘air sont
régulièrement prélevés, afin de confirmer que l‘atmosphère reste dans les niveaux recommandés par les
organismes de réglementation. Suivez le manuel d‘utilisation duPX5 PAPR pour plus de d‘informations.
Débit maximal prévu par le fabricant
RESPONSABILITÉS DE L’EMPLOYEUR
Vos responsabilités spécifiques peuvent varier en fonction de votre localité et de votre secteur d‘activité, mais en
règle générale,RPBestime que les employeurs doivent :
Suivre toutes les normes et règlementations applicables à leur localité, secteur et activité. En fonction
de votre localité et de votre secteur d‘activité, un certain nombre de normes et de règlementations peut
s‘appliquer à la sélection et l‘utilisation de respirateurs et autres équipements de protection individuelle. Cela
peut inclure des normes et des règlementations fédérales, locales ou militaires et des normes consensuelles
comme EN et AS/NZS. Il existe également des exigences spécifiques pour certains contaminants, par ex
: la silice (voir gvs-rpb.com/healthcare/important-safety-information/ pour plus d‘informations), l‘amiante,
les organismes pathogènes, etc. Renseignez-vous sur les exigences s‘appliquant à votre localité et à votre
secteur d‘activité.
Avoir mis en place des programmes de sécurité appropriés.
Mettez en place et suivez :
Un programme de sécurité sur le lieu de travail.
Un programme écrit pour la protection respiratoire en conformité avec les normes et
règlementations applicables.
Conformément à ce qui précède,
Effectuer une analyse des dangers et sélectionner l‘équipement approprié pour chaque activité.
Une analyse des dangers devrait être effectuée par une personne qualifiée. Des contrôles doivent
être mis en place, comme il convient, et une personne qualifiée devrait déterminer quel type de
protection respiratoire, des yeux et du visage, de la tête et auditive est approprié pour les activités et
les environnements d‘utilisation prévus. Par exemple : sélectionnez un respirateur approprié pour les
dangers aériens spécifiques, en prenant en compte les facteurs du lieu de travail et de l‘utilisateur et
avec unFacteur de Protection Nominal correspondant ou dépassant le niveau requis pour la protection
de l‘employé.
Selon le cas, vérifiez votre programme de sécurité sur le lieu de travail ainsi que les normes et
règlementations associées aux exigences de protection pour votre secteur et activité, et consultez
ce manuel (Protection fournie et restrictions, page 4) et le manuel du PX5 PAPR ou du dispositif de
régulation du débit pour connaitre les spécifications de ces produits.
S‘assurer que les employés sont médicalement aptes à utiliser un respirateur.
Faites appel à un médecin qualifié ou un autre professionnel de santé agréé pour effectuer des
évaluations médicales à l‘aide d‘un questionnaire médical ou d‘un examen médical initial.
Former les employés à l‘utilisation, l‘entretien et aux limites du T200.
Désignez une personne qualifiée, ayant des connaissances sur le T200 de RPB afin d‘assurer la
formation :
FILTRE
180 L/MIN VITESSE 1
180 L/MIN VITESSE 2
180 L/MIN VITESSE 3
03-892-P
>10 heures
>7 heures
>6 heures
03-893-A2
>5 heures
>4 heures
>4 heures
03-894-ABE
>5 heures
>4 heures
>4 heures
03-895-ABEK
>5 heures
>4 heures
>4 heures

65
Qualifications duformateur pour le respirateur. Toute personne chargée de la formation au respirateur
doit :
a) avoir des connaissances sur l‘application et l‘utilisation du/des respirateur(s) ;
b) avoir une connaissance pratique quant au choix du/des respirateur(s) et aux pratiques
professionnelles du site ;
c) comprendre le programme respiratoire du site ; et
d) connaitre les règlementations applicables.
Formez chaque utilisateur du T200 à l‘utilisation, l‘inspection, l‘entretien, au stockage, aux ajustements,
aux applications et aux restrictions de l‘appareil, conformément au contenu de ce manuel d‘utilisation
et du manuel d‘utilisation du dispositif de régulation du débit approuvé, et aux normes et exigences
règlementaires. Veillez à ce que chaque utilisateur prévu lise chacun de ces manuels.
Veiller à ce que l‘équipement soit correctement configuré, utilisé et entretenu.
Veillez à ce que l‘équipement soit correctement configuré, inspecté, ajusté, utilisé et entretenu. Cela
inclut la sélection d‘une cartouche de filtre à air appropriée pour l‘application prévue.
Mesurer et surveiller les contaminants aériens dans la zone de travail.
Mesurez et surveillez les niveaux des contaminants aériens dans la zone de travail, conformément aux
règlementations applicables. Assurez-vous également que la zone de travail est bien ventilée.
Si vous avez des questions, veuillez contacter RPB.
Contactez le service client par :
Tél: 1-866-494-4599
E-mail: sa[email protected]m
Internet: gvs-rpb.com
INSTRUCTIONS DE SÉCURITÉ POUR L‘UTILISATEUR DU PRODUIT
AVANT LA PREMIÈRE UTILISATION - ÊTRE FORMÉ ET MÉDICALEMENT APTE
N‘utilisez pas ce respirateur avant d‘avoir lu ce manuel et le manuel d‘utilisation du PX5 PAPR ou du dispositif
de régulation du débit (procurez-vous des copies supplémentaires sur gvs-rpb.com) et d‘avoir été formé
à l‘utilisation, l‘entretien et aux restrictions du respirateur par une personne qualifiée (désignée par votre
employeur) et ayant des connaissances sur le respirateur T200 de RPB.
Ne portez pas ce respirateur avant d‘avoir passé une évaluation médicale, incluant un questionnaire médical ou
un examen médical initial, effectuée par un médecin qualifié ou un autre professionnel de santé agréé.
Allergènes : Ce produit ne contient aucun allergène commun.
Certains matériaux pourraient causer une réaction allergique chez les personnes sensibles. Si vous avez une
allergie connue ou développez une irritation, informez votre employeur. Les irritations peuvent être causées par
un nettoyage insuffisant. Suivez toutes les instructions de nettoyage et d‘entretien données dans les manuels
d‘utilisation, pour ce produit et tous les autres produits RPB que vous utilisez.
S‘ASSURER QUE LE SYSTÈME EST PRÊT À L‘EMPLOI
Assurez-vous d‘avoir un système complet. Vérifiez que vous avez bien tous les composants requis pour utiliser
le T200 en tant que respirateur complet et approuvé :
Assemblage du capot du respirateur (T200 ou T-Link)
Assemblage du tube respiratoire
Dispositif de régulation du débit (PX5 PAPR)
Voir le schéma des composants du respirateur Le T200 de RPB est uniquement approuvé pour une utilisation
avec le PX5 PAPR de RPB, la vanne de régulation à débit constant de RPB ou le dispositif de contrôle
climatique de RPB. Utilisez uniquement des pièces et des composants authentiques de la marque RPB faisant
partie de l‘assemblage du respirateur approuvé. L‘utilisation d‘équipements incomplets ou inappropriés, y
compris l‘utilisation de faux ou de pièces autres que celles de RPB, peut induire une protection inadéquate et
annulera l‘approbation du respirateur entier. Ne pas modifier ou altérer des pièces du produit.
Inspectez quotidiennement tous les composants, afin de détecter des signes de détérioration ou d‘usure et
defissure, qui pourraient réduire le niveau de protection initialement prévu. Mettez hors service tout composant

66
T200™
ou produit endommagé, y compris une visière ou un casque ayant subi un impact, jusqu‘à ce qu‘il soit réparé
ou remplacé. Des lunettes de sécurité ou tout autre composant rayés ou endommagés devraient être remplacés
par des pièces de rechange RPB authentiques. Lorsque des lunettes de sécurité ou résistantes aux impacts sont
remplacées, assurez-vous de retirer le film de protection additionnel des deux côtés des lunettes. Si le film reste
en place, cela pourrait affecter la clarté optique des lunetteset causer une fatigue oculaire. Inspectez l‘intérieur
du respirateur afin de détecter des poussières respirables ou d‘autres objets étrangers. Veillez à ce que l‘intérieur
du respirateur reste tout le temps propre.
Veillez à ce que l‘équipement soit assemblé correctement selon la configuration qui convient à votre utilisation.
Un capot incomplet ou mal installé pourrait ne pas fournir une protection adéquate sur le plan respiratoire
et contre les impacts. Voir Configuration et entretien du respirateur. Voir Revêtir le respirateur pour des
informations sur l‘ajustement.
S‘ASSURER D‘AVOIR L‘ÉQUIPEMENT APPROPRIÉ POUR SON ACTIVITÉ
Vérifiez que le T200 fournit la protection adéquate pour votre activité. Le cas échéant, vérifiez le programme de
sécurité de votre lieu de travail, le programme de protection respiratoire et les normes et règlementations pour
votre activité et votre secteur. Voir PROTECTION FOURNIE ET RESTRICTIONS.
AVANT DE REVÊTIR LE T200 :
Vérifiez que les contaminants aériens sont dans les limites recommandées pour l‘utilisation du respirateur :
Déterminez le type et le niveau de contamination. Vérifiez que les concentrations des
contaminants aériens ne dépassent pas celles autorisées par les règlementations et
recommandations pour les respirateurs motorisés purifiants à adduction d‘air ou les respirateurs
à adduction d‘air.
Filtrer l‘air respirable :
PAPR: Une fois le niveau de contamination confirmé, sélectionnez la cartouche de filtre adaptée
à votre utilisation pour vous assurer d‘être suffisamment protégé. Suivez le manuel d‘utilisation
du PX5 PAPR.
S‘assurer que la zone est bien ventilée et surveillée :
Assurez-vous que la zone est bien ventilée et que des échantillons d‘air sont régulièrement
prélevés, afin de confirmer que l‘atmosphère reste bien dans les niveaux recommandés par les
organismes de réglementation.
Si vous avez des questions, adressez-vous à votre employeur.
NE RENTREZ PAS DANS LA ZONE DE TRAVAIL si l‘une des conditions suivantes existe :
L‘atmosphère présente un danger immédiat pour la vie ou la santé.
Vous ne pouvez pas vous s‘échapper sans l‘aide du respirateur.
L‘atmosphère contient moins de 21% ±1% d’oxygène.
Une atmosphère inflammable ou explosive est présente lorsqu‘il est utilisé avec des systèmes
comportant des pièces dépourvues de sécurité intrinsèque, PX5.
Les niveaux de contaminants dépassent les réglementations ou les recommandations.
Les niveaux ou les concentrations des contaminants sont inconnus.
La zone de travail est mal ventilée.
Lorsque la température est en-dehors de la plage de -10°C à +60°C (14°F à 140°F).
QUITTEZ IMMÉDIATEMENT LA ZONE DE TRAVAIL SI :
L‘un des composants du produit est endommagé.
Votre visions‘affaiblit.
Le débit d‘air s‘arrête ou ralentit, ou une alarme retentit. Ne pas utiliser de respirateur motorisé purifiant
à adduction d‘air si le débit de l‘air est inférieur à 170 lpm (6 cfm).
Vous avez du mal à respirer.
Vous ressentez des étourdissements, de la nausée, vous avez trop froid, trop chaud ou vous sentez mal.
Vos yeux, votre nez ou votre peau sont irrités.
La zone de travail est un espace confiné (à moins que des mesures spécifiques pour les espaces
confinés n‘aient été prises).

67
Vous sentez un goût, une odeur ou apercevez des contaminants à l‘intérieur du casque.
Vous avez toute autre raison de soupçonner que le respirateur ne fournit pas une protection adéquate.
ENTRETIEN DU PRODUIT
Ne placez jamais le casque sur des surfaces chaudes. N‘appliquez pas de peintures, de solvants, de colles ou
d‘étiquettes autocollantes, sauf lorsque cela est indiqué parRPB. Le produit pourrait être gravement affecté par
certains produits chimiques.
Voir la section «Configuration et entretien du respirateur» pour des instructions de nettoyage plus détaillées.
INSTRUCTIONS POUR DES UTILISATIONS OU DES ENVIRONNEMENTS SPÉCIAUX
Espaces confinés
Si ce respirateur est utilisé dans des espaces confinés, veillez à ce que le lieu soit bien ventilé et à ce que les
concentrations en contaminants soient inférieures aux recommandations données pour ce respirateur. Suivez
toutes les procédures relatives à l‘entrée et l‘opération dans et à la sortie d‘un espace confiné, telles que
définies dans les règlementations et normes applicables.
CONFIGURATION ET ENTRETIEN DU RESPIRATEUR
ASSEMBLAGE ET AJUSTEMENT DU HARNAIS DE
TÊTE AVEC SANGLES SUPÉRIEURES
IMAGE 2.1 À LA PAGE 12
Attachez le bandeau frontal aux supports de
fixation du harnais de tête. 1. Faites glisser les
extrémités dans les sillons des supports de
fixation. 2. Placez le trou en face de la cheville
à l’intérieur du support de fixation. Accrochez et
ajustez.
IMAGE 2.2 À LA PAGE 12
Attachez les sangles supérieures aux supports
de fixation du harnais de tête avec le côté arrondi
vers la tête. Fixez le trou des sangles sous
l’attache du support du harnais de tête. Poussez
ensuite l’encoche située sur les sangles par-
dessus le clip supérieur du support de fixation du
harnais de tête.
IMAGE 2.3 À LA PAGE 12
Alignez l’assemblage du cliquet de façon que
le logo RPB à l’intérieur du rembourrage soit à
l’endroit. Fixez l’assemblage du cliquet dans les
trou des supports de fixation du harnais de tête en
(1) faisant glisser l’attache située à l’extrémité du
bandeau du cliquet sur le trou du support à partir
de l’intérieur. 2. Enclenchez ensuite le cliquet
dans le trou sur le support.
IMAGE 2.4 À LA PAGE 12
Le harnais de tête peut être ajusté avec le
dispositif de réglage du cliquet situé à l’arrière
du bandeau. Tournez la molette pour serrer et
desserrer le bandeau.
IMAGE 2.5 À LA PAGE 13
Pour que les sangles du harnais soient plus
petites, poussez les deux sangles en même temps
pour serrer.
IMAGE 2.6 À LA PAGE 13
Pour que les sangles du harnais soient plus
grandes, 1. Détachez les attaches d’extrémité de
la sangle. 2. Tirez ensuite sur les sangles jusqu’à
l’encoche souhaitée. Clipsez et fixez à nouveau
les attaches sur la sangle.
ASSEMBLAGE DE LA CASQUETTE ANTICHOC
IMAGE 3.1 À LA PAGE 13
Retirez les sangles du support de fixation,
décrochez-les en bas et soulevez vers le haut.
IMAGE 3.2 À LA PAGE 13
Fixez la casquette antichoc aux mêmes
emplacements de montage sur lesquels les
sangles étaient fixées. Placez le trou de la
casquette antichoc sous l’attache du support du
harnais de tête. Faites ensuite tourner le trou
d’assemblage de la casquette antichoc sur le
clip supérieur du support de fixation du harnais
de tête.
REMARQUE : L’ASSEMBLAGE DE LA
CASQUETTE ANTICHOC EST ILLUSTRÉ SUR LES
IMAGES 4.1-6.5. TOUTES LES INSTRUCTIONS
RELATIVES À LA CONFIGURATION DU
HARNAIS DE TÊTE ET DE LA CONDUITE D’AIR
S’APPLIQUENT ÉGALEMENT À LA CASQUETTE
ANTICHOC (15-850) ET AU HARNAIS AVEC
SANGLES SUPÉRIEURES (15-841).
ATTACHER LES MONTURES DE LA LUNETTE
IMAGE 4.1 À LA PAGE 14
Alignez le support de fixation du harnais de tête
avec la monture de la lunette, relevez l’attache
et poussez vers l’avant jusqu’à l’emplacement
souhaité, en veillant à ce que l’attache soit bien
fixée dans l’encoche de positionnement souhaitée.
Répétez les mêmes étapes de l’autre côté.

68
T200™
IMAGE 4.2 À LA PAGE 14
Ajustez les montures de la lunette en utilisant
l’attache pour les faire avancer ou reculer sur
les montures. Cela va rapprocher ou éloigner la
lunette du capot du visage de l’utilisateur.
ATTACHER LA CONDUITE D’AIR
IMAGE 5.1 À LA PAGE 14
1. Alignez les flèches d’alignement. 2. Faites
glisser les ailes de l’assemblage de la conduite
dans l’encoche en forme de «W» située sur les
clips latéraux jusqu’à ce que le clip du milieu
soit bien enclenché au-dessus de la section de
croisement de l’aile.
IMAGE 5.2 À LA PAGE 14
Assemblage de conduite attachée aux montures
de la lunette
PLACER LA CONDUITE D’AIR DE LA SUSPENSION
DE TÊTE / CASQUETTE ANTICHOC DANS LE
CAPOT
IMAGE 6.1 À LA PAGE 15
Insérez l’assemblage de la suspension de tête ou
de la casquette antichoc dans le capot.
IMAGE 6.2 À LA PAGE 15
Insérez l’entrée filetée de la conduite d’air dans le
joint en caoutchouc noir situé à l’arrière du capot.
En commençant par le bas, étirez le joint en
caoutchouc jusqu’à la nervure de retenue derrière
la section filetée.
IMAGE 6.3 À LA PAGE 15
Alignez les attaches de la lunette avec les clips
situés sur les côtés des montures de la lunette.
- Accrochez le point 1 sous le point 1 comme sur
l’image.
- Clipsez le point 2 au-dessus du point 2 comme
sur l’image.
IMAGE 6.4 À LA PAGE 15
Insérez la bande de fixation et insérez-la dans
l’encoche située sur le support de fixation du
harnais de tête. Fixez les extrémités en appuyant
fermement.
IMAGE 6.5 À LA PAGE 15
Ajustez le dispositif d’orientation du débit vers
le haut ou vers le bas pour que l’air afflue vers la
lunette ou vers le visage.
ATTACHER LE TUBE RESPIRATOIRE
IMAGE 7.1 À LA PAGE 16
Vérifiez que le joint torique est bien sur l’entrée
filetée. Fixez le tube respiratoire sur l’entrée en
tournant dans le sens horaire. Ne serrez pas
excessivement. Tenez le capot pour l’empêcher
de tourner pendant le serrage du tube respiratoire.
ADDUCTION D’AIR MOTORISÉE
IMAGE 8.1 À LA PAGE 16
Vérifiez que le joint plat est bien sur le raccord du
tube respiratoire. Insérez l’extrémité à baïonnette
du tube respiratoire dans la sortie du PX5 PAPR
et faites un demi-tour dans le sens horaire jusqu’à
qu’elle soit bien fixée.
POUR UNE UTILISATION AVEC LE PX5 DE RPB -
VOIR LE MANUEL D’UTILISATION DU PAPR
Lorsque le respirateur T200 est utilisé en
conjonction avec le PX5 AIR PAPR de RPB,
veuillez consulter le manuel d’utilisation du PX5
PAPR de RPB pour la configuration et l’utilisation
de l’assemblage.
Remarque : Le PX5 DERPB est un respirateur
purifiant à adduction d’air motorisée, par
conséquent, une attention particulière est requise
lors de la sélection du filtre approprié selon
l’utilisation prévue du respirateur.
UTILISATION D’UN STÉTHOSCOPE OU DE PRO-
TECTIONS AUDITIVES
IMAGE 9.1 À LA PAGE 17
Le capot a été conçu de façon que les oreilles
de l’utilisateur soient exposées afin de pouvoir
utiliser un stéthoscope sans compromettre la
qualité de l’air respiré par l’utilisateur.
IMAGE 9.2 À LA PAGE 17
Placez les protections auditives Quiet-Slim
18-524 de RPB avec le tour de cou situé à l’arrière
du cou, en veillant à ce que les rembourrages
encadrent parfaitement les oreilles. Fixez le
bandeau du dessus de la tête avec la sangle
en velcro. Enfilez le capot après avoir placé les
protections auditives.
Consultez le manuel d’utilisation des protections
auditives Quiet-Slim pour des informations plus
détaillées.
LUNETTES EN KIT CLEAR-VISION
IMAGE 10.1 À LA PAGE 17
Décollez la protection des lunettes en kit et
appliquez les lunettes à l’extérieur de la lunette
cousue dans le capot.
IMAGE 10.2 À LA PAGE 17
Utilisez les languettes repliées pour retirer
chaque lunette selon le besoin.
REMPLACEMENT ET NETTOYAGE DU REMBOUR-
RAGE FRONTAL
IMAGE 11.1 À LA PAGE 18
Pour retirer le rembourrage frontal, détachez les

69
fixations en velcro. Nettoyez-le avec un détergent
doux ou remplacez-le par un nouveau.
IMAGE 11.2 À LA PAGE 18
Placez le rembourrage frontal de rechange ou
nettoyé à l’intérieur du bandeau avant du harnais
de tête. Repliez le haut et le bas, et fixez les
languettes en velcro.
NETTOYER LE T200 ET LE REMBOURRAGE DE LA
CASQUETTE ANTICHOC
IMAGE 12.1 À LA PAGE 18
Retirez l’assemblage de la conduite du harnais de
tête ou de la casquette antichoc en déclipsant la
lunette de chaque côté et en tirant l’entrée filetée
hors du joint en caoutchouc situé à l’arrière.
IMAGE 12.2 À LA PAGE 18
Le rembourrage de la casquette antichoc est
attaché à l’intérieur de la casquette antichoc
par des points en velcro. Sortez le rembourrage
du casque en le décrochant. Le rembourrage
peut être nettoyé avec un détergeant doux ou
remplacé.
Nettoyez le harnais de tête ou la casquette
antichoc avec l’assemblage de la conduite en
utilisant de l’eau chaude et un détergeant doux.
Laissez-les sécher avant de les replacer dans le
capot.
REVÊTIR ET RETIRER LE RESPIRATEUR
REVÊTIR LE CAPOT
Après avoir terminé la configuration, vous êtes prêt à enfiler votre respirateur T200 de RPB. Commencez
par examiner l’intérieur du capot et du harnais de tête, afin de vérifier qu’ils ne contiennent ni poussières,
ni saletés, ni contaminants. Vérifiez si la source d’air est activée et si de l’air circule bien. Ouvrez ensuite le
bas du capot, placez le respirateur sur votre tête, tirez le capot vers le bas, réglez le cliquet du harnais de
tête pour l’ajuster correctement. Veillez à ce que la fermeture soit bien hermétique en utilisant le cordon
élastique. Le joint doit reposer au-dessus du cliquet pour un ajustement facile, mais le reste du harnais de
tête ainsi que la conduite devraient être entièrement rentrés dans le capot.
Si vous utilisez un capot avec un col scellé, veillez à ce que le col scellé soit hermétiquement fermé tout
autour du cou avec le cordon élastique ajustable. Rentrez le plastron interne sous votre combinaison ou
autre vêtement externe. Étirez le plastron externe le long de vos épaules et vous assurant qu’il est bien à
plat sur votre poitrine et votre dos, de façon à ne pas entraver vos travaux.
T200 CAPOTS À ÉTANCHÉITÉ FACIALE
IMAGE 13.1 À LA PAGE 19
Ouvrez le bas du capot avec de l’air arrivant de
la source et placez le respirateur sur votre tête.
Veillez à ce que le capot soit bien centré sur votre
tête.
IMAGE 13.2 À LA PAGE 19
Tirez le capot vers le bas, serrez le cliquet du
harnais de tête pour l’ajuster. Veillez à ce que le
cordon élastique ajustable assure une fermeture
hermétique autour du menton, au niveau des
joues, des oreilles et à l’arrière de la tête.
T-LINK CAPOT À COLS SCELLÉS
IMAGE 14.1 À LA PAGE 20
Avec de l’air circulant, ouvrez le bas du capot et
placez le respirateur sur votre tête. Veillez à ce
que le capot soit bien centré sur votre tête.
IMAGE 14.2 À LA PAGE 20
Tirez le capot vers le bas, serrez le cliquet du
harnais de tête pour l’ajuster et veillez à ce que le
col scellé forme bien une fermeture hermétique
autour de votre cou en veillant à ce que l’élastique
soit bien serré
IMAGE 14.3 À LA PAGE 20
Rentrez le plastron interne dans le col de votre
chemise, combinaison ou tenue de protection
afin d’empêcher l’entrée de contaminants dans le
capot. Tirez le plastron externe vers le bas.
IMAGE 14.4 À LA PAGE 20
Serrez la ceinture du dispositif de régulation du
débit autour de votre taille au niveau des hanches.
Vérifiez toujours la présence de contaminants à l’intérieur du
respirateur avant de le revêtir. Enfilez et retirez toujours le casque en-dehors de la zone de travail,
en gardant l’intérieur du casque propre et sans contaminants. Ne pas effectuer ces étapes pourrait
vous exposer à des matières et des contaminants dangereux qui pourraient affecter les fonctions du
respirateur.
AVERTISSEMENT

70
T200™
RETIRER LE CAPOT
Une fois votre travail terminé, gardez votre respirateur avec de l’air circulant dans le casque tant que
vous n’avez pas quitté la zone contaminée. En fonction des contaminants, il pourrait être recommandé de
nettoyer l’extérieur du casque et vos vêtements de travail avant de retirer le respirateur. Un programme de
nettoyage du lieu de travail pourrait être nécessaire.
INSPECTION
Si le capot est contaminé ou présente des traces d’usure excessives, débarrassez-vous du capot en
respectant les règlementations locales et fédérales. Conservez le casque, le tube respiratoire et les autres
pièces pour un usage ultérieur s’ils sont encore en bon état.
STOCKAGE
Avant de ranger le respirateur, nettoyez l’unité en suivant les instructions de nettoyage de ce manuel
d’utilisation. Veillez à ce qu’il soit bien propre, à l’intérieur comme à l’extérieur. Après utilisation, rangez
le respirateur en le suspendant dans un endroit propre et sec, éloigné de la zone de travail. Si vous ne
prévoyez pas d’utiliser le T200 pendant une période prolongée, rangez-le dans un conteneur ou un
sac. Stocker dans en endroit frais et sec entre -10°C et +45°C (14°F à 113°F) <90% RH. Le PX5 pourrait
nécessiter un stockage séparé, veuillez consulter le manuel d’utilisation du PX5 pour des instructions de
stockage spécifiques.
Après utilisation : IMAGE 15.1 À LA PAGE 21
Stockage ou transport de longue durée : IMAGE 15.2 À LA PAGE 21
Les cagoules sont destinées à être jetables. Si un lavage est nécessaire, lavez à la main uniquement. Il
est recommandé d’établir un programme de nettoyage régulier du rembourrage afin d’assurer une bonne
hygiène.
Cagoules : Lavage à la main uniquement avec un détergent doux et de l’eau tiède. Suspendre pour
sécher. Ne pas laver dans une machine à laver ou un sèche-linge. S’il est lavé dans une laveuse ou une
sécheuse, la durée de vie du produit sera réduite et la garantie annulée.
Rembourrage : Lavage à la main uniquement avec un détergent doux et de l’eau tiède. Sécher à plat.
Assurez-vous que tous les composants sont secs avant utilisation. Inspectez l’usure et remplacez s’il est
endommagé ou excessivement usé.
PIÈCES ET ACCESSOIRES IMAGE 16.1 À LA PAGE 22
LISTE DES PIÈCES
Numéro d‘article Description Numéro de pièce
1 T200 Tychem® 2000 - Étanchéité faciale 17-722
2 T200 Tychem® 2000 - Capot longueur d’épaule
avec étanchéité faciale interne 17-732
3 T-Link Tychem® 2000 - Capot complet avec col scellé 17-712
T-Link Tychem® 4000 - Capot complet avec col scellé, coutures scellées 17-713
T-Link Tychem® 4000 - Capot complet extra long avec
col scellé, coutures scellées, lunettes de sécurité 17-713-SX
4 Assemblage de la conduite d’air (15-861)
avec montures de lunettes (17-513) (Pas à vendre) 15-860
5 Assemblage du harnais de tête 15-841
6 Assemblage du harnais de la casquette antichoc 15-850
7 Assemblage du cliquet du harnais de tête 16-530
8 Rembourrage frontal du harnais de tête 16-526
9 Montures de lunettes (paire) 17-513
10 T200 Kit de lunettes Clear-Vision (1 kit de 7 lunettes) (Paquet de 10)
- pour capots à étanchéité facile (petites lunettes) 17-811
11 T-Link Kit de lunettes Clear-Vision (1 kit de 7 lunettes) (Paquet de 10)
- pour capots extra longs (grandes lunettes) 17-817

71
12 T-Link Lunettes jetables (Paquet de 25)
- pour capots extra longs (grandes lunettes) 17-815
13 Protections auditives Quiet-Slim 18-524
14 Protections auditives Quiet-Slim avec Structures latéral (paire) 18-525
15 Structures latéral (paire) 15-842
16 Couvercle du tube respiratoire - Tychem® 04-852
Couvercle du tube respiratoire - Clear Plastic (pack of 10) 04-856
17 Couvercle du tube respiratoire pour Harnais de sac - Tychem® 04-872
PIÈCES ET ACCESSOIRES DU PAPR IMAGE 16.2 À LA PAGE 24
Numéro d‘article Description Numéro de pièce
1 PX5 PAPR et Ceinture 03-801
2 Tube respiratoire pour PX5 PAPR 04-831
3 Débitmètre pour PX5 PAPR 03-819
4 Ceinture de 5 cm (2’’) 07-765
Ceinture de 5 cm (2’’) - Nettoyage facile 07-765-DC
5 Harnais de sac à dos - Nettoyage facile 03-822-DC
6 Tube respiratoire pour sac à dos 04-841
Utilisez uniquement des pièces de rechange RPB authentiques
(avec le logo et le numéro de pièce), et uniquement selon la configuration spécifiée. L‘utilisation d‘un
équipement incomplet ou inapproprié, y compris l‘utilisation de faux ou de pièces autres que celles de
RPB, peut induire une protection inadéquate et annulera l‘approbation de l‘assemblage complet du
respirateur.
AVERTISSEMENT
GARANTIE LIMITÉE
RPB® garantit que ses produits seront exempts de défauts de matériaux et de fabrication pendant un (1) an,
sous réserve des conditions énoncées dans cette garantie limitée. Ces produits sont vendus pour un usage
uniquement commercial et aucune garantie de consommateur ne s’applique à ces produits. Cette garantie
limitée s’applique à l’acheteur initial du produit et ne peut être transférée ou cédée. Cette garantie est la
garantie unique et exclusive fournie par RPB® et TOUTE CONDITION OU GARANTIE IMPLICITE (Y COMPRIS
TOUTE GARANTIE QUANT À LA QUALITÉ MARCHANDE OU L’ADÉQUATION À UN USAGE SPÉCIFIQUE)
EST REJETÉE ET EXCLUE DE LA PRESTATION DE GARANTIE. La couverture de la garantie limitée de RPB®
ne s’applique pas à des dommages résultant d’un accident, d’une utilisation inappropriée ou détournée des
produits, à de l’usure et des détériorations résultant de l’utilisation normale des produits ou à un mauvais
entretien des produits.
La couverture de la garantie limitée de RPB® est valide à compter de la date d’achat des produits et s’applique
uniquement aux défauts garantis se manifestant en premier et signalés à RPB® pendant la période de garantie.
RPB® se réserve le droit de déterminer de façon raisonnable si un défaut signalé est couvert par cette garantie
limitée.
En cas de défaut garanti, RPB® réparera ou remplacera le produit défectueux (ou un composant du produit) à
son entière discrétion. Cette solution de «réparation ou remplacement» est la seule et unique solution prévue
par cette garantie limitée et en aucun cas la responsabilité de RPB® en vertu de la présente garantie ne
dépassera le prix d’achat initial des produits (ou du composant concerné). RPB® n’assume aucune responsabilité
quant à des dommages consécutifs et indirects, incluant la perte de l’usage, l’entretien et autres coûts et TOUT
DOMMAGE CONSÉCUTIF ET INDIRECT EST REJETÉ ET EXCLU de cette garantie limitée. Contactez RPB® afin
d’avoir accès au service de garantie. Tous les frais encourus pour retourner les produits à RPB® pour un service
de garantie devront être payés par l’acheteur.
RPB® se réserve le droit d’améliorer ses produits à travers des modifications de la conception ou des matériaux
sans avoir d’obligation envers les acheteurs des produits fabriqués antérieurement.

72
T200™
RESPONSABILITÉ
RPB® Safety rejette toute responsabilité, de quelque nature que ce soit, résultant directement ou
indirectement de l’utilisation ou de l’utilisation inappropriée des produits RPB® Safety, y compris à des fins
autres que celles pour lesquelles ils ont été prévus. RPB® Safety ne sera pas tenu responsable de dommages,
de préjudices ou de dépenses résultant d’un manque, ou d’une absence de conseils ou d’informations, ou pour
avoir donné un conseil ou des informations erronés, que cela soit dû à une négligence de la part de RPB®
Safety ou de ses employés, agents ou sous-traitants.
ITALIANO
Fare riferimento ai numeri di pagina del Manuale di istruzioni inglese T200™ per immagini e diagrammi.
SPIEGAZIONE DELLE PAROLE E DEI SIMBOLI DI SEGNALAZIONE
Nel presente manuale sono utilizzati i seguenti simboli di segnalazione e di sicurezza e il prodotto è etichettato
come di seguito:
AVVERTENZA indica una situazione pericolosa che, se non evitata,
potrebbe provocare la morte o gravi lesioni.
PERICOLO indica una situazione pericolosa che, se non evitata, provocherà la
morte o gravi lesioni.
Leggere il Manuale di Istruzioni.
Ulteriori copie dei manuali RPB® sono disponibili su gvs-rpb.com.
TESTATO E CERTIFICATO DA:
CE: BSI Group The Netherlands B.V. (NB2797), Say Building, John M. Keynesplein 9, 1066 EP, Amsterdam, NL
UKCA: BSI Group (AB0086), Kitemark Court, Knowhill, Milton Keynes MK5 8PP, United Kingdom
RPB® Safety LLC è un’azienda certificata ISO9001.
INTRODUZIONE
Il T200 è un respiratore multiuso progettato per una gamma di applicazioni diverse in cui è necessario
essere protetti da agenti contaminanti aero-dispersi. Con un casco antiurto opzionale per la protezione
della testa e tre opzioni di cappa disponibili, il T200 può essere utilizzato sia in ambienti industriali
che sanitari. Per una maggiore protezione dell’udito, è possibile installare il sistema di cuffie auricolari
Quiet-Slim™ opzionale.
Questo prodotto deve essere sempre ispezionato e sottoposto a manutenzione in conformità con il
presente manuale di istruzioni.
Vedere PROTEZIONE FORNITA E LIMITAZIONI per dettagli.
PERICOLO
AVVERTENZA
RPB® SAFETY - GLOBAL HEADQUARTERS
2807 Samoset Rd, Royal Oak, MI 48073, USA
T: 1-866-494-4599 F: 1-866-494-4509 E: sales@gvs.com
RPB® SAFETY - APAC
3 Robin Mann Place, Christchurch Airport, Christchurch 8053, New Zealand
T: +64-3-357-1761 F: +64-3-357-1763 E: sales@gvs.com
GVS S.p.A. - EMEA
Via Roma 50, 40069 Zona Industriale BO, Italy
T: +39 0516176391 E: sales@gvs.com
GVS Filter Technology UK Ltd.
Vickers Industrial Estate, Mellishaw Ln, Morecambe LA3 3EN, UK
T: +44 (0)1524 847600 E: sales@gvs.com

73
gvs-rpb.com
Copyright ©2022 RPB IP, LLC. Tutti i diritti riservati. Tutto il materiale contenuto in questo sito Web
è protetto dalla legge sul copyright degli Stati Uniti e non può essere riprodotto, distribuito, inviato,
visualizzato, pubblicato o trasmesso senza previa autorizzazione scritta di RPB IP, LLC. Non è consentito
alterare o rimuovere alcun marchio, copyright o altra dicitura dalle copie del contenuto.
Tutti i marchi, i marchi di servizio e i loghi utilizzati in questa pubblicazione, sia registrati che non, sono
marchi, marchi di servizio o loghi dei rispettivi proprietari. La combinazione di colori verde e grigio è un
marchio registrato di RPB IP, LLC. Tutti i diritti sulla proprietà intellettuale di RPB riportata in questa
pubblicazione, inclusi copyright, marchi, marchi di servizio, segreti commerciali e diritti di brevetto, sono
riservati. Diritti di proprietà intellettuale di RPB significa qualsiasi brevetto, articolo brevettato, domanda
di brevetto, disegno, disegno industriale, diritto d’autore, software, codice sorgente, diritto di database,
diritto morale, invenzione, tecnica, dato tecnico, segreto commerciali, know-how, brand, marchio
registrato, nome commerciale, slogan, logo e qualsiasi altro diritto comune e di proprietà, registrato o non
registrato in tutto il mondo di proprietà di, sviluppato in tutto o in parte da o concesso in licenza da RPB IP,
LLC.
Per assistenza tecnica contattare il nostro servizio clienti al numero 1-866-494-4599 o tramite email:
sales@gvs.com
Modulo #: 7.20.506 Revisione: 2
INFORMAZIONI IMPORTANTI DI SICUREZZA
Scegliere, indossare, utilizzare o manutenere dispositivi per la protezione
respiratoria impropri o eseguire su di essi una manutenzione impropria,
può provocare lesioni, malattie letali ai polmoni con manifestazione ritardata nel tempo, malattie della pelle
degli occhi o morte. Questo prodotto è destinato all’uso professionale in conformità con gli standard o le
normative applicabili per la vostra posizione geografica, il settore e l’attività (vedere le Responsabilità del Datore
di Lavoro). Si raccomanda di familiarizzare con le norme e i regolamenti relativi all’uso di questo dispositivo di
protezione, anche se non applicabili direttamente al vostro caso. In caso di lavoro autonomo o se utilizzati in
un contesto non professionale, fare riferimento alle Responsabilità del Datore di Lavoro e alle Istruzioni per la
sicurezza dell’utilizzatore del prodotto. Per link utili relativi alle normative CE, alle norme AS/NZS e per altri
contenuti: gvs-rpb.com/healthcare/important-safety-information.
DATORI DI LAVORO: leggere il presente manuale e ottemperare alle responsabilità specifiche del datore di
lavoro.
UTILIZZATORI DEL PRODOTTO: leggere il presente manuale e seguire le Istruzioni sulla Sicurezza per
l’Utilizzatore del Prodotto.
CONTROLLARE IL SITO WEB PER GLI AGGIORNAMENTI. I manuali dei prodotti vengono aggiornati
regolarmente. Visitare il sito Web gvs-rpb.com/healthcare/resources per la versione più recente di questo
manuale prima di utilizzare il prodotto.
AVVERTENZA
PROTEZIONE FORNITA E LIMITAZIONI
RESPIRAZIONE
Il dispositivo RPB T200 è omologato nelle categorie come di seguito:
Aria Compressa
Il PAPR RPB T200, quando correttamente montato e utilizzato con tutti i componenti necessari,
compreso il Tubo di Respirazione Completo e il Respiratore Purificatore ad Aria Compressa RPB PX5, è
un respiratore purificatore ad aria compressa omologato EN 12941: 1998 + A1: 2003 + A2: 2008 TH3
P R SL . Come tale, riduce significativamente, ma non elimina completamente, la respirazione di agenti
contaminanti da parte di chi utilizza il respiratore. La protezione specifica dipende dal filtro selezionato per
l’utilizzo con il dispositivo RPB PX5 PAPR (fare riferimento al Manuale di Istruzioni del PX5).

74
T200™
LIMITAZIONI DEL RISCHIO
Il respiratore RPB T200 NON DEVE ESSERE USATO:
In atmosfere immediatamente pericolose per la vita o la salute (IDLH).
L‘utilizzatore non può allontanarsi rapidamente senza l‘aiuto del respiratore.
L‘atmosfera contiene meno del 21% ±1% di ossigeno.
In applicazioni di sabbiatura abrasiva.
Per la protezione da gas pericolosi (ad es. monossido di carbonio).
Gli agenti contaminanti sono in eccesso rispetto alle normative o alle prescrizioni.
Gli agenti contaminanti o le loro concentrazioni non sono noti.
L‘area di lavoro è scarsamente ventilata.
La temperatura non è compresa tra 10°C e +60°C (tra 14°F e 140°F).
In presenza di un‘atmosfera infiammabile o esplosiva quando viene utilizzato con sistemi che includono
parti elettriche non intrinsecamente sicure, come il dispositivo PX5 PAPR.
VISO E OCCHI:
Il T200 con lente standard soddisfa i requisiti di protezione facciale EN 166:2001 1F3 (AS/NZS
1 3 3 7.1 : 2 0 1 0 ) .
Il respiratore T200 non è progettato o testato per fornire protezione contro metalli fusi o liquidi
corrosivi.
Nota: potrebbe essere necessario indossare degli occhiali di sicurezza a seconda dell‘analisi del
rischio del lavoro. Il respiratore T200 non protegge dal potenziale trasferimento di impatto sugli
occhiali indossati sotto il Visore. Non fornisce una protezione completa per occhi e viso contro impatti
di forte intensità e penetrazioni e non è un sostituto per le buone pratiche di sicurezza e per controlli
ingegneristici.
TESTA:
Il T200, se dotato di protezione antiurto, offre una protezione minima per la testa e non soddisfa i
requisiti EN 812:2012. Non soddisfa i requisiti EN 397:2012 + A1: 2012 (AS / NZS 1801: 1997).
UDITO:
Il sistema di protezione per l’udito Quiet-Slim fornisce un indice di riduzione del rumore (NRR) pari a 21 e
un SNR pari a 28 e soddisfa i requisiti EN 352-1. Fare riferimento al manuale di istruzioni del dispositivo
Quiet-Slim per un’installazione e una vestibilità corrette.
Altre protezioni per l’udito, come tappi per le orecchie o cuffie antirumore, devono essere
adeguatamente montate e indossate quando i livelli di rumore superano i livelli di esposizione
consentiti.
REGOLAMENTO DPI
Il dispositivo T200 è conforme al regolamento sui DPI (UE) 2016/425. Regolamento 2016/425 sui DPI
come introdotto nella legge britannica e modificato.
La Dichiarazione di Conformità per CE e UKCA è disponibile su gvs-rpb.com/healthcare/resources/
Vedere la sezione Conservazione per informazioni sull‘imballaggio e sulla protezione richiesti durante
il trasporto.
SCHEMA DEI COMPONENTI DEL RESPIRATORE - PAPR
Il Respiratore RPB T200 è costituito da 3 componenti principali, come mostrato in Figura 1.1. Tutti e 3 i
componenti devono essere presenti e correttamente assemblati per costituire un respiratore completo
omologato EN12941:1998 +A1: 2003 +A2: 2008 come respiratore purificatore ad aria compressa.
FIGURA 1.1 PAGINA 6
1. CASCO RESPIRATORE COMPLETO
2. TUBO DI RESPIRAZIONE COMPLETO
3. ALIMENTAZIONE ARIA PAPR

75
PRECAUZIONI E LIMITAZIONI
ARIA COMPRESSA
A. Non utilizzare in atmosfere contenenti meno del 21% ±1% di Ossigeno.
B. Non utilizzare in atmosfere immediatamente pericolose per la vita o la salute.
C. Non eccedere le concentrazioni massime stabilite dalle normative.
F. Non utilizzare i respiratori purificatori d‘aria se il flusso d‘aria è inferiore a 170 lpm (sei cfm) per le cappe
e/o i caschi.
H. Seguire i programmi stabiliti per la sostituzione delle cartucce e dei canister o osservare le prescrizioni
ESLI per assicurarsi che la cartuccia e i canister vengano sostituiti prima che si verifichi una rottura.
I. Contiene parti elettriche che possono causare un‘accensione in atmosfere infiammabili o esplosive.
J. L‘utilizzo e la manutenzione non corretti di questo prodotto potrebbero causare lesioni o morte.
L. Per la sostituzione delle cartucce, filtro e/o filtri, seguire le istruzioni per l‘uso del produttore .
M. Tutti i dispositivi omologati devono essere scelti, montati, utilizzati e manutenuti in conformità con le
leggi locali e con le altre normative applicabili.
N. Non sostituire, modificare e/o rimuovere componenti. Utilizzare solo pezzi di ricambio originali identici al
pezzo da sostituire nella configurazione specificata dal produttore.
O. Fare riferimento alle istruzioni utente e/o ai manuali di manutenzione per informazioni sull‘uso e sulla
manutenzione di questi respiratori.
P. Non è previsto l‘utilizzo del T200 come maschera chirurgica.
FONTE DI ALIMENTAZIONE ARIA, FISSAGGI E PRESSIONE
FONTE DI ALIMENTAZIONE ARIA
Aria Compressa
Verificare che l‘area contaminata rientri nei limiti di utilizzo per un respiratore purificatore dell‘aria e
determinare il tipo di contaminazione. Una volta che il livello di contaminazione è stato confermato,
è possibile determinare la cartuccia del filtro da utilizzare per l‘applicazione, per assicurarsi di essere
sufficientemente protetti. Assicurarsi che l‘area sia ben ventilata e che vengano prelevati campioni
d‘aria regolari per confermare che l‘atmosfera rimanga all‘interno dei livelli raccomandati dagli organi di
governo. Seguire il Manuale di istruzioni PX5 PAPR per ulteriori dettagli.
Il Produttore ha Progettato Per un Flusso Minimo
RESPONSABILITÀ DEL DATORE DI LAVORO
Le responsabilità specifiche possono variare a seconda della posizione geografica e del settore, ma in generale
RPB si aspetta che i datori di lavoro:
Si attengano a tutti gli standard e le normative applicabili in base alla propria posizione geografica
e al settore industriale. In funzione della posizione geografica e del settore, possono essere applicabili
standard e normative diversi alla vostra scelta e utilizzo del respiratore e di altri dispositivi di protezione
individuale. Tra questi norme e regolamenti nazionali, locali o militari e standard di consenso come CE e AS/
NZS. Vi sono anche requisiti specifici per particolari agenti contaminanti, ad esempio la silice (per ulteriori
informazioni gvs-rpb.com/healthcare/important-safety-information), amianto, agenti patogeni organici, ecc.
E‘ necessario conoscere su quali requisiti si applicano alla propria posizione geografica e al proprio settore
industriale.
Abbiano in essere appropriati programmi di sicurezza.
Abbiano e seguano:
Un programma di sicurezza sul posto di lavoro.
Un programma scritto di protezione respiratoria redatto in conformità con le norme e i
regolamenti applicabili.
FILTER
180 L/MIN VELOCITÀ 1
180 L/MIN VELOCITÀ 2
180 L/MIN VELOCITÀ 3
03-892-P
>10 ore
>7 ore
>6 ore
03-893-A2
>5 ore
>4 ore
>4 ore
03-894-ABE
>5 ore
>4 ore
>4 ore
03-895-ABEK
>5 ore
>4 ore
>4 ore

76
T200™
In accordo con quanto sopra,
Effettuino un‘analisi dei pericoli e selezionino l‘attrezzatura appropriata per ciascuna attività.
L‘analisi dei rischi deve essere eseguita da una persona qualificata. Devono essere previsti controlli
appropriati e una persona qualificata deve determinare quale tipo di protezione è appropriata per
le vie respiratorie, il viso, gli occhi, la testa e l‘udito per le attività e gli ambienti di utilizzo previsti.
(Ad esempio, scegliere un respiratore idoneo per i rischi specifici per le vie aeree, tenendo in
considerazione il posto di lavoro e i fattori specifici dell‘utente e con un Fattore di Protezione Nominale
che soddisfi o superi il livello richiesto per la protezione dei lavoratori, scegliere una protezione per
saldatura per il viso e gli occhi appropriata al tipo di saldatura da eseguire, ecc.)
Se applicabile, controllino il programma per la sicurezza sul luogo di lavoro, il programma per
la protezione respiratoria e gli standard e le normative relative alla propria attività o settore per
identificare i relativi requisiti di protezione e consulti il presente manuale (Protezione Fornita e
Limitazioni) e il Manuale di Istruzioni del PAPR PX5 o del dispositivo di controllo del flusso per le
specifiche del prodotto.
Si assicurino che i lavoratori siano qualificati dal punto di vista medico per usare un respiratore.
Dispongano di un medico qualificato o di altro professionista sanitario autorizzato (PLHCP) che esegua
valutazioni mediche utilizzando un questionario medico o una visita medica iniziale.
Forniscano formazione ai lavoratori sull‘uso, la manutenzione e le limitazioni del dispositivo
T200.
Nominino una persona qualificata che abbia una conoscenza approfondita del dispositivo RPB T200
per fornire formazione:
Qualifiche di colui che fornisce formazione sul Respiratore. Coloro che forniscono formazione sul
respiratore devono:
a) avere una conoscenza approfondita dell‘applicazione e dell‘uso del/dei respiratore/i;
b) avere conoscenze pratiche nella scelta e nell‘uso dei respiratori e delle lavorazioni che
avvengono nel sito;
c) avere una conoscenza approfondita del programma per il respiratore nel sito;
d) conoscere i regolamenti applicabili.
Forniscano formazione a ciascun utilizzatore del dispositivo T200 sull‘uso, l‘applicazione, l‘ispezione,
la manutenzione, la conservazione, su come indossarlo e sui limiti del prodotto in conformità con il
contenuto del presente Manuale di istruzioni, del Manuale di istruzioni del casco e con i requisiti standard
o regolamentari. Si assicurino che ciascun utilizzatore abbia letto entrambi questi manuali.
Si accertino che il dispositivo sia configurato, utilizzato e manutenuto correttamente.
Si assicurino che il dispositivo sia correttamente configurato, ispezionato, indossato, utilizzato e
manutenuto, compresa la scelta della cartuccia filtro appropriata e, laddove applicabile, le regolazioni
del filtro oscurante per saldatura, per l‘applicazione specifica.
Misurino e monitorino gli agenti contaminanti presenti nell‘aria nell‘area di lavoro.
Misurino e monitorino i livelli di agenti contaminanti presenti nell‘aria nell‘area di lavoro in conformità
con i requisiti applicabili. Assicurarsi che l‘area di lavoro sia ben ventilata.
In caso di domande, contattare RPB.
Chiamare il servizio clienti tramite i seguenti contatti:
Tel: 1-866-494-4599
E-mail: sa[email protected]m
Web: gvs-rpb.com
ISTRUZIONI DI SICUREZZA PER L‘UTILIZZATORE DEL PRODOTTO
PRIMA DEL PRIMO UTILIZZO - E‘ NECESSARIO AVER RICEVUTO LA FORMAZIONE ED ESSERE
QUALIFICATO DAL PUNTO DI VISTA MEDICO
Non utilizzare questo dispositivo prima di aver letto il presente manuale e il Manuale di istruzioni del casco
(copie aggiuntive disponibili su gvs-rpb.com) e di aver ricevuto formazione sull‘uso, la manutenzione e le

77
limitazioni del respiratore da parte di una persona qualificata (nominata dal datore di lavoro) che abbia una
conoscenza approfondita del dispositivo di climatizzazione RPB T200.
Non indossare questo respiratore prima di essere stati sottoposti a valutazione medica tramite un questionario
medico o una visita medica iniziale eseguita da un medico qualificato o da altro professionista sanitario
autorizzato (PLHCP).
Allergeni: in questo prodotto non è usato alcun allergene comune noto.
Alcuni materiali potrebbero causare una reazione allergica in individui sensibili. Se si ha un‘allergia nota o se
si sviluppa un‘irritazione, informare il datore di lavoro. Le irritazione possono essere causate da mancanza di
pulizia. Seguire tutte le istruzioni relative alla pulizia e alla manutenzione riportate nei manuali di istruzioni di
questo e altri prodotti RPB che si utilizzano.
ASSICURARSI CHE IL SISTEMA SIA PRONTO PER L‘USO
Assicurarsi di disporre di un sistema completo. Verificare di disporre di tutti i componenti necessari perché il
dispositivo T200 costituisca un respiratore completo omologato:
Casco Respiratore Completo (T200 o T-LINK)
Tubo di Respirazione Completo
Dispositivo di Controllo del Flusso (PX5 PAPR)
Fare riferimento allo Schema dei Componenti del Respiratore. Il dispositivo RPB T200 è omologato solo per
l‘uso con il PAPR RPB PX5 la Valvola a Flusso Costante RPB. Utilizzare solo parti e componenti originali RPB
facenti parte del respiratore completo omologato. L‘uso di attrezzature incomplete o inappropriate, compreso
l‘uso di ricambi contraffatti o non originali RPB, può comportare una protezione inadeguata e farà decadere
l‘omologazione del respiratore completo. Non modificare né alterare alcuna parte di questo prodotto.
Ispezionare quotidianamente tutti i componenti per rilavare eventuali segni di danneggiamento o di usura
che possano ridurre il livello di protezione originariamente previsto. Non utilizzare qualsiasi componente o
prodotto danneggiato, inclusi il casco o la visiera se hanno subito un impatto, fino alla loro riparazione o
sostituzione. Lenti di sicurezza graffiate o danneggiate, così come altri componenti, devono essere sostituiti con
ricambi originali a marchio RPB. Quando le lenti di sicurezza e di protezione dagli impatti vengono sostituite,
assicurarsi di rimuovere le eventuali pellicole protettive aggiuntive da entrambi i lati della lente. Se l‘eventuale
pellicola viene lasciata in posizione, potrebbe influire sulla visibilità della lente e causare affaticamento degli
occhi. Ispezionare l‘interno del respiratore per individuare polvere respirabile o altri corpi estranei. Mantenere
sempre pulito l‘interno del respiratore.
Assicurarsi che il casco sia correttamente assemblato nella configurazione idonea per la propria applicazione.
Una cappa incompleta o installata in modo inadeguato potrebbe fornire un impatto inadeguato e una protezione
respiratoria. Vedere Configurazione E Manutenzione Del Respiratore. Vedere Indossare il Respiratore per
informazioni in merito.
VERIFICARE DI DISPORRE DELLE APPARECCHIATURE APPROPRIATE PER LA PROPRIA ATTIVITÀ
Verificare che il dispositivo T200 offra una protezione adeguata per la propria attività. Se applicabile, controllare
il programma di sicurezza sul posto di lavoro, il programma di protezione delle vie respiratorie e gli standard e le
normative relative alla propria attività o settore industriale. (Vedere Protezione Fornita E Limitazioni.)
PRIMA DI INDOSSARE IL RESPIRATORE T200:
Verificare che gli agenti contaminanti presenti nell‘aria rientrino nei limiti raccomandati per l‘uso del
respiratore:
Determinare il tipo e il livello di contaminazione. Verificare che le concentrazioni di agenti
contaminanti nell‘aria non eccedano quelle consentite dalle normative applicabili e dalle
raccomandazioni per i respiratori ad aria alimentata.
Filtrazione dell‘aria di respirazione:
PAPR: Quando i livelli di contaminazione sono stati confermati, determinare la cartuccia filtro
corretta da utilizzare per l‘applicazione, per assicurarsi di essere sufficientemente protetti.
Seguire il Manuale di Istruzioni del PAPR PX5.

78
T200™
Assicurarsi che l‘area sia ventilata e monitorata:
Assicurarsi che l‘area sia ben ventilata e che vengano prelevati regolarmente campioni d‘aria per
confermare che l‘atmosfera rimanga all‘interno dei livelli raccomandati dagli organi di governo.
In caso di domande, chiedere al proprio datore di lavoro.
NON ENTRARE NELL‘AREA DI LAVORO se sussiste una delle seguenti condizioni:
L‘atmosfera è nell‘immediato pericolosa per la vita o la salute.
Non è possibile allontanarsi velocemente senza l‘aiuto del respiratore.
L‘atmosfera contiene meno del 21% ±1% di Ossigeno.
In presenza di un‘atmosfera infiammabile o esplosiva quando utilizzato con sistemi che includono parti
elettriche non intrinsecamente sicure, PX5.
Gli agenti contaminanti eccedono i regolamenti o le raccomandazioni.
Gli agenti contaminanti o le loro concentrazioni Non sono note.
L‘area di lavoro è scarsamente ventilata.
La temperatura non è compresa tra -10°C e +60°C (tra 14°F e 140°F).
LASCIARE IMMEDIATAMENTE L‘AREA DI LAVORO SE:
Qualsiasi componente del prodotto viene danneggiato.
La visione è compromessa.
Il flusso d‘aria si arresta o rallenta o suona un allarme. Non utilizzare Respiratori Purificatori ad Aria
Compressa se il flusso d‘aria è inferiore a 170 slpm (6 cfm).
Respirare diventa difficoltoso
Si avvertono vertigini, nausea, caldo eccessivo, freddo eccessivo o malessere.
Gli occhi, il naso o la pelle diventano irritati.
L‘area di lavoro è uno spazio confinato (a meno che non vengano intraprese opportune misure per gli
spazi confinati).
Si avvertono sapori o odori o si vedono agenti contaminanti all‘interno del casco.
Si percepisce qualsiasi altra ragione che induca a sospettare che il respiratore non stia offrendo un
livello di protezione adeguato.
CURA DEL PRODOTTO
Non posizionare mai il casco su superfici calde. Non applicare vernici, solventi, adesivi o etichette autoadesive
ad eccezione di quanto prescritto da RPB. Questo prodotto può essere danneggiato da alcune sostanze
chimiche.
Vedere la sezione „Configurazione e Manutenzione del Respiratore“ per istruzioni di pulizia più specifiche.
ISTRUZIONI PER USI O AMBIENTI SPECIFICI
Spazi Confinati
Se questo respiratore viene utilizzato in spazi confinati, assicurarsi che l‘area sia ben ventilata e che tutte le
concentrazioni di agenti contaminanti siano inferiori a quelle raccomandate per questo respiratore. Seguire
tutte le procedure per l‘ingresso, la permanenza lavorativa e l‘uscita dallo spazio confinato come definito nelle
normative e negli standard applicabili.
CONFIGURAZIONE E MANUTENZIONE DEL RESPIRATORE
IMBRACATURA PER LA TESTA CON CINGHIE
SUPERIORI COMPLETO. MONTAGGIO E
REGOLAZIONE
FIGURA 2.1 PAGINA 12
Collegare la fascia anteriore alle staffe
dell’imbracatura per la testa. 1. Far scorrere le
estremità nella gola sulle staffe. 2. fissare il foro
al perno all’interno della staffa. Regolarla per
adattarla al meglio.
FIGURA 2.2 PAGINA 12
Collegare le cinghie superiori alle staffe
dell’imbracatura per la testa con il lato
arrotondato rivolto verso la testa. Fissare il
foro nelle cinghie sotto la linguetta sulla staffa
dell’imbracatura. Quindi spingere l’alloggiamento
sulle cinghie sopra la clip superiore sulla staffa
dell’imbracatura.
FIGURA 2.3 PAGINA 12
Allineare il gruppo del cricchetto in modo che

79
il logo RPB sull’imbottitura interna si trovi in
alto a destra. Collegare il cricchetto completo
ai fori nelle staffe della imbracatura per la testa
(1) facendo scorrere la linguetta sull’estremità
della fascia del cricchetto sul foro nella staffa
dall’interno. 2. Quindi far scattare la clip del
cricchetto nel foro sulla staffa.
FIGURA 2.4 PAGINA 12
L’imbracatura per la testa può essere regolata
con il regolatore a cricchetto sul retro della fascia
per la testa. Ruotare la manopola per stringere e
allentare la fascia per la testa.
FIGURA 2.5 PAGINA 13
Per stringere le cinghie dell’imbracatura, spingere
insieme le due cinghie per stringerle.
FIGURA 2.6 PAGINA 13
Per allargare le cinghie superiori, 1. Sganciare le
linguette terminali da sopra la cinghia. 2. Quindi
tirare le cinghie allontanandole tra loro, fino alla
tacca desiderata. Quindi agganciare le linguette
sulla cinghia per fissarla saldamente.
ASSEMBLAGGIO DEL CASCO DI PROTEZIONE
DAGLI URTI
FIGURA 3.1 PAGINA 13
Per rimuoverlo, tirare la cinghia fuori dalla staffa,
sganciarla dalla parte inferiore e sollevarla verso
l’alto.
FIGURA 3.2 PAGINA 13
Fissare il casco di protezione dagli urti nelle
stesse posizioni di montaggio da cui sono state
rimosse le cinghie. Agganciare il foro nel casco di
protezione dagli urti sotto la linguetta sulla staffa
dell’imbracatura per la testa. Ruotare quindi il
foro di montaggio del casco di protezione dagli
urti sulla clip superiore sulla staffa del cablaggio
della testa.
COLLEGAMENTO DEGLI ATTACCHI DELLA LENTE
FIGURA 4.1 PAGINA 14
Allineare la staffa dell’imbracatura per la testa
con l’attacco della lente, sollevare la linguetta
posteriore e spingerla in avanti fino alla posizione
desiderata, assicurandosi che la linguetta sia
fissata nella fessura corrispondente alla posizione
desiderata. Ripetere sull’altro lato.
FIGURA 4.2 PAGINA 14
Regolare gli attacchi della lente utilizzando la
linguetta per posizionarli in avanti o indietro sugli
attacchi. Così facendo la lente della cappa si
avvicinerà o si allontanerà dal viso.
NOTA: CASCO DI PROTEZIONE DAGLI URTI
COMPLETO MOSTRATO NELLE FIGURE
4.1-6.5. TUTTE LE ISTRUZIONI PER LA
CONFIGURAZIONE DELL’IMBRACATURA PER
LA TESTA E DEL CONDOTTO DELL’ARIA SI
APPLICANO SIA AL CASCO DI PROTEZIONE
DAGLI URTI (15-850) CHE ALLE VERSIONI
(15-841) CON CINGHIE SUPERIORI.
COLLEGAMENTO DEL CONDOTTO DELL’ARIA
FIGURA 5.1 PAGINA 14
1. Allineare le frecce di allineamento. 2. Far
scorrere le alette del condotto completo nella
fessura a forma di “W” sulle clip laterali finché
il fermaglio centrale scatta saldamente sulla
sezione trasversale dell’aletta.
FIGURA 5.2 PAGINA 14
Condotto completo fissato al supporto della lente.
POSIZIONAMENTO DEL CONDOTTO DELL’ARIA
DELL’IMBRACATURA/DEL CASCO ANTI URTO
NELLA CAPPA.
FIGURA 6.1 PAGINA 15
Inserire l’imbracatura per la testa o casco antiurto
completo nella cappa.
FIGURA 6.2 PAGINA 15
Inserire l’ingresso filettato del condotto dell’aria
nella guarnizione in gomma nera sul retro della
cappa. Partendo dal lato inferiore, stendere la
guarnizione in gomma sulla nervatura di fissaggio
dietro la sezione filettata.
FIGURA 6.3 PAGINA 15
Allineare le linguette della lente con le clip sui lati
del supporto della lente.
- Punto di aggancio 1 sotto il punto 1 come
illustrato.
- Agganciare il punto 2 sul punto 2 come
mostrato.
FIGURA 6.4 PAGINA 15
Inserire la cinghia di fissaggio, quindi inserirla
attraverso la fessura sulla staffa dell’imbracatura
per la testa. Fissare insieme le estremità
premendo saldamente.
FIGURA 6.5 PAGINA 15
Regolare l’ugello del flusso d’aria verso l’alto o
verso il basso in modo che l’aria fluisca verso la
lente o verso il viso.
COLLEGARE IL TUBO DI RESPIRAZIONE
FIGURA 7.1 PAGINA 16
Assicurarsi sull’ingresso filettato sia presente
l’o-ring. Collegare il tubo di respirazione

80
T200™
all’ingresso ruotando in senso orario. Non serrare
eccessivamente. Tenere la cappa evitando che
si attorcigli quando il tubo di respirazione viene
serrato.
ARIA COMPRESSA
FIGURA 8.1 PAGINA 16
Assicurarsi che sulla connessione del tubo di
respirazione sia presente la guarnizione piatta.
Inserire l’estremità a baionetta del tubo di
respirazione nell’uscita del PAPR PX5 e ruotare di
mezzo giro in senso orario fino a fissarlo.
PER L’UTILIZZO CON IL PX5 RPB - VEDERE IL
MANUALE DI ISTRUZIONI DEL PAPR
Quando il Respiratore T200 viene utilizzato
insieme al PAPR PX5 RPB, fare riferimento al
manuale di istruzioni per l’utilizzatore del PX5
RPB per la configurazione e l’uso del sistema
completo.
Nota: il PX5 RPB è un Respiratore Purificatore
d’Aria ad Aria Compressa, pertanto è necessario
prestare la massima attenzione quando si sceglie
il filtro corretto per l’applicazione in cui verrà
utilizzato il respiratore.
USO DI UNO STETOSCOPIO O DI UN PARAOREC-
CHIE
FIGURA 9.1 PAGINA17
La cappa è stata progettata affinché le orecchie
degli utenti siano esposte in modo da poter
utilizzare uno stetoscopio senza compromettere
la qualità dell’aria di respirazione degli
utilizzatori.
FIGURA 9.2 PAGINA 17
Indossare i paraorecchie RPB Quiet-Slim 18-524
con l’archetto intorno alla nuca, assicurandosi
che le imbottiture aderiscano completamente alle
orecchie. Fissare la fascia sopra la testa con la
cinghia a strappo. Indossare la cappa dopo aver
indossato i paraorecchie.
Per maggiori dettagli, fare riferimento al manuale
di istruzioni dei paraorecchie Quiet-Slim.
LENTI ADDIZIONALI CLEAR-VISION
FIGURA 10.1 PAGINA 17
Staccare il retro delle lenti addizionali. Applicare
la lente addizionale all’esterno della lente cucita
sulla cappa.
FIGURA 10.2 PAGINA 17
Usare le linguette pre-piegate per rimuovere la
lente in base alle necessità.
SOSTITUZIONE E PULIZIA DELL’IMBOTTITURA
PER LA FRONTE
FIGURA 11.1 PAGINA 18
Per rimuovere l’imbottitura per la fronte, aprire
i ganci e i fissaggi. Pulire con un detergente
delicato o sostituirlo con uno nuovo.
FIGURA 11.2 PAGINA 18
Posizionare l’imbottitura per la fronte nuova
o pulita all’interno della cinghia anteriore
dell’imbracatura per la testa. Piegare le parti
superiore e inferiore e fissare gli agganci.
PULIZIA DEL T200 E DELL’IMBOTTITURA DEL
CASCO ANTI URTO
FIGURA 12.1 PAGINA 18
Rimuovere l’imbracatura per la testa o condotto
completo del casco anti urto dalla cappa,
sganciare la lente su entrambi i lati ed estrarre
l’ingresso filettato dalla guarnizione in gomma
sul retro.
FIGURA 12.2 PAGINA 18
L’imbottitura del casco anti urto è fissata
all’interno del casco anti urto con punti di
aggancio. Staccare l’imbottitura dal casco.
L’imbottitura può essere lavata con un detergente
delicato o sostituita.
Pulire l’imbracatura per la testa o il casco anti
urto e il condotto completo con acqua calda e un
detergente delicato. Lasciar asciugare prima di
montarli nuovamente all’interno di una cappa.
INDOSSARE E RIMUOVERE IL RESPIRATORE
INDOSSARE LA CAPPA
Completata la configurazione, si è pronti per indossare il proprio respiratore RPB T200. Per prima cosa
controllare l’interno della cappa e l’imbracatura per la testa completa per assicurarsi che siano prive di
polvere, sporcizia o agenti contaminanti. Verificare che la sorgente dell’aria sia aperta e che l’aria stia
fluendo. Quindi aprire la parte inferiore della cappa, posizionare il respiratore sulla testa, tirare la cappa
verso il basso, ruotare il cricchetto dell’imbracatura per la testa per regolarlo. Assicurarsi che faccia
tenuta con il laccio elastico. La guarnizione è progettata per essere posizionata sopra il cricchetto per
consentire una facile regolazione, ma il resto dell’imbracatura per la testa e del condotto devono trovarsi
completamente all’interno della cappa.

81
T200 CAPPE A TENUTA FACCIALE
FIGURA 13.1 PAGINA 19
Aprire la parte inferiore della cappa con l’aria
che fluisce dalla sorgente dell’aria, posizionare il
respiratore sulla testa. Assicurarsi che la cappa
sia centrato sulla testa.
FIGURA 13.2 PAGINA 19
Abbassare la cappa e serrare il cricchetto
dell’imbracatura per regolarlo. Assicurarsi che
il laccio elastico regolabile faccia tenuta sotto il
mento, sulle guance, sopra le orecchie e intorno
alla parte posteriore della testa.
T-LINK CAPPE A TENUTA SUL COLLO
FIGURA 14.1 PAGINA 20
Con l’aria che fluisce, aprire la parte inferiore
della cappa e mettere il respiratore sulla testa.
Assicurarsi che la cappa sia centrata sulla tua
testa.
RIMUOVERE IL CASCO
Al termine del lavoro, mantenere acceso il respiratore con l’aria che fluisce nel casco fino a quando si è
fuori dall’area contaminata. A seconda degli agenti contaminanti, può essere consigliabile pulire l’esterno
del casco e gli indumenti da lavoro prima di rimuovere il respiratore. Può essere necessario un program-
ma di pulizia del posto di lavoro.
ISPEZIONE
Se la cappa è contaminata o mostra un’usura eccessiva, smaltire la cappa secondo le normative federali e
locali. Se in buone condizioni conservare casco, tubo di respirazione e le altre parti per un utilizzo futuro.
CONSERVAZIONE
Prima di riporre il respiratore, pulire l’unità seguendo le istruzioni di pulizia contenute nel presente
manuale di istruzioni. Assicurarsi che sia pulito, sia all’interno che all’esterno. Dopo l’uso, riporre il
respiratore appendendolo in un luogo pulito e asciutto, lontano dall’area di lavoro. Se il T200 non viene
utilizzato per un lungo periodo di tempo o se deve essere trasportato, riporlo in un contenitore o in una
borsa. Conservare in un luogo fresco e asciutto tra -10°C e +45°C (tra 14°F e 113°F) e umidità relativa
<90%. Potrebbe essere necessario riporre separatamente il PX5, fare riferimento al manuale di istruzioni
del PX5 per istruzioni specifiche sulla conservazione.
Dopo l’uso: FIGURA 15.1 ON PAGE 21
Conservazione nel lungo periodo o trasporto: FIGURA 15.2 ON PAGE 21
I cappucci sono pensati per essere usa e getta. Se è necessario il lavaggio, lavare solo a mano. Si
raccomanda di stabilire un programma di pulizia regolare per l’imbottitura per garantire una buona igiene.
FIGURA 14.2 PAGINA 20
Abbassare la cappa, stringere il cricchetto
dell’imbracatura per regolarlo e assicurarsi che
la guarnizione sul collo faccia tenuta intorno
al collo, verificando che l’elastico sia fissato
saldamente.
FIGURA 14.3 PAGINA 20
Infilare la pettorina interna nel colletto della
propria camicia, della tuta o dell’equipaggiamento
protettivo per evitare che eventuali agenti
contaminanti entrino nella cappa. Abbassare la
pettorina esterna.
FIGURA 14.4 PAGINA 20
Allacciare la cintura del dispositivo di controllo
del flusso intorno alla vita sopra l’anca.
Se si utilizza una cappa con guarnizione sul collo, assicurarsi che la guarnizione sul collo faccia tenuta
tutto intorno al collo stesso con un laccio elastico regolabile. Infilare la pettorina interna sotto le tute
o altri indumenti esterni. Tirare la pettorina esterna verso il basso sopra le spalle e assicurarsi che sia
distesa sul petto e sulla schiena in modo che non intralci il lavoro.
Controllare sempre l’interno del respiratore per verificare la
presenza di agenti contaminanti prima di indossarlo. Indossare e togliere sempre il casco al di fuori
dall’area di lavoro, mantenendo l’interno del casco pulito e privo di agenti contaminanti. Non eseguire i
passaggi suddetti può esporre l’utilizzatore a sostanze pericolose e agenti contaminanti che potrebbero
compromettere il funzionamento del respiratore.
AVVERTENZA

82
T200™
COMPONENTI E ACCESSORI FIGURA 16.1 PAGINA22
ELENCO DEI COMPONENTI
N° Descrizione Numero di parte
1 T200 Tychem® 2000 - Cappa Guarnizione Facciale 17-722
2 T200 Tychem® 2000 - Cappa Lunghezza della spalla
con Guarnizione Facciale Interna 17-732
3 T-Link Tychem® 2000 - Cappa completa con Guarnizione sul Collo 17-712
T-Link Tychem® 4000 - Cappa completa con Guarnizione sul Collo,
Cuciture a tenuta 17-713
T-Link Tychem® 4000 - Cappa completa Extra Lunga con Guarnizione
sul Collo, Cuciture a tenuta, Lente di Sicurezza 17-713-SX
4 Condotto Aria Completo (15-861) - con supporti per lente (17-513)
(Non in vendita) 15-860
5 Imbracatura per la testa completa 15-841
6 Imbracatura per il casco anti urto completa 15-850
7 Cricchetto per l’imbracatura per la testa completo 16-530
8 Imbottitura per la fronte dell’imbracatura per la testa 16-526
9 Supporti Lente (Coppia) 17-513
10 T200 Lente aggiuntiva Clear-Vision (1 serie di 7 lenti) (Confezione di 10)
- per cappe a tenuta facciale (lente corta) 17-811
11 T-Link Lente aggiuntiva Clear-Vision (1 serie di 7 lenti) (Confezione di 10)
- per cappe a tutta lunghezza (lente lunga) 17-817
12 T-Link Lenti Peel-Off (Confezione di 25)
- per cappe a tutta lunghezza (lente lunga) 17-815
13 Paraorecchie Quiet-Slim 18-524
14 Paraorecchie Quiet-Slim con supporti laterali (coppia) 18-525
15 Supporti laterali (coppia) 15-842
4 Copertura del tubo di respirazione - Tychem® 04-852
Copertura del tubo di respirazione - plastica trasparente (confezione da 10) 04-856
5 Copertura del tubo di respirazione per lo zaino - Tychem® 04-872
RICAMBI E ACCESSORI DEL PAPR FIGURA 16.2 PAGINA 24
N° Descrizione Numero di parte
1 PX5 PAPR e Cintura 03-801
2 Tubo di Respirazione per PX5 PAPR 04-831
3 Misuratore di Flusso PX5 PAPR 03-819
4 Cintura da 5cm (2”) 07-765
Cintura da 5cm (2”) - Pulizia facile 07-765-DC
5 Imbracatura per zaino - Pulizia facile 03-822-DC
6 Tubo di respirazione per zaino 04-841
Utilizzare solo ricambi originali RPB identici al pezzo da sostituire
(contrassegnati con il logo RPB e il part number) e solo nella configurazione specificata. L‘utilizzo
di apparecchiature inadeguate, compreso l‘uso di parti contraffatte o non originali RPB, possono
comportare una protezione inadeguata e faranno decadere l‘omologazione dell‘intero respiratore
completo.
AVVERTENZA
Cappe: lavare a mano solo con detersivo delicato e acqua tiepida. Appendere ad asciugare. Non lavare
in lavatrice o asciugatrice. Se lavato in lavatrice o asciugatrice, la durata del prodotto sarà ridotta e la
garanzia sarà annullata.
Imbottitura: lavare a mano solo con detersivo delicato e acqua tiepida. Stendi ad asciugare.
Assicurarsi che tutti i componenti siano asciutti prima dell’uso. Ispezionare per usura e sostituire se
danneggiato o eccessivamente usurato.

83
GARANZIA E DICHIARAZIONE DI RESPONSABILITÀ
RPB® garantisce che i suoi prodotti saranno privi di difetti nei materiali e nel montaggio per un (1) anno, in
conformità con i termini della presente garanzia limitata. I Prodotti vengono venduti solo per uso professionale
e pertanto su di essi non si applicano le garanzie dei consumatori. La presente garanzia limitata si applica a
beneficio dell’acquirente del prodotto originale e non può essere trasferita o assegnata ad altri. La presente è
l’unica ed esclusiva garanzia fornita da RPB®, e SONO ESCLUSE E NON RICONOSCITE DALLA COPERTURA
DELLA GARANZIA TUTTE LE CONDIZIONI E LE GARANZIE IMPLICITE (INCLUSA QUALSIASI GARANZIA DI
COMMERCIABILITÀ O IDONEITÀ PER UN PARTICOLARE SCOPO). La copertura della garanzia limitata di RPB®
non si applica ai danni derivanti da incidenti, uso improprio o uso scorretto dei Prodotti, usura dovuta al normale
utilizzo dei Prodotti, o mancata corretta manutenzione dei Prodotti.
La copertura della garanzia limitata di RPB® decorre dalla data di acquisto dei Prodotti e si applica solo ai difetti
coperti da garanzia che si manifestano per la prima volta e dei quali è stata inviata comunicazione a RPB®
durante il periodo di garanzia. RPB® si riserva il diritto di determinare a sua ragionevole discrezione se un difetto
dichiarato è coperto da questa garanzia limitata.
Se si verifica un difetto coperto da garanzia, RPB® riparerà o sostituirà il Prodotto difettoso (o un suo
componente), a sua esclusiva discrezione. Questa sostituzione mediante “riparazione o sostituzione” è l’unico
ed esclusivo rimedio ai sensi della presente garanzia limitata e in nessun caso la responsabilità di RPB® potrà
eccedere il prezzo di acquisto originale dei Prodotti (o del componente in questione) ai sensi della presente
garanzia limitata). RPB® non ha alcuna responsabilità per danni incidentali o consequenziali, incluse perdite di
lavoro, manutenzione e altri costi, e TUTTI I DANNI ACCIDENTALI E CONSEQUENZIALI SONO ESCLUSI E NON
RICONOSCIUTI da questa garanzia limitata. Per ottenere il servizio di garanzia contattare RPB®. Per ottenere il
servizio di garanzia deve essere fornita la prova di acquisto . Tutti i costi di restituzione dei prodotti a RPB® per i
servizi in garanzia sono a carico dell’acquirente.
RPB® si riserva il diritto di migliorare i propri Prodotti attraverso modifiche al design o ai materiali senza essere
in obbligo nei confronti degli acquirenti di Prodotti precedentemente fabbricati.
RESPONSABILITÀ
RPB® Safety non può accettare alcuna responsabilità di qualsivoglia natura derivante direttamente
o indirettamente dall’uso o dall’uso scorretto dei prodotti RPB® Safety, compresi eventuali scopi per
i quali i prodotti non sono specificatamente progettati. RPB® Safety non è responsabile per danni,
perdite o spese derivanti dalla mancata fornitura di indicazioni o informazioni o dalla fornitura di
consigli o informazioni errati, dovuti o meno a negligenza di RPB® Safety, dei suoi dipendenti, agenti o
rappresentanti.
POLSKIE
Aby uzyskać zdjęcia i diagramy, patrz numery stron instrukcji obsługi T200™ English.
OBJAŚNIENIE NAPISÓW I SYMBOLI OSTRZEGAWCZYCH
W niniejszej instrukcji obsługi oraz na etykietach produktów stosowane są następujące słowa ostrzegawcze i
symbole bezpieczeństwa:
OSTRZEŻENIE wskazuje na niebezpieczną sytuację, której nieuniknięcie
może spowodować ciężkie obrażenia ciała lub śmierć.
NIEBEZPIECZEŃSTWO wskazuje na niebezpieczną sytuację,
której nieuniknięcie spowoduje ciężkie obrażenia ciała lub
śmierć.
Przeczytaj Instrukcję Obsługi.
Inne wersje językowe instrukcji RPB® można znaleźć na stronie gvs-rpb.com
NIEBEZPIECZEŃSTWO
OSTRZEŻENIE

84
T200™
RPB® SAFETY - GLOBAL HEADQUARTERS
2807 Samoset Rd, Royal Oak, MI 48073, USA
T: 1-866-494-4599 F: 1-866-494-4509 E: [email protected]
RPB® SAFETY - APAC
3 Robin Mann Place, Christchurch Airport, Christchurch 8053, New Zealand
T: +64-3-357-1761 F: +64-3-357-1763 E: sales@gvs.com
GVS S.p.A. - EMEA
Via Roma 50, 40069 Zona Industriale BO, Italy
T: +39 0516176391 E: [email protected]
GVS Filter Technology UK Ltd.
Vickers Industrial Estate, Mellishaw Ln, Morecambe LA3 3EN, UK
T: +44 (0)1524 847600 E: [email protected]
gvs-rpb.com
Prawa autorskie ©2022 RPB IP, LLC. Wszelkie prawa zastrzeżone. Wszystkie materiały zawarte na tej
stronie internetowej są chronione prawem autorskim Stanów Zjednoczonych i nie mogą być powielane,
rozpowszechniane, przesyłane, wyświetlane, publikowane lub nadawane bez uprzedniej pisemnej
zgody firmy RPB IP, LLC. Użytkownik nie może zmieniać ani usuwać żadnych znaków towarowych, praw
autorskich ani innych informacji z kopii tych treści.
Wszystkie znaki towarowe, znaki usługowe i loga użyte w niniejszej publikacji, zarówno zarejestrowane,
jak i niezarejestrowane, są znakami towarowymi, znakami usługowymi lub logami odpowiednich
właścicieli. Wszelkie prawa do własności intelektualnej RPB zawarte w niniejszej publikacji, w tym prawa
autorskie, znaki towarowe, znaki usługowe, tajemnice handlowe i prawa patentowe są zastrzeżone.
Własność intelektualna RPB oznacza każdy patent, opatentowane artykuły, zgłoszenia patentowe, wzory,
wzory przemysłowe, prawa autorskie, oprogramowanie, kody źródłowe, prawa do baz danych, prawa
osobiste, wynalazki, techniki, dane techniczne, tajemnice handlowe, know-how, marki, znaki towarowe,
nazwy handlowe, slogany, loga, wszelkie inne prawa zwyczajowe i prawa własności, zarejestrowane lub
niezarejestrowane w dowolnym miejscu na świecie, które są własnością, opracowane w całości lub w
części oraz licencjonowane przez RPB IP, LLC.
Aby uzyskać pomoc techniczną, skontaktuj się z naszym Działem Obsługi Klienta pod numerem 1-866-
494-4599 lub za pośrednictwem poczty elektronicznej pod adresem: sales@gvs.com
Formularz #: 7.20.506 Wersja: 2
WAŻNE INFORMACJE DOTYCZĄCE BEZPIECZEŃSTWA
Nieprawidłowy dobór, używanie lub konserwacja tego produktu może
powodować urazy; zagrażające życiu, opóźnione choroby płuc, skóry, oczu;
również śmierć. Produkt ten jest przeznaczony do użytku zawodowego zgodnie z obowiązującymi normami
PRODUKT PRZETESTOWANY I CERTYFIKOWANY PRZEZ:
CE: BSI Group The Netherlands B.V. (NB2797), Say Building, John M. Keynesplein 9, 1066 EP, Amsterdam, NL
UKCA: BSI Group (AB0086), Kitemark Court, Knowhill, Milton Keynes MK5 8PP, United Kingdom
RPB® Safety LLC jest firmą posiadającą certyfikat ISO9001.
WPROWADZENIE
T200 to wszechstronny aparat oddechowy przeznaczony do zadań wymagających ochrony przed
zanieczyszczeniami powietrza. Dzięki opcjonalnej osłonie chroniącej głowę i trzem dostępnym
przysłonom, T200 może być używany zarówno w środowisku przemysłowym, jak i medycznym. W celu
zwiększenia ochrony słuchu możliwa jest instalacja dodatkowych nauszników Quiet-Slim™ Ear Defender.
Produkt musi przechodzić cykliczne przeglądy oraz konserwację, zgodnie z wytycznymi zamieszczonymi
w niniejszej instrukcji.
Zobacz ZAKRES OCHRONY I OGRANICZENIA, aby dowiedzieć się więcej.
OSTRZEŻENIE

85
ZAKRES OCHRONY I OGRANICZENIA
ODDYCHANIE
RPB T200 został zatwierdzony w następujących kategoriach:
Zasilanie powietrzem
Aparat Oddechowy RPB T200, w pełni dopasowany i wyposażony we wszystkie wymagane podzespoły,
w tym Zespół Rury Oddechowej oraz Oczyszczacz Powietrza RPB PX5, jest urządzeniem zatwierdzonym
zgodnie z normą EN 12941: 1998 + A1: 2003 + A2: 2008 TH3 PR SL. Z tego względu aparat w znaczny
sposób zmniejsza, acz całkowicie nie eliminuje zanieczyszczeń wdychanych przez użytkownika. Ochrona
zależy od zainstalowanego filtra w RPB PX5 PAPR (sprawdź instrukcję obsługi PX5).
OGRANICZENIA
Aparat oddechowy RPB T200 NIE JEST PRZEZNACZONY DO UŻYTKOWANIA:
W atmosferze bezpośrednio zagrażającej życiu lub zdrowiu (IDLH).
Jeśli nie można opuścić miejsca pracy bez pomocy aparatu.
W atmosferze zawierającej mniej niż 21% ±1% tlenu.
Przy obróbce strumieniowo-ściernej.
Jako ochrona przed niebezpiecznymi gazami (np. tlenkiem węgla).
Przy zanieczyszczeniach przekraczających normy i zalecenia.
Jeśli zanieczyszczenia lub stężenia zanieczyszczeń są nieznane.
W miejscu pracy o słabej wentylacji.
Jeśli temperatura otoczenia znajduje się poza przedziałem -10°C – +60°C (14°F – 140°F).
Korzystasz z podzespołów zawierających części elektryczne w atmosferze łatwopalnej lub zagrożonej
wybuchem, np. PX5.
TWARZ I OCZY:
T-200 ze standardową soczewką nie spełnia wymagań EN 166:2002 (AS/NZS 1337.1:2010) dotyczących
ochrony twarzy użytkownika.
T200 nie został zaprojektowany ani nie posiada atestu na ochronę przed gorącymi metalami lub żrącymi
płynami.
Uwaga: Zaleca się noszenie okularów ochronnych podczas wykonywania prac o podwyższonym ryzyku.
T200 nie chroni przed potencjalnym przeniesieniem uderzenia na okulary noszone pod osłoną wizjera.
Wizjery T200 nie zapewniają pełnej ochrony oczu i twarzy przed silnym uderzeniem bądź penetracją i nie
zwalniają ze stosowania się do zasad bezpieczeństwa pracy oraz wytycznych nadzoru przemysłowego.
GŁOWA:
T200, po wyposażeniu w hełm, zapewnia minimalną ochronę głowy nie spełnia normy EN 812. Hełm nie
spełnia normy EN 397:2012+A1:2012 (AS/NZS 1801:1997).
lub obowiązującymi lokalnymi przepisami dla branży i działalności (patrz Obowiązki Pracodawcy). Zaleca się
znajomość norm i przepisów związanych z używaniem tego sprzętu ochronnego, nawet jeśli nie dotyczą one
bezpośrednio ciebie. W przypadku prowadzenia własnej działalności lub korzystania ze sprzętu w celu innym niż
zawodowy, należy zapoznać się z sekcją Obowiązki Pracodawcy oraz Instrukcja Bezpieczeństwa Użytkownika.
Sprawdź stronę gvs-rpb.com/healthcare/important-safety-information, aby uzyskać przydatne odnośniki
dotyczące standardów CE i innych treści.
Pracodawco: Przeczytaj niniejszą instrukcję obsługi oraz instrukcję obsługi aparatu oddechowego. Postępuj
zgodnie z Obowiązkami Pracodawcy.
Użytkowniku: Przeczytaj niniejszą instrukcję obsługi oraz instrukcję obsługi aparatu oddechowego. Postępuj
zgodnie z Instrukcją Bezpieczeństwa Użytkownika.
Sprawdź, czy na stronie nie ma aktualizacji. Instrukcje obsługi produktów są regularnie aktualizowane. Odwiedź
stronę gvs-rpb.com/healthcare/resources, aby uzyskać najnowszą wersję tej instrukcji przed skorzystaniem z
produktu.

86
T200™
SCHEMAT UKŁADU APARATU ODDECHOWEGO - PAPR
Aparat Oddechowy RPB T200 składa się z 3 głównych podzespołów, jak pokazano na rysunku 1.1. Wszystkie
3 komponenty muszą być obecne i odpowiednio zmontowane, aby stanowić kompletny aparat oddechowy
oczyszczający powietrze zgodny z EN12941:1998 +A1: 2003 + A2: 2008.
RYSUNEK 1.1 NA STRONA 6
1. Zespół hełma oddechowego
2. Zespół rury oddechowej
3. Oczyszczacz powietrza PAPR
UWAGI I OGRANICZENIA
ZASILANIE POWIETRZEM
A. Nie stosować w atmosferze zawierającej mniej niż 21% ±1% tlenu.
B. Nie stosować w atmosferze bezpośrednio zagrażającej życiu lub zdrowiu (IDLH).
C. Nie stosować w przypadku przekroczenia stężeń ustalonych przez normy regulacyjne.
F. Nie korzystaj z aparatów oddechowych zasilanych oczyszczonym powietrzem, jeżeli przepływ powietrza
jest mniejszy niż 115 l/min (4 cfm) dla masek przylegających do twarzy oraz 170 l/min (6 cfm) dla przysłon
i/lub hełmów.
H. Postępuj zgodnie z ustalonymi harmonogramami wymiany wkładów i pojemników. Obserwuj ESLI, aby
upewnić się, że wkład i pojemniki zostały wymienione przed upłynięciem terminu użytkowania.
I. Urządzenie zawiera układy elektryczne, które mogą spowodować zapłon w atmosferze łatwopalnej lub
zagrożonej wybuchem
J. Nieprawidłowe używanie lub konserwacja tego produktu może spowodować obrażenia ciała lub śmierć.
L. Postępuj zgodnie z instrukcjami producenta dotyczącymi wymiany wkładów, pojemników i/lub filtrów.
M. Wszystkie zatwierdzone urządzenia są wybierane, instalowane, wykorzystywane i konserwowane zgodnie
z przepisami prawa lokalnego i innymi obowiązującymi przepisami.
N. Nigdy nie korzystaj z zamienników, nie modyfikuj ani nie pomijaj części przy montażu. Używaj wyłącznie
części zamiennych określonych przez producenta.
O. Zapoznaj się z instrukcją obsługi i/lub konserwacji, aby uzyskać informacje na temat użytkowania i
konserwacji tych urządzeń.
P. T200 nie spełnia funkcji maski chirurgicznej.
ŹRÓDŁO POWIETRZA, ZŁĄCZA I CIŚNIENIE
ŹRÓDŁO POWIETRZA
Zasilanie powietrzem
Sprawdź, czy zanieczyszczony obszar kwalifikuje się w granicach stosowania aparatu oddechowego
zasilanego oczyszczanym powietrzem. Określ rodzaj zanieczyszczenia. Po ustaleniu poziomu
zanieczyszczenia należy dobrać odpowiedni filtr do instalacji, który ma za zadanie chronić twój układ
oddechowy. Upewnij się, że obszar pracy jest dobrze wentylowany i pobierane są z niego regularne próbki
powietrza w celu potwierdzenia, że atmosfera utrzymuje się w normach określoych przez miejscowe
regulacje lub inne organy zarządzające. Aby uzyskać więcej informacji, postępuj zgodnie z instrukcją obsługi
PX5 PAPR.
SŁUCH:
System Quiet-Slim Ear Defender zapewnia redukcję hałasu (NRR) na poziomie 21 i SNR na poziomie
28 spełnia normy EN 352-1. Aby zapewnić prawidłowy montaż i dopasowanie, należy zapoznać się z
instrukcją obsługi systemu Quiet-Slim.
Inne środki ochrony słuchu, takie jak zatyczki do uszu lub nauszniki, muszą zostać odpowiednio
dopasowane w przypadku przekroczenia dopuszczalnej ekspozycji na hałas.
DYREKTYWA PPE
T200 jest zgodny z rozporządzeniem środków ochrony indywidualnej (PPE) (UE) 2016/425.
Rozporządzenie 2016/425 w sprawie ŚOI, wprowadzone do prawa brytyjskiego i zmienione.
Deklarację zgodności można znaleźć pod adresem gvs-rpb.com/industrial/resources/
Przejdź do sekcji Przechowywanie, aby dowiedzieć się więcej o pakowaniu i ochronie akcesoriów podczas
transportu.

87
FILTREM
180 L/MIN PRĘDKOŚĆ 1
180 L/MIN PRĘDKOŚĆ 2
180 L/MIN PRĘDKOŚĆ 3
03-892-P
>10 godzin
>7 godzin
>6 godzin
03-893-A2
>5 godzin
>4 godzin
>4 godzin
03-894-ABE
>5 godzin
>4 godzin
>4 godzin
03-895-ABEK
>5 godzin
>4 godzin
>4 godzin
OBOWIĄZKI PRACODAWCY
Obowiązki pracodawcy mogą się różnić w zależności od lokalizacji i branży, ale na ogół RPB oczekuje od
pracodawcy:
Przestrzegania wszystkich obowiązujących norm i przepisów obowiązujących w danym miejscu pracy,
rodzaju przemysłu i działalności. W zależności od lokalizacji i branży, wybór i stosowanie aparatów
oddechowych i innych środków ochrony indywidualnej jest określone przez szereg norm i przepisów, np.
krajowe, lokalne lub wojskowe standardy i przepisy oraz standardy konsensusowe, takie jak CE i AS/NZS.
Istnieją również specyficzne wymagania dla poszczególnych zanieczyszczeń, np. dla krzemionki (więcej
informacji pod adresem: gvs-rpb.com/healthcare/important-safety-information), azbestu, patogenów
organicznych itp. Dowiedz się, jakie wymagania obowiązują w twoim kraju i branży.
Stosowania odpowiednich procedur bezpieczeństwa.
Posiadania i przestrzegania:
Procedur bezpieczeństwa pracy.
Drukowanej kopii programu ochrony dróg oddechowych, zgodnej z obowiązującymi normami i
regulacjami.
Zgodnie z powyższym,
Wykonaj analizę zagrożeń i wybierz odpowiedni sprzęt dla każdej aktywności. Analizę zagrożeń
powinna wykonać osoba wykwalifikowana. Kontrola powinna być przeprowadzona stosownie do
potrzeb, a osoba kontrolująca powinna określić, jaki rodzaj ochrony dróg oddechowych, twarzy, oczu,
głowy i słuchu jest odpowiedni dla wykonywanych prac i środowiska. (Dla przykładu: dobierz aparat
oddechowy odpowiedni do określonych zagrożeń będących w powietrzu, biorąc pod uwagę czynniki
występujące w miejscu pracy, użytkownika oraz przypisany współczynnik ochrony (APF), który
powinien spełniać lub przewyższać wymagany poziom ochrony pracownika).
W stosownych przypadkach należy zapoznać się z instrukcją bezpieczeństwa w miejscu pracy
oraz instrukcją ochrony dróg oddechowych. Ponadto należy zapoznać się z normami i przepisami
dotyczącymi działalności w branży w celu uzyskania informacji dotyczących wymagań w zakresie
ochrony, a także z niniejszą instrukcją (Zakres ochrony i ograniczenia) i z instrukcją obsługi regulatora
przepływu powietrza dla danego urządzenia.
Upewnij się, że pracownicy nie posiadają przeciwwskazań medycznych do korzystania z aparatu
oddechowego.
Należy zlecić odpowiedniemu lekarzowi lub innemu licencjonowanemu pracownikowi służby zdrowia
(PLHCP) przeprowadzenie oceny medycznej za pośrednictwem kwestionariusza medycznego lub
wstępnego badania lekarskiego.
i ograniczeń T200.
Należy do tego celu wyznaczyć wykwalifikowaną osobę, która potrafi obsługiwać RPB T200.
Każdy, kto prowadzi szkolenie w zakresie środków ochrony układu oddechowego, musi:
a) posiadać wiedzę w zakresie stosowania i użytkowania aparat(ów) oddechowy(ch);
b) posiadać praktyczną wiedzę w zakresie doboru i stosowania aparat(ów) oddechowy(ch) oraz ich
stosowania w miejscu pracy;
c) znać instrukcję ochrony dróg oddechowych w miejscu pracy; oraz
d) znać obowiązujące przepisy.
Każdego użytkownika T200 należy przeszkolić w zakresie użytkowania, stosowania, kontroli, konserwacji,
przechowywania i ograniczeń zgodnie z treścią niniejszej instrukcji oraz instrukcją obsługi górnego zespołu
aparatu oddechowego wraz ze standardowymi lub regulacyjnymi wymaganiami. Upewnij się, że każdy
użytkownik zapoznał się z obiema instrukcjami obsługi.
Minimalny Zaprojektowany Przez Producenta Przepływ

88
T200™
INSTRUKCJA BEZPIECZEŃSTWA UŻYTKOWNIKA
PRZED PIERWSZYM UŻYCIEM - NALEŻY PRZEJŚĆ SZKOLENIE I DOSTAĆ UPRAWNIENIA MEDYCZNE
Nie powinieneś korzystać z tego urządzenia, dopóki nie przeczytasz tej instrukcji obsługi oraz instrukcji PX5
PAPR lub instrukcji regulatora przepływu powietrza (inne wersje językowe są dostępne na stronie gvs-rpb.com/
healthcare/resources/). Użytkownicy muszą być przeszkoleni w zakresie użytkowania, konserwacji i ograniczeń
używanego sprzętu przez wykwalifikowaną osobę (wyznaczoną przez pracodawcę), która potrafi w prawidłowy i
bezpieczny sposób korzystać z aparatu oddechowego RPB T200.
Nie należy nosić tego aparatu dopóki nie przejdzie się oceny medycznej przy pomocy kwestionariusza
medycznego lub wstępnego badania lekarskiego, przeprowadzonego przez wykwalifikowanego lekarza lub
innego licencjonowanego pracownika służby zdrowia (PLHCP).
Alergeny: Ten produkt nie zawiera żadnych znanych alergenów.
Niektóre materiały mogą wywoływać reakcje alergiczne u osób na nie podatnych. Jeśli masz znaną alergię lub
cierpisz na podrażnienia skóry, poinformuj o tym swojego pracodawcę. Brak dbałości o czystość sprzętu może
powodować podrażnienia. Przestrzegaj wszystkich instrukcji czyszczenia i konserwacji zawartych w instrukcjach
obsługi tego i wszelkich innych produktów RPB, z których korzystasz.
UPEWNIJ SIĘ, ŻE SYSTEM JEST GOTOWY DO UŻYCIA
Sprawdź, czy twoje urządzenie jest kompletne. Upewnij się, że masz wszystkie wymagane podzespoły,
niezbędne do działania aparatu oddechowego T200:
Zespół Przysłony (T200 albo T-LINK)
Zespół Rury Oddechowej
Regulatorem Przepływu Powietrza (PX5 PAPR)
Sprawdź Schemat układu aparatu oddechowego. RPB T200 jest urządzeniem zatwierdzonym przez
normy tylko w przypadku wyposażenia w RPB PX5 PAPR lub Regulator Przepływu Powietrza RPB. Korzystaj
tylko z oryginalnych części i komponentów marki RPB zgodnych ze odpowiednimi standardami. Używanie
niekompletnego lub nieodpowiedniego sprzętu, w tym używanie części podrobionych lub innych niż RPB,
może spowodować nieprawidłową ochronę całego urządzenia. Nie modyfikuj i nie zmieniaj żadnych części tego
urządzenia.
Należy dokonywać codziennych inspekcji elementów urządzenia, czy nie posiadają śladów uszkodzeń lub
zużycia, które mogą obniżyć pierwotnie przewidziany stopień ochrony. Napraw lub wymień uszkodzony element
lub produkt, w tym hełm lub soczewkę, jeśli uległy uszkodzeniom. Porysowane lub uszkodzone soczewki
zabezpieczające wraz z innymi elementami należy wymienić na oryginalne części zamienne marki RPB. Przy
wymienianiu soczewki zabezpieczającej należy usunąć dodatkową folię ochronną z obu stron soczewki. Jeśli folia
pozostanie na swoim miejscu, może to negatywnie wpłynąć na przejrzystość soczewki i powodować zmęczenie
oczu. Sprawdź wnętrze aparatu oddechowego pod kątem pyłu respirabilnego lub innych ciał obcych. Przez cały
czas utrzymuj wnętrze aparatu w czystości.
Upewnij się, że hełm został prawidłowo zainstalowany w twojej konfiguracji sprzętowej. Niekompletna lub
Upewnij się, że sprzęt jest właściwie skonfigurowany, używany i konserwowany.
Upewnij się, że sprzęt jest właściwie skonfigurowany, sprawdzony, prawidłowo używany i
konserwowany. Wkład filtra powietrza oraz filtr wizjera spawalniczego powinien być wymieniony
zgodnie z zaleceniami niniejszej instrukcji.
Mierz i monitoruj zanieczyszczenia przenoszone drogą powietrzną w obszarze roboczym.
Zgodnie z obowiązującymi wymogami należy wykonać pomiary i monitorować poziom zanieczyszczenia
znajdującego się w powietrzu w miejscu pracy. Upewnij się, że w miejscu pracy jest prawidłowa
wentylacja.
W razie pytań prosimy o kontakt z RPB.
Zadzwoń do naszego Działu Obsługi Klienta lub napisz pod podany adres mailowy:
Tel: 1-866-494-4599
Adres e-mail: sales@gvs.com
Strona internetowa: gvs-rpb.com

89
nieprawidłowo zainstalowana przysłona może zapewniać niewystarczającą ochronę dróg oddechowych
oraz przed uderzeniem. Aby dowiedzieć się więcej, przejdź do sekcji „Ustawienia i Użytkowanie” oraz
„Zakładanie”, aby uzyskać informacje na temat dopasowania.
SPRAWDŹ, CZY UŻYWANY SPRZĘT JEST ODPOWIEDNI DO WYKONYWANEJ PRACY
Upewnij się, że aparat T200 zapewnia odpowiednią ochronę dla warunków, w których jest używany. W
stosownych przypadkach należy zapoznać się z instrukcją bezpieczeństwa pracy, instrukcją ochrony dróg
oddechowych oraz normami i przepisami dotyczącymi wykonywanej czynności lub branży (patrz ZAKRES
OCHRONY I OGRANICZENIA).
PRZED ZAŁOŻENIEM I SKORZYSTANIEM Z APARATU T200 NALEŻY:
Sprawdzić, czy zanieczyszczenia powietrza w miejscu pracy mieszczą się w zalecanych granicach:
Określić rodzaj i poziom zanieczyszczenia. Sprawdzić, czy stężenia zanieczyszczeń w powietrzu nie
przekraczają dopuszczalnych stężeń zgodnie z obowiązującymi przepisami dla tego typu sprzętu.
Filtrowanie powietrza oddechowego:
PAPR: Po ustaleniu poziomu zanieczyszczenia należy dobrać odpowiedni filtr do instalacji, który ma
za zadanie chronić twój układ oddechowy. Postępuj zgodnie z instrukcją obsługi PX5 PAPR.
Upewnij się, że obszar jest wentylowany i monitorowany:
Upewnij się, że obszar pracy jest dobrze wentylowany i pobierane są z niego regularne próbki
powietrza w celu potwierdzenia, że atmosfera utrzymuje się na poziomach zalecanych przez i inne
organy zarządzające.
W razie jakichkolwiek pytań należy zwrócić się do pracodawcy.
NIE ROZPOCZYNAJ PRACY, jeśli wystąpi jedna z następujących sytuacji:
Atmosfera bezpośrednio zagrażająca życiu lub zdrowiu (IDLH).
Nie można opuścić miejsca pracy bez pomocy aparatu.
Atmosfera zawiera mniej niż 21% ±1% tlenu.
Korzystasz z podzespołów zawierających części elektryczne w atmosferze łatwopalnej lub zagrożonej
wybuchem, np. PX5.
Zanieczyszczenia przekraczają normy i zalecenia.
Zanieczyszczenia lub stężenia zanieczyszczeń są nieznane.
Miejsce pracy jest słabo wentylowane.
Temperatura otoczenia znajduje się poza przedziałem -10°C – +60°C (14°F – 140°F).
NATYCHMIAST OPUŚĆ MIEJSCE PRACY W PRZYPADKU:
Uszkodzenia którejkolwiek z części składowych wyposażenia.
Zmniejszenia widoczności.
Zmniejszenia/braku przepływu powietrza w urządzeniu lub wystąpienia alarmu. Nie korzystaj z aparatu
oddechowego zasilanego powietrzem w przypadku, gdy przepływ powietrza jest mniejszy niż 170 l/min (6 cfm).
Wystąpienia trudności z oddychaniem.
Pojawienia się zawrotów głowy, mdłości, złego samopoczucia.
Wystąpienia podrażnień skóry, oczu lub układu oddechowego.
Gdy miejsce pracy znajduje się w zamkniętej przestrzeni (dopuszcza się pracę w zamkniętych przestrzeniach
pod warunkiem podjęcia odpowiednich środków ostrożności).
Pojawienia się nieprzyjemnych zapachów lub zanieczyszczeń w hełmie.
Podejrzenia, że aparat nie zapewnia prawidłowej ochrony.
DBAŁOŚĆ O PRODUKT
Nie wolno umieszczać hełmu na gorących powierzchniach. Na aparat nie wolno nakładać farb, rozpuszczalników,
klejów ani etykiet samoprzylepnych, z wyjątkiem wyszczególnionych w instrukcji RPB. Niektóre chemikalia mogą
mieć negatywny wpływ na produkt.
Sprawdź sekcję „Ustawienia i Użytkowanie”, aby uzyskać szczegółowe instrukcje dotyczące czyszczenia
urządzenia.

90
T200™
USTAWIENIA I UŻYTKOWANIE
UPRZĄŻ NA GŁOWĘ Z GÓRNYMI PASAMI
MONTAŻ I REGULACJA
RYSUNEK 2.1 NA STRONA 12
Przymocuj przednią opaskę do wsporników
uprzęży na głowę. 1. Wsuń końcówki do kanału na
wspornikach. 2. Przeciągnij pętelkę przez kołek w
wewnętrznej części wspornika. 2. Dopasuj wedle
uznania.
RYSUNEK 2.2 NA STRONA 12
Przymocuj górne paski do wsporników uprzęży
zaokrągloną stroną do głowy. Przypnij otwory
w pasach pod zakładką wspornika. Następnie
przesuń otwór w taśmach nad górnym zaczepem
wspornika uprzęży na głowę.
RYSUNEK 2.3 NA STRONA 12
Użyj pokrętła do wyrównania logo RPB od
wewnętrznej strony podkładki w taki sposób,
aby znajdowało się po prawej stronie. Wepnij
pokrętło do otworów we wspornikach uprzęży (1)
przesuwając zakładkę na końcu taśmy pokrętła
nad otworem wspornika od wewnątrz. 2. Następnie
zamknij zatrzask w otworze wspornika.
RYSUNEK 2.4 NA STRONA 12
Uprząż na głowę można regulować przy pomocy
pokrętła z tyłu uprzęży. Przekręć pokrętło, aby
dokręcić lub poluzować opaskę na głowę.
RYSUNEK 2.5 NA STRONA 13
Aby zmniejszyć rozmiar uprzęży, należy zsunąć
oba pasy do siebie.
RYSUNEK 2.6 NA STRONA 13
Aby wydłużyć górne pasy: 1. wypnij zakładki
końcowe z paska. 2. Następnie rozciągnij paski
do danego wycięcia. Następnie załóż zakładki
z powrotem na pasek i upewnij się, że są dobrze
przymocowane.
OSŁONA CHRONIĄCA GŁOWĘ
RYSUNEK 3.1 NA STRONA 13
Aby zdemontować osłonę należy odciągnąć pasek
od uchwytu, wysunąć go do dołu i podnieść do
góry.
RYSUNEK 3.2 NA STRONA 13
Przymocuj osłonę przeciwuderzeniową w tych
UWAGA: OSŁONA PRZECIWUDERZENIOWA
ZOSTAŁA POKAZANA NA RYSUNKACH
4.1-6.5. WSZYSTKIE INSTRUKCJE MONTAŻU
UPRZĘŻY I PRZEWODÓW POWIETRZNYCH
DOTYCZĄ ZARÓWNO OSŁONY
PRZECIWUDERZENIOWEJ (15-850), JAK I
PASÓW GÓRNYCH (15-841).
samych miejscach, z których wypiąłeś paski.
Nałóż otwory osłony pod zakładkę wspornika
uprzęży. Następnie obróć otwór montażowy osłony
nad górnym zaczepem wspornika uprzęży.
INSTRUKCJE DOTYCZĄCE OKREŚLONYCH MIEJSC PRACY I ZASTOSOWAŃ
Pomieszczenia zamknięte
Jeśli aparat jest używany w zamkniętych pomieszczeniach, należy upewnić się, że pomieszczenia są dobrze
wentylowane, a wszystkie stężenia zanieczyszczeń są poniżej zalecanych norm. Należy przestrzegać wszystkich
procedur dotyczących wchodzenia, obsługi i wychodzenia z zamkniętych pomieszczeń pracy, określonych w
obowiązujących przepisach i normach.
MONTAŻ UCHWYTÓW SOCZEWEK
RYSUNEK 4.1 NA STRONA 14
Wyrównaj uchwyt uprzęży głowy z uchwytem
soczewki, unieś tylną zakładkę i popchnij do
przodu upewniając się, iż klapa jest zamocowana
w żądanym gnieździe pozycyjnym. Powtórz
czynność z drugiej strony hełmu.
RYSUNEK 4.2 NA STRONA 14
Wyreguluj mocowania soczewki przesuwając je
do przodu lub do tyłu przy pomocy mechanizmu
przesuwającego - spowoduje to zbliżenie lub
oddalenie soczewki od twarzy.
MONTAŻ PRZEWODU POWIETRZNEGO
RYSUNEK 5.1 NA STRONA 14
1. Wyrównaj strzałki wyrównujące. 2. Wsuń
skrzydło podzespołu w szczelinę w kształcie
litery „W” z boku hełmu, aby środkowa zapadka
bezpiecznie zatrzasnęła się na przekroju skrzydła.
RYSUNEK 5.2 NA STRONA 14
Podzespół przewodu powietrznego przymocowany
do uchwytu soczewki.
UMIESZCZANIE OBUDOWY/OSŁONY
PRZECIWUDERZENIOWEJ PRZEWODU
POWIETRZNEGO W MASCE
RYSUNEK 6.1 NA STRONA 15
Włóż obudowę hełmu lub osłonę
przeciwuderzeniową do maski.
RYSUNEK 6.2 NA STRONA 15
Włóż gwintowany wlot przewodu powietrznego do
czarnej gumowej uszczelki z tyłu maski. Zacznij od

91
dołu, rozciągając uszczelkę na żebrze oporowym
za gwintowaniem.
RYSUNEK 6.3 NA STRONA15
Wyrównaj zakładki soczewki z zatrzaskami po
bokach mocowania soczewki.
- Zaczep element oznaczony 1 pod punktem 1, jak
na zdjęciu.
- Zatrzaśnij element oznaczony 2 nad punktem 2,
jak na zdjęciu.
RYSUNEK 6.4 NA STRONA 15
Włóż listwę mocującą przez otwór w uchwycie
uprzęży. Mocno dociśnij końcówki.
RYSUNEK 6.5 NA STRONA 15
Ustaw regulator przepływu powietrza w górę, jeśli
chcesz aby powietrze przepływało w kierunku
soczewki oraz w dół, jeśli chcesz, aby było
kierowane na twarz.
MONTAŻ RURY ODDECHOWEJ
RYSUNEK 7.1 NA STRONA 16
Upewnij się, że uszczelka o-ring znajduje
się na gwintowanym wlocie. Przymocuj rurę
oddechową do wlotu, obracając ją zgodnie z
ruchem wskazówek zegara. Nie należy nadmiernie
dokręcać. Przytrzymaj maskę, aby zapobiec
skręceniu przewodu powietrznego podczas jego
dokręcania.
ZASILANIE POWIETRZEM
RYSUNEK 8.1 NA STRONA 16
Upewnij się, że płaska uszczelka znajduje się na
złączce węża oddechowego. Włóż bagnetową
końcówkę węża oddechowego do wylotu PX5
PAPR i wykonaj pół obrotu zgodnie z ruchem
wskazówek zegara do momentu zabezpieczenia.
DO STOSOWANIA Z RPB PX5 - PATRZ
INSTRUKCJA OBSŁUGI PAPR
Podczas korzystania z aparatu oddechowego T200
z urządzeniem RPB PX5 PAPR należy zapoznać się
z instrukcją obsługi urządzenia RPB PX5 w celu jego
konfiguracji i użytkowania.
Uwaga: RPB PX5 jest aparatem oddechowym
zasilanym powietrzem oczyszczonym, dlatego
należy zachować ostrożność przy wyborze
właściwego filtra do niniejszego urządzenia.
STOSOWANIE STETOSKOPU ORAZ
NAUSZNIKÓW
RYSUNEK 9.1 NA STRONA 17
Kaptur został zaprojektowany tak, aby odsłaniał
uszy użytkowników, dzięki czemu stetoskop może
być używany bez utraty jakości dostarczanego
powietrza oddechowego.
RYSUNEK 9.2 NA STRONA 17
Załóż nauszniki RPB 18-524 Quiet-Slim z pałąkiem
na szyję z tyłu szyi, upewniając się, że podkładki
całkowicie przykrywają uszy. Przymocuj opaskę
na głowę przy pomocy haczyka i opaski. Załóż
hełm po założeniu nauszników.
Więcej szczegółów znajduje się w Instrukcji obsługi
nauszników Quiet-Slim.
SOCZEWKI KASETOWE CLEAR-VISION
RYSUNEK 10.1 NA STRONA 17
Zdejmij zabezpieczenie soczewki kasetowej. Nałóż
kasetę na zewnętrzną stronę soczewki zaszytą w
przyłbicy.
RYSUNEK 10.2 NA STRONA 17
Użyj wstępnie złożonych zakładek, aby w razie
potrzeby wyjąć każdą soczewkę.
WYMIANA I CZYSZCZENIE NAKŁADKI
BRWIOWEJ
RYSUNEK 11.1 NA STRONA 18
Aby zdjąć nakładkę brwiową, należy odpiąć
zaczepy i pętelki. Wyczyść ją łagodnym
detergentem lub wymień na nową.
RYSUNEK 11.2 NA STRONA 18
Umieść nową lub oczyszczoną nakładkę brwiową
na wewnętrznej stronie przedniego paska uprzęży.
Nałóż górną i dolną część uprzęży, zapinając haki i
pętle w zakładkach.
CZYSZCZENIE T200 ORAZ OSŁONY
PRZECIWUDERZENIOWEJ
RYSUNEK 12.1 NA STRONA 18
Zdejmij uprzęż na głowę lub osłonę
przeciwuderzeniową odkręcając soczewkę po obu
stronach i wyciągając gwintowany wlot z gumowej
uszczelki z tyłu.
RYSUNEK 12.2 NA STRONA 18
Podkładka osłony przeciwuderzeniowej jest
przymocowana do wewnętrznej strony osłony
przeciwuderzeniowej przy pomocy haków i pętli.
Wyjmij podkładkę z hełmu. Podkładkę można
umyć delikatnym detergentem lub wymienić na
nową.
Wyczyść uprząż na głowę, osłonę
przeciwuderzeniową oraz zespół przewodów
gorącą wodą z dodatkiem łagodnego detergentu.
Pozostaw je do wyschnięcia przed ponownym
włożeniem do środka.

92
T200™
T200 MASKI OSŁANIAJĄCE TWARZ
RYSUNEK 13.1 NA STRONA 19
Otwórz dolną część przysłony z powietrzem
przepływającym ze źródła powietrza i załóż
maskę na głowę. Upewnij się, że przysłona jest
wyśrodkowana na twojej głowie.
RYSUNEK 13.2 NA STRONA 19
Naciągnij przysłonę i zapnij uprząż, a następnie
dopasuj ją do twojej głowy. Upewnij się, że
regulowana elastyczna linka jest szczelna pod
brodą, na policzkach, nad uszami i z tyłu głowy.
T-LINK USZCZELNIENIE OSŁONY SZYI
RYSUNEK 14.1 NA STRONA 20
Przy przepływającym powietrzu, otwórz dolną
część przysłony i załóż aparat oddechowy na
głowę. Upewnij się, że przysłona na twojej głowie
jest wyśrodkowana.
RYSUNEK 14.2 NA STRONA 20
Naciągnij przysłonę, dokręć uprząż na głowę, aby
ją dopasować i upewnij się, że uszczelnienie wokół
szyi jest prawidłowe.
RYSUNEK 14.3 NA STRONA 20
Wpraw kołnierz wewnętrzny w kombinezon
lub inną odzież ochronną, aby zapobiec
przedostawaniu się zanieczyszczeń do aparatu
oddechowego. Pociągnij w dół pelerynę
zewnętrzną.
RYSUNEK 14.4 NA STRONA 20
Zapnij pas urządzenia regulującego przepływ
wokół talii nad biodrem.
ZAKŁADANIE I ZDEJMOWANIE
ZAKŁADANIE HEŁMU
Po zakończeniu montażu przysłony możesz przejść do montażu aparatu oddechowego RPB T200.
Sprawdź, czy wewnątrz przysłony i uprzęży nie ma kurzu, brudu lub innych zanieczyszczeń. Upewnij
się, że źródło powietrza jest włączone i płynie przez aparat oddechowy. Następnie otwórz dolną część
przysłony, załóż aparat oddechowy na głowę, zaciągnij przysłonę, dopasuj wielkość uprzęży na głowę
wedle swoich potrzeb. Upewnij się, iż hełm jest uszczelniony elastyczną linką. Uszczelnienie jest tak
zaprojektowane, by znajdowało się nad pokrętłem, aby umożliwić łatwą regulację. W ten sposób pozostała
część uprzęży i przewodów powietrznych powinna znajdować się w całości wewnątrz przysłony.
W przypadku stosowania osłony uszczelniającej na szyję, należy upewnić się, że uszczelnienie szyi
zachodzi na całej długości wokół szyi przy pomocy regulowanego elastycznego sznurka. Wewnętrzny
śliniak należy schować pod kombinezonem lub innym ubraniem zewnętrznym. Załóż śliniak zewnętrzny
przez ramiona. Upewnij się, że leży płasko na klatce piersiowej i plecach, aby nie przeszkadzał w pracy.
Przed założeniem aparatu oddechowego zawsze należy sprawdzić jego
wnętrze na okoliczność zanieczyszczeń. Poza miejscem pracy zawsze zakładaj i zdejmuj hełm, dbając
o czystość jego wnętrza. Nieprzestrzeganie powyższych czynności może narazić Cię na kontakt z
niebezpiecznymi materiałami i zanieczyszczeniami, osłabiającymi działanie aparatu oddechowego.
OSTRZEŻENIE
ZDEJMOWANIE HEŁMU
Po zakończeniu pracy zostaw aparat oddechowy włączony, z powietrzem przepływającym do hełmu, aż do
momentu opuszczenia zanieczyszczonego obszaru. W zależności od zanieczyszczeń, przed zdjęciem hełmu
zaleca się wyczyszczenie jego zewnętrznej części i odzieży roboczej. Stosuj się do zaleceń sanitarnych
miejsca pracy.
PRZEGLĄD
Jeśli nakrycie (kombinezon, peleryna) jest zanieczyszczone lub zużyte, zutylizuj je zgodnie z przepisami
krajowymi/lokalnymi. Jeśli hełm, rura oddechowa lub inne części są w dobrym stanie, zachowaj je do
późniejszego wykorzystania.
PRZECHOWYWANIE
PRZECHOWYWANIE
Przed odłożeniem aparat oddechowy należy wyczyścić zgodnie z procedurami czyszczenia zawartymi w
niniejszej instrukcji. Upewnij się, że urządzenie zostało dokładnie wyczyszczone wewnątrz, jak i na zewnątrz.
Po wyczyszczeniu aparat należy pozostawić do wyschnięcia, wieszając go w czystym, suchym miejscu, z
dala od miejsca pracy. Zaleca się przechowywanie lub transportowanie aparatu oddechowego w pojemniku

93
lub torbie do tego przeznaczonej. Przechowywać w chłodnym, suchym miejscu, w temperaturze od -10°C do
+45°C (od 14°F do 113°F) o wilgotności względnej <90%.PX5 może wymagać osobnego przechowywania.
Sprawdź instrukcję obsługi PX5, aby uzyskać szczegółowe informacje dotyczące przechowywania.
Po użyciu: RYSUNEK 15.1 NA STRONA 21
Długotrwałe przechowywanie lub transport: RYSUNEK 15.2 NA STRONA 21
Kaptury są przeznaczone do jednorazowego użytku. Jeśli potrzebne jest pranie, prać tylko ręcznie. Zaleca się
ustalenie regularnego harmonogramu czyszczenia wyściółki, aby zapewnić odpowiednią higienę.
Okapy: prać ręcznie tylko łagodnym detergentem i ciepłą wodą. Powiesić do wyschnięcia. Nie prać w
pralce lub suszarce. Pranie w pralce lub suszarce skraca żywotność produktu i unieważnia gwarancję.
Wyściółka: prać ręcznie tylko łagodnym detergentem i ciepłą wodą. Płasko do wyschnięcia.
Upewnij się, że wszystkie elementy są suche przed użyciem. Sprawdź, czy nie ma zużycia i wymień, jeśli jest
uszkodzony lub nadmiernie zużyty.
CZĘŚCI I AKCESORIA RYSUNEK 16.1 NA STRONA 22
LISTA CZĘŚCI
Numer przedmiotu Opis Numer części
1 T200 Tychem® 2000 - Przyłbica Uszczelnienie Twarzy 17-722
2 T200 Tychem® 2000 - Przyłbica do ramion z Uszczelnieniem
wewnętrznym twarzy 17-732
3 T-Link Tychem® 2000 - Przyłbica z Uszczelnieniem szyi 17-712
T-Link Tychem® 4000 - Przyłbica z Uszczelnieniem szyi,
uszczelnione szwy 17-713
T-Link Tychem® 4000 - Przyłbica z Uszczelnieniem szyi,
uszczelnione szwy, soczewka bezpieczeństwa 17-713-SX
4 Zespół przewodu powietrznego (15-861)
z mocowaniem soczewek (17-513) (Nie na sprzedaż) 15-860
5 Zespół uprzęży na głowę 15-841
6 Uprząż osłony na głowę 15-850
7 Zespół regulacyjny uprzęży na głowę 16-530
8 Nakładka brwiowa uprzęży na głowę 16-526
9 Mocowanie soczewki (para) 17-513
10 T200 Soczewka kasetowa Clear-Vision (1 kaseta z 7 soczewkami) (opakowanie
10szt.) - do masek uszczelniających na twarz (krótka soczewka) 17-811
11 T-Link Soczewka kasetowa Clear-Vision (1 kaseta z 7 soczewkami) (opakowanie
10szt.) - do masek pełnowymiarowych (długie soczewki) 17-817
12 T-Link Soczewki do odklejania (opakowanie 25szt.)
- do masek pełnowymiarowych (długie soczewki) 17-815
13 Nauszniki Ochronne Quiet-Slim 18-524
14 Nauszniki Ochronne Quiet-Slim z mocowania boczne (para) 18-525
15 Mocowania boczne (para) 15-842
16 Osłona przewodu oddechowego - Ognioodporny 04-854
Osłona przewodu oddechowego - Tychem® 04-852
Osłona przewodu oddechowego - Czysty plastik (opakowanie 10) 04-856
17 Osłona przewodu oddechowego dla Szelki plecakowe - Ognioodporny 04-874
Osłona przewodu oddechowego dla Szelki plecakowe - Tychem® 04-872
CZĘŚCI I AKCESORIA PAPR RYSUNEK 16.2 NA STRONA 24
Numer przedmiotu Opis Numer części
1 PX5 PAPR i Pas 03-801
2 Rura oddechowa do PX5 PAPR 04-831
3 PX5 PAPR Tester przepływu 03-819

94
T200™
OŚWIADCZENIE O GWARANCJI I ODPOWIEDZIALNOŚCI
Firma RPB® gwarantuje, że jej Produkty są wolne od wad materiałowych i produkcyjnych przez jeden (1)
rok, z zastrzeżeniem warunków niniejszej ograniczonej gwarancji. Produkty są sprzedawane wyłącznie
do użytku komercyjnego. Do Produktów nie mają zastosowania żadne gwarancje konsumenckie.
Niniejsza ograniczona gwarancja przysługuje pierwotnemu nabywcy produktu i nie może zostać
przeniesiona ani przypisana. Jest to jedyna i wyłączna gwarancja udzielona przez RPB®. WSZYSTKIE
WARUNKI I DOROZUMIANE GWARANCJE (W TYM GWARANCJA WARTOŚCI HANDLOWEJ LUB
PRZYDATNOŚCI DO OKREŚLONEGO CELU) SĄ WYŁĄCZONE I ZWOLNIONE Z GWARANCJI. Zakres
ograniczonej gwarancji RPB® nie obejmuje szkód powstałych w wyniku wypadku, niewłaściwego użycia
lub nieprawidłowego użytkowania Produktów, uszkodzeń wynikających z normalnego użytkowania
Produktów lub niewłaściwej konserwacji Produktów.
Ograniczona gwarancja RPB® obowiązuje od daty zakupu Produktu i ma zastosowanie tylko do
usterek, które pojawiły się po raz pierwszy i są zgłaszane do RPB® w okresie gwarancyjnym. Firma
RPB® zachowuje prawo do stwierdzenia, czy którakolwiek z deklarowanych wad jest objęta niniejszą
ograniczoną gwarancją.
Jeśli wystąpi uzasadniona usterka, firma RPB® naprawi lub wymieni wadliwy Produkt (lub element
Produktu) według własnego uznania. Ten „naprawczy lub wymienny” środek zaradczy jest jedynym i
wyłącznym w ramach niniejszej ograniczonej gwarancji i w żadnym wypadku odpowiedzialność RPB® w
ramach tej ograniczonej gwarancji nie przekracza pierwotnej ceny zakupu Produktów (lub konkretnego
elementu). Firma RPB® nie ponosi odpowiedzialności za przypadkowe lub wtórne szkody, w tym za koszty
poniesione w wyniku użytkowania, konserwacji i innych. WSZELKIE SZKODY UBOCZNE I WTÓRNE SĄ
WYŁĄCZONE I ZWOLNIONE Z NINIEJSZEJ OGRANICZONEJ GWARANCJI. Skontaktuj się z RPB®, aby
skorzystać z serwisu gwarancyjnego. Przed skorzystaniem z serwisu należy dostarczyć dowód zakupu.
Wszelkie koszty wysyłki Produktów do serwisu gwarancyjnego RPB® ponosi klient.
RPB® zastrzega sobie prawo do ulepszania swoich Produktów poprzez zmiany w projekcie lub materiałach
bez zobowiązania wobec klientów, którzy zakupili Produkty wyprodukowane wcześniej.
ODPOWIEDZIALNOŚĆ
Firma RPB® Safety nie przyjmuje żadnej odpowiedzialności w jakikolwiek sposób wynikającej
bezpośrednio lub pośrednio z użytkowania lub niewłaściwego użytkowania produktów RPB® Safety, w tym
do celów, do których produkty nie są przeznaczone. RPB® Safety nie ponosi odpowiedzialności za szkody,
straty lub wydatki wynikające z niezastosowania się do porad lub informacji lub udzielenia niewłaściwych
porad lub informacji, niezależnie od tego, czy wynikają one z zaniedbania RPB® Safety, czy też z winy jej
pracowników, agentów lub podwykonawców.
4 5cm (2”) Pas 07-765
5cm (2”) Pas - Łatwe do czyszczenia 07-765-DC
5 Uprząż plecakowa - Łatwe do czyszczenia 03-822-DC
6 Rura oddechowa do plecaka 04-841
Korzystaj tylko z oryginalnych części i komponentów marki RPB
(oznaczonych logo RPB i numerem części), które są przeznaczone wyłącznie do danego aparatu
oddechowego. Używanie niekompletnego lub nieodpowiedniego sprzętu, w tym używanie części
podrobionych lub innych niż RPB, może spowodować nieprawidłową ochronę całego urządzenia i
utratę gwarancji.
OSTRZEŻENIE

95
NOTES
...................................................................................................................................
...................................................................................................................................
...................................................................................................................................
...................................................................................................................................
...................................................................................................................................
...................................................................................................................................
...................................................................................................................................
...................................................................................................................................
...................................................................................................................................
...................................................................................................................................
...................................................................................................................................
...................................................................................................................................
...................................................................................................................................
...................................................................................................................................
...................................................................................................................................
...................................................................................................................................
...................................................................................................................................
...................................................................................................................................
...................................................................................................................................
...................................................................................................................................

OTHER PRODUCTS
RPB PX5 PAPR
The RPB PX5 is a compact and versatile
PAPR that changes the way people
experience clean filtered air across
multiple industries – from medical and
chemical settings, to the profoundly harsh
environments of foundries. Boasting a sleek
lightweight design, the PX5 contours to
the users back, evenly distributing weight
through its vertical mounting. With simple
considered edges, curves and sealed
housing unit, the PX5 is certified to meet
IP65 in use for ease of decontamination.
RPB® QUIET-SLIM™ EAR
DEFENDERS
The RPB® Quiet-Slim™ ear defenders
can be worn with the T200® or the Z4®
with no modifications. Combine with bell
shaped earplugs for the ultimate in hearing
protection.
MAN-87
RPB GX4® GAS MONITOR
The RPB GX4 Gas Monitor gives you
complete confidence that the supplied/
compressed air you and your employees
breathe is safe. Detecting when there
are dangerous levels of toxic gases and
utilizing smart device and cloud integration
capabilities, the GX4 enables you to view
your air quality from any device, in real
time.
gvs-rpb.com│1-866-494-4599
-
 1
1
-
 2
2
-
 3
3
-
 4
4
-
 5
5
-
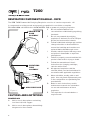 6
6
-
 7
7
-
 8
8
-
 9
9
-
 10
10
-
 11
11
-
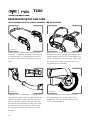 12
12
-
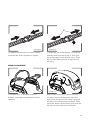 13
13
-
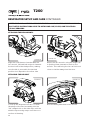 14
14
-
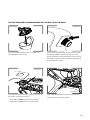 15
15
-
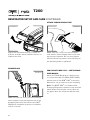 16
16
-
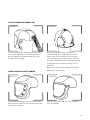 17
17
-
 18
18
-
 19
19
-
 20
20
-
 21
21
-
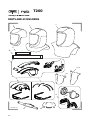 22
22
-
 23
23
-
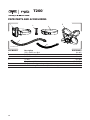 24
24
-
 25
25
-
 26
26
-
 27
27
-
 28
28
-
 29
29
-
 30
30
-
 31
31
-
 32
32
-
 33
33
-
 34
34
-
 35
35
-
 36
36
-
 37
37
-
 38
38
-
 39
39
-
 40
40
-
 41
41
-
 42
42
-
 43
43
-
 44
44
-
 45
45
-
 46
46
-
 47
47
-
 48
48
-
 49
49
-
 50
50
-
 51
51
-
 52
52
-
 53
53
-
 54
54
-
 55
55
-
 56
56
-
 57
57
-
 58
58
-
 59
59
-
 60
60
-
 61
61
-
 62
62
-
 63
63
-
 64
64
-
 65
65
-
 66
66
-
 67
67
-
 68
68
-
 69
69
-
 70
70
-
 71
71
-
 72
72
-
 73
73
-
 74
74
-
 75
75
-
 76
76
-
 77
77
-
 78
78
-
 79
79
-
 80
80
-
 81
81
-
 82
82
-
 83
83
-
 84
84
-
 85
85
-
 86
86
-
 87
87
-
 88
88
-
 89
89
-
 90
90
-
 91
91
-
 92
92
-
 93
93
-
 94
94
-
 95
95
-
 96
96


in andere talen
- italiano: RPB T200 Manuale utente
- français: RPB T200 Manuel utilisateur
- español: RPB T200 Manual de usuario
- Deutsch: RPB T200 Benutzerhandbuch
- polski: RPB T200 Instrukcja obsługi
Gerelateerde artikelen
Andere documenten
-
audizio HTS25 Speaker Wall Bracket de handleiding
-
audizio TTB65 de handleiding
-
-
-
-
Alpine SNR=24 Racing Pro Earmuf Handleiding
-
Wolf R-55 Operation And Maintenance Instructions
-
Telcoma Stone de handleiding
-
Thomashilfen SWIFTY Assembly Instructions
-
Sony VCL-DE07TB Handleiding