
PLEASE READ INSTRUCTION BEFORE COMMENCING INSTALLATION AND RETAIN
FOR FUTURE REFERENCES.
! Electrical products can cause death or injury, or damage to property. If in any
doubt about the installation or use of this product, consult a competent electrician
Note:
Product technical information and specification may change over time without prior
notification. For the latest technical information please visit our web site
www.ledgrouprobus.com or robusdirect.com
Issue 1 130718
Page 1
Information for the Product user:
Installation
1. Please note the requirement to dispose of Waste Electrical & Electronic
Equipment separately from household waste (WEEE marked with crossed out
wheelie bin symbol).
2. Please consider your role in contributing to re-use and recycling by returning
this product at end of life to a collection centre for waste electrical equipment or
a Civic Amenity site, or to a retail outlet from which you are purchasing a
replacement.
3. This equipment may contain substances that are hazardous to health and the
environment if disposed of carelessly. It is important that it is separated from
normal household waste and recycled in the WEEE chain
4. The “crossed out wheelie bin symbol” on a product indicates this equipment
must not be disposed of in normal household waste, but should be disposed of
according to local WEEE regulations
The Installation must be carried out by a qualified electrician
-20°C < Ta < +40°C, DC 12-24V, Class III, IP20
Suitable for mounting on a normally flammable surface.
-20°C < Ta < +40°C, DC 12-24V , Klasse III, IP20
Geschikt voor montage op een normaal ontvlambare oppervlake.
LED-versterker ontworpen om de LED-strip te verlengen en het vermogen van
enkelkleurige, RGB en RGBW-controllers te versterken.
-20°C < UT < +40°C, DC 12-24V , Klasse III, IP20
Geeignet zur Montage auf einer brennbaren Fläche.
LED-Verstärker für die Erweiterung eines LED-Streifens und zur Verstärkung der
Farbleistung von RGB- und RGBW-Steuerungen.
Installatie Installation
LEES DE INSTRUCTIES VOORDAT U BEGINT MET DE INSTALLATIE EN HOU ZE BIJ
VOOR LATER.
! Elektrische producten kunnen de dood of letsel veroorzaken of eigendommen
beschadigen. Als u twijfelt over de installatie of het gebruik van dit product,
raadpleeg dan een erkende elektricien
Opmerkingen:
Technische gegevens en specificaties van dit product kunnen zonder voorafgaande
kennisgeving wijzigen. Ga voor de meest recente technische gegevens naar onze
website www.ledgrouprobus.com of robusdirect.com
Informatie voor de gebruiker van het product:
1. Hou bij het verwijderen van afval rekening met de regeling voor afgedankte elektrische
en elektronische apparatuur, gescheiden van gewoon huishoudelijk afval (AEEA,
pictogram van een kliko met een kruis erdoorheen).
2. Neem uw verantwoordelijkheid op het vlak van hergebruik en recycling door dit product
aan het einde van zijn levenscyclus in te leveren bij een inleverpunt voor elektronisch
afval, een milieupark of een winkel waar u een nieuw product koopt.
3. Deze apparatuur kan stoffen bevatten die gevaarlijk zijn voor de gezondheid en het
milieu indien ze onachtzaam wordt weggegooid. Het is belangrijk dat het
gescheiden gehouden wordt van het normaal huishoudelijk afval en gerecycled wordt in
het netwerk voor AEEA.
4. Het pictogram van een kliko met een kruis erdoorheen op een product betekent dat dit
apparaat niet samen met het gewone huishoudelijk afval mag worden weggegooid,
maar dat het dient te worden verwijderd in overeenstemming met de lokale regelgeving
voor AEEA (afgedankte elektrische en elektronische apparatuur).
De installatie dient te worden uitgevoerd door een erkende elektricien
LESEN SIE DIE ANLEITUNG, BEVOR SIE MIT DER INSTALLATION BEGINNEN, UND
BEWAHREN SIE SIE FÜR DIE SPÄTERE VERWENDUNG AUF.
! Elektronikprodukte können Tod, schwere Verletzungen oder Sachschaden
verursachen. Bei Zweifeln hinsichtlich der Installation oder des Gebrauchs
konsultieren Sie einen qualifizierten Elektriker.
Hinweis:
Technische Produktinformationen und Angaben können sich im Lauf der Zeit ohne
weitere Mitteilung ändern. Besuchen Sie unsere Webseite www.ledgrouprobus.com
oder robusdirect.com für aktuelle technische Informationen
Informationen für den Benutzer:
1. Beachten Sie, dass die Entsorgung von ausgedienten Elektro- und Elektronikgeräten
getrennt vom Hausmüll erfolgen muss (die Geräte sind mit dem Symbol einer
durchgestrichenen Tonne gekennzeichnet).
2. Beachten Sie Ihre Rolle im Wiederverwendungs- und Recycling-Zyklus, indem Sie
dieses Produkt am Ende der Nutzungsdauer bei einer Sammelstelle für
Elektronikaltgeräte oder einer städtischen Müllkippe, oder einer Verkaufsstelle, wo Sie
einen Ersatz besorgen, entsorgen.
3. Dieses Gerät kann Substanzen enthalten, die gesundheits- und umweltschädlich sind,
falls sie achtlos entsorgt werden. Es ist wichtig, dass es vom normalen Hausmüll
getrennt und in der Kette der Elektro-Altgeräte recycelt wird
4. Das „durchgestrichene Tonnen-Symbol“ auf einem Produkt bedeutet, dass dieses
Gerät nicht mit dem normalen Hausmüll, sondern gemäß der Entsorgungsvorschriften
für Elektro-Altgeräte entsorgt werden muss
Die Installation muss von einem Elektriker vorgenommen werden
EN NL DE
VEGAS SINGLE COLOUR, RGB AND RGBW
AMPLIFIERS, IP20
RVACCT1-AMP RVARGB-AMP RVARGBW-AMP
VEGAS ENKEL KLEUREN, RGB EN RGBW
VERSTERKERS, IP20
RVACCT1-AMP RVARGB-AMP RVARGBW-AMP
VEGAS EINFARBIG, RGB UND RGBW
VERSTÄRKER, IP20
RVACCT1-AMP RVARGB-AMP RVARGBW-AMP
LED amplifier designed to extend LED strip and amplify power of single-color, RGB and
RGBW controllers.
Note:
1 Ensure mains supply is switched off before commencing work.
2 If products are used outdoors please use IP rated enclosure
3 Connect 12/ 24 V Supply to input terminals DC+ & DC
RVACCT1-AMP
4 Input connect, all positives Red “+” to V+. Connect Channel 1 Black “-“ to
CH1. Connect Channel 2 Black “-“ to CH2. Or join all negative inputs
5 Output connection: Follow similar sequence to input connections (instruction 3)
RVARGB-AMP
6 Input connect: + black to V+, “-“ Red to R/ CH1, Green “-“ to G/ Ch2 and Blue “-“
to B/ Ch3.
7 Output Connection: Follow similar sequence to input connections (instruction 5).
RVARGBW-AMP
8 Input Connection: + black to V+, Red “-“ to R, Green “-“ to G, Blue “-“ to B, White “-“
to W.
9 Output Connection: Follow similar sequence to input connections (instruction 7)
Note: Connection sequence to the LED strip may not correspond with the colour of the
wire.
Opmerking:
1. Zorg dat het lichtnet is uitgeschakeld voordat u begint.
2. Als de producten buiten worden gebruikt, moet een behuizing met gepaste IP-klasse worden
gebruikt.
3. Sluit de 12/ 24 V stroomvoorziening aan op de ingangsaansluitklemmen DC+ en DC-
RVACCT1-AMP
4. Ingangsaansluiting, alle positieven rood “+” op V+. Sluit Kanaal 1 Zwart “-” aan op CH1. Sluit
Kanaal 2 Zwart “-” aan op CH2. Of voeg alle negatieve ingangen samen
5. Uitgangsaansluiting: Volg dezelfde volgorde als voor de ingangsaansluitingen (aanwijzing 3)
RVARGB-AMP
6. Ingangsaansluiting: + zwart op V+, “-“ Rood op R/ CH1, Groen “-“ op G/ Ch2 en Blauw “-“ op
B/ Ch3.
7. Uitgangsaansluiting: Volg dezelfde volgorde als voor de ingangsaansluitingen (aanwijzing 5).
RVARGBW-AMP
8. Ingangsaansluiting: + zwart op V+, Rood “-“ op R, Groen “-“ op G, Blauw “-“ op B, Wit “-“ op
W.
9. Uitgangsaansluiting: Volg dezelfde volgorde als voor de ingangsaansluitingen (aanwijzing 7).
Opmerking: De aansluitingsvolgorde op de LED-strip kan afwijken van de kleur van de draad.
Zorg dat de polariteit van de draden juist is.
Hinweis:
1. Vergewissern Sie sich, dass die Stromzufuhr ausgeschaltet ist, bevor Sie mit der Installation
beginnen.
2. Soll das Produkt im Freien genutzt werden, verwenden Sie bitte ein IP-klassifiziertes Gehäuse.
3. Eingangsklemmen DC+ und DC- RVACCT1-AMP an 24-V-Strom anschließen.
RVACCT1-AMP
4. Eingangsverbindung: alle Rot „+“ (positiv) an V+; Kanal 1 Schwarz „-“ an CH1; Kanal 2
Schwarz „-“ an CH2; Oder alle negativen Eingänge miteinander verbinden.
5. Ausgangsverbindung: Vergleichbare Reihenfolge wie bei Eingangsverbindungen (Anleitung 2)
RVARGB-AMP.
6. Eingangsverbindung: + Schwarz an V+; „-“ Rot an R/ CH1; Grün „-“ an G/ Ch2 und Blau „-“ an
B/ Ch3.
7. Ausgangsverbindung: Vergleichbare Reihenfolge wie bei Eingangsverbindungen (Anleitung 5)
RVARGBW-AMP
8. Eingangsverbindung: + Schwarz an V+; Rot „-“ an R; Grün „-“ an G; Blau „-“ an B; Weiß „-“ an
W.
9. Ausgangsverbindung: Vergleichbare Reihenfolge wie bei Eingangsverbindungen (Anleitung 7)
Hinweis: Die Reihenfolge der Verbindung mit dem LED-Streifen entspricht möglicherweise nicht
der Kabelfarbe. Achten Sie auf die korrekte Polarität der Kabel.
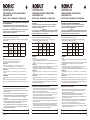
80 x 73 x 34mm
80 x 73 x 34mm
83 x 82 x 33mm
RVACCT1-AMP 12V: ≤144W
24V: ≤288W
RVARGB-AMP 12V: ≤216W
24V: ≤432W
12V: ≤384W
24V: ≤768W
6A x 2CH
12A Max.
6A x 3CH
18A Max.
8A x 4CH
32A Max.
12V DC
24V DC
12V DC
24V DC
12V DC
24V DC
RVARGBW-AMP
Output power Dimension
Output
Current
Output
Voltage
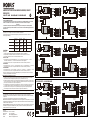
80 x 73 x 34mm
80 x 73 x 34mm
83 x 82 x 33mm
RVACCT1-AMP 12V: ≤144W
24V: ≤288W
RVARGB-AMP 12V: ≤216W
24V: ≤432W
12V: ≤384W
24V: ≤768W
6A x 2CH
12A Max.
6A x 3CH
18A Max.
8A x 4CH
32A Max.
12V DC
24V DC
12V DC
24V DC
12V DC
24V DC
RVARGBW-AMP
uitgang
svermogen Dimensie
uitgang
sstroom
uitgang
sspanning
80 x 73 x 34mm
80 x 73 x 34mm
83 x 82 x 33mm
RVACCT1-AMP 12V: ≤144W
24V: ≤288W
RVARGB-AMP 12V: ≤216W
24V: ≤432W
12V: ≤384W
24V: ≤768W
6A x 2CH
12A Max.
6A x 3CH
18A Max.
8A x 4CH
32A Max.
12V DC
24V DC
12V DC
24V DC
12V DC
24V DC
RVARGBW-AMP
Ausgangsleistung Abmessungen
Ausgangs
strom
Ausgangs
spannung

-20°C < Ta < +40°C, DC 12-24V , Classe III, IP20
Approprié pour un montage sur une surface normalement inflammable.
Amplificateur LED conçu pour étendre et amplifier la puissance d’une seule couleur, contrôleurs
RGB (rouge/vert/bleu) et
Remarque :
1. Vérifier que l’alimentation électrique est coupée avant de commencer l’installation.
2. Si les produits sont utilisés à l’extérieur, veuillez utiliser un boîtier conforme à la norme IP.
3. Connecter l’alimentation 12/ 24 V aux bornes d’entrée DC+ & DC-
RVACCT1-AMP
4. Connexion d’entrée, tous les positifs Rouges « + » à V+. Connecter le Canal 1 Noir « - » au CH1.
Connecter le Canal 2 Noir « - » au CH2. Ou relier toutes les entrées négatives
5. Connexion de sortie : Suivre une séquence similaire aux connexions d’entrée (instruction 3)
RVARGB-AMP
6. Connexion d’entrée : + noir au V+, « - » Rouge au R/ CH1, Vert « - » au G/ Ch2 et Bleu « - » au B/ Ch3.
7. Connexion de sortie : Suivre une séquence similaire aux connexions d’entrée (instruction 5).
RVARGBW-AMP
8. Connexion d’entrée : + noir au V+, Rouge « - » au R, Vert « - » au G, Bleu « - » au B, Blanc « - » au W.
9. Connexion de sortie : Suivre une séquence similaire aux connexions d’entrée (instruction 7).
Remarque : La séquence de connexion à la Bande LED peut ne pas correspondre avec la couleur du fil.
S’assurer que la polarité des fils est correcte.
IT: AVVERTENZA – I dispositivi elettrici possono causare lesioni gravi o la morte o danneggiare
l’apparecchio. In caso di dubbi sull’installazione o sull’utilizzo di questo prodotto, consultare un elettricista
competente.
Assicurarsi che l’alimentazione principale sia spenta prima di effettuare interventi.
EST: HOIATUS! Elektritooted võivad põhjustada surma, raskeid vigastusi või varakahjustusi. Kui teil on toote
paigaldamisel või kasutamisel kahtlusi, küsige nõu asjatundlikult elektrikult. Enne töö alustamist veenduge,
et elektrivool oleks välja lülitatud.
SLK: UPOZORNENIE - Elektrické výrobky môžu spôsobiť smrť, vážne zranenie alebo škodu na majetku. Ak
máte akékoľvek pochybnosti o inštalácii tohto výrobku, poraďte sa s kvalifikovaným elektrikárom. Pred
začatím práce skontrolujte, že je hlavný zdroj
VEUILLEZ LIRE LES INSTRUCTIONS AVANT DE COMMENCER L’INSTALLATION ET CONSERVEZ-LES POUR
TOUTES UTILISATIONS FUTURES.
Les produits électriques peuvent causer la mort, de graves blessures ou des dégâts matériels. Si vous avez des
doutes sur l’installation ou sur l’utilisation de ce produit, veuillez consulter un électricien compétent.
Remarque :
Les informations techniques et caractéristiques peuvent changer au fil du temps sans notification préalable.
Pour rester informé de ces possibles modifications, veuillez consulter le site internet www.ledgrouprobus.com ou
robusdirect.com.
Informations pour l’utilisateur du produit :
Installation
1. Veuillez, s’il vous plait, noter l’importance de disposer des Déchets d’Equipement Electriques et Electroniques
séparément des déchets ménagers (DEEE représenté par une poubelle barrée d’une croix).
2. Veuillez tenir compte de l’importance de votre contribution à la réutilisation et au recyclage de ce produit en fin de
vie en le retournant dans un centre de collecte de déchets des équipements électriques ou dans le point de vente à
partir duquel vous effectuez l’achat du produit de remplacement.
3. Cet équipement peut contenir des substances dangereuses pour la santé et l’environnement s’il est jeté n’importe
où. Il est important de le séparer des ordures ménagères et le recycler dans une consigne DEEE appropriée.
4. La “poubelle barrée d’une croix” présent sur le produit indique que cet appareil ne doit pas être jeté dans les
ordures ménagères mais doit être éliminé conformément à la réglementation DEEE locale.
L’installation doit être effectuée par un électricien qualié
FR
LED Group
Western Retail Park
Nangor Road
Dublin 12
Ireland
Tel: +353 1 7099000
Fax: +353 1 7099060
Email: [email protected]
Website: www.ledgrouprobus.com
Page 2
AMPLIFICATEURS VEGAS MONOCHROMES, RGB ET
RGBW, IP20
RVACCT1-AMP RVARGB-AMP RVARGBW-AMP
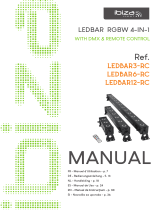
RVARGB-CRTL & RVARGB-AMP
DC+
DC-
R/CH1
G/CH2
B/CH3
V+
R/CH1
G/CH2
B/CH3
V+
DC+
DC-
V+
R/CH1
G/CH2
B/CH3
2
RVARGB-CRTL
RVARGB-AMP
PSU
PSU
DC+
DC-
R/CH1
G/CH2
B/CH3
V+
R/CH1
G/CH2
B/CH3
V+
DC+
DC-
V+
R/CH1
G/CH2
B/CH3
RVARGB-CRTL
RVARGB-AMP
PSU
PSU
RVACCT1-CRTL & RVACCT1-AMP
1
DC+
DC-
V-
V-
V-
V+
W/CH1
C/CH2
V+
DC+
DC-
V+
W/CH1
C/CH2
RVACCT1-CRTL
RVACCT1-AMP
PSU
PSU
DC+
DC-
V-
V-
V-
V+
W/CH1
C/CH2
V+
DC+
DC-
V+
W/CH1
C/CH2
RVACCT1-CRTL
RVCCT1-AMP
PSU
PSU
80 x 73 x 34mm
80 x 73 x 34mm
83 x 82 x 33mm
RVACCT1-AMP 12V: ≤144W
24V: ≤288W
RVARGB-AMP 12V: ≤216W
24V: ≤432W
12V: ≤384W
24V: ≤768W
6A x 2CH
12A Max.
6A x 3CH
18A Max.
8A x 4CH
32A Max.
12V DC
24V DC
12V DC
24V DC
12V DC
24V DC
RVARGBW-AMP
puissance
de sortie Dimension
courant de
sortie
tension
de sortie
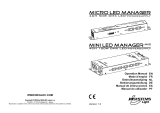
RVARGBW-CRTL & RVARGBW-AMP
DC+
DC-
R/CH1
G/CH2
B/CH3
W/CH4
V+
R/CH1
G/CH2
B/CH3
W/CH4
V+
DC+
DC-
V+
R/CH1
G/CH2
B/CH3
W/CH4
2
RVARGBW-CRTL
220V-240V
~50/60Hz
220V-240V
~50/60Hz
220V-240V
~50/60Hz
220V-240V
~50/60Hz
220V-240V
~50/60Hz
220V-240V
~50/60Hz
220V-240V
~50/60Hz
220V-240V
~50/60Hz
220V-240V
~50/60Hz
220V-240V
~50/60Hz
RVARGBW-AMP
PSU
PSU
DC+
DC-
R/CH1
G/CH2
B/CH3
W/CH4
V+
R/CH1
G/CH2
B/CH3
W/CH4
V+
DC+
DC-
V+
R/CH1
G/CH2
B/CH3
W/CH4
RVARGBW-CRTL
220V-240V
~50/60Hz
220V-240V
~50/60Hz
RVARGBW-AMP
PSU
PSU
-
 1
1
-
 2
2


Robus RVARGBW-AMP Handleiding
- Type
- Handleiding
- Deze handleiding is ook geschikt voor
in andere talen
- français: Robus RVARGBW-AMP Manuel utilisateur
- Deutsch: Robus RVARGBW-AMP Benutzerhandbuch
- eesti: Robus RVARGBW-AMP Kasutusjuhend
Gerelateerde papieren
Andere documenten
-
Brigade MDR-304A-500 (3880) Handleiding
-
Adastra 952.996 Handleiding
-
-
 Ibiza Light & Sound LEDBAR3-RC de handleiding
-
CAME ZM2 de handleiding
-
-
Blaupunkt VR 504 VELOCITY AMP de handleiding
-
-
 JBSYSTEMS MINI LED MANAGER MK2 de handleiding

