Unold 68010 de handleiding
- Categorie
- Machines voor het maken van brood
- Type
- de handleiding

Bedienungsanleitung
Instructions for use | Notice d´utilisation
Gebruiksaanwijzing
| Istruzioni per l’uso
Manual de instrucciones | Instrukcja obsługi
Modell 68010
BACKMEISTER DESIGN
Copyright UNOLD AG | www.unold.de

Impressum:
Bedienungsanleitung Modell 68010
Stand: Februar 2020 /nr
Copyright ©
Mannheimer Straße 4
68766 Hockenheim
Telefon +49 (0) 62 05/94 18-0
Telefax +49 (0) 62 05/94 18-12
E-Mail [email protected]
Internet www.unold.de
Copyright UNOLD AG | www.unold.de

Weitere Informationen zu unserem Sortiment erhalten Sie unter www.unold.de
Copyright UNOLD AG | www.unold.de

INHALTSVERZEICHNIS
Bedienungsanleitung Modell 68010
Technische Daten ........................................................... 8
Symbolerklärung ............................................................. 8
Sicherheitshinweise ........................................................ 8
In Betrieb nehmen ......................................................... 10
Schnelleinstieg – das erste Brot ....................................... 11
Erklärung der Tasten ....................................................... 12
Die Tasten-Funktionen .................................................... 12
Die Funktionen des Backmeisters
®
................................... 14
Zubereiten von Brot, Kuchen oder Teig ............................. 15
Reinigen und Pflegen ...................................................... 16
Tabelle zeitlicher Ablauf .................................................. 17
Fragen zum Gerät und zur Handhabung ............................ 19
Mögliche Fehler am Gerät ................................................ 21
Mögliche Fehler bei den Rezepten .................................... 21
Anmerkungen zu den Rezepten ........................................ 22
Brotrezepte .................................................................... 25
Brote aus Backmischungen .............................................. 27
Brote für Allergiker/Glutenfreies Brot ................................ 27
Kuchen Grundrezept ....................................................... 29
Teig Zubereiten............................................................... 29
Konfitüre zubereiten ....................................................... 30
Garantiebestimmungen ................................................... 31
Entsorgung / Umweltschutz ............................................. 31
Informationen für den Fachhandel .................................... 31
Service-Adressen ............................................................ 32
Bestellformular ............................................................... 33
Instructions for use model 68010
Technical specifications .................................................. 34
Explanation of symbols .................................................... 34
Safety information .......................................................... 34
Start-up ......................................................................... 36
Quick guide – the first bread ............................................ 37
Explanation of the symbols ............................................. 38
Explanations of the control panel ..................................... 38
The functions of the breadmaker ...................................... 39
The program process of the breadmaker ............................ 40
Cleaning and care ........................................................... 41
Timing process of the programs ........................................ 42
Questions and answer concerning the use
of the breadmaker .......................................................... 44
Trouble shooting - appliance ............................................ 46
Trouble shooting - recipes ................................................ 47
Comments on baking ...................................................... 48
Bread recipes ................................................................. 50
Breads for persons with allergies ...................................... 52
Bread mixtures ............................................................... 53
Cake recipe ................................................................... 53
Dough preparation .......................................................... 54
Preparation of jam and marmelade ................................... 55
Guarantee conditions ...................................................... 55
Waste disposal / environmental protection ......................... 55
Service .......................................................................... 32
Notice d´utilisation modèle 68010
Spécification technique .................................................. 56
Explication des symboles ................................................. 56
Consignes de sécurité ..................................................... 56
Avant d’utiliser l’appareil ................................................. 58
Tout ce qu’il faut savoir pour réussir son premier pain ! ...... 59
Explication des symboles ................................................ 60
Explications du champ de commande ............................... 60
Les fonctions du backmeister
®
......................................... 62
Déroulement de programme du Backmeister
®
.................... 62
Nettoyage et entretien ..................................................... 63
Déroulement temporel des programmes ............................ 65
Questions concernant l‘appareil et l‘utilisation ................... 67
Défauts de l‘appareil ....................................................... 69
Faute de réalisation des recettes ...................................... 70
Remarques concernant la cuisson .................................... 71
Recettes ........................................................................ 73
Melanges de farine pour pain ........................................... 74
Pain pour les personnes allergiques .................................. 74
Gateau – recette de base ................................................ 76
Preparation de pate ........................................................ 76
Preparation de confiture .................................................. 77
Conditions de garantie .................................................... 77
Traitement des déchets / protection de l’environnement ...... 77
Service .......................................................................... 32
Gebruiksaanwijzing modell 68010
Technische gegevens ..................................................... 78
Verklaring van de symbolen .............................................. 78
Veiligheidsinstructies ...................................................... 78
Iinbedrijfname ................................................................ 80
Een snelle start – het eerste brood .................................... 81
Verklaring van de symbolen ............................................. 82
Toelichtingen bij het bedieningspaneel ............................. 82
De functies van de Backmeister
®
...................................... 84
Het programma van de Backmeister
®
................................ 85
Schoonmaken en onderhoud ............................................ 86
Tijdschema van de programma’s ....................................... 87
Vragen over het apparaat en de werking ............................ 89
Fout aan het apparaat ..................................................... 91
Fout bij de recepten ........................................................ 92
Opmerkingen bij de recepten ........................................... 93
Recepten ....................................................................... 95
Broden uit bakmengsels .................................................. 97
Brood voor mensen met een allergie ................................. 97
Cake - basisrecept .......................................................... 98
Deegbereiding ................................................................ 99
Confituren bereiden ........................................................ 99
Garantievoorwaarden ....................................................... 100
Verwijderen van afval / milieubescherming ........................ 100
Service .......................................................................... 32
Copyright UNOLD AG | www.unold.de

INHALTSVERZEICHNIS
Istruzioni per l‘uso modello 68010
Specifiche tecniche ........................................................ 101
Significato dei simboli .................................................... 101
Avvertenze di sicurezza ................................................... 101
Messa in funzione ........................................................... 103
Primi passi - il primo pane ............................................... 103
Spiegazione dei simboli .................................................. 105
Spiegazioni sul pannello comandi..................................... 105
Funzioni del backmeister ................................................. 107
Preparazione di pane, dolci o pasta .................................. 107
Pulizia e cura ................................................................. 108
Tabella sequenza temporale ............................................. 110
Domande sull‘apparecchio e sul suo uso ........................... 112
Possibili problemi nelle ricette ......................................... 114
Note sulle ricette ............................................................ 115
Ricette per pane ............................................................. 117
Pani da miscele per pane ................................................ 118
Pani per allergici ............................................................ 118
Ricetta base per dolce ..................................................... 119
Preparazione di paste ...................................................... 119
Preparazione di confetture ............................................... 120
Norme die garanzia ......................................................... 120
Smaltimento / tutela dell’ambiente ................................... 120
Service .......................................................................... 32
Manual de instrucciones modelo 68010
Datos técnicos ............................................................... 121
Explicación de símbolos .................................................. 121
Indicaciones de seguridad ............................................... 121
Puesta en servicio ........................................................... 123
Guía rápida – el primer pan ............................................. 124
Explicación de los símbolos ............................................ 125
Aclaraciones sobre el panel de control .............................. 125
Las funciones del aparato de hornear ................................ 127
El transcurso del programa ............................................. 128
Limpieza y mantenimiento ............................................... 129
Transcurso de los programas ............................................ 130
Preguntas sobre el uso del aparato y su manejo ................. 132
Errores del aparat ........................................................... 134
Errores en las recetas ...................................................... 135
Comentarios sobre las recetas .......................................... 136
Recetas ......................................................................... 138
Panes hechos con mezclas de harinas preparadas .............. 140
Panes para alérgicos ....................................................... 140
Preparacion de la masa ................................................... 141
Receta básica de torta ..................................................... 142
Mermelada ..................................................................... 143
Condiciones de garantia .................................................. 143
Disposición/protección del medio ambiente ....................... 143
Service .......................................................................... 32
Instrukcja obsługi modelu 68010
Dane techniczne ............................................................ 144
Objaśnienie symboli ........................................................ 144
Przepisy bezpieczeństwa ................................................. 144
Uruchomienie i użycie ..................................................... 146
Pierwszy chleb................................................................ 146
Objaśnienie symboli ........................................................ 148
Wyjaśnienia do pola sterowania ........................................ 148
Funkcje piekarnika ........................................................ 150
Przebieg programu piekarnik ............................................ 151
Czyszczenie i konserwacja ............................................... 152
Czasowy przebieg programu ............................................. 153
Czasowy przebieg programu ............................................. 154
Pytania dotyczące urządzenia i jego używania .................... 155
Błędy w urządzeniu ......................................................... 157
Błędy w przepisach ......................................................... 158
Uwagi do przepisów ........................................................ 159
Przepisy na chleb klasyczny ............................................ 161
Chleby z mieszanek do pieczenia ...................................... 162
Chleby dla alergików ....................................................... 163
Ciasta – przepisy podstawowe .......................................... 163
Przygotowanie ciasta ....................................................... 164
Gotowanie konfitur .......................................................... 165
Warunki gwarancji........................................................... 165
Utylizacja/ochrona środowiska .......................................... 165
Service .......................................................................... 32
Copyright UNOLD AG | www.unold.de

EINZELTEILE
6
5
1
7
2
4
3
6 von 168
Stand 21.2.2020
DE
EN
FR
NL
IT
ES
PL
Copyright UNOLD AG | www.unold.de

EINZELTEILE
DE Ab Seite 8
1 Kneter
2 Backform
3 Deckel mit Sichtfenster
4 Bedienfeld mit Display
5 Hakenspieß zum Entnehmen des Kneters
6 Messlöffel Art-Nr. 8656151
7 Messbecher Art-Nr. 8656152
EN Page 34
1 Kneader
2 Baking pan
3 Lid with viewing window
4 Control panel with display
5 Hook to remove the kneading blade
6 Measuring spoon
7 Measuring cup
FR Page 56
1 Pale de pétrissage
2 Moule
3 Couvercle avec hublot de contrôle
4 Boutons de commande avec écran
5 Crochet pour enlever les pétrins
6 Cuillère mesureur
7 Gobelet mesureur
NL Pagina 78
1 Kneedhaak
2 Bakvorm
3 Deksel met kijkvenster
4 Bedieningsveld met display
5 Haak voor het uitnemen van de kneedhaak
6 Maatlepel
7 Maatbeker
ES Página 101
1 Amasadora
2 Molde
3 Tapa con ventana de control
4 Panel de control con pantalla
5 Cuchara dosificadora
6 Cuchara medidora
7 Vaso medidor
PL Strony 144
1 Ugniatarka
2 Forma do pieczenia pokryta warstwą
nieprzywierającą
3 Pokrywa
4 Wyświetlacz
5 Szpikulec hakowy do wyjmowania ugniatarki
6 Łyżka do odmierzania
7 Pojemnik z miarką
Stand 21.2.2020
7 von 168
DE
EN
FR
NL
IT
ES
PL
Copyright UNOLD AG | www.unold.de

8 von 168
Stand 21.2.2020
DE
EN
FR
NL
IT
ES
PL
BEDIENUNGSANLEITUNG MODELL 68010
SICHERHEITSHINWEISE
TECHNISCHE DATEN
Bitte lesen Sie die folgenden Anweisungen
und bewahren Sie diese auf.
1. Dieses Gerät kann von Kindern ab
8 Jahren sowie von Personen mit
reduzierten physischen, sensorischen
oder mentalen Fähigkeiten oder Mangel
an Erfahrung und/oder Wissen benutzt
werden, wenn sie beaufsichtigt oder
bezüglich des sicheren Gebrauchs
des Geräts unterwiesen wurden und
die daraus resultierenden Gefahren
verstanden haben.
2. Kinder dürfen nicht mit dem Gerät
spielen.
3. Reinigung und benutzerseitige War-
tung dürfen nicht von Kindern durch-
geführt werden, es sei denn, sie sind
älter als 8 Jahre und werden beauf-
sichtigt.
4. Bewahren Sie das Gerät und das Kabel
außerhalb der Reichweite von Kindern
unter 8 Jahren auf.
5. VORSICHT - Teile dieses Produkts
können sehr heiß werden und Verbren-
nungen verursachen! In Anwesenheit
von Kindern und gefährdeten Perso-
nen ist besondere Vorsicht geboten.
6. Gerät nur an Wechselstrom mit
Spannung gemäß dem Typenschild
anschließen.
Leistung: 550 W, 220–240 V~, 50 Hz
Abmessungen: Ca. 24,7 x 36,2 x 29,1 cm (L/B/H)
Gewicht Ca. 4,4 kg
Backform: Innenmaß Backform ca. 16,8 x 12,8 x 14,3 cm (L/B/H)
Inhalt: 700 – 1.000 g Brotgewicht
Zuleitung: Ca. 80 cm fest montiert
Gehäuse: Kunststoff, weiß/schwarz
Deckel: Deckel mit Sichtfenster
Ausstattung: Deckel mit großem Sichtfenster, 12 gespeicherte Programme, Stufentaste für verschiedene
Brotgewichte, Wahlschalter für Bräunungsgrad, Zeitwahlschalter bis zu 13 Stunden
vorprogrammierbar, automatische Warmhaltestufe, BPA-frei
Zubehör: Herausnehmbare, antihaftbeschichtete Backform, Kneter, Messbecher, Messlöffel, Hakenspieß,
Bedienungsanleitung mit großem Rezeptteil
Änderungen und Irrtümer in Ausstattungsmerkmalen, Technik, Farben und Design vorbehalten
SYMBOLERKLÄRUNG
Dieses Symbol kennzeichnet eventuelle Gefahren, die Verletzungen nach sich
ziehen können oder zu Schäden am Gerät führen.
Dieses Symbol weist Sie auf eine eventuelle Verbrennungsgefahr hin. Gehen
Sie hier immer besonders achtsam vor.
Copyright UNOLD AG | www.unold.de

Stand 21.2.2020
9 von 168
DE
EN
FR
NL
IT
ES
PL
7. Dieses Gerät darf nicht mit einer exter-
nen Zeitschaltuhr oder einem Fernbe-
dienungssystem betrieben werden.
8. Tauchen Sie das Gerät oder die
Zuleitung keinesfalls in Wasser oder
andere Flüssigkeiten ein.
9. Das Gerät darf nicht in der Spülma-
schine gereinigt werden.
10. Das Gerät bzw. die Zuleitung niemals
mit nassen Händen berühren.
11. Wenn das Gerät nicht benutzt wird,
wie auch vor dem Reinigen, bitte
das Gerät ausschalten und den Netz-
stecker ziehen. Vor dem Abnehmen
einzelner Teile das Gerät auskühlen
lassen.
12. Ziehen Sie die Zuleitung immer nur
am Anschlussstecker aus der Steck-
dose, nie am Anschlusskabel.
13. Tragen Sie das Gerät nicht am
Anschlusskabel.
14. Verwenden Sie das Gerät nur in
Innenräumen.
15. Die Verwendung von nicht vom
Hersteller empfohlenem Zubehör
kann zu Beschädigungen führen. Das
Gerät nur für den vorgesehenen Zweck
verwenden.
16. Stellen Sie das Gerät so auf, dass es
nicht von der Arbeitsplatte rutscht,
z. B. beim Kneten eines schweren
Teiges. Dies ist insbesondere beim
Vorprogrammieren zu beachten, wenn
das Gerät unbeaufsichtigt arbeitet.
Bei sehr glatten Arbeitsflächen
sollte man das Gerät auf eine
dünne Gummimatte stellen, um die
Rutschgefahr auszuschließen.
17. Das Gerät ist ausschließlich für den
Haushaltsgebrauch oder ähnliche
Verwendungszwecke bestimmt, z. B.
Teeküchen in Geschäften, Büros oder
sonstigen Arbeitsstätten,
landwirtschaftlichen Betrieben,
zur Verwendung durch Gäste in Hotels,
Motels oder sonstigen Beherbergungs-
betrieben,
in Privatpensionen oder Ferienhäusern.
18. Der Backmeister
®
muss mit min-
destens 10 cm Abstand zu anderen
Gegenständen platziert sein, wenn er
in Betrieb ist. Das Gerät nur innerhalb
von Gebäuden verwenden.
19. Sorgen Sie dafür, dass das Kabel
keine heißen Oberflächen berührt
und nicht über eine Tischkante hängt,
damit z. B. Kinder nicht daran ziehen
können.
20. Das Gerät nie auf oder neben einen
Gas- oder Elektroherd oder einen
heißen Backofen stellen.
21. Höchste Vorsicht ist beim Bewegen
des Gerätes geboten, wenn dieses mit
heißen Zutaten gefüllt ist.
22. Nehmen Sie die Backform niemals
während des Betriebes heraus.
23. Füllen Sie insbesondere bei Weißbrot
keine größeren als die angegebenen
Mengen in die Backform. Sollte
dies geschehen, wird das Brot nicht
gleichmäßig gebacken oder der Teig
läuft über. Beachten Sie dazu unsere
Hinweise.
24. Beim Ausprobieren eines neuen
Rezeptes sollten Sie beim ersten
Mal in der Nähe bleiben, um den
Backvorgang zu überwachen.
25. Lassen Sie das Gerät nie aufheizen,
wenn die Backform nicht eingesetzt
ist.
26. Zum Herausnehmen des Brotes
darf die Backform auf keinen Fall
Copyright UNOLD AG | www.unold.de

10 von 168
Stand 21.2.2020
DE
EN
FR
NL
IT
ES
PL
auf eine Kante oder Arbeitsplatte
aufgeschlagen werden, da dies zur
Beschädigung führen kann.
27. Metallfolien oder andere Materialien
dürfen nicht in das Gerät eingeführt
werden, da dadurch das Risiko eines
Brandes oder Kurzschlusses entsteht.
28. Decken Sie das Gerät niemals mit
einem Handtuch oder anderem
Material ab. Hitze und Dampf müssen
entweichen können. Ein Brand
kann entstehen, wenn das Gerät mit
brennbarem Material abgedeckt wird
oder in Kontakt kommt, wie z. B. mit
Vorhängen.
29. Bevor Sie ein bestimmtes Brot über
Nacht backen wollen, probieren Sie das
Rezept erst aus, um sicherzustellen,
dass das Verhältnis der Zutaten
zueinander stimmt, der Teig nicht zu
fest oder zu dünn ist, oder die Menge
zu groß ist und dann evtl. überläuft.
30. Öffnen Sie auf keinen Fall das Gehäuse
des Gerätes. Es besteht Gefahr durch
Stromschlag.
31. Prüfen Sie regelmäßig Stecker und
Zuleitung auf Verschleiß oder Beschä-
digungen. Bei Beschädigung des
Anschlusskabels oder anderer Teile
senden Sie das Gerät bitte zur Über-
prüfung und Reparatur an unseren
Kundendienst. Unsachgemäße Repa-
raturen können zu erheblichen Gefah-
ren für den Benutzer führen und füh-
ren zum Ausschluss der Garantie.
VORSICHT:
Das Gerät wird während des Betriebs sehr heiß!
Öffnen Sie auf keinen Fall das Gehäuse des Gerätes. Es besteht die Gefahr eines
Stromschlages.
Der Hersteller übernimmt keine Haftung bei fehlerhafter Montage, bei unsachgemäßer oder fehlerhafter Verwendung oder nach Durchführung
von Reparaturen durch nicht autorisierte Dritte.
IN BETRIEB NEHMEN
1. Überprüfen Sie beim Auspacken des Gerätes, ob alle
Teile vollständig und unbeschädigt vorhanden sind.
2. Entnehmen Sie vor dem ersten Benutzen alle
Verpackungsmaterialien sowie alle losen Teile aus
dem Innenraum. Halten Sie Verpackungsmaterial von
Kindern fern – Erstickungsgefahr!
3. Vor dem ersten Gebrauch spülen Sie die Backform des
Backmeisters
®
mit warmem Wasser und einem milden
Spülmittel kurz aus und reinigen Sie den Kneter.
4. Wischen Sie das Gerät von außen mit einem gut
ausgedrückten, feuchten Tuch ab. Das Gerät darf auf
keinen Fall in Wasser eingetaucht werden.
5. Trocknen Sie alle Teile gut ab. Setzen Sie die Backform
in das Gerät ein.
6. Stecken Sie nun den Stecker in die Steckdose.
7. Nun ist das Gerät betriebsbereit.
8. Da beim ersten Aufheizen Rauch entstehen kann,
empfehlen wir, das Gerät einmal mit eingesetzter leerer
Backform (ohne Kneter) im Programm BACKPULVER
durchlaufen zu lassen, um eventuelle Rückstände auf
den Heizschlangen zu beseitigen.
9. Danach können Sie mit dem Backen beginnen.
Copyright UNOLD AG | www.unold.de

Stand 21.2.2020
11 von 168
DE
EN
FR
NL
IT
ES
PL
1. Bereiten Sie das Gerät wie im Kapitel „In Betrieb
nehmen“ beschrieben vor.
2. Öffnen Sie den Deckel des Backmeisters
®
und
entnehmen Sie die Backform (nach links gegen den
Uhrzeigersinn drehen).
3. Streichen Sie das Loch des Kneters dick mit
hitzebeständiger Margarine aus, damit der Teig nicht
in den Hohlraum eindringen und dort festbacken kann.
4. Setzen Sie den Kneter auf die Antriebswelle in der
Backform.
5. Geben Sie die Zutaten wie im jeweiligen Rezept
angegeben, in die Backform. Bei schweren Teigen
erzielen Sie ein optimales Backergebnis, wenn
Sie die Reihenfolge der Zutaten ändern, d. h. erst
die trockenen Zutaten und dann die Flüssigkeit
hineingeben. Achten Sie jedoch beim Verwenden der
Zeitwahlfunktion darauf, dass die Hefe nicht vorzeitig
mit der Flüssigkeit in Kontakt kommt.
6. Setzen Sie die Backform wieder in das Gerät ein,
drehen Sie dabei die Form im Uhrzeigersinn, bis diese
einrastet.
7. Schließen Sie den Deckel des Backmeisters
®
.
8. Stecken Sie den Netzstecker in eine Steckdose.
9. Wählen Sie das gewünschte Programm aus. Hinweise
zu den einzelnen Programmen erhalten Sie ab Seite
13. Für ein Brot aus einer Standard-Backmischung
erzielen Sie z. B. im Programm „Basis“ gute
Ergebnisse.
10. Wählen Sie den gewünschten Bräunungsgrad über
die Taste BRÄUNUNG (Hell – Mittel – Dunkel) aus.
Beachten Sie bitte, dass die Bräunungsgrad-Auswahl
nicht bei allen Backprogrammen möglich ist. Hinweise
dazu erhalten Sie auf Seite 14.
11. Wählen Sie die gewünschte Brotgröße aus. Beachten
Sie bitte, dass die Brotgrößen-Auswahl nicht bei allen
Backprogrammen möglich ist. Hinweise dazu erhalten
Sie auf Seite 14.
12. Wenn Sie alle gewünschten Einstellungen vorgenom-
men haben, drücken Sie die START/STOP-Taste.
13. Je nach ausgewähltem Programm ertönt während des
zweiten Knetvorganges ein mehrmaliges Piepsen. Sie
können jetzt nach Wunsch den Deckel öffnen und
weitere Zutaten wie Nüsse zum Teig geben. Schließen
Sie den Deckel anschließend wieder.
14. Wenn Ihr Brot fertig gebacken ist, signalisiert der
Backmeister durch mehrmaliges Piepsen, dass das
Brot entnommen werden kann. Wenn Sie das Brot vor
Ablauf der Warmhaltezeit entnehmen wollen, drücken
Sie die Taste START/STOP und halten Sie diese, bis
der Programmabbruch mit einem Signalton bestätigt
wurde.
15. Entnehmen Sie die Backform vorsichtig. Um
Verbrennungen zu vermeiden, benutzen Sie hierbei
bitte geeignete Topflappen. Drehen Sie die Backform
mit der Öffnung nach unten und lassen Sie das Brot
zum Auskühlen auf ein Kuchengitter gleiten. Sofern
das Brot nicht gleich auf das Kuchengitter fällt,
den Knetantrieb von unten einige Male hin und her
bewegen, bis das Brot herausfällt. Achten Sie hierbei
darauf, dass der Knetantrieb noch heiß sein kann.
Verwenden Sie auch hier geeignete Topflappen. Auf
keinen Fall dürfen Sie die Backform auf eine Kante
oder Arbeitsfläche aufschlagen. Die Backform könnte
sich dabei verformen.
16. Wenn der Kneter im Brot stecken bleibt, können Sie
ihn mit dem mitgelieferten Hakenspieß lösen. Führen
Sie ihn an der Unterseite des noch warmen Brotes in
die Öffnung des Kneters und verkanten Sie ihn am
unteren Rand des Kneters am besten dort, wo sich
der Flügel des Kneters befindet. Ziehen Sie dann den
SCHNELLEINSTIEG – DAS ERSTE BROT
Copyright UNOLD AG | www.unold.de

12 von 168
Stand 21.2.2020
DE
EN
FR
NL
IT
ES
PL
Kneter mittels Hakenspieß vorsichtig nach oben. Dabei
kann man sehen, an welcher Stelle im Brot sich der
Flügel des Kneters befindet, und diesen herausziehen.
17. Reinigen Sie die Backform anschließend, wie auf
Seite 16beschrieben.
VORSICHT:
Das Gerät wird während des
Betriebs heiß!
ERKLÄRUNG DER TASTEN
Menü
Die angezeigte
Nummer weist
auf das aktuell
ausgewählte
Menü hin.
Bräunung
Der jeweils aus-
gewählte Bräu-
nungsgrad wird im
Display angezeigt.
Start/Stop-Taste
Zum Starten und
Beenden des Pro-
grammablaufs
Zeitwahl +
Erhöhen der
gewünschten
Zeit
Zeitwahl -
Verringern der
gewünschten
Zeit
Brotgröße
Auswahl der
gewünschten
Brotgröße
Grundeinstellung
Sobald der Stecker in die Steckdose gesteckt wird, er-
scheint im Display 3:00 (der Doppelpunkt zwischen den
Zahlen blinkt nicht). Die Pfeile zeigen auf 1, Stufe II und
Bräunung mittel.
Damit wird die Betriebsbereitschaft angezeigt.
Während des Betriebes kann der Programmstand sowohl an
den rückwärts laufenden Zeitangaben, als auch durch den
Pfeil im Display abgelesen werden.
START/STOP-Taste
Zum Starten und Beenden des Programmablaufs. Mit der
START/STOP-Taste können Sie das Programm in jeder Po-
sition abbrechen. Halten Sie die Taste so lange gedrückt,
bis ein Signalton zu hören ist. Im Display erscheint die
Anfangsposition des Basis-Programms. Wenn Sie ein an-
deres Programm verwenden wollen, wählen Sie dieses mit
der Menü-Taste.
ZEIT + / Zeit -
Verwenden Sie die Zeitwahl-Funktion nur für Rezepte, die
Sie vorher unter Aufsicht erfolgreich ausprobiert haben
und verändern Sie diese Rezepte danach nicht mehr.
VORSICHT: Bei einer zu großen Teigmenge kann der Teig über-
laufen und auf dem Heizelement festbrennen.
DIE TASTEN-FUNKTIONEN
Copyright UNOLD AG | www.unold.de

Stand 21.2.2020
13 von 168
DE
EN
FR
NL
IT
ES
PL
Die Programme können zeitverzögert gestartet werden.
Füllen Sie die Zutaten in die Form und setzen Sie sie ins
Gerät ein. Achten Sie darauf, dass die Hefe nicht mit dem
Wasser in Berührung kommt. Wählen Sie Programm und
ggf. Stufe und Bräunung und wählen Sie über die Taste
Zeit die Stundenzahl, in der das Brot fertig sein soll.
Beispiel:
Es ist abends 20:00 Uhr und Sie wollen morgens um
7:00Uhr frisch gebackenes Weißbrot haben.
Die Zutaten in der vorgegebenen Reihenfolge in die Back-
form geben und diese ins Gerät einsetzen. Darauf ach-
ten, dass die Hefe nicht mit der Flüssigkeit in Berührung
kommt.
Mit der Taste MENÜ das gewünschte Programm auswählen
und mit der Taste BRÄUNUNG die gewünschte Kruste
eingeben und mit GRÖSSE die gewünschte Größe
wählen. Im Beispiel nehmen wir Programm 1 = Basis. Das
Programm ist um 7 Uhr morgens beendet. Dann beginnt die
Warmhaltezeit von 1 Stunde. Durch Drücken der START/
STOP-Taste kann die Warmhaltephase beendet werden.
Sie müssen deshalb, um morgens um 7:00 Uhr warmes
frisches Brot entnehmen zu können, abends um 20:00 Uhr
mit der Taste ZEIT + durch wiederholtes Drücken der Taste
die Programmzeit auf 11 Stunden erhöhen. Dies erfolgt
beim Drücken der Taste ZEIT + in Schritten von jeweils
10 Minuten.
Zum Schluss die Taste START/STOP drücken, um das zeit-
versetzte Backprogramm zu starten. Bitte beachten Sie:
Beim zeitversetzten Backen keine leicht verderblichen
Zutaten, wie Milch, Eier, Früchte, Joghurt, Zwiebeln etc.
verwenden.
Der 10-malige Signalton, der den Zeitpunkt zum Zufügen
von Zutaten sowie das Programmende anzeigt, kann nicht
abgeschaltet werden, ertönt also auch nachts.
MENÜ
Mit der Menü-Taste rufen Sie die einzelnen Programme
auf, die in der Tabelle „Zeitlicher Ablauf“ ausführlich
beschrieben sind. Man verwendet die Programme für fol-
gende Zubereitungen:
1 BASIS Das Standardprogramm für
alle Brote, wie z. B. Weiß- und
Mischbrote
2 WEISSBROT Für besonders lockere Weißbrote
mit längerer Gehzeit
3 VOLLKORN Für Vollkornbrote
4 SCHNELL Zur schnelleren Zubereitung
von Weiß- und Mischbrot
5 HEFEKUCHEN Für die Zubereitung von süßem
Hefeteig
6 ULTRA Für alle Rezepte der Stufe
I, die in den Programmen
Basis, Weißbrot, Schnell oder
Toastbrot gebacken werden. Der
Teig geht im Programm Ultra-
Schnell wesentlich kürzer und
die Brote sind daher kompakter
und weniger locker. Bei
diesem Programm lauwarme
Flüssigkeiten verwenden.
7 KONFITÜRE Zum Kochen von Konfitüre und
Marmelade. Für die Zuberei-
tung von Konfitüre sollte eine
zweite Backform angeschafft
werden, die ausschließlich für
Konfitüre verwendet wird.
8 TEIG Zur Herstellung von Teig, ohne
Backfunktion
9 GLUTENFREI Ideal für glutenfreie Brote
10 BACKPULVER Für Gebäck, das mit Backpulver
hergestellt wird, z. B.
Rührkuchen
11 TOASTBROT Zur Herstellung von Toastbrot
12 BACKEN Zum Backen von separat
hergestellten Hefe- oder
Rührteigen (von Hand oder im
Programm TEIG).
Dieses Programm ist nicht
geeignet für Mürbeteig,
Brandteig u. ä.
In den Programmen BASIS, WEISSBROT, VOLLKORN,
HEFEKUCHEN, TOASTBROT und GLUTENFREI ertönen
während des zweiten Knetvorgangs Pieptöne. Diese zeigen
den Zeitpunkt an, zu dem weitere Zutaten wie Nüsse,
Trockenfrüchte usw. zugegeben werden können. Öffnen Sie
den Deckel, geben Sie die Zutaten hinzu. Dann den Deckel
wieder schließen.
BRÄUNUNG
Mit dieser Taste lässt sich in den Programmen 1-12 außer
8, die Bräunung in HELL - MITTEL - DUNKEL einstellen.
Im Programm 8 ist diese Funktion nicht wählbar. Sie er-
Copyright UNOLD AG | www.unold.de

14 von 168
Stand 21.2.2020
DE
EN
FR
NL
IT
ES
PL
kennen die jeweilige Einstellung am entsprechenden Pfeil
im Display.
BROTGRÖSSE
Es lassen sich damit in verschiedenen Programmen ein-
stellen:
STUFE I = für ein kleineres Brotgewicht (ca. 700 g)
STUFE II = für ein größeres Brotgewicht (ca. 1.000 g)
Bitte beachten Sie, dass eine Einstellung der Stufe nur
in den Programmen 1, 2, 3, 5, 9, 11 möglich ist. In den
Rezepten finden Sie dazu unsere Empfehlungen.
VORSICHT:
Das Gerät wird während des
Betriebs heiß!
DIE FUNKTIONEN DES BACKMEISTERS
®
Summer - Funktion
Der Summer ertönt
wenn eine aktive Taste gedrückt wird,
während des zweiten Knetvorgangs in einigen
Programmen, um darauf hinzuweisen, dass jetzt
Körner, Früchte, Nüsse etc. hinzugefügt werden
können. Dieser lässt sich nicht abschalten, z. B. bei
Verwendung der Zeitwahlfunktion.
nach Ende des Backvorgangs piept das Gerät 10 mal
während der Warmhaltephase.
am Ende der Warmhaltezeit ertönt 1 mal ein
Signalton, um anzuzeigen, dass das Programm nun
komplett beendet ist und das Brot aus der Backform
genommen werden muss. Dieser Signalton lässt
sich nicht abschalten, z. B. bei Verwendung der
Zeitwahlfunktion
Netzausfall-Sicherung
Falls während des Betriebs des Backmeisters
®
der Strom
ausfällt, startet das Gerät automatisch, sobald die Strom-
versorgung wieder vorhanden ist, und setzt den Ablauf dort
fort, wo es unterbrochen wurde, sofern der Ausfall nicht
länger als 15Minuten gedauert hat.
Falls der Stromausfall länger als 15 Minuten dauert und
das Display die Grundeinstellung anzeigt, muss der Back-
meister
®
erneut gestartet werden. Das ist nur dann prakti-
kabel, wenn der Teig beim Abbruch des Programmablaufes
nicht weiter als in der Knetphase war. Ggf. kann man den
gewählten Programmablauf fortsetzen. Sollte der Teig aber
schon in der letzten Gehphase sein und der Stromausfall
längere Zeit andauern, ist der Teig nicht mehr verwendbar
und man muss von vorne beginnen.
Sicherheitsfunktionen
Wenn die Temperatur im Gerät für ein neu gewähltes Pro-
gramm noch zu hoch ist, erscheint bei einem erneuten
Start im Display „H HH“. Falls dies eintritt, entnehmen
Sie die Backform und warten Sie, bis das Gerät abgekühlt
ist und wieder am Anfang des ursprünglich ausgewählten
Programms steht.
Wenn die Temperatur im Gerät zu niedrig ist, erscheint
bei einem erneuten Start (außer im Programm „Konfitü-
re“ oder „Backen“ im Display „L LL“. Falls dies eintritt,
drücken Sie die START/STOP-Taste, öffnen Sie den Deckel
des Gerätes und warten Sie ca. 10-20 Minuten, bevor Sie
das Gerät erneut nutzen.
Wenn nach dem Drücken der START/STOP-Taste im Display
„E rr“ erscheint, liegt ein Defekt der Temperatursteuerung
vor. Bitte senden Sie das Gerät zur Überprüfung/Reparatur
an unseren Kundendienst. Bitte beachten Sie, dass das
Gerät aus Sicherheitsgründen keine Oberhitze hat, daher
wird die Kruste an der Oberseite des Brotes weniger dun-
kel, während die Unterseite und die Seiten dunkler sind.
Aus sicherheitstechnischen Gründen ist eine zusätzliche
Heizung im Deckelbereich jedoch nicht zulässig. Nach
dem Programmstart sollte der Deckel nur noch während
der Knetphasen zum Zufügen von Zutaten geöffnet wer-
den, keinesfalls aber während der Aufgeh- und Backphase,
weil sonst der Teig zusammenfällt.
Copyright UNOLD AG | www.unold.de

Stand 21.2.2020
15 von 168
DE
EN
FR
NL
IT
ES
PL
ZUBEREITEN VON BROT, KUCHEN ODER TEIG
1. Zutaten einfüllen
Streichen Sie das Loch des Kneters dick mit
hitzebeständiger Margarine aus, damit der Teig nicht
in den Hohlraum eindringen und dort festbacken kann.
Setzen Sie den Kneter mit der langen Seite unten wie in
der Gerätebeschreibung gezeigt auf die Antriebswelle.
Die Zutaten müssen in der angegebenen Reihenfolge des
jeweiligen Rezeptes in die Backform eingefüllt werden.
Bei sehr schweren Teigen empfehlen wir, die Reihenfolge
der Zutaten zu ändern und Trockenhefe und Mehl zuerst
und die Flüssigkeit zuletzt einzufüllen, damit der Teig gut
durchgeknetet wird. Allerdings muss bei Nutzung der Zeit-
wahlfunktion darauf geachtet werden, dass die Hefe nicht
vorzeitig in Kontakt mit der Flüssigkeit kommt.
2. Einsetzen der Backform
Die antihaftbeschichtete Backform am Rand festhalten
und leicht schräg in die Mitte des Sockels im Backraum
einsetzen. Im Uhrzeigersinn drehen, bis sie einrastet.
3. Programmablauf wählen
Wählen Sie den gewünschten Programmablauf mit der Me-
nü-Taste. Wählen Sie je nach Programm die entsprechende
Stufe und die gewünschte Bräunung. Mit der Zeittaste kön-
nen Sie den Ablauf verzögern.
4. Programm starten
Drücken Sie die START/STOP-Taste. Danach ist eine Kor-
rektur nicht mehr möglich.
5. Teig Mischen und Kneten
Der Backmeister
®
mischt und knetet den Teig automatisch
so lange, bis er die richtige Konsistenz hat.
6. Ruhezeit
Nach dem ersten Knetvorgang ist eine Ruhezeit vorgesehen,
in der die Flüssigkeit die Hefe und das Mehl langsam
durchdringen kann.
7. Teig gehen lassen
Nach dem letzten Kneten erzeugt der Backmeister
®
die
optimale Temperatur zum Gehen des Teiges.
8. Backen
Der Brotbackautomat reguliert die Backtemperatur und
-zeit automatisch.
9. Warmhalten
Wenn das Gebäck fertig ist, zeigt ein mehrmaliger Signal-
ton an, dass das Brot oder die Speisen entnommen werden
können. Gleichzeitig beginnt damit eine Warmhaltezeit von
1 Stunde. Wenn Sie das Brot vor Ablauf der Warmhaltezeit
entnehmen wollen, drücken Sie die Taste START/STOP und
halten Sie diese kurz, bis der Programmabbruch mit einem
Signalton bestätigt wurde.
10. Ende des Programmablaufs
Nach Beendigung des Programmablaufes die Backform
mit Hilfe von Topflappen leicht gegen den Uhrzeigersinn
drehen und die Backform herausnehmen. Drehen Sie die
Backform mit der Öffnung nach unten und lassen Sie das
Brot zum Auskühlen auf ein Kuchengitter gleiten. Sofern
das Brot nicht gleich auf das Kuchengitter fällt, den Knet-
antrieb von unten einige Male hin und her bewegen bis das
Brot heraus fällt. Auf keinen Fall dürfen Sie die Backform
auf eine Kante oder Arbeitsfläche aufschlagen. Die Back-
form könnte sich dabei verformen.
Wenn der Kneter im Brot stecken bleibt, können Sie ihn
mit dem mitgelieferten Hakenspieß lösen. Führen Sie ihn
an der Unterseite des noch warmen Brotes in die Öffnung
des Kneters und verkanten Sie ihn am unteren Rand des
Kneters, am besten dort, wo sich der Flügel des Kneters
befindet. Ziehen Sie dann den Kneter mittels Hakenspieß
vorsichtig nach oben. Dabei kann man sehen an welcher
Stelle im Brot sich der Flügel des Kneters befindet und ihn
herausziehen (siehe Abbildung Seite 12).
Reinigen Sie die Backform anschließend, wie auf Seite
16beschrieben.
Copyright UNOLD AG | www.unold.de

16 von 168
Stand 21.2.2020
DE
EN
FR
NL
IT
ES
PL
REINIGEN UND PFLEGEN
Vor dem Reinigen immer
den Netzstecker ziehen.
Lassen Sie das Gerät
immer erst mindestens eine
halbe Stunde auskühlen,
bevor Sie es reinigen oder
einlagern bzw. bevor Sie
das Gerät wieder zum
Backen und Teigzubereiten
benutzen.
Tauchen Sie das Gerät
niemals in Wasser und
füllen Sie niemals Wasser
in die Backkammer.
1. Vor dem ersten Gebrauch spülen Sie die Backform des
Backmeisters mit
einem milden Spülmittel kurz aus
und reinigen Sie den Kneter. Vor dem Einsetzen in
das Gerät müssen die Teile gut abgetrocknet werden.
2. Entfernen Sie alle Zutaten und Krümel von Deckel,
Gehäuse und Backkammer mit einem feuchten Tuch.
3. Die Backform außen mit einem feuchten Tuch abwi-
schen. Von innen kann die Form mit etwas Spülmit-
tel ausgespült werden. Bitte nicht längere Zeit unter
Wasser setzen. Verwenden Sie nur ein mildes Spül-
mittel, auf keinen Fall chemische Reiniger, Benzin,
Backofenreiniger oder kratzende Mittel.
4. Die Backform und der Kneter dürfen nicht in der Spül-
maschine gereinigt werden.
5. Sowohl Kneter als auch Antriebswelle sollten sofort
nach der Verwendung gereinigt werden. Falls der Kne-
ter in der Form bleibt, ist er später schwer zu entfer-
nen. In diesem Fall für ca. 30 Minuten warmes Wasser
in die Backform einfüllen. Danach lässt sich der Kne-
ter herausnehmen.
6. Der Backform ist mit einer hochwertigen Antihaftbe-
schichtung ausgestattet. Verwenden Sie daher zum
Reinigen keine Metallgegenstände, die die Oberfläche
zerkratzen könnten. Es ist normal, dass sich die Farbe
der Beschichtung mit der Zeit verändert, die Funktion
wird hierdurch nicht beeinträchtigt.
7. Backform und Kneter unterliegen bei häufigem
Gebrauch einer Abnutzung infolge der hohen mecha-
nischen Belastung beim Kneten, insbesondere von
Vollkornteigen oder Teigen mit hohem Körneranteil.
Daher ist eventuell von Zeit zu Zeit ein Austausch der
Backform und der Kneter notwendig. Diese können bei
unserem Kundendienst bestellt werden
8. Bevor Sie das Gerät zur Aufbewahrung wegstellen,
vergewissern Sie sich, dass es vollständig abgekühlt,
gereinigt und getrocknet ist. Lagern Sie das Gerät mit
geschlossenem Deckel.
Copyright UNOLD AG | www.unold.de

Stand 21.2.2020
17 von 168
DE
EN
FR
NL
IT
ES
PL
TABELLE ZEITLICHER ABLAUF
1 2 3 4 5
BASIS WEISSBROT VOLLKORN SCHNELL HEFEKUCHEN
Brotgewicht wählbar ST. I ST. II ST. I ST. II ST. I ST. II ST.I ST.II
Bäunung • • • • • • • • •
Gesamtzeit 2:53 3:00 3:40 3:50 3:32 3:40 1:40 2:50 2:55
1.Kneten
(Heizung AUS)
9 10 16 18 9 10 7 10 10
1. Aufgehen
Heizung
EIN/AUS
kein Kneten
20 20 40 40 25 25 5 5 5
2. Kneten
14
Zutaten
beifügen
15
Zutaten
beifügen
19
Zutaten
beifügen
22
Zutaten
beifügen
18
Zutaten
beifügen
20
Zutaten
beifügen
8 20
Zutaten
beifügen
20
Zutaten
beifügen
2. Aufgehen
Heizung
EIN/AUS
25 25 30 30 35 35 30 30
3. Aufgehen
Heizung
EIN/AUS
kein Kneten
40 40 45 45 60 60 15 40 40
Backen
Heizung EIN/
AUS
65 70 70 75 65 70 65 65 70
Warm-
halten
bei 60 °C
Heizung
EIN/AUS
60 60 60 60 60 60 60 60 60
Angaben in Minuten
Copyright UNOLD AG | www.unold.de

18 von 168
Stand 21.2.2020
DE
EN
FR
NL
IT
ES
PL
6 7 8 9 10 11 12
ULTRA KONFITÜRE TEIG GLUTENFREI BACKPULVER TOASTBROT BACKEN
Brotgewicht wählbar ST. I ST. I ST. II ST. I ST. II
Bräunung • • • • • • • •
Gesamtzeit 0:58 1:20 1:30 3:15 3:20 2:50 2:55 3:00 1:00
1. Kneten
(Heizung AUS)
12 20 12 12 10 15 15
1. Aufgehen
Heizung
EIN/AUS
kein Kneten
0 15
Heizung
EIN/AUS
20 20 5 40 40
2. Kneten
0 13
Zutaten
beifügen
13
Zutaten
beifügen
20 5
Zu-
taten
bei-
fügen
5
Zu-
taten
bei-
fügen
2. Aufgehen
Heizung
EIN/AUS
0 30 45 45 30 25 25
3. Aufgehen
Heizung
EIN/AUS
kein Kneten
11 45
Kneten EIN/
AUS
Heizung
EIN/AUS
40 45 45 35 40 40
Backen
Heizung EIN/
AUS
35 Ruhen
20
60 65 70 50 55 10-60
Warm-
halten
bei 60 °C
Heizung
EIN/AUS
60 60 60 60 60 60 60 60
TABELLE ZEITLICHER ABLAUF
Angaben in Minuten
Copyright UNOLD AG | www.unold.de

Stand 21.2.2020
19 von 168
DE
EN
FR
NL
IT
ES
PL
FRAGEN ZUM GERÄT UND ZUR HANDHABUNG
Das Brot klebt nach dem Backen in der Form.
Das Brot in der Backform ca. 10 Minuten auskühlen las-
sen. Backform mit der Öffnung nach unten drehen, evtl.
den Mitnehmer (Kneteranschluss – Flügelschraube an der
Unterseite der Backform) leicht bewegen. Vor dem Einset-
zen das Loch im Kneter dick mit hitzebeständiger Marga-
rine ausstreichen (keine Halbfettmargarine!), so dass beim
Kneten kein Teig in den Zwischenraum eindringen und
festbacken kann. Den Kneter vor dem Backen mit etwas
Öl einreiben.
Falls Sie mit dem Gerät auch Konfitüre herstellen, empfeh-
len wir für Brot und Konfitüre jeweils eine eigene Backform
zu verwenden, da durch die entstehende Säure Brote nicht
mehr gut aus der Form gelöst werden können. Zusätzliche
Backformen und Kneter können Sie bei unserem Kunden-
dienst bestellen.
Wie lassen sich die Löcher im Brot (Kneter) verhindern?
Sie können mit bemehlten Fingern den Kneter entnehmen
bevor der Teig zum letzten Mal aufgeht (siehe Zeitlicher
Programmablauf und Anzeige im Display).
Sollten Sie das nicht tun wollen, verwenden Sie nach dem
Backen den Hakenspieß. Wenn man damit vorsichtig vor-
geht, lässt sich ein größeres Loch vermeiden.
Der Teig läuft beim Aufgehen über die Backform.
Das passiert häufig bei Verwendung von Weizenmehl, das
aufgrund des höheren Kleberanteils besser aufgeht.
Als Abhilfe:
die Mehlmenge reduzieren und die übrigen Zutaten
angleichen. Das fertige Brot hat nach wie vor ein gro-
ßes Volumen.
1 EL flüssige Margarine auf das Mehl geben.
Das Brot geht auf, fällt jedoch beim Backen ein.
Wenn in der Mitte des Brotes eine „V“-förmige Kuhle ent-
steht, fehlt dem Mehl Kleber, was daran liegt, dass das
Getreide zu wenig Eiweiß enthält (kommt bei verregneten
Sommern vor), oder dass das Mehl zu feucht ist.
Als Abhilfe:
Dem Brotteig für 500 g Mehl 1 EL Weizenkleber bei-
fügen.
Programm mit kürzerer Laufzeit verwenden (z. B.
SCHNELL)
Wenn das Brot trichterförmig in der Mitte einfällt, kann das
daran liegen, dass
die Wassertemperatur zu hoch war,
zu viel Wasser verwendet wurde
dem Mehl Kleber fehlt.
Das Brot ist von oben nicht braun genug.
1 Eigelb mit 1 TL süßer oder saurer Sahne verrühren und
den Teig nach dem letzten Kneten damit bestreichen.
Wann kann man den Deckel des Backmeisters
®
während des
Backvorgangs öffnen?
Grundsätzlich ist dies immer dann möglich, wenn der Knet-
vorgang läuft. In dieser Zeit kann man nötigenfalls noch
geringe Mengen Mehl oder Flüssigkeit ergänzen. Wenn das
Brot nach dem Backen ein bestimmtes Aussehen haben
soll, geht man wie folgt vor: Man öffnet nach dem letz-
ten Kneten, d. h. vor dem letzten Aufgehen (siehe Tabelle
Zeitlicher Ablauf der Programme und Anzeige im Display)
vorsichtig den Deckel und ritzt z. B. mit einem scharfen,
vorgewärmten Messer die sich bildende Brotkruste ein oder
streut Körner darauf oder bestreicht die Brotkruste mit ei-
ner Kartoffelmehl-Wasser-Mischung, damit es nach dem
Backen glänzt. In dem angegebenen Zeitabschnitt ist das
Öffnen des Backmeisters
®
letztmalig möglich. Geschieht
dies während des letzten Aufgehens oder zu Beginn der
Backphase kann das Brot zusammenfallen.
Was ist Vollkornmehl?
Aus allen Getreidesorten lässt sich Vollkornmehl herstellen,
d. h. auch von Weizen. Die Bezeichnung Vollkorn bedeutet,
dass das Mehl aus dem ganzen Korn gemahlen wird und
entsprechend mehr Ballaststoffgehalt hat. Weizenvollkorn-
mehl ist deshalb etwas dunkler. Vollkornbrot muss aber
kein dunkles Brot ergeben, wie meist angenommen wird.
Was ist bei der Verwendung von Roggenmehl zu beachten?
Roggenmehl enthält keinen Kleber und das Brot daraus
geht deshalb kaum auf. Der Verträglichkeit wegen muss
deshalb ein „ROGGEN VOLLKORN-BROT“ mit Sauerteig
Copyright UNOLD AG | www.unold.de

20 von 168
Stand 21.2.2020
DE
EN
FR
NL
IT
ES
PL
hergestellt werden. Der Teig geht nur dann auf, wenn man
bei Verwendung von Roggenmehl, das keinen Kleber ent-
hält, mindestens ¼ der angegebenen Menge mit Mehl der
Type 550 austauscht.
Was ist Kleber im Mehl?
Je höher die Typen-Zahl um so weniger Kleber (Gluten,
Klebereiweiß) enthält das Mehl und umso weniger geht der
Teig auf. Den höchsten Kleberanteil enthält Mehl mit der
Typen-Zahl 550.
Welche verschiedene Mehlsorten gibt es und wie werden sie
verwendet?
Mais, Reis, Kartoffelmehl
eignet sich insbesondere für Gluten-Allergiker oder
Personen, die an „Sprue“ oder „Zölakie“ leiden. Im
Rezeptteil dieser Anleitung finden Sie sowohl Rezepte
als auch Kontaktadressen von Herstellern für spezi-
elle Allergiker-Produkte.
Dinkelmehl
ist sehr teuer, aber auch vollkommen frei von chemi-
schen Mitteln, da Dinkel, der auf sehr kargen Böden
wächst, keine Düngemittel aufnimmt. Dinkelmehl
eignet sich deshalb insbesondere für Allergiker. Es
können alle Rezepte, die die Mehltypen 405 - 550
- 1050 tragen, wie in der Bedienungsanleitung
beschrieben, verwendet werden.
Hartweizenmehl (DURUM)
eignet sich aufgrund seiner Konsistenz besonders
für Baguette-Brote und kann durch Hartweizengrieß
ersetzt werden.
Wie ist frisches Brot besser verträglich?
Wenn man eine pürierte gekochte Kartoffel auf das Mehl
gibt und unterknetet, ist frisches Brot besser verträglich.
In welchem Verhältnis verwendet man Treibmittel?
Sowohl bei Hefe, als auch beim Sauerteig, die es in unter-
schiedlichen Mengen zu kaufen gibt, muss man sich an
die Angaben der Hersteller auf der Verpackung halten und
die Menge ins Verhältnis zu der verwendeten Mehlmen-
ge setzen. Für die Treibkraft von Hefe ist auch die Was-
serhärte sehr wichtig, bei sehr weichem Wasser geht die
Hefe stärker, so dass in Gegenden mit weichen Wasser die
Hefemenge um ca. ¼ verringert werden sollte. Das beste
Verhältnis von Hefe und Wasser muss allerdings erst aus-
probiert und evtl. nochmals verändert werden.
Was kann man tun, wenn das Brot nach Hefe schmeckt?
Sofern Zucker verwendet wurde, diesen reduzieren oder
ganz weglassen, wobei das Brot weniger braun wird.
Dem Wasser ganz gewöhnlichen Branntweinessig zusetzen,
für ein kleines Brot ca. 1 EL, für ein großes Brot ca. 1,5 EL.
Das Wasser durch Buttermilch oder Kefir ersetzen, was
übrigens bei allen Rezepten möglich ist und sich wegen
der Frische des Brotes empfiehlt.
Warum schmeckt das Brot aus dem Backofen anders als aus
dem Backmeister
®
?
Das liegt an der unterschiedlichen Feuchtigkeit: Im
Backofen wird das Brot durch den größeren Backraum
wesentlich trockener ausgebacken. Aus dem Backmeister
®
ist das Brot feuchter.
Was bedeuten die Typen-Zahlen beim Mehl?
Je niedriger die Typen-Zahl, umso weniger enthält das Mehl
Ballaststoffe und umso heller ist es. Da die Bezeichnung
der einzelnen Mehlsorten je nach Land unterschiedlich ist,
anbei eine kurze Aufstellung:
Deutschland Type Österreich Type Schweiz Type
Weizenmehl Sehr fein ausgemahlenes Mehl, für Kuchen 405 480
400
Fein ausgemahlenes Mehl, ideal für Brot 550 780
550
Mittelfein ausgemahlenes Mehl 1050 1600
1100
Vollkornmehl, grob ausgemahlen 1600 1700
1900
Roggenmehl Sehr fein ausgemahlenes Mehl 815 500
720
Fein ausgemahlenes Mehl 997 960
1100
Mittelfein ausgemahlenes Mehl 1150 960
1100
Grob ausgemahlenes Mehl, Vollkornmehl 1740 2500
1900
Copyright UNOLD AG | www.unold.de

Stand 21.2.2020
21 von 168
DE
EN
FR
NL
IT
ES
PL
MÖGLICHE FEHLER AM GERÄT
Fehler Ursache Beseitigung
Rauch entweicht aus der Backkammer
oder den Lüftungsöffnungen
Bei der ersten Nutzung
Zutaten kleben in der Backkammer
oder an der Außenseite der Form
Netzstecker ziehen, Gerät abkühlen
lassen, dann Form entnehmen
und Außenseite der Form sowie
Backkammer reinigen.
Brot ist teilweise zusammengefallen
und an der Unterseite feucht
Brot ist nach dem Backen und
Warmhalten zu lange in der Form
geblieben
Brot spätestens nach Ablauf der
Warmhaltefunktion aus der Form
nehmen, damit Dampf entweichen
kann.
Brot lässt sich schlecht aus der Form
entnehmen
Die Unterseite des Brotes hängt am
Kneter fest
Kneter und -welle nach dem
Backvorgang reinigen. Dazu falls
erforderlich warmes Wasser für
30 Minuten in die Form füllen.
Dann lässt sich der Kneter leicht
entnehmen und reinigen.
Zutaten sind nicht gemischt oder
Brot nicht durchgebacken
Falsche Programmeinstellung Überprüfen Sie nochmals das
gewählte Menü und die anderen
Einstellungen.
START/STOP-Taste wurde gedrückt,
während die Maschine in Betrieb war
Zutaten entsorgen und neu anfangen.
Deckel wurde während des Betriebs
mehrfach geöffnet
Der Deckel sollte nur während der
Knetphasen geöffnet werden. Nach
dem vorletzten Aufgehen den Deckel
nicht mehr öffnen.
Längerer Stromausfall Zutaten wegwerfen und neu anfangen.
Die Rotation des Kneters ist blockiert Prüfen, ob Backform und Kneter
richtig eingesetzt sind. Prüfen, ob
Kneter durch Körner etc. blockiert
sind. Backform entnehmen und
prüfen, ob sich der Mitnehmer
dreht. Falls nicht, das Gerät an den
Kundendienst einsenden. Wenn
sich der Mitnehmer noch dreht,
genügt der Einsatz einer neuen
Backform.
MÖGLICHE FEHLER BEI DEN REZEPTEN
Fehler Ursache Behebung
Brot geht zu stark auf Zu viel Hefe, zu viel Mehl, zu wenig Salz, zu
weiches Wasser oder mehrere dieser Ursachen
a/b
Brot geht nicht oder nicht genug auf Keine oder zu wenig Hefe
Alte oder überlagerte Hefe
Flüssigkeit zu heiß
Hefe mit Flüssigkeit in Kontakt gekommen
Falsches oder altes Mehl
Zu viel oder zu wenig Flüssigkeit
Zu wenig Zucker
a/b
e
c
d
e
a/b/g
a/b
Teig geht zu sehr auf und läuft über die Backform Sehr weiches Wasser lässt die Hefe stärker gären
Zu viel Milch beeinflusst die Hefegärung
f/k
c
Brot zusammengefallen Brotvolumen größer als Form, daher
zusammengefallen
Brot ist zu stark aufgegangen
a/f
m
Brot hat nach dem Backen eine Delle Zu frühe oder schnelle Hefegärung durch zu warmes
Wasser, warme Backkammer, hohe Feuchtigkeit
Zu wenig Kleber im Mehl
Programm mit zu langer Laufzeit
Zu viel Flüssigkeit
c/h/i
l
m
a/b/h
Copyright UNOLD AG | www.unold.de

22 von 168
Stand 21.2.2020
DE
EN
FR
NL
IT
ES
PL
Fehler Ursache Behebung
Schwere, klumpige Struktur Zu viel Mehl oder zu wenig Flüssigkeit
Zu wenig Hefe oder Zucker
Zu viel Früchte, Vollkorn oder sonstige Zutaten
Altes oder schlechtes Mehl
a/b/g
a/b
b
e
In der Mitte nicht durchgebacken Zu viel oder zu wenig Flüssigkeit
Hohe Feuchtigkeit
Rezepte mit feuchten Zutaten, wie z. B. Joghurt
a/b/g
h
g
Offene, grobe oder löchrige
Struktur
Zu viel Wasser, kein Salz
Hohe Feuchtigkeit, zu warmes Wasser
Zu heiße Flüssigkeit
g/b
h/i
c
Pilzartige, nicht gebackene Oberfläche Brotvolumen größer als Form
Mehlmenge insbesondere bei Weißbrot zu groß
Zu viel Hefe oder zu wenig Salz
Zu viel Zucker
Süße Zutaten zusätzlich zum Zucker
a/f
f
a/b
a/b
b
Brotscheiben werden ungleichmäßig oder klumpen Brot nicht ausreichend abgekühlt
(Dampf entwichen)
j
Mehlrückstände an der
Brotkruste
Mehl wird beim Kneten an den Seiten nicht
richtig untergearbeitet
g
Behebung der Fehlerpunkte
a Messen Sie die Zutaten korrekt ab.
b Passen Sie die Zutatenmenge entsprechend an und prüfen Sie, ob eine Zutat vergessen wurde.
c Nehmen Sie eine andere Flüssigkeit oder lassen Sie diese auf Raumtemperatur abkühlen.
d Fügen Sie die Zutaten in genannter Reihenfolge zu. Machen Sie ein kleines Loch in der Mitte und geben Sie dort die
zerbröckelte Hefe oder die Trockenhefe hinein. Vermeiden Sie den direkten Kontakt zwischen Hefe und Flüssigkeit.
e Verwenden Sie nur frische und richtig gelagerte Zutaten.
f Vermindern Sie die Gesamtzutatenmenge, nehmen Sie keinesfalls mehr als die angegebene Mehlmenge. Reduzieren Sie ggf.
alle Zutaten um 1/3.
g Korrigieren Sie die Flüssigkeitsmenge. Falls feuchte Zutaten verwendet werden, muss die Flüssigkeitsmenge entsprechend
verringert werden.
h Bei sehr feuchtem Wetter 1-2 EL weniger nehmen.
i Bei warmem Wetter nicht die Zeitwahlfunktion verwenden. Verwenden Sie kalte Flüssigkeiten. Verwenden Sie die
Programme SCHNELL oder ULTRA-SCHNELL, um die Gehzeit zu verkürzen.
j Nehmen Sie das Brot sofort nach dem Backen aus der Form und lassen Sie es auf einem Rost mind. 15 Minuten auskühlen,
bevor Sie es anschneiden.
k Verringern Sie die Hefe oder ggf. die gesamten Zutaten um ¼ der angegebenen Mengen.
l Fügen Sie dem Teig 1 EL Weizenkleber bei
m Programm SCHNELL wählen.
ANMERKUNGEN ZU DEN REZEPTEN
1. Zutaten
Da jede Zutat eine bestimmte Rolle beim Gelingen des
Brotes spielt, ist das Abmessen ebenso wichtig wie die
richtige Reihenfolge beim Zugeben der Zutaten.
Die wichtigsten Zutaten, wie Flüssigkeit, Mehl, Salz, Zu-
cker und Hefe (sowohl Trocken- als auch Frischhefe kann
verwendet werden) beeinflussen das erfolgreiche Ergebnis
bei der Zubereitung von Brot und Teig. Verwenden Sie da-
her immer die entsprechenden Mengen im richtigen Ver-
hältnis zueinander.
Verwenden Sie die Zutaten lauwarm, wenn Sie das Gebäck
sofort zubereiten. Wenn Sie das Programm „Zeitwahl“
wählen, sollten die Zutaten kalt sein, damit die Hefe nicht
zu früh gärt.
Margarine, Butter und Milch beeinflussen lediglich den Ge-
schmack des Brotes.
Zucker kann um 20 % reduziert werden, damit die Kruste
heller und dünner wird, ohne dass damit das sonstige
Backergebnis beeinträchtigt wird. Falls Sie eine weichere
Copyright UNOLD AG | www.unold.de

Stand 21.2.2020
23 von 168
DE
EN
FR
NL
IT
ES
PL
und hellere Kruste bevorzugen, können Sie den Zucker
durch Honig ersetzen.
Gluten, das beim Kneten im Mehl entsteht, sorgt für die
Struktur des Brotes. Die ideale Mehlmischung besteht aus
40 % Vollkornmehl und 60 % Weißmehl.
Wenn Sie ganze Getreidekörner zugeben wollen, weichen Sie
diese vorher über Nacht ein. Verringern Sie entsprechend
die Mehlmenge und die Flüssigkeit (bis zu 1/5 weniger).
Sauerteig ist bei Verwendung von Roggenmehl unentbehr-
lich. Er enthält Milch- und Essigsäurebakterien, die be-
wirken, dass das Brot locker wird und fein gesäuert ist.
Man kann ihn selbst herstellen, was allerdings einiger Zeit
bedarf. Deshalb verwenden wir in den nachstehenden Re-
zepten Sauerteigpulver konzentriert, das es in Päckchen
zu 15 g (für 1 kg Mehl) zu kaufen gibt. Die Angaben in
den Rezepten müssen eingehalten werden, weil weniger
das Brot krümeln lässt.
Sofern Sie Sauerteigpulver in anderer Konzentration
(Päckchen zu 100 g für 1 kg Mehl) verwenden, müssen
Sie 1 kg Mehlmenge um ca. 80 g reduzieren, bzw.
entsprechend dem Rezept anpassen.
Flüssiger Sauerteig, den es abgepackt in Beuteln zu
kaufen gibt, lässt sich ebenfalls gut verwenden. Richten
Sie sich bezüglich der Menge nach den Angaben auf der
Verpackung. Füllen Sie den flüssigen Sauerteig in den
Messbecher und füllen Sie mit der im Rezept angegebenen
Flüssigkeitsmenge auf.
Weizensauerteig, den es ebenfalls getrocknet zu kaufen
gibt, verbessert die Teigbeschaffenheit, Frischhaltung und
den Geschmack. Er ist milder als Roggensauerteig.
Backen Sie Sauerteigbrot im „Basis“ oder „Vollkorn“- Pro-
gramm, damit es richtig aufgehen und backen kann.
Weizenkleie fügen Sie dem Teig bei, wenn Sie ein
besonders ballastreiches und lockeres Brot haben möchten.
Verwenden Sie 1 EL für 500 g Mehl und erhöhen Sie die
Flüssigkeitsmenge um 50 ml.
Weizenkleber ist ein natürlicher Helfer aus Getreideeiweiß.
Er bewirkt, dass das Brot lockerer wird, ein besseres Vo-
lumen hat, seltener einfällt und bekömmlicher ist. Insbe-
sondere bei Vollkornbackwaren und Backwaren aus selbst
gemahlenem Mehl ist die Wirkung sehr deutlich.
Farbmalz, das wir in einigen Rezepten angeben, ist ein dun-
kel geröstetes Gerstenmalz. Man verwendet es, um eine
dunklere Krume und Kruste zu erhalten (z. B. bei Schwarz-
brot). Erhältlich ist auch ein Roggenmalz, das nicht so
dunkel ist. Man erhält dieses Malz in Bioläden.
Brotgewürz können Sie allen unseren Mischbroten zu-
sätzlich beifügen. Die Menge richtet sich nach Ihrem Ge-
schmack und den Angaben des Herstellers
Rein Lecithin-Pulver ist ein natürlicher Emulgator, der das
Gebäckvolumen steigert, die Krume zarter und weicher
macht, und die Frischhaltung verlängert.
Alle genannten, fett gedruckten, Backhilfsmittel und Zu-
taten erhalten Sie in Bioläden, Reformhäusern, Reformab-
teilungen der Lebensmittelgeschäfte oder in Mühlen. Sie
können diese Backartikel aber auch per Katalog bestellen
bei:
Hobbybäcker-Versand - Inge Pinzer
Am Mühlholz 6 – 89287 Bellenberg
Tel. 0 73 06/92 59 00 - Fax 0 73 06/92 59 05
Internet: www.hobbybaecker.de
2. Anpassen der Zutaten
Sofern Sie die Zutaten erhöhen oder vermindern, beach-
ten Sie, dass die Mengenverhältnisse dem Originalrezept
entsprechen müssen. Damit ein perfektes Ergebnis erzielt
wird, sind die folgenden Grundregeln für die Anpassung
der Zutaten zu beachten:
Flüssigkeiten/Mehl: Der Teig sollte weich sein (nicht zu
weich), leicht kleben, aber keine Fäden ziehen. Eine Kugel
ergibt sich bei leichten Teigen. Bei schweren Teigen, wie
Roggenvollkorn oder Körnerbroten ist das nicht der Fall.
Prüfen Sie den Teig 5 Minuten nach dem ersten Kneten.
Falls er noch zu feucht ist, geben Sie Mehl hinzu, bis der
Teig die richtige Konsistenz hat. Ist der Teig zu trocken,
löffelweise Wasser unterkneten lassen.
Ersetzen von Flüssigkeit: Falls Sie bei einem Rezept Zu-
taten ersetzen, die Flüssigkeit enthalten (z. B. Frischkäse,
Joghurt usw.), muss die entsprechende Flüssigkeitsmenge
Copyright UNOLD AG | www.unold.de

24 von 168
Stand 21.2.2020
DE
EN
FR
NL
IT
ES
PL
reduziert werden. Bei Verwendung von Eiern, schlagen Sie
diese in den Messbecher und füllen mit der Flüssigkeit bis
zur vorgeschriebenen Menge auf. Falls Sie in großer Höhe
wohnen (ab 750 m) geht der Teig schneller auf. Die Hefe
kann in diesen Gegenden um ¼bis ½ TL verringert wer-
den, um übermäßiges Aufgehen zu vermeiden. Dasselbe
gilt für Gegenden mit besonders weichem Wasser.
3. Beifügen und Abmessen der Zutaten und Mengen
Immer zuerst die Flüssigkeit und zuletzt die Hefe zugeben.
Lediglich bei sehr schweren Teigen mit hohem Roggen-
oder Vollkornanteil kann es sinnvoll sein, die Reihenfolge
zu tauschen und zuerst die Trockenhefe und das Mehl und
zum Schluss die Flüssigkeit einzufüllen. Allerdings ist in
diesem Fall insbesondere bei der Zeitwahlfunktion zu be-
achten, dass die Hefe nicht vor dem Programmstart mit
dem Wasser in Kontakt kommt.
Verwenden Sie beim Abmessen immer die gleichen Mess-
einheiten, d. h. verwenden Sie bei der Angabe von EL und
TL entweder die dem Backautomaten beigefügten Messlöf-
fel oder Löffel wie Sie diese im Haushalt verwenden. Die
Grammangaben sollten Sie wegen der Genauigkeit abwie-
gen. Für die Milliliter-Angaben können Sie den beigefügten
Messbecher verwenden.
Die Abkürzungen in den Rezepten bedeuten:
EL = Esslöffel gestrichen (oder Messlöffel groß)
TL = Teelöffel gestrichen (oder Messlöffel klein)
g = Gramm
ml = Milliliter
Pckg.= Päckchen, z. B. Trockenhefe von 7 g Inhalt für
500 g Mehl - entspricht 10-15 g Frischhefe.
4. Zugaben von Früchten, Nüssen oder Körnern
Wenn Sie weitere Zutaten beifügen wollen, können Sie dies
in allen Programmen (außer Konfitüre, Schnell, Ultra, Teig,
Backpulver und Backen) immer dann tun, wenn der Piep-
ton zu hören ist. Falls Sie die Zutaten zu früh zugeben,
werden Sie durch den Kneter zermahlen. Auch könnte die
Beschichtung der Backform beschädigt werden.
Sollten in den Rezepten keine Stufen angegeben sein,
weil es diese in den vorgeschlagenen Programmen nicht
gibt, dann gelingen sowohl die kleinen, als auch die groß-
en Mengen, die wir für das jeweilige Modell vorschlagen,
im angegebenen Programm. Die Programme ohne Stufen-
schaltung sind entsprechend programmiert.
5. Brotgewichte und Volumen
In den Rezepten finden Sie genaue Angaben zum Brot-
gewicht. Sie werden feststellen, dass die Gewichte bei
reinem Weißbrot geringer sind, als bei Vollkornbroten. Das
hängt damit zusammen, dass Weißmehl stärker aufgeht
und von daher Grenzen gesetzt sind. Trotz diesen genauen
Gewichtsangaben, kann es zu geringfügigen Abweichungen
kommen. Das tatsächliche Brotgewicht hängt sehr wesent-
lich von der Luftfeuchtigkeit ab, die bei der Zubereitung
herrscht. Alle Brote mit überwiegendem Weizenanteil
erreichen ein größeres Volumen und übersteigen in der
höchsten Gewichtsklasse nach dem letzten Aufgehen die
Backformrand. Sie laufen aber nicht über. Der Brotwulst
über dem Behälterrand ist deshalb etwas schwächer ge-
bräunt, als das Brot im Behälter. Wenn bei süßen Broten
das Programm SCHNELL vorgeschlagen wird, dann kön-
nen Sie ausschließlich die kleineren Mengen der jeweiligen
Rezeptvorschläge auch im Programm Hefekuchen backen,
womit das Brot lockerer wird. Wählen Sie im Programm
Hefekuchen dann die Stufe I.
6. Backergebnisse
Das Backergebnis hängt insbesondere von den Umstän-
den vor Ort ab (weiches Wasser - hohe Luftfeuchtigkeit -
große Höhe - Beschaffenheit der Zutaten etc.). Deshalb
sind die Rezeptangaben Anhaltspunkte, die man eventuell
anpassen muss. Wenn das ein oder andere Rezept nicht
auf Anhieb gelingt, verlieren Sie nicht den Mut, sondern
versuchen Sie die Ursache herauszufinden und probieren
Sie z. B. andere Mengenverhältnisse. Wir empfehlen, bevor
Sie Brot über Nacht mit der Zeitvorwahl backen, erst ein-
mal ein Versuchsbrot zu backen, damit Sie bei Bedarf das
Rezept noch ändern können.
Copyright UNOLD AG | www.unold.de

Stand 21.2.2020
25 von 168
DE
EN
FR
NL
IT
ES
PL
BROTREZEPTE
Klassisches Weißbrot
Stufe I Stufe II
Brotgewicht,ca. 500 g 750 g
Wasser 230 ml 350 ml
Salz ¾ TL 1 TL
Zucker ¾ TL 1 TL
Hartweizengrieß 100 g 150 g
Mehl, Type 550 230 g 350 g
Trockenhefe ½ Pckg. ¾ Pckg.
Programm: SCHNELL oder WEISSBROT
Tipp: Wenn Sie das Wasser durch Milch ersetzen,
erhalten Sie ein ideales Toastbrot.
Bauernweißbrot
Stufe I Stufe II
Brotgewicht, ca. 500 g 750 g
Milch 180 ml 275 ml
Margarine/
Butter
15 g 25 g
Salz ½ TL 1 TL
Zucker ½ TL 1 TL
Mehl Type
1050
330 g 500 g
Trockenhefe ½ Pckg. ¾ Pckg.
Programm: BASIS oder WEISSBROT
Rosinenbrot
Stufe I Stufe II
Brotgewicht, ca. 560 g 850 g
Wasser 200 ml 300 ml
Margarine/
Butter
20 g 30 g
Salz 1 Prise ½ TL
Honig 1 TL 1 EL
Mehl Type 405 330 g 500 g
Zimt ½ TL ¾ TL
Trockenhefe ½ Pckg. ¾ Pckg.
Rosinen (od.
Trockenobst)
50 g 75 g
Programm: SCHNELL oder HEFEKUCHEN
Vollkornbrot
Stufe I Stufe II
Brotgewicht, ca. 570 g 860 g
Wasser 250 ml 370 ml
Margarine/
Butter
15 g 25 g
Salz ½ TL 1 TL
Zucker ½ TL 1 TL
Mehl Type 1050 180 g 270 g
Weizenvoll-
kornmehl
180 g 270 g
Trockenhefe ½ Pckg. ¾ Pckg.
Programm: VOLLKORN
Weizenschrotbrot
Stufe I Stufe II
Brotgewicht, ca. 600 g 900 g
Wasser 230 ml 350 ml
Salz ½ TL 1 TL
Butter/
Margarine
15 g 25 g
Honig 1 TL 1 TL
Essig ½ EL ¾ EL
Weizenvoll-
kornmehl
330 g 500 g
Weizenschrot 50 g 75 g
Trockenhefe 1/3 Pckg. 1 Pckg.
Programm: VOLLKORN
Sauerteigbrot
Stufe I Stufe II
Brotgewicht, ca. 740 g 1050 g
Trockensauerteig
(kein
Konzentrat)
½ Pckg. ¾ Pckg.
Wasser 350 ml 450 ml
Brotgewürz ½ TL ¾ TL
Salz 1 TL 1 ½ TL
Roggenmehl 250 g 340 g
Mehl Typ 1050 250 g 340 g
Trockenhefe 1 Pckg. 1½ Pckg.
Programm: BASIS
Copyright UNOLD AG | www.unold.de

26 von 168
Stand 21.2.2020
DE
EN
FR
NL
IT
ES
PL
Bauernbrot
Stufe I Stufe II
Brotgewicht, ca. 520 g 960 g
Wasser 200 ml 360 ml
Salz ½ TL 1 TL
Weizensauerteig
getrocknet*
15 g 30 g
Mehl Type 1050 330 g 600 g
Zucker ½ TL 1 TL
Trockenhefe ½ Pckg. 1 Pckg.
Programm: BASIS
* kein Konzentrat
100 % Vollkornbrot
Stufe I Stufe II
Brotgewicht, ca. 560 g 850 g
Wasser 230 ml 350 ml
Salz ½ TL 1 TL
Honig 1 TL 1 TL
Weizenvoll-
kornmehl
360 g 540 g
Trockenhefe ½ Pckg. ¾ Pckg.
Programm: VOLLKORN
Feigen-Walnussbrot
Stufe I Stufe II
Brotgewicht, ca. 600 g 900 g
Wasser 230 ml 350 ml
Weizenmehl
Type 1050
170 g 260 g
Roggenmehl 260 g 400 g
Salz 1 gestr. TL 1 TL
Kranzfeigen fein
geschnitten
30 g 50 g
Walnusskerne
gehackt
30 g 50 g
Honig 1 TL 1 ½ TL
Trocken-
sauerteig (kein
Konzentrat)
½ Pckg. ¾ Pckg.
Trockenhefe ½ Pckg. ¾ Pckg.
Programm: BASIS
Dinkelbrot
Stufe I Stufe II
Brotgewicht, ca. 670 g 990 g
Buttermilch 350 ml 470 ml
Dinkelvoll-
kornmehl
150 g 230 g
Roggenvoll-
kornmehl
120 g 180 g
Dinkelschrot
grob
120 g 180 g
Sonnenblumen-
kerne
50 g 75 g
Salz ½ TL 1 TL
Zucker 1 TL 1 TL
Trockensauerteig
(kein
Konzentrat)
½ Pckg. ¾ Pckg.
Trockenhefe ½ Pckg. ¾ Pckg.
Programm: VOLLKORN
Frischkäsebrot
Stufe I Stufe II
Brotgewicht, ca. 530 g 800 g
Wasser oder
Milch
160 ml 250 ml
Margarine/Butter 20 g 30 g
Eier ganz 1 kleines 1
Salz ½ TL 1 TL
Zucker 1 TL 1 EL
körniger
Frischkäse
80 g 125 g
Mehl Type 550 330 g 500 g
Trockenhefe ½ Pckg. ¾ Pckg.
Programm: SCHNELL
Pizzabrot
Stufe I Stufe II
Brotgewicht, ca. 610 g 920 g
Wasser 250 ml 375 ml
Öl 1 TL 1 EL
Salz ½ TL 1 TL
Zucker ½ TL 1 TL
Oregano ½ TL ¾ TL
Parmesankäse 1 ½ EL 2 ½ EL
Maisgrieß 65 g 100 g
Mehl Type 550 315 g 475 g
Trockenhefe ½ Pckg. ¾ Pckg.
Programm: SCHNELL
Copyright UNOLD AG | www.unold.de

Stand 21.2.2020
27 von 168
DE
EN
FR
NL
IT
ES
PL
Eierbrot
Stufe I Stufe II
Brotgewicht, ca. 480 g 730 g
Eier, mit Wasser
oder Milch
auffüllen bis
1
180 ml
2
275 ml
Margarine/Butter 15 g 25 g
Salz ½ TL 1 TL
Zucker ½ TL 1 TL
Mehl Type 550 330 g 500 g
Hefe ½ Pckg. ¾ Pckg.
Programm: BASIS (ohne Zeitvorwahl)
TIPP: Das Brot nach dem Backen noch frisch verzehren.
Französisches Kräuterbrot
Stufe I Stufe II
Brotgewicht, ca. 560 g 850 g
Wasser 230 ml 350 ml
Weizenmehl Type
550
350 g 525 g
Hartweizenmehl 50 g 75 g
Zucker ½ TL 1 TL
Salz ½ TL 1 TL
gehackte
gemischte
Kräuter
1 EL 1 ½ EL
Knoblauchzehen
fein zerdrückt
1 St. 2 St.
Butter 10 g 15 g
Trockenhefe ½ Pckg. ¾ Pckg.
Programm: BASIS oder SCHNELL
BROTE AUS BACKMISCHUNGEN
Sie können in unserem Backmeister
®
praktisch alle im Handel erhältlichen Brotbackmischungen verarbeiten. Lediglich
reine Roggenbrote lassen sich im Backmeister
®
nicht zufrieden stellend ausbacken, da diese sehr fest werden.
Manche im Handel erhältliche Backmischungen enthalten bereits Trockenhefe. In diesem Fall muss natürlich keine zu-
sätzliche Trockenhefe zugefügt werden.
Bitte beachten Sie die Mengenangaben auf der Packung und gehen Sie wie folgt vor:
1. Gerät einschalten, Flüssigkeit (evtl. etwas weniger als auf der Packung empfohlen) einfüllen.
2. Die entsprechende Menge Backmischung zufügen.
3. Evtl. Trockenhefe lt. Anweisung auf der Packung der Backmischung zufügen (1 kleiner UNOLD
®
-Messlöffel fasst
2,5 g Trockenhefe),
4. Das Programm auswählen, START drücken, alles andere erledigt der Backmeister
®
für Sie.
BROTE FÜR ALLERGIKER/GLUTENFREIES BROT
Bitte beachten Sie bei glutenfreien Broten folgende Hinweise:
Glutenfreie Mehle benötigten mehr Flüssigkeit als glutenhaltiges Mehl (400–500 ml lauwarme Flüssigkeit pro
500 g Mehl).
Glutenfreie Mehle benötigen zum guten Gelingen etwas Öl oder Fett. Sie können Öl, Butter oder auch Margarine
verwenden (10 bis 20 g).
Wenn Sie Brote aus glutenfreien Mehlen herstellen, können Sie das Programm nicht vorprogrammieren. Der Pro-
grammablauf muss immer sofort gestartet werden.
Glutenfreies Brot aus dem Brotbackautomat benötigt weniger Hefe als im Ofen gebackenes Brot. Verwenden Sie ca.
3,5 bis 5 g Trockenhefe für ein Standardbrot.
Wenn das Brot beim Backen in der Mitte zusammenfällt, reduzieren Sie die Hefemenge um ca. 1 g. Wenn das Brot
dennoch einfällt, schlagen Sie ein Ei in einen Messbecher und füllen Sie den Becher mit der benötigten Flüssig-
keitsmenge auf. Achtung: das Ei nicht zusätzlich zur Flüssigkeitsmenge dazu geben!
Copyright UNOLD AG | www.unold.de

28 von 168
Stand 21.2.2020
DE
EN
FR
NL
IT
ES
PL
Die Kruste von glutenfreien Broten wird nicht so braun wie bei glutenhaltigen Broten. Brotbackautomaten dürfen
aus Sicherheitsgründen keine Oberhitze haben, so dass die Oberseite des Brotes heller bleibt. Um dem Brot eine
schönere Farbe zu geben, können Sie ein Eigelb mit 1 TL Sahne verquirlen und auf das Brot streichen, wenn das
Display als Restlaufzeit 1:15 anzeigt.
Lösen Sie nach ca. acht Minuten Knetzeit mit einem Silikonteigschaber die Mehl bzw. Teigreste vom Rand der
Backform. Wenn Sie bei der Restzeit 1:15 nochmal den Teigrand leicht von der Backform lösen, bleibt kein dünner
Teigrand beim Backen stehen.
Für Personen, die unter einer Getreide-Allergie leiden oder bestimmte Diätpläne einhalten müssen, haben wir mit ver-
schiedenen Mehlmischungen, die teilweise auf Maisstärke-, Reisstärke-, Kartoffelstärkebasis hergestellt sind, Backver-
suche in unserem Backmeister
®
durchgeführt und dabei gute Ergebnisse erzielt. Bitte beachten Sie bei Verwendung der
Backmischungen die Anweisungen auf der Verpackung.
Wir haben gute Backergebnisse mit den Produkten der Firma Schär und der Hammermühle Diät GmbH erzielt. Bei Fragen
zu glutenfreien Produkten oder bei Mehrfachunverträglichkeiten können Sie sich direkt an diese Firmen wenden:
Hotline Fa. Schär Hotline Hammermühle
Deutschland Tel. 08 00/1 81 35 37 Deutschland Tel. 0 63 21/9 58 90
Österreich Tel. 08 00/29 17 28
Die erforderlichen Zutaten erhalten Sie in Reformhäusern und Bioläden. Die Hammermühle-Produkte können unter der
o. g. Telefonnummer direkt beim Hersteller bestellt werden. Alle aufgeführten Mehlsorten sind für Kuchen und Brote bei
besonderer Ernährung (Zöliakie/Sprue) im Rahmen eines Diätplanes geeignet. Auch bei Zugabe von erhöhten Mengen an
Hefe, bzw. Weinsteinbackpulver bleiben die Brote, die im Backmeister
®
gebacken wurden, relativ fest.
Füllen Sie die Zutaten in die Backform. Wählen Sie folgende Programme:
für die Zubereitung von Brot
„GLUTENFREI“
für die Zubereitung von Teig, den Sie weiter verarbeiten wollen: Programm „TEIG“
für die Zubereitung von Brot mit Backpulver oder Weinstein als Treibmittel: Programm „BACKPULVER“
Schär Dunkles Kastenbrot
Zutaten Kleines Brot Großes Brot
Brot-Mix Dunkel 375 g 500 g
Öl 4 g 6 g
Trockenhefe 1 Packung (7 g) 10 g
Wasser, lauwarm 470 ml 630 ml
Salz ¾ TL 1 TL
Nach Belieben können Sie zufügen:
Kümmel oder 2 TL 3 TL
Walnüsse oder 50 g 75 g
Röstzwiebeln oder 50 g 75 g
Speckwürfel oder 50 g 75 g
Leinsamen 1 EL 1 ½ TL
Copyright UNOLD AG | www.unold.de

Stand 21.2.2020
29 von 168
DE
EN
FR
NL
IT
ES
PL
KUCHEN GRUNDREZEPT
Im Backmeister
®
lässt sich sehr gut Rührkuchen backen. Weil das Gerät mit Knet- und nicht mit Rührwerkzeugen ar-
beitet, wird der Kuchen etwas fester. Das Kuchenbacken lässt sich nicht vorprogrammieren. Wenn der Kuchen fertig
gebacken ist, nehmen Sie die Backform aus dem Gerät. Stellen Sie die Backform auf ein feuchtes Tuch und lassen Sie
den Kuchen noch ca. 15Minuten in der Form auskühlen. Dann können Sie mit einem Gummiteigschaber den Kuchen
von den Seiten der Backform leicht lösen und stürzen.
Zutaten für ein Gewicht von ca. 700 g
Eier 3
weiche Butter 100 g
Zucker 100 g
Vanillezucker 1 Pckg.
Mehl Type 405 300 g
Backpulver 1 Pckg.
Zimt ½ TL
geriebene Nüsse
oder: geriebene Schokolade
oder: Kokosflocken
oder geschälte und in Würfel
geschnittene (1cm) Äpfel
50 g
Programm: BACKPULVER
TEIG ZUBEREITEN
In Ihrem Backmeister
®
können Sie im Programm TEIG Hefeteig zubereiten, den Sie dann anschließend weiterbearbeiten
und im Backofen backen können. Während des zweiten Knetens können Zutaten wie Nüsse, Trockenfrüchte, usw. beige-
fügt werden. Im Programm TEIG gibt es keine verschiedenen Backstufen. Sie können so z. B. aus jedem der obigen Re-
zepte Brötchen herstellen, indem Sie im Programm TEIG einen Teig zubereiten, diesen dann formen und im Ofen backen.
Christstollen
Gewicht 1.000 g
Milch 125 ml
Butter flüssig 125 g
Ei 1
Rum 3 EL
Mehl Type 405 500 g
Zucker 100 g
Zitronat 50 g
Orangeat 25 g
Mandeln gemahlen 50 g
Sultaninen 100 g
Salz 1 Prise
Zimt 2 Prisen
Trockenhefe 2 Pckg.
Den Teig aus dem Behälter nehmen. In eine Stollenform
drücken und bei 180 °C (im Heißluftofen bei 160 °C) ca.
eine Stunde backen.
Programm: TEIG
Kaffeekuchen
Zutaten für eine Kuchenform von 22 cm Ø
Milch 170 ml
Salz ¼ TL
Eigelb 1
Butter/Margarine 10 g
Mehl Type 550 350 g
Zucker 35 g
Trockenhefe ½ Pckg.
Programm: TEIG
Den Teig dem Behälter entnehmen, nochmals
durchkneten und auswellen. Eine runde oder eckige
Form damit auslegen und folgenden Belag darauf
verteilen.
Butter,
geschmolzen
2 EL
Zucker 75 g
gemahlener Zimt 1 TL
gehackte Nüsse 60 g
Zuckerguß nach
Wunsch
Butter über den Teig verteilen.
In einer Schüssel Zucker, Zimt und Nüsse mischen und
auf der Butter verteilen.
An einem warmen Ort 30 Minuten gehen lassen und
backen
Copyright UNOLD AG | www.unold.de

30 von 168
Stand 21.2.2020
DE
EN
FR
NL
IT
ES
PL
Vollkornpizza
Zutaten für ca. 2 Pizzen
Wasser 150 ml
Salz ½ TL
Olivenöl 2 EL
Weizenvollkornmehl 300 g
Weizenkeime 1 EL
Trockenhefe ½ Pckg.
Teig ausrollen, in eine runde Form geben und 10 Min.
gehen lassen. Pizzasauce auf dem Teig verstreichen
und gewünschten Belag darauf verteilen. 20 Minuten
bei 200 °C backen.
Programm: TEIG
Brezeln
Zutaten für ca. 9 – 10 Stück
Wasser 200 ml
Salz ¼ TL
Mehl Type 405 360 g
Zucker ½ TL
Trockenhefe ½ Pckg.
Ei (leicht
geschlagen) zum
Bestreichen
1
grobes Salz zum
Bestreuen
Alle Zutaten außer dem Ei und dem grobem Salz in die
Backform füllen. Das Programm TEIG auswählen und
starten
Wenn das Signal ertönt und das Display „1:30“ anzeigt,
START/STOP drücken.
Backofen auf 230 °C vorheizen. Teig in Stücke teilen und
jedes Teil zu einer langen dünnen Rolle formen.
Daraus Brezeln bilden, auf ein gefettetes Backblech
setzen. Mit verquirltem Ei bestreichen, mit grobem Salz
bestreuen. Im vorgeheizten Backofen bei 200 °C 12 bis
15 Minuten backen.
Programm: TEIG
KONFITÜRE ZUBEREITEN
Konfitüre oder Marmelade kann im Backmeister
®
schnell und einfach zubereitet werden. Auch wenn Sie noch nie zuvor
welche gekocht haben, sollten Sie das versuchen. Sie erhalten eine besonders köstliche, gut schmeckende Konfitüre.
1. Frische, reife Früchte waschen. Äpfel, Pfirsiche, Birnen und andere hartschalige Früchte evtl. schälen. Nehmen Sie
nie mehr als die angegebenen Mengen. Bei einer zu großen Menge kocht die Masse zu früh und läuft über.
2. Die Früchte abwiegen, klein schneiden oder mit dem ESGE-Zauberstab
®
pürieren und in die Backform geben.
3. Den Gelierzucker „2:1“ in der angegebenen Menge zufügen. Verwenden Sie keinen Haushaltszucker oder Gelierzu-
cker „1:1“, weil die Konfitüre dann nicht fest wird. Früchte mit Zucker mischen und Programm starten.
4. Nach 1:20 Stunde piept das Gerät und Sie können die Konfitüre in Gläser füllen und diese gut verschließen.
Erdbeer-Konfitüre
Frische Erdbeeren
gewaschen, geputzt und
klein geschnitten oder
püriert
600 g
Gelierzucker „2:1“ 400 g
Zitronensaft 1-2 TL
Alle Zutaten in der Backform mit einem Gummischaber
vermischen. Programm „KONFITÜRE“ wählen und star-
ten. Von den Seitenwänden der Backform Zuckerreste
mit einem Spatel abstreifen. Wenn das Signal ertönt die
Backform mit Topflappen aus dem Gerät nehmen. Die
Konfitüre in Gläser abfüllen und diese gut verschließen.
Programm: KONFITÜRE
Orangenmarmelade
Orangen geschält und
klein gewürfelt
600 g
Zitronen geschält und
klein gewürfelt
50 g
Gelierzucker „2:1“ 400 g
Orangen und Zitronen schälen und in Stückchen schnei-
den. Zucker beifügen und alle Zutaten in der Backform
vermischen. Programm KONFITÜRE wählen und starten.
Mit einem Gummispatel Zuckerreste von den Seiten der
Backform abstreifen. Wenn das Signal ertönt, den Behäl-
ter mit Topf lappen aus dem Gerät nehmen.
Die Marmelade in Gläser abfüllen und diese gut verschlie-
ßen.
Programm: KONFITÜRE
Copyright UNOLD AG | www.unold.de

Stand 21.2.2020
31 von 168
DE
EN
FR
NL
IT
ES
PL
Die Rezepte in dieser Bedienungsanleitung wurden von den Autoren und von der UNOLD AG sorgfältig erwogen und geprüft, dennoch
kann keine Garantie übernommen werden. Eine Haftung der Autoren bzw. der UNOLD AG und ihrer Beauftragten für Personen-, Sach-
und Vermögensschäden ist ausgeschlossen.
GARANTIEBESTIMMUNGEN
Wir gewähren auf unsere Geräte eine Garantie von 24 Monaten, bei gewerblichem Gebrauch 12 Monate, ab dem Kaufda-
tum für Schäden, die bei bestimmungsgemäßem Gebrauch nachweislich auf Werksfehler zurückzuführen sind. Innerhalb
der Garantiezeit beheben wir Material- und Herstellungsfehler nach unserem Ermessen durch Reparatur oder Umtausch.
Unsere Garantieleistungen gelten ausschließlich für in Deutschland und Österreich verkaufte Geräte. Bei anderen Län-
dern wenden Sie sich bitte an den zuständigen Importeur. Geräte, für die eine Mängelbeseitigung beansprucht wird,
senden Sie bitte zusammen mit einer Kopie des maschinell erstellten Kaufbelegs, aus dem das Kaufdatum ersichtlich
sein muss, sowie einer Fehlerbeschreibung gut verpackt an unseren Kundendienst. Auf unserer Internetseite www.unold.
de/ruecksendung können Sie sich einen Rücksendeschein ausdrucken. (nur für Einsendungen aus Deutschland und
Österreich). Von der Garantie ausgeschlossen sind Schäden durch Verschleiß, unsachgemäße Handhabung und Nicht-
einhaltung der Wartungs- und Pflegeanweisungen. Der Garantieanspruch erlischt, wenn Reparaturen oder Eingriffe am
Gerät von dritter Stelle vorgenommen werden. Eventuelle Ansprüche des Endverbrauchers gegenüber dem Verkäufer oder
Händler werden durch diese Garantie nicht eingeschränkt.
ENTSORGUNG / UMWELTSCHUTZ
Unsere Geräte werden auf hohem Qualitätsniveau für eine lange Nutzungsdauer her ge stellt. Regelmäßige
Wartung und fachge rechte Reparaturen durch unseren Kunden dienst können die Nutzungsdauer des
Gerätes verlängern. Wenn ein Gerät defekt und nicht mehr zu reparieren ist, beachten Sie bitte: Dieses
Produkt darf nicht zusammen mit dem normalen Hausmüll entsorgt werden. Sie müssen dieses Produkt
an einer ausgewiesenen Sammelstelle zum Recycling von elektrischen oder elektronischen Geräten ab-
liefern. Durch das separate Sammeln und Recyceln von Abfallprodukten helfen Sie mit, die natürlichen
Ressourcen zu schonen und stellen sicher, dass das Produkt in gesundheits- und umweltverträglicher
Weise entsorgt wird.
INFORMATIONEN FÜR DEN FACHHANDEL
Hiermit erklärt die UNOLD AG, dass sich der Backmeister 68010 in Übereinstimmung mit den grundlegenden Anforderungen der europäischen
Richtlinie für elektromagnetische Verträglichkeit (2014/30/EU) und der Niederspannungsrichtlinie (2014/35/EC) bendet.
Hiermit bestätigt die UNOLD AG, dass sowohl das Produkt als auch die eingesetzten Rohstoffe den Vorschriften des LFBG 2005, § 30+31,
den EU-Verordnungen 2007/19/EC, 2002/72/EC, 82/711/EEC, 85/572/EEC, 97/48/EC und den Empfehlungen des BfR in ihrer jeweils
aktuellen Fassung entspricht. Die gesetzlichen Grenzwerte werden eingehalten.
Die Übereinstimmung mit den Regularien bezieht sich auf den Tag der Erstellung dieser Erklärung.
Hockenheim, 9.8.2017
UNOLD AG, Mannheimer Straße 4, 68766 Hockenheim
Copyright UNOLD AG | www.unold.de

Diese Anleitung kann im Internet unter www.unold.de als pdf-Datei heruntergeladen werden.
DE
EN
FR
NL
IT
ES
PL
32 von 168
Stand 21.2.2020
MENAGROS AG
Hauptstr. 23
CH 9517 Mettlen
Telefon +41 (0) 71 6346015
Telefax +41 (0) 71 6346011
E-Mail [email protected]
Internet www.bamix.ch
Quadra-Net
Dziadoszanska 10
61-248 Poznań
Internet www.quadra-net.pl
SERVICE-ADRESSEN
DEUTSCHLAND
SCHWEIZ
POLEN
Mannheimer Straße 4
68766 Hockenheim
Kundendienst
Telefon +49 (0) 62 05/94 18-27
Telefax +49 (0) 62 05/94 18-22
E-Mail [email protected]
Internet www.unold.de
Sie möchten innerhalb der Garantiezeit ein Gerät zur Reparatur einsenden? Auf unserer Internetseite www.unold.de/ruecksendung
können Sie sich einen Rücksendeschein ausdrucken, um damit das Paket kostenlos bei der Post abzugeben (nur für Einsendungen
aus Deutschland und Österreich).
Copyright UNOLD AG | www.unold.de

BESTELLFORMULAR
Stück
Art.-Nr.
Bezeichnung
6801024 Backform/Bread pan
869538 Kneter/Kneader
8656152 Messbecher/Measuring cup
8656151 Messlöffel/Measuring spoon
8656150 Hakenspieß/Hook
Bitte senden Sie das ausgefüllte Bestellformular an:
Abteilung Service
Mannheimer Straße 4
68766 Hockenheim
BESTELLUNG / ORDER für Modell 68010
Anrede /
Title
Telefon
Phone No.
Vorname /
First name
Name /
Surname
Telefax
Fax No.
Straße/Nr. /
Street/No.
PLZ/Ort /
City
E-Mail
Telefon +49 (0) 62 05/94 18-27
Telefax +49 (0) 62 05/94 18-22
E-Mail [email protected]
Internet www.unold.de
Es gelten unsere AGB. Die Verarbeitung Ihrer personenbezogenen Daten richtet sich nach den Regelungen der Europäischen Daten-
schutzgrundverordnung. Weitere Hinweise erhalten Sie unter http://www.unold.de/datenschutz/ und http://www.unold.de/agb/
Aktuelle Preise und Informationen erhalten Sie auf unserer Internetseite unter www.unold.de oder telefonisch bei unserem Service.
DE
EN
FR
NL
IT
ES
PL
Stand 21.2.2020
33 von 168
Copyright UNOLD AG | www.unold.de

34 von 168
Stand 21.2.2020
DE
EN
FR
NL
IT
ES
PL
Power Rating: 550 W, 220–240 V~, 50 Hz
Dimensions: Approx. 24.7 x 36.2 x 29.1 cm (L/W/H)
Weight: Approx. 4.4 kg
Bread pan Inner dimensions approx. 16,8 x 12,8 x 14,3 cm (L/W/H)
Volume: 700-1.000 g bread weight
Power cord: Approx. 80 cm fitted
Housing: Plastic, white/black
Lid: Lid with large control window
Features: 12 memorized programs, select key for two weight levels, select key for three browning levels of the crust, timer
for up to 13 hours presetting, automatic keep warm phase
Accessories: Removable bread pan with non-stick coating, 1 kneading blade, measuring jug, measuring spoon, hook to remove
the kneader, instruction manual with extensive recipe section
Equipment features, technology, colours and design are subject to change without notice.
INSTRUCTIONS FOR USE MODEL 68010
SAFETY INFORMATION
TECHNICAL SPECIFICATIONS
Please read the following instructions and
keep them on hand for later reference.
1. This appliance can be used by
children 8 years and older, as well
as by persons with reduced physical,
sensory or mental abilities or with
lack of experience and/or knowledge,
if they are supervised or if they have
been instructed with regard to safe use
of the appliance and have understood
the dangers that can result from use
of the appliance.
2. Children must not play with the
appliance.
3. Children are not allowed to perform
cleaning and user maintenance,
unless they are 8 years of age or older
and are supervised.
4. Keep the appliance and the power
cord out of the reach of children under
8 years of age.
5. CAUTION – parts of this product
can become very hot and cause
burn injuries! Particular caution is
required if children or persons at risk
are present.
6. Connect the appliance only to an
AC power supply with the voltage
indicated on the rating plate.
7. Do not operate this appliance with
an external timer or remote control
system.
8. Never immerse the appliance or the
lead cable in water or other liquids.
9. Always switch off and disconnect the
power supply plug from the mains
EXPLANATION OF SYMBOLS
This symbol denotes a possible hazard which could cause injury or damage to
the appliance.
This symbol indicates a potential burning hazard. Please be especially careful
at all times here.
Copyright UNOLD AG | www.unold.de

Stand 21.2.2020
35 von 168
DE
EN
FR
NL
IT
ES
PL
when the appliance is not being used
and before it is cleaned.
10. Do not use the breadmaker if the
power supply cable is damaged, in the
event of faulty performance or if the
breadmaker itself is damaged. The
breadmaker must only be examined
and repaired by an authorised repair
workshop. Do not attempt to repair the
breadmaker yourself as the guarantee
will then become null and void.
11. The use of alien accessories that have
not been approved by the manufacturer
can damage the breadmaker, and
which must only be used for its
intended purpose.
12. This appliance is intended for domestic
and similar use such as:
staff kitchen areas in shops, offices
and other working environments;
agricultural enterprises;
by clients in hotels, motels and other
accommodation facilities;
bed and breakfast accommodations
and holiday homes.
13. Place the breadmaker on a surface
in such a manner that it cannot slip,
as can happen when kneading a stiff
dough. This must be taken into account
with advance programming when the
breadmaker operates unattended.
Use a thin rubber mat on a slippery
surface so that the danger of slipping
is prevented.
14. The Backmeister must be operated
at least 10 cm from other objects.
The breadmaker must not be used
outdoors!
15. Ensure that the power supply cable
does not come into contact with hot
surfaces, nor hang down from the
worktop so that children cannot pull
the cable.
16. Never place the breadmaker on a
gas or electric hob or alongside a hot
baking oven.
17. Utmost care must be taken when
moving the breadmaker when it
contains hot ingredients.
18. Never remove the baking tin during
operation.
19. Never fill the baking tin with more than
the specified quantities, particularly
with white bread. The bread will not
be baked uniformly and the dough
will overflow! Please refer to the
instructions.
20. Provide close supervision when testing
new recipes. Before a certain type of
bread is baked overnight, you should
always try out the recipe first to
confirm the correct mixing ratio of the
individual ingredients, that the dough
is not too stiff or thin, or that the
quantity is not excessive and overflow.
21. Never heart the appliance without
properly placed bread pan filled with
ingredients.
22. Never beat the bread pan on a working
top or edge to remove the pan. This
may entail damages.
23. Metal foils or other materials must not
be inserted into the breadmaker as
this can give rise to the risk of a fire or
short circuit.
24. Never cover the breadmaker with
a towel or any other material. Heat
and steam must escape freely. A fire
can be caused if the breadmaker is
covered by, or comes into contact with,
combustible material, e.g. curtains.
Copyright UNOLD AG | www.unold.de

36 von 168
Stand 21.2.2020
DE
EN
FR
NL
IT
ES
PL
The manufacturer will not be liable in the event of incorrect assembly, improper or incorrect use or if repairs are carried out by unauthorized
third parties.
CAUTION:
The appliance becomes very hot during operation and maintains the heat during
some time after disconnection!
Never open the housing of the appliance. This can result in electric shock.
START-UP
1. Remove all packaging materials and any transport
safety devices. Keep packaging materials away from
children - danger of suffocation!
2. Please check, if all parts and accessories are complete
and faultless.
3. Before using the machine for the first time, remove
all packing materials and loose parts from the inside.
Keep packaging materials away from children - danger
of suffocation!
4. Wipe the bread pans of the Backmeister
®
with warm
water and a mild detergent and clean the kneading
blades.
5. Wipe the exterior of the appliance with a damp cloth.
Do not immerse the appliance into water.
6. Dry all parts thoroughly. Place the bread pan into the
machine.
7. Put the plug into a power socket. The breadmaker is
now ready for operation and can be programmed.
8. During the first operation cycle, steam may be pro-
duced. We recommend to use the appliance for the
first time with only the bread pan inserted (no knead-
ing blades, no ingredients) in the program BAKING
POWDER. Afterwards let the appliance cool down.
9. Now your breadmaker is ready for baking the first
bread.
25. Before a certain type of bread is
baked overnight, you should always
try out the recipe first to confirm the
correct mixing ratio of the individual
ingredients, that the dough is not too
stiff or thin, or that the quantity is not
excessive and overflow.
26. Check the appliance, the wall socket
and the lead cable regularly for wear
or damage. In case the lead cable or
other parts appear damaged, please
send the appliance or the base to
our after sales service for inspection
and repair. Unauthorised repairs can
constitute serious risks for the user
and void the warranty.
Copyright UNOLD AG | www.unold.de

Stand 21.2.2020
37 von 168
DE
EN
FR
NL
IT
ES
PL
1. Prepare the appliance as described in the chapter
„Start-up“.
2. Open the lid of the Backmeister
®
breadmaker and take
out the bread pan.
3. Fill the hole for the kneading blade with heat resistant
margarine in order to prevent the dough from entering
and adhering to it.
4. Put the kneading blade on the drive shaft in the bread
pan.
5. Add the ingredients into the bread pan as described
in the corresponding recipe. With thick dough you will
achieve best results changing the order of the ingredi-
ents, i.e. adding first the dry ingredients and then the
liquid. Nevertheless, mind that the yeast does not get
in contact with the liquid when using the time preset-
ting feature.
6. Put the bread pan back into the appliance and turn
clockwise until it latches into position.
7. Close the lid of the Backmeister
®
breadmaker.
8. Connect the plug of the appliance to the wall socket.
9. Select the desired programme. You may find the details
for the different programmes from page 39 onwards.
For a standard bread mix you will obtain good results
using the programme „Basis“ for example.
10. Select the desired browning setting (Hell – Mittel –
Dunkel) (Light – Medium – Dark). Please bear in mind
that the browning setting cannot be selected in all
baking programmes. You may find the corresponding
details on page 39.
11. Select the desired bread size. Please bear in mind that
the bread size cannot be selected in all baking pro-
grammes. You may find the corresponding details on
page 39.
12. After having selected all desired adjustments, push
the Start/Stop button.
13. According to the programme selected a repeated beep
can be heard during the second kneading process.
Now you may open the lid and add the desired ingre-
dients like nuts to the dough. Close the lid afterwards.
14. The Backmeister
®
breadmaker emits a repeated beep
when your bread is ready and can be taken out. If you
want to take the bread out before the temperature
maintenance time is over, push the Start/Stop button
and keep it pressed shortly until the interruption of the
programme is confirmed with a beep.
15. Carefully take out the bread pan. In order to avoid
burns, please use adequate pot holders. Turn the
bread pan upside-down and let the bread slip onto a
cake cooler to cool down. If the bread does not slip out
immediately onto the cake cooler, move the kneading
drive slightly from one side to another from the bottom
until the bread comes out. Please remember that the
kneading drive may still be hot and use adequate pot
holders. Never knock the bread pan on an edge or the
working plate, as this may deform the bread pan.
16. If the kneader sticks to the bread, it may be loosened
with the provided hook. Insert the hook on the bottom
side of the warm bread in the opening of the kneader
and twist it at the bottom rim of the kneader where
the blade is. Then pull the kneader carefully upwards
using the hook. This allows you to see where the blade
of the kneader is inside the bread and pull it out.
17. Clean the bread pan afterwards as described on
page 41.
CAUTION:
The appliance becomes very hot
during operation
QUICK GUIDE – THE FIRST BREAD
Copyright UNOLD AG | www.unold.de

38 von 168
Stand 21.2.2020
DE
EN
FR
NL
IT
ES
PL
Menu
The number
displayed
indicates
the currently
selected menu.
Browning
The selected degree
of browning is
indicated in the
display.
Start/Stop button
This button is used
to start and stop the
program.
Time selection
+
Increase of the
desired time
Time selection
-
Decrease of the
desired time
Loaf size
Selection of
the desired loaf
size
EXPLANATION OF THE SYMBOLS
BASIC SETTING
As soon as the plug is inserted in the socket, the display
shows 3:00 - (the figures do not flash). During operation
the programme stage can be read from the time-remaining
clock as well as from the details on the display.
START/STOP
For starting and terminating the program. With the Start/
Stop-Button you can terminate the program in every stage.
Keep the button pressed until a bleep can be heard. The
starting position is shown in the display. Should you wish
to choose an alternative program, this can be done with the
menu button.
ZEIT + / - TIME PRESETTING
Only use the time presetting for recipes which you have
already tested under close supervision and do not modify
these recipes to avoid overflowing of the dough with all it’s
risks.
CAUTION: In case of too much dough the dough may flow over
and may burn on the heating.
Most of the programs, can be started with a timing de-
lay. You must add the hours and minutes after which the
preparation is to be started to the time that is automatically
applicable for the respective program and, if appropriate,
the 1 hour keep-warm time (following the baking process).
Example:
It is evening 8:00 p.m. and you wish to have freshly baked
white bread at 7:00 in the morning. The ingredients in the
prescribed order are put into the pan and set in the appli-
ance. Care must be taken that the yeast does not come
into contact with liquid. Choose the required program with
the Menu button and enter the required browning with the
BRÄUNUNG button.
In this example we choose program 1 = BASIS/Basic. In
order to get fresh warm bread at 7:00 in the morning,
you must set the timing at 8:00 the previous evening to
11 hours with the ZEIT/Time button and start the program.
The program is finished at 7:00 a.m., the keep-warm phase
starts and ends exactly at 8:00a.m. If you don’t need the
keep-warm-phase, you can push the Start/Stop-button
EXPLANATIONS OF THE CONTROL PANEL
Copyright UNOLD AG | www.unold.de

Stand 21.2.2020
39 von 168
DE
EN
FR
NL
IT
ES
PL
ATTENTION: For time delayed baking please do not use
perishable ingredients such as milk, eggs, fruit, yoghurt or
onions, etc. The beep alert to add ingredients and the beep
alert at the end of the program can not be deactivated for
night operation.
MENU
With the Menu button you can call up the individual pro-
grams that are described in detail in the table “Timing Pro-
cess”. The programs are used for the following prepara-
tions:
1 BASIS
Basic
This is the most widely used
program, for white and mixed
bread.
2 WEISSBROT
White Bread
For more soft white bread with
a longer rising phase
3 VOLLKORN
Wholemeal
For wholemeal bread
4 SCHNELL
Fast
For fast preparation of white
and mixed bread
5 HEFEKUCHEN
Sweet
For preparation of sweet yeast
dough
6 ULTRA For all recipes of size I, which
can be prepared in the pro-
grams BASIS, WEISSBROT,
FAST, or TOAST. Please note,
that the rising phase is short-
ened in the Ultra-Fast pro-
gram, therefore the bread will
be less soft and more com-
pact. Always use lukewarm
liquids for preparations in this
program.
7 KONFITÜRE
JAM
For cooking jams and jel-
lies. For for making jam, you
should purchase a second
baking pan which is used only
for this purpose.
8 TEIG
Dough
For the preparation of yeast
dough - e. g. dough for pizza,
without baking function
9 GLUTENFREI
gluten-free
The standard program for all
gluten-free breads
10 BACKPULVER
Baking powder
For cakes and biscuits baked
with baking powder
11 TOASTBROT
Toast
To prepare toast bread
12 BACKEN
Bake
To bake separately prepared
yeast or cake dough (by hand
or in the program TEIG). This
program is not fitted for spe-
cial preparations such as
choux pastry mixture or short-
crust pastry).
In some programs (BASIS, WEISSBROT, VOLLKORN,
HEFE-KUCHEN, TOASTBROT and GLUTENFREI) several
beeps during the second kneading phase remind you to
add more ingredients such as nuts, seeds, dried fruit etc.
Just open the lid, add the ingredients and close the lid
again.
BRÄUNUNG/CRUST
To select the browning degree of the crust: HELL/LIGHT,
MITTEL/MEDIUM or DUNKEL/DARK, available in the
programs 1-6, 9-12. The respective setting is indicated by
an arrow in the LCD display.
BROTGRÖSSE/SIZE
This enables the following setting in the various programs:
ST. I / SIZE I = for a small bread weight, approx. 700 g
ST II / SIZE II = for a larger bread weigh, approx. 1.000 g
Please note, that this option is only available in the pro-
grams 1, 2, 3, 5, 9, 11. Please note also our recommenda-
tions in the recipes.
CAUTION:
The appliance becomes very hot
during operation
THE FUNCTIONS OF THE BREADMAKER
Alarm function
The alarm sounds:
whenever an active button is pressed,
during the second kneading process, to remind you
to add seeds, fruit, nuts or other ingredients. Please
note that this function cannot be deactivated, e.g. in
the time preset function,
at the end of the baking process, the appliance beeps
10 times during the keep-warm phase,
at the end of the keep-warm phase 1 beep remind you
that the appliance is now switched off and the bread
Copyright UNOLD AG | www.unold.de

40 von 168
Stand 21.2.2020
DE
EN
FR
NL
IT
ES
PL
THE PROGRAM PROCESS OF THE BREADMAKER
1. Inserting the Bread pan
Hold the non-stick bread pan with both hands and slide it
slightly inclined on the socle inside the baking chamber.
Turn the bread pan clockwise, until it clicks into position.
Fill the holes of the kneading blade with heat resisting
margarine before fitting it into the bread pan. This avoids
that dough penetrates and bakes into the kneading blade.
2. Pouring in the ingredients
The ingredients must be poured into the pan in the order
prescribed in the recipe. In case of very heavy dough, e.g.
with a high rye portion, we recommend to fill in first the
liquid, then the flour and other ingredients and finally the
yeast to ensure better kneading results. When using the
time preset function, it must be ensured that no contact
between the water and the yeast takes place before the
program is started.
3. Selecting the program process
Select the required program process with the menu button.
Select the stage appropriate for the program. Select the
required browning. You can set a delay with the timing
button. Press the START button. After pressing START
further corrections are no more possible.
4. Mixing and kneading dough
The Breadmaker mixes and kneads the dough automatically
as long as necessary to reach the proper consistency.
5. Pause
After each kneading process there is a pause to allow the
liquid to slowly penetrate the yeast and the flour.
6. Dough raising
After each kneading phase the Breadmaker produces the
optimal temperature for the rising of the dough.
has to be taken out of the bread pan. Please note that
this function cannot be deactivated, e.g. in the time
preset function.
Repeat function after power outage
Should the electricity supply been cut off during the op-
eration of the Breadmaker, the appliance will re-start, on
reinstatement of the supply, automatically from the point
arrived at when the cut-off occurred as long as the inter-
ruption is not longer than 10 minutes. If the interruption
in the electricity supply lasts more than 20 minutes and
the display shows the basic setting, the Breadmaker must
be restarted. This is only practical if the dough was not
further than the kneading phase when the break occurred.
If the program was already in the last rising cycle when the
power broke down and the interruption lasts over a longer
time, the dough cannot be saved and the program has to
be started again.
Safety functions
The lid should not be opened after the program has start-
ed, except during the second kneading phase for adding
of ingredients. During the rising and baking phase the lid
should never be opened, as the bread may sink down.
If the temperature in the appliance, due to previous use, is
too high for a newly chosen program, when an attempt to
restart is made, the display will show “H HH” and an alarm
sound will be heard. Should this occur, remove the pan and
wait until the appliance has cooled off and is back to the
beginning of the originally chosen program.
Please not that the breadmaker has no top heating for safe-
ty reasons, so the crust will be lighter on top and darker at
the sides and bottom of the bread. For safety reasons an
additional top heating is not allowed.
If after pressing START/STOP, “E rr” is shown in the dis-
play, the temperature control is defective. In this case
please send the appliance to our technical service.
If the display shows” LL L” after pressing the Start/Stop button
( except the program BAKE and JAM), it means the temperature
inside is too low accompanied by 5 beep sounds. Stop sound by
pressing the Start/Stop button, open the lid and let the machine
rest for 10 to 20 minutes to return to room temperature.
Copyright UNOLD AG | www.unold.de

Stand 21.2.2020
41 von 168
DE
EN
FR
NL
IT
ES
PL
7. Baking
The bread baking automatic regulates the baking
temperature and the timing automatically.
8. Keeping warm
When the baking is over, a 10 beeps sound indicates that
the bread or food can be removed. At the same time a
keep-warm time of 1 hour starts. If you want to remove the
bread before the keep-warm phase has ended, just press
the STOP button and take out the bread.
9. End of the program process
After the end of the program process, take out the pan
with the help of handcloths by turning it counter-clockwise.
Stand it on end and, when the bread does not immediately
fall onto the cooling wire, waggle the kneading drive from
below until the bread falls out. Do not knock the bread pan
on an edge or table, as the warm bread pan may be de-
formed. If the kneader sticks in the bread, use the hook to
remove it. Push it on the underside of the still-warm bread
in the (almost) round opening of the kneader and fold it on
the bottom edge of the kneader, ideally at the point where
the kneader blade is. Then pull the kneader up with the
hooked skewer. You can then see where the blade is in the
bread.
CLEANING AND CARE
Always allow the
breadmaker to cool down
before it is cleaned
and stored. It takes
approximately 30 minutes
for the breadmaker to cool
down before it can be used
again for baking and dough
preparation.
Always switch off the
appliance, disconnect the
power supply plug from
the mains, and allow the
breadmaker to cool down,
before it is cleaned. Always
use a mild washing-up
liquid. Never use chemical
cleaners, benzine, oven
cleaners and scouring
agents.
1. Before the Backmeister
®
is used for the first time,
wash the baking container and kneader with warm
water and a mild washing-up liquid.
2. Remove all ingredients and crumbs from the lid,
case and baking chamber with a moist cloth. Never
immerse the breadmaker in water and never fill the
baking chamber with water.
3. Wipe the baking tin with a moist cloth. The inside of
the tin can be rinsed with warm water and a washing-
up liquid. Do not soak the tin in water for prolonged
periods.
4. Both the kneader and driving shaft should be cleaned
immediately after use. The kneader may be difficult
to remove if it remains in the baking tin. In such an
event fill the container with warm water and allow it to
soak for approx. 30 minutes. The kneader can then be
easily removed for cleaning.
5. The bread pan is equipped with a high quality non
stick coating. Never use metal objects or scourers to
clean the surface of the non-stick container. It is nor-
mal for the colour of the non-stick surface to change
in the course of time. This does not influence the non-
stick function.
6. Condensation from the steam accumulates between
the inside and outside lid during baking and flows
off the lid when baking has been completed. This is
normal. Any discolouration of the lid is of no conse-
quence, but it can be removed with an appropriate
cleaner.
7. Before the breadmaker is packed away for storage
ensure that it has completely cooled down, is clean
and dry, and that the lid is closed.
Copyright UNOLD AG | www.unold.de

42 von 168
Stand 21.2.2020
DE
EN
FR
NL
IT
ES
PL
TIMING PROCESS OF THE PROGRAMS
1 2 3 4 5
BASIS Weissbrot Vollkorn Schnell HEFEKUCHEN
Basic White bread Wholemeal Fast Sweet
Select bread size ST. I ST. II ST. I ST. II ST. I ST. II ST. I ST. II
Crust • • • • • • • • •
Total time 2:53 3:00 3:40 3:50 3:32 3:40 1:40 2:50 2:55
1.Kneading
(Heating OFF)
9 10 16 18 9 10 7 10 10
1. Rising
Heating
ON/OFF
no Kneading
20 20 40 40 25 25 5 5 5
2. Kneading
14
Add
ingred.
15
Add
ingred.
19
Add
ingred.
22
Add
ingred.
18
Add
ingred.
20
Add
ingred.
8 20
Add
ingred.
20
Add
ingred.
2. Rising
Heating
ON/OFF
25 25 30 30 35 35 30 30
3. Rising
Heating
ON/OFF
no Kneading
40 40 45 45 60 60 15 40 40
Bake
Heating
ON/OFF
65 70 70 75 65 70 65 65 70
Keep warm
at 60 °C
Heating
ON/OFF
60 60 60 60 60 60 60 60 60
Copyright UNOLD AG | www.unold.de

Stand 21.2.2020
43 von 168
DE
EN
FR
NL
IT
ES
PL
TIMING PROCESS OF THE PROGRAMS
6 7 8 9 10 11 12
ULTRA KONFITÜRE TEIG GLUTENFREI BACKPULVER TOASTBROT BACKEN
Ultra Jam Dough Glutenfree Baking
Powder
Toast Bake
Select bread size ST. I ST. I ST. II ST. I ST. II
Crust • • • • • • • •
Total time 0:58 1:20 1:30 3:15 3:20 2:50 2:55 3:00 1:00
1.Kneading
(Heating OFF)
12 20 12 12 10 15 15
1. Rising
Heating
ON/OFF
no Kneading
0 15
Heating
ON/OFF
20 20 5 40 40
2. Kneading
0 13
Add
ingred.
13
Add
ingred.
20 5
Add
in-
gred.
5
Add
in-
gred.
2. Rising
Heating
ON/OFF
0 30 45 45 30 25 25
3. Rising
Heating
ON/OFF
no Kneading
11 45
Kneading
ON/OFF
Heating
ON/OFF
40 45 45 35 40 40
Bake
Heating
ON/OFF
35 Rest
20
60 65 70 50 55 10-60
Keep warm
at 60 °C
Heating
ON/OFF
60 60 60 60 60 60 60 60
Copyright UNOLD AG | www.unold.de

44 von 168
Stand 21.2.2020
DE
EN
FR
NL
IT
ES
PL
QUESTIONS AND ANSWER CONCERNING THE USE OF THE BREADMAKER
The bread sticks in the pan after baking
Allow the bread to cool off for approx. 10 minutes. Stand
the pan on its head - if appropriate, lightly waggle the
blade (kneader connection) at the underside of the bread
pan. Before placing the kneading blade, fill the hole in
it with heat-resisting margarine (full-fat), this avoids, that
dough may penetrate between kneading blade and shaft
and may bake there. Before baking is commenced, rub a
little oil on the kneaders.
If you intend to make jam in the breadmaker we recom-
mend to buy a second bread pan exclusively for making
jam, as bread may stick in the pan of jam has been pre-
pared in the same one before. Before making bread: smash
food or materials such as fruit, nuts etc.. and put them into
bread pan, then start the breadmaker
How can the holes in the bread from the kneader be avoided?
Before the last raising phase, you can remove the kneader
with floured fingers (see the timing of the program process
on the display.
Should you not wish to do that, after baking use the hooked
skewer. If care is taken, larger holes are avoidable.
The dough flows over the bread pan
This may happen, when wheat flour is used, as wheat con-
tains more gluten and thus rises more. In this case
reduce the flour amount and adapt the other ingredients.
The bread will nevertheless have the desired volume.
add 1 tablespoon of liquid butter or margarine.
The bread rises, but sinks in the baking phase
If a “V”-formed channel appears in the bread flour gluten
is missing, that means that the flour contains too little pro-
tein (occurs in rainy summers) or the flour is damp.
Help:
Add to the flour 1 tablespoon of wheat gluten for
every 500 g of flour.
Use a shorter programm, e.g. SCHNELL or ULTRA-
SCHNELL.
If the bread sinks like a funnel in the middle then it could
be that:
the water temperature was too high,
too much water was used.
flour gluten is missing.
When can the Breadmaker lid be opened during the baking
process?
Basically it is always possible when the kneading is taking
place. In this time, one can add small amounts of flour or
liquid when applicable.
If the bread has to have a particular appearance after bak-
ing, take the following steps: before the last raising, care-
fully and shortly open the lid (see the program process
table), make a cut in the crust with a sharp pre-warmed
knife, strew corns on the surface or spread a potato-flour
and water mixture on the crust so that it shines after bak-
ing. This is the last phase in which the BREADMAKER lid
can be opened, otherwise the bread will sink.
What is wholemeal flour?
Wholemeal flour can be made from all sorts of grain, even
wheat. The designation whole meal means that the flour
is ground from the whole grain and thus has more rough-
age. Therefore wheat wholemeal flour is darker. Wholemeal
bread is not necessarily darker as is often assumed.
What has to taken into account when using rye flour?
Rye flour does not contain any binding substances, thus
bread made from it does not rise very much. To make it
edible, a RYE WHOLEMEAL BREAD must be made with
leaven dough.
The dough will only rise when using rye flour that contains
no gluten, if at least ¼ of the amount is replaced by wheat
flour type 550.
Copyright UNOLD AG | www.unold.de

Stand 21.2.2020
45 von 168
DE
EN
FR
NL
IT
ES
PL
What means binding substances in the flour?
The higher the type figure in the above schedule, the lower
the contained binding substances. This means in general
that flours with high type figures do not rise as much as
flour with low type figures. The flour with the highest por-
tion of binding substances is wheat flour of type 550.
Which are the different kind of flour and how are they used?
Corn, rice, potato flour
is ideal for persons suffering from a gluten allergy or
from sprue or coeliakia. In the following you will find
recipes as well as contact addresses of manufacturers
for special allergy products.
Spelt flour
is quite expensive, but completely free of chemical
deposits, as spelt only grows on very poor ground and
does not tolerate any fertilizers. Sprout flour is ideal
for persons suffering from allergies. All recipies for
flour types 405 – 550 – 1050 can also be prepared
with spelt flour.
Hard wheat flour (durum/semolina)
is ideal for French baguette due to its consistency,
but can be replaced by hard wheat semolina.
How can fresh bread be made more edible?
If a boiled mashed potato is added to the dough, the fresh
bread is more edible.
In what proportion can one use rising substances?
It can be bought in various quantities, so the manufac-
turer’s instructions on the packing have to be followed and
the quantity set in relation to the amount of flour used,
with both yeast and leaven dough. The rising capacity of
yeast is depending on the freshness of the yeast as well as
of the water quality. If the water is very soft, the yeast will
rise much more, so it may become necessary to reduce the
yeast by up to 25 % if you live in regions with soft water.
The bread tastes of yeast
If sugar is used, leave it out, but the bread will not be so
brown.
Add to the water a quantity of spirits vinegar, for a small
loaf = 1 tablespoon - for a large loaf 1.5 tablespoons.
Replace the water with buttermilk or kefir, which is possi-
ble with all recipes and is recommended due to the fresh-
ness of the bread.
Why has bread from the breadmaker another taste than out of
the oven?
This is due to the different humidity. In an oven, the bread
becomes more dry because of the larger space, in the
breadmaker, the bread remains more humid.
What do the type figures mean with flour?
The lower the figure the less roughage is contained in the
flour and the lighter it is and the more it rises because it
contains a higher proportion of gluten.
Please find on the next page a schedule with the differ-
ent types for Germany, Austria, and Switzerland as well as
some rough explanations
Description German
Type No.
Austrian
Type No.
Swiss
Type No.
Wheat
flour
very fine, white, for cake 405 480 400
white flour for bread 550 780 550
medium flour 1050 1600 1100
wholemeal flour, rough 1600 1700 1900
Rye
flour
very fine 815 500 720
fine 997 960 1100
medium 1150 960 1100
wholemeal, rough 1740 2500 1900
Copyright UNOLD AG | www.unold.de

46 von 168
Stand 21.2.2020
DE
EN
FR
NL
IT
ES
PL
TROUBLE SHOOTING - APPLIANCE
Default Cause Remedy
Smoke coming out of the baking
chamber or vents
Ingredients sticking to baking cham-
ber or on the outside of the baking
tin
Switch off the machine, disconnect
the mains plug; wait until cooled
down, then clean the baking chamber
and tin.
Bread has partly collapsed and is
moist at the bottom
Bread remained too long in tin after
being kept warm
Remove bread at the latest after end
of keep-warm function, to allow the
steam to escape.
Bread cannot be easily removed from
the tin.
The loaf is sticking to the kneading
knife.
Before baking the next bread, clean
kneading knife and shaft after If nec-
essary fill the tin with warm water and
soak for 30 minutes. The kneading
knife can then be easily removed
Ingredients have not been properly
mixed or the bread has not been
properly baked.
Incorrect program Check selected menu; set another
program.
START/STOP key was touched while
breadmaker was operating
Discard ingredients and start anew
The lid was opened several times
during operation
The lid should only be opened when
display reads more than 1:30. Ensure
that the lid is properly closed after it
has been opened.
Prolonged power failure during op-
eration
Discard ingredients and start anew.
Kneader rotation is blocked. Check whether kneader is blocked by
grains Remove tin and check whether
catch rotates. If not send breadmaker
for repair.
Copyright UNOLD AG | www.unold.de

Stand 21.2.2020
47 von 168
DE
EN
FR
NL
IT
ES
PL
TROUBLE SHOOTING - RECIPES
Mistake Cause Remedy
Bread rises too much. Too much yeast, too much flour
not enough salt, or a combination of these causes
a/b
Bread does not rise or only
insufficiently
No or insufficient yeast
Old yeast.
Liquid too hot
Yeast came into contact with liquid
Wrong or old flour.
Too much or insufficient liquid.
Not enough sugar
a/b
e
c
d
e
a/b/g
a/b
Dough rises and flows over the
baking tin.
Very soft water so that yeast fermentation is stronger.
Too much milk has influenced yeast fermentation
f/k
c
Bread has collapsed. Bread volume larger than the bread pan causing it to collapse
Too early or too fast yeast fermentation due to warm water,
warm baking chamber or high humidity level.
a/f
c/h/i
Bread is dented after baking. Not enough gluten in the flour.
Too much liquid
l
a/b/h
Stiff, lumpy texture Too much flour or insufficient liquid
Not enough yeast or sugar
Too much fruit, wholemeal or other ingredients.
Old or poor quality flour
a/b/g
a/b
b
e
Not baked in the centre. Too much or insufficient liquid.
High amount of moisture.
Recipe with moist ingredients, e.g. yoghurt.
a/b/g
h
g
Open, coarse texture or full of
holes.
Too much water.
No salt.
High amount of moisture; water was too warm.
Liquid was too hot.
g
b
h/i
c
Mushroom-like surface that has not
been baked properly
Bread volume larger than the tin
Too much flour, particularly with white bread.
Too much yeast or insufficient salt.
Too much sugar
Sweet ingredients in addition to the sugar.
a/f
f
a/b
a/b
b
Unevenly sliced or lumpy bread. Bread has not cooled down sufficiently. j
Flour was not properly kneaded in at the sides g/l
Remedying the mistakes
a Measure the ingredients correctly.
b Match the quantity of ingredients accordingly and check whether an ingredient has been forgotten.
c Use another liquid or allow it too cool down to room temperature.
d Add the ingredients in the sequence listed in the recipe. Produce a small hole in the centre and immediately add
the crumbled or dried yeast. Avoid direct contact between yeast and liquid.
e Only use fresh and properly stored ingredients.
f Reduce the overall quantity; do not use more that the specified quantity of flour. Reduce all ingredients by one third.
g Correct the amount of liquid. If moist ingredients are used then the amount of liquid must be reduced.
h Use 1-2 tablespoons less during wet weather.
i Do not use the timing program in hot weather. Use cold liquids. Use the program SCHNELL or ULTRA-SCHNELL to
shorten the rising phases.
j Immediately remove the bread from the tin after baking and allow it to cool down on a grid for at least 15 minutes
before it is cut.
k Diminish the yeast or all ingredients by one quarter of the specified amount.
l Add one tablespoon of wheat gluten to the dough.
Copyright UNOLD AG | www.unold.de

48 von 168
Stand 21.2.2020
DE
EN
FR
NL
IT
ES
PL
COMMENTS ON BAKING
1. Ingredients
As each ingredient has a particular role in the success of
bread-making, the measuring is important as the correct
order of adding ingredients.
The important ingredients, such as liquid, flour, salt, sugar
and yeast (both dry and fresh yeast can be used) affect the
successful results in the preparation of bread and dough.
Therefore always use the appropriate quantities in the cor-
rect proportions to one another.
Use lukewarm ingredients if you are immediately starting
to bake. If the TIME program is to be used, the ingredients
must be cold so that the yeast does not ferment too soon.
Margarine, butter and milk only affect the taste of the bread.
Sugar can be reduced by 20 % so that the crust will be
lighter and thinner without otherwise affecting the baking
results. Should you prefer a softer and lighter crust, you
can replace the sugar with honey.
Gluten, that is formed through kneading, provides the struc-
ture of the bread. The ideal flour mixture contains 40%
wholemeal flour and 60% white flour.
Should you wish to add whole grains, soften them up over-
night. Appropriately reduce the quantity of flour and liquid
(up to 1/5 less).
Leaven is indispensable in the making of rye flour bread.
It contains milk and vinegar acid bacteria that cause the
bread to be light and slightly sour. Making it up oneself
takes up quite some time. Therefore we use in the fol-
lowing recipes concentrated leaven-dough powder which
comes in packs of 15 g (for 1 kg of flour). The quantities in
the recipes (½ - ¾ - 1 bag) must be adhered to cut down
on bread crumbing.
If leaven-dough powder is used in other concentrations,
(packs of 100 g for 1 kg flour), 1 kg flour must be reduced
by 80 g or as appropriate to suit the recipe.
Liquid leaven dough, available packed in bags, can also be
used well. As far as quantities are concerned adjust to the
details on the packing. Fill the leaven dough into a meas-
uring jug and add the appropriate quantity of liquid men-
tioned in the recipe.
Wheat leaven dough, that can also be bought dried, im-
proves the dough quality, the freshness and the taste. It is
milder than rye leaven dough.
Bake leaven bread in the BASIS or the VOLLKORN pro-
grams, so that it rises and bakes properly.
Wheat bran should be added to the dough when a particu-
larly roughage-full and light bread is required. Use 1 ES
for 500 g of flour and raise the quantity of liquid by ½ ES.
Wheat germ is a natural helper out of grain protein. It
makes the bread lighter, gives a better volume, sinks less
often and is more wholesome. This is particularly the case
with wholemeal breads and pastries and those made from
self-ground flour.
Colour malt, which we use in several recipes, is a dark-
roasted barley malt. It is used to obtain a darker crumb
and crust (such as black bread). A rye malt is also available
and is not so dark. Such malts are available in whole food
shops.
Bread seasoning can be added to all mixed breads. The
quantity used depends on the taste and the information of
the manufacturer.
Pure lecithin powder is a natural emulsion that raises the
baking volume, makes the crumb tender and softer and
prolongs the freshness.
All the above boldly-printed baking substances and ingre-
dients are available in whole food, health food shops and
the health food departments of grocery stores or from flour
mills.
2. Adjusting the ingredients
In cases where certain ingredients are increased or re-
duced, ensure that the proportions in the original recipe
are maintained. In order to achieve a perfect result, take
note of the following basic rules on adjusting the ingredi-
ents:
Copyright UNOLD AG | www.unold.de

Stand 21.2.2020
49 von 168
DE
EN
FR
NL
IT
ES
PL
Liquid/flour: The dough must be soft (not too soft), slightly
sticky and not stringy. Light dough is in a ball, whereas
with heavier dough, such as rye wholemeal or other whole-
meal breads, this is not the case. Check the dough 5 min-
utes after the first kneading. Should it be too moist, add
more flour until the correct consistency is achieved. If the
dough is too dry, knead in spoonful by spoonful of water.
Replacing liquids: Should you replace ingredients in the
recipes which contain liquid (such as cream-cheese, yo-
ghurt, etc.), the appropriate liquid quantities must be ad-
justed accordingly. When using eggs, break then into the
measuring jug and fill up with liquid to the required level.
If you live high up (above 2,500 ft.), the dough rises more
quickly. In such regions the amount of yeast can be re-
duced by ¼ to ½ TS, to avoid excessive rising. The same is
the case in regions where soft water is present.
3. Adding and measuring the ingredients and quantities
Always first add the liquid and then the yeast. Only in case
of very heavy dough such as rye bread, we recommend to
fill in first the flour and the dry yeast and to pour the liquid
on top to ensure proper kneading. However, if this is com-
bined with the TIME function, make sure, that any con-
tact between yeast and liquid is avoided until the program
starts.
In order to prevent the yeast from fermenting too soon (in
particular using the time delay), contact between the yeast
and the liquid must be avoided.
Always use the same units in measuring, which means that
with the indication of tablespoon and teaspoons either use
the measuring spoon supplied with baking automatic or
spoons which are normally used in the household.
Weighing in grams is preferable due to their accuracy.
The supplied measuring jug can be used for millilitres
measurements.
Abbreviations in the recipes mean:
tbsp = tablespoon (or measuring spoon large)
tsp. = level tea spoon (or measuring spoon small)
g = grams
ml = millilitres
bag = bag package dry yeast of 7 g content for
500 g flour - corresponds to 20 g fresh yeast
4. Adding of fruit, nuts or corn
Should you wish to include further ingredients, this can be
done in all programs (except Schnell, Ultra, Jam, Dough,
Cake, Bake) as soon as the peep sound is heard. If the
ingredients are added too soon, they can be ground up by
the kneader.
Should there be no sizes mentioned in the recipes because
they do not exist in the prescribed program, then the small
and also the large quantities will be successful for the ap-
propriate type in the mentioned program. The programs
without size selection are programmed appropriately.
5. Bread weights and volumes
In the following recipes you will find exact details of bread:
However, you will see that the weights for pure white bread
are less than those for wholemeal bread. This is because
white flour rises more and therefore is somewhat limited.
In spite of these exact weight details, certain differences
may occur. The actual bread weight is very much depend-
ant on the humidity in the air on preparation. All breads
that have a high proportion of wheat will achieve a greater
volume and in the highest weight class will rise above the
pan edge after the last raising. Nevertheless, they do not
overflow. The bread bulging over the pan edge will be some-
what lighter browned as the bread in the pan. It is recom-
mended to use the FAST program for sweet breads, or the
HEFEKUCHEN program; thus the bread will be lighter. Do
not use more than the quantities of step I in this program.
6. Baking results
The baking results are in particular dependant upon the lo-
cal situation (soft water, high humidity, great heights state
of the ingredients, etc.). For this reason, the figures in the
recipes are only clues and have to be adapted accordingly
If one or other recipe is not successful, do not give up,
moreover try to find out the cause and try again, for exam-
ple with alternative quantity proportions. Before you bake
a bread overnight with the timer delay, we recommend that
you make a trial bread so that, in certain circumstances,
the recipe can be altered.
Copyright UNOLD AG | www.unold.de

50 von 168
Stand 21.2.2020
DE
EN
FR
NL
IT
ES
PL
BREAD RECIPES
Classical Whitebread
Step I Step II
Bread weight,
approx.
500 g 750 g
Water 230 ml 350 ml
Salt ¾ tsp 1 tsp
Sugar ¾ tsp 1 tsp
Semolina 100 g 150 g
Flour, type 550 230 g 350 g
Dry yeast ½ bag ¾ bag
Program: SCHNELL (Fast)
If the water is replaced by milk, you will get an toast
bread.
Country bread
Step I Step II
Bread weight,
approx.
500 g 750 g
Milk 180 ml 275 ml
Margarine/
butter
15 g 25 g
Salt 1/3 tsp 1 tsp
Sugar 1/3 tsp 1 tsp
Flour type
1050
330 g 500 g
Dry yeast ½ bag ¾ bag
Program: BASIS or WEISSBROT
Sultana bread
Step I Step II
Bread weight,
approx.
560 g 850 g
Water 180 ml 275 ml
Margarine/
butter
20 g 30 g
Salt 1/3 tsp ½ tsp
Honey 2/3 tblsp 1 tblsp
Flour type 405 330 g 500 g
Cinnamon ½ tsp ¾ tsp
Dry yeast ½ bag ¾ bag
Sultanas (or
dried fruits)
50 g 75 g
Program: SCHNELL (Fast) or HEFEKUCHEN
(Sweet)
Wholemeal bread
Step Step II
Bread weight,
approx.
570 g 860 g
Water 230 ml 350 ml
Margarine/
butter
15 g 25 g
Salt 2/3 tsp 1 tsp
Sugar 1/3 tsp 1 tsp
Flour type
1050
180 g 270 g
Wholemeal
flour
180 g 270 g
Dry yeast ½ bag ¾ bag
Program: SCHNELL / VOLLKORN
Leaven bread
Step I Step II
Bread weight,
approx.
740 g 1050 g
Dry leaven ½ bag ¾ bag
Water 350 ml 450 ml
Bread spice ½ tsp ¾ tsp
Salt 1 tsp 1 ½ tsp
Rye flour 250 g 340 g
Flour Typ 1050 250 g 340 g
Dry yeast 1 bag 1 ½ bag
Program: BASIS
100 % wholemeal bread
Step I Step II
Bread weight,
approx.
560 g 850 g
Water 230 ml 350 ml
Salt 2/3 tsp 1 tsp
Honey 1/3 tsp 1 tsp
Wholemeal flour 360 g 540 g
Dry yeast ½ bag ¾ bag
Program: VOLLKORN
Copyright UNOLD AG | www.unold.de

Stand 21.2.2020
51 von 168
DE
EN
FR
NL
IT
ES
PL
Pure wholemeal bread
Step I Step II
Bread weight,
approx.
570 g 860 g
Water 230 ml 350 ml
Salt 2/3 tsp 1 tsp
Vegetable oil 2/3 tblsp 1 tblsp
Honey ½ tsp ¾ tsp
Beet syrup ½ tsp ¾ tsp
Wholemeal
flour
330 g 500 g
Vital wheat
gluten
½ tblsp ¾ tblsp
Dry yeast ½ bag ¾ bag
Program: VOLLKORN
Farmer bread
Step I Step II
Bread weight,
approx.
520 g 780 g
Water 200 ml 300 ml
Salt 2/3 tsp 1 tsp
Dried wheat
leaven (no
concentrate)
15 g 25 g
Flour type
1050
330 g 500 g
Sugar 2/3 tsp 1 tsp
Dry yeast ½ bag ¾ bag
Program: BASIS
Fig-walnut bread
Step I Step II
Bread weight,
approx.
600 g 900 g
Water 230 ml 350 ml
Wheat flour
type 1050
170 g 260 g
Rye flour 260 g 400 g
Salt 2/3 tsp 1 tsp
Figs, finely
chopped
30 g 50 g
Walnuts,
choppedt
30 g 50 g
Honey 1 tsp 1 ½ tsp
Dry leaven ½ bag ¾ bag
Dry yeast ½ bag ¾ bag
Program: BASIS
Egg Bread
Step I Step II
Bread weight,
approx.
480 g 730 g
Eggs
fill up with
water or milk to
be totally
1
180 ml
2
275 ml
Margarine/
butter
15 g 25 g
Salt 2/3 tsp 1 tsp
Sugar 2/3 tsp 1 tsp
Flour, type 550 330 g 500 g
Yeast 1/2 bag 3/4 bag
Program: Basis
Bake immediately and do not conserve
Cottage cheese bread
Step I Step II
Bread weight,
approx.
530 g 800 g
Water or milk 130 ml 200 ml
Margarine/
butter
20 g 30 g
Egg, complete 1 small 1
Salt 2/3 tsp 1 tsp
Sugar 2/3 tblsp 1 tblsp
Cottage cheese 80 g 125 g
Flour type 550 330 g 500 g
Dry yeast ½ bag ¾ bag
Program: SCHNELL
French herb bread
Step I Step II
Bread weight,
approx.
560 g 850 g
Water 230 ml 350 ml
Wheat flour
type 550
350 g 525 g
Durum wheat
flour
50 g 75 g
Sugar 2/3 tsp 1 tsp
Salt 1/3 tsp 1 tsp
Chopped
parsley,
dill,etc.
1 tblsp 1½ tblsp
Garlic gloves,
mashed
1 St. 2 St.
Butter 10 g 15 g
Dry yeast ½ bag ¾ bag
Program: BASIS / SCHNELL
Copyright UNOLD AG | www.unold.de

52 von 168
Stand 21.2.2020
DE
EN
FR
NL
IT
ES
PL
BREADS FOR PERSONS WITH ALLERGIES
Please note the following when preparing gluten-free breads:
Gluten-free flour needs more liquid than flour containing gluten (400–500 ml lukewarm liquid per 500 g flour).
Gluten-free flours need a little oil or fat for successful baking. You can use vegetable oil, butter or margarine (10 to
20 g).
When you bake bread from gluten-free flour, you cannot use the timer function. The program has to be started right
away.
Gluten-free bread from the breadmaker requires less yeast then bread baked in the oven. Use about 3.5 to 5 g of
dry yeast for a standard loaf.
If the bread collapses in the middle during baking, reduce the amount of yeast by about 1 g. If the bread still col-
lapses, beat on e egg in the measuring cup and then fill the cup with the amount of liquid stated in the recipe.
Important: do not add the egg to the quantity of liquid!
The crust of gluten-free breads does not brown as much as that of breads containing gluten. For safety reasons,
breadmakers cannot be equipped with top heating elements, so the top side of the bread is lighter in color. To give
the bread a more attractive color, you can whisk one egg yolk with 1 tsp of sweet cream and brush this on the bread
when the display shows a remaining time of 1:15.
After about eight minutes of kneading, loosen the flour or dough from the edge of the baking pan with a silicone
dough scraper. You can loosen the edge of the dough from the baking pan again when the remaining time is 1:15
for better results.
For persons who suffer from grain allergies or who have to follow strict diets, we have tested various flour mixes made
with cornstarch, rice starch or potato starch in the Backmeister
®
with very good results. When using baking mixes, please
follow the instructions on the package.
We have achieved good results with products from the Schär company and Hammermühle Diät GmbH. If you have ques-
tions about gluten-free products or intolerabilities, please contact these companies directly:
Hotline Fa. Schär Hotline Hammermühle
Deutschland Tel. 08 00/1 81 35 37 Deutschland Tel. 0 63 21/9 58 90
Österreich Tel. 08 00/29 17 28
The necessary ingredients can be purchased in health food stores. Hammermühle products can be ordered directly from
the manufacturer at the above number. All flour types listed are suitable for cakes and breads for special diets neces-
sitated by affliction with sprue. Breads baked in the Backmeister
®
are also relatively compact when the quantity of yeast
or cream of tartar is increased.
Add the ingredients to the baking pan. Select the following programs:
“GLUTENFREI”
for preparing dough not to be baked in the breadmaker: “TEIG” program
for preparing bread with baking powder or cream of tartar as the raising agent: “BAKING POWDER” program
Copyright UNOLD AG | www.unold.de

Stand 21.2.2020
53 von 168
DE
EN
FR
NL
IT
ES
PL
BREAD MIXTURES
As our recipes are based on products which are only available on the German market, we did not translate these recipes,
but will give you some general information. You may use any bread mixtures available in your country for baking bread in
the bread maker. Please note, that some mixtures contain already the necessary amount of dry yeast. Please follow the
instructions of the respective manufacturer, in particular concerning the relation from flour to water, but do not exceed
the following maximum quantity of 500 g flour mix and approx. 350 ml of liquid.
CAKE RECIPE
You may also prepare cake in the BACKMEISTER
®
. As it is equipped with kneading blades, the cake will not be as light
as usual, but very delicious. The cake program cannot be preset. You may add different ingredients to the basic recipe.
However, do not take more than the quantities below to ensure good baking results. After baking, take the container out
of the machine and put it on a wet towel. Let the cake cool down for about 15 minutes in the mould before turning the
mould to take out the cake.
Ingredients for a weight of 700 g
Egg 3
soft Butter 100 g
Sugar 100 g
Vanilla sugar 1 bag
Flour type 405 300 g
Baking powder 1 bag
Ingredients:
grated nuts 50 g
or: grated chocolate 50 g
or: coconut flakes 50 g
Or peleed an cubes
apples
50 g
Program: BACKPULVER
Schär dark sandwich loaf
Ingredients Step I Step II
Bread mix, dark 375 g 500 g
Vegetable oil 4 g 6 g
Dry yeast 1 package (7 g) 10 g
Water, lukewarm 470 ml 630 ml
Salt ¾ tsp. 1 tsp.
You can add the following, as desired
caraway or 2 tsp 3 tsp
walnuts or 50 g 75 g
roasted onions or 50 g 75 g
bacon bits or 50 g 75 g
flaxseed 1 tbsp. 1½ tsp.
Copyright UNOLD AG | www.unold.de

54 von 168
Stand 21.2.2020
DE
EN
FR
NL
IT
ES
PL
DOUGH PREPARATION
You may use your Backmeister
®
to prepare dough, which is formed and baked in the oven. Select the program TEIG
(dough). Ingredients can be added after the beep during the second kneading. The program TEIG (dough) does not dis-
pose of several bread sizes. However, we offer to amounts for different cake sizes:
Pretzel
Ingredients for 9–10 pcs.
Water 200 ml
Salt ¼ tsp
Flour type 405 360 g
Sugar ½ tsp
Dry yeast ½ bag
Egg (beaten) to
brush the surface
1
coarse salt to sprin-
kle on the surface
Fill all ingredients except the egg and the salt into the
container. Select the program: TEIG (dough)
When the signal sounds an the display shows „0:00“,
press Stop.
Preheat the oven to 230 °C: Divide the dough in portions
form thin rolls. Form pretzels and lay them on a greased
baking plate: Brush the pretzels with beaten egg and
sprinkle them with coarse salt.
Bake in the preheated oven at 200 °C 12-15 minutes.
Program: TEIG
Christmas cake (German speciality)
Weight 750 g
Milk 100 ml
Melted butter 100 g
Egg 1
Rum 2 tblsp
Flour type 405 375 g
Sugar 75 g
Candied lemon peel 40 g
Candied orange peel 20 g
Almonds, grated 40 g
Sultanas 750 g
Salt 1 pinch
Cinnamon 1 pinch
Dry yeast 1.5 bags
Take dough out of the container, fill into a long mould
(special German form) and bake at 180 °C about 1 to
1:15 hs
Program: TEIG
Wholemeal pizza
Ingredients for 2 Pizzas
Water 150 ml
Salt ½ tsp
Olive oil 2 tblsp
Wholemeal flour 300 g
Wheat sprouts 1 tblsp
Dry yeast ½ bag
Roll the dough, place it on a baking plate and let it leaven
for 10 minutes.
Distribute pizza sauce and the desired topping on the
dough. Bake it about 20 minutes.
Program: TEIG
Teatime cake
Ingredients for a form of 22 cm Ø
Milk 170 ml
Salt ¼ tsp
Egg yolk 1
Butter/margarine 10 g
Flour type 550 350 g
Sugar 35 g
Dry yeast ½ bag
Program: TEIG
Take the dough out of the machine, knead it again and
roll it. Lay the dough plate into the mould and spread the
following topping on the dough.
Melted butter 2 tblsp
Sugar 75 g
Cinnamon 1 tsp
Chopped nuts 60 g
Sugar icing
Spread butter on the dough. Mix sugar, cinnamon and
nuts, spread and the butter. Let leave for 30 min. and
bake.
Copyright UNOLD AG | www.unold.de

Stand 21.2.2020
55 von 168
DE
EN
FR
NL
IT
ES
PL
The authors have thoroughly considered and tested the recipes included in these operating instructions. Nevertheless, a guarantee
cannot be accepted. The authors, respectively UNOLD AG and their assignees shall not be liable for personal injuries, material
damages and financial loss.
GUARANTEE CONDITIONS
We grant a 24 months guarantee, and in case of commercial use a 12 months guarantee, starting from the date of pur-
chase for any damage demonstrably due to manufacturing defects and when the appliance has been used according to
its intended use. Within the warranty period we will remedy defective materials or workmanship through repair or re-
placement, at our option. Our warranty terms apply only to appliances sold in Germany and Austria. For other countries,
please contact the responsible importer. In the event of a claim for remedy of defects, please send the appliance to our
after sales service, properly packaged, together with a copy of the automatically generated sales receipt, which must
show the date of purchase, and a description of the defect. You can print out a return receipt on our website www.unold.
de/ruecksendung. (only for entries from Germany and Austria). The warranty does not cover damage from normal wear,
improper handling and failure to comply with the maintenance and care instructions. The warranty is void if repairs or
modifications are made to the appliance by third parties. Any claims of the end consumer vis-à-vis the retailer are not
limited by this warranty.
WASTE DISPOSAL / ENVIRONMENTAL PROTECTION
Our appliances are produced on a high quality level for a long lifetime. Regular maintenance and expert
repairs by our after-sales service can extend the useful life of the appliance. If an appliance is defective
and repair is not possible we ask you to follow the following instructions for disposal. Do not dispose this
appliance together with your standard household waste. Please bring this product to an approved collec-
tion point for recycling of electric and electronic products. By separate collection and disposal of waste
products you help to protect natural resources and ensure, that the product is disposed in an adequate
way to protect health and environment.
The instruction booklet is also available for download: www.unold.de
PREPARATION OF JAM AND MARMELADE
Jam and marmelade can be prepared rapidly and easily in the Backmeister
®
. Even if you have never tried it before, you
should do this now. You will get very delicious jam. Just process as follows:
1. Wash fresh fruit. Peels apples, peaches, pears and other fruit with hard skin. Never take more than the prescribed
quantities. Otherwise the fruit will cook too early and will overcook. Weight the fruit, cut hem into small pieces (max.
1cm) or mash them with a handblender and fill them into the container.
2. Add preserving sugar „2:1“ in the indicated amount. Never use standard sugar or preserving sugar “1:1”, as jam will
be remain liquid. Mix fruit and sugar and start the program which will run fully automatically.
3. After 1:20 hour the machine beeps and you may fill the jam into glasses and close them.
Orange marmelade
Fresh strawberries
washed, cut or mashed
600 g
Preserving sugar „2:1“ 400 g
Orange marmelade
Peel oranges and cut them into small cubes. Add sugar
and mix all ingredients in the container,.Select the program
„KONFITÜRE“ (jam) and start. Remove sugar residues from
the side withs of a rubber scraper. After the beep remove the
container from the machine. Attention: HOT! Fill the jam into
glasses and close them carefully.
Program: KONFITÜRE
Copyright UNOLD AG | www.unold.de

56 von 168
Stand 21.2.2020
DE
EN
FR
NL
IT
ES
PL
Puissance : 550 W, 220–240 V~, 50 Hz
Dimensions : Env. 24,7 x 36,2 x 29,1 cm (L/B/H)
Poids : Env. 4,4 kg
Récipient : Dimensions du récipient env. 16,8 x 12,8 x 14,3 cm
Volume : 700 – 1.000 g
Cordon d’alimention : 80 cm fixé
Boîtier : Plastique, blanc/noir
Couvercle : Plastique, avec grand voyant
Caractéristiques : 12 programmes en mémoire, sélection du poids de pain et du degré de brunissement, présélection du temps
de départ du programme, jusqu’à 13 heures en avance, chauffage automatique du pain
Accessoires : Récipient amovible avec enduction antiadhérente, pétrin, gobelet gradué, cuillère graduée, crochet pour
enlever le pétrin, notice d’utilisation avec recettes
Modifications et erreurs des caractéristiques de l‘équipement, de la technique, des couleurs et du design réservées.
NOTICE D´UTILISATION MODÈLE 68010
SPÉCIFICATION TECHNIQUE
EXPLICATION DES SYMBOLES
Ce symbole indique les dangers susceptibles de provoquer des blessures ou
des endommagements de l’appareil.
Ce symbole indique le risque d’être brûlé. Soyez prudent en utilisant l’appareil.
CONSIGNES DE SÉCURITÉ
Veuillez lire les instructions suivantes et les
conserver.
1. Cet appareil peut être utilisé par des
enfants de plus de 8 ans et par des
personnes dont les capacités physiques,
sensorielles ou intellectuelles sont
limitées ou dont l’expérience et/ou
les connaissances sont insuffisantes,
si ceux-ci sont surveillés ou s’ils ont
été formés à une utilisation sûre de
l’appareil et aux dangers pouvant en
résulter.
2. Les enfants ne doivent pas jouer avec
l’appareil.
3. Le nettoyage et la maintenance
incombant à l’utilisateur ne doivent
pas être effectués par des enfants, à
moins qu’ils soient âgés de plus de 8
ans et qu’ils soient surveillés.
4. Conserver l’appareil ainsi que le câble
hors de portée des enfants de moins
de 8 ans.
5. ATTENTION : certaines parties de ce
produit peuvent devenir très chaudes
et occasionner des brûlures ! Une
prudence particulière est requise en
présence d’enfants et de personnes
menacées.
6. Il convient de surveiller les enfants
pour s’assurer qu’ils ne jouent pas
avec l’appareil.
7. Tenir l’appareil hors de portée des
enfants.
Copyright UNOLD AG | www.unold.de

Stand 21.2.2020
57 von 168
DE
EN
FR
NL
IT
ES
PL
8. Vérifier que l’installation électrique
est compatible avec la puissance et
la tension indiquées sur la plaque
signalétique. Ne raccorder qu’à un
courant alternatif.
9. Cet appareil n‘est pas destiné à être mis
en marche au moyen d‘un minuteur
indépendant ou par un système de
commande à distance.
10. Les enfants devraient être sous
surveillance afin de s’assurer qu’ils ne
jouent pas avec l’appareil.
11. Ne touchez pas les surfaces brûlantes
de l‘appareil, utilisez toujours des
manchettes ou des gants de protection.
Juste après la cuisson, le Backmeister
est brûlant.
12. Ne plongez jamais le câble de
raccordement ou l‘appareil dans l‘eau
ou dans du liquide.
13. L’appareil est exclusivement destiné
à un usage domestique ou similaire
comme par ex. :
espaces thé et café (boutiques), coins
cuisine (bureaux et autres lieux de
travail),
exploitations agricoles,
mis à la disposition des clients
séjournant dans un hôtel, motel ou
autre type d’hébergement,
dans des chambres d’hôtes ou maisons
de vacances.
14. Lorsque l‘appareil n‘est pas utilisé
ainsi qu‘avant de le nettoyer, veuillez
le mettre hors service à laide veuillez
débrancher la fiche de la prise secteur.
Laissez refroidir l‘appareil.
15. N‘utilisez jamais l‘appareil avec un
câble de raccordement défectueux, à
la suite d‘un mauvais fonctionnement
ou si l‘appareil est endommagé.
Dans pareil cas, laissez vérifier ou
réparer l‘appareil par le service après-
vente. Ne réparez pas vous-même
l‘appareil car vous perdriez dans ce
cas automatiquement vos droits de
garantie.
16. L‘utilisation d‘accessoires qui n‘ont pas
été préconisés par le constructeur de
l‘appareil est susceptible d‘entraîner
des détériorations. N‘utilisez l‘appareil
qu‘à ses fins prévues.
17. Placez l‘appareil de manière à ce qu‘il
ne glisse pas du plateau de travail, ce
qui risque de se produire en pétrissant
une pâte lourde. Ceci doit être plus
particulièrement pris en considération
lorsque l‘appareil travaille en mode
préprogrammé, lorsqu‘il fonctionne
sans surveillance. En présence de
surfaces de travail extrêmement lisses,
vous placer l‘appareil sur un mince
tapis de caoutchouc afin d‘exclure
tout risque de glissement.
18. Le Backmeister doit être placé distant
au moins de 10 cm d‘autres objets
et appareils quelconques lorsqu‘il
est en marche. Cet appareil doit être
exclusivement utilisé à l‘intérieur de
bâtiments.
19. Veillez à ce que le câble ne soit jamais
en contact de surfaces brûlantes et
à ce qu‘il ne pende pas le long d‘un
rebord de table de manière à ce que
des enfants ne puissent pas le tirer.
20. Ne jamais déposer l‘appareil sur ou à
côté d‘une cuisinière électrique ou à
gaz ou d‘un four brûlant.
21. Une extrême prudence est de règle
lorsque vous déplacez l‘appareil
rempli de ingrédients brûlants.
22. N‘extrayez jamais le moule de cuisson
en cours de fonctionnement de
l‘appareil.
Copyright UNOLD AG | www.unold.de

58 von 168
Stand 21.2.2020
DE
EN
FR
NL
IT
ES
PL
23. Surtout lorsque vous faites du pain
blanc, ne remplissez jamais une
quantité de pâte supérieure aux
quantités prescrites dans le moule.
Si cela est le cas, le pain ne sera
pas cuit de manière homogène ou
la pâte débordera du moule. A cet
effet, veuillez tenir compte de nos
consignes.
24. En essayant de nouvelles recettes
restez dans la proximité pour surveiller
l’appareil. Avant de programmer le
cuisson automatique pendant la nuit,
essayez tout d‘abord la recette une
première fois au cours de la journée
afin que vous puissiez constater si les
rapports des ingrédients utilisés sont
bien équilibrés ou pas, si la pâte n‘est
pas trop épaisse ou trop liquide ou si la
quantité est trop importante, donnant
lieu à un débordement éventuel du
moule.
25. Ne jamais mettre l’appareil en marche
sans que la moule est mise en place
et contient des ingrédients.
26. Pour enlever le pain, ne jamais frapper
la moule sur une table pour éviter des
endommagements.
27. Il est interdit d‘introduire des feuilles
métalliques (aluminium par exemple)
ou d‘autres matériaux dans l‘appareil
étant donné qu‘il y a sinon risque
d‘incendie ou de court-circuit.
28. Ne recouvrez jamais l‘appareil d‘un
linge ou d‘autres matériaux. En effet, il
est indispensable que la forte chaleur
et que la vapeur se dissipent. Un
incendie peut se déclarer si l‘appareil
est recouvert ou entré en contact de
matériaux inflammables (rideaux,
doubles rideaux par exemple).
MISE EN GARDE :
L’appareil est très chaud pendant et après l’utilisation !
N’ouvrez en aucun cas la coque de l’appareil. Risque d‘électrocution.
Le fabricant n’est nullement responsable en cas de montage non conforme, d‘utilisation irrégulière ou non conforme ou suite à l’exécution de
réparations par des tiers non autorisés.
AVANT D’UTILISER L’APPAREIL
1. Retirez tous les matériaux d‘emballage et, le cas échéant, les
protections de transport. Conserver les éléments d‘emballage
hors de portée des enfants - Risque d‘asphyxie !
2. Contrôlez si tous les composants et accessoires sont contenus
dans le carton et sont en bonne condition.
3. Avant d’utiliser l’appareil pour la première fois veuillez
enlever tous les matériaux d’emballage et veuillez retirer tous
les composants détachés.
4. Nettoyez les pieces detachable ainsi que l’appareil comme
décrit dans le chapître NETTOYAGE.
5. Mettez la fiche dans la prise de courant et établissez le
contact. Placer le récipient nécessaire dans l’appareil.
Choisissez la fonction BACKPULVER, et chauffez l’appareil
pour env. 10 minutes. L’appareil peur fumer pendant le
premier chauffe. Puis mettez l’appareil hors marche en
pressant la touche START/STOP . Laissez refroidir l’appareil
et essuyez l’intérieur avec un chiffon humide.
6. Séchez tous les elements soigneusement.
Copyright UNOLD AG | www.unold.de

Stand 21.2.2020
59 von 168
DE
EN
FR
NL
IT
ES
PL
1. Préparez la machine à pain comme décrit dans le chapitre «
Mise en service ».
2. Ouvrez le couvercle du Backmeister
®
et retirez le moule.
3. Appliquez une bonne couche de margarine résistante à de
hautes températures dans l’orifice du pétrin pour éviter que la
pâte ne s’introduise et ne colle dans la cavité.
4. Fixez ensuite la lame de pétrissage sur l’axe d’entraînement
dans le moule à pain.
5. Versez les ingrédients dans le moule en respectant l’ordre
préconisé dans chaque recette. Pour un résultat de cuisson
optimal, il est recommandé pour les pâtes lourdes d’inverser
l’ordre d’ajout des ingrédients : les solides avant les liquides.
Lorsque vous utilisez la fonction de départ différée, veillez
cependant à ce que la levure n’entre pas en contact avec les
ingrédients liquides avant le début du programme.
6. Replacez le moule dans la machine à pain en le tournant dans
le sens des aiguilles d’une montre jusqu’à ce qu’il s’emboîte.
7. Fermez le couvercle du Backmeister.
8. Insérez la fiche dans une prise secteur.
9. Sélectionnez le programme désiré. Pour plus d’informations
sur les différents programmes, veuillez-vous reporter à la page
61. Le programme « BASIS » (base) est par exemple idéal
pour un pain classique à base de farine prête à l’emploi.
10. Sélectionnez le degré de brunissement désiré (Hell – clair,
Mittel – moyen, Dunkel – foncé). Remarque : cette fonction
ne peut pas être activée dans tous les programmes de cuisson.
Pour en savoir plus, veuillez-vous reporter à la page 61.
11. Choisissez le poids du pain. Remarque : cette fonction ne
peut pas être activée dans tous les programmes de cuisson.
Pour en savoir plus, veuillez-vous reporter à la page 61.
12. Une fois tous les préréglages effectués, appuyez sur la touche
Start/Stop.
13. Selon le programme sélectionné, la machine émet un signal
sonore prolongé au cours du deuxième pétrissage. Vous
pouvez alors ouvrir le couvercle et ajouter à la pâte les autres
ingrédients (par ex. des noix). Refermez ensuite le couvercle.
14. Lorsque la cuisson est terminée, le Backmeister
®
émet à la
fin du programme plusieurs signaux sonores à intervalles
réguliers indiquant que vous pouvez sortir votre pain. Si vous
souhaitez retirer le pain avant que la machine ne se mette
en mode « Maintien au chaud », appuyez sur la touche Start/
Stop en la maintenant enfoncée quelques secondes, jusqu’à
ce que l’arrêt manuel du programme soit confirmé par un
signal sonore.
15. Retirez le moule à cuisson avec précaution. Pour éviter tout
risque de brûlure, veuillez toujours utiliser des maniques ou
des gants adaptés. Retournez le moule et laissez refroidir le
pain sur une grille à pâtisserie. Si le pain ne se démoule pas
tout de suite, munissez-vous de maniques et faites bouger
plusieurs fois l’axe du pétrin par en dessous jusqu’à ce que
le pain tombe. Même si le pain reste collé, ne jamais taper
le moule contre un bord ou sur un plan de travail, pouvant
déformer le moule.
16. Si le pétrisseur reste coincé dans le pain après démoulage,
vous pouvez utiliser le crochet récupérateur pour l’enlever.
Introduisez le crochet dans l’ouverture du pétrisseur en
passant par le dessous du pain encore chaud et calez-le sur le
bord inférieur du pétrisseur, idéalement où se trouve l’ailette.
Tirez ensuite le pétrisseur avec précaution vers le haut à l’aide
du crochet. Vous pouvez ainsi voir à quel endroit se trouve
précisément l’ailette dans le pain et retirer sans problème le
pétrisseur.
17. Après chaque utilisation, nettoyez soigneusement le moule
(cf. conseils, page 63).
MISE EN GARDE :
L’appareil est très chaud pendant
et après l’utilisation !
TOUT CE QU’IL FAUT SAVOIR POUR RÉUSSIR SON PREMIER PAIN !
Copyright UNOLD AG | www.unold.de

60 von 168
Stand 21.2.2020
DE
EN
FR
NL
IT
ES
PL
Affichage
Dès que la fiche a été enfichée dans la prise de courant, l‘affi-
chage indique 3:00 - (les chiffres ne clignotent pas). Les flèches
sont dirigées sur „Basis“ (base) - „Stufe“ (échelon) et brunisse-
ment „mittel“ (moyen). Ceci indique l‘état de fonctionnement.
Pendant le fonctionnement, la position du programme peut être
déterminée aussi bien par les indications temporelles descen-
dantes que par les indications sur l‘affichage.
Touche START/STOP
Pour lancer et terminer le déroulement du programme
La touche Start/Stop vour permet d‘abandonner le programme
à chaque position. Maintenez la touche enfoncée jusqu‘à ce
que vous entendiez un son bîpe. L‘affichage indique la position
de début. Lorsque vous désirez utiliser un autre programme,
sélectionnez celui-ci au moyen de la touche de menu.
Programmation avec délai de temps
Utilisez cette fonction seulement avec des recettes que vous avez
déjà essayées avec succès et que vous ne modifiez plus.
ATTENTION : Si la quantité de la pâte est trop grande, la pâte pourrait
dépasser des bords de la moule et pourrait brûler sur le chauffage.
Tous les programmes peuvent être démarrés décalés dans le
temps avec un délai de 12 heures au maximum plus le temps de
tenir au chaud (après la fin du programme).
Exemple :
Il est 20.00 heures et vous désirez manger du pain blanc frais le
matin à 7,00 heures.
Versez les ingrédients requis dans le récipient dans l’ordre pres-
crit et placez ce dernier dans l’appareil. Veillez à ce que la levure
n’entre pas en contact avec du liquide.
Choisissez le programme souhaité au moyen de la touche MENÜ/
MENU et choisissez le brunissement souhaité au moyen de la
touche BRÄUNUNG/BRUNISSEMENT ainsi que le poids du pain
avec la touché FUNKTION/FONCTION .
Dans l’exemple, nous choisissons le programme 1 = Basis, St.
I base qui nécessite 3:30 heures. Calculez le temps entre la
programmation et la fin du programme et programme ce temps
avec la touche ZEIT/Temps.
EXPLICATIONS DU CHAMP DE COMMANDE
EXPLICATION DES SYMBOLES
Menu
Le numéro
indiqué fait
référence
au menu
actuellement
sélectionné.
Degré de cuisson
Le degré de cuisson
sélectionné est
afché à l‘écran
Touche marche /
arrêt
Pour démarrer
et terminer le
déroulement du
programme.
Choix de durée
+
augmenter
la durée
souhaitée
Choix de durée
-
réduire
la durée
souhaitée
Taille du pain
Choix de la
taille de pain
souhaitée
Copyright UNOLD AG | www.unold.de

Stand 21.2.2020
61 von 168
DE
EN
FR
NL
IT
ES
PL
Le temps (dans l’exemple, il est 20,00 heures) entre la program-
mation et la fin du programme est 11 heures. Donc augmen-
ter le temps indiqué du programme de 3,00 h à 11heures en
pressant la touche ZEITWAHL/MINUTEUR et les touches STD/
HRS et MIN . Finalement pressez la touche START/STOP pour
démarrer le programme.
Le programme démarre donc pendant la nuit pour finir exacte-
ment à 7 h le matin, le pain est cuit et peut être enlevé. Sinon, le
temps de chauffe commence pour une heure. A 8 h le plus tard
il faut enlever le pain.
ATTENTION : En remplissant le moule, commencez toujours avec
le liquide, plus la farine et les autres ingrédients et finalement
la levure. Si la levure entre trop tôt en contact avec le liquide, le
pain ne lève pas.
Dans le cas de la cuisson décalée dans le temps, n’utilisez pas
d’ingrédients périssables tels que lait, oeufs, fruits, yaourt, oi-
gnons, etc.
Le signale pour ajouter des ingrédients et pour la fin du programme
ne peut pas être dé-activé.
MENU
La touche MENU permet d‘appeler les différents programmes qui
sont décrits en détail dans le tableau „déroulement temporel“.
Les programmes sont utilisés pour les préparations suivantes :
1 BASIS
Base
Ce programme est utilisé le plus
souvent , pour pain blanc et pain
bis
2 WEISSBROT
pain blanc
Pour pain blanc avec levée plus
longue
3 VOLLKORN
complet
Pour pain complet
4 SCHNELL
Rapide
Pour la préparation plus rapide de
pain blanc et de pain bis
5 HEFEKUCHEN
Gâteau à la levure
Pour la préparation de levain sucré
6 ULTRA
Ultra-Rapide
Pour toutes les recettes de l’éche-
lon I, qui sont préparées dans les
programmes BASIS, WEISSBROT,
RAPIDE, ou TOAST. La levée est-
plus courte dans ce programme,
donc le pain est plus compact.
Nous recommandons des liquides
tièdes pour la preparation.
7 KONFITÜRE
CONFITURE
Pour faire cuire confitures et mar-
melades. Pour préparer des confi-
tures, il est nécessaire d‘acheter
un deuxième moule qui servira
exclusivement aux confitures.
8 TEIG
Pâte
Pour la préparation rapide de pâte,
de pâte à pizza p. ex., sans cuis-
son
9
GLUTENFREi
sans gluten
Le programme standard pour
tous les pains sans gluten
10 BACKPULVER
Levure en poudre
Pour pâtisseries préparées avec la
levure en poudre
11 TOASTBROT
Toast
Pour pain à toast ou pain blanc
plus compact
12 BACKEN
Cuisson
Pour cuire une pâte préparée ail-
leurs (e. g. dans le programme
TEIG)
Dans le programmes BASIS, WEISSBROT, VOLLKORN, HEFE-
KUCHEN, TOASTBROT et GLUTENFREI un signale acoustique
vous indique d’ajouter des ingrédients comme par exemples des
raisins, des noisettes etc. Ouvrez le couvercle, ajoutez les ingré-
dients en question et fermez le couvercle pour continuer.
BRÄUNUNG / BRUNISSEMENT de la croute
Cette touche permet de régler le brunissement sur HELL/CLAIR –
MITTEL/MOYEN – DUNKEL/FONCÉ dans les programmes 1-6 et
9-12. Cette fonction est déactivée dans les autres programmes.
Le degré choisi est indiqué par une flèche dans l’affichage.
BROTGRÖSSE/ECHELON-Poids du pain
Les échelons suivants peuvent être réglés dans différents pro-
grammes (voir tableau) :
ECHELON I = pour un faible poids de pain 700 g environ
ECHELON II = pour un poids de pain élevé 1.000 g environ
Un choix du poids de pain n’est pas possible dans tous les
programmes.
MISE EN GARDE :
L’appareil est très chaud pendant
et après l’utilisation !
Copyright UNOLD AG | www.unold.de

62 von 168
Stand 21.2.2020
DE
EN
FR
NL
IT
ES
PL
LES FONCTIONS DU BACKMEISTER
®
Fonction du signale acoustique
Le signale acoustique est audible
lorsqu’une touche active est actionnée,
pendant le deuxième pétrissage afin de signaler qu‘il est
maintenant possible d‘ajouter des graines, des noix, des
fruits ou d‘autres ingrédients, ce signale retentit aussi dans
la fonction décalée et ne peut pas être déactivée.
après la fin de la cuisson, l‘appareil émet plusieurs fois un
son bîpe pendant la phase de maintien à chaud,
à la fin de la phase de maintien à chaud pour indiquer que
le programme est terminé et le pain peut être enlevé, ce
signale retentit ne peut pas être déactivée.
Fonction de répétition
Au cas où, pendant le service du Backmeister
®
, il y a une panne
de courant, l‘appareil se remet automatiquement en service après
le rétablissement du courant et continue son travail là où il a été
interrompu dans la mesure où la panne de courant n‘a pas duré
plus de 10 minutes. Lorsque la panne de courant a duré plus
de 10 minutes et que l‘affichage indique le réglage de base, le
Backmeister
®
doit être démarré de nouveau. Ceci n‘est possible
que lorsque la pâte se trouvait en phase de pétrissage lors de
l‘interruption du programme. Sinon, il faut recommencer dès le
début. Versez les ingrédients requis dans le récipient dans l‘ordre
prescrit et introduisez ce dernier dans l‘appareil. Veillez à ce que
la levure n‘entre pas en contact avec du liquide.
Fonctions de sécurité
Après que le programme est démarré il n’est plus recommandable
d’ouvrir le couvercle, sauf pendant les phase de pétrissage, mais
dans aucun cas dans les phases de levée et de cuisson.
Lorsque la température dans l‘appareil est trop élevée pour un
nouveau programme sélectionné, «H HH» apparaît sur l‘affichage
lors d‘un nouveau démarrage. Dans ce cas, retirez le récipient et
attendez jusqu‘à ce que l‘appareil ait refroidi et qu‘il se trouve de
nouveau au début du programme sélectionné initialement. L’ap-
pareil ne dispose pas d’une chauffage dans le couvercle pour des
raisons de sécurité. Donc, la croûte reste plus clair.
Lorsque le display montre «E rr» après avoir pressé la touche
START/STOP, le règlement de température est en panne. Dans ce
cas, veuillez envoyer l’appareil à notre service.
DÉROULEMENT DE PROGRAMME DU BACKMEISTER
®
1. Mise en place du moule
Tenez le moule avec les deux mains à son bord et placez-le au
milieu du socle de l‘espace de cuisson.
Tournez le moule à droite jusqu’à ce qu’elle s’engage. Brossez
le creux du pétrin avec de la margarine pour éviter que la pâte y
colle, puis placez le deux pétrn sur l’arbres d‘entraînement.
2. Remplissage des ingrédients
Les ingrédients doivent être mis dans le moule en respectant
l‘ordre indiqué dans la recette.
En cas de pâtes très lourdes on peut changer l’ordre. Dans ce cas
il est important d’éviter tout contact entre le liquide et la levure
avant le début du programme.
3. Sélection du déroulement de programme
Sélectionnez le déroulement de programme souhaité au moyen
de la touche menu. Sélectionnez l‘échelon suivant le programme.
Sélectionnez le brunissement souhaité. Vous pouvez retarder
le déroulement au moyen de la touche de sélection de temps.
Actionnez la touche start.
4. Mélange et pétrissage de la pâte
Le Backmeister
®
mélange et pétrit la pâte automatiquement
jusqu‘à ce qu‘elle ait la consistance adéquate.
5. Temps de repos
Après le premier pétrissage, un temps de repos est prévu pendant
lequel le liquide pénètre lla levure et la farine.
6. Levée de la pâte
Après le dernier pétrissage, le Backmeister
®
génère la température
optimale pour la levée de la pâte.
Copyright UNOLD AG | www.unold.de

Stand 21.2.2020
63 von 168
DE
EN
FR
NL
IT
ES
PL
NETTOYAGE ET ENTRETIEN
Vous devrez patienter une
trentaine de minute jusqu‘à
ce que l‘appareil se soit
refroidi et qu‘il puisse
ensuite être de nouveau
utilisé pour la cuisson et la
préparation de la pâte.
Avant le nettoyage, n‘oubliez
pas de toujours mettre
l’appareil hors marche et
de débrancher la fiche du
câble de raccordement
de l‘appareil de la prise
d‘alimentation secteur et de
laisser refroidir l‘appareil.
1. Avant la première utilisation, veuillez nettoyer le récipient de
cuisson du Backmeister en utilisant un nettoyant non agres-
sif. Nettoyez également le pétrisseur. Après utilisation, lais-
sez toujours l‘appareil refroidir avant de le nettoyer ou de le
ranger.
2. Utilisez uniquement un nettoyant non agressif, en aucun cas
un détergent chimique, de l‘essence, du décape-fours ou des
produits qui risqueraient de rayer la surface.
3. Enlevez tous les ingrédients et toutes les miettes du cou-
vercle, du boîtier et de la chambre de cuisson au moyen d‘un
chiffon humide. Ne plongez jamais l‘appareil dans de l‘eau
et ne remplissez jamais d‘eau la chambre de cuisson. Pour
simplifier le nettoyage, enlevez le couvercle en retirant le
couvercle de la charnière. Essuyez l‘extérieur du moule de
cuisson au moyen d‘un chiffon humide. De l‘intérieur, vous
pouvez rincer le moule avec un peu de nettoyant. Veuillez ne
pas laisser le moule trop longtemps sous l‘eau.
4. Aussi bien le pétrisseur que l‘arbre d‘entraînement devraient
être immédiatement nettoyés après utilisation. Si le pétris-
seur demeure dans le moule, vous aurez par la suite des dif-
ficultés à le retirer. Dans pareil cas, vous devriez remplir le
récipient d‘eau chaude que vous devrez y laisser pendant une
trentaine de minutes. Ensuite, vous pourrez enlever le pétris-
seur pour le nettoyer. Le récipient de cuisson est revêtu d’un
enduction antiadhésive. Pour cette raison, ne le nettoyer avec
des objets métalliques susceptibles de rayer la surface. Si
vous constatez un changement de couleur du revêtement au
bout d‘un certain temps, ne vous inquiétez pas, cela est tout
à fait normal et n‘influence en aucun cas le bon fonctionne-
ment de l‘appareil.
5. Au cours de la cuisson, la vapeur du pain génère de l‘eau
de condensation qui s‘accumule entre le couvercle intérieur
et extérieur, cette eau s‘échappe ensuite au niveau du cou-
vercle une fois la cuisson terminé. Ceci est tout à fait normal.
Les modifications de couleur du couvercle qui en résultent
sont sans importance, ne vous inquiétez pas, vous pourrez
les enlever avec un peu de produit à récurer. Avant de ranger
7. Cuisson
L‘appareil à faire du pain règle la température et le temps de
cuisson automatiquement.
8. Maintien à chaud
Lorsque le pain est fini, un son bîpe est audible plusieurs fois afin
de signaler que le pain ou autres peuvent être retirés. Un temps
de maintien à chaud d‘1 heure commence simultanément. Piur
enlever le pain avant la fin de ce phase pressez la touche START/
STOP.
9. Fin du déroulement de programme
A la fin du déroulement de programme, le récipient doit être
tourné à gauche et retiré au moyen de chiffons à plat et être
renversé. Si le pain ne tombe pas automatiquement sur la grille,
agitez l‘entraînement de pétrissage plusieurs fois du dessous
jusqu‘à ce que le pain tombe. Lorsque le pétrisseur demeure
dans le pain, servez-vous de la broche à crochet. Introduisez-la,
sur le dessous du pain encore chaud, dans l‘ouverture (presque)
ronde du pétrisseur et coincez-la au bord inférieur du pétrisseur
à l‘endroit où se trouve l‘aile du pétrisseur. Tirez le pétrisseur
ensuite avec précaution vers le haut en vous servant de la broche
à crochet. Vous voyez ainsi à quel endroit se trouve l‘aile du
pétrisseur dans le pain. Vous pouvez couper le pain légèrement à
cet endroit et retirer le pétrisseur entièrement.
Copyright UNOLD AG | www.unold.de

64 von 168
Stand 21.2.2020
DE
EN
FR
NL
IT
ES
PL
l‘appareil après emploi, assurez-vous qu‘il s‘est entièrement
refroidi, qu‘il est impeccablement nettoyé et bien sec. Rangez
l‘appareil à couvercle fermé.
Copyright UNOLD AG | www.unold.de

Stand 21.2.2020
65 von 168
DE
EN
FR
NL
IT
ES
PL
DÉROULEMENT TEMPOREL DES PROGRAMMES
1 2 3 4 5
BASIS Weissbrot Vollkorn Schnell HEFEKUCHEN
BASE Pain blanc Complet Rapide Gateau
Poids de pain/
échelon
ST. I ST. II ST. I ST. II ST. I ST. II ST. I ST. II
Temps total 2:53 3:00 3:40 3:50 3:32 3:40 1:40 2:50 2:55
1.pétrissage
(
9 10 16 18 9 10 7 10 10
1. Levée
Chauffage
I/0
sans pétrir
20 20 40 40 25 25 5 5 5
2.
pétrissage
14
Ajouter
ingréd.
15
Ajouter
ingréd.
19
Ajouter
ingréd.
22
Ajouter
ingréd.
18
Ajouter
ingréd.
20
Ajouter
ingréd.
8 20
Ajouter
ingréd.
20
Ajouter
ingréd.
2. Levée
Chauffage
I/0
25 25 30 30 35 35 30 30
3. Levée
Chauffage
I/0
sans pétrir
40 40 45 45 60 60 15 40 40
Cuisson
Chauffage
I/0
65 70 70 75 65 70 65 65 70
Maint.
chaud
at 60 °C
Chauffage
I/0
60 60 60 60 60 60 60 60 60
Copyright UNOLD AG | www.unold.de

66 von 168
Stand 21.2.2020
DE
EN
FR
NL
IT
ES
PL
6 7 8 9 10 11 12
ULTRA-
SCHNELL I
KONFITÜRE TEIG GLUTENFREI BACKPULVER TOASTBROT BACKEN
ULTRA-
RAPIDE I
Confiture Pate Sans gluten Levure poudre Toast Cuisson
Poids de pain/
échelon
ST. I ST. I ST. II ST. I ST. II
Temps total 0:58 1:20 1:30 3:15 3:20 2:50 2:55 3:00 1:00
1.pétrissage
12 20 12 12 10 15 15
1. Levée
Chauffage
I/0
sans pétrir
0 15
Chauffage
I/0
20 20 5 40 40
2. pétrissage
0 13
Ajouter
ingréd. .
13
Ajouter
ingréd.
20 5
Ajou-
ter
in-
gréd.
5
Ajou-
ter
in-
gréd .
2. Levée
Chauffage
I/0
0 30 45 45 30 25 25
3. Levée
Chauffage
I/0
sans pétrir
11 45
Pétrir I/O
Chauffage
I/0
40 45 45 35 40 40
Cuisson
Chauffage
I/0
35 20 60 65 70 50 55 10-60
Maint.
chaud
at 60 °C
Chauffage
I/0
60 60 60 60 60 60 60 60
DÉROULEMENT TEMPOREL DES PROGRAMMES
Copyright UNOLD AG | www.unold.de

Stand 21.2.2020
67 von 168
DE
EN
FR
NL
IT
ES
PL
QUESTIONS CONCERNANT L‘APPAREIL ET L‘UTILISATION
Le pain colle dans le récipient après la cuisson.
Laissez refroidir le pain dans le récipient pendant 10 minutes
env. - renversez le récipient - agitez si nécessaire légèrement l‘aile
(raccord de pétrisseur). Appliquez un peu de margarine dans le
creux du pétrin pour éviter que la pâte y colle. Appliquez un peu
d‘huile sur le pétrisseur avant la cuisson. Si vous utilisez l’appa-
reil pour préparer de la confiture, nous recommandons d’acheter
une moule qui est utilisé exclusivement pour la confiture.
Comment éviter les trous dans le pain (par le pétrisseur) ?
Vous pouvez retirer les pétrisseurs avec vos doigts recouverts de
farine avant la dernière levée de la pâte (voir déroulement tempo-
rel du programme et indication sur l‘affichage). Lorsque vous ne
désirez pas faire cela, utilisez la broche à crochets après la cuis-
son. En procédant avec précaution, un grand trou peut être évité.
La pate dépasse les bords de la moule
Cela arrive de temps en temps en utilisant de la farine fine de
blé. Dans ce cas
reduisez la quantité de farine et des autres ingrédients,
ajoutez 1 petite cuillère de beurre fondu à la farine.
Le pain lève, il retombe cependant pendant la cuisson ?
Lorsqu‘un creux en „V“ se forme au milieu du pain, la farine
manque de gluten étant donné que le blé ne contient pas assez
d‘albumen (trop de pluie pendant l‘été) ou que la farine est trop
humide.
Remède : Ajoutez 1 cuillerée à soupe de gluten de blé à
500 g de farine.
Utilisez un programme plus vite (SCHNELL ou ULTRA-
SCHNELL).
Lorsque le pain s‘afaisse en forme d‘entonnoir dans le milieu,
la température de l‘eau était éventuellement trop éle-vée ou
vous avez utilisé trop d‘eau,
la farine manque de gluten.
Le pain n’est pas suffisamment doré ?
Mélangez 1 jaune d’œuf avec un peu de crème et distribuez cette
mélange sur la pâte après le dernier pétrissage.
Quand le couvercle du Backmeister
®
peut-il être ouvert
pendant la cuisson ?
Fondamentalement, ceci est possible pendant la phase de pétris-
sage. Pendant ce temps, il est possible d‘ajouter, si nécessaire,
un peu de farine ou de liquide. Lorsque le pain doit avoir un
aspect précis après la cuisson, voici comment procéder: ouvrez
brièvement et avec précaution le couvercle avant la dernière levée
(indication sur l‘affichage) et grattez p. ex. une décoration dans la
croûte qui se forme en utilisant un couteau préchauffé ou saupou-
drez de graines ou appliquez un mélange de farine de pommes
de terre et d‘eau sur la croûte de pain pour qu‘elle brille après
la cuisson. Pendant le temps indiqué, il est possible d‘ouvrir le
Backmeister pour la dernière fois que sinon, le pain retombe.
Qu‘est-ce que la farine complète ?
La farine complète est fabriquée à partir de toutes les céréales,
c.-à-d. également de blé. La désignation „complète“ signifie que
la farine est fabriquée à partir du grain complet et qu‘elle contient
par conséquent davantage de substances de lest. La farine de blé
complète est ainsi un peu plus foncée. Le pain complet n‘est pas
forcément un pain noir.
De quoi faut-il tenir compte lors de l‘utilisation de farine de
seigle ?
La farine de seigle ne contient pas de gluten et le pain ne lève
presque pas. Pour que le pain soit plus digeste, il faut préparer
un „PAIN DE SEIGLE COMPLET“ au levain. La pâte lève unique-
ment lorsqu‘en cas d‘utilisation de farine de seigle ne contenant
pas de gluten, au moins ¼ de la quantité indiquée est remplacé
par de la farine du type 550.
Comment utiliser les differentes types de farine?
Farine de mais, de riz, de pommes de terres
particulièrement pour les personnes allergiques ou souf-
frant de sprue ou de céliacie. Avec les recettes vous trouvez
aussi des adresses de manufacteurs pour les produits dié-
tétiques.
Copyright UNOLD AG | www.unold.de

68 von 168
Stand 21.2.2020
DE
EN
FR
NL
IT
ES
PL
Farine d’épéautre
es très cher mais ne contient aucunes résidus chimiques,
comme l’épéautre ne tolère pas des fertilisateurs et ne
pousse que sur les terrains très pauvres. Vous pouvez tou-
jours remplacer la farine de blé des types 405 - 550 - 1050
par la farine d’épéautre.
Farine de blé dur (DURUM)
est idéale pour préparer des baguettes, on peut la rempla-
cer par la semoule de blé.
Quelle est la colle vegetale?
Les farines avec les chiffres de type le plus hautes contiennent le
moins de colle végétale. La pâte se leve le mieux avec les farines
de types 405 et 550.
Comment le pain frais devient-il plus digeste ?
Le pain frais devient plus digeste en ajoutant 1 pomme de terre
cuite écrasée à la farine.
Dans quel rapport faut-il utiliser du levain ?
Aussi bien dans le cas de la levure que dans le cas du levain
que l‘on peut acheter en différentes quantités, il faut toujours
respecter les indications du fabricant et calculer la quantité re-
quise pour la quantité de farine utilisée. Si vous habitez dans
une région avec de l’eau très douce, la pâte se lève plus, donc
on peut réduire la levure. Il faut éventuellement quelques essais
pour trouver la relation optimale de levain et d’eau.
Lorsque le pain a le goût de levure :
Dans la mesure où vous avez utilisé du sucre, supprimez celui-ci,
le pain devient cependant moins brun.
Ajoutez à l‘eau du vinaigre ordinaire, pour un pain de faible poids
= 1 ½ cuillerée à soupe, pour un grand pain = 2 cuillerées à
soupe.
Remplacez l‘eau par du lait de beurre ou du kéfir, ce qui est
d‘ailleurs possible pour toutes les recettes et ce qui augmente la
fraîcheur du pain.
Le tableau ci-dessous contient une liste des défauts pouvant se
présenter éventuellement :
Quelle est la signification des chiffres de type de la farine ?
Moins le chiffre de type est élevé, moins la farine contient de
substances de lest, plus elle est claire et plus elle se lève étant
qu‘il contient une quantité de gluten plus élevée.
Allemagne Explication
Farine de
blé, type
405 farine de blé très fine et
blanche
550 farine de blé fine, blanche,
pour pain
1050 farine moyennement moulue
1600 farine grossièrement moulu
pour pain complet
Farine de
seigle, type
815 farine très fine
997 farine fine
1150 farine moyennement moulue
1740 farine grossièrement moulu
pour pain complet
Copyright UNOLD AG | www.unold.de

Stand 21.2.2020
69 von 168
DE
EN
FR
NL
IT
ES
PL
DÉFAUTS DE L‘APPAREIL
Défaut Cause Remède
De la fumée s'échappe de la chambre de
cuisson ou des ouvertures d'aération.
Les ingrédients collent dans la chambre
de cuisson ou sur la paroi extérieure du
moule
Débranchez la fiche d'appareil de la prise
secteur, enlevez le moule puis nettoyez
la paroi extérieure du moule ainsi que la
chambre de cuisson.
Le pain est en partie retombé et son
dessous est humide
Le pain est resté trop longtemps dans le
moule à la suite de la cuisson et de la
phase de maintien à température.
Enlevez le pain au plus tard une fois que
la fonction de maintien à température
s'est terminée.
Le pain ne se laisse que difficilement
démouler
Le dessous du pain adhère à la lame du
pétrisseur.
Nettoyez la lame et l'arbre du pétrisseur
une fois la phase de cuisson terminée. A
cet effet, si nécessaire, remplir le moule
d'eau chaude pendant une trentaine de
minutes. Ensuite, la lame de pétrissage
peut être aisément retirée puis nettoyée.
Les ingrédients ne sont pas mélangés
ou le pain n‘est pas correctement cuit à
coeur.
Réglage de programme erroné Vérifiez de nouveau le programme
sélectionné de même que les autres
réglages.
La touche Marche/Arrêt a été touchée
alors que la machine fonctionnait
Jetez les ingrédients et recommencez au
tout début.
Le couvercle a été ouvert à maintes
reprises en cours de fonctionnement
Le couvercle n'a le droit d'être ouvert
que si le temps affiché est plus de 1:30.
Assurez-vous que le couvercle a été fermé
après son ouverture.
Panne de courant prolongée en cours de
fonctionnement
Jetez les ingrédients et recommencez au
tout début.
La rotation du pétrisseur est bloquée. Vérifier si le pétrisseur n'est pas bloqué
par des graines. Retirez le moule et
vérifiez si le toc d'entraînement tourne. Si
ce n'est pas le cas, expédiez l'appareil au
service après-vente.
Copyright UNOLD AG | www.unold.de

70 von 168
Stand 21.2.2020
DE
EN
FR
NL
IT
ES
PL
FAUTE DE RÉALISATION DES RECETTES
Faute Cause Remède
Le pain lève de trop Trop de levure de boulangerie, trop de farine, pas assez de sel ou plusieurs de
ces causes
a/b
Le pain ne lève pas ou pas
suffisamment.
Pas de levure de boulangerie ou pas assez
Levure de boulangerie vieille ou trop longtemps entreposée
Liquide trop chaud
La levure de boulangerie est entrée au contact de liquide
Farine pas appropriée ou trop vieille
Trop ou pas assez de liquide
Pas assez de sucre
a/b
e
c
d
e
a/b/g
a/b
La pâte lève de trop et déborde du
moule de cuisson
De l‘eau extrêmement douce fait beaucoup plus fermenter la levure de
boulangerie
Trop de lait influence la fermentation de la levure
f/k
c
Le pain est retombé Volume du pain plus important que le moule, par conséquent, la pâte du pain
retombe
a/f
Fermentation de la levure de boulangerie trop précoce ou trop rapide due à
de l‘eau trop chaude, à une chambre de cuisson trop chaude, à une humidité
élevée.
c/h/i
Le pain présente de creux après
cuisson.
Pas assez de colle dans la farine
Trop de liquide
L
a/b/h
Structure lourde et contenant
des grumeaux
Trop de farine ou pas assez de liquide a/b/g
Pas assez de levure de boulangerie ou de sucre a/b
Trop de fruits, de grains ou d‘autres ingrédients b
Farine trop vieille ou plus avariée e
La cuisson n‘a pas atteint le milieu Trop ou pas assez de liquide
Humidité élevée
Recettes réalisées avec des ingrédients humides tels que yaourt par exemple
a/b/g
h
g
Structure ouverte, grossière ou
constituée de trous
Trop d‘eau
Pas de sel
g
b
Humidité élevée, eau trop chaude h/i
Liquide trop chaud c
Surface en forme de champignon,
pas cuite
Volume du pain plus important que le moule
Quantité de farine trop importante, surtout pour le pain blanc
a/f
f
Trop de levure de boulangerie ou pas assez de sel a/b
Trop de sucre a/b
Ingrédients sucrés en plus du sucre b
Les tranches de pain deviennent
irrégulières ou s‘agglutinent
Le pain n‘a pas suffisamment refroidi (de la vapeur s‘est échappée) j
Restants de farine sur la croûte du
pain
Lors du pétrissage, la farine n‘est pas correctement mélangée à la pâte au
niveau des parois du récipient
g
l
Elimination des différents points critiques
a Mesurez correctement les ingrédients.
b Adaptez les quantités des ingrédients en fonction des besoins et vérifiez si un ingrédient n’a pas été oublié.
c Prenez un autre type de liquide ou laissez-le se refroidir à température ambiante.
d Ajoutez les ingrédients dans l’ordre mentionné dans la recette. Faites une fontaine dans la farine et versez-y la levure de
boulangerie fraîche que vous avez délayée auparavant ou la levure de boulangerie sèche. Evitez le contact direct entre la
levure et le liquide.
e Utilisez uniquement des ingrédients frais et correctement stockés.
f Si vous réduisez la quantité totale d’ingrédients, ne prenez en aucun cas davantage que la quantité de farine indiquée.
Réduisez le cas échéant tous les ingrédients d’un tiers.
g Corrigez la quantité de liquide. Si vous utilisez des ingrédients humides, la quantité de liquide devra être réduite
correspondamment.
h En présence d’un temps très humide, prenez 1 à 2 cuillères à soupe (CS) de moins.
i Par temps chaud, n’utilisez pas la fonction «Sélection de temps». Utilisez des liquides froids.
j Dès la cuisson terminée, retirez immédiatement le pain du moule et laissez-le refroidir au moins pendant 15 minutes sur
une grille avant d’en couper une tranche.
Copyright UNOLD AG | www.unold.de

Stand 21.2.2020
71 von 168
DE
EN
FR
NL
IT
ES
PL
REMARQUES CONCERNANT LA CUISSON
1. INGRÉDIENTS
Étant donné que chaque ingrédient joue un rôle précis pour la
réussite du pain, la pesée exacte est aussi importante que l‘ordre
d‘adjonction des ingrédients.
Les ingrédients les plus importants tels que liquide, farine, sel,
sucre et levure (il est possible d‘utiliser de la levure fraîche ou de
la levure sèche) influencent le résultat lors de la préparation de
pain et de pâte. Utilisez pour cette raison toujours les quantités
correspondantes dans le rapport adéquat.
Utilisez les ingrédients à l‘état tiède lorsque vous préparez le pain
immédiatement. Lorsque vous sélectionnez le programme „sélec-
tion de temps“, les ingrédients doivent être froids pour éviter une
fermentation précoce de la levure.
La margarine, le beurre et le lait influencent simplement le goût
du pain.
Le sucre peut être réduit de 20 % afin que la croûte devienne
plus claire sans que le résultat restant soit influencé. Lorsque
vous préférez une croûte plus molle et plus claire, vous pouvez
remplacez le sucre par du miel.
Le gluten qui se forme dans la farine lors du pétrissage influence
la structure du pain. Le mélange de farine idéal est constitué de
40 % de farine complète et de 60 % de farine blanche.
Lorsque vous désirez ajouter des grains de blé entiers, trempez-
les pendant la nuit. Réduisez la quantité de farine et de liquide
(jusqu‘à 1/5 de moins).
Le levain est indispensable lors de l‘utilisation de farine de seigle.
Il contient des bactéries d‘acide lactique et d‘acide acétique qui
rendent le pain plus léger. Vous pouvez le préparer vous-même,
ce qui nécessite cependant du temps. C‘est pour cette raison
que nous utilisons dans les recettes suivantes de la poudre de
levain concentrée disponible dans le commerce en paquets de
15 g (pour 1 kg de farine). Les indications des recettes (1/2 - ¾ -
1 paquet) doivent être respectées pour éviter que le pain devient
friable.
Lorsque vous utilisez de la poudre de levain en une concentration
différente (paquets de 100 g pour 1 kg de farine), vous devez
réduire la quantité d‘1 kg de farine de 80 g env. resp. l‘adapter
suivant la recette.
Le levain liquide disponible en sachets peut également être uti-
lisé. La quantité requise est indiquée sur l‘emballage. Remplissez
le levain liquide dans le gobelet gradué et ajoutez la quantité de
liquide indiquée dans la recette.
Le levain de blé sec également disponible dans le commerce amé-
liore la consistance de la pâte, la fraîcheur et le goût. Il est plus
doux que le levain de seigle.
Faites cuire le pain à levain dans le programme „base“ ou „pain
complet“ pour qu‘une levée et une cuisson adéquate soient assu-
rées.
Ajouter du son de froment à la pâte pour faire un pain très léger et
riche en lest. Utilisez 1 cuillerée à soupe pour 500 g de farine et
augmentez la quantité de liquide d‘1/2 cuillerée à soupe.
Le gluten de blé est un produit naturel à base d‘albumen. Le pain
devient plus léger, il présente un volume amélioré, il tombe plus
rarement et est plus digeste. C‘est surtout dans le cas de pain et
de pâtisserie de farine complète et de farine moulue à la maison
que l‘effet est nettement sensible.
Le malt torréfié indiqué dans quelques recettes est un malt d‘orge
spécial. Il est utilisé pour obtenir une mie et une croûte plus
foncées (p. ex. pain noir). Il est également disponible en tant que
malt de seigle qui n‘est pas aussi foncé. Vous pouvez vous procu-
rer ce malt dans les magasins de produits biologiques.
L‘épice de pain peut être ajoutée à tous pains bis. La quantité
depend de votre goût et des indications du fabricant.
La poudre de lécithine pure est un émulsifiant naturel qui aug-
mente le volume du pain, qui rend la mie plus douce et plus
molle et qui prolonge la fraîcheur.
k Diminuez la quantité de levure de boulangerie ou, si besoin est, la quantité totale d’ingrédients par ¼ par rapport aux
quantités indiquées.
l Ajoutez à la farine 1 cuillère à soupe de colle de froment.
Copyright UNOLD AG | www.unold.de

72 von 168
Stand 21.2.2020
DE
EN
FR
NL
IT
ES
PL
Tous les auxiliaires et ingrédients imprimés en caractères gras sont
disponibles dans les magasins de produits biologiques, dans les
magasins et rayons d‘alimentation de régime ou dans les moulins.
2. ADAPTATION DES INGRÉDIENTS
Lorsque vous augmentez ou réduisez la quantité d‘ingrédients,
tenez compte que les rapports quantitatifs doivent correspondre
à la recette originale. Afin d‘obtenir un résultat optimal, les règles
de base suivantes pour l‘adaptation des ingrédients doivent être
respectées :
Liquides/farine : la pâte devrait être molle (pas trop molle), coller
légèrement sans tirer de fils. Une boule se forme dans le cas de
pâtes légères. Cela n‘est pas le cas pour les pâtes lourdes. Contrô-
lez la pâte 5 minutes après le premier pétrissage. Lorsqu‘elle est
encore trop humide, ajoutez de la farine jusqu‘à ce que la pâte ait
la consistance correcte. Lorsque la pâte est trop sèche, ajoutez en
pétrissant de l‘eau cuiller par cuiller.
Remplacement de liquide : lorsque vous remplacez des ingrédients
d‘une recette par des ingrédients qui contiennent du liquide (fro-
mage frais, yaourt, etc.), la quantité de liquide correspondante
doit être réduite. En cas d‘utilisation d‘oeufs, cassez-les dans
le gobelet gradué et remplissez du liquide jusqu‘à la quantité
prescrite.
Lorsque vous habitez à une grande altitude (à partir de 750 m),
la pâte lève plus rapidement. Dans ces régions, la levure peut
être réduite d‘1/4 jusqu‘à d‘½ cuillerée à thé afin d‘éviter une
levée excessive. Il en est de même pour les régions où l‘eau est
particulièrement douce.
3. ADJONCTION ET MESURE DES INGRÉDIENTS ET QUANTITÉS
Ajouter toujours le liquide en premier et la levure en dernier.
Afin que la levure ne fermente pas trop rapidement (plus particu-
lièrement en cas d‘utilisation de la présélection de temps), éviter
tout contact entre la levure et le liquide.
Utilisez, pour la mesure, toujours les mêmes unités de mesure,
c.-à-d. utilisez, lors de l‘indication de cuillerée à soupe ou de
cuillerée à thé, les cuillers graduées jointes à l‘appareil ou les
cuillers que vous utilisez dans votre cuisine.
Les indications en grammes devraient être pesées pour assurer
l‘exactitude. Pour les indications en millimètres, utilisez le gobe-
let gradué. Voici la signification des abréviations utilisées dans
les recettes :
CS = cuillerée à soupe (ras) (ou grande cuiller graduée)
CT = cuillerée à thé (ras) (ou petite cuiller graduée)
g = gramme
ml = millilitre
sachet = sachet de levure sèche de 7 g pour 500 g de farine -
correspond à 10-15 g de levure fraîche
4. Ajouter des fruits, des noix ou des graines
Lorsque vous désirez ajouter d‘autres ingrédients, vous pouvez le
faire, dans tous les programmes (sauf confiture) toujours lorsque
vous entendez le son bîpe. Si vous ajoutez les ingrédients trop
tôt, ils sont broyés par le pétrisseur. Dans ce cas également, il
est possible de sélectionner l‘échelon I ou II dans différents pro-
grammes.
Au cas où aucun échelon ne serait indiqué dans une recette étant
que les programmes proposés ne disposent pas d‘échelons, il
est possible de préparer aussi bien les grandes quantités que les
petites quantités proposées
5. POIDS DE PAIN ET VOLUME
Les recettes suivantes contiennent des indications exactes du
poids de pain que notre experte, Madame Blum, a déterminé
après la cuisson des pains. Vous constaterez que le poids d‘un
pain blanc pur est plus faible que celui d‘un pain complet. Ceci
est dû au fait que la farine blanche lève davantage et que des
limites sont ainsi posées. Malgré ces indications pondérales
exactes, de faibles écarts sont possibles. Le poids réel du pain
dépend essentiellement de l‘humidité de l‘air qui règne lors de
la préparation.
Tous les pains avec une proportion prépondérante de froment at-
teignent un volume plus grand et dépassent, dans la classe pon-
dérale la plus élevée, après la levée le bord du récipient. Toute-
fois, ils ne débordent pas. Le bourrelet de pain au-dessus du bord
de récipient est ainsi moins bruni que le pain dans le récipient.
Lorsque, pour les pains sucrés, le programme rapide est proposé,
vous pouvez préparer les quantités plus petites (et uniquement
celles-ci) des recettes également dans le programme gâteau à
levain, le pain devient ainsi plus léger. Dans ce cas, sélectionnez
l‘échelon I du programme gâteau à levain.
Copyright UNOLD AG | www.unold.de

Stand 21.2.2020
73 von 168
DE
EN
FR
NL
IT
ES
PL
RECETTES
Pain boulot
Degré I Degré II
Poids du pain,
env.
500 g 750 g
Lait 180 ml 275 ml
Margarine/Beurre 15 g 25 g
Sel 1/3 CT 1 CT
Sucre 1/3 CT 1 CT
Farine Type
1050
330 g 500 g
Levure sèche ½ sachet ¾ sachet
Programme: BASIS
Pain campagnard
Degré I Degré II
Poids du pain,
env.
510 g 770 g
Eau 230 ml 350 ml
Farine de blé
noir
110 g 170 g
Farine de blé
complet
110 g 170 g
Farine d’épéautre 110 g 170 g
Sirop de mélasse 2/3 CT 1 CT
Graines de
piment
1 pincée ¼ CT
Coriandre 1 pincée ¼ CT
Muscat râpé 1 pt. pincée 1 pincée
Sel 2/3 CT 1 CT
Levain sec 1/3 sach. ½ sachet
Levure sèche ½ sachet ¾ sachet
Programme: BASIS
6. Résultats de cuisson
Le résultat de cuisson dépend plus particulièrement des cir-
constances in situ (eau douce, humidité élevée, grande altitude,
nature des ingrédients, etc.). C‘est pour cette raison que les indi-
cations des recettes constituent des points de repère qui doivent
éventuellement être adaptés.
Le résultat de cuisson dépend plus particulièrement des cir-
constances en situ (eau douce, humidité élevée, grande altitude,
nature des ingrédients, etc.). C’est pour cette raison que les indi-
cations des recettes constituent des points de repère qui doivent
éventuellement être adaptés. Lorsqu’une recette ne réussit pas
immédiatement, tentez de trouver la cause et essayez p. ex.
d’autres rapports quantitatifs.
Avant de préparer un pain avec présélection de temps dans la
nuit, nous recommandons de faire d’abord un pain d’essai afin de
pouvoir modifier la recette si nécessaire.
Pain complet
Degré
I
Degré II
Poids du pain,
env.
570 g 860 g
Eau 230 ml 350 ml
Margarine/Beurre 15 g 25 g
Sel 2/3 CT 1 CT
Sucre 2/3 CT 1 CT
Farine Type 1050 180 g 270 g
Farine de blé
complet
180 g 270 g
Levure sèche ½ sachet ¾ sachet
Programme: VOLLKORN
Pain blanc classique
Degré I Degré II
Poids du pain,
env.
500 g 750 g
Eau 230 ml 350 ml
Sel ¾ CT 1 CT
Sucre ¾ CT 1 CT
Semoule de blé
dur
100 g 150 g
Farine, Type 550 230 g 350 g
Levure sèche ½ sachet ¾ sachet
Programme: SCHNELL
Copyright UNOLD AG | www.unold.de

74 von 168
Stand 21.2.2020
DE
EN
FR
NL
IT
ES
PL
Pain aux fines herbes
Degré I Degré II
Poids du pain,
env.
560 g 850 g
Eau 230 ml 350 ml
Farine de blé
Type 550
350 g 525 g
Farine de blé dur 50 g 75 g
Sucre 2/3 CT 1 CT
Sel 2/3 CT 1 CT
Fines herbes
hachées
1 CS 1 ½ CS
Gousses d’ail
hachées
1 2
Beurre 10 g 15 g
Levure sèche ½ sachet ¾ sachet
Programme: BASIS / SCHNELL
Pain au fromage frais
Degré I Degré II
Poids du pain, env. 530 g 800 g
Eau ou Lait 130 ml 200 ml
Margarine/Beurre 20 g 30 g
Oeufs 1 kleines 1
Sel 2/3 CT 1 CT
Sucre 2/3 CS 1 CS
Fromage frais 80 g 125 g
Farine Type 550 330 g 500 g
Levure sèche ½ sachet ¾ sachet
Programme: SCHNELL
Pain aux figues et aux noix
Degré I Degré II
Poids du pain,
env.
600 g 900 g
Eau 230 ml 350 ml
Farine de blé
Type 1050
170 g 260 g
Farine de blé
noir
260 g 400 g
Sel 2/3 CT 1 CT
Figues hachées 30 g 50 g
Noix 30 g 50 g
Miel 1 CT 1 ½ CT
Levain sec ½ sachet ¾ sachet
Levure sèche ½ sachet ¾ sachet
Programme: BASIS
Pain complet de ble
Degré I Degré II
Poids du pain,
env.
570 g 860 g
Eau 230 ml 350 ml
Sel 2/3 CT 1 CT
Huile végétale 2/3 CS 1 CS
Miel ½ CT ¾ CT
Sirop de mélasse ½ CT ¾ CT
Farine de blé
complet
330 g 500 g
Gluten de blé ½ CS ¾ CS
Levure sèche ½ sachet ¾ sachet
Programme: BASIS / VOLLKORN
MELANGES DE FARINE POUR PAIN
1. Comme nos recettes pevoient les mélanges de pain en vente sur le marché allemand, nous vous recommendons de prendre les
mélanges en vente dans votre région et de suivre les instructions du fabricant. Faites attention de ne pas prendre plus que 500 g
de mélange de pain et 350 ml de liquide environ.
PAIN POUR LES PERSONNES ALLERGIQUES
Pour les pains sans gluten, veuillez respecter les consignes suivantes :
• Les farines sans gluten nécessitent une quantité de liquide plus importante que les farines contenant du gluten (400–500 ml de
liquide tiède pour 500 g de farine).
• Les farines sans gluten ont besoin d’un peu d’huile ou de matière grasse pour donner un bon résultat. Vous pouvez utiliser de l’huile,
du beurre ou de la margarine (10 à 20 g).
Copyright UNOLD AG | www.unold.de

Stand 21.2.2020
75 von 168
DE
EN
FR
NL
IT
ES
PL
Pain aux châtaignes
Degré I
Eau tiède 450 ml
Huile 20 g
Préparation de farine pour
pain aux châtaignes
500 g
Levure déshydratée 5 g
Programme: BASIS
Pain blanc
Degré I
Eau tiède 400 ml
Beurre 20 g
Préparation de farine
pour pain blanc
500 g
Levure déshydratée 4 g
Programme: BASIS
IDÉE RECETTE et conseil : Avec le programme Pâte, vous
pouvez également faire de la pâte à pizza avec la préparation
de farine pour pain blanc. Au lieu de beurre, utiliser 40 g
d’huile et 380 ml d’eau. Mettre la pizza garnie dans le four à
200 °C pendant environ 20 minutes.
Vous pouvez également faire de la pâte à petits pains avec un
mélange de farines à pain blanc. Il suffit de mettre la pâte
dans des moules à muffins graissés. Badigeonner le dessus
avec du beurre fondu, laisser gonfler 20 minutes. Préchauffer
le four à 200 °C et faire cuire pendant environ 20 minutes.
• Si vous faites des pains à base de farines sans gluten, vous ne pouvez pas préprogrammer le programme. Le déroulement du
programme doit toujours être immédiatement démarré.
• Le pain sans gluten réalisé dans la machine à pain nécessite moins de levure que le pain cuit dans le four. Utilisez environ 3,5 à 5
g de levure déshydratée pour un pain standard.
• Si le pain s’affaisse en son milieu au cours de la cuisson, réduisez la quantité de levure d’environ 1 g. Si le pain s’affaisse encore,
battez un œuf dans un gobelet mesureur et remplissez le gobelet avec la quantité de liquide nécessaire. Attention : Ne pas ajouter
l’œuf en plus de la quantité de liquide !
• La croûte des pains sans gluten ne devient pas aussi brune que les pains à base de gluten. Pour des raisons de sécurité, les machines
à pain ne peuvent pas avoir d’élément de chauffage par le haut de sorte que le dessus du pain reste clair. Pour donner une plus belle
couleur au pain, vous pouvez battre un jaune d’œuf avec 1 c. à café de crème fraîche et le badigeonner sur le pain lorsque l’écran
indique qu’il reste 1:15 de cuisson.
• Décollez au bout de 8 minutes environ de pétrissage à l’aide d’une spatule en silicone la farine ou le reste de pâte sur le rebord du
moule. Si vous redécollez légèrement du moule le bord de la pâte lorsque l’écran indique qu’il reste 1:15 de cuisson, il ne reste pas
ce fin bord de pâte dû à la cuisson.
Pour les personnes qui souffrent d‘une allergie aux céréales ou qui doivent suivre un régime spécifique, nous avons effectué des essais
de cuisson dans notre Backmeister
®
et obtenu de bons résultats avec différents mélanges de farines, qui sont pour partie fabriquées
à base de fécule de maïs, de riz et de pomme de terre. Lorsque vous utilisez des préparations de farines, veuillez respecter les
indications figurant sur l’emballage.
Nous avons obtenu de bons résultats de cuisson avec les produits de la société Schär et de la société Hammermühle Diät GmbH. Pour
toute question sur les produits sans gluten ou en cas d’intolérances multiples, vous pouvez vous adresser directement à ces sociétés :
Hotline Dr. Schaer, Italie +39 (0) 4 73/29 33 00 Hotline Hammermühle, Allemagne +49 (0) 63 21/9 58 90
Toutes les sortes de farine dénommées sont conviennent aux gateaux et aux pains dans le cadre d’un régime spéciale (coeliacie/
stéatorrhée idiopathique). Même en augmentant les quantités de levure, resp. de levure de tartre les pains préparés dans le Backmeister
®
reste bien solide. Mettez les ingrédients dans l’ordre préscrit dans le moule.
Choisissez les programmes suivants:
pour la préparation de pain : BASIS sombre pour une croûte bien dorée / SCHNELL sombre pour une croûte moyennement dorée.
pour la préparation de pâte: Programme TEIG
pour la préparation de petits gateaux avec chimique ou levure de tartre: programme BACKPULVER
Pain aux graines
Degré I
Eau 480 ml
Huile 10 g
Mélange de farines pour
pain aux graines
500 g
Levure déshydratée 4 g
Programme: BASIS
Copyright UNOLD AG | www.unold.de

76 von 168
Stand 21.2.2020
DE
EN
FR
NL
IT
ES
PL
GATEAU – RECETTE DE BASE
Le Backmeister
®
est idéal pour préparer des gateaux. Comme la machine est équipée de pétrins, le gateau est un peu plus solide,
mais le goût est excellent. La préparation de gateau ne peut pas être programmée en avance. Ajoutez les ingrédients de votre choix à
la recette de base. Ne prenez pas plus que les quantités mentionnées ci-dessous. Après la cuisson, enlevez le moule et mettez-le sur
une serviette humide pour 15 minutes environ. Après enlevez le gateau.
Ingrédients pour un gateau de env. 750 g
Oeufs 3
Beurre mou 100 g
Sucre 100 g
Sucre à la vanille 1 sachet
Farine Type 405 300 g
Levure chimique 1 sachet
½ TL
Ingrédients aux choix: 50 g
50 g
Noisettes rapées 50 g
ou: chocolat râpé 50 g
ou: flocons de coco 50 g
ou : une pomme coupée
en pétits morceaxúx
Programme: BACKPULVER
PREPARATION DE PATE
Votre Backmeister
®
vous permet de préparer facilement une pâte pour la traiter et cuire dans le four. Choisissez le programme TEIG
(pâte). Vous pouvez ajouter des ingrédients après le son pendant le deuxième pétrissage. Dans le programme „Pâte“ il n’y a aucuns
degrés. Néanmoins, nous vous donnons deux quantités différents.
Pizza de farine complète
Ingrédients pour env. 2 pizzas
Eau 150 ml
Sel ½ CT
Huile d’olives 2 CS
Farine de blé complet 300 g
Germes de blé 1 CS
Levure sèche ½ sachet
Roulez la pâte, mettez-la dans un moule ronde et laissez lever
pendant 10 min. Distribuez la sauce de pizza sur la pâte et
mettez les ingrédients de votre choix. Faites cuire pendant 20
minutes.
Programme: TEIG
Christstollen – pain de noel
Poids 1000 g
Lait 125 ml
Beurre liquide 125 g
Oeuf 1
Rhum 3 CS
Farine Type 405 500 g
Sucre 100 g
Citronat 50 g
Orangeat 25 g
Amandes moulues 50 g
Raisins secs 100 g
Sel 1 pincée
Canelle 2 pincéen
Levure sec 2 sachet
Enlevez la pâte et formez un pain. Faites cuire dans le four à
180°C (dans le four à circulation d’air à 160°C) pour env. 1 h.
Programme: TEIG
Copyright UNOLD AG | www.unold.de

Stand 21.2.2020
77 von 168
DE
EN
FR
NL
IT
ES
PL
Les recettes figurant dans la présente notice ont été soigneusement étudiées et testées par leurs auteurs et par UNOLD AG, mais elles
ne sont pas garanties. Toute responsabilité des auteurs ainsi que d’UNOLD AG et ses représentants est exclue pour tous dommages
corporels, matériels et pécuniaires.
CONDITIONS DE GARANTIE
TRAITEMENT DES DÉCHETS / PROTECTION DE L’ENVIRONNEMENT
Nos appareils sont produits selon un standard élevé de qualité pour une longue durée d’utilisation. Un
entretien régulier et des réparations compétentes par notre service après-vente prolongent cette durée
d’utilisation. Si néanmoins l’appareil est endommagé et ne peut plus être réparé, veuillez suivre les ins-
tructions suivantes. Ne jamais disposer ce produit avec les dégâts de ménage. Apportez ce produit à une
station de collection pour récupération de produits électriques et électroniques. Par la collection séparée
vous aidez à protéger les ressources naturelles et prenez soin, que le produit est démonté sans risque
pour la santé et l’environnement.
En cas d’utilisation conforme et lors de dégâts manifestement dus à des défauts de fabrication, nos appareils sont garan-
tis 24 mois, lors d’utilisation professionnelles 12 mois, à dater de l’achat pour les dommages qui sont manifestement
attribuables à des défauts d’usine lorsqu’ils sont utilisés comme prévu. Pendant la période de garantie, nous réparerons
les défauts de matériaux et de fabrication à notre discrétion en les réparant ou en les échangeant. Notre garantie n’est
valide que pour les appareils vendus en Allemagne et en Autriche. Dans tout autre pays veuillez contacter l’importateur.
Veuillez envoyer à notre adresse les appareils, pour lesquels vous réclamez une suppression de défauts, avec le bon
d’achat montrant la date d’achat. Vous pouvez imprimer un coupon de retournement sur notre site Web www.unold.de/
ruecksendung. (uniquement pour les entrées d’Allemagne et d’Autriche). Les défauts causés par usure, utilisation incor-
recte ou non-respect des instructions de maintenance sont exclus. Notre obligation de garantie cesse, si de réparations
ou des interventions sont accomplies par des tiers. Cette garantie n’affecte pas les droits du consommateur contre le
commerçant.
PREPARATION DE CONFITURE
Lavez les fruits frais et murs. Pelez les fruits avec une peau dure comme les pommes, les pèches, les poires etc. Ne prenez que les
quantités indiquées, comme celles-ci sont adaptées au programme. Avec d’autres quantités la masse bouillit trop vite et écoule.
Pesez les fruits, coupez les en petits morceaux (max.1 cm) ou purez-les et remplissez cette masse dans le recipient. Ajoutez le gélisuc
„2:1“ dans la quantité indiquée. Ne prenez pas du sucre normale ou du gélisuc „1:1“, comme la confiture ne gélit pas dans ce cas.
Mélangez les fruits avec le sucre et commencez le programme.
Confiture aux fraises
Fraises fraîches, lavées et
coupées
600 g
Gélisuc „2:1“ 400 g
Jus de citron 1-2 CT
Mélangez tous les ingrédients dans le moule, démarrez le
programme „confiture“. Enlevez le sucre qui colle aux côtés du
moule à l’aide d’une spatule de caoutchouc,. Si le son retentit,
enlevez le moule en utilisant des poignées à plat. Versez la
confiture dans des vers et fermez-les soigneusement.
Programme: KONFITÜRE
Confiture aux oranges
Oranges, pêlées et coupées 600 g
Citrons pêlées et coupées 50 g
Gélisuc „2:1“ 400 g
Pelez les oranges et les citrons et coupez-les en petits
morceaux.
Ajoutez le sucre et mélangez les ingrédients dans le récipient.
Démarrez le programme „confiture“.
Enlevez le sucre qui colle aux côtés du moule à l’aide d’une
spatule de caoutchouc.
Si le son retentit, enlevez le moule en utilisant des poignées à
plat.
Versez la confiture dans des vers et fermez-les soigneusement.
Programme: KONFITÜRE
Copyright UNOLD AG | www.unold.de

78 von 168
Stand 21.2.2020
DE
EN
FR
NL
IT
ES
PL
GEBRUIKSAANWIJZING MODELL 68010
TECHNISCHE GEGEVENS
Vermogen: 550 W, 220–240 V~, 50 Hz
Afmetingen: Ca. 24,7 x 36,2 x 29,1 cm (L/B/H)
Gewicht: Ca. 4,4 kg
Bakvormen: Binnenmaat bakvorm ca. 16,8 x 12,8 x 14,3 cm (L/B/H)
Inhoud: 700 – 1.000 g broodgewicht
Apparaatsnoer: Ca. 80 cm vast gemonteerd
Behuizing: Plastiek geïsoleerd
Deksel: Met groot kijkglas
Ausstattung 12 vaste programma‘s, standtoets voor 2 verschillende gewichten van het brood, keuzeschakelaar voor
de bruiningsgraad van de korst, tijdkeuzeschakelaar tot max. 13 uur voorprogrammeerbaar, automatische
warmhoudstand
Zubehör: Uitneembare bakvorm met antikleeflaag kneedhaken, maatbeker, maatlepel, haakje, bedieningshandleiding
met recepten
Wijzigingen en vergissingen in de uitrustingskenmerken, techniek, kleuren en design voorbehouden.
VERKLARING VAN DE SYMBOLEN
Dit symbool wijst op eventuele gevaren die letsel tot gevolg kunnen hebben of
tot schade aan het apparaat leiden.
Dit symbool wijst op een eventueel verbrandingsgevaar. Ga hier altijd zeer
voorzichtig te werk.
VEILIGHEIDSINSTRUCTIES
Lees de volgende aanwijzingen a.u.b. door
en bewaar ze goed.
1. Dit apparaat kan door kinderen
vanaf 8 jaar worden gebruikt en
door personen die over gebrekkige
fysieke, sensorische of geestelijke
vaardigheden of gebrek aan ervaring
en/of kennis beschikken, mits zij
onder toezicht staan of instructies
hebben gekregen aangaande het
veilige gebruik van dit apparaat en de
hieruit resulterende gevaren begrepen
hebben.
2. Kinderen mogen niet met het apparaat
spelen.
3. Reiniging en onderhoud door de
gebruiker mogen niet door kinderen
worden uitgevoerd, tenzij deze ouder
dan 8 jaar zijn en onder toezicht staan.
4. Berg het apparaat en de kabel op
buiten bereik van kinderen onder de
8 jaar.
5. VOORZICHTIG - delen van dit
product kunnen zeer heet worden
en brandwonden veroorzaken! Wees
in aanwezigheid van kinderen en
kwetsbare personen bijzonder
voorzichtig.
6. Kinderen moeten onder toezicht
gehouden worden om ervoor te zorgen
dat zij niet met het apparaat spelen.
7. Bewaar het apparaat op een voor
kinderen niet toegankelijke plaats.
Copyright UNOLD AG | www.unold.de

Stand 21.2.2020
79 von 168
DE
EN
FR
NL
IT
ES
PL
8. Sluit het apparaat alleen aan op
wisselstroom met spanning conform
typeplaatje.
9. Dit apparaat mag niet met een externe
tijdschakelklok of een afstands-
bedieningssysteem worden gebruikt.
10. Dompel het apparaat of het snoer
in geen geval in water of andere
vloeistoffen.
11. Als het apparaat niet wordt gebruikt,
alsmede voor het reinigen, a.u.b. eerst
de stekker uit het stopcontact trekken.
Vóór het afnemen van afzonderlijke
delen het apparaat laten afkoelen.
12. Gebruik het apparaat nooit met
een beschadigde voedingskabel, na
foutieve werking of als het apparaat
op enige manier is beschadigd.
Laat in dit geval het apparaat door
de klantenservice controleren resp.
repareren. A.u.b. niet zelf repareren.
U raakt uw recht op garantie kwijt.
13. Het gebruik van niet door de
fabrikant aanbevolen toebehoren
kan tot beschadiging leiden. Het
apparaat uitsluitend voor de voorziene
doeleinden gebruiken.
14. Het apparaat is uitsluitend bedoeld
voor huishoudelijke doeleinden of
soortgelijke doeleinden, bijv.
kitchenettes in winkels, kantoren of
andere werkplaatsen,
landbouwbedrijven,
voor gebruik door gasten in hotels,
motels of andere toeristische accom-
modaties,
in privé pensions of vakantiewoningen.
15. Het apparaat altijd zo plaatsen dat
het niet van het werkvlak glijdt wat bij
het kneden van een zwaar deeg kan
gebeuren. Bij zeer gladde werkvlakken
adviseren wij het apparaat op een
dunne rubbermat te plaatsen om het
slipgevaar te voorkomen.
16. De Backmeister
®
dient tijdens het
bedrijf op een afstand van tenminste
10 cm t.o.v. andere voorwerpen
te worden geplaatst. Het apparaat
uitsluitend binnen gebouwen
gebruiken.
17. Let erop dat de voedingskabel niet
in aanraking met hete oppervlakken
komt en niet over het werkvlak heen
hangt opdat bijv. kinderen er niet aan
kunnen trekken.
18. Het apparaat nooit op of naast een
gas- of elektrisch fornuis of op een
hete bakoven plaatsen.
19. Wees heel voorzichtig bij het bewegen
van het apparaat, wanneer dit met
hete ingrediënten is gevuld.
20. De bakvorm nooit tijdens het bedrijf
uit het apparaat nemen.
21. Vul in het bijzonder bij witbrood geen
grotere hoeveelheden in de bakvorm
dan aangegeven. Als dit het geval
is, wordt het brood niet gelijkmatig
gebakken of het deeg stroomt over. Let
op onze desbetreffende instructies.
22. Bij het testen van een nieuw recept
dient u bij de eerste keer in de
buurt te blijven om het bakproces te
controleren.
23. Schakel het apparaat nooit in wanneer
de bakvorm er niet ingezet is of
deze niet met ingrediënten gevuld
is. onderlinge verhouding van de
ingrediënten wel klopt, het deeg niet
te stevig of te slap is, of de hoeveelheid
te groot is en dan eventueel overloopt.
24. Om het brood eruit te nemen mag de
bakvorm in geen geval tegen een kant
of werkvlak worden getikt, omdat dit
tot beschadiging kan leiden.
Copyright UNOLD AG | www.unold.de

80 von 168
Stand 21.2.2020
DE
EN
FR
NL
IT
ES
PL
25. Metalen folies of andere materialen
mogen niet in het apparaat worden
gebracht omdat hierdoor het gevaar
van brand of kortsluiting ontstaat.
26. Het apparaat nooit met een handdoek
of ander materiaal afdekken. Hitte en
damp moeten kunnen ontwijken. Er
kan brand ontstaan als het apparaat
met brandbaar materiaal wordt
afgedekt of in aanraking komt, bijv.
met gordijnen.
27. Voordat u een bepaald brood tijdens
de nacht wilt bakken, test eerst het
recept zodat u kunt vaststellen of
de onderlinge verhouding van de
ingrediënten wel klopt, het deeg niet
te stevig of te slap is, of de hoeveelheid
te groot is en dan eventueel overloopt.
28. Controleer de stekker en het snoer
regelmatig op slijtage en beschadi-
gingen. Stuur het apparaat in geval
van beschadigingen van het snoer of
andere onderdelen a.u.b. voor con-
trole en/of reparatie aan onze klan-
tenservice. Ondeskundig uitgevoerde
reparaties kunnen aanzienlijke geva-
ren voor de gebruiker veroorzaken en
leiden tot het vervallen van de garan-
tie.
LET OP:
Het apparaat is tijdens en na het gebruik zeer heet!
Open de behuizing van het apparaat in geen geval. Er bestaat gevaar voor een
elektrische schok
De fabrikant aanvaardt geen aansprakelijkheid als het apparaat voor commerciële doeleinden of op een manier wordt gebruikt die niet
overeenkomt met de bedieningshandleiding.
IINBEDRIJFNAME
1. Verwijder alle verpakkingsmaterialen, ook in de bakruimte.
Bewaar de originele verpakking. Houd verpakkingsmateriaal
uit de buurt van kinderen - gevaar voor verstikking!
2. Controleer of alle genoemde toebehoren volledig voorhanden
zijn.
3. Reinig de onderdelen zoals in hoofdstuk REINIGING EN
ONDERHOUD beschreven.
4. Sluit het apparaat aan (zie paragrafen STANDPLAATS /
STROOMAANSLUITING. Zet de bakvorm resp. de rijstvorm
in. Kies eerst de modus BACKPULVER en laat het apparaat
gedurende ca. 10 minuten opwarmen. Schakel het apparaat
dan uit door op START/STOP te drukken. Laat het apparaat
afkoelen en veeg de bakruimte met een doek uit.
5. Droog alle onderdelen zorgvuldig af voordat u het apparaat
weer gebruikt.
Copyright UNOLD AG | www.unold.de

Stand 21.2.2020
81 von 168
DE
EN
FR
NL
IT
ES
PL
1. Bereid het apparaat voor zoals in het hoofdstuk “Inbedrijfname”
beschreven.
2. Open het deksel van de Backmeister
®
en neem de bakvorm
eruit.
3. Bestrijk het gat van de kneedhaak dik met hittebestendige
margarine, om te voorkomen dat het deeg in de holte
binnendringt en daar kan vastbakken.
4. Zet de kneedhaak op de aandrijfas in de bakvorm.
5. Vul de ingrediënten in de bakvorm zoals telkens in het recept
aangegeven. Bij zware degen bereikt u een optimaal bakresul-
taat wanneer u de volgorde van de ingrediënten wijzigt, d.w.z.
wanneer u eerst de droge ingrediënten en dan de vloeistof erin
doet. Let er bij gebruik van de tijdkeuze-functie evenwel op
dat de gist niet te vroeg met de vloeistof in aanraking komt.
6. Zet de bakvorm weer in het apparaat; draai hierbij de bakvorm
met de klok mee tot deze inklikt.
7. Sluit het deksel van de Backmeister
®
.
8. Steek de stekker in het stopcontact en schakel het apparaat
aan de AAN/UIT-schakelaar in.
9. Kies het gewenste programma. Informatie over de afzonder-
lijke programma’s vindt u vanaf pagina 83. Voor een brood uit
een standaard bakmengsel bereikt u bijv. in het programma
“BASIS” goede resultaten.
10. Kies de gewenste bruiningsgraad (licht – midden – donker).
Neem in acht dat de keuze van de bruiningsgraad niet bij alle
bakprogramma’s mogelijk is. Informatie hieromtrent vindt u
op pagina 83.
11. Kies de gewenste broodgrootte. Neem in acht dat de keuze
van de broodgrootte niet bij alle bakprogramma’s mogelijk is.
Informatie hieromtrent vindt u op pagina 83.
12. Wanneer u alle gewenste instellingen hebt uitgevoerd, druk op
de start/stop-toets.
13. Afhankelijk van het geselecteerde programma weerklinkt
gedurende de tweede kneedfase meermaals een pieptoon. U
kunt nu naar wens het deksel openen en verdere ingrediën-
ten zoals noten aan het deeg toevoegen. Sluit dan het deksel
weer.
14. Wanneer het brood klaar is, weerklinkt er meerdere malen
een signaaltoon om aan te geven dat het brood kan worden
verwijderd. Als u het brood er vóór afloop van de warmhoudtijd
uit wilt halen, druk op de start/stop-toets en houd deze een
moment ingedrukt tot een pieptoon het afbreken van het
programma bevestigt.
15. Neem de bakvorm voorzichtig uit het apparaat. Gebruik hier-
voor geschikte pannenlappen om verbrandingen te voorko-
men. Zet de bakvorm op zijn kop en laat het brood om af te
koelen op een taartrooster glijden. Als het brood niet dadelijk
op het taartrooster valt, beweeg dan de kneedaandrijving van
onderen enkele malen heen en weer totdat het brood eruit
valt. Neem hierbij in acht dat de kneedaandrijvingen nog heet
kunnen zijn. Gebruik ook hier geschikte pannenlappen. In
geen geval mag u de bakvorm tegen een kant of werkvlak tik-
ken om het brood los te maken. De bakvorm zou zich daarbij
kunnen vervormen.
16. Indien de kneedhaak in het brood vast blijft zitten, kunt u
deze met de bijgeleverde haakspies losmaken. Steek deze aan
de onderkant van het nog warme brood in de opening van
de kneedhaak en kantel hem langs de onderste rand van de
kneedhaak, bij voorkeur op de plaats waar de vleugel van de
kneedhaak zit. Trek vervolgens de kneedhaak met behulp van
de haakspies voorzichtig omhoog. Hierbij kunt u zien op welke
plaats in het brood de vleugel van de kneedhaak zich bevindt
en deze eruit trekken.
17. Reinig de bakvorm dan zoals op pagina 86 beschreven.
LET OP:
Het apparaat is tijdens en na het
gebruik zeer heet!
EEN SNELLE START – HET EERSTE BROOD
Copyright UNOLD AG | www.unold.de

82 von 168
Stand 21.2.2020
DE
EN
FR
NL
IT
ES
PL
VERKLARING VAN DE SYMBOLEN
Menu
Het
aangegeven
nummer
verwst naar
het actueel
geselecteerde
menu.
Bruining
De telkens geselec-
teerde bruinings-
graad wordt met
een streep op het
display aangegeven.
Start/stop-toets
Om het programma-
verloop te starten
en te beëindigen
Tdkeuze +
Verhogen van
de gewenste
td
Tdkeuze -
Verlagen van
de gewenste
td
Broodgrootte
Keuze van
de gewenste
broodgrootte
BASISINSTELLING:
Zodra de stekker in het Stopcontact wordt gestoken, verschijnt op
het Display 3:00 (de dubbele punt tussen de getallen knippert
niet).
Tijdens de werking kan de programmastand zowel aan de hand
van de teruglopende tijdaanduidingen, als aan de hand van de
aanduidingen op het display worden afgelezen.
START/STOP-toets
Voor het starten en beëindigen van het programma
Met de Start/Stop-toets kunt u het programma op ieder moment
afbreken. Houd hiervoor de toets zo lang ingedrukt tot u een piep-
toon hoort. Op het display verschijnt de uitgangspositie. Wanneer
u een ander programma wilt gebruiken, kiest u dit met de Menu-
toets.
ZEIT + / - TIJDKEUZE
Gebruik de tijdkeuze-functie slechts voor recepten die u tevoren
onder toezicht met succes hebt uitgeprobeerd en verander dit
recept daarna niet meer.
PAS OP: Bij een te grote hoeveelheid deeg kan het deeg over de rand
heen lopen en op het verwarmingselement vastbranden.
De programma’s kunnen op een later tijdstip met een uitstel
van maximaal 12 uur worden gestart. Bij de in het betreffende
programma automatisch ingevoerde tijd, en de evt. daaropvolgende
warmhoudtijd van 1 uur tot 1 uur 20 minuten (na beëindiging van
het bakproces), moet u de uren en minuten optellen, waarna de
bereiding moet worden gestart.
Voorbeeld: Het is ’s avonds 20.00 uur en u wilt ’s morgens om
7.00 uur vers gebakken witbrood hebben:
De ingrediënten in de aangegeven volgorde in de broodvorm doen
en deze in het apparaat plaatsen. Let op dat de gist niet met de
vloeistof in contact komt.
Met de toets MENÜ het gewenste programma kiezen en met de
toets BRÄUNUNG de gewenste bruining invoeren.
In het voorbeeld nemen wij programma 1 = BASIS, Stufe KLEIN
met een programmaduur van 3:30 uur.
TOELICHTINGEN BIJ HET BEDIENINGSPANEEL
Copyright UNOLD AG | www.unold.de

Stand 21.2.2020
83 von 168
DE
EN
FR
NL
IT
ES
PL
De periode (in het voorbeeld is het 20.00 uur) tussen de
programmering en de tijd waarop u het brood uit het apparaat
wilt nemen (7.00 uur) bedraagt 11 uur.
Met de toets ZEITWAHL en de toetsen STD (uur) en MIN
moet u nu de duur van het programma in stappen van 10mi-
nuten verhogen naar 11 uur. Zodra de tijd op het display wordt
weergegeven, kunt u met de toets START/STOP het programma
starten.
Het programma wordt dan op tijd gestart, zo dat het om 7 uur
beëindigd is. Als u het brood dan niet meteen eruit neemt, begint
de warmhoudtijd van 1 uur.
Neem a.u.b. in acht:
Bij het voorgeprogrammeerd bakken a.u.b. geen bederfelijke
ingrediënten, zoals melk, eieren, vruchten, yoghurt, uien
enz. gebruiken.
De 10 keer klinkende pieptoon, die het tijdstip voor het
toevoegen van ingrediënten zoals noten, graankorrels en
vruchten alsmede het programma-einde aangeeft, kan niet
uitgeschakeld worden en weerklinkt dus ook ’s nachts.
MENU
Met de Menu-toets roept u de afzonderlijke programma’s op
die uitvoerig zijn beschreven in de tabel “Tijdschema van de
programma’s”. Deze programma’s kunt u gebruiken voor de
volgende bereidingen:
1 BASIS Het standaard programma voor alle
broden, voor wit- en rogge-tarwe-
brood,
2 WEISSBROT
Witbrood
voor bijzonder luchtige witbroden
met een langere rijstijd,
3 VOLLKORN
Volkoren
Voor volkorenbrood
4 SCHNELL
Snel
Voor een snellere bereiding van
wit- en rogge-tarwe-brood
5 HEFEKUCHEN
Gistkoek
voor de bereiding van zoet gistdeeg
6 ULTRA
Ultra-Snel
voor alle recepten van Stand I die
in de programma’s Basis,
Witbrood, Snel of Toast worden
gebakken. Houd er rekening mee
dat het deeg in het programma
ULTRA-SNEL aanzienlijk korter
rijst en de broden daardoor
compacter en minder luchtig zijn.
Gebruik bij dit programma altijd
lauwwarme vloeistoffen.
7 KONFITÜRE
CONFITUUR
Om confituur en marmelade te
koken. Voor de toebereiding van
confituur dient nog een bakvorm
te worden aangeschaft, die uitslui-
tend voor confituur wordt gebruikt.
8 TEIG
Deeg
voor het maken van deeg; zonder
bakfunctie
9
GLUTENFREI
glutenvrij
Het standaardprogramma voor
alle glutenvrije broden
10 BACKPULVER
Backpoeder
voor gebak dat met bakpoeder
wordt gebakken, bijv. cake
11 TOASTBROT
Toast
voor het maken van toast
12 BACKEN
Bakken
voor het bakken van afzonderlijk
bereide degen (met de hand of in
het programma BAKPOEDER of
DEEG)
In de programma’s BASIS, WITBROOD, VOLKOREN, GISTKOEK,
TOAST en GLUTENFRJI klinken er tijdens het tweede kneedpro-
ces meerdere Signaltonen. Deze geven het tijdstip aan waarop u
verdere ingrediënten zoals noten, gedroogde vruchten enz. kunt
toevoegen. Open het deksel, voeg de ingrediënten toe. Daarna het
deksel weer sluiten.
BRÄUNUNG – BRUINING – KORST
Met deze toets kunt u de bruining van de korst op HELL/
LICHT – MITTEL/GEMIDDELD – DUNKEL/ DONKER
instellen (1-6 + 9-12)
BROTGRÖSSE- STAND
Hiermee kunt u in verschillende programma’s instellen:
STAND I = voor een lager gewicht van het brood (ca. 700g)
STAND II = voor een hoger gewicht van het brood (ca. 1.000 g)
Let op dat deze standen slechts in de programma’s 1, 2, 3,
5, 9, 11 mogelijk zijn. In de recepten vindt u hiervoor onze
aanbevelingen.
LET OP:
Het apparaat is tijdens en na het
gebruik zeer heet!
Copyright UNOLD AG | www.unold.de

84 von 168
Stand 21.2.2020
DE
EN
FR
NL
IT
ES
PL
DE FUNCTIES VAN DE BACKMEISTER
®
Zoemerfunctie
De zoemer klinkt
wanneer een actieve toets wordt ingedrukt,
tijdens het tweede kneedproces, om aan te geven dat er
nu graankorrels, vruchten, noten of andere ingrediënten
kunnen worden toegevoegd,
na beëindiging van het bakproces piept het apparaat meer
dan eens tijdens de warmhoudfase,
aan het einde van de warmhoudtijd klinkt 1 keer een
pieptoon om aan te geven dat het programma nu geheel
beëindigd is.
De 10 keer weerklinkende pieptoon, die het tijdstip voor het
toevoegen van ingrediënten zoals noten, pitten en vruchten
en het einde van het programma aangeeft, kan niet worden
uitgeschakeld, hij klinkt dus ook in de nacht.
Herhalingsfunctie
Indien tijdens de werking van de Backmeister
®
de stroom is uitge-
vallen, hervat het apparaat het programma automatisch daar waar
het onderbroken werd, mits de uitval niet langer dan 10 minuten
heeft geduurd.
Indien de stroomuitval langer dan 2 minuten duurt en het display
de uitgangspositie aangeeft, moet de Backmeister
®
opnieuw
worden opgestart. Dit is alleen mogelijk, wanneer het deeg bij het
afbreken van het programma nog niet verder was dan de kneedfase.
Eventueel kunt u het gekozen programmaverloop voortzetten. In
andere gevallen moet u helemaal opnieuw beginnen.
Veiligheidsfuncties
Zodra een programma is gestart, mag het deksel alleen nog maar
tijdens de kneedfases eventjes voor het toevoegen van ingrediën-
ten worden geopend. Tijdens de rijs- en bakfase dient dit achter-
wege te blijven, omdat het deeg anders inzakt.
Wanneer de temperatuur in het apparaat voor een nieuw program-
ma nog te hoog is, verschijnt bij een hernieuwde start op het
display “H HH”. Verwijder in dit geval de broodvorm en wacht tot
het apparaat is afgekoeld en weer aan het begin van het oorspron-
kelijk gekozen programma staat.
Houd er rekening mee dat het apparaat om veiligheidsredenen
geen bovenwarmte heeft, daardoor wordt de korst aan de boven-
zijde van het brood minder donker, terwijl de onderzijde en de
zijkanten donkerder zijn. Om veiligheidstechnische redenen is
een extra verwarming in de omgeving van het deksel echter niet
toegestaan.
Als na een druk op de START/STOP-toets in het display “E rr”
verschijnt, is er een defect in de temperatuurregeling. In dit geval
verzoeken wij u het apparaat voor controle/reparatie naar onze
klantenservice te zenden (adres zie bladzijde 1 respectievelijk ga-
rantievoorwaarden).
Copyright UNOLD AG | www.unold.de

Stand 21.2.2020
85 von 168
DE
EN
FR
NL
IT
ES
PL
HET PROGRAMMA VAN DE BACKMEISTER
1. De bakvorm plaatsen
De bakvorm met antikleef-coating met beide handen aan de rand
vasthouden en lichtelijk schuin in het midden van de sokkel in
het bakinterieur plaatsen. Met de wijzers van de klok mee draaien
tot hij vastklikt. Bestrijk de gaten van de kneedhaak dik met hitte-
bestendige margarine, om te voorkomen dat het deeg in de holte
binnendringt en daar kan vastbakken. Zet de kneedhaak op de
aandrijfassen.
2. Ingrediënten erin doen
De ingrediënten moeten in de volgorde die in het recept wordt
aangegeven in de bakvorm worden gedaan.
Bij zeer zware degen, bijv. degen die overwegend rogge bevatten,
adviseren wij u de volgorde van de ingrediënten te wijzigen en
eerst meel en gist erin te scheppen en als laatste de vloeistof erin
te gieten. Bij gebruik van de tijdkeuze-functie dient u er evenwel
op te letten dat de gist niet te vroeg met de vloeistof in aanraking
komt.
3. Programma kiezen
Kies het gewenste programma met behulp van de Menu-toets.
Kies afhankelijk van het programma de gewenste stand. Kies de
gewenste bruining. Met de Tijdkeuze-toets kunt u de tijd voorpro-
grammeren. Druk op de Start-toets.
4. Deeg mengen en kneden
De Backmeister mengt en kneedt het deeg automatisch zo lang
tot het de juiste consistentie heeft.
5. Rusttijd
Na het eerste kneedproces is een rusttijd ingepland, waarin de
vloeistof in de gist en het meel kan doordringen.
6. Deeg laten rijzen
Na de laatste kneedfase bereikt de Backmeister de optimale
temperatuur voor het rijzen van het deeg.
7. Bakken
De broodbakautomaat regelt de baktemperatuur en -tijd auto-
matisch.
8. Warmhouden
Wanneer het product klaar is, klinkt er meerdere malen een piep-
toon om aan te geven dat het brood of de etenswaren kunnen
worden verwijderd. Tegelijkertijd begint een warmhoudtijd van 1
uur. Druk op de START/STOP-toets, als u het brood er vóór afloop
van de warmhoudtijd uit wilt halen.
9. Einde van het programma
Draai de broodvorm na beëindiging van het programmaverloop
met behulp van pannenlappen lichtjes tegen de wijzers van de
klok in en neem de bakvorm eruit. Zet de bakvorm op zijn kop
en laat het brood om af te koelen op een taartrooster glijden. Als
het brood niet dadelijk op het taartrooster valt, beweeg dan de
kneedaandrijving van onderen enkele malen heen en weer totdat
het brood eruit valt. In geen geval mag u de bakvorm tegen een
kant of werkvlak tikken om het brood los te maken. De bakvorm
zou zich daarbij kunnen vervormen.
Na beëindiging van het programma met behulp van ovenwanten
de broodvorm eruit nemen, op de kop zetten, en indien het brood
niet direct op het rooster valt, de kneedaandrijving van onderaf
enkele malen heen en weer bewegen tot het brood eruit valt. In-
dien de kneedhaak in het brood vast blijft zitten, neemt u de bij-
geleverde haakspies in de hand. Steek deze aan de onderkant van
het nog warme brood in de (bijna) ronde opening van de kneed-
haak en kantel hem langs de onderste rand van de kneedhaak, bij
voorkeur op de plaats waar de vleugel van de kneedhaak zit. Trek
vervolgens de kneedhaak met behulp van de haakspies voorzich-
tig omhoog. Hierbij kunt u zien op welke plaats in het brood de
vleugel van de kneedhaak zich bevindt. Het brood op die plaats
iets insnijden en de kneedhaak er in zijn geheel uittrekken.
Copyright UNOLD AG | www.unold.de

86 von 168
Stand 21.2.2020
DE
EN
FR
NL
IT
ES
PL
SCHOONMAKEN EN ONDERHOUD
Voor het schoonmaken
moet u altijd het apparaat
uitschakelen en de stekker
uit het stopcontact trekken
en het apparaat laten
afkoelen.
Na het gebruik laat u
het apparaat altijd eerst
afkoelen, voordat u het
schoonmaakt of opbergt.
Het duurt ongeveer een half
uur, voordat het apparaat
is afgekoeld en weer kan
worden gebruikt voor het
bakken of het maken van
deeg.
1. Reinig voor het eerste gebruik de broodvorm van de Backmeister
met een mild afwasmiddel en maak de kneedhaak schoon.
2. Gebruik alleen een mild afwasmiddel en in geen geval che-
mische producten, benzine, bakovenspray of schurende pro-
ducten.
3. Verwijder alle ingrediënten en kruimels met een vochtige doek
van deksel, behuizing en bakruimte. Dompel het apparaat
nooit onder water en giet ook geen water in de bakruimte.
4. Bakvorm aan de buitenkant met een vochtige doek schoonve-
gen. De binnenkant kunt u met een beetje afwasmiddel uit-
spoelen. Zet de vorm niet voor langere tijd onder water.
5. Maak de kneedhaak en de drijfas meteen na gebruik schoon.
Als de kneedhaak in de vorm achterblijft, is hij later moeilijk
te verwijderen. In dat geval vult u de broodvorm ong. een half
uur met warm water. Daarna kunt u de kneedhaak los- en
schoonmaken.
6. De bakvorm is voorzien van een antikleef-coating. Gebruik
daarom bij het schoonmaken geen metalen voorwerpen, die
krassen op het oppervlak kunnen veroorzaken. Het is normaal,
dat de kleur van de coating mettertijd verandert. Dit heeft
geen invloed op de functie.
7. Voordat u het apparaat opbergt, dient u zich ervan te overtui-
gen, dat het volkomen is afgekoeld en dat het schoon en droog
is. Berg het apparaat met gesloten deksel op.
Copyright UNOLD AG | www.unold.de

Stand 21.2.2020
87 von 168
DE
EN
FR
NL
IT
ES
PL
TIJDSCHEMA VAN DE PROGRAMMA’S
1 2 3 4 5
BASIS Weissbrot Vollkorn Schnell HEFEKUCHEN
Basis Witbrood Volkoren Snel Gistkoek
Keuze van het brood
gewicht
ST. I ST. II ST. I ST. II ST. I ST. II ST. I ST. II
Tijdsduur 2:53 3:00 3:40 3:50 3:32 3:40 1:40 2:50 2:55
1.Kneden
9 10 16 18 9 10 7 10 10
1.
Rijsen
Verwarm.
AAN/UIT
geen kneden
20 20 40 40 25 25 5 5 5
2. Kneden
14
Ingred.
toevoeg.
15
Ingred.
toevoeg.
19
Ingred.
toevoeg.
22
Ingred.
toevoeg.
18
Ingred.
toevoeg.
20
Ingred.
toevoeg.
8 20
Ingred.
toevoeg.
20
Ingred.
toevoeg.
2.
Rijsen
Verwarm.
AAN/UIT
25 25 30 30 35 35 30 30
3. Rijsen
Verwarm.
AAN/UIT
geen kneden
40 40 45 45 60 60 15 40 40
Bakken
Verwarm.
AAN/UIT
65 70 70 75 65 70 65 65 70
Warm
houden
bij 60 °C
Verwarm.
AAN/UIT
60 60 60 60 60 60 60 60 60
Copyright UNOLD AG | www.unold.de

88 von 168
Stand 21.2.2020
DE
EN
FR
NL
IT
ES
PL
6 7 8 9 10 11 12
ULTRA- KONFITÜRE TEIG GLUTENFREI BACKPULVER TOASTBROT BACKEN
Ultra-Snell Confiture Deeg
Glutenvrij
Bakpoeder Toast Bakken
Keuze van het brood
gewicht
ST. I ST. I ST. II ST. I ST. II
Tijdsduur 0:58 1:20 1:30 3:15 3:20 2:50 2:55 3:00 1:00
1.Kneden
12 0 20 12 12 10 15 15
1.
Rijsen
Verwarm.
AAN/UIT
geen kneden
0 15
Verwarm.
AAN/UIT
20 20 5 40 40
2. Kneden
0 0 13
Ingred.
toevoeg.
13
Ingred.
toevoeg.
20 5
Ing-
red.
toe-
voeg..
5
Ing-
red.
toe-
voeg.
2.
Rijsen
Verwarm.
AAN/UIT
0 0 30 45 45 30 25 25
3. Rijsen
Verwarm.
AAN/UIT
geen kneden
11 45
Kneden
AAN/UIT
Verwarm.
AAN/UIT
40 45 45 35 40 40
Bakken
Verwarm.
AAN/UIT
35 20 60 65 70 50 55 10-60
Warm
houden
bij 60 °C
Verwarm.
AAN/UIT
60 60 60 60 60 60 60 60
TIJDSCHEMA VAN DE PROGRAMMA’S
Copyright UNOLD AG | www.unold.de

Stand 21.2.2020
89 von 168
DE
EN
FR
NL
IT
ES
PL
VRAGEN OVER HET APPARAAT EN DE WERKING
Het brood blijft na het bakken in de broodvorm vastzitten?
Het brood in de broodvorm ca. 10 minuten laten afkoelen
– de broodvorm omkeren – indien nodig de vleugel
(kneedhaakaansluiting) licht heen en weer bewegen. Bestrijk het
gat in de kneedhaak dik met hittebestendige margarine (geen
halfvetmargarine!) voordat u hem er inzet, zodat er bij het kneden
geen deeg in de tussenruimte binnendringen en vastbakken kan.
De kneedhaak voor het bakken met wat olie invetten.
Als u met het apparaat ook confituren wilt maken, adviseren wij u
voor brood en confituren telkens een eigen bakvorm te gebruiken,
omdat de broden door de zuren die er ontstaan niet meer zo
goed uit de vorm gehaald kunnen worden. Extra bakvormen en
kneedhaken kunt u bij onze klantenservice bestellen.
Hoe kunt u gaten in het brood (kneedhaak) voorkomen?
Strooi wat meel op uw vingers en verwijder de kneedhaken
voordat het deeg voor de laatste maal rijst (zie Tijdschema van de
programma’s en aanduiding op het display).
Wanneer u dit niet wilt, gebruik dan na het bakken de haakspies.
Wanneer u dit voorzichtig doet, kunt u een groot gat voorkomen.
Het deeg loopt bij het rijzen over de bakvorm heen.
Dit gebeurt vooral bij het gebruik van tarwemeel dat op grond van
het hogere gehalte aan kleefstoffen beter rijst.
Oplossing:
De hoeveelheid meel reduceren en de overige ingrediënten
aanpassen. Het klaargebakken brood heeft nog altijd een
groot volume.
1 EL vloeibare margarine bij het meel doen.
Het brood rijst, maar zakt bij het bakken in.
Wanneer in het midden van het brood een “V”-vormige kuil ont-
staat, is het meel niet kleverig genoeg. De reden hiervoor is dat
het graan te weinig eiwitten bevat (dit komt voor bij verregende
zomers), of
dat het meel te vochtig is.
Oplossing: Aan het brooddeeg voor 500 g meel 1 EL tar-
wekleefmiddel toevoegen.
het brood in het programma SNEL of ULTRA-SNEL backen.
Wanneer het brood trechtervormig in het midden inzakt, kan de
oorzaak zijn dat
de watertemperatuur te hoog was,
er teveel water gebruikt is
het meel te weinig kleefmiddel bevat.
Het brood is aan de bovenzijde niet bruin genoeg.
Roer 1 eierdooier en 1 TL zoete of zure room door elkaar en
bestrijk daarmee het deeg na de laatste kneedfase.
Wanneer kan het deksel van de Backmeister
®
tijdens het bak-
proces worden geopend?
In principe is dit altijd mogelijk tijdens het kneedproces. Gedurende
deze tijd kunnen indien nodig nog geringe hoeveelheden meel of
vloeistof worden toegevoegd.
Wanneer het brood na het bakken een bepaald uiterlijk moet heb-
ben, gaat u als volgt te werk: u opent voor de laatste rijsfase
(zie tabel Tijdschema van het programma en de aanduiding op
het display) voorzichtig en kort het deksel en maakt bijv. met
een scherp, voorverwarmd mes een inkeping in de zich vormende
broodkorst, u strooit hier graankorrels op, of bestrijkt de brood-
korst met een mengsel van aardappelmeel en water zodat de korst
na het bakken mooi glanst. Binnen de aangegeven tijdsduur mag
u de Backmeister
®
voor het laatst openen, omdat het brood an-
ders inzakt.
Wat is volkorenmeel?
Van alle graansoorten kan volkorenmeel worden gemaakt, d.w.z.
ook van tarwe. De benaming volkoren betekent dat het meel uit
de hele graankorrel wordt gemalen en dus ook meer ballaststoffen
bevat. Volkorentarwemeel is daarom iets donkerder. Volkorenmeel
hoeft echter geen donker brood op te leveren, zoals meestal wordt
gedacht.
Waarop moet worden gelet bij het gebruik van roggemeel?
Roggemeel bevat geen kleefstoffen en het brood rijst daarom
nauwelijks. “VOLKOREN-ROGGEBROOD” moet met zuurdesem
worden gemaakt, omdat het anders slecht wordt verdragen.
Het deeg rijst alleen wanneer men bij gebruik van roggemeel,
dat geen kleefstoffen bevat, minimaal ¼ van de aangegeven
hoeveelheid door meel van het type 550 vervangt.
Copyright UNOLD AG | www.unold.de

90 von 168
Stand 21.2.2020
DE
EN
FR
NL
IT
ES
PL
Wat is kleefstof in het meel?
Hoe hoger het type-getal des te minder kleefstof het meel bevat
en des te minder het deeg rijst. Het hoogste kleefstofgehalte
bevat meel met het type-getal 550.
Welke verschillende meelsoorten zijn er en hoe worden deze
gebruikt?
Maïs, rijst, aardappelmeel
zijn met name geschikt voor mensen die allergisch voor
gluten zijn of die aan “spruw” of “coeliakie” lijden. Over-
eenkomstige recepten alsmede de adressen van fabrikanten
van speciale ingrediënten vindt u in het receptengedeelte
van deze bedieningshandleidung.
Speltmeel
is zeer duur, echter ook volkomen vrij van chemische mid-
delen, omdat spelt, die op zeer magere grond groeit, geen
meststoffen opneemt. Speltmeel is daarom met name
geschikt voor mensen die aan allergieën lijden. Er kunnen
alle recepten die de meeltypes 405 - 550 - 1050 dragen,
zoals in de bedieningshandleiding beschreven, worden
gebruikt.
Harde-tarwemeel (DURUM)
is vanwege zijn consistentie met name geschikt voor
stokbrood en kan worden vervangen door harde-tarwegries.
Hoe kan men vers brood beter verdragen?
Wanneer u 1 gepureerde gekookte aardappel door het meel
kneedt, kunt u vers brood beter verdragen.
In welke verhouding moeten rijsmiddelen worden gebruikt?
Zowel bij gist als bij zuurdesem, die in verschillende hoeveelhe-
den te koop zijn, moet u zich aan de gegevens van de fabrikant
op de verpakking houden en een hoeveelheid gebruiken die in
verhouding staat tot de gebruikte hoeveelheid meel.
Voor de gistkracht is ook de hardheid van het water van groot
belang, bij heel zacht water fermenteert de gist heviger, zodat
de hoeveelheid gist in streken met zacht water met ca. ¼ dient
te worden gereduceerd. De beste verhouding gist tot water moet
evenwel eerst worden uitgeprobeerd en eventueel nogmaals wor-
den gewijzigd.
Wat kan men doen wanneer het brood naar gist smaakt?
Indien suiker is gebruikt, deze weglaten, waardoor het brood
echter ook minder bruin wordt.
Aan het water gewone azijn toevoegen,
voor een klein brood = 1 ½ EL,
voor een groot brood 2 EL.
Het water vervangen door karnemelk of yoghurt, wat overigens bij
alle recepten mogelijk is en voor de versheid van het brood ook
aan te bevelen is.
Waarom smaakt het brood uit de bakoven anders dan het brood uit
de BACKMEISTER
®
?
Dat komt door de verschillende vochtigheid: in de bakoven
wordt het brood door de grotere bakruimte aanmerkelijk droger
gebakken. In de BACKMEISTER blijft het brood vochtiger.
Wat betekenen de type-getallen bij het meel?
Hoe lager het type-getal, des te minder ballaststoffen het meel
bevat en des te lichter het is. Omdat de aanduiding van de
afzonderlijke meelsoorten van land tot land verschilt, volgt hier
een kort overzicht:
Duitsland type Oostenrijk type Zwitserland type
Tarwemeel Zeer fijn gemalen meel, voor koek 405 480 400
Fijn gemalen meel, ideaal voor brood 550 780 550
Middelfijn gemalen meel 1050 1600 1100
Volkorenmeel, grof gemalen 1600 1700 1900
Roggemeel Zeer fijn gemalen meel 815 500 720
Fijn gemalen meel 997 960 1100
Middelfijn gemalen meel 1150 960 1100
Grof gemalen meel, volkorenmeel 1740 2500 1900
Copyright UNOLD AG | www.unold.de

Stand 21.2.2020
91 von 168
DE
EN
FR
NL
IT
ES
PL
FOUT AAN HET APPARAAT
Fout Oorzaak Oplossing
Er ontwijkt rook uit de bakruimte of de
luchtopeningen.
Ingrediënten plakken vast in de bakruimte
of aan de buitenkant van de vorm.
Stekker uit het stopcontact trekken,
buitenkant van de vorm resp. bakruimte
schoonmaken.
Het brood is ten dele ingezakt en aan de
onderkant vochtig.
Brood is na het bakken en warmhouden te
lang in de vorm gebleven.
Brood uiterlijk na afloop van de
warmhoudfase uit de vorm nemen.
Het brood laat zich slecht uit de vorm
nemen.
De onderkant van het brood hangt vast
aan het kneedmes.
Kneedmes en -as na het bakken
schoonmaken. Hiervoor eventueel warm
water ong. 30 minuten in de vorm laten
staan. Dan kunt u het kneedmes goed
wegnemen en schoonmaken.
De ingrediënten zijn niet gemengd of het
brood is niet goed doorgebakken.
Verkeerde programma ingesteld. Controleer het gekozen menu en de
andere instellingen nogmaals.
Start/Stop-toets ingedrukt, terwijl de
machine in bedrijf was
Ingrediënten wegdoen en helemaal
opnieuw beginnen.
Deksel meermaals geopend, terwijl de
machine in bedrijf was
Het deksel mag alleen worden geopend
als op het display KNEAD of RISE 2 staat
aangegeven. Na de voorlaatste rijsfase het
deksel niet meer openen.
Stroom langere tijd uitgevallen tijdens het
bakken
Ingrediënten wegdoen en helemaal
opnieuw beginnen.
Het roteren van de kneedhaken is
geblokkeerd.
Controleren of de kneedhaken door korrels
e.d. geblokkeerd zijn. Bakvorm wegnemen
en kijken of de meenemer draait. Als dat
niet het geval is, het apparaat naar de
klantendienst opsturen.
Copyright UNOLD AG | www.unold.de

92 von 168
Stand 21.2.2020
DE
EN
FR
NL
IT
ES
PL
FOUT BIJ DE RECEPTEN
Fout Oorzaak Oplossing
Brood rijst te sterk Te veel gist, te veel meel, te weinig zout, of meerdere van deze oorzaken a/b
Brood rijst helemaal niet of niet
genoeg
Geen of te weinig gist
Te oude of bedorven gist
Vloeistof te heet
Gist is met vloeistof in contact gekomen
Verkeerd of te oud meel
Te veel of te weinig vloeistof
Te weinig suiker
a/b
e
c
d
e
a/b/g
a/b
Deeg rijst te sterk en druipt over de
rand van de bakvorm
Door heel zacht water rijst de gist sterker
Te veel melk beïnvloedt de werking van de gist.
f/k
c
Brood is in elkaar gezakt Broodvolume te groot voor de vorm, daarom zakt het in elkaar a/f
m
Brood heeft na het bakken een deuk
Te vroege of te snelle werking van de gist door te warm water, een warme
bakruimte of een te hoog vochtgehalte.
Te weinig kleefstof in het meel.
c/h/i
l
Te veel vloeistof a/b/h
Zware, klonterige structuur Te veel melk of te weinig vloeistof a/b/g
Te weinig gist of suiker a/b
Te veel vruchten, volkoren of andere ingrediënten b
Te oud of slecht meel
e
Brood in het midden niet
doorgebakken
Te veel of te weinig vloeistof
Hoog vochtgehalte,
Recepten met vochtige ingrediënten, b.v. yoghurt
a/b/g
h
g
Open, grove structuur Te veel water g/b
met gaten Hoog vochtgehalte, te warm water h/i
Te hete vloeistof c
Schimmelachtig, niet gebakken
oppervlak
Broodvolume groter dan de vorm
Hoeveelheid meel te groot, vooral bij witbrood
a/f
f
Te veel gist of te weinig zout of te veel zuiker a/b
Behalve de suiker nog andere zoete ingrediënten b
Broodsneden onregelmatig of
plakkerig
Brood niet voldoende afgekoeld
(damp ontweken)
j
Meelresten op de korst van het brood Meel bij het kneden aan de zijkanten niet goed in het deeg verwerkt g
l
Oplossing van de fouten
a Meet en weeg de ingrediënten zorgvuldig af.
b Pas de hoeveelheden correct aan en controleer of u een van de ingrediënten vergeten hebt.
c Neem een andere vloeistof of laat deze tot kamertemperatuur afkoelen.
d Voeg de ingrediënten toe in de voorgeschreven volgorde. Maak een klein kuiltje in het midden en doe daar de gebrokkelde of
droge gist in. Vermijd direct contact van de gist met de vloeistof.
e Gebruik alleen verse ingrediënten, die op de juiste wijze bewaard zijn.
f Reduceer de totale hoeveelheid ingrediënten. Gebruik in geen geval meer meel dan aangegeven. Reduceer alle ingrediënten
eventueel met 1/3.
g Corrigeer de hoeveelheid vloeistof. Als u vochtige ingrediënten gebruikt, moet de hoeveelheid vloeistof gereduceerd worden.
h Bij zeer vochtig weer 1-2 eetlepels minder gebruiken
i Bij warm weer niet met tijdselectie werken. Gebruik koude vloeistoffen.
j Neem het brood meteen na het bakken uit de vorm en laat het op een rooster minstens een kwartier afkoelen, voordat u het
snijdt.
k Gebruik minder gist of reduceer eventueel alle ingrediënten met ¼.
l Voeg een eetlepel tarwekleefstof bij het deeg.
m Het brood in het programm SNEL of ULTRA-SNEL bakken.
Copyright UNOLD AG | www.unold.de

Stand 21.2.2020
93 von 168
DE
EN
FR
NL
IT
ES
PL
OPMERKINGEN BIJ DE RECEPTEN
1. INGREDIËNTEN
Omdat ieder ingrediënt een bepaalde rol speelt voor het resultaat
van het brood, is bij het toevoegen van de ingrediënten het
afmeten net zo belangrijk als de juiste volgorde.
De belangrijkste ingrediënten, zoals vloeistof, meel, zout, suiker
en gist (zowel droge als verse gist kan worden gebruikt) hebben
een grote invloed op het resultaat bij de bereiding van brood en
deeg. Gebruik daarom altijd de betreffende hoeveelheden in een
juiste verhouding tot elkaar.
Gebruik de ingrediënten lauwwarm, wanneer u het product direct
bereidt. Wanneer u het programma “Tijdkeuze” kiest, moeten de
ingrediënten koud zijn, zodat de gist niet te vroeg fermenteert.
Margarine, boter en melk beïnvloeden uitsluitend de smaak van
het brood.
De hoeveelheid suiker kan met 20 % worden verminderd, zodat
de korst lichter en dunner wordt zonder dat daardoor het overige
bakresultaat wordt beïnvloed. Indien u een zachtere en lichtere
korst prefereert, kunt u de suiker door honing vervangen.
Gluten, die tijdens het kneden in het meel ontstaan, zorgen voor
de structuur van het brood. Het ideale meelmengsel bestaat uit
40 % volkorenmeel en 60 % witmeel.
Wanneer u hele graankorrels wilt toevoegen, laat deze dan eerst
een nacht inweken. Verlaag de hoeveelheid meel en de vloeistof
(tot 1/5 minder) dienovereenkomstig.
Zuurdesem is onmisbaar bij het gebruik van roggemeel. Het bevat
melk- en azijnzuurbacteriën, die ervoor zorgen dat het brood lucht
wordt en subtiel aangezuurd is. U kunt zelf zuurdesem maken, wat
echter enige tijd vergt. Daarom gebruiken wij in de onderstaande
recepten geconcentreerd zuurdesempoeder, dat in pakjes van
15 g (voor 1 kg meel) verkrijgbaar is. De gegevens in de recepten
(½ - ¾ - 1 pakje) moeten worden aangehouden, omdat het brood
bij te kleine hoeveelheden gaat kruimelen.
Indien u zuurdesempoeder in andere concentraties (verpakkingen
van 100 g voor 1 kg meel) gebruikt, moet u 1 kg meel met ca.
80 g verminderen, c.q. volgens het recept aanpassen.
Vloeibaar zuurdesem dat in zakjes verpakt te koop is, kan
eveneens goed worden gebruikt. Houd u zich met betrekking
tot de hoeveel-heid aan de gegevens op de verpakking. Giet de
vloeibare zuurdesem in de maatbeker en vul dit aan met de in het
recept aangegeven hoeveelheid vloeistof.
Tarwezuurdesem, dat eveneens gedroogd te koop is, verbetert de
deegsamenstelling en de smaak en houdt het brood langer vers.
Het heeft een zachtere smaak dan roggezuurdesem.
Bak uw zuurdesembrood in het “BASIS-” of “VOLLKOREN”-
programma, zodat het goed rijst en goed gebakken wordt.
Bakkersgist vervangt de zuurdesem en is alleen bepalend voor
de smaak. Er kan in de Backmeister
®
zeer goed mee worden
gebakken. Let op onze speciale recepten.
Tarwezemelen voegt u aan het deeg toe, wanneer u een bijzonder
ballastrijk en luchtig brood wilt maken. Gebruik 1 EL voor 500 g
meel en verhoog de hoeveelheid vloeistof met ½ EL.
Tarwekleefstof is een natuurlijke hulpstof van graaneiwitten. Het
zorgt ervoor dat het brood luchtiger wordt, een groter volume
heeft, minder vaak inzakt en lichter verteerbaar is. Met name
bij gebakken volkorenproducten en gebakken producten van
zelfgemalen meel is dit effect heel duidelijk.
Kleurmout, dat we in enkele recepten vermelden, is een donker
gebrand gerstemout. Het wordt gebruikt om een donkerdere
kruim en korst te verkrijgen (bijv. bij donker brood). Er is ook een
roggemout verkrijgbaar, dat niet zo donker is. Deze moutsoort is
verkrijgbaar in natuurvoedingswinkels.
Broodkruiden kunt u aan al onze rogge-tarwe-broden toevoegen.
De hoeveelheid wordt bepaald door uw smaak en de gegevens van
de fabrikant.
Puur lecithine-poeder is een natuurlijke emulgator die het volume
van de producten verhoogt, de kruim zachter en weker maakt en
de producten langer vers houdt.
Alle hierboven genoemde - vetgedrukte - bakhulpmiddelen en
ingrediënten zijn verkrijgbaar in reformwinkels, reformafdelingen
van supermarkten of in molens. U kunt deze bakartikelen ook per
catalogus bestellen bij:
Copyright UNOLD AG | www.unold.de

94 von 168
Stand 21.2.2020
DE
EN
FR
NL
IT
ES
PL
Hobbybäcker-Versand - Inge Pinzer
Am Mühlholz 6 – 89287 Bellenberg
Tel. 0 73 06/92 59 00 - Fax 0 73 06/92 59 05
Internet: www.hobbybaecker.de
2. AANPASSEN VAN DE INGREDIËNTEN
Indien u de hoeveelheden van de ingrediënten verhoogt of verlaagt,
houd er dan rekening mee, dat de hoeveelheidsverhoudingen
met het originele recept overeen moeten komen. Om een perfect
resultaat te bereiken, moeten de volgende basisregels voor de
aanpassing van de ingrediënten in acht worden genomen:
Vloeistoffen/meel: Het deeg moet week zijn (niet te week), iets
kleven, maar geen draden vormen. Een bal ontstaat bij lichte
deegsoorten. Bij zware deegsoorten, zoals volkorenrogge, of
korrelbroden is dat niet het geval. Controleer het deeg 5 minuten
na de eerste kneedfase. Indien het nog te vochtig is, moet u meel
toevoegen tot het deeg de juiste consistentie heeft. Is het deeg te
droog, kneed er dan lepelgewijs water doorheen.
Vervangen van vloeistoffen: Indien u bij een recept ingrediënten
gebruikt die vloeistof bevatten (bijv. kwark, yoghurt enz.), moet de
bijbehorende hoeveelheid vloeistof worden aangepast. Wanneer
u eieren gebruikt, sla deze dan in de maatbeker stuk en vul het
geheel aan met vloeistof tot de voorgeschreven hoeveelheid.
Indien u op grote hoogte woont (vanaf 750 m) rijst het deeg
sneller. De hoeveelheid gist kan in dergelijke streken met ¼ tot
½ TL worden verminderd, om een overmatig rijzen te voorkomen.
Hetzelfde geldt voor streken waar zeer zacht water wordt gebruikt.
3. Toevoegen en afmeten van de ingrediënten en hoeveelheden
Altijd eerst de vloeistof en het laatst de gist toevoegen. Om te
voorkomen dat de gist te snel gaat werken (met name bij gebruik
van de tijdkeuze), moet u ervoor zorgen dat de gist en de vloeistof
niet met elkaar in contact komen.
Gebruik voor het afmeten altijd dezelfde maateenheden, d.w.z.
gebruik voor het afmeten in EL en TL ofwel de bij de bakautomaat
geleverde maatlepels ofwel lepels zoals u die thuis gebruikt.
De hoeveelheden in grammen moet u nauwkeurig wegen.
Voor de hoeveelheden in milliliters kunt u de bijgeleverde
maatbeker gebruiken.
De afkortingen in de recepten betekenen:
EL = afgestreken eetlepel (of maatlepel groot)
TL = afgestreken (grote) theelepel (of maatlepel klein)
g = gram
ml = milliliter
Pckg. pakje = pakje droge gist met een inhoud van 7 g voor 500 g
meel – komt overeen met 20 g verse gist
4. Toevoegen van vruchten, noten of graankorrels
Wanneer u ingrediënten wilt toevoegen kunt u dat in alle
programma‘s (behalve confituren) alleen doen, wanneer de
pieptoon te horen is. Indien u de ingrediënten te vroeg toevoegt,
worden ze door de kneedhaak vermalen.
Wanneer in de recepten geen standen worden aangegeven, omdat
deze in de voorgestelde programma‘s niet aanwezig zijn, dan
lukken zowel de kleine als de grote hoeveelheden die wij voor
het betreffende model voorstellen, in het aangegeven programma.
De programma‘s zonder standschakeling zijn hierop ge-
programmeerd.
5. GEWICHT EN VOLUME VAN HET BROOD
In de onderstaande recepten vindt u precieze gegevens m.b.t. het
gewicht van het brood, die onze adviseuse, mevrouw Blum, na het
bakken van de broden heeft vastgesteld. U zult vaststellen dat de
gewichten bij zuiver witbrood lager zijn dan bij volkorenbrood.
Dit komt doordat witmeel sterker rijst en de gewichten daarop
gebaseerd zijn.
Ondanks deze precieze gewichtsgegevens, kunnen er kleine
afwijkingen voorkomen. Het daadwerkelijke ge-wicht van het
brood hangt in grote mate af van de luchtvochtigheid tijdens de
bereiding.
Alle broden met een overwegend tarwe-aandeel bereiken een
groter volume en komen in de hoogste gewichtsklasse na de
laatste rijsfase boven de rand van de broodvorm uit. Ze stromen
echter niet over. De broodbolling boven de rand van de broodvorm
is daarom iets minder bruin dan het brood binnen de broodvorm.
Wanneer bij zoete broden het programma Snel wordt voorgesteld,
kunt u de kleinere hoeveelheden (alleen deze) van de betreffende
receptvoorstellen ook in het programma Gistkoek bakken,
waardoor het brood luchtiger wordt. Kies in het programma
Gistkoek dan Stand I.
6. BAKRESULTATEN
Het bakresultaat hangt met name af van de plaatselijke
omstandigheden (zacht water - hoge luchtvochtigheid - grote
hoogte – samenstelling van de ingrediënten enz.). Daarom
Copyright UNOLD AG | www.unold.de

Stand 21.2.2020
95 von 168
DE
EN
FR
NL
IT
ES
PL
RECEPTEN
Klassiek witbrood
Stand I Stand II
Broodgewicht, ca: 500 g 750 g
Water 230 ml 350 ml
Zout ¾ TL 1 TL
Suiker ¾ TL 1 TL
Harde
tarwegriesmeel
100 g 150 g
Meel type 550 230 g 350 g
Droge gist ½ pakje ¾ pakje
Programma: SCHNELL/WEISSBROT
Wit boerenbrood
Stand I Stand II
Broodgewicht,
ca:
500 g 750 g
Melk 180 ml 275 ml
Margarine/boter 15 g 25 g
Zout ½ TL 1 TL
Suiker ½ TL 1 TL
Meel 1050 330 g 500 g
Droge gist ½ pakje ¾ pakje
Programma: BASIS/WEISSBROT
Volkorenbrood
Stand I Stand II
Broodgewicht,
ca:
570 g 860 g
Water 230 ml 350 ml
Margarine/boter 15 g 25 g
Zout ½ TL 1 TL
Suiker ½ TL 1 TL
Meel type 1050 180 g 270 g
Tarwe-
volkorenmeel
180 g 270 g
Droge gist ½ pakje ¾ pakje
Programma: VOLLKORN
100 % Volkorenbrood
Stand I Stand II
Broodgewicht, ca: 560 g 850 g
Water 230 ml 350 ml
Zout ½ TL 1 TL
Honing 1 TL 1 TL
Tarwevolkorenmeel 360 g 540 g
Droge gist ½ pakje ¾ pakje
Programma: VOLLKORN
zijn de gegevens in de recepten richtwaarden, die eventueel
moeten worden aangepast. Wanneer een bepaald recept
niet in een keer lukt, laat de moed dan niet zakken, maar
tracht de oorzaak te achterhalen en probeer bijv. eens andere
hoeveelheidsverhoudingen.
Wij adviseren, voordat u met behulp van de Tijdkeuze `s nachts
brood gaat bakken, eerst een proefbrood te bakken, zodat u indien
nodig het recept nog kunt wijzigen.
Boerenbrood
Stand I Stand I
Broodgewicht,
ca:
520 g 780 g
Water 200 ml 300 ml
Zout ½ TL 1 TL
Tarwezuurdesem
gedroogd (geen
conentraat)
15 g 25 g
Meel type 1050 330 g 500 g
Suiker ½ TL 1 TL
Droge gist ½ pakje ¾ pakje
Programma: BASIS
Zuurdesembrood
Stand I Stand II
Broodgewicht,
ca:
740 g 1050 g
Droge zuurdesem
*
½ pakje ¾ pakje
Water 350 ml 450 ml
Broodkruiden ½ TL ¾ TL
Zout 1 TL 1½ TL
Roggemeel 250 g 340 g
Meel type 1050 250 g 340 g
Droge gist 1 pakje 1½ pakje
Programma: BASIS
Copyright UNOLD AG | www.unold.de

96 von 168
Stand 21.2.2020
DE
EN
FR
NL
IT
ES
PL
Walnotenbrood met vijgen
Stand I Stand II
Broodgewicht,
ca:
600 g 900 g
Water 230 ml 350 ml
Tarwemeel type
1050
170 g 260 g
Roggemeel 260 g 400 g
Zout ½ TL 1 TL
Kransvijgen fijn
gesneden
30 g 50 g
Walnootpitten
gehakt
30 g 50 g
Honing 1 TL 1½ TL
Droge zuurdesem ½ pakje ¾ pakje
Droge gist ½ pakje ¾ pakje
Programma: BASIS
Speltbrood
Stand I Stand II
Broodgewicht, ca: 620 g 940 g
Karnemelk 260 ml 400 ml
Speltvolkoren-
meel
150 g 230 g
Roggevolkoren-
meel
120 g 180 g
Gemalen
speltgraan grof
120 g 180 g
Zonnebloempitten 50 g 75 g
Zout ½ TL 1 TL
Suiker 1 TL 1 TL
Droge zuurdesem ½ pakje ¾ pakje
Droge gist ½ pakje ¾ pakje
Programma: VOLLKORN
Brood met roomkaas
Stand I Stand II
Broodgewicht,
ca:
530 g 800 g
Water of melk 130 ml 200 ml
Margarine/boter 20 g 30 g
Ei compleet 1 kleines 1
Zout ½ TL 1 TL
Suiker 1 TL 1 EL
Korrelige
roomkaas
80 g 125 g
Meel type 550 330 g 500 g
Droge gist ½ pakje ¾ pakje
Programma: SCHNELL
Pizzabrood
Stand I Stand II
Brotgewicht, ca. 610 g 920 g
Water 250 ml 375 ml
Olie 1 TLL 1 EL
Zout ½ TL 1 TL
Suiker ½ TL 1 TL
Oregano ½ TL ¾ TL
Parmezaanse
kaas
1 ½ EL 2 ½ EL
Maïsgries 65 g 100 g
Meel type 550 315 g 475 g
Droge gist ½ Pckg. ¾ Pckg.
Programm/e: SCHNELL
Rozijnenbrood
Stand I Stand II
Broodgewicht,
ca:
560 g 850 g
Water 180 ml 275 ml
Margarine/Boter 20 g 30 g
Zout 1 snufje ½ TL
Honing 1 TL 1 EL
Meel type 405 330 g 500 g
Kaneel ½ TL ¾ TL
Droge gist ½ pakje ¾ pakje
Rozijnen (of
gedroogd fruit)
50 g 75 g
Programma: SCHNELL/HEFEKUCHEN
Copyright UNOLD AG | www.unold.de

Stand 21.2.2020
97 von 168
DE
EN
FR
NL
IT
ES
PL
BRODEN UIT BAKMENGSELS
Het gebruik van moderne bakmengsels is heel simpel omdat vele bakmengsels de benodigde gist reeds bevatten. U moet slechts in
het begin enkele minuten tijd besteden:
1. Apparaat inschakelen.
2. Vocht invullen (ca. 300 ml per 500 g bakmengsel).
3. De overeenkomstige hoeveelheid bakmengsel toevoegen.
4. Indien nodig droge gist toevoegen (indien het bakmengsel deze niet bevat), 1 kleine UNOLD
®
maatlepel neemt 2,5 g droge gist op,
5. Het programma kiezen.
6. START drukken,
7. De rest doet de Backmeister
®
voor u.
BROOD VOOR MENSEN MET EEN ALLERGIE
Neem bij glutenvrij brood de volgende aanwijzingen in acht:
• Voor glutenvrij meel is meer vloeistof nodig dan glutenbevattend meel (400-500 ml lauwwarme vloeistof per 500 g meel).
• Om goede resultaten te verkrijgen moet aan glutenvrij meel een beetje olie of vet worden toegevoegd. U kunt olie, boter of ook
margarine gebruiken (10 tot 20 g).
• Als u brood van glutenvrij meel maakt, kunt u het programma niet vooraf programmeren. Het programmaverloop moet altijd meteen
gestart worden.
• Voor glutenvrij brood dat in de broodbakmachine gebakken wordt is minder gist nodig dan voor brood dat in de oven gebakken wordt.
Gebruik ca. 3,5 tot 5 g droge gist voor een standaard brood.
• Als het brood tijdens het bakken in het midden ineen zakt, reduceert u de hoeveelheid gist met ca. 1 g. Als het brood toch nog ineen
zakt, doet u een ei in een maatbeker en vult u de maatbeker met de benodigde hoeveelheid vloeistof op. Attentie: het ei niet extra aan
de hoeveelheid vloeistof toevoegen!
• De korst van glutenvrij brood wordt niet zo donker als de korst van glutenbevattend brood. Broodbakmachines mogen om
veiligheidsredenen geen bovenhitte hebben, zodat de bovenkant van het brood licht van kleur blijft. Om een mooiere kleur aan het
brood te geven, kunt u een eidooier met 1 tl room verroeren en het brood hiermee bestrijken, als het display als resterende verlooptijd
1:15 aangeeft.
• Verwijder na ca. acht minuten kneedtijd met behulp van een siliconen pannenlikker de resten van het meel resp. van het deeg van de
rand van de bakvorm. Als u bij een resttijd van 1:15 de deegrand nogmaals van de bakvorm verwijdert, blijft tijdens het bakken geen
dunne deegrand achter.
Voor personen, die allergisch zijn voor granen of die zich aan een bepaald dieet moeten houden hebben wij met verschillende meel-
mengsels, die ten dele op basis van maiszetmeel, rijstzetmeel of aardappelzetmeel vervaardigd zijn, baktests in onze Backmeister
®
uitgevoerd en hierbij goede resultaten behaald. Houd u bij het gebruik van bakmengels a.u.b. steeds aan de aanwijzingen op de verpak-
king. Wij hebben goede bakresultaten behaald met de producten van de firma Schär en de firma Hammermühle Diät GmbH. Bij vragen
over glutenvrije producten of overgevoeligheidsreacties kunt u direct contact opnemen met deze firma‘s
Hotline firma Schär Hotline Hammermühle
Duitsland Tel. +49 (0)8 00/1 81 35 37 Duitsland Tel. +49 (0) 63 21/9 58 90
Oostenrijk Tel. +43 (0)8 00/29 17 28
De noodzakelijke ingrediënten zijn verkrijgbaar in reformwinkels en biowinkels. De producten van de firma Hammermühle kunnen via
het bovengenoemde telefoonnummer direct bij de fabrikant besteld worden. Alle genoemde meelsoorten zijn geschikt voor koek, gebak
Copyright UNOLD AG | www.unold.de

98 von 168
Stand 21.2.2020
DE
EN
FR
NL
IT
ES
PL
en brood in het kader van een speciaal dieet voor bijzondere voeding (coeliakie/spruw). Ook bij toevoeging van grotere hoeveelheden
van gist, resp. wijnsteenbakpoeder blijven de broden die in de Backmeister
®
werden gebakken, relatief vast.
Doe de ingrediënten in de bakvorm. Selecteer de volgende programma‘s:
voor het bereiden van brood
“GLUTENFREI“
voor het bereiden van deeg, die u verder wilt verwerken: programma „TEIG“
voor het bereiden van brood met bakpoeder of wijnsteen als rijsmiddel: programma „BACKPULVER“
CAKE - BASISRECEPT
De Backmeister
®
kunt u cake van roerdeeg bakken. Omdat het apparaat met kneeden niet met roerwerktuigen werkt, wordt de cake een
beetje steviger. Aan het basisrecept kunt u verschillende ingrediënten toevoegen. Wanneer de cake gereed gebakken is, neemt u de
broodvorm uit het apparaat. Plaats de broodvorm op een vochtige doek en laat de cake nog ongeveer 15 minuten in de vorm helemaal
afkoelen. Dan kunt u de cake met een rubberen deegkrabber aan de zijkanten van de bakvorm gemakkelijk losmaken en voorzichtig
omdraaien.
Ingrediënten voor een gewicht van ca. 700 g
Eieren 3
Zachte boter 100 g
Suiker 100 g
Vanillesuiker 1 pakje
Meel type 405 300 g
Bakpoeder 1 pakje
Geraspte noten 50 g
Of: geraspte chocolade 50 g
Of: kokosvlokken 50 g
Of: geschilde en in
blokjes gesneden (1cm)
appel
50 g 50 g
Programma: BACKPULVER
Schär donker blikbrood
Ingrediënten Klein brood Groot brood
Broodmix donker 375 g 500 g
Olie 4 g 6 g
Droge gist 1 zakje (7 g) 10 g
Water, lauwwarm 470 ml 630 ml
Zout ¾ tl 1 tl
Naar smaak toe te voegen:
karwij of 2 tl 3 tl
walnoten of 50 g 75 g
gebakken uien of 50 g 75 g
spekblokjes of 50 g 75 g
lijnzaad 1 el 1 ½ tl
Copyright UNOLD AG | www.unold.de

Stand 21.2.2020
99 von 168
DE
EN
FR
NL
IT
ES
PL
DEEGBEREIDING
In uw Backmeister
®
kunt u op eenvoudige wijze deeg bereiden, dat u dan vervolgens verder kunt verwerken en in de bakoven kunt
bakken. U kunt het programma Deeg nemen (zie ook tabel „Tijdschema van de programma’s“). In beide programma‘s kan men tijdens
het tweede kneden, wanneer de pieptoon te horen is, ingrediënten toevoegen. Bij het programma Deeg bestaan er geen verschillende
standen voor het bakken.
Volkorenpizza
Ingrediënten voor ongeveer 2 pizza’s
Water 150 ml
Zout ½ TL
Olijfolie 2 EL
Tarwevolkorenmeel 300 g
Tarwekiemen 1 EL
Droge gist ½ pakje
Deeg uitrollen, in een ronde vorm doen en gedurende 10minuten
laten rijzen. Pizzasaus op het deeg uitstrijken en gewenste
garnering erop verdelen. Gedurende 20minuten bakken.
Programma: TEIG
Kerstbrood
Gewicht 750 g
Melk 100 ml
Boter gesmolten 100 g
Ei 1
Rum 2 EL
Meel type 405 375 g
Suiker 75 g
Sukade 40 g
Gekonfijte
sinaasappelschil
20 g
Amandelen gemalen 40 g
Sultanarozijnen 75 g
Zout 1 snufje
Kaneel 2 snufjes
Droge gist 2 snufjes
Het deeg uit de broodvorm nemen, in de vorm van kerststollen
drukken. Bij 180 °C (heteluchtoven 160 °C) gedurende circa
1 uur bakken.
Programma: TEIG
CONFITUREN BEREIDEN
Confituren of jam kunnen in de Backmeister
®
snel en eenvoudig klaargemaakt worden. Ook wanneer u nog nooit voorheen confituren
of jam gemaakt heeft, moet u het eens een keertje proberen. Als u met het apparaat ook confituren wilt maken, adviseren wij u voor
brood en confituren telkens een eigen bakvorm te gebruiken, omdat de broden door de zuren die er ontstaan niet meer zo goed uit de
vorm gehaald kunnen worden.
1. Verse, rijpe vruchten wassen. Appels, perziken, peren en andere vruchten met een harde schil eventueel schillen.
2. Neem steeds de aangegeven hoeveelheden, omdat deze nauwkeurig op het programma Confituren afgestemd zijn. Anders zal de
massa te vroeg koken en overlopen. De vruchten in kleine stukken (max 1 cm) snijden of pureren.
3. De geleisuiker „2:1“ in de aangegeven hoeveelheid toevoegen. Gelieve uitsluitend deze geleisuiker en geen huishoudsuiker of
geleisuiker „1:1“ te gebruiken omdat de confituur dan niet vast wordt. Meng de vruchten met de suiker en start het programma,
dat nu volledig automatisch verloopt.
4. Na 1 uur en 20 minuten piept het apparaat en kunt u de confituur in potjes vullen en deze goed afsluiten.
Copyright UNOLD AG | www.unold.de

100 von 168
Stand 21.2.2020
DE
EN
FR
NL
IT
ES
PL
GARANTIEVOORWAARDEN
VERWIJDEREN VAN AFVAL / MILIEUBESCHERMING
Wij geven op onze apparaten een garantietermijn van 24 maanden (12 maanden bij commerciële gebruik), gerekend
vanaf de dag van aanschaf. Deze garantie geldt voor schade, die bij correct gebruik aantoonbaar is veroorzaakt door een
fout in de productie. Binnen de garantietermijn verhelpen wij materiaal- en productiefouten door herstelling of vervanging
naar onze keuze. Onze garantie is slechts geldig voor in Duitsland en Oostenrijk verkopte apparaten. In andere landen
a.u.b. de importeur aanspreken. Apparaaten, waarvoor garantie in aanspraak wordt genomen, moeten ons samen met een
kopie van de machineel gegenereerde kassabon waaruit de koopdatum duidelijk wordt, alsmede een beschrijving van de
fout goed verpakt aan onze klantenservice worden toegezonden. U kunt een retourbon afdrukken op onze website www.
unold.de/ruecksendung. (alleen voor inzendingen uit Duitsland en Oostenrijk). De garantie dekt geen schade veroorzaakt
door slijtage, onbehoorlijk gebruik/foutieve handelingen en niet-naleving van de onderhouds- en reinigingsaanwijzingen.
Het recht op garantie vervalt, wanneer reparaties of manipulaties aan het apparaat door derden worden doorgevoerd.
Eventuele rechten van de eindgebruiker t.o.v. de verkoper of distributeur worden door deze garantie niet aangetast.
Onze apparaten zijn geproduceerd met een hoge qualiteit voor een lange gebruik. Regelmatige onderhoud
en vakkundig reparaties door onze klantenservice verlengt de gebruiksduur. Wanneer het apparat defekt is
en kan niet meer gerepareerd worden, let op de volgende instructies. Dit product mag niet samen met het
normale huishoudelijke afval worden afgevoerd. U dient dit product bij een voor het recycleren van elek-
trische of elektronische apparaten aangewezen verzamelplaats in te leveren. Door het separaat inzamelen
en recycleren van afvalproducten helpt u mee bij het zuinig omgaan met de natuurlijke hulpbronnen en
zorgt u ervoor dat het product op een gezondheidsen milieuvriendelijke manier afgevoerd wordt.
Aardbeienconfituur
Verse aardbeien gewassen,
schoongemaakt en
kleingesneden of gepureerd
600 g
Geleisuiker „2:1“ 400 g
Citroensap 1-2 TL
Alle ingrediënten in de broodvorm met een rubberen
krabber dooreenmengen.
Programma „Confituren“ kiezen en starten.
Suikerresten met een spatel van de zijwanden van de
broodvorm verwijderen.
Wanneer het signaal weerklinkt, de broodvorm met
pannenlap uit het apparaat nemen
De confituur in potjes vullen en deze goed afsluiten.
Programma: KONFITÜRE
Sinaasappeljam
Sinaasappelen geschild en in
kleine stukjes gesneden
600 g
Citroenen geschild en in
kleine stukjes gesneden
50 g
Geleisuiker „2:1“ 400 g
Sinaasappelen en citroenen schillen en in stukjes snijden.
Suiker toevoegen en alle ingrediënten in de bak dooreen-
mengen.
Programma KONFITÜRE kiezen en starten.
Met een rubberen spatel suikerresten van de zijkanten van
de bak verwijderen.
Wanneer het signaal weerklinkt, de bak met een pannenlap
uit het apparaat nemen.
De jam in potjes vullen en deze goed afsluiten.
Programma’s: KONFITÜRE
Copyright UNOLD AG | www.unold.de

Stand 21.2.2020
101 von 168
DE
EN
FR
NL
IT
ES
PL
Potenza: 550 W, 220–240 V~, 50 Hz
Misure: circa 24,7 x 36,2 x 29,1 cm (lung./largh./alt.)
Peso: circa 4,4 kg
Capacità:
700 – 1.000 g di pane
Cavo di alimentazione: circa 80 cm montato in maniera fissa
Corpo: Plastica
Dotazioni: 12 programmi memorizzati, un programma personale, selettore per 3 diversi pesi del pane, selettore
del grado di doratura, temporizzatore programmabile con massimo 13 ore di anticipo, tenuta in caldo
automatica
Accessori: Cestello asportabile con rivestimento, pala impastatrice, misurino a bicchiere, misurino a cucchiaio,
gancio, istruzioni per l‘uso con ricettario
Con riserva di modifiche ed errori relativi a caratteristiche delle dotazioni, tecnica, colore e design
ISTRUZIONI PER L‘USO MODELLO 68010
AVVERTENZE DI SICUREZZA
SPECIFICHE TECNICHE
Si raccomanda di leggere e conservare le
presenti istruzioni.
1. Questo apparecchio può essere utilizzato
da bambini a partire dagli 8 anni di età e
da persone che presentano ridotte capacità
fisiche, sensoriali o mentali o che difettano
della necessaria esperienza e/o conoscenze
solo se adeguatamente sorvegliati o addestrati
sull’uso in sicurezza dell’apparecchio e se a
conoscenza dei rischi correlati.
2. I bambini non devono giocare con
l’apparecchio.
3. La pulizia e la manutenzione dell’utente non
devono essere eseguite da bambini, a meno
che non abbiano più di 8 anni e non vengano
sorvegliati.
4. Conservare l’apparecchio e il cavo fuori dalla
portata dei bambini di età inferiore agli 8
anni.
5. CAUTELA - Parti di questo prodotto possono
essere molto calde e causare ustioni! In
presenza di bambini e persone a rischio usare
la massima cautela.
6. I bambini devono essere sorvegliati per
accertarsi che non giochino con l’apparecchio.
7. Conservare l‘apparecchio fuori dalla portata
dei bambini.
8. Collegare l’apparecchio soltanto a corrente
alternata con la tensione indicata nella
targhetta.
SIGNIFICATO DEI SIMBOLI
Questo simbolo segnala possibili pericoli in grado di provocare lesioni a persone o danni all‘apparecchio.
Questo simbolo indica un possibile pericolo di ustioni. In presenza di questo simbolo agire sempre con la massima
cautela.
Copyright UNOLD AG | www.unold.de

102 von 168
Stand 21.2.2020
DE
EN
FR
NL
IT
ES
PL
9. Questo apparecchio non deve essere
comandato tramite un timer esterno o un
sistema di telecomando.
10. Non immergere mai l‘apparecchio o il cavo di
alimentazione in acqua o altri liquidi.
11. L’ apparecchio non è idoneo per il lavaggio in
lavastoviglie.
12. Non toccare mai né l‘apparecchio né il cavo di
alimentazione con le mani bagnate.
13. Quando l‘apparecchio è inutilizzato, nonché
prima della pulizia, spegnerlo e staccare la
spina dalla presa elettrica. Prima di asportare
i singoli componenti lasciar raffreddare
l‘apparecchio.
14. Staccare il cavo di alimentazione dalla presa
elettrica sempre mediante la spina, mai
tramite il cavo.
15. Non trasportare l‘apparecchio per il cavo di
collegamento.
16. Usare l‘apparecchio solo in interni.
17. L‘utilizzo di accessori non raccomandati
dal produttore può causare danni. Usare
l‘apparecchio soltanto per lo scopo previsto.
18. Posizionare l‘apparecchio di modo che non
possa scivolare dal piano di lavoro, ad es.
quando impasta una pasta pesante. Ciò
va tenuto presente in particolare in caso di
partenza differita tramite temporizzazione
quando l‘apparecchio lavora incustodito. Se i
piani di lavoro sono molto lisci l‘apparecchio
va collocato su un tappetino in gomma sottile,
al fine di prevenire rischi di scivolate.
19. L’apparecchio è progettato esclusivamente
per l’uso domestico o impieghi similari, ad es.
in aree cucina di negozi, uffici o altri luoghi
di lavoro,
aziende agrituristiche,
per l‘uso da parte degli ospiti di hotel, motel
o altre strutture ricettive,
in pensioni private o case di vacanza.
20. Quando è in funzione il Backmeister
®
deve
trovarsi ad una distanza di almeno 10 cm
dagli altri oggetti. Usare l‘apparecchio solo
all‘interno di edifici.
21. Fare in modo che il cavo non tocchi alcuna
superficie calda e non penda dal bordo di
tavoli, di modo che ad es. i bambini non
possano strattonarlo.
22. Non appoggiare mai l‘apparecchio su o accanto
a fornelli a gas o elettrici o su un forno caldo.
23. Nello spostare l‘apparecchio pieno di
ingredienti caldi è richiesta la massima
prudenza.
24. Non estrarre mai il cestello ad apparecchio in
funzione.
25. Non riempire il cestello con quantità di
ingredienti superiori a quelle indicate, in
particolare non per il pane bianco. Così
facendo, infatti, il pane non cuoce in maniera
uniforme oppure l‘impasto trabocca. Osservare
le nostre avvertenze in merito.
26. La prima volta che si sperimenta una nuova
ricetta è meglio rimanere nei paraggi della
macchina a sorvegliare il processo.
27. Non lasciar mai surriscaldare l‘apparecchio a
cestello non inserito.
28. Non trasportare il dispositivo dalla maniglia.
La maniglia è progettato esclusivamente per
l‘apertura e chiusura del dispositivo.
29. Per sformare il pane non sbattere mai il
cestello contro spigoli o piani di lavoro, in
quanto così facendo lo si danneggia.
30. Nell‘apparecchio non devono mai venir
introdotte pellicole metalliche o altri materiali,
in quanto ciò crea il rischio di incendi o
cortocircuiti.
31. Non coprire mai l‘apparecchio con stracci
o altri materiali. Calore e vapore devono
infatti poter essere dissipati e fuoriuscire. Se
l‘apparecchio è coperto o entra in contatto con
materiale infiammabile, come ad es. tende,
può scoppiare un incendio.
32. Prima di preparare un determinato tipo di pane
di notte, sperimentare la ricetta per accertarsi
Copyright UNOLD AG | www.unold.de

Stand 21.2.2020
103 von 168
DE
EN
FR
NL
IT
ES
PL
ATTENZIONE:
Durante il funzionamento l‘apparecchio diventa molto caldo!
Non aprire mai la scocca dell‘apparecchio. Pericolo di scossa elettrica.
Il fabbricante non si assume alcuna responsabilità per montaggi errati, utilizzi errati o inadeguati o per riparazioni eseguite da terzi non
autorizzati.
MESSA IN FUNZIONE
1. Nello sballare l‘apparecchio verificare che tutti i
componenti siano presenti e integri.
2. Prima del primo utilizzo estrarre dall‘interno
dell‘apparecchio tutti i materiali da imballo e i
componenti spediti alla rinfusa. Tenere il materiale da
imballo fuori dalla portata dei bambini – pericolo di
soffocamento!
3. Prima del primo impiego lavare brevemente con acqua
calda e detersivo delicato sia il cestello che la pala
impastatrice della Backmeister
®
. Per fare ciò aprire
il coperchio della Backmeister
®
ed estrarre il cestello
ruotandolo verso sinistra in senso antiorario.
4. Strofinare l‘apparecchio con un panno umido ben
strizzato. L‘apparecchio non deve mai essere immerso
in acqua.
5. Asciugare bene tutti i componenti. Inserire il cestello
nella macchina.
6. Quindi introdurre la spina in una presa elettrica.
Accendere l‘apparecchio. A questo punto l‘apparecchio
è pronto a funzionare.
7. Dato che al primo riscaldamento può sprigionarsi del
fumo, la prima volta raccomandiamo di mettere in
funzione l‘apparecchio con il cestello inserito ma vuoto
(senza pala impastatrice) nel programma COTTURA,
in modo da eliminare eventuali residui presenti sulle
serpentine di riscaldamento.
8. Lasciar raffreddare l’apparecchio per qualche tempo.
9. Quindi è possibile iniziare a preparare il pane.
che il rapporto reciproco tra gli ingredienti sia
corretto, la pasta non sia troppo dura o troppo
molle o la quantità eccessiva in quanto in
questo caso potrebbe traboccare.
33. Non aprire mai la scocca dell‘apparecchio.
Sussiste il pericolo di scosse elettriche.
34. Controllare regolarmente la spina e il cavo
di alimentazione per verificare che non
vi siano usura o danni. In caso di danni al
cavo di collegamento o ad altre parti, inviare
l’apparecchio al nostro Servizio clienti per
il controllo e la riparazione. Riparazioni
inadeguate possono comportare notevoli
pericoli per l‘utente e causare l‘esclusione
dalla garanzia.
PRIMI PASSI - IL PRIMO PANE
1. Preparare l‘apparecchio come illustrato nel capitolo
„Messa in funzione“.
2. Aprire il coperchio della Backmeister
®
ed estrarre il
cestello ruotandolo verso sinistra in senso antiorario.
3. Spalmare attorno al foro della pala impastatrice uno
spesso strato di margarina resistente al calore, di
modo che la pasta non possa penetrare nella cavità e
qui solidificarsi.
Copyright UNOLD AG | www.unold.de

104 von 168
Stand 21.2.2020
DE
EN
FR
NL
IT
ES
PL
4. Infilare la pala impastatrice sull‘albero motore
nel cestello. Prestare attenzione a inserire la pala
impastatrice nella giusta direzione, in quanto
altrimenti il rivestimento può venir danneggiato.
5. Versare nel cestello gli ingredienti indicati nella ricetta.
Per gli impasti pesanti un risultato ottimale può essere
ottenuto modificando la sequenza degli ingredienti,
ossia mettendo prima i secchi e poi i liquidi. Se si usa
la funzione di temporizzazione fare attenzione che il
lievito non entri in contatto con il liquido anzitempo.
6. Rimettere il cestello nell‘apparecchio girandolo in
senso orario finché scatta in posizione.
7. Chiudere il coperchio della Backmeister
®
.
8. Inserire la spina in una presa elettrica.
9. Selezionare il programma desiderato tramite il tasto
„MENU“. Premere questo tasto finché il numero di
programma desiderato (ad es. 1 per il programma
base) è visualizzato sul display. Informazioni sui
singoli programmi sono fornite da pagina 106. Per
un pane fatto con miscela per pane standard, buoni
risultati si ottengono ad es. con il programma „Base“.
10. Selezionare il grado di doratura desiderato tramite il
tasto DORATURA (chiara – media – scura). Si tenga
presente che non in tutti i programmi è possibile
selezionare il grado di doratura. Indicazioni in merito
sono fornite da pagina 106 in poi.
11. Selezionare le dimensioni del pane desiderate tramite
il tasto DIMENSIONI PANE. Si tenga presente che
non per tutti i programmi è possibile selezionare le
dimensioni del pane. Indicazioni in merito sono fornite
a pagina 106.
12. Dopo aver effettuato tutte le impostazioni desiderate
premere il tasto START/STOP. Attenzione: Se si
desidera interrompere il programma, è possibile farlo
con il tasto START/STOP. Per ragioni di sicurezza,
il tasto START/STOP reagisce con un certo ritardo.
Pertanto è normale che l‘apparecchio non reagisca
immediatamente alla pressione del tasto, bensì soltanto
dopo alcuni secondi. Attendere che la pressione del
tasto sia confermata da un segnale acustico (dopo
circa 3 secondi). Si raccomanda di non premere
ripetutamente il tasto.
13. Quando la cottura del pane è terminata, la Backmeister
avvisa mediante segnali acustici ripetuti che il pane
può essere sformato. Se si desidera sformare il pane
prima che sia trascorso il tempo di tenuta in caldo,
premere il tasto START/STOP e tenerlo premuto per
qualche istante finché l‘interruzione del programma è
confermata da un apposito segnale.
14. Estrarre il cestello con cautela. Per evitare ustioni,
usare presine idonee. Capovolgere il cestello e lasciar
scivolare il pane su una gratella per farlo raffreddare.
Se il pane non scende subito da solo sulla gratella,
smuovere alcune volte dal basso l‘azionamento
della pala impastatrice finché il pane scivola fuori.
Fare attenzione in quanto l‘azionamento della pala
impastatrice può essere ancora caldo. Anche in questo
caso usare presine idonee. Il cestello non va mai
sbattuto contro spigoli o piani di lavoro. Così facendo
potrebbe infatti deformarsi.
15. Se la pala impastatrice rimane incastrata nel pane
può essere staccata con il gancio fornito in dotazione.
Introdurre il gancio lungo il lato inferiore del pane
ancora caldo fino all‘apertura della pala impastatrice
e inclinare il gancio sul bordo inferiore della pala,
preferibilmente nel punto in cui questa si trova.
Quindi, con il gancio, tirare cautamente verso l‘alto la
pala impastatrice. Così facendo è possibile vedere in
che punto del pane si trova la pala ed estrarla.
16. Quindi pulire il cestello come illustrato a pagina 108.
ATTENZIONE:
Durante il funzionamento l‘appa-
recchio diventa molto caldo!
Copyright UNOLD AG | www.unold.de

Stand 21.2.2020
105 von 168
DE
EN
FR
NL
IT
ES
PL
SPIEGAZIONE DEI SIMBOLI
Menu
Il numero
visualizzato
indica il menu
attualmente
selezionato.
Doratura
Il grado di doratura
selezionato è indi-
cato sul display da
un trattino.
Tasto Start/Stop
Serve ad avviare e a
terminare l‘esecu-
zione del program-
ma
Selezione
tempo +
Aumento
del tempo
desiderato
Selezione
tempo -
Diminuzione
del tempo
desiderato
Dimensioni
pane
Scelta delle
dimensioni
del pane
desiderato
Impostazione base:
Non appena la spina è inserita in una presa elettrica il display
visualizza 3:00 (i due punti tra le cifre non lampeggiano). La
frecce indicano BASIS/Base, Stufe/Livello II e Bräunung mittel/
Doratura media. In questo modo è indicata la condizione di pron-
to a funzionare. Durante l‘esercizio lo stato del programma può
essere compreso sia dal conto alla rovescia del tempo che dalle
indicazioni del display.
Tasto START/STOP
Serve ad avviare e terminare la sequenza del programma. Con
il tasto START/STOP è possibile interrompere il programma in
qualunque posizione. Tenere premuto il tasto finché si sente un
segnale acustico. Sul display compare la posizione iniziale del
programma base. Se si vuole usare un altro programma, selezio-
narlo con il tasto Menü.
ZEIT/Temporizzazione
Usare la funzione di temporizzazione solo per ricette già speri-
mentate con successo sotto sorveglianza e quindi non modificare
più tali ricette.
CAUTELA: Se la quantità di pasta è eccessiva questa può traboc-
care e bruciarsi aderendo all‘elemento riscaldatore.
I programmi possono essere avviati con differimento temporale.
Esempio:
Sono le ore 20:00 e vuole avere del pane bianco fresco pronto per
le 7:00 del mattino successivo.
Inserire la pala impastatrice. Mettere gli ingredienti nel cestello
nella sequenza indicata e quindi introdurre il cestello nell‘appa-
recchio. Fare attenzione che il lievito non entri a contatto con il
liquido.
Con il tasto Menü selezionare il programma desiderato, impostare
il livello/Stufe richiesto e con il tasto BRÄUNUNG scegliere la
doratura preferita. Nell‘esempio viene usato il programma 1 = Ba-
sis/Base. Il programma termina alle 7 del mattino. Quindi inizia il
tempo di tenuta in caldo di 1 ora.
Pertanto per poter avere il pane fresco caldo alle 7:00 del mat-
tino, la sera alle 20:00 si deve aumentare di 11 ore il tempo del
programma premendo ripetutamente il tasto ZEIT/Tempo. Ciò si
SPIEGAZIONI SUL PANNELLO COMANDI
Copyright UNOLD AG | www.unold.de

106 von 168
Stand 21.2.2020
DE
EN
FR
NL
IT
ES
PL
effettua premendo il tasto ZEIT/Tempo a intervalli di 10 minuti
ciascuno.
Al termine premere il tasto START/STOP per avviare il programma
di panificazione con il differimento temporale. Nota bene:
Quando si esegue la panificazione con differimento temporale
non usare ingredienti facilmente deperibili, come latte, uova,
frutta, yogurt, cipolle ecc.
Il segnale acustico a 10 toni, che segnala il momento per l‘ag-
giunta degli ingredienti nonché la fine del programma, non può
essere disattivato e quindi si sente anche di notte.
MENÜ/MENU
Con il tasto Menü/Menu si richiamano i singoli programmi det-
tagliatamente descritti nella Tabella „Sequenza temporale“. Si
utilizzano i programmi per le seguenti preparazioni:
BASIS/Base Programma standard per tutti i tipi di
pani, come ad es. pani bianchi e misti
WEISSBROT/Pane
bianco
Per pani bianchi con consistenza
particolarmente leggera e tempo di
lievitazione lungo
VOLLKORN/
Integrale
Per pani integrali
SCHNELL/Rapido Per la preparazione rapida di pane
bianco e misto
HEFEKUCHEN/
Dolci
Per la preparazione di paste lievitate
dolci
ULTRA
IUltra-rapido
Per tutte le ricette del livello I, che
possono essere preparate nei program-
mi Basis/Base, Weißbrot/Pane bianco,
Schnell/Rapido o Toastbrot/Pane per
toast. Nel programma Ultra-Schnell/Ul-
tra-rapido la pasta lievita per un tempo
molto minore e quindi i pani sono più
compatti e meno leggeri.
Per questo programma utilizzare liquidi
tiepidi.
KONFITÜRE
CONFETTURA
Per cuocere confetture e marmellate.
Per la preparazione di confetture ci si
dovrebbe procurare un secondo cestello
da usare esclusivamente per queste.
TEIG/Impasto Per la preparazione di paste, senza fun-
zione di cottura
GLUTENFREI
[senza glutine]
Programma standard per tutti i pani
senza glutine
BACKPULVER/Torte Per prodotti da forno preparati con lievi-
to in polvere, ad es. torte
TOASTBROT/Pane
per toast
Per la preparazione di pane per toast
BACKEN/Cottura Per la cottura di paste lievitate o torte
preparate separatamente (a mano o
nel programma TEIG/Impasto). Questo
programma è non idoneo per pasta
frolla, pasta da bigné e simili.
Nei programmi BASIS/Base, WEISSBROT/Pane bianco,
VOLLKORN/Integrale, HEFEKUCHEN/Dolci, TOASTBROT/Pane
per toast e Glutenfrei, durante il secondo processo di impasto
vengono inviati dei segnali acustici indicanti il momento in cui
possono essere aggiunti altri ingredienti come noci, frutta secca
ecc. Aprire il coperchio e aggiungere gli ingredienti. Quindi ri-
chiudere il coperchio.
BRÄUNUNG/Crosta
Con questo tasto in tutti i programmi 1 - 6 + 9 - 12, è pos-
sibile impostare la doratura su HELL/Chiara - MITTEL/Me-
dia - DUNKEL/Scura. L‘impostazione è riconoscibile dalla
freccia sul display.
BROTGRÖSSE/Livello
Con questo possono essere impostati diversi programmi:
STUFE I = per peso del pane più piccolo (circa 700 g)
STUFE II = per peso del pane più grande (circa 1.000 g)
Si osservi che il livello può essere impostato soltanto nei program-
mi 1, 2, 3, 5, 9, 11. Nelle ricette sono riportati i nostri consigli
in merito.
ATTENZIONE:
Durante il funzionamento l‘appa-
recchio diventa molto caldo!
Copyright UNOLD AG | www.unold.de

Stand 21.2.2020
107 von 168
DE
EN
FR
NL
IT
ES
PL
FUNZIONI DEL BACKMEISTER
Funzione cicalino
Il cicalino suona
all‘accensione dell‘apparecchio,
quando vengono premuti i tasti Menü/Menu o Zeitwahl/tem-
porizzazione.
Quale conferma alla pressione dei tasti di programma attivi.
Durante il secondo impasto, per indicare che possono
essere aggiunti cereali, frutta, noci o altro. Non può essere
disinserito, nemmeno ad es. quando si usa la funzione di
temporizzazione.
Alla fine del tempo di cottura è inviato un segnale acustico
multiplo indicante che il programma è terminato e il pane
può essere estratto dal cestello. A questo punto ha inizio la
fase di tenuta in caldo.
Al termine del tempo di tenuta in caldo è inviato un segnale
acustico multiplo indicante che il programma è terminato e
il pane può essere estratto dal cestello.
La funzione cicalino non può essere disinserita, ad es. quando si
utilizza la funzione di temporizzazione.
Protezione dalle interruzioni dell‘energia elettrica
Se durante il funzionamento del Backmeister
®
si verifica un‘in-
terruzione dell‘energia elettrica l‘apparecchio si riavvia automa-
ticamente non appena la corrente è ripristinata riprendendo la
sequenza da dove era stata interrotta purché l‘interruzione non
sia durata più di 10 minuti.
Se l‘interruzione dura più di 10 minuti e il display visualizza
l‘impostazione base, il Backmeister
®
deve venir riavviato. Ciò è
fattibile soltanto se al momento dell‘interruzione della sequenza
del programma la pasta era in una fase non successiva a quella di
impasto. Eventualmente può essere utile proseguire la sequenza
di programma selezionata con l‘ausilio del programma personale.
Qualora la pasta sia già nell‘ultima fase di lievitazione e l‘interru-
zione dell‘energia elettrica si protragga a lungo la pasta non è più
utilizzabile e bisogna ricominciare da capo.
Funzioni di sicurezza
Dopo l‘avvio del programma il coperchio dovrebbe essere aperto
soltanto durante la fase di impasto per aggiungere degli ingre-
dienti, mai durante le fasi di lievitazione e cottura in quanto altri-
menti la pasta si sgonfia.
Se la temperatura nell‘apparecchio è ancora troppo alta per un
nuovo programma selezionato al riavvio il display visualizza “H
HH”. In questo caso, estrarre il cestello e attendere che l‘ap-
parecchio si sia raffreddato e si trovi nuovamente all‘inizio del
programma originariamente scelto.
Si osservi che, per ragioni di sicurezza, l‘apparecchio non dispone
di un riscaldamento superiore e pertanto sul lato superiore del
pane la crosta è meno scura che non sotto e sui lati. Per ragioni
tecniche di sicurezza non è ammesso un riscaldamento aggiunti-
vo nella zona del coperchio.
Se dopo aver premuto il tasto START/STOP il display visualizza
“E rr”, vi è un guasto del controllo della temperatura. Inviare l‘ap-
parecchio al nostro Servizio clienti per il controllo e l‘eventuale
riparazione.
PREPARAZIONE DI PANE, DOLCI O PASTA
1. Introduzione degli ingredienti
Spalmare attorno al foro della pala impastatrice uno spesso strato
di margarina termoresistente, di modo che la pasta non possa
penetrare nella cavità e qui solidificarsi. Montare la pala impa-
statrice con il lato lungo rivolto verso il basso sull‘albero motore.
Gli ingredienti devono essere introdotti nel cestello nella sequen-
za indicata dalla relativa ricetta.
Per le paste molto pesanti consigliamo di modificare la sequenza
degli ingredienti e di introdurre prima il lievito secco e la farina e
il liquido per ultimo, in modo che la pasta possa venir impastata
bene. Tuttavia quando si usa la funzione di temporizzazione oc-
corre accertarsi che il lievito non entri in contatto con il liquido
anzitempo.
2. Inserimento del cestello
Afferrare il cestello con rivestimento antiaderente per il bordo e
inserirlo, leggermente inclinato, al centro dello zoccolo del vano
cottura. Girare in senso orario finché scatta in posizione.
3. Selezione della sequenza di programma
Con il tasto Menü selezionare la sequenza di programma. Selezio-
nare il livello e la doratura desiderata a seconda del programma.
Copyright UNOLD AG | www.unold.de

108 von 168
Stand 21.2.2020
DE
EN
FR
NL
IT
ES
PL
Con il tasto ZEIT è possibile differire nel tempo la sequenza. Pre-
mere il tasto START/STOP. Una successiva correzione non è più
possibile.
4. Mescolamento e impasto della pasta
Il Backmeister
®
mescola e impasta automaticamente la pasta fin-
ché assume la consistenza corretta.
5. Tempo di riposo
Dopo il primo processo di impasto è previsto un tempo di ripo-
so, in cui il liquido può penetrare lentamente nel lievito e nella
farina.
6. Lievitazione della pasta
Dopo l‘ultimo impasto il Backmeister
®
instaura la temperatura
ottimale per la lievitazione della pasta.
7. Cottura
La macchina per il pane regola automaticamente la temperatura
e il tempo di cottura.
8. Tenuta in caldo
Quando il prodotto da forno è pronto un segnale acustico multiplo
indica che il pane o altro può essere sformato. Contemporanea-
mente ha inizio un tempo di tenuta in caldo di 1 ora. Se si desi-
dera sformare il pane prima che sia trascorso il tempo di tenuta
in caldo, premere e tenere premuto per qualche istante il tasto
START/STOP finché l‘interruzione del programma è confermata
da un apposito segnale acustico.
9. Fine della sequenza del programma
Al termine della sequenza del programma estrarre il cestello gi-
randolo leggermente in senso orario e servendosi di presine.
Capovolgere il cestello e lasciar scivolare il pane su una gratella
per farlo raffreddare. Se il pane non scende subito da solo sul-
la gratella, smuovere alcune volte dal basso l‘azionamento della
pala impastatrice finché il pane scivola fuori. Il cestello non va
mai sbattuto contro spigoli o piani di lavoro. Così facendo potreb-
be infatti deformarsi.
Se la pala impastatrice rimane incastrata nel pane può essere
staccata con il gancio fornito in dotazione. Introdurre il gancio
lungo il lato inferiore del pane ancora caldo fino all‘apertura della
pala impastatrice e inclinare il gancio sul bordo inferiore della
pala, preferibilmente nel punto in cui questa si trova. Quindi, con
il gancio, tirare cautamente la pala impastatrice verso l‘alto. Così
facendo è possibile vedere in che punto del pane si trova la pala
ed estrarla.
Dopo che tutti i punti del programma sono stati eseguiti si racco-
manda di premere il tasto „Start/Stop“ di modo che l‘apparecchio
torni nella condizione iniziale.
Prima di procedere alla
pulizia staccare sempre
la spina.
Lasciar raffreddare
sempre l‘apparecchio per
almeno mezz‘ora prima di
pulirlo o riporlo oppure
prima di riutilizzarlo
per preparare e cuocere
paste.
1. Prima del primo impiego lavare i cestelli della Backmeister
®
con un detersivo delicato e pulire la pala impastatrice. Prima
di essere reinseriti nell‘apparecchio i componenti devono
essere perfettamente asciutti.
2. Rimuovere tutti gli ingredienti e le briciole dal coperchio,
la scocca e camera di cottura con un panno umido. Non
immergere mai l‘apparecchio in acqua e non versare mai
acqua nella camera di cottura.
3. Strofinare l‘esterno del cestello con un panno umido.
Internamente il cestello può essere lavato con un po‘ di
detersivo. Si raccomanda di non tenerlo a lungo sott‘acqua.
Usare solo detersivi delicati, mai detergenti chimici, benzina,
pulitori per forni o prodotti abrasivi.
PULIZIA E CURA
Copyright UNOLD AG | www.unold.de

Stand 21.2.2020
109 von 168
DE
EN
FR
NL
IT
ES
PL
4. Il cestello e la pala impastatrice non devono essere lavati in
lavastoviglie.
5. Sia la pala impastatrice che l‘albero motore andrebbero lavati
immediatamente dopo l‘utilizzo. Se la pala impastatrice
rimane nel cestello, dopo diventa difficile da togliere. In
questo caso mettere dell‘acqua calda nel cestello e lasciarcela
per circa 30 minuti. Quindi la pala impastatrice può essere
tirata fuori.
6. Il cestello è dotato di un rivestimento antiaderente di pregio
Whitford
®
. Pertanto per la pulizia non usare oggetti metallici
che potrebbero graffiarne la superficie. E‘ normale che il
colore del rivestimento cambi con il tempo. Tuttavia ciò non
ne pregiudica in alcun modo la funzionalità.
7. Per un uso frequente il cestello e la pala impastatrice
sono soggetti a usura causata dalle elevate sollecitazioni
meccaniche che si creano nella fase di impasto, in particolare
se si lavorano paste integrali o con una quota di cereali
elevata. Pertanto di tanto in tanto può rendersi necessaria
una sostituzione del cestello e della pala impastatrice. Questi
componenti possono essere ordinati al nostro Servizio clienti
8. Prima di riporre l‘apparecchio per la conservazione assicurarsi
che sia completamente raffreddato, pulito e asciutto.
Conservare l‘apparecchio a coperchio chiuso.
Copyright UNOLD AG | www.unold.de

110 von 168
Stand 21.2.2020
DE
EN
FR
NL
IT
ES
PL
1 2 3 4 5
BASIS Weissbrot Vollkorn Schnell HEFEKUCHEN
Base Pane bianco Integrale Rapido Dolci
Peso pane
selezionabile
ST. I ST. II ST. I ST. II ST. I ST. II ST. I ST. II
Tempo totale 2:53 3:00 3:40 3:50 3:32 3:40 1:40 2:50 2:55
1° impasto
9 10 16 18 9 10 7 10 10
1°
lievitazione
Riscaldamento
ON/OFF
Niente impasto
20 20 40 40 25 25 5 5 5
2° impasto
14
Aggi-
unta
ingre.-
dient
15
Aggi-
unta
ingre.-
dient
19
Aggi-
unta
ingre.-
dient
22
Aggi-
unta
ingre.-
dient
18
Aggi-
unta
ingre.-
dient
20
Aggi-
unta
ingre.-
dient
8 20
Aggi-
unta
ingre.-
dient
20
Aggi-
unta
ingre.-
dient
2° lievitazione
Riscaldamento
ON/OFF
25 25 30 30 35 35 30 30
3° lievitazione
Riscaldamento
ON/OFF
Niente impasto
40 40 45 45 60 60 15 40 40
Cottura
Riscaldamento
ON/OFF
65 70 70 75 65 70 65 65 70
Tenuta in
caldo
at 60 °C
Riscaldamento
ON/OFF
60 60 60 60 60 60 60 60 60
TABELLA SEQUENZA TEMPORALE
Copyright UNOLD AG | www.unold.de

Stand 21.2.2020
111 von 168
DE
EN
FR
NL
IT
ES
PL
6 7 8 9 10 11 12
ULTRA
KONFITÜRE
TEIG GLUTENFREI BACKPULVER TOASTBROT BACKEN
Ultra-
rapido I
CONFETTURA
Impasto Senza glutine Torte Pane per toast Cottura
Peso pane
selezionabile
ST. I ST. I ST. II ST. I ST. II
Tempo totale 0:58 1:20 1:30 3:15 3:20 2:50 2:55 3:00 1:00
1° impasto
12 0 20 12 12 10 15 15
1°
lievitazione
Riscaldamento
ON/OFF
Niente
impasto
0 15
Riscaldamento
ON/OFF
20 20 5 40 40
2° impasto
0 0 13
Aggi-
unta
ingre.-
dient
13
Aggi-
unta
ingre.-
dient
20 5
Aggi-
unta
ingre.-
dient.
5
Aggi-
unta
ingre.-
dient
2° lievitazione
Riscaldamento
ON/OFF
0 0 30 45 45 30 25 25
3° lievitazione
Riscaldamento
ON/OFF
Niente
impasto
11 45
Impasto ON/
OFF
Riscaldamento
ON/OFF
40 45 45 35 40 40
Cottura
Riscaldamento
ON/OFF
35 20 60 65 70 50 55 10-60
Tenuta in
caldo
at 60 °C
Riscaldamento
ON/OFF
60 60 60 60 60 60 60 60
TABELLA SEQUENZA TEMPORALE
Copyright UNOLD AG | www.unold.de

112 von 168
Stand 21.2.2020
DE
EN
FR
NL
IT
ES
PL
DOMANDE SULL‘APPARECCHIO E SUL SUO USO
Dopo la cottura il pane è attaccato al cestello.
Far raffreddare il pane nel cestello per circa 10 minuti. Capo-
volgere il cestello portandone l‘apertura verso il basso, eventual-
mente smuovere leggermente il trascinatore (attacco pala im-
pastatrice – vite ad alette sul lato inferiore del cestello). Prima
dell‘inserimento spalmare attorno al foro della pala impastatrice
uno spesso strato di margarina resistente al calore (non margarina
a ridotto contenuto di grassi!), di modo che durante l‘impasto la
pasta non possa penetrare nell‘interstizio e qui solidificarsi. Pri-
ma della cottura spalmare dell‘olio sulla pala impastatrice.
Se con l‘apparecchio si preparano anche confetture, raccoman-
diamo di usare cestelli a sè stanti per il pane e la confettura, in
quanto a causa degli acidi che si formano il pane non più essere
adeguatamente staccato dal cestello. Stampi e pale impastatrici
aggiuntive possono essere ordinate al nostro Servizio clienti.
Come si possono evitare i fori nel pane (pala impastatrice)?
E‘ possibile rimuovere la pala impastatrice con le dita infarinate
prima che la pasta lieviti per l‘ultima volta (vedere la sequenza
temporale del programma e l‘indicazione sul display).
Altrimenti usare il gancio dopo la cottura. Procedendo con caute-
la è possibile evitare la formazione di un grosso foro.
Durante la lievitazione la pasta trabocca dal cestello.
Ciò accade spesso quando si usa farina di grano che, dato il mag-
gior contenuto di glutine, lievita meglio.
Rimedio:
ridurre la quantità di farina e adattare il resto degli ingre-
dienti. Il pane finito continua ad avere un grosso volume.
Aggiungere alla farina 1 cucchiaio di margarina liquida.
Il pane lievita, ma si sgonfia durante la cottura.
Se al centro del pane si forma un avvallamento a „V“ la farina è
carente di glutine. Ciò dipende, a sua volta, dal fatto che il ce-
reale contiene troppo poche proteine (succede nelle estati molto
piovose) o che la farina è troppo umida.
Rimedio:
Aggiungere alla pasta del pane 1 cucchiaio di glutine di
frumento ogni 500 g di farina.
Usare un programma con durata minore (ad es. SCHNELL/
Rapido)
Se il pane si sgonfia al centro a forma di imbuto, ciò può dipen-
dere dal fatto che
la temperatura dell‘acqua era troppo alta,
è stata usata troppa acqua
la farina è carente di glutine.
Il pane non è abbastanza dorato nella parte superiore.
Sbattere 1 tuorlo d‘uovo con 1 cucchiaino di panna dolce o acida
e dopo l‘ultimo impasto spennellare la pasta con tale composto.
Quando si può aprire il coperchio del Backmeister
®
durante il
procedimento di cottura?
In linea di principio ciò è sempre possibile durante la fase di im-
pasto. In questa fase, se necessario, si possono ancora aggiunge-
re piccole quantità di farina o liquido. Se dopo la cottura il pane
deve avere un determinato aspetto, procedere come segue: Dopo
l‘ultimo impasto, ossia prima dell‘ultima lievitazione (vedere la
Tabella della sequenza temporale dei programmi e l‘indicazione
del display) aprire il cautamente il coperchio e, ad es. con un
coltello caldo affilato preriscaldato, praticare degli intagli sulla
crosta in via di formazione oppure cospargerci sopra dei cereali o
ancora spennellare la crosta del pane con una miscela di farina di
patate e acqua, di modo che dopo la cottura risulti lucente. L‘a-
pertura del Backmeister
®
è possibile un‘ultima volta nella sezione
temporale indicata. Se ciò si effettua durante l‘ultima lievitazione
o all‘inizio della fase di cottura il pane può sgonfiarsi.
Cos‘è la farina integrale?
La farina integrale può essere prodotta da tutti i tipi di cereali,
anche dal grano. Integrale significa che la farina è macinata dal
chicco intero e quindi ha un maggior contenuto di fibre. Pertanto
il pane di grano integrale è leggermente più scuro. Il pane integra-
le non è tuttavia necessariamente nero, come spesso si presume.
Cosa occorre tener presente se si usa la farina di segale?
La farina di segale non contiene glutine e il pane ricavato dalla
stessa non lievita quasi per nulla. Per ragioni di compatibilità è
quindi necessario preparare un „PANE INTEGRALE DI SEGALE“
con lievito naturale. Quando si usa farina di segale, che non con-
tiene glutine, la pasta lievita soltanto se si sostituisce almeno ¼
della quantità indicata con farina tipo 550.
Copyright UNOLD AG | www.unold.de

Stand 21.2.2020
113 von 168
DE
EN
FR
NL
IT
ES
PL
Che cos‘è il glutine della farina?
Quanto più alto è il numero che contraddistingue la farina
tanto meno glutine contiene la stessa e tanto meno lievita
la pasta. La maggior quantità di glutine è contenuta nella
farina numero 550.
Quali differenti tipi di farina esistono e come vengono utiliz-
zati?
Farina di mais, riso, patate
particolarmente adatte per gli allergici al glutine e per le
persone che soffrono di „sprue“ o „celiachia“. Il ricetta-
rio delle presenti istruzioni comprende apposite ricette e
indica dei fornitori di prodotti speciali per allergici.
Farina di spelta
è molto costosa, ma anche completamente priva di sostanze
chimiche in quanto la spelta, che cresce su terreni molto
poveri, non assorbe concimi. Pertanto la farina di spelta
è particolarmente adatta per gli allergici. Possono essere
usate tutte le ricette in cui siano indicati i tipi di farina
405 - 550 - 1050, come descritto nelle istruzioni per l‘uso.
Farina di grano duro
per la sua consistenza è adatta in particolare per baguette e
può essere sostituita da semola di grano duro.
Come si può rendere più digeribile il pane fresco?
Il pane fresco risulta più digeribile incorporando nella farina una
patata lessa ridotta in purea.
In che rapporto si usano gli agenti lievitanti?
Sia per il lievito che per il lievito naturale, che possono essere
acquistati in varie quantità, occorre rispettare le indicazioni del
produttore riportate sulla confezione e regolare la quantità in pro-
porzione alla quantità di farina utilizzata. Per quanto riguarda il
potere lievitante del lievito molto importante è anche la durezza
dell‘acqua, infatti se l‘acqua è molto dolce il lievito lievita di più
e pertanto nelle regioni con acqua dolce la quantità di lievito può
essere ridotta di circa ¼. Il rapporto ideale tra lievito e acqua va
tuttavia sperimentato e quindi eventualmente modificato.
Cosa si può fare se il pane sa di lievito?
Se si è usato lo zucchero ridurlo o eliminarlo del tutto, nel qual
caso il pane diviene meno marrone.
Aggiungere all‘acqua del normale aceto di acquavite, per un pane
piccolo 1 cucchiaio, per uno grande 1,5 cucchiai.
Sostituire l‘acqua con latticello o kefir, il che peraltro è possibile
per tutte le ricette ed è anche raccomandabile in quanto favorisce
la freschezza del pane.
Perché il pane cotto in forno ha un sapore diverso da quello del
Backmeister
®
?
Dipende dalla diversa umidità: In forno, dato il vano cottura molto
più grande, il pane cotto è molto più asciutto. Il pane estratto dal
Backmeister
®
è umido.
Cosa significano i numeri che contraddistinguono i diversi tipi di fa-
rina?
Quanto più basso è il numero, tanto meno fibre contiene la farina
e tanto più questa è chiara. Dato che la denominazione delle
singole varietà è diversa da paese a paese, ecco una breve elen-
cazione:
Farina di
grano
Farina macinata finissima, per dolci 405 480 400
Farina macinata fine, ideale per pane 550 780 550
Farina macinata media 1050 1600 1100
Farina integrale, macinata grossa 1600 1700 1900
Farina di
segale
Farina macinata finissima 815 500 720
Farina macinata fine 997 960 1100
Farina macinata media 1150 960 1100
Farina macinata grossa, farina
integrale
1740 2500 1900
Copyright UNOLD AG | www.unold.de

114 von 168
Stand 21.2.2020
DE
EN
FR
NL
IT
ES
PL
POSSIBILI PROBLEMI NELLE RICETTE
Problema Causa Rimedio
Il pane lievita troppo Troppo lievito, troppa farina, troppo poco sale, acqua troppo dolce o
combinazione di queste cause
a/b
Il pane non lievita o non lievita a
sufficienza
Niente o troppo poco lievito
Lievito vecchio o conservato male
Liquido troppo caldo
Il lievito è venuto a contatto con liquido
Farina non corretta o vecchia
Troppo o troppo poco liquido
Troppo poco zucchero
a/b
e
c
d
e
a/b/g
a/b
La pasta lievita troppo e trabocca dal
cestello
Acqua molto dolce fa fermentare maggiormente il lievito
Troppo latte influenza la fermentazione del lievito
f/k
c
Pane sgonfio Volume del pane maggiore di quello del cestello, per questo si è sgonfiato
Il pane è lievitato troppo
a/f
m
Dopo la cottura il pane presenta una
bozza
Fermentazione del lievito troppo precoce o troppo veloce a causa di acqua
calda, camera di cottura calda, umidità elevata
Troppo poco glutine nella farina
Programma con tempo di esecuzione troppo lungo
Troppo liquido
c/h/i
l
m
a/b/h
Struttura pesante e grumosa Troppa farina o troppo poco liquido
Troppo poco lievito o zucchero
Troppa frutta, cereali integrali o altri ingredienti
Farina vecchia o di cattiva qualità
a/b/g
a/b
b
e
Non ben cotto al centro Troppo o troppo poco liquido
Umidità elevata
Ricette con ingredienti umidi, come ad es. yogurt
a/b/g
h
g
Struttura aperta, grossolana o
forata
Troppa acqua, niente sale
Umidità elevata, acqua troppo calda
Liquido troppo caldo
g/b
h/i
c
Superficie a fungo, non cotta Volume del pane maggiore di quello del cestello
Eccessiva quantità di farina in particolare per il pane bianco
Troppo lievito o troppo poco sale
Troppo zucchero
Ingredienti dolci oltre allo zucchero
a/f
f
a/b
a/b
b
Le fette di pane risultano non
uniformi o presentano dei grumi
Pane non sufficientemente raffreddato
(vapore fuoriuscito)
j
Residui di farina sulla
crosta del pane
Durante l‘impasto la farina non è
correttamente amalgamata sui lati
g
Eliminare gli errori
a Misurare correttamente gli ingredienti.
b Adattare la quantità di ingredienti e controllare di non avere dimenticato un ingrediente.
c Usare un altro liquido o lasciarlo raffreddare a temperatura ambiente.
d Aggiungere gli ingredienti nella sequenza indicata. Formare una piccola conca al centro e mettervi dentro il lievito sbriciolato o
il lievito secco. Evitare il contatto diretto tra lievito e liquido.
e Usare solo ingredienti freschi e correttamente conservati.
f Ridurre la quantità totale di ingredienti, non aumentare mai la quantità di farina indicata. Eventualmente ridurre tutti gli
ingredienti di 1/3.
g Correggere la quantità di liquido. Se si usano ingredienti umidi la quantità di liquido deve essere ridotta in maniera conforme.
h Se il tempo è molto umido usare 1-2 cucchiai in meno.
i Quando il tempo è caldo non usare la funzione di temporizzazione. Usare liquidi freddi. Usare i
programmi SCHNELL\Rapido o ULTRA-SCHNELL\Ultra-rapido in modo da accorciare il tempo di lievitazione.
j Sformare il pane dal cestello immediatamente dopo la cottura e lasciarlo raffreddare su una gratella per min. 15 minuti prima
di tagliarlo.
k Ridurre il lievito o eventualmente tutti gli ingredienti di ¼ della quantità indicata.
l Aggiungere all‘impasto 1 cucchiaio di glutine di frumento
m Selezionare il programma SCHNELL/Rapido.
Copyright UNOLD AG | www.unold.de

Stand 21.2.2020
115 von 168
DE
EN
FR
NL
IT
ES
PL
NOTE SULLE RICETTE
1. Ingredienti
Dato che ogni ingrediente svolge un determinato ruolo nella
riuscita del pane la misura è tanto importante quanto la sequenza
corretta nell‘aggiunta degli ingredienti.
Gli ingredienti principali, come liquido, farina, sale, zucchero e
lievito (si può usare lievito sia secco che fresco) influenzano il
successo del risultato nella preparazione del pane e della pasta.
Pertanto usare sempre le quantità con un corretto rapporto
reciproco.
Se il prodotto da forno è preparato immediatamente utilizzare
ingredienti tiepidi. Se si seleziona il programma „Zeitwahl/
Temporizzazione“, gli ingredienti devono essere freddi di modo
che il lievito non fermenti troppo presto.
Margarina, burro e latte influenzano soltanto il sapore del pane.
Lo zucchero può essere ridotto del 20 % in modo da rendere
la crosta sia più chiara e sottile, senza che il risultato della
panificazione venga influenzato in altro modo. Se si preferisce
un pane con crosta più morbida e chiara, lo zucchero può essere
sostituito con miele.
Il glutine che si forma nella farina durante l‘impasto conferisce
struttura al pane. La miscela di farina ideale è composta dal
40 % di farina integrale e 60 % farina bianca.
Se si vogliono aggiungere chicchi di cereali interi prima metterli in
ammollo per tutta la notte. Ridurre la quantità di farina e liquidi
in maniera proporzionale (fino a 1/5 in meno).
Il lievito naturale è indispensabile quando si usa la farina di
segale. Esso contiene infatti batteri dell‘acido lattico e dell‘acido
acetico in grado di far sì che il pane assuma una consistenza più
leggera e risulti gradevolmente acidulo. Lo si può preparare in
casa, ma il processo richiede molto tempo. Per questo motivo,
nelle ricette riportate di seguito viene utilizzato lievito madre in
polvere concentrato, che viene venduto in pacchetti da 15 g (per
1 kg di farina). Attenersi alle indicazioni riportate nelle ricette
in quanto se si utilizza una quantità di lievito inferiore a quella
richiesta, il pane può sbriciolarsi.
Se si utilizzano lieviti in polvere con concentrazione diversa
(pacchetto da 100 g per 1 kg di farina) ridurre la quantità di
farina di circa 80 g per ogni 1 kg di farina oppure adattarla in
conformità alla ricetta.
E‘ disponibile anche del lievito naturale liquido venduto in bustine.
Attenersi ai dosaggi riportati sulla confezione. Versare il lievito
liquido nel misurino a bicchiere e riempirlo con la quantità di
liquido indicata nella ricetta.
Il lievito naturale di grano, spesso fornito essiccato, migliora la
lavorabilità dell’impasto, la freschezza e il sapore. È più delicato
del lievito di segale.
Il pane di lievito naturale va cotto nel programma „Basis“ o
„Vollkorn“ affinché possa lievitare e cuocersi correttamente.
All‘impasto si può aggiungere crusca se si desidera un pane
particolarmente leggero e ricco di fibre. Utilizzarne 1 cucchiaio
per 500 g di farina e aumentare la quantità di liquido di 50 ml.
Il glutine di frumento è un additivo naturale ottenuto dalle
proteine del grano. Rende il pane più leggero e voluminoso, meno
tendente a sgonfiarsi e oltre tutto più digeribile. Questo effetto
è estremamente evidente in particolare quando si realizzano
prodotti da forno integrali o preparati con farina macinata in
proprio.
Il malto nero utilizzato in alcune ricette è malto d’orzo
scuro arrostito. Si utilizza per ottenere una crosta di pane più
scura e una mollica più morbida (ad B. per il pane nero). E‘ adatto
anche il malto di segale, anche se non è così scuro. È possibile
acquistare questo tipo di malto nei negozi di alimenti biologici.
Inoltre a tutti i nostri pani misti è anche possibile aggiungere
aromi per pane. La quantità dipende dai gusti personali e dalle
indicazioni del produttore.
La lecitina in polvere pura è un emulsionante naturale che
aumenta il volume del prodotto da forno, rende la mollica più
morbida e leggera e mantiene il pane fresco più a lungo.
Tutti gli ingredienti e gli additivi menzionati stampati in grassetto
sono reperibili nei negozi di alimenti naturali o direttamente nei
mulini. Questi articoli da panificazione possono essere ordinati
anche a catalogo da:
Hobbybäcker-Versand - Inge Pinzer
Am Mühlholz 6 – 89287 Bellenberg
Tel. 0 73 06/92 59 00 - Fax 0 73 06/92 59 05
Internet: www.hobbybaecker.de
Copyright UNOLD AG | www.unold.de

116 von 168
Stand 21.2.2020
DE
EN
FR
NL
IT
ES
PL
2. Regolare le quantità
Se le quantità devono essere aumentate o ridotte, prestare
attenzione a mantenere le proporzioni della ricetta originale. Per
ottenere un risultato perfetto, osservare le seguenti regole base
per l‘adattamento degli ingredienti:
Liquidi/farina: l‘impasto deve essere soffice (ma non troppo),
leggermente appiccicoso, senza tuttavia formare filamenti. Per le
paste leggere si ottiene una palla. Ciò non accade invece per le
paste pesanti come quelle integrali di segale o i pani con semi.
Controllare la pasta 5 minuti dopo il primo impasto. Se è ancora
troppo umida, aggiungere farina fino a ottenere la consistenza
corretta. Se la pasta è troppo asciutta incorporare acqua a
cucchiai.
Sostituzione di liquidi: Se per una ricetta si sostituiscono degli
ingredienti contenenti liquidi (ad es. formaggio fresco, yogurt
ecc.), la corrispondente quantità di liquido deve venir ridotta.
Quando si utilizzano uova, sbatterle nel misurino a bicchiere e
quindi riempire il contenitore con gli altri liquidi nella quantità
indicata.
Ad altitudini elevate (oltre 750 m) la pasta lievita più in fretta. In
questi casi il lievito può venir ridotto da ¼ a ½ cucchiaino al fine
di evitare lievitazioni eccessive. Lo stesso vale quando l’acqua è
particolarmente dolce.
3. Aggiungere e misurare ingredienti e quantità
Versare sempre prima il liquido e il lievito alla fine. Soltanto
per le paste molto pesanti con un elevato contenuto di segale
o cereali integrali può essere utile modificare la sequenza e
mettere prima il lievito secco e la farina e il liquido solo alla fine.
Tuttavia in questo caso, in particolare se si usa la funzione di
temporizzazione, occorre fare in modo che il lievito non entri in
contatto con l‘acqua prima dell‘avvio del programma.
Per evitare che il lievito agisca troppo in fretta (soprattutto
quando si usa la funzione di temporizzazione), evitare il contatto
tra lievito e liquido.
In sede di misurazione utilizzare sempre le stesse unità di misura,
ossia per le quantità indicate in cucchiai e cucchiaini usare il
misurino a doppio cucchiaio fornito in dotazione con la macchina
oppure i cucchiai da casa. Le misure in grammi devono essere
molto precise. Per le indicazioni in millilitri è possibile utilizzare
il misurino a bicchiere fornito in dotazione.
Le abbreviazioni nelle ricette significano quanto segue:
Cucchiaio = cucchiaio da tavola raso
(oppure cucchiaio grande del misurino doppio)
Cucchiaino = cucchiaino da tè raso (cucchiaio piccolo del
misurino doppio)
g = grammi
ml = millilitri
conf. = confezione, ad es.
lievito secco da 7 g di contenuto per 500 g di farina - corrisponde
a 10-15 g di lievito fresco.
4. Aggiunte di frutti, noci o cereali
Se si desidera aggiungere altri ingredienti, è possibile farlo in
programmi specifici quando si sente il segnale acustico. Se si
aggiungono gli ingredienti troppo presto vengono sminuzzati
durante la fase di impasto. Inoltre potrebbero danneggiare il
rivestimento del cestello.
Se nelle ricette non sono indicati i livelli in quanto questi non
sono previsti nei programmi proposti, nel programma indicato
vengono bene le quantità sia piccole che grandi che proponiamo
per il relativo modello. I programmi senza selezione del livello
sono programmati in maniera conforme.
5. Pesi e volume del pane
Nelle ricette sono riportate le indicazioni esatte per il peso del
pane. Il peso del pane bianco è inferiore a quello del pane di
farina integrale. Ciò dipende dal fatto che la farina bianca
lievita di più e ciò pone dei limiti. Malgrado l’accuratezza delle
indicazioni di peso, vi possono essere lievi scostamenti. Il peso
effettivo del pane dipende in larga misura dall’umidità presente
al momento della preparazione.
Tutti i pani con un’elevata quantità di grano hanno un volume
elevato e per la classe di peso maggiore dopo l’ultima lievitazione
diventano più grandi del contenitore. Tuttavia, il pane non
trabocca dal contenitore. La parte di pane che fuoriesce dal
contenitore è meno dorata di quella all’interno del contenitore.
Se per i pani dolci si consiglia il programma SCHNELL/Rapido, è
possibile cuocere soltanto le quantità più piccole delle proposte
della ricetta anche nel programma HEFEKUCHEN/Dolci, nel qual
caso il pane riesce più leggero. Nel qual caso nel programma
HEFEKUCHEN/Dolci selezionare Stufe/Livello I.
6. Risultati della panificazione
Il risultato della panificazione dipende tra l‘altro anche dalle
condizioni locali (acqua dolce - umidità dell‘aria - altitudine
elevata - caratteristiche degli ingredienti ecc.). Pertanto le
Copyright UNOLD AG | www.unold.de

Stand 21.2.2020
117 von 168
DE
EN
FR
NL
IT
ES
PL
ricette fornite vanno considerate alla stregua di suggerimenti
che andranno eventualmente adattati. Se una o l‘altra ricetta
non riesce la prima volta, non bisogna scoraggiarsi, bensì
occorre capire la causa e provare ad es. a variare i rapporti tra le
quantità. Prima di preparare il pane di notte con la funzione di
temporizzazione consigliamo di sperimentare una volta la ricetta,
di modo da poterla modificare a seconda delle necessità.
RICETTE PER PANE
Pane bianco classico
Livello I Livello II
Peso del pane circa 500 g 750 g
Acqua 230 ml 350 ml
Sale ¾ di cucchiaino 1 cucchiaino
Zucchero ¾ di cucchiaino 1 cucchiaino
Semola di grano
duro
100 g 150 g
Farina tipo 550 230 g 350 g
Lievito secco ½ conf. ¾ di conf.
Programma: SCHNELL/WEISSBROT
Suggerimento: Sostituendo l'acqua con il latte, si ottiene un
pane per toast ideale.
Pane bianco del contadino
Livello I Livello II
Peso del pane
circa
500 g 750 g
Latte 180 ml 275 ml
Burro/margarina 15 g 25 g
Sale ½ cucchiaino 1 cucchiaino
Zucchero ½ cucchiaino 1 cucchiaino
Farina tipo 1050 330 g 500 g
Lievito secco ½ conf. ¾ di conf.
Programma: BASIS/WEISSBROT
Pane integrale
Livello I Livello II
Peso del pane
circa
570 g 860 g
Acqua 250 ml 370 ml
Burro/margarina 15 g 25 g
Sale ½ cucchiaino 1 cucchiaino
Zucchero ½ cucchiaino 1 cucchiaino
Farina tipo 1050 180 g 270 g
Farina di grano
integrale
180 g 270 g
Lievito secco ½ conf. ¾ di conf.
Programma: VOLLKORN
Pasta per pizza
Livello I Livello II
Peso circa 610 g 920 g
Acqua 250 ml 375 ml
Olio 1 cucchiaino 1 cucchiaio
Sale ½ cucchiaino 1 cucchiaino
Zucchero ½ cucchiaino 1 cucchiaino
Origano ½ cucchiaino ¾ di cucchiaino
Formaggio
parmigiano
1 cucchiaio e ½ 2 cucchiai e ½
Semola di mais 65 g 100 g
Farina tipo 550 315 g 475 g
Lievito secco ½ conf. ¾ di conf.
Programma: SCHNELL
Pane di lievito naturale
Livello I Livello II
Peso del pane
circa
740 g 1050 g
Lievito naturale
essiccato (non
concentrato)
½ conf. ¾ di conf.
Acqua 350 ml 450 ml
Aromi per pane ½ cucchiaino ¾ di cucchiaino
Sale 1 cucchiaino 1 cucchiaino e ½
Farina di segale 250 g 340 g
Farina tipo 1050 250 g 340 g
Lievito secco 1 conf. 1 conf. e ½
Programma: BASIS
Pane al formaggio fresco
Livello I Livello II
Peso del pane
circa
530 g 800 g
Acqua o latte 160 ml 250 ml
Burro/margarina 20 g 30 g
Uova intere 1 piccolo 1
Sale ½ cucchiaino 1 cucchiaino
Zucchero 1 cucchiaino 1 cucchiaio
Formaggio fresco
granulare
80 g 125 g
Farina tipo 550 330 g 500 g
Lievito secco ½ conf. ¾ di conf.
Programma: SCHNELL
Copyright UNOLD AG | www.unold.de

118 von 168
Stand 21.2.2020
DE
EN
FR
NL
IT
ES
PL
PANI DA MISCELE PER PANE
Nel Backmeister
®
possono essere lavorate praticamente tutte le miscele per pane disponibili in commercio. Soltanto i pani di pura
segale non possono essere preparati in maniera soddisfacente nel Backmeister
®
in quanto tendono a risultare troppo compatti.
Alcune delle miscele per pane in commercio contengono già lievito secco. In questo caso ovviamente non si deve aggiungere dell‘altro
lievito secco. Rispettare i quantitativi indicati sulla confezione e procedere come segue:
1. Accendere l‘apparecchio, versarci il liquido (si raccomanda di stare un po‘ indietro rispetto alla quantità indicata sulla confezione).
2. Aggiungere la corrispondente quantità di miscela per pane.
3. Eventualmente aggiungere il lievito secco nella quantità indicata sulla confezione della miscela (1 cucchiaio piccolo del doppio
misurino UNOLD
®
contiene 2,5 g di lievito secco),
4. Selezionare il programma e premere START. Il Backmeister
®
fa tutto il resto.
PANI PER ALLERGICI
Per i pani senza glutine occorre osservare le seguenti avvertenze:
Le farine senza glutine richiedono più liquidi che non quelle contenenti glutine (400–500 ml di liquido tiepido ogni 500 g di farina).
Le farine senza glutine richiedono, per una buona riuscita, un po‘ di olio o grasso. Si può usare olio, burro o anche margarina (10 -
20 g). Per fare pani con farine senza glutine la preprogrammazione non è possibile. La sequenza del programma deve essere avviata
sempre immediatamente. Il pane senza glutine fatto con la macchina del pane richiede meno lievito di quello cotto in forno. Usare
circa 3,5 - 5 g di lievito secco per un pane standard. Se durante la cottura il pane si affloscia al centro, ridurre la quantità di lievito di
circa 1 g. Se il pane continua ad afflosciarsi, sbattere un uovo nel misurino a bicchiere e quindi riempire il misurino con la quantità di
liquido richiesta. Attenzione: non aggiungere l‘uovo alla quantità di liquido! La crosta dei pani senza glutine non diventa tanto scura
come quella dei pani contenenti glutine. Per ragioni di sicurezza le macchine del pane non possono avere un riscaldamento superiore
e pertanto la sommità del pane rimane più chiara. Per conferire al pane un colore più bello è possibile sbattere un tuorlo d‘uovo con
1 cucchiaino di panna e con questo composto spennellare il pane quando il display indica 1:15 come tempo residuo.
Dopo un tempo di impasto di circa otto minuti, con un raschino in silicone, staccare la farina e i residui di impasto dal bordo il cestello.
Staccando di nuovo leggermente il bordo della pasta dal cestello quando il tempo residuo è di 1:15, durante la cottura non imane un
sottile bordo di pasta. Per le persone che soffrono di allergia ai cereali o che devono seguire delle diete specifiche, abbiamo effettuato
varie prove nel nostro Backmeister
®
con diverse miscele di farine, in parte anche a base di amido di mais, riso e patata, ottenendo
buoni risultati. Quando si usano le miscele per pane attenersi alle indicazioni fornite sulla confezione.
Abbiamo ottenuto buoni risultati con i prodotti della ditta Schär e della Hammermühle Diät GmbH. Queste due aziende sono a dispo-
sizione per qualunque chiarimento sui prodotti senza glutine o intolleranze multiple.
Hotline ditta Schär
Germania Tel. +49 (0)8 00/1 81 35 37
Austria Tel. +43 (0)8 00/29 17 28
Hotline Hammermühle
Germania Tel. +49 (0) 63 21/9 58 90
Gli ingredienti richiesti si trovano nei negozi di alimenti biologici. I prodotti Hammermühle possono venir ordinati direttamente dal
produttore al numero telefonico su indicato. Tutti i tipi di farine indicati sono adatti per dolci e pani per diete speciali (celiachia/sprue).
I pani cotti nel Backmeister
®
rimangono relativamente solidi anche aggiungendo maggiori quantità di lievito o cremor tartaro.
Versare gli ingredienti nel cestello. Selezionare i seguenti programmi:
per la preparazione del pane
“GLUTENFREI“
Copyright UNOLD AG | www.unold.de

Stand 21.2.2020
119 von 168
DE
EN
FR
NL
IT
ES
PL
Per la preparazione di paste da destinare a ulteriore lavorazione: Programma „TEIG/Impasto“
Per preparare pane con lievito in polvere o cremor tartaro quale agente lievitante: Programma „BACKPULVER/Torte“
Pane a cassetta nero Schär
Ingredienti Pane piccolo Pane grande
Miscela per pane nero 375 g 500 g
Olio 4 g 6 g
Lievito secco 1 confezione
(7 g)
10 g
Acqua tiepida 470 ml 630 ml
Sale ¾ di
cucchiaino
1 cucchiaino
E' possibile aggiungere a piacere
cumino o 2 cucchiaini 3 cucchiaini
noci o 50 g 75 g
cipolle arrostite o 50 g 75 g
speck a dadini o 50 g 75 g
semi di lino 1 cucchiaio 1½ cucchiaio
RICETTA BASE PER DOLCE
Nel Backmeister
®
è possibile fare delle ottime torte. Dato che l‘apparecchio lavora con utensili per impastare e non con sbattitori, le
torte hanno una consistenza un po‘ più pesante. Non è possibile preprogrammare la cottura delle torte. Quando la cottura della torta
è terminata estrarre il cestello dall‘apparecchio. Mettere sul cestello uno strofinaccio umido e lasciar raffreddare la torta nel cestello
per altri 15 minuti circa. Quindi è possibile staccare leggermente la torta dai lati del cestello con un raschino in gomma e rovesciarla.
Ingredienti per un peso di circa 700 g
Uova 3
Burro ammorbidito 100 g
Zucchero 100 g
Zucchero vanigliato 1 conf.
Farina tipo 405 300 g
Lievito in polvere 1 conf.
Cannella ½ cucchiaino
Noci grattugiate 50 g
oppure: 50 g
Cioccolato grattugiato
oppure 50 g
Fiocchi di cocco BACKPULVER
oppure mela sbucciata e
tagliata a dadini (1cm)
50 g
Programma: BACKPULVER/Torte
PREPARAZIONE DI PASTE
Nel Backmeister
®
nel programma TEIG/Impasto è possibile preparare paste lievitate che successivamente possono essere sottoposte
a ulteriore lavorazione e cotte in forno. Durante il secondo impasto si possono aggiungere ingredienti come noci, frutta secca, ecc.
Nel programma TEIG/Impasto non sono previsti diversi livelli di cottura. Pertanto nel programma TEIG/Impasto è possibile preparare,
seguendo ciascuna delle ricette precedenti, una pasta con cui successivamente si possono fare ad es. dei panini da cuocere in forno.
"Stollen" (Dolce natalizio tedesco)
Peso 1.000 g
Latte 125 ml
Burro liquido 125 g
Uovo 1
Rum 3 cucchiaio
Farina tipo 405 500 g
Zucchero 100 g
Buccia di limone
candita
50 g
Buccia di arancio
candita
25 g
"Stollen" (Dolce natalizio tedesco)
Mandorle macinate 50 g
Uvetta sultanina 100 g
Sale 1 presa
Cannella 2 prese
Lievito secco 2 conf.
Estrarre la pasta del contenitore. Metterla in uno stampo per
Stollen e cuocerla a 180 °C (a 160 °C in forno ad aria calda)
per circa un‘ora.
Programma: TEIG/Impasto
Copyright UNOLD AG | www.unold.de

120 von 168
Stand 21.2.2020
DE
EN
FR
NL
IT
ES
PL
NORME DIE GARANZIA
SMALTIMENTO / TUTELA DELL’AMBIENTE
I nostri apparecchi vengono prodotti rispettando un elevato standard qualitativo per una lunga durata
di utilizzo. Una corretta manutenzione e riparazioni adeguate a cura dal nostro servizio clienti possono
prolungare la durata di utilizzo del prodotto. Se un apparecchio è difettoso e non più riparabile, per il
suo smaltimento si presti attenzione ai punti che seguono. Questo prodotto non deve essere smaltito uni-
tamente ai comuni rifiuti domestici. Consegnare il prodotto a un centro di raccolta per il riciclaggio dei
rifiuti elettrici o elettronici. Con la raccolta differenziata dei rifiuti e dei prodotti riciclabili è possibile con-
tribuire alla tutela delle risorse naturali e far smaltire il prodotto nel rispetto dell’ambiente e della salute.
I nostri prodotti sono garantiti per 24 mesi, 12 mesi in caso di uso professionale, dalla data di acquisto per i guasti ma-
nifestatisi durante un utilizzo conforme alle disposizioni e attribuibili in modo dimostrabile a difetti di fabbricazione. Nel
periodo di garanzia porremo rimedio ai difetti materiali e di produzione secondo la nostra valutazione, procedendo alla
riparazione o alla sostituzione dell’apparecchio. Le nostre prestazioni di garanzia valgono esclusivamente per gli apparec-
chi venduti in Germania e Austria. In tutti gli altri casi rivolgersi all‘importatore. Gli apparecchi per i quali si richiede la
riparazione di guasti ci devono essere e debitamente imballati, unitamente a una copia del documento di acquisto redatto
a macchina dal quale risulti la data di vendita, nonché la descrizione del guasto. È possibile stampare un modulo di reso
sul nostro sito Web www.unold.de/ruecksendung. (solo per voci provenienti da Germania e Austria). Sono esclusi dalla
garanzia i guasti dovuti all’usura, all’uso inappropriato o al mancato rispetto delle regole di manutenzione. Il diritto di
garanzia decade qualora siano state effettuate riparazioni o interventi da parte di terzi. Eventuali diritti del consumatore
finale verso il venditore o negoziante non vengono limitati dalla presente garanzia.
PREPARAZIONE DI CONFETTURE
Nel Backmeister
®
è possibile preparare in maniera semplice e veloce confetture o marmellate. Si consiglia di provare anche se prima
non si è mai fatta alcuna marmellata. Infatti le confetture ottenute sono assolutamente deliziose.
1. Lavare della frutta fresca matura. Eventualmente sbucciare mele, pesche, pere e altra frutta a buccia dura. Non superare le
quantità indicate. Infatti se la quantità è eccessiva la massa bolle troppo presto e trabocca.
2. Pesare la frutta, tagliarla a pezzi piccoli oppure ridurla in purea con il frullatore a immersione Zauberstab
®
ESGE e metterla nel
cestello.
3. Aggiungere zucchero da gelatina „2:1“ nella quantità indicata. Non usare zucchero normale o zucchero da gelatina „1:1“, in
quanto altrimenti la confettura non si solidifica. Mescolare la frutta con lo zucchero e avviare il programma.
4. Dopo un tempo di 1 ora e 20 minuti l‘apparecchio invia un segnale acustico e la confettura può essere travasata in barattoli, che
devono essere chiusi per bene.
Confettura di fragole
Fragole fresche lavate, pulite
e tagliate a pezzi piccoli o
ridotte in purea
600 g
Zucchero da gelatina „2:1“ 400 g
Succo di limone 1-2 cucchiaini
Mescolare tutti gli ingredienti nel contenitore con un raschino
in gomma. Selezionare e avviare il programma KONFITÜRE/
Confettura. Con una spatola rimuovere i residui di zucchero
dalle pareti del recipiente. Quando è inviato il segnale acustico
estrarre il contenitore dall‘apparecchio usando delle presine.
Travasare la marmellata nei barattoli e chiuderli bene.
Programma: KONFITÜRE/Confettura
Le ricette di queste istruzioni per l’uso sono state ideate e verificate dagli autori e da UNOLD AG. Tuttavia non può essere emessa alcuna garanzia. È esclusa la responsabilità
degli autori, di UNOLD AG e dei rispettivi incaricati per danni provocati a persone, cose o materiali.
Copyright UNOLD AG | www.unold.de

Stand 21.2.2020
121 von 168
DE
EN
FR
NL
IT
ES
PL
Potencia: 550 W, 220–240 V~, 50 Hz
Medidas: Aprox 24,7 x 36,2 x 29,1 cm (L/B/H)
Peso: Aprox. 4,4 kg
Recipiente Dimensiones internas: ca. 16,8 x 12,8 x 14,3 cm (L/B/H)
Volumen de pan : 700 – 1.000 g
Cable de alimentación: Aprox. 80 cm montado fijo
Carcasa: Carcasa de polipropileno blanco/negro
Tapa: Tapa con gran ventana visor
Equipamiento: 12 programas en memoria, tecla para seleccionar el peso del pan, tecla para seleccionar el grado de
tostado, tecla para preprogramación hasta 13 horas, fase automática de calentamiento tras finalizarse los
programas
Accesorios: Recipiente de hornear extraíble con recubrimiento antiadherente, amasador, vaso medidor, cuchara
medidora, gancho para extraer la varilla, manual de instrucciones con recetas
Salvo modificaciones y errores a nivel de las características de equipamiento, la tecnología, los colores y el diseño
MANUAL DE INSTRUCCIONES MODELO 68010
DATOS TÉCNICOS
EXPLICACIÓN DE SÍMBOLOS
Este símbolo se asocia con riesgos eventuales que pueden provocar lesiones
o daños en el aparato.
Este símbolo hace referencia a un eventual riesgo de quemaduras. Proceda
siempre con especial cuidado.
INDICACIONES DE SEGURIDAD
Por favor lea y guarde las siguientes
instrucciones.
1. Este aparato puede ser usado por
niños a partir de 8 años, así como por
personas con una capacidad física,
mental o sensorial reducida o carentes
de experiencia y/o conocimientos
siempre que estén supervisados o
hayan sido correspondientemente
instruidos en el manejo seguro de
dicho aparato y comprendan los
peligros que conlleva.
2. El aparato no es un juguete.
3. No está permitido que los niños lleven
a cabo la limpieza o el mantenimiento
del usuario a no ser que tengan más
de 8 años y estén supervisados.
4. Guarde el aparato y el cable fuera del
alcance de niños menores de 8 años.
5. PRECAUCIÓN: ¡Algunas de las piezas
de este producto pueden llegar
a calentarse demasiado y causar
quemaduras! Tener especial cuidado
si hay niños o personas que puedan
estar en peligro presentes.
6. Los niños deberían vigilarse para
garantizar que no jueguen con el
equipo.
7. Guarde el equipo en un lugar
inalcanzable para los niños.
8. Conecte el equipo siempre a corriente
alterna de acuerdo con las indicaciones
en la placa indicadora.
Copyright UNOLD AG | www.unold.de

122 von 168
Stand 21.2.2020
DE
EN
FR
NL
IT
ES
PL
9. Este equipo no debe operarse mediante
temporizador externo ni sistema de
mando a distancia.
10. No sumerja el equipo o el cable de
alimentación en agua u otros líquidos.
11. Conecte el aparato únicamente a la
corriente alterna según la placa de
características.
12. Este aparato no debe ser accionado
mediante un reloj temporizador
externo, ni con un sistema de mando
a distancia.
13. No toque las superficies calientes del
aparato, utilice agarradores de cocina.
La panificadora está muy caliente
justo después del horneado.
14. El equipo está diseñado exclusiva-
mente para el uso doméstico o usos
similares como
en cocinas en negocios, oficinas u
otros lugares de trabajo,
en establecimientos rurales,
para el uso por huéspedes en hoteles,
moteles y establecimientos hoteleros
similares,
en pensiones privadas o casas
vacacionales.
15. Saque el enchufe de la toma de
corriente cuando ya no utilice el
aparato o antes de limpiarlo. Deje
enfriar el aparato antes de desmontar
sus piezas individuales.
16. La utilización de accesorios no
recomendados por el fabricante podría
provocar daños. Utilice el aparato
únicamente para el fin previsto.
17. Coloque el aparato de manera que no
resbale de la encimera de cocina, por
ej. al amasar una masa pesada. Esto
es de especial importancia en caso de
ser preprogramado, cuando el aparato
esté funcionando sin vigilancia. En
encimeras muy lisas habría que poner
el aparato sobre una fina estera de
goma, para descartar el peligro de
deslizamiento.
18. La máquina panificadora debe situarse
al menos a una distancia de 10 cm
respecto a otros objetos, cuando esté
en funcionamiento. Utilice el aparato
únicamente en el interior de edificios.
19. Procure que el cable no toque ninguna
superficie caliente y que no quede
colgando del borde de una mesa, para
que por ej. los niños no puedan tirar
de él.
20. No coloque nunca el aparato encima
de o junto a una cocina de gas o
eléctrica o un horno caliente.
21. Se aconseja la máxima precaución al
mover el aparato, si éste está lleno de
ingredientes calientes.
22. No extraiga nunca el molde de pan o
de arroz durante el funcionamiento.
23. En el molde para hornear no vierta
cantidades más grandes que las
indicadas, en particular para el pan
blanco. Si esto ocurriera, el pan no se
cocerá homogéneamente o la masa se
desbordará. Preste atención a nuestros
consejos al respecto.
24. Al probar una receta nueva, usted
debería permanecer cerca, para
controlar el proceso de horneado.
25. No conecte nunca el aparato sin haber
colocado antes el molde para hornear.
26. Para extraer el pan, en ningún caso
se debe golpear el molde para hornear
contra un borde o contra la encimera,
porque se podrían provocar deterioros.
27. No se deben introducir láminas de
metal u otros materiales dentro del
Copyright UNOLD AG | www.unold.de

Stand 21.2.2020
123 von 168
DE
EN
FR
NL
IT
ES
PL
aparato, ya que en tal caso se podría
originar un riesgo de incendio o de
cortocircuito.
28. No cubra nunca el aparato con una
toalla u otro material. Tanto el calor
como el vapor deben poder escapar.
Se puede originar un fuego si se cubre
el aparato con un material inflamable
o entra en contacto con él, como por
ej. con cortinas.
29. Antes de que usted quiera hornear un
determinado pan durante la noche,
pruebe la receta previamente para
asegurarse de que la relación de los
ingredientes entre sí es correcta, que
la masa no es demasiado compacta o
demasiado ligera, o que la cantidad
no es excesiva y pudiera desbordase
eventualmente.
30. Compruebe regularmente el enchufe y
el cable de alimentación por si hubiera
desgaste o deterioros. En caso de que
esté dañado el cable de conexión u
otras piezas, envíe el aparato para
su inspección o reparación a nuestro
servicio técnico. Las reparaciones
indebidas pueden ocasionar peligros
considerables al usuario y suponen la
exclusión de la garantía.
ATENCIÓN:
El equipo está muy caliente durante e inmediatamente después de su uso.
No abra nunca la carcasa del aparato. Existe peligro de una descarga eléctrica.
El fabricante no asume ninguna responsabilidad en caso de utilización indebida o de mal uso, o de reparaciones efectuadas por talleres o
personas no autorizadas.
PUESTA EN SERVICIO
1. Retire todos los materiales de embalaje, también los que hay
dentro de la cavidad del horno. Conserve el embalaje original.
2. Compruebe que se encuentren absolutamente todos los
accesorios especificados.
3. Limpie las piezas individuales tal como se describe en el
capítulo LIMPIEZA Y MANTENIMIENTO.
4. Conecte el aparato (véase los puntos LUGAR DE UBICACIÓN
/ CONEXIÓN A LA CORRIENTE). Coloque el molde de hornear
o bien el recipiente de arroz. Seleccione primero el modo
de funcionamiento BACKPULVER y deje que el aparato
se precaliente durante aprox. 10 minutos. A continuación
apague el aparato pulsando la tecla START/STOP. Deje
enfriar el aparato y limpie la cavidad del horno con un trapo.
5. Seque todas las piezas minuciosamente, antes de poner en
marcha el aparato.
Copyright UNOLD AG | www.unold.de

124 von 168
Stand 21.2.2020
DE
EN
FR
NL
IT
ES
PL
1. Prepare el equipo tal y como se describe en el capítulo
„Puesta en servicio“.
2. Abra la tapa de la panificadora Backmeister
®
y retire el molde.
3. Rellene el alojamiento para el agitador con margarina
resistente al calor para que la masa no entre en el hueco y
no se adhiera.
4. Coloque el agitador en el eje motriz en el molde.
5. Añada los ingredientes al molde tal y como se indica en la
receta correspondiente. Obtendrá el mejor resultado con
las masas espesas si invierte el orden de los ingredientes,
es decir, si añade primero los ingredientes secos y luego el
líquido. Observe, sin embrago, que la levadura no entre aún
en contacto con el líquido si utiliza el temporizador.
6. Vuelva a colocar el molde en el equipo, girándolo en el sentido
de las agujas del reloj hasta que encastre.
7. Cierre la tapa de la panificadora Backmeister.
8. Conecte el equipo a la toma de corriente.
9. Seleccione el programa deseado. Encontrará detalles acerca
de los diferentes programas a partir de la página 126.
Obtendrá buenos resultados con las mezclas preparadas
estándar utilizando el programa „BASIS“ („Base“).
10. Seleccione el grado de tostado deseado Hell – Mittel – Dunkel
(Claro – Medio – Oscuro). Tenga en cuenta que no se podrá
seleccionar el grado de tostado en todos los programas de
horneado. Encontrará más información en la página 126.
11. Seleccione el tamaño del pan deseado. Tenga en cuenta que
no se podrá seleccionar el tamaño del pan en todos los progra-
mas de horneado. Encontrará más información en la página
126.
12. Si ha efectuado todos los ajustes deseados, pulse la tecla
START/STOP.
13. Según el programa seleccionado, el equipo repetidamente
emite un pitido durante el segundo amasado. Ahora podrá
abrir la tapa y añadir más ingredientes a la masa como, por
ejemplo, nueces. Después vuelva a cerrar la tapa.
14. Cuando su pan esté horneado completamente, la panifica-
dora Backmeister
®
indica que puede sacar el pan emitiendo
un pitido repetido. Si desea sacar el pan antes de que haya
terminado el tiempo para mantener la temperatura, pulse la
tecla START/STOP, manteniéndola pulsada hasta que la inte-
rrupción del programa se confirme con un pitido.
15. Retire el molde con cuidado. Utilice unas manoplas para evi-
tar quemaduras. Vuelque el molde y deje que el pan se deslice
a una rejilla donde podrá enfriarse. Si el pan no se desliza
fácilmente, mueva el accionamiento del agitador varias veces
de un lado para otro hasta que el pan salga. Tenga en cuenta
que el accionamiento del agitador puede seguir estando
caliente. Utilice unas manoplas adecuadas. En ningún caso
debe golpear el molde sobre un canto o la encimera, ya que
podría deformar el molde.
16. Si el agitador se queda en el pan, lo podrá sacar con el gancho
suministrado con el equipo. Introduzca el gancho en la parte
inferior del pan caliente a través de la abertura del agitador
y ladéelo en el borde inferior del agitador, preferiblemente
donde se encuentra la aleta del agitador. A continuación, tire
del gancho hacia arriba sacando el agitador. Así podrá ver
dónde se encuentra la aleta del agitador y sacarla del pan.
17. Después limpie el molde tal y como se describe en la
página 129.
ATENCIÓN:
El equipo está muy caliente durante
e inmediatamente después de su
uso.
GUÍA RÁPIDA – EL PRIMER PAN
Copyright UNOLD AG | www.unold.de

Stand 21.2.2020
125 von 168
DE
EN
FR
NL
IT
ES
PL
Funcionamiento básico:
Una vez enchufado, se podrá leer en el display 3:00 - (los dos
puntos entre las cifras no están intermitentes).
De esta manera se indica que está pronto para funcionar.
Mientras está en marcha puede verse el programa elegido y el
tiempo restante para finalizar en el visor.
TECLA START/STOP
Para iniciar y finalizar el transcurso del programa. Con la tecla
START/STOP se inicia el programa seleccionado en cada caso.
También sirve para interrumpir el programa en cualquier posición
en caso deseado. Mantener el botón presionado hasta que suene
un bip. En el visor se puede ver la posición inicial del programa
básico. Si Usted desea utilizar otro programa, seleccionelo con la
tecla menú.
SELECCIONAR LA HORA
Sólo utilice la función de selección de hora para recetas que
haya probado antes exitosamente, y no modifique estas recetas
después.
PRECAUCIÓN: EN CASO DE INTRODUCIR DEMASIADA CANTIDAD
DE MASA, ÉSTA PUEDE LLEGAR A DESBORDARSE Y CAER EN LAS
RESISTENCIAS QUEMÁNDOSE.
La mayoría de los programas pueden programarse con antelación.
Además de la hora indicada automáticamente en cada programa,
agregando en su caso el período de mantenimiento caliente de
1 hora (después de terminado el proceso de horneado), debe
agregar las horas y minutos después de los cuales debe iniciarse
la preparación. Ejemplo: Son las 20:00 y Usted desea tener pan
blanco a la mañana siguiente a las 7.00 de la mañana: Introducir
los ingredientes en el orden indicado en el recipiente y colocarlo
en el aparato. Tener cuidado que la levadura no entre en contacto
con el líquido. Con la tecla MENÜ (menú) seleccionar el programa
deseado y con la tecla BRÄUNUNG (tostado) indicar el tostado
deseado. En el ejemplo elegimos el programa 1 = BASIS (básico),
que requiere 3:00 horas. Calcule el tiempo necesario entre la
programación (sin tiempo de mantenimiento caliente) y ajuste
este tiempo con la ayuda de la tecla ZEIT (tiempo).
ACLARACIONES SOBRE EL PANEL DE CONTROL
EXPLICACIÓN DE LOS SÍMBOLOS
Menú
El número
visualizado
indica el menú
actualmente
seleccionado.
Tostado
El grado de tueste
seleccionado corres-
pondientemente se
indica con una línea
en la pantalla.
Tecla comenzar/
detener
Para iniciar y na-
lizar el proceso de
programa
Selección de
tiempo +
aumento
del tiempo
deseado
Selección de
tiempo -
Reducción
del tiempo
deseado
Tamaño de pan
Selección del
tamaño de pan
deseado
Copyright UNOLD AG | www.unold.de

126 von 168
Stand 21.2.2020
DE
EN
FR
NL
IT
ES
PL
Si por ej. Usted desea tener un pan a las 7:00 de la mañana
y para ello programa el aparato a las 20:00 horas, debería
aumentar la duración del programa preprogramado en 3 horas a
11 horas, pulsando varias veces la tecla ZEIT. Cuando Usted ha
ajustado las horas deseadas, apriete al final la tecla START/STOP
para confirmar e iniciar el programa de horneado programado con
antelación.
Así, el programa tiene un período de espera de 8 horas, y comien-
za entonces a las 4 de la mañana con el transcurso del programa.
A las 7 horas el pan está listo y puede retirarse. Si Usted no lo
hiciera inmediatamente, comienza entonces la fase de calenta-
miento de 1 hora. A más tardar a las 8 horas el pan tiene que
retirarse definitivamente. Por favor considere lo siguiente:
Por favor al llenar los ingredientes, primero siempre el líquido,
después la harina y al final la levadura seca. Durante el tiempo de
espera antes de iniciarse el programa, la levadura no debe entrar
en contacto con el líquido, pues entonces leudaría demasiado
pronto y la masa, o el pan se hunden más adelante.
El en caso de horneado con antelación, por favor no utilizar
ingredientes perecederos tales como leche, huevos, fruta, yogur,
cebollas, etc.
MENU
Con el botón Menú se pueden escoger los distintos programas
que se describen extensamente en la lista: “transcurso”.
Los programas se utilizan para las siguientes preparaciones.
Explicación de los programas y sus usos.
1 BASIS Panes blancos y mezcla, el
programa estándar para todos los
panes
2 WEISSBROT para panes blancos muy esponjosos
con largo tiempo de leudar (Tamaño
I y II)
3 VOLLKORN Panes integrales (Tamaño I y II)
4 SCHNELL Preparación rápida de pan blanco
y mezcla
5 HEFEKUCHEN Panes dulces con levadura (Tamaño
I y II).
6 ULTRA Preparación ultra rápida de pan
blanco y mezcla
7
KONFITÜRE
CONFITURA
Para preparar confitura y mer-
melada. Para la preparación de
confitura debería adquirirse un
segundo molde, que se utiliza
exclusivamente para confituras.
8 TEIG Solamente para la preparación de
masa; sin función de horneado, la
masa puede seguir manipulándose
a voluntad, formar-la o hornearla en
el horno.
9
GLUTENFREI
Sin gluten
El programa estándar para todos los
panes sin gluten
10 BACKPULVER Para preparaciones con polvo de
hornear, por ej. Tortas rápidas de
revolver
11 TOASTBROT Preparación rápida de pan blanco
toast
12 BACKEN Para horneado más largo, en el
caso que el pan no se hornee
suficientemente en el programa
normal, o para hornear masas de
levadura o de revolver preparadas
por separado (manualmente o en
el programa TEIG/Masa), ajustable
de 10– 60 minutos en fases de
10 minutos. Este programa no se
adecua para hornear masa batida a
mano, para frituras, etc..
En los programas BASIS; WEISSBROT; VOLLKORN; HEFEKU-
CHEN, TOASTBROT y GLUTENFREI durante el segundo proceso
de amasado suenan varias señales acústicas. Estas indican el
momento en que deben agregarse otros ingredientes tales como
nueces,frutos secos, etc. Abra la tapa, agregue los ingredientes y
continuar el programa.
BRÄUNUNG/GRADO DE TOSTADO
Mediante esta tecla en los programas 1-6 + 9-12 se puede ajustar
el tostado en HELL/CLARO; MITTEL/MEDIO ; DUNKEL/OSCURO.
En los demás programas esta función no puede seleccionarse.
Usted reconocerá el ajuste seleccionado en cada caso por la
flecha correspondiente en el display.
BROTGRÖSSE/ETAPA
Se pueden ajustar los diferentes programas:
STUFE I / ETAPA I = para un peso menor del pan (aprox. 700 g)
STUFE II / ETAPA II = para un peso mayor del pan (aprox.
1.000 g)
ATENCIÓN:
El equipo está muy caliente durante
e inmediatamente después de su
uso.
Copyright UNOLD AG | www.unold.de

Stand 21.2.2020
127 von 168
DE
EN
FR
NL
IT
ES
PL
LAS FUNCIONES DEL APARATO DE HORNEAR
Función de alarma
La alarma suena:
Cuando se presiona las teclas de menú o temporizador,
Como confirmación al presionar las correspondientes teclas
activas del programa,
Durante la segunda fase de amasado, para indicar que
es el momento de agregar granos, frutas, nueces u otros
ingredientes. No se puede desconectar, por ej. al utilizar la
función del temporizador.
Al terminar el horneado suena varias veces un bip, para
indicar que el programa ha finalizado totalmente y que el
pan puede retirarse del molde. A partir de este momento
comienza la fase de mantenimiento del calor.
Al final de la fase de mantenimiento del calor suena un bip
varias veces para indicarnos que el programa ha finalizado
totalmente y que el pan debe ser sacado.
Funcion de repetición
En caso de un corte de luz, la máquina de hornear se pondrá en
marcha automáticamente en la fase donde se había parado, en
cuanto el suministro de corriente vuelva a ser normal, y siempre y
cuando el corte no haya sido de más de dos minutos. En el caso
que el corte haya sido demás de 10 minutos, y que el display
muestre el ajuste básico, el aparato debe ponerse en marcha
nuevamente. Esto sólo es posible, si la masa al interrumpir el
programa no estaba en la fase de amasado. En su caso, se puede
continuar el transcurso del programa seleccionado mediante
una programación correspondiente del programa personal
(desconectar etapas del programa ya finalizadas).
Funciónes de seguridad
Después de iniciar el programa, la tapa solamente debería abrirse
durante las fases de amasado para agregar ingredientes, de
ninguna manera durante la fase de leudado y de horneado, pues
de lo contrario la masa caería.
Si la temperatura en el aparato es demasiado alta para un programa
recién seleccionado, al prender nuevamente el aparato aparece “H
HH” en el display. Si este es el caso, retire el recipiente y espere
a que el aparato se haya enfriado y que se encuentre nuevamente
al comienzo del programa seleccionado originalmente. Por favor
considere que el aparato por razones de seguridad no tiene calor
superior, de manera que la corteza en la parte superior del pan
se oscurecerá menos, mientras que en la parte inferior y en los
lados estará más oscuro. Por razones técnicas de seguridad, sin
embargo, no se permite una calefacción adicional el el sector de
la tapa.
Si después de presionar la tecla START/STOP en el display
apareciera “E rr”, hay un defecto en el manejo de la temperatura.
Por favor envíe el aparato para su revisión/reparación a nuestro
servicio al cliente.
Copyright UNOLD AG | www.unold.de

128 von 168
Stand 21.2.2020
DE
EN
FR
NL
IT
ES
PL
EL TRANSCURSO DEL PROGRAMA
Sólo utilice el aparato de hornear en espacios con una temperatura
de más de 18 °C. la levadura recién se activa a una temperatura
de aprox. 17°C. si el aparato se encuentra en un espacio más frío,
no se garantiza un buen leudado de la masa.
1. Introduciendo los ingredientes
Coloque mucha margarina resistente al calor en el agujero del
amasador, de manera qeu la masa no penetre en el espacio vacío
y pueda pegarse. Coloque el amasador sobre el impulsor. Los
ingredientes deben colocarse en el molde de acuerdo con el orden
indicado en las recetas.
En caso de una masa muy densa como la del pan de centeno
recomendamos cambiar el orden de los ingredientes y colocar pri-
mero la harina y la levadura seca y el líquido por último, para que
la masa se amase bien. Al utilizar el temporizador debe prestarse
atención a que la levadura no entre en contacto con el líquido
demasiado pronto
2. Sujetando el recipiente
Sujetar el recipiente con ambas manos en el borde y colocar con
cuidado algo inclinado hacia el centro del soporte en el espacio
para hornear. Girar en el sentido de las agujas del reloj hasta que
ajuste correctamente..
3. Seleccionando el programa
Seleccionar el programa deseado mediante la tecla menú. Elija
según el porgrama la etapa correspondiente. Seleccione el grado
de tostado deseado. Con el temporizador Usted puede demorar
el proceso. Presione la tecla de START. Después ya no es posible
realizar correcciones.
4. Mezclando y amasando la masa
El aparato mezcla y amasa automáticamente los ingredientes el
tiempo necesario para alcanzar la consistencia adecuada.
5. Leudado de la masa
Tras el primer amasado, el aparato de hornear produce la tempe-
ratura óptima para que la masa aumente de tamaño.
6. Horneado
Regula automáticamente la temperatura de horneado y el tiempo
necesario.
7. PerÌodo de calentamiento
Cuando el horneado ha finalizado, suena varias veces un tono de
bip, para indicar que el pan o las comidas pueden retirarse. Al
mismo tiempo comienza un período de mantenimiento caliente
durante 1 hora. Si Usted desea retirar el pan antes de terminar el
período de calentamiento, presione la tecla START/STOP.
8. Finalizacion del programa
Tras finalizar el proceso y la fase de calentamiento, extraer el
recipiente con guantes girándolo hacia la izquierda.!Cuidado:
el molde está muy caliente directamente al final del programa!
Deje el pan aprox. 10 a 15 minutos en el molde y recién sáquelo
después de ese tiempo indicado. Para ello gire el molde y deje
deslizar el pan para enfriarlo sobre una rejilla. Si el pan no cae
inmediatament sobre la rejilla, mueva el impulsor de amasado
desde la parte inferior algunas veces a un lado y otro hasta que el
pan caiga. De ninguna manera Usted puede pegar el molde sobre
un borde o sobre la superficie de trabajo para soltar el pan. El
molde podría deformarse.
Si el amasador queda dentro del pan, sírvase de la varilla
con gancho para ayudarse. Empuje la parte inferior del pan
aún caliente (casi) hasta la apertura redonda del amasador y
colóquelo en el borde inferior del amasador, lo mejor sería en el
lugar en el que se encuentra la hoja del maasador. Tire entonces
del amasador con el gancho con cuidado hacia arriba. Así puede
verse en qué lugar del pan se encuentra la hoja del amasador..
Copyright UNOLD AG | www.unold.de

Stand 21.2.2020
129 von 168
DE
EN
FR
NL
IT
ES
PL
LIMPIEZA Y MANTENIMIENTO
Antes de limpiar la
máquina, desenchúfela y
déjela enfriar. Antes de usar
el aparato por primera vez,
lave brevemente el molde
de hornear de la máquina
de hacer pan con agua
caliente y eventualmente
un detergente no abrasivo
y limpie el amasador.
Antes del uso, deje enfriar
siempre el aparato antes
de limpiarlo o guardarlo.
Demora siempre aprox.
media hora hasta que el
aparato se ha enfriado y
puede volver a ser utilizado
para hornear y preparar
masa.
1. Use un jabón no abrasivo. Nunca use agentes limpiadores
químicos, gasolina, limpiador para hornos o cualquier
detergente que pueda estropear la capa antiadherente.
2. Quite todos los ingredientes y migas de la tapa, carcasa y
compartimiento de horneado con un trapo húmedo. ¡Nunca
introduzca el aparato en agua ni llene el compartimiento de
hornear con agua!
3. Limpie el exterior del molde de hornear con un trapo húmedo.
El interior del molde puede lavarse con agua caliente. Si
a pesar del recubrimiento quedaran restos de masa en el
molde, puede llenarlo con agua caliente y en remojo durante
30minutos aprox. El agregado de detergentes no es necesario
por lo general, en caso necesario puede utilizarse un deter-
gente suave. Por favor no deje el molde demasiado tiempo
sumergido en agua o lleno de agua, pues el revestimiento
podría dañarse.
4. Tanto el amasador como los ejes de giro necesitan limpiarse
inmediatamente después de usarse. Si el amasador quedó en
el molde al hornear, resulta difícil quitarlo después. En este
caso, llene el recipiente con agua caliente y déjelo durante 30
minutos. Luego quite el amasador.
5. Para limpiar el amasador y el molde utilice solamente agua
caliente, un detergente suave y un trapo blando. Evite todo
daño del revestimiento mediante detergentes no adecuados,
por ej. esponjas de acero o polvo abrasivo.
6. El molde de hornear tiene una capa antiadherente. No use
objetos metálicos que puedan dañar la superficie cuando la
limpie. Es normal que el color de la capa cambie con el trans-
curso del tiempo. Este cambio no altera su eficacia de ningún
modo.
7. Limpie el visor después de cada horneado con un trapo
húmedo. Si el visor estuviera muy sucio, ponga algo de lim-
piador de vidrio en un trapo y páselo por los vidrios. Pasar un
trapo húmedo y secar.
8. Antes de guardar el aparato, asegúrese que está perfectamente
frío, limpio y seco. Retire el aparato con la tapa cerrada.
Copyright UNOLD AG | www.unold.de

130 von 168
Stand 21.2.2020
DE
EN
FR
NL
IT
ES
PL
1 2 3 4 5
BASIS Weissbrot Vollkorn Schnell HEFEKUCHEN
ST. I ST. II ST. I ST. II ST. I ST. II ST. I ST. II
Tiempo total 2:53 3:00 3:40 3:50 3:32 3:40 1:40 2:50 2:55
1.Amasado
9 10 16 18 9 10 7 10 10
1. Leudado
horneado ON/
OFF
20 20 40 40 25 25 5 5 5
2. Kneading
14
Añadir
ingred.
15
Añadir
ingred.
19
Añadir
ingred.
22
Añadir
ingred.
18
Añadir
ingred.
20
Añadir
ingred.
8 20
Añadir
ingred.
20
Añadir
ingred.
2. Leudado
horneado ON/
OFF
25 25 30 30 35 35 30 30
3. Leudado
horneado ON/
OFF
40 40 45 45 60 60 15 40 40
Horneado
horneado ON/
OFF
65 70 70 75 65 70 65 65 70
Manten
caliente
at 60 °C
horneado ON/
OFF
60 60 60 60 60 60 60 60
TRANSCURSO DE LOS PROGRAMAS
Copyright UNOLD AG | www.unold.de

Stand 21.2.2020
131 von 168
DE
EN
FR
NL
IT
ES
PL
6 7 8 9 10 11 12
ULTRA-
KONFITÜRE
TEIG GLUTENFREI BACKPULVER TOASTBROT BACKEN
ST. I ST. II ST. I ST. II ST. I ST. II
Tiempo total 0:58 0:58 1:30 3:15 3:20 2:50 2:55 3:00 1:00
1.Amasado
12 0 20 12 12 10 15 15
1. Leudado
horneado ON/
OFF
0 15
horneado
ON/OFF
20 20 5 40 40
2. Kneading
0 0 13
Añadir
ingred.
13
Añadir
ingred.
20 5
Añadir
ingred.
5
Añadir
ingred.
2. Leudado
horneado ON/
OFF
0 0 30 45 45 30 25 25
3. Leudado
horneado ON/
OFF
11 45
horneado
ON/OFF
40 45 45 35 40 40
Horneado
horneado ON/
OFF
35 20 60 65 70 50 55 10-60
Manten
caliente
at 60 °C
horneado ON/
OFF
60 60 60 60 60 60 60 60
TRANSCURSO DE LOS PROGRAMAS
Copyright UNOLD AG | www.unold.de

132 von 168
Stand 21.2.2020
DE
EN
FR
NL
IT
ES
PL
PREGUNTAS SOBRE EL USO DEL APARATO Y SU MANEJO
El pan se pega al recipiente después de hornear
Deje el pan enfriarse durante unos 10 mn. después de hornear-
se - vuelque la parte de arriba del recipiente hacia abajo. Si es
necesario mueva el impulsor levemente (conexión del amasador
– tornillo en parte inferior del molde). Antes de colocarlo en el
agujero, colocar bastante margarina resistente al calor en el agu-
jero del amasador (ninguna margarina de grado medio de grasa!),
de manera que al amasar no penetre masa en los espacios inter-
medios y pueda secarse. Pasar algo de aceite al amasador antes
de hornear.
Si Usted prepara mermelada con el aparato, recomendamos para
pan y mermelada utilizar un molde propio, pues a causa de la
acidez los panes no pueden soltarse bien del molde. Usted puede
encargar otros moldes y amasadores en nuestro servicio al cliente.
¿Cómo pueden evitarse los agujeros en el pan (amasador)?
Usted puede retirar el amasador con dedos enharinados antes
de que la masa suba por última vez (ver transcurso temporal del
programa y aviso en el display).
Si no desea hacerlo, utilice después de hornear el gancho. Si se
utiliza con cuidado, se puede evitar un agujero más grande.
La masa se eleva demasiado y se desborda
Esto ocurre particularmente cuando se usa harina de trigo debido
a su mayor contenido de gluten.
Remedio:
Reduzca la cantidad de harina y ajuste las cantidades de los
demás ingredientes. Cuando el pan esté listo, aún tendrá un
gran volumen.
Añada una cucharada de margarina líquida a la harina.
La masa sube mucho y en la fase de horneado se hunde.
Si una zanja con forma de V se forma en el medio del pan, la
harina no tiene suficiente gluten. Esto significa que el trigo
contiene muy pocas proteínas (especialmente ocurre durante
veranos lluviosos) o que la harina esta demasiado húmeda.
Remedio:
Añada una cucharada de trigo con gluten para 500 gramos
de trigo.
Eventualmente utilizar el programa RÁPIDO.
Reducir cantidad de levadura a ¼.
Si el pan tiene una forma de embudo en el medio, la posible
causa puede ser una de las siguientes:
La temperatura del agua era demasiado alta.
Se utilizó demasiada agua. (en algunas mezclas de horneado
para 500 g de mezcla para hornear se indican 340 ml de
agua, nosotros recomendamos 300 ml agua para 500 ml de
mezcla de hornear, ya que el aparato de hornear, gracias al
impulsor dentado amasa también sin problemas una masa
dura).
La harina era pobre en gluten.
El pan no está demasiado tostado en la parte superior.
Mezclar una yema con una cucharada de crema dulce o ácida y
cubrir la masa con la mezcla después del último amasado
¿Cuando puede abrirse la tapa durante el horneado?
Generalmente hablando, siempre es posible mientras la amasadora
está funcionando. Durante esta fase podrán añadirse pequeñas
cantidades de harina o líquido en caso de ser necesario.
Si quiere que el pan tenga un aspecto determinado después
de hornear, proceda como sigue: antes de la ultima fase de
levado, (ver „tabla de programa con fase de tiempo“ , “Retiro
del amasador” y el mensaje en el display) abra la tapa con
precaución y luego pinche la superficie del pan con un cuchillo
afilado precalentado (sin tocar el molde), puede añadir unos
cereales dispersos sobre la superficie o extender una mezcla de
harina de patata y agua sobre la corteza para darle un acabado
elegante para que el pan brille. Esta es la ultima vez que puede
abrirse la tapa. Si lo abriese después de este momento, el pan se
iría hacia abajo quedando apelmazado en el centro.
¿Qué es la harina integral?
Usted puede preparar su pan también con harina molida por Usted
mismo. El contenido de salvado no debe sobrepasar el 50%. El
resto de la harina debe estar molida fina y cribada. Ideal es una
mezcla de 30% de salvado y 70% de harina. Por favor considere
que en el caso de harina molida por Usted eventualmente requiera
algo más de líquido.
Copyright UNOLD AG | www.unold.de

Stand 21.2.2020
133 von 168
DE
EN
FR
NL
IT
ES
PL
¿Qué es el gluten en la harina?
Cuanto más alto sea la cifra del tipo de harina, más bajo será el
contenido de gluten de la harina y menos subirá la masa. Las
cantidades más altas de gluten se contienen en la harina de trigo
del tipo 550.
Usando harina de centeno
La harina de centeno contiene poco gluten y el pan apenas se
eleva. Para hacerlo más fácil de digerir se hace un pan integral de
centeno con levadura deshidratada especial para centeno (masa
agria). Estos deberían hornearse siempre sin función de tempo-
rizador. La masa sólo subirá sin al utilizar harina de centeno que
no contenga gluten, se sustituya por lo menos ¼ de la cantidad
indicada por harina del tipo 550. Los panes con más proporción
de centeno son siempre panes más duros que los hechos con
harina de trigo o mixtos.
Tipos de harina y cuando usarlos
Harina de mijo, amaranto, quinoa, tapioca, maíz, arroz y patata
son apropiadas para personas alérgicas al gluten o que sufren
de “Sprue” o “Zölakie”. En la parte de las recetas de estas
instrucciones encontrará tanto recetas como direcciones de
contacto con fabricantes para productos especiales para personas
alérgicas.
La harina de espelta es muy cara, pero está libre de aditivos
químicos porque la espelta crece en tierras muy pobres sin
fertilizantes. La espelta es apropiada especialmente para
personas alérgicas. Muchas personas con alergia al trigo y
al gluten pueden consumirla sin problemas. Todas las recetas
con los tipos de harina 405 – 550 – 1050 pueden prepararse
de forma alternativa también con harina de espelta. Al utilizar
harina de espelta en lugar de harina de trigo debería reducirse la
cantidad de levadura en ¼.
La harina de trigo durum es apropiada para pan baguette gracias
a su consistencia y puede ser reemplazada por sémola de trigo
durum.
Como hacer el pan fresco mas digestivo
Si se añade una patata hervida y hecha puré a la harina y la masa
se amasa, el pan fresco es más fácil de digerir.
I¿Qué dosis de leudantes utilizar
Tanto en el caso de levadura como en el de masa ácida, que
se puede comprar en cantidades variadas, es necesario seguir
los datos del fabricante en el embalaje y poner la cantidad en
relación a la cantidad de harina utilizada. Para que la levadura
tenga potencia, es muy importante también la dureza del agua,
en el caso de agua muy blanda, la levadura sube más, de manera
que en zonas con agua blanda la cantidad de levadura debería
reducirse en aprox. ¼. La mejor relación de levadura y agua debe
probarse primero y eventualmente volver a modificarse.
Si el pan sabe a levadura
Si se añade azúcar, reducirlo o dejarlo, sin embargo, el pan no se
tostará tanto.
Añada una cucharada de vinagre para una pequeña hogaza de
pan y una cucharada y media para una gran hogaza.
Use suero de leche o yogur en lugar de agua. Esto es posible para
todas las recetas y se recomienda para aumentar la frescura del
pan. Por favor considere que el suero de leche y el yogur son más
gruesos que el agua, pro lo que según la consistencia eventual-
mente deberá agregarse algo de agua.
¿Por qué el pan del aparato de hornear es distinto al del
horno?
Depende del diferente grado de humedad: el pan es horneado
más seco en el horno debido al mayo espacio, mientras que el
pan hecho en la máquina es más húmedo.
Qué significan los tipos de numeros para la harina
Cuanto más bajo el tipo de número, menos fibra contiene la harina
y más ligera será. Como la denominación de los distintos tipos de
harina se diferencian según país, a continuación una lista breve:
Copyright UNOLD AG | www.unold.de

134 von 168
Stand 21.2.2020
DE
EN
FR
NL
IT
ES
PL
Alemania tipo Austria tipo Suiza tipo
Harina de trigo Harina molida muy fina, para pasteles 405 480 400
Harina molida fina, ideal para pan 550 780 550
Harina molida entrefina 1050 1600 1100
Harina integral, molida gruesa 1600 1700 1900
Harina de centeno Harina molida muy fina 815 500 720
Harina molida muy fina 997 960 1100
Harina molida entrefina 1150 960 1100
Harina molida gruesa, harina integral 1740 2500 1900
ERRORES DEL APARAT
Errores Causa Solución
El humo sale del compartimiento de
horneado o de los respiraderos.
Los ingredientes se pegan al
compartimiento de horneado o al exterior
del molde de horneado.
Durante el primer calentamiento del
aparato es normal. En caso de repetición,
sacar el enchufe, dejar enfriar el aparato
y luego sacar el molde y limpiar parte
exterior del molde y espacio de horneado.
El pan se va hacia abajo por el centro y
está húmedo en el fondo.
El pan se dejó demasiado tiempo en el
molde después de hornear y recalentar.
Saque el pan del molde de hornear
antes que la función de recalentamiento
termine, para que pueda salir el vapor.
Es difícil sacar el pan del molde de
hornear.
El fondo de la hogaza esta pegada a la
pinza amasadora.
Colocar bastante margarina en el agujero
del amasador antes de colocarlo. Limpie
la pinza amasadora y los ejes de giro
después de hornear. Si es necesario, llene
el molde de hornear con agua caliente
durante 30 minutos. Luego las varillas
amasadoras pueden sacarse y limpiarse
fácilmente.
Los ingredientes no se mezclan o el pan
no se hornean correctamente.
Posición de un programa incorrecto. Compruebe el menú seleccionado y las
otras posiciones
Se tocó la tecla de encendido/apagado
mientras la máquina estaba funcionando.
Eliminar ingredientes y volver a comenzar,
ya que la masa de levadura no soporta
interrupciones largas y la levadura ya no
sube.
La tapa se abrió varias veces mientras la
máquina estaba funcionando.
El programa se interrumpió antes de
tiempo. Revise si los ingredientes aún
pueden utilizarse. En caso de duda,
eliminar ingredientes y volver a hacer la
masa.
Un corte de luz largo mientras la
máquina estaba funcionando.
Abrir sólo la tapa cuando en el display
aparece KNEAD 2. Después de el último
leudado no volver a abrir la tapa.
La rotación del amasador está
bloqueada.
Revisar si el molde y el amasador están
bien colocados. Revisar si el amasador
está bloqueado por cereales, etc. Retirar
molde y revisar si el impulsor gira. Si este
no es el caso, enviar el aparato al servicio
al cliente.
Copyright UNOLD AG | www.unold.de

Stand 21.2.2020
135 von 168
DE
EN
FR
NL
IT
ES
PL
ERRORES EN LAS RECETAS
Error Causa Subsanación
El pan sube con demasiada fuerza Demasiada levadura, demasiada harina, muy poca sal, agua
Demasiado blanda o varias de estas causas
a/b
El pan no sube o no sube lo suficiente Nada o muy poca levadura
Levadura vieja o pasada
Líquido demasiado caliente
La levadura ha entrado en contacto con el líquido
Harina incorrecta o vieja
Demasiado líquido o demasiado poco
Muy poco azúcar
a/b
e
c
d
e
a/b/g
a/b
La masa sube demasiado y se
desborda del molde para hornear
El agua muy blanda hace que la levadura fermente con más fuerza
Demasiada leche afecta a la fermentación de la levadura
f/k
c
El pan se ha desinflado El volumen del pan es mayor que el molde, por eso se ha desinflado a/f
El pan tiene una abolladura tras el
horneado
Fermentación de la levadura demasiado temprana o rápida a causa
De agua demasiado caliente, cámara de horneado caliente, mucha
humedad
Muy poco gluten en la harina
c/h/i
l
Demasiado líquido a/b/h
Estructura pesada, grumosa Demasiada harina o muy poco líquido a/b/g
Muy poca levadura o azúcar a/b
Demasiados frutos, cereales integrales u otros ingredientes b
Harina vieja o pasada e
No se ha cocido por el centro Demasiado líquido o demasiado poco
Elevada humedad,
Recetas con ingredientes húmedos, como por ej. yogur
a/b/g
h
g
Estructura abierta, basta o agujereada Demasiada agua, nada de sal g/b
Elevada humedad, agua demasiado caliente h / i
Líquido demasiado caliente c
Superficie fungosa, no hecha Volumen del pan mayor que el molde
Cantidad de harina excesiva, en especial para pan blanco
a/f
f
Demasiada levadura o muy poca sal a/b
Demasiado azúcar a/b
Ingredientes dulces además del azúcar b
Las rodajas de pan resultan desiguales
o se forman grumos
El pan no se ha enfriado lo suficiente (el vapor ha escapado) j
Restos de harina en la costra del pan La harina no se ha entremezclado bien por los lados durante el
amasado
g
Subsanación de los puntos de error
a Tome correctamente las medidas de los ingredientes.
b Adapte la cantidad de los ingredientes de la forma correspondiente y compruebe que no ha olvidado ningún ingrediente.
c Use otro líquido o déjelo enfriar a temperatura ambiente.
d Añada los ingredientes en el orden mencionado en la receta. Haga un pequeño agujero en el centro de la harina e introduzca ahí
la levadura desmenuzada o la levadura seca. Evite el contacto directo entre levadura y líquido.
e Utilice únicamente ingredientes frescos y correctamente almacenados.
f Reduzca la cantidad total de ingredientes, en ningún caso ponga más cantidad de harina que la indicada. Reduzca, dado el caso,
todos los ingredientes en 1/3.
g Corrija la cantidad de líquido. En caso de haber usado ingredientes húmedos, hay que disminuir la cantidad de líquido de forma
correspondiente.
h Si el tiempo es muy húmedo, ponga 1-2 cs menos de líquido.
i Si hace calor, no utilice la función ajuste de tiempo (Zeitwahl). Utilice líquidos fríos. Use los programas SCHNELL (rápido) o
ULTRA-SCHNELL (ultrarrápido), para recortar el tiempo de aumento de la masa.
j Saque el pan del molde inmediatamente después del horneado y déjelo enfriar sobre una rejilla 15 minutos como mínimo, antes
de cortarlo.
k Disminuya la cantidad de levadura o, si es necesario, la totalidad de ingredientes en 1/4 de las cantidades indicadas.
l Incorpore a la masa 1 cs de gluten de trigo.
Copyright UNOLD AG | www.unold.de

136 von 168
Stand 21.2.2020
DE
EN
FR
NL
IT
ES
PL
COMENTARIOS SOBRE LAS RECETAS
1. INGREDIENTES
Ya que cada ingrediente juega un papel específico para el hornea-
do con éxito del pan, la medida es tan importante como el orden
en el cual se añaden los ingredientes.
Los ingredientes más importantes, tales como el líquido, harina,
sal, azúcar y levadura (pueden utilizarse tanto levadura seca o
fresca) afectan el resultado de la preparación de la masa y el pan.
Use siempre las cantidades correctas en la proporción correcta.
Use ingredientes tibios si la masa necesita ser preparada inme-
diatamente. Si usted desea ajustar la función del programa con
fase de tiempo, es aconsejable usar ingredientes fríos para evitar
que la levadura comience a fermentar demasiado pronto.
Margarina, mantequilla y leche afectan el sabor del pan.
Recomendamos levadura seca para nuestras recetas, ya que leuda
mejor y deja medirse más fácilmente. Por supuesto que también
puede utilizarse levadura fresca, pero en este caso la fuerza de
leudado puede variar mucho según cuán fresca es la levadura. La
levadura fresca debe disolverse antes en el líquido indicado en las
recetas. Para 500 g de levadura Usted requiere aprox. 10 – 13 g
de levadura fresca, cuando Usted hornea el pan en el aparato de
hacer pan, ya que la levadura leuda mejor en el clima húmedo-
caliente del aparato de hornear que en el horno. Si Usted prepara
la masa solamente en el aparato de hornear y luego lo hornea en
el horno convencional, Usted precisará aprox. 20 g de levadura.
El azúcar puede reducirse el 20 % para hacer la corteza más
delgada y clara sin afectar al resultado exitoso del horneado. Si
usted prefiere una corteza mas clara y más blanda sustituya el
azúcar con miel.
Si Usted utiliza granos enteros de cereales, déjelos la noche
anterior en remojo. Disminuya de forma correspondiente la
cantidad de harina y de líquido (hasta 1/5 menos).
La masa agria es indispensable para la harina de centeno.
Contiene leche y acetobacteria que hacen que el pan tenga un
color más claro y que fermente completamente. Usted puede
hacer su propia masa agria, pero tarda tiempo. Por esta razón
la levadura deshidratada concentrada se usa en las recetas de
abajo. La levadura deshidratada en polvo se vende en paquetes
de 15 gramos (para un kilo de harina). Siga las instrucciones
dadas en las recetas, pues entonces el pan tendrá menos migas.
Si se usa masa agria en polvo con una concentración diferente
(paquete de 100 g por 1 kg de harina), la cantidad de harina debe
reducirse 1 kg de harina en aprox. 80 g, o adaptar la receta de
forma correspondiente.
La masa agria líquida también está disponible y es apropiada para
usar. Siga las dosis especificadas en el paquete. Llene la taza
medidora con la masa agria líquida y rellénela hasta arriba con los
otros ingredientes líquidos en la dosis como se especifica.
La masa agria de trigo, la cual se puede comprar también seca,
mejora la cualidad de la masa, la frescura y el sabor. Es más
suave que la masa agria de centeno.
Hornee el pan con masa agria en el programa “Basis” (básico) o
“Pan integral”, para que pueda leudar y hornearse bien.
El salvado de trigo se añade a la masa si usted quiere sobre todo
un pan rico en fibra. Use una cucharada para 500 g de harina e
incremente la cantidad de líquido en ½ cucharada.
El gluten de trigo es un aditivo natural obtenido de las proteínas
del trigo. Esto hace al pan más liviano y más voluminoso, se
hunde menos y es más digerible. El efecto puede ser fácilmente
apreciado cuando hornee productos integrales y otros productos
de panadería hechos con harina molida casera. La mezcla ideal
de harina es de 40 % de harina integral y 60 % de harina blanca.
La malta negra usada en algunas recetas es malta oscura tostada
de cebada. Se usa para obtener una corteza de pan más oscura
(por ejemplo, pan moreno). La malta de centeno también es
apropiada pero no es tan oscura. Usted puede encontrar esta
malta en tiendas de productos orgánicos.
Los condimentos del pan pueden ser agregados a todos nuestros
panes mixtos. La cantidad se utiliza según Su propio gusto y los
datos del fabricante.
La levadura pura de lecitina es un agente emulgante que mejora
el volumen del pan, hace la corteza blanda más blanda y más
suave, y lo mantiene fresco más tiempo. Todos los productos para
hornear mencionados más arriba y en letra negrita pueden ad-
Copyright UNOLD AG | www.unold.de

Stand 21.2.2020
137 von 168
DE
EN
FR
NL
IT
ES
PL
quirirse en tiendas de productos orgánicos, y otras de productos
alimenticios, o de ventas de cereales.
2. AJUSTANDO LAS DOSIS
Si las dosis necesitan ser incrementadas o reducidas, asegúrese
de que las proporciones de la receta original se mantengan. Para
obtener un resultado perfecto, deben seguirse las reglas básicas
mencionadas más abajo para el ajuste de los ingredientes:
Líquidos/harina: la masa debe ser blanda (no demasiado blanda) y
fácil de amasar sin llegar a ser fibrosa. Una bola puede obtenerse
amasándola ligeramente. Este no es el caso de masas pesadas
como pan integral de centeno o pan de cereal. Compruebe la
masa 5 minutos después del primer amasado. Si es demasiada
húmeda, añada algo de harina hasta que la masa haya alcanzado
la consistencia correcta. Si la masa es demasiado seca, añada
agua de a cucharadas durante el amasado.
Sustituyendo líquidos: Cuando se sustituyen ingredientes que
contienen líquidos en una receta (por ejemplo, queso fresco,
yogur, etc.), la cantidad requerida de líquido debe ser reducida.
Cuando use huevos bátalos en la taza medidora y llénela con el
otro líquido requerido hasta la cantidad prevista.
Si usted vive en un lugar situado a una gran altitud (mas de
750 m) la masa se eleva más rápidamente. La levadura puede
reducirse en estos casos a 1/4 hasta 1/2 de cucharadita para
reducir proporcionalmente su elevación. Lo mismo ocurre en
lugares con agua más blanda de lo normal.
3. AÑADIENDO Y MIDIENDO LOS INGREDIENTES Y CANTIDADES
Ponga siempre el líquido primero y la levadura al final. Solamente
en el caso de masas muy pesadas con alto contenido de centeno
o harina integral puede tener sentido, modificar el orden y agregar
primero la harina con la levadura seca y al final el líquido. Sin
embargo, en este caso debe cuidarse sobre todo en la función de
temporizador que la levadura no entre en contacto con el agua
antes de iniciar el programa. Para que la levadura no aumente
demasiado rápido (especialmente al utilizar temporizador), debe
evitarse un contacto entre levadura y líquido. Cuando mida use
las mismas unidades de medida para cumplir con los datos in-
dicados en las recetas, es decir, use la cuchara medidora habili-
tada con la máquina de hacer pan o una cuchara usada en casa
cuando las recetas requieren dosis medidas en cucharas grandes
o cucharas pequeñas.
Las medidas en gramos deben pesarse con precisión. Para las
indicaciones de milímetros usted puede usar la taza medidora.
Las abreviaciones en las recetas significan:
EL= nivel de cucharada grande (cuchara de medida grande)
TL= nivel de cuchara pequeña o cucharadita (cuchara de medida
pequeña)
g = gramos
ml = milílitro
Paquete = 7 g de levadura deshidratada seca por 500 g de harina
- corresponde a 20 g de levadura fresca.
4. AGREGADO DE FRUTA, NUECES O CEREALES
Si usted desea añadir otros ingredientes, usted puede hacerlo con
la mayoría de los programas (BASIS; VOLLKORN; WEISSBROT;
SCHNELL; HEFEKUCHEN), cuando usted escuche la señal
acústica o bip. Si usted añade los demás ingredientes en este
momento, quedarán agregados sobre todo en la parte superior del
pan. Si los añade ya al comienzo, se distribuirán en toda la masa,
pero quedarán aplastados durante el amasado.
5. PESOS Y VOLÚMENES DEL PAN
En las siguientes recetas usted encontrará indicaciones exactas en
cuanto al peso del pan averiguadas por nuestra asesora después
de hornear panes. Usted verá que el peso del pan blanco puro
es menos que el del pan integral. Esto depende de que la harina
blanca se eleva más y por lo tanto es necesario poner límites.
A pesar de los indicadores precisos de peso, pueden haber
ciertas diferencias. El peso actual del pan depende mucho de la
humedad ambiente en el momento de la preparación.
Todos los panes con una porción sustancial de trigo alcanzan un
gran volumen y exceden el borde del recipiente después de la
última elevación en el caso del tipo de peso más alto. Pero el pan
no se desborda. La parte del pan fuera del molde se tuesta más
fácilmente en comparación con el pan dentro del molde.
Cuando el programa Schnell (rápido) se sugiere para panes
dulces, Usted puede usar los ingredientes en menores cantidades
también para el programa Hefekuchen (torta con levadura) para
hacer un pan mas liviano. Seleccione entonces en el programa
Hefekuchen la etapa I (Tamaño I).
Copyright UNOLD AG | www.unold.de

138 von 168
Stand 21.2.2020
DE
EN
FR
NL
IT
ES
PL
6. RESULTADOS DEL HORNEADO
El resultado del horneado depende de las condiciones (agua blan-
da - alta humedad del aire - gran altitud - consistencia de los
ingredientes, etc.). Por tanto, las indicaciones de las recetas son
puntos de referencia que pueden ser adaptados. Si una receta u
otra no sale bien la primera vez, no se desanime. Intente encon-
trar la causa e inténtelo de nuevo variando las proporciones.
Antes de hornear el pan con temporizador, se recomienda hornear
un pan de prueba con exactamente los mismos ingredientes y
vigilar el transcurso del programa para que en caso de necesidad
aún pueda modificar la receta antes de hornear un pan con
temporizador.
Como no podemos ejercer influencia sobre la consistencia de los
ingredientes u otros factores al hornear, tales como temperatura
ambiente, humedad etc, no podemos asumir garantías por el
éxito de las recetras.
RECETAS
Pan blanco clásico
Tamaño I Tamaño II
Peso del pan,
aprox.
500 g 750 g
Agua 230 ml 350 ml
Sal ¾ tsp 1 tsp
Azúcar ¾ tsp 1 tsp
Semolina 100 g 150 g
Harina, tipo 550 230 g 350 g
Levadura seca ½ Bolsita ¾ Bolsita
Programa: SCHNELL o WEISSBROT
Pan de pueblo blanco
Tamaño I Tamaño II
Peso del pan,
aprox.
500 g 750 g
Leche 180 ml 275 ml
Margarina/
mantequilla
15 g 25 g
Sal ½ tsp 1 tsp
Azúcar ½ tsp 1 tsp
Harina tipo 1050 330 g 500 g
Levadura seca ½ Bolsita ¾ Bolsita
Programa: BASIS o WEISSBROT
PAN de pasas de uva
Tamaño I Tamaño II
Peso del pan,
aprox.
560 g 850 g
Agua 180 ml 275 ml
Margarina/
mantequilla
20 g 30 g
Sal 1 Prise ½ tsp
Miel 1 tsp 1 tblsp
Harina tipo 405 330 g 500 g
Canela ½ tsp ¾ tsp
Levadura seca ½ Bolsita ¾ Bolsita
Pasas de uva 50 g 75 g
Programa: SCHNELL o HEFEKUCHEN
Pan de masa agria
Tamaño I Tamaño II
Peso del pan,
aprox.
740 g 1050 g
Masa agria seca
*
½ Bolsita ¾ Bolsita
Agua 350 ml 450 ml
Especia de pan ½ tsp ¾ tsp
Sal 1 tsp 1 ½ tsp
Harina centeno 250 g 340 g
Harina Tipo 1050 250 g 340 g
Levadura seca 1 Bolsita 1½ Bolsita
Programa: BASIS
Copyright UNOLD AG | www.unold.de

Stand 21.2.2020
139 von 168
DE
EN
FR
NL
IT
ES
PL
Pan de cebolla
Tamaño I Tamaño II
Peso del pan,
aprox.
570 g 860 g
Agua 230 ml 350 ml
Sal ½ tsp 1 tsp
Azúcar ½ tsp 1 tsp
Cebolla frita 30 g 50 g
Harina tipo 1050 360 g 540 g
Levadura seca ½ Bolsita ¾ Bolsita
Programa: VOLLKORN
Pan de salvado de trigo
Tamaño I Tamaño II
Peso del pan,
aprox.
560 g 850 g
Agua 270 ml 400 ml
Margarina/
mantequilla
20 g 30 g
Sal ½ tsp 1 tsp
Azúcar ½ tsp 1 tsp
Weizenkleie 50 g 75 g
Weizenkeime 30 g 50 g
Vinagre 1 tsp 1 tblsp
Harina integral 260 g 400 g
Levadura seca ½ Bolsita ¾ Bolsita
Programa: VOLLKORN
Pan del campesino
Tamaño I Tamaño II
Peso del pan,
aprox.
520 g 780 g
Agua 200 ml 300 ml
Sal ½ tsp 1 tsp
Masa agria de
trigo seca*
15 g 25 g
Harina tipo 1050 330 g 500 g
Azúcar ½ tsp 1 tsp
Levadura seca ½ Bolsita ¾ Bolsita
Programa: BASIS
Pan de especias
Tamaño I Tamaño II
Peso del pan,
aprox.
510 g 770 g
Agua 230 ml 350 ml
Masa agria seca 1/3 bolsita ½ bolsita
Harina Tipo 1150 200 g 300 g
Harina Tipo 1050 130 g 200 g
Sal ½ tsp 1 tsp
Azúcar ½ tsp 1 tsp
Cilantro 1 pizca ½ tsp
Hinojo 1 pizca ½ tsp
Anís 1 pizca ½ tsp
levadura seca 2/3 bolsita 1 bolsita
Programa: BASIS/BÁSICO ¾ Pckg.
Programm/e: VOLLKORN
Pan al queso cottage
Tamaño I Tamaño II
Peso del pan,
aprox.
530 g 800 g
Agua o leche 130 ml 200 ml
Margarina/
mantequilla
20 g 30 g
Huevo, 1 pequeño 1
Sal ½ tsp 1 tsp
Azúcar 1 tsp 1 tblsp
Queso tipo
Cottage
80 g 125 g
Harina tipo 550 330 g 500 g
Levadura seca ½ bolsita ¾ bolsita
Programa: SCHNELL (Rápido)
Pan Pizza
Tamaño I Tamaño II
Peso del pan,
aprox.
610 g 920 g
Agua 250 ml 375 ml
Öl 1 tsp 1 tblsp
Sal ½ tsp 1 tsp
Azúcar ½ tsp 1 tsp
Oregano ½ tsp ¾ tsp
Queso de
parmesan
1 ½ tblsp 2 ½ tblsp
Harina de trigo
durum
65 g 100 g
Harina tipo 550 315 g 475 g
Levadura seca ½ Bolsita ¾ Bolsita
Programa: SCHNELL
Copyright UNOLD AG | www.unold.de

140 von 168
Stand 21.2.2020
DE
EN
FR
NL
IT
ES
PL
PANES HECHOS CON MEZCLAS DE HARINAS PREPARADAS
El uso de modernos preparados en polvo para panificar es más que fácil muchos preparados contienen la levadura requerida. Usted
solamente tiene que emplear algunos minutos de tiempo al principio:
1. Conectar el aparato.
2. Llenar de líquido (aprox. 300 ml para 500 g de preparado en polvo)
3. Añadir la correspondiente cantidad de la mezcla preparada
4. Agregar levadura seca en caso necesario (si no está contenida en la mezcla). 1 cuchara medidora pequeña de UNOLD
®
comprende
2 g de levadura seca.
5. Seleccionar el programa.
6. Presionar START.
7. Todo lo demás lo hace la máquina panificadora por usted.
PANES PARA ALÉRGICOS
Observe las siguientes indicaciones en los panes sin gluten:
Las harinas sin gluten necesitan más líquido que las harinas con gluten (400-500 ml de líquido templado por 500 g de harina).
Las harinas sin gluten necesitan un poco de aceite o grasa para dar buen resultado. Puede utilizar aceite, mantequilla o también
margarina (de 10 a 20 g).
Si elabora pan con harinas sin gluten, no podrá preprogramar el programa. El desarrollo del programa debe iniciarse siempre de
inmediato.
El pan sin gluten de la panificadora necesita menos levadura que un pan hecho al horno. Utilice aproximadamente 3,5 a 5 g de
levadura seca para un pan normal.
Si durante el horneado el pan se asienta en el centro, reduzca la cantidad de levadura en 1 g aproximadamente. Si a pesar de ello
el pan sigue asentándose, casque un huevo en un vaso medidor y rellene el vaso con la cantidad de líquido necesario. Atención:
¡no añadir el huevo adicionalmente a la cantidad de líquido!
La costra de panes sin gluten no se tuesta tanto como la de los panes con gluten. Las panificadoras no pueden ofrecer calor
superior por razones de seguridad, por lo cual la parte superior del pan queda más clara. Para dar un buen color al pan, puede
mezclar con la batidora una yema de huevo con 1 cucharadita de nata y untarlo sobre el pan cuando la pantalla indica 1:15 de
tiempo restante de funcionamiento.
Después de unos ocho minutos de tiempo de amasado retire los restos de harina o masa del borde del molde con una rasqueta
de panadero de silicona. Si con el tiempo restante de 1:15 retira de nuevo suavemente el borde de masa del molde, no quedará
ningún borde de masa fino durante el horneado.
Para las personas que sufren alergia a los cereales o deben seguir ciertas dietas hemos efectuado pruebas de horneado con diferentes
mezclas de harina (en parte a base de fécula de maíz, de arroz y de patatas) con nuestro Backmeister
®
, obteniendo buenos resultados.
Durante el uso de preparados siga las instrucciones del envase.
Hemos obtenido buenos resultados de horneado con productos de las empresas Schär y Hammermühle Diät GmbH. Si tiene preguntas
sobre los productos sin gluten o si tiene intolerancias múltiples puede dirigirse directamente a estas empresas:
Línea directa empresa Schär Línea directa Hammermühle
Alemania Tel. 08 00/1 81 35 37 Alemania Tel. 0 63 21/9 58 90
Austria Tel. 08 00/29 17 28
Puede adquirir los ingredientes necesarios en tiendas de productos dietéticos y biológicos y tiendas de productos naturales. Los pro-
ductos de Hammermühle puede pedirse directamente al fabricante en el número de teléfono arriba mencionado. Todas las clases de
Copyright UNOLD AG | www.unold.de

Stand 21.2.2020
141 von 168
DE
EN
FR
NL
IT
ES
PL
harina detalladas son aptos para bizcochos o panes propios de una nutrición especial (enfermedad celíaca) en el marco de un plan de
dieta. Incluso añadiendo una cantidad mayor de levadura o levadura química (crémor tártaro), los panes horneados en el Backmeister
®
quedan relativamente consistentes.
Vierta los ingredientes en el molde. Seleccione los siguientes programas:
para la preparación de pan
“BASIS” oscuro, con lo que el pan tendrá una costra más fuerte, “SCHNELL” oscuro, con lo que el pan tendrá una costa más débil.
para la preparación de masa que pretende trabajar posteriormente: programa “TEIG”
para la preparación de pan con levadura en polvo o crémor tártaro como levadura: programa “BACKPULVER”
PREPARACION DE LA MASA
Se puede emplear la máquina de pan para hacer masas de levadura, a las que darles distintas formas y luego hornear en el horno
convencional. Seleccionar el programa de amasado TEIG . Durante el segundo amasado y al sonar el bip pueden agregarse ingredientes
como nueces, frutas secas, chocolate rallado, etc. En el programa Teig hay varias estapas de horneado.
Pizza integral
Ingredientes para 2 Pizzas
Agua 150 ml
Sal ½ tsp
Aceite de oliva 2 tblsp
Harina Integral 300 g
Germen de trigo 1 tblsp
Levadura
deshidratada
½ bolsita
Extender la masa dejar sobre un plato de hornear y dejar diez
minutos. Echar la salsa de pizza y los ingredientes deseados
por encima. Hornear unos 20 minutos.
Programa: TEIG
Pretzel
Ingredientes para 9-10 uds.
Agua 200 ml
Sal ¼ tsp
Harina tipo 405 360 g
Azúcar ½ tsp
Levadura
deshidratada
½ bolsita
Huevo batido para
untar la superficie y
darle color
1
Sal gruesa para la
superficie
Introducir todos los ingredientes excepto el huevo y la sal en el
recipiente. Seleccionar el programa: Teig (masa)
Cuando se escuche la señal acústica y en el visor aparezca:0:00“,
presione Stop.
Precalentar el horno a 230 °C
Divida la masa en porciones y enrolle.
Forme pretzels y sitúelos en una bandeja para el horno engrasada.
Pintar con huevo y espolvorear sal gruesa por encima.
Hornear en el horno precalentado a 200 °C 12-15
Programm: TEIG
Pan de molde oscuro de Schär
Ingredientes Pan pequeño Pan grande
Mezcla de pan oscuro 375 g 500 g
Aceite 4 g 6 g
Levadura seca 1 paquete
(7 g)
10 g
Agua, tibia 470 ml 630 ml
Sal ¾ de
cucharadita
1 cucharadita
Según prefiera puede añadir
comino o 2 cucharaditas 3
cucharaditas
nueces o 50 g 75 g
cebolla frita crujiente o 50 g 75 g
tocino en taquitos o 50 g 75 g
semillas de lino 1 cucharada 1 ½
cucharadita
Copyright UNOLD AG | www.unold.de

142 von 168
Stand 21.2.2020
DE
EN
FR
NL
IT
ES
PL
Pan dulce de navidad alemán
Peso 1.000 g
Leche 125 ml
Mantequilla derretida 125 g
Huevo 1
Ron 3 TEL
Harina tipo 405 500 g
Azúcar 100 g
Piel de limón
confitada
50 g
Piel de naranja
confitada
25 g
Almendras ralladas 50 g
Sultanas 100 g
Sal 1 pizca
Canela 2 pizcas
Levadura
deshidratada
2 bolsitas
Sacar la masa e introducir en un molde alargado y hornear a
180°C 1 hora aprox. (en horno caliente 160°C). Para pintar:
Manteca derretida 250 g, Azúcar 200 g. Después de hornear
cubrir el pan dulce aún caliente varias veces conmanteca
derretida y con azúcar. Envolver el pan dulce enfriado en
lámina de aluminio y dejar 1 semana.
Programa: TEIG
Piezas de levadura
Leche 100 ml
Sal ¾ tsp
Agua 30 ml
Mantequilla 30 g
Huevo 1
Harina tipo 405 350 g
Azúcar 1 ½ tblsp
Levadura seca ½ Bolsita
Programa: TEIG
Formar la masa a gusto para rollos de canela, elaborar como
sigue:
Manteca líquida o
margarina
50 g
Azúcar 50 g
Canela molida ½ tsp
Baño de azúcar a
gusto
Retirar la masa del recipiente y volver a amasar.
Desenrollar en forma de cuadrado sobre una superficie de
trabajo enharinada y distribuir la manteca blanda sobre la masa.
Mezclar el azúcar y la canela y distribuir sobre la manteca.
Desenrollar de forma liviana del lado ancho.
Doblar bien los lados debajo de la masa. Cortar el rollo en
porciones y colocarlas sobre la bandeja con distancia entre
ellas.
Dejar leudar aprox. 40 min. Hornear en horno precalentado a
190°C aprox. 25 –30 min.
Estando aún caliente espolvorear con baño de azúcar.
RECETA BÁSICA DE TORTA
En el aparato de hornear también se puede hornear bien torta de revolver. Porque el aparato trabaja con herramientas de amasar y no de
revolver la torta se pone más compacta, lo que sin embargo no cambia el sabor. Por favor consdiere que el programa „polvo de hornear“
no se puede preprogramar. Se pueden agregar varios ingredientes a la receta básica. No hay límites a su fantasía. Por favor considere
que las cantidades que figuran a continuación no sean excediedas, pues de lo contrario la torta, entre otras cosas, no quedará bien
horneada. Cuando la torta está pronta, retire el recipiente del aparato. Coloque el recipiente sobre un trapo húmedo y deje enfriar la
torta 15 minutos en el molde. Después podrá soltar la torta en los costados con una raspa de goma y darla vuelta.
Zimt ½ TL
Nueces ralladas 50 g
o: chocolate rallado 50 g
o: copos de coco 50 g
o: Manzanas peladas y
cortadas en cubitos (1
cm)
50 g
Programa: POLVO DE HORNEAR
Ingredientes para un peso de aprox. 700 g
Huevos 3
Mantequilla blanda 100 g
Azúcar 100 g
Azúcar de vainilla 1 Bolsita
Harina tipo 405 300 g
Polvo de hornear 1 Bolsita
Copyright UNOLD AG | www.unold.de

Stand 21.2.2020
143 von 168
DE
EN
FR
NL
IT
ES
PL
Las recetas del presente manual de instrucciones han sido cuidadosamente seleccionadas y probadas tanto por sus autores como por UNOLD AG quienes, no obstante, no
asumen garantía alguna. Queda explícitamente excluida cualquier responsabilidad de los autores y UNOLD AG o sus delegados por daños personales, materiales o financieros.
CONDICIONES DE GARANTIA
La garantía para nuestros equipos es de 24 meses, y de 12 meses en el caso de uso comercial, a partir de la fecha de
compra, cubriendo los daños que con un uso acorde a lo prescrito pueden atribuirse fehacientemente a defectos de
fabricación. Dentro del período de garantía, solucionamos errores de material y de fabricación a consideración nuestra
mediante reparación o cambio. Nuestros servicios de garantía son válidos únicamente para los aparatos que han sido
vendidos en Alemania y Austria. Para todos los demás casos diríjase por favor al importador correspondiente. Aquellos
aparatos que se presentan para eliminar errores, por favor enviarlos junto a una copia del comprobante de compra ex-
tendido a máquina, del cual debe desprenderse la fecha de compra, así como una breve descripción de las deficiencias,
apropiadamente embalado a nuestro servicio al cliente. Puede imprimir un comprobante de devolución en nuestro sitio
web www.unold.de/ruecksendung. (solo para entradas de Alemania y Austria). Aquellos daños causados por desgaste es-
tán excluidos de la garantía, así como manipulación incorrecta, e incumplimiento de las condiciones de mantenimiento y
cuidado. El derecho a garantía expira si las reparaciones o mantenimiento son realizadas por terceros. Todo reclamo del
consumidor final ante el vendedor, comerciante no se ve afectado por esta garantía.
DISPOSICIÓN/PROTECCIÓN DEL MEDIO AMBIENTE
Nuestros aparatos se fabrican con un alto nivel de calidad por un largo período de uso. El mantenimien-
to regular y las reparaciones de tipo técnico a través de nuestro servicio al cliente pueden prolongar la
duración del aparato. Cuando un aparato está defectuoso y ya no puede repararse, por favor considere
en la disposición final los siguientes puntos: Este producto no puede ser eliminado junto a la basura do-
miciliaria. Usted debe entregar este producto a un lugar oficial para el reciclaje de aparatos eléctricos o
electrónicos. Mediante la clasificación por separado y el reciclaje de productos residuales, Usted contri-
buye a proteger los recursos naturales y asegura que el producto sea eliminado de forma salubre y acorde
con el medio ambiente.
MERMELADA
Es fácil hacer mermeladas con la máquina de hacer pan. Incluso si usted nunca ha hecho mermelada antes, merece la pena intentarlo.
Usted puede estar seguro de hacer mermeladas sabrosas.
Proceda como sigue
1. Use siempre las dosis recomendadas como se especifican precisamente para el programa MERMELADA. De otro modo la mermelada
corre el riesgo de hervir demasiado pronto o desbordarse.
2. Pese la fruta, córtala en trozos pequeños (max 1 cm) o haga un puré con ello y póngalo dentro del recipiente. Utilice siempre 600
g de fruta y 400 de azúcar gelificante 2:1.
3. Añada 2:1 azúcar gelificante en las cantidades especificadas. No use azúcar nomal o 1:1 azúcar gelificante o azúcar gelificante
para diabéticos, ya que la mermelada no sería lo suficiente gruesa. En caso de no encontrar azúcar gelificante, se puede emplear
gelatina o agar-agar.
4. Mezcle la fruta con azúcar y ponga en marcha el programa que funciona completamente de forma automática. Después de 1:20
horas el aparato suena y Usted puede llenar los frascos con mermelada y cerrarlos bien.
5. También puede elaborar cantidades pequeñas u otras relaciones de mezcla en el programa persona, cambiando el transcurso del
programa Rühren (Kneten) y Kochen (Backen) según sus deseos y programar todos los demás puntos del programa a 0. Por favor
considere que la fase de cocina no dure demasiado, para que la mermelada no se desborde.
Copyright UNOLD AG | www.unold.de

144 von 168
Stand 21.2.2020
DE
EN
FR
NL
IT
ES
PL
Moc: 550W, 220–240V~, 50 Hz
Pojemność dla: 700g - 1000g wagi chleba
Wymiary: Wewnętrzne formy do pieczenia dł./szer./wys.: 16,8 x 12,8 x 14,3 cm
urządzenia (dł./szer./wys.): 24,7 x 36,2 x 29,1 cm
Kabel: urządzenia 80cm zamontowany na stałe
Obudowa: Cool-Touch z tworzywa sztucznego
Waga: 4,4kg
Wyposażenie Pokrywa z dużym okienkiem, 12 zapisanych programów, przycisk do stopniowego ustawienia różnej wagi chleba,
przycisk do stopnia przyrumienienia, przycisk wyboru czasu, programowany do 13 godzin w przód, automatyczny
stopień utrzymywania ciepła
Akcesoria: Wyjmowana, nieprzywierająca forma do pieczenia, Wygniatarka, pojemnik do odmierzania, łyżka do odmierzania,
szpikulec hakowy, Instrukcja obsługi
Zmiany i błędy w opisie wyposażenia, technice, kolorach i konstrukcji są zastrzeżone.
INSTRUKCJA OBSŁUGI MODELU 68010
DANE TECHNICZNE
OBJAŚNIENIE SYMBOLI
Symbol ten oznacza ewentualne niebezpieczeństwa, które mogą prowadzić do
obrażeń lub uszkodzenia urządzenia.
Symbol ten wskazuje na ewentualne niebezpieczeństwo poparzenia. Zawsze
postępować tutaj ze szczególną ostrożnością.
PRZEPISY BEZPIECZEŃSTWA
Prosimy przeczytać poniższe instrukcje i
zachować je.
1. Urządzenie może być używane przez
dzieci w wieku powyżej 8 lat oraz osoby
o ograniczonej sprawności fizycznej,
sensorycznej czy umysłowej lub osoby
nie posiadające doświadczenia i/
lub wiedzy, jeśli są one nadzorowane
lub zostały przeszkolone w zakresie
bezpiecznego użytkowania i zrozumiały
wynikającego z tego zagrożenia.
2. Nie wolno dzieciom bawić się
urządzeniem.
3. Czyszczenia i konserwacji, które
powinien wykonać użytkownik, nie
mogą wykonywać dzieci poniżej 8 lat.
Dzieci w wieku powyżej 8 lat mogą
robić to pod nadzorem.
4. Urządzenie z przewodem przechowywać
w miejscu niedostępnym dla dzieci w
wieku poniżej 8 lat.
5. OSTROŻNIE! Niektóre części tego
produktu mogą być bardzo gorące
i powodować oparzenia! Zachować
szczególną ostrożność w obecności
dzieci i osób zagrożonych.
6. Urządzenie musi być podłączone
do prądu elektrycznego o napięciu
podanym na tabliczce znamionowej.
7. Nie należy używać urządzenia z
zewnętrznym włącznikiem czasowym
lub z systemem zdalnego sterowania.
8. Urządzenia nie należy zanurzać w
wodzie i innych płynach.
9. Włącznik, podstawa i kabel nie mogą
mieć kontaktu z wodą. Jeżeli jednak
do tego dojdzie, przed ponownym
użyciem wszystkie części muszą
zostać całkowicie wysuszone.
10. Proszę przeczytać wszystkie instrukcje
znajdujące się w instrukcji obsługi i
proszę je dobrze przechowywać!
Copyright UNOLD AG | www.unold.de

Stand 21.2.2020
145 von 168
DE
EN
FR
NL
IT
ES
PL
11. Urządzenie przeznaczone jest
wyłącznie do użycia w gospodarstwie
domowym lub w podobnych
zastosowaniach, np.
aneksach kuchennych w sklepach,
biurach lub innych zakładach,
do użycia przez gości w hotelach,
motelach lub innych noclegowniach,
w prywatnych pensjonatach lub domach
letniskowych.
12. Nie dotykać żadnych gorących części
na urządzeniu, używać rękawic
kuchennych / ściereczek do garnków.
Piekarnik bezpośrednio po pieczeniu
jest bardzo gorący.
13. Kabla ani urządzenia nigdy nie
zanurzać w wodzie lub innym płynie.
14. Gdy dzieci są w pobliżu proszę bardzo
uważać na nie i na urządzenie.
15. Gdy urządzenie nie jest używane
lub też przed czyszczeniem proszę
wyłączyć i wyciągnąć kabel z sieci.
Przed wyjęciem poszczególnych części
urządzenie schłodzić.
16. Nie używać urządzenia z uszkodzonym
kablem, po błędach w funkcjonowaniu
lub gdy urządzenie w jakiś sposób
zostało uszkodzone. W takim przypadku
proszę przekazać urządzenie do
serwisu celem kontroli lub naprawy.
Proszę samemu nic nie naprawiać.
Traci się wtedy gwarancję.
17. Używanie niezalecanych przez produ-
centa akcesoriów może doprowadzić
do uszkodzenia. Urządzenia używać
tylko do przewidzianego celu.
18. Proszę tak ustawić urządzenie, żeby
nie zsunęło się z płyty roboczej, np.
przy ugniataniu twardego ciasta.
Należy na to zwrócić szczególną uwagę
przy programowaniu wstępnym, gdy
urządzenie pracuje bez nadzoru. Przy
bardzo gładkich płytach roboczych
należy podłożyć cienką matę gumową,
aby zapobiec niebezpieczeństwu
zsunięcia się urządzenia.
19. Piekarnik w czasie pracy musi być
ustawiony w odległości co najmniej 10
cm od innych przedmiotów. Używać
urządzenia tylko w pomieszczeniach.
20. Proszę uważać, aby kabel nie dotykał
żadnych gorących powierzchni i nie
zwisał poza brzeg stołu, aby dzieci nie
mogły go pociągnąć.
21. Nie ustawiać nigdy urządzenia obok
kuchenki gazowej ani elektrycznej ani
też obok gorącego pieca piekarskiego.
22. Z największą uwagą należy obchodzić
się z urządzeniem, gdy wypełnione
jest ono składniki.
23. Nie wyciągać nigdy foremki chlebowej
w czasie pracy urządzenia.
24. Do foremki do pieczenia nie wkładać,
w szczególności przy białym pieczy-
wie,większych ilości niż podano. Jeśli
tak się zdarzy, to chleb nie będzie
równomiernie wypieczony lub ciasto
wypłynie. Proszę zwrócić uwagę na
nasze odnośne wskazówki.
25. Przy wypróbowaniu nowego przepisu
powinni Państwo ten pierwszy raz
być w pobliżu, aby doglądać procesu
pieczenia. Zanim zdecydują się
Państwo piec chleb przez noc, proszę
najpierw wypróbować przepis, aby
stwierdzić, że proporcje składników
się zgadzają, i czy ciasto nie jest zbyt
gęste lub za rzadkie lub czy ilość
nie jest za duża, bo wtedy ono może
wypłynąć.
26. Nigdy nie włączać urządzenia,
gdy foremka do pieczenia nie jest
wstawiona i nie ma w niej składników.
Copyright UNOLD AG | www.unold.de

146 von 168
Stand 21.2.2020
DE
EN
FR
NL
IT
ES
PL
Producent nie przejmuje gwarancji jeśli urządzenie wykorzystywane będzie w celach przemysłowych lub w sposób niezgodny z instrukcją
obsługi.
Uwaga! Podczas i po zakończeniu używania urządzenie jest bardzo gorące!
Nie używać urządzenia w pobliżu umywalek, wanien do kapieli lub innych
zbiorników napełnionych wodą.
URUCHOMIENIE I UŻYCIE
1. Usunąć wszystkie materiały pakunkowe, również te wewnątrz
piekarnika. Zachować oryginalne opakowanie.
2. Proszę sprawdzić, czy są wszystkie należne akcesoria.
3. Poszczególne części należy wyczyścić zgodnie z zaleceniami
podanymi w rozdziale CZYSZCZENIE I KONSERWACJA.
4. Proszę podłączyć urządzenie (patrz punkt MIEJSCE PRACY
/ PODŁĄCZENIE DO PRĄDU) i włożyć foremkę do pieczenia
względnie pojemnik na ryż. Najpierw należy wybrać rodzaj
pracy BACKPULVER potem program BACKEN/ pieczenie/
i zostawić urządzenie na ok 10 minut celem nagrzania.
Następnie przyciskiem START/STOP wyłączyć urządzenie i
schłodzić je. Po schłodzeniu wytrzeć pojemnik do pieczenia
ściereczką.
5. Należy wytrzeć starannie wszystkie części urządzenia, zanim
się je ponownie uruchomi. MIEJSCE PRACY
6. Urządzenie należy używać w pomieszczeniu, w którym
najniższa temperatura jest 18°C a najwyższa ok. 34°C. Gdy
temperatura pomieszczenia jest niższa to drożdże nie mogą
dobrze wyrosnąć i chleb będzie zbity.
7. Jeśli temperatura pomieszczenia będzie za wysoka, składniki
mogą ewentualnie skwaśnieć.
8. Jak tylko urządzenie zostanie podłączone do prądu, zabrzmi
sygnał dźwiękowy a na wyświetlaczu ukaże się 0:00. Liczby
pulsują a tło wyświetlacza oświetlone jest na niebiesko.
Urządzenie jest gotowe do pracy.
27. W celu wyjęcia chleba nie wolno w
żadnym wypadku uderzać foremką o
kant lub płytę roboczą, gdyż może to
spowodować jej uszkodzenie.
28. Do urządzenia nie wolno wkładać folii
metalowej lub innych materiałów, gdyż
stwarza to ryzyko pożaru lub zwarcia.
29. Nigdy nie nakrywać urządzenia
ręcznikiem lub innym materiałem.
Gorąco i para muszą mieć ujście.
Pożar może powstać, gdy urządzenie
przykryte zostanie materiałem
łatwopalnym lub gdy dotknie np.
zasłon.
PIERWSZY CHLEB
1. Przygotować urządzenie zgodnie z opisem podanym w
rozdziale „Uruchomienie“.
2. Otworzyć pokrywę automatu Backmeister
®
i wyjąć
formę do pieczenia, obracając ją w lewą stronę w
kierunku przeciwnym do ruchu wskazówek zegara.
3. Posmarować otwór ugniatacza grubo margaryną
odporną na działanie wysokiej temperatury, aby ciasto
nie mogło przedostać się do wnętrza otworu i do niego
przywrzeć.
Copyright UNOLD AG | www.unold.de

Stand 21.2.2020
147 von 168
DE
EN
FR
NL
IT
ES
PL
4. Włożyć ugniatacz na wał napędowy w formie do
pieczenia. Zwrócić uwagę na to, aby włożyć ugniatacz
prawidłową stroną, w innym przypadku może dojść do
uszkodzenia powłoki.
5. Włożyć do formy do pieczenia składniki jak podano w
przepisie. W przypadku ciężkich ciast optymalny wynik
pieczenia osiąga się przez zamianę kolejności władania
składników, tzn. najpierw suche, a potem płynne.
Zwrócić jednak uwagę na to, aby przy używaniu funkcji
wyboru czasu drożdże nie miały za wcześnie kontaktu
z płynem.
6. Włożyć formę do pieczenia z powrotem do urządzenia,
obracając ją w kierunku zgodnym z ruchem wskazówek
zegara, aż do zatrzaśnięcia.
7. Zamknąć pokrywę automatu Backmeister
®
.
8. Włożyć wtyczkę do gniazdka.
9. Wybrać żądany program za pomocą przycisku MENU.
Naciskać ten przycisk tak często, aż na wyświetlaczu
wyświetli się żądany numer programu (np. 1 dla
programu podstawowego). Wskazówki dotyczące
poszczególnych programów znajdą Państwo od strony
148. Dla chleba ze standardowej mieszanki do
wypieku chleba dobry wynik można uzyskać piekąc go
np. w programie podstawowym.
10. Za pomocą przycisku ZBRĄZOWIENIE wybrać żądany
stopień zbrązowienia skórki (jasna – średnia – ciemna).
Zwracamy uwagę na to, że wybór stopnia zbrązowienia
nie jest możliwy we wszystkich programach pieczenia.
Wskazówki na ten temat zawarte są na stronie 148.
11. Wybrać żądaną wielkość chleba za pomocą przycisku
WIELKOŚĆ CHLEBA. Zwracamy uwagę na to, wybór
wielkości chleba nie jest możliwy we wszystkich
programach pieczenia. Wskazówki na ten temat
zawarte są na stronie 148.
12. Po dokonaniu wszystkich ustawień nacisnąć przycisk
START/STOP. Uwaga: Aby przerwać program, należy
również nacisnąć przycisk START/STOP. Przycisk
start/stop reaguje wtedy ze względów bezpieczeństwa
z opóźnieniem czasowym. Jest więc normalne, że
urządzenie nie reaguje od razu po przyciśnięciu
przycisku, ale dopiero po kilku sekundach. Należy
zaczekać, aż naciśnięcie przycisku zostanie
potwierdzone przez sygnał dźwiękowy (po upływie ok.
3 sekund). Nie naciskać przycisku kilkakrotnie.
13. Gdy chleb jest upieczony i może zostać wyjęty,
automat Backmeister
®
sygnalizuje ten fakt
kilkakrotnym sygnałem dźwiękowym. Jeżeli chleb
ma zostać wyjęty przed upływem fazy utrzymywania
ciepła, należy nacisnąć przycisk START/STOP i krótko
go przytrzymać, aż przerwanie programu zostanie
potwierdzone sygnałem dźwiękowym.
14. Ostrożnie wyjąć formę do pieczenia. Aby uniknąć
oparzeń, należy zawsze używać odpowiednich łapek
do garnków. Obrócić formę do pieczenia otworem
na dół i położyć chleb do ochłodzenia na ruszcie do
studzenia ciast. Jeżeli chleb nie wysuwa się sam na
ruszt do chłodzenia ciast, kilka razy poruszyć od dołu
napęd ugniatacza, aż chleb wypadnie z formy. Zwrócić
przy tym uwagę na to, że napęd ugniatacza może być
jeszcze bardzo gorący. Użyć również do tego celu
odpowiednich łapek do garnków. Nie wolno uderzać w
krawędź formy do pieczenia ani powierzchni roboczej.
Forma do pieczenia mogłaby ulec zniekształceniu.
15. Jeżeli ugniatacz utkwi w chlebie, można go wyciągnąć
za pomocą dostarczonego haczyka. Wprowadzić go od
spodu jeszcze ciepłego chleba do otworu w ugniataczu
i zahaczyć o dolną krawędź ugniatacza najlepiej tam,
gdzie znajduje się łopatka ugniatacza. Ostrożnie
wyciągnąć ugniatacz za pomocą haczyka do góry.
Można przy tym zobaczyć,w którym miejscu w chlebie
znajduje się łopatka ugniatacza, aby go wyjąć.
16. Następnie wyczyścić formę do pieczenia w sposób
opisany na stronie 151 .
Uwaga! Podczas i po zakończeniu
używania urządzenie jest bardzo
gorące!
Copyright UNOLD AG | www.unold.de

148 von 168
Stand 21.2.2020
DE
EN
FR
NL
IT
ES
PL
USTAWIENIE PODSTAWOWE:
Gdy tylko włoży się wtyczkę do kontaktu, na wyświetlaczu pojawi
się 3:00 - (dwukropek pomiędzy liczbami nie pulsuje).
Tym samym jest pokazana gotowość do pracy.
Podczas pracy urządzenia stan programu może być odczytany przy
wskaźniku czasu z cofającymi się danymi czasu, jak również na
wyświetlaczu.
KLAWISZ START/STOP
Służy do rozpoczęcia i zakończenia przebiegu programu.
Przyciskiem start/stop można przerwać program w każdej chwili.
Przycisk należy wcisnąć i trzymać tak długo, aż usłyszy się dźwięk
pip. Na wyświetlaczu pojawi się pozycja początkowa wcześniej
wybranego programu. Jeśli chcecie Państwo zastosować inny pro-
gram, należy go wybrać klawiszem MENU.
ZEITWAHL/WYBÓR CZASU
Proszę stosować funkcję wyboru czasu tylko dla przepisów, które
Państwo wcześniej z sukcesem praktycznie wypróbowali i proszę
tych przepisów już nie zmieniać.
UWAGA: Przy zbyt dużej ilości ciasta może ono wypłynąć i przypiec
się na elemencie grzewczym.
Programy mogą rozpocząć się z opóźnieniem. Do podawanego au-
tomatycznie w każdym programie czasu i ew. dodatkowo czasu
utrzymania ciepła przez 1 godz (po zakończeniu procesu piecze-
nia), trzeba dodać godziny i minuty, po których powinno się roz-
począć przygotowanie.
Przykład:
Jest 20:00 wieczorem i Państwo chcą mieć rano o 7:00 świeżo
upieczony biały chleb:
Składniki włożyć do pojemnika w podanej kolejności i wstawić
pojemnik do urządzenia. Uważać na to, aby drożdże nie miały
styczności z płynem.
Przyciskiem Menu wybrać żądany program a przyciskiem BRÄU-
NUNG podać oczekiwane przyrumienienie. Na przykład bierzemy
program 1 = BASIS. Program zakończy się o godz. 6:00 rano.
Potem rozpocznie się czas trzymania ciepła 1 godziny.
Dlatego trzeba, aby móc o godz. 7:00 rano wyjąć ciepły świeży
chleb, wieczorem o 20:00 wciskając ciągle przycisk ZEIT/CZAS
WYJAŚNIENIA DO POLA STEROWANIA
Menu
Wyświetlony
numer
pokazuje
aktualnie
wybrane menu.
Zbrązowienie
Wybrany stopień
zbrązowienia
pieczywa wskazy-
wany jest kreską na
wyświetlaczu.
Przycisk start/stop
Ten przycisk roz-
poczyna i kończy
przebieg programu.
Wybór czasu +
Wydłużenie
żądanego czasu
Wybór czasu -
Skrócenie
żądanego czasu
Wielkość
chleba
Wybór żądanej
wielkości
chleba
OBJAŚNIENIE SYMBOLI
Copyright UNOLD AG | www.unold.de

Stand 21.2.2020
149 von 168
DE
EN
FR
NL
IT
ES
PL
ustawić czas programu na 11 godzin. Aby to zrobić należy wci-
skać przycisk CZAS w odstępach za każdym razem po 10 minut.
Na koniec wcisnąć przycisk START/STOP aby przestawiony czaso-
wo program pieczenia rozpocząć.
Uwaga:
przy przesuniętym czasowo programie pieczenia nie należy uży-
wać łatwo psujących się składników jak mleko, jajka, owoce, jo-
gurt, cebula itp.
Dźwięku 10-krotnego pip, który wskazuje czas na dodanie skład-
ników jak orzechy, ziarna i owoce nie można wyłączyć, będzie go
więc słychać nocą.
MENU
Przyciskiem Menu wywołuje się poszczególne programy, które
opisane są dokładnie w tabeli „ czas pieczenia“. Programy stosuje
się do przygotowania następującego pieczywa:
1 BASIS
PODSTAWOWY-
Do białego i mieszanego chleba,
program standardowy do każdego
chleba
2 WEISSBROT
CHLEB BIAŁY-
Dla delikatnego białego chleba o
dłuższym czasie dochodzenia
3 VOLLKORN
PEŁNOZIARNISTY-
Dla chlebów pełnoziarnistych
4 SCHNELL
SZYBKI
Do szybkiego przygotowania chleba
białego i mieszanego
5 HEFEKUCHEN
CIASTO
DROŻDŻOWE
Do przygotowania słodkiego ciasta
drożdżowego
6 ULTRA
ULTRA-SZYBKI
Do wszystkich przepisów stopnia
I pieczonych w programie Basis,
chleb biały, szybki lub tostowy.
Ciasto w programie Ultra szybki
jest wyrabiane zdecydowanie krócej
i chleby są dlatego bardziej gęste,
zbite i mniej pulchne.
Proszę przy tym programie stosować
lekko ciepłe płyny.
7 KONFITÜRE
KONFITURY
Do gotowania konfitury i marmola-
dy. Do przyrządzania konfitur nale-
ży nabyć drugą formę do pieczenia,
która będzie używana wyłącznie do
tego celu.
8 TEIG
CIASTO SUROWE-
Do wyrobienia ciasta, bez funkcji
pieczenia.
9
GLUTENFREI
(PODSTAWOWY
bezglutenowy)
Standardowy program do wypie-
kania wszystkich chlebów bez-
glutenowych
10 BACKPULVER
PROSZEK DO
PIECZENIA
Dla wypieków z dodatkiem proszku
do pieczenia, np ciasta ubijanego /
ucieranego.
11 TOASTBROT
CHLEB TOSTOWY-
Do wyrabiania chleba tostowego
wzgl. trochę mocniej wypieczonego
chleba białego.
12 BACKEN
PIECZENIE
Do pieczenia ciasta przygotowanego
osobno np drożdżowego czy
ubijanego/ucieranego (ręcznie lub
w programie CIASTO SUROWE).
Ten program nie jest dostosowany
do pieczenia ciasta kruchego i
przygotowywanego na ciepło i.in.
W programach BASIS/BAZA, CHLEB BIAŁY, PEŁNOZIARNISTY,
CIASTO DROŻDZOWE, CHLEB TOSTOWY i GLUTENFREI przy
drugim procesie ugniatania rozbrzmiewają wielokrotne dźwięki
pip. Wskazują one czas, w którym dalsze składniki jak orzechy,
suszone owoce itp. mogą być dodane. Należy wtedy otworzyć po-
krywę i dodać składniki po czym zamknąć pokrywę.
BRÄUNUNG/PRZYRUMIENIENIE
Tym przyciskiem ustawia się w programach 1-6 + 9-12 przyru-
mienienie na HELL(JASNY) / MITTEL(ŚREDNI) / DUNKEL(CIEM-
NY). W innych programach ta funkcja nie jest dostępna. Aktualne
ustawienie rozpoznaje się po odpowiedniej strzałce na wyświe-
tlaczu.
BROTGRÖSSE / STOPIEŃ
Można nim ustawić w różnych programach:
STUFE/STOPIEŃ I = dla mniejszej wagi chleba (ok. 700g)
STUFE/STOPIEŃ II = dla większej wagi chleba (ok. 7.000g)
Proszę zwrócić uwagę na to, że ustawienie stopnia możliwe jest
tylko w programach 1, 2, 3, 5, 9, 11. W przepisach znajdą
Państwo nasze zalecenia. Aktualne ustawienie rozpoznaje się po
odpowiedniej strzałce na wyświetlaczu.
Uwaga! Podczas i po zakończeniu
używania urządzenie jest bardzo
gorące!
Copyright UNOLD AG | www.unold.de

150 von 168
Stand 21.2.2020
DE
EN
FR
NL
IT
ES
PL
FUNKCJE PIEKARNIKA
FUNKCJA BRZĘCZYKA
Brzęczyk zabrzmi
po naciśnięciu aktywnego przycisku,
podczas drugiego procesu ugniatania, aby zwrócić uwagę
na to, że teraz można dodać ziarna, owoce, orzechy lub
inne składniki. Ten dźwięk nie daje się wyłączyć, np. przy
zastosowaniu funkcji wyboru czasu.
po zakończeniu procesu pieczenia urządzenie brzęczy
częściej podczas fazy utrzymania ciepła.
na zakończenie fazy utrzymania ciepła dźwięk ten zabrzmi
10 razy, aby wskazać, że program teraz został całkowicie
zakończony i że chleb należy wyjąć z foremki. Ten dźwięk
nie daje się wyłączyć, np. przy zastosowaniu funkcji wyboru
czasu.
FUNKCJA POWTÓRZENIA
Jeśli podczas pracy piekarnika BACKMEISTER zostanie
wyłączony prąd, urządzenie włączy się automatycznie, jak tylko
prąd ponownie dopłynie i będzie kontynuować pracę od miejsca,
w którym została ona przerwana, o ile przerwa nie trwała dłużej
niż dwie minuty.
Jeśli przerwa w dopływie prądu trwała dłużej niż 10 minuty i
wyświetlacz pokaże ustawienie podstawowe, trzeba piekarnik
ponownie uruchomić. Praktykuje się to tylko wtedy, gdy w
chwili przerwania dopływu prądu ciasto znajdowało się w fazie
ugniatania. Względnie można kontynuować wybrany przebieg
programu. Jeżeli jednak ciasto znajdowało się już w fazie ruchu a
prądu nie było dłuższy czas, to ciasto nie nadaje się już do użytku
i trzeba zaczynać od nowa.
FUNKCJE BEZPIECZEŃSTWA
Po rozpoczęciu programu pokrywa może być otwarta tylko podczas
fazy ugniatania w celu dodania składników, w żadnym jednak
wypadku w fazie rośnięcia i pieczenia, ponieważ wtedy ciasto
opadnie.
Jeśli temperatura w urządzeniu jest jeszcze za wysoka dla nowo
wybranego programu, to przy ponownym rozruchu pojawi się na
wyświetlaczu „H HH”. Jeśli to się pojawi należy zdjąć pojemnik
i czekać aż urządzenie się ochłodzi i znowu znajdzie się na
początku pierwotnie wybranego programu.
Proszę pamiętać, że urządzenie ze względów bezpieczeństwa nie
ma ogrzewania górnego, dlatego skórka na części górnej będzie
jaśniejsza, podczas gdy spód i boki będą ciemniejsze. Ze względów
bezpieczeństwa nie jest dozwolone dodatkowe ogrzewanie na
pokrywie.
Gdy po wciśnięciu przycisku START/STOP na wyświetlaczu pojawi
się „E rr” to znaczy, że jest defekt regulacji temperatury. W takim
przypadku proszę wysłać urządzenie do kontroli i/lub naprawy do
naszego biura obsługi klienta. (Patrz adres na stronie 1 lub w
warunkach gwarancji).
Copyright UNOLD AG | www.unold.de

Stand 21.2.2020
151 von 168
DE
EN
FR
NL
IT
ES
PL
PRZEBIEG PROGRAMU PIEKARNIK
1. DODAWANIE SKŁADNIKÓW
Posmarować otwory wygniatarki grubo margaryną odporną na go-
rąco, aby ciasto nie przedostało się do próżni i tam przywarło.
Wstawić ugniatarkę na wał napędowy.
Składniki muszą być dodawane do foremki w kolejności podanej
w poszczególnych przepisach.
Przy bardzo ciężkich ciastach, zalecamy zmienić kolejność do-
dawania składników i najpierw dodać mąkę i suche drożdże a na
koniec płyn, aby zapewnić, żeby ciasto zostało dobrze zagniecio-
ne. Zresztą trzeba przy korzystaniu z funkcji wyboru czasu zwra-
cać uwagę na to, żeby drożdże nie zetknęły się zbyt wcześnie z
płynem.
2. WKŁADANIE FOREMKI DO PIECZENA
Pokrytą materiałem nieprzywierającym foremkę złapać za brzeg
obiema rękoma i lekko ukośnie wstawić do środka cokołu w pie-
karniku. Przekręcić zgodnie z kierunkiem ruchu wskazówek zega-
ra, aż do zatrzaśnięcia.
3. PWYBÓR PRZEBIEGU PROGRAMU
Wybrać za pomocą przycisku menu żądany przebieg programu.
W zależności od programu wybrać odpowiedni stopień i żądane
przyrumienienie. Przyciskiem czasu można przesunąć czas roz-
poczęcia pracy. Proszę wcisnąć przycisk Start. Po tym nie ma
możliwości zmiany.
4. MIESZANIE I UGNIATANIE CIASTA
Piekarnik miesza i ugniata ciasto automatycznie tak długo, aż
osiągnie ono właściwą konsystencję.
5. CZAS ODPOCZYNKU
Po pierwszym procesie ugniatania przewidziana jest chwila od-
poczynku, w czasie której płyn, drożdże i mąka mogą powoli się
przeniknąć.
6. DOCHODZENIE CIASTA
Po ostatnim ugniataniu piekarnik wytwarza optymalną temperatu-
rę na dochodzenie ciasta.
7. PIECZENIE
Automat pieczenia chleba reguluje automatycznie temperaturę i
czas pieczenia.
8. UTRZYMYWANIE TEMPERATURY
Jeśli wypiek jest gotowy, zadźwięczy kilkakrotnie dźwięk pip, aby
zakomunikować, że chleb lub potrawy można wyjąć. Równocze-
śnie z tym dźwiękiem zaczyna się czas utrzymywania ciepła przez
1 godz.
Jeśli chcecie Państwo wyjąć chleb przed upływem czasu utrzymy-
wania ciepła, to należy wcisnąć przycisk START/STOP.
9. KONIEC PROGRAMU
Po zakończeniu przebiegu programu chwycić pojemnik przez
ściereczki i obrócić go delikatnie w stronę odwrotną do ruchu
wskazówek zegara i wyciągnąć foremkę do pieczenia.
Odwrócić foremkę do góry dnem i wysunąć chleb do ochłodzenia
na siatkę kuchenną. Jeśli chleb nie chce wyjść od razu, należy
poruszać od spodu walcem napędowym ugniatacza , aż chleb wy-
padnie. W żadnym przypadku nie należy uderzać foremką o kant
lub powierzchnię roboczą aby wyciągnąć chleb. Można by wtedy
zdeformować foremkę.
Jeśli wygniatarka utkwi w chlebie, należy wziąć dołączony szpi-
kulec z haczykiem, wprowadzić do (prawie) okrągłego otworu wy-
gniatarki na spodzie jeszcze ciepłego chleba, przechylić go na
dolny brzeg wygniatarki, najlepiej w miejsce gdzie znajduje się
skrzydło wygniatarki i pociągnąć wygniatarkę ostrożnie do góry.
Można wtedy zobaczyć, w którym miejscu w chlebie znajduje się
skrzydło wygniatarki.
Copyright UNOLD AG | www.unold.de

152 von 168
Stand 21.2.2020
DE
EN
FR
NL
IT
ES
PL
CZYSZCZENIE I KONSERWACJA
Przed pierwszym użyciem
należy krótko umyć pojem-
nik piekarnika łagodnym
środkiem do mycia naczyń
i wyczyścić wygniatarkę.
Po użyciu urządzenie
należy zawsze najpierw
schłodzić, zanim będzie
się je czyścić lub zanim się
je odstawi. Wychłodzenie
urządzenia trwa około pół
godziny i dopiero po tym
czasie może być ono użyte
do ponownego pieczenia
lub przygotowania ciasta.
1. Przed czyszczeniem wyłączyć urządzenie wyłącznikiem I/O,
wyciągnąć wtyczkę z gniazda i wychłodzić je. Proszę stosować
tylko łagodne środki myjące, w żadnym wypadku nie stosować
chemicznych czyścików, benzyny, środków do czyszczenia
pieców piekarskich lub szorujących.
2. Usunąć wilgotną ściereczką wszystkie składniki i okruchy
z pokrywy, obudowy i ze zbiornika na pojemnik. Nigdy nie
zanurzać urządzenia w wodzie i nie wlewać wody do zbiornika
na pojemnik. Do zwykłego czyszczenia można zdjąć pokrywę.
Śrubokrętem należy zdjąć pokrywę na zawiasie i zdjąć pokrywę.
3. Foremkę z zewnątrz przetrzeć wilgotną ściereczką. Wewnątrz
można ją umyć gorącą wodą z niewielką ilością płynu do
mycia naczyń. Jeśli mimo powłoki przylgną do foremki resztki
ciasta, można ją wtedy napełnić wodą z niewielką ilością
płynu do mycia naczyń i pozostawić na ok. 30 min. Nie należy
zostawiać foremki na dłuższy czas całej zanurzonej w wodzie,
ponieważ powłoka spodu może się zrobić szorstka.
4. Zaraz po użyciu należy natychmiast wyczyścić ugniatarkę i
wał napędowy. Jeśli ugniatarka zostanie w foremce to ciężko
jest ją później usunąć. W takim przypadku należy wlać na
30 minut do pojemnika ciepłej wody. Potem wygniatarka da
się łatwo wyciągnąć.
5. Pojemnik wyposażony jest w - warstwę nieprzywierającą.
Proszę więc nie stosować do czyszczenia żadnych metalowych
przedmiotów, które mogły by porysować powierzchnię. Jest
normalne, że z czasem zmieni się kolor powłoki, ale nie
wpłynie to ujemnie na funkcję.
6. Zanim urządzenie zostanie odstawione, proszę się upewnić,
że jest dokładnie schłodzone, wyczyszczone i wysuszone.
Urządzenie odstawiać zawsze z zamkniętą pokrywą.
Copyright UNOLD AG | www.unold.de

Stand 21.2.2020
153 von 168
DE
EN
FR
NL
IT
ES
PL
CZASOWY PRZEBIEG PROGRAMU
1 2 3 4 5
BASIS Weissbrot Vollkorn Schnell HEFEKUCHEN
Waga chleba do
wyboru
ST. I ST. II ST. I ST. II ST. I ST. II ST. I ST. II
Czas łączny 2:53 3:00 3:40 3:50 3:32 3:40 1:40 2:50 2:55
1. ugniatanie
9 10 16 18 9 10 7 10 10
1. rośnięcie
Ogrzewanie
On/Off
20 20 40 40 25 25 5 5 5
2. gniatanie
14
dodać
składniki
15
dodać
składniki
19
dodać
składniki
22
dodać
składniki
18
dodać
składniki
20
dodać
składniki
8 20
dodać
składniki
20
dodać
składniki
2. rośnięcie
Ogrzewanie
On/Off
25 25 30 30 35 35 30 30
3. rośnięcie
Ogrzewanie
On/Off
40 40 45 45 60 60 15 40 40
Pieczenie
Ogrzewanie
On/Off
65 70 70 75 65 70 65 65 70
Utrzymanie
ciepła
Przy 60°C
Ogrzewanie
On/Off
60 60 60 60 60 60 60 60 60
Copyright UNOLD AG | www.unold.de

154 von 168
Stand 21.2.2020
DE
EN
FR
NL
IT
ES
PL
CZASOWY PRZEBIEG PROGRAMU
6 7 8 9 10 11 12
ULTRA-
SCHNELL I
KONFITÜRE TEIG GLUTENFREI BACKPULVER TOASTBROT BACKEN
Waga chleba do
wyboru
ST. I ST. I ST. II ST. I ST. II
Czas łączny 0:58 1:20 1:30 3:15 3:20 2:50 2:55 3:00 1:00
1. ugniatanie
12 20 12 12 10 15 15
1. rośnięcie
Ogrzewanie
On/Off
0 15
Ogrzewanie
On/Off
20 20 5 40 40
2. gniatanie
0 13
dodać
składniki
13
dodać
składniki
20 5
dodać
skła-
dniki
.
5
dodać
skła-
dniki .
2. rośnięcie
Ogrzewanie
On/Off
0 30 45 45 30 25 25
3. rośnięcie
Ogrzewanie
On/Off
9 45
Ogrzewanie
On/Off
40 45 45 35 40 40
Pieczenie
Ogrzewanie
On/Off
35 20 60 65 70 50 55 10-60
Utrzymanie
ciepła
at 60 °C
Ogrzewanie
On/Off
60 60 60 60 60 60 60 60
Copyright UNOLD AG | www.unold.de

Stand 21.2.2020
155 von 168
DE
EN
FR
NL
IT
ES
PL
PYTANIA DOTYCZĄCE URZĄDZENIA I JEGO UŻYWANIA
Chleb po pieczeniu przykleja się do pojemnika?
Chłodzić chleb w piekarniku ok. 10 minut – pojemnik przewró-
cić do góry dnem- ew. zbieraczem (przyłącze wygniatarki – śru-
ba ramienia na spodniej stronie foremki) lekko poruszać. Przed
włożeniem dziurę grubo posmarować odporną na temperaturę
margaryną (nie stosować półtłustej margaryny!) tak, aby w czasie
ugniatania ciasto nie mogło się dostać do przestrzeni pomiędzy
foremką a pojemnikiem. Wygniatarkę nasmarować przed piecze-
niem odrobiną oleju.
Jeśli robią państwo w tym urządzeniu również konfiturę, zalecamy
używanie osobnych foremek dla chleba i dla konfitury, ponieważ
poprzez powstające kwasy chleb nie wychodzi już tak łatwo z fo-
remki. Dodatkową foremkę i ugniatacz można zamówić w naszym
biurze obsługi klienta.
Jak można zapobiec powstawaniu dziur w chlebie (wygni-atarka)?
Wygniatarkę można wyciągnąć palcami obsypanymi mąką, zanim
ciasto po raz ostatni urośnie (patrz czasowy przebieg programu i
wskazówka na wyświetlaczu).
Jeśli nie chcą Państwo tego robić, proszę użyć po pieczeniu szpi-
kulca z haczykiem. Jeśli posługuje się nim ostrożnie można unik-
nąć zrobienia większej dziury.
Ciasto przy rośnięciu wylewa się poza foremkę.
To zdarza się w szczególności przy używaniu białej mąki, która
zawiera większą ilość glutenu i lepiej rośnie. Pomoc:
a) zredukować ilość mąki i dopasować do niej pozostałe składniki.
Gotowy chleb będzie miał nadal dużą objętość.
b) dać 1 łyżkę stołową płynnej margaryny na mąkę.
Chleb rośnie, jednakże przy pieczeniu opada.
Jeśli w środku chleba powstaje dziura w kształcie „V“, to mące
brakuje glutenu(lepniku), a dzieje się tak dlatego, że zboże za-
wiera za mało białka (zdarza się to przy deszczowym lecie) lub że
mąka jest zbyt wilgotna.
Pomoc:
Dodać do ciasta na chleb na 500 g mąki 1 łyżkę stołową
glutenu pszenicznego.
Użyć programu o krótszym czasie działania (np. SCHNELL/
SZYBKI)
Jeśli chleb opada w środku w formie lejka, może to zależeć od
tego, że
temperatura wody była za wysoka,
za dużo wody dodano
w mące brakuje glutenu.
Chleb nie jest z wierzchu wystarczająco wypieczony.
Wymieszać 1 białko z 1 łyżka stołową słodkiej lub kwaśnej śmieta-
ny i posmarować tym ciasto po ostatnim ugniataniu.
Kiedy można otworzyć pokrywę piekarnika podczas pieczenia?
Zasadniczo możliwe jest to tylko w czasie procesu ugniatania.
W tym czasie można w razie potrzeby uzupełnić niewielkie ilości
mąki lub płynów.
Gdy chleb po pieczeniu ma mieć określony wygląd, należy: po
ostatnim ugniataniu, tzn. przed ostatnim dochodzeniem (patrz
tabela czasowy przebieg programu i wskaźnik na wyświetlaczu)
ostrożnie otworzyć i naciąć tworzącą się skórkę ostrym, rozgrza-
nym nożem lub posypać ziarnami lub posmarować mieszanką
wody z mąką ziemniaczaną, aby miał on po pieczeniu połysk. W
podanym odcinku czasu jest możliwe otwarcie piekarnika ostatni
raz. Jeśli otworzy się go podczas ostatniego dochodzenia lub na
początku fazy pieczenia chleb może opaść.
Co to jest mąka pełnoziarnista?
Mąkę pełnoziarnistą można wyprodukować ze wszystkich rodza-
jów zboża, tzn również z pszenicy. Oznaczenie pełne ziarno zna-
czy, że mąka mielona jest z całego ziarna i ma odpowiednio wię-
cej części pokarmowych wspomagających trawienie. Biała mąka
z pełnego ziarna jest dlatego trochę ciemniejsza. Chleb z pełnego
ziarna wcale nie musi być ciemny, jak zwykle się uważa.
O czym należy wiedzieć przy stosowaniu mąki żytniej?
Mąka żytnia nie zawiera glutenu/lepnika i dlatego chleb z niej
prawie wcale nie rośnie. Dlatego z powodu tolerancji/ wymiesza-
nia się składników „PEŁNOZIARNISTY CHLEB ŻYTNI“ musi być
produkowany z dodatkiem zaczynu.
Ciasto urośnie wtedy, gdy stosując mąkę żytnią, która zawiera
małą ilość lepnika, zamienimy ¼ z tej ilości maki na mąkę typu
550.
Copyright UNOLD AG | www.unold.de

156 von 168
Stand 21.2.2020
DE
EN
FR
NL
IT
ES
PL
Czym jest gluten/lepnik w mące?
Im wyższa jest liczba typu, tym mniej zawiera mąka glutenu/lep-
niku i tym mniej rośnie ciasto. Największą część glutenu/lepniku
zawiera mąka typu 550,
Jakie są rodzaje mąki i jak się je stosuje?
Mąka kukurydziana, ryżowa i ziemniaczana
nadaje się w szczególności dla alergików glutenowych lub
osób, które cierpią na „sprue“ lub „celiakie“. W części z prze-
pisami znajdą Państwo zarówno przepisy jak i adresy produ-
centów specjalnych produktów dla alergików.
Mąka orkiszowa
jest bardzo droga ale zupełnie wolna od środków chemicznych,
ponieważ orkisz, który rośnie na bardzo skromnych glebach,
nie przyjmuje żadnych nawozów. Dlatego mąka orkiszowa
nadaje się w szczególności dla alergików. Można stosować
wszystkie przepisy z typami mąki 405 – 550 – 1050, jak to
opisano we wstępie.
mąka z prosa nadaje się w szczególności dla osób z różną aler-
gią. Można stosować wszystkie przepisy z typami mąki 405
– 550 – 1050, jak to opisano we wstępie.
Mąka z pszenicy twardej (DURUM)
ze względu na swoją konsystencję nadaje się do bagietek i
można ją zastąpić kaszką z twardej pszenicy.
Jaki jest sposób, aby świeży chleb był lepiej tolerowany?
Gdy się doda puree z 1 ugotowanego ziemniaka do mąki i wymie-
sza, to taki chleb jest łatwiej przyswajalny.
W jakiej proporcji używa się środków spulchniających?
Zarówno drożdże jak i zaczyn, które można kupić w różnych ilo-
ściach, należy stosować wg danych producenta na opakowaniu
i stosować ich ilość w stosunku do użytej mąki. Jeśli chodzi o
drożdże to bardzo ważna jest tu twardość wody, przy bardzo mięk-
kiej wodzie drożdże pracują mocniej, tak że w okolicach z miękką
wodą ilość drożdży powinna być zmniejszona o ¼. Należy zresztą
wypróbować w jakim stosunku drożdże i woda najlepiej pracują i
ew. jeszcze raz go ustalić .
Co trzeba robić, gdy chleb ma smak drożdży?
a) jeśli był używany cukier, zredukować jego ilość lub wykluczyć
zupełnie ale wtedy chleb będzie mniej brązowy.
b) dodać do wody zwykłego octu winnego, - na mały chleb ok. 1
łyżki stołowej, na duży ok. 1,5 łyżki stołowej.
c) wodę zastąpić maślanką lub kefirem, co zresztą możliwe jest
we wszystkich przepisach i zalecane jest z uwagi na zachowanie
świeżości chleba.
Dlaczego chleb ze zwykłego piekarnika smakuje inaczej niż z piekar-
nika BACKMEISTER
®
?
Spowodowane jest to różną wilgotnością: w zwykłym piekarniku z
uwagi na większą powierzchnię chleb będzie bardziej wysuszony.
Chleb z piekarnika BACKMEISTER
®
jest bardziej wilgotny.
Co oznaczają liczby typu przy mące?
Im niższa jest liczba typu, tym mniej zawiera mąka części pokar-
mowych wspomagających trawienie, tym jest jaśniejsza. Ponieważ
oznaczenie poszczególnych rodzajów mąk jest różne w różnych
krajach, przedstawiamy poniżej krótki przykład:
Niemcy Austria Szwajcaria
Mąka
pszenna, typ
405 480
400
550 780
550
1050 1600
1100
1600 1700
1900
Mąka żytnia,
typ
815 500
720
997 960
1100
1150 960
1100
1740 2500
1900
Copyright UNOLD AG | www.unold.de

Stand 21.2.2020
157 von 168
DE
EN
FR
NL
IT
ES
PL
BŁĘDY W URZĄDZENIU
BŁĄD PRZYCZYNA JAK USUNĄĆ
Dym uchodzi z piekarnika lub z otworów
wentylacyjnych
Składniki przykleiły się do piekarnika lub
po zewnętrznej stronie foremki
Wyciągnąć wtyczkę z kontaktu, schłodzić
urządzenie, potem wyjąć foremkę i
wyczyścić zewnętrzną stronę foremki i
piekarnik.
Chleb częściowo opadł i na spodzie jest
wilgotny
Chleb po upieczeniu i po upływie czasu
utrzymania ciepła za długo był w foremce
Wyciągnąć chleb z foremki najpóźniej po
upływie czasu utrzymania ciepła, ażeby
para mogła się ulotnić
Chleb nie daje się łatwo wyciągnąć z
foremki
Spodnia część chleba przylgnęła do
ramienia ugniatarki
Po pieczeniu wyczyścić ramię i walec
ugniatarki. W razie potrzeby wlać na 30
min ciepłą wodę do foremki, wtedy będzie
można łatwiej wyjąć ramię ugniatarki i
wyczyścić je.
Składniki nie są dobrze wymieszane lub
chleb nie jest dobrze upieczony
Złe ustawienie programu Proszę sprawdzić jeszcze raz wybrane
menu i inne ustawienia
Przycisk start/stop został poruszony
wtedy, gdy maszyna już pracowała
Składniki wyrzucić i zacząć od nowa.
Podczas pracy maszyny często otwierano
pokrywę
Pokrywa może być otwierana tylko podczas
fazy ugniatania. Po przedostatnim
rośnięciu nie otwierać więcej pokrywy.
Dłuższy czas bez prądu w czasie pracy Składniki wyrzucić i zacząć od nowa.
Wirowanie wygniatarki jest zablokowane Sprawdzić, czy foremka i wygniatarka
są prawidłowo osadzone. Sprawdzić, czy
wygniatarka nie została zablokowana
ziarnem itp. Wyjąć foremkę i sprawdzić,
czy podbierak się kręci. Jeśli tak nie
jest, wysłać urządzenie do biura obsługi
klienta.
Copyright UNOLD AG | www.unold.de

158 von 168
Stand 21.2.2020
DE
EN
FR
NL
IT
ES
PL
BŁĘDY W PRZEPISACH
BŁĄD PRZYCZYNA JAK USUNĄĆ
Chleb za mocno rośnie Za dużo drożdży, za dużo mąki, za mało soli, zbyt miękka woda lub
inne tego typu przyczyny
a/b
Chleb nie rośnie lub za mało
rośnie
Brak lub za mało drożdży
stare lub zleżałe drożdże
płyn za gorący
drożdże zetknęły się z płynem
zła lub stara mąka
za dużo lub za mało płynu
za mało cukru
a/b
e
c
d
e
a/b/g
a/b
Ciasto zbyt mocno rośnie i
wylewa się z foremki
Bardzo miękka woda powoduje, że drożdże mocniej pracują
za dużo mąki wpływa na fermentację drożdży
f/k
c
Chleb opadł Objętość chleba większa niż foremka, dlatego opadł
Chleb urósł zbyt mocno
a/f
m
Chleb po upieczeniu ma
wklęśnięcie
Za wczesna lub za szybka fermentacja drożdży poprzez za ciepłą
wodę, ciepły piekarnik, wysoką wilgotność,
za mało lepniku w mące
Program o zbyt długim czasie pracy
Za dużo płynu
c/h/i
l
m
a/b/h
Ciężka, bryłowata struktura Za dużo mąki lub za mało płynu
za mało drożdży lub cukru
za dużo owoców, ziarna lub innych składników
stara lub niedobra mąka
a/b/g
a/b
b
e
W środku niewypieczony Za dużo lub za mało płynu
wysoka wilgotność
przepis z wilgotnymi dodatkami jak np. jogurt
a/b/g
h
g
Struktura otwarta, ciężka lub
z dziurami
Za dużo wody, brak soli
wysoka wilgotność, za ciepła woda
zbyt gorący płyn
g/b
h/i
c
Grzybiasta, niewypieczona
powierzchnia
Objętość chleba większa niż foremka
zbyt duża ilość mąki w szczególności przy białym chlebie
za dużo drożdży lub za mało soli
za dużo cukru
słodkie dodatki dodatkowo do cukru
a/f
f
a/b
a/b
b
Kromki chleba są nierówne i
zbrylają się
Chleb nie został wystarczająco schłodzony
(para się nie ulotniła)
j
Pozostałości mąki na skórce
chleba
Mąka w czasie ugniatania nie została na brzegach dobrze przerobiona g
Usuwanie błędów
a należy dokładnie odmierzać składniki,
b odpowiednio dopasować składniki i sprawdzać, czy któregoś nie brakuje,
c wziąć inny płyn lub ten schłodzić do pokojowej temperatury,
d składniki dodawać w kolejności podanej w przepisach, na środku zrobić małą dziurkę i włożyć tam pokruszone lub suszone
drożdże. Unikać bezpośredniego kontaktu drożdży z płynem.
e Stosować tylko świeże i prawidłowo magazynowane składniki.
f Zmniejszyć łączną ilość składników, w żadnym przypadku nie dawać więcej mąki niż podano w przepisie. W razie potrzeby
zmniejszy wszystkie składniki o 1/3.
g Skorygować ilość płynu. Jeśli dodaje się wilgotne/płynne składniki, ilość płynu musi być odpowiednio zredukowana.
h Przy bardzo wilgotnej pogodzie wziąć 1-2 łyżki mniej.
i Przy ciepłej pogodzie nie stosować funkcji wyboru czasu. Stosować zimne płyny. Stosować programy SCHNELL lub ULTRA-
SCHNELL, aby skrócić czas pracy.
j Chleb wyjąć z foremki natychmiast po upieczeniu i zostawić na ruszcie do schłodzenia przez najmniej 15 minut, zanim go się
pokroi.
k Zmniejszyć drożdże wzgl. łączne składniki o ¼ podanej ilości.
l Dodać do ciasta 1 łyżkę lepniku pszennego.
m Wybrać program SCHNELL/SZYBKI
Copyright UNOLD AG | www.unold.de

Stand 21.2.2020
159 von 168
DE
EN
FR
NL
IT
ES
PL
UWAGI DO PRZEPISÓW
1. SKŁADNIKI
Ponieważ każdy składnik odgrywa określoną rolę przy wypieku
chleba, jest więc dokładne ich odmierzenie tak samo ważne jak i
kolejność dodawanych składników.
Najważniejsze składniki, jak płyn, mąka,sól cukier i drożdże
(można użyć zarówno świeżych jak i suchych drożdży) mają duży
wpływ na pozytywny wynik przy przygotowaniu chleba i ciasta.
Dlatego należy stosować zawsze odpowiednią ich ilość w prawi-
dłowej proporcji do pozostałych.
Jeśli pieczywo ma być natychmiast przygotowane, należy stoso-
wać ciepłe składniki. Jeśli jednak wybiorą Państwo program „wy-
bór czasu“ składniki powinny być zimne, aby drożdże nie zaczęły
za wcześnie fermentować.
Margaryna, masło i mleko mają wpływ jedynie na smak chleba.
Cukier można zredukować o 20%, aby skórka była jaśniejsza i
cieńsza a pozostały wynik pieczenia był bez zmian. Jeśli wolą
Państwo jaśniejszą i bardziej miękka skórkę, cukier można zastą-
pić miodem.
Gluten, który powstaje w mące przy ugniataniu, dba o strukturę
chleba. Idealna mieszanka mąki to 40% mąki pełnoziarnistej i
60% białej mąki.
Jeśli chcą Państwo dodać całe ziarna zboża, proszę je na noc na-
moczyć. Należy wtedy odpowiednio zmniejszyć ilość mąki i płynu
(do 1/5 mniej).
Zaczyn jest nieodzowny przy stosowaniu mąki żytniej. Zawiera on
bakterie kwasu mlekowego i octowego, które sprawiają, że chleb
jest lżejszy i delikatnie zakwaszony. Można go samemu wyprodu-
kować, co jednakże wymaga trochę czasu. Dlatego do poniższych
przepisów stosujemy skoncentrowany proszek zaczynu, który moż-
na kupić w paczuszkach po 15g (na 1kg mąki). Dane w przepi-
sach muszą być zachowane, ponieważ mniejsza ilość spowoduje,
że chleb będzie się kruszył.
Jeśli będą Państwo stosować proszek zaczynu w innym koncen-
tracie (paczuszki po 100 g na 1 kg mąki), muszą Państwo zredu-
kować ilość mąki 1 kg o ok. 80 g, wzgl. odpowiednio dopasować
do przepisu.
Płynny zaczyn, który można kupić pakowany w woreczkach, można
równie dobrze stosować . Odnośnie ilości zastosować się do da-
nych na opakowaniu. Płynny zaczyn wlać do kubka z miarką i do-
pełnić ilością płynu podaną w przepisie. Zaczyn z pszenicy, który
można również kupić w postaci proszku, poprawia jakość ciasta,
utrzymanie świeżości i smak. Jest łagodniejszy niż zaczyn z żyta.
Chleb z zaczynu należy piec w programie „Basis“ lub „Vollkorn-
brot“, żeby dobrze wyrósł i dobrze się upiekł.
Otręby pszenne dodajemy do ciasta wtedy, gdy chcemy mieć
chleb lekki, bogaty w substancje balastowe. Stosujemy wtedy 1
łyżkę stołową na 500 g mąki i podwyższamy ilość płynu o ½ łyżki.
Lepnik pszenicy jest naturalnym środkiem pomocniczym z białka
zbożowego. Sprawia on, że chleb jest lżejszy, ma lepszą bryłowa-
tość, rzadziej opada i jest łatwostrawny. Jego działanie jest bardzo
wyraźne w szczególności przy wypiekach z pełnego ziarna i wypie-
kach z samodzielnie zrobionej mąki.
Słód barwiony, który podajemy w kilku przepisach, jest ciemnym,
smażonym słodem jęczmiennym. Stosuje się go, aby otrzymać
ciemniejszy miękisz i ciemniejszą skórkę chleba (np. przy czar-
nym chlebie). Kupić można również słód żytni, który nie jest tak
ciemny. Można go nabyć w sklepach z produktami ekologicznymi
(bio). Przyprawy do chleba można dodać dodatkowo do wszystkich
chlebów mieszanych. Ilość zależy od Państwa smaku i danych
producenta.
Czysta lecytyna w proszku jest naturalnym emulgatorem, który
zwiększa objętość pieczywa, miąższ czyni delikatniejszym i bar-
dziej miękkim i przedłuża świeżość pieczywa.
Wszystkie wymienione - tłustym drukiem- powyżej środki pomoc-
nicze do pieczenia otrzymają Państwo w sklepach bio, sklepach
ze zdrową żywnością, na stoiskach ze zdrową żywnością w skle-
pach spożywczych lub w młynach. Można je również zamówić z
katalogu:
Hobbybäcker-Versand - Inge Pinzer
Am Mühlholz 6 – 89287 Bellenberg
Tel. 0 73 06/92 59 00 - Fax 0 73 06/92 59 05
Internet: www.hobbybaecker.de
Copyright UNOLD AG | www.unold.de

160 von 168
Stand 21.2.2020
DE
EN
FR
NL
IT
ES
PL
2. DOPASOWANIE SKŁADNIKÓW
Jeśli ilość danego składnika zostanie zwiększona lub zmniejszo-
na, należy pamiętać o tym, aby proporcje ilości odpowiadały pro-
porcjom z przepisu oryginalnego. Aby osiągnąć perfekcyjny wynik,
należy przestrzegać następujących podstawowych zasad dopaso-
wania składników:
Płyny / mąka: ciasto powinno być miękkie (nie za miękkie), lekko
kleiste, ale bez ciągnących się włókien. Z lekkich ciast można
uformować kulę. Przy ciężkich ciastach jak żytnie pełnoziarniste
lub chleby ziarniste nie da się tego zrobić. Proszę sprawdzić cia-
sto 5 minut po pierwszym ugniataniu. Jeśli jest ono jeszcze za
wilgotne, należy dodać tyle mąki, aż ciasto uzyska prawidłową
konsystencję. Jeśli ciasto jest za suche, należy dodawać wody
stopniowo, po łyżce.
Zastępowanie płynu: jeśli przy jakimś przepisie zmieniają Państwo
składniki, które zawierają płyn (np. świeży ser, jogurt, ) to trzeba
zredukować odpowiednio ilość płynu. Stosując jajka należy je wy-
bić do kubka z miarką i dopełnić płynem do odpowiedniej ilości.
Jeśli mieszkają Państwo na większej wysokości (powyżej 750 m)
to tam ciasto szybciej rośnie. W tych okolicach można zmniejszyć
ilość drożdży o ¼ do ½ łyżeczki, aby uniknąć nadmiernego wy-
rośnięcia ciasta. To samo dotyczy okolic ze szczególnie miękką
woda.
3. DODAWANIE I ODMIERZANIE SKŁADNIKÓW I ILOŚCI
Zawsze dodać najpierw płyn a na końcu drożdże. Jedynie przy
bardzo ciężkich ciastach z dużą ilością mąki żytniej i pełnoziar-
nistej można zmienić kolejność i najpierw dać mąkę z suchymi
drożdżami a na koniec wlać płyn. Zresztą należy pamiętać o tym
- w szczególności przy funkcji wyboru czasu, żeby drożdże przed
startem programu nie miały kontaktu z wodą. Żeby drożdże nie za
szybko rosły (w szczególności przy zastosowaniu wyboru czasu),
należy unikać kontaktu drożdży z płynami. Do odmierzania należy
zawsze używać tej samej miareczki, tzn. przy danych jak łyżka
stołowa lub łyżeczka należy stosować załączoną do automatu łyż-
kę-miarkę lub łyżkę, jaką używa się w domu.
Dane w gramach powinno się z racji dokładności odważyć.
Do danych w mililitrach powinno się stosować dołączony kubek
z miarką.
Skróty w przepisach oznaczają:
g – gram
ml – mililitr
pacz. - paczuszka np, drożdży, cukru waniliowego itp
4. Dodawanie owoców , orzechów i ziaren
Jeśli chce się dodać inne składniki, można to robić we wszystkich
programach (oprócz konfitury) tylko wtedy, gdy usłyszy się dźwięk
pip. Jeśli te składniki doda się za wcześnie, to wygniatarka je
zmieli. Jeśli w przepisach nie zostały podane etapy, ponieważ nie
ma ich w zaproponowanych programach, wtedy udają się zarówno
małe jak i duże ilości, które proponujemy dla danego modelu, w
podanym programie. Programy bez przełączania etapów są odpo-
wiednio zaprogramowane.
5. WAGA CHLEBA I OBJĘTOŚĆ
W poniższych przepisach znajdą Państwo dokładne dane odno-
śnie wagi chleba, które nasza pani doradca, pani Blum, ustali-
ła po upieczeniu chlebów. Można stwierdzić, że waga czystego
białego chleba jest mniejsza niż chleba pełnoziarnistego. Ma to
związek z tym, że biała mąka mocniej rośnie i na podstawie tego
ustalone zostały granice. Mimo tych dokładnych danych wago-
wych, mogą wystąpić małe odchylenia. Fakyczna waga chleba za-
leży w istotnym stopniu od wilgotności powietrza, jaka panuje w
czasie przygotowania.
Wszystkie chleby z przeważającym udziałem białej mąki osiągają
większą objętość i wychodzą w najwyższej klasie wagi po ostatnim
wyrośnięciu poza brzeg pojemnika, ale nie wylewają się. Wałeczek
chleba ponad brzegiem pojemnika jest dlatego nieco słabiej zaru-
mieniony, niż chleb w pojemniku.
Jeśli przy słodkich chlebach proponowany jest program szybki,
wtedy można wypiekać wyłącznie małe ilości w danych przepisach
również w programie ciasta drożdżowego, przy czym chleb wtedy
jest bardziej luźny. Proszę wybrać wtedy w programie ciasto droż-
dżowe stopień I.
6. WYNIKI PIECZENIA
Wynik pieczenia zależy w szczególności od warunków na miej-
scu (miękka woda, wilgotność powietrza – duża wysokość – stan
składników itp.). Dlatego dane w przepisach są punktami oparcia,
które ewentualnie należy dopasować. Jeśli jeden czy drugi przepis
nie uda się za pierwszym razem, nie należy tracić otuchy, lecz
spróbować znaleźć przyczynę i wypróbować np.: inne proporcje
składników.
Zalecamy, zanim włączą Państwo chleb z ustawieniem czasu na
pieczenie w nocy, upiec raz chleb na próbę, ażeby w razie potrze-
by móc jeszcze trochę zmienić przepis.
Copyright UNOLD AG | www.unold.de

Stand 21.2.2020
161 von 168
DE
EN
FR
NL
IT
ES
PL
PRZEPISY NA CHLEB KLASYCZNY
KLASYCZNY BIAŁY CHLEB
Stufe I Stufe II
Waga chleba, ok. 500 g 750 g
woda 230 ml 350 ml
sól ¾ łyżeczki 1 łyżeczka
cukier ¾ łyżeczki 1 łyżeczka
Grysik z twardej
pszenicy
100 g 150 g
Mąka, typ 550 230 ml 350 ml
Suche drożdże ½ pacz. ¾ pacz.
Program/y: SZYBKI / BIAŁY CHLEB
CHLEB PEŁNOZIARNISTY
Stufe I Stufe II
Waga chleba, ok. 570 g 860 g
woda 250 ml 370 ml
Margaryna/ masło 15 g 25 g
Sól ½ łyżeczki 1 łyżeczka
cukier ½ łyżeczki 1 łyżeczka
Mąka, typ 1050 180 g 270 g
Mąka pszenna
pełnoziarnista
180 g 270 g
Suche drożdże ½ pacz. ¾ pacz.
Program/y: PEŁNE ZIARNO
WIEJSKI BIAŁY CHLEB
Stufe I Stufe II
Waga chleba, ok. 500 g 750 g
mleko 180 ml 275 ml
Margaryna/ masło 15 g 25 g
Sól ½ łyżeczki 1 łyżeczka
cukier ½łyżeczki 1 łyżeczka
Mąka, typ 1050 330 g 500 g
Suche drożdże ½ pacz. ¾ pacz.
Program/y: BAZA / BIAŁY CHLEB
CHLEB Z RODZYNKAMI
Stufe I Stufe II
Waga chleba, ok. 560 g 850 g
woda 200 ml 300 ml
Margaryna/ masło 20 g 30 g
sól 1 szczypta ½ łyżeczki
miód 1 łyżeczka 1 łyżka
Mąka, typ 405 330 g 500 g
cynamon ½ łyżeczki ¾ łyżeczki
Suche drożdże ½ pacz. ¾ pacz.
Rodzynki/
suszone owoce
50 g 75 g
Program/y: SZYBKIE lub CIASTO DROŻDŻOWE
CHLEB ZE ŚRUTU PSZENNEGO
Stufe I Stufe II
Waga chleba, ok. 600 g 900 g
woda 230 ml 350 ml
sól ½ łyżeczki 1 łyżeczka
Margaryna/
masło
15 g 25 g
miód 1 łyżeczka 1 łyżeczka
ocet ½ łyżki ¾ łyżki
Mąka pszenna
pełne ziarno
330 g 500 g
Śruta pszenna 50 g 75 g
Suche drożdże 1/3 pacz. 1 pacz.
Program/y: PEŁNE ZIARNO
CHLEB JAJECZNY
Stufe I Stufe II
Waga chleba, ok. 480 g 730 g
Jajka dopełnić
wodą lub
mlekiem do
1 200ml 2 300ml
Margaryna /masło 15 g 25 g
sól ½ łyżeczki 1 łyżeczka
cukier ½ łyżeczki 1 łyżeczka
Mąka typ 550 330 g 500 g
drożdże ½ pacz. ¾ pacz.
Program/y: BAZA 500 g
Wskazówka: chleb od razu upiec i spożyć na świeżo
100 % CHLEB PEŁNOZIARNISTY
Stufe I Stufe II
Waga chleba, ok. 560 g 850 g
woda 230 ml 350 ml
sól ½ łyżeczki 1 łyżeczka
miód 1 łyżeczka 1 łyżeczka
Mąka pszenna pełne
ziarno
360 g 540 g
Suche drożdże ½ pacz. ¾ pacz.
Program/y: PEŁNE ZIARNO
Copyright UNOLD AG | www.unold.de

162 von 168
Stand 21.2.2020
DE
EN
FR
NL
IT
ES
PL
CHLEB WIEJSKI
Stufe I Stufe II
Waga chleba, ok. 520 g 960 g
woda 200 ml 300 ml
Sól ½ łyżeczki 1 łyżeczka
Zaczyn z mąki
pszen. suchy*
15 g 25 g
Mąka, typ 1050 330 g 500 g
cukier ½ łyżeczki 1 łyżeczka
suche drożdże ½ opak. 1 opak.
Program/y: BAZA
* kein Konzentrat
CHLEB NA ZACZYNIE
Stufe I Stufe II
Waga chleba, ok. 740 g 1050 g
Suchy zaczyn * ½ pacz. ¾ pacz.
woda 350 ml 450 ml
Przyprawy do
chleba
½ łyżeczki ¾ łyżeczki
Sól 1 łyżeczka 1½ łyżeczki
Mąka żytnia 250 g 340 g
Mąka, typ 1050 250 g 340 g
Suche drożdże 1 pacz. 1½ pacz.
Program/y: BAZA
CHLEB Z FIGAMI I ORZECHAMI WŁOSKIMI
Stufe I Stufe II
Waga chleba, ok. 600 g 900 g
woda 230 ml 350 ml
Mąka typu 1050 170 g 260 g
Mąka żytnia 260 g 400 g
Sól 1 płaska łyżeczka 1 łyżeczka
Figi drobno
siekane
30 g 50 g
Orzechy włoskie
siekane
30 g 50g
miód 1 łyżeczka 1½ łyżeczki
Suchy zaczyn ½ pacz. ¾ pacz.
Suche drożdże ½ pacz. ¾ pacz.
Program/y: BAZA
CHLEB ORKISZOWY
Stufe I Stufe II
Waga chleba, ok. 670 g 990 g
Maślanka 350 ml 470 ml
Mąka orkiszowa
pełne ziarno
150 g 230 g
Mąka żytnia
pełne ziarno
120 g 180 g
Śruta z orkiszu 120 g 180 g
Ziarno
słonecznika
50 g 75g
sól ½ łyżeczki 1 łyżeczka
cukier 1 łyżeczka 1 łyżeczka
Suche drożdże ½ pacz. ¾ pacz.
Suchy zaczyn ½ pacz. ¾ pacz.
Program/y: PEŁNE ZIARNO
CHLEBY Z MIESZANEK DO PIECZENIA
Polecamy mieszankę do pieczenia firmy DIAMANT, z którą osiągnęliśmy najlepsze wyniki. Proszę dostosować się do wskazówek na
opakowaniu i postępować w następujący sposób:
1. Włączyć urządzenie, nalać płyn
2. Dodać odpowiednią ilość mieszanki do pieczenia
3. Ewentualnie dodać suche drożdże, zgodnie z instrukcjami na opakowaniu mieszanki do pieczenia (mała łyżeczka do odmierzania
UNOLD mieści 2,5g suchych drożdży)
4. Wybrać program, nacisnąć START
5. Resztą zajmie się dla Państwa piekarnik Backmeister
®
.
6. Niektóre dostępne w handlu mieszanki zawierają już suche drożdże. W tym przypadku nie należy już oczywiście dodawać dodatkowo
suchych drożdży.
Copyright UNOLD AG | www.unold.de

Stand 21.2.2020
163 von 168
DE
EN
FR
NL
IT
ES
PL
CHLEBY DLA ALERGIKÓW
Dla osób, które cierpią z powodu alergii na zboża lub muszą utrzmać określoną dietę, wypróbowaliśmy w naszym PIEKARNIKU
MISTRZ WYPIEKÓW, wypieki z różnych mieszanek mąki, na bazie częściowo mąki kukurydzianej, ryżowej i ziemniaczanej i uzyskaliśmy
dobre wyniki.
Uzyskaliśmy dobre wyniki z produktami firmy Schär i Hammermühle Diät GmbH. Odnośnie produktów bezglutenowych lub większej ilości nietolero-
wanych produktów mogą się Państwo zwrócić bezpośrednio do tej firmy:
Hotline Fa. Schär
Niemcy Tel. 08 00/1 81 35 37
Austria Tel. 08 00/29 17 28
Hotline Hammermühle
Niemcy Tel. 0 63 21/9 58 90
Zastosowane w naszych przepisach składniki otrzymają Państwo w sklepach ze zdrową żywnością. Produkty firmy Hammermühle można
pod w.w. numerem telefonu zamówić bezpośrednio u producenta.
Wszystkie podane rodzaje mąki nadają się do ciast i chlebów przy szczególnym odżywianiu (celiaklia /sprue) w ramach zaplanowanej
diety. Również przy dodaniu większej ilości drożdży wzgl. winnikowego proszku do pieczenia (kwaśny winian potasu) chleby pieczone
w piekarniku Backmeister
®
pozostają względnie spójne.
Dodać składniki do pojemnika piekarnika, wybrać następujące programy:
Dla przygotowania chleba„GLUTENFREI“ ciemny:
Do przygotowania ciasta, które będzie jeszcze dalej przerabiane: program „TEIG/CIASTO“
Do przygotowania wypieków, do których stosuje się proszek do pieczenia lub winnik:wyłącznie program „BACKPULVER/PROSZEK
DO PIECZENIA“.
CIASTA – PRZEPISY PODSTAWOWE
W piekarniku Backmeister
®
można upiec bardzo dobrze ciasta ucierane . Ponieważ jednak urządzenie pracuje z narzędziem do
ugniatania a nie ucierania, ciasto będzie trochę bardziej zbite, ale nie pomniejsza to smaku. Pieczenia ciasta nie można wstępnie
zaprogramować. Gdy ciasto się upiecze należy wyjąć pojemnik z urządzenia i postawić na wilgotną ściereczkę i zostawić w foremce
na ok. 15 minut aby ostygło. Potem można gumową skrobaczką odsunąć delikatnie ciasto od ścianek foremki i ostrożnie je wysunąć.
Składniki na ok. 700 g wagi
Jajka 3
Miękkie masło 100 g
Cukier 100 g
Cukier waniliowy 1 pacz.
Mąka typu 405 300 g
Proszek do pieczenia 1 pacz.
Utarte orzechy 50 g
Lub: utarta czekolada 50 g
Lub:
obrane i pokrojone w
1cm kostki jabłka
50 g
Lub: wiórki kokosowe 50 g
Program/y: BACKPULVER
Copyright UNOLD AG | www.unold.de

164 von 168
Stand 21.2.2020
DE
EN
FR
NL
IT
ES
PL
PRZYGOTOWANIE CIASTA
W piekarniku Backmeister
®
można w programie TEIG w prosty sposób przygotować ciasto drożdżowe, które można potem dalej dorobić
i upiec w normalnym piekarniku.
W czasie 2 ugniatania można po rozbrzmieniu dźwięku pip dodać dodatki jak orzechy, suszone owoce, wiórki kokosowe itp. W programie
TEIG/CIASTO nie ma żadnych zróżnicowanych stopni pieczenia. W ten sposób można z każdego powyższego przepisu przygotować
bułki, o ile w programie TEIG przygotujecie Państwo ciasto, które uformujecie i upieczecie w piekarniku.
STRUCLA ŚWIĄTECZNA
Waga 1000 g
Mleko 125 ml
Masło płynne 125 g
Jajko 1
Rum 3 łyżki
Mąka typu 405 500 g
Cukier 100 g
Skórka cytrynowa w
cukrze
50 g
Skórka
pomarańczowa
25 g
Zmielone migdały 50 g
Rodzynki/ sultaninen 100 g
sól 1 szczypta
cynamon 2 szczypty
Suche drożdże 2 pacz.
ciasto wyjąć z pojemnika – włożyć do formy na strucle i piec ok.
1 godz w temp. 180 °C (w piekarniku z nawiewem 160 °C)
Program/y: TEIG
PIZZA Z PEŁNEGO ZIARNA
Składniki na 2 pizze
Woda 150 ml
Sól ½ łyżeczki
Olej z oliwek 2 łyżki
Mąka pszenna z
pełnego ziarna
300 g
Kiełki pszenicy 1 łyżka
Suche drożdże ½ pacz.
ciasto rozwałkować , nadać mu okrągłą formę i zostawić do
wyrośnięcia na ok. 10 minut, na cieście rozsmarować sos do
pizzy i położyć na nim wg uznania składniki, piec 20 minut w
temp. 200°C.
Program/y: TEIG
CIASTO DO KAWY
Składniki na jedną foremkę ciasta o śr. 22 cm
mleko 170 ml
sól ¼ łyżeczki
żółtko 1
Masło / margaryna 10 g
Mąka typu 550 350 g
cukier 35 g
Suche drożdże ½ pacz.
Program/y: TEIG/CIASTO
Ciasto wyjąć z pojemnika jeszcze raz ugnieść i rozłożyć
nadając mu okrągłą lub kwadratową formę
położyć na nie następujące składniki
Masło stopione 2 łyżki
cukier 75 g
Mielony cynamon 1 łyżeczka
Siekane orzechy 60 g
Lukier wg życzenia
Posmarować ciasto masłem,
w miseczce wymieszać razem cukier, cynamon i orzechy i ułożyć
na rozsmarowanym maśle
zostawić w ciepłym miejscu na 30 min aby wyrosło i potem
piec.
PRECELKI
Składniki na ok. 9 – 10 szt
Woda 200ml
sól ¼ łyżeczki
Mąka typu 405 360 g
Cukier ½ łyżeczki
Suche drożdże ½ pacz.
Jajko (lekko rozbite)
do posmarowania
1
Gruba sól do
posypania
wszystkie składniki oprócz jajka i grubej soli włożyć do
pojemnika. Wybrać program TEIG/CIASTO i włączyć.
gdy zabrzmi sygnał i na wyświetlaczu pokaże się “0:00”,
wcisnąć STOP.
rozgrzać piekarnik do 230°C
ciasto podzielić na części i każdą z nich uformować na cienki
wałeczek.
utworzyć z nich precelki i położyć na wysmarowaną
tłuszczem blaszkę.
posmarować precelki roztrzepanym jajkiem i posypać grubą solą.
piec w rozgrzanym piekarniku w temp. 200°C 12-15 minut.
Program/y:: TEIG
Copyright UNOLD AG | www.unold.de

Stand 21.2.2020
165 von 168
DE
EN
FR
NL
IT
ES
PL
Nasze urządzenia wyprodukowane zostały na wysokim poziomie do długiego użytkowania. Regularna
konserwacja i fachowe naprawy poprzez nasz serwis mogą wydłużyć pracę urządzenia. W razie kiedy urzą-
dzenie jest uszkodzone i nie nadaje się do naprawy, proszę przestrzegać zaleceń: Ten produkt nie może
być zutylizowany razem z normalnymi odpadami domowymi. Muszą Państwo dostarczyć ten produkt do
zbiorczego punktu recyklingowego dla urządzeń elektrycznych i elektronicznych. Poprzez oddzielne zbie-
ranie i recykling odpadów pomagają Państwo chronić naturalne zasoby i sprawiają, że ten produkt będzie
zutylizowany w sposób bezpieczny dla zdrowia i środowiska naturalnego.
WARUNKI GWARANCJI
UTYLIZACJA / OCHRONA ŚRODOWISKA
Udzielamy na nasze produkty 24 miesięcznej gwarancji od daty zakupu (warunkiem jest zachowanie faktury zakupu
lub paragonu) na szkody, które przy użytkowaniu zgodnym z przeznaczeniem wskazują na wadę fabryczną. W czasie
trwania gwarancji usuniemy wady materiałowe bądź fabryczne zgodnie z naszym osądem poprzez naprawę lub wymianę.
Gwarancja udzielana jest na produkty sprzedawane na terenie Niemiec i Austrii. W innych krajach proszę zwrócić się do
właściwego Importera. Urządzenia, w których wymagane jest usunięcie wady, proszę przesłać razem z kopią faktury za-
kupu, na której musi być widoczna data zakupu, z załączonym opisem wady, w oryginalnym pudełku, dobrze zapakowane
na adres serwisu. Możesz wydrukować dokument zwrotny na naszej stronie internetowej www.unold.de/ruecksendung.
(tylko dla wpisów z Niemiec i Austrii). Gwarancja nie obejmuje szkód wynikających ze zużycia, użytkowania niezgodnie
z przeznaczeniem i nieprzestrzegania wskazówek dotyczących konserwacji i pielęgnacji. Roszczenie gwarancji wygasa,
jeżeli naprawa bądź otwarcie przedmiotu będą przeprowadzone przez stronę trzecią. Ewentualne roszczenia użytkownika
końcowego wobec sprzedawcy/dealera nie są ograniczone tą gwarancją.
Przepisy podane w tej instrukcji obsługi zostały starannie opracowane i sprawdzone przez autorów i przedsiębiorstwo UNOLD AG, ale
bez gwarancji. Wyklucza się odpowiedzialność autorów lub przedsiębiorstwa UNOLD AG i ich pełnomocników za szkody osobowe, rze-
czowe i majątkowe.
GOTOWANIE KONFITUR
Konfiturę lub marmoladę można przygotować szybko i łatwo w piekarniku Backmeister. Nawet jeśli wcześniej nigdy Państwo jej nie
gotowali, można spróbować. Otrzymają Państwo wyśmienitą, o bardzo dobrym smaku konfiturę.
1. Wymyć świeże dojrzałe owoce. Jabłka, brzoskwinie, gruszki i inne owoce z twardą skórką ew. obrać.
2. Proszę brać zawsze tylko podaną ilość, ponieważ jest ona ustalona do programu konfitury. W innym przypadku masa zagotuje się
za wcześnie i wypłynie.
3. Owoce odważyć, pokroić na małe (maks. 1cm) kawałki lub rozdrobnić mixerem np. ESGE-ZAUBERSTAB
®
i włożyć do pojemnika.
4. Dodać cukru żelującego w stosunku „2:1“ w podanej ilości. Proszę używać tylko tego i nie żadnego domowego cukru lub cukru
żelowego „1:1“, ponieważ konfitura nie będzie wtedy miała odpowiedniej konsystencji.
5. Proszę zmieszać owoce z cukrem i włączyć program, który przebiega automatycznie
6. Po 1:20 godz. Urządzenie zabrzęczy i można wyłożyć konfiturę do słoików i dobrze je zamknąć.
7. Mogą Państwo zrobić mniejsze ilości lub inny stosunek mieszanki w programie własnym, zmieniając odpowiednio do potrzeby
przebieg programu mieszać (ugniatać) i gotować (piec) a pozostałe punkty programu zaprogramować na 0. Proszę pamiętać, żeby
faza gotowania nie trwała za długo, ażeby marmolada nie wykipiała.
Copyright UNOLD AG | www.unold.de

Copyright UNOLD AG | www.unold.de

Copyright UNOLD AG | www.unold.de

Aus dem Hause
Copyright UNOLD AG | www.unold.de
-
 1
1
-
 2
2
-
 3
3
-
 4
4
-
 5
5
-
 6
6
-
 7
7
-
 8
8
-
 9
9
-
 10
10
-
 11
11
-
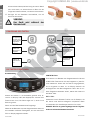 12
12
-
 13
13
-
 14
14
-
 15
15
-
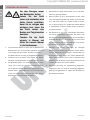 16
16
-
 17
17
-
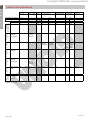 18
18
-
 19
19
-
 20
20
-
 21
21
-
 22
22
-
 23
23
-
 24
24
-
 25
25
-
 26
26
-
 27
27
-
 28
28
-
 29
29
-
 30
30
-
 31
31
-
 32
32
-
 33
33
-
 34
34
-
 35
35
-
 36
36
-
 37
37
-
 38
38
-
 39
39
-
 40
40
-
 41
41
-
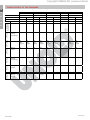 42
42
-
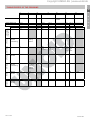 43
43
-
 44
44
-
 45
45
-
 46
46
-
 47
47
-
 48
48
-
 49
49
-
 50
50
-
 51
51
-
 52
52
-
 53
53
-
 54
54
-
 55
55
-
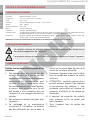 56
56
-
 57
57
-
 58
58
-
 59
59
-
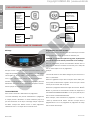 60
60
-
 61
61
-
 62
62
-
 63
63
-
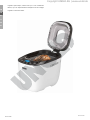 64
64
-
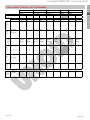 65
65
-
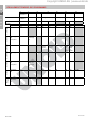 66
66
-
 67
67
-
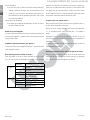 68
68
-
 69
69
-
 70
70
-
 71
71
-
 72
72
-
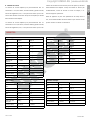 73
73
-
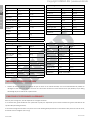 74
74
-
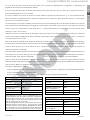 75
75
-
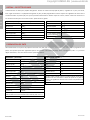 76
76
-
 77
77
-
 78
78
-
 79
79
-
 80
80
-
 81
81
-
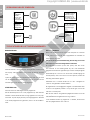 82
82
-
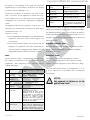 83
83
-
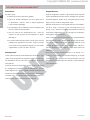 84
84
-
 85
85
-
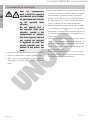 86
86
-
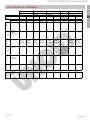 87
87
-
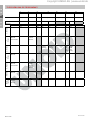 88
88
-
 89
89
-
 90
90
-
 91
91
-
 92
92
-
 93
93
-
 94
94
-
 95
95
-
 96
96
-
 97
97
-
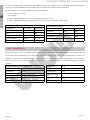 98
98
-
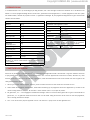 99
99
-
 100
100
-
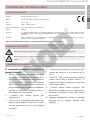 101
101
-
 102
102
-
 103
103
-
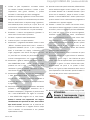 104
104
-
 105
105
-
 106
106
-
 107
107
-
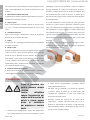 108
108
-
 109
109
-
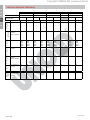 110
110
-
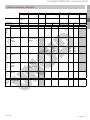 111
111
-
 112
112
-
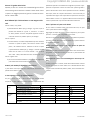 113
113
-
 114
114
-
 115
115
-
 116
116
-
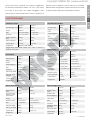 117
117
-
 118
118
-
 119
119
-
 120
120
-
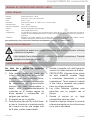 121
121
-
 122
122
-
 123
123
-
 124
124
-
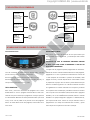 125
125
-
 126
126
-
 127
127
-
 128
128
-
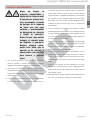 129
129
-
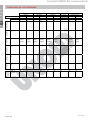 130
130
-
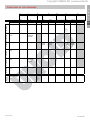 131
131
-
 132
132
-
 133
133
-
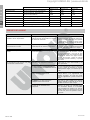 134
134
-
 135
135
-
 136
136
-
 137
137
-
 138
138
-
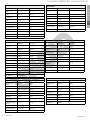 139
139
-
 140
140
-
 141
141
-
 142
142
-
 143
143
-
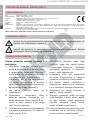 144
144
-
 145
145
-
 146
146
-
 147
147
-
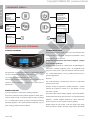 148
148
-
 149
149
-
 150
150
-
 151
151
-
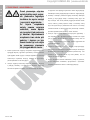 152
152
-
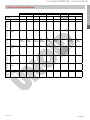 153
153
-
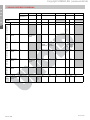 154
154
-
 155
155
-
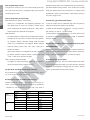 156
156
-
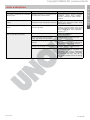 157
157
-
 158
158
-
 159
159
-
 160
160
-
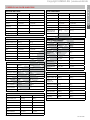 161
161
-
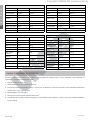 162
162
-
 163
163
-
 164
164
-
 165
165
-
 166
166
-
 167
167
-
 168
168


Unold 68010 de handleiding
- Categorie
- Machines voor het maken van brood
- Type
- de handleiding
in andere talen
- italiano: Unold 68010 Manuale del proprietario
- français: Unold 68010 Le manuel du propriétaire
- español: Unold 68010 El manual del propietario
- Deutsch: Unold 68010 Bedienungsanleitung
- polski: Unold 68010 Instrukcja obsługi
Gerelateerde papieren
-
Unold 68125 de handleiding
-
-
-
-
Unold backmeister onyx 8695 Instructions For Use Manual
-
-
-
-
-