Beko RCNE720E3VZXPN de handleiding
- Categorie
- Koelkast-diepvriezers
- Type
- de handleiding

www.beko.com.trwww.beko.com
EN
FR DE SL
RCNE720E3VZP
Réfrgérateur
Manuel d'utilisation
Kühlschrank
Bedienungsanleitung
Hladilnik
Navodila za uporabo

Please read this manual before using the product!
Dear Valued Customer,
We wish you to get the best results from your product that has been manufactured meticulously at modern plants
and tested with detailed quality control checks.
For this reason, we recommend that you read this user manual thoroughly before starting the product. If you hand
over the product to someone else, please remember to give the user manual as well.
This manual will help you use your appliance in a fast and safe way.
• Please read this user manual carefully before installing and using the product.
• Always follow the applicable safety instructions.
• Keep the user manual in an easily accessible place for further use.
• Please read all the other documents provided with the product.
Please keep in mind that this manual may apply to several product models. This manual expressly indicates the
differences between various models.
C
Important information and
useful hints.
A
Risk of injury and property
damage.
B
Risk of electric shock.
Packaging materials of
this product has been
manufactured from recyclable
materials in accordance with
the National Environment
Regulations.

2 /25EN
Refrigerator / User Manual
1. Safety and environment instructions 3
1.1. General safety . . . . . . . . . . . . . . . . . . . . . . . . . . 3
1.1.1 HC warning. . . . . . . . . . . . . . . . . . . . . . . . . . . . 4
1.1.2 For models with water dispenser . . . . . . . . . . . . 4
1.2. Intended use . . . . . . . . . . . . . . . . . . . . . . . . . . . 5
1.3. Child safety . . . . . . . . . . . . . . . . . . . . . . . . . . . . 5
1.4. Compliance with WEEE Directive and Disposing of
the Waste Product. . . . . . . . . . . . . . . . . . . . . . . 5
1.5. Compliance with RoHS Directive . . . . . . . . . . . . . 5
1.6. Package information. . . . . . . . . . . . . . . . . . . . . . 5
2 Your Refrigerator 6
3 Installation 7
3.1. Appropriate location for installation . . . . . . . . . . . 7
3.2. Installing the plastic wedges . . . . . . . . . . . . . . . . 7
3.3. Adjusting the feet . . . . . . . . . . . . . . . . . . . . . . . . 8
3.4. Electrical connection. . . . . . . . . . . . . . . . . . . . . . 8
4 Preparation 9
4.1. Things to be done for energy saving . . . . . . . . . . 9
4.2. Initial use . . . . . . . . . . . . . . . . . . . . . . . . . . . . . . 9
5 Operating the product 10
5.1. Indicator panel . . . . . . . . . . . . . . . . . . . . . . . . . 10
5.2. Indicator panel . . . . . . . . . . . . . . . . . . . . . . . . . 11
5.3. Ice machine . . . . . . . . . . . . . . . . . . . . . . . . . . . 14
5.4. Icematic. . . . . . . . . . . . . . . . . . . . . . . . . . . . . . 14
5.5. Ice tray . . . . . . . . . . . . . . . . . . . . . . . . . . . . . . 14
5.6. Blue light . . . . . . . . . . . . . . . . . . . . . . . . . . . . . 15
5.7. Deodoriser Module. . . . . . . . . . . . . . . . . . . . . . 15
(FreshGuard) . . . . . . . . . . . . . . . . . . . . . . . . . . . . . . 15
5.8. Chiller compartment. . . . . . . . . . . . . . . . . . . . . 16
5.9. Crisper. . . . . . . . . . . . . . . . . . . . . . . . . . . . . . . 16
5.10. Using the water dispenser . . . . . . . . . . . . . . . . 17
5.11. Filling the water dispenser's tank . . . . . . . . . . . 17
5.12. Cleaning the water tank . . . . . . . . . . . . . . . . . . 17
5.13. Drip tra y. . . . . . . . . . . . . . . . . . . . . . . . . . . . . . 18
5.14. Humidity-controlled crisper (Ever Fresh). . . . . . . 19
5.15. Freezing fresh food. . . . . . . . . . . . . . . . . . . . . . 19
5.16. Recommendations for preserving the frozen food 20
5.17. Deep-freeze inf ormation. . . . . . . . . . . . . . . . . . 20
5.18. Placing the food . . . . . . . . . . . . . . . . . . . . . . . . 20
5.19. Door open warning. . . . . . . . . . . . . . . . . . . . . . 20
5.20. Illumination lamp . . . . . . . . . . . . . . . . . . . . . . . 20
6 Care and Cleaning 21
6.1. Avoiding Bad Odours . . . . . . . . . . . . . . . . . . . . 21
6.2. Protection of plastic surfaces . . . . . . . . . . . . . . 21
6.3. Cleaning the Inner Surface . . . . . . . . . . . . . . . . 21
6.4. Stainless Steel Outer Surfaces . . . . . . . . . . . . . 21
6.5. Cleaning Products with Glass Doors . . . . . . . . . 22
7 Troubleshooting 23

3 /25 EN
Refrigerator / User Manual
This section provides the safety instructions necessary
to prevent the risk of injury and material damage. Failure
to observe these instructions will invalidate all types of
product warranty.
Intended use
A
WARNING:
Keep ventilation openings, in the
appliance enclosure or in the built-
instructure, clear of obstruction.
A
WARNING:
Do not use mechanical
devices or other means to accelerate
the defrosting process, other
than those recommended by the
manufacturer.
A
WARNING:
Do not damage the refrigerant circuit.
A
WARNING:
Do not use electrical appliances inside
the food storage compartments of the
appliance, unless they are of the type
recommended by the manufacturer.
This appliance is intended to be used in household and
similar applications such as
– staff kitchen areas in shops, offices and other working
environments;
– farm houses and by clients in hotels, motels and other
residential type environments;
– bed and breakfast type environments;
– catering and similar non-retail applications.
1.1. General safety
• This product should not be used by
persons with physical, sensory and
mental disabilities, without sufficient
knowledge and experience or by
children. The device can only be used
by such persons under supervision
and instruction of a person responsible
for their safety. Children should not be
allowed to play with this device.
• In case of malfunction, unplug the
device.
• After unplugging, wait at least 5
minutes before plugging in again.
• Unplug the product when not in use.
• Do not touch the plug with wet hands!
Do not pull the cable to plug off, always
hold the plug.
• Do not plug in the refrigerator if the
socket is loose.
• Unplug the product during installation,
maintenance, cleaning and repair.
• If the product will not be used for a
while, unplug the product and remove
any food inside.
• Do not use the product when the
compartment with circuit cards located
on the upper back part of the product
(electrical card box cover) (1) is open.
1
1
• Do not use steam or steamed cleaning
materials for cleaning the refrigerator
and melting the ice inside. Steam may
contact the electrified areas and cause
short circuit or electric shock!
• Do not wash the product by spraying or
pouring water on it! Danger of electric
shock!
• In case of malfunction, do not use the
product, as it may cause electric shock.
Contact the authorised service before
doing anything.
1. Safety and environment instructions

Instructions for safety and environment
4 / 25 EN
Refrigerator / User Manual
• Plug the product into an earthed
socket. Earthing must be done by a
qualified electrician.
• If the product has LED type lighting,
contact the authorised service for
replacing or in case of any problem.
• Do not touch frozen food with wet
hands! It may adhere to your hands!
• Do not place liquids in bottles and
cans into the freezer compartment.
They may explode.
• Place liquids in upright position after
tightly closing the lid.
• Do not spray flammable substances
near the product, as it may burn or
explode.
• Do not keep flammable materials and
products with flammable gas (sprays,
etc.) in the refrigerator.
• Do not place containers holding liquids
on top of the product. Splashing water
on an electrified part may cause
electric shock and risk of fire.
• Exposing the product to rain, snow,
sunlight and wind will cause electrical
danger. When relocating the product,
do not pull by holding the door handle.
The handle may come off.
• Take care to avoid trapping any part
of your hands or body in any of the
moving parts inside the product.
• Do not step or lean on the door,
drawers and similar parts of the
refrigerator. This will cause the product
to fall down and cause damage to the
parts.
• Take care not to trap the power cable.
• When positioning the appliance, ensure the
supply cord is not trapped or damaged.
• Do not locate multiple portable socket-outlets
or portable power supplies at the rear of the
appliance.
1.1.1 HC warning
If the product comprises a cooling system using
R600a gas, take care to avoid damaging the cooling
system and its pipe while using and moving the
product. This gas is flammable. If the cooling system
is damaged, keep the product away from sources of
fire and ventilate the room immediately.
C
The label on the inner left side
indicates the type of gas used in the
product.
1.1.2 For models with water dispenser
• Pressure for cold water inlet shall
be maximum 90 psi (620 kPa). If
your water pressure exceeds 80 psi
(550 kPa), use a pressure limiting
valve in your mains system. If you
do not know how to check your
water pressure, ask for the help of a
professional plumber.
• If there is risk of water hammer
effect in your installation, always
use a water hammer prevention
equipment in your installation.
Consult Professional plumbers if you
are not sure that there is no water
hammer effect in your installation.

Instructions for safety and environment
5 /25EN
Refrigerator / User Manual
• Do not install on the hot water inlet.
Take precautions against of the
risk of freezing of the hoses. Water
temperature operating interval shall
be 33°F (0.6°C) minimum and
100°F (38°C) maximum.
• Use drinking water only.
1.2. Intended use
• This product is designed for
home use. It is not intended for
commercial use.
• The product should be used to store
food and beverages only.
• Do not keep sensitive products
requiring controlled temperatures
(vaccines, heat sensitive medication,
medical supplies, etc.) in the
refrigerator.
• The manufacturer assumes no
responsibility for any damage due to
misuse or mishandling.
• Original spare parts will be provided
for 10 years, following the product
purchasing date.
1.3. Child safety
• Keep packaging materials out of
children’s reach.
• Do not allow the children to play
with the product.
• If the product’s door comprises a
lock, keep the key out of children’s
reach.
1.4. Compliance with WEEE Directive
and Disposing of the Waste Product
This product complies with EU WEEE
Directive (2012/19/EU). This product bears a
classification symbol for waste electrical and
electronic equipment (WEEE).
This product has been
manufactured with high quality
parts and materials which can be
reused and are suitable for
recycling. Do not dispose of the
waste product with normal
domestic and other wastes at the
end of its service life. Take it to the
collection center for the recycling of electrical and
electronic equipment. Please consult your local
authorities to learn about these collection centers.
1.5. Compliance with RoHS Directive
• This product complies with EU WEEE
Directive (2011/65/EU). It does not contain
harmful and prohibited materials specified in the
Directive.
1.6. Package information
Packaging materials of the product are
manufactured from recyclable materials in
accordance with our National Environment
Regulations. Do not dispose of the packaging
materials together with the domestic or other
wastes. Take them to the packaging material
collection points designated by the local
authorities.

6 /25EN
Refrigerator / User Manual
1. Door shelves of fridge compartment
2. Freezer compartment drawers
3. Icematic
4. Water tank
5. Crisper
6. Crisper cover
7. Chiller compartment
8. Glass shelves of fridge compartment
9. Odour filter (violed)
10. Inside display
11. Glass shelves of fridge compartment
12. Freezer compartment
*Optional
2 Your Refrigerator
C
*Optional: Figures in this user manual are given as an example and may not match the product
exactly. If the relevant parts are not available in the product you purchased, the figure applies to other
models.
*1
*3
*4
6
*5
7
*8
11
12
*2
*1
*2
*3
*5
7
*8
9
10
11
6
12
It may not apply to all models

7 /25 EN
Refrigerator / User Manual
3 Installation
3.1. Appropriate location for installation
Contact an Authorized Service for the installation of the
product. In order to prepare the product for use, refer the
information in the user manual and ensure that electrical
installation and water installation are appropriate. If not,
call a qualified electrician and technician to have any
necessary arrangements carried out.
B
WARNING: Manufacturer shall not
be held liable for damages that may
arise from procedures carried out by
unauthorized persons.
B
WARNING: Product must not be plugged
in during installation. Otherwise, there is
the risk of death or serious injury!
A
WARNING: : If the door clearance of the
room where the product will be placed is
so tight to prevent passing of the product,
contact the authorised service provider.
• Placetheproductonalevelfloorsurfacetoprevent
jolts.
•Ifyouaregoingtousetheproductinacabin/furniture,
there must be a clearance of at least 2 cm between
the side walls and the cabin/furniture.
• Installtheproductatleast30cmawayfromheat
sources such as hobs, heater cores and stoves and at
least 5 cm away from electrical ovens.
•Productmustnotbesubjectedtodirectsunlightand
kept in humid places.
• Appropriateairventilationmustbeprovidedaround
your product in order to achieve an efficient operation.
If the product is to be placed in a recess in the wall,
pay attention to leave at least 5 cm distance with the
ceiling and the side walls.
• In environments where the room temperature drops
below 10°C, the refrigerator will continue to run to
preserve the food in the freezer. However, fresh food
in the fridge compartment might freeze due to the
cold environment.
3.2. Installing the plastic wedges
Plastic wedges supplied with the product are used to
create the distance for the air circulation between the
product and the rear wall.
1. To install the wedges, remove the screws on the
product and use the screws supplied together with
the wedges.
2. Insert the 2 plastic wedges onto the rear ventilation
cover as illustrated in the figure.

Installation
8 / 25EN
Refrigerator / User Manual
3.3. Adjusting the feet
If the product stands unbalanced after installation,
adjust the feet on the front by rotating them to the
right or left.
3.4. Electrical connection
A
WARNING: Do not make connections
via extension cables or multi-plugs.
B
WARNING: Damaged power cable
must be replaced by the Authorized
Service Agent.
C
If two coolers are to be installed side
by side, there should be at least 4 cm
distance between them.
• Our company shall not be liable for any
damages that will arise when the product
is used without grounding and electrical
connection in accordance with the national
regulations.
• Power cable plug must be within easy reach
after installation.
• Do not extension cords or cordless multiple
outlets between your product and the wall
outlet.
C
Hot surface warning!
Your product is equipped with coolant
pipes to improve the cooling system for
the side walls. The hot fluid might flow
through these surfaces, causing heat on
the side walls. This is normal and does
not require service maintenance. Be
careful when touching these areas.
A
WARNING: “The protective films on the vertical handle” will be removed.

9 /25 EN
Refrigerator / User Manual
4.1. Things to be done for energy saving
mehmet
A
Connecting the product to electric energy
saving systems is risky as it may cause
damage on the product.
• Do not leave the doors of your refrigerator open for
a long time.
• Do not put hot food or drinks in your refrigerator.
• Do not overload the refrigerator, cooling capacity will
fall when the air circulation inside is hindered.
• To be able store maximum food in the freezer
compartment of your refrigerator, the upper flap
and drawer must be removed and placed on top of
glass shelves. Power consumption stated for your
refrigerator has been determined after removing the
icebox, ice tray and flap and the middle drawer as
to allow maximum loading. Using the upper flap and
lower drawer while loading is highly recommended.
• Depending on the features of your product, thawing
frozen food in fridge compartment will both provide
energy saving and preserve the food quality.
• Airflow should not be blocked by placing foods in
front of the freezer compartment fan. Foods should
be loaded by leaving minimum 5 cm space in front
of the protective fan grid.
• The temperature sensor in the freezer compartment
must not directly contact food packages. In case of
contact with the sensor, the power consumption of
the product may increase.
C
Inside of your product must be cleaned.
C
If two coolers are to be installed side
by side, there should be at least 4 cm
distance between them.
4 Preparation
4.2. Initial use
Before starting to use your refrigerator, ensure that
all preparations are made in accordance with the
instructions in sections "Instructions for safety and
environment" and "Installation".
Run the product without putting any food for 6 hours
and do not open its door unless certainly required.
C
You will hear a noise when the compressor
starts up. The liquids and gases sealed
within the refrigeration system may also
give rise to noise, even if the compressor is
not running. This is normal.
C
It is normal that the front edges of
the refrigerator are hot. These areas
are designed to be warm to avoid
condensation.

10 /25EN
Refrigerator / User Manual
5 Operating the product
5.1. Indicator panel
Indicator panels may vary according to the product model.
Audio – visual functions on the indicator panel helps you in using your product.
C
*Optional: Figures in this user manual are given as an example and may not match the product
exactly. If the relevant parts are not available in the product you purchased, the figure applies to other
models.
1. Temperature Adjustment / Temperature Increase
2. Temperature Adjustment- Slider / Temperature
value indicator
3. Temperature Unit Selection (°C) Celsius indicator
4. Temperature Unit Selection (°F) Fahrenheit
indicator
5. Temperature Adjustment / Temperature Decrease
6. Quick Fridge function indicator / button
7. * Wireless
8. Eco Mode indicator/button
9. *Joker Freezer indicator/button
10. *Auto Door
11. High Temperature Warning/Error
12. *Bottle Cooler
13. *Filter Replacement Warning/Button
14. Menu Button
15. Product On/Off indicator/button
16. *Icematic indicator/button
17. *Sabbath Mode
18. Vacation Mode indicator/button
19. Key Lock indicator
20. Quick Freeze function indicator/button
21. Cabin Selection
22. Fridge compartment indicator
23. Freezer compartment indicator
It may not apply to all models
1
2
3
4
*16
*17
18
20
21
22
23
19
5
6
8
*7
*10
*12
*13
14
15
11
*9a
*9b

Operating the product
11 /25EN
Refrigerator / User Manual
1. Temperature Adjustment / Temperature
Increase
When pressed, increases the temperature of the
selected compartment.
2. Temperature Adjustment- Slider/
Temperature value indicator
Shows the temperature value of the selected
compartment. Plus, you can slide your finger up or
down to increase or decrease the temperature.
3. Temperature Unit Selection (°C)
Celsius
indicator
When the button is pressed, the temperature unit is
selected as Celsius.
It is the Celsius indicator. When the Celsius
indication is activated, temperature set values are
shown in Celsius and the relevant icon turns on by
100%.
Fahrenheit icon turns on by 50%.
4. Temperature Unit Selection (°F)
Fahrenheit
indicator
When the button is pressed, the temperature unit is
selected as Celsius.
It is the Fahrenheit indicator. When the Fahrenheit
indication is activated, temperature set values are
shown in Fahrenheit and the relevant icon turns on
completely.
Celsius icon turns on by 50%.
5. Temperature Adjustment / Temperature
Decrease
When pressed, decreases the temperature of the
selected compartment.
5.2. Indicator panel
Indicator panels may vary according to the product model.
Audio – visual functions on the indicator panel helps you in using your product.
C
*Optional: Figures in this user manual are given as an example and may not match the product
exactly. If the relevant parts are not available in the product you purchased, the figure applies to other
models.
It may not apply to all models
Select
!
15
21
22 23
5
2
1
*13
*7
*11
*10
*17
*12
*16
*9b
*9a
8
18
6
20
4
3
6. Quick fridge function indicator
When the quick fridge function is activated, the
indicator turns on by 100%. When the function
is cancelled, the product returns to its normal
settings and the indicator turns on by 50%.
Quick fridge function button
It is used to activate or deactivate the quick fridge
function.
C
Use quick fridge function when you
want to quickly cool the food placed
in the fridge compartment. If you want
to cool large amounts of fresh food,
activate this function before putting the
food into the product.
C
If you do not cancel it, quick fridge
will cancel itself automatically after 8
hours at the most or when the fridge
compartment reaches to the required
temperature.
C
If you press the quick fridge button
repeatedly with short intervals, the
electronic circuit protection will be
activated and the compressor will not
start up immediately.
C
This function is not recalled when
power restores after a power failure.
7. *Wireless
When the button is pressed, the product is
introduced to the home network. When the function

Operating the product
12 / 25EN
Refrigerator / User Manual
is activated, the indicator turns on by 100%, when it
is cancelled, the indicator turns on by 50%.
8. Eco mode indicator/button
Press this button to activate and deactivate the Eco
mode.
When the Eco mode is activated, the indicator turns
on by 100%. When the function is active, the freezer
will start to run in the eco mode at least 6 hours
later. When the function is cancelled, the indicator
will turn on by 50%.
9a. *Joker freezer indicator/button
When the button is pressed, the joker
compartment runs as a freezer and the indicator
turns on by 100%. Joker fridge compartment
turns on by 50%.
9b. *Joker fridge indicator/button
When the button is pressed, the joker
compartment runs as a fridge and the indicator
turns on by 100%. Joker freezer compartment
turns on by 50%.
10.* Auto Door
Press this button to activate or deactivate the Auto
Door mode. When the function is activated, the
indicator turns on by 100%. When the function is
cancelled, the indicator will turn on by 50%.
When the function is active, touch the relevant
section on the door handle to make the door open
automatically.
11. High Temperature Warning/Error
This indicator illuminates during power failure, high
temperature failures and error warnings. During
long-term power failures, the highest temperature
value that the freezer compartment reaches will
blink on the digital display. After checking the food
located in the freezer compartment, press the high
temperature button to clear the warning.
12. *Bottle Cooler
Press this button to activate or deactivate the bottle
cooler mode.
When the function is activated, the indicator turns
on by 100%. When the function is cancelled, the
indicator turns on by 50%.
13. *Filter Replacement Warning/Button
This icon turns on when the filter needs to be reset.
When the button is pressed, the filter will be reset
and the reset icon will go off.
14. Menu Button
It is used the activate or deactivate the sleep mode
for the display. If you do not press any button or
open the door in 30 seconds, it switches to sleep
mode automatically.
15. Product On/Off indicator/button
Press and hold the On/Off button for 3 seconds to
switch on or off the product.
When the product is turned off, the product on/off
indicator turns on by 100%, and all the other indi-
cators go off. To turn on the product, press and hold
the button for 3 seconds again. The refrigerator will
turn on and the on/off indicator will turn on by 50%.
16. *Icematic indicator/button
Press this button to activate or deactivate the
Icematic. If the indicator is on by 100%, this means
that the icematic is running. If the indicator is on by
50%, this means that the icematic is off.
C
Water flow from water tank will stop
when this function is not selected.
However, ice made previously can be
taken from the icematic.
17. *Sabbath Mode
Press this button to activate or deactivate the
Sabbath mode. When the function is activated, the
indicator turns on by 100%. When the function is
cancelled, the indicator will turn on by 50%.
18. Vacation Mode indicator/button
Press this button to activate the vacation mode The
vacation mode indicator will turn on by 100%. When
the vacation mode is active, “- -” will be shown
on the Temperature Value Indicator and no active
cooling is performed in the fridge compartment.
It is not suitable to keep the food in the fridge
compartment when this function is activated. Other
compartments will continue to be cooled according
to their set temperatures.
To cancel this function press
Vacation function
button again. When the function is cancelled, the
indicator will turn on by 50%.
19. Key Lock indicator
Press and hold the quick fridge and vacation
buttons simultaneously for 3 seconds. When
pressing the button, a countdown will start in the
temperature value indicator. When the key lock
is activated, the key lock indicator will turn on by
100% and the key lock mode will be enabled.

Operating the product
13 /25EN
Refrigerator / User Manual
Buttons will not function when the key lock mode is
active. Press and hold the quick fridge and vacation
buttons again simultaneously for 3 seconds. When
pressing the button, a countdown will start in the
temperature value indicator. When the key lock is
cancelled, the key lock indicator will turn on by 50%
and the key lock mode will be disabled.
Activate
this function if you want to prevent
changing of the temperature setting of the
refrigerator.
20.Quick freeze function indicator
When the quick freeze function is activated,
the indicator will turn on by 100%. When the
function is cancelled, the product will return to its
normal settings and the indicator will turn on by
50%.
Quick freeze function button
It is used to activate or deactivate the quick
freeze
function.
Press this button to activate or deactivate the quick
freeze function. When you activate the function, the
freezer compartment will be cooled to a temperature
lower than the set value.
C
Use the quick freeze function when you
want to quickly freeze the food placed
in freezer compartment. If you want
to freeze large amounts of fresh food,
activate this function before putting the
food into the product.
C
If you do not cancel it, Quick Freeze
will cancel itself automatically after 4
hours at the most or when the fridge
compartment reaches to the required
temperature.
C
This function is not recalled when
power restores after a power failure.
21. Cabin Selection
Press the cabin selection button to see and change
the temperature value of the fridge or freezer on the
Temperature Value indicator.
22. Fridge compartment indicator
When this indicator is active, the temperate of the
fridge compartment is displayed on the temperature
value indicator.
23 Freezer compartment indicator
When this indicator is active, the temperate of the
freeze compartment is displayed on the temperature
value indicator.

Operating the product
14 / 25EN
Refrigerator / User Manual
5.3. Ice machine
(This feature is optional)
Ice machine allows you to obtain ice from the
product easily.
Using the ice machine
1. Remove the water tank from the fridge
compartment.
2. Fill the water tank with water.
3. Replace the water tank. First ice cubes will be
ready in approximately four hours in the ice machine
drawer located in the freezer compartment.
C
While the water tank is completely
filled, you will be able to obtain
approximately 60-70 ice cubes.
C
The water within the tank should be
renewed in every 2-3 weeks.
5.4. Icematic
(This feature is optional)
Icematic allows you to obtain ice from the product
easily.
Using the icematic
1. Take out the icematic pulling it out carefully.
2. Fill the Icematic with water.
3. Place Icematic in place. About two hours later, the
ice is ready.
4. To obtain ice, turn the knobs on the ice reservoirs
clockwise by 90˚ degrees. Ice cubes in the reservoirs
will fall down into the ice storage container below.
5. You may take out the ice storage container and
serve the ice cubes.
C
Do not remove the Icematic from its
seating to obtain ice.
C
If you wish, you may keep the ice
cubes in the ice storage container.
The ice storage container is just for
accumulating ice cubes. Do not put
water in it. Otherwise, it will break.
5.5. Ice tray
(This feature is optional)
Ice tray allows you to obtain ice from the product
easily.
Using the ice tray
1. Remove the ice tray from the freezer
compartment.
2. Fill the ice tray with water.
3. Place the ice tray in the freezer compartment.
About two hours later, the ice is ready.
4. Remove the ice tray from the freezer
compartment and bend it over the service plate. Ice
cubes will easily fall down to the service plate.

Operating the product
15 /25EN
Refrigerator / User Manual
5.6. Blue light
(This feature is optional)
Crispers of the product are illuminated with a blue
light. Foodstuff stored in the crispers continue their
photosynthesis by means of the wavelength effect of
blue light and thus, preserve their freshness.
5.7. Deodoriser Module
(FreshGuard)
(This feature is optional)
The deodoriser module quickly eliminates the bad
smells in your refrigerator before they permeate the
surfaces. Thanks to this module, which is placed
on the ceiling of the fresh food compartment, the
bad odours dissolve while the air is actively being
passed on the odour filter, then the air that has
been cleaned by the filter is re-emitted to the fresh
food compartment. This way, the unwanted odours
that may emerge during the storage of foods in the
refrigerator are eliminated before they permeate the
surfaces.
This is achieved thanks to the fan, LED and
the odour filter integrated into the module. The
deodoriser module will get activated automatically
on a periodical basis. The sound you will hear
during periodical activation of the module is normal;
it is emitted by the integrated fan. If you open
the door of the fresh food compartment while the
module is active, the fan will pause temporarily and
resume where it has left off when the door is closed
again. In case of a power failure, the deodoriser
module will get activated when the power is back.
Info: It is recommended to store aromatic foods
(such as cheese, olives and delicatessen foods) in
their packaging and sealed to avoid bad odours that
may result when smells of various foods get mixed.
Besides, it is recommended to take spoiled foods
out of the refrigerator quickly to prevent the other
foods from getting spoiled and avoid bad odours.

Operating the product
16 / 25EN
Refrigerator / User Manual
5.8. Chiller compartment
(This feature is optional)
Use this compartment to store delicatessen that shall
be stored in a lower temperature or meat products
that you will consume in a short time. Do not store
your vegetables or fruits in this compartment.
You can increase the inner volume of your product by
removing any of the chiller compartments:
To remove, just pull forwards until it stops and then lift
it and pull towards yourself.
5.9. Crisper
Crisper of the refrigerator is designed specially
to keep the vegetables fresh without loosing their
humidity. For this purpose, cool air circulation is
intensified around the crisper in general. Store your
fruits and vegetables in this compartment. Do not
place leafy greens next to fruits to prolong their life.

Operating the product
17 /25EN
Refrigerator / User Manual
5.10. Using the water dispenser
(This feature is optional)
C
It is normal for the first few glasses
of water taken from the dispenser to
be warm.
C
If the water dispenser is not used for
a long period of time, dispose of first
few glasses of water to obtain fresh
water.
1. Push in the lever of the water dispenser with your
glass. If you are using a soft plastic cup, pushing
the lever with your hand will be easier.
2. After filling the cup up to the level you want,
release the lever.
C
Please note, how much water flows
from the dispenser depends on how far
you depress the lever. As the level of
water in your cup / glass rises, gently
reduce the amount of pressure on the
lever to avoid overflow. If you slightly
press the arm, the water will drip; this
is quite normal and not a failure.
5.11. Filling the water dispenser's tank
Water tank filling reservoir is located inside the door
rack.
1. Open the cover of the tank.
2. Fill the tank with fresh drinking water.
3. Close the cover.
C
Do not fill the water tank with
any other liquid except for water
such as fruit juices, carbonated
beverages or alcoholic drinks which
are not suitable to use in the water
dispenser. Water dispenser will be
irreparably damaged if these kinds of
liquids are used. Warranty does not
cover such usages. Some chemical
substances and additives contained
in these kinds of drinks/liquids may
damage the water tank.
C
Use clean drinking water only.
C
Capacity of the water tank is 3 liters;
do not overfill.
5.12. Cleaning the water tank
1. Remove the water filling reservoir inside the door
rack.

Operating the product
18 / 25EN
Refrigerator / User Manual
2. Remove the door rack by holding from both sides.
3. Grab the water tank from both sides and remove it
with an angle of 45°C.
4. Remove the cover of the water tank and clean the
tank.
C
Components of the water tank and
water dispenser should not be washed
in dishwasher.
5.13. Drip tray
Water that dripped while using the water dispenser
accumulates in the spillage tray.
Remove the plastic filter as shown in the figure.
With a clean and dry cloth, remove the water that
has accumulated.

Operating the product
19 /25EN
Refrigerator / User Manual
S E B Z E L İ K
5.15. Freezing fresh food
• In order to preserve the quality of the food, it
shall be frozen as quickly as possible when it is
placed in the freezer compartment, use the fast
freezing feature for this purpose.
• You may store the food longer in freezer
compartment when you freeze them while they
are fresh.
• Pack the food to be frozen and close the packing
so that it would not allow entrance of air.
• Ensure that you pack your food before putting
them in the freezer. Use freezer containers, foils
and moisture-proof papers, plastic bags and
other packing materials instead of traditional
packing papers.
• Label each pack of food by adding the date
before freezing. You may distinguish the
freshness of each food pack in this way when
you open your freezer each time. Store the food
frozen before in the front side of compartment to
ensure that they are used first.
• Frozen food must be used immediately after
they are thawed and they should not be re-
frozen.
• Do not freeze too large quantities of food at one
time.
5.14. Humidity-controlled
crisper (Ever Fresh)
(This feature is optional)
Thanks to the humidity-controlled crisper, fruits and
vegetables can be stored for a longer time in an
environment with ideal humidity conditions. With
the humidity adjustment system with 3 options in
front of the crisper, you can control the humidity
level inside depending on the food you store. It is
recommended to select the vegetable option if you
are storing vegetables only, the fruit option if you are
storing fruits only, and mixed option when you are
storing both fruits and vegetables.
To benefit from the humidity control system and
prolong the storage life of foods, it is recommended
not to store fruits and vegetables in plastic bags.
If the vegetables are left inside their bags, this will
cause them to decompose in a short period of time.
In particular, we recommend not to store cucumbers
or broccoli in sealed plastic bags. In case contacting
with other vegetables is not preferred for hygiene
concerns, use a perforated paper bag and other
similar packaging materials instead of a bag.
While the vegetables are being placed, specific
gravity of the vegetables should be taken into
consideration. Heavy and hard vegetables should be
put at the bottom of the crisper and the lightweight
and soft vegetables should be placed over.
Do not place together the pear, apricot, peach, etc.
and apple in particular which have a high level of
generation of ethylene gas in the same crisper with
the other vegetables and fruit. The ethylene gas
which is emitted by these fruit may cause the other
fruit to ripen faster and decompose in a shorter
time.

Operating the product
20 / 25EN
Refrigerator / User Manual
Freezer
Compartment
Setting
Fridge
Compartment
Setting
Remarks
-18°C 4°C This is the normal recommended setting.
-20, -22 or
-24°C
4°C
These settings are recommended when the ambient temperature
exceeds 30°C.
Quick Freeze 4°C
Use when you wish to freeze your food in a short time. Your product
will return to its previous mode when the process is over.
-18°C or colder 2°C
Use these settings if you think that your fridge compartment is not
cold enough because of the hot ambient conditions or frequent
opening and closing of the door.
5.16. Recommendations for
preserving the frozen food
Compartment shall be set to -18°C at least.
1. Put packages in the freezer as quickly as
possible after purchase without allowing the
to thaw.
2. Check whether the "Use By" and "Best Before"
dates on the packaging are expired or not
before freezing it.
3. Ensure that the package of the food is not
damaged.
5.17. Deep-freeze information
According to IEC 62552 standards, the product
shall freeze at least 4.5 kg of food at 25°C ambient
temperature to -18°C or lower within 24 hours for
every 100-litres of freezer volume.
It is possible to preserve the food for a long time
only at -18°C or lower temperatures.
You can keep the freshness of food for many months
(at -18°C or lower temperatures in the deep freeze).
Foods to be frozen should not be allowed to come in
contact with the previously frozen items to prevent
them from getting thawed partially.
Boil the vegetables and drain their water in order to
store vegetables for a longer time as frozen. After
draining their water, put them in air-proof packages
and place them inside the freezer. Food such as
bananas, tomatoes, lettuce, celery, boiled eggs,
potatoes are not suitable for freezing. When these
foods are frozen, only their nutritional value and
taste shall be affected negatively. They shall not be
spoiled so that they would create a risk for human
health.
5.18. Placing the food
Freezer
compartment
shelves
Various frozen food such
as meat, fish, ice cream,
vegetables and etc.
Refrigerator
compartment
shelves
Food in pans, covered plates
and closed containers, eggs (in
closed container)
Door shelves
of fridge
compartment
Small and packaged food or
beverage
Crisper Vegetables and fruits
Fresh zone
compartment
Delicatessen (breakfast food,
meat products that shall be
consumed in a short time)
5.19. Door open warning
(This feature is optional)
An audio warning signal will be given when the
door of your product is left open for 1 minute. This
warning will be muted when the door is closed or
any of the display buttons (if any) are pressed.
5.20. Illumination lamp
LED lamps are used as illumination lamps. Contact
authorised service in case of any problem with this
type of light.
Illumination lamps used in product are not designed
for, nor are they suitable for household lighting. The
illumination lamps in your fridge and/or freezer are
aimed to ensure comfortable and safe food loading.

21 /25 EN
Refrigerator / User Manual
6 Care and Cleaning
Service life of the product will extend and frequently
encountered problems will decrease if the product is
cleaned periodically.
B
WARNING: Switch off the product
before cleaning.
B
WARNING: It is recommended to
clean the condenser every six months
using gloves. You must not use
vacuum cleaners.
• Never use gasoline, benzene or similar substances
for cleaning purposes.
• Never use any sharp abrasive instruments, soap,
household cleaners, detergent or wax polish for
cleaning.
• Dissolve one teaspoon of carbonate in half liter
of water. Soak a cloth in the solution and wring it
thoroughly. Wipe the interior of the refrigerator with
this cloth and the dry thoroughly.
• Make sure that no water enters the lamp housing or
other electrical parts.
• If you will not use the refrigerator for a long time,
unplug it, remove all food inside, clean it and leave
the door ajar.
• Check regularly that the door gaskets are clean. If
not, clean them.
• Take out all items in the product to remove the door
and body shelves.
• Remove the door shelves by pulling them up. Slide
the shelves downwards to re-install them after
cleaning.
• Never use chloric cleaning agents or water to clean
outer surfaces or chrome-coated parts of the product.
Chlorine causes abrasion on such metal surfaces.
• For non-No Frost products, water drops and frosting
up to a fingerbreadth occur on the rear wall of the
Fridge compartment. Do not clean it; never apply oil
or similar agents on it.
• Only use slightly damp microfiber cloths to clean
the outer surface of the product. Sponges and other
types of cleaning cloths may scratch the surface.
6.1. Avoiding Bad Odours
Materials that may cause odour are not used in the
production of our refrigerators. However, odour may be
emitted if foods are stored improperly or if the inner
surface of the product is not cleaned as required. Please
consider the following to avoid this problem:
• It is important that the refrigerator is kept clean.
Food residuals, stains, etc. can cause odour. For
this reason, clean your refrigerator with carbonate
solved in water every 15 days. Never use detergents
or soap.
• Keep your foods in closed vessels. Microorganisms
emitted from vessels without a cover may cause
unpleasant odours.
• Never keep expired or spoiled foods in your
refrigerator.
6.2. Protection of plastic surfaces
Do not put liquid oils or oil-cooked meals in your
refrigerator in unsealed containers as they damage
the plastic surfaces of your refrigerator. If oil is spilled
or smeared onto the plastic surfaces, clean and rinse
the relevant part of the surface with warm water
immediately.
6.3. Cleaning the Inner Surface
To clean the inner surfaces and all removable parts,
wash them with a mild solution comprising soap, water
and carbonate. Rinse and dry thoroughly. Prevent the
water from contacting the lighting means and control
panel.
A
ATTENTION:
Do not use vinegar, rubbing
alcohol or other alcohol-based
cleaning agents on any of the
inner surfaces.
6.4. Stainless Steel Outer Surfaces
Use a stainless steel cleaning agent that is non-abrasive
and apply it with a lint-free, soft cloth. For polishing,
wipe the surface softly with a damp microfiber cloth and
use dry wash-leather. Always follow the strands of the
stainless steel.

22 /25EN
Refrigerator / User Manual
6.5. Cleaning Products with Glass Doors
Remove the protection foil on the glass.
There is a coating on the surface of the glass. This
coating minimises stain formation and ensures
that stains and dirt are cleaned easily. Glasses
that are not protected by a coating might be exposed
to permanent bonding of organic or inorganic, air or
waterborne pollutants such as limescale, mineral salts,
unburned hydrocarbons, metal oxides an silicons,
which lead to stains and physical damage in a short
time. Despite regular washing, the glass becomes very
hard to keep clean, though not impossible. As a result,
the clarity and good appearance of the glass reduces.
Hard and abrasive cleaning compounds and methods
increase these defects even further and accelerate the
deterioration process.
*Non-alkali, non-abrasive and water-based cleaning
products must be used for routing cleaning procedures.
For the coating to have long service life, alkali or
abrasive substances must not be used during cleaning
processes.
These glasses were subject to a tempering process to
increase their impact and breakage resistance.
As an additional safety measure, there is a safety film on
the back surfaces of the glasses to ensure that they will
not harm the environment in case of breakage.
Care and Cleaning

23 /25 EN
Refrigerator / User Manual
7 Troubleshooting
Please review this list before calling the service. This will
save you time and money. This list contains frequently
encountered problems that are not results of faulty
workmanship or material use. Your product may not
have some of the features described here.
The refrigerator is not operating.
• It may not be plugged in properly. >>>Plug in the
product properly.
• The fuse of the socket to which your refrigerator
is connected or the main fuse may have blown.
>>>Check the fuse.
Condensation on the side wall of the fridge
compartment (MULTI ZONE, COOL CONTROL and
FLEXI ZONE).
• The door may have been opened/closed
frequently. >>>Do not open/close the refrigerator
door frequently.
• The environment may be too humid. >>>Do not
install the refrigerator at locations with a very high
level of humidity.
• Foods containing liquid may have been placed
into the refrigerator in vessels without covers.
>>>Do not place foods containing liquid into the
refrigerator in unsealed vessels.
• Door of the refrigerator may have been left ajar.
>>>Do not keep the doors of your refrigerator
open for a long time.
• The thermostat may have been set to a very cold
level. >>>Set the thermostat to an appropriate
level.
The compressor is not operating.
• Protective thermal of the compressor will blow out
during sudden power failures or plug-out plug-ins
as the refrigerant pressure in the cooling system
of the refrigerator has not been balanced yet. The
refrigerator will start running approximately after
6 minutes. Please call the Authorised Service
Provider if the refrigerator does not start at the
end of this period.
• The freezer is in defrosting cycle. >>>This
is normal for a refrigerator that performs
full-automatic defrosting. Defrosting cycle is
performed periodically.
• The refrigerator may not be plugged in. >>>Make
sure that the plug fits the socket.
• Temperature settings may be incorrect.
>>>Select the correct temperature value.
• Possible power failure. >>>The refrigerator will
start to operate normally when power restores.
The operation noise increases when the
refrigerator is running.
• Operating performance of the refrigerator may
vary based on the ambient temperature changes.
This is normal and not a fault.
The fridge is running frequently or for a long
time.
• Your new product may be bigger than the previous
one. Larger refrigerators operate for a longer
period of time.
• The room temperature may be high. >>> It
is normal that the product operates for longer
periods in hot environments.
• The refrigerator may have just been plugged in or
loaded with food. >>>It takes the product longer
to reach the set temperature when it has just been
plugged in or loaded with food. This is normal.
• Large amounts of hot food may have been placed
into the refrigerator recently. >>>Do not place hot
foods into the refrigerator.
• The doors may have been opened frequently or
left ajar for a long time. >>>The warm air that
enters the refrigerator causes it to operate for
a longer period of time. Do not open the doors
frequently.
• Freezer or fridge compartment door may have
been left ajar. >>> Check if the doors are closed
completely.
• The appliance may be set to a very low
temperature. >>> Set the refrigerator
temperature to a warmer degree and wait until the
product reaches this temperature.
• Door seal of the fridge or freezer compartment
may be soiled, worn out, broken or not properly
seated. >>> Clean or replace the seal. Damaged/
broken seal causes the refrigerator to run for
a longer period of time to maintain the current
temperature.
Fridge temperature is adequate but the freezer
temperature is very low.
• The freezer compartment temperature may be
set to a very low value. >>> Set the freezer
compartment temperature to a higher value and
check.
Freezer temperature is adequate but the fridge
temperature is very low.
• The fridge temperature is adjusted to a very low
value. >>> Adjust the fridge temperature to a
higher value and check.
Food kept in the fridge compartment drawers is
frozen.

24 /25EN
Refrigerator / User Manual
Troubleshooting
• The fridge compartment temperature may be
set to a very high value. >>> Set the fridge
compartment temperature to a lower value and
check.
Temperature in the fridge or freezer is very high.
• The fridge compartment temperature may
be set to a very high value. >>> Fridge
compartment temperature setting has an effect
on the temperature of the freezer. Change the
temperature of the fridge or freezer compartment
until the fridge or freezer compartment
temperature reaches an adequate level.
• The doors may have been opened frequently or
left ajar for a long time. >>>Do not open the
doors frequently.
• The door may have been left ajar. >>>Close the
door completely.
• The refrigerator may have been just plugged in or
loaded with food. >>>This is normal. It takes the
product longer to reach the set temperature when
it has just been plugged in or loaded with food.
• Large amounts of hot food may have been placed
into the refrigerator recently. >>>Do not place hot
foods into the refrigerator.
Vibration or noise.
• The floor may not be stable or level. >>>If the
refrigerator shakes when moved slightly, adjust the
feed to balance it. Make sure that the floor is level
and capable of carrying the refrigerator.
• Objects placed onto the refrigerator may cause
noise. >>>Remove the objects on the refrigerator.
There are noises coming from the refrigerator
like liquid spilling or spraying.
• Liquid and gas flows occur in accordance with the
operating principles of the refrigerator. >>>This is
normal and not a fault.
Whistle is heard from the refrigerator.
• There are fans that are used to cool the
refrigerator. This is normal and not a fault.
Damp accumulates on the inner walls of
refrigerator.
• Hot and humid weather increases icing and
condensation. This is normal and not a fault.
• The doors may have been opened frequently or
left ajar for a long time. >>>Do not open the
doors frequently. Close the doors, if open.
• The door may have been left ajar. >>>Close the
door completely.
Humidity occurs on the outer surface of the
refrigerator or between the doors.
• Air might be humid. This is quite normal in humid
weathers. >>>Condensation will disappear when
the humidity level decreases.
• There might be external condensation at the
section between two doors of the refrigerator
if you use your product rarely. This is normal.
Condensation will disappear upon frequent use.
There is a bad odour inside the refrigerator.
• No regular cleaning may have been performed.
Clean the inside of the refrigerator with a sponge,
lukewarm water or carbonated water.
• Some vessels or packaging materials may cause
the odour. >>>Use another vessel, or packaging
materials from another brand.
• Foods may have been placed into the refrigerator
in vessels without covers. >>>Store the foods
in closed vessels. Microorganisms emitted from
vessels without a cover may cause unpleasant
odours.
• Take out expired or spoiled foods from the
refrigerator.
The door cannot be closed.
• Food packages may be preventing the door from
closing. >>> Re-locate the packages that are
obstructing the door.
• The refrigerator may be unstable on the floor.
>>>Adjust the refrigerator feet as required to
keep the refrigerator in balance.
• The floor may not be level or solid. >>>Make sure
that the floor is level and capable of carrying the
refrigerator.
Crispers are stuck.
• Foods may be touching the upper wall of the
crisper. >>>Re-organise the foods in the crisper.
If The Surface Of The Product Is Hot.
High temperatures may be observed between the two
doors, on the side panels and at the rear grill while
the product is operating. This is normal and does not
require service maintenance!
Fan keeps running when the door is open.
The fan may keep running when the door of the
freezer is open.
A
WARNING: If you cannot eliminate
the problem although you follow the
instructions in this section, consult your
dealer or the Authorised Service Provider.
Never attempt to repair a malfunctioned
product.

EWWERQWEW
FR
Réfrigérateur
Manuel d'utilisation

Veuillez lire attentivement ce manuel avant d’utiliser l’appareil !
Chère cliente, cher client
Nous espérons que vous tirerez le meilleur parti de votre appareil, qui a été fabriqué méticuleusement dans des
usines modernes et a subi des tests de contrôle de qualité approfondis.
À cet effet, nous vous recommandons de lire attentivement ce manuel d’utilisation avant de mettre l’appareil en
marche. Si vous remettez cet appareil à quelqu’un d’autre, n’oubliez pas de lui remettre également le manuel
d’utilisation.
Ce manuel vous aidera à utiliser votre appareil avec rapidité et sécurité.
• Lisez attentivement ce manuel d’utilisation avant d’installer et d’utiliser l’appareil.
• Respectez toujours les instructions de sécurité en vigueur.
• Conservez ce manuel dans un endroit facilement accessible pour une utilisation ultérieure.
• Veuillez lire tous les autres documents fournis avec l’appareil.
Notez que ce manuel d’utilisation peut se rapporter à plusieurs modèles de cet appareil. Ce manuel indique
expressément les différences entre les différents modèles.
C
Informations importantes et
conseils utiles.
A
Risque de blessures et de
dommages matériels.
B
Risque de choc électrique.
Les matériaux d’emballage
de cet appareil sont fabriqués
à partir de matériaux
recyclables, conformément à
la réglementation nationale en
matière d’environnement.

3 /28 FR
Réfrigérateur / Manuel d’utilisation
1 Instructions en matière de sécurité et
d’environnement 4
1.1. Sécurité Générale. . . . . . . . . . . . . . . . . . . . . . . . 4
1.1.1 Avertissement HC . . . . . . . . . . . . . . . . . . . . . . . 6
1.1.2 Pour les Modèles Avec Distributeur D'eau. . . . . . 6
1.2. Utilisation Prévue . . . . . . . . . . . . . . . . . . . . . . . . 6
1.3. Sécurité Enfants. . . . . . . . . . . . . . . . . . . . . . . . . 7
1.4. Conformité Avec la Directive DEEE et Mise Au Rebut
de Votre Ancien Appareil . . . . . . . . . . . . . . . . . . 7
1.5. Conformité Avec la Directive RoHS . . . . . . . . . . . 7
1.6. Informations Relatives à L'emballage . . . . . . . . . 7
2 Votre réfrigérateur 8
3 Installation 9
3.1. Lieu d’installation approprié . . . . . . . . . . . . . . . . 9
3.2. Installation des cales en plastique . . . . . . . . . . . . 9
3.3. Réglage des pieds . . . . . . . . . . . . . . . . . . . . . . 10
3.4. Branchement électrique . . . . . . . . . . . . . . . . . . 10
4 Préparation 11
4.1. Mesures d’économie d’énergie. . . . . . . . . . . . . 11
4.2. Première utilisation. . . . . . . . . . . . . . . . . . . . . . 11
5 Utilisation de l’appareil 12
5.1. Bandeau indicateur . . . . . . . . . . . . . . . . . . . . . 12
5.2. Bandeau indicateur . . . . . . . . . . . . . . . . . . . . . 13
5.3. Machine à glace. . . . . . . . . . . . . . . . . . . . . . . . 16
5.4. Distributeur de glaçons. . . . . . . . . . . . . . . . . . . 16
5.5. Bac à glaçons . . . . . . . . . . . . . . . . . . . . . . . . . 16
5.6. Éclairage bleu . . . . . . . . . . . . . . . . . . . . . . . . . 17
5.7. Module de désodorisation. . . . . . . . . . . . . . . . . 17
(FreshGuard) . . . . . . . . . . . . . . . . . . . . . . . . . . . . . . 17
5.8. Compartiment refroidisseur. . . . . . . . . . . . . . . . 18
5.9. Bac à légumes. . . . . . . . . . . . . . . . . . . . . . . . . 18
5.10. Utilisation du distributeur . . . . . . . . . . . . . . . . . 19
5.11. Remplir le réservoir d'eau de la fontaine
frigorifique . . . . . . . . . . . . . . . . . . . . . . . . . . . 19
5.12. Nettoyer le réservoir d’eau . . . . . . . . . . . . . . . . 20
5.13. Bac de dégivrage . . . . . . . . . . . . . . . . . . . . . . . 20
5.14. Bac à humidité contrôlée (Fraîcheur assurée). . . 21
5.15. Congélation des produits frais. . . . . . . . . . . . . . 21
5.16. Recommandations concernant la conservation des
aliments congelés. . . . . . . . . . . . . . . . . . . . . . 22
5.17. Informations concernant la congélation . . . . . . . 22
5.18. Disposition des denrées . . . . . . . . . . . . . . . . . . 22
5.19. Avertissement - Porte ouverte. . . . . . . . . . . . . . 22
5.20. Ampoule . . . . . . . . . . . . . . . . . . . . . . . . . . . . . 23
6 Entretien et nettoyage 24
6.1. Prévention des mauvaises odeurs . . . . . . . . . . . 24
6.2. Protection des surfaces en plastique. . . . . . . . . 24
6.3. Nettoyage de la surface intérieure . . . . . . . . . . 24
6.4. Surfaces extérieures en acier inoxydable. . . . . . 25
6.5. Nettoyage d’appareils avec portes en verre . . . . 25
7 Dépannage 26

4 /28FR
Réfrigérateur / Manuel d’utilisation
Cette section fournit les instructions de
sécurité nécessaires à la prévention des
risques de blessures ou de dommage
matériel. Le non-respect de ces
instructions annule tous les types de
garantie de l'appareil.
Utilisation Préconisée
A
AVERTISSEMENT:
Assurez-vous que les trous d’aération
ne sont pas fermés quand le dispositif
est dans son boîtier ou est installé à
sa place.
A
AVERTISSEMENT:
Ne pas utiliser tout dispositif
mécanique ou un autre dispositif hors
des recommandations du fabricant
pour accélérer le processus de
décongeler.
A
AVERTISSEMENT:
Ne pas endommager le circuit de fluide
du réfrigérateur.
A
AVERTISSEMENT:
Ne pas utiliser des appareils
électriques non prévus par le
fabricant dans les compartiments de
conservation des aliments.
A
AVERTISSEMENT:
Ne conservez pas de substances
explosives comme des aérosols avec
un liquide inflammable dans cet
appareil.
Ce dispositif est conçu pour l’usage
domestique ou les applications similaires
suivantes :
- Pour être utilisé dans la cuisine de
personnel dans les magasins, bureaux et
autres environnements de travail ;
- Pour être utilisé par les clients dans les
maisons de campagne et hôtels et les
autres environnements d’hébergement ;
- Dans des environnements de type de
pension de famille
- Dans des applications similaires
n’ayant pas de service alimentaire et non
détaillants
1.1. Sécurité Générale
• Cet appareil ne doit pas être utilisé par
des personnes atteintes de déficience
physique, sensorielle ou mentale,
des personnes sans connaissances
suffisantes et inexpérimentées ou
par des enfants. Il ne doit être utilisé
par ces personnes que si elles sont
supervisées ou sous les instructions
d’une personne responsable de leur
sécurité. Ne laissez pas les enfants
jouer avec l’appareil.
• En cas de dysfonctionnement,
débranchez l’appareil.
• Après avoir débranché l’appareil,
patientez 5 minutes avant de le
rebrancher. Débranchez l’appareil
lorsqu’il n’est pas utilisé. Évitez de
toucher le cordon d’alimentation avec
des mains humides ! Ne le débranchez
jamais en tirant le câble, mais plutôt en
tenant la prise.
• Nettoyez la fiche du câble
d’alimentation à l’aide d’un chiffon sec,
avant de le brancher.
• Évitez de brancher le réfrigérateur
lorsque la prise est instable.
• Débranchez l’appareil pendant
l’installation, l’entretien, le nettoyage et
la réparation.
• Si l’appareil ne sera pas utilisé pendant
une longue période, débranchez-le et
videz l’intérieur.
• N’utilisez pas la vapeur ou de matériel
de nettoyage à vapeur pour nettoyer le
réfrigérateur et faire fondre la glace.
La vapeur peut atteindre les zones
électrifiées et causer un court-circuit
ou l’électrocution !
1 Instructions en matière de sécurité et d’environnement

Consignes relatives à la sécurité et à l'environnement
5 /28FR
Réfrigérateur / Manuel d’utilisation
• Ne lavez pas l’appareil par
pulvérisation ou aspersion d’eau !
Risque d’électrocution !
• Ne jamais utiliser le produit si
la section située dans sa partie
supérieure ou inférieure avec cartes
de circuits imprimés électroniques
à l’intérieur est ouverte (couvercle
de cartes de circuits imprimés
électroniques) (1).
1
1
Ils pourraient coller à vos mains !
• Ne placez pas de boissons en
bouteille ou en canette dans le
compartiment de congélation. Elles
risquent d’exploser !
• Placez les boissons verticalement,
dans des récipients convenablement
fermés.
• Ne pulvérisez pas de substances
contenant des gaz inflammables
près du réfrigérateur pour éviter tout
risque d’incendie et d’explosion.
• Ne conservez pas de substances
et produits inflammables
(vaporisateurs, etc.) dans le
réfrigérateur.
• Ne placez pas de récipients
contenants des liquides au-dessus
du réfrigérateur. Les projections
d’eau sur des pièces électrifiées
peuvent entraîner des électrocutions
et un risque d’incendie.
• L’exposition du produit à la pluie,
à la neige, au soleil et au vent
présente des risques pour la
sécurité électrique. Quand vous
transportez le réfrigérateur, ne le
tenez pas par la poignée de la porte.
Elle peut se casser.
• Évitez que votre main ou toute autre
partie de votre corps ne se retrouve
coincée dans les parties amovibles
de l’appareil.
• Évitez de monter ou de vous
appuyer contre la porte, les tiroirs ou
toute autre partie du réfrigérateur.
Cela peut faire tomber l’appareil et
l’endommager.
• Évitez de coincer le câble
d’alimentation.
• En cas de dysfonctionnement,
n’utilisez pas l’appareil car il
peut entraîner une électrocution.
Contactez le service agréé avant de
procéder à toute intervention.
• Branchez votre appareil à une prise
de mise à la terre. La mise à la terre
doit être effectuée par un technicien
qualifié.
• Si l’appareil possède un éclairage
de type LED, contactez le service
agréé pour tout remplacement ou
en cas de problème.
• Évitez de toucher les aliments
congelés avec des mains humides !

Consignes relatives à la sécurité et à l'environnement
6 / 28 FR
Réfrigérateur / Manuel d’utilisation
• Lors du positionnement de
l’appareil, s’assurer que le câble
d’alimentation n’est ni coincé, ni
endommagé.
• Ne pas placer des prises multiples
ou des blocs d’alimentation
portables à l’arrière de l’appareil.
1.1.1 Avertissement HC
Si votre réfrigérateur possède un
système de refroidissement utilisant
le gaz R600a, évitez d’endommager
le système de refroidissement et
sa tuyauterie pendant l’utilisation
et le transport de l’appareil. Ce gaz
est inflammable. Si le système de
refroidissement est endommagé,
éloignez l’appareil des flammes et
aérez la pièce immédiatement.
C
L’étiquette sur la paroi
intérieure gauche de l’appareil
indique le type de gaz utilisé.
1.1.2 Pour les Modèles Avec
Distributeur D'eau
• La pression de l’eau froide à
l’entrée ne doit pas excéder 90
psi (620 kPa). Si votre pression
d’eau dépasse 80 psi 550 kPa),
utilisez une soupape de limitation
de pression sur votre réseau de
conduite. Si vous ne savez pas
comment vérifiez la pression de
l’eau, demandez l’assistance d’un
plombier professionnel.
• S’il existe un risque d’effet coup
de bélier sur votre installation,
utilisez systématiquement un
équipement de protection contre
l’effet coup de bélier sur celle-
ci. Consultez des plombiers
professionnels si vous n’êtes pas
sûr de la présence de cet effet sur
votre installation.
• Ne l’installez pas sur l’entrée
d’eau chaude. Prenez des
précautions contre le risque de
congélation des tuyaux. L’intervalle
de fonctionnement de la
température des eaux doit être de
33 F (0,6°C) au moins et de 100 F
(38 C) au plus.
• Utilisez uniquement de l’eau
potable.
1.2. Utilisation Prévue
• Cet appareil est exclusivement
conçu pour un usage domestique.
Il n’est pas destiné à un usage
commercial.
• Il doit être exclusivement utilisé
pour le stockage des denrées et
des boissons.
• Les produits qui nécessitent un
contrôle de température précis
(vaccins, médicaments sensibles
à la chaleur, matériels médicaux,
etc.) ne doivent pas être conservés
dans le réfrigérateur.
• Le fabricant ne sera pas tenu
responsable de tout dommage
résultant d’une mauvaise
utilisation ou manipulation.

Consignes relatives à la sécurité et à l'environnement
7 /28FR
Réfrigérateur / Manuel d’utilisation
• Les pièces détachées d’origine
sont disponibles pendant 10 ans,
à compter de la date d’achat du
produit.
1.3. Sécurité Enfants
• Conservez les matériaux
d’emballage hors de la portée des
enfants.
• Ne laissez pas les enfants jouer
avec l’appareil.
• Si la porte de l’appareil est dotée
d’une serrure, gardez la clé hors de
la portée des enfants.
1.4. Conformité Avec la Directive DEEE
et Mise Au Rebut de Votre Ancien Appareil
Cet appareil est conforme à la directive
DEEE de l’Union européenne (2012/19/UE). Il porte
un symbole de classification pour la mise au rebut
des équipements électriques et électroniques
(DEEE).
Le présent produit a été fabriqué avec
des pièces et du matériel de qualité
supérieure susceptibles d’être
réutilisés et adaptés au recyclage. Ne
le mettez pas au rebut avec les
ordures ménagères et d’autres
déchets à la fin de sa durée de vie.
Rendez-vous dans un point de
collecte pour le recyclage de tout matériel électrique
et électronique. Rapprochez-vous des autorités de
votre localité pour plus d’informations concernant
ces points de collecte.
1.5. Conformité Avec la Directive RoHS
• Cet appareil est conforme à la directive DEEE
de l’Union européenne (2011/65/UE). Il ne
comporte pas les matériaux dangereux et
interdits mentionnés dans la directive.
1.6. Informations Relatives
à L'emballage
• Les matériaux d’emballage de cet appareil sont
fabriqués à partir de matériaux recyclables,
conformément à nos réglementations nationales
en matière d’environnement. Ne mettez pas
les matériaux d’emballage au rebut avec
les ordures ménagères et d’autres déchets.
Amenez-les plutôt aux points de collecte
des matériaux d’emballage, désignés par les
autorités locales.

8 /28FR
Réfrigérateur / Manuel d’utilisation
1. Étagères sur la porte du compartiment réfrigérant
2. Tiroirs du compartiment congélateur
3. Distributeur de glaçons
4. Réservoir à eau
5. Bac à légumes
6. Couvercle du bac à légumes
7. Compartiment refroidisseur
8. Étagères en verre du compartiment réfrigérant
9. Filtre à odeurs (violet)
10. Affichage intérieur
11. Étagères en verre du compartiment réfrigérant
12. Compartiment congélateur
*en option
2 Votre réfrigérateur
C
*en option :Les chiffres figurant dans ce manuel sont donnés à titre indicatif et peuvent ne pas
correspondre exactement au produit. Si l'accessoire représenté par le chiffre ne se trouve pas dans
l’appareil que vous avez acheté, c'est que le chiffre s'applique à d'autres modèles.
*1
*3
*4
6
*5
7
*8
11
12
*2
*1
*2
*3
*5
7
*8
9
10
11
6
12
Cela peut ne pas s’appliquer à tous les modèles

9 /28 FR
Réfrigérateur / Manuel d’utilisation
3 Installation
3.1. Lieu d’installation approprié
Contactez le service après-vente agréé pour l’installation
du produit. Pour préparer l’appareil à l'utilisation,
reportez-vous aux informations du manuel d'utilisation
et assurez-vous que les branchements électriques
et le système d’alimentation en eau sont appropriés.
Si ce n'est pas le cas, appelez un électricien et un
technicien qualifiés pour qu’ils prennent les dispositions
nécessaires.
B
AVERTISSEMENT : Le fabriquant ne
sera pas tenu responsable des dommages
survenus suite à des activités effectuées
par des personnes non-autorisées.
B
AVERTISSEMENT : Ne branchez pas
l'appareil pendant l’installation. Vous vous
exposeriez à un danger de mort ou à de
blessures graves !
A
AVERTISSEMENT : Si le dégagement
de la porte de la pièce où l’appareil sera
placé est trop serré pour empêcher le
passage de l’appareil, contactez l’agent de
service agréé.
• Posezl’appareilsurunesurfaceplanepouréviterles
secousses.
•Sivousprévoyezd’utiliserl’appareildansunecabine/
un meuble, laissez un dégagement d’au moins 2 cm
entre les parois latérales et la cabine/le meubles.
• Installezl’appareilaumoinsà30cmdessources
de chaleur telles que les plaques de cuisson, les
radiateurs de chauffage et les cuisinières, et au moins
à 5 cm des fours électriques.
•N'exposezpasl’appareilàlalumièredirectedusoleil
et ne le placez pas dans des endroits humides.
• Uneventilationd'airdoitêtreaménagéeautourdu
réfrigérateur pour obtenir un fonctionnement efficace.
Si vous avez l'intention de poser l'appareil dans un
renfoncement, assurez-vous de laisser au moins 5 cm
de distance entre le plafond et les parois latérales.
• Dans les environnements où la température
ambiante est inférieure à 10 °C, le réfrigérateur
continue à fonctionner pour conserver les aliments
placés dans le compartiment congélateur.
Cependant, les aliments frais dans le compartiment
réfrigérateur peuvent geler en raison de
l’environnement froid.
3.2. Installation des cales en plastique
Les cales en plastique fournies avec l’appareil
permettent de créer une distance afin que l'air circule
entre l'appareil et la paroi arrière.
1. Pour installer les cales, retirez les vis de l'appareil et
utilisez celles qui ont été fournies avec les cales.
2. Insérez les 2 cales en plastique sur le couvercle
de la ventilation arrière, comme illustré à la figure
suivante.

Installation
10 / 28FR
Réfrigérateur / Manuel d’utilisation
3.3. Réglage des pieds
Si après l'installation l’appareil est en déséquilibre,
réglez les pieds à l’avant en les tournant à droite ou
à gauche
3.4. Branchement électrique
A
AVERTISSEMENT : N'effectuez
pas de connexion via les câbles
d'extension ou les multiprises.
B
AVERTISSEMENT : Les câbles
d'alimentation endommagés doivent
être remplacés par des prestataires
de services agréés.
C
Si deux réfrigérateurs sont installés
côte à côte, ils doivent être séparés
d'au moins 4 cm de distance.
• Notre entreprise ne sera pas tenue pour
responsable de tout dommage survenu si
vous utilisez cet appareil sans le connecter à
une mise à la terre ou le brancher au réseau
électrique conformément aux réglementations
nationales
• La prise du câble d'alimentation doit être
facilement accessible après l'installation.
• N’utilisez pas de rallonges ou de prises
multiples sans fil entre votre appareil et la prise
murale.
C
Avertissement en cas de contact avec
une surface chaude !
Votre appareil est équipé de tuyaux
de refroidissement qui permettent
d’améliorer le système de
refroidissement des parois latérales.
Le fluide chaud pourrait circuler à
travers ces surfaces, provoquant un
dégagement de chaleur sur les parois
latérales. Ce phénomène est normal
et ne nécessite aucune opération
d’entretien. Faites attention lorsque
vous touchez ces zones chaudes.
A
AVERTISSEMENT : « Les films protecteurs disponibles sur la poignée verticale »
seront supprimés.

11 /28 FR
Réfrigérateur / Manuel d’utilisation
4.1. Mesures d’économie d’énergie
mehmet
A
Le branchement de l’appareil aux
systèmes d'économie d'énergie électrique
est risquant dans la mesure où il peut
endommager l’appareil.
• Ne laissez pas les portes du réfrigérateur ouvertes
pendant une durée prolongée.
• Ne mettez pas d'aliments ou des boissons chaud(e)s
dans le réfrigérateur.
• Évitez de surcharger le réfrigérateur, car la capacité
de refroidissement diminue lorsque la circulation de
l'air à l'intérieur est entravée.
• Pour conserver le maximum d'aliments dans le
compartiment congélateur de votre réfrigérateur,
enlevez le rabat supérieur et le tiroir et placez-les
au-dessus des étagères en verre. La consommation
en énergie prévue pour votre réfrigérateur a
été déterminée après enlèvement de l'appareil
à glaçons, du bac à glaçons, du rabat et de
l'étagère centrale afin de permettre un chargement
maximum. Il est fortement recommandé d'utiliser
le rabat supérieur et le tiroir inférieur lors du
chargement.
• Selon les caractéristiques de votre appareil, la
décongélation des aliments dans le compartiment
réfrigérateur permet de faire des économies
d'énergie et de préserver la qualité des aliments.
• La circulation d'air ne doit pas être bloquée
par les aliments placés devant le ventilateur du
compartiment congélateur. Laissez un espace
minimum de 5cm devant la grille de protection du
ventilateur, lors du chargement des aliments.
• Le capteur de température dans le compartiment
congélateur ne doit pas entrer directement en
contact avec les emballages alimentaires. En cas de
contact avec le capteur, la consommation d’énergie
de l’appareil pourrait augmenter.
4 Préparation
C
L’intérieur de votre réfrigérateur doit être
nettoyé.
C
Si deux réfrigérateurs sont installés côte à
côte, ils doivent être séparés d'au moins
4 cm de distance.
4.2. Première utilisation
Avant de commencer à utiliser votre réfrigérateur,
assurez-vous que toutes les préparations sont
effectuées conformément aux instructions contenues
dans les sections « Consignes relatives à la sécurité et à
l’environnement » et « Installation ».
Laissez le réfrigérateur en marche sans y mettre
d'aliment, pendant une durée de 6 heures et n'ouvrez
pas ses portes à moins que cela soit vraiment
nécessaire.
C
Vous remarquerez un bruit lorsque le
compresseur se met en marche. Les
liquides et les gaz intégrés au système de
réfrigération peuvent également émettre du
bruit, même si le compresseur n’est pas en
marche. Ce phénomène est normal.
C
Il est tout à fait normal les bords avant du
réfrigérateur chauffent. Ces zones doivent
être chaudes pour éviter tout risque de
condensation.

12 /28FR
Réfrigérateur / Manuel d’utilisation
5 Utilisation de l’appareil
5.1. Bandeau indicateur
Les bandeaux indicateurs peuvent varier en fonction du modèle de l’appareil.
Les fonctions sonores et visuelles sur le panneau indicateur vous aident dans l’utilisation de votre réfrigérateur.
C
*en option : Les chiffres de ce manuel sont donnés à titre indicatif et peuvent ne pas correspondre
exactement au produit. Si l'accessoire représenté par le chiffre ne se trouve pas dans l’appareil que
vous avez acheté, c'est que le chiffre s'applique à d'autres modèles.
1.
Réglage de la température / Augmentation de la
température
2.
Réglage de la température - Curseur / indicateur de
valeur de la température
3.
Indicateur Celsius (°C) de sélection de l’unité de
température
4.
Indicateur Fahrenheit (°F) de sélection de l’unité de
température
5.
Réglage de la température / Baisse de la température
6.
Bouton / Indicateur de la fonction de réfrigération
rapide
7.
* Sans fil
8.
Bouton / indicateur de Mode éco
9.
*Bouton / indicateur Congélateur Joker
10.
*Porte automatique
11.
Erreur / Alarme de température élevée
12.
*Refroidisseur de bouteille
13.
*Bouton / Alarme de remplacement du filtre
14.
Bouton Menu
15.
Bouton / Indicateur de Marche/Arrêt de l’appareil
16.
*Bouton / indicateur de distributeur de glaçons
17.
*Mode Sabbat
18.
Bouton / indicateur du mode Vacances
19.
Voyant de verrouillage des commandes
20.
Bouton / indicateur de la fonction de congélation rapide
21.
Sélection de la cabine
22.
Indicateur du compartiment réfrigérateur
23.
Indicateur du compartiment congélateur
Cela peut ne pas s’appliquer à tous les modèles
1
2
3
4
*16
*17
18
20
21
22
23
19
5
6
8
*7
*10
*12
*13
14
15
11
*9a
*9b

Utilisation de l'appareil
13 /28FR
Réfrigérateur / Manuel d’utilisation
1. Réglage de la température / Augmentation
de la température
Appuyez sur ce bouton pour augmenter la
température du compartiment sélectionné.
2. Réglage de la température -
Curseur / indicateur de valeur de la
température
Affiche la valeur de température du compartiment
sélectionné. De plus, vous pouvez faire glisser votre
doigt vers le haut ou le bas pour augmenter ou
diminuer la température.
3. Sélection de l’unité de température (°C)
Indicateur
Celsius
Appuyez sur ce bouton pour définir l'unité de
température sur degrés Celsius.
Il s’agit de l’indicateur Celsius. Lorsque l’indicateur
Celsius est activé, les valeurs de réglage de la
température s’affichent en degrés Celsius et l’icône
correspondante s’allume à 100 %.
L’icône Fahrenheit s’allume à 50 %.
4. Sélection de l’unité de température (°F)
Indicateur
Fahrenheit
Appuyez sur ce bouton pour définir l'unité de
température sur degrés Fahrenheit.
Il s’agit de l’indicateur Fahrenheit. Lorsque
l’indicateur Fahrenheit est activé, les valeurs de
réglage de la température s’affichent en degrés
Fahrenheit et l’icône correspondante s’allume
entièrement
L’icône Celsius s’allume à 50 %.
5. Réglage de la température / Baisse de la
température
Appuyez sur ce bouton pour baisser la température
du compartiment sélectionné.
5.2. Bandeau indicateur
Les bandeaux indicateurs peuvent varier en fonction du modèle de l’appareil.
Les fonctions sonores et visuelles sur le panneau indicateur vous aident dans l’utilisation de votre réfrigérateur.
C
*en option : Les chiffres de ce manuel sont donnés à titre indicatif et peuvent ne pas correspondre
exactement au produit. Si l'accessoire représenté par le chiffre ne se trouve pas dans l’appareil que
vous avez acheté, c'est que le chiffre s'applique à d'autres modèles.
Cela peut ne pas s’appliquer à tous les modèles
Select
!
15
21
22 23
5
2
1
*13
*7
*11
*10
*17
*12
*16
*9b
*9a
8
18
6
20
4
3
6. Indicateur de la fonction réfrigération
rapide
Lorsque la fonction de réfrigération rapide est
activée, l’indicateur s’allume à 100 %. Lorsque
la fonction est annulée, l’appareil retourne à ses
réglages normaux et l’indicateur s’allume à 50 %.
Bouton de la fonction Réfrigération rapide
Il est utilisé pour activer ou désactiver la fonction de
réfrigération rapide.
C
Utilisez la fonction de réfrigération
rapide lorsque vous souhaitez refroidir
rapidement les aliments placés dans
le compartiment réfrigérateur. Si
vous souhaitez refroidir de grandes
quantités d'aliments frais, nous vous
recommandons d'activer cette fonction
au préalable.
C
Au bout de 8 heures de temps ou
lorsque le compartiment réfrigérateur
atteint la température souhaitée, la
fonction de réfrigération rapide se
désactive automatiquement si vous ne
la désactivez pas vous-même.
C
Si vous appuyez sur le bouton de
réfrigération rapide de façon répétée
à intervalles courts, la protection
du circuit électronique s'activera et
le compresseur ne démarrera pas
automatiquement.

Utilisation de l'appareil
14 / 28FR
Réfrigérateur / Manuel d’utilisation
C
Cette fonction n’est pas réactivée
lorsque le courant est rétabli après
une panne de courant.
7. *Sans fil
Appuyez sur ce bouton pour connecter l’appareil au
réseau domestique. Lorsque la fonction est activée,
l’indicateur s’allume à 100 % ; lorsqu’elle est
annulée, l’indicateur s’allume à 50 %.
8. Bouton / indicateur de Mode Eco
Appuyez sur ce bouton pour activer ou désactiver le
mode Eco.
Lorsque le mode Eco est activé, l’indicateur
s’allume à 100 %. Lorsque la fonction est active, le
congélateur commence à fonctionner en mode Eco
au moins 6 heures plus tard. Lorsque la fonction est
annulée, l’indicateur s’allume à 50 %.
9a. *Bouton / indicateur Congélateur
Joker
Lorsque le bouton est enfoncé, le compartiment
joker fonctionne comme un congélateur et
l’indicateur s’allume à 100 %. Le compartiment
réfrigérateur Joker s’allume à 50%.
9b. *Bouton / indicateur Réfrigérateur
Joker
Lorsque le bouton est enfoncé, le compartiment
joker fonctionne comme un réfrigérateur et
l’indicateur s’allume à 100 %. Le compartiment
congélateur joker s’allume à 50%.
10.*Porte automatique
Appuyez sur ce bouton pour activer ou désactiver
le mode Porte automatique. Lorsque la fonction est
activée, l’indicateur s’allume à 100 %. Lorsque la
fonction est annulée, l’indicateur s’allume à 50 %.
Une fois la fonction active, touchez la section corres-
pondante sur la poignée de porte pour que la porte
s'ouvre automatiquement.
11. Erreur / Alarme de température élevée
Cet indicateur s’allume en cas de panne de courant,
de défaut de température élevée et d’avertissements
d’erreur. En cas de panne de courant prolongée, la
température maximale du compartiment congélateur
s’affiche sur l’écran numérique. Après le contrôle
des aliments dans le compartiment congélateur,
appuyez sur le bouton de température élevée pour
annuler l'avertissement.
12. *Refroidisseur de bouteille
Appuyez sur ce bouton pour activer ou désactiver le
mode Refroidisseur de bouteille.
Lorsque la fonction est activée, l’indicateur
s’allume à 100 %. Lorsque la fonction est annulée,
l’indicateur s’allume à 50 %.
13. *Bouton / Alarme de remplacement
du filtre
Cette icône s’allume lorsque le filtre doit être
réinitialisé.
Lorsque vous appuyez sur le bouton, le filtre est
réinitialisé et l’icône de réinitialisation s’éteint.
14. Bouton Menu
Il est utilisé pour activer ou désactiver le mode veille
sur l'affichage. Si vous n’appuyez sur aucun bouton
ou n’ouvrez pas la porte dans les 30 secondes, il
passe automatiquement en mode veille.
15. Bouton / Indicateur de Marche/Arrêt
de l’appareil
Maintenez enfoncé bouton Marche/Arrêt pendant
3 secondes pour allumer ou éteindre l’appareil.
Lorsque l’appareil est éteint, l’indicateur de Marche/
Arrêt de l’appareil s’allume à 100% et tous les aut-
res indicateurs s’éteignent. Pour allumer l’appareil,
maintenez à nouveau le bouton enfoncé pendant
3 secondes. Le réfrigérateur s’allume et l’indicateur
de Marche/Arrêt s’allume à 50 %.
16. *Bouton / indicateur de distributeur de
glaçons
Appuyez sur ce bouton pour activer ou désactiver le
distributeur de glaçons. Si l’indicateur est allumé à
100%, cela signifie que le distributeur de glaçons
est en cours d’exécution. Si l’indicateur est allumé à
50%, cela signifie que le distributeur de glaçons est
désactivé.
C
L’arrivée d’eau du réservoir à eau
s’arrête lorsque cette fonction n’est
pas sélectionnée. Toutefois, les glaçons
déjà formés peuvent être retirés du
distributeur.
17. *Mode Sabbat
Appuyez sur ce bouton pour activer ou désactiver
le mode Sabbat. Lorsque la fonction est activée,
l’indicateur s’allume à 100 %. Lorsque la fonction
est annulée, l’indicateur s’allume à 50 %.

Utilisation de l'appareil
15 /28FR
Réfrigérateur / Manuel d’utilisation
18. Bouton / indicateur du mode Vacances
Appuyez sur ce bouton pour activer le mode
Vacances. L’indicateur du mode Vacances
s’allume à 100 %. Si le mode Vacances est activé,
l'inscription « - - » s’affiche sur l’indicateur de valeur
de température et aucun refroidissement actif
n’est sélectionné sur le compartiment réfrigérateur.
Il n’est pas adapté de conserver les denrées dans
le compartiment réfrigérateur lorsque cette fonction
est activée. Les autres compartiments maintiendront
le niveau de froid paramétré.
Pour désactiver cette fonction, appuyez
à nouveau
sur le bouton de la fonction Vacances.
Lorsque la fonction est annulée, l’indicateur s’allume
à 50 %.
19. Voyant de verrouillage des
commandes
Appuyez simultanément sur les boutons
Réfrigération rapide et Vacances et maintenez-
les enfoncés pendant 3 secondes. Lorsque vous
appuyez sur le bouton, un compte à rebours est
lancé dans l’indicateur de valeur de température.
Lorsque le verrouillage des commandes est activé,
l’indicateur de verrouillage des commandes s’allume
à 100 % et le mode de verrouillage des commandes
est activé. Les boutons ne fonctionneront pas
lorsque le mode de verrouillage des commandes
est actif. Appuyez simultanément sur les boutons
Réfrigération rapide et Vacances et maintenez-les
enfoncés à nouveau pendant 3 secondes. Lorsque
vous appuyez sur le bouton, un compte à rebours
est lancé dans l’indicateur de valeur de température.
Lorsque le verrouillage des commandes est annulé,
l’indicateur de verrouillage des commandes s’allume
à 50 % et le mode de verrouillage des commandes
est désactivé.
Activez
cette fonction si vous voulez évitez
de changer le réglage de la température du
réfrigérateur.
20.Indicateur de la fonction de congélation
rapide
Lorsque la fonction de congélation rapide est
activée, l’indicateur s’allume à 100 %. Lorsque
la fonction est annulée, l’appareil retourne à ses
réglages normaux et l’indicateur s’allume à 50 %.
Bouton de la fonction de congélation rapide
Il est utilisé pour activer ou désactiver la fonction de
congélation rapide.
Appuyez sur ce bouton pour activer ou désactiver la
fonction de congélation rapide. Lorsque vous activez
la fonction, le compartiment congélateur refroidi à
une température inférieure à la valeur de consigne.
C
Utilisez la fonction de congélation
rapide lorsque vous souhaitez congeler
rapidement les aliments placés dans
le compartiment congélateur. Si
vous souhaitez congeler de grandes
quantités d'aliments, nous vous
recommandons d'activer cette fonction
au préalable.
C
Au bout de 4 heures de temps ou
lorsque le compartiment congélateur
atteint la température souhaitée, la
fonction de congélation rapide se
désactive automatiquement si vous ne
la désactivez pas vous-même.
C
Cette fonction n’est pas réactivée
lorsque le courant est rétabli après une
panne de courant.
21. Sélection de la cabine
Appuyez sur le bouton de sélection de la cabine
pour afficher et modifier la valeur de température du
réfrigérateur ou du congélateur sur l’indicateur de
valeur de température.
22. Indicateur du compartiment réfrigérateur
Lorsque cet indicateur est actif, la température
du compartiment réfrigérateur est affichée sur
l’indicateur de température.
23 Indicateur du compartiment réfrigérateur
Lorsque cet indicateur est actif, la température
du compartiment congélateur est affichée sur
l’indicateur de température.

Utilisation de l'appareil
16 / 28FR
Réfrigérateur / Manuel d’utilisation
5.3. Machine à glace
(Cette caractéristique est en option)
La machine à glace vous permet d'obtenir facilement
des glaçons provenant du réfrigérateur.
Utilisation de la machine à glace
1. Retirez le réservoir d'eau du compartiment
réfrigérateur.
2. Remplissez le réservoir d’eau.
3. Replacez le réservoir d’eau. Les premiers glaçons
seront prêts après environ quatre heures dans le
tiroir à glace de la machine à glace situé dans le
compartiment congélateur.
C
Lorsque le réservoir d’eau est
complètement rempli, vous pouvez
obtenir environ 60 à 70 glaçons.
C
L’eau du réservoir doit être remplacée
toutes les 2 à 3 semaines.
5.4. Distributeur de glaçons
(Cette caractéristique est en option)
Le distributeur de glaçons vous permet d'obtenir
facilement des glaçons provenant du réfrigérateur.
Utilisation du distributeur de glaçons
1. Retirez le distributeur de glaçons en le tirant
doucement.
2. Remplissez-le d’eau.
3. Remettez le distributeur en place. Après environ
deux heures, vous obtenez des glaçons.
4. Pour obtenir des glaçons, tournez les molettes des
réservoirs à glaçons dans le sens horaire, de manière
à former un angle de 90 ˚. Les glaçons contenus
dans les réservoirs tomberont dans le récipient de
conservation de glaçons situé en dessous.
5. Vous pouvez alors sortir le récipient de
conservation de glaçons et servir les glaçons.
C
Ne retirez pas le distributeur de
glaçons de son logement pour obtenir
de la glace.
C
Si vous le désirez, vous pouvez
laisser les glaçons dans leur récipient
de conservation. Le récipient de
conservation sert simplement à
accumuler les glaçons. Ne versez pas
d’eau à l’intérieur. Cela peut le casser.
5.5. Bac à glaçons
(Cette caractéristique est en option)
Le bac à glaçons vous permet d’obtenir facilement
des glaçons provenant du réfrigérateur.
Utilisation du bac à glaçons
1. Retirez le bac à glaçons du compartiment
congélateur.
2. Remplissez bac à glaçons d’eau.
3. Remettez le bac à glaçons dans le compartiment
congélateur. Après environ deux heures, vous
obtenez des glaçons.
4. Retirez le bac à glaçons du compartiment
congélateur et tordez-le contre la plaque de service.
Vous pourrez alors enlever facilement les glaçons.

Utilisation de l'appareil
17 /28FR
Réfrigérateur / Manuel d’utilisation
5.6. Éclairage bleu
(Cette caractéristique est en option)
Les bacs à légumes du réfrigérateur sont éclairés
par une lumière bleue. Les denrées conservées dans
les bacs à légumes continuent leur photosynthèse
grâce aux effets de longueur d’onde de la lumière
bleue et conservent ainsi leur fraîcheur.
5.7. Module de désodorisation
(FreshGuard)
(Cette caractéristique est en option)
Le module de désodorisation élimine rapidement
les mauvaises odeurs dans votre réfrigérateur avant
qu’elles ne pénètrent dans les surfaces. Grâce à ce
module placé sur le plafond du compartiment des
aliments frais, les mauvaises odeurs se dissolvent
pendant que l’air circule de manière active sur le filtre
anti-odeurs, puis l’air qui a été nettoyé par le filtre est
réintroduit dans le compartiment des aliments frais.
De cette façon, les odeurs indésirables qui peuvent
apparaître lors de la conservation des aliments dans
le réfrigérateur sont éliminées avant qu’elles ne
pénètrent dans les surfaces.
Ceci grâce au ventilateur, aux rayonnements
ultra-violet et au filtre anti-odeurs intégré dans
le module. Le module de désodorisation s’active
automatiquement sur une base périodique. Le son
que vous entendrez lors de l’activation périodique
du module est normal ; il est émis par le ventilateur
intégré. Si vous ouvrez la porte du compartiment
d’aliments frais pendant que le module est actif,
le ventilateur se met temporairement en pause et
reprend là où il s’était arrêté lorsque la porte est à
nouveau fermée. En cas de panne de courant, le
module de désodorisation s’active une fois le courant
rétabli.
Info : Il est recommandé de conserver les aliments
aromatiques (tels que les fromages, les olives et les
plats de charcuterie) dans leur emballage et scellés
pour éviter les mauvaises odeurs qui peuvent se
produire lorsque les odeurs de divers aliments se
mélangent. En outre, il est recommandé de sortir
rapidement les aliments avariés du réfrigérateur
pour éviter que les autres aliments ne se détériorent
et éviter les mauvaises odeurs.

Utilisation de l'appareil
18 / 28FR
Réfrigérateur / Manuel d’utilisation
5.8. Compartiment refroidisseur
(Cette caractéristique est en option)
Utilisez ce compartiment pour conserver les produits
délicats qui requièrent une température plus basse ou
les produits à base de viande à consommer dans un
court délai. Ne conservez pas vos légumes ou fruits
dans ce compartiment.
Vous pouvez augmenter le volume interne de votre
appareil en enlevant le compartiment Zone fraîche
souhaité.
Pour l’enlever, tirez juste vers l’avant jusqu’à ce qu’il
s’arrête, puis soulevez-le et tirez-le vers vous.
5.9. Bac à légumes
Le bac à légumes du réfrigérateur a été spécialement
conçu pour vous aider à conserver vos denrées
au frais sans que celles-ci n'aient à perdre de leur
humidité. C'est pourquoi en général, l’air frais circule
davantage tout autour du bac à légumes. Conservez
vos fruits et légumes dans ce compartiment. Ne
placez pas de légumes verts à côté des fruits pour si
vous souhaitez les conserver plus longtemps.

Utilisation de l'appareil
19 /28FR
Réfrigérateur / Manuel d’utilisation
5.10. Utilisation du distributeur
(Cette caractéristique est en option)
C
Il est tout à fait normal que les
premiers verres d'eau obtenus du
distributeur soient chauds.
C
Si vous n'utilisez pas le distributeur
d'eau pendant une période prolongée,
débarrassez-vous des premiers verres
d'eau afin d'obtenir de l'eau fraîche.
1. Appuyez sur le bouton du distributeur avec votre
verre. Si vous utilisez une tasse en plastique
souple, il est préférable d'appuyer sur le bouton
avec vos doigts.
2. Une fois que vous avez rempli la tasse au niveau
souhaité, relâchez le bouton.
C
Veuillez remarquer que la quantité
d’eau qui s’écoule du distributeur
dépend du niveau d’appui du bouton.
À mesure que le niveau d’eau
de votre tasse / verre augmente,
réduisez doucement la quantité de
pression du bouton pour éviter tout
risque de débordement. Si vous
appuyez légèrement sur le bouton,
l'eau s'écoulera ; ce phénomène
est tout à fait normal et n'est pas un
dysfonctionnement.
5.11. Remplir le réservoir d'eau
de la fontaine frigorifique
Le réservoir d'approvisionnement en eau se trouve
dans le balconnet de la porte.
1. Ouvrez le couvercle du réservoir.
2. Remplissez le réservoir d'eau potable fraîche.
3. Fermez le couvercle.
C
Ne remplissez pas le réservoir
d’eau avec un liquide autre que de
l’eau ; des boissons comme le jus
de fruit, les boissons gazeuses, et
les boissons alcooliques ne sont pas
adaptées pour être utilisées avec le
distributeur d’eau. Si de tels liquides
sont utilisés, le distributeur connaîtra
un dysfonctionnement et peut être
profondément endommagé. La garantie
ne couvre pas de telles utilisations.
Certaines substances chimiques
et additifs contenus dans de telles
boissons / breuvages peuvent également
endommager le réservoir d'eau.
C
Utilisez uniquement de l'eau potable
propre.
C
La capacité du réservoir est de 3
litres ; ne dépassez pas la limite.

Utilisation de l'appareil
20 / 28FR
Réfrigérateur / Manuel d’utilisation
5.12. Nettoyer le réservoir d’eau
1. Retirez le réservoir d'approvisionnement en eau du
balconnet de la porte.
2. Retirez le balconnet de la porte en le tenant par les
deux côtés.
3. Tenez le réservoir par les deux côtés et retirez-le
selon un angle de 45 °C.
4. Enlevez le couvercle du réservoir d’eau et
nettoyez le réservoir.
C
Le réservoir d’eau et les composantes
du distributeur d’eau ne peuvent pas
être passés au lave-vaisselle.
5.13. Bac de dégivrage
L’eau qui s’écoule lors de l’utilisation du distributeur
d’eau s’accumule dans le bac de dégivrage.
Retirez le filtre en plastique comme indiqué sur le
schéma.
Essuyez l’excédent d’eau à l’aide d’un chiffon
propre et sec.

Utilisation de l'appareil
21 /28FR
Réfrigérateur / Manuel d’utilisation
S E B Z E L İ K
5.15. Congélation des produits frais
• Afin de préserver la qualité des aliments,
ils doivent être congelés le plus rapidement
possible lorsqu’ils sont placés dans le
compartiment congélateur ; utilisez pour cela la
fonction de congélation rapide.
• Vous pouvez conserver les aliments plus
longtemps dans le compartiment congélateur
lorsque vous les congelez frais.
• Emballez les aliments à congeler et fermez
l’emballage de sorte qu’il ne laisse pas entrer
l’air.
• Assurez-vous d’emballer vos aliments avant
de les mettre au congélateur. Utilisez des
contenants de congélation, des feuilles et des
papiers à l’épreuve de l’humidité, des sacs en
plastique et d’autres matériaux d’emballage
plutôt que des papiers d’emballage traditionnels.
• Étiquetez chaque paquet d’aliments en ajoutant
la date avant la congélation. De cette manière,
vous pouvez connaître le degré fraîcheur de
chaque paquet d’aliments chaque fois que vous
ouvrez votre congélateur. Conservez les aliments
congelés dans la partie avant du compartiment
pour vous assurer qu’ils sont utilisés en premier.
• Consommez immédiatement les denrées
congelées après leur décongélation et ne les
congelez plus à nouveau.
• Ne congelez pas une quantité trop importante
à la fois.
5.14. Bac à humidité contrôlée
(Fraîcheur assurée)
(Cette caractéristique est en option)
Grâce au bac à humidité contrôlée, les fruits et
légumes peuvent être conservés plus longtemps
dans un environnement présentant des conditions
d’humidité idéales. Le système de réglage de
l’humidité à 3 options situé en face du bac à
légumes vous permet de contrôler le niveau
d’humidité à l’intérieur en fonction des aliments que
vous conservez. Il est recommandé de sélectionner
l’option légumes si vous conservez des légumes
seulement, l’option fruits si vous conservez des
fruits seulement, et l’option mixte lorsque vous
conservez des fruits et des légumes.
Pour profiter du système de contrôle de l’humidité
et prolonger la durée de conservation des aliments,
il est recommandé de ne pas conserver les fruits
et légumes dans des sacs en plastique. Si vous
laissez les légumes dans leurs sachets, ils se
décomposeront en très peu de temps. En particulier,
nous recommandons de ne pas conserver les
concombres ou les brocolis dans des sacs en
plastique scellés. Pour des raisons d'hygiène, il vaut
mieux éviter le contact de l'emballage avec d'autres
légumes, préférez un sac en papier perforé ou tout
autre emballage similaire plutôt que le sachet.
Une fois les légumes placés dans le bac, il faut
prendre en considération le poids spécifique des
légumes. Les légumes lourds et durs doivent être
disposés au fond du bac, tandis que les plus légers
et tendres seront placés au-dessus.
Ne rangez pas ensemble dans le même bac, les
poires, les abricots, les pêches, etc. ainsi que
les pommes, en particulier celles générant un
niveau élevé de gaz d'éthylène, avec les autres
fruits et légumes. Le gaz d'éthylène émis par ces
premiers fruits peut accélérer la détérioration et la
décomposition des autres en très peu de temps.

Utilisation de l'appareil
22 / 28FR
Réfrigérateur / Manuel d’utilisation
Réglage du
compartiment
congélateur
Réglage du
compartiment
réfrigérateur
Remarques
-18 °C 4 °C Voici le réglage normal recommandé.
-20, -22 ou
-24 °C
4 °C
Ces réglages sont recommandés lorsque la température ambiante
dépasse 30 °C.
Congélation
rapide
4 °C
Cet indicateur est utilisé lorsque vous voulez congeler vos denrées
pendant une courte période. Le réfrigérateur retourne à son mode de
fonctionnement précédent lorsque le processus est achevé.
-18°C ou plus
froid
2 °C
Utilisez ces paramètres si vous estimez que le compartiment
réfrigérateur n’est pas assez froid à cause de la chaleur ou des
ouvertures/fermetures fréquentes de la porte.
5.16. Recommandations concernant la
conservation des aliments congelés
Le compartiment doit être réglé à -18 °C en guise
de valeur minimale.
1. Mettez les paquets dans le congélateur aussi
rapidement que possible après l’achat pour
éviter qu’ils ne dégivrent.
2. Vérifiez que les mentions « À consommer avant
le » et « À consommer de préférence avant le »
figurant sur l’emballage sont respectées avant
de congeler les paquets.
3. Assurez-vous que l'emballage des aliments
n’est pas endommagé.
5.17. Informations concernant
la congélation
Selon les normes IEC 62552, le produit congèle
au moins 4,5 kg d’aliments à une température
ambiante de 25 °C jusqu’à -18 °C ou moins
dans les 24 heures pour 100 litres de volume de
congélation.
Il n’est possible de conserver des denrées sur
de longues périodes qu’avec des températures
inférieures ou égales à -18°C.
Vous pouvez conserver la fraîcheur de vos denrées
pendant plusieurs mois (à des températures
inférieures ou égales à -18 °C dans le surgélateur).
Il faut éviter que les denrées à congeler n’entrent
en contact avec des aliments déjà congelés afin
d’empêcher le dégel partiel de ces derniers.
Faites bouillir les légumes et égoutter leur eau pour
conserver les légumes plus longtemps. Après avoir
égoutté leur eau, placez-les dans des emballages
à l’épreuve de l’air et disposez-les à l’intérieur du
congélateur. Les aliments tels que les bananes,
les tomates, la laitue, le céleri, les œufs durs,
les pommes de terre ne sont pas adaptés à la
congélation. Lorsque ces aliments sont congelés,
leur valeur nutritionnelle et leur goût sont affectés
négativement. En outre, ils peuvent se détériorer et
présenter un risque pour la santé humaine.
5.18. Disposition des denrées
Clayettes du
compartiment
congélation
Différentes denrées congelées
comme de la viande, du
poisson, des crèmes glacées,
des légumes, etc.
Étagères du
compartiment
réfrigérateur.
Aliments dans les casseroles,
les assiettes couvertes et les
récipients fermés, œufs (dans
un contenant fermé)
Étagères sur
la porte du
compartiment
réfrigérant
Produits ou boissons de petite
taille et sous emballage
Bac à légumes Fruits et légumes
Compartiment
Produits frais
Charcuterie (aliments pour
le petit déjeuner, produits
de viande qui doivent être
consommés dans un court laps
de temps)
5.19. Avertissement - Porte ouverte
(Cette caractéristique est en option)
Un signal d'avertissement sonore retentit lorsque
la porte du réfrigérateur reste ouverte pendant
1 minute. Le signal sonore s'arrête lorsque vous
fermez la porte ou lorsque vous appuyez sur
n'importe quel bouton d'affichage (le cas échéant).

Utilisation de l'appareil
23 /28FR
Réfrigérateur / Manuel d’utilisation
5.20. Ampoule
Les lampes LED sont utilisées comme ampoules.
Contactez le service agréé en cas de problème avec
ce type d’éclairage.
Les ampoules utilisées dans l’appareil ne sont
pas conçues pour l'éclairage domestique et ne
conviennent pas non plus à un tel usage. Les
ampoules de votre réfrigérateur et/ou congélateur
visent à assurer un chargement d’aliments
confortable et sécuritaire.

24 /28FR
Réfrigérateur / Manuel d’utilisation
6 Entretien et nettoyage
Nettoyez régulièrement l’appareil afin de prolonger sa
durée de vie et réduire les problèmes fréquemment
rencontrés.
B
AVERTISSEMENT : Éteignez
l’appareil avant de le nettoyer.
B
AVERTISSEMENT : Il est
recommandé de nettoyer le
condenseur tous les six mois avec
des gants. Vous ne devez pas utiliser
d'aspirateur.
• N’utilisez jamais d’essence, de benzène ou de
matériaux similaires pour le nettoyage.
• N’utilisez jamais d'ustensiles abrasifs tranchants,
de savon, de produit de nettoyage domestique, de
détergent et de cirage pour effectuer le nettoyage.
• Dissolvez une cuillerée à café de carbonate dans
un demi-litre d'eau. Trempez un chiffon dans cette
solution et essorez-le complètement. Nettoyez
soigneusement l'intérieur du réfrigérateur avec ce
chiffon et séchez ensuite à l'aide d'un chiffon sec.
• Ne laissez pas de l’eau pénétrer dans le logement de
lampe ou dans toute autre pièce électrique.
• Si vous n'utilisez pas le réfrigérateur pendant une
période prolongée, débranchez-le, retirez-y tous les
aliments, nettoyez-le et laissez la porte entrouverte.
• Vérifiez régulièrement que les joints des portes sont
propres. Si tel n'est pas le cas, nettoyez-les.
• Retirez tous les aliments de l’appareil avant de retirer
la porte et les étagères.
• Retirez les balconnets en les tirant vers le haut. Faites
glisser les balconnets vers le bas pour les réinstaller
après le nettoyage.
• N'utilisez jamais de produits de nettoyage chlorés ou
d'eau pour nettoyer les surfaces extérieures ou les
parties du produit recouvertes de chrome. Le chlore
entraîne l'abrasion de ces surfaces métalliques.
• Pour des appareils qui ne sont pas de la marque
No Frost, des gouttes d’eau et une couche de givre
pouvant atteindre la largeur d’un doigt se forment
sur la paroi arrière du compartiment réfrigérateur. Ne
les nettoyez pas et évitez d'y utiliser de l’huile ou des
produits similaires.
• Utilisez uniquement des tissus en microfibres
légèrement mouillés pour nettoyer la surface externe
de l’appareil. Les éponges et autres tissus de
nettoyage sont susceptibles de rayer la surface.
6.1. Prévention des mauvaises odeurs
Les matériaux susceptibles d'être à l'origine d'une
odeur ne sont pas utilisés dans la fabrication de nos
réfrigérateurs. Toutefois, des odeurs peuvent se dégager
si les aliments sont mal rangés ou si la surface interne
de l’appareil n'est pas nettoyée comme il se doit.
Veuillez tenir compte des points suivants pour éviter ce
problème :
• Il est important de garder le réfrigérateur propre.
Les résidus d'aliments, les taches, etc. peuvent être
à l'origine des odeurs. Pour cette raison, nettoyez
votre réfrigérateur avec du carbonate dissout dans
de l'eau tous les 15 jours. N'utilisez jamais de
détergent ou de savon.
• Conservez vos aliments dans des récipients fermés.
Les micro-organismes émis par les récipients
sans couvercle peuvent provoquer des odeurs
désagréables.
• Ne gardez jamais les aliments périmés ou abîmés
dans votre réfrigérateur.
6.2. Protection des surfaces en plastique.
Ne placez pas d’huiles ou de plats huileux dans le
réfrigérateur dans des récipients non fermés, car
les graisses peuvent endommager les surfaces en
plastique du réfrigérateur. Si de l'huile est répandue ou
étalée sur les surfaces en plastique, nettoyez et rincez
immédiatement la partie concernée de la surface à l'eau
tiède.
6.3. Nettoyage de la surface intérieure
Pour nettoyer les surfaces intérieures et toutes les
parties amovibles, lavez-les avec une solution douce
contenant du savon, de l'eau et du carbonate. Rincez et
séchez complètement. Empêchez l'eau de toucher les
dispositifs d'éclairage et le panneau de commande.

25 /28 FR
Réfrigérateur / Manuel d’utilisation
A
ATTENTION :
N’utilisez pas de vinaigre, d'alcool
à friction ou d'autres produits de
nettoyage à base d'alcool sur les
surfaces intérieures.
6.4. Surfaces extérieures
en acier inoxydable
Utilisez un produit de nettoyage en acier inoxydable
non abrasif et appliquez-le avec un chiffon doux et non
pelucheux. Pour le polissage, essuyez avec douceur la
surface avec un chiffon humide en microfibres et utilisez
du cuir sec. Suivez toujours les fils d'acier inoxydable.
6.5. Nettoyage d’appareils
avec portes en verre
Enlevez le film protecteur qui recouvre la vitre.
Il y a un revêtement sur la surface de la vitre.
Ce revêtement minimise la formation de taches
et garantit un nettoyage facile des taches et
des salissures. Les vitres non protégées par un tel
revêtement peuvent être exposées à un colmatage
persistant de polluants transportés par l’eau ou par
l’air et d'origine organique ou inorganique comme le
calcaire, les sels minéraux, les hydrocarbones non
brûlés, les oxydes métalliques et les silicones qui
peuvent facilement et rapidement former des taches ou
entraîner ainsi des dégâts matériels. Malgré un lavage
régulier, la vitre devient très difficile à nettoyer, mais
reste nettoyable. En conséquence, la clarté et la bonne
apparence du verre en pâtit. Les composés et méthodes
de nettoyage durs et abrasifs augmentent encore ces
défauts et accélèrent le processus de détérioration.
*Les produits de nettoyage non alcalins, non abrasifs et
à base d’eau doivent être utilisés pour les procédures de
nettoyage usuelles.
Pour que le revêtement ait une longue durée de vie, les
substances alcalines ou abrasives ne doivent pas être
utilisées lors des opérations de nettoyage.
Ces vitres ont été soumises à un processus de trempe
pour augmenter leur résistance aux chocs et à la
rupture.
Comme mesure de sécurité supplémentaire, les
surfaces arrière des verres sont recouvertes d’un film
de sécurité pour s’assurer qu’ils ne nuisent pas à
l’environnement en cas de rupture.
Entretien et nettoyage

26 /28FR
Réfrigérateur / Manuel d’utilisation
7 Dépannage
Vérifiez la liste suivante avant de contacter le service
après-vente. Cela vous permet de gagner du temps
et de l’argent. Cette liste contient les problèmes
fréquemment rencontrés qui ne sont pas le résultat d'un
défaut de fabrication ou d'une mauvaise utilisation des
matériaux. Il se peut que votre appareil ne présente pas
certaines des caractéristiques décrites ici.
Le réfrigérateur ne fonctionne pas.
• Il peut ne pas être branché comme il se doit.
>>>Branchez l’appareil correctement.
• Le fusible de la prise à laquelle votre réfrigérateur
est branché ou le fusible principal a peut-être
sauté. >>>Vérifiez le fusible.
Condensation sur la paroi intérieure du
compartiment réfrigérateur. (MULTI ZONE, COOL
CONTROL et FLEXI ZONE).
•
La porte peut avoir été ouverte/fermée fréquemment.
Évitez d’ouvrir/de fermer la porte du réfrigérateur
fréquemment.
•
L'environnement peut être trop humide.
>>>N'installez pas le réfrigérateur à des endroits très
humides.
•
Les aliments contenant du liquide peuvent avoir été
placés au réfrigérateur dans des récipients sans
couvercle. >>>Assurez-vous que des aliments
contenant du liquide rangés dans des récipients non
fermés ne soient pas placés pas dans le réfrigérateur.
•
La porte du réfrigérateur peut avoir été laissée
entrouverte. >>>Ne gardez pas longtemps les portes
de votre réfrigérateur ouvertes.
•
Le thermostat peut avoir été réglé à un niveau très
froid. >>>Réglez le thermostat à un niveau approprié.
Le compresseur ne fonctionne pas.
•
Le dispositif de protection thermique du compresseur
sautera en cas de coupures soudaines du courant ou
de débranchement intempestif, en effet la pression
du liquide réfrigérant du système de refroidissement
ne sera pas équilibrée. Le réfrigérateur recommence
à fonctionner normalement après 6 minutes environ.
Si le réfrigérateur ne démarre pas à la fin de cette
période, veuillez appeler le prestataire de services
agréé.
•
Le congélateur est en mode dégivrage. >>>Ceci est
normal pour un réfrigérateur qui effectue le dégivrage
entièrement automatique. Le cycle de dégivrage est
effectué périodiquement.
•
Le réfrigérateur ne doit pas être branché.
>>>Assurez-vous que la fiche est bien insérée dans
la prise.
•
Les réglages de température peuvent être incorrects.
>>>Sélectionnez la valeur de température correcte.
•
Panne de courant possible. >>>Le réfrigérateur
commence à fonctionner normalement une fois que
l'alimentation est rétablie.
Le niveau sonore augmente lorsque le
réfrigérateur est en marche.
• Les performances de fonctionnement du
réfrigérateur peuvent varier en fonction des
variations de température ambiante. Cela est
normal et n’est pas un défaut.
Le réfrigérateur fonctionne fréquemment ou
pendant de longue périodes.
•
Votre nouveau réfrigérateur est peut-être plus grand
que l’ancien. Les grands réfrigérateurs durent plus
longtemps.
•
La température de la pièce est probablement élevée.
>>>Il est normal que l'appareil fonctionne plus
longtemps dans des environnements chauds.
•
Il se peut que le réfrigérateur ait été branché ou
chargé d’aliments. >>>Il faut plus de temps à
l’appareil pour atteindre la température réglée
lorsqu'il vient d'être branché ou chargé. Ce
phénomène est normal.
•
De grandes quantités d'aliments chauds ont peut-
être été mises au réfrigérateur récemment. >>>Ne
placez pas les aliments chauds dans le réfrigérateur.
•
Les portes peuvent avoir été ouvertes fréquemment
ou laissées entrouvertes depuis longtemps.
>>>L'air chaud qui pénètre dans le réfrigérateur
le fait fonctionner plus longtemps. N’ouvrez pas les
portes fréquemment.
•
Les portes des compartiments congélateur
et réfrigérateur ont été laissées entrouvertes.
>>>Assurez-vous que les portes sont bien fermées.
•
L'appareil peut être réglé à une température très
basse. >>> Réglez la température du réfrigérateur
à un degré plus chaud et patientez que l’appareil
atteigne ce niveau de température.
•
Le joint de porte du réfrigérateur ou du
compartiment congélateur peut être sale, usé,
brisé ou mal fixé. >>> Nettoyez ou remplacez le
joint. Tout joint endommagé/brisé fait fonctionner
le réfrigérateur pendant une période de temps plus
longue afin de conserver la température actuelle.
La température du réfrigérateur est adéquate,
mais la température du congélateur est très
basse.
• La température du compartiment congélateur peut
être réglée à une valeur très basse.>>> Réglez la
température du compartiment congélateur à une
valeur supérieure et vérifiez.

27 /28 FR
Réfrigérateur / Manuel d’utilisation
Dépannage
La température du congélateur est adéquate,
mais la température du réfrigérateur est très
basse.
• Le réfrigérateur est réglé à une température
très basse. >>> Réglez la température du
réfrigérateur à un degré supérieur et vérifiez.
Les denrées conservées dans les tiroirs du
compartiment de réfrigération sont congelées.
• La température du compartiment réfrigérateur
peut être réglée à une valeur très élevée.>>>
Réglez la température du compartiment
réfrigérateur à une valeur inférieure et vérifiez.
La température dans le réfrigérateur ou le
congélateur est très élevée.
•
La température du compartiment réfrigérateur peut
être réglée à une température très élevée. >>>Le
réglage du compartiment réfrigérant a un effet sur la
température du congélateur. Modifiez la température
du réfrigérateur ou du compartiment congélateur
jusqu'à ce que la température du réfrigérateur ou
du compartiment congélateur atteigne un niveau
adéquat.
•
Les portes peuvent avoir été ouvertes fréquemment
ou laissées entrouvertes depuis longtemps.
>>>N'ouvrez pas les portes fréquemment.
•
La porte a peut-être été laissée entrouverte.
>>>Fermez complètement la porte.
•
Le réfrigérateur était peut-être tout simplement
branché ou chargé d’aliment. >>>Ce phénomène
est normal. Il faut plus de temps à l’appareil pour
atteindre la température réglée lorsqu'il vient d'être
branché ou chargé.
•
De grandes quantités d'aliments chauds ont peut-
être été mises au réfrigérateur récemment. >>>Ne
placez pas les aliments chauds dans le réfrigérateur.
Vibrations ou bruits.
• Le plancher peut ne pas être stable ou de niveau.
>>>Si le réfrigérateur vibre légèrement, ajustez
l'alimentation pour l'équilibrer. Assurez-vous que
le sol est de niveau et capable de supporter le
poids du réfrigérateur.
• Les objets placés sur le réfrigérateur peuvent
causer du bruit. >>>Retirez tout objet placé sur le
réfrigérateur.
Le réfrigérateur produit des bruits semblables
à de l’eau qui coule ou à la pulvérisation d’un
liquide.
• Les écoulements de liquide et de gaz surviennent
conformément aux principes de fonctionnement
du réfrigérateur. >>>Ce phénomène est normal et
n'est pas considéré comme un défaut.
Le réfrigérateur émet un sifflement.
• Votre appareil est doté de ventilateurs qui servent
à le refroidir. Cela est normal et n’est pas un
défaut.
L'humidité s'accumule sur les parois intérieures
du réfrigérateur.
• Un temps chaud et humide augmente la formation
de givre et de condensation. Cela est normal et
n’est pas un défaut.
• Les portes peuvent avoir été ouvertes
fréquemment ou laissées entrouvertes depuis
longtemps. >>>N'ouvrez pas les portes
fréquemment. Fermez les portes, si elles sont
ouvertes.
• La porte a peut-être été laissée entrouverte.
>>>Fermez complètement la porte.
L'humidité est présente sur la surface extérieure
du réfrigérateur ou entre les portes.
• L'air peut être humide. C'est tout à fait normal par
temps humide. >>>La condensation disparaît une
fois que le taux d'humidité diminue.
• L’espace présent entre deux portes du
réfrigérateur peut présenter de l’humidité si vous
utilisez rarement votre appareil. Ce phénomène
est normal. Cette humidité disparaît en cas
d'utilisation fréquente du réfrigérateur.

28 /28FR
Réfrigérateur / Manuel d’utilisation
Dépannage
L'intérieur du réfrigérateur dégage une
mauvaise odeur.
• L’appareil n’a peut-être pas été nettoyé
régulièrement. Nettoyez l’intérieur du réfrigérateur
avec une éponge, de l’eau tiède ou de l’eau
gazeuse.
• Certains récipients ou matériaux d'emballage
peuvent provoquer des odeurs. >>>Utilisez un
autre récipient ou du matériel d'emballage d'une
autre marque.
• Les aliments peuvent avoir été mis au
réfrigérateur dans des récipients sans couvercle.
>>>Conservez les aliments dans des récipients
fermés. Les micro-organismes émis par les
récipients sans couvercle peuvent provoquer des
odeurs désagréables.
• Sortez les aliments périmés ou abîmés du
réfrigérateur.
Il est impossible de fermer la porte.
• Des récipients peuvent empêcher la porte de
se fermer. >>> Repérez les emballages qui
obstruent la porte.
• Le réfrigérateur peut être instable sur le sol.
>>>Ajustez les pieds du réfrigérateur au besoin
pour le garder en équilibre.
• Le plancher peut ne pas être de niveau ou solide.
>>>Assurez-vous que le plancher est de niveau
et qu'il peut supporter le poids du réfrigérateur..
Les bacs à légumes sont coincés.
• Les aliments peuvent toucher la paroi supérieure
du bac à légumes. >>>Réorganisez les aliments
dans le bac à légumes.
Si la surface de l'appareil est chaude
Vous pouvez observer une élévation de la température
entre les deux portes, sur les panneaux latéraux et au
niveau de la grille arrière pendant le fonctionnement
de l’appareil. Ce phénomène est normal et ne
nécessite aucune opération d’entretien !
Le ventilateur continue de fonctionner lorsque la
porte est ouverte.
Le ventilateur peut continuer de fonctionner lorsque la
porte du congélateur est ouverte.
A
AVERTISSEMENT : Si vous ne parvenez
pas à résoudre le problème même après
avoir suivi les instructions données dans
cette section, contactez votre revendeur ou
le prestataire de services agréé. N'essayez
jamais de réparer un appareil défectueux.

EWWERQWEW
DE
Kühlschrank
Bedienungsanleitung

Bitte lesen Sie vor Inbetriebnahme des Gerätes diese Anleitung!
Sehr geschätzte Kundin, sehr geschätzter Kunde,
wir hoffen, dass Sie mit Ihrem Produkt, das sorgfältig in modernen Anlagen hergestellt und mit detaillierten
Qualitätsprüfungen getestet wurde, optimale Ergebnisse erzielen.
Daher empfehlen wir Ihnen, diese Bedienungsanleitung vor Inbetriebnahme des Produktes aufmerksam zu lesen.
Falls Sie das Gerät an jemand anderen weitergeben, vergessen Sie nicht, diese Bedienungsanleitung ebenfalls
beizulegen.
Die Anleitung hilft Ihnen, Ihr Gerät schnell und sicher zu bedienen.
• Bitte lesen Sie die Bedienungsanleitung aufmerksam, bevor Sie das Produkt aufstellen und bedienen.
• Halten Sie stets die zutreffenden Sicherheitshinweise ein.
• Bewahren Sie die Bedienungsanleitung zum künftigen Nachschlagen an einem leicht zugänglichen Ort auf.
• Bitte lesen Sie alle anderen mit dem Produkt bereitgestellten Dokumente.
Beachten Sie, dass diese Bedienungsanleitung auf verschiedene Produktmodelle zutreffen kann. Diese Anleitung
weist ausdrücklich auf Unterschiede zwischen verschiedenen Modellen hin.
C
Wichtige Informationen und
nützliche Hinweise.
A
Gefahr von Verletzungen und
Sachschäden.
B
Stromschlaggefahr.
Die Verpackungsmaterialien
des Gerätes wurden
gemäß nationalen
Umweltschutzbestimmungen
aus recyclingfähigen
Materialien hergestellt.

3 /29 DE
Kühlschrank / Bedienungsanleitung
1 Wichtige Hinweise zu Sicherheit und Umwelt 4
1.1. Allgemeine Hinweise zu Ihrer Sicherheit . . . . . . . 4
1.1.1 Kohlenwasserstoff-Warnung . . . . . . . . . . . . . . . 7
1.1.2 Bei Produkten mit Wasserspender/Eisbereiter. . . 7
1.2. Bestimmungsgemäßer Einsatz . . . . . . . . . . . . . . 8
1.3. Sicherheit von Kindern . . . . . . . . . . . . . . . . . . . . 8
1.4. Erfüllung der WEEE-Vorgaben zur Entsorgung von
Altgeräten: . . . . . . . . . . . . . . . . . . . . . . . . . . . . 8
1.5. Einhaltung von RoHS-Vorgaben: . . . . . . . . . . . . . 8
1.6. Verpackungsinformationen . . . . . . . . . . . . . . . . . 8
2 Ihr Kühlschrank 10
3 Installation 11
3.1. Der richtige Aufstellungsort. . . . . . . . . . . . . . . . 11
3.2. Kunststoffkeile anbringen . . . . . . . . . . . . . . . . . 11
3.3. Füße einstellen. . . . . . . . . . . . . . . . . . . . . . . . . 12
3.4. Elektrischer Anschluss . . . . . . . . . . . . . . . . . . . 12
4 Vorbereitungen 13
4.1. Tipps zum Energiesparen . . . . . . . . . . . . . . . . . 13
4.2. Erste Inbetriebnahme . . . . . . . . . . . . . . . . . . . . 13
5 Gerät bedienen 14
5.1. Anzeigefeld . . . . . . . . . . . . . . . . . . . . . . . . . . . 14
5.2. Anzeigefeld . . . . . . . . . . . . . . . . . . . . . . . . . . . 15
5.3. Eisbereiter . . . . . . . . . . . . . . . . . . . . . . . . . . . . 18
5.4. Eisbereiter . . . . . . . . . . . . . . . . . . . . . . . . . . . . 18
5.5. Eisschale . . . . . . . . . . . . . . . . . . . . . . . . . . . . . 18
5.6. Blaues Licht. . . . . . . . . . . . . . . . . . . . . . . . . . . 19
5.7. Geruchvernichtungsmodul . . . . . . . . . . . . . . . . 19
(FreshGuard) . . . . . . . . . . . . . . . . . . . . . . . . . . . . . . 19
5.8. Kühlfach . . . . . . . . . . . . . . . . . . . . . . . . . . . . . 20
5.9. Gemüsefach. . . . . . . . . . . . . . . . . . . . . . . . . . . 20
5.10. So benutzen Sie den Wasserspender. . . . . . . . . 21
5.11. Wasserspendertank füllen. . . . . . . . . . . . . . . . . 21
5.12. Wassertank reinigen . . . . . . . . . . . . . . . . . . . . 21
5.13. Tropfschale . . . . . . . . . . . . . . . . . . . . . . . . . . . 22
5.14. Gemüsefach mit Feuchtigkeitsregelung (Ever
Fresh). . . . . . . . . . . . . . . . . . . . . . . . . . . . . . . 23
5.15. Frische Lebensmittel tiefkühlen. . . . . . . . . . . . . 23
5.16. Empfehlungen zur optimalen Haltbarkeit gefrorener
Lebensmittel. . . . . . . . . . . . . . . . . . . . . . . . . . 24
5.17. Hinweise zum Tiefkühlen . . . . . . . . . . . . . . . . . 24
5.18. Lebensmittel pla tzieren . . . . . . . . . . . . . . . . . . . 24
5.19. Tür-offen-Warnung . . . . . . . . . . . . . . . . . . . . . . 25
5.20. Beleuchtung. . . . . . . . . . . . . . . . . . . . . . . . . . . 25
6 Wartung und Reinigung 26
6.1. Unangenehme Gerüche verhindern . . . . . . . . . . 26
6.2. Kunststoffflächen schützen . . . . . . . . . . . . . . . 26
6.3. Innenfläche reinigen . . . . . . . . . . . . . . . . . . . . 26
6.4. Edelstahl-Außenflächen . . . . . . . . . . . . . . . . . . 27
6.5. Produkte mit Glastüren reinigen . . . . . . . . . . . . 27
7 Problemlösung 28

4 /29 DE
Kühlschrank / Bedienungsanleitung
Dieses Kapitel enthält Sicherheitshinweise,
die Ihnen dabei helfen, die Gefahr von
Verletzungen oder Sachschäden zu
verhindern. Bei Nichtbeachtung dieser
Anweisungen erlöschen sämtliche
Gewährleistungen.
Bestimmungsgemäßer Einsatz
A
ACHTUNG:
Stellen Sie sicher, dass die
Entlüftungsöffnungen am
Aufstellort des Gerätes nicht
blockiert sind.
ACHTUNG:
Um den Auftauvorgang zu
beschleunigen, keine
anderen mechanischen
Geräte oder
Geräte verwenden, die nicht
vom Hersteller empfohlen
sind.
ACHTUNG:
Dem Kühlmittelkreislauf
keine Schäden zufügen.
ACHTUNG:
In den Lebensmittelaufbe-
wahrungsfächern keine
Geräte
verwenden, die nicht vom
Hersteller empfohlen sind.
Dieses Gerät ist für die private Nutzung
oder für den Gebrauch bei folgenden
ähnliche Anwendungen konzipiert worden
- In Personalküchen in Geschäften, Büros
und anderen Arbeitsumgebungen;
- In Bauernhöfen, Hotels, Motels und
anderen Unterkünften, für den Gebrauch
der Kunden;
- Umgebungen mit Übernachtung und
Frühstück;
1.1. Allgemeine Hinweise zu Ihrer Sicherheit
• Personen mit körperlichen,
sensorischen oder geistigen
Behinderungen, oder die sich mit dem
Gerät nicht auskennen, sollten es nicht
nutzen. Kinder sollten nicht daran
spielen oder hineinklettern.
• Die Nichteinhaltung der Anweisungen
zum Gerät oder eine unkontrollierte
Nutzung des Gerätes könnten zu
gefährlichen Situationen führen!
• Ziehen Sie den Netzstecker, falls
während der Benutzung eine Störung
auftritt.
• Falls das Produkt nicht richtig
funktioniert, darf es erst nach
Reparatur durch einen autorisierten
Serviceanbieter in Betrieb genommen
werden. Stromschlaggefahr!
• Schließen Sie das Gerät an eine
geerdete Steckdose an, die mit einer
Sicherung, die dem Wert auf dem
Typenschild entspricht, ausgestattet
ist. Lassen Sie das Produkt von
einem qualifizierten Elektriker erden.
Unser Unternehmen übernimmt keine
Verantwortung für Schäden aufgrund
einer nicht gemäß den örtlichen
Bestimmungen geerdeten Steckdose.
• Ziehen Sie den Netzstecker, wenn Sie
das Gerät nicht nutzen.
• Lassen Sie niemals Wasser direkt auf
das Gerät gelangen; auch nicht zum
Reinigen! Stromschlaggefahr!
• Berühren Sie den Netzstecker niemals
mit feuchten oder gar nassen Händen!
• Trennen Sie das Gerät niemals durch
Ziehen am Kabel vom Stromnetz.
Greifen Sie beim Ziehen immer am
Stecker.
1 Wichtige Hinweise zu Sicherheit und Umwelt

Wichtige Hinweise zu Sicherheit und Umwelt
5 /28 DE
Kühlschrank / Bedienungsanleitung
• Achten Sie beim Aufstellen des
Gerätes darauf, dass das Netzkabel
nicht eingeklemmt oder anderweitig
beschädigt wird.
• Platzieren Sie nicht mehrere
Mehrfachsteckdosen oder Netzteile
hinter dem Gerät.
• Schließen Sie den Kühlschrank nicht
an lose Steckdosen an.
• Verbinden Sie Ihren Kühlschrank nie
mit Energiesparvorrichtungen. Solche
Systeme können dem Gerät schaden.
• Sorgen Sie dafür, dass das Gerät bei
Installation, Pflege, Reinigung und
Reparaturen komplett vom Stromnetz
getrennt wird.
• Überlassen Sie die Produktaufstellung
und den elektrischen Anschluss
immer einem autorisierten
Serviceanbieter. Der Hersteller
übernimmt keine Verantwortung
für Schäden, die durch von nicht
autorisierten Personen ausgeführten
Arbeitsschritten verursacht werden.
• Verzehren Sie Speiseeis und
Eiswürfel nicht unmittelbar nach der
Entnahme aus dem Tiefkühlbereich!
Andernfalls kann es zu Erfrierungen
an den Lippen kommen.
• Berühren Sie gefrorene Lebensmittel
nicht mit feuchten Händen! Die
Lebensmittel können an den Händen
festfrieren!
• Bewahren Sie Getränke in
Flaschen und Dosen niemals im
Tiefkühlbereich auf. Sie können
platzen!
• Verwenden Sie zum Reinigen oder
Abtauen des Kühlschranks niemals
Dampf oder Dampfreiniger. Wenn
Dampf mit spannungsführenden
Teilen in Ihrem Kühlschrank
in Berührung kommt, drohen
Kurzschlüsse und Stromschläge!
• Nutzen Sie keine mechanischen
oder anderen Hilfsmittel, um
das Gerät abzutauen – es sei
denn, solche Hilfsmittel werden
ausdrücklich vom Hersteller
empfohlen.
• Missbrauchen Sie niemals Teile
Ihres Kühlschranks (z. B. Tür oder
Schubladen) als Befestigungen oder
Kletterhilfen. Mit anderen Worten:
Stellen Sie sich niemals auf Teile
Ihres Kühlschranks, hängen Sie
sich nicht daran. Dies gilt natürlich
auch für Kinder. Andernfalls kann
das Gerät umkippen und beschädigt
werden.
• Achten Sie darauf, den
Kühlkreislauf keinesfalls mit
Bohr- oder Schneidwerkzeugen
zu beschädigen. Das Kühlmittel
kann herausspritzen, wenn die
Gaskanäle des Verdunsters,
Rohr- und Schlauchleitungen
oder Oberflächenversiegelungen
beschädigt werden. Dies
kann zu Hautreizungen und
Augenverletzungen führen.
• Decken Sie keinerlei
Belüftungsöffnungen des
Kühlschranks ab.
• Lagern Sie hochprozentige
alkoholische Getränke gut
verschlossen und aufrecht.
• Benutzen Sie keine Sprays
in der Nähe des Gerätes; es
besteht eine gewisse Brand- und
Explosionsgefahr!
• Bewahren Sie in dem Gerät niemals
entflammbare oder explosive
Produkte auf oder solche, die

Wichtige Hinweise zu Sicherheit und Umwelt
6 /28 DE
Kühlschrank / Bedienungsanleitung
entflammbare oder explosive Gase
(z. B. Spray) enthalten.
• Stellen Sie keine mit Flüssigkeiten
gefüllten Gegenstände auf dem
Produkt ab. Falls Wasser oder
andere Flüssigkeiten an elektrische
Teile gelangen, kann es zu
Stromschlägen oder Bränden
kommen.
• Bewahren Sie Gegenstände, die
eine präzise Temperatureinstellung
benötigen (wie Impfstoffe,
hitzeempfindliche Medikamente,
wissenschaftliche Materialien usw.)
nicht im Kühlschrank auf.
• Ziehen Sie den Netzstecker und
entnehmen Sie die Lebensmittel,
falls das Produkt voraussichtlich
längere Zeit nicht benutzen.
• Falls der Kühlschrank über ein
blaues Licht verfügt, blicken Sie
nicht mit optischen Werkzeugen in
dieses Licht.
• In Bezug auf die elektrische
Sicherheit besteht Gefahr, wenn das
Produkt Regen, Schnee, direkter
Sonneneinstrahlung und Wind
ausgesetzt wird.
• Bei Geräten mit mechanischer
Temperaturregelung (Thermostat)
warten Sie nach Unterbrechungen
der Stromversorgung grundsätzlich
mindestens 5 Minuten lang ab,
bevor Sie den Netzstecker wieder
einstecken.
• Überladen Sie den Kühlschrank
nicht. Gegenstände im Kühlschrank
könnten herunterfallen und
Verletzungen oder Schäden
verursachen, wenn die Tür geöffnet
wird. Ähnliche Probleme können
auftreten, wenn ein Gegenstand auf
dem Produkt platziert wird.
• Falls das Gerät einen Türgriff
hat, bewegen Sie es nicht durch
Ziehen am Griff. Der Griff könnte
sich lockern.
• Achten Sie darauf, dass Ihre
Hände sowie andere Körperteile
nicht zwischen die beweglichen
Teile des Kühlschranks geraten.
• Stecken Sie weder Ihre Hand noch
irgendwelche Gegenstände in den
Eisbereiter, während er in Betrieb
ist.
• Kinder im Alter von 3 bis 8 Jahren
dürfen Kühlgeräte ein- und
ausräumen.
• Vermeiden Sie durch Einhaltung
der folgenden Anweisungen
Lebensmittelkontamination:
• Durch langes Öffnen der Tür kann
die Temperatur in den Fächern
des Gerätes drastisch ansteigen.
• Reinigen Sie die Oberflächen, die
mit Lebensmitteln in Berührung
kommen, sowie zugängliche
Ableitungssysteme regelmäßig.
• Reinigen Sie Wassertanks, wenn
diese 48 Stunden lang nicht
benutzt wurden; spülen Sie
das an die Wasserversorgung
angeschlossene Wassersystem
durch, falls 5 Tage lang kein
Wasser entnommen wurde.
• Bewahren Sie rohes Fleisch und
Fisch in geeigneten Behältern
im Kühlschrank auf, damit diese
nicht mit anderen
• Lebensmitteln in Berührung
kommen.
• Zwei-Sterne-Gefrierfächer
eignen sich zur Aufbewahrung
von Tiefkühlkost, zur Lagerung

Wichtige Hinweise zu Sicherheit und Umwelt
7 /28 DE
Kühlschrank / Bedienungsanleitung
oder Herstellung von Speiseeis
und zur Herstellung von
Eiswürfeln.
• Ein-, Zwei- und Drei-Sterne-
Fächer eignen sich nicht zum
Einfrieren frischer Lebensmittel.
• Falls das Kühlgerät lange Zeit leer
bleibt, sollten Sie es abschalten,
abtauen, reinigen, trocknen und
die
• Tür geöffnet lassen, damit sich
kein Schimmel im Gerät bildet.
• Achten Se bem Aufstellen
des Gerätes darauf, dass das
Netzkabel ncht engeklemmt oder
anderwetg beschädgt wrd.
• Platzeren Se ncht mehrere
Mehrfachsteckdosen oder
Netztele hnter dem Gerät.
1.1.1 Kohlenwasserstoff-Warnung
•
Falls das Kühlsystem Ihres
Produktes R600a enthält:
Dieses Gas ist leicht entflammbar.
Achten Sie also darauf, Kühlkreislauf
und Leitungen während Betrieb und
Transport nicht zu beschädigen.
Halten Sie das Produkt bei Schäden
von möglichen Feuerquellen fern und
belüften Sie den Raum, in dem das
Produkt aufgestellt ist.
C
Halten Sie sich vom Gas fern,
falls das Produkt beschädigt
ist und offensichtlich Gas
austritt. Es kann bei Hautkontakt
Erfrierungen verursachen.
(Einschließlich R134)
C
Ignorieren Sie diese Warnung,
falls das Kühlsystem Ihres
Produktes R134a enthält.
C
Die Art des im Produkt
eingesetzten Gases wird auf
dem Typenschild an der linken
Innenwand des Kühlschranks
angegeben.
A
WARNUNG:
Entsorgen Sie das Produkt
keinesfalls durch Verbrennen.
1.1.2 Bei Produkten mit
Wasserspender/Eisbereiter
• Der Druck für die Kaltwasserzufuhr
sollte maximal 90 psi (620 kPa)
betragen. Wenn der Wasserdruck
in Ihrem Haushalt 80 psi (550 kPa)
übersteigt, verwenden Sie bitte
ein Druckbegrenzungsventil in
Ihrem Leitungssystems. Sollten Sie
nicht wissen, wie der Wasserdruck
gemessen wird, ziehen Sie bitte
einen Fachinstallateur hinzu.
• Falls die Gefahr von Wasserschlägen
in Ihrer Installation besteht, nutzen
Sie immer eine Wasserschlag-
Präventionsausrüstung in dieser
Installation. Wenden Sie sich an
einen professionellen Klempner,
wenn Sie nicht sicher sind, ob bei
Ihrer Installation die Gefahr eines
Wasserschlags besteht.
• Nehmen Sie keine Installation am
Warmwasserzulauf vor.
• Nutzen Sie ausschließlich
Trinkwasser.
• Schützen Sie die Schläuche mit
geeigneten Maßnahmen vor Frost.
Der Wassertemperaturbereich muss
zwischen 0,6 und 38 °C liegen.

Wichtige Hinweise zu Sicherheit und Umwelt
8 /28 DE
Kühlschrank / Bedienungsanleitung
A
WARNUNG:
Schließen
Sie das Produkt niemals an
einen Kaltwasseranschluss
mit einem Druck von 550 kPa
oder mehr an.
1.2. Bestimmungsgemäßer Einsatz
• Dieses Gerät ist zur Nutzung im
Haushalt vorgesehen. Es eignet
sich nicht zum kommerziellen
Einsatz und darf nur für
seinen bestimmungsgemäßen
Einsatzzweck verwendet werden.
• Es darf nur zur Aufbewahrung von
Lebensmitteln genutzt werden.
• Der Hersteller übernimmt keine
Verantwortung für Schäden
aufgrund von unsachgemäßem
Gebrauch oder Transport.
• Originalersatzteile sind ab
Kaufdatum des Produktes 10 Jahre
erhältlich.
1.3. Sicherheit von Kindern
• Wenn Sie ein Schloss an der
Gerätetür haben, sollte der
Schlüssel außerhalb der Reichweite
von Kindern aufbewahrt werden.
• Kinder dürfen nicht mit dem Gerät
spielen.
A
GEFAHR:
Bevor Sie Ihr Altgerät
entsorgen:
• Kinder könnten sich im
Inneren des Gerätes
einsperren.
• Entfernen Sie die Türen.
• Lassen Sie die Ablagen im
Gerät, damit Kinder nicht
so einfach in das Produkt
gelangen.
1.4. Erfüllung der WEEE-Vorgaben
zur Entsorgung von Altgeräten:
Dieses Produkt erfüllt die Vorgaben
der europäischen WEEE-Richtlinie
(2012/19/EU). Das Gerät wurde
mit einem Klassifizierungssymbol
für elektrische und elektronische
Altgeräte (WEEE) gekennzeichnet.
Dieses Gerät wurde aus hochwertigen
Materialien hergestellt, die wiederverwendet und
recycelt werden können. Entsorgen Sie das Gerät
am Ende seiner Einsatzzeit daher nicht mit dem
regulären Hausmüll oder anderen Abfällen. Bringen
Sie das Gerät zu einer Sammelstelle zum Recycling
von elektrischen und elektronischen Geräten. Ihre
Stadtverwaltung informiert Sie gerne über geeignete
Sammelstellen in Ihrer Nähe.
1.5. Einhaltung von RoHS-Vorgaben:
Das von Ihnen erworbene Gerät erfüllt die
Anforderungen der europäischen RoHS-Richtlinie
(2011/65/EU). Es enthält keine in der Direktive
angegebenen gefährlichen oder unzulässigen
Materialien.
1.6. Verpackungsinformationen
• Die Verpackungsmaterialien des Gerätes wurden
gemäß nationalen Umweltschutzbestimmungen
aus recyclingfähigen Materialien hergestellt.
Entsorgen Sie Verpackungsmaterialien nicht mit
dem normalen Hausmüll oder anderen Abfällen.
Bringen Sie diese Materialien zu einer von Ihrer
Stadtverwaltung vorgesehenen Recyclingstelle.

Wichtige Hinweise zu Sicherheit und Umwelt
9 /28 DE
Kühlschrank / Bedienungsanleitung
A
GEFAHR:
Brand- oder Explosionsgefahr:
• Dieses Produkt nutzt ein
entflammbares Kühlmittel.
• Tauen Sie den Kühlschrank nicht mit
mechanischen Geräten ab.
• Verwenden Sie zur Reinigung keine
Chemikalien.
• Durchstechen Sie die
Kühlmittelleitung nicht.
• Falls die Kühlmittelleitung
durchstochen wird, darf sie nur
von autorisiertem Servicepersonal
repariert werden.
• Bitte wenden Sie sich vor der
Reinigung des Produktes an die
Reparatur- / Bedienungsanleitung.
Alle Sicherheitshinweise müssen
befolgt werden.
• Entsorgen Sie das Produkt
entsprechend den staatlichen oder
örtlichen Vorschriften.

10 /29 DE
Kühlschrank / Bedienungsanleitung
1. Kühlbereich-Türablagen
2. Tiefkühlbereichschubladen
3. Eisbereiter
4. Wassertank
5. Gemüsefach
6. Gemüsefachabdeckung
7. Kühlfach
8. Kühlbereich-Glasablagen
9. Geruchsfilter
10. Innenliegendes Display
11. Kühlbereich-Glasablagen
12. Tiefkühlbereich
* Optional
2 Ihr Kühlschrank
C
* Optional:Die Abbildungen in dieser Anleitung dienen zur Orientierung und können etwas vom
tatsächlichen Aussehen des Gerätes abweichen. Falls bestimmte Teile bei Ihrem Gerät nicht vorhanden
sind, gilt die Abbildung für andere Modelle.
*1
*3
*4
6
*5
7
*8
11
12
*2
*1
*2
*3
*5
7
*8
9
10
11
6
12
Trifft möglicherweise nicht auf alle Modelle zu

11 /29 DE
Kühlschrank / Bedienungsanleitung
3 Installation
3.1. Der richtige Aufstellungsort
Wenden Sie sich zur Aufstellung des Gerätes an den
autorisierten Kundendienst. Bereiten Sie das Produkt
auf die Inbetriebnahme vor, indem Sie die Informationen
in der Bedienungsanleitung befolgen und sicherstellen,
dass Elektro- und Wasserinstallation geeignet sind. Falls
noch weitere Vorbereitungen zu treffen sind, lassen Sie
die entsprechenden Arbeiten von einem qualifizierten
Elektriker oder Techniker ausführen.
B
WARNUNG: Der Hersteller haftet nicht
bei Schäden, die durch das Zutun nicht
autorisierter Personen verursacht werden.
B
WARNUNG: Das Gerät darf während
der Installation nicht mit dem Stromnetz
verbunden werden. Andernfalls besteht die
Gefahr schwerer bis tödlicher Unfälle!
A
WARNUNG: Wenden Sie sich an den
autorisierten Kundendienst, falls das Gerät
nicht durch die Tür des Raums passt, in
dem es aufgestellt werden soll.
• StellenSiedasGerätaufeinerebenenUnterlageauf,
damit es nicht wackelt.
•WennSiedasGerätineinemSchrank/Möbelstück
verwenden, muss zwischen den Seitenwänden
und dem Schrank/Möbelstück ein Abstand von
mindestens 2 cm bestehen.
• StellenSiedasGerätmindestens30cmvon
Wärmequellen wie Herden, Zentralheizungen und
ähnlichen Geräten, und mindestens 5 cm von
elektrischen Öfen entfernt auf.
•DasGerätdarfkeinemdirektenSonnenlichtoder
Feuchtigkeit ausgesetzt werden.
• DamitdasGerätrichtigarbeitenkann,müssenSie
ausreichend Platz um das Gerät herum freilassen,
damit es ausreichend belüftet werden kann. Falls
Sie das Gerät in einer Nische aufstellen, achten Sie
darauf, dass mindestens 5 cm zur Decke und zu den
Wänden frei bleiben.
• In Umgebungen, in denen die Raumtemperatur auf
unter 10 °C fällt, läuft der Kühlschrank weiter, um
die Lebensmittel im Tiefkühlbereich entsprechend
kalt zu halten. Frische Lebensmittel im Kühlbereich
könnten aufgrund der kalten Umgebung jedoch
gefrieren.
3.2. Kunststoffkeile anbringen
Die mitgelieferten Kunststoffkeile sorgen für den
richtigen Abstand zwischen Kühlschrank und Wand –
und damit für ausreichende Luftzirkulation.
1. Dazu drehen Sie die Schrauben aus dem Gerät
heraus und drehen stattdessen die mitgelieferten
Schrauben ein. Die Schrauben finden Sie bei den
Keilen.
2. Setzen Sie die beiden Kunststoffkeile wie in der
Abbildung gezeigt an der Abdeckung der hinteren
Belüftungsöffnungen ein.

Installation
12 / 28 DE
Kühlschrank / Bedienungsanleitung
3.3. Füße einstellen
Falls das Produkt nach der Installation nicht gerade
steht, drehen Sie die Füße an der Vorderseite nach
rechts oder links.
3.4. Elektrischer Anschluss
A
WARNUNG: Verzichten Sie
auf Verlängerungskabel und
Mehrfachsteckdosen.
B
WARNUNG: Beschädigte
Netzkabel müssen vom autorisierten
Kundendienst ausgetauscht werden.
C
Falls zwei Kühlschränke
nebeneinander aufgestellt werden
sollen, achten Sie darauf, dass
mindestens 4 cm Abstand zwischen
den Geräten verbleibt.
• Unser Unternehmen haftet nicht bei
Schäden, die durch Einsatz des Gerätes ohne
ordnungsgemäße Erdung und elektrischen
Anschluss gemäß nationalen Vorschriften
entstehen.
• Der Netzstecker muss auch nach der Installation
stets leicht zugänglich bleiben.
• Verwenden Sie zwischen Ihrem Produkt und
der Steckdose keine Verlängerungskabel oder
Mehrfachsteckdosen.
C
Warnung vor heißen Oberflächen!
Ihr Produkt ist mit Kühlmittelrohren
ausgestattet, die das Kühlsystem
der Seitenwände verbessern.
Möglicherweise fließt heiße Flüssigkeit
durch diese Oberflächen, wodurch
sich die Seitenwände erhitzen. Dies
ist völlig normal und weist nicht auf
eine Fehlfunktion hin. Seien Sie sehr
vorsichtig, wenn Sie diese Bereiche
berühren.
A
WARNUNG: „Die Schutzfolien am vertikalen Griff“ werden entfernt.

13 /29 DE
Kühlschrank / Bedienungsanleitung
4.1. Tipps zum Energiesparen
A
Der Anschluss des Gerätes an
Energiesparsysteme birgt Risiken, da
Schäden am Gerät auftreten können.
• Halten Sie die Kühlschranktüren nur möglichst kurz
geöffnet.
• Stellen Sie keine warmen Speisen oder Getränke in
den Kühlschrank.
• Überladen Sie den Kühlschrank nicht. Die
Kühlleistung nimmt ab, wenn die freie Luftzirkulation
im Inneren behindert wird.
• Zur maximalen Beladung des Tiefkühlbereichs
Ihres Kühlschranks müssen Sie die obere Klappe
und Schublade entfernen und auf den Glasablagen
platzieren. Der für Ihren Kühlschrank angegebene
Energieverbrauch wurde nach Entfernen von
Eiswürfelbehälter, Eisschale, Klappe und mittlerer
Schublade zur Gewährleistung maximaler Beladung
bestimmt. Bei Beladung wird der Einsatz der
oberen Klappe und der unteren Schublade dringend
empfohlen.
• Je nach den Merkmalen Ihres Produkts ist das
Auftauen von gefrorenen Lebensmitteln im
Kühlbereich energiesparend und bewahrt die
Qualität der Lebensmittel.
• Die Luftzirkulation sollte nicht durch Einlagern von
Lebensmitteln vor dem Lüfter des Tiefkühlbereichs
blockiert werden. Lebensmittel sollten so eingelagert
werden, dass vor dem Lüfter-Gitterschutz ein
Freiraum von 5 cm bleibt.
• Der Temperatursensor im Tiefkühlbereich darf
Lebensmittelverpackungen nicht direkt berühren.
Bei Kontakt mit dem Sensor könnte sich der
Stromverbrauch des Produkts erhöhen.
4 Vorbereitungen
C
Das Innere Ihres Gerätes muss gereinigt
werden.
C
Falls zwei Kühlschränke nebeneinander
aufgestellt werden sollen, achten Sie
darauf, dass mindestens 4 cm Abstand
zwischen den Geräten verbleibt.
4.2. Erste Inbetriebnahme
Bevor Sie Ihren Kühlschrank zum ersten Mal benutzen,
vergewissern Sie sich, dass sämtliche Vorkehrungen wie
in den Abschnitten „Wichtige Hinweise zu Sicherheit und
Umwelt“ und „Installation“ getroffen wurden.
Lassen Sie den Kühlschrank etwa 6 Stunden lang
leer arbeiten; verzichten Sie in dieser Zeit möglichst
vollständig auf das Öffnen der Türen.
C
Sie hören Geräusche, wenn sich der
Kompressor einschaltet. Die Flüssigkeiten
und Gase im Kühlsystem können auch
leichte Geräusche erzeugen, wenn der
Kompressor nicht läuft. Dies ist völlig
normal.
C
Es ist normal, dass sich die Vorderkanten
des Kühlgerätes erwärmen können. Diese
Bereiche wärmen sich etwas auf, damit
sich kein Kondenswasser bildet.

14 /29 DE
Kühlschrank / Bedienungsanleitung
5 Gerät bedienen
5.1. Anzeigefeld
Die Anzeigefelder können je nach Modell etwas anders ausfallen.
Audiovisuelle Funktionen am Anzeigefeld helfen Ihnen bei der Bedienung Ihres Gerätes.
C
* Optional: Die Abbildungen in dieser Anleitung dienen zur Orientierung und können etwas vom
tatsächlichen Aussehen des Gerätes abweichen. Falls bestimmte Teile bei Ihrem Gerät nicht vorhanden
sind, gilt die Abbildung für andere Modelle.
1. Temperatureinstellung / Temperatur erhöhen
2. Temperatureinstellregler / Temperaturanzeige
3. Temperatureinheit-Auswahl (°C) Celsius-Anzeige
4. Temperatureinheit-Auswahl (°F) Fahrenheit-
Anzeige
5. Temperatureinstellung / Temperatur verringern
6. Anzeige / Taste Schnellkühlen
7. * Drahtlos
8. Anzeige / Taste Energiesparmodus
9. *Anzeige / Taste Joker-Gefrieren
10. *Auto-Tür
11. Warnung / Fehler Hochtemperatur
12. *Flaschenkühler
13. *Warnung / Fehler Filterwechsel
14. Menütaste
15. Betriebsanzeige / Ein-/Austaste
16. *Anzeige / Taste Eisbereiter
17. *Sabbat-Modus
18. Anzeige / Taste Urlaubsmodus
19. Tastensperre-Anzeige
20. Anzeige / Taste Schnellgefrieren
21. Schrankauswahl
22. Kühlbereichanzeige
23. Tiefkühlbereichanzeige
Trifft möglicherweise nicht auf alle Modelle zu
1
2
3
4
*16
*17
18
20
21
22
23
19
5
6
8
*7
*10
*12
*13
14
15
11
*9a
*9b

Gerät bedienen
15 /28 DE
Kühlschrank / Bedienungsanleitung
1. Temperatureinstellung / Temperatur erhö-
hen
Erhöht bei Betätigung die Temperatur des
ausgewählten Fachs.
2. Temperatureinstellregler /
Temperaturanzeige
Zeigt den Temperaturwert des ausgewählten Fachs.
Zudem können Sie Ihren Finger zum Erhöhen oder
Verringern der Temperatur nach oben oder unten
ziehen.
3. Temperatureinheit-Auswahl (°C)
Celsius
-Anzeige
Wenn die Taste gedrückt wird, ändert sich die
Temperatureinheit in Celsius.
Dies ist die Celsius-Anzeige. Wenn die
Celsius-Anzeige aktiviert ist, werden die
Temperatureinstellwerte in Celsius angezeigt und
das relevante Symbol schaltet sich zu 100 % ein.
Das Fahrenheit-Symbol schaltet sich zu 50 % ein.
4. Temperatureinheit-Auswahl (°F)
Fahrenheit
-Anzeige
Wenn die Taste gedrückt wird, ändert sich die
Temperatureinheit in Celsius.
Dies ist die Fahrenheit-Anzeige. Wenn die
Fahrenheit-Anzeige aktiviert ist, werden die
Temperatureinstellwerte in Fahrenheit angezeigt und
das relevante Symbol schaltet sich vollständig ein.
Das Celsius-Symbol schaltet sich zu 50 % ein.
5. Temperatureinstellung / Temperatur
verringern
Verringert bei Betätigung die Temperatur des
ausgewählten Fachs.
5.2. Anzeigefeld
Die Anzeigefelder können je nach Modell etwas anders ausfallen.
Audiovisuelle Funktionen am Anzeigefeld helfen Ihnen bei der Bedienung Ihres Gerätes.
C
* Optional: Die Abbildungen in dieser Anleitung dienen zur Orientierung und können etwas vom
tatsächlichen Aussehen des Gerätes abweichen. Falls bestimmte Teile bei Ihrem Gerät nicht vorhanden
sind, gilt die Abbildung für andere Modelle.
Trifft möglicherweise nicht auf alle Modelle zu
Select
!
15
21
22 23
5
2
1
*13
*7
*11
*10
*17
*12
*16
*9b
*9a
8
18
6
20
4
3
6. Schnellkühlanzeige
Wenn die Schnellkühlfunktion aktiviert ist,
schaltet sich die Anzeige zu 100 % ein. Wenn
die Funktion aufgehoben wird, kehrt das Produkt
zu seinen normalen Einstellungen zurück und die
Anzeige schaltet sich zu 50 % ein.
Schnellkühltaste
Zum Aktivieren oder Deaktivieren der
Schnellkühlfunktion.
C
Die Schnellkühlfunktion nutzen Sie,
wenn Sie Lebensmittel im Kühlbereich
besonders schnell abkühlen möchten.
Wenn Sie große Mengen frischer
Lebensmittel kühlen möchten, sollten
Sie diese Funktion vor dem Einlagern
der Lebensmittel einschalten.
C
Sofern Sie diese Funktion nicht
vorzeitig abschalten, wird das
Schnellgefrieren beendet, sobald
die nötige Temperatur erreicht ist,
spätestens jedoch nach 8 Stunden.
C
Sollten Sie die Schnellkühltaste
mehrmals innerhalb kurzer Zeit
drücken, springt eine elektronische
Schutzschaltung an, die dafür sorgt,
dass der Kompressor nicht sofort
anläuft.

Gerät bedienen
16 / 28 DE
Kühlschrank / Bedienungsanleitung
C
Diese Funktion wird nach einem
Stromausfall nicht automatisch wieder
eingeschaltet.
7. * Drahtlos
Bei Betätigung der Taste wird das Produkt in das
Heimnetzwerk aufgenommen. Wenn die Funktion
aktiviert ist, schaltet sich die Anzeige zu 100 % ein; bei
Abbruch schaltet sich die Anzeige zu 50 % ein.
8. Anzeige / Taste Energiesparmodus
Drücken Sie diese Taste zum Aktivieren und
Deaktivieren des Energiesparmodus.
Wenn der Energiesparmodus aktiviert ist, schaltet sich
die Anzeige zu 100 % ein. Wenn die Funktion aktiv ist,
arbeitet das Tiefkühlgerät nach mindestens 6 Stunden
im Energiesparmodus. Bei Abbruch der Funktion schal-
tet sich die Anzeige zu 50 % ein.
9a. *Anzeige / Taste Joker-Gefrieren
Bei Betätigung der Taste fungiert das Joker-Fach
als Tiefkühlbereich und die Anzeige leuchtet zu
100 % auf. Der Joker-Kühlbereich schaltet sich zu
50 % ein.
9b. *Anzeige / Taste Joker-Kühlen
Bei Betätigung der Taste fungiert das Joker-Fach
als Kühlbereich und die Anzeige leuchtet zu 100
% auf. Der Joker-Tiefkühlbereich schaltet sich zu
50 % ein.
10. *Auto-Tür
Mit dieser Taste schalten Sie den Auto-Tür-Modus ein
und aus. Wenn die Funktion aktiviert ist, schaltet sich
die Anzeige zu 100 % ein. Bei Abbruch der Funktion
schaltet sich die Anzeige zu 50 % ein.
Wenn die Funktion aktiv ist, berühren Sie die relevante
Auswahl am Türgriff, damit sich die Tür automatisch
öffnet.
11. Warnung / Fehler Hochtemperatur
Diese Anzeige leuchtet bei einem Stromausfall, zu
hohen Innentemperaturen und sonstigen Fehlern.
Bei längeren Stromausfällen blinkt der höchste
Temperaturwert, den der Tiefkühlbereich erreicht, in
der digitalen Anzeige. Drücken Sie nach Kontrolle der
Lebensmittel im Tiefkühlbereich zum Aufheben der
Warnung die Hochtemperatur-Taste.
12. * Flaschenkühler
Mit dieser Taste schalten Sie den Flaschenkühler-
Modus ein und aus.
Wenn die Funktion aktiviert ist, schaltet sich
die Anzeige zu 100 % ein. Wenn die Funktion
aufgehoben wird, schaltet sich die Anzeige zu 50
% ein.
13. * Warnung / Fehler Filterwechsel
Dieses Symbol leuchtet auf, sobald der Filter ersetzt
werden muss.
Bei Betätigung der Taste wird der Filter
zurückgesetzt und das Reset-Symbol erlischt.
14. Menütaste
Sie dient dem Aktivieren oder Deaktivieren des
Display-Ruhezustands. Wenn Sie 30 Sekunden
lang keine Taste drücken und die Tür nicht
öffnen, wechselt das Display automatisch in den
Ruhezustand.
15. Betriebsanzeige / Ein-/Austaste
Halten Sie die Ein-/Austaste zum Ein- oder
Ausschalten des Produktes 3 Sekunden lang ged-
rückt.
Wenn das Produkt ausgeschaltet ist, schaltet sich
die Betriebsanzeige zu 100 % ein und alle ande-
ren Anzeigen erlöschen. Halten Sie zum Einschalten
des Produktes erneut 3 Sekunden die Taste ged-
rückt. Der Kühlschrank schaltet sich ein und die
Betriebsanzeige leuchtet zu 50 % auf.
16. * Anzeige / Taste Eisbereiter
Mit dieser Taste schalten Sie den Eisbereiter ein und
aus. Falls die Anzeige zu 100 % eingeschaltet ist,
bedeutet dies, dass der Eisbereiter läuft. Falls die
Anzeige zu 50 % eingeschaltet ist, bedeutet dies,
dass der Eisbereiter ausgeschaltet ist.
C
Bei Abwahl dieser Funktion wird kein
Wasser mehr aus dem Tank zugeführt.
Bereits bereitetes Eis kann aber
nach wie vor aus dem Eisbereiter
entnommen werden.
17. * Sabbat-Modus
Mit dieser Taste schalten Sie den Sabbat-Modus
ein und aus. Wenn die Funktion aktiviert ist, schaltet
sich die Anzeige zu 100 % ein. Bei Abbruch der
Funktion schaltet sich die Anzeige zu 50 % ein.

Gerät bedienen
17 /28 DE
Kühlschrank / Bedienungsanleitung
18. Anzeige / Taste Urlaubsmodus
Drücken Sie diese Taste zum Aktivieren des
Urlaubsmodus. Die Anzeige des Urlaubsmodus
leuchtet zu 100 % auf. Wenn der Urlaubsmodus
aktiv ist, erscheint „- -“ in der Temperaturanzeige
– der Kühlbereich wird nun nicht mehr aktiv
gekühlt. Während diese Funktion aktiv ist, sollten
keine Lebensmittel im Kühlbereich aufbewahrt
werden. Andere Bereiche werden entsprechend den
eingestellten Temperaturen weiterhin gekühlt.
Zum Aufheben dieser Funktion drücken Sie die
Urlaubsfunktionstaste noch einmal. Bei Abbruch
der Funktion schaltet sich die Anzeige zu 50 % ein.
19. Tastensperre-Anzeige
Halten Sie die Schnellkühl- und die
Urlaubstaste 3 Sekunden gleichzeitig gedrückt.
Bei Betätigung der Taste startet ein Countdown
in der Temperaturanzeige. Wenn die Tastensperre
aktiviert ist, schaltet sich die Tastensperre-Anzeige
zu 100 % ein und der Tastensperre-Modus wird
aktiviert. Bei aktiver Tastensperre reagiert das
Gerät nicht auf Tastenbetätigungen. Halten Sie
Schnellkühl- und Urlaubstaste erneut 3 Sekunden
gleichzeitig gedrückt. Bei Betätigung der Taste
startet ein Countdown in der Temperaturanzeige.
Wenn die Tastensperre aufgehoben wird, schaltet
sich die Tastensperre-Anzeige zu 50 % ein und der
Tastensperre-Modus wird deaktiviert.
Aktivieren
Sie diese Funktion, wenn Sie
Änderungen der Temperatureinstellung des
Kühlschranks verhindern möchten.
20.Schnellgefrieranzeige
Wenn die Schnellgefrierfunktion aktiviert ist,
leuchtet die Anzeige zu 100 % auf. Wenn
die Funktion aufgehoben wird, kehrt das Gerät
zu seinen normalen Einstellungen zurück und die
Anzeige schaltet sich zu 50 % ein.
Schnellgefriertaste
Zum Aktivieren oder Deaktivieren der
Schnell
gefrierfunktion.
Mit dieser Taste schalten Sie die
Schnellgefrierfunktion ein und aus. Wenn diese
Funktion aktiv ist, wird der Tiefkühlbereich
besonders stark (über die eingestellte Temperatur
hinaus) gekühlt.
C
Die Schnellgefrierfunktion nutzen
Sie, wenn Sie die Lebensmittel im
Tiefkühlbereich besonders schnell
abkühlen möchten. Wenn Sie große
Mengen frischer Lebensmittel kühlen
möchten, sollten Sie diese Funktion
vor dem Einlagern der Lebensmittel
einschalten.
C
Sofern Sie diese Funktion nicht
vorzeitig abschalten, wird das
Schnellgefrieren beendet, sobald
die nötige Temperatur erreicht ist,
spätestens jedoch nach 4 Stunden.
C
Diese Funktion wird nach einem
Stromausfall nicht automatisch wieder
eingeschaltet.
21. Schrankauswahl
Drücken Sie zum Einsehen und Ändern des
Temperaturwertes von Kühl- und Tiefkühlbereich in
der Temperaturanzeige die Schrankauswahltaste.
22. Kühlbereichanzeige
Wenn diese Anzeige aktiv ist, wird die Temperatur
des Kühlbereichs in der Temperaturanzeige
angezeigt.
23. Tiefkühlbereichanzeige
Wenn diese Anzeige aktiv ist, wird die Temperatur
des Tiefkühlbereichs in der Temperaturanzeige
angezeigt.

Gerät bedienen
18 / 28 DE
Kühlschrank / Bedienungsanleitung
5.3. Eisbereiter
(Diese Funktion gibt es nur bei bestimmten
Geräten.)
Mit dem Eisbereiter bereiten Sie Eiswürfel schnell
und einfach.
Eisbereiter verwenden
1. Nehmen Sie den Wassertank aus dem
Kühlbereich.
2. Füllen Sie den Tank mit Trinkwasser.
3. Setzen Sie den Wassertank wieder ein. Nach
etwa vier Stunden liegen die ersten Eiswürfel in der
Eisbereiter-Schublade im Tiefkühlbereich für Sie
bereit.
C
Eine Komplettfüllung des Wassertanks
reicht für etwa 60 – 70 Eiswürfel.
C
Das Wasser im Tank sollte alle 2 - 3
Wochen erneuert werden.
5.4. Eisbereiter
(Diese Funktion gibt es nur bei bestimmten
Geräten.)
Mit dem Eisbereiter bereiten Sie Eiswürfel schnell und
einfach.
Eisbereiter verwenden
1. Ziehen Sie den Eisbereiter vorsichtig aus dem
Gerät.
2. Füllen Sie den Eisbereiter mit Trinkwasser.
3. Setzen Sie den Eisbereiter wieder an Ort und Stelle.
Nach etwa 2 Stunden liegen die ersten Eiswürfel für
Sie bereit.
4. Zum Entnehmen der Eiswürfel drehen Sie die
Knöpfe am Eisbehälter um 90 ° im Uhrzeigersinn. Die
Eiswürfel fallen in den Eiswürfelbehälter darunter.
5. Sie können den Eisbehälter zum Servieren der
Eiswürfel herausnehmen.
C
Nehmen Sie den Eisbereiter zum
Entnehmen der Eiswürfel nicht heraus.
C
Wenn Sie möchten, können Sie das
Eis auch im Eisbehälter aufbewahren.
Der Eiswürfelbehälter dient nur dazu,
Eiswürfel aufzufangen. Füllen Sie kein
Wasser ein; der Behälter kann sonst
brechen.
5.5. Eisschale
(Diese Funktion gibt es nur bei bestimmten
Geräten.)
Mit der Eisschale bereiten Sie Eiswürfel schnell und
einfach vor.
Eisschale verwenden
1. Nehmen Sie die Eisschale aus dem
Tiefkühlbereich.
2. Füllen Sie die Eisschale mit Trinkwasser.
3. Legen Sie die Eisschale in den Tiefkühlbereich.
Nach etwa 2 Stunden liegen die ersten Eiswürfel für
Sie bereit.
4. Nehmen Sie die Eisschale aus dem
Tiefkühlbereich, biegen Sie sie über einem Teller
etwas durch. Die Eiswürfel fallen auf den Teller.

Gerät bedienen
19 /28 DE
Kühlschrank / Bedienungsanleitung
5.6. Blaues Licht
(Diese Funktion gibt es nur bei bestimmten
Geräten.)
Die Gemüsefächer des Kühlschranks werden
mit blauem Licht beleuchtet. Dadurch wird die
Photosynthese durch die bestimmte Wellenlängen
des blauen Lichtes fortgesetzt, ihre Frische bleibt
erhalten.
5.7. Geruchvernichtungsmodul
(FreshGuard)
(Diese Funktion gibt es nur bei bestimmten
Geräten.)
Das Geruchvernichtungsmodul beseitigt schlechte
Gerüche in Ihrem Kühlschrank schnell, bevor
sie in die Lebensmittel eindringen. Dank dieses
Moduls, das an der Decke des Fachs für frische
Lebensmittel angebracht ist, werden unangenehme
Gerüche abgeführt, indem die Luft aktiv zum
Geruchsfilter geleitet wird. Anschließend wird die
vom Filter gereinigte Luft wieder in das Fach für
frische Lebensmittel zurückgeleitet. Auf diese Weise
werden während der Lagerung von Lebensmitteln
entstehende unerwünschte Gerüche beseitigt, bevor
Sie in die Lebensmittel eindringen.
Dies wird durch das Gebläse, die LED und den
im Modul integrierten Geruchsfilter erzielt. Das
Geruchvernichtungsmodul wird automatisch
regelmäßig aktiviert. Das Geräusch während der
regelmäßigen Aktivierung des Moduls wird vom
integrierten Gebläse abgegeben. Wenn Sie die
Tür des Fachs für frische Lebensmittel öffnen,
während das Modul aktiv ist, stoppt das Gebläse
vorübergehend; beim Schließen der Tür setzt es
den Betrieb fort. Nach einem Stromausfall wird das
Geruchvernichtungsmodul wieder aktiviert.
Info: Sie sollte aromatische Lebensmittel (wie
Käse, Oliven und Feinkost) gut abgedichtet in
ihrer Verpackung aufbewahren, damit keine
unangenehmen Gerüche durch Vermischung der
Gerüche verschiedener Lebensmittel entstehen.
Darüber hinaus sollten Sie verdorbene Lebensmittel
schnell aus dem Kühlschrank entfernen; andernfalls
könnten andere Lebensmittel ebenfalls verderben
und unangenehme Gerüche entstehen.

Gerät bedienen
20 / 28 DE
Kühlschrank / Bedienungsanleitung
5.8. Kühlfach
(Diese Funktion gibt es nur bei bestimmten
Geräten.)
Bewahren Sie in diesem Fach Lebensmittel auf, die
bei niedrigerer Temperatur gelagert werden sollen,
oder Fleisch, das Sie in Kürze konsumieren werden.
Lagern Sie in diesem Bereich weder Früchte noch
Gemüse.
Durch Herausnehmen von Kühlfächern können Sie
das Stauvolumen Ihres Geräts vergrößern:
Ziehen Sie sie einfach so weit wie möglich nach oben,
dann anheben und zu sich ziehen.
5.9. Gemüsefach
Im Gemüsefach Ihres Kühlgerätes bleibt Gemüse
länger frisch und behält seine natürliche Feuchtigkeit.
Dazu wird ständig reichlich kühle Luft zum
Gemüsefach geleitet. Bewahren Sie in diesem Bereich
Obst und Gemüse auf. Lagern Sie grünes Blattgemüse
für längere Haltbarkeit nicht neben Früchten.

Gerät bedienen
21 /28 DE
Kühlschrank / Bedienungsanleitung
5.10. So benutzen Sie den Wasserspender
(Diese Funktion gibt es nur bei bestimmten
Geräten.)
C
Das erste Wasser, das aus dem
Spender fließt, kann noch etwas warm
sein. Dies ist normal.
C
Falls der Wasserspender längere Zeit
nicht genutzt wurde, gießen Sie die
ersten paar Gläser Wasser weg, bis
frisches Wasser ausgegeben wird.
1. Drücken Sie mit dem Glas gegen den Hebel des
Wasserspenders. Wenn Sie weiche Plastikbecher
benutzen, drücken Sie den Hebel am besten mit
der Hand.
2. Lassen Sie den Hebel wieder los, wenn das Glas
gefüllt ist.
C
Die Wassermenge können Sie nach
Wunsch regulieren, indem Sie den
Hebel nur leicht oder ganz betätigen.
Verringern Sie den Druck auf den
Hebel, wenn das Gefäß fast gefüllt ist,
damit nichts überläuft. Das Wasser
tritt nur tropfenweise aus, wenn Sie
den Hebel nur leicht betätigen; dies ist
völlig normal.
5.11. Wasserspendertank füllen
Der Wassertank befindet sich an der Innenseite der
Türablage.
1. Öffnen Sie den Deckel des Tanks.
2. Füllen Sie den Tank mit Trinkwasser.
3. Schließen Sie den Deckel.
C
Füllen Sie den Wassertank
nur mit frischem Trinkwasser,
nicht mit anderen Flüssigkeiten
gleich welcher Art. Falls andere
Flüssigkeiten eingefüllt werden,
kann der Wasserspender irreparabel
beschädigt werden. Solche
Beschädigungen werden nicht
durch die Garantie abgedeckt. Viele
Flüssigkeiten und Getränke enthalten
Zusätze, die das Material des
Wassertanks schädigen können.
C
Nutzen Sie ausschließlich reines
Trinkwasser.
C
Der Wassertank fasst maximal 3
Liter; füllen Sie nicht mehr ein.
5.12. Wassertank reinigen
1. Nehmen Sie den Füllbehälter an der Innenseite
der Türablage heraus.

Gerät bedienen
22 / 28 DE
Kühlschrank / Bedienungsanleitung
2. Entfernen Sie die Türablage, indem Sie diese an
beiden Seiten greifen.
3. Fassen Sie den Wassertank an beiden Seiten, nehmen
Sie ihn in einem Winkel von 45 ° heraus.
4. Nehmen Sie den Deckel vom Wassertank ab, reinigen
Sie den Tank gründlich.
C
Die Komponenten des Wasserspenders
und des Wassertanks sollten nicht in
der Spülmaschine gereinigt werden.
5.13. Tropfschale
Wasser, das bei der Nutzung des Wasserspenders
heruntertropft, sammelt sich in der Tropfschale.
Nehmen Sie den Kunststofffilter wie in der Abbildung
gezeigt heraus.
Entfernen Sie angesammeltes Wasser mit einem
sauberen, trockenen Tuch.

Gerät bedienen
23 /28 DE
Kühlschrank / Bedienungsanleitung
S E B Z E L İ K
5.15. Frische Lebensmittel tiefkühlen
• Zur Wahrung der Lebensmittelqualität
sollten die Lebensmittel nach Einlagerung
im Tiefkühlbereich so schnell wie möglich
eingefroren werden; verwenden Sie dazu die
Schnellgefrierfunktion.
• Sie können Lebensmittel im Tiefkühlbereich
länger aufbewahren, wenn Sie sie einfrieren,
solange sie frisch sind.
• Verpacken Sie die einzufrierenden Lebensmittel
und schließen Sie die Verpackung, damit keine
Luft hineingelangt.
• Achten Sie darauf, Ihre Lebensmittel zu
verpacken, bevor Sie sie in den Tiefkühlbereich
geben. Verwenden Sie Gefrierbehälter,
Folien und feuchtigkeitsbeständiges
Papier, Plastikbeutel und andere
Verpackungsmaterialien anstelle von
herkömmlichem Verpackungspapier.
• Beschriften Sie jede Verpackung vor dem
Einfrieren mit dem Datum. Auf diese Weise
können Sie die Frische jeder Verpackung prüfen,
wenn Sie auf den Tiefkühlbereich zugreifen.
Bewahren Sie ältere eingefrorene Lebensmittel
weiter vorne auf, damit sie als erste verzehrt
werden.
• Verbrauchen Sie eingefrorene Lebensmittel
direkt nach dem Auftauen, frieren Sie sie nicht
wieder ein.
• Frieren Sie nicht zu große Mengen auf einmal
ein.
5.14. Gemüsefach mit
Feuchtigkeitsregelung (Ever Fresh)
(Diese Funktion gibt es nur bei bestimmten
Geräten.)
Dank des Gemüsefachs mit Feuchtigkeitsregelung
können Gemüse und Früchte in einer Umgebung mit
idealen Feuchtigkeitsbedingungen länger aufbewahrt
werden. Mit dem Feuchtigkeitsregulierungssystem
mit 3 Optionen an der Vorderseite des Gemüsefachs
können Sie den Feuchtigkeitsgehalt im Inneren je
nach Art der Lebensmittel regulieren. Wenn Sie
nur Gemüse lagern, sollten Sie die Gemüseoption
wählen; wenn Sie nur Früchte lagern, sollten Sie die
Fruchtoption wählen; wenn Sie Gemüse und Früchte
lagern, sollten Sie die gemischte Funktion nutzen.
Zur Nutzung des Systems zur
Feuchtigkeitsregulierung und zur Verlängerung der
Haltbarkeit der Lebensmittel sollten Sie Gemüse und
Früchte nicht in Plastikbeuteln aufbewahren. Wenn
Gemüse in seiner Verpackung verbleibt, verdirbt
es in kürzester Zeit. Bewahren Sie insbesondere
Gurken und Brokkoli nicht in dicht verschlossenen
Plastikbeuteln auf. Falls Gemüse aus hygienischen
Gründen nicht mit anderen Lebensmitteln in Kontakt
geraten soll, nutzen Sie perforiertes Papier oder
ähnliche Verpackungsmaterialien statt Tüten oder
Beuteln.
Beim Platzieren von Gemüse im Gemüsefach sollten
Sie das unterschiedliche Gewicht der einzelnen
Gemüsesorten beachten. Schweres, hartes Gemüse
sollte auf dem Boden des Gemüsefaches liegen,
leichtes und weiches Gemüse darüber.
Geben Sie Erbsen, Aprikosen, Pfirsiche und
besonders Äpfel nicht gemeinsam mit anderen
Obst- oder Gemüsesorten in dasselbe Gemüsefach,
da diese Früchte und Gemüse Ethylengas abgeben.
Ethylengas führt dazu, dass andere Früchte
schneller reifen und daher auch schneller verderben.

Gerät bedienen
24 / 28 DE
Kühlschrank / Bedienungsanleitung
Tiefkühlbereicheinstellung Kühlbereicheinstellung Anmerkungen
-18 °C 4 °C
Dies ist die allgemein empfohlene
Einstellung.
-20, -22 oder -24 °C 4 °C
Diese Einstellungen empfehlen wir bei
Umgebungstemperaturen über 30 °C.
Schnellgefrieren 4 °C
Diese Funktion nutzen Sie zum
Einfrieren von Lebensmitteln in kurzer
Zeit. Nach Abschluss wechselt Ihr
Gerät wieder zur zuvor eingestellten
Betriebsart.
-18 °C und kälter 2 °C
Nutzen Sie diese Einstellungen, falls Sie
meinen, dass der Kühlbereich aufgrund
zu hoher Umgebungstemperatur,
der Nähe zu Wärmequellen oder zu
häufigem Öffnen und Schließen der Tür
nicht kalt genug wird.
5.16. Empfehlungen zur optimalen
Haltbarkeit gefrorener Lebensmittel
Das Fach sollte auf mindestens -18 °C eingestellt
werden.
1. Geben Sie Lebensmittel so schnell wie möglich
nach dem Kauf in den Tiefkühlbereich, damit
sie nicht antauen.
2. Achten Sie vor dem Einfrieren darauf,
dass die an der Verpackung angegebenen
Daten bei „Verfallsdatum“ und
„Mindesthaltbarkeitsdatum“ nicht abgelaufen
sind.
3. Stellen Sie sicher, dass die
Lebensmittelverpackung nicht beschädigt ist.
5.17. Hinweise zum Tiefkühlen
Der Kühlschrank muss gemäß den IEC-62552-
Standards bei einer Umgebungstemperatur von 25
°C mindestens 4,5 kg Lebensmittel pro 100 Liter
Gefriervolumen in 24 Stunden auf -18 °C abkühlen.
Nur bei Temperaturen von -18 °C oder weniger ist
es möglich, Lebensmittel lange Zeit zu lagern.
Bei einer Tiefkühlbereichtemperatur von maximal
-18 °C können Sie die Frische Ihrer Lebensmittel
viele Monate bewahren.
Einzufrierende Lebensmittel sollten keinen direkten
Kontakt zu bereits gefrorenen Lebensmitteln haben,
damit diese nicht antauen.
Kochen Sie das Gemüse und lassen Sie das
Wasser ab, wenn Sie es längere Zeit einfrieren
möchten. Geben Sie es anschließend in luftdichten
Verpackungen in den Tiefkühlbereich. Lebensmittel
wie Bananen, Tomaten, Kopfsalat, Sellerie, gekochte
Eier und Kartoffeln sind nicht zum Einfrieren
geeignet. Wenn solche Lebensmittel eingefroren
werden, beeinträchtigt dies jedoch lediglich ihren
Nährwert und Geschmack. Achten Sie darauf, dass
die Lebensmittel nicht verdorben sind; andernfalls
stellt dies ein Gesundheitsrisiko dar.
5.18. Lebensmittel platzieren
Tiefkühlbereich-
Ablagen
Unterschiedliche gefrorene
Lebensmittel wie Fleisch,
Fisch, Speiseeis, Gemüse
usw.
Kühlbereichablagen
Lebensmittel in Pfannen,
Töpfen, auf abgedeckten
Tellern, in geschlossenen
Behältern, Eier (in
geschlossenem Behälter)
Kühlbereich-
Türablagen
Kleine und verpackte
Lebensmittel oder
Getränke
Gemüsefach Gemüse und Früchte

Gerät bedienen
25 /28 DE
Kühlschrank / Bedienungsanleitung
Frischbereich
Feinkost
(Frühstücksprodukte,
schnell verderbliche
Fleischprodukte)
5.19. Tür-offen-Warnung
(Diese Funktion gibt es nur bei bestimmten
Geräten.)
Ein Tonsignal erklingt, wenn die Tür länger als eine
Minute offen steht. Die Warnung verstummt, sobald
Sie die Tür schließen oder eine Anzeigetaste (sofern
vorhanden) betätigen.
5.20. Beleuchtung
LED-Lampen dienen der Beleuchtung. Wenden Sie
sich bei Problemen mit dieser Art von Beleuchtung
an den autorisierten Kundendienst.
Die im Produkt verwendeten Lampen sind nicht
zur Haushaltsbeleuchtung vorgesehen oder
dafür geeignet. Die Lampen im Kühl- und/oder
Tiefkühlbereich sollen den Komfort erhöhen und das
Einlagern von Lebensmitteln vereinfachen.

26 /29 DE
Kühlschrank / Bedienungsanleitung
6 Wartung und Reinigung
Die Einsatzdauer des Produktes verlängert sich und
häufige Probleme lassen nach, wenn das Produkt
regelmäßig gereinigt wird.
B
WARNUNG: Schalten Sie das Gerät
ab, bevor Sie es reinigen.
B
WARNUNG: Es wird empfohlen, den
Kondensator alle sechs Monate mit
Handschuhen zu reinigen. Sie dürfen
keine Staubsauger verwenden.
• Verwenden Sie zu Reinigungszwecken niemals
Benzin oder ähnliche Substanzen.
• Verwenden Sie zur Reinigung niemals scharfe
Gegenstände, Seife, Haushaltsreiniger, Waschmittel
oder Wachspolituren.
• Lösen Sie einen Teelöffel Natron in einem halben
Liter Wasser auf. Tränken Sie ein Tuch mit der
Lösung, wringen Sie das Tuch gut aus. Waschen Sie
die Innenflächen des Kühlschranks gründlich mit
diesem Tuch ab; anschließend gut trocknen.
• Achten Sie darauf, dass kein Wasser in das
Lampengehäuse oder in andere elektrische
Komponenten eindringt.
• Falls Sie den Kühlschrank längere Zeit nicht
benutzen, ziehen Sie den Netzstecker, nehmen
sämtliche Lebensmittel heraus, reinigen das Gerät
und lassen die Tür offen stehen.
• Prüfen Sie die Türdichtungen regelmäßig auf
Sauberkeit. Bei Bedarf reinigen.
• Nehmen Sie zum Entfernen der Tür- und
Gehäuseablagen alle Gegenstände aus dem Produkt
heraus.
• Ziehen Sie die Türablagen nach oben heraus. Setzen
Sie die Ablagen nach der Reinigung wieder ein,
indem Sie sie nach unten schieben.
• Reinigen Sie Außenflächen und verchromte Teile des
Produktes niemals mit chlorhaltigen Reinigern oder
Wasser. Chlor greift Metalloberflächen an.
• Bei Geräten ohne No-Frost-Einrichtung können
Wassertropfen entstehen und sich mit der Zeit bis zu
fingerbreite Eisschichten an Rückwand und Seiten
des Tiefkühlfachs bilden. Niemals reinigen; niemals
Öl oder andere Substanzen aufbringen.
• Verwenden Sie nur ein leicht angefeuchtetes
Mikrofasertuch zum Reinigen der
Geräteaußenflächen. Scheuerschwämme oder
grobe Reinigungstücher könnten die Oberflächen
verkratzen.
6.1. Unangenehme Gerüche verhindern
Bei der Herstellung Ihres Kühlschranks wurde darauf
geachtet, dass keine Materialien verwendet werden,
die unangenehme Gerüche verursachen können.
Allerdings können Gerüche abgesondert werden,
wenn Lebensmittel falsch aufbewahrt werden oder die
Innenseite des Gerätes nicht wie erforderlich gereinigt
wird. Dieses Problem können Sie mit folgenden
Hinweisen vermeiden:
• Es ist wichtig, das Kühlschrank sauber zu halten.
Lebensmittelreste, Verschmutzungen usw.
können Gerüche verursachen. Reinigen Sie den
Kühlschrank daher alle 15 Tage mit etwas in Wasser
aufgelöstem Natron. Verzichten Sie grundsätzlich auf
Reinigungsmittel und Seifen.
• Bewahren Sie Ihre Lebensmittel in geschlossenen
Behältern auf. Mikroorganismen aus Behältern ohne
Deckel können unangenehme Gerüche verursachen.
• Bewahren Sie keine abgelaufenen oder verdorbenen
Lebensmittel in Ihrem Kühlschrank auf.
6.2. Kunststoffflächen schützen
Geben Sie keine Öle oder stark fetthaltige Speisen
offen in Ihren Kühlschrank – dadurch können die
Kunststoffflächen angegriffen werden. Sollten
Kunststoffteile einmal mit Öl in Berührung kommen,
reinigen Sie die entsprechenden Stellen möglichst sofort
mit warmem Wasser.
6.3. Innenfläche reinigen
Reinigen Sie die Innenflächen und alle herausnehmbaren
Teile mit einer milden Lösung aus Seife, Wasser und
Karbonat. Gründlich abspülen und abtrocknen Achten
Sie darauf, dass Wasser nicht mit Leuchtmitteln und
Bedienfeld in Berührung kommt.

27 /29 DE
Kühlschrank / Bedienungsanleitung
A
ACHTUNG:
Reinigen Sie die Innenflächen
nicht mit Essig, Reinigungsalkohol
oder anderen alkoholbasierten
Reinigern.
6.4. Edelstahl-Außenflächen
Verwenden Sie einen nicht scheuernden Edelstahl-
Reiniger und tragen Sie ihn auf ein fusselfreies, weiches
Tuch auf. Zum Polieren wischen Sie die Oberfläche
vorsichtig mit einem feuchten Mikrofasertuch und
einem trockenen Fensterleder ab. Folgen Sie immer den
Strängen des Edelstahls.
6.5. Produkte mit Glastüren reinigen
Entfernen Sie die Schutzfolie von den Scheiben.
Die Oberfläche der Scheiben ist beschichtet. Diese
Beschichtung minimiert Fleckenbildung und sorgt dafür,
dass sich Flecken und Schmutz leicht entfernen lassen
. Auf Scheiben, die nicht durch eine Beschichtung
geschützt sind, können sich dauerhaft organische
oder anorganische in Luft oder Wasser befindliche
Verunreinigungen, wie Kalk, Mineralsalze, unverbrannte
Kohlenwasserstoffe, Metalloxide und Silikone,
ablagern, die innerhalb kurzer Zeit zu Flecken und
Materialschäden führen. Trotz regelmäßiger Reinigung
lässt sich das Glas nur mit großer Mühe sauber halten.
Dadurch lassen Klarheit und Aussehen der Scheiben
nach. Aggressive und scheuernde Reinigungsmittel
und Methoden verstärken diese Mängel weiter und
beschleunigen den Verschleiß.
*Verwenden Sie zur regelmäßigen Reinigung Mittel auf
Wasserbasis, die weder alkalisch noch scheuernd sind.
Damit die Beschichtung lange hält, dürfen während
der Reinigung keine alkalischen oder scheuernden
Substanzen zum Einsatz kommen.
Die Scheiben wurden zur Erhöhung ihrer Stoß- und
Bruchfestigkeit gehärtet.
Als zusätzliche Sicherheitsmaßnahme befindet sich auf
der Rückseite der Scheiben eine Sicherheitsfolie, damit
das Glas keine Schäden im Umfeld anrichtet, falls es
bricht.
Wartung und Reinigung

28 /29 DE
Kühlschrank / Bedienungsanleitung
7 Problemlösung
Bitte arbeiten Sie diese Liste durch, bevor Sie sich
an den Kundendienst wenden. Das kann Ihnen
Zeit und Geld sparen. Diese Liste enthält häufig
aufgetretene Probleme, die nicht auf Material- oder
Verarbeitungsfehler zurückzuführen sind. Nicht alle
hier beschriebenen Funktionen sind bei jedem Modell
verfügbar.
Der Kühlschrank schaltet sich nicht ein.
• Möglicherweise ist er nicht richtig angeschlossen.
>>> Schließen Sie das Gerät richtig an.
• Die entsprechende Haussicherung ist
herausgesprungen oder durchgebrannt. >>>
Prüfen Sie die Sicherung.
Kondensation an den Seitenwänden des
Kühlbereiches (Multizone, Kühlkontrolle und
FlexiZone).
• Die Tür wurde häufig geöffnet/geschlossen. >>>
Verzichten Sie auf häufiges Öffnen/Schließen der
Kühlschranktür.
• Die Umgebung könnte zu feucht sein. >>>
Installieren Sie das Kühlschrank nicht an sehr
feuchten Orten.
• Lebensmittel mit hohem Feuchtigkeitsgehalt
wurden in Behältern ohne Deckel in den
Kühlschrank gegeben. >>> Geben Sie
Lebensmittel mit hohem Feuchtigkeitsgehalt nicht
in offenen Behältern in den Kühlschrank.
• Die Kühlschranktür steht offen. >>> Halten Sie
die Kühlschranktüren nur möglichst kurz geöffnet.
• Das Thermostat wurde auf eine sehr niedrige
Temperatur eingestellt. >>> Stellen Sie das
Thermostat auf einen geeigneten Wert ein.
Der Kompressor arbeitet nicht.
• Eine Schutzschaltung stoppt den Kompressor
bei kurzzeitigen Unterbrechungen der
Stromversorgung und wenn das Gerät zu oft
und schnell ein- und ausgeschaltet wird, um
eine Überdruck des Kühlmittels im System zu
vermeiden. Der Kühlschrank beginnt nach etwa
sechs Minuten wieder zu arbeiten. Bitte wenden
Sie sich an den autorisierten Kundendienst, falls
Ihr Kühlschrank nach Ablauf dieser Zeit nicht
wieder zu arbeiten beginnt.
• Das Kühlgerät wird abgetaut. >>> Dies ist
bei einem Kühlschrank mit vollautomatischem
Abtauen völlig normal. Das Gerät wird regelmäßig
abgetaut.
• Der Kühlschrank ist nicht angeschlossen. >>>
Achten Sie darauf, dass der Stecker in die
Steckdose passt.
• Die Temperatureinstellungen stimmen nicht. >>>
Wählen Sie den richtigen Temperaturwert.
• Es liegt ein Stromausfall vor. >>> Der
Kühlschrank setzt seinen Betrieb fort, wenn die
Stromversorgung wiederhergestellt ist.
Das Betriebsgeräusch nimmt zu, wenn der
Kühlschrank arbeitet.
• Das Leistungsverhalten des Kühlgerätes kann sich
je nach Umgebungstemperatur ändern. Dies ist
völlig normal und keine Fehlfunktion.
Der Kühlschrank arbeitet sehr intensiv oder über
eine sehr lange Zeit.
• Ihr neues Gerät ist vielleicht etwas größer als sein
Vorgänger. Große Kühlgeräte arbeiten oft längere
Zeit.
• Die Umgebungstemperatur ist eventuell sehr hoch.
>>> Bei hohen Umgebungstemperaturen arbeitet
das Gerät etwas länger.
• Der Kühlschrank wurde erst vor Kurzem in Betrieb
genommen oder mit Lebensmitteln gefüllt. >>>
Wenn das Gerät erst vor Kurzem in Betrieb
genommen oder mit Lebensmitteln gefüllt wurde,
dauert es etwas länger, bis die eingestellte
Temperatur erreicht ist. Dies ist völlig normal.
• Kurz zuvor wurden größere Mengen warmer
Speisen in den Kühlschrank gestellt. >>> Geben
Sie keine warmen oder gar heißen Speisen in den
Kühlschrank.
• Die Türen wurden häufig geöffnet oder
längere Zeit nicht richtig geschlossen. >>>
Der Kühlschrank muss länger arbeiten, weil
warme Luft in den Innenraum eingedrungen ist.
Vermeiden Sie häufiges Öffnen der Türen.
• Die Tür des Kühl- oder Tiefkühlbereichs war nur
angelehnt. >>> Vergewissern Sie sich, dass die
Türen richtig geschlossen wurden.
• Die Kühlschranktemperatur ist sehr
niedrig eingestellt. >>> Stellen Sie die
Kühlschranktemperatur höher ein. Warten Sie
dann ab, bis diese Temperatur erreicht ist.
• Die Türdichtungen von Kühl- oder Gefrierbereich
sind verschmutzt, verschlissen, beschädigt oder
sitzen nicht richtig. >>> Reinigen oder ersetzen
Sie die Dichtung. Beschädigte oder defekte
Dichtungen führen dazu, dass der Kühlschrank
länger arbeiten muss, um die Temperatur halten
zu können.
Die Temperatur im Kühlbereich ist angemessen,
während Temperatur im Tiefkühlbereich sehr
niedrig ist.
• Die Tiefkühlbereichtemperatur ist sehr niedrig
eingestellt. >>> Tiefkühlbereichtemperatur höher
einstellen, Temperatur nach einer Weile prüfen.

29 /29 DE
Kühlschrank / Bedienungsanleitung
Problemlösung
Die Temperatur im Tiefkühlbereich ist
angemessen, während die Temperatur im
Kühlbereich sehr niedrig ist.
• Die Kühltemperatur ist sehr niedrig eingestellt.
>>> Stellen Sie die Kühltemperatur wärmer ein,
prüfen Sie die Temperatur nach einer Weile.
Im Kühlbereich gelagerte Lebensmittel frieren
ein.
• Die Kühlbereichtemperatur ist sehr hoch
eingestellt. >>> Kühlbereichtemperatur niedriger
einstellen, Temperatur nach einer Weile prüfen.
Die Temperatur im Kühl- oder Tiefkühlbereich ist
sehr hoch.
• Die Kühlbereichtemperatur ist sehr hoch
eingestellt. >>> Die Kühlbereichtemperatur wirkt
sich auf die Temperatur des Tiefkühlbereichs aus.
Stellen Sie den Kühl- oder Tiefkühlbereich auf eine
geeignete Temperatur ein.
• Türen wurden häufig geöffnet oder längere Zeit
nicht richtig geschlossen. >>> Verzichten Sie auf
häufiges Öffnen der Türen.
• Die Tür wurde eventuell nicht richtig geschlossen.
>>> Tür richtig schließen.
• Der Kühlschrank wurde erst vor Kurzem in Betrieb
genommen oder mit Lebensmitteln gefüllt. >>>
Dies ist normal. Wenn das Gerät erst vor Kurzem
in Betrieb genommen oder mit Lebensmitteln
gefüllt wurde, dauert es etwas länger, bis die
eingestellte Temperatur erreicht ist.
• Kurz zuvor wurden größere Mengen warmer
Speisen in den Kühlschrank gestellt. >>> Geben
Sie keine warmen oder gar heißen Speisen in den
Kühlschrank.
Vibrationen oder Betriebsgeräusche.
• Der Boden ist nicht stabil oder gerade. >>> Falls
der Kühlschrank bei Bewegung leicht wackelt,
richten Sie ihn mit den Füßen aus. Achten Sie
darauf, dass der Boden eben ist und das Gewicht
des Kühlschranks problemlos tragen kann.
• Gegenstände, die auf dem Kühlschrank abgestellt
wurden, können Geräusche verursachen. >>>
Nehmen Sie die Gegenstände herunter.
Fließ- oder Spritzgeräusche sind zu hören.
• Aus technischen Gründen bewegen sich
Flüssigkeiten und Gase innerhalb des Gerätes.
>>> Dies ist völlig normal und keine Fehlfunktion.
Der Kühlschrank pfeift.
• Im Inneren befinden sich Gebläse zum Kühlen
des Gerätes. Dies ist völlig normal und keine
Fehlfunktion.
Feuchtigkeit an den Kühlschrankinnenflächen.
• Bei heißen und feuchten Wetterlagen treten
verstärkt Eisbildung und Kondensation auf. Dies ist
völlig normal und keine Fehlfunktion.
• Türen wurden häufig geöffnet oder längere Zeit
nicht richtig geschlossen. >>> Verzichten Sie
auf häufiges Öffnen der Türen. Schließen Sie die
Türen, falls sie offen sind.
• Eine Tür wurde eventuell nicht richtig geschlossen.
>>> Tür richtig schließen.
Feuchtigkeit sammelt sich an der Außenseite
des Kühlschranks oder an den Türen an.
• Hohe Luftfeuchtigkeit. Dies ist bei feuchtem
Wetter völlig normal. >>> Die Kondensation
verschwindet, wenn der Feuchtigkeitsgehalt
abnimmt.
• Externer Feuchtigkeitsniederschlag im Bereich
zwischen den beiden Türen des Kühlschranks,
wenn das Gerät selten benutzt wird. Dies ist
völlig normal. Der Feuchtigkeitsniederschlag
verschwindet bei häufiger Verwendung.
Unangenehmer Geruch im Kühlschrank.
• Das Gerät wurde nicht regelmäßig gereinigt.
Reinigen Sie das Innere des Kühlschranks mit
einem Schwamm, den Sie mit lauwarmem oder
kohlensäurehaltigem Wasser angefeuchtet haben.
• Einige Behälter oder Verpackungsmaterialien
können Gerüche verursachen. >>> Andere
Behälter und Verpackungsmaterialien bzw.
Produkte anderer Hersteller verwenden.
• Lebensmittel wurden in Behältern ohne Deckel
in den Kühlschrank gegeben. >>> Lebensmittel
in geschlossenen Behältern aufbewahren.
Mikroorganismen aus Behältern ohne Deckel
können unangenehme Gerüche verursachen.
• Nehmen Sie abgelaufene oder verdorbene
Lebensmittel aus dem Kühlschrank.
Die Tür kann nicht geschlossen werden.
• Lebensmittelpackungen verhindern ein
vollständiges Schließen der Tür. >>> Entfernen
Sie die Verpackungen, welche die Tür blockieren.
• Der Kühlschrank hat keinen stabilen Stand. >>>
Passen Sie die Kühlschrankfüße so an, dass der
Kühlschrank in Waage ist.
• Der Boden ist nicht eben oder nicht stabil genug.
>>> Achten Sie darauf, dass der Boden eben ist
und das Gewicht des Kühlschranks problemlos
tragen kann.

30 /29 DE
Kühlschrank / Bedienungsanleitung
Problemlösung
Das Gemüsefach klemmt.
• Lebensmittel könnten die obere Wand des
Gemüsefachs berühren. >>> Verteilen Sie die
Lebensmittel im Gemüsefach anders.
Wenn die Geräteoberfläche heiß ist.
Die Bereiche zwischen den beiden Türen, an den
Seitenflächen und hinten am Grill können im Betrieb
sehr heiß werden. Dies ist völlig normal und weist
nicht auf eine Fehlfunktion hin.
Gebläse läuft weiter, wenn die Tür geöffnet wird.
Es ist normal, dass das Gebläse weiterläuft, wenn die
Tür des Tiefkühlbereichs geöffnet wird.
A
WARNUNG: Falls sich ein Problem nicht
mit den Hinweisen in diesem Abschnitt
lösen lassen sollte, wenden Sie sich bitte
an Ihren Händler oder an den autorisierten
Kundendienst. Versuchen Sie niemals, ein
fehlerhaftes Produkt selbst zu reparieren.

EWWERQWEW
SL
Hladilnik
Navodila za uporabo

Prosimo, da najprej preberete navodila za uporabo!
Dragi kupec,
upamo, da bo naprava, ki je bila izdelana v modernih obratih in preizkušena z natančnimi postopki kakovosti,
zagotovila učinkovito delovanje.
Zato priporočamo, da pred uporabo pazljivo preberete celotna navodila za uporabo naprave in jih hranite v bližini, saj
jih boste morda potrebovali v prihodnje.
Priročnik
• Priročnik vam bo pomagal pri hitri in varni uporabi naprave.
• Priročnik preberite preden napravo namestite in uporabite.
• Sledite navodilom, predvsem varnostnim.
• Priročnik hranite na lahko dosegljivem mestu, saj ga boste morda kasneje potrebovali.
• Poleg tega preberite tudi ostale dokumente, ki so priloženi napravi.
• Prosimo upoštevajte, da je priročnik lahko veljaven tudi za druge modele.
Simboli in njihov opis
Navodila za uporabo vsebujejo naslednje simbole:
C Pomembne informacije in koristni nasveti za uporabo.
A Opozorila pred nevarnostmi za življenje in lastnino.
B Opozorila pred električno napetostjo.

2 /24SL
Hladilnik / Navodila za uporabo
1 Varnost in okoljska navodila 3
1.1. Splošna varnost . . . . . . . . . . . . . . . . . . . . . . . . . 3
1.1.1 HC opozorilo . . . . . . . . . . . . . . . . . . . . . . . . . . . 4
1.1.2 Pri modelih z vodno fontano. . . . . . . . . . . . . . . . 4
1.2. Predvidena uporaba . . . . . . . . . . . . . . . . . . . . . . 5
1.3. Varnost otrok . . . . . . . . . . . . . . . . . . . . . . . . . . . 5
1.4. Skladnost z Direktivo OEEO in odstranjevanje
naprave kot odpadka. . . . . . . . . . . . . . . . . . . . . 5
1.5. Skladnost z direktivo RoHS . . . . . . . . . . . . . . . . . 5
1.6. Informacije o embalaži . . . . . . . . . . . . . . . . . . . . 5
2 Vaš hladilnik 6
3 Namestitev 7
3.1. Primerno mesto za namestitev . . . . . . . . . . . . . . 7
3.2. Namestite plastične kline . . . . . . . . . . . . . . . . . . 7
3.3. Prilagajanje nogic. . . . . . . . . . . . . . . . . . . . . . . . 8
3.4. Električna povezava . . . . . . . . . . . . . . . . . . . . . . 8
4 Priprava 9
4.1. Varčevanje z energijo . . . . . . . . . . . . . . . . . . . . . 9
4.2. Začetna uporaba . . . . . . . . . . . . . . . . . . . . . . . . 9
5 Uporaba naprave 10
5.1. Indikatorska tabla. . . . . . . . . . . . . . . . . . . . . . . 10
5.2. Indikatorska tabla. . . . . . . . . . . . . . . . . . . . . . . 11
5.3. Narava za led. . . . . . . . . . . . . . . . . . . . . . . . . . 14
5.4. Ledomat . . . . . . . . . . . . . . . . . . . . . . . . . . . . . 14
5.5. Pladenj za led. . . . . . . . . . . . . . . . . . . . . . . . . . 14
5.6. Modra luč . . . . . . . . . . . . . . . . . . . . . . . . . . . . 15
5.7. Modul z osvežilcem zraka . . . . . . . . . . . . . . . . . 15
(FreshGuard) . . . . . . . . . . . . . . . . . . . . . . . . . . . . . . 15
5.8. Predel za hlajenje. . . . . . . . . . . . . . . . . . . . . . . 16
5.9. Predal za sveža živila . . . . . . . . . . . . . . . . . . . . 16
5.10. Uporaba dispenzerja za vodo. . . . . . . . . . . . . . . 17
5.11. Polnjenje rezervoarja dispenzerja za vodo . . . . . 17
5.12. Čiščenje vodnega rezervoarja . . . . . . . . . . . . . . 17
5.13. Pladenj za kapljanje . . . . . . . . . . . . . . . . . . . . . 18
5.14. Predel za sveža živila . . . . . . . . . . . . . . . . . . . . 18
5.15. Zamrzovanje svežih živil . . . . . . . . . . . . . . . . . . 19
5.16. Priporočila za shranjevanje zamrznjenih živil . . . 20
5.17. Informacije za globoko zamrzovanje . . . . . . . . . 20
5.18. Postavitev živil . . . . . . . . . . . . . . . . . . . . . . . . . 20
5.19. Opozorilo za odpiranje vrat . . . . . . . . . . . . . . . . 20
5.20. Lučka . . . . . . . . . . . . . . . . . . . . . . . . . . . . . . . 20
6 Vzdrževanje in čiščenje 21
6.1. Izogibanje neprijetnim vonjavam . . . . . . . . . . . . 21
6.2. Zaščita plastičnih površin . . . . . . . . . . . . . . . . . 21
6.3. Čiščenje notranjih površin . . . . . . . . . . . . . . . . 21
6.4. Zunanje površine in nerjavečega jekla . . . . . . . . 21
6.5. Čiščenjeizdelkov s steklenimi vrati. . . . . . . . . . . 22
7 Odpravljanje motenj 23
VSEBINA

3 /24 SL
Hladilnik / Navodila za uporabo
To poglavje vsebuje navodila za varno
uporabo, potrebna za preprečitev
nevarnosti poškodb in materialne škode.
Neupoštevanje teh navodil bo izničila vse
vrste garancije izdelka.
Namen uporabe
A
OPOZORILO :
Odprtine za zračenje, ohišje
naprave ali vgrajeni hladilni
elementi naj bodo vedno
nezastrti.
A
OPOZORILO :
Za hitrejše odmrzovanje ne
uporabljajte mehanskih naprav,
razen takih, ki jih priporoča
proizvajalec.
A
OPOZORILO :
Ne poškodujte tokokroga
hladilnega sredstva.
A
OPOZORILO :
V notranjosti razdelka za
shranjevanje živil aparata ne
uporabljajte električnih naprav,
razen takih, ki jih priporoča
proizvajalec.
Ta naprava je namenjena za uporabo v
gospodinjstvu in podobnih okoljih, kot so:
– kuhinje za osebje v trgovinah, pisarnah
in drugih delovnih okoljih;
– hoteli, moteli in druga stanovanjska
okolja, kjer jo lahko uporabljajo gostje;
– okolja, kjer ponujajo nočitve z zajtrkom.
– pri cateringu in v podobnih okoljih, kjer
ne gre za neposredno prodajo.
1.1. Splošna varnost
• Ta izdelek naj ne uporabljajo otroci in
osebe s telesnimi, čutnimi in duševnimi
motnjami brez zadostnega znanja in
izkušenj. Napravo smejo uporabljati
takšne osebe le pod nadzorom in po
navodilih osebe, odgovorne za njihovo
varnost. Otroci se ne smejo igrati s to
napravo.
• V primeru okvare, izklopite napravo.
• Ko odklopite, počakajte najmanj 5
minut pred ponovnim priklopom.
Izključite napravo, ko ni v uporabi. Ne
dotikajte se vtiča z mokrimi rokami! Ko
želite izklopiti ne vlecite za kabel, vedno
držite le za vtič.
• Ne priklapljajte hladilnika, če je vtičnica
razrahljana.
• Izključite napravo med namestitvijo,
vzdrževanjem, čiščenjem in popravilom.
• Če naprave nekaj časa ne boste
uporabljali, jo izključite in iz notranjosti
odstranite vso hrano.
• Ne uporabljajte pare ali parnih čistilnih
sredstev za notranje čiščenje hladilnika
in taljenje ledu. Para lahko pride v
stik z električnimi elementi in povzroči
kratek stik ali električni udar!
• Izdelka tudi zunaj ne perite z
razprševanjem ali polivanjem vode!
Nevarnost električnega udara!
• Izdelka ne uporabljajte, če je področje
na vrhu ali na zadnji strani izdelka,
ki vsebuje elektronska tiskana vezja,
odprto (pokrov elektronskega tiskanega
vezja) (1).
1 Varnost in okoljska navodila
1
1

Varnostna in okoljevarstvena navodila
4 / 24 SL
Hladilnik / Navodila za uporabo
• V primeru okvare ne uporabljajte
naprave, saj lahko to povzroči
električni udar. Preden karkoli
poskušate se obrnite na
pooblaščenega serviserja.
• Napravo priključite v ozemljeno
vtičnico. Ozemljitev mora izvesti
usposobljen električar.
• Če ima naprava razsvetljavo vrste
LED, se obrnite na pooblaščenega
servisa zaradi zamenjave ali v
primeru kakršnih koli težav.
• Ne dotikajte se zmrznjene hrane z
mokrimi rokami! Lahko se prilepi
vašim rokam!
• Ne postavljajte tekočin v steklenicah,
plastenkah in pločevinkah v
zamrzovalnik. Lahko počijo ali pa
tekočina izbruhne!
• Postavite tekočine v pokončnem
položaju, ko tesno zaprete pokrov.
• Ne pršite vnetljivih snovi v bližini
naprave, saj lahko to povzroči požar
ali eksplozijo.
• Ne hranite vnetljivih materialov in
izdelkov z vnetljivimi plini (razpršilci
itd) v hladilniku.
• Ne postavljajte posod v katerih so
tekočine na vrh naprave. Politje vode
po elektrificiranih delih lahko povzroči
električni udar in nevarnost požara.
• Izpostavljanje naprave dežju, snegu,
soncu in vetru povzroči električno
nevarnost. Ko prestavljate napravo, jo
ne vlecite tako, da držite za ročaj vrat.
Ročaj se lahko odtrga.
• Bodite pozorni, da preprečite
ukleščenje katerihkoli delov vaših rok
ali telesa v katerega od gibljivih delov
naprave.
• Ne stopajte ali se obešajte na vrata,
predale in podobne dele hladilnika. To
bi povzročilo, da se naprava prevrne
in se deli poškodujejo.
• Pazite, da ne zapnete v napajalni
kabel.
1.1.1 HC opozorilo
Če naprava vsebuje hladilni sistem, ki
uporablja plin R600a, pazite, da ne bi
poškodovali hladilni sistem in njegovo
cev med uporabo in premikanjem
naprave. Ta plin je vnetljiv. Če je
hladilni sistem poškodovan, imejte
napravo stran od virov ognja in takoj
prezračite prostor.
C
Nalepka na notranji levi strani označuje
vrsto uporabljenega plina v napravi.
1.1.2 Pri modelih z vodno fontano
• Tlak vstopne hladne vode ne sme
presegati 620 kPa (90 psi). Če tlak
vstopne vode presega 550 kPa (80
psi), uporabite ventil za omejevanje
tlaka v vodovodnem tokokrogu. Če
ne veste, kako izmeriti vodni tlak,
poprosite inštalaterja za vodovod.
• Če je v vaši inštalaciji prisotno
tveganje nastanka hidravličnega
udara, vedno uporabite opremo za
preprečevanje hidravličnega udara.
Da preverite, da v vaši inštalaciji
ni tveganja za pojav hidravličnega
udara, se posvetujte z inštalaterjem
za vodovod.

Varnostna in okoljevarstvena navodila
5 /24SL
Hladilnik / Navodila za uporabo
• Ne nameščajte na vod s toplo
vodo. Izvedite potrebne ukrepe za
preprečevanje zamrznitve cevi.
Območje temperature vode za
delovanje naj bo med najmanj 0,6°C
(33°F) in največ 38°C (100°F).
• Uporabljajte samo pitno vodo.
1.2. Predvidena uporaba
• Ta naprava je namenjena za
domačo uporabo. Ni namenjena za
komercialno uporabo.
• To napravo se sme uporabiti samo
za shranjevanje hrane in pijače.
• Ne hranite v hladilniku občutljive
izdelke, ki zahtevajo nadzorovane
temperature (cepiva, toplotno
občutljiva zdravila, medicinski izdelki
itd).
• Proizvajalec ne prevzema
odgovornosti za morebitno škodo
zaradi zlorabe ali napačne uporabe.
• Originalne nadomestne dele
zagotavljamo 10 let po datumu
nakupa.
1.3. Varnost otrok
• Hranite embalažne materiale izven
dosega otrok.
• Ne dovolite, da bi se otroci igrali z
napravo.
• Če vrata naprave vsebujejo
ključavnico, hranite ključ izven
dosega otrok.
1.4. Skladnost z Direktivo OEEO in
odstranjevanje naprave kot odpadka
Ta naprava je skladna z direktivo EU
WEEE (2012/19/EU). Ta naprava nosi oznako
klasifikacije za odpadno električno in elektronsko
opremo (OEEO).
Naprava je bila izdelana iz visoko
kakovostnih delov in materialov, ki jih je
mogoče ponovno uporabiti in so
primerni za recikliranje. Ne zavrzite
naprave kot odpadek med običajne
domače in druge odpadke na koncu
njegove življenjske dobe. Odnesite jo v zbirni
center za recikliranje električne in elektronske
opreme. Obrnite se na lokalne oblasti, da izveste
za lokacije teh zbirnih centrov.
1.5. Skladnost z direktivo RoHS
• Ta naprava je skladna z direktivo EU
WEEE (2011/65/EU). Ne vsebuje
škodljivih in prepovedanih snovi,
navedenih v direktivi.
1.6. Informacije o embalaži
• Embalaža naprave je izdelana iz
recikliranih materialov v skladu z našimi
nacionalnimi predpisi za okolje. Ne
odlagajte embalažnih materialov skupaj
z domačimi ali drugimi odpadki. Peljite
jih v zbirne centre za embalažo, ki so jih
lokalne oblasti pooblastile.

6 /24SL
Hladilnik / Navodila za uporabo
1. Police na vratih hladilnika
2. Predali za zamrzovalnika
3. Ledomat
4. Posoda za vodo
5. Predal za sveža živila
6. Pokrov predala za sveža živila
7. Predel za hlajenje
8. Steklene police hladilnega dela
9. Filter proti zunanjim vonjavam (violed)
10. Notranji zaslon
11. Steklene police hladilnega dela
12. Predal zamrzovalnika
*Možnosti izvedbe:
2 Vaš hladilnik
*1
*3
*4
6
*5
7
*8
11
12
*2
*1
*2
*3
*5
7
*8
9
10
11
6
12
C
*Možnosti izvedbe: Številke v tem priročniku so shematične in se morebiti ne bodo popolnoma ujemale
z vašo napravo. Če vaša naprava ne vsebuje navedene dele, se informacije nanašajo na druge modele.
Se ne nanaša na vse modele

7 /24 SL
Hladilnik / Navodila za uporabo
3 Namestitev
3.1. Primerno mesto za namestitev
Za namestitev izdelka se obrnite na pooblaščeni servis.
Za pripravo izdelka na uporabo se obrnite na informacije
v priročniku za uporabnika in zagotovite, da sta
električna in vodna napeljava primerni. Če nista, pokličite
kvalificiranega električarja ali tehnika, ki bo izvedel
potrebne prilagoditve.
B
OPOZORILO: Proizvajalci niso odgovorni
za škodo, ki lahko nastane zaradi
postopkov s strani nepooblaščenih oseb.
B
OPOZORILO: Med nameščanjem
izdelek ne sme biti vklopljen v napajanje.
V nasprotnem primeru obstaja nevarnost
smrti ali resne poškodbe!
A
OPOZORILO: : Če so vrata v prostor,
kamor nameščate izdelek, preozka, da
bi ga skoznje prenesli v prostor, pokličite
pooblaščenega serviserja.
• Namestiteizdeleknaravnopovršino,dapreprečite
tresenje.
•Čenameravateizdelekvgraditivomarico/pohištvo,
mora biti med steno izdelka in pohištvom 2 cm
prostora.
• Namestiteizdelekvsaj30cmoddaljenodvirov
toplote, kot so kuhinjske plošče, sredina grelca ali
štedilniki, ter vsaj 5cm daleč od električnih peči.
•Izdelekhranitenasuhemmestuinganeizpostavljajte
sončni svetlobi.
• Daboizdelekučinkovitodeloval,morabitiokoli
njega primerna zračna ventilacija. Če ga nameravate
vgraditi v odprtino v steni, bodite pozorni, da pustite
vsaj 5cm razdalje od stropa in stranskih sten.
• V okolju, kjer sobna temperatura pade pod 10°C, bo
hladilnik še naprej deloval, da se ohrani zmrznjena
hrana v zamrzovalniku. Lahko pa se zgodi, da sveža
hrana v hladilniku zmrzne zaradi nizkih temperatur.
3.2. Namestite plastične kline
Plastični klini, ki so priloženi izdelku, so namenjeni
zagotavljanju zadostnega prostora za kroženje zraka med
izdelkom in zadnjo steno.
1. Za namestitev klinov, odstranite vijake na izdelku in
jih uporabite skupaj s klini.
2. Vstavite dva plastična klina v pokrov ventilacije na
hrbtni strani, kot je prikazano na sliki.

Installation
8 / 24SL
Hladilnik / Navodila za uporabo
3.3. Prilagajanje nogic
Če izdelek po namestitvi ni stabilen, lahko prilagodite
položaj s premestitvijo sprednjih nogic proti levi ali
desni strani.
3.4. Električna povezava
A
OPOZORILO: Ne povezujte s
povezovalnimi ali razdelilnimi kabli.
B
OPOZORILO: Poškodovan napajalni
kabel lahko zamenja le pooblaščeni
servis.
C
Če bosta dva hladilnika nameščena
drug ob drugem, naj bo vmes vsaj 4
cm razmika.
• Podjetje ne odgovarja za škodo, ki nastane
zaradi uporabe izdelka brez pravilne ozemljitve
in električne povezave v skladu z nacionalnimi
pravili.
• Vtičnica za napajalni kabel mora biti po
namestitvi na neposrednem dosegu kabla.
• Med izdelek in stensko vtičnico ne napeljujte
podaljševalnih ali razdelilnih kablov.
C
Opozorilo glede vroče podlage!
Vaš izdelek je opremljen s cevmi, ki
vsebujejo hladilno tekočino, kar izboljša
hladilni sistem na stranskih stenah.
Vroča tekočina lahko teče skozi te
površine, kar na stranskih stenah lahko
povzroči vročino. To je povsem normalno
in ne bo zahtevalo servisiranja. Bodite
previdni pri dotikanju teh površin.
A
OPOZORILO: “Zaščitne plasti vertikalne ročice” bodo odstranjene.

9 /24 SL
Hladilnik / Navodila za uporabo
4.1. Varčevanje z energijo
mehmet
A
Priključitev naprave na sisteme varčevanja
električne energije je nevarno, saj lahko
poškodujejo napravo.
• Vrat hladilnika ne puščajte odprtih dalj časa.
• V hladilniku ne shranjujte toplih živil ali pijač.
• Ne preobremenjujte hladilnika, saj bo zmožnost
hlajenja oslabljena, če je kroženje zraka v njem
ovirano.
• Če želite v predalu zamrzovalnika shraniti
maksimalno količino živil, morate odstraniti zgornji
pokrov in predal, ter ju namestiti na vrh steklenih
polic. Poraba energije, ki je navedena za vaš
hladilnik, je bila določena po odstranitvi posode za
led, pladnja za led in pokrova, ter srednjega predala
tako, da vanj spravite maksimalno količino živil.
Močno priporočamo, da pri nalaganju uporabite
zgornji pokrov in spodnji predal.
• Odtajanje zmrznjenih živil v hladilnem delu bo
verjetno, glede na lastnosti živil, privarčevalo
energijo in ohranilo kakovost živil.
• Ko postavljate živila pred ventilator hladilnega
dela pazite, da ne bo ovirano kroženje zraka. Živila
morajo stati vsaj 5cm oddaljena od zaščitne mreže
ventilatorja.
• Senzor temperature in predal zamrzovalnika ne
smeta biti v neposrednem stiku z živili. V primeru
stika s senzorjem lahko naraste poraba energije
izdelka.
C
Notranji del izdelka morate očistiti.
C
Če bosta dva hladilnika nameščena
drug ob drugem, naj bo vmes vsaj 4 cm
razmika.
4 Priprava
4.2. Začetna uporaba
Pred začetkom uporabe hladilnika se prepričajte, da
ste vse pripravili pravilno v skladu z navodili v poglavjih
„Varnostna in okoljevarstvena pravila“ in „Namestitev“.
Izdelek pustite delovati prazen šest ur in ne odpirajte
vrat, če to ni nujno potrebno.
C
Ko se vklopi kompresor, boste zaslišali
hrup. Tekočina in plini v hladilnem sistemu
običajno lahko povzročijo hrup, tudi kadar
kompresor ne deluje. To je običajno.
C
Običajno je, da sprednji robovi hladilnika
vroči. Te površine so oblikovane, tako da so
tople, kar preprečuje kondenzacijo.

10 /24SL
Hladilnik / Navodila za uporabo
5 Uporaba naprave
5.1. Indikatorska tabla
Indikatorske table so lahko različne glede na model izdelka.
Audio-vizualne funkcije na indikatorski tabli so vam lahko v pomoč pri uporabi izdelka.
1. Nastavitev / povišanje temperature
2. Drsni gumb za nastavitev temperature/kazalec
vrednosti temperature
3. Izbira enote temperature (°C) Kazalec v stopinjah
Celzija
4. Izbira enote temperature (°C) Kazalec v stopinjah
Fahrenheita
5. Nastavitev / znižanje temperature
6. Kazalec / gumb funkcije hitrega hlajenja
7. * Brezžična povezava
8. Gumb kazalca varčnega delovanja
9. Kazalec/gumb zamrzovalnika *Joker (spremenljivi
del)
10. * Samodejna vrata
11. Opozorilo visoke temperature/napake
12. *Hladilnik za steklenice
13. *Opozorilni gumb za menjavo filtra
14. Gumb menija
15. Gumb za vklop/izklop izdelka s kazalcem
16. *Gumb/kazalec za ledomat
17. *Način Sabbath
18. Kazalec/gumb za način počitnic
19. Kazalec za ključavnico
20. Kazalec funkcije hitrega zamrzovanja
21. Izbira omarice
22. Kazalec hladilnega predela
23. Kazalec zamrzovalnega predela
1
2
3
4
*16
*17
18
20
21
22
23
19
5
6
8
*7
*10
*12
*13
14
15
11
*9a
*9b
C
*Možnosti izvedbe: Številke v tem priročniku so namenjene kot osnutek in se mogoče
ne ujemajo popolnoma z vašo napravo. Če vaša naprava ne vsebuje navedene dele, se
informacije nanašajo na druge modele.
Se ne nanaša na vse modele

Upravljanje izdelka
11 /24SL
Hladilnik / Navodila za uporabo
1. Nastavitev / povišanje temperature
Ko to pritisnete, bo temperatura v izbranem delu
hladilnika narasla.
2. Nastavitev temperature - drsni gumb/
Indikator vrednosti temperature
Prikaže vrednost temperature izbranega dela. Poleg
tega lahko z drsenjem s prstom navzgor in navzdol
temperature povišate ali znižate.
3. Izbira enote temperature (°C)
Kazalec stopinj Celzija
S pritiskom na ta gumb boste izbrali kot enoto za
prikaz temperature izbrali Celzije.
To je kazalec stopinj Celzija Ko je aktiviran
kazalec stopinj Celzija, bodo nastavljene vrednosti
temperature prikazane v Celzijih, odgovarjajoča
ikona pa se vklopi za 100%.
Ikona Fahrenheita se vklopi za 50%.
4. Izbira enote temperature (°F)
Kazalec za stopinje Fahrenheita
S pritiskom na ta gumb boste kot enoto za prikaz
temperature izbrali Celzije.
Kazalec za stopinje Fahrenheita Ko je aktiviran
kazalec stopinj Fahrenheit, bodo nastavljene
vrednosti temperature prikazane v Fahrenheit,
odgovarjajoča ikona pa se docela vklopi.
Ikona Celzij se vklopi za 50%.
5. Nastavitev / znižanje temperature
Ko to pritisnete, se bo prikazala temperatura
izbranega dela.
5.2. Indikatorska tabla
Indikatorske table so lahko različne glede na model izdelka.
Audio-vizualne funkcije na indikatorski tabli so vam lahko v pomoč pri uporabi izdelka.
Select
!
15
21
22 23
5
2
1
*13
*7
*11
*10
*17
*12
*16
*9b
*9a
8
18
6
20
4
3
6. Kazalec funkcije hitrega hlajenja
Ko je funkcija vklopljena, se docela vklopi
kazalec. Ko funkcijo prekinete, se izdelek vrne v
normalne nastavitve, kazalec pa se vklopi za 50%.
Gumb funkcije hitrega hlajenja
Pritisnite ta gumb za vklop ali izklop funkcije hitrega
hlajenja.
C
Funkcijo hitrega hlajenja uporabite,
ko želite hitro ohladiti hrano, ki ste jo
postavili v hladilni predel. Če želite
ohladiti velike količine svežih živil,
vklopite funkcijo preden postavite živila
v hladilnik.
C
Če funkcije hitrega zamrzovanja ne
prekličete, se bo po največ 8 urah,
ali ko hladilni del doseže želeno
temperaturo, samodejno izklopila.
C
Če gumb za hitro hlajenje pritisnete
večkrat zaporedoma v kratkih
intervalih, se vklopi zaščitni sistem
elektronskega vezja in kompresor ne
bo pričel z delovanjem nemudoma.
C
Po vzpostavitvi napetosti v primeru
izpada elektrike se funkcija ne povrne.
7. *Brezžična povezava
Ko pritisnete ta gumb, se izdelek poveže z domačim
omrežjem. Kadar je ta funkcija aktivirana, se
indikator poveča za 100%, kadar je prekinjen, pa
za 50%.
C
*Možnosti izvedbe: Številke v tem priročniku so namenjene kot osnutek in se mogoče
ne ujemajo popolnoma z vašo napravo. Če vaša naprava ne vsebuje navedene dele, se
informacije nanašajo na druge modele.
Se ne nanaša na vse modele

Upravljanje izdelka
12 / 24SL
Hladilnik / Navodila za uporabo
8. Gumb kazalca varčnega delovanja
S tem gumbom vklopite ali izklopite varčno delova-
nje.
Kadar je vklopljeno varčno delovanje, se kazalec
poveča za 100%. Kadar je ta funkcija dejavna, bo
zamrzovalnik zagnal varčni način vsaj 6 ur kasneje.
Kadar funkcijo prekinete, se bo kazalec zvišal za
50%.
9a. Kazalec/gumb zamrzovalnika *Joker
(spremenljivi del)
Ko pritisnete ta gumb, bo del hladilnika, bo
spremenljivi del deloval kot zamrzovalnik,
kazalec pa se vklopi 100%. Kazalec hladilnika za
spremenljivi del bo ostal vklopljen pri 50%.
9b. Kazalec/gumb hladilnika *Joker
(spremenljivi del)
Ko pritisnete ta gumb, bo del hladilnika, bo
spremenljivi del deloval kot hladilnik, kazalec
pa se vklopi 100% Kazalec zamrzovalnika za
spremenljivi del bo ostal vklopljen pri 50%.
10.* Samodejna vrata
Pritisnite ta gumb za vklop ali izklop funkcije samo-
dejnih vrat. Ko je funkcija vklopljena, kazalec zasveti
100%. Kadar funkcijo prekinete, se bo kazalec zvišal
za 50%.
Kadar je funkcija dejavna, se dotaknite odgovar-
jajočega dela na ročici vrat, da se ta samodejno
odprejo.
11 Opozorilo visoke temperature/napake
Ta kazalec zasveti pri izpadu električnega toka,
napakah visokih temperatur in opozorilih na napako.
Med dolgotrajnimi izpadi električnega toka bo najviš-
ja temperatura, ki jo zamrzovalni del doseže, utripala
na digitalnem zaslonu. Najprej preverite živila v
zamrzovalnem delu in nato pritisnite gumb za izklop
alarma, da ustavite opozorilo.
12. *Hladilnik za steklenice
Pritisnite ta gumb za vklop ali izklop funkcije
hladilnika za steklenice.
Ko je funkcija vklopljena, kazalec zasveti 100%. Ko
funkcijo prekinete, kazalec pade na 50%.
13. *Opozorilni gumb za menjavo filtra
Ta ikona se vklopi, kadar je filter potrebno ponovno
nastaviti.
Ko pritisnete gumb, se bo filter ponovno nastavil,
ikona pa bo zasvetila.
14. Gumb menija
Tega lahko uporabite za vklop ali izklop načina
spanja na zaslonu. Če ne pritisnete nobenega
gumba ali odprete vrat v roku 30 sekund, se bo
samodejno preklopil v način spanja.
15. Gumb za vklop/izklop izdelka s
kazalcem
Pritisnite in držite gumb za zvklop/izklop 3 sekunde,
da izdelke vklopite ali izklopite.
Ko izdelek izklopite, bo kazalec gumba za vklop/izk-
lop svetil 100%, vsi ostali kazalci pa se bodo docela
izklopili. Za vklop izdelka, ponovno pritisnite in držite
gumb za tri sekunde. Hladilnik se bo vklopil, kazalec
vklopa/izklpa pa bo padel na 50%.
16. *Gumb/kazalec za ledomat
Pritisnite ta gumb za vklop ali izklop funkcije
ledomata. Če kazalec sveti 100%, to pomeni, da
ledomat deluje. Če sveti 50%, je ledomat izklopljen.
C
Če ne izberete te funkcije, se tok vode
iz rezervoarja za vodo ustavi. Vendar
lahko iz ledomata še vedno dobite led,
ki je bil do tedaj narejen.
17. *Način Sabbath
Pritisnite ta gumb za vklop ali izklop načina Sabbath
Ko je funkcija vklopljena, kazalec zasveti 100%.
Kadar funkcijo prekinete, se bo kazalec zvišal za
50%.
18. Kazalec/gumb za način počitnic
S pritiskom na ta gumb aktivirate način počitnic.
Kazalec načina počitnic bo zasvetil 100%. Ko je
funkcija za počitnice vklopljena, je na kazalcu
temperature hladilnega dela prikazano »- -« in v
hladilnem delu ni aktivnega hlajenja. Kadar je ta
funkcija vklopljena, v hladilnem delu ni primerno
hraniti živil. Drugi deli se bodo še naprej hladili v
skladu z nastavljeno temperaturo.Drugi deli se bodo
še naprej hladili v skladu z nastavljeno temperaturo.
Za preklic funkcije ponovno pritisnite gumb
funkcije
za počitnice Kadar funkcijo prekinete, se bo
kazalec zvišal za 50%.
19. Kazalec za ključavnico
Za tri sekunde istočasno pritisnite in držite gumba
za hitro hlajenje in za počitnice. Ob pritisku na
gumb bo štetje začelo z kazalcem temperature. Ko
vklopite ključavnico, se bo kazalec za ključavnico
vklopil 100% in omogočen bo način ključavnice.
Med delovanjem načina ključavnice gumbi ne

Upravljanje izdelka
13 /24SL
Hladilnik / Navodila za uporabo
delujejo. Ponovno istočasno za tri sekunde pritisnite
in držite gumba za hitro hlajenje in za počitnice.
Ob pritisku na gumb bo štetje začelo z kazalcem
temperature. Ko vklopite ključavnico, se bo kazalec
za ključavnico vklopil 50% in način ključavnice bo
onemogočen.
To funkcijo vklopite
, če želite preprečiti
spreminjanje nastavitve temperature hladilnika.
20.Kazalec funkcije hitrega zamrzovanja
Če vklopite funkcijo hitrega zamrzovanja, bo ta
kazalec zasvetil 100%. Ko funkcijo prekličete, se
bo izdelke vrnil na normalne nastavitve, kazalec pa
bo zasvetil 50%.
Gumb funkcije hitrega zamrzovanja
Pritisnite ta gumb za vklop ali izklop funkcije hitrega
zamrzovanja.
Pritisnite ta gumb za vklop ali izklop funkcije hitrega
zamrzovanja. Ko aktivirate to funkcijo, se zamrzovalni
del ohladi na temperaturo, ki je nižja od nastavljene
vrednosti.
C
Funkcijo hitrega zamrzovanja
uporabite, ko želite hitro zamrzniti
hrano, ki ste jo postavili v zamrzovalni
del. Če želite zamrzniti večje količine
svežih živil, to funkcijo vklopite, preden
daste živila v izdelek.
C
Če funkcije hitrega zamrzovanja ne
prekličete, se bo po največ 4 urah
ali ko hladilni del doseže želeno
temperaturo samodejno izklopila.
C
Po vzpostavitvi napetosti v primeru
izpada elektrike se funkcija ne povrne.
21. Izbira omarice
Če pritisnete gumb za izbiro omarice lahko
spremenite vrednost temperature hladilnika ali
zamrzovalnika na kazalcu vrednosti temperature.
22. Kazalec hladilnega predela
Ko je ta kazalec dejaven, se temperatura hladilnega
dela prikaže na kazalcu vrednosti temperature.
23. Kazalec zamrzovalnega predela
Ko je kazalec dejaven, se temperatura zamrzovalnika
prikaže na kazalcu vrednosti temperature.

Upravljanje izdelka
14 / 24SL
Hladilnik / Navodila za uporabo
5.3. Narava za led
(Ta funkcija je izbirna)
Naprava za led vam omogoča preprosto pridobivanje
ledu iz izdelka.
Uporaba naprave za led
1. Odstranitev posode za vodo iz hladilnega dela.
2 Napolnite posodo z vodo.
3. Vrnite posodo na njeno mesto. Prve ledene kocke
bodo pripravljene približno štiri ure kasneje v predalu
naprave za led v zamrzovalniku.
C
Ko je posoda za vodo docela
napolnjena, boste lahko dobili približno
60-70 ledenih kock.
C
Vodo v posodi je potrebno zamenjati
približno vsake 2-3 tedne.
5.4. Ledomat
(Ta funkcija je izbirna)
Ledomat vam omogoča preprosto pridobivanje ledu
iz izdelka.
Uporaba ledomata
1. Previdno povlecite ledomat iz izdelka.
2 Napolnite ledomat z vodo.
3. Namestite ledomat. Led bo pripravljen približno dve
uri kasneje.
4. Gumbe na njem zavrtite v smeri urinega kazalca
za 90 stopinj, da dobite led. Kocke ledu v zbiralnikih
bodo padle v posodo za shranjevanje ledu spodaj.
5. Posodo za shranjevanje ledu lahko izvlečete in
postrežete kocke ledu.
C
Ledomata ne odstranjujte iz svojega
mesta, da bi vzeli led.
C
Če želite, lahko kocke ledu hranite v
posodi za shranjevanje ledu. Posoda
za shranjevanje ledu je namenjena le
za zadrževanje kock ledu. V posodo ne
vlivajte vode, saj se lahko zlomi.
5.5. Pladenj za led
(Ta funkcija je izbirna)
Pladenj za led vam omogoča na preprost način
pridobiti led iz izdelka.
Uporaba pladnja za led
1. Odstranite pladenj za led iz zamrzovalnika.
2 Napolnite pladenj z vodo.
3. Namestite pladenj v zamrzovalnik. Led bo
pripravljen približno dve uri kasneje.
4. Odstranite pladenj za led iz zamrzovalnika in ga
prepognite preko krožnika. Kocke bodo z lahkoto
padle na krožnik.

Upravljanje izdelka
15 /24SL
Hladilnik / Navodila za uporabo
5.6. Modra luč
(Ta funkcija je izbirna)
Predali za sveža živila so osvetljeni z modro lučjo.
Živila, shranjena v predalih za sveža živila, ki so
osvetljeni z modro lučjo, s pomočjo valovne dolžine
modre luči nadaljujejo fotosintezo in tako ohranijo
svežino in povečajo vsebnost vitaminov.
5.7. Modul z osvežilcem zraka
(FreshGuard)
(Ta funkcija je izbirna)
Modul z osvežilcem zraka hitro odstrani neprijetne
vonjave v hladilniku, preden prežamejo površine.
S tem modulom, ki je nameščen na strop predala
za sveža živila, se bodo slabe vonjave razblinile,
zrak bo prešel v filter za odpravo neprijetnih vonjav
ta pa bo zrak poslal nazaj v predal za sveža živila.
Tako bodo odstranjene neprijetne vonjave, ki se
pojavijo med shranjevanjem živil v hladilniku, preden
prežamejo površine.
To omogoča ventilator, dioda in filter za svež zrak,
ki je vgrajen v modulu. Modul odstranjevalca vonja
se bo samodejno vklopil v intervalih. Zvok, ki ga
slišite med intervalnim vklopom modula, je običajen,
oddaja ga vgrajeni ventilator. Če odprete vrata
predala za svežo vodo medtem, ko modul deluje,
se bo ventilator začasno zaustavil, ter se ponovno
vklopil in nadaljeval, ko vrata zaprete. V primeru
izpada električnega toka se bo modul z osvežilcem
zraka ponovno vklopil, ko se tok vrne.
Informacije: Priporočamo, da aromatična živila
(kot je sir, olive, delikatese) hranite zaprta v njihovi
embalaži, da se izognete slabim vonjavam, ki se
lahko pojavijo, kadar se meša več vonjav. Poleg tega
priporočamo, da pokvarjena živila hitro vzamete ven
iz hladilnika, da preprečite kvarjenje drugih živil in se
izognete sabim vonjavam.

Upravljanje izdelka
16 / 24SL
Hladilnik / Navodila za uporabo
5.8. Predel za hlajenje
(Ta funkcija je izbirna)
Ta del lahko uporabite za shranjevanje delikates, ki
potrebujejo nižjo temperaturo, ali pa mesa, katerega
nameravate v kratkem pojesti. Sadja in zelenjave ne
shranjujte v tem predelu.
Notranjo prostornino izdelka povečate tako, da
odstranite katerikoli predel za hlajenje.
Za odstranitev preoprosto potegnite naprej,
privzdignite in povlecite proti sebi.
5.9. Predal za sveža živila
Predal za sveža živila v hladilniku je oblikovan posebej
z namenom ohranjati svežino zelenjave in sadja ter
vlago. V ta namen okrog predela za sveža živila kroži
hladen zrak. Sadja in zelenjave ne shranjujte v tem
predelu. Ne puščajte listnate zelenjave dlje časa blizu
sadja.

Upravljanje izdelka
17 /24SL
Hladilnik / Navodila za uporabo
5.10. Uporaba dispenzerja za vodo
(Ta funkcija je izbirna)
C
Prvi kozarci vode iz dispenzerja so
običajno topli.
C
Če se dispenzer za vodo dlje časa
ne uporablja, zavrzite prvih nekaj
kozarcev vode, da dobite svežo vodo.
1. S kozarcem pritisnite ob ročico dispenzerja za
vodo. Če uporabljate mehko plastično skodelico,
bo postopek potiskanja ročice z roko olajšan.
2 Ko napolnite skodelice do želene stopnje, spustite
ročko.
C
Upoštevajte, da je količina iztečene
vode iz dispenzerja odvisna od tega,
koliko pritisnete ročico. Ko nivo vode
v skodelici / kozarcu narašča, počasi
zmanjšujte pritisk ob ročico, da
preprečite presežek vode. Če nekoliko
pritisnete ročico, bo voda pričela
kapljati. To je običajno in ni napaka.
5.11. Polnjenje rezervoarja
dispenzerja za vodo
Vodni rezervoar se nahaja znotraj vratne police.
1. Odprite pokrov rezervoarja.
2 Napolnite rezervoar s svežo pitno vodo.
3. Zaprite pokrov.
C
Rezervoar za vodo polnite izključno
z vodo, saj druge tekočine, kot so
sokovi, gazirane pijače ali alkoholne
pijače, niso primerne za uporabo
v dispenzerju za vodo. Če boste v
dispenzerju uporabljali te tekočine,
ga boste nepopravljivo poškodovali.
V teh primerih garancija ne velja.
Nekatere kemične sestavine in
dodatki v teh pijačah/tekočinah lahko
poškodujejo rezervoar za vodo.
C
Uporabljajte izključno čisto pitno
vodo.
C
Prostornina rezervoarja za vodo je 3
litre; ne nalijte več.
5.12. Čiščenje vodnega rezervoarja
1. Odstranite vodni rezervoar znotraj vratne police.
2 Odstranite vratno polico, tako da jo držite za obe
strani.

Upravljanje izdelka
18 / 24SL
Hladilnik / Navodila za uporabo
3. Zagrabite vodni rezervoar na obeh straneh in ga
odstranite pod kotom 45 °C.
4. Odprite pokrov rezervoarja za vodo in ga očistite.
C
Delov rezervoarja za vodo in
dispenzerja za vodo ne umivajte v
pomivalnem stroju.
5.13. Pladenj za kapljanje
Voda, ki se stoči mimo kozarca med uporabo
dispenzerja, se nabira na podstavku za prestrezanje
vode.
Odstranite plastični filter, kot je prikazano na sliki.
S čisto in suho krpo odstranite nakopičeno vodo.
5.14. Predel za sveža živila
(Ta funkcija je izbirna)
Zaradi predela za sveža živila, ki ima uravnavano
vlago, je mogoče sadje in zelenjavo shraniti dlje
v okolju z idealnimi pogoji vlage. S sistemom
prilagajanja vlage s tremi možnostmi pred predalom
za sveža živila, lahko notri nadzorujete vlago
glede na to, kakšna živila so shranjena v predalu.

Upravljanje izdelka
19 /24SL
Hladilnik / Navodila za uporabo
S E B Z E L İ K
5.15. Zamrzovanje svežih živil
• Živila morajo biti zamrznjena v predalu
zamrzovalnika kolikor hitro je mogoče, da
se ohrani svežina, za ta namen priporočamo
uporabo funkcije za hitro zamrznitev.
• Živila lahko dlje hranite v predalu zamrzovalnika,
če jo zamrznete, dokler so še sveža.
• Živila, ki jih nameravate zamrzniti, zapakirajte v
vrečke tako, da vanje ne bo mogel vdreti zrak.
• Ne pozabite živil zapakirati, preden jih daste v
zamrzovalnik. Namesto tradicionalnih papirjev
za pakiranje uporabite posode za zmrzovanje ali
papirje, odporne na vlago, plastične vrečke ali
druge materiale za pakiranje.
• Vsak kos živila pred zamrzovanjem označite
z datumom. Tako boste vsakič, ko odprete
zamrzovalnik, lahko ločili med svežinami
različnih paketov živil. Shranite prej zamrznjena
živila na sprednjo stran predala, da zagotovite,
da jih boste prej porabili.
• Zamrznjena živila porabite nemudoma, ko se
odtalijo ter jih nikoli ne zamrznite ponovno.
• Ne zamrzujte velike količine živil naenkrat.
Priporočamo vam izbiro možnosti samo za zelenjavo,
če nameravate hraniti samo zelenjavo, samo za
sadje, če nameravate hraniti sadje, oziroma mešano,
če boste v predalu hranili tako sadje, kot zelenjavo.
Za najboljši izkoristek sistema za nadzor vlage in
daljši rok trajanja živil odsvetujemo shranjevanje
sadja in zelenjave v plastičnih vrečkah. Če zelenjavo
pustite v vrečkah, bo hitro razpadla. Predvsem vam
odsvetujemo shranjevanje kumar ali brokolija v
plastičnih vrečkah. Če zaradi higiene ne želite stika
z drugo zelenjavo, uporabite preluknjano papirnato
vrečko ali drug embalažni material namesto vrečke.
Ko zelenjavo nameščate, morate upoštevati tudi
njeno težo. Težka in trda zelenjava mora biti na dnu
predala za sveža živila, lahka in mehka pa na vrhu.
Ne postavljajte skupaj hrušk, marelic, breskev, itd.,
posebno ne jabolk, ki proizvajajo veliko etilena,v isti
predal za sveža živila kot ostalo sadje in zelenjavo.
Etilen, ki ga oddaja to sadje, lahko povzroči prehitro
zorenje in gnitje ostalega sadja.

Upravljanje izdelka
20 / 24SL
Hladilnik / Navodila za uporabo
Nastavitev
zamrzovalnega
dela
Nastavitev
hladilnega
dela.
Opombe
-18°C 4°C To je običajna priporočljiva nastavitev.
-20, -22 or -24°C 4°C
Te nastavitve so priporočljive, če temperatura prostora presega 30
°C.
Funkcija hitrega
zamrzovanja
4°C
Uporabite, ko želite v kratkem času zamrzniti hrano. Ko je postopek
končan, se hladilnik nastavi na prejšnji način.
-18 ℃ ali hladneje 2 ℃
Te nastavitve uporabite, če menite, da zaradi toplih razmer ali
pogostega odpiranja in zapiranja vrat hladilni del ni dovolj hladen.
5.16. Priporočila za shranjevanje
zamrznjenih živil
Predel mora biti nameščen vsaj na -18°C.
1. Po nakupu nemudoma postavite zavitke v
zamrzovalnik - ne dovolite, da se odtalijo.
2. Pred zamrznitvijo preverite rok uporabe na
embalaži, da niso morda že pretečeni.
3. Zagotovite, da embalaža ni poškodovana.
5.17. Informacije za globoko zamrzovanje
V skladu s standardi ES 62552 mora zamrzovalnik
zamrzniti vsaj 4.5 kg živil pri zunanji temperaturi
25°C do -18°C ali nižje v roku 24 ur na 100 litrov
prostornine zamrzovalnika.
Živila lahko dalj časa hranite pri -18°C ali nižjih
temperaturah.
Svežino živil lahko ohranite več mesecev (pri -18°C
ali nižjih temperaturah v globokem zamrzovanju).
Pazite, da živila za zamrzovanje ne pridejo v stik s
predhodno zamrznjenimi živili, saj lahko povzročijo
delno taljenje.
Če želite zelenjavo dlje ohraniti zamrznjeno, jo
skuhajte na pari in odcedite vodo. Po tem, ko
zelenjavo osušite, jo zapakirajte v vakuumsko
embalažo in to spravite v zamrzovalnik. Nekatera
živila, kot so banane, paradižniki, solata, zelena,
kuhana jajca ali krompir, niso primerna za
zamrzovanje. Če jih zamrznete, bo njihova hranilna
vrednost upadla in okus se spremeni. Če jih tako
pokvarite, lahko predstavljajo tveganje za zdravje.
5.18. Postavitev živil
Police
zamrzovalnega
dela
Različna zamrznjena živila,
kot so meso, ribe, sladoled,
zelenjava itd.
Police
zamrzovalnega
dela
Živila v ponvah, pokritih
krožnikih in zaprtih posodah,
jajca (v zaprti posodi)
Police
na vratih
hladilnika
Manjša in pakirana živila ali
pijače
Predal za
sveža živila
Zelenjava in sadje
Predel za
sveža živila
Delikatese (hrana za zajtrk,
mesni izdelki, ki jih boste
porabili v kratkem času)
5.19. Opozorilo za odpiranje vrat
(Ta funkcija je izbirna)
Zvočni alarm za odprta vrata se vklopi, če so vrata
naprave odprta najmanj 1 minuto. Zvočni alarm
ugasne, ko zaprete vrata ali pritisnete katerokoli
tipko (če so na voljo) na prikazovalniku.
5.20. Lučka
Izdelek je osvetljen z diodami. Če imate z njimi
težave, pokličite pooblaščen servis.
Diode, ki jih uporablja izdelek, niso namenjene, niti
niso primerne za hišno razsvetljavo. Luči v vašem
hladilniku so namenjene udobnemu in varnemu
nalaganju hrane.

21 /24 SL
Hladilnik / Navodila za uporabo
6 Vzdrževanje in čiščenje
Če izdelek uporabljate v rednih intervalih, bo njegova
življenjska doba daljša in bo redkeje naletaval na težave.
B
OPOZORILO: Pred čiščenjem izdelek
izklopite.
B
OPOZORILO: Priporočamo vam
čiščenje kondenzatorja vsakih šest
mesecev, pri čemer morate uporabiti
rokavice. Ne uporabljajte sesalcev.
• Pri čiščenju nikoli ne uporabljajte bencina, benzena
ali podobnih snovi.
• Za čiščenje ne uporabljajte ostrih abrazivnih
predmetov, mila, gospodinjskih čistil, čistilnih sredstev
in loščila.
• Raztopite eno žličko karbonata v pol litra vode. V to
raztopino pomočite krpo in jo temeljito ožemite. S to
krpo obrišite notranjost naprave in temeljito posušite.
• Preprečite, da bi ohišje luči in ostali električni
predmeti prišli v stik z vodo.
• Če hladilnika dlje časa ne nameravate uporabiti, ga
izklopite, odstranite vsa živila, očistite in pustite vrata
odprta.
• Redno preverjajte, ali so košarice na vratih čiste. Če
niso, jih očistite.
• Da odstranite vrata in police telesa, vzemite ven vse
predmete.
• Odstranite police na vratih tako, da jih povlečete
navzgor. Za ponovno namestitev po čiščenju jih z
drsnim gibom potisnite pod kotom navzdol.
• Ne uporabljajte čistilnih sredstev ki vsebujejo klor,
ali vode za čiščenje s kromom prevlečenih zunanjih
površin izdelka. Klor povzroči korozijo na kovinskih
površinah.
• Pri hladilnikih brez tehnologije No Frost se na zadnji
notranji steni hladilnega dela lahko pojavijo vodne
kaplje ali plast ledu, debeline do 2 cm. Hladilnega
dela ne čistite; nikoli ne uporabljajte olja ali podobnih
sredstev.
• Za čiščenje zunanje površine izdelka uporabite samo
rahlo vlažno krpo iz mikrovlaken. Gobice in druge
vrste krp za čiščenje lahko opraskajo površino.
6.1. Izogibanje neprijetnim vonjavam
V proizvodnji hladilnikov ne uporabljamo materialov,
ki povzročajo vonj. Vendar lahko, če hrano nepravilno
spravite ali, če notranjih površin ne očistite pravilno,
še vedno oddaj vonj. Da se izognete tej težavi, prosimo
upoštevajte naslednje:
• Hladilnik mora ostati čist. Ostanki živil, madeži itd.
lahko povzročijo neprijetne vonjave. Zato vsakih 15
dni čistite hladilnik s karbonatom, raztopljenim v
vodi. Nikoli ne uporabljajte detergentov ali mila.
• Hranite živila v zaprtih posodah. Mikroorganizmi,
ki izhajajo iz živil brez pokrova, lahko povzročajo
neprijetne vonjave.
• Ne hranite pokvarjene hrane v hladilniku.
6.2. Zaščita plastičnih površin
Tekočega olja ali na olju kuhanih jedi ne shranjujte v
hladilniku v odprtih posodah, saj lahko poškodujejo
plastične površine hladilnika. Če na plastičnih površinah
razlijete olje ali jih umažete z oljem, jih očistite in
splaknite s toplo vodo.
6.3. Čiščenje notranjih površin
Notranje površine in vse odstranljive dele umijte z blago
raztopino vode, mila in karbonata. Sperite in temeljito
posušite. Preprečite stik osvetlitve in nadzorne plošče z
vodo.
A
POZOR:
Ne uporabljajte kisa, alkohola
ali čistil na osnovi alkohola za
čiščenje notranjih površin.
6.4. Zunanje površine in nerjavečega jekla
Uporabite ne-abrazivno sredstvo za čiščenje površin iz
nerjavečega jekla, ki ga nanesete na mehko krpo brez
muck. Za poliranje uporabite vlažno krpo iz mikrovlaken
in suho usnjeno krpico. Vedno sledite vlaknom
nerjavečega jekla.

22 /24SL
Hladilnik / Navodila za uporabo
6.5. Čiščenjeizdelkov s steklenimi vrati
Odstranite zaščitno folijo na steklu..
Na površini stekla je prevleka. Ta prevleka zmanjša
nastajanje madežev in zagotavlja da bodo madeži
in umazanija preprosto očiščeni. Steklene površine,
ki niso zaščitene s prevleko, so lahko izpostavljene
stalnemu nalaganju organske in neorganske umazanije,
ali pa umazanije v zraku, kot je vodni kamen, mineralne
soli, neizgoreli ogljikovi hidrati, kovinski oksidi ali silikoni,
kar sčasoma vodi do madežev in fizičnih poškodb. Kljub
rednemu umivanju bo steklo sčasoma težje ohraniti
čisto. Posledično bo zmanjšana prosojnost in lep videz.
Trde in abrazivne komponente čistilnih sredstev bodo te
nepravilnosti še poslabšale in tako pospešile obrabo.
*Za čiščenje morate uporabiti nealkalna, neabrazivna
čistilna sredstva.
Za daljšo življenjsko dobo prevleke odsvetujemo uporabo
alkalnih ali abrazivnih čistilnih sredstev.
Stekla so bila tempirana, kar ojača njihovo odpornost
proti zlomu.
Kot dodaten varnostni ukrep je na hrbtni površini stekel
varnostna prevleka, ki preprečuje poškodovanje okolice v
primeru, da se steklo vendarle zlomi.
Vzdrževanje in čiščenje

23 /24 SL
Hladilnik / Navodila za uporabo
7. Odpravljanje motenj
Preverite ta seznam, preden se obrnete na servisno
službo. S tem boste prihranili čas in denar. Ta seznam
vključuje pogoste pritožbe, ki niso povezane z
nestrokovno izdelavo ali materiali. Nekatere funkcije, ki
so omenjene, morda ne veljajo za vašo napravo.
Hladilnik ne deluje.
•Napajalni kabel ni v celoti vključen v vtičnico. >>>
Priključite ga v celoti, da se vsede v vtičnico.
•Pregorela je glavna varovalka ali pa varovalka
priključena na vtičnico, ki napaja napravo. >>>
Preverite varovalke.
Kondenzacija na stranski steni predela
hladilnika (MULTI CONA, COOL, NADZOR in FLEXI
CONA).
•Vrata se prepogosto odpirajo. >>> Pazite, da ne
boste odpirali vrat naprave prepogosto.
•Okolje je preveč vlažno. >>> Ne nameščajte
naprave v vlažnih okoljih.
•Živila, ki vsebujejo tekočine, so shranjena v nezaprtih
posodah. >>> Naj bodo živila, ki vsebujejo tekočine, v
zaprtih posodah.
•Vrata naprave so ostala odprta. >>> Vrata naprave
ne imejte odprta predolgo časa.
•Termostat je nastavljen na prenizko temperaturo.
>>> Nastavite termostat na primerno temperaturo.
Kompresor ne deluje.
•V primeru nenadnega izpada električne energije ali
izvlečenega vtikača ter nato ponovnega vklopa, tlak
plina v hladilnem sistemu naprave ni uravnotežen,
kar sproži termično zaščito kompresorja. Naprava se
bo ponovno zagnala po približno 6 minutah. Če se
naprava ne zažene ponovno po tem času, se obrnite
na servis.
•Odtajanje je vključeno. >>> To je normalno za
popolnoma samodejno odtajanje naprave. Odtajanje se
izvaja v rednih časovnih presledkih.
•Naprava ni priključena. >>> Prepričajte se, da je
napajalni kabel priključen.
•Nastavitev temperature je napačna. >>> Izberite
nastavitev na primerno temperaturo.
•Napajanja ni. >>> Naprava bo še naprej normalno
delovala, ko se bo vrnilo napajanje.
Obratovalni hrup hladilnika se povečuje, medtem
ko je v uporabi.
•Delovna intenzivnost naprave se lahko razlikuje,
odvisno od nihanja temperature okolice. To je normalno
in ne gre za okvaro.
Hladilnik teče prepogosto ali predolgo.
•Nova naprava je lahko večja od prejšnje. Večje
naprave bodo delovale več časa.
•Sobna temperatura je lahko visoka. >>> Naprava
običajno deluje več časa pri visoki sobni temperaturi.
•Naprava je lahko bila pred kratkim priključena
na električno omrežje ali pa se novo živilo nahaja v
notranjosti. >>> Naprava bo zahtevala več časa,
da doseže nastavljeno temperaturo, če je bila pred
kratkim priključena na električno omrežje ali pa se
nahaja v notranjosti novo živilo. To je normalno.
•Velike količine tople hrane so bili morda pred kratkim
dane v napravo. >>> Ne postavljajte tople hrane v
napravo.
•Vrata so se pogosto odprla ali bila odprta daljše
obdobje. >>> Topel zrak, ki se giblje znotraj povzroči,
da naprava več časa deluje. Ne odpirajte vrat
prepogosto.
•Vrata zamrzovalne skrinje ali hladilnika so lahko
samo priprta. >>> Preverite, če so vrata popolnoma
zaprta.
•Naprava je nastavljena na prenizko temperaturo.
>>> Nastavite temperaturo na višjo stopnjo in
počakajte, da naprava doseže nastavljeno temperaturo.
•Podložka vrat hladilnika ali zamrzovalnika je morda
umazana, obrabljena, počena ali ni pravilno vstavljena.
>>> Očistite jih ali zamenjajte podložko. Poškodovana
oz. raztrgana podložka vrat bo povzročila, da naprava
deluje več časa, da ohrani trenutno temperaturo.
Temperatura zamrzovalnika je zelo nizka, vendar
je temperatura hladilnika primerna.
•Termostat zamrzovalnika je nastavljen na zelo nizko
temperaturo. >>> Nastavite temperaturo predela
zamrzovalnika na višjo stopnjo in še enkrat preverite.
Temperatura hladilnika je zelo nizka, vendar je
temperatura zamrzovalnika primerna.
•Termostat hladilnika je nastavljen na zelo nizko
temperaturo. >>> Nastavite temperaturo predela
hladilnika na višjo stopnjo in še enkrat preverite.

24 /24SL
Hladilnik / Navodila za uporabo
Odpravljanje motenj
Živilski izdelki hranjeni v predalih hladilnika so
zamrznjeni.
•Termostat hladilnika je nastavljen na zelo nizko
temperaturo. >>> Nastavite temperaturo predela
zamrzovalnika na višjo stopnjo in še enkrat preverite.
Temperatura hladilnika ali zamrzovalnika je
previsoka.
•Termostat hladilnika je nastavljen na zelo visoko
stopnjo. >>> Nastavitev temperature v predelu
hladilnika vpliva na temperaturo predela zamrzovalnika.
Spremenite temperaturo hladilnika ali zamrzovalnika
in počakajte, da ustrezni predeli dosežejo nastavljeno
temperaturno raven.
•Vrata so se pogosto odpirala ali bila odprta daljše
obdobje. >>> Ne odpirajte vrat prepogosto.
•Vrata so lahko samo priprta. >>> Popolnoma
zaprite vrata.
•Naprava je lahko bila pred kratkim priključena
na električno omrežje ali pa se novo živilo nahaja v
notranjosti. >>> To je normalno. Naprava bo zahtevala
več časa, da doseže nastavljeno temperaturo, če je bila
pred kratkim priključena na električno omrežje ali pa se
nahaja v notranjosti novo živilo.
•Velike količine tople hrane so bili morda pred kratkim
dane v napravo. >>> Ne postavljajte tople hrane v
napravo.
Tresenje ali hrup.
•Tla niso ravna ali gladka. >>> Če se naprava
trese, ko jo počasi premikate, prilagodite nogice za
uravnoteženje naprave. Prav tako poskrbite, da so tla
dovolj trdna, da nosijo napravo.
•Vsi predmeti, ki so dani na napravo lahko povzročijo
hrup. >>> Odstranite vse predmete, ki so postavljeni
na napravo.
Naprava proizvaja hrup pretoka tekočine,
pršenja ipd.
•Principi delovanja naprave vključujejo tokove tekočin
in plinov. >>> To je normalno in ne gre za okvaro.
Sliši se zvok podoben vetriču, ki prihaja iz
naprave.
•Naprava uporablja ventilator za postopek hlajenja. To
je normalno in ne gre za okvaro.
Nabira se kondenzacija na notranjih stenah
naprave.
•Vroče ali vlažno vreme bo povečalo nabiranje ledu in
kondenzacije. To je normalno in ne gre za okvaro.
•Vrata so se pogosto odprla ali bila odprta daljše
obdobje. >>> Ne odpirajte vrat prepogosto; če so
odprta, zaprite vrata.
•Vrata so lahko samo priprta. >>> Popolnoma
zaprite vrata.
Nabira se kondenzacija na zunanjih stenah
naprave ali med vrati.
•Prostor je lahko vlažen, kar je povsem normalno v
vlažnem vremenu. >>> Kondenzacija se bo umaknila,
ko se vlažnost zmanjša.
Notranjost ima neprijetne vonjave.
•Naprava se ne čisti redno. >>> Redno čistite
notranjost z uporabo gobice, tople vode in vode s sodo.
•Nekatere posodice in embalažni materiali lahko
povzročijo neprijeten vonj. >>> Uporabite posodice in
embalažne materiale brez neprijetnega vonja.
•Živila so se hranila v nezaprtih posodah. >>>
Hranite živila v zaprtih posodah. Mikroorganizmi se
lahko širijo iz nezaprte hrane in povzročijo vonjave.
•Odstranite vsa pretekla ali pokvarjena živila iz
naprave.
Vrata se ne zapirajo.
•Embalaža živil lahko ovira vrata. >>> Premaknite
vse predmete, ki ovirajo vrata.
•Naprava ne stoji v popolnem pokončnem položaju
glede na tla. >>> Prilagodite nogice za uravnoteženje
naprave.
•Tla niso ravna ali gladka. >>> Poskrbite, da so tla v
ravnini in dovolj trdna, da nosijo napravo.
Posoda za zelenjavo se je zataknila.
•Živilski izdelki so lahko v stiku z zgornjim delom
predala. >>> Premestite kose hrane v predalu.
A
OPOZORILO: Če težave ne odpravite
po sledenju navodilom v tem poglavju,
se obrnite na prodajalca ali pooblaščeni
servis. Ne poskušajte sami popraviti
naprave.

www.beko.com.tr
www.beko.com
58 0506 0000/AG
1/3
EN-FR-DE-SL

EWWERQWEW
CZ
SK
NL
RCNE720E3VZP
Lednice
Návod k použití
Chladnička
Používateľská príručka
Koelkast
Gebruikershandleiding

EWWERQWEW
CZ
Lednice
Návod k použití

Před použitím produktu si pozorně přečtěte tento návod k obsluze.
Vážení zákazníci,
Chceme Vám poskytnout možnost nejlepšího použití našeho výrobku, který byl vyroben v moderních
zařízeních s péčí a důkladnou kontrolou kvality.
Také, před použitím výrobku Vám doporučujeme přečíst si celý návod k použití. V případě odprodeje
výrobku, nezapomeňte předat návod jeho novému majiteli společně s výrobkem.
Tato příručka vám pomůže abyste mohli výrobek používat rychle a bezpečně.
• Před instalací a použitím výrobku si prosím pozorně přečtěte uživatelskou příručku.
• Vždy dodržujte platné bezpečnostní předpisy.
• Mějte uživatelskou příručku v dosahu pro budoucí použití.
• Přečtěte si prosím všechny další dokumenty dodané s výrobkem.
Nezapomínejte, že tato Uživatelská příručka se může vztahovat na několik modelů výrobků. Příručka
jasně ukáže všechny variace různých modelů.
C
Důležité informace a užitečné tipy.
A
Ohrožení života a majetku.
B
Riziko zranění elektrickým pro-
udem
Obal tohoto výrobku je vyroben z
recyklovatelných materiálů, v soula-
du s Národní legislativou pro životní
prostředí.

3/26 CZ
Chladnička / Uživatelská příručka
1. Bezpečnostní pokyny a životní
prostředí 4
1.1. Všeobecná bezpečnost . . . . . . . . . . . . . . . . 4
1.1.1 Varování HC . . . . . . . . . . . . . . . . . . . . . . . 6
1.1.2 Pro modely s dávkovačem vody . . . . . . . . . 6
1.2. Účel použití . . . . . . . . . . . . . . . . . . . . . . . . . 7
1.3. Bezpečnost dětí . . . . . . . . . . . . . . . . . . . . . 7
1.4. Soulad se směrnicí WEEE a Odstranění odpadů
výrobku . . . . . . . . . . . . . . . . . . . . . . . . . . . 7
1.5. Soulad se směrnicí RoHS. . . . . . . . . . . . . . . 7
1.6. Informace o balení. . . . . . . . . . . . . . . . . . . . 7
2 Vaše lednička 8
3 Instalace 9
3.1. Vhodné umístění pro instalaci . . . . . . . . . . . 9
3.2. Instalace plastových klínů . . . . . . . . . . . . . . 9
3.3. Nastavování nožek . . . . . . . . . . . . . . . . . . . 9
3.4. Elektrické zapojení. . . . . . . . . . . . . . . . . . . 10
4 Příprava 11
4.1. Postup pro úsporu energie. . . . . . . . . . . . . 11
4.2. První použití . . . . . . . . . . . . . . . . . . . . . . . 11
5 Tlačítko pro Nastavení teploty 12
5.1. Panel indikátorů . . . . . . . . . . . . . . . . . . . . 12
5.2. Panel indikátorů . . . . . . . . . . . . . . . . . . . . 13
5.3. Výrobník ledu . . . . . . . . . . . . . . . . . . . . . . 16
5.4. Automat na led . . . . . . . . . . . . . . . . . . . . . 16
5.5. Podnos na led. . . . . . . . . . . . . . . . . . . . . . 16
5.6. Modré světlo. . . . . . . . . . . . . . . . . . . . . . . 17
5.7. Deodorant. . . . . . . . . . . . . . . . . . . . . . . . . 17
(FreshGuard) . . . . . . . . . . . . . . . . . . . . . . . . . . 17
5.8. Prostor chlazení . . . . . . . . . . . . . . . . . . . . 18
5.9. Prostor pro čerstvé ovoce a zeleninu . . . . . 18
5.10. Používání nádržky na vodu . . . . . . . . . . . . 19
5.11. Plnění zásobníku chladiče vody. . . . . . . . . 19
5.12. Čištění zásobníku na vodu . . . . . . . . . . . . 19
5.13. Odkapávací miska . . . . . . . . . . . . . . . . . . 20
5.15. Prostor pro čerstvé ovoce a zeleninu s řízenou
vlhkostí (vždy čerstvé potraviny) . . . . . . . . 21
5.14. Mražení čerstvých potravin. . . . . . . . . . . . 21
5.16. Doporučení pro uschování mražených
potravin. . . . . . . . . . . . . . . . . . . . . . . . . . 22
5.17. Informace o hloubkovém mražení . . . . . . . 22
5.18. Vkládání potravin . . . . . . . . . . . . . . . . . . . 22
5.19. Upozornění na otevření dveří. . . . . . . . . . . 22
5.20. Žárovka. . . . . . . . . . . . . . . . . . . . . . . . . . 22
6 Údržba a čištění
23
6.1. Zabránění vzniku nepříjemných pachů . . . . 23
6.2. Ochrana plastových povrchů . . . . . . . . . . 23
6.3. Dveřní skla . . . . . . . . . . . . . . . . . . . . . . . . 23
7 Řešení problémů 24

4 /26 CZ
Chladnička / Uživatelská příručka
Tato část obsahuje bezpečnostní pokyny
nezbytné pro zabránění nebezpečí zranění
a materiálních škod. Nedodržením těchto
pokynů zanikají všechny typy záruky
výrobku.
Určené použití
A
UPOZORNĚNÍ:
V případě, že je zařízení
v ochranné fázi nebo
umísteno, ujistěte se, zda
nejsou odvětrávací dírky
uzavřeny.
UPOZORNĚNÍ:
Za účelem urychlení
rozpouštěné ledu
nepoužívejte žádné jiné
mechanické zařízení nebo
jiný přístroj než ty jež byly
doporučeny výrobcem.
UPOZORNĚNÍ:
Pokud je chladidlo v
provozu, nezasahujte do
jeho obvodu.
UPOZORNĚNÍ:
Uvnitř skladovacích prostor
jídla přístroje nepoužívejte
jiná elektrická zařízení než
ta, která byla doporučena
výroobcem.
Toto zařízení bylo navrženo pro použití
v domácnosti nebo pro níže uvedené
aplikování.
- V kuchyních personálu obchodů,
kanceláří a jiných pracovních míst;
- Za účelem použití návštěvníky farem
a hotelů, motelů a jiných míst s ubytováním.
- V prostorách typu penzionů
- V podobných zařízeních, která
nejsou stravovacími službami nebo
maloobchodem.
1.1. Všeobecná bezpečnost
• Tento produkt by neměly používat
osoby s tělesným, smyslovým a
mentálním postižením, osoby bez
dostatečných znalostí a zkušeností,
nebo děti. Zařízení mohou tyto osoby
používat jen pod dohledem a po
poučení osobou odpovědnou za jejich
bezpečnost. Nedovolte dětem hrát si s
tímto zařízením.
• V případě poruchy přístroj odpojte.
• Po odpojení počkejte nejméně 5
minut před opětovným připojením.
Odpojte výrobek, když se nepoužívá.
Nedotýkejte se zástrčky mokrýma
rukama! Při odpojování netahejte za
kabel, vždy uchopte zástrčku.
• Před zasunutím dovnitř otřete hrot
síťové zástrčky suchým hadříkem.
• Nezapojujte ledničku, pokud je zásuvka
uvolněná.
• Při instalaci, údržbě, čištění a opravách
odpojte výrobek.
• Pokud se výrobek nebude delší
dobu používat, odpojte jej a vyjměte
potraviny.
• Nepoužívejte páru nebo čistící
prostředky s párou pro čištění
chladničky a tání ledu uvnitř. Pára
může přijít do styku s elektrifikovanými
oblastmi a způsobit zkrat nebo
elektrický šok!
• Nemyjte výrobek stříkáním nebo
poléváním vodou na něj! Nebezpečí
úrazu elektrickým proudem!
• Nikdy nepoužívejte výrobek, pokud část
nacházející se na horní nebo zadní
straně výrobku s elektronickou deskou
s plošným spojem uvnitř je otevřená
(krycí deska elektronických plošných
spojů) (1).
1. Bezpečnostní pokyny a životní prostředí

Bezpečnostní pokyny a životní prostředí
5/25 CZ
Chladnička / Uživatelská příručka
1
1
• V případě jeho poruchy výrobek
nepoužívejte, protože by mohlo dojít
k úrazu elektrickým proudem. Před
tím, než cokoliv uděláte, se obraťte
na autorizovaný servis.
• Výrobek zapojujte do uzemněné
zásuvky. Uzemnění musí být
provedeno kvalifikovaným
elektrikářem.
• Pokud produkt má osvětlení typu
LED, pro jeho nahrazení nebo v
případě jakéhokoliv problému se
obraťte na autorizovaný servis.
• Nedotýkejte se mražených potravin
mokrýma rukama! Mohou se nalepit
na Vaše ruce!
• Nepokládejte do mrazničky tekutiny
v lahvích a plechovkách. Mohou
vybuchnout!
• Tekutiny umístěte ve vzpřímené
poloze a pevně uzavřete jejich víko.
• Nestříkejte hořlavé látky v blízkosti
výrobku, protože se může zapálit
nebo explodovat.
• Nenechávejte hořlavé materiály a
produkty s hořlavým plynem (spreje,
atd.) v chladničce.
• Nepokládejte nádoby obsahující
kapaliny na horní část výrobku. Voda
stříkající na elektrifikované části
může způsobit úraz elektrickým
proudem a nebezpečí požáru.
• Vystavení produktu dešti, sněhu,
slunci a větru může způsobit
elektrické nebezpečí. Při
přemisťování výrobku jej netahejte
držením za rukojeť dveří. Rukojeť se
může odtrhnout.
• Dbejte na to, aby nedošlo k
zachycení jakékoliv části vašich
rukou či těla do jakýchkoli z
pohybujících se částí uvnitř výrobku.
• Nevylézejte nebo se neopírejte o
dveře, zásuvky a podobné části
chladničky. Může to mít za následek
pád výrobku a způsobit poškození
dílů.
• Dávejte pozor, aby nedošlo k přivření
napájecího kabelu.
• Při umístění zařízení se ujistěte, že
napájecí kabel není zachycen nebo
poškozen.
• Neumísťujte více přenosných
zásuvek nebo přenosných zdrojů
napájení vzadu od zařízení.
• Děti ve věku od 3 do 8 let smí
nakládat a vykládat chladicí zařízení.
• Abyste předešli znečištění jídla,
dodržujte prosím následující pokyny:

Bezpečnostní pokyny a životní prostředí
6 /25 CZ
Chladnička / Uživatelská příručka
• Ponecháte-li dvířka otevřená po
dlouhou dobu, může to způsobit
značné zvýšení teploty v odděleních
zařízení.
• Pravidelně očišťujte povrchy, které
mohou přijít do kontaktu s jídlem, a
přístupné odtokové systémy.
• Očišťujte nádrže na vodu, pokud
nebyly používány během 48 h;
propláchněte vodní systém připojený
k přívodu vody,
• pokud jste nečerpali vodu ze
zařízení během 5 dní.
• Syrové maso a ryby uchovávejte v
chladničce ve vhodných nádobách,
aby nepřicházely do kontaktu
s jídlem ani na něho nemohly
ukápnout.
• Oddělení se dvěma hvězdičkami
pro mražené potraviny jsou vhodná
pro uchovávání předem zmražených
jídel, uchovávání nebo přípravu
zmrzliny a výrobu kostek ledu.
• Oddělení s jednou, dvěma a třemi
hvězdičkami nejsou vhodná pro
zmrazení čerstvého jídla.
• Je-li chladicí zařízení ponecháno
prázdné po dlouhou dobu, vypněte
ho, rozmrazte, očistěte, osušte a
nechte dvířka otevřená, abyste
tak zabránili tvoření plísní uvnitř
zařízení.
1.1.1 Varování HC
Jestliže výrobek obsahuje chladicí
systém ve kterém se používá plyn
R600a, zajistěte, aby při používání
a pohybování spotřebiče nedošlo k
poškození chladicího systému a jeho
potrubí. Tento plyn je hořlavý. Pokud je
chladicí systém poškozen, zajistěte, aby
bylo zařízení mimo dosah zdrojů ohně a
okamžitě vyvětrejte místnost.
C
Štítek na vnitřní levé
straně označuje druh plynu
používaného v produktu.
1.1.2 Pro modely s
dávkovačem vody
• Tlak pro přívod studené vody musí
být maximálně 90 psi (620 kPa).
Pokud je váš tlak vody vyšší než 80
psi (550 kPa), použijte ve vaší síti
ventil na omezování tlaku. Pokud
nevíte, jak zkontrolovat tlak vody,
požádejte o pomoc profesionálního
instalatéra.
• Pokud při instalaci existuje riziko
vodního rázu, vždy použijte
preventivně zařízení proti vodnímu
rázu. Pokud jste si není jistý, zda
ve Vaší síti je efekt vodního rázu,
poraďte se s profesionálním
instalatérem.
• Neinstalujte na přívodu pro teplou
vodu. Proveďte nezbytná opatření
proti riziku zamrznutí hadic. Provozní
interval teplota vody musí být
mezi minimálně 33 ° F (0,6 ° C) a
maximálně 100 ° F (38 ° C).

Bezpečnostní pokyny a životní prostředí
7/25 CZ
Chladnička / Uživatelská příručka
• Používejte pouze pitnou vodu.
1.2. Účel použití
• Tento výrobek je určen pro domácí
použití. Není určen pro komerční
použití.
• Spotřebič by měl být používán pouze
pro skladování potravin a nápojů.
• Do chladničky neukládejte citlivé
produkty, které vyžadují řízené
teploty (očkovací látky, léky citlivé na
teplo, zdravotnický materiál, atd.).
• Výrobce nenese žádnou
zodpovědnost za případné škody
způsobené nesprávným použitím
nebo nesprávnou manipulací.
• Životnost výrobku je 10 let. Náhradní
díly potřebné pro funkčnost tohoto
výrobku budou pro toto období k
dispozici.
1.3. Bezpečnost dětí
• Obalové materiály uchovávejte
mimo dosah dětí.
• Nedovolte dětem, aby se s
výrobkem hrály.
• Pokud je na dveřích výrobku zámek,
klíč držte mimo dosah dětí.
1.4. Soulad se směrnicí WEEE
a Odstranění odpadů výrobku
Tento výrobek splňuje
požadavky směrnice WEEE EU
(2012/19/EU). Na tomto produktu je
zobrazen symbol klasifikace odpadu
elektrických a elektronických zařízení
(OEEZ).
Tento výrobek byl vyroben z
vysoce kvalitních materiálů
a komponent, které lze
opětovně použít a které jsou
vhodné pro recyklaci. Na
konci své životnosti
spotřebič nevyhazujte spolu
s běžnými domácími a jinými odpady.
Odneste jej do sběrného centra pro
recyklaci elektrických a elektronických
zařízení. Pro informace o těchto
sběrných stredisakách se prosím
obraťte na místní úřady.
1.5. Soulad se směrnicí RoHS
• Tento výrobek splňuje požadavky směrnice
WEEE EU (2011/65/EU). Neobsahuje škodlivé
a zakázané látky uvedené ve směrnici.
1.6. Informace o balení
• Obalové materiály výrobku jsou vyrobeny z
recyklovatelných materiálů v souladu s našimi
národními předpisy o životním prostředí.
Nevyhazujte obalové materiály spolu s
domácími nebo jinými odpady. Vezměte je do
sběrných míst pro obalové materiály určené
místními orgány.

8 /26 CZ
Chladnička / Uživatelská příručka
C
*volitelné: Obrázky uvedené v této příručce jsou uváděny jako příklad a nemusí se
přesně shodovat s Vašim produktům. Pokud váš výrobek neobsahuje příslušné části, tyto
informace se vztahují na ostatní modely.
1. Police dveří prostoru chladničky
2. Zásuvky prostoru mrazničky
3. Automat na led
4. Zásobník na vodu
5. Prostor pro čerstvé ovoce a zeleninu
6. Kryt prostoru pro čerstvé ovoce a zeleninu
7. Prostor chlazení
8. Skleněné police dveří prostoru chladničky
9. Pachový filtr
10. Vnitřní displej
11. Skleněné police dveří prostoru chladničky
12. Prostor mrazničky
*volitelné
*1
*3
*4
6
*5
7
*8
11
12
*2
*1
*2
*3
*5
7
*8
9
10
11
6
12
2 Vaše lednička
Nemusí se vztahovat na všechny modely

9/26 CZ
Chladnička / Uživatelská příručka
3 Instalace
3.1. Vhodné umístění pro instalaci
Pro instalaci spotřebiče se obraťte na autorizovaný
servis. Pro přípravu spotřebiče k použití postupujte
podle pokynů v uživatelské příručce a ujistěte
se, že jsou elektrická instalace a instalace
vody správné. V opačném případě kontaktujte
kvalifikovaného elektrikáře a technika, aby provedl
veškerá potřebná opatření.
B
UPOZORNĚNÍ: Výrobce nenese
odpovědnost za škody, které mohou
vzniknout z postupů prováděných
neoprávněnými osobami.
B
UPOZORNĚNÍ: Spotřebič nesmí být
během instalace zapojen do el. sítě.
V opačném případě hrozí nebezpečí
smrti nebo vážného zranění!
A
UPOZORNĚNÍ: : Pokud je prostor
dveří v místnosti, kde bude spotřebič
umístěn, tak těsný, že jimi neprojde,
obraťte se na autorizovaného
poskytovatele služeb.
•Umístětespotřebičnarovnoupodlahu,aby
nedošlo k otřesům.
•Pokudbudetespotřebičinstalovatdoskříně
/ nábytku, musí být mezi bočními stěnami
spotřebiče a skříní / nábytkem ponechán prostor
nejméně 2 cm.
•Instalujtespotřebičnavzdálenostnejméně
30 cm od zdrojů tepla, jako jsou varné desky,
ohřívače a sporáky a minimálně 5 cm od
elektrických trub.
•Spotřebičnesmíbýtvystavenpřímému
slunečnímu záření a nesmí být umístěn na
vlhkém místě.
•Kolemchladničkymusíbýtdostatečnýprostor
pro ventilaci, aby se zajistila účinnost provozu.
Pokud se má spotřebič umístit do výklenku ve
stěně, věnujte pozornost tomu, aby strop a boční
stěny byly alespoň 5 cm od sebe.
• V prostředí, kde teplota v místnosti klesne pod
10°C, bude chladnička pokračovat v chodu,
aby zachovala potraviny v mrazáku. Čerstvé
potraviny by však v chladničce mohly zmrznout
v důsledku chladného prostředí.
3.2. Instalace plastových klínů
Plastové klíny dodávané se spotřebičem slouží
k vytvoření odstupu pro cirkulaci vzduchu mezi
spotřebičem a zadní stěnou.
1.
Pro instalaci klínů odstraňte šrouby na spotřebiči a
použijte dodané šrouby spolu s klíny.
2. Zasuňte 2 plastové klínky do krytu zadních větracích
otvorů jak je zobrazeno na obrázku.
3.3. Nastavování nožek
Pokud je spotřebič po instalaci nevyvážený, upravte
přední nožky otočením doprava nebo doleva.

Instalace
10 /25CZ
Chladnička / Uživatelská příručka
3.4. Elektrické zapojení
A
UPOZORNĚNÍ: Připojení
neprovádějte přes prodlužovací kabely
nebo vícenásobné zástrčky.
B
UPOZORNĚNÍ: Poškozený
napájecí kabel musí být vyměněn
autorizovaným servisním zástupcem.
C
Pokud vedle sebe instalujete dvě
chladničky, měl by mezi nimi být
rozestup nejméně 4 cm.
• Naše společnost nenese odpovědnost za
jakékoliv škody vzniklé při použití spotřebiče
bez uzemnění a elektrického připojení v
souladu s národními předpisy.
• K zástrčce napájecího kabelu musí být po
instalaci snadný přístup.
• Nepoužívejte prodlužovací kabely nebo
bezdrátové několikanásobné zásuvky mezi
spotřebičem a síťovou zásuvkou.
C
Varování před horkými povrchy!
Váš spotřebič je vybaven chladicím
potrubím pro zlepšení chladicího
systému bočních stěn. Těmito povrchy
může protékat horká kapalina, což
způsobuje teplo na bočních stěnách. To
je běžné a není to důvod pro servisní
údržbu. Při kontaktu s těmito plochami
buďte opatrní.
A
UPOZORNĚNÍ: „Ochranné fólie na svislé rukojeti“ budou odstraněny.

11/26 CZ
Chladnička / Uživatelská příručka
4.1. Postup pro úsporu energie
mehmet
A
Připojení výrobku k systémům pro úsporu
elektrické energie je riskantní a může vést
k poškození výrobku.
• Nenechávejte dvířka chladničky otevřená delší
dobu.
• Nevkládejte do chladničky horké potraviny nebo
nápoje.
• Chladničku nepřeplňujte, chladicí objem se
sníží, pokud něco brání cirkulaci vzduchu v
chladničce.
• Abyste mohli v mrazicím oddílu své chladničky
uchovávat maximum potravin, je třeba odstranit
horní klapku a zásuvku a umístit je na skleněné
police. Spotřeba energie udávaná pro vaši
chladničku byla určena po vyjmutí přístroje
na led, zásobníku na led, klapky a prostřední
zásuvky tak, aby byla možná maximální náplň.
Při plnění chladničky je doporučeno používat
horní klapku a spodní zásuvku.
• V závislosti na funkcích vaší chladničky,
rozmrazování zmražených potravin v prostoru
chladničky zajistí úsporu energie a zachová
kvalitu potravin.
• Ukládáním potravin před ventilátor v mrazničce
by nemělo docházet k blokování proudění
vzduchu. Potraviny by měly být umisťovány tak,
aby byl ponechán prostor alespoň 5 cm před
ochrannou mřížkou ventilátoru.
• Teplotní čidlo v mrazicím prostoru nesmí být v
přímém kontaktu s balením potravin. V případě
kontaktu se snímačem se může zvýšit spotřeba
energie spotřebiče.
4 Příprava
C
Vnitřek spotřebiče musí být vyčištěn.
C
Pokud vedle sebe instalujete dvě
chladničky, měl by mezi nimi být rozestup
nejméně 4 cm.
4.2. První použití
Před prvním použitím vaší chladničky se ujistěte,
že jste provedli všechny kroky přípravy podle
pokynů uvedených v kapitolách „Pokyny týkající se
bezpečnosti a prostředí“ a „Instalace“.
Nechte chladničku spuštěnou po dobu 6 hodin, aniž
byste do ní vkládali potraviny, a pokud to nebude
nezbytně nutné, neotevírejte dveře.
C
Uslyšíte hluk při startování kompresoru.
Kapalina a plyn v chladicí soustavě mohou
také vydávat zvuky, i když kompresor
neběží. To je normální.
C
Je normální, že jsou přední hrany
chladničky horké. Tyto oblasti mají být
teplé, aby nedocházelo ke kondenzaci.

12 /26 CZ
Chladnička / Uživatelská příručka
5 Tlačítko pro Nastavení teploty
5.1. Panel indikátorů
Panely indikátorů se mohou lišit v závislosti na modelu spotřebiče.
Audiovizuální funkce na panelu indikátorů vám pomáhají při používání vašeho spotřebiče.
1.
Nastavení teploty / zvýšení teploty
2. Nastavení teploty – posuvník / indikátor teploty
3. Indikátor výběru jednotky teploty (°C) – stupeň
Celsia
4. Indikátor výběru jednotky teploty (°F) – stupeň
Fahrenheita
5. Nastavení teploty / snížení teploty
6. Ukazatel funkce rychlého chlazení / tlačítko
7. * Bezdrátové připojení
8. Indikátor / tlačítko režimu Eco
9. *Joker Freezer indikátor / tlačítko
10. *Automatické dveře
11. Varování / Chyba při vysokých teplotách
12. *Chladič na láhve
13. *Varování / tlačítko výměny filtru
14. Tlačítko Nabídka
15. Indikátor / tlačítko zapnutí / vypnutí spotřebiče
16. *Indikátor / tlačítko automatického výrobníku
ledu
17. *Režim Sabbath
18. Indikátor / tlačítko režimu Dovolená
19. Indikátor zámku
20. Ukazatel /tlačítko funkce rychlého mražení
21. Výběr kabiny
22. Indikátor prostoru chladničky
23. Indikátor prostoru mrazničky
1
2
3
4
*16
*17
18
20
21
22
23
19
5
6
8
*7
*10
*12
*13
14
15
11
*9a
*9b
C
*volitelné: Obrázky uvedené v této příručce jsou uváděny jako příklad a nemusí se
přesně shodovat s Vašim produktům. Pokud váš výrobek neobsahuje příslušné části, tyto
informace se vztahují na ostatní modely.
Nemusí se vztahovat na všechny modely

Tlačítko pro Nastavení teploty
13/25 CZ
Chladnička / Uživatelská příručka
1. Nastavení teploty / zvýšení teploty
Po stisknutí se zvýší teplota vybraného
prostoru.
2. Nastavení teploty – Posuvník / Indikátor
teploty
Zobrazuje se na něm teplota zvoleného
prostoru. Navíc můžete posunutím prstu nahoru
nebo dolů zvýšit nebo snížit teplotu.
3. Výběr jednotky teploty (°C)
Indikátor Celsius
Po stisknutí tlačítka se jednotka teploty změní
na stupeň Celsia.
Jedná se o ukazatel teploty ve stupních
Celsia. Pokud je ukazatel aktivní, jsou teploty
nastaveny na zobrazení ve stupních Celsia a
příslušný indikátor se zapne na 100 %.
Ikona pro stupně Fahrenheita se zapne na 50
%.
4. Výběr jednotky teploty (°F)
Ukazatel Fahrenheit
Po stisknutí tlačítka se jednotka teploty změní
na stupeň Fahrenheita.
Jedná se o ukazatel teploty v stupních
Fahrenheita. Pokud je ukazatel aktivní, jsou
teploty nastaveny na zobrazení ve stupních
Fahrenheita a rozsvítí se příslušná ikona.
Ikona pro stupně Celsia se zapne na 50 %.
5. Nastavení teploty / snížení teploty
Po stisknutí se sníží teplota vybraného
prostoru.
5.2. Panel indikátorů
Panely indikátorů se mohou lišit v závislosti na modelu spotřebiče.
Audiovizuální funkce na panelu indikátorů vám pomáhají při používání vašeho spotřebiče.
Select
!
15
21
22 23
5
2
1
*13
*7
*11
*10
*17
*12
*16
*9b
*9a
8
18
6
20
4
3
6. Ukazatel funkce rychlého chlazení
Je-li funkce rychlého chlazení aktivována,
indikátor se rozsvítí na 100 %. Po zrušení
funkce se spotřebič vrátí do normálního
nastavení a indikátor se rozsvítí na 50 %.
Tlačítko funkce rychlého chlazení
Používá se k aktivaci nebo deaktivaci funkce
rychlého chlazení.
C
Funkci rychlého chlazení použijte,
kdykoli chcete rychle zchladit potraviny
vložené do chladničky. Pokud chcete
zchladit velké množství čerstvých
potravin, doporučujeme aktivovat
tuto funkci, než vložíte potraviny do
chladničky.
C
Pokud funkci rychlého chlazení
nezrušíte, vypne se sama automaticky
nejdéle po 8 hodinách nebo
jakmile prostor chladničky dosáhne
požadované teploty.
C
Pokud opakovaně rychle za sebou
stisknete tlačítko rychlého chlazení,
aktivuje se ochrana elektrického
obvodu a kompresor se nespustí hned.
C
Tato funkce se nevyvolá po selhání
napájení.
7. *Bezdrátové připojení
Po stisknutí tlačítka se spotřebič připojí k
domácí síti. Když funkce je aktivováno, indikátor
se rozsvítí na 100 %, když je zrušeno, indikátor
se rozsvítí na 50 %.
Nemusí se vztahovat na všechny modely

Tlačítko pro Nastavení teploty
14 /25CZ
Chladnička / Uživatelská příručka
8. Indikátor / tlačítko režimu Eco
Stisknutím tohoto tlačítka aktivujete a
deaktivujete režim Eco.
Je-li aktivován režim Eco, indikátor se rozsvítí
na 100 %. Když je funkce aktivní, mraznička
začne běžet v eco režimu nejméně o 6 hodin
později. Po zrušení funkce se indikátor rozsvítí
na 50 %.
9a. *Indikátor / tlačítko Joker freezer
Když je tlačítko stisknuto, oddíl Joker běží jako
mrazák a indikátor se rozsvítí na 100 %. Oddíl
Joker jako prostor chladničky se zapne na 50 %.
9b. *Indikátor / tlačítko Joker fridge
Když je tlačítko stisknuto, oddíl Joker běží jako
prostor chladničky a indikátor se rozsvítí při 100
%. Oddíl Joker jako mrazák se zapne na 50 %.
10. *Automatické dveře
Stisknutím tohoto tlačítka aktivujete nebo
deaktivujete funkci Automatické dveře. Je-li
funkce aktivována, indikátor se rozsvítí na 100
%. Po zrušení funkce se indikátor rozsvítí na
50 %.
Pokud je funkce aktivní, dotkněte se příslušné
části rukojeti dveří, aby se dveře automaticky
otevřely.
11. Varování / Chyba při vysokých
teplotách
Tato kontrolka se rozsvítí během výpadku
napájení, při selhání při vysokých teplotách a
upozornění na chybu. Během dlouhodobých
výpadků napájení se nejvyšší teplota, které
mraznička dosáhne, rozbliká na digitálním
displeji. Po kontrole potravin v mrazničce
stiskněte tlačítko vysoké teploty a upozornění
vymažte.
12. *Chladič na láhve
Stisknutím tohoto tlačítka aktivujete nebo
deaktivujete funkci chladiče na láhve.
Je-li funkce aktivována, indikátor se rozsvítí
na 100 %. Je-li funkce zrušena, indikátor se
rozsvítí na 50 %.
13. *Varování / tlačítko výměny filtru
Tato ikona se zobrazí, pokud je nutné resetovat
filtr.
Po stisknutí tlačítka se filtr resetuje a ikona
zhasne.
14. Tlačítko Nabídka
Používá se k aktivaci nebo deaktivaci režimu
spánku displeje. Pokud nestisknete žádné
tlačítko ani neotevřete dveře po dobu 30
sekund, chladnička se automaticky přepne do
režimu spánku.
15. Indikátor / tlačítko zapnutí / vypnutí
spotřebiče
Stisknutím a podržením tlačítka Zap. / Vyp. na
3 sekundy zapnete nebo vypnete zařízení.
Když je spotřebič vypnutý, indikátor zapnutí
/ vypnutí se rozsvítí na 100 % a ostatní
indikátory zhasnou. Chcete-li spotřebič zapno-
ut, stiskněte znovu a podržte tlačítko po dobu
3 sekund. Chladnička se zapne a indikátor
zapnutí / vypnutí se rozsvítí na 50 %.
16. *Indikátor / tlačítko automatického
výrobníku ledu
Stisknutím tohoto tlačítka aktivujete nebo
deaktivujete funkci automatického výrobníku
ledu. Pokud je indikátor zapnut na 100 %,
znamená to, že je v provozu automatický
výrobník ledu. Pokud je indikátor zapnut na 50
%, znamená to, že je automatický výrobník ledu
vypnut.
C
Není-li vybrána tato funkce, průtok
vody z nádrže na vodu se zastaví.
Nicméně z výrobníku lze vybrat dříve
vyrobený led.
17. *Režim Sabbath
Stisknutím tohoto tlačítka aktivujete nebo
deaktivujete funkci Sabbath. Je-li funkce
aktivována, indikátor se rozsvítí na 100 %. Po
zrušení funkce se indikátor rozsvítí na 50 %.

Tlačítko pro Nastavení teploty
15/25 CZ
Chladnička / Uživatelská příručka
18. Indikátor / tlačítko režimu Dovolená
Stisknutím tohoto tlačítka aktivujete režim
dovolené. Indikátor režimu dovolené se zapne
na 100 %. Když se kontrolka funkce dovolené
aktivuje, na panelu indikátoru teploty se
zobrazí “- -” a v chladničce nedochází k
žádnému aktivnímu chlazení. Když je tato
funkce aktivovaná, nehodí se uchovávat
potraviny v chladničce. Ostatní prostory se
budou chladit v souladu s nastavenou teplotou.
Chcete-li tuto funkci zrušit, znovu stiskněte
tlačítko funkce Dovolená. Po zrušení funkce
se indikátor rozsvítí na 50 %.
19. Indikátor zámku
Stiskněte a podržte současně tlačítka rychlé
chladničky a dovolené po dobu 3 sekund.
Po stisku tlačítka se spustí odpočítávání na
ukazateli teploty. Když je aktivován zámek
tlačítek, indikátor zámku tlačítek se zapne
na 100 % a bude aktivován režim zamknutí
tlačítek. Tlačítka nebudou v režimu zámku
tlačítek funkční. Znovu stiskněte a podržte
současně tlačítka rychlé chladničky a dovolené
po dobu 3 sekund. Po stisku tlačítka se spustí
odpočítávání na ukazateli teploty. Když je
deaktivován zámek tlačítek, indikátor zámku
tlačítek se zapne na 50 % a režim zámku
tlačítek bude deaktivován.
Aktivujte tuto funkci, pokud chcete předejít
změně nastavení teploty chladničky.
20.Ukazatel funkce rychlého mrazení
Když je aktivována funkce rychlého mrazení,
indikátor se rozsvítí na 100 %. Po zrušení
funkce se spotřebič vrátí do normálního
nastavení a indikátor se rozsvítí na 50 %.
Tlačítko funkce Rychlé mrazení
Používá se k aktivaci nebo deaktivaci funkce
rychlého mrazení.
Stisknutím tohoto tlačítka aktivujete nebo
deaktivujete funkci rychlého mrazení. Když tuto
funkci aktivujete, mraznička se vychladí na
teplotu nižší než je nastavená hodnota.
C
Funkci rychlého mrazení použijte
kdykoli chcete rychle zchladit potraviny
vložené do mrazničky. Pokud chcete
zmrazit velké množství čerstvých
potravin, doporučujeme aktivovat
tuto funkci, než vložíte potraviny do
chladničky.
C
Pokud funkci rychlého mrazení
nezrušíte, vypne se sama automaticky
nejdéle po 4 hodinách nebo
jakmile prostor chladničky dosáhne
požadované teploty.
C
Tato funkce se nevyvolá po selhání
napájení.
21. Výběr prostoru
Stiskněte tlačítko pro volbu prostoru a zobrazte
a změňte hodnotu teploty chladničky nebo
mrazničky na ukazateli teploty.
22. Indikátor prostoru chladničky
Když je tento indikátor aktivní, na ukazateli
teploty je zobrazena teplota chladicího
prostoru.
23 Indikátor prostoru mrazničky
Když je tento indikátor aktivní, na ukazateli
teploty je zobrazena teplota mrazícího prostoru.

Tlačítko pro Nastavení teploty
16 /25CZ
Chladnička / Uživatelská příručka
5.3. Výrobník ledu
(Tato funkce je volitelná)
Výrobník ledu vám umožňuje snadno získat led
ze spotřebiče.
Používání výrobníku ledu
1. Odstraňte zásobník na vodu z chladničky.
2. Naplňte zásobník na vodu vodou.
3. Vraťte zásobník na vodu zpět na místo.
První kostky ledu budou připraveny zhruba za
4 hodiny a budou v zásuvce na led v prostoru
mrazničky.
C
Pokud zásobník na vodu naplníte celý,
získáte zhruba 60 – 70 kostek ledu.
C
Voda v zásobníku by se měla měnit
každé 2 – 3 týdny.
5.4. Automat na led
(Tato funkce je volitelná)
Automat na led vám umožňuje snadno získat led
ze spotřebiče.
Použití automatu na led
1. Automat na led opatrně vyndejte.
2. Naplňte jej vodou.
3. A vraťte zpět na místo. Za cca dvě hodiny je
led připraven.
4. Otočte knoflíky zásobníků na led doprava
o 90 stupňů, abyste získali led. Kostky ledu v
zásobnících spadnou do nádoby na skladování
ledu níže.
5. Můžete vyjmout nádobu na skladování ledu a
podávat led.
C
Nevyjímejte automat na led pro odběr
ledu.
C
Pokud chcete, můžete skladovat
kostky ledu v nádobě na uskladnění
ledu. Nádoba na skladování ledu
je určena jen pro sběr kostek ledu.
Nelijte do ní vodu. Jinak praskne.
5.5. Podnos na led
(Tato funkce je volitelná)
Podnos na led vám umožňuje snadno získat
led ze spotřebiče.
Používání podnosu na led
1. Odstraňte podnos na led z prostoru
mrazničky.
2. Naplňte jej vodou.
3. Vraťte podnos na led zpět do prostoru
mrazničky. Za cca dvě hodiny je led
připraven.
4. Vyjměte podnos na led z prostoru
mrazničky a ohněte jej nad talířem. Kostky
ledu snadno vypadnou na talíř.

Tlačítko pro Nastavení teploty
17/25 CZ
Chladnička / Uživatelská příručka
5.6. Modré světlo
(Tato funkce je volitelná)
Prostor pro čerstvé ovoce a zeleninu je
osvětlen modrým světlem. Potraviny v prostoru
pro čerstvé ovoce a zeleninu pokračují ve
fotosyntéze pomocí účinku vlnové délky
modrého světla, a tím se zachovává jejich
čerstvost.
5.7. Deodorant
(FreshGuard)
(Tato funkce je volitelná)
Deodorant rychle odstraní zápach ve vaší
ledničce dříve, než prostoupí na povrch. Díky
tomuto deodorantu, který se umisťuje do
vrchní části prostoru určeného pro čerstvé
potraviny, se zápach rozpustí, a bude aktivně
přenesen do pachového filtru. Poté pročištěný
vzduch přejde zpět do prostoru pro čerstvé
potraviny. Tímto způsobem budou nechtěné
pachy, které se mohou objevit v průběhu
skladování potravin v ledničce, odstraněny,
dříve než prostoupí na povrch.
Této funkce se dosáhne pomocí větráku,
kontrolek LED a zápachového filtru
zabudovaného v deodorantu. Deodorant se
zapíná automaticky v pravidelných intervalech.
Zvuk, který slyšíte během pravidelné aktivace
modulu, je normální; Vydává ho zabudovaný
ventilátor. Pokud otevřete dveře prostoru pro
čerstvé ovoce a zeleninu, když je deodorant
zapnut, větrák se automaticky přeruší a opět
se zapne, jakmile dveře zavřete. V případě
výpadku proudu se deodorant zapne při
opětovném zapnutí elektřiny.
Informace: Doporučujeme skladovat
aromatické potraviny (např. sýry, olivy a
další lahůdky) v utěsněných obalech, aby
se zabránilo zápachu, který může nastat
smícháním pachů různých potravin. Kromě
toho doporučujeme vyndat z ledničky zkažené
potraviny, jejichž zápach může ohrozit další
potraviny, čímž se zamezí vzniku zápachu v
chladničce.

Tlačítko pro Nastavení teploty
18 /25CZ
Chladnička / Uživatelská příručka
5.8. Prostor chlazení
(Tato funkce je volitelná)
Použijte tento prostor k ukládání lahůdek,
které mají být skladovány při nižší teplotě,
nebo masných výrobků, které budete brzy
konzumovat. V tomto prostoru neskladujte ovoce
a zeleninu.
Můžete zvýšit vnitřní objem chladničky, pokud
odstraníte některý z prostorů chlazení:
Chcete-li jej vyjmout, stačí vytáhnout dopředu,
dokud se nezastaví, a pak jej zvedněte a
zatáhněte směrem k sobě.
5.9. Prostor pro čerstvé
ovoce a zeleninu
Prostor pro čerstvé ovoce a zeleninu ve vaší
chladničce je navržen tak, aby se vaše zelenina
udržela čerstvá a neztrácela vlhkost. Z tohoto
důvodu dochází k cirkulaci chladného vzduchu
po prostoru. V tomto prostoru skladujte ovoce
a zeleninu. Abyste prodloužili jejich životnost,
nepokládejte listovou zeleninu vedle ovoce.

Tlačítko pro Nastavení teploty
19/25 CZ
Chladnička / Uživatelská příručka
5.10. Používání nádržky na vodu
(Tato funkce je volitelná)
C
Je normální, že prvních pár sklenic
vody z dávkovače je teplých.
C
Není-li zásobník na vodu dlouhou
dobu používán, několik prvních sklenic
vody vylijte, abyste získali čerstvou
vodu.
1. Zatlačte skleničkou na páčku nádržky. Pokud
používáte měkký plastový pohárek, páčku
stlačte rukou, bude to snazší.
2. Páčku uvolněte po naplnění skleničky na
požadovanou úroveň.
C
Povšimněte si, že podle toho, jak
daleko zatlačíte páčku, tak proudí
voda. S tím, jak se plní vaše sklenička,
pomalu snižujte tlak na páčku,
aby nedošlo k přetečení. Pokud
páčku stisknete jemně, voda začne
odkapávat, což je zcela normální a
nejde o selhání.
5.11. Plnění zásobníku
chladiče vody
Zásobník se nachází uvnitř dveří.
1. Otevření krytu nádrže.
2. Zásobník naplňte čerstvou pitnou vodou.
3. Zavřete víčko.
C
Nenaplňujte nádržku na vodu žádnou
jinou kapalinou s výjimkou vody, např.
ovocnými džusy, sycenými nápoji
nebo alkoholickými nápoji, které není
vhodné v nádržce na vodu používat.
Nádržka na vodu se při použití těchto
druhů kapalin nevratně poškodí.
Taková použití nekryje záruka.
Některé chemické látky a přísady
obsažené v těchto typech nápojů /
kapalinách mohou nádržku poškodit.
C
Použijte pouze čistou pitnou vodu.
C
Kapacita zásobníku na vodu je 3 litry,
nepřeplňte ho.
5.12. Čištění zásobníku na vodu
1. Vyjměte zásobník vody z vnitřní části dveří.

Tlačítko pro Nastavení teploty
20 /25CZ
Chladnička / Uživatelská příručka
2. Držák vyjměte tak, že ho podržíte po obou
stranách.
3. Uchopte zásobník na vodu a vyndejte ho v úhlu
45 °C.
4. Sejměte kryt zásobníku a zásobník vyčistěte.
C
Komponenty vodní nádržky nesmí být
umývány v myčce na nádobí.
5.13. Odkapávací miska
Voda, která odkapává při používání vodní
nádržky, se hromadí na tomto tácu.
Plastový filtr sejměte tak, jak je zobrazeno na
obrázku.
Nahromaděnou vodu vytřete čistým a suchým
hadříkem.

Tlačítko pro Nastavení teploty
21/25 CZ
Chladnička / Uživatelská příručka
S E B Z E L İ K
5.14. Mražení čerstvých potravin
• Aby se zachovala kvalita potravin, musí být
co nejrychleji zmraženy, když jsou umístěny
v mrazicím prostoru, pro tento účel použijte
funkci rychlého mrazení.
• V mrazničce můžete potraviny skladovat
déle, když je zmrazíte, dokud jsou čerstvé.
• Zabalte potraviny, které chcete zmrazit, a
uzavřete balení tak, aby nedošlo k vniknutí
vzduchu.
• Před vložením do mrazničky se ujistěte, že
jste potraviny zabalili. Používejte mrazící
kontejnery, fólie a papíry odolné proti
vlhkosti, plastové tašky a jiné obalové
materiály místo tradičních obalových papírů.
• Každé balení potravin před zmrazením
označte datem. Takto můžete rozlišit
čerstvost jednotlivých balení potravin
pokaždé, když otevřete mrazák. Předtím
zmrazené potraviny skladujte v přední
části prostoru, abyste se ujistili, že budou
spotřebovány nejdříve.
• Mražené potraviny je nutno použít rychle
poté, co rozmrznou, nikdy se nesmí znovu
mrazit.
• Nezmrazujte příliš velké množství najednou.
5.15. Prostor pro čerstvé ovoce
a zeleninu s řízenou vlhkostí
(vždy čerstvé potraviny)
(Tato funkce je volitelná)
Prostor pro čerstvé ovoce a zeleninu s řízenou
vlhkostí zajistí, že tyto potraviny zůstanou
déle čerstvé díky ideální úrovni vlhkosti.
Se systémem nastavení vlhkosti se třemi
možnostmi v přední části prostoru můžete
ovládat vlhkost uvnitř v závislosti na uložených
potravinách. Doporučuje se zvolit možnost
zeleniny, pokud ukládáte pouze zeleninu,
možnost ovoce, pokud ukládáte pouze ovoce,
a kombinovanou volbu, pokud ukládáte ovoce
i zeleninu.
Chcete-li využít systém kontroly vlhkosti
a prodloužit skladovatelnost potravin,
doporučujeme neuchovávat ovoce a zeleninu
v plastových sáčcích. V případě, že zeleninu v
sáčcích ponecháte, dojde k jejímu rychlému
rozkladu. Zejména nedoporučujeme ukládat
okurky nebo brokolici v uzavřených plastových
sáčcích. V případě kontaktu s jinými druhy
zeleniny, který se z hygienických důvodů
nedoporučuje, použijte místo sáčku perforovaný
papír nebo podobné balicí materiály.
Při vložení zeleniny je třeba vzít v úvahu
specifickou hmotnost zeleniny. Těžkou a tvrdou
zeleninu musíte vložit do spodní části prostoru
a na ni lehkou a měkkou zeleninu.
Do stejného prostoru jako další zeleninu a
ovoce neukládejte hrušky, meruňky, broskve,
atd. a zejména jablka, která mají vysokou
úroveň tvorby ethylenu. Ethylenový plyn
vydávaný tímto ovocem může způsobit rychlejší
zkažení jiného ovoce a zeleniny.

Tlačítko pro Nastavení teploty
22 /25CZ
Chladnička / Uživatelská příručka
Nastavení
mrazničky
Nastavení
chladničky
Poznámky
-18 °C 4 °C Toto je normální doporučené nastavení.
-20, -22 nebo
-24 °C
4 °C
Tato nastavení jsou doporučena, pokud teplota prostředí
přesáhne 30 °C.
Rychlé mrazení 4 °C
Toto nastavení použijte, pokud chcete rychle zmrazit potraviny.
Jakmile proces skončí, spotřebič se vrátí na předchozí režim.
-18 °C nebo
chladněji
2 °C
Použijte tato nastavení, pokud se domníváte, že v chladničce
není dostatečně chladno kvůli vysoké okolní teplotě nebo
častému otevírání a zavírání dveří.
5.16. Doporučení pro uschování
mražených potravin
Oddíl musí být nastaven minimálně na -18 °C.
1. Balení vkládejte do mrazničky co nejrychleji
po zakoupení, aniž byste je nechali rozmrazit.
2. Zkontrolujte, zda neuplynuli lhůty "Použít do"
a "Nejlépe před" před jejich zmrazením.
3. Ujistěte se, že balení potravin není
poškozeno.
5.17. Informace o
hloubkovém mražení
Podle norem IEC 62552 musí spotřebič zmrazit
nejméně 4,5 kg potravin při okolní teplotě 25 °C
na -18 °C nebo nižší během 24 hodin na každých
100 litrů objemu mrazáku.
Je možné udržet potraviny dlouhodobě jen při -18
°C nebo nižších teplotách.
Čerstvé potraviny můžete uchovat mnoho měsíců
(při -18 °C nebo nižších teplotách při hloubkovém
mražení).
Potraviny by neměly být v kontaktu s předtím
zmraženými potravinami, aby nedošlo k
částečnému rozmrazení.
Krátce povařte zeleninu a zbavte ji vody, aby se
zmrzlá uchovala po delší dobu. Po odstranění
vody ji vložte do vzduchotěsných obalů a umístěte
ji do mrazáku. Potraviny, jako jsou banány,
rajčata, salát, celer, vařené vejce, brambory,
nejsou k zmrazení vhodné. Když jsou tyto
potraviny zmrazené, negativně to ovlivní jejich
nutriční hodnotu a chuť. Zkažené však nebudou,
takže nebudou vytvářet riziko pro lidské zdraví.
5.18. Vkládání potravin
Police prostoru
mrazničky
Různé mražené potraviny,
jako je maso, ryby, zmrzlina,
zelenina atd.
Police prostoru
chladničky
Potraviny v pánvích,
přikrytých talířích a
uzavřených nádobách, vejce
(v uzavřené nádobě)
Police dveří
prostoru
chladničky
Malé a balené potraviny
nebo nápoje
Prostor pro
čerstvé ovoce
a zeleninu
Zelenina a ovoce
Prostor pro
čerstvé
potraviny
Lahůdky (snídaňová jídla,
masné výrobky, které se
konzumují v krátkém čase)
5.19. Upozornění na otevření dveří
(Tato funkce je volitelná)
Necháte-li dveře chladničky otevřené déle než 1
minutu, zazní výstražný zvukový signál. Toto upozornění
se ztlumí po zavření dveří chladničky nebo stisknutí
některého z tlačítek na displeji (pokud je tam nějaké).
5.20. Žárovka
K osvětlení jsou použity LED žárovky. Obraťte se na
autorizovaný servis v případě jakéhokoli problému s
tímto typem osvětlení.
Žárovky používané ve spotřebiči nejsou určeny ani
vhodné pro domácí osvětlení. Žárovky v chladničce
nebo mrazáku jsou určeny k zajištění pohodlného a
bezpečného ukládání potravin.

23/26 CZ
Chladnička / Uživatelská příručka
6 Údržba a čištění
Při pravidelném čištění se zvýší životnost výrobku.
B
VAROVÁNÍ: Před čištěním chladničky
produkt nejprve odpojte z elektrické sítě.
•
K čištění nikdy nepoužívejte ostré nebo brusné
nástroje, mýdlo, domácí čistidla, detergenty a
voskové čistidlo.
•
Rozpusťte jednu lžičku karbonátu v půl litru
vody. Namočte hadřík do roztoku a důkladně
ji vyždímejte. Otřete vnitřek spotřebiče s touto
látkou a vysušte ho.
•
Ujistěte se, aby se o tělesa osvětlení a jiných
elektrických předmětů nedostala žádná voda.
•
Očistěte dveře pomocí vlhkého hadříku.
Chcete-li odstranit police ve dveřích a hlavní
police, odstraňte veškerý jejich obsah. Vyberte
police dveří jejich posunutím směrem nahoru.
Po očištění, k uložení je vložte směrem shora
dolů.
•
Pro čištění vnějších povrchů a pochromovaných
součástí výrobku nikdy nepoužívejte čistící
prostředky ani vodu s obsahem chloru. Chlór
způsobuje korozi kovových povrchů.
•
Pro zabránění odstranění a deformaci nápisů
na plastových dílech, nepoužívejte žádné ostré,
brusné nástroje, mýdlo, čisticí prostředky pro
domácnost, čistící prostředky, petrolej, topný
olej, laky atd .. K čištění použijte vlažnou vodu a
měkký hadřík a otřete je do sucha.
6.1. Zabránění vzniku
nepříjemných pachů
Při výrobě našich zařízení se nepoužívají materiály,
které mohou způsobit zápach. Nicméně, nevhodné
podmínky pro zachování potravin a zanedbání
čištění vnitřního povrchu zařízení v potřebné míře
může způsobit problém zápachu.
Proto ledničku čistěte karbonáty rozpuštěným ve
vodě každých 15 dní.
•
Potraviny uchovávejte v uzavřených nádobách.
Mikroorganismy šířící se z nekrytých nádob
mohou způsobit nepříjemné pachy.
•
Nikdy neskladujte jídlo, kterým vypršela
trvanlivosti a jsou rozlité v chladničce.
6.2. Ochrana plastových povrchů
Okamžitě očistěte s teplou vodou, protože olej
nanesený na plastové povrchy může způsobit
poškození povrchu.
6.3. Dveřní skla
Ze skel odstraňte ochrannou fólii.
Na povrchu skla se nachází povlak. Tento
povlak minimalizuje vznik skvrn a pomáhá
snadno odstranit případné nečistoty a skvrny.
Skla, které nejsou chráněny takovým povlakem
mohou být vystaveny trvalým organickým nebo
anorganickým nečistotám na bázi vzduchu nebo
vody, jako jsou vodní kámen, minerální solí,
nespálené uhlovodíky, oxidy kovů a silikony,
které snadno a rychle způsobují skvrny nebo
materiální škody. Udržování skla v čistém stavu
se stává příliš těžkým, navzdory pravidelnému
čištění. V důsledku toho, vzhled a transparentnost
skla se zhoršuje. Drsné a žíravé metody čištění
a sloučeniny zintenzivňují tyto vady a urychlují
proces zhoršování se.
Pro běžné čisticí účely použijte čisticí prostředky
na vodní bázi, které nejsou zásadité a korozivní.
K čištění použijte nealkoholické a nekorozivní
materiály, abyste zachovali povlak po dlouhou
dobu.
Skla jsou temperované pro zvýšení jejich
odolnosti proti nárazům a lámání.
Na jejich zadní ploše byla také aplikována
bezpečnostní fólie, jako další bezpečnostní
opatření pro zabránění poškození jejich okolí v
případě jejich rozbití.
* Alkálie je báze, která při rozpuštění ve vodě tvoří
hydroxidové ionty (OH).
Kovy Li (lithium), Na (sodík), K (draslík) Rb
(rubidium), Cs (cesium), a umělý a radioaktivní Fr
(Francium) se nazývají alkalické kovy.

24 /26 CZ
Chladnička / Uživatelská příručka
7 Řešení problémů
Než se obrátíte na servis, viz následující seznam. Může Vám to ušetřit čas i peníze. Tento seznam
obsahuje časté stížnosti, které nejsou spojeny s vadným zpracováním nebo poškozením materiálu.
Některé funkce uvedené v tomto dokumentu se nemusí vztahovat na váš produkt.
Chladnička nefunguje.
• Zástrčka není úplně nasazena. >>> Zapojte ji úplně do zásuvky.
• Pojistka připojená do zásuvky která napájí produkt nebo hlavní pojistka je spálená. >>>
Zkontrolujte pojistky.
Kondenzace na boční stěně chladicího prostoru (MULTI ZÓNA, CHLADÍCÍ, KONTROLNÍ a FLEXI ZÓNA).
• Prostředí je příliš chladné. >>> Neinstalujte výrobek v prostředí s teplotami pod -5 °C.
• Dveře se otevírají příliš často >>> Dbejte na to, abyste dveře výrobku neotvírali příliš často.
• Prostředí je příliš vlhké. >>> Neinstalujte výrobek ve vlhkém prostředí.
• Potraviny obsahující tekutiny jsou uchovávány v neuzavřených nádobách. >>> Uchovávejte
potraviny, které obsahují tekutiny v uzavřených nádobách.
• Dveře výrobku byly ponechány otevřené. >>> Nenechávejte dveře chladničky otevřeny po delší
dobu.
• Termostat je nastaven na příliš nízkou teplotu. >>> Nastavte termostat na vhodnou teplotu.
Kompresor nepracuje.
• V případě náhlého výpadku proudu nebo vytažení napájecího kabelu a po jeho opětovném
připojení tlak plynu v chladicím systému výrobku není vyvážený, což spustí tepelný jistič
kompresoru. Produkt se restartuje po přibližně 6 minutách. Když se výrobek po uplynutí této
doby nerestartuje, obraťte se na servis.
• Je aktivní rozmrazování. >>> To je normální pro chladničku s plně automatickým rozmrazováním.
Rozmrazování se provádí pravidelně.
• Produkt není zapojen do elektrické sítě >>> Ujistěte se, že napájecí kabel je zapojen.
• Nastavení teploty je nesprávné. >>> Zvolte odpovídající nastavení teploty.
• Není proud. >>> Produkt bude nadále fungovat normálně po obnovení napájení.
Provozní hluk chladničky se při používání zvyšuje.
• Provozní výsledky tohoto výrobku se mohou lišit v závislosti na změnách teploty okolního
prostředí. To je normální a nejedná se o závadu.
Chladnička běží příliš často nebo příliš dlouho.

25/26 CZ
Chladnička / Uživatelská příručka
Řešení problémů
• Nový výrobek může být větší než ten předchozí. Větší výrobky budou pracovat po delší dobu.
• Teplota v místnosti může být vysoká. >>> Výrobek bude v místnosti s vyšší teplotou spuštěn po
delší dobu.
• Výrobek mohl být zapojen pouze nedávno nebo v něm byly umístěny nové položky potravin. >>>
Výrobek dosáhne nastavené teploty déle, když byl jen právě zapojen nebo do něj byly umístěny
nové potraviny. To je normální.
• Do výrobku bylo v poslední době umístěno velké množství teplého jídla. >>> Nepokládejte horké
jídlo do výrobku.
• Dveře byly často otevřeny nebo zůstaly otevřeny po delší dobu. >>> Teplý vzduch pohybující se
uvnitř způsobí, že výrobek bude v provozu déle. Neotvírejte dveře chladničky příliš často.
• Dveře mrazničky nebo chladničky mohly zůstat pootevřené. >>> Zkontrolujte, zda jsou dveře
úplně zavřené.
• Výrobek může být nastaven na příliš nízkou teplotu. >>> Nastavte teplotu na vyšší stupeň a
počkejte, až výrobek dosáhne nastavené teploty.
• Podložky dveří ledničky nebo mrazničky mohou být špinavé, opotřebované, rozbité nebo
nesprávně nasazené. >>> Vyčistěte nebo vyměňte podložky. Poškozené / roztrhané podložky
dveří způsobí, že výrobek bude běžet delší dobu pro zachování aktuální teploty.
Teplota mražení je velmi nízká, ale teplota chladiče je dostačující.
• Teplota prostoru mrazničky je nastavena na velmi nízký stupeň. >>> Nastavte teplotu v
mrazničce na vyšší stupeň a znovu zkontrolujte.
Teplota chlazení je velmi nízká, ale teplota mrazničky je dostačující.
• Teplota prostoru chladničky je nastavena na velmi nízký stupeň. >>> Nastavte teplotu v
mrazničce na vyšší stupeň a znovu zkontrolujte.
Potraviny uchovávané v chladnějších zásuvek prostor jsou zmrazeny.
• Teplota prostoru chladničky je nastavena na velmi nízký stupeň. >>> Nastavte teplotu v
mrazničce na vyšší stupeň a znovu zkontrolujte.
Teplota v chladničce nebo v mrazničce je příliš vysoká.
• Teplota prostoru chladničky je nastavena na velmi vysoký stupeň. >>> Nastavení teploty
chladicího prostoru má vliv na teplotu v mrazicím prostoru. Počkejte, až teplota příslušných částí
dosáhne dostatečnou úroveň změnou teploty chladicího nebo mrazicího prostoru.
• Dveře byly často otevřeny nebo zůstaly otevřeny po delší dobu. >>> Neotvírejte dveře chladničky
příliš často.
• Dveře mohou být pootevřené. >>> Zcela zavřete dveře.
• Výrobek mohl být zapojen pouze nedávno nebo v něm byly umístěny nové položky potravin. >>>
To je normální. Výrobek dosáhne nastavenou teplotu déle, když byl jen právě zapojen nebo do
něj byly umístěny nové potraviny.
• Do výrobku bylo v poslední době umístěno velké množství teplého jídla. >>> Nepokládejte horké
jídlo do výrobku.
Třese se nebo vydává hluk.
• Podlaha není ve vodováze nebo není odolná. >>> Pokud se výrobek třese, když se pomalu
pohybuje, nastavte stojany na vyrovnání výrobku. >>> Ujistěte se také, že podlaha je dostatečně
odolná k tomu, aby unesla produkt.
• Všechny položky umístěné na výrobku může způsobit hluk. >>> Odstraňte všechny položky
umístěné na výrobku.

26 /26 CZ
Chladnička / Uživatelská příručka
Řešení problémů
Výrobek vytváří hluk tekoucí, stříkající kapaliny apod.
• Princip fungování tohoto výrobku je založen na toku kapalin a plynu. >>> To je normální a
nejedná se o závadu.
Z výrobku zní zvuk jako vanoucí vítr.
• Výrobek pro proces chlazení používá ventilátor. To je normální a nejedná se o závadu.
Na vnitřních stěnách výrobku se vytvořil kondenzát.
• Horké nebo vlhké počasí zvýší námrazu a kondenzaci. To je normální a nejedná se o závadu.
• Dveře byly často otevřeny nebo zůstaly otevřeny po delší dobu. >>> Neotvírejte dveře příliš
často, pokud zůstaly otevřené, zavřete je.
• Dveře mohou být pootevřené. >>> Zcela zavřete dveře.
Vytváří se kondenzát na vnější straně výrobku nebo mezi dveřmi.
• Okolní prostředí může být vlhké, je to naprosto normální ve vlhkém počasí. >>> Kondenzace se
rozptýlí, když se sníží vlhkost.
Interiér zapáchá.
• Produkt není pravidelně čištěn. >>> Pravidelně čistěte vnitřek pomocí houbičky, teplé vody a
sycené vody.
Některé balení a obalové materiály můžou způsobit zápach. >>> Používejte balení a obalové
materiály bez zápachu.
Potraviny byly umístěny v neuzavřených baleních. >>> Uchovávejte potraviny v uzavřených
baleních. Mikroorganismy se mohou z neuzavřených potravin rozšířit a způsobit zápach. Z
výrobku odstraňte všechny potraviny se zašlým datem spotřeby a zkažené potraviny.
Dveře se nezavírají.
• Balíčky s potravinami mohou blokovat dveře. >>> Přemístěte předměty blokující dveře.
• Produkt nestojí v zcela svislé poloze na zemi. >>> Nastavte stojany pro uvedení výrobku do
svislé polohy.
• Podlaha není ve vodováze nebo není odolná. >>> Ujistěte se, že podlaha je vyvážená a
dostatečně odolná k tomu, aby unesla produkt.
Zásobník na zeleninu se zasekl.
• Potraviny mohou být v kontaktu s horní částí zásobníku. >>> Znovu uspořádejte potraviny v
šuplíku.
A
VAROVÁNÍ: Pokud problém přetrvává i po provedení pokynů v této části, obraťte se na svého
prodejce nebo na autorizovaný servis. Nepokoušejte se opravit produkt.

EWWERQWEW
SK
Chladnička
Používateľská príručka

Pred použitím produktu si pozorne prečítajte tento návod na obsluhu.
Vážení zákazníci,
Chceme Vám poskytnúť možnosť najlepšieho použitia nášho výrobku, ktorý bol vyrobený v
moderných zariadeniach so starostlivosťou a dôkladnou kontrolou kvality.
Tiež, pred použitím výrobku Vám odporúčame prečítať si celý návod na použitie. V prípade odpredaja
výrobku, nezabudnite odovzdať návod jeho novému majiteľovi spoločne s výrobkom.
Táto príručka vám pomôže aby ste mohli výrobok používať rýchlo a bezpečne.
• Pred inštaláciou a použitím výrobku si prosím pozorne prečítajte užívateľskú príručku.
• Vždy dodržujte platné bezpečnostné predpisy.
• Majte užívateľskú príručku v dosahu pre budúce použitie.
• Prečítajte si prosím všetky ďalšie dokumenty dodané s výrobkom.
Nezabúdajte, že táto Užívateľská príručka sa môže vzťahovať na viacero modelov výrobkov. Príručka
jasne ukáže všetky variácie rôznych modelov.
C
Dôležité informácie a užitočné tipy.
A
Ohrozenie života a majetku.
B
Riziko zranenia elektrickým
prúdom.
Obal tohto výrobku je vyrobený
z recyklovateľných materiálov, v
súlade s Národnou legislatívou pre
životné prostredie.

3/25 SK
Chladnička / Uživatelská příručka
1. Bezpečnostné pokyny a životné
prostredie 4
1.1. Všeobecná bezpečnosť . . . . . . . . . . . . . . . . 4
1.1.1 Varovanie HC. . . . . . . . . . . . . . . . . . . . . . . 6
1.1.2 Pre modely s dávkovačom vody . . . . . . . . . 6
1.2. Účel použitia . . . . . . . . . . . . . . . . . . . . . . . . 6
1.3. Bezpečnosť detí . . . . . . . . . . . . . . . . . . . . . 6
1.4. Súlad so smernicou WEEE a Odstránenie
odpadov výrobku . . . . . . . . . . . . . . . . . . . . 6
1.5. Súlad so smernicou RoHS . . . . . . . . . . . . . . 6
1.6. Informácie o balení . . . . . . . . . . . . . . . . . . . 6
2 Vaša chladnička 7
3 Inštalácia 8
3.1. Vhodné miesto inštalácie. . . . . . . . . . . . . . . 8
3.2. Inštalácia plastových klinov . . . . . . . . . . . . . 8
3.3. Nastavenie nožičiek. . . . . . . . . . . . . . . . . . . 8
3.4. Pripojenie do elektrickej siete. . . . . . . . . . . . 9
4 Príprava 10
4.1. Opatrenia, ktoré treba urobiť pre úsporu
energie . . . . . . . . . . . . . . . . . . . . . . . . . . 10
4.2. Prvé použitie. . . . . . . . . . . . . . . . . . . . . . . 10
5 Tlačidlo pre Nastavenie teploty 11
5.1. Indikačný panel. . . . . . . . . . . . . . . . . . . . . 11
5.2. Indikačný panel. . . . . . . . . . . . . . . . . . . . . 12
5.3. Výrobník ľadu . . . . . . . . . . . . . . . . . . . . . . 15
5.4. Icematic . . . . . . . . . . . . . . . . . . . . . . . . . . 15
5.5. Forma na ľad . . . . . . . . . . . . . . . . . . . . . . 15
5.6. Modré svetlo. . . . . . . . . . . . . . . . . . . . . . . 16
5.7. Dezodorizačný modul . . . . . . . . . . . . . . . . 16
(FreshGuard) . . . . . . . . . . . . . . . . . . . . . . . . . . 16
5.8. Priečinok ochladzovača . . . . . . . . . . . . . . . 17
5.9. Crisper (Priečinok na zeleninu a ovocie) . . . 17
5.10. Používanie chladiča vody . . . . . . . . . . . . . 18
5.11. Plnenie zásobníka chladiča vody. . . . . . . . 18
5.12. Čistenie zásobníka vody . . . . . . . . . . . . . 18
5.13. Odkvapkávacia miska. . . . . . . . . . . . . . . . 19
5.14. Priečinok na zeleninu a ovocie s kontrolou
vlhkosti (Ever Fresh) . . . . . . . . . . . . . . . . . 20
5.15. Mrazenie čerstvých potravín . . . . . . . . . . . 20
5.16. Odporúčania pre uchovávanie mrazeného
jedla . . . . . . . . . . . . . . . . . . . . . . . . . . . . 21
5.17. Informácie na hlboké mrazenie. . . . . . . . . 21
5.18. Umiestnenie potravín . . . . . . . . . . . . . . . . 21
5.19. Varovanie pred otvorenými dverami . . . . . 21
5.20. Lampa osvetlenia. . . . . . . . . . . . . . . . . . . 21
6 Údržba a čistenie
22
6.1. Zabránenie vzniku nepríjemných pachov . . 22
6.2. Ochrana plastových povrchov . . . . . . . . . . 22
6.3. Dverové sklá . . . . . . . . . . . . . . . . . . . . . . 22

4 /25 SK
Chladnička / Uživatelská příručka
Táto časť obsahuje bezpečnostné
pokyny nevyhnutné pre zabránenie
nebezpečenstvu zranení a materiálnych
škôd. Nedodržaním týchto pokynov
zanikajú všetky typy záruky výrobku.
Určené použitie
A
UPOZORNENIE:
Udržujte vetracie otvory na kryte
prístroja alebo v konštrukcii
zabudovania bez prekážok.
UPOZORNENIE:
Nepoužívajte mechanické nástroje alebo
iné prostriedky na urýchlenie procesu
odmrazenia, okrem tých, ktoré odporúča
výrobca.
UPOZORNENIE:
Nepoškodzujte chladiaci okruh.
UPOZORNENIE:
Nepoužívajte elektrické
spotrebiče vo vnútri priestoru
na potraviny, iba ak sú
doporučené výrobcom.
Toto zariadenie je určené pre použitie v
domácnosti a v podobných podmienkach,
ako sú napríklad
– Kuchynské miestnosti pre personál
v obchodoch, kanceláriách a v iných
pracovných prostrediach;
– farmárske domy a klienti v hoteloch,
moteloch a iných typoch bytových
zariadení;
– v ubytovacích zariadeniach typu bed and
breakfast;
– stravovacie a podobné zariadenia
neobchodného typu.
1.1. Všeobecná bezpečnosť
• Tento produkt by nemali používať osoby s
telesným, zmyslovým a mentálnym postihnutím,
osoby bez dostatočných znalostí a skúseností,
alebo deti. Zariadenie môžu tieto osoby používať len
pod dohľadom a po poučení osobou zodpovednou
za ich bezpečnosť. Nedovoľte deťom hrať sa s týmto
zariadením.
• V prípade poruchy prístroj odpojte.
• Po odpojení počkajte najmenej 5 minút pred
opätovným pripojením. Odpojte výrobok, keď sa
nepoužíva. Nedotýkajte sa zástrčky mokrými rukami!
Pri odpájaní neťahajte za kábel, vždy uchopte
zástrčku.
• Nezapájajte chladničku, ak je zásuvka uvoľnená.
• Pri inštalácii, údržbe, čistení a opravách výrobok
odpojte.
• Ak sa výrobok nebude dlhší čas používať, odpojte
ho a vyberte z neho potraviny.
• Nepoužívajte paru alebo čistiace prostriedky
s parou pre čistenie chladničky a topenia ľadu vo
vnútri. Para môže prísť do styku s elektrifikovanými
oblasťami a spôsobiť skrat alebo elektrický šok!
• Neumývajte výrobok striekaním alebo polievaním
vodou na neho! Nebezpečenstvo úrazu elektrickým
prúdom!
• Nikdy nepoužívajte výrobok, ak časť nachádzajúca
sa na hornej alebo zadnej strane výrobku s
elektronickou doskou s plošným spojom vo vnútri
je otvorená (krycia doska elektronických plošných
spojov) (1).
1
1
• V prípade jeho poruchy výrobok nepoužívajte,
pretože by mohlo dôjsť k úrazu elektrickým prúdom.
Pred tým, než čokoľvek urobíte, sa obráťte na
autorizovaný servis.
1. Bezpečnostné pokyny a životné prostredie

Bezpečnostné pokyny a životné prostredie
5/24 SK
Chladnička / Uživatelská příručka
• Výrobok zapájajte do uzemnenej zásuvky.
Uzemnenie musí byť vykonané kvalifikovaným
elektrikárom.
• Ak produkt má osvetlenie typu LED, pre
jeho nahradenie alebo v prípade akéhokoľvek
problému sa obráťte na autorizovaný servis.
• Nedotýkajte sa mrazených potravín
mokrými rukami! Môžu sa nalepiť na Vaše
ruky!
• Neklaďte do mrazničky tekutiny vo
fľašiach a plechovkách. Môžu vybuchnúť!
• Tekutiny umiestnite vo vzpriamenej polohe
a pevne uzatvorte ich veko.
• Nestriekajte horľavé látky v blízkosti
výrobku, nakoľko sa môže zapáliť alebo
explodovať.
• Nenechávajte horľavé materiály a produkty
s horľavým plynom (spreje, atď,) v chladničke.
• Neklaďte nádoby obsahujúce kvapaliny
na hornú časť výrobku. Voda striekajúca
na elektrifikované časti môže spôsobiť úraz
elektrickým prúdom a nebezpečenstvo požiaru.
• Vystavenie produkt dažďu, snehu,
slnku a vetru môže spôsobiť elektrické
nebezpečenstvo. Pri premiestňovaní výrobku
ho neťahajte držaním za rukoväť dverí.
Rukoväť sa môže odtrhnúť.
• Dbajte na to, aby nedošlo k zachyteniu
akúkoľvek časti vašich rúk či tela do
akýchkoľvek z pohybujúcich sa častí vo vnútri
výrobku.
• Nevyliezajte alebo sa neopierajte o dvere,
zásuvky a podobné časti chladničky. Môže
to mať za následok pád výrobku a spôsobiť
poškodenie dielov.
• Dávajte pozor, aby nedošlo k privretiu
napájacieho kábla.
• Pri umiestnení zariadenia sa uistite,
že napájací kábel nie je zachytený alebo
poškodený.
• Neumiestňujte viac prenosných zásuviek
alebo prenosných zdrojov napájania vzadu od
zariadení.
• Deti vo veku od 3 do 8 rokov smú nakladať
a vykladať chladiace zariadenia.
• Aby ste predišli znečisteniu jedla, dodržujte
prosím nasledujúce pokyny:
• – Ak necháte dvierka otvorené po dlhú
dobu, môže to spôsobiť značné zvýšenie teploty
v oddeleniach zariadení.
• – Pravidelne očisťujte povrchy, ktoré môžu
prísť do kontaktu s jedlom, a prístupné odtokové
systémy.
• – očisťujte nádrže na vodu, pokiaľ neboli
používané počas 48 h; prepláchnite vodný
systém pripojený k prívodu vody, ak ste nečerpali
vodu zo zariadenia počas 5 dní.
• – Surové mäso a ryby uchovávajte v
chladničke vo vhodných nádobách, aby
neprichádzali do kontaktu
• s jedlom ani na neho nemohli ukvapnúť.
• – Oddelenia s dvoma hviezdičkami pre
mrazené potraviny sú vhodné pre uchovávanie
vopred zmrazených jedál, uchovávanie alebo
prípravu zmrzliny a tvorbu kociek ľadu.
• – Oddelenia s jednou, dvoma a tromi
hviezdičkami nie sú vhodné pre zmrazenie
čerstvého jedla.
• – Ak je chladiace zariadenie ponechané
prázdne po dlhú dobu, vypnite ho, rozmrazte,
očistite, osušte a nechajte dvierka otvorené,
aby ste tak zabránili tvoreniu plesní vo vnútri
zariadenia.

Bezpečnostné pokyny a životné prostredie
6 /24SK
Chladnička / Uživatelská příručka
1.1.1 Varovanie HC
Ak výrobok obsahuje chladiaci systém
v ktorom sa používa plyn R600a,
zabezpečte, aby pri používaní a
pohybovaní spotrebiča nedošlo k
poškodeniu chladiaceho systému a jeho
potrubia. Tento plyn je horľavý. Ak je
chladiaci systém poškodený, zabezpečte,
aby bolo zariadenie mimo dosahu zdrojov
ohňa a okamžite vyvetrajte miestnosť.
C
Štítok na vnútornej ľavej
strane označuje druh plynu
používaného v produkte.
1.1.2 Pre modely s dávkovačom vody
Tlak pre prívod studenej vody musí byť
maximálne 90 psi (620 kPa). Ak je váš tlak vody
vyšší ako 80 psi (550 kPa, použite vo vašej
sieti ventil na obmedzovanie tlaku. Ak neviete,
ako skontrolovať tlak vody, požiadajte o pomoc
profesionálneho inštalatéra.
• Ak pri inštalácii existuje riziko vodného
rázu, vždy použite preventívne zariadenia
proti vodnému rázu. Ak ste si nie je istý, či vo
Vašej sieti je efekt vodného rázu, poraďte sa s
profesionálnym inštalatérom.
Neinštalujte na prívode pre teplú vodu. Vykonajte
nevyhnutné opatrenia proti riziku zamrznutia
hadíc. Prevádzkový interval teplota vody musí byť
medzi minimálne 33 ° F (0,6 ° C) a maximálne
100 ° F (38 ° C).
• Používajte len pitnú vodu.
1.2. Účel použitia
• Tento výrobok je určený pre domáce
použitie. Nie je určený pre komerčné použitie.
• Spotrebič by mal byť používaný iba pre
skladovanie potravín a nápojov.
• Do chladničky neukladajte citlivé produkty,
ktoré si vyžadujú riadené teploty (očkovacie látky,
lieky citlivé na teplo, zdravotnícky materiál, atď.).
• Výrobca nenesie žiadnu zodpovednosť za
prípadné škody spôsobené nesprávnym použitím
alebo nesprávnou manipuláciou.
• Životnosť výrobku je 10 rokov. Náhradné diely
potrebné pre funkčnosť tohoto výrobku budú pre
toto obdobie k dispozícii.
1.3. Bezpečnosť detí
• Obalové materiály uchovávajte mimo dosahu
detí.
• Nedovoľte deťom, aby sa s výrobkom hrali.
• Ak je na dverách výrobku zámok, kľúč držte
mimo dosahu detí.
1.4. Súlad so smernicou WEEE a
Odstránenie odpadov výrobku
Tento výrobok spĺňa požiadavky
smernice WEEE EÚ (2012/19/EU). Na
tomto priodukte je zobrazený symbol
klasifikácie odpadu elektrických a
elektronických zariadení (OEEZ).
Tento výrobok bol vyrobený z
vysoko kvalitných materiálov a
komponentov, ktoré sa dajú
opätovne použiť a ktoré sú
vhodné pre recykláciu. Na
konci svojej životnosti spotrebič
nevyhadzujte spolu s bežnými
domácimi a inými odpadmi. Odneste ho
do zberného centra pre recykláciu
elektrických a elektronických zariadení.
Pre informácie o týchto zberných
stredisakách sa prosím obráťte na
miestne úrady.
1.5. Súlad so smernicou RoHS
Tento výrobok spĺňa požiadavky smernice
WEEE EÚ (2011/65/EU). Neobsahuje
škodlivé a zakázané látky uvedené v
smernici.
1.6. Informácie o balení
Obalové materiály výrobku sú vyrobené
z recyklovateľných materiálov v súlade s
našimi národnými predpismi o životnom
prostredí. Nevyhadzujte obalové materiály
spolu s domácimi alebo inými odpadmi.
Vezmite ich do zberných miest pre
obalové materiály určené miestnymi
orgánmi.

7/25 SK
Chladnička / Uživatelská příručka
C
*voliteľné: Obrázky uvedené v tejto príručke sú uvádzané ako príklad a nemusia sa
presne zhodovať s Vašim produktom. Ak váš výrobok neobsahuje príslušné časti, tieto
informácie sa vzťahujú na ostatné modely.
2 Vaša chladnička
1. Poličky na dverách priestoru chladničky
2. Priehradky priestoru mrazničky
3. Icematic
4. Nádržka na vodu
5. Priečinok Crisper (na zeleninu a ovocie)
6. Kryt priečinku na zeleninu a ovocie
7. Priečinok ochladzovača
8. Sklenené poličky priestoru chladničky
9. Protizápachový filter
10. Vnútorný displej
11. Sklenené poličky priestoru chladničky
12. Priestor mrazničky
*voliteľné
*1
*3
*4
6
*5
7
*8
11
12
*2
*1
*2
*3
*5
7
*8
9
10
11
6
12
Nemusí sa vzťahovať na všetky modely

8 /25 SK
Chladnička / Uživatelská příručka
3 Inštalácia
3.1. Vhodné miesto inštalácie
Pre inštaláciu tohto produktu kontaktujte
autorizovaný servis. Pre prípravu tohoto
produktu na použitie sa riaďte informáciami v
používateľskej príručke a zabezpečte vyhovujúcu
elektrickú a vodovodnú inštaláciu. Ak nie, oslovte
kvalifikovaného elektrikára a technika a požiadajte
ho o zabezpečenie náležitých úkonov.
B
VAROVANIE: Výrobca nenesie
zodpovednosť za škody, ktoré môžu
vyvstať z postupov realizovaných
neoprávnenými osobami.
B
VAROVANIE: Tento produkt nemôže byť
počas inštalácie pripojený do elektrickej
siete. V opačnom prípade hrozí riziko
usmrtenia alebo vážneho poranenia!
A
VAROVANIE: : Ak je svetlá výška dverí
miestnosti, kde má byť tento výrobok
umiestnený, príliš nízka na to, aby mohol
cez ne prejsť, kontaktujte autorizovaný
servis.
•Produktumiestnitenavodorovnýpodklad,aby
ste zabránili otrasom.
•Akbudeteproduktpoužívaťvstavanývskrini/
nábytku, musí byť medzi jeho bočnými stenami
a nábytkom ponechaná medzera min. 2 cm.
•Produktinštalujtenajmenej30cmodtepelných
zdrojov, ako sú varné dosky, radiátory a sporáky,
a aspoň 5 cm od elektrických rúr.
•Produktsanesmievystavovaťpriamemu
slnečnému žiareniu a uchovávať na vlhkých
miestach.
•Nadosiahnutieefektívnejprevádzkymusí
byť okolo produktu zabezpečená dostatočná
cirkulácia vzduchu. Ak sa bude produkt
umiestňovať do výklenku v stene, zabezpečte
minimálne 5 cm odstup spotrebiča od stropu
a bočných stien.
• V prostrediach, kde izbová teplota klesá
pod 10°C, bude chladnička pokračovať v
prevádzke, aby boli chránené potraviny v
mrazničke. Čerstvé potraviny v priestore
chladničky však môžu kvôli chladnému
prostrediu zamrznúť.
3.2. Inštalácia plastových klinov
Plastové kliny dodané s produktom sú určené na
vytvorenie odstupu medzi produktom a zadnou
stenou na zabezpečenie cirkulácie vzduchu.
1.
Pre inštaláciu klinov odstráňte skrutky na produkte a
použite skrutky nachádzajúce sa v rovnakom puzdre
s klinmi.
2. Vložte dva plastové kliny na zadný kryt ventilácie,
ako je to znázornené na nasledujúcom obrázku.
3.3. Nastavenie nožičiek
Ak po inštalácii produkt nestojí rovnovážne,
nastavte predné nožičky otáčaním doprava alebo
doľava.

Inštalácia
9/24 SK
Chladnička / Uživatelská příručka
3.4. Pripojenie do elektrickej siete
A
VAROVANIE: Spotrebič nepripájajte
cez predlžovacie káble ani rozvodky a
viacnásobné zásuvky.
B
VAROVANIE: Poškodený napájací
kábel musia vymieňať výlučne
zástupcovia autorizovaného servisu.
C
Ak sa budú vedľa seba inštalovať dve
chladničky, mala by byť medzi nimi
vzdialenosť minimálne 4 cm.
• Naša spoločnosť nenesie zodpovednosť
za žiadne škody, ktoré vyvstanú v prípade,
keď sa produkt používa bez uzemnenia
a spôsobmi elektrického pripojenia,
ktoré nie sú v súlade s miestne platnými
nariadeniami.
• Napájací kábel musí byť po inštalácii ľahko
dostupný.
• Medzi svoj produkt a zásuvku v stene
nepripájajte žiadne predlžovacie káble ani
bezdrôtové viacnásobné zásuvky.
C
Varovanie pred horúcimi povrchmi!
Váš produkt je na zlepšenie chladiaceho
systému v bočných stenách vybavený
chladiacimi trubkami. Týmito povrchmi
môže pretekať horúca chladiaca
kvapalina a zahrievať ich. Je to
normálny stav, ktorý nevyžaduje údržbu.
Pri dotýkaní sa týchto častí buďte
opatrní.
A
VAROVANIE: „Ochranné fólie zvislej rukoväte“ je potrebné odstrániť.

10 /25 SK
Chladnička / Uživatelská příručka
4.1. Opatrenia, ktoré treba
urobiť pre úsporu energie
mehmet
A
Pripojenie produktu k systémom úspory
elektrickej energie môže byť nebezpečné,
pretože môže spôsobiť poškodenie
produktu.
• Dvere svojej chladničky nenechávajte otvorené
dlhý čas.
• Do chladničky nevkladajte horúce jedlá alebo
nápoje.
• Chladničku nepreťažujte, chladiaca kapacita
klesne v prípade, ak dôjde k zábrane cirkulácie
vzduchu vnútri chladničky.
• Aby ste v mraziacom priestore chladničky
mohli uskladňovať maximálne množstvo
potravín, musia sa horná klapka a zásuvka
vybrať a umiestniť na vrch sklenených poličiek.
Spotreba elektrickej energie uvedená pre vašu
chladničku sa stanovila po vybratí nádoby na
ľad, formy na ľad, klapky a strednej zásuvky,
aby sa umožnilo maximálne naplnenie. Pri
napĺňaní chladničky veľmi odporúčame použiť
hornú klapku a dolnú zásuvku.
• V závislosti od vlastností produktu budú
rozmrazujúce sa potraviny v priestore
chladničky znižovať spotrebu energie a
zachovávať kvalitu potravín.
• Tok vzduchu by nemal byť blokovaný tým, že
umiestnite potraviny do prednej časti mrazničky
a pred ventilátory priestoru mrazničky.
Potraviny by sa mali ukladať tak, aby ste
nechali 5 cm voľné miesto pred ochrannou
mriežkou ventilátora.
• Snímač teploty v priestore mrazničky sa
nesmie priamo dotýkať obalov potravín. V
prípade kontaktu so snímačom môže spotreba
energie vzrásť.
4 Príprava
C
Vnútro produktu je potrebné čistiť.
C
Ak sa budú vedľa seba inštalovať dve
chladničky, mala by byť medzi nimi
vzdialenosť minimálne 4 cm.
4.2. Prvé použitie
Predtým, ako začnete produkt používať,
skontrolujte, či sa vykonali všetky prípravy
podľa pokynov uvedených v častiach „Pokyny o
bezpečnosti a ochrane životného prostredia“ a
„Inštalácia“.
Chladničku nechajte v prevádzke bez vložených
potravín 6 hodín a pokiaľ to nie je absolútne
nevyhnutné, neotvárajte dvere.
C
Pri zapnutí kompresora budete počuť zvuk.
Kvapaliny a plyny utesnené v chladiacom
systéme môžu tiež vydávať zvuky, a to aj
vtedy, keď kompresor nie je v prevádzke.
Je to normálne.
C
Je tiež normálne, že predné okraje
chladničky sú horúce. Tieto časti sú
konštruované tak, aby boli teplé, aby sa tak
predišlo kondenzácii.

11/25 SK
Chladnička / Uživatelská příručka
5 Tlačidlo pre Nastavenie teploty
5.1. Indikačný panel
Indikačné panely sa môžu líšiť v závislosti od modelu produktu.
Audiovizuálne funkcie na indikačnom paneli vám pomáhajú pri obsluhe chladničky.
1.
Nastavenie teploty / Zvýšenie teploty
2. Prepínač nastavenia teploty / Indikátor teploty
3. Voľba jednotiek teploty (°C), indikátor Celzia
4. Voľba jednotiek teploty (°F), indikátor Fahrenheita
5. Nastavenie teploty / Zníženie teploty
6. Indikátor / tlačidlo funkcie rýchleho chladenia
7. *Bezdrôtové
8. Indikátor / tlačidlo režimu Eco
9. *Indikátor / tlačidlo priečinka Joker
10. *Automatické dvierka
11. Upozornenie na vysokú teplotu / Chyba
12. *Ochladzovač fliaš
13. *Upozornenie / tlačidlo na výmenu filtra
14. Tlačidlo Menu
15. Indikátor / tlačidlo Zapnutie / Vypnutie
produktu
16. *Tlačidlo / indikátor Icematic
17. *Režim Sabbath
18. Indikátor / tlačidlo režimu Dovolenka
19. Indikátor uzamknutia tlačidiel
20. Indikátor funkcie rýchleho mrazenia
21. Výber priečinka
22. Indikátor priestoru chladničky
23. Indikátor priestoru mrazničky
1
2
3
4
*16
*17
18
20
21
22
23
19
5
6
8
*7
*10
*12
*13
14
15
11
*9a
*9b
C
*voliteľné: Obrázky uvedené v tejto príručke sú uvádzané ako príklad a nemusia sa
presne zhodovať s Vašim produktom. Ak váš výrobok neobsahuje príslušné časti, tieto
informácie sa vzťahujú na ostatné modely.
Nemusí sa vzťahovať na všetky modely

Tlačidlo pre Nastavenie teploty
12 /24 SK
Chladnička / Uživatelská příručka
C
*voliteľné: Obrázky uvedené v tejto príručke sú uvádzané ako príklad a nemusia sa
presne zhodovať s Vašim produktom. Ak váš výrobok neobsahuje príslušné časti, tieto
informácie sa vzťahujú na ostatné modely.
1. Nastavenie teploty / Zvýšenie teploty
Po stlačení sa zvýši teplota vybraného priečinka.
2. Prepínač nastavenia teploty / Indikátor
teploty
Zobrazuje sa na ňom hodnota chladenia zvoleného
priečinka. Jeho posunutím prstom nahor alebo
nadol môžete teplotu zvýšiť alebo znížiť.
3. Voľba jednotiek teploty (°C)
Indikátor Celzius
Keď je stlačené toto tlačidlo, jednotky teploty sú
nastavené na stupne Celzia.
Toto je indikátor teploty v stupňoch Celzia. Keď
je aktivovaný indikátor Celzia, nastavené hodnoty
teploty sa zobrazujú v stupňoch Celzia a príslušná
ikona sa zapne na 100 %.
Ikona Fahrenheita sa prepne na 50 %.
4. Voľba jednotiek teploty (°F)
Indikátor Fahrenheit
Keď je stlačené toto tlačidlo, jednotky teploty sú
nastavené na stupne Fahrenheita.
Toto je indikátor teploty v stupňoch Fahrenheita.
Keď je aktivovaný indikátor Fahrenheita, nastavené
hodnoty teploty sa zobrazujú vo Fahrenheitoch a
príslušná ikona sa naplno rozsvieti.
Ikona Celzia sa prepne na 50 %.
5. Nastavenie teploty / Zníženie teploty
Po stlačení sa zníži teplota vybraného priečinka.
6. Indikátor funkcie rýchleho chladenia
Po zapnutí funkcie rýchleho chladenia sa na 100
% rozsvieti indikátor rýchleho chladenia. Kaď je
táto funkcia vypnutá, produkt sa prepne na svoje
5.2. Indikačný panel
Indikačné panely sa môžu líšiť v závislosti od modelu produktu.
Audiovizuálne funkcie na indikačnom paneli vám pomáhajú pri obsluhe chladničky.
Select
!
15
21
22 23
5
2
1
*13
*7
*11
*10
*17
*12
*16
*9b
*9a
8
18
6
20
4
3
normálne nastavenie a indikátor bude svietiť na
50 %.
Tlačidlo funkcie rýchleho chladenia
Toto tlačidlo sa používa na aktiváciu alebo
deaktiváciu funkcie rýchleho chladenia.
C
Funkciu rýchleho chladenia použite
kedykoľvek, keď chcete rýchlo
schladiť potraviny vložené do
priestoru chladničky. Ak chcete
schladiť veľké množstvo čerstvých
potravín, odporúčame aktivovať túto
funkciu skôr, ako vložíte potraviny do
spotrebiča.
C
Ak funkciu rýchleho chladenia
nezrušíte, vypne sa sama automaticky
najneskôr po 8 hodinách alebo hneď
ako priestor chladničky dosiahne
požadovanú teplotu.
C
Ak tlačidlo rýchleho chladenia stlačíte
opakovane v krátkych intervaloch,
aktivuje sa ochrana elektronického
obvodu a kompresor sa nespustí
okamžite.
C
Táto funkcia sa opätovne nevyvolá,
keď sa obnoví prívod elektriny po jej
výpadku.
7. *Bezdrôtové
Stlačením tohto tlačidla sa produkt pripojí
do domácej siete. Keď niektorá z funkcií
je
aktivovaná, príslušný indikátor sa rozsvieti na
100 %, po jej zrušení sa indikátor prepne na
50 %.
Nemusí sa vzťahovať na všetky modely

Tlačidlo pre Nastavenie teploty
13/24 SK
Chladnička / Uživatelská příručka
8. Indikátor / tlačidlo režimu Eco
Stlačením tohto tlačidla aktivujete a
deaktivujete režim Eco.
Keď je režim Eco aktivovaný, indikátor sa
rozsvieti na 100 %. Keď je táto funkcia
aktivovaná, mraznička začne fungovať v režime
Eco najneskôr o 6 hodín. Po zrušení funkcie sa
indikátor prepne na 50 %.
9a. *Indikátor / tlačidlo priečinka Joker
Po stlačení tohto tlačidla bude priečinok Joker
fungovať ako mraznička a indikátor sa rozsvieti
na 100 %. Priečinok Joker sa zapne pri 50 %.
9b. *Indikátor / tlačidlo priečinka Joker
Po stlačení tohto tlačidla bude priečinok Joker
fungovať ako chladnička a indikátor sa rozsvieti
na 100 %. Priečinok Joker sa zapne ako
mraznička pri 50 %.
10. *Automatické dvierka
Stlačte toto tlačidlo na aktiváciu alebo
deaktiváciu funkcie Automatických dvierok. Keď
je táto funkcia aktivovaná, indikátor sa rozsvieti
na 100 %. Po zrušení funkcie sa indikátor
prepne na 50 %.
Keď je táto funkcia zapnutá, dotknite sa
rukoväte dvierok príslušnej časti a tieto sa
otvoria automaticky.
11. Upozornenie na vysokú teplotu /
Chyba
Tento indikátor sa rozsvieti počas výpadku
napájania, pri vysokých teplotách a
upozorneniach na chybu. Počas dlhodobých
výpadkov napájania začne na digitálnom
displeji blikať najvyššia teplota, ktorú mraziaci
priestor dosiahne. Po kontrole potravín v
mraziacom priestore stlačte tlačidlo vysokej
teploty a upozornenie sa vymaže.
12. *Ochladzovač fliaš
Stlačte toto tlačidlo na aktiváciu alebo
deaktiváciu funkcie chladenia fliaš.
Keď je táto funkcia aktivovaná, indikátor sa
rozsvieti na 100 %. Po jej zrušení sa indikátor
prepne na 50 %.
13* Upozornenie / tlačidlo výmeny filtra
Ikona sa zapne, keď je potrebné resetovať filter.
Po stlačení tlačidla sa filter resetuje a ikona sa
vypne.
14. Tlačidlo Menu
Používa sa na aktiváciu alebo deaktiváciu
pohotovostného režimu displeja. Ak do 30
sekúnd nestlačíte žiadne tlačidlo alebo
neotvoríte dvierka, automaticky sa prepne do
pohotovostného režimu.
15. Indikátor / tlačidlo Zapnutie / Vypnutie
produktu
Stlačením a podržaním tlačidla Zapnutie /
Vypnutie na 3 sekundy produkt zapnete ale-
bo vypnete.
V stave vypnutia sa rozsvieti indikátor Zapnutie
/ Vypnutie na 100 % a všetky ostatné
indikátory sa vypnú. Na zapnutie opätovne
stlačte a podržte toto tlačidlo na 3 sekundy.
Chladnička sa zapne a indikátor Zapnutie /
Vypnutie sa prepne na 50 %.
16. *Tlačidlo / indikátor Icematic
Stlačte toto tlačidlo na aktiváciu alebo
deaktiváciu Icematic. Ak indikátor svieti na
100 %, znamená to, že Icematic je práve
v prevádzke. Ak indikátor svieti na 50 %,
znamená to, že Icematic je vypnutý.
C
Ak nie je zvolená táto funkcia, tok
vody z nádržky na vodu sa zastaví. Z
výrobníka ľadu však môžete vybrať už
vyrobený ľad.
17. *Režim Sabbath
Stlačte toto tlačidlo na aktiváciu alebo
deaktiváciu režimu Sabbath. Keď je táto
funkcia aktivovaná, indikátor sa rozsvieti na
100 %. Po zrušení funkcie sa indikátor prepne
na 50 %.
18. Indikátor / tlačidlo režimu Dovolenka
Stlačením tohto tlačidla aktivujete režim
Dovolenka a indikátor sa rozsvieti na 100
%. Keď je aktivovaná funkcia dovolenky, na
indikátore hodnoty teploty sa zobrazí “- -”

Tlačidlo pre Nastavenie teploty
14 /24 SK
Chladnička / Uživatelská příručka
a priestor chladničky sa nebude aktívne
chladiť. Keď je aktivovaná táto funkcia, nie
je vhodné uchovávať potraviny v priestore
chladničky. Ostatné priečinky sa budú chladiť v
súlade s ich nastavenou teplotou.
Ak chcete túto funkciu zrušiť, znova stlačte
tlačidlo funkcie Dovolenka. Po zrušení
funkcie sa indikátor prepne na 50 %.
19. Indikátor uzamknutia tlačidiel
Súčasne stlačte a na 3 sekundy podržte
tlačidlá Rýchle chladenie a Dovolenka. Pri
stlačení sa spustí odpočítavanie na indikátore
hodnoty teploty. Keď je uzamknutie tlačidiel
aktivované, indikátor uzamknutia sa rozsvieti
na 100 % a spustí sa režim uzamknutia
tlačidiel. Pri aktívnom režime uzamknutia
nebudú tlačidlá fungovať. Súčasne znovu
stlačte a na 3 sekundy podržte tlačidlá Rýchle
chladenie a Dovolenka. Pri stlačení sa spustí
odpočítavanie na indikátore hodnoty teploty.
Keď je uzamknutie tlačidiel zrušené, indikátor
uzamknutia sa prepne na 50 % a vypne sa
režim uzamknutia tlačidiel.
Túto funkciu aktivujte v prípade, ak chcete
zabrániť zmene nastavenia teploty chladničky.
20. Indikátor funkcie rýchleho mrazenia
Keď sa aktivuje funkcia rýchleho mrazenia,
tento indikátor sa rozsvieti na 100 %. Keď je
táto funkcia vypnutá, produkt sa prepne na
svoje normálne nastavenie a indikátor bude
svietiť na 50 %.
Tlačidlo funkcie rýchleho mrazenia
Používa sa na aktiváciu alebo deaktiváciu
funkcie rýchleho mrazenia.
Stlačte toto tlačidlo na aktiváciu alebo
deaktiváciu funkcie rýchleho mrazenia. Keď
túto funkciu aktivujete, mraznička sa vychladí
na teplotu nižšiu, ako je nastavená hodnota.
C
Funkciu rýchleho mrazenia použite,
keď chcete rýchlo zmraziť potraviny
vložené do priestoru mrazničky.
Ak chcete zmraziť veľké množstvo
čerstvých potravín, aktivujte túto
funkciu ešte pred ich vložením.
C
Ak funkciu rýchleho mrazenia
nezrušíte, vypne sa sama automaticky
najneskôr po 4 hodinách alebo hneď
ako priestor chladničky dosiahne
požadovanú teplotu.
C
Táto funkcia sa opätovne nevyvolá,
keď sa obnoví prívod elektriny po jej
výpadku.
21. Výber priečinka
Stlačte tlačidlo Výber priečinka, aby ste videli
a mohli zmeniť hodnotu teploty chladničky a
mrazničky na Indikátore hodnoty teploty.
22. Indikátor priestoru chladničky
Keď je tento indikátor aktívny, teplota priestoru
chladničky sa zobrazí na Indikátore hodnoty
teploty.
Indikátor priestoru mrazničky
Keď je tento indikátor aktívny, teplota priestoru
mrazničky sa zobrazí na Indikátore hodnoty
teploty.

Tlačidlo pre Nastavenie teploty
15/24 SK
Chladnička / Uživatelská příručka
5.3. Výrobník ľadu
(Táto funkcia je voliteľná)
Výrobník ľadu umožňuje jednoduché získanie ľadu.
Používanie výrobníka ľadu
1. Z priestoru chladničky vyberte nádržku na vodu.
2. Nádržku na vodu naplňte vodou.
3. Nádržku na vodu umiestnite späť. Prvé kocky
ľadu budú v zásuvke výrobníka ľadu, ktorá sa
nachádza v priestore mrazničky, hotové približne
o 4 hodiny.
C
Ak naplníte nádržku na vodu úplne,
získate približne 60 – 70 kociek ľadu.
C
Voda v nádržke by sa mala vymieňať
každé 2 – 3 týždne.
5.4. Icematic
(Táto funkcia je voliteľná)
Icematic umožňuje získať ľad jednoducho.
Používanie Icematic-u
1. Icematic vyberte opatrným vytiahnutím.
2. Naplňte Icematic vodou.
3. Icematic dajte späť na miesto. Ľad bude
hotový približne o 2 hodiny.
4. Na vybratie ľadu otočte ovládače na
zásobníkoch ľadu v smere hodinových ručičiek
o 90 stupňov. Kocky ľadu v zásobníkoch budú
padať do nádoby na skladovanie ľadu pod nimi.
5. Nádobu na skladovanie ľadu môžete vybrať a
podávať ľadové kocky.
C
Zariadenie Icematic nevyberajte z
miesta, keď chcete vybrať ľad.
C
Ak si prajete, môžete kocky ľadu
ponechať v nádobe na skladovanie.
Nádoba na skladovanie ľadu slúži len
na uskladnenie kociek ľadu. Nedávajte
do nej vodu. Mohla by sa zlomiť.
5.5. Forma na ľad
(Táto funkcia je voliteľná)
Forma na ľad umožňuje získať ľad jednoducho.
Používanie formy na ľad
1. Formu na ľad vyberte z priestoru mrazničky.
2. Naplňte ju vodou.
3. Formu na ľad vložte späť do priestoru
mrazničky. Ľad bude hotový približne o 2
hodiny.
4. Formu na ľad vyberte z priestoru mrazničky
a ohnite ju nad servírovacou nádobou. Ľadové
kocky ľahko vypadnú do nádoby.

Tlačidlo pre Nastavenie teploty
16 /24 SK
Chladnička / Uživatelská příručka
5.6. Modré svetlo
(Táto funkcia je voliteľná)
Priečinok Crisper (na zeleninu a ovocie) je
osvetlený modrým svetlom. Potraviny uložené
v priečinku Crisper budú vďaka účinku vlnovej
dĺžky modrého svetla pokračovať v procese
fotosyntézy, a tak si uchovajú svoju čerstvosť.
5.7. Dezodorizačný modul
(FreshGuard)
(Táto funkcia je voliteľná)
Dezodoračným modulom sa rýchlo odstraňujú
zápachy v chladničke skôr, ako preniknú na
povrchy. Vďaka tomuto modulu, ktorý sa
nachádza na strope priehradky na čerstvé
potraviny, sa zápachy rozptýlia počas aktívneho
presúvania vzduchu do pachového filtra, potom
sa vzduch prečistený filtrom opätovne vypúšťa
do priehradky na čerstvé potraviny. Takto sa
nežiaduce zápachy, ktoré môžu vzniknúť počas
uskladnenia potravín v chladničke, odstraňujú
skôr, ako preniknú na povrchy.
Dosahuje sa to vďaka ventilátoru, LED a
pachovému filtru, ktoré sú zabudované
v module. Dezodoračný modul sa bude
pravidelne automaticky spúšťať. Zvuk, ktorý
budete počuť počas pravidelnej aktivácie
modulu, je normálny. Vydáva ho zabudovaný
ventilátor. Ak otvoríte dvierka priehradky na
čerstvé potraviny, keď je modul v činnosti,
ventilátor sa dočasne zastaví a po opätovnom
zatvorení dvierok bude pokračovať, kde
prestal. V prípade výpadku elektriny sa tento
modul opäť aktivuje po obnovení pripojenia.
Informácie: Aromatické potraviny (napr.
syr, olivy a lahôdky) sa odporúča uchovávať
v pôvodnom balení a uzavreté, aby sa
zamedzilo zápachom, ktoré môžu vzniknúť v
dôsledku zmiešania pachov rôznych potravín.
Okrem toho sa odporúča pokazené potraviny
bezodkladne vybrať z chladničky, aby sa
zabránilo pokazeniu ostatných potravín a
zamedzilo zápachu.

Tlačidlo pre Nastavenie teploty
17/24 SK
Chladnička / Uživatelská příručka
5.8. Priečinok ochladzovača
(Táto funkcia je voliteľná)
Tento priečinok sa používa na uskladnenie
lahôdok, ktoré sa musia skladovať pri nižších
teplotách, alebo mäsových výrobkov, ktoré
budete konzumovať v krátkom čase. Do tohto
priečinka nedávajte zeleninu ani ovocie.
Vnútornú kapacitu chladničky môžete
zvýšiť vybratím ktoréhokoľvek z priečinkov
ochladzovača:
Na vybratie ho len potiahnite, až kým sa
nezastaví, potom zdvihnite a potiahnite k sebe.
5.9. Crisper (Priečinok
na zeleninu a ovocie)
Priečinok na zeleninu a ovocie v chladničke
je špeciálne navrhnutý tak, aby vašu zeleninu
uchoval čerstvú bez straty vlhkosti. Kvôli tomu
sa v priestore priečinka na ovocie a zeleninu
zintenzívňuje cirkulácia chladného vzduchu.
V tomto priečinku skladujte ovocie a zeleninu.
Ak chcete predĺžiť životnosť listovej zeleniny,
nedávajte ju k ovociu.

Tlačidlo pre Nastavenie teploty
18 /24 SK
Chladnička / Uživatelská příručka
5.10. Používanie chladiča vody
(Táto funkcia je voliteľná)
C
Je úplne normálne, že voda v prvých
niekoľko pohároch z chladiča bude
teplá.
C
Ak sa chladič nepoužíva dlhšie časové
obdobie, prvých niekoľko pohárov
vody vylejte, aby ste získali čerstvú
vodu.
1. Pohárom zatlačte páčku dávkovača vody.
Ak používate mäkký plastový pohárik, bude
jednoduchšie páčku stlačiť rukou.
2. Po naplnení pohára do požadovanej úrovne
páčku uvoľnite.
C
Všimnite si, že množstvo vody, ktoré
vytečie z dávkovača, závisí od toho,
ako ďaleko ste zatlačili páčku. Ako
sa hladina vody v poháriku zvyšuje,
jemne znižujte tlak na páčku, aby ste
predišli pretečeniu. Po jemnom stlačení
ramena bude voda kvapkať. Je to
celkom normálne a nie je to porucha.
5.11. Plnenie zásobníka
chladiča vody
Zásobník sa nachádza vo vnútri poličiek dverí.
1. Otvorte kryt nádrže.
2. Zásobník naplňte čerstvou pitnou vodou.
3. Zatvorte kryt.
C
Zásobník vody nenapĺňajte žiadnou
inou kvapalinou okrem vody, ako
sú napríklad ovocné šťavy, perlivé
nápoje či alkoholické nápoje,
ktoré nie sú vhodné na použitie v
chladiči vody. V prípade použitia
takýchto druhov kvapalín dôjde
k nenapraviteľnému poškodeniu
chladiča vody. Na takéto použitie
sa záruka nevzťahuje. Niektoré
chemické látky a prísady obsiahnuté
v takýchto druhoch nápojov /
kvapalín môžu poškodiť zásobník
vody.
C
Používajte iba čistú pitnú vodu.
C
Kapacita zásobníka vody je 3 litre,
nepreplňte ho.
5.12. Čistenie zásobníka vody
1. Vyberte zásobník vody z vnútornej časti
dverí.

Tlačidlo pre Nastavenie teploty
19/24 SK
Chladnička / Uživatelská příručka
2. Poličky dvierok vyberte tak, že ich budete držať
na oboch stranách.
3. Uchopte zásobník na vodu a vyberte ho v uhle
45 °C.
4. Odstráňte kryt zásobníka a zásobník vyčistite.
C
Komponenty zásobníka na vodu a
dávkovača vody sa nesmú umývať v
umývačke riadu.
5.13. Odkvapkávacia miska
Voda, ktorá kvapká počas používania
dávkovača vody, sa nahromadí v zbernej miske.
Plastový filter zložte tak, ako je zobrazené na
obrázku.
Nahromadenú vodu vytrite čistou a suchou
handričkou.

Tlačidlo pre Nastavenie teploty
20 /24 SK
Chladnička / Uživatelská příručka
S E B Z E L İ K
5.15. Mrazenie čerstvých potravín
• Aby sa zachovala kvalita, jednotlivé
potraviny by mali byť zmrazené čo
najrýchlejšie, keď sa umiestňujú do
priestoru mrazničky. Na to použite funkciu
rýchleho zmrazovania.
• Potraviny môžete v mrazničke skladovať
dlhšie, ak ich zmrazíte, kým sú ešte čerstvé.
• Potraviny určené na zmrazenie zabaľte a
balenie uzavrite, aby sa zamedzilo prístupu
vzduchu.
• Zabezpečte zabalenie potravín predtým, ako
ich dáte do mrazničky. Použite nádoby, fólie
a vlhkuodolné papiere, plastové vrecká a
iné baliace materiály vhodné do mrazničky
namiesto tradičných papierových baliacich
materiálov.
• Ešte pred zmrazovaním označte každé
balenie dátumom. Takto dokážete určiť
čerstvosť každého balenia vždy, keď otvoríte
mrazničku. Skôr zmrazené potraviny
skladujte v prednej časti priečinkov, aby ste
zabezpečili, že sa spotrebujú prednostne.
• Zmrazené potraviny musíte použiť okamžite
po rozmrazení a nikdy ich opätovne
nezmrazujte.
• Naraz nemrazte príliš veľké množstvá
potravín.
5.14. Priečinok na zeleninu a ovocie
s kontrolou vlhkosti (Ever Fresh)
(Táto funkcia je voliteľná)
Vďaka kontrole vlhkosti v tomto priečinku tu
môžu byť ovocie aj zelenina uskladnené dlhší
čas v prostredí s ideálnymi podmienkami
vlhkosti. Systémom nastavenia vlhkosti s troma
voľbami na prednej strane priečinka môžete
ovládať úroveň vlhkosti vo vnútri podľa toho,
aké potraviny tu uskladňujete. Odporúča sa
vybrať voľbu pre zeleninu, ak skladujete len
zeleninu, voľbu pre ovocie, ak skladujete len
ovocie, a kombinovanú voľbu, ak skladujete
oboje.
Aby ste naplno využili tento systém kontroly
vlhkosti a predĺžili dobu skladovania potravín,
odporúča sa neskladovať ovocie a zeleninu v
plastových vreckách. Ak sa zelenina ponechá
vo vreckách, spôsobí to jej rýchle skazenie.
Konkrétne, neodporúčame skladovať uhorky
ani brokolicu v pôvodnom obale z plastovej
fólie. V prípade, že kontakt s inými druhmi
zeleniny sa neodporúča z hygienických
dôvodov, použite namiesto vrecka perforovaný
papier a iné podobné baliace materiály.
Pri umiestňovaní zeleniny by ste mali zvážiť
hmotnosť konkrétnej zeleniny. Ťažká a tvrdá
zelenina by sa mala umiestniť do spodnej časti
priečinka na zeleninu a ovocie a ľahká a mäkká
zelenina by sa mala umiestniť navrch.
Nedávajte spolu hrušky, marhule, broskyne
atď. a obzvlášť jablká, ktoré majú vysokú
úroveň tvorby etylénového plynu, do rovnakého
priečinka na zeleninu a ovocie s inými druhmi
zeleniny a ovocia. Etylénový plyn sa z tohto
ovocia vyparuje a môže spôsobiť rýchlejšie
dozretie iného ovocia a jeho skazenie za kratší
čas.

Tlačidlo pre Nastavenie teploty
21/24 SK
Chladnička / Uživatelská příručka
Nastavenie
priestoru
mrazničky
Nastavenie
priestoru
chladničky
Poznámky
-18 °C 4 °C Toto je normálne, odporúčané nastavenie.
-20, -22 alebo
-24 °C
4 °C
Tieto nastavenia sa odporúča použiť, keď okolitá teplota
prekročí 30 °C.
Rýchle
mrazenie
4 °C
Použite, keď budete chcieť potraviny zmraziť v krátkom čase.
Mraznička sa vráti do predchádzajúceho režimu, keď sa
proces dokončí.
-18 °C alebo
chladnejšie
2 °C
Toto nastavenie použite v prípade, ak si myslíte, že
priestor chladničky nie je dostatočne chladný kvôli teplým
podmienkam okolia alebo kvôli častému otváraniu a
zatváraniu dvierok.
5.16. Odporúčania pre
uchovávanie mrazeného jedla
Priečinok by mal byť nastavený najmenej na -18 °C.
1.
Balenia po zakúpení čo najskôr vkladajte do
mrazničky a zabráňte rozmrazovaniu.
2.
Pred zmrazením skontrolujte, či neuplynul
dátum „Spotrebovať do“ alebo „Minimálna
trvanlivosť“ vyznačený na obale.
3.
Zabezpečte, aby obaly na potravinách neboli
poškodené.
5.17. Informácie na hlboké mrazenie
Podľa normy IEC 62552 by mal tento produkt
zmraziť najmenej 4,5 kg potravín pri teplote okolitého
prostredia 25 °C na teplotu -18 °C alebo nižšiu do
24 hodín na každých 100 litrov mraziaceho objemu.
Dlhodobé uchovanie potravín je možné len pri teplote
-18 °C alebo nižšej.
Čerstvosť potravín môžete uchovať mnoho mesiacov
(pri teplote -18 °C alebo nižšej pri hlbokom
zmrazení).
Kvôli zabráneniu ich čiastočnému rozmrazeniu
nesmiete dovoliť, aby sa potraviny určené na
zmrazenie dostali do kontaktu s predtým zmrazenými
potravinami.
Zeleninu určenú na dlhodobé uskladnenie zmrazením
uvarte a nechajte z nej odkvapkať vodu. Po
odkvapkaní vody ju vložte do vzduchotesného balenia
a umiestnite do mrazničky. Potraviny ako banány,
paradajky, šalát, zeler, varené vajíčka alebo zemiaky
nie sú vhodné na mrazenie. Pri ich zmrazení dôjde
len k negatívnemu ovplyvneniu chuti a výživových
hodnôt. Nepokazia sa natoľko, aby ohrozovali zdravie
človeka.
5.18. Umiestnenie potravín
Poličky priestoru
mrazničky
Rôzne zmrazené potraviny,
ako napríklad mäso, ryby,
zmrzlina, zelenina a pod.
Poličky priestoru
chladničky
Jedlo v hrncoch, zakrytých
tanieroch a zatvorených
nádobách, vajíčka (v
zatvorenej nádobe)
Poličky na
dverách priestoru
chladničky
Malé, balené potraviny a
nápoje
Crisper (Priečinok
na zeleninu a
ovocie)
Zelenina a ovocie
Priečinok čerstvej
zóny
Lahôdky (raňajkové potraviny,
mäsové výrobky, ktoré je
potrebné skonzumovať v
krátkom čase)
5.19. Varovanie pred otvorenými dverami
(Táto funkcia je voliteľná)
Ak sa dvierka na produkte ponechajú otvorené 1
minútu, zaznie varovný zvukový signál. Toto varovanie
sa vypne, keď sa dvierka uzavrú, prípadne dôjde
k stlačeniu tlačidiel na displeji (ak sú vo výbave).
5.20. Lampa osvetlenia
Na osvetlenie sú použité LED lampy. V prípade
akýchkoľvek problémov s týmto typom osvetlenia
kontaktujte autorizovaný servis.
Lampy osvetlenia neboli navrhnuté ani nie sú určené
na osvetlenie domácnosti. Osvetlenie v chladničke

22 /25 SK
Chladnička / Uživatelská příručka
6 Údržba a čistenie
Pri pravidelnom čistení sa zvýši životnosť
výrobku.
B
VAROVANIE: Pred čistením chladničky
produkt najprv odpojte z elektrickej siete.
•
Na čistenie nikdy nepoužívajte ostré alebo
brúsne nástroje, mydlo, domáce čistidlá,
detergenty a voskové politúry.
•
Rozpusťte jednu lyžičku karbonátu v pol
litri vody. Namočte handričku do roztoku
a dôkladne ju vyžmýkajte. Utrite vnútro
spotrebiča s touto látkou a vysušte ho.
•
Uistite sa, aby sa o telesa osvetlenia a iných
elektrických predmetov nedostala žiadna
voda.
•
Očistite dvere pomocou vlhkej handričky. Ak
chcete odstrániť police vo dverách a hlavné
police, odstráňte všetok ich obsah. Vyberte
police dverí ich posunutím smerom nahor. Po
očistení, k uloženiu ich vložte smerom zhora
nadol.
•
Pre čistenie vonkajších povrchov a
pochrómovaných súčastí výrobku nikdy
nepoužívajte čistiace prostriedky ani vodu
s obsahom chlóru. Chlór spôsobuje koróziu
kovových povrchov.
•
Pre zabránenie odstráneniu a deformácii
nápisov na plastových dielach, nepoužívajte
žiadne ostré, brúsne nástroje, mydlo,
čistiace prostriedky pre domácnosť, čistiace
prostriedky, petrolej, vykurovací olej, laky
atď.. Na čistenie použite vlažnú vodu a mäkkú
handričku a utrite ich do sucha.
6.1. Zabránenie vzniku
nepríjemných pachov
Pri výrobe našich zariadení sa nepoužívajú
materiály, ktoré môžu spôsobiť zápach. Avšak,
nevhodné podmienky pre zachovanie potravín
a zanedbanie čistenia vnútorného povrchu
zariadenia v potrebnej miere môže spôsobiť
problém zápachu.
Preto chladničku čistite karbonáto rozpusteným
vo vode každých 15 dní.
•
Potraviny uchovávajte v uzavretých nádobách.
Mikroorganizmy šíriace sa z nekrytých nádob
môžu spôsobiť nepríjemné pachy.
•
Nikdy neskladujte jedlo, ktorým vypršala
trvanlivosti a sú rozliate v chladničke.
6.2. Ochrana plastových povrchov
Okamžite očistite s teplou vodou, nakoľko olej
nanesený na plastové povrchy môže spôsobiť
poškodenie povrchu.
6.3. Dverové sklá
Zo skiel odstráňte ochrannú fóliu.
Na povrchu skla sa nachádza povlak. Tento
povlak minimalizuje vznik škvŕn pomáha ľahko
odstrániť prípadné nečistoty a škvrny. Sklá,
ktoré nie sú chránené takýmto povlakom
môžu byť vystavené trvalým organickým alebo
anorganickým nečistotám na báze vzduchu
alebo vody, ako sú vodný kameň, minerálne
solí, nespálené uhľovodíky, oxidy kovov a
silikóny, ktoré ľahko a rýchlo spôsobujú škvrny
alebo materiálne škody. Udržiavanie skla v
čistom stave sa stáva príliš ťažkým, napriek
pravidelnému čisteniu. V dôsledku toho, vzhľad a
transparentnosť skla sa zhoršuje. Drsné a žieravé
metódy čistenia a zlúčeniny zintenzívňujú tieto
vady a urýchľujú proces zhoršovania sa.
Pre bežné čistiace účely použite čistiace
prostriedky na vodnej báze, ktoré nie sú zásadité
a korozívne.
Na čistenie použite nealkoholické a nekorozívne
materiály, aby ste zachovali povlak po dlhú dobu.
Sklá sú temperované pre zvýšenie ich odolnosti
proti nárazom a lámaniu.
Na ich zadnej ploche bola tiež aplikovaná
bezpečnostná fólia, ako ďalšie bezpečnostné
opatrenie pre zabránenie poškodeniu ich okolia v
prípade ich rozbitia.
* Alkál je báza, ktorá pri rozpustení vo vode tvorí
hydroxidové ióny (OH).
Kovy Li (lítium), Na (sodík), K (draslík) Rb
(rubídium), Cs (cézium), a umelý a rádioaktívny Fr
(Francium) sa nazývajú alkalické kovy.

23/25 SK
Chladnička / Uživatelská příručka
7 Riešenie problémov
Než sa obrátite na servis, pozrite si nasledujúci
zoznam. Môže Vám to ušetriť čas aj peniaze.
Tento zoznam obsahuje časté sťažnosti, ktoré
nie sú spojené s chybným spracovaním alebo
poškodením materiálu. Niektoré funkcie uvedené
v tomto dokumente sa nemusia vzťahovať na váš
produkt.
Chladnička nefunguje.
•
Zástrčka nie je úplne nasadená.
>>> Zapojte ju úplne do zásuvky.
• Poistka pripojená do zásuvky
ktorá napája produkt alebo
hlavná poistka je spálená. >>>
Skontrolujte poistky.
Kondenzácia na bočnej stene chladiaceho
priestoru (MULTI ZÓNA, CHLADIACA ,
KONTROLNÁ a FLEXI ZÓNA).
•
Dvere sa otvárajú príliš často
>>> Dbajte na to, aby ste dvere
výrobku neotvárali príliš často.
• Prostredie je príliš vlhké. >>>
Neinštalujte výrobok vo vlhkom
prostredí.
• Potraviny obsahujúce tekutiny
sú uchovávané v neuzavretých
nádobách. >>> Uchovávajte
potraviny, ktoré obsahujú
tekutiny v uzavretých nádobách.
• Dvere výrobku boli ponechané
otvorené. >>> Nenechávajte
dvere chladničky otvorené po
dlhšiu dobu.
• Termostat je nastavený na príliš
nízku teplotu. >>> Nastavte
termostat na vhodnú teplotu.
Kompresor nepracuje.
• V prípade náhleho výpadku
prúdu alebo vytiahnutia
napájacieho kábla a po jeho
opätovnom pripojení tlak plynu
v chladiacom systéme výrobku
nie je vyvážený, čo spustí tepelný
istič kompresora. Produkt
sa reštartuje po približne 6
minútach. Keď sa výrobok po
uplynutí tejto doby nereštartuje,
obráťte sa na servis.
• Je aktívne rozmrazovanie.
>>> To je normálne pre
chladničku s plne automatickým
rozmrazovaním. Odmrazovania
sa vykonáva pravidelne.
• Produkt nie je zapojený do
elektrickej siete >>> Uistite sa, že
napájací kábel je zapojený.
• Nastavenie teploty je nesprávne.
>>> Zvoľte zodpovedajúce
nastavenie teploty.
• Nie je prúd. >>> Produkt bude
naďalej fungovať normálne po
obnovení napájania.
Prevádzkový hluk chladničky sa pri
používaní zvyšuje.
•
Prevádzkové výsledky tohto
výrobku sa môžu líšiť v závislosti
na zmenách teploty okolitého
prostredia. To je normálne a
nejedná sa o závadu.
Chladnička beží príliš často alebo príliš
dlho.

24 /25 SK
Chladnička / Uživatelská příručka
Riešenie problémov
• Nový výrobok môže byť väčší ako ten
predchádzajúci. Väčšia výrobky budú pracovať po
dlhšiu dobu.
• Teplota v miestnosti môže byť vysoká. >>>
Výrobok bude v miestnosti s vyššou teplotou
spustený po dlhšiu dobu.
• Výrobok mohol byť zapojený len nedávno alebo
v ňom boli umiestnené nové položky potravín. >>>
Výrobok dosiahne nastavenú teplotu dlhšie, keď bol
len práve zapojený alebo doň boli umiestnené nové
potraviny. To je normálne.
• Do výrobku bolo v poslednej dobe umiestnené
veľké množstvo teplého jedla. >>> Nepokladajte
horúce jedlo do výrobku.
• Dvere boli často otvorené alebo zostali otvorené
po dlhšiu dobu. >>> Teplý vzduch pohybujúce sa vo
vnútri spôsobí, že výrobok bude v prevádzke dlhšie.
Neotvárajte dvere chladničky príliš často.
• Dvere mrazničky alebo chladničky mohli zostať
pootvorené. >>> Skontrolujte, či sú dvere úplne
zatvorené.
• Výrobok môže byť nastavený na príliš nízku
teplotu. >>> Nastavte teplotu na vyšší stupeň a
počkajte, až výrobok dosiahne nastavenú teplotu.
• Podložky dvier chladničky alebo mrazničky môžu
byť špinavé, opotrebované, rozbité alebo nesprávne
nasadené. >>> Vyčistite alebo vymeňte podložky.
Poškodené / roztrhané podložky dverí spôsobia,
že výrobok bude bežať dlhšiu dobu pre zachovanie
aktuálnej teploty.
Teplota mrazenia je veľmi nízka, ale
teplota chladiča je dostačujúca.
• Teplota priestoru mrazničky je nastavená
na veľmi nízky stupeň. >>> Nastavte teplotu v
mrazničke na vyšší stupeň a znovu skontrolujte.
Teplota chladenia je veľmi nízka, ale
teplota mrazničky je dostačujúca.
• Teplota priestoru chladničky je nastavená
na veľmi nízky stupeň. >>> Nastavte teplotu v
chladničke na vyšší stupeň a znovu skontrolujte.
Potraviny uchovávané v chladnejších
zásuviek priestorov sú zmrazené.
• Teplota priestoru chladničky je nastavená
na veľmi nízky stupeň. >>> Nastavte teplotu v
mrazničke na vyšší stupeň a znovu skontrolujte.
Teplota v chladničke alebo v mrazničke je
príliš vysoká.
• Teplota priestoru chladničky je nastavená
na veľmi vysoký stupeň. >>> Nastavenie
teploty chladiacej časti ovplyvňuje teplotu v
mrazničke. Zmeňte teplotu v chladiacej alebo
mraziacej časti a počkajte, kým príslušné
priehradky dosiahnú nastavenú úroveň teploty.
• Dvere boli často otvorené alebo zostali
otvorené po dlhšiu dobu. >>> Neotvárajte
dvere chladničky príliš často.
• Dvere môžu byť pootvorené. >>> Úplne
zatvorte dvere.
• Produkt mohol byť zapojený len nedávno
alebo v ňom boli umiestnené nové položky
potravín. >>> To je normálne. Výrobok
dosiahne nastavenú teplotu dlhšie, keď bol len
práve zapojený alebo doň boli umiestnené nové
potraviny.
• Do výrobku bolo v poslednej dobe
umiestnené veľké množstvo teplého jedla. >>>
Nepokladajte horúce jedlo do výrobku.
Trasie sa alebo vydáva hluk.
• Podlaha nie je vo vodováhe alebo nie
je odolná. >>> Ak sa výrobok trasie, keď
sa pomaly pohybuje, nastavte stojany na
vyrovnanie výrobku. >>> Uistite sa tiež, že
podlaha je dostatočne odolná k tomu, aby
uniesla produkt.
• Všetky položky umiestnené na výrobku
môže spôsobiť hluk. >>> Odstrániť všetky
položky umiestnené na výrobku.
Výrobok vytvára hluk tečúcej, striekajúcej
kvapaliny a pod.
• Princíp fungovania tohto výrobku je
založený na toku kvapalín a plynu. >>> To je
normálne a nejedná sa o závadu.
Z výrobku znie zvuk ako vanúci vietor.

25/25 SK
Chladnička / Uživatelská příručka
Riešenie problémov
• Výrobok pre proces chladenia používa
ventilátor. To je normálne a nejedná sa o
závadu.
Na vnútorných stenách výrobku sa vytvoril
kondenzát.
• Horúce alebo vlhké počasie zvýši námrazu
a kondenzáciu. To je normálne a nejedná sa o
závadu.
• Dvere boli často otvorené alebo zostali
otvorené po dlhšiu dobu. >>> Neotvárajte
dvere príliš často, ak zostali otvorené, zatvorte
ich.
• Dvere môžu byť pootvorené. >>> Úplne
zatvorte dvere.
Vytvára sa kondenzát na vonkajšej strane
výrobku alebo medzi dverami.
• Okolité prostredie môže byť vlhké, je
to úplne normálne vo vlhkom počasí. >>>
Kondenzácia sa rozptýli, keď sa zníži vlhkosť.
Interiér zapácha.
• Produkt nie je pravidelne čistený. >>>
Pravidelne čistite vnútro pomocou hubky, teplej
vody a sýtenej vody.
• Niektoré balenia a obalové materiály môže
spôsobiť zápach. >>> Používajte balenia a
obalové materiály bez zápachu.
• Potraviny boli umiestnené v neuzavretých
baleniach. >>> Uchovávajte potraviny v
uzavretých baleniach. Mikroorganizmy sa môžu
z neuzavretých potravín rozšíriť a spôsobiť
zápach.
• Z výrobku odstráňte všetky potraviny
so zašlým dátumom spotreby a pokazené
potraviny.
Dvere sa nezatvárajú.
• Balíčky s potravinami môžu blokovať dvere.
>>> Premiestnite predmety blokujúce dvere.
• Produkt nestojí v úplne zvislej polohe na
zemi. >>> Nastavte stojany pre uvedenie
výrobku do zvislej polohy.
• Podlaha nie je vo vodováhe alebo nie je
odolná. >>> Uistite sa, že podlaha je vyvážená
a dostatočne odolná k tomu, aby uniesla
produkt.
Zásobník na zeleninu sa zasekol.
• Potraviny môžu byť v kontakte s hornou
časťou zásobníka. >>> Preusporiadajte
potraviny v šuplíku.
Ak je povrch zariadenia horúci.
• Vysoké teploty je možné spozorovať v
priestore medzi dverami, na bočných paneloch
a na zadnom rošte, počas prevádzky zariadenia.
Je to normálny stav, ktorý nevyžaduje údržbu!
A
UPOZORNENIE: Ak problém pretrváva
aj po vykonaní pokynov v tejto časti,
obráťte sa na svojho predajcu alebo
na autorizovaný servis. Nepokúšajte sa
opraviť produkt.

EWWERQWEW
NL
Koelkast
Gebruiksaanwijzing

Lees deze gebruiksaanwijzing voordat u het product gaat gebruiken!
Geachte klant,
We willen dat u het beste uit uw product haalt dat uiterst nauwgezet werd vervaardigd in moderne fabrieken en dat
werd getest door middel van gedetailleerde kwaliteitscontroles.
Daarom raden wij u aan deze handleiding grondig door te lezen voordat u het product gaat gebruiken. Als u het
product aan iemand anders geeft, denk er dan ook aan de gebruiksaanwijzing over te dragen.
Deze handleiding helpt u uw toestel snel en veilig te gebruiken.
• Lees deze gebruikershandleiding nauwkeurig door voordat u het product installeert en gebruikt.
• Volg altijd de toepasselijke veiligheidsvoorschriften op.
• Bewaar de gebruikershandleiding op een handig toegankelijke plaats voor toekomstig gebruik.
• Lees ook de andere documenten die bij uw product worden geleverd.
Let erop dat deze handleiding ook van toepassing kan zijn op andere productmodellen. Deze handleiding geeft
uitdrukkelijk de verschillen tussen de diverse modellen aan.
C
Belangrijke informatie en
nuttige tips.
A
Gevaar voor letsel
en beschadiging van
eigendommen.
B
Gevaar op een elektrische
schok.
De verpakkingsmaterialen van
het product zijn vervaardigd
uit recycleerbare materialen
in overeenstemming met onze
nationale milieunormen.

2 /25NL
Koelkast / Gebruiksaanwijzing
1. Instructies voor de veiligheid en het milieu 3
1.1. Algemene veiligheid . . . . . . . . . . . . . . . . . . . . . . 3
1.1.1 HC-waarschuwing. . . . . . . . . . . . . . . . . . . . . . . 4
1.1.2 Voor modellen met waterdispenser. . . . . . . . . . . 5
1.2. Bedoeld gebruik. . . . . . . . . . . . . . . . . . . . . . . . . 5
1.3. Kinderveiligheid . . . . . . . . . . . . . . . . . . . . . . . . . 5
1.4. Voldoet aan de WEEE-richtlijn en de richtlijnen voor
afvoeren van het restproduct. . . . . . . . . . . . . . . 5
1.5. Naleving van Richtlijn RoHS . . . . . . . . . . . . . . . . 5
1.6. Verpakkingsinformatie . . . . . . . . . . . . . . . . . . . . 5
2 Uw koelkast 6
3 Installatie 7
3.1. Geschikte plaats voor installatie . . . . . . . . . . . . . 7
3.2. Installatie van de kunststof wiggen . . . . . . . . . . . 7
3.3. Het verstellen van de voetjes. . . . . . . . . . . . . . . . 8
3.4. Elektrische aansluiting . . . . . . . . . . . . . . . . . . . . 8
4 Voorbereiding 9
4.1. Aanwijzingen ter besparing van energie. . . . . . . . 9
4.2. Eerste gebruik . . . . . . . . . . . . . . . . . . . . . . . . . . 9
5 Bediening van het product 10
5.1. Indicatorpaneel. . . . . . . . . . . . . . . . . . . . . . . . . 10
5.2. Indicatorpaneel. . . . . . . . . . . . . . . . . . . . . . . . . 11
5.3. IJsmachine . . . . . . . . . . . . . . . . . . . . . . . . . . . 14
5.4. Icematic. . . . . . . . . . . . . . . . . . . . . . . . . . . . . . 14
5.5. IJsbakje . . . . . . . . . . . . . . . . . . . . . . . . . . . . . . 14
5.6. Blauw licht. . . . . . . . . . . . . . . . . . . . . . . . . . . . 15
5.7. Ontgeuringsmodule . . . . . . . . . . . . . . . . . . . . . 15
(FreshGuard) . . . . . . . . . . . . . . . . . . . . . . . . . . . . . . 15
5.8. Koelgedeelte . . . . . . . . . . . . . . . . . . . . . . . . . . 16
5.9. Groentelade . . . . . . . . . . . . . . . . . . . . . . . . . . . 16
5.10. Gebruik van de waterdispenser. . . . . . . . . . . . . 17
5.11. Het reservoir van de waterdispenser vullen . . . . 17
5.12. Reinigen van het waterreservoir . . . . . . . . . . . . 17
5.13. Druplade . . . . . . . . . . . . . . . . . . . . . . . . . . . . . 18
5.14. Vochtigheidsregulerende groentelade (Ever Fresh) 19
5.15. Verse etenswaren invriezen. . . . . . . . . . . . . . . . 19
5.16. Aanbevelingen voor het bewaren van
diepvriesvoedsel . . . . . . . . . . . . . . . . . . . . . . . 20
5.17. Diepvriesinformatie . . . . . . . . . . . . . . . . . . . . . . 20
5.18. Het plaatsen van de levensmiddelen . . . . . . . . . 20
5.19. Waarschuwing deur open. . . . . . . . . . . . . . . . . 20
5.20. Verlichtingslamp. . . . . . . . . . . . . . . . . . . . . . . . 20
6 Onderhoud en reiniging 21
6.1. Vermijden van nare geuren. . . . . . . . . . . . . . . . 21
6.2. Bescherming van de kunststof oppervlakken . . 21
6.3. De binnenkant van het product reinigen . . . . . . 21
6.4. Roestvrijstalen buitenoppervlakken . . . . . . . . . . 22
6.5. Reiniging van producten met glazen deuren . . . 22
7
Probleemoplossing 23

3 /25 NL
Koelkast / Gebruiksaanwijzing
Dit hoofdstuk geeft veiligheidsvoorschriften die in acht
moeten worden genomen om het risico op letsel en
beschadiging aan materiaal te voorkomen. Het niet
naleven van deze voorschriften zal iedere vorm van
productgarantie laten vervallen.
Bedoeld gebruik
A
WAARSCHUWING:
Ventilatieopeningen in de behuizing
van het apparaat of in de ingebouwde
structuur niet afdekken.
A
WAARSCHUWING:
Gebruik geen mechanische
apparaten of andere middelen om
het ontdooiproces te versnellen dan
de middelen die door de fabrikant
worden aangeraden.
A
WAARSCHUWING:
Het koelcircuit niet beschadigen.
A
WAARSCHUWING:
Gebruik geen elektrische apparatuur
in de bewaarladen van het apparaat,
tenzij ze het type zijn dat door de
fabrikant wordt aangeraden.
Dit apparaat is gedoeld voor gebruik in huishoudens en
soortgelijke toepassingen, zoals
- personeelskeukenruimten in winkels, kantoren en
andere werkomgevingen;
- boerderijen en door klanten in hotels, motels en andere
verblijfsomgevingen;
- bed and breakfast-type omgevingen.
- catering en soortgelijke niet-verkopende toepassingen.
1.1. Algemene veiligheid
• Dit product dient niet te worden
gebruikt door personen met
lichamelijke, zintuiglijke en geestelijke
beperkingen, zonder voldoende
kennis of ervaring, of door kinderen.
Het apparaat mag uitsluitend door
dergelijke personen worden gebruikt
indien deze onder toezicht staan
en veiligheidsinstructies hebben
gekregen van een verantwoordelijk
persoon. Kinderen mogen niet worden
toegestaan met het apparaat te spelen.
• Bij storing het apparaat uit het
stopcontact trekken.
• Wacht na het uittrekken minstens 5
minuten voordat u de stekker weer in
het stopcontact steekt.
• Trek het product uit het stopcontact
wanneer het niet in gebruik is.
• Raak de stekker nooit aan met natte
handen! Trek nooit aan het snoer, maar
altijd aan de stekker.
• Plaats de stekker van de koelkast niet
in het stopcontact als dit stopcontact
los zit.
• Koppel het product los tijdens de
installatie, onderhoud, schoonmaak en
reparaties.
• Indien het product tijdelijk niet wordt
gebruikt, trek de stekker dan uit en
verwijder het voedsel dat erin zit.
• Gebruik het product niet als het vak
met printplaten dat aan zich bovenaan
op de achterkant van het product
bevindt (elektrische printplaatdeksel)
(1), open is.
1
1
• Gebruik geen stoom of materialen voor
stoomreiniging om de koelkast schoon
te maken of ijs aan de binnenkant
te smelten. Stoom kan in contact
1. Instructies voor de veiligheid en het milieu

Instructies voor de veiligheid en het milieu
4 /25 NL
Koelkast / Gebruiksaanwijzing
komen met de onder stroom staande
gebieden en kortsluiting of elektrische
schokken veroorzaken!
• Was het product nooit door er water
op te sproeien of te gieten! Gevaar op
een elektrische schok.
• In geval van storing het product niet
gebruiken, want dit kan elektrische
schokken veroorzaken. Neem voor
iets te ondernemen contact op met de
erkende servicedienst.
• Steek de stekker van het product in
een geaard stopcontact. Aarding moet
worden uitgevoerd door een bevoegd
elektricien.
• Als het product is uitgerust met
ledverlichting, dient u bij vervanging of
problemen contact op te nemen met
de erkende servicedienst.
• Raak diepvriesproducten niet met
natte handen aan! Ze kunnen aan uw
handen blijven kleven!
• Plaats geen vloeistoffen in flessen
en blikjes in het vriesvak. Ze kunnen
uiteen basten.
• Plaats vloeistoffen rechtop nadat de
deksel stevig is aangedraaid.
• Sproei geen ontvlambare substanties
in de buurt van het product. Het kan
branden of ontploffen.
• Bewaar geen ontvlambare materialen
en producten met ontvlambaar gas
(sprays, enz.) in de koelkast.
• Plaats bovenop het toestel geen
schalen met vloeistof. Het spatten van
water op een elektrisch onderdeel
kan elektrische schokken of brand
veroorzaken.
• Het product blootstellen aan
regen, sneeuw, zonlicht en wind
veroorzaakt elektrisch gevaar.
Verplaats het product niet door aan
de deurhandgreep te trekken. De
handgreep kan loskomen.
• Let erop dat er geen delen van
uw handen of lichaam tussen
bewegende onderdelen binnenin het
product terechtkomen.
• Stap en leun niet op de deur,
laden en soortgelijke delen van
de koelkast. Hierdoor kan het
product omvallen en schade aan de
onderdelen veroorzaken.
• Let erop dat u niet over het
stroomsnoer valt.
• Zorg er bij het plaatsen van het apparaat
voor dat het stroomsnoer niet ingeklemd of
beschadigd is.
• Plaats geen stekkerdozen of draagbare
stroomvoorzieningen aan de achterkant van het
apparaat.
1.1.1 HC-waarschuwing
Indien het product is uitgerust met een koelsysteem
dat R600a-gas gebruikt, zorg er dan voor dat het
koelsysteem en de leiding tijdens het gebruik en
verplaatsen van het product niet worden beschadigd.
Dit gas is ontvlambaar. Als het koelsysteem
beschadigd is, houd het product dan uit de
buurt van vuurbronnen en zorg onmiddellijk voor
kamerventilatie.
C
Het label links aan de binnenkant geeft
het type gas aan dat in het product
wordt gebruikt.

Instructies voor de veiligheid en het milieu
5 /25NL
Koelkast / Gebruiksaanwijzing
1.1.2 Voor modellen met waterdispenser
•
De druk voor de koudwatertoevoer
bedraagt maximaal 90 psi (620
kPa). Als u waterdruk hoger is
dan 80 psi (550 kPa), gebruik dan
een drukbegrenzingsklep in uw
waterleidingsysteem. Als u niet weet
hoe u de waterdruk kunt meten, vraag
dan een erkende loodgieter om hulp.
•
Als er risico bestaat op waterslag
in uw installatie, gebruik dan altijd
beschermapparatuur tegen waterslag in
uw installatie. Neem contact op met een
erkende loodgieter als u er niet zeker
van bent of er sprake is van waterslag in
uw installatie.
•
Niet installeren op de
warmwatertoevoer. Neem
voorzorgsmaatregelen tegen
het risico van bevriezing van de
leidingen. De werkingsinterval van de
watertemperatuur moet minimaal 0,6°C
en maximaal 38°C zijn.
•
Gebruik alleen drinkwater.
1.2. Bedoeld gebruik
•
Dit product is ontworpen voor
huishoudelijk gebruik. Het is niet
bestemd voor commercieel gebruik.
•
Het product dient uitsluitend te
worden gebruikt voor het bewaren van
levensmiddelen en dranken.
•
Bewaar geen gevoelige producten in de
koelkast die gereguleerde temperaturen
nodig hebben (vaccins, warmtegevoelige
medicamenten, medicijnen, enz.).
•
De fabrikant is niet verantwoordelijk
voor schade die voortkomt uit
verkeerd(e) gebruik of behandeling.
•
Originele onderdelen zijn tot 10 jaar
na de aankoopdatum van het product
verkrijgbaar.
1.3. Kinderveiligheid
•
Houd verpakkingsmiddelen buiten
bereik van kinderen.
•
Laat kinderen niet met het product
spelen.
•
Indien het product voorzien is van een
vergrendeling, houd de sleutel dan
buiten bereik van kindere
n.
1.4. Voldoet aan de WEEE-
richtlijn en de richtlijnen voor
afvoeren van het restproduct
Dit product voldoet aan de EU-richtlijn
WEEE (2012/19/EU). Dit product is voorzien van
een classificatiesymbool voor afvalsortering van
elektrische en elektronische apparatuur (WEEE).
Dit product werd vervaardigd uit
onderdelen en materialen van hoge
kwaliteit die hergebruikt kunnen
worden en geschikt zijn voor
reclycling. Gooi het restproduct aan
het einde van zijn levensduur niet
weg bij normaal huishoudelijk of
ander afval. Breng het naar het
verzamelpunt voor recycling van elektrische en
elektronische apparatuur. Raadpleeg uw
plaatselijke autoriteiten om te weten waar deze
verzamelpunten gelegen zijn.
1.5. Naleving van Richtlijn RoHS
• Dit product voldoet aan de EU-richtlijn WEEE
(2011/65/EU). Het bevat geen schadelijke en
verboden materialen die in deze richtlijn zijn
opgenomen.
1.6. Verpakkingsinformatie
De verpakkingsmaterialen van het product
zijn vervaardigd uit recycleerbare materialen
in overeenstemming met onze nationale
milieunormen. Gooi het verpakkingsmateriaal
niet weg met het huishoudelijk of ander
afval. Breng het naar een verzamelpunt voor
verpakkingsmateriaal dat is aangesteld door de
lokale autoriteiten.

6 /25NL
Koelkast / Gebruiksaanwijzing
1. Deurschappen van het koelgedeelte
2. Laden diepvriesgedeelte
3. Icematic
4. Waterreservoir
5. Groentelade
6. Deksel groentelade
7. Koelgedeelte
8. Glazen schappen van het koelgedeelte
9. Geurfilter (violet)
10. Binnendisplay
11. Glazen schappen van het koelgedeelte
12. Vriesgedeelte
* Optioneel
2 Uw koelkast
C
* Optioneel: De afbeeldingen in deze gebruiksaanwijzing zijn bedoeld als voorbeeld en hoeven niet
exact met uw product overeen te komen. Wanneer betreffende onderdelen niet tot het product behoren
dat u hebt gekocht, geldt de afbeelding voor andere modellen.
*1
*3
*4
6
*5
7
*8
11
12
*2
*1
*2
*3
*5
7
*8
9
10
11
6
12
Het kan zijn dat dit niet op alle modellen van toepassing is

7 /25 NL
Koelkast / Gebruiksaanwijzing
3 Installatie
3.1. Geschikte plaats voor installatie
Neem voor installatie van het product contact
op met de erkende servicedienst. Raadpleeg de
gebruikershandleiding om het product gebruiksklaar
te maken en zorg ervoor dat de elektrische en
waterinstallatie correct zijn. Indien dit niet het geval
is neemt u contact op met een erkende elektricien of
monteur op om alle noodzakelijke regelingen te laten
uitvoeren.
B
WAARSCHUWING: De fabrikant zal
niet aansprakelijk worden gehouden voor
schade die kan voortkomen uit procedures
uitgevoerd door onbevoegde personen.
B
WAARSCHUWING: De stekker van het
product mag tijdens de installatie niet in
het stopcontact zitten. Anders bestaat er
kans op overlijden of ernstig letsel!
A
WAARSCHUWING: : Als de deuropening
van de ruimte waar het product geplaats
gaat worden te klein is om het product er
doorheen laten, neem dan contact op met
de erkende servicedienst.
• Plaatsuwkoelkastopeenvlakvloeroppervlakom
schokken te vermijden.
•Zorgerindienuhetproductineenkast/meubelzet
voor dat er tussen de zijwanden en het kast/meubel
een ruimte van minimaal 2 cm zit.
• Installeerhetproductopminstens30cmafstand
van warmtebronnen zoals kookplaten, centrale
verwarming en kachels en op minstens 5 cm afstand
van elektrische ovens.
•Dekoelkastmagnietindirectzonlichtworden
geplaatst en in vochtige plaatsen worden gehouden.
• Geschikteluchtventilatiemoetwordenvoorzienrond
uw product om een efficiënte werking te verkrijgen.
Als de koelkast in een uitsparing in de muur wordt
geplaatst, moet er minstens 5 cm afstand zijn ten
opzichte van het plafond en van de zijmuren.
• In een omgeving waar de kamertemperatuur
beneden 10°C daalt, zal de koelkast blijven werken
om de etenswaren in de vriezer te goed te houden.
Verse etenswaren in het koelkastcompartiment
kunnen echter bevriezen vanwege de koude
omgeving.
3.2. Installatie van de kunststof wiggen
De kunststof wiggen die meegeleverd worden met het
product zijn bedoeld om afstand te houden voor de
luchtcirculatie tussen uw koelkast en de achterwand.
1. Om de wiggen te installeren, verwijdert u de
schroeven op het product en gebruikt de schroeven
die bij de wiggen werden geleverd.
2. Steek de 2 kunststof wiggen op de achterkant van
de ventilatiedeksel zoals in de volgende afbeelding
wordt weergegeven.

Installatie
8 /25NL
Koelkast / Gebruiksaanwijzing
3.3. Het verstellen van de voetjes
Als het product na de installatie niet evenwichtig
staat, pas dan de voetjes aan de voorkant aan door
ze naar rechts of links te draaien.
3.4. Elektrische aansluiting
A
WAARSCHUWING: Maak geen
aansluitingen via verlengkabels of
meerwegstekkers.
B
WAARSCHUWING: Een
beschadigde stroomkabel kabel
moet door een erkende servicedienst
worden vervangen.
C
Bij installatie van twee koeleenheden
naast elkaar, moeten deze minstens 4
cm van elkaar worden geplaatst.
• Ons bedrijf is niet aansprakelijk voor schade
die zich voordoet wanneer het product
wordt gebruikt als de aarding en elektrische
aansluiting niet in overeenstemming met de
landelijke voorschriften zijn.
• De stekker van de stroomkabel moet
gemakkelijk bereikbaar zijn na de installatie.
• Gebruik geen verlengsnoeren of snoerloze
meervoudige contactdozen tussen uw product
en het stopcontact in de muur.
C
Waarschuwing heet oppervlak!
Uw product is uitgerust met een
koelleidingen om het koelsysteem voor
de zijwanden te bevorderen. De hete
vloeistof kan door deze oppervlakken
lopen, waardoor de zijwanden warm
worden. Dit is normaal en behoeft geen
serviceonderhoud. Wees voorzichtig bij
het aanraken van deze zones.
A
WAARSCHUWING: “De beschermfolie op de verticale handgreep” dient te worden
verwijderd.

9 /25 NL
Koelkast / Gebruiksaanwijzing
4.1. Aanwijzingen ter besparing van energie
mehmet
A
Het toestel aansluiten op elektrische
energiebesparende systemen is riskant
gezien dit schade aan het toestel kan
veroorzaken.
• Houd de deuren van uw koelkast niet lang open.
• Plaats geen warme levensmiddelen of dranken in de
koelkast.
• Zet niet te veel in de koelkast, de koelcapaciteit
verlaagt wanneer de luchtcirculatie aan de
binnenzijde wordt belemmerd.
• Om zoveel mogelijk voedsel in het vriesgedeelte
van uw koelkast te kunnen opslaan, moeten de
bovenste klep en lade worden verwijderd en op de
glazen schappen geplaatst worden. Het aangegeven
stroomverbruik voor uw koelkast werd vastgesteld
nadat de ijsbak, ijscontainer met klep en de
middelste lade werden verwijderd om maximale
vulling mogelijk te maken. Het is aangeraden de
bovenste klep en de onderste lade te gebruiken bij
het vullen.
• Afhankelijk van de kenmerken van uw product
zal het ontdooien van bevroren etenswaren in het
koelgedeelte zorgen voor energiebesparing en het
behoud van de voedingskwaliteit.
• De luchtstroom moet niet worden geblokkeerd
door levensmiddelen voor de ventilator van het
vriesvak te zetten. Er moet minstens 5 cm ruimte
voor het beschermrooster van de ventilator worden
vrijgelaten als etenswaren in het product worden
geplaatst.
• De temperatuursensor in het diepvriesgedeelte
en mag niet direct in contact komen met de
voedselverpakkingen. Het energieverbruik van het
product kan stijgen indien er contact wordt gemaakt
met de sensor.
C
De binnenkant van uw product moet
gereinigd worden.
C
Bij installatie van twee koeleenheden naast
elkaar, moeten deze minstens 4 cm van
elkaar worden geplaatst.
4 Voorbereiding
4.2. Eerste gebruik
Controleer voordat u uw koelkast gaat gebruiken of alle
voorbereidingen werden getroffen in overeenstemming
met de instructies in de hoofdstukken "Belangrijke
instructies voor veiligheid en milieu" en "Installatie".
Laat de koelkast 6 uur werken zonder er
levensmiddelen in te doen en open de deur niet, tenzij
dit zeker nodig is.
C
U zult een geluid horen wanneer de
compressor opstart. De vloeistof en
de gassen die zich in het koelsysteem
bevinden, zouden ook wat lawaai kunnen
veroorzaken zelfs wanneer de compressor
niet werkt. Dit is normaal.
C
Het is normaal dat de buitenranden van de
voorkant van de koelkast warm worden.
Deze oppervlakken zijn bedoeld om
warm te worden om condensvorming te
voorkomen.

10 /25NL
Koelkast / Gebruiksaanwijzing
5 Bediening van het product
5.1. Indicatorpaneel
De indicatorpanelen kunnen verschillen, afhankelijk van het model van uw product.
Audio-visuele functies op het indicatorpaneel helpen u bij het gebruik van uw koelkast.
C
* Optioneel: De afbeeldingen in deze gebruiksaanwijzing zijn bedoeld als voorbeeld en hoeven niet
exact met uw product overeen te komen. Wanneer betreffende onderdelen niet tot het product behoren
dat u hebt gekocht, geldt de afbeelding voor andere modellen.
1. Temperatuurregeling / Temperatuurverhoging
2. Temperatuurregelschuif / Temperatuurindicator
3. Temperatuureenheidselectie (°C), Celciusindicator
4. Temperatuureenheidselectie (°F),
Fahrenheitindicator
5. Temperatuurregeling / Temperatuurdaling
6. Indicator functie/knop Snelkoelen
7. * Draadloos
8. Indicator/knop besparingsmodus
9. * Indicator:knop Joker-diepvriezer
10. * Automatische deur
11. Waarschuwing hoge temperatuur / Storing
12. * Flessenkoeler
13. *Waarschuwing/knop filtervervanging
14. Menuknop
15. Aan/uit-indicator/knop
16. * Indicator/knop Icematic
17. * Sabbat-modus
18. Indicator/knop vakantie
19. Aanduiding Toetsvergrendeling
20. Indicator/knop snelvriesfunctie
21. Compartimentselectie
22. Lampje koelkastcompartiment
23. Lampje vriescompartiment
Het kan zijn dat dit niet op alle modellen van toepassing is
1
2
3
4
*16
*17
18
20
21
22
23
19
5
6
8
*7
*10
*12
*13
14
15
11
*9a
*9b

Bediening van het product
11 /25NL
Koelkast / Gebruiksaanwijzing
1. Temperatuurregeling /
Temperatuurverhoging
Als u hierop drukt, wordt de temperatuur van het
geselecteerde compartiment verhoogd.
2. Temperatuurregelschuif /
Temperatuurindicator
Geeft de temperatuur weer van het geselecteerde
compartiment. Bovendien kunt u met uw vinger naar
boven of naar beneden bewegen om de temperatuur
te verhogen of te verlagen.
3. Temperatuureenheidselectie (°C)
Celsius-
lampje
Als de knop is ingedrukt, wordt de
temperatuureenheid ingesteld als Celsius.
Het is de Celsius-indicator. Als de Celsius-modus
geactiveerd is, zullen de temperatuurwaarden
in Celsius worden weergegeven en zal het
desbetreffende pictogram 100% gaan branden.
Het Fahrenheit-pictogram gaat 50% branden.
4. Temperatuureenheidselectie (°F)
Fahrenheit-
indicator
Als de knop is ingedrukt, wordt de
temperatuureenheid ingesteld als Celsius.
Het is de Fahrenheit-indicator Als de
Fahrenheit-modus geactiveerd is, worden de
temperatuurwaarden in Fahrenheit weergegeven
en zal het desbetreffende pictogram volledig gaan
branden.
Het Celsius-pictogram gaat 50% branden.
5. Temperatuurregeling / Temperatuurdaling
Als u hierop drukt, wordt de temperatuur van het
geselecteerde compartiment verlaagd.
5.2. Indicatorpaneel
De indicatorpanelen kunnen verschillen, afhankelijk van het model van uw product.
Audio-visuele functies op het indicatorpaneel helpen u bij het gebruik van uw koelkast.
C
* Optioneel: De afbeeldingen in deze gebruiksaanwijzing zijn bedoeld als voorbeeld en hoeven niet
exact met uw product overeen te komen. Wanneer betreffende onderdelen niet tot het product behoren
dat u hebt gekocht, geldt de afbeelding voor andere modellen.
Het kan zijn dat dit niet op alle modellen van toepassing is
Select
!
15
21
22 23
5
2
1
*13
*7
*11
*10
*17
*12
*16
*9b
*9a
8
18
6
20
4
3
6. Indicator functie Snelkoelen
Als de functie Snelkoelen wordt geactiveerd,
gaat de indicator 100% branden. Als de functie
wordt geannuleerd, keert het product terug naar zijn
normale instellingen en de gaat de indicator 50%
branden.
Knop functie Snelkoelen
Deze knop wordt gebruikt om de functie Snelkoelen
in of uit te schakelen.
C
Gebruik de functie Snelkoelen als u het
voedsel dat u in het koelkastgedeelte
heeft gelegd snel wilt koelen. Indien u
grotere hoeveelheden vers voedsel wilt
koelen, moet u deze functie activeren
vóór het voedsel in het product te
plaatsen.
C
Als u de functie niet annuleert,
schakelt de functie Snelkoelen zichzelf
automatisch uit na maximaal 8 uur
of wanneer het vriesvak de gewenste
temperatuur heeft bereikt.
C
Wanneer u de knop Snelkoelen
herhaaldelijk met korte onderbrekingen
indrukt, wordt de zekering van de
elektronische schakeling geactiveerd
en start de compressor niet meteen
op.
C
Deze functie wordt niet teruggezet
wanneer de stroom na een
stroomuitval wordt hersteld.

Bediening van het product
12 /25NL
Koelkast / Gebruiksaanwijzing
7. * Draadloos
Als deze knop wordt ingedrukt, wordt het product
aangemeld bij het thuisnetwerk. Als de functie wordt
geactiveerd, gaat de indicator 100% branden. Als hij
wordt geannuleerd, gaat de indicator 50% branden.
8. Indicator/knop besparingsmodus
Druk op deze knop om de besparingsmodus in/uit te
schakelen.
Als de besparingsmodus is geactiveerd, gaat de in-
dicator 100% branden. Als deze functie actief is, zal
de vriezer minstens 6 uur later in besparingsmodus
gaan werken. Als de functie geannuleerd is, gaat de
indicator 50% branden.
9a. * Indicator/knop Joker-diepvriezer
Als de knop wordt ingedrukt, werkt het Joker-
compartiment als vriezer en brandt de indicator
100%. Het Joker-koelcompartiment gaat 50%
branden.
9b. * Indicator/knop Joker-koelkast
Als de knop wordt ingedrukt, werkt het Joker-
compartiment als koelkast en brandt de
indicator 100%. Het Joker-vriescompartiment
gaat 50% branden.
10.* Automatische deur
Druk op deze knop om de modus automatische deur
in/uit te schakelen. Als de functie is geactiveerd,
gaat de indicator 100% branden. Als de functie
geannuleerd is, gaat de indicator 50% branden.
Als de functie ingeschakeld is, raakt u het desbe-
treffende deel van de deurgreep aan om de deur
automatisch te openen.
11. Waarschuwing hoge temperatuur /
Storing
Dit lampje licht op bij een stroomstoring, storing door
hoge temperatuur en foutberichten. Tijdens een lan-
gere stroomstoring zal de hoogste temperatuur die
het vriescompartiment bereikt op de dig
itale display
knipperen. Druk na het controleren van het voedsel
dat in het vriescompartiment zit op de knop voor
hoge temperaturen om de waarschuwing te wissen.
12. * Flessenkoeler
Druk deze knop in om de modus flessenkoelen in/uit
te schakelen.
Als de functie is geactiveerd, gaat de indicator
100% branden. Als de functie is geannuleerd, gaat
de indicator 50% branden.
13. * Waarschuwing/knop voor
filtervervanging
Dit pictogram gaat branden wanneer het filter
gereset moet worden.
Als de knop wordt ingedrukt, zal het filter gereset
worden en gaat het reset-pictogram uit.
14. Menuknop
Deze wordt gebruikt om de sleeptimer voor het
display in en uit te schakelen. Als u gedurende 30
seconden op geen enkele knop drukt of de deur
opent, zal het apparaat automatisch overgaan op de
sleeptimer.
15. Aan/uit-indicator/knop
Houd de Aan/uit-knop 3 seconden ingedrukt om het
product aan of uit te zetten.
Als het product aanstaat zal de Aan/uit-indicator
100% branden en alle andere indicators uitstaan.
Houd de knop nogmaals 3 seconden ingedrukt om
het product aan te zetten. De koelkast wordt dan
ingeschakeld en de Aan/uit-indicator gaat 50%
branden.
16. * Indicator/knop Icematic
Druk op deze knop om de Icematic in/uit te
schakelen. Als de indicator 100% brandt, betekent
dit dat de Icematic ingeschakeld is. Als de
indicator 50% brandt, betekent dit dat de Icematic
uitgeschakeld is.
C
De watertoevoer van het waterreservoir
stopt als deze functie niet wordt
gekozen. Eerder gemaakt ijs kan
echter uit de Icematic genomen
worden.
17. * Sabbat-modus
Druk op deze knop om de sabbat-modus in/uit te
schakelen. Als de functie is geactiveerd, gaat de
indicator 100% branden. Als de functie geannuleerd
is, gaat de indicator 50% branden.
18. Indicator/knop vakantie
Druk op deze knop om de modus vakantie in te
schakelen; de indicator voor de vakantiemodus
zal 100% branden. Als de vakantiemodus actief
is, verschijnt “- -” op de temperatuurindicator en
zal het koelgedeelte niet actief koelen. Het is niet
wenselijk om voedsel in het koelcompartiment
achter te laten wanneer deze functie geactiveerd is.
Andere compartimenten blijven koelen volgens hun
ingestelde temperaturen.

Bediening van het product
13 /25NL
Koelkast / Gebruiksaanwijzing
Druk om deze functie te annuleren opnieuw op de
knop van de
Vakantie-functie. Als de functie
geannuleerd is, gaat de indicator 50% branden.
19. Aanduiding Toetsvergrendeling
Druk de knoppen voor Snelkoelen en Vakantie
3 seconden tegelijkertijd in. Terwijl u op de knopt
drukt, begint het apparaat af te tellen op de tem-
peratuurweergave. Zodra toetsvergrendeling wordt
ingesteld zal de toetsvergrendelingsindicator 100%
branden en zal de toetsvergrendelingsmodus inge-
schakeld worden. Knoppen zullen niet functioneren
als de toetsvergrendelingsmodus ingeschakeld
is. Druk de knoppen voor Snelkoelen en Vakantie
nogmaals 3 seconden tegelijkertijd in. Terwijl u op
de knopt drukt, begint het apparaat af te tellen op
de temperatuurweergave. Zodra toetsvergrendeling
wordt geannuleerd, zal de toetsvergrendelingsindi-
cator 50% branden en zal de toetsvergrendelings-
modus uitgeschakeld worden.
Gebruik
deze functie als u niet wilt dat de
temperatuurinstelling van uw koelkast verandert.
20.Indicator functie Snelvriezen
Als de functie Snelvriezen ingeschakeld is,
zal de indicator 100% branden. Als de functie
geannuleerd wordt, treden de standaardinstellingen
van het product weer in werking en zal de indicator
50% branden.
Functieknop Snelvriezen
Deze knop wordt gebruikt om de functie Snel
vriezen
in of uit te schakelen.
Druk op deze knop om de functie Snelvriezen in of
uit te schakelen. Als u de functie activeert, wordt het
vriesgedeelte gekoeld tot een temperatuur die lager
ligt dan de ingestelde waarde.
C
Gebruik de functie Snelvriezen als u het
voedsel dat u in het diepvriesgedeelte
heeft gelegd snel wilt invriezen. Indien
u grotere hoeveelheden vers voedsel
wilt invriezen, moet u deze functie
activeren vóór u het voedsel in het
product plaatst.
C
Als u de functie niet annuleert,
schakelt de functie Snelvriezen zichzelf
automatisch uit na maximaal 4 uur
of wanneer het vriesvak de gewenste
temperatuur heeft bereikt.
C
Deze functie wordt niet teruggezet
wanneer de stroom na een
stroomuitval wordt hersteld.
21. Compartimentselectie
Druk op de knop compartimentselectie om de
temperatuur van de koelkast of diepvriezer te zien
en te veranderen op de temperatuurindicator.
22. Lampje koelkastcompartiment
Als dit lampje brandt, wordt de temperatuur
van het koelcompartiment weergegeven op de
temperatuurindicator.
23. Lampje vriescompartiment
Als dit lampje brandt, wordt de temperatuur
van het vriescompartiment weergegeven op de
temperatuurindicator.

Bediening van het product
14 /25NL
Koelkast / Gebruiksaanwijzing
5.3. IJsmachine
(Deze functie is optioneel)
Met de ijsmachine kunt u gemakkelijk ijs maken met
dit product.
Gebruik van de ijsmachine
1. Verwijder het waterreservoir uit het
koelkastcompartiment.
2. Vul het waterreservoir met water.
3. Zet het waterreservoir terug. De eerste ijsblokjes
zullen in ongeveer vier uur klaar zijn in de lade van
de ijsmachine in het vriescompartiment.
C
Als het waterreservoir volledig gevuld
is, is dat voldoende voor ongeveer 60-
70 ijsblokjes.
C
Het water in het reservoir moet elke
2-3 weken ververst worden.
5.4. Icematic
(Deze functie is optioneel)
Met de ijsmachine kunt u gemakkelijk ijs maken met
dit product.
Gebruik van de Icematic
1. Verwijder de Icematic door hem voorzichtig uit de
vriezer te trekken.
2. Vul de Icematic met water.
3. Plaats Icematic terug op zijn plaats. Na ongeveer
twee uur is het ijs klaar.
4. Draai de knoppen op de ijsreservoirs 90 graden
met de klok mee om het ijs eruit te halen. De
ijsblokjes in de reservoirs zullen naar beneden vallen
in het ijsbakje eronder.
5. U kunt de ijsblokjes nu uit het ijsbakje pakken en
serveren.
C
Haal de Icematic niet van zijn plaats
om ijs te pakken.
C
Indien gewenst kunt u de ijsblokjes
in het ijsbakje bewaren. Dit ijsbakje
is alleen bedoeld om de ijsblokjes te
verzamelen. Doe hier geen water in.
Anders breekt het.
5.5. IJsbakje
(Deze functie is optioneel)
Met het ijsbakje kunt u gemakkelijk ijs maken met
dit product.
Gebruik van de ijsmachine
1. Haal het ijsbakje uit het diepvriesgedeelte.
2. Vul het ijsbakje met water.
3. Plaats het ijsbakje in het diepvriesgedeelte. Na
ongeveer twee uur is het ijs klaar.
4. Haal het ijsbakje uit het diepvriesgedeelte en
buig hem over de opdienschaal. De ijsblokjes vallen
gemakkelijk op de opdienschaal.

Bediening van het product
15 /25NL
Koelkast / Gebruiksaanwijzing
5.6. Blauw licht
(Deze functie is optioneel)
De groenteladen van dit product zijn voorzien van
een blauw licht. Levensmiddelen opgeslagen in de
groenteladen gaan door met hun fotosynthese door
middel van het golflengte-effect van blauw licht en
behouden zo hun versheid.
5.7. Ontgeuringsmodule
(FreshGuard)
(Deze functie is optioneel)
De ontgeuringsmodule verwijdert slechte luchtjes
in uw koelkast snel voor deze in de etenswaren
kunnen trekken. Via deze module die in de
bovenkant van het schap voor verse voeding is
gemonteerd, lossen de ongewenste geuren op
terwijl de lucht door het geurfilter gaat. De lucht
die door het filter is gezuiverd wordt vervolgens
teruggebracht in het schap voor verse voeding.
Op deze manier worden ongewenste geuren die
mogelijk ontstaan als er etenswaren in de koelkast
worden bewaard verwijderd voordat ze in de
oppervlakken door kunnen dringen.
Het systeem wordt geactiveerd via de
ventilator, led en het geurfilter in de module. De
ontgeuringsmodule wordt automatisch periodiek
geactiveerd. Het geluid dat u tijdens de periodieke
activering van de module hoort, is normaal; het
wordt veroorzaakt door de geïntegreerde ventilator.
Als u de deur van het vak voor verse voeding opent
terwijl de module in werking is, valt de ventilator
stil. Deze begint weer nadat de deur weer wordt
gesloten. In het geval van een stroomonderbreking
wordt de ontgeuringsmodule geactiveerd als de
stroom wordt hersteld.
Info: het wordt aanbevolen om aromatische
levensmiddelen (zoals kaas, olijven en delicatessen)
in hun verzegelde verpakking te bewaren om
ongewenste geuren te voorkomen wanneer de
geuren van verschillende levensmiddelen onderling
worden gemengd. Bovendien is het aanbevolen
om bedorven levensmiddelen snel uit de koelkast
te verwijderen om te voorkomen dat andere
levensmiddelen bederven en om ongewenste geuren
te vermijden.

Bediening van het product
16 /25NL
Koelkast / Gebruiksaanwijzing
5.8. Koelgedeelte
(Deze functie is optioneel)
Gebruik dit compartiment voor het bewaren van
delicatessen die bij een lagere temperatuur bewaard
moeten worden of voor vleesproducten die u spoedig
zult consumeren. Bewaar geen fruit en groenten in
dit vak.
U kunt het binnenvolume van uw koelkast verhogen
door een van de koelervakken te verwijderen:
Om een compartiment te verwijderen, trekt u deze
naar u toe totdat het stopt, en vervolgens tilt u het op
en trekt u het naar uzelf toe.
5.9. Groentelade
De groentelade van de koelkast is speciaal ontworpen
om de groenten vers te houden zonder hun vocht te
verliezen. Hiervoor wordt koele luchtcirculatie versterkt
rond de groentelade in het algemeen. Bewaar uw fruit
en groenten in dit compartiment. Plaats bladgroenten
om hun levensduur te verlengen niet naast fruit.

Bediening van het product
17 /25NL
Koelkast / Gebruiksaanwijzing
5.10. Gebruik van de waterdispenser
(Deze functie is optioneel)
C
Het is normaal wanneer de eerste
glazen water uit de dispenser warm
zijn.
C
Als de waterdispenser langdurig niet
wordt gebruikt, de eerste glazen water
weggooien om daarna vers water te
krijgen.
1. Druk met uw glas tegen de hefboom van de
waterdispenser. Indien u een zacht plastic
bekertje gebruikt, kunt u de hendel beter met uw
hand indrukken.
2. Laat de hendel los nadat u de beker naar wens
heeft gevuld.
C
De hoeveelheid water die uit de
waterdispenser stroomt is afhankelijk
van hoe ver u de hendel indrukt.
Naarmate het waterniveau in uw
kopje of glas stijgt, dient u geleidelijk
de hoeveelheid druk op de hefboom
te verminderen om overstromen te
vermijden. Wanneer u de hefboom
slechts lichtjes indrukt druppelt het
water, dit is normaal en is geen storing.
5.11. Het reservoir van de
waterdispenser vullen
Het waterreservoir bevindt zich aan de binnenkant van
het deurrooster.
1. Open de deksel van de waterreservoir.
2. Vul het reservoir met vers drinkwater.
3. Sluit het deksel.
C
Giet geen andere vloeistof (zoals
vruchtensappen, koolzuurhoudende
dranken of alcoholische dranken)
dan water in het waterreservoir. Deze
zijn niet geschikt voor gebruik in de
waterdispenser. De waterdispenser zal
onherstelbaar beschadigd raken wanneer
deze vloeistoffen worden gebruikt. Als
u dit doet vervalt de garantie. Sommige
chemische producten en toevoegingen die
in deze dranken/vloeistoffen aanwezig zijn
kunnen het waterreservoir beschadigen.
C
Gebruik alleen schoon drinkwater.
C
De capaciteit van het waterreservoir
is 3 liter. Het reservoir niet te vol
vullen.
5.12. Reinigen van het waterreservoir
1. Verwijder het waterreservoir in het deurrooster.

Bediening van het product
18 /25NL
Koelkast / Gebruiksaanwijzing
2. Verwijder het deurrooster door dit aan beide kanten
vast te houden.
3. Pak het waterreservoir aan beide kanten vast en
verwijder het in een hoek van 45°C.
4. Open de deksel van het waterreservoir en reinig het
waterreservoir.
C
Componenten van de watertank en
de waterdispenser mogen niet in de
vaatwasser worden schoongemaakt.
5.13. Druplade
In deze druplade wordt water dat tijdens het gebruik
van de waterdispenser druppelt opgevangen.
Verwijder het kunststof filter zoals weergegeven in
de afbeelding.
Verwijder het water dat zich heeft opgehoopt met
een schone en droge doek.

Bediening van het product
19 /25NL
Koelkast / Gebruiksaanwijzing
S E B Z E L İ K
5.15. Verse etenswaren invriezen
• Om de kwaliteit van het voedsel zo goed
mogelijk te bewaren, moet het zo snel mogelijk
ingevroren worden wanneer het in het
vriescompartiment wordt geplaatst. Gebruik
hiervoor de functie Snelvriezen.
• U kunt etenswaren langer in het
diepvriescompartiment bewaren als u ze vers
invriest.
• Verpak het voedsel dat bevroren moet worden
en sluit de verpakking zodat er geen lucht bij
komt.
• Zorg ervoor dat u uw voedsel verpakt voordat
u dit in de vriezer legt. Hiervoor gebruikt u
containers, folie en vochtbestendig papier,
plastic zakken en ander verpakkingsmateriaal in
plaats van traditioneel verpakkingspapier.
• Voorzie elk voedselpakketje van een etiket met
datum voordat u dit invriest. Op deze manier
weet u hoe oud elk voedselpakketje is, elke keer
wanneer u de vriezer opent. Bewaar voedsel dat
u eerder ingevroren heeft aan de voorkant van
het compartiment, zodat dit het eerst gebruikt
wordt.
• Bevroren levensmiddelen moeten meteen na
ontdooiing worden gebruikt en mogen nooit
opnieuw worden ingevroren.
• Vries nooit te grote hoeveelheden
levensmiddelen in één keer in.
5.14. Vochtigheidsregulerende
groentelade (Ever Fresh)
(Deze functie is optioneel)
Met de vochtigheidsregulerende groentelade
kunt u fruit en groenten voor langere tijd in bij
een ideaal vochtigheidsniveau bewaren. Met
het vochtregelsysteem met 3 opties voorin de
groentelade kunt u het vochtigheidsniveau binnenin
regelen afhankelijk van het voedsel dat u bewaart.
Het wordt aanbevolen de groenteoptie te selecteren
als u alleen groenten bewaart, de fruitoptie als u
alleen fruit bewaart en de gemengde optie als u
zowel groenten als fruit bewaart.
Om zo veel mogelijk profijt te hebben van
het vochtigheidsregulerende systeem en de
houdbaarheid van uw etenswaren te verlengen,
raden we u aan fruit en groenten niet in plastic
verpakkingen te bewaren. Als de groenten in
hun zakken blijven, zullen ze snel bederven. We
bevelen in het bijzonder aan komkommers en
broccoli te bewaren zonder plastic verpakking. In
het geval het contact met andere groenten voor
hygiënische redenen vermeden moet worden,
gebruik dan een geperforeerd papieren zak of ander
verpakkingsmateriaal in plaats van een zak.
Tijdens het plaatsen van groenten dient het gewicht
van de groenten in de gaten te worden gehouden.
Zware en harde groenten dienen op de bodem van
de groentelade gelegd te worden en de lichte en
zachte groente daarboven op.
Leg geen peer, abrikoos, perzik, enz. en in het
bijzonder appel, die een hoge mate van ethyleengas
ontwikkelt, in dezelfde groentelade met andere
groenten en fruit. Het ethyleengas dat door dit fruit
wordt afgegeven, kan het andere fruit sneller laten
rijpen en in kortere tijd laten bederven.

Bediening van het product
20 /25NL
Koelkast / Gebruiksaanwijzing
Instelling
diepvriesgedeelte
Instelling
koelgedeelte
Opmerkingen
-18°C 4°C Dit is de normale aanbevolen instelling.
-20, -22 of -24°C 4°C
Deze instellingen worden aanbevolen wanneer de
omgevingstemperatuur boven de 30°C komt.
Snelvriezen 4°C
Te gebruiken wanneer u de levensmiddelen in korte tijd wilt
invriezen. Uw product keert terug naar de vorige modus
wanneer het proces is afgerond.
-18°C of kouder 2℃
Wanneer u denkt dat uw koelgedeelte niet koud genoeg is als
gevolg van de warme omgevingstemperatuur of het frequent
openen en sluiten van de deur.
5.16. Aanbevelingen voor het
bewaren van diepvriesvoedsel
Het compartiment wordt ingesteld op een temperatuur
van tenminste -18°C.
1.
Plaats de diepvriesproducten zo snel mogelijk
na aankoop in de vriezer, voordat ze kunnen
ontdooien.
2.
Zorg ervoor dat de data "Te gebruiken voor" of
"Tenminste houdbaar tot" op de verpakking niet
overschreden zijn voordat u producten invriest.
3.
Zorg dat de verpakking van het voedsel niet
beschadigd is.
5.17. Diepvriesinformatie
Overeenkomstig de norm IEC 62552 bevriest dit
product binnen 24 uur minstens 4,5 kg levensmiddelen
bij een omgevingstemperatuur van 25°C tot -18°C of
lager voor elke 100 liter vriezerinhoud.
Het is mogelijk om de levensmiddelen gedurende lange
tijd op een temperatuur van -18°C of lager te bewaren.
U kunt de versheid van levensmiddelen gedurende vele
maanden bewaren (bij een temperatuur van -18°C of
lager in de diepvriezer).
In te vriezen levensmiddelen mogen niet in aanraking
komen met eerder ingevroren stukken om gedeeltelijke
ontdooiing daarvan te voorkomen.
Kook de groenten en giet het water af om de groenten
langer bevroren te kunnen bewaren. Nadat u het
water heeft afgegoten, doet u de groenten in een
luchtdichte verpakking en plaats u ze in de vriezer.
Producten zoals bananen, tomaten, sla, bleekselderij,
gekookte eieren en aardappelen zijn niet geschikt voor
invriezen. Als deze etenswaren bevroren worden zal dit
hun voedingswaarde en smaak negatief beïnvloeden.
Ze bederven echter niet zodat ze de gezondheid van
mensen in gevaar zouden brengen.
5.18. Het plaatsen van de levensmiddelen
Schappen van het
diepvriesvak
Verschillende ingevroren
levensmiddelen zoals vlees,
vis, ijs, groenten enz.
Schappen van het
koelgedeelte
Levensmiddelen in pannen,
bedekte borden, gesloten
bakjes
Deurschappen
van het
koelgedeelte
Kleine en verpakte
levensmiddelen of dranken
Groentelade Groenten en fruit
Vershoudgedeelte
Delicatessen
(ontbijtproducten, vleeswaren
die snel geconsumeerd
zullen worden)
5.19. Waarschuwing deur open
(Deze functie is optioneel)
Er gaat een alarmsignaal af wanneer de deur van
uw product langer dan 1 minuut open blijft staan.
Deze waarschuwing wordt gedempt wanneer de deur
wordt gesloten of een van de displayknoppen wordt
ingedrukt.
5.20. Verlichtingslamp
Ledlampjes worden gebruikt als
waarschuwingslampjes. Neem in geval van
problemen met dit type licht contact op met een
erkende servicedienst.
De lampjes die in dit product worden gebruikt
zijn niet ontworpen voor en niet geschikt als
huishoudverlichting. De lampjes in uw koelkast en/
of vriezer zijn bedoeld om het plaatsen van voedsel
comfortabel en veilig te maken.

21 /25 NL
Koelkast / Gebruiksaanwijzing
6 Onderhoud en reiniging
Door het product regelmatig schoon te maken wordt
de levensduur van het product verlengd en zullen vaak
voorkomende problemen afnemen.
B
WAARSCHUWING: Schakel het
product uit voordat u het schoonmaakt.
B
WAARSCHUWING: Het is
aanbevolen om de condensator elke
zes maanden te reinigen en daarbij
handschoenen te gebruiken. Gebruik
geen stofzuiger.
• Gebruik nooit benzine, benzeen of gelijksoortige
substanties voor het reinigingswerk.
• Gebruik nooit scherpe voorwerpen, zeep,
huishoudproducten, afwasmiddel of boenwas om het
product te reinigen.
• Los één theelepeltje carbonaat in een halve liter
water op. Doorweek een doek met de oplossing en
wring deze grondig uit. Veeg grondig de binnenkant
van de koelkast met deze doek en droog af.
• Zorg ervoor dat er geen water in de lampbehuizing en
andere elektrische onderdelen binnensijpelt.
• Als uw koelkast voor een lange periode niet zal
worden gebruikt, trek dan de stroomkabel uit het
stopcontact, verwijder alle etenswaren, maak de
koelkast schoon en laat de deur op een kier staan.
• Controleer regelmatig dat de deurpakkingen schoon
zijn. Indien dat niet het geval is, maak ze schoon.
• Om deur- en koelkastschappen te verwijderen,
verwijdert u eerst alle inhoud.
• Verwijder de deurschappen door ze omhoog te
tillen. Schuif na het schoonmaken de schappen in
neerwaartse richting weer op hun plaats.
• Gebruik nooit reinigingsmiddelen of water dat
chloor bevat om de buitenkant en de verchroomde
onderdelen van het product te reinigen. Chloor
veroorzaakt slijtage op dergelijke metalen
oppervlakken.
• In producten die geen No Frost hebben ontstaan er
op de achterwand van het koelvak waterdruppels en
een vingerdikke ijslaag. Maak het niet schoon; doe er
nooit olie op soortgelijke middelen op.
• Gebruik uitsluitend licht vochtige microvezeldoeken
om de buitenkant van het product schoon te maken.
Sponzen en andere soorten schoonmaakdoeken
kunnen het oppervlak krassen.
6.1. Vermijden van nare geuren
Materialen die geuren kunnen veroorzaken, worden niet
gebruikt bij de productie van onze koelkasten. Echter, als
voedsel niet correct wordt bewaard of de binnenkant van
het product niet naar behoren wordt schoongemaakt,
kan dit geurtjes veroorzaken. Neem het volgende in
overweging om dit probleem te voorkomen:
• De koelkast schoon houden is belangrijk.
Voedselresten, vlekken, enz. kunnen geuren
veroorzaken. Maak uw koelkast daarom elke 15
dagen schoon met een oplossing van carbonaat en
water. Gebruik nooit reinigingsmiddelen of zeep.
• Bewaar uw levensmiddelen in gesloten bakjes.
Micro-organismen uit containers zonder deksel
kunnen onaangename geuren veroorzaken.
• Bewaar nooit bedorven voedsel of voedsel waarvan
de gebruiksdatum is verlopen in uw koelkast.
6.2. Bescherming van de
kunststof oppervlakken
Plaats geen vloeibare olie of in olie bereide maaltijden
in uw koelkast in onafgesloten bakjes. Deze kunnen de
kunststof oppervlakken van uw koelkast beschadigen.
Mocht u olie morsen op de kunststof oppervlakken,
reinig dit deel van het oppervlak dan meteen met warm
water en spoel het af.
6.3. De binnenkant van het product reinigen
Om de oppervlakken aan de binnenkant en alle
verwijderbare onderdelen te reinigen, wast u deze met
een mild sopje van zeep, water en carbonaat. Spoel het
af en laat het goed drogen. Voorkom dat water in contact
komt met verlichting en het bedieningspaneel.
A
LET OP:
Gebruik geen azijn, alcohol of
andere schoonmaakmiddelen
die alcohol bevatten op de
oppervlakken aan de binnenkant

22 /25NL
Koelkast / Gebruiksaanwijzing
6.4. Roestvrijstalen buitenoppervlakken
Gebruik een niet-schurend schoonmaakmiddel voor
roestvrij staal en breng dit met een pluisvrije zachte
doek aan. Om te polijsten veegt u zachtjes over het
oppervlak met een vochtig microvezeldoekje en gebruikt
u een droge leren zeem. Volg altijd de ‚nerf‘ van het
roestvrij staal.
6.5. Reiniging van producten
met glazen deuren
Verwijder de beschermfolie van het glas.
Op het oppervlak van het glas bevindt zich een coating.
De coating minimaliseert vlekvorming en zorgt ervoor
dat vlekken en vuil gemakkelijk schoongemaakt kunnen
worden. Glas dat niet door een coating beschermd
wordt, kan blootgesteld worden aan een permanente
hechting van organische en niet-organische vervuilende
deeltjes, in de lucht of in het water, zoals kalk, minerale
zouten, niet-verbrande koolwaterstoffen, metaaloxiden
en siliconen, die binnen korte tijd vlekken en materiële
schade kunnen veroorzaken. Ondanks regelmatige
reiniging wordt het glas heel moeilijk schoon te maken,
hoewel dit niet onmogelijk is. Dit leidt ertoe dat het glas
minder helder wordt en er minder goed uitziet. Harde
en schurende schoonmaakmiddelen en -methoden
bevorderen deze defecten nog meer en versnellen het
afbraakproces.
*Voor alle routinematige schoonmaakprocedures moeten
niet-alkalische, niet-schurende schoonmaakmiddelen op
waterbasis worden gebruikt.
Voor een lange levensduur van de coating mogen er
geen alkalische off schurende substanties worden
gebruikt voor het schoonmaken.
Dit glas is getemperd om het beter bestendig te maken
tegen impact en breken.
Als extra beveiliging is de achterkant van het glas van
veiligheidsfolie voorzien om ervoor te zorgen dat in
geval van breken geen schade aan de omgeving wordt
berokkend.
Onderhoud en reiniging

23 /25 NL
Koelkast / Gebruiksaanwijzing
7 Probleemoplossing
Controleer de volgende punten voordat u de onderhoudsdienst
belt. Dit zal u tijd en geld besparen. Deze lijst omvat
regelmatige klachten die niet voortkomen uit defect
vakmanschap of materiaalgebruik. Het is mogelijk dat bepaalde
functies die hier beschreven zijn niet tot uw product behoren.
Als de koelkast niet werkt.
•
Het kan zijn dat het product niet goed is aangesloten.
>>>Zorg dat de stekker goed in het stopcontact zit.
•
De zekering van het stopcontact waarop de koelkast
is aangesloten of de hoofdzekering is gesprongen.
>>>Controleer de zekering
.
Condensvorming langs de wand van het
koelgedeelte (MULTI ZONE, COOL CONTROL en
FLEXI ZONE).
•
De deur van de koelkast werd misschien regelmatig
geopend. >>>Open en sluit de deur van de koelkast
niet te vaak.
•
De omgeving is misschien te vochtig. >>>Plaats
de koelkast niet in een ruimte met een hoog
vochtigheidsgehalte.
•
Misschien is er onafgedekte vloeistof in de koelkast
gezet. >>>Bewaar vloeistof bevattende etenswaren niet
in onafgesloten containers in de koelkast.
•
De deur van de koelkast staat misschien op een kier.
>>>Houd de deuren van uw koelkast niet lang open.
•
De thermostaat staat misschien veel te laag. >>>Zet
de thermostaat op een gepast niveau
.
De compressor draait niet.
•
Thermische bescherming van de compressor kan
springen gedurende plotselinge stroomuitval of
afsluiting van de stroomtoevoer wanneer de druk van
het koelmiddel in het koelsysteem van de koelkast
niet in balans is. De koelkast gaat na ongeveer 6
minuten draaien. Neem contact op met de bevoegde
servicedienst wanneer uw koelkast na deze periode
niet start.
•
De vriezer is bezig met een ontdooicyclus. >>>Dit is
normaal voor een volledig automatisch ontdooiende
koelkast. De ontdooicylus vindt periodiek plaats.
•
De stekker van de koelkast zit misschien niet in het
stopcontact. >>>Zorg ervoor dat de stekker goed in het
stopcontact zit.
•
De temperatuurinstellingen zijn misschien niet correct.
>>>Kies een geschikte temperatuurwaarde.
•
Er is een stroomstoring. >>>Zodra de storing is
verholpen begint de koelkast weer normaal te werken.
Het werkingsgeluid neemt toe wanneer de
koelkast werkt.
• De werking van de koelkast kan
veranderen als gevolg van wijzigingen in de
omgevingstemperatuur. Dit is normaal en geen
defect.
De koelkast werkt frequent of gedurende lange
tijd.
•
Uw nieuwe product kan groter zijn dan het vorige. Grote
koelkasten werken langer.
•
De omgevingstemperatuur kan hoog zijn. >>>Het
is normaal dat het product langer draait wanneer de
omgevingstemperatuur hoog is.
•
De stekker van de koelkast kan onlangs ingestoken
zijn of de koelkast kan zijn volgeladen met etenswaren.
>>>Wanneer de stekker van de koelkast net is
ingestoken of de koelkast kortgeleden werd gevuld,
duurt het langer om de ingestelde temperatuur te
bereiken. Dit is normaal.
•
Grote hoeveelheden warme levensmiddelen kunnen
recentelijk in de koelkast zijn geplaatst. >>>Plaats
geen warme etenswaren in de koelkast.
•
Deuren werden misschien regelmatig geopend of
hebben enige tijd op een kier gestaan. >>>De warme
lucht die in de koelkast is binnengekomen doet de
koelkast langer werken. Open de deuren niet te dikwijls.
•
De deur van het vries- of koelvak is mogelijk op een
kier blijven staan. >>>Controleer of de deuren goed
gesloten zijn.
•
De koelkast is misschien zeer koud ingesteld. >>>Stel
de koelkasttemperatuur hoger en wacht tot de
temperatuur wordt bereikt.
•
De deurafdichting van het koelkas-t of
diepvriescompartiment kan vuil, versleten, gebroken
of niet goed geplaatst zijn. >>>Reinig of vervang de
afdichting. Een beschadigde/gebroken afdichting maakt
dat de koelkast langer moet werken om de huidige
temperatuur te handhaven.
Koelkasttemperatuur is geschikt, maar de
diepvriestemperatuur is erg laag.
• De temperatuur van het diepvriescompartiment
is misschien zeer koud ingesteld. >>>Stel de
diepvriestemperatuur hoger in en controleer.
Diepvriestemperatuur is geschikt, maar de
koelkasttemperatuur is erg laag.
• De temperatuur van de koelkast is zeer koud
ingesteld. >>>Stel de koelkasttemperatuur hoger
in en controleer.
Etenswaren die in laden van het koelgedeelte
worden bewaard, bevriezen.

24 /25NL
Koelkast / Gebruiksaanwijzing
Probleemoplossing
• De temperatuur van het koelkastcompartiment
is misschien zeer hoog ingesteld. >>>Stel de
koelkasttemperatuur lager in en controleer.
Temperatuur in de koelkast of diepvriezer is zeer
hoog.
•
De temperatuur van het koelkastcompartiment is misschien
zeer hoog ingesteld. >>>De temperatuur van het koelvak
heeft invloed op de temperatuur van de diepvriezer.
Verander de temperatuur van de koelkast of diepvriezer
totdat de temperatuur van de koelkast of diepvriezer het
gewenste niveau bereikt.
•
De deuren zijn misschien regelmatig geopend of hebben
enige tijd op een kier gestaan. >>>Open de deuren niet
te vaak.
•
De deur is mogelijk op een kier blijven staan. >>>Doe de
deur volledig dicht.
•
De koelkast is misschien net ingeschakeld of werd recent
gevuld met voedsel. >>>Dit is normaal. Wanneer het
product net is ingeschakeld of kortgeleden werd gevuld,
duurt het langer om de ingestelde temperatuur te bereiken.
•
Grote hoeveelheden warme levensmiddelen kunnen
recentelijk in de koelkast zijn geplaatst. >>>Plaats geen
warme etenswaren in de koelkast.
Trilling of geluid.
•
De vloer is misschien niet gelijk of stabiel. >>>Indien
de koelkast schommelt bij enige beweging, moet u
de stelvoetjes aanpassen. Zorg dat de vloer vlak is en
bestand is tegen het gewicht van de koelkas.
•
Spullen die boven op de koelkast liggen kunnen geluid
veroorzaken. >>>Verwijder deze voorwerpen van de
bovenzijde van de koelkast.
Een geluid van morsende of sprayende vloeistof
komt uit de koelkast.
• Vloeistof- en gasstromen vinden plaats conform
de werkingsprincipes van uw koelkast. >>> Dit is
normaal en geen defect.
Er komt een fluitend geluid van de koelkast.
•
Er zijn ventilatoren die niet worden gebruikt om de
koelkast af te koelen. Dit is normaal en geen defect.
Er verzamelt zich vocht op binnenwanden van
de koelkast.
•
Met warm en vochtig weer neemt ijs- en
condensvorming toe. Dit is normaal en geen defect.
•
De deuren zijn misschien regelmatig geopend of hebben
enige tijd op een kier gestaan. >>>Open de deuren niet
te vaak. Sluit de deuren, als deze open zijn.
•
De deur is mogelijk op een kier blijven staan. >>>Doe
de deur volledig dicht.
Er is vocht aan de buitenkant van de koelkast of
tussen de deuren.
•
Lucht kan vochtig zijn. Dit is heel normaal bij vochtig
weer. >>>Als het vochtigheidsniveau afneemt zal de
condensatie verdwijnen.
•
Als u uw product zelden gebruikt, kan er externe
condensatie zijn op het stuk tussen de twee deuren van
de koelkast. Dit is normaal. De condens zal verdwijnen
als de koelkast regelmatig wordt gebruikt
.
Er hangt een slechte geur in de koelkast.
•
Het kan zijn dat er niet regelmatig is schoongemaakt.
Maak de binnenkant van de koelkast schoon met een
spons met lauw of sodawater.
•
Sommige containers of verpakkingsmaterialen kunnen
de geur veroorzaken. >>>Gebruik een andere container
of verpakkingsmaterialen van een ander merk.
•
Misschien is er onafgedekt voedsel in de koelkast
gezet. >>>Bewaar voedsel in afgesloten containers.
Micro-organismen uit containers zonder deksel kunnen
onaangename geuren veroorzaken.
•
Verwijder verlopen voedingsproducten of bedorven
voedsel uit de koelkast.
De deur gaat niet dicht.
•
Voedselverpakkingen kunnen er de reden van zijn dat de
deur niet sluit. >>>Verplaats de verpakkingen die de deur
belemmeren.
•
De koelkast staat misschien niet stabiel op de vloer. >>>Pas
de voetjes van de koelkast zo nodig aan om de koelkast in
evenwicht te houden.
•
De vloer is misschien niet gelijk of stevig. >>>Zorg dat de
vloer vlak is en bestand is tegen het gewicht van de koelkast.
Groenteladen zitten vast.
• Het kan zijn dat voedsel de bovenrand van de
groentelade raken. >>>Deel het voedsel in de
groentelade opnieuw in.
Als het oppervlak van het product heet is.
Tijdens de werking kunnen tussen de twee deuren, de
zijpanelen en het achterste rooster hoge temperaturen
worden waargenomen. Dit is normaal en behoeft geen
serviceonderhoud!
De ventilator blijft doorlopen terwijl de deur
openstaat.
Mogelijk blijft de ventilator doorlopen terwijl de deur
van de diepvriezer openstaat.
A
WAARSCHUWING: Als u het probleem
ondanks de instructies in dit hoofdstuk niet
kunt verhelpen, raadpleeg dan uw verkoper
of de erkende servicedienst. Probeer nooit
zelf een defect product te repareren.

www.beko.com.tr
www.beko.com
58 0506 0000/AG
CZ-SK-/L
2/3

EWWERQWEW
İT
RCNE720E3VZP
Frigorifero
Manuale utente
Frigorifero
Manuale utente

Gentile cliente,
ci piacerebbe che lei potesse raggiungere un livello di efficacia ottimale dal nostro
prodotto, che è stato realizzato in una struttura moderna, adottando controlli
meticolosi a livello qualitativo.
A tal fine la invitiamo a leggere con attenzione il manuale dell'utente prima di iniziare
a servirsi del dispositivo. La invitiamo altresì a conservare il presente manuale per
poterlo consultare in futuro.Qualora dovesse cedere il prodotto a terzi, consigliamo
di accludere il presente manuale.
Il manuale dell’utente garantsce un utlzzo veloce e scuro
dell’apparecchatura.
• Consglamo d leggere l manuale dell’utente prma d nstallare e mettere n
funzone l’apparecchatura.
• Rspettare sempre le struzon d scurezza.
• Consglamo d tenere la guda dell’utente a portata d mano per poterla
consultare n futuro.
• La nvtamo a leggere gl altr eventual document fornt con l’apparecchatura
Ricordi che questo manuale può riferirsi a diversi modelli. Il manuale indica
chiaramente le eventuali variazioni da un modello all'altro.
Smbol e note
Nel manuale sono utlzzat seguent smbol:
C
Informazioni importanti e
consigli utili.
A
Rischio di vita e proprietà.
B
Rischio di scosse elettriche.
L’mballaggo del prodotto è
fatto d materal rcclabl,
n conformtà con la
Normatva Ambentale
Nazonale.

2 / 32 IT
Frigorifero / Manuale
dell’Utente
1. Istruzioni relative a sicurezza
e ambiente 3
1.1. Uso previsto . . . . . . . . . . . . . . . . . . . . . 3
1.2. Norme di sicurezza generali . . . . 3
1.3. Avvertenza HC . . . . . . . . . . . . . . . . . . 5
1.4. Sicurezza bambini . . . . . . . . . . . . . . . 6
1.5. Conformità con la direttiva RoHS 6
1.6. Informazioni sull'imballaggio . . . . 7
2 Frigorifero 8
3. Installazione 9
3.1. Luogo idoneo per l'installazione 9
3.2. Fissaggio dei cunei in plastica. . . 9
3.3. Collegamenti elettrici. . . . . . . . . . .10
3.4. Regolazione dei supporti. . . . . . . 11
4 Preparazione 12
4.1. Cose da fare ai fini del risparmio
energetico . . . . . . . . . . . . . . . . . . . . . . 12
4.2. Uso iniziale. . . . . . . . . . . . . . . . . . . . . . 12
5 Utilizzo del frigorifero 13
5.1. Pannello dei comandi. . . . . . . . . . . 13
5.2. Pannello indicatoreI . . . . . . . . . . . . 14
5.3. Icematic. . . . . . . . . . . . . . . . . . . . . . . . .18
5.4. Macchina del ghiaccio . . . . . . . . . .18
5.5. Vassoio per il ghiaccio . . . . . . . . . .19
5.6. Luce blu. . . . . . . . . . . . . . . . . . . . . . . . .19
5.7. Modulo deodorante . . . . . . . . . . . .20
5.8. Scomparto di raffreddamento .20
5.9. Scomparto verdura . . . . . . . . . . . . .20
5.10.Cassetto verdura a umidità
controllata (sempre fresco) . . . .21
5.11. Descrizione e pulizia del filtro
odori:. . . . . . . . . . . . . . . . . . . . . . . . . . . .22
5.12. Erogatore d’acqua. . . . . . . . . . . . . .22
5.13. Uso dell’erogatore d’acqua. . . . .22
5.14.Riempimento del serbatoio
dell’erogatore d’acqua . . . . . . . . . .22
5.15.Pulizia del serbatoio dell’acqua 23
5.16.Vaschetta per l’acqua. . . . . . . . . . .24
5.17.Consigli per conservare alimenti
surgelati . . . . . . . . . . . . . . . . . . . . . . . .25
5.18.Dettagli congelatore . . . . . . . . . . .25
5.19.Posizionamento degli alimenti 25
5.20.Avvertenza sportello aperto. . .26
5.21.Cambiare la lampadina di
illuminazione . . . . . . . . . . . . . . . . . . .26
6. Pulizia e manutenzione 27
6.1. Evitare i cattivi odori. . . . . . . . . . . .27
6.2. Protezione delle superfici in
plastica. . . . . . . . . . . . . . . . . . . . . . . . . .27
6. Pulizia e manutenzione 28
6.3. Protezione delle superfici in
plastica . . . . . . . . . . . . . . . . . . . . . . . . .28
6.4. Pulizia della superficie interna 28
7. Risoluzione dei problemi 29
Indice

3 / 32 IT
Frigorifero / Manuale dell’Utente
1. Istruzioni relative a sicurezza e ambiente
Questa sezone fornsce le
struzon d scurezza necessare
per evtare l rscho d leson
e dann materal. Il mancato
rspetto d queste struzon
nvalda tutt tp d garanza
esstent sul prodotto.
1.1. Uso previsto
A
AVVERTENZA:
Asscurars che for
d ventlazone non
sano chus quando
l dspostvo è nella
sua custoda o quando
lo s nsersce nel suo
alloggamento.
AVVERTENZA:
Non utlzzare alcun
dspostvo meccanco
o altr dspostv per
accelerare l processo d
sbrnamento e segure
solo consgl del
fabbrcante.
AVVERTENZA:
Non danneggare l
crcuto del lqudo
refrgerante.
AVVERTENZA: Non
utlzzare apparecch
elettrc non consglat
dal fabbrcante
all’nterno de van per
la conservazone degl
alment.
AVVERTENZA: Non
conservare sostanze
esplosve come
aerosol con gas
propellent nfammabl
nell’appareccho.
Questo appareccho é stato
progettato per applcazon
domestche e per la seguent
applcazon smlar:
- Per essere utlzzato nelle
cucne del personale d negoz,
uffc e altr luogh d lavoro;
- Per essere utlzzato da
clent negl albergh e nelle case
d campagna, motel e altr luogh
d alloggo.
- n ambent tpo penson
- n luogh sml che non
offrano servz d rstorazone e
non sano d vendta al dettaglo.
1.2. Norme di sicurezza generali
• Questo prodotto non dovrebbe
essere usato da persone
con dsabltà a lvello fsco,
sensorale e mentale, da
persone senza un quanttatvo
suffcente d conoscenze
ed esperenza e da bambn.
Queste persone potranno usare
l dspostvo uncamente sotto
la supervsone e le struzon d
una persona responsable della
loro scurezza. A bambn non
dovrebbe essere consentto d
gocare con questo dspostvo.
• In caso d malfunzonamento,
scollegare l dspostvo.
• Dopo aver scollegato l
dspostvo, attendere almeno
cnque mnut prma d collegarlo
nuovamente. Scollegare l
prodotto se non vene usato.
Non toccare la presa con le
man umde! Non trare l cavo
per esegure lo scollegamento;
prenderlo sempre per la spna.
• Non collegare l frgorfero se la
presa sembra essere allentata.
• Scollegare l prodotto n fase d
nstallazone, manutenzone,
pulza e rparazone.
• Qualora s preveda d non
utlzzare l prodotto per un po’

4 / 32 IT
Frigorifero / Manuale
dell’Utente
Istruzioni relativamente a sicurezza e ambiente
d tempo, scollegarlo ed estrarre
gl eventual element contenut
al suo nterno.
• Non usare vapore o materal
detergent a base d vapore per
la pulza del frgorfero e per
lo scoglmento del ghacco al
suo nterno. Il vapore potrebbe
entrare n contatto con le
aree sotto tensone elettrca e
causare cortocrcut o scosse
elettrche!
• Non lavare l prodotto
spruzzando o versando acqua
sullo stesso! Percolo d scossa
elettrca!
• Non usare ma l prodotto se
la sezone che s trova sulla
parte superore o posterore
del prodotto, con le schede
de crcut elettronc stampat
all’nterno, è aperta (coprre
schede de crcut elettronc
stampat) (1).
1
1
• In caso d malfunzonamento,
non usare l prodotto, dato che
potrebbe emettere scosse
elettrche. Contattare l servzo
autorzzato prma d ntervenre.
• Collegare l prodotto a una
presa che dsponga d messa a
terra. L’operazone d messa a
terra deve essere eseguta da un
elettrcsta qualfcato.
• Qualora l prodotto dsponga
d un’llumnazone a LED,
contattare l’assstenza
autorzzata per la sosttuzone.
• Non toccare alment congelat
con le man bagnate! Gl alment
s potrebbero attaccare alle man!
• Non poszonare lqud n
bottgle o lattne all’nterno
dello scomparto congelatore.
Potrebbero esplodere!
• Collocare lqud n poszone
vertcale dopo aver saldamente
chuso l tappo.
• Non spruzzare sostanze
nfammabl vcno al prodotto.
Potrebbero brucare o esplodere!
• Non conservare materal e
prodott nfammabl, come ad
esempo spray, all’nterno del
frgorfero.
• Non collocare contentor d
lqud sopra al prodotto. Gl
spruzz su part sotto tensone
potrebbero provocare scosse
elettrche e rscho d ncendo.
• L’esposzone del prodotto a
pogga, neve, sole e vento
potrebbe causare percol a lvello
elettrco. Qualora sa necessaro
spostare l prodotto, non trarlo
per la mangla della porta. La
mangla s potrebbe staccare.
• Evtare che part delle man o
del corpo restno mpglate ne
meccansm mobl all’nterno del
prodotto.
• Non calpestare o appoggars
a porta, cassett e altre
component del frgorfero.

5 / 32 IT
Frigorifero / Manuale dell’Utente
Istruzioni relativamente a sicurezza e ambiente
Cos facendo l prodotto
potrebbe cadere e s potrebbe
danneggare.
• Fare attenzone a non bloccare l
cavo d almentazone.
• Quando s poszona
l’elettrodomestco, asscurars
che l cavo d almentazone non
sa ntrappolato o danneggato.
• Non poszonare prese multple
portatl o almentator portatl
sul retro dell’elettrodomestco.
• Il frgorfero Sde by Sde
necessta della connessone
drca. Se non v è un rubnetto
dell’acqua dsponble e s
deve chamare un draulco,
consderare quanto segue: Nel
caso n cu la casa sa dotata d
un sstema d rscaldamento
a pavmento, s consder
che pratcare de for nel
sofftto n cemento potrebbe
danneggare questo sstema d
rscaldamento.
• I bambn da 3 agl 8 ann
possono carcare e svuotare
congelator.
• Per evtare la contamnazone
degl alment, segure le
seguent struzon:
• Tenere lo sportello aperto
per perod prolungat può
determnare un sgnfcatvo
aumento della temperatura
negl scompart dell’appareccho.
• Pulre regolarmente le superfc
che possono entrare n contatto
con gl alment e sstem d
drenaggo accessbl.
• Pulre serbato dell’acqua se
non sono stat utlzzat per
48h; svuotare l sstema drco
collegato a un’almentazone
drca se non s attnge l’acqua
per 5 gorn.
• Rporre la carne e l pesce
crud n contentor adeguat
nel frgorfero, n manera
tale da evtare che vengano a
contatto con altr alment o che
goccolno sugl stess.
• Gl scompart cb congelat
a due stelle sono adatt per
conservare cb precongelat,
per conservare o preparare
gelat e preparare cubett d
ghacco.
• Gl scompart del ghacco a una,
due e tre stelle non sono adatt
per l congelamento d alment
fresch.
• Nel caso n cu l congelatore
sa lascato a lungo vuoto,
spegnerlo, sbrnarlo, pulrlo,
ascugarlo e lascare aperto
lo sportello per evtare che s
svluppno muffe.
1.3. Avvertenza HC
Qualora l prodotto sa dotato
d sstema d raffreddamento
che utlzza l gas R600a,
fare attenzone ad evtare
d danneggare l sstema d
raffreddamento e l relatvo
tubo n fase d utlzzo e
spostamento del prodotto.
Questo gas è nfammable. Se
vene danneggato l sstema d
raffreddamento, tenere l pr
odotto lontano da font d calore
e provvedere mmedatamente ad
areggare la stanza.

6 / 32 IT
Frigorifero / Manuale
dell’Utente
Istruzioni relativamente a sicurezza e ambiente
C
Sul lato snstro nterno
è ndcato l tpo d gas
utlzzato nel prodotto.
Per modell con la fontana d'acqua
• La pressone d ngresso dell’acqua
fredda dovrebbe essere al massmo
90 ps (620 kPa). Qualora la pressone
dell’acqua super l valore 80 ps
(550 kPa), utlzzare una valvola d
lmtazone della pressone nel
sstema prncpale. Qualora non s
sappa come verfcare la pressone
dell’acqua, chedere auto a ad un
draulco professonsta.
• In caso d rscho dell’effetto ‘colpo
d’arete’ nel propro mpanto, usare la
strumentazone adatta per rdurre la
probabltà d accadmento. Rvolgers
a draulc professonst n caso d
dubbo relatvamente alla presenza o
meno dell’effetto ‘colpo d’arete’ nel
propro mpanto.
• Non nstallare l’ngresso dell’acqua
calda. Prendere precauzon contro
l rscho d congelamento de tub.
La gamma d funzonamento della
temperatura dell’acqua dovrebbe
essere 33°F (0.6°C) come mnmo e
100°F (38°C) al massmo.
• Utlzzare solo acqua potable.
Impego conforme allo scopo prevsto
• Questo prodotto è stato
pensato per essere utlzzato
n ambto domestco. Non è
stato pensato per un uso d tpo
commercale.
• Il prodotto dovrebbe essere
utlzzato uncamente per la
conservazone d alment e
bevande.
• Non tenere prodott dedcat,
che rchedano temperature
controllate, qual ad esempo
vaccn, farmac sensbl al
calore, all’nterno del frgorfero.
• Il produttore non s assume
nessuna responsabltà per
gl eventual dann causat da
un cattvo utlzzo o da un uso
scorretto.
• I pezz d rcambo orgnal
verranno fornt per 10 ann,
successvamente alla data d
acqusto del prodotto.
1.4. Sicurezza bambini
• Tenere gl mballagg fuor dalla
portata de bambn.
• Non permettere a bambn d
gocare con l prodotto.
• Qualora la porta del prodotto
comprenda un lucchetto, tenere
la chave fuor dalla portata de
bambn.
Conformtà con la Drettva WEEE e
smaltmento de prodott d scarco
Questo prodotto è conforme alla
drettva WEEE dell’UE (2012/19/EU).
Questo prodotto è dotato d un smbolo
d classfcazone per prodott elettrc
ed elettronc d scarto (WEEE).
Il prodotto è stato realzzato
con component e materal d
alta qualtà che possono
essere rutlzzat oltre che
rcclat. Non smaltre l
prodotto con normal rfut
domestc e altr rfut al
termne del suo cclo d vta utle. Portare
l prodotto a un centro d raccolta per l
rcclaggo della strumentazone elettrca
ed elettronca. Consglamo d rvolgers
alle autortà local per ulteror
nformazon su quest centr d raccolta.
1.5. Conformità con la direttiva RoHS
• Questo prodotto è conforme alla
drettva WEEE dell’UE (2011/65/
EU). Non contene materal
dannos e probt, ndcat nella
Drettva.

7 / 32 IT
Frigorifero / Manuale dell’Utente
Istruzioni relativamente a sicurezza e ambiente
1.6. Informazioni sull'imballaggio
• I materal che compongono l’
mballo del prodotto sono realzzat
a partre da materal rcclabl
n conformtà con le Normatve
Ambental Nazonal. Non
smaltre materal dell’m mballo
conguntamente a rfut domestc
o ad altr rfut. Portarl presso
punt d raccolta mballagg ndcat
dalle autortà local.

8 / 32 IT
Frigorifero / Manuale
dell’Utente
2 Frgorfero
C
*Opzonale: Le fgure n questo manuale utente sono schematche, e potrebbe-
ro non corrspondere esattamente al prodotto. Qualora l prodotto non contenga le
part descrtte, l’nformazone rguarda altr modell.
1- Ripiani della porta dello scomparto del
frigorifero
2- Cassetti dello scomparto congelatore
3- Icematic
4- Serbatoio dell'acqua
5- Scomparto verdura
6- Coperchio del cassetto verdura
7- Scomparto di raffreddamento
8- Ripiani in vetro dello scomparto del frigorifero
9- Filtro odori (viola)
10- Display interno
11- Ripiani in vetro dello scomparto del frigorifero
12- Scomparto congelatore
Può non essere presente n tutt modell.
*1
*3
*4
6
*5
7
*8
11
12
*2
*1
*2
*3
*5
7
*8
9
10
11
6
12

9 / 32 IT
Frigorifero / Manuale dell’Utente
3. Installazione
3.1. Luogo idoneo per l'installazione
Rvolgers al Servzo Autorzzato per
l'nstallazone del prodotto. Per rendere
l prodotto pronto per essere nstallato,
confrontare le nformazon nella gu-
da dell'utente e accertars che servz
elettrc e drc sano present. In caso
contraro contattare un elettrcsta e un
draulco per rendere quest servz con-
form a requst.
B
AVVERTENZA: Il produtto-
re non s assume nessuna
responsabltà per gl eventua-
l dann causat dagl ntervent
esegut da personale non au-
torzzato.
B
AVVERTENZA: Il cavo d almen-
tazone del prodotto deve es-
sere scollegato n fase d utlz-
zo. Il mancato rspetto d ques-
te struzon potrebbe provoca-
re morte o altre grav leson!
A
AVVERTENZA: Qualora la porta
sa troppo stretta per consen-
tre l passaggo del prodotto,
toglere la porta e ruotarla; qu-
alora cò non funzon, contat-
tare l servzo autorzzato.
• Posizionarel’elettrodomesticosolosu
superfc unform e pane per evtare
dondol.
•Sesiusal’elettrodomesticoall’interno
d un armado/moble, lascare uno
spazo d almeno 2 cm tra le paret
lateral e l’armado/l moble.
• Installarel’elettrodomesticoadalmeno
30 cm d dstanza da font d calore,
come pan cottura, forn, rscaldamento
centrale e stufe e ad almeno 5 cm da
forn elettrc.
•L’elettrodomesticonondeveessere
sottoposto alla luce solare dretta
né tenuto n luogh umd dopo
l’nstallazone.
• Intornoall’elettrodomesticodeve
esserc ventlazone approprata per
poter avere operatvtà effcente.
Se l’elettrodomestco deve essere
poszonato n una rentranza nella
parete, fare attenzone a lascare
almeno 5 cm d dstanza dal sofftto
e dalle paret lateral. Per verson
prve d cune n plastca, asscurars d
lascare uno spazo d 5 cm dalla parete
posterore.
• In spaz n cu la temperatura ambente
scende al d sotto d 10 °C, l frgorfero
contnua a funzonare per conservare
l cbo nel freezer. Tuttava, l cbo
fresco nello scomparto del frgo può
congelare per va dell’ambente freddo.
3.2. Fissaggio dei cunei in plastica
Servrs de cune n plastca fornt n
dotazone con l prodotto per garantre
una crcolazone d’ara suffcente fra l
prodotto della parete.
1. Per fssare cune, rmuovere le vt
sul prodotto e usare le vt fornte n
dotazone con cune.
2. Fssare due cune n plastca sul
copercho della ventlazone, come
ndcato nella fgura.

10 / 32 IT
Frigorifero / Manuale
dell’Utente
Installazione
3.3. Collegamenti elettrici
A
Avvertenza: Non eseguire
collegamenti tramite prolunghe o
multi-prese.
A
Avvertenza: I cavi di
alimentazione danneggiati vanno
sostituiti dagli Agenti di Servizio
Autorizzati.
C
Qualora debbano essere
installati due dispositivi di
raffreddamento fianco a fianco,
lasciare una distanza di almeno
4 cm fra di loro.
La nostra azienda non sarà responsabile
di eventuali danni che deriveranno
dall'uso del prodotto senza messa a terra
e collegamenti elettrici in conformità con
le normative locali.
Il cavo di corrente deve essere a portata
dopo l'installazione.
Non inserire altri elementi quali ad
esempio prolunghe o ciabatte multi-
presa fra il dispositivo e la presa di
corrente a parete.
C
Avvertenza:
superfce calda!
Il prodotto è dotato di tubi di
raffreddamento per migliorare
il sistema di raffreddamento
delle pareti laterali. Del fluido
caldo potrebbe fluire attraverso
queste superfici, causando la
presenza di calore sulle pareti
laterali. Ciò è normale e non
comporta la sostituzione del
filtro Fare attenzione quando si
toccano queste aree.
A
AVVERTENZA: “Le pellcole protettve sull’mpugnatura vertcale” verranno
rmosse.

11 / 32 IT
Frigorifero / Manuale dell’Utente
Installazione
3.4. Regolazione dei supporti
Qualora l prodotto non sa n equlbro,
regolare support anteror regolabl,
ruotandos verso destra o verso snstra.

12 / 32 IT
Frigorifero / Manuale
dell’Utente
4 Preparazione
4.1. Cose da fare ai fini del risparmio
energetico
A
La connessone del prodotto a
sstem d rsparmo elettrco è
rschosa poché potrebbe pro-
vocare dann allo stesso.
• Non lascare aperte le porte del
frgorfero per perod d tempo
troppo lungh.
• Non mettere alment o bevande
calde all’nterno del frgorfero.
• Non sovraccarcare l frgorfero,
la capactà d raffreddamento
dmnusce, quando la crcolazone
dell’ara all’nterno è ostacolata.
• Per ottmzzare lo spazo d
conservazone d cbo nello scomparto
del congelatore del frgorfero, è
necessaro rmuovere l cassetto e
lo sportello superore e collocarl sul
rpano n vetro superore.
• Il consumo d corrente ndcato per l
frgorfero è stato determnato dopo
aver tolto la macchna del
• ghacco, la vaschetta, lo sportello del
ghacco e l cassetto centrale n modo
da consentre l massmo
• carco. S consgla d utlzzare lo
sportello superore e l cassetto
nferore durante l carco.
• A seconda delle caratterstche del
prodotto, lo scongelamento de
cb surgelat nel vano frgorfero
consente d rsparmare energa e d
preservare la qualtà del cbo.
• Il flusso dell’ara non dovrebbe
essere bloccato mettendo alment
davant al congelatore e alle ventole
dello scomparto. Gl alment vanno
carcat lascando uno spazo mnmo
d 5 mnut davant alla grgla della
ventola d protezone.
• Il sensore della temperatura nel vano
congelatore non deve entrare n
contatto dretto con gl alment.
• In caso d contatto con l sensore, l
consumo energetco del prodotto può
aumentare.
C
L’nterno dell'appareccho deve
essere pulto.
C
In caso d nstallazone d due
frgorfer l’uno accanto all’altro,
devono esserv almeno 4 cm d
dstanza tra d loro.
4.2. Uso iniziale
Prma d comncare ad usare l
frgorfero, asscurars d esegure tutte
le preparazon secondo le struzon
delle sezon “Istruzon per la scurezza e
l’ambente” e “Installazone”.
Utilizzare l’apparecchio senza mettere
alimenti all’interno per 6 ore e non aprire
lo sportello a meno che non sia necessario.
C
S sente un rumore quando l
compressore s avva. I lqud
e gas sgllat nel sstema
refrgerante possono produrre de
rumor, anche se l compressore
non è n funzone; questo è
abbastanza normale.
C
È normale che bord anteror del
frgorfero sano cald. Queste zone
sono progettate per essere tepde
per evtare la condensazone.

13 / 32 IT
Frigorifero / Manuale dell’Utente
5 Utilizzo del frigorifero
C
*Opzionale: I dati in questo manuale devono essere intesi come bozze, e
potrebbero non essere perfettamente corrispondenti al vostro prodotto
Qualora il prodotto non contenga le parti descritte, l'informazione riguarda
altri modelli.
1.
Regolazone della temperatura / Aumento
della temperatura
2.
Regolazone della temperatura - Cursore /
Indcatore del valore della temperatura
3.
Selezone dell’untà d msura della temperatura
(°C) Indcatore Celsus
4.
Selezone dell’untà d msura della temperatura
(°F) Indcatore Fahrenhet
5.
Regolazone della temperatura / Dmnuzone
della temperatura
6.
Indcatore/tasto funzone Quck Frdge
7.
* Wreless
8.
Indcatore/tasto Eco Mode
9.
* Indcatore/tasto Joker Freezer
10.
*Sportello Automatco
11.
Avvertenza/errore alte temperature
12.
*Raffreddamento bottgle
13.
*Avvso sosttuzone fltro/tasto
14.
Pulsante menu
15.
Indcatore/tasto On/Off del prodotto
16.
*Indcatore/tasto Icematc
17.
*Modaltà Sabbath
18.
Indcatore/tasto Vacaton Mode
19.
Indcatore blocco tast
20.
Indcatore/tasto funzone Quck Freeze
21.
Selezone vano
22.
Indcatore scomparto frgorfero
23.
Indcatore scomparto congelator
5.1. Pannello dei comandi
I pannelli degli indicatori possono variare secondo il modello del prodotto.Il pannello
degli indicatore aiuta ad usare il frigorifero con le relative funzioni audio e visive.
Può non essere presente n tutt modell.
1
2
3
4
*16
*17
18
20
21
22
23
19
5
6
8
*7
*10
*12
*13
14
15
11
*9a
*9b

14 / 32 IT
Frigorifero / Manuale
dell’Utente
Utilizzo del frigorifero
C
*Optional: Fgures n ths user manual are gven as an example and may not
match the product exactly. If the relevant parts are not avalable n the product you
purchased, the fgure apples to other models.
Può non essere presente n tutt modell.
Select
!
15
21
22 23
5
2
1
*13
*7
*11
*10
*17
*12
*16
*9b
*9a
8
18
6
20
4
3
5.2. Pannello indicatoreI
pannell ndcator possono varare a seconda del modello d prodotto.Le funzon audo e
vdeo de pannell ndcator assstono n fase d utlzzo del prodotto.
1. Regolazone della temperatura /
Aumento della temperatura
Se premuto, aumenta la temperatura dello
scomparto selezonato.
2. Regolazone della temperatura -
Cursore / Indcatore del valore della
temperatura
Mostra l valore della temperatura dello
scomparto selezonato. Inoltre, è possble
far scorrere l dto verso l’alto o verso l basso
per aumentare o dmnure la temperatura.
3. Selezone dell’untà d msura della
temperatura (°C)
Indcatore Celsus
Premendo l pulsante, l’untà d msura della
temperatura vene mpostata come Celsus.
S tratta d un ndcatore Celsus. Quando
l’ndcazone Celsus vene attvato, valor d
temperatura mpostat vengono vsualzzat
n Celsus e l’cona pertnente s accende al
100%.
L’cona Fahrenhet s accende al 50%.
4. Selezone dell’untà d msura della
temperatura (°F)
Indcatore Fahrenhet
Premendo l pulsante, l’untà d msura della
temperatura vene mpostata come Celsus.
S tratta d un ndcatore Fahrenhet. Quando
l’ndcazone Fahrenhet vene attvata,
valor d temperatura mpostat vengono
vsualzzat n Fahrenhet e l’cona pertnente
d accende completamente.
L’cona Celsus s accende al 50%.
5. Regolazone della temperatura /
Dmnuzone della temperatura
Se premuto, dmnusce la temperatura dello
scomparto selezonato.
6. Indcatore funzone quck frdge
Quando la funzone quck frdge è attva,
l’ndcatore s accende al 100%. Quando la
funzone vene cancellata, l prodotto rtorna
alle normal mpostazon e l’ndcatore torna
al 50%.
Tasto funzone quck frdge
Utlzzato per attvare o dsattvare la
funzone quck frdge.
C
Usare la funzone quck
frdge quando s desdera
raffreddare rapdamente
gl alment collocat nello
scomparto del frgorfero. Se
s desdera raffreddare grand
quanttatv d cbo fresco,
attvare questa funzone
prma d mettere gl alment
all’nterno del prodotto.

15 / 32 IT
Frigorifero / Manuale dell’Utente
Utilizzo del frigorifero
C
Qualora non venga annullata,
la funzone quck frdge s
annulla automatcamente
dopo 8 ore al massmo
o quando lo scomparto
frgorfero raggunge la
temperatura rchesta.
C
Se l pulsante quck frdge
vene premuto rpetutamente,
a brev ntervall d tempo,
verrà attvata la protezone
elettronca del crcuto e l
compressore non s avverà
mmedatamente.
C
Questa funzone non vene
rchamata quando la corrente
vene rprstnata n seguto a
un black-out.
7. *Wreless
Quando s preme l pulsante, l prodotto vene
collegato alla rete domestca. Quando la
funzone è attvata, l’ndcatore s accende al
100%, quando vene dsattvata, l’ndcatore
s accende al 50%.
8. Indcatore/tasto Eco Mode
Premere questo pulsante per attvare o
dsattvare la funzone Eco mode.
Quando la funzone Eco mode è attva,
l’ndcatore s accende al 100%. Quando la
funzone è attva, l congelatore nzerà a
funzonare n modaltà ecologca almeno 6
ore dopo. Quando la funzone è dsattvata,
l’ndcatore s accende al 50%.
9a. * Indcatore/tasto Joker Freezer
Quando s preme l pulsante, lo scomparto
joker opera come congelatore e l’ndcatore
s accende al 100%. Lo scomparto frgo
Joker s accende del 50%.
9b. * Indcatore/tasto Joker Frdge
Quando s preme l pulsante, lo scomparto
joker opera come frgo e l’ndcatore s
accende al 100%. Lo scomparto freezer
Joker s accende del 50%.
10.* Sportello automatco
Premere questo pulsante per attvare o
dsattvare la funzone Auto Door (sportello
automatco). Quando la funzone è attva,
l’ndcatore s accende al 100%. Quando
la funzone è dsattvata, l’ndcatore s
accende al 50%.
Quando la funzone è attva, toccare
l’apposta sezone della mangla dello
sportello per farlo aprre automatcamente.
11.Avvertenza/errorealte temperature
Questo ndcatore s llumna durante
l guasto d corrente, durante guast
temperatura elevata e durante le avvertenze
d errore. Durante guast d temperatura
a lungo termne, l valore d temperatura
pù alto che lo scomparto congelatore
raggunge lampegga sul dsplay dgtale.
Dopo aver controllato gl alment nello
scomparto congelatore, premere l pulsante
alta temperatura per elmnare l’avvso.
12. *Raffreddamento bottgle
Premere questo pulsante per attvare o
dsattvare la modaltà raffreddamento
bottgle (bottle cooler).
Quando la funzone è attva, l’ndcatore
s accende al 100%. Quando la funzone è
dsattvata, l’ndcatore s accende al 50%.
13. *Avvso sosttuzone fltro/tasto
Questa cona s accende quando è necessaro
procedere al reset del fltro.
Premendo l pulsante, l fltro vene resettato
e l’cona d reset s spegne.

16 / 32 IT
Frigorifero / Manuale
dell’Utente
Utilizzo del frigorifero
14. Pulsante menu
Vene utlzzato per attvare o dsattvare
la modaltà sleep per l dsplay. Se non s
preme alcun tasto o non s apre lo sportello
per 30 second, l’appareccho passa
automatcamente alla modaltà sleep.
15. Indcatore/tasto On/Off del
prodotto
Tenere premuto l pulsante On/Off per
3 second per accendere o spegnere l
prodotto.
Quando l prodotto è spento, l’ndcatore On/
Off del prodotto s accende al 100% e tutt
gl altr ndcator s spengono. Per accendere
l prodotto, tenere premuto l pulsante
per 3 second. Il frgorfero s accenderà e
l’ndcatore on/off s accenderà del 50%.
16. *Indcatore/tasto Icematc
Premere questo pulsante per attvare o
dsattvare Icematc. Se l’ndcatore è acceso
al 100%, sgnfca che Icematc è n funzone.
Se l’ndcatore è acceso al 50%, sgnfca che
Icematc non è n funzone.
C
Il flusso dell’acqua dal
serbatoo s nterrompe
quando non vene selezonata
questa funzone. Sarà tuttava
possble estrarre l ghacco
prodotto n precedenza dalla
macchna del ghacco.
17. *Modaltà Sabbath
Premere questo pulsante per attvare o
dsattvare la modaltà Sabbath. Quando la
funzone è attva, l’ndcatore s accende al
100%. Quando la funzone è dsattvata,
l’ndcatore s accende al 50%.
18. Indcatore/tasto Vacaton Mode
Premere questo pulsante per attvare la
modaltà vacanza. L’ndcatore della modaltà
vacanza s accende al 100%. Quando la
modaltà vacanza è attva, sull’ndcatore
del valore d temperatura vene vsualzzato
“- - -” e non vene eseguto alcun
raffreddamento attvo nel vano frgorfero.
Quando questa funzone è attvata, non è
possble conservare gl alment nel vano
frgorfero. Gl altr scompart contnuano ad
essere raffreddat n base alla temperatura
mpostata.
Per annullare questa funzone, premere
nuovamente l pulsante funzone Vacanza.
Quando la funzone è dsattvata, l’ndcatore
s accende al 50%.
19. Indcatore blocco tast
Tenere premut contemporaneamente per
3 second pulsant quck frdge e vacanza.
Quando s preme l pulsante, s avva un
conto alla rovesca per l’ndcatore del valore
della temperatura. Quando l blocco tast
è attvo, l’ndcatore s accende al 100% e
la modaltà d blocco tast vene attvata. I
pulsant non funzonano quando la modaltà
d blocco tast è attva. Tenere premut
contemporaneamente per 3 second
pulsant quck frdge e vacanza. Quando
s preme l pulsante, s avva un conto alla
rovesca per l’ndcatore del valore della
temperatura. Quando l blocco tast vene
dsattvato, l’ndcatore d blocco tast s
accende del 50% e la modaltà d blocco
tast vene dsattvata.
Attvare questa funzone qualora s desder
mpedre la varazone dell’mpostazone d
temperatura del frgorfero.
20.Indcatore funzone quck freeze
Quando la funzone quck freeze è attva,
l’ndcatore s accende al 100%. Quando la
funzone vene cancellata,l prodotto rtorna
alle normal mpostazon e l’ndcatore torna
al 50%.
Pulsante funzone congelamento rapdo

17 / 32 IT
Frigorifero / Manuale dell’Utente
Utilizzo del frigorifero
Utlzzato per attvare o dsattvare la
funzone quck freeze.
Premere questo pulsante per attvare o
dsattvare la funzone d congelamento
rapdo. Quando s attva la funzone, l
vano congelatore vene raffreddato a una
temperatura nferore al valore mpostato.
C
Usare la funzone d
congelamento rapdo
quando s desdera congelare
rapdamente gl alment
collocat nello scomparto del
congelatore. Se s desdera
congelare grand quanttatv
d cbo fresco, attvare questa
funzone prma d mettere
gl alment all’nterno del
prodotto.
C
Qualora non venga annullata,
la funzone d Congelamento
rapdo s annulla
automatcamente dopo 4
ore al massmo o quando
lo scomparto frgorfero
raggunge la temperatura
rchesta.
C
Questa funzone non vene
rchamata quando la corrente
vene rprstnata n seguto a
un black-out.
21. Selezone vano
Premere l pulsante d selezone dello
scomparto, per vsualzzare e modfcare l
valore d temperatura del frgorfero o del
congelatore sull’ndcatore del valore della
temperatura.
22. Indcatore scomparto frgorfero
Quando questo ndcatore è attvo, la
temperatura del vano frgorfero vene
vsualzzata sull’ndcatore del valore della
temperatura.
23. Indcatore scomparto congelatore
Quando questo ndcatore è attvo, la
temperatura del vano congelatore vene
vsualzzata sull’ndcatore del valore d
temperatura.
Macchna per l ghacco
(Questa funzone è opzonale)
La macchna per l ghacco consente d
ottenere faclmente de cubett d ghacco
tramte l dspostvo.
Utlzzo della macchna per l ghacco
1. Rmuovere l serbatoo dell’acqua dallo
scomparto del frgo.
2. Rempre con acqua l serbatoo dell’acqua.
3. Sosttuzone del serbatoo dell’acqua. I
prm cubett d ghacco saranno pront dopo
crca quattro ore nel cassetto della macchna
per l ghacco stuato nel vano congelatore.
C
Col serbatoo dell’acqua
completamente rempto s
possono ottenere crca 60-70
cubett d ghacco.
C
L’acqua all’nterno del
serbatoo deve essere
rnnovata ogn 2-3 settmane.

18 / 32 IT
Frigorifero / Manuale
dell’Utente
Utilizzo del frigorifero
5.3. Icematic
(Questa funzone è opzonale)
Icematic consente di ottenere ghiaccio
dall’elettrodomestico facilmente.
Usare l’Icematc
1. Estrarre l'Icematic tirandolo con
attenzione.
2. Riempire d’acqua l'Icematic.
3. Mettere l’Icematic in posizione. Circa
due ore dopo, il ghiaccio è pronto.
4. Per ottenere il ghiaccio, ruotare le
manopole sui serbatoi del ghiaccio in
senso orario di 90˚. I cubetti di ghiaccio
dai serbatoi cadono nel contenitore per
la conservazione del ghiaccio sotto.
5. È possibile estrarre il contenitore per
la conservazione del ghiaccio e servire
i cubetti.
C
Non rmuovere l’Icematc
dalla sua sede per prendere l
ghacco.
C
Se lo s desdera, è
possble lascare cubett
nel contentore per la
conservazone del ghacco.
Il contentore del ghacco
serve solo ad accumulare
cubett d ghacco. Non
nserrv dell’acqua, altrment
s romperà.
5.4. Macchina del ghiaccio
(Questa funzone è opzonale)
La macchina del ghiaccio consente di
ottenere ghiaccio dall’elettrodomestico
facilmente.
Uso della macchina del ghiaccio
1. Rimuovere il serbatoio dell'acqua dallo
scomparto frigo.
2. Riempire il serbatoio dell’acqua con
acqua.
3. Riposizionare il serbatoio dell’acqua. I
primi cubetti di ghiaccio saranno pronti
in circa quattro ore nel cassetto della
macchina del ghiaccio che si trova nello
scomparto freezer.
C
Mentre s rempe
completamente l serbatoo
dell'acqua, sarà possble
ottenere crca 60-70 cubett d
ghacco.
C
L'acqua all'nterno del serbatoo
deve essere cambata ogn 2-3
settmane.

19 / 32 IT
Frigorifero / Manuale dell’Utente
Utilizzo del frigorifero
5.5. Vassoio per il ghiaccio
(Questa funzone è opzonale)
Il vassoo del ghacco permette d
ottenere faclmente l ghacco tramte
l’appareccho.
Utlzzo del vassoo per l ghacco
1. Togliere il vassoio del ghiaccio dallo
scomparto congelatore.
2. Riempire con acqua il vassoio del
ghiaccio.
3. Collocarlo nello scomparto congelatore.
Circa due ore dopo, il ghiaccio è pronto.
4. Rimuovere il vassoio del ghiaccio dallo
scomparto congelatore e piegarlo sul
piatto. I cubetti di ghiaccio cadranno
facilmente sul piatto.
5.6. Luce blu
(Questa funzione è opzionale)
Lo scomparto verdura del frigorifero è
illuminato da una luce blu. Gli alimenti
conservati nello scomparto verdura
continuano la loro fotosintesi tramite
l'effetto lunghezza d'onda della luce blu e
conservano quindi la loro freschezza.

20 / 32 IT
Frigorifero / Manuale
dell’Utente
Utilizzo del frigorifero
5.7. Modulo deodorante
(FreshGuard)
(Questa funzone è opzonale)
Il modulo deodorante elmna
rapdamente cattv odor nel frgorfero
prma che penetrno nelle superfc.
Graze a questo modulo, che s trova
nella parte alta del vano alment fresch,
cattv odor s dssolvono mentre l’ara
vene attvamente convoglata verso
l fltro ant-odor; d conseguenza,
l’ara pulta dal fltro vene remessa nel
vano alment fresch. In questo modo,
gl odor ndesderat che possono
presentars durante la conservazone
degl alment n frgorfero vengono
elmnat prma d permeare le superfc.
Cò è possble graze alla ventola, al
LED e al fltro ant-odor ntegrato
nel modulo. Il modulo deodorante
s attva automatcamente su base
perodca. Il suono che s avverte
durante l’attvazone perodca del
modulo è normale; vene emesso dalla
ventola ntegrata. Se s apre lo sportello
del vano alment fresch mentre l
modulo è attvo, la ventola s ferma
temporaneamente e rprende da dove
era rmasta quando lo sportello vene
nuovamente chuso. In caso d mancanza
d corrente, l modulo deodorante s
attva al rtorno dell’almentazone.
Info: S raccomanda d conservare gl
alment aromatzzat (come formaggo,
olve e salum) nel loro mballaggo e
sgllat, per evtare cattv odor che
possono presentars quando gl odor
d var alment s mescolano. Inoltre, s
raccomanda d estrarre rapdamente dal
frgorfero gl alment andant a male,
per evtare che gl altr alment vadano
ugualmente a male ed evtare cattv
odor.
5.8. Scomparto di raffreddamento
(Questa funzone è opzonale)
Usare questo scomparto per conservare
prodott che vanno tenut a temperature pù
basse o carne che va consumata n temp
brev. Non collocare frutta e verdura n
questo scomparto.
Sarà possble aumentare l volume nterno
del frgorfero rmuovendo uno qualsas
degl scompart d raffreddamento:
Per rmuoverne uno, trare n avant fno
all'arresto, qund sollevare lo scomparto e
trarlo verso d sé.
5.9. Scomparto verdura
Lo scomparto verdura del frgorfero è stato
progettato appostamente per conservare
le verdure fresche senza che perdano la
loro umdtà. A tal fne, l'ntensfcazone
dell'ara fresca vene ntensfcata all'nterno
d questo scomparto. Consglamo d tenere
frutta e verdura all'nterno d questo
scomparto. Non mettere le verdure a fogla
accanto alla frutta, per prolungarne la
durata.

21 / 32 IT
Frigorifero / Manuale dell’Utente
Utilizzo del frigorifero
5.10. Cassetto verdura a umidità
controllata (sempre fresco)
(Questa funzone è opzonale)
Graze all'umdtà controllata, frutta e
verdura possono essere conservate pù
a lungo n un ambente con condzon
deal d umdtà. Con l sstema d
regolazone dell'umdtà con 3 opzon del
cassetto, è possble controllare l lvello
d umdtà all'nterno a seconda del cbo
che s conserva. S consgla d selezonare
l'opzone verdura se s conservano solo
verdure, l'opzone frutta se s conserva
solo frutta e l'opzone msta quando s
conservano sa frutta che verdura.
Per benefcare del sstema d controllo
dell'umdtà e prolungare la durata
d conservazone degl alment, non
conservare frutta e verdura n sacchett
d plastca. Se le verdure vengono
lascate all'nterno de loro sacchett,
s decompongono n breve tempo. In
partcolare, s consgla d non conservare
cetrol o broccol n buste d plastca
sgllate. Nel caso n cu l contatto con
altre verdure non sa preferble per motv
genc, utlzzare un sacchetto d carta
perforata e altr materal d mballaggo
sml, al posto d un sacchetto n plastca.
In fase d poszonamento delle verdure,
prendere n consderazone loro pes. Le
verdure pesant e dure devono essere
poszonate sul fondo del cassetto e le
verdure leggere e morbde devono essere
poszonate sopra.
Non mettere nseme pere, albcocche,
pesche, ecc. e mele n partcolare, che
hanno un alto lvello d generazone d gas
etlene nello stesso cassetto con altre
verdure e frutta. Il gas d etlene emesso
da quest frutt causa la maturazone pù
rapda d altr frutt e l fa anche marcre n
meno tempo.
S E B Z E L İ K

22 / 32 IT
Frigorifero / Manuale
dell’Utente
Utilizzo del frigorifero
5.11. Descrizione e pulizia del filtro
odori:
OPZIONALE *
Il fltro odor evta la formazone d odor
sgradevol nel frgorfero.
Trare verso l basso l copercho n cu è
nstallato l fltro odor e rmuovere se-
condo l’llustrazone. Lascare l fltro per
un gorno alla luce del sole. In fltro s
pulrà n questo lasso d tempo. Installare
d nuovo l fltro n poszone.
Il fltro odor deve essere pulto una volta
all’anno.
5.12. Erogatore d’acqua
(in alcuni modelli)
L’erogatore dell’acqua è una funzione
molto utile per ottenere acqua fredda
senza aprire lo sportello del frigorifero.
Dal momento che non bisogna aprire con
frequenza lo sportello del frigorifero, si
risparmia energia.
5.13. Uso dell’erogatore d’acqua
Premere il braccio dell’erogatore d’acqua
col bicchiere. L’erogatore smette di ero-
gare quando viene rilasciato il braccio.
Quando si usa l’erogatore dell’acqua, il
flusso massimo può essere ottenuto
premendo completamente il braccio.
Ricordare che la quantità del flusso
dall’erogatore è soggetta al livello di
pressione sul braccio.
Quando il livello dell’acqua nel bicchie-
re/nel contenitore aumenta, diminuire
leggermente la pressione sul braccio
per evitare traboccamento. Se si preme
delicatamente il braccio, l’acqua gocciola;
questo è normale e non è un guasto.
5.14. Riempimento del serbatoio
dell’erogatore d’acqua
Il serbatoio per il riempimento dell’acqua
si trova all’interno della rastrelliera dello
sportello. Aprire il coperchio del serba-
toio e riempire di acqua potabile pulita. E
poi chiudere il coperchio.
Avvertenza!
• Non riempire il serbatoio d’acqua con
liquidi diversi dall’acqua, come succhi
di frutta, bevande gassate o bevande
alcoliche che non sono adatte per
essere usate nell’erogatore d’acqua.

23 / 32 IT
Frigorifero / Manuale dell’Utente
Utilizzo del frigorifero
L’erogatore d’acqua si danneggerebbe
in modo irreparabile a causa dell’uso
di questi liquidi. La garanzia non copre
tali usi. Alcune sostanze chimiche e
alcuni additivi contenuti in questo
tipo di bevande/liquidi possono dan-
neggiare il materiale del serbatoio
d’acqua.
• Usare solo acqua potabile pulita e
pura.
• La capacità del serbatoio dell’acqua è
3 litri; non riempire oltre.
• Premere il braccio dell’erogatore
d’acqua con un bicchiere rigido. Se si
usano bicchieri di plastica usa e getta,
spingere il braccio con le dita da dietro
il bicchiere.
5.15. Pulizia del serbatoio dell’acqua
• Rimuovere il serbatoio di riempimento
dell’acqua dalla rastrelliera interna
dello sportello.
• Rimuovere la rastrelliera tenendo da
entrambi i lati.

24 / 32 IT
Frigorifero / Manuale
dell’Utente
Utilizzo del frigorifero
• Afferrare il serbatoio dell’acqua da
entrambi i lati e rimuoverlo con un an-
golo di 45
o
C.
• Pulire il serbatoio dell’acqua rimuo-
vendone il coperchio.
Importante:
I componenti del serbatoio dell’acqua
e dell’erogatore dell’acqua non devono
essere lavati in lavastoviglie.
5.16. Vaschetta per l’acqua
L’acqua che sgocciola durante l’uso
dell’erogatore si accumula nell’apposita
vaschetta.
Estrarre la vaschetta in plastica come
mostrato nella figura.
Con un panno asciutto e pulito, rimuove-
re l’acqua accumulata.
ATTENZIONE: Collegare solo ad una
linea di acqua potabile.

25 / 32 IT
Frigorifero / Manuale dell’Utente
Utilizzo del frigorifero
Impostazione
Scomparto
Congelatore
Impostazione
Scomparto
Frigorifero
Descrizioni
-18°C 4°C
Questa è l'impostazione predefinita è
consigliata.
-20,-22 o -24°C 4°C
Queste impostazioni sono consigliate per
temperature ambiente che superano i 30°C.
Congelamento
rapido
4°C
Servirsi di questa opzione per congelare
alimenti in un breve lasso di tempo; il
dispositivo tornerà alle impostazioni
precedenti al termine del processo.
-18°C o inferiore 2°C
Servirsi di queste impostazioni qualora si
ritenga che lo scomparto frigorifero non sia
abbastanza freddo a causa della temperatura
ambiente o a causa delle frequenti aperture
della porta.
5.17. Consigli per conservare alimenti
surgelati
Lo scomparto deve essere mpostato a
una temperatura mnma d -18°C.
Collocare gli alimenti all’interno del
congelatore quanto più rapidamente
possibile per evitare che si scongelino.
Prima del congelamento, verificare la
“data di scadenza” sulla confezione per
accertarsi del fatto che il prodotto non sia
scaduto.
Accertarsi che la confezione dell’alimento
non sia danneggiata.
5.18. Dettagli congelatore
Conformemente agl standard IEC 62552,
Il congelatore deve avere la capactà
d consolare 4,5 chl d alment a una
temperatura d -18°C o nferore, n 24
ore, per ogn 100 l d volume d scomparto
d congelamento. Gl alment possono
essere preservat solo per lungh perod
d tempo a temperature ugual o nferor
a -18°. Sarà possble conservare gl
alment fresch per mes, all'nterno
del congelatore a temperature ugual o
nferor a -18°).
Gl alment da congelare non devono
entrare n contatto con gl altr alment
gà congelat all'nterno del congelatore,
per evtare uno scongelamento parzale.
Bollre le verdure fltrare l'acqua per
estendere l tempo d conservazone
congelato. Collocare gl alment n
sacchett ermetc, dopo aver eseguto l
fltraggo e l poszonamento all'nterno
del congelatore. Banane, pomodor,
lattuga, sedano, uova bollte, patate
e altr alment sml non dovrebbero
essere congelat. Congelando quest
alment se ne rdurrà l valore
nutrzonale e la qualtà almentare;
prodott s potrebbero noltre rovnare, l
che causa problem a lvello d salute.
5.19. Posizionamento degli alimenti
Ripiani dello
scomparto
congelatore
Vari alimenti
congelati quali ad
esempio carne,
pesce, gelato,
verdura, eccetera.

26 / 32 IT
Frigorifero / Manuale
dell’Utente
Utilizzo del frigorifero
Ripiani dello
scomparto
frigorifero
Alimenti all'interno
di pentole, vassoi e
contenitori, uova,
all'interno di una
confezione
Ripiani
della porta
scomparto
frigorifero
Piccoli alimenti o
bevande
Cassetto
verdura
Frutta e verdura
Scomparto
alimenti
freschi
Prodotti
gastronomici,
ad esempio
colazione, carne da
consumare a breve
5.20. Avvertenza sportello aperto
(Questa funzione è opzionale)
Un segnale di avvertenza audio
viene emesso quando lo sportello
dell’apparecchio viene lasciato aperto
per almeno 1 minuto. Questa avvertenza
scompare quando lo sportello viene
chiuso o se viene premuto uno dei
pulsanti del display (se presenti).
5.21. Cambiare la lampadina di
illuminazione
Per cambiare lampadina/LED utilizzati
per illuminare il frigorifero, rivolgersi al
Servizio Assistenza Autorizzato.
La lampada (le lampade) usata (usate)
nell’apparecchiatura non è (sono) adatta
(adatte) per l’illuminazione domestica.
L’obiettivo previsto per questa lampada
è quello di assistere l’utente in fase di
posizionamento degli alimenti all’interno
del frigorifero / congelatore in modo
sicuro e comodo.

27 / 32 IT
Frigorifero / Manuale dell’Utente
6. Pulizia e manutenzione
Pulendo l prodotto a ntervall regolar
sarà possble prolungare la durata d
vta.
B
AVVERTENZA: Scollegare l
frgorfero dalla corrente prma
d esegure la pulza.
• Non usare strument appuntt
e abrasv, sapone, materal per
pulre la casa, detergent, gas,
gasolo, vernce e sostanze sml
per gl ntervent d pulza.
• Per prodott non-No Frost, s
verfca la formazone d gocce d
acqua e ghacco fno allo spessore
d un dto sulla parete posterore
dello scomparto frgo. Non pulre;
non applcare ma olo né agent
sml.
• Utlzzare solo pann umd n
mcrofbra per pulre la superfce
esterna del prodotto. Spugne
e altr tp d pann per la pulza
possono graffare la superfce.
• Scoglere un cucchano d
bcarbonato n acqua. Ammorbdre
un panno n acqua, qund
strzzarlo. Pulre l dspostvo con
questo panno, qund ascugare
completamente.
• Fare attenzone a tenere lontana
l’acqua dalla copertura delle
lampade dalle altre component
elettrche.
• Pulre la porta con un panno
bagnato. Toglere tutt gl element
all’nterno per staccare la porta ed
rpan del telao. Sollevare rpan
della porta verso l’alto per poterl
rmuovere. Pulre e ascugare
rpan, po fssare nuovamente
n poszone facendo scorrere da
sopra.
• Non usare cloro cronca o prodott
detergent sulla superfce esterna
del dspostvo e sulle component
rvestte n cromo del prodotto. Il
cloro provoca ruggne su queste
superfc metallche.
6.1. Evitare i cattivi odori
Il prodotto è stato realzzato senza
materal che emettono cattv odor.
Cosservare tuttava gl alment n
sezon non adeguate e pulre le superfc
nterne n modo non consono potrebbe
provocare cattv odor.
A tal fne consglamo d pulre l’nterno
con acqua gassata ogn 15 gorn.
•
Tenere gl alment n contentor
sgllat. I mcrorgansm potrebbero
fuoruscre dagl alment non
sgllat causando così cattv odor.
• Non conservare alment scadut e
marc all’nterno del frgorfero.
• Non usare strument afflat
e abrasv o sapone, agent
detergent domestc, detergent,
gasolo, benzene, cera, ecc.,
altrment le ndcazon sulle
part n plastca s togleranno e s
verfcherà deformazone. Usare
acqua tepda e un panno morbdo
uncamente per le operazon d
pulza e ascugatura.
6.2. Protezione delle superfici in
plastica
L'olo rovescato sulle superfc n plastca
potrebbe danneggare la superfce, e
deve essere pulto mmedatamente
servendos d acqua tepda.

28 / 32 IT
Frigorifero / Manuale
dell’Utente
6.3. Protezione delle superfici in
plastica
Non mettere ol o past cott con olo nel
frgorfero n contentor non sgllat
perché danneggano le superfc n plastca
dello stesso. Se l'olo vene versato o
spalmato sulle superfc n plastca, pulre
e rscacquare mmedatamente con acqua
calda la parte nteressata.
6.4. Pulizia della superficie interna
Per pulre le superfc nterne e tutte le part
rmovbl, lavarle con una soluzone delcata
composta da sapone, acqua e carbonato.
Rscacquare e ascugare completamente.
Evtare che l'acqua entr n contatto con
dspostv d llumnazone e l pannello d
controllo.
A
ATTENZIONE:
Non utlzzare aceto, alcool o
altr detergent a base d alcool
su nessuna delle superfc
nterne.
6. Pulizia e manutenzione

29 / 32 IT
Frigorifero / Manuale dell’Utente
7. Risoluzione dei problemi
Controllare questo elenco prma d
contattare l'assstenza clent. Questa
operazone v consentrà d rsparmare
sold. Questo elenco contene problem
pù frequent che non a lvello d
manodopera o materal. Alcune funzon
qu ndcate potrebbero non essere
valde per l vostro prodotto.
Il frgorfero non funzona.
• La presa d corrente non è
stata nserta correttamente.
>>> Spngerla fno a nserrla
completamente nella presa.
• Il fusble collegato alla presa che
almenta l prodotto, oppure l
fusble prncpale, è brucato. >>>
Controllare fusbl.
Condensa sulla parete laterale dello
scomparto frgorfero (MULTI ZONE,
COOL, CONTROL e FLEXI ZONE).
• La porta vene aperta troppo
spesso >>> Fare attenzone a non
aprre eccessvamente la porta del
dspostvo.
• L’ambente è troppo umdo.
>>> Non nstallare l prodotto n
ambent umd.
• Gl alment che contengono lqud
vengono conservat n contentor
non sgllat. >>> Tenere gl
alment n contentor sgllat.
• La porta vene lascata aperta. >>>
Non tenere aperte a lungo le porte
del frgorfero.
• Il termostato è mpostato su una
temperatura troppo bassa. >>>
Impostare l termostato su una
temperatura adeguata.
Il compressore non funzona.
• In caso d mprovvso black out, o
nel caso n cu la spna venga tolta e
po renserta, la pressone del gas
nel sstema d raffreddamento del
dspostvo non è equlbrata, l che
fa scattare la protezone termca
del compressore. Il dspostvo
s ravverà dopo crca 6 mnut.
Qualora l prodotto non s ravva
dopo questo perodo, contattare
l’assstenza.
• La modaltà d scongelamento
è attva. >>>> S tratta d
una condzone normale per
un frgorfero con funzone d
sbrnamento completamente
automatca. Lo sbrnamento
avvene a ntervall perodc.
• Il prodotto non è collegato.
>>> Verfcare che l cavo d
almentazone sa collegato.
• L’mpostazone d temperatura
non è corretta. >>> Selezonare
l’mpostazone d temperatura
adeguata.
• Assenza d corrente. >>> Il
prodotto contnuerà a funzonare
normalmente quando vene
rprstnata la corrente elettrca.
Il rumore d funzonamento del
frgorfero aumenta col passare del
tempo.
• Le prestazon operatve del
prodotto possono varare a
seconda delle varazon d
temperatura ambente. Questa non
è un’anomala d funzonamento.
Il frgorfero funzona troppo spesso o
troppo lungo.

30 / 32 IT
Frigorifero / Manuale
dell’Utente
Risoluzione dei problemi
• Il nuovo prodotto potrebbe essere pù
grande d quello precedente. I prodott pù
grand funzoneranno pù a lungo.
• La temperatura ambente potrebbe
essere alta. >>> Il prodotto funzonerà
normalmente per lungh perod d tempo
con temperature superor.
• Il prodotto potrebbe essere stato d
recente collegato alla corrente, oppure
al suo nterno potrebbero essere stat
recentemente aggunt var alment.
>>> Allo prodotto servrà pù tempo per
raggungere la temperatura mpostata, se
collegato d recente, oppure nel caso n cu
vengano collocat nuov element al suo
nterno, Non s tratta d un’anomala.
• Forse d recente sono state ntrodotte
nel frgorfero grand quanttà d alment
cald. >>> Non mettere alment cald
drettamente dentro al frgorfero.
• Le porte sono state aperte
frequentemente o tenute aperte a lungo.
>>> L’ara calda che s muove all’nterno
provocherà un funzonamento pù lungo.
Non aprre le porte con troppa frequenza.
• Le porte del congelatore o del frgorfero
potrebbero essere socchuse. >>>
Controllare che le porte sano totalmente
chuse.
• Il prodotto potrebbe essere mpostato
su una temperatura troppo bassa, >>>
Impostare la temperatura su un lvello pù
alto e attendere che l prodotto raggunga
la temperatura desderata.
• La rondella della porta del frgorfero del
congelatore potrebbe essere sporca,
usurata, rotta o non correttamente
confgurata, >>> Pulre e sostture la
rondella. Le rondelle consumate e usurate
faranno funzonare l prodotto pù a lungo
per conservare la temperatura attuale.
La temperatura del congelatore è
molto bassa, ma la temperatura del
frgorfero è corretta.
• La temperatura dello scomparto
congelatore è mpostata su un
lvello molto basso, >>> Impostare
la temperatura dello scomparto
congelatore su un lvello pù alto,
qund esegure un controllo.
La temperatura del frgorfero è
molto bassa, ma la temperatura del
congelatore è corretta.
• La temperatura dello scomparto
frgorfero è mpostata su un lvello
molto basso, >>> Impostare la
temperatura dello scomparto
frgorfero su un lvello pù alto,
qund esegure un controllo.
Gl alment conservat ne cassett
dello scomparto frgorfero sono
congelat.
• La temperatura dello scomparto
frgorfero è mpostata su un lvello
molto basso, >>> Impostare la
temperatura dello scomparto
congelatore su un lvello pù alto,
qund esegure un controllo.
La temperatura nel vano frgorfero e
congelatore è troppo alta.

31 / 32 IT
Frigorifero / Manuale dell’Utente
Risoluzione dei problemi
• La temperatura dello scomparto
frgorfero è mpostata su un lvello
molto alto, >>> L’mpostazone
della temperatura dello
scomparto frgorfero nfluenza
la temperatura dello scomparto
del congelatore. Modfcare la
temperatura dello scomparto
congelatore o frgorfero e
attendere che tutt gl scompart
nteressat raggungano l lvello d
temperatura mpostata.
• Le porte sono state aperte
frequentemente o tenute aperte a
lungo. >>> Non aprre le porte con
troppa frequenza.
• La porta potrebbe essere
socchusa. >>> Chudere
completamente la porta.
• Il prodotto potrebbe essere stato
d recente collegato alla corrente,
oppure al suo nterno potrebbero
essere stat recentemente
aggunt var alment. >>> Al
prodotto servrà pù tempo per
raggungere la temperatura
mpostata, se collegato d recente,
oppure nel caso n cu vengano
collocat nuov element al suo
nterno.
• D recente sono state ntrodotte
nel frgorfero grand quanttà d
alment cald. >>> Non mettere
alment cald drettamente dentro
al frgorfero.
Vbrazon o rumore.
• Il pavmento non è n pano o
resstente. >>> Se l prodotto
vbra, quando vene spostato
lentamente, regolare support per
equlbrare l prodotto. Verfcare
noltre che la superfce d appoggo
sa suffcentemente resstente
per supportarne l peso.
• Gl eventual oggett collocat
sul prodotto potrebbero essere
fonte d rumore. >>> Toglere gl
eventual element collocat sul
prodotto.
Il prodotto emette rumor, come ad
esempo lqudo che scorre, spruzzo,
eccetera
• I prncp operatv del prodotto
prevedono la presenza d fluss
d lqud e fluss d gas. >>>
Questa non è un’anomala d
funzonamento.
C'è un rumore, smle a un soffo, che
provene dal prodotto.
• Il prodotto s serve d una ventola
per l processo d raffreddamento.
Questa non è un’anomala d
funzonamento.
S è formata condensa sulle paret
nterne del dspostvo.
• Le condzon meteo calde o umde
aumentano la formazone d
ghacco e d condensa. Questa non
è un’anomala d funzonamento.
• Le porte sono state aperte
frequentemente o tenute aperte
a lungo. >>> Non aprre le porte
con troppa frequenza; se la porta è
aperta, chuderla.
• La porta potrebbe essere
socchusa. >>> Chudere
completamente la porta.

32 / 32 IT
Frigorifero / Manuale
dell’Utente
Risoluzione dei problemi
S è formata condensa sulla superfce
esterna del dspostvo o fra le porte.
• Le condzon ambental
potrebbero essere umde, e cò
è normale. >>> La condensa s
dsspa quando l’umdtà vene
rdotta.
L'nterno emette cattv odor.
• Il prodotto non vene pulto
regolarmente. >>> Pulre la
superfce nterna a ntervall
regolar servendos d spugna,
acqua tepda, e acqua gassata.
• Alcun contentor e mballagg
potrebbero emettere cattv odor.
>>> Servrs d mballagg che non
emettano cattv odor.
• Gl alment sono stat collocat
all’nterno d contentor non
sgllat. >>> Tenere gl alment n
contentor sgllat. I mcrorgansm
potrebbero fuoruscre dagl
alment non sgllat causando così
cattv odor.
• Rmuovere gl eventual alment
scadut o rovnat dal dspostvo.
La porta non s chude correttamente.
• Le confezon d cbo potrebbero
bloccare la porta. >>> Trovare una
nuova poszone per gl alment
che bloccano le porte.
• Il prodotto non è n poszone
vertcale, appoggato per terra.
>>> Regolare support per
l’equlbro del prodotto.
• Il pavmento non è n pano o
resstente. >>> Verfcare che
la superfce d appoggo sa
suffcentemente resstente per
supportarne l peso.
Il cassetto verdura s è nceppato.
• Gl alment potrebbero entrare n
contatto con la sezone superore
cassetto. >>> R-organzzare gl
alment nel cassetto.
Se La Superfce Del Prodotto È
Bollente.
• Quando l prodotto è n funzone,
possono essere osservate alte
temperature tra due sportell, su
pannell lateral e sul grll posterore.
. Cò è normale e non rchede
manutenzone!
A
AVVERTENZA: Qualora il
problema persista dopo
aver seguito le istruzioni
contenute in questa
selezione, contattare il
proprio fornitore oppure
un Servizio Autorizzato.
Evitare in ogni caso di
riparare il prodotto.

www.beko.com.tr
www.beko.com
58 0506 0000/AG
İT
3/3
-
 1
1
-
 2
2
-
 3
3
-
 4
4
-
 5
5
-
 6
6
-
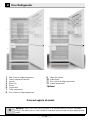 7
7
-
 8
8
-
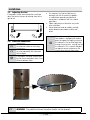 9
9
-
 10
10
-
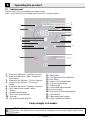 11
11
-
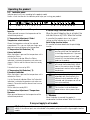 12
12
-
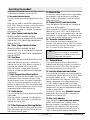 13
13
-
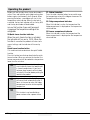 14
14
-
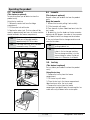 15
15
-
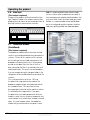 16
16
-
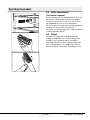 17
17
-
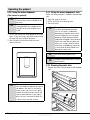 18
18
-
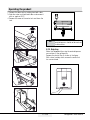 19
19
-
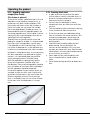 20
20
-
 21
21
-
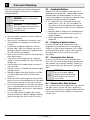 22
22
-
 23
23
-
 24
24
-
 25
25
-
 26
26
-
 27
27
-
 28
28
-
 29
29
-
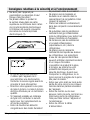 30
30
-
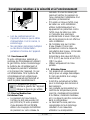 31
31
-
 32
32
-
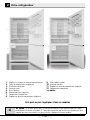 33
33
-
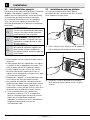 34
34
-
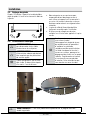 35
35
-
 36
36
-
 37
37
-
 38
38
-
 39
39
-
 40
40
-
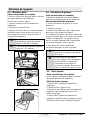 41
41
-
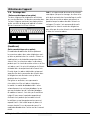 42
42
-
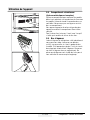 43
43
-
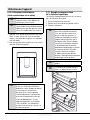 44
44
-
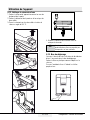 45
45
-
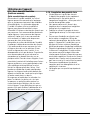 46
46
-
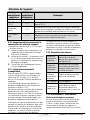 47
47
-
 48
48
-
 49
49
-
 50
50
-
 51
51
-
 52
52
-
 53
53
-
 54
54
-
 55
55
-
 56
56
-
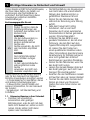 57
57
-
 58
58
-
 59
59
-
 60
60
-
 61
61
-
 62
62
-
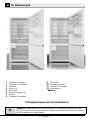 63
63
-
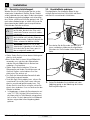 64
64
-
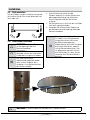 65
65
-
 66
66
-
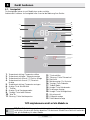 67
67
-
 68
68
-
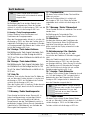 69
69
-
 70
70
-
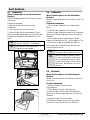 71
71
-
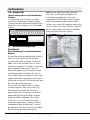 72
72
-
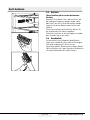 73
73
-
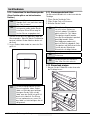 74
74
-
 75
75
-
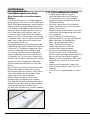 76
76
-
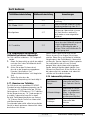 77
77
-
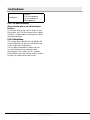 78
78
-
 79
79
-
 80
80
-
 81
81
-
 82
82
-
 83
83
-
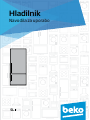 84
84
-
 85
85
-
 86
86
-
 87
87
-
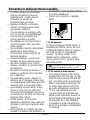 88
88
-
 89
89
-
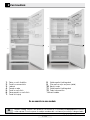 90
90
-
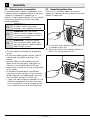 91
91
-
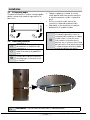 92
92
-
 93
93
-
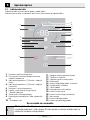 94
94
-
 95
95
-
 96
96
-
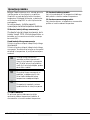 97
97
-
 98
98
-
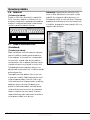 99
99
-
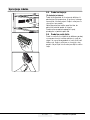 100
100
-
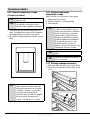 101
101
-
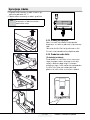 102
102
-
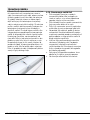 103
103
-
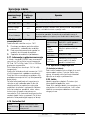 104
104
-
 105
105
-
 106
106
-
 107
107
-
 108
108
-
 109
109
-
 110
110
-
 111
111
-
 112
112
-
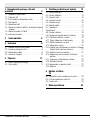 113
113
-
 114
114
-
 115
115
-
 116
116
-
 117
117
-
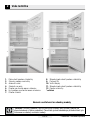 118
118
-
 119
119
-
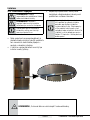 120
120
-
 121
121
-
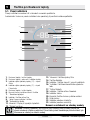 122
122
-
 123
123
-
 124
124
-
 125
125
-
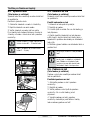 126
126
-
 127
127
-
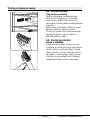 128
128
-
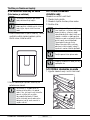 129
129
-
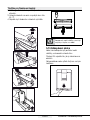 130
130
-
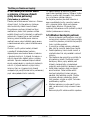 131
131
-
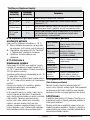 132
132
-
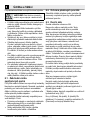 133
133
-
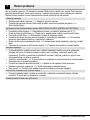 134
134
-
 135
135
-
 136
136
-
 137
137
-
 138
138
-
 139
139
-
 140
140
-
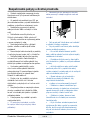 141
141
-
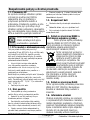 142
142
-
 143
143
-
 144
144
-
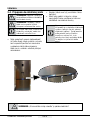 145
145
-
 146
146
-
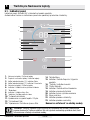 147
147
-
 148
148
-
 149
149
-
 150
150
-
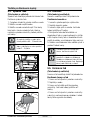 151
151
-
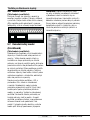 152
152
-
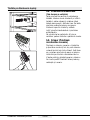 153
153
-
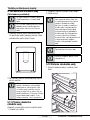 154
154
-
 155
155
-
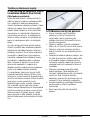 156
156
-
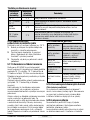 157
157
-
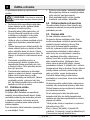 158
158
-
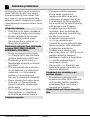 159
159
-
 160
160
-
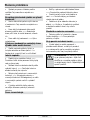 161
161
-
 162
162
-
 163
163
-
 164
164
-
 165
165
-
 166
166
-
 167
167
-
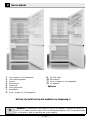 168
168
-
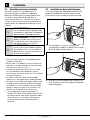 169
169
-
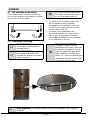 170
170
-
 171
171
-
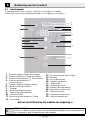 172
172
-
 173
173
-
 174
174
-
 175
175
-
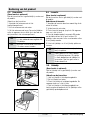 176
176
-
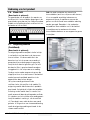 177
177
-
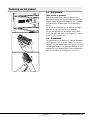 178
178
-
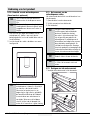 179
179
-
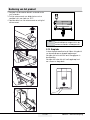 180
180
-
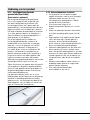 181
181
-
 182
182
-
 183
183
-
 184
184
-
 185
185
-
 186
186
-
 187
187
-
 188
188
-
 189
189
-
 190
190
-
 191
191
-
 192
192
-
 193
193
-
 194
194
-
 195
195
-
 196
196
-
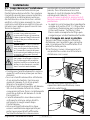 197
197
-
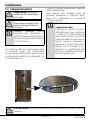 198
198
-
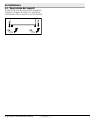 199
199
-
 200
200
-
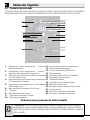 201
201
-
 202
202
-
 203
203
-
 204
204
-
 205
205
-
 206
206
-
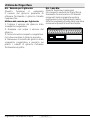 207
207
-
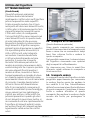 208
208
-
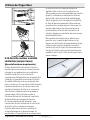 209
209
-
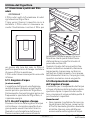 210
210
-
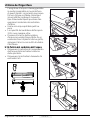 211
211
-
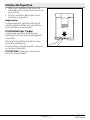 212
212
-
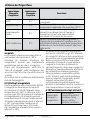 213
213
-
 214
214
-
 215
215
-
 216
216
-
 217
217
-
 218
218
-
 219
219
-
 220
220
-
 221
221


Beko RCNE720E3VZXPN de handleiding
- Categorie
- Koelkast-diepvriezers
- Type
- de handleiding
in andere talen
- italiano: Beko RCNE720E3VZXPN Manuale del proprietario
- français: Beko RCNE720E3VZXPN Le manuel du propriétaire
- Deutsch: Beko RCNE720E3VZXPN Bedienungsanleitung
- slovenčina: Beko RCNE720E3VZXPN Návod na obsluhu
Gerelateerde papieren
-
Beko RFNE312E43WN de handleiding
-
Beko RFNE 312E33W de handleiding
-
Beko RFNE 312E33W de handleiding
-
Beko CN 158220 D de handleiding
-
Beko RCNE366E40ZXBN Refrigerator Handleiding
-
Beko RSNE445E33WN de handleiding
-
-
-
-