
DE1
WS6442 - BEDIENUNGSANLEITUNG
Übersicht:
1 - Wettervorhersage-Symbol 2 - Wettertendenz-Symbol
3 - Außentemperatur 4 - Außenluftfeuchtigkeit
5 - Außentemperaturalarm 6 - Uhrzeit
7 - Innentemperatur 8 - Innenluftfeuchtigkeit
9 - Innentemperaturalarm 10 – Mondphasen-Symbol
11 - Fenster schließen/öffnen - Symbol 12 - Wochentag
13 - Datum und Monat
Komplette Anzeige

DE2
Tasten
Es gibt sieben Funktionstasten:
SET/RCC ALARM +/HEAT/DEW -/MAX/MIN
ALERT CHANNEL SNOOZE/LIGHT
Funktionen
Jahreszahlen:2019-2099
Anzeige von Datum/Monat/Wochentag
Innen-/Außentemperatur und -luftfeuchtigkeit
Temperatur- und Luftfeuchtigkeitstrend im Innen- und Außenbereich
Batterieendanzeige für Basisstation und Aussensender
12/24 Stunden Zeitformat wählbar
Weckalarm mit Schlummerfunktion
Wettervorhersage: Sonnig, teilweise sonnig, bewölkt, regnerisch und stürmisch
Maximale und minimale Temperatur/Luftfeuchtigkeit
Sieben Sprachen für Wochentage (GER, FRE, ITA, DUT, SPA, DAN,ENG)
Zeitzoneneinstellung: -12/+12HR
DCF77-Signalempfang der Funkuhrzeit
Hintergrundbeleuchtung einstellbar: HI, LOW, OFF
Wärmeindex und Taupunkt für den Außenbereich
Höchst-/Tiefsttemperaturalarm für den Innen- und Außenbereich
Hinweise zum Schließen/Öffnen von Fenstern(Wenn die Aussentemperatur zwischen 20°C- 25°C und die Luftfeuchtigkeit zwischen 40%
-70% liegt, wird das „Fenster öffnen“ Symbol angezeigt und wenn nicht im Bereich, wird das „Fenster schließen“ Symbol angezeigt.)
Anzeige der Mondphasen
Verbinden von bis zu 3 Aussensendern möglich
Batterien der Basisstation(WS6442): 3 x AAA
Batterien des Aussensenders(TX960-TH): 2 x AAA
Inbetriebnahme:
Verbinden Sie die Station mit dem Netzteil an eine Steckdose.
Sobald die Station eingeschaltet ist, leuchten alle Symbole auf der LCD-Anzeige 3 Sekunden lang auf und Sie hören einen Signalton.
Die Wetterstation beginnt nun, eine Verbindung zum Aussensender herzustellen. Dieser Vorgang dauert ca. 3 Minuten und wird durch ein
blinkendes Funkempfang-Antennensymbol im Anzeigebereich "OUTDOOR" an der Basisstation angezeigt.
Entfernen Sie die Batteriefachabdeckung des Außensenders und legen Sie 2 x AAA Batterien unter Beachtung der Polarität [ "+" und "-"
Markierungen] ein. Schließen Sie dann das Batteriefach wieder.
Nachdem die Station eine Verbindung zum Außensender hergestellt hat, wechselt sie in den Empfangsmodus für das Funkzeitsignal.
Optional: Batterien für das Backup (keine permanente Hintergrund-
beleuchtung bei Verwendung ohne Netzteil)
Öffnen Sie die Batteriefachabdeckung der Wetterstation.
Legen Sie 3 x AAA Batterien unter Beachtung der Polarität [ "+" und " -" Markierungen] ein.

DE3
Schließen Sie das Batteriefach wieder.
Hinweise:
Wenn die Aussentemperatur nach 3 Minuten nicht angezeigt wird, halten Sie die "CHANNEL" Taste an der Basisstation gedrückt, um nach
dem Aussensender zu suchen. Drücken Sie dann die TX Taste am Aussensender, um gleichzeitig das Signal zu senden. Wenn die Station
immer noch nicht die Außentemperatur empfängt, entfernen Sie die Batterien aus dem Aussensender und beginnen Sie die
Inbetriebnahme von Anfang an.
Dauerhaft niedrige Temperaturen (unter -20°C) können dazu führen, dass Alkaline Batterien nicht mit voller Leistung funktionieren. Dies
führt dazu, dass der Funk-Aussensender keine Temperatur- messungen mehr sendet. Verwenden Sie Lithium Batterien bei diesen
niedrigen Temperaturen, um den weiteren Betrieb von Aussensendern im Freien zu gewährleisten.
Platzieren Sie den Aussensender an einen trockenen und schattigen Ort.
Empfang des Funkzeitsignals:
Die Station startet die DCF77-Signalsuche automatisch 7 Minuten nach jedem Neustart oder Wechsel neuer Batterien. Das
Funkmastsymbol beginnt zu blinken.
Um 1:00 / 2:00 / 3:00 / 4:00 / 5:00 Uhr startet die Station automatisch den Synchronisationsvorgang mit dem DCF77-Signal, um
Abweichungen zeitgenau zu korrigieren. Wenn dieser Synchronisationsversuch fehlschlägt (das Symbol des Funkmastes verschwindet
aus der Anzeige), versucht das System automatisch eine weitere Synchronisation in der nächsten vollen Stunde. Dieser Vorgang wird
automatisch bis zu insgesamt 5 mal wiederholt.
Um den DCF77-Signalempfang manuell zu starten, drücken Sie die "SET/RCC" Taste. Wenn innerhalb von 7 Minuten keine Signale
empfangen wurden, stoppt die DCF77-Signalsuche (das Funkmast-Symbol verschwindet) und startet bei der nächsten vollen Stunde
erneut.
Drücken Sie während der DCF77-Signalsuche einmal die "SET/RCC" Taste, um die Suche nach dem Funkzeitsignal zu beenden.
Hinweise:
Ein blinkendes Funkmast-Symbol zeigt an, dass der DCF77-Signalempfang begonnen hat.
Ein kontinuierlich angezeigtes Funkmast-Symbol zeigt an, dass das DCF77-Signal erfolgreich empfangen wurde.
Wir empfehlen einen Mindestabstand von 2,5 Metern zu allen Störquellen wie Fernsehern oder Computermonitoren.
In Räumen mit Betonwänden (z.B.: in Kellern) und in Büros ist der Funkempfang schwächer. Stellen Sie die Station in diesem Fall in der
Nähe des Fensters auf.
Manuelle Zeiteinstellung
Halten Sie die SET/RCC Taste gedrückt, um in den Einstellmodus zu gelangen:
12/24-STUNDEN: 24Hr blinkt auf der Anzeige. Drücken Sie die +/HEAT/DEW oder die -/MAX/MIN Taste, um das 12-Stunden oder das
24-Stunden Zeitformat auszuwählen. Drücken Sie die SET/RCC Taste um mit der Einstellung fortzufahren.
ZEITZONE: Die Zeitzone wird angezeigt und die ausgewählte Zeitzone blinkt auf der Anzeige. Drücken Sie die +/HEAT/DEW oder die

DE4
-/MAX/MIN Taste, um eine Zeitzone einzustellen ( Einstellung von 0~+12,0~-12). +0 für Deutschland und +1 für das Vereinigte
Königreich. Drücken Sie die SET/RCC Taste um mit der Einstellung fortzufahren.
STUNDEN: Die Stundenziffern blinken auf der Anzeige. Drücken Sie die +/HEAT/DEW oder die -/MAX/MIN Taste, um die Stunden
einzustellen. Drücken Sie die SET/RCC Taste um mit der Einstellung fortzufahren.
MINUTEN: Die Minutenziffern blinken auf der Anzeige. Drücken Sie die +/HEAT/DEW oder die -/MAX/MIN Taste, um die Minuten
einzustellen. Drücken Sie die SET/RCC Taste um mit der Einstellung fortzufahren.
JAHR: Die Jahresziffern blinken auf der Anzeige. Drücken Sie die +/HEAT/DEW oder die -/MAX/MIN Taste, um das Jahr einzustellen.
Drücken Sie die SET/RCC Taste um mit der Einstellung fortzufahren.
MONAT: Die Monatsziffern blinken auf der Anzeige. Drücken Sie die +/HEAT/DEW oder die -/MAX/MIN Taste, um den Monat
einzustellen. Drücken Sie die SET/RCC Taste um mit der Einstellung fortzufahren.
DATUM: Die Datumsziffern blinken auf der Anzeige. Drücken Sie die +/HEAT/DEW oder die -/MAX/MIN Taste, um das Datum
einzustellen. Der Wochentag wird automatisch eingestellt, nachdem JAHR, MONAT und DATUM eingestellt wurden. Drücken Sie die
SET/RCC Taste um mit der Einstellung fortzufahren.
SPRACHE: GER (Werkseinstellung) blinkt auf der Anzeige. Drücken Sie die +/HEAT/DEW oder die -/MAX/MIN Taste, um die
gewünschte Sprache auszuwählen: GER, FRE, ITA, DUT, SPA, DAN,ENG. Drücken Sie die SET/RCC Taste um mit der Einstellung
fortzufahren.
°C/°F: Die Temperatureinheit °C blinkt auf der Anzeige. Drücken Sie die +/HEAT/DEW oder die -/MAX/MIN Taste, um °C oder °F als
Temperatureinheit einzustellen. Drücken Sie die SET/RCC Taste um Einstellung zu speichern und zu beenden.
Hinweise:
1. Wenn für 20 Sekunden keine Taste gedrückt wird, schaltet sich der Einstellmodus aus und kehrt in den normalen Anzeigemodus zurück.
Alle vorgenommenen Einstellungen werden übernommen.
2. +/HEAT/DEW oder -/MAX/MIN: Einmal drücken, um 1 den Wert um eine Einheit zu verändern, halten Sie die jeweilige Taste zur
Schnelleinstellung gedrückt.
Alarmeinstellung
Halten Sie die ALARM Taste gedrückt, um in die Alarmeinstellung zu gelangen:
ALARMSTUNDEN: Die Stundenziffern blinken auf der Anzeige. Drücken Sie die +/HEAT/DEW oder die -/MAX/MIN Taste, um die
Stunden einzustellen. Drücken Sie die ALARM Taste um mit der Einstellung fortzufahren.
ALARMMINUTEN: Die Minutenziffern blinken auf der Anzeige. Drücken Sie die +/HEAT/DEW oder die -/MAX/MIN Taste, um die
Minuten einzustellen. Drücken Sie die ALARM Taste um Einstellung zu speichern und zu beenden.
Hinweise:
1. Wenn für 20 Sekunden keine Taste gedrückt wird, schaltet sich die Alarmeinstellung aus und kehrt in den normalen Anzeigemodus zurück.
Alle vorgenommenen Einstellungen werden übernommen.
2. +/HEAT/DEW oder -/MAX/MIN: Einmal drücken, um den Wert um eine Einstellschritt zu verändern oder halten Sie die jeweilige Taste zur
Schnelleinstellung gedrückt.

DE5
Alarm anschalten/ausschalten
Drücken Sie die ALARM Taste und ALM wird angezeigt. Drücken Sie die +/HEAT/DEW oder die -/MAX/MIN Taste um den Alarm
an-/auszuschalten
ALARM SYMBOL: wird bei eingeschaltetem Alarm angezeigt und nicht mehr angezeigt, wenn der Alarm ausgeschaltet ist.
Schlummerfunktion
Drücken Sie die SNOOZE Taste während der Alarm ertönt, um die Schlummerdauer für 10 Minuten auszulösen. Das Alarmsymbol blinkt,
wenn die Schlummerfunktion aktiviert ist.
Um den Alarm für einen Tag zu stoppen, drücken Sie eine beliebige Taste außer der SNOOZE Taste, während die Schlummerfunktion
aktiviert ist. Das Alarmsymbol wird angezeigt.
Hinweis: Der Alarm ist ansteigend. Wenn der Alarm ertönt, wird er für 2 Minuten fortgesetzt und schaltet sich dann vollständig ab.
Wettervorhersage
Die Station zeigt 1 von 6 verschiedenen Wettervorhersagen an:
Sonnig Teilweise sonnig Bewölkt
Regnerisch Stürmisch Schneefall
Aussensenderkanäle
Drücken Sie die CHANNEL Taste um einen Kanal auszuwählen: CH1 (Kanal 1), CH2 (Kanal 2), CH3 (Kanal 3) und alle Kanäle als
Rotationsansicht (jeder Kanal wird kurzzeitig angezeigt)
Halten Sie die CHANNEL Taste für 2 Sekunden gedrückt, um nach einem Aussensender für den ausgewählten Kanal auf Ihrer Station zu
suchen. Am Aussensender muss der identische Kanal eingestellt sein.
Das Signalsymbol blinkt, bis das Sensorsignal empfangen wird oder stoppt, wenn innerhalb von 3 Minuten kein Signal empfangen wird.
Hitzeindex- (HEAT) und Taupunktwerte (DEW)
Drücken Sie im normalen Anzeigemodus die +/HEAT/DEW Taste, um den Hitzeindexwerte mit HEAT anzuzeigen.
Drücken Sie die +/HEAT/DEW Taste erneut, um die Taupunktwerte mit DEW anzuzeigen.
Drücken Sie die +/HEAT/DEW Taste erneut, um in den normalen Anzeigemodus zurückzukehren.
Hinweise:
Mit HEAT wird der Hitzeindexwert (Messwert aus Schattenmessung, gebildet aus Temperatur und Luftfeuchtigkeit) angezeigt, der zur
Warnung vor Hitzegefahren verwendet wird. Bei voller Sonneneinstrahlung kann sich der Hitzeindexwert um bis zu 8 °C (14 °F) erhöhen.

DE6
Celsius
Fahrenheit
Warnung
27-32°C
80-90°F
Vorsicht: Ermüdung ist bei längerer
Aussetzung und Aktivität möglich. Eine
anhaltende Aktivität kann zu
Hitzekrämpfen führen.
32-41°C
90-105°F
Große Vorsicht: Hitzekrämpfe und
Hitzeerschöpfung sind möglich.
Anhaltende Aktivität kann zu einem
Hitzschlag führen.
41-54°C
105-130°F
Gefahr: Hitzekrämpfe und
Hitzeerschöpfung sind wahrscheinlich;
ein Hitzschlag ist bei anhaltender Aktivität
wahrscheinlich.
Über 54°C
Über 130°F
Große Gefahr: Hitzschlag steht
unmittelbar bevor.
Maximale (MAX) und minimale (MIN) Werte
Drücken Sie im normalen Anzeigemodus die -/MAX/MIN Taste, um die maximalen Werte der Innen- und Außentemperatur und
-feuchtigkeit mit MAX anzuzeigen.
Drücken Sie die -/MAX/MIN Taste erneut, um die minimalen Werte der Innen- und Außentemperatur und -feuchtigkeit mit MIN
anzuzeigen.
Drücken Sie die -/MAX/MIN Taste erneut, um in den normalen Anzeigemodus zurückzukehren.
Hinweise:
Halten Sie die -/MAX/MIN Taste für 2 Sekunden gedrückt, um die maximalen und minimalen Werte aus dem Speicher zu löschen.
Die MAX/MIN-Werte werden automatisch jeden Tag um Mitternacht (0:00) gelöscht.
Nach 5 Sekunden ohne Drücken einer Taste, kehrt die Anzeige in den normalen Anzeigemodus zurück.
Höchst-/Tiefsttemperaturalarm anschalten/ausschalten
Drücken Sie im normalen Anzeigemodus die ALERT Taste und das “HI” Symbol im Aussenbereich der Anzeige blinkt. Drücken Sie die
+/HEAT/DEW Taste, um den Höchsttemperaturalarm anzuschalten oder drücken Sie die -/MAX/MIN Taste, um den
Höchsttemperaturalarm auszuschalten. Drücken Sie die ALERT Taste um die Einstellung zu bestätigen.
Das “LO” Symbol im Aussenbereich der Anzeige blinkt. Drücken Sie die +/HEAT/DEW Taste, um den Tiefsttemperaturalarm
anzuschalten oder drücken Sie die -/MAX/MIN Taste, um den Tiefsttemperaturalarm auszuschalten. Drücken Sie die ALERT Taste um
die Einstellung zu bestätigen.
Das “HI” Symbol im Innenbereich der Anzeige blinkt.
Drücken Sie die +/HEAT/DEW Taste, um den Höchsttemperaturalarm anzuschalten oder drücken Sie die -/MAX/MIN Taste, um den
Höchsttemperaturalarm auszuschalten. Drücken Sie die ALERT Taste um die Einstellung zu bestätigen.
Das “LO” Symbol im Innenbereich der Anzeige blinkt. Drücken Sie die +/HEAT/DEW Taste, um den Tiefsttemperaturalarm anzuschalten
oder drücken Sie die -/MAX/MIN Taste, um den Tiefsttemperaturalarm auszuschalten. Drücken Sie die ALERT Taste um die Einstellung
zu bestätigen und zu beenden.
Hinweis:
Wenn der HI/LO-Temperaturalarm ausgeschaltet ist, wird das Symbol OFF auf dem LCD angezeigt.
Einstellungswerte des Höchst-/Tiefsttemperaturalarms
Halten Sie die ALERT Taste für 2 Sekunden gedrückt, um den Einstellwert für den Temperaturalarm einzugeben. “HI” und die
Aussentemperatur blinken auf der Anzeige. Drücken Sie die +/HEAT/DEW oder die -/MAX/MIN Taste um den Temperaturwert
anzupassen oder halten Sie eine dieser Tasten gedrückt, um die Einstellung zu beschleunigen. Drücken Sie die ALERT Taste um die
Einstellung zu bestätigen.
“LO” und die Aussentemperatur blinken auf der Anzeige. Drücken Sie die +/HEAT/DEW oder die -/MAX/MIN Taste um den

DE7
Temperaturwert anzupassen oder halten Sie eine dieser Tasten gedrückt, um die Einstellung zu beschleunigen. Drücken Sie die ALERT
Taste um die Einstellung zu bestätigen.
“HI” und die Innentemperatur blinken auf der Anzeige. Drücken Sie die +/HEAT/DEW oder die -/MAX/MIN Taste um den Temperaturwert
anzupassen oder halten Sie eine dieser Tasten gedrückt, um die Einstellung zu beschleunigen. Drücken Sie die ALERT Taste um die
Einstellung zu bestätigen.
“LO” und die Innentemperatur blinken auf der Anzeige. Drücken Sie die +/HEAT/DEW oder die -/MAX/MIN Taste um den Temperaturwert
anzupassen oder halten Sie eine dieser Tasten gedrückt, um die Einstellung zu beschleunigen. Drücken Sie die ALERT Taste um die
Einstellung zu beenden.
Hintergrundbeleuchtung
Drücken Sie die SNOOZE/LIGHT Taste, um die Hintergrundbeleuchtung auf HI/LO/OFF zu stellen, wenn Sie das Netzteil zur
Stromversorgung der Station verwenden.
Drücken Sie die SNOOZE/LIGHT Taste, um die Hintergrundbeleuchtung für 10 Sekunden zu aktivieren, wenn Sie Batterien und kein
Netzteil zur Stromversorgung der Station verwenden.
Hinweis:
HI ist die hellste Hintergrundbeleuchtung, LO ist die gedimmte Hintergrundbeleuchtung und OFF schaltet die Hintergrundbeleuchtung
aus.
Batterieendanzeige
Die Station braucht neue Batterien, wenn das Batteriesymbol im Bereich der Innentemperatur angezeigt wird.
Der Aussensender braucht neue Batterien, wenn das Batteriesymbol im Bereich der Aussentemperatur angezeigt wird.
Technische Daten
Innentemperatur
Betriebstemperaturbereich = 0°C bis 50°C (32°F bis 122°F)
Genauigkeit ± 1 Grad Celsius von 0°C bis 50°C (32°F bis 122°F)
Auflösung = 0.1 Grad Celsius
Bei einer Temperatur über 50°C (122 °F) zeigt das LCD HI an
Bei einer Temperatur unter -9,9°C (14°F) zeigt das LCD LO an
Innenluftfeuchtigkeit
Betriebsluftfeuchtigkeitsbereich =20% RH bis 95%
Genauigkeit +/- 5% RH (@25°C , 30%RH bis 80%RH)
Genauigkeit +/- 8% RH (@25°C, 20%RH bis 29%RH, 80%RH bis 95%RH)
Auflösung = 1 % RH
Aussentemperatur
Betriebstemperaturbereich = -40°C bis 60°C (-40°F bis 140°F)
Genauigkeit ± 1 Grad Celsius von 0°C bis 50°C (32°F bis 122°F)
Genauigkeit ±1.5 Grad Celsius von -40°C bis 0°C (-40°F bis 32°F) und von 50°C bis 60°C (122°F bis 140°F)
Auflösung = 0.1 Grad Celsius
Bei einer Temperatur über 60°C (140 °F) zeigt das LCD HI an
Bei einer Temperatur unter -40°C (-40°F) zeigt das LCD LO an
Aussenluftfeuchtigkeit
Betriebsluftfeuchtigkeitsbereich =20% RH bis 95%
Genauigkeit +/- 5% RH (@25°C , 30%RH bis 80%RH)
Genauigkeit +/- 8% RH (@25°C , 20%RH bis 30%RH, 80%RH bis 95%RH)
Auflösung = 1 % RH
Umwelteinflüsse auf Funkempfang

DE8
Die Station empfängt kabellos die genaue Uhrzeit. Wie bei allen kabellosen Geräten kann der Funkempfang durch folgende Einflüsse
beeinträchtigt sein:
lange Übertragungswege
naheliegende Berge und Täler
nahe Autobahnen, Gleisen, Flughäfen, Hochspannungsleitungen, etc.
nahe Baustellen
inmitten hoher Gebäude
in Betonbauten
nahe elektrischer Geräte (Computer, Fernseher, etc) und metallischer Gegenstände
in bewegten Fahrzeugen
Platzieren Sie die Station an einem Ort mit optimalem Empfang, z.B. in der Nähe von Fenstern und entfernt zu metallischen oder elektrischen
Gegenständen.
Vorsichtsmaßnahmen
Die Basisstation ist ausschließlich für den Gebrauch in Innenräumen und der Außensender für den Gebrauch im Freien gedacht.
Setzen Sie das Gerät nicht extremer Gewalteinwirkung oder Stößen aus.
Setzen Sie das Gerät nicht hohen Temperaturen, direktem Sonnenlicht, Staub und Feuchtigkeit aus.
Tauchen Sie das Gerät nicht in Wasser.
Vermeiden Sie den Kontakt mit ätzenden Materialien.
Werfen Sie das Gerät nicht ins Feuer. Es könnte explodieren.
Öffnen Sie nicht das Gehäuse und manipulieren Sie nicht bauliche Bestandteile des Geräts.
Batterie-Sicherheitshinweise
Verwenden Sie nur Alkali-Batterien, keine wiederaufladbaren Batterien.
Legen Sie die Batterien unter Beachtung der Polarität (+/-) richtig ein.
Entfernen Sie erschöpfte Batterien sofort.
Entfernen Sie die Batterien bei Nichtnutzung.
Laden Sie die Batterien nicht auf und werfen Sie sie nicht ins Feuer. Sie könnten explodieren.
Bewahren Sie die Batterien nicht in der Nähe von Metallobjekten auf, da ein Kontakt einen Kurzschluss verursachen kann.

DE9
Setzen Sie Batterien keinen hohen Temperaturen, extremer Feuchtigkeit oder direktem Sonnenlicht aus.
Bewahren Sie Batterien außerhalb der Reichweite von Kindern auf. Verschlucken der Batterien kann zum Ersticken führen.
Verwenden Sie das Produkt ausschließlich für den vorgesehenen Zweck!
Hinweispflicht nach dem Batteriegesetz
Altbatterien gehören nicht in den Hausmüll. Wenn Batterien in die Umwelt gelangen, können diese Umwelt- und
Gesundheitsschäden zur Folge haben. Sie können gebrauchte Batterien unentgeltlich bei ihrem Händler und
Sammelstellen zurückgeben. Sie sind als Verbraucher zur Rückgabe von Altbatterien gesetzlich verpflichtet!
Hinweispflicht nach dem Elektronikgerätegesetz
Laut Elektro- und Elektronikgerätegesetz (ElektroG) gehört Elektroschrott nicht in den Hausmüll, sondern ist zu recyceln
oder umweltfreundlich zu entsorgen. Entsorgen Sie ihr Gerät in einen Recycling Container oder an eine lokale
Abfallsammelstelle.

EN1
WS6442 - INSTRUCTIONS MANUAL
Overview:
1 – Weather forecast icons 2 – Weather tendency icon
3 – Outdoor temperature 4 – Outdoor humidity
5 – Outdoor temperature alert 6 – Time
7 – Indoor temperature 8 – Indoor humidity
9 – Indoor temperature alert 10 – Moon phase icon
11 – Close/Open window icon 12 – Weekday
13 – Date and month
Full Display

EN2
Buttons
There are seven function buttons:
SET/RCC ALARM +/HEAT/DEW -/MAX/MIN
ALERT CHANNEL SNOOZE/LIGHT
Functions
Year:2019-2099
Date/Month/Day
Indoor/outdoor temperature and humidity
Indoor/outdoor temperature and humidity trend
Low battery icon for station and sensor
24/12 hour selectable
Alarm and snooze function
Weather forecast: Sunny, Partly sunny, Cloudy, Rainy and stormy
Maximum and Minimum temperature/humidity
Seven languages for week (GER, FRE, ITA, DUT, SPA, DAN,ENG)
Time zone: -12/+12HR
DCF Radio clock receiver function
Backlight,HI、LOW、OFF
Heat index and dew point for outdoor
High/Low Temperature alert for indoor and outdoor
Close/Open window tips (When temperature between 20℃- 25℃ and humidity between 40% -70% will display to open the window if not in
the range will display to close)
Moon phase
Can be connected to up to 3 outdoor sensors
Batteries base station(WS6442): 3 x AAA
Batteries outdoor sensor(TX960-TH): 2 x AAA
Initial operation:
Connect the station with a household socket by using the adapter.
When the station is powered, all icons on the LCD display will light up for 3 seconds, and you will hear a beep tone.
The weather station will now start to make a connection to the outdoor remote sensor. This operation takes about 3 minutes and is
displayed by a flashing reception RF antenna symbol in the “OUTDOOR” display area on the receiver.
Remove the outdoor sensor battery compartment cover and insert 2 x AAA batteries observing polarity [ “+” and “–“ marks]. Then close the
battery compartment.
After station has created a connection to the outdoor remote sensor, it will then enter the radio control time reception mode.
Optional: batteries for back-up (no permanent backlight if used without power adapter)
Open weather station battery compartment cover.
Insert 3 x AAA batteries observing polarity [ “+” and “ –“ marks].
Close the battery compartment.

EN3
Notes:
If the outdoor temperature is not displayed after 3 minutes, hold the “CHANNEL” button on the main unit to search for outdoor sensor.
Then press the TX button on the sensor to send signal. If it still does not receive the outdoor temperature, remove the batteries from the
transmitter and go back to step 1 of the set up.
Extended periods of cold temperature (below-20°C) can cause alkaline batteries to function improperly. This will cause the outdoor
wireless sensor to stop transmitting temperature readings. Use lithium batteries in these low temperature conditions to ensure continued
operation for wireless sensors placed outdoors.
Place the outdoor sensor in a dry and shady area.
Reception of the radio-controlled time signal:
The clock automatically starts the DCF signal search after 7 minutes of any restart or changing of new fresh batteries. The radio mast icon
starts to flash.
At 1:00 / 2:00 / 3:00 / 4:00 / 5:00 the clock automatically starts the synchronization procedure with the DCF signal to correct any deviations
to the exact time. If this synchronization attempt is unsuccessful (the radio mast icon disappears from the display), the system will
automatically attempt another synchronization at the next full one hour. This procedure is repeated automatically up to total 5 times.
To start manual DCF signal reception, press the “SET/RCC” button. If no signals received within 7 minutes, then the DCF signal search
stops (the radio mast icon disappears) and start again at the next full one hour.
During RC reception,to stop searching radio signal, press the “SET/RCC” button once.
Notes:
A flashing radio mast icon indicates that the DCF signal reception has started
A continuously displayed radio mast icon indicates that the DCF signal was received successfully
We recommend a minimum distance of 2.5 meters to all sources of interference, such as televisions or computer monitors
Radio reception is weaker in rooms with concrete walls (e.g.: in cellars) and in offices. In such circumstances, place the system close to
the window.
Manual time setting
Press and hold SET/RCC button to enter setting mode:
24/12-HOUR: 24Hr will flash. Press the +/HEAT/DEW or -/MAX/MIN button to select the 24-hour or 12-hour time. Press the SET/RCC
button to continue.
Time zone: Time zone will be displayed and the selected time zone will flash. Press the +/HEAT/DEW or -/MAX/MIN button to set the
desired time zone ( setting range is 0~+12,0~-12). +0 for Germany, +1 for UK. Press and release the SET/RCC button to continue.
HOURS: The hours will flash. Press the+/HEAT/DEW or -/MAX/MIN button to select the hours. Press the SET/RCC button to continue.
MINUTES: The minutes will flash. Press the +/HEAT/DEW or -/MAX/MIN button to select the minutes. Press the SET/RCC button to
continue.
YEAR: The year will flash. Press the +/HEAT/DEW or -/MAX/MIN button to select the year. Press the SET/RCC button to continue.
MONTH: The month will flash. Press the +/HEAT/DEW or -/MAX/MIN button to select the month. Press the SET/RCC button to continue.

EN4
DATE: The date will flash. Press the +/HEAT/DEW or -/MAX/MIN button to select the date. Day of the week will set automatically after
YEAR, MONTH and DATE are set. Press the SET/RCC button to continue.
LANGUAGE: GER will flash(default is GER). Press the +/HEAT/DEW or -/MAX/MIN button to select the desired language: GER, FRE,
ITA, DUT, SPA, DAN,ENG. Press the SET/RCC button to continue.
°C/°F: Temperature unit °C will flash. Press and release the +/HEAT/DEW or -/MAX/MIN button to select the °C or °F, Press and release
the SET/RCC button to confirm the setting.
Notes:
1. If no buttons are pressed in a 20 seconds period, set mode will time out and return to live display mode, reflecting whatever adjustments
were made by user before timed out
2. +/HEAT/DEW or -/MAX/MIN: Press once to adjust by 1 unit, hold for fast scroll adjustment
Alarm setting
Press and hold the ALARM button to enter alarm setting mode:
ALARM HOUR: The Alarm Hour will flash. Use the +/HEAT/DEW or -/MAX/MIN button to set the Hour. Press and release the ALARM
button to confirm.
ALARM MINUTE: The Alarm Minutes will flash. Use the +/HEAT/DEW or -/MAX/MIN button to set the Minutes. Press and release the
ALARM button to confirm. Press the ALARM button to exit.
Notes:
1. If no buttons are pressed in a 20 seconds period, set mode will time out and return to live display mode, reflecting whatever adjustments
were made by user before timed out
2. +/HEAT/DEW or -/MAX/MIN: Press once to adjust setting by 1 value, hold for fast scroll adjustment
Activate/deactivate alarm
Press the ALARM button once and ALM is displayed. Use +/HEAT/DEW or -/MAX/MIN to activate or deactivate alarm
ALARM ICON: is displayed when alarm is activated and no longer displayed when alarm is deactivated
Snooze function
When alarm sounds, press the SNOOZE button to trigger snooze time for 10 minutes. The alarm icon flashes when the snooze feature is
active.
To stop alarm for one day, press any button but SNOOZE button, while in snooze mode. The alarm icon will still be displayed.
Note: Alarm is crescendo sound. When the alarm sounds, it continues for 2 minute and then shuts off completely.
Weather forecast
The station displays 1 of 6 different weather forecasts:

EN5
Sunny Partly sunny Cloudy
Rainy Stormy Snowy
Outdoor sensor channels
Press the CHANNEL button to view the channels: CH1 (Channel 1), CH2 (Channel 2), CH3 (Channel 3) and Channel rotation (each
channel is displayed for a short time)
Hold the CHANNEL button for 2 seconds to search for a sensor for the selected channel on your station. The powered sensor needs to
have the same channel selected on it’s backside.
The rf signal icon will flash until the sensor signal is received or no signal is available within 3 minutes.
HEAT and DEW values
In normal display mode, press the +/HEAT/DEW button to view the HEAT (heat index) value.
Press the +/HEAT/DEW button again to view the DEW (dew point) value.
Press the +/HEAT/DEW button again to return to normal display mode.
Notes:
The HEAT value shows the heat index value (shade value, made from temperature and humidity) used to warn from dangers of heat,
exposure to full sunshine can increase heat index values by up to 8 °C (14 °F).
Celsius
Fahrenheit
Warning
27-32°C
80-90°F
Caution: fatigue is possible with
prolonged exposure and activity.
Continuing activity could result in heat
cramps.
32-41°C
90-105°F
Extreme caution: heat cramps and heat
exhaustion are possible. Continuing
activity could result in heat stroke
41-54°C
105-130°F
Danger: heat cramps and heat exhaustion
are likely; heat stroke is probable with
continued activity.
Over 54°C
Over 130°F
Extreme danger: heat stroke is imminent.
MAX and MIN values
In normal display mode, press the -/MAX/MIN button to view the MAX values of indoor and outdoor temperature and humidity.

EN6
Press the -/MAX/MIN button again to view the MIN values of indoor and outdoor temperature and humidity.
Press the -/MAX/MIN button again to return to normal display mode.
Notes:
Press and hold the -/MAX/MIN button for 2 seconds to clear MAX and MIN values from memory.
The MAX/MIN values will also be automatically cleared at every midnight (0:00).
After 5 seconds without pressing a button the display will return back to the normal display mode.
Activate/deactivate HI/LO alert function
In normal display mode, press the ALERT button and outdoor “HI” will blink. Press +/HEAT/DEW button to activate the HI temperature
alert, press -/MAX/MIN button to turn off the HI temperature alert. Press ALERT button to confirm.
Outdoor LO flashes on the display. Press +/HEAT/DEW button to activate the HI temperature alert or press -/MAX/MIN button to turn off
the HI temperature alert. Press ALERT button to confirm.
Indoor “HI” flashes on the display. Press +/HEAT/DEW button to activate the HI temperature alert or press -/MAX/MIN button to turn off
the HI temperature alert. Press ALERT button to confirm.
Indoor LO flashes on the display. Press +/HEAT/DEW button to active the HI temperature alert or press -/MAX/MIN button to turn off the
HI temperature alert. Press ALERT button to confirm.
Notes:
If HI/LO temperature alert is turned off the icon OFF will show on the display.
Setting HI/LO alert values
Hold the ALERT button for about 2 seconds to enter the setting value of temperature alert. “HI” outdoor temperature flashes on the
display. Press and release +/HEAT/DEW and -/MAX/MIN button to adjust the value or hold the button for fast adjust during setting mode.
Press ALERT button to confirm.
“LO” outdoor temperature flashes on the display. Press and release +/HEAT/DEW and -/MAX/MIN button to adjust the value or hold the
button for fast adjust during setting mode. Press ALERT button to confirm.
“HI” indoor temperature flashes on the display. Press and release +/HEAT/DEW and -/MAX/MIN button to adjust the value or hold the
button for fast adjust during setting mode. Press ALERT button to confirm.
“LO” indoor temperature flashes on the display. Press and release +/HEAT/DEW and -/MAX/MIN button to adjust the value or hold the
button for fast adjust during setting mode. Press ALERT button to end the setting.
Backlight
Press the SNOOZE/LIGHT button to set backlight to HI/LO/OFF, if using adapter to power the station.
Press the SNOOZE/LIGHT button to activate backlight for 10 seconds, if using batteries and not adapter to power the station.
Low battery indicator
Battery icon by indoor temperature means to change batteries in the station.
Battery icon by outdoor temperature means to change batteries in the sensor.
Specifications
Indoor temperature
Operating temperature range = 0°C to 50°C (32°F to 122°F)
Accuracy ± 1 degrees Celsius 0°C to 50°C (32°F to122°F)
Resolution = 0.1 degree Celsius
When above 50°C (122 °F), the LCD will display HI
When below- 9.9°C (14°F) the LCD will display LO
Indoor humidity
Operating humidity range =20% RH to 95%
Accuracy +/- 5% RH (@25°C , 30%RH to 80%RH)

EN7
Accuracy +/- 8% RH (@25°C, 20%RH to29%RH 80%RH to 95%RH)
Resolution = 1 % RH
Outdoor temperature
Operating temperature range = -40°C to 60°C (-40°F to 140°F)
Accuracy ± 1 degrees Celsius from 0°C to 50°C (32°F to 122°F)
Accuracy ±1.5 degrees Celsius from -40°C to 0°C (-40°F to 32°F) and 50°C to 60°C (122°F to 140°F)
Resolution = 0.1 degree Celsius
When above 60°C (140 °F), the LCD will display HI.
When below-40°C (-40°F), the LCD will display LO.
Outdoor humidity
Operating humidity range =20% RH to 95%
Accuracy +/- 5% RH (@25°C , 30%RH to 80%RH)
Accuracy +/- 8% RH (@25°C , 20%RH to 30%RH-80%RH to 95%RH)
Resolution = 1 % RH
Environmental reception effects
The station obtains the accurate time with wireless technology. Same as all wireless devices, the reception is maybe affected by the following
circumstances:
long transmitting distance
nearby mountains and valleys
near freeway, railway, airports, high voltage cable etc.
near construction site
among tall buildings
inside concrete buildings
near electrical appliances (computers, TV’s, etc) and metallic structures
inside moving vehicles
Place the station at a location with optimal signal, i.e. close to a window and away from metal surfaces or electrical appliances.
Precautions
This main unit is intended to be used only indoors, the outdoor sensor is to be used outdoors.
Do not subject the unit to excessive force or shock.
Do not expose the unit to extreme temperatures, direct sunlight, dust or humidity.
Do not immerse in water.
Avoid contact with any corrosive materials.
Do not dispose this unit in a fire as it may explode.

EN8
Do not open the inner back case or tamper with any components of this unit.
Batteries safety warnings
Use only alkaline batteries, not rechargeable batteries.
Install batteries correctly by matching the polarities (+/-).
Always replace a complete set of batteries.
Never mix used and new batteries.
Remove exhausted batteries immediately.
Remove batteries when not in use.
Do not recharge and do not dispose of batteries in fire as the batteries may explode.
Ensure batteries are stored away from metal objects as contact may cause a short circuit.
Avoid exposing batteries to extreme temperature or humidity or direct sunlight.
Keep all batteries out of reach from children. They are a choking hazard.
Use the product only for its intended purpose!
Consideration of duty according to the battery law
Old batteries do not belong to domestic waste because they could cause damages of health and environment. You can
return used batteries free of charge to your dealer and collection points. As end-user you are committed by law to bring
back needed batteries to distributors and other collecting points!
Consideration of duty according to the law of electrical devices
This symbol means that you must dispose of electrical devices separated from the General household waste when it
reaches the end of its useful life. Take your unit to your local waste collection point or recycling centre. This applies to all
countries of the European Union, and to other European countries with a separate waste collection system.

FR1
WS6442 – Guide d’utilisation
Vue d’ensemble :
1 - Icônes des prévisions météo
2 - Icônes de la tendance météo
3 - Température extérieure
4 - Humidité extérieure
5 - Alerte de
température extérieure
6 - Heure
7 - Température intérieure
8 - Humidité intérieure
9 - Alerte de température intérieure
10 - Icône de la phase de la lune
11 - Icône Fermer/Ouvrir
les fenêtres
12 - Jour de la semaine
13 - Jour et mois
Affichage complet

FR2
Touches
Il y a sept boutons de fonction :
SET/RCC
ALARME
+/HEAT/DEW
-/MAX/MIN
ALERTE
CANAL
SNOOZE/LIGHT
Fonctions
● Année : 2019-2099
● Année/mois/jour
● Température et humidité intérieure/extérieure
● Tendance de la température et de l'humidité intérieure/extérieure
● Icône de piles faibles pour la station et le capteur
● 24 ou 12 heures
● Alarme avec fonction de rappel d’alarme
● Prévisions météo : Ensoleillé, Partiellement ensoleillé, Nuageux, Pluvieux et Orageux
● Température/humidité maximale et minimale
● Sept langues pour la semaine (GER, FRE, ITA, DUT, SPA, DAN, ENG)
● Fuseau horaire : -12 à +12 Heures
● Station météo radio-pilotée par signal DCF
● Rétroéclairage, HI, LOW, OFF
● Indice de chaleur et point de rosée pour l’extérieur
● Alerte de température intérieure et extérieure Haute/Basse
● Conseil pour fermer/ouvrir les fenêtres (lorsque la température est entre 20°C et 25°C et l’humidité entre 40% et 70% l’icône ouvrir les
fenêtres apparaît, autrement l’icône fermer les fenêtres apparaît)
● Phases lunaires
● Peut être connectée à 3 capteurs extérieurs maximum
● Piles de la station de base (WS6442) : 3 x AAA
● Piles du capteur extérieur (TX960-TH) : 2 x AAA
Mise en marche :
● Branchez la station à l’adaptateur secteur.
● Lorsque la station est sous tension, tous les icônes de l’écran LCD s’allument pendant 3 secondes et un bip est émis.
● La station météo commence à établir une connexion avec le capteur extérieur. Cette opération prend environ 3 minutes et est indiquée par
le symbole d’une antenne de réception RF clignotante dans la zone d'affichage « EXTÉRIEUR » du récepteur.
● Retirez le couvercle du compartiment à piles du capteur extérieur et insérez 2 piles AAA en respectant les polarités [«+» et «-»]. Refermez
le couvercle du compartiment à piles.
● Après l’établissement d’une connexion avec le capteur extérieur, la station passe en mode réception de l’heure radiocommandée.
En option : piles de secours (pas de rétro-éclairage permanent si utilisé sans adaptateur d’alimentation)
● Ouvrez le compartiment à piles de la station météo
● Insérez 3 piles AAA en respectant les polarités [«+» et «-»].
● Fermez le compartiment à piles.

FR3
Remarques :
● Si la température extérieure ne s’affiche pas au bout de 3 minutes, maintenez appuyé le bouton «CHANNEL» de l’unité principale pour
rechercher le capteur extérieur. Appuyez ensuite sur la touche « TX » du capteur pour envoyer le signal. Si l’unité principale ne reçoit
toujours pas la température extérieure, retirez les piles de l’émetteur et retournez à l’étape 1 de l'installation.
● Des périodes prolongées de froid (inférieures à -20°C) peuvent entraîner un dysfonctionnement des piles alcalines. Le capteur sans fil
extérieur s’arrête alors de transmettre les mesures de la température. Dans ces conditions de basse température, utilisez des piles au
lithium pour assurer le fonctionnement continu des capteurs sans fil placés à l’extérieur.
Réception du signal horaire radio-piloté :
● L'horloge commence automatiquement la recherche de signal DCF 7 minutes après un redémarrage ou un changement de piles. L'icône
d'antenne radio se met à clignoter.
● L'horloge effectue automatiquement une procédure de synchronisation avec le signal DCF pour corriger les écarts avec l'heure exacte à
1h00/2h00/3h00/4h00/5h00. En cas d’échec des tentatives de synchronisation (l'icône d'antenne radio disparaît de l'écran), le système
essaie automatiquement une nouvelle synchronisation au bout d'une heure. Cette procédure est répétée automatiquement au maximum 5
fois.
● Pour démarrer la réception manuelle du signal DCF, appuyez sur le bouton « SET/RCC ». Si aucun signal n’est reçu dans les 7 minutes, la
recherche du signal DCF s’arrête (l’icône de l’antenne radio disparaît), vous devez alors recommencer à la prochaine heure pleine.
● Pendant la réception du signal radio-piloté, pour arrêter la recherche du signal radio, appuyez une fois sur le bouton « SET/RCC ».
Remarques :
● Une icône d’antenne radio clignotante indique que la réception du signal DCF a démarré
● Une icône d’antenne radio affichée de façon continue indique que le signal DCF est reçu avec succès
● Veillez à respecter une distance minimale de 2,5 m des sources d'interférence telles que téléviseurs ou écrans d'ordinateur.
● La réception du signal radio est plus faible dans des pièces avec murs en béton (ex. sous-sol) et dans les immeubles. Dans de telles
circonstances extrêmes, placez le système près d’une fenêtre.
Réglage manuel de l’heure
Maintenez appuyé le bouton SET/RCC pour passer en mode réglage:
● 24/12-HOUR: 24Hr se met à clignoter. Utilisez +/HEAT/DEW ou -/MAX/MIN pour choisir le format d'affichage de l'heure, 24 ou 12 heures
Appuyez sur SET/RCC pour continuer.
● Time zone: Les fuseaux horaires seront affichés et le fuseau horaire sélectionné se met à clignoter. Utilisez +/HEAT/DEW ou -/MAX/MIN
pour choisir un fuseau horaire (de 0 à + 12 ou de 0 à -12) 0 pour l’Allemagne, -1 pour le Royaume-Uni Appuyez sur SET/RCC pour
continuer.
● HOURS: Les heures se mettent à clignoter. Utilisez +/HEAT/DEW ou -/MAX/MIN pour choisir les heures. Appuyez sur SET/RCC pour
continuer.
● MINUTES: Les minutes se mettent à clignoter. Utilisez +/HEAT/DEW ou -/MAX/MIN pour choisir les minutes. Appuyez sur SET/RCC pour

FR4
continuer.
● YEAR: L'année se met à clignoter. Utilisez +/HEAT/DEW ou -/MAX/MIN pour choisir l'année. Appuyez sur SET/RCC pour continuer.
● MONTH: Le mois se met à clignoter. Utilisez +/HEAT/DEW ou -/MAX/MIN pour choisir le mois. Appuyez sur SET/RCC pour continuer.
● DATE: La date se met à clignoter. Utilisez +/HEAT/DEW ou -/MAX/MIN pour choisir le jour. Le jour de la semaine sera défini
automatiquement après ANNÉE, MOIS et JOUR. Appuyez sur SET/RCC pour continuer.
● LANGUAGE: GER se met à clignoter (L’allemand est la langue par défaut). Utilisez +/HEAT/DEW ou -/MAX/MIN pour choisir une langue.
GER, FRE, ITA, DUT, SPA, DAN, ENG. Appuyez sur SET/RCC pour continuer.
● °C/°F: L’unité de température °C se met à clignoter. Utilisez +/HEAT/DEW ou -/MAX/MIN pour choisir °C ou° F ; appuyez sur le bouton
SET/RCC pour confirmer le réglage.
Remarques :
1. Si aucune touche n’est appuyée pendant 20 secondes, le mode réglage sera interrompu et il y aura retour au mode affichage normal,
reflétant les réglages effectués par l'utilisateur
2. +/HEAT/DEW ou -/MAX/MIN : Appuyez une fois pour rajouter/soustraire 1, maintenez appuyée pour aller rapidement
Réglage de l’alarme
Maintenez appuyé le bouton ALARM pour passer en mode réglage de l'alarme:
● HEURE D’ALARME : Les heures de l’alarme se mettent à clignoter. Utilisez +/HEAT/DEW ou -/MAX/MIN pour régler les heures. Appuyez
sur le bouton ALARM pour confirmer.
● MINUTES DE L’ALARME : Les minutes de l’alarme se mettent à clignoter. Utilisez +/HEAT/DEW ou -/MAX/MIN pour régler les minutes.
Appuyez sur le bouton ALARM pour confirmer. Appuyez sur le bouton ALARM pour quitter.
Remarques :
1. Si aucune touche n’est appuyée pendant 20 secondes, le mode réglage sera interrompu et il y aura retour au mode affichage normal,
reflétant les réglages effectués par l'utilisateur
2. +/HEAT/DEW ou -/MAX/MIN : Appuyez pour ajuster par pas de 1, maintenez appuyé pour aller rapidement.
Activer/désactiver l'alarme
Appuyez sur le bouton ALARM, ALM sera affiché. Utilisez +/HEAT/DEW ou -/MAX/MIN pour activer/désactiver l'alarme.
● ICÔNE D’ALARME : apparaît lorsque l’alarme est activée et disparaît lorsque l’alarme est désactivée
Rappel d'alarme
● Lorsque l’alarme sonne, appuyez sur le bouton SNOOZE pour déclencher le rappel d’alarme dans 10 minutes. L’icône alarme clignote
lorsque le rappel d’alarme est activé.
● Pour arrêter l’alarme pour la journée, appuyez sur un bouton quelconque à part SNOOZE en mode rappel d’alarme. L’icône d’alarme reste
toujours affiché.
Remarque : Le son de l’alarme augmente progressivement. Lorsque l’alarme se déclenche, elle reste active pendant 2 minutes, puis s’arrête.

FR5
Prévisions météo
La station affiche une des 6 différentes prévisions météo :
Ensoleillé
Partiellement
ensoleillé
Nuageux
Pluvieux
Orageux
Neigeux
Canaux du capteur extérieur
● Appuyez sur le bouton CHANNEL pour afficher les canaux : CH1 (canal 1), CH2 (canal 2), CH3 (canal 3) et rotation des canaux (chaque
canal est affiché pendant une courte période)
● Maintenez appuyé le bouton CHANNEL pendant 2 secondes pour rechercher un capteur associé au canal sélectionné. Le capteur alimenté
doit avoir le même canal sélectionné sur son panneau arrière.
● L’icône du signal RF clignote jusqu’à ce que le signal du capteur soit reçu ou qu’aucun signal ne soit disponible dans les 3 minutes.
Valeurs de chaleur et point de rosée
● En mode d’affichage normal, appuyez sur le bouton +/HEAT/DEW pour afficher la valeur de chaleur (indice de chaleur).
● Appuyez à nouveau sur le bouton +/HEAT/DEW pour afficher la valeur du point de rosée.
● Appuyez à nouveau sur le bouton +/HEAT/DEW pour retourner au mode d'affichage normal.
Remarques :
● La valeur HEAT indique l’indice de chaleur (valeur de l’ombre, calculée à partir de La température et de l'humidité) utilisé pour avertir contre
les dangers de chaleur, l'exposition au plein soleil peut augmenter l'indice de chaleur jusqu'à 8°C (14°F).
Celsius
Fahrenheit
Avertissement
27-32°C
80-90°F
Attention : Une exposition prolongée et
une quelconque activité peut entrainer
une fatigue. Une activité continue pourrait
donner des crampes de chaleur.
32-41°C
90-105°F
Extrême prudence : des crampes de
chaleur et l’épuisement par la chaleur
sont possibles. Une activité continue
pourrait donner un coup de chaleur.
41-54°C
105-130°F
Danger : des crampes et un épuisement
par la chaleur sont probables ; un coup de
chaleur est probable avec une activité
continue.
> 54°C
> 130°F
Danger extrême : coup de chaleur
imminent.

FR6
Valeurs max. et min.
● En mode d’affichage normal, appuyez sur le bouton -/MAX/MIN pour afficher les valeurs maximales de la température et de l'humidité
intérieures et extérieures.
● Appuyez de nouveau sur le bouton -/MAX/MIN pour afficher les valeurs minimales de la température et de l'humidité intérieures et
extérieures.
● Appuyez à nouveau sur le bouton -/MAX/MIN pour retourner au mode d'affichage normal.
Remarques :
● Maintenez appuyé le bouton -/MAX/MIN pendant 2 secondes pour effacer de la mémoire les valeurs maximales et minimales.
● Les valeurs maximales et minimales sont également automatiquement effacées chaque jour à minuit (0:00).
● Si aucun bouton n'est appuyé pendant 5 secondes, l’écran bascule automatiquement au mode d'affichage normal.
Activer/désactiver l’alerte Haute/Basse température (HI/LO)
● En mode d’affichage normal, appuyez sur le bouton ALERT pour que la Haute température « HI » extérieure se mette à clignoter. Appuyez
sur le bouton +/HEAT/DEW pour activer l’alerte Haute température, appuyez sur le bouton -/MAX/MIN pour la désactiver. Appuyez sur le
bouton ALERT pour confirmer.
● La Basse température (LO) extérieure se met à clignoter. Appuyez sur le bouton +/HEAT/DEW pour activer l’alerte Haute température,
appuyez sur le bouton -/MAX/MIN pour la désactiver. Appuyez sur le bouton ALERT pour confirmer.
● Si l’alerte Haute/Basse température (HI/LO) est désactivée, OFF apparaît à l’écran. La haute température (HI) intérieure se met à clignoter.
Appuyez sur le bouton +/HEAT/DEW pour activer l’alerte Haute température, appuyez sur le bouton -/MAX/MIN pour la désactiver.
Appuyez sur le bouton ALERT pour confirmer.
● La Basse température (LO) intérieure se met à clignoter. Appuyez sur le bouton +/HEAT/DEW pour activer l’alerte Haute température,
appuyez sur le bouton -/MAX/MIN pour la désactiver. Appuyez sur le bouton ALERT pour confirmer.
Remarques :
● Si l’alerte Haute/Basse température (HI/LO) est désactivée, OFF apparaît à l’écran.
Définition des valeurs d’alerte Haute/Basse température (HI/LO)
● Maintenez appuyé le bouton ALERT pendant environ 2 secondes pour entrer les valeurs d’alertes de température. La Haute température «
HI » extérieure se met à clignoter. Utilisez les boutons +/HEAT/DEW et -/MAX/MIN pour ajuster la valeur ou maintenez appuyé le bouton
pour aller rapidement. Appuyez sur le bouton ALERT pour confirmer.
● La Basse température « LO » extérieure se met à clignoter. Utilisez les boutons +/HEAT/DEW et -/MAX/MIN pour ajuster la valeur ou
maintenez appuyé le bouton pour aller rapidement. Appuyez sur le bouton ALERT pour confirmer.
● La Haute température « HI » intérieure se met à clignoter. Utilisez les boutons +/HEAT/DEW et -/MAX/MIN pour ajuster la valeur ou
maintenez appuyé le bouton pour aller rapidement. Appuyez sur le bouton ALERT pour confirmer.
● La Basse température « LO » intérieure se met à clignoter. Utilisez les boutons +/HEAT/DEW et -/MAX/MIN pour ajuster la valeur ou
maintenez appuyé le bouton pour aller rapidement. Appuyez sur le bouton ALERT pour terminer le réglage.
Rétroéclairage
● Appuyez sur le bouton SNOOZE/LIGHT pour régler le rétroéclairage sur HI/LO/OFF dans le cas où la station est alimentée par un
adaptateur.
● Appuyez sur le bouton SNOOZE/LIGHT pour allumer le rétroéclairage pendant 10 secondes, dans le cas où la station est alimentée par
piles.
Indicateur de faible niveau des piles
● L’icône de pile affiché près de la température intérieure indique que les piles de la station doivent être changées.
● L’icône de pile affiché près de la température extérieure indique que les piles du capteur doivent être changées.

FR7
Spécifications
Température intérieure
● Plage de température : 0°C à 50°C (32°F à 122°F)
● Précision ± 1 degré Celsius de 0°C à 50°C (de 32°F à 122°F)
● Résolution = 0,1 degré Celsius
● Lorsque la température est supérieure à 50°C (122°F), l’écran LCD affiche HI
● En dessous de -9,9°C (14°F), l’écran LCD affiche LO (Faible)
Humidité intérieure
● Plage de l’humidité de fonctionnement = de 20 % à 95 % HR
● Précision +/- 5% HR (@25°C, 30%HR à 80%HR)
● Précision +/- 8% HR (@25°C, 20%HR à 29%HR - 80%HR à 95%HR)
● Résolution = 1 % HR
Température extérieure
● Plage d’humidité supportée en fonctionnement = de -40° C à 60° C (de -40° F à 140° F)
● Précision ± 1 degré Celsius de 0°C à 50°C (32°F à 122°F)
● Précision ±1,5 degré Celsius de -40°C à 0°C (-40°F à 32°F) et 50°C à 60°C (122°F à 140°F)
● Résolution = 0,1 degré Celsius
● Lorsque la température est supérieure à 60°C (140°F), l’écran LCD affiche HI
● En dessous de -40°C (-40°F), l’écran LCD affiche LO (Faible).
Humidité extérieure
● Plage de l’humidité de fonctionnement = de 20 % à 95 % HR
● Précision +/- 5% HR (@25°C, 30%HR à 80%HR)
● Précision +/- 8% HR (@25°C, 20%HR à 30%HR - 80%HR à 95%HR)
● Résolution = 1 % HR
Effets de l'environnement sur la réception
La station utilise la technologie sans fil pour obtenir l'heure précise. Comme pour tout appareil sans fil, la réception peut être affectée dans les
cas suivants :
● Distance de transmission longue
● Montagnes et vallées toutes proches
● Près d'autoroutes, chemins de fer, aéroports, câbles à haute tension, etc.
● À proximité d'un chantier de construction
● Entouré de bâtiments élevés
● À l'intérieur de bâtiments en béton
● À proximité d'appareils électriques (ordinateurs, téléviseurs, etc.) et des structures métalliques
● À l'intérieur de véhicules mobiles
Placez votre station météo dans un endroit avec des signaux optimaux, par exemple près d'une fenêtre, loin des surfaces métalliques et des
appareils électriques.
Précautions
● L’unité principale est destinée à être utilisée uniquement à l’intérieur, le capteur extérieur doit être utilisé à l’extérieur.
● Ne soumettez pas l’appareil à une force ou à un choc excessif.
● N’exposez pas l’appareil à la lumière directe du soleil, à des températures extrêmes, à l’humidité ou à la poussière.
● Ne plongez pas l’appareil dans l’eau.
● Évitez de le mettre en contact avec des matériaux corrosifs.

FR8
● Ne jetez pas cet appareil au feu, il risque d’exploser.
● N’ouvrez pas le panneau arrière et n’apportez aucune modification aux composants de cette unité.
Avertissements de sécurité concernant les piles
● Utilisez uniquement des piles alcalines non rechargeables.
● Installez les piles en respectant les polarités (+/-).
● Remplacez toujours toutes les piles en même temps.
● Ne mélangez pas des piles usagées avec des piles neuves.
● Lorsque les piles sont déchargées, les retirer immédiatement de l’appareil.
● Retirez les piles lorsque vous n’allez pas utiliser l’appareil.
● N’essayez pas de recharger des piles qui ne sont pas rechargeables et ne jetez aucune pile au feu, elle risque d’exploser.
● Rangez vos piles de façon à ce qu’aucun objet métallique ne puisse causer de court-circuit.
● Évitez d’exposer les piles à des températures extrêmes, à l’humidité ou à la lumière directe du soleil.
● Conservez vos piles hors de la portée des enfants. Elles présentent un risque d’étouffement.
N’utilisez cet appareil que pour l’usage auquel il est destiné !
Obligation légale concernant la mise au rebut des piles
Ne jetez pas les piles usagées avec les ordures ménagères, car elles sont nuisibles à la santé et à l'environnement. Vous
pouvez ramener les piles usagées sans frais à votre revendeur et aux points de collecte. En tant que consommateur, vous
êtes obligé par la loi de ramener les piles usagées aux revendeurs et aux points de collecte !
Respect de l’obligation de la loi sur les appareils électriques
Ce symbole signifie que les appareils électriques ne doivent pas être jetés avec les ordures ménagères à la fin de leur vie
utile. Ramenez votre appareil à un point de collecte de déchets ou à un centre de recyclage local. Ceci s’applique à tous les
pays de l’Union européenne et aux autres pays européens disposant d’un système de collecte sélectif des déchets.

ES1
WS6442 – MANUAL DE INSTRUCCIONES
Vista genera:
1 – Iconos de
previsión meteorológica
2 – Icono de
tendencia meteorológica
3 – Temperatura exterior
4 – Humedad exterior
5 – Alerta de temperatura exterior
6 – Hora
7 – Temperatura interior
8 –Humedad interior
9 – Alerta de temperatura interior
10 – Icono de fase lunar
11 – Icono de abrir / cerrar ventana
12 – Día de la semana
13 – Fecha y mes
Pantalla completa

ES2
Botones
Existen siete botones de función:
SET/RCC
ALARM
+/HEAT/DEW
-/MAX/MIN
ALERT
CHANNEL
SNOOZE/LIGHT
Funciones
● Año: 2019-2099
● Fecha/Mes/Día
● Temperatura y humedad interior / exterior
● Tendencia de temperatura y humedad interior / exterior
● Icono de batería baja para la estación y el sensor
● Seleccionable 24/12 horas
● Función de alarma y retardo de alarma
● Previsión meteorológica: Soleado, Parcialmente soleado, Nuboso, Lluvioso y tomentoso
● Temperatura y humedad máximas y mínimas
● Siete idiomas para la semana (GER, FRE, ITA, DUT, SPA, DAN, ENG)
● Zona horaria: -12/+12HR
● Función de receptor de radio reloj DCF
● Retroiluminación, HI, LOW, OFF
● Índice de calor y punto de rocío exterior
● Alerta de temperatura alta / baja para el interior y el exterior
● Consejos para abrir / cerrar ventanas (Cuando la temperatura se encuentra entre 20°C- 25°C y la humedad entre 40% -70% se mostrará
abrir la ventana si no se encuentra en el alcance se mostrará cerrar)
● Fase lunar
● Se puede conectar hasta a 3 sensores exteriores
● Pilas de la estación base (WS6442): 3 x AAA
● Pilas del sensor exterior (TX960-TH): 2 x AAA
Funcionamiento inicial:
● Conecte la estación a una toma doméstica usando el adaptador.
● Cuando la estación está encendida, todos los iconos de la pantalla LCD se iluminarán durante 3 segundos y oirá un tono de pitido.
● La estación meteorológica empezará ahora a realizar una conexión con el sensor remoto exterior. Esta operación tarda aproximadamente
3 minutos y se muestra mediante un símbolo de antena de recepción de RF que parpadea en la zona de la pantalla “EXTERIOR” del
receptor.
● Retire la tapa del compartimento de las pilas del sensor exterior e inserte 2 pilas AAA observando la polaridad [marcas “+” y “–”]. Después
cierre el compartimiento de las pilas.
● Una vez que la estación ha creado una conexión con el sensor exterior remoto, entrará en el modo de recepción de hora controlado por
radio.
Opcional: pilas de respaldo (no hay retroiluminación permanente si se usa sin adaptador de alimentación)
● Abra la cubierta del compartimento de las pilas de la estación meteorológica.

ES3
● Inserte 3 pilas AAA observando la polaridad [marcas “+” y “ –”].
● Cierre el compartimento de las pilas.
Notas:
● Si la temperatura exterior no se muestra después de 3 minutos, mantenga pulsado el botón “CHANNEL” en la unidad principal para buscar
el sensor exterior. Posteriormente, pulse el botón “TX” en el sensor para enviar la señal. Si todavía no recibe la temperatura exterior, saque
las pilas del transmisor y repita el proceso desde el paso 1.
● Periodos prolongados de tiempo con temperaturas frías (inferiores a -20°C) pueden provocar que las pilas alcalinas no funcionen
correctamente. Esto provocará que el sensor inalámbrico exterior deje de transmitir las lecturas de temperatura. Use pilas de litio en estas
condiciones de temperaturas bajas para asegurarse un funcionamiento continuo de los sensores inalámbricos colocados en el exterior.
Recepción de la señal horaria controlada por radio:
● El reloj empieza a buscar automáticamente la señal DCF después de 7 minutos de cualquier reinicio o cambio de pilas nuevas. El icono del
mástil de radio empieza a parpadear.
● A las 1:00/2:00/3:00/4:00/5:00 el reloj automáticamente empieza el procedimiento de sincronización con la señal DCF para corregir
cualquier desviación de la hora exacta. Si esta sincronización no tiene éxito, (el icono del mástil de la radio desaparece de la pantalla), el
sistema automáticamente intentará otra sincronización en la siguiente hora completa. Este procedimiento se repite automáticamente hasta
un total de 5 veces.
● Para iniciar la recepción manual de la señal DCF, pulse el botón “SET/RCC”. Si no se recibe ninguna señal en 7 minutos, se detiene la
búsqueda de la señal DCF (el icono de la antena de radio desaparece) y vuelve a empezar en la siguiente hora completa.
● Durante la recepción RC, para detener la búsqueda de la señal de radio, pulse una vez el botón “SET/RCC”.
Notas:
● Un icono del mástil de la radio que parpadea indica que la recepción de la señal DCF se ha iniciado.
● Un icono del mástil de la radio que se muestra continuamente indica que la señal DCF se recibe con éxito.
● Recomendamos una distancia mínima de 2,5 metros a todas las fuentes de interferencia, como televisores o monitores de ordenadores.
● La recepción de radio es más débil en habitaciones con hormigón (por ejemplo, en sótanos) y en oficinas. En tales circunstancias, coloque
el Sistema cerca de una ventana.
Ajuste manual de la hora
Mantenga pulsado el botón SET/RCC para entrar en el modo de configuración:
● 24/12-HOUR: 24Hr parpadeará. Pulse el botón +/HEAT/DEW o -/MAX/MIN para seleccionar la hora en formato 24 horas o 12 horas. Pulse
el botón SET/RCC para continuar.
● Time zone: Se mostrará la zona horaria y la zona seleccionada parpadeará. Pulse el botón +/HEAT/DEW o -/MAX/MIN para configurar la
zona horaria que desee (el alcance de configuración es 0~+12, 0~-12). +0 para Alemania, +1 para el Reino Unido. Pulse y suelte el botón
SET/RCC para continuar.

ES4
● HOURS: Las horas parpadearán. Pulse el botón +/HEAT/DEW o -/MAX/MIN para seleccionar las horas. Press the SET/RCC button to
continue.
● MINUTES: Los minutos parpadearán. Pulse el botón +/HEAT/DEW o -/MAX/MIN para seleccionar los minutos. Press the SET/RCC button
to continue.
● YEAR: El año parpadeará. Pulse el botón +/HEAT/DEW o -/MAX/MIN para seleccionar el año. Press the SET/RCC button to continue.
● MONTH: El mes parpadeará. Pulse el botón +/HEAT/DEW o -/MAX/MIN para seleccionar el mes. Press the SET/RCC button to continue.
● DATE: La fecha parpadeará. Pulse el botón +/HEAT/DEW o -/MAX/MIN para seleccionar la fecha. El día de la semana se configurará
automáticamente una vez configurados AÑO, MES y FECHA. Press the SET/RCC button to continue.
● LANGUAGE: GER parpadeará (GE Res el idioma predeterminado). Pulse el botón +/HEAT/DEW o -/MAX/MIN para seleccionar el idioma
que desee: GER, FRE, ITA, DUT, SPA, DAN, ENG. Press the SET/RCC button to continue.
● °C/°F: La unidad de temperatura °C parpadeará. Pulse y suelte el botón +/HEAT/DEW o -/MAX/MIN para seleccionar °C o °F; pulse y
suelte el botón SET/RCC para confirmar la configuración.
Notas:
1. Si no se pulsa ningún botón durante 20 segundos, vencerá el tiempo para realizar ajustes y regresará al modo de presentación normal,
reflejando todos los ajustes realizados antes de que expirara el tiempo
2. +/HEAT/DEW o -/MAX/MIN: Púlselo una vez para ajustarlo 1 unidad; manténgalo pulsado para un ajuste de desplazamiento rápido.
Configuración de la alarma
Mantenga pulsado el botón ALARM para entrar en el modo de configuración de la alarma:
● ALARM HOUR: La hora de la alarma parpadeará. Use el botón +/HEAT/DEW o -/MAX/MIN para configurar la hora. Pulse y suelte el botón
ALARM para confirmarlo.
● ALARM MINUTE: Los minutos de la alarma parpadearán. Use el botón +/HEAT/DEW o -/MAX/MIN para configurar los minutos. Press and
release the ALARM button to confirm. Pulse el botón ALARM para salir.
Notas:
1. Si no se pulsa ningún botón durante 20 segundos, vencerá el tiempo para realizar ajustes y regresará al modo de presentación normal,
reflejando todos los ajustes realizados antes de que expirara el tiempo
2. +/HEAT/DEW or -/MAX/MIN: Púlselo una vez para ajustar la configuración en 1 valor; manténgalo pulsado para un desplazamiento rápido
del ajuste
Activar/desactivar la alarma
Pulse una vez el botón ALARM y se muestra ALM. Use +/HEAT/DEW o -/MAX/MIN para activar o desactivar la alarma
● ICONO DE ALARMA: se muestra cuando la alarma está activada y ya no se muestra cuando se desactiva la alarma
Función retardo
● Cuando suene la alarma, pulse el botón SNOOZE para activar el tiempo de retardo durante 10 minutos. El icono de la alarma permanecerá
parpadeando mientras que la función de retardo de alarma esté activa.

ES5
● Para detener la alarma un día, pulse cualquier botón salvo el botón SNOOZE mientras está en modo retardo. Todavía mostrará el icono de
la alarma.
Nota: Alarma con sonido creciente. Cuando suena la alarma, continúa durante 2 minutos y luego se apaga completamente.
Previsión meteorológica
La estación muestra 1 de las 6 previsiones meteorológicas diferentes:
Soleado
Parcialmente nublado
Nublado
Lluvioso
Tormentoso
Nevando
Canales del sensor exterior
● Pulse el botón CHANNEL para ver los canales: CH1 (Canal 1), CH2 (Canal 2), CH3 (Canal 3) y Rotación de canales (cada canal se
muestra durante un breve periodo de tiempo)
● Mantenga pulsado el botón CHANNEL durante 2 segundos para buscar un sensor para el canal seleccionado de su estación. El sensor
alimentado debe tener el mismo canal seleccionado que está en la parte posterior.
● El icono de la señal rf parpadeará hasta que se reciba la señal del sensor o no habrá señal disponible en 3 minutos.
Valor de CALOR y ROCÍO
● En modo de pantalla normal, pulse el botón +/HEAT/DEW para ver el valor de HEAT (índice de calor).
● Vuelva a pulsar el botón +/HEAT/DEW para ver el valor de DEW (punto de rocío).
● Vuelva a pulsar el botón +/HEAT/DEW para volver al modo de pantalla normal.
Notas:
● El valor HEAT muestra el valor del índice de calor (valor a la sombra, creado a partir de la temperatura y humedad) usado para avisar de
los peligros del calor; la exposición a los rayos solares puede aumentar los valores del índice de calor hasta en 8 °C (14 °F).
Celsius
Fahrenheit
Advertencia
27-32°C
80-90°F
Precaución: Es posible la fatiga con la
exposición prolongada y la actividad. Una
actividad continuada puede provocar
calambres por calor.
32-41°C
90-105°F
Precaución extrema: Son posibles los
calambres por calor y el agotamiento por
calor. La actividad continuada puede
provocar un golpe de calor
41-54°C
105-130°F
Peligro: Son probables los calambres por
calor y el agotamiento por calor; el golpe
de calor es probable con actividad
continuada.

ES6
Superior a
54°C
Superior a
130°F
Peligro extremo: Un golpe de calor es
inminente.
Valores MAX y MIN
● En modo de pantalla normal, pulse el botón -/MAX/MIN para ver los valores MAX de la temperatura y humedad interior y exterior.
● Vuelva a pulsar el botón -/MAX/MIN para ver los valores MIN de la temperatura y humedad interior y exterior.
● Vuelva a pulsar el botón -/MAX/MIN para volver al modo de pantalla normal.
Notas:
● Mantenga pulsado el botón -/MAX/MIN durante 2 segundos para eliminar los valores MAX y MIN de la memoria.
● Los valores MAX/MIN asimismo se eliminarán automáticamente cada media noche (0:00).
● Después de 5 segundos sin pulsar un botón la pantalla volverá al modo de pantalla normal.
Activar/desactivar la función de alerta HI/LO
● En modo de pantalla normal, pulse el botón ALERT y parpadeará “HI” exterior. Pulse el botón +/HEAT/DEW para activar la alerta de
temperatura HI; pulse el botón -/MAX/MIN para apagar la alerta de temperatura HI. Pulse el botón ALERT para confirmarlo.
● LO exterior parpadea en la pantalla. Pulse el botón +/HEAT/DEW para activar la alerta de temperatura HI o pulse el botón -/MAX/MIN para
apagar la alerta de temperatura HI. Press ALERT button to confirm.
● Si la alerta de temperatura HI/LO está apagada, se mostrará en la pantalla OFF. “HI” interior parpadea en la pantalla. Press +/HEAT/DEW
button to activate the HI temperature alert or press -/MAX/MIN button to turn off the HI temperature alert. Press ALERT button to confirm.
● LO interior parpadea en la pantalla. Pulse el botón +/HEAT/DEW para activar la alerta de temperatura HI o pulse el botón -/MAX/MIN para
apagar la alerta de temperatura HI. Press ALERT button to confirm.
Notas:
● Si la alerta de temperatura HI/LO está apagada, el icono OFF se mostrará en la pantalla.
Configuración de los valores de alerta HI/LO
● Mantenga pulsado el botón ALERT durante aproximadamente 2 segundos para entrar en el valor de configuración de la alerta de
temperatura. La temperatura exterior “HI” parpadea en la pantalla. Pulse y suelte el botón +/HEAT/DEW y -/MAX/MIN para ajustar el valor o
mantenga pulsado el botón para un ajuste rápido durante el modo de configuración. Pulse el botón ALERT para confirmarlo.
● La temperatura exterior “LO” parpadea en la pantalla. Press and release +/HEAT/DEW and -/MAX/MIN button to adjust the value or hold
the button for fast adjust during setting mode. Press ALERT button to confirm.
● La temperatura interior “HI” parpadea en la pantalla. Press and release +/HEAT/DEW and -/MAX/MIN button to adjust the value or hold the
button for fast adjust during setting mode. Press ALERT button to confirm.
● La temperatura interior “LO” parpadea en la pantalla. Press and release +/HEAT/DEW and -/MAX/MIN button to adjust the value or hold the
button for fast adjust during setting mode. Pulse el botón ALERT para finalizar la configuración.
Luz de fondo
● Pulse el botón SNOOZE/LIGHT para configurar la retroiluminación en HI/LO/OFF, si usa el adaptador para alimentar la estación.
● Pulse el botón SNOOZE/LIGHT para activar la retroiluminación durante 10 segundos, si usa pilas y no el adaptador para alimentar la
estación.
Indicador de batería baja
● El icono de la batería mediante la temperatura interior indica que hay que cambiar las pilas de la estación.
● El icono de la batería mediante la temperatura exterior indica que hay que cambiar las pilas del sensor.
Especificaciones
Temperatura interior
● Alcance operativo de temperatura = 0°C hasta 50°C (32°F hasta 122°F)
● Precisión ± 1 grados centígrados desde 0°C hasta 50°C (32°F hasta 122°F)

ES7
● Resolución = 0,1 grados centígrados
● Cuando se encuentra por encima de 50°C (122 °F), la pantalla LCD mostrará HI
● Si la temperatura es inferior a -9,9°C (14°F), la pantalla LCD mostrará LO
Humedad interior
● Margen de humedad de funcionamiento = 20% hasta 95% de HR
● Precisión +/- 5% RH (@25°C, 30%RH hasta 80%RH)
● Precisión +/- 8% RH (@25°C, 20%RH hasta 29%RH 80%RH hasta 95%RH)
● Resolución = 1% de HR
Temperatura exterior
● Alcance operativo de temperatura = -40°C hasta 60°C (-40°F hasta 140°F)
● Precisión ± 1 grados Celsius desde 0°C hasta 50°C (32°F hasta 122°F)
● Precisión ±1.5 grados Celsius desde -40°C hasta 0°C (-40°F hasta 32°F) y 50°C hasta 60°C (122°F hasta 140°F)
● Resolución = 0,1 grados centígrados
● Cuando se encuentra por encima de 60°C (140 °F), la pantalla LCD mostrará HI.
● Si la temperatura es inferior a -40°C (-40°F), la pantalla LCD mostrará LO
Humedad exterior
● Margen de humedad de funcionamiento = 20% hasta 95% de HR
● Accuracy +/- 5% RH (@25°C, 30%RH to 80%RH)
● Precisión +/- 8% RH (@25°C, 20%RH hasta 30%RH-80%RH hasta 95%RH)
● Resolución = 1% de HR
Efectos del medio ambiente sobre la recepción
La estación obtiene la hora precisa mediante tecnología inalámbrica. Y al igual que en el resto de los dispositivos inalámbricos, la recepción
puede verse afectada por las circunstancias siguientes:
● largas distancias de transmisión
● proximidad de montañas y valles
● proximidad de autopistas, vías de tren, aeropuertos, cables de alta tensión, etc.
● proximidad de edificios en construcción
● encontrarse entre edificios altos
● en el interior de edificios de hormigón
● proximidad de aparatos eléctricos (PCs, TVs, etc.) y estructuras metálicas
● en el interior de vehículos en movimiento
Coloque la estación en una posición donde obtenga una señal óptima, p.ej. cerca de una ventana y lejos de superficies metálicas o aparatos
eléctricos.
Precauciones
● Esta unidad principal está diseñada para un uso interno únicamente y el sensor exterior debe usarse en el exterior.
● No golpee la unidad ni la someta a una fuerza excesiva.
● No exponga la unidad a temperaturas extremas, luz directa del sol, polvo o humedad.
● No la sumerja en el agua.
● Evite que entre en contacto con materiales corrosivos.
● No se deshaga de la unidad arrojándola al fuego, ya que podría explotar.
● No abra la carcasa posterior interna ni altere ningún componente de la unidad.
Advertencias de seguridad sobre las pilas

ES8
● Use solamente pilas alcalinas, no use pilas recargables.
● Instale las pilas correctamente, haciendo coincidir las polaridades (+/-).
● Siempre cambie el juego completo de pilas.
● Nunca mezcle baterías usadas y nuevas.
● Quite las pilas agotadas de inmediato.
● Quite las pilas cuando no se utilicen.
● No las recargue ni las deseche en el fuego, ya que pueden explotar.
● Asegúrese de que las pilas estén almacenadas lejos de objetos metálicos, ya que el contacto con ellos puede causar un cortocircuito.
● Evite exponer las pilas a temperaturas extremas, a la humedad o a los rayos directos del sol.
● Mantenga todas las pilas lejos del alcance de los niños. Constituyen peligro de asfixia.
¡Use el producto únicamente para la finalidad prevista!
Consideración de obligaciones según la ley sobre pilas
Las pilas viejas no pertenecen a los residuos domésticos ya que pueden provocar daños en la salud y el medioambiente.
Puede devolver las pilas usadas sin cargo alguno a su distribuidor y puntos de recogida. ¡Como usuario final, tiene la
obligación de devolver las pilas que utilice a su distribuidor y otros puntos de recogida!
Consideración de obligaciones según las leyes sobre dispositivos electrónicos
Este símbolo indica que debe eliminar los dispositivos eléctricos de forma separada a los residuos domésticos generales
cuando alcancen el final de su vida útil. Lleve su unidad a su punto de recogida selectiva de basura o al centro de reciclaje
de su localidad. Esto es de aplicación en todos los países de la Unión Europea, y en otros países no europeos con sistema
de recogida selectiva de basuras.

NL1
WS6442 - GEBRUIKSHANDLEIDING
Overzicht:
1 – Icoontjes weersverwachting
2 – Icoontje weertendens
3 – Buitentemperatuur
4 – Luchtvochtigheid buiten
5 – Alarm buitentemperatuur
6 – Tijd
7 – Binnentemperatuur
8 – Luchtvochtigheid binnen
9 – Alarm binnentemperatuur
10 – Icoontje maanfase
11 – Icoontje raam sluiten/openen
12 – Weekdag
13 – Datum en maand
Volledige Display

NL2
Knoppen
Er zijn zeven functietoetsen:
SET/RCC
ALARM
+/HEAT/DEW
-/MAX/MIN
ALERT
CHANNEL
SNOOZE/LIGHT
Functies
● Jaar: 2019-2099
● Datum/Maand/Dag
● Temperatuur en luchtvochtigheid binnen/buiten
● Tendens van temperatuur en luchtvochtigheid binnen/buiten
● “Lage batterij”-icoontje voor station en sensor
● 24/12 uur selecteerbaar
● Alarm- en sluimerfunctie
● Weersvoorspelling: Zonnig, Half bewolkt, Bewolkt, Regenachtig en Stormachtig
● Maximale en minimale temperatuur/luchtvochtigheid
● Zeven talen voor de week (GER, FRE, ITA, DUT, SPA, DAN, ENG)
● Tijdzone: -12/+12 uur
● Functie DCF-radioklok ontvangst
● Achtergrondlicht, HI, LOW, OFF
● Warmte-index en dauwpunt buiten
● Alarm hoge/lage temperatuur binnen en buiten
● Tips voor raam sluiten/openen (wanneer de temperatuur tussen 20°C- 25°C is en de vochtigheidsgraad tussen 40% -70%, dan zal de
display u aanraden een raam te openen, wanneer buiten dit bereik dan wordt aangeraden ramen te sluiten)
● Maanfase
● Kan worden verbonden met tot 3 buitensensoren
● Batterijen basisstation (WS6442): 3 x AAA
● Batterijen buitensensor (TX960-TH): 2 x AAA
Aanvankelijk gebruik:
● Sluit het station via de adapter aan op een huishoudelijk stopcontact.
● Wanneer het station van stroom wordt voorzien, dan zullen alle icoontjes op de LCD-display 3 seconden oplichten terwijl er een pieptoon
klinkt.
● Het weerstation zal nu beginnen verbinding te maken met de buitensensor. Deze procedure duurt ongeveer 3 minuten en wordt
aangegeven door een knipperend RF antennesymbooltje in de “BUITEN” zone op de display van de ontvanger.
● Verwijder de klep van het batterijvak van de buitensensor, installeer 2 x type AAA batterijen en let daarbij op de polariteit [“+” en “–”
markeringen]. Sluit vervolgens het batterijvak.
● Nadat het station de verbinding met de buitensensor tot stand heeft gebracht, zal deze automatisch de ontvangstmodus openen voor de
radiogestuurde tijd.
Optioneel: batterijen voor back-up (geen permanent achtergrondlicht wanneer gebruikt zonder stroomadapter)
● Open het klepje van de batterijhouder van het weerstation.

NL3
● Installeer 3 x type AAA batterijen en let daarbij op de polariteit [“+” en “–” markeringen].
● Sluit de batterijhouder.
Opmerkingen:
● Als de buitentemperatuur na 3 minuten niet wordt weergegeven, houd dan de toets “CHANNEL” op het hoofdapparaat ingedrukt om naar
de buitensensor te zoeken. Druk vervolgens op de knop “TX” op de sensor om een signaal te verzenden. Als de buitentemperatuur nog
steeds niet wordt verkregen. Verwijder de batterijen uit de zender en ga terug naar stap 1 van de set-up.
● Alkalinebatterijen kunnen slecht beginnen te presteren wanneer langdurig blootgesteld aan lage temperaturen (lager dan -20°C). De
draadloze buitensensor zal hierdoor stoppen met het zenden van temperatuurlezingen. Gebruik lithiumbatterijen in deze lage
temperatuursomstandigheden om een continue werking van buiten geplaatste draadloze sensoren te garanderen.
Ontvangst van het radiogestuurde tijdsignaal:
● De klok begint automatisch 7 minuten na iedere herstart of wisselen van de batterijen met het zoeken naar het DCF-signaal. Het
radiomasticoontje begint te knipperen.
● De klok start om 1:00/2:00/3:00/4:00/5:00 automatische de synchronisatieprocedure met het DCF-signaal om eventuele afwijkingen van de
exacte tijd te corrigeren. Als deze synchronisatiepoging mislukt (het radiomasticoontje verdwijnt uit de display), dan zal het systeem
automatisch een nieuwe synchronisatiepoging starten om het volgende volle uur. Deze procedure wordt automatisch tot op 5 keer herhaald.
● Druk op de toets “SET/RCC” om de DCF-signaalontvangst handmatig te starten. Als er binnen 7 minuten geen signaal wordt ontvangen,
dan zal de DCF-signaalscan stoppen (radiomasticoontje verdwijnt) en om het volgende volle uur weer starten.
● Druk tijdens de radiogestuurde ontvangst eenmaal op de toets “SET/RCC” om het zoeken naar het radiosignaal te stoppen.
Opmerkingen:
● Een knipperend radiomasticoontje betekent dat de DCF-signaalontvangst is gestart.
● Een continu weergegeven radiomasticoontje betekent dat de DCF-signaalontvangst is geslaagd.
● Wij raden een minimale afstand van 2,5 meter aan tot enigerlei interferentiebronnen zoals televisies of computermonitors.
● Radio-ontvangst is zwakker in kamers met betonnen muren (bijv.: in kelders) en op kantoor. Plaats het systeem in dit soort gevallen dicht in
de buurt van een raam.
Handmatige tijdinstelling
Houd de toets SET/RCC ingedrukt om de instellingsmodus te openen:
● 24/12-HOUR: 24 uur zal knipperen. Druk op de toets +/HEAT/DEW of -/MAX/MIN om het 12-uur of 24-uur tijdsformaat te selecteren. Druk
op de toets SET/RCC om verder te gaan.
● Time zone: De tijdzone zal worden weergegeven en de geselecteerde tijdzone zal knipperen. Druk op de toets +/HEAT/DEW of -/MAX/MIN
om de gewenste tijdzone in te stellen (het instellingsbereik is 0~+12, 0~-12). +0 f\voor Duitsland, +1 voor het Verenigd Koninkrijk. Laat de
toets SET/RCC los om verder te gaan.
● HOURS: De uren zullen knipperen. Druk op de toets +/HEAT/DEW of -/MAX/MIN om de uren te selecteren. Druk op de toets SET/RCC om

NL4
verder te gaan.
● MINUTES: De minuten zullen knipperen. Druk op de toets +/HEAT/DEW of -/MAX/MIN om de minuten te selecteren. Druk op de toets
SET/RCC om verder te gaan.
● YEAR: Het jaar zal knipperen. Druk op de toets +/HEAT/DEW of -/MAX/MIN om het jaar te selecteren. Druk op de toets SET/RCC om
verder te gaan.
● MONTH: De maand zal knipperen. Druk op de toets +/HEAT/DEW of -/MAX/MIN om de maand te selecteren. Druk op de toets SET/RCC
om verder te gaan.
● DATE: De datum zal knipperen. Druk op de toets +/HEAT/DEW of -/MAX/MIN om de datum te selecteren. De dag van de week zal
automatisch worden ingesteld nadat JAAR, MAAND en DATM zijn ingesteld. Druk op de toets SET/RCC om verder te gaan.
● LANGUAGE: GER zal knipperen (GER is standaard ingesteld). Druk op de toets +/HEAT/DEW of -/MAX/MIN om de gewenste taal te
selecteren: GER, FRE, ITA, DUT, SPA, DAN, ENG. Druk op de toets SET/RCC om verder te gaan.
● °C/°F: De temperatuureenheid °C zal knipperen. Druk op de toets +/HEAT/DEW of -/MAX/MIN en laat weer los om °C of °F te selecteren,
druk op de toets SET/RCC ben laat weer los om de instelling te bevestigen.
Opmerkingen:
1. Als u voor 20 seconden op geen enkele toets drukt, zal de instellingsmodus automatisch worden verlaten, het station zal terugkeren op de
live weergave en de tot nog toe gemaakte instellingen blijven behouden
2. +/HEAT/DEW of -/MAX/MIN: Druk eenmaal om aan te passen met 1 stap, en houd vast om sneller te scrollen.
Alarminstelling
Houd de toets ALARM ingedrukt om de alarminstellingsmodus te openen:
● UREN VAN DE ALARMTIJD: De uren van de alarmtijd zullen knipperen. Gebruik de toets +/HEAT/DEW of -/MAX/MIN om de uren in te
stellen. Druk op de toets ALARM en laat weer los om te bevestigen.
● MINUTEN VAN DE ALARMTIJD: De minuten van de alarmtijd zullen knipperen. Gebruik de toets +/HEAT/DEW of -/MAX/MIN om de
minuten in te stellen. Druk op de toets ALARM en laat weer los om te bevestigen. Druk op de toets ALARM om te verlaten.
Opmerkingen:
1. Als u voor 20 seconden op geen enkele toets drukt, zal de instellingsmodus automatisch worden verlaten, het station zal terugkeren op de
live weergave en de tot nog toe gemaakte instellingen blijven behouden
2. +/HEAT/DEW of -/MAX/MIN: Druk eenmaal in om de instelling met 1 eenheid aan te passen of houd ingedrukt om de instellingen sneller te
doorlopen.
Het alarm activeren/deactiveren
Druk eenmaal op de toets ALARM en ALM wordt weergegeven. Gebruik +/HEAT/DEW of -/MAX/MIN om het alarm te activeren of deactiveren.
● ALARMICOONTJE: wordt weergegeven wanneer het alarm is geactiveerd en zal niet langer worden weergegeven wanneer het alarm
is gedeactiveerd.

NL5
Sluimerfunctie
● Wanneer het alarm klinkt, dan kunt u op de toets SNOOZE drukken om een sluimertijd van 10 minuten te activeren. Het alarmicoontje zal
knipperen terwijl de sluimerfunctie actief is.
● Druk in de sluimermodus op een willekeurige andere toets dan SNOOZE om het alarm voor de huidige dag te stoppen. Het alarmicoontje
zal nog steeds worden weergegeven.
Opmerking: Het alarm verhoogt geleidelijk aan in volume. Wanneer het alarm klinkt, zal het voor 2 minuten actief blijven en vervolgens volledig
uitschakelen.
Weersvoorspelling
Het station toont 1 van de 6 verschillende weersvoorspellingen:
Zonnig
Gedeeltelijk bewolkt
Bewolkt
Regenachtig
Stormachtig
Sneeuwachtig
Kanalen voor buitensensoren
● Druk op de toets CHANNEL om de kanalen te bekijken: CH1 (Kanaal 1), CH2 (Kanaal 2), CH3 (Kanaal 3) en kanaalrotatie (elk kanaal wordt
achtereenvolgens een korte tijd weergegeven).
● Houd de toets CHANNEL 2 seconden ingedrukt om naar een sensor te zoeken voor het kanaal geselecteerd op uw station. Hetzelfde
kanaal moet geselecteerd zijn op de achterzijde van de betreffende sensor.
● Het RF-signaalicoontje zal knipperen totdat het sensorsignaal is ontvangen of gedurende 3 minuten zonder dat er een signaal beschikbaar
is.
HITTE- en DAUWWAARDEN
● Druk in de normale weergavemodus op de toets +/HEAT/DEW om de HITTEWAARDE (warmte-index) te bekijken.
● Druk nogmaals op de toets +/HEAT/DEW om de DAUWWAARDE (dauwpunt) te bekijken.
● Druk nog een keer op de toets +/HEAT/DEW om terug te keren naar de normale weergavemodus.
Opmerkingen:
● De HITTEWAARDE toont de waarde van de warmte-index (schaduwwaarde, berekend op basis van temperatuur en vochtigheidsgraad) en
wordt gebruikt om de gevaren van hitte aan te geven. Volledige blootstelling aan zonlicht kan de waarden van de warmte-index met tot 8 °C
(14 °F) verhogen.

NL6
Celsius
Fahrenheit
Waarschuwing
27-32°C
80-90°F
Opgelet: Uitputting is mogelijk door
langdurige blootstelling en activiteiten.
Voortgezette activiteit kan tot
hittekrampen leiden.
32-41°C
90-105°F
Uiterste voorzichtigheid: Hittekrampen en
hitte-uitputting zijn mogelijk. Voortgezette
activiteit kan tot hitteberoerte leiden.
41-54°C
105-130°F
Gevaar: Hoge kans op hittekrampen en
hitte-uitputting; hitteberoerte is
waarschijnlijk bij voortgezette activiteit.
Hoger dan
54°C
Hoger dan
130°F
Extreem gevaar: Onmiddellijk risico op
hitteberoerte.
MAX en MIN waarden
● Druk in de normale weergavemodus op de toets -/MAX/MIN om de MAX. waarden te bekijken van de temperatuur en vochtigheidsgraad
binnen en buiten.
● Druk nogmaals op de toets -/MAX/MIN om de MIN. waarden te bekijken van de temperatuur en vochtigheidsgraad binnen en buiten.
● Druk nogmaals op de toets -/MAX/MIN om terug te keren naar de normale weergavemodus.
Opmerkingen:
● Houd de toets -/MAX/MIN 2 seconden ingedrukt om de MAX. en MIN. waarden uit het geheugen te verwijderen.
● De MAX./MIN. waarden zullen ook elke middernacht (0:00u) automatisch worden gewist.
● De display zal automatisch terugkeren naar de normale weergavemodus nadat er 5 seconden lang op geen enkele toets wordt gedrukt.
De HI/LO alarmfunctie activeren/deactiveren
● Druk in de normale weergavemodus op de toets ALERT en “HO” buiten zal knipperen. Druk op de toets +/HEAT/DEW om het HO
temperatuuralarm te activeren of druk op de toets -/MAX/MIN om het HO temperatuuralarm uit te schakelen. Druk ter bevestiging op de
toets ALERT.
● “LA” buiten zal op de display knipperen. Druk op de toets +/HEAT/DEW om het HI temperatuuralarm te activeren of druk op de toets
-/MAX/MIN om het HI temperatuuralarm uit te schakelen. Druk ter bevestiging op de toets ALERT.
● Als u het HI/LO temperatuuralarm uitschakelt, dan zal OFF op de display worden weergegeven. “HI” binnen zal op de display knipperen.
Druk op de toets +/HEAT/DEW om het HI temperatuuralarm te activeren of druk op de toets -/MAX/MIN om het HI temperatuuralarm uit te
schakelen. Druk ter bevestiging op de toets ALERT.
● “LO” buiten zal op de display knipperen. Druk op de toets +/HEAT/DEW om het LA temperatuuralarm te activeren of druk op de toets
-/MAX/MIN om het LA temperatuuralarm uit te schakelen. Druk ter bevestiging op de toets ALERT.
Opmerkingen:
● Als u het HI/LO temperatuuralarm uitschakelt, dan zal OFF op de display worden weergegeven.
De HI/LO alarmwaarden instellen
● Houd de toets ALERT ongeveer 2 seconden ingedrukt om de instellingswaarde te openen van het temperatuuralarm. “HO”
buitentemperatuur zal op de display knipperen. Druk op de toetsen +/HEAT/DEW en -/MAX/MIN en laat weer los om de waarde aan te
passen of houd de toets ingedrukt om de instellingen sneller te doorlopen. Druk ter bevestiging op de toets ALERT.
● “LO” buitentemperatuur zal op de display knipperen. Druk op de toetsen +/HEAT/DEW en -/MAX/MIN en laat weer los om de waarde aan te
passen of houd de toets ingedrukt om de instellingen sneller te doorlopen. Druk ter bevestiging op de toets ALERT.
● “HI” binnentemperatuur zal op de display knipperen. Druk op de toetsen +/HEAT/DEW en -/MAX/MIN en laat weer los om de waarde aan te
passen of houd de toets ingedrukt om de instellingen sneller te doorlopen. Druk ter bevestiging op de toets ALERT.
● “LO” binnentemperatuur zal op de display knipperen. Druk op de toetsen +/HEAT/DEW en -/MAX/MIN en laat weer los om de waarde aan
te passen of houd de toets ingedrukt om de instellingen sneller te doorlopen. Druk op de toets ALERT om de instelling te beëindigen.

NL7
Achtergrondverlichting
● Druk op de toets SNOOZE/LICHT om het achtergrond in te stellen op HI/LO/OFF, vooropgesteld dat u de adapter gebruikt als
voedingsbron voor het station.
● Druk op de toets SNOOZE/LICHT om het achtergrondlicht 10 seconden lang te activeren als u batterijen i.p.v. de adapter gebruikt als
voedingsbron voor het station.
Indicator batterij bijna leeg
● Een batterijicoontje bij de binnentemperatuur betekent dat de batterijen in het station moeten worden vervangen.
● Een batterijicoontje bij de buitentemperatuur betekent dat de batterijen in de sensor moeten worden vervangen.
Specificaties
Binnentemperatuur
● Bereik bedrijfstemperatuur = 0°C tot 50°C (32°F tot 122°F)
● Nauwkeurigheid ± 1 graden Celsius 0°C tot 50°C (32°F to122°F)
● Resolutie = 0,1 graden Celsius
● Wanneer hoger dan 50°C (122 °F), zal de LCD “HO” weergeven
● Beneden -9,9°C (14°F) zal de LCD LO weergeven
Binnenvochtigheid
● Vochtigheidsbereik =20% RH tot 95%
● Nauwkeurigheid +/- 5% RH (@25°C, 30%RH tot 80%RH)
● Nauwkeurigheid +/- 8% RH (@25°C, 20%RH tot 29%RH 80%RH tot 95%RH)
● Resolutie = 1 % RH
Buitentemperatuur
● Bereik bedrijfstemperatuur = -40°C tot 60°C (-40°F tot 140°F)
● Nauwkeurigheid ± 1 graad Celsius van 0°C tot 50°C (32°F tot 122°F)
● Nauwkeurigheid ±1,5 graad Celsius van -40°C tot 0°C (-40°F tot 32°F) en 50°C tot 60°C (122°F tot 140°F)
● Resolutie = 0,1 graden Celsius
● Wanneer hoger dan 60°C (140 °F), zal de LCD “HO” weergeven.
● Beneden -40°C (-40°F), zal de LCD LO weergeven
Buitenvochtigheid
● Vochtigheidsbereik =20% RH tot 95%
● Nauwkeurigheid +/- 5% RH (@25°C, 30%RH tot 80%RH)
● Nauwkeurigheid +/- 8% RH (@25°C, 20%RH tot 30%RH-80%RH tot 95%RH)
● Resolutie = 1 % RH
Omgevingseffecten op ontvangst
Het station verkrijgt de exacte tijd via draadloze technologie. Zoals met alle draadloze apparatuur, kan de ontvangst in de volgende gevallen
worden aangetast:
● Lange zendafstand
● Nabij bergen en valleien
● Nabij snelwegen, treinsporen, vliegvelden, hoogspanningkabels, enz.
● Nabij bouwterreinen
● Tussen hoge gebouwen
● Binnenin betonnen gebouwen
● Nabij elektrische apparatuur (computers, TV's, enz.) en metalen structuren
● Binnenin bewegende voertuigen.
Plaats het station op een plek met optimale signalen, d.w.z. dicht in de buurt van een raam en uit de buurt van metalen oppervlaktes of

NL8
elektrische apparaten.
Voorzorgsmaatregelen
● Deze hoofdeenheid is uitsluitend bestemd voor gebruik binnenshuis, terwijl de buitensensor buitenshuis dient te worden gebruikt.
● Stel het apparaat niet bloot aan overmatige krachten of schokken.
● Stel het apparaat niet bloot aan extreme temperaturen, direct zonlicht, stof of vochtigheid.
● Dompel het apparaat niet onder in water.
● Laat het niet in contact komen met bijtende materialen.
● Stel het apparaat niet bloot aan open vuur, omdat het kan exploderen.
● Open nooit de interne achterbehuizing en modificeer geen enkele onderdelen van dit apparaat.
Veiligheidswaarschuwingen batterijen
● Gebruik uitsluitend alkaline batterijen, geen herlaadbare batterijen.
● Neem bij het plaatsen van de batterijen de juiste polariteit in acht (+/-).
● Vervang altijd alle batterijen tegelijk.
● Gebruik nooit nieuwe en gebruikte batterijen door elkaar.
● Verwijder lege batterijen onmiddellijk.
● Verwijder de batterijen als het toestel niet wordt gebruikt.
● Herlaad de batterijen niet en gooi ze niet in vuur, omdat de batterijen zouden kunnen ontploffen.
● Zorg ervoor dat de batterijen uit de buurt van metalen voorwerpen worden bewaard, omdat hierdoor kortsluiting kan ontstaan.
● Stel batterijen niet bloot aan extreme temperaturen, vochtigheid of direct zonlicht.
● Houd alle batterijen buiten bereik van kinderen. Er bestaat gevaar van verstikking.
Gebruik dit product uitsluitend voor het doel waarvoor het is bedoeld!
Neem wettelijke heffingen in verband met de afvoer van batterijen in aanmerking
Oude batterijen behoren niet tot normaal huishoudelijk afval, omdat deze de volksgezondheid en het milieu in gevaar
brengen. U kunt verbruikte batterijen kosteloos inleveren bij uw dealer of inzamelpunten. U bent als eindgebruiker wettelijk
verplicht verbruikte batterijen in te leveren bij distributeurs of andere inzamelpunten!
Houd rekening met heffingen in het kader van wetgeving m.b.t. het afvoeren van elektrische apparatuur.
Dit symbooltje betekent dat u elektrische apparaten aan het einde van hun levensduur gescheiden van het algemene
huishoudelijke afval moet afdanken. Lever uw apparaat in bij een plaatselijk inzamelpunt voor afvalverwerking of bij een
recyclingcentrum. Dit geldt voor alle landen in de Europese Unie, en voor andere Europese landen met inzamelsystemen
voor gescheiden afval.

IT1
WS6442 - MANUALE DI ISTRUZIONI
Panoramica:
1 – Icone previsioni meteo
2 – Icona tendenza meteo
3 – Temperatura esterna
4 – Umidità esterna
5 – Allarme temperatura esterna
6 – Orario
7 – Temperatura interna
8 – Umidità interna
9 – Allarme temperatura interna
10 – Icona fase lunare
11 – Icona Chiudere/Aprire finestra
12 – Giorno della settimana
13 – Data e mese
Display completo

IT2
Pulsanti
Ci sono sette pulsanti funzione:
SET/RCC
ALARM
+/HEAT/DEW
-/MAX/MIN
ALERT
CHANNEL
SNOOZE/LIGHT
Funzioni
● Anno: 2019-2099
● Giorno della settimana/Mese/Giorno
● Temperatura/umidità interna/esterna
● Tendenza temperatura/umidità interna/esterna
● Icona batteria scarica per stazione e sensore
● 24/12 ore selezionabile
● Funzione sveglia e posticipo
● Previsioni meteorologiche: Soleggiato, Parzialmente soleggiato, Nuvoloso, Piovoso e Tempestoso
● Temperatura/umidità massima e minima
● Sette lingue per la settimana (GER, FRE, ITA, DUT, SPA, DAN, ENG)
● Fuso orario: -12/+12 ORE
● Funzione di ricevitore radiocontrollato di segnale DCF
● Retroilluminazione HI, LOW, OFF
● Indice calore e punto rugiada per esterno
● Allarme temperatura alta/bassa per interno ed esterno
● Suggerimenti Chiudere/Aprire finestra (quando la temperatura è tra 20°C- 25°C e l'umidità tra 40% -70% sarà visualizzata per aprire la
finestra se non nell'intervallo sarà visualizzata per chiudere)
● Fase lunare
● Possono essere collegati fino a 3 sensori esterni
● Batterie stazione base (WS6442): 3 x AAA
● Batterie sensore esterno (TX960-TH): 2 x AAA
Funzionamento iniziale:
● Collegare la stazione con una presa domestica usando l'adattatore.
● Quando la stazione meteo è accesa, tutte le icone sul display LCD si illuminano per 3 secondi e l’unità emette un bip.
● La stazione meteo inizierà a connettersi al sensore remoto esterno. Questa operazione può richiedere fino a 3 minuti ed è visualizzata dal
simbolo dell'antenna RF di ricezione lampeggiante nell'area del display “ESTERNO”.
● Rimuovere il coperchio del vano batteria del sensore esterno e inserire 2 batterie AAA osservando la polarità [segni “+” e “–”]. In seguito
chiudere di nuovo il vano portabatterie.
● Dopo essersi connessa con il sensore remoto esterno, la stazione meteo entra in modalità di ricezione dell’ora radiocontrollata.
Opzionale: batterie di riserva (nessuna retroilluminazione permanente se usata senza adattatore)
● Aprire il coperchio del vano batteria della stazione meteo.
● Inserire 3 batterie di tipo AAA rispettando le polarità [i segni “+” e “–”].
● Chiudere il vano batteria.

IT3
Note:
● Se la temperatura esterna non è visualizzata dopo 3 minuti, tenere premuto il pulsante “CHANNEL” sull'unità principale per cercare il
sensore esterno. Quindi, premere il tasto "TX" sul sensore per inviare il segnale. Se l'unità ancora non riceve la temperatura esterna,
rimuovere le batterie dal trasmettitore e tornare al passo 1 della configurazione.
● Periodi prolungati di temperatura fredda (al di sotto di -20°C) possono causare il funzionamento improprio delle batterie alcaline. Ciò farà sì
che il sensore wireless esterno interrompa la trasmissione delle letture della temperatura. Utilizzare batterie al litio in queste condizioni di
bassa temperatura per garantire il funzionamento continuo dei sensori wireless posizionati all'esterno.
Ricezione del segnale orario radiocontrollato:
● L'orologio avvia automaticamente la ricerca del segnale DCF dopo 7 minuti dal riavvio o quando si inseriscono batterie nuove. L'icona
dell'antenna radio inizia a lampeggiare.
● Alle 1:00/2:00/3:00/4:00/5:00, l'orologio avvia automaticamente la procedura di sincronizzazione con il segnale DCF per correggere
qualsiasi deviazione dall'orario esatto. Se questo tentativo di sincronizzazione non ha successo (l'icona dell'antenna radio scompare dal
display), il sistema tenterà automaticamente un'altra sincronizzazione dopo un'ora. Questa procedura viene ripetuta automaticamente fino a
5 volte.
● Per avviare la ricezione manuale del segnale DCF, premere il pulsante “SET/RCC”. Se non viene ricevuto alcun segnale per 7 minuti, la
ricerca del segnale DCF si interrompe (l’icona dell’antenna radio scompare) e riprende all’ora successiva.
● Durante la ricezione RC, per arrestare la ricerca del segnale orario, premere una volta il pulsante “SET/RCC”.
Note:
● L'icona dell'antenna radio lampeggiante indica che la ricezione del segnale DCF è stata avviata
● L'icona dell'antenna radio lampeggiante di continuo indica che il segnale DCF è stato ricevuto con successo
● Si raccomanda una distanza minima di 2,5 metri da tutte le fonti di interferenza, come televisioni o monitor di computer
● La ricezione radio è più debole in ambienti con pareti in cemento (ad es.: in cantine) e in uffici. In tal caso, avvicinare l’unità a una finestra.
Impostazione manuale dell’ora
Premere e tenere premuto il pulsante SET/RCC per accedere alla modalità di impostazione:
● 24/12-HOUR: 24 ore lampeggia. Premere il pulsante +/HEAT/DEW o -/MAX/MIN per selezionare l'orario 24 o 12 ore. Premere il pulsante
SET/RCC per continuare.
● Time zone: Il fuso orario sarà visualizzato e il fuso orario selezionato lampeggia. Premere il pulsante +/HEAT/DEW o -/MAX/MIN per
impostare il fuso orario desiderato (intervallo di impostazione 0~+12, 0~-12). +0 per Germania, +1 per Regno Unito. Premere e rilasciare il
pulsante SET/RCC per continuare.
● HOURS: Le ore lampeggiano. Premere il pulsante +/HEAT/DEW o -/MAX/MIN per selezionare le ore. Premere il pulsante SET/RCC per
continuare.
● MINUTES: I minuti lampeggeranno. Premere il pulsante +/HEAT/DEW o -/MAX/MIN per selezionare i minuti. Premere il pulsante SET/RCC
per continuare.
● YEAR: L'anno lampeggerà. Premere il pulsante +/HEAT/DEW o -/MAX/MIN per selezionare l'anno. Premere il pulsante SET/RCC per

IT4
continuare.
● MONTH: Il mese lampeggerà. Premere il pulsante +/HEAT/DEW o -/MAX/MIN per selezionare il mese. Premere il pulsante SET/RCC per
continuare.
● DATE: La data lampeggerà. Premere il pulsante +/HEAT/DEW o -/MAX/MIN per selezionare il giorno. Il giorno della settimana si imposterà
automaticamente dopo l'impostazione di ANNO, MESE e GIORNO. Premere il pulsante SET/RCC per continuare.
● LANGUAGE: GER lampeggia (predefinito è GER). Premere il pulsante +/HEAT/DEW o -/MAX/MIN per selezionare la lingua desiderata:
GER, FRA, ITA, DUT, SPA, DAN, ENG. Premere il pulsante SET/RCC per continuare.
● °C/°F: L'unità di temperatura °C lampeggia. Premere e rilasciare il pulsante +/HEAT/DEW o -/MAX/MIN per selezionare °C o °F. Premere e
rilasciare il pulsante SET/RCC per confermare l'impostazione.
Note:
1. Se nessun tasto è premuto in un arco di 20 secondi, si uscirà dalla modalità di impostazione e si ritorna alla modalità di visualizzazione dal
vivo, riflettendo le regolazione che sono state effettuate prima dell'uscita
2. +/HEAT/DEW o -/MAX/MIN: Premere una volta per regolare 1 unità alla volta, tenere premuto per una rapida regolazione.
Impostazione della sveglia
Premere e tenere premuto il pulsante ALARM per accedere alla modalità di impostazione della sveglia:
● ORA ALARM: L'ora della sveglia lampeggia. Usare il pulsante +/HEAT/DEW o -/MAX/MIN per impostare l'ora. Premere e rilasciare il
pulsante ALARM per confermare.
● MINUTI ALARM: I minuti della sveglia lampeggiano. Usare il pulsante +/HEAT/DEW o -/MAX/MIN per impostare i minuti. Premere e
rilasciare il pulsante ALARM per confermare. Premere il pulsante ALARM per uscire.
Note:
1. Se nessun tasto è premuto in un arco di 20 secondi, si uscirà dalla modalità di impostazione e si ritorna alla modalità di visualizzazione dal
vivo, riflettendo le regolazione che sono state effettuate prima dell'uscita
2. +/HEAT/DEW o -/MAX/MIN: Premere una volta per regolare l'impostazione di 1 valore, tenere premuto per scorrere velocemente
l'impostazione
Attivare/disattivare la sveglia
Premere il pulsante ALARM una volta e ALM è visualizzato. Usare +/HEAT/DEW o -/MAX/MIN per attivare o disattivare la sveglia
● ICONA ALARM: è visualizzato quando la sveglia è attivata e non è più visualizzato quando la sveglia è attivata
Funzione di ripetizione
● Quando la sveglia suona, premere il pulsante SNOOZE per attivare lo snooze per 10 minuti. L'icona della sveglia lampeggia mentre la
funzione di posticipo è attiva.
● Per arrestare la sveglia per un giorno, premere qualsiasi pulsante tranne SNOOZE, mentre è in modalità snooze. L'icona sveglia è ancora
visualizzata.
Nota: La sveglia è un suono crescendo. Quando la sveglia suona, essa continua per 2 minuti e quindi si spegne completamente.

IT5
Previsioni meteo
La stazione mostra 1 di 6 diverse previsioni meteo:
Soleggiato
Parzialmente
soleggiato
Nuvoloso
Piovoso
Tempestoso
Nevoso
Canali sensore esterno
● Premere il pulsante CHANNEL per visualizzare i canali: CH1 (Canale 1), CH2 (Canale 2), CH3 (Canale 3) e Rotazione canale (ogni canale
è visualizzato per un breve periodo di tempo)
● Tenere premuto il pulsante CHANNEL per 2 secondi per ricercare un sensore per il canale selezionato della propria stazione. Il sensore
alimentato deve avere lo stesso canale selezionato sul retro.
● L'icona di segnale rf lampeggerà fino a quando il segnale del sensore è ricevuto o nessun segnale è disponibile per 3 minuti.
Valori HEAT e DEW
● In modalità di visualizzazione normale, premere il pulsante +/HEAT/DEW per visualizzare il valore HEAT (indice calore).
● Premere nuovamente il pulsante +/HEAT/DEW per visualizzare il valore DEW (punto rugiada).
● Premere nuovamente il pulsante +/HEAT/DEW per ritornare alla modalità di visualizzazione normale.
Note:
● Il valore HEAT mostra il valore dell'indice di calore (valore ombra, composto da temperatura e umidità) usato per avvertire dai pericoli del
calore, esposizione a pieno sole può aumentare i valori dell'indice di calore fino a 8 °C (14 °F).
Celsius
Fahrenheit
Avvertenza
27-32°C
80-90°F
Attenzione: affaticamento è possibile con
esposizione e attività prolungata. Attività
continua potrebbe comportare crampi da
calore.
32-41°C
90-105°F
Estrema cautela: sono possibili crampi da
calore ed esaurimento da calore. L'attività
continua potrebbe comportare un colpo di
calore
41-54°C
105-130°F
Pericolo: crampi da calore ed
esaurimento da calore sono probabili; il
colpo di calore è probabile con l'attività
continua.
Oltre 54°C
Oltre 130°F
Pericolo estremo: colpo di calore
imminente.

IT6
Valori MAX e MIN
● In modalità di visualizzazione normale, premere il pulsante -/MAX/MIN per visualizzare i valori MAX della temperatura e dell'umidità interna
ed esterna.
● Premere nuovamente il pulsante -/MAX/MIN per visualizzare i valori della temperatura e dell'umidità interna ed esterna.
● Premere nuovamente il pulsante -/MAX/MIN per ritornare alla modalità di visualizzazione normale.
Note:
● Premere e tenere premuto il pulsante -/MAX/MIN per 2 secondi per cancellare i valori MAX e MIN dalla memoria.
● I valori MAX/MIN si cancellano automaticamente a ogni mezzanotte (0:00).
● Dopo 5 secondi senza premere alcun pulsante il display ritorna alla modalità di visualizzazione normale.
Attivare/disattivare la funzione allarme HI/LO
● In modalità di visualizzazione normale, premere il pulsante ALERT e “HI” esterna lampeggia. Premere il pulsante +/HEAT/DEW per attivare
l'allarme temperatura HI, premere il pulsante -/MAX/MIN per spegnere l'allarme temperatura HI. Premere ALERT per confermare.
● LO esterna lampeggia sul display. Premere il pulsante +/HEAT/DEW per attivare l'allarme temperatura HI, premere il pulsante -/MAX/MIN
per spegnere l'allarme temperatura HI. Premere ALERT per confermare.
● Se l'allarme temperatura HI/LO si spegne, OFF appare sul display. “HI” interna lampeggia sul display. Premere il pulsante +/HEAT/DEW
per attivare l'allarme temperatura HI, premere il pulsante -/MAX/MIN per spegnere l'allarme temperatura HI. Premere ALERT per
confermare.
● “LO” interna lampeggia sul display. Premere il pulsante +/HEAT/DEW per attivare l'allarme temperatura HI, premere il pulsante -/MAX/MIN
per spegnere l'allarme temperatura HI. Premere ALERT per confermare.
Note:
● Se l'allarme temperatura HI/LO è spento, l'icona OFF apparirà sul display.
Impostazione valori allarme HI/LO
● Tenere premuto il pulsante ALERT per circa 2 secondi per accedere al valore di impostazione dell'allarme temperatura. La temperatura
esterna “HI” lampeggia sul display. Premere e rilasciare il pulsante +/HEAT/DEW e -/MAX/MIN per impostare questo valore o tenere
premuto il pulsante per regolare velocemente durante la modalità di impostazione. Premere il pulsante ALERT per confermare.
● La temperatura esterna “LO” lampeggia sul display. Premere e rilasciare il pulsante +/HEAT/DEW e -/MAX/MIN per impostare questo
valore o tenere premuto il pulsante per regolare velocemente durante la modalità di impostazione. Premere il pulsante ALERT per
confermare.
● La temperatura interna “HI” lampeggia sul display. Premere e rilasciare il pulsante +/HEAT/DEW e -/MAX/MIN per impostare questo valore
o tenere premuto il pulsante per regolare velocemente durante la modalità di impostazione. Premere il pulsante ALERT per confermare.
● La temperatura interna “LO” lampeggia sul display. Premere e rilasciare il pulsante +/HEAT/DEW e -/MAX/MIN per impostare questo valore
o tenere premuto il pulsante per regolare velocemente durante la modalità di impostazione. Premere il pulsante ALERT per terminare
l'impostazione.
Retroilluminazione
● Premere il pulsante SNOOZE/LIGHT per impostare la retroilluminazione a HI/LO/OFF, se si usa l'adattatore per alimentare la stazione.
● Premere il pulsante SNOOZE/LIGHT per attivare la retroilluminazione per 10 secondi, se si usano le batterie e non l'adattatore per
alimentare la stazione.
Indicatore di batteria quasi scarica
● L'icona batteria con la temperatura interna indica di ricaricare le batterie della stazione.
● L'icona batteria con la temperatura esterna indica di ricaricare le batterie del sensore.

IT7
Caratteristiche tecniche
Temperatura interna
● Intervallo temperatura interna = da 0°C a 50°C (da 32°F a 122°F)
● Precisione ± 1 gradi Celsius da 0°C a 50°C (da 32°F a 122°F)
● Risoluzione = 0,1 gradi Celsius
● Quando sopra 50°C (122 °F), l'LCD indica HI
● Se inferiore a 9,9 °C (14 °F), il display indica LO
Umidità interna
● Intervallo umidità operativa = da 20% a 95% UR
● Precisione +/- 5% UR (@25°C, da 30% UR a 80% UR)
● Precisione +/- 8% UR (@25°C, da 20% UR a 29% UR, da 80% UR a 95% UR)
● Risoluzione = 1 % UR
Temperatura esterna
● Intervallo temperatura interna = da -40°C a 60°C (da -40°F a 140°F)
● Precisione ± 1 gradi Celsius da 0°C a 50°C (da 32°F a 122°F)
● Precisione ±1,5 gradi Celsius da -40°C a 0°C (da -40°F a 32°F) e da 50°C a 60°C (da 122°F a 140°F)
● Risoluzione = 0,1 gradi Celsius
● Quando sopra 60°C (140 °F), l'LCD indica HI.
● Se inferiore a -40 °C (-40 °F), il display indica LO
Umidità esterna
● Intervallo umidità operativa = da 20% a 95% UR
● Precisione +/- 5% UR (@25°C, da 30% UR a 80% UR)
● Precisione +/- 8% UR (@25°C, da 20% UR a 30% UR - da 80% UR a 95% UR)
● Risoluzione = 1 % UR
Effetti della ricezione ambientale
La stazione ottiene l'orario preciso con tecnologia wireless. Come per tutti i dispositivi wireless, la ricezione può essere influenzata dalle seguenti
circostanze:
● Lunga distanza di trasmissione
● Prossimità di montagne e valli
● Prossimità di autostrade, stazioni, aeroporti, cavi di alta tensione e così via.
● Prossimità di cantieri
● Collocazione tra edifici alti
● Collocazione all'interno di edifici in cemento
● Prossimità di apparecchiature elettriche (computer, TV e altro) e strutture metalliche
● Collocazione all'interno di veicoli in movimento
Collocare la stazione in una posizione con segnale ottimale, ad esempio vicino a una finestra e lontano da superfici metalliche o apparecchiature
elettriche.
Precauzioni
● Questa unità principale è intesa per essere usata solo all'interno, il sensore per esterno è inteso per esterni.
● Non esporre l'unità a forza eccessiva o shock.
● Non esporre l'unità a temperature estreme, raggi solari diretti, polvere o umidità.
● Non immergere in acqua.
● Evitare il contatto con qualsiasi materiale corrosivo.

IT8
● Non gettare l'unità nel fuoco in quanto potrebbe esplodere.
● Non aprire l'alloggiamento posteriore interno o alterare componenti di questa unità.
Avvisi di sicurezza delle batterie
● Utilizzare solo batterie alcaline, non batterie ricaricabili.
● Installare le batterie correttamente rispettando la polarità (+/-).
● Sostituire sempre un set completo di batterie.
● Non utilizzare mai batterie usate e nuove contemporaneamente.
● Rimuovere immediatamente le batterie scariche.
● Rimuovere le batterie inutilizzate.
● Non ricaricare e non smaltire le batterie nel fuoco in quanto possono esplodere.
● Assicurarsi che le batterie siano conservate lontano da oggetti metallici in quanto il contatto può causare un corto circuito.
● Evitare di esporre le batterie a temperatura o a umidità estreme o a luce solare diretta.
● Tenere tutte le batterie fuori dalla portata dei bambini. Perché potrebbero causare il rischio di soffocamento.
Utilizzare il prodotto solo per lo scopo previsto.
Obblighi in base alla normativa sulle batterie
Le batterie vecchie non appartengono ai rifiuti domestici perché potrebbero causare danni alla salute e all'ambiente. È
possibile consegnare le batterie usate gratuitamente al proprio rivenditore e punti di raccolta. L'utente finale è obbligato
per legge a portare le batterie esauste ai distributori e agli altri punti di raccolta!
Considerare il carico in base alla normativa sui dispositivi elettrici
Questo simbolo significa che è necessario smaltire i dispositivi elettrici separati dai rifiuti domestici generici quando
raggiunge la fine della sua vita utile. Portare l'unità al proprio punto di raccolta rifiuti locale o a un centro per la raccolta
differenziata. Questa disposizione si applica a tutti i paesi dell’Unione europea e agli altri paesi europei in cui viene
praticata la raccolta differenziata.

CZ1
WS6442 - NÁVOD K OBSLUZE
Přehled:
1 – Ikony předpovědi počasí
2 – Ikony tendence počasí
3 – Venkovní teplota
4 – Venkovní vlhkost
5 – Výstraha na venkovní teplotu
6 – Čas
7 – Vnitřní teplota
8 – Vnitřní vlhkost
9 – Výstraha na vnitřní teplotu
10 – Ikona měsíční fáze
11 – Ikona zavření/otevření okna
12 – Den v týdnu
13 – Datum a měsíc
Úplné zobrazení

CZ2
Tlačítka
K dispozici je sedm funkčních tlačítek:
SET/RCC
ALARM
+/HEAT/DEW
-/MAX/MIN
ALERT
CHANNEL
SNOOZE/LIGHT
Funkce
● Rok: 2019-2099
● Datum/měsíc/den
● Vnitřní/venkovní teplota a vlhkost
● Vnitřní/venkovní teplota a vlhkost – trend
● Ikona vybité baterie pro stanici a senzor
● Formát 24/12 hod – volitelný
● Funkce budíku a opakovaného buzení
● Předpověď počasí: Slunečno, částečně slunečno, zataženo, deštivo a bouřky
● Maximální a minimální teplota a vlhkost
● Sedm jazyků pro týden (NĚM, FRA, ITA, NIZ, ŠPA, DÁN, ANG)
● Časové pásmo: −12/+12 h
● Funkce řízení času rádiovým signálem DCF
● Podsvícení, HI, LOW, OFF
● Tepelný index a rosný bod pro venkovní prostředí
● Výstraha na vysokou/nízkou teploty pro vnitřní i venkovní prostředí
● Tipy pro zavření/otevření okna (při teplotě mezi 20 °C – 25 °C a vlhkosti 40 % – 70 % se zobrazí výzva k otevření okna; pokud teplota
v tomto rozsahu není, zobrazí se pokyn k zavření)
● Fáze Měsíce
● Lze připojit až 3 venkovní senzory
● Baterie v základní stanici (WS6442): 3 × AAA
● Baterie ve venkovním senzoru (TX960-TH): 2 × AAA
První spuštění:
● Pomocí adaptéru připojte stanici k domácí zásuvce.
● Po zapnutí stanice se na displeji LCD rozsvítí na 3 sekundy všechny ikony a uslyšíte pípnutí.
● Meteostanice nyní začne navazovat spojení s venkovním dálkovým senzorem. Tato operace trvá přibližně 3 minuty a zobrazuje se pomocí
blikající ikony rádiového příjmu v oblasti displeje přijímače určené pro venkovní hodnoty.
● Sejměte kryt přihrádky na baterie pro venkovní senzor a vložte 2 × baterie tipu AAA – dodržte správnou polaritu [„+“ a „-“]. Poté bateriový
prostor zavřete.
● Jakmile stanice vytvoří spojení s vnějším čidlem, vstoupí do režimu příjmu rádiového příjmu časového signálu.
Volitelné: baterie pro zálohování (bez trvalého podsvícení, pokud je zařízení používáno bez napájecího adaptéru)
● Otevřete kryt bateriového prostoru meteostanice.
● Vložte 3 × baterie typu AAA a dodržte správnou polaritu [ značky "+" a "–"].
● Zavřete prostor pro baterie.

CZ3
Poznámky:
● Pokud se venkovní teplota nezobrazí během 3 min, přidržte tlačítko „CHANNEL“ na hlavní jednotce a vyhledejte venkovní senzor. Poté
stisknutím tlačítka „TX“ na senzoru odešlete signál. Pokud jednotka stále nepřijímá informace o venkovní teplotě, vyjměte z vysílače baterie
a vraťte se ke kroku 1 nastavení.
● Při delších obdobích nízkých teplot (nižších než -20 °C) nemusí alkalické baterie fungovat správně. Venkovní bezdrátový senzor tak nebude
správně přenášet údaje o teplotě. Při takto nízkých teplotách používejte lithiové baterie pro zajištění nepřetržitého provozu bezdrátových
senzorů umístěných venku.
Příjem rádiově řízeného časového signálu:
● Po jakémkoli restartu nebo výměně baterií začnou hodiny po 7 minutách automaticky vyhledávat signál DCF. Začne blikat ikona rádiového
vysílače.
● V 1:00/2:00/3:00/4:00/5:00 hodiny automaticky provedou synchronizaci se signálem DCF a opraví všechny odchylky od přesného času.
Pokud je tento synchronizační pokus neúspěšný (ikona rozhlasového stožáru zmizí z displeje), tak se systém automaticky pokusí o další
synchronizaci v další celou hodinu. Tento proces se opakuje automaticky až pětkrát.
● Pro spuštění ručního příjmu signálu DCF stiskněte tlačítko „SET/RCC“. Pokud během 7 minut nedojde k přijmu signálu DCF hledání signálu
se zastaví (ikona rozhlasového stožáru zmizí) a začne zase v další celou hodinu.
● Chcete-li během příjmu RC zastavit vyhledávání rádiového signálu, stiskněte jednou tlačítko „SET/RCC”.
Poznámky:
● Blikající ikona rádiového vysílače indikuje, že byl zahájen příjem signálu DCF.
● Trvale zobrazená ikona rádiového vysílače indikuje, že signál DCF byl přijat úspěšně.
● Doporučujeme minimální vzdálenost 2,5 metru od všech zdrojů elektromagnetického rušení, jako jsou například televize nebo počítačové
monitory.
● Příjem rádiového signálu je slabší v místnostech s betonovými zdmi (např. ve sklepích) a v kancelářích. V takovýchto podmínkách umístěte
systém blízko k oknu.
Ruční nastavení času
Stiskněte a přidržte tlačítko SET/RCC pro otevření režimu nastavení:
● 24/12-HOUR: Bliká text „24Hr“. Stisknutím tlačítka +/HEAT/DEW nebo -/MAX/MIN vyberte formát 24 hod nebo 12 hod. Pro pokračování
stiskněte tlačítko SET/RCC.
● Time zone: Zobrazí se časové pásmo a zvolené časové pásmo bliká. Stisknutím tlačítka +/HEAT/DEW nebo -/MAX/MIN vyberte
požadované časové pásmo (rozsah nastavení je 0~+12, 0~-12). +0 pro Německo, +1 pro VB. Stisknutím a uvolněním tlačítka SET/RCC
pokračujte.
● HOURS: Hodiny se rozblikají. Stisknutím tlačítka +/HEAT/DEW nebo -/MAX/MIN vyberte hodiny. Pro pokračování stiskněte tlačítko
SET/RCC.
● MINUTES: Začne blikat zobrazení minut. Stisknutím tlačítka +/HEAT/DEW nebo -/MAX/MIN vyberte minuty. Pro pokračování stiskněte

CZ4
tlačítko SET/RCC.
● YEAR: Začne blikat zobrazení roku. Stisknutím tlačítka +/HEAT/DEW nebo -/MAX/MIN vyberte příslušný rok. Pro pokračování stiskněte
tlačítko SET/RCC.
● MONTH: Začne blikat zobrazení měsíce. Stisknutím tlačítka +/HEAT/DEW nebo -/MAX/MIN vyberte měsíc. Pro pokračování stiskněte
tlačítko SET/RCC.
● DATE: Začne blikat zobrazení data. Stisknutím tlačítka +/HEAT/DEW nebo -/MAX/MIN vyberte datum. Den v týdnu se nastaví automaticky
po nastavení ROKU, MĚSÍCE a DATA. Pro pokračování stiskněte tlačítko SET/RCC.
● LANGUAGE: Bliká NĚM (výchozí hodnota je NĚM). Stisknutím tlačítka +/HEAT/DEW nebo -/MAX/MIN vyberte požadovaný jazyk: GER,
FRE, ITA, DUT, SPA, DAN, ENG. Pro pokračování stiskněte tlačítko SET/RCC.
● °C/°F: Jednotka teploty °C bliká. Stisknutím a uvolněním tlačítka +/HEAT/DEW nebo -/MAX/MIN vyberte jednotky °C nebo °F, stisknutím a
uvolněním tlačítka SET/RCC potvrďte nastavení.
Poznámky:
1. Pokud během 20 sekund nedojde ke stisknutí žádného tlačítka, režim nastavení se ukončí a dojde k návratu do režimu živého zobrazení.
Všechny změny provedené uživatelem před ukončením režimu se uloží
2. +/HEAT/DEW nebo -/MAX/MIN: Jedním stisknutím změníte hodnotu o 1 jednotku, podržením budete nastavení procházet rychle.
Nastavení budíku
Stisknutím a přidržením tlačítka ALARM otevřete režim nastavení budíku:
● ALARM HODINA: Hodina budíku bliká. Stisknutím tlačítka +/HEAT/DEW nebo -/MAX/MIN nastavte hodiny. Stisknutím a uvolněním tlačítka
ALARM potvrďte volbu.
● ALARM MINUTA: Minuty budíku blikají. Stisknutím tlačítka +/HEAT/DEW nebo -/MAX/MIN nastavte minuty. Stisknutím a uvolněním
tlačítka ALARM potvrďte volbu. Stisknutím tlačítka ALARM ukončíte nastavení.
Poznámky:
1. Pokud během 20 sekund nedojde ke stisknutí žádného tlačítka, režim nastavení se ukončí a dojde k návratu do režimu živého zobrazení.
Všechny změny provedené uživatelem před ukončením režimu se uloží
2. +/HEAT/DEW nebo -/MAX/MIN: Jedním stisknutím změníte hodnotu o 1, přidržením pro rychlé nastavení posunem
Aktivace/deaktivace budíku
Jedním stisknutím tlačítka ALARM se zobrazí ALM. Stisknutím tlačítka +/HEAT/DEW nebo -/MAX/MIN aktivujte nebo deaktivujte budík.
● ALARM IKONA: se zobrazí, když je budík aktivován, a nezobrazí se, když je budík deaktivován
Funkce opakovaného buzení
● Když zazní budík, stiskněte tlačítko SNOOZE pro aktivaci času zdřímnutí v délce 10 minut. Pokud je funkce opakovaného buzení aktivní,
ikona budíku bliká.
● Chcete-li budík pozastavit na jeden den, stiskněte jakékoliv tlačítko kromě SNOOZE v režimu zdřímnutí. Ikona budíku se i nadále zobrazuje.
Poznámka: Zvuk budíku má zesilující tendenci. Pokud zní zvuk budíku, zní po dobu 2 minut a poté se zcela vypne.

CZ5
Předpověď počasí
Stanice zobrazuje 1 z 6 různých předpovědí počasí:
Jasno
Polojasno
Zataženo
Déšť
Bouřky
Sněhové srážky
Kanály venkovního senzoru
● Stiskněte tlačítko CHANNEL pro zobrazení kanálů: CH1 (kanál 1), CH2 (kanál 2), CH3 (kanál 3) a procházení kanálů (každý kanál se
zobrazí na krátkou dobu)
● Přidržte tlačítko CHANNEL po dobu 2 s pro vyhledání senzoru pro vybraný kanál na vaší stanici. Napájený senzor musí mít na zadní
straně zvolen stejný kanál.
● Ikona signálu rf bude blikat, dokud nebude přijat signál senzoru nebo pokud během 3 minut nebude k dispozici žádný signál.
Hodnoty TEPLOT a ROSA
● V normálním režimu zobrazení stiskněte tlačítko +/HEAT/DEW pro zobrazení hodnoty TEPLA (tepelný index).
● Opětovným stisknutím tlačítka +/HEAT/DEW zobrazíte hodnotu ROSY (rosný bod).
● Opětovným stisknutím tlačítka +/HEAT/DEW se vrátíte do normálního režimu zobrazení.
Poznámky:
● Hodnota TEPLO zobrazuje hodnotu tepelného indexu (hodnota ve stínu, vypočítaná z teploty a vlhkosti), která se používá pro varování
před nebezpečím tepla, při vystavení plnému slunečnímu svitu se může zvýšit hodnota tepelného indexu až o 8 °C (14 ° F).
Celsia
Fahrenheit
a
Varování
27-32 °C
80-90 °F
Upozornění: Únava je možná při
prodloužené expozici a aktivitě. Při
pokračující aktivitě by mohlo dojít
k tepelným křečím.
32-41°C
90-105°F
Extrémní opatrnost: Jsou možné tepelné
křeče a vyčerpání kvůli teplu. Při
pokračující činnosti by mohlo dojít
k úpalu.
41-54°C
105-130°F
Nebezpečí: Jsou pravděpodobné tepelné
křeče a vyčerpání kvůli teplu;
s pokračující aktivitou je pravděpodobný
úpal.
Nad 54 °C
Nad 130°F
Extrémní nebezpečí: Akutně hrozí úpal.

CZ6
Hodnoty MAX a MIN
● V normálním režimu zobrazení stiskněte tlačítko -/MAX/MIN pro zobrazení hodnot MAX vnitřní a venkovní teploty a vlhkosti.
● Opětovným stisknutím tlačítka -/MAX/MIN zobrazíte hodnoty MIN vnitřní a venkovní teploty a vlhkosti.
● Opětovným stisknutím tlačítka -/MAX/MIN se vrátíte do normálního režimu zobrazení.
Poznámky:
● Stisknutím a přidržením tlačítka -/MAX/MIN po dobu 2 s vymažete hodnoty MAX a MIN z paměti.
● Hodnoty MAX/MIN se také automaticky odstraní vždy o půlnoci (0:00).
● Po 5 s bez stisknutí tlačítka se displej vrátí zpět do normálního režimu zobrazení.
Aktivace/deaktivace funkce výstrahy HI/LO
● Režimu normálního zobrazení stiskněte tlačítko ALERT a hodnota venkovní teploty „HI“ bude blikat. Stisknutím tlačítka +/HEAT/DEW
aktivujte výstrahu na VYSOKOU teplotu. Stisknutím tlačítka -/MAX/MIN pro vypnete výstrahu na VYSOKOU teplotu. Stisknutím tlačítka
ALERT potvrďte nastavení.
● Na displeji bliká venkovní LO teplota. Stisknutím tlačítka +/HEAT/DEW aktivujte výstrahu na HI teplotu nebo stiskněte tlačítko -/MAX/MIN
pro vypnutí výstrahy na HI teplotu. Stisknutím tlačítka ALERT potvrďte nastavení.
● Pokud se vypne signalizace HI/LO, na displeji se zobrazí nápis OFF. Na displeji bliká indikace „HI“ interní teplota. Stisknutím tlačítka
+/HEAT/DEW aktivujte výstrahu na HI teplotu nebo stiskněte tlačítko -/MAX/MIN pro vypnutí výstrahy na HI teplotu. Stisknutím tlačítka
ALERT potvrďte nastavení.
● Na displeji bliká indikace „LO“ interní teplota. Stisknutím tlačítka +/HEAT/DEW aktivujte výstrahu na VYSOKOU teplotu nebo stiskněte
tlačítko -/MAX/MIN pro vypnutí výstrahy na VYSOKOU teplotu. Stisknutím tlačítka ALERT potvrďte nastavení.
Poznámky:
● Pokud je vypnuta výstraha na HI/LO teplotu, na displeji se zobrazí ikona OFF.
Nastavení hodnot výstrahy HI/LO
● Přidržte tlačítko ALERT po dobu asi 2 s a zadejte nastavovací hodnotu výstrahy teploty. Na displeji bliká výstraha na „VYSOKOU“ venkovní
teplotu. Stiskněte a uvolněte tlačítko +/HEAT/DEW a tlačítko -/MAX/MIN pro nastavení hodnoty nebo přidržte tlačítko pro rychlé nastavení
během nastavovacího režimu. Stisknutím tlačítka ALERT potvrďte zadání.
● Na displeji bliká výstraha na „LO“ venkovní teplotu. Stiskněte a uvolněte tlačítko +/HEAT/DEW a tlačítko -/MAX/MIN pro nastavení hodnoty
nebo přidržte tlačítko pro rychlé nastavení během nastavovacího režimu. Stisknutím tlačítka ALERT potvrďte zadání.
● Na displeji bliká výstraha na „HI“ vnitřní teplotu. Stiskněte a uvolněte tlačítko +/HEAT/DEW a tlačítko -/MAX/MIN pro nastavení hodnoty
nebo přidržte tlačítko pro rychlé nastavení během nastavovacího režimu. Stisknutím tlačítka ALERT potvrďte zadání.
● Na displeji bliká výstraha na „LO“ vnitřní teplotu. Stiskněte a uvolněte tlačítko +/HEAT/DEW a tlačítko -/MAX/MIN pro nastavení hodnoty
nebo přidržte tlačítko pro rychlé nastavení během nastavovacího režimu. Stisknutím tlačítka ALERT ukončíte nastavení.
Podsvícení
● Stisknutím tlačítka SNOOZE/LIGHT nastavte podsvícení na HI/LO/OFF, pokud používáte adaptér pro napájení stanice.
● Stisknutím tlačítka SNOOZE/ LIGHT aktivujte podsvícení po dobu 10 s, pokud používáte baterie, a nikoliv adaptér pro napájení stanice.
Indikátor slabé baterie
● Ikona baterie vedle vnitřní teploty znamená nutnost výměny baterií ve stanici.
● Ikona baterie vedle venkovní teploty znamená nutnost výměny baterií v senzoru.
Specifikace
Vnitřní teplota
● Rozsah provozních teplot = 0 °C až 50 °C (32°F až 122°F)
● Přesnost ±1 °C při teplotě 0 až 50 °C (32°F až 122°F)
● Rozlišení = 0,1 °C
● Při teplotě nad 50 °C (122 °F), zobrazí displej hlášení „HI“

CZ7
● Při teplotě nižší než −9,9 °C (14°F) se na displeji LCD zobrazí „LO“
Vnitřní vlhkost
● Rozsah provozní vlhkosti = 20 až 95 % rel. vlhkosti
● Přesnost +/- 5 % RH (při 25°C, 30 % RH až 80 % RH)
● Přesnost +/- 8% RH (při 25°C, 20 % RH až 29 % RH 80 % RH až 95 % RH)
● Rozlišení = 1 % rel. vlhkosti
Venkovní teplota
● Rozsah provozní teploty = −40 až 60°C (-40°F až 140°F)
● Přesnost ± 1 stupňů Celsia od 0 °C do 50 °C (32°F až 122°F)
● Přesnost ±1,5 stupňů Celsia od -40 °C do 0 °C (-40 °F až 32 °F) a 50 °C až 60 °C (122°F až 140°F)
● Rozlišení = 0,1 °C
● Při teplotě nad 60°C (140 °F), zobrazí displej hlášení „HI“.
● Při teplotě nižší než −40 °C (-40°F) se na displeji LCD zobrazí „LO“
Venkovní vlhkost
● Rozsah provozní vlhkosti = 20 až 95 % rel. vlhkosti
● Přesnost +/- 5 % RH (při 25°C, 30 % RH až 80 % RH)
● Přesnost +/- 8 % RH (při 25 °C, 20 % RH až 30 % RH-80 % RH až 95 % RH)
● Rozlišení = 1 % rel. vlhkosti
Vlivy prostředí na příjem signálu
Čas stanice je přesně řízen bezdrátovou technologií. Stejně jako u jiných bezdrátových zařízení může být příjem negativně ovlivněn
následujícími podmínkami:
● Dlouhá přenosová vzdálenost
● Blízkost hor a údolí
● Blízkost dálnic, železnic, letišť, vedení vysokého napětí apod.
● Blízkost staveniště
● Umístění mezi vysokými stavbami
● Umístění uvnitř betonových staveb
● Blízkost elektrických zařízení (počítačů, televizorů apod.) a kovových předmětů
● Umístění uvnitř jedoucích vozidel
Stanici umístěte na místě s optimálním signálem, to znamená v blízkosti okna a mimo dosah vlivu kovových povrchů nebo elektrických zařízení.
Bezpečnostní opatření
● Tato hlavní jednotka je určena pro použití pouze ve vnitřních prostorách, venkovní snímač je určen pro venkovní použití.
● Nevystavujte jednotku působení nadměrné síly ani otřesům.
● Nevystavujte jednotku extrémním teplotám, přímému slunečnímu svitu, prachu či vlhkosti.
● Neponořujte do vody.
● Vyhněte se kontaktu s jakýmkoliv korozivním materiálem.
● Nevhazujte jednotku do ohně, hrozí nebezpečí exploze.
● Neotevírejte vnitřní kryt a nemanipulujte s žádnými součástkami této jednotky.
Bezpečnostní opatření u baterií
● Používejte pouze alkalické baterie, nikdy ne dobíjecí baterie.
● Vložte baterie se správnou polaritou (+/−).
● Vždy vyměňte kompletní sadu baterií.

CZ8
● Nikdy nemíchejte dohromady použité a nové baterie.
● Slabé baterie okamžitě vyjměte.
● Jestliže zařízení nepoužíváte, vyjměte z něj baterie.
● Baterie nenabíjejte a nevhazujte je do ohně – mohou explodovat.
● Baterie skladujte mimo dosah kovových předmětů, kontakt s nimi může způsobit zkrat.
● Nevystavujte baterie extrémním teplotám, vlhkosti či přímému slunečnímu svitu.
● Veškeré baterie skladujte mimo dosah dětí. Hrozí riziko udušení.
Výrobek používejte pouze k zamýšlenému účelu!
Likvidace baterií podle předpisů
Staré baterie nepatří do domovního odpadu, protože by mohly poškodit zdraví a životní prostředí. Použité baterie můžete
zdarma vrátit prodejci a do sběrných míst. Jako koncoví uživatelé jste vázáni zákonem použité baterie vrátit distributorům a
do jiných sběrných míst!
Povinnosti dle zákona o elektrických zařízeních
Tento symbol znamená, že elektrická zařízení je nutné po dosažení konce životnosti zlikvidovat odděleně od běžného
domovního odpadu. Zařízení vraťte do místního sběrného místa nebo centra pro recyklaci. To platí pro všechny země
Evropské unie a ostatní evropské země se samostatným systémem shromažďování odpadu.

PL1
WS6442 – INSTRUKCJA OBSŁUGI
Przegląd:
1 – Ikony prognozy pogody
2 – Ikona tendencji pogody
3 – Temperatura na zewnątrz
4 – Wilgotność na zewnątrz
5 – Alert temperatury zewnętrznej
6 – Czas
7 – Temperatura w pomieszczeniu
8 – Wilgotność w pomieszczeniu
9 – Alert temperatury
w pomieszczeniu
10 – Ikona fazy księżyca
11 – Ikona otwarcia/
zamknięcia okna
12 – Dzień tygodnia
13 – Data i miesiąc
Wszystkie wskazania wyświetlacza

PL2
Przyciski
Dostępnych jest siedem przycisków funkcyjnych:
SET/RCC
ALARM
+/HEAT/DEW
-/MAX/MIN
ALERT
CHANNEL
SNOOZE/LIGHT
Funkcje
● Rok: 2019-2099
● Data/miesiąc/dzień
● Temperatura i wilgotność w pomieszczeniu/na zewnątrz
● Trend temperatury i wilgotności w pomieszczeniu/na zewnątrz
● Ikona niskiego napięcia w bateriach w stacji i czujniku
● Wybór tryby 24/12 godzin
● Funkcja alarmu i drzemki
● Prognoza pogody: Słonecznie, przejaśnienia, pochmurnie, deszczowo i burze
● Maksymalna i minimalna temperatura/wilgotność
● Siedem języków dla nazw dni tygodnia (niemiecki, francuski, włoski, holenderski, hiszpański, duński, angielski)
● Strefa czasowa: -12/+12HR
● Funkcja odbiornika radiobudzika DCF
● Podświetlenie, HI, LOW, OFF
● Temperatura odczuwalna i punkt rosy na zewnątrz
● Alert temperatury HI/LO wewnątrz i na zewnątrz
● Zalecenie zamknięcia/otwarcia okna (gdy temperatura mieści się w zakresie 20-25°C przy wilgotności 40-70%, wyświetlone zostanie
zalecenie otwarcia okna, w przeciwnym razie wyświetla zalecenie zamknięcia okna)
● Faza księżyca
● Możliwość podłączenia nawet 3 czujników zewnętrznych
● Baterie do stacji głównej (WS6442): 3 x AAA
● Baterie do czujnika zewnętrznego (TX960-TH): 2 x AAA
Rozpoczęcie działania:
● Podłączyć stację do gniazda ściennego za pomocą zasilacza.
● Po włączeniu zasilania stacji wszystkie ikony na wyświetlaczu będą włączone przez trzy sekundy i zostanie wygenerowany krótki sygnał
dźwiękowy.
● Stacja pogodowa uruchomi się teraz, aby nawiązać połączenie z zewnętrznym czujnikiem zdalnym. To działanie trwa około 3 minut i jest
sygnalizowane migającym symbolem anteny odbioru RF w obszarze wyświetlacza „NA ZEWNĄTRZ” na odbiorniku.
● Zdjąć pokrywę komory baterii czujnika zewnętrznego i umieścić w komorze baterii 2 baterie AAA, zwracając uwagę na poprawne
zorientowanie biegunów baterii [oznaczenia „+” oraz „–”]. Następnie zamknąć komorę baterii.
● Po ustanowieniu przez stację połączenia ze zdalnym czujnikiem zewnętrznym stacja zostanie przełączona do trybu odbioru sygnału czasu
sterowania radiowego.
Opcjonalnie: baterie podtrzymujące (gdy zasilacz nie jest podłączony, stałe podświetlenie będzie wyłączone)
● Otworzyć pokrywę komory baterii stacji pogodowej

PL3
● Umieścić 3 baterie AAA, zwracając uwagę na poprawne zorientowanie biegunów baterii [oznaczenia „+” oraz „–”].
● Zamknąć komorę baterii.
Uwagi:
● Jeżeli po 3 minutach temperatura zewnętrzna nie zostanie wyświetlona, przytrzymać przycisk „CHANNEL” urządzenia głównego, aby
wyszukać sygnał czujnika zewnętrznego. Następnie należy nacisnąć przycisk „TX” na czujniku, aby wysłać sygnał. Jeżeli nadal nie zostanie
odebrana temperatura zewnętrzna, należy wyjąć baterie z przekaźnika i wrócić do kroku 1 konfiguracji.
● Utrzymywanie się niskiej temperatury (poniżej -20°C) może powodować nieprawidłowe działanie baterii alkalicznych. W rezultacie
zewnętrzny czujnik bezprzewodowy może przestać nadawać odczyty temperatury. Przy niskiej temperaturze należy używać baterii litowych,
które zapewnią nieprzerwaną pracę bezprzewodowych czujników działających na zewnątrz.
Odbiór radiowego sygnału czasu:
● Zegar automatycznie uruchamia wyszukiwanie sygnału DCF po 7 minutach każdego ponownego uruchomienia lub wymianie baterii na
nowe. Ikona masztu radiowego zacznie migać.
● O godzinie 1:00/2:00/3:00/4:00/5:00 zegar uruchamia automatyczną procedurę synchronizacji z sygnałem DCF, aby skorygować
ewentualną rozbieżność wskazania czasu. Jeśli próba synchronizacji się nie powiedzie (ikona masztu radiowego znika z wyświetlacza),
system automatycznie podejmie kolejną próbę synchronizacji o najbliższej pełnej godzinie. Ta procedura powtarza się automatycznie
maksymalnie 5 razy.
● Aby rozpocząć ręczny odbiór sygnału DCF, nacisnąć przycisk „SET/RCC”. Jeśli w ciągu 7 minut nie zostanie odebrany żaden sygnał,
wyszukiwanie sygnału DCF zostanie zatrzymane (ikona masztu radiowego zniknie) i uruchomi się ponownie o najbliższej pełnej godzinie.
● Aby przerwać wyszukiwanie sygnału radiowego, gdy odbierany jest sygnał RC, należy jednokrotnie nacisnąć przycisk „SET/RCC”.
Uwagi:
● Migająca ikona masztu radiowego oznacza, że rozpoczął się odbiór sygnału DCF.
● Stale wyświetlana ikona masztu radiowego wskazuje, że sygnał DCF został odebrany pomyślnie.
● Zalecamy minimalną odległość 2,5 metra od wszystkich źródeł zakłóceń, takich jak telewizory i monitory komputerowe.
● Odbiór radiowy jest słabszy w pomieszczeniach z betonowymi ścianami (np. w podziemiach) i w biurach. W takich okolicznościach umieść
system w pobliżu okna.
Ręczne ustawianie czasu
Nacisnąć i przytrzymać przycisk SET/RCC, aby uruchomić tryb konfiguracji:
● 24/12-HOUR: 24-godz. będzie migać. Nacisnąć przycisk +/HEAT/DEW lub -/MAX/MIN, aby wybrać 24 lub 12-godzinny tryb wyświetlania
czasu. Nacisnąć przycisk SET/RCC, aby przejść dalej.
● Time zone: Wyświetlona zostanie strefa czasowa, a wybrana strefa czasowa będzie migać. Nacisnąć przycisk +/HEAT/DEW lub
-/MAX/MIN, aby ustawić żądaną strefę czasową (zakres ustawień: od 0 do +12, od 0 do -12). +0 dla Niemiec, +1 dla Wielkiej Brytanii.
Nacisnąć i zwolnić przycisk SET/RCC, aby przejść dalej.

PL4
● HOURS: Cyfry godzin zaczną migać. Nacisnąć przycisk +/HEAT/DEW lub -/MAX/MIN, aby ustawić godzinę. Nacisnąć przycisk SET/RCC,
aby przejść dalej.
● MINUTES: Minuty będą migać. Nacisnąć przycisk +/HEAT/DEW lub -/MAX/MIN, aby ustawić minuty. Nacisnąć przycisk SET/RCC, aby
przejść dalej.
● YEAR: Rok będzie migać. Nacisnąć przycisk +/HEAT/DEW lub -/MAX/MIN, aby ustawić rok. Nacisnąć przycisk SET/RCC, aby przejść
dalej.
● MONTH: Miesiąc będzie migać. Nacisnąć przycisk +/HEAT/DEW lub -/MAX/MIN, aby ustawić miesiąc. Nacisnąć przycisk SET/RCC, aby
przejść dalej.
● DATE: Dzień będzie migać. Nacisnąć przycisk +/HEAT/DEW lub -/MAX/MIN, aby ustawić dzień. Dzień tygodnia zostanie ustawiony
automatycznie po ustawieniu roku, miesiąca i dnia. Nacisnąć przycisk SET/RCC, aby przejść dalej.
● LANGUAGE: Wskazanie GER zacznie migać (ustawienie domyślne: GER). Nacisnąć przycisk +/HEAT/DEW lub -/MAX/MIN, aby wybrać
język: GER, FRE, ITA, DUT, SPA, DAN, ENG. Nacisnąć przycisk SET/RCC, aby przejść dalej.
● °C/°F: Jednostka temperatury (°C) zacznie migać. Nacisnąć i zwolnić przycisk +/HEAT/DEW lub -/MAX/MIN, aby wybrać °C lub °F.
Nacisnąć i zwolnić przycisk SET/RCC, aby potwierdzić ustawienie.
Uwagi:
1. Jeżeli przez 20 sekund nie zostaną naciśnięte żadne przyciski, tryb ustawień zakończy się i wrócić do trybu wyświetlania na żywo,
przedstawiając regulacje wprowadzone przez użytkownika przed upływem czasu
2. +/HEAT/DEW lub -/MAX/MIN: Nacisnąć jeden raz, aby wyregulować o 1 jednostkę, przytrzymać, aby szybko przewijać regulację
Ustawianie alarmu
Nacisnąć i przytrzymać przycisk ALARM, aby uruchomić tryb konfiguracji:
● Godzina alarmu Godzina alarmu zacznie migać. Za pomocą przycisku +/HEAT/DEW lub -/MAX/MIN ustawić godzinę. Nacisnąć i zwolnić
przycisk ALARM, aby potwierdzić.
● Minuty alarmu: Minuty alarmu zaczną migać. Za pomocą przycisku +/HEAT/DEW lub -/MAX/MIN ustawić minuty. Nacisnąć i zwolnić
przycisk ALARM, aby potwierdzić. Nacisnąć przycisk ALARM, aby wyjść.
Uwagi:
1. Jeżeli przez 20 sekund nie zostaną naciśnięte żadne przyciski, tryb ustawień zakończy się i wrócić do trybu wyświetlania na żywo,
przedstawiając regulacje wprowadzone przez użytkownika przed upływem czasu
2. +/HEAT/DEW lub -/MAX/MIN: Nacisnąć jednokrotnie, aby zmienić ustawienie o 1 jednostkę, przytrzymać, aby szybko przewijać wartości
Aktywacja/wyłączenie alarmu
Jednokrotnie nacisnąć przycisk ALARM. Wyświetlone zostanie wskazanie ALM. Użyć przycisku +/HEAT/DEW lub -/MAX/MIN, aby włączyć lub
wyłączyć alarm
● Ikonka alarmu: jest wyświetlana, jeżeli alarm jest aktywny, a gdy nie jest aktywny, nie jest wyświetlana

PL5
Funkcja drzemki
● Gdy wybrzmiewa alarm, nacisnąć przycisk SNOOZE, aby uruchomić tryb drzemki trwający 10 minut. Kiedy funkcja drzemki jest aktywna,
ikona alarmu będzie migać.
● Aby wyłączyć alarm na cały dzień, nacisnąć dowolny przycisk (inny niż SNOOZE), gdy uruchomiony jest tryb drzemki. Ikona alarmu będzie
nadal wyświetlana.
Uwaga: Dźwięk alarmu jest narastający. Kiedy rozlegnie się alarm, będzie trwał przez 2 minuty, a następnie całkowicie się wyłączy.
Prognoza pogody
Stacja wyświetla 1 z 6 prognoz pogody:
Słonecznie
częściowo słonecznie
Zachmurzenie
Deszcz
Burze
Śnieg
Kanały czujnika zewnętrznego
● Naciśnij przycisk CHANNEL, aby wyświetlić inne kanały: CH1 (kanał 1), CH2 (kanał 2), CH3 (kanał 3) oraz cykliczne przełączanie kanałów
(każdy kolejny kanał wyświetlany jest przez chwilę)
● Przytrzymać przycisk CHANNEL przez 2 sekundy, aby wyszukać czujnik przypisany do danego kanału stacji. Czujnik musi mieć wybrany
ten sam kanał (ustawienie wybiera się przełącznikiem znajdującym się na tylnej obudowie czujnika).
● Ikona sygnału radiowego będzie migać do momentu odebrania sygnału czujnika lub jeżeli sygnał nie zostanie odebrany w ciągu 3 minut.
Wartości HEAT oraz DEW (temperatura odczuwalna i punkt rosy)
● W zwykłym trybie wyświetlania nacisnąć przycisk +/HEAT/DEW, aby wyświetlić wartość temperatury odczuwalnej (HEAT).
● Ponownie nacisnąć przycisk +/HEAT/DEW, aby wyświetlić punkt rosy (DEW).
● Ponownie nacisnąć przycisk +/HEAT/DEW, aby powrócić do zwykłego trybu wyświetlania.
Uwagi:
● Wartość HEAT to tzw. temperatura odczuwalna (mierzona w cieniu z uwzględnieniem temperatury i wilgotności) umożliwiająca ostrzeżenie
przed upałem: ekspozycja na pełne słońce może podwyższać temperaturę odczuwalną nawet o 8°C.
Stopnie
Celsjusza
Stopnie
Fahrenheit
a
Ostrzeżenie
27-32°C
80-90°F
Uwaga: przedłużona ekspozycja i
aktywność może wywołać zmęczenie.
Przedłużona aktywność może skutkować
kurczami cieplnymi.

PL6
32-41°C
90-105°F
Zachować ostrożność: możliwe
wystąpienie kurczów cieplnych i znużenia
cieplnego. Przedłużona aktywność może
skutkować udarem cieplnym.
41-54°C
105-130°F
Niebezpieczeństwo: duże
prawdopodobieństwo wystąpienia
kurczów cieplnych i znużenia cieplnego;
ciągła aktywność może skutkować
udarem cieplnym.
Powyżej
54°C
Powyżej
130°F
Najwyższy stopień zagrożenia:
wystąpienie udaru cieplnego jest kwestią
czasu.
Wartości MAX i MIN
● W zwykłym trybie wyświetlania nacisnąć przycisk -/MAX/MIN, aby wyświetlić wartości maksymalne temperatury i wilgotności wewnętrznej i
zewnętrznej.
● Ponownie nacisnąć przycisk -/MAX/MIN, aby wyświetlić wartości minimalne temperatury i wilgotności wewnętrznej i zewnętrznej.
● Ponownie nacisnąć przycisk -/MAX/MIN, aby powrócić do zwykłego trybu wyświetlania.
Uwagi:
● Nacisnąć i przytrzymać przycisk -/MAX/MIN przez 2 sekundy, aby wykasować z pamięci wartości maksymalne i minimalne.
● Wartości maksymalne/minimalne zostaną wykasowane automatycznie każdego dnia o północy (0:00).
● Jeżeli przez 5 sekund nie zostanie naciśnięty żaden przycisk, wyświetlacz powróci do zwykłego trybu wyświetlania.
Włączenie/wyłączenie funkcji alertu temperatury HI/LO
● W zwykłym trybie wyświetlania nacisnąć przycisk ALERT. W obszarze wyświetlania warunków na zewnątrz zacznie migać wskazanie „HI”.
Nacisnąć przycisk +/HEAT/DEW, aby włączyć alert wysokiej temperatury, nacisnąć przycisk -/MAX/MIN, aby wyłączyć alert HI temperatury.
Nacisnąć przycisk ALERT, aby potwierdzić.
● Na wyświetlaczu temperatury na zewnątrz zacznie migać wskazanie LO. Nacisnąć przycisk +/HEAT/DEW, aby włączyć alert wysokiej
temperatury lub nacisnąć przycisk -/MAX/MIN, aby wyłączyć alert HI temperatury. Nacisnąć przycisk ALERT, aby potwierdzić.
● Jeżeli alert temperatury HI/LO jest wyłączony, na wyświetlaczu widoczne jest wskazanie OFF. Na wyświetlaczu temperatury w
pomieszczeniu zacznie migać wskazanie „HI”. Nacisnąć przycisk +/HEAT/DEW, aby włączyć alert wysokiej temperatury lub nacisnąć
przycisk -/MAX/MIN, aby wyłączyć alert HI temperatury. Nacisnąć przycisk ALERT, aby potwierdzić.
● Na wyświetlaczu temperatury w pomieszczeniu zacznie migać wskazanie LO. Nacisnąć przycisk +/HEAT/DEW, aby włączyć alert wysokiej
temperatury lub nacisnąć przycisk -/MAX/MIN, aby wyłączyć alert wysokiej temperatury. Nacisnąć przycisk ALERT, aby potwierdzić.
Uwagi:
● Jeżeli alert HI/LO temperatury jest wyłączony, na wyświetlaczu widoczne jest wskazanie OFF.
Ustawianie wartości alertu HI/LO temperatury
● Przytrzymać przycisk ALERT przez około 2 sekundy, aby uruchomić konfigurację wartości temperatury dla alertu. Na wyświetlaczu
temperatury na zewnątrz zacznie migać wskazanie „HI”. Nacisnąć i zwolnić przycisk +/HEAT/DEW oraz -/MAX/MIN, aby zmienić wartość
lub przytrzymać przycisk, aby szybko zmieniać wartość ustawienia. Nacisnąć przycisk ALERT, aby potwierdzić.
● Na wyświetlaczu temperatury na zewnątrz zacznie migać wskazanie „LO”. Nacisnąć i zwolnić przycisk +/HEAT/DEW oraz -/MAX/MIN, aby
zmienić wartość lub przytrzymać przycisk, aby szybko zmieniać wartość ustawienia. Nacisnąć przycisk ALERT, aby potwierdzić.
● Na wyświetlaczu temperatury w pomieszczeniu zacznie migać wskazanie „HI”. Nacisnąć i zwolnić przycisk +/HEAT/DEW oraz -/MAX/MIN,
aby zmienić wartość lub przytrzymać przycisk, aby szybko zmieniać wartość ustawienia. Nacisnąć przycisk ALERT, aby potwierdzić.
● Na wyświetlaczu temperatury w pomieszczeniu zacznie migać wskazanie „LO”. Nacisnąć i zwolnić przycisk +/HEAT/DEW oraz -/MAX/MIN,
aby zmienić wartość lub przytrzymać przycisk, aby szybko zmieniać wartość ustawienia. Nacisnąć przycisk ALERT, aby zakończyć
konfigurację.

PL7
Podświetlenie
● Nacisnąć przycisk SNOOZE/LIGHT, aby wybrać ustawienie podświetlenia: HI/LO/OFF (jasne/ciemne/wyłączone), które będzie aktywne po
podłączeniu stacji do zasilacza.
● Nacisnąć przycisk SNOOZE/LIGHT, aby włączyć podświetlenie na 10 sekund – gdy stacja działa na bateriach i nie jest podłączona do
zasilacza.
Wskaźnik rozładowania baterii
● Ikona baterii w obszarze temperatury w pomieszczeniu oznacza konieczność wymiany baterii w stacji.
● Ikona baterii w obszarze temperatury na zewnątrz oznacza konieczność wymiany baterii w czujniku.
Specyfikacja
Temperatura wewnętrzna
● Zakres mierzonych temperatur = 0°C do 50°C (32°F do 122°F)
● Dokładność ± 1 stopień Celsjusza od 0°C do 50°C (od 32°F do 122°F)
● rozdzielczość = 0,1 stopnia Celsjusza
● Gdy temperatura przekroczy 50°C (122 °F), na LCD pojawi się wskazanie: HI
● jeżeli poniżej - 9,9°C (14°F), na ekranie LCD wyświetli się LO
Wilgotność wewnątrz
● zakres wilgotności roboczej =20% wilg. wzgl. do 95%
● Dokładność +/- 5% RH (przy 25°C, 30%RH do 80%RH)
● Dokładność +/- 8% RH (przy 25°C, 20%RH do 29%RH, 80%RH to 95%RH)
● rozdzielczość = 1 % wilg. wzgl.
Temperatura na zewnątrz
● Zakres mierzonych temperatur = -40°C do 60°C (-40°F do 140°F)
● Dokładność ± 1 stopień Celsjusza od 0°C do 50°C (32°F do 122°F)
● Dokładność ±1,5 stopnia Celsjusza od -40°C do 0°C (-40°F do 32°F) i od 50°C do 60°C (122°F do 140°F)
● rozdzielczość = 0,1 stopnia Celsjusza
● Gdy temperatura przekroczy 60°C (140 °F), na LCD pojawi się wskazanie: HI.
● W temperaturze poniżej -40 C (-40 F) na wyświetlaczu LCD pojawi się LO.
Wilgotność na zewnątrz
● zakres wilgotności roboczej =20% wilg. wzgl. do 95%
● Dokładność +/- 5% RH (przy 25°C, 30%RH do 80%RH)
● Dokładność +/- 8% RH (przy 25°C, 20%RH do 30%RH-80%RH do 95%RH)
● rozdzielczość = 1 % wilg. wzgl.
Wpływ środowiska na odbiór
Stacja zawdzięcza dokładny odczyt czasu technologii bezprzewodowej. Podobnie jak w przypadku wszystkich urządzeń bezprzewodowych,
odbiór może być zakłócony następującymi czynnikami:
● duża odległość przekazu;
● góry i doliny znajdujące się w pobliżu;
● autostrada, kolej, porty lotnicze, kable wysokiego napięcia itd. znajdujące się w pobliżu;
● teren budowy znajdujący się w pobliżu;
● usytuowanie pomiędzy wysokimi budynkami;
● usytuowanie wewnątrz betonowych budynków;
● znajdujące się w pobliżu urządzenia elektryczne (komputery, telewizory itd.) i struktury metalowe;
● usytuowanie w poruszających się pojazdach.
Stację najlepiej jest ustawić w miejscu, gdzie uzyska ona najlepszy zasięg sygnału, tj. blisko okna i z dala od metalowych powierzchni czy

PL8
urządzeń elektrycznych.
Środki ostrożności
● Stacja główna przeznaczona jest wyłącznie do użytku wewnątrz pomieszczeń, a czujnik zewnętrzny powinien być stosowany na zewnątrz.
● Nie stosować nadmiernej siły i nie potrząsać urządzeniem podczas korzystania.
● Nie wystawiać jednostki na ekstremalne temperatury, bezpośrednie światło słoneczne, kurz czy wilgoć.
● Nie zanurzać w wodzie.
● Unikać kontaktu z materiałami korodującymi.
● Urządzenia nie wolno utylizować w ogniu, ponieważ może wybuchnąć.
● Nie otwierać tylnej obudowy wewnętrznej ani nie ingerować w żadne komponenty urządzenia.
Ostrzeżenia bezpieczeństwa dotyczące baterii
● Używać wyłącznie baterii alkalicznych, a nie baterii akumulatorowych.
● Włożyć baterie prawidłowo, zgodnie z biegunowością (+/-).
● Zawsze należy wymieniać cały zestaw baterii.
● Nigdy nie wolno mieszać zużytych i nowych baterii.
● Zużyte baterie należy natychmiast wymieniać.
● Wyjmować baterie, jeśli urządzenie nie jest używane.
● Nie ładować ponownie baterii ani nie wyrzucać ich do ognia, ponieważ mogą eksplodować.
● Należy upewnić się, że baterie są przechowywane z dala od metalowych obiektów, ponieważ zetknięcie z nimi może spowodować zwarcie.
● Unikać wystawiania baterii na działanie ekstremalnych temperatur, wilgoć czy światło słoneczne.
● Baterie należy trzymać w miejscu niedostępnym dla dzieci. Stwarzają one zagrożenie udławienia się.
Produkt należy używać tylko zgodnie z przeznaczeniem!
Zobowiązania według przepisów prawa dotyczących baterii
Zużyte baterie nie mogą być wyrzucane ze zwykłymi śmieciami domowymi, ponieważ mogą powodować szkody dla
zdrowia i środowiska. Zużyte baterie można oddać bezpłatnie u swojego sprzedawcy lub w punktach zbiórek. Użytkownik
końcowy jest zobowiązany prawem do zwrotu odpowiednich baterii sprzedawcom lub w innych punktach zbiórek!
Zobowiązania według przepisów prawa dotyczących urządzeń elektrycznych
Symbol ten oznacza, że po zakończeniu okresu użytkowania należy pozbyć się urządzeń elektrycznych oddzielnie od odpadów
pochodzących z gospodarstw domowych. Swoje urządzenie najlepiej jest oddać w lokalnym punkcie zbiórki odpadów lub
centrum recyklingu. Dotyczy to wszystkich państw Unii Europejskiej oraz innych państw europejskich, w których obowiązuje
system zbierania odpadów segregowanych.
-
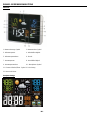 1
1
-
 2
2
-
 3
3
-
 4
4
-
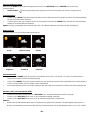 5
5
-
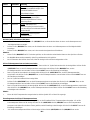 6
6
-
 7
7
-
 8
8
-
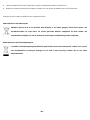 9
9
-
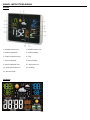 10
10
-
 11
11
-
 12
12
-
 13
13
-
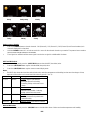 14
14
-
 15
15
-
 16
16
-
 17
17
-
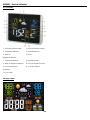 18
18
-
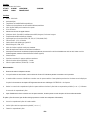 19
19
-
 20
20
-
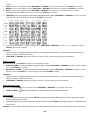 21
21
-
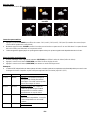 22
22
-
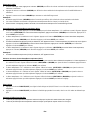 23
23
-
 24
24
-
 25
25
-
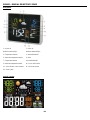 26
26
-
 27
27
-
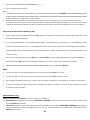 28
28
-
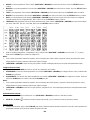 29
29
-
 30
30
-
 31
31
-
 32
32
-
 33
33
-
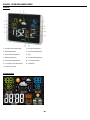 34
34
-
 35
35
-
 36
36
-
 37
37
-
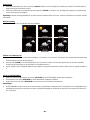 38
38
-
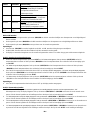 39
39
-
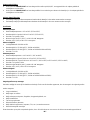 40
40
-
 41
41
-
 42
42
-
 43
43
-
 44
44
-
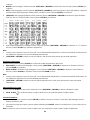 45
45
-
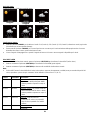 46
46
-
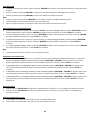 47
47
-
 48
48
-
 49
49
-
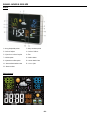 50
50
-
 51
51
-
 52
52
-
 53
53
-
 54
54
-
 55
55
-
 56
56
-
 57
57
-
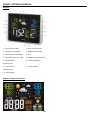 58
58
-
 59
59
-
 60
60
-
 61
61
-
 62
62
-
 63
63
-
 64
64
-
 65
65


in andere talen
- italiano: Technoline Model Manuale utente
- français: Technoline Model Manuel utilisateur
- español: Technoline Model Manual de usuario
- Deutsch: Technoline Model Benutzerhandbuch
- polski: Technoline Model Instrukcja obsługi
Gerelateerde papieren
Andere documenten
-
 Explore Scientific WSH4008LC2000 de handleiding
-
Hama TC500 - 76048 de handleiding
-
Explore Scientific WSH5001 Handleiding
-
 Explore Scientific WSH4005000000 de handleiding
-
Alecto WS-5300 Handleiding
-
-
Alecto WS-3400 de handleiding
-
TFA Wireless Weather Station with Colour Display PRIMAVERA de handleiding
-
-
König KN-WS300 de handleiding

