
DE
WT 539
PROJEKTIONSWECKER
Allgemeine Sicherheitshinweise
• Das Gerät ist kein Spielzeug. Es darf nicht im Zugriffsbereich von Kindern aufbewahrt oder
betrieben werden.
• Betreiben Sie das Gerät nur in trockener, staubfreier Umgebung, setzen Sie es keinem
Einuss von Feuchtigkeit, Vibrationen, ständiger Wärmeeinstrahlung, Kälte und keinen
mechanischen Belastungen aus.
• Lassen Sie das Verpackungsmaterial nicht achtlos liegen, Plastikfolien/-tüten, Styroporteile,
etc., könnten für Kinder zu einem gefährlichen Spielzeug werden.
• Das Gerät nicht verwenden, wenn es von außen erkennbare Schäden z. B. am Gehäuse,
bzw. eine Funktionsstörung aufweist. Im Zweifelsfall das Gerät von einer Fachkraft oder
unserem Service prüfen lassen.
• Das Gerät darf nur mit dem beiliegenden Originalnetzteil betrieben werden!
• Das Gerät darf nicht geöffnet werden und es dürfen keine eigenhändigen Reparaturen
durchgeführt werden.
Umwelteinüsse auf Funkempfang
Die Uhr empfängt kabellos die genaue Uhrzeit. Wie bei allen kabellosen Geräten kann der
Funkempfang durch folgende Einüsse beeinträchtigt sein:
• lange Übertragungswege
• naheliegende Berge und Täler
• nahe Autobahnen, Gleisen, Flughäfen, Hochspannungsleitungen, etc.
• nahe Baustellen
• inmitten hoher Gebäude
• in Betonbauten
• nahe elektrischer Geräte (Computer, Fernseher, etc) und metallischer Gegenstände
• in bewegten Fahrzeugen
Platzieren Sie die Uhr an einem Ort mit optimalem Empfang, z.B. in der Nähe von Fenstern und
entfernt zu metallischen oder elektrischen Gegenständen.
Vorsichtsmaßnahmen
• Setzen Sie das Gerät nicht extremer Gewalteinwirkung oder Stößen aus.
• Setzen Sie das Gerät nicht hohen Temperaturen, direktem Sonnenlicht, Staub und Feuchtigkeit aus.
• Tauchen Sie das Gerät nicht in Wasser.
• Vermeiden Sie den Kontakt mit ätzenden Materialien.
• Öffnen Sie nicht das Gehäuse und manipulieren Sie nicht bauliche Bestandteile des Geräts.
Batterie-Sicherheitshinweise
• Verwenden Sie nur Alkali-Batterien, keine wiederauadbaren Batterien.
• Legen Sie die Batterien unter Beachtung der Polarität (+/-) richtig ein.
• Ersetzen Sie stets einen vollständigen Batteriesatz.
• Mischen Sie niemals alte und neue Batterien.
• Entfernen Sie erschöpfte Batterien sofort.
• Entfernen Sie die Batterien bei Nichtnutzung.
• Laden Sie die Batterien nicht auf und werfen Sie sie nicht ins Feuer. Sie könnten explodieren.
• Bewahren Sie die Batterien nicht in der Nähe von Metallobjekten auf, da ein Kontakt einen
Kurzschluss verursachen kann.
• Setzen Sie Batterien keinen hohen Temperaturen, extremer Feuchtigkeit oder direktem
Sonnenlicht aus.
• Bewahren Sie Batterien außerhalb der Reichweite von Kindern auf. Verschlucken der Batterien
kann zum Ersticken führen.
Verwenden Sie das Produkt ausschließlich für den vorgesehenen Zweck!
Hinweispicht nach dem Batteriegesetz
Altbatterien gehören nicht in den Hausmüll. Wenn Batterien in die Umwelt gelangen, können
diese Umwelt- und Gesundheitsschäden zur Folge haben. Sie können gebrauchte Batterien
unentgeltlich bei ihrem Händler und Sammelstellen zurückgeben. Sie sind als Verbraucher zur
Rückgabe von Altbatterien gesetzlich verpichtet!
Hinweispicht nach dem Elektronikgerätegesetz
Laut Elektro- und Elektronikgerätegesetz (ElektroG) gehört Elektroschrott nicht in den
Hausmüll, sondern ist zu recyceln oder umweltfreundlich zu entsorgen. Entsorgen Sie ihr Gerät
in einen Recycling Container oder an eine lokale Abfallsammelstelle.
EIGENSCHAFTEN
Projektionswecker
1 2 3
DC 4 .5V 300mA
5
1312 14 15 16 17 18
6 7 8 9 10 11
19
4
1)
[SNOOZE]
Taste
Stoppt den aktuellen Alarm und startet die
Schlummerfunktion
9)
[LOOP]
Taste
Drücken Sie diese Taste um den
Farbwechsel der
Hintergrundbeleuchtung ein- oder
auszuschalten
2)
3)
4)
5)
6)
7
)
8
)
[ ]
Taste
Drücken Sie die Taste, um die Projektion
umzudrehen 180°
PROJEKTOR
Projiziert die Uhrzeit und Innen- /
Außentemperatur (schaltet automatisch
alle 5 Sekunden zwischen Innen- und
Außentemperatur um)
LCD
Display
[TIME]
Taste
Drücken Sie diese Taste um zwischen
Monat/Datum und Weckzeit zu wechseln
Drücken und halten Sie diese Taste für 2
Sekunden im normalen Zeitmodus um zur
manuellen Zeiteinstellung zu gelangen
[ALARM]
Taste
Drücken Sie im normalen Zeitmodus
diese Taste um ALM 1 & ALM 2 ein oder
auszuschalten
Drücken Sie im ALM 1 / ALM 2-Modus
diese Taste um den Alarm und Voralarm
ein- oder auszuschalten
Drücken Sie diese Taste wenn der Alarm
ertönt um ihn und die Schlummerfunktion
auszuschalten
Drücken und halten Sie im Alarmzeit-
Modus diese Taste für 2 Sekunden um in
die Einstellung zu gelangen
Drücken Sie diese Taste in der
Alarmzeiteinstellung um in den
Einstellungsmodus zu gelangen
[UP]
Taste
Drücken Sie diese Taste im
Einstellungsmodus um die Werte zu
erhöhen
Drücken Sie diese Taste im normalen
Zeitmodus um zwischen Kanal 1, 2 und 3
zu wechseln
[DOWN]
Taste
Drücken Sie diese Taste im
Einstellungsmodus um die Werte zu
vermindern
Drücken Sie diese Taste im normalen
Zeitmodus um zwischen dem 12/24h
Format zu wechseln
10)
11
)
12
)
13
)
14
)
15
)
16
)
17
)
18
)
19
)
[RAINBOW]
Taste
Schalten Sie die LOOP-Funktion aus
und drücken Sie diese Taste um die
Hintergrundbeleuchtung sich wie folgt
ändern zu lassen: Weiß Rot
Orange Gelb Grün Cyan
Blau Lila
[TUNE]
Taste
Schalten Sie die LOOP-Funktion aus und
drücken Sie diese Taste um die Farbe
der Hintergrundbeleuchtung manuell
einzustellen
FOCUS
Knopf
Einstellrad zum Einstellen der
Projektionsschärfe
[MAX/MIN]
Taste
Drücken Sie diese Taste um die minimale
und maximale Temperaturaufzeichnungen
zu überprüfen
[RCC]
Taste
Drücken Sie diese Taste um den
Funkempfangstest zu starten
°C/°F
Taste
Drücken Sie diese Taste um zwischen
Celsius und Fahrenheit umzuschalten
[RESET]
Taste
Drücken Sie diese Taste um das Gerät
zurückzusetzen
Im Fall einer Störung ist es erforderlich,
das Gerät zurückzusetzen
[OFF/LO/HI]
Schieberegler
Schieben Sie diese Taste zum Ein- und
Ausschalten der Hintergrundbeleuchtung,
bzw zwischen hoher und geringer
Helligkeit zu wechseln
DC
Buchse
Batteriefach
Lithium-Batterie CR2032 für Back-Up,
speichert im Falle eines
Stromausfalls die Uhrzeit
Die LED Beleuchtung funktioniert nur mit
Netzteil
Außensender
1)
LED
Blinkt wenn ein Signal übertragen wird
2)
Aufhängeöse
Zum Aufhängen an der Wand
3)
[RESET]
Taste
Drücken Sie diese Taste um den Sender
neuzustarten
4)
[CHANNEL]
Schieberegler
Wählen Sie den Kanal 1, 2 oder 3 damit aus
5)
Batteriefach
Für 2x AA Batterien
INBETRIEBNAHME DES AUSSENSENDERS
1. Entfernen Sie den Batteriefachdeckel
2. Legen Sie 2x AA Batterien unter Beachtung der richtigen Polarität in das Batteriefach ein.
3. Schließen Sie das Batteriefach wieder.
Hinweis:
1. Sobald Sie dem Sender einen Kanal zugeordnet haben, können Sie diesen nur noch
durch Entfernen der Batterien oder zurücksetzen des Geräts ändern.
2.
Platzieren Sie den Sender draußen an einem Ort, der vor direktem Sonnenlicht,
Regen und Schnee geschützt ist.
PROJEKTIONSWECKER
1.
Stecken Sie das Netzteil in die DC Buchse.
2.
Drücken Sie die
[RESET]
Taste um das Gerät neuzustarten. Die Kanäle des Senders werden
automatisch synchronisiert.
Hinweis:
1.
Wenn keine Signal empfangen wird oder die Übertragung gestört ist, wird auf dem
LCD “-“ angezeigt.
2. Positionieren Sie Sender und Empfänger nicht weiter als 30m (Freifeld) voneinander
entfernt.
D
EMPFANG DES FUNKZEITSIGNALS
Die Uhrzeit und das Datum werden über Funk empfangen. Die aktuelle Uhrzeit und das Datum
werden automatisch mit dem deutschen Zeitsignal synchronisiert. Wenn Sie das Gerät zum ersten
mal benutzen (nach Einsetzen der Batterien oder Drücken vom
[RESET]
Knopf), versucht die Uhr
innerhalb von 5min das Funksignal zu empfangen und zeigt dies mit einem blinkenden Symbol an
.
SIGNALSTÄRKEANZEIGE
Die Signalstärke wird in 4 Stufen angezeigt. Das Funksignal blinkt wenn es empfangen wird. Die
Signalqualität kann in 4 Stufen eingeteilt werden:
Kein Signal Schwaches Signal Gutes Signal Sehr gutes Signal
Hinweis:
1. Jeden Tag sucht das Gerät automatisch um 2:00, 8:00, 14:00 und 20:00Uhr das
Signal.
2. Stellen Sie das Gerät nicht in die Nähe von Störquellen wie Fernseher, Computer
usw.
3. Stellen Sie das Gerät nicht auf oder neben Metallplatten.
4. Der Gebrauch in geschlossenen Räumen wie Flughäfen, Keller, Hochhäuser oder
Fabriken wird nicht empfohlen.
5. Starten Sie die Signalsuche nicht in sich bewegenden Fahrzeugen.
MANUELLE ZEITEINSTELLUNG
Wenn Sie außerhalb der Reichweite des Funksenders sind oder kein Signal empfangen werden
kann, kann die Zeit manuell eingestellt werden. Sobald der Sender wieder empfangbar ist, wird die
Uhr automatisch synchronisiert.
1. Drücken und Halten Sie im normalen Zeitmodus die
[TIME]
Taste für 2 Sekunden um das Jahr
einzustellen.
2. Drücken Sie
[UP]
oder
[DOWN]
um den gewünschten Wert einzustellen.
3. Drücken Sie erneut die
[TIME]
Taste und die Monatsanzeige blinkt. Drücken Sie die
[UP]
oder
[DOWN]
Taste um den gewünschten Wert einzustellen.
4. Wiederholen Sie diesen Vorgang um folgende Werte einzustellen: Jahr Monat Datum
Stunde Minute Sekunde Wochentagssprache (GB, FR, DE, ES, IT)
5. Drücken Sie die
[TIME]
Taste um die Einstellungen zu speichern und zu beenden oder drücken
Sie keine Taste und die Einstellung wird nach 30 Sekunden automatisch beendet.
ALARM UND SCHLUMMERFUNKTIONS-EINSTELLUNG
1. Drücken Sie im normalen Zeitmodus die
[TIME]
Taste um ALM 1 oder ALM 2 auszuwählen.
2. Drücken und Halten Sie im ALM1 / ALM 2 Modus die
[ALARM]
Taste für 2 Sekunden bis die
Alarm-Stundenanzeige blinkt.
3. Drücken Sie die
[UP]
oder
[DOWN]
Taste um den gewünschten Wert einzustellen.
4. Wiederholen Sie diesen Vorgang um die Werte einzustellen: Stunde Minute
5. Drücken Sie die
[ALARM]
Taste um die Einstellungen zu speichern und zu beenden oder
drücken Sie keine Taste und die Einstellung wird nach 30sek automatisch beendet.
Hinweis:
1. Der Alarm wird automatisch eingeschaltet wenn Sie die Alarmzeit einstellen. Auf dem
Display wird “ ” oder “ ” angezeigt.
2. Die Dual-Alarm-Funktion (ALM 1 & ALM 2) bietet Ihnen die Möglichkeit zwei
Alarmzeiten einzustellen.
VERWENDUNG DER ALARM & TEMPERATUR-VORALARM FUNKTION
1. Stellen Sie die Alarmzeit wie im vorherigen Abschnitt beschrieben ein.
2. Drücken Sie im normalen Zeitmodus die
[ALARM]
Taste einmal um ALM 1 einzuschalten,
zweimal um ALM 2 einzuschalten und dreimal um ALM1 & ALM 2 einzuschalten. Die
entsprechenden Symbole erscheinen auf dem Display. Drücken Sie die Taste erneut um beide
Alarme auszuschalten und die Symbole verschwinden wieder.
3. Drücken Sie im ALM1 / ALM2-Modus einmal die
[ALARM]
Taste um ALM 1 / ALM 2
einzuschalten, drücken Sie zweimal um die Voralarmfunktion einzuschalten – auf dem Display
wird dann “
LO
” angezeigt. Drücken Sie erneut die Taste um Alarm und Voralarm auszuschalten –
die Alarmsymbole und “
LO
” werden nun nicht mehr angezeigt.
Hinweis:
1. Um den Temperatur-Voralarm zu aktivieren, muss der Alarm eingeschaltet sein.
2. Der Temperatur-Voralarm ertönt nun 30 Minuten vorher, wenn die Außentemperatur
bei -3°C (26°F) liegt.
3. Wenn während des Alarms keine Taste gedrückt wird, endet dieser automatisch, der
Alarm dauert 2 Minuten.
4. Drücken Sie die
[SNOOZE]
Taste um den Alarm zu stoppen und die
Schlummerfunktion zu aktivieren. Das Alarmsymbol blinkt kontinuierlich. Der Alarm
ertönt nach 5min erneut. Die Schlummerfunktion kann 24 Stunden lang benutzt
werden.
5. Drücken Sie die
[ALARM]
Taste um den Alarm auszuschalten. Der Alarm ertönt in
24h erneut.
WETTERVORHERSAGE
Die Station hat einen eingebauten Luftdrucksensor um die Wettervorhersage für die nächsten 12-
24h vorherzusagen.
Sonnig Wolkig Teilweise bewölkt
Regnerisch Schnee
FARBWECHSEL DISPLAY
1. Drücken Sie die
[LOOP]
Taste um die Hintergrund-Farbwechsel-Funktion ein- oder
auszuschalten.
2. Schalten Sie die Loop-Funktion aus und drücken Sie die
[RAINBOW]
Taste um die
Hintergrundbeleuchtung in dieser Reihenfolge zu ändern: Weiß Rot Orange G e l b
Grün Cyan Blau Violett
3. Schalten Sie die Loop-Funktion aus und drücken Sie die
[TUNE]
Taste um die Farbe manuell
einzustellen.
PRüFEN UND LöSCHEN VON MAX/MIN TEMPERATURHISTORIE
1. Drücken Sie einmal die
[MAX/MIN]
Taste um die maximalen Werte anzuzeigen. Drücken Sie die
Taste zweimal um die minimalen Werte anzuzeigen. Drücken Sie erneut die Taste um die
Anzeige zu schließen.
2. Halten Sie die
[MAX/MIN]
Taste für 3 Sekunden um die maximalen und minimalen Werte mit
einem Signalton zu löschen.
MAX Temperaturhistorie MIN Temperaturhistorie
KANALANZEIGE
Der Standardkanal ist Kanal 1. Drücken Sie im normalen Zeitmodus die
[UP]
Taste um Kanal 1 – 3
anzuzeigen. Außerdem können die Kanäle automatisch durch Drücken und Halten (2 Sekunden) der
[UP]
Taste gewechselt werden, es ertönt ein Signalton.
BENUTZUNG DES PROJEKTORS
Drehen Sie den Projektor auf eine Fläche in 1-4m Entfernung. Es wird folgendes angezeigt:
Hinweis:
1. Bei Verwendung der Stromversorgung ist die Projektion immer eingeschaltet.
2. Drücken Sie die [ ] Taste um die Anzeige umzukehren. Der Drehwinkel des
Projektors beträgt +/- 180°.
3. Passen Sie die Schärfe der projizierten Daten mit dem FOCUS-Knopf an.
TEMPERATURTREND
Die Temperatur-Trend-Anzeige zeigt die Veränderungen in den nächsten Minuten an. Die Pfeile
zeigen eine steigende, stabile oder fallende Tendenz.
Pfeilanzeige
Temperaturtrend Steigend Konstant Fallend
BATTERIEENDANZEIGE
Wenn die Batterieendanzeige “ ” in dem Außentemperaturfenster erscheint, zeigt dies dass die
Batterieleistung des Senders nicht ausreicht. Ersetzen Sie beide AA Batterien.
Hinweis:
1. Wenn die Batterieleistung des Senders nicht ausreicht, legen Sie 2x neue AA Batterien ein und
drücken Sie die
[RESET]
Taste auf dem Außensender. Drücken Sie auf dem Wecker die
[SENSOR]
Taste um die Temperatur und Uhrzeit automatisch zu empfangen.
2. Achtung! Bitte entsorgen Sie gebrauchte Geräte oder Batterien nicht in den Hausmüll.
TECHNISCHE DATEN
PROJEKTIONSWECKER
Betriebstemperatur: -5°C ~ 50°C 23°F ~ 122°F
Auösung: 0.1°C / °F (über -10°C / 14°F) 1°C / °F (unter -10°C / 14°F)
Funksignal: DCF
AUSSENSENDER
Betriebstemperatur: -20°C ~ 60°C -4°F ~ 140°F
Auösung: 0.1°C / °F (über -10°C / 14°F) 1°C / °F (unter -10°C / 14°F)
RF Übertragungsfrequenz: 433 MHz
Anzahl Außensender: Bis zu 3 Sender
RF Übertragungsreichweite: Maximal 30m (Freifeld)
Temperaturerfassungszyklus: Etwa 60-64 Sekunden
STROMVERSORGUNG
Station: AC/DC Adapter 4.5V, 300mA Lithium Batterie CR2032 für BackUp
Außensender: 3V, 2x AA 1.5V (Alkaline Batterie empfohlen)
ABMAßE
Station: 160 x 72 x 48 mm
Außensender: 65 x 100 x 35 mm
1 2 3 4

GB
WT 539
PROJECTION ALARM CLOCK
General safety
• This device is not a toy. It should be placed and used outside of the access area of children.
• Operate this device in a dry and dust-free environment and don’t expose your device to humidity,
vibrations, permanent heat, cold and mechanical strains.
• Do not leave the packaging material lying around carelessly, plastic foils / bags, polystyrene parts,
etc., could become a dangerous toy for children.
• Do not use the device if it has such externally visible damage. B. on the housing, or in case of
malfunction. If in doubt, get the equipment checked by a qualied electrician or our service.
• The device may be operated only with the supplied original AC/DC adapter!
• The device must not be opened and no manually repairs should be carried out.
Environmental reception effects
The clock obtains the accurate time with wireless technology. Same as all wireless devices, the
reception is maybe affected by the following circumstances:
• long transmitting distance
• nearby mountains and valleys
• near freeway, railway, airports, high voltage cable etc.
• near construction site
• among tall buildings
• inside concrete buildings
• near electrical appliances (computers, TV’s, etc) and metallic structures
• inside moving vehicles
Place the clock at a location with optimal signal, i.e. close to a window and away from metal surfaces
or electrical appliances.
Precautions
• Do not subject the unit to excessive force or shock.
• Do not expose the unit to extreme temperatures, direct sunlight, dust or humidity.
• Do not immerse in water.
• Avoid contact with any corrosive materials.
• Do not dispose this unit in a re as it may explode.
• Do not open the inner back case or tamper with any components of this unit.
Batteries safety warnings
• Use only alkaline batteries, not rechargeable batteries.
• Install batteries correctly by matching the polarities (+/-).
• Always replace a complete set of batteries.
• Never mix used and new batteries.
• Remove exhausted batteries immediately.
• Remove batteries when not in use.
• Do not recharge and do not dispose of batteries in re as the batteries may explode.
• Ensure batteries are stored away from metal objects as contact may cause a short circuit.
• Avoid exposing batteries to extreme temperature or humidity or direct sunlight.
• Keep all batteries out of reach from children. They are a choking hazard.
Use the product only for its intended purpose!
Consideration of duty according to the battery law
Old batteries do not belong to domestic waste because they could cause damages of health
and environment. You can return used batteries free of charge to your dealer and collection
points. As end-user you are committed by law to bring back needed batteries to is tributors and
other collecting points!
Consideration of duty according to the law of electrical devices
This symbol means that you must dispose of electrical devices separated from the General
household waste when it reaches the end of its useful life. Take your unit to your local waste
collection point or recycling centre. This applies to all countries of the European Union, and to
other European countries with a separate waste collection system.
MAIN FEATURES
Projection alarm clock
1 2 3
DC 4 .5V 300mA
5
1312 14 15 16 17 18
6 7 8 9 10 11
19
4
1)
2)
[SNOOZE]
key
Stop the current alarm when it is
sounding and enter into snooze mode
[ ]
key
Press it to reverse the projected data
180°
9
)
10)
[LOOP]
key
Press the
[LOOP]
key to turn on or off the
backlight color change
[RAINBOW]
key
Turn off the LOOP function and press
[
RAINBOW]
key, the backlight will change
its color in this sequence: white red
orange yellow green
cyan blue purple
3)
4)
5)
6)
7)
8)
PROJECTOR
Project the time and indoor/outdoor
temperature (switch automatically
between indoor and outdoor temperature
in every 5 seconds)
LCD
display
[TIME]
key
Press it to switch between Month/Date
and alarm time mode
Press and hold it for 2 seconds to enter
time setting
In normal time setting, press it to step the
setting mode
[ALARM]
key
In normal time display, press it to turn on/
off ALM 1 & ALM 2
In ALM 1 / ALM 2 mode, press it to turn
on/off alarm and pre-alarm function
Press it to stop the current alarm when
the bell is ringing and turn off the alarm
and snooze function
In alarm time mode, press and hold it for
2 seconds to enter alarm time setting
In alarm time setting, press it to step the
setting mode
[UP]
key
In setting mode, press it to increase the
setting values
In normal time mode, press it to switch
among Channel 1, 2 and 3
[DOWN]
key
In setting mode, press it to decrease the
setting values
In normal time mode, press it to switch
among 12/24h format
11)
12)
13)
14)
15)
16)
17
)
18
)
19
)
[TUNE]
key
Turn off the LOOP function and press and
hold
[TUNE]
key, to set the color manually
FOCUS
knob
Adjust the sharpness of the projected data
[MAX/MIN]
key
Press it to check the minimum and
maximum temperature records
[RCC]
key
Press it to receive the RC signal for
reception testing
°C/°F
key
Press it to switch between Celsius and
Fahrenheit
[RESET]
key
Press it to reset all values to default
values
In case of malfunction, the unit may be
required to reset
[OFF/LO/HI]
slide switch
Slide it to turn on/off the backlight function
DC
jack
Battery door
Accommodates lithium battery CR2032
for back-up(LED backlight only works with
DC-power)
Transmitter
1)
LED
indicator
Flashes when the remote unit transmits a
reading
2) Wall mounting holder
Use it to support the transmitter on the wall
3)
[RESET]
key
Press it to restart the transmitter
4)
[CHANNEL]
slide switch
Assign the transmitter to Channel 1, 2 or 3
5) Battery compartment
Accommodates 2x AA size batteries
BEFORE USING TRANSMITTER
1. Remove the battery door
2. Insert 2x AA size batteries into the battery compartment. Make sure you insert them the right way
according to the polarity information marked on the battery compartment.
3. Replace the battery door.
Note:
1. Once the channel is assigned to one transmitter, you can only change it by removing
the batteries or resetting the unit.
2. Avoid placing the transmitter in direct sunlight, rain or snow.
PROJECTION ALARM CLOCK
1. Plug the adaptor into the DC jack.
2. Press
[RESET]
key to re-start the clock and it will synchronize the channels of transmitter
automatically.
Note:
1. If no signals are received or the transmission is interfered, “-“ will appear on the LCD.
2. Position the receiver and transmitter within the effective transmission range: 30m in
free eld.
RECEPTION OF RADIO CONTROLLED TIME SIGNAL
The time and date are radio-controlled. The current time and date are automatically synchronized
with the time signal transmitted from Germany. When used for the first time (after inserting the
batteries or pressing
[RESET]
key), the clock will start to receive the RC signal in 5 minutes with the
signal strength indicator ashing.
SIGNAL STRENGTH INDICATOR
The signal indicator displays signal strength in 4 levels. Wave segment ashing means time signals
are being received. The signal quality could be classied into four types:
No signal Weak signal Acceptable signal Excellent signal
Note:
1. Everyday the unit will automatically search for the time signal at 2:00am, 8:00am,
2:00pm and 8:00pm.
2. Always place the unit away from interfering sources such as TV set, computer etc.
3. Avoid placing the unit on or next to metal plate.
4. Closed area such as airport, basement, tower block or factory is not recommended.
5. Do not start reception on a moving vehicle or train.
MANUAL TIME SETTING
If you are out of reach of the Radio Controlled Transmitter or if the reception is not possible, the
time can be set manually. As soon as the transmitter is received again, the clock will automatically
synchronize with received time.
1. In normal time mode, press and hold
[TIME]
key for 2 seconds to enter the year setting.
2. Press
[UP
] or
[DOWN]
key to set the desired value.
3. Press
[TIME]
key again, Month digit ashes, press
[UP]
or
[DOWN]
key to change its value.
4. Repeat the above operation to set the time in this order: Year Month Date Hour
Minute Second Weekday Language (GB, FR, DE, ES, IT)
5. Press
[TIME]
key to save and exit the setting or let it exit automatically 30 seconds later without
pressing any key.
ALARM AND SNOOZE SETTING
1. In normal time mode, press
[TIME]
key to select the ALM 1 or ALM 2.
2. In ALM1 / ALM 2 mode, press and hold
[ALARM]
key for 2 seconds until alarm hour digit ashes.
3. Press
[UP]
or
[DOWN]
key to change the value.
4. Repeat the above operations to set time in this order: Hour Minute
5. Press
[ALARM]
key to save and exit the setting, or let it exit automatically 30 seconds later
without pressing any key.
Note:
1. The alarm will be automatically turned on when you set the alarm time with the icon “
” or “ ” displayed.
2. The dual-alarm (ALM 1 & ALM 2) design of this unit will provide you with more
convenience, and you can set two-alarm time if needed.
USING ALARM & TEMPERATURE PRE-ALARM FUNCTIONS
1. Set the alarm time as described in the previous section.
2. In normal time mode, press
[ALARM]
key once to turn on ALM 1, press it twice to turn on ALM 2,
press it thrice to turn on both ALM 1 and ALM 2, with the bell icons display on the LCD.
Press it again to turn off both ALM 1 and ALM 2, with the icons disappearing.
3. In ALM 1 / ALM 2 mode, press
[ALARM]
key once to turn on ALM 1 / ALM 2, press it twice to turn
on pre-alarm function, with the icon “
LO
” displays on the LCD. Press it again to turn off both
alarm and pre-alarm functions, with the icons “
LO
” and alarm icon disappearing.
Note:
1. To turn on temperature pre-alarm, ALARM must be on.
2. The temperature pre-alarm can sound 30 minutes earlier than the alarm only when
the outdoor temperature is below -3°C (26°F).
3. If no key is pressed during the alarm period, the alarm will turn off automatically.
Alarm beeping lasts for 2 minutes.
4. Press
[SNOOZE]
button to stop the current alarm and enter snooze. Alarm icon
will be ashing continuously. The alarm will sound again in 5 minutes. Snooze can be
operated continuously in 24 hours.
5. Press
[ALARM]
button to turn off alarm function.
WEATHER FORECAST FUNCTION
The clock contains a built-in sensitive pressure se
nsor
to predict the weather forecast for the next
12-24 hours.
Sunny Cloudy Partly Cloudy
Rainy Snowy
COLOUR CHANGE DISPLAY
1. Press
[LOOP]
key to turn on or off the backlight color change.
2. Turn off the loop function and press
[RAINBOW]
key, the backlight will change its color in this
sequence: white red orange yellow green cyan blue purple
3. Turn off the loop function and press
[TUNE]
key, to set the color manually.
CHECKING AND DELETING MAX/MIN TEMPERATURE RECORDS
1. Press
[MAX/MIN]
key once to check the maximum temperature records. Press it twice to check
the minimum records. Press it again to exit.
2. Press and hold
[MAX/MIN]
key for 3 seconds to delete the maximum and minimum temperature
records, with “beep” tone.
MAX temperature record
MIN temperature record
VIEWING THE CHANNEL
The default channel is Channel 1. In normal time mode, press
[UP]
key to view the channels from
1 to 3. Besides, the channels can automatically switch by pressing and holding
[UP]
key for 2
seconds, with “beep” tone.
USING THE PROJECTOR
Rotate the projector to project the light beam to a surface within 1-4m, the projected data will be
displayed on the dark background as following diagram.
Note:
1. If using DC power, the projector data will be always on.
2. Press the
[ ]
key will reverse the projected data. The rotate angle of the projector
is +/- 180°.
3. Adjust the sharpness of the projected data by adjusting the FOCUS knob.
TEMPERATURE TREND
The temperature-trend indicator shows the trends of changes in the forthcoming few minutes. Arrows
indicate a rising, steady or falling trend.
Arrow indicator
Temperature trend Rising Steady Falling
LOW BATTERY INDICATOR
If the low battery indicator “ ” displays in the outdoor temperature window, it indicates that the
battery power of the transmitter is not enough, and you should replace with 2x AA size batteries at
once.
Note:
1. If the battery power of the transmitter is not enough, insert 2x AA size batteries and
press
[RESET]
key of transmitter and
[SENSOR]
key of the main unit so that it can
receive the time and temperature automatically.
2. Attention! Please dispose of used unit or batteries in an ecologically safe manner.
SPECIFICATION
MAIN UNIT
Operating temperature range: -5°C ~ 50°C 23°F ~ 122°F
Resolution: 0.1°C / °F (above -10°C / 14°F) 1°C / °F (below -10°C / 14°F)
Radio controlled signal: DCF
REMOTE SENSOR
Operating temperature range: -20°C ~ 60°C -4°F ~ 140°F
Resolution: 0.1°C / °F (above -10°C / 14°F) 1°C / °F (below -10°C / 14°F)
RF transmission frequency: 433 MHz
No. of remote sensor: Up to 3 units
RF transmission range: Maximum 30m (free eld)
Temperature sensing cycle: Around 60-64 seconds
POWER
Main unit: AC/DC adapter 4.5V, 300mA lithium battery CR2032 for back-up
Remote sensor: 3V, use 2x AA 1.5V (alkaline battery recommended)
DIMENSION
Main unit: 160 x 72 x 48 mm
Remote sensor: 65 x 100 x 35 mm
1 2 3 4

WT 539
RÉVEIL À PROJECTION
Consignes de sécurité générales
• Cet appareil n'est pas un jouet. Il doit être installé hors de la portée des enfants.
• Cet appareil doit être utilisé dans un environnement sec et sans poussière, il ne doit pas être
exposé à l'humidité, aux vibrations, à une chaleur/froid permanent ou à des contraintes
mécaniques.
• Ne laissez pas les matériaux d'emballage (feuilles/sacs en plastique ou en polystyrène etc.)
traîner à la portée des enfants, ils pourraient devenir un jouet dangereux pour eux.
• N’utilisez pas l'appareil s’il présente des dommages visibles sur le boîtier, ou en cas de
dysfonctionnement. B. on the housing, or in case of malfunction. En cas de doute, faites vérier
l'appareil par un électricien qualié ou par notre service technique.
• N’utilisez l'appareil qu’avec l'adaptateur secteur d'origine fourni !
• Il ne faut jamais ouvrir l'appareil ou le réparer vous-même.
Effets de l'environnement sur la réception
Votre horloge récupère l'heure exacte grâce à la technologie sans l. Comme pour tout appareil
sans l, la réception peut être affectée dans les cas suivants :
• Distance de transmission longue.
• À proximité de montagnes et vallées.
• Près d'autoroutes, chemins de fer, aéroports, câbles haute tension, etc.
• À proximité d’un chantier de construction.
• Dans le voisinage de bâtiments élevés.
• À l’intérieur de bâtiments en béton.
• À proximité d'appareils électriques (ordinateurs, téléviseurs, etc.) et des structures métalliques
• À l’intérieur de véhicules mobiles.
Placez votre horloge dans un endroit avec des signaux optimaux, par exemple près d'une fenêtre,
loin des surfaces métalliques et des appareils électriques.
Précautions
• Ne soumettez pas l'appareil à une force ou à un choc excessif.
• N'exposez pas l'appareil à la lumière directe du soleil, à des températures élevées, à l'humidité ou
à la poussière.
• Ne plongez pas l'appareil dans l'eau.
• Évitez de mettre l'appareil en contact avec des matériaux corrosifs.
• Ne jetez pas cet appareil au feu, il risque d'exploser.
• N’ouvrez pas le panneau arrière et n’altérez aucun composant de cet appareil.
Avertissements de sécurité concernant les piles
• Utilisez uniquement des piles alcalines non rechargeables.
• Installez les piles en respectant le sens des polarités (+/-).
• Remplacez toujours toutes les piles en même temps.
• Ne mélangez pas des piles usagées avec des piles neuves.
• Retirez les piles usées de l'appareil.
• Retirez les piles lorsque vous n’allez pas utiliser l'appareil pendant une longue période.
• N'essayez pas de recharger des piles qui ne sont pas rechargeables et ne jetez aucune pile dans
le feu (elle risque d'exploser).
• Rangez vos piles loin de tout objet métallique pouvant provoquer un court-circuit.
• Évitez d'exposer les piles à des températures extrêmes, à l'humidité ou à la lumière directe du
soleil.
• Conservez vos piles hors de la portée des enfants. Elles présentent un risque d'étouffement.
Utilisez le produit uniquement pour son usage prévu!
Obligation légale concernant la mise au rebut des piles
Ne jetez pas les piles usagées avec les ordures ménagères car elles sont nuisibles pour la
anté et l'environnement. Vous pouvez retourner les piles usagées sans frais à votre revendeur
ou les remettre à des points de collecte. En tant que consommateur, vous êtes obligés par la
loi de ramener les piles usagées aux revendeurs et aux points de collecte !
Respect de l'obligation de la Loi sur les appareils électriques
Ce symbole signie que les appareils électriques ne doivent pas être jetés avec les ordures
ménagères à la n de leur vie utile. Ramenez votre appareil à un point de collecte de déchets
ou à un centre de recyclage local. Ceci s'applique à tous les pays de l'Union européenne et
aux autres pays européens disposant d'un système de collecte sélectif des déchets.
CARACTERISTIQUES PRINCIPALES
Réveil à projection
1 2 3
DC 4 .5V 300mA
5
1312 14 15 16 17 18
6 7 8 9 10 11
19
4
1) Touche
[SNOOZE]
Arrête l’alarme lorsqu'elle se déclenche
et active le mode rappel d’alarme.
9) Touche
[LOOP]
Appuyez sur la touche
[LOOP]
pour
activer/désactiver le changement de
couleur du rétroéclairage
FR
2)
3)
4)
5)
6)
7)
Touche
[ ]
Appuyez dessus pour faire pivoter les
informations projetées de 180°
PROJECTEUR
Projette l'heure et la température
intérieure/extérieure (bascule
automatiquement entre la température
intérieure et extérieure toutes les 5
secondes)
Écran
LCD
Touche
[TIME]
Appuyez sur cette touche pour passer
du mode mois/date au mode heure
d’alarme.
Maintenez appuyée cette touche
pendant 2 secondes pour accéder au
réglage de l'heure.
En mode réglage normal de l'heure,
appuyez dessus pour accéder au mode
réglage.
Touche
[ALARM]
En mode afchage normal de l'heure,
appuyez dessus pour activer/désactiver
l’alarme 1/2.
En mode alarme 1/2, appuyez dessus
pour activer/désactiver les fonctions
alarme et pré-alarme
Appuyez sur cette touche pour arrêter
la sonnerie et désactiver les fonctions
alarme et rappel d’alarme.
En mode afchage de l’heure d’alarme,
maintenez appuyée cette touche
pendant 2 secondes pour modier l'heure
d’alarme.
En mode réglage de l'heure de l'alarme,
appuyez dessus à pour accéder au
mode réglage
Touche
[UP]
En mode réglage, appuyez sur cette
touche pour augmenter la valeur en
cours.
En mode afchage de l’heure, appuyez
sur cette touche pour changer de canal,
parmi les canaux 1, 2 et 3.
10)
11)
12)
13)
14)
15)
16)
17)
18)
19)
Touche
[RAINBOW]
Désactivez la fonction LOOP et appuyez
sur la touche
[RAINBOW]
pour changer
la couleur du rétroéclairage selon l’ordre
suivant: Blanc rouge Orange
jaune vert cyan bleu
violet
Touche
[TUNE]
Désactivez la fonction LOOP (boucle),
puis maintenez appuyée la touche
[TUNE]
pour choisir manuellement la couleur
Touche
FOCUS
Permet de régler la netteté des
informations projetée
Touche
[MAX/MIN]
Appuyez sur cette touche pour afcher les
températures minimales et maximales.
Touche
[RCC]
Appuyez sur cette touche pour tester la
réception du signal radio-piloté.
Touche
°C/°F
Appuyez sur cette touche pour
sélectionner l'unité de température (Celsius
ou Fahrenheit).
Touche
[RESET]
Appuyez dessus pour rétablir tous les
réglages par défaut.
Exécutez cette opération lorsque votre
appareil ne fonctionne pas correctement.
Commutateur
[OFF/LO/HI]
À utiliser pour activer/désactiver le
rétroéclairage
Prise
CC
Couvercle du compartiment à piles
Pour une pile lithium de secours CR2032
(Le témoin ne fonctionne qu’en
alimentation CC)
8) Touche
[DOWN]
En mode réglage, appuyez sur cette
touche pour diminuer la valeur en cours.
En mode affichage normal de l'heure,
appuyez dessus pour basculer entre les
formats 12/24h
Émetteur
1)
Témoin
Clignote pendant la transmission de données
vers la base.
2) Support pour accrochage au mur
Permet d’accrocher l’émetteur au mur.
3) Touche
[RESET]
Appuyez sur cette touche pour réinitialiser
l’émetteur.
4) Sélecteur de canal
[CHANNEL]
Permet de choisir le canal (1, 2 ou 3) de
l'émetteur.
5) Compartiment à piles
Pour 2 piles AA
AVANT D’UTILISER L’EMETTEUR
1. Enlevez le couvercle des piles
2. Insérez 2 piles AA dans le compartiment à piles. Respectez le sens des polarités indiquées à
l'intérieur du compartiment à piles.
3. Refermez le compartiment à piles.
Remarque :
1. Pour modier le canal de transmission affecté à l’émetteur, retirez puis remettez l
es piles ou réinitialisez l'unité.
2. Évitez d'exposer l’émetteur aux rayons directs du soleil, à la pluie et à la neige.
RÉVEIL À PROJECTION
1. Branchez l'adaptateur dans la prise DC.
2. Appuyez sur la touche
[RESET]
pour redémarrer l'horloge qui synchronisera automatiquement
les canaux de l'émetteur.
Remarque :
1. «-» s'afche sur l'écran LCD si aucun signal n'est reçu ou la transmission est
perturbée.
2. N'éloignez pas de trop l'unité réceptrice de la base : Jusqu’à 30 m dans un environnement
sans obstacles.
RÉCEPTION DU SIGNAL RADIO-PILOTÉ
L'heure et la date sont radio-pilotées. L’heure et la date seront synchronisées automatiquement avec
le signal horaire transmis à partir de l’Allemagne. Lorsqu'il est utilisé pour la première fois (après
l'insertion des piles ou en appuyant sur la touche
[RESET]
), l'horloge se met en mode réception du
signal RC au bout de 5 minutes, avec l'indicateur force du signal clignotant.
INDICATEUR DE FORCE DU SIGNAL
Cet indicateur afche la force du signal selon 4 niveaux. Un symbole d’ondes apparaît à la réception
du signal horaire. La qualité du signal peut être classée en quatre types :
Pas de signal Signal faible Signal acceptable Signal excellent
Remarque :
1. Chaque jour, la base récupère automatiquement le signal horaire à 2h00, 8h00,
14h00 et 20h00.
2. Éloignez l’unité de toute source d’interférence (poste de télévision, ordinateur,
etc.).
3. Évitez de placer l’unité au dessus/à côté d'une surface métallique.
4. Évitez d'installer la base dans un espace fermé, par exemple un aéroport, un
sous-sol, une tour ou une usine.
5. Ne lancez pas la réception dans un véhicule/train en mouvement.
RÉGLAGE MANUEL DE L'HEURE
Il est toujours possible de régler manuellement l’heure si vous êtes hors de la portée de l'émetteur
radio-pilotée ou si la réception est impossible. Lorsque la réception sera de nouveau possible,
l'horloge se synchronisera automatiquement à l'heure reçue.
1. En mode afchage normal de l'heure, maintenez appuyée la touche
[TIME]
pendant 2 secondes
pour accéder au mode réglage de l'année.
2. Utilisez les touches
[UP]/[DOWN]]
pour dénir la valeur souhaitée.
3. Appuyez à nouveau sur la touche
[TIME]
, les chiffres du mois se mettent à clignoter, utilisez les
touches
[UP] /[DOWN]
pour en changer la valeur.
4. Répétez les opérations ci-dessus pour régler l’heure selon l’ordre suivant : Année Mois
Jour Heure Minutes Secondes jour de semaine Langue (GB, FR, DE,
ES, IT)
5. Appuyez sur la touche
[TIME]
pour mémoriser et quitter le réglage, ou n’appuyez sur aucune
touche pendant 30 secondes pour quitter automatiquement.
RÉGLAGE DE L’ALARME ET DU RAPPEL D’ALARME
1. En mode afchage normal de l'heure, appuyez sur la touche
[TIME]
pour sélectionner ALM 1 ou
ALM 2.
2. En mode afchage normal de l'heure, maintenez appuyée la touche
[ALARM]
pendant 2
secondes jusqu'à ce que l'heure de l'alarme se mettent à clignoter.
3. Utilisez les touches
[UP]/[DOWN]
pour en changer la valeur.
4. Répétez les opérations ci-dessus pour régler l’heure selon l’ordre suivant : Heure Minute
5. Appuyez sur la touche
[ALARM]
pour mémoriser et quitter le réglage, ou n’appuyez sur aucune
touche pendant 30 secondes pour quitter automatiquement.
Remarque :
1. L'alarme sera automatiquement activée lorsque vous réglez l'heure de l'alarme,
l'icône « » ou « » sera afché.
2. Le double-alarme (alarme 1 & 2) de cet appareil vous donne la possibilité de
dénir deux heures différentes d’alarme.
UTILISATION DES FONCTIONS D’ALARME ET DE PRÉ-ALARME SUR TEMPÉRATURE
1. Réglez l'heure d’alarme comme indiqué dans la section précédente.
2. En mode afchage normal de l'heure, appuyez une fois sur la touche
[ALARM]
pour activer
l’alarme 1, appuyez deux fois pour allumer l’alarme 2, appuyez trois fois pour activer les deux
alarmes, les symboles de cloche s’afchent à l'écran LCD.
Appuyez à nouveau pour désactiver les deux alarmes, les symboles de cloche disparaissent de
l'écran.
3. En mode alarme 1/2, appuyez une fois sur la touche
[ALARM]
pour activer l’alarme 1/2, appuyez
deux fois pour activer la fonction de pré-alarme, le symbole «
LO
» apparaît sur l'écran LCD.
Appuyez à nouveau pour désactiver les fonctions alarme et pré-alarme, les symboles «
LO
» et de
l'alarme disparaissent de l'écran.
Remarque :
1. La fonction ALARM doit être active pour pouvoir utiliser la pré-alarme sur
température.
2. La pré-alarme sur température se déclenche 30 minutes avant le déclenchement
de l’alarme lorsque la température extérieure est inférieure à -3°C (26°F).
3. La sonnerie de l’alarme s'arrête automatiquement si vous ne l'arrêtez pas avant la
n du délai xé. Le bip de l’alarme dure 2 minutes.
4. Appuyez sur la touche
[SNOOZE]
pour arrêter l'alarme en cours et passer en
、
mode rappel d’alarme. L’icône de l’alarme se met à clignoter de manière continue.
La sonnerie retentira de nouveau 5 minutes après. Le rappel d’alarme peut
fonctionner de manière continue pendant 24 heures.
5. Appuyez sur la touche
[ALARM]
pour désactiver l'alarme.
PRÉVISIONS MÉTÉO
L'horloge est équipée d’un capteur sensible à la pression pour prévoir les conditions météo des
prochaines 12-24 heures.
Ensoleillé Nuageux Partiellement nuageux
Pluvieux Neigeux
CHANGEMENT DE COULEUR DE L’ÉCRAN
1. Appuyez sur la touche
[LOOP]
pour activer/désactiver le changement de couleur du
rétroéclairage
2. Désactivez la fonction LOOP (boucle) et appuyez sur la touche
[RAINBOW]
pour changer la
couleur du rétroéclairage selon l’ordre suivant : blanc rouge Orange jaune
vert cyan bleu violet
3. Désactivez la fonction LOOP (boucle), puis appuyez sur la touche
[TUNE]
pour choisir
manuellement la couleur.
AFFICHAGE ET SUPPRESSION DES ENREGISTREMENTS DE TEMPÉRATURE MAX/MIN
1. Appuyez une fois sur la touche
[MAX/MIN]
pour afcher les températures maximales. Appuyez
deux fois pour afcher les enregistrements des températures minimales. Appuyez à nouveau
pour quitter.
2. Maintenez appuyée la touche
[MAX/MIN]
pendant 3 secondes pour supprimer les
enregistrements des températures maximales et minimales, un «bip» sera émis.
Enregistrements des températures maximales Enregistrements des températures minimales
AFFICHAGE DU CANAL
Par défaut, le canal 1 est actif. En mode afchage normal de l'heure, appuyez sur la touche
[UP]
pour afcher les canaux 1-3. Les canaux peuvent changer automatiquement en maintenant appuyée
la touche
[UP]
pendant 2 secondes, un «bip» sera émis.
UTILISATION DU PROJECTEUR
Tournez le projecteur pour envoyer le faisceau lumineux sur une surface à 1-4 mètre, les
informations seront projetées sur un fond sombre comme dans l’image suivante.
Remarque :
1. En utilisation sur piles, les informations seront projetées en permanence.
2. Appuyez sur la touche
[ ]
pour faire pivoter les informations projetées. L'angle
de rotation du projecteur est de +/- 180°.
3. Utilisez la touche FOCUS pour régler la netteté des informations projetées.
TENDANCE DE LA TEMPÉRATURE
L'indicateur de tendance vous permet de connaitre l'évolution de la température pour les minutes à
venir. Le sens de la èche indique une hausse, une stabilité ou une baisse de la température.
Indicateur de tendance
Tendance de la
empérature
Hausse Stable Baisse
INDICATEUR DE PILES FAIBLES
Si l'indicateur piles faibles « » apparaît dans la fenêtre de température extérieure, cela indique
que les 2 piles AA de l'émetteur sont faibles et qu’il faut les remplacer.
Remarque :
1. Lorsque les piles de l'émetteur sont faibles, insérez 2 piles AA et appuyez sur
la touche
[RESET]
de l'émetteur et la touche
[SENSOR]
de l'unité principale pour
qu'elle puisse recevoir automatiquement l’heure et la température.
2. Attention ! Pour vous débarrasser de votre appareil ou des piles, consultez les
règlements en la matière de votre municipalité an de protéger votre
environnement.
SPÉCIFICATIONS
RÉVEIL À PROJECTION
Plage de température de
fonctionnement
-5°C~50°C 23°F~122°F
Résolution : 0,1°C/°F (supérieure à -10°C/14°F) 1°C/°F (inférieure à -10°C/14°F)
Signal radiocommandé : DCF
DÉTECTEUR DE TÉLÉCOMMANDE
Plage de température de
fonctionnement
-20°C~60°C
-4°F~140°F
Résolution : 0,1°C/°F (supérieure à -10°C/14°F) 1°C/°F (inférieure à -10°C/14°F)
Fréquence radio de
transmission :
433 MHz
Nombre de capteurs distants : 3 maximum
Portée de transmission RF : Maximum 30 m (sans obstacles)
Cycle de détection de
température :
Environ 60-64 secondes
ALIMENTATION
Unité principale : Adaptateur secteur 4,5 V, 300 mA ; pile lithium CR2032 de secours
Unité extérieure : 3V, utilisez 2 piles AA 1,5 V (piles alcalines recommandées)
DIMENSIONS
Unité principale : 160 x 72 x 48 mm
Unité extérieure : 65 x 100 x 35 mm
1 2 3 4

WT 539
DESPERTADOR CON PROYECCIÓN
Seguridad general
Este aparato no es un juguete. Debe colocarse y usarse fuera de la zona de acceso de los niños.
• Haga funcionar este aparato en un entorno seco y libre de polvo y no exponga el aparato a la
humedad, vibraciones, calor permanente y esfuerzos mecánicos.
• No deje el material del envase dispuesto por el suelo sin vigilancia; las bolsas/láminas de plástico,
piezas de poliestireno, etc., pueden convertirse en un juguete peligroso para los niños.
• No use el aparato si presenta daños visibles externamente. B. en la carcasa o en caso de un
funcionamiento incorrecto. Si tiene dudas, haga que un electricista cualicado o nuestro servicio
técnico comprueben el equipo.
• ¡El aparato solo puede operarse con el adaptador CA/CC original que se adjunta!
• No se debe abrir el aparato y no deben realizarse reparaciones manuales.
Efectos del medio ambiente sobre la recepción
El reloj consigue la hora precisa mediante tecnología inalámbrica. Y al igual que en el resto de los
dispositivos inalámbricos, la recepción puede verse afectada por las circunstancias siguientes:
• largas distancias de transmisión
• proximidad de montañas y valles
• proximidad de autopistas, vías de tren, aeropuertos, cables de alta tensión, etc.
• proximidad de edicios en construcción
• encontrarse entre edicios altos
• en el interior de edicios de hormigón
• proximidad de aparatos eléctricos (PCs, TVs, etc.) y estructuras metálicas
• en el interior de vehículos en movimiento
Coloque el reloj en una posición donde obtenga una señal óptima, p.ej. cerca de una ventana y
lejos de supercies metálicas o aparatos eléctricos.
Precauciones
• No golpee la unidad ni la someta a una fuerza excesiva.
• No exponga la unidad a temperaturas extremas, luz directa del sol, polvo o humedad.
• No la sumerja en el agua.
• Evite que entre en contacto con materiales corrosivos.
• No se deshaga de la unidad arrojándola al fuego, ya que podría explotar.
• No abra la carcasa posterior interna ni altere ningún componente de la unidad.
Advertencias de seguridad sobre las pilas
• Use solamente pilas alcalinas, no use pilas recargables.
• Instale las pilas correctamente, haciendo coincidir las polaridades (+/-).
• Siempre cambie el juego completo de pilas.
• Nunca mezcle baterías usadas y nuevas.
• Quite las pilas agotadas de inmediato.
• Quite las pilas cuando no se utilicen.
• No las recargue ni las deseche en el fuego, ya que pueden explotar.
• Asegúrese de que las pilas estén almacenadas lejos de objetos metálicos, ya que el contacto con
ellos puede causar un cortocircuito.
• Evite exponer las pilas a temperaturas extremas, a la humedad o a los rayos directos del sol.
• Mantenga todas las pilas lejos del alcance de los niños. Constituyen peligro de asxia.
Utilice el producto sólo para la nalidad expuesta!
Consideración de obligaciones según la ley sobre pilas
No debe tirar las pilas usadas a la basura de su hogar, ya que pueden causar daños a la
saludy al medio ambiente. Puede devolver las pilas usadas sin cargo alguno a su distribuidor y
puntos de recogida. ¡Como usuario nal, tiene la obligación de devolver las pilas que utilice a
su distribuidor y otros puntos de recogida!
Consideración de obligaciones según las leyes sobre dispositivos electrónicos
Este símbolo indica que no debe deshacerse de los aparatos eléctricos en la basura
doméstica general cuando lleguen al nal de su vida útil. Lleve su unidad a su punto de
recogida selectiva de basura o al centro de reciclaje de su localidad. Esto es de aplicación en
todos los países de la Unión Europea, y en otros países no europeos con sistema de recogida
selectiva de basuras.
FUNCIONES PRINCIPALES
Despertador con proyección
1 2 3
DC 4 .5V 300mA
5
1312 14 15 16 17 18
6 7 8 9 10 11
19
4
1) Tecla
[SNOOZE]
Cuando está sonando la alarma para el
sonido y entra en el modo de retardo de
alarma.
9) Tecla
[LOOP]
Pulse la tecla
[LOOP]
para encender
o apagar el cambio de color de la
retroiluminación
ES
2)
3)
4)
5)
6)
7)
8)
Tecla
[ ]
Púlsela para invertir 180º los datos
proyectados
PROYECTOR
Proyecta la hora y la temperatura interior/
exterior (cambia automáticamente entre
la temperatura interior y exterior cada 5
segundos)
Pantalla
LCD
Tecla
[TIME]
Púlsela para cambiar entre los modos Mes/
Día y Hora alarma.
Manténgala pulsada durante 2 segundos
para entrar en la conguración de hora.
En la conguración de hora normal, púlsela
para pasar al modo de conguración.
Tecla
[ALARM]
En la pantalla horaria normal, púlsela para
encender / apagar ALARMA 1 y ALARMA 2
En modo ALARMA 1/ALARMA 2, púlsela
para encender/apagar la función de alarma
y pre-alarma
Púlsela para detener el sonido de la alarma
que esté sonando y desactivar la función
de retardo de alarma.
En el modo de hora de alarma,
manténganla pulsada durante 2 segundos
para ajustar la hora de se activará la
alarma.
En la conguración de la hora de la
alarma, púlsela para pasar al modo de
conguración
Tecla
[UP]
En el modo de ajustes, púlsela para
aumentar los valores.
En el modo de presentación de la hora
actual, al pulsarla cambia entre los canales
1, 2 y 3.
Tecla
[DOWN]
En el modo de ajustes, púlsela para
disminuir los valores.
En modo hora normal time, púlsela para
cambiar entre el formato de 12/24 horas.
10)
11)
12)
13)
14)
15)
16)
17)
18)
19)
Tecla
[RAINBOW]
Desconecte la función BUCLE y pulse
la tecla
[RAINBOW
]; la retroiluminación
cambiará su color en esta secuencia:
blanco rojo naranja amarillo
verde turquesa azul
morado
Tecla
[TUNE]
Desconecte La función BUCLE y mantenga
pulsada la tecla
[TUNE]
para jar el color
manualmente
Dial
FOCUS
Ajusta la nitidez de los datos proyectados
Tecla
[MAX/MIN]
Púlsela para vericar los registros de las
temperaturas máxima y mínima.
Tecla
[RCC]
Púlsela para recibir la señal de RC para
prueba de recepción.
Tecla
°C/°F
Púlsela para cambiar entre grados Celsius
y Fahrenheit.
Tecla
[RESET]
Púlsela para recuperar los valores por
defecto de fábrica.
En caso de un mal funcionamiento, puede
ser que necesite reiniciar la unidad.
Interruptor deslizable
[OFF/LO/HI]
Deslícelo para conectar/desconectar la
función de retroiluminación
Tom
aCC
Tapa de las pilas
Alberga como batería de litio CR2032 como
batería de soporte
(La retroiluminación LED sólo funciona con
alimentación
CC
)
Transmisor
1) Indicador
LED
Parpadea cuando la unidad remota transmite
una lectura.
2) Soporte para montaje en pared
Úselo para colgar el transmisor en la pared.
3) Tecla
[RESET]
Púlselo para reiniciar el transmisor.
4) Interruptor deslizable
[CHANNEL]
Asigna al transmisor el canal 1, 2 o 3.
5) Compartimento de las pilas
Alberga 2 pilas tamaño
ANTES DE USAR EL TRANSMISOR
1. Retire la puerta de las pilas
2. Inserte 2 pilas tamaño AA en el compartimento de las pilas. Compruebe que las coloca
correctamente de acuerdo con la información de polaridad indicada en el compartimiento.
3. Vuelva a colocar la tapa de las pilas.
Nota:
1. Una vez que asigne el canal a un transmisor, sólo podrá cambiarlo si quita las pilas
o si reinicia la unidad.
2. Evite colocar el transmisor bajo los rayos directos del sol, la lluvia o nieve.
DESPERTADOR CON PROYECCIÓN
1. Conecte el adaptador a la toma CC.
2. Pulse la tecla
[RESET]
para reiniciar el reloj y sincronizará los canales del transmisor de forma
automática.
Nota:
1. Si no se recibe ninguna señal o la transmisión presenta interferencias, aparecerá en
la LCD “-”.
2. Coloque el receptor y el transmisor dentro del alcance efectivo de transmisión: 30 m
en campo abierto.
RECEPCIÓN DE LA SEÑAL HORARIA RADIO-CONTROLADA
La fecha y la hora son controladas por radio. La fecha y hora actuales se sincronizan
automáticamente con la señal horaria transmitida desde Alemania. Cuando se use por primera vez
(tras insertar las pilas o pulsando la tecla
[RESET]
), el reloj empezará a recibir la señal RC en 5
minutos con el indicador de fuerza de señal parpadeando.
INDICADOR DE FUERZA DE LA SEÑAL
El indicador de señal muestra la potencia de la señal en 4 niveles. El segmento de onda
parpadeante signica que se están recibiendo señales de hora. La calidad de señal se puede
clasicar en cuatro tipos:
No hay señal Señal débil Señal aceptable Señal excelente
Nota:
1. La unidad buscará automáticamente la señal horaria todos los días a las 2:00, 8:00,
14:00 y 20:00.t
2. Siempre coloque la unidad lejos de fuentes de interferencia, tales como TV,
ordenadores, etc.
3. Evite colocar la unidad sobre una placa de metal o cerca de ella.
4. Recintos cerrados como aeropuertos, sótanos, bloques de pisos o fábricas no están
recomendados.
5. No inicie la recepción en un vehículo o tren en movimiento.
AJUSE MANUAL DE LA HORA
Si está fuera del alcance del transmisor controlado por radio o en caso de que no sea posible
la recepción, la hora puede fijarse manualmente. Tan pronto como vuelva a recibir la señal del
Transmisor, el reloj sincronizará automáticamente con la hora recibida.
1. En modo hora normal, mantenga pulsada la tecla
[TIME]
durante 2 segundos para entrar en la
conguración del año.
2. Pulse la tecla
[UP]
o
[DOWN]
para jar el valor que desee.
3. Vuelva a pulsar la tecla
[TIME]
; parpadea el dígito del mes; pulse la tecla
[UP]
o
[DOWN]
para
cambiar su valor.
4. Repita la operación anterior para ajustar la hora en este orden: Año Mes Fecha
Hora Minutos Segundos Día de la semana-Idioma (GB, FR, DE, ES, IT)
5. Pulse la tecla
[TIME]
para guardar y salir de la conguración o déjelo que salga automáticamente
30 segundos más tarde sin pulsar ninguna tecla.
AJUSTE DE LA ALARMA Y RETARDO DE ALARMA
1. En modo hora normal, pulse la tecla
[TIME]
para seleccionar la ALARMA 1 o ALARMA 2.
2. En modo ALARMA1/ALARMA 2, mantenga pulsada la tecla
[ALARM]
durante 2 segundos hasta
que parpadee el dígito de la hora de la alarma.
3. Pulse la tecla
[UP]
o
[DOWN]
para cambiar el valor.
4. Repita la operación anterior para ajustar la hora en este orden: Horas > Minutos
5. Pulse la tecla
[ALARM]
para guardarlo y salir de la conguración o déjelo que salga
automáticamente 30 segundos más tarde sin pulsar ninguna tecla.
Nota:
1. La alarma se encenderá automáticamente cuando je la hora de la alarma y se
muestre el icono “ ” o “ ”.
2. El diseño de alarma dual (ALARMA 1 y ALARMA 2) de esta unidad le ofrece una
mayor practicidad, y puede jar dos horas de alarma si es necesario.
USAR LAS FUNCIONES DE ALARMA Y PRE-ALARMA DE TEMPERATURA
1. Ajuste la hora de alarma como se describe en la sección previa.
2. En modo hora normal, pulse la tecla
[ALARM]
una vez para encender la ALARMA 1; púlsela dos
veces para encender la ALARMA 2; púlselo tres veces para encender tanto la ALARMA 1 como l
a ALARMA 2, con los iconos de campanas que se muestran en la pantalla LCD.Vuélvalo a pulsar
para apagar tanto la ALARMA 1 como la ALARMA 2, y desaparecerán los iconos.
3. En modo ALARMA 1/ALARMA 2, pulse la tecla
[ALARM]
una vez para encender ALARMA 1/
ALARMA 2; púlsela dos veces para encender la función pre-alarma y el icono “
LO
” aparece en la
pantalla LCD. Vuélvala a pulsar para apagar ambas alarmas y desconectar la función de alarma
y pre-alarma; desaparecen los iconos de “
LO
” y de alarma.
Nota:
1. Para habilitar la pre-alarma de temperatura, la ALARM debe estar habilitada.
2. La pre-alarma de temperatura puede sonar 30 minutos antes de la hora de la alarma
solamente si a temperatura en exteriores está por debajo de la -3°C (26°F).
3. Si no pulsa ninguna tecla mientras suena la alarma, esta se apagará
automáticamente. El pitido de la alarma dura 2 minutos.
4. Pulse el botón
[SNOOZE]
para detener la alarma actual y entrar en retardo. El icono
de la alarma parpadeará de forma continuada. La alarma sonará otra vez en 5
minutos. El retardo puede activarse de forma continua durante 24 horas.
5. Pulse el botón
[ALARM]
para desconectar la función de alarma.
FUNCIÓN DE LA ESTACIÓN METEOROLÓGICA
El reloj contiene un sensor de presión sensible integrado para predecir el pronóstico del tiempo para
las siguientes 12-24 horas.
Soleado Nublado Parcialmente nuboso
Lluvioso
Nevado
CAMBIO DE COLOR DE LA PANTALLA
1. Pulse la tecla
[LOOP]
para conectar o desconectar el cambio de color de la retroiluminación.
2. Desconecte la función de bucle y pulse la tecla
[RAINBOW
]; la retroiluminación cambiará su
color en esta secuencia: blanco rojo naranja amarillo verde turquesa
azul morado.
3. Desconecte la función de bucle y pulse la tecla
[TUNE]
para jar el color manualmente.
VER Y ELIMINAR LOS REGISTROS DE TEMPERATURA MAX/MIN
1. Pulse la tecla
[MAX/MIN]
una vez para comprobar los registros de temperatura máxima. Púlsela
dos veces para ver los registros mínimos. Vuélvala a pulsar para salir.
2. Mantenga pulsada la tecla
[MAX/MIN]
durante 3 segundos para eliminar los registros de
temperaturas máximas y mínimas, con un tono de “pitido”.
Registro de temperatura MAX Registro de temperatura MIN
VER EL CANAL DE TRANSMISIÓN
El canal de transmisión por defecto es el Canal 1. En modo hora normal, pulse la tecla
[UP]
para
ver los canales del 1 al 3. Además, se pueden cambiar los canales automáticamente manteniendo
pulsada la tecla
[UP]
durante 2 segundos, con un tono de “pitido”.
USAR EL PROYECTOR
Gire el proyector para proyectar el haz de luz a una supercie en un alcance de 1-4 m; los datos
proyectados se mostrarán en un fondo oscuro tal y como se muestra en el siguiente diagrama.
Nota:
1. Si usa alimentación CC, los datos del proyector siempre estarán encendidos.
2. Pulsar la tecla
[ ]
invertirá los datos proyectados. El ángulo de giro del proyector
es de +/- 180°.
3. Ajuste la nitidez de los datos proyectados ajustando el dial de FOCUS.
TENDENCIA DE LA TEMPERATURA
El indicador de la tendencia de la temperatura muestra la tendencia de los cambios en los minutos
venideros. Las fechas muestran una tendencia a la subida, estabilidad o bajada.
Indicador de echa
Tendencia De La
Temperatura
Subida Estable Caída
INDICADOR DE BATERÍA BAJA
Si aparece en indicador de batería baja “ ” en la ventana de temperatura exterior, indica que
la potencia de la batería del transmisor no es suciente y que debe sustituirlo inmediatamente con 2
pilas tamaño AA.
Nota:
1. Si la potencia de la batería del transmisor no es suciente, inserte 2 pilas tamaño AA
y pulse la tecla
[RESET]
del transmisor y la tecla
[SENSOR]
de la unidad principal
de forma que pueda recibir la hora y la temperatura automáticamente.
2. ¡Atención! Por favor, elimine la unidad o las pilas de un modo ecológicamente
seguro.
ESPECIFICACIONES
UNIDAD PRINCIPAL
Alcance de temperaturas
operativas:
-5°C~50°C 23°F~122°F
Resolución: 0,1°C/°F (por encima de los
-10°C/14°F)
1°C/°F (por debajo -10°C/14°F)
Señal de Radio-control: DCF
SENSOR REMOTO
Alcance de temperaturas
operativas:
-20°C~60°C -4°F~140°F
Resolución: 0,1°C/°F (por encima de los
-10°C/14°F)
1°C/°F (por debajo -10°C/14°F)
Frecuencia de transmisión RF: 433 MHz
Núm. de sensores remotos: hasta 3 unidades
Alcance de transmisión RF: Máximo de 30 m (campo
abierto)
Ciclo de lectura de temperatura: Aproximadamente 60-64
segundos
ALIMENTACIÓN
Unidad principal: Adaptador CA/CC de 4,5 V, batería de litio 300 mA CR2032 para respaldo
Sensor remoto: 3V, usa 2x AA 1,5 V (pilas alcalinas recomendadas)
DIMENSIONES
Unidad principal: 160 x 72x 48 mm
Sensor remoto: 65 x 100 x 35 mm
1 2 3 4

WT 539
PROJECTIE-WEKKER
Algemene veiligheidsvoorschriften
• Dit apparaat is geen speelgoed. Plaats en gebruik dit apparaat buiten bereik van kinderen.
• Gebruik dit apparaat in een droge en stofvrije omgeving, niet blootgesteld aan vochtigheid,
trillingen, permanente hitte of koude en mechanische spanningen.
• Laat verpakkingsmaterialen niet lichtzinnig rondliggen, plastic folie/zakjes, polysterenen
onderdelen enz. kunnen gevaarlijk speelgoed zijn voor kinderen.
• Gebruik het apparaat niet wanneer deze zichtbare externe schade vertoont op de behuizing, of
in het geval van storing. B. on the housing, or in case of malfunction. In geval van twijfel, laat de
apparatuur inspecteren door een gekwaliceerde elektricien of door onze klantendienst.
• Het apparaat dient alleen te worden gebruikt met de meegeleverde, originele AC/DC-adapter!
• Dit apparaat dient nooit te worden geopend en mag niet zelf worden gerepareerd.
Omgevingseffecten op ontvangst
De klok behoudt nauwkeurig de tijd d.m.v. draadloze technologie. Zoals met alle draadloze
apparatuur, kan de ontvangst in de volgende gevallen worden aangetast:
• Lange zendafstand.
• Nabij bergen en valleien.
• Nabij snelwegen, rails, vliegvelden, hoogspanningkabels, enz.
• Nabij bouwterreinen.
• Tussen hoge gebouwen.
• Binnenin betonnen gebouwen.
• Nabij elektrische apparatuur (computers, TV's, enz.) en metalen structuren
• Binnenin bewegende voertuigen.
Plaats de klok op een plek met optimale signalen, d.w.z. dicht in de buurt van een raam en uit de
buurt van metalen oppervlaktes of elektrische apparaten.
Voorzorgsmaatregelen
• Stel het apparaat niet bloot aan overmatige krachten of schokken.
• Stel het apparaat niet bloot aan extreme temperaturen, direct zonlicht, stof of vochtigheid.
• Dompel het apparaat niet onder in water.
• Laat het niet in contact komen met bijtende materialen.
• Stel het apparaat niet bloot aan open vuur, omdat het kan exploderen.
• Open nooit de interne achterbehuizing en modiceer geen enkele onderdelen van dit apparaat.
Veiligheidswaarschuwingen batterijen
• Gebruik uitsluitend alkaline batterijen, geen herlaadbare batterijen.
• Neem bij het plaatsen van de batterijen de juiste polariteit in acht (+/-).
• Vervang altijd alle batterijen tegelijk.
• Gebruik nooit nieuwe en gebruikte batterijen door elkaar.
• Verwijder lege batterijen onmiddellijk.
• Verwijder de batterijen als het toestel niet wordt gebruikt.
• Herlaad de batterijen niet en gooi ze niet in vuur, omdat de batterijen zouden kunnen ontploffen.
• Zorg ervoor dat de batterijen uit de buurt van metalen voorwerpen worden bewaard, omdat
hierdoor kortsluiting kan ontstaan.
• Stel batterijen niet bloot aan extreme temperaturen, vochtigheid of direct zonlicht.
• Houd alle batterijen buiten bereik van kinderen. Er bestaat gevaar van verstikking.
Gebruik het product alleen voor het doel waarvoor deze bestemd!
Neem wettelijke hefngen in verband met de afvoer van batterijen in aanmerking
Oude batterijen behoren niet tot huishoudelijk afval, omdat deze schadelijk
zijn voor de volksgezondheid en het milieu. U kunt verbruikte batterijen
kosteloos inleveren bij uw dealer of inzamelpunten. U bent als eindgebruiker
wettelijk verplicht verbruikte batterijen in te leveren bij distributeurs of andere
inzamelpunten!
Houd rekening met hefngen in het kader van wetgeving m.b.t. het afvoeren van elektrische apparatuur
Dit symbooltje betekent dat u elektrische apparaten aan het einde van hun
levensduur niet als algemeen, huishoudelijk afval mag afvoeren. Lever uw
apparaat in bij een plaatselijk inzamelpunt voor afvalverwerking of bij een
recyclingcentrum. Dit geldt voor alle landen in de Europese Unie, en voor andere
Europese landen met inzamelsystemen voor gescheiden afval.
HOOFDEIGENSCHAPPEN
Projectie-wekker
1 2 3
DC 4 .5V 300mA
5
1312 14 15 16 17 18
6 7 8 9 10 11
19
4
1)
2)
[SNOOZE]
-toets
Stopt het huidige alarm wanneer het klinkt
en opent de sluimermodus.
[ ]
-toets
Indrukken om de geprojecteerde gegevens
180° om te draaien.
9)
[LOOP]
-toets
Druk op de
[LOOP]
-toets om de
kleurwijziging van het achtergrondlicht in of
uit te schakelen.
NL
3)
4)
5)
6)
7)
8)
PROJECTOR
Projecteer de tijd en binnen/
buitentemperatuur (wisselt automatisch
tussen binnen- en buitentemperatuur elke
5 seconden).
LCD
-scherm
[TIME]
-toets
Indrukken om te wisselen tussen de
modus Maand/Datum en alarmtijd.
Voor 2 seconden ingedrukt houden om de
tijdinstelling te openen.
In de normale tijdinstelling, indrukken om
de instellingsmodus te doorlopen.
[ALARM]
-toets
In de normale tijdweergave, indrukken om
ALM 1 & ALM 2 in of uit te schakelen.
In modus ALM 1/ALM 2, indrukken om
de vooralarm- en alarmfunctie in of uit te
schakelen.
Indrukken om het huidige alarm te stoppen
wanneer de bel klinkt en de alarm- en
sluimerfunctie uitschakelen.
In alarmtijdmodus voor 2 seconden
ingedrukt houden om de instellingen voor
de alarmtijd te openen.
In de alarmtijdinstelling, indrukken om de
instellingsmodus te doorlopen.
[UP]
-toets
In instellingsmodus indrukken om
instellingswaarden te verhogen.
In normale tijdmodus indrukken om te
wisselen tussen Kanaal 1, 2 en 3.
[DOWN]
-toets
In instellingsmodus indrukken om
instellingswaarden te verlagen.
In normale tijdmodus, indrukken om te
wisselen tussen 12/24 uurformaat.
10)
11)
12)
13)
14)
15)
16)
17)
18)
19)
[RAINBOW]
-toets
Schakel de LUS-functie uit en druk op de
toets
[RAINBOW]
om het achtergrondlicht
als volgt van kleur te laten veranderen: wit
rood oranje geel groen
cyaan blauw paars
[TUNE]
-toets
Schakel de LUS-functie uit en houd de
toets
[TUNE]
ingedrukt om de kleur
handmatig in te stellen.
FOCUS
-knop
De scherpte aanpassen van de
geprojecteerde gegevens.
[MAX/MIN]
-toets
Indrukken om de minimum en maximum
temperatuurregistraties te controleren.
[RCC]
-toets
Indrukken om het RC-signaal te ontvangen
om de ontvangst te testen
.
°C/°F
-toets
Indrukken om te wisselen tussen Celsius
en Fahrenheit.
[RESET]
-toets
Indrukken om alle waarden terug te stellen
op de standaard waarden.
Het apparaat vereist in geval van storing
mogelijk een reset.
[OFF/LO/HI]
-schuifschakelaar
Verschuiven om het achtergrondlicht in of
uit te schakelen.
DC
-ingang
Batterijklepje
Accomodeert de lithiumbatterij CR2032
voor back-up(LED-achtergrondlicht werkt
alleen met DC-voeding).
Zender
1)
LED
-indicator
Knippert wanneer de afstandeenheid een
lezing zendt.
2) Steun voor muurmontage
Gebruikt om de zender op de muur te houden.
3)
[RESET]
-toets
Indrukken om de zender te herstarten.
4)
[CHANNEL]
-schuifschakelaar
Wijst de zender toe aan Kanaal 1, 2 of 3.
5) Batterijvak
Accommodeert 2x type AA batterijen
VÓÓR INGEBRUIKNAME VAN DE ZENDER
1. Verwijder het batterijklepje
2. Plaats 2x type AA batterijen in de batterijhouder. Zorg ervoor de batterijen volgens de juiste
polariteitrichting te installeren, zoals gemarkeerd op de batterijhouder.
3. Plaats het batterijklepje terug
.
Opmerking:
1. Nadat het kanaal eenmaal is toegewezen aan één zender, kunt u dit alleen
veranderen door de batterijen te verwijderen of het apparaat terug te stellen.
2. Plaats de zender niet in direct zonlicht, regen of sneeuw.
PROJECTIE-WEKKER
1. Steek dee adapter in de DC-ingang.
2. Druk op de toets
[RESET]
om de klok te herstarten en de kanalen van de zender automatisch te
synchroniseren.
Opmerking:
1. Als er geen signalen worden vervangen of als de signaaloverdracht is verstoord,
zal “-” op de LCD verschijnen.
2. Plaats de ontvanger en zender binnen het effectieve overdrachtbereik: 30 m in
een vrij veld.
ONTVANGST VAN RADIOGESTUURD TIJDSIGNAAL
De tijd en datum zijn radiogestuurd. De huidige tijd en datum worden automatisch gesynchroniseerd
met het tijdsignaal uitgezonden in Duitsland. Wanneer voor het eerst gebruikt (na installatie van
de batterijen of indrukken van de toets
[RESET]
), zal de klok binnen 5 minuten het RC-signaal
beginnen te ontvangen terwijl de signaalsterkte-indicator knippert.
SIGNAALSTERKTE INDICATOR
De signaalindicator geeft de signaalsterkte weer in 4 niveaus. Als het golfsegment knippert, betekent
dit dat tijdssignalen worden ontvangen. De signaalkwaliteit is geclassiceerd in vier soorten:
Geen signaal Zwak signaal Acceptabel signaal Uitstekend signaal
Opmerking:
1. Het apparaat zal dagelijks naar het tijdsignaal zoeken om 2:00, 8:00, 14:00 en
20:00.
2. Plaats het toestel altijd uit de buurt van storingsbronnen, zoals TV-toestellen,
computers enz.
3. Plaats het toestel niet op of naast metalen platen.
4. Omsloten ruimtes zoals een vliegveld, kelder, torenblok of fabriek zijn niet
aanbevolen.
5. Start de ontvangst niet in een bewegend voertuig of een trein.
HANDMATIGE TIJDINSTELLING
Als u buiten bereik bent van de radiogestuurde zender of als de ontvangst onmogelijk is, dan kunt
u de tijd handmatig instellen. De klok zal automatisch de ontvangen tijd synchroniseren zodra het
zendersignaal weer wordt ontvangen.
1. In normale tijdmodus, houd de toets
[TIME]
voor 2 seconden ingedrukt om de jaarinstelling te
openen.
2. Druk op de toets
[UP]
of
[DOWN]
om de gewenste waarde in te stellen.
3. Druk nogmaals op de toets
[TIME]
en de maandcijfers beginnen te knipperen. Druk nu op de
toets
[UP
] of
[DOWN]
om de gewenste waarde in te stellen.
4. Herhaal de hierboven beschreven procedure om de tijd als volgt in te stellen: Jaar Maand
Datum Uur Minuut Seconde Weekdag-Taal (GB, FR, DE, ES, IT)
5. Druk op de toets
[TIME]
om de instellingen op te slaan en te verlaten of wacht 30 seconden
zonder op een toets te drukken om automatisch te verlaten.
ALARM- EN SLUIMERINSTELLING
1. In normale tijdmodus, druk op de toets
[TIME]
om ALM 1 of ALM 2 te selecteren.
2. In modus ALM1/ALM 2, houd de toet
s [ALARM]
voor 2 seconden ingedrukt totdat de alarmuren
knipperen.
3. Druk op de toets
[UP
] of
[DOWN]
om de waarde te veranderen.
4. Herhaal de hierboven beschreven procedure om de tijd als volgt in te stellen: Uur > Minuut
5. Druk op de toets
[ALARM]
om de instellingen op te slaan en te verlaten of wacht 30 seconden
zonder op een toets te drukken om automatisch te verlaten.
Opmerking:
1. Het alarm zal automatisch worden ingeschakeld wanneer u de alrmtijd instelt en
het icoontje “ ” of “ ” wordt weergegeven.
2. De dubbele alarmfunctie (ALM 1 & ALM 2) van dit apparaat biedt u meer comfort
en laat u indien gewenst 2 alarmen instellen.
ALARM & TEMPERATUUR VOORALARMFUNCTIES GEBRUIKEN
1. Stel de alarmtijd in zoals beschreven in de vorige sectie.
2. In normale tijdmodus, druk eenmaal op de toets
[ALARM]
om ALM 1 in te schakelen, tweemaal
om ALM 2 in te schakelen en driemaal om beide ALM 1 en ALM 2 in te schakelen, de betreffende
alarmicoontjes zullen op de LCD verschijnen.
Druk nogmaals op de toets om beide ALM 1 en ALM 2 uit te schalelen, de icoontjes zullen nu
verdwijnen.
3. In modus ALM 1/ALM 2, druk eenmaal op de toets
[ALARM]
om ALM 1/ALM 2 in te schakelen
of tweemaal om het vooralarm in te schakelen, het icoontje “
LO
” zal op de LCD verschijnen. Druk
nogmaals op de toets om beide het alarm en vooralarm uit te schakelen, het icoontje “
LO
” en het
alarmicoontje zullen nu verdwijnen.
Opmerking:
1. Om het temperatuur-vooralarm in te schakelen, moet ALARM ingeschakeld zijn.
2. Het temperatuur-vooralarm kan 30 minuten eerder dan het alarm klinken,
vooropgesteld dat de buitentemperatuur lager is dan -3°C (26°F).
3. Als u tijdens de alarmperiode niet op een toets drukt, zal het alarm automatisch
uitschakelen. Het alarm zal voor 2 minuten klinken.
4. Druk op de toets
[SNOOZE]
om het huidige alarm te stoppen en de sluimerfunctie
in te schakelen. Het alarmicoontje zal blijven knipperen. Na 5 minuten gaat het
alarm opnieuw af. De sluimerfunctie kan voor 24 uur lang worden herhaald.
5. Druk op de toets
[ALARM]
om de alarmfunctie uit te schakelen.
WEERSVOORSPELLINGFUNCTIE
De klok bevat een ingebouwde, gevoelige druksensor om het weer voor de komende 12-24 uur te
voorspellen.
Zonnig Bewolkt Halfbewolkt
Regenachtig
Sneeuw
KLEURWIJZIGING VAN DE DISPLAY
1. Druk op de toets
[LOOP]
om de kleurwijziging van het achtergrondlicht in of uit te schakelen.
2. Schakel de lusfunctie uit en druk op de toets
[RAINBOW]
om het achtergrondlicht als volgt van
kleur te laten veranderen: wit rood oranje geel groen cyaan blauw
paars
3. Schakel de lusfunctie uit en druk op de toets
[TUNE]
om de kleur handmatig in te stellen.
MAX/MIN TEMPERATUURREGISTRATIES CONTROLEREN EN WISSEN
1. Druk eenmaal op de toets
[MAX/MIN]
om de maximale temperatuurregistraties te controleren.
Druk het tweemaal in om de minimale registraties te controleren. Druk nog een keer in om te
verlaten.
2. Houd de toets
[MAX/MIN]
voor 3 seconden ingedrukt om de maximale en minimale
temperatuurregistraties te wissen, dit wordt bevestigd door een pieptoon.
MAX temperatuurregistratie MIN temperatuurregistratie
HET KANAAL WEERGEVEN
Het standaard kanaal is Kanaal 1. In normale tijdmodus, druk op de toets
[UP]
om de kanalen weer
te geven van 1 tot 3. U kunt de kanalen ook automatisch laten wisselen door de toets
[UP]
voor 2
seconden ingedrukt te houden, dit wordt bevestigd door een pieptoon.
DE PROJECTOR GEBRUIKEN
Draai de projector om de lichtbundel op een oppervlakte binnen 1-4 m te richten, de geprojecteerde
gegevens zullen op de donkere achtergrond worden weergegeven volgens het diagram hieronder.
Opmerking:
1. Zolang het apparaat op DC-voeding werkt, blijven de geprojecteerde gegevens
altijd ingeschakeld.
2. Druk op de toets
[ ]
om de geprojecteerde gegevens om te draaien. De
rotatiehoek van de projector is +/- 180°.
3. Gebruik de FOCUS-knop om de scherpte van de geprojecteerde gegevens aan
te passen.
TEMPERATUURTREND
De temperatuurtrend-indicator toon de trend van schommelingen in de komende aantal minuten.
Pijltjes tonen een stijgende, stabiele of vallende trend.
Pijlindicator
Temperatuurtrend Stijgen Stabiel Vallen
LAGE BATTERIJ INDICATOR
Als de lage batterijindicator “ ” weergeeft in het buitentemperatuurvenster, betekent dit dat de
batterijcapaciteit van de zender te laag is en u de batterijen onmiddellijk door 2x type AA batterijen
dient te vervangen.
Opmerking:
1. Als de batterijcapaciteit van de zender te laag is, installeer 2x type AA batterijen
en druk op de toets
[RESET]
van de zender en op de toets
[SENSOR]
van het
hoofdapparaat om de tijd en temperatuur automatisch te ontvangen.
2. Opgelet! Dank verbruikte apparaten of batterijen a.u.b. op milieuvriendelijke wijze
af.
SPECIFICATIES
HOOFDEENHEID
Temperatuurbereik: -5°C~50°C 23°F~122°F
Resolutie: 0,1°C/°F (boven -10°C/14°F) 1°C/°F (onder -10°C/14°F)
Radiogestuurd signaal: DCF
AFSTANDSENSOR
Temperatuurbereik: -20°C~60°C -4°F~140°F
Resolutie: 0,1°C/°F (boven -10°C/14°F) 1°C/°F (onder -10°C/14°F)
RF zendfrequentie: 433 MHz
Aantal afstandsensoren: Tot op 3 eenheden
RF overdrachtbereik: Maximum 30 m (vrij veld)
Temperatuurmeetcyclus: Ca. 60-64 seconden
VOEDING
Hoofdeenheid: AC/DC-adapter 4,5 V, 300 mA lithiumbatterij CR2032 voor back-up
Afstandsensor: 3V, gebruik 2x AA 1,5 V (alkalinebatterij aanbevolen)
AFMETINGEN
Hoofdeenheid: 160 x 72 x 48 mm
Afstandsensor: 65 x 100 x 35 mm
1 2 3 4

WT 539
SVEGLIA CON PROIEZIONE
Sicurezza generale
• Questo dispositivo non è un giocattolo. Si consiglia di posizionarlo e usarlo al di fuori della portata
dei bambini.
• Utilizzare il dispositivo in un ambiente asciutto e non polveroso, non esporlo a umidità, vibrazioni,
calore permanente, freddo o tensioni meccaniche.
• Non lasciare l’imballaggio, sacchetti o pellicole di plastica, polistirolo, ecc., incustoditi, potrebbero
essere pericolosi per i bambini.
• Non utilizzare il dispositivo se presenta evidenti danni esterni. B. sull’involucro esterno o in caso di
malfunzionamento. In caso di dubbio, far controllare il dispositivo da un elettricista qualicato o
dalla nostra assistenza.
• Usare il dispositivo solo insieme all’adattatore AC/DC in dotazione.
• Non aprire il dispositivo, non effettuare riparazioni manuali.
Effetti della ricezione ambientale
La orologio riceve l’ora esatta tramite la tecnologia wireless. Come per tutti i dispositivo wireless, la
ricezione può essere inuenzata dalle seguenti circostanze:
• Lunga distanza di trasmissione.
• Prossimità di montagne e valli.
• In prossimità di autostrada, stazione, aeroporti, cavi di alta tensione ecc.
• In prossimità di cantieri.
• Tra edici alti.
• All'interno di edici in cemento.
• in prossimità di apparecchiature elettriche (computer, TV, ecc.) e strutture metalliche
• All'interno di veicoli in movimento.
Porre la orologio in una posizione con segnale ottimale, ad es. vicino a una nestra e lontano da
superci in metallo o apparecchiature elettriche.
Precauzioni
• Non esporre l'unità a forza eccessiva o shock.
• Non esporre l'unità a temperature t, raggi solari diretti, polvere o umidità.
• Non immergere in acqua.
• Evitare il contatto con qualsiasi materiale corrosivo.
• Non gettare l'unità nel fuoco in quanto può esplodere.
• Non aprire l'alloggiamento posteriore interno o alterare componenti di questa unità.
Avvisi di sicurezza delle batterie
• Utilizzare solo batterie alcaline, non batterie ricaricabili.
• Installare le batterie correttamente rispettando la polarità (+/-).
• Sostituire sempre un set completo di batterie.
• Non mescolare mai batterie usate e nuove.
• Rimuovere immediatamente le batterie scariche.
• Rimuovere le batterie quando non in uso.
• Non ricaricare e non smaltire le batterie nel fuoco in quanto possono esplodere.
• Assicurarsi che le batterie siano conservate lontano da oggetti metallici in quanto il contatto può
causare un corto circuito.
• Evitare di esporre le batterie a temperatura o a umidità estreme o a luce solare diretta.
• Tenere tutte le batterie fuori dalla portata dei bambini. Esse possono comportare pericolo di
soffocamento.
Utilizzare il prodotto solo per lo scopo previsto!
Obblighi in base alla normativa sulle batterie
Le batterie vecchie non appartengono ai riuti domestici in quanto possono causare danni
alla salute e all'ambiente. È possibile consegnare le batterie usate gra tuitamente al proprio
rivenditore e punti di raccolta. L'utente nale è obbligato per legge a portare le batterie esauste
ai distributori e agli altri punti di raccolta!
Considerare il carico in base alla normativa sui dispositivi elettrici
Questo simbolo indica che i dispositivi elettrici alla ne del loro ciclo di vita devono essere
smaltiti separatamente dai riuti domestici generali. Portare l'unità al proprio punto di raccolta
riuti locale o a un centro di riciclaggio. Questa disposizione si applica a tutti i paesi dell’Unione
europea e agli altri paesi europei in cui viene praticata la raccolta differenziata.
CARATTERISTICHE PRINCIPALI
Sveglia con proiezione
1 2 3
DC 4 .5V 300mA
5
1312 14 15 16 17 18
6 7 8 9 10 11
19
4
1)
2)
Tasto
[SNOOZE]
Arrestare la sveglia corrente quando suona
ed entrare in modalità snooze
Tasto
[ ]
Premere per invertire di 180° i dati
proiettati
9) Tasto
[LOOP
]
Premere il tasto
[LOOP]
per accendere
o spegnere l’alternanza di colori della
retroilluminazione
3)
4)
5)
6)
7)
8)
PROIETTORE
Proiettare l’ora e la temperatura interna/
esterna (alterna automaticamente la
temperatura interna a quella esterna ogni
5 secondi).
Display
LCD
Tasto
[TIME]
Premerlo per commutare tra Mese/Date e
modalità ora sveglia.
Tener premuto per due secondi per
accedere alla congurazione dell’ora
In impostazione normale ora, premerlo per
passare alla modalità congurazione
Tasto
[ALARM]
In visualizzazione normale ora, premerlo
per accendere/spegnere ALM 1 & ALM 2
In modalità ALM 1/ALM 2, premerlo per
accendere/spegnere la funzione sveglia e
pre-sveglia.
Premerlo per interrompere la sveglia
corrente quando la campanella suona e
spegnere la sveglia e la funzione snooze.
In modalità ora sveglia, premere e tenere
premuto per 2 secondi per accedere alle
impostazioni dell'ora della sveglia.
Da impostazione ora sveglia, premerlo per
accedere alla modalità congurazione
Tasto
[UP]
In modalità impostazione, premerlo per
aumentare i valori di impostazione.
In modalità ora normale, premerlo per
commutare tra Canale 1, 2 e 3.
Tasto
[DOWN]
In modalità impostazione, premerlo per
diminuire i valori di impostazione.
In modalità ora normale, premerlo per
commutare da formato 12h a formato 24h
10)
11)
12)
13)
14)
15)
16)
17)
18)
19)
Tasto
[RAINBOW]
Spegnere la funzione LOOP e premere
il tasto
[RAINBOW]
, la retrolluminazione
cambierà colore secondo la sequenza:
bianco rosso arancione
giallo verde turchese blu
viola
Tasto
[TUNE]
Spegnere la funzione LOOP e tener
premuto il tasto
[TUNE]
per scegliere
manualmente il colore.
Manopola
FOCUS
Regolare la nitidezza dei dati proiettati
Tasto
[MAX/MIN]
Premerlo per controllare le registrazioni di
temperatura minima e massima.
Tasto
[RCC]
Premerlo per ricevere il segnale RC per il
test di ricezione.
Tasto
°C/°F
Premerlo per commutare tra Celsius e
Fahrenheit.
Tasto
[RESET]
Premerlo per ripristinare i valori ai valori
predeniti.
In caso di malfunzionamento, si necessita
ripristinare l’unità.
Interruttore
[OFF/LO/HI]
Far scattare per accendere/spegnere la
funziona retroilluminazione
Jack
DC
Coperchio batteria
Posizionarci la batteria al litio CR2032 di
riserva
(La retrolluminazione LED funziona solo
con alimentazione DC)
Trasmettitore
1) Indicatore
LED
Lampeggia quando l'unità remota trasmette
una lettura.
2) Supporto da parete
Utilizzarlo per montare il trasmettitore alla
parete.
3) Tasto
[RESET]
Premerlo per riavviare il trasmettitore.
4) Interruttore
[CHANNEL]
Assegna il trasmettitore al Canale 1, 2 o 3.
5) Vano batteria
Posizionare due batterie AA
PRIMA DI USARE IL TRASMETTITORE
1. Rimuovere il coperchio della batteria
2. Inserire 2 batterie AA nello scompartimento. Assicurarsi che siano inserite nel modo giusto
secondo la polarità indicata nel vano.
3. Riposizionare il coperchio del vano batteria.
Avviso:
1. Una volta che il canale è assegnato a un trasmettitore, è possibile solo modicarlo
rimuovendo le batterie o ripristinando l’unità.
2. Evitare di esporre il trasmettitore a raggi solari, pioggia o neve.
SVEGLIA CON PROIEZIONE
1. Inserire l’adattatore nel jack DC.
2. Premere il tasto
[RESET]
per riavviare l’orologio e tutti i canali del trasmettitore si
sincronizzeranno automaticamente.
Avviso:
1. Se non vengono ricevuti segnali o ci sono interferenze nella trasmissione, “-”
comparirà sullo schermo LCD.
2. Porre il ricevitore e il trasmettitore entro un raggio di trasmissione effettivo: 30 m
senza ostacoli.
RICEZIONE DEL SEGNALE ORARIO RADIOCONTROLLATO
L'ora e la data sono radiocontrollate. L’ora e la data attuali sono sincronizzate automaticamente con
il segnale trasmesso dalla Germania. Quando si usa per la prima volta (dopo aver inserito le batteria
o aver premuto il testo
[RESET]
), l’orologio comincerà a ricevere il segnale RC entro 5 minuti
mentre la spia di intensità del segnale lampeggia.
`
INDICATORE POTENZA SEGNALE
L'indicatore di segnale visualizza la potenza di segnale in 4 livelli. Un'onda lampeggiante indica che i
segnali dell'ora sono ricevuti. La qualità del segnale potrebbe essere classicata in quattro tipi:
Nessun segnale Segnale debole Segnale accettabile Segnale eccellente
Avviso:
1. Ogni giorno l’unità ricerca automaticamente il segnale orario a 2:00, 8:00, 14:00 e
20:00.
IT
2. Porre sempre l’unità lontano da fonti di interferenza quali impianti TV, computer ecc.
3. Evitare di posizionare l’unità su o in prossimità di piastre metalliche.
4. Aree chiuse quali aeroporti, sotterranei, blocchi torre o fabbriche non sono
raccomandate.
5. Non avviare la ricezione su un veicolo in movimento o in treno.
IMPOSTAZIONE MANUALE DELL’ORA
Se ci si trova fuori dalla portata del Trasmettitore Radio-controllato o se la ricezione non è possibile,
l’ora può essere impostata manualmente. Non appena il trasmettitore riceve nuovamente, l'orologio
sincronizzerà automaticamente con l’orario ricevuto.
1. In modalità ora normale, tener premuto il tasto
[TIME]
per 2 secondi per acceder alla
congurazione dell’anno.
2. Premere il tasto
[UP]
o il tasto
[DOWN]
per selezionare il valore desiderato.
3. Premere di nuovo il tasto
[TIME]
, le cifre del mese lampeggiano, premere il tasto [
UP]
o
[DOWN]
per modicare il valore.
4. Ripetere le operazioni precedenti per impostare l'ora in quest'ordine: Anno Mee Data
ORa Minuti Secondi Giorno della settimana-Lingua (GB, FR, DE, ES, IT)
5. Premere il tasto
[TIME]
per salvare e uscire dalle impostazioni o attendere l’uscita automatica
dopo 30 secondi senza premere altri tasti.
IMPOSTAZIONE SVEGLIA E SNOOZE
1. In modalità ora normale, premere il tasto
[TIME]
per selezionare ALM 1 o ALM 2.
2. In modalità ALM1/ALM 2, tener premuto il tasto
[ALARM]
per 2 secondi nché le cifre dell’ora
della sveglia lampeggiano.
3. Premere il tasto
[UP]
o
[DOWN]
per modicare il valore.
4. Ripetere le operazioni precedenti per impostare l'ora in quest'ordine: Ora Minuti
5. Premere il tasto
[ALARM]
per salvare e uscire dalle impostazioni o attendere l’uscita automatica
dopo 30 secondi senza premere altri tasti.
Avviso:
1. La sveglia su accende automaticamente quando s’imposta l’ora della sveglia e le
icone “ ” o “ ” compaiono.
2. Il design con doppio allarme (ALM 1 & ALM 2) di questo dispositivo offre una
maggiore comodità dato che è possibile impostare due sveglie a orari diversi.
UTILIZZO DELLE FUNZIONI SVEGLIA E PRE-ALLARME TEMPERATURA
1. Impostare l'ora della sveglia come descritto nella sezione precedente.
2. In modalità ora normale, premere una volta il tasto
[ALARM]
per attivare ALM 1, premerlo due
volte per attivare ALM 2, premerlo tre volte per attivare entrambe ALM 1 e ALM 2, le icone della
campanella compaiono sullo schermo LCD.
Premerlo nuovamente per disattivare entrambe ALM 1 e ALM 2, le icone scompariranno.
3. In modalità ALM 1/ALM 2 premere il tasto
[ALARM]
una volta per attivare ALM 1/ALM 2,
premerlo due volte per la funzione pre-sveglia, e l’icona “
LO
” compare sullo schermo LCD.
Premerlo di nuovo per spegnere le funzioni di sveglia e pre-sveglia e le icone“
LO
” e sveglia
scompaiono.
Avviso:
1. Per attivare il pre-allarme temperatura, ALARM deve essere attivo.
2. Il pre-allarme temperatura può suonare no a 30 minuti prima rispetto alla sveglia
solo quando la temperatura esterna è inferiore a -3°C (26°F).
3. Se non è premuto alcun tasto durante il periodo della sveglia, la svegli si spegne
automaticamente. Il bit della sveglia dura 2 minuti.
4. Premere il tasto
[SNOOZE]
per fermare la sveglia in corso ed entrare in modalità
snooze. L'icona lla sveglia lampeggia continuamente. La sveglia suona di nuovo dopo
5 minuti. Lo snooze può funzionare di continuo per 24 ore.
5. Premere il tasto
[ALARM]
per spegnere completamente la sveglia.
FUNZIONE PREVISIONI METEO
La orologio include un sensore di pressione integrato per le previsioni meteo delle successive 12-24 ore.
Soleggiato Nuvoloso
Parzialmente nuvoloso
Piovoso Nevoso
MODIFICA COLORE DEL DISPLAY
1. Premere il tasto
[LOOP]
per accendere o spegnere l’alternanza di colori della retroilluminazione.
2. Spegnere la funzione loop e premere il tasto
[RAINBOW]
il colore della retroilluminazione cambia
nella sequenza: bianco rosso arancione giallo verde turchese blu
viola
3. Spegnere la funzione loop e premere il tasto
[TUNE]
per scegliere il colore manualmente.
VERIFICA E CANCELLAZIONE DELLE REGISTRAZIONE DI TEMPERATURA MAX/MIN
1. Premere una volta il tasto
[MAX/MIN]
per controllare i record di temperatura massima. Prere due
volte per vericare le registrazioni di temperatura minima. Premere nuovamente per uscire.
2. Tener premuto il tasto
[MAX/MIN]
per 3 secondi per cancellare i record di temperatura massima
e minima, seguirà un bip.
Registrazione temperatura MAX Registrazione temperatura MIN
VISUALIZZAZIONE CANALE
Il canale predenito è Canale 1. In modalità ora normale, premere il tasto
[UP]
per visualizzare i
canali da 1 a 3. Inoltre è possibile cambiare canale automaticamente tenendo premuto il tasto
[UP]
per 2 secondi, seguirà un bip.
UTILIZZO DEL PROIETTORE
Ruotare il proiettore per proiettare il fascio di luce su una superficie a 1-4 m di distanza. I dati
proiettati compariranno su sfondo scuro secondo il seguente diagramma.
Avviso:
1. Se si usa la DC, il proiettore dati sarà sempre attivo.
2. Premere il tasto
[ ]
invertirà i dati proiettati. L’angolo di rotazione del proiettore è di
+/- 180°.
3. Regolare la nitidezza dei dati proiettati ruotando la manopola FOCUS.
TREND TEMPERATURA
L’indicatore del trend di temperatura mostra i trend di cambiamenti nei minuti successivi. Le frecce
indicano un trend in aumento, stabile o diminuzione.
Indicatore freccia
Trend temperatura In aumento Stabile In diminuzione
INDICATORE DI BATTERIA IN ESAURIMENTO
Se la spia per la batteria scarica “ ” compare nella nestra della temperatura esterna, signica
che la capacità della batteria del trasmettitore non è sufciente e che bisogna sostituire subito le 2
batterie AA.
Avviso:
1. Se la capacità della batteria del trasmettitore non è sufciente, inserire due batterie
AA e premere il tasto
[RESET]
del trasmettitore e il tasto
[SENSOR]
dell’unità
principale per ricevere ora e temperatura automaticamente.
2. Attenzione! Smaltire l’unità o le batterie usate in modo ecologico.
SPECIFICHE TECNICHE
UNITÀ PRINCIPALE
Temperatura di funzionamento: -5°C~50°C 23°F~122°F
Risoluzione: 0.1°C/°F (oltre -10°C/14°F) 1°C/°F (al di sotto -10°C/14°F)
Segnale radio controllato: DCF
SENSORE REMOTO
Temperatura di funzionamento: -20°C~60°C -4°F~140°F
Risoluzione: 0.1°C/°F (oltre -10°C/14°F) 1°C/°F (al di sotto -10°C/14°F)
Frequenza trasmissione RF: 433 MHz
Numero di sensori remoti: Fino a 3 unità
Intervallo di trasmissione RF: Massimo 30 m (senza ostacoli)
Ciclo rilevazione temperatura: Circa 60-64 secondi
ALIMENTAZIONE
Unità principale: Adattatore AC/DC da 4,5 V, batteria al litio 300 mA CR2032 di riserva
Sensore remoto: 3V, usare 2 batterie AA da 1,5 V (batterie alcaline consigliate)
DIMENSIONI
Unità principale: 160 x 72 x 48 mm
Sensore remoto: 65 x 100 x 35 mm
1 2 3 4

WT 539
PROJEKCNÍ HODINY S BUDÍKE
Všeobecné bezpečnostní pokyny
• Toto zařízení není hračka. Musí být umístěno z dosahu a mimo přístup dětí.
• Používejte jej v suchém a čistém prostředí bez prachu, nevystavujte jej vlhkosti, vibracím, trvalému
teplu, chladu a mechanickému namáhání.
• Nenechávejte obalový materiál nedbale ležet, plastové folie/sáčky, polystyrenové díly atd. se
mohou pro děti stát nebezpečnou hračkou.
• Zařízení nepoužívejte, pokud je viditelně poškozeno nebo. má poškozený kryt. Nepoužívejte jej
ani v případě selhání. Pokud si nejste jistí, nechte zařízení zkontrolovat oprávněným
elektrotechnikem nebo naším servisem.
• Zařízení lze používat pouze s dodaným originálním adaptérem střídavého/stejnosměrného
proudu!
• Zařízení nesmíte otevírat, nesmíte provádět manuální opravy.
Vlivy prostředí na příjem signálu
Tato hodiny získává přesný čas prostřednictvím bezdrátové technologie. Stejně jako u jiných
bezdrátových zařízení může být příjem negativně ovlivněn následujícími podmínkami:
• Dlouhá přenosová vzdálenost
• Blízkost hor a údolí
• Blízkost dálnic, železnic, letišť, vedení vysokého napětí apod.
• Blízkost staveniště
• Umístění mezi vysokými stavbami
• Umístění uvnitř betonových staveb
• Blízkost elektrických zařízení (počítačů, televizorů apod.) a kovových předmětů
• Umístění uvnitř jedoucích vozidel
Hodiny umístěte na místě s optimálním signálem, to znamená v blízkosti okna a mimo dosah vlivu
kovových povrchů nebo elektrických zařízení.
Bezpečnostní opatření
• Nevystavujte jednotku působení nadměrné síly ani otřesům.
• Nevystavujte jednotku extrémním teplotám, přímému slunečnímu svitu, prachu či vlhkosti.
• Neponořujte do vody.
• Vyhněte se kontaktu s jakýmkoliv korozivním materiálem.
• Nevhazujte jednotku do ohně, hrozí nebezpečí exploze.
• Neotevírejte vnitřní kryt a nemanipulujte s žádnými součástkami této jednotky.
Bezpečnostní opatření u baterií
• Používejte pouze alkalické baterie, nikdy ne dobíjecí baterie.
• Vložte baterie se správnou polaritou (+/-).
• Vždy vyměňte kompletní sadu baterií.
• Nikdy nemíchejte dohromady použité a nové baterie.
• Slabé baterie okamžitě vyměňte.
• Jestliže zařízení nepoužíváte, vyjměte z něj baterie.
• Baterie nenabíjejte a nevhazujte je do ohně – mohou explodovat.
• Baterie skladujte mimo dosah kovových předmětů, kontakt s nimi může způsobit zkrat.
• Nevystavujte baterie extrémním teplotám, vlhkosti či přímému slunečnímu svitu.
• Veškeré baterie skladujte mimo dosah dětí. Hrozí riziko udušení.
Výrobek používejte pouze ke stanovenému účelu!
Likvidace baterií podle předpisu
Staré baterie nepatří do domácího odpadu, protože mohou způsobit škody na zdraví a
životním prostředí. Použité baterie můžete zdarma vrátit prodejci a do sběrných míst. Jako
koncoví uživatelé jste vázáni zákonem použité baterie vrátit distributorům a do jiných sběrných
míst!
Povinnosti dle zákona o elektrických zařízeních
Tento symbol znamená, že elektrická zařízení na konci jejich životnosti je třeba likvidovat
odděleně od běžného domácího odpadu. Zařízení vraťte do místního sběrného místa nebo
centra pro recyklaci. To platí pro všechny země Evropské unie a ostatní evropské země se
samostatným systémem shromažďování odpadu.
HLAVNÍ FUNKCE
Projekcní hodiny s budíke
1 2 3
DC 4 .5V 300mA
5
1312 14 15 16 17 18
6 7 8 9 10 11
19
4
1)
2)
Tlačítko
[SNOOZE]
Zastavte stávající budík, když zvoní a
vejděte do režimu snooze.
Tlačítko
[ ]
Stisknutím otočíte promítané údaje o
180°
9)
10)
Tlačítko
[LOOP]
Stisknutím tlačítka
[LOOP]
zapnete nebo
vypnete změnu barvy podsvícení.
Tlačítko
[RAINBOW]
Vypněte funkci LOOP a stiskněte tlačítko
[RAINBOW]
, podsvícení změní barvu
v tomto pořadí:bílá červená
oranžová žlutá zelená
modrozelená modrá alová
CZ
3)
4)
5)
6)
7)
8)
PROJEKTOR
Promítne čas a venkovní/vnitřní teplotu
(každých 5 sekund automaticky přepíná
mezi vnitřní a venkovní teplotou).
LCD
displej
Tlačítko
[TIME]
Stiskněte pro přepnutí mezi režimem
Měsíc/Datum a časového režimu budíku.
V časovém režimu budíku tlačítko
stiskněte a držte po 2 sekundy a
vstoupíte do režimu nastavení času.
V normálním nastavení času stiskněte
pro pohyb v režimu nastavení.
Tlačítko [
ALARM]
V normálním zobrazení času tlačítko
stiskněte a zapněte/vypněte ALM 1 a
ALM 2.
V režimu ALM 1/ALM 2 tlačítko stiskněte
a vypněte/zapněte funkci budíku a
předbudíku.
Stiskněte klávesu pro zastavení
stávajícího budíku, když zvoní a vypnutí
budíku a funkce snooze
V časovém režimu budíku klávesu
stiskněte a držte po 2 sekundy a
vstoupíte do režimu nastavení času
buzení
V nastavení času stiskněte pro pohyb
v režimu nastavení.
Tlačítko
[UP]
V nastavovacím režimu ji stiskněte pro
zvýšení nastavovacích hodnot
V normálním časovém režimu stiskněte
klávesu a přepínejte mezi kanálem 1, 2 a
3
Tlačítko
[DOWN]
V nastavovacím režimu stiskněte klávesu
a snižte nastavovací hodnoty
V normálním časovém režimu tlačítko
stiskněte a přepínejte mezi formátem
času 12/24 hodin.
11)
12)
13)
14)
15)
16)
17)
18)
19)
Tlačítko
[TUNE]
Vypněte funkci LOOP a stisknutím a
přidržením tlačítka
[TUNE]
nastavte
manuálně barvu.
Regulátor
FOCUS
Nastavení ostrosti promítaných údajů.
Tlačítko
[MAX/MIN]
Stiskněte klávesu a zkontrolujte minimální
a maximální teplotní údaje.
Tlačítko
[RCC]
Stiskněte pro příjem signálu RC, signálu
pro testování příjmu
Tlačítko
°C/°F
Stiskněte tlačítko pro přepínání mezi
stupni Celsia a Fahrenheit.
Tlačítko
[RESET]
Tlačítko stiskněte k restartování
výchozích hodnot
V případě poruchy může být nutné
jednotku restartovat
Posuvný regulátor
[OFF/LO/HI]
Posunem vypnete/zapnete funkci
osvícení pozadí.
Zdířka
DC
napájení
Bateriová dvířka
Pro lithiovou baterii CR2032 sloužící jako
záloha
LED podsvícení funguje pouze se
stejnosměrným napájením).
Vysílač
1) Ukazatel
LED
Bliká, když vzdálená jednotka vysílá čtení
2) Držák na zeď
Použijte ho pro uchycení na zeď
3) Tlačítko
[RESET]
Stiskněte k restartování vysílače
4) Posuvný regulátor
[CHANNEL]
Přiřaď vysílači kanál 1, 2 nebo 3
5) Prostor pro baterie
Pro 2 baterie velikosti AA
PŘED POUŽITÍM VYSÍLAČE
1. Otevřete dvířka bateriového prostoru.
2. Do prostoru pro baterie vložte 2 baterie velikosti AA. Ujistěte se o tom, že baterie vkládáte
správnou polaritou dle značení na bateriovém prostoru.
3. Znovu zavřete dvířka bateriového prostoru.
Poznámka:
1. Jakmile je kanál přiřazen jednomu vysílači, můžete to změnit pouze vyndáním
baterií a resetováním jednotky.
2. Vyhněte se umístění vysílače na přímé sluneční světlo, do deště nebo sněhu.
PROJEKCNÍ HODINY S BUDÍKE
1. Připojte adaptér do zdířky DC napájení.
2. Stisknutím tlačítka
[RESET]
restartujete hodiny, automaticky se také synchronizují kanály
vysílače.
Poznámka:
1. Pokud není přijat žádný signál nebo je vysílání rušeno, na LCD se objeví symbol „-“.
2. Přijímač a vysílač umístěte do okruhu efektivního okruhu vysílání: 30 metrů
v otevřeném prostoru.
PŘÍJEM RÁDIOVĚ ŘÍZENÉHO SIGNÁLU
Čas a datum jsou rádiově řízené. Aktuální čas a datum se automaticky synchronizuje s časovým
signálem vysílaným z Německa. Při prvním použití (po vložení baterií a stisknutí tlačítka
[RESET])
začnou hodiny do 5 minut přijímat RC signál, ukazatel síly signálu bude blikat.
UKAZATEL SÍLY SIGNÁLU
Ukazuje intenzitu signálu ve 4 úrovních. Jestliže symbol vln bliká, hodiny přijímají časový signál.
Intenzita (kvalita) signálu může být rozdělena do čtyř typů:
Bez signálu Slabý signál Přijatelný signál Vynikající signál
Poznámka:
1. Jednotka bude automaticky hledat signál v 2:00, 8:00, 14:00 a 20:00 hod. každý
den.
2. Vždy hodiny umístěte z dosahu rušivých zdrojů jako je televize, počítač apod.
3. Vyhněte se umístění hodin na kovový talíř nebo v jeho blízkosti.
4. Nejsou doporučena uzavřená místa, jako je letiště, věžový dům nebo továrna.
5. Příjem nezačínejte v pohybujících se vozidlech nebo vlaku.
RUČNÍ NASTAVENÍ ČASU
Pokud jste z dosahu radiem řízeného vysílače, nebo pokud není příjem možný, lze čas nastavit
manuálně. Když je vysílač opět v dosahu, tak se hodiny automaticky zesynchronizují s přijímaným časem.
1. V normálním časovém režimu stiskněte tlačítko
[TIME]
, držte jej po dobu 2 sekund a nastavte rok.
2. Stiskněte tlačítko
[UP]
nebo
[DOWN]
a nastavte požadovanou hodnotu.
3. Znovu stiskněte tlačítko
[TIME]
, začne blikat číslice měsíce, stiskněte tlačítko
[UP]
nebo
[DOWN]
a nastavte požadovanou hodnotu.
4. Opakujte výše uvedenou operaci pro nastavení času v tomto pořadí: Rok Měsíc Datum
Hodina Minuta Sekunda Týdně Jazyk (GB, FR, DE, ES, IT)
5. Uložte a ukončete nastavení stisknutím tlačítka [TIME], k automatickému ukončení dojde i po
30 sekundách bez stisknutí jakéhokoli tlačítka.
BUDÍK A NASTAVENÍ FUNKCE SNOOZE
1. V normálním časovém režimu stiskněte tlačítko
[TIME]
a vyberte ALM 1 nebo ALM 2.
2. V režimu ALM1/ALM 2 stiskněte tlačítko
[ALARM]
a držte jej po dobu 2 sekund, dokud nezačne
blikat číslice hodin budíku.
3. Stiskněte tlačítko
[UP]
nebo
[DOWN]
a změňte hodnotu.
4. Opakujte výše uvedenou operaci pro nastavení času v tomto pořadí: Hodina Minuty
5. Uložte a ukončete nastavení stisknutím tlačítka
[ALARM]
, k automatickému ukončení dojde i po
30 sekundách bez stisknutí jakéhokoli tlačítka.
Poznámka:
1. Budík se automaticky zapne, pokud nastavíte čas budíku a bude zobrazena ikona
„ “ nebo „ “.
2. Dvojité buzení (ALM 1 a ALM 2) tohoto zařízení vám poskytne další pohodlí, podle
své potřeby můžete nastavit dva časy buzení.
POUŽITÍ BUDÍKU & FUNKCE TEPLOTNÍHO PŘEDBUZENÍ
1. Nastavte si čas alarmu, jak bylo popsáno v předešlé části.
2. V normálním časovém režimu stiskněte tlačítko
[ALARM]
jednou a zapněte ALM 1, dvakrát a
zapněte ALM 2, nebo jej stiskněte třikrát a zapněte ALM 1 i ALM 2. Na LCD displeji se zobrazí
ikony zvonku.
Dalším stisknutím tlačítka vypnete ALM 1 i ALM 2, ikony se ztratí.
3. V režimu ALM 1/ALM 2 jednou stiskněte tlačítko
[ALARM]
a zapněte ALM 1/ALM 2, pokud jej
stisknete dvakrát, zapnete funkci předbudíku. Na LCD displeji se zobrazí „
LO
“. Dalším stisknutím
vypnete oba budíky a funkci předbuzení, ikona „
LO
“ a ikona budíku se ztratí.
Poznámka:
1. Pro zapnutí teplotního předbudíku musí být zapnutý budík/ALARM.
2. Teplotní předbudík může zaznít o 30 minut dříve než budík pouze když je venkovní
teplota pod -3 °C.
3. Pokud není během času buzení stisknutá žádná jiná klávesa, tak se budík
automaticky vypne. Pípání budíku trvá po dobu 2 minut.
4. Stisknutím tlačítka
[SNOOZE]
vypnete aktuální buzení a zapnete opakované
buzení. Ikona budíku bude trvale blikat. Alarm zazní znovu za 5 minut. Režim
snooze lze provozovat nepřetržitě po 24 hodin.
5. Stisknutím tlačítka
[ALARM]
funkci buzení vypnete.
FUNKCE PŘEDPOVĚDI POČASÍ
Hodiny obsahuje integrovaný citlivý senzor tlaku, který je určený k provádění předpovědi počasí na
dalších 12–24 hodin.
Jasno Oblačno Částečně zataženo
Déšť Sněžení
ZMĚNA BARVY DISPLEJE
1. Stisknutím tlačítka
[LOOP]
zapnete nebo vypnete změnu barvy podsvícení.
2. Vypněte funkci LOOP a stiskněte tlačítko
[RAINBOW]
, podsvícení změní barvu v tomto pořadí:
bílá červená oranžová žlutá zelená modrozelená modrá
alová
3. Vypněte funkci LOOP a stisknutím a stisknutím tlačítka
[TUNE]
nastavte manuálně barvu.
KONTROLA A MAZÁNÍ MAX/MIN TEPLOTNÍCH ÚDAJŮ
1. Jedním stisknutím tlačítka
[MAX/MIN]
zobrazíte maximální teplotní záznamy. Pro kontrolu
minimálních údajů tlačítko stiskněte dvakrát. Pro odchod tlačítko stiskněte ještě jednou.
2. Stisknutím a přidržením tlačítka
[MAX/MIN]
po dobu 3 sekund odstraníte záznamy maximální a
minimální teploty, ozve se „pípnutí“.
MAX teplotní údaje MIN teplotní údaje
ZOBRAZENÍ KANÁLU
Výchozí nastavený kanál je kanál č. 1. V normálním časovém režimu stiskněte tlačítko
[UP]
a
zobrazte kanály 1 až 3. Kromě toho mohou být kanály automaticky přepnuty stisknutím a přidržením
tlačítka
[UP]
po dobu 2 sekund, ozve se „pípnutí“.
POUŽITÍ PROJEKTORU
Otočí projektor a promítne světelný paprsek na povrch vzdálený 1–4 metry, promítané údaje budou
zobrazeny na tmavém pozadí tak, jak je uvedeno na obrázku.
Poznámka:
1. Při použití DC napájení budou údaje projektoru vždy zapnutá.
2. Stisknutím tlačítka
[ ]
promítané údaje otočíte. Úhel otočení projektoru je +/-
180°.
3. Ostrost promítaných údajů upravíte nastavením regulátoru FOCUS.
TEPLOTNÍ TENDENCE
Indikátor teplotního trendu ukazuje trendy změny v následujících několika minutách. Šipky ukazují
stoupající, stabilní nebo klesající tendenci.
Šipkový ukazatel
Teplotní tendence Stoupající Trvalý Klesající
INDIKÁTOR SLABÝCH BATERIÍ
Pokud se v okně venkovní teploty zobrazí indikátor slabých baterií „ “, znamená to, že nabití
baterií vysílače není dostatečné a měli byste je okamžitě vyměnit za 2 baterie velikosti AA.
Poznámka:
1. Pokud není nabití baterií vysílače dostatečné, vložte 2 baterie velikosti AA, na
vysílači stiskněte tlačítko
[RESET]
a na hlavní jednotce stiskněte tlačítko
[SENSOR]
. Ta bude potom automaticky přijímat čas a teplotu.
2. Upozornění! Prosím, zlikvidujte použitou jednotku nebo baterie ekologicky
bezpečným způsobem.
SPECIFIKACE
HLAVNÍ JEDNOTKA
Rozsah provozní teploty: -5 °C~50 °C 23 °F~122 °F
Rozlišení: 0,1 °C/°F (nad -10 °C/14 °F) 1 °C/°F (pod -10 °C/14 °F)
Rádiově řízený signál: DCF
DÁLKOVÝ SENZOR
Rozsah provozní teploty: -20 °C~60 °C -4 °F~140 °F
Rozlišení: 0,1 °C/°F (nad -10 °C/14 °F) 1 °C/°F (pod -10 °C/14 °F)
Vysílací frekvence RF: 433 MHz
Počet vzdálených senzorů: až 3 jednotky
RF dosah přenosu: Maximálně 30 m (otevřený
prostor)
Cyklus snímání teploty: Přibližně 60–64 sekund
NAPÁJENÍ
Hlavní jednotka: Adaptér AC/DC 4,5 V, jako záloha lithiová baterie CR2032, 300 mA
Dálkový senzor: 3 V, používá 2 baterie velikosti AA 1,5 V (doporučujeme alkalické baterie)
ROZMĚRY
Hlavní jednotka: 160 x 72 x 48 mm
Dálkový senzor: 65 x 100 x 35 mm
1 2 3 4

WT 539
BUDZIK PROJEKCYJNY
Ogólne zalecenia dotyczące bezpieczeństwa
• To urządzenie nie jest zabawką. Należy je ustawiać i użytkować w miejscach poza zasięgiem
dzieci.
• Z urządzenia tego należy korzystać w miejscu suchym i niezapylonym oraz nie narażać
go na działanie wilgoci, drgań, stale wysokiej temperatury, niskich temperatur ani naprężeń
mechanicznych.
• Nie pozostawiać rozrzuconych materiałów opakowaniowych, ponieważ folie/torby papierowe,
elementy styropianowe itd. mogą stać się niebezpieczną zabawką dla dzieci.
• Nie używać tego urządzenia, jeżeli jest ono wyraźnie uszkodzone na zewnątrz. B. na obudowie
lub razie usterki. W razie wątpliwości należy oddać urządzenie do sprawdzenia wykwalikowanemu
elektrykowi lub do naszego serwisu.
• Urządzenie można użytkować tylko z dostarczonym oryginalnym adapterem AC/DC!
• Nie wolno otwierać urządzenia ani wykonywać napraw ręcznych.
Środowiskowe efekty odbioru
Zegar pobiera dokładny czas za pomocą technologii bezprzewodowej. Podobnie jak w przypadku
wszystkich urządzeń bezprzewodowych, odbiór może być zakłócony następującymi czynnikami:
• Duża odległość przekazu.
• Góry i doliny w pobliżu.
• Autostrada, kolej, porty lotnicze, kable wysokiego napięcia itd. w pobliżu.
• Bliskość budów.
• Między wysokimi budynkami.
• Wewnątrz betonowych budynków.
• Znajdujące się w pobliżu urządzenia elektryczne (komputery, telewizory itd.) i struktury metalowe.
• W poruszających się pojazdach.
Zegar najlepiej jest ustawić w miejscu, gdzie uzyska ona najlepszy zasięg sygnału, tj. blisko okna i z
dala od metalowych powierzchni czy urządzeń elektrycznych.
Środki ostrożności
• Nie wystawiać urządzenia na nadmierną siłę lub wstrząsy.
• Nie wystawiać jednostki na ekstremalne temperatury, bezpośrednie światło słoneczne, kurz czy
wilgoć.
• Nie zanurzać w wodzie.
• Unikać kontaktu z materiałami korodującymi.
• Urządzenia nie wolno utylizować w ogniu, ponieważ może wybuchnąć.
• Nie otwierać tylnej obudowy wewnętrznej ani nie ingerować w żadne komponenty urządzenia.
Ostrzeżenia bezpieczeństwa dotyczące baterii
• Używać wyłącznie baterii alkalicznych, a nie baterii akumulatorowych.
• Włożyć baterie prawidłowo, zgodnie z biegunowością (+/-).
• Zawsze należy wymieniać cały zestaw baterii.
• Nigdy nie wolno mieszać zużytych i nowych baterii.
• Zużyte baterie należy natychmiast wymieniać.
• Wyjmować baterie, jeśli urządzenie nie jest używane.
• Nie ładować ponownie baterii ani nie wyrzucać ich do ognia, ponieważ mogą eksplodować.
• Należy zapewnić, że baterie są przechowywane z dala od metalowych obiektów, ponieważ
zetknięcie z nimi może spowodować zwarcie.
• Unikać wystawiania baterii na działanie ekstremalnych temperatur, na wilgoć czy światło
słoneczne.
• Baterie należy trzymać w miejscu niedostępnym dla dzieci. Powodują one zagrożenie
udławieniem.
Stosować produkt tylko zgodnie z jej przeznaczeniem!
Zobowiązania według przepisów prawa dotyczących baterii
Stare baterie nie należą do odpadów domowych, ponieważ mogą szkodzić zdrowiu i
środowisku. Zużyte baterie można oddać bezpłatnie u swojego sprzedawcy lub punktach
zbiórek. Użytkownik końcowy jest zobowiązany prawem do zwrotu odpowiednich baterii
sprzedawcom lub w innych punktach zbiórek!
Zobowiązania według przepisów prawa dotyczących urządzeń elektrycznych
Ten symbol oznacza, że użytkownik musi utylizować urządzenia elektryczne z dala od ogólnych
odpadów domowych, kiedy osiągną one koniec okresu eksploatacji. Swoje urządzenie najlepiej
jest oddać w lokalnym punkcie zbiórki odpadów lub centrum recyklingu. Dotyczy to wszystkich
państw Unii Europejskiej oraz innych państw europejskich, w których obowiązuje system
zbierania odpadów segregowanych.
CECHY
Budzik projekcyjny
1 2 3
DC 4 .5V 300mA
5
1312 14 15 16 17 18
6 7 8 9 10 11
19
4
1) Przycisk
[SNOOZE]
Zatrzymanie aktualnego alarmu podczas
jego trwania i przejście do trybu drzemki.
9) Przycisk
[LOOP]
Naciśnięcie przycisku
[LOOP]
włącza lub
wyłącza zmianę koloru podświetlenia
PL
2)
3)
4)
5)
6)
7)
Przycisk
[ ]
Naciśnięcie powoduje odwrócenie
wyświetlanych danych o 180°
PROJEKTOR
Wyświetla czas oraz temperaturę
wewnątrz/na zewnątrz (automatycznie
przełącza między temperaturą wewnątrz
i na zewnątrz co 5 sekund)
Wyświetlacz
LCD
Przycisk
[TIME]
Naciśnięcie powoduje zmianę między
miesiącem a datą a także trybem czasu
alarmu.
Naciśnięcie i przytrzymanie przez
2 sekundy powoduje przejście do
ustawienia czasu
Przy ustawieniu zwykłego czasu
naciśnięcie tego przycisku powoduje
przejście do trybu ustawień
Przycisk
[ALARM]
Podczas wyświetlania zwykłego czasu
naciśnięcie tego przycisku włącza/
wyłącza ALARM 1 i ALARM 2
W trybie ALARM1/ALARM2 naciśnięcie
tego przycisku włącza/wyłącza alarm i
funkcję alarmu wstępnego
Naciśnięcie tego przycisku powoduje
zatrzymanie aktualnego alarm podczas
dzwonienia oraz wyłączenie alarmu i
funkcji drzemki.
W trybie czasu alarmu naciśnięcie i
przytrzymanie przycisku przez 2 sekundy
powoduje przejście do ustawienia czasu
alarmu.
W trybie ustawiania czasu alarmu
naciśnięcie tego przycisku powoduje
przejście do trybu ustawień
Przycisk
[UP]
W trybie ustawień naciśnięcie powoduje
zwiększenie wartości ustawień.
W trybie zwykłego czasu naciśnięcie
powoduje przejście między kanałem 1, 2
i 3.
10)
11)
12)
13)
14)
15)
16)
17)
18)
19)
Przycisk
[RAINBOW]
Wyłączenie funkcji PĘTLA i naciśnięcie
przycisku
[RAINBOW]
powoduje zmianę
koloru podświetlenia w kolejności: biały
czerwony pomarańczowy
żółty zielony turkusowy
niebieski oletowy
Przycisk
[TUNE]
Aby ustawić kolor ręcznie, należy
wyłączyć funkcję PĘTLA oraz nacisnąć i
przytrzymać przycisk
[TUNE]
Pokrętło FOCUS
Reguluje ostrość wyświetlanych danych
Przycisk
[MAX/MIN]
Naciśnięcie tego przycisku sprawdza
zapisane wartości temperatury minimalnej
i maksymalnej
Przycisk
[RCC]
Naciśnięcie powoduje odebranie sygnału
RC do testowania odbierania.
Przycisk
°C/°F
Naciśnięcie powoduje przełączenie
między stopniami Celsjusza a
Fahrenheita.
Przycisk
[RESET]
Naciśnięcie resetuje wszystkie wartości
do wartości standardowych.
W przypadku nieprawidłowego działania
konieczne może okazać się zresetowanie
urządzenia.
Przełącznik suwakowy
[OFF/LO/HI]
Przesunięcie powoduje włączenie/
wyłączenie funkcji podświetlenia
Gniazdo
DC
Drzwiczki baterii
Znajduje się tutaj zapasowa bateria litowa
CR2032(podświetlenie LED działa tylko z
zasilaniem DC)
8) Przycisk
[DOWN]
W trybie ustawień naciśnięcie powoduje
zmniejszenie wartości ustawień.
W trybie zwykłego czasu naciśnięcie
powoduje zmianę formatu 12-/24-godz.
CZUJNIK ZDALNY
1) Wskaźnik
LED
Miga, kiedy urządzenie zdalne przesyła
odczyt.
2) Uchwyt do montażu naściennego
Do mocowania przekaźnika na ścianie.
3) Przycisk
[RESET]
Naciśnięcie powoduje ponowne uruchomienie
przekaźnika.
4) Przełącznik suwakowy
[CHANNEL]
Przydziela przekaźnik do kanału 1, 2 lub 3.
5) Komora baterii
Na 2 baterie AA
PRZED UŻYCIEM PRZEKAŹNIKA
1. Zdjąć drzwiczki komory baterii
2. Włożyć 2 baterie AA do komory baterii. Upewnić się, że zostały włożone zgodnie z informacją o
biegunowości zaznaczoną na komorze baterii.
3. Zamknąć drzwiczki baterii.
Uwaga:
1. Po przydzieleniu kanału do przekaźnika można to zmienić tylko po wyjęciu baterii
lub zresetowaniu urządzenia.
2. Unikać ustawiania przekaźnika bezpośrednio na promieniach słonecznych, w
deszczu lub śniegu.
BUDZIK PROJEKCYJNY
1. Podłączyć adapter do gniazda DC.
2. Nacisnąć przycisk
[RESET]
, aby ponownie uruchomić zegar. Synchronizacja kanałów
przekaźnika nastąpi automatycznie.
Uwaga:
1. Jeżeli nie odebrano sygnałów lub następują zakłócenia przekazu, na ekranie LCD
pojawi się „-”.
2. Ustawiać odbiornik i przekaźnik w odległości skutecznego przekazu: 30 m w miejscu
bez przeszkód.
ODBIÓR SYGNAŁU CZASU STEROWANEGO RADIOWO
Czas i data są sterowane radiowo. Aktualny czas i data są synchronizowane automatycznie z
sygnałem czasu przekazywanym z Niemiec. Podczas użycia po raz pierwszy (po włożeniu baterii
lub naciśnięciu przycisku
[RESET]
), zegar rozpocznie odbiór sygnału RC za 5 minut. Wskaźnik siły
sygnału będzie migać.
WSKAŹNIK SIŁY SYGNAŁU
Wskaźnik sygnału wyświetla siłę sygnału na 4 poziomach. Miganie segmentu falistego oznacza, że
otrzymywane są sygnały czasu. Jakość sygnału można zakwalikować w czterech typach:
Brak sygnału Słaby sygnał Akceptowalny sygnał Doskonały sygnał
Uwaga:
1. Codziennie urządzenie będzie automatycznie wyszukiwać sygnał czasu o godz. 2:00,
8:00, 14:00 i 20:00.
2. Urządzenie należy zawsze ustawiać z dala od źródeł zakłóceń, takich jak telewizor,
komputer, itd.
3. Należy unikać ustawiania urządzenia na płycie metalowej lub obok niej.
4. Nie zaleca się ustawiania w zamkniętych obszarach, takich jak lotnisko, piwnica,
wieżowiec lub fabryka.
5. Nie zaczynać odbioru w poruszającym się samochodzie lub pociągu.
RĘCZNE USTAWANIE CZASU
Jeżeli urządzenie znajduje się poza zasięgiem przekaźnika sterowanego radiowo lub nie ma
możliwości odbioru, czas można ustawić ręcznie. Po ponownym uzyskaniu odbioru z przekaźnika
zegar od razu automatycznie zsynchronizuje odebrany czas.
1. W trybie zwykłego czasu należy przycisnąć i przytrzymać przycisk
[TIME]
przez 2 sekundy, aby
przejść do ustawień roku.
2. Nacisnąć przycisk
[UP]
lub
[DOWN]
, aby ustawić żądaną wartość.
3. Nacisnąć ponownie przycisk
[TIME]
, cyfra miesiąca miga, nacisnąć przycisk
[UP]
lub
[DOWN]
,
aby zmienić tę wartość.
4. Powtórzyć powyższe działania, aby ustawić czas w tej kolejności: rok miesiąc data
godzina minuty sekundy dzień tygodnia język (GB, FR, DE, ES, IT)
5. Naciśnięcie przycisku
[TIME]
powoduje zapisanie i wyjście z ustawień. Jeśli żaden przycisk nie
zostanie naciśnięty, automatyczne wyjście nastąpi 30 sekund później.
USTAWIENIA ALARMU I DRZEMKI
1. W trybie zwykłego czasu należy nacisnąć przycisk
[TIME]
, aby wybrać ALARM 1 lub ALARM 2.
2. W trybie ALARM 1 lub ALARM 2 należy przycisnąć i przytrzymać przycisk
[ALARM]
przez 2
sekundy, aż cyfry godziny zaczną migać.
3. Nacisnąć przycisk
[UP]
lub
[DOWN]
, aby zmienić wartość.
4. Powtórzyć powyższe działania, aby ustawić czas w tej kolejności: godzina minuta
5. Naciśnięcie przycisku
[ALARM]
powoduje zapisanie i wyjście z ustawień. Jeśli żaden przycisk
nie zostanie naciśnięty, automatyczne wyjście nastąpi 30 sekund później.
Uwaga:
1. Alarm zostanie automatycznie włączony po ustawieniu czasu alarmu z wyświetloną
ikoną „ ” lub „ ”.
2. Konstrukcja urządzenia z podwójnym alarmem (ALARM 1 i ALARM 2) zapewnia
większą wygodę, a w razie potrzeby można ustawić dwa czasy alarmu.
KORZYSTANIE Z FUNKCJI ALARMU I ALARMU WSTĘPNEGO TEMPERATURY
1. Ustawianie alarmu w sposób opisany w poprzednim rozdziale.
2. W trybie czasu zwykłego naciśnięcie jeden raz przycisku
[ALARM]
włącza ALARM 1, naciśnięcie
dwa razy włącza ALARM 2, naciśnięcie trzy razy włącza ALARM 1 i ALARM 2, a na ekranie LCD
wyświetlają się ikony dzwonka.
Ponowne naciśnięcie wyłącza ALARM 1 i ALARM 2, a obydwie ikony znikają.
3. W trybie ALARM 1/ALARM 2 naciśnięcie jeden raz przycisku
[ALARM]
włącza ALARM 1 i ALARM 2,
naciśnięcie dwa razy włącza funkcję alarmu wstępnego, na ekranie LCD wyświetla się ikona
„
LO
”. Ponowne naciśnięcie wyłącza funkcję alarmu i alarmu wstępnego, a ikona „
LO
” i ikona
alarmu znikają.
Uwaga:
1. Aby włączyć alarm wstępny temperatury, ALARM musi być włączony.
2. Alarm wstępny temperatury może rozlec się 30 minut wcześniej niż alarm, tylko
wtedy, gdy temperatura na zewnątrz jest niższa niż -3°C (26°F).
3. Jeśli w czasie trwania alarmu nie wciśnięto żadnego przycisku, alarm wyłączy się
automatycznie.Dźwięk alarmu trwa przez 2 minuty.
4. Nacisnąć przycisk
[SNOOZE]
, aby zatrzymać aktualny alarm i przejść do drzemki.
Ikona alarmu będzie migać ciągle. Alarm rozlegnie się ponownie za 5 minut. Z
funkcji drzemki można korzystać stale w ciągu 24 godzin.
5. Nacisnąć przycisk
[ALARM]
, aby wyłączyć funkcję alarmu.
FUNKCJA PROGNOZY POGODY
Zegar posiada wbudowany czujnik ciśnienia, aby sprawdzić prognozę pogody na następne 12-24
godziny.
Słonecznie Zachmurzenie
Częściowe zachmurzenie
Deszcz Śnieg
ZMIANA KOLORU WYŚWIETLANIA
1. Naciśnięcie przycisku
[LOOP]
włącza lub wyłącza zmianę koloru podświetlenia.
2. Wyłączenie funkcji pętli i naciśnięcie przycisku
[RAINBOW]
powoduje zmianę koloru
podświetlenia w kolejności: biały czerwony pomarańczowy żółty zielony
turkusowy niebieski oletowy
3. Aby ustawić kolor ręcznie, należy wyłączyć funkcję pętli oraz nacisnąć i przytrzymać przycisk
[TUNE]
.
KONTROLA I USUWANIE ZAPISÓW TEMPERATURY MAKS/MIN
1. Nacisnąć raz przycisk
[MAX/MIN]
, aby sprawdzić zapisy temperatury maksymalnej. Nacisnąć
dwa razy, aby sprawdzić zapisy minimalne. Ponowne naciśnięciu powoduje wyjście.
2. Naciśnięcie i przytrzymanie przycisku
[MAX/MIN]
przez 3 sekundy powoduje usunięcie zapisów
temperatury maksymalnej i minimalnej przy sygnale dźwiękowym.
Zapis temperatury maksymalnej Zapis temperatury minimalnej
OGLĄDANIE KANAŁU
Kanałem domyślnym jest kanał 1. W trybie zwykłego czasu należy nacisnąć przycisk
[UP]
, aby
zobaczyć kanały od 1 do 3. Ponadto kanały można automatycznie przełączać poprzez naciśnięcie i
przytrzymanie przycisku
[UP]
przez 2 sekundy z sygnałem dźwiękowym.
KORZYSTANIE Z PROJEKTORA
Obrócić projektor tak, aby wyświetlić wiązkę światła na powierzchni z odległości 1-4 metrów.
Wyświetlane dane pojawią się na ciemnym tle tak jak na poniższym schemacie.
Uwaga:
1. w przypadku korzystania z zasilania DC wyświetlane dane będą zawsze włączone.
2. Naciśnięcie przycisku
[ ]
odwraca wyświetlane dane. Kąt obrotu projektora
wynosi +/- 180°.
3. Ostrość wyświetlanych danych reguluje się pokrętłem OSTROŚĆ.
TREND TEMPERATURY
Wskaźnik trendu temperatury pokazuje trendy zmian w ciągu kilku następnych minut. Strzałki
wskazują trend rosnący, stały lub opadający.
Wskaźnik strzałkowy
Trend temperatury Wzrastający Stały Opadający
WSKAŹNIK ROZŁADOWANIA BATERII
Jeżeli wskaźnik rozładowania baterii wyświetla „ ” w oknie temperatury na zewnątrz, oznacza
to, że zasilanie przekaźnika z baterii nie jest wystarczające i należy wymienić jednocześnie 2 baterie
AA.
Uwaga:
1. jeżeli stan naładowania baterii przekaźnika jest niewystarczający, należy włożyć
2 baterie AA i nacisnąć przycisk
[RESET]
przekaźnika oraz przycisk
[SENSOR]
na
urządzeniu głównym, aby automatycznie uzyskać czas i temperaturę.
2. Należy pamiętać! Zużyte urządzenie lub baterie należy utylizować w sposób
przyjazny dla środowiska.
SPECYFIKACJA
GŁÓWNE URZĄDZENIE
Zakres temperatury roboczej: -5°C~50°C 23°F~122°F
Rozdzielczość: 0,1°C/°F (ponad -10°C/14°F) 1°C/°F (poniżej -10°C/14°F)
Sygnał sterowany radiowo: DCF
CZUJNIK ZDALNY
Zakres temperatury roboczej: -20°C~60°C -4°F~140°F
Rozdzielczość: 0,1°C/°F (ponad -10°C/14°F) 1°C/°F (poniżej -10°C/14°F)
Częstotliwość przekazu RF: 433 MHz
Liczba zdalnych czujników: Do 3 urządzeń
Zasięg przekazu RF: maksymalnie 30 m (bez
przeszkód)
Cykl odczytu temperatury: około 60-64 sekundy
ZASILANIE
Główna jednostka: adapter AC/DC 4,5 V, 300 mA zapasowa bateria litowa CR2032
Czujnik zdalny: 3V, 2 baterie AA 1,5 V (zaleca się baterię alkaliczną)
WYMIARY
Główna jednostka: 160 x 72x 48 mm
Czujnik zdalny: 65 x 100 x 35 mm
1 2 3 4
-
 1
1
-
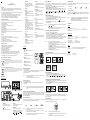 2
2
-
 3
3
-
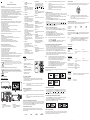 4
4
-
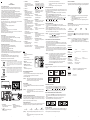 5
5
-
 6
6
-
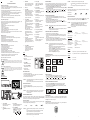 7
7
-
 8
8


in andere talen
- italiano: Technoline Model Manuale utente
- français: Technoline Model Manuel utilisateur
- español: Technoline Model Manual de usuario
- Deutsch: Technoline Model Benutzerhandbuch
- polski: Technoline Model Instrukcja obsługi
Gerelateerde papieren
Andere documenten
-
MOB MO6289 Handleiding
-
Hama 00106963 de handleiding
-
-
NATURE & DECOUVERTES 15212190 Handleiding
-
-
-
AEG FU 4002 P de handleiding
-
Braun BC15-DCF Handleiding
-
Conrad Electronic WS-9611IT Operating Instructions Manual
-
TFA Wireless Weather Station LALUNA Handleiding