
DE1
WT260 Bedienungsanleitung
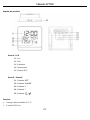
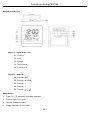
Produktaufbau
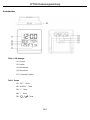
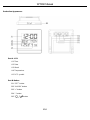
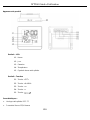
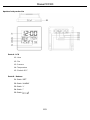
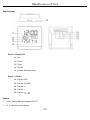
Teil A- LCD-Anzeige
A1: Uhrzeit
A2: Datum
A3: Wochentag
A4: Temperatur
A5: Funkmast-Symbol
Teil B- Tasten
B1: “SET” - Taste
B2: “ALARM” - Taste
B3: “+” - Taste
B4: “-” - Taste
B5: “ ” - Taste

DE2
Funktionen:
Funkgesteuerte DCF77-Uhr
12/24 Stunden Zeitformat
Manuelle Zeiteinstellung
Ewiger Kalender bis 2099
Datums- und Wochentagsanzeige
Temperatur alternativ in °C oder °F
Schlummerfunktion (5 Minuten)
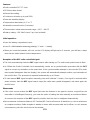
Temperatur: Innenmessbereich: -9.9°C ~ 49.9°C
Batterien: 2 x 1.5V “AAA” Micro (nicht inklusive)
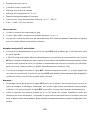
Inbetriebnahme:
Öffnen Sie die Batteriefachabdeckung.
Legen Sie 2 x AAA Batterien unter Berücksichtigung der richtigen Polarität ein [ “+” und “ –“ Markierungen].
Beim Einlegen der Batterien blinken alle Symbole für 3 Sekunden auf der Anzeige auf, ein Signalton ist zu
hören und die Uhr zeigt die Innentemperatur an.
Empfang des Funksignals:
Nach der Inbetriebnahme beginnt die Uhr automatisch nach dem DCF77-Funksignal zu suchen. Das
Funkmast-Symbol blinkt auf.
Um 1:00, 2:00 und 3:00 Uhr beginnt die Uhr automatisch das DCF77-Funksignal zu suchen und die Uhrzeit
zu synchronisieren. Sollte die Synchronisation der Zeitdaten fehlschlagen (das Funkmast-Symbol
verschwindet), dann wird die Uhr automatisch zur nächsten vollen Stunde eine weitere Synchronisation
starten. Dieser Prozess wird automatisch bis zu 5 Mal wiederholt.
Halten Sie die “-” Taste für 2 Sekunden gedrückt um die manuelle Signalsuche zu beginnen. Die
Signalsuchen wird nach 7 Minuten ohne Signalempfang beendet (das Funkmast-Symbol verschwindet) und
ein weiterer Versuch wird zur nächsten vollen Stunde durchgeführt.
Hinweise:
Wenn die Uhr kein DCF77-Signal empfangen kann (z.B. wegen zu großer Distanz vom Signal des Senders in
Mainfingen, Deutschland), dann kann die Uhr trotzdem manuell eingestellt werden, wie unten beschrieben.
Die Uhr stellt sich automatisch um, wenn der Empfang des DCF77-Signals möglich ist.
Eine Mindestentfernung von 2,5 Metern(8.2 Fuß) zu allen möglichen Störquellen wird empfohlen, wie z.B. von
Fernsehgeräten oder Computerbildschirmen. Der Funkempfang ist schwächer in Räumen mit Betonwänden

DE3
(z.B. in Kellern) und in Büros. In solchen Umgebungen sollte die Uhr in der Nähe eines Fensters aufgestellt
werden.
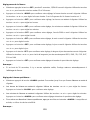
Manuelle Zeiteinstellung:
Um die manuelle Zeiteinstellung zu starten, drücken und halten Sie die "-" Taste. Wenn innerhalb von 7
Minuten kein Funksignal empfangen wird, wird die Suche automatisch beendet (Funksymbol wird nicht
angezeigt) und beginnt erneut zur nächsten vollen Stunde.
Halten Sie die “SET” Taste für 2 Sekunden gedrückt und die 12/24 Stundenanzeige blinkt. Drücken Sie die “+”
und die “-” Tasten um die 12 oder 24 Stundenanzeige auszuwählen.
Drücken Sie die “SET” Taste um die Einstellung zu bestätigen und die Zeitzone blinkt. Drücken Sie die “+”
und die “-” Tasten um die Zeitzone einzustellen. Für Deutschland wird die Zeitzone 0 und für das Vereinigte
Königreich wird die Zeitzone -1 genutzt.
Drücken Sie die “SET” Taste um die Einstellung zu bestätigen und die Stundenanzeige blinkt. Drücken Sie die
“+” und die “-” Tasten um die Stunde einzustellen.
Drücken Sie die “SET” Taste um die Einstellung zu bestätigen und die Minutenanzeige blinkt. Drücken Sie die
“+” und die “-” Tasten um die Minuten einzustellen.
Drücken Sie die “SET” Taste um die Einstellung zu bestätigen und die Jahresanzeige 2009 blinkt. Drücken
Sie die “+” und die “-” Tasten um das Jahr einzustellen.
Drücken Sie die “SET” Taste um die Einstellung zu bestätigen und die Monatsanzeige blinkt. Drücken Sie die
“+” und die “-” Taste um den Monat einzustellen.
Drücken Sie die “SET” Taste um die Einstellung zu bestätigen und die Datumsanzeige blinkt. Drücken Sie die
“+” und die “-” Tasten um das Datum einzustellen.
Drücken Sie die “SET” Taste um die Einstellung zu bestätigen und die Sprache für den Wochentag blinkt.
Drücken Sie die “+” und die “-” Tasten um eine Sprache auszuwählen: GER, ENG, ITA, FRE, DUT,SPA oder
DAN ( Deutsch, Englisch, Italienisch, Französisch, Niederländisch, Spanisch, Dänisch)
Drücken Sie die “SET” Taste um die Einstellung zu bestätigen und zu beenden. Die Uhr kehrt in den
Zeitanzeigemodus zurück.
Hinweis:
Die Uhr beendet automatisch den Einstellungsmodus und wechselt in den normalen Zeitanzeigemodus,
wenn innerhalb von 30 Sekunden keine Taste gedrückt wird
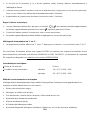
Alarmeinstellung:
Halten Sie die “ALARM” Taste für 2 Sekunden gedrückt und die Alarmzeit blinkt.

DE4
Die Stunde der Alarmzeit blinkt. Drücken Sie die “+” und die “-” Taste um die Alarmstunde einzustellen.
Drücken Sie die “ALARM” Taste um die Einstellung zu bestätigen.
Die Minute der Alarmzeit blinkt. Drücken Sie die “+” und die “-” Taste um die Alarmminute einzustellen.
Drücken Sie die “ALARM” Taste um die Einstellung zu bestätigen.
Drücken Sie die “ALARM” Taste um den Alarm zu deaktivieren. Ein Glockensymbol wird angezeigt, wenn der
Alarm aktiviert ist.
Hinweise:
Die Uhr beendet automatisch den Einstellungsmodus und wechselt in den normalen Zeitanzeige- modus,
wenn innerhalb von 30 Sekunden keine Taste gedrückt wird.
Der Alarmton ist für 2 Minuten zu hören, wenn keine Taste zum Beenden gedrückt wird. In diesem Fall wird
der Alarm nach 24 Stunden automatisch wiederholt.
Ansteigender Alarmton (Crescendo, Dauer: 2 Minuten)
Schlummerfunktion:
Drücken Sie während des Alarms die “ ” Taste und der Alarmton wechselt in die Schlummer-
funktion. Die Schlummerfunktion ist aktiviert und das “ ”-Symbol blinkt auf der Anzeige.
Der Alarm wird angehalten und ertönt nach 5 Minuten erneut.
Die Schlummerfunktion kann durch das Drücken einer beliebigen anderen Taste unterbrochen werden.
°C/°F-Temperaturanzeige:
Die Temperatur kann in den Einheiten °C oder °F angezeigt werden. Drücken Sie die “-” Taste um zwischen
den Temperatureinheiten °C und °F zu wechseln.
Hiermit erklärt Technotrade, dass sich das Produkt WT260 in Übereinstimmung mit den grundlegenden
Anforderungen und den übrigen einschlägigen Bestimmungen der Richtlinie 2014/53/EU und ROHS
2011/65/EG befindet. Die Original-EU-Konformitätserklärung finden Sie unter:
www.technoline.de/doc/4029665002606
Technische Daten:
Batterielebensdauer 12 Monate
Umweltbedingungen: Nutzung -10~50°C & 20%~95%
Lagerung -20~60°C & 20%~95%
:

DE5
Umwelteinflüsse auf Funkempfang
Die Uhr empfängt kabellos die genaue Uhrzeit. Wie bei allen kabellosen Geräten kann der Funkempfang durch
folgende Einflüsse beeinträchtigt sein:
lange Übertragungswege
naheliegende Berge und Täler
nahe Autobahnen, Gleisen, Flughäfen, Hochspannungsleitungen, etc.
nahe Baustellen
inmitten hoher Gebäude
in Betonbauten
nahe elektrischer Geräte (Computer, Fernseher, etc) und metallischer Gegenstände
in bewegten Fahrzeugen
Platzieren Sie die Uhr an einem Ort mit optimalem Empfang, z.B. in der Nähe von Fenstern und entfernt zu
metallischen oder elektrischen Gegenständen.
Vorsichtsmaßnahmen
Dieses Gerät ist ausschließlich für den Gebrauch in Innenräumen gedacht.
Setzen Sie das Gerät nicht extremer Gewalteinwirkung oder Stößen aus.
Setzen Sie das Gerät nicht hohen Temperaturen, direktem Sonnenlicht, Staub und Feuchtigkeit aus.
Tauchen Sie das Gerät nicht in Wasser.
Vermeiden Sie den Kontakt mit ätzenden Materialien.
Werfen Sie das Gerät nicht ins Feuer. Es könnte explodieren.
Öffnen Sie nicht das Gehäuse und manipulieren Sie nicht bauliche Bestandteile des Geräts.
Batterie-Sicherheitshinweise
Verwenden Sie nur Alkali-Batterien, keine wiederaufladbaren Batterien.
Legen Sie die Batterien unter Beachtung der Polarität (+/-) richtig ein.
Ersetzen Sie stets einen vollständigen Batteriesatz.
Mischen Sie niemals alte und neue Batterien.
Entfernen Sie erschöpfte Batterien sofort.
Entfernen Sie die Batterien bei Nichtnutzung.
Laden Sie die Batterien nicht auf und werfen Sie sie nicht ins Feuer. Sie könnten explodieren.
Bewahren Sie die Batterien nicht in der Nähe von Metallobjekten auf, da ein Kontakt einen Kurzschluss
verursachen kann.
Setzen Sie Batterien keinen hohen Temperaturen, extremer Feuchtigkeit oder direktem Sonnenlicht aus.
Bewahren Sie Batterien außerhalb der Reichweite von Kindern auf. Verschlucken der Batterien kann zum
Ersticken führen.
Verwenden Sie das Produkt ausschließlich für den vorgesehenen Zweck!

DE6
Hinweispflicht nach dem Batteriegesetz
Altbatterien gehören nicht in den Hausmüll. Wenn Batterien in die Umwelt gelangen,
können diese Umwelt- und Gesundheitsschäden zur Folge haben. Sie können
gebrauchte Batterien unentgeltlich bei ihrem Händler und Sammelstellen zurückgeben.
Sie sind als Verbraucher zur Rückgabe von Altbatterien gesetzlich verpflichtet!
Hinweispflicht nach dem Elektronikgerätegesetz
Laut Elektro- und Elektronikgerätegesetz (ElektroG) gehört Elektroschrott nicht in den
Hausmüll, sondern ist zu recyceln oder umweltfreundlich zu entsorgen. Entsorgen Sie
ihr Gerät in einen Recycling Container oder an eine lokale Abfallsammelstelle.

EN1
WT260 Manual
Production Appearance
Part A- LCD
A1: Time
A2: Date
A3: Week
A4: Temperature
A5: RCC symbol
Part B-Button
B1: “SET” button
B2: “ALARM” button
B3: “+” button
B4: “-” button
B5: “ ” button

EN2
Features:
Radio controlled DCF-77 clock
12/24 hour time format
Manual time setting
Continuous calendar up to year 2099
Date and weekday display
Temperature alternatively in °C or °F
Automatic snooze function (5 minutes)
Thermometer: Indoor measurement range: -9.9°C ~ 49.9°C
Battery: battery 1.5V “AAA” size x 2 pcs (not included)
Initial operation:
Open the battery compartment cover
Insert 2 x AAA batteries observing polarity [ “+” and “ –“ marks]
When you insert the batteries, all icons on the LCD display will light up for 3 seconds, you will hear a beep
tone and the station detects indoor temperature.
Reception of the DCF radio controlled signal:
The clock automatically starts the DCF signal search after starting up. The radio mast symbol starts to flash.
At 1:00am the Radio Controlled clock automatically carries out a synchronization procedure with the DCF
signal to correct any deviations to the exact time. If this synchronization attempt is unsuccessful (The radio
mast symbol disappears from the display), the system will automatically attempt another synchronization at
the next full hour. This procedure is repeated automatically up to 5 times.
To start manual DCF signal reception manually, press and hold the “-“ button, If no signal is received within
seven minutes, then the DCF signal search stops (the radio mast symbol disappears) and starts again the
next full hour.
Please note:
If the clock cannot receive the DCF signal (because the distance is too great to receive a signal from the
transmitter in Mainflingen,Germany), you have the option of setting the time manually as mentioned below.
As soon as the reception of the DCF signal is possible, then the clock is readjusted automatically.
We recommend a minimum distance of 2.5 meters(8.2 Feet) to all sources of interference, such as televisions
or computer monitors, Radio reception is weaker in rooms with concrete walls and in offices. In such extreme
circumstances, place the clock close to the window.

EN3
Manual time setting:
To start manual DCF signal reception, press and hold the "-" button, If no signal is received within seven
minutes, then the DCF signal search stops (the radio mast symbol disappears) and starts again the next
full hour.
Press and hold the “SET” button for 2 seconds, 12/24HR start to flash. Now use “+” and “-” buttons to switch
12/24 hour mode.
Press “SET” to confirm your setting, the time zone starts to flash. Use“+” and “-“ buttons to set a correct time
zone. For UK time please set time zone to -1.
Press “SET” to confirm your setting, the hour display starts to flash. Now use “+” and “-“buttons to set the
hour.
Press “SET” to confirm your setting, the minute displays starts to flash. Now use “+” and “-“buttons to set the
minute.
Press “SET” to confirm your setting, the year display 2009 starts to flash. Now use “+” and “-“ buttons to set
the year.
Press SET to confirm your setting, the month display starts to flash. Now use “+” and “-“ buttons to set the
month.
Press “SET” to confirm your setting, the Date display starts to flash. Now use “+” and “-“ buttons to set the
date.
Press “SET” to confirm your setting, the weekday language display starts to flash. Now use “+” and
“-“ buttons to set the weekday language in GER, ENG, ITA, FRE, DUT,SPA or DAN
Press “SET” to confirm your setting and to end the setting procedures, enter the clock mode.
Please note:
If there is no valid operation within 30 seconds, the clock will automatically return to normal time mode from
the set mode.
Setting the daily alarm:
Press and hold down the “ALARM” button for 2 seconds until the alarm time is flashing.
The Hour display of the Alarm time starts to flash. Use the “+” and “-“buttons to set the hour. Press “ALARM”
button to confirm your setting
The Minute display of the Alarm time starts to flash. Use the “+” and “-“buttons to set the minute. Press
“ALARM” button to confirm your setting and to end the setting procedure.
To activate or deactivate the daily alarms, press the “ALARM” button once. When active, a bell icon is

EN4
displayed.
Please note:
If there is no valid operation within 30 seconds, the clock will automatically return to normal time mode from
the set mode.
The alarm will sound for 2 minutes if you do not deactivate it by pressing any button. In this case the alarm will
be repeated automatically after 24 hours.
Rising alarm sound (crescendo, duration: 2 minutes)
Automatic Snooze function:
While the alarm is sounding, touch the “ ” to activate snooze function. The Snooze function is active
and a flashing “ ” icon appears on the display.
This stops the alarm for 5 minutes and will sound again.
The Snooze function can be interrupted by pressing any other button.
°C/°F temperature display:
The temperature is displayed either in °C or °F. Pressing the “- “ button allows you to switch between °C or °F.
Hereby, Technotrade declares that this product WT260 is in compliance with the essential requirements and
other relevant provisions of Directive 2014/53/EU and ROHS 2011/65/EC. The original EU declaration of
conformity may be found at: www.technoline.de/doc/4029665002606
Specifications:
Battery life 12 months
Environmental requirement: usage -10~50℃ & 20%~95%
storage -20~60℃ & 20%~95%
Environmental reception effects
The clock obtains the accurate time with wireless technology. Same as all wireless devices, the reception is
maybe affected by the following circumstances:
long transmitting distance
nearby mountains and valleys
near freeway, railway, airports, high voltage cable etc.
near construction site

EN5
among tall buildings
inside concrete buildings
near electrical appliances (computers, TV’s, etc) and metallic structures
inside moving vehicles
Place the clock at a location with optimal signal, i.e. close to a window and away from metal surfaces or
electrical appliances.
Precautions
This main unit is intended to be used only indoors.
Do not subject the unit to excessive force or shock.
Do not expose the unit to extreme temperatures, direct sunlight, dust or humidity.
Do not immerse in water.
Avoid contact with any corrosive materials.
Do not dispose this unit in a fire as it may explode.
Do not open the inner back case or tamper with any components of this unit.
Batteries safety warnings
Use only alkaline batteries, not rechargeable batteries.
Install batteries correctly by matching the polarities (+/-).
Always replace a complete set of batteries.
Never mix used and new batteries.
Remove exhausted batteries immediately.
Remove batteries when not in use.
Do not recharge and do not dispose of batteries in fire as the batteries may explode.
Ensure batteries are stored away from metal objects as contact may cause a short circuit.
Avoid exposing batteries to extreme temperature or humidity or direct sunlight.
Keep all batteries out of reach from children. They are a choking hazard.
Use the product only for its intended purpose!
Consideration of duty according to the battery law
Old batteries do not belong to domestic waste because they could cause damages of
health and environment. You can return used batteries free of charge to your dealer and
collection points. As end-user you are committed by law to bring back needed batteries
to distributors and other collecting points!
Consideration of duty according to the law of electrical devices
This symbol means that you must dispose of electrical devices separated from the
General household waste when it reaches the end of its useful life. Take your unit to
your local waste collection point or recycling centre. This applies to all countries of the
European Union, and to other European countries with a separate waste collection
system.

FR1
WT260 Guide d’utilisation
Apparence du produit
Partie A - LCD
A1 : Heure
A2 : Jour
A3 : Semaine
A4 : Température
A5 : Symbole heure radio-pilotée
Partie B - Touches
B1 : Touche «SET»
B2 : Touche «ALARM»
B3 : Touche «+»
B4 : Touche «-»
B5 : Touche « »
Caractéristiques :
Horloge radio pilotée DCF-77
Format de l'heure 12/24 heures

FR2
Réglage manuel de l'heure
Calendrier continu jusqu'à 2099
Affichage du jour et de la semaine
Affichage de la température en °C ou °F
Rappel d’alarme automatique (5 minutes)
Thermomètre : Plage de température intérieure : -9,9 °C ~ 49,9 °C
Piles : 2 «AAA» 1,5V (non incluses)
Mise en marche :
Ouvrez le couvercle du compartiment à piles
Insérez 2 piles AAA en respectant les polarités [marques «+» et «-»]
Lorsque vous insérez les piles, tous les icônes de l'écran LCD s’allument pendant 3 secondes, un bip sera
émis et la station détecte la température intérieure.
Réception de signal DCF radio-pilotée:
L'horloge lance automatiquement la recherche du signal DCF après le démarrage. L'icône d'antenne radio
se met à clignoter.
A 01h00 l'horloge radio-pilotée effectue automatiquement une procédure de synchronisation avec le signal
DCF pour corriger les écarts avec l'heure exacte. En cas d’échec des tentatives de synchronisation (l'icône
d'antenne radio disparaît de l'écran), le système va automatiquement essayer une nouvelle synchronisation
après une heure. Cette procédure est répétée automatiquement au maximum 5 fois.
Pour lancer la réception manuelle du signal DCF, maintenez appuyée la touche «-», si aucun signal n’est
reçu dans les sept minutes, la recherche du signal DCF sera arrêtée (l’icône d'antenne radio disparaît) le
système va essayer une nouvelle réception après une heure.
Remarque :
Si l'horloge n’arrive pas à recevoir le signal DCF (parce que la distance est trop grande pour recevoir un
signal de l'émetteur à Mainflingen, Allemagne), vous pouvez régler l'heure manuellement comme indiqué
ci-dessous. Dès que la réception du signal DCF est possible, l'horloge sera réajustée automatiquement.
Veillez à respecter une distance minimale de 2,5 m (8,2 pieds) des sources d'interférence telles que
téléviseurs ou écrans d'ordinateur ; la réception du signal radio est plus faible dans les chambres avec des
murs en béton et dans les immeubles. Dans de telles circonstances extrêmes, placez l'horloge près d’une
fenêtre.

FR3
Réglage manuel de l'heure :
Maintenez appuyée la touche «SET» pendant 2 secondes, 12/24HR se met à clignoter. Utilisez les touches
«+» et «-» pour basculer entre les modes 12 et 24 heures.
Appuyez sur la touche «MODE» pour confirmer votre réglage, le fuseau horaire se met à clignoter. Utilisez
les touches «+» et «-» pour régler le fuseau horaire. Pour le Royaume-Uni le fuseau horaire est -1.
Appuyez sur la touche «SET» pour confirmer votre réglage, les heures se mettent à clignoter. Utilisez les
touches «+» et «-» pour régler les heures.
Appuyez sur la touche «SET» pour confirmer votre réglage, les minutes se mettent à clignoter. Utilisez les
touches «+» et «-» pour régler les minutes.
Appuyez sur la touche «SET» pour confirmer votre réglage, l'année 2009 se met à clignoter. Utilisez les
touches «+» et «-» pour régler l'année.
Appuyez sur la touche «SET» pour confirmer votre réglage, le mois se met à clignoter. Utilisez les touches
«+» et «-» pour régler le mois.
Appuyez sur la touche «SET» pour confirmer votre réglage, le jour se met à clignoter. Utilisez les touches
«+» et «-» pour régler le jour.
Appuyez sur la touche «SET» pour confirmer votre réglage, la langue du jour de semaine se met à clignoter.
Utilisez les touches «+» et «-» pour choisir la langue du jour de semaine parmi GER, ENG, ITA, FRE, DUT,
SPA ou DAN
Appuyez sur la touche «SET» pour confirmer votre réglage et terminer la procédure de réglage.
Remarque :
Si au bout de 30 secondes, il n'y a aucune opération valide, l'horloge retourne automatiquement à
l’affichage de l'heure.
Réglage de l'alarme quotidienne :
Maintenez appuyée la touche «ALARM» pendant 2 secondes jusqu'à ce que l’heure d'alarme se mette à
clignoter.
Les heures de l’alarme se mettent à clignoter. Utilisez les touches «+» et «-» pour régler les heures.
Appuyez sur la touche ALARM» pour confirmer votre réglage.
Les minutes de l’alarme se mettent à clignoter. Utilisez les touches «+» et «-» pour régler les minutes.
Appuyez sur la touche «ALARM» pour confirmer votre réglage et terminer la procédure de réglage.
Pour activer ou désactiver l’alarme quotidienne, appuyez une fois sur la touche «ALARM». Lorsqu'elle est
activée, un icône de cloche est affiché.
Remarque :

FR4
Si au bout de 30 secondes, il n'y a aucune opération valide, l'horloge retourne automatiquement à
l’affichage de l'heure.
L'alarme sonne pendant 2 minutes si vous ne la désactivez pas en appuyant sur une touche quelconque.
Dans ce cas, l'alarme sera déclenchée automatiquement après 24 heures.
Augmentation du niveau sonore de alarme (crescendo, durée : 2 minutes)
Rappel d’alarme automatique :
Lorsque l'alarme est déclenchée, appuyez sur la touche « » pour activer la fonction rappel d’alarme.
La fonction rappel d’alarme est active et un icône « » clignotant apparaît sur l'écran.
Cela arrête l'alarme pendant 5 minutes puis celle-ci sonne de nouveau.
La fonction rappel d’alarme peut être arrêtée en appuyant sur une touche quelconque.
Affichage de la température en °C ou °F :
La température peut être affichée en °C ou en °F. Appuyez sur la touche «-» pour basculer entre °C et °F.
Par la présente Technotrade déclare que l'appareil WT260 est conforme aux exigences essentielles et aux
autres dispositions pertinentes de la directive 2014/53/EU et ROHS 2011/65/CE. La déclaration de conformité
UE originelle est disponible sur: www.technoline.de/doc/4029665002606
Caractéristiques techniques :
Durée de vie de la pile : 12 mois
Conditions environnementales : utilisation -10~50 °C & 20%~95%
stockage -20~60 °C & 20%~95%
Effets de l'environnement sur la réception
L’horloge utilise la technologie sans fil pour obtenir l'heure précise. Comme pour tout appareil sans fil, la
réception peut être affectée dans les cas suivants :
Distance de transmission longue.
Montagnes et vallées toute proches.
Près d'autoroutes, chemins de fer, aéroports, câbles haute tension, etc.
À proximité d’un chantier de construction.
Entouré de bâtiments élevés.
À l’intérieur de bâtiments en béton.
À proximité d'appareils électriques (ordinateurs, téléviseurs, etc.) et des structures métalliques

FR5
À l’intérieur de véhicules mobiles.
Placez votre horloge dans un endroit avec des signaux optimaux, par exemple près d'une fenêtre, loin des
surfaces métalliques et des appareils électriques.
Précautions
Cet appareil n'est destiné qu'à une utilisation intérieure.
Ne soumettez pas l'appareil à une force ou à un choc excessif.
N'exposez pas l'appareil à la lumière directe du soleil, à des températures élevées, à l'humidité ou à la
poussière.
Ne plongez pas l'appareil dans l'eau.
Éviter tout contact avec des matériaux corrosifs.
Ne jetez pas cet appareil au feu, il risque d'exploser.
Ne pas ouvrir l’arrière du boîtier intérieur ou modifier les composants de cette unité.
Avertissements de sécurité concernant les piles
Utilisez uniquement des piles alcalines non rechargeables.
Installez les piles en respectant le sens des polarités (+/-).
Remplacez toujours toutes les piles en même temps.
Ne combinez pas des piles usagées avec des piles neuves.
Lorsque les piles sont déchargées, retirez-les immédiatement de l'appareil.
Retirez les piles lorsque vous n'envisagez pas d'utiliser votre appareil avant longtemps.
N'essayez pas de recharger des piles qui ne sont pas rechargeables et ne jetez aucune pile dans le feu (elle
risque d'exploser).
Rangez vos piles de façon à ce qu'aucun objet métallique ne puisse mettre leurs bornes en court-circuit.
Évitez d'exposer les piles à des températures extrêmes, à l'humidité ou à la lumière directe du soleil.
Conservez vos piles hors de portée des enfants. Elles présentent un risque d'étouffement.
Utilisez le produit uniquement pour son usage prévu!
Obligation légale concernant la mise au rebut des piles
Ne jetez pas les piles usagées avec les ordures ménagères car elles sont nuisibles pour la
santé et l'environnement. Il est conseillé de ramener les piles usagées sans frais à votre
revendeur et aux points de collecte. En tant que consommateur, vous êtes obligés par la loi
de ramener les piles usagées aux revendeurs et aux points de collecte !
Respect de l'obligation de la Loi sur les appareils électriques
Ce symbole signifie que les appareils électriques ne doivent pas être jetés aux ordures
ménagères à la fin de leur vie utile. Ramenez votre appareil à votre point de collecte de
déchets ou à un centre de recyclage local. Ceci s'applique à tous les pays de l'Union
européenne et aux autres pays européens disposant d'un système de collecte sélectif des
déchets.

ES1
Manual WT260
Apariencia de producción
Parte A - LCD
A1: Hora
A2: Día
A3: Semana
A4: Temperatura
A5: Símbolo RCC
Parte B - Botones
B1: Botón “SET”
B2: Botón “ALARM”
B3: Botón “+”
B4: Botón “-”
B5: Botón “ ”

ES2
Funciones:
Reloj DCF-77 controlado por radio
Formato de la hora en 12/24
Ajuste manual de la hora
Calendario continuo hasta el año 2099
Pantalla de fecha y día de la semana
Temperatura alternativamente en °C o °F
Función de retardo automática (5 minutos)
Termómetro: Alcance de la medición interna: -9,9 °C ~ 49,9 °C
Pilas: 2 pilas de 1.5V tamaño “AAA” (no incluidas)
Funcionamiento inicial:
Abra la tapa del compartimernto de las pilas
Inserte 2 pilas AAA observando la polaridad [marcas “+” y “–”]
Al insertar las pilas, todos los iconos de la pantalla LCD se iluminarán durante 3 segundos, se escuchará un
pitido y la estación detectará automáticamente la temperatura interior.
Recepción de la señal de radiocontrol DCF:
El reloj buscará automáticamente la señal DCF después de encenderse. El icono del mástil de radio
empieza a parpadear.
A la 1:00 am el reloj de radiocontrol realiza automáticamente el procedimiento de sincronización con la
señal DCF para corregir cualquier desviación de la hora exacta. Si el intento de sincronización no tiene
éxito (el icono del mástil de la radio desaparece de la pantalla), el sistema intentará automáticamente otra
sincronización después de una hora. Este procedimiento se repite automáticamente hasta un total de 5
veces.
Para iniciar la recepción de la señal DCF manual, mantenga pulsado el botón “-”. Si no recibe señal en un
periodo de siete minutos, la búsqueda de señal DCF se detendrá (el icono del mástil de la radio desaparece
de la pantalla) y empezará de nuevo después de una hora.
Por favor tenga en cuenta:
Si el reloj no puede recibir la señal DCF (porque la distancia es demasiado grande para recibir una señal
del transmisor de Mainflingen, Alemania), puede ajustar el tiempo manualmente como se describe a
continuación. En cuanto sea posible recibir la señal DCF el reloj se reajustará automáticamente.
Recomendamos mantener una distancia mínima de 2,5 metros (8,2 pies) respecto a toda fuente de

ES3
interferencias, como televisores o monitores de ordenador. La recepción de radio es más débil en salas con
paredes de hormigón y en oficinas. En tales condiciones extremas, coloque el reloj cerca de una ventana.
Ajuste manual de la hora:
Mantenga pulsado el botón “SET” durante dos segundos y el indicador 12/24HR empezará a parpadear.
Ahora use los botones “+” y “-” para cambiar el modo de horas 12/24.
Pulse “SET” para confirmar la configuración y la zona horaria empezará a parpadear. Use los botones “+” y
“-” para configurar una zona horaria correcta. Para configurar la hora de Reino Unido, seleccione la zona
horaria -1.
Pulse “SET” para confirmar la configuración y la hora empezará a parpadear. Ahora use los botones “+” y “-”
para configurar la hora.
Pulse “SET” para confirmar la configuración y los minutos empezarán a parpadear. Ahora use los botones
“+” y “-” para configurar los minutos.
Pulse “SET” para confirmar la configuración y el año 2009 empezará a parpadear. Ahora use los botones
“+” y “-” para configurar el año.
Pulse “SET” para confirmar la configuración y el mes empezará a parpadear. Ahora use los botones “+” y “-”
para configurar el mes.
Pulse “SET” para confirmar la configuración y la fecha empezará a parpadear. Ahora use los botones “+” y
“-” para configurar la fecha.
Pulse “SET” para confirmar la configuración y el idioma de los días empezará a parpadear. Ahora use los
botones “+” y “-” para configurar el idioma de los días en GER, ENG, ITA, FRE, DUT, SPA o DAN.
Pulse “SET” para confirmar y finalizar el procedimiento de configuración y entrar en el modo de reloj.
Por favor tenga en cuenta:
Si no se realiza una operación válida en un periodo de 30 segundos, el reloj volverá automáticamente al
modo de hora normal.
Configurar la alarma diaria:
Mantenga pulsado el botón “ALARM” durante 2 segundos hasta que parpadee la hora de alarma.
El dígito de hora de la hora de alarma empezará a parpadear. Use los botones “+” y “-” para configurar la
hora. Pulse el botón “ALARM” para confirmar la configuración.
El dígito de minutos de la hora de alarma empezará a parpadear. Use los botones “+” y “-” para configurar
los minutos. Pulse el botón “ALARM” para confirmar y finalizar el procedimiento de configuración.
Para activar o desactivar las alarmas diarias, pulse una vez el botón “ALARM”. Cuando esté activa,

ES4
aparecerá un icono de campana.
Por favor tenga en cuenta:
Si no se realiza una operación válida en un periodo de 30 segundos, el reloj volverá automáticamente al
modo de hora normal.
La alarma sonará durante 2 minutos si no la desactiva pulsando cualquier botón. En este caso la alarma se
repetirá automáticamente transcurridas 24 horas.
Subir el sonido de la alarma (crescendo, duración: 2 minutos)
Función de repetición automática:
Mientras suene la alarma, toque “ ” para activar la función de repetición. La función de repetición
está activa y en la pantalla aparece un icono “ ” parpadeante.
Esto detendrá la alarma durante 5 minutos y después volverá a sonar.
Se puede interrumpir la función de repetición pulsando cualquier botón.
Presentación de la temperatura °C/°F:
La temperatura se muestra en °C o °F. Puede alternar entre °C o °F pulsando el botón “-”.
Por medio de la presente Technotrade declara que el WT260 cumple con los requisitos esenciales y
cualesquiera otras disposiciones aplicables o exigibles de la Directiva 2014/53/EU y ROHS 2011/65/CE. El
original de la declaración de conformidad UE se puede encontrar en: www.technoline.de/doc/4029665002606
Datos técnicos:
Vida útil de las pilas 12 meses
Requisitos ambientales: uso -10–50 °C y 20%–95%
almacenamiento -20~60 °C & 20%~95%
Efectos del medio ambiente sobre la recepción
El reloj consigue la hora precisa con tecnología inalámbrica. Y al igual que en el resto de los dispositivos
inalámbricos, la recepción puede verse afectada por las circunstancias siguientes:
largas distancias de transmisión
proximidad de montañas y valles
proximidad de autopistas, vías de tren, aeropuertos, cables de alta tensión, etc.
proximidad de edificios en construcción

ES5
encontrarse entre edificios altos
en el interior de edificios de hormigón
proximidad de aparatos eléctricos (PCs, TVs, etc.) y estructuras metálicas
en el interior de vehículos en movimiento
Coloque el reloj en una posición donde obtenga una señal óptima, p.ej. cerca de una ventana y lejos de
superficies metálicas o aparatos eléctricos.
Precauciones
La unidad principal está diseñada solamente para interiores.
No golpee la unidad ni la someta a una fuerza excesiva.
No exponga la unidad a temperaturas extremas, luz directa del sol, polvo o humedad.
No la sumerja en el agua.
Evite que entre en contacto con materiales corrosivos.
No se deshaga de la unidad arrojándola al fuego, ya que podría explotar.
No abra la carcasa posterior interna ni altere ningún componente de la unidad.
Advertencias de seguridad sobre las pilas
Use solamente pilas alcalinas, no use pilas recargables.
Instale las pilas correctamente, haciendo coincidir las polaridades (+/-).
Siempre cambie el juego completo de pilas.
Nunca mezcle baterías usadas y nuevas.
Quite las pilas agotadas de inmediato.
Quite las pilas cuando no se utilicen.
No las recargue ni las deseche en el fuego, ya que pueden explotar.
Asegúrese de que las pilas estén almacenadas lejos de objetos metálicos, ya que el contacto con ellos
puede causar un cortocircuito.
Evite exponer las pilas a temperaturas extremas, a la humedad o a los rayos directos del sol.
Mantenga todas las pilas lejos del alcance de los niños. Constituyen peligro de asfixia.
Utilice el producto sólo para la finalidad expuesta!
Consideración de obligaciones según la ley sobre pilas
No debe tirar las pilas usadas a la basura de su hogar, ya que pueden causar daños a la
salud y al medio ambiente. Puede devolver las pilas usadas sin cargo alguno a su
distribuidor y puntos de recogida. ¡Como usuario final, tiene la obligación de devolver las
pilas que utilice a su distribuidor y otros puntos de recogida!

ES6
Consideración de obligaciones según las leyes sobre dispositivos electrónicos
Este símbolo indica que no debe deshacerse de los aparatos eléctricos en la basura
doméstica general cuando lleguen al final de su vida útil. Lleve su unidad a su punto de
recogida selectiva de basura o al centro de reciclaje de su localidad. Esto es de aplicación
en todos los países de la Unión Europea, y en otros países no europeos con sistema de
recogida selectiva de basuras.

NL1
WT260 Handleiding
Uiterlijk van product
Deel A - LCD
A1: Tijd
A2: Datum
A3: Week
A4: Temperatuur
A5: RCC-symbooltje
Deel B -Toets
B1: “SET”-toets
B2: “ALARM”-toets
B3: “+”-toets
B4: “-”-toets
B5: “ ”-toets
Eigenschappen:
Radiogestuurde DCF-77 klok
12/24 uur tijdformaat

NL2
Handmatige tijdinstelling
Doorlopende kalender tot jaar 2099
Weergave van datum en weekdag
Temperatuur kan worden uitgedrukt in °C of °F
Automatische sluimerfunctie (5 minuten)
Thermometer: Meetbereik binnenshuis: -9,9 °C ~ 49,9 °C
Batterij: battery 1,5V type “AAA” x 2 stuks (niet inbegrepen)
Aanvankelijk gebruik:
Open het klepje van de batterijhouder
Installeer 2 x AAA batterijen en let daarbij op de polariteit [“+” en “–” markeringen]
Nadat de batterijen zijn geïnstalleerd, zullen alle icoontjes op de LCD-display voor 3 seconden oplichten
terwijl er een pieptoon klinkt en het station zal vervolgens de binnentemperatuur beginnen te meten.
Ontvangst van het radiogestuurde DCF-signaal:
De klok begint automatisch het DCF-signaal te scannen na te worden ingeschakeld. Het
radiotorensymbooltje begint te knipperen.
De radiogestuurde klok voert om 1:00am automatisch een synchronisatieprocedure uit met het
DCF-signaal om eventuele afwijkingen van de exacte tijd te corrigeren. Als de synchronisatiepoging mislukt
(radiotorensymbooltje verdwijnt uit de display), zal het systeem automatisch een nieuwe poging starten op
het volgende volle uur. Deze procedure wordt 5 keer automatisch herhaald.
U kunt de DCF-signaalontvangst ook handmatig starten door de toets “-” ingedrukt te houden. Als er binnen
zeven minuten geen signaal wordt ontvangen, zal de DCF-signaalscan stoppen (radiotorensymbooltje
verdwijnt uit de display) en op het volgende volle uur weer starten.
Merk op:
Als de klok het DCF-signaal niet kan ontvangen (omdat de afstand te groot is om het signaal te ontvangen
van de zender in Mainflingen, Duitsland), kunt u de tijd handmatig instellen volgens de aanwijzingen
hieronder. Zodra de DCF-signaalontvangst mogelijk is, zal de klok zichzelf automatisch aanpassen.
Wij raden u aan de klok op een minimale afstand van 2,5 meter (8,2 voet) vanaf interferentiebronnen te
houden zoals televisies of computermonitors. De radio-ontvangst is zwakker in kamers met betonnen
muren en in kantoren. Plaats de klok in dergelijke extreme omstandigheden dicht in de buurt van een raam.

NL3
Handmatige tijdinstelling:
Houd de toets “SET” voor 2 seconden ingedrukt en “12/24HR” zal beginnen te knipperen. Gebruik nu de
toetsen “+” en “-” om te wissen tussen 12/24 uurformaat.
Druk op “SET” om uw instelling te bevestigen en de tijdzone begint te knipperen. Gebruik de toetsen “+” en
“-” om de juiste tijdzone in te stellen. Stel voor Groot Brittannië bijvoorbeeld de tijdzone -1 in.
Druk op “SET” om uw instelling te bevestigen en de uren beginnen te knipperen. Gebruik vervolgens te
toetsen “+” en “-” om het uur in te stellen.
Druk op “SET” om uw instelling te bevestigen en de minuten beginnen te knipperen. Gebruik nu de toetsen
“+” en “-” om de minuten in te stellen.
Druk op “SET” om uw instelling te bevestigen en de jaarweergave 2009 begint te knipperen. Gebruik nu de
toetsen “+” en “-” om het jaar in te stellen.
Druk op “SET” om uw instelling te bevestigen en de maandweergave begint te knipperen. Gebruik nu de
toetsen “+” en “-” om de maand in te stellen.
Druk op “SET” om uw instelling te bevestigen en de datumweergave begint te knipperen. Gebruik nu de
toetsen “+” en “-” om de datum in te stellen.
Druk op “SET” om uw instelling te bevestigen en de taal voor de weekdagen begint te knipperen. Gebruik
vervolgens de toetsen “+” en “-” om de taal voor de weekdagen in te stellen op GER, ENG, ITA, FRE, DUT,
SPA of DAN
Druk op “SET” om uw instelling te bevestigen, de instellingen te verlaten en de klokmodus te openen.
Merk op:
Als u binnen 30 seconden geen geldige actie uitvoert, zal de klok de instellingen automatisch verlaten en
terugkeren naar de normale tijdmodus.
Het dagelijkse alarm instellen:
Houd de toets “ALARM” voor 2 seconden ingedrukt totdat de alarmtijd begint te knipperen.
De uren van de alarmtijd zullen beginnen te knipperen. Gebruik de toetsen “+” en “-” om het uur in te stellen.
Druk op de toets “ALARM” om uw instelling te bevestigen.
De minuten van de alarmtijd zullen beginnen te knipperen. Gebruik de toetsen “+” en “-” om de minuten in te
stellen. Druk op de toets “ALARM” om uw instelling te bevestigen en de instellingen te verlaten.
Druk eenmaal op de toets “ALARM” om de dagelijkse alarmen te activeren of deactiveren. Wanneer actief,
zal er een klokicoontje worden weergegeven.
Merk op:
Als u binnen 30 seconden geen geldige actie uitvoert, zal de klok de instellingen automatisch verlaten en

NL4
terugkeren naar de normale tijdmodus.
Het alarm zal voor 2 minuten klinken als u het niet deactiveert door op een willekeurige toets te drukken. Het
alarm zal in dit geval na 24 uur weer automatisch worden herhaald.
Verhogend alarmgeluid (crescendo, tijdsduur: 2 minuten)
Automatische sluimerfunctie:
Druk terwijl het alarm klinkt op “ ” om de sluimerfunctie te activeren. De sluimerfunctie is acrief en
het icoontje “ ” knippert op de display.
Dit stelt het alarm voor 5 minuten uit.
De sluimerfunctie kan worden onderbroken door op een willekeurige andere toets te drukken.
Temperatuurweergave °C/°F:
De temperatuur kan worden weergegeven in °C of °F. Druk op de toets “-” om te wisselen tussen °C en °F.
Hierbij verklaart Technotrade dat het toestel WT260 in overeenstemming is met de essentiële eisen en de
andere relevante bepalingen van richtlijn 2014/53/EU en ROHS 2011/65/EG. De oorspronkelijke EU-verklaring
van overeenstemming is te vinden op: www.technoline.de/doc/4029665002606
Technische gegevens:
Levensduur batterij 12 maanden
Omgevingsvereisten: gebruik -10~50 °C & 20%~95%
opslag -20~60 °C & 20%~95%
Omgevingseffecten op ontvangst
Het klok verkrijgt de tijd uiterst nauwkeurig dankzij draadloze technologie. Zoals met alle draadloze apparatuur,
kan de ontvangst in de volgende gevallen worden aangetast:
Lange zendafstand.
Nabij bergen en valleien.
Nabij snelwegen, rails, vliegvelden, hoogspanningkabels, enz.
Nabij bouwterreinen.
Tussen hoge gebouwen.
Binnenin betonnen gebouwen.
Nabij elektrische apparatuur (computers, TV's, enz.) en metalen structuren
Binnenin bewegende voertuigen.

NL5
Plaats het klok op een plek met optimale signalen, d.w.z. dicht in de buurt van een raam en uit de buurt van
metalen oppervlaktes of elektrische apparaten.
Voorzorgsmaatregelen
Het hoofdapparaat is uitsluitend bestemd voor gebruik binnenshuis.
Stel het apparaat niet bloot aan overmatige krachten of schokken.
Stel het apparaat niet bloot aan extreme temperaturen, direct zonlicht, stof of vochtigheid.
Dompel het apparaat niet onder in water.
Laat het niet in contact komen met bijtende materialen.
Stel het apparaat niet bloot aan open vuur, omdat het kan exploderen.
Open nooit de interne achterbehuizing en modificeer geen enkele onderdelen van dit apparaat.
Veiligheidswaarschuwingen batterijen
Gebruik uitsluitend alkaline batterijen, geen herlaadbare batterijen.
Neem bij het plaatsen van de batterijen de juiste polariteit in acht (+/-).
Vervang altijd alle batterijen tegelijk.
Gebruik nooit nieuwe en gebruikte batterijen door elkaar.
Verwijder lege batterijen onmiddellijk.
Verwijder de batterijen als het toestel niet wordt gebruikt.
Herlaad de batterijen niet en gooi ze niet in vuur, omdat de batterijen zouden kunnen ontploffen.
Zorg ervoor dat de batterijen uit de buurt van metalen voorwerpen worden bewaard, omdat hierdoor
kortsluiting kan ontstaan.
Stel batterijen niet bloot aan extreme temperaturen, vochtigheid of direct zonlicht.
Houd alle batterijen buiten bereik van kinderen. Er bestaat gevaar van verstikking.
Gebruik het product alleen voor het doel waarvoor deze bestemd!
Neem wettelijke heffingen in verband met de afvoer van batterijen in aanmerking
Oude batterijen behoren niet tot huishoudelijk afval, omdat deze schadelijk zijn voor de
volksgezondheid en het milieu. U kunt verbruikte batterijen kosteloos inleveren bij uw
dealer of inzamelpunten. U bent als eindgebruiker wettelijk verplicht verbruikte batterijen in
te leveren bij distributeurs of andere inzamelpunten!
Houd rekening met heffingen in het kader van wetgeving m.b.t. het afvoeren van elektrische apparatuur.
Dit symbooltje betekent dat u elektrische apparaten aan het einde van hun levensduur niet
als algemeen, huishoudelijk afval mag afvoeren. Lever uw apparaat in bij een plaatselijk
inzamelpunt voor afvalverwerking of bij een recyclingcentrum. Dit geldt voor alle landen in
de Europese Unie, en voor andere Europese landen met inzamelsystemen voor gescheiden
afval.

IT1
Manuale WT260
Aspetto del prodotto
Parte A - LCD
A1: Ora
A2: Dati
A3: Settimana
A4: Temperatura
A5: Simbolo RCC
Parte B - Pulsanti
B1: Pulsante “SET”
B2: Pulsante “ALARM”
B3: Pulsante “+”
B4: Pulsante “-”
B5: Pulsante “ ”
Funzioni:
Orologio radiocontrollato DCF-77
Formato 12/24 ore

IT2
Impostazione manuale dell’ora
Calendario continuo fino all'anno 2099
Visualizzazione data e giorno della settimana
Temperatura commutabile in °C o °F
Funzione snooze automatica (5 minuti)
Termometro: Intervallo di misurazione interno: -9,9 °C ~ 49,9 °C
Batteria: batteria 1,5V “AAA” x 2 pz (non inclusa)
Funzionamento iniziale:
Aprire il coperchio del vano batteria
Inserite 2 batterie di tipo AAA rispettando le polarità [i segni “+” e “–”]
Quando si inseriscono le batterie, tutte le icone del display LCD appaiono per 3 secondi, si sentirà un bip e
la stazione rileva la temperatura interna.
Ricezione del segnale radiocontrollato DCF:
L'orologio avvia automaticamente la ricerca del segnale DCF dopo l'avvio. Il simbolo dell'antenna radio
inizia a lampeggiare.
All'1:00 l'orologio radiocontrollato effettua automaticamente la procedura di sincronizzazione con il segnale
DCF per correggere qualsiasi deviazione all'orario esatto. Se il tentativo di sincronizzazione non ha
successo (il simbolo dell'antenna radio scompare dal display), il sistema tenterà automaticamente un'altra
sincronizzazione all'ora successiva. Questa procedura è ripetuta automaticamente fino a 5 volte.
Per avviare manualmente la ricezione del segnale DCF, premere e tenere premuto il pulsante “-”, se nessun
segnale è ricevuto entro sette minuti, quindi la ricerca del segnale DCF si arresta (il simbolo dell'antenna
radio scompare) e si avvia nuovamente all'ora successiva.
Nota:
Se l'orologio non può ricevere il segnale DCF (in quanto la distanza è eccessiva per ricevere un segnale dal
trasmettitore di Mainflingen, Germania), si ha la possibilità di impostare manualmente l'orario come indicato
di seguito. Non appena la ricezione del segnale DCF è possibile, l'orologio torna a regolarsi
automaticamente.
Raccomandiamo una distanza minima di 2,5 m da tutte le fonti di interferenza, come televisioni o monitor di
computer. La ricezione radio è più debole in ambienti con mura in cemento e in uffici. In tali circostanze
estreme, porre l'orologio vicino alla finestra.

IT3
Impostazione manuale dell’ora:
Premere e tenere premuto il pulsante “SET” per 2 secondi, 12/24HR inizia a lampeggiare. Ora usare i
pulsanti “+” e “-” per commutare la modalità 12/24 ore.
Premere “SET” per confermare la propria impostazione, il fuso orario inizia a lampeggiare. Usare i pulsanti
“+” e “-” per impostare un fuso orario corretto. Per il Regno Unito impostare il fuso orario a -1.
Premere “SET” per confermare la propria impostazione, l'ora inizia a lampeggiare. Ora usare i pulsanti “+” e
“-” per impostare l'ora.
Premere “SET” per confermare la propria impostazione, l'indicazione dei minuti inizia a lampeggiare. Ora
usare i pulsanti “+” e “-” per impostare i minuti.
Premere “SET” per confermare la propria impostazione, l'indicazione dell'anno 2009 inizia a lampeggiare.
Ora usare i pulsanti “+” e “-” per impostare l'anno.
Premere “SET” per confermare la propria impostazione, l'indicazione del mese inizia a lampeggiare. Ora
usare i pulsanti “+” e “-” per impostare il mese.
Premere “SET” per confermare la propria impostazione, l'indicazione del giorno inizia a lampeggiare. Ora
usare i pulsanti “+” e “-” per impostare il giorno.
Premere “SET” per confermare la propria impostazione, l'indicazione della lingua del giorno della settimana
inizia a lampeggiare. Ora usare i pulsanti “+” e “-” per impostare la lingua del giorno della settimana a GER,
ENG, ITA, FRE, DUT, SPA o DAN
Premere “SET” per confermare l'impostazione e terminare le procedure di impostazione, si accede alla
modalità orologio.
Nota:
se non c'è alcuna operazione valida entro 30 secondi, l'orologio ritornerà automaticamente alla modalità
orario normale dalla modalità di impostazione.
Impostazione della sveglia quotidiana:
Premere e tenere premuto il pulsante “ALARM” per 2 secondi fino a quando l'orario di allarme sta
lampeggiando.
L'indicazione dell'ora dell'orario della sveglia inizia a lampeggiare. Usare i pulsanti “+” e “-” per impostare
l'ora. Premere il pulsante “ALARM” per confermare l'impostazione.
L'indicazione dei minuti dell'orario della sveglia inizia a lampeggiare. Usare i pulsanti “+” e “-” per impostare
il minuto. Premere “ALARM” per confermare l'impostazione e terminare la procedura di impostazione.
Per attivare o disattivare le sveglie giornaliere, premere una volta il pulsante “ALARM”. Quando attivo,
appare l'icona della campanella.

IT4
Nota:
se non c'è alcuna operazione valida entro 30 secondi, l'orologio ritornerà automaticamente alla modalità
orario normale dalla modalità di impostazione.
La sveglia suonerà per 2 minuti se non è disattivata premendo un qualsiasi pulsante. In questo caso la
sveglia sarà ripetuta automaticamente dopo 24 ore.
Il suono della sveglia (crescendo, durata: 2 minuti)
Funzione Snooze automatica:
Mentre la sveglia suona, toccare “ ” per attivare la funzione snooze. La funzione Snooze è attiva e
un'icona “ ” lampeggiante appare sul display.
Ciò arresta la sveglia per 5 minuti e suonerà di nuovo.
La funzione Snooze può essere interrotta premendo qualsiasi pulsante.
Visualizzazione temperatura °C/°F:
La temperatura è visualizzata in °C o °F. Premendo il pulsante “-” è possibile commutare tra °C o °F.
Con la presente Technotrade dichiara che questo WT260 è conforme ai requisiti essenziali ed alle altre
disposizioni pertinenti stabilite dalla direttiva 2014/53/EU e ROHS 2011/65/CE. La dichiarazione di conformità
UE originale si trova a: www.technoline.de/doc/4029665002606
Dati tecnici:
Durata batteria 12 mesi
Requisito ambientale: in uso -10~50 °C & 20%~95%
conservazione -20~60 °C & 20%~95%
Effetti della ricezione ambientale
L’orario ottiene preciso mediante tecnologia wireless. Come per tutti i dispositivi wireless, la ricezione può
essere influenzata dalle seguenti circostanze:
Lunga distanza di trasmissione.
Prossimità di montagne e valli.
In prossimità di autostrada, stazione, aeroporti, cavi di alta tensione ecc.
In prossimità di cantieri.
Tra edifici alti.

IT5
All'interno di edifici in cemento.
in prossimità di apparecchiature elettriche (computer, TV, ecc.) e strutture metalliche
All'interno di veicoli in movimento.
Porre l’orario in una posizione con segnale ottimale, ad es. vicino a una finestra e lontano da superfici in metallo
o apparecchiature elettriche.
Precauzioni
L'unità principale è intesa solo per uso in interni.
Non esporre l'unità a forza eccessiva o shock.
Non esporre l'unità a temperature estreme, raggi solari diretti, polvere o umidità.
Non immergere in acqua.
Evitare il contatto con qualsiasi materiale corrosivo.
Non gettare l'unità nel fuoco in quanto può esplodere.
Non aprire l'alloggiamento posteriore interno o alterare componenti di questa unità.
Avvisi di sicurezza delle batterie
Utilizzare solo batterie alcaline, non batterie ricaricabili.
Installare le batterie correttamente rispettando la polarità (+/-).
Sostituire sempre un set completo di batterie.
Non mescolare mai batterie usate e nuove.
Rimuovere immediatamente le batterie scariche.
Rimuovere le batterie quando non in uso.
Non ricaricare e non smaltire le batterie nel fuoco in quanto possono esplodere.
Assicurarsi che le batterie siano conservate lontano da oggetti metallici in quanto il contatto può causare un
corto circuito.
Evitare di esporre le batterie a temperatura o a umidità estreme o a luce solare diretta.
Tenere tutte le batterie fuori dalla portata dei bambini. Esse possono comportare pericolo di soffocamento.
Utilizzare il prodotto solo per lo scopo previsto!
Obblighi in base alla normativa sulle batterie
Le batterie vecchie non appartengono ai rifiuti domestici in quanto possono causare danni
alla salute e all'ambiente. È possibile consegnare le batterie usate gratuitamente al proprio
rivenditore e punti di raccolta. L'utente finale è obbligato per legge a portare le batterie
esauste ai distributori e agli altri punti di raccolta!

IT6
Considerare il carico in base alla normativa sui dispositivi elettrici
Questo simbolo indica che i dispositivi elettrici alla fine del loro ciclo di vita devono essere
smaltiti separatamente dai rifiuti domestici generali. Portare l'unità al proprio punto di
raccolta rifiuti locale o a un centro di riciclaggio. Questa disposizione si applica a tutti i paesi
dell’Unione europea e agli altri paesi europei in cui viene praticata la raccolta differenziata.

CZ1
Návod k zařízení WT260
Popis výrobku
Část A – displej LCD
A1: Čas
A2: Datum
A3: Týden
A4: Teplota
A5: Symbol rádiového příjmu
Část B – tlačítka
B1: Tlačítko „SET“
B2: Tlačítko „ALARM“
B3: Tlačítko „+“
B4: Tlačítko „−“
B5: Tlačítko „ “
Funkce
Hodiny řízené rádiovým signálem DCF-77
12- a 24hodinový formát času

CZ2
Ruční nastavení času
Souvislý kalendář až do roku 2099
Zobrazení data a dnů v týdnu
Zobrazení teploty ve °C nebo °F
Automatická funkce opakovaného buzení (po 5 minutách)
Teploměr: Rozsah měření vnitřní teploty: -9,9 až 49,9 °C
Baterie: 2 kusy 1,5V baterií AAA (nejsou součástí dodávky)
První spuštění:
Otevřete kryt bateriového prostoru.
Vložte 2 baterie AAA a dbejte přitom na správnou polaritu (označení „+“ a „−“).
Po vložení baterií se všechny ikony na displeji LCD rozsvítí a budou svítit po dobu 3 sekund. Ozve se
pípnutí a stanice začne měřit vnitřní teplotu.
Příjem rádiově řízeného signálu DCF:
Hodiny začnou po spuštění automaticky vyhledávat signál DCF. Ikona rádiového příjmu začne blikat.
V 1:00 hod. se rádiově řízené hodiny automaticky synchronizují se signálem DCF a opraví všechny
odchylky od přesného času. Pokud je pokus o synchronizaci neúspěšný (ikona rádiového příjmu z displeje
zmizí), systém se pokusí automaticky o další synchronizaci v příští celou hodinu. Tento postup se opakuje
automaticky až 5krát.
Chcete-li spustit příjem signálu DCF ručně, stiskněte tlačítko „−“ a držte jej stisknuté. Pokud nedojde
k příjmu signálu do sedmi minut, vyhledávání signálu DCF se poté zastaví (ikona rádiového příjmu zmizí) a
spustí se znovu v příští celou hodinu.
Upozornění:
Pokud se hodinám nedaří signál DCF přijmout (kvůli příliš velké vzdálenosti pro příjem signálu z vysílače
v Mainflingenu v Německu), lze hodiny nastavit ručně níže uvedeným postupem. Jakmile je příjem signálu
DCF možný, hodiny se poté automaticky přenastaví.
Doporučujeme vzdálenost minimálně 2,5 metru od všech zdrojů rušení, jako jsou televizory nebo monitory
počítače. Příjem rádiového signálu je slabší v místnostech s betonovými stěnami a v kancelářích. V takto
extrémních podmínkách umístěte hodiny do blízkosti okna.
Ruční nastavení času
Stiskněte tlačítko „SET“ a držte jej stisknuté po dobu 2 sekund. Začne blikat text „12/24HR“. K přepnutí

CZ3
mezi 12- a 24hodinovým formátem nyní použijte tlačítka „+“ a „−“.
Stisknutím tlačítka „SET“ potvrďte nastavení. Začne blikat časové pásmo. Pomocí tlačítek „+“ a „−“ nastavte
správné časové pásmo. Ve Velké Británii nastavte časové pásmo na hodnotu −1.
Stisknutím tlačítka „SET“ potvrďte nastavení. Začne blikat zobrazení hodin. Nyní nastavte hodiny pomocí
tlačítek „+“ a „−“.
Stisknutím tlačítka „SET“ potvrďte nastavení. Začne blikat zobrazení minut. Nyní nastavte minuty pomocí
tlačítek „+“ a „−“.
Stisknutím tlačítka „SET“ potvrďte nastavení. Začne blikat zobrazení roku 2009. Nyní nastavte rok pomocí
tlačítek „+“ a „−“.
Stisknutím tlačítka „SET“ potvrďte nastavení. Začne blikat zobrazení měsíce. Nyní nastavte měsíc pomocí
tlačítek „+“ a „−“.
Stisknutím tlačítka „SET“ potvrďte nastavení. Začne blikat zobrazení data. Nyní nastavte datum pomocí
tlačítek „+“ a „−“.
Stisknutím tlačítka „SET“ potvrďte nastavení. V příslušném jazyce začne blikat zobrazení dne v týdnu. Nyní
pomocí tlačítek „+“ a „−“ nastavte jazyk pro dny v týdnu na hodnotu GER, ENG, ITA, FRE, DUT, SPA nebo
DAN.
Stisknutím tlačítka „SET“ potvrďte nastavení, ukončete proces nastavování a přejděte do režimu hodin.
Upozornění:
Pokud během 30 sekund nedojde k žádné akci, hodiny přejdou z režimu nastavování automaticky do
režimu normálního zobrazení času.
Nastavení každodenního budíku:
Stiskněte tlačítko „ALARM“ a držte jej stisknuté po dobu 2 sekund, dokud nezačne blikat čas budíku.
Začne blikat zobrazení hodin v času budíku. Pomocí tlačítek „+“ a „-“ nastavte hodiny. Stisknutím tlačítka
„ALARM“ potvrďte nastavení.
Začne blikat zobrazení minut v času budíku. Pomocí tlačítek „+“ a „−“ nastavte minuty. Stisknutím tlačítka
„ALARM“ potvrďte nastavení a ukončete proces nastavování.
Chcete-li aktivovat nebo deaktivovat každodenní budík, stiskněte jednou tlačítko „ALARM“. Je-li budík
aktivní, zobrazuje se ikona zvonku.
Upozornění:
Pokud během 30 sekund nedojde k žádné akci, hodiny přejdou z režimu nastavování automaticky do
režimu normálního zobrazení času.
Budík bude znít po dobu 2 minut, pokud nedojde stisknutím jakéhokoliv tlačítka k jeho vypnutí. V tomto

CZ4
případě se budík automaticky zopakuje po 24 hodinách.
Zesilující zvuk budíku (stupňující se hlasitost, trvání: 2 minuty)
Automatická funkce opakovaného buzení
Během zvonění budíku aktivujete funkci opakovaného buzení stisknutím tlačítka „ “. Funkce
opakovaného buzení bude aktivní a na displeji se zobrazí blikající ikona „ “.
Dojde tak k vypnutí zvonění budíku a jeho opětovnému zapnutí za 5 minut.
Funkci opakovaného buzení lze zrušit stisknutím jakéhokoli jiného tlačítka.
Zobrazení teploty ve °C nebo °F
Teplota se zobrazuje v jednotkách °C nebo °F. Přepínat mezi jednotkami °C a °F lze stisknutím tlačítka „−“.
Technotrade tímto prohlašuje, že tento WT260 je ve shodě se základními požadavky a dalšími příslušnými
ustanoveními směrnice 2014/53/EU a ROHS 2011/65/ES. Originál EU prohlášení o shodě lze nalézt na:
www.technoline.de/doc/4029665002606
Technické údaje
Životnost baterií 12 měsíců
Požadavky na prostředí: používání -10 až 50 °C, 20–95 %
skladování -20 až 60 °C, 20–95 %
Vlivy prostředí na příjem signálu
Čas hodiny je přesně řízen bezdrátovou technologií. Stejně jako u jiných bezdrátových zařízení může být příjem
negativně ovlivněn následujícími podmínkami:
Dlouhá přenosová vzdálenost
Blízkost hor a údolí
Blízkost dálnic, železnic, letišť, vedení vysokého napětí apod.
Blízkost staveniště
Umístění mezi vysokými stavbami
Umístění uvnitř betonových staveb
Blízkost elektrických zařízení (počítačů, televizorů apod.) a kovových předmětů
Umístění uvnitř jedoucích vozidel
Hodiny umístěte na místě s optimálním signálem, to znamená v blízkosti okna a mimo dosah vlivu kovových
povrchů nebo elektrických zařízení.

CZ5
Bezpečnostní opatření
Tato jednotka je určena pro použití ve vnitřních prostorách.
Nevystavujte jednotku působení nadměrné síly ani otřesům.
Nevystavujte jednotku extrémním teplotám, přímému slunečnímu svitu, prachu či vlhkosti.
Neponořujte do vody.
Vyhněte se kontaktu s jakýmkoliv korozivním materiálem.
Nevhazujte jednotku do ohně, hrozí nebezpečí exploze.
Neotevírejte vnitřní kryt a nemanipulujte s žádnými součástkami této jednotky.
Bezpečnostní opatření u baterií
Používejte pouze alkalické baterie, nikdy ne dobíjecí baterie.
Vložte baterie se správnou polaritou (+/−).
Vždy vyměňte kompletní sadu baterií.
Nikdy nemíchejte dohromady použité a nové baterie.
Slabé baterie okamžitě vyjměte.
Jestliže zařízení nepoužíváte, vyjměte z něj baterie.
Baterie nenabíjejte a nevhazujte je do ohně – mohou explodovat.
Baterie skladujte mimo dosah kovových předmětů, kontakt s nimi může způsobit zkrat.
Nevystavujte baterie extrémním teplotám, vlhkosti či přímému slunečnímu svitu.
Veškeré baterie skladujte mimo dosah dětí. Hrozí riziko udušení.
Výrobek používejte pouze ke stanovenému účelu!
Likvidace baterií podle předpisů
Staré baterie nepatří do domácího odpadu, protože mohou způsobit škody na zdraví a
životním prostředí. Použité baterie můžete zdarma vrátit prodejci a do sběrných míst.
Jako koncoví uživatelé jste vázáni zákonem použité baterie vrátit distributorům a do
jiných sběrných míst!
Povinnosti dle zákona o elektrických zařízeních
Tento symbol znamená, že elektrická zařízení na konci jejich životnosti je třeba likvidovat
odděleně od běžného domácího odpadu. Zařízení vraťte do místního sběrného místa
nebo centra pro recyklaci. To platí pro všechny země Evropské unie a ostatní evropské
země se samostatným systémem shromažďování odpadu.

PL1
Instrukcja obsługi WT260
Wygląd produkcyjny
Część A – wyświetlacz LCD
A1: Godzina
A2: Data
A3: Tydzień
A4: Temperatura
A5: Symbol RCC
Część B – przycisk
B1: Przycisk „SET”
B2: Przycisk „ALARM”
B3: Przycisk „+”
B4: Przycisk „-”
B5: Przycisk „ ”
Właściwości:
Zegar DCF-77 sterowany sygnałem radiowym
Format czasu 12/24 godz.
Ręczne ustawianie czasu
Ciągły kalendarz do roku 2099

PL2
Wyświetlacz daty i dnia tygodnia
Temperatura w °C lub °F
Automatyczna funkcja drzemki (5 minut)
Termometr: Zakresy pomiarowe wewnątrz: -9.9 °C ~ 49.9 °C
Bateria: 2 baterie 1,5 V typu „AAA” (nie zawarte w zestawie)
Działania wstępne:
Otworzyć pokrywę komory baterii
Włożyć 2 baterie AAA zgodnie z biegunowością [oznaczenia „+” i „–”]
Po włożeniu baterii, na 3 sekundy zapalają się wszystkie ikony na wyświetlaczu LCD, użytkownik usłyszy
sygnał dźwiękowy, a stacja wykrywa temperaturę wewnątrz.
Odbiór sygnału radiowego DCF:
Zegar automatycznie rozpoczyna wyszukiwanie sygnału DCF po uruchomieniu urządzenia. Zaczyna migać
symbol masztu radiowego.
O godzinie 1:00 zegar sterowany sygnałem radiowym automatycznie wykonuje procedurę synchronizacji z
sygnałem DCF, aby poprawić wszelkie odchylenia dokładnego czasu. Jeśli próby synchronizacji nie
powiodą się (symbol masztu radiowego znika z wyświetlacza), system automatycznie ponownej
synchronizacji o następnej pełnej godzinie. Procedura powtarza się automatycznie do 5 razy.
Aby rozpocząć ręczną procedurę odbioru sygnału DCF, należy nacisnąć i przytrzymać przycisk „-”, jeśli w
ciągu siedmiu minut urządzenie nie uzyska sygnału, wyszukiwanie sygnału DCF zostanie zatrzymane
(symbol masztu radiowego znika) i rozpocznie się ponownie o następnej pełnej godzinie.
Uwaga:
Jeśli zegar nie może pobrać sygnału DCF (ponieważ odległość jest zbyt duża, aby odebrać sygnał z
nadajnika w Mainflingen, Niemcy), masz opcję ustawienia czasu ręcznie, zgodnie z poniższą informacją.
Jak tylko możliwy jest odbiór sygnału DCF, zegar zostanie ponownie automatycznie nastawiony.
Zalecamy minimalną odległość 2,5 m (8,2 stopy) od wszystkich źródeł zakłóceń, takich tak odbiorniki
telewizyjne czy komputery. Odbiór sygnału radiowego jest słabszy w pomieszczeniach o betonowych
ścianach i w biurach. W takich ekstremalnych warunkach zegar należy umieścić blisko okna.
Ręczne ustawianie czasu:
Nacisnąć i przytrzymać przycisk „SET” przez 2 sekundy, zaczyna migać wskazanie 12/24HR. Teraz użyć
przycisków „+” oraz „-”, aby przełączyć tryb 12/24-godziny.

PL3
Nacisnąć przycisk „SET”, aby potwierdzić swoje ustawienie, zacznie migać strefa czasowa. Użyć
przycisków „+” oraz „-”, aby ustawić prawidłową strefę czasową. W Wielkiej Brytanii strefa czasowa jest
ustawiana na -1.
Nacisnąć „SET”, aby potwierdzić ustawienia, wyświetlacz godziny zacznie migać. Teraz użyć przycisków
„+” oraz „-”, aby ustawić godzinę.
Nacisnąć „SET”, aby potwierdzić ustawienia, wyświetlacz minut zacznie migać. Teraz użyć przycisków „+”
oraz „-”, aby ustawić minuty.
Nacisnąć „SET”, aby potwierdzić ustawienia, wyświetlacz roku 2009 zacznie migać. Teraz użyć przycisków
„+” oraz „-”, aby ustawić rok.
Nacisnąć „SET”, aby potwierdzić ustawienia, wyświetlacz miesiąca zacznie migać. Teraz użyć przycisków
„+” oraz „-”, aby ustawić miesiąc.
Nacisnąć „SET”,aby potwierdzić ustawienia, wyświetlacz daty zacznie migać. Teraz użyć przycisków „+”
oraz „-”, aby ustawić dzień.
Nacisnąć przycisk „SET”, aby potwierdzić swoje ustawienie, zaczyna migać wyświetlacz języka. Teraz użyć
przycisków „+” oraz „-”, aby ustawić język na GER, ENG, ITA, FRE, DUT,SPA lub DAN.
Nacisnąć „SET”, aby potwierdzić ustawienia i zakończyć procedurę ustawiania, przejść do trybu zegara.
Uwaga:
Jeśli w ciągu 30 sekund nie dojdzie do żadnej czynności, zegar automatycznie przejdzie z trybu ustawiania
do trybu normalnego czasu.
Ustawianie codziennego alarmu:
Nacisnąć i przytrzymać przycisk „ALARM” przez 2 sekundy, aż zacznie migać wyświetlacz czasu alarmu.
Wyświetlacz godziny czasu alarmu zacznie migać. Użyć przycisków „+” oraz „-”, aby ustawić godzinę.
Nacisnąć przycisk „ALARM”, aby potwierdzić ustawienia.
Wyświetlacz minut czasu alarmu zacznie migać. Użyć przycisków „+” oraz „-”, aby ustawić minuty. Nacisnąć
przycisk „ALARM”, aby potwierdzić ustawienia i zakończyć procedurę ustawiania.
Aby aktywować lub wyłączyć codzienne alarmy, należy krótko nacisnąć jeden raz przycisk „ALARM”. Po
uaktywnieniu wyświetla się ikona dzwonka.
Uwaga:
Jeśli w ciągu 30 sekund nie dojdzie do żadnej czynności, zegar automatycznie przejdzie z trybu ustawiania
do trybu normalnego czasu.
Dźwięk alarmu będzie trwał przez 2 minuty, jeśli nie zostanie wyłączony poprzez naciśnięcie dowolnego
przycisku. W takim przypadku alarm powtórzy się automatycznie po 24 godzinach.

PL4
Nasilający się dźwięk alarmu (crescendo, czas trwania: 2 minuty)
Funkcja automatycznej drzemki:
Kiedy rozlega się alarm, nacisnąć „ ”, aby aktywować funkcję drzemki. Funkcja drzemki jest
aktywna, a na wyświetlaczu miga ikona „ ”.
Wstrzymuje ona alarm na 5 minut, po czym alarm rozlega się ponownie.
Funkcję drzemki można wyłączyć, naciskając jakikolwiek inny przycisk.
Wyświetlanie temperatury °C/°F:
Temperatura jest wyświetlana w formacie °C lub °F. Naciśnięcie przycisku „-” umożliwia przełączenie
formatu na °C lub °F.
Niniejszym Technotrade oświadcza, że WT260 jest zgodny z zasadniczymi wymogami oraz pozostałymi
stosownymi postanowieniami Dyrektywy 2014/53/EU i ROHS 2011/65/EC.Kopię pełnej deklaracji zgodności
można pobrać pod adresem: www.technoline.de/doc/4029665002606
Dane techniczne:
Czas życia baterii 12 miesięcy
Wymagania otoczenia: podczas użycia -10 – 50 °C i 20% – 95%
podczas przechowywania -20 – 60 °C i 20% – 95%
Środowiskowe efekty odbioru
Zegar zawdzięcza dokładny odczyt czasu technologii bezprzewodowej. Podobnie jak w przypadku wszystkich
urządzeń bezprzewodowych, odbiór może być zakłócony następującymi czynnikami:
Duża odległość przekazu.
Góry i doliny w pobliżu.
Autostrada, kolej, porty lotnicze, kable wysokiego napięcia itd. w pobliżu.
Bliskość budów.
Między wysokimi budynkami.
Wewnątrz betonowych budynków.
Znajdujące się w pobliżu urządzenia elektryczne (komputery, telewizory itd.) i struktury metalowe.
W poruszających się pojazdach.
Zegar najlepiej jest ustawić w miejscu, gdzie uzyska ona najlepszy zasięg sygnału, tj. blisko okna i z dala od
metalowych powierzchni czy urządzeń elektrycznych.

PL5
Środki ostrożności
Jednostkę główną można wykorzystywać jedynie w pomieszczeniach.
Nie wystawiać urządzenia na nadmierną siłę lub wstrząsy.
Nie wystawiać jednostki na ekstremalne temperatury, bezpośrednie światło słoneczne, kurz czy wilgoć.
Nie zanurzać w wodzie.
Unikać kontaktu z materiałami korodującymi.
Urządzenia do wolno utylizować w ogniu, ponieważ może wybuchnąć.
Nie otwierać tylnej obudowy wewnętrznej ani nie ingerować w żadne komponenty urządzenia.
Ostrzeżenia bezpieczeństwa dotyczące baterii
Używać wyłącznie baterii alkalicznych, a nie baterii akumulatorowych.
Włożyć baterie prawidłowo, zgodnie z biegunowością (+/-).
Zawsze należy wymieniać cały zestaw baterii.
Nigdy nie wolno mieszać zużytych i nowych baterii.
Zużyte baterie należy natychmiast wymieniać.
Wyjmować baterie, jeśli urządzenie nie jest używane.
Nie ładować ponownie baterii ani nie wyrzucać ich do ognia, ponieważ mogą eksplodować.
Należy zapewnić, że baterie są przechowywane z dala od metalowych obiektów, ponieważ zetknięcie z nimi
może spowodować zwarcie.
Unikać wystawiania baterii na działanie ekstremalnych temperatur, na wilgoć czy światło słoneczne.
Baterie należy trzymać w miejscu niedostępnym dla dzieci. Powodują one zagrożenie udławieniem.
Stosować produkt tylko zgodnie z jej przeznaczeniem!
Zobowiązania według przepisów prawa dotyczących baterii
Stare baterie nie należą do odpadów domowych, ponieważ mogą szkodzić zdrowiu i
środowisku. Zużyte baterie można oddać bezpłatnie u swojego sprzedawcy lub punktach
zbiórek. Użytkownik końcowy jest zobowiązany prawem do zwrotu odpowiednich baterii
sprzedawcom lub w innych punktach zbiórek!
Zobowiązania według przepisów prawa dotyczących urządzeń elektrycznych
Ten symbol oznacza, że użytkownik musi utylizować urządzenia elektryczne z dala od
ogólnych odpadów domowych, kiedy osiągną one koniec okresu eksploatacji. Swoje
urządzenie najlepiej jest oddać w lokalnym punkcie zbiórki odpadów lub centrum
recyklingu. Dotyczy to wszystkich państw Unii Europejskiej oraz innych państw
europejskich, w których obowiązuje system zbierania odpadów segregowanych.
-
 1
1
-
 2
2
-
 3
3
-
 4
4
-
 5
5
-
 6
6
-
 7
7
-
 8
8
-
 9
9
-
 10
10
-
 11
11
-
 12
12
-
 13
13
-
 14
14
-
 15
15
-
 16
16
-
 17
17
-
 18
18
-
 19
19
-
 20
20
-
 21
21
-
 22
22
-
 23
23
-
 24
24
-
 25
25
-
 26
26
-
 27
27
-
 28
28
-
 29
29
-
 30
30
-
 31
31
-
 32
32
-
 33
33
-
 34
34
-
 35
35
-
 36
36
-
 37
37
-
 38
38
-
 39
39
-
 40
40
-
 41
41
-
 42
42
-
 43
43


in andere talen
- italiano: Technoline Model Manuale utente
- français: Technoline Model Manuel utilisateur
- español: Technoline Model Manual de usuario
- Deutsch: Technoline Model Benutzerhandbuch
- polski: Technoline Model Instrukcja obsługi
