Medela Swing Maxi Instructions For Use Manual
- Type
- Instructions For Use Manual


Thank you for choosing the Swing Maxi Breastpump. Breastmilk is the natural choice for your
baby, but there are reasons and situations where breastfeeding is not possible. For over 50 years,
it has been Medela’s conviction that these mothers and babies can be supported. In close co-
operation with breastfeeding experts, Medela, one of the market leaders, has researched and
developed breastpumps that perfectly meet breastfeeding mothers needs. For mothers who insist
on the best for their babies and themselves. Because you care.
Hartelijk dank dat u voor de Swing Maxi borstkolf hebt gekozen. Moedermelk is de natuurlijke
keuze voor uw baby, maar er zijn redenen en omstandigheden waarin het niet mogelijk is om
borstvoeding te geven. Medela is er al meer dan 50 jaar van overtuigd dat deze moeders en
baby’s ondersteund kunnen worden. In nauwe samenwerking met borstvoedingsdeskundigen
heeft Medela, een van de marktleiders, borstkolven onderzocht en ontwikkeld die perfect
tegemoetkomen aan de behoeften van moeders die borstvoeding geven. Voor moeders die
het beste willen voor hun baby en voor zichzelf. Uit liefde.
Medela vous remercie d’avoir acheté un tire-lait Swing Maxi. Le lait maternel est le meilleur
aliment pour votre enfant, mais de nombreuses raisons et circonstances empêchent l’allaitement
au sein. Depuis plus de 50 ans, l’objectif de Medela, l’un des leaders sur le marché des tire-laits
et accessoires d’allaitement, est de soutenir le bien-être des mamans et de leurs bébés. Medela
a développé des tire-laits qui répondent de façon optimale aux besoins des mamans allaitantes,
en collaboration avec des experts de l’allaitement et des chercheurs avant-gardistes. Pour les
mamans qui ne veulent que le meilleur pour elles et leurs bébés. „Because you care.“
Terima kasih telah memilih Pompa ASI Swing Maxi. ASI adalah pilihan alami bagi bayi Anda,
tetapi situasi dan kondisi kadang membuat menyusui tidak mungkin. Selama lebih dari 50 tahun,
Medela yakin ada yang dapat dilakukan untuk membantu ibu-ibu dan bayi-bayi ini. Medela,
salah satu pemimpin pasar, bekerja sama dengan pakar per-ASI-an, berhasil meneliti dan
mengembangkan pompa ASI yang benar-benar memenuhi kebutuhan ibu menyusui. Untuk para
ibu yang menginginkan yang terbaik bagi bayi mereka juga mereka sendiri. Karena Anda peduli.


1. Intended Use / Contraindication / Population 5
2. Meaning of symbols 6
3. Important safety information
8
4. Product description 10
5. Cleaning 12
5.1 Before using for the rst time and after every use 12
5.2 Before using for the rst time and once a day 14
5.3 Cleaning the motor unit 15
6. Preparing for pumping 16
6.1 Mains operation 16
6.2 Battery operation 16
6.3 Assembling the pump set 18
7. Expression 20
7.1 Preparing for single pumping 20
7.2 Pumping 20
7.3 Preparing for hands-free expression with Easy Expression Bustier 22
7.4 Preparing for double pumping 24
8. Storing and thawing breastmilk 26
8.1 Storage 26
8.2 Freezing 26
8.3 Thawing 26
9. Feeding breastmilk 27
10. Troubleshooting 28
11. Warranty / disposal 29
12. Complete care during breastfeeding time 30
13. EMC / Technical description 116
14. Technical specications 123
Table of Contents

The intended use and indications of breastpumps
Breastpumps are intended to be used by lactating women in the hospital or home
environment for expressing breastmilk. Breastpumps are indicated to alleviate the
symptoms of engorgement by expressing milk. In case of mastitis breastpumps
support the healing process by removing breastmilk from the affected breast.
Breastpumps are indicated to relieve sore and cracked nipples and to bring out at
or inverted nipples. Also breastpumps enable mothers to provide breastmilk for
babies who cannot feed directly at the breast for a variety of reasons such as
latch-on problems, cleft palate or premature babies.
Intended patient population/user
Adolescent paediatric or adult lactating women. Many women nd it convenient, or
even necessary, to use a breastpump to express and store their breastmilk once they
have returned to work, are travelling or are otherwise separated from their baby.
Women are often delighted to learn that a breastpump can be used as a supplement
to breastfeeding and that some pumps are designed to mimic the suckling of a
nursing baby.
Contraindications
There are no known contraindications for the Swing Maxi breastpump.
1. 1. Intended use / Population – Contraindication
5

Warning
Can lead to serious injury or death.
Caution
Can lead to minor injury.
Note
Can lead to material damage.
Info
Useful or important information that is not related to safety.
Symbols on the packaging
This symbol indicates that the material is part of a recovery/recycling process.
This symbol indicates a carton package.
This symbol indicates to keep the device away from sunlight.
This symbol indicates to handle the fragile device with care.
°C
This symbol indicates the temperature limitation for operation, transport and storage.
This symbol indicates the humidity limitation for operation, transport and storage.
This symbol indicates the atmospheric pressure limitation for operation,
transport and storage.
This symbol indicates to keep the device dry.
This symbol indicates that the packaging contains products intended to come in
contact with food according to regulation 1935/2004.
This symbol indicates unique GSI Global Trade Item Numbers (GTIN)
This symbol indicates do not dispose the device together with unsorted municipal
waste (for EU only).
This symbol indicates to follow instructions for use.
Symbols on the device
This symbol indicates to follow instructions for use.
0123 This symbol indicates the compliance with the essential requirements of the Council
Directive 93/42/EEC of 14 June 1993 concerning medical devices.
2. Meaning of symbols
i
The warning symbol identies all instructions that are important for safety. Failure to
observe these instructions can lead to injury or damage to the breastpump!
When used in conjunction with the following words, the warning symbol stands for:
i
6

This symbol indicates the manufacturer.
This symbol indicates do not dispose the device together with unsorted municipal
waste (for EU only).
This symbol indicates the compliance with additional USA and Canada safety
requirements for medical electrical equipment.
This symbol indicates a type BF applied part.
SN This symbol indicates manufacturer’s serial number of the device.
+This symbol indicates the positioning of battery cell.
IP22 This symbol indicates the protection against ingress of solid foreign objects and
against harmful effects due to the ingress of water.
This symbol indicates the date of manufacture (four digits for the year and
two digits for the month).
Symbols on the mains adapter
This symbol indicates that the mains adapter is a class II device.
This symbol indicates the compliance with China Compulsory Certication.
This symbol indicates that the mains adapter is safety tested.
This symbol indicates that the mains adapter is for indoor use only.
This symbol indicates the compliance with USA and Canada safety requirements.
This symbol indicates the compliance with Federal Communications Commission
requirements.
This symbol indicates polarity of d.c. power connector.
This symbol indicates the compliance with AUS/NZ regulatory requirements
(Regulaltory compliance mark).
This CE-mark indicates the compliance with the low voltage and electromagnetic
compatibility directive.
This symbol indicates to not dispose the device together with unsorted municipal
waste (for EU only). The solid bar symbol indicates that mains adapter is put on the
market after 13 August 2005.
This symbol indicates the compliance with Japanese safety requirements.
This symbol indicates the compliance with energy efciency requirements.
This symbol indicates alternating current.
This symbol indicates direct current.
–
9 VDC
N136
7

3. Important safety information
Failure to follow these instructions/safety information can lead to danger
from the device. Subject to technical changes.
Device
Danger of electrocution! Keep the device dry! Never immerse in water or
other liquids!
The Swing Maxi breastpump is not heat-resistant: keep away from radiators
and open ames.
Do not expose the motor unit to direct sunlight.
Repairs must be performed only by an authorised service agency
Do not repair yourself! No modications to the device are permitted.
Never use a damaged device. Replace damaged or worn parts.
MAX.
250 h
The operating life of the Swing Maxi breastpump is 250 hours.
The service life is two years.
Electrical use
Separation from the mains is only assured through the disconnection of
the mains adapter from the wall socket outlet.
Keep the mains adapter away from heated surfaces.
Do not reach for any electrical device if it has fallen into water.
Unplug immediately.
The breastpump should never be left unattended when plugged into
a power source.
8

Use
Use the Swing Maxi breastpump only for its intended use as described
in this manual.
Never operate an electrical device if it has a damaged cord or plug, if it is
not working properly, if it has been dropped or damaged, or dropped into
water.
Do not use the Swing Maxi breastpump while bathing or showering.
Do not use the Swing Maxi breastpump while sleeping or overly drowsy.
This is a single user product. Use by more than one person may
present a health risk.
Do not drive whilst hands-free pumping.
Supervision is necessary when the Swing Maxi breastpump is used
in the vicinity of children.
Contact your lactation consultant or physician if you experience
problems or pain.
Portable and mobile radio frequency communications equipment
can affect the Swing Maxi breastpump.
l Plastic bottles and component parts become brittle when frozen and
may break when dropped.
l Also, bottles and component parts may become damaged if mishandled,
e.g. dropped, over-tightened, or knocked over.
l Take appropriate care in handling bottles and components.
l Do not use the breastmilk if bottles or components become damaged.
9

2x PersonalFit™ Breastshield M (24mm)
(for other breast shield sizes
see Chapter 12, page 30)
810.7084
2x Freestyle connectors
(breast shield base, membrane,
transparent cap)
200.1513
2x bottle
811.0 0 21
2x bottle stand
810.0462
2x Calma multi lid
200.2714
1x Calma Solitaire
200.3386
4. Product description
Spare parts and accessories available for order can be found
on page 30
10

2x Calma multi lid
200.2714
Long tubing
1x mains adapter
200.4725 Euro 12V
200.4726 UK and US/JP 12V
200.4727 AUS/NZ 12V
200.4728 Adapter CN 12V
1x motor unit
200.4932
On/Off button
Reduce
vacuum
Increase
vacuum
Let-down
button
LED
1x Swing Maxi tubing
200.5259
Tubing support
Short tubing
Power adapter port
PVC tubing
port
Battery
compartment
Fixing clip
11

4
1
i
5.1 Before using for the rst
time and after every use
Disassemble the pump set
into individual parts.
Rinse all parts with cold,
clear water (approx. 20 °C)
for 10 – 15 seconds.
l Only use drinking-quality water
for cleaning.
l Take apart and wash all parts that
come in contact with the breast and
breastmilk immediately after use to
avoid dry up of milk residues and to
prevent growth of bacteria.
l The pump set requires no main-
tenance.
l Take care not to damage parts
of the pump set during cleaning.
l If the individual components of the
pump set are cleaned in a dish-
washer parts may be discoloured by
food pigments. This has no impact
on the function.
Note
Caution
5. Cleaning
12

23
5
Rinse all parts with cold,
clear water (approx. 20 °C).
If you clean the individual parts
of the pump set in the dish-
washer, place them on the top
rack or in the cutlery section.
Clean all parts with plenty
of warm soapy water
(approx. 30 °C).
Dry with a clean cloth or leave
to dry on a clean cloth.
As an alternative
to steps 2, 3 and 4.
or
13

1
i
3
More information on
page 12, chapter 5.1
steps 2–4
5.2 Before using for
the rst time and
once a day
Disassemble the pump set
into individual parts.
l Only use drinking-quality water
for cleaning.
l Take apart and wash all parts that
come in contact with the breast and
breastmilk immediately after use to
avoid dry up of milk residues and to
prevent growth of bacteria.
l When boiling, a tea spoon of citric
acid may be added to avoid a build-
up of limescale.
l Store the pump set in a clean bag/
container until next use. Or store it in
clean paper or a cloth.
Dry with a clean cloth or leave
to dry on a clean cloth.
Caution
Note
5. Cleaning
14


1
1
i
Plug the mains adapter cord
into the motor unit.
6.1 Mains operation
6. Preparing for pumping
l re 6.2 Battery operation:
The batteries do not need to be
removed when the main adapter
is used for pumping.
l Regularly check the condition of
the batteries in the motor unit.
l If Swing Maxi will remain unused
for a longer period of time, remove
the batteries from the battery
compartment.
l Batteries last for two to three
pumping sessions
(approx. 1 ½ hours pumping time).
6.2 Battery operation
Open the battery compart-
ment on the back in the
direction of the arrow.
l re 6.1 Mains operation:
Follow the exact order of the steps.
l Only use the mains adapter supplied
with the Swing Maxi.
l Make sure the voltage of the mains
adapter is compatible with the
power source.
Info
Warning
16


1
4
i
i
Carefully insert the light yellow
membrane into the base of the
breast shield.
6. Preparing for pumping
l Wash hands thoroughly (at least one
minute) with soap and water before
touching the breast and pump parts.
Screw bottle into connector.
6.3 Assembling
the pump set
l Carry out all the steps with care and
assemble the pump set correctly.
Otherwise a good vacuum may not
be achieved.
l Use Medela original accessories
only.
l Check pump set components for
wear or damage before use and
replace if necessary.
l All components must be completely
dry before use.
Caution
Info
Note
18


1
1
7. Expression
Insert the unused short tubing
into the tubing holder.
7.1 Preparing for
single pumping
Switch on the breast pump with
.
➙ The stimulation phase lasts
a maximum of two minutes.
The stimulation phase will
then automatically change
to the expression phase.
7.2 Pumping
l re step 2 (chapter 7.1):
Answer the following questions
to nd out whether the available
breast shield size will t:
l Is your nipple moving freely in
the tunnel?
l Is minimal or no areolar tissue
being pulled into the tunnel of
the breastshield?
l Do you see a gentle, rhythmical
motion in the breast with each
cycle of the pump?
l Do you feel the breast emptying
all over?
l Is your nipple pain-free?
If the answer to any of these ques-
tions is “No” or if you experience
problems or pain during expression,
consult your breastfeeding and
lactation consultant or midwife.
Caution
i
l re step 3 (chapter 7.1):
Do not hold the pump set by the
bottle. This can lead to blockage of
the milk ducts and engorgement.
l Wipe the breast with a warm
washcloth (do not use alcohol).
Note
20

1
2 3
1
23
Hold the breast shield onto
your breast with your thumb
and index nger.
Support your breast with the
palm of your hand.
Place the breast shield on
your breast so that your
nipple is properly centred
in the tunnel.
The vacuum can be adjusted
in every phase. Comfort
vacuum: Use to increase
the vacuum until it is slightly
unpleasant. Then press to
dial it back minimally.
If your milk starts to ow
earlier, press the button
to change to the expression
phase.
➙ Make sure that the milk
is owing into the bottle
properly.
21

i
i
4
1
7. Expression
Switch off the breast pump with
.
l Always disconnect the Swing Maxi
from the power source after
expression.
l Only ll the bottle to the 150 ml mark.
l Contact your midwife or lactation
consultant if you can express only
minimal or no milk or if expression is
painful.
l The Swing Maxi switches off auto-
matically if the pump has been
running for 30 minutes without any
manipulations.
l Do not kink the tubing during
expression.
Overview of LEDs
lights up On
does not light up Off
even, regular ashing Stimulation phase
light constantly on Expression phase
rapid ashing Min./Max. vacuum
Put on the Easy Expression
Bustier and leave the zip open
slightly.
7.3 Preparing for hands-free
expression with the
Easy Expression Bustier*
Note
Caution
Info
22

1
56
23
Use the stand to prevent the
bottle from tipping over.
Close the bottle with a lid.
➙ Follow the instructions in
Chapter 8 “Storing and thawing
breastmilk”.
Place the breast shield on your
breast under the bustier such
that your nipple is centred in
the tunnel of the breast shield.
Close the zip and insert the
connector onto the breast
shield.
More information on
page 20, Chapter 7.2. Clean in accordance
with Chapter 5,
page 12.
*Optional, see Chapter 12, page 30
23

1
4
i
7. Expression
Place the breast shield on your
breast so that your nipple is
properly centred in the tunnel.
l re step 2:
Do not hold the pump set by the
bottle. This can lead to blockage of
the milk ducts and engorgement.
7.4 Preparing for double
pumping
Place the second breast shield
on your breast so that your
nipple is properly centred in
the tunnel.
More on page 20,
Chapter 7.2, step 3
l Double pumping saves time and
increases the energy content of the
milk. Milk production is increased
and maintained long-term.
Caution
Info
24


8.1 Storage
Storage guidelines for freshly expressed breastmilk
(for healthy terms babies)
Room temperature Refrigerator Freezer Thawed breastmilk
4–6 hours at 19 to
26 °C ( 66 to 78 °F)
3–8 days at 4°C
(39 °F) or lower
6–12 months
–18 to –20 °C
(0 to 4 °F)
In refrigerator for
10 h max. Do not
refreeze!
l Do not store breastmilk in the door of the refrigerator. Instead choose the coldest
part of the refrigerator (this is at the back of the glass shelf above the vegetable
compartment).
8.2 Freezing
l You can freeze expressed breastmilk in milk bottles or “Pump & Save”* bags. Do
not ll the bottles or bags more than 3/4 full to allow space for possible expansion.
l Label the bottles or “Pump & Save” bags with the date of expression.
8.3 Thawing
Do not thaw frozen breastmilk or do not warm breastmilk in a microwave or
a pan of boiling water to avoid loss of vitamins, minerals and other important
components and to prevent burns.
l ln order to preserve the components of the breastmilk, thaw the milk in the
refrigerator overnight. Alternatively, you can hold the bottle or “Pump & Save”
bag under warm water (max. 37 °C).
l Gently swirl the bottle or “Pump & Save” bag to mix any fat that has separated.
Avoid shaking or stirring the milk.
Caution
8. Storing and thawing breastmilk
26

i
F
E
E
D
I
N
G
P
U
M
P
I
N
G
RESEARCH BASED SUPPORT FOR
BREASTFEEDING MOTHERS
Invented by Medela
Supporting
babies feeding
behavior
More
milk in
less time
S
U
C
K
L
I
N
G
2
-
P
H
A
S
E
C
A
L
M
A
S
T
I
M
U
L
A
T
I
O
N
E
X
P
R
E
S
S
I
O
N
M
I
L
K
F
L
O
W
9. Feeding breastmilk
Medela recommends Calma* for
feeding breastmilk.
Info
As a result of its comprehensive
research work, Medela is one of
the rst companies in the world t
o incorporate babies’ breastfeed-
ing behaviour into its 2-Phase
Expression and Calma innovations.
2-Phase Expression is based on the
baby’s natural suckling rhythm so
that more milk can be expressed in
less time. Short, stimulating patterns
are followed by longer ones, provid-
ing optimal milk ow. The unique
Calma breastmilk teat allows the
baby to pause and breathe during
feeding whilst maintaining the suck-
ling behaviour learned at the breast.
Developed for mother and baby for
a happy breastfeeding time.
*More information at www.medela.com
With Calma
l your baby can feed, pause and
breathe regularly.
l milk will only ow when a vacuum is
created.
l your baby’s natural feeding behaviour
will be maintained supporting easy
transition back to the breast.
Calma – unique feeding
solution for breastmilk.
You can nd detailed information
about Calma on the Medela website
(www.medela.com).
27

10. Troubleshooting
Problem Solution
If the motor
is not running
Check presence of mains current.
Check the position of the batteries in the battery compartment.
If there is loss
of power during
battery operation
Replace batteries.
If there is low
or no suction
Check all connections.
Engage cap correctly at the three connection points.
Hold the breast shield, not the connector or bottle, while expressing.
Ensure the breast shield forms a complete seal around the breast.
During single pumping, insert the unused tubing into the tubing
holder. Do not kink the tubing.
There should be no water in the tubing.
All components must be completely dry.
The pump
becomes wet
Unplug the mains adapter from the socket.
Switch off the pump.
Do not place the pump upside down. Control panel must point
upwards.
Store the pump in a dry, warm place for 24 hours.
Note:
Do not expose the pump to direct sunlight.
Do not accelerate the drying process by use of heat.
If condensation
appears in
the tubing
Rinse out the tubing.
Shake out any water droplets.
Hang up the tubing to air-dry.
28

Warranty
The “International Warranty” brochure contains detailed warranty information.
Disposal
The unit is made of various metal and plastics. Before disposal, the device is to
be rendered unusable and it must not be disposed of as unsorted municipal waste
in accordance with local regulations. Use your local return and collection system
for waste electrical and electronic equipment (incl. batteries). Improper disposal
may have harmful effects on the environment and on public health.
11. Warranty / disposal
29

Spare parts
Article number
Product
099.0271
099.0272
099.0273
099.0274
800.0840
200.1693
Swing maxi / Freestyle (100-240V; 12V) Euro
Swing maxi / Freestyle (100-240V; 12V) UK and US / JP
Swing maxi / Freestyle (100-240V; 12V) AUS / NZ
Swing maxi / Freestyle (100-240V; 12V) CN
Swing Battery cover 5 pcs.
Freestyle connector with valve 5 pcs.
099.0270 Swing Maxi Motor Unit
099.0275 Swing Maxi Tubing
Accessories
Article number
Product
008.0337
008.0338
008.0339
008.0340
008.0341
PersonalFit™ Breastshield S (21 mm)
PersonalFit™ Breastshield M (24 mm)
PersonalFit™ Breastshield L (27 mm)
PersonalFit™ Breastshield XL (30 mm)
PersonalFit™ Breastshield XXL (36 mm)
800.0796
200.1659
Breastmilk Bottle 150 ml
Breastmilk Bottle 250 ml
008.0139 Calma Solitaire
200.1756
200.0625
Cooling Bag
City Style Bag
008.0217
008.0220
008.0224
008.0225
Easy Expression Bustier white S
Easy Expression Bustier white M
Easy Expression Bustier white L
Easy Expression Bustier white XL
Other Medela products are available on the www.medela.com web site.
The following accessories for the Swing Maxi are available from Medela distribution
partners by specifying the product number.
12. Complete care during breastfeeding time
* If the result of expression is unsatisfactory or expression is painful, contact your
midwife or lactation consultant. A different size of PersonalFitTM breast shield may
help make expression more comfortable and successful.
30


1. Beoogd gebruik / contra-indicatie / populatie 33
2. Betekenis van de symbolen 34
3. Belangrke veiligheidsinformatie 36
4. Productomschrving 38
5. Reiniging 40
5.1 Voorafgaand aan het eerste gebruik en na elk gebruik 40
5.2 Voor het eerste gebruik en daarna eenmaal per dag 42
5.3 Het reinigen van de motor 43
6. Voorbereidingen voor het afkolven 44
6.1 Werking op netstroomadapter 44
6.2 Gebruik met batteren 44
6.3 De afkolfset in elkaar zetten 46
7. Afkolven 48
7.1 Voorbereiding enkel afkolven 48
7.2 Kolven 48
7.3 Voorbereiding voor handsfree afkolven met de Easy Expression Bustier 50
7.4 Voorbereiding voor dubbel afkolven 52
8. Moedermelk bewaren en ontdooien 54
8.1 Bewaren 54
8.2 Invriezen 54
8.3 Ontdooien 54
9. Moedermelk voeden 55
10. Problemen oplossen 56
11. Garantie / afvoeren 57
12. Volledige verzorging tdens de borstvoedingsperiode 58
13. EMC / Technische omschrving 116
14. Technische specicaties 123
Inhoudsopgave
32

1. 1. Beoogd gebruik / populatie – contra-indicatie
Het beoogde gebruik en indicaties van borstkolven
Borstkolven zn bedoeld voor gebruik door lacterende moeders, thuis of in het
ziekenhuis. Door het afkolven van moedermelk verzachten borstkolven de symptomen
van stuwing. In geval van mastitis ondersteunen borstkolven het genezingsproces
door moedermelk uit de aangedane borst te kolven. Door het afkolven worden tepels
met wondjes en kloven minder belast, en kunnen vlakke of ingetrokken tepels naar
buiten worden gebracht. Borstkolven zn ook bedoeld om moedermelk te geven
aan baby's die om diverse redenen niet rechtstreeks aan de borst kunnen drinken,
bvoorbeeld wegens problemen met aanleggen, gespleten gehemelte of in geval van
premature baby's.
Beoogde patiëntenpopulatie/gebruikers
Adolescente pediatrische of volwassen lacterende moeders. Veel vrouwen vinden
het gemakkelk, en soms ook noodzakelk, om nadat ze weer aan het werk zn
gegaan, op reis zn, of om andere redenen van hun baby zn gescheiden, met behulp
van een borstkolf de moedermelk af te kolven en te bewaren. Vrouwen zn vaak bl
te horen dat een borstkolf gebruikt kan worden als ondersteuning b het geven van
borstvoeding en dat sommige kolven zo zn ontworpen dat ze het zuigen van een
baby imiteren.
Contra-indicaties
Er zn geen contra-indicaties voor de Swing Maxi borstkolf bekend.
33

Waarschuwing
Kan leiden tot ernstig letsel of de dood.
Waarschuwing
Kan leiden tot lichte verwondingen.
Let op
Kan leiden tot materiële schade.
Info
Nuttige of belangrke informatie die niet gerelateerd is aan de veiligheid.
Symbolen op de verpakking
Dit symbool geeft aan dat het materiaal deel uitmaakt van een terugwinnings-/recy-
clingproces.
Dit symbool duidt een kartonnen verpakking aan.
Dit symbool geeft aan dat het apparaat niet in zonlicht geplaatst mag worden.
Dit symbool geeft aan dat het apparaat met zorg behandeld moet worden.
°C
Dit symbool geeft de temperatuurbeperkingen aan b gebruik, transport en opslag.
Dit symbool geeft de vochtigheidsbeperkingen aan b gebruik, transport en opslag.
Dit symbool geeft de luchtdrukbeperkingen aan b bediening, transport en opslag.
Dit symbool geeft aan dat het apparaat droog gehouden moet worden.
Dit symbool geeft aan dat de verpakking produkten bevat die goedgekeurd zn om
in contact te komen met levensmiddelen conform EG-verordening 1935/2004.
Dit symbool duidt op de unieke GSI identicatie van handelseenheden (GTIN) (barcodes)
Dit symbool geeft aan dat het apparaat niet samen met ongesorteerd gemeentelk
afval dient te worden afgevoerd (geldt alleen in de EU).
Dit symbool geeft te kennen dat de gebruiksaanwzing gevolgd moet worden.
Symbolen op het apparaat
Dit symbool geeft te kennen dat de gebruiksaanwzing gevolgd moet worden.
0123 Dit symbool geeft de conformiteit aan met de essentiële eisen van de Richtln
93/42/EEC van de Raad van 14 juni 1993 betreffende medische hulpmiddelen.
2. Betekenis van de symbolen
i
Het waarschuwingssymbool geeft belangrke veiligheidsinstructies aan. Als deze
instructies niet in acht worden genomen, kan dit letsel of schade aan de borstkolf
veroorzaken! Indien het waarschuwingssymbool wordt gebruikt in combinatie met
de volgende woorden, staat het voor:
i
34

Dit symbool geeft de fabrikant aan.
Dit symbool geeft aan dat het apparaat niet samen met ongesorteerd gemeentelk
afval dient te worden afgevoerd (geldt alleen in de EU).
Dit symbool duidt op de conformiteit met aanvullende Amerikaanse en
Canadese veiligheidseisen voor elektrische medische hulpmiddelen.
Dit symbool duidt op een type BF toegepast onderdeel.
SN Dit symbool geeft het serienummer van de fabrikant aan.
+Dit symbool geeft aan hoe de batter geplaatst moet worden.
IP22 Dit symbool wst op de bescherming tegen indringing van vaste vreemde voorwerpen
en schadelke effecten door indringing van water.
Dit symbool geeft de fabricagedatum aan (vier cfers voor het jaar
en twee cfers voor de maand).
Symbolen op de netstroomadapter
Dit symbool geeft aan dat de netstroomadapter een klasse II-apparaat is.
Dit symbool duidt op de conformiteit met de in China verplichte CCC-certicering
(China Compulsory Certication).
Dit symbool geeft aan dat de netstroomadapter op veiligheid is getest.
Dit symbool geeft aan dat de netstroomadapter alleen is bedoeld voor gebruik
binnenshuis.
Dit symbool duidt op de conformiteit met Amerikaanse en Canadese veiligheidseisen.
Dit symbool duidt op de conformiteit met de eisen van de
Federale Communicatiecommissie.
Dit symbool geeft de polariteit van de gelkstroomconnector aan.
Dit symbool duidt op de conformiteit met de regelgeving in Australië/Nieuw-Zeeland
(conformiteitsmarkering).
Dit CE-keurmerk geeft de conformiteit aan met de richtln betreffende lage voltage
en elektromagnetische compatibiliteit.
Dit symbool geeft aan dat het apparaat niet samen met ongesorteerd gemeentelk afval
dient te worden afgevoerd (geldt alleen in de EU). Het symbool met de gesloten balk
geeft aan dat de netstroomadapter na 13 augustus 2005 op de markt is gebracht.
Dit symbool wst op de conformiteit met Japanse veiligheidseisen.
Dit symbool duidt op de conformiteit met de eisen betreffende energie-efciëntie.
Dit symbool betekent wisselstroom.
Dit symbool betekent gelkstroom.
–
9 VDC
N136
35

3. Belangrijke veiligheidsinformatie
Als deze aanwzingen/veiligheidsinformatie niet wordt opgevolgd,
kan een veilig gebruik van het apparaat niet worden gegarandeerd.
Technische wzigingen voorbehouden.
Apparaat
Gevaar voor elektrocutie! Apparaat droog houden! Nooit in water of
in andere vloeistoffen dompelen!
De Swing Maxi borstkolf is niet hittebestendig: niet b radiatoren en
open vuur plaatsen.
Stel de motoreenheid niet bloot aan direct zonlicht.
Reparatiewerkzaamheden mogen alleen door een bevoegde servicedienst
worden uitgevoerd.
Repareer het apparaat niet zelf. Aan het apparaat mogen geen wzigingen
worden aangebracht.
Gebruik nooit een beschadigd apparaat. Vervang beschadigde of
versleten onderdelen.
MAX.
250 h
De bedrfsduur van de Swing Maxi borstkolf bedraagt 250 uur.
De levensduur die onder fabrieksgarantie valt, bedraagt twee jaar.
Omgaan met elektriciteit
De stroomtoevoer is pas gegarandeerd afgesloten als de stekker
van de netstroomadapter uit het stopcontact verwderd is.
Houd de netstroomadapter uit de buurt van verwarmde oppervlakken.
Pak een elektrisch apparaat dat in het water is gevallen niet vast.
Trek onmiddellk de stekker uit het stopcontact.
Laat de borstkolf niet onbeheerd achter met de stekker in het stopcontact.
36

Gebruik
Gebruik de Swing Maxi borstkolf alleen voor het doel waarvoor deze
bestemd is, zoals beschreven in deze gebruiksaanwzing.
Gebruik een elektrisch apparaat niet als het snoer of de stekker beschadigd
is, als het niet goed werkt, als het gevallen of beschadigd is of in het water
is gevallen.
Gebruik de Swing Maxi borstkolf niet tdens baden of douchen.
Gebruik de Swing Maxi borstkolf niet tdens het slapen of als u zeer
slaperig bent.
Dit is een product voor één gebruiker. Gebruik door meer dan één persoon
kan gezondheidsrisico’s met zich meebrengen.
Bestuur geen auto tdens het handsfree afkolven.
Er is toezicht vereist als de Swing Maxi borstkolf in de buurt van kinderen
wordt gebruikt.
Consulteer uw lactatiekundige of arts in geval van problemen of pn.
De frequenties van mobiele telefoons en radio’s kunnen een negatieve
invloed hebben op de Swing Maxi borstkolf.
l Door invriezen worden de plastic essen en onderdelen broos en is er een
verhoogde kans op breken als ze vallen.
l Ook kunnen essen en onderdelen beschadigd raken b verkeerde hantering,
bv. als ze vallen, te vast worden dichtgedraaid of worden omgestoten.
l Ga voorzichtig om met essen en onderdelen.
l Gebruik de moedermelk niet als de essen of onderdelen beschadigd zn.
37

2x PersonalFit™ borstschild M (24 mm)
(voor borstschilden in andere maten, zie
hoofdstuk 12, pagina 58)
810.7084
2x Freestyle connector
(borstschild-basis, membraan,
transparante kap)
200.1513
2x es
811.0021
2x standaard
810.0462
2x Calma multideksel
200.2714
1x Calma
200.3386
4. Productomschrijving
De leverbare reserveonderdelen en accessoires zn vermeld
op pagina 58.
38

2x Calma multideksel
200.2714
Lange slang
1x netstroomadapter
200.4725 Euro 12 V
200.4726 VK en VS/JP 12 V
200.4727 AU/NZ 12 V
200.4728 Adapter CN 12 V
1x motoreenheid
200.4932
Knop aan / uit
Vacuüm
verlagen
Vacuüm
verhogen
„Druppel“
toets
Led
1x Swing Maxi-slang
200.5259
Y-stuk slang
Korte slang
Poort voor
stroomadapter
Poort voor
PVC-slang
Battervak
Bevestigingsclip
39

4
1
i
5.1 Voorafgaand aan
het eerste gebruik
en na elk gebruik
Haal de afkolfset uit elkaar
tot losse onderdelen.
Spoel alle onderdelen 10 - 15
seconden in koud, schoon
water van circa 20 °C.
l Gebruik voor het reinigen alleen
drinkwater.
l Haal de borstkolf uit elkaar en maak
alle onderdelen die in aanraking
komen met de borst en moedermelk
onmiddellk na het gebruik schoon,
om te voorkomen dat melkresten
opdrogen en om de vorming van
bacteriën tegen te gaan.
l De afkolfset vraagt geen onderhoud.
l Pas op dat u tdens het reinigen
geen onderdelen van de afkolfset
beschadigt.
l Als de afzonderlke onderdelen van
de afkolfset in een afwasmachine
worden gereinigd, kunnen ze door
kleurstoffen in voedingsmiddelen
verkleuren. Dit is niet van invloed
op de functie.
Let op
Waarschuwing
5. Reiniging
40

23
5
Spoel alle onderdelen in koud,
schoon water van circa 20 °C
Als u de afzonderlke
onderdelen van de afkolfset
in de vaatwasser reinigt,
leg ze dan op het bovenste
rek of in de bestekmand.
Maak alle delen schoon in
ruim warm sop (circa 30 °C).
Droog af met een schone doek
of leg op een schone doek
om te drogen.
Als alternatief voor de
stappen 2, 3 en 4.
of
41

1
i
3
Meer informatie vindt u
op pagina 40, hoofd-
stuk 5.1, stappen 2-4
5.2 Voor het eerste
gebruik en daarna
eenmaal per dag
Haal de afkolfset uit elkaar tot
losse onderdelen.
l Gebruik voor het reinigen
alleen drinkwater.
l Haal de borstkolf uit elkaar en maak
alle onderdelen die in aanraking
komen met de borst en moedermelk
onmiddellk na het gebruik schoon,
om te voorkomen dat melkresten
opdrogen en om de vorming van
bacteriën tegen te gaan.
l Als u de delen reinigt in kokend
water, kunt u een beetje citroenzuur
toevoegen om te verhinderen dat er
kalkaanslag ontstaat.
l Bewaar de afkolfset tot het volgende
gebruik in een schoon zakje/schone
verpakking. Of bewaar hem in
schoon papier of in een doek.
Droog af met een schone doek
of leg op een schone doek om
te drogen.
Waarschuwing
Let op
5. Reiniging
42

2a 2b
1
Zorg dat alle delen onder
water staan en laat
vf minuten koken.
Maak voor reiniging in de mag-
netron gebruik van QuickClean*
Magnetronzakken en volg de
daarop aangegeven instructies.
of
*Meer informatie vindt u op www.medela.com
Afvegen met een schone,
vochtige doek.
5.3 Het reinigen van
de motor
43

1
1
i
Sluit het snoer van de
netstroomadapter aan
op de motoreenheid.
6.1 Werking op
netstroomadapter
6. Voorbereidingen voor het afkolven
l Betreffende 6.2 Gebruik met
batteren:
De batteren hoeven niet verwderd te
worden als de netstroomadapter voor
het kolven wordt gebruikt.
l Controleer regelmatig de staat van de
batteren in de motoreenheid.
l Als de Swing Maxi gedurende langere
td niet wordt gebruikt, verwder dan de
batteren uit het battercompartiment.
l De batteren gaan twee tot drie afkolf-
sessies mee (ongeveer anderhalf uur
afkolftd).
6.2 Gebruik met batteren
Open het battercompartiment
op de achterkant in de richting
van de pl.
l Betreffende 6.1 Gebruik met
netstroomadapter:
Voer de stappen in de juiste
volgorde uit.
l Gebruik alleen de netstroomadapter
die b de Swing Maxi geleverd is.
l Let erop dat de spanning van de
netstroomadapter overeenkomt met
die van de spanningsbron.
Info
Waarschuwing
44


1
4
i
i
Plaats het lichtgele membraan
zorgvuldig in de basis van het
borstschild.
6. Voorbereidingen voor het afkolven
l Was uw handen grondig (ten minste
een minuut) met water en zeep voor-
dat u uw borst en onderdelen van de
afkolfset aanraakt.
Schroef de es op de
connector.
6.3 De afkolfset in elkaar
zetten
l Voer alle stappen zorgvuldig uit en
zet de afkolfset op de juiste wze in
elkaar. Anders wordt misschien geen
goed vacuüm verkregen.
l Gebruik alleen originele accessoires
van Medela.
l Controleer voor gebruik de onderde-
len van de afkolfset op sltage en be-
schadiging en vervang ze zo nodig.
l Voor gebruik moeten alle onderdelen
helemaal droog zn.
Waarschuwing
Info
Let op
46


1
1
7. Afkolven
Steek de ongebruikte korte
slang in het Y-stuk.
7.1 Voorbereiding enkel
afkolven
Schakel de kolf in via .
➙ De stimulatiefase duurt
maximaal twee minuten.
De stimulatiefase gaat dan
automatisch over in
de afkolffase.
7.2 Kolven
l Betreffende stap 2 (hoofdstuk 7.1):
Beantwoord de volgende vragen om
de juiste maat van het borstschild te
bepalen:
l Kan de tepel vr binnen de schacht
bewegen?
l Wordt er geen of weinig weefsel
van uw tepelhof in de tunnel van het
borstschild getrokken?
l Ziet u b elke cyclus van de kolf een
rustige, ritmische beweging in uw
borst?
l Voelt u de borst helemaal leeg wor-
den?
l Is uw tepel pnloos?
Als uw antwoord op een van deze
vragen „nee“ is, of als u tdens het
afkolven problemen of pn ondervindt,
raadpleeg dan uw borstvoedings- en
lactatiekundige of uw verloskundige.
Waarschuwing
i
l Betreffende stap 3 (hoofdstuk 7.1):
Pak de afkolfset niet vast aan de es.
Dit kan leiden tot een blokkade van
de melkkanalen en tot stuwing.
l Neem de borst af met een warm
washandje (geen alcohol gebruiken).
Let op
48

1
2 3
1
23
Houd het borstschild met uw
duim en wsvinger op de borst.
Ondersteun uw borst met de
palm van uw hand.
Plaats het borstschild op
uw borst met de tepel in
het midden van de tunnel.
Het vacuümniveau kan in elke
fase worden aangepast. Com-
fort vacuüm: Druk op de knop
om het vacuüm te verhogen
totdat het enigszins onprettig
is. Druk dan op de knop om
het minimaal terug te stellen.
Als de melk eerder begint te
stromen, druk dan op de knop
om over te schakelen
naar de afkolffase.
➙ Zorg ervoor dat de melk
op de juiste manier de
es instroomt.
49

i
i
4
1
7. Afkolven
Schakel de borstkolf uit door
de knop in te drukken.
l Haal de stekker van de Swing Maxi
na het afkolven altd direct uit het
stopcontact.
l Vul de es niet verder dan tot aan de
150 ml-markering
l Raadpleeg uw verloskundige of lac-
tatiekundige als u slechts een mini-
male hoeveelheid of geen melk kunt
afkolven of als het afkolven pnlk is.
l De Swing Maxi schakelt automatisch
uit als de borstkolf 30 minuten heeft
aangestaan zonder dat enige aanpas-
sing aan de instellingen is uitgevoerd.
l Zorg ervoor dat de slang tdens
het afkolven niet knikt.
Overzicht van de leds
Brandt Aan
Brandt niet Uit
Knippert regelmatig Stimulatiefase
Lampje constant aan Afkolffase
Knippert snel Min./max. vacuüm
Doe de Easy Expression Bustier
aan en laat de rits een stukje open.
7.3 Voorbereidingen voor
handsfree afkolven met de
Easy Expression Bustier*
Let op
Waarschuwing
Info
50

1
56
23
Gebruik de standaard
om te voorkomen dat de
es omvalt.
Sluit de es met een deksel.
➙ Volg de aanwzingen in hoofd-
stuk 8 „Moedermelk bewaren
en ontdooien“.
Plaats het borstschild onder
de bustier op uw borst, zodanig
dat de tepel zich centraal in
de tunnel van het borstschild
bevindt.
Sluit de rits nu geheel en
plaats de connector op
het borstschild.
Meer informatie op
pagina 48,
hoofdstuk 7.2.
Reinigen zoals vermeld
in hoofdstuk 5,
pagina 40.
*Optioneel, zie hoofdstuk 12, pagina 58
51

1
4
i
7. Afkolven
Plaats het borstschild op uw
borst met de tepel in het
midden van de tunnel.
l Betreft stap 2:
Pak de afkolfset niet vast aan de es.
Dit kan leiden tot een blokkade van
de melkkanalen en tot stuwing.
7.4 Voorbereiding voor
dubbel afkolven
Plaats het tweede borstschild
op uw borst zodanig dat de
tepel zich centraal in de
schacht bevindt.
Meer informatie op
pagina 48, hoofdstuk
7.2, stap 3
l Dubbel afkolven bespaart td en
verhoogt de voedingswaarde van
de melk. Op de langere termn
neemt de melkproductie toe.
Waarschuwing
Info
52


8.1 Bewaren
Richtlijnen voor het bewaren van vers afgekolfde moedermelk
(voor gezonde, voldragen baby's)
Kamertemperatuur Koelkast Diepvriezer Ontdooide moedermelk
4–6 uur bij 19 tot
26 °C (66 tot 78 °F)
3–8 dagen bij 4 °C
(39 °F) of lager
6–12 maanden
–18 tot –20 °C
(0 tot 4 °F)
In de koelkast max. 10 u.
Niet opnieuw invriezen!
l Moedermelk niet in het deurvak van de koelkast bewaren. Kies in plaats daarvan de
koelste plaats in de koelkast (dat is achterin op de glazen plaat boven het groente-
compartiment).
8.2 Invriezen
l Vers afgekolfde moedermelk kan worden ingevroren in melkesjes of in “Pump
& Save“*-zakken. De esjes of zakken niet meer dan voor 3/4 vullen zodat er
ruimteoverblft voormogelkuitzettenbinvriezen.
l Label de esjes of “Pump & Save“-zakken met de afkolfdatum.
8.3 Ontdooien
Ingevroren moedermelk niet in een magnetron of in een pan met kokend water
ontdooien, om te voorkomen dat er vitaminen, mineralen of andere belangrijke
bestanddelen verloren gaan en om brandwonden te voorkomen.
l Ontdooi de melk door ze gedurende een nacht in de koelkast te plaatsen. Zo
worden de bestanddelen van de moedermelk goed beschermd. Een andere
mogelijkheid is om het esje of de “Pump & Save“-zak in warm water (max. 37 °C)
te plaatsen.
l Schud zachtjes het esje of de “Pump & Save“-zak om eventueel gescheiden vet
door de melk te mengen. Vermijd hard schudden en roeren van de melk.
Waarschuwing
8. Moedermelk bewaren en ontdooien
54

i
V
O
E
D
E
N
A
F
K
O
L
V
E
N
OP ONDERZOEK GEBASEERDE
ONDERSTEUNING VOOR
MOEDERS DIE BORSTVOEDING
GEVEN
Een uitvinding
van Medela
Ondersteuning
van het
drinkgedrag
van baby's
Meer melk in
minder tijd
Z
U
I
G
E
N
2
-
F
A
S
E
C
A
L
M
A
S
T
I
M
U
L
A
T
I
E
A
F
K
O
L
V
E
N
M
E
L
K
S
T
R
O
O
M
Gedetailleerde informatie over Calma
vindt u in de bgesloten instructies.
Calma – uniek voedingssys-
teem voor moedermelk.
9. Moedermelk voeden
Medela adviseert voor het voeden
Calma* te gebruiken.
Info
Op basis van uitvoerig onderzoek heeft
Medela als een van de eerste bedrven
ter wereld het borstvoedingsgedrag van
de baby gebruikt b het ontwikkelen
van de innovatieve 2-Phase Expression
en de Calma. 2-Phase Expression is
gebaseerd op het natuurlke zuigritme
van de baby, zodat er meer melk in
minder td kan worden afgekolfd.
Korte, stimulerende kolfpatronen
worden gevolgd door langere, voor
een optimale melkstroom. Door het
unieke Calma-voedingssysteem kan
de baby tdens het voeden pauzeren
en ademhalen, en behoudt h het aan
de borst geleerde zuiggedrag. Ontwik-
keld voor moeder en baby voor een
jne borstvoedingsperiode.
*Meer informatie vindt u op www.medela.com
Met Calma
l kan uw baby in zn eigen ritme drinken,
pauzeren en ademen;
l stroomt de melk pas als er een vacuüm
is gecreëerd;
l blft uw baby’s natuurlke drinktechniek
gehandhaafd waardoor h gemakkelk
weer kan overschakelen op de borst.
55

10. Problemen oplossen
Probleem Oplossing
De motor
loopt niet
Controleer of de stroomvoorziening in orde is.
Controleer de plaatsing van de batteren in het battercompartiment.
Er treedt verlies
van vermogen
op tdens werking
op batteren
Vervang de batteren.
Er is weinig of
geen zuigkracht
Controleer alle aansluitingen.
Bevestig de kap correct op de drie verbindingspunten.
Houd tdens het afkolven het borstschild vast, niet de connector of de
es.
Zorg ervoor dat het borstschild rondom luchtdicht op de borst afsluit.
Plaats tdens enkel afkolven de ongebruikte slang in het Y-stuk. Laat
de slang niet knikken.
Er mag zich geen water in de slang bevinden.
Alle onderdelen moeten volkomen droog zn.
De borstkolf is nat
geworden
Trek de netstroomadapter uit het stopcontact.
Schakel de borstkolf uit.
Houd de borstkolf niet ondersteboven. De bedieningsknoppen moeten
naar boven wzen.
Plaats de borstkolf gedurende 24 uur in een warme omgeving.
NB:
Plaats de borstkolf niet in direct zonlicht.
Het droogproces niet door verwarming versnellen.
De slang bevat
condensatie
Spoel de slangen.
Schud de waterdruppels eruit.
Hang de slang op en laat deze aan de lucht drogen.
56

Garantie
De „International Warranty“-brochure bevat gedetailleerde informatie over de garantie.
Weggooien
Het apparaat bestaat uit verschillende metalen en kunststoffen. Alvorens het apparaat
als afval af te voeren, moet het onbruikbaar worden gemaakt. Niet afvoeren als onge-
sorteerd gemeentelk afval, maar behandelen in overeenstemming met de plaatselke
regelgeving. Gebruik de plaatselke voorzieningen voor teruggave en inzamelen
van oude elektrische en elektronische apparatuur (incl. batteren). Als het apparaat
niet correct wordt vernietigd, kan dit schadelke gevolgen hebben voor het milieu
en de volksgezondheid.
11. Garantie / afvoeren
57

Reserveonderdelen
Artikelnummer Product
099.0271
099.0272
099.0273
099.0274
800.0840
200.1693
Swing Maxi / Freestyle (100-240 V; 12 V) Euro
Swing Maxi / Freestyle (100-240 V; 12 V) VK en VS / JP
Swing Maxi / Freestyle (100-240 V; 12 V) AU / NZ
Swing Maxi / Freestyle (100-240 V; 12 V) CN
Swing Batterij Cover 5 stuk
Freestyle Connector met Ventiel 5 stuk
099.0270 Swing Maxi motor
099.0275 Swing Maxi slangen
Accessoires
Artikelnummer Product
008.0337
008.0338
008.0339
008.0340
008.0341
PersonalFit™ borstschild S (21 mm)
PersonalFit™ borstschild M (24 mm)
PersonalFit™ borstschild L (27 mm)
PersonalFit™ borstschild XL (30 mm)
PersonalFit™ borstschild XXL (36 mm)
800.0796
200.1659
Moedermelkesje, 150 ml
Moedermelkesje, 250 ml
008.0139 Calma Solitaire
200.1756
200.0625
Koeltas
City Style tas
008.0217
008.0220
008.0224
008.0225
Easy Expression Bustier wit S
Easy Expression Bustier wit M
Easy Expression Bustier wit L
Easy Expression Bustier wit XL
Andere producten van Medela vindt u op de website www.medela.com.
De volgende accessoires voor de Swing Maxi kunnen, onder vermelding van het
productnummer, via de distributiepartners van Medela worden aangeschaft.
12. Volledige verzorging tijdens de borstvoedingsperiode
* Als het resultaat van het afkolven onbevredigend is of als het afkolven pnlk is,
raadpleeg dan uw verlos- of lactatiekundige. Wellicht kan een andere maat
PersonalFitTM borstschild het comfort en succes van het afkolven helpen vergroten.
58


1. Utilisation/Contre-indications/Public cible 61
2. Signication des symboles 62
3. Informations de sécurité importantes 64
4. Description du produit 66
5. Nettoyage 68
5.1 Avant la première utilisation et après chaque utilisation 68
5.2 Avant la première utilisation et une fois par jour 70
5.3 Nettoyage du bloc-moteur 71
6. Préparation de l’expression 72
6.1 Fonctionnement sur secteur 72
6.2 Fonctionnement sur piles 72
6.3 Assemblage du tire-lait 74
7. Expression 76
7.1 Préparation de l’expression simple 76
7.2 Expression du lait 76
7.3 Préparation de l’expression en mains libres avec le bustier
Easy Expression 78
7.4 Préparation de l’expression double 80
8. Conservation et décongélation du lait maternel 82
8.1 Conservation 82
8.2 Congélation 82
8.3 Décongélation 82
9. Alimentation au lait maternel 83
10. Résolution des problèmes 84
11. Garantie/recyclage 85
12. Une gamme complète pour l’allaitement maternel 86
13. Compatibilité électromagnétique/Description technique 116
14. Caractéristiques techniques 123
Table des matières
60

1. 1. Utilisation / Public cible – Contre-indications
Utilisation du tire-lait et indications
Les tire-laits sont conçus pour être utilisés par des femmes allaitantes, à l'hôpital ou à
domicile, en vue d'extraire le lait maternel. Ils aident à atténuer les symptômes
d'engorgement lors de la collecte du lait maternel. En cas de mastite, les tire-laits
servent à extraire le lait maternel du sein infecté, ce qui facilite le processus de
guérison. Les tire-laits servent à soulager les mamelons douloureux et crevassés, ainsi
qu'à faire ressortir des mamelons plats ou ombiliqués. Ils permettent également aux
mères de donner du lait maternel aux bébés qui ne peuvent pas être nourris directe-
ment au sein pour des raisons diverses (par exemple en cas de difcultés à téter, de
fente palatine ou de bébés prématurés).
Public cible
Les femmes allaitantes, qu'elles soient adolescentes ou adultes. De nombreuses
femmes trouvent pratique, voire nécessaire, d'utiliser un tire-lait pour extraire et
conserver leur lait une fois qu'elles ont repris le travail, qu'elles sont en voyage ou
séparées de quelque façon que ce soit de leur bébé. Elles sont souvent ravies
d'apprendre qu'un tire-lait peut être utilisé en tant que complément à l'allaitement
maternel et que certains sont même conçus pour imiter la succion d'un bébé au sein.
Contre-indications
Il n'existe aucune contre-indication connue pour le tire-lait Swing Maxi.
61

Attention
Peut engendrer des blessures graves ou la mort.
Avertissement
Peut provoquer des blessures légères.
Remarque
Peut causer un endommagement du matériel.
Info
Informations utiles ou importantes non relatives à la sécurité.
Symboles présents sur le conditionnement
Ce symbole indique que le matériau fait partie d’un procédé de récupération/recyclage.
Ce symbole indique un emballage en carton.
Ce symbole indique que l’appareil doit être tenu éloigné de la lumière du soleil.
Ce symbole indique que l’appareil est fragile et doit être manipulé avec soin.
°C
Ce symbole indique la limite de température à ne pas dépasser en cas de fonctionne-
ment, de transport et de stockage.
Ce symbole indique la limite d’humidité à ne pas dépasser en cas de fonctionnement,
de transport et de stockage.
Ce symbole indique la limite de pression atmosphérique à ne pas dépasser en cours
de fonctionnement, ainsi que pour le transport et le stockage.
Ce symbole indique que l’appareil doit être conservé au sec.
Ce symbole indique que l'emballage contient des produits destinés à entrer en
contact avec des denrées alimentaires conformément au règlement N° 1935/2004.
Ce symbole indique les codes articles internationaux (GTIN) GSI uniques.
Ce symbole indique que l’appareil ne peut être éliminé avec les déchets ménagers
non triés (en UE exclusivement).
Ce symbole indique qu’il est impératif de respecter les instructions d’utilisation.
Symboles présents sur l’appareil
Ce symbole indique qu’il est impératif de respecter les instructions d’utilisation.
0123 Ce symbole indique la conformité aux exigences essentielles de la Directive du Conseil
93/42/CEE du 14 juin 1993 relative aux dispositifs médicaux.
2. Signification des symboles
i
Le symbole d’avertissement indique toutes les instructions importantes pour la sécurité.
Le non-respect de ces instructions peut provoquer blessures ou endommagements du
tire-lait ! Utilisé conjointement avec les mots suivants, le symbole d’avertissement signie :
i
62

Ce symbole indique le fabricant.
Ce symbole indique que l’appareil ne peut être éliminé avec les déchets ménagers
non triés (en UE exclusivement).
Ce symbole indique la conformité aux exigences de sécurité supplémentaires des
États-Unis et du Canada en ce qui concerne les dispositifs médicaux électriques.
Ce symbole indique l’application d’une pièce de type BF.
SN Ce symbole indique le numéro de série assigné par le fabricant à l’appareil.
+Ce symbole indique le positionnement des piles.
IP22 Ce symbole indique la protection contre l’introduction de corps étrangers solides
et les effets nocifs de l’inltration d’eau.
Ce symbole indique la date de fabrication (quatre chiffres pour l’année et deux
chiffres pour le mois).
Symboles présents sur l’adaptateur secteur
Ce symbole indique que l’adaptateur secteur est un appareil de classe II.
Ce symbole indique la conformité à la certication chinoise obligatoire.
Ce symbole indique que l’adaptateur secteur a été testé quant à sa sécurité.
Ce symbole indique que l’adaptateur secteur est uniquement destiné à un usage intérieur.
Ce symbole indique la conformité aux exigences de sécurité des É.-U. et du Canada.
Ce symbole indique la conformité aux exigences de la commission fédérale des
communications américaine (FCC).
Ce symbole indique la polarité du connecteur d’alimentation CC.
Ce symbole indique la conformité aux exigences réglementaires d’Australie/de
Nouvelle-Zélande (marquage de conformité réglementaire).
Ce marquage CE indique la conformité aux directives sur la basse tension et la
compatibilité électromagnétique.
Ce symbole indique que l’appareil ne peut être éliminé avec les déchets ménagers
non triés (en UE exclusivement). Le symbole de la barre pleine indique que l’adaptateur
secteur a été mis sur le marché après le 13 août 2005.
Ce symbole indique la conformité aux exigences de sécurité japonaises.
Ce symbole indique la conformité aux exigences d’efcacité énergétique.
Ce symbole représente le courant alternatif.
Ce symbole représente le courant direct.
–
9 VDC
N136
63

3. Informations de sécurité importantes
Le non-respect de ces instructions/informations de sécurité peut engendrer
un danger de l’appareil. Susceptible de subir des modications techniques.
Logo
Risque d’électrocution ! Conservez l’appareil au sec ! N’immergez jamais
l’appareil dans l’eau ou dans d’autres liquides !
Le tire-lait Swing Maxi n’est pas thermorésistant : éloignez-le des radiateurs
et des ammes nues.
N’exposez pas le bloc-moteur à la lumière directe du soleil.
Toute réparation doit exclusivement être réalisée par un service technique
agréé.
Ne réparez pas l’appareil vous-même ! Aucune modication de l’appareil
n’est autorisée.
N’utilisez jamais un appareil endommagé. Remplacez les pièces endomma-
gées ou usées.
MAX.
250 h
La durée de vie en fonctionnement du tire-lait Swing Maxi est de 250 heures.
Sa durée de vie utile est de deux ans.
Utilisation de l’électricité
La déconnexion du secteur n’est assurée que par le débranchement
de l’adaptateur secteur de la prise électrique murale.
Conservez l’adaptateur secteur éloigné de toute surface chaude.
Ne saisissez jamais un appareil électrique tombé dans l’eau.
Débranchez-le immédiatement.
Ne laissez jamais le tire-lait sans surveillance lorsqu’il est branché à une
source d’alimentation.
64

Utilisation
N’utilisez le tire-lait Swing Maxi que pour l’usage auquel il est destiné,
tel que décrit dans ce manuel.
Ne faites jamais fonctionner un appareil électrique dont la che ou le cordon
est endommagé, s’il ne fonctionne pas correctement, est tombé, est
endommagé ou est tombé dans l’eau.
N’utilisez pas le tire-lait Swing Maxi lors du bain ou de la douche.
N’utilisez pas le tire-lait Swing Maxi pendant le sommeil ou en cas de grosse
somnolence.
Ce produit est exclusivement réservé à un usage personnel. L’utilisation du
même appareil par plusieurs personnes peut présenter un risque sanitaire.
Ne conduisez pas pendant l’expression en mains libres.
Une surveillance est nécessaire lorsque le tire-lait Swing Maxi est employé
à proximité d’enfants.
Consultez un spécialiste de l’allaitement ou un médecin en cas de pro-
blèmes ou de douleur.
Les appareils de communication portables et mobiles peuvent inuencer le
fonctionnement du tire-lait Swing Maxi.
l Les biberons et composants en plastique sont fragilisés par la congélation
et risquent de se briser en cas de chute.
l De même, les biberons et composants peuvent être endommagés à la suite
d’une mauvaise manipulation, par exemple en cas de chute, de serrage
excessif ou de renversement.
l Manipuler avec prudence les biberons et composants.
l Ne pas utiliser le lait maternel si les biberons ou composants sont
endommagés.
65

2x téterelles PersonalFit™ M (24 mm)
(pour d’autres tailles de téterelle,
reportez-vous au chapitre12 à la page86)
810.7084
2x connecteurs Freestyle
(base de la téterelle, membrane,
capuchon transparent)
200.1513
2x biberons
811.0021
2x supports de biberon
810.0462
2x couvercles
multiples Calma
200.2714
1x Calma Solitaire
200.3386
4. Description du produit
Les pièces détachées et accessoires disponibles à la vente sont indiqués
à la page 86.
66

Long tuyau
1x adaptateur secteur
200.4725 Europe 12 V
200.4726 R.-U. et É.-U./Japon 12 V
200.4727 Australie/Nouvelle Zélande 12 V
200.4728 Chine 12 V
1x bloc-moteur
200.4932
Bouton
marche/arrêt
Diminution
de la force
d’aspiration
Augmenta-
tion de
la force
d’aspiration
Bouton
d’écoulement
LED
1x tuyau Swing Maxi
200.5259
Support de tuyau
Petit tuyau
Port de
l’adaptateur secteur
Port du tuyau
en PVC
Compartiment
des piles
Attache de xation
67

4
1
i
5.1 Avant la première
utilisation et après
chaque utilisation
Démontez chaque élément
du tire-lait.
Rincez toutes les pièces
à l’eau claire et froide
(plus ou moins 20 °C) pendant
10 à 15 secondes.
l N’utilisez que de l’eau potable pour
le nettoyage de l’appareil.
l Démontez et nettoyez toutes les
pièces entrant en contact avec la
poitrine et le lait maternel immédia-
tement après utilisation an d’éviter
l’assèchement de résidus de lait et
la prolifération de bactéries.
l Le tire-lait ne nécessite aucun
entretien.
l Veillez à ne pas endommager les
pièces du tire-lait lors du nettoyage.
l Si les composants du set pour tire-
lait sont nettoyés au lave-vaisselle,
ils peuvent décolorer sous l’action
de pigments alimentaires. Ce phéno-
mène n’a aucune conséquence sur
le fonctionnement de l’appareil.
Remarque
Avertissement
5. Nettoyage
68

23
5
Rincez toutes les pièces
à l’eau claire et froide
(plus ou moins 20 °C).
Si vous nettoyez les compo-
sants du set pour tire-lait au
lave-vaisselle, placez-les sur
le panier supérieur ou dans
le bac à couverts.
Nettoyez toutes les pièces
à l’eau savonneuse et chaude
(plus ou moins 30 °).
Séchez l’appareil avec un
chiffon propre ou laissez-le
sécher sur un chiffon propre.
Alternative aux
étapes 2, 3 et 4.
ou
69

1
i
3
Pour plus d’informations,
consultez le chapitre 5.1,
étapes 2 à 4, page 68.
5.2 Avant la première
utilisation et une
fois par jour
Démontez chaque élément
du tire-lait.
l N’utilisez que de l’eau potable
pour le nettoyage de l’appareil.
l Démontez et nettoyez toutes les
pièces entrant en contact avec la
poitrine et le lait maternel immédia-
tement après utilisation an d’éviter
l’assèchement de résidus de lait et
la prolifération de bactéries.
l Lors de l’ébullition, vous pouvez
ajouter une cuillère à thé d’acide
citrique pour éviter la formation
de calcaire.
l Rangez le tire-lait dans un sac/
conteneur propre jusqu’à sa pro-
chaine utilisation. Ou emballez-le
dans un papier ou chiffon propre.
Séchez l’appareil avec un
chiffon propre ou laissez-le
sécher sur un chiffon propre.
Avertissement
Remarque
5. Nettoyage
70

2a 2b
1
Recouvrez toutes les pièces
d’eau et portez à ébullition
pendant 5 minutes.
Utilisez les sacs QuickClean*
pour four à micro-ondes
conformément aux instructions.
ou
*Pour plus d’informations, consultez le site www.medela.com.
Essuyez-le avec un chiffon
propre et humide.
5.3 Nettoyage du
bloc-moteur
71

1
1
i
Branchez le cordon de l’adap-
tateur secteur au bloc-moteur.
6.1 Fonctionnement
sur secteur
6. Préparation de l’expression
l 6.2 Fonctionnement sur piles :
Les piles ne doivent pas être retirées
lors de l’utilisation de l’appareil avec
l’adaptateur secteur.
l Vériez régulièrement l’état des piles
dans le bloc-moteur.
l En cas de non-utilisation du Swing
Maxi pendant une période prolongée,
retirez les piles de leur compartiment.
l Les batteries ont une autonomie de
deux à trois séances d’expression
(environ 1 ½ heure d’expression).
6.2 Fonctionnement
sur piles
Ouvrez le compartiment des
piles situé au dos de l’appareil
en suivant le sens de la èche.
l 6.1 Fonctionnement sur secteur :
Respectez l’ordre exact des étapes
indiquées.
l N’utilisez que l’adaptateur secteur
fourni avec le Swing Maxi.
l Veillez à ce que la tension de
l’adaptateur secteur corresponde
à celle de la source d’alimentation.
Info
Attention
72


1
4
i
i
Insérez précautionneusement
la membrane jaune clair dans
la base de la téterelle.
6. Préparation de l’expression
l Lavez-vous soigneusement les mains
(au moins pendant une minute) avec
de l’eau et du savon avant de tou-
cher le sein et les pièces du tire-lait.
Vissez le biberon sur le
connecteur.
6.3 Assemblage du tire-lait
l Exécutez soigneusement toutes les
étapes de la procédure et montez
le tire-lait correctement. Sans quoi,
vous n’obtiendrez pas une bonne
force d’aspiration.
l N’utilisez que des accessoires Medela
originaux.
l Avant utilisation, vériez que les
composants du tire-lait ne présentent
aucun signe d’usure ou d’endomma-
gement et remplacez-les si néces-
saire.
l Tous les composants doivent être
complètement secs avant utilisation.
Avertissement
Info
Remarque
74


1
1
7. Expression
Insérez le petit tuyau non
utilisé dans le support
de tuyau.
7.1 Préparation de
l’expression simple
Activez le tire-lait en appuyant
sur le bouton .
➙ La phase de stimulation dure
deux minutes au maximum.
La phase de stimulation passe
ensuite automatiquement en
phase d’expression.
7.2 Expression du lait
l Étape 2 (chapitre 7.1) :
Répondez au questionnaire suivant
pour vérier que la taille de la téterelle
est adaptée :
l Le mamelon bouge-t-il librement
dans l’embout de la téterelle ?
l Est-ce qu’une petite partie de
l’aréole, voire aucune, s’étire dans
l’embout de la téterelle ?
l Observez-vous un mouvement doux
et rythmé du sein à chaque cycle
d’aspiration ?
l Sentez-vous votre sein se vider pen-
dant toute l’expression ?
l Vos mamelons sont-ils indolores ?
Si la réponse à l’une de ces questions
est „Non“ ou si vous éprouvez des
problèmes ou une douleur pendant
l’expression, consultez un spécialiste
en allaitement ou une sage-femme.
Avertissement
i
l Étape 3 (chapitre 7.1) :
Ne tenez pas le tire-lait par le biberon.
Vous pourriez provoquer un blocage
des conduites de lait et un engorge-
ment de celles-ci.
l Essuyez le sein avec un gant de toi-
lette chaud (n’utilisez pas d’alcool).
Remarque
76

1
2 3
1
23
Maintenez la téterelle sur le
sein à l’aide de votre pouce
et de votre index.
Soutenez votre sein avec la
paume de votre main.
Placez la téterelle sur le
sein de manière à centrer
correctement le mamelon
dans l’embout.
La force d’aspiration peut être
adaptée à chaque phase. Force
d’aspiration de confort : utilisez
le bouton pour augmenter la
force d’aspiration jusqu’à ce qu’elle
devienne légèrement désagréable.
Appuyez ensuite sur le bouton
pour la régler de nouveau au
minimum.
Si le lait commence à s’écouler
plus rapidement, appuyez sur
le bouton pour passer
en phase d’expression.
➙ Veillez à ce que le lait
s’écoule correctement
dans le biberon.
77

i
i
4
1
7. Expression
Désactivez le tire-lait en appuyant
sur le bouton .
l Déconnectez toujours le tire-lait Swing
Maxi de la source d’alimentation après
l’expression.
l Ne remplissez le biberon que jusqu’au
marquage 150 ml.
l Contactez une sage-femme ou un
spécialiste en allaitement si vous
n’exprimez que très peu de lait ou
pas du tout ou si l’expression s’avère
douloureuse.
l Le Swing Maxi se désactive auto-
matiquement si le tire-lait fonctionne
pendant 30 minutes sans aucune
manipulation.
l Ne pliez pas le tuyau pendant
l’expression.
Aperçu des LED
s’allume Activé
ne s’allume pas Désactivé
clignote lentement Phase de stimulation
lumière constante Phase d’expression
clignote rapidement Force d’aspiration
min./max.
Mettez le bustier Easy Expression
et laissez la fermeture-éclair
légèrement ouverte.
7.3 Préparation de l’expression
en mains libres avec le
bustier Easy Expression*
Remarque
Avertissement
Info
78

1
56
23
Utilisez le support pour
éviter que le biberon ne
se renverse.
Fermez le biberon avec un couvercle.
➙ Respectez les instructions conte-
nues au chapitre 8 „Conservation
et décongélation du lait maternel“.
Placez la téterelle sur votre sein
sous le bustier de manière à
centrer votre mamelon dans
l’embout de la téterelle.
Refermez la fermeture-éclair
et insérez le connecteur sur la
téterelle.
Pour plus d’informa-
tions, consultez le
chapitre 7.2, page 76.
Nettoyez-le en respectant
les instructions
contenues au
chapitre 5, page 68.
*Consultez éventuellement le chapitre 12, page 86.
79

1
4
i
7. Expression
Placez la téterelle sur le sein de
manière à centrer correctement
le mamelon dans l’embout.
l Étape 2 :
Ne tenez pas le tire-lait par le bi-
beron. Vous pourriez provoquer un
blocage des conduites de lait et
un engorgement de celles-ci.
7.4 Préparation de
l’expression double
Placez l’autre téterelle sur
le sein de manière à centrer
correctement le mamelon
dans l’embout.
Pour plus d’informations,
consultez le chapitre 7.2,
étape 3, page 76.
l Une expression double permet de
gagner du temps et accroît la teneur
énergétique du lait. La production
de lait s’en voit ainsi augmentée
et maintenue à long terme.
Avertissement
Info
80

1
23
Maintenez la téterelle sur le
sein à l’aide de votre pouce
et de votre index.
Soutenez votre sein avec
la paume de votre main.
Activez le tire-lait en appuyant
sur le bouton .
➙ La phase de stimulation dure
deux minutes au maximum.
La phase de stimulation passe
ensuite automatiquement
en phase d’expression.
81

8.1 Conservation
Règles de conservation pour le lait maternel fraîchement exprimé
(pour les bébés en bonne santé nés à terme)
Température ambiante Réfrigérateur Congélateur Lait maternel décongelé
4–6 heures de
19 à 26 °C (66 à 78 °F)
3–8 jours à 4 °C
(39 °F) ou moins
6–12 mois
–18 à –20 °C
(0 à 4 °F)
Au réfrigérateur pendant
au max. 10 h. Ne pas
recongeler !
l Ne conservez pas le lait maternel dans la porte du réfrigérateur. Choisissez plutôt la
partie la plus froide du réfrigérateur (à l'arrière de la clayette au-dessus du bac
à légumes).
8.2 Congélation
l Vous pouvez congeler le lait maternel exprimé dans des biberons ou des sachets
« Pump & Save »*. Ne remplissez pas les biberons ou sachets à plus de 3/4 an de
laisser de l'espace pour la solidication du ilait.
l Indiquez la date d'expression sur les biberons ou sachets « Pump & Save ».
8.3 Décongélation
Ne décongelez pas et ne réchauffez pas le lait maternel au four à micro-ondes
ni dans une casserole d'eau bouillante an d'éviter toute perte de vitamines, de
minéraux et d'autres nutriments essentiels, ainsi que tout risque de brûlure.
l Pour préserver les composants du lait maternel, décongelez le lait dans le
réfrigérateur la veille de son utilisation. Vous pouvez également tenir le biberon
ou le sachet « Pump & Save » sous l'eau chaude (max. 37 °C).
l Secouez délicatement le biberon ou le sachet « Pump & Save » an d'homogé-
néiser les corps gras. Évitez de secouer vigoureusement ou d'agiter le lait.
Avertissement
8. Conservation et décongélation du lait maternel
82

i
A
L
L
A
I
T
E
M
E
N
T
E
X
P
R
E
S
S
I
O
N
SUPPORT BASÉ SUR
LA RECHERCHE POUR LES
MÈRES ALLAITANTES
Invention de
Medela
Prise en
considération
du mécanisme
d'alimentation
acquis par
bébé
Plus de lait en
moins de temps
S
U
C
C
I
O
N
D
U
B
É
B
É
2
-
P
H
A
S
E
C
A
L
M
A
S
T
I
M
U
L
A
T
I
O
N
E
X
P
R
E
S
S
I
O
N
É
C
O
U
L
E
M
E
N
T
D
U
L
A
I
T
9. Alimentation au lait maternel
Medela recommande Calma* pour une
alimentation au lait maternel.
Calma – une solution d’alimentation
unique conçue pour le lait maternel
Info
Conséquence de ses travaux de
recherche, Medela est devenue l’une
des premières entreprises au monde à
intégrer le mécanisme d’allaitement des
bébés dans ses innovations : 2-Phase
Expression et Calma. 2-Phase Expres-
sion se base sur le rythme naturel de
succion du bébé, an d’exprimer plus
de lait en moins de temps. Les mou-
vements brefs de stimulation sont
suivis de mouvements plus longs,
générant un écoulement de lait
optimal. Calma, l’unique embout
conçu pour le lait maternel, per-
met à votre enfant de marquer des
pauses et de reprendre son soufe
pendant l’allaitement, tout en conser-
vant le comportement de succion qu’il
a appris naturellement en tétant le sein.
Développé pour permettre aux mamans
et aux bébés de faire de l’allaitement un
moment privilégié.
*Pour plus d’informations, consultez le site www.medela.com.
Avec Calma
l Votre bébé peut se nourrir, marquer des
pauses et respirer régulièrement.
l Le lait s’écoule uniquement lorsqu’une
force d’aspiration est exercée.
l Le mécanisme naturel d’alimentation de
votre bébé est maintenu, ce qui permet
un retour aisé à l’allaitement au sein.
Des informations détaillées concernant
Calma peuvent être trouvées dans les
instructions ci-jointes. 83

10. Résolution des problèmes
Problème Solution
Si le moteur ne
fonctionne pas
Vériez l’alimentation en courant électrique.
Vériez la position des piles dans le compartiment.
S’il y a une perte
de puissance pen-
dant le fonctionne-
ment sur piles
Remplacez les piles.
S’il n’y a pas
d’aspiration ou
si l’aspiration
est trop faible
Vériez toutes les connexions.
Engagez le capuchon correctement dans les trois points d’ancrage.
Tenez la téterelle, pas le connecteur ni le biberon, pendant l’expression.
Vériez que la téterelle est placée de manière hermétique sur le sein.
Lors de l’expression simple, insérez le tuyau non utilisé dans le support
de tuyau. Ne pliez pas le tuyau.
Vériez qu’il n’y a pas de résidu d’eau dans le tuyau.
Tous les composants doivent être complètement secs.
Le tire-lait
devient humide
Débranchez l’adaptateur secteur de la prise.
Désactivez le tire-lait.
Ne placez pas le tire-lait à l’envers. Le panneau de commandes doit
être dirigé vers le haut.
Laissez le tire-lait dans un endroit sec et chaud pendant 24 heures.
Remarque :
N’exposez pas le tire-lait à la lumière directe du soleil.
N’accélérez pas le procédé de séchage en utilisant une source
de chaleur.
Si de la
condensation
apparaît dans
le tuyau
Rincez le tuyau.
Secouez-le an d’éliminer les gouttes d’eau.
Suspendez le tuyau pour le laisser sécher à l’air.
84

Garantie
La brochure „Garantie internationale“ contient des informations détaillées relatives
à la garantie.
Recyclage
Cet appareil est composé de différents métaux et plastiques. Avant élimination,
l’appareil doit être rendu inutilisable. En fonction de la réglementation locale, il ne
peut être jeté avec les déchets ménagers non triés. Utilisez votre système local de
collecte de rebuts d’équipements électriques et électroniques (y compris les piles).
Une élimination non conforme peut avoir des effets néfastes sur l’environnement
et la santé publique.
11. Garantie/recyclage
85

Pièces détachées
Référence
de l’article Produit
099.0271
099.0272
099.0273
099.0274
800.0840
200.1693
Swing Maxi/Freestyle (100-240 V ; 12 V) Europe
Swing Maxi/Freestyle (100-240 V ; 12 V) R.-U. et É.-U./Japon
Swing Maxi/Freestyle (100-240 V ; 12 V) Australie/Nouvelle Zélande
Swing Maxi/Freestyle (100-240 V ; 12 V) Chine
Swing Couvercle de la batterie 5 pces
Freestyle Connecteur avec valve 5 pces
099.0270 Bloc-moteur Swing Maxi
099.0275 Tuyau Swing Maxi
Accessoires
Référence de l’article Produit
008.0337
008.0338
008.0339
008.0340
008.0341
Téterelle PersonalFit™ S (21 mm)
Téterelle PersonalFit™ M (24 mm)
Téterelle PersonalFit™ L (27 mm)
Téterelle PersonalFit™ XL (30 mm)
Téterelle PersonalFit™ XXL (36 mm)
800.0796
200.1659
Biberon pour lait maternel 150 ml
Biberon pour lait maternel 250 ml
008.0139 Calma Solitaire
200.1756
200.0625
Sac de refroidissement
Sac City Style
008.0217
008.0220
008.0224
008.0225
Bustier Easy Expression blanc S
Bustier Easy Expression blanc M
Bustier Easy Expression blanc L
Bustier Easy Expression blanc XL
Les autres produits Medela sont disponibles sur le site web www.medela.com.
En spéciant le numéro de produit, vous pouvez obtenir auprès des distributeurs
Medela les accessoires suivants du Swing Maxi.
12. Une gamme complète pour l’allaitement maternel
* Si l’expression s’avère douloureuse ou insatisfaisante, contactez une sage-femme
ou un spécialiste en allaitement. Une téterelle PersonalFitTM de taille différente peut
aider à rendre l’expression plus confortable et plus efcace.
86


1. Peruntukan / Kontraindikasi / Populasi 89
2. Arti simbol 90
3. Petunjuk keselamatan penting 92
4. Uraian produk 94
5. Membersihkan 96
5.1 Sebelum menggunakannya untuk kali pertama dan selanjutnya 96
5.2 Sebelum menggunakannya untuk kali pertama dan sekali setiap hari 98
5.3 Membersihkan unit motor 99
6. Persiapan memompa 100
6.1 Pengoperasian dengan listrik 100
6.2 Pengoperasian dengan baterai 100
6.3 Merakit pompa 102
7. Ekspresi 104
7.1 Menyiapkan pemompaan tunggal 104
7.2 Memompa 104
7.3 Mempersiapkan ekspresi tanpa menggunakan tangan dengan
Easy Expression Bustier 106
7.4 Menyiapkan pemompaan ganda 108
8. Penyimpanan dan Pencairan ASI 110
8.1 Penyimpanan 110
8.2 Pembekuan 110
8.3 Pencairan 110
9. Memberikan ASI 111
10. Jika ada masalah 112
11. Garansi / pembuangan 113
12. Perawatan lengkap selama periode menyusui 114
13. EMC / Uraian Teknis 116
14. Spesikasi teknis 123
Daftar Isi
88

1. 1. Peruntukan / Populasi – Kontraindikasi
Peruntukan dan indikasi pompa ASI ini
Pompa ASI ini ditujukan untuk membantu ibu-ibu menyusui di rumah sakit atau
di rumah untuk memerah ASI. Indikasi pompa ASI adalah meringankan gejala
pembengkakan dengan memerah ASI. Untuk kasus mastitis, pompa ASI mendukung
proses penyembuhan dengan membuang ASI dari payudara yang sakit. Pompa ASI ini
ditujukan untuk meringankan puting luka dan retak dan mengembalikan posisi puting
yang terbenam atau datar. Pompa ASI ini juga memudahkan para ibu memberikan ASI
pada bayi yang tidak dapat menyusu secara langsung akibat gangguan menghisap,
bibir sumbing, atau lahir prematur.
Populasi pasien/pengguna yang dituju
Perempuan menjelang dewasa atau ibu menyusui. Banyak ibu merasa nyaman,
atau bahkan perlu, menggunakan pompa ASI untuk mengeluarkan dan menyimpan
ASI sepulang kerja, atau selama melakukan perjalanan atau saat sedang jauh dari
bayi mereka. Wanita senang mengetahui bahwa pompa ASI dapat digunakan untuk
menyempurnakan pemberian ASI dan bahwa beberapa jenis pompa dirancang meniru
isapan bayi yang sedang menyusu.
Kontraindikasi
Tidak ada kontraindikasi yang diketahui untuk pompa ASI Swing Maxi.
89

Peringatan
Dapat menyebabkan cedera serius atau kematian.
Awas
Dapat menyebabkan cedera ringan .
Catatan
Dapat menimbulkan kerusakan pada harta benda
Info
Informasi berguna atau penting yang tidak berhubungan dengan keselamatan.
Simbol pada kemasan
Simbol ini berarti produk menggunakan bahan hasil daur ulang.
Simbol ini berarti kemasan karton.
Simbol ini berarti jauhkan perangkat dari sinar matahari.
Simbol ini berarti barang mudah pecah tangani dengan hati-hati.
°C
Simbol menunjukkan batasan suhu pengoperasian, pengangkutan, dan penyimpanan.
Simbol ini menunjukkan batasan kelembaban pengoperasian, pengangkutan,
dan penyimpanan.
Simbol ini menunjukkan batasan tekanan atmosfer untuk pengoperasian,
Pengangkutan / Penyimpanan
Simbol ini artinya jaga perangkat tetap kering.
Simbol ini menunjukkan bahwa kemasan berisi produk yang ditujukan berhubungan
dengan makanan sesuai dengan peraturan 1935/2004.
Simbol ini menunjukkan Nomor Item Perdagangan Global GSI (GTIN) unik.
Simbol ini artinya jangan buang produk bersama limbah rumah tangga lain yang
tidak disortir (khusus UE).
Simbol ini artinya patuhi petunjuk penggunaan.
Simbol pada perangkat
Simbol ini artinya patuhi petunjuk penggunaan.
0123 Simbol ini artinya produk memenuhi ketentuan Council Directive 93/42/EEC
tanggal 14 Juni 1993 untuk peralatan medis.
2. Arti simbol
i
Simbol peringatan berisi semua petunjuk penting bagi keselamatan. Patuhi
petunjuk-petunjuk tersebut untuk menghindari cedera atau kerusakan pada pompa
ASI. Jika digunakan bersama kata-kata berikut, simbol peringatan tersebut artinya:
i
90

Simbol ini menunjukkan produsen alat.
Simbol ini artinya jangan buang produk bersama limbah rumah tangga lain yang
tidak disortir (khusus UE).
Simbol ini berarti produk memenuhi ketentuan keselamatan tambahan AS dan
Kanada untuk peralatan medis elektrik.
Simbol ini menunjukkan komponen terapan tipe BF.
SN Simbol ini menunjukkan nomor seri yang ditetapkan produsen untuk perangkat
tersebut.
+Simbol ini menunjukkan posisi sel baterai.
IP22 Simbol ini menunjukkan perlindungan terhadap masuknya objek asing padat dan
pengaruh negatif masuknya air.
Simbol ini menunjukkan tanggal produksi (empat digit untuk tahun dan
dua digit untuk bulan).
Simbol pada adaptor
Simbol ini berarti adaptor ini termasuk perangkat kelas II.
Simbol ini artinya adaptor memenuhi Ketentuan Sertikasi Wajib di Cina.
Simbol ini artinya adaptor sudah menjalani uji keamanan.
Simbol ini artinya adaptor hanya boleh digunakan di dalam ruang.
Simbol ini artinya produk memenuhi ketentuan keselamatan yang berlaku di A.S
dan Kanada.
Simbol ini berarti produk memenuhi ketentuan Federal Commission.
Simbol ini menunjukkan polaritas konektor d.c.
Simbol ini artinya produk memenuhi ketentuan peraturan AUZ/NZ
(Tanda memenuhi peraturan).
Tanda CE artinya produk memenuhi ketentuan kompatibilitas tegangan rendah
dan elektromagnetik.
Simbol ini artinya jangan membuang produk bersama limbah kota yang tidak disortir (khu-
sus UE). Simbol batang solid artinya adaptor dpasarkan setelah tanggal 13 Agustus 2005.
Simbol ini artinya produk memenuhi ketentuan keselamatan yang berlaku di Jepang.
Simbol ini artinya produk memenuhi ketentuan tentang esiensi energi.
Simbol ini artinya arus bolak-balik.
Simbol ini artinya arus searah.
–
9 VDC
N136
91

3. Petunjuk keselamatan penting
Mengoperasikan produk tanpa mematuhi petunjuk/informasi keselamatan
ini dapat menimbulkan bahaya. Perubahan teknis dapat dilakukan.
Produk
Bahaya tersengat listrik! Jaga produk tetap kering! Jangan merendamnya
di air atau cairan lain!
Pompa ASI Swing Maxi tidak tahan panas: jauhkan dari radiator dan api
terbuka.
Hindarkan unit motor dari sinar matahari langsung.
Hanya boleh diperbaiki oleh bengkel servis resmi.
Jangan memperbaiki sendiri! Dilarang memodikasi produk.
Jangan menggunakan produk rusak. Ganti komponen yang rusak atau aus.
MAX.
250 h
Umur pengoperasian pompa ASI Maxi Swing adalah 250 jam.
Masa pakainya adalah dua tahun.
Pengoperasian dengan tenaga listrik
Copot selang hanya setelah adaptornya dilepas dari stopkontak.
Jauhkan adaptor dari sumber panas.
Jangan mengambil peralatan elektrik apapun yang jatuh ke dalam air.
Segera cabut jack-nya.
Jangan pernah meninggalkan pompa ASI ini tanpa melepas jack-nya dari
sumber arus.
92

Penggunaan
Gunakan pompa ASI Swing Maxi sesuai peruntukannya seperti diuraikan
di dalam buku petunjuk ini.
Jangan menggunakan peralatan elektrik yang kabel atau jack-nya rusak,
tidak berfungsi dengan benar, pernah jatuh atau rusak, atau jatuh ke air.
Jangan gunakan pompa ASI Swing Maxi sambil mandi atau di bawah pancuran.
Jangan gunakan pompa ASI Swing Maxi sambil tidur atau saat terlalu ngantuk.
Satu produk satu pengguna saja. Menggunakannya secara bergantian
berbahaya bagi kesehatan.
Jangan gunakan produk ini saat mengemudi.
Hati-hati saat menggunakan pompa ASI Swing Maxi ini di sekitar anak-anak.
Jika muncul gangguan atau rasa sakit, hubungi konsultan menyusui atau
dokter Anda.
Peralatan komunikasi frekuensi radio portabel dan bergerak dapat
mengganggu fungsi Pompa ASI Swing Maxi.
l Botol dan bagian komponen dari plastik menjadi rapuh jika beku dan dapat
pecah jika jatuh.
l Selain itu, botol dan bagian-bagian komponen dapat rusak jika tidak ditangani
dengan benar, misalnya, terjatuh, terlalu kencang, atau terbentur.
l Hati-hati saat menangani botol dan komponen.
l Jangan gunakan ASI jika botol atau komponen rusak.
93

2x PersonalFit™ Breastshield M (24mm)
(untuk ukuran corong lain baca Bab 12,
halaman 114)
810.7084n
2x konektor Freestyle
(dasar corong, membran,
tutup transparan)
200.1513
2x botol
811.0021
2x kaki botol
810.0462
2x Calma multi lid
200.2714
1x Calma Solitaire
200.3386
4. Uraian produk
Suku cadang dan aksesoris yang tersedia untuk dipesan dapat
ditemukan pada halaman 114.
94

2x Calma multi lid
200.2714
Selang panjang
1x adaptor
200.4725 Eropa 12V
200.4726 Inggris dan A.S./JP 12V
200.4727 AUS/NZ 12V
200.4728 Adaptor CN 12V
1x unit motor
200.4932
Tombol On/Off
Vakum
pengurang
Vakum
penambah
Tombol
cucuran
LED
1x selang Swing Maxi
200.5259
Penahan selang
Selang pendek
Lubang adaptor daya
Lubang selang
PVC
Baterai kosong
baterai.
Klip penahan
95

4
1
i
5.1 Sebelum menggunakan-
nya untuk kali pertama
dan selanjutnya
Urai pompa per komponennya.
Bilas semua komponen dengan
air bersih dingin (suhu kira-kira
20 °C) selama 10 - 15 detik.
l Hanya gunakan air yang benar-benar
bersih untuk membersihkan produk.
l Lepas dan cuci semua komponen
yang berkontak dengan payudara dan
ASI segera setelah digunakan untuk
menghindari sisa ASI yang mengering
dan mencegah pertumbuhan bakteri.
l Pompa tidak perlu dirawat secara
khusus.
l Hati-hati jangan sampai merusak
komponen pompa saat dibersihkan.
l Pigmen makanan dapat memudarkan
warna komponen pompa yang diber-
sihkan di dalam pencuci perabotan.
Perubahan warna ini tidak mengurangi
fungsi produk.
Catatan
Awas
5. Membersihkan
96

23
5
Bilas semua komponen
dengan air bersih dingin
(suhu kira-kira 20 °C).
Taruh komponen pompa di
rak atas atau rak pisau jika
Anda membersihkannya di
pencuci perabot.
Bersihkan semua komponen
dengan air sabun yang banyak
(suhu kira-kira 30 °C).
Keringkan dengan kain bersih
atau biarkan mengering di
atas kain bersih.
Sebagai alternatif
untuk langkah 2,
3 dan 4.
atau
97

1
i
3
Informasi lebih lengkap
ada di halaman 96,
bab 5.1, langkah 2-4
5.2 Sebelum mengguna-
kannya untuk
kali pertama dan
sekali setiap hari
Urai pompa per komponennya.
l Hanya gunakan air yang benar-benar
bersih untuk membersihkan produk.
l Lepas dan cuci semua komponen
yang berkontak dengan payudara
dan ASI segera setelah digunakan
untuk menghindari sisa ASI yang
mengering dan mencegah pertum-
buhan bakteri.
l Selama perebusan, tambahkan satu
sendok teh asam sitrat untuk mence-
gah timbulnya karat.
l Simpan peralatan pompa di dalam
kantong/wadah yang bersih untuk
pemakaian selanjutnya. Atau simpan
di dalam kertas atau kain bersih.
Keringkan dengan kain bersih
atau biarkan mengering di atas
kain bersih.
Awas
Catatan
5. Membersihkan
98


1
1
i
Colokkan kabel adaptor ke unit
motor.
6.1 Pengoperasian dengan
listrik
6. Persiapan memompa
l re 6.2 Pengoperasian dengan
baterai
Catatan: Tidak perlu melepas baterai
saat menggunakan adaptor untuk
memompa.
l Periksa kondisi baterai unit motor seca-
ra teratur.
l Jika Swing Maxi tidak akan digunakan
dalam waktu lama, lepas baterai dari
kompartemennya.
l Baterai cukup untuk dua sampai tiga kali
sesi pemompaan (sekitar 1 1/2 jam).
6.2 Pengoperasian dengan
baterai
Buka tutup kompartemen
baterai di bagian belakang
produk searah anak panah.
l re 6.1 Pengoperasian dengan listrik
Ikuti urutan langkah-langkahnya.
l Gunakan adaptor yang disertakan
bersama Pompa ASI Swing Maxi saja.
l Pastikan tegangan adaptor sesuai
dengan sumber arus.
Info
Peringatan
100


1
4
i
i
Masukkan membran berwarna
kuning muda dengan hati-hati
ke dasar corong.
6. Persiapan memompa
l Cuci tangan dengan teliti (mini-
mal satu menit) dengan air sabun
sebelum menyentuh payudara dan
komponen pompa.
Pasang botol ke konektornya.
6.3 Merakit pompa
l Laksanakan semua langkah di atas
dengan hati-hati dan rangkai pompa
dengan benar. Jika salah, alat tidak
akan bekerja maksimal.
l Gunakan aksesoris asli Medela saja.
l Perika apakah komponen pompa aus
atau rusak sebelum dipakai dan ganti
jika perlu.
l Semua komponen harus benar-benar
kering sebelum dipakai.
Awas
Info
Catatan
102


1
1
7. Ekspresi
Masukkan selang yang tidak
dipakai ke penahan selang.
7.1 Menyiapkan
pemompaan tunggal
Aktifkan pompa ASI dengan .
➙ Fase stimulasi paling lama
berlangsung selama 2 menit.
Selanjutnya, fase stimulasi be-
rubah menjadi fase ekspresi.
7.2 Memompa
l re langkah 2 (bab 7.1):
Jawab pertanyaan-pertanyaan berikut
untuk mengetahui kecocokan ukuran
corong yang tersedia:
l Apakah puting Anda bergerak bebas
di dalam terowongan?
l Apakah jaringan di sekitar puting sedi-
kit tertarik ke terowongan corong atau
tidak sama sekali?
l Apakah Anda melihat gerakan lembut
dan ritmis pada payudara selama
siklus pemompaan?
l Apakah Anda merasa payudara ko-
song dengan cepat?
l Apakah puting Anda tidak terasa
nyeri?
Jika jawaban Anda untuk salah satu
pertanyaan tersebut adalah „Tidak“
atau Anda mengalami gangguan atau
nyeri selama ekspresi, hubungi konsul-
tan ASI atau bidan terdekat.
Awas
i
l re langkah 3 (bab 7.1):
Jangan menggunakan botol untuk
menahan pompa. Cara ini dapat
menghambat saluran susu dan
menyebabkan pemuaian.
l Lap payudara dengan seka hangat
(jangan gunakan alkohol).
Catatan
104

1
2 3
1
23
Tahan corong ke payudara den-
gan ibu jari dan telunjuk Anda.
Sangga payudara dengan tela-
pak tangan Anda.
Pasang corong ke payudara
Anda. Posisikan puting tepat
di tengah-tengah terowongan.
Vakum dapat disesuaikan pada
tiap fase. Vakum nyaman: Gu-
nakan untuk meningkatkan
vakum sampai terasa sedikit ti-
dak nyaman. Kemudian tekan
untuk menurunkannya kembali.
Jika ASI sudah terlanjur
mengalir, tekan tombol
untuk beralih ke fase ekspresi.
➙ Pastikan ASI mengalir masuk
ke botol dengan benar.
105

i
i
4
1
7. Ekspresi
Matikan pompa ASI dengan.
l Jangan lupa mencabut Swing Maxi
dari sumber arus setelah ekspresi.
l Isi botol tidak lebih dari tanda 150 ml.
l Hubungi bidan atau konsultan ASI jika
ASI yang dihasilkan terlalu sedikit atau
tidak keluar sama sekali atau Anda
merasa nyeri selama fase ekspresi.
l Swing Maxi akan mati secara otoma-
tis, jika pompa menyala selama
30 menit tanpa manipulasi.
l Jangan membuat selang kusut sela-
ma ekspresi.
Sekilas tentang LED
menyala Hidup
tidak menyala Mati
berkedip teratur Fasa stimulasi
menyala konstan Fasa ekspresi
berkedip cepat Vakum Min/Maks
Kenakan Easy Expression
Bustier dan biarkan risleting
terbuka sedikit.
7.3 Bersiap melakukan
ekspresi tanpa menggu-
nakan tangan dengan
Easy Expression Bustier*
Catatan
Awas
Info
106

1
56
23
Gunakan kaki botol untuk
mencegahnya terbalik.
Tutup botol.
➙ Ikuti petunjuk pada Bab 8
„Menyimpan dan mencairkan
ASI.“
Tempatkan corong pada payu-
dara di bawah korset sehingga
posisi puting tepat di tengah
terowongan corong.
Kancing risleting dan masuk-
kan konektor ke corong.
Informasi lain ada di
halaman 104,
Bab 7.2.
Bersihkan sesuai
petunjuk di Bab 5,
halaman 96.
*Opsi lain, baca Bab 12, halaman 114
107

1
4
i
7. Ekspresi
Pasang corong ke payudara
Anda. Posisikan puting tepat
di tengah-tengah terowongan.
l re langkah 2:
Jangan menggunakan botol untuk
menahan pompa. Cara ini dapat
menghambat saluran susu dan menye-
babkan pemuaian.
7.4 Menyiapkan
pemompaan ganda
Pasang corong kedua ke
payudara Anda sedemikian
rupa sehingga puting tepat
berada di tengah terowongan.
Info lain ada pada ha-
laman 104, Bab 7.2,
langkah 3
l Pemompaan ganda menghemat waktu
dan menambah kandungan energi
susu. Produksi susu meningkat dan
terjaga dalam jangka panjang.
Awas
Info
108


8.1 Penyimpanan
Pedoman untuk penyimpanan baru ASI
(untuk bayi yang lahir sehat dan normal)
Suhu ruangan Kulkas Lemari beku Pencairan ASI
4–6 jam pada 19
sampai 26 °C
(66 sampai 78 °F)
3–8 hari pada 4 °C
(39 °F) atau lebih
rendah
6–12 bulan
–18 sampai –20 °C
(0 sampai 4 °F)
Di dalam lemari es untuk
maksimum 10 j. Jangan
dibekukan kembali!
l Tidak menyimpan ASI di pintu lemari es. Sebaliknya pilih tbagian terdingin dari
lemari es (terletak di belakang dari rak gelas di atas rak sayuran).
8.2 Pembekuan
l Anda dapat membekukan ASI di dalam botol susu atau tas „Pompa & Penyim-
panan“*. Tidak mengisi botol atau tas lebih dari 3/4 penuh untuk memungkinkan
jarakruangkosong.
l Label botol atau tas „Pompa & Penyimpanan“ dengan pernyataan tanggal.
8.3 Pencairan
Tidak mencairkan ASI atau tidak menghangatkannya ASIdi dalam microwave atau
merebus dengan air mendidih di dalam panci untukmenghilangkan vitamin, mineral
dan protein-protein penting lainnyadan untuk mencegahterjadinyahangus.
l Untuk mempertahankan komponen- komponen ASI, cair kanASI didalamlemaries
dalamwaktuse malam. Secarabergantian, Anda dapat memegang tas botol atau
„Pompa & Simpandi“ ba wah air hangat (maks. 37 °C).
l Secara lembut kocok botol atau tas „Pompa dan Simpan“ untuk mencampur le
mak yang terpisah. Hindari kocokaniatau adukan susu.
Awas
8. Penyimpanan dan Pencairan ASI
110

i
M
A
K
A
N
M
E
M
O
M
P
A
DUKUNGAN BERBASIS
PENELITIAN BAGI
IBU MENYUSUI
Diciptakan oleh
Medela
Mendukung
perilaku
makan bayi
Lebih banyak
ASI lebih
sedikit waktu
M
E
N
G
I
S
A
P
2
-
F
A
S
A
C
A
L
M
A
S
T
I
M
U
L
A
S
I
E
K
S
P
R
E
S
I
A
L
I
R
A
N
S
U
S
U
9. Memberikan ASI
Medela merekomendasikan Calma*
untuk memberikan ASI.
Calma – solusi unik untuk
memberikan ASI.
Info
Berkat kerja riset yang komprehensif,
Medela menjadi salah satu perusahaan
pertama di dunia yang berhasil mere-
eksikan perilaku menyusu bayi lewat
inovasinya yaitu 2 Phase Expression
dan Calma. 2 Phase Expression
berdasarkan ritme alami bayi men-
ghisap sehingga lebih banyak ASI
dapat diperah dalam waktu singkat.
Pola stimulasi pendek diikuti pola
stimulasi yang lebih panjang, sehing-
ga menghasilkan aliran susu yang
optimal. Berkat dot Calma yang unik
ini, bayi dapat beristirahat dan bernafas
selama menyusu sekaligus memperta-
hankan perilaku menyusu yang mereka
pelajari secara alami. Dikembangkan
agar aktivitas menyusui terasa menyen-
angkan bagi ibu maupun bayi.
*Informasi lain ada di www.medela.com
Dengan Calma
l bayi Anda dapat minum, beristirahat
sejenak dan bernafas secara teratur.
l susu hanya akan mengalir dalam kon-
disi vakum.
l perilaku menyusu alami bayi Anda
dipertahankan sehingga transisi
kembali ke payudara dapat
dilakukan dengan mudah. Informasi rinci tentang Calma dapat
ditemukan pada buklet terlampir.
111

10. Jika ada masalah
Gangguan Tindakan
Motor tidak
bergerak
Periksa adakah arus.
Periksa posisi baterai di dalam wadah baterai.
Tidak ada daya
selama dioper-
asikan dengan
baterai
Ganti baterai.
Isapan lemah
atau tidak ada
sama sekali
Periksa semua sambungan.
Pasang tutup dengan benar pada ketiga titik sambung.
Tahan corong, bukan konektor atau botolnya, selama ekspresi.
Pastikan corong menutup payudara dengan sempurna.
Selama pemompaan tunggal, simpan selang yang tidak terpakai
di dok selang. Jangan membuat selang kusut.
Tidak boleh ada air di dalam selang.
Semua komponen harus benar-benar kering.
Jika pompa
terkena air.
Cabut adaptor dari stopkontak.
Matikan pompa.
Jangan menaruh pompa terbalik. Panel kontrol harus menghadap ke atas.
Simpan pompa di tempat kering dan hangat selama 24 jam.
Catatan:
Hindarkan pompa dari sinar matahari langsung.
Jangan mempercepat pengeringan dengan memanaskannya.
Jika muncul
embun di da-
lam selang
Bilas selang.
Buang sisa air.
Angin-anginkan selang supaya kering dengan menggantungnya.
112

Garansi
Brosur „Garansi Internasional“ berisi informasi rinci tentang garansi.
Pembuangan
Alat ini terbuat dari berbagai jenis logam dan plastik. Sebelum membuangnya,
pastikan alat ini sudah tidak berfungsi dan jangan membuang tanpa memilahnya
terlebih dahulu sesuai ketentuan setempat. Patuhi ketentuan tentang pengembalian
dan pengumpulan limbah elektrik dan elektronik (termasuk baterai) yang berlaku
di tempat Anda. Membuangnya sembarangan dapat membahayakan lingkungan
dan kesehatan masyarakat.
11. Garansi / pembuangan
113

Suku cadang
Nomor artikel Produk
099.0271
099.0272
099.0273
099.0274
800.0840
200.1693
Swing maxi / Freestyle (100-240V; 12V) Eropa
Swing maxi / Freestyle (100-240V; 12V) Inggris dan A.S. / JP
Swing maxi / Freestyle (100-240V; 12V) AUS / NZ
Swing maxi / Freestyle (100-240V; 12V) CN
Swing penutup baterai 5 buah
Konektor Freestyle dengan Ujung Katup 5 buah
099.0270 Unit Motor Swing Maxi
099.0275 Selang Swing Maxi
Aksesoris
Nomor artikel Produk
008.0337
008.0338
008.0339
008.0340
008.0341
PersonalFit™ Breastshield S (21 mm)
PersonalFit™ Breastshield M (24 mm)
PersonalFit™ Breastshield L (27 mm)
PersonalFit™ Breastshield XL (30 mm)
PersonalFit™ Breastshield XXL (36 mm)
800.0796
200.1659
Botol ASI 150 ml
Botol ASI 250 ml
008.0139 Calma Solitaire
200.1756
200.0625
Kantung Pendingin
Tas City Style
008.0217
008.0220
008.0224
008.0225
Easy Expression Bustier putih S
Easy Expression Bustier putih M
Easy Expression Bustier putih L
Easy Expression Bustier putih XL
Produk lain dari Medela dapat dilihat di situs web www.medela.com.
Sebutkan nomor produk saat memesan aksesoris berikut untuk Swing Maxi dari mitra
distributor Medela.
12. Perawatan lengkap selama periode menyusui
* Jika hasil ekspresi tidak memuaskan atau ekspresi terasa sakit, hubungi bidan
atau konsultan ASI Anda. Corong PersonalFitTM ukuran lain mungkn dapat
membuat ekspresi terasa lebih nyaman dan berhasil.
114


The Swing Maxi breastpump needs special precautions regarding EMC (Electromag-
netic compatibility) and needs to be installed and put into service according to the
EMC information provided in these instructions for use.
Wireless communications equipment such as wireless home network devices,
mobile phones, cordless telephones and their base stations, walkie-talkies can affect
the electric breastpump Swing Maxi and should be kept at least a distance 1.0 m
away from the equipment.
Electromagnetic Compatibility (EMC, IEC 60601-1-2:2007, Table 1)
13. EMC / Technical description
Electromagnetic emissions
The electric breastpump Swing Maxi is intended for use in the electromagnetic environment
specied below. The customer or the user of the electric breastpump Swing Maxi should
assure that it is used in such an environment.
Emission tests Compliance Electromagnetic environment –
guidance
RF emissions
CISPR 11 Group 1
The electric breastpump Swing Maxi uses RF
energy only for its internal function. Therefore,
its RF emissions are very low and are not likely
to cause any interference in nearby electronic
equipment.
RF emissions
CISPR 11 Class B
The electric breastpump Swing Maxi is suitable
for use in all establishments, including domestic
establishments and those directly connected
to the public low-voltage power supply network
that supplies buildings used for domestic pur-
poses.
Harmonic emissions
IEC 61000-3-2 Class A
Voltage uctuations /
icker emissions
IEC 61000-3-3
Complies
Warning – The electric breastpump Swing Maxi should not be used adjacent
to or stacked with other equipment. If adjacent or stacked use is necessary,
the electric breastpump Swing Maxi should be observed to verify normal operation in
the conguration in which it will be used.
116

Electromagnetic immunity
The electric breastpump Swing Maxi is intended for use in the electromagnetic environment
specied below. The customer or the user of the electric breastpump Swing Maxi should
assure that it is used in such an environment.
Immunity test IEC 60601
test level
Compliance
level
Electromagnetic
environment
– guidance
Electrostatic
discharge ( ESD )
IEC 61000-4-2
± 6 kV contact
± 8 kV air
± 6 kV contact
± 8 kV air
Floors should be wood,
concrete or ceramic
tile. If oors are covered
with synthetic material,
the relative humidity
should be at least 30%.
Electrical fast
transient / burst
IEC 61000-4-4
± 2 kV for power
supply lines
± 1 kV for input /
output lines
± 2 kV for power
supply lines
± 1 kV for input/
output lines
Mains power quality
should be that of a
typical commercial or
hospital environment.
Surge
IEC 61000-4-5
± 1 kV line( s ) to
line(s)
± 2 kV line( s ) to
earth
± 1 kV differential
mode
± 2 kV common
mode
Mains power quality
should be that of a
typical commercial or
hospital environment.
Electromagnetic Compatibility (EMC, IEC 60601-1-2:2007, Table 2)
117

Voltage dips, short
interruptions and
voltage variations
on power supply
input lines
IEC 61000-4-11
<5 % UT
(>95 % dip in UT)
for 0,5 cycle
40 % UT
(60 % dip in UT)
for 5 cycles
70 % UT
(30 % dip in UT)
for 25 cycles
<5 % UT
(>95 % dip in UT)
for 5 s
<5 % UT
(>95 % dip in UT)
for 0,5 cycle
40 % UT
(60 % dip in UT)
for 5 cycles
70 % UT
(30 % dip in UT)
for 25 cycles
<5 % UT
(>95 % dip in UT)
for 5 s
Mains power qual-
ity should be that of a
typical commercial or
hospital environment.
If the user of the elec-
tric breastpump Swing
Maxi requires continued
operation during power
mains interruptions,
it is recommended
that the electric breast-
pump Swing Maxi
is powered from an
uninterruptible power
supply or a battery.
Power frequency
(50/60 Hz)
magnetic eld
IEC 61000-4-8
3 A/m 30 A/m
Power frequency mag-
netic elds should be
at levels characteristic
of a typical location in
a typical commercial
or hospital environment.
NOTE UT is the a.c. mains voltage prior to application of the test level.
13. EMC / Technical description
118

Electromagnetic immunity
The electric breastpump Swing Maxi is intended for use in the electromagnetic environment
specied below. The customer or the user of the electric breastpump Swing Maxi should
assure that it is used in such an environment.
Immunity test IEC 60601
test level
Compliance
level
Electromagnetic
environment – guidance
Conducted RF
IEC 61000-4-6
Radiated RF
IEC 61000-4-3
3 Vrms
150 kHz to
80 MHz
3 V/m
80 MHz to
2,5 GHz
10 Vrms
10 V/m
Portable and mobile RF communi-
cations equipment should be used
no closer to any part of the electric
breastpump Swing Maxi, including
cables, than the recommended
separation distance calculated from
the equation applicable to the fre-
quency of the transmitter.
Recommended separation distance
d = 0,35√P
d = 0,35√P 80 MHz to 800 MHz
d = 0,7√P 800 MHz to 2,5 GHz
where P is the maximum output power
rating of the transmitter in watts (W)
according to the transmitter manufac-
turer and d is the recommended sepa-
ration distance in metres (m).
Field strengths from xed RF trans-
mitters, as determined by an electro-
magnetic site survey,a should be less
than the compliance level in each fre-
quency range.b
Interference may occur in the vicinity
of equipment marked with the follow-
ing symbol:
Electromagnetic Compatibility (EMC, IEC 60601-1-2:2007, Table 4)
119

a Field strengths from xed transmitters, such as base stations for radio (cellular/cordless) tel-
ephones and land mobile radios, amateur radio, AM and FM radio broadcast and TV broadcast
cannot be predicted theoretically with accuracy. To assess the electromagnetic environment
due to xed RF transmitters, an electromagnetic site survey should be considered. If the meas-
ured eld strength in the location in which the electric breastpump Swing Maxi is used exceeds
the applicable RF compliance level above, the electric breastpump Swing Maxi should be ob-
served to verify normal operation. If abnormal performance is observed, additional measures
may be necessary, such as re-orienting or relocating the electric breastpump Swing Maxi.
b Over the frequency range 150 kHz to 80 MHz, eld strengths should be less than 10 V/m.
Note 1 At 80 MHz and 800 MHz, the higher frequency range applies.
Note 2 These guidelines may not apply in all situations. Electromagnetic propagation is
affected by absorption and reection from structures, objects and people.
13. EMC /Technical description
120

Recommended separation distances between portable and mobile RF
communications equipment and the electric breastpump Swing Maxi
The electric breastpump Swing Maxi is intended for use in an electromagnetic environment
in which radiated RF disturbances are controlled. The customer or the user of the electric
breastpump Swing Maxi can help prevent electromagnetic interference by maintaining a
minimum distance between portable and mobile RF communications equipment (transmit-
ters) and the electric breastpump Swing Maxi as recommended below, according to the
maximum output power of the communications equipment.
Rated maximum
output power of
transmitter W
Separation distance according to frequency of
transmitter M
150 kHz to 80 MHz
d = 0.35√P
80 MHz to 800
MHz
d = 0.35√P
800 MHz to 2.5 GHz
d = 0.7√P
0.01 0.04 0.04 0.07
0.1 0.11 0.11 0.22
10.35 0.35 0.7
10 1.11 1.11 2.21
100 3.50 3.50 7. 0 0
For transmitters rated at a maximum output power not listed above, the recommended
separation distance d in metres (m) can be estimated using the equation applicable to the
frequency of the transmitter, where P is the maximum output power rating of the transmitter
in watts (W) according to the transmitter manufacturer.
Note 1 At 80 MHz and 800 MHz, the separation distance for the higher frequency range
applies.
Note 2 These guidelines may not apply in all situations. Electromagnetic propagation is
affected by absorption and reection from structures, objects and people.
Electromagnetic Compatibility (EMC, IEC 60601-1-2:2007, Table 6)
121

Electromagnetic environments
Environment Locations General characteristics
Typical health care Hospital, large clinic, doctor’s
ofce
Partly controlled, covered
by the general requirements
of this collateral standard
Residential Doctor’s ofce, small clinic Not controlled, health care
professional present
Residential Home
Not controlled, health care
professional not normally
present
Transport, mobile Car, aircraft (xed-wing and
helicopter), ambulance
Not controlled, wide vari-
ations, critical receivers
nearby, harsh environments
for ESD, RF, electric and
magnetic elds
Special Operating theatre,
emergency room
Case-by-case examination
of environment
13. EMC / Technical description
122

vacuum (approx.)
-15....-295 mmHg
-2....-39 kPa
45 … 120 cpm
Operation
Bediening
Fonctionnement
Pengoperasian
Transport / Storage
Transport / opslag
Transport / stockage
Pengangkutan / Penyimpanan
6 x 1.5V, Alkaline
AAA, Micro, LR03
Operation
Bediening
Fonctionnement
Pengoperasian
121 x 129 x 57 mm
Transport / Storage
Transport / opslag
Transport / stockage
Pengangkutan / Penyimpanan
290 g
220 g
Operation / Transport / Storage
Bediening / Transport / opslag
Fonctionnement / Transport / stockage
Pengoperasian / Pengangkutan / Penyimpanan
In Out
100-240V~ 50/60 Hz 12 V
1 A / 1.5 A
°C
+40
+5
°C
+70
-25
93
15
93
15
kg
106
70
intermittent
kPa
ref. master doc 200.7496/B
14. Technical specifications
123

Australia
Medela Pty Ltd,
Medical Technology
3 Arco Lane
Heatherton, Vic 3202
Australia
Phone +61 (0) 3 9552 8600
Fax +61 (0) 3 9552 8699
contact@medela.com.au
www.medela.com.au
United Kingdom
Medela UK Ltd.
Huntsman Drive
Northbank Industrial Park
Irlam, Manchester M44 5EG
United Kingdom
Phone +44 161 776 0400
Fax +44 161 776 0444
info@medela.co.uk
www.medela.co.uk
Medela AG
Lättichstrasse 4b
6341 Baar, Switzerland
www.medela.com
International Sales
Medela AG
Lättichstrasse 4b
6341 Baar
Switzerland
Phone +41 (0)41 769 51 51
Fax +41 (0)41 769 51 00
ism@medela.ch
www.medela.com
France
Medela France Sarl
14, rue de la Butte Cordière
91154 Etampes cedex
France
Phone +33 (0)1 69 16 10 30
Fax +33 (0)1 69 16 10 32
info@medela.fr
www.medela.fr
Netherlands & Belgium
Medela Benelux BV
Uilenwaard 31
5236 WB ’s-Hertogenbosch
Netherlands
Phone +31 73 690 40 40
Fax +31 73 690 40 44
info@medela.nl
info@medela.be
www.medela.nl
www.medela.be
©Medela AG/200.5035/2014-05/F
-
 1
1
-
 2
2
-
 3
3
-
 4
4
-
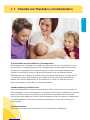 5
5
-
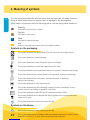 6
6
-
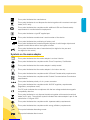 7
7
-
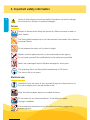 8
8
-
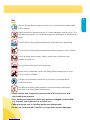 9
9
-
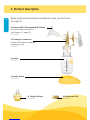 10
10
-
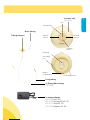 11
11
-
 12
12
-
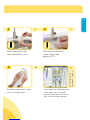 13
13
-
 14
14
-
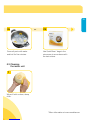 15
15
-
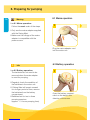 16
16
-
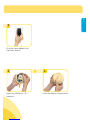 17
17
-
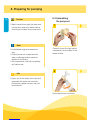 18
18
-
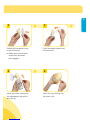 19
19
-
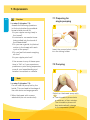 20
20
-
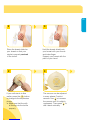 21
21
-
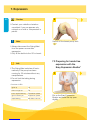 22
22
-
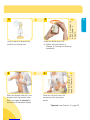 23
23
-
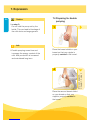 24
24
-
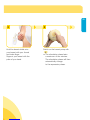 25
25
-
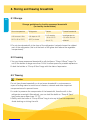 26
26
-
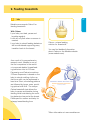 27
27
-
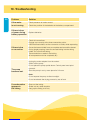 28
28
-
 29
29
-
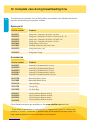 30
30
-
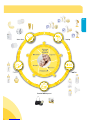 31
31
-
 32
32
-
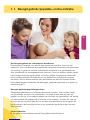 33
33
-
 34
34
-
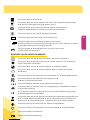 35
35
-
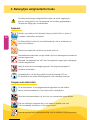 36
36
-
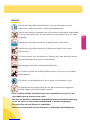 37
37
-
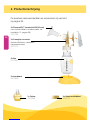 38
38
-
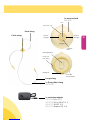 39
39
-
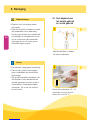 40
40
-
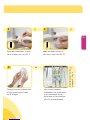 41
41
-
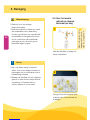 42
42
-
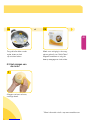 43
43
-
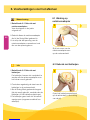 44
44
-
 45
45
-
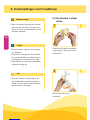 46
46
-
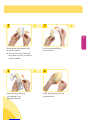 47
47
-
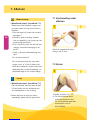 48
48
-
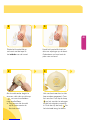 49
49
-
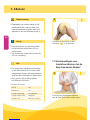 50
50
-
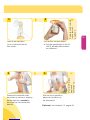 51
51
-
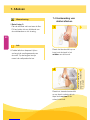 52
52
-
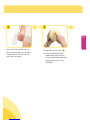 53
53
-
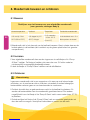 54
54
-
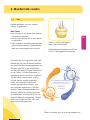 55
55
-
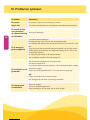 56
56
-
 57
57
-
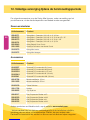 58
58
-
 59
59
-
 60
60
-
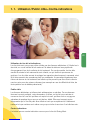 61
61
-
 62
62
-
 63
63
-
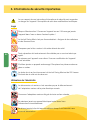 64
64
-
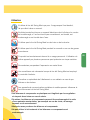 65
65
-
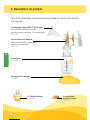 66
66
-
 67
67
-
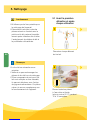 68
68
-
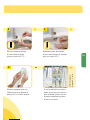 69
69
-
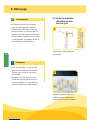 70
70
-
 71
71
-
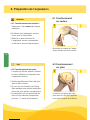 72
72
-
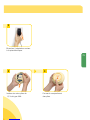 73
73
-
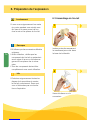 74
74
-
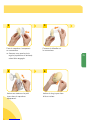 75
75
-
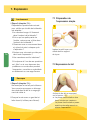 76
76
-
 77
77
-
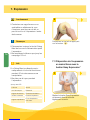 78
78
-
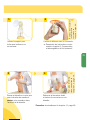 79
79
-
 80
80
-
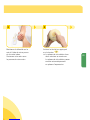 81
81
-
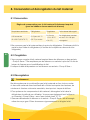 82
82
-
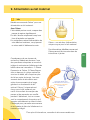 83
83
-
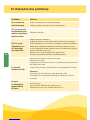 84
84
-
 85
85
-
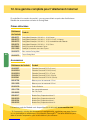 86
86
-
 87
87
-
 88
88
-
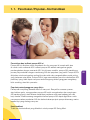 89
89
-
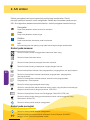 90
90
-
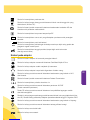 91
91
-
 92
92
-
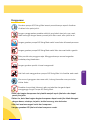 93
93
-
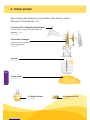 94
94
-
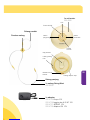 95
95
-
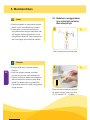 96
96
-
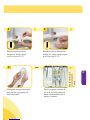 97
97
-
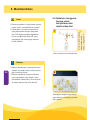 98
98
-
 99
99
-
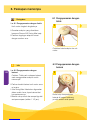 100
100
-
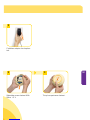 101
101
-
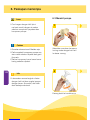 102
102
-
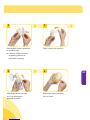 103
103
-
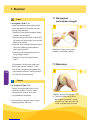 104
104
-
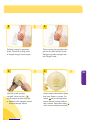 105
105
-
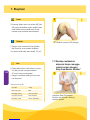 106
106
-
 107
107
-
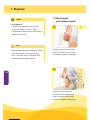 108
108
-
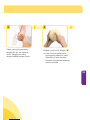 109
109
-
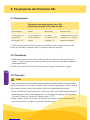 110
110
-
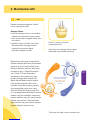 111
111
-
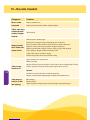 112
112
-
 113
113
-
 114
114
-
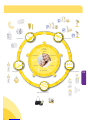 115
115
-
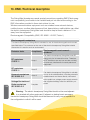 116
116
-
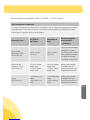 117
117
-
 118
118
-
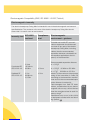 119
119
-
 120
120
-
 121
121
-
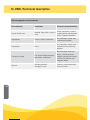 122
122
-
 123
123
-
 124
124


Medela Swing Maxi Instructions For Use Manual
- Type
- Instructions For Use Manual
in andere talen
- English: Medela Swing Maxi
- français: Medela Swing Maxi
Gerelateerde papieren
Andere documenten
-
mothercare Medela New Swing Maxi Flex Double Electric Pump_0724326 Gebruikershandleiding
-
-
Ardo Bellis Handleiding
-
Lansinoh 2in1 ELECTRIC BREAST PUMP Instructions For Use Manual
-
Avent SCF397/11 Handleiding
-
Avent SCF396/11 Handleiding