Perfectpro TEAMBOX de handleiding
- Categorie
- Tabletten
- Type
- de handleiding

GB
GB
F
NL
D
NL
D
INSTRUCTION MANUAL
MANUEL DE L'UTILISATEUR
GEBRUIKSAANWIJZING
BEDIENUNGSANLEITUNG


1 2
GB
GB
CONTENTS
Important safety instructions ........................................................................................... 3
Power supply .................................................................................................................. 4
AC mains operation...................................................................................................4
Lithium battery operation and charging .................................................................. 4
User safety precautions.................................................................................... 5
Using the device for the rst time ............................................................................... 6
Controls................................................................................................................ 7
DAB Mode....................................................................................................................9
Operating the radio..................................................................................................9
Selecting a station.........................................................................................9
Secondary services............................................................................................9
Display modes...................................................................................................10
Finding new stations.............................................................................................10
Manual tuning.....................................................................................................10
Dynamic Range Control (DRC) settings .............................................................. 11
Prune stations.......................................................................................... 11
FM Mode............................................................................................................12
Operating the radio...................................................................................................12
Manual tuning...........................................................................................................12
RDS station service................................................................................................12
Display modes....................................................................................................13
Scan sensitivity setting..........................................................................................13
Preset stations.............................................................................................................13
Storing preset stations.............................................................................................13
Recalling preset stations ......................................................................................... 14
Bluetooth .....................................................................................................................14
Pairing Bluetooth with your mobile phone ....................................................... 15
Playing music from your mobile phone .................................................................... 15
Display modes........................................................................................................16
Device List – Connect to the paired device ..............................................................16
Restart Bluetooth paring ..................................................................................... 16
USB Mode ................................................................................................................... 17
Insert and remove an USB stick ............................................................................. 17
Playing music files ....................................................................................... 17
Play mode .................................................................................................... 18
Information function...................................................................................... 19
Aux-in Mode..................................................................................................... 19
Setting the clock ........................................................................................................... 19
Auto update ....................................................................................................... 20
Equaliser ................................................................................................................. 21
Language ............................................................................................................ 21
Software update ....................................................................................................... 21
Software version ........................................................................................................ 22
Factory reset .............................................................................................................. 22
Backlight .......................................................................................................... 23
Additional metal telescopic antenna .......................................................................... 24
Warranty ................................................................................................................... 24
Specifications ....................................................................................................... 25
Power requirements ............................................................................................... 25
Frequency coverage .......................................................................................... 25
Circuit features .................................................................................................. 25
Bluetooth ............................................................................................ 25
Environmental note .............................................................................................. 26
WARNING ! WARRANTY BECOMES VOID ONCE THE DEVISE CABINET HAS
BEEN OPENED OR ANY MODIFICATIONS TO THE ORIGINAL DEVICE HAVE
BEEN MADE. NEVER OPEN THE DEVICE CASING. THE MANUFACTURER WILL
NOT ACCEPT ANY LIABILITY FOR DAMAGE RESULTING FROM IMPROPER
HANDLING. THE TYPE PLATE IS LOCATED ON THE BOTTOM OF THE DEVICE.
The Bluetooth® word mark and logos are registered trademarks owned by Bluetooth
SIG, Inc. and any use of such marks is under license.

3 4
GB
GB
IMPORTANT SAFETY INSTRUCTIONS
1. Read these instructions.
2. Keep these instructions.
3. Heed all warnings.
4. Follow all instructions.
5. Clean only with dry cloth.
6. Do not block any ventilation openings. Install in accordance with the instructions.
7. Do not install near any heat sources such as radiators, heat registers, stoves or
other apparatus (including ampliers) that produce heat.
8. Do not defect the safety purpose of the polarized or grounding – type plug. A
polarized plug has two blades with one wider than the other. A grounding type
plug has two blades and a third grounding prong. The wide blade or the third prong
is provided for your safety. If the provided plug does not t into your outlet, consult
an electrician for replacement of the obsolete outlet.
9. Protect the power cord from being walked on or pinched particularly at plug,
convenience receptacles, and the point where they exit from the apparatus.
10. Only use attachments/accessories specied by the manufacturer.
11. Use only with the cart, stand, tripod, bracket, or table specied by the manufacturer,
or sold with the apparatus. When a cart is used, use caution when moving the cart/
apparatus combination to avoid injury from tip-over.
12. Unplug this apparatus during lightning storms or when unused for long periods of
time.
13. Refer all servicing to qualied service personnel. Servicing is required if the
apparatus has been damaged in any, such as power-supply cord or plug is
damaged, liquid has been spilled or objects have fallen into the apparatus, the
apparatus has been exposed to rain or moisture, does not operate normally, or has
been dropped.
14. To reduce the risk of re or electric shock, do not expose this appliance to rain or
moisture.
15. Do not remove the cover; there are no user-serviceable parts inside.
16. No naked ame sources shall be placed on the apparatus.
17. For outdoors use, to avoid electric shock, use battery only during a raining day or
the weather is wet. To prevent electric shock, if the radio has been exposed to rain
or water, the power supply cord and plug must be completely dried before plugging
into the mains socket outlet.
18. The power plug should be close to the apparatus, and easy to be approached that
during emergency, to disconnect the power from the apparatus, just unplug the
power plug from the AC power slot.
19. The marking information is located at the bottom of the apparatus.
20. This apparatus is provided with protection against splashing water (IP65).
21. In case of malfunction due to electrostatic discharge or fast transient (burst),
remove and reconnect the power supply.
22. The apparatus must be used in a moderate climate.
23. To prevent possible hearing damage, do not listen at high volume levels
or long periods.
24. Under the environment with Conducted Immunity disturbance / Radiated Immunity,
the radio may malfunction. It will automatically recover to normal when the
Conducted Immunity disturbance / Radiated Immunity stopped.
POWER SUPPLY
AC Mains Operation
1. Before plugging the AC power plug into the AC mains power socket, be sure the
voltage is correct.
2. AC power cord storage and power plug storage is designed to store the cord and
the plug when the Teambox is not in use.
NOTE:
In order to disconnect the Teambox from the AC mains power completely, the AC power
plug should be removed from the AC mains power socket completely and it shall remain
readily operable and should not be obstructed during intended use.
In case of malfunction due to electrostatic discharge or fast transient (burst), remove
the AC power plug from AC mains power socket and reconnect the AC power plug after
approximately one minute.
LITHIUM BATTERY OPERATION AND CHARGING
NOTE ON FIRST USE: BEFORE OPERATING THE TEAMBOX FOR THE FIRST TIME
ALWAYS FIRST FULLY CHARGE THE BATTERY.
The Teambox can be operated by the built-in Lithium battery. During operation on
battery power the approximate power level of the battery is displayed in the LCD display
of the radio.
When the battery power level is very low, the battery symbol ashes on the display.
Under this condition, the battery should be recharged as soon as possible to continue
normal operation of the Teambox.
Charging time from empty to full battery is approximately 5-6 hours (at room temperature
with radio in Standby mode). The Teambox can be charged in Standby mode as well
as in On mode while playing music. While playing music the charging time will be longer
than in Standby mode.
The Teambox, for additional safety, will not start charging when the battery is
already full or nearly full.
NOTE ON PLAYING TIME ON BATTERY POWER: The achieved playing time on
battery power depends on many factors such as: selected volume level, music type (bass
heavy music consumes more energy), selected music source (DAB, FM, Bluetooth or
AUX-IN), selected EQ setting, ambient temperature and age of the battery. Depending
on these variables a playing time of approximately 20 to 26 hours on a medium set
volume level can be achieved.

5 6
GB
GB
NOTE ON LITHIUM BATTERY LIFE: If the Teambox is not used for any extended
period of time, always rst charge the built-in battery until it is full. The optimum working
life from the built-in battery will be obtained if it is kept topped up by recharging after
each use of the Teambox, even if it is only partially discharged. The battery’s working life
will be reduced if the product is left in a discharged condition for a long period of time.
WARNING:
Do not attempt to replace or repair the built-in lithium battery. If you have any doubts
about the built-in lithium battery, please contact the service department of Perfectpro for
further assistance.
WARNING:
Danger of explosion if the battery is incorrectly replaced.
Do not expose the battery to excessive heat such as sunshine, re or the like.
Batteries should not be disposed of by incineration and with household waste.
Disposable batteries should be taken to a suitable recycling centre if possible.
Safety information for internal rechargeable Lithium battery
The internal rechargeable lithium-polymer battery used in this device is able to supply
power for a long period of time. However, even lithium-polymer batteries reach a point
where they cannot be recharged. If the battery does not recharge after several attempts,
it may be drained (have a too low charge), please contact [email protected] for
repair information.
However, if you do not want us to replace the battery, you will need to dispose of used
batteries/ device in accordance to the laws and regulations in your area. In addition, you
can contact your local electronics retailers or recycling centre for disposal.
User Safety Precautions
n Check the room temperature range is 0°C – 35° C (32°- 95° Fahrenheit) before
charging the battery.
n Do not attempt to disassemble the plastic covering or any parts of the device, as the
materials inside may be toxic and may damage skin and clothes.
n Do not puncture, crush, modify, throw or cause any unnecessary shock to your
battery, as the battery used in this device may present a risk of re, explosion,
or chemical burn if mistreated.
n Do not leave, charge or use the battery in a car under direct sunlight, near re or a
heated source.
n Do not immerse, throw, wet the battery in water/ seawater.
n Do not use or charge the battery if it appears to be abnormally hot, discoloration,
deformation or abnormal conditions is detected during use, charge or storage.
n Do not leave a charging battery unattended. Keep the battery away from babies and
children.
USING THE DEVICE FOR THE FIRST TIME
1. Place the radio on a at surface.
2. Carefully extend the antenna located on the top of the radio. Adjust the antenna so
it is vertically extending above the radio.
3. Plug the AC power cord into the AC socket. The radio will start and will automatically
perform an auto scan of the Band III DAB channels and the FM band in the back
ground.
4. When the scan is completed, the 10 strongest FM stations will be stored as presets.
The radio will switch to standby with the updated clock and date showing on the
display.
5. If no signals are found, the clock will not be updated. It may be necessary to
relocate the radio to a position giving better reception.

7 8
GB
GB
CONTROLS
1. Power button
2. Source button
3. Select / Info button
4. Tuning << button
5. Tuning >> button
6. Menu / Folder button
7. Preset / ►|| button
8. EQ button
9. Volume – button
10. Volume + button
11. Antenna
CONTROLS
12. USB socket
13. Aux-in socket
14. AC power cord
15. Battery door 15 14
12 13
6
7
8
9
10
1
2
3
4
5
11

9 10
GB
GB
DAB MODE
Operating the radio
1. Carefully extend the antenna. Press the Power button to switch on the radio.
2. If this is the rst time to switch on, the radio will be in DAB mode.
3. The rst station (in numeric-alpha order 0…9…A…Z) in the list of stations found will
be played. The display will show the station name.
If the radio has been used before, the last used station will be selected.
4. If no signals are detected, “Service not available” will be displayed. It may be
necessary to relocate the radio to a position giving better reception.
You should then carry out an auto scan to nd stations, please refer to the section
“Find new stations”.
Selecting a station
1. Press the Power button to switch on the radio.
2. The display shows the name of the radio station currently selected.
3. Press the Tuning << or Tuning >> button to scroll through the list of available
stations.
4. When the desired station name appears on the display, press the Select / Info
button to select the station. The display will show the station name while playing.
Note: If after selecting a station the display shows “Service not available”, it may be
necessary to relocate the radio to a position giving better reception.
Secondary services
1. Certain radio stations have one or more secondary services associated with them.
If a station has a secondary service associated with it, then the secondary service
will appear immediately after the primary service as you turn the Select / Info
button.
2. Press the Select / Info button to select the secondary service.
Most of secondary services do not broadcast continually and if the selected service
is not available, the radio will re-tune to the associated primary service.
Display modes
In DAB mode, the radio can display a range of information on the display.
1. Press the Select / Info button to cycle through the various modes.
a. Scrolling text Displays scrolling text message such as artist/
track name, phone in number, etc.
b. Program type Displays type of station being listened to e.g. Pop,
classic, News, etc.
c. Signal strength Displays the signal strength of radio reception. The
clear unlled rectangle indicates minimum signal
level required for satisfactory reception.
d. Multiplex name & frequency Displays name of multiplex to which the current
station belongs. And to displays channel number
and frequency for the currently tuned DAB station.
e. Bit rate & audio type Displays the digital audio bit rate.
f. Date Displays the date of today.
Finding new stations
From time to time, new stations may become available. You may proceed to nd new
stations as follows:
1. Press the Source button to enter DAB mode.
2. Press the Menu button, the display will show “Full scan”.
3. Press the Select / Info button, the radio will perform a scan of the Band III DAB
channels.
As new stations are found, the station counter on the right-hand side of the display will
increase and stations will be added to the list.
Manual tuning
Manual tuning allows you to tune the radio directly to various DAB Band III channels.
1. Press the Menu button, the display shows “Full scan”,
2. Press the Tuning >> button to select “Manual tune”, then press the Select / Info
button to enter.
3. Press the Tuning << or Tuning >> button to select the desired DAB channel.
Press the Select / Info button to tune the chosen frequency.
4. The signal strength display with an open bar shows the minimum signal strength
needed for good DAB reception. The signal strength bars will go up or down
showing the changing signal strength as you adjust the antenna or the radio
position.

11 12
GB
GB
5. When a DAB signal is found, the display will show its signal strength. Any new radio
stations found will be added to the list stored in the radio.
6. Press the Select / Info button to return to normal DAB service.
Dynamic Range Control (DRC) settings
DRC can make quieter sounds easier to hear when the radio is used in a noisy
environment.
1. In DAB mode, press the Menu button, the display shows “Full scan”.
2. Press the Tuning << or Tuning >> button until the display shows “DRC”. Press the
Select / Info button.
3. Press the Tuning << or Tuning >> button to select required DRC setting (default is
Off).
DRC off DRC is switched off. Broadcast DRC will be ignored.
DRC high DRC is set to high as sent by broadcaster.
DRC low DRC level is set to low that sent by broadcaster.
4. Press the Select / Info button to conrm the setting. The display will return to
normal radio display.
Note: Not all DAB broadcasts use the DRC function. If the broadcast does not provide
DRC information, the DRC setting in the radio will have no effect.
Prune stations
If you move to a different part of the country, some of the stations which were listed
may no longer be available. Also, from time to time, some DAB services may stop
broadcasting, or may change location or frequency. The Prune stations function will
delete the unavailable DAB stations from your station list.
1. In DAB mode, press the Menu button, the display shows “Full scan”.
2. Press the Tuning << or Tuning >> button until the display shows “Prune”.
3. Press the Select / Info button to enter the setting.
4. Press the Tuning << or Tuning >> button to select between “Yes” or “No” (default
is No).
Select “Yes” to enable this function if required, otherwise, select “No”.
5. Press the Select / Info button to conrm your setting. The display will return to
normal radio display.
Note: If you have moved the radio to a different part of the country, you should also
carry out a search for new stations (please see the section “Finding new stations”).
FM MODE
Operating the radio
1. Press the Power button to turn on the radio.
2. Select the FM waveband by pressing the Source button.
3. If this is the rst time to switch to FM mode, the station in preset 1 will be played.
If the radio has been used before, the last listened station will be played.
4. To seek station, press and hold the Tuning << or Tuning >> button. The scan
stops automatically when it nds a station of sufcient strength.
5. After a few seconds, the display will update and show station name if RDS
information is being received.
6. To nd other stations, press the Tuning << or Tuning >> button again.
7. When the waveband end is reached, the radio will recommence tuning from the
opposite waveband end.
Manual tuning
1. Press the Power button to turn on the radio.
2. Select the FM band by pressing the Source button.
3. Press the Tuning << or Tuning >> button to reach the required FM station.
The radio will change the frequency in steps of 50 kHz.
4. Rotate the rubber antenna to get the best reception. If the radio is tuned to a station
of sufcient signal strength with RDS information present, the display may change
to show the station name.
5. When the waveband end is reached, the radio will recommence tuning from the
opposite waveband end.
RDS station service
RDS (Radio Data System) is an information system which inaudible digital information
is transmitted in addition to the normal FM radio program. When the radio is receiving a
RDS station and the reception strength is sufcient, the station name will appear in the
display. It may take some time before the RDS information is available.

13 14
GB
GB
Display modes
When you are listening to a FM station with RDS system, repeatedly press the Select /
Info button to cycle through the information. This will only function if the reception level
is sufcient and clear.
a. Radio text Displays the message about the station being listened to as
ticker text.
b. Program type Displays the type of station being listened to, e.g. Pop,
Classic, News, etc.
c. Signal strength Displays signal strength for the station being listened to.
d. Frequency Displays the frequency of the station being listened to.
e. Date Displays the date of today.
Scan sensitivity setting
The radio will normally scan all stations from FM broadcasts including the weaker
signals. However, you may wish the Auto-scan to nd only those stations with strong
enough signals to give good reception.
1. Press the Power button to turn on the radio.
2. Select the FM band by pressing the Source button.
3. Press the Menu button, the display shows “Scan setting”; Then press the Select /
Info button to enter.
4. Press the Tuning << or Tuning >> button to select between “All stations” or
“Strong stations only” (default is “Strong stations only”).
The “Strong station” option will allow the radio to nd strong signals only when
scanning.
5. Press the Select / Info button to conrm your setting. The display will return to
normal radio display.
PRESET STATIONS
Storing preset stations
There are 20 memory presets in the radio, 10 for DAB and 10 for FM. Presets are
remembered by the radio in the event of a power failure.
1. Press the Power button to turn on the radio.
2. Press the Source button to select the desired waveband.
3. Tune to the required station.
4. Press and hold the Preset button until the display shows for example “Preset 01:
Empty”.
5. Press the Tuning << or Tuning >> button to select the desired preset number,
then press the Select / Info button to conrm saving preset. The display will show,
for example, “Preset 01 Stored”.
6. Repeat step 3 to 5 for the remaining presets.
7. Stations stored in the preset memories can be over-written by following the above
procedure.
Recalling preset stations
1. Press the Power button to turn on the radio.
2. Press the Source button to select the desired waveband.
3. Press the Preset button until shows for example “Preset 01: 88.10MHz”.
4. Press the Tuning << or Tuning >> button to select the desired preset number,
then press the Select / Info button to recall the preset.
5. The display will show, e.g. “P01”, at the end of rst line.
BLUETOOTH
The Bluetooth mode on your Teambox allows you to play audio, play sound from video
les and stream music from Bluetooth capable devices such as your mobile phone,
computer, tablet etc. through your Teambox loudspeaker.
• When a Bluetooth enabled device such as your Teambox is in a ‘discoverable’
state other Bluetooth devices can detect, pair with or connect to it.
• ‘Bluetooth pairing’ occurs when two Bluetooth enabled devices agree to establish a
connection and communicate with each other.
Bluetooth connectivity performance may vary depending on the connected Bluetooth
devices. Please refer to the Bluetooth capabilities of your device before connecting to
your Teambox. All features may not be supported on some paired Bluetooth devices.
A Bluetooth connection can provide a link for audio up to a distance of approximately ten
metres. When pairing two Bluetooth enabled devices, for convenience, we recommend
they should be no more than 2 to 3 metres apart. The presence of other functioning
Bluetooth devices during connection may lead to operational difculties.
Bluetooth is a short-range radio communication system and generally Bluetooth devices
can communicate with each other clearly within a regular sized room or ofce. The
reliability of a Bluetooth connection between different rooms will greatly depend upon
the construction of the building.
Bluetooth communication range may be substantially reduced if the signal passes
through a solid object. Human bodies, brick and concrete walls, heavy furniture or
bookcases will all reduce the operational range of your Bluetooth devices to a greater
or lesser extent. Glass, dry-wall or wood panelled walls and ofce partitions may have
a less severe but noticeable effect. Metal pipes, foil-lined plasterboard, metal window
frames and domestic wiring can also have an effect. You should position your Bluetooth
devices closer to each other if you observe communication difculties.

15 16
GB
GB
WiFi networks and cordless phones generally use similar radio frequencies to Bluetooth
and may interfere with one another. If any interference is noticed, then try relocating the
Teambox or one of the other devices.
The Bluetooth capabilities of your Teambox enable it to receive audio from many
Bluetooth capable devices including mobile phones, personal computers and tablets.
Only one Bluetooth device can be connected to your Teambox at a time. It supports the
following Bluetooth proles and functionality.
• Your Teambox supports A2DP (Advanced Audio Distribution Prole) which is a
audio connection that streams music from PCs, mobile phones etc. SBC and AAC
audio codecs are supported.
• Your Teambox supports AVRCP (Audio Video Remote Control Prole) that allows
your radio to control music playback from the connected device.
•
Note: Some mobile phones may temporarily disconnect from your Teambox when
you make or receive calls. Some devices may temporarily mute their Bluetooth audio
streaming when they receive text messages, emails or for other reasons unrelated to
audio streaming. Such behaviour is a function of the connected device and does not
indicate a fault with your Teambox.
Pairing Bluetooth with your mobile phone
1. Press the Power button to turn on the radio.
2. Select Bluetooth mode by pressing the Source button.
3. The LCD display will show “Connecting” when radio is not yet paired with your
mobile phone. At the same time, the Bluetooth icon will be blinking as the Bluetooth
is in searching mode.
4. In your mobile phone open the Setting menu and select Bluetooth, then select
“Teambox” in the Bluetooth devices list (Bluetooth pairing instructions may vary per
type of mobile phone, please check your mobile phone manual).
5. When Bluetooth pairing is successful, the LCD display will show the name of the
mobile device. At the same time, the Bluetooth icon will be lightened.
6. After that, the LCD display will show the connected mobile phone’s name to indicate
the connected device to the radio.
Playing music from your mobile phone
1. Press the Power button to turn on the radio.
2. Select Bluetooth mode by pressing the Source button.
3. Start playing music by using the media players in the paired mobile phone.
4. Playback can be controlled from the mobile phone or by pressing the Preset / ►||,
Tuning <<, and Tuning >> buttons on the radio.
5. After music playback started, the name of the song will be displayed in the LCD.
Display modes
In Bluetooth mode, the radio can display a range of information of the current playing
music on the display. Press the Select / Info button to cycle through the various types.
a. Title Displays scrolling song’s name of the current playback music.
b. Artist Displays the artist’s name of the current playback music.
c. Album Displays the album name of current playback music.
d. Time and date Display the current time and date.
Device List – Connect to the paired device
In the radio, you can select the Bluetooth device from the device list to connect again.
The device names would be shown if the name of the Bluetooth devices were congured
in the mobile devices. Please refer to the user manual of your mobile device for the
congurations.
The device lists can be checked as below:
1. In Bluetooth mode, press the Menu button to enter the system setting. The display
will show “Discoverable”.
2. Press the Tuning << or Tuning >> button until “Device list” is displayed; press the
Select / Info button to select the setting.
3. Press the Tuning << or Tuning >> button to view the name of the devices.
4. Press the Select / Info button to start Bluetooth reconnection. The radio will
automatically connect to this mobile device.
Note: There can be up to 8 device names to be stored in the speaker. If there are more
than 8 mobile devices have been connected and stored into the speakers, the earliest
paired device name will be erased.
Note: If you have ever deleted the “Teambox” from your connected mobile device, the
auto reconnection will be unsuccessful.
Restart Bluetooth pairing
The Bluetooth function can be set to operate in different ways as below:
1. In Bluetooth mode, press the Menu button to enter the system setting. The display
will show “Discoverable”, press the Select / Info button to activate Bluetooth
discovery function.
2. The LCD display will show “Connecting”, and the Bluetooth icon will be ashing at
the same time. Now, the radio’s Bluetooth is free for any mobile phone connection
as it is in discoverable mode now.
Note: “Discoverable” is the option that forces the Bluetooth of this radio to disconnect
from your mobile phone and enter the “discoverable mode”. This is the way to allow
the Bluetooth pairing to another device. If no new device is paired, the Bluetooth will
automatically try to connect to the last device when it is switched off and on again.

17 18
The Auto-Power management function will be activated in Bluetooth mode. If there is no
signal from Bluetooth for a period of over 15 minutes, the radio will automatically switch
to standby mode. Pressing the Power button will wake up the unit.
USB MODE
CONDITIONS TO PREVENT MOIST FROM ENTERING THE RADIO!! KEEP THE
RUBBER COVER CLOSED UNDER THESE CONDITIONS.
USB sticks can be used with the radio for playback of MP3, AAC, FLAC and WAV les.
The radio has been tested with a range of USB sticks up to 32GB. However, there are
many different USB stick variants available and not all of them can be guaranteed to
work in this radio. Memory must use the FAT or FAT32 ling system in order to operate
in this radio.
Audio formats supported for playback are MP3, AAC, FLAC and WAV. Playback does
not support les encoded using WMA lossless, WMA voice, WMA 10 professional, or
les of any format that have DRM protection.
The USB socket are located on the back behind the rubber cover. Make sure the rubber
cover is closed well after use to prevent moist and dirt from entering the radio.
The USB stick should not be removed during playback as damage or corruption of les
may occur.
USB sticks are not included with this radio.
Note: When the radio is playing an USB stick, the batteries will be charged in low current
mode. Once the USB stick is removed normal charging will continue.
Insert and remove an USB stick
Carefully insert an USB stick into the USB socket.
To remove the USB stick, simply pull the device out.
Playing music les
1. Press the Power button to turn on the radio.
2. Press the Source button to select the USB. The display shows “Reading”. It
may take some time before the radio has read in the folders and les data on the
memory device.
3. After reading the USB stick, the radio will start to play the rst le (song) in the rst
folder. If no USB stick is inserted, the display will show “No USB stick” respectively.
4. To pause the playback, press the Preset / ►|| button. Press the Preset / ►||
button again to resume the playback from pause position.
5. To skip to the next le, press the Tuning >> button.
6. To skip to the previous le, press the Tuning << button.
7. While the le is playing, press and hold down either the Tuning >> button
or Tuning << button. Release the button when the desired part of the le is
reached.
8. To skip to the next folder, press and hold the Menu button for 2 seconds, then
press Tuning << or Tuning >> buttons to navigate.
9. Press the Select / Info button to conrm.
The radio supports a limited number of folders and les in the searching:
Mode Max. no. of folders supported Max. no. of les supported
Stop 999 (with folder name) 9999 (with le name)
Play 999 9999
(1-99 with folder name) (1-999 with le name)
(100-999 without folder name) (1000-9999 without le name)
Play mode
During USB stick is playing,
1. Press the Menu button,
2. Press the Tuning << or Tuning >> button until the display shows “USB setting”.
Press the Select / Info button.
3. Press the Tuning << or Tuning >> button to the desire play mode and press the
Select / Info button to conrm.
The radio will step through the following options:
Normal play → Repeat track → Repeat folder → Repeat all → Shufe
Normal play Playback in sequential order one to another.
Repeat track Repeatedly play the le you are listening to.
Repeat folder Repeatedly play the les within the folder you are listening to.
Repeat all Repeatedly play all les in the USB stick.
Shufe Play all les in the USB once in random order.
The selected mode is indicated on the right of the top line of the display by an icon. No
icon is shown when in Normal play mode.
GB
GB

19 20
GB
GB
Information function
During USB stick playback, the title and the current playing time of the current playing
music will be shown. Press the Select / Info button to cycle through the following
information (only if this information is present with the le on the memory device):
Play time → Title → Folder name → Artist name → Album name → Total no. of les →
Bitrate of the music → Time and date → Play time again.
AUX-IN MODE
A 3.5mm stereo Aux-in socket is provided on the side behind the rubber cover, for
connecting an external audio device such as MP3 player or CD player (not included with
this radio).
1. Connect an audio source to the Aux-in socket.
2. Press the Source button to select Aux-in. Display will show “Aux-in”.
3. Play the external player.
4. Adjust the volume of both the radio and the player for comfortable listening.
5. After use, close the rubber cover to prevent moist or dust from entering into the s
ockets and radio.
Notes: Never use the Aux-in socket in rainy or moist conditions to prevent moist from
entering the radio. Keep the rubber cover closed under these conditions.
The Auto-Power management function will be activated in Aux-in mode. If there is no
signal from the Aux-in jack for a period over 15 minutes, the unit will automatically switch
to standby mode. The operation indicator and the LCD will go off in such case. Pressing
the Power button will wake up the unit.
SETTING THE CLOCK
The clock can be set in system menu. If no buttons are pressed for 30 seconds, the
radio will exit the clock setup and the setting is cancelled.
1. Press the Power button to switch on the radio.
2. Press the Menu button to display current menu.
3. Press the Tuning << or Tuning >> button to select “System settings” and press
the Select / Info button.
4. Then press the Tuning << or Tuning >> button to select “Time/Date” and press
the Select / Info button to conrm.
5. Then press the Tuning << or Tuning >> button to select “Set Time/Date” and
press the Select / Info button to conrm.
6. Press the Tuning << or Tuning >> button to set the hour.
7. Press the Select / Info button to conrm, the minute digits ashes on the display.
8. Press the Tuning << or Tuning >> button to set the minute.
9. Press the Select / Info button to conrm, the day ashes on the display.
10. Press the Tuning << or Tuning >> button to set the current day.
11. Press the Select / Info button to conrm, the month ashes on the display.
12. Press the Tuning << or Tuning >> button to set the current month.
13. Press the Select / Info button to conrm, the year will then ash on the display.
14. Press the Tuning << or Tuning >> button to set the current year.
15. Press the Select / Info button to conrm and nish the settings.
Auto update
The radio can receive the latest time information from either DAB or FM signal, then
synchronizes the current date/time of the radio.
1. Press the Power button to switch on the radio.
2. Press the Menu button to display current menu.
3. Press the Tuning << or Tuning >> button to select “System settings” and press
the Select / Info button.
4. Then press the Tuning << or Tuning >> button to select “Time/Date” and press
the Select / Info button to conrm.
5. Press the Tuning << or Tuning >> button to select “Time auto update” and press
the Select / Info button.
6. Press the Tuning << or Tuning >> button to select
“Any” Radio will be automatically synchronizes the date/time from DAB or
FM signal.
“DAB” Radio will automatically synchronizes the date/time from current DAB
station.
“FM” Radio will automatically synchronizes the date/time from current FM
station.
“No update” Radio will stop updating date/time from any of the radio stations.
7. Press the Select / Info button again to conrm and nish setting.
Note: If reception is good and you have selected the “DAB” or “FM” option from Auto
Update option, the time will be automatically updated. Time synchronization can take
several minutes. The automatic time setting is always activated when the radio is
switched from standby to last played radio mode.

21 22
GB
GB
EQUALISER
The sound on Teambox can be adjusted to suit your personal taste for the material that
you are listening to.
1. Press the Power button to switch on the radio.
2. Press the EQ button to display current menu.
3. Press the Tuning << or Tuning >> button to select
Neutral → Rock → Indoor → Jazz → Outdoor
4. Press the Select / Info button to conrm.
LANGUAGE
The radio can be congured to a different language.
1. Press the Power button to turn on the radio.
2. Press the Menu button, and then Press the Tuning << or Tuning >> button until
the display shows “System settings”.
3. Press the Select / Info button; Press the Tuning << or Tuning >> button until the
display shows “Language”.
4. Press the Select / Info button to enter the language adjustment menu.
5. Press the Tuning << or Tuning >> button until the desired language appears on
the display (default is English).
6. Press the Select / Info button to conrm your choice. The display will change to
the chosen language.
SOFTWARE UPDATE
From time to time, new software features for your radio may be developed. Teambox
has therefore been designed to allow its internal software to be updated using USB
connection.
You should not attempt to update your radio unless it is recommended to you by
Customer Services. Updating the software may remove all radio station presets from
Teambox.
SOFTWARE VERSION
The software display cannot be altered and is just for your reference.
1. Press the Power button to turn on the radio.
2. Press the Menu button, and then Press the Tuning << or Tuning >> button until
the display shows “System settings”.
3. Press the Select / Info button; Press the Tuning << or Tuning >> button until the
display shows “SW version”.
4. Press the Select / Info button to view the software version.
FACTORY RESET
If the radio fails to operate correctly, or some digits on the display are missing or
incomplete, carry out the following procedure.
1. Press the Power button to switch on the radio.
2. Press the Menu button.
3. Press the Tuning << or Tuning >> button until the display shows “System
settings” and press the Select / Info button.
4. Press the Tuning << or Tuning >> button until the display shows “Factory reset”
and press the Select / Info button.
5. Press the Tuning << or Tuning >> button to select between “Yes” or “No”.
Select “Yes” if you wish to reset the radio, otherwise, select “No”.
6. Press the Select / Info button to cause the factory reset.
7. A full reset will be performed. All presets and the station list will be erased. All
settings will be set to the default values.
After a brief stop, the radio will complete reset and automatically perform an auto scan
of the Band III DAB channels and the FM band.
In case of malfunction due to electrostatic discharge; reset the product as above to
resume normal operation. If you are not able to perform the reset operation as above,
remove and reconnect the power supply.

23 24
GB
GB
BACKLIGHT
The backlight of Teambox can be adjusted the brightness level of both radio on mode
and radio standby mode.
Radio on
You can set the brightness level of radio on mode.
1. Press the Power button to switch on the radio.
2. Press the Tuning << or Tuning >> button to select “System settings” and press
the Select / Info button to enter system menu.
3. Then press the Tuning << or Tuning >> button to select “Backlight” and press the
Select / Info button to conrm.
4. Press the Tuning << or Tuning >> button to select “Radio on” and press the
Select / Info button.
5. Press the Tuning << or Tuning >> button to select from High / Medium / Low / Off,
then press the Select / Info button to conrm.
Standby
You can set the brightness level of radio on mode.
1. Press the Power button to switch on the radio.
2. Press the Tuning << or Tuning >> button to select “System settings” and press
the Select / Info button.
3. Then press the Tuning << or Tuning >> button to select “Backlight” and press the
Select / Info button to conrm.
4. Press the Tuning << or Tuning >> button to select “Radio standby” and press the
Select / Info button to conrm.
5. Press the Tuning << or Tuning >> button to select from High / Medium / Low / Off,
then press the Select / Info button to conrm.
ADDITIONAL METAL TELESCOPIC ANTENNA
You can use this as an alternative antenna for your radio in areas or locations where the
radio-signal (FM/DAB/DAB+) is weak to very weak.
ATTENTION: the standard antenna on the radio is exible, this antenna is not
exible.
Installing: Carefully screw off the standard exible antenna. First carefully loosen the
antenna screw by a screwdriver – turn counter clockwise.
Carefully screw on the metal telescopic antenna and tighten it by a screwdriver – turn
clockwise.
ATTENTION: do not use too much force when xing the antennas as this can
damage the screw threat of the antennas or make it break off.
WARRANTY
This radio has a 2 year limited warranty.
WARNING ! Warranty becomes void once the radio cabinet has been opened or
any modications or alterations to the radio have been made !
The terms of the warranty of this radio do not cover the following:
• Damage caused by misuse, abuse, neglect, alterations, accidents or unauthorized
repair.
• Normal wear and tear.
• Breaking or bending of the metal telescopic antenna
Never open the device casing. The manufacturer will not accept any liability for damage
resulting from improper handling. The type plate is located on the bottom of the device.

25 26
GB
GB
SPECIFICATIONS
Power requirements
Mains 230 volts AC, 50/60Hz
Built-in Lithium Polymer Battery: 11.1V, 4000mAh
Frequency coverage
DAB 174,928 – 239,200 MHz
FM 87.5 – 108 MHz
Circuit features
USB socket 5V 1A for charging mobile phones via authorised USB cable
Loudspeaker ø5 inch + ø1 inch
Output power 25 Watts
Aux-in socket 3.5 mm, stereo
Aerial System DAB Telescopic aerial
FM Telescopic aerial
Bluetooth
Version 4.1 Supports Bluetooth proles A2DP and AVRCP.
The company reserves the right to amend the specications without notice.
Environmental note
This product has been manufactured with high quality parts and
materials which can be reused and recycled.
Therefore, do not throw the product away with normal household
waste at the end of its service life. Take it to a collection point for
the recycling of electrical and electronic device. This is indicated
by this symbol on the product, in the operating manual and on the
packaging.
Please nd out about collection points operated by your local
authority.
Help protect the environment by recycling used products.
This device is noise-suppressed according to the applicable EU
directives.
This product fullls the European directives 2005/32/EC and
2014/53/EU.
This device conforms to the safety regulation DIN EN 60065 (VDE
0860) and therefore the international safety regulation IEC 60065.
Never open the device casing. The manufacturer will not accept
any liability for damage resulting from improper handling.
The type plate is located on the bottom of the device.

1
CONTENU
Consignes de sécurité importantes ................................................................ 3
Alimentation electrique .................................................................................... 4
Utilisation sur secteur ......................................................................... 4
Utilisation sur batterie lithium et charge .......................................................... 4
Précautions à l’attention de l’utilisateur ..................................................... 5
Première utilisation de la radio ............................................................................. 6
Commandes .................................................................................................... 7
Mode DAB .................................................................................................... 9
Utiliser de la radio .................................................................................. 9
Sélection d’une station ............................................................................... 9
Programmes secondaires .......................................................................... 9
Modes d’affichage .................................................................................. 10
Recherche de nouvelles stations ................................................................. 10
Recherche manuelle de stations ................................................................ 10
Réglages Dynamic Range Control (DRC) ............................................... 11
Suppression de stations ........................................................................ 11
Mode FM ............................................................................................................. 12
Utiliser de la radio ......................................................................................... 12
Recherche manuelle de stations .................................................................... 12
Système d’informations RDS ..................................................................... 12
Modes d’affichage ................................................................................... 13
Réglage de la sensibilité de balayage ............................................................. 13
Présélections de stations ..................................................................... 13
Mémoire de stations présélectionnées ..................................................... 13
Rappel de stations présélectionnées .......................................................... 14
Mode Bluetooth .................................................................................................... 14
Connexion Bluetooth avec votre téléphone portable ....................................... 15
Écoute de musique à partir de votre téléphone portable ........................... 16
Modes d’affichage ..................................................................................... 16
Liste des appareils – Se connecter à l’appareil couplé ..................................... 16
Recommencer l’appareillage Bluetooth ...................................................... 17
Mode USB ........................................................................................................... 17
Insertion et retrait d’un périphérique de stockage USB ................................ 18
Lecture de fichiers ............................................................................................ 18
Mode lecture ................................................................................................ 19
Fonction d’information ............................................................................... 19
2
F
Mode Aux In .................................................................................................... 19
Réglage manuel de l’heure et de la date .................................................................... 20
Mise à jour automatique de l’heure .................................................................... 21
Fonction égaliseur .................................................................................................. 21
Sélection de la langue ......................................................................................... 21
Mise à jour du logiciel .................................................................................................. 22
Version du logiciel ....................................................................................................... 22
System reset .................................................................................................... 22
Éclairage de l’écran ............................................................................................... 23
Antenne télescopique supplémentaire en métal ............................................... 23
Garantie .................................................................................................................. 24
Caractéristiques ............................................................................................... 25
Sources de courant ............................................................................................... 25
Plage de fréquences ........................................................................................... 25
Caractéristiques électroniques .......................................................................... 25
Bluetooth .................................................................................................... 25
Protection de l’environnement ....................................................................... 26
ATTENTION !
LA GARANTIE PREND FIN LORSQUE LE BOITIER DE LA RADIO A ETE OUVERT
OU LORSQUE DES MODIFICATIONS ONT ETE APPORTEES A LA RADIO.
N’OUVREZ JAMAIS LE BOITIER DE L’APPAREIL. LE CONSTRUCTEUR
N’ACCEPTERA AUCUNE RESPONSABILITÉ POUR UN DOMMAGE RESULTANT
D’UNE MAUVAISE UTILISATION. LA PLAQUE SIGNALÉTIQUE EST SITUÉE AU
DOS DE L’APPAREIL.
La marque et les logos Bluetooth® sont enregistrés comme des marques déposées et
détenues par Bluetooth SIG, Inc. et tout usage de ces marques par Perfectpro B.V. se
fait sous licence.

3
CONSIGNES DE SECURITE IMPORTANTES
1. Lisez ces consignes.
2. Conservez ces consignes.
3. Respectez ces avertissements.
4. Suivez ces consignes.
5. Nettoyez seulement avec un chiffon sec.
6. Ne bloquez aucune ouverture de ventilation. Installez selon les consignes.
7. N'installez pas à proximité de sources de chaleur telles que les radiateurs, grilles de
chauffage, fourneaux ou autres appareils (y compris les amplicateurs) qui
produisent de la chaleur.
8. Ne supprimez pas la fonction de scurit de la che polarise ou terre – type de
prise. Une che polarise possde deux broches dont une est plus large que l'autre.
Une prise à terre possède deux broches et une troisième broche à terre. La broche
large ou la troisième broche reliée à la terre sont fournies pour des raisons de
scurit. Si la che fournie ne rentre pas dans votre prise, consultez un lectricien
pour qu'il vous change l'ancienne prise.
9. Protgez le cordon d'alimentation an qu'il ne soit pas pitin ou serr,
particulirement au niveau de la che, de la prise lectrique et l'endroit o il sort
de l'appareil.
10. Utilisez seulement des cordons/accessoires précisés par le fabricant.
11. Utilisez seulement avec le chariot, le support, le trépied, la console ou la table
précisés par le fabricant ou vendus avec l'appareil. En utilisant un chariot, faites
attention en déplaçant la combinaison chariot/appareil pour éviter de vous blesser
en cas de chute.
12. Débranchez cet appareil pendant les orages ou lorsque vous ne l'utilisez pas
pendant de longues périodes.
13. Conez toutes les rparations du personnel de rparation quali. La rparation
est requise si cet appareil a été endommagé de quelque manière que ce soit, par
exemple si le cordon d'alimentation ou la che ont t endommags, si du liquide a
été renversé ou si des objets sont tombés sur l'appareil, si l'appareil a été exposé à
la pluie ou à de l'humidité, s'il ne fonctionne pas correctement ou s'il est tombé.
14. Pour réduire les risques de feu ou de choc électrique, n'exposez pas cet appareil à
la pluie ou à de l'humidité.
15. N'enlevez pas le dessus de l'appareil, il n'y a pas de pièces de réparation a l'intérieur.
16. Ne placer aucune source de amme nue sur l’appareil.
17. Lors d’une utilisation en extérieur,pour éviter les chocs électriques, utilisez
seulement des piles en cas de pluie ou de temps humide. An d’viter tout
risque d’électrocution lorsque la radio a été exposée à la pluie ou à l’eau, le cordon
d’alimentation et la che doivent tre schs compltement avant d’insrer la che
dans la prise de courant.
18. La prise de courant doit tre proximit de l'appareil et facile d'accs pour
qu'en cas d'urgence, pour couper le courant de l'appareil, vous puissiez simplement
débrancher la prise de courant.
19. Les informations légales concernant la radio se trouvent sur la face inférieure de
celle-ci.
20. Cet appareil est protégé contre les projections et éclaboussures d’eau (IP65).
21. En cas de perturbations provoquées par une décharge électrostatique ou une
pointe de tension, la che du cordon d’alimentation de la radio doit tre retire un
bref instant de la prise de courant et réinsérée ensuite dans celle-ci.
22. Cet appareil doit tre utilis en climat modr.
23. Pour éviter d’endommager l’audition, ne pas écouter à volume élevé
pendant de longues périodes.
24. Sous l'environnement avec une perturbation de l'immunité conduite / Immunité rayonnée,
la radio peut mal fonctionner. Il se récupérera automatiquement à la normale lorsque
la perturbation de l'immunit entraîne / l'immunit rayonne s'est arrte.
4
F
ALIMENTATION ELECTRIQUE
Utalisation sur secteur
1. Avant d’insrer la che du cordon d’alimentation de la radio dans une prise de
courant secteur, assurez-vous que la tension du courant secteur soit correct.
2. N’utilisez jamais la che du cordon d’alimentation de la radio dans des conditions
pluvieuses ou humides an d’viter un court-circuit ou d’empcher l’humidit de
pénétrer dans la radio. Dans ces conditions, gardez les protections en caoutchouc
bien fermées.
REMARQUE :
Pour dconnecter totalement la radio de l’alimentation, la che du cordon d’alimentation
doit tre retire entirement de la prise de courant. La che et le cordon d’alimentation
doivent rester accessibles à tout moment.
En cas de perturbations provoquées par une décharge électrostatique ou une pointe de
tension, la che du cordon d’alimentation de la radio doit tre retire de la prise de cou-
rant et les piles doivent tre dconnectes un bref instant.
UTILISATION SUR BATTERIE LITHIUM ET CHARGE
REMARQUE RELATIVE À LA PREMIÈRE UTILISATION : AVANT D’UTILISER VOTRE
RADIO POUR LA PREMIÈRE FOIS, COMMENCEZ TOUJOURS PAR CHARGER LA
BATTERIE LITHIUM COMPLÈTEMENT.
Votre radio peut tre utilise sur la batterie Lithium intgre. Pendant l’utilisation sur
piles, le niveau approximatif de la batterie sera signalé par l’icône batterie constitué de
4 segments dans le coin supérieur droit de l’écran LCD. Lorsque le niveau de la batterie
est trs faible, l’icône « vide » commencera clignoter. Dans ce cas de gure, la batterie
doit tre recharge aussi vite que possible pour permettre une utilisation normale de
votre radio.
Le temps de charge de la batterie pour passer de vide à pleine est d’environ 6 à 7
heures ( temprature ambiante et en mode Standby). Votre radio peut tre aussi bien
chargée en mode Standby (mode veille) qu’en mode On lorsque l’appareil diffuse de la
musique. Lorsque l’appareil diffuse de la musique, le temps de charge peut-tre plus
long qu’en mode Standby. Lorsque l’appareil est en charge, les segments de l’icône de
la batterie s’animeront.
Pour raison de sécurité supplémentaire, votre radio ne commencera pas le
processus de charge si la batterie est déjà pleine ou presque pleine.

5
REMARQUE SUR LE TEMPS D’UTILISATION SUR BATTERIE : La durée d’utilisation
sur batterie dépend de plusieurs facteurs tels que : le niveau de volume sélectionné, le
type de musique écouté ( la musique riche en basses consomme davantage d’énergie),
la Source de musique sélectionnée, le réglage EQ sélectionné, la température ambiante
et l’âge de la batterie. En fonction de ces variables, un temps d’utilisation compris entre
20 et 26 heures peut tre atteint un niveau de volume moyen.
REMARQUE SUR LA VIE DE LA BATTERIE LITHIUM :
Si la radio n’est pas utilisée pendant une longue période, commencez toujours par
charger complètement la batterie. La durée de vie optimale de la batterie intégrée sera
atteinte en rechargeant compltement la batterie aprs chaque usage de la radio, mme
si elle n’est que partiellement déchargée. La durée de vie de la batterie sera amoindrie
si la batterie est laissée longtemps déchargée.
AVERTISSEMENT :
Ne tentez pas de remplacer ou réparer la batterie lithium intégrée. Si vous avez des
doutes concernant la batterie lithium intégrée, veuillez contacter le département service
client pour plus d’assistance.
AVERTISSEMENT :
Danger d’explosion si la batterie est remplacée de façon incorrecte.
N’exposez pas la batterie à une chaleur excessive telle que le soleil, le feu ou autre. La
batterie ne doit pas tre jete avec les dchets mnagers et ne doit pas tre incinre.
Elle doit tre apporte un centre de recyclage.
INFORMATIONS DE SÉCURITÉ CONCERNANT LA BATTERIE INTERNE
RECHARGEABLE LITHIUM POLYMÈRE
La batterie rechargeable intégrée au Lithium polymère utilisée dans cet appareil peut
fournir de l’nergie pendant une longue priode. Cependant mme les batteries Lithium
polymres atteignent un point o elles ne peuvent plus tre recharges. Si la batterie
ne se recharge toujours pas après plusieurs tentatives, il est possible qu’elle n’ait
plus d’énergie. Veuillez alors contacter [email protected] pour les informations
concernant la réparation.
Cependant si vous ne souhaitez pas que nous remplacions la batterie, vous devrez re-
cycler les batteries et appareils usagés selon les lois et les règles en vigueur dans votre
région. Vous pouvez en plus contacter votre distributeur électronique local ou un centre
de recyclage.
Précautions à l’attention de l’utalisateur
• Vriez que la temprature de la pice est comprise entre 0°C – 35° C (32°- 95°
Fahrenheit) avant de charger la batterie.
• Ne tentez pas de démonter la protection en plastique ou quelque partie de
l’appareil que ce soit puisque le matriel situ l’intrieur peut tre toxique et peut
endommager la peau ou les vtements.
6
F
• Ne percez pas, n’crasez pas, ne modiez pas, ne jetez pas la batterie et ne lui
causez pas de choc particulier. En effet la batterie utilisée dans cet appareil peut
risquer de s’enammer, prsenter un risque d’explosion ou de brûlure chimique en
cas de mauvais traitement.
• Ne laissez pas la batterie, ne la chargez pas et ne l’utilisez pas dans une voiture
sous une exposition directe du soleil, près d’un feu ou d’une Source de chaleur.
• N’immergez pas et ne jetez pas la batterie dans l’eau/dans la mer, ne la mouillez
pas.
• N’utilisez pas la batterie si elle vous semble anormalement chaude, décolorée
ou déformée ou si vous détectez des conditions anormales lorsque vous l’utilisez, la
rechargez o la stockez.
• Ne laissez pas une batterie en charge sans surveillance. Gardez la batterie à dis
tance des bébés et des enfants.
PREMIÈRE UTILISATION DE LA RADIO
1. Posez la radio sur une surface stable et plane.
2. Relevez l’antenne souple située au-dessus de la radio. Orientez l’antenne
verticalement par rapport à la radio.
3. Insrez la che du cordon d’alimentation dans une prise de courant. La radio
effectuera ensuite automatiquement un balayage de la bandede fréquences DAB et
FM.
4. Les 10 stations FM offrant le meilleur signal de réception seront alors mises dans la
mémoire de stations. Après ce premier balayage, la radio s’éteindra
automatiquement et l’heure et la date actualises seront ensuite afches l’cran.
5. En l’absence de réception d’un signal radio, l’heure et la date ne seront pas
actualises. Il peut alors tre ncessai e de placer la radio dans un autre endroit
offrant une meilleure réception radio.

7 8
F
COMMANDES
12. Connection USB
13. Aux-In
14. Cordon d’alimentation
15. Compartiment batterie interne
COMMANDES
1. Touche On/Off
2. Source
3. Select / Info
4. Fréquence <<
5. Fréquence >>
6. Menu
7. Prselections / ►|| button
8. Egaliseur
9. Volume –
10. Volume +
11. Antenne
15 14
12 13
6
7
8
9
10
1
2
3
4
5
11

9 10
F
MODE DAB
Utiliser de la radio en mode DAB
1. Relevez l’antenne souple située au-dessus de la radio. Orientez l’antenne
verticalement par rapport à la radio. Appuyez sur la touche On/Off pour allumer la r
adio.
2. Appuyez sur la touche Source (touche de sélection de la Source audio) pour
sélectionner le mode DAB.
3. La premire station (dans l’ordre alphanumrique 0…9, A…Z) de la liste de stations
sera alors audible et le nom de la station sera afch l’cran. Si la radio a dj t
utilisée, la dernière station sélectionnée sera dans ce cas audible.
4. Lorsqu’aucun signal radio n’a été trouvé, le message “Service not available” (Aucune
station disponible) sera afch l’cran. Il peut tre ncessaire dans ce cas de
placer la radio dans un autre endroit offrant une meilleure réception. Vous pouvez
ensuite effectuer un Auto Scan pour rechercher des stations DAB. Voir le point
“Recherche de nouvelles stations en mode DAB”.
Sélection d’une station en mode DAB
1. Appuyez sur la touche On/Off pour allumer la radio.
2. Le nom de la station DAB trouve sera ensuite afch l’cran.
3. Appuyez sur la touche Fréquence >> ou Fréquence << pour parcourir la liste des
stations DAB disponibles.
4. Lorsque le nom de la station DAB souhaitée apparaît à l’écran, appuyez sur la
touche Select / Info pour sélectionner la station DAB en question.
Lorsque le message “Service not available” (Aucune station disponible) apparaît à l’écran
aprs avoir slectionn une station DAB, il peut tre ncessaire dans ce cas de placer
la radio dans un autre endroit offrant une meilleure réception.
Programmes secondaires - DAB
1. Certaines stations de radio ont un ou plusieurs programmes secondaires associé(s),
qui ne sont pas diffusés continuellement. Si une station de radio a un programme
secondaire associé, alors ce programme apparaîtra immédiatement après le
premier programme dans la liste des noms de stations.
2. Appuyez sur la touche Select / Info pour sélectionner le programme secondaire et
appuyez sur la touch pour écouter la station.
Afchage en mode DAB
En mode DAB, la radio est capable d’afcher diverses informations.
Appuyez sur la touche Select / Info pour parcourir les différentes informations dispo-
nibles.
a. Texte dlant Afche des messages de la station DAB que
vous coutez, sous la forme d’un texte dlant.
b. Type de programme Afche le type de programme que vous coutez,
par exemple Pop, Classique, Actualités, etc.
c. Force du signal Afche la force du signal de rception de la
station DAB que vous écoutez. Le bloc ouvert
indique le niveau minimum du signal nécessaire
pour obtenir une bonne réception.
d. Multiplex & frquence Afche le nom du multiplex et frquence de la
station DAB que vous écoutez.
e. Dbit binaire et type audio Afche le dbit binaire et le format audio de
l’émission.
f. Date Afche la date.
Recherche de nouvelles stations en mode DAB
De temps à autre, il se peut que de nouvelles stations DAB soient disponibles.
Pour trouver celles-ci :
1. Appuyez sur la touche Source pour sélectionner le mode DAB.
2. Appuyez sur la touche Menu et appuyez sur la touche Select / Info. La radio
effectuera alors un balayage complet des fréquences de la DAB Bande III. Lorsque
la radio trouve de nouvelles stations DAB, celles-ci seront ajoutées à la liste des
stations DAB disponibles.
Recherche manuelle de stations en mode DAB
Une recherche manuelle vous offre la possibilité de sélectionner directement des sta-
tions dans la DAB Bande III.
1. En mode DAB, appuyez sur la touche Menu. “Full scan” sera ensuite afch
l’écran.
2. Appuyez sur la touche Fréquence >> ou Fréquence << jusqu’à ce que “Manual
tune” sera ensuite afch l’cran. Appuyez sur la touche Select / Info.
3. Appuyez sur la touche Fréquence >> ou Fréquence << pour rechercher la
fréquence DAB souhaitée. Appuyez sur la touche Select / Info pour sélectionner la
fréquence DAB en question.
4. L’afchage de la force du signal indique le niveau du signal capt par la radio. Le
bloc ouvert indique le niveau minimum du signal nécessaire pour obtenir une bonne
rception. L’afchage de la force du signal change lorsque vous changez la position
de l’antenne et/ou de la radio.

11 12
F
5. Lorsque la radio capte un signal DAB, le nom de la station sera afch l’cran.
6. Appuyez sur la touche Select / Info pour revenir au menu DAB standard.
Réglages Dynamic Range Control (DRC) en mode DAB
La fonction DRC permet de rendre des sons doux plus audibles lorsque la radio est
utilisée dans un environnement ou un endroit particulièrement bruyant.
1. En mode DAB, appuyez sur la touche Menu. “Full scan” sera ensuite afch
l’écran.
2. Appuyez sur la touche Fréquence >> ou Fréquence << jusqu’à ce que “DRC” soit
afch l’cran. Appuyez ensuite sur la touche Select / Info.
3. Appuyez sur la touche Fréquence >> ou Fréquence << pour sélectionner le
réglage DRC souhaité (normalement, la fonction DRC est désactivée).
DRC Off fonction DRC désactivée.
DRC 1/2 niveau DRC réglé à 50% du niveau émis.
DRC 1 niveau DRC réglé à 100% du niveau émis.
4. Appuyez sur la touche Select / Info pour conrmer votre slection et revenir au
menu DAB standard.
Remarque : Toutes les stations DAB n’utilisent pas la fonction DRC. Lorsqu’une station
DAB n’émet aucune information DRC, les réglages DRC n’auront aucun effet sur la
radio.
Suppression de stations (fonction ‘prune’) en mode DAB
Lorsque vous vous rendez dans une autre région ou dans un autre pays, il se peut que
certaines stations DAB ne soient plus disponibles. Il se peut également que certaines
stations DAB arrtent d’mettre ou changent de frquence. La fonction “Prune” (Sup-
pression) permet de supprimer de la liste des stations DAB, les stations DAB qui ne sont
plus disponibles.
1. En mode DAB, appuyez sur la touche Menu.
2. Appuyez sur la touche Fréquence >> ou Fréquence << jusqu’à ce que “Prune”
(Suppression) soit afch l’cran.
3. Appuyez ensuite sur la touche Select / Info.
4. Appuyez sur la touche Fréquence >> ou Fréquence << pour sélectionner
“Yes”(Oui) ou “No”(Non) (Le réglage standard est Non).
5. Appuyez sur la touche Select / Info pour conrmer votre slection et revenir au
menu DAB standard.
Remarque : Lorsque vous vous rendez dans une autre région ou dans un autre pays, il
est conseillé d’effectuer une recherche des nouvelles stations DAB disponibles. Voir à
cet effet le point “Recherche de nouvelles stations en mode DAB”.
MODE FM
Utilisation de la radio en mode FM
1. Appuyez sur la touche On/Off pour allumer la radio.
2. Appuyez sur la touche Source (touche de sélection de la Source audio) pour
sélectionner le mode FM.
3. Lors de la première utilisation de la radio, la station FM dans la mémoire de
présélection 1 sera sélectionnée. Si la radio a déjà été utilisée dans le passé, la
dernière station FM écoutée sera dans ce cas sélectionnée.
4. Appuyez sur la touche Fréquence >> ou Fréquence << en maintenez pour
démarrer la recherche automatique de stations FM.
5. La radio lancera alors la recherche et s’arrtera automatiquement lorsqu’elle trouve
une station FM offrant une bonne réception.
6. Pour rechercher une autre station FM, appuyez de nouveau sur la touche
Fréquence >> ou Fréquence << en maintenez.
7. Lorsque la n de la plage de frquences FM est atteinte, la radio recommencera la
recherche depuis l’autre extrémité de la plage de fréquences FM.
Recherche manuelle de stations en mode FM
1. Appuyez sur la touche On/Off pour allumer la radio.
2. Appuyez sur la touche Source pour sélectionner le mode FM.
3. Appuyez sur la touche Fréquence >> ou Fréquence << pour atteindre la station
FM souhaitée. La fréquence changera par incréments de 50 kHz.
4. Tournez éventuellement l’antenne pour obtenir une meilleure réception.
5. Lorsque la n de la plage de frquences FM est atteinte, la radio recommencera la
recherche depuis l’autre extrémité de la plage de fréquences FM.
Système d’informations RDS en mode FM
Le RDS (Radio Data System) est un système d’informations par lequel des informations
numériques non audibles sont transmises en plus du programme radio FM normal.
Lorsque la radio capte une station RDS et que la rception est sufsamment bonne, le
nom de la station FM apparaîtra à l’écran LCD. Un certain temps peut s’écouler avant
que les informations RDS soient disponibles.

13
F
14
Activation du système d’informations RDS
Lorsque vous écoutez une station FM comportant le système RDS, appuyez plusieurs
fois sur la touche Select / Info pour parcourir les informations RDS disponibles. Ceci
fonctionne uniquement lorsque la rception est sufsamment bonne et claire.
a. Radio Texte (RT) Afche des messages de la station FM que vous
coutez, sous la forme d’un texte dlant.
b. Type de Programme (PTY) Afche le type de station FM que vous coutez.
Exemples : Pop, Classique, Actualités, etc.
c. Force du signal Afche la force du signal de rception de la
station FM que vous écoutez.
d. Frquence Afche la frquence de la station FM que vous
écoutez.
e. Date Afche la date.
Réglage de la sensibilité de balayage en mode FM
La radio effectue normalement un balayage de toutes les stations FM, y compris celles
dont le signal est faible. Il vous est toutefois possible de régler la fonction de balayage
de telle sorte que seules les stations FM dont le signal est fort assez pour offrir une
bonne réception, soient captées.
1. Appuyez sur la touche On/Off pour allumer la radio.
2. Appuyez sur la touche Source pour sélectionner le mode FM.
3. Appuyez sur la touche Menu. “Scan setting” (Réglage de la sensibilité de balayage)
sera ensuite afch l’cran. Appuyez sur la touche Select / Info.
4. Appuyez sur la touche Fréquence >> ou Fréquence << pour sélectionner “All
stations” or “Strong stations only”. Le réglage standard est “Strong stations only”.
Lorsque l’option “Strong station” (Stations au signalfort) a été sélectionnée, la radio
captera, lors du balayage des stations FM, uniquement les stations dont le signal
est fort.
5. Appuyez sur la touche Select / Info pour conrmer le rglage.
PRÉSELECTIONS DE STATIONS
Mémoire de stations présélectionnées
La radio possède 20 emplacements de mémoire de stations présélectionnées, 10 pour
la FM et 10 pour la DAB. Les stations présélectionnées seront conservées dans la mé-
moire de la radio mme en cas de coupure de courant.
1. Appuyez sur la touche On/Off pour allumer la radio.
2. Appuyez sur la touche Source pour sélectionner le mode FM ou DAB.
3. Sélectionnez la station souhaitée.
4. Appuyez sur la touche de Présélections souhaite jusqu’ ce que la radio afche
“Preset 01 : Empty”.
5. Appuyez sur la touche Fréquence >> ou Fréquence << pour choisir l’emplacement
désiré (1-10). Appuyez sur la touche Select / Info. La radio afche “Preset 01 :
Stored”.
6. Répétez les étapes 3, 4 et 5 pour les autres présélections.
7. Les stations prslectionnes et mmorises peuvent tre crases en rptant les
points ci-dessus.
Rappel de stations présélectionnées
1. Appuyez sur la touche On/Off pour allumer la radio.
2. Appuyez sur la touche Source pour sélectionner le mode FM ou DAB.
3. Appuyez brièvement sur la touche de Présélections.
4. Appuyez sur la touche Fréquence >> ou Fréquence << pour choisir le station
désiré (1-10).
5. Appuyez sur la touche Select / Info.
MODE BLUETOOTH
Le mode Bluetooth de votre système son vous permet de lire de l’audio, du son de
chiers video, et d’couter la musique d’appareils tels que votre tlphone portable,
votre ordinateur, votre tablette etc. dans les haut-parleurs de votre Teambox.
● Lorsque qu’un appareil compatible Bluetooth tel que votre systme son Teambox
est « détectable », d’autres appareils bluetooth peuvent le détecter, s’appairer avec
ou s’y connecter.
● L’appairage Bluetooth survient lorsque les appareils compatibles Bluetooth
acceptent d’établir une connexion et de communiquer entre eux.
La performance de la connectivité Bluetooth peut varier en fonction des appareils
Bluetooth connectés. Veuillez vous référer aux capacités Bluetooth de votre appareil
avant de le connecter à votre système son. Toutes les caractéristiques peuvent ne pas
tre compatibles avec vos appareils Bluetooth.
Une connexion Bluetooth peut fournir un lien pour l’audio jusqu’à environ 10 mtres.
Lorsque vous appairez deux appareils compatibles Bluetooth, nous recommandons
qu’ils ne soient pas éloignés de plus de deux trois mètres. La présence d’autres appa-
reils Bluetooth pendant la connexion peut provoquer des difcults oprationnelles.
Le Bluetooth est un système de communication radio de courte portée et en général les
appareils Bluetooth peuvent communiquer correctement dans une pièce ou un bureau
de taille moyenne. La abilité de la connexion Bluetooth entre diffrentes pices dpen-
dra majoritairement des matériaux du bâtiment.
La porte du Bluetooth communication peut tre considrablement rduite si le signal
passe à travers un objet solide. Les corps humains, les murs de brique et de béton, les

meubles lourds ou les bibliothèques réduiront la portée de vos appareils Bluetooth. Les
murs en verre, les cloisons sèches ou les panneaux de bois et séparation de bureaux
pourront avoir un impact moins important. Les tuyaux en métal, les plaques de plâtre et
l’installation électrique domestique peuvent également avoir un effet. Vous devez posi-
tionner vos appareils Bluetooth le plus près l’un de l’autre que possible si vous observez
des problèmes de communication.
Les rseaux WiFi et les tlphones sans l utilisent gnralement des frquences radio
similaires au Bluetooth et peuvent interférer entre eux. Si vous notez des interférences,
tentez alors de repositionner le système son ou l’un des autres appareils.
Les capacités Bluetooth de votre système son lui permettent de recevoir de l’audio de-
puis de nombreux appareils compatibles Bluetooth incluant les téléphones portables, les
PCs et les tablettes. Seul un appareil la fois peut tre connect votre systme son. Il
est compatible avec les prols Bluetooth suivants :
● Votre Teambox est compatible avec A2DP (Advanced Audio Distribution Prole)
qui est une connexion audio stereo qui diffuse de la musique depuis les pcs,
téléphones portables etc. Les codecs audio SBC et AAC sont compatibles.
● Votre Teambox est compatible avec AVRCP (Audio Video Remote Control Prole)
cep ui permet à votre radio de contrôler la lecture de votre musique depuis l’appareil
connecté.
REMARQUE : Certains téléphones portables peuvent se déconnecter temporairement
de votre système son lorsque vous passez ou recevez un appel. Certains appareils
peuvent temporairement mettre en mode muet le streaming audio pendant que vous
recevez des textos, des emails ou pour d’autres raisons liées au streaming audio. De
tels comportements sont la conséquence des caractéristiques de l’appareil connecté et
n’indique pas un défaut de votre système son.
Connexion Bluetooth avec votre téléphone portable
1. Appuyez sur la touche On/Off pour allumer la radio.
2. Appuyez sur la touche Source pour sélectionner le mode Bluetooth.
3. “Connecting” sera ensuite afch l’cran.
4. Appelez le menu Bluetooth sur votre téléphone portable et sélectionnez “Teambox”
dans la liste des appareils Bluetooth (ces instructions de connexion peuvent varier
en fonction du modèle de votre téléphone portable. Pour plus de détails, veuillez
consulter le mode d’emploi de votre téléphone portable).
5. Dès que votre téléphone portable parvient à établir une connexion avec la radio,
l’cran afche ensuite le nom du tlphone portable connect.
6. L’cran afche ensuite le nom du tlphone portable connect.
15
Ecoute de musique à partir de votre téléphone portable
1. Appuyez sur la touche On/Off pour allumer la radio.
2. Appuyez sur la touche Source pour sélectionner le mode Bluetooth.
3. Ecoutez la musique souhaitée à partir des lecteurs de média de votre téléphone
portable.
4. Utilisez les touches Préselections / ►||, Tuning <<, et Tuning >> sur de la radio
pour commander les différentes fonctions d’écoute de vos morceaux préférés.
5. Aprs avoir cout de la musique, le nom de la chanson s’afche l’cran.
Modes d’afchage
En mode Bluetooth, la radio peut afcher une srie d’informations propos de la mu-
sique en écoute.
Appuyez sur la touche Select / Info pour naviguer entre les différents types.
a. Titre Afche le nom du titre.
b. Artiste Afche le nom de l’artiste.
c. Album Afche le nom de l’album d’o provient la chanson.
d. Heure et date Afche l’heure et la date actuelles.
Liste des appareils – Se connecter à l’appareil couplé
Sur cette radio, vous pouvez sélectionner l’appareil Bluetooth à appareiller dans la Liste
des appareils an de vous reconnecter cet appareil.
Les noms des appareils s’afcheront dans la liste si le nom du Bluetooth a t prala-
blement congur dans les appareils mobiles. Rfrez-vous au mode d’emploi de votre
tlphone portable pour la conguration.
La liste des appareils peut-tre consulte en suivant ces instructions :
1. En mode Bluetooth, appuyez sur la touche Menu pour entrer dans le menu
réglage.
2. Appuyez sur la touche Fréquence >> ou Fréquence << pour jusqu’à ce que
« Device list » s’afche l’cran ; appuyez sur la touche Select / Info.
3. Appuyez sur la touche Fréquence >> ou Fréquence << pour voir le nom des
appareils.
4. Appuyez sur la touche Select / Info pour commencer la reconnexion Bluetooth.
La radio se reconnectera automatiquement l’appareil mobile slectionné.
Remarque : Cette radio peut mémoriser jusqu’à 8 appareils Bluetooth. Lorsque la
mémoire dépasse ce nombre, le premier appareil couplé sera effacé de la radio.
Remarque : Si vous avez effacé « Teambox » de la liste des appareils de votre
téléphone portable, la reconnexion automatique ne pourra s’établir.
F
16

17
Remarque : Lorsque la radio lit un périphérique de stockage USB, elle consomme
davantage de puissance et la charge des piles est donc interrompue pour assurer un
fonctionnement normal de la radio et une lecture optimale du périphérique de stockage
USB. Lorsque le périphérique de stockage USB est retiré, la charge des piles reprend
normalement.
Insertion et retrait d’un périphérique de stockage USB
Insérez méticuleusement un périphérique de stockage USB dans le port USB.
Pour retirer un périphérique de stockage USB, tirez simplement sur le périphérique.
Lecture de chiers
1. Appuyez sur la touch On/Off pour allumer la radio.
2. Appuyez sur la touch Source pour slectionner le mode USB. L’cran afche
“Reading” (en lecture). La lecture des chiers du priphrique de mmoire par la
radio peut prendre un certain temps.
3. Après avoir lu le périphérique de stockage USB, la radio commencera lire le
premier chier (chanson) du premier dossier. Si aucun priphrique de stockage
USB n’est insr, l’cran afchera « No USB Stick ».
4. Pour mettre la lecture en pause, appuyez sur la touche Préselections / ►||.
Appuyez sur la touche Préselections / ►|| à nouveau pour reprendre la lecture.
5. Pour passer au chier suivant, appuyez sur la touche Tuning >>.
6. Pour relire le chier prcdent, appuyez sur la touche Tuning <<.
7. Lorsque le chier est en lecture, appuyez sur la touche Tuning >> ou sur la
touche Tuning <<. Relâchez la touch lorsque la partie dsire du chier est
atteinte.
8. Pour passer au dossier suivant, appuyez sur la touche Menu pendant 2 sec., et
appuyez sur la touche Fréquence >>.
9. Pour relire le chier prcdent, appuyez sur la touche Fréquence <<.
La radio supporte un nombre limit de dossiers et de chiers lors de la recherche :
Mode Nombre max. de dossiers supports Nombre max. de chiers supports
Stop 999 (avec le nom de dossier) 9999 (avec le nom de chier)
Play 999 9999
(1-99 avec le nom de dossier) (1-999 avec le nom de chier)
(100-999 sans le nom de dossier) (1000-9999 sans le nom de chier)
F
18
Recommencer l’appareillage Bluetooth
La fonction Bluetooth peut tre gre de diffrentes manires :
1. En mode Bluetooth, appuyez sur la touche Menu pour entrer dans le menu de
rglages. L’cran d’afchage afchera « Discoverable » (Non connect) et appuyez
sur la touche Select / Info.
2. L’cran d’afchage afchera « Connecting » et le Bluetooth de la radio sera alors
disponible pour tre connect un autre appareil mobile puisqu’il sera dsormais
en mode visible.
Remarque : “Discoverable” est l’option qui force le Bluetooth de la radio à se déconnec-
ter de l’appareil mobile et à devenir visible pour un autre appareillage. Si aucun nouvel
appareil est appareillé, le Bluetooth de la radio tentera automatiquement de se recon-
necter au dernier appareil couplé lorsque la radio sera rallumée.
La fonction Auto-Power Management sera activée en mode Bluetooth. S’il n’y a pas de
signal pendant plus de 15 minutes, la radio se mettra automatiquement en mode veille.
Appuyez sur la touche On/Off pour enclencher la radio à nouveau.
MODE USB
NE JAMAIS UTILISER LE PORT USB OU LA PRISE AUX-IN DANS DES CONDI-
TIONS HUMIDES OU PLUVIEUSES POUR EVITER QUE L’HUMIDITÉ PENETRE
DANS LA RADIO! GARDER LA PROTECTION EN CAOUTCHOUC FERMEE DANS
CES CONDITIONS.
Les chiers MP3, AAC, FLAC et WAV contenus dans le priphrique de stockage USB
peuvent tre lus sur la radio.
Cette radio a été testée avec une large gamme de périphériques de stockage USB al-
lant jusqu’à 32 Go. Cependant, de nombreux fabricants sont présents sur le marché, il
n’est donc pas garanti que toutes les marques de cartes mémoire soient compatibles
avec la radio. Le périphérique de stockage mémoire doit posséder un système de chiers
FAT ou FAT32 an de pouvoir tre utilis avec la radio.
Les formats audios supportés sont les formats MP3, AAC, FLAC et WAV. La radio ne lit
pas les de format comprenant une protection DRM.
L’emplacement pour le connecteur USB est situé à l’arrière de la radio sous la protection
en caoutchouc. Assurez-vous que la protection en caoutchouc est bien fermée après
usage an d’vite que l’humidit et la salet ne pntre dans la radio.
Le priphrique de stockage USB ne doit pas tre retir pendant la lecture d’un chier,
les chiers pouvant alors tre endommags ou corrompus.
Le périphérique de stockage USB ne sont pas inclus avec cette radio.

Mode lecture
Lorsque le périphérique de stockage USB est en lecture :
1. Appuyez sur la touche Menu.
2. Appuyez sur la touche Fréquence >> ou Fréquence << jusqu’à ce que l’écran
afche « USB setting « (mode lecture). Appuyez sur la touche Select / Info.
3. Appuyez sur la touche Fréquence >> ou Fréquence << pour sélectionner le mode
de lecture souhaité et Appuyez sur la touche Select / Info.
La radio af chera les options suivantes :
Normal play → Repeat track → Repeat folder → Repeat all → Shufe
Normal play
Repeat track Lecture répétée de la piste en cours
Repeat folder Joue en boucle les chiers dans le dossier que vous tes en train
d’écouter.
Repeat all Lecture répétée de toutes les pistes sur le dispositif de mémoire.
Shufe Les chiers sur le dispositif de mmoire seront lus au hasard.
Le mode de lecture sélectionné est indiqué par un ic ne à droite sur la ligne du haut
de l’écran d’af chage. Aucune icône n’est af ch lorsque la radio est en mode de lecture
normal.
Fonction d’information
Pendant l’utilisation d’un périphérique de stockage, appuyez sur la touche Select / Info
pour naviguer entre les informations suivantes (uniquement si ces informations sont pré-
sentes sur le chier d’origine du priphrique) :
Statut de lecture -> Nom de l’artiste -> Nom de l’album -> Bitrate -> Nom de la chanson
-> Statut de lecture
MODE AUX IN
Une prise Aux In stéréo de 3,5 mm est prévue derrière la coiffe en caoutchouc, et per-
met d’y brancher des appareils audio externes tels que lecteur MP3 ou lecteur de CD
(non fourni avec la radio).
1. Raccordez un lecteur externe à la prise Aux In.
2. Appuyez sur la touche Source pour sélectionner le mode AUX IN. “AUX IN” sera
alors afch l’cran.
3. Allumez et démarrez le lecteur externe.
4. Réglez le volume de la radio et du lecteur externe au niveau d’écoute souhaité.
5. Assurez-vous que le couvercle en caoutchouc est à nouveau correctement fermé
aprs utilisation, an que l’humidit et la salet ne puissent pas pntrer dans la
radio.
19
Remarque : N’utilisez jamais la prise AUX IN sous la pluie ou dans un environnement
humide, de façon à éviter que de l’humidité pénètre dans la radio. Conservez dans ce
cas la coiffe en caoutchouc toujours bien fermée.
La fonction de gestion automatique de l’alimentation sera activée en mode AUX IN. En
l’absence de signal d’entrée à la prise AUX IN pendant plus de 15 minutes, la radio se
mettra automatiquement en mode standby (veille). Pour rallumer la radio, appuyez sur
la touche On/Off.
REGLAGE MANUEL DE L’HEURE ET DE LA DATE
Lorsqu’aucune touche n’est activée pendant 30 secondes, la radio quittera le mode de
réglage de l’heure et l’heure réglée sera annulée.
1. Appuyez sur la touche On/Off pour allumer la radio.
2. Appuyez sur la touche Menu.
3. Appuyez sur la touche Fréquence >> ou Fréquence << jusqu‘à ce que “System
Settings” soit afch l’cran et appuyez sur la touche Select / Info.
4. Appuyez sur la touche Fréquence >> ou Fréquence << jusqu‘à ce que “Time/
Date” soit afch l’cran et appuyez sur la touche Select / Info.
5. Appuyez sur la touche Fréquence >> ou Fréquence << jusqu‘à ce que “Set Time/
Date” soit afch l’cran et appuyez sur la touche Select / Info.
6. Le chiffres du jour clignoteront.
7. Appuyez sur la touche Fréquence >> ou Fréquence << jusqu’à ce que le jour
correct soit afch l’cran.
8. Appuyez sur la touche Select / Info. Les chiffres du mois clignoteront à l’écran.
9. Appuyez sur la touche Fréquence >> ou Fréquence << pour sélectionnes les
chiffres du mois.
10. Appuyez sur la touche Select / Info. Les chiffres de l’année clignoteront à l’écran.
11. Appuyez sur la touche Fréquence >> ou Fréquence << pour sélectionnes les
chiffres de l’année et appuyez la touche Select / Info. Les chiffres de l’heure cli
gnoteront à l’écran.
12. Appuyez sur la touche Fréquence >> ou Fréquence << pour sélectionnes les
chiffres de l’heure.
13. Appuyez sur la touche Select / Info. Les chiffres des minutes clognoteront à l’écran.
14. Appuyez sur la touche Fréquence >> ou Fréquence << pour sélectionnes les
chiffes des minutes.
15. Appuyez sur la touche Select / Info pour conrmer la slection.
Mise à jour automatique de l’heure
Votre radio mettra normalement l’heure à jour automatiquement.
1. Appuyez sur la touche On/Off pour allumer la radio.
2. Appuyez sur la touche Menu.
3. Appuyez sur la touche Fréquence >> ou Fréquence << jusqu‘à ce que “System
Settings” soit afch l’cran et appuyez sur la touche Select / Info.
F
20

21
MISE À JOUR DU LOGICIEL
De temps en temps, de nouvelles fonctionnalités logicielles pour votre radio peuvent
tre dveloppes. Le Teambox est donc conçu pour pouvoir mettre à jour le logiciel
interne via une connexion USB.
Ne lancez pas de mise à jour à moins que le service client ne vous le recommande.
La mise à jour du logiciel peut supprimer toutes les stations de radio et les paramètres
d’alarme.
VERSION DU LOGICIEL
Il n’est pas possible de modier l’afchage de la version du logiciel. Cet afchage est
donné uniquement à titre d’information
1. Appuyez sur la touche On/Off pour allumer la radio.
2. Appuyez sur la touche Menu et Appuyez sur la touche Fréquence >> ou
Fréquence << jusqu’ ce que “System settings” soit afch l’cran.
3. Appuyez sur la touche Select / Info et appuyez sur la touche Fréquence >> ou
Fréquence << ensuite celui-ci jusqu’à ce que “SW version” (Version du logiciel)
soit afch l’cran.
4. Appuyez sur la touche Select / Info pour voir la version du logiciel.
SYSTEM RESET
Lorsque la radio ou l’afchage ne fonctionne pas correctement ou en l’absence d’af-
chage, suivez la procédure ci-dessous.
1. Appuyez sur la touche On/Off pour allumer la radio.
2. Appuyez sur la touche Menu.
3. Appuyez sur la touche Fréquence >> ou Fréquence << jusqu’à ce que “System
setting” soit afch l’cran.
4. Appuyez sur la touche Select / Info et appuyez sur la touche Fréquence >> ou
Fréquence << jusqu’ ce que “Factory reset” (Rglages d’usine) soit afch
l’écran.
5. Appuyez sur la touche Select / Info et appuyez sur la touche Fréquence >> ou
Fréquence << pour sélectionner “Yes” (“Oui”) ou “No” (“Non”).
6. Appuyez sur la touche Select / Info pour conrmer votre slection.
7. Une réinitialisation complète de la radio sera alors effectuée. La mémoire de
stations présélectionnées sera effacée et tous les réglages personnels seront annu
lés. Les réglages d’usine seront ensuite restaurés. La radio effectuera ensuite auto
matiquement un balayage de la plage de fréquences DAB et FM.
En cas de perturbations provoquées par une décharge électrostatique, procédez à la
rinitialisation de la radio comme dcrit ci-dessus. En cas d’chec, retirez la che du
cordon d’alimentation de la prise de courant et enlevez les piles. Rebranchez ensuite le
cordon d’alimentation et réinsérez les piles dans la radio.
F
22
4. Appuyez sur la touche Fréquence >> ou Fréquence << jusqu‘à ce que “Time/
Date” soit afch l’cran et appuyez sur la touche Select / Info.
5. Appuyez sur la touche Fréquence >> ou Fréquence << jusqu‘à ce que “Time auto
update” soit afch l’cran et appuyez sur la touche Select / Info.
6. Appuyez sur la touche Fréquence >> ou Fréquence << pour circuler et éclairer les
différents modes :
« Any » MAJ duipuis DAB et FM
« DAB» MAJ depuis DAB
« FM» MAJ depuis FM
«No update» Pas de mise à jour
7. Appuyez sur la touche Select / Info pour conrmer votre slection
Remarque : Si le signal est sufsant et que vous slectionnez les options «Update from
DAB» ou «Update from FM», l’heure sera automatiquement mise à jour. La synchroni-
sation de l’heure peut prendre quelques minutes.
FONCTION EGALISEUR
Le son de la votre radio peut tre ajust selon vos goûts personnels en fonction de la
musique que vous écoutez.
1. Appuyez sur la touche On/Off pour allumer la radio.
2. Appuyez sur la touche EQ.
3. Appuyez sur la touche Fréquence >> ou Fréquence << pour selectionner
Neutral > Rock > Indoor > Jazz > Outdoor
4. Appuyez sur la touche Select / Info pour conrmer votre slection.
SELECTION DE LA LANGUE
La radio peut tre rgle de faon ce que l’afchage soit dans la langue de votre
choix.
1. Appuyez sur la touche On/Off pour allumer la radio.
2. Appuyez sur la touche Menu et appuyez sur la touche Fréquence >> ou
Fréquence << jusqu‘à ce que “System settings” soit afch l’cran.
3. Appuyez sur la touche Select / Info et appuyez sur la touche Fréquence >> ou
Fréquence << ensuite celui-ci jusqu’à ce que “Language” (Langue) soit afch
l’écran.
4. Appuyez sur la touche Select / Info pour entrer dans le menu de sélection de la
langue.
5. Appuyez sur la touche Fréquence >> ou Fréquence << pour sélectionner la
langue souhaitée. Le réglage standard est l’anglais.
6. Appuyez sur la touche Select / Info pour conrmer votre slection.

ECLAIRAGE DE L’ECRAN
Conguration du rtro-clairage de l’cran d’afchage LCD
1. Appuyez sur la touche On/Off pour allumer la radio.
2. Appuyez sur la touche Menu puis appuyez sur la touche Fréquence >> ou
Fréquence << jusqu’ ce que l’cran afche « System settings ».
3. Appuyez sur la touche Select / Info ; Appuyez sur la touche Fréquence >> ou
Fréquence << jusqu’ ce que l’cran afche « Backlight » (LCD clairage).
4. Appuyez sur la touche Select / Info pour entrer dans le menu de réglage du
rtro-clairage de l’cran d’afchage LCD.
5. Appuyez sur la touche Fréquence >> ou Fréquence << pour sélectionner « Radio
on » an de garder le rtro-clairage continuellement allum lorsque la radio
fonctionne sur secteur.
6. Ou Appuyez sur la touche Fréquence >> ou Fréquence << pour sélectionner
« Radio standby » an que lorsque vous utilisez la radio sur secteur.
7. Appuyez sur la touche Select / Info pour conrmer votre choix.
8. Appuyez sur la touche Fréquence >> ou Fréquence << pour sélectionner high/
medium/low/off.
9. Appuyez sur la touche Select / Info pour conrmer votre choix.
ANTENNE TÉLESCOPIQUE SUPPLÉMENTAIRE EN MÉTAL
Vous pouvez utiliser cette antenne télescopique en métal sur votre radio en remplace-
ment de l’antenne exible monte d’origine, lorsque vous vous trouvez dans des rgions
ou des endroits où le signal radio (FM/DAB/DAB+) est faible trs faible.
Remarque : contrairement l’antenne exible monte d’origine sur la radio, cette
antenne tlescopique en mtal n’est pas exible.
Installation de l’antenne : Dvissez prudemment l’antenne exible d’origine. Desserrez
d’abord celle-ci avec précaution l’aide d’une clé plate fourche de 14 mm en tour-
nant celle-ci dans le sens inverse des aiguilles d’une montre. Vissez ensuite prudem-
ment l’antenne télescopique en métal et serrez celle-ci sans forcer l’aide d’une clé
plate à fourche de 14 mm en tournant dans le sens des aiguilles d’une montre.
ATTENTION : Evitez de forcer sur la clé plate fourche de 14 mm de faon ne
pas endommager l’extrmité lete de l’antenne.
23
GARANTIE
Ce produit est garanti pendant deux ans.
AVERTISSEMENT : LA GARANTIE PREND FIN LORSQUE LE BOITIER DE LA
RADIO A ETE OUVERT OU LORSQUE LA RADIO A ETE MODIFIEE DE QUELQUE
MANIERE QUE CE SOIT PAR L’UTILISATEUR FINAL.
La garantie de la radio ne couvre pas :
- Les dommages et le bris résultant d’une utilisation non correcte, d’un usage abusif,
d’une ngligence, de modications, d’accidents ou de rparations non autorises.
- L’usure normale en cours d’utilisation.
- Le bris ou la courbure excessive de l’antenne télescopique en métal.
N’OUVREZ JAMAIS LE BOITIER DE L’APPAREIL. LE CONSTRUCTEUR N’AC-
CEPTERA AUCUNE RESPONSABILITÉ POUR UN DOMMAGE RESULTANT D’UNE
MAUVAISE UTILISATION. LA PLAQUE SIGNALÉTIQUE EST SITUÉE AU DESSOUS
DE L’APPAREIL.
F
24

25
F
26
CARACTÉRISTIQUES
Sources de courant
Courant secteur : 230 V ~ 50/60hz
Batterie Lithium polymère intégrée : 11.1 v, 4000mAh
Plage de fréquences
DAB 174.928 – 239.200 MHz
FM 87,5 – 108 MHz
Caractéristiques électroniques
Sortie USB : 5V, 1A pour charger des téléphones mobiles via
un câble USB autorisé
Haut-parleur : ø5 inch + ø1 inch
Puissance de sortie: 25 watts
Prise Aux In : 3,5 mm Stéréo
Système d’antenne : Antenne DAB
Antenne FM
Bluetooth
Version 4.1 Supports pour prols Bluetooth A2DP et AVRCP.
La socit se rserve le droit de modier ces caractristiques sans pravis.
Protection de l’environnement
Ce produit est fabriqué avec des pièces et des matériaux de
qualit, susceptibles d’tre rutiliss et recycls.
Lorsque ce produit a atteint la n de sa vie utile, ne le jetez par
conséquent pas avec les ordures ménagères ordinaires, mais
conez-le un point de collecte et de recyclage d’appareils
lectriques et lectroniques. Le symbole ci-contre gure cet effet
sur le produit, dans le mode d’emploi ainsi que sur l’emballage.
Veuillez-vous informer auprès des autorités communales au sujet
des points de collecte les plus proches de chez vous. Aidez à
protéger l'environnement en recyclant les produits usagés.
La radio est déparasitée conformément aux directives EU en
vigueur.
Ce produit satisfait aux directives européennes 2005/32/CE et
2014/53/EU.
La radio satisfait à la réglementation en matière de sécurité
DIN EN 60065 (VDE 0860) et dès lors à la réglementation
internationale en matière de sécurité IEC 60065.
Ne jamais ouvrir le boîtier de la radio. Le fabricant décline toute
responsabilité en cas de dommages résultant d’une utilisation non
correcte ou abusive de la radio.
La plaque signalétique se trouve sur la face inférieure de la radio.

1
INHOUDSOPGAVE
Belangrijke veiligheidsinstructies .................................................................................... 3
Stroomvoorziening .......................................................................................................... 4
Gebruik op netstroom ............................................................................................... 4
Lithium batterij gebruiken en laden .......................................................................... 4
Voorzorgsmaatregelen gebruiker ............................................................................. 5
Het apparaat voor de eerste keer gebruiken .................................................................. 6
Bedieningselementen .................................................................................................. 7
DAB+ Digitale Radio modus ............................................................................................ 9
De radio bedienen .................................................................................................. 9
Een DAB-zender selecteren .................................................................................... 9
Secundaire diensten ................................................................................................. 9
Weergavemodi .................................................................................................. 10
Het vinden van nieuwe zenders ............................................................................. 10
Handmatig afstemmen .................................................................................... 10
Dynamic Range Control (DRC) instellingen ........................................................... 11
Niet-beschikbare zenders verwijderen .................................................................... 11
FM Radio modus .................................................................................................. 12
De radio bedienen .................................................................................................. 12
Handmatig afstemmen .................................................................................... 12
RDS-informatie .................................................................................................. 12
Weergavemodi .................................................................................................. 13
Scan gevoeligheid instelling .................................................................................. 13
Voorkeurzenders ........................................................................................................... 13
Voorkeurzenders opslaan .................................................................................... 13
Voorkeurzenders oproepen .................................................................................... 14
Bluetooth ................................................................................................................ 14
Bluetooth koppelen met uw mobiele telefoon ........................................................ 15
Muziek afspelen vanaf uw mobiele telefoon ........................................................... 15
Weergavemodi .................................................................................................. 16
Device List – Afspelen vanaf een apparaat waarmee eerder is gekoppeld ............ 16
Bluetooth koppelen opnieuw starten ...................................................................... 16
USB Modus ................................................................................................................ 17
Een USB-stick aansluiten en verwijderen ............................................................ 17
Muziekbestanden afspelen .................................................................................... 18
Afspeelmodus .................................................................................................. 18
Infofunctie ............................................................................................................... 19
2
NL
NL
Aux-in Modus ................................................................................................................ 19
De klok instellen ............................................................................................................ 19
Automatische update .............................................................................................. 20
Equalizer ................................................................................................................ 21
Taal .............................................................................................................................. 21
Software-update ............................................................................................................ 21
Software versie ............................................................................................................. 21
Systeem reset ............................................................................................................... 22
Display verlichting .................................................................................................. 22
Metalen telescopische antenne .................................................................................... 23
Garantie ................................................................................................................ 23
Specicaties ................................................................................................................ 24
Stroombron ............................................................................................................. 24
Frequentiebereik .................................................................................................. 24
Circuit functies ..................................................................................................... 24
Bluetooth ................................................................................................................ 24
Opmerking over milieubescherming ....................................................................... 24
WAARSCHUWING!
DE GARANTIE VERVALT INDIEN DE BEHUIZING VAN HET APPARAAT GEOPEND
IS OF INDIEN HET APPARAAT DOOR DE EINDGEBRUIKER OP ENIGERLEI
WIJZE GEMODIFICEERD OF VERANDERD IS! OPEN NOOIT DE BEHUIZING. DE
PRODUCENT AANVAART GEEN AANSPRAKELIJKHEID VOOR SCHADE EN/OF
LETSEL VEROORZAAKT DOOR ONJUIST GEBRUIK. HET TYPEPLAATJE VINDT U
OP DE ONDERZIJDE VAN HET APPARAAT.
De Bluetooth® markering en logo’s zijn geregistreerde handelsmerken die eigendom zijn
van Bluetooth SIG, Inc. en elk gebruik van deze markering en logo’s is onder licentie.

BELANGRIJKE ALGEMENE VEILIGHEIDSINSTRUCTIES
1. Lees deze instructies.
2. Bewaar deze instructies goed.
3. Neem alle waarschuwingen in acht.
4. Volg alle aanwijzingen op.
5. Reinig het uitsluitend met een droge doek.
6. Blokkeer geen ventilatieopeningen en plaats het toestel volgens de instructies.
7. Plaats het niet in de buurt van warmtebronnen zoals verwarmingen, ventilatiekleppen,
ovens en andere apparaten (incl. versterkers) die warmte afgeven.
8. Beschadig niet de ten behoeve van de veiligheid gepoolde of geaarde stekkers.
Een gepoolde stekker bezit twee contacten, een is breder dan de andere. Een
geaarde stekker bezit twee contacten en een derde pen voor de aarding. Het brede
contact of de derde pin dienen voor uw veiligheid. Mocht de meegeleverde stekker
niet in uw stopcontact passen, neem dan voor het vervangen van het verouderde
stopcontact contact op met een elektricien.
9. Bescherm de stroomkabel, opdat hierop niet gelopen wordt en er geen
beschadigingen of knikken optreden aan de stekker, aan het stopcontact of op de
plek waar de stekker uit het toestel komt.
10. Gebruik uitsluitend de door de fabrikant aangegeven onderdelen/accessoires.
11. Gebruik het toestel uitsluitend met de door de fabrikant aangegeven of samen met
het toestel gekochte wagentjes, standaards, driepoten, klemmen of tafel. Wanneer
u een wagen gebruikt, wees dan voorzichtig bij het bewegen van de combinatie
wagen/toestel om letsel door omvallen te vermijden.
12. Koppel het toestel van de stroomvoorziening af bij onweer of wanneer het langere
tijd niet wordt gebruikt.
13. Laat iedere vorm van onderhoud door gekwaliceerd personeel verrichten. Een
onderhoud is noodzakelijk wanneer het toestel aan de stroomkabel of stekker
beschadigd werd, wanneer er vloeistof of voorwerpen in het toestel zijn
binnengedrongen, wanneer het toestel aan regen of vochtigheid was blootgesteld
en wanneer het niet normaal functioneert resp. gevallen is.
14. Stel het toestel noch aan regen noch aan vochtigheid bloot om het gevaar voor
brand of het risico van een elektrische schok te reduceren.
15. Verwijder de afdekking niet. In het binnenste bevinden zich geen onderdelen
waarvoor een onderhoud noodzakelijk is.
16. Geen voorwerpen op het apparaat plaatsen welke een bron zijn van open vlammen.
17. Gebruik bij het gebruik in de open lucht op regenachtige dagen of bij vochtig weer
uitsluitend batterijen om een elektrische schok te vermijden. Om elektrische schok
te voorkomen, als de radio blootgesteld is geweest aan regen of water, dienen
zowel het snoer als de stekker volledig gedroogd te worden alvorens de stekker in
het stopcontact wordt gestoken.
18. De netstekker moet dicht bij het toestel en steeds toegankelijk zijn, zodat in geval
van nood (bijv. om het toestel van het stroomnet te scheiden) alleen de stekker uit
het stopcontact moet worden getrokken.
19. De productinformatie is te vinden op de onderzijde van het toestel.
20. Dit apparaat is voorzien van bescherming tegen spattend water (IP65).
21. In geval van storing ten gevolge van Electro-statische ontlading of piekspanning,
verwijder de stroombron en sluit deze daarna weer aan.
22. Het apparaat moet gebruikt worden in een gemiddeld klimaat.
23. Om mogelijke gehoorschade te voorkomen niet op een hoog volume
gedurende een lange periode luisteren.
24. Een omgeving met lijnstoring / radiosensitiviteit kan bij de radio storingen
veroorzaken. Dit zal automatisch weer normaliseren wanneer de lijnstoring /
radiosensitiviteit is gestopt.“
3
STROOMVOORZIENING
Gebruik op netstroom
1. Zorg ervoor dat de spanning correct is voordat u de stekker van het netsnoer in het
stopcontact steekt.
2. De kabel- en stekker-opbergmogelijkheid, die zich aan de achterzijde van de radio
bevindt, dient ervoor om de stroomkabel en de stekker op te bergen wanneer u de
radio niet gebruikt of wanneer deze op de ingebouwde accu speelt.
Opmerking:
Om de Teambox volledig van het stroomnet af te koppelen moet de stekker volledig uit
het stopcontact worden getrokken. De stekker en stroomkabel dienen daarvoor altijd
bereikbaar te zijn met directe toegang.
In geval van storing door elektrostatische ontlading of piekspanning (burst), verwijdert u
de stekker uit het stopcontact en sluit u de stekker na ongeveer een minuut weer aan.
Lithium batterij gebruiken en laden
Opmerking voor het eerste gebruik: voordat u de Teambox de eerste keer
gebruikt, dient u de batterij volledig op te laden.
De Teambox kan worden gebruikt op de ingebouwde lithium batterij. Tijdens het gebruik
van de ingebouwde batterij zal het geschatte energieniveau van de batterij worden
weergegeven in het display van de radio.
Als het batterijniveau zeer laag is en/of het batterijsymbool knippert op het display, moet
de ingebouwde batterij zo snel mogelijk worden opgeladen om de normale werking van
de Teambox voort te zetten.
De laadtijd van een lege naar volledige batterij is ongeveer 5-6 uur (bij kamertemperatuur
met de radio in de standby-modus). De Teambox kan worden opgeladen in de standby-
modus en tijdens het gebruik. Tijdens het gebruik is de oplaadtijd langer dan in de
standby-modus.
De Teambox zal, voor extra veiligheid, niet beginnen met opladen wanneer de
batterij al vol is of bijna vol is.
Opmerking over de speelduur van de ingebouwde Lithium batterij: De te behalen
speelduur op de ingebouwde Lithium batterij hangt af van vele factoren zoals: gekozen
volumeniveau, soort muziek (muziek met veel bas verbruikt meer stroom), gekozen
muziekbron, gekozen EQ-instelling, omgevingstemperatuur en de leeftijd van de batterij.
Afhankelijk van deze factoren is een speelduur te behalen van ongeveer 20 tot 26 uur
op een gemiddeld volume.
4
NL
NL

OPMERKING OVER DE LEVENSDUUR VAN DE INGEBOUWDE LITHIUM BATTERIJ:
Wanneer u de Teambox langere tijd niet gebruikt, laad dan altijd eerst de ingebouwde
Lithium batterij volledig op. De optimale levensduur van de batterij zal worden verkregen
door het apparaat na elk gebruik steeds op te laden, ook als het apparaat slechts
gedeeltelijk is ontladen. De levensduur van de batterij zal worden verkort indien het
apparaat met een lege batterij gedurende langere tijd niet zal worden gebuikt.
WAARSCHUWING:
Probeer de ingebouwde Lithium batterij niet te vervangen. Wanneer u twijfelt aan de
staat van de ingebouwde Lithium batterij, neemt u dan contact op met de serviceafdeling
voor verdere assistentie.
WAARSCHUWING:
Er bestaat gevaar voor explosie, wanneer de ingebouwde Lithium batterij foutief wordt
vervangen. Stel de ingebouwde Lithium batterij niet bloot aan een buitensporig grote
hitte zoals bijv. fel zonlicht, vuur of iets dergelijks. De ingebouwde Lithium batterij mag
niet door verbranding of via het normale huisvuil worden verwijderd. Wegwerpbatterijen
dienen indien mogelijk bij een recyclage-centrum te worden afgegeven.
VEILIGHEIDSINFORMATIE VOOR DE INGEBOUWDE LITHIUM BATTERIJ
De ingebouwde, oplaadbare Lithium batterij van dit apparaat staat garant voor
een langdurige stroomvoorziening. Zelfs Lithium batterijen kunnen echter een punt
bereiken waar ze niet meer opnieuw kunnen worden opgeladen. Als de batterij ook
na verschillende pogingen niet meer kan worden opgeladen, dan kan deze defect of
leeg zijn. Neem in dit geval contact op met [email protected] voor informatie
over reparaties. Als u niet wilt dat wij de ingebouwde batterij vervangen, dan moet u
gebruikte batterijen/apparaten afvoeren in overeenstemming met de wet- en regelgeving
in uw regio. Daarnaast kunt u voor het afvoeren contact opnemen met lokale
elektronicawinkels of recyclingcentra.
Voorzorgsmaatregelen gebruiker
• Controleer of de kamertemperatuur tussen 0°C – 35° C (32°- 95° Fahrenheit) ligt
voordat u de batterij oplaadt.
• Probeer de plastic behuizing of andere delen van het apparaat niet te demonteren,
omdat de materialen binnen in het apparaat giftig kunnen zijn en mogelijk uw huid
en kleren kunnen beschadigen.
• De batterij mag niet worden doorboord, geplet, aangepast, gegooid of worden
blootgesteld aan onnodige schokken, omdat het verkeerd behandelen van de
batterij in dit apparaat kan leiden tot een risico op brand, explosie en chemische
brandwonden.
• De batterij niet achterlaten, opladen of gebruiken in een auto in direct zonlicht of in
de buurt van vuur of een andere warmtebron.
• De batterij niet onderdompelen in, werpen in of bevochtigen met (zee) water.
5 6
NL
NL
• Gebruik of laad de batterij niet op als deze abnormaal warm lijkt te zijn, als
de batterij verkleurd of vervormd is of als er abnormale omstandigheden worden
geconstateerd tijdens het gebruik, het opladen of het opbergen.
• Laat een batterij die wordt opgeladen niet onbeheerd achter. Houd de batterij uit de
buurt van baby’s en kinderen.
HET APPARAAT VOOR DE EERSTE KEER GEBRUIKEN
1. Plaats de radio op een vlakke ondergrond.
2. Zet de antenne, die zich bovenop de radio bevindt, rechtop.
3. Steek de stekker in het stopcontact. De radio zal vanzelf opstarten en automatisch
het DAB- en FM-frequentiebereik scannen.
4. Als de scan is voltooid, worden de 10 sterkste FM-zenders opgeslagen in het
voorkeuze-geheugen. De radio schakelt over naar stand-by met de bijgewerkte tijd
en datum op het display.
5. Als er geen radiosignaal gevonden is, zal de klok niet bijgewerkt worden. Het kan
nodig zijn om de radio te verplaatsen naar een positie voor een betere ontvangst.

7 8
NL
NL
BEDIENINGSELEMENTEN
12. USB aansluiting
13. Aux ingang
14. Stroomkabel
15. Batterij compartiment
BEDIENINGSELEMENTEN
1. Aan/uit knop
2. Audiobron knop
3. Select / Info knop
4. Tuning << knop
5. Tuning >> knop
6. Menu / Map knop
7. Voorkeuze / ►|| knop
8. Equaliser knop
9. Volume – knop
10. Volume + knop
11. Antenne
15 14
12 13
6
7
8
9
10
1
2
3
4
5
11

9 10
NL
NL
DAB+ DIGITALE RADIO MODUS
De radio bedienen
1. Zet de antenne rechtop en druk op de Aan/uit knop om de radio in te schakelen.
2. Als dit de eerste keer is, zal de radio in de DAB-modus staan.
3. De eerste zender (in numerieke-alfa volgorde: 0... 9... A... Z) in de lijst met
gevonden zenders zal worden afgespeeld. Het display zal de zendernaam
weergegeven. Als de radio eerder is gebruikt, zal de laatst beluisterde zender
afgespeeld worden.
4. Als geen zendersignaal is gevonden zal “Geen zenders beschikbaar” worden
weergegeven. Het kan dan nodig zijn om de radio te verplaatsen naar een andere
positie met een betere radio-ontvangst. U kunt dan een nieuwe scan uitvoeren om
zenders te zoeken. Zie verderop “Het vinden van nieuwe zenders”.
Een DAB-zender selecteren
1. Druk op de Aan/uit knop om de radio in te schakelen.
2. Het display geeft de naam van de geselecteerde zender weer.
3. Druk op de Tuning << of Tuning >> knop om door de lijst met beschikbare zenders
te bladeren.
4. Als de gewenste zendernaam op het display verschijnt, drukt u op de Select / info
knop.
Opmerking: Als na het selecteren van een zender het display “Service not available”
weergeeft, kan het noodzakelijk zijn om de radio naar een positie te verplaatsen die
betere ontvangst geeft.
Secundaire diensten
1. Bepaalde zenders hebben een of meer secundaire diensten. Als een zender een
secundaire dienst heeft, dan zal de secundaire dienst in de zenderlijst verschijnen
onder de hoofdzender. Om naar een secundaire dienst te luisteren drukt u op de
Select / info knop om de gewenste secundaire dienst te kiezen.
2. Druk op de Select / info knop om de secundaire dienst te selecteren.
De meeste secundaire diensten worden niet voortdurend uitgezonden en als de
geselecteerde dienst niet beschikbaar is, wordt de radio opnieuw afgestemd op de
bijbehorende primaire service.
Weergavemodi
In de DAB-modus kan de radio een reeks informatie op het display weergeven.
Druk op de Select / info knop om door de verschillende opties te bladeren.
a. Tekst Toont tekstberichten, zoals de artiest- of tracknaam,
telefoonnummer, verkeersberichten, etc.
b. Programma type Toont het soort zender waarnaar geluisterd wordt,
zoals pop, klassiek, nieuws, etc.
c. Signaalsterkte Toont de signaalsterkte van de huidige zender.
Het ongevuld blokje geeft het minimum
signaalniveau aan dat nodig is voor een goede
ontvangst.
d. Multiplex & frequentie Toont de naam van de DAB-multiplex waar
de huidige zender toe behoort evenals de
uitzendfrequentie.
e. Bitrate & audiotype Toont de digitale bitrate en audio codeer-informatie
voor de huidige zender.
f. Datum Toont de huidige datum.
Het vinden van nieuwe zenders
Als u uw radio wilt gebruiken voor DAB-ontvangst op een nieuwe locatie, of als er geen
zenders worden gevonden tijdens de initiële scan, dan kunt u deze procedure volgen
om uw radio naar beschikbare DAB-zenders te laten scannen.
1. Druk op de Audiobron knop om naar de DAB-modus te gaan.
2. Druk op de Menu / map knop, op het display wordt “Full scan” weergegeven.
3. Druk op de Select / info knop, de radio voert een scan uit op de DAB Band III en
de zenderteller zal worden opgehoogd als er nieuwe zenders worden gevonden.
Handmatig afstemmen
Handmatig afstemmen geeft u de mogelijkheid om direct zenders te kiezen in de DAB
Band III.
1. Druk op de Menu / map knop, het display zal “Full scan” weergeven
2. Druk op de Tuning << of Tuning >> knop het display “Manual tune” weergeeft,
druk dan op de Select / info knop.
3. Druk op de Tuning << of Tuning >> knop om de gewenste DAB-frequentie te
zoeken. Druk op de Select / info knop om de gekozen frequentie af te stemmen.
4. De signaalsterkte balk geeft het ontvangst niveau van de zender aan. Het open
blokje geeft het minimum signaal-niveau aan wat nodig is voor een goede
ontvangst.
5. Als een DAB-signaal gevonden is, toont het display de signaalsterkte. Alle nieuw
gevonden zenders zullen worden toegevoegd aan de zenderlijst.
6. Druk op de Select / info knop om terug te keren naar de normale weergave.

11 12
NL
NL
Dynamic Range Control (DRC) instellingen
Dynamic Range Control (ook bekend als DRC) kan zachte geluiden makkelijker
hoorbaar maken, wanneer uw radio wordt gebruikt in een lawaaiige omgeving door het
dynamisch bereik van het audiosignaal te verminderen.
1. Druk in de DAB-modus op de Menu / map knop, op het display wordt “Full scan”
weergegeven.
2. Druk op de Tuning << of Tuning >> knop totdat op het display “DRC” wordt
weergegeven. Druk op de Select / info knop.
3. Druk op de Tuning << of Tuning >> knop om de vereiste DRC-instelling te
selecteren (standaard is OFF).
DRC Off DRC is uitgeschakeld, uitgezonden DRC zal worden genegeerd.
DRC High DRC is ingesteld zoals verzonden door de uitzender.
DRC Low DRC niveau is ingesteld op ½ van datgene wat de uitzender verzendt.
4. Druk op de Select / info knop om de instelling te bevestigen. Het display gaat
terug naar de normale weergave.
Opmerking: Niet alle DAB-uitzendingen maken gebruik van de DRC-functie. Als de
uitzending geen ondersteuning biedt aan DRC, dan zal de DRC-instelling op de radio
geen effect hebben.
Niet-beschikbare zenders verwijderen (snoeien)
Als u zich verplaatst naar een ander gebied of land kunnen bepaalde zenders niet
meer beschikbaar zijn. Ook kunnen bepaalde zenders stoppen met uitzenden of van
frequentie veranderen. Zenders die niet gevonden kunnen worden of die lang niet zijn
ontvangen, worden in de zenderlijst gemarkeerd met een vraagteken.
1. Druk in de DAB-modus op de Menu / map knop, dan toont het display “Full scan”.
2. Druk op de Tuning << of Tuning >> knop totdat het display “Prune” toont.
3. Druk op de Select / info knop.
4. Druk op de Tuning << of Tuning >> knop om te kiezen tussen “Yes” of “No”
(standaard is No).
Selecteer “Yes” om deze functie in te schakelen indien nodig anders selecteer “No”.
5. Druk op de Select / info knop om uw instelling te bevestigen. Het display gaat
terug naar het normale radio display.
Opmerking: Als u uw radio heeft verplaatst naar een ander gebied of land, dan moet u
ook opnieuw naar zenders zoeken (zie de paragraaf ‘Het vinden van nieuwe zenders’)
FM RADIO MODUS
De radio bedienen
1. Druk op de Aan/uit knop om de radio in te schakelen.
2. Selecteer de FM-band door op de Audiobron knop te drukken.
3. Bij het eerste gebruik zal de zender van voorkeuze 1 worden afgespeeld.
Als de radio eerder gebruikt werd dan speelt de laatst beluisterde zender af.
4. Om zenders te zoeken, drukt u op de Tuning << of Tuning >> knop en houdt
deze even ingedrukt. De radio zoekt en stopt onmiddellijk wanneer hij een zender
met voldoende signaalsterkte vindt.
5. Na enkele seconden wordt de zendernaam bijgewerkt en weergegeven als RDS-
informatie wordt ontvangen.
6. Om een volgende zender te zoeken, drukt u opnieuw op de Tuning << of Tuning
>> knop en houdt deze even ingedrukt.
7. Wanneer het einde van het frequentiebereik is bereikt, begint de radio opnieuw te
zoeken vanaf het tegenovergestelde einde van het frequentiebereik.
Handmatig afstemmen
1. Druk op de Aan/uit knop om de radio in te schakelen.
2. Selecteer de FM-band door op de Audiobron knop te drukken.
3. Druk op de Tuning << of Tuning >> knop voor het instellen van de gewenste FM-
zender.
De radio zal de frequentie in stappen van 50 kHz veranderen.
4. Draai de rubberen antenne om de beste ontvangst te krijgen. Als er RDS-informatie
beschikbaar is, dan zal het display na een aantal seconden de zendernaam
weergeven.
5. Wanneer het einde van het frequentiebereik is bereikt, begint de radio opnieuw te
zoeken vanaf het tegenovergestelde einde van het frequentiebereik.
RDS-informatie
RDS (Radio Data System) is een informatiesysteem dat behalve het normale FM-
radioprogramma onhoorbare digitale informatie meezendt. Wanneer de radio een RDS-
zender ontvangt en de ontvangst voldoende sterk is, verschijnt de naam van de zender
in het display. Het kan even duren tot deze RDS-informatie beschikbaar is.

13 14
NL
NL
7. In het geheugen opgeslagen voorkeurzenders kunnen op de bovenstaande wijze
weer worden overschreven.
Voorkeurzenders oproepen
1. Druk op de Aan/uit knop om de radio in te schakelen.
2. Druk op de Audiobron knop om de gewenste band te selecteren (FM of DAB).
3. Druk op de Preset knop. Op het display wordt bijvoorbeeld “Preset 01: 88.10MHz”
weergegeven.
4. Druk op de Tuning << of Tuning >> knop om de gewenste voorkeurzender te
kiezen. Druk daarna op de Select / Info knop om te bevestigen.
5. Op het scherm wordt nu bijvoorbeeld “P1” getoond aan het einde van de eerste
regel.
BLUETOOTH
In de Bluetooth modus op uw Teambox kunt u de audio, audio van video en streaming
muziek afspelen vanaf een Bluetooth geschikt apparaat zoals een mobiele telefoon,
computer, tablet, etc. via de speakers van uw radio.
● Wanneer een Bluetooth geschikt apparaat zoals uw Teambox in de ‘discoverable’
modus staat, kunnen andere apparaten deze zien en verbinden.
● ‘Bluetooth pairing’ komt tot stand wanneer twee apparaten de benodigde informatie
met elkaar hebben uitgewisseld.
De kwaliteit van de Bluetooth verbinding is afhankelijk van de verbonden Bluetooth
apparaten. Controleer de Bluetooth mogelijkheden van het apparaat voordat u
verbinding maakt met de Teambox. Niet alle opties zijn op alle gekoppelde apparaten
beschikbaar.
Een Bluetooth verbinding werkt tot een afstand van ongeveer 10 meter. Wanneer
twee apparaten moeten verbinden is een afstand van 2 tot 3 meter het beste. De
aanwezigheid van andere Bluetooth apparaten kan de verbinding storen.
Bluetooth is een korte-golf radioverbinding systeem en is ontworpen om te
communiceren in normale formaat kamers en kantoren. De werking van Bluetooth
tussen verschillende kamers is zeer sterk afhankelijk van de constructie van het
gebouw.
De verbinding van Bluetooth kan sterk worden beïnvloed wanneer het signaal
door massieve objecten heen moet. Personen, stenen en betonnen muren, grote
meubelstukken of boekenkasten zullen de Bluetooth verbinding in meer of mindere
mate beïnvloeden. Glas, dunne wanden en hout hebben minder invloed maar kan
wel merkbaar zijn. Metalen pijpen, metalen frames en huis-bekabeling heeft ook een
negatief effect op de kwaliteit van de verbinding. Wanneer u een slechtere verbinding
ervaart, kunt u het beste de Bluetooth apparaten iets dichter bij elkaar plaatsen.
Weergavemodi
Wanneer u naar een FM-zender met RDS-systeem luistert, drukt u meermaals op de
Select / Info knop om door de RDS-informatie te lopen. Dit functioneert alleen wanneer
het niveau van de ontvangst voldoende sterk en helder is.
a. Radio tekst. (RT) Toont tekstberichten, zoals de artiest- of tracknaam,
telefoonnummer, verkeersberichten, etc.
b. Programma type (PTY) Toont het soort zender waarnaar geluisterd wordt,
zoals pop, klassiek, nieuws, etc.
c. Signaal sterkte Toont de sterkte van het signaal van de huidige
zender.
d. Frequentie Toont de frequentie van de huidige zender.
e. Datum Toont de huidige datum.
Scan gevoeligheid instelling - FM
De radio scant normaal alle FM-zenders inclusief diegene met een zwakker signaal.
U kunt de scan functie echter ook instellen dat deze alleen de zenders met een sterk
signaal voor een goede ontvangst vindt.
1. Druk op de Aan/uit knop om de radio in te schakelen.
2. Selecteer de FM-band door op de Audiobron knop te drukken.
3. Druk op de Menu / map knop, in het display wordt “Scan setting” weergegeven.
Druk op de Select / info knop.
4. Druk op de Tuning << of Tuning >> knop om te kiezen uit “All stations” of “Strong
stations only” (standaard is “Strong stations only”).
5. Druk op de Select / info knop om uw instelling te bevestigen. Het display gaat
terug naar het normale radio display.
VOORKEURZENDERS
Voorkeurzenders opslaan
Deze radio beschikt over 20 geheugenplaatsen, 10 voor DAB en 10 voor FM.
De voorkeurzenders worden opgeslagen in de radio als de stroombron
onderbroken wordt.
1. Druk op de Aan/uit knop om de radio in te schakelen.
2. Druk op de Audiobron knop om de gewenste band te selecteren (FM of DAB).
3. Stel de gewenste zender in.
4. Houd de Preset knop ingedrukt tot het display bijvoorbeeld “Preset 01: Empty”
toont.
5. Druk op de Tuning << of Tuning >> knop om de gewenste plaats te kiezen.
Druk daarna op de Select / Info knop om te bevestigen. Op het scherm wordt nu
bijvoorbeeld “Preset 01 Stored” getoond.
6. Herhaal stap 3 tot en met 5 voor de overige voorkeurzenders.

15
WiFi-netwerken en mobiele telefoonnetwerken gebruiken golven die overeenkomen
met Bluetooth. Deze kunnen elkaar negatief beïnvloeden. Indien u dit merkt dient u de
apparaten opnieuw te positioneren.
Bluetooth stelt uw Teambox in staat om audio te ontvangen van een grote
verscheidenheid aan mobiele telefoons, computers en tablets. U kunt slechts met 1
apparaat verbinding maken op hetzelfde moment. Uw radio ondersteunt de volgende
Bluetooth proelen en functies:
• Uw Teambox ondersteunt A2DP (Advanced Audio Distribution prole) welke audio
in stereo streamt naar uw radio vanaf andere Bluetooth apparaten. SBC en AAC-
audio codecs worden ondersteunt.
• Uw Teambox ondersteunt AVRCP (Audio Video Remote Control Prole) waardoor
u via uw radio de afspeelbron kunt bedienen.
Opmerking: Sommige mobiele telefoons verbreken tijdelijk de verbinding met uw radio
wanneer er een telefoongesprek wordt gestart of ontvangen. Sommige apparaten
dempen ook het geluid van de Bluetooth audio stream wanneer er een sms, e-mail of
ander bericht wordt ontvangen. Dit duidt niet op een probleem met uw radio.
Bluetooth koppelen met uw mobiele telefoon
1. Druk op de Aan/uit knop om de radio in te schakelen.
2. Selecteer Bluetooth-modus door op de Audiobron knop te drukken.
3. Het display toont “Connecting” wanneer de radio nog niet is gekoppeld aan uw
mobiele telefoon. Daarnaast gaat ook op het scherm het Bluetooth logo knipperen.
4. Open op uw mobiele telefoon het Bluetooth menu en zoek naar het apparaat
”Teambox” (Bluetooth-koppeling instructies kunnen per type mobiele telefoon
anders zijn, raadpleegt u de handleiding van uw mobiele telefoon).
5. Wanneer de Bluetooth koppeling succesvol is, zal het display de naam van de
verbonden mobiele telefoon weergeven en het Bluetooth logo zal getoond worden.
6. Hierna geeft het display de naam van de aangesloten mobiele telefoon weer.
Muziek afspelen vanaf uw mobiele telefoon
1. Druk op de Aan/uit knop om de radio in te schakelen.
2. Selecteer Bluetooth-modus door op de Audiobron knop te drukken.
3. Start het afspelen van muziek met behulp van de mediaspeler op de gekoppelde
mobiele telefoon.
4. De weergave kan worden bediend vanaf de mobiele telefoon of door op de Preset /
►||, Tuning <<, en Tuning >> knoppen op de radio te drukken.
5. Nadat het afspelen van muziek is gestart, wordt de naam van het nummer
weergegeven op het display.
16
NL
NL
Weergavemodi
In de Bluetooth-modus kan de radio een reeks informatie op het display weergeven.
Druk op de Select / Info knop om door de verschillende opties te bladeren.
a. Titel Toont de naam van de artiest van de huidige track.
b. Artiest Toont de naam van de artiest van de huidige track.
c. Album Toont de naam van het album waarvan het huidige nummer
afkomstig is.
d. Tijd en datum Toont de huidige tijd en datum.
Device List – Afspelen vanaf een apparaat waarmee eerder is gekoppeld
Op de radio kunt u in de apparatenlijst een apparaat selecteren om opnieuw mee te
verbinden.
De namen van de gekoppelde apparaten worden weergegeven wanneer deze op het
apparaat zijn ingesteld. Raadpleeg hiervoor de handleiding van uw mobiele apparaat.
U raadpleegt de apparaten lijst als volgt:
1. Druk in de Bluetooth-modus op de Menu / map knop.
2. Druk op de Tuning << of Tuning >> knop tot “Device list” wordt weergegeven;
Druk op de Select / info knop om de instelling te selecteren.
3. Druk op de Tuning << of Tuning >> knop om de gekoppelde apparaten weer te
geven.
4. Druk op de Select / info knop om de Bluetooth-verbinding te starten. De Teambox
zal automatisch verbinding maken met het gekozen apparaat.
Opmerking: De Teambox kan tot 8 apparaten onthouden waarmee eerder is
gekoppeld. Als er met meer dan 8 apparaten zijn gekoppeld, dan zal het apparaat
waarmee het langst niet is gekoppeld worden gewist uit het geheugen.
Opmerking: Wanneer u “Teambox” uit uw lijst van gekoppelde apparaten
op uw mobiele telefoon heeft verwijderd, zult u niet automatisch opnieuw kunnen
verbinden.
Bluetooth koppelen opnieuw starten
De Bluetooth functie kan op verschillende manieren ingesteld worden:
1. Druk in de Bluetooth-modus op de Menu / map knop om het menu te openen.
Op het scherm wordt nu “Discoverable” getoond, druk op de Select / info knop om
Bluetooth beschikbaar te maken.
2. Het display toont “Connecting”, het Bluetooth logo knippert en de radio is gereed
voor het maken van een nieuwe Bluetooth verbinding.
Opmerking: “Discoverable” is de optie om de Bluetooth verbinding met uw mobiele
telefoon direct te verbreken. De radio zoekt nu naar een nieuw apparaat om verbinding
mee te maken. Indien er geen nieuwe verbinding tot stand wordt gebracht zal de radio

17 18
NL
NL
Muziekbestanden afspelen
1. Druk op de Aan/uit knop om de radio in te schakelen.
2. Druk op de Audiobron knop om de USB-modus te selecteren. Het display toont
“Reading “. Het neemt enige tijd in beslag voor alle mappen en bestanden van het
geheugen apparaat zijn gelezen.
3. Na het lezen van de USB-stick, zal de radio beginnen te spelen met het eerste
bestand in de eerste map. Als er geen USB-stick is geplaatst, wordt in het display
”NO USB STICK” weergeven.
4. Om het afspelen te onderbreken drukt u op de Preset / ►|| Knop. Druk nogmaals
op de Preset / ►|| knop om het afspelen weer te hervatten.
5. Om naar het volgende bestand te gaan, drukt u op de Tuning >> knop.
6. Om naar het vorige bestand te gaan, drukt u op de Tuning << knop.
7. Om binnen het bestand vooruit of achteruit te spelen, houdt u de Tuning >>
of Tuning << knop ingedrukt tot de gewenste positie is bereikt.
8. Om naar een andere map te gaan, hou de Menu / map knop 2 seconden
ingedrukt. Druk daarna op Tuning >> of Tuning << knop om door de mappen te
bladeren.
9. Druk op de Select / info knop om uw keuze te bevestigen.
De radio ondersteunt een beperkt aantal mappen en bestanden in de zoekfunctie:
Modus Max. aantal mappen Max. aantal bestanden
Stop 999 (met mapnaam) 9999 (met bestandsnaam)
Afspelen 999 9999
(1-99 met mapnaam) (1-999 met bestandsnaam)
(100-999 zonder mapnaam) (1000-9999 zonder bestandsnaam)
Afspeelmodus
Tijdens het afspelen van een USB-stick
1. Druk op de Menu / map knop,
2. Druk op de Tuning >> of Tuning << knop tot “USB setting” is geselecteerd. Druk
op de Select / info knop.
3. Druk op de Tuning >> of Tuning << knop om de gewenste afspeelmodus te
selecteren en druk op de Select / info knop om te bevestigen.
De radio heeft de volgende opties:
Normal play → Repeat track → Repeat folder → Repeat all → Shufe
Normal play
Repeat track Herhaalt het bestand waar u naar luistert.
Repeat folder Herhaalt de bestanden in de map waar u naar luistert.
Repeat all Herhaal alle bestanden op de USB-stick.
Shufe Speel alle bestanden uit alle mappen af in willekeurige volgorde.
automatisch proberen te verbinden met het laatste apparaat, wanneer de radio uit en
terug aan wordt geschakeld.
De Auto-Power managementfunctie wordt geactiveerd in Bluetooth modus. Als er
gedurende een periode van meer dan 15 minuten, geen of zwak signaal binnenkomt,
dan zal de radio automatisch overschakelen naar stand-by modus. Als u op de Aan/uit
knop drukt zal de radio terug aan gaan.
USB MODUS
GEBRUIK DE USB-INGANG NOOIT IN REGENACHTIGE OF VOCHTIGE
OMSTANDIGHEDEN OM TE VOORKOMEN DAT VOCHT IN DE RADIO
BINNENKOMT EN OM ZO MOGELIJKE KORTSLUITING TE VOORKOMEN.
HOUD ALTIJD DE RUBBEREN AFDICHTING GOED AFGESLOTEN IN DEZE
ONSTANDIGHEDEN.
USB-geheugen apparaten kunnen worden gebruikt met de radio voor het afspelen van
MP3, AAC, FLAC en WAV-bestanden.
De radio is getest met een reeks van USB-sticks tot 32GB. Er zijn echter vele
verschillende varianten USB-sticks en er kan niet worden gegarandeerd dat alle
apparaten werken met deze radio. Een USB-stick moet gebruik maken van het FAT16
of FAT32 bestandssysteem om te kunnen werken met deze radio.
Audioformaten welke worden ondersteund zijn MP3, AAC, FLAC en WAV. Het afspelen
van bestanden met codering of bestanden van elk formaat met DRM-beveiliging is niet
mogelijk.
De USB-aansluiting zit aan de achterkant van de radio achter de rubberen bedekking.
Zorg ervoor dat de rubberen bedekking goed is afgesloten om te voorkomen dat er
vocht en stof in de radio kunnen komen. De USB-stick niet verwijderen tijdens het
afspelen. Dit kan schade veroorzaken aan de USB-stick of de bestanden onleesbaar
maken.
USB-stick is niet meegeleverd met de radio.
Opmerking: Wanneer de radio afspeelt vanaf een USB-stick, zal vanwege het extra
stroomverbruik wat hiermee gepaard gaat, de laadfunctie worden uitgeschakeld.
Wanneer de USB-stick is verwijderd, zal de radio weer normaal laden.
Een USB-stick aansluiten en verwijderen
Sluit voorzichtig een USB-stick aan op de USB-aansluiting.
Om de USB-stick te verwijderen trekt u voorzichtig aan de USB-stick.

De geselecteerde afspeelmodus wordt rechtsboven in het display weergegeven middels
een icoon. Er wordt geen icoon weergegeven wanneer de normale afspeelmodus is
geselecteerd.
Infofunctie
Druk tijdens het afspelen van een USB-stick op de Select / info knop om door de
volgende weergavemodi te bladeren: (enkel wanneer de informatie beschikbaar is in de
betreffende bestanden)
Speeltijd → Naam artiest → Album naam → Bitrate van de muziek → Bestandsnaam →
Speeltijd
AUX IN MODUS
Achter de rubberen afdekking bevindt zich een 3,5mm stereo Aux in ingang voor het
aansluiten van een extern audioapparaat zoals bijvoorbeeld een MP3-speler of een Cd-
speler (niet meegeleverd).
1. Verbind een audiobron met de Aux in ingang.
2. Druk op de Audiobron knop om Aux In te kiezen. Het display geeft “AUX In” aan.
3. Speel de externe speler af.
4. Stel het volume van zowel de radio als de speler in op het gewenste luisterniveau.
5. Zorg ervoor dat de rubberen afdekking na het gebruik weer goed wordt gesloten,
zodat er geen vocht of vuil in de radio kan binnendringen.
Opmerking: Gebruik de Aux in ingang nooit in de regen of in een vochtige omgeving om
te voorkomen dat er vocht binnendringt in de radio! Houd de rubberen afdekking altijd
gesloten in deze omstandigheden.
De Auto-Power managementfunctie wordt geactiveerd in de AUX IN modus. Als er
gedurende 15 minuten geen of zwak signaal ontvangen wordt door de Aux in ingang
dan schakelt de radio vanzelf naar de standby-stand. Het apparaat kan weer aangezet
worden door op de Aan/uit knop te drukken.
DE KLOK INSTELLEN
De klok kan worden ingesteld in het menu. Wanneer er gedurende 30 seconden lang
geen knopen worden ingedrukt verlaat de radio de instellingsmodus van de klok en de
instelling wordt gewist.
1. Druk op de Aan/uit knop om de radio te inschakelen.
2. Druk op de Menu / map knop.
3. Druk op de Tuning >> of Tuning << knop om “System settings” te selecteren en
druk op de Select / info knop.
19
4. Druk op de Tuning >> of Tuning << knop om “Time/Date” te selecteren en druk op
de Select / info knop om te bevestigen.
5. Selecteer “Set Time/Date” en druk op de Select / info knop.
6. De dag knippert op het display.
7. Druk op de Tuning >> of Tuning << knop om de huidige dag in te stellen.
8. Druk op de Select / info knop om te bevestigen, de maand knippert.
9. Druk op de Tuning >> of Tuning << knop om de huidige maand in te stellen.
10. Druk op de Select / info knop om te bevestigen, het jaartal knippert.
11. Druk op de Tuning >> of Tuning << knop om het huidige jaar in te stellen, druk op
de Select / info knop om te bevestigen, het uur knippert.
12. Druk op de Tuning >> of Tuning << knop om het uur in te stellen.
13. Druk op de Select / info knop om te bevestigen, de minuten knipperen.
14. Druk op de Tuning >> of Tuning << knop om de minuten in te stellen.
15. Druk op de Select / info knop om de klokinstelling te bevestigen en te voltooien.
Automatische update
De radio kan tijd informatie van het DAB- of FM-signaal synchroniseren.
1. Druk op de Aan/uit knop om de radio in te schakelen.
2. Druk op de Menu / map knop.
3. Druk op de Tuning >> of Tuning << knop om “System settings” te selecteren en
druk op de Select / info knop om het menu te openen.
4. Druk op de Tuning >> of Tuning << knop om “Time/Date” te selecteren en druk op
de Select / info knop.
5. Druk op de Tuning >> of Tuning << knop om “Time auto update” te selecteren en
druk op de Select / info knop.
6. Druk op de Tuning >> of Tuning << knop om te kiezen uit:
“Any” De datum en tijd worden van de huidige DAB- of FM-zender
gesynchroniseerd.
“DAB” De datum en tijd wordt gesynchroniseerd vanaf de huidige DAB-
zender.
“FM” De datum en tijd wordt gesynchroniseerd vanaf de huidige FM-zender.
“No update” De radio voert geen synchronisatie uit van de datum/tijd.
7. Druk nogmaals op de Select / info knop om de instelling te bevestigen en te
voltooien.
Opmerking: Bij een voldoende signaal en bij de keuze voor “Update from DAB” of
“Update from FM” optie, wordt de tijd automatisch bijgewerkt. Tijdsynchronisatie kan
enkele minuten duren.
20
NL
NL

21
SYSTEM RESET
Als de radio niet correct functioneert of b.v. de weergave in het display ontbreekt,
geheel of gedeeltelijk, voer dan de volgende procedure uit.
1. Druk op de Aan/uit knop om de radio in te schakelen.
2. Druk op de Menu / map knop.
3. Druk op de Tuning >> of Tuning << knop tot op het display “System settings”
geselecteerd is. Druk op de Select / info knop.
4. Druk op de Tuning >> of Tuning << knop tot op het display “Factory Reset”
geselecteerd is. Druk op de Select / info knop.
5. Druk op de Tuning >> of Tuning << knop om te kiezen tussen “Yes” of “No”.
Selecteer “Yes” om de radio te resetten, anders selecteer “No”.
6. Druk op de Select / info knop om de om de instelling te bevestigen.
7. Een volledige reset zal worden uitgevoerd. Alle voorkeuzezenders en de zenderlijst
zullen gewist worden. Alle instellingen worden ingesteld op de standaardwaarden.
De radio zal automatisch een scan van de DAB band III en de FM-band uitvoeren.
In geval van storing ten gevolge van elektrostatische ontlading, reset de radio zoals
hierboven beschreven. Als dat niet werkt verwijder de stekker uit het stopcontact en sluit
deze daarna weer aan.
DISPLAY VERLICHTING
Display verlichting instellen
1. Druk op de Aan/uit knop om de radio in te schakelen.
2. Druk op de Menu / map knop en druk op de Tuning >> of Tuning << knop tot op
het display “System settings” is geselecteerd.
3. Druk op de Select / info knop; Druk op de Tuning >> of Tuning << knop tot op het
display “Backlight “ is geselecteerd.
4. Druk op de Select / info knop om het Display verlichting-menu te openen.
5. Druk op de Tuning >> of Tuning << knop “Radio on” te selecteren voor het
instellen van de display verlichting wanneer de radio in gebruik is;
6. Of druk op de Tuning >> of Tuning << knop “Radio standby” te selecteren, om het
gedrag van de display verlichting in de radio standby-modus in te stellen.
7. Druk op de Select / info knop om uw keuze te bevestigen.
8. Druk op de Tuning >> of Tuning << knop om een de opties te kiezen, t.w.: high/
medium/low/off.
9. Druk op de Select / info knop om de selectie te bevestigen.
22
NL
NL
EQUALIZER
Het geluid van de Teambox kan worden aangepast aan uw persoonlijke smaak.
1. Druk op de Aan/uit knop om de radio in te schakelen.
2. Druk op de EQ knop.
3. Druk op de Tuning >> of Tuning << knop om te kiezen uit:
Neutral → Rock → Indoor → Jazz → Outdoor
4. Druk nogmaals op de Select / info knop om de instelling te bevestigen en te voltooien.
TAAL
Het bedieningsmenu kan worden ingesteld op diverse talen.
1. Druk op de Aan/uit knop om de radio in te schakelen.
2. Druk op de Menu / map knop en druk op de Tuning >> of Tuning << knop tot
“System settings” is geselecteerd.
3. Druk op de Select / info knop; druk op de Tuning >> of Tuning << knop tot
“Language” is geselecteerd.
4. Druk op de Select / info knop.
5. Druk op de Tuning >> of Tuning << knop tot de gewenste taal op het display
verschijnt (standaard is Engels).
6. Druk op de Select / info knop om uw keuze te bevestigen. Het display zal
veranderen in de gekozen taal.
SOFTWARE-UPDATE
Van tijd tot tijd, kunnen nieuwe softwarefuncties voor uw radio worden ontwikkeld. De
Teambox is daarom ontworpen om de interne software te kunnen bijwerken via een
USB-aansluiting.
Start geen update, tenzij het wordt aanbevolen door de Perfectpro klantenservice. Het
updaten van de software zal alle radiozenders en instellingen verwijderen.
SOFTWARE VERSIE
De weergave van de software kan niet worden aangepast en is alleen voor uw
informatie.
1. Druk op de Aan/uit knop om de radio in te schakelen.
2. Druk op de Menu / map knop en druk op de Tuning >> of Tuning << knop tot op
het display “System settings” is geselecteerd.
3. Druk op de Select / info knop; Druk op de Tuning >> of Tuning << knop tot het
display “SW version” toont.
4. Druk op de Select / info knop om de softwareversie te bekijken.

23 24
NL
NL
SPECIFICATIES
Stroombron
Netstroom: 230 V ~ 50/60hz
Ingebouwde lithium-polymeer batterij: 11.1 v, 4000mAh
Frequentiebereik
DAB 174.928 – 239.200 MHz
FM 87,5 – 108 MHz
Circuit functies
USB-aansluiting: 5V 1A voor het opladen van mobiele telefoons
via een geautoriseerde USB-kabel
Speaker: ø5 inch + ø1 inch
Uitgangsvermogen: 25 watt
Aux-In aansluiting: 3,5 mm Stereo
Antennesysteem: DAB-antenne
FM-antenne
Bluetooth
Versie 4.1 Ondersteunt Bluetooth proelen A2DP en AVRCP.
Het bedrijf behoudt zich het recht voor om de specicaties zonder voorafgaande
kennisgeving te wijzigen.
Opmerking over milieubescherming
Dit product is gemaakt van hoogwaardige onderdelen en
materialen, die kunnen worden hergebruikt en gerecycled.
Gooi het product aan het einde van zijn levensduur dus niet weg
met het normale huisvuil. Breng het naar een inzamelpunt voor
het recyclen van elektrische en elektronische apparaten. Dit is
aangegeven door dit symbool op het product, in de handleiding en
op de verpakking.
Raadpleeg uw gemeente voor meer informatie over inzamelpunten.
Help het milieu te beschermen door het recyclen van gebruikte
producten.
Dit apparaat is ontstoord volgens de geldende EU-richtlijnen.
Dit product voldoet aan de Europese richtlijnen 2005/32/EC en
2014/53/EU.
Dit apparaat voldoet aan de veiligheidsregelgeving DIN EN 60065
(VDE 0860) en dus de internationale veiligheidsregelgeving IEC
60065.
Nooit de behuizing van het apparaat openen. De fabrikant
aanvaardt geen aansprakelijkheid voor schade die voortkomt uit
onjuist gebruik.
Het typeplaatje bevindt zich op de onderkant van het apparaat.
METALEN TELESCOPISCHE ANTENNE
U kan deze additionele antenne gebruiken op locaties waar het radiosignaal (FM/DAB/
DAB+) zwak tot zeer zwak is.
OPGELET: De standaard geplaatste antenne op de radio is exibel. Deze metalen
telescoop antenne is NIET buigbaar en dient voorzichtig te worden gebruikt. Het
breken of buigen van de antenne valt niet onder de garantie.
Plaatsing: schroef de standaard exibele antenne eraf. Deze eerst voorzichtig los
maken met een steeksleutel (maat 14) – draairichting “tegen de klok in”.
Schroef de metalen telescopische antenne er voorzichtig op en zet hem zachtjes vast
met een steeksleutel (maat 14) – draairichting “met de klok mee”.
LET OP: de antennes niet overmatig vastzetten met de steeksleutel om te
voorkomen dat schroefdraad van de antennes afbreekt of beschadigd.
GARANTIE
Deze radio heeft 2 jaar beperkte garantie.
WAARSCHUWING DE GARANTIE VERVALT INDIEN DE BEHUIZING VAN HET
APPARAAT GEOPEND IS OF INDIEN HET APPARAAT DOOR DE EINDGEBRUIKER
OP ENIGERLEI WIJZE GEMODIFICEERD OF VERANDERD IS.
De voorwaarden van de garantie van deze radio dekken niet de volgende zaken:
- Schade, beschadigingen en breuk veroorzaakt door verkeerd gebruik, misbruik,
verwaarlozing, wijzigingen, ongevallen of ongeautoriseerde reparaties.
- Normale gebruiksslijtage.
- Breken of buigen van de metalen telescopische antenne.
OPEN NOOIT DE BEHUIZING. DE PRODUCENT AANVAART GEEN
AANSPRAKELIJKHEID VOOR SCHADE EN/OF LETSEL VEROORZAAKT DOOR
ONJUIST GEBRUIK. HET TYPEPLAATJE VINDT U OP DE ACHTERZIJDE VAN HET
APPARAAT.

1
INHALTSVERZEICHNIS
Wichtige Sicherheitshinweise ...................................................................................... 3
Stromversorgung ............................................................................................................. 4
Netzbetrieb ............................................................................................................... 4
Lithium-Batterie verwenden und auaden ................................................................ 4
Sicherheitsvorkehrungen für den Gebrauch ........................................................ 5
Erstmaliger Gebrauch des Radios ....................................................................... 6
Tastenübersicht .................................................................................................. 7
DAB+ Digital Radio Modus .................................................................................... 9
Radiobetrieb .................................................................................................. 9
Sender einstellen .................................................................................................. 9
Zusatzdienste .................................................................................................. 9
Anzeigeoptionen .................................................................................................. 10
Neue Sender auffinden .................................................................................... 10
Manuelle Sendersuche ........................................................................................... 10
Dynamikbereich-Einstellungen (DRC) .................................................................... 11
Sender löschen .................................................................................................. 11
UKW Radio Modus .................................................................................................. 12
Radio betrieb .................................................................................................. 12
Manuelle Sendersuche .................................................................................... 12
RDS ................................................................................................................ 12
RDS-Daten aufrufen .................................................................................... 13
Empfindlichkeit der Sendersuche ...................................................................... 13
Senderspeicher .................................................................................................. 13
Sender im DAB- oder UKW Modus speichern ....................................................... 13
Sender im DAB- oder UKW Modus aufrufen ........................................................ 14
Bluetooth ................................................................................................................ 14
Bluetooth mit einem Handy koppeln ...................................................................... 15
Musik von Ihrem Handy abspielen ...................................................................... 16
Anzeigeoptionen .................................................................................................. 16
Geräteliste – Früher verbundene Geräte erneut verbinden ............................ 16
Neustart der Bluetooth-Kopplung ...................................................................... 17
USB Modus ................................................................................................................ 17
Einsetzen und Entfernen eines USB-Speichergeräts .......................................... 18
Wiedergabe ............................................................................................................ 18
Wiedergabesteuerung .................................................................................... 19
Anzeigeoptionen .................................................................................................. 19
2
D
D
Aux-in Modus ................................................................................................................ 19
Uhrzeit manuell einstellen ........................................................................................... 20
Automatische Aktualisierung der Uhrzeit ........................................................ 20
Equaliser ................................................................................................................ 21
Spracheinstellungen .................................................................................................. 21
Softwareupdate .................................................................................................. 22
Software-Version .................................................................................................. 22
Systeemrückstellung .................................................................................................. 22
Hintergrundbeleuchtung ................................................................................................ 23
Zusätzliche Teleskopantenne .................................................................................... 23
Garantie ................................................................................................................ 24
Technische Daten .................................................................................................. 24
Stromversorgung .................................................................................................. 24
Frequenzbereich .................................................................................................. 24
Kreislauf ................................................................................................................ 24
Bluetooth ................................................................................................................ 24
Umweltgerechte Entsorgung .................................................................................. 25
WARNUNG!
DIE GARANTIE ERLISCHT, FALLS DAS GEHÄUSE DES GERÄTS GEÖFFNET
ODER DAS URSPRÜNGLICHE GERÄT MODIFIZIERT BZW. VERÄNDERT WIRD.
NIEMALS DAS GEHÄUSE DES GERÄTS ÖFFNEN. DER HERSTELLER HAFTET
NICHT FÜR SCHÄDEN AUFGRUND UNSACHGEMÄSSER VERWENDUNG. DAS
TYPENSCHILD BEFINDET SICH AN DER RÜCKSEITE DES GERÄTS.
Die Bluetooth® Wortmarke und die Logos sind eingetragene Handelszeichen von
Bluetooth SIG, Inc. und werden unter Lizenz verwendet.

3
WICHTIGE SICHERHEITSHINWEISE
1. Lesen Sie diese Hinweise.
2. Bewahren Sie diese Hinweise auf.
3. Beachten Sie alle Warnungen.
4. Befolgen Sie alle Anweisungen..
5. Reinigen Sie es nur mit einem trockenen Tuch.
6. Blockieren Sie keine der Belüftungsöffnungen. Stellen Sie es gemäß der
Anweisungen auf.
7. Stellen Sie es nicht in der Nähe von Wärmequellen wie Heizkörpern,
Lüftungsklappen, Öfen oder anderen Geräten (einschließlich Verstärkern) auf, die
Wärme abgeben.
8. Beschädigen Sie nicht den aus Sicherheitsgründen gepolten oder geerdeten
Stecker. Ein gepolter Stecker besitzt zwei Kontakte, einer breiter als der andere.
Ein geerdeter Stecker besitzt zwei Kontakte und einen dritten Erdungsstift. Der
breite Kontakt oder der dritte Stift dienen Ihrer Sicherheit. Wenn der mitgelieferte
Stecker nicht in Ihre Steckdose paβt, so wenden Sie sich bitte zum Austausch der
veralteten Steckdose an einen Elektriker.
9. Schützen Sie das Stromkabel, damit hierauf nicht gelaufen oder es insbesondere
am Stecker, an der Steckdose oder an der Stelle, wo es aus dem Gerät austritt,
nicht geknickt wird.
10. Verwenden Sie ausschließlich vom Hersteller angegebene Anbauteile/Zubehör.
11. Verwenden Sie es ausschließlich mit der/dem vom Hersteller angegebenen oder mit
dem Gerät verkauften Wagen, Ständer, Dreibein, Klammer oder Tisch. Wenn ein
Wagen verwendet wird, so lassen Sie Vorsicht walten beim Bewegen der
Kombination aus Wagen und Gerät, um Verletzungen durch Kippen zu vermeiden.
12. Trennen Sie das Gerät bei Gewitter oder wenn es über einen längeren Zeitraum
nicht verwendet wird vom Netz.
13. Überlassen Sie jegliche Wartung qualiziertem Wartungspersonal. Eine Wartung
ist erforderlich, wenn das Gerät am Stromkabel oder Stecker beschädigt wurde,
wenn Flüssigkeit verschüttet wurde oder Gegenstände ins Gerät gefallen sind,
wenn das Gerät Regen oder Feuchtigkeit ausgesetzt war, nicht normal funktioniert
oder fallengelassen wurde.
14. Setzen Sie das Gerät weder Regen noch Feuchtigkeit aus, um die Brandgefahr
oder das Risiko einen elektrischen Schlages zu reduzieren.
15. Entfernen Sie nicht die Abdeckung. Im Innenbereich benden sich keine Teile, die
durch den Nutzer zu warten wären.
16. Es dürfen keine offene Feuerquellen auf dem Apparat abgestellt werden.
17. Verwenden Sie bei der Benutzung im Freien an Regentagen oder bei feuchtem
Wetter zur Vermeidung eines elektrischen Schlages ausschließlich Batterien.
Wenn das Radio Regen oder Feuchtigkeit ausgesetzt war, so müssen
Anschlusskabel und Stecker zur Vermeidung eines elektrischen Schlages
Vollständig getrocknet werden, bevor dieses mit einer Steckdose verbunden wird.
18. Der Netzstecker sollte nahe am Gerät und leicht zugänglich sein, damit im Notfall
zur Trennung vom Netz lediglich der Netzstecker aus der Steckdose gezogen
werden muss.
19. Das Typenschild bendet sich an der Rückseite des Geräts.
20. Dieses Apparat ist gegen Spritzwasser geschützt (IP65).
21. Falls das Gerät aufgrund elektrostatischer Entladung oder schneller Stoßspannung
nicht mehr richtig funktioniert, ziehen Sie den Netzstecker und schließen das Gerät
dann erneut an.
22. Verwenden Sie das Gerät nur in moderaten Klimazonen.
23. Um mögliche Gehörschäden zu vermeiden, setzen Sie sich nicht über
längere Zeiträume hohen.
24. Unter der Umgebung mit Leitungsstörung / Strahlungsunempndlichkeit kann das
Radio fehlerhaft sein. Es wird automatisch wieder normal, wenn die Leitungsstörung
/ Strahlungsunempndlichkeit stoppt.
4
D
D
STROMVERSORGUNG
Netzbetrieb
1. Vor dem Anschluss des Netzkabels an der Steckdose vergewissern Sie sich, dass
Ihre Netzspannung mit den Angaben auf dem Typenschild übereinstimmt.
2. Die Aufbewahrung für das Netzkabel und den Stecker ist dafür bestimmt, das Netz
kabel und den Stecker aufzubewahren, wenn Sie das Radio nicht verwenden.
Hinweis:
Um das Gerät vollständig von der Netzstromversorgung zu trennen, muss der Netzste-
cker ganz aus der Steckdose gezogen werden. Der Netzstecker muss immer betriebs-
bereit sein und darf während des bestimmungsgemäßen Gebrauchs nicht blockiert wer-
den.
Falls das Gerät aufgrund elektrostatischer Entladung oder schneller Stoßspannung nicht
mehr ordnungsgemäß funktioniert, trennen Sie das Gerät vom Netz und schließen Sie
das Gerät wieder ans Netz an.
LITHIUM-BATTERIE VERWENDEN UND AUFLADEN
HINWEIS FÜR DEN ERSTMALIGEN GEBRAUCH: VOR DEM ERSTMALIGEN GE-
BRAUCH DES TEAMBOX LADEN SIE DIE LITHIUM-BATTERIE VOLLSTÄNDIG AUF.
Das Gerät kann über die integrierte Lithium-Batterie betrieben werden.
Während des Batteriebetriebs wird die ungefähre Batteriekapazität anhand eines 4-tei-
ligen Batteriesymbols im LCD angezeigt. Bei sehr niedriger Batteriekapazität fängt das
„leere“ Batteriesymbol an zu blinken. In solch einem Fall muss die Batterie so schnell
wie möglich aufgeladen werden, um den weiteren normalen Betrieb des Geräts zu
gewährleisten.
Es dauert 5-6 Stunden, um eine leere Batterie vollständig aufzuladen (bei Raumtempe-
ratur im Standby-Modus). Das Gerät kann sowohl im Standby-Modus als auch während
der Musikwiedergabe aufgeladen werden, wobei die Auadung während der Wiederga-
be länger dauert als im Standby-Modus. Während der Auadung sind alle 4 Balken des
Batteriesymbols animiert.
Das Gerät verfügt über eine zusätzliche Sicherheitsvorkehrung, die den Start des
Ladevorgangs verhindert, sofern die Batterie bereits voll bzw. fast vollständig ge-
laden ist.
HINWEIS ZUR WIEDERGABEDAUER WÄHREND DES BATTERIEBETRIEBS: Die
tatsächliche Wiedergabedauer während des Batteriebetriebs ist von mehreren Faktoren
abhängig, u.a.: Lautstärke Einstellung, Art der Musik (Bass bzw. schwere Musik ver-
braucht mehr Energie), Musikquelle, EQ-Einstellungen, Umgebungstemperatur sowie
Alter der Batterie. Abhängig von diesen Faktoren variiert die Wiedergabedauer zwischen
20 und 26 Stunden bei mittlerer Lautstärke.

5 6
D
D
ERSTMALIGER GEBRAUCH DES RADIOS
1. Stellen Sie das Radio auf einen achen Untergrund.
2. Richten Sie die Antenne vertikal über dem Radio aus.
3. Schließen Sie das Netzkabel an eine Steckdose (AC) an. Das Radio wird
eingeschaltet. Das Radio sucht dann automatisch nach Sendern der Band III DAB
und UKW Frequenzbänder.
4. Nach dem Scan werden die 10 stärksten UKW-Sender als Favorit gespeichert. Das
Radio schaltet nun in den Standby-Modus über und im Display werden die
aktualisierte Uhrzeit und das Datum angezeigt.
5. Werden keine Signale gefunden, wird die Uhrzeit nicht aktualisiert. Stellen Sie das
Radio gegebenenfalls an einen anderen Ort mit besserem Empfang.
HINWEISE ZUR NUTZUNGSDAUER VON LITHIUM-BATTERIEN:
Falls das Gerät längere Zeit nicht verwenden werden, laden Sie die integrierte Batterie
zunächst vollständig auf. Die optimale Nutzungsdauer der integrierten Batterie erreichen
Sie, indem Sie die Batterie nach jedem Gebrauch des Geräts auaden, auch wenn die-
se dann nur teilweise entladen ist. Die Nutzungsdauer der Batterie wird beeinträchtigt,
falls das Gerät längere Zeit im entladenen Zustand verbleibt.
WARNUNG:
Versuchen Sie nicht, die integrierte Lithium-Batterie zu ersetzen oder zu reparieren.
Falls Sie Zweifel bzgl. der integrierten Lithium-Batterie haben, wenden Sie sich bitte an
den Kundendienst.
WARNUNG:
Bei unsachgemäßem Austausch der Batterie besteht Explosionsgefahr.
Schützen Sie die Batterie vor übermäßiger Wärme wie Sonneneinstrahlung, Feuer oder
ähnlichem.
Batterien dürfen nicht ins Feuer geworfen oder über den Hausmüll entsorgt werden.
Geben Sie verbrauchte Batterien an entsprechenden Sammelstellen für das Recycling ab.
SICHERHEITSHINWEISE ZUR INTEGRIERTEN WIEDERAUFLADBAREN
LITHIUM-ION-BATTERIE
Die integrierte wiederauadbare Lithium-Ion-Batterie kann das Gerät über einen langen
Zeitraum mit Strom versorgen. Nichtsdestotrotz erreichen auch Lithium-Ion-Batterien
einen Zeitpunkt, an dem sie nicht mehr aufgeladen werden können. Falls sich die Bat-
terie auch nach mehreren Versuchen nicht mehr auaden lässt, ist sie möglicherweise
leer (Kapazität zu gering); wenden Sie sich zwecks Reparatur an [email protected]
Falls Sie die Batterie nicht von uns ersetzen lassen möchten, müssen Sie die Batterie/
das Gerät gemäß örtlich geltenden Gesetzen und Vorschriften entsorgen. Sie können
sich auch an Ihren Elektronikhändler oder Ihre Abfallbehörde wenden.
SICHERHEITSVORKEHRUNGEN FÜR DEN GEBRAUCH
● Überprüfen Sie vor dem Auaden die Raumtemperatur; diese muss bei zwischen
0°C und 35°C (32°- 95° Fahrenheit) liegen.
● Versuchen Sie nicht, die Kunststoffabdeckung oder andere Teile des Geräts zu de
montieren. Die Materialien im Inneren des Geräts können giftig sein und Hautverlet
zungen verursachen bzw. Ihre Kleidung beschädigen.
● Die Batterie nicht durchstechen, zerschlagen, modizieren, werfen oder Schock
aussetzen. Bei falscher Handhabung der Batterie besteht die Gefahr von Feuer, Ex
plosion oder Verätzungen.
● Die Batterie nicht im Auto bei direkter Sonneneinstrahlung, in der Nähe von Feuer
oder anderen Wärmequellen aufbewahren, auaden oder verwenden.
● Batterie nicht in Wasser/Gewässer eintauchen, hineinwerfen oder damit befeuchten.
● Verwenden oder laden Sie die Batterie nicht, falls diese ungewöhnlich heiß,
verfärbt, verformt ist bzw. falls während des Gebrauchs, der Auadung oder der
Lagerung abnormale Situationen auftreten.
● Lassen Sie die Batterie während der Auadung nicht unbeaufsichtigt. Batterie von
Babys und Kindern fernhalten.

7
TASTENÜBERSICHT
1. Ein-/Ausschalttaste
2. Source (Signalquelle)
3. Select / Info
4. Tuning <<
5. Tuning >>
6. Menu
7. Senderspeicher / ►||
8. EQ
9. Lautstärke –
10. Lautstärke +
11. Antenne
8
D
D
TASTENÜBERSICHT
12. USB-Anschluss
13. Aux-Eingang
14. Netzkabel
15. Batteriefach
15 14
12 13
6
7
8
9
10
1
2
3
4
5
11

9 10
D
D
DAB+ DIGITAL RADIO MODUS
Radiobetrieb
1. Ziehen Sie die Antenne vorsichtig aus. Drücken Sie die Ein-/Ausschalttaste, um
das Radio einzuschalten.
2. Stellen Sie mit der Taste Source das Frequenzband DAB ein.
3. Der erst gefundene Sender der Senderliste wird wiedergegeben. Im Display
erscheint der Sendername. Falls Sie das Radio bereits früher verwendet haben,
schaltet das Gerät den zuletzt angehörten Sender ein.
4. Werden keine DAB-Signale empfangen, erscheint im Display die Anzeige „Service
not available“. Stellen Sie das Gerät gegebenenfalls an einen anderen Ort mit
besserem Empfang. Führen Sie dann eine automatische Sendersuche durch, siehe
Abschnitt „Neue Sender aufnden - DAB“.
Sender einstellen - DAB
1. Drücken Sie die Ein-/Ausschalttaste, um das Radio einzuschalten.
2. Im Display wird der Name des aktuellen Senders angezeigt.
3. Drücken Sie den Tuning << oder Tuning >> Taste, um durch die Liste der
verfügbaren Sender zu scrollen.
4. Sobald der gewünschte Sender im Display erscheint, drücken Sie den Tuning <<
oder Tuning >> Taste, um den Sender wiederzugeben.
Hinweis: Falls nach der Auswahl eines Senders im Display die Anzeige „Station not
available“ erscheint, ist es eventuell erforderlich, das Radio an einen anderen Ort mit
besserem Empfang zu stellen.
Zusatzdienste - DAB
1. Einige Radiostationen bieten einen oder mehrere Zusatzdienste an. Bietet ein
Sender einen Zusatzdienst an, wird der Zusatzdienst unmittelbar nach dem
primären Dienst angezeigt, wenn Sie den Select / Info Taste drücken.
2. Drücken Sie den Select / Info Taste, um den Zusatzdienst auszuwählen.
Die meisten Zusatzdienste werden nicht kontinuierlich übertragen. Falls der ausgewählte
Dienst nicht verfügbar ist, schaltet das Radio automatisch den primären Dienst ein.
Anzeigeoptionen - DAB
Im DAB-Modus kann das Radio eine Vielzahl von Informationen anzeigen.
Drücken Sie die Taste Select / Info, um durch die unterschiedlichen Anzeigeoptionen
zu scrollen.
a. Lauftext Anzeige von Laufteksten, z.B. Senderinfos, Interpret,
Titelname Hotline, usw.
b. Programmtyp Anzeige des aktuellen Sendertyps, z.B. Pop, Klassik,
Nachrichten, usw.
c. Signalstärke Anzeige der aktuellen Signalstärke. Das leere Rechteck
weist auf die Mindestsignalstärke hin, die für einen
zufriedenstellenden Empfang erforderlich ist.
d. Multiplex & Frequenz Anzeige des Multiplex-Namens und der Frequenz des
aktuell eingestellten DAB-Senders.
e. Bitrate & Audioformat Anzeige vor digitaler Audio-Bitrate und Audioformat.
f. Datum Anzeige von aktuellem Datum.
Neue Sender aufnden - DAB
Von Zeit zu Zeit wird es neue Sender geben. Suchen Sie Sender wie folgt:
1. Drücken Sie im DAB-Modus die Taste Menu. Im Display erscheint die Anzeige „Full
scan“.
2. Drücken Sie den Select / Info Taste. Das Radio führt einen Scan aller Band III
DAB-Kanäle durch.
Wenn neue Sender gefunden werden, erhöht sich der Zähleranzeige rechts im Display
und die neuen gefunden Sender werden der Senderliste des Radios hinzugefügt.
Manuelle Sendersuche - DAB
Alternativ haben Sie die Möglichkeit, manuell nach Sendern zu suchen. Anstatt das
gesamte Band III automatisch zu scannen, können Sie einen Ihnen bekannten DAB-
Sender direkt einstellen und alle mit diesem Sender verfügbaren Multiplex-Namen in der
Senderliste speichern.
1. Drücken Sie im DAB-Modus die Taste Menu und Drücken Sie den Tuning << oder
Tuning >> Taste, bis im Display die Anzeige „Manual Tuning“ erscheint. Drücken
Sie dann den Select / Info Taste.
2. Drücken Sie den Tuning << oder Tuning >> Taste, um den gewünschten
Kanal oder die Frequenz zu suchen. Drücken Sie den Select / Info Taste, um den
ausgewählten Kanal einzuschalten.
3. Das leere Rechteck weist auf die Mindestsignalstärke hin, die für einen
zufriedenstellenden Empfang erforderlich ist. Wenn Sie die Antenne ausrichten oder
das Radio umstellen, verändert sich die Signalanzeige mit der Signalstärke.
4. Die im Display angezeigte Signalstärke spiegelt die Empfangsqualität des Senders
wider.
5. Drücken Sie den Select / Info Taste um die manuelle Sendersuche zu beenden
und zum normalen DAB-Betrieb zurückzukehren.

11 12
D
D
Dynamikbereich-Einstellungen (DRC)
Die Einstellung des Dynamikbereichs kann leise Töne besser hörbar machen, wenn Sie
das Radio in einer lauten Umgebung benutzen.
1. Drücken Sie im DAB-Modus die Taste Menu.
2. Drücken Sie den Tuning << oder Tuning >> Taste bis im Display die Anzeige
"DRC" erscheint. Drücken Sie dann den Select / Info Taste.
3. Drücken Sie den Tuning << oder Tuning >> Taste, um die gewünschte DRC-
Einstellung auszuwählen („OFF“ ist die Standardeinstellung).
DRC Off DRC ist deaktiviert, übertragene DRC-Einstellung wird ignoriert.
DRC High DRC ist aktiviert und entspricht der Einstellung der Sendung.
DRC Low DRC beträgt ½ der Einstellung der Sendung.
4. Drücken Sie den Select / Info Taste um Ihre Einstellungen zu bestätigen. Das
Display kehrt zur normalen Anzeige zurück.
Hinweis: Nicht alle DAB-Sendungen unterstützen die DRC-Funktion. Bei Sendungen,
die DRC nicht unterstützen, sind die DRC-Einstellungen des Radios ohne Effekt.
Sender löschen - DAB
Falls Sie umziehen, werden einige der Sender in der Liste möglicherweise nicht mehr
empfangen. Einige DAB-Dienste werden im Laufe der Zeit auch aufgegeben oder
ändern ihren Standort oder ihre Frequenz. Zum Entfernen solcher DAB-Sender von der
Senderliste können Sie diese DAB-Sender löschen.
1. Drücken Sie in DAB-Modus die Taste Menu.
2. Drücken Sie den Tuning << oder Tuning >> Taste, bis in Display “Prune” erscheint.
3. Drücken Sie den Select / Info Taste um die Einstellung zu öffnen.
4. Drücken Sie den Tuning << oder Tuning >> Taste zur Auswahl von "Yes" oder
"No" (No ist Standardeinstellung).
Wählen Sie "Yes", um diese Funktion zu aktivieren, oder wählen Sie anderenfalls
"No".
5. Drücken Sie den Select / Info Taste zum bestätigen Ihrer Einstellung. Das Display
kehrt zum normalen Radioanzeige zurück.
HINWEIS: Wenn Sie Ihr Radio an einem anderen Standort verwenden, sollten Sie eine
neue Suche nach Radiosendern durchführen (siehe Abschnitt „Neue Sender aufnden”).
UKW Radio Modus
Radiobetrieb
1. Drücken Sie die Ein-/Ausschalttaste, um das Radio einzuschalten.
2. Stellen Sie mit die Taste Source den UKW-Modus ein.
3. Schalten Sie den UKW-Modus zum ersten Mal ein, wird der voreingestellte Sender
auf Speicherplatz 1 abgespielt. Wurde das Radio bereits früher benutzt, wird der
zuletzt angehörte Sender eingeschaltet.
4. Drücken Sie den Tuning << oder Tuning >> Taste 2 Sekunden, um die
Sendersuche zu starten. Die Suche wird automatisch unterbrochen, sobald das
Radio einen Sender mit ausreichender Signalstärke gefunden hat.
5. Nach einigen Sekunden wird das Display aktualisiert. Liegen RDS-Daten vor, wird
der Sendername angezeigt.
6. Drücken Sie den Tuning << oder Tuning >> Taste erneut 2 Sekunden um weitere
Sender zu suchen.
7. Am Ende des Wellenbands setzt das Radio die Suche am anderen Ende des
Wellenbands fort.
Manuelle Sendersuche - UKW
1. Drücken Sie die Ein-/Ausschalttaste, um das Radio einzuschalten.
2. Stellen Sie mit die Taste Source den UKW-Modus ein.
3. Drücken Sie den Tuning << oder Tuning >> Taste, um einen UKW-Sender
einzustellen. Die Frequenz ändert sich in Schritten von 50 kHz.
4. Drehen Sie die Gummiantenne für einen optimalen Empfang. Falls das Radio einen
Sender mit ausreichender Signalstärke und mit verfügbaren RDS-Daten empfängt, dann
erscheint im Display der Sendername.
5. Am Ende des Wellenbands setzt das Radio die Suche am anderen Ende des
Wellenbands fort.
RDS - UKW
RDS (Radio Data System) ist ein System, bei dem nicht hörbare digitale Informationen
zusätzlich zum normalen UKW-Radioprogramm übertragen werden. Falls das Radio
einen RDS-Sender mit ausreichender Signalstärke empfängt, erscheint der Sendername
im Display. Es kann einige Zeit dauern, bis die RDS-Daten übertragen werden.

13
Gespeicherte Sender im DAB- oder UKW-modus aufrufen
1. Drücken Sie die Ein-/Ausschalttaste, um das Radio einzuschalten.
2. Stellen Sie mit die Taste Source den DAB- oder UKW-Modus ein.
3. Drücken sie kurz den Speichertaste.
4. Drücken Sie den Tuning << oder Tuning >> Taste bis den gewünschten
Speicherplatz markiert ist (1-10) und drücken Sie den Select /Info Taste zum
bestätigen.
5. Im Display erscheint, z.B. "P01”.
BLUETOOTH
Im Bluetooth-Modus Ihres Teambox können Sie Audio, Audio von Videodateien und
Musik von Bluetooth-fähigen Gerät wie z.B. Handys, Computern, Tablets usw. über den
Lautsprecher Ihres Teambox abzuspielen.
● Wenn sich ein Bluetooth-Gerät wie Ihres Teambox im „discoverable“ Modus
bendet, kann es von bzw. mit anderen Bluetooth-Geräten erkannt, gekoppelt und
verbunden werden.
● Die „Bluetooth-Kopplung“ ndet statt, wenn zwei Bluetooth-Geräte eine Verbindung
eingehen und miteinander kommunizieren.
Die Bluetooth-Verbindungsleistung kann je nach Bluetooth-Gerät variieren. Informieren
Sie sich über die Bluetooth-Fähigkeit Ihres externen Geräts, bevor Sie es mit Ihres
Teambox verbinden. Einige gekoppelte Bluetooth-Geräte unterstützen möglicherweise
nicht alle Funktionen des Radios.
Eine Bluetooth-Verbindung ermöglicht eine Audioverbindung mit einer Reichweite von
ungefähr 10 Meter. Wenn Sie zwei Bluetooth-fähige Geräte miteinander verbinden,
empfehlen wir, dass diese nicht weiter als 2 bis 3 Meter voneinander entfernt sind.
Falls andere aktive Bluetooth-Geräte während der Verbindung vorhanden sind, können
Betriebsstörungen auftreten.
Bluetooth ist eine Funkkommunikationstechnologie für kurze Reichweiten und
Bluetooth- Geräte sind normalerweise in der Lage, in einem normal großen Raum oder
Büro reibungslos miteinander zu kommunizieren. Die Zuverlässigkeit einer Bluetooth-
Verbindung über mehrere Räume hinweg hängt von der Bauweise des jeweiligen
Gebäudes ab.
Die Bluetooth-Kommunikationsreichweite kann deutlich reduziert werden, falls das
Signal feste Gegenstände durchdringen muss. Menschen, Ziegel- und Betonwände,
sowie schwere Möbel oder Bücherschränke werden die effektive Reichweite Ihrer
Bluetooth-Geräte mehr oder weniger stark beeinträchtigen. Glass, Gipswände oder
holzverkleidete Wände sowie Büropartitionen haben einen weniger gravierenden aber
dennoch wahrnehmbaren Effekt. Metallrohre, mit Folie ausgekleidete Gipskartonplatten,
Metallfensterrahmen und häusliche Kabel können ebenfalls einen negativen Effekt
14
D
D
RDS-Daten aufrufen
Drücken Sie, wenn Sie einen UKW-Sender mit RDS-Daten anhören, wiederholt die
Taste Select / Info, um durch die Daten zu scrollen. Dies funktioniert nur, wenn das
Signal stark genug und klar ist.
a. Radiotext (RT) Anzeige der Nachricht über den aktuell eingestellten
Sender als Lauftext.
b. Programmtyp (PTY) Anzeige des jeweiligen Sendertyps, z.B. Pop, Klassik,
Nachrichten, usw.
c. Signalstärke Anzeige der aktuelle Signalstärke
d. Frequenz Anzeige der Frequenz des aktuell eingestellten Senders.
e. Datum Anzeige von Datum.
Empndlichkeit der Sendersuche - UKW
Das Radio sucht normalerweise alle UKW-Sender einschließlich solcher mit
schwächerem Signal. Sie können die automatische Sendersuche jedoch auch benutzen,
um nur Sender zu nden, deren Signal stark genug für einen guten Empfang ist.
1. Drücken Sie die Ein-/Ausschalttaste, um das Radio einzuschalten.
2. Stellen Sie mit die Taste Source den UKW-Modus ein.
3. Drücken Sie die Taste Menu. Im Display erscheint „Scan setting“.
4. Drücken Sie den Select / Info Taste.
5. Drücken Sie den Tuning << oder Tuning >> Taste zur Auswahl von „All stations“
oder „Strong stations“. („Strong Stations“ ist die Standardeinstellung). Mit der Option
„Strong Stations“ sucht das Radio nur nach Sendern mit starkem Signal.
6. Drücken Sie den Select / Info Taste zur Bestätigung Ihrer Einstellungen. Das
Display kehrt zur normalen Radioanzeige zurück.
SENDERSPEICHER
Sender im DAB- oder UKW-modus speichern
Sie können bis zu 20 Radiosender speichern – 10 DAB-Sender und 10 UKW-Sender.
Die Speichereinstellungen werden auch bei einem Stromausfall beibehalten.
1. Drücken Sie die Ein-/Ausschalttaste, um das Radio einzuschalten.
2. Stellen Sie mit die Taste Source den DAB- oder UKW-Modus ein.
3. Stellen Sie den gewünschten Radiosender ein.
4. Halten Sie die entsprechende Speichertaste gedrückt, bis im Display die Anzeige
z.B. “Preset 01 empty” erscheint.
5. Drücken Sie den Tuning << oder Tuning >> Taste bis den gewünschten
Speicherplatz markiert ist (1-10) und drücken Sie den Select /Info Taste zum
bestätigen.
6. Wiederholen Sie die Schritte 3 bis 5 für weitere Sender.

haben. Reduzieren Sie den Abstand zwischen Ihren Bluetooth-Geräten, falls Sie
Kommunikationsstörungen feststellen.
Wi-Fi-Netzwerke und schnurlose Telefone verwenden oft die gleichen Funkfrequenzen
wie Bluetooth und können daher Störungen verursachen. Falls Sie Störungen
feststellen, dann stellen Sie Ihres Teambox oder eines der anderen betroffenen Geräte
um.
Die Bluetooth-Fähigkeit erlaubt Ihres Teambox, Audioinhalte von vielen anderen
Bluetooth-fähige Geräten wie z.B. Handys, PCs oder Tablets zu empfangen. Sie
können immer nur ein externes Bluetooth-Gerät mit dem Soundsystem verbinden. Ihres
Teambox unterstützt die nachfolgenden Bluetooth-Prole und Funktionen.
● Ihr Radio unterstützt A2DP (Advanced Audio Distribution Prole), eine Stereo-
Audioverbindung zur Übertragung von Stereomusik von PCs, Handys, usw. SBC-
und AAC-Audiocodecs werden unterstützt.
● Ihr Radio unterstützt AVRCP (Audio Video Remote Control Prole), das Ihrem
Radio ermöglicht, die Musikwiedergabe eines verbundenen Geräts zu steuern.
Hinweis: Einige Handys werden möglicherweise von Ihres Teambox getrennt, wenn
Sie einen Anruf tätigen oder empfangen. Einige Geräte schalten die Bluetooth-
Audioübertragung temporär stumm, wenn sie Textnachrichten oder E-Mails erhalten
oder andere Ursachen auftreten. Dies liegt an den verbundenen Geräten und ist keine
Fehlfunktion Ihres Teambox.
Bluetooth mit einem Handy koppeln
1. Drücken Sie die Ein-/Ausschalttaste, um das Radio einzuschalten.
2. Stellen Sie mit die Taste Source den Bluetooth-Modus ein.
3. Im Display wird “Connecting” angezeigt, falls Ihres Teambox noch nicht mit Ihrem
Handy gekoppelt wurde.
4. Öffnen Sie an Ihrem Handy das Einstellungmenü und wählen Sie in der Bluetooth-
Geräteliste "Teambox” (Die Bluetooth-Anleitungen können je nach Handy
variieren. Informieren Sie sich in der Bedienungsanleitung Ihres Handys
entsprechend).
5. Nach der erfolgreichen Bluetooth-Kopplung wird im Display der Name des
gekoppelten Handys angezeigt.
6. Der Name des gekoppelten Handys wird auf dem Display angezeigt.
15
Musik von Ihrem Handy abspielen
1. Drücken Sie die Ein-/Ausschalttaste, um das Radio einzuschalten.
2. Stellen Sie mit die Taste Source den Bluetooth-Modus ein.
3. Öffnen Sie an Ihrem gekoppelten Handy den Media Player und starten Sie die
Wiedergabe.
4. Sie können die Wiedergabe direkt am Handy oder mit den Tasten Senderspeicher
/ ►||, Tuning <<, und Tuning >> am Radio steuern.
5. Wenn die Wiedergebe beginnt, wird der Name des Songs im Display angezeigt.
Anzeigeoptionen - Bluetooth
Im DAB-Modus kann das Radio eine Vielzahl von Informationen anzeigen.
Drücken Sie die Taste Select / Info, um durch die unterschiedlichen Anzeigeoptionen
zu scrollen.
a. Titel Anzeige des aktuellen Titels.
b. Künstler Anzeige des Künstlers für den aktuellen Titel.
c. Album Name des Albums, zu dem der aktuelle Titel gehört.
d. Uhrzeit und Datum Anzeige des aktuelle Uhrzeit und Datum.
Geräteliste – Früher verbundene Geräte erneut verbinden
Auf dem Radio können Sie ein Gerät in der Geräteliste auswählen, um die Verbindung
wiederherzustellen. Die Namen der gekoppelten Geräte werden angezeigt, wenn sie auf
dem Gerät festgelegt sind. Konsultieren Sie das Handbuch für Ihr Handy.
Sie konsultieren die Geräteliste wie folgt:
1. Drücken Sie im Bluetooth-Modus die Taste Menu.
2. Drücken Sie den Tuning << oder Tuning >> Taste zur Auswahl von "Device list”
und drücken Sie den Select / Info Taste.
3. Drücken Sie den Tuning << oder Tuning >> Taste und wählen Sie ein Bluetooth-
Gerät in der Liste aus.
4. Falls Sie das ausgewählte Mobilgerät erneut verbinden möchten, drücken Sie den
Select / Info Taste zum Aufbau der Verbindung.
HINWEIS: Das Radio zeigt nur die Bluetooth-Namen der letzten 8 Mobilgeräte an, mit
denen das Radio verbunden war.
16
D
D

Neustart der Bluetooth-Kopplung
Die Bluetooth-Funktion kann für verschiedene Funktionsweisen eingestellt werden,
siehe unten:
1. Betätigen Sie im Bluetooth-Modus die Taste Menu.
2. Drücken Sie den Tuning << oder Tuning >> Taste zur Auswahl der „Discoverable”
Optionen, und drücken Sie dann auf den Select / Info Taste.
3. Das LCD-Display zeigt „Connecting“ an, und das Bluetooth des Radios ist für die
Verbindung mit einem anderen Mobiltelefon bereit da es jetzt im Erkennungsmodus
ist.
Hinweis: „Discoverable“ ist die Option, die das Bluetooth dieses Radios von Ihrem
Mobiltelefon trennt und den „Erkennungsmodus“ aktiviert. Dadurch wird die Bluetooth-
Kopplung mit einem anderen Gerät ermöglicht. Wenn kein anderes Gerät gekoppelt
wird, versucht die Bluetooth-Funktion automatisch, die Verbindung zum letzten Gerät
wiederherzustellen, wenn sie aus- und dann wieder eingeschaltet wird.
Im Bluetooth-Modus wird der automatische Stromsparmodus aktiviert. Erfolgt am
Aux- Eingang innerhalb von 15 Minuten keine Signaleingabe*, schaltet das Radio
automatisch den Standby-Modus ein. Drücken Sie die Ein-/Ausschalttaste, um das
Gerät wieder einzuschalten.
* Der Standby-Modus wird auch dann aktiviert, wenn das eingehende Signal vom
externen Gerät zu schwach ist und vom
USB Modus
VERWENDEN SIE DEN USB EINGANG NICHT BEI REGEN ODER UNTER
FEUCHTEN BEDINGUNGEN, DAMIT KEINE FEUCHTIGKEIT IN DAS RADIO
EINDRINGEN KANN. HALTEN SIE DIE GUMMIABDECKUNG UNTER SOLCHEN
BEDINGUNGEN GUT VERSCHLOSSEN.
USB-Speichermedien können mit dem Radio für die Wiedergabe von MP3, AAC, FLAC
oder WAV-Dateien benutzt werden.
Der Radio wurde mit einer großen Palette von USB-Speichermedien getestet mit einer
Kapazität von 2 bis zu 32 GB unterstützt. Da allerdings eine besonders große Anzahl
von USB-Speichermedien auf dem Markt vorhanden ist, kann es nicht garantiert
werden, dass alle Speichermedien mit dem Radio benutzt werden können. Um mit dem
Radio benutzt werden zu können, müssen die verwendeten Speichermedien mit den
Dateisystemen FAT oder FAT 32 formatiert sein.
Die unterstützten Audio-Abspielformate sind MP3, AAC, FLAC und WAV. Die
Abspielfunktion unterstützt keine Dateien mit DRM-Schutz (unabhängig vom Format).
Stellen Sie sicher, dass die Gummiabdeckung nach der Benutzung wieder gut
verschlossen wir, um das Eindringen von Schmutz und Feuchtigkeit zu verhindern.
Ziehen Sie den USB-Stick während der Wiedergabe nicht ab. Dies kann zu Schäden an
den USB-Stick führen, oder machen Sie Dateien nicht lesbar.
17
USB-Stick ist nicht im Lieferumfang enthalten.
Hinweis: Wenn das Radio einen USB-Stick abspielt, wird aufgrund des höheren
Energieverbrauchs dieser Funktion das Laden der Batterien angehalten, um die normale
Funktion und die Qualität des USB-Abspielvorgangs zu wahren. Sobald der USB-Stick
entfernt wird, wird der normale Ladevorgang fortgesetzt.
Einsetzen und Entfernen eines USB-Speichergeräts
Stecken Sie vorsichtig ein USB-Speichergerät in den USB-Anschluss.
Um das USB-Speichergerät zu entfernen, ziehen Sie es einfach heraus.
Wiedergabe
1. Schalten Sie das Radio mit der Ein-/Ausschalttaste ein.
2. Stellen Sie mit die Taste Source den USB-Modus ein. Auf dem Display erscheint
“READING”. Das Radio liest den Inhalt des Speichermediums ein. Dieser Vorgang
dauert ca. 30 Sekunden, je nachdem wie groß die Kapazität des Speichermediums
ist.
3. Das Radio startet die Wiedergabe von der ersten Datei (Musiktitel) in dem ersten
Verzeichnis. Ohne Speichermediums, erscheint auf dem Display “NO USB STICK”.
4. Drücken Sie die Senderspeicher / ►|| Taste um die Wiedergabe vorübergehend
anzuhalten und drücken Sie die Senderspeicher / ►|| Taste erneut, um mit der
Wiedergabe fortzufahren.
5. Drücken Sie die Tuning >> Taste, um zur nächsten Datei zu springen.
6. Drücken Sie die Tuning << Taste, um zur vorheriges Datei zu springen.
7. Um die Datei vorwärts oder rückwärts zu spülen, halten Sie die Tuning >> Taste
oder Tuning << Taste bis Sie die gewünschte Position erreicht hat.
8. Um das nächste Verzeichnis zu wählen, drücken un halten Sie die Menu Taste vor
2 Sekunden und drücken sie den Tuning >> Taste oder Tuning << Taste bis Sie
die gewünschte Verzeichnis erreicht hat.
9. Drücken Sie den Select /Info Taste zum bestätigen
Das Radio unterstützt eine begrenzte Anzahl Verzeichnisse und Dateien in der
Dateiauswahl-funktion:
Modi Max. Anzahl Verzeichnisse Max. Anzahl Dateien
Stopp 999 (mit Verzeichnissnamen) 9999 (mit Dateinamen)
Abspielen 999 9999
(1-99 mit Verzeichnissnamen) (1-999 mit Dateinamen)
(100-999 ohne Verzeichnissnamen) (1000-9999 ohne Dateinamen)
18
D
D

19
HINWEIS: Verwenden Sie den Aux-Eingang nicht bei Regen oder unter feuchten
Bedingungen, damit keine Feuchtigkeit in das Radio eindringen kann. Halten Sie die
Gummiabdeckung unter solchen Bedingungen gut verschlossen.
Im AUX-IN-Modus wird der automatische Stromsparmodus aktiviert. Erfolgt am
Aux-Eingang innerhalb von 15 Minuten keine Signaleingabe*, schaltet das Radio
automatisch den Standby-Modus ein. Drücken Sie die Ein-/Ausschalttaste, um das
Gerät wieder einzuschalten.
UHRZEIT MANUELL EINSTELLEN
Wenn Sie innerhalb von 30 Sekunden keine Taste drücken, verlässt das Radio die
Uhrzeiteinstellung und Ihre Einstellungen werden gelöscht.
1. Drücken Sie die Ein-/Ausschalttaste, um das Radio einzuschalten.
2. Drücken Sie die Taste Menu.
3. Drücken Sie den Tuning << oder Tuning >> Taste zur Auswahl von "System
settings” und drücken Sie den Select / Info Taste.
4. Drücken Sie den Tuning << oder Tuning >> Taste zur Auswahl von "Time/Date”
und drücken Sie den Select / Info Taste.
5. Drücken Sie den Tuning << oder Tuning >> Taste zur Auswahl von "Set Time/
Date" ” und drücken Sie den Select / Info Taste.
6. Die Tagesanzeige beginnt zu blinken.
7. Drücken Sie den Tuning << oder Tuning >> Taste zur Einstellung des Datums.
8. Drücken Sie den Select / Info Taste zum bestätigen, die Monatsanzeige beginnt zu
blinken.
9. Drücken Sie den Tuning << oder Tuning >> Taste zur Einstellung des Monats.
10. Drücken Sie den Select / Info zum bestätigen, die Jahresanzeige beginnt zu
blinken.
11. Drücken Sie den Tuning << oder Tuning >> Taste zur Einstellung des Jahres und
drücken Sie den Select / Info zur Einstellung, die Stundenanzeige beginnt zu
blinken.
12. Drücken Sie den Tuning << oder Tuning >> Taste zur Einstellung der Stunden.
13. Drücken Sie den Select / Info zum bestätigen, die Minutenanzeige beginnt zu
blinken.
14. Drücken Sie den Tuning << oder Tuning >> Taste zur Einstellung der Minuten.
15. Drücken Sie den Select / Info zum bestätigen und um die Uhrzeiteinstellung zu
beenden.
Automatische Aktualisierung der Uhrzeit
Das Radio kann die Zeit vom DAB- oder UKW-Signal synchronisieren.
1. Drücken Sie die Ein-/Ausschalttaste, um das Radio einzuschalten.
2. Drücken Sie die Taste Menu.
3. Drücken Sie den Tuning << oder Tuning >> Taste zur Auswahl von "System
settings" und drücken Sie den Select / Info Taste.
20
D
D
Wiedergabesteuerung
Während der Wiedergabe von USB-Stick:
1. Drücken Sie die Taste Menu.
2. Drücken Sie den Tuning << oder Tuning >> Taste zur Auswahl von "USB setting".
Drücken Sie den Select / Info Taste.
3. Drücken Sie den Tuning << oder Tuning >> Taste zur Auswahl von der
gewünschten Option, drücken Sie den Select / Info Taste zum bestätigen.
Das Radio zeigt die folgenden Optionen:
Normal play → Repeat track → Repeat folder → Repeat all → Shufe
Normal play
Repeat track wiederholt den aktuellen Titel.
Repeat folder wiederholt alle Dateien innerhalb der aktuellen Verzeichnisse.
Repeat all wiederholt alle Titel aus den Speichermedien.
Shufe die Dateien auf den Speichermedien werden in zufälliger Reihenfolge
abgespielt.
Der ausgewählte Wiedergabemodus wird oben rechts im Display mit einem Symbol
angezeigt. Wenn der normale Wiedergabemodus ausgewählt ist, wird kein Symbol
angezeigt.
Anzeigemodi
Drücken Sie die Taste Select / Info und Sie erhalten Zugriff auf die folgenden
Informationen:
(nur wenn die Information in den relevanten Dateien verfügbar ist)
Spielzeit → Titel → Ordnername → Künstlername → Albumname → Gesamtzahl der
Dateien → Bitrate der Musik → Uhrzeit und Datum → Spielzeit.
AUX IN MODUS
Unter der Gummiabdeckung an der Rückseite des Geräts bendet sich ein 3,5 mm Aux-
In Stereoeingang, an den externe Audiogeräte wie z.B. MP3-Spieler oder CD-Spieler
angeschlossen werden können (Aux-Kabel nicht im Lieferumfang enthalten).
1. Schließen Sie ein Audiogerät an den Aux-Eingang an.
2. Schalten Sie mit die Taste Source den AUX-In-Modus ein. Im Display erscheint
„AUX IN“.
3. Starten Sie die Wiedergabe am externen Gerät.
4. Stellen Sie sowohl am Radio als auch am externen Gerät die Lautstärke
entsprechend ein.
5. Schließen Sie nach dem Gebrauch die Gummiabdeckung, damit weder Feuchtigkeit
noch Staub in die Anschlüsse oder das Radio eindringen können.

21
SOFTWAREUPDATE
Von Zeit zu Zeit können neue Software-Funktionen für Ihr Radio entwickelt werden.
Der Teambox ist daher so ausgelegt, dass er die interne Software über eine USB-
Verbindung aktualisieren kann.
Starten Sie ein Update nur, wenn dies vom Kundendienst empfohlen wird. Durch das
Aktualisieren der Software können alle Radiostationen und Alarmeinstellungen gelöscht
werden.
SOFTWARE-VERSION
Die Anzeige der Software-Version kann nicht geändert werden und dient nur Ihrer
Information.
1. Drücken Sie die Ein-/Ausschalttaste, um das Radio einzuschalten.
2. Drücken Sie die Taste Menu und Drücken Sie den Tuning << oder Tuning >>
Taste zur Auswahl von "System settings.
3. Drücken Sie den Select / Info Taste; Drücken Sie den Tuning << oder Tuning >>
Taste zur Auswahl von "SW version".
4. Drücken Sie den Select / Info Taste um die Software-Version anzuzeigen.
SYSTEMRÜCKSTELLUNG
Falls Ihr Radio nicht ordnungsgemäß funktioniert oder Anzeigen im Display fehlen bzw.
unvollständig sind, führen Sie bitte wie folgt eine Rückstellung durch.
1. Drücken Sie die Ein-/Ausschalttaste, um das Radio einzuschalten.
2. Drücken Sie die Taste Menu.
3. Drücken Sie den Tuning << oder Tuning >> Taste zur Auswahl von "System
settings. Drücken Sie den Select / Info Taste.
4. Drücken Sie den Tuning << oder Tuning >> Taste zur Auswahl von "Factory
Reset". Drücken Sie den Select / Info Taste.
5. Drücken Sie den Tuning << oder Tuning >> Taste zur Auswahl von "Yes" oder
"No".
Wählen Sie "Yes" für die Rückstellung oder "No" falls Sie das System nicht
zurückstellen möchten.
6. Drücken Sie den Select / Info Taste um die Rückstellung zu starten.
7. Das System führt eine vollständige Rückstellung durch. Alle Favoriteneinstellungen
und die Senderliste werden gelöscht. Alle Einstellungen werden auf die
Werkseinstellungen zurückgesetzt, und dann führt das Radio einen Scan nach
Band III DAB-Kanälen und UKW-Sendern durch.
Bei Fehlfunktion aufgrund elektrostatischer Entladung führen Sie eine Rückstellung wie
oben beschrieben durch, um den normalen Betrieb wiederherzustellen. Falls Sie die
Rückstellung wie oben beschrieben nicht durchführen können, ist es erforderlich, den
Netzstecker zu ziehen und anschließend wieder einzulegen bzw. anzuschließen.
22
D
D
4. Drücken Sie den Tuning << oder Tuning >> Taste zur Auswahl von "Time/Date"
und drücken Sie den Select / Info Taste.
5. Drücken Sie den Tuning << oder Tuning >> Taste zur Auswahl von “Time auto
update” und drücken Sie den Select / Info Taste.
6. Drücken Sie den Tuning << oder Tuning >> Taste zur Auswahl von:
„Any“ Das Datum wird von der aktuellen DAB- oder FM-Station
synchronisiert.
" DAB" Das Datum wird von der aktuellen DAB-Station synchronisiert.
" FM" Das Datum wird vom aktuellen UKW-Sender synchronisiert.
"No update” Das Radio synchronisiert Datum / Uhrzeit nicht.
7. Drücken Sie den Select / Info Taste zum bestätigen und um die Einstellung zu
beenden.
Hinweis: Bei ausreichendem Signal und Auswahl der Option "DAB" oder „FM" wird die
Uhrzeit automatisch aktualisiert. Die Zeitsynchronisation kann einige Minuten dauern.
EQUALISER
Wenn der voreingestellte Sound nicht gefällt, können Sie die Hochton- und
Tieftoneinstellungen wie folgt kongurieren:
1. Drücken Sie die Ein-/Ausschalttaste, um das Radio einzuschalten.
2. Drücken Sie die EQ Taste.
Drücken Sie den Tuning << oder Tuning >> Taste zur Auswahl von
Neutral → Rock → Indoor → Jazz → Outdoor
3. Drücken Sie den Select / Info Taste zum Bestätigen.
SPRACHEINSTELLUNGEN
Sie haben die Möglichkeit, unterschiedliche Menüsprachen für das Radio einzustellen.
1. Drücken Sie die Ein-/Ausschalttaste, um das Radio einzuschalten.
2. Drücken Sie die Taste Menu Drücken Sie den Tuning << oder Tuning >> Taste zur
Auswahl von “Systems settings”.
3. Drücken Sie den Select / Info Taste; Drücken Sie den Tuning << oder Tuning >>
Taste zur Auswahl von "Language”.
4. Drücken Sie den Select / Info Taste.
5. Drücken Sie den Tuning << oder Tuning >> Taste zur Auswahl der gewünschten
Sprache (Englisch ist die Standardeinstellung).
6. Drücken Sie den Select / Info Taste. Das Menü wird nun in der ausgewählten
Sprache angezeigt.

HINTERGRUNDBELEUCHTUNG
Konguration der LCD-Hintergrundbeleuchtung
1. Drücken Sie die Ein-/Ausschalttaste, um das Radio einzuschalten.
2. Drücken Sie die Taste Menu und Drücken Sie den Tuning << oder Tuning >>
Taste zur Auswahl von "System settings".
3. Drücken Sie den Select / Info Taste; Drücken Sie den Tuning << oder Tuning >>
Taste zur Auswahl von "Backlight ".
4. Drücken Sie den Select / Info Taste, um das Menü für die Anpassung der LCD-
Hintergrundbeleuchtung aufzurufen.
5. Drücken Sie den Tuning << oder Tuning >> Taste zur Auswahl von "Radio on” um
die Hintergrundbeleuchtung einzustellen, wenn das Radio in Betrieb ist;
6. Oder Drücken Sie den Tuning << oder Tuning >> Taste zur Auswahl von "Radio
standby", um die Hintergrundbeleuchtung im Standby-Modus einzustellen.
7. Drücken Sie den Select / Info Taste.
8. Drücken Sie den Tuning << oder Tuning >> Taste zur Auswahl von high/medium/
low/off.
9. Drücken Sie den Select / Info Taste.
ZUSÄTZLICHE TELESKOPANTENNE
Verwenden Sie diese Antenne an Orten oder in Gegenden mit schwachem oder sehr
schwachem Radioempfang (UKW/DAB/DAB+).
ACHTUNG: Die Standardantenne des Radios ist exibel. Die Teleskopantenne ist
nicht exibel und lässt sich nicht knicken und sollte daher vorsichtig verwendet werden.
Gebrochene oder geknickte Antennen fallen nicht unter die Garantie.
Installation: Schrauben Sie die exible Standardantenne vorsichtig ab. Lockern Sie die
Antenne zunächst vorsichtig mit einem Maulschlüssel (Größe 14) – links herum drehen.
Schrauben Sie die Teleskopantenne an und ziehen diese vorsichtig mit einem
Maulschlüssel (Größe 14) fest – rechts herum drehen.
ACHTUNG: Wenden Sie beim Anschluss der Antennen nicht zu viel Kraft an, um nicht
das Gewinde der Antenne zu beschädigen oder die Antenne abzubrechen.
23
GARANTIE
Dieses Gerät kommt mit einer 2-jährigen eingeschränkten Garantie.
WARNUNG! Die Garantie wird nichtig, falls die Abdeckung geöffnet und das Gerät
modiziert oder verändert wurde!
Die Garantie des Radios erstreckt sich nicht auf folgendes:
- Schäden aufgrund falscher Nutzung, Missbrauch, Fahrlässigkeit, Unfällen,
Änderungen oder nicht genehmigter Reparaturen.
- Normale(r) Abnutzung und Verschleiß.
- Die Teleskopantenne wurde gebrochen oder geknickt.
ÖFFNEN SIE NIEMALS DAS GEHÄUSE DES GERÄTS. DER HERSTELLER HAFTET
NICHT FÜR SCHÄDEN AUFGRUND UNSACHGEMÄSSER HANDHABUNG. DAS
TYPENSCHILD BEFINDET SICH AN DER RÜCKSEITE DES GERÄTS.
TECHNISCHE DATEN
Stromversorgung
AC-Netzteil: 230 V ~ 50/60hz
Integrierte Lithium-Polymer-Batterie: 11.1 v, 4000mAh
Frequenzbereich
DAB 174.928 – 239.200 MHz
UKW 87,5 – 108 MHz
Kreislauf
USB: 5V 1A zum Auladen eines Handys über ein autorisiertes USB-Kabel
Lautsprecher: ø5 Zoll + ø1 Zoll
Ausgangsleistung: 25 watt
Aux-Eingang: 3,5 mm Stereo
Antennesystem: DAB-Antenne
UKW-Antenne
Bluetooth
Version 4.1 Unterstützt Bluetooth-Prole A2DP und AVRCP.
Das Unternehmen behält sich das Recht vor, die technischen Daten jederzeit ohne
besondere Vorankündigung zu ändern.
24
D
D

Umweltgerechte Entsorgung
Dieses Produkt besteht aus hochwertigen Teilen und Materialien,
die wiederverwertet und recycelt werden können.
Entsorgen Sie das Gerät nicht über den normalen Haushaltsmüll.
Geben Sie es an einer Sammelstelle für das Recycling von
elektrischen und elektronischen Geräten ab. Dieses Symbol auf
dem Gerät, in der Bedienungsanleitung und auf der Verpackung
weist auf diese Art der Entsorgung hin.
Informieren Sie sich auf Ihrer Gemeinde über örtliche
Sammelstellen. Recyceln Sie Altgeräte, um die Umwelt zu
schützen.
Dieses Gerät ist gemäß geltenden EU-Richtlinien
geräuschgedämpft.
Das Produkt entspricht den Europäischen Richtlinien 2005/32/EC
und 2014/53/EU.
Dieses Gerät entspricht der Sicherheitsnorm DIN EN 60065 (VDE
0860) und somit der internationalen Sicherheitsnorm IEC 60065.
Das Gehäuse des Geräts darf unter keinen Umständen geöffnet
werden. Der Hersteller haftet nicht für Schäden aufgrund
unsachgemäßer Nutzung.
Das Typenschild bendet sich an der Unterseite des Geräts.
25 26
D
D

Perfectpro B.V.
Everdenberg 9A
Oosterhout
The Netherlands
www.perfectpro.eu
11/18
-
 1
1
-
 2
2
-
 3
3
-
 4
4
-
 5
5
-
 6
6
-
 7
7
-
 8
8
-
 9
9
-
 10
10
-
 11
11
-
 12
12
-
 13
13
-
 14
14
-
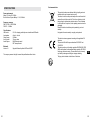 15
15
-
 16
16
-
 17
17
-
 18
18
-
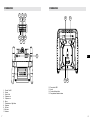 19
19
-
 20
20
-
 21
21
-
 22
22
-
 23
23
-
 24
24
-
 25
25
-
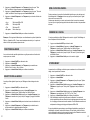 26
26
-
 27
27
-
 28
28
-
 29
29
-
 30
30
-
 31
31
-
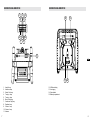 32
32
-
 33
33
-
 34
34
-
 35
35
-
 36
36
-
 37
37
-
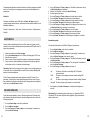 38
38
-
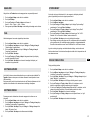 39
39
-
 40
40
-
 41
41
-
 42
42
-
 43
43
-
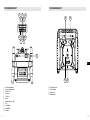 44
44
-
 45
45
-
 46
46
-
 47
47
-
 48
48
-
 49
49
-
 50
50
-
 51
51
-
 52
52
-
 53
53
-
 54
54


Perfectpro TEAMBOX de handleiding
- Categorie
- Tabletten
- Type
- de handleiding
in andere talen
- English: Perfectpro TEAMBOX Owner's manual
- français: Perfectpro TEAMBOX Le manuel du propriétaire
- Deutsch: Perfectpro TEAMBOX Bedienungsanleitung