
1
ENG
Guide for installation and use
Infrared Room Thermostat CONTROL BOX
Presentation
This infrared room thermostat has been
designed to bring you comfort and energy
savings. It is for the remote control of your
appliance.
You can regulate the room temperature as
you desire [regulation temperature].
Its BOOST function will enable you to
heat up your room quickly and/or dry your
towels.
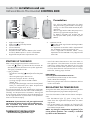
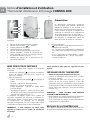
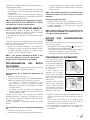
Infrared receiver
1
2
3
Infrared Room Thermostat
1. Appliance on/off light.
2. Appliance
on/standby button.
3. Infrared receiver.
4. Infrared emitter.
5. Thermostat on/off light.
6. OK/Boost button: Manual Boost cycle launch
and Daily Boost cycles P1 and P2 save button.
7. Regulation temperature adjustment dials.
8. 3 position cursor:
•
comfort mode: regulation according to room
temperature.
• P1: regulation in comfort mode + repetition of
the 1st Boost 2h programmed time slot.
• P1+P2: regulation in comfort mode + daily
repetition of the two Boost 2h programmed
time slots.
STARTING UP THE DEVICE
After having plugged your device into the mains:
• Press the
button [2] located on the receiver on
the bottom of the device to start up the appliance.
The light [1] should turn on.
• Light [1] modes:
- Off: Manual standby [
button] or off via the pilot
wire.
- Constant green light: device is on.
- Constant red light: device is heating.
- Flashing red light: device in Boost mode
[forced ‘on’].
- Flashing Green/Red light: no infrared wave [out of
order] or overheated [the room temperature
measured is higher than 35°C].
The infrared receiver has an autonomous regulation
system which memorises the status information [on/
standby] and temperature instructions. Storing the
last instruction received means that the temperature
can be regulated even if the emitter is off [batteries
have run out for example].
IMPORTANT: if your receiver is off, your appliance will
not receive the orders from the infrared thermostat.
Your installation may freeze because the device
cannot regulate its temperature.
THERMOSTAT INSTALLATION
• Remove the battery protection strips.
• Install the room thermostat in the same room as
the appliance. The thermostat must be installed
around 1.5 metres from the ground, on an inside
wall, sheltered from water splashes, direct sunlight
and any direct thermal disturbance such as a lamp,
television, heating pipe, draft etc.
PLEASE NOTE :
to ensure perfect infrared trans-mission :
• Do not obstruct the emitter or the receiver.
[with a towel for example]
• Avoid using lamps with a built-in electronic ballast
in the same room.
REGULATING THE TEMPERATURE
To regulate the room temperature depending on the
desired temperature [regulation temperature]:
Turn the thermostat knob to the chosen tempera-
ture:
• The thermostat light [5] gives a long flash to
show that the regulation temperature has been
registered.
• The heated towel rack switches on [red light [1]]
as soon as the ambient temperature is lower than
the chosen temperature.
NOTE: any change in temperature regulation [7] or
cursor position [Confort P1 P1+P2] is indicated
by a flash on the thermostat.
8
4
5
6
7

2
LAUNCHING A MANUAL BOOST
This function enables you to increase the tempera-
ture in your room rapidly and/or to dry your towels
for 2 hours. The device’s thermostat will not be in use
over this period.
The device will function normally again [the thermo-
stat will be used to regulate room temperature] as
soon as the timer stops.
•
Press the OK/Boost button: when it is released, the
light [5] will flash once to show that the manual
Boost has been registered, and the receiver light [1]
will flash red.
NOTE:
You can stop the Boost at any time by pressing the
button again. The receiver light [1] will stop flashing.
PROGRAMMING DAILY BOOSTS
The infrared room thermostat enables you to
programme 2 daily Boosts P1 and P2.
Programming a daily P1 Boost
• Turn the cursor [8] to P1.
• At the desired time, press the OK/Boost button for
three seconds to save the P1 cycle:
- The light [5] will flash twice briefly to indicate
that the daily Boost has been registered, and the
receiver light [1] will flash red.
- The Boost will start immediately for 2 hours and
will repeat after 23 hours and 15 minutes, and
then every 24 hours.
Example: The first morning at 7 o’clock, press the OK/
Boost button for three seconds. The next day, and on
subsequent days, the appliance will switch on at 6.15
for 2 hours. At the end of the Boost, the device goes
back to comfort mode.
Programming a second daily P2 Boost
• Turn the cursor [8] to P1+P2.
• Proceed as for programming P1 Boost .
- The second 2 hour Boost will start immediately
and will repeat after 13 hours and 15 minutes,
and then every 24 hours.
NOTE: You can stop the timer at an time by pressing
the OK/Boost button briefly.
Changing a programmed Boost
• Turn the cursor [8] to the chosen programme and,
at the desired time, press the OK/Boost button
for 3 seconds: the new cycle will be saved and the
previous one will be erased.
NOTE: 2 quick flashes indicate that a P1 Boost [or
P2 Boost] programme has already been saved when
going into P1 mode [or P1+P2 mode].
RETURNING TO FACTORY SETTINGS
This will erase all programmes and restore the default
factory settings.
• Turn the cursor [8] to
mode then press down for
at least 10 seconds:
- The light [5] will flash twice to indicate that the
re-set has been registered.
- P1 and P2 programmes will be erased.
CALIBRATING THE THERMOSTAT
It is normal for there to
be a 1 to 2°C difference
between the temperature
displayed on the emitter
and that measured by a
thermometer.
If you wish to synchronize
these two values, let your
thermostat regulate the
temperature for at least
an hour and then proceed
as follows:
Example: you have set
your thermostat to
21°C. After an hour of
regulating the tempera-
ture, the thermometer is
displaying 23°C.
• Remove the temperature knob, taking care not to
turn it at the same time.
• Remove the knob’s central notched axle [with a
small pair of pincers] and put the axle back in the
thermostat pivot, without making it move round.
• Then place the knob back so as the temperature
you have measured is the same as that shown on
the thermostat dial.
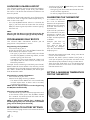
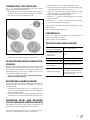
SETTING A MAXIMUM TEMPERATURE
FOR THE THERMOSTAT

3
If you wish to limit the room temperature to a
predefined level:
• Remove the temperature knob.
Find the temperature indicators [see diagram
opposite] and place the pins there.
• Place the knob back on the thermostat.
REPLACING EMITTER BATTERIES
Batteries must be replaced when the receiver does
not register orders sent by the emitter [low batteries]
or when the light [5] doesn’t react to operations
carried out on the emitter [flat batteries].
• Replace the batteries with 2 new flat CR2430 type
batteries.
SPECIFIC RECOMMENDATIONS
When using, you may notice that the upper and lower
parts of the appliance are not as hot as the rest of it:
• The upper parts are not completely full to allow
for the heat-conductor liquid to expand when the
device is switched on.
• The lower parts carry the liquid on its return cycle
after it has transmitted its heat.
SPECIFIC CASE OF REGULATING
USING THE PILOT WIRE [BLACK WIRE]
Your appliance enables you to manage orders sent
by EDF [cf. Tempo rates]. It also enables you to view
them using display [A] or [F] [depending on how the
device is equipped]:
1. Comfort: constant green light.
2. Reduced: flashing green light
[3,5°C below set temperature].
3. Freeze protection mode: light is off with green
flashes [set temperature=7°C].
4. Off: Light is off.
5. Comfort -1°C: green light with single blink.
6. Comfort -2°C: green light with double blink.
Orders generated by the user.
Orders generated by EDF.
MAINTENANCE
Use a soft, dry cloth to clean the control box.
Never use abrasive cleaning products.
TECHNICAL SPECIFICATIONS
Margin for measuring
temperature
0.1°C [receiver]
Margin for setting the
temperature
0.5°C
Range of temperature 5°C -30°C
Electrical protection Receiver: Class II - IP44
Power [receiver] 12A / 250V RELAIS 16A
Batteries [emitter]
2 flat CR2430 type
batteries provided [with
an approximately 24
month life]

4
Notice d’installation et d’utilisation
Thermostat d’Ambiance Infrarouge CONTROL BOX
Présentation
Ce thermostat d’ambiance infrarouge
est conçu pour vous apporter confort et
économies d’énergie. Il est destiné à la
commande à distance de votre appareil.
Il vous permet de réguler la température
ambiante en fonction de la température
souhaitée [température de régulation].
Sa fonction BOOST vous permet de gérer
des montées en température rapide de
votre lieu et/ou de sécher vos serviettes.
Récepteur
infrarouge
1
2
3
Thermostat d’Ambiance Infrarouge
1. Voyant de fonctionnement de l’ appareil.
2. Touche marche/veille
de l’ appareil.
3. Cellule réceptrice infrarouge.
4. Cellule émettrice infrarouge.
5. Voyant de fonctionnement du thermostat.
6. Touche OK/Boost : touche de lancement des
cycles de Boost manuel et d’enregistrement
des Boost quotidiens P1 et P2.
7. Molette de réglage de la température de
régulation souhaitée.
8. Curseur 3 positions :
•
mode confort : régulation en fonction de la
température ambiante.
• P1 : régulation en mode confort + répétitivité
de la 1ère plage de programmation du Boost
2h.
• P1+P2 : régulation en mode confort + répéti-
tivité quotidienne des 2 plages de program-
mation du Boost 2h.
MISE EN ROUTE DE L’APPAREIL
Après avoir raccordé votre appareil à l’installation
électrique :
• Appuyer sur le bouton
[2] situé sur le récepteur
en bas de l’appareil pour démarrer l’ appareil. Le
voyant [1] s’allume.
• Etats du voyant [1] :
- Eteint : Veille manuel [bouton
] ou arrêt par fil
pilote.
- Vert fixe : appareil en fonctionnement.
- Rouge fixe : appareil en chauffe.
- Rouge clignotant : appareil en mode Boost
[marche forcée].
- Vert/Rouge clignotant : défaut de sonde [hors
service] ou surchauffe [la température ambiante
mesurée est supérieure à 35°C].
Le récepteur infrarouge dispose d’un système de
régulation autonome qui conserve en mémoire les
informations d’état [marche/veille] et de consigne
de température. Le stockage de la dernière
consigne reçue permet d’assurer la régulation même
si l’émetteur est éteint [piles usées par exemple].
IMPORTANT : si votre récepteur est éteint, votre
appareil ne recevra pas les ordres du thermostat
infrarouge.
Votre installation peut geler car l’appareil ne peut
réguler.
INSTALLATION DU THERMOSTAT
• Retirez les languettes de protection des piles.
• Installez le thermostat d’ambiance dans la même
pièce que l’ appareil.
Le thermostat doit être installé à environ 1,5
mètres du sol, sur un mur intérieur, à l’abri des
projections d’eau, du rayonnement solaire direct et
de toute perturbation thermique directe telle que
lampe d’éclairage, téléviseur, tuyau de chauffage,
courant d’air...
REMARQUE : POUR ASSURER UNE PARFAITE
TRANSMISSION INFRAROUGE :
• Ne pas obturer les cellules émettrices et réceptrices
[drap de bains ou serviette devant la cellule].
• Éviter l’éclairage par lampe à ballast électronique
intégrée dans la même pièce.
RÉGLAGE DE LA TEMPÉRATURE
Pour régler la température ambiante en fonction de la
température souhaitée [température de régulation] :
8
FR
4
5
6
7

5
Positionner la molette de réglage du thermostat sur
la température choisie :
• Le voyant [5] du thermostat émet un flash long
pour indiquer la prise en compte de la température
de régulation.
• L’ appareil se remet en chauffe [voyant rouge [1]]
dès lors que la température ambiante est inférieure
à la température souhaitée.
NOTE : toute modification du réglage [7] de tempéra-
ture ou de position du curseur [ConfortP1P1+P2]
est signalé par un flash sur le thermostat.
LANCEMENT D’UN BOOST MANUEL
Cette fonction permet de gérer des montées en
température rapides de votre lieu et/ou de sécher
vos serviettes pendant une durée de 2h.
Le thermostat de l’appareil est inactif pendant tout
ce temps.
L’appareil reprend un fonctionnement normal [régu-
lation de la température ambiante par le thermostat]
dès l’arrêt de la minuterie.
•
Appuyer sur la touche OK/Boost : au relâchement,
le voyant [5] flashe une fois pour indiquer la prise
en compte du Boost manuel, et le voyant [1] du
récepteur se met à clignoter rouge.
NOTE : vous pouvez interrompre le Boost à tout
moment en appuyant de nouveau sur la touche.
Le voyant [1] du récepteur cesse de clignoter.
PROGRAMMATION DES BOOST
QUOTIDIENS
Le thermostat d’ambiance infrarouge vous permet de
programmer 2 Boost quotidiens P1 et P2.
Programmation de la répétitivité quotidienne du
Boost P1
• Positionner le curseur [8] sur P1.
•
A l’heure souhaitée, appuyer sur la touche OK/Boost
pendant 3 secondes pour enregistrer le cycle P1 :
- Le voyant [5] clignote brièvement 2 fois
pour indiquer la prise en compte du Boost
quotidien, et le voyant [1] du récepteur se met à
clignoter rouge.
- Le Boost se met en route immédiatement
pendant 2h et se répètera au bout de 23h15, et
ensuite toutes les 24h.
Exemple: Le 1er matin à 7H, appuyez sur la touche
OK/Boost pendant 3 secondes. Le lendemain, et les
jours suivants, l’ appareil se met en chauffe à 6 heures
15 pour une durée de 2H.
A la fin du Boost, la régulation revient en mode
confort.
Programmation de la 2ème répétitivité quotidienne
P2
• Positionner le curseur [8] sur P1+P2.
•
Procéder comme pour la programmation du Boost P1.
- Le 2ème boost 2H se met en route immédiate-
ment et se répétera au bout de 23h15, et ensuite
toutes les 24h.
NOTE : Vous pouvez interrompre la minuterie à tout
moment en exerçant 1 pression brève sur la touche
OK/Boost.
Changer une programmation
• Positionnez le curseur [8] sur le programme choisi,
et à l’heure souhaitée, appuyer pendant 3 sec sur
la touche OK/Boost : le nouveau cycle enregistré
efface le précédent.
NOTE : 2 flashs rapides signalent une programmation
déjà mémorisée du Boost P1 [ou Boost P2] lors du
passage en mode P1[ou P1+P2].
RETOUR AUX CONFIGURATIONS
USINES
Efface tous les programmes et restaure les paramè-
tres usine par défaut.
• Positionnez le curseur [8] en mode
puis faites un
appui long de plus de 10 secondes :
- Le voyant [5] émet 2 flashs rapides pour indiquer
la prise en compte de la réinitialisation.
- Les programmations P1et P2 sont effacées.
ETALONNAGE DU THERMOSTAT
Il est normal qu’il puisse
subsister un décalage de 1
à 2°C entre la température
référencée sur l’émetteur
et celle mesurée par un
thermomètre.
Si vous souhaitez faire
coïncider ces 2 valeurs,
laissez votre thermostat
réguler pendant au moins
une heure puis procédez
comme suit :
Exemple : vous avez posi-
tionné votre thermostat
sur 21°C . Après une heure
de régulation, la tempéra-
ture mesurée par le ther-
momètre est de 23°C.
• Retirez la molette de réglage de la température en
prenant soin de ne pas la faire tourner en même
temps.
• Retirez l’axe cranté central de la molette [avec
une petite pince] et replacez l’axe sur le pivot du
thermostat, sans faire tourner ce dernier.
• Puis repositionnez la molette en faisant coïncider
la température mesurée avec le repère du
thermostat.

6
BRIDAGE DU THERMOSTAT
Si vous souhaitez limiter la température ambiante à
un niveau prédéfini :
• Retirez la molette de réglage de la température.
Repérez les indicateurs de température [schéma
ci-contre] et placez-y les pions.
• Repositionnez la molette sur le thermostat.
REMPLACEMENT DES PILES DE
L’ÉMETTEUR
Les piles doivent être remplacées lorsque le récep-
teur ne prend pas en compte les ordres envoyés par
l’émetteur [piles faibles] ou lorsque le voyant [5] ne
réagit plus lors d’une action sur l’émetteur [piles HS].
• Remplacez les piles par 2 piles plates de type
CR2430 neuves.
RECOMMANDATIONS PARTICULIÈRES
Au cours de l’utilisation, vous pourrez remarquer que
les éléments hauts et bas sont plus tièdes que le reste
de l’ appareil :
• Les éléments supérieurs ne sont pas complètement
remplis pour permettre la dilatation du fluide
caloporteur lors de la mise en chauffe.
• Les éléments bas reçoivent le retour du fluide qui a
transmis sa chaleur.
CAS PARTICULIER DE RÉGULATION
PAR FIL PILOTE [FIL NOIR]
Votre appareil permet de gérer les ordres envoyés par
EDF [cf. tarif Tempo].
Il permet également de les visualiser grâce au voyant
[A] ou [F] [selon équipement de l’appareil] :
1. Confort : voyant vert fixe.
2. Réduit : voyant vert clignotant [consigne réduite
de 3,5°C].
3. Hors gel : voyant éteint avec flashs vert
[consigne=7°C].
4. Arrêt : voyant éteint.
5.
Confort -1°C : voyant vert avec un flash d’extinction.
6. Confort -2°C : voyant vert avec deux flashs
d’extinction.
Ordres générés par le programmateur
Ordres générés par EDF
ENTRETIEN
Utilisez de préférence un chiffon sec et doux pour
nettoyer le boîtier. Ne jamais utiliser de produits
abrasifs.
CARACTÉRISTIQUES TECHNIQUES
Précision de la
mesure de
température
0.1°C [récepteur]
Précision de la con-
signe de température
0.5°C
Plage de température 5°C -30°C
Protection Electrique
Récepteur : Classe II - IP44
Puissance pilotée
[récepteur]
12A / 250V RELAIS 16A
Piles [émetteur]
2 piles plates de type
CR2430 fournie [Auton-
omie 24 mois environ].

7
NL
Installatie en gebruikershandleiding
Infrarood ruimtethermostaat CONTROL BOX
Voorstelling
Deze infrarode gestuurde omgevings-
thermostaat werd speciaal ontworpen
om u comfort te bieden en energie te
besparen. Hij dient om uw toestel op
afstand te bedienen.
Met deze thermostaat kunt u de omge-
vingstemperatuur regelen in functie van
de gewenste temperatuur [regeltempe-
ratuur]. Met de BOOST-functie kunt u uw
ruimte snel opwarmen en/of uw hand-
doeken op korte tijd drogen.
Infraroodontvanger
1
2
3
Infrarood-ruimtethermostaat
1. Indicatorlampje voor de werking van het toestel.
2. Aan/waakstand-knop
van het toestel.
3. Ontvangstsensor infrarood.
4. Zender infrarood.
5. Indicatorlampje voor de werking van de ther-
mostaat.
6. OK/Boost-knop: Knop voor het handmatig op-
starten van Boost-cycli en opslaan van dagelijkse
Boost P1 en P2.
7. Draaiknop voor temperatuurregeling voor het
instellen van de gewenste temperatuur.
8. Cursor 3 posities:
•
modus comfort: regeling in functie van de
omgevingstemperatuur.
• P1: regeling in modus comfort + herhaling van
de eerste ingestelde cyclus Boost 2u.
• P1+P2: regeling in modus comfort + dagelijkse
herhaling van de twee in te stellen Boost-cycli
van 2u.
HET TOESTEL INSCHAKELEN
Nadat u uw toestel op de elektrische installatie hebt
aangesloten:
• Drukt u op de knop
die zich op de ontvangst-
sensor onderaan op het toestel bevindt om het
toestel in te schakelen.
Het indicatorlampje [1] licht op.
• Statussen van het indicatorlampje [1]:
- Uit: handmatige waakstand [knop
of
uitschakelen via stuurdraad.
- Continu groen: toestel is in werking.
- Continu rood: toestel warmt op.
- Rood knipperen: toestel in Boost-modus
[geforceerde gang]
- Groen/rood knipperen: defect aan sonde [buiten
werking] of oververhitting [de gemeten omge-
vingstemperatuur > 35°C].
De IR-ontvangstsensor is uitgerust met een auto-
noom regelmechanisme dat de statusgegevens [aan/
waakstand] en de ingestelde temperatuur opslaat in
het geheugen.
Dankzij de opslag van de laatst ingestelde tempera-
tuur kan bijregelen ook gebeuren wanneer de ver-
zender is uitgeschakeld [bv. als gevolg van een lege
batterij].
BELANGRIJK: als uw ontvanger is uitgeschakeld, ont-
vangt uw toestel geen commando’s van de infrarood
gestuurde thermostaat. Uw installatie kan bevriezen
aangezien het toestel niet kan regelen.
INSTALLATIE VAN DE THERMOSTAAT
• Trek de beschermingslipjes van de batterijen.
• Installeer de omgevingsthermostaat in hetzelfde
vertrek als het toestel.
De thermostaat moet op ongeveer 1,5 meter boven
de vloer op een binnenwand aangebracht worden,
beschut tegen waterstralen, direct zonlicht, tocht
en rechtstreekse warmtebronnen zoals een lamp,
televisietoestel, verwarmingsbuizen …
Opmerking: Voor een perfecte infraroodtransmissie:
• Bedek de fotocellen en ontvangstsensoren niet
[badlakens of handdoeken voor de cel].
• Vermijd verlichting met elektronische ballast in
hetzelfde vertrek.
DE TEMPERATUUR REGELEN
Om de omgevingstemperatuur te regelen in functie
van de gewenste temperatuur [temperatuurregeling]:
4
5
7
8
6

8
Stelt u de draaiknop van de thermostaat in op de
gewenste temperatuur.
• Het indicatorlampje [5] van de thermostaat gaat
lang knipperen om aan te geven dat de regeltem-
peratuur wordt ingesteld.
• Het toestel begint op te warmen [rode indicator-
lampje [1]] zodra de omgevingstemperatuur onder
de gewenste temperatuur zakt.
OPMERKING: elke wijziging van de [7] tempe-
ratuurregeling of van de positie van de cursor
[Comfort
P1P1+P2] wordt aangegeven door een
kort knipperen op de thermostaat.
HANDMATIG OPSTARTEN VAN BOOST
Met deze functie kunt u uw badkamer snel opwar-
men en/of uw handdoeken op korte tijd drogen.
De thermostaat van het toestel is gedurende die
tijd inactief. Het apparaat gaat opnieuw in normale
werkingsmodus [regeling van omgevingstempera-
tuur door de thermostaat] zodra de tijdschakelaar
wordt gestopt.
•
Druk op de OK /Boost-knop: bij het opnieuw op-
starten knippert het indicatorlampje [5] een keer
om aan te geven dat de Boost handmatig wordt
ingesteld, en het indicatorlampje [1] van de
ontvangstsensor begint rood te knipperen.
OPMERKING: u kunt de Boost op ieder moment stop-
zetten door opnieuw op de knop te drukken.
Het indicatorlampje [1] van de ontvangstsensor stopt
met knipperen.
PROGRAMMEREN VAN DE DAGE-
LIJKSE BOOST
Met de omgevingsthermostaat kunt u 2 dagelijkse
Boosts P1 en P2 programmeren.
Programmeren van dagelijkse herhaling van Boost P1
• Plaats de cursor [8] op P1.
• Houd op het gewenste uur de OK/Boost-knop drie
seconden lang ingedrukt om de P1-cyclus op te
slagen.
- Het indicatorlampje [5] knippert kort twee keer
om aan te geven dat de dagelijkse Boost wordt
ingesteld, en het indicatorlampje [1] van de
ontvangstsensor begint rood te knipperen.
- De Boost treedt onmiddellijk in werking
gedurende 2u en zal dit herhalen na 23u15, en
vervolgens om de 24u.
Bijvoorbeeld: s’ morgens houdt u om 7u de OK/Boost-
knop drie seconden lang ingedrukt. De volgende dag
[en de volgende dagen] slaat het toestel op om 6.15
u. voor een duur van 2u.
Na de Boost wordt overgeschakeld op de modus
comfort.
Programmeren van de tweede dagelijkse P2-cyclus
• Plaats de cursor [8] op P1+P2.
•
Ga verder zoals voor het programmeren van Boost P1.
- De 2
e
Boost treedt onmiddellijk in werking
gedurende 2 u. en zal dit herhalen na 23.15 u, en
vervolgens om de 24 u.
OPMERKING: u kunt de tijdschakelaar op ieder
moment onderbreken door één maal kort op de
OK/Boost-knop te drukken.
Een programmatie wijzigingen
• Plaats de cursor [8] op het gewenste programma
en houdt op het gewenste uur gedurende drie
seconden de OK/Boost-knop ingedrukt.
De nieuwe cyclus overschrijft de vorige.
OPMERKING: 2 keer kort knipperen geeft aan dat er
in het geheugen van Boost P1 [of Boost P2] al een
programmatie is opgeslagen bij het overschakelen
naar modus P1 [of P1+P2].
STANDAARDINSTELLINGEN HER-
STELLEN
Hiermee worden alle programma’s gewist en worden
de standaard fabrieksinstellingen hersteld.
• Plaats de cursor [8] in modus
en houd de knop
10 seconden lang ingedrukt.
- Het indicatorlampje [5] knippert 2 keer kort
achtereen om de reïnitialisatie aan te geven.
- De programma’s P1 en P2 worden gewist.
IJKEN VAN DE THERMOSTAAT
Een verschuiving van 1 tot
2° C tussen de referentie-
temperatuur op de zender
en die temperatuur die op
de thermometer wordt
gemeten is normaal. Als
u de twee waarden wilt
laten samenvallen, laat
u uw thermostaat gedu-
rende minstens één uur
regelen en gaat u als volgt
te werk.
Bijvoorbeeld: u hebt uw
thermostaat ingesteld op
21° C. Na een uur regelen
bedraagt de gewenste
door de thermometer ge-
meten temperatuur 23° C.
• Trek de draaiknop voor temperatuurregeling eraf
en let erop dat u hem niet tegelijk draait.
• Verwijder de centrale gekartelde as van de knop
[met een tangetje] en plaats de as terug op de spil
van de thermostaat zonder aan deze laatste te
draaien.
• Plaats vervolgens de draaiknop terug en zorg er-
voor dat de gemeten temperatuur samenvalt met
het merkteken van de thermostaat.

9
THERMOSTAAT VAST INSTELLEN
Als u de omgevingstemperatuur tot een vooraf
gedefinieerd niveau wilt beperken.
• Verwijder de draaiknop voor temperatuurregeling.
Detecteer de temperatuurindicatoren [zie schema
hiernaast] en plaats de pionnen erop.
• Plaats de draaiknop terug op de thermostaat.
DE BATTERIJEN VAN DE ZENDER VER-
VANGEN
De batterijen moeten worden vervangen wanneer de
ontvangstsensor de commando’s van de zender niet
meer ontvangt [batterijen bijna leeg] of wanneer het
indicatorlampje [5] niet meer reageert op een actie
van de zender [batterijen leeg].
• Vervang de batterijen door 2 nieuwe platte batte-
rijen van het type CR2430.
BIJZONDERE AANBEVELINGEN
Tijdens het gebruik merkt u mogelijk dat de hoge en
lage elementen veel lauwer aanvoelen dan de rest
van het toestel.
• De bovenste elementen zijn niet volledig gevuld.
Zo kan de warmtegeleidende vloeistof uitzetten
tijdens het opwarmen.
• De onderste elementen vangen de terugstromende
vloeistof die haar warmte heeft overgedragen op.
BIJZONDER GEVAL VAN REGELING
VIA STUURDRAAD [ZWARTE DRAAD]
Uw toestel laat toe om commando’s te beheren die
door EDF [bv. tarief Tempo] worden verzonden.
Via indicatorlampjes [A] of [F] [al naargelang de uit-
rusting van het toestel] kunt u ze visualiseren.
1. Comfort: permanent groen indicatorlampje.
2. Verlaagd: knipperend groen indicatorlampje [inge-
stelde temperatuur verlaagd met 3,5° C].
3. Vorstvrij: indicatorlampje uitgeschakeld met kort
groen knipperen [ingestelde temperatuur = 7° C].
4. Stop: indicatorlampje uitgedoofd.
5. Comfort -1° C: groen indicatorlampje met verdwij-
nend knipperen.
6. Comfort -2° C: groen indicatorlampje met twee
keer kort verdwijnend knipperen.
Commando’s die door de programmaregelaar wor-
den beheerd.
Commando’s beheerd door EDF.
ONDERHOUD
Gebruik bij voorkeur een droge zachte doek om de
behuizing schoon te maken.
Gebruik geen schuurmiddelen.
TECHNISCHE EIGENSCHAPPEN
Nauwkeurigheid van
temperatuurregeling
0,1° C [ontvanger]
Nauwkeurigheid van
ingestelde
temperatuur
0,5° C
Temperatuurbereik 5° C – 30° C
Elektrische beveiliging Ontvanger: Klasse II - IP44
Gestuurd vermogen
[ontvanger]
12A / 250V RELAIS 16A
Batterijen [zender]
2 platte batterijen van
het type CR2430 meege-
leverd [gaan ongeveer 24
maanden mee].

10
Documenttranscriptie
Guide for installation and use Infrared Room Thermostat CONTROL BOX ENG 8 Presentation 5 1 This infrared room thermostat has been designed to bring you comfort and energy savings. It is for the remote control of your appliance. You can regulate the room temperature as you desire [regulation temperature]. Its BOOST function will enable you to heat up your room quickly and/or dry your towels. 6 2 3 7 4 Infrared receiver 1. 2. 3. 4. 5. 6. 7. Infrared Room Thermostat Appliance on/off light. Appliance on/standby button. Infrared receiver. Infrared emitter. Thermostat on/off light. OK/Boost button: Manual Boost cycle launch and Daily Boost cycles P1 and P2 save button. Regulation temperature adjustment dials. Starting up the device After having plugged your device into the mains: button [2] located on the receiver on • Press the the bottom of the device to start up the appliance. The light [1] should turn on. • Light [1] modes: - Off: Manual standby [ button] or off via the pilot wire. - Constant green light: device is on. - Constant red light: device is heating. - Flashing red light: device in Boost mode [forced ‘on’]. - Flashing Green/Red light: no infrared wave [out of order] or overheated [the room temperature measured is higher than 35°C]. The infrared receiver has an autonomous regulation system which memorises the status information [on/ standby] and temperature instructions. Storing the last instruction received means that the temperature can be regulated even if the emitter is off [batteries have run out for example]. IMPORTANT: if your receiver is off, your appliance will not receive the orders from the infrared thermostat. Your installation may freeze because the device cannot regulate its temperature. Thermostat installation • Remove the battery protection strips. 8. 3 position cursor: • comfort mode: regulation according to room temperature. • P1: regulation in comfort mode + repetition of the 1st Boost 2h programmed time slot. • P1+P2: regulation in comfort mode + daily repetition of the two Boost 2h programmed time slots. • Install the room thermostat in the same room as the appliance. The thermostat must be installed around 1.5 metres from the ground, on an inside wall, sheltered from water splashes, direct sunlight and any direct thermal disturbance such as a lamp, television, heating pipe, draft etc. Please note : to ensure perfect infrared trans-mission : • Do not obstruct the emitter or the receiver. [with a towel for example] • Avoid using lamps with a built-in electronic ballast in the same room. Regulating the temperature To regulate the room temperature depending on the desired temperature [regulation temperature]: Turn the thermostat knob to the chosen temperature: • The thermostat light [5] gives a long flash to show that the regulation temperature has been registered. • The heated towel rack switches on [red light [1]] as soon as the ambient temperature is lower than the chosen temperature. NOTE: any change in temperature regulation [7] or cursor position [Confort P1 P1+P2] is indicated by a flash on the thermostat. 1 Launching a manual Boost • Turn the cursor [8] to mode then press down for at least 10 seconds: - The light [5] will flash twice to indicate that the re-set has been registered. - P1 and P2 programmes will be erased. The device will function normally again [the thermostat will be used to regulate room temperature] as soon as the timer stops. • Press the OK/Boost button: when it is released, the light [5] will flash once to show that the manual Boost has been registered, and the receiver light [1] will flash red. Calibrating the thermostat This function enables you to increase the temperature in your room rapidly and/or to dry your towels for 2 hours. The device’s thermostat will not be in use over this period. NOTE: You can stop the Boost at any time by pressing the button again. The receiver light [1] will stop flashing. Programming daily boosts The infrared room thermostat enables you to programme 2 daily Boosts P1 and P2. Programming a daily P1 Boost • Turn the cursor [8] to P1. • At the desired time, press the OK/Boost button for three seconds to save the P1 cycle: - The light [5] will flash twice briefly to indicate that the daily Boost has been registered, and the receiver light [1] will flash red. - The Boost will start immediately for 2 hours and will repeat after 23 hours and 15 minutes, and then every 24 hours. Example: The first morning at 7 o’clock, press the OK/ Boost button for three seconds. The next day, and on subsequent days, the appliance will switch on at 6.15 for 2 hours. At the end of the Boost, the device goes back to comfort mode. Programming a second daily P2 Boost • Turn the cursor [8] to P1+P2. • Proceed as for programming P1 Boost . - The second 2 hour Boost will start immediately and will repeat after 13 hours and 15 minutes, and then every 24 hours. NOTE: You can stop the timer at an time by pressing the OK/Boost button briefly. Changing a programmed Boost • Turn the cursor [8] to the chosen programme and, at the desired time, press the OK/Boost button for 3 seconds: the new cycle will be saved and the previous one will be erased. NOTE: 2 quick flashes indicate that a P1 Boost [or P2 Boost] programme has already been saved when going into P1 mode [or P1+P2 mode]. Returning to factory settings This will erase all programmes and restore the default factory settings. 2 It is normal for there to be a 1 to 2°C difference between the temperature displayed on the emitter and that measured by a thermometer. If you wish to synchronize these two values, let your thermostat regulate the temperature for at least an hour and then proceed as follows: Example: you have set your thermostat to 21°C. After an hour of regulating the temperature, the thermometer is displaying 23°C. • Remove the temperature knob, taking care not to turn it at the same time. • Remove the knob’s central notched axle [with a small pair of pincers] and put the axle back in the thermostat pivot, without making it move round. • Then place the knob back so as the temperature you have measured is the same as that shown on the thermostat dial. Setting a maximum temperature for the thermostat If you wish to limit the room temperature to a predefined level: • Remove the temperature knob. Find the temperature indicators [see diagram opposite] and place the pins there. • Place the knob back on the thermostat. Replacing emitter batteries Batteries must be replaced when the receiver does not register orders sent by the emitter [low batteries] or when the light [5] doesn’t react to operations carried out on the emitter [flat batteries]. • Replace the batteries with 2 new flat CR2430 type batteries. Specific recommendations Technical Specifications Margin for measuring temperature 0.1°C [receiver] Margin for setting the temperature 0.5°C Range of temperature 5°C -30°C Electrical protection Receiver: Class II - IP44 Power [receiver] 12A / 250V RELAIS 16A Batteries [emitter] 2 flat CR2430 type batteries provided [with an approximately 24 month life] When using, you may notice that the upper and lower parts of the appliance are not as hot as the rest of it: • The upper parts are not completely full to allow for the heat-conductor liquid to expand when the device is switched on. • The lower parts carry the liquid on its return cycle after it has transmitted its heat. Specific case of regulating using the pilot wire [black wire] Your appliance enables you to manage orders sent by EDF [cf. Tempo rates]. It also enables you to view them using display [A] or [F] [depending on how the device is equipped]: 1. Comfort: constant green light. 2. Reduced: flashing green light [3,5°C below set temperature]. 3. Freeze protection mode: light is off with green flashes [set temperature=7°C]. 4. Off: Light is off. 5. Comfort -1°C: green light with single blink. 6. Comfort -2°C: green light with double blink. Orders generated by the user. Orders generated by EDF. Maintenance Use a soft, dry cloth to clean the control box. Never use abrasive cleaning products. 3 FR Notice d’installation et d’utilisation Thermostat d’Ambiance Infrarouge CONTROL BOX 8 Présentation 5 1 Ce thermostat d’ambiance infrarouge est conçu pour vous apporter confort et économies d’énergie. Il est destiné à la commande à distance de votre appareil. Il vous permet de réguler la température ambiante en fonction de la température souhaitée [température de régulation]. Sa fonction BOOST vous permet de gérer des montées en température rapide de votre lieu et/ou de sécher vos serviettes. 6 2 3 7 4 Récepteur infrarouge 1. 2. 3. 4. 5. 6. 7. Thermostat d’Ambiance Infrarouge Voyant de fonctionnement de l’ appareil. Touche marche/veille de l’ appareil. Cellule réceptrice infrarouge. Cellule émettrice infrarouge. Voyant de fonctionnement du thermostat. Touche OK/Boost : touche de lancement des cycles de Boost manuel et d’enregistrement des Boost quotidiens P1 et P2. Molette de réglage de la température de régulation souhaitée. Mise en route de l’appareil Après avoir raccordé votre appareil à l’installation électrique : [2] situé sur le récepteur • Appuyer sur le bouton en bas de l’appareil pour démarrer l’ appareil. Le voyant [1] s’allume. • Etats du voyant [1] : - Eteint : Veille manuel [bouton ] ou arrêt par fil pilote. - Vert fixe : appareil en fonctionnement. - Rouge fixe : appareil en chauffe. - Rouge clignotant : appareil en mode Boost [marche forcée]. - Vert/Rouge clignotant : défaut de sonde [hors service] ou surchauffe [la température ambiante mesurée est supérieure à 35°C]. Le récepteur infrarouge dispose d’un système de régulation autonome qui conserve en mémoire les informations d’état [marche/veille] et de consigne de température. Le stockage de la dernière consigne reçue permet d’assurer la régulation même si l’émetteur est éteint [piles usées par exemple]. IMPORTANT : si votre récepteur est éteint, votre appareil ne recevra pas les ordres du thermostat infrarouge. 4 8. Curseur 3 positions : • mode confort : régulation en fonction de la température ambiante. • P1 : régulation en mode confort + répétitivité de la 1ère plage de programmation du Boost 2h. • P1+P2 : régulation en mode confort + répétitivité quotidienne des 2 plages de programmation du Boost 2h. Votre installation peut geler car l’appareil ne peut réguler. Installation du thermostat • Retirez les languettes de protection des piles. • Installez le thermostat d’ambiance dans la même pièce que l’ appareil. Le thermostat doit être installé à environ 1,5 mètres du sol, sur un mur intérieur, à l’abri des projections d’eau, du rayonnement solaire direct et de toute perturbation thermique directe telle que lampe d’éclairage, téléviseur, tuyau de chauffage, courant d’air... Remarque : Pour assurer une parfaite transmission infrarouge : • Ne pas obturer les cellules émettrices et réceptrices [drap de bains ou serviette devant la cellule]. • éviter l’éclairage par lampe à ballast électronique intégrée dans la même pièce. Réglage de la température Pour régler la température ambiante en fonction de la température souhaitée [température de régulation] : Positionner la molette de réglage du thermostat sur la température choisie : • Le voyant [5] du thermostat émet un flash long pour indiquer la prise en compte de la température de régulation. • L’ appareil se remet en chauffe [voyant rouge [1]] dès lors que la température ambiante est inférieure à la température souhaitée. NOTE : toute modification du réglage [7] de température ou de position du curseur [ConfortP1P1+P2] est signalé par un flash sur le thermostat. Lancement d’un Boost manuel Cette fonction permet de gérer des montées en température rapides de votre lieu et/ou de sécher vos serviettes pendant une durée de 2h. Le thermostat de l’appareil est inactif pendant tout ce temps. L’appareil reprend un fonctionnement normal [régulation de la température ambiante par le thermostat] dès l’arrêt de la minuterie. • Appuyer sur la touche OK/Boost : au relâchement, le voyant [5] flashe une fois pour indiquer la prise en compte du Boost manuel, et le voyant [1] du récepteur se met à clignoter rouge. NOTE : vous pouvez interrompre le Boost à tout moment en appuyant de nouveau sur la touche. Le voyant [1] du récepteur cesse de clignoter. Programmation quotidiens des Boost Le thermostat d’ambiance infrarouge vous permet de programmer 2 Boost quotidiens P1 et P2. Programmation de la répétitivité quotidienne du Boost P1 • Positionner le curseur [8] sur P1. • A l’heure souhaitée, appuyer sur la touche OK/Boost pendant 3 secondes pour enregistrer le cycle P1 : - Le voyant [5] clignote brièvement 2 fois pour indiquer la prise en compte du Boost quotidien, et le voyant [1] du récepteur se met à clignoter rouge. - Le Boost se met en route immédiatement pendant 2h et se répètera au bout de 23h15, et ensuite toutes les 24h. Exemple: Le 1er matin à 7H, appuyez sur la touche OK/Boost pendant 3 secondes. Le lendemain, et les jours suivants, l’ appareil se met en chauffe à 6 heures 15 pour une durée de 2H. A la fin du Boost, la régulation revient en mode confort. Programmation de la 2ème répétitivité quotidienne P2 • Positionner le curseur [8] sur P1+P2. • Procéder comme pour la programmation du Boost P1. - Le 2ème boost 2H se met en route immédiatement et se répétera au bout de 23h15, et ensuite toutes les 24h. NOTE : Vous pouvez interrompre la minuterie à tout moment en exerçant 1 pression brève sur la touche OK/Boost. Changer une programmation • Positionnez le curseur [8] sur le programme choisi, et à l’heure souhaitée, appuyer pendant 3 sec sur la touche OK/Boost : le nouveau cycle enregistré efface le précédent. NOTE : 2 flashs rapides signalent une programmation déjà mémorisée du Boost P1 [ou Boost P2] lors du passage en mode P1[ou P1+P2]. Retour usines aux configurations Efface tous les programmes et restaure les paramètres usine par défaut. • Positionnez le curseur [8] en mode puis faites un appui long de plus de 10 secondes : - Le voyant [5] émet 2 flashs rapides pour indiquer la prise en compte de la réinitialisation. - Les programmations P1et P2 sont effacées. Etalonnage du thermostat Il est normal qu’il puisse subsister un décalage de 1 à 2°C entre la température référencée sur l’émetteur et celle mesurée par un thermomètre. Si vous souhaitez faire coïncider ces 2 valeurs, laissez votre thermostat réguler pendant au moins une heure puis procédez comme suit : Exemple : vous avez positionné votre thermostat sur 21°C . Après une heure de régulation, la température mesurée par le thermomètre est de 23°C. • Retirez la molette de réglage de la température en prenant soin de ne pas la faire tourner en même temps. • Retirez l’axe cranté central de la molette [avec une petite pince] et replacez l’axe sur le pivot du thermostat, sans faire tourner ce dernier. • Puis repositionnez la molette en faisant coïncider la température mesurée avec le repère du thermostat. 5 Bridage du thermostat Si vous souhaitez limiter la température ambiante à un niveau prédéfini : • Retirez la molette de réglage de la température. Repérez les indicateurs de température [schéma ci-contre] et placez-y les pions. 3. Hors gel : voyant éteint avec flashs vert [consigne=7°C]. 4. Arrêt : voyant éteint. 5. Confort -1°C : voyant vert avec un flash d’extinction. 6. Confort -2°C : voyant vert avec deux flashs d’extinction. Ordres générés par le programmateur Ordres générés par EDF Entretien Utilisez de préférence un chiffon sec et doux pour nettoyer le boîtier. Ne jamais utiliser de produits abrasifs. Caractéristiques techniques • Repositionnez la molette sur le thermostat. Remplacement l’émetteur des piles 0.1°C [récepteur] Précision de la consigne de température 0.5°C Plage de température 5°C -30°C Protection Electrique Récepteur : Classe II - IP44 Puissance pilotée [récepteur] 12A / 250V RELAIS 16A Piles [émetteur] 2 piles plates de type CR2430 fournie [Autonomie 24 mois environ]. de Les piles doivent être remplacées lorsque le récepteur ne prend pas en compte les ordres envoyés par l’émetteur [piles faibles] ou lorsque le voyant [5] ne réagit plus lors d’une action sur l’émetteur [piles HS]. • Remplacez les piles par 2 piles plates de type CR2430 neuves. Recommandations particulières Au cours de l’utilisation, vous pourrez remarquer que les éléments hauts et bas sont plus tièdes que le reste de l’ appareil : • Les éléments supérieurs ne sont pas complètement remplis pour permettre la dilatation du fluide caloporteur lors de la mise en chauffe. • Les éléments bas reçoivent le retour du fluide qui a transmis sa chaleur. Cas particulier de régulation par fil pilote [fil noir] Votre appareil permet de gérer les ordres envoyés par EDF [cf. tarif Tempo]. Il permet également de les visualiser grâce au voyant [A] ou [F] [selon équipement de l’appareil] : 1. Confort : voyant vert fixe. 2. Réduit : voyant vert clignotant [consigne réduite de 3,5°C]. 6 Précision de la mesure de température Installatie en gebruikershandleiding Infrarood ruimtethermostaat CONTROL BOX NL 8 Voorstelling 5 1 Deze infrarode gestuurde omgevingsthermostaat werd speciaal ontworpen om u comfort te bieden en energie te besparen. Hij dient om uw toestel op afstand te bedienen. Met deze thermostaat kunt u de omgevingstemperatuur regelen in functie van de gewenste temperatuur [regeltemperatuur]. Met de BOOST-functie kunt u uw ruimte snel opwarmen en/of uw handdoeken op korte tijd drogen. 6 2 3 7 4 Infraroodontvanger 1. 2. 3. 4. 5. 6. Infrarood-ruimtethermostaat Indicatorlampje voor de werking van het toestel. Aan/waakstand-knop van het toestel. Ontvangstsensor infrarood. Zender infrarood. Indicatorlampje voor de werking van de thermostaat. OK/Boost-knop: Knop voor het handmatig opstarten van Boost-cycli en opslaan van dagelijkse Boost P1 en P2. Het toestel inschakelen Nadat u uw toestel op de elektrische installatie hebt aangesloten: die zich op de ontvangst• Drukt u op de knop sensor onderaan op het toestel bevindt om het toestel in te schakelen. Het indicatorlampje [1] licht op. • Statussen van het indicatorlampje [1]: of - Uit: handmatige waakstand [knop uitschakelen via stuurdraad. - Continu groen: toestel is in werking. - Continu rood: toestel warmt op. - Rood knipperen: toestel in Boost-modus [geforceerde gang] - Groen/rood knipperen: defect aan sonde [buiten werking] of oververhitting [de gemeten omgevingstemperatuur > 35°C]. De IR-ontvangstsensor is uitgerust met een autonoom regelmechanisme dat de statusgegevens [aan/ waakstand] en de ingestelde temperatuur opslaat in het geheugen. Dankzij de opslag van de laatst ingestelde temperatuur kan bijregelen ook gebeuren wanneer de verzender is uitgeschakeld [bv. als gevolg van een lege batterij]. 7. 8. Draaiknop voor temperatuurregeling voor het instellen van de gewenste temperatuur. Cursor 3 posities: • modus comfort: regeling in functie van de omgevingstemperatuur. • P1: regeling in modus comfort + herhaling van de eerste ingestelde cyclus Boost 2u. • P1+P2: regeling in modus comfort + dagelijkse herhaling van de twee in te stellen Boost-cycli van 2u. BELANGRIJK: als uw ontvanger is uitgeschakeld, ontvangt uw toestel geen commando’s van de infrarood gestuurde thermostaat. Uw installatie kan bevriezen aangezien het toestel niet kan regelen. Installatie van de thermostaat • Trek de beschermingslipjes van de batterijen. • Installeer de omgevingsthermostaat in hetzelfde vertrek als het toestel. De thermostaat moet op ongeveer 1,5 meter boven de vloer op een binnenwand aangebracht worden, beschut tegen waterstralen, direct zonlicht, tocht en rechtstreekse warmtebronnen zoals een lamp, televisietoestel, verwarmingsbuizen … Opmerking: Voor een perfecte infraroodtransmissie: • Bedek de fotocellen en ontvangstsensoren niet [badlakens of handdoeken voor de cel]. • Vermijd verlichting met elektronische ballast in hetzelfde vertrek. De temperatuur regelen Om de omgevingstemperatuur te regelen in functie van de gewenste temperatuur [temperatuurregeling]: 7 Stelt u de draaiknop van de thermostaat in op de gewenste temperatuur. • Het indicatorlampje [5] van de thermostaat gaat lang knipperen om aan te geven dat de regeltemperatuur wordt ingesteld. • Het toestel begint op te warmen [rode indicatorlampje [1]] zodra de omgevingstemperatuur onder de gewenste temperatuur zakt. OPMERKING: elke wijziging van de [7] temperatuurregeling of van de positie van de cursor [ComfortP1P1+P2] wordt aangegeven door een kort knipperen op de thermostaat. Handmatig opstarten van Boost Met deze functie kunt u uw badkamer snel opwarmen en/of uw handdoeken op korte tijd drogen. De thermostaat van het toestel is gedurende die tijd inactief. Het apparaat gaat opnieuw in normale werkingsmodus [regeling van omgevingstemperatuur door de thermostaat] zodra de tijdschakelaar wordt gestopt. • Druk op de OK /Boost-knop: bij het opnieuw opstarten knippert het indicatorlampje [5] een keer om aan te geven dat de Boost handmatig wordt ingesteld, en het indicatorlampje [1] van de ontvangstsensor begint rood te knipperen. OPMERKING: u kunt de Boost op ieder moment stopzetten door opnieuw op de knop te drukken. Het indicatorlampje [1] van de ontvangstsensor stopt met knipperen. Programmeren van de dagelijkse Boost Met de omgevingsthermostaat kunt u 2 dagelijkse Boosts P1 en P2 programmeren. Programmeren van dagelijkse herhaling van Boost P1 • Plaats de cursor [8] op P1. • Houd op het gewenste uur de OK/Boost-knop drie seconden lang ingedrukt om de P1-cyclus op te slagen. - Het indicatorlampje [5] knippert kort twee keer om aan te geven dat de dagelijkse Boost wordt ingesteld, en het indicatorlampje [1] van de ontvangstsensor begint rood te knipperen. - De Boost treedt onmiddellijk in werking gedurende 2u en zal dit herhalen na 23u15, en vervolgens om de 24u. Bijvoorbeeld: s’ morgens houdt u om 7u de OK/Boostknop drie seconden lang ingedrukt. De volgende dag [en de volgende dagen] slaat het toestel op om 6.15 u. voor een duur van 2u. Na de Boost wordt overgeschakeld op de modus comfort. 8 Programmeren van de tweede dagelijkse P2-cyclus • Plaats de cursor [8] op P1+P2. • Ga verder zoals voor het programmeren van Boost P1. - De 2e Boost treedt onmiddellijk in werking gedurende 2 u. en zal dit herhalen na 23.15 u, en vervolgens om de 24 u. OPMERKING: u kunt de tijdschakelaar op ieder moment onderbreken door één maal kort op de OK/Boost-knop te drukken. Een programmatie wijzigingen • Plaats de cursor [8] op het gewenste programma en houdt op het gewenste uur gedurende drie seconden de OK/Boost-knop ingedrukt. De nieuwe cyclus overschrijft de vorige. OPMERKING: 2 keer kort knipperen geeft aan dat er in het geheugen van Boost P1 [of Boost P2] al een programmatie is opgeslagen bij het overschakelen naar modus P1 [of P1+P2]. Standaardinstellingen stellen her- Hiermee worden alle programma’s gewist en worden de standaard fabrieksinstellingen hersteld. • Plaats de cursor [8] in modus en houd de knop 10 seconden lang ingedrukt. - Het indicatorlampje [5] knippert 2 keer kort achtereen om de reïnitialisatie aan te geven. - De programma’s P1 en P2 worden gewist. IJken van de thermostaat Een verschuiving van 1 tot 2° C tussen de referentietemperatuur op de zender en die temperatuur die op de thermometer wordt gemeten is normaal. Als u de twee waarden wilt laten samenvallen, laat u uw thermostaat gedurende minstens één uur regelen en gaat u als volgt te werk. Bijvoorbeeld: u hebt uw thermostaat ingesteld op 21° C. Na een uur regelen bedraagt de gewenste door de thermometer gemeten temperatuur 23° C. • Trek de draaiknop voor temperatuurregeling eraf en let erop dat u hem niet tegelijk draait. • Verwijder de centrale gekartelde as van de knop [met een tangetje] en plaats de as terug op de spil van de thermostaat zonder aan deze laatste te draaien. • Plaats vervolgens de draaiknop terug en zorg ervoor dat de gemeten temperatuur samenvalt met het merkteken van de thermostaat. Thermostaat vast instellen Als u de omgevingstemperatuur tot een vooraf gedefinieerd niveau wilt beperken. • Verwijder de draaiknop voor temperatuurregeling. Detecteer de temperatuurindicatoren [zie schema hiernaast] en plaats de pionnen erop. 1. Comfort: permanent groen indicatorlampje. 2. Verlaagd: knipperend groen indicatorlampje [ingestelde temperatuur verlaagd met 3,5° C]. 3. Vorstvrij: indicatorlampje uitgeschakeld met kort groen knipperen [ingestelde temperatuur = 7° C]. 4. Stop: indicatorlampje uitgedoofd. 5. Comfort -1° C: groen indicatorlampje met verdwijnend knipperen. 6. Comfort -2° C: groen indicatorlampje met twee keer kort verdwijnend knipperen. Commando’s die door de programmaregelaar worden beheerd. Commando’s beheerd door EDF. Onderhoud Gebruik bij voorkeur een droge zachte doek om de behuizing schoon te maken. Gebruik geen schuurmiddelen. Technische eigenschappen • Plaats de draaiknop terug op de thermostaat. De batterijen van de zender vervangen De batterijen moeten worden vervangen wanneer de ontvangstsensor de commando’s van de zender niet meer ontvangt [batterijen bijna leeg] of wanneer het indicatorlampje [5] niet meer reageert op een actie van de zender [batterijen leeg]. • Vervang de batterijen door 2 nieuwe platte batterijen van het type CR2430. Nauwkeurigheid van temperatuurregeling 0,1° C [ontvanger] Nauwkeurigheid van ingestelde temperatuur 0,5° C Temperatuurbereik 5° C – 30° C Elektrische beveiliging Ontvanger: Klasse II - IP44 Gestuurd vermogen [ontvanger] 12A / 250V RELAIS 16A Batterijen [zender] 2 platte batterijen van het type CR2430 meegeleverd [gaan ongeveer 24 maanden mee]. Bijzondere aanbevelingen Tijdens het gebruik merkt u mogelijk dat de hoge en lage elementen veel lauwer aanvoelen dan de rest van het toestel. • De bovenste elementen zijn niet volledig gevuld. Zo kan de warmtegeleidende vloeistof uitzetten tijdens het opwarmen. • De onderste elementen vangen de terugstromende vloeistof die haar warmte heeft overgedragen op. Bijzonder geval van regeling via stuurdraad [zwarte draad] Uw toestel laat toe om commando’s te beheren die door EDF [bv. tarief Tempo] worden verzonden. Via indicatorlampjes [A] of [F] [al naargelang de uitrusting van het toestel] kunt u ze visualiseren. 9 10-
 1
1
-
 2
2
-
 3
3
-
 4
4
-
 5
5
-
 6
6
-
 7
7
-
 8
8
-
 9
9
-
 10
10


RADSON Control Box de handleiding
- Type
- de handleiding
- Deze handleiding is ook geschikt voor
in andere talen
- English: RADSON Control Box Owner's manual
- français: RADSON Control Box Le manuel du propriétaire