Silvercrest SND 3600 D2 Operating Instructions Manual
- Type
- Operating Instructions Manual

IAN 289910
NEGATIV-DIGITALISIERER / NEGATIVE DIGITISER
SCANNER DE DIAPOSITIVES ET NÉGATIFS SND 3600 D2
NEGATIV-DIGITALISIERER
Bedienungsanleitung
NEGATIVE DIGITISER
Operating instructions
SCANNER DE DIAPOSITIVES ET
NÉGATIFS
Mode d’emploi
DIASCANNER
Gebruiksaanwijzing
DIGITALIZADOR DE NEGATIVOS
Instrucciones de uso
DIGITALIZADOR DE NEGATIVOS
Manual de instruções
PŘÍSTROJ NA DIGITALIZOVÁNÍ
NEGATIVŮ
Návod k obsluze

DE / AT / CH Bedienungsanleitung Seite 1
GB/IE Operating instructions Page 25
FR / BE Mode d’emploi Page 49
NL / BE Gebruiksaanwijzing Pagina 73
CZ Návod k obsluze Strana 97
ES Instrucciones de uso Página 121
PT Manual de instruções Página 145
Klappen Sie vor dem Lesen die beiden Seiten mit den Abbildungen aus und
machen Sie sich anschließend mit allen Funktionen des Gerätes vertraut.
Before reading, unfold both pages containing illustrations and familiarise
yourself with all functions of the device.
Avant de lire le mode d’emploi, ouvrez les deux pages contenant les illustra-
tions et familiarisez-vous ensuite avec toutes les fonctions de l’appareil.
Vouw vóór het lezen de beide pagina‘s met de afbeeldingen open en maak
u vertrouwd met alle functies van het apparaat.
Před čtením si odklopte obě dvě strany s obrázky a potom se seznamte se
všemi funkcemi přístroje.
Antes de empezar a leer abra las dos páginas que contienen las imágenes
y, en seguida, familiarícese con todas las funciones del dispositivo.
Antes de começar a ler abra as duas páginas com as imagens e, de seguida,
familiarize-se com todas as funções do aparelho.


2 x

SND 3600 D2
DE
│
AT
│
CH
│
1 ■
Inhaltsverzeichnis
Einführung ....................................3
Informationen zu dieser Bedienungsanleitung .................3
Hinweise zu Warenzeichen ...............................3
Bestimmungsgemäße Verwendung .........................3
Verwendete Warnhinweise ................................4
Sicherheitshinweise .............................5
Inbetriebnahme ................................6
Lieferumfang prüfen .....................................6
Entsorgung der Verpackung ...............................6
Anschluss an einen Computer .............................7
Software installieren .....................................7
Bedienelemente ...............................9
Bedienung und Betrieb ..........................9
Negativstreifen einlegen ..................................9
Dias einlegen .........................................10
Negative / Dias digitalisieren ............................11
Nach dem Gebrauch ...................................16
Fehlerbehebung ..............................17
Reinigung ....................................18
Lagerung/Entsorgung ..........................19
Lagerung bei Nichtbenutzung ............................19
Gerät entsorgen .......................................19

SND 3600 D2
■ 2
│
DE
│
AT
│
CH
Anhang ......................................20
Technische Daten ......................................20
Hinweise zur EU-Konformitätserklärung .....................21
Garantie der Kompernaß Handels GmbH ...................21
Service ..............................................24
Importeur ............................................24

SND 3600 D2
DE
│
AT
│
CH
│
3 ■
Einführung
Informationen zu dieser Bedienungsanleitung
Herzlichen Glückwunsch zum Kauf Ihres neuen Gerätes.
Sie haben sich damit für ein hochwertiges Produkt entschieden.
Die Bedienungsanleitung ist Bestandteil dieses Produkts. Sie enthält
wichtige Hinweise für Sicherheit, Gebrauch und Entsorgung. Ma-
chen Sie sich vor der Benutzung des Produkts mit allen Bedien- und
Sicherheitshinweisen vertraut. Benutzen Sie das Produkt nur wie
beschrieben und für die angegebenen Einsatzbereiche. Bewahren
Sie die Bedienungsanleitung immer als Nachschlagewerk in der
Nähe des Produkts auf. Händigen Sie bei Weitergabe oder Verkauf
des Produktes an Dritte alle Unterlagen inkl. dieser Bedienungsanlei-
tung mit aus.
Hinweise zu Warenzeichen
- USB
®
ist ein eingetragenes Warenzeichen von USB Implementers
Forum, Inc..
- Microsoft
®
, Windows
®
, Windows
®
XP, Windows Vista
®
, Windows
7
®
, Windows 8
®
und Windows 10
®
sind eingetragene Marken-
zeichen der Microsoft Corporation in den Vereinigten Staaten von
Amerika und/oder anderen Ländern.
- Mac OS X
®
ist eine eingetragene Marke von Apple Inc. in den USA
und anderen Ländern.
- Das SilverCrest Warenzeichen und der Handelsname sind Eigentum
des jeweiligen Inhabers.
Alle weiteren Namen und Produkte können die Warenzeichen oder
eingetragene Warenzeichen ihrer jeweiligen Eigentümer sein.
Bestimmungsgemäße Verwendung
Dieses Gerät ist ein Gerät der Informationstechnik und ist ausschließlich
für den nicht gewerblichen Gebrauch zum Scannen und Digitalisieren
von Filmnegativen und Dias bestimmt.
Eine andere oder darüber hin-
ausgehende Benutzung gilt als nicht bestimmungsgemäß. Ansprüche
jeglicher Art wegen Schäden aus nicht bestimmungsgemäßer Ver-
wendung sind ausgeschlossen. Das Risiko trägt allein der Benutzer.

SND 3600 D2
■ 4
│
DE
│
AT
│
CH
Verwendete Warnhinweise
In der vorliegenden Bedienungsanleitung werden folgende
Warnhinweise verwendet:
GEFAHR
Ein Warnhinweis dieser Gefahrenstufe kennzeich-
net eine drohende gefährliche Situation.
Falls die gefährliche Situation nicht vermieden wird, kann dies
zu schweren Verletzungen oder zum Tod führen.
► Die Anweisungen in diesem Warnhinweis befolgen, um
die Gefahr von schweren Verletzungen oder des Todes zu
vermeiden.
ACHTUNG
Ein Warnhinweis dieser Gefahrenstufe kennzeichnet
einen möglichen Sachschaden.
Falls die Situation nicht vermieden wird, kann dies zu Sach-
schäden führen.
► Die Anweisungen in diesem Warnhinweis befolgen, um
Sachschäden zu vermeiden.
HINWEIS
► Ein Hinweis kennzeichnet zusätzliche Informationen, die den
Umgang mit dem Gerät erleichtern.

SND 3600 D2
DE
│
AT
│
CH
│
5 ■
Sicherheitshinweise
■ Kontrollieren Sie das Gerät vor der Verwendung auf äußere
sichtbare Schäden. Nehmen Sie ein beschädigtes oder herunter-
gefallenes Gerät nicht in Betrieb.
■ Bei Beschädigung der Kabel oder Anschlüsse lassen Sie diese
von autorisiertem Fachpersonal oder dem Kundenservice
austauschen.
■ Dieses Gerät kann von Kindern ab 8 Jahren und darüber sowie
von Personen mit verringerten physischen, sensorischen oder
mentalen Fähigkeiten oder Mangel an Erfahrung und Wissen
benutzt werden, wenn Sie beaufsichtigt oder bezüglich des siche-
ren Gebrauchs des Gerätes unterwiesen wurden und die daraus
resultierenden Gefahren verstehen. Kinder dürfen nicht mit dem
Gerät spielen. Reinigung und Benutzer-Wartung dürfen nicht von
Kindern ohne Beaufsichtigung durchgeführt werden.
■ Lassen Sie Reparaturen am Gerät nur von autorisierten Fachbetrieben
oder dem Kundenservice durchführen. Durch unsachgemäße
Reparaturen können erhebliche Gefahren für den Benutzer
entstehen. Zudem erlischt der Garantieanspruch.
■ Nehmen Sie keine eigenmächtigen Umbauten oder Veränderungen
an dem Gerät vor.
■ Schützen Sie das Gerät vor Feuchtigkeit und dem Eindringen von
Flüssigkeiten. Stellen Sie keine mit Flüssigkeit gefüllten Gegenstän-
de (z.B. Vasen) neben das Gerät.
■ Halten Sie das Gerät fern von offenen Flammen und stellen Sie
keine Kerzen auf oder neben das Gerät. So vermeiden Sie die
Ausbreitung von Bränden.
■ Wenn das Gerät schnell von einer warmen in eine kalte, oder von
einer kalten in eine warme Umgebung geführt wird, lassen Sie es
sich 30 min. akklimatisieren.
■
GEFAHR! Verpackungsmaterialien sind kein Kinderspielzeug!
Halten Sie alle Verpackungsmaterialien von Kindern fern.
Es besteht Erstickungsgefahr!

SND 3600 D2
■ 6
│
DE
│
AT
│
CH
Inbetriebnahme
Lieferumfang prüfen
(Abbildungen siehe Ausklappseiten)
Der Lieferumfang besteht aus folgenden Komponenten:
▯ Scanner
▯ 1 x Dia Magazin
▯ 2 x Halterung für Negative
▯ Programm-CD
▯ Reinigungsbürste
▯ USB-Kabel
▯ Bedienungsanleitung
♦ Entnehmen Sie alle Teile aus der Verpackung und entfernen Sie
sämtliches Verpackungsmaterial.
HINWEIS
► Prüfen Sie die Lieferung auf Vollständigkeit und auf sichtbare
Schäden.
► Bei einer unvollständigen Lieferung oder Schäden infolge
mangelhafter Verpackung oder durch Transport wenden Sie
sich an die Service-Hotline (siehe Kapitel Service).
Entsorgung der Verpackung
Die Verpackungsmaterialien sind nach umweltverträglichen und
entsorgungstechnischen Gesichtspunkten ausgewählt und deshalb
recyclebar.
Entsorgen Sie nicht mehr benötigte Verpackungsmaterialien
gemäß den örtlich geltenden Vorschriften.

SND 3600 D2
DE
│
AT
│
CH
│
7 ■
Anschluss an einen Computer
Systemvoraussetzungen
Betriebssystem: Windows XP/Vista/7/8/10, Mac OS 10.6 - 10.12
Steckplatz: USB-Anschluss (USB 2.0)
♦ Verbinden Sie den Micro-USB-Stecker des USB-Kabels
8
mit
der Micro-USB-Buchse
3
des Scanners.
♦ Verbinden Sie den USB-Stecker des USB-Kabels
8
mit einem
eingeschalteten Computer. Der Computer erkennt die neue
Hardware und startet die automatische Treiberinstallation. Dieser
Vorgang kann ca. eine Minute dauern. Die LED PWR leuch-
tet, sobald der Scanner richtig verbunden wurde.
Software installieren
Installation unter Windows
ACHTUNG
► Bei der Installation der Software können wichtige Dateien
überschrieben oder verändert werden. Um bei eventuellen
Problemen nach der Installation auf die Originaldateien
zugreifen zu können, sollten Sie vor der Installation der Soft-
ware eine Sicherung Ihres Festplatteninhaltes erstellen.
♦ Legen Sie die mitgelieferte Programm-CD in das CD-Laufwerk
Ihres Computers ein. Das Installationsmenü startet automatisch.
♦ Klicken Sie auf die Schaltfläche „Installation“, um die
Installation zu starten.
♦ Installieren Sie die Software gemäß den Anleitungen auf dem
Bildschirm.

SND 3600 D2
■ 8
│
DE
│
AT
│
CH
HINWEIS
► Wenn Sie die Autostartfunktion ausgeschaltet haben und der
Installationsvorgang nicht automatisch beginnt, starten Sie
den Installationsvorgang durch einen Doppelklick auf die
Datei „WinSetup.exe“ im Hauptverzeichnis der CD.
♦ Nach erfolgreicher Installation können Sie das Menü durch
klicken auf die Schaltfläche „Exit“ verlassen.
Installation unter Mac OS
ACHTUNG
► Bei der Installation der Software können wichtige Dateien
überschrieben oder verändert werden. Um bei eventuellen
Problemen nach der Installation auf die Originaldateien
zugreifen zu können, sollten Sie vor der Installation der Soft-
ware eine Sicherung Ihres Festplatteninhaltes erstellen.
♦ Legen Sie die mitgelieferte Programm-CD in das CD-Laufwerk
Ihres Mac-Computers ein.
♦ Öffnen Sie das Hauptverzeichnis der Programm-CD.
♦ Wechseln Sie in das Verzeichnis „Mac“.
♦ Starten Sie den Installationsvorgang durch einen Doppelklick auf
die Datei „ImageScan.dmg“.
♦ Installieren Sie die Software gemäß den Anleitungen auf dem
Bildschirm.

SND 3600 D2
DE
│
AT
│
CH
│
9 ■
Bedienelemente
(Abbildungen siehe Ausklappseiten)
LED PWR
2
Taste SCAN
3
Micro-USB-Buchse
4
Einschub für Negativhalterung bzw. Dia-Magazin
5
Negativhalterung
6
Dia-Magazin
7
Reinigungsbürste
8
USB-Kabel (USB auf Micro-USB)
Bedienung und Betrieb
Negativstreifen einlegen
♦ Entriegeln Sie den Verschluss an der Vorderseite der Negativhal-
terung
5
und öffnen Sie die Halterung.
♦ Legen Sie den Negativstreifen seitenrichtig in die Halterung ein.
Achten Sie darauf, dass die Löcher der Negativstreifen auf die
entsprechenden Haltenasen der Halterung gelegt werden, damit
sich der Negativstreifen nicht verschieben kann.
♦ Schließen Sie die Halterung, bis der Deckel einrastet.
♦ Führen Sie nun die Negativhalterung
5
mit der Dreiecksmarkie-
rung voran und sichtbar in den rechten Einschub
4
ein (siehe
Abbildung 1).
♦ Schieben Sie die Negativhalterung
5
so weit in den rechten
Einschub
4
, bis diese spürbar in der ersten Position einrastet.
Für weitere Negative schieben Sie die Negativhalterung
5
weiter ein, bis diese spürbar in der nächsten Position einrastet.

SND 3600 D2
■ 10
│
DE
│
AT
│
CH
Abbildung 1 Abbildung 2
Dias einlegen
♦ Legen Sie die Dias seitenrichtig in den dafür vorgesehenen
Schacht des Dia-Magazins
6
. Es können ca. 10-12 Dias (je
nach Größe) in das Dia-Magazin eingelegt werden.
♦ Führen Sie das Dia-Magazin
6
mit dem Sichtfenster zuerst in
den rechten Einschub
4
ein. Beachten Sie dabei, dass die Drei-
ecksmarkierung voran und sichtbar ist (siehe Abbildung 2).
Mit dem Schieber, der sich seitlich am Dia-Magazin
6
befindet,
werden die im Schacht befindlichen Dias einzeln in den Scanner
geschoben.
♦ Schieben Sie dazu den Schieber zunächst bis zum Anschlag
vom Scanner weg. Anschließend den Schieber wieder vorsichtig
in Richtung des Scanners bewegen.
HINWEIS
► Ein im Scanner befindliches Dia wird dadurch aus dem
Gerät ausgeworfen und ein neues Dia in den Sichtbereich
des Scanner geschoben.
► Achten Sie darauf, ein neues Dia langsam in den Scanner zu
schieben. Geschieht dies zu schnell, so kann das Dia über
den Sichtbereich des Scanners hinaus gleiten.

SND 3600 D2
DE
│
AT
│
CH
│
11 ■
♦ Sobald Sie keine weiteren Dias mehr scannen möchten,
entfernen Sie das Dia-Magazin
6
aus dem Einschub
4
.
Entnehmen Sie das letzte Dia von unten aus dem Sichtfenster des
Dia-Magazins
6
.
Negative / Dias digitalisieren
Windows Software
♦ Starten Sie das Programm „Image Scan Tool“ durch einen
Doppelklick auf das Programmsymbol auf den Desktop oder
wählen Sie den entsprechenden Eintrag im Startmenü aus. Das
Programm öffnet sich direkt im Hauptfenster.
A Wählen Sie hier den Typ (Negativ, Dia oder Schwarz/Weiß),
den Sie verwenden möchten.
B Wählen Sie hier das Dateiformat (JPG oder TIFF) in welchem
Sie die Bilder speichern wollen.
C Wählen Sie hier die Auflösung aus:
Standard: 2592 x 1680 Pixel; Interpoliert: 5184 x 3360 Pixel

SND 3600 D2
■ 12
│
DE
│
AT
│
CH
D Klicken Sie auf diese Schaltfläche oder drücken Sie direkt auf
die Taste SCAN
2
, um ein Bild zu scannen.
E Klicken Sie auf diese Schaltfläche, um das aktuell markierte
Bild zu löschen.
F Hier wird Ihnen das aktuell markierte Bild angezeigt.
G Klicken Sie auf diese Schaltfläche, um das aktuell markierte
Bild zu spiegeln.
H Klicken Sie auf diese Schaltfläche, um das aktuell markierte
Bild im Uhrzeigersinn zu drehen.
I Klicken Sie auf diese Schaltfläche, um die aufgenommenen
Bilder zu speichern. Bei Eingabe eines ungültigen Speicher-
pfads erscheint eine Warnmeldung.
J Klicken Sie auf diese Schaltfläche, um das Programm zu
beenden.
K Klicken Sie auf diese Schaltfläche, um Farb- oder Helligkeits-
einstellungen vorzunehmen, bevor Sie das Bild scannen. Die
Anpassungen werden Ihnen in der Live-Ansicht angezeigt.
L Klicken Sie auf diese Schaltfläche, um einen Ordner zum
Speichern der gescannten Bilder auszuwählen.
M Hier wird Ihnen der Ordner angezeigt, in welchen die ge-
scannten Bilder gespeichert werden.
N Hier werden die bereits gescannten Bilder angezeigt, welche
bisher noch nicht gespeichert wurden. Das aktuell markierte
Bild wird mit einem grünen Rahmen dargestellt und im Fenster
(F) angezeigt.
O Hier wird eine Live-Ansicht des eingelegten Negativs/Dias
angezeigt.

SND 3600 D2
DE
│
AT
│
CH
│
13 ■
Farb- und Helligkeitseinstellungen
♦ Stellen Sie bei Bedarf die Farben und die Helligkeit ein, indem
Sie auf die Schaltfläche „Farb/Helligkeitseinstellungen“ (K)
klicken. Ein Einstellungsfenster wird geöffnet.
♦ Bewegen Sie den Schieberegler „Helligkeit“, um die Helligkeit
zwischen -64 und 64 einzustellen.
♦ Bewegen Sie die drei Schieberegler „Farbbalance“, um die
RGB-Werte zwischen -6 und 6 einzustellen.
♦ Um die Standardwerte wieder herzustellen, klicken Sie auf die
Schaltfläche „Standard“.
♦ Um die eingestellten Werte zu übernehmen und das
Einstellungsfenster zu schließen, klicken Sie auf die Schaltfläche
„Verlassen“.

SND 3600 D2
■ 14
│
DE
│
AT
│
CH
Mac Software
♦ Starten Sie das Programm „ImageScan“ durch einen
Doppelklick auf das Programmsymbol. Das Programm öffnet sich
direkt im Hauptfenster.
A Wählen Sie hier den Typ (Negativ, Dia oder Schwarz/Weiß),
den Sie verwenden möchten.
B Wählen Sie hier das Dateiformat (JPG oder TIFF) in welchem
Sie die Bilder speichern wollen.
C Wählen Sie hier die Auflösung aus:
Standard: 2592 x 1680 Pixel
Interpoliert: 5184 x 3360 Pixel
D Klicken Sie auf diese Schaltfläche oder drücken Sie direkt auf
die Taste SCAN
2
, um ein Bild zu scannen.
E Klicken Sie auf diese Schaltfläche, um das aktuell markierte
Bild zu löschen.

SND 3600 D2
DE
│
AT
│
CH
│
15 ■
F Hier wird Ihnen das aktuell markierte Bild angezeigt.
G Klicken Sie auf diese Schaltfläche, um das aktuell markierte
Bild zu spiegeln.
H Klicken Sie auf diese Schaltfläche, um das aktuell markierte
Bild im Uhrzeigersinn zu drehen.
I Klicken Sie auf diese Schaltfläche, um die aufgenommenen
Bilder zu speichern. Bei Eingabe eines ungültigen Speicher-
pfads erscheint eine Warnmeldung.
J Klicken Sie auf diese Schaltfläche, um das Programm zu
beenden.
K Klicken Sie auf diese Schaltfläche, um Farb- oder Helligkeits-
einstellungen vorzunehmen, bevor Sie das Bild scannen. Die
Anpassungen werden Ihnen in der Live-Ansicht angezeigt.
L Klicken Sie auf diese Schaltfläche, um einen Ordner zum
Speichern der gescannten Bilder auszuwählen.
M Hier wird Ihnen der Ordner angezeigt, in welchen die ge-
scannten Bilder gespeichert werden.
N Hier werden die bereits gescannten Bilder angezeigt, welche
bisher noch nicht gespeichert wurden. Das aktuell markierte
Bild wird mit einem grünen Rahmen dargestellt und im Fenster
(F) angezeigt.
O Hier wird eine Live-Ansicht des eingelegten Negativs/Dias
angezeigt.

SND 3600 D2
■ 16
│
DE
│
AT
│
CH
Farb- und Helligkeitseinstellungen
♦ Stellen Sie bei Bedarf die Farben und die Helligkeit ein, indem
Sie auf die Schaltfläche „Farb/Helligkeitseinstellungen“ (K)
klicken. Ein Einstellungsfenster wird geöffnet.
♦ Bewegen Sie den Schieberegler „Helligkeit“, um die Helligkeit
zwischen 0 und 255 einzustellen.
♦ Bewegen Sie die drei Schieberegler „Farbbalance“, um die
RGB-Werte zwischen 0 und 255 einzustellen.
♦ Um die Standardwerte wieder herzustellen, klicken Sie auf die
Schaltfläche „Standard“.
♦ Um die eingestellten Werte zu übernehmen und das
Einstellungsfenster zu schließen, klicken Sie auf die Schaltfläche
„Verlassen“.
Nach dem Gebrauch
♦ Entnehmen Sie die Negativhalterung
5
, indem Sie sie komplett
durch das Gerät hindurchschieben.
♦ Entnehmen Sie das Dia-Magazin
6
, indem Sie es wieder aus
dem rechten Einschub
4
herausziehen.
♦ Entfernen Sie das USB-Kabel
8
vom USB-Anschluss Ihres Com-
puters und des Scanners.

SND 3600 D2
DE
│
AT
│
CH
│
17 ■
Fehlerbehebung
Die nachfolgende Tabelle hilft bei der Lokalisierung und Behebung
kleinerer Störungen:
Fehler Mögliche Ursache Behebung
LED PWR
leuchtet
nicht.
Das Gerät ist nicht
korrekt angeschlossen.
Schließen Sie das
Gerät an.
Schlechte Bildqualität.
Staub auf der Hinter-
grundbeleuchtung des
Scanners.
Reinigen Sie die
Hintergrundbeleuch-
tung (siehe Kapitel
Reinigung).
Staub auf dem Film
bzw. dem Dia.
Reinigen Sie den
Film bzw. das Dia.
Gescannte Bilder sind
verschwommen.
Die Linse des Scanners
ist aufgrund von
Temperaturunterschieden
beschlagen.
Warten Sie, bis
sich das Gerät bei
Zimmertemperatur
akklimatisiert hat.
HINWEIS
► Wenn Sie mit den vorstehend genannten Schritten das
Problem nicht lösen können, wenden Sie sich bitte an den
Kundendienst (siehe Kapitel Service).

SND 3600 D2
■ 18
│
DE
│
AT
│
CH
Reinigung
ACHTUNG
► Stellen Sie sicher, dass bei der Reinigung keine Feuchtigkeit
in das Gerät eindringt, um eine irreparable Beschädigung
des Gerätes zu vermeiden.
♦ Reinigen Sie das Gehäuse ausschließlich mit einem leicht
feuchten Tuch und einem milden Spülmittel.
♦ Reinigen Sie die Oberfläche der Hintergrundbeleuchtung im
Inneren des Gerätes mit der Reinigungsbürste
7
. Schieben Sie
dazu die Reinigungsbürste mit der Reinigungsfläche nach unten
nur in den rechten Einschub
4
(siehe Abbildung 3)
.
Abbildung 3
7
4

SND 3600 D2
DE
│
AT
│
CH
│
19 ■
Lagerung/Entsorgung
Lagerung bei Nichtbenutzung
♦ Lagern Sie das Gerät in einer trockenen und staubfreien
Umgebung ohne direkte Sonneneinstrahlung.
Gerät entsorgen
Das nebenstehende Symbol einer durchgestrichenen
Mülltonne auf Rädern zeigt an, dass dieses Gerät der
Richtlinie 2012/19/EU unterliegt. Diese Richtlinie
besagt, dass Sie dieses Gerät am Ende seiner
Nutzungszeit nicht mit dem normalen Hausmüll
entsorgen dürfen, sondern in speziell eingerichteten
Sammelstellen, Wertstoffhöfen oder Entsorgungsbetrie-
ben abgeben müssen.
Diese Entsorgung ist für Sie kostenfrei. Schonen Sie die
Umwelt und entsorgen Sie fachgerecht.
Weitere Informationen erhalten Sie bei Ihrem lokalen Entsorger oder
der Stadt- bzw. Gemeindeverwaltung.

SND 3600 D2
■ 20
│
DE
│
AT
│
CH
Anhang
Technische Daten
Betriebsspannung/Stromaufnahme
5 V / 500 mA
(über USB-Anschluss)
Schnittstelle USB 2.0
Betriebstemperatur +5 - +40 °C
Feuchtigkeit (keine Kondensation) ≤ 75 %
Abmessungen (B x H x T) ca. 9,4 x 16,9 x 10,4 cm
Gewicht (ohne Zubehör) ca. 450 g
Bildsensor 5 Megapixel CMOS-Sensor
Fokussierungsbereich fester Fokus
Helligkeitssteuerung Automatisch
Farbabgleich Automatisch
Auflösung
Standard: 2592 x 1680 Pixel
Interpoliert: 5184 x 3360 Pixel
Scanmethode Single pass
Lichtquelle Gegenlicht (3 weiße LED)

SND 3600 D2
DE
│
AT
│
CH
│
21 ■
Hinweise zur EU-Konformitätserklärung
Dieses Gerät entspricht hinsichtlich Übereinstimmung
mit den grundlegenden Anforderungen und den
anderen relevanten Vorschriften der europäischen
Richtlinie für elektromagnetische Verträglichkeit
2014/30/EU und der RoHS Richtlinie 2011/65/EU.
Die vollständige EU-Konformitätserklärung ist beim
Importeur erhältlich.
Garantie der Kompernaß Handels GmbH
Sehr geehrte Kundin, sehr geehrter Kunde,
Sie erhalten auf dieses Gerät 3 Jahre Garantie ab Kaufdatum. Im
Falle von Mängeln dieses Produkts stehen Ihnen gegen den Verkäu-
fer des Produkts gesetzliche Rechte zu. Diese gesetzlichen Rechte
werden durch unsere im Folgenden dargestellte Garantie nicht einge-
schränkt.
Garantiebedingungen
Die Garantiefrist beginnt mit dem Kaufdatum. Bitte bewahren Sie
den Original-Kassenbon gut auf. Diese Unterlage wird als Nachweis
für den Kauf benötigt.
Tritt innerhalb von drei Jahren ab dem Kaufdatum dieses Produkts
ein Material- oder Fabrikationsfehler auf, wird das Produkt von
uns – nach unserer Wahl – für Sie kostenlos repariert oder ersetzt.
Diese Garantieleistung setzt voraus, dass innerhalb der Drei-Jahres-
Frist das defekte Gerät und der Kaufbeleg (Kassenbon) vorgelegt
und schriftlich kurz beschrieben wird, worin der Mangel besteht und
wann er aufgetreten ist.
Wenn der Defekt von unserer Garantie gedeckt ist, erhalten Sie
das reparierte oder ein neues Produkt zurück. Mit Reparatur oder
Austausch des Produkts beginnt kein neuer Garantiezeitraum.

SND 3600 D2
■ 22
│
DE
│
AT
│
CH
Garantiezeit und gesetzliche Mängelansprüche
Die Garantiezeit wird durch die Gewährleistung nicht verlängert.
Dies gilt auch für ersetzte und reparierte Teile. Eventuell schon beim
Kauf vorhandene Schäden und Mängel müssen sofort nach dem
Auspacken gemeldet werden. Nach Ablauf der Garantiezeit anfal-
lende Reparaturen sind kostenpflichtig.
Garantieumfang
Das Gerät wurde nach strengen Qualitätsrichtlinien sorgfältig produ-
ziert und vor Auslieferung gewissenhaft geprüft.
Die Garantieleistung gilt für Material- oder Fabrikationsfehler. Diese
Garantie erstreckt sich nicht auf Produktteile, die normaler Abnut-
zung ausgesetzt sind und daher als Verschleißteile angesehen wer-
den können oder für Beschädigungen an zerbrechlichen Teilen, z. B.
Schalter, Akkus, Backformen oder Teile die aus Glas gefertigt sind.
Diese Garantie verfällt, wenn das Produkt beschädigt, nicht sachge-
mäß benutzt oder gewartet wurde. Für eine sachgemäße Benutzung
des Produkts sind alle in der Bedienungsanleitung aufgeführten
Anweisungen genau einzuhalten.Verwendungszwecke und Hand-
lungen, von denen in der Bedienungsanleitung abgeraten oder vor
denen gewarnt wird, sind unbedingt zu vermeiden.
Das Produkt ist nur für den privaten und nicht für den gewerblichen
Gebrauch bestimmt. Bei missbräuchlicher und unsachgemäßer
Behandlung, Gewaltanwendung und bei Eingriffen, die nicht von
unserer autorisierten Service-Niederlassung vorgenommen wurden,
erlischt die Garantie.

SND 3600 D2
DE
│
AT
│
CH
│
23 ■
Abwicklung im Garantiefall
Um eine schnelle Bearbeitung Ihres Anliegens zu gewährleisten,
folgen Sie bitte den folgenden Hinweisen:
■ Bitte halten Sie für alle Anfragen den Kassenbon und die Artikel-
nummer (z. B. IAN 12345) als Nachweis für den Kauf bereit.
■ Die Artikelnummer entnehmen Sie bitte dem Typenschild, einer
Gravur, auf dem Titelblatt Ihrer Anleitung (unten links) oder als
Aufkleber auf der Rück- oder Unterseite.
■ Sollten Funktionsfehler oder sonstige Mängel auftreten, kontak-
tieren Sie zunächst die nachfolgend benannte Serviceabteilung
telefonisch oder per E-Mail.
■ Ein als defekt erfasstes Produkt können Sie dann unter Beifügung
des Kaufbelegs (Kassenbon) und der Angabe, worin der Mangel
besteht und wann er aufgetreten ist, für Sie portofrei an die Ihnen
mitgeteilte Service-Anschrift übersenden.
Auf www.lidl-service.com können Sie diese und viele
weitere Handbücher, Produktvideos und Software
herunterladen.

SND 3600 D2
■ 24
│
DE
│
AT
│
CH
Service
Service Deutschland
Tel.: 0800 5435 111
(Kostenfrei aus dem dt. Festnetz/Mobilfunknetz)
E-Mail: k[email protected]
Service Österreich
Tel.: 0820 201 222 (0,15 EUR/Min.)
E-Mail: k[email protected]
Service Schweiz
Tel.: 0842 665566 (0,08 CHF/Min.,
Mobilfunk max. 0,40 CHF/Min.)
E-Mail: k[email protected]
IAN 289910
Importeur
Bitte beachten Sie, dass die folgende Anschrift keine Serviceanschrift
ist. Kontaktieren Sie zunächst die benannte Servicestelle.
KOMPERNASS HANDELS GMBH
BURGSTRASSE 21
DE - 44867 BOCHUM
DEUTSCHLAND
www.kompernass.com

SND 3600 D2
GB
│
IE
│
25 ■
Contents
Introduction ..................................27
Information about these operating instructions ................27
Notes on trademarks ...................................27
Proper use ...........................................27
Warning notices .......................................28
Safety information ............................29
Initial operation ...............................30
Check package contents ................................30
Disposal of the packaging ...............................30
Connecting to a computer ...............................31
Installing the software ...................................31
Operating elements ...........................33
Handling and use .............................33
Inserting negatives .....................................33
Inserting slides ........................................34
Digitizing negatives/slides ...............................35
After use .............................................40
Troubleshooting ..............................41
Cleaning .....................................42
Storage/disposal .............................43
Storage when not in use .................................43
Disposal of the device ..................................43

SND 3600 D2
■ 26
│
GB
│
IE
Appendix ....................................44
Technical data ........................................44
Notes on the EU Declaration of Conformity ..................45
Kompernass Handels GmbH warranty .....................45
Service ..............................................48
Importer .............................................48

SND 3600 D2
GB
│
IE
│
27 ■
Introduction
Information about these operating instructions
Congratulations on the purchase of your new device.
You have selected a high-quality product. The operating instructions
are part of this product. They contain important information about
safety, use and disposal. Before using the product, please familiarise
yourself with all operating and safety instructions. Use the product
only as described and for the range of applications specified. Keep
these operating instructions as a reference and store them near the
product. Please pass on all documentation incl. these operating
instructions to any future owner(s) if you sell this product or give it
away.
Notes on trademarks
- USB
®
is a registered trademark of USB Implementers Forum, Inc.
- Microsoft
®
, Windows
®
, Windows
®
XP, Windows Vista
®
, Windows 7
®
,
Windows 8
®
and Windows 10
®
are registered trademarks of the
Microsoft Corporation in the United States of America and/or other
countries.
- Mac OS X
®
is a registered trademark of Apple Inc. in the USA and
other countries.
- The SilverCrest trademark and the retail name are the property of
their respective owner.
All other names and products may be trademarks or registered
trademarks of their respective owner.
Proper use
This device is a consumer electronics device intended exclusively for
the non-commercial scanning and digitizing of film negatives and
slides. The device is not intended for any other purpose, nor for use
beyond the scope described. No claims of any kind will be accepted
for damage arising as a result of incorrect use. The risk is borne
solely by the user.

SND 3600 D2
■ 28
│
GB
│
IE
Warning notices
The following warning notices are used in these operating instructions:
DANGER
A warning notice of this hazard level indicates an
imminently hazardous situation.
Failure to avoid this hazardous situation could result in serious
injuries or even death.
► Follow the instructions in this warning notice to avoid the risk
of serious injuries or death.
CAUTION!
A warning notice of this hazard level indicates a
risk of property damage.
Failure to avoid this situation could result in property damage.
► Follow the instructions in this warning notice to prevent material
damage.
NOTE
► A note provides additional information which will assist you
in using the device.

SND 3600 D2
GB
│
IE
│
29 ■
Safety information
■ Check the device for visible external damage before use. Do not
operate a device that has been damaged or dropped.
■ If the cables or connections are damaged, have them replaced
by authorised specialists or Customer Service.
■ This device may be used by children aged 8 years and above
and by persons with limited physical, sensory or mental capabili-
ties, or lack of experience and knowledge, provided that they are
under supervision or have been told how to use the device safely
and are aware of the potential risks. Children must not play with
the device. Cleaning and user maintenance tasks may not be
carried out by children unless they are supervised.
■ All repairs must be carried out by authorised specialist companies
or by the Customer Service department. Improper repairs can pose
significant risks to the user. It will also invalidate any warranty
claims.
■ Do not make any unauthorised modifications or alterations to the
device.
■ Protect the device from penetration by moisture and liquids.
Do not place any liquid-filled vessels (such as flower vases) next
to the device.
■ Keep the device away from naked flames, and do not place
candles on or next to the device. This will help to prevent the
spread of fires.
■ If you move the device quickly from a warm to a cold room or
vice versa, allow the device 30minutes to acclimatise.
■
DANGER! Do not allow children to play with the packaging
material! Keep all packaging materials away from children.
There is a risk of suffocation!

SND 3600 D2
■ 30
│
GB
│
IE
Initial operation
Check package contents
(For illustrations see fold-out pages)
The product includes the following components:
▯ Scanner
▯ 1 x slide magazine
▯ 2 x holders for negatives
▯ Program CD
▯ Cleaning brush
▯ USB cable
▯ Operating instructions
♦ Unpack all parts of the device from the packaging and remove
all packaging materials.
NOTE
► Check the package for completeness and signs of visible
damage.
► If the delivery is incomplete or damage has occurred as a
result of defective packaging or during transport, contact the
service hotline (see section Service).
Disposal of the packaging
The packaging materials have been selected for aspects of environ-
mental friendliness and disposal, and they are therefore recyclable.
Dispose of packaging materials which are no longer
needed in accordance with applicable local regulations.

SND 3600 D2
GB
│
IE
│
31 ■
Connecting to a computer
System requirements
Operating system: Windows XP/Vista/7/8/10, Mac OS 10.6–10.12
Slot: USB connection (USB 2.0)
♦ Connect the micro-USB plug on the USB cable
8
to the micro-
USB port
3
on the scanner.
♦ Connect the USB plug on the USB cable
8
to a powered-on
PC. The computer recognises the new hardware and starts in-
stalling the drivers automatically. This process can take a around
a minute. The PWR LED lights up as soon as the scanner is
properly connected.
Installing the software
Installation on Windows
CAUTION!
► Important files may be changed or overwritten during the
installation of the software! Before installing the installing
the software, make a backup of your original files to ensure
that you will be able to access them later if problems occur
during installation.
♦ Insert the supplied program CD into your CD drive of your com-
puter. The installation menu starts automatically.
♦ Click on the “Installation” button to start the installation.
♦ Install the software as described in the on-screen instructions.

SND 3600 D2
■ 32
│
GB
│
IE
NOTE
► If the autostart function is deactivated and the installation
does not start automatically, you can start the installation
with a double-click on the "WinSetup.exe" file in the main
directory of the CD.
♦ After successful installation you can leave the menu by clicking
on the “Exit” button.
Installation on Mac OS
CAUTION!
► Important files may be changed or overwritten during the
installation of the software! Before installing the installing
the software, make a backup of your original files to ensure
that you will be able to access them later if problems occur
during installation.
♦ Insert the supplied program CD into your CD drive of your Mac
computer.
♦ Open the main directory of the program CD.
♦ Switch to the “Mac” directory.
♦ Start the installation by double-clicking on the
“ImageScan.dmg” file.
♦ Install the software as described in the on-screen instructions.

SND 3600 D2
GB
│
IE
│
33 ■
Operating elements
(For illustrations see fold-out pages)
PWR LED
2
SCAN button
3
Micro-USB socket
4
Slot for the negative holder or slide magazine
5
Negative holder
6
Slide magazine
7
Cleaning brush
8
USB cable (USB to micro-USB)
Handling and use
Inserting negatives
♦ Unlock the catch on the front of the negative holder
5
and
open the holder.
♦ Lay the negative in the holder the right way up. Ensure that holes
of the negative strip are placed on the corresponding retaining
tabs on the holder, so that the negative strip can not move.
♦ Close the holder until the lid clicks into place.
♦ Now insert the negative holder
5
with the triangle marking at
the front and visible into the slot
4
on the right (see figure 1).
♦ Push the negative holder
5
into the slot
4
until it audibly clicks
into the first position. For additional negatives, push the negative
holder
5
further in until it audibly clicks into the next position.

SND 3600 D2
■ 34
│
GB
│
IE
Figure 1 Figure 2
Inserting slides
♦ Insert slides the right way round into the shaft provided on the
slide magazine
6
. Around 10–12 slides (depending on size)
can be added to the magazine.
♦ Push the slide magazine
6
into the slot
4
on the right with the
viewing window at the front. Ensure that the triangle marking is
at the front and visible (see figure 2).
Use the pusher on the side of the slide magazine
6
to push the
slides in the shaft individually into the scanner.
♦ To do this, first slide the pusher away from the scanner as far
as the stop. Afterwards, move the pusher carefully towards the
scanner.
NOTE
► This pushes any slide that is in the scanner out of the device
and a new slide is pushed into the viewing range of the
scanner.
► Make sure that you push the new slide into the scanner
slowly. If you push too quickly, the slide could slip past the
viewing range of the scanner.

SND 3600 D2
GB
│
IE
│
35 ■
♦ When you have finished scanning slides, remove the slide maga-
zine
6
from the slot
4
.
Remove the last slide from below from out of the slide magazine
viewing window
6
.
Digitizing negatives/slides
Windows software
♦ Start the “Image Scan Tool” program by double-clicking on pro-
gram icon on the desktop or select the corresponding entry from
the start menu. The program opens directly in the main window.
A Select the type here (negative, slide or colour/black & white)
you want to use.
B Select here the format (JPG or TIFF) you want to use for
saving images.
C Select the resolution here: standard: 2592 x 1680 pixels;
interpolated: 5184 x 3360 pixels

SND 3600 D2
■ 36
│
GB
│
IE
D
Click on this button or press the SCAN button
2
directly to
scan an image.
E Click this button to delete the currently selected image.
F The currently selected image is shown here.
G Click this button to flip the currently selected image.
H Click this button to rotate the currently selected image clockwise.
I Click this button to save the scanned images. If the path
entered is invalid, a warning will appear.
J Click this button to close the program.
K Click this button to make colour or brightness settings before scan-
ning the image. The adjustments will be shown in the live view.
L Click this button to select a folder as a save location for the
scanned images.
M Here you will see the folder where the scanned images have
been saved.
N Here you can see scanned images which have not yet been
saved. The currently selected image is shown with a green
frame and displayed in the window (F).
O Here you will see a live view of the inserted negative/slide.

SND 3600 D2
GB
│
IE
│
37 ■
Colour and brightness settings
♦ Adjust the colours and brightness as required by clicking on the
“Color/Brightness adjustment” button (K). A settings window
appears.
♦ Move the “Brightness” slider to set the brightness between
−64 and 64.
♦ Move the three “Color Balance” sliders to set the RGB values
between −6 and 6.
♦ To reset to the default values, click on the “Default” button.
♦ To accept the new values and close the settings window, click on
the “Exit” button.

SND 3600 D2
■ 38
│
GB
│
IE
Mac software
♦ Start the program “ImageScan” by double-clicking the icon.
The program opens directly in the main window.
A Select the type here (negative, slide or colour/black & white)
you want to use.
B Select here the format (JPG or TIFF) you want to use for
saving images.
C Select the resolution here:
Standard: 2592 x 1680 pixels
Interpolated: 5184 x 3360 pixels
D
Click on this button or press the SCAN button
2
directly to
scan an image.
E Click this button to delete the currently selected image.
F The currently selected image is shown here.

SND 3600 D2
GB
│
IE
│
39 ■
G Click this button to flip the currently selected image.
H Click this button to rotate the currently selected image clockwise.
I Click this button to save the scanned images. If the path
entered is invalid, a warning will appear.
J Click this button to close the program.
K Click this button to make colour or brightness settings before
scanning the image. The adjustments will be shown in the live view.
L Click this button to select a folder as a save location for the
scanned images.
M Here you will see the folder where the scanned images have
been saved.
N Here you can see scanned images which have not yet been
saved. The currently selected image is shown with a green
frame and displayed in the window (F).
O Here you will see a live view of the inserted negative/slide.

SND 3600 D2
■ 40
│
GB
│
IE
Colour and brightness settings
♦ Adjust the colours and brightness as required by clicking on the
“Color/Brightness adjustment” button (K). A settings window
appears.
♦ Move the “Brightness” slider to set the brightness between
0 and 255.
♦ Move the three “Color Balance” sliders to set the RGB values
between 0 and 255.
♦ To reset to the default values, click on the “Default” button.
♦ To accept the new values and close the settings window, click on
the “Exit” button.
After use
♦ Remove the negative holder
5
by pushing it all the way through
the device.
♦ Remove the slide magazine
6
by pulling it back out of the
slot
4
on the right.
♦ Remove the USB cable
8
from the USB port on your computer
and the scanner.

SND 3600 D2
GB
│
IE
│
41 ■
Troubleshooting
The following table will help you to identify and rectify minor
malfunctions:
Fault Possible cause Remedy
PWR LED
does
not light up.
The device is not
correctly connected.
Connect the device.
Poor image quality.
Dust on the scanner's
background lighting.
Clean the back-
ground lighting (see
section "Cleaning").
Dust on the film/slide. Clean the film/slide.
The scanned images
are blurred.
The lens of the scanner
has fogged up due to
temperature differences.
Wait until the device
has acclimatised to
room temperature.
NOTE
► If the above-mentioned solutions do not resolve the problem,
please contact Customer Service (see section Service).

SND 3600 D2
■ 42
│
GB
│
IE
Cleaning
CAUTION!
► To avoid irreparable damage to the device, ensure that no
moisture penetrates it during cleaning.
♦ Clean the housing only with a soft damp cloth and a mild
detergent.
♦ Clean the surfaces of the background lighting inside the device
with the cleaning brush
7
. To do this, push the cleaning brush
with the cleaning surface facing downwards into the slot
4
on
the right (see figure 3).
Figure 3
7
4

SND 3600 D2
GB
│
IE
│
43 ■
Storage/disposal
Storage when not in use
♦ Store the device in a dry and dust-free environment away from
direct sunlight.
Disposal of the device
The symbol on the left showing a crossed-out dustbin
means that this device is subject to Directive
2012/19/EU. This directive states that this device may
not be disposed of in normal household waste at the
end of its useful life, but must be brought to a specially
set-up collection point, recycling depot or disposal
company.
This disposal is free of charge for the user. Protect the
environment and dispose of this device properly.
You can obtain further information from your local disposal company
or the city or local authority.

SND 3600 D2
■ 44
│
GB
│
IE
Appendix
Technical data
Operating voltage/current
5 V /500 mA
(via USB port)
Interface USB 2.0
Operating temperature +5 to +40°C
Humidity (no condensation) ≤ 75%
Dimensions (W x H x D) approx. 9.4 x 16.9 x 10.4 cm
Weight (without accessories) approx. 450g
Image sensor 5 megapixel CMOS sensor
Focus range Fixed focus
Brightness control Automatic
Colour adjustment Automatic
Resolution
Standard: 2592 x 1680 pixels
Interpolated: 5184 x 3360 pixels
Scanning method Single pass
Light source Backlight (3 white LEDs)

SND 3600 D2
GB
│
IE
│
45 ■
Notes on the EU Declaration of Conformity
This device complies with the basic requirements
and other relevant provisions of the Electromagnetic
Compatibility Directive 2014/30/EU and the
RoHS Directive 2011/65/EU.
The complete EU Declaration of Conformity is
available from the importer.
Kompernass Handels GmbH warranty
Dear Customer,
This appliance has a 3-year warranty valid from the date of purchase.
If this product has any faults, you, the buyer, have certain statutory
rights. Your statutory rights are not restricted in any way by the war-
ranty described below.
Warranty conditions
The validity period of the warranty starts from the date of purchase.
Please keep your original receipt in a safe place. This document will
be required as proof of purchase.
If any material or production fault occurs within three years of the
date of purchase of the product, we will either repair or replace the
product for you at our discretion. This warranty service is dependent
on you presenting the defective appliance and the proof of purchase
(receipt) and a short written description of the fault and its time of
occurrence.
If the defect is covered by the warranty, your product will either be
repaired or replaced by us. The repair or replacement of a product
does not signify the beginning of a new warranty period.

SND 3600 D2
■ 46
│
GB
│
IE
Warranty period and statutory claims for defects
The warranty period is not prolonged by repairs effected under the
warranty. This also applies to replaced and repaired components.
Any damage and defects present at the time of purchase must be
reported immediately after unpacking. Repairs carried out after ex-
piry of the warranty period shall be subject to a fee.
Scope of the warranty
This appliance has been manufactured in accordance with strict qual-
ity guidelines and inspected meticulously prior to delivery.
The warranty covers material faults or production faults. The warranty
does not extend to product parts subject to normal wear and tear
or fragile parts such as switches, batteries, baking moulds or parts
made of glass.
The warranty does not apply if the product has been damaged,
improperly used or improperly maintained. The directions in the oper-
ating instructions for the product regarding proper use of the product
are to be strictly followed. Uses and actions that are discouraged
in the operating instructions or which are warned against must be
avoided.
This product is intended solely for private use and not for commercial
purposes. The warranty shall be deemed void in cases of misuse or
improper handling, use of force and modifications / repairs which
have not been carried out by one of our authorised Service centres.

SND 3600 D2
GB
│
IE
│
47 ■
Warranty claim procedure
To ensure quick processing of your case, please observe the follow-
ing instructions:
■ Please have the till receipt and the item number (e.g. IAN
12345) available as proof of purchase.
■ You will find the item number on the type plate, an engraving on
the front page of the instructions (bottom left), or as a sticker on
the rear or bottom of the appliance.
■ If functional or other defects occur, please contact the service
department listed either by telephone or by e-mail.
■ You can return a defective product to us free of charge to the ser-
vice address that will be provided to you. Ensure that you enclose
the proof of purchase (till receipt) and information about what the
defect is and when it occurred.
You can download these instructions along with
many other manuals, product videos and software
on www.lidl-service.com.

SND 3600 D2
■ 48
│
GB
│
IE
Service
Service Great Britain
Tel.: 0871 5000 720 (£ 0.10/Min.)
E-Mail: k[email protected]
Service Ireland
Tel.: 1890 930 034
(0,08 EUR/Min., (peak))
(0,06 EUR/Min., (off peak))
E-Mail: k[email protected]
IAN 289910
Importer
Please note that the following address is not the service address.
Please use the service address provided in the operating instructions.
KOMPERNASS HANDELS GMBH
BURGSTRASSE 21
DE - 44867 BOCHUM
GERMANY
www.kompernass.com

SND 3600 D2
FR│BE │ 49 ■
Table des matières
Introduction ..................................51
Informations relatives à ce mode d'emploi ...................51
Remarques sur les marques commerciales ...................51
Utilisation conforme ....................................51
Avertissements utilisés ...................................52
Consignes de sécurité ..........................53
Mise en service ...............................54
Vérification du matériel livré ..............................54
Élimination de l'emballage ...............................54
Raccordement à un ordinateur ............................55
Installation du logiciel ...................................55
Éléments de commande ........................57
Utilisation et fonctionnement ....................57
Mise en place des négatifs ..............................57
Mise en place des diapositives ...........................58
Numériser des négatifs/diapositives .......................59
Après chaque utilisation .................................64
Dépannage ..................................65
Nettoyage ...................................66
Entreposage/mise au rebut .....................67
Rangement en cas de non-utilisation .......................67
Mise au rebut de l'appareil ..............................67

SND 3600 D2
■ 50 │ FR│BE
Annexe ......................................68
Caractéristiques techniques ..............................68
Remarques concernant la déclaration de conformité EU ........69
Garantie de Kompernass Handels GmbH ...................69
Service après-vente ....................................72
Importateur ...........................................72

SND 3600 D2
FR│BE │ 51 ■
Introduction
Informations relatives à ce mode d'emploi
Toutes nos félicitations pour l'achat de votre nouvel appareil.
Vous venez ainsi d'opter pour un produit de grande qualité.
Le mode d'emploi fait partie intégrante de ce produit. Il contient des
remarques importantes concernant la sécurité, l'usage et la mise
au rebut. Avant d'utiliser le produit, veuillez vous familiariser avec
toutes les consignes d'utilisation et de sécurité. N'utilisez le produit
que conformément aux consignes et pour les domaines d'utilisation
prévus. Conservez toujours le mode d'emploi comme ouvrage de
référence à proximité du produit. Lors de la transmission ou de la
vente du produit, remettez tous les documents y compris ce mode
d'emploi.
Remarques sur les marques commerciales
- USB
®
est une marque déposée de USB Implementers Forum, Inc.
- Microsoft
®
, Windows
®
, Windows
®
XP, Windows Vista
®
, Windows 7
®
,
Windows 8
®
et Windows 10
®
sont des marques déposées de
Microsoft Corporation aux États-Unis d'Amérique et/ou dans
d'autres pays.
- Mac OS X
®
est une marque de Apple Inc., enregistrée aux États-Unis
et dans d'autres pays.
- Le nom de marque SilverCrest et le nom commercial sont la propriété
du propriétaire respectif.
Tous les autres noms et produits peuvent être les marques ou les
marques déposées de leurs propriétaires respectifs.
Utilisation conforme
Cet appareil est un appareil relevant des techniques d'information et
est exclusivement prévu pour scanner et numériser des films négatifs
et des diapositives dans un cadre non commercial. Toute utilisation
autre ou dépassant ce cadre est réputée non conforme.

SND 3600 D2
■ 52 │ FR│BE
Toute réclamation visant des dommages issus d'une utilisation non
conforme sera rejetée. L'utilisateur assume seul la responsabilité des
risques encourus.
Avertissements utilisés
Les avertissements suivants sont utilisés dans le présent mode
d'emploi:
DANGER
Un avertissement à ce niveau de danger signale
une situation dangereuse menaçante.
Si la situation dangereuse n'est pas évitée, elle peut entraîner
des blessures graves ou la mort.
► Les instructions de cet avertissement doivent être respectées
pour éviter tout risque de blessures graves, voire de mort.
ATTENTION
Un avertissement à ce niveau de danger signale
un risque de dégâts matériels.
Si la situation ne peut pas être écartée, elle risque d'entraîner
des dégâts matériels.
► Les instructions stipulées dans cet avertissement doivent être
suivies pour éviter tout dégât matériel.
REMARQUE
► Une remarque contient des informations supplémentaires
facilitant le maniement de l'appareil.

SND 3600 D2
FR│BE │ 53 ■
Consignes de sécurité
■ Avant d'utiliser l'appareil, vérifiez que celui-ci ne présente aucun
dégât extérieur visible. Ne mettez pas en service un appareil
endommagé ou qui a chuté.
■ Si les câbles ou les raccordements sont endommagés, faites-les
remplacer par le personnel technique agréé ou le service après-
vente.
■ Cet appareil peut être utilisé par des enfants à partir de 8 ans et
plus et par des personnes ayant des capacités physiques, sen-
sorielles ou mentales réduites ou un manque d'expérience et de
connaissances, à condition d'être surveillés ou d'avoir reçu des
instructions concernant l'utilisation de l'appareil en toute sécurité
et d'avoir compris les dangers qui en résultent. Les enfants ne
doivent pas jouer avec l'appareil. Le nettoyage et la maintenance
utilisateur ne doivent pas être réalisés par des enfants s'ils ne sont
pas surveillés.
■ Confiez les réparations de l'appareil exclusivement à des entre-
prises agréées ou au service après-vente. Toute réparation non
conforme peut entraîner des risques importants pour l'utilisateur.
À cela s'ajoute l'annulation de la garantie.
■ Ne procédez pas à des transformations ou des modifications sur
l'appareil de votre propre initiative.
■ Protégez l'appareil de l'humidité et de la pénétration de liquides.
Ne posez pas de récipients pleins de liquides à côté de l'appa-
reil, comme des vases par exemple.
■ Tenez l'appareil loin de flammes nues et ne placez pas de
bougies sur l'appareil ni à côté de celui-ci. Vous évitez ainsi la
propagation d'incendies.
■ Si l'appareil est introduit rapidement d'un environnement chaud
dans un environnement froid, ou d'un environnement froid dans
un environnement chaud, laissez-le s'acclimater 30min.
■
DANGER! Les matériaux d'emballage ne sont pas des jouets
pour les enfants! Tenez tous les matériaux d'emballage éloignés
des enfants. Il y a risque d'étouffement!

SND 3600 D2
■ 54 │ FR│BE
Mise en service
Vérification du matériel livré
(Figures: voir les volets dépliants)
Le matériel livré comprend les éléments suivants:
▯ Scanner
▯ 1 x chargeur de diapositives
▯ 2 x supports à négatifs
▯ CD du programme
▯ Brosse de nettoyage
▯ Câble USB
▯ Mode d'emploi
♦ Enlevez toutes les pièces de l'emballage et retirez l'ensemble du
matériau d'emballage.
REMARQUE
► Vérifiez si la livraison est au complet et ne présente aucun
dégât apparent.
► En cas de livraison incomplète ou de dommages résultant
d'un emballage défectueux ou du transport, veuillez vous
adresser à la hotline du service après-vente (voir le chapitre
Service après-vente).
Élimination de l'emballage
Les matériaux d'emballage ont été sélectionnés selon des critères de
respect de l'environnement et de recyclage permettant leur élimina-
tion écologique.
Veuillez éliminer les matériaux d'emballage qui ne
servent plus en respectant la réglementation locale.

SND 3600 D2
FR│BE │ 55 ■
Raccordement à un ordinateur
Exigences système
Système d'exploitation : Windows XP/Vista/7/8/10,
Mac OS 10.6 - 10.12
Emplacement : Port USB (USB 2.0)
♦ Reliez la fiche micro-USB du câble USB
8
avec le port micro-
USB
3
du scanner.
♦ Reliez la fiche USB du câble USB
8
à un PC allumé. L'ordinateur
reconnait le matériel et lance automatiquement l'installation du
pilote. Cette opération peut durer env. une minute.
La LED PWR s'allume dès que le scanner est correctement
connecté.
Installation du logiciel
Installation sous Windows
ATTENTION
► Lors de l'installation du logiciel, des fichiers importants risquent
d'être écrasés ou modifiés. Afin, en cas de problème, de pouvoir
accéder aux fichiers d'origine après l'installation, il est recom-
mandé de faire une sauvegarde du contenu de votre disque dur
avant d'installer le logiciel.
♦ Insérez le CD du programme fourni dans le lecteur CD de votre
ordinateur. Le menu d'installation s'ouvre automatiquement.
♦ Cliquez sur le bouton "Installation" pour démarrer l'installation.
♦ Installez le logiciel conformément aux instructions apparaissant
à l'écran.

SND 3600 D2
■ 56 │ FR│BE
REMARQUE
► Si vous avez désactivé la fonction de démarrage automatique
et que l'opération d'installation ne démarre pas automatique-
ment, démarrez l'opération d'installation d'un double clic sur le
fichier "WinSetup.exe" dans le répertoire principal du CD.
♦ Une fois l'installation terminée, vous pouvez quitter le menu en
cliquant sur le bouton "Exit".
Installation sous Mac OS
ATTENTION
► Lors de l'installation du logiciel, des fichiers importants risquent
d'être écrasés ou modifiés. Afin, en cas de problème, de pouvoir
accéder aux fichiers d'origine après l'installation, il est recom-
mandé de faire une sauvegarde du contenu de votre disque dur
avant d'installer le logiciel.
♦ Insérez le CD du programme fourni dans le lecteur CD de votre
ordinateur Mac.
♦ Ouvrez le répertoire principal du CD de programme.
♦ Passez au répertoire "Mac".
♦ Démarrez l'opération d'installation d'un double clic sur le fichier
"ImageScan.dmg".
♦ Installez le logiciel conformément aux instructions apparaissant
à l'écran.

SND 3600 D2
FR│BE │ 57 ■
Éléments de commande
(Figures: voir les volets dépliants)
LED PWR
2
Touche SCAN
3
Port micro-USB
4
Tiroir pour le support à négatifs ou le chargeur de diapositives
5
Support à négatifs
6
Chargeur de diapositives
7
Brosse de nettoyage
8
Câble USB (USB vers micro-USB)
Utilisation et fonctionnement
Mise en place des négatifs
♦ Déverrouillez la fermeture sur l'avant du support à négatifs
5
et
ouvrez le support.
♦ Placez le négatif du bon côté dans le support. Veillez à ce que les
perforations des négatifs soient placées sur les becs de retenue
correspondants supports afin que les négatifs ne puissent pas se
déplacer.
♦ Fermez le support jusqu'à ce que le couvercle s'enclenche.
♦ Poussez maintenant le support à négatifs
5
avec le triangle
repère en avant et bien visible dans le tiroir de droite
4
(voir figure 1).
♦ Poussez le support à négatifs
5
dans le tiroir de droite
4
jusqu'à ce qu'il s'enclenche nettement en première position.
Pour les négatifs suivants, poussez un peu plus le support à
négatifs
5
jusqu'à ce qu'il s'enclenche nettement dans la posi-
tion suivante.

SND 3600 D2
■ 58 │ FR│BE
Figure 1 Figure 2
Mise en place des diapositives
♦ Placez les diapositives du bon côté dans le logement à cet effet
du chargeur de diapositives
6
. Environ 10-12 diapositives
(en fonction de leur épaisseur) peuvent être placées dans le
chargeur de diapositives.
♦ Introduisez d'abord le chargeur de diapositives
6
avec la
fenêtre de visualisation dans le tiroir de droite
4
. Veillez à ce
que le triangle repère soit à l'avant et bien visible (voir figure 2).
Avec le poussoir qui se trouve sur le côté du chargeur de diaposi-
tives
6
, les diapositives du chargeur sont poussées une à une dans
le scanner.
♦ Poussez pour cela le poussoir jusqu'en butée en direction oppo-
sée de celle du scanner. Pousser ensuite le poussoir à nouveau
prudemment en direction du scanner.
REMARQUE
► Une diapositive qui se trouve dans le scanner est alors éjectée
de l'appareil et une nouvelle diapositive est glissée dans la
fenêtre de visualisation du scanner.
► Veillez à pousser une nouvelle diapositive lentement dans le
scanner. Si cela se fait trop rapidement, la diapositive risque
de glisser hors du champ de visualisation du scanner.

SND 3600 D2
FR│BE │ 59 ■
♦ Dès que vous ne souhaitez plus scanner d'autres diapositives,
retirez le chargeur de diapositives
6
du tiroir
4
.
Retirez la dernière diapositive, par le bas, de la fenêtre de visua-
lisation du chargeur de diapositives
6
.
Numériser des négatifs/diapositives
Logiciel Windows
♦ Lancez le programme "Image Scan Tool" d'un double clic sur
l'icône programme sur le bureau ou sélectionnez l'entrée corres-
pondante dans le menu Démarrer. Le programme s'ouvre alors
directement dans la fenêtre principale.
A Choisissez ici le type (négatif, diapositive ou noir/blanc)
que vous souhaitez utiliser.
B Sélectionnez ici le format de fichier (JPG ou TIFF) sous lequel
vous souhaitez enregistrer les images.
C Sélectionnez la résolution souhaitée : Standard :
2592 x 1680 pixels ; interpolée : 5184 x 3360 pixels

SND 3600 D2
■ 60 │ FR│BE
D Cliquez sur cette touche logicielle ou appuyez directement
sur la touche SCAN
2
pour scanner une image.
E Cliquez sur cette touche logicielle pour supprimer l'image
actuellement sélectionnée.
F Ici s'affiche l'image actuellement sélectionnée.
G Cliquez sur cette touche logicielle pour retourner l'image
actuellement sélectionnée.
H Cliquez sur cette touche logicielle pour tourner l'image actuelle-
ment sélectionnée dans le sens des aiguilles d'une montre.
I Cliquez sur cette touche logicielle pour enregistrer les images
prises. Un message d'avertissement s'affiche en cas de saisie
d'un chemin de sauvegarde incorrect.
J Cliquez sur cette touche logicielle pour quitter le programme.
K Cliquez sur cette touche logicielle pour procéder à des
réglages de couleur ou de luminosité avant de scanner
l'image. Les modifications s'affichent dans la vue live.
L Cliquez sur cette touche logicielle pour sélectionner un dossier
où enregistrer les images scannées.
M Vous voyez ici le dossier dans lequel les images scannées
sont enregistrées.
N Vous voyez ici les images déjà scannées mais qui n'ont pas
encore été enregistrées. L'image actuellement sélectionnée est
représentée dans un cadre vert et affichée dans la fenêtre (F).
O Une vue live du négatif/ de la diapositive mise en place
s’affiche.

SND 3600 D2
FR│BE │ 61 ■
Réglages de couleur et de luminosité
♦ Si nécessaire, réglez les couleurs et la luminosité en cliquant sur
la touche logicielle "Color/Brightness Adjustment (K)".
Une fenêtre de réglage s'ouvre.
♦ Faites glisser le curseur "Brightness" pour régler la luminosité
entre -64 et 64.
♦ Faites glisser les trois curseurs "Color Balance" pour régler les
valeurs RGB entre -6 et 6.
♦ Pour restaurer les valeurs standards, cliquez sur le bouton
"Default".
♦ Pour enregistrer les valeurs réglées, cliquez sur la touche
logicielle "Exit".

SND 3600 D2
■ 62 │ FR│BE
Logiciel Mac
♦ Lancez le programme "Image Scan" d'un double clic sur l'icône
programme. Le programme s'ouvre alors directement dans la
fenêtre principale.
A Choisissez ici le type (négatif, diapositive ou noir/blanc) que
vous souhaitez utiliser.
B Sélectionnez ici le format de fichier (JPG ou TIFF) sous lequel
vous souhaitez enregistrer les images.
C Sélectionnez la résolution souhaitée :
Standard : 2592 x 1680 pixels
Interpolée : 5184 x 3360 pixels
D Cliquez sur cette touche logicielle ou appuyez directement
sur la touche SCAN
2
pour scanner une image.
E Cliquez sur cette touche logicielle pour supprimer l'image
actuellement sélectionnée.

SND 3600 D2
FR│BE │ 63 ■
F Ici s'affiche l'image actuellement sélectionnée.
G Cliquez sur cette touche logicielle pour retourner l'image
actuellement sélectionnée.
H Cliquez sur cette touche logicielle pour tourner l'image actuelle-
ment sélectionnée dans le sens des aiguilles d'une montre.
I Cliquez sur cette touche logicielle pour enregistrer les images
prises. Un message d'avertissement s'affiche en cas de saisie
d'un chemin de sauvegarde incorrect.
J Cliquez sur cette touche logicielle pour quitter le programme.
K Cliquez sur cette touche logicielle pour procéder à des
réglages de couleur ou de luminosité avant de scanner
l'image. Les modifications s'affichent dans la vue live.
L Cliquez sur cette touche logicielle pour sélectionner un dossier
où enregistrer les images scannées.
M Vous voyez ici le dossier dans lequel les images scannées
sont enregistrées.
N Vous voyez ici les images déjà scannées mais qui n'ont pas
encore été enregistrées. L'image actuellement sélectionnée est
représentée dans un cadre vert et affichée dans la fenêtre (F).
O Une vue live du négatif/ de la diapositive mise en place
s’affiche.

SND 3600 D2
■ 64 │ FR│BE
Réglages de couleur et de luminosité
♦ Si nécessaire, réglez les couleurs et la luminosité en cliquant
sur la touche logicielle "Color/Brightness Adjustment" (K).
Une fenêtre de réglage s'ouvre.
♦ Faites glisser le curseur "Brightness" pour régler la luminosité
entre 0 et 255.
♦ Faites glisser les trois curseurs "Color Balance" pour régler les
valeurs RGB entre 0 et 255.
♦ Pour restaurer les valeurs standards, cliquez sur le bouton
"Default".
♦ Pour enregistrer les valeurs réglées, cliquez sur la touche
logicielle "Exit".
Après chaque utilisation
♦ Retirez le support à négatifs
5
en le poussant entièrement au
travers de l'appareil.
♦ Retirez le chargeur de diapositives
6
en le ressortant du tiroir
de droite
4
.
♦ Retirez le câble USB
8
du port USB de votre ordinateur et du
scanner.

SND 3600 D2
FR│BE │ 65 ■
Dépannage
Le tableau ci-dessous vous aidera à localiser les petits dysfonctionne-
ments et à y remédier:
Panne Cause possible Suppression
La LED PWR
ne s'allume pas.
L'appareil n'est pas
correctement branché.
Branchez l'appareil.
Mauvaise qualité
d'image.
Poussière sur le rétroé-
clairage du scanner.
Nettoyez le rétro-
éclairage (voir le
chapitre Nettoyage).
Poussière sur le film ou
la diapositive.
Nettoyez le film ou
la diapositive.
Les images scannées
sont floues.
La lentille du scanner
est embuée à cause
de différences de
température.
Attendez que l'appa-
reil se soit acclimaté
à la température
ambiante.
REMARQUE
► Si vous ne pouvez pas résoudre le problème en prenant les
mesures susmentionnées, veuillez vous adresser au service
après-vente (voir chapitre Service après-vente).

SND 3600 D2
■ 66 │ FR│BE
Nettoyage
ATTENTION
► Lors du nettoyage de l'appareil, veillez à ce qu'aucune
humidité ne pénètre dans ce dernier afin d'éviter tous dégâts
irréparables.
♦ Nettoyez le boîtier exclusivement à l'aide d'un chiffon humecté et
d'un liquide vaisselle doux.
♦ Nettoyez la surface du rétroéclairage à l'intérieur de l'appareil
avec la brosse de nettoyage
7
. Glissez pour cela la brosse de
nettoyage avec la surface de nettoyage vers le bas dans le tiroir
de droite
4
(voir figure 3).
Figure 3
7
4

SND 3600 D2
FR│BE │ 67 ■
Entreposage/mise au rebut
Rangement en cas de non-utilisation
♦ Entreposez l'appareil dans un environnement sec et sans
poussières, sans rayonnement direct du soleil.
Mise au rebut de l'appareil
Le symbole ci-contre, d'une poubelle barrée sur roues,
indique que l'appareil est assujetti à la directive
2012/19/EU. Cette directive stipule que vous ne
devez pas éliminer cet appareil en fin de vie avec les
ordures ménagères, mais le rapporter à des points de
collecte désignés, des centres de recyclage ou des
entreprises de gestion des déchets.
Cette mise au rebut est gratuite. Respectez l'environne-
ment et mettez au rebut en bonne et due forme.
Vous obtiendrez de plus amples informations auprès de votre
collecteur local ou de l'administration de votre ville ou commune.

SND 3600 D2
■ 68 │ FR│BE
Annexe
Caractéristiques techniques
Tension de service/ courant
absorbé
5 V / 500 mA
(via port USB)
Interface USB 2.0
Température de fonctionnement +5 - +40 °C
Humidité (sans condensation) ≤ 75 %
Dimensions (l x h x p) env. 9,4 x 16,9 x 10,4 cm
Poids (sans accessoires) env. 450 g
Capteur d'images
Capteur CMOS de
5 mégapixels
Zone de focalisation focus fixe
Commande de luminosité Automatique
Équilibrage des couleurs Automatique
Résolution
Standard : 2592 x 1680 pixels
Interpolée : 5184 x 3360 pixels
Méthode de scan Single pass
Source de lumière Rétroéclairage (3 LED blanches)

SND 3600 D2
FR│BE │ 69 ■
Remarques concernant la déclaration de
conformité EU
Cet appareil est conforme aux exigences de base et
aux autres prescriptions pertinentes de la directive
européenne en matière de compatibilité électro-
magnétique 2014/30/EU ainsi que de la directive
RoHS 2011/65/EU.
La déclaration de conformité EU complète est dispo-
nible auprès de l'importateur.
Garantie de Kompernass Handels GmbH
Chère cliente, cher client,
Cet appareil est garanti 3 ans à partir de la date d’achat. Si ce pro-
duit venait à présenter des vices, vous disposez de droits légaux face
au vendeur de ce produit. Vos droits légaux ne sont pas restreints par
notre garantie présentée ci-dessous.
Conditions de garantie
La période de garantie débute à la date de l’achat. Veuillez bien
conserver le ticket de caisse d’origine. Ce document servira de
preuve d’achat.
Si dans un délai de trois ans suivant la date d’achat de ce produit,
un vice de matériel ou de fabrication venait à apparaître, le produit sera
réparé ou remplacé gratuitement par nos soins, selon notre choix.
Cette prestation de garantie nécessite dans un délai de trois ans la
présentation de l’appareil défectueux et du justificatif d’achat (ticket
de caisse) ainsi que la description brève du vice et du moment de
son apparition.
Si le vice est couvert par notre garantie, vous recevrez le produit
réparé ou un nouveau produit en retour. Aucune nouvelle période de
garantie ne débute avec la réparation ou l’échange du produit.

SND 3600 D2
■ 70 │ FR│BE
Période de garantie et réclamation légale pour vices cachés
L’exercice de la garantie ne prolonge pas la période de garantie.
Cette disposition s’applique également aux pièces remplacées ou
réparées. Les dommages et vices éventuellement déjà présents à
l’achat doivent être signalés immédiatement après le déballage.
Toute réparation survenant après la période sous garantie fera
l’objet d’une facturation.
Étendue de la garantie
L’appareil a été fabriqué avec soin conformément à des directives de
qualité strictes et consciencieusement contrôlé avant sa livraison.
La prestation de garantie est valable pour des vices de matériel et
de fabrication. Cette garantie ne s’étend pas aux pièces du produit
qui sont exposées à une usure normale et peuvent de ce fait être consi-
dérées comme pièces d’usure, ni aux détériorations de pièces fragiles,
par ex. connecteur, accu, moules ou pièces en verre.
Cette garantie devient caduque si le produit est détérioré, utilisé ou
entretenu de manière non conforme. Toutes les instructions listées
dans le manuel d’utilisation doivent être exactement respectées pour
une utilisation conforme du produit. Des buts d’utilisation et actions
qui sont déconseillés dans le manuel d’utilisation, ou dont vous êtes
avertis doivent également être évités.
Le produit est uniquement destiné à un usage privé et ne convient pas
à un usage professionnel. La garantie est annulée en cas d’entretien
incorrect et inapproprié, d’usage de la force et en cas d’intervention
non réalisée par notre centre de service après-vente agréé.

SND 3600 D2
FR│BE │ 71 ■
Procédure en cas de garantie
Afin de garantir un traitement rapide de votre demande, veuillez
suivre les indications suivantes :
■ Veuillez avoir à portée de main pour toutes questions le ticket de
caisse et la référence article (par ex. IAN 12345) en tant que
justificatif de votre achat.
■ Vous trouverez la référence sur la plaque signalétique, une gra-
vure, sur la page de garde de votre manuel d’utilisation (en bas à
gauche) ou sous forme d’autocollant au dos ou sur le dessous.
■ Si des erreurs de fonctionnement ou d’autres vices venaient à
apparaître, veuillez d’abord contacter le département service
clientèle cité ci-dessous par téléphone ou par e-mail.
■ Vous pouvez ensuite retourner un produit enregistré comme étant
défectueux en joignant le ticket de caisse et en indiquant en quoi
consiste le vice et quand il est survenu, sans devoir l’affranchir à
l’adresse de service après-vente communiquée.
Sur www.lidl-service.com, vous pouvez télécharger ce
manuel ainsi que beaucoup d’autres, des vidéos produit
et logiciels.

SND 3600 D2
■ 72 │ FR│BE
Service après-vente
Service France
Tel.: 0800 919270
E-Mail: k[email protected]
Service Belgique
Tel.: 070 270 171 (0,15 EUR/Min.)
E-Mail: k[email protected]
IAN 289910
Importateur
Veuillez tenir compte du fait que l’adresse suivante n’est pas une
adresse de service après-vente. Veuillez d’abord contacter le service
mentionné.
KOMPERNASS HANDELS GMBH
BURGSTRASSE 21
DE - 44867 BOCHUM
ALLEMAGNE
www.kompernass.com

SND 3600 D2
NL│BE │ 73 ■
Inhoud
Inleiding .....................................75
Informatie bij deze gebruiksaanwijzing .....................75
Informatie over handelsmerken ...........................75
Gebruik in overeenstemming met bestemming ................75
Gebruikte waarschuwingen ..............................76
Veiligheidsvoorschriften ........................77
Ingebruikname ...............................78
Inhoud van het pakket controleren .........................78
De verpakking afvoeren .................................78
Aansluiten op een computer ..............................79
Software installeren ....................................79
Bedieningselementen . . . . . . . . . . . . . . . . . . . . . . . . . . 81
Bediening en gebruik ..........................81
Negatievenstrook plaatsen. . . . . . . . . . . . . . . . . . . . . . . . . . . . . . .81
Dia's plaatsen .........................................82
Negatieven/dia's digitaliseren ............................83
Na gebruik ...........................................88
Problemen oplossen ...........................89
Reinigen .....................................90
Opbergen/afvoeren ...........................91
Opslag bij niet-gebruik ..................................91
Apparaat afvoeren .....................................91

SND 3600 D2
■ 74 │ NL│BE
Bijlage ......................................92
Technische gegevens ...................................92
Opmerkingen over de EU-conformiteitsverklaring .............93
Garantie van Kompernaß Handels GmbH ..................93
Service ..............................................95
Importeur ............................................96

SND 3600 D2
NL│BE │ 75 ■
Inleiding
Informatie bij deze gebruiksaanwijzing
Hartelijk gefeliciteerd met de aankoop van uw nieuwe apparaat.
U hebt hiermee gekozen voor een hoogwaardig product. De ge-
bruiksaanwijzing maakt deel uit van dit product. Deze bevat belang-
rijke aanwijzingen voor veiligheid, gebruik en afvoeren. Lees alle
bedienings- en veiligheidsvoorschriften voordat u het product in ge-
bruik neemt. Gebruik het product uitsluitend op de voorgeschreven
wijze en voor de aangegeven doeleinden. Bewaar de gebruiksaan-
wijzing altijd als naslagwerk in de buurt van het product. Geef alle
documenten inclusief deze gebruiksaanwijzing mee als u het product
overdraagt of verkoopt aan een derde.
Informatie over handelsmerken
- USB
®
is een gedeponeerd handelsmerk van USB Implementers
Forum, Inc.
- Microsoft
®
, Windows
®
, Windows
®
XP, Windows Vista
®
, Windows 7
®
,
Windows 8
®
en Windows 10
®
zijn wettig gedeponeerde handels-
merken van Microsoft Corporation in de Verenigde Staten en/of
andere landen.
- Mac OS X
®
is een wettig gedeponeerd handelsmerk van Apple Inc.
in de VS en andere landen.
- Het handelsmerk en de handelsnaam SilverCrest zijn eigendom van
de betreffende eigenaar.
Alle overige namen en producten kunnen handelsmerken of gedepo-
neerde handelsmerken van hun respectieve eigenaren zijn.
Gebruik in overeenstemming met bestemming
Dit apparaat is een apparaat uit de informatietechniek en is uitsluitend
bestemd voor niet-bedrijfsmatig gebruik om filmstroken en dia's te
scannen en te digitaliseren. Een ander of verdergaand gebruik geldt
als niet in overeenstemming met de bestemming.

SND 3600 D2
■ 76 │ NL│BE
Alle mogelijke claims wegens schade door gebruik dat niet volgens
de bestemming is, zijn uitgesloten. Het risico is uitsluitend voor de
gebruiker.
Gebruikte waarschuwingen
In deze gebruiksaanwijzing worden de volgende waarschuwingen
gebruikt:
GEVAAR
Een waarschuwing op dit niveau van gevaar
duidt op een dreigende, gevaarlijke situatie.
Als de gevaarlijke situatie niet wordt vermeden, kan dit ernstig
letsel of de dood tot gevolg hebben.
► Neem de aanwijzingen in deze waarschuwing in acht om
gevaar voor ernstig of dodelijk letsel te voorkomen.
LET OP
Een waarschuwing op dit niveau van gevaar duidt
op mogelijke materiële schade.
Als de situatie niet wordt vermeden, kan dit materiële schade
tot gevolg hebben.
► Neem de aanwijzingen in deze waarschuwing in acht om
materiële schade te voorkomen.
OPMERKING
► Een opmerking bevat extra informatie die de omgang met
het apparaat vergemakkelijkt.

SND 3600 D2
NL│BE │ 77 ■
Veiligheidsvoorschriften
■ Controleer het apparaat vóór gebruik op zichtbare schade aan de
buitenzijde. Gebruik geen apparaat dat beschadigd of gevallen is.
■ Laat, in geval van beschadiging van het snoer of van de aan-
sluitingen, deze vervangen door geautoriseerd en vakkundig
personeel of door de klantenservice.
■ Dit apparaat mag worden gebruikt door kinderen vanaf 8jaar
en door personen met beperkte fysieke, zintuiglijke of geestelijke
vermogens of gebrek aan ervaring of kennis, mits ze onder
toezicht staan of over het veilige gebruik van het apparaat zijn
geïnstrueerd en de daaruit resulterende gevaren hebben begre-
pen. Kinderen mogen niet met het apparaat spelen. Kinderen
mogen zonder toezicht geen reiniging en gebruikersonderhoud
uitvoeren.
■ Laat reparaties aan het apparaat alleen uitvoeren door geauto-
riseerde vakbedrijven of door de klantenservice. Ondeskundige
reparaties kunnen resulteren in aanzienlijke gevaren voor de
gebruiker. Bovendien vervalt dan de garantie.
■ Probeer niet zelf het apparaat om te bouwen of te modificeren.
■ Bescherm het apparaat tegen vocht en het binnendringen van
vloeistoffen. Plaats geen met vloeistoffen gevulde voorwerpen
(bijv. vazen) naast het apparaat.
■ Houd het apparaat uit de buurt van open vuur en plaats geen
kaarsen op of nabij het apparaat. Zo voorkomt u de verspreiding
van brand.
■ Wanneer het apparaat snel van een warme naar een koude of
van een koude naar een warme omgeving wordt overgebracht,
laat u het 30min. acclimatiseren.
■
GEVAAR! Verpakkingsmateriaal is geen speelgoed!
Houd alle verpakkingsmaterialen uit de buurt van kinderen.
Er bestaat verstikkingsgevaar!

SND 3600 D2
■ 78 │ NL│BE
Ingebruikname
Inhoud van het pakket controleren
(afbeeldingen: zie uitvouwpagina's)
Het pakket bestaat uit de volgende onderdelen:
▯ Scanner
▯ 1 x diamagazijn
▯ 2 x houder voor negatieven
▯ Programma-cd
▯ Schoonmaakborsteltje
▯ USB-kabel
▯ Gebruiksaanwijzing
♦ Haal alle onderdelen uit de verpakking en verwijder alle verpak-
kingsmateriaal.
OPMERKING
► Controleer of het pakket compleet is en of er sprake is van
zichtbare schade.
► Neem contact op met de service-hotline (zie het hoofdstuk
Service) als het pakket niet compleet is, of indien er sprake
is van schade door gebrekkige verpakking of transport.
De verpakking afvoeren
De verpakkingsmaterialen zijn niet schadelijk voor het milieu. Ze zijn
gekozen op grond van milieuvriendelijkheid en daarom recyclebaar.
Voer niet meer benodigde verpakkingsmaterialen af
conform de plaatselijk geldende voorschriften.

SND 3600 D2
NL│BE │ 79 ■
Aansluiten op een computer
Systeemeisen
Besturingssysteem: Windows XP/Vista/7/8/10, Mac OS 10.6 - 10.12
Poort: USB-aansluiting (USB 2.0)
♦ Verbind de Micro-USB-stekker van de USB-kabel
8
met de
Micro-USB-aansluiting
3
van de scanner.
♦ Verbind de USB-stekker van de USB-kabel
8
met een ingescha-
kelde computer. De computer herkent de nieuwe hardware en
start automatische de installatie van de driver. Dit kan ca. een
minuut duren. De LED PWR brandt zodra de scanner correct
is verbonden.
Software installeren
Installatie onder Windows
LET OP
► Bij de installatie van de software kunnen belangrijke bestan-
den worden overschreven of gewijzigd. Om bij eventuele
problemen na de installatie nog terug te kunnen vallen op
de oorspronkelijke bestanden, dient u voorafgaand aan
installatie van de software een back-up te maken van de
inhoud van de harde schijf.
♦ Plaats de meegeleverde programma-cd in het cd-romstation van
de computer. Het installatiemenu verschijnt automatisch.
♦ Klik op de knop “Installation” om de installatie te starten.
♦ Installeer de software conform de aanwijzingen op het beeld-
scherm.

SND 3600 D2
■ 80 │ NL│BE
OPMERKING
► Wanneer u de autostartfunctie hebt uitgeschakeld en de
installatieprocedure niet automatisch begint, start u de
installatieprocedure door te dubbelklikken op het bestand
“WinSetup.exe” in de hoofdmap van de cd.
♦ Als de installatie is voltooid, kunt u het menu verlaten door te
klikken op de knop “Exit”.
Installatie onder Mac OS
LET OP
► Bij de installatie van de software kunnen belangrijke bestan-
den worden overschreven of gewijzigd. Om bij eventuele
problemen na de installatie nog terug te kunnen vallen op
de oorspronkelijke bestanden, dient u voorafgaand aan
installatie van de software een back-up te maken van de
inhoud van de harde schijf.
♦ Plaats de meegeleverde programma-cd in het cd-romstation van
uw Mac-computer.
♦ Open de hoofdmap van de programma-cd.
♦ Ga naar de map “Mac”.
♦ Start de installatieprocedure door te dubbelklikken op het
bestand “ImageScan.dmg”.
♦ Installeer de software conform de aanwijzingen op het beeld-
scherm.

SND 3600 D2
NL│BE │ 81 ■
Bedieningselementen
(afbeeldingen: zie uitvouwpagina's)
LED PWR
2
Toets SCAN
3
Micro-USB-aansluiting
4
Inschuifvak voor negatievenhouder resp. diamagazijn
5
Negatievenhouder
6
Diamagazijn
7
Schoonmaakborsteltje
8
USB-kabel (USB naar Micro-USB)
Bediening en gebruik
Negatievenstrook plaatsen
♦ Ontgrendel de sluiting aan de voorkant van de negatievenhou-
der
5
en open de houder.
♦ Leg de negatievenstrook met de zijkanten op de juiste positie on-
der in de houder. Let erop dat de gaatjes in de negatievenstrook
op de hiervoor bestemde pennetjes van de houder worden
gelegd, zodat de negatievenstrook niet kan verschuiven.
♦ Sluit de houder tot het deksel vastklikt.
♦ Schuif nu de negatievenhouder
5
met de driehoeksmarkering
vooraan en zichtbaar in het rechterinschuifvak
4
(zie afbeel-
ding 1).
♦ Schuif de negatievenhouder
5
zo ver in het rechterinschuifvak
4
, tot deze merkbaar in de eerste positie vastklikt. Voor vol-
gende negatieven schuift u de negatievenhouder
5
verder naar
binnen, tot deze merkbaar in de volgende positie vastklikt.

SND 3600 D2
■ 82 │ NL│BE
Afbeelding 1 Afbeelding 2
Dia's plaatsen
♦ Leg de dia's met de zijkanten op de juiste positie in de daarvoor
bestemde schacht van het diamagazijn
6
. Er kunnen ca. 10-12
dia's (afhankelijk van het formaat) in het diamagazijn worden
geplaatst.
♦ Schuif het diamagazijn
6
met het kijkvenster eerst in het rech-
terinschuifvak
4
. Zorg daarbij dat de driehoeksmarkering zich
vooraan bevindt en zichtbaar is (zie afbeelding 2).
Met de schuif, die zich aan de zijkant van het diamagazijn
6
bevindt,
worden de dia's in de schacht een voor een in de scanner geschoven.
♦ Schuif daartoe de schuif eerst tot aan de aanslag weg van
de scanner. Beweeg de schuif daarna weer voorzichtig in de
richting van de scanner.
OPMERKING
► Een dia in de scanner wordt daardoor uit het apparaat
geworpen en er wordt een nieuwe dia in het detectiebereik
van de scanner geschoven.
► Schuif een nieuwe dia langzaam in de scanner. Als dit te
snel gebeurt, kan de dia voorbij het detectiebereik van de
scanner glijden.

SND 3600 D2
NL│BE │ 83 ■
♦ Als u geen verdere dia's wilt scannen, verwijdert u het diamaga-
zijn
6
uit het inschuifvak
4
.
Haal de laatste dia van onder af uit het zichtvenster van het
diamagazijn
6
.
Negatieven/dia's digitaliseren
Windows-software
♦ Start het programma “Image Scan Tool” door te dubbelklikken
op het programmapictogram op het bureaublad of selecteer het
betreffende item in het menu Start. Het programma wordt direct
in het hoofdvenster geopend.
A Selecteer hier het type dat u wilt gebruiken (negatief, dia of
zwart-wit).
B Selecteer hier het bestandsformaat (JPG of TIFF) waarin u de
afbeeldingen wilt opslaan.
C Selecteer hier de resolutie: standaard: 2592 x 1680 pixels;
geïnterpoleerd: 5184 x 3360 pixels

SND 3600 D2
■ 84 │ NL│BE
D
Klik op deze knop of druk rechtstreeks op de toets SCAN
2
om een beeld te scannen.
E Klik op deze knop om het gemarkeerde beeld te wissen.
F Hier wordt het gemarkeerde beeld weergegeven.
G Klik op deze knop om het gemarkeerde beeld te spiegelen.
H Klik op deze knop om het gemarkeerde beeld met de wijzers
van de klok mee te draaien.
I Klik op deze knop om de gescande beelden op te slaan.
Bij invoer van een ongeldig opslagpad verschijnt er een
waarschuwingsmelding.
J Klik op deze knop om het programma af te sluiten.
K Klik op deze knop om kleur- of helderheidsinstellingen uit te
voeren voordat u het beeld scant. De aanpassingen verschij-
nen in de live-weergave.
L Klik op deze knop om een map te selecteren voor het opslaan
van de gescande beelden.
M Hier wordt de map aangegeven waarin de gescande beelden
worden opgeslagen.
N Hier worden gescande beelden weergegeven die nog niet
zijn opgeslagen. Het gemarkeerde beeld is groen omrand
en wordt in het venster (F) weergegeven.
O Hier wordt het geplaatste negatief/de geplaatste dia live
weergegeven.

SND 3600 D2
NL│BE │ 85 ■
Kleur- en helderheidsinstellingen
♦ Stel desgewenst de kleuren en helderheid in door op de knop
“Color/Brightness Adjustment” (K) te klikken. Er verschijnt een
instellingsvenster.
♦ Beweeg de schuifregelaar “Brightness” om de helderheid in te
stellen tussen -64 en 64.
♦ Beweeg de drie schuifregelaars “Color Balance” om de RGB-
waarden in te stellen tussen -6 en 6.
♦ Klik op de knop “Default” om de standaardwaarden te herstellen.
♦ Klik op de knop “Exit” om de ingestelde waarden over te nemen
en het instellingsvenster te sluiten.

SND 3600 D2
■ 86 │ NL│BE
Mac-software
♦ Start het programma “ImageScan” door te dubbelklikken op
het programmapictogram. Het programma wordt direct in het
hoofdvenster geopend.
A Selecteer hier het type dat u wilt gebruiken (negatief, dia of
zwart-wit).
B Selecteer hier het bestandsformaat (JPG of TIFF) waarin u de
afbeeldingen wilt opslaan.
C Selecteer hier de resolutie:
standaard: 2592 x 1680 pixels
geïnterpoleerd: 5184 x 3360 pixels
D
Klik op deze knop of druk rechtstreeks op de toets SCAN
2
om een beeld te scannen.
E Klik op deze knop om het gemarkeerde beeld te wissen.
F Hier wordt het gemarkeerde beeld weergegeven.

SND 3600 D2
NL│BE │ 87 ■
G Klik op deze knop om het gemarkeerde beeld te spiegelen.
H Klik op deze knop om het gemarkeerde beeld met de wijzers
van de klok mee te draaien.
I Klik op deze knop om de gescande beelden op te slaan.
Bij invoer van een ongeldig opslagpad verschijnt er een
waarschuwingsmelding.
J Klik op deze knop om het programma af te sluiten.
K Klik op deze knop om kleur- of helderheidsinstellingen uit te
voeren voordat u het beeld scant. De aanpassingen verschij-
nen in de live-weergave.
L Klik op deze knop om een map te selecteren voor het opslaan
van de gescande beelden.
M Hier wordt de map aangegeven waarin de gescande beelden
worden opgeslagen.
N Hier worden gescande beelden weergegeven die nog niet
zijn opgeslagen. Het gemarkeerde beeld is groen omrand en
wordt in het venster (F) weergegeven.
O Hier wordt het geplaatste negatief/de geplaatste dia live
weergegeven.

SND 3600 D2
■ 88 │ NL│BE
Kleur- en helderheidsinstellingen
♦ Stel desgewenst de kleuren en helderheid in door op de knop
“Color/Brightness Adjustment” (K) te klikken. Er verschijnt een
instellingsvenster.
♦ Beweeg de schuifregelaar “Brightness” om de helderheid in te
stellen tussen 0 en 255.
♦ Beweeg de drie schuifregelaars “Color Balance” om de RGB-
waarden in te stellen tussen 0 en 255.
♦ Klik op de knop “Default” om de standaardwaarden te herstellen.
♦ Klik op de knop “Exit” om de ingestelde waarden over te nemen
en het instellingsvenster te sluiten.
Na gebruik
♦ Verwijder de negatievenhouder
5
door deze volledig door het
apparaat heen te schuiven.
♦ Verwijder het diamagazijn
6
door het weer uit het rechterin-
schuifvak
4
te halen.
♦ Maak de USB-kabel
8
los van de USB-aansluiting van de
computer en van de scanner.

SND 3600 D2
NL│BE │ 89 ■
Problemen oplossen
De onderstaande tabel helpt bij het opsporen en verhelpen van
kleinere storingen:
Probleem Mogelijke oorzaak Oplossing
LED PWR
brandt niet.
Het apparaat is niet
correct aangesloten.
Sluit het apparaat
correct aan.
Slechte beeldkwaliteit.
Stof op de achter-
grondverlichting van de
scanner.
Reinig de achter-
grondverlichting
(zie het hoofdstuk
Reinigen).
Stof op de film resp.
de dia.
Reinig de film resp.
de dia.
Gescande beelden zijn
wazig.
De lens van de scanner
is door tempera-
tuurschommelingen
beslagen.
Wacht tot het appa-
raat bij kamertempe-
ratuur is geacclima-
tiseerd.
OPMERKING
► Neem contact op met de klantenservice als u met de stappen
hiervoor het probleem niet kunt verhelpen (zie het hoofdstuk
Service).

SND 3600 D2
■ 90 │ NL│BE
Reinigen
LET OP
► Zorg ervoor dat er geen vocht in het apparaat binnendringt
tijdens het reinigen, om onherstelbare schade aan het ap-
paraat te voorkomen.
♦ Reinig de behuizing uitsluitend met een licht bevochtigde doek
en een mild afwasmiddel.
♦ Reinig het oppervlak van de achtergrondverlichting met het
schoonmaakborsteltje
7
. Schuif daartoe het schoonmaakbor-
steltje met het schoonmaakvlak omlaag alleen in het rechterin-
schuifvak
4
(zie afbeelding 3).
Afbeelding 3
7
4

SND 3600 D2
NL│BE │ 91 ■
Opbergen/afvoeren
Opslag bij niet-gebruik
♦ Berg het apparaat op in een droge en stofvrije omgeving
zonder rechtstreeks zonlicht.
Apparaat afvoeren
Het symbool hiernaast met een doorgekruiste vuilnisbak
geeft aan dat dit apparaat is onderworpen aan de
Richtlijn 2012/19/EU. Deze richtlijn stelt dat u dit
apparaat aan het einde van zijn levensduur niet met het
normale huisvuil mag afvoeren, maar moet inleveren bij
speciaal hiervoor bestemde inzamelpunten, milieupar-
ken of afvalverwerkingsbedrijven.
Dit afvoeren is voor u kosteloos. Spaar het milieu en
voer producten op een voor het milieu verantwoorde
manier af.
Neem voor meer informatie contact op met uw lokale afvalverwer-
kingsbedrijf of uw gemeentereiniging.

SND 3600 D2
■ 92 │ NL│BE
Bijlage
Technische gegevens
Bedrijfsspanning/stroomopname
5 V / 500 mA
(via USB-aansluiting)
Interface USB 2.0
Bedrijfstemperatuur +5 tot +40 °C
Luchtvochtigheid
(geen condensatie)
≤ 75%
Afmetingen (b x h x d) ca. 9,4 x 16,9 x 10,4 cm
Gewicht (zonder accessoires) ca. 450 g
Beeldsensor 5 megapixel CMOS-sensor
Scherpstelbereik Fixed focus
Helderheidsbesturing Automatisch
Kleurafstemming Automatisch
Resolutie
standaard: 2592 x 1680 pixels
geïnterpoleerd: 5184 x 3360 pixels
Scanmethode Single pass
Lichtbron Tegenlicht (3 witte LED's)

SND 3600 D2
NL│BE │ 93 ■
Opmerkingen over de EU-conformiteitsverklaring
Dit apparaat voldoet wat betreft overeenstemming
met de fundamentele eisen en de andere relevante
voorschriften aan de Europese richtlijn voor elektro-
magnetische compatibiliteit 2014/30/EU en aan de
RoHS-richtlijn 2011/65/EU.
De volledige EU-conformiteitsverklaring is te verkrijgen
bij de importeur.
Garantie van Kompernaß Handels GmbH
Geachte klant,
U hebt op dit apparaat 3 jaar garantie vanaf de aankoopdatum. In
geval van ge breken in dit product hebt u wettelijke rechten tegenover
de verkoper van het product. Deze wettelijke rechten worden door
onze hierna beschreven garantie niet beperkt.
Garantievoorwaarden
De garantieperiode geldt vanaf de datum van aankoop. Bewaar de
originele kassabon. U hebt de bon nodig als bewijs van aankoop.
Als er binnen drie jaar vanaf de aankoopdatum van dit product een
materiaal- of fabricagefout optreedt, wordt het product door ons
– naar onze keuze – voor u kosteloos gerepareerd of vervangen.
Voorwaarde voor deze garantie is dat binnen de termijn van drie
jaar het defecte apparaat en het aankoopbewijs (kassabon) worden
overlegd en dat kort wordt omschreven waaruit het gebrek bestaat
en wanneer het is opgetreden.
Wanneer het defect door onze garantie wordt gedekt, krijgt u het
gerepareerde product of een nieuw product retour. Met de reparatie
of vervanging van het product begint er geen nieuwe garantieperi-
ode.

SND 3600 D2
■ 94 │ NL│BE
Garantieperiode en wettelijke aanspraken bij gebreken
De garantieperiode wordt door deze waarborg niet verlengd. Dat
geldt ook voor vervangen en gerepareerde onderdelen. Eventueel al
bij aankoop aanwezige schade en gebreken moeten meteen na het
uitpakken worden gemeld. Voor reparaties na afloop van de garan-
tieperiode worden kosten in rekening gebracht.
Garantieomvang
Het apparaat is op basis van strenge kwaliteitsnormen met de
grootst mogelijke zorg vervaardigd en voorafgaand aan de levering
nauwkeurig gecontroleerd.
De garantie geldt voor materiaal- of fabricagefouten. Deze garantie
geldt niet voor productonderdelen die blootstaan aan normale slij-
tage en derhalve als aan slijtage onderhevige onderdelen kunnen
worden aangemerkt, of voor beschadigingen aan breekbare onder-
delen, bijv. schakelaars, accu’s, bakvormen of onderdelen die van
glas zijn gemaakt.
Deze garantie vervalt wanneer het product is beschadigd, ondes-
kundig is gebruikt of is gerepareerd. Voor deskundig gebruik van het
product moeten alle in de gebruiksaanwijzing beschreven aanwij-
zingen precies worden opgevolgd. Gebruiksdoeleinden en hande-
lingen die in de gebruiksaanwijzing worden afgeraden of waarvoor
wordt gewaarschuwd, moeten beslist worden vermeden.
Het product is uitsluitend bestemd voor privégebruik en niet voor
bedrijfsmatige doeleinden. Bij verkeerd gebruik en ondeskundige
behandeling, bij gebruik van geweld en bij reparaties die niet door
ons erkend servicefiliaal zijn uitgevoerd, vervalt de garantie.

SND 3600 D2
NL│BE │ 95 ■
Afhandeling bij een garantiekwestie
Voor een snelle afhandeling van uw aanvraag neemt u de volgende
aanwijzingen in acht:
■ Houd voor alle aanvragen de kassabon en het artikelnummer
(bijv. IAN 12345) als aankoopbewijs bij de hand.
■ Het artikelnummer vindt u op het typeplaatje, in het product ge-
graveerd, op de titelpagina van de gebruiksaanwijzing (linkson-
der) of als sticker op de achter- of onderkant van het product.
■ Als er fouten in de werking of andere gebreken optreden, neemt
u eerst contract op met de hierna genoemde serviceafdeling,
telefonisch of via e-mail.
■ Een als defect geregistreerd product kunt u dan zonder portokos-
ten naar het aan u doorgegeven serviceadres sturen. Voeg het
aankoopbewijs (kassabon) bij en vermeld waaruit het gebrek
bestaat en wanneer het is opgetreden.
Op www.lidl-service.com kunt u deze en vele andere
handboeken, productvideo’s en software downloaden.
Service
Service Nederland
Tel.: 0900 0400223 (0,10 EUR/Min.)
E-Mail: k[email protected]
Service België
Tel.: 070 270 171 (0,15 EUR/Min.)
E-Mail: k[email protected]
IAN 289910

SND 3600 D2
■ 96 │ NL│BE
Importeur
Let op: het volgende adres is geen serviceadres. Neem eerst contact
op met het opgegeven serviceadres.
KOMPERNASS HANDELS GMBH
BURGSTRASSE 21
DE - 44867 BOCHUM
DUITSLAND
www.kompernass.com

SND 3600 D2
CZ │ 97 ■
Obsah
Úvod ........................................99
Informace ktomuto návodu kobsluze ......................99
Informace oochranných známkách ........................99
Použití vsouladu surčením ...............................99
Použitá výstražná upozornění .......................... 100
Bezpečnostní pokyny .........................101
Uvedení do provozu ..........................102
Kontrola rozsahu dodávky ............................. 102
Likvidace obalu ..................................... 102
Zapojení do počítače ................................. 103
Instalace softwaru ................................... 103
Ovládací prvky . . . . . . . . . . . . . . . . . . . . . . . . . . . . . .104
Obsluha a provoz ............................105
Vložení negativů ..................................... 105
Vložení diapozitivů ................................... 106
Digitalizace negativů / diapozitivů ...................... 107
Po použití .......................................... 112
Odstranění závad ............................113
Čištění ......................................114
Skladování/likvidace .........................115
Skladování při nepoužívání ............................ 115
Likvidace přístroje .................................... 115

SND 3600 D2
■ 98 │ CZ
Dodatek ....................................116
Technické údaje ..................................... 116
Upozornění kprohlášení oshodě EU ..................... 117
Záruka společnosti Kompernass Handels GmbH ............ 117
Servis ............................................. 120
Dovozce ........................................... 120

SND 3600 D2
CZ │ 99 ■
Úvod
Informace ktomuto návodu kobsluze
Blahopřejeme Vám kzakoupení nového přístroje.
Rozhodli jste se tím pro vysoce kvalitní výrobek. Návod kobsluze je
součástí tohoto výrobku. Obsahuje důležité informace obezpečnosti,
použití a likvidaci. Před použitím výrobku se seznamte se všemi
obslužnými a bezpečnostními pokyny. Výrobek používejte pouze
předepsaným způsobem a pro uvedené oblasti použití. Návod k
obsluze uchovejte vždy jako referenční příručku v blízkosti výrobku.
Při předávání nebo prodeji výrobku třetím osobám předejte spolu
sním ityto podklady, vč. tohoto návodu k obsluze.
Informace oochranných známkách
- USB
®
je registrovaná ochranná známka společnosti USB Implementers
Forum, Inc..
- Microsoft
®
, Windows
®
, Windows
®
XP, Windows Vista
®
, Windows 7
®
,
Windows 8
®
a Windows 10
®
jsou registrované ochranné známky
společnosti Microsoft Corporation ve Spojených státech amerických
a/nebo dalších zemích.
- Mac OS X
®
je registrovaná ochranná známka společnosti Apple
Inc. v USA a dalších zemích.
- Ochranná známka SilverCrest a obchodní název jsou majetkem
příslušného vlastníka.
Veškeré ostatní názvy a produkty mohou být ochrannými známkami
nebo registrovanými ochrannými známkami jejich příslušných vlastníků.
Použití vsouladu surčením
Tento přístroj je přístroj informační technologie a je určen pouze pro
nekomerční použití ke skenování a digitalizaci filmových negativů a
diapozitivů. Jiné použití než kurčenému účelu nebo nad jeho rámec
je považováno za použití vrozporu surčením.
Jsou vyloučeny nároky jakéhokoliv druhu kvůli poškození, které vzniklo na
základě použití vrozporu surčením. Riziko nese výhradně sám uživatel.

SND 3600 D2
■ 100 │ CZ
Použitá výstražná upozornění
Vpředloženém návodu kobsluze jsou použita následující výstražná
upozornění:
NEBEZPEČÍ
Výstražným upozorněním tohoto stupně nebezpečí
se označuje hrozící nebezpečná situace.
Pokud se takové nebezpečné situaci nezabrání, může tato
vést k těžkým zraněním nebo usmrcení.
► Pro zabránění nebezpečí vážných zranění nebo usmrcení
se musí dodržovat pokyny uvedené v tomto výstražném
upozornění.
POZOR
Výstražné upozornění tohoto stupně nebezpečí
označuje možný vznik hmotné škody.
Pokud se této nebezpečné situaci nezabrání, může dojít
khmotným škodám.
► Pro zabránění hmotným škodám je proto zapotřebí dodržovat
pokyny uvedené vtomto výstražném upozornění.
UPOZORNĚNÍ
► Upozornění označuje doplňující informace usnadňující
manipulaci s přístrojem.

SND 3600 D2
CZ │ 101 ■
Bezpečnostní pokyny
■ Před použitím přístroje zkontrolujte, zda na něm nejsou vnější
viditelná poškození. Poškozený nebo na zem spadlý přístroj
neuvádějte do provozu.
■ Poškozené kabely nebo přípojky nechte vyměnit autorizovaným
odborným personálem nebo zákaznickým servisem.
■ Děti starší 8let a osoby somezenými fyzickými, smyslovými nebo
mentálními schopnostmi či nedostatkem zkušeností a znalostí smí
používat tento přístroj pouze pod dohledem nebo pokud byly
poučeny obezpečném používání přístroje a porozuměly ztoho
vyplývajícímu nebezpečí. Děti si nesmí s přístrojem hrát. Čištění
a uživatelskou údržbu nesmí provádět děti bez dozoru.
■ Opravy na přístroji nechte provádět pouze autorizovanými
odbornými firmami nebo zákaznickým servisem. V důsledku
neodborných oprav může dojít ke vzniku závažných nebezpečí
pro uživatele. Navíc zanikne nárok na záruku.
■ Neprovádějte na přístroji žádné neoprávněné změny ani úpravy.
■ Chraňte přístroj před vlhkostí a vniknutím kapalin. Na přístroj ani
vedle něj nepokládejte žádné předměty (např. vázy) naplněné
kapalinou.
■ Udržujte přístroj mimo dosah otevřeného ohně a nepokládejte
svíčky na přístroj ani v jeho blízkosti. Tím zabráníte šíření požárů.
■ Pokud přístroj přenesete rychle z teplého do studeného, nebo
z chladného do teplého prostředí, nechte ho na 30minut aklima-
tizovat.
■
NEBEZPEČÍ! Obalový materiál není hračka pro děti!
Uchovávejte všechen obalový materiál mimo dosah dětí.
Hrozí nebezpečí udušení!

SND 3600 D2
■ 102 │ CZ
Uvedení do provozu
Kontrola rozsahu dodávky
(Zobrazení viz výklopné strany)
Rozsah dodávky se skládá znásledujících komponent:
▯ skener
▯ 1 x zásobník na diapozitivy
▯ 2 x držák na negativy
▯ programové CD
▯ čisticí kartáček
▯ kabel USB
▯ návod k obsluze
♦ Vyjměte všechny části zbalení a odstraňte veškerý obalový
materiál.
UPOZORNĚNÍ
► Zkontrolujte kompletnost dodávky a zda není viditelně
poškozena.
► Vpřípadě neúplné dodávky nebo poškození, vzniklého
vdůsledku vadného obalu nebo během přepravy, kontaktuj-
te servisní poradenskou linku (viz kapitola Servis).
Likvidace obalu
Zvolený obalový materiál odpovídá hlediskům ochrany životního
prostředí a likvidace, a je tudíž recyklovatelný.
Již nepotřebný obalový materiál zlikvidujte podle místních
platných předpisů.

SND 3600 D2
CZ │ 103 ■
Zapojení do počítače
Systémové požadavky
Operační systém: Windows XP/Vista/7/8/10, Mac OS 10.6 - 10.12
Zásuvné místo: USB port (USB 2.0)
♦ Zasuňte micro USB konektor kabelu USB
8
do micro USB portu
3
skeneru.
♦ Zapojte USB konektor kabelu USB
8
do zapnutého počítače.
Počítač rozpozná nový hardware a spustí automatickou instalaci
ovladače. Tento proces může trvat cca jednu minutu.
LED PWR svítí, jakmile byl skener správně zapojen.
Instalace softwaru
Instalace na Windows
POZOR
► Při instalaci softwaru se mohou přepsat nebo změnit důležité
soubory. Pro přístup k původním souborům v případě jistých
problémů po instalaci byste měli před instalací softwaru
vytvořit zálohu obsahu pevného disku.
♦ Vložte přiložené programové CD do jednotky CD počítače.
Nabídka instalace se spustí automaticky.
♦ Ke spuštění instalace klikněte na tlačítko „Installation“.
♦ Nainstalujte software podle instrukcí na obrazovce.
UPOZORNĚNÍ
► Pokud jste vypnuli funkci automatického spuštění a instalace
se nespustí automaticky, spusťte instalaci dvojitým kliknutím
na soubor „WinSetup.exe“ v hlavním adresáři CD.
♦ Po úspěšné instalaci můžete opustit nabídku kliknutím na tlačítko
„Exit“.

SND 3600 D2
■ 104 │ CZ
Instalace v systému Mac OS
POZOR
► Při instalaci softwaru může dojít k přepsání nebo změně
důležitých souborů. Pro přístup k původním souborům v pří-
padě jistých problémů po instalaci byste měli před instalací
softwaru vytvořit zálohu obsahu pevného disku.
♦ Vložte přiložené programové CD do jednotky CD počítače Mac.
♦ Otevřete hlavní adresář programového CD.
♦ Přejděte do adresáře „Mac“.
♦ Spusťte instalaci dvojitým kliknutím na soubor „ImageScan.dmg“.
♦ Nainstalujte software podle instrukcí na obrazovce.
Ovládací prvky
(Zobrazení viz výklopné strany)
LED PWR
2
tlačítko SCAN
3
mikro USB port
4
zasunutí pro držák negativů resp. zásobník na diapozitivy
5
držák negativů
6
zásobník na diapozitivy
7
čisticí kartáček
8
kabel USB (USB pro mikro USB)

SND 3600 D2
CZ │ 105 ■
Obsluha a provoz
Vložení negativů
♦ Odblokujte uzávěr na přední straně držáku negativů
5
a otevřete držák.
♦ Vložte proužky s negativy správnou stranu do držáku. Dbejte
na to, aby otvory na proužky s negativy ležely na příslušných
upevňovacích výčnělcích držáku tak, aby se proužek s negativy
nemohl posunout.
♦ Zavřete držák, až víko zaskočí.
♦ Zasuňte nyní držák negativů
5
s trojúhelníkovou značkou do-
předu a viditelně do pravého zasunutí
4
(viz obrázek 1).
♦ Zasuňte držák negativů
5
tak daleko do pravého zasunutí
4
,
až citelně zaskočí v první poloze. Pro další negativy zasuňte
držák negativů
5
dál, až citelně zaskočí v následné poloze.
Obrázek1 Obrázek2

SND 3600 D2
■ 106 │ CZ
Vložení diapozitivů
♦ Vložte diapozitivy správnou stranou do k tomu určené šachty
zásobníku na diapozitivy
6
. Do zásobníku na diapozitivy lze
vložit cca 10-12 diapozitivů (podle velikosti).
♦ Zasuňte zásobník na diapozitivy
6
průzorem nejprve do pravé-
ho zasunutí
4
. Dbejte při tom na to, aby trojúhelníková značka
byla vpředu a viditelná (viz obrázek 2).
Šoupátkem nacházejícím se bočně na zásobníku na diapozitivy
6
se do skeneru zasunou diapozitivy nacházející se v šachtě.
♦ Za tím účelem odsuňte nejdříve šoupátko až na doraz od skene-
ru. Poté šoupátko opět mírně posuňte směrem ke skeneru.
UPOZORNĚNÍ
► Diapozitiv nacházející se ve skeneru se tím z přístroje vysune
a do zobrazovací oblasti skeneru se zasune nový diapozitiv.
► Dbejte na to, aby se nový diapozitiv do skeneru zasouval
pomalu. Pokud se toto stane příliš rychle, může diapozitiv
vyklouznout přes zobrazovací oblast skeneru ven.
♦ Jakmile nechcete více skenovat další diapozitivy, vyjměte zásobník
na diapozitivy
6
ze zasunutí
4
.
Vyjměte poslední diapozitiv zespodu ze zobrazovacího okénka
zásobníku na diapozitivy
6
.

SND 3600 D2
CZ │ 107 ■
Digitalizace negativů / diapozitivů
Software Windows
♦ Spusťte program „Image Scan Tool“ dvojitým kliknutím na
symbol programu na ploše nebo vyberte příslušnou položku
v nabídce Start. Program se otevře přímo v hlavním okně.
A Vyberte zde typ (negativ, diapozitiv nebo černo/bílý), který
chcete použít.
B Vyberte formát (JPG nebo TIFF), v němž chcete obrázky uložit.
C Zde vyberte rozlišení: Standard: 2592 x 1680 pixelů;
interpolováno: 5184 x 3360pixelů
D Pro skenování snímku klikněte na toto tlačítko nebo přímo
stiskněte tlačítko SCAN
2
.
E K vymazání aktuálně označeného snímku klikněte na toto
tlačítko.
F Zde se zobrazí aktuálně označený snímek.

SND 3600 D2
■ 108 │ CZ
G K zrcadlovému zobrazení aktuálně označeného snímku
klikněte na toto tlačítko.
H K otáčení aktuálně označeného snímku ve směru hodinových
ručiček klikněte na toto tlačítko.
I K uložení zaznamenaných snímků klikněte na toto tlačítko.
V případě zadání nesprávné cesty k místu uložení se objeví
výstražné hlášení.
J K ukončení programu klikněte na toto tlačítko.
K Ke konfiguraci nastavení barev a jasu před skenováním
snímku klikněte na toto tlačítko. Přizpůsobení se zobrazí
v živém náhledu.
L K výběru složky pro uložení naskenovaných snímků klikněte
na toto tlačítko.
M Zde se zobrazí složka, do které se uloží naskenované snímky.
N Zde se zobrazí již naskenované snímky, které dosud nebyly
ještě uloženy. Aktuálně označený snímek se znázorní se
zeleným rámečkem a zobrazí se v okně (F).
O Zde se zobrazí živý náhled na vložené negativy/diapozitivy.

SND 3600 D2
CZ │ 109 ■
Nastavení barev a jasu
♦ Podle potřeby nastavte barvy a jas kliknutím na tlačítko „Color/
Brightness Adjustment“ (K). Otevře se okno nastavení.
♦ Přesouvejte posuvníkem „Brightness“ pro nastavení jasu mezi -64
a 64.
♦ Přesouvejte třemi posuvníky „Color Balance“ pro nastavení
hodnot RGB mezi -6 a 6.
♦ K obnovení standardních hodnot klikněte na tlačítko „Default“.
♦ Pro převzetí nastavených hodnot a zavření okna nastavení
klikněte na tlačítko „Exit“.

SND 3600 D2
■ 110 │ CZ
Software Mac
♦ Spusťte program „ImageScan“ dvojitým kliknutím na symbol
programu. Program se otevře přímo v hlavním okně.
A Vyberte zde typ (negativ, diapozitiv nebo černo/bílý), který
chcete použít.
B Vyberte formát (JPG nebo TIFF), v němž chcete obrázky uložit.
C Zde vyberte rozlišení:
Standard: 2592 x 1680pixelů
Interpolováno: 5184 x 3360pixelů
D Pro skenování snímku klikněte na toto tlačítko nebo přímo
stiskněte tlačítko SCAN
2
.
E K vymazání aktuálně označeného snímku klikněte na toto tlačítko.
F Zde se zobrazí aktuálně označený snímek.

SND 3600 D2
CZ │ 111 ■
G K zrcadlovému zobrazení aktuálně označeného snímku
klikněte na toto tlačítko.
H K otáčení aktuálně označeného snímku ve směru hodinových
ručiček klikněte na toto tlačítko.
I K uložení zaznamenaných snímků klikněte na toto tlačítko.
V případě zadání nesprávné cesty k místu uložení se objeví
výstražné hlášení.
J K ukončení programu klikněte na toto tlačítko.
K K vykonání nastavení barev a jasu před skenováním snímku
klikněte na toto tlačítko. Přizpůsobení se zobrazí v živém
náhledu.
L K výběru složky pro uložení naskenovaných snímků klikněte
na toto tlačítko.
M Zde se zobrazí složka, do které se uloží naskenované snímky.
N Zde se zobrazí již naskenované snímky, které dosud nebyly
ještě uloženy. Aktuálně označený snímek se znázorní se
zeleným rámečkem a zobrazí se v okně (F).
O Zde se zobrazí živý náhled na vložené negativy/diapozitivy.

SND 3600 D2
■ 112 │ CZ
Nastavení barev a jasu
♦ Podle potřeby nastavte barvy a jas kliknutím na tlačítko
„Color/Brightness Adjustment“ (K). Otevře se okno nastavení.
♦ Přesouvejte posuvníkem „Brightness“ pro nastavení jasu mezi
0 a 255.
♦ Přesouvejte třemi posuvníky „Color Balance“ pro nastavení
hodnot RGB mezi 0 a 255.
♦ K obnovení standardních hodnot klikněte na tlačítko „Default“.
♦ Pro převzetí nastavených hodnot a zavření okna nastavení
klikněte na tlačítko „Exit“.
Po použití
♦ Vyjměte držák negativů
5
tak, že jej kompletně přesunete
přístrojem.
♦ Vyjměte zásobník na diapozitivy
6
tím, že jej opět vytáhnete
z pravého zasunutí
4
.
♦ Vytáhněte kabel USB
8
z USB portu počítače a skeneru.

SND 3600 D2
CZ │ 113 ■
Odstranění závad
Následující tabulka pomůže při hledání a odstranění drobných
závad:
Závada Možná příčina Odstranění
LED PWR
nesvítí.
Přístroj není správně
zapojen.
Zapojte přístroj.
Špatná kvalita snímku.
Prach na podsvícení
skeneru.
Očistěte podsvícení
(viz kapitola Čištění).
Prach na filmu resp.
diapozitivu.
Očistěte film resp.
diapozitiv.
Naskenované snímky
jsou rozmazané.
Čočka skeneru je
zamlžená z důvodů
teplotních rozdílů.
Vyčkejte, až se pří-
stroj aklimatizuje na
pokojovou teplotu.
UPOZORNĚNÍ
► Pokud nemůžete problém vyřešit výše uvedenými kroky,
obraťte se na zákaznický servis (viz kapitola Servis).

SND 3600 D2
■ 114 │ CZ
Čištění
POZOR
► Při čištění zabraňte vniknutí vlhkosti do přístroje, aby nedošlo
kjeho neopravitelnému poškození.
♦ Kryt přístroje čistěte výhradně mírně navlhčeným hadříkem
a jemným čisticím prostředkem.
♦ Očistěte povrch podsvícení uvnitř přístroje čisticím kartáčkem
7
.
Za tím účelem zasuňte čisticí kartáček čisticí plochou směrem
dolů pouze do pravého zasunutí
4
(viz obrázek 3).
Obrázek3
7
4

SND 3600 D2
CZ │ 115 ■
Skladování/likvidace
Skladování při nepoužívání
♦ Skladujte přístroj v suchém a bezprašném prostředí bez přímého
slunečního záření.
Likvidace přístroje
Vedle uvedený symbol přeškrtnuté pojízdné popelnice
označuje, že tento přístroj podléhá směrnici č. 2012/19/EU.
Tato směrnice uvádí, že tento přístroj se na konci doby
svého použití nesmí zlikvidovat sběžným domovním
odpadem, ale musí se odevzdat vurčených sběrných
místech či dvorech nebo podnicích oprávněných
knakládání sodpady.
Tato likvidace je pro Vás zdarma. Chraňte životní
prostředí a zajistěte odbornou likvidaci přístroje.
Další informace získáte umístního podniku oprávněného knakládání
sodpady nebo městské resp. místní správy.

SND 3600 D2
■ 116 │ CZ
Dodatek
Technické údaje
Provozní napětí/odběr proudu
5 V / 500 mA
(přes USB port)
Rozhraní USB 2.0
Provozní teplota +5 - +40 °C
Vlhkost (bez kondenzace) ≤ 75 %
Rozměry (š x v x h) cca 9,4 x 16,9 x 10,4 cm
Hmotnost (bez příslušenství) cca 450g
Obrazový snímač 5Mpix senzor CMOS
Oblast zaostřování Pevné zaostřování
Ovládání jasu Automaticky
Kompenzace barev Automaticky
Rozlišení
Standard: 2592 x 1680pixelů
Interpolováno: 5184 x 3360pixelů
Metoda skenování Single pass
Zdroj světla
Protisluneční clona
(3 bílé LED)

SND 3600 D2
CZ │ 117 ■
Upozornění kprohlášení oshodě EU
Tento přístroj vyhovuje základní požadavkům a
ostatním relevantním předpisům evropské směrnice
č. 2014/30/EU pro elektromagnetickou kompatibilitu
a směrnice RoHS č. 2011/65/EU.
Kompletní prohlášení oshodě EU obdržíte
udovozce.
Záruka společnosti Kompernass Handels GmbH
Vážená zákaznice, vážený zákazníku,
na tento přístroj získáváte záruku v trvání 3let od data zakoupení.
V případě závad tohoto výrobku máte zákonná práva vůči prodejci
výrobku. Tato zákonná práva nejsou omezena naší níže uvedenou
zárukou.
Záruční podmínky
Záruční doba začíná plynout dnem nákupu. Dobře uschovejte origi-
nál pokladního lístku. Tento doklad je potřebný jako důkaz o koupi.
Pokud do tří let od data zakoupení tohoto výrobku dojde k vadě
materiálu nebo vý robní závadě, pak Vám podle našeho uvážení vý-
robek zdarma opravíme nebo vyměníme. Předpokladem této záruky
je, že bude během tříleté lhůty předložen vadný přístroj a doklad o
koupi (pokladní lístek) a stručně se popíše v čem závada spočívá a
kdy se vyskytla.
Vztahuje-li se na závadu naše záruka, obdržíte zpět buď opravený
nebo nový produkt. Opravou nebo výměnou výrobku nezačne ply-
nout nová záruční doba.

SND 3600 D2
■ 118 │ CZ
Záruční doba a zákonné nároky vyplývající ze závad
Záručním plněním se záruční doba neprodlužuje. To platí ipro
vyměněné a opravené součásti. Poškození nebo vady vyskytující
se případně již při nákupu se musí oznámit ihned po vybalení. Po
uplynutí záruční doby podléhají veškeré opravy zpoplatnění.
Rozsah záruky
Přístroj byl vyroben pečlivě podle přísných směrnic kvality a před
expedicí byl svědomitě vyzkoušen.
Záruka se vztahuje na materiálové nebo výrobní vady. Tato záruka
se nevztahuje na součásti produktu, které jsou vystaveny normálnímu
opotřebení, a proto je lze považovat za opotřebovatelné díly nebo
za poškození křehkých součástí jako jsou např. spínače, akumuláto-
ry, formy na pečení nebo části, které jsou vyrobeny ze skla.
Tato záruka zaniká, pokud je výrobek poškozen, nebyl řádně pou-
žíván nebo udržován. Pro zajištění správného používání výrobku se
musí přesně dodržovat všechny pokyny uvedené v návodu kobsluze.
Účelům použití a úkonům, které se v návodu kobsluze nedoporučují
nebo se před nimi varuje, je třeba se bezpodmínečně vyhnout.
Výrobek je určen pouze pro soukromé účely a ne pro komerční pou-
žití. Při nesprávném a neodborném používání, při použití násilí a při
zásazích, které nebyly provedeny našimi autorizovanými servisními
provozovnami, záruční nároky zanikají.

SND 3600 D2
CZ │ 119 ■
Vyřízení v případě záruky
Pro zajištění rychlého Vaší žádosti postupujte podle následujících
pokynů:
■ Pro všechny dotazy mějte připraven pokladní lístek a číslo výrob-
ku (např. IAN 12345) jako doklad o koupi.
■ Číslo výrobku naleznete na typovém štítku, rytině, na titulní straně
svého návodu (vlevo dole) nebo jako nálepku na zadní nebo
spodní straně.
■ Pokud by se měly vyskytovat funkční vady nebo jiné závady,
kontaktujte nejprve níže uvedené servisní oddělení telefonicky
nebo e-mailem.
■ Výrobek, zaevidovaný jako vadný výrobek pak můžete při při-
ložení dokladu o nákupu (pokladní lístek) a při uvedení, v čem
spočívá vada a kdy k ní došlo, poslat výrobek pro Vás bez poštov-
ného na adresu, kterou Vám oznámí servis.
Na webových stránkách www.lidl-service.com si můžete
stáhnout tyto a mnoho dalších příruček, videí o výrobku a
software.

SND 3600 D2
■ 120 │ CZ
Servis
Servis Česko
Tel.: 800143873
E-Mail: k[email protected]
IAN 289910
Dovozce
Dbejte prosím na to, že následující adresa není adresou servisu.
Kontaktujte nejprve uvedený servis.
KOMPERNASS HANDELS GMBH
BURGSTRASSE 21
DE - 44867 BOCHUM
NĚMECKO
www.kompernass.com

SND 3600 D2
ES
│
121 ■
Índice
Introducción .................................123
Información sobre estas instrucciones de uso. . . . . . . . . . . . . . . 123
Indicaciones sobre las marcas comerciales ................ 123
Uso previsto ........................................ 123
Indicaciones de advertencia utilizadas ................... 124
Indicaciones de seguridad .....................125
Puesta en funcionamiento .....................126
Comprobación del volumen de suministro .................126
Desecho del embalaje ................................ 126
Conexión a un ordenador ............................. 127
Instalación del software ............................... 127
Elementos de mando .........................129
Manejo y funcionamiento ......................129
Inserción de tiras de negativos .......................... 129
Inserción de diapositivas .............................. 130
Digitalización de negativos/diapositivas .................. 131
Después del uso ..................................... 136
Eliminación de fallos ..........................137
Limpieza ....................................138
Almacenamiento/desecho .....................139
Almacenamiento cuando el aparato no esté en uso ......... 139
Desecho del aparato .................................139

SND 3600 D2
■ 122
│
ES
Anexo ......................................140
Características técnicas ............................... 140
Indicaciones sobre la Declaración de conformidad CE ....... 141
Garantía de Kompernass Handels GmbH ................. 141
Asistencia técnica .................................... 144
Importador ......................................... 144

SND 3600 D2
ES
│
123 ■
Introducción
Información sobre estas instrucciones de uso
Felicidades por la compra de su aparato nuevo.
Ha adquirido un producto de alta calidad. Las instrucciones de uso
forman parte del producto y contienen indicaciones importantes acer-
ca de la seguridad, del uso y del desecho de este aparato. Antes de
usar el producto, familiarícese con todas las indicaciones de manejo y
de seguridad. Utilice el producto únicamente como se describe y para
los ámbitos de aplicación indicados. Guarde siempre las instrucciones
de uso cerca del producto para poder utilizarlas como material de
consulta. Entregue todos los documentos, incluidas estas instrucciones
de uso, cuando transfiera o venda el producto a terceros.
Indicaciones sobre las marcas comerciales
- USB
®
es una marca comercial registrada de USB Implementers
Forum, Inc.
- Microsoft
®
, Windows
®
, Windows
®
XP, Windows Vista
®
, Windows 7
®
,
Windows 8
®
y Windows 10
®
son marcas comerciales registradas de
Microsoft Corporation en EE.UU. y en otros países.
- Mac OS X
®
es una marca registrada de Apple Inc. en EE. UU. y en
otros países.
- La marca SilverCrest y el nombre comercial pertenecen a su respec-
tivo propietario.
El resto de términos y productos pueden ser marcas comerciales o
marcas comerciales registradas de sus respectivos propietarios.
Uso previsto
Este aparato es un dispositivo informático diseñado exclusivamente
para el escaneado y la digitalización de negativos de películas y
diapositivas para un uso no comercial. Cualquier uso diferente o
que supere lo indicado se considerará contrario al uso previsto.
Se excluyen las reclamaciones de cualquier tipo en relación con los
daños causados por un uso contrario al uso previsto. El riesgo será
responsabilidad exclusiva del usuario.

SND 3600 D2
■ 124
│
ES
Indicaciones de advertencia utilizadas
En estas instrucciones de uso se utilizan las siguientes indicaciones
de advertencia:
PELIGRO
Una advertencia de este nivel de peligro indica
una situación de peligro inminente.
Si no se evita la situación de peligro, pueden producirse
lesiones graves o incluso la muerte.
► Deben cumplirse las instrucciones de esta advertencia para
evitar un peligro de lesiones graves o incluso mortales.
ATENCIÓN
Una advertencia de este nivel de peligro indica un
posible daño material.
Si no se evita la situación, pueden producirse daños materiales.
► Deben cumplirse las instrucciones de esta advertencia para
evitar daños materiales.
INDICACIÓN
► La indicación proporciona información adicional que facilita
el manejo del aparato.

SND 3600 D2
ES
│
125 ■
Indicaciones de seguridad
■ Antes de usar el aparato, compruebe si hay signos de daños ex-
ternos visibles. No ponga en funcionamiento un aparato dañado
o que se haya caído.
■ Si se daña el cable o las conexiones, solicite su sustitución al
personal especializado autorizado o al servicio de asistencia
técnica.
■ Este aparato puede ser utilizado por niños a partir de 8años y
por personas cuyas facultades físicas, sensoriales o mentales sean
reducidas o carezcan de los conocimientos y de la experiencia
necesaria siempre que sean vigilados o hayan sido instruidos co-
rrectamente sobre el uso seguro del aparato y hayan comprendido
los peligros que entraña. Los niños no deben jugar con el aparato.
Los niños no deben realizar las tareas de limpieza y mantenimiento
del aparato sin supervisión.
■ Solo los talleres autorizados o el servicio de asistencia técnica
pueden reparar el aparato. Las reparaciones indebidas pueden
provocar riesgos considerables para los usuarios. Además, se
anulará la garantía.
■ No realice cambios ni transformaciones por cuenta propia en el
aparato.
■ Proteja el aparato frente a la humedad y la penetración de
líquidos. No coloque objetos llenos de líquidos, (p. ej. jarrones)
cerca del aparato.
■ Mantenga el aparato alejado de llamas abiertas y evite la colo-
cación de velas encima o al lado del aparato. De esta manera,
impedirá la propagación de incendios.
■ Si traslada el aparato rápidamente de un ambiente cálido a uno
frío o viceversa, deje que se aclimate durante 30min.
■
¡PELIGRO! ¡Los materiales de embalaje no son un juguete!
Mantenga los materiales de embalaje fuera del alcance de los
niños.
¡Existe peligro de asfixia!

SND 3600 D2
■ 126
│
ES
Puesta en funcionamiento
Comprobación del volumen de suministro
(Consulte las ilustraciones de las páginas desplegables)
El volumen de suministro consta de los siguientes componentes:
▯ Escáner
▯ 1 cargador de diapositivas
▯ 2 soportes para negativos
▯ CD del programa
▯ Cepillo de limpieza
▯ Cable USB
▯ Instrucciones de uso
♦ Extraiga todas las piezas del embalaje y deseche todo el
material de embalaje.
INDICACIÓN
► Compruebe la integridad del suministro y si hay daños
visibles.
► Si el suministro está incompleto o se observan daños debido
a un embalaje deficiente o al transporte, póngase en con-
tacto con la línea directa de asistencia (consulte el capítulo
Asistencia técnica).
Desecho del embalaje
El material de embalaje se ha seleccionado teniendo en cuenta
criterios ecológicos y de desecho, por lo que es reciclable.
Deseche el material de embalaje que ya no necesite
según lo dispuesto por las normativas locales aplicables.

SND 3600 D2
ES
│
127 ■
Conexión a un ordenador
Requisitos del sistema
Sistema operativo: Windows XP/Vista/7/8/10, Mac OS 10.6-10.12
Conexión: conexión USB (USB 2.0)
♦ Conecte el conector micro-USB del cable USB
8
al conector
hembra micro-USB
3
del escáner.
♦ Conecte el conector USB del cable USB
8
a un ordenador en-
cendido. El ordenador reconoce el nuevo hardware y empieza
la instalación automática del controlador. Este proceso puede
durar aprox. un minuto. El LED PWR se ilumina cuando el
escáner se haya conectado correctamente.
Instalación del software
Instalación en Windows
ATENCIÓN
► Al instalar el software, pueden sobrescribirse o modificarse
archivos importantes. Para poder acceder a los archivos
originales en caso de haber problemas tras la instalación,
debe realizar una copia de seguridad del contenido del
disco duro antes de instalar el software.
♦ Inserte el CD del programa suministrado en la unidad de
CD de su ordenador. Se abre automáticamente el menú de
instalación.
♦ Haga clic en el botón “Installation” para empezar con la
instalación.
♦ Instale el software siguiendo las indicaciones que aparecen en
la pantalla.

SND 3600 D2
■ 128
│
ES
INDICACIÓN
► Si ha desactivado la función de inicio automático y el proceso
de instalación no empieza automáticamente, inicie dicho
proceso haciendo doble clic en el archivo "WinSetup.exe"
que encontrará en el directorio principal del CD.
♦ Tras una instalación correcta, puede salir del menú haciendo
clic en el botón “Exit”.
Instalación en Mac OS
ATENCIÓN
► Al instalar el software, pueden sobrescribirse o modificarse
archivos importantes. Para poder acceder a los archivos
originales en caso de haber problemas tras la instalación,
debe realizar una copia de seguridad del contenido del
disco duro antes de instalar el software.
♦ Inserte el CD de programa suministrado en la unidad de CD de
su ordenador Mac.
♦ Abra el directorio principal del CD de programa.
♦ Pase al directorio “Mac”.
♦ Inicie el proceso de instalación haciendo doble clic en el archivo
“ImageScan.dmg”.
♦ Instale el software siguiendo las indicaciones que aparecen en
la pantalla.

SND 3600 D2
ES
│
129 ■
Elementos de mando
(Consulte las ilustraciones de las páginas desplegables)
LED PWR
2
Botón SCAN
3
Conector hembra micro-USB
4
Ranura para el soporte de negativos o el cargador
de diapositivas
5
Soporte de negativos
6
Cargador de diapositivas
7
Cepillo de limpieza
8
Cable USB (USB y micro-USB)
Manejo y funcionamiento
Inserción de tiras de negativos
♦ Desbloquee el cierre de la parte delantera del soporte de
negativos
5
y abra el soporte.
♦ Inserte las tiras de negativos del lado correcto en el soporte.
Procure enganchar las perforaciones de los negativos en las
pestañas correspondientes del soporte para que las tiras de
negativos queden fijas.
♦ Cierre el soporte hasta que encastre la tapa.
♦ A continuación, inserte el soporte de negativos
5
con la marca
triangular hacia delante y visible en la ranura
4
derecha
(consulte la figura 1).
♦ Deslice el soporte de negativos
5
en la ranura
4
derecha
hasta que encastre audiblemente en la primera posición. Para
añadir negativos, siga deslizando el soporte de negativos
5
hasta que encastre audiblemente en la siguiente posición.

SND 3600 D2
■ 130
│
ES
Figura 1 Figura 2
Inserción de diapositivas
♦ Coloque las diapositivas del lado correcto en el alojamiento
previsto del cargador de diapositivas
6
. Según el tamaño,
pueden colocarse aprox. 10-12 diapositivas en el cargador de
diapositivas.
♦ Introduzca el cargador de diapositivas
6
con la mirilla primero
en la ranura
4
derecha. Al hacerlo, observe que la marca
triangular esté hacia delante y sea visible (consulte la figura 2).
Con el desplazador situado en el lateral del cargador de diapositivas
6
se introducirán en el escáner una a una las diapositivas que se
encuentren en el alojamiento.
♦ Para ello, tire primero del desplazador hasta el tope alejándolo
del escáner. A continuación, vuelva a mover el desplazador con
cuidado en dirección al escáner.
INDICACIÓN
► La diapositiva que se encuentre en el escáner se extraerá
del aparato y se introducirá una nueva diapositiva en la
zona de visión del escáner.
► Introduzca lentamente cada nueva diapositiva en el escáner.
Si lo hace con demasiada rapidez, la diapositiva puede
salirse de la zona de visión del escáner.

SND 3600 D2
ES
│
131 ■
♦ Cuando ya no quiera escanear más diapositivas, retire el
cargador de diapositivas
6
de la ranura
4
.
Retire la última diapositiva desde abajo de la mirilla del carga-
dor de diapositivas
6
.
Digitalización de negativos/diapositivas
Software Windows
♦ Inicie el programa “Image Scan Tool” haciendo doble clic en el
acceso directo del programa en el escritorio o seleccionando la
entrada correspondiente en el menú de inicio. El programa se
abre directamente en la ventana principal.
A Seleccione aquí el tipo (negativo, diapositiva o blanco y
negro) que desea usar.
B Seleccione aquí el formato de archivo (JPG o TIFF) con el
que desee guardar las imágenes.
C Seleccione aquí la resolución: Estándar: 2592x1680 píxeles;
Interpolada: 5184x3360 píxeles

SND 3600 D2
■ 132
│
ES
D Haga clic en este botón o pulse directamente el botón
SCAN
2
para escanear una imagen.
E Haga clic en este botón para eliminar la imagen seleccionada
en ese momento.
F Aquí se le muestra la imagen seleccionada en ese momento.
G Haga clic en este botón para reflejar la imagen seleccionada
en ese momento.
H Haga clic en este botón para girar en sentido antihorario la
imagen seleccionada en ese momento.
I Haga clic en este botón para guardar las imágenes regis-
tradas. Al introducir una ruta de almacenamiento incorrecta,
aparece una advertencia.
J Haga clic en este botón para finalizar el programa.
K Haga clic en este botón para realizar ajustes de color y brillo
antes de escanear la imagen. Los ajustes se mostrarán en la
visualización en tiempo real.
L Haga clic en este botón para seleccionar una carpeta en la
que guardar las imágenes escaneadas.
M Aquí se le mostrará la carpeta en la que se van a guardar las
imágenes escaneadas.
N Aquí se mostrarán las imágenes ya escaneadas que aún no
se han guardado. La imagen seleccionada en ese momento
se representará con un marco verde y se mostrará en la
ventana (F).
O Aquí se visualiza en tiempo real el negativo o la diapositiva
que se ha insertado.

SND 3600 D2
ES
│
133 ■
Ajustes de color y brillo
♦ De ser necesario, ajuste los colores y el brillo haciendo clic
en el botón “Color/Brightness Adjustment”(K). Se abrirá una
ventana de ajustes.
♦ Mueva el control deslizante “Brightness” para ajustar el brillo
entre -64 y 64.
♦ Mueva los tres controles deslizantes “Color Balance” para
ajustar los valores de RGB entre -6 y 6.
♦ Para restablecer los valores predeterminados, haga clic en el
botón “Default”.
♦ Para aceptar los valores ajustados y cerrar la ventana de ajustes,
haga clic en el botón “Exit”.

SND 3600 D2
■ 134
│
ES
Software Mac
♦ Inicie el programa “ImageScan” haciendo doble clic en el
símbolo del programa. El programa se abre directamente en la
ventana principal.
A Seleccione aquí el tipo (negativo, diapositiva o blanco y
negro) que desea usar.
B Seleccione aquí el formato de archivo (JPG o TIFF) con el
que desee guardar las imágenes.
C Seleccione aquí la resolución:
Estándar: 2592 x 1680 píxeles
Interpolada: 5184x3360 píxeles
D Haga clic en este botón o pulse directamente el botón
SCAN
2
para escanear una imagen.
E Haga clic en este botón para eliminar la imagen selecciona-
da en ese momento.

SND 3600 D2
ES
│
135 ■
F Aquí se le muestra la imagen seleccionada en ese momento.
G Haga clic en este botón para reflejar la imagen seleccionada
en ese momento.
H Haga clic en este botón para girar en sentido antihorario la
imagen seleccionada en ese momento.
I Haga clic en este botón para guardar las imágenes regis-
tradas. Al introducir una ruta de almacenamiento incorrecta,
aparece una advertencia.
J Haga clic en este botón para finalizar el programa.
K Haga clic en este botón para realizar ajustes de color y brillo
antes de escanear la imagen. Los ajustes se mostrarán en la
visualización en tiempo real.
L Haga clic en este botón para seleccionar una carpeta en la
que guardar las imágenes escaneadas.
M Aquí se le mostrará la carpeta en la que se van a guardar las
imágenes escaneadas.
N Aquí se mostrarán las imágenes ya escaneadas que aún no
se han guardado. La imagen seleccionada en ese momento
se representará con un marco verde y se mostrará en la
ventana (F).
O Aquí se visualiza en tiempo real el negativo o la diapositiva
que se ha insertado.

SND 3600 D2
■ 136
│
ES
Ajustes de color y brillo
♦ De ser necesario, ajuste los colores y el brillo haciendo clic
en el botón “Color/Brightness Adjustment” (K). Se abrirá una
ventana de ajustes.
♦ Mueva el control deslizante “Brightness” para ajustar el brillo
entre 0 y 255.
♦ Mueva los tres controles deslizantes “Color Balance” para
ajustar los valores de RGB entre 0 y 255.
♦ Para restablecer los valores predeterminados, haga clic en el
botón “Default”.
♦ Para aceptar los valores ajustados y cerrar la ventana de ajustes,
haga clic en el botón “Exit”.
Después del uso
♦ Retire el soporte de negativos
5
pasándolo por completo a
través del aparato.
♦ Retire el cargador de diapositivas
6
volviéndolo a extraer de
la ranura
4
derecha.
♦ Desenchufe el cable USB
8
de la conexión USB de su ordena-
dor y del escáner.

SND 3600 D2
ES
│
137 ■
Eliminación de fallos
La siguiente tabla ayuda a la localización y solución de averías
menores:
Fallo Posible causa Solución
El LED PWR
no se
ilumina.
El aparato no está co-
nectado correctamente.
Conecte el aparato.
La calidad de las imá-
genes no es buena.
Hay polvo en la retroilu-
minación del escáner.
Limpie la retroilumi-
nación (consulte el
capítulo "Limpieza").
Hay polvo en la pelícu-
la o la diapositiva.
Limpie la película o
la diapositiva.
Las imágenes escanea-
das están borrosas.
La lente del escáner
se ha empañado a
causa de diferencias de
temperatura.
Espere hasta que
el aparato se haya
aclimatado a la tem-
peratura ambiente.
INDICACIÓN
► Si no logra solucionar el problema con los pasos indicados,
póngase en contacto con la línea directa de asistencia
(consulte el capítulo Asistencia técnica).

SND 3600 D2
■ 138
│
ES
Limpieza
ATENCIÓN
► Durante la limpieza, asegúrese de que no penetre humedad
en el aparato para evitar daños irreparables.
♦ Limpie la carcasa exclusivamente con un paño ligeramente
húmedo y con un producto de limpieza suave.
♦ Limpie la superficie de la retroiluminación en el interior del apa-
rato con un cepillo de limpieza
7
. Para ello, deslice el cepillo
de limpieza con la superficie de limpieza hacia abajo solo en
la ranura derecha
4
(consulte la figura3).
Figura 3
7
4

SND 3600 D2
ES
│
139 ■
Almacenamiento/desecho
Almacenamiento cuando el aparato no esté en uso
♦ Guarde el aparato en un entorno seco y sin polvo protegido de
la radiación solar directa.
Desecho del aparato
El símbolo adyacente de un contenedor tachado sobre
unas ruedas indica que este aparato está sujeto a la
Directiva 2012/19/EU. Dicha Directiva estipula que
el aparato no debe desecharse con la basura
doméstica normal al finalizar su vida útil, sino en
puntos de recogida, puntos limpios o empresas de
desechos previstas especialmente para ello.
Este tipo de desecho es gratuito. Cuide el medio
ambiente y deseche el aparato de la manera adecuada.
Para obtener más información al respecto, póngase en contacto con
las instalaciones locales de desechos o con las administraciones
públicas competentes.

SND 3600 D2
■ 140
│
ES
Anexo
Características técnicas
Tensión de funcionamiento/
consumo de corriente
5V /500mA
(mediante conexión USB)
Interfaz USB 2.0
Temperatura de funcionamiento 5-40°C
Humedad (sin condensación) ≤ 75%
Dimensiones (an. x al. x pr.) Aprox. 9,4x16,9x10,4cm
Peso (sin accesorios) Aprox. 450g
Fotosensor
Sensor CMOS de
5 megapíxeles
Rango de enfoque Enfoque fijo
Control de brillo Automático
Balance de blancos Automático
Resolución
Estándar: 2592 x 1680 píxeles
Interpolada: 5184x3360 píxeles
Método de escaneado Single pass (una sola pasada)
Fuente de luz Contraluz (3 LED blancos)

SND 3600 D2
ES
│
141 ■
Indicaciones sobre la Declaración de conformidad CE
Este aparato cumple los requisitos básicos y las
demás normas relevantes de la Directiva de com-
patibilidad electromagnética 2014/30/EU y de la
Directiva sobre restricciones a la utilización de deter-
minadas sustancias peligrosas en aparatos eléctricos
y electrónicos 2011/65/EU.
Puede solicitarse la declaración de conformidad de
la CE completa al importador.
Garantía de Kompernass Handels GmbH
Estimado cliente:
Este aparato cuenta con una garantía de 3 años a partir de la fecha
de compra. Si se detectan defectos en el producto, puede ejercer
sus derechos legales frente al vendedor. Estos derechos legales no
se ven limitados por la garantía descrita a continuación.
Condiciones de la garantía
El plazo de la garantía comienza con la fecha de compra. Guarde
bien el comprobante de caja original, ya que lo necesitará como
justificante de compra.
Si dentro de un periodo de tres años a partir de la fecha de compra
de este producto se detecta un defecto en su material o un error
de fabricación, asumiremos la reparación o sustitución gratuita del
producto a nuestra elección. La prestación de la garantía requiere la
presentación del aparato defectuoso y del comprobante de caja, así
como una breve descripción por escrito del defecto detectado y de
las circunstancias en las que se haya producido dicho defecto, den-
tro del plazo de tres años.

SND 3600 D2
■ 142
│
ES
Si el defecto está cubierto por nuestra garantía, le devolveremos el
producto reparado o le suministraremos uno nuevo. La reparación o
sustitución del producto no supone el inicio de un nuevo periodo de
garantía.
Duración de la garantía y reclamaciones legales por
vicios
La duración de la garantía no se prolonga por hacer uso de ella.
Este principio también se aplica a las piezas sustituidas y reparadas.
Si después de la compra del aparato, se detecta la existencia de
daños o de defectos al desembalarlo, deben notificarse de inmedia-
to. Cualquier reparación que se realice una vez finalizado el plazo
de garantía estará sujeta a costes.
Alcance de la garantía
El aparato se ha fabricado cuidadosamente según estándares elevados
de calidad y se ha examinado en profundidad antes de su entrega.
La prestación de la garantía solo rige para defectos en los materia-
les o errores de fabricación. Esta garantía no cubre las piezas del
producto normalmente sometidas al desgaste y que, en consecuen-
cia, puedan considerarse piezas de desgaste ni los daños produ-
cidos en los componentes frágiles, p. ej., interruptores, baterías,
moldes de horno o piezas de vidrio.
Se anulará la garantía si el producto se daña o no se utiliza o man-
tiene correctamente. Para utilizar correctamente el producto, deben
observarse todas las indicaciones especificadas en las instrucciones
de uso. Debe evitarse cualquier uso y manejo que esté desaconseja-
do o frente al que se advierta en las instrucciones de uso.
El producto está previsto exclusivamente para su uso privado y no
para su uso comercial. En caso de manipulación indebida e inco-
rrecta, uso de la fuerza y apertura del aparato por personas ajenas
a nuestros centros de asistencia técnica autorizados, la garantía
perderá su validez.

SND 3600 D2
ES
│
143 ■
Proceso de reclamación conforme a la garantía
Para garantizar una tramitación rápida de su reclamación, le rogamos
que observe las siguientes indicaciones:
■ Mantenga siempre a mano el comprobante de caja y el número
de artículo (p. ej., IAN 12345) como justificante de compra.
■ Podrá ver el número de artículo en la placa de características,
grabado en el aparato, en la portada de las instrucciones (parte
inferior izquierda) o en un adhesivo en la parte trasera o inferior
del aparato.
■ Si se producen errores de funcionamiento u otros defectos, pón-
gase primero en contacto con el departamento de asistencia
técnica especificado a continuación por teléfono o por co-
rreo electrónico.
■ Podrá enviar el producto calificado como defectuoso junto con
el justificante de compra (comprobante de caja) y la descripción
del defecto y de las circunstancias en las que se haya producido
de forma gratuita a la dirección de correo proporcionada.
En www.lidl-service.com, podrá descargar este
manual de usuario y muchos otros más, así como
vídeos sobre los productos y software.

SND 3600 D2
■ 144
│
ES
Asistencia técnica
Servicio España
Tel.: 902 59 99 22
(0,08 EUR/Min. + 0,11 EUR/llamada (tarifa normal))
(0,05 EUR/Min. + 0,11 EUR/llamada (tarifa reducida))
E-Mail: k[email protected]
IAN 289910
Importador
Tenga en cuenta que la dirección siguiente no es una dirección de
asistencia técnica. Póngase primero en contacto con el centro de
asistencia técnica especificado.
KOMPERNASS HANDELS GMBH
BURGSTRASSE 21
DE - 44867 BOCHUM
ALEMANIA
www.kompernass.com

SND 3600 D2
PT │ 145 ■
Índice
Introdução ..................................147
Informações acerca deste manual de instruções ............ 147
Indicações sobre marcas .............................. 147
Utilização correta .................................... 147
Indicações de aviso utilizadas ..........................148
Instruções de segurança .......................149
Colocação em funcionamento ..................150
Verificar o conteúdo da embalagem ..................... 150
Eliminação da embalagem ............................ 150
Ligação a um computador ............................. 151
Instalar o software ................................... 151
Elementos de comando .......................153
Operação e funcionamento ....................153
Introduzir tiras de película ............................. 153
Introduzir os diapositivos .............................. 154
Digitalizar negativos/diapositivos ....................... 155
Depois da utilização ................................. 160
Resolução de falhas ..........................161
Limpeza ....................................162
Armazenamento/eliminação ...................163
Armazenamento quando o aparelho não estiver a ser utilizado . .163
Eliminação do aparelho ...............................163

SND 3600 D2
■ 146 │ PT
Anexo ......................................164
Dados técnicos ...................................... 164
Indicações relativas à Declaração EU de Conformidade ..... 165
Garantia da Kompernass Handels GmbH ................. 165
Assistência Técnica ................................... 167
Importador ......................................... 168

SND 3600 D2
PT │ 147 ■
Introdução
Informações acerca deste manual de instruções
Parabéns pela compra do seu novo aparelho.
Optou por um produto de elevada qualidade. O manual de instru-
ções é parte integrante deste produto. Este contém instruções impor-
tantes para a segurança, utilização e eliminação. Antes de utilizar
o produto, familiarize-se com todas as instruções de operação e
segurança. Utilize o produto apenas como descrito e nas áreas de
aplicação indicadas. Guarde sempre o manual de instruções na
proximidade do produto para futuras consultas. Ao transferir ou ven-
der o produto a terceiros, entregue todos os respetivos documentos,
incluindo este manual de instrução.
Indicações sobre marcas
- USB
®
é uma marca registada da USB Implementers Forum, Inc.
- Microsoft
®
, Windows
®
, Windows
®
XP, Windows Vista
®
, Windows 7
®
,
Windows 8
®
e Windows 10
®
são marcas comerciais registadas
da Microsoft Corporation nos Estados Unidos da América e/ou
noutros países.
- Mac OS X
®
é uma marca registada da Apple Inc. nos EUA e
noutros países.
- A marca de fábrica SilverCrest e o nome comercial são propriedade
do respetivo proprietário.
Todos os outros nomes e produtos podem ser marcas ou marcas
registadas dos respetivos proprietários.
Utilização correta
Este aparelho é um aparelho da tecnologia de informação e destina-se
unicamente à utilização comercial para a digitalização de película e
diapositivos. Qualquer utilização diferente ou fora do âmbito descrito
é considerada incorreta. Excluem-se quaisquer direitos de garantia
relativos a danos resultantes de uma utilização incorreta. O risco é
assumido exclusivamente pelo utilizador.

SND 3600 D2
■ 148 │ PT
Indicações de aviso utilizadas
No presente manual de instruções são utilizadas as seguintes indica-
ções de aviso:
PERIGO
Uma indicação de aviso deste nível de perigo
identifica uma situação de perigo iminente.
Se a situação de perigo não for evitada, existe perigo de
ferimentos graves ou morte.
► Seguir as instruções desta indicação de aviso para evitar o
perigo de ferimentos graves ou morte.
ATENÇÃO
Uma indicação de aviso deste nível de perigo
identifica possíveis danos materiais.
Se a situação não for evitada, existe perigo de danos
materiais.
► Seguir as instruções desta indicação de aviso para evitar
danos materiais.
NOTA
► Uma nota fornece informações adicionais que facilitam o
manuseamento do aparelho.

SND 3600 D2
PT │ 149 ■
Instruções de segurança
■ Antes da utilização, verifique a existência de eventuais danos
exteriores visíveis no aparelho. Não tente colocar em funciona-
mento um aparelho avariado ou que tenha sofrido uma queda.
■ Em caso de danos nos cabos ou ligações, solicite a sua substitui-
ção a um técnico autorizado ou à Assistência Técnica.
■ Este aparelho pode ser utilizado por crianças com idades supe-
riores a 8 anos, bem como por pessoas com capacidades físicas,
sensoriais ou mentais reduzidas, ou com falta de experiência
e/ou conhecimento, caso sejam vigiadas ou instruídas sobre a
utilização segura do aparelho e compreendam os perigos daí
resultantes. As crianças não podem brincar com o aparelho.
A limpeza e a manutenção pelo utilizador não podem ser reali-
zadas por crianças não vigiadas.
■ Solicite as reparações do aparelho apenas a empresas autoriza-
das ou ao Serviço de Assistência Técnica. Reparações inadequa-
das podem acarretar perigos consideráveis para o utilizador.
Além disso, a garantia extingue-se.
■ Não realize quaisquer transformações ou alterações no aparelho
por iniciativa própria.
■ Proteja o aparelho contra humidade e infiltração de líquidos.
Não coloque quaisquer objetos com líquidos (como por ex.
jarras) ao lado do aparelho.
■ Mantenha o aparelho longe de chamas abertas e não coloque
velas em cima ou junto do aparelho. Deste modo, evita a propaga-
ção de incêndios.
■ Se o aparelho for levado rapidamente de um ambiente quente
para um ambiente frio, ou de um frio para um quente, deixe-o
aclimatar-se durante 30 min.
■
PERIGO! Os materiais de embalagem não são brinquedos
para crianças! Mantenha todos os materiais de embalagem fora
do alcance das crianças.
Perigo de asfixia!

SND 3600 D2
■ 150 │ PT
Colocação em funcionamento
Verificar o conteúdo da embalagem
(Figuras, ver páginas desdobráveis)
A embalagem inclui os seguintes componentes:
▯ Scanner
▯ 1 Carregador de diapositivos
▯ 2 Suportes para negativos
▯ CD do programa
▯ Escova de limpeza
▯ Cabo USB
▯ Manual de instruções
♦ Retire da embalagem todas as peças e remova todo o material
de embalagem.
NOTA
► Verifique a integralidade do produto fornecido e a existência
de eventuais danos visíveis.
► Caso falte algum componente ou se verifiquem danos resul-
tantes de embalagem defeituosa ou do transporte, contacte a
linha direta de Assistência Técnica (ver capítulo Assistência
Técnica).
Eliminação da embalagem
Os materiais de embalagem são selecionados tendo em conta os
aspetos ambientais e técnicos relativamente à eliminação, sendo,
por isso, recicláveis.
Elimine os materiais de embalagem que já não são
necessários de acordo com os regulamentos locais em
vigor.

SND 3600 D2
PT │ 151 ■
Ligação a um computador
Requisitos do sistema
Sistema operativo: Windows XP/Vista/7/8/10, Mac OS 10.6 - 10.12
Slot: Porta USB (USB 2.0)
♦ Ligue a ficha USB micro do cabo USB
8
à entrada USB
micro
3
do scanner.
♦ Ligue a ficha USB do cabo USB
8
a um computador ligado.
O computador reconhece o novo hardware e inicia a instala-
ção automática do programa de controlo. Este processo pode
durar aprox. um minuto. O LED PWR acende-se assim que o
scanner tenha sido devidamente ligado.
Instalar o software
Instalação no Windows
ATENÇÃO
► Durante a instalação do software, é possível que ficheiros
importantes sejam substituídos ou alterados. Para poder ace-
der aos ficheiros originais, em caso de eventuais problemas
depois da instalação , deve realizar uma cópia de segurança
do conteúdo do seu disco rígido antes de instalar o software.
♦ Coloque o CD do programa fornecido na unidade de CD do
seu computador. O menu de instalação inicia-se automatica-
mente.
♦ Clique no botão “Installation”, para iniciar a instalação.
♦ Instale o software de acordo com as instruções no ecrã.

SND 3600 D2
■ 152 │ PT
NOTA
► Caso tenha desligado a função de arranque automático e o
processo não comece automaticamente, inicie o processo de
instalação clicando duas vezes no ficheiro "WinSetup.exe", no
diretório principal do CD.
♦ Após a instalação bem-sucedida, pode abandonar o menu,
clicando no botão “Exit”.
Instalação no Mac OS
ATENÇÃO
► Durante a instalação do software, é possível que ficheiros
importantes sejam substituídos ou alterados. Para poder ace-
der aos ficheiros originais, em caso de eventuais problemas
depois da instalação , deve realizar uma cópia de segurança
do conteúdo do seu disco rígido antes de instalar o software.
♦ Coloque o CD do programa fornecido na unidade de CD do
seu computador Mac.
♦ Abra o diretório principal do CD do programa.
♦ Mude para o diretório “Mac”.
♦ Inicie o processo de instalação clicando duas vezes no ficheiro
“ImageScan.dmg”.
♦ Instale o software de acordo com as instruções no ecrã.

SND 3600 D2
PT │ 153 ■
Elementos de comando
(Figuras, ver páginas desdobráveis)
LED PWR
2
Tecla SCAN
3
Entrada USB micro
4
Abertura para suporte de negativos ou carregador
de diapositivos
5
Suporte de negativos
6
Carregador de diapositivos
7
Escova de limpeza
8
Cabo USB (USB para USB micro)
Operação e funcionamento
Introduzir tiras de película
♦ Desbloqueie o fecho na parte frontal do suporte de negativos
5
e abra o suporte.
♦ Introduza as tiras de película, no lado correto, no suporte.
Verifique se os orifícios da tira de película estão colocados nos
respetivos fixadores do suporte, para que esta não se possa
deslocar.
♦ Feche o suporte até a tampa encaixar.
♦ Introduza então o suporte de negativos
5
, com a marcação
triangular virada para a frente e visível, na abertura da direita
4
(ver fig. 1).
♦ Introduza o suporte de negativos
5
na abertura da direita
4
,
até este encaixar de forma audível na primeira posição. Para
passar para outros negativos, introduza o suporte de negativos
5
mais para dentro na abertura da direita , até este encaixar
de forma audível na posição seguinte.

SND 3600 D2
■ 154 │ PT
Figura 1 Figura 2
Introduzir os diapositivos
♦ Introduza os diapositivos, no lado correto, no compartimento
do carregador de diapositivos
6
previsto para tal. É possível
colocar aprox. 10-12 diapositivos (consoante o tamanho) no
carregador de diapositivos.
♦ Introduza primeiro o carregador de diapositivos
6
com a janela
de visualização na abertura direita
4
. Ao fazê-lo, verifique se
a marcação triangular está virada para a frente e visível (ver
figura 2).
É possível introduzir os diapositivos existentes no compartimento, um
por um, no scanner com o deslocador que se encontra lateralmente
no carregador de diapositivos
6
.
♦ Movimente, para isso, primeiro o deslocador até ao batente, na
direção contrária ao scanner. Em seguida, volte a movimentar o
deslocador cuidadosamente na direção do scanner.
NOTA
► Um diapositivo que se encontre no interior do scanner é
assim expelido do aparelho e é introduzido um novo diapo-
sitivo na zona de visualização do scanner.
► Tenha em atenção que deve introduzir devagar um novo
diapositivo no scanner. Se isto for realizado de forma de-
masiado rápida, o diapositivo pode ultrapassar a zona de
visualização do scanner.

SND 3600 D2
PT │ 155 ■
♦ Quando já não pretender digitalizar mais diapositivos, retire o
carregador de diapositivos
6
da abertura
4
.
Retire o último diapositivo, por baixo, da janela de visualização
do carregador de diapositivos
6
.
Digitalizar negativos/diapositivos
Software Windows
♦ Inicie o programa “Image Scan Tool” clicando duas vezes no
ícone do programa, no ambiente de trabalho, ou selecione a
entrada correspondente no menu Iniciar. O programa abre-se
diretamente na janela principal.
A Selecione aqui o tipo (negativo, diapositivo ou preto/branco)
que pretender utilizar.
B Selecione aqui o formato do ficheiro (JPG ou TIFF), no qual
pretende guardar as imagens.
C Selecione aqui a resolução: Standard: 2592 x 1680 píxeis;
interpolados: 5184 x 3360 píxeis

SND 3600 D2
■ 156 │ PT
D
Clique neste botão ou prima diretamente a tecla SCAN
2
,
para digitalizar uma imagem.
E Clique neste botão, para apagar a imagem atualmente
marcada.
F Aqui é visualizada a imagem atualmente marcada.
G Clique neste botão, para inverter a imagem atualmente
marcada.
H Clique neste botão, para rodar a imagem atualmente marcada
no sentido dos ponteiros do relógio.
I Clique neste botão, para armazenar as imagens realizadas.
Se for introduzido um caminho de armazenamento inválido,
é emitida uma mensagem de aviso.
J Clique neste botão, para terminar o programa.
K Clique neste botão, para regular a cor ou a luminosidade
antes de digitalizar a imagem. As alterações são visualizadas
numa imagem real.
L Clique neste botão, para selecionar uma pasta onde armazenar
as imagens digitalizadas.
M Aqui é visualizada a pasta na qual as imagens digitalizadas
vão ser armazenadas.
N Aqui são visualizadas as imagens já digitalizadas que ainda
não foram armazenadas. A imagem atualmente marcada é
visualizada com um caixilho verde e na janela (F).
O Aqui é visualizada uma imagem real do negativo/diapositivo
colocado.

SND 3600 D2
PT │ 157 ■
Regulação da cor e luminosidade
♦ Em caso de necessidade, regule as cores e a luminosidade,
clicando no botão “Color/Brightness Adjustment” (K). Abre-se
uma janela de configuração.
♦ Movimente o deslocador de regulação “Brightness”, para regu-
lar a luminosidade entre -64 e 64.
♦ Movimente os três deslocadores de regulação “Color Balance”,
para regular os valores RGB entre -6 e 6.
♦ Para repor os valores standard, clique no botão “Default”.
♦ Para assumir os valores configurados e fechar a janela de confi-
guração, clique no botão “Exit”.

SND 3600 D2
■ 158 │ PT
Software Mac
♦ Inicie o programa “ImageScan” clicando duas vezes no ícone
do programa. O programa abre-se diretamente na janela
principal.
A Selecione aqui o tipo (negativo, diapositivo ou preto/branco)
que pretender utilizar.
B Selecione aqui o formato do ficheiro (JPG ou TIFF), no qual
pretende guardar as imagens.
C Selecione aqui a resolução:
Standard: 2592 x 1680 píxeis
Interpolados: 5184 x 3360 píxeis
D
Clique neste botão ou prima diretamente a tecla SCAN
2
,
para digitalizar uma imagem.
E Clique neste botão, para apagar a imagem atualmente
marcada.

SND 3600 D2
PT │ 159 ■
F Aqui é visualizada a imagem atualmente marcada.
G Clique neste botão, para inverter a imagem atualmente
marcada.
H Clique neste botão, para rodar a imagem atualmente marca-
da no sentido dos ponteiros do relógio.
I Clique neste botão, para armazenar as imagens realizadas.
Se for introduzido um caminho de armazenamento inválido,
é emitida uma mensagem de aviso.
J Clique neste botão, para terminar o programa.
K Clique neste botão, para regular a cor ou a luminosidade
antes de digitalizar a imagem. As alterações são visualiza-
das numa imagem real.
L Clique neste botão, para selecionar uma pasta onde armaze-
nar as imagens digitalizadas.
M Aqui é visualizada a pasta na qual as imagens digitalizadas
vão ser armazenadas.
N Aqui são visualizadas as imagens já digitalizadas que ainda
não foram armazenadas. A imagem atualmente marcada é
visualizada com um caixilho verde e na janela (F).
O Aqui é visualizada uma imagem real do negativo/diapositivo
colocado.

SND 3600 D2
■ 160 │ PT
Regulação da cor e luminosidade
♦ Em caso de necessidade, regule as cores e a luminosidade,
clicando no botão “Color/Brightness Adjustment” (K). Abre-se
uma janela de configuração.
♦ Movimente o deslocador de regulação “Brightness”, para regu-
lar a luminosidade entre 0 e 255.
♦ Movimente os três deslocadores de regulação “Color Balance”,
para regular os valores RGB entre 0 e 255.
♦ Para repor os valores standard, clique no botão “Default”.
♦ Para assumir os valores configurados e fechar a janela de confi-
guração, clique no botão “Exit”.
Depois da utilização
♦ Remova o suporte dos negativos
5
, passando-o completamente
pelo aparelho.
♦ Remova o carregador dos diapositivos
6
, retirando-o novamen-
te da abertura direita
4
.
♦ Remova o cabo USB
8
da porta USB do seu computador e do
scanner.

SND 3600 D2
PT │ 161 ■
Resolução de falhas
A tabela abaixo ajuda na localização e resolução de avarias mais
pequenas:
Falha Causa possível Resolução
LED PWR
não se acende.
O aparelho não está
corretamente montado.
Ligue o aparelho.
Má qualidade de
imagem.
Pó na iluminação de
fundo do scanner.
Limpe a iluminação
de fundo (ver capítu-
lo "Limpeza").
Pó na película ou no
diapositivo.
Limpe a película ou
o diapositivo.
As imagens digitaliza-
das não estão nítidas.
A lente do scanner está
embaciada devido a
oscilações de tempe-
ratura.
Aguarde até que o
aparelho se tenha
aclimatizado à tem-
peratura ambiente.
NOTA
► Caso não seja possível solucionar o problema com os passos
acima mencionados, contacte o serviço de apoio ao cliente
(ver capítulo Assistência Técnica).

SND 3600 D2
■ 162 │ PT
Limpeza
ATENÇÃO
► Certifique-se de que, durante a limpeza, não se infiltra
humidade no aparelho, para evitar danos irreparáveis no
mesmo.
♦ Limpe o corpo do aparelho apenas com um pano ligeiramente
humedecido e um detergente suave.
♦ Limpe a superfície da iluminação de fundo no interior do apare-
lho com uma escova de limpeza
7
. Para este fim, introduza a
escova de limpeza, com a superfície de limpeza para baixo, na
abertura direita
4
(ver figura 3).
Figura 3
7
4

SND 3600 D2
PT │ 163 ■
Armazenamento/eliminação
Armazenamento quando o aparelho não estiver
a ser utilizado
♦ Guarde o aparelho num ambiente seco, isento de pó e sem
radiação solar direta.
Eliminação do aparelho
O símbolo ao lado de um contentor de lixo com rodas
riscado indica que este aparelho está sujeito à Diretiva
Europeia 2012/19/EU. Esta Diretiva determina que
não pode eliminar este aparelho, no fim da sua vida
útil, no lixo doméstico, devendo entregá-lo em locais
de recolha, especialmente concebidos para o efeito,
depósitos de materiais recicláveis ou empresas de
eliminação de resíduos.
A eliminação é gratuita. Proteja o meio ambiente e
elimine os resíduos de modo adequado.
Mais informações poderão ser obtidas junto da sua empresa de
eliminação de resíduos local ou das entidades municipais.

SND 3600 D2
■ 164 │ PT
Anexo
Dados técnicos
Tensão de funcionamento/
consumo de corrente
5 V / 500 mA
(por meio de porta USB)
Interface USB 2.0
Temperatura de funcionamento +5 - +40 °C
Humidade (sem condensação) ≤ 75 %
Dimensões (L x A x P) aprox. 9,4 x 16,9 x 10,4 cm
Peso (sem acessórios) aprox. 450 g
Sensor de imagem Sensor CMOS de 5 megapíxeis
Zona de focalização Foco fixo
Controlo de luminosidade Automático
Comparação de cor Automático
Resolução
Standard: 2592 x 1680 píxeis
Interpolados: 5184 x 3360 píxeis
Método de digitalização Single pass
Fonte de luz Contraluz (3 LEDs brancos)

SND 3600 D2
PT │ 165 ■
Indicações relativas à Declaração EU de
Conformidade
Este aparelho encontra-se em conformidade com
os requisitos fundamentais e com outras disposições
relevantes da Diretiva relativa à Compatibilidade
Eletromagnética 2014/30/EU e da Diretiva RSP
2011/65/EU.
Pode obter a versão completa da Declaração EU de
Conformidade junto do importador.
Garantia da Kompernass Handels GmbH
Estimada Cliente, Estimado Cliente,
Este aparelho tem uma garantia de 3 anos a contar da data de com-
pra. No caso deste produto ter defeitos, tem direitos legais contra
o vendedor do produto. Estes direitos legais não são limitados pela
nossa garantia que passamos a transcrever.
Condições de garantia
O prazo de garantia tem início na data da compra. Por favor, guarde
bem o talão de compra original. Este documento é necessário como
comprovativo da compra.
Se dentro de três anos a partir da data de compra deste produto,
ocorrer um defeito de material ou fabrico, o produto será reparado
ou substituído por nós – consoante a nossa preferência – gratuita-
mente. Esta garantia parte do princípio que o aparelho defeituoso
e o comprovativo da compra (talão de compra) são apresentados
dentro do prazo de três anos e é descrito brevemente, por escrito,
em que consiste o defeito e quando ocorreu.
Se o defeito estiver coberto pela nossa garantia, receberá o produto
reparado ou um novo produto.

SND 3600 D2
■ 166 │ PT
Prazo de garantia e direitos legais
O período de garantia não é prolongado pelo acionamento da
mesma. Isto também se aplica a peças substituídas e reparadas.
Danos e defeitos que possam eventualmente já existir no momento
da compra devem ser imediatamente comunicados, após retirar o
aparelho da embalagem. Expirado o período da garantia, quaisquer
reparações necessárias estão sujeitas a pagamento.
Âmbito da garantia
O aparelho foi fabricado segundo diretivas de qualidade rigorosas,
com o maior cuidado, e testado escrupulosamente antes da sua
distribuição.
A garantia abrange apenas defeitos de material ou de fabrico. Esta
garantia não abrange peças do produto, que estão sujeitas ao
desgaste normal e podem ser consideradas desta forma peças de
desgaste, ou danos em peças frágeis, p. ex. interruptores, acumula-
dores, formas para bolos ou peças de vidro.
Esta garantia perde a validade, se o produto for danificado, uti-
lizado incorretamente ou se a manutenção tenha sido realizada
indevidamente. Para garantir uma utilização correta do produto, é
necessário cumprir todas as instruções contidas no manual de instru-
ções. Ações ou fins de utilização que são desaconselhados, ou para
os quais é alertado no manual de instruções, têm de ser impreterivel-
mente evitados.
O produto foi concebido apenas para uso privado e não para uso
comercial. A garantia extingue-se em caso de utilização incorreta,
uso de força e intervenções que não tenham sido efetuadas pela
nossa Filial de Assistência Técnica autorizada.

SND 3600 D2
PT │ 167 ■
Procedimento em caso de acionamento da garantia
Para garantir um processamento rápido do seu pedido, siga, por favor,
as seguintes instruções:
■ Para todos os pedidos de esclarecimento, tenha à mão o talão
de compra e o número do artigo (p. ex. IAN 12345) como com-
provativo da compra.
■ O número do artigo consta na placa de características, numa
impressão, na capa do seu manual de instruções (em baixo à
esquerda) ou, como autocolante, no verso ou no lado inferior.
■ Caso ocorram falhas de funcionamento ou outros defeitos,
contacte primeiro o Serviço de Assistência Técnico, indicado em
seguida, telefonicamente ou por e-mail.
■ De seguida, pode enviar gratuitamente o produto registado como
defeituoso, incluindo o comprovativo da compra (talão de com-
pra) e indique o defeito e quando este ocorreu, para a morada
do Serviço de Assistência Técnica que lhe foi indicada.
Em www.lidl-service.com poderá descarregar este
manual de instruções e muitos outros, bem como
vídeos sobre os produtos e software.
Assistência Técnica
Assistência Portugal
Tel.: 70778 0005 (0,12 EUR/Min.)
E-Mail: k[email protected]
IAN 289910

SND 3600 D2
■ 168 │ PT
Importador
Por favor, observe que a seguinte morada não é a morada do Servi-
ço de Assistência Técnica. Primeiro entre em contacto com o Serviço
de Assistência Técnica.
KOMPERNASS HANDELS GMBH
BURGSTRASSE 21
DE - 44867 BOCHUM
ALEMANHA
www.kompernass.com

8
IAN 289910
KOMPERNASS HANDELS GMBH
BURGSTRASSE 21
DE - 44867 BOCHUM
GERMANY
www.kompernass.com
Stand der Informationen · Last Information Update · Version des informations
Stand van de informatie · Stav informací · Estado de las informaciones
Estado das informações: 08 / 2017 · Ident.-No.: SND3600D2-082017-3
Documenttranscriptie
NEGATIV-DIGITALISIERER / NEGATIVE DIGITISER SCANNER DE DIAPOSITIVES ET NÉGATIFS SND 3600 D2 NEGATIV-DIGITALISIERER NEGATIVE DIGITISER SCANNER DE DIAPOSITIVES ET NÉGATIFS DIASCANNER PŘÍSTROJ NA DIGITALIZOVÁNÍ NEGATIVŮ DIGITALIZADOR DE NEGATIVOS Bedienungsanleitung Operating instructions Gebruiksaanwijzing Mode d’emploi Návod k obsluze DIGITALIZADOR DE NEGATIVOS Manual de instruções IAN 289910 Instrucciones de uso Klappen Sie vor dem Lesen die beiden Seiten mit den Abbildungen aus und machen Sie sich anschließend mit allen Funktionen des Gerätes vertraut. Before reading, unfold both pages containing illustrations and familiarise yourself with all functions of the device. Avant de lire le mode d’emploi, ouvrez les deux pages contenant les illustrations et familiarisez-vous ensuite avec toutes les fonctions de l’appareil. Vouw vóór het lezen de beide pagina‘s met de afbeeldingen open en maak u vertrouwd met alle functies van het apparaat. Před čtením si odklopte obě dvě strany s obrázky a potom se seznamte se všemi funkcemi přístroje. Antes de empezar a leer abra las dos páginas que contienen las imágenes y, en seguida, familiarícese con todas las funciones del dispositivo. Antes de começar a ler abra as duas páginas com as imagens e, de seguida, familiarize-se com todas as funções do aparelho. DE / AT / CH GB/IE FR / BE NL / BE CZ ES PT Bedienungsanleitung Operating instructions Mode d’emploi Gebruiksaanwijzing Návod k obsluze Instrucciones de uso Manual de instruções Seite Page Page Pagina Strana Página Página 1 25 49 73 97 121 145 2x Inhaltsverzeichnis Einführung . . . . . . . . . . . . . . . . . . . . . . . . . . . . . . . . . . . . 3 Informationen zu dieser Bedienungsanleitung . . . . . . . . . . . . . . . . .3 Hinweise zu Warenzeichen . . . . . . . . . . . . . . . . . . . . . . . . . . . . . . .3 Bestimmungsgemäße Verwendung . . . . . . . . . . . . . . . . . . . . . . . . .3 Verwendete Warnhinweise. . . . . . . . . . . . . . . . . . . . . . . . . . . . . . . .4 Sicherheitshinweise. . . . . . . . . . . . . . . . . . . . . . . . . . . . . 5 Inbetriebnahme . . . . . . . . . . . . . . . . . . . . . . . . . . . . . . . . 6 Lieferumfang prüfen . . . . . . . . . . . . . . . . . . . . . . . . . . . . . . . . . . . . .6 Entsorgung der Verpackung . . . . . . . . . . . . . . . . . . . . . . . . . . . . . . .6 Anschluss an einen Computer . . . . . . . . . . . . . . . . . . . . . . . . . . . . .7 Software installieren . . . . . . . . . . . . . . . . . . . . . . . . . . . . . . . . . . . . .7 Bedienelemente . . . . . . . . . . . . . . . . . . . . . . . . . . . . . . . 9 Bedienung und Betrieb . . . . . . . . . . . . . . . . . . . . . . . . . . 9 Negativstreifen einlegen. . . . . . . . . . . . . . . . . . . . . . . . . . . . . . . . . .9 Dias einlegen . . . . . . . . . . . . . . . . . . . . . . . . . . . . . . . . . . . . . . . . .10 Negative / Dias digitalisieren . . . . . . . . . . . . . . . . . . . . . . . . . . . .11 Nach dem Gebrauch . . . . . . . . . . . . . . . . . . . . . . . . . . . . . . . . . . .16 Fehlerbehebung . . . . . . . . . . . . . . . . . . . . . . . . . . . . . . 17 Reinigung . . . . . . . . . . . . . . . . . . . . . . . . . . . . . . . . . . . . 18 Lagerung/Entsorgung . . . . . . . . . . . . . . . . . . . . . . . . . . 19 Lagerung bei Nichtbenutzung . . . . . . . . . . . . . . . . . . . . . . . . . . . .19 Gerät entsorgen . . . . . . . . . . . . . . . . . . . . . . . . . . . . . . . . . . . . . . .19 SND 3600 D2 DE│AT│CH │ 1 ■ Anhang. . . . . . . . . . . . . . . . . . . . . . . . . . . . . . . . . . . . . . 20 Technische Daten . . . . . . . . . . . . . . . . . . . . . . . . . . . . . . . . . . . . . .20 Hinweise zur EU-Konformitätserklärung . . . . . . . . . . . . . . . . . . . . .21 Garantie der Kompernaß Handels GmbH . . . . . . . . . . . . . . . . . . .21 Service . . . . . . . . . . . . . . . . . . . . . . . . . . . . . . . . . . . . . . . . . . . . . .24 Importeur . . . . . . . . . . . . . . . . . . . . . . . . . . . . . . . . . . . . . . . . . . . .24 ■ 2 │ DE│AT│CH SND 3600 D2 Einführung Informationen zu dieser Bedienungsanleitung Herzlichen Glückwunsch zum Kauf Ihres neuen Gerätes. Sie haben sich damit für ein hochwertiges Produkt entschieden. Die Bedienungsanleitung ist Bestandteil dieses Produkts. Sie enthält wichtige Hinweise für Sicherheit, Gebrauch und Entsorgung. Machen Sie sich vor der Benutzung des Produkts mit allen Bedien- und Sicherheitshinweisen vertraut. Benutzen Sie das Produkt nur wie beschrieben und für die angegebenen Einsatzbereiche. Bewahren Sie die Bedienungsanleitung immer als Nachschlagewerk in der Nähe des Produkts auf. Händigen Sie bei Weitergabe oder Verkauf des Produktes an Dritte alle Unterlagen inkl. dieser Bedienungsanleitung mit aus. Hinweise zu Warenzeichen - USB® ist ein eingetragenes Warenzeichen von USB Implementers Forum, Inc.. - Microsoft®, Windows®, Windows® XP, Windows Vista®, Windows 7®, Windows 8® und Windows 10® sind eingetragene Markenzeichen der Microsoft Corporation in den Vereinigten Staaten von Amerika und/oder anderen Ländern. - Mac OS X® ist eine eingetragene Marke von Apple Inc. in den USA und anderen Ländern. - Das SilverCrest Warenzeichen und der Handelsname sind Eigentum des jeweiligen Inhabers. Alle weiteren Namen und Produkte können die Warenzeichen oder eingetragene Warenzeichen ihrer jeweiligen Eigentümer sein. Bestimmungsgemäße Verwendung Dieses Gerät ist ein Gerät der Informationstechnik und ist ausschließlich für den nicht gewerblichen Gebrauch zum Scannen und Digitalisieren von Filmnegativen und Dias bestimmt. Eine andere oder darüber hinausgehende Benutzung gilt als nicht bestimmungsgemäß. Ansprüche jeglicher Art wegen Schäden aus nicht bestimmungsgemäßer Verwendung sind ausgeschlossen. Das Risiko trägt allein der Benutzer. SND 3600 D2 DE│AT│CH │ 3 ■ Verwendete Warnhinweise In der vorliegenden Bedienungsanleitung werden folgende Warnhinweise verwendet: GEFAHR Ein Warnhinweis dieser Gefahrenstufe kennzeichnet eine drohende gefährliche Situation. Falls die gefährliche Situation nicht vermieden wird, kann dies zu schweren Verletzungen oder zum Tod führen. ► Die Anweisungen in diesem Warnhinweis befolgen, um die Gefahr von schweren Verletzungen oder des Todes zu vermeiden. ACHTUNG Ein Warnhinweis dieser Gefahrenstufe kennzeichnet einen möglichen Sachschaden. Falls die Situation nicht vermieden wird, kann dies zu Sachschäden führen. ► Die Anweisungen in diesem Warnhinweis befolgen, um Sachschäden zu vermeiden. HINWEIS ► Ein Hinweis kennzeichnet zusätzliche Informationen, die den Umgang mit dem Gerät erleichtern. ■ 4 │ DE│AT│CH SND 3600 D2 Sicherheitshinweise ■ Kontrollieren Sie das Gerät vor der Verwendung auf äußere sichtbare Schäden. Nehmen Sie ein beschädigtes oder heruntergefallenes Gerät nicht in Betrieb. ■ Bei Beschädigung der Kabel oder Anschlüsse lassen Sie diese von autorisiertem Fachpersonal oder dem Kundenservice austauschen. ■ Dieses Gerät kann von Kindern ab 8 Jahren und darüber sowie von Personen mit verringerten physischen, sensorischen oder mentalen Fähigkeiten oder Mangel an Erfahrung und Wissen benutzt werden, wenn Sie beaufsichtigt oder bezüglich des sicheren Gebrauchs des Gerätes unterwiesen wurden und die daraus resultierenden Gefahren verstehen. Kinder dürfen nicht mit dem Gerät spielen. Reinigung und Benutzer-Wartung dürfen nicht von Kindern ohne Beaufsichtigung durchgeführt werden. ■ Lassen Sie Reparaturen am Gerät nur von autorisierten Fachbetrieben oder dem Kundenservice durchführen. Durch unsachgemäße Reparaturen können erhebliche Gefahren für den Benutzer entstehen. Zudem erlischt der Garantieanspruch. ■ Nehmen Sie keine eigenmächtigen Umbauten oder Veränderungen an dem Gerät vor. ■ Schützen Sie das Gerät vor Feuchtigkeit und dem Eindringen von Flüssigkeiten. Stellen Sie keine mit Flüssigkeit gefüllten Gegenstände (z.B. Vasen) neben das Gerät. ■ Halten Sie das Gerät fern von offenen Flammen und stellen Sie keine Kerzen auf oder neben das Gerät. So vermeiden Sie die Ausbreitung von Bränden. ■ Wenn das Gerät schnell von einer warmen in eine kalte, oder von einer kalten in eine warme Umgebung geführt wird, lassen Sie es sich 30 min. akklimatisieren. ■ GEFAHR! Verpackungsmaterialien sind kein Kinderspielzeug! Halten Sie alle Verpackungsmaterialien von Kindern fern. Es besteht Erstickungsgefahr! SND 3600 D2 DE│AT│CH │ 5 ■ Inbetriebnahme Lieferumfang prüfen (Abbildungen siehe Ausklappseiten) Der Lieferumfang besteht aus folgenden Komponenten: ▯ ▯ ▯ ▯ ▯ ▯ ▯ Scanner 1 x Dia Magazin 2 x Halterung für Negative Programm-CD Reinigungsbürste USB-Kabel Bedienungsanleitung ♦ Entnehmen Sie alle Teile aus der Verpackung und entfernen Sie sämtliches Verpackungsmaterial. HINWEIS ► Prüfen Sie die Lieferung auf Vollständigkeit und auf sichtbare Schäden. ► Bei einer unvollständigen Lieferung oder Schäden infolge mangelhafter Verpackung oder durch Transport wenden Sie sich an die Service-Hotline (siehe Kapitel Service). Entsorgung der Verpackung Die Verpackungsmaterialien sind nach umweltverträglichen und entsorgungstechnischen Gesichtspunkten ausgewählt und deshalb recyclebar. Entsorgen Sie nicht mehr benötigte Verpackungsmaterialien gemäß den örtlich geltenden Vorschriften. ■ 6 │ DE│AT│CH SND 3600 D2 Anschluss an einen Computer Systemvoraussetzungen Betriebssystem: Windows XP/Vista/7/8/10, Mac OS 10.6 - 10.12 Steckplatz: USB-Anschluss (USB 2.0) ♦ Verbinden Sie den Micro-USB-Stecker des USB-Kabels 8 mit der Micro-USB-Buchse 3 des Scanners. ♦ Verbinden Sie den USB-Stecker des USB-Kabels 8 mit einem eingeschalteten Computer. Der Computer erkennt die neue Hardware und startet die automatische Treiberinstallation. Dieser Vorgang kann ca. eine Minute dauern. Die LED PWR leuchtet, sobald der Scanner richtig verbunden wurde. Software installieren Installation unter Windows ACHTUNG ► Bei der Installation der Software können wichtige Dateien überschrieben oder verändert werden. Um bei eventuellen Problemen nach der Installation auf die Originaldateien zugreifen zu können, sollten Sie vor der Installation der Software eine Sicherung Ihres Festplatteninhaltes erstellen. ♦ Legen Sie die mitgelieferte Programm-CD in das CD-Laufwerk Ihres Computers ein. Das Installationsmenü startet automatisch. ♦ Klicken Sie auf die Schaltfläche „Installation“, um die Installation zu starten. ♦ Installieren Sie die Software gemäß den Anleitungen auf dem Bildschirm. SND 3600 D2 DE│AT│CH │ 7 ■ HINWEIS ► Wenn Sie die Autostartfunktion ausgeschaltet haben und der Installationsvorgang nicht automatisch beginnt, starten Sie den Installationsvorgang durch einen Doppelklick auf die Datei „WinSetup.exe“ im Hauptverzeichnis der CD. ♦ Nach erfolgreicher Installation können Sie das Menü durch klicken auf die Schaltfläche „Exit“ verlassen. Installation unter Mac OS ACHTUNG ► Bei der Installation der Software können wichtige Dateien überschrieben oder verändert werden. Um bei eventuellen Problemen nach der Installation auf die Originaldateien zugreifen zu können, sollten Sie vor der Installation der Software eine Sicherung Ihres Festplatteninhaltes erstellen. ♦ Legen Sie die mitgelieferte Programm-CD in das CD-Laufwerk Ihres Mac-Computers ein. ♦ Öffnen Sie das Hauptverzeichnis der Programm-CD. ♦ Wechseln Sie in das Verzeichnis „Mac“. ♦ Starten Sie den Installationsvorgang durch einen Doppelklick auf die Datei „ImageScan.dmg“. ♦ Installieren Sie die Software gemäß den Anleitungen auf dem Bildschirm. ■ 8 │ DE│AT│CH SND 3600 D2 Bedienelemente (Abbildungen siehe Ausklappseiten) LED PWR 2 Taste SCAN 3 Micro-USB-Buchse 4 Einschub für Negativhalterung bzw. Dia-Magazin 5 Negativhalterung 6 Dia-Magazin 7 Reinigungsbürste 8 USB-Kabel (USB auf Micro-USB) Bedienung und Betrieb Negativstreifen einlegen ♦ Entriegeln Sie den Verschluss an der Vorderseite der Negativhalterung 5 und öffnen Sie die Halterung. ♦ Legen Sie den Negativstreifen seitenrichtig in die Halterung ein. Achten Sie darauf, dass die Löcher der Negativstreifen auf die entsprechenden Haltenasen der Halterung gelegt werden, damit sich der Negativstreifen nicht verschieben kann. ♦ Schließen Sie die Halterung, bis der Deckel einrastet. ♦ Führen Sie nun die Negativhalterung 5 mit der Dreiecksmarkierung voran und sichtbar in den rechten Einschub 4 ein (siehe Abbildung 1). ♦ Schieben Sie die Negativhalterung 5 so weit in den rechten Einschub 4 , bis diese spürbar in der ersten Position einrastet. Für weitere Negative schieben Sie die Negativhalterung 5 weiter ein, bis diese spürbar in der nächsten Position einrastet. SND 3600 D2 DE│AT│CH │ 9 ■ Abbildung 1 Abbildung 2 Dias einlegen ♦ Legen Sie die Dias seitenrichtig in den dafür vorgesehenen Schacht des Dia-Magazins 6 . Es können ca. 10-12 Dias (je nach Größe) in das Dia-Magazin eingelegt werden. ♦ Führen Sie das Dia-Magazin 6 mit dem Sichtfenster zuerst in den rechten Einschub 4 ein. Beachten Sie dabei, dass die Dreiecksmarkierung voran und sichtbar ist (siehe Abbildung 2). Mit dem Schieber, der sich seitlich am Dia-Magazin 6 befindet, werden die im Schacht befindlichen Dias einzeln in den Scanner geschoben. ♦ Schieben Sie dazu den Schieber zunächst bis zum Anschlag vom Scanner weg. Anschließend den Schieber wieder vorsichtig in Richtung des Scanners bewegen. HINWEIS ► Ein im Scanner befindliches Dia wird dadurch aus dem Gerät ausgeworfen und ein neues Dia in den Sichtbereich des Scanner geschoben. ► Achten Sie darauf, ein neues Dia langsam in den Scanner zu schieben. Geschieht dies zu schnell, so kann das Dia über den Sichtbereich des Scanners hinaus gleiten. ■ 10 │ DE│AT│CH SND 3600 D2 ♦ Sobald Sie keine weiteren Dias mehr scannen möchten, entfernen Sie das Dia-Magazin 6 aus dem Einschub 4 . Entnehmen Sie das letzte Dia von unten aus dem Sichtfenster des Dia-Magazins 6 . Negative / Dias digitalisieren Windows Software ♦ Starten Sie das Programm „Image Scan Tool“ durch einen Doppelklick auf das Programmsymbol auf den Desktop oder wählen Sie den entsprechenden Eintrag im Startmenü aus. Das Programm öffnet sich direkt im Hauptfenster. A Wählen Sie hier den Typ (Negativ, Dia oder Schwarz/Weiß), den Sie verwenden möchten. B Wählen Sie hier das Dateiformat (JPG oder TIFF) in welchem Sie die Bilder speichern wollen. C Wählen Sie hier die Auflösung aus: Standard: 2592 x 1680 Pixel; Interpoliert: 5184 x 3360 Pixel SND 3600 D2 DE│AT│CH │ 11 ■ D Klicken Sie auf diese Schaltfläche oder drücken Sie direkt auf die Taste SCAN 2 , um ein Bild zu scannen. E Klicken Sie auf diese Schaltfläche, um das aktuell markierte Bild zu löschen. F Hier wird Ihnen das aktuell markierte Bild angezeigt. G Klicken Sie auf diese Schaltfläche, um das aktuell markierte Bild zu spiegeln. H Klicken Sie auf diese Schaltfläche, um das aktuell markierte Bild im Uhrzeigersinn zu drehen. I Klicken Sie auf diese Schaltfläche, um die aufgenommenen Bilder zu speichern. Bei Eingabe eines ungültigen Speicherpfads erscheint eine Warnmeldung. J Klicken Sie auf diese Schaltfläche, um das Programm zu beenden. K Klicken Sie auf diese Schaltfläche, um Farb- oder Helligkeitseinstellungen vorzunehmen, bevor Sie das Bild scannen. Die Anpassungen werden Ihnen in der Live-Ansicht angezeigt. L Klicken Sie auf diese Schaltfläche, um einen Ordner zum Speichern der gescannten Bilder auszuwählen. M Hier wird Ihnen der Ordner angezeigt, in welchen die gescannten Bilder gespeichert werden. N Hier werden die bereits gescannten Bilder angezeigt, welche bisher noch nicht gespeichert wurden. Das aktuell markierte Bild wird mit einem grünen Rahmen dargestellt und im Fenster (F) angezeigt. O Hier wird eine Live-Ansicht des eingelegten Negativs/Dias angezeigt. ■ 12 │ DE│AT│CH SND 3600 D2 Farb- und Helligkeitseinstellungen ♦ Stellen Sie bei Bedarf die Farben und die Helligkeit ein, indem Sie auf die Schaltfläche „Farb/Helligkeitseinstellungen“ (K) klicken. Ein Einstellungsfenster wird geöffnet. ♦ Bewegen Sie den Schieberegler „Helligkeit“, um die Helligkeit zwischen -64 und 64 einzustellen. ♦ Bewegen Sie die drei Schieberegler „Farbbalance“, um die RGB-Werte zwischen -6 und 6 einzustellen. ♦ Um die Standardwerte wieder herzustellen, klicken Sie auf die Schaltfläche „Standard“. ♦ Um die eingestellten Werte zu übernehmen und das Einstellungsfenster zu schließen, klicken Sie auf die Schaltfläche „Verlassen“. SND 3600 D2 DE│AT│CH │ 13 ■ Mac Software ♦ Starten Sie das Programm „ImageScan“ durch einen Doppelklick auf das Programmsymbol. Das Programm öffnet sich direkt im Hauptfenster. A Wählen Sie hier den Typ (Negativ, Dia oder Schwarz/Weiß), den Sie verwenden möchten. B Wählen Sie hier das Dateiformat (JPG oder TIFF) in welchem Sie die Bilder speichern wollen. C Wählen Sie hier die Auflösung aus: Standard: 2592 x 1680 Pixel Interpoliert: 5184 x 3360 Pixel D Klicken Sie auf diese Schaltfläche oder drücken Sie direkt auf die Taste SCAN 2 , um ein Bild zu scannen. E Klicken Sie auf diese Schaltfläche, um das aktuell markierte Bild zu löschen. ■ 14 │ DE│AT│CH SND 3600 D2 F Hier wird Ihnen das aktuell markierte Bild angezeigt. G Klicken Sie auf diese Schaltfläche, um das aktuell markierte Bild zu spiegeln. H Klicken Sie auf diese Schaltfläche, um das aktuell markierte Bild im Uhrzeigersinn zu drehen. I Klicken Sie auf diese Schaltfläche, um die aufgenommenen Bilder zu speichern. Bei Eingabe eines ungültigen Speicherpfads erscheint eine Warnmeldung. J Klicken Sie auf diese Schaltfläche, um das Programm zu beenden. K Klicken Sie auf diese Schaltfläche, um Farb- oder Helligkeitseinstellungen vorzunehmen, bevor Sie das Bild scannen. Die Anpassungen werden Ihnen in der Live-Ansicht angezeigt. L Klicken Sie auf diese Schaltfläche, um einen Ordner zum Speichern der gescannten Bilder auszuwählen. M Hier wird Ihnen der Ordner angezeigt, in welchen die gescannten Bilder gespeichert werden. N Hier werden die bereits gescannten Bilder angezeigt, welche bisher noch nicht gespeichert wurden. Das aktuell markierte Bild wird mit einem grünen Rahmen dargestellt und im Fenster (F) angezeigt. O Hier wird eine Live-Ansicht des eingelegten Negativs/Dias angezeigt. SND 3600 D2 DE│AT│CH │ 15 ■ Farb- und Helligkeitseinstellungen ♦ Stellen Sie bei Bedarf die Farben und die Helligkeit ein, indem Sie auf die Schaltfläche „Farb/Helligkeitseinstellungen“ (K) klicken. Ein Einstellungsfenster wird geöffnet. ♦ Bewegen Sie den Schieberegler „Helligkeit“, um die Helligkeit zwischen 0 und 255 einzustellen. ♦ Bewegen Sie die drei Schieberegler „Farbbalance“, um die RGB-Werte zwischen 0 und 255 einzustellen. ♦ Um die Standardwerte wieder herzustellen, klicken Sie auf die Schaltfläche „Standard“. ♦ Um die eingestellten Werte zu übernehmen und das Einstellungsfenster zu schließen, klicken Sie auf die Schaltfläche „Verlassen“. Nach dem Gebrauch ♦ Entnehmen Sie die Negativhalterung 5 , indem Sie sie komplett durch das Gerät hindurchschieben. ♦ Entnehmen Sie das Dia-Magazin 6 , indem Sie es wieder aus dem rechten Einschub 4 herausziehen. ♦ Entfernen Sie das USB-Kabel 8 vom USB-Anschluss Ihres Computers und des Scanners. ■ 16 │ DE│AT│CH SND 3600 D2 Fehlerbehebung Die nachfolgende Tabelle hilft bei der Lokalisierung und Behebung kleinerer Störungen: Fehler LED PWR nicht. leuchtet Schlechte Bildqualität. Gescannte Bilder sind verschwommen. Mögliche Ursache Behebung Das Gerät ist nicht korrekt angeschlossen. Schließen Sie das Gerät an. Staub auf der Hintergrundbeleuchtung des Scanners. Reinigen Sie die Hintergrundbeleuchtung (siehe Kapitel Reinigung). Staub auf dem Film bzw. dem Dia. Reinigen Sie den Film bzw. das Dia. Die Linse des Scanners ist aufgrund von Temperaturunterschieden beschlagen. Warten Sie, bis sich das Gerät bei Zimmertemperatur akklimatisiert hat. HINWEIS ► Wenn Sie mit den vorstehend genannten Schritten das Problem nicht lösen können, wenden Sie sich bitte an den Kundendienst (siehe Kapitel Service). SND 3600 D2 DE│AT│CH │ 17 ■ Reinigung ACHTUNG ► Stellen Sie sicher, dass bei der Reinigung keine Feuchtigkeit in das Gerät eindringt, um eine irreparable Beschädigung des Gerätes zu vermeiden. ♦ Reinigen Sie das Gehäuse ausschließlich mit einem leicht feuchten Tuch und einem milden Spülmittel. ♦ Reinigen Sie die Oberfläche der Hintergrundbeleuchtung im Inneren des Gerätes mit der Reinigungsbürste 7 . Schieben Sie dazu die Reinigungsbürste mit der Reinigungsfläche nach unten nur in den rechten Einschub 4 (siehe Abbildung 3). 4 7 Abbildung 3 ■ 18 │ DE│AT│CH SND 3600 D2 Lagerung/Entsorgung Lagerung bei Nichtbenutzung ♦ Lagern Sie das Gerät in einer trockenen und staubfreien Umgebung ohne direkte Sonneneinstrahlung. Gerät entsorgen Das nebenstehende Symbol einer durchgestrichenen Mülltonne auf Rädern zeigt an, dass dieses Gerät der Richtlinie 2012/19/EU unterliegt. Diese Richtlinie besagt, dass Sie dieses Gerät am Ende seiner Nutzungszeit nicht mit dem normalen Hausmüll entsorgen dürfen, sondern in speziell eingerichteten Sammelstellen, Wertstoffhöfen oder Entsorgungsbetrieben abgeben müssen. Diese Entsorgung ist für Sie kostenfrei. Schonen Sie die Umwelt und entsorgen Sie fachgerecht. Weitere Informationen erhalten Sie bei Ihrem lokalen Entsorger oder der Stadt- bzw. Gemeindeverwaltung. SND 3600 D2 DE│AT│CH │ 19 ■ Anhang Technische Daten Betriebsspannung/Stromaufnahme Schnittstelle Betriebstemperatur Feuchtigkeit (keine Kondensation) 5V / 500 mA (über USB-Anschluss) USB 2.0 +5 - +40 °C ≤ 75 % Abmessungen (B x H x T) ca. 9,4 x 16,9 x 10,4 cm Gewicht (ohne Zubehör) ca. 450 g Bildsensor 5 Megapixel CMOS-Sensor Fokussierungsbereich fester Fokus Helligkeitssteuerung Automatisch Farbabgleich Automatisch Auflösung Scanmethode Lichtquelle ■ 20 │ DE│AT│CH Standard: 2592 x 1680 Pixel Interpoliert: 5184 x 3360 Pixel Single pass Gegenlicht (3 weiße LED) SND 3600 D2 Hinweise zur EU-Konformitätserklärung Dieses Gerät entspricht hinsichtlich Übereinstimmung mit den grundlegenden Anforderungen und den anderen relevanten Vorschriften der europäischen Richtlinie für elektromagnetische Verträglichkeit 2014/30/EU und der RoHS Richtlinie 2011/65/EU. Die vollständige EU-Konformitätserklärung ist beim Importeur erhältlich. Garantie der Kompernaß Handels GmbH Sehr geehrte Kundin, sehr geehrter Kunde, Sie erhalten auf dieses Gerät 3 Jahre Garantie ab Kaufdatum. Im Falle von Mängeln dieses Produkts stehen Ihnen gegen den Verkäufer des Produkts gesetzliche Rechte zu. Diese gesetzlichen Rechte werden durch unsere im Folgenden dargestellte Garantie nicht eingeschränkt. Garantiebedingungen Die Garantiefrist beginnt mit dem Kaufdatum. Bitte bewahren Sie den Original-Kassenbon gut auf. Diese Unterlage wird als Nachweis für den Kauf benötigt. Tritt innerhalb von drei Jahren ab dem Kaufdatum dieses Produkts ein Material- oder Fabrikationsfehler auf, wird das Produkt von uns – nach unserer Wahl – für Sie kostenlos repariert oder ersetzt. Diese Garantieleistung setzt voraus, dass innerhalb der Drei-JahresFrist das defekte Gerät und der Kaufbeleg (Kassenbon) vorgelegt und schriftlich kurz beschrieben wird, worin der Mangel besteht und wann er aufgetreten ist. Wenn der Defekt von unserer Garantie gedeckt ist, erhalten Sie das reparierte oder ein neues Produkt zurück. Mit Reparatur oder Austausch des Produkts beginnt kein neuer Garantiezeitraum. SND 3600 D2 DE│AT│CH │ 21 ■ Garantiezeit und gesetzliche Mängelansprüche Die Garantiezeit wird durch die Gewährleistung nicht verlängert. Dies gilt auch für ersetzte und reparierte Teile. Eventuell schon beim Kauf vorhandene Schäden und Mängel müssen sofort nach dem Auspacken gemeldet werden. Nach Ablauf der Garantiezeit anfallende Reparaturen sind kostenpflichtig. Garantieumfang Das Gerät wurde nach strengen Qualitätsrichtlinien sorgfältig produziert und vor Auslieferung gewissenhaft geprüft. Die Garantieleistung gilt für Material- oder Fabrikationsfehler. Diese Garantie erstreckt sich nicht auf Produktteile, die normaler Abnutzung ausgesetzt sind und daher als Verschleißteile angesehen werden können oder für Beschädigungen an zerbrechlichen Teilen, z. B. Schalter, Akkus, Backformen oder Teile die aus Glas gefertigt sind. Diese Garantie verfällt, wenn das Produkt beschädigt, nicht sachgemäß benutzt oder gewartet wurde. Für eine sachgemäße Benutzung des Produkts sind alle in der Bedienungsanleitung aufgeführten Anweisungen genau einzuhalten.Verwendungszwecke und Handlungen, von denen in der Bedienungsanleitung abgeraten oder vor denen gewarnt wird, sind unbedingt zu vermeiden. Das Produkt ist nur für den privaten und nicht für den gewerblichen Gebrauch bestimmt. Bei missbräuchlicher und unsachgemäßer Behandlung, Gewaltanwendung und bei Eingriffen, die nicht von unserer autorisierten Service-Niederlassung vorgenommen wurden, erlischt die Garantie. ■ 22 │ DE│AT│CH SND 3600 D2 Abwicklung im Garantiefall Um eine schnelle Bearbeitung Ihres Anliegens zu gewährleisten, folgen Sie bitte den folgenden Hinweisen: ■ Bitte halten Sie für alle Anfragen den Kassenbon und die Artikelnummer (z. B. IAN 12345) als Nachweis für den Kauf bereit. ■ Die Artikelnummer entnehmen Sie bitte dem Typenschild, einer Gravur, auf dem Titelblatt Ihrer Anleitung (unten links) oder als Aufkleber auf der Rück- oder Unterseite. ■ Sollten Funktionsfehler oder sonstige Mängel auftreten, kontaktieren Sie zunächst die nachfolgend benannte Serviceabteilung telefonisch oder per E-Mail. ■ Ein als defekt erfasstes Produkt können Sie dann unter Beifügung des Kaufbelegs (Kassenbon) und der Angabe, worin der Mangel besteht und wann er aufgetreten ist, für Sie portofrei an die Ihnen mitgeteilte Service-Anschrift übersenden. Auf www.lidl-service.com können Sie diese und viele weitere Handbücher, Produktvideos und Software herunterladen. SND 3600 D2 DE│AT│CH │ 23 ■ Service Service Deutschland Tel.: 0800 5435 111 (Kostenfrei aus dem dt. Festnetz/Mobilfunknetz) E-Mail: [email protected] Service Österreich Tel.: 0820 201 222 (0,15 EUR/Min.) E-Mail: [email protected] Service Schweiz Tel.: 0842 665566 (0,08 CHF/Min., Mobilfunk max. 0,40 CHF/Min.) E-Mail: [email protected] IAN 289910 Importeur Bitte beachten Sie, dass die folgende Anschrift keine Serviceanschrift ist. Kontaktieren Sie zunächst die benannte Servicestelle. KOMPERNASS HANDELS GMBH BURGSTRASSE 21 DE - 44867 BOCHUM DEUTSCHLAND www.kompernass.com ■ 24 │ DE│AT│CH SND 3600 D2 Contents Introduction . . . . . . . . . . . . . . . . . . . . . . . . . . . . . . . . . . 27 Information about these operating instructions . . . . . . . . . . . . . . . .27 Notes on trademarks . . . . . . . . . . . . . . . . . . . . . . . . . . . . . . . . . . .27 Proper use . . . . . . . . . . . . . . . . . . . . . . . . . . . . . . . . . . . . . . . . . . .27 Warning notices . . . . . . . . . . . . . . . . . . . . . . . . . . . . . . . . . . . . . . .28 Safety information . . . . . . . . . . . . . . . . . . . . . . . . . . . . 29 Initial operation. . . . . . . . . . . . . . . . . . . . . . . . . . . . . . . 30 Check package contents . . . . . . . . . . . . . . . . . . . . . . . . . . . . . . . .30 Disposal of the packaging . . . . . . . . . . . . . . . . . . . . . . . . . . . . . . .30 Connecting to a computer . . . . . . . . . . . . . . . . . . . . . . . . . . . . . . .31 Installing the software . . . . . . . . . . . . . . . . . . . . . . . . . . . . . . . . . . .31 Operating elements . . . . . . . . . . . . . . . . . . . . . . . . . . . 33 Handling and use . . . . . . . . . . . . . . . . . . . . . . . . . . . . . 33 Inserting negatives . . . . . . . . . . . . . . . . . . . . . . . . . . . . . . . . . . . . .33 Inserting slides . . . . . . . . . . . . . . . . . . . . . . . . . . . . . . . . . . . . . . . .34 Digitizing negatives/slides . . . . . . . . . . . . . . . . . . . . . . . . . . . . . . .35 After use . . . . . . . . . . . . . . . . . . . . . . . . . . . . . . . . . . . . . . . . . . . . .40 Troubleshooting . . . . . . . . . . . . . . . . . . . . . . . . . . . . . . 41 Cleaning . . . . . . . . . . . . . . . . . . . . . . . . . . . . . . . . . . . . . 42 Storage/disposal . . . . . . . . . . . . . . . . . . . . . . . . . . . . . 43 Storage when not in use . . . . . . . . . . . . . . . . . . . . . . . . . . . . . . . . .43 Disposal of the device . . . . . . . . . . . . . . . . . . . . . . . . . . . . . . . . . .43 SND 3600 D2 GB│IE │ 25 ■ Appendix . . . . . . . . . . . . . . . . . . . . . . . . . . . . . . . . . . . . 44 Technical data . . . . . . . . . . . . . . . . . . . . . . . . . . . . . . . . . . . . . . . .44 Notes on the EU Declaration of Conformity. . . . . . . . . . . . . . . . . .45 Kompernass Handels GmbH warranty . . . . . . . . . . . . . . . . . . . . .45 Service . . . . . . . . . . . . . . . . . . . . . . . . . . . . . . . . . . . . . . . . . . . . . .48 Importer . . . . . . . . . . . . . . . . . . . . . . . . . . . . . . . . . . . . . . . . . . . . .48 ■ 26 │ GB│IE SND 3600 D2 Introduction Information about these operating instructions Congratulations on the purchase of your new device. You have selected a high-quality product. The operating instructions are part of this product. They contain important information about safety, use and disposal. Before using the product, please familiarise yourself with all operating and safety instructions. Use the product only as described and for the range of applications specified. Keep these operating instructions as a reference and store them near the product. Please pass on all documentation incl. these operating instructions to any future owner(s) if you sell this product or give it away. Notes on trademarks - USB® is a registered trademark of USB Implementers Forum, Inc. - Microsoft®, Windows®, Windows® XP, Windows Vista®, Windows 7®, Windows 8® and Windows 10® are registered trademarks of the Microsoft Corporation in the United States of America and/or other countries. - Mac OS X® is a registered trademark of Apple Inc. in the USA and other countries. - The SilverCrest trademark and the retail name are the property of their respective owner. All other names and products may be trademarks or registered trademarks of their respective owner. Proper use This device is a consumer electronics device intended exclusively for the non-commercial scanning and digitizing of film negatives and slides. The device is not intended for any other purpose, nor for use beyond the scope described. No claims of any kind will be accepted for damage arising as a result of incorrect use. The risk is borne solely by the user. SND 3600 D2 GB│IE │ 27 ■ Warning notices The following warning notices are used in these operating instructions: DANGER A warning notice of this hazard level indicates an imminently hazardous situation. Failure to avoid this hazardous situation could result in serious injuries or even death. ► Follow the instructions in this warning notice to avoid the risk of serious injuries or death. CAUTION! A warning notice of this hazard level indicates a risk of property damage. Failure to avoid this situation could result in property damage. ► Follow the instructions in this warning notice to prevent material damage. NOTE ► A note provides additional information which will assist you in using the device. ■ 28 │ GB│IE SND 3600 D2 Safety information ■ Check the device for visible external damage before use. Do not operate a device that has been damaged or dropped. ■ If the cables or connections are damaged, have them replaced by authorised specialists or Customer Service. ■ This device may be used by children aged 8 years and above and by persons with limited physical, sensory or mental capabilities, or lack of experience and knowledge, provided that they are under supervision or have been told how to use the device safely and are aware of the potential risks. Children must not play with the device. Cleaning and user maintenance tasks may not be carried out by children unless they are supervised. ■ All repairs must be carried out by authorised specialist companies or by the Customer Service department. Improper repairs can pose significant risks to the user. It will also invalidate any warranty claims. ■ Do not make any unauthorised modifications or alterations to the device. ■ Protect the device from penetration by moisture and liquids. Do not place any liquid-filled vessels (such as flower vases) next to the device. ■ Keep the device away from naked flames, and do not place candles on or next to the device. This will help to prevent the spread of fires. ■ If you move the device quickly from a warm to a cold room or vice versa, allow the device 30 minutes to acclimatise. ■ DANGER! Do not allow children to play with the packaging material! Keep all packaging materials away from children. There is a risk of suffocation! SND 3600 D2 GB│IE │ 29 ■ Initial operation Check package contents (For illustrations see fold-out pages) The product includes the following components: ▯ ▯ ▯ ▯ ▯ ▯ ▯ Scanner 1 x slide magazine 2 x holders for negatives Program CD Cleaning brush USB cable Operating instructions ♦ Unpack all parts of the device from the packaging and remove all packaging materials. NOTE ► Check the package for completeness and signs of visible damage. ► If the delivery is incomplete or damage has occurred as a result of defective packaging or during transport, contact the service hotline (see section Service). Disposal of the packaging The packaging materials have been selected for aspects of environmental friendliness and disposal, and they are therefore recyclable. Dispose of packaging materials which are no longer needed in accordance with applicable local regulations. ■ 30 │ GB│IE SND 3600 D2 Connecting to a computer System requirements Operating system: Windows XP/Vista/7/8/10, Mac OS 10.6–10.12 Slot: USB connection (USB 2.0) ♦ Connect the micro-USB plug on the USB cable 8 to the microUSB port 3 on the scanner. ♦ Connect the USB plug on the USB cable 8 to a powered-on PC. The computer recognises the new hardware and starts installing the drivers automatically. This process can take a around a minute. The PWR LED lights up as soon as the scanner is properly connected. Installing the software Installation on Windows CAUTION! ► Important files may be changed or overwritten during the installation of the software! Before installing the installing the software, make a backup of your original files to ensure that you will be able to access them later if problems occur during installation. ♦ Insert the supplied program CD into your CD drive of your computer. The installation menu starts automatically. ♦ Click on the “Installation” button to start the installation. ♦ Install the software as described in the on-screen instructions. SND 3600 D2 GB│IE │ 31 ■ NOTE ► If the autostart function is deactivated and the installation does not start automatically, you can start the installation with a double-click on the "WinSetup.exe" file in the main directory of the CD. ♦ After successful installation you can leave the menu by clicking on the “Exit” button. Installation on Mac OS CAUTION! ► Important files may be changed or overwritten during the installation of the software! Before installing the installing the software, make a backup of your original files to ensure that you will be able to access them later if problems occur during installation. ♦ Insert the supplied program CD into your CD drive of your Mac computer. ♦ Open the main directory of the program CD. ♦ Switch to the “Mac” directory. ♦ Start the installation by double-clicking on the “ImageScan.dmg” file. ♦ Install the software as described in the on-screen instructions. ■ 32 │ GB│IE SND 3600 D2 Operating elements (For illustrations see fold-out pages) PWR LED 2 SCAN button 3 Micro-USB socket 4 Slot for the negative holder or slide magazine 5 Negative holder 6 Slide magazine 7 Cleaning brush 8 USB cable (USB to micro-USB) Handling and use Inserting negatives ♦ Unlock the catch on the front of the negative holder 5 and open the holder. ♦ Lay the negative in the holder the right way up. Ensure that holes of the negative strip are placed on the corresponding retaining tabs on the holder, so that the negative strip can not move. ♦ Close the holder until the lid clicks into place. ♦ Now insert the negative holder 5 with the triangle marking at the front and visible into the slot 4 on the right (see figure 1). ♦ Push the negative holder 5 into the slot 4 until it audibly clicks into the first position. For additional negatives, push the negative holder 5 further in until it audibly clicks into the next position. SND 3600 D2 GB│IE │ 33 ■ Figure 1 Figure 2 Inserting slides ♦ Insert slides the right way round into the shaft provided on the slide magazine 6 . Around 10–12 slides (depending on size) can be added to the magazine. ♦ Push the slide magazine 6 into the slot 4 on the right with the viewing window at the front. Ensure that the triangle marking is at the front and visible (see figure 2). Use the pusher on the side of the slide magazine 6 to push the slides in the shaft individually into the scanner. ♦ To do this, first slide the pusher away from the scanner as far as the stop. Afterwards, move the pusher carefully towards the scanner. NOTE ► This pushes any slide that is in the scanner out of the device and a new slide is pushed into the viewing range of the scanner. ► Make sure that you push the new slide into the scanner slowly. If you push too quickly, the slide could slip past the viewing range of the scanner. ■ 34 │ GB│IE SND 3600 D2 ♦ When you have finished scanning slides, remove the slide magazine 6 from the slot 4 . Remove the last slide from below from out of the slide magazine viewing window 6 . Digitizing negatives/slides Windows software ♦ Start the “Image Scan Tool” program by double-clicking on program icon on the desktop or select the corresponding entry from the start menu. The program opens directly in the main window. A Select the type here (negative, slide or colour/black & white) you want to use. B Select here the format (JPG or TIFF) you want to use for saving images. C Select the resolution here: standard: 2592 x 1680 pixels; interpolated: 5184 x 3360 pixels SND 3600 D2 GB│IE │ 35 ■ D Click on this button or press the SCAN button 2 directly to scan an image. E Click this button to delete the currently selected image. F The currently selected image is shown here. G Click this button to flip the currently selected image. H Click this button to rotate the currently selected image clockwise. I Click this button to save the scanned images. If the path entered is invalid, a warning will appear. J Click this button to close the program. K Click this button to make colour or brightness settings before scanning the image. The adjustments will be shown in the live view. L Click this button to select a folder as a save location for the scanned images. M Here you will see the folder where the scanned images have been saved. N Here you can see scanned images which have not yet been saved. The currently selected image is shown with a green frame and displayed in the window (F). O Here you will see a live view of the inserted negative/slide. ■ 36 │ GB│IE SND 3600 D2 Colour and brightness settings ♦ Adjust the colours and brightness as required by clicking on the “Color/Brightness adjustment” button (K). A settings window appears. ♦ Move the “Brightness” slider to set the brightness between −64 and 64. ♦ Move the three “Color Balance” sliders to set the RGB values between −6 and 6. ♦ To reset to the default values, click on the “Default” button. ♦ To accept the new values and close the settings window, click on the “Exit” button. SND 3600 D2 GB│IE │ 37 ■ Mac software ♦ Start the program “ImageScan” by double-clicking the icon. The program opens directly in the main window. A Select the type here (negative, slide or colour/black & white) you want to use. B Select here the format (JPG or TIFF) you want to use for saving images. C Select the resolution here: Standard: 2592 x 1680 pixels Interpolated: 5184 x 3360 pixels D Click on this button or press the SCAN button 2 directly to scan an image. E Click this button to delete the currently selected image. F The currently selected image is shown here. ■ 38 │ GB│IE SND 3600 D2 G Click this button to flip the currently selected image. H Click this button to rotate the currently selected image clockwise. I Click this button to save the scanned images. If the path entered is invalid, a warning will appear. J Click this button to close the program. K Click this button to make colour or brightness settings before scanning the image. The adjustments will be shown in the live view. L Click this button to select a folder as a save location for the scanned images. M Here you will see the folder where the scanned images have been saved. N Here you can see scanned images which have not yet been saved. The currently selected image is shown with a green frame and displayed in the window (F). O Here you will see a live view of the inserted negative/slide. SND 3600 D2 GB│IE │ 39 ■ Colour and brightness settings ♦ Adjust the colours and brightness as required by clicking on the “Color/Brightness adjustment” button (K). A settings window appears. ♦ Move the “Brightness” slider to set the brightness between 0 and 255. ♦ Move the three “Color Balance” sliders to set the RGB values between 0 and 255. ♦ To reset to the default values, click on the “Default” button. ♦ To accept the new values and close the settings window, click on the “Exit” button. After use ♦ Remove the negative holder 5 by pushing it all the way through the device. ♦ Remove the slide magazine 6 by pulling it back out of the slot 4 on the right. ♦ Remove the USB cable 8 from the USB port on your computer and the scanner. ■ 40 │ GB│IE SND 3600 D2 Troubleshooting The following table will help you to identify and rectify minor malfunctions: Fault PWR LED not light up. does Poor image quality. The scanned images are blurred. Possible cause Remedy The device is not correctly connected. Connect the device. Dust on the scanner's background lighting. Clean the background lighting (see section "Cleaning"). Dust on the film/slide. Clean the film/slide. The lens of the scanner has fogged up due to temperature differences. Wait until the device has acclimatised to room temperature. NOTE ► If the above-mentioned solutions do not resolve the problem, please contact Customer Service (see section Service). SND 3600 D2 GB│IE │ 41 ■ Cleaning CAUTION! ► To avoid irreparable damage to the device, ensure that no moisture penetrates it during cleaning. ♦ Clean the housing only with a soft damp cloth and a mild detergent. ♦ Clean the surfaces of the background lighting inside the device with the cleaning brush 7 . To do this, push the cleaning brush with the cleaning surface facing downwards into the slot 4 on the right (see figure 3). 4 7 Figure 3 ■ 42 │ GB│IE SND 3600 D2 Storage/disposal Storage when not in use ♦ Store the device in a dry and dust-free environment away from direct sunlight. Disposal of the device The symbol on the left showing a crossed-out dustbin means that this device is subject to Directive 2012/19/EU. This directive states that this device may not be disposed of in normal household waste at the end of its useful life, but must be brought to a specially set-up collection point, recycling depot or disposal company. This disposal is free of charge for the user. Protect the environment and dispose of this device properly. You can obtain further information from your local disposal company or the city or local authority. SND 3600 D2 GB│IE │ 43 ■ Appendix Technical data Operating voltage/current Interface Operating temperature Humidity (no condensation) Dimensions (W x H x D) Weight (without accessories) 5V /500 mA (via USB port) USB 2.0 +5 to +40°C ≤ 75% approx. 9.4 x 16.9 x 10.4 cm approx. 450 g Image sensor 5 megapixel CMOS sensor Focus range Fixed focus Brightness control Automatic Colour adjustment Automatic Resolution Scanning method Light source ■ 44 │ GB│IE Standard: 2592 x 1680 pixels Interpolated: 5184 x 3360 pixels Single pass Backlight (3 white LEDs) SND 3600 D2 Notes on the EU Declaration of Conformity This device complies with the basic requirements and other relevant provisions of the Electromagnetic Compatibility Directive 2014/30/EU and the RoHS Directive 2011/65/EU. The complete EU Declaration of Conformity is available from the importer. Kompernass Handels GmbH warranty Dear Customer, This appliance has a 3-year warranty valid from the date of purchase. If this product has any faults, you, the buyer, have certain statutory rights. Your statutory rights are not restricted in any way by the warranty described below. Warranty conditions The validity period of the warranty starts from the date of purchase. Please keep your original receipt in a safe place. This document will be required as proof of purchase. If any material or production fault occurs within three years of the date of purchase of the product, we will either repair or replace the product for you at our discretion. This warranty service is dependent on you presenting the defective appliance and the proof of purchase (receipt) and a short written description of the fault and its time of occurrence. If the defect is covered by the warranty, your product will either be repaired or replaced by us. The repair or replacement of a product does not signify the beginning of a new warranty period. SND 3600 D2 GB│IE │ 45 ■ Warranty period and statutory claims for defects The warranty period is not prolonged by repairs effected under the warranty. This also applies to replaced and repaired components. Any damage and defects present at the time of purchase must be reported immediately after unpacking. Repairs carried out after expiry of the warranty period shall be subject to a fee. Scope of the warranty This appliance has been manufactured in accordance with strict quality guidelines and inspected meticulously prior to delivery. The warranty covers material faults or production faults. The warranty does not extend to product parts subject to normal wear and tear or fragile parts such as switches, batteries, baking moulds or parts made of glass. The warranty does not apply if the product has been damaged, improperly used or improperly maintained. The directions in the operating instructions for the product regarding proper use of the product are to be strictly followed. Uses and actions that are discouraged in the operating instructions or which are warned against must be avoided. This product is intended solely for private use and not for commercial purposes. The warranty shall be deemed void in cases of misuse or improper handling, use of force and modifications / repairs which have not been carried out by one of our authorised Service centres. ■ 46 │ GB│IE SND 3600 D2 Warranty claim procedure To ensure quick processing of your case, please observe the following instructions: ■ Please have the till receipt and the item number (e.g. IAN 12345) available as proof of purchase. ■ You will find the item number on the type plate, an engraving on the front page of the instructions (bottom left), or as a sticker on the rear or bottom of the appliance. ■ If functional or other defects occur, please contact the service department listed either by telephone or by e-mail. ■ You can return a defective product to us free of charge to the service address that will be provided to you. Ensure that you enclose the proof of purchase (till receipt) and information about what the defect is and when it occurred. You can download these instructions along with many other manuals, product videos and software on www.lidl-service.com. SND 3600 D2 GB│IE │ 47 ■ Service Service Great Britain Tel.: 0871 5000 720 (£ 0.10/Min.) E-Mail: [email protected] Service Ireland Tel.: 1890 930 034 (0,08 EUR/Min., (peak)) (0,06 EUR/Min., (off peak)) E-Mail: [email protected] IAN 289910 Importer Please note that the following address is not the service address. Please use the service address provided in the operating instructions. KOMPERNASS HANDELS GMBH BURGSTRASSE 21 DE - 44867 BOCHUM GERMANY www.kompernass.com ■ 48 │ GB│IE SND 3600 D2 Table des matières Introduction . . . . . . . . . . . . . . . . . . . . . . . . . . . . . . . . . . 51 Informations relatives à ce mode d'emploi . . . . . . . . . . . . . . . . . . .51 Remarques sur les marques commerciales . . . . . . . . . . . . . . . . . . .51 Utilisation conforme . . . . . . . . . . . . . . . . . . . . . . . . . . . . . . . . . . . .51 Avertissements utilisés . . . . . . . . . . . . . . . . . . . . . . . . . . . . . . . . . . .52 Consignes de sécurité . . . . . . . . . . . . . . . . . . . . . . . . . . 53 Mise en service . . . . . . . . . . . . . . . . . . . . . . . . . . . . . . . 54 Vérification du matériel livré . . . . . . . . . . . . . . . . . . . . . . . . . . . . . .54 Élimination de l'emballage . . . . . . . . . . . . . . . . . . . . . . . . . . . . . . .54 Raccordement à un ordinateur . . . . . . . . . . . . . . . . . . . . . . . . . . . .55 Installation du logiciel. . . . . . . . . . . . . . . . . . . . . . . . . . . . . . . . . . .55 Éléments de commande . . . . . . . . . . . . . . . . . . . . . . . . 57 Utilisation et fonctionnement . . . . . . . . . . . . . . . . . . . . 57 Mise en place des négatifs . . . . . . . . . . . . . . . . . . . . . . . . . . . . . .57 Mise en place des diapositives . . . . . . . . . . . . . . . . . . . . . . . . . . .58 Numériser des négatifs/diapositives . . . . . . . . . . . . . . . . . . . . . . .59 Après chaque utilisation . . . . . . . . . . . . . . . . . . . . . . . . . . . . . . . . .64 Dépannage . . . . . . . . . . . . . . . . . . . . . . . . . . . . . . . . . . 65 Nettoyage . . . . . . . . . . . . . . . . . . . . . . . . . . . . . . . . . . . 66 Entreposage/mise au rebut . . . . . . . . . . . . . . . . . . . . . 67 Rangement en cas de non-utilisation . . . . . . . . . . . . . . . . . . . . . . .67 Mise au rebut de l'appareil . . . . . . . . . . . . . . . . . . . . . . . . . . . . . .67 SND 3600 D2 FR│BE │ 49 ■ Annexe . . . . . . . . . . . . . . . . . . . . . . . . . . . . . . . . . . . . . . 68 Caractéristiques techniques . . . . . . . . . . . . . . . . . . . . . . . . . . . . . .68 Remarques concernant la déclaration de conformité EU . . . . . . . .69 Garantie de Kompernass Handels GmbH . . . . . . . . . . . . . . . . . . .69 Service après-vente . . . . . . . . . . . . . . . . . . . . . . . . . . . . . . . . . . . .72 Importateur . . . . . . . . . . . . . . . . . . . . . . . . . . . . . . . . . . . . . . . . . . .72 ■ 50 │ FR│BE SND 3600 D2 Introduction Informations relatives à ce mode d'emploi Toutes nos félicitations pour l'achat de votre nouvel appareil. Vous venez ainsi d'opter pour un produit de grande qualité. Le mode d'emploi fait partie intégrante de ce produit. Il contient des remarques importantes concernant la sécurité, l'usage et la mise au rebut. Avant d'utiliser le produit, veuillez vous familiariser avec toutes les consignes d'utilisation et de sécurité. N'utilisez le produit que conformément aux consignes et pour les domaines d'utilisation prévus. Conservez toujours le mode d'emploi comme ouvrage de référence à proximité du produit. Lors de la transmission ou de la vente du produit, remettez tous les documents y compris ce mode d'emploi. Remarques sur les marques commerciales - USB® est une marque déposée de USB Implementers Forum, Inc. - Microsoft®, Windows®, Windows® XP, Windows Vista®, Windows 7®, Windows 8® et Windows 10® sont des marques déposées de Microsoft Corporation aux États-Unis d'Amérique et/ou dans d'autres pays. - Mac OS X® est une marque de Apple Inc., enregistrée aux États-Unis et dans d'autres pays. - Le nom de marque SilverCrest et le nom commercial sont la propriété du propriétaire respectif. Tous les autres noms et produits peuvent être les marques ou les marques déposées de leurs propriétaires respectifs. Utilisation conforme Cet appareil est un appareil relevant des techniques d'information et est exclusivement prévu pour scanner et numériser des films négatifs et des diapositives dans un cadre non commercial. Toute utilisation autre ou dépassant ce cadre est réputée non conforme. SND 3600 D2 FR│BE │ 51 ■ Toute réclamation visant des dommages issus d'une utilisation non conforme sera rejetée. L'utilisateur assume seul la responsabilité des risques encourus. Avertissements utilisés Les avertissements suivants sont utilisés dans le présent mode d'emploi : DANGER Un avertissement à ce niveau de danger signale une situation dangereuse menaçante. Si la situation dangereuse n'est pas évitée, elle peut entraîner des blessures graves ou la mort. ► Les instructions de cet avertissement doivent être respectées pour éviter tout risque de blessures graves, voire de mort. ATTENTION Un avertissement à ce niveau de danger signale un risque de dégâts matériels. Si la situation ne peut pas être écartée, elle risque d'entraîner des dégâts matériels. ► Les instructions stipulées dans cet avertissement doivent être suivies pour éviter tout dégât matériel. REMARQUE ► Une remarque contient des informations supplémentaires facilitant le maniement de l'appareil. ■ 52 │ FR│BE SND 3600 D2 Consignes de sécurité ■ Avant d'utiliser l'appareil, vérifiez que celui-ci ne présente aucun dégât extérieur visible. Ne mettez pas en service un appareil endommagé ou qui a chuté. ■ Si les câbles ou les raccordements sont endommagés, faites-les remplacer par le personnel technique agréé ou le service aprèsvente. ■ Cet appareil peut être utilisé par des enfants à partir de 8 ans et plus et par des personnes ayant des capacités physiques, sensorielles ou mentales réduites ou un manque d'expérience et de connaissances, à condition d'être surveillés ou d'avoir reçu des instructions concernant l'utilisation de l'appareil en toute sécurité et d'avoir compris les dangers qui en résultent. Les enfants ne doivent pas jouer avec l'appareil. Le nettoyage et la maintenance utilisateur ne doivent pas être réalisés par des enfants s'ils ne sont pas surveillés. ■ Confiez les réparations de l'appareil exclusivement à des entreprises agréées ou au service après-vente. Toute réparation non conforme peut entraîner des risques importants pour l'utilisateur. À cela s'ajoute l'annulation de la garantie. ■ Ne procédez pas à des transformations ou des modifications sur l'appareil de votre propre initiative. ■ Protégez l'appareil de l'humidité et de la pénétration de liquides. Ne posez pas de récipients pleins de liquides à côté de l'appareil, comme des vases par exemple. ■ Tenez l'appareil loin de flammes nues et ne placez pas de bougies sur l'appareil ni à côté de celui-ci. Vous évitez ainsi la propagation d'incendies. ■ Si l'appareil est introduit rapidement d'un environnement chaud dans un environnement froid, ou d'un environnement froid dans un environnement chaud, laissez-le s'acclimater 30 min. DANGER ! Les matériaux d'emballage ne sont pas des jouets ■ pour les enfants ! Tenez tous les matériaux d'emballage éloignés des enfants. Il y a risque d'étouffement ! SND 3600 D2 FR│BE │ 53 ■ Mise en service Vérification du matériel livré (Figures : voir les volets dépliants) Le matériel livré comprend les éléments suivants : ▯ ▯ ▯ ▯ ▯ ▯ ▯ Scanner 1 x chargeur de diapositives 2 x supports à négatifs CD du programme Brosse de nettoyage Câble USB Mode d'emploi ♦ Enlevez toutes les pièces de l'emballage et retirez l'ensemble du matériau d'emballage. REMARQUE ► Vérifiez si la livraison est au complet et ne présente aucun dégât apparent. ► En cas de livraison incomplète ou de dommages résultant d'un emballage défectueux ou du transport, veuillez vous adresser à la hotline du service après-vente (voir le chapitre Service après-vente). Élimination de l'emballage Les matériaux d'emballage ont été sélectionnés selon des critères de respect de l'environnement et de recyclage permettant leur élimination écologique. Veuillez éliminer les matériaux d'emballage qui ne servent plus en respectant la réglementation locale. ■ 54 │ FR│BE SND 3600 D2 Raccordement à un ordinateur Exigences système Système d'exploitation : Windows XP/Vista/7/8/10, Mac OS 10.6 - 10.12 Emplacement : Port USB (USB 2.0) ♦ Reliez la fiche micro-USB du câble USB 8 avec le port microUSB 3 du scanner. ♦ Reliez la fiche USB du câble USB 8 à un PC allumé. L'ordinateur reconnait le matériel et lance automatiquement l'installation du pilote. Cette opération peut durer env. une minute. La LED PWR s'allume dès que le scanner est correctement connecté. Installation du logiciel Installation sous Windows ATTENTION ► Lors de l'installation du logiciel, des fichiers importants risquent d'être écrasés ou modifiés. Afin, en cas de problème, de pouvoir accéder aux fichiers d'origine après l'installation, il est recommandé de faire une sauvegarde du contenu de votre disque dur avant d'installer le logiciel. ♦ Insérez le CD du programme fourni dans le lecteur CD de votre ordinateur. Le menu d'installation s'ouvre automatiquement. ♦ Cliquez sur le bouton "Installation" pour démarrer l'installation. ♦ Installez le logiciel conformément aux instructions apparaissant à l'écran. SND 3600 D2 FR│BE │ 55 ■ REMARQUE ► Si vous avez désactivé la fonction de démarrage automatique et que l'opération d'installation ne démarre pas automatiquement, démarrez l'opération d'installation d'un double clic sur le fichier "WinSetup.exe" dans le répertoire principal du CD. ♦ Une fois l'installation terminée, vous pouvez quitter le menu en cliquant sur le bouton "Exit". Installation sous Mac OS ATTENTION ► Lors de l'installation du logiciel, des fichiers importants risquent d'être écrasés ou modifiés. Afin, en cas de problème, de pouvoir accéder aux fichiers d'origine après l'installation, il est recommandé de faire une sauvegarde du contenu de votre disque dur avant d'installer le logiciel. ♦ Insérez le CD du programme fourni dans le lecteur CD de votre ordinateur Mac. ♦ Ouvrez le répertoire principal du CD de programme. ♦ Passez au répertoire "Mac". ♦ Démarrez l'opération d'installation d'un double clic sur le fichier "ImageScan.dmg". ♦ Installez le logiciel conformément aux instructions apparaissant à l'écran. ■ 56 │ FR│BE SND 3600 D2 Éléments de commande (Figures : voir les volets dépliants) LED PWR 2 Touche SCAN 3 Port micro-USB 4 Tiroir pour le support à négatifs ou le chargeur de diapositives 5 Support à négatifs 6 Chargeur de diapositives 7 Brosse de nettoyage 8 Câble USB (USB vers micro-USB) Utilisation et fonctionnement Mise en place des négatifs ♦ Déverrouillez la fermeture sur l'avant du support à négatifs 5 et ouvrez le support. ♦ Placez le négatif du bon côté dans le support. Veillez à ce que les perforations des négatifs soient placées sur les becs de retenue correspondants supports afin que les négatifs ne puissent pas se déplacer. ♦ Fermez le support jusqu'à ce que le couvercle s'enclenche. ♦ Poussez maintenant le support à négatifs 5 avec le triangle repère en avant et bien visible dans le tiroir de droite 4 (voir figure 1). ♦ Poussez le support à négatifs 5 dans le tiroir de droite 4 jusqu'à ce qu'il s'enclenche nettement en première position. Pour les négatifs suivants, poussez un peu plus le support à négatifs 5 jusqu'à ce qu'il s'enclenche nettement dans la position suivante. SND 3600 D2 FR│BE │ 57 ■ Figure 1 Figure 2 Mise en place des diapositives ♦ Placez les diapositives du bon côté dans le logement à cet effet du chargeur de diapositives 6 . Environ 10-12 diapositives (en fonction de leur épaisseur) peuvent être placées dans le chargeur de diapositives. ♦ Introduisez d'abord le chargeur de diapositives 6 avec la fenêtre de visualisation dans le tiroir de droite 4 . Veillez à ce que le triangle repère soit à l'avant et bien visible (voir figure 2). Avec le poussoir qui se trouve sur le côté du chargeur de diapositives 6 , les diapositives du chargeur sont poussées une à une dans le scanner. ♦ Poussez pour cela le poussoir jusqu'en butée en direction opposée de celle du scanner. Pousser ensuite le poussoir à nouveau prudemment en direction du scanner. REMARQUE ► Une diapositive qui se trouve dans le scanner est alors éjectée de l'appareil et une nouvelle diapositive est glissée dans la fenêtre de visualisation du scanner. ► Veillez à pousser une nouvelle diapositive lentement dans le scanner. Si cela se fait trop rapidement, la diapositive risque de glisser hors du champ de visualisation du scanner. ■ 58 │ FR│BE SND 3600 D2 ♦ Dès que vous ne souhaitez plus scanner d'autres diapositives, retirez le chargeur de diapositives 6 du tiroir 4 . Retirez la dernière diapositive, par le bas, de la fenêtre de visualisation du chargeur de diapositives 6 . Numériser des négatifs/diapositives Logiciel Windows ♦ Lancez le programme "Image Scan Tool" d'un double clic sur l'icône programme sur le bureau ou sélectionnez l'entrée correspondante dans le menu Démarrer. Le programme s'ouvre alors directement dans la fenêtre principale. A Choisissez ici le type (négatif, diapositive ou noir/blanc) que vous souhaitez utiliser. B Sélectionnez ici le format de fichier (JPG ou TIFF) sous lequel vous souhaitez enregistrer les images. C Sélectionnez la résolution souhaitée : Standard : 2592 x 1680 pixels ; interpolée : 5184 x 3360 pixels SND 3600 D2 FR│BE │ 59 ■ D Cliquez sur cette touche logicielle ou appuyez directement sur la touche SCAN 2 pour scanner une image. E Cliquez sur cette touche logicielle pour supprimer l'image actuellement sélectionnée. F Ici s'affiche l'image actuellement sélectionnée. G Cliquez sur cette touche logicielle pour retourner l'image actuellement sélectionnée. H Cliquez sur cette touche logicielle pour tourner l'image actuellement sélectionnée dans le sens des aiguilles d'une montre. I Cliquez sur cette touche logicielle pour enregistrer les images prises. Un message d'avertissement s'affiche en cas de saisie d'un chemin de sauvegarde incorrect. J Cliquez sur cette touche logicielle pour quitter le programme. K Cliquez sur cette touche logicielle pour procéder à des réglages de couleur ou de luminosité avant de scanner l'image. Les modifications s'affichent dans la vue live. L Cliquez sur cette touche logicielle pour sélectionner un dossier où enregistrer les images scannées. M Vous voyez ici le dossier dans lequel les images scannées sont enregistrées. N Vous voyez ici les images déjà scannées mais qui n'ont pas encore été enregistrées. L'image actuellement sélectionnée est représentée dans un cadre vert et affichée dans la fenêtre (F). O Une vue live du négatif/ de la diapositive mise en place s’affiche. ■ 60 │ FR│BE SND 3600 D2 Réglages de couleur et de luminosité ♦ Si nécessaire, réglez les couleurs et la luminosité en cliquant sur la touche logicielle "Color/Brightness Adjustment (K)". Une fenêtre de réglage s'ouvre. ♦ Faites glisser le curseur "Brightness" pour régler la luminosité entre -64 et 64. ♦ Faites glisser les trois curseurs "Color Balance" pour régler les valeurs RGB entre -6 et 6. ♦ Pour restaurer les valeurs standards, cliquez sur le bouton "Default". ♦ Pour enregistrer les valeurs réglées, cliquez sur la touche logicielle "Exit". SND 3600 D2 FR│BE │ 61 ■ Logiciel Mac ♦ Lancez le programme "Image Scan" d'un double clic sur l'icône programme. Le programme s'ouvre alors directement dans la fenêtre principale. A Choisissez ici le type (négatif, diapositive ou noir/blanc) que vous souhaitez utiliser. B Sélectionnez ici le format de fichier (JPG ou TIFF) sous lequel vous souhaitez enregistrer les images. C Sélectionnez la résolution souhaitée : Standard : 2592 x 1680 pixels Interpolée : 5184 x 3360 pixels D Cliquez sur cette touche logicielle ou appuyez directement sur la touche SCAN 2 pour scanner une image. E Cliquez sur cette touche logicielle pour supprimer l'image actuellement sélectionnée. ■ 62 │ FR│BE SND 3600 D2 F Ici s'affiche l'image actuellement sélectionnée. G Cliquez sur cette touche logicielle pour retourner l'image actuellement sélectionnée. H Cliquez sur cette touche logicielle pour tourner l'image actuellement sélectionnée dans le sens des aiguilles d'une montre. I Cliquez sur cette touche logicielle pour enregistrer les images prises. Un message d'avertissement s'affiche en cas de saisie d'un chemin de sauvegarde incorrect. J Cliquez sur cette touche logicielle pour quitter le programme. K Cliquez sur cette touche logicielle pour procéder à des réglages de couleur ou de luminosité avant de scanner l'image. Les modifications s'affichent dans la vue live. L Cliquez sur cette touche logicielle pour sélectionner un dossier où enregistrer les images scannées. M Vous voyez ici le dossier dans lequel les images scannées sont enregistrées. N Vous voyez ici les images déjà scannées mais qui n'ont pas encore été enregistrées. L'image actuellement sélectionnée est représentée dans un cadre vert et affichée dans la fenêtre (F). O Une vue live du négatif/ de la diapositive mise en place s’affiche. SND 3600 D2 FR│BE │ 63 ■ Réglages de couleur et de luminosité ♦ Si nécessaire, réglez les couleurs et la luminosité en cliquant sur la touche logicielle "Color/Brightness Adjustment" (K). Une fenêtre de réglage s'ouvre. ♦ Faites glisser le curseur "Brightness" pour régler la luminosité entre 0 et 255. ♦ Faites glisser les trois curseurs "Color Balance" pour régler les valeurs RGB entre 0 et 255. ♦ Pour restaurer les valeurs standards, cliquez sur le bouton "Default". ♦ Pour enregistrer les valeurs réglées, cliquez sur la touche logicielle "Exit". Après chaque utilisation ♦ Retirez le support à négatifs 5 en le poussant entièrement au travers de l'appareil. ♦ Retirez le chargeur de diapositives 6 en le ressortant du tiroir de droite 4 . ♦ Retirez le câble USB 8 du port USB de votre ordinateur et du scanner. ■ 64 │ FR│BE SND 3600 D2 Dépannage Le tableau ci-dessous vous aidera à localiser les petits dysfonctionnements et à y remédier : Panne Cause possible Suppression La LED PWR ne s'allume pas. L'appareil n'est pas correctement branché. Branchez l'appareil. Poussière sur le rétroéclairage du scanner. Nettoyez le rétroéclairage (voir le chapitre Nettoyage). Poussière sur le film ou la diapositive. Nettoyez le film ou la diapositive. La lentille du scanner est embuée à cause de différences de température. Attendez que l'appareil se soit acclimaté à la température ambiante. Mauvaise qualité d'image. Les images scannées sont floues. REMARQUE ► Si vous ne pouvez pas résoudre le problème en prenant les mesures susmentionnées, veuillez vous adresser au service après-vente (voir chapitre Service après-vente). SND 3600 D2 FR│BE │ 65 ■ Nettoyage ATTENTION ► Lors du nettoyage de l'appareil, veillez à ce qu'aucune humidité ne pénètre dans ce dernier afin d'éviter tous dégâts irréparables. ♦ Nettoyez le boîtier exclusivement à l'aide d'un chiffon humecté et d'un liquide vaisselle doux. ♦ Nettoyez la surface du rétroéclairage à l'intérieur de l'appareil avec la brosse de nettoyage 7 . Glissez pour cela la brosse de nettoyage avec la surface de nettoyage vers le bas dans le tiroir de droite 4 (voir figure 3). 4 7 Figure 3 ■ 66 │ FR│BE SND 3600 D2 Entreposage/mise au rebut Rangement en cas de non-utilisation ♦ Entreposez l'appareil dans un environnement sec et sans poussières, sans rayonnement direct du soleil. Mise au rebut de l'appareil Le symbole ci-contre, d'une poubelle barrée sur roues, indique que l'appareil est assujetti à la directive 2012/19/EU. Cette directive stipule que vous ne devez pas éliminer cet appareil en fin de vie avec les ordures ménagères, mais le rapporter à des points de collecte désignés, des centres de recyclage ou des entreprises de gestion des déchets. Cette mise au rebut est gratuite. Respectez l'environnement et mettez au rebut en bonne et due forme. Vous obtiendrez de plus amples informations auprès de votre collecteur local ou de l'administration de votre ville ou commune. SND 3600 D2 FR│BE │ 67 ■ Annexe Caractéristiques techniques Tension de service/ courant absorbé Interface Température de fonctionnement Humidité (sans condensation) Dimensions (l x h x p) Poids (sans accessoires) Capteur d'images Zone de focalisation 5V / 500 mA (via port USB) USB 2.0 +5 - +40 °C ≤ 75 % env. 9,4 x 16,9 x 10,4 cm env. 450 g Capteur CMOS de 5 mégapixels focus fixe Commande de luminosité Automatique Équilibrage des couleurs Automatique Résolution Standard : 2592 x 1680 pixels Interpolée : 5184 x 3360 pixels Méthode de scan Single pass Source de lumière Rétroéclairage (3 LED blanches) ■ 68 │ FR│BE SND 3600 D2 Remarques concernant la déclaration de conformité EU Cet appareil est conforme aux exigences de base et aux autres prescriptions pertinentes de la directive européenne en matière de compatibilité électromagnétique 2014/30/EU ainsi que de la directive RoHS 2011/65/EU. La déclaration de conformité EU complète est disponible auprès de l'importateur. Garantie de Kompernass Handels GmbH Chère cliente, cher client, Cet appareil est garanti 3 ans à partir de la date d’achat. Si ce produit venait à présenter des vices, vous disposez de droits légaux face au vendeur de ce produit. Vos droits légaux ne sont pas restreints par notre garantie présentée ci-dessous. Conditions de garantie La période de garantie débute à la date de l’achat. Veuillez bien conserver le ticket de caisse d’origine. Ce document servira de preuve d’achat. Si dans un délai de trois ans suivant la date d’achat de ce produit, un vice de matériel ou de fabrication venait à apparaître, le produit sera réparé ou remplacé gratuitement par nos soins, selon notre choix. Cette prestation de garantie nécessite dans un délai de trois ans la présentation de l’appareil défectueux et du justificatif d’achat (ticket de caisse) ainsi que la description brève du vice et du moment de son apparition. Si le vice est couvert par notre garantie, vous recevrez le produit réparé ou un nouveau produit en retour. Aucune nouvelle période de garantie ne débute avec la réparation ou l’échange du produit. SND 3600 D2 FR│BE │ 69 ■ Période de garantie et réclamation légale pour vices cachés L’exercice de la garantie ne prolonge pas la période de garantie. Cette disposition s’applique également aux pièces remplacées ou réparées. Les dommages et vices éventuellement déjà présents à l’achat doivent être signalés immédiatement après le déballage. Toute réparation survenant après la période sous garantie fera l’objet d’une facturation. Étendue de la garantie L’appareil a été fabriqué avec soin conformément à des directives de qualité strictes et consciencieusement contrôlé avant sa livraison. La prestation de garantie est valable pour des vices de matériel et de fabrication. Cette garantie ne s’étend pas aux pièces du produit qui sont exposées à une usure normale et peuvent de ce fait être considérées comme pièces d’usure, ni aux détériorations de pièces fragiles, par ex. connecteur, accu, moules ou pièces en verre. Cette garantie devient caduque si le produit est détérioré, utilisé ou entretenu de manière non conforme. Toutes les instructions listées dans le manuel d’utilisation doivent être exactement respectées pour une utilisation conforme du produit. Des buts d’utilisation et actions qui sont déconseillés dans le manuel d’utilisation, ou dont vous êtes avertis doivent également être évités. Le produit est uniquement destiné à un usage privé et ne convient pas à un usage professionnel. La garantie est annulée en cas d’entretien incorrect et inapproprié, d’usage de la force et en cas d’intervention non réalisée par notre centre de service après-vente agréé. ■ 70 │ FR│BE SND 3600 D2 Procédure en cas de garantie Afin de garantir un traitement rapide de votre demande, veuillez suivre les indications suivantes : ■ Veuillez avoir à portée de main pour toutes questions le ticket de caisse et la référence article (par ex. IAN 12345) en tant que justificatif de votre achat. ■ Vous trouverez la référence sur la plaque signalétique, une gravure, sur la page de garde de votre manuel d’utilisation (en bas à gauche) ou sous forme d’autocollant au dos ou sur le dessous. ■ Si des erreurs de fonctionnement ou d’autres vices venaient à apparaître, veuillez d’abord contacter le département service clientèle cité ci-dessous par téléphone ou par e-mail. ■ Vous pouvez ensuite retourner un produit enregistré comme étant défectueux en joignant le ticket de caisse et en indiquant en quoi consiste le vice et quand il est survenu, sans devoir l’affranchir à l’adresse de service après-vente communiquée. Sur www.lidl-service.com, vous pouvez télécharger ce manuel ainsi que beaucoup d’autres, des vidéos produit et logiciels. SND 3600 D2 FR│BE │ 71 ■ Service après-vente Service France Tel.: 0800 919270 E-Mail: [email protected] Service Belgique Tel.: 070 270 171 (0,15 EUR/Min.) E-Mail: [email protected] IAN 289910 Importateur Veuillez tenir compte du fait que l’adresse suivante n’est pas une adresse de service après-vente. Veuillez d’abord contacter le service mentionné. KOMPERNASS HANDELS GMBH BURGSTRASSE 21 DE - 44867 BOCHUM ALLEMAGNE www.kompernass.com ■ 72 │ FR│BE SND 3600 D2 Inhoud Inleiding . . . . . . . . . . . . . . . . . . . . . . . . . . . . . . . . . . . . . 75 Informatie bij deze gebruiksaanwijzing . . . . . . . . . . . . . . . . . . . . .75 Informatie over handelsmerken . . . . . . . . . . . . . . . . . . . . . . . . . . .75 Gebruik in overeenstemming met bestemming . . . . . . . . . . . . . . . .75 Gebruikte waarschuwingen . . . . . . . . . . . . . . . . . . . . . . . . . . . . . .76 Veiligheidsvoorschriften . . . . . . . . . . . . . . . . . . . . . . . . 77 Ingebruikname . . . . . . . . . . . . . . . . . . . . . . . . . . . . . . . 78 Inhoud van het pakket controleren . . . . . . . . . . . . . . . . . . . . . . . . .78 De verpakking afvoeren . . . . . . . . . . . . . . . . . . . . . . . . . . . . . . . . .78 Aansluiten op een computer. . . . . . . . . . . . . . . . . . . . . . . . . . . . . .79 Software installeren . . . . . . . . . . . . . . . . . . . . . . . . . . . . . . . . . . . .79 Bedieningselementen . . . . . . . . . . . . . . . . . . . . . . . . . . 81 Bediening en gebruik . . . . . . . . . . . . . . . . . . . . . . . . . . 81 Negatievenstrook plaatsen. . . . . . . . . . . . . . . . . . . . . . . . . . . . . . .81 Dia's plaatsen . . . . . . . . . . . . . . . . . . . . . . . . . . . . . . . . . . . . . . . . .82 Negatieven/dia's digitaliseren . . . . . . . . . . . . . . . . . . . . . . . . . . . .83 Na gebruik . . . . . . . . . . . . . . . . . . . . . . . . . . . . . . . . . . . . . . . . . . .88 Problemen oplossen . . . . . . . . . . . . . . . . . . . . . . . . . . . 89 Reinigen . . . . . . . . . . . . . . . . . . . . . . . . . . . . . . . . . . . . . 90 Opbergen/afvoeren . . . . . . . . . . . . . . . . . . . . . . . . . . . 91 Opslag bij niet-gebruik . . . . . . . . . . . . . . . . . . . . . . . . . . . . . . . . . .91 Apparaat afvoeren . . . . . . . . . . . . . . . . . . . . . . . . . . . . . . . . . . . . .91 SND 3600 D2 NL│BE │ 73 ■ Bijlage . . . . . . . . . . . . . . . . . . . . . . . . . . . . . . . . . . . . . . 92 Technische gegevens . . . . . . . . . . . . . . . . . . . . . . . . . . . . . . . . . . .92 Opmerkingen over de EU-conformiteitsverklaring . . . . . . . . . . . . .93 Garantie van Kompernaß Handels GmbH . . . . . . . . . . . . . . . . . .93 Service . . . . . . . . . . . . . . . . . . . . . . . . . . . . . . . . . . . . . . . . . . . . . .95 Importeur . . . . . . . . . . . . . . . . . . . . . . . . . . . . . . . . . . . . . . . . . . . .96 ■ 74 │ NL│BE SND 3600 D2 Inleiding Informatie bij deze gebruiksaanwijzing Hartelijk gefeliciteerd met de aankoop van uw nieuwe apparaat. U hebt hiermee gekozen voor een hoogwaardig product. De gebruiksaanwijzing maakt deel uit van dit product. Deze bevat belangrijke aanwijzingen voor veiligheid, gebruik en afvoeren. Lees alle bedienings- en veiligheidsvoorschriften voordat u het product in gebruik neemt. Gebruik het product uitsluitend op de voorgeschreven wijze en voor de aangegeven doeleinden. Bewaar de gebruiksaanwijzing altijd als naslagwerk in de buurt van het product. Geef alle documenten inclusief deze gebruiksaanwijzing mee als u het product overdraagt of verkoopt aan een derde. Informatie over handelsmerken - USB® is een gedeponeerd handelsmerk van USB Implementers Forum, Inc. - Microsoft®, Windows®, Windows® XP, Windows Vista®, Windows 7®, Windows 8® en Windows 10® zijn wettig gedeponeerde handelsmerken van Microsoft Corporation in de Verenigde Staten en/of andere landen. - Mac OS X® is een wettig gedeponeerd handelsmerk van Apple Inc. in de VS en andere landen. - Het handelsmerk en de handelsnaam SilverCrest zijn eigendom van de betreffende eigenaar. Alle overige namen en producten kunnen handelsmerken of gedeponeerde handelsmerken van hun respectieve eigenaren zijn. Gebruik in overeenstemming met bestemming Dit apparaat is een apparaat uit de informatietechniek en is uitsluitend bestemd voor niet-bedrijfsmatig gebruik om filmstroken en dia's te scannen en te digitaliseren. Een ander of verdergaand gebruik geldt als niet in overeenstemming met de bestemming. SND 3600 D2 NL│BE │ 75 ■ Alle mogelijke claims wegens schade door gebruik dat niet volgens de bestemming is, zijn uitgesloten. Het risico is uitsluitend voor de gebruiker. Gebruikte waarschuwingen In deze gebruiksaanwijzing worden de volgende waarschuwingen gebruikt: GEVAAR Een waarschuwing op dit niveau van gevaar duidt op een dreigende, gevaarlijke situatie. Als de gevaarlijke situatie niet wordt vermeden, kan dit ernstig letsel of de dood tot gevolg hebben. ► Neem de aanwijzingen in deze waarschuwing in acht om gevaar voor ernstig of dodelijk letsel te voorkomen. LET OP Een waarschuwing op dit niveau van gevaar duidt op mogelijke materiële schade. Als de situatie niet wordt vermeden, kan dit materiële schade tot gevolg hebben. ► Neem de aanwijzingen in deze waarschuwing in acht om materiële schade te voorkomen. OPMERKING ► Een opmerking bevat extra informatie die de omgang met het apparaat vergemakkelijkt. ■ 76 │ NL│BE SND 3600 D2 Veiligheidsvoorschriften ■ Controleer het apparaat vóór gebruik op zichtbare schade aan de buitenzijde. Gebruik geen apparaat dat beschadigd of gevallen is. ■ Laat, in geval van beschadiging van het snoer of van de aansluitingen, deze vervangen door geautoriseerd en vakkundig personeel of door de klantenservice. ■ Dit apparaat mag worden gebruikt door kinderen vanaf 8 jaar en door personen met beperkte fysieke, zintuiglijke of geestelijke vermogens of gebrek aan ervaring of kennis, mits ze onder toezicht staan of over het veilige gebruik van het apparaat zijn geïnstrueerd en de daaruit resulterende gevaren hebben begrepen. Kinderen mogen niet met het apparaat spelen. Kinderen mogen zonder toezicht geen reiniging en gebruikersonderhoud uitvoeren. ■ Laat reparaties aan het apparaat alleen uitvoeren door geautoriseerde vakbedrijven of door de klantenservice. Ondeskundige reparaties kunnen resulteren in aanzienlijke gevaren voor de gebruiker. Bovendien vervalt dan de garantie. ■ Probeer niet zelf het apparaat om te bouwen of te modificeren. ■ Bescherm het apparaat tegen vocht en het binnendringen van vloeistoffen. Plaats geen met vloeistoffen gevulde voorwerpen (bijv. vazen) naast het apparaat. ■ Houd het apparaat uit de buurt van open vuur en plaats geen kaarsen op of nabij het apparaat. Zo voorkomt u de verspreiding van brand. ■ Wanneer het apparaat snel van een warme naar een koude of van een koude naar een warme omgeving wordt overgebracht, laat u het 30 min. acclimatiseren. ■ GEVAAR! Verpakkingsmateriaal is geen speelgoed! Houd alle verpakkingsmaterialen uit de buurt van kinderen. Er bestaat verstikkingsgevaar! SND 3600 D2 NL│BE │ 77 ■ Ingebruikname Inhoud van het pakket controleren (afbeeldingen: zie uitvouwpagina's) Het pakket bestaat uit de volgende onderdelen: ▯ ▯ ▯ ▯ ▯ ▯ ▯ Scanner 1 x diamagazijn 2 x houder voor negatieven Programma-cd Schoonmaakborsteltje USB-kabel Gebruiksaanwijzing ♦ Haal alle onderdelen uit de verpakking en verwijder alle verpakkingsmateriaal. OPMERKING ► Controleer of het pakket compleet is en of er sprake is van zichtbare schade. ► Neem contact op met de service-hotline (zie het hoofdstuk Service) als het pakket niet compleet is, of indien er sprake is van schade door gebrekkige verpakking of transport. De verpakking afvoeren De verpakkingsmaterialen zijn niet schadelijk voor het milieu. Ze zijn gekozen op grond van milieuvriendelijkheid en daarom recyclebaar. Voer niet meer benodigde verpakkingsmaterialen af conform de plaatselijk geldende voorschriften. ■ 78 │ NL│BE SND 3600 D2 Aansluiten op een computer Systeemeisen Besturingssysteem: Windows XP/Vista/7/8/10, Mac OS 10.6 - 10.12 Poort: USB-aansluiting (USB 2.0) ♦ Verbind de Micro-USB-stekker van de USB-kabel 8 met de Micro-USB-aansluiting 3 van de scanner. ♦ Verbind de USB-stekker van de USB-kabel 8 met een ingeschakelde computer. De computer herkent de nieuwe hardware en start automatische de installatie van de driver. Dit kan ca. een minuut duren. De LED PWR brandt zodra de scanner correct is verbonden. Software installeren Installatie onder Windows LET OP ► Bij de installatie van de software kunnen belangrijke bestanden worden overschreven of gewijzigd. Om bij eventuele problemen na de installatie nog terug te kunnen vallen op de oorspronkelijke bestanden, dient u voorafgaand aan installatie van de software een back-up te maken van de inhoud van de harde schijf. ♦ Plaats de meegeleverde programma-cd in het cd-romstation van de computer. Het installatiemenu verschijnt automatisch. ♦ Klik op de knop “Installation” om de installatie te starten. ♦ Installeer de software conform de aanwijzingen op het beeldscherm. SND 3600 D2 NL│BE │ 79 ■ OPMERKING ► Wanneer u de autostartfunctie hebt uitgeschakeld en de installatieprocedure niet automatisch begint, start u de installatieprocedure door te dubbelklikken op het bestand “WinSetup.exe” in de hoofdmap van de cd. ♦ Als de installatie is voltooid, kunt u het menu verlaten door te klikken op de knop “Exit”. Installatie onder Mac OS LET OP ► Bij de installatie van de software kunnen belangrijke bestanden worden overschreven of gewijzigd. Om bij eventuele problemen na de installatie nog terug te kunnen vallen op de oorspronkelijke bestanden, dient u voorafgaand aan installatie van de software een back-up te maken van de inhoud van de harde schijf. ♦ Plaats de meegeleverde programma-cd in het cd-romstation van uw Mac-computer. ♦ Open de hoofdmap van de programma-cd. ♦ Ga naar de map “Mac”. ♦ Start de installatieprocedure door te dubbelklikken op het bestand “ImageScan.dmg”. ♦ Installeer de software conform de aanwijzingen op het beeldscherm. ■ 80 │ NL│BE SND 3600 D2 Bedieningselementen (afbeeldingen: zie uitvouwpagina's) LED PWR 2 Toets SCAN 3 Micro-USB-aansluiting 4 Inschuifvak voor negatievenhouder resp. diamagazijn 5 Negatievenhouder 6 Diamagazijn 7 Schoonmaakborsteltje 8 USB-kabel (USB naar Micro-USB) Bediening en gebruik Negatievenstrook plaatsen ♦ Ontgrendel de sluiting aan de voorkant van de negatievenhouder 5 en open de houder. ♦ Leg de negatievenstrook met de zijkanten op de juiste positie onder in de houder. Let erop dat de gaatjes in de negatievenstrook op de hiervoor bestemde pennetjes van de houder worden gelegd, zodat de negatievenstrook niet kan verschuiven. ♦ Sluit de houder tot het deksel vastklikt. ♦ Schuif nu de negatievenhouder 5 met de driehoeksmarkering vooraan en zichtbaar in het rechterinschuifvak 4 (zie afbeelding 1). ♦ Schuif de negatievenhouder 5 zo ver in het rechterinschuifvak 4 , tot deze merkbaar in de eerste positie vastklikt. Voor volgende negatieven schuift u de negatievenhouder 5 verder naar binnen, tot deze merkbaar in de volgende positie vastklikt. SND 3600 D2 NL│BE │ 81 ■ Afbeelding 1 Afbeelding 2 Dia's plaatsen ♦ Leg de dia's met de zijkanten op de juiste positie in de daarvoor bestemde schacht van het diamagazijn 6 . Er kunnen ca. 10-12 dia's (afhankelijk van het formaat) in het diamagazijn worden geplaatst. ♦ Schuif het diamagazijn 6 met het kijkvenster eerst in het rechterinschuifvak 4 . Zorg daarbij dat de driehoeksmarkering zich vooraan bevindt en zichtbaar is (zie afbeelding 2). Met de schuif, die zich aan de zijkant van het diamagazijn 6 bevindt, worden de dia's in de schacht een voor een in de scanner geschoven. ♦ Schuif daartoe de schuif eerst tot aan de aanslag weg van de scanner. Beweeg de schuif daarna weer voorzichtig in de richting van de scanner. OPMERKING ► Een dia in de scanner wordt daardoor uit het apparaat geworpen en er wordt een nieuwe dia in het detectiebereik van de scanner geschoven. ► Schuif een nieuwe dia langzaam in de scanner. Als dit te snel gebeurt, kan de dia voorbij het detectiebereik van de scanner glijden. ■ 82 │ NL│BE SND 3600 D2 ♦ Als u geen verdere dia's wilt scannen, verwijdert u het diamagazijn 6 uit het inschuifvak 4 . Haal de laatste dia van onder af uit het zichtvenster van het diamagazijn 6 . Negatieven/dia's digitaliseren Windows-software ♦ Start het programma “Image Scan Tool” door te dubbelklikken op het programmapictogram op het bureaublad of selecteer het betreffende item in het menu Start. Het programma wordt direct in het hoofdvenster geopend. A Selecteer hier het type dat u wilt gebruiken (negatief, dia of zwart-wit). B Selecteer hier het bestandsformaat (JPG of TIFF) waarin u de afbeeldingen wilt opslaan. C Selecteer hier de resolutie: standaard: 2592 x 1680 pixels; geïnterpoleerd: 5184 x 3360 pixels SND 3600 D2 NL│BE │ 83 ■ D Klik op deze knop of druk rechtstreeks op de toets SCAN 2 om een beeld te scannen. E Klik op deze knop om het gemarkeerde beeld te wissen. F Hier wordt het gemarkeerde beeld weergegeven. G Klik op deze knop om het gemarkeerde beeld te spiegelen. H Klik op deze knop om het gemarkeerde beeld met de wijzers van de klok mee te draaien. I Klik op deze knop om de gescande beelden op te slaan. Bij invoer van een ongeldig opslagpad verschijnt er een waarschuwingsmelding. J Klik op deze knop om het programma af te sluiten. K Klik op deze knop om kleur- of helderheidsinstellingen uit te voeren voordat u het beeld scant. De aanpassingen verschijnen in de live-weergave. L Klik op deze knop om een map te selecteren voor het opslaan van de gescande beelden. M Hier wordt de map aangegeven waarin de gescande beelden worden opgeslagen. N Hier worden gescande beelden weergegeven die nog niet zijn opgeslagen. Het gemarkeerde beeld is groen omrand en wordt in het venster (F) weergegeven. O Hier wordt het geplaatste negatief/de geplaatste dia live weergegeven. ■ 84 │ NL│BE SND 3600 D2 Kleur- en helderheidsinstellingen ♦ Stel desgewenst de kleuren en helderheid in door op de knop “Color/Brightness Adjustment” (K) te klikken. Er verschijnt een instellingsvenster. ♦ Beweeg de schuifregelaar “Brightness” om de helderheid in te stellen tussen -64 en 64. ♦ Beweeg de drie schuifregelaars “Color Balance” om de RGBwaarden in te stellen tussen -6 en 6. ♦ Klik op de knop “Default” om de standaardwaarden te herstellen. ♦ Klik op de knop “Exit” om de ingestelde waarden over te nemen en het instellingsvenster te sluiten. SND 3600 D2 NL│BE │ 85 ■ Mac-software ♦ Start het programma “ImageScan” door te dubbelklikken op het programmapictogram. Het programma wordt direct in het hoofdvenster geopend. A Selecteer hier het type dat u wilt gebruiken (negatief, dia of zwart-wit). B Selecteer hier het bestandsformaat (JPG of TIFF) waarin u de afbeeldingen wilt opslaan. C Selecteer hier de resolutie: standaard: 2592 x 1680 pixels geïnterpoleerd: 5184 x 3360 pixels D Klik op deze knop of druk rechtstreeks op de toets SCAN 2 om een beeld te scannen. E Klik op deze knop om het gemarkeerde beeld te wissen. F Hier wordt het gemarkeerde beeld weergegeven. ■ 86 │ NL│BE SND 3600 D2 G Klik op deze knop om het gemarkeerde beeld te spiegelen. H Klik op deze knop om het gemarkeerde beeld met de wijzers van de klok mee te draaien. I Klik op deze knop om de gescande beelden op te slaan. Bij invoer van een ongeldig opslagpad verschijnt er een waarschuwingsmelding. J Klik op deze knop om het programma af te sluiten. K Klik op deze knop om kleur- of helderheidsinstellingen uit te voeren voordat u het beeld scant. De aanpassingen verschijnen in de live-weergave. L Klik op deze knop om een map te selecteren voor het opslaan van de gescande beelden. M Hier wordt de map aangegeven waarin de gescande beelden worden opgeslagen. N Hier worden gescande beelden weergegeven die nog niet zijn opgeslagen. Het gemarkeerde beeld is groen omrand en wordt in het venster (F) weergegeven. O Hier wordt het geplaatste negatief/de geplaatste dia live weergegeven. SND 3600 D2 NL│BE │ 87 ■ Kleur- en helderheidsinstellingen ♦ Stel desgewenst de kleuren en helderheid in door op de knop “Color/Brightness Adjustment” (K) te klikken. Er verschijnt een instellingsvenster. ♦ Beweeg de schuifregelaar “Brightness” om de helderheid in te stellen tussen 0 en 255. ♦ Beweeg de drie schuifregelaars “Color Balance” om de RGBwaarden in te stellen tussen 0 en 255. ♦ Klik op de knop “Default” om de standaardwaarden te herstellen. ♦ Klik op de knop “Exit” om de ingestelde waarden over te nemen en het instellingsvenster te sluiten. Na gebruik ♦ Verwijder de negatievenhouder 5 door deze volledig door het apparaat heen te schuiven. ♦ Verwijder het diamagazijn 6 door het weer uit het rechterinschuifvak 4 te halen. ♦ Maak de USB-kabel 8 los van de USB-aansluiting van de computer en van de scanner. ■ 88 │ NL│BE SND 3600 D2 Problemen oplossen De onderstaande tabel helpt bij het opsporen en verhelpen van kleinere storingen: Probleem Mogelijke oorzaak Oplossing LED PWR brandt niet. Het apparaat is niet correct aangesloten. Sluit het apparaat correct aan. Slechte beeldkwaliteit. Stof op de achtergrondverlichting van de scanner. Reinig de achtergrondverlichting (zie het hoofdstuk Reinigen). Stof op de film resp. de dia. Reinig de film resp. de dia. De lens van de scanner is door temperatuurschommelingen beslagen. Wacht tot het apparaat bij kamertemperatuur is geacclimatiseerd. Gescande beelden zijn wazig. OPMERKING ► Neem contact op met de klantenservice als u met de stappen hiervoor het probleem niet kunt verhelpen (zie het hoofdstuk Service). SND 3600 D2 NL│BE │ 89 ■ Reinigen LET OP ► Zorg ervoor dat er geen vocht in het apparaat binnendringt tijdens het reinigen, om onherstelbare schade aan het apparaat te voorkomen. ♦ Reinig de behuizing uitsluitend met een licht bevochtigde doek en een mild afwasmiddel. ♦ Reinig het oppervlak van de achtergrondverlichting met het schoonmaakborsteltje 7 . Schuif daartoe het schoonmaakborsteltje met het schoonmaakvlak omlaag alleen in het rechterinschuifvak 4 (zie afbeelding 3). 4 7 Afbeelding 3 ■ 90 │ NL│BE SND 3600 D2 Opbergen/afvoeren Opslag bij niet-gebruik ♦ Berg het apparaat op in een droge en stofvrije omgeving zonder rechtstreeks zonlicht. Apparaat afvoeren Het symbool hiernaast met een doorgekruiste vuilnisbak geeft aan dat dit apparaat is onderworpen aan de Richtlijn 2012/19/EU. Deze richtlijn stelt dat u dit apparaat aan het einde van zijn levensduur niet met het normale huisvuil mag afvoeren, maar moet inleveren bij speciaal hiervoor bestemde inzamelpunten, milieuparken of afvalverwerkingsbedrijven. Dit afvoeren is voor u kosteloos. Spaar het milieu en voer producten op een voor het milieu verantwoorde manier af. Neem voor meer informatie contact op met uw lokale afvalverwerkingsbedrijf of uw gemeentereiniging. SND 3600 D2 NL│BE │ 91 ■ Bijlage Technische gegevens Bedrijfsspanning/stroomopname Interface 5V / 500 mA (via USB-aansluiting) USB 2.0 Bedrijfstemperatuur +5 tot +40 °C Luchtvochtigheid (geen condensatie) ≤ 75% Afmetingen (b x h x d) Gewicht (zonder accessoires) Beeldsensor ca. 9,4 x 16,9 x 10,4 cm ca. 450 g 5 megapixel CMOS-sensor Scherpstelbereik Fixed focus Helderheidsbesturing Automatisch Kleurafstemming Automatisch Resolutie Scanmethode Lichtbron ■ 92 │ NL│BE standaard: 2592 x 1680 pixels geïnterpoleerd: 5184 x 3360 pixels Single pass Tegenlicht (3 witte LED's) SND 3600 D2 Opmerkingen over de EU-conformiteitsverklaring Dit apparaat voldoet wat betreft overeenstemming met de fundamentele eisen en de andere relevante voorschriften aan de Europese richtlijn voor elektromagnetische compatibiliteit 2014/30/EU en aan de RoHS-richtlijn 2011/65/EU. De volledige EU-conformiteitsverklaring is te verkrijgen bij de importeur. Garantie van Kompernaß Handels GmbH Geachte klant, U hebt op dit apparaat 3 jaar garantie vanaf de aankoopdatum. In geval van gebreken in dit product hebt u wettelijke rechten tegenover de verkoper van het product. Deze wettelijke rechten worden door onze hierna beschreven garantie niet beperkt. Garantievoorwaarden De garantieperiode geldt vanaf de datum van aankoop. Bewaar de originele kassabon. U hebt de bon nodig als bewijs van aankoop. Als er binnen drie jaar vanaf de aankoopdatum van dit product een materiaal- of fabricagefout optreedt, wordt het product door ons – naar onze keuze – voor u kosteloos gerepareerd of vervangen. Voorwaarde voor deze garantie is dat binnen de termijn van drie jaar het defecte apparaat en het aankoopbewijs (kassabon) worden overlegd en dat kort wordt omschreven waaruit het gebrek bestaat en wanneer het is opgetreden. Wanneer het defect door onze garantie wordt gedekt, krijgt u het gerepareerde product of een nieuw product retour. Met de reparatie of vervanging van het product begint er geen nieuwe garantieperiode. SND 3600 D2 NL│BE │ 93 ■ Garantieperiode en wettelijke aanspraken bij gebreken De garantieperiode wordt door deze waarborg niet verlengd. Dat geldt ook voor vervangen en gerepareerde onderdelen. Eventueel al bij aankoop aanwezige schade en gebreken moeten meteen na het uitpakken worden gemeld. Voor reparaties na afloop van de garantieperiode worden kosten in rekening gebracht. Garantieomvang Het apparaat is op basis van strenge kwaliteitsnormen met de grootst mogelijke zorg vervaardigd en voorafgaand aan de levering nauwkeurig gecontroleerd. De garantie geldt voor materiaal- of fabricagefouten. Deze garantie geldt niet voor productonderdelen die blootstaan aan normale slijtage en derhalve als aan slijtage onderhevige onderdelen kunnen worden aangemerkt, of voor beschadigingen aan breekbare onderdelen, bijv. schakelaars, accu’s, bakvormen of onderdelen die van glas zijn gemaakt. Deze garantie vervalt wanneer het product is beschadigd, ondeskundig is gebruikt of is gerepareerd. Voor deskundig gebruik van het product moeten alle in de gebruiksaanwijzing beschreven aanwijzingen precies worden opgevolgd. Gebruiksdoeleinden en handelingen die in de gebruiksaanwijzing worden afgeraden of waarvoor wordt gewaarschuwd, moeten beslist worden vermeden. Het product is uitsluitend bestemd voor privégebruik en niet voor bedrijfsmatige doeleinden. Bij verkeerd gebruik en ondeskundige behandeling, bij gebruik van geweld en bij reparaties die niet door ons erkend servicefiliaal zijn uitgevoerd, vervalt de garantie. ■ 94 │ NL│BE SND 3600 D2 Afhandeling bij een garantiekwestie Voor een snelle afhandeling van uw aanvraag neemt u de volgende aanwijzingen in acht: ■ Houd voor alle aanvragen de kassabon en het artikelnummer (bijv. IAN 12345) als aankoopbewijs bij de hand. ■ Het artikelnummer vindt u op het typeplaatje, in het product gegraveerd, op de titelpagina van de gebruiksaanwijzing (linksonder) of als sticker op de achter- of onderkant van het product. ■ Als er fouten in de werking of andere gebreken optreden, neemt u eerst contract op met de hierna genoemde serviceafdeling, telefonisch of via e-mail. ■ Een als defect geregistreerd product kunt u dan zonder portokosten naar het aan u doorgegeven serviceadres sturen. Voeg het aankoopbewijs (kassabon) bij en vermeld waaruit het gebrek bestaat en wanneer het is opgetreden. Op www.lidl-service.com kunt u deze en vele andere handboeken, productvideo’s en software downloaden. Service Service Nederland Tel.: 0900 0400223 (0,10 EUR/Min.) E-Mail: [email protected] Service België Tel.: 070 270 171 (0,15 EUR/Min.) E-Mail: [email protected] IAN 289910 SND 3600 D2 NL│BE │ 95 ■ Importeur Let op: het volgende adres is geen serviceadres. Neem eerst contact op met het opgegeven serviceadres. KOMPERNASS HANDELS GMBH BURGSTRASSE 21 DE - 44867 BOCHUM DUITSLAND www.kompernass.com ■ 96 │ NL│BE SND 3600 D2 Obsah Úvod . . . . . . . . . . . . . . . . . . . . . . . . . . . . . . . . . . . . . . . . 99 Informace k tomuto návodu k obsluze . . . . . . . . . . . . . . . . . . . . . .99 Informace o ochranných známkách . . . . . . . . . . . . . . . . . . . . . . . .99 Použití v souladu s určením. . . . . . . . . . . . . . . . . . . . . . . . . . . . . . .99 Použitá výstražná upozornění . . . . . . . . . . . . . . . . . . . . . . . . . . 100 Bezpečnostní pokyny . . . . . . . . . . . . . . . . . . . . . . . . .101 Uvedení do provozu . . . . . . . . . . . . . . . . . . . . . . . . . .102 Kontrola rozsahu dodávky . . . . . . . . . . . . . . . . . . . . . . . . . . . . . 102 Likvidace obalu . . . . . . . . . . . . . . . . . . . . . . . . . . . . . . . . . . . . . 102 Zapojení do počítače . . . . . . . . . . . . . . . . . . . . . . . . . . . . . . . . . 103 Instalace softwaru . . . . . . . . . . . . . . . . . . . . . . . . . . . . . . . . . . . 103 Ovládací prvky . . . . . . . . . . . . . . . . . . . . . . . . . . . . . .104 Obsluha a provoz . . . . . . . . . . . . . . . . . . . . . . . . . . . .105 Vložení negativů . . . . . . . . . . . . . . . . . . . . . . . . . . . . . . . . . . . . . 105 Vložení diapozitivů . . . . . . . . . . . . . . . . . . . . . . . . . . . . . . . . . . . 106 Digitalizace negativů / diapozitivů . . . . . . . . . . . . . . . . . . . . . . 107 Po použití . . . . . . . . . . . . . . . . . . . . . . . . . . . . . . . . . . . . . . . . . . 112 Odstranění závad . . . . . . . . . . . . . . . . . . . . . . . . . . . .113 Čištění . . . . . . . . . . . . . . . . . . . . . . . . . . . . . . . . . . . . . .114 Skladování/likvidace . . . . . . . . . . . . . . . . . . . . . . . . .115 Skladování při nepoužívání . . . . . . . . . . . . . . . . . . . . . . . . . . . . 115 Likvidace přístroje . . . . . . . . . . . . . . . . . . . . . . . . . . . . . . . . . . . . 115 SND 3600 D2 CZ │ 97 ■ Dodatek . . . . . . . . . . . . . . . . . . . . . . . . . . . . . . . . . . . .116 Technické údaje . . . . . . . . . . . . . . . . . . . . . . . . . . . . . . . . . . . . . 116 Upozornění k prohlášení o shodě EU. . . . . . . . . . . . . . . . . . . . . 117 Záruka společnosti Kompernass Handels GmbH . . . . . . . . . . . . 117 Servis . . . . . . . . . . . . . . . . . . . . . . . . . . . . . . . . . . . . . . . . . . . . . 120 Dovozce . . . . . . . . . . . . . . . . . . . . . . . . . . . . . . . . . . . . . . . . . . . 120 ■ 98 │ CZ SND 3600 D2 Úvod Informace k tomuto návodu k obsluze Blahopřejeme Vám k zakoupení nového přístroje. Rozhodli jste se tím pro vysoce kvalitní výrobek. Návod k obsluze je součástí tohoto výrobku. Obsahuje důležité informace o bezpečnosti, použití a likvidaci. Před použitím výrobku se seznamte se všemi obslužnými a bezpečnostními pokyny. Výrobek používejte pouze předepsaným způsobem a pro uvedené oblasti použití. Návod k obsluze uchovejte vždy jako referenční příručku v blízkosti výrobku. Při předávání nebo prodeji výrobku třetím osobám předejte spolu s ním i tyto podklady, vč. tohoto návodu k obsluze. Informace o ochranných známkách - USB® je registrovaná ochranná známka společnosti USB Implementers Forum, Inc.. - Microsoft®, Windows®, Windows® XP, Windows Vista®, Windows 7®, Windows 8® a Windows 10® jsou registrované ochranné známky společnosti Microsoft Corporation ve Spojených státech amerických a/nebo dalších zemích. - Mac OS X® je registrovaná ochranná známka společnosti Apple Inc. v USA a dalších zemích. - Ochranná známka SilverCrest a obchodní název jsou majetkem příslušného vlastníka. Veškeré ostatní názvy a produkty mohou být ochrannými známkami nebo registrovanými ochrannými známkami jejich příslušných vlastníků. Použití v souladu s určením Tento přístroj je přístroj informační technologie a je určen pouze pro nekomerční použití ke skenování a digitalizaci filmových negativů a diapozitivů. Jiné použití než k určenému účelu nebo nad jeho rámec je považováno za použití v rozporu s určením. Jsou vyloučeny nároky jakéhokoliv druhu kvůli poškození, které vzniklo na základě použití v rozporu s určením. Riziko nese výhradně sám uživatel. SND 3600 D2 CZ │ 99 ■ Použitá výstražná upozornění V předloženém návodu k obsluze jsou použita následující výstražná upozornění: NEBEZPEČÍ Výstražným upozorněním tohoto stupně nebezpečí se označuje hrozící nebezpečná situace. Pokud se takové nebezpečné situaci nezabrání, může tato vést k těžkým zraněním nebo usmrcení. ► Pro zabránění nebezpečí vážných zranění nebo usmrcení se musí dodržovat pokyny uvedené v tomto výstražném upozornění. POZOR Výstražné upozornění tohoto stupně nebezpečí označuje možný vznik hmotné škody. Pokud se této nebezpečné situaci nezabrání, může dojít k hmotným škodám. ► Pro zabránění hmotným škodám je proto zapotřebí dodržovat pokyny uvedené v tomto výstražném upozornění. UPOZORNĚNÍ ► Upozornění označuje doplňující informace usnadňující manipulaci s přístrojem. ■ 100 │ CZ SND 3600 D2 Bezpečnostní pokyny ■ Před použitím přístroje zkontrolujte, zda na něm nejsou vnější viditelná poškození. Poškozený nebo na zem spadlý přístroj neuvádějte do provozu. ■ Poškozené kabely nebo přípojky nechte vyměnit autorizovaným odborným personálem nebo zákaznickým servisem. ■ Děti starší 8 let a osoby s omezenými fyzickými, smyslovými nebo mentálními schopnostmi či nedostatkem zkušeností a znalostí smí používat tento přístroj pouze pod dohledem nebo pokud byly poučeny o bezpečném používání přístroje a porozuměly z toho vyplývajícímu nebezpečí. Děti si nesmí s přístrojem hrát. Čištění a uživatelskou údržbu nesmí provádět děti bez dozoru. ■ Opravy na přístroji nechte provádět pouze autorizovanými odbornými firmami nebo zákaznickým servisem. V důsledku neodborných oprav může dojít ke vzniku závažných nebezpečí pro uživatele. Navíc zanikne nárok na záruku. ■ Neprovádějte na přístroji žádné neoprávněné změny ani úpravy. ■ Chraňte přístroj před vlhkostí a vniknutím kapalin. Na přístroj ani vedle něj nepokládejte žádné předměty (např. vázy) naplněné kapalinou. ■ Udržujte přístroj mimo dosah otevřeného ohně a nepokládejte svíčky na přístroj ani v jeho blízkosti. Tím zabráníte šíření požárů. ■ Pokud přístroj přenesete rychle z teplého do studeného, nebo z chladného do teplého prostředí, nechte ho na 30 minut aklimatizovat. ■ NEBEZPEČÍ! Obalový materiál není hračka pro děti! Uchovávejte všechen obalový materiál mimo dosah dětí. Hrozí nebezpečí udušení! SND 3600 D2 CZ │ 101 ■ Uvedení do provozu Kontrola rozsahu dodávky (Zobrazení viz výklopné strany) Rozsah dodávky se skládá z následujících komponent: ▯ ▯ ▯ ▯ ▯ ▯ ▯ skener 1 x zásobník na diapozitivy 2 x držák na negativy programové CD čisticí kartáček kabel USB návod k obsluze ♦ Vyjměte všechny části z balení a odstraňte veškerý obalový materiál. UPOZORNĚNÍ ► Zkontrolujte kompletnost dodávky a zda není viditelně poškozena. ► V případě neúplné dodávky nebo poškození, vzniklého v důsledku vadného obalu nebo během přepravy, kontaktujte servisní poradenskou linku (viz kapitola Servis). Likvidace obalu Zvolený obalový materiál odpovídá hlediskům ochrany životního prostředí a likvidace, a je tudíž recyklovatelný. Již nepotřebný obalový materiál zlikvidujte podle místních platných předpisů. ■ 102 │ CZ SND 3600 D2 Zapojení do počítače Systémové požadavky Operační systém: Windows XP/Vista/7/8/10, Mac OS 10.6 - 10.12 Zásuvné místo: USB port (USB 2.0) ♦ Zasuňte micro USB konektor kabelu USB 8 do micro USB portu 3 skeneru. ♦ Zapojte USB konektor kabelu USB 8 do zapnutého počítače. Počítač rozpozná nový hardware a spustí automatickou instalaci ovladače. Tento proces může trvat cca jednu minutu. LED PWR svítí, jakmile byl skener správně zapojen. Instalace softwaru Instalace na Windows POZOR ► Při instalaci softwaru se mohou přepsat nebo změnit důležité soubory. Pro přístup k původním souborům v případě jistých problémů po instalaci byste měli před instalací softwaru vytvořit zálohu obsahu pevného disku. ♦ Vložte přiložené programové CD do jednotky CD počítače. Nabídka instalace se spustí automaticky. ♦ Ke spuštění instalace klikněte na tlačítko „Installation“. ♦ Nainstalujte software podle instrukcí na obrazovce. UPOZORNĚNÍ ► Pokud jste vypnuli funkci automatického spuštění a instalace se nespustí automaticky, spusťte instalaci dvojitým kliknutím na soubor „WinSetup.exe“ v hlavním adresáři CD. ♦ Po úspěšné instalaci můžete opustit nabídku kliknutím na tlačítko „Exit“. SND 3600 D2 CZ │ 103 ■ Instalace v systému Mac OS POZOR ► Při instalaci softwaru může dojít k přepsání nebo změně důležitých souborů. Pro přístup k původním souborům v případě jistých problémů po instalaci byste měli před instalací softwaru vytvořit zálohu obsahu pevného disku. ♦ Vložte přiložené programové CD do jednotky CD počítače Mac. ♦ Otevřete hlavní adresář programového CD. ♦ Přejděte do adresáře „Mac“. ♦ Spusťte instalaci dvojitým kliknutím na soubor „ImageScan.dmg“. ♦ Nainstalujte software podle instrukcí na obrazovce. Ovládací prvky (Zobrazení viz výklopné strany) LED PWR 2 tlačítko SCAN 3 mikro USB port 4 zasunutí pro držák negativů resp. zásobník na diapozitivy 5 držák negativů 6 zásobník na diapozitivy 7 čisticí kartáček 8 kabel USB (USB pro mikro USB) ■ 104 │ CZ SND 3600 D2 Obsluha a provoz Vložení negativů ♦ Odblokujte uzávěr na přední straně držáku negativů 5 a otevřete držák. ♦ Vložte proužky s negativy správnou stranu do držáku. Dbejte na to, aby otvory na proužky s negativy ležely na příslušných upevňovacích výčnělcích držáku tak, aby se proužek s negativy nemohl posunout. ♦ Zavřete držák, až víko zaskočí. ♦ Zasuňte nyní držák negativů 5 s trojúhelníkovou značkou dopředu a viditelně do pravého zasunutí 4 (viz obrázek 1). ♦ Zasuňte držák negativů 5 tak daleko do pravého zasunutí 4 , až citelně zaskočí v první poloze. Pro další negativy zasuňte držák negativů 5 dál, až citelně zaskočí v následné poloze. Obrázek 1 SND 3600 D2 Obrázek 2 CZ │ 105 ■ Vložení diapozitivů ♦ Vložte diapozitivy správnou stranou do k tomu určené šachty zásobníku na diapozitivy 6 . Do zásobníku na diapozitivy lze vložit cca 10-12 diapozitivů (podle velikosti). ♦ Zasuňte zásobník na diapozitivy 6 průzorem nejprve do pravého zasunutí 4 . Dbejte při tom na to, aby trojúhelníková značka byla vpředu a viditelná (viz obrázek 2). Šoupátkem nacházejícím se bočně na zásobníku na diapozitivy 6 se do skeneru zasunou diapozitivy nacházející se v šachtě. ♦ Za tím účelem odsuňte nejdříve šoupátko až na doraz od skeneru. Poté šoupátko opět mírně posuňte směrem ke skeneru. UPOZORNĚNÍ ► Diapozitiv nacházející se ve skeneru se tím z přístroje vysune a do zobrazovací oblasti skeneru se zasune nový diapozitiv. ► Dbejte na to, aby se nový diapozitiv do skeneru zasouval pomalu. Pokud se toto stane příliš rychle, může diapozitiv vyklouznout přes zobrazovací oblast skeneru ven. ♦ Jakmile nechcete více skenovat další diapozitivy, vyjměte zásobník na diapozitivy 6 ze zasunutí 4 . Vyjměte poslední diapozitiv zespodu ze zobrazovacího okénka zásobníku na diapozitivy 6 . ■ 106 │ CZ SND 3600 D2 Digitalizace negativů / diapozitivů Software Windows ♦ Spusťte program „Image Scan Tool“ dvojitým kliknutím na symbol programu na ploše nebo vyberte příslušnou položku v nabídce Start. Program se otevře přímo v hlavním okně. A Vyberte zde typ (negativ, diapozitiv nebo černo/bílý), který chcete použít. B Vyberte formát (JPG nebo TIFF), v němž chcete obrázky uložit. C Zde vyberte rozlišení: Standard: 2592 x 1680 pixelů; interpolováno: 5184 x 3360 pixelů D Pro skenování snímku klikněte na toto tlačítko nebo přímo stiskněte tlačítko SCAN 2 . E K vymazání aktuálně označeného snímku klikněte na toto tlačítko. F Zde se zobrazí aktuálně označený snímek. SND 3600 D2 CZ │ 107 ■ G K zrcadlovému zobrazení aktuálně označeného snímku klikněte na toto tlačítko. H K otáčení aktuálně označeného snímku ve směru hodinových ručiček klikněte na toto tlačítko. I K uložení zaznamenaných snímků klikněte na toto tlačítko. V případě zadání nesprávné cesty k místu uložení se objeví výstražné hlášení. J K ukončení programu klikněte na toto tlačítko. K Ke konfiguraci nastavení barev a jasu před skenováním snímku klikněte na toto tlačítko. Přizpůsobení se zobrazí v živém náhledu. L K výběru složky pro uložení naskenovaných snímků klikněte na toto tlačítko. M Zde se zobrazí složka, do které se uloží naskenované snímky. N Zde se zobrazí již naskenované snímky, které dosud nebyly ještě uloženy. Aktuálně označený snímek se znázorní se zeleným rámečkem a zobrazí se v okně (F). O Zde se zobrazí živý náhled na vložené negativy/diapozitivy. ■ 108 │ CZ SND 3600 D2 Nastavení barev a jasu ♦ Podle potřeby nastavte barvy a jas kliknutím na tlačítko „Color/ Brightness Adjustment“ (K). Otevře se okno nastavení. ♦ Přesouvejte posuvníkem „Brightness“ pro nastavení jasu mezi -64 a 64. ♦ Přesouvejte třemi posuvníky „Color Balance“ pro nastavení hodnot RGB mezi -6 a 6. ♦ K obnovení standardních hodnot klikněte na tlačítko „Default“. ♦ Pro převzetí nastavených hodnot a zavření okna nastavení klikněte na tlačítko „Exit“. SND 3600 D2 CZ │ 109 ■ Software Mac ♦ Spusťte program „ImageScan“ dvojitým kliknutím na symbol programu. Program se otevře přímo v hlavním okně. A Vyberte zde typ (negativ, diapozitiv nebo černo/bílý), který chcete použít. B Vyberte formát (JPG nebo TIFF), v němž chcete obrázky uložit. C Zde vyberte rozlišení: Standard: 2592 x 1680 pixelů Interpolováno: 5184 x 3360 pixelů D Pro skenování snímku klikněte na toto tlačítko nebo přímo stiskněte tlačítko SCAN 2 . E K vymazání aktuálně označeného snímku klikněte na toto tlačítko. F Zde se zobrazí aktuálně označený snímek. ■ 110 │ CZ SND 3600 D2 G K zrcadlovému zobrazení aktuálně označeného snímku klikněte na toto tlačítko. H K otáčení aktuálně označeného snímku ve směru hodinových ručiček klikněte na toto tlačítko. I K uložení zaznamenaných snímků klikněte na toto tlačítko. V případě zadání nesprávné cesty k místu uložení se objeví výstražné hlášení. J K ukončení programu klikněte na toto tlačítko. K K vykonání nastavení barev a jasu před skenováním snímku klikněte na toto tlačítko. Přizpůsobení se zobrazí v živém náhledu. L K výběru složky pro uložení naskenovaných snímků klikněte na toto tlačítko. M Zde se zobrazí složka, do které se uloží naskenované snímky. N Zde se zobrazí již naskenované snímky, které dosud nebyly ještě uloženy. Aktuálně označený snímek se znázorní se zeleným rámečkem a zobrazí se v okně (F). O Zde se zobrazí živý náhled na vložené negativy/diapozitivy. SND 3600 D2 CZ │ 111 ■ Nastavení barev a jasu ♦ Podle potřeby nastavte barvy a jas kliknutím na tlačítko „Color/Brightness Adjustment“ (K). Otevře se okno nastavení. ♦ Přesouvejte posuvníkem „Brightness“ pro nastavení jasu mezi 0 a 255. ♦ Přesouvejte třemi posuvníky „Color Balance“ pro nastavení hodnot RGB mezi 0 a 255. ♦ K obnovení standardních hodnot klikněte na tlačítko „Default“. ♦ Pro převzetí nastavených hodnot a zavření okna nastavení klikněte na tlačítko „Exit“. Po použití ♦ Vyjměte držák negativů 5 tak, že jej kompletně přesunete přístrojem. ♦ Vyjměte zásobník na diapozitivy 6 tím, že jej opět vytáhnete z pravého zasunutí 4 . ♦ Vytáhněte kabel USB 8 z USB portu počítače a skeneru. ■ 112 │ CZ SND 3600 D2 Odstranění závad Následující tabulka pomůže při hledání a odstranění drobných závad: Závada LED PWR nesvítí. Špatná kvalita snímku. Naskenované snímky jsou rozmazané. Možná příčina Odstranění Přístroj není správně zapojen. Zapojte přístroj. Prach na podsvícení skeneru. Očistěte podsvícení (viz kapitola Čištění). Prach na filmu resp. diapozitivu. Očistěte film resp. diapozitiv. Čočka skeneru je zamlžená z důvodů teplotních rozdílů. Vyčkejte, až se přístroj aklimatizuje na pokojovou teplotu. UPOZORNĚNÍ ► Pokud nemůžete problém vyřešit výše uvedenými kroky, obraťte se na zákaznický servis (viz kapitola Servis). SND 3600 D2 CZ │ 113 ■ Čištění POZOR ► Při čištění zabraňte vniknutí vlhkosti do přístroje, aby nedošlo k jeho neopravitelnému poškození. ♦ Kryt přístroje čistěte výhradně mírně navlhčeným hadříkem a jemným čisticím prostředkem. ♦ Očistěte povrch podsvícení uvnitř přístroje čisticím kartáčkem 7 . Za tím účelem zasuňte čisticí kartáček čisticí plochou směrem dolů pouze do pravého zasunutí 4 (viz obrázek 3). 4 7 Obrázek 3 ■ 114 │ CZ SND 3600 D2 Skladování/likvidace Skladování při nepoužívání ♦ Skladujte přístroj v suchém a bezprašném prostředí bez přímého slunečního záření. Likvidace přístroje Vedle uvedený symbol přeškrtnuté pojízdné popelnice označuje, že tento přístroj podléhá směrnici č. 2012/19/EU. Tato směrnice uvádí, že tento přístroj se na konci doby svého použití nesmí zlikvidovat s běžným domovním odpadem, ale musí se odevzdat v určených sběrných místech či dvorech nebo podnicích oprávněných k nakládání s odpady. Tato likvidace je pro Vás zdarma. Chraňte životní prostředí a zajistěte odbornou likvidaci přístroje. Další informace získáte u místního podniku oprávněného k nakládání s odpady nebo městské resp. místní správy. SND 3600 D2 CZ │ 115 ■ Dodatek Technické údaje Provozní napětí/odběr proudu Rozhraní Provozní teplota Vlhkost (bez kondenzace) Rozměry (š x v x h) Hmotnost (bez příslušenství) 5V / 500 mA (přes USB port) USB 2.0 +5 - +40 °C ≤ 75 % cca 9,4 x 16,9 x 10,4 cm cca 450 g Obrazový snímač 5Mpix senzor CMOS Oblast zaostřování Pevné zaostřování Ovládání jasu Automaticky Kompenzace barev Automaticky Rozlišení Metoda skenování Zdroj světla ■ 116 │ CZ Standard: 2592 x 1680 pixelů Interpolováno: 5184 x 3360 pixelů Single pass Protisluneční clona (3 bílé LED) SND 3600 D2 Upozornění k prohlášení o shodě EU Tento přístroj vyhovuje základní požadavkům a ostatním relevantním předpisům evropské směrnice č. 2014/30/EU pro elektromagnetickou kompatibilitu a směrnice RoHS č. 2011/65/EU. Kompletní prohlášení o shodě EU obdržíte u dovozce. Záruka společnosti Kompernass Handels GmbH Vážená zákaznice, vážený zákazníku, na tento přístroj získáváte záruku v trvání 3 let od data zakoupení. V případě závad tohoto výrobku máte zákonná práva vůči prodejci výrobku. Tato zákonná práva nejsou omezena naší níže uvedenou zárukou. Záruční podmínky Záruční doba začíná plynout dnem nákupu. Dobře uschovejte originál pokladního lístku. Tento doklad je potřebný jako důkaz o koupi. Pokud do tří let od data zakoupení tohoto výrobku dojde k vadě materiálu nebo výrobní závadě, pak Vám podle našeho uvážení výrobek zdarma opravíme nebo vyměníme. Předpokladem této záruky je, že bude během tříleté lhůty předložen vadný přístroj a doklad o koupi (pokladní lístek) a stručně se popíše v čem závada spočívá a kdy se vyskytla. Vztahuje-li se na závadu naše záruka, obdržíte zpět buď opravený nebo nový produkt. Opravou nebo výměnou výrobku nezačne plynout nová záruční doba. SND 3600 D2 CZ │ 117 ■ Záruční doba a zákonné nároky vyplývající ze závad Záručním plněním se záruční doba neprodlužuje. To platí i pro vyměněné a opravené součásti. Poškození nebo vady vyskytující se případně již při nákupu se musí oznámit ihned po vybalení. Po uplynutí záruční doby podléhají veškeré opravy zpoplatnění. Rozsah záruky Přístroj byl vyroben pečlivě podle přísných směrnic kvality a před expedicí byl svědomitě vyzkoušen. Záruka se vztahuje na materiálové nebo výrobní vady. Tato záruka se nevztahuje na součásti produktu, které jsou vystaveny normálnímu opotřebení, a proto je lze považovat za opotřebovatelné díly nebo za poškození křehkých součástí jako jsou např. spínače, akumulátory, formy na pečení nebo části, které jsou vyrobeny ze skla. Tato záruka zaniká, pokud je výrobek poškozen, nebyl řádně používán nebo udržován. Pro zajištění správného používání výrobku se musí přesně dodržovat všechny pokyny uvedené v návodu k obsluze. Účelům použití a úkonům, které se v návodu k obsluze nedoporučují nebo se před nimi varuje, je třeba se bezpodmínečně vyhnout. Výrobek je určen pouze pro soukromé účely a ne pro komerční použití. Při nesprávném a neodborném používání, při použití násilí a při zásazích, které nebyly provedeny našimi autorizovanými servisními provozovnami, záruční nároky zanikají. ■ 118 │ CZ SND 3600 D2 Vyřízení v případě záruky Pro zajištění rychlého Vaší žádosti postupujte podle následujících pokynů: ■ Pro všechny dotazy mějte připraven pokladní lístek a číslo výrobku (např. IAN 12345) jako doklad o koupi. ■ Číslo výrobku naleznete na typovém štítku, rytině, na titulní straně svého návodu (vlevo dole) nebo jako nálepku na zadní nebo spodní straně. ■ Pokud by se měly vyskytovat funkční vady nebo jiné závady, kontaktujte nejprve níže uvedené servisní oddělení telefonicky nebo e-mailem. ■ Výrobek, zaevidovaný jako vadný výrobek pak můžete při přiložení dokladu o nákupu (pokladní lístek) a při uvedení, v čem spočívá vada a kdy k ní došlo, poslat výrobek pro Vás bez poštovného na adresu, kterou Vám oznámí servis. Na webových stránkách www.lidl-service.com si můžete stáhnout tyto a mnoho dalších příruček, videí o výrobku a software. SND 3600 D2 CZ │ 119 ■ Servis Servis Česko Tel.: 800143873 E-Mail: [email protected] IAN 289910 Dovozce Dbejte prosím na to, že následující adresa není adresou servisu. Kontaktujte nejprve uvedený servis. KOMPERNASS HANDELS GMBH BURGSTRASSE 21 DE - 44867 BOCHUM NĚMECKO www.kompernass.com ■ 120 │ CZ SND 3600 D2 Índice Introducción . . . . . . . . . . . . . . . . . . . . . . . . . . . . . . . . .123 Información sobre estas instrucciones de uso. . . . . . . . . . . . . . . 123 Indicaciones sobre las marcas comerciales . . . . . . . . . . . . . . . . 123 Uso previsto . . . . . . . . . . . . . . . . . . . . . . . . . . . . . . . . . . . . . . . . 123 Indicaciones de advertencia utilizadas . . . . . . . . . . . . . . . . . . . 124 Indicaciones de seguridad . . . . . . . . . . . . . . . . . . . . .125 Puesta en funcionamiento . . . . . . . . . . . . . . . . . . . . .126 Comprobación del volumen de suministro . . . . . . . . . . . . . . . . . 126 Desecho del embalaje . . . . . . . . . . . . . . . . . . . . . . . . . . . . . . . . 126 Conexión a un ordenador . . . . . . . . . . . . . . . . . . . . . . . . . . . . . 127 Instalación del software . . . . . . . . . . . . . . . . . . . . . . . . . . . . . . . 127 Elementos de mando . . . . . . . . . . . . . . . . . . . . . . . . .129 Manejo y funcionamiento. . . . . . . . . . . . . . . . . . . . . .129 Inserción de tiras de negativos . . . . . . . . . . . . . . . . . . . . . . . . . . 129 Inserción de diapositivas . . . . . . . . . . . . . . . . . . . . . . . . . . . . . . 130 Digitalización de negativos/diapositivas . . . . . . . . . . . . . . . . . . 131 Después del uso . . . . . . . . . . . . . . . . . . . . . . . . . . . . . . . . . . . . . 136 Eliminación de fallos . . . . . . . . . . . . . . . . . . . . . . . . . .137 Limpieza . . . . . . . . . . . . . . . . . . . . . . . . . . . . . . . . . . . .138 Almacenamiento/desecho . . . . . . . . . . . . . . . . . . . . .139 Almacenamiento cuando el aparato no esté en uso . . . . . . . . . 139 Desecho del aparato . . . . . . . . . . . . . . . . . . . . . . . . . . . . . . . . . 139 SND 3600 D2 ES │ 121 ■ Anexo . . . . . . . . . . . . . . . . . . . . . . . . . . . . . . . . . . . . . .140 Características técnicas . . . . . . . . . . . . . . . . . . . . . . . . . . . . . . . 140 Indicaciones sobre la Declaración de conformidad CE . . . . . . . 141 Garantía de Kompernass Handels GmbH . . . . . . . . . . . . . . . . . 141 Asistencia técnica . . . . . . . . . . . . . . . . . . . . . . . . . . . . . . . . . . . . 144 Importador . . . . . . . . . . . . . . . . . . . . . . . . . . . . . . . . . . . . . . . . . 144 ■ 122 │ ES SND 3600 D2 Introducción Información sobre estas instrucciones de uso Felicidades por la compra de su aparato nuevo. Ha adquirido un producto de alta calidad. Las instrucciones de uso forman parte del producto y contienen indicaciones importantes acerca de la seguridad, del uso y del desecho de este aparato. Antes de usar el producto, familiarícese con todas las indicaciones de manejo y de seguridad. Utilice el producto únicamente como se describe y para los ámbitos de aplicación indicados. Guarde siempre las instrucciones de uso cerca del producto para poder utilizarlas como material de consulta. Entregue todos los documentos, incluidas estas instrucciones de uso, cuando transfiera o venda el producto a terceros. Indicaciones sobre las marcas comerciales - USB® es una marca comercial registrada de USB Implementers Forum, Inc. - Microsoft®, Windows®, Windows® XP, Windows Vista®, Windows 7®, Windows 8® y Windows 10® son marcas comerciales registradas de Microsoft Corporation en EE. UU. y en otros países. - Mac OS X® es una marca registrada de Apple Inc. en EE. UU. y en otros países. - La marca SilverCrest y el nombre comercial pertenecen a su respectivo propietario. El resto de términos y productos pueden ser marcas comerciales o marcas comerciales registradas de sus respectivos propietarios. Uso previsto Este aparato es un dispositivo informático diseñado exclusivamente para el escaneado y la digitalización de negativos de películas y diapositivas para un uso no comercial. Cualquier uso diferente o que supere lo indicado se considerará contrario al uso previsto. Se excluyen las reclamaciones de cualquier tipo en relación con los daños causados por un uso contrario al uso previsto. El riesgo será responsabilidad exclusiva del usuario. SND 3600 D2 ES │ 123 ■ Indicaciones de advertencia utilizadas En estas instrucciones de uso se utilizan las siguientes indicaciones de advertencia: PELIGRO Una advertencia de este nivel de peligro indica una situación de peligro inminente. Si no se evita la situación de peligro, pueden producirse lesiones graves o incluso la muerte. ► Deben cumplirse las instrucciones de esta advertencia para evitar un peligro de lesiones graves o incluso mortales. ATENCIÓN Una advertencia de este nivel de peligro indica un posible daño material. Si no se evita la situación, pueden producirse daños materiales. ► Deben cumplirse las instrucciones de esta advertencia para evitar daños materiales. INDICACIÓN ► La indicación proporciona información adicional que facilita el manejo del aparato. ■ 124 │ ES SND 3600 D2 Indicaciones de seguridad ■ Antes de usar el aparato, compruebe si hay signos de daños externos visibles. No ponga en funcionamiento un aparato dañado o que se haya caído. ■ Si se daña el cable o las conexiones, solicite su sustitución al personal especializado autorizado o al servicio de asistencia técnica. ■ Este aparato puede ser utilizado por niños a partir de 8 años y por personas cuyas facultades físicas, sensoriales o mentales sean reducidas o carezcan de los conocimientos y de la experiencia necesaria siempre que sean vigilados o hayan sido instruidos correctamente sobre el uso seguro del aparato y hayan comprendido los peligros que entraña. Los niños no deben jugar con el aparato. Los niños no deben realizar las tareas de limpieza y mantenimiento del aparato sin supervisión. ■ Solo los talleres autorizados o el servicio de asistencia técnica pueden reparar el aparato. Las reparaciones indebidas pueden provocar riesgos considerables para los usuarios. Además, se anulará la garantía. ■ No realice cambios ni transformaciones por cuenta propia en el aparato. ■ Proteja el aparato frente a la humedad y la penetración de líquidos. No coloque objetos llenos de líquidos, (p. ej. jarrones) cerca del aparato. ■ Mantenga el aparato alejado de llamas abiertas y evite la colocación de velas encima o al lado del aparato. De esta manera, impedirá la propagación de incendios. ■ Si traslada el aparato rápidamente de un ambiente cálido a uno frío o viceversa, deje que se aclimate durante 30 min. ■ ¡PELIGRO! ¡Los materiales de embalaje no son un juguete! Mantenga los materiales de embalaje fuera del alcance de los niños. ¡Existe peligro de asfixia! SND 3600 D2 ES │ 125 ■ Puesta en funcionamiento Comprobación del volumen de suministro (Consulte las ilustraciones de las páginas desplegables) El volumen de suministro consta de los siguientes componentes: ▯ ▯ ▯ ▯ ▯ ▯ ▯ Escáner 1 cargador de diapositivas 2 soportes para negativos CD del programa Cepillo de limpieza Cable USB Instrucciones de uso ♦ Extraiga todas las piezas del embalaje y deseche todo el material de embalaje. INDICACIÓN ► Compruebe la integridad del suministro y si hay daños visibles. ► Si el suministro está incompleto o se observan daños debido a un embalaje deficiente o al transporte, póngase en contacto con la línea directa de asistencia (consulte el capítulo Asistencia técnica). Desecho del embalaje El material de embalaje se ha seleccionado teniendo en cuenta criterios ecológicos y de desecho, por lo que es reciclable. Deseche el material de embalaje que ya no necesite según lo dispuesto por las normativas locales aplicables. ■ 126 │ ES SND 3600 D2 Conexión a un ordenador Requisitos del sistema Sistema operativo: Windows XP/Vista/7/8/10, Mac OS 10.6-10.12 Conexión: conexión USB (USB 2.0) ♦ Conecte el conector micro-USB del cable USB 8 al conector hembra micro-USB 3 del escáner. ♦ Conecte el conector USB del cable USB 8 a un ordenador encendido. El ordenador reconoce el nuevo hardware y empieza la instalación automática del controlador. Este proceso puede durar aprox. un minuto. El LED PWR se ilumina cuando el escáner se haya conectado correctamente. Instalación del software Instalación en Windows ATENCIÓN ► Al instalar el software, pueden sobrescribirse o modificarse archivos importantes. Para poder acceder a los archivos originales en caso de haber problemas tras la instalación, debe realizar una copia de seguridad del contenido del disco duro antes de instalar el software. ♦ Inserte el CD del programa suministrado en la unidad de CD de su ordenador. Se abre automáticamente el menú de instalación. ♦ Haga clic en el botón “Installation” para empezar con la instalación. ♦ Instale el software siguiendo las indicaciones que aparecen en la pantalla. SND 3600 D2 ES │ 127 ■ INDICACIÓN ► Si ha desactivado la función de inicio automático y el proceso de instalación no empieza automáticamente, inicie dicho proceso haciendo doble clic en el archivo "WinSetup.exe" que encontrará en el directorio principal del CD. ♦ Tras una instalación correcta, puede salir del menú haciendo clic en el botón “Exit”. Instalación en Mac OS ATENCIÓN ► Al instalar el software, pueden sobrescribirse o modificarse archivos importantes. Para poder acceder a los archivos originales en caso de haber problemas tras la instalación, debe realizar una copia de seguridad del contenido del disco duro antes de instalar el software. ♦ Inserte el CD de programa suministrado en la unidad de CD de su ordenador Mac. ♦ Abra el directorio principal del CD de programa. ♦ Pase al directorio “Mac”. ♦ Inicie el proceso de instalación haciendo doble clic en el archivo “ImageScan.dmg”. ♦ Instale el software siguiendo las indicaciones que aparecen en la pantalla. ■ 128 │ ES SND 3600 D2 Elementos de mando (Consulte las ilustraciones de las páginas desplegables) LED PWR 2 Botón SCAN 3 Conector hembra micro-USB 4 Ranura para el soporte de negativos o el cargador de diapositivas 5 Soporte de negativos 6 Cargador de diapositivas 7 Cepillo de limpieza 8 Cable USB (USB y micro-USB) Manejo y funcionamiento Inserción de tiras de negativos ♦ Desbloquee el cierre de la parte delantera del soporte de negativos 5 y abra el soporte. ♦ Inserte las tiras de negativos del lado correcto en el soporte. Procure enganchar las perforaciones de los negativos en las pestañas correspondientes del soporte para que las tiras de negativos queden fijas. ♦ Cierre el soporte hasta que encastre la tapa. ♦ A continuación, inserte el soporte de negativos 5 con la marca triangular hacia delante y visible en la ranura 4 derecha (consulte la figura 1). ♦ Deslice el soporte de negativos 5 en la ranura 4 derecha hasta que encastre audiblemente en la primera posición. Para añadir negativos, siga deslizando el soporte de negativos 5 hasta que encastre audiblemente en la siguiente posición. SND 3600 D2 ES │ 129 ■ Figura 1 Figura 2 Inserción de diapositivas ♦ Coloque las diapositivas del lado correcto en el alojamiento previsto del cargador de diapositivas 6 . Según el tamaño, pueden colocarse aprox. 10-12 diapositivas en el cargador de diapositivas. ♦ Introduzca el cargador de diapositivas 6 con la mirilla primero en la ranura 4 derecha. Al hacerlo, observe que la marca triangular esté hacia delante y sea visible (consulte la figura 2). Con el desplazador situado en el lateral del cargador de diapositivas 6 se introducirán en el escáner una a una las diapositivas que se encuentren en el alojamiento. ♦ Para ello, tire primero del desplazador hasta el tope alejándolo del escáner. A continuación, vuelva a mover el desplazador con cuidado en dirección al escáner. INDICACIÓN ► La diapositiva que se encuentre en el escáner se extraerá del aparato y se introducirá una nueva diapositiva en la zona de visión del escáner. ► Introduzca lentamente cada nueva diapositiva en el escáner. Si lo hace con demasiada rapidez, la diapositiva puede salirse de la zona de visión del escáner. ■ 130 │ ES SND 3600 D2 ♦ Cuando ya no quiera escanear más diapositivas, retire el cargador de diapositivas 6 de la ranura 4 . Retire la última diapositiva desde abajo de la mirilla del cargador de diapositivas 6 . Digitalización de negativos/diapositivas Software Windows ♦ Inicie el programa “Image Scan Tool” haciendo doble clic en el acceso directo del programa en el escritorio o seleccionando la entrada correspondiente en el menú de inicio. El programa se abre directamente en la ventana principal. A Seleccione aquí el tipo (negativo, diapositiva o blanco y negro) que desea usar. B Seleccione aquí el formato de archivo (JPG o TIFF) con el que desee guardar las imágenes. C Seleccione aquí la resolución: Estándar: 2592 x 1680 píxeles; Interpolada: 5184 x 3360 píxeles SND 3600 D2 ES │ 131 ■ D Haga clic en este botón o pulse directamente el botón SCAN 2 para escanear una imagen. E Haga clic en este botón para eliminar la imagen seleccionada en ese momento. F Aquí se le muestra la imagen seleccionada en ese momento. G Haga clic en este botón para reflejar la imagen seleccionada en ese momento. H Haga clic en este botón para girar en sentido antihorario la imagen seleccionada en ese momento. I Haga clic en este botón para guardar las imágenes registradas. Al introducir una ruta de almacenamiento incorrecta, aparece una advertencia. J Haga clic en este botón para finalizar el programa. K Haga clic en este botón para realizar ajustes de color y brillo antes de escanear la imagen. Los ajustes se mostrarán en la visualización en tiempo real. L Haga clic en este botón para seleccionar una carpeta en la que guardar las imágenes escaneadas. M Aquí se le mostrará la carpeta en la que se van a guardar las imágenes escaneadas. N Aquí se mostrarán las imágenes ya escaneadas que aún no se han guardado. La imagen seleccionada en ese momento se representará con un marco verde y se mostrará en la ventana (F). O Aquí se visualiza en tiempo real el negativo o la diapositiva que se ha insertado. ■ 132 │ ES SND 3600 D2 Ajustes de color y brillo ♦ De ser necesario, ajuste los colores y el brillo haciendo clic en el botón “Color/Brightness Adjustment” (K). Se abrirá una ventana de ajustes. ♦ Mueva el control deslizante “Brightness” para ajustar el brillo entre -64 y 64. ♦ Mueva los tres controles deslizantes “Color Balance” para ajustar los valores de RGB entre -6 y 6. ♦ Para restablecer los valores predeterminados, haga clic en el botón “Default”. ♦ Para aceptar los valores ajustados y cerrar la ventana de ajustes, haga clic en el botón “Exit”. SND 3600 D2 ES │ 133 ■ Software Mac ♦ Inicie el programa “ImageScan” haciendo doble clic en el símbolo del programa. El programa se abre directamente en la ventana principal. A Seleccione aquí el tipo (negativo, diapositiva o blanco y negro) que desea usar. B Seleccione aquí el formato de archivo (JPG o TIFF) con el que desee guardar las imágenes. C Seleccione aquí la resolución: Estándar: 2592 x 1680 píxeles Interpolada: 5184 x 3360 píxeles D Haga clic en este botón o pulse directamente el botón SCAN 2 para escanear una imagen. E Haga clic en este botón para eliminar la imagen seleccionada en ese momento. ■ 134 │ ES SND 3600 D2 F Aquí se le muestra la imagen seleccionada en ese momento. G Haga clic en este botón para reflejar la imagen seleccionada en ese momento. H Haga clic en este botón para girar en sentido antihorario la imagen seleccionada en ese momento. I Haga clic en este botón para guardar las imágenes registradas. Al introducir una ruta de almacenamiento incorrecta, aparece una advertencia. J Haga clic en este botón para finalizar el programa. K Haga clic en este botón para realizar ajustes de color y brillo antes de escanear la imagen. Los ajustes se mostrarán en la visualización en tiempo real. L Haga clic en este botón para seleccionar una carpeta en la que guardar las imágenes escaneadas. M Aquí se le mostrará la carpeta en la que se van a guardar las imágenes escaneadas. N Aquí se mostrarán las imágenes ya escaneadas que aún no se han guardado. La imagen seleccionada en ese momento se representará con un marco verde y se mostrará en la ventana (F). O Aquí se visualiza en tiempo real el negativo o la diapositiva que se ha insertado. SND 3600 D2 ES │ 135 ■ Ajustes de color y brillo ♦ De ser necesario, ajuste los colores y el brillo haciendo clic en el botón “Color/Brightness Adjustment” (K). Se abrirá una ventana de ajustes. ♦ Mueva el control deslizante “Brightness” para ajustar el brillo entre 0 y 255. ♦ Mueva los tres controles deslizantes “Color Balance” para ajustar los valores de RGB entre 0 y 255. ♦ Para restablecer los valores predeterminados, haga clic en el botón “Default”. ♦ Para aceptar los valores ajustados y cerrar la ventana de ajustes, haga clic en el botón “Exit”. Después del uso ♦ Retire el soporte de negativos 5 pasándolo por completo a través del aparato. ♦ Retire el cargador de diapositivas 6 volviéndolo a extraer de la ranura 4 derecha. ♦ Desenchufe el cable USB 8 de la conexión USB de su ordenador y del escáner. ■ 136 │ ES SND 3600 D2 Eliminación de fallos La siguiente tabla ayuda a la localización y solución de averías menores: Fallo El LED PWR ilumina. no se La calidad de las imágenes no es buena. Las imágenes escaneadas están borrosas. Posible causa Solución El aparato no está conectado correctamente. Conecte el aparato. Hay polvo en la retroiluminación del escáner. Limpie la retroiluminación (consulte el capítulo "Limpieza"). Hay polvo en la película o la diapositiva. Limpie la película o la diapositiva. La lente del escáner se ha empañado a causa de diferencias de temperatura. Espere hasta que el aparato se haya aclimatado a la temperatura ambiente. INDICACIÓN ► Si no logra solucionar el problema con los pasos indicados, póngase en contacto con la línea directa de asistencia (consulte el capítulo Asistencia técnica). SND 3600 D2 ES │ 137 ■ Limpieza ATENCIÓN ► Durante la limpieza, asegúrese de que no penetre humedad en el aparato para evitar daños irreparables. ♦ Limpie la carcasa exclusivamente con un paño ligeramente húmedo y con un producto de limpieza suave. ♦ Limpie la superficie de la retroiluminación en el interior del aparato con un cepillo de limpieza 7 . Para ello, deslice el cepillo de limpieza con la superficie de limpieza hacia abajo solo en la ranura derecha 4 (consulte la figura 3). 4 7 Figura 3 ■ 138 │ ES SND 3600 D2 Almacenamiento/desecho Almacenamiento cuando el aparato no esté en uso ♦ Guarde el aparato en un entorno seco y sin polvo protegido de la radiación solar directa. Desecho del aparato El símbolo adyacente de un contenedor tachado sobre unas ruedas indica que este aparato está sujeto a la Directiva 2012/19/EU. Dicha Directiva estipula que el aparato no debe desecharse con la basura doméstica normal al finalizar su vida útil, sino en puntos de recogida, puntos limpios o empresas de desechos previstas especialmente para ello. Este tipo de desecho es gratuito. Cuide el medio ambiente y deseche el aparato de la manera adecuada. Para obtener más información al respecto, póngase en contacto con las instalaciones locales de desechos o con las administraciones públicas competentes. SND 3600 D2 ES │ 139 ■ Anexo Características técnicas Tensión de funcionamiento/ consumo de corriente 5V /500 mA (mediante conexión USB) Interfaz USB 2.0 Temperatura de funcionamiento 5-40 °C Humedad (sin condensación) ≤ 75 % Dimensiones (an. x al. x pr.) Aprox. 9,4 x 16,9 x 10,4 cm Peso (sin accesorios) Fotosensor Aprox. 450 g Sensor CMOS de 5 megapíxeles Rango de enfoque Enfoque fijo Control de brillo Automático Balance de blancos Automático Resolución Método de escaneado Fuente de luz ■ 140 │ ES Estándar: 2592 x 1680 píxeles Interpolada: 5184 x 3360 píxeles Single pass (una sola pasada) Contraluz (3 LED blancos) SND 3600 D2 Indicaciones sobre la Declaración de conformidad CE Este aparato cumple los requisitos básicos y las demás normas relevantes de la Directiva de compatibilidad electromagnética 2014/30/EU y de la Directiva sobre restricciones a la utilización de determinadas sustancias peligrosas en aparatos eléctricos y electrónicos 2011/65/EU. Puede solicitarse la declaración de conformidad de la CE completa al importador. Garantía de Kompernass Handels GmbH Estimado cliente: Este aparato cuenta con una garantía de 3 años a partir de la fecha de compra. Si se detectan defectos en el producto, puede ejercer sus derechos legales frente al vendedor. Estos derechos legales no se ven limitados por la garantía descrita a continuación. Condiciones de la garantía El plazo de la garantía comienza con la fecha de compra. Guarde bien el comprobante de caja original, ya que lo necesitará como justificante de compra. Si dentro de un periodo de tres años a partir de la fecha de compra de este producto se detecta un defecto en su material o un error de fabricación, asumiremos la reparación o sustitución gratuita del producto a nuestra elección. La prestación de la garantía requiere la presentación del aparato defectuoso y del comprobante de caja, así como una breve descripción por escrito del defecto detectado y de las circunstancias en las que se haya producido dicho defecto, dentro del plazo de tres años. SND 3600 D2 ES │ 141 ■ Si el defecto está cubierto por nuestra garantía, le devolveremos el producto reparado o le suministraremos uno nuevo. La reparación o sustitución del producto no supone el inicio de un nuevo periodo de garantía. Duración de la garantía y reclamaciones legales por vicios La duración de la garantía no se prolonga por hacer uso de ella. Este principio también se aplica a las piezas sustituidas y reparadas. Si después de la compra del aparato, se detecta la existencia de daños o de defectos al desembalarlo, deben notificarse de inmediato. Cualquier reparación que se realice una vez finalizado el plazo de garantía estará sujeta a costes. Alcance de la garantía El aparato se ha fabricado cuidadosamente según estándares elevados de calidad y se ha examinado en profundidad antes de su entrega. La prestación de la garantía solo rige para defectos en los materiales o errores de fabricación. Esta garantía no cubre las piezas del producto normalmente sometidas al desgaste y que, en consecuencia, puedan considerarse piezas de desgaste ni los daños producidos en los componentes frágiles, p. ej., interruptores, baterías, moldes de horno o piezas de vidrio. Se anulará la garantía si el producto se daña o no se utiliza o mantiene correctamente. Para utilizar correctamente el producto, deben observarse todas las indicaciones especificadas en las instrucciones de uso. Debe evitarse cualquier uso y manejo que esté desaconsejado o frente al que se advierta en las instrucciones de uso. El producto está previsto exclusivamente para su uso privado y no para su uso comercial. En caso de manipulación indebida e incorrecta, uso de la fuerza y apertura del aparato por personas ajenas a nuestros centros de asistencia técnica autorizados, la garantía perderá su validez. SND 3600 D2 ■ 142 │ ES Proceso de reclamación conforme a la garantía Para garantizar una tramitación rápida de su reclamación, le rogamos que observe las siguientes indicaciones: ■ Mantenga siempre a mano el comprobante de caja y el número de artículo (p. ej., IAN 12345) como justificante de compra. ■ Podrá ver el número de artículo en la placa de características, grabado en el aparato, en la portada de las instrucciones (parte inferior izquierda) o en un adhesivo en la parte trasera o inferior del aparato. ■ Si se producen errores de funcionamiento u otros defectos, póngase primero en contacto con el departamento de asistencia técnica especificado a continuación por teléfono o por correo electrónico. ■ Podrá enviar el producto calificado como defectuoso junto con el justificante de compra (comprobante de caja) y la descripción del defecto y de las circunstancias en las que se haya producido de forma gratuita a la dirección de correo proporcionada. En www.lidl-service.com, podrá descargar este manual de usuario y muchos otros más, así como vídeos sobre los productos y software. SND 3600 D2 ES │ 143 ■ Asistencia técnica Servicio España Tel.: 902 59 99 22 (0,08 EUR/Min. + 0,11 EUR/llamada (tarifa normal)) (0,05 EUR/Min. + 0,11 EUR/llamada (tarifa reducida)) E-Mail: [email protected] IAN 289910 Importador Tenga en cuenta que la dirección siguiente no es una dirección de asistencia técnica. Póngase primero en contacto con el centro de asistencia técnica especificado. KOMPERNASS HANDELS GMBH BURGSTRASSE 21 DE - 44867 BOCHUM ALEMANIA www.kompernass.com ■ 144 │ ES SND 3600 D2 Índice Introdução . . . . . . . . . . . . . . . . . . . . . . . . . . . . . . . . . .147 Informações acerca deste manual de instruções . . . . . . . . . . . . 147 Indicações sobre marcas . . . . . . . . . . . . . . . . . . . . . . . . . . . . . . 147 Utilização correta . . . . . . . . . . . . . . . . . . . . . . . . . . . . . . . . . . . . 147 Indicações de aviso utilizadas . . . . . . . . . . . . . . . . . . . . . . . . . . 148 Instruções de segurança . . . . . . . . . . . . . . . . . . . . . . .149 Colocação em funcionamento . . . . . . . . . . . . . . . . . .150 Verificar o conteúdo da embalagem . . . . . . . . . . . . . . . . . . . . . 150 Eliminação da embalagem . . . . . . . . . . . . . . . . . . . . . . . . . . . . 150 Ligação a um computador . . . . . . . . . . . . . . . . . . . . . . . . . . . . . 151 Instalar o software . . . . . . . . . . . . . . . . . . . . . . . . . . . . . . . . . . . 151 Elementos de comando . . . . . . . . . . . . . . . . . . . . . . .153 Operação e funcionamento . . . . . . . . . . . . . . . . . . . .153 Introduzir tiras de película . . . . . . . . . . . . . . . . . . . . . . . . . . . . . 153 Introduzir os diapositivos . . . . . . . . . . . . . . . . . . . . . . . . . . . . . . 154 Digitalizar negativos/diapositivos . . . . . . . . . . . . . . . . . . . . . . . 155 Depois da utilização . . . . . . . . . . . . . . . . . . . . . . . . . . . . . . . . . 160 Resolução de falhas . . . . . . . . . . . . . . . . . . . . . . . . . .161 Limpeza . . . . . . . . . . . . . . . . . . . . . . . . . . . . . . . . . . . .162 Armazenamento/eliminação . . . . . . . . . . . . . . . . . . .163 Armazenamento quando o aparelho não estiver a ser utilizado . .163 Eliminação do aparelho . . . . . . . . . . . . . . . . . . . . . . . . . . . . . . . 163 SND 3600 D2 PT │ 145 ■ Anexo . . . . . . . . . . . . . . . . . . . . . . . . . . . . . . . . . . . . . .164 Dados técnicos . . . . . . . . . . . . . . . . . . . . . . . . . . . . . . . . . . . . . . 164 Indicações relativas à Declaração EU de Conformidade . . . . . 165 Garantia da Kompernass Handels GmbH . . . . . . . . . . . . . . . . . 165 Assistência Técnica . . . . . . . . . . . . . . . . . . . . . . . . . . . . . . . . . . . 167 Importador . . . . . . . . . . . . . . . . . . . . . . . . . . . . . . . . . . . . . . . . . 168 ■ 146 │ PT SND 3600 D2 Introdução Informações acerca deste manual de instruções Parabéns pela compra do seu novo aparelho. Optou por um produto de elevada qualidade. O manual de instruções é parte integrante deste produto. Este contém instruções importantes para a segurança, utilização e eliminação. Antes de utilizar o produto, familiarize-se com todas as instruções de operação e segurança. Utilize o produto apenas como descrito e nas áreas de aplicação indicadas. Guarde sempre o manual de instruções na proximidade do produto para futuras consultas. Ao transferir ou vender o produto a terceiros, entregue todos os respetivos documentos, incluindo este manual de instrução. Indicações sobre marcas - USB® é uma marca registada da USB Implementers Forum, Inc. - Microsoft®, Windows®, Windows® XP, Windows Vista®, Windows 7®, Windows 8® e Windows 10® são marcas comerciais registadas da Microsoft Corporation nos Estados Unidos da América e/ou noutros países. - Mac OS X® é uma marca registada da Apple Inc. nos EUA e noutros países. - A marca de fábrica SilverCrest e o nome comercial são propriedade do respetivo proprietário. Todos os outros nomes e produtos podem ser marcas ou marcas registadas dos respetivos proprietários. Utilização correta Este aparelho é um aparelho da tecnologia de informação e destina-se unicamente à utilização comercial para a digitalização de película e diapositivos. Qualquer utilização diferente ou fora do âmbito descrito é considerada incorreta. Excluem-se quaisquer direitos de garantia relativos a danos resultantes de uma utilização incorreta. O risco é assumido exclusivamente pelo utilizador. SND 3600 D2 PT │ 147 ■ Indicações de aviso utilizadas No presente manual de instruções são utilizadas as seguintes indicações de aviso: PERIGO Uma indicação de aviso deste nível de perigo identifica uma situação de perigo iminente. Se a situação de perigo não for evitada, existe perigo de ferimentos graves ou morte. ► Seguir as instruções desta indicação de aviso para evitar o perigo de ferimentos graves ou morte. ATENÇÃO Uma indicação de aviso deste nível de perigo identifica possíveis danos materiais. Se a situação não for evitada, existe perigo de danos materiais. ► Seguir as instruções desta indicação de aviso para evitar danos materiais. NOTA ► Uma nota fornece informações adicionais que facilitam o manuseamento do aparelho. ■ 148 │ PT SND 3600 D2 Instruções de segurança ■ Antes da utilização, verifique a existência de eventuais danos exteriores visíveis no aparelho. Não tente colocar em funcionamento um aparelho avariado ou que tenha sofrido uma queda. ■ Em caso de danos nos cabos ou ligações, solicite a sua substituição a um técnico autorizado ou à Assistência Técnica. ■ Este aparelho pode ser utilizado por crianças com idades superiores a 8 anos, bem como por pessoas com capacidades físicas, sensoriais ou mentais reduzidas, ou com falta de experiência e/ou conhecimento, caso sejam vigiadas ou instruídas sobre a utilização segura do aparelho e compreendam os perigos daí resultantes. As crianças não podem brincar com o aparelho. A limpeza e a manutenção pelo utilizador não podem ser realizadas por crianças não vigiadas. ■ Solicite as reparações do aparelho apenas a empresas autorizadas ou ao Serviço de Assistência Técnica. Reparações inadequadas podem acarretar perigos consideráveis para o utilizador. Além disso, a garantia extingue-se. ■ Não realize quaisquer transformações ou alterações no aparelho por iniciativa própria. ■ Proteja o aparelho contra humidade e infiltração de líquidos. Não coloque quaisquer objetos com líquidos (como por ex. jarras) ao lado do aparelho. ■ Mantenha o aparelho longe de chamas abertas e não coloque velas em cima ou junto do aparelho. Deste modo, evita a propagação de incêndios. ■ Se o aparelho for levado rapidamente de um ambiente quente para um ambiente frio, ou de um frio para um quente, deixe-o aclimatar-se durante 30 min. ■ PERIGO! Os materiais de embalagem não são brinquedos para crianças! Mantenha todos os materiais de embalagem fora do alcance das crianças. Perigo de asfixia! SND 3600 D2 PT │ 149 ■ Colocação em funcionamento Verificar o conteúdo da embalagem (Figuras, ver páginas desdobráveis) A embalagem inclui os seguintes componentes: ▯ ▯ ▯ ▯ ▯ ▯ ▯ Scanner 1 Carregador de diapositivos 2 Suportes para negativos CD do programa Escova de limpeza Cabo USB Manual de instruções ♦ Retire da embalagem todas as peças e remova todo o material de embalagem. NOTA ► Verifique a integralidade do produto fornecido e a existência de eventuais danos visíveis. ► Caso falte algum componente ou se verifiquem danos resultantes de embalagem defeituosa ou do transporte, contacte a linha direta de Assistência Técnica (ver capítulo Assistência Técnica). Eliminação da embalagem Os materiais de embalagem são selecionados tendo em conta os aspetos ambientais e técnicos relativamente à eliminação, sendo, por isso, recicláveis. Elimine os materiais de embalagem que já não são necessários de acordo com os regulamentos locais em vigor. ■ 150 │ PT SND 3600 D2 Ligação a um computador Requisitos do sistema Sistema operativo: Windows XP/Vista/7/8/10, Mac OS 10.6 - 10.12 Slot: Porta USB (USB 2.0) ♦ Ligue a ficha USB micro do cabo USB 8 à entrada USB micro 3 do scanner. ♦ Ligue a ficha USB do cabo USB 8 a um computador ligado. O computador reconhece o novo hardware e inicia a instalação automática do programa de controlo. Este processo pode durar aprox. um minuto. O LED PWR acende-se assim que o scanner tenha sido devidamente ligado. Instalar o software Instalação no Windows ATENÇÃO ► Durante a instalação do software, é possível que ficheiros importantes sejam substituídos ou alterados. Para poder aceder aos ficheiros originais, em caso de eventuais problemas depois da instalação , deve realizar uma cópia de segurança do conteúdo do seu disco rígido antes de instalar o software. ♦ Coloque o CD do programa fornecido na unidade de CD do seu computador. O menu de instalação inicia-se automaticamente. ♦ Clique no botão “Installation”, para iniciar a instalação. ♦ Instale o software de acordo com as instruções no ecrã. SND 3600 D2 PT │ 151 ■ NOTA ► Caso tenha desligado a função de arranque automático e o processo não comece automaticamente, inicie o processo de instalação clicando duas vezes no ficheiro "WinSetup.exe", no diretório principal do CD. ♦ Após a instalação bem-sucedida, pode abandonar o menu, clicando no botão “Exit”. Instalação no Mac OS ATENÇÃO ► Durante a instalação do software, é possível que ficheiros importantes sejam substituídos ou alterados. Para poder aceder aos ficheiros originais, em caso de eventuais problemas depois da instalação , deve realizar uma cópia de segurança do conteúdo do seu disco rígido antes de instalar o software. ♦ Coloque o CD do programa fornecido na unidade de CD do seu computador Mac. ♦ Abra o diretório principal do CD do programa. ♦ Mude para o diretório “Mac”. ♦ Inicie o processo de instalação clicando duas vezes no ficheiro “ImageScan.dmg”. ♦ Instale o software de acordo com as instruções no ecrã. ■ 152 │ PT SND 3600 D2 Elementos de comando (Figuras, ver páginas desdobráveis) LED PWR 2 Tecla SCAN 3 Entrada USB micro 4 Abertura para suporte de negativos ou carregador de diapositivos 5 Suporte de negativos 6 Carregador de diapositivos 7 Escova de limpeza 8 Cabo USB (USB para USB micro) Operação e funcionamento Introduzir tiras de película ♦ Desbloqueie o fecho na parte frontal do suporte de negativos 5 e abra o suporte. ♦ Introduza as tiras de película, no lado correto, no suporte. Verifique se os orifícios da tira de película estão colocados nos respetivos fixadores do suporte, para que esta não se possa deslocar. ♦ Feche o suporte até a tampa encaixar. ♦ Introduza então o suporte de negativos 5 , com a marcação triangular virada para a frente e visível, na abertura da direita 4 (ver fig. 1). ♦ Introduza o suporte de negativos 5 na abertura da direita 4 , até este encaixar de forma audível na primeira posição. Para passar para outros negativos, introduza o suporte de negativos 5 mais para dentro na abertura da direita , até este encaixar de forma audível na posição seguinte. SND 3600 D2 PT │ 153 ■ Figura 1 Figura 2 Introduzir os diapositivos ♦ Introduza os diapositivos, no lado correto, no compartimento do carregador de diapositivos 6 previsto para tal. É possível colocar aprox. 10-12 diapositivos (consoante o tamanho) no carregador de diapositivos. ♦ Introduza primeiro o carregador de diapositivos 6 com a janela de visualização na abertura direita 4 . Ao fazê-lo, verifique se a marcação triangular está virada para a frente e visível (ver figura 2). É possível introduzir os diapositivos existentes no compartimento, um por um, no scanner com o deslocador que se encontra lateralmente no carregador de diapositivos 6 . ♦ Movimente, para isso, primeiro o deslocador até ao batente, na direção contrária ao scanner. Em seguida, volte a movimentar o deslocador cuidadosamente na direção do scanner. NOTA ► Um diapositivo que se encontre no interior do scanner é assim expelido do aparelho e é introduzido um novo diapositivo na zona de visualização do scanner. ► Tenha em atenção que deve introduzir devagar um novo diapositivo no scanner. Se isto for realizado de forma demasiado rápida, o diapositivo pode ultrapassar a zona de visualização do scanner. SND 3600 D2 ■ 154 │ PT ♦ Quando já não pretender digitalizar mais diapositivos, retire o carregador de diapositivos 6 da abertura 4 . Retire o último diapositivo, por baixo, da janela de visualização do carregador de diapositivos 6 . Digitalizar negativos/diapositivos Software Windows ♦ Inicie o programa “Image Scan Tool” clicando duas vezes no ícone do programa, no ambiente de trabalho, ou selecione a entrada correspondente no menu Iniciar. O programa abre-se diretamente na janela principal. A Selecione aqui o tipo (negativo, diapositivo ou preto/branco) que pretender utilizar. B Selecione aqui o formato do ficheiro (JPG ou TIFF), no qual pretende guardar as imagens. C Selecione aqui a resolução: Standard: 2592 x 1680 píxeis; interpolados: 5184 x 3360 píxeis SND 3600 D2 PT │ 155 ■ D Clique neste botão ou prima diretamente a tecla SCAN 2 , para digitalizar uma imagem. E Clique neste botão, para apagar a imagem atualmente marcada. F Aqui é visualizada a imagem atualmente marcada. G Clique neste botão, para inverter a imagem atualmente marcada. H Clique neste botão, para rodar a imagem atualmente marcada no sentido dos ponteiros do relógio. I Clique neste botão, para armazenar as imagens realizadas. Se for introduzido um caminho de armazenamento inválido, é emitida uma mensagem de aviso. J Clique neste botão, para terminar o programa. K Clique neste botão, para regular a cor ou a luminosidade antes de digitalizar a imagem. As alterações são visualizadas numa imagem real. L Clique neste botão, para selecionar uma pasta onde armazenar as imagens digitalizadas. M Aqui é visualizada a pasta na qual as imagens digitalizadas vão ser armazenadas. N Aqui são visualizadas as imagens já digitalizadas que ainda não foram armazenadas. A imagem atualmente marcada é visualizada com um caixilho verde e na janela (F). O Aqui é visualizada uma imagem real do negativo/diapositivo colocado. ■ 156 │ PT SND 3600 D2 Regulação da cor e luminosidade ♦ Em caso de necessidade, regule as cores e a luminosidade, clicando no botão “Color/Brightness Adjustment” (K). Abre-se uma janela de configuração. ♦ Movimente o deslocador de regulação “Brightness”, para regular a luminosidade entre -64 e 64. ♦ Movimente os três deslocadores de regulação “Color Balance”, para regular os valores RGB entre -6 e 6. ♦ Para repor os valores standard, clique no botão “Default”. ♦ Para assumir os valores configurados e fechar a janela de configuração, clique no botão “Exit”. SND 3600 D2 PT │ 157 ■ Software Mac ♦ Inicie o programa “ImageScan” clicando duas vezes no ícone do programa. O programa abre-se diretamente na janela principal. A Selecione aqui o tipo (negativo, diapositivo ou preto/branco) que pretender utilizar. B Selecione aqui o formato do ficheiro (JPG ou TIFF), no qual pretende guardar as imagens. C Selecione aqui a resolução: Standard: 2592 x 1680 píxeis Interpolados: 5184 x 3360 píxeis D Clique neste botão ou prima diretamente a tecla SCAN 2 , para digitalizar uma imagem. E Clique neste botão, para apagar a imagem atualmente marcada. ■ 158 │ PT SND 3600 D2 F Aqui é visualizada a imagem atualmente marcada. G Clique neste botão, para inverter a imagem atualmente marcada. H Clique neste botão, para rodar a imagem atualmente marcada no sentido dos ponteiros do relógio. I Clique neste botão, para armazenar as imagens realizadas. Se for introduzido um caminho de armazenamento inválido, é emitida uma mensagem de aviso. J Clique neste botão, para terminar o programa. K Clique neste botão, para regular a cor ou a luminosidade antes de digitalizar a imagem. As alterações são visualizadas numa imagem real. L Clique neste botão, para selecionar uma pasta onde armazenar as imagens digitalizadas. M Aqui é visualizada a pasta na qual as imagens digitalizadas vão ser armazenadas. N Aqui são visualizadas as imagens já digitalizadas que ainda não foram armazenadas. A imagem atualmente marcada é visualizada com um caixilho verde e na janela (F). O Aqui é visualizada uma imagem real do negativo/diapositivo colocado. SND 3600 D2 PT │ 159 ■ Regulação da cor e luminosidade ♦ Em caso de necessidade, regule as cores e a luminosidade, clicando no botão “Color/Brightness Adjustment” (K). Abre-se uma janela de configuração. ♦ Movimente o deslocador de regulação “Brightness”, para regular a luminosidade entre 0 e 255. ♦ Movimente os três deslocadores de regulação “Color Balance”, para regular os valores RGB entre 0 e 255. ♦ Para repor os valores standard, clique no botão “Default”. ♦ Para assumir os valores configurados e fechar a janela de configuração, clique no botão “Exit”. Depois da utilização ♦ Remova o suporte dos negativos 5 , passando-o completamente pelo aparelho. ♦ Remova o carregador dos diapositivos 6 , retirando-o novamente da abertura direita 4 . ♦ Remova o cabo USB 8 da porta USB do seu computador e do scanner. ■ 160 │ PT SND 3600 D2 Resolução de falhas A tabela abaixo ajuda na localização e resolução de avarias mais pequenas: Falha Causa possível Resolução LED PWR não se acende. O aparelho não está corretamente montado. Ligue o aparelho. Pó na iluminação de fundo do scanner. Limpe a iluminação de fundo (ver capítulo "Limpeza"). Pó na película ou no diapositivo. Limpe a película ou o diapositivo. A lente do scanner está embaciada devido a oscilações de temperatura. Aguarde até que o aparelho se tenha aclimatizado à temperatura ambiente. Má qualidade de imagem. As imagens digitalizadas não estão nítidas. NOTA ► Caso não seja possível solucionar o problema com os passos acima mencionados, contacte o serviço de apoio ao cliente (ver capítulo Assistência Técnica). SND 3600 D2 PT │ 161 ■ Limpeza ATENÇÃO ► Certifique-se de que, durante a limpeza, não se infiltra humidade no aparelho, para evitar danos irreparáveis no mesmo. ♦ Limpe o corpo do aparelho apenas com um pano ligeiramente humedecido e um detergente suave. ♦ Limpe a superfície da iluminação de fundo no interior do aparelho com uma escova de limpeza 7 . Para este fim, introduza a escova de limpeza, com a superfície de limpeza para baixo, na abertura direita 4 (ver figura 3). 4 7 Figura 3 ■ 162 │ PT SND 3600 D2 Armazenamento/eliminação Armazenamento quando o aparelho não estiver a ser utilizado ♦ Guarde o aparelho num ambiente seco, isento de pó e sem radiação solar direta. Eliminação do aparelho O símbolo ao lado de um contentor de lixo com rodas riscado indica que este aparelho está sujeito à Diretiva Europeia 2012/19/EU. Esta Diretiva determina que não pode eliminar este aparelho, no fim da sua vida útil, no lixo doméstico, devendo entregá-lo em locais de recolha, especialmente concebidos para o efeito, depósitos de materiais recicláveis ou empresas de eliminação de resíduos. A eliminação é gratuita. Proteja o meio ambiente e elimine os resíduos de modo adequado. Mais informações poderão ser obtidas junto da sua empresa de eliminação de resíduos local ou das entidades municipais. SND 3600 D2 PT │ 163 ■ Anexo Dados técnicos Tensão de funcionamento/ consumo de corrente Interface 5V / 500 mA (por meio de porta USB) USB 2.0 Temperatura de funcionamento +5 - +40 °C Humidade (sem condensação) ≤ 75 % Dimensões (L x A x P) aprox. 9,4 x 16,9 x 10,4 cm Peso (sem acessórios) aprox. 450 g Sensor de imagem Zona de focalização Sensor CMOS de 5 megapíxeis Foco fixo Controlo de luminosidade Automático Comparação de cor Automático Resolução Método de digitalização Fonte de luz ■ 164 │ PT Standard: 2592 x 1680 píxeis Interpolados: 5184 x 3360 píxeis Single pass Contraluz (3 LEDs brancos) SND 3600 D2 Indicações relativas à Declaração EU de Conformidade Este aparelho encontra-se em conformidade com os requisitos fundamentais e com outras disposições relevantes da Diretiva relativa à Compatibilidade Eletromagnética 2014/30/EU e da Diretiva RSP 2011/65/EU. Pode obter a versão completa da Declaração EU de Conformidade junto do importador. Garantia da Kompernass Handels GmbH Estimada Cliente, Estimado Cliente, Este aparelho tem uma garantia de 3 anos a contar da data de compra. No caso deste produto ter defeitos, tem direitos legais contra o vendedor do produto. Estes direitos legais não são limitados pela nossa garantia que passamos a transcrever. Condições de garantia O prazo de garantia tem início na data da compra. Por favor, guarde bem o talão de compra original. Este documento é necessário como comprovativo da compra. Se dentro de três anos a partir da data de compra deste produto, ocorrer um defeito de material ou fabrico, o produto será reparado ou substituído por nós – consoante a nossa preferência – gratuitamente. Esta garantia parte do princípio que o aparelho defeituoso e o comprovativo da compra (talão de compra) são apresentados dentro do prazo de três anos e é descrito brevemente, por escrito, em que consiste o defeito e quando ocorreu. Se o defeito estiver coberto pela nossa garantia, receberá o produto reparado ou um novo produto. SND 3600 D2 PT │ 165 ■ Prazo de garantia e direitos legais O período de garantia não é prolongado pelo acionamento da mesma. Isto também se aplica a peças substituídas e reparadas. Danos e defeitos que possam eventualmente já existir no momento da compra devem ser imediatamente comunicados, após retirar o aparelho da embalagem. Expirado o período da garantia, quaisquer reparações necessárias estão sujeitas a pagamento. Âmbito da garantia O aparelho foi fabricado segundo diretivas de qualidade rigorosas, com o maior cuidado, e testado escrupulosamente antes da sua distribuição. A garantia abrange apenas defeitos de material ou de fabrico. Esta garantia não abrange peças do produto, que estão sujeitas ao desgaste normal e podem ser consideradas desta forma peças de desgaste, ou danos em peças frágeis, p. ex. interruptores, acumuladores, formas para bolos ou peças de vidro. Esta garantia perde a validade, se o produto for danificado, utilizado incorretamente ou se a manutenção tenha sido realizada indevidamente. Para garantir uma utilização correta do produto, é necessário cumprir todas as instruções contidas no manual de instruções. Ações ou fins de utilização que são desaconselhados, ou para os quais é alertado no manual de instruções, têm de ser impreterivelmente evitados. O produto foi concebido apenas para uso privado e não para uso comercial. A garantia extingue-se em caso de utilização incorreta, uso de força e intervenções que não tenham sido efetuadas pela nossa Filial de Assistência Técnica autorizada. ■ 166 │ PT SND 3600 D2 Procedimento em caso de acionamento da garantia Para garantir um processamento rápido do seu pedido, siga, por favor, as seguintes instruções: ■ Para todos os pedidos de esclarecimento, tenha à mão o talão de compra e o número do artigo (p. ex. IAN 12345) como comprovativo da compra. ■ O número do artigo consta na placa de características, numa impressão, na capa do seu manual de instruções (em baixo à esquerda) ou, como autocolante, no verso ou no lado inferior. ■ Caso ocorram falhas de funcionamento ou outros defeitos, contacte primeiro o Serviço de Assistência Técnico, indicado em seguida, telefonicamente ou por e-mail. ■ De seguida, pode enviar gratuitamente o produto registado como defeituoso, incluindo o comprovativo da compra (talão de compra) e indique o defeito e quando este ocorreu, para a morada do Serviço de Assistência Técnica que lhe foi indicada. Em www.lidl-service.com poderá descarregar este manual de instruções e muitos outros, bem como vídeos sobre os produtos e software. Assistência Técnica Assistência Portugal Tel.: 70778 0005 (0,12 EUR/Min.) E-Mail: [email protected] IAN 289910 SND 3600 D2 PT │ 167 ■ Importador Por favor, observe que a seguinte morada não é a morada do Serviço de Assistência Técnica. Primeiro entre em contacto com o Serviço de Assistência Técnica. KOMPERNASS HANDELS GMBH BURGSTRASSE 21 DE - 44867 BOCHUM ALEMANHA www.kompernass.com ■ 168 │ PT SND 3600 D2 KOMPERNASS HANDELS GMBH BURGSTRASSE 21 DE - 44867 BOCHUM GERMANY www.kompernass.com Stand der Informationen · Last Information Update · Version des informations Stand van de informatie · Stav informací · Estado de las informaciones Estado das informações: 08 / 2017 · Ident.-No.: SND3600D2-082017-3 IAN 289910 8-
 1
1
-
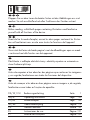 2
2
-
 3
3
-
 4
4
-
 5
5
-
 6
6
-
 7
7
-
 8
8
-
 9
9
-
 10
10
-
 11
11
-
 12
12
-
 13
13
-
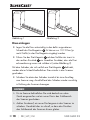 14
14
-
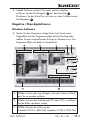 15
15
-
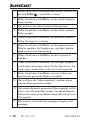 16
16
-
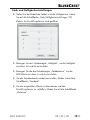 17
17
-
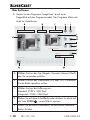 18
18
-
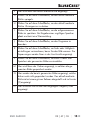 19
19
-
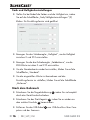 20
20
-
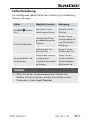 21
21
-
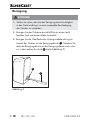 22
22
-
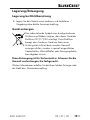 23
23
-
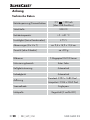 24
24
-
 25
25
-
 26
26
-
 27
27
-
 28
28
-
 29
29
-
 30
30
-
 31
31
-
 32
32
-
 33
33
-
 34
34
-
 35
35
-
 36
36
-
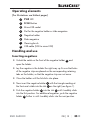 37
37
-
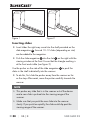 38
38
-
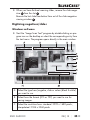 39
39
-
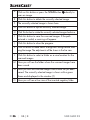 40
40
-
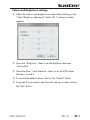 41
41
-
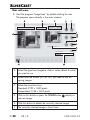 42
42
-
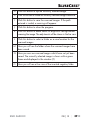 43
43
-
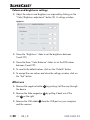 44
44
-
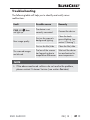 45
45
-
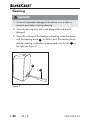 46
46
-
 47
47
-
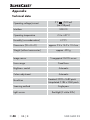 48
48
-
 49
49
-
 50
50
-
 51
51
-
 52
52
-
 53
53
-
 54
54
-
 55
55
-
 56
56
-
 57
57
-
 58
58
-
 59
59
-
 60
60
-
 61
61
-
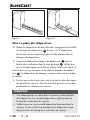 62
62
-
 63
63
-
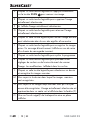 64
64
-
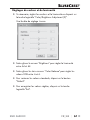 65
65
-
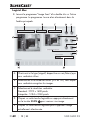 66
66
-
 67
67
-
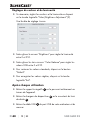 68
68
-
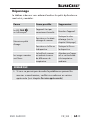 69
69
-
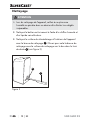 70
70
-
 71
71
-
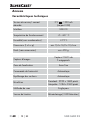 72
72
-
 73
73
-
 74
74
-
 75
75
-
 76
76
-
 77
77
-
 78
78
-
 79
79
-
 80
80
-
 81
81
-
 82
82
-
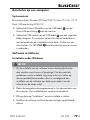 83
83
-
 84
84
-
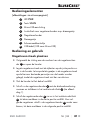 85
85
-
 86
86
-
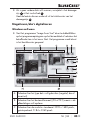 87
87
-
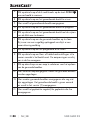 88
88
-
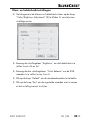 89
89
-
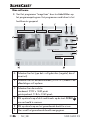 90
90
-
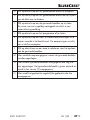 91
91
-
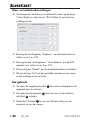 92
92
-
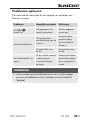 93
93
-
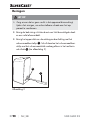 94
94
-
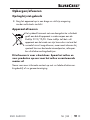 95
95
-
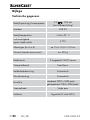 96
96
-
 97
97
-
 98
98
-
 99
99
-
 100
100
-
 101
101
-
 102
102
-
 103
103
-
 104
104
-
 105
105
-
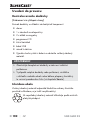 106
106
-
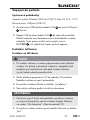 107
107
-
 108
108
-
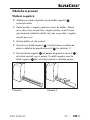 109
109
-
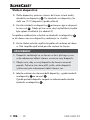 110
110
-
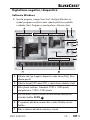 111
111
-
 112
112
-
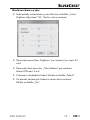 113
113
-
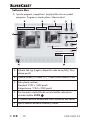 114
114
-
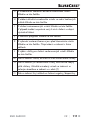 115
115
-
 116
116
-
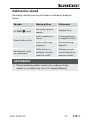 117
117
-
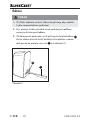 118
118
-
 119
119
-
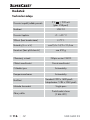 120
120
-
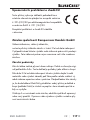 121
121
-
 122
122
-
 123
123
-
 124
124
-
 125
125
-
 126
126
-
 127
127
-
 128
128
-
 129
129
-
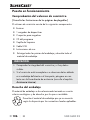 130
130
-
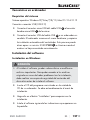 131
131
-
 132
132
-
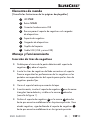 133
133
-
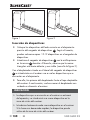 134
134
-
 135
135
-
 136
136
-
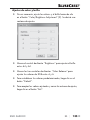 137
137
-
 138
138
-
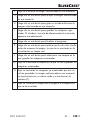 139
139
-
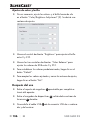 140
140
-
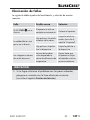 141
141
-
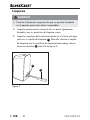 142
142
-
 143
143
-
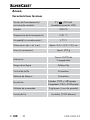 144
144
-
 145
145
-
 146
146
-
 147
147
-
 148
148
-
 149
149
-
 150
150
-
 151
151
-
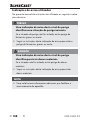 152
152
-
 153
153
-
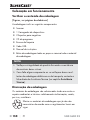 154
154
-
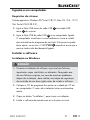 155
155
-
 156
156
-
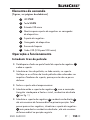 157
157
-
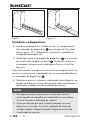 158
158
-
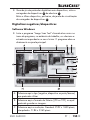 159
159
-
 160
160
-
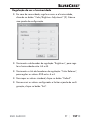 161
161
-
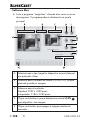 162
162
-
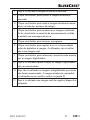 163
163
-
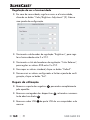 164
164
-
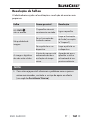 165
165
-
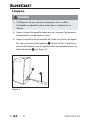 166
166
-
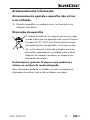 167
167
-
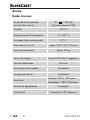 168
168
-
 169
169
-
 170
170
-
 171
171
-
 172
172
-
 173
173


Silvercrest SND 3600 D2 Operating Instructions Manual
- Type
- Operating Instructions Manual
in andere talen
- English: Silvercrest SND 3600 D2
- français: Silvercrest SND 3600 D2
- español: Silvercrest SND 3600 D2
- Deutsch: Silvercrest SND 3600 D2
- português: Silvercrest SND 3600 D2
- čeština: Silvercrest SND 3600 D2
Gerelateerde artikelen
-
Silvercrest SND 3600 C2 Operating Instructions Manual
-
Silvercrest SND 3600 A2 de handleiding
-
-
-
-
Silvercrest SND 3600 D3 Snelstartgids
-
-
-
-