
Pergola io
FR Notice
DE Anleitung
IT Manuale
NL Handleiding
EN Instructions
ES Manual
PT Guia
EL Οδηγίες χρήσης
TR Talimatlar
5069577C107-Pergola_io.indb 15069577C107-Pergola_io.indb 1 18/05/2022 18:45:4918/05/2022 18:45:49

Par la présente, Somfy Activités SA, F-74300 CLUSES déclare en tant que fabricant que la motorisation
couverte par ces instructions, marquée pour être alimentée en 230V~50Hz et utilisée comme indiqué dans
ces instructions, est conforme aux exigences essentielles des Directives Européennes applicables et en
particulier de la Directive Machine 2006/42/EC et de la Directive Radio 2014/53/EU.
Le texte complet de la déclaration de conformité à l’UE est disponible sur www.somfy.com/ce.
Christian Rey, responsable des homologations, agissant au nom du Directeur de l’Activité, Cluses, 05/2022.
Cette notice s'applique à toutes les motorisations Pergola 50 et Pergola 60 dont les déclinaisons sont
disponibles au catalogue en vigueur.
Domaine d’application
Les motorisations Pergola 50 et Pergola 60 sont conçues pour motoriser tous types de stores Pergola,
excepté les Pergola à lames orientables.
L’installateur, professionnel de la motorisation et de l’automatisation de l’habitat doit s’assurer que
l’installation du produit motorisé une fois installé respecte les normes en vigueur dans le pays de mise
en service comme notamment la norme sur les stores d’extérieur EN 13561.
Responsabilité
Avant d’installer et d’utiliser la motorisation, lire attentivement cette notice. Outre les instructions
décrites dans cette notice, respecter également les consignes détaillées dans le document joint
Consignes de sécurité.
La motorisation doit être installée par un professionnel de la motorisation et de l’automatisation de
l’habitat, conformément aux instructions de Somfy et à la réglementation applicable dans le pays de
mise en service.
Toute utilisation de la motorisation hors du domaine d’application décrit ci-dessus est interdite. Elle
exclurait, comme tout irrespect des instructions gurant dans cette notice et dans le document joint
Consignes de sécurité, toute responsabilité et garantie de Somfy.
L’installateur doit informer ses clients des conditions d’utilisation et de maintenance de la motorisation
et doit leur transmettre les instructions d’utilisation et de maintenance, ainsi que le document joint
Consignes de sécurité, après l’installation de la motorisation. Toute opération de Service Après-
Vente sur la motorisation nécessite l’intervention d’un professionnel de la motorisation et de
l’automatisation de l’habitat.
Si un doute apparaît lors de l’installation de la motorisation ou pour obtenir des informations
complémentaires, consulter un interlocuteur Somfy ou aller sur le site www.somfy.com.
Consignes particulières de sécurité
Respecter la Norme NF C 15-100 pour les installations électriques.
Les câbles traversant une paroi métallique doivent être protégés et isolés par un manchon ou un
fourreau.
Attacher les câbles pour éviter tout contact avec une partie en mouvement.
Si la motorisation est utilisée en extérieur, et si le câble d’alimentation est de type H05-VVF, alors
installer le câble dans un conduit résistant aux UV, par exemple sous goulotte.
Laisser le câble d’alimentation de la motorisation accessible : il doit pouvoir être remplacé
facilement.
Toujours faire une boucle sur le câble d’alimentation pour éviter la pénétration d’eau dans la
motorisation !
Pour les moteurs tubulaires de Ø 50/60 mm:
La roue doit être bloquée en translation dans le tube d’enroulement :
- Soit en xant le tube d’enroulement sur la roue à l’aide de 4 vis ou 4 rivets pop placés entre 5
mm et 15 mm de l’extrémité extérieure de la roue, quel que soit le tube d’enroulement. Les vis ou
les rivets pop ne doivent pas être xés sur la motorisation mais uniquement sur la roue.
- Soit par l’utilisation d’un stop roue, pour les tubes non lisses.
NOTICE ORIGINALE
Copyright © 2010-2022 Somfy Activités SA, Société Anonyme. All rights reserved.
2
5069577C107-Pergola_io.indb 25069577C107-Pergola_io.indb 2 18/05/2022 18:45:5018/05/2022 18:45:50

Pergola io
3
FR
Copyright © 2010-2022 Somfy Activités SA,Société Anonyme. All rights reserved.
1. Introduction 3
2. Sécurité 4
Consignes spéciques de sécurité 4
3. Installation 4
3.1. Préparation du moteur 4
3.2. Préparation du tube 4
3.3. Assemblage moteur - tube 5
3.4. Montage de l’ensemble tube-moteur 5
4. Câblage 5
5. Mise en service 6
5.1. Identication des étapes de réglage
déjà effectuées 6
5.2. Pré-enregistrement du point de
commande local io Somfy 6
5.3. Vérication du sens de rotation du moteur 6
5.4. Réglage des ns de course 7
5.5. Enregistrement du premier point de
commande local io Somfy 8
5.6. Contrôle des réglages 8
6. Utilisation 8
6.1. Fonctionnement standard 8
6.2. Fonctionnement avec un capteur io
Somfy 9
6.3. Retour d’informations 9
7. Réglages supplémentaires 9
7.1. Position favorite (my) 9
7.2. Ajout/Suppression de points de
commande io et capteurs io Somfy 9
7.3. Modication des ns de course 9
7.4. Fonctions avancées 10
8. Astuces et conseils 10
8.1. Questions sur le Pergola io ? 10
8.2. Remplacement d’un point de
commande io Somfy perdu ou cassé 11
8.3. Retour en conguration d’origine 11
9. Données techniques 11
Qu’est ce que io-homecontrol® ?
Le Pergola io utilise io-homecontrol®, le nouveau protocole de communication sans l universel et
sécurisé, partagé avec de grands fabricants de l’univers de la maison. io-homecontrol® permet à tous
les équipements de confort et de sécurité de communiquer entre eux et d’être pilotés par un seul et
même point de commande.
La exibilité et la parfaite compatibilité du système io-homecontrol®, permet d’accompagner
l’évolution de vos besoins. Automatiser d’abord les volets roulants et la porte d’entrée, puis équiper
les stores extérieurs, le portail et la porte du garage ou l’éclairage du jardin avec le système
io-homecontrol®.
Echelonnés dans le temps, ces équipements demeurent compatibles avec l’installation existante
grâce la technologie io-homecontrol® qui garantit leur interopérabilité.
Pour plus d’information veuillez consulter le site internet www.io-homecontrol.com.
SOMMAIRE
1. INTRODUCTION
5069577C107-Pergola_io.indb 35069577C107-Pergola_io.indb 3 18/05/2022 18:45:5018/05/2022 18:45:50

Pergola io
4
FR
Copyright © 2010-2022 Somfy Activités SA, Société Anonyme. All rights reserved.
Consignes spéciques de sécurité
1) Couper l’alimentation secteur qui correspond au store
avant toute opération d’entretien autour de celui-ci.
2) Éviter les manoeuvres lors de la formation de gel sur le
store.
3) Consignes à suivre impérativement par le professionnel
de la motorisation et de l’automatisation de l’habitat
réalisant l’installation de la motorisation.
4) Ne jamais laisser tomber, choquer, percer, immerger la
motorisation.
5) Installer un point de commande individuel pour chaque
motorisation.
3. INSTALLATION
Le Pergola io doit être installé à l’abri des intempéries.
3.1. Préparation du moteur
1) Monter la couronne (A) et la roue (B) sur le moteur.
2) Mesurer la longueur (L1) entre le bord intérieur de la tête
du moteur et l’extrémité de la roue.
1
2
AB
L1
L1 = …
3.2. Préparation du tube
1) Couper le tube d’enroulement à la longueur désirée.
2) Ébavurer le tube d’enroulement et éliminer les copeaux.
3) Pour les tubes d’enroulement lisses, découper une
encoche selon les cotes suivantes :
- e = 4 mm
- h = 28 mm.
Ø > 47
1
3
2
eh
2. SÉCURITÉ
1
3
5 6
2
4
OFF
5069577C107-Pergola_io.indb 45069577C107-Pergola_io.indb 4 18/05/2022 18:45:5118/05/2022 18:45:51

Pergola io
5
FR
Copyright © 2010-2022 Somfy Activités SA,Société Anonyme. All rights reserved.
3.3. Assemblage moteur - tube
1) Glisser le moteur dans le tube d’enroulement.
Pour les tubes d’enroulement lisses, positionner l’encoche
découpée sur la couronne.
2) Pour des raisons de sécurité, xer le tube d’enroulement
sur la roue avec 4 vis parker Ø 5 mm ou 4 rivets pop acier
Ø 4,8 mm placés à :
- au moins 5 mm de l’extrémité extérieure de la roue :
L1 - 5, et
- au plus 15 mm de l’extrémité extérieure de la roue :
L1 - 15.
Les vis ou les rivets pop ne doivent pas être xés sur le
moteur mais uniquement sur la roue.
3.4. Montage de l’ensemble tube-moteur
1) Monter l’ensemble tube-moteur sur le support embout (C).
2) Monter l’ensemble tube-moteur sur le support moteur (D).
3) Suivant le type de support, mettre l’anneau d’arrêt (E)
en place (Pour les moteurs ≥ à 85 Nm, avec un anneau
d’arrêt, utiliser impérativement l’anneau d’arrêt vérrouillable
(F).
15 mm
5 mm
20 mm
L1
1
2
C
D
E
F
1
2
3
- Couper l’alimentation secteur.
- Connecter le moteur selon les informations du tableau
ci-dessous :
230 V ~ 50 Hz Câble moteur
1Marron Phase (P)
2Bleu Neutre (N)
3Vert-Jaune Terre ( )
1
2
3
1
2
3
OFF
230 V
~
50 Hz
3 x 1,5 mm2
3 x 0,75 mm2
4. CÂBLAGE
5069577C107-Pergola_io.indb 55069577C107-Pergola_io.indb 5 18/05/2022 18:45:5318/05/2022 18:45:53

Pergola io
6
FR
Copyright © 2010-2022 Somfy Activités SA, Société Anonyme. All rights reserved.
La notice ne décrit que la mise en service à l’aide d’un point de commande local io Somfy de type
Situo io. Pour une mise en service à l’aide de tout autre point de commande io, se référer à la notice
correspondante.
5.1. Identication des étapes de réglage déjà effectuées
Un seul moteur doit être alimenté à la fois.
Mettre sous tension et suivre la procédure «a» ou «b» en
fonction de la réaction du store:
aLe store effectue un bref mouvement
Les ns de course sont réglées et aucun point de
commande io Somfy n’est enregistré.
Passer au chapitre « Enregistrement du premier point
de commande local io Somfy ».
ou
bLe store ne bouge pas
Appuyer sur la touche Montée ou Descente et suivre
la procédure «c» ou «d» en fonction de la réaction du
store :
cLe store ne bouge toujours pas
Les ns de course ne sont pas réglées et aucun
point de commande io Somfy n’est enregistré.
Passer au chapitre « Pré-enregistrement du point
de commande local io Somfy ».
ou
dLe store monte ou descend complètement
Les ns de course sont réglées et le point de
commande io Somfy est enregistré.
Passer au chapitre « Utilisation ».
5.2. Pré-enregistrement du point de commande local io Somfy
- Appuyer en même temps sur les touches Montée et
Descente : le store effectue un bref mouvement, le point
de commande local io Somfy est pré-enregistré dans le
moteur.
5.3. Vérication du sens de rotation du moteur
1) Appuyer sur la touche Montée:
a) Si le store monte, le sens de rotation est correct :
passer au chapitre « Réglage des ns de course ».
b) Si le store descend, le sens de rotation est incorrect :
appuyer sur la touche «my», jusqu’au bref mouvement
du store, le sens de rotation est modié.
2) Appuyer sur la touche Montée pour contrôler le sens de
rotation.
ON
Enregistrement
du 1er point de
commande local io
Somfy.
cor d
Pré-enregistrement
du point de
commande local io
Somfy.
Utilisation.
a
b
Réglage des
ns de course
2 s
1
2
5. MISE EN SERVICE
5069577C107-Pergola_io.indb 65069577C107-Pergola_io.indb 6 18/05/2022 18:45:5418/05/2022 18:45:54

Pergola io
7
FR
Copyright © 2010-2022 Somfy Activités SA,Société Anonyme. All rights reserved.
5.4. Réglage des ns de course
Le réglage des ns de course dépend du type de stores.
5.4.1. Réglage automatique des ns de course des stores Pergola à toile tendue
Les ns de course haute et basse se règlent automatiquement.
1) Appuyer en même temps sur les touches Montée et
Descente : le store effectue un bref mouvement.
2) Appuyer sur la touche «my» jusqu’au bref mouvement
du store : les ns de course sont enregistrées, passer
au chapitre « Enregistrement du premier point de
commande local io Somfy ».
5.4.2. Réglage semi-automatiques des ns de course des stores Pergola à toile tendue
La n de course basse se règle automatiquement alors que la n de course haute doit être
réglée manuellement.
Il est toujours possible de dénir une nouvelle n de
course haute avant de l’enregistrer.
Réglage de la n de course haute
1) Placer le store en n de course haute.
Un appui > 2 s sur la touche Montée entraîne un
mouvement de montée en continu du store.
2) Stopper le store à l’endroit désiré.
3) Si besoin, ajuster la position du store à l’aide des touches
Montée ou Descente.
4) Appuyer en même temps sur les touches «my» et
Descente : le store descend dans un mouvement continu
même après avoir lâché les touches «my» et Descente.
5) A mi-hauteur, faire un appui bref sur la touche «my» pour
arrêter le store.
6) Appuyer de nouveau sur la touche «my» jusqu’au
bref mouvement du store : les ns de course sont
enregistrées, passer au chapitre « Enregistrement du
premier point de commande local io Somfy ».
5.4.3. Réglage manuel des ns de course pour stores Pergola à toile non-tendue
Pour les stores Pergola à toile non-tendue, les ns de course haute et basse doivent être réglées.
Il est toujours possible de dénir des nouvelles n de course haute ou basse avant de les
enregistrer.
Réglage de la n de course haute
1) Placer le store en n de course haute.
Un appui > 2 s sur la touche Montée entraîne un
mouvement de montée en continu du store.
2) Stopper le store à l’endroit désiré.
3) Si besoin, ajuster la position du store à l’aide des touches
Montée ou Descente.
4) Appuyer en même temps sur les touches «my» et
Descente : le store descend dans un mouvement continu
même après avoir lâché les touches «my» et Descente.
5) A mi-hauteur, faire un appui bref sur la touche «my» pour
arrêter le store et passer à l’étape « Réglage de la n de
course basse ».
1 2
2 s
1
3
2
4
5 6
2 s
1
3
5
2
4
Réglage de la n
de course basse.
5069577C107-Pergola_io.indb 75069577C107-Pergola_io.indb 7 18/05/2022 18:45:5518/05/2022 18:45:55

Pergola io
8
FR
Copyright © 2010-2022 Somfy Activités SA, Société Anonyme. All rights reserved.
6. UTILISATION
Réglage de la n de course basse
1) Placer le store en position de n de course basse.
Un appui > 2 s sur la touche Descente entraîne un
mouvement de descente en continu du store.
2) Stopper le store à l’endroit désiré.
3) Si besoin, ajuster la position du store à l’aide des touches
Montée ou Descente.
4) Appuyer en même temps sur les touches «my» et
Montée : le store monte dans un mouvement continu
même après avoir lâché les touches «my» et Montée.
5) A mi-hauteur, faire un appui bref sur la touche «my» pour
arrêter le store.
6) Appuyer de nouveau sur la touche «my» jusqu’au
bref mouvement du store : les ns de course sont
enregistrées. Passer au chapitre « Enregistrement du
premier point de commande local io Somfy ».
5.5. Enregistrement du premier point de commande local io Somfy
5.5.1. À l’aide d’un point de commande local io Somfy enregistré
- Faire un appui bref sur le bouton PROG de ce point de
commande (G) : le store effectue un bref mouvement, le
point de commande est enregistré.
ou
5.5.2. Après une simple coupure d’alimentation
À la mise sous tension, le store effectue un bref mouvement.
1) Appuyer en même temps sur les touches Montée et
Descente du nouveau point de commande (H) jusqu’au
bref mouvement du store.
2) Faire un appui bref sur le bouton PROG de ce point de
commande (H) : le store effectue un bref mouvement, le
point de commande est enregistré.
5.6. Contrôle des réglages
- Contrôler le réglage des ns de course haute et basse à l’aide du point de commande local io Somfy.
1
3
5
2
4
6
2 s
PROG. G
2
PROG. HH
1
6.1. Fonctionnement standard
6.1.1. Touches Montée et Descente
Un appui bref sur la touche Montée ou Descente provoque
une montée ou descente complète du store.
Pour les stores Pergola à toile tendue, la détection
d’obstacle est active durant toute la descente ou toute la
montée.
6.1.2. Fonction STOP
Le store est en cours de mouvement.
- Faire un appui bref sur la touche «my» : le store s’arrête.
6.1.3. Position favorite (my)
Dénition
Une position intermédiaire appelée « position favorite (my) »
autre que la position haute et la position basse, peut être
enregistrée dans le moteur.
Pour enregistrer, modier ou supprimer la position
favorite (my), voir chapitre « Réglages supplémentaires
».
Pour utiliser la position favorite (my) :
- Faire un appui bref sur la touche «my» : le store se met en mouvement et s’arrête en position
favorite (my).
my my
5069577C107-Pergola_io.indb 85069577C107-Pergola_io.indb 8 18/05/2022 18:45:5618/05/2022 18:45:56

Pergola io
9
FR
Copyright © 2010-2022 Somfy Activités SA,Société Anonyme. All rights reserved.
7. RÉGLAGES SUPPLÉMENTAIRES
6.2. Fonctionnement avec un capteur io Somfy
Se référer à la notice correspondante.
6.3. Retour d’informations
Après chaque ordre, le Pergola io envoie un message. Cette information est traitée par les points de
commande bidirectionnels io.
7.1. Position favorite (my)
7.1.1 Enregistrement ou modication de la position favorite (my)
La procédure à suivre pour l’enregistrement ou la modication
de la position favorite (my) est identique.
1) Placer le store dans la position favorite (my) souhaitée.
2) Appuyer sur la touche «my» jusqu’au bref mouvement du
store : la position favorite (my) est enregistrée.
7.1.2. Suppression de la position favorite (my)
1) Appuyer sur la touche «my» : le store se met en
mouvement et s’arrête en position favorite (my).
2) Appuyer de nouveau sur la touche «my» jusqu’au
bref mouvement du store : la position favorite (my) est
supprimée.
7.2. Ajout/Suppression de points de commande io et capteurs io Somfy
Se référer à la notice correspondante.
7.3. Modication des ns de course
La modication des ns de course dépend du type de stores.
7.3.1. Modication pour stores Pergola à toile tendue
Pour les stores Pergola à toile tendue, la n de course haute en réglage de n de course semi-
automatique peut-être modié.
Réajustement de la n de course haute en mode
semi-automatique
1) Placer le store en n de course haute.
2) Appuyer en même temps sur les touches Montée et
Descente jusqu’au bref mouvement du store : le moteur
est en mode réglage.
3) Ajuster la position haute du store à l’aide des touches
Montée ou Descente.
4) Appuyer sur la touche «my» jusqu’au bref mouvement
du store : la nouvelle n de course haute est enregistrée.
7.3.2. Modication pour stores Pergola à toile non-tendue
Pour les stores Pergola à toile non-tendue, les ns de course haute et basse peuvent être modiées.
Réajustement de la n de course haute
1) Placer le store en n de course haute.
2) Appuyer en même temps sur les touches Montée et
Descente jusqu’au bref mouvement du store : le moteur
est en mode réglage.
3) Ajuster la position haute du store à l’aide des touches
Montée ou Descente.
4) Appuyer sur la touche «my» jusqu’au bref mouvement
du store : la nouvelle n de course haute est enregistrée.
1 2
my
5 s
ou
1 2
my
5 s
1
ou
3
2
4
2 s
5 s
1
ou
3
2
4
2 s
5 s
5069577C107-Pergola_io.indb 95069577C107-Pergola_io.indb 9 18/05/2022 18:45:5718/05/2022 18:45:57

Pergola io
10
FR
Copyright © 2010-2022 Somfy Activités SA, Société Anonyme. All rights reserved.
Réajustement de la n de course basse
1) Placer le store en n de course basse.
2) Appuyer en même temps sur les touches Montée et
Descente jusqu’au bref mouvement du store : le moteur
est en mode réglage.
3) Ajuster la position basse du store à l’aide des touches
Montée ou Descente.
4) Appuyer sur la touche «my» jusqu’au bref mouvement
du store : la nouvelle n de course basse est enregistrée.
7.4. Fonctions avancées
Contacter le fabricant du store avant toute utilisation de ces fonctions pour valider la compatibilité
de votre installation.
7.4.3. Fonction « Tension de toile » uniquement pour stores Pergola à toile tendue
Cette fonction permet d’augmenter ou de diminuer la tension de la toile store sur 3 seuils
(fort-moyen-faible).
Par défaut, le moteur est positionné en sortie d’usine sur le niveau moyen.
Par sécurité, cette fonction est atteignable par le point de commande io Somfy dans 3 cas seulement :
• Après la validation des réglages et avant l’enregistrement du premier point de commande io
Somfy.
• Après l’enregistrement du premier point de commande io Somfy et durant les 4 cycles suivants.
• Après une simple coupure d’alimentation et durant les 4 cycles suivants.
Pour mettre en œuvre cette fonction :
1) Placer le store en position médiane.
2) Faire un appui bref et simultané sur les touches «my»
et Descente, suivi immédiatement d’un appui maintenu
et simultané sur les touches «my» et Descente jusqu’au
bref mouvement du store.
Le moteur est en mode programmation pendant 10 s
uniquement.
3) Ajuster la tension de la toile à l’aide des touches Montée
ou Descente.
- Pour augmenter la tension de la toile, appuyer sur la touche Montée jusqu’au mouvement lent du
store : la tension de la toile du store est passée au seuil supérieur.
- Pour diminuer la tension de la toile, appuyer sur la touche Descente jusqu’au mouvement lent du
store : la tension de la toile du store est passée au seuil inférieur.
4) Appuyer sur la touche «my» jusqu’au bref mouvement du store : la nouvelle tension de la toile est
enregistrée.
2 s
5 s
1 2
4
3
ou
ou
ou
0.5 s 5 s
1 2
3 4
8. ASTUCES ET CONSEILS
8.1. Questions sur le Pergola io ?
Constats Causes possibles Solutions
Le store ne
fonctionne pas. Le câblage est incorrect. Contrôler le câblage et le modier si besoin.
Le moteur est au thermique. Attendre que le moteur refroidisse.
Le câble utilisé est non conforme. Contrôler le câble utilisé et s’assurer qu’il
possède 3 conducteurs.
La pile du point de commande io
Somfy est faible. Contrôler si la pile est faible et la remplacer
si besoin.
Le point de commande n’est pas
compatible. Contrôler la compatibilité et remplacer le
point de commande si besoin.
Le point de commande io Somfy
utilisé n’est pas enregistré dans le
moteur.
Utiliser un point de commande enregistré
ou enregistrer ce point de commande.
Le store s’arrête
trop tôt. La couronne est mal mise en place. Fixer la couronne correctement.
Les ns de course sont mal réglées. Réajuster les ns de course.
5069577C107-Pergola_io.indb 105069577C107-Pergola_io.indb 10 18/05/2022 18:45:5718/05/2022 18:45:57

Pergola io
11
FR
Copyright © 2010-2022 Somfy Activités SA,Société Anonyme. All rights reserved.
8.2. Remplacement d’un point de commande io Somfy perdu ou cassé
Se référer à la notice correspondante.
8.3. Retour en conguration d’origine
Cette remise à zéro supprime tous les points de commande, tous les capteurs, tous les réglages
de ns de course et ré-initialise le sens de rotation et la position favorite (my) du moteur.
Cependant, le réglage de la tension de toile reste conservé uniquement pour les stores Pergola
à toile tendue.
Ne réaliser la double coupure de courant qu’au niveau du moteur à remettre à zéro.
1) Placer le store en position médiane (si possible).
2) Couper l’alimentation secteur pendant 2 s.
3) Remettre l’alimentation secteur entre 5 s et 15 s.
4) Couper l’alimentation secteur pendant 2 s.
5) Remettre l’alimentation secteur : le store se met en
mouvement quelques secondes.
Si le store est en n de course haute ou basse alors il
effectuera un bref mouvement.
6) Maintenir l’appui sur le bouton PROG : le store effectue
un premier mouvement bref puis un second quelques
instants plus tard. Le moteur est en conguration usine.
- Reprendre les procédures du chapitre « Mise en
service »
2 s
2 s
15 s
5 s
1
6
5
3
2
4
OFF
OFF
ON
ON
my
7 s 7 s2 s
9. DONNÉES TECHNIQUES
Fréquence radio 868-870 MHz io-homecontrol® bidirectionnel Tri-bandes
Bandes de fréquence et Puissance
maximale utilisées
868,000 MHz - 868.600 MHz e.r.p. <25 mW
868,700 MHz - 869.200 MHz e.r.p. <25 mW
869,700 MHz - 870.000 MHz e.r.p. <25 mW
Alimentation 230 V ~ 50 Hz
Température d’utilisation - 20 °C à + 60 °C
Indice de protection IP 44
Nombre maximal de points de commandes
et de capteurs associés 9
Niveau de sécurité Classe I
5069577C107-Pergola_io.indb 115069577C107-Pergola_io.indb 11 18/05/2022 18:45:5818/05/2022 18:45:58

Pergola io
12
DE
Copyright © 2010-2022 Somfy Activités SA, Société Anonyme. All rights reserved.
Somfy Activités SA, F-74300 CLUSES (Frankreich), erklärt hiermit als Hersteller, dass der in dieser
Anleitung beschriebene Antrieb bei bestimmungsgemäßem Einsatz und angeschlossen gemäß
Kennzeichnung an eine 230 V / 50 Hz-Stromversorgung die grundlegenden Anforderungen der geltenden
europäischen Richtlinien und insbesondere der Maschinenrichtlinie 2006/42/EG sowie der
Funkanlagenrichtlinie 2014/53/EU erfüllt.
Der vollständige Text der EU-Konformitätserklärung ist unter der Internetadresse www.somfy.com/ce
verfügbar.
Christian Rey, Bevollmächtiger für Zulassungen, in Vertretung des Directeur de l‘Activité, Cluses, Frankreich,
05/2022.
Diese Anleitung gilt für alle Antriebe vom Typ Pergola 50 und Pergola 60, deren Ausführungen im
aktuellen Katalog zu nden sind.
Bestimmungsgemässeverwendung
Die Antriebe Pergola 50 und Pergola 60 wurden für den Antrieb aller Arten von Pergola-Markisen,
außer Pergola-Markisen mit wendbaren Lamellen entwickelt.
Der Installateur, ein Fachmann für Gebäudeautomation, muss sicherstellen, dass die Installation des
Antriebs nach Montage den geltenden Vorschriften des Orts der Inbetriebnahme entspricht. Hierzu
gehören insbesondere die Norm(en): EN 13561 (Außenjalousien)
Haftung
Lesen Sie bitte vor der Montage und Verwendung des Antriebs diese Installationsanleitung sorgfältig
durch. Beachten Sie außer den Anweisungen in dieser Anleitung auch die detaillierten Hinweise im
beiliegenden Dokument Sicherheitshinweise.
Die Installation des Antriebs muss von einem Fachmann für Gebäudeautomation unter Einhaltung
der Anweisungen von Somfy und der am Ort der Inbetriebnahme geltenden Vorschriften ausgeführt
werden.
Jede Nutzung des Antriebs zu Zwecken, die über den im vorliegenden Dokument beschriebenen
Anwendungsbereich hinausgehen, ist untersagt. Jede Missachtung dieser sowie aller anderen in
dieser Anleitung und im beiliegenden Dokument Sicherheitshinweise enthaltenen Anweisungen
führt zum Ausschluss jeglicher Haftung und Gewährleistungsansprüche durch Somfy.
Der Installateur hat seine Kunden auf die Nutzungs- und Wartungsbedingungen des Antriebs
hinzuweisen und ihnen diese sowie das beiliegende Dokument Sicherheitshinweise nach Abschluss
der Installation des Antriebs auszuhändigen. Wartungs- und Reparaturarbeiten für den Antrieb dürfen
ausschließlich von Fachleuten für Gebäudeautomation ausgeführt werden.
Für Fragen zur Installation des Antriebs und weiterführende Informationen wenden Sie sich bitte an
Ihren Somfy-Ansprechpartner oder besuchen Sie unsere Website www.somfy.com.
Besondere Sicherheitshinweise
Alle Kabel, die in Kontakt mit einer metallischen Wandung geraten könnten, müssen mit einer
Hülse oder Ummantelung geschützt und isoliert werden.
Bringen Sie die Kabel so an, dass sie nicht in Kontakt zu beweglichen Teilen geraten können.
Wenn der Antrieb im Freien eingesetzt wird und wenn ein Versorgungskabel des Typs H05-VVF
verwendet wird, muss dieses in einem UV-beständigen Kabelrohr, zum Beispiel in einem
Kabelkanal, verlegt werden.
Achten Sie darauf, dass das Netzkabel des Antriebs zugänglich bleibt: Es muss sich einfach
austauschen lassen.
Sehen Sie eine Manschette am Netzkabel vor, um das Eindringen von Wasser in den Antrieb zu
vermeiden!
Für Rohrmotoren mit Ø 50/60 mm:
Der Mitnehmer muss im Inneren der Welle gegen Verschieben gesichert werden:
- Die Welle unabhängig vom Wellentyp im Abstand von 5 bis 15 mm vom Ende der Welle mit 4
selbstschneidenden Schrauben oder 4 Stahlnieten am Mitnehmer befestigen. Schrauben bzw.
Blindnieten dürfen nur am Mitnehmer angebracht werden, niemals am Antrieb.
- Oder durch Verwendung einer Aufschraubkappe für Wellen mit Innengewinde.
UBERSETZUNG DES HANDBUCHS
5069577C107-Pergola_io.indb 125069577C107-Pergola_io.indb 12 18/05/2022 18:45:5918/05/2022 18:45:59

1. Einleitung 13
2. Sicherheitshinweise 14
Spezische Sicherheitshinweise 14
3. Installation 14
3.1. Vorbereiten des Antriebs 14
3.2. Vorbereiten der Welle 14
3.3. Montieren des Antriebs mit der Welle 15
3.4. Einbauen der Einheit Welle/Antrieb 15
4. Verkabelung 15
5. Inbetriebnahme 16
5.1. Feststellung der bereits durchgeführten
Einstellschritte 16
5.2. Vorabprogrammieren eines lokalen Somfy
io Funksenders 16
5.3. Testen der Drehrichtung des Antriebes 16
5.4. Endlageneinstellung 17
5.5. Speichern des ersten lokalen Somfy io
Funksenders 18
5.6. Überprüfen der Einstellungen 18
6. Bedienung 18
6.1. Standardbetrieb 18
6.2. Betrieb mit einem Somfy io Sensor 19
6.3. Rückmeldung 19
7. Zusätzliche Einstellmöglichkeiten 19
7.1. Lieblingsposition („my“-Position) 19
7.2. Verknüpfen/Löschen von Somfy
io-Funksendern und io-Sensoren 19
7.3. Ändern der Endlagen 19
7.4. Erweiterte Funktionen 20
8. Tipps und Hinweise 20
8.1. Fragen zum Pergola io? 20
8.2. Austausch eines verlorenen oder
beschädigten Somfy io-Funksenders 21
8.3. Rücksetzen auf Werkseinstellung 21
9. Technische Daten 21
Was ist io-homecontrol® ?
Der Pergola io basiert auf der fortschrittlichen und sicheren io-homecontrol® Funktechnologie
mit einem universellen Kommunikationsprotokoll, das mit Haustechnikprodukten namhafter
Hersteller kompatibel ist. io-homecontrol® ermöglicht die Kommunikation aller Komfort- und
Sicherheitseinrichtungen untereinander und deren Steuerung über eine einzige Bedieneinheit.
Durch seine Flexibilität und exzellente Kompatibilität kann sich das io-homecontrol® System
neuen Bedürfnissen anpassen. So ist es möglich, zunächst die Rollläden und die Eingangstür zu
automatisieren
und später die Außenjalousien, das Hoftor und das Garagentor oder die Gartenbeleuchtung in das
io-homecontrol® System einzubinden.
Auch wenn der Einbau zeitlich versetzt erfolgt, sind diese Einrichtungen dank io-homecontrol® mit
der bestehenden Anlage kompatibel.
Weitere Informationen hierzu nden Sie auf der Internetseite www.io-homecontrol.com
INHALTSVERZEICHNIS
1. EINLEITUNG
Copyright © 2010-2022 Somfy Activités SA, Société Anonyme. All rights reserved. 13
5069577C107-Pergola_io.indb 135069577C107-Pergola_io.indb 13 18/05/2022 18:45:5918/05/2022 18:45:59

Pergola io
14
DE
Copyright © 2010-2022 Somfy Activités SA, Société Anonyme. All rights reserved.
Spezische Sicherheitshinweise
1) Unterbrechen Sie die Spannungsversorgung (z.B. Sicherung auf AUS) der jeweiligen Markise,
wenn Sie Wartungsarbeiten an der Markise oder deren unmittelbaren Umgebung durchführen.
Um Schäden am Produkt zu vermeiden:
2) Tauchen Sie das Produkt nicht in Flüssigkeiten!
3) Vermeiden Sie Stöße!
4) Lassen Sie das Produkt nicht fallen!
5) Bohren Sie keine Löcher in das Produkt!
6) Unterlassen Sie die Bedienung der Markise, wenn sich Frost gebildet hat.
Der Pergola io muss an einem vor Witterungseinüssen
geschützten Ort montiert werden.
3.1. Vorbereiten des Antriebs
1) Montieren Sie den Adapter (A) und den Mitnehmer (B) an
den Antrieb.
2) Messen Sie die Länge (L1) zwischen der Innenseite
des Antriebskopfes und dem äußerem Rand des
Mitnehmers.
3.2. Vorbereiten der Welle
1) Schneiden Sie die Welle auf die gewünschte Länge zu.
2) Entgraten Sie die Welle und entfernen Sie die Späne.
3) Versehen Sie Präzisionsrohre, unter Berücksichtigung
folgender Maße, mit einer Ausklinkung:
- e = 4 mm
- h = 28 mm.
1
2
AB
L1
L1 = …
Ø > 47
1
3
2
Eh
2. SICHERHEITSHINWEISE
3. INSTALLATION
5069577C107-Pergola_io.indb 145069577C107-Pergola_io.indb 14 18/05/2022 18:45:5918/05/2022 18:45:59

Pergola io
15
DE
Copyright © 2010-2022 Somfy Activités SA,Société Anonyme. All rights reserved.
3.3. Montieren des Antriebs mit der Welle
1) Führen Sie den Antrieb in die Welle ein.
Positionieren Sie -bei Präzisionsrohren- die Ausklinkung
auf dem Adapter.
2) Fixieren Sie die Welle zur Sicherheit mit 4
selbstschneidenden Schrauben (5 mm Ø) oder mit 4
Blindnieten aus Stahl (4,8 mm Ø) an folgenden Stellen
am Mitnehmer:
- in einem Abstand von mind. 5 mm vom äußeren Rand
des Mitnehmers: L1 - 5, und
- in einem Abstand von max. 15 mm vom äußeren
Rand des Mitnehmers: L1 - 15.
Die Schrauben bzw. Blindnieten dürfen nur am Mitnehmer angebracht werden, nicht am Antrieb.
3.4. Einbauen der Einheit Welle/Antrieb
1) Bringen Sie die Einheit Welle/Antrieb am Gegenlager (C)
an.
2) Bringen Sie die Einheit Welle/Antrieb am Antriebslager
(D) an.
3) Je nach Lagertyp den Federring (E) einsetzen (Bei
Antrieben ≥ 85 Nm mit Federring, unbedingt den Federring
mit Sicherungsschraube (F) verwenden.
15 mm
5 mm
20 mm
L1
1
2
c
D
E
F
1
2
3
Dieses Produkt darf nur von einer Elektrofachkraft
nach DIN VDE 1000-10 angeschlossen werden!
- Unterbrechen Sie die Spannungsversorgung.
- Schließen Sie den Antrieb gemäß den Angaben in unten
stehender Tabelle an:
230 V ~ 50 Hz Antriebskabel
1Braun Phase (L)
2Blau Neutralleiter (N)
3Gelb-Grün Schutzleiter ( )
1
2
3
1
2
3
AUS
230 V
~
50 Hz
3 x 1,5 mm2
3 x 0,75 mm2
4. VERKABELUNG
5069577C107-Pergola_io.indb 155069577C107-Pergola_io.indb 15 18/05/2022 18:46:0118/05/2022 18:46:01

Pergola io
16
DE
Copyright © 2010-2022 Somfy Activités SA, Société Anonyme. All rights reserved.
Diese Anleitung beschreibt nur die Inbetriebnahme mit Hilfe eines lokalen Somfy io-Funksenders
vom Typ Situo io. Für die Inbetriebnahme mit Hilfe einer anderen io-Bedieneinheit ziehen Sie die
entsprechende Anleitung zurate.
5.1. Feststellung der bereits durchgeführten Einstellschritte
Schließen Sie nur einen Antrieb an die
Spannungsversorgung an.
Schalten Sie die Spannungsversorgung ein und folgen Sie
je nach Reaktion der Markise den Anweisungen «a oder
«b»:
aDie Markise bewegt sich kurz
Die Endlagen sind eingestellt und es ist noch kein io
Funksender eingelernt.
Weiter mit dem Kapitel« Speichern des ersten lokalen
Somfy io Funksenders ».
oder
bKeine Reaktion der Markise
Drücken Sie die AUF- oder AB-Taste und folgen Sie je
nach Reaktion der Markise den Anweisungen "c" oder
"d".
cImmer noch keine Reaktion der Markise
Die Endlagen sind nicht eingestellt und es ist noch
kein Somfy io Funksender eingelernt.
Weiter mit dem Kapitel «Vorabprogrammierung
eines Somfy io Funksenders ».
oder
dDie Markise fährt komplett ein oder aus
Die Endlagen sind eingestellt und der Somfy io
Funksender ist eingelernt.
Fahren Sie mit dem Kapitel „ Bedienung “fort.
5.2. Vorabprogrammieren eines lokalen Somfy io Funksenders
- Drücken Sie gleichzeitig die AUF- und AB-Taste:
Die Markise bewegt sich kurz, der lokale Somfy io
Funksender (1W) ist jetzt vorabgespeichert.
5.3. Testen der Drehrichtung des Antriebes
1) Drücken Sie die AUF-Taste.
a) Fährt die Markise nach oben ist die Drehrichtung
korrekt: Weiter mit dem Kapitel «Endlageneinstellung».
b) Fährt die Markise nach unten, ist die Drehrichtung
nicht korrekt: Drücken Sie die «my»-Taste solange,
bis die Markise sich bewegt. Jetzt ist die Drehrichtung
geändert.
2) Drücken Sie die AUF-Taste, um die neue Drehrichtung
zu kontrollieren.
EIN
Speichern
des ersten
lokalen Somfy
io-Funksenders
coder d
Vorabprogrammieren
eines lokalen Somfy
io Funksenders.
Bedienung.
a
b
Endlageneinstellung
2 s
1
2
5. INBETRIEBNAHME
5069577C107-Pergola_io.indb 165069577C107-Pergola_io.indb 16 18/05/2022 18:46:0218/05/2022 18:46:02

Pergola io
17
DE
Copyright © 2010-2022 Somfy Activités SA,Société Anonyme. All rights reserved.
5.4. Endlageneinstellung
Je nach Art der Markise sind die Einstellungen der Endlagen unterschiedlich.
5.4.1. Automatische Einstellung der Endlagen bei Pergolamarkisen mit
gespanntem Tuch
Die oberen und unteren Endlage werden automatisch eingestellt.
1) Drücken Sie gleichzeitig die AUF- und AB-Taste: Die
Markise bewegt sich kurz
2) Drücken Sie die «my»-Taste solange, bis die Markise
sich kurz bewegt: Die Endlagen sind gespeichert. Weiter
mit dem Kapitel « Speichern des ersten lokalen Somfy io
Funksenders ».
5.4.2. Halbautomatische Einstellung der Endlagen bei Pergolamarkisen mit gespanntem Tuch
Die untere Endlage wird automatisch eingestellt, während die obere Endlage manuell
eingestellt werden muss.
Es besteht jederzeit die Möglichkeit, vor dem Speichern
eine neue obere Endlage einzustellen
Einstellung der oberen Endlage
1) Fahren Sie die Markise in ihre obere Endlage.
Wenn Sie die AUF-Taste länger als 2 Sekunden
gedrückt halten, fährt die Markise selbstständig weiter
ein.
2) Stoppen Sie die Markise an der gewünschten Position.
3) Korrigieren Sie, falls nötig, die Position der Markise mit
der AUF- oder AB-Taste.
4) Drücken Sie gleichzeitig die Tasten AB und «my»: Nach
dem Loslassen der Tasten «my» und AB fährt die Markise
selbstständig aus.
5) Lassen Sie die Markise bis zur Hälfte ausfahren
und drücken Sie dann kurz die «my»-Taste, um sie
anzuhalten.
6) Drücken Sie die «my»-Taste erneut, bis die Markise
sich kurz bewegt: Die Endlagen sind gespeichert. Weiter mit dem Kapitel « Speichern des ersten
lokalen Somfy io Funksenders ».
5.4.3. Manuelle Einstellung der Endlagen bei Faltmarkisen
Bei Faltmarkisen müssen die untere und obere Endlage eingestellt werden.
Es besteht jederzeit die Möglichkeit, vor dem Speichern eine neue obere Endlage einzustellen.
Einstellung der oberen Endlage
1) Fahren Sie die Markise in ihre obere Endlage.
Wenn Sie die AUF-Taste länger als 2 Sekunden
gedrückt halten, fährt die Markise selbstständig weiter
ein.
2) Stoppen Sie die Markise an der gewünschten Position.
3) Korrigieren Sie, falls nötig, die Position der Markise mit
der AUF- oder AB-Taste.
4) Drücken Sie gleichzeitig die Tasten AB und «my»: Nach
dem Loslassen der Tasten «my» und AB fährt die Markise
selbstständig aus.
5) Lassen Sie die Markise bis zur Hälfte ausfahren
und drücken Sie dann kurz die «my»-Taste, um sie
anzuhalten. Weiter mit dem Kapitel " Einstellung der
unteren Endlage ".
1 2
2 s
1
3
2
4
5 6
2 s
1
3
5
2
4
Einstellung der
unteren Endlage.
5069577C107-Pergola_io.indb 175069577C107-Pergola_io.indb 17 18/05/2022 18:46:0318/05/2022 18:46:03

Pergola io
18
DE
Copyright © 2010-2022 Somfy Activités SA, Société Anonyme. All rights reserved.
6. BEDIENUNG
Einstellung der unteren Endlage
1) Bringen Sie die Markise in die untere Endlage.
Wenn Sie die AUF-Taste länger als 2 Sekunden
gedrückt halten, fährt die Markise selbstständig aus.
2) Stoppen Sie die Markise an der gewünschten Position.
3) Korrigieren Sie, falls nötig, die Position der Markise mit
der AUF- oder AB-Taste.
4) Drücken Sie gleichzeitig die Tasten AUF und «my»: Nach
dem Loslassen der Tasten «my»- und AUF fährt die
Markise selbstständig ein.
5) Lassen Sie die Markise bis zur Hälfte einfahren
und drücken Sie dann kurz die «my»-Taste, um sie
anzuhalten.
6) Drücken Sie die «my»-Taste erneut, bis die Markise sich
kurz bewegt: Die Endlagen sind eingestellt. Weiter mit
dem Kapitel «Speichern des ersten lokalen Somfy io
Funksenders».
5.5. Speichern des ersten lokalen Somfy io Funksenders
5.5.1. Mit dem vorabgespeicherten lokalen Somfy io
Funksender:
- Drücken Sie kurz auf die PROG-Taste dieses
Funksenders (G): Die Markise bewegt sich kurz, der
Funksender ist gespeichert.
oder
5.5.2. Nach einer einfachen Spannungsunterbrechung
Beim Einschalten führt die Markise eine kurze Bewegung aus.
1) Drücken Sie gleichzeitig solange auf die AUF- und/
AB-Taste des neuen Funksenders, (H) , bis die Markise
sich kurz bewegt.
2) Drücken Sie kurz auf die PROG-Taste dieses
Funksenders (H) : Die Markise bewegt sich kurz, der
Funksender ist gespeichert.
5.6. Überprüfen der Einstellungen
- Überprüfen Sie die Endlageneinstellungen mit dem lokalen Somfy io Funksender.
1
3
5
2
4
6
2 s
2
H
1
6.1. Standardbetrieb
6.1.1. AUF- und AB-Tasten
Um die Markise komplett ein- oder auszufahren, drücken Sie
kurz auf die Taste AUF oder AB.
Bei den Pergolamarkisen mit gespanntem Tuch ist die
Hinderniserkennung während der gesamten Abwärts-
oder Aufwärtsbewegung aktiv.
6.1.2. Funktion STOP
Die Markise bendet sich in Bewegung.
- Drücken Sie kurz die «my»-Taste: die Markise hält an.
6.1.3. Lieblingsposition („my“-Position)
Beschreibung
Eine als "Lieblingsposition (my)" bezeichnete
Zwischenposition, bei der es sich nicht um die obere oder
untere Endlage handelt, kann im Antrieb eingelernt werden.
5069577C107-Pergola_io.indb 185069577C107-Pergola_io.indb 18 18/05/2022 18:46:0418/05/2022 18:46:04

Pergola io
19
DE
Copyright © 2010-2022 Somfy Activités SA,Société Anonyme. All rights reserved.
7. ZUSÄTZLICHE EINSTELLMÖGLICHKEITEN
Um die Lieblingsposition («my»-Position) zu programmieren, zu ändern oder zu löschen, siehe
Kapitel "Optionale Einstellungen".
Anfahren der Lieblingsposition («my»-Position):
- Drücken Sie kurz die «my»-Taste: Die Markise bewegt sich und hält an der Lieblingsposition (my) an.
6.2. Betrieb mit einem Somfy io Sensor
Lesen Sie in der entsprechenden Gebrauchsanleitung nach.
6.3. Rückmeldung
Nach jedem Befehl sendet der Pergola io eine Information. Diese Information wird von den
bidirektionalen io Funksendern verarbeitet.
7.1. Lieblingsposition („my“-Position)
7.1.1 Einlernen oder Ändern der Lieblingsposition („my“)
Die Vorgehensweise für das Speichern und Ändern der
Lieblingsposition («my»-Position) ist dieselbe.
1) Fahren Sie die Markise in die gewünschte
Lieblingsposition («my»-Position).
2) Drücken Sie die «my»-Taste solange, bis die Markise
sich kurz bewegt: Die gewünschte Lieblingsposition
(«my»-Position) ist jetzt gespeichert.
7.1.2. Löschen der Lieblingsposition («my»-Position)
1) Drücken Sie die «my»-Taste: Die Markise bewegt sich
und hält an der Lieblingsposition (my) an.
2) Drücken Sie die «my»-Taste erneut, bis die Markise sich
kurz bewegt: Die Lieblingsposition («my»-Position) ist
gelöscht.
7.2. Verknüpfen/Löschen von Somfy io-Funksendern und io-Sensoren
Lesen Sie in der entsprechenden Gebrauchsanleitung nach.
7.3. Ändern der Endlagen
Das Ändern der Endlagen ist vom Markisentyp abhängig.
7.3.1. Änderung bei Pergolamarkisen mit gespanntem Tuch
Bei Pergolamarkisen mit gespanntem Tuch kann die obere Endlage bei der halbautomatischen
Einstellung geändert werden.
Anpassung der oberen Endlage im halbautomatischen Modus
1) Fahren Sie die Markise in ihre obere Endlage.
2) Drücken Sie gleichzeitig die AUF- und AB-Taste, bis die
Markise sich kurz bewegt: Der Antrieb bendet sich jetzt
im Einstellmodus.
3) Stellen Sie die obere Endlage der Markise mit der AUF-
oder AB-Taste neu ein.
4) Drücken Sie die «my»-Taste solange, bis die Markise sich
kurz bewegt: die neue obere Endlage ist gespeichert.
7.3.2. Änderung bei Faltmarkisen
Bei Faltmarkisen können die untere und obere Endlage
geändert werden.Nachjustieren der oberen Endlage
1) Fahren Sie die Markise in ihre obere Endlage.
2) Drücken Sie gleichzeitig die AUF- und AB-Taste, bis die
Markise sich kurz bewegt: Der Antrieb bendet sich jetzt
im Einstellmodus.
3) Stellen Sie die obere Endlage der Markise mit der AUF-
oder AB-Taste neu ein.
4) Drücken Sie die «my»-Taste solange, bis die Markise sich
kurz bewegt: die neue obere Endlage ist gespeichert.
1 2
my
5 s
oder
1 2
my
5 s
1
oder
3
2
4
2 s
5 s
1
oder
3
2
4
2 s
5 s
5069577C107-Pergola_io.indb 195069577C107-Pergola_io.indb 19 18/05/2022 18:46:0418/05/2022 18:46:04

Pergola io
20
DE
Copyright © 2010-2022 Somfy Activités SA, Société Anonyme. All rights reserved.
Nachjustieren der unteren Endlage
1) Fahren Sie die Markise in ihre untere Endlage.
2) Drücken Sie gleichzeitig die AUF- und AB-Taste, bis die
Markise sich kurz bewegt: Der Antrieb bendet sich jetzt
im Einstellmodus.
3) Stellen Sie die untere Endlage der Markise mit der AUF-
oder AB-Taste neu ein.
4) Drücken Sie die «my»-Taste solange, bis die Markise sich
kurz bewegt: die neue untere Endlage ist gespeichert.
7.4. Erweiterte Funktionen
Bevor Sie diese Funktionen verwenden, setzen Sie sich mit Ihrem Hersteller der Markise in
Verbindung, um sich über die Kompatibilität Ihrer Anlage zu informieren.
7.4.3. Funktion "Tuchspannung", ausschließlich für Pergolamarkisen mit
gespanntem Tuch
Diese Funktion ermöglicht die Erhöhung oder Verringerung der Tuchspannung in 3 Stufen
(stark-mittel-gering).
Werksseitig ist der Antrieb auf die mittlere Stufe eingestellt.
Aus Sicherheitsgründen kann diese Funktion mit dem Somfy io Funksender nur in den 3 folgenden
Fällen betätigt werden:
• Nach Bestätigung der Einstellung und vor dem Speichern des ersten Somfy io Funksenders.
• Nach dem Speichern des ersten Somfy io Funksenders und in den 4 folgenden Zyklen.
• Nach einer einfachen Spannungsunterbrechung und in den folgenden 4 Zyklen.
Für die Einstellung dieser Funktion:
1) Fahren Sie die Markise in eine mittlere Position.
2) Drücken Sie gleichzeitig kurz die «my»- und AB-Taste,
drücken Sie dann sofort noch einmal die «my»- und
AB-Taste solange, bis die Markise sich kurz bewegt.
Der Antrieb ist jetzt 10 Sekunden lang in
Lernbereitschaft.
3) Stellen Sie die Tuchspannung mit der AUF- oder
AB-Taste ein.
- Zur Erhöhung der Tuchspannung drücken Sie die
AUF-Taste, bis die Markise sich langsam bewegt: Die Tuchspannung ist auf die nächsthöhere Stufe
eingestellt.
- Zur Verringerung der Tuchspannung drücken Sie die AB-Taste, bis die Markise sich langsam
bewegt: Die Tuchspannung ist auf die nächstniedrige Stufe eingestellt.
4) Drücken Sie die «my»-Taste solange, bis die Markise sich kurz bewegt: Die neue Tuchspannung
2 s
5 s
1 2
4
3
oder
oder
oder
0.5 s 5 s
1 2
3 4
ist gespeichert.
8. TIPPS UND HINWEISE
8.1. Fragen zum Pergola io?
Fehlfunktionen Mögliche Ursachen Lösungen
Die Markise
funktioniert nicht. Die Verkabelung ist fehlerhaft. Die Verkabelung überprüfen und ggf.
ändern.
Der Überhitzungsschutz ist aktiv. Warten, bis der Antrieb abgekühlt ist.
Das verwendete Kabel ist nicht
konform. Das verwendete Kabel überprüfen und
sicherstellen, dass es über 3 Leiter verfügt.
Die Batterie des io-Funksenders ist
schwach. Prüfen, ob die Batterie schwach ist und sie
ggf. austauschen.
Der Funksender ist nicht kompatibel. Die Kompatibilität überprüfen und den
Funksender ggf. austauschen.
Der verwendete Somfy io-Funksender
ist nicht im Antrieb gespeichert. Einen eingelernten Funksender verwenden
oder den Funksender speichern.
5069577C107-Pergola_io.indb 205069577C107-Pergola_io.indb 20 18/05/2022 18:46:0518/05/2022 18:46:05

Pergola io
21
DE
Copyright © 2010-2022 Somfy Activités SA,Société Anonyme. All rights reserved.
Die Markise hält
zu früh an. Der Adapter wurde nicht richtig
angebracht. Den Adapter richtig anbringen.
Die Endlagen sind falsch eingestellt. Endlagen nachjustieren.
8.2. Austausch eines verlorenen oder beschädigten Somfy io-Funksenders
Lesen Sie in der entsprechenden Gebrauchsanleitung nach.
8.3. Rücksetzen auf Werkseinstellung
Bei diesem Zurücksetzen werden alle Funksender, alle Sensoren und alle Endlagen-Einstellungen
gelöscht sowie die Drehrichtung des Antriebs und die Lieblingsposition («my»-Position)
zurückgesetzt. Die Einstellung der Tuchspannung
bleibt für die Pergolamarkisen mit gespanntem Tuch
jedoch gespeichert.
Führen Sie die doppelte Spannungsunterbrechung nur
an dem Antrieb durch, der zurückgesetzt werden soll!
1) Die Markise möglichst in die mittlere Position bringen.
2) Schalten Sie die Spannungsversorgung für die Dauer
von 2 s. aus.
3) Schalten Sie die Spannungsversorgung zwischen 5 s.
und 15 s. ein.
4) Schalten Sie die Spannungsversorgung für die Dauer
von 2 s. aus.
5) Schalten Sie die Spannungsversorgung wieder ein: Die
Markise bewegt sich einige Sekunden lang.
Wenn sich die Markise in der oberen oder unteren
Endlage bendet, bewegt sie sich kurz.
6) Halten Sie die Taste PROG gedrückt: Die Markise führt
eine erste kurze Bewegung aus und einige Augenblicke
später eine zweite. Für den Antrieb sind jetzt die
Werkseinstellungen hergestellt.
2 s
2 s
15 s
5 s
1
6
5
3
2
4
AUS
AUS
EIN
EIN
7 s 7 s2 s
- Programmieren Sie den Antrieb neu, wie im Kapitel «Inbetriebnahme» beschrieben.
9. TECHNISCHE DATEN
Funkfrequenz 868-870 MHz io homecontrol® bidirektional Triband
Frequenzband und maximale Leistung
868,000 MHz - 868.600 MHz e.r.p. <25 mW
868,700 MHz - 869.200 MHz e.r.p. <25 mW
869,700 MHz - 870.000 MHz e.r.p. <25 mW
Betriebsspannung 230 V ~ 50 Hz
Temperaturbereich - 20 °C bis + 60 °C
Schutzart IP 44
Max. Anzahl Funksender mit den
entsprechenden Sensoren 9
Schutzklasse Klasse I
5069577C107-Pergola_io.indb 215069577C107-Pergola_io.indb 21 18/05/2022 18:46:0618/05/2022 18:46:06

Con la presente, Somfy Activités SA, F-74300 CLUSES dichiara, in qualità di produttore, che la motorizzazione
coperta da queste istruzioni, contrassegnata per essere alimentata a 230V~50Hz e per essere utilizzata
come indicato nelle presenti istruzioni, è conforme ai requisiti essenziali delle Direttive Europee applicabili e,
in particolare, della Direttiva Macchina 2006/42/CE e della Direttiva Radio 2014/53/UE.
Il testo completo della dichiarazione di conformità all’UE è disponibile all’indirizzo Internet www.somfy.com/ce.
Christian Rey, responsabile delle omologazioni, che agisce per conto del Direttore dell’Attività, Cluses,
05/2022.
Il presente manuale si applica a tutte le motorizzazioni Pergola 50 e Pergola 60 le cui versioni sono
disponibili nel catalogo in vigore.
Settore d’applicazione
Le motorizzazioni Pergola 50 e Pergola 60 sono progettate per motorizzare tutti i tipi di Pergole,
tranne quelle a stecche orientabili.
L’installatore, professionista della motorizzazione e dell’automazione d’interni, deve accertarsi che
l’installazione del prodotto motorizzato una volta installato rispetti le norme in vigore nel paese di
messa in servizio come, nello specico, la normativa sulle tende esterne EN 13561.
Responsabilità
Prima di installare e di utilizzare la motorizzazione, leggere attentamente questo libretto. Oltre le
istruzioni riportate nel presente manuale, rispettare altresì le istruzioni elencate nel documento
annesso Istruzioni di sicurezza.
La motorizzazione deve essere installata da un professionista della motorizzazione e dell’automazione
d’interni, conformemente alle istruzioni di Somfy e alle normative applicabili nel paese di messa in
servizio.
Ogni utilizzo della motorizzazione al di fuori dell’ambito di applicazione descritto sopra è vietato. Esso
escluderebbe, così come il mancato rispetto delle istruzioni riportate nel presente manuale e nel
documento annesso Istruzioni di sicurezza,ogni responsabilità e garanzia di Somfy.
L’installatore deve informare i suoi clienti in relazione alle condizioni d’uso e di manutenzione della
motorizzazione e deve consegnare loro le istruzioni d’uso e di manutenzione, oltre al documento
allegato Istruzioni di sicurezza, dopo l’installazione della motorizzazione. Ogni operazione di Servizio
Post-vendita sulla motorizzazione necessita dell’intervento di un professionista della motorizzazione
e dell’automazione d’interni.
In caso di dubbi durante l’installazione della motorizzazione o per avere maggiori informazioni,
consultare un interlocutore Somfy o visitare il sito www.somfy.com.
Istruzioni di sicurezza particolari
I cavi che passano attraverso una parete metallica devono essere protetti ed isolati da un
manicotto o una guaina.
Fissare i cavi per evitare il contatto con parti in movimento.
Se la motorizzazione viene utilizzata all’esterno e se il cavo di alimentazione è di tipo H05-VVF,
allora installare il cavo in un condotto resistente ai raggi UV, ad esempio sotto una canalina
passacavi.
Lasciare libero l’accesso al cavo d’alimentazione della motorizzazione: deve poter essere
sostituito facilmente.
Creare sempre un doppino sul cavo di alimentazione per evitare infiltrazioni di acqua all’interno
della motorizzazione!
Per i motori tubolari Ø 50/60 mm:
La ruota deve essere bloccata in traslazione nel tubo di avvolgimento:
- O fissando il tubo di avvolgimento sulla ruota per mezzo di 4 viti o 4 rivetti in acciaio posizionati
tra 5 mm e 15 mm dall’estremità esterna della ruota, indipendentemente dal tipo di tubo di
avvolgimento. Le viti o i rivetti non devono essere fissati sulla motorizzazione ma esclusivamente
sulla ruota.
- O mediante l’uso di un bloccaruota, per i tubi non lisci.
ISTRUZIONI TRADOTTE
Copyright © 2010-2022 Somfy Activités SA, Société Anonyme. All rights reserved. 22
5069577C107-Pergola_io.indb 225069577C107-Pergola_io.indb 22 18/05/2022 18:46:0618/05/2022 18:46:06

Pergola io
23
IT
Copyright © 2010-2022 Somfy Activités SA,Société Anonyme. All rights reserved.
1. Introduzione 23
2. Avvertenze 24
Istruzioni di sicurezza speciche 24
3. Installazione 24
3.1. Preparazione del motore 24
3.2. Preparazione del tubo 24
3.3. Assemblaggio motore - tubo 25
3.4. Montaggio dell'asse motorizzato 25
4. Cablaggio 25
5. Messa in servizio 26
5.1. Identicazione delle fasi di regolazione già
effettuate 26
5.2. Preimpostazione del trasmettitore locale
io Somfy 26
5.3. Verica del senso di rotazione del motore
26
5.4. Regolazione dei necorsa 27
5.5. Programmazione del primo trasmettitore
locale io Somfy 28
5.6. Controllo delle regolazioni 28
6. Utilizzo 28
6.1. Funzionamento standard 28
6.2. Funzionamento con un sensore io Somfy
29
6.3. Invio informazioni 29
7. Regolazioni supplementari 29
7.1. Posizione preferita (my) 29
7.2. Aggiunta/Eliminazione dei trasmettitori io
e dei sensori io Somfy 29
7.3. Modica dei necorsa 29
7.4. Funzioni avanzate 30
8. Consigli e raccomandazioni 30
8.1. Domande sul Pergola io? 30
8.2. Sostituzione di un trasmettitore io Somfy
perso o guasto 31
8.3. Ritorno alla congurazione originale 31
9. Dati tecnici 31
Che cos'è io-homecontrol®?
Il Pergola io utilizza io-homecontrol®, il nuovo protocollo di comunicazione wireless universale e
sicuro, condiviso con grandi costruttori del settore residenziale. io-homecontrol® permette a tutti i
dispositivi per il comfort e la sicurezza di comunicare tra di loro e di essere comandati da un unico
trasmettitore.
La flessibilità e la perfetta compatibilità del sistema io-homecontrol® permettono di accompagnare
l'evoluzione delle vostre necessità. Automatizzare innanzitutto le tapparelle e la porta d'ingresso, poi
dotare
le tende esterne, il portone e la porta del garage o l'illuminazione del giardino del sistema
io-homecontrol®.
Scaglionati nel tempo, questi dispositivi restano compatibili con l'installazione esistente grazie alla
tecnologia io-homecontrol® che garantisce la loro interoperabilità.
Per ulteriori informazioni consultate il sito internet www.io-homecontrol.com.
INDICE
1. INTRODUZIONE
5069577C107-Pergola_io.indb 235069577C107-Pergola_io.indb 23 18/05/2022 18:46:0618/05/2022 18:46:06

Pergola io
24
IT
Copyright © 2010-2022 Somfy Activités SA, Société Anonyme. All rights reserved.
Istruzioni di sicurezza specifiche
1) Disinserire l'alimentazione di rete collegata alla tenda
prima di eseguire ogni operazione di manutenzione su
quest'ultima.
Per evitare di danneggiare il prodotto:
2) Non immergerlo mai!
3) Evitare gli urti!
4) Evitare che cada!
5) Non forarlo mai!
6) Evitare di muoverlo nel caso si formi del ghiaccio sulla
tenda
3. INSTALLAZIONE
Il Pergola io deve essere installato al riparo dalle intemperie.
3.1. Preparazione del motore
1) Montare la corona (A) e la ruota (B) sul motore.
2) Misurare la lunghezza (L1) tra il bordo interno della testa
del motore e l'estremità della ruota.
1
2
AB
L1
L1 = …
3.2. Preparazione del tubo
1) Tagliare il tubo di avvolgimento alla lunghezza desiderata.
2) Sbavare il tubo di avvolgimento ed eliminare i trucioli.
3) Per i tubi di avvolgimento lisci, praticare una tacca
rispettando le misure indicate:
- e = 4 mm
- h = 28 mm.
Ø > 47
1
3
2
eh
2. AVVERTENZE
1
3
5 6
2
4
OFF
5069577C107-Pergola_io.indb 245069577C107-Pergola_io.indb 24 18/05/2022 18:46:0718/05/2022 18:46:07

Pergola io
25
IT
Copyright © 2010-2022 Somfy Activités SA,Société Anonyme. All rights reserved.
3.3. Assemblaggio motore - tubo
1) Inserire il motore nel tubo di avvolgimento.
Per i tubi di avvolgimento lisci, posizionare la scanalatura
tagliata sulla corona.
2) Per motivi di sicurezza, fissare il tubo di avvolgimento alla
ruota usando 4 viti parker Ø 5 mm o 4 rivetti in acciaio Ø
4,8 mm posizionati a:
- almeno 5 mm dall'estremità esterna della ruota: L1 -
5, e
- a non più di 15 mm dall'estremità esterna della ruota:
L1 - 15.
Le viti o i rivetti non devono essere fissati sul motore
ma esclusivamente sulla ruota.
3.4. Montaggio dell'asse motorizzato
1) Montare l'asse motorizzato sul supporto calotta (C).
2) Montare l'asse motorizzato sul supporto motore (D).
3) A seconda del tipo di supporto posizionare la molla
di fissaggio(E). (per motori > a 85 Nm utilizzare
obbligatoriamente la molla con vite).
15 mm
5 mm
20 mm
L1
1
2
C
D
E
F
1
2
3
- Togliere tensione.
- Collegare il motore come indicato nella tabella riportata
in basso:
230 V ~ 50 Hz Cavo motore
1Marrone Fase (F)
2Blu Neutro (N)
3Verde-Giallo Terra ( )
1
2
3
1
2
3
OFF
230 V
~
50 Hz
3 x 1,5 mm2
3 x 0,75 mm2
4. CABLAGGIO
5069577C107-Pergola_io.indb 255069577C107-Pergola_io.indb 25 18/05/2022 18:46:0818/05/2022 18:46:08

Pergola io
26
IT
Copyright © 2010-2022 Somfy Activités SA, Société Anonyme. All rights reserved.
La guida descrive soltanto la messa in servizio mediante un trasmettitore locale io Somfy di tipo
Situo io. Per una messa in servizio mediante qualsiasi altro trasmettitore io, consultare la guida
corrispondente.
5.1. Identificazione delle fasi di regolazione già effettuate
Deve essere alimentato un solo motore alla volta.
Alimentare il motore e seguire la procedura "a" o "b" in
funzione della reazione della tenda:
aLa tenda compie un breve movimento
I fine corsa sono regolati e nessun trasmettitore io
Somfy è impostato.
Consultate il capitolo « Programmazione del primo
trasmettitore locale io Somfy ».
o
bLa tenda non si muove
Premere il pulsante Salita o Discesa e seguire la
procedura "c"o "d" in funzione della reazione della
tenda:
cLa tenda non si muove ancora
I finecorsa non sono regolati e nessun trasmettitore
io Somfy è impostato.
Consultate il capitolo "Preimpostazione del
trasmettitore locale io SOMFY".
o
dLa tenda sale o scende completamente
I fine corsa sono regolati e il trasmettitore io Somfy
è impostato.
Consultate il capitolo "Utilizzo".
5.2. Preimpostazione del trasmettitore locale io Somfy
- Premere contemporaneamente i pulsanti Salita e
Discesa: la tenda compie un breve movimento, il
trasmettitore locale io Somfy viene preimpostato nel
motore.
5.3. Verifica del senso di rotazione del motore
1) Premere il pulsante Salita:
a) Se la tenda sale, il senso di rotazione è corretto:
consultate il capitolo "Regolazione dei finecorsa".
b) Se la tenda scende, il senso di rotazione non è
corretto: premere il pulsante "my", fino a un breve
movimento della tenda, il senso di rotazione viene
modificato.
2) Premere il pulsante Salita per controllare il nuovo senso
di rotazione.
ON
Programmazione
del 1° trasmettitore
locale io Somfy
co d
Preimpostazione del
trasmettitore locale io
Somfy.
Utilizzo.
a
b
Regolazione
dei necorsa
2 s
1
2
5. MESSA IN SERVIZIO
5069577C107-Pergola_io.indb 265069577C107-Pergola_io.indb 26 18/05/2022 18:46:0918/05/2022 18:46:09

Pergola io
27
IT
Copyright © 2010-2022 Somfy Activités SA,Société Anonyme. All rights reserved.
5.4. Regolazione dei finecorsa
La regolazione dei finecorsa dipende dal tipo di tenda.
5.4.1. Regolazione automatica dei fine corsa delle tende Pergola a tela tesa
I finecorsa alto e basso si regolano automaticamente.
1) Premere contemporaneamente i pulsanti Salita e
Discesa: la tenda compie un breve movimento.
2) Premere il pulsante "my" fino a un breve movimento
della tenda: i finecorsa vengono impostati, consultate il
capitolo "Programmazione del primo trasmettitore locale
io Somfy".
5.4.2. Regolazione semiautomatica dei finecorsa delle tende Pergola a tela tesa
ll finecorsa basso viene regolato in modo automatico, mentre il finecorsa alto si regola
manualmente.
È sempre possibile definire un nuovo finecorsa alto
prima di memorizzarlo.
Regolazione del finecorsa alto
1) Posizionare la tenda in posizione di finecorsa alto.
Una pressione > di 2 s sul pulsante Salita comporta un
movimento di salita continuo della tenda.
2) Fermare la tenda nel punto desiderato.
3) Se necessario, regolare la posizione della tenda agendo
sui pulsanti Salita o Discesa.
4) Premere simultaneamente i pulsanti "my" e Discesa: la
tenda scende con un movimento continuo anche dopo
aver rilasciato i pulsanti "my" e Discesa.
5) A metà altezza, premere brevemente il pulsante "my" per
fermare la tenda.
6) Premere di nuovo il pulsante "my" fino a un breve
movimento della tenda: i finecorsa vengono impostati,
consultate il capitolo "Programmazione del primo
trasmettitore locale io Somfy".
5.4.3. Regolazione manuale dei finecorsa delle tende Pergola a tela non tesa
Per le tende Pergola a tela non tesa, i finecorsa alto e basso devono essere regolati.
È sempre possibile definire un nuovo finecorsa alto o basso prima di memorizzarlo.
Regolazione del finecorsa alto
1) Posizionare la tenda in posizione di finecorsa alto.
Una pressione > di 2 s sul pulsante Salita comporta un
movimento di salita continuo della tenda.
2) Fermare la tenda nel punto desiderato.
3) Se necessario, regolare la posizione della tenda agendo
sui pulsanti Salita o Discesa.
4) Premere simultaneamente i pulsanti "my" e Discesa: la
tenda scende con un movimento continuo anche dopo
aver rilasciato i pulsanti "my" e Discesa.
5) A metà altezza, premere brevemente il pulsante "my" per
fermare la tenda e passare alla fase "Regolazione del
finecorsa basso".
12
2 s
1
3
2
4
5 6
2 s
1
3
5
2
4
Regolazione del
necorsa basso.
5069577C107-Pergola_io.indb 275069577C107-Pergola_io.indb 27 18/05/2022 18:46:1018/05/2022 18:46:10

Pergola io
28
IT
Copyright © 2010-2022 Somfy Activités SA, Société Anonyme. All rights reserved.
6. UTILIZZO
Regolazione del finecorsa basso
1) Portare la tenda nella posizione di finecorsa basso.
Una pressione > di 2 s sul pulsante Discesa comporta
un movimento di discesa continuo della tenda.
2) Fermare la tenda nel punto desiderato.
3) Se necessario, regolare la posizione della tenda agendo
sui pulsanti Salita o Discesa.
4) Premere simultaneamente i pulsanti "my" e Salita: la
tenda sale con un movimento continuo anche dopo aver
rilasciato i pulsanti "my" e Salita.
5) A metà altezza, premere brevemente il pulsante "my" per
fermare la tenda.
6) Premere di nuovo il pulsante "my" fino a un breve
movimento della tenda: i finecorsa sono impostati.
Consultate il capitolo "Programmazione del primo
trasmettitore locale io Somfy".
5.5. Programmazione del primo trasmettitore locale io Somfy
5.5.1. Con un trasmettitore locale io Somfy programmato
- Premere brevemente il pulsante PROG di questo
trasmettitore (G): la tenda compie un breve movimento, il
trasmettitore è impostato.
o
5.5.2. Dopo un'interruzione di corrente
All'inserimento della tensione, la tenda esegue un breve movimento.
1) Premere contemporaneamente i pulsanti Salita e
Discesa del nuovo trasmettitore (H) finché la tenda non
si muove brevemente.
2) Premere brevemente il pulsante PROG di questo
trasmettitore (H) : la tenda compie un breve movimento,
il trasmettitore è impostato.
5.6. Controllo delle regolazioni
- Controllare la regolazione dei finecorsa alto e basso utilizzando il trasmettitore locale io Somfy.
1
3
5
2
4
6
2 s
2
H
1
6.1. Funzionamento standard
6.1.1. Pulsanti Salita e Discesa
Una breve pressione del pulsante Salita o Discesa causa la
salita o discesa completa della tenda.
Per le tende Pergola a tela tesa, il rilevamento di un
ostacolo è attivo per tutta la discesa o per tutta la salita.
6.1.2. Funzione STOP
La tenda si sta muovendo.
- Premere brevemente il pulsante "my": la tenda si ferma.
6.1.3. Posizione preferita (my)
Definizione
Una posizione intermedia chiamata "posizione preferita
(my)", diversa dalla posizione alta e dalla posizione bassa,
può essere registrata nel motore.
Per impostare, modificare o cancellare la posizione
preferita (my), consultate il capitolo "Regolazioni
supplementari".
Per usare la posizione preferita (my):
- Premere brevemente il pulsante "my": la tenda inizia a muoversi e si ferma nella posizione preferita
(my).
5069577C107-Pergola_io.indb 285069577C107-Pergola_io.indb 28 18/05/2022 18:46:1118/05/2022 18:46:11

Pergola io
29
IT
Copyright © 2010-2022 Somfy Activités SA,Société Anonyme. All rights reserved.
7. REGOLAZIONI SUPPLEMENTARI
6.2. Funzionamento con un sensore io Somfy
Consultare il manuale corrispondente.
6.3. Invio informazioni
Dopo ogni ordine, il Pergola io invia un segnale. Questa informazione viene ricevuta dai trasmettitori
bidirezionali io.
7.1. Posizione preferita (my)
7.1.1 Programmazione o modifica della posizione preferita (my)
La procedura da seguire per la programmazione o modifica
della posizione preferita (my) è la medesima.
1) Posizionare la tenda nella posizione preferita (my).
2) Premere il pulsante "my" fino a un breve movimento della
tenda: la posizione preferita (my) è stata registrata.
7.1.2. Cancellazione della posizione preferita (my)
1) Premere il pulsante "my": la tenda inizia a muoversi e si
ferma nella posizione preferita (my).
2) Premere di nuovo il pulsante "my" fino a un breve
movimento della tenda: la posizione preferita (my) è
eliminata.
7.2. Aggiunta/Eliminazione dei trasmettitori io e dei sensori io Somfy
Consultare il manuale corrispondente.
7.3. Modifica dei finecorsa
La modifica dei finecorsa dipende dal tipo di tenda.
7.3.1. Modifica per tende Pergola a tela tesa
Per le tende Pergola a tela tesa, il finecorsa alto in modalità di finecorsa semiautomatico può essere
modificato.
Nuova regolazione del finecorsa alto in modalità
semiautomatica
1) Posizionare la tenda in posizione di finecorsa alto.
2) Premere simultaneamente i pulsanti Salita e Discesa fino
al breve movimento della tenda: il motore è in modalità
regolazione.
3) Regolare la posizione alta della tenda agendo sui pulsanti
Salita o Discesa.
4) Premere il pulsante "my" fino a un breve movimento
della tenda: la nuova posizione del finecorsa alto è stata
memorizzata.
7.3.2. Modifica per tende Pergola a tela non tesa
Per le tende Pergola tela non tesa, i finecorsa alto e basso possono essere modificati. Nuova
regolazione del finecorsa alto
1) Posizionare la tenda in posizione di finecorsa alto.
2) Premere simultaneamente i pulsanti Salita e Discesa fino
al breve movimento della tenda: il motore è in modalità
regolazione.
3) Regolare la posizione alta della tenda agendo sui pulsanti
Salita o Discesa.
4) Premere il pulsante "my" fino a un breve movimento
della tenda: la nuova posizione del finecorsa alto è stata
memorizzata.
12
my
5 s
o
12
my
5 s
1
o
3
2
4
2 s
5 s
1
o
3
2
4
2 s
5 s
5069577C107-Pergola_io.indb 295069577C107-Pergola_io.indb 29 18/05/2022 18:46:1218/05/2022 18:46:12

Pergola io
30
IT
Copyright © 2010-2022 Somfy Activités SA, Société Anonyme. All rights reserved.
Nuova regolazione del finecorsa basso
1) Posizionare la tenda in posizione di finecorsa basso.
2) Premere simultaneamente i pulsanti Salita e Discesa fino
al breve movimento della tenda: il motore è in modalità
regolazione.
3) Regolare la posizione bassa della tenda agendo sui
pulsanti Salita o Discesa.
4) Premere il pulsante "my" fino a un breve movimento della
tenda: la nuova posizione del finecorsa basso è stata
memorizzata.
7.4. Funzioni avanzate
Contattare il costruttore della tenda prima di utilizzare queste funzioni per avere conferma della
compatibilità della vostra installazione.
7.4.3. Funzione "Tensione tela" unicamente per tende Pergola a tela tesa
Questa funzione consente di aumentare o diminuire la tensione della tela della tenda in base a tre
livelli (forte - medio - debole).
Di default, il motore viene posizionato sul livello medio come impostazione di fabbrica.
Per sicurezza, questa funzione è raggiungibile dal trasmettitore io Somfy soltanto in 3 casi:
• Dopo la convalida delle regolazioni e prima della programmazione del primo trasmettitore io Somfy.
• Dopo la programmazione del primo trasmettitore io Somfy e nei 4 cicli successivi.
• Dopo un'interruzione dell'alimentazione e nei 4 cicli successivi.
Per attivare questa funzione:
1) Portare la tenda in posizione centrale.
2) Premere brevemente e contemporaneamente i
pulsanti "my" e Discesa, quindi premerli nuovamente
mantenendoli premuti fino al breve movimento della
tenda.
Il motore resta in modalità programmazione solo per
10 secondi.
3) Regolare la tensione della tela con i pulsanti Salita o
Discesa.
- Per aumentare la tensione della tela, premere il pulsante
Salita fino al movimento lento della tenda: la tensione della tela della tenda è passata al livello
superiore.
- Per diminuire la tensione della tela, premere il pulsante Discesa fino al movimento lento della
tenda: la tensione della tela della tenda è passata al livello inferiore.
4) Premere il pulsante "my" fino a un breve movimento della tenda: la nuova tensione della tenda è
memorizzata.
2 s
5 s
12
4
3
o
o
o
0,5 s 5 s
12
3 4
8. CONSIGLI E RACCOMANDAZIONI
8.1. Domande sul Pergola io?
Problemi Possibili cause Soluzioni
La tenda non
funziona. Il cablaggio non è corretto. Controllare il cablaggio e modicarlo, se
necessario.
Il motore si è surriscaldato. Attendere che il motore si raffreddi.
Il cavo utilizzato non è conforme. Controllare il cavo utilizzato e accertarsi che
siano presenti 3 conduttori.
Il livello della batteria del trasmettitore
io Somfy è basso. Controllare se la batteria è scarica e
sostituirla, se necessario.
Il trasmettitore non è compatibile. Controllare la compatibilità e sostituire il
trasmettitore, se necessario.
Il trasmettitore io Somfy utilizzato non
è stato programmato nel motore. Utilizzare un trasmettitore programmato o
programmare questo trasmettitore.
La tenda si ferma
troppo presto. La corona non è montata
correttamente. Fissare la corona in modo corretto.
I necorsa non sono impostati
correttamente. Reimpostare i necorsa.
5069577C107-Pergola_io.indb 305069577C107-Pergola_io.indb 30 18/05/2022 18:46:1318/05/2022 18:46:13

Pergola io
31
IT
Copyright © 2010-2022 Somfy Activités SA,Société Anonyme. All rights reserved.
8.2. Sostituzione di un trasmettitore io Somfy perso o guasto
Consultare il manuale corrispondente.
8.3. Ritorno alla configurazione originale
Questo reset elimina tutti i trasmettitori, i sensori, le regolazioni di finecorsa e resetta il senso di
rotazione e la posizione preferita (my) del motore. Tuttavia, la regolazione della tensione della
tela rimane memorizzata solo per le tende Pergola a tela tesa.
Effettuare un doppio taglio di corrente solo sul motore da resettare.
1) Portare la tenda in posizione qualsiasi tranne in quelle di finecorsa (se possibile).
2) Togliere tensione per 2 s.
3) Alimentare nuovamente il motore tra 5 s e 15 s.
4) Togliere tensione per 2 s.
5) Alimentare nuovamente il motore: la tenda si muove per
alcuni secondi.
Se la tenda si trova in posizione di finecorsa alto o
basso, questa effettuerà un breve movimento.
6) Premere a lungo il pulsante PROG: la tenda effettua un
primo breve movimento e poi un secondo movimento
alcuni istanti dopo. Il motore è tornato nella configurazione
originale.
- Riprendere le procedure del capitolo "Messa in servizio"
2 s
2 s
15 s
5 s
1
6
5
3
2
4
OFF
OFF
ON
ON
7 s 7 s2 s
9. DATI TECNICI
Frequenza radio 868-870 MHz io-homecontrol® bidirezionale Tri-band
Bande di frequenza e la massima potenza
utilizzati
868.000 MHz - 868.600 MHz e.r.p. <25 mW
868.700 MHz - 869.200 MHz e.r.p. <25 mW
869.700 MHz - 870.000 MHz e.r.p. <25 mW
Alimentazione 230 V ~ 50 Hz
Temperatura di utilizzo da - 20 °C a + 60 °C
Grado di protezione: IP 44
Numero massimo di trasmettitori e di
sensori associati 9
Classe d'isolamento Classe I
5069577C107-Pergola_io.indb 315069577C107-Pergola_io.indb 31 18/05/2022 18:46:1418/05/2022 18:46:14

Hierbij verklaart Somfy Activités SA, F-74300 CLUSES dat de motorisatie die bestemd is om te worden
gebruikt met 230V~50Hz volgens de aanwijzingen in dit document, in overeenstemming is met de essentiële
eisen en de andere relevante bepalingen van de Europese richtlijnen voor toepassing binnen de Europese
Unie en in het bijzonder met de Machinerichtlijn 2006/42/EG en de Richtlijn Radioapparatuur 2014/53/EU.
De volledige EU-conformiteitsverklaring staat ter beschikking op de website www.somfy.com/ce.
Christian Rey, verantwoordelijk voor de typegoedkeuringen, handelend uit naam van de Directeur van de
onderneming, Cluses, 05/2022.
Deze handleiding is geldig voor alle uitvoeringen van de motorisaties Pergola 50 en Pergola 60 die in
de actuele catalogus zijn opgenomen.
Toepassingsgebied
De motorisaties Pergola 50 en Pergola 60 zijn ontworpen voor het motoriseren van elk type pergola
zonwering, met uitzondering van de pergola’s met kantelbare lamellen.
Het gemotoriseerde systeem moet geïnstalleerd worden door een erkende installateur van
automatiseringssystemen in woningen, in overeenstemming met de instructies van Somfy en met de
van het land van gebruik geldende normen en met name met buitenzonweringen EN 13561.
Verantwoordelijkheid
Voordat de motorisatie geïnstalleerd en gebruikt wordt, moet deze handleiding zorgvuldig gelezen
worden. Houd u altijd aan de aanwijzingen die in deze handleiding staan. Houd u ook altijd aan de
gedetailleerde voorschriften die in het bijgevoegde document Veiligheidsvoorschriften staan.
De motorisatie moet geïnstalleerd worden door een erkende installateur van automatiseringssystemen
in woningen, in overeenstemming met de instructies van Somfy en met de in het land van gebruik
geldende wet- en regelgeving.
Ieder gebruik van de motorisatie buiten het hierboven beschreven toepassingsgebied is verboden.
Hierdoor en door het niet opvolgen van de instructies die in deze handleiding en in het bijgevoegde
document Veiligheidsvoorschriften staan, vervalt de aansprakelijkheid en de garantie van Somfy.
De installateur moet de klant informeren over de voorwaarden voor het gebruik en het onderhoud
van de motorisatie en moet hem/haar, na de installatie van de motorisatie, de aanwijzingen voor
het gebruik en het onderhoud, evenals het bijgevoegde document Veiligheidsvoorschriften,
overhandigen. Servicewerkzaamheden aan de motorisatie mogen alleen uitgevoerd worden door een
erkende installateur van automatiseringssystemen in woningen.
Raadpleeg, bij twijfel tijdens de installatie van de motorisatie of voor aanvullende informatie uw Somfy
leverancier of ga naar de website www.somfy.com.
Veiligheidsvoorschriften
Kabels die door een metalen schot lopen moeten beschermd en geïsoleerd worden door een
doorvoerrubber of -huls.
Maak kabels vast zodat zij niet in contact kunnen komen met bewegende delen.
Als de motorisatie buiten wordt gebruikt, en als de voedingskabel van het type H05-VVF is,
installeer de kabel dan in een UV-bestendige kabelgoot.
Zorg dat de voedingskabel van de motorisatie toegankelijk blijft: hij moet gemakkelijk vervangen
kunnen worden.
Monteer de voedingskabel altijd met een lus zodat er geen water in de motorisatie kan
binnendringen!
Voor buismotoren van Ø 50/60 mm:
De meenemer mag niet axiaal kunnen verschuiven in de oprolbuis:
- Ofwel door de oprolbuis vast te zetten op de meenemer met behulp van 4 schroeven of 4
klinknagels tussen 5 mm en 15 mm van het buitenste uiteinde van de meenemer, ongeacht het
type oprolbuis. De schroeven of klinknagels mogen niet aan de motorisatie, maar uitsluitend aan
de meenemer worden vastgezet.
- Ofwel door een meenemerstop te gebruiken voor niet gladde buizen.
INSTRUCTIES VERTAALD
Copyright © 2010-2022 Somfy Activités SA, Société Anonyme. All rights reserved. 32
5069577C107-Pergola_io.indb 325069577C107-Pergola_io.indb 32 18/05/2022 18:46:1418/05/2022 18:46:14

Pergola io
33
NL
Copyright © 2010-2022 Somfy Activités SA,Société Anonyme. All rights reserved.
1. Inleiding 33
2. Veiligheid 34
Specieke veiligheidsvoorschriften 34
3. Installatie 34
3.1. Voorbereiden van de motor 34
3.2. Voorbereiden van de buis 34
3.3. Assemblage motor - buis 35
3.4. Montage van het geheel buis-motor 35
4. Aansluiting 35
5. In bedrijf stellen 36
5.1. Bepalen van de reeds uitgevoerde
afstellingen 36
5.2. Controle nemen met het lokale Somfy io
bedieningspunt 36
5.3. Controle van de draairichting van de
motor 36
5.4. Afstellen van de eindpunten 37
5.5. Opslaan van het eerste lokale Somfy io
bedieningspunt 38
5.6. Controle van de afstellingen 38
6. Gebruik 38
6.1. Standaard werking 38
6.2. Werking van een Somfy io sensor 39
6.3. Feedback informatie 39
7. Extra afstellingen 39
7.1. Favoriete positie (“MY”) 39
7.2. Toevoegen/Wissen van tweerichtings io
bedieningen en Somfy io sensoren 39
7.3. Wijzigen van de eindpunten 39
7.4. Geavanceerde functies 40
8. Tips en adviezen 40
8.1. Vragen over de Pergola io? 40
8.2. Vervangen van een verloren of defect
Somfy io bedieningspunt 41
8.3. Terug naar de oorspronkelijke conguratie
41
9. Technische gegevens 41
Wat is io-homecontrol® ?
De Pergola io gebruikt io-homecontrol®, de nieuwe draadloze universele en beveiligde communicatie-
interface van de grote fabrikanten van domotica. Met io-homecontrol® kunnen alle comfort- en
veiligheidsuitrustingen met elkaar communiceren en door een en hetzelfde bedieningspunt
aangestuurd worden.
Dankzij de exibiliteit en de perfecte compatibiliteit van het io-homecontrol® systeem kan het
meegroeien met uw behoeften. Eerst de rolluiken en de voordeur met het io-homecontrol ®systeem
automatiseren, dan uitbreiden
met de zonweringen, het toegangshek en de garagedeur of de tuinverlichting.
Ook in de toekomst blijven deze systemen compatibel met de bestaande installatie doordat de
io-homecontrol® technologie hun samenwerking garandeert.
Kijk voor meer informatie op de website www.io-homecontrol.com
INHOUD
1. INLEIDING
5069577C107-Pergola_io.indb 335069577C107-Pergola_io.indb 33 18/05/2022 18:46:1418/05/2022 18:46:14

Pergola io
34
NL
Copyright © 2010-2022 Somfy Activités SA, Société Anonyme. All rights reserved.
Specieke veiligheidsvoorschriften
1) Voordat u werkzaamheden uitvoert aan een screen,
zonnescherm of zonwering moet u de netvoeding
uitschakelen.
Om het product niet te beschadigen:
2) Nooit onderdompelen!
3) Voorkom schokken!
4) Niet laten vallen!
5) Niet in boren!
6) Gebruik het zonnescherm of de zonwering niet als er ijs
op zit.
De Pergola io moet op een tegen de weersinvloeden beschutte plaats geïnstalleerd worden.
3.1. Voorbereiden van de motor
1) Monteer de adapter (A) en de meenemer (B) op de motor.
2) Meet de lengte (L1) tussen de binnenrand van de motor
en het uiteinde van de meenemer.
3.2. Voorbereiden van de buis
1) Zaag de oprolbuis op de gewenste lengte af.
2) Verwijder de bramen en de splinters van de oprolbuis.
3) Bij ronde oprolbuizen zaagt u een inkeping met de
volgende afmetingen:
- e = 4 mm
- h = 28 mm.
1
2
AB
L1
L1 = …
2. VEILIGHEID
3. INSTALLATIE
1
3
5 6
2
4
OFF
Ø > 47
1
3
2
eh
5069577C107-Pergola_io.indb 345069577C107-Pergola_io.indb 34 18/05/2022 18:46:1518/05/2022 18:46:15

Pergola io
35
NL
Copyright © 2010-2022 Somfy Activités SA,Société Anonyme. All rights reserved.
3.3. Assemblage motor - buis
1) Schuif de motor in de oprolbuis.
Bij ronde oprolbuizen plaatst u de inkeping over de
adapter.
2) Bevestig uit veiligheidsoverwegingen de oprolbuis aan
de meenemer met 4 parkerschroeven Ø 5 mm of 4 stalen
klinknagels Ø 4,8 mm die zijn geplaatst op:
- minstens 5 mm van de rand van de meenemer: L1
- 5, en
- maximum 15 mm van de rand van de meenemer: L1
- 15.
De schroeven of klinknagels mogen niet aan de motor, maar uitsluitend aan de meenemer
worden vastgezet.
3.4. Montage van het geheel buis-motor
1) Monteer het geheel buis-motor op de eindsteun (C).
2) Monteer het geheel buis-motor op de motorsteun (D).
3) Afhankelijk van het type van de steun, zet de borgring (E)
op zijn plaats (gebruik voor motoren ≥ 85 Nm met een
borgring altijd een vergrendelbare borgring (F)).
15 mm
5 mm
20 mm
L1
1
2
C
D
E
F
1
2
3
Monteer de voedingskabel altijd met een lus zodat er geen
water in de motor kan binnendringen!
- Schakel de netvoeding uit.
- Sluit de motor aan volgens de tabel hieronder:
230 V ~ 50 Hz Motorkabel
1Bruin Fase (F)
2Blauw Nul (N)
3Geel-Groen Aarding ( ) 1
2
3
1
2
3
OFF
230 V
~
50 Hz
3 x 1,5 mm2
3 x 0,75 mm2
4. AANSLUITING
5069577C107-Pergola_io.indb 355069577C107-Pergola_io.indb 35 18/05/2022 18:46:1618/05/2022 18:46:16

Pergola io
36
NL
Copyright © 2010-2022 Somfy Activités SA, Société Anonyme. All rights reserved.
De handleiding beschrijft alleen de installatie met behulp van een lokaal Somfy io bedieningspunt van
het type Situo io. Raadpleeg voor het installeren met behulp van ieder ander io bedieningspunt de
bijbehorende handleiding.
5.1. Bepalen van de reeds uitgevoerde afstellingen
Er mag slechts één motor tegelijk gevoed worden.
De spanning inschakelen en de procedure "a" of "b" volgen
afhankelijk van de reactie van de zonwering:
aDe zonwering beweegt kort
De eindpunten zijn afgesteld en geen enkel Somfy io
bedieningspunt is geprogrammeerd.
Ga naar hoofdstuk "Programmeren van het eerste
lokale Somfy io bedieningspunt".
of
bDe zonwering beweegt niet
Druk op de OP of NEER toets en volg de procedure "c"
of "d" afhankelijk van de zonwering:
cDe zonwering beweegt nog steeds niet
De eindpunten zijn niet afgesteld en geen enkel
Somfy io bedieningspunt is geprogrammeerd.
Ga naar hoofdstuk "Controle nemen met het lokale
Somfy io bedieningspunt".
of
dDe zonwering gaat helemaal naar boven of
beneden
De eindpunten zijn afgesteld en het Somfy io
bedieningspunt is geprogrammeerd.
Ga naar het hoofdstuk "Gebruik".
5.2. Controle nemen met het lokale Somfy io bedieningspunt
- Druk tegelijkertijd op de OP en NEER toets: de zonwering
beweegt kort, het lokale Somfy io bedieningspunt is
aangemeld op de motor.
5.3. Controle van de draairichting van de motor
1) Druk op de OP toets:
a) Als de zonwering omhoog gaat, is de draairichting
correct: ga naar het hoofdstuk “Afstellen van de
eindpunten".
b) Als de zonwering omlaag gaat, is de draairichting
niet correct: druk op de "MY" toets tot de zonwering kort
beweegt, de draairichting is veranderd.
2) Druk op de OP toets om de draairichting te controleren.
ON
Opslaan van het
1e lokale Somfy io
bedieningspunt
cof d
Controle nemen met
het lokale Somfy io
bedieningspunt
Gebruik.
a
b
Afstellen van
de eindpunten
2 s
1
2
5. IN BEDRIJF STELLEN
5069577C107-Pergola_io.indb 365069577C107-Pergola_io.indb 36 18/05/2022 18:46:1718/05/2022 18:46:17

Pergola io
37
NL
Copyright © 2010-2022 Somfy Activités SA,Société Anonyme. All rights reserved.
5.4. Afstellen van de eindpunten
De afstelling van de eindpunten hangt van het type zonwering af.
5.4.1. Automatisch afstellen van de eindpunten van de Pergola zonweringen met
gespannen doek
De bovenste en onderste eindpunten worden automatische afgesteld.
1) Druk tegelijkertijd op de OP en NEER toets: de zonwering
beweegt kort
2) Druk op de "MY" toets tot de zonwering kort beweegt:
de posities van de eindpunten zijn opgeslagen, ga naar
hoofdstuk "Opslaan van het eerste lokale Somfy io
bedieningspunt".
5.4.2. Half automatisch afstellen van de eindpunten van de Pergola zonweringen met
gespannen doek
Het onderste eindpunt wordt automatisch afgesteld terwijl het bovenste eindpunt handmatig
afgesteld moet worden.
Het is altijd mogelijk een nieuw bovenste eindpunt in te
stellen voordat het opgeslagen wordt.
Afstellen van het bovenste eindpunt
1) Zet de zonwering in het bovenste eindpunt.
Een druk van > 2 s op de OP toets zorgt voor het
continu naar boven gaan van de zonwering.
2) Stop de zonwering op het gewenste punt.
3) Wijzig de positie van de zonwering zo nodig met behulp
van de OP of NEER toets.
4) Druk tegelijkertijd op de "MY" en de NEER toets: de
zonwering gaat met een continue beweging omlaag,
zelfs als de "MY" en NEER toetsen niet langer ingedrukt
worden.
5) Druk halverwege kort op de toets "MY" om de zonwering
te stoppen.
6) Druk opnieuw op de "MY" toets tot de zonwering kort
beweegt: de posities van de eindpunten zijn opgeslagen, ga naar hoofdstuk "Opslaan van het
eerste lokale Somfy io bedieningspunt".
5.4.3. Handmatig afstellen van de eindpunten voor de Pergola zonweringen met
niet-gespannen doek
Voor Pergola zonweringen met niet-gespannen doek moeten het bovenste en het onderste eindpunt
afgesteld worden.
Het is altijd mogelijk een nieuw bovenste of onderste eindpunt in te stellen voordat ze opgeslagen
worden.
Afstellen van het bovenste eindpunt
1) Zet de zonwering in het bovenste eindpunt.
Een druk van > 2 s op de OP toets zorgt voor het
continu naar boven gaan van de zonwering.
2) Stop de zonwering op het gewenste punt.
3) Wijzig de positie van de zonwering zo nodig met behulp
van de OP of NEER toets.
4) Druk tegelijkertijd op de "MY" en de NEER toets: de
zonwering gaat met een continue beweging omlaag,
zelfs als de "MY" en NEER toetsen niet langer ingedrukt
worden.
5) Druk halverwege kort op de "MY" toets om de zonwering
te stoppen en ga naar stap " Afstellen van het onderste
eindpunt ».
1 2
2 s
1
3
2
4
5 6
2 s
1
3
5
2
4
Afstellen van het
onderste eindpunt.
5069577C107-Pergola_io.indb 375069577C107-Pergola_io.indb 37 18/05/2022 18:46:1818/05/2022 18:46:18

Pergola io
38
NL
Copyright © 2010-2022 Somfy Activités SA, Société Anonyme. All rights reserved.
6. GEBRUIK
Afstellen van het onderste eindpunt
1) Zet de zonwering in het laagste eindpunt.
Een druk van > 2 s op de NEER toets zorgt voor het
continu naar beneden gaan van de zonwering.
2) Stop de zonwering op het gewenste punt.
3) Wijzig de positie van de zonwering zo nodig met behulp
van de OP of NEER toets.
4) Druk tegelijkertijd op de "MY" en de OP toets: de
zonwering gaat met een continue beweging omhoog,
zelfs als de "MY" en OP toetsen niet langer ingedrukt
worden.
5) Druk halverwege kort op de toets "MY" om de zonwering
te stoppen.
6) Druk opnieuw op de "MY" toets tot de zonwering kort
beweegt: de eindpunten zijn opgeslagen. Ga naar
hoofdstuk "Programmeren van het eerste lokale Somfy
io bedieningspunt".
5.5. Opslaan van het eerste lokale Somfy io bedieningspunt
5.5.1. Met een aangemeld lokaal Somfy io bedieningspunt
- Druk kort op de PROG toets van dit bedieningspunt
(G): de zonwering beweegt kort, het bedieningspunt is
opgeslagen.
of
5.5.2. Na een eenvoudige stroomonderbreking
Bij het aanzetten van de elektrische spanning maakt de zonwering een korte beweging.
1) Druk tegelijkertijd op de OP en NEER toetsen van
het nieuwe bedieningspunt (H) tot de zonwering kort
beweegt.
2) Druk kort op de PROG toets van dit bedieningspunt
(H): de zonwering beweegt kort, het bedieningspunt is
opgeslagen.
5.6. Controle van de afstellingen
- Controleer de afstelling van het bovenste en onderste eindpunt met behulp van het lokale Somfy io
bedieningspunt.
1
3
5
2
4
6
2 s
2
H
1
6.1. Standaard werking
6.1.1. OP en NEER toetsen
Een korte druk op de OP toets of de NEER toets zorgt voor het
geheel omhoog of omlaag gaan van de zonwering.
Voor Pergola zonweringen met gespannen doek is de
obstakeldetectie actief tijdens het omlaag of omhoog
gaan.
6.1.2. STOP functie
De zonwering is in beweging.
- Druk kort op de "MY" toets: de zonwering stopt.
6.1.3. Favoriete positie (“MY”)
Denitie
In de motor kan een tussenpositie genaamd "favoriete
positie (MY)", tussen het bovenste en onderste eindpunt,
opgeslagen worden.
Voor het opslaan, wijzigen of wissen van de favoriete
positie (MY), raadpleegt u het hoofdstuk "Extra
instellingen".
5069577C107-Pergola_io.indb 385069577C107-Pergola_io.indb 38 18/05/2022 18:46:1918/05/2022 18:46:19

Pergola io
39
NL
Copyright © 2010-2022 Somfy Activités SA,Société Anonyme. All rights reserved.
7. EXTRA AFSTELLINGEN
Om de favoriete positie (MY) te gebruiken:
- Druk kort op de "MY" toets: de zonwering komt in beweging en stopt in de favoriete positie (MY).
6.2. Werking van een Somfy io sensor
Raadpleeg de bijbehorende handleiding.
6.3. Feedback informatie
Na elke opdracht stuurt de Pergola io een boodschap. Deze informatie wordt verwerkt door de
tweerichtings io bedieningspunten.
7.1. Favoriete positie (“MY”)
7.1.1 Opslaan of wijzigen van de favoriete positie (MY)
De te volgen procedure voor het opslaan of het wijzigen van
de favoriete positie (MY) is identiek.
1) Zet de zonwering in de gewenste favoriete positie (MY).
2) Druk op de "MY" toets tot de zonwering kort beweegt: De
favoriete positie (MY) is geprogrammeerd.
7.1.2. Wissen van de favoriete positie (MY)
1) Druk op de "MY" toets. de zonwering komt in beweging
en stopt in de favoriete positie (MY).
2) Druk opnieuw op de "MY" toets tot de zonwering kort
beweegt: De favoriete positie (MY) is nu gewist.
7.2. Toevoegen/Wissen van tweerichtings io
bedieningen en Somfy io sensoren
Raadpleeg de bijbehorende handleiding.
7.3. Wijzigen van de eindpunten
De wijziging van de eindpunten hangt af van het type zonwering.
7.3.1. Wijziging voor Pergola zonweringen met gespannen doek
Voor Pergola zonweringen met gespannen doek kan het bovenste eindpunt gewijzigd worden in geval
van de halfautomatische afstelling van het eindpunt.
Bijstellen van het bovenste eindpunt in de halfautomatische
modus
1) Zet de zonwering in het bovenste eindpunt.
2) Druk tegelijkertijd op de OP en NEER toetsen tot de
zonwering kort beweegt: de motor is in de afstelmodus.
3) Wijzig het bovenste eindpunt van de zonwering met
behulp van de OP of NEER toets.
4) Druk op de "MY" toets tot de zonwering kort beweegt: het
nieuwe bovenste eindpunt is geprogrammeerd.
7.3.2. Wijziging voor Pergola zonweringen met niet-gespannen doek
Voor Pergola zonweringen met niet-gespannen doek kan het bovenste en het onderste eindpunt
gewijzigd worden. Bijstellen van het bovenste eindpunt
1) Zet de zonwering in het bovenste eindpunt.
2) Druk tegelijkertijd op de OP en NEER toetsen tot de
zonwering kort beweegt: de motor is in de afstelmodus.
3) Wijzig het bovenste eindpunt van de zonwering met
behulp van de OP of NEER toets.
4) Druk op de "MY" toets tot de zonwering kort beweegt: het
nieuwe bovenste eindpunt is geprogrammeerd.
1 2
MY
5 s
of
1 2
MY
5 s
1
of
3
2
4
2 s
5 s
1
of
3
2
4
2 s
5 s
5069577C107-Pergola_io.indb 395069577C107-Pergola_io.indb 39 18/05/2022 18:46:2018/05/2022 18:46:20

Pergola io
40
NL
Copyright © 2010-2022 Somfy Activités SA, Société Anonyme. All rights reserved.
Bijstellen van het onderste eindpunt
1) Zet de zonwering in het onderste eindpunt.
2) Druk tegelijkertijd op de OP en NEER toetsen tot de
zonwering kort beweegt: de motor is in de afstelmodus.
3) Wijzig het onderste eindpunt van de zonwering met
behulp van de OP of NEER toets.
4) Druk op de "MY" toets tot de zonwering kort beweegt: het
nieuwe onderste eindpunt is geprogrammeerd.
7.4. Geavanceerde functies
Raadpleeg de fabrikant van de zonwering voordat u deze functies gebruikt om de compatibiliteit
van uw installatie te controleren.
7.4.3. Functie "Regeling van de doekspanning" uitsluitend voor Pergola zonweringen
met gespannen doek
Met deze functie kan de spanning van het doek van de zonwering vergroot of verkleind worden. Er
zijn 3 niveaus: strak, gemiddeld, weinig.
Standaard is de motor in de fabriek ingesteld op het middelste niveau.
Voor de veiligheid is deze functie slechts in 3 gevallen toegankelijk door het bedieningspunt:
• Na het controleren van de afstelling en vóór het opslaan van het eerste Somfy io bedieningspunt.
• Na het opslaan van het eerste Somfy io bedieningspunt en gedurende de 4 volgende cycli.
• Na een enkele voedingsonderbreking en gedurende de 4 volgende cycli.
Voor het inschakelen van deze functie:
1) Stuur de zonwering tot halverwege.
2) Druk kort en tegelijkertijd op de MY toets en de NEER
toets, en houdt direct daarna de MY toets en de NEER
toets tegelijkertijd ingedrukt tot de zonwering kort beweegt.
De motor staat slecht 10 seconden in de
programmeermodus.
3) Stel de spanning van het doek af met behulp van de OP
of NEER toets.
- Voor het verhogen van de spanning van het doek, drukt
u op de OP toets tot de zonwering langzaam beweegt:
de spanning van het doek van de zonwering is ingesteld op de bovenste waarde.
- Voor het verlagen van de spanning van het doek, drukt u op de NEER toets tot de zonwering
langzaam beweegt: de spanning van het doek van de zonwering is ingesteld op de onderste waarde.
4) Druk op de "MY" toets tot de zonwering kort beweegt: de nieuwe spanning van het doek is
opgeslagen.
2 s
5 s
1 2
4
3
of
of
of
0.5 s 5 s
1 2
3 4
8. TIPS EN ADVIEZEN
8.1. Vragen over de Pergola io?
Vaststellingen Mogelijke oorzaken Oplossingen
De zonwering
werkt niet. De aansluiting is niet correct. Controleer de aansluiting en wijzig deze
indien nodig.
De motor is te warm geworden. Wacht tot de motor afgekoeld is.
De gebruikte kabel is niet conform. Controleer de gebruikte kabel en controleer
of deze 3 draden heeft.
De batterij van het Somfy io
bedieningspunt is leeg. Controleer of de batterij leeg is en vervang
deze indien nodig.
Het bedieningspunt is niet compatibel. Controleer de compatibiliteit en vervang het
bedieningspunt indien nodig.
Het gebruikte Somfy io
bedieningspunt is niet in de motor
geprogrammeerd.
Gebruik een bedieningspunt dat
geprogrammeerd is of programmeer dit
bedieningspunt.
De zonwering
stopt te vroeg. De adapter is niet goed geplaatst. Zet de adapter correct vast.
De eindpunten zijn niet goed
afgesteld. Stel de eindpunten bij.
5069577C107-Pergola_io.indb 405069577C107-Pergola_io.indb 40 18/05/2022 18:46:2118/05/2022 18:46:21

Pergola io
41
NL
Copyright © 2010-2022 Somfy Activités SA,Société Anonyme. All rights reserved.
8.2. Vervangen van een verloren of defect Somfy io bedieningspunt
Raadpleeg de bijbehorende handleiding.
8.3. Terug naar de oorspronkelijke conguratie
Dit resetten wist alle bedieningspunten, alle sensoren, alle ingestelde eindpunten en reset de
draairichting en de favoriete positie (MY) van de motor. Alleen voor de Pergola zonweringen met
gespannen doek blijft de afstelling van de spanning van het doek bewaard.
Voer de dubbele stroomonderbreking alleen uit op de motor die gereset moet worden!
1) Zet de zonwering in de middelste positie (indien
mogelijk).
2) Schakel de netvoeding gedurende 2 s uit.
3) Schakel de netvoeding tussen 5 s en 15 s in.
4) Schakel de netvoeding gedurende 2 s uit.
5) Schakel de netvoeding weer in: de zonwering beweegt
een paar seconden.
Als de zonwering in het bovenste of onderste eindpunt
staat, beweegt deze kort.
6) Houd de PROG toets ingedrukt : de zonwering beweegt
een eerste keer kort en even later nog een keer. De
motor is in de fabrieksconguratie.
- Herhaal de procedures van het hoofdstuk "In bedrijf
stellen"
2 s
2 s
15 s
5 s
1
6
5
3
2
4
OFF
OFF
ON
ON
7 s 7 s2 s
9. TECHNISCHE GEGEVENS
Radiofrequentie 868-870 MHz io homecontrol® tweerichting driebanden
Gebruikte frequentiebanden en maximaal
vermogen
868,000 MHz - 868,600 MHz e.r.p. <25 mW
868,700 MHz - 869,200 MHz e.r.p.<25 mW
869,700 MHz - 870,000 MHz e.r.p.<25 mW
Voeding 230 V ~ 50 Hz
Werkingstemperatuur - 20 °C tot + 60 °C
Beschermingsklasse IP 44
Maximum aantal te programmeren
bedieningspunten en sensoren 9
Veiligheidsniveau Klasse I
5069577C107-Pergola_io.indb 415069577C107-Pergola_io.indb 41 18/05/2022 18:46:2218/05/2022 18:46:22

Somfy Activités SA, F-74300 CLUSES as manufacturer hereby declares that the drive covered by these
instructions when marked for input voltage 230V~50Hz and used as intended according to these instructions,
is in compliance with the essential requirements of the applicable European Directives and in particular of
the Machinery Directive 2006/42/EC, and the Radio Directive 2014/53/EU.
The full text of the EU declaration of conformity is available at www.somfy.com/ce.
Christian REY, Approval manager, acting on behalf of Activity director, Cluses, 05/2022.
Somfy limited, Yeadon LS19 7ZA UK hereby declares that the drive covered by these instructions when
marked for input voltage 230V~50Hz and used as intended according to these instructions, is in compliance
with UK legislation of Machinery safety regulations S.I.2008 N°1597 and the Radio Equipment Regulations
S.I. 2017 N°1206. The full text of the UKCA declaration of conformity is available at www.somfy.co.uk.
Steven MONTGOMERY, Managing Director Somfy Ltd UK & Ireland, Yeadon, 05/2022.
These instructions apply to all Pergola 50 and Pergola 60 drive, the different versions of which are
available in the current catalogue.
Field of application
Pergola 50 and Pergola 60 drive are designed to drive all types of Pergola awnings, except Pergola
awnings with tiltable slats.
The installer, who must be a motorisation and home automation professional, must ensure that the
motorised product is installed in accordance with the standards in force in the country in which it is
installed such as EN 13561 relating to outdoor screens and awnings.
Liability
Please read these instructions carefully before installing and using the drive. In addition to following
the instructions given in this guide, the instructions detailed in the attached Safety instructions
document must also be observed.
The drive must be installed by a motorisation and home automation professional, according to
instructions from Somfy and the regulations applicable in the country in which it is commissioned.
It is prohibited to use the drive outside the eld of application described above. Such use, and any
failure to comply with the instructions given in this guide and in the attached Safety instructions
document, absolves Somfy of any liability and invalidates the warranty.
The installer must inform its customers of the operating and maintenance conditions for the drive
and must provide them with the instructions for use and maintenance, and the attached Safety
instructions document, after installing the drive. Any After-Sales Service operation on the drive must
be performed by a motorisation and home automation professional.
If in doubt when installing the drive, or to obtain additional information, contact a Somfy adviser or go
to the website www.somfy.com.
Specic safety instructions
Cables which pass through a metal wall must be protected and isolated using a sheath or sleeve.
Attach cables to prevent any contact with moving parts.
If the drive is used outdoors, and if the power supply cable is a type H05-VVF cable, the cable
should be installed in a UV-resistant duct, e.g. under a gland.
Leave the drive power supply cable accessible: it must be possible to replace it easily.
Always make a loop in the power supply cable to prevent water entering the drive.
For tubular motors 50/60 mm in diameter:
The drive wheel must be locked in place to prevent it moving along the roller tube:
- Either by securing the roller tube onto the drive wheel using 4 screws or 4 pop rivets positioned
between 5 mm and 15 mm from the outer edge of the drive wheel, suitable for all types of roller
tube. The screws or pop rivets must only be attached to the drive wheel and not to the drive.
- Or by using a drive wheel stop, suitable for tubes which are not smooth.
TRANSLATED INSTRUCTIONS
Copyright © 2010-2022 Somfy Activités SA, Société Anonyme. All rights reserved. 42
5069577C107-Pergola_io.indb 425069577C107-Pergola_io.indb 42 18/05/2022 18:46:2318/05/2022 18:46:23

Pergola io
43
EN
Copyright © 2010-2022 Somfy Activités SA,Société Anonyme. All rights reserved.
1. Introduction 43
2. Safety 44
Specic safety advice 44
3. Installation 44
3.1. Motor preparation 44
3.2. Tube preparation 44
3.3. Motor/tube assembly 45
3.4. Installing the tube/motor assembly 45
4. Wiring 45
5. Commissioning 46
5.1. Identifying setting steps already
completed 46
5.2. Pre-programming the Somfy io local
control point 46
5.3. Checking the motor's direction of rotation 46
5.4. Setting the end limits 47
5.5. Programming the rst Somfy io local
control point 48
5.6. Checking the settings 48
6. Operation 48
6.1. Standard operation 48
6.2. Operating with a Somfy io sensor 49
6.3. Feedback 49
7. Additional settings 49
7.1. Favourite position (my) 49
7.2. Adding/Deleting Somfy io control points
and io sensors 49
7.3. Modifying end limits 49
7.4. Advanced functions 50
8. Tips and recommendations 50
8.1. Questions about the Pergola io 50
8.2. Replacing a lost or broken Somfy io
control point 51
8.3. Restoring the original conguration 51
9. Technical data 51
The Pergola io motor is designed to motorise all types of Pergola awning.
What is io-homecontrol®?
The Pergola io uses io-homecontrol®, the new universal and secure wireless communication protocol,
shared by the major manufacturers in the world of home automation. io-homecontrol® enables all
comfort and security equipment to intercommunicate and be actuated via a single control point.
The exibility and perfect compatibility of the io-homecontrol® system provides support for you as
your needs evolve. You can start by automating roller shutters and the front door, then equip
the outside awnings, the gate and garage door or garden lighting with the io-homecontrol® system.
These scalable items of equipment are still compatible with the existing system, thanks to
io-homecontrol® technology, which ensures their inter-operability.
For further information please visit the website www.io-homecontrol.com..
CONTENTS
1. INTRODUCTION
5069577C107-Pergola_io.indb 435069577C107-Pergola_io.indb 43 18/05/2022 18:46:2318/05/2022 18:46:23

Pergola io
44
EN
Copyright © 2010-2022 Somfy Activités SA, Société Anonyme. All rights reserved.
Specic safety advice
ISwitch off the mains supply for the awning before performing any service operation in the vicinity.
To avoid damaging the product:
1) Never immerse it in liquid!
2) Avoid impacts!
3) Do not drop it!
4) Never drill holes in it!
5) Avoid moving the awning if ice has formed on it.
1
3
5 6
2
4
OFF
3. INSTALLATION
The Pergola io must be installed in a location sheltered from
inclement weather.
3.1. Motor preparation
1) Fit the crown (A) and the drive wheel (B) to the motor.
2) Measure the length (L1) between the interior edge of the
motor head and the outer rim of the drive wheel.
1
2
AB
L1
L1 = …
3.2. Tube preparation
1) Cut the roller tube to the required length.
2) Deburr the roller tube and remove the swarf.
3) For smooth roller tubes, cut a notch with the following
measurements:
- e = 4 mm
- h = 28 mm.
Ø > 47
1
3
2
eh
2. SAFETY
5069577C107-Pergola_io.indb 445069577C107-Pergola_io.indb 44 18/05/2022 18:46:2418/05/2022 18:46:24

Pergola io
45
EN
Copyright © 2010-2022 Somfy Activités SA,Société Anonyme. All rights reserved.
3.3. Motor/tube assembly
1) Slide the motor into the roller tube.
For smooth roller tubes, position the notch previously cut
on the crown.
2) For safety reasons, x the roller tube to the drive wheel
with 4 x Ø 5 mm self-tapping screws or 4 x Ø 4.8 mm
steel pop rivets located:
- at least 5 mm from the outer rim of the drive wheel:
L1 - 5, and
- no more than 15 mm from the outer rim of the drive
wheel: L1 - 15.
The screws or pop rivets must only be attached to the
drive wheel and not to the motor.
3.4. Installing the tube/motor assembly
1) Fit the tube/motor assembly to the end bracket (C).
2) Fit the tube/motor assembly to the motor bracket (D).
3) Depending on the type of bracket, position the retaining ring
(E) (for motors ≥ 85 Nm with a retaining ring, it is essential
to use the locking retaining ring (F)).
15 mm
5 mm
20 mm
L1
1
2
C
D
E
F
1
2
3
- Cut off the mains power supply.
- Connect the motor according to the information in the
table below:
230 V ~ 50 Hz Motor cable
1Brown Live (P)
2Blue Neutral (N)
3Yellow/Green Earth ( )
1
2
3
1
2
3
OFF
230 V
~
50 Hz
3 x 1.5 mm2
3 x 0.75 mm2
4. WIRING
5069577C107-Pergola_io.indb 455069577C107-Pergola_io.indb 45 18/05/2022 18:46:2518/05/2022 18:46:25

Pergola io
46
EN
Copyright © 2010-2022 Somfy Activités SA, Société Anonyme. All rights reserved.
The guide only describes commissioning using a Situo io type Somfy io local control point. For
commissioning using any other io control point, refer to the corresponding guide.
5.1. Identifying setting steps already completed
Only one motor should be powered at a time.
Switch on the power and follow procedure "a" or "b",
according to the awning's reaction:
aThe awning moves briey
The end limits are set and no Somfy io control point
has been programmed.
Go to the section"Programming the rst Somfy io local
control point".
or
bThe awning does not move
Press the Up or Down button, and follow procedure "c"
or "d" according to the awning's reaction:
cThe awning still does not move
The end limits are not set and no Somfy io control
point has been programmed.
Go to the section "Pre-programming the Somfy io
local control point".
or
dThe awning is fully raised or lowered
The end limits are set and the Somfy io control point
has been programmed.
Go to the section "Operation".
5.2. Pre-programming the Somfy io local control point
- Press the Up and Down buttons simultaneously: the
awning will move briey; the Somfy io local control point
has been pre-programmed into the motor.
5.3. Checking the motor's direction of rotation
1) Press the Up button:
a) If the awning is raised, the direction of rotation is
correct: go to the section "Setting the end limits".
b) If the awning is lowered, the direction of rotation is
incorrect: press the "my" button until the awning moves
briey; the direction of rotation has been modied.
2) Press the Up button to check the direction of rotation.
ON
Programming the
1st Somfy io local
control point.
cor d
Pre-programming the
Somfy io local control
point.
Operation.
a
b
Setting the end
limits
2 s
1
2
5. COMMISSIONING
5069577C107-Pergola_io.indb 465069577C107-Pergola_io.indb 46 18/05/2022 18:46:2618/05/2022 18:46:26

Pergola io
47
EN
Copyright © 2010-2022 Somfy Activités SA,Société Anonyme. All rights reserved.
5.4. Setting the end limits
The end limit setting depends on the type of awning.
5.4.1. Automatically setting the end limits for tensioned Pergola awnings
The upper and lower end limits are set automatically.
1) Press the Up and Down buttons simultaneously: the
awning moves briey.
2) Press the "my" button until the awning moves briey:
the end limits have been programmed, go to the section
"Programming the rst Somfy io local control point".
5.4.2. Semi-automatically setting the end limits for
tensioned Pergola awnings
The lower end limit is set automatically, while the upper end limit must be set manually.
It is always possible to dene a new upper end limit
before programming it.
Setting the upper end limit
1) Position the awning at the upper end limit.
Press and hold the Up button for > 2 seconds to raise
the awning in one continuous movement.
2) Stop the awning at the desired point.
3) If necessary, adjust the position of the awning using the
Up or Down buttons.
4) Press the "my" and Down buttons simultaneously: the
awning will be lowered in one continuous movement,
even after the "my" and Down buttons have been
released.
5) At mid-height, briey press the "my" button to stop the
awning.
6) Press the "my" button again until the awning moves
briey: the end limits have been programmed, go to the
section "Programming the rst Somfy io local control point".
5.4.3. Manually setting the end limits for untensioned Pergola awnings
The upper and lower end limits must be set for untensioned Pergola awnings.
It is always possible to dene new upper or lower end limits before programming them.
Setting the upper end limit
1) Position the awning at the upper end limit.
Press and hold the Up button for > 2 s to raise the
awning in one continuous movement.
2) Stop the awning at the desired point.
3) If necessary, adjust the position of the awning using the
Up or Down buttons.
4) Press the "my" and Down buttons simultaneously: the
awning will be lowered in one continuous movement,
even after the "my" and Down buttons have been
released.
5) At mid-height, briey press the "my" button to stop the
awning, and go to the section "Setting the lower end
limit".
1 2
2 s
1
3
2
4
5 6
2 s
1
3
5
2
4
Setting the lower
end limit.
5069577C107-Pergola_io.indb 475069577C107-Pergola_io.indb 47 18/05/2022 18:46:2818/05/2022 18:46:28

Pergola io
48
EN
Copyright © 2010-2022 Somfy Activités SA, Société Anonyme. All rights reserved.
6. OPERATION
Setting the lower end limit
1) Put the awning in the lower end limit position.
Press and hold the Down button for > 2 seconds to
lower the awning in one continuous movement.
2) Stop the awning at the desired point.
3) If necessary, adjust the position of the awning using the
Up or Down buttons.
4) Press the "my" and Up buttons simultaneously: the
awning will be raised in one continuous movement, even
after the "my" and Up buttons have been released.
5) At mid-height, briey press the "my" button to stop the
awning.
6) Press the "my" button again until the awning moves
briey: the end limits have been programmed. Go to the
section "Programming the rst Somfy io local control
point".
5.5. Programming the rst Somfy io local control point
5.5.1. Using a programmed Somfy io local control point
- Briey press the PROG button on this control point (G):
the awning will make a brief movement; the control point
has been programmed.
or
5.5.2. After a power cut
When the power is switched on, the awning makes a brief movement.
1) Press the Up and Down buttons simultaneously on the
new control point (H) until the awning moves briey.
2) Briey press the PROG button on this control point (H):
the awning will move briey; the control point has been
programmed.
5.6. Checking the settings
- Check the settings of the upper and lower end limits using the Somfy io local control point.
1
3
5
2
4
6
2 s
2
H
1
6.1. Standard operation
6.1.1. Up and Down buttons
Briey press the Up or Down button to raise or lower the
awning fully.
For tensioned Pergola awnings, obstacle detection is
active throughout lowering or raising.
6.1.2. STOP function
The awning is moving.
- Briey press the "my" button: the awning will stop.
6.1.3. Favourite position (my)
Denition
Besides the upper and lower positions, an intermediate
position known as the "favourite position (my)" may be
programmed in the motor.
To program, modify or delete the favourite position (my),
see the section "Additional settings".
To use the favourite position (my):
- Briey press the "my" button: the awning will start to move, and stop in the favourite position (my).
5069577C107-Pergola_io.indb 485069577C107-Pergola_io.indb 48 18/05/2022 18:46:2918/05/2022 18:46:29

Pergola io
49
EN
Copyright © 2010-2022 Somfy Activités SA,Société Anonyme. All rights reserved.
7. ADDITIONAL SETTINGS
6.2. Operating with a Somfy io sensor
Refer to the corresponding guide.
6.3. Feedback
After each order, the Pergola io sends a message. This information is processed by the io two-way
control points.
7.1. Favourite position (my)
7.1.1 Programming or modifying the favourite position (my)
The procedure to follow for programming or modifying the
favourite position (my) is identical.
1) Put the awning in the desired favourite position (my).
2) Press the "my" button until the awning moves briey: the
favourite position (my) has been programmed.
7.1.2. Deleting the favourite position (my)
1) Press the "my" button: the awning will start to move, and
stop in the favourite position (my).
2) Press the "my" button again until the awning moves
briey: the favourite position (my) has been deleted.
7.2. Adding/Deleting Somfy io control points
and io sensors
Refer to the corresponding guide.
7.3. Modifying end limits
Modication of end limits depends on the type of awning.
7.3.1. Modication for tensioned Pergola awnings
For tensioned Pergola awnings, the upper end limit can be modied in semi-automatic mode.
Readjusting the upper end limit in semi-automatic mode
1) Position the awning at the upper end limit.
2) Press the Up and Down buttons simultaneously until the
awning moves briey: the motor is in setting mode.
3) Adjust the awning's top position using the Up or Down
buttons.
4) Press the "my" button until the awning moves briey: the
new upper end limit has been programmed.
7.3.2. Modication for untensioned Pergola awnings
The upper and lower end limits can be modied for untensioned Pergola awnings. Readjusting the
upper end limit
1) Position the awning at the upper end limit.
2) Press the Up and Down buttons simultaneously until the
awning moves briey: the motor is in setting mode.
3) Adjust the awning's top position using the Up or Down
buttons.
4) Press the "my" button until the awning moves briey: the
new upper end limit has been programmed.
1 2
my
5 s
or
1 2
my
5 s
1
or
3
2
4
2 s
5 s
1
or
3
2
4
2 s
5 s
5069577C107-Pergola_io.indb 495069577C107-Pergola_io.indb 49 18/05/2022 18:46:3018/05/2022 18:46:30

Pergola io
50
EN
Copyright © 2010-2022 Somfy Activités SA, Société Anonyme. All rights reserved.
Readjusting the lower end limit
1) Position the awning at the lower end limit.
2) Press the Up and Down buttons simultaneously until the
awning moves briey: the motor is in setting mode.
3) Adjust the awning's bottom position using the Up or
Down buttons.
4) Press the "my" button until the awning moves briey: the
new lower end limit has been programmed.
7.4. Advanced functions
Please contact the manufacturer of the awning before using these functions to conrm the
compatibility of your installation.
7.4.3. "Fabric tension" function for tensioned Pergola awnings only
This function is used to increase or decrease the awning fabric tension to three levels (high-medium-low).
The motor is factory set at the medium level.
For safety reasons, this function can only be accessed via the Somfy io control point in 3 scenarios:
• After validation of the settings and before programming the rst Somfy io control point.
• After programming the rst Somfy io control point and for the next 4 cycles.
• After a power cut, and for the next 4 cycles.
To activate this function:
1) Put the awning in the middle position.
2) Briey press the "my" and Down buttons simultaneously,
then immediately afterwards press and hold the "my"
and Down buttons until the awning moves briey.
The motor is in programming mode for just 10 seconds.
3) Adjust the fabric tension using the Up or Down
buttons.
- To increase the fabric tension, press the Up button until
the awning moves slowly: the fabric tension has switched
to "high".
- To decrease the fabric tension, press the Down button until the awning moves slowly: the fabric
tension has switched to "low".
4) Press the "my" button until the awning moves briey: the new fabric tension has been programmed.
2 s
5 s
1 2
4
3
or
or
or
0.5 s 5 s
1 2
3 4
8. TIPS AND RECOMMENDATIONS
8.1. Questions about the Pergola io
Observations Possible causes Solutions
The awning does
not operate. The wiring is incorrect. Check the wiring and modify it if necessary.
The motor is hot. Wait until the motor cools down.
An incorrect cable has been used. Check the cable and ensure it has 3
strands.
The Somfy io control point battery is
low. Check whether the battery is weak and
replace it if necessary.
The control point is not compatible. Check for compatibility and replace the
control point if necessary.
The Somfy io control point used has
not been programmed into the motor. Use a programmed control point or program
this control point.
The awning stops
too soon. The crown is incorrectly positioned. Fit the crown correctly.
The end limits have been incorrectly
set. Readjust the end limits.
5069577C107-Pergola_io.indb 505069577C107-Pergola_io.indb 50 18/05/2022 18:46:3118/05/2022 18:46:31

Pergola io
51
EN
Copyright © 2010-2022 Somfy Activités SA,Société Anonyme. All rights reserved.
8.2. Replacing a lost or broken Somfy io control point
Refer to the corresponding guide.
8.3. Restoring the original conguration
This reset deletes all control points, all the sensors and all the end limit settings, and resets the
motor's direction of rotation and favourite position (my). However, for tensioned Pergola awnings
only, the fabric tension setting is maintained.
Only switch off the power for the motor to be reset.
1) Put the awning in the middle position (if possible).
2) Cut the power supply for 2 seconds.
3) Switch the power supply back on for 5 to 15 seconds.
4) Cut the power supply for 2 seconds.
5) Switch the power supply back on: the awning moves for
several seconds.
If the awning is at the upper or lower end limit, it will
move briey.
6) Hold down the PROG button: the awning will make a
brief rst movement followed by a second a few moments
later. The motor is congured with the factory settings.
- Repeat the procedures from the Commissioning" section
2 s
2 s
15 s
5 s
1
6
5
3
2
4
OFF
OFF
ON
ON
7 s 7 s2 s
9. TECHNICAL DATA
Radio frequency 868-870 MHz io-homecontrol®, two-way Tri-band
Frequency bands and maximum power
used
868,000 MHz - 868.600 MHz e.r.p. <25 mW
868,700 MHz - 869.200 MHz e.r.p. <25 mW
869,700 MHz - 870.000 MHz e.r.p. <25 mW
Power supply 230 V ~ 50 Hz
Operating temperature - 20°C to + 60°C
Protection rating IP 44
Maximum number of associated control
points and sensors 9
Safety level Class I
5069577C107-Pergola_io.indb 515069577C107-Pergola_io.indb 51 18/05/2022 18:46:3218/05/2022 18:46:32

En virtud del presente documento, Somfy Activités SA, F-74300 CLUSES declara que, en tanto que fabricante
de la motorización que cubren estas instrucciones, marcada para recibir alimentación a 230 V~50 Hz y
utilizada tal y como se indica en las mismas, es conforme a las exigencias básicas de las Directivas europeas
aplicables y, en particular, la Directiva de máquinas 2006/42/CE y la Directiva de radio 2014/53/UE.
El texto completo de la declaración de conformidad en la UE se encuentra disponible en www.somfy.com/ce.
Christian Rey, responsable de homologaciones, en representación del director de la actividad, Cluses, 05/2022
Este manual se aplica a todos los motores Pergola 50 y Pergola 60 cuyas versiones se encuentran
disponibles en el catálogo en vigor.
Ámbito de aplicación
Los motores Pergola 50 y Pergola 60 están diseñados para automatizar todos los tipos de toldos
Pergola, excepto los Pergola de láminas orientables.
El instalador, profesional del motor y de la automatización de la vivienda, debe asegurarse de que
la instalación del producto automatizado una vez instalado respete las normas vigentes en el país
donde vaya a utilizarse y las normas toldos exteriores EN 13561.
Responsabilidad
Antes de instalar y utilizar a motorización, lea atentamente este manual. Además de las instrucciones
descritas en este manual, deben respetarse las normas detalladas en el documento adjunto Normas
de seguridad.
La motorización debe ser instalada por un profesional de la motorización y de la automatización
de la vivienda, de conformidad con las instrucciones proporcionadas por Somfy y con la normativa
aplicable en el país donde vaya a utilizarse.
Se prohíbe cualquier uso de la motorización fuera del ámbito de aplicación anteriormente descrito.
Ello conllevaría, como todo incumplimiento de las instrucciones que guran en este manual y en el
documento adjunto Normas de seguridad, la exclusión de toda responsabilidad por parte de Somfy
y la anulación de la garantía.
El instalador debe informar a sus clientes de las condiciones de uso y de mantenimiento de la
motorización y debe entregarles las instrucciones de uso y de mantenimiento, así como el documento
adjunto Normas de seguridad, tras la instalación de la motorización. Cualquier operación del
Servicio posventa que deba realizarse en la motorización requiere la intervención de un profesional
de la motorización y la automatización de la vivienda.
Para resolver cualquier duda que pudiera surgir durante la instalación del motor o para obtener
información adicional, póngase en contacto con uno de los agentes de Somfy o visite la página web
www.somfy.com.
Normas especiales de seguridad
En caso de que los cables deban atravesar una pared metálica, deben protegerse y aislarse con
un manguito o una vaina.
Fije los cables para evitar cualquier contacto con un componente en movimiento.
Si la motorización se utiliza en el exterior y siempre que el cable de alimentación sea de tipo
H05-VVF, instale el cable en un conducto resistente a los rayos UV, por ejemplo, en una canaleta.
Deje accesible el cable de alimentación del motor: debe poder ser sustituido fácilmente.
Efectúe siempre un bucle en el cable de alimentación para evitar que penetre agua en el motor.
En el caso de los motores tubulares de Ø 50/60 mm:
El movimiento de traslación de la rueda debe quedar bloqueado dentro del tubo de enrollamiento:
- Fijando el tubo de enrollamiento a la rueda con cuatro tornillos o cuatro remaches Pop
colocados a entre 5 mm y 15 mm del extremo exterior de la rueda, sea cual sea el tipo de
tubo de enrollamiento utilizado. Los tornillos o los remaches Pop no deben jarse al motor, sino
únicamente a la rueda.
- Mediante un dispositivo de retención de rueda, en caso de los tubos no lisos.
INSTRUCCIONES TRADUCIDAS
Copyright © 2010-2022 Somfy Activités SA, Société Anonyme.. All rights reserved. 52
5069577C107-Pergola_io.indb 525069577C107-Pergola_io.indb 52 18/05/2022 18:46:3318/05/2022 18:46:33

Pergola io
53
ES
Copyright © 2010-2022 Somfy Activités SA,Société Anonyme. All rights reserved.
1. Introducción 53
2. Seguridad 54
Normas de seguridad especícas 54
3. Instalación 54
3.1. Preparación del motor 54
3.2. Preparación del tubo 54
3.3. Instalación motor - tubo 55
3.4. Montaje del conjunto tubo-motor 55
4. Cableado 55
5. Puesta en marcha 56
5.1. Identicación de las etapas de ajuste ya
realizadas 56
5.2. Registro previo del punto de mando local
io de Somfy 56
5.3. Comprobación del sentido de rotación del
motor 56
5.4. Ajuste de los nales de carrera 57
5.5. Registro previo del primer punto de
mando local io de Somfy 58
5.6. Comprobación de los ajustes 58
6. Utilización 58
6.1. Funcionamiento estándar 58
6.2. Funcionamiento con un sensor io de
Somfy 59
6.3. Retorno de información 59
7. Ajustes adicionales 59
7.1. Posición favorita ("My") 59
7.2. Adición o supresión de puntos de mando
y sensores io de Somfy 59
7.3. Modicación de los nales de carrera 59
7.4. Funciones avanzadas 60
8. Trucos y consejos 60
8.1. ¿Alguna pregunta acerca del Pergola io? 60
8.2. Sustitución de un punto de mando io de
Somfy perdido o dañado 61
8.3. Regreso a la conguración original 61
9. Datos técnicos 61
¿Qué es el io-homecontrol®?
El Pergola io utiliza io-homecontrol®, un nuevo protocolo de comunicación sin cables universal y
seguro, compartido por los fabricantes líderes del sector del hogar. La tecnología io-homecontrol®
permite que todos los accesorios de confort y seguridad puedan establecer comunicación entre ellos
y puedan controlarse por medio de un único punto de mando.
La exibilidad y perfecta compatibilidad del sistema io-homecontrol® permite dar respuesta a
necesidades cambiantes. Automatizar primero las persianas enrollables y la puerta de entrada, luego
equipar
los toldos exteriores, la cancela y la puerta del garaje o la iluminación del jardín con el sistema
io-homecontrol®.
Escalonados en el tiempo, estos accesorios resultan compatibles con la instalación existente gracias
a la tecnología io-homecontrol®, que garantiza su interoperabilidad.
Para obtener información adicional, consulte el sitio web www.io-homecontrol.com.
ÍNDICE
1. INTRODUCCIÓN
5069577C107-Pergola_io.indb 535069577C107-Pergola_io.indb 53 18/05/2022 18:46:3318/05/2022 18:46:33

Pergola io
54
ES
Copyright © 2010-2022 Somfy Activités SA, Société Anonyme. All rights reserved.
Normas de seguridad especícas
1) Corte la alimentación eléctrica del toldo antes de
realizar cualquier intervención de mantenimiento en el
mismo.
Para no estropear el producto:
2) No sumergir
3) Atención: evite los golpes
4) Atención: evite las caídas
5) No perforar
6) Evite realizar maniobras en caso de formación de hielo
en el toldo.
1
3
5 6
2
4
OFF
3. INSTALACIÓN
El Pergola io debe instalarse en un lugar protegido de la
intemperie.
3.1. Preparación del motor
1) Introduzca la corona (A) y la rueda (B) en el motor.
2) Mida la longitud (L1) entre el borde interior de la cabeza
del motor y el extremo de la rueda.
1
2
AB
L1
L1 = …
3.2. Preparación del tubo
1) Corte el tubo a la longitud necesaria.
2) Elimine rebabas y virutas del tubo de enrollamiento.
3) En tubos lisos, realice una muesca según las dimensiones
indicadas:
- e = 4 mm
- h = 28 mm.
Ø > 47
1
3
2
eh
2. SEGURIDAD
5069577C107-Pergola_io.indb 545069577C107-Pergola_io.indb 54 18/05/2022 18:46:3418/05/2022 18:46:34

Pergola io
55
ES
Copyright © 2010-2022 Somfy Activités SA,Société Anonyme. All rights reserved.
3.3. Instalación motor - tubo
1) Introduzca el motor en el tubo de enrollamiento.
Para los tubos de enrollamiento lisos, haga coincidir la
muesca practicada con la corona.
2) A este nivel los clientes también se benecian de
nuestro "savoir-faire". Por motivos de seguridad, je el
tubo de enrollamiento en la rueda con 4 tornillos Parker
de Ø 5 mm o 4 remaches Pop de acero de Ø 4,8 mm
situados:
- a 5 mm como mínimo del extremo exterior de la
rueda: L1 - 5, y
- a 15 mm como máximo del extremo exterior de la rueda: L1 - 15.
los tornillos o los remaches Pop no deben jarse al motor sino únicamente a la rueda.
3.4. Montaje del conjunto tubo-motor
1) Monte el conjunto tubo-motor en el soporte del extremo
(C).
2) Monte el conjunto tubo-motor en el soporte del motor (D).
3) En función del tipo de soporte, instale el clip con tornillo (E)
(en el caso de los motores ≥ a 85 Nm, con un anillo de tope
se utiliza obligatoriamente el clip con tornillo bloqueable
(F).
15 mm
5 mm
20 mm
L1
1
2
C
D
E
F
1
2
3
- Corte la alimentación eléctrica.
- Conecte el motor según la información de la siguiente
tabla:
230 V ~ 50 Hz Cable de motor
1Marrón Fase (P)
2Azul Neutro (N)
3Verde-amarillo Tierra ( )
1
2
3
1
2
3
OFF
230 V
~
50 Hz
3 x 1,5 mm2
3 x 0,75 mm2
4. CABLEADO
5069577C107-Pergola_io.indb 555069577C107-Pergola_io.indb 55 18/05/2022 18:46:3518/05/2022 18:46:35

Pergola io
56
ES
Copyright © 2010-2022 Somfy Activités SA, Société Anonyme. All rights reserved.
En esta guía se describe únicamente la puesta en marcha con un punto de mando local io de Somfy
de tipo Situo io. Para la puesta en marcha con cualquier otro tipo de punto de mando io, consulte la
guía correspondiente.
5.1. Identicación de las etapas de ajuste ya realizadas
Sólo debe alimentarse un motor a la vez.
Suministrar tensión y seguir el procedimiento "a" o "b" en
función de la reacción del toldo:
aEl toldo efectúa un leve movimiento
Los nales de carrera están ajustados y no hay ningún
punto de mando io de Somfy registrado.
Continúe en el capítulo "Registro del primer punto de
mando local io de Somfy".
o
bEl toldo no se mueve.
Pulsar el botón de subida o bajada y llevar a cabo el
procedimiento "c" o "d" en función de la reacción del
toldo:
cEl toldo sigue sin moverse.
Los nales de carrera no están ajustados y no hay
ningún punto de mando io de Somfy registrado.
Continúe en el capítulo "Registro previo del punto
de mando local io de Somfy".
o
dEl toldo sube o baja totalmente
Los nales de carrera están ajustados y el punto de
mando io de Somfy está registrado.
Continúe en el capítulo "Utilización".
5.2. Registro previo del punto de mando local io de Somfy
- Pulse simultáneamente los botones de subida y de
bajada: el toldo efectúa un breve movimiento, el punto de
mando local io de Somfy se ha registrado previamente
en el motor.
5.3. Comprobación del sentido de rotación del motor
1) Pulse el botón de subida:
a) Si el toldo sube, el sentido de rotación será correcto:
continúe en el capítulo "Ajuste de los nales de carrera".
b) Si el toldo baja, el sentido de rotación será incorrecto:
pulse el botón "My" hasta que se desplace ligeramente
el toldo; el sentido de rotación ha sido modicado.
2) Pulse el botón de subida para comprobar el sentido de
rotación.
ON
Registro previo del
primer punto de
mando local io de
Somfy.
co d
Registro previo del
punto de mando local
io de Somfy
Utilización.
a
b
Ajuste de los
nales de
carrera
2 s
1
2
5. PUESTA EN MARCHA
5069577C107-Pergola_io.indb 565069577C107-Pergola_io.indb 56 18/05/2022 18:46:3618/05/2022 18:46:36

Pergola io
57
ES
Copyright © 2010-2022 Somfy Activités SA,Société Anonyme. All rights reserved.
5.4. Ajuste de los nales de carrera
El ajuste de los nales de carrera depende del tipo de toldo.
5.4.1. Ajuste automático de los nales de carrera de los toldos Pergola de lona
tensada
Los nales de carrera superior e inferior se regulan automáticamente.
1) Pulse simultáneamente los botones de subida y de
bajada: el toldo efectúa un leve movimiento.
2) Pulse el botón "My" hasta que el toldo se desplace
ligeramente: los nales de carrera están registrados,
continúe en el capítulo "Registro del primer punto de
mando local io de Somfy".
5.4.2. Ajuste semiautomático de los nales de carrera de los toldos Pergola de lona tensada
El nal de carrera inferior se ajusta automáticamente, pero debe ajustarse manualmente
el nal de carrera superior.
Siempre es posible denir un nuevo nal de carrera
superior antes de registrarlo.
Ajuste del nal de carrera superior
1) Coloque el toldo en posición de nal de carrera superior.
Si se pulsa el botón de subida durante > 2 s, se
producirá un movimiento de subida continuo del toldo.
2) Detenga el toldo en el punto deseado.
3) Cuando fuera necesario, ajuste la posición del toldo por
medio de los botones de subida y bajada.
4) Pulse simultáneamente los botones "My" y de bajada: el
toldo baja en desplazamiento continuo incluso después
de dejar de pulsar los botones "My" y de bajada.
5) A media altura, pulse brevemente el botón "My" para
detener el toldo.
6) Pulse de nuevo el botón "My" hasta que el toldo se
desplace ligeramente: los nales de carrera están
registrados, continúe en el capítulo "Registro del primer
punto de mando local io de Somfy".
5.4.3. Ajuste manual de los nales de carrera de los toldos Pergola de lona no
tensada
Para los toldos Pergola de lona no tensada deben ajustarse los nales de carrera superior e inferior.
Siempre es posible denir nuevos nales de carrera superior o inferior y registrarlos.
Ajuste del nal de carrera superior
1) Coloque el toldo en posición de nal de carrera superior.
Si se pulsa el botón de subida durante > 2 s, se
producirá un movimiento de subida continuo del toldo.
2) Detenga el toldo en el punto deseado.
3) Cuando fuera necesario, ajuste la posición del toldo por
medio de los botones de subida y bajada.
4) Pulse simultáneamente los botones "My" y de bajada: el
toldo baja en desplazamiento continuo incluso después
de dejar de pulsar los botones "My" y de bajada.
5) A media altura, pulse brevemente el botón "My" para
detener el toldo y pase a la etapa "Ajuste del nal de
carrera inferior".
1 2
2 s
1
3
2
4
5 6
2 s
1
3
5
2
4
Ajuste del nal de
carrera inferior.
5069577C107-Pergola_io.indb 575069577C107-Pergola_io.indb 57 18/05/2022 18:46:3718/05/2022 18:46:37

Pergola io
58
ES
Copyright © 2010-2022 Somfy Activités SA, Société Anonyme. All rights reserved.
6. UTILIZACIÓN
Ajuste del nal de carrera inferior
1) Sitúe el toldo en la posición de nal de carrera inferior.
Si se pulsa el botón de bajada > 2 s, se producirá un
movimiento de bajada continua del toldo.
2) Detenga el toldo en el punto deseado.
3) Cuando fuera necesario, ajuste la posición del toldo por
medio de los botones de subida y bajada.
4) Pulse simultáneamente los botones "My" y de subida: el
toldo sube en desplazamiento continuo incluso después
de dejar de pulsar los botones "My" y de subida.
5) A media altura, pulse brevemente el botón "My" para
detener el toldo.
6) Pulse de nuevo el botón "My" hasta que el toldo se
desplace ligeramente: los nales de carrera están
registrados. Continúe en el capítulo "Registro del primer
punto de mando local io de Somfy".
5.5. Registro previo del primer punto de mando local io de Somfy
5.5.1. Por medio de un punto de mando local io de Somfy registrado
- Pulse brevemente el botón PROG de este punto de
mando (G): el toldo efectúa un breve movimiento, el
punto de mando ha quedado registrado.
o
5.5.2. Simplemente tras un corte de la alimentación
Cuando se restablece la corriente, el toldo realiza un leve movimiento.
1) Pulse simultáneamente los botones de subida y bajada
del nuevo punto de mando (H) hasta que el toldo se
desplace ligeramente.
2) Pulse brevemente el botón PROG de este punto de
mando (H): el toldo efectúa un breve movimiento, el
punto de mando ha quedado registrado.
5.6. Comprobación de los ajustes
- Compruebe los ajustes de los nales de carrera superior e inferior con el punto de mando local io de
Somfy.
1
3
5
2
4
6
2 s
2
H
1
6.1. Funcionamiento estándar
6.1.1. Botones de subida y bajada
Si se pulsa brevemente el botón de subida o de bajada, el
toldo sube o baja completamente.
En el caso de los toldos Pergola de lona tensada, la
detección del obstáculo se encuentra activa durante
toda la bajada o toda la subida.
6.1.2. Función STOP
El toldo está en movimiento.
- Pulse brevemente el botón "My": el toldo se detiene.
6.1.3. Posición preferida ("My")
Denición
El motor puede registrar una posición intermedia
denominada "posición favorita (My)" distinta a las posiciones
superior e inferior.
Para registrar, modicar o suprimir la posición favorita
("My"), consulte el capítulo "Ajustes adicionales".
Para utilizar la posición favorita ("My"):
- Pulse brevemente el botón "My": el toldo se pondrá en movimiento y se detendrá en la posición
favorita ("My").
5069577C107-Pergola_io.indb 585069577C107-Pergola_io.indb 58 18/05/2022 18:46:3818/05/2022 18:46:38

Pergola io
59
ES
Copyright © 2010-2022 Somfy Activités SA,Société Anonyme. All rights reserved.
7. AJUSTES ADICIONALES
6.2. Funcionamiento con un sensor io de Somfy
Consulte la guía correspondiente.
6.3. Retorno de información
Después de cada orden, el Pergola io envía un mensaje. Esta información recibe tratamiento por
parte de los puntos de mando bidireccionales io.
7.1. Posición favorita ("My")
7.1.1 Registro o modicación de la posición favorita ("My")
El procedimiento para registrar o modicar la posición favorita
("My") es el mismo.
1) Coloque el toldo en la posición favorita ("My") deseada.
2) Pulse el botón "My" hasta que el toldo se desplace
ligeramente: la posición favorita ("My") quedará
registrada.
7.1.2. Eliminación de la posición favorita ("My")
1) Pulse el botón "My": el toldo se pondrá en movimiento y
se detendrá en la posición favorita (My).
2) Pulse de nuevo el botón "My" hasta que el toldo se
desplace ligeramente: la posición favorita ("My") quedará
suprimida.
7.2. Adición o supresión de puntos de mando y sensores io de Somfy
Consulte la guía correspondiente.
7.3. Modicación de los nales de carrera
La modicación de los nales de carrera depende del tipo de toldo.
7.3.1. Modicación para toldos Pergola de lona tensada
Para los toldos Pergola de lona tensada se puede modicar el nal de carrera superior en ajuste de
nal de carrera semiautomático.
Reajuste del nal de carrera superior en modo semiautomático
1) Coloque el toldo en posición de nal de carrera superior.
2) Pulse simultáneamente los botones de subida y bajada
hasta que el toldo se desplace ligeramente: el motor se
encuentra en modo de ajuste.
3) Ajuste la posición superior del toldo por medio de los
botones de subida y bajada.
4) Pulse el botón "My" hasta que el toldo se desplace
ligeramente: el nuevo nal de carrera superior queda
registrado.
7.3.2. Modicación para toldos Pergola de lona no tensada
En los toldos Pergola de lona no tensada se pueden modicar los nales de carrera superior e inferior.
Reajuste del nal de carrera superior
1) Coloque el toldo en posición de nal de carrera superior.
2) Pulse simultáneamente los botones de subida y bajada
hasta que el toldo se desplace ligeramente: el motor se
encuentra en modo de ajuste.
3) Ajuste la posición superior del toldo por medio de los
botones de subida y bajada.
4) Pulse el botón "My" hasta que el toldo se desplace
ligeramente: el nuevo nal de carrera superior queda
registrado.
1 2
My
5 s
o
1 2
My
5 s
1
o
3
2
4
2 s
5 s
1
o
3
2
4
2 s
5 s
5069577C107-Pergola_io.indb 595069577C107-Pergola_io.indb 59 18/05/2022 18:46:3918/05/2022 18:46:39

Pergola io
60
ES
Copyright © 2010-2022 Somfy Activités SA, Société Anonyme. All rights reserved.
Reajuste del nal de carrera inferior
1) Coloque el toldo en posición de nal de carrera inferior.
2) Pulse simultáneamente los botones de subida y bajada
hasta que el toldo se desplace ligeramente: el motor se
encuentra en modo de ajuste.
3) Ajuste la posición inferior del toldo por medio de los
botones de subida y bajada.
4) Pulse el botón "My" hasta que el toldo se desplace
ligeramente: el nuevo nal de carrera inferior queda
registrado.
7.4. Funciones avanzadas
Póngase en contacto con el fabricante del toldo antes de usar estas funciones para comprobar
la compatibilidad de su instalación.
7.4.3. Función "Tensión de lona" únicamente para toldos Pergola de lona tensada
Esta función permite aumentar o reducir la tensión de la lona del toldo en tres niveles
(elevado-medio-bajo).
Por defecto, el motor viene de fábrica con el nivel medio.
Por seguridad, a esta función se accede desde el punto de mando io de Somfy únicamente en 3 casos:
• Tras la conrmación de los ajustes y antes de registrar el primer punto de mando io de Somfy.
• Tras registrar el primer punto de mando io de Somfy y durante los 4 ciclos siguientes.
• Tras un simple corte de la alimentación y durante los 4 ciclos siguientes.
Para instalar esta función:
1) Coloque el toldo en posición media.
2) Pulse breve y simultáneamente los botones "My" y de
bajada seguido de una pulsación sostenida y simultánea
de los botones "My" y de bajada hasta que el toldo se
desplace ligeramente.
El motor se encuentra en modo programación sólo
durante 10 s.
3) Ajuste la tensión de la lona por medio de los botones de
subida o bajada.
- Para aumentar la tensión de la lona, pulse el botón de subida hasta que se produzca un movimiento
lento del toldo: la tensión de la lona del toldo cambia al nivel superior.
- Para reducir la tensión de la lona, pulse el botón de bajada hasta que se produzca un movimiento
lento del toldo: la tensión de la lona del toldo cambia al nivel inferior.
4) Pulse el botón "My" hasta que el toldo se desplace ligeramente: la nueva tensión de la lona queda
registrada.
2 s
5 s
1 2
4
3
o
o
o
0,5 s 5 s
1 2
3 4
8. TRUCOS Y CONSEJOS
8.1. ¿Alguna pregunta acerca del Pergola io?
Problemas Posibles causas Soluciones
El toldo no
funciona. El cableado es incorrecto. Verique el cableado y modifíquelo si es preciso.
El motor está en el térmico. Espere a que se enfríe el motor.
El cable utilizado no es adecuado. Verique el cable utilizado y asegúrese que
tiene 3 hilos.
La pila del punto de mando io de Somfy
está agotada. Verique la pila y cámbiela si está agotada.
El punto de mando no es compatible. Verique la compatibilidad y cambie el punto de
mando si es preciso.
El punto de mando io de Somfy
utilizado no está registrado en el motor. Utilice un punto de mando registrado o registre
este punto de mando.
El toldo
se detiene
demasiado
pronto.
La corona está mal colocada. Fije la corona correctamente.
Los nales de carrera están mal
programados. Ajuste nuevamente los nales de carrera.
5069577C107-Pergola_io.indb 605069577C107-Pergola_io.indb 60 18/05/2022 18:46:4018/05/2022 18:46:40

Pergola io
61
ES
Copyright © 2010-2022 Somfy Activités SA,Société Anonyme. All rights reserved.
8.2. Sustitución de un punto de mando io de Somfy perdido o dañado
Consulte la guía correspondiente.
8.3. Regreso a la conguración original
Esta puesta a cero elimina todos los puntos de mando, sensores y ajustes de nal de carrera y
reinicializa el sentido de rotación y la posición favorita ("My") del motor. No obstante, se conserva
el ajuste de tensión de lona únicamente en los toldos Pergola de lona tensada.
sólo debe realizarse el doble corte de tensión en el motor que hay que poner a cero
1) Coloque el toldo en posición media (si es posible).
2) Desconecte la alimentación eléctrica durante 2 segundos.
3) Vuelva a conectar la alimentación eléctrica entre 5 y 15
segundos.
4) Desconecte la alimentación eléctrica durante 2 segundos.
5) Conecte nuevamente la alimentación eléctrica: el toldo
se pondrá en movimiento durante algunos segundos.
Si el toldo está en posición de nal de carrera superior
o inferior, efectuará un breve movimiento.
6) Mantener pulsado el botón PROG: el toldo realiza
un primer movimiento breve y luego un segundo
unos instantes después. el motor se encuentra en
conguración de fábrica.
- Repita el procedimiento del capítulo "Puesta en marcha".
2 s
2 s
15 s
5 s
1
6
5
3
2
4
OFF
OFF
ON
ON
7 s 7 s2 s
9. DATOS TÉCNICOS
Frecuencia de radio 868-870 MHz io-homecontrol® bidireccional tribanda
Bandas de frecuencias y potencia máxima
usados
868.000 MHz - 868.600 MHz E.R.P. < 25 mW
868.700 MHz - 869.200 MHz E.R.P. < 25 mW
869.700 MHz - 870.000 MHz E.R.P. < 25 mW
Alimentación 230 V ~ 50 Hz
Temperatura de uso -20 °C a +60 °C
Índice de protección IP 44
Número máximo de puntos de mando y
sensores asociados 9
Nivel de seguridad Clase I
5069577C107-Pergola_io.indb 615069577C107-Pergola_io.indb 61 18/05/2022 18:46:4118/05/2022 18:46:41

Pela presente, a Somfy Activités SA, F-74300 CLUSES declara que o motor abrangido por estas instruções,
marcado para ser alimentado a 230V~50Hz e utilizado como indicado nas mesmas, está conforme as
exigências essenciais das Directivas Europeias aplicáveis e, em particular, da Directiva de Máquinas
2006/42/CE e da Directiva de Equipamentos de Rádio 2014/53/UE.
O texto completo da declaração de conformidade da UE está disponível em www.somfy.com/ce.
Christian Rey, responsável pelas homologações, agindo em nome do Director da Actividade, Cluses,
05/2022.
Estas instruções aplicam-se a todos os motores Pergola 50 e Pergola 60, cujas variantes estão
disponíveis no catálogo em vigor.
Área de aplicação
Os motores Pergola 50 e Pergola 60 foram concebidos para motorizar todos os tipos de toldos
Pergola, excepto os Pergola com ripas orientáveis.
O técnico de instalação, prossional da motorização e da automatização do lar, deve assegurar que
a instalação do produto motorizado respeita as normas em vigor no país de colocação em serviço,
tais como a norma sobre os estores exteriores EN 13561.
Responsabilidade
Antes de instalar e de utilizar o motor, ler atentamente estas instruções. Tal como acontece com as
instruções descritas nestas instruções, também devem ser respeitadas as instruções detalhadas
apresentadas no documento em anexo Instruções de segurança.
O motor deve ser instalado por um prossional da motorização e da automatização do lar, em
conformidade com as instruções da Somfy e a regulamentação do país no qual é instalado.
Qualquer utilização do motor fora da área de aplicação acima descrita é proibida. Tal utilização
excluiria, como qualquer desrespeito pelas instruções constantes deste guia e no documento em
anexo Instruções de segurança, toda a responsabilidade e garantia da Somfy.
O técnico de instalação deve informar os seus clientes sobre as condições de funcionamento e de
manutenção do motor e deve comunicar-lhes as instruções de utilização e de manutenção, bem como
o documento em anexo Instruções de segurança, após a instalação do motor. Todas as operações
do Serviço Pós-Venda no motor requerem a intervenção de um prossional da motorização e da
automatização do lar.
Em caso de dúvidas aquando da instalação do motor ou para obter informações complementares,
consultar um interlocutor Somfy ou o site www.somfy.com.
Instruções específicas de segurança
Os cabos que atravessam uma parede metálica devem ser protegidos e isolados por uma manga
ou um forro.
Prender os cabos para evitar um eventual contacto com uma parte móvel.
Se o motor for utilizado no exterior e se o cabo de alimentação for do tipo H05-VVF, o cabo deve
ser instalado dentro de uma conduta resistente aos UV, por exemplo sob uma manga de
protecção.
Deixar o cabo de alimentação do motor em posição acessível: deve poder ser facilmente
substituído.
Fazer sempre um arco no cabo de alimentação, para evitar a entrada de água no motor!
Para os motores tubulares de Ø 50/60 mm:
A roda de tracção deve ser bloqueada em translação, dentro do tubo de enrolamento:
- Fixando o tubo de enrolamento à roda de tracção com 4 parafusos ou 4 rebites, colocados
entre 5 mm e 15 mm da extremidade exterior da roda de tracção, qualquer que seja o tubo de
enrolamento. Os parafusos ou os rebites não devem ser fixos ao motor, mas apenas à roda de
tracção.
- Ou utilizando um bloqueador de roda, no caso dos tubos não lisos.
INSTRUÇÕES TRADUZIDO
Copyright © 2010-2022 Somfy Activités SA, Société Anonyme. All rights reserved. 62
5069577C107-Pergola_io.indb 625069577C107-Pergola_io.indb 62 18/05/2022 18:46:4118/05/2022 18:46:41

Pergola io
63
PT
Copyright © 2010-2022 Somfy Activités SA,Société Anonyme. All rights reserved.
1. Introdução 63
2. Segurança 64
Instruções especícas de segurança 64
3. Instalação 64
3.1. Preparação do motor 64
3.2. Preparação do tubo de enrolamento 64
3.3. Montagem motor/tubo de enrolamento 65
3.4. Instalação do conjunto tubo de
enrolamento/motor 65
4. Cablagem 65
5. Colocação em serviço 66
5.1. Identicação das etapas de regulação já
efectuadas 66
5.2. Pré-memorização do ponto de comando
local io Somfy 66
5.3. Vericação do sentido de rotação do
motor 66
5.4. Regulação dos ns de curso 67
5.5. Memorização do primeiro ponto de
comando local io Somfy 68
5.6. Vericação das regulações 68
6. Utilização 68
6.1. Funcionamento normal 68
6.2. Funcionamento com um sensor io Somfy 69
6.3. Retorno de informações 69
7. Regulações suplementares 69
7.1. Posição preferida («my») 69
7.2. Adicionar/Apagar pontos de comando io e
sensores io Somfy 69
7.3. Modicação dos ns de curso 69
7.4. Funções avançadas 70
8. Sugestões e conselhos 70
8.1. Questões sobre o Pergola io 70
8.2. Substituição de um ponto de comando io
Somfy perdido ou danicado 71
8.3. Regresso à conguração de origem 71
9. Dados técnicos 71
O que signica io-homecontrol®?
O Pergola io utiliza o novo protocolo de comunicação sem os universal e seguro, io-homecontrol®,
partilhado com os mais importantes fabricantes do universo da habitação. O protocolo io-homecontrol®
permite estabelecer a comunicação entre todos os equipamentos de conforto e de segurança e
controlá-los com um único ponto de comando.
A exibilidade e a perfeita compatibilidade do sistema io-homecontrol® permite acompanhar a
evolução das suas exigências. Antes de mais, automatizar os estores e a porta de entrada e, em
seguida, equipar
os toldos exteriores, os portões exterior e da garagem ou a iluminação do jardim com o sistema
io-homecontrol®.
Independentemente do nível tecnológico, estes equipamentos são compatíveis com a instalação
existente, graças à tecnologia io-homecontrol®, que assegura a sua interoperabilidade.
Para obter mais informações, consulte o sítio Web www.io-homecontrol.com
ÍNDICE
1. INTRODUÇÃO
5069577C107-Pergola_io.indb 635069577C107-Pergola_io.indb 63 18/05/2022 18:46:4118/05/2022 18:46:41

Pergola io
64
PT
Copyright © 2010-2022 Somfy Activités SA, Société Anonyme. All rights reserved.
Instruções especícas de segurança
1) Desligar a fonte de alimentação correspondente ao
toldo, antes de efectuar qualquer operação de
manutenção no mesmo.
Para não danicar o produto:
2) Nunca imergir o motor!
3) Evitar choques!
4) Evitar quedas!
5) Nunca perfurar o motor!
6) Evitar as manobras, se houver formação de gelo no
toldo.
1
3
5 6
2
4
OFF
3.2. Preparação do tubo de enrolamento
1) Cortar o tubo de enrolamento consoante o comprimento
pretendido.
2) Fresar o tubo de enrolamento e eliminar as aparas.
3) Se os tubos de enrolamento forem lisos, efectuar um
entalhe de acordo com as seguintes cotas:
- e = 4 mm
- h = 28 mm
Ø > 47
1
3
2
eh
2. SEGURANÇA
3. INSTALAÇÃO
O Pergola io deve ser instalado ao abrigo das intempéries.
3.1. Preparação do motor
1) Montar a coroa (A) e a roda de tracção (B) no motor.
2) Medir o comprimento (L1) entre o rebordo interior da
cabeça do motor e a extremidade da roda de tracção.
1
2
AB
L1
L1 = …
5069577C107-Pergola_io.indb 645069577C107-Pergola_io.indb 64 18/05/2022 18:46:4318/05/2022 18:46:43

Pergola io
65
PT
Copyright © 2010-2022 Somfy Activités SA,Société Anonyme. All rights reserved.
3.3. Montagem motor/tubo de enrolamento
1) Inserir o motor no tubo de enrolamento.
Se os tubos de enrolamento forem lisos, posicionar o
entalhe na coroa.
2) Por motivos de segurança, xar o tubo de enrolamento à
roda de tracção, com 4 parafusos de fendas, de Ø 5 mm
ou 4 rebites de aço, de Ø 4,8 mm, colocados:
- no mínimo, a 5 mm da extremidade exterior da roda
de tracção: L1 - 5, e
- no máximo, a 15 mm da extremidade exterior da roda
de tracção: L1 - 15.
Os parafusos ou rebites não devem ser xos ao motor,
mas apenas à roda de tracção.
3.4. Instalação do conjunto tubo de
enrolamento/motor
1) Montar o conjunto tubo de enrolamento/motor no suporte
da extremidade (C).
2) Montar o conjunto tubo de enrolamento/motor no suporte
do motor (D).
3) Em função do tipo de suporte, aplicar o anel de retenção
(E) (nos motores ≥ 85 Nm, que integram um anel deste
tipo, é imperativo utilizar um anel de retenção com
travamento (F).
15 mm
5 mm
20 mm
L1
1
2
C
D
E
F
1
2
3
- Desligar a alimentação do sector.
- Ligar o motor de acordo com as informações do seguinte
quadro:
230 V ~ 50 Hz Cabo motor
1Castanho Fase (P)
2Azul Neutro (N)
3Verde/Amarelo Terra ( )
1
2
3
1
2
3
OFF
230 V
~
50 Hz
3 x 1,5 mm2
3 x 0,75 mm2
4. CABLAGEM
5069577C107-Pergola_io.indb 655069577C107-Pergola_io.indb 65 18/05/2022 18:46:4418/05/2022 18:46:44

Pergola io
66
PT
Copyright © 2010-2022 Somfy Activités SA, Société Anonyme. All rights reserved.
O guia apenas descreve a colocação em serviço com um ponto de comando local io Somfy de tipo
Situo io. Para uma colocação em serviço com qualquer outro ponto de comando io, consultar o guia
correspondente.
5.1. Identicação das etapas de regulação já efectuadas
Apenas um motor deve ser alimentado de cada vez!
Ligar e aplicar o procedimento «a» ou «b», em função da
reacção do toldo:
aO toldo efectua um breve movimento
Os ns de curso estão regulados e não há qualquer
ponto de comando io Somfy memorizado.
Passar ao capítulo «Memorização do primeiro ponto de
comando local io Somfy».
ou
bO toldo não efectua qualquer movimento
Pressionar o botão Subida ou Descida e aplicar o
procedimento «c» ou «d», em função da reacção do
toldo:
cO toldo continua imóvel
Os ns de curso não estão regulados e não há
qualquer ponto de comando io Somfy memorizado.
Passar ao capítulo «Pré-memorização do ponto de
comando local io Somfy».
ou
dO toldo sobe ou desce completamente
Os ns de curso estão regulados e o ponto de
comando io Somfy está memorizado.
Passar ao capítulo «Utilização».
5.2. Pré-memorização do ponto de comando local io Somfy
- Pressionar simultaneamente os botões Subida e
Descida: o toldo efectua um breve movimento, o ponto
de comando local io Somfy está pré-memorizado no
motor.
5.3. Vericação do sentido de rotação do motor
1) Pressionar o botão Subida:
a) Se o toldo subir, o sentido de rotação está correcto:
passar ao capítulo «Regulação dos ns de curso».
b) Se o toldo descer, o sentido de rotação está
incorrecto: pressionar o botão «my», até que o toldo
efectue um breve movimento, o sentido de rotação é
invertido.
2) Pressionar o botão Subida, para vericar o sentido de
rotação.
ON
Memorização do
primeiro ponto de
comando local io
Somfy.
cou d
Pré-memorização do
ponto de comando
local io Somfy.
Utilização.
a
b
Regulação dos
ns de curso
2 s
1
2
5. COLOCAÇÃO EM SERVIÇO
5069577C107-Pergola_io.indb 665069577C107-Pergola_io.indb 66 18/05/2022 18:46:4518/05/2022 18:46:45

Pergola io
67
PT
Copyright © 2010-2022 Somfy Activités SA,Société Anonyme. All rights reserved.
5.4. Regulação dos ns de curso
A regulação dos ns de curso depende do tipo de toldo.
5.4.1. Regulação automática dos ns de curso dos toldos Pergola de tela esticada
Os ns de curso superior e inferior regulam-se automaticamente.
1) Pressionar simultaneamente os botões Subida e
Descida: o toldo efectua um breve movimento.
2) Pressionar o botão «my», até que o toldo efectue um
breve movimento: os ns de curso estão memorizados.
Passar ao capítulo «Memorização do primeiro ponto de
comando local io Somfy».
5.4.2. Regulação semiautomática dos ns de curso dos toldos Pergola de tela esticada
O m de curso inferior regula-se automaticamente enquanto que o m de curso superior
deve ser regulado manualmente.
É sempre possível denir um novo m de curso
superior antes de o memorizar.
Regulação do m de curso superior
1) Colocar o toldo na posição de m de curso superior.
Uma pressão > 2 s no botão Subida provoca um
movimento ascendente contínuo do toldo.
2) Parar o toldo na posição pretendida.
3) Se necessário, ajustar a posição do toldo com os botões
Subida e Descida.
4) Pressionar simultaneamente os botões «my» e Descida:
o toldo efectua um movimento descendente contínuo,
mesmo após ter libertado os botões «my» e Descida.
5) A meia-altura, pressionar brevemente o botão «my»,
para interromper o movimento do toldo.
6) Pressionar novamente o botão «my», até que o toldo
efectue um breve movimento: os ns de curso estão
memorizados. Passar ao capítulo «Memorização do
primeiro ponto de comando local io Somfy».
5.4.3. Regulação manual dos ns de curso dos toldos Pergola de tela não-esticada
Nos toldos Pergola de tela não-esticada, os ns de curso superior e inferior devem ser regulados.
É sempre possível denir novos ns de curso superior ou inferior antes de os memorizar.
Regulação do m de curso superior
1) Colocar o toldo na posição de m de curso superior.
Uma pressão > 2 s no botão Subida provoca um
movimento ascendente contínuo do toldo.
2) Parar o toldo na posição pretendida.
3) Se necessário, ajustar a posição do toldo com os botões
Subida e Descida.
4) Pressionar simultaneamente os botões «my» e Descida:
o toldo efectua um movimento descendente contínuo,
mesmo após ter libertado os botões «my» e Descida.
5) A meia-altura, pressionar brevemente o botão «my»,
para interromper o movimento do toldo, e passar à etapa
«Regulação do m de curso inferior».
1 2
2 s
1
3
2
4
5 6
2 s
1
3
5
2
4
Regulação do m
de curso inferior.
5069577C107-Pergola_io.indb 675069577C107-Pergola_io.indb 67 18/05/2022 18:46:4718/05/2022 18:46:47

Pergola io
68
PT
Copyright © 2010-2022 Somfy Activités SA, Société Anonyme. All rights reserved.
6. UTILIZAÇÃO
Regulação do m de curso inferior
1) Colocar o toldo na posição de m de curso inferior.
Uma pressão > 2 s no botão Descida provoca um
movimento descendente contínuo do toldo.
2) Parar o toldo na posição pretendida.
3) Se necessário, ajustar a posição do toldo com os botões
Subida e Descida.
4) Pressionar simultaneamente os botões «my» e Subida:
o toldo efectua um movimento ascendente contínuo,
mesmo após ter libertado os botões «my» e Subida.
5) A meia-altura, pressionar brevemente o botão «my»,
para interromper o movimento do toldo.
6) Pressionar novamente o botão «my», até que o toldo
efectue um breve movimento: os ns de curso estão
memorizados. Passar ao capítulo «Memorização do
primeiro ponto de comando local io Somfy».
5.5. Memorização do primeiro ponto de comando local io Somfy
5.5.1. Com um ponto de comando local io Somfy memorizado
- Pressionar brevemente o botão PROG deste ponto de
comando (G): o toldo efectua um breve movimento, o
ponto de comando está memorizado.
ou
5.5.2. Após um simples corte da alimentação eléctrica
Ao ligar a alimentação, o toldo efectua um breve movimento.
1) Pressionar simultaneamente os botões Subida e Descida
do novo ponto de comando (H), até que o toldo efectue
um breve movimento.
2) Pressionar brevemente o botão PROG deste ponto de
comando (H): o toldo efectua um breve movimento, o
ponto de comando está memorizado.
5.6. Vericação das regulações
- Vericar a regulação dos ns de curso superior e inferior, com o ponto de comando local io Somfy.
1
3
5
2
4
6
2 s
2
H
1
6.1. Funcionamento normal
6.1.1. Botões Subida e Descida
Uma pressão breve no botão Subida ou Descida provoca
uma subida ou descida completa do toldo.
Nos toldos Pergola de tela esticada, a detecção de
obstáculo está activa durante todo o movimento de
descida ou de subida.»
6.1.2. Função STOP
O toldo está em curso de movimento.
- Pressionar brevemente o botão «my»: o toldo pára.
6.1.3. Posição preferida («my»)
Denição
Para além das posições superior e inferior, é possível
memorizar uma posição intermédia chamada «posição
preferida («my») no motor.
Para memorizar, modicar ou apagar a posição preferida
(«my»), consultar o capítulo «Regulações
suplementares».
Para utilizar a posição preferida («my»):
- Pressionar brevemente o botão «my»: o toldo efectua um movimento e pára na posição preferida
(«my»).
5069577C107-Pergola_io.indb 685069577C107-Pergola_io.indb 68 18/05/2022 18:46:4818/05/2022 18:46:48

Pergola io
69
PT
Copyright © 2010-2022 Somfy Activités SA,Société Anonyme. All rights reserved.
7. REGULAÇÕES SUPLEMENTARES
6.2. Funcionamento com um sensor io Somfy
Consultar o guia correspondente.
6.3. Retorno de informações
Após cada ordem, o Pergola io envia uma mensagem. Esta informação é tratada pelos pontos de
comando bidireccionais io.
7.1. Posição preferida («my»)
7.1.1 Memorização ou modicação da posição preferida («my»)
O procedimento a aplicar para a memorização ou a
modicação da posição preferida («my») é idêntico.
1) Coloque o toldo na posição preferida («my») pretendida.
2) Pressionar o botão «my», até que o toldo efectue um
breve movimento: a posição preferida («my») é registada.
7.1.2. Apagar a posição preferida («my»)
1) Pressionar o botão «my»: o toldo efectua um movimento
e pára na posição preferida («my»).
2) Pressionar novamente o botão «my», até que o toldo
efectue um breve movimento: a posição preferida («my»)
é apagada.
7.2. Adicionar/Apagar pontos de comando io e sensores io Somfy
Consultar o guia correspondente.
7.3. Modicação dos ns de curso
A modicação dos ns de curso depende do tipo de toldo.
7.3.1. Modicação nos toldos Pergola de tela esticada
Nos toldos Pergola de tela esticada, o m de curso superior pode ser modicado no modo de
regulação semiautomático.
Nova regulação do m de curso superior em modo
semiautomático
1) Colocar o toldo na posição de m de curso superior.
2) Pressionar simultaneamente os botões Subida e
Descida, até que o toldo efectue um breve movimento: o
motor está em modo de regulação.
3) Ajustar a posição superior do toldo, com os botões
Subida e Descida.
4) Pressionar o botão «my», até que o toldo efectue um
breve movimento: o novo m de curso superior está
memorizado.
7.3.2. Modicação nos toldos Pergola de tela não-esticada
Nos toldos Pergola de tela não-esticada, os ns de curso superior e inferior podem ser modicados.
Nova regulação do m de curso superior
1) Colocar o toldo na posição de m de curso superior.
2) Pressionar simultaneamente os botões Subida e
Descida, até que o toldo efectue um breve movimento: o
motor está em modo de regulação.
3) Ajustar a posição superior do toldo, com os botões
Subida e Descida.
4) Pressionar o botão «my», até que o toldo efectue um
breve movimento: o novo m de curso superior está
memorizado.
1 2
«my»
5 s
ou
1 2
«my»
5 s
1
ou
3
2
4
2 s
5 s
1
ou
3
2
4
2 s
5 s
5069577C107-Pergola_io.indb 695069577C107-Pergola_io.indb 69 18/05/2022 18:46:4918/05/2022 18:46:49

Pergola io
70
PT
Copyright © 2010-2022 Somfy Activités SA, Société Anonyme. All rights reserved.
Nova regulação do m de curso inferior
1) Colocar o toldo na posição de m de curso inferior.
2) Pressionar simultaneamente os botões Subida e
Descida, até que o toldo efectue um breve movimento: o
motor está em modo de regulação.
3) Ajustar a posição inferior do toldo, com os botões Subida
e Descida.
4) Pressionar o botão «my», até que o toldo efectue um
breve movimento: o novo m de curso inferior está
memorizado.
7.4. Funções avançadas
Contactar o fabricante do toldo antes de utilizar estas funções, para validar a compatibilidade da
sua instalação.
7.4.3. Função «Tensão de tela» apenas disponível nos toldos Pergola de tela
esticada
Esta função permite aumentar ou diminuir a tensão da tela do toldo em 3 níveis (forte - médio - fraco).
Por defeito, o motor está regulado no nível médio, à saída de fábrica.
Por motivos de segurança, esta função só pode ser activada ou desactivada com o ponto de comando
io Somfy somente em 3 casos:
• Após a validação das regulações e antes da memorização do primeiro ponto de comando io
Somfy.
• Após a memorização do primeiro ponto de comando io Somfy e durante os 4 ciclos seguintes.
• Após um simples corte da alimentação eléctrica e durante os 4 ciclos seguintes.
Para activar esta função:
1) Colocar o toldo na posição intermédia.
2) Pressionar breve e simultaneamente os botões «my» e
Descida e, imediatamente a seguir, pressionar contínua
e simultaneamente os botões «my» e Descida, até que
o toldo efectue um breve movimento.
O motor está em modo de programação apenas
durante 10 s.
3) Ajustar a tensão da tela, com os botões Subida e
Descida.
- Para aumentar a tensão da tela, pressionar o botão Subida, até que o toldo efectue um movimento
lento: a tensão da tela do toldo passa para o nível superior.
- Para diminuir a tensão da tela, pressionar o botão Descida, até que o toldo efectue um movimento
lento: a tensão da tela do toldo passa para o nível inferior.
4) Pressionar o botão «my», até que o toldo efectue um breve movimento: a nova tensão da tela está
memorizada.
2 s
5 s
1 2
4
3
ou
ou
ou
0,5 s 5 s
1 2
3 4
8. SUGESTÕES E CONSELHOS
8.1. Questões sobre o Pergola io
Situações Causas possíveis Soluções
O toldo não
trabalha. A cablagem está incorrecta. Vericar a cablagem e modicá-la, se
necessário.
O motor está quente. Aguardar que o motor arrefeça.
O cabo utilizado não está conforme. Vericar o cabo utilizado e assegurar-se de
que tem 3 condutores.
A pilha do ponto de comando io
Somfy está fraca. Vericar se a pilha está fraca e substituí-la,
se necessário.
O ponto de comando não é
compatível. Vericar a compatibilidade e substituir o
ponto de comando, se necessário.
O ponto de comando io Somfy
utilizado não está memorizado no
motor.
Utilizar um ponto de comando memorizado
ou memorizar este ponto de comando.
5069577C107-Pergola_io.indb 705069577C107-Pergola_io.indb 70 18/05/2022 18:46:5018/05/2022 18:46:50

Pergola io
71
PT
Copyright © 2010-2022 Somfy Activités SA,Société Anonyme. All rights reserved.
Situações Causas possíveis Soluções
O toldo pára
demasiado cedo. A coroa está mal instalada. Fixar a coroa correctamente.
Os ns de curso estão mal regulados. Voltar a regular os ns de curso.
8.2. Substituição de um ponto de comando io Somfy perdido ou danicado
Consultar o guia correspondente.
8.3. Regresso à conguração de origem
Esta reposição a zero elimina todos os pontos de comando, todos os sensores, todas as
regulações de ns de curso e reinicializa o sentido de rotação e a posição preferida («my») do
motor. No entanto, a regulação da tensão de tela é conservada apenas nos toldos Pergola de
tela esticada.
O duplo corte de corrente só deve ser efectuado ao nível do motor que deve ser reposto a zero.
1) Colocar o toldo na posição intermédia (se for possível).
2) Desligar a alimentação do sector durante 2 s.
3) Voltar a ligar a alimentação do sector entre 5 e 15 s.
4) Desligar a alimentação do sector durante 2 s.
5) Voltar a ligar a alimentação do sector: o toldo efectua um
movimento durante alguns segundos.
Se o toldo estiver em m de curso superior ou inferior,
então efectuará um breve movimento.
6) Manter a pressão no botão PROG: o toldo efectua um
primeiro movimento breve e, depois, um segundo alguns
momentos mais tarde. O motor está na conguração de
fábrica.
- Retomar os procedimentos do capítulo «Colocação em
serviço»
2 s
2 s
15 s
5 s
1
6
5
3
2
4
OFF
OFF
ON
ON
7 s 7 s2 s
9. DADOS TÉCNICOS
Frequência rádio 868-870 MHz io-homecontrol® bidireccional tri-banda
Bandas de frequência e potência máxima
utilizada
868,000 MHz - 868,600 MHz e.r.p. <25 mW
868,700 MHz - 869,200 MHz e.r.p.<25 mW
869,700 MHz - 870,000 MHz e.r.p.<25 mW
Alimentação 230 V ~ 50 Hz
Temperatura de utilização - 20 °C a + 60 °C
Índice de protecção IP 44
Número máximo de pontos de comando e
de sensores associados 9
Nível de segurança Classe I
5069577C107-Pergola_io.indb 715069577C107-Pergola_io.indb 71 18/05/2022 18:46:5018/05/2022 18:46:50

Με την παρούσα, η Somfy Activités SA, F-74300 CLUSES δηλώνει ως κατασκευαστής ότι ο μηχανισμός που
καλύπτεται από αυτές τις οδηγίες, εφόσον φέρει σήμανση για τροφοδοσία 230V~50Hz και χρησιμοποιείται με
τον τρόπο που υποδεικνύεται στις παρούσες οδηγίες, συμμορφώνεται με τις ουσιώδεις απαιτήσεις των
εφαρμοζόμενων ευρωπαϊκών οδηγιών και ειδικότερα με την οδηγία για τις μηχανές και την οδηγία
για το ραδιοεξοπλισμό.
Το πλήρες κείμενο της δήλωσης συμμόρφωσης με την ΕΕ διατίθεται στην ιστοσελίδα www.somfy.com/ce.
Ο Christian Rey, υπεύθυνος εγκρίσεων, ο οποίος ενεργεί για λογαριασμό του Διευθυντή Τομέα, Cluses,
05/2022.
Το παρόν εγχειρίδιο ισχύει για όλους τους μηχανισμούς Pergola 50 και Pergola 60 οι παραλλαγές των
οποίων είναι διαθέσιμες στον ισχύοντα κατάλογο.
Οι μηχανισμοί Pergola 50 και Pergola 60 σχεδιάστηκαν για να εφοδιάζουν με ηλεκτροκίνηση όλους
τους τύπους στοριών τύπου Pergola με εξαίρεση τους τύπους Pergola με προσανατολιζόμενα
φυλλαράκια.
Ο τεχνικός εγκατάστασης, επαγγελματίας με γνώσεις στους μηχανισμούς και αυτοματισμούς
κατοικιών, οφείλει να διασφαλίσει ότι η εγκατάσταση του ηλεκτροκίνητου προϊόντος ανταποκρίνεται
στα πρότυπα που ισχύουν στη χώρα στην οποία τίθεται σε λειτουργία, και κυρίως στο πρότυπο EN
13561 για τα στόρια εξωτερικού χώρου.
Πριν εγκαταστήσετε και χρησιμοποιήσετε το μηχανισμό, διαβάστε προσεκτικά το παρόν εγχειρίδιο.
Εκτός από τις οδηγίες που περιγράφονται στο παρόν εγχειρίδιο, τηρήστε επίσης τις οδηγίες που
αναφέρονται αναλυτικά στο συνημμένο έγγραφο Οδηγίες ασφαλείας.
Ο μηχανισμός πρέπει να εγκαθίσταται από επαγγελματία με γνώσεις στους μηχανισμούς και
αυτοματισμούς κατοικιών, σύμφωνα με τις οδηγίες της Somfy και τους ισχύοντες κανονισμούς της
χώρας στην οποία τίθεται σε λειτουργία.
Απαγορεύεται οποιαδήποτε χρήση του μηχανισμού πέραν του πεδίου εφαρμογής που περιγράφεται
πιο πάνω. Οποιαδήποτε άλλη χρήση καθώς και η μη τήρηση των οδηγιών που αναφέρονται στο
παρόν εγχειρίδιο και στο συνημμένο έγγραφο Οδηγίες ασφαλείας συνεπάγεται τον αποκλεισμό
οποιασδήποτε ευθύνης και εγγύησης εκ μέρους της Somfy.
Ο τεχνικός εγκατάστασης οφείλει να ενημερώνει τους πελάτες του για τις συνθήκες χρήσης και
συντήρησης του μηχανισμού, οφείλει δε να τους μεταβιβάζει τις οδηγίες χρήσης και συντήρησης, καθώς
επίσης και το συνημμένο έγγραφο Οδηγίες ασφαλείας, μετά την εγκατάσταση του μηχανισμού. Για
οποιαδήποτε εργασία σέρβις μετά την πώληση στο μηχανισμό απαιτείται η επέμβαση επαγγελματία
με γνώσεις στους μηχανισμούς και αυτοματισμούς κατοικιών.
Σε περίπτωση αμφιβολίας κατά την εγκατάσταση του μηχανισμού ή αν επιθυμείτε συμπληρωματικές
πληροφορίες, συμβουλευτείτε αρμόδιο άτομο επικοινωνίας της Somfy ή επισκεφθείτε τον ιστότοπο
www.somfy.com.
Τα καλώδια που διέρχονται από μεταλλικό τοίχωμα πρέπει να προστατεύονται και να μονώνονται
με χιτώνιο ή μακαρόνι.
Στερεώστε τα καλώδια προς αποφυγή οποιασδήποτε επαφής με κάποιο κινούμενο εξάρτημα.
Αν ο μηχανισμός χρησιμοποιηθεί σε εξωτερικό χώρο και το καλώδιο τροφοδοσίας είναι τύπου
H05-VVF, βάλτε το καλώδιο μέσα σε αγωγό που είναι ανθεκτικός στην υπεριώδη ακτινοβολία, για
παράδειγμα μέσα σε κανάλι.
Επιτρέψτε την πρόσβαση στο καλώδιο τροφοδοσίας του μηχανισμού: πρέπει να μπορεί να
αντικαθίσταται εύκολα.
Κάνετε πάντοτε μια θηλιά στο καλώδιο τροφοδοσίας, για να αποτρέπεται η διείσδυση νερού στο
μηχανισμό!
Για σωληνωτά μοτέρ Ø 50/60 mm:
Ο τροχός πρέπει να ακινητοποιηθεί ως προς τη μετατόπισή του μέσα στο σωλήνα τύλιξης:
- Στερεώστε το σωλήνα τύλιξης στον τροχό τοποθετώντας 4 βίδες ή 4 τυφλά πριτσίνια σε απόσταση
από 5 mm έως 15 mm από το εξωτερικό άκρο του τροχού, ανεξάρτητα από το σωλήνα τύλιξης.
Οι βίδες ή τα τυφλά πριτσίνια δεν πρέπει να στερεώνονται στο μηχανισμό, αλλά μόνο στον τροχό.
- Είτε χρησιμοποιώντας ένα στοπ τροχού, σε σωλήνες που δεν είναι λείοι.
Copyright © 2010-2022 Somfy Activités SA, Société Anonyme. All rights reserved.
72
5069577C107-Pergola_io.indb 725069577C107-Pergola_io.indb 72 18/05/2022 18:46:5118/05/2022 18:46:51

Pergola io
73
EL
Copyright © 2010-2022 Somfy Activités SA,Société Anonyme. All rights reserved.
Ειδικές οδηγίες ασφαλείας 74
3.1. Προετοιμασία του μοτέρ 74
3.2. Προετοιμασία του σωλήνα 74
3.3. Συναρμολόγηση μοτέρ - σωλήνα 75
3.4. Τοποθέτηση του συνόλου σωλήνα-μοτέρ 75
5.1. Αναγνώριση των βημάτων ρύθμισης που
έχουν ήδη λάβει χώρα 76
5.2. Προ-καταχώρηση του τοπικού
χειριστηρίου io Somfy 76
5.3. Επαλήθευση της φοράς περιστροφής του
μοτέρ 76
5.4. Ρύθμιση των ορίων διαδρομής 77
5.5. Καταχώρηση του πρώτου τοπικού
χειριστηρίου io Somfy 78
5.6. Έλεγχος των ρυθμίσεων 78
6.1. Κανονική λειτουργία 78
6.2. Λειτουργία με αισθητήρα io Somfy 79
6.3. Επιστροφή πληροφοριών 79
7.1. Αγαπημένη θέση (my) 79
7.2. Προσθήκη/Αφαίρεση χειριστηρίων io και
αισθητήρων io Somfy 79
7.3. Τροποποίηση των ορίων διαδρομής 79
7.4. Προηγμένες λειτουργίες 80
8.1. Ερωτήσεις σχετικά με το Pergola io; 80
8.2. Αντικατάσταση ενός χειριστηρίου io Somfy
που έχει χαθεί ή σπάσει 81
8.3. Επαναφορά αρχικών ρυθμίσεων 81
Το Pergola io χρησιμοποιεί το io-homecontrol®, το νέο ασφαλές πρωτόκολλο ασύρματης επικοινωνίας
παγκόσμιας χρήσης, από κοινού με μεγάλους κατασκευαστές οικιακών συσκευών. Το io-homecontrol®
επιτρέπει την επικοινωνία μεταξύ όλων των εξοπλισμών άνεσης και ασφάλειας και τον έλεγχό τους
από ένα ενιαίο χειριστήριο.
Η ευελιξία και η άριστη συμβατότητα του συστήματος io-homecontrol® επιτρέπει να ακολουθούμε την
εξέλιξη των αναγκών σας. Μπορούμε να αυτοματοποιήσουμε πρώτα τα οικιακά ρολά και την πόρτα
της εισόδου, ύστερα να εξοπλίσουμε
τις τέντες, την πόρτα της αυλής και την πόρτα του γκαράζ ή τα φώτα του κήπου με το σύστημα
io-homecontrol®.
Ενώ τοποθετούνται σε διαφορετικές χρονικές στιγμές, αυτοί οι εξοπλισμοί παραμένουν συμβατοί
με την υπάρχουσα εγκατάσταση, χάρη στην τεχνολογία io-homecontrol® που διασφαλίζει τη
διαλειτουργικότητά τους.
Για περισσότερες πληροφορίες, συμβουλευθείτε την τοποθεσία internet .
5069577C107-Pergola_io.indb 735069577C107-Pergola_io.indb 73 18/05/2022 18:46:5118/05/2022 18:46:51

Pergola io
74
EL
Copyright © 2010-2022 Somfy Activités SA, Société Anonyme. All rights reserved.
1) Διακόψτε την τροφοδοσία του δικτύου, που αντιστοιχεί
στην τέντα, πριν από οποιαδήποτε εργασία συντήρησης
γύρω από αυτήν.
Για να μην προκληθεί ζημιά στο προϊόν:
2) Μην το βυθίζετε ποτέ σε υγρό!
3) Αποφεύγετε τα χτυπήματα!
4) Αποφεύγετε τις πτώσεις!
5) Μην το τρυπάτε ποτέ!
6) Αποφεύγετε τους χειρισμούς εάν έχει σχηματιστεί πάγος
πάνω στην τέντα.
1
3
5 6
2
4
OFF
Το Pergola io πρέπει να εγκατασταθεί σε σημείο
προφυλαγμένο από την κακοκαιρία.
1) Τοποθετήστε την κορώνα (Α) και τη ρόδα (Β) στο μοτέρ.
2) Μετρήστε το μήκος (L1) ανάμεσα στο εσωτερικό άκρο της
κεφαλής του μοτέρ και το άκρο της ρόδας.
1) Κόψτε το σωλήνα τύλιξης στο επιθυμητό μήκος.
2) Αφαιρέστε τα γρέζια από το σωλήνα τύλιξης και
απομακρύνετε τα ρινίσματα.
3) Για στρογγυλούς σωλήνες τύλιξης, κόψτε έτσι το σωλήνα
ώστε να σχηματιστεί μια εγκοπή, σύμφωνα με τις
παρακάτω διαστάσεις:
- e = 4 mm
- h = 28 mm.
1
2
AB
L1
L1 = …
Ø > 47
1
3
2
εη
5069577C107-Pergola_io.indb 745069577C107-Pergola_io.indb 74 18/05/2022 18:46:5218/05/2022 18:46:52

Pergola io
75
EL
Copyright © 2010-2022 Somfy Activités SA,Société Anonyme. All rights reserved.
1) Περάστε το μοτέρ μέσα στο σωλήνα τύλιξης.
Για τους στρογγυλούς σωλήνες, τοποθετήστε το
αντίστοιχο καρέ της κορώνας στην εγκοπή του σωλήνα.
2) Για λόγους ασφαλείας, στερεώστε το σωλήνα τύλιξης στη
ρόδα με 4 λαμαρινόβιδες Ø 5 mm ή 4 χαλύβδινα τυφλά
πριτσίνια Ø 4,8 mm τοποθετημένα σε απόσταση:
- τουλάχιστον 5 mm από το εξωτερικό άκρο της ρόδας:
L1 - 5, και
- το πολύ 15 mm από το εξωτερικό άκρο της ρόδας:
L1 - 15.
Οι βίδες ή τα τυφλά πριτσίνια δεν πρέπει να
στερεώνονται στο μοτέρ, αλλά μόνο στη ρόδα.
1) Τοποθετήστε το σύνολο σωλήνα-μοτέρ στο στήριγμα
άκρου (Γ).
2) Τοποθετήστε το σύνολο σωλήνα-μοτέρ στο στήριγμα
μοτέρ (Δ).
3) Ανάλογα με τον τύπο στηρίγματος, τοποθετήστε στη θέση
τους το δακτύλιο συγκράτησης (E) (Για τα μοτέρ ≥ 85 Nm,
με δακτύλιο συγκράτησης, χρησιμοποιείτε οπωσδήποτε
τον ασφαλιζόμενο δακτύλιο συγκράτησης (ΣΤ).
15 mm
5 mm
20 mm
L1
1
2
Γ
Δ
E
1
2
3
ΣΤ
- Διακόψτε την τροφοδοσία δικτύου.
- Συνδέστε το μοτέρ, σύμφωνα με τις πληροφορίες του
παρακάτω πίνακα:
1Καφέ Φάση (P)
2Μπλε Ουδέτερος (N)
3Πράσινο-Κίτρινο Γείωση ( )
1
2
3
1
2
3
OFF
230 V
~
50 Hz
3 x 1,5 mm2
3 x 0,75 mm2
5069577C107-Pergola_io.indb 755069577C107-Pergola_io.indb 75 18/05/2022 18:46:5418/05/2022 18:46:54

Pergola io
76
EL
Copyright © 2010-2022 Somfy Activités SA, Société Anonyme. All rights reserved.
Το παρόν έγγραφο περιγράφει μόνο τον έλεγχο λειτουργίας με χρήση ενός τοπικού χειριστηρίου io
Somfy τύπου Situo io. Για έλεγχο λειτουργίας με οποιονδήποτε άλλο χειριστήριο io, ανατρέξτε στις
αντίστοιχες οδηγίες.
Μπορεί να τροφοδοτείται μόνο ένα μοτέρ τη φορά.
Θέστε υπό τάση και ακολουθήστε τη διαδικασία «α» ή «β»
ανάλογα με την αντίδραση της τέντας:
Τα όρια διαδρομής έχουν ρυθμιστεί και κανένα
χειριστήριο io Somfy δεν είναι καταχωρημένο.
Περάστε στο κεφάλαιο «Καταχώρηση του πρώτου
τοπικού χειριστηρίου io Somfy».
ή
Πατήστε το πλήκτρο Ανόδου ή Καθόδου και
ακολουθήστε τη διαδικασία «γ» ή «δ» ανάλογα με την
αντίδραση της τέντας:
Τα όρια διαδρομής δεν έχουν ρυθμιστεί και κανένα
χειριστήριο io Somfy δεν είναι καταχωρημένο.
Περάστε στο κεφάλαιο «Προ-καταχώρηση του
τοπικού χειριστηρίου io Somfy».
ή
Τα όρια διαδρομής έχουν ρυθμιστεί και το χειριστήριο
io Somfy είναι καταχωρημένο.
Περάστε στο κεφάλαιο «Χρήση».
- Πατήστε ταυτόχρονα τα πλήκτρα Ανόδου και Καθόδου:
η τέντα πραγματοποιεί μια σύντομη κίνηση, το τοπικό
χειριστήριο io Somfy προ-καταχωρείται στο μοτέρ.
1) Πατήστε το πλήκτρο Ανόδου:
a) Εάν η τέντα ανεβαίνει, η φορά περιστροφής είναι
σωστή: περάστε στο κεφάλαιο «Ρύθμιση των ορίων
διαδρομής».
b) Εάν η τέντα κατεβαίνει, η φορά περιστροφής δεν
είναι σωστή: πατήστε το πλήκτρο «my», έως ότου η
τέντα κάνει μια σύντομη κίνηση, η φορά περιστροφής
τροποποιείται.
2) Πατήστε το πλήκτρο Ανόδου για να ελέγξετε τη φορά
περιστροφής.
ON
Καταχώρηση
του 1ου τοπικού
χειριστηρίου io
Somfy.
ή
Προ-καταχώρηση του
τοπικού χειριστηρίου
io Somfy.
Χρήση.
α
β
Ρύθμιση των
ορίων διαδρομής
2 δευτ.
1
2
5069577C107-Pergola_io.indb 765069577C107-Pergola_io.indb 76 18/05/2022 18:46:5518/05/2022 18:46:55

Pergola io
77
EL
Copyright © 2010-2022 Somfy Activités SA,Société Anonyme. All rights reserved.
Η ρύθμιση των ορίων διαδρομής εξαρτάται από τον τύπο των τεντών.
Το επάνω και το κάτω όριο διαδρομής ρυθμίζονται αυτόματα.
1) Πατήστε ταυτόχρονα τα πλήκτρα Ανόδου και Καθόδου: η
τέντα πραγματοποιεί μια σύντομη κίνηση.
2) Πατήστε το πλήκτρο «my» έως ότου η τέντα κάνει μια
σύντομη κίνηση: τα όρια διαδρομής καταχωρούνται,
περάστε στο κεφάλαιο «Καταχώρηση του πρώτου
τοπικού χειριστηρίου io Somfy».
Το κάτω όριο διαδρομής ρυθμίζεται αυτόματα, ενώ το επάνω όριο διαδρομής πρέπει να ρυθμιστεί
χειροκίνητα.
Εξακολουθεί να υπάρχει η δυνατότητα ορισμού ενός
νέου επάνω ορίου διαδρομής πριν από την καταχώρησή
του.
1) Τοποθετήστε την τέντα στο επάνω όριο της διαδρομής.
Ένα πάτημα > 2 δευτ. στο πλήκτρο Ανόδου προκαλεί
μια συνεχή κίνηση ανόδου της τέντας.
2) Σταματήστε την τέντα στην επιθυμητή θέση.
3) Εάν χρειάζεται, προσαρμόστε τη θέση της τέντας
χρησιμοποιώντας τα πλήκτρα Ανόδου ή Καθόδου.
4) Πατήστε ταυτόχρονα τα πλήκτρα «my» και Καθόδου: η
τέντα κατεβαίνει με μια συνεχή κίνηση, ακόμη και αφού
αφήσετε τα πλήκτρα «my» και Καθόδου.
5) Στη μέση του ύψους, πατήστε στιγμιαία το πλήκτρο «my»
για να σταματήσετε την τέντα.
6) Πατήστε ξανά το πλήκτρο «my» έως ότου η τέντα κάνει
μια σύντομη κίνηση: τα όρια διαδρομής καταχωρούνται, περάστε στο κεφάλαιο «Καταχώρηση του
πρώτου τοπικού χειριστηρίου io Somfy».
Για τις τέντες Pergola με μη τεντωμένο ύφασμα, πρέπει να ρυθμιστούν το επάνω και το κάτω όριο
διαδρομής.
Εξακολουθεί να υπάρχει η δυνατότητα ορισμού νέου επάνω και κάτω ορίου διαδρομής πριν από
την καταχώρησή τους.
1) Τοποθετήστε την τέντα στο επάνω όριο της διαδρομής.
Ένα πάτημα > 2 δευτ. στο πλήκτρο Ανόδου προκαλεί
μια συνεχή κίνηση ανόδου της τέντας.
2) Σταματήστε την τέντα στην επιθυμητή θέση.
3) Εάν χρειάζεται, προσαρμόστε τη θέση της τέντας
χρησιμοποιώντας τα πλήκτρα Ανόδου ή Καθόδου.
4) Πατήστε ταυτόχρονα τα πλήκτρα «my» και Καθόδου: η
τέντα κατεβαίνει με μια συνεχή κίνηση, ακόμη και αφού
αφήσετε τα πλήκτρα «my» και Καθόδου.
5) Στη μέση του ύψους, πατήστε στιγμιαία το πλήκτρο «my»
για να σταματήσετε την τέντα και περάστε στο βήμα
« Ρύθμιση του κάτω ορίου διαδρομής ».
12
2 δευτ.
1
3
2
4
5 6
2 δευτ.
1
3
5
2
4
Ρύθμιση του κάτω
ορίου διαδρομής.
5069577C107-Pergola_io.indb 775069577C107-Pergola_io.indb 77 18/05/2022 18:46:5618/05/2022 18:46:56

Pergola io
78
EL
Copyright © 2010-2022 Somfy Activités SA, Société Anonyme. All rights reserved.
1) Τοποθετήστε την τέντα στη θέση κάτω ορίου διαδρομής.
Ένα πάτημα > 2 δευτ. στο πλήκτρο Καθόδου προκαλεί
μια συνεχή κίνηση καθόδου της τέντας.
2) Σταματήστε την τέντα στην επιθυμητή θέση.
3) Εάν χρειάζεται, προσαρμόστε τη θέση της τέντας
χρησιμοποιώντας τα πλήκτρα Ανόδου ή Καθόδου.
4) Πατήστε ταυτόχρονα τα πλήκτρα «my» και Ανόδου: η
τέντα ανεβαίνει με μια συνεχή κίνηση, ακόμη και αφού
αφήσετε τα πλήκτρα «my» και Ανόδου.
5) Στη μέση του ύψους, πατήστε στιγμιαία το πλήκτρο «my»
για να σταματήσετε την τέντα.
6) Πατήστε ξανά το πλήκτρο «my» έως ότου η τέντα
κάνει μια σύντομη κίνηση: τα όρια διαδρομής έχουν
καταχωρηθεί. Περάστε στο κεφάλαιο «Καταχώρηση του
πρώτου τοπικού χειριστηρίου io Somfy».
- Πιέστε σύντομα το πλήκτρο προγραμματισμού «PROG»
αυτού του χειριστηρίου (Ζ): η τέντα πραγματοποιεί μια
σύντομη κίνηση, το χειριστήριο καταχωρείται.
Κατά τη θέση υπό τάση, η τέντα πραγματοποιεί μια σύντομη κίνηση.
1) Πατήστε ταυτόχρονα τα πλήκτρα Ανόδου και Καθόδου
του νέου χειριστηρίου (H) έως ότου η τέντα κάνει μια
σύντομη κίνηση.
2) Πιέστε σύντομα το πλήκτρο προγραμματισμού «PROG»
αυτού του χειριστηρίου (H): η τέντα πραγματοποιεί μια
σύντομη κίνηση, το χειριστήριο καταχωρείται.
- Ελέγξτε τη ρύθμιση του επάνω και του κάτω ορίου της διαδρομής χρησιμοποιώντας το τοπικό
χειριστήριο io Somfy.
1
3
5
2
4
6
2 δευτ.
2
H
1
Ένα σύντομο πάτημα του πλήκτρου Ανόδου ή Καθόδου
προκαλεί πλήρη άνοδο ή κάθοδο της τέντας.
Για τις τέντες Pergola με τεντωμένο ύφασμα, η ανίχνευση
εμποδίου είναι ενεργή σε όλη τη διάρκεια της καθόδου ή
της ανόδου.
Η τέντα βρίσκεται σε κίνηση.
- Πατήστε στιγμιαία το πλήκτρο «my»: η τέντα σταματάει.
Μια ενδιάμεση θέση που ονομάζεται «αγαπημένη θέση
(my)», διαφορετική από την επάνω θέση και την κάτω θέση,
μπορεί να καταχωρηθεί στο μοτέρ.
Για να καταχωρήσετε, να τροποποιήσετε ή να
καταργήσετε την αγαπημένη θέση (my), βλ. κεφάλαιο «Πρόσθετες ρυθμίσεις».
Για να χρησιμοποιήσετε την αγαπημένη θέση (my):
- Πατήστε στιγμιαία το πλήκτρο «my»: η τέντα αρχίζει να κινείται και σταματάει στην αγαπημένη θέση
(my).
5069577C107-Pergola_io.indb 785069577C107-Pergola_io.indb 78 18/05/2022 18:46:5718/05/2022 18:46:57

Pergola io
79
EL
Copyright © 2010-2022 Somfy Activités SA,Société Anonyme. All rights reserved.
Ανατρέξτε στις αντίστοιχες οδηγίες.
Μετά από κάθε εντολή, το Pergola io στέλνει ένα μήνυμα. Αυτή η πληροφορία υφίσταται επεξεργασία
από τα αμφίδρομα χειριστήρια io.
Η ίδια διαδικασία χρησιμοποιείται για την καταχώρηση ή την τροποποίηση της αγαπημένης θέσης (my).
1) Τοποθετήστε την τέντα στην επιθυμητή αγαπημένη θέση
(my).
2) Πατήστε το πλήκτρο «my» έως ότου η τέντα κάνει
μια σύντομη κίνηση: η αγαπημένη θέση (my) έχει
καταχωρηθεί.
1) Πατήστε το πλήκτρο «my»: η τέντα αρχίζει να κινείται και
σταματάει στην αγαπημένη θέση (my).
2) Πατήστε ξανά το πλήκτρο «my» έως ότου η τέντα
κάνει μια σύντομη κίνηση: η αγαπημένη θέση (my) έχει
καταργηθεί.
Ανατρέξτε στις αντίστοιχες οδηγίες.
Η τροποποίηση των ορίων διαδρομής εξαρτάται από τον τύπο των τεντών.
Για τις τέντες Pergola με τεντωμένο ύφασμα, το επάνω όριο διαδρομής κατά την ημιαυτόματη ρύθμιση
ορίων διαδρομής μπορεί να τροποποιηθεί.
1) Τοποθετήστε την τέντα στο επάνω όριο της διαδρομής.
2) Πατήστε ταυτόχρονα τα πλήκτρα Ανόδου και Καθόδου,
έως ότου η τέντα κάνει μια σύντομη κίνηση: το μοτέρ είναι
σε λειτουργία ρύθμισης.
3) Προσαρμόστε την επάνω θέση της τέντας
χρησιμοποιώντας τα πλήκτρα Ανόδου ή Καθόδου.
4) Πατήστε το πλήκτρο «my» έως ότου η τέντα κάνει
μια σύντομη κίνηση: το νέο επάνω όριο διαδρομής
καταχωρείται.
Για τις τέντες Pergola με μη τεντωμένο ύφασμα, μπορούν να τροποποιηθούν το επάνω και το κάτω
όριο διαδρομής.
1) Τοποθετήστε την τέντα στο επάνω όριο της διαδρομής.
2) Πατήστε ταυτόχρονα τα πλήκτρα Ανόδου και Καθόδου,
έως ότου η τέντα κάνει μια σύντομη κίνηση: το μοτέρ είναι
σε λειτουργία ρύθμισης.
3) Προσαρμόστε την επάνω θέση της τέντας
χρησιμοποιώντας τα πλήκτρα Ανόδου ή Καθόδου.
4) Πατήστε το πλήκτρο «my» έως ότου η τέντα κάνει
μια σύντομη κίνηση: το νέο επάνω όριο διαδρομής
καταχωρείται.
12
my
5 δευτ.
ή
12
my
5 δευτ.
1
ή
3
2
4
2 δευτ.
5 δευτ.
1
ή
3
2
4
2 δευτ.
5 δευτ.
5069577C107-Pergola_io.indb 795069577C107-Pergola_io.indb 79 18/05/2022 18:46:5918/05/2022 18:46:59

Pergola io
80
EL
Copyright © 2010-2022 Somfy Activités SA, Société Anonyme. All rights reserved.
1) Τοποθετήστε την τέντα στο κάτω όριο της διαδρομής.
2) Πατήστε ταυτόχρονα τα πλήκτρα Ανόδου και Καθόδου,
έως ότου η τέντα κάνει μια σύντομη κίνηση: το μοτέρ είναι
σε λειτουργία ρύθμισης.
3) Προσαρμόστε την κάτω θέση της τέντας χρησιμοποιώντας
τα πλήκτρα Ανόδου ή Καθόδου.
4) Πατήστε το πλήκτρο «my» έως ότου η τέντα κάνει
μια σύντομη κίνηση: το νέο κάτω όριο διαδρομής
καταχωρείται.
Επικοινωνήστε με τον κατασκευαστή της τέντας, πριν χρησιμοποιήσετε αυτές τις λειτουργίες, για
να επικυρώσετε τη συμβατότητα της εγκατάστασής σας.
Αυτή η λετιουργία επιτρέπει το επιπλέον τέντωμα ή τη χαλάρωση του υφάσματος βάσει 3 ρυθμίσεων
(δυνατό-μεσαίο-ελαφρύ).
Από προεπιλογή, το μοτέρ έχει τοποθετηθεί, κατά την έξοδο από το εργοστάσιο, στο μεσαίο επίπεδο.
Για λόγους ασφαλείας, αυτή η λειτουργία ενεργοποιείται με το χειριστήριο io Somfy σε 3 περιπτώσεις μόνο:
• Μετά την επικύρωση των ρυθμίσεων και πριν από την καταχώρηση του πρώτου χειριστηρίου io
Somfy.
• Μετά από την καταχώρηση του πρώτου χειριστηρίου io Somfy και κατά τους 4 επόμενους κύκλους.
• Μετά από μια απλή διακοπή τροφοδοσίας και κατά τους 4 επόμενους κύκλους.
Για να εφαρμόσετε αυτήν τη λειτουργία:
1) Τοποθετήστε την τέντα σε μεσαία θέση.
2) Πατήστε στιγμιαία και ταυτόχρονα τα πλήκτρα «my» και
Καθόδου και αμέσως μετά πατήστε παρατεταμένα και
ταυτόχρονα τα πλήκτρα «my» και Καθόδου, έως ότου η
τέντα κάνει μια σύντομη κίνηση.
Το μοτέρ βρίσκεται σε λειτουργία προγραμματισμού
για 10 δευτ. μόνο.
3) Προσαρμόστε το τέντωμα του υφάσματος με τα πλήκτρα
Ανόδου ή Καθόδου.
- Για να τεντώσετε περισσότερο το ύφασμα, πατήστε το
πλήκτρο Ανόδου, έως ότου η τέντα κάνει μια αργή κίνηση: το τέντωμα του υφάσματος της τέντας
περνάει στην αμέσως ανώτερη ρύθμιση.
- Για να χαλαρώσετε το ύφασμα, πατήστε το πλήκτρο Καθόδου, έως ότου η τέντα κάνει μια αργή
κίνηση: το τέντωμα του υφάσματος της τέντας περνάει στην αμέσως κατώτερη ρύθμιση.
4) Πατήστε το πλήκτρο «my» έως ότου η τέντα κάνει μια σύντομη κίνηση: το νέο τέντωμα του
υφάσματος είναι καταχωρημένο.
2 δευτ.
5 δευτ.
12
4
3
ή
ή
ή
0,5 δευτ. 5 δευτ.
12
3 4
Η τέντα δεν
λειτουργεί. Η καλωδίωση δεν είναι σωστή. Ελέγξτε την καλωδίωση και τροποποιήστε
την, εάν χρειάζεται.
Το μοτέρ έχει υπερθερμανθεί. Περιμένετε έως ότου το μοτέρ κρυώσει.
Το καλώδιο που χρησιμοποιείται είναι
ακατάλληλο. Ελέγξτε το καλώδιο που χρησιμοποιείται και
βεβαιωθείτε ότι διαθέτει 3 αγωγούς.
Η μπαταρία του χειριστηρίου io Somfy
έχει εξασθενήσει. Ελέγξτε εάν η μπαταρία έχει εξασθενήσει
και αντικαταστήστε την, εάν χρειάζεται.
Το χειριστήριο δεν είναι συμβατό. Ελέγξτε τη συμβατότητα και αντικαταστήστε
το χειριστήριο, εάν χρειάζεται.
Το χειριστήριο io Somfy που
χρησιμοποιείται δεν έχει καταχωρηθεί
στη μνήμη του μοτέρ.
Χρησιμοποιήστε ένα καταχωρημένο
ασύρματο χειριστήριο ή καταχωρήστε το
συγκεκριμένο χειριστήριο.
5069577C107-Pergola_io.indb 805069577C107-Pergola_io.indb 80 18/05/2022 18:46:5918/05/2022 18:46:59

Pergola io
81
EL
Copyright © 2010-2022 Somfy Activités SA,Société Anonyme. All rights reserved.
Η τέντα σταματάει
πολύ νωρίς. Η κορώνα δεν έχει τοποθετηθεί
σωστά. Στερεώστε την κορώνα σωστά.
Τα όρια διαδρομής δεν έχουν
ρυθμιστεί σωστά. Επαναπροσαρμόστε τα όρια διαδρομής.
Ανατρέξτε στις αντίστοιχες οδηγίες.
Με αυτόν το μηδενισμό καταργούνται όλα τα χειριστήρια, όλοι οι αισθητήρες, όλες οι ρυθμίσεις
ορίων διαδρομής και επαναρχικοποιείται η φορά περιστροφής και η αγαπημένη θέση (my) του
μοτέρ. Ωστόσο, η ρύθμιση του τεντώματος της τέντας διατηρείται μόνο για τις τέντες Pergola με
τεντωμένο ύφασμα.
Κάντε τη διπλή διακοπή ρεύματος μόνο για το μοτέρ
του οποίου τις ρυθμίσεις θέλετε να μηδενίσετε.
1) Τοποθετήστε την τέντα σε μεσαία θέση (εάν είναι δυνατό).
2) Διακόψτε την τροφοδοσία δικτύου για 2 δευτ.
3) Αποκαταστήστε την τροφοδοσία δικτύου μεταξύ 5 δευτ.
και 15 δευτ.
4) Διακόψτε την τροφοδοσία δικτύου για 2 δευτ.
5) Αποκαταστήστε την τροφοδοσία δικτύου: η τέντα τίθεται
σε κίνηση για μερικά δευτερόλεπτα.
Εάν η τέντα βρίσκεται στο επάνω ή το κάτω όριο
διαδρομής, τότε θα πραγματοποιήσει μια σύντομη
κίνηση.
6) Κρατήστε πατημένο το πλήκτρο προγραμματισμού
«PROG»: η τέντα πραγματοποιεί μια πρώτη σύντομη
κίνηση κι έπειτα μια δεύτερη, μερικά δευτερόλεπτα
αργότερα. Το μοτέρ είναι σε εργοστασιακές ρυθμίσεις.
- Επαναλάβετε τις διαδικασίες του κεφαλαίου «Έλεγχος
λειτουργίας»
1
6
5
3
2
4
OFF
OFF
ON
ON
7 δευτ. 7 δευτ.2 δευτ.
Ραδιοσυχνότητα 868-870 MHz io-homecontrol® αμφίδρομης λειτουργίας
Tri-band
Ζώνες συχνοτήτων και Μέγιστη ισχύς
χρησιμοποιείται
868,000 MHz - 868.600 MHz e.r.p. <25 mW
868,700 MHz - 869.200 MHz e.r.p. <25 mW
869,700 MHz - 870.000 MHz e.r.p. <25 mW
Τροφοδοσία 230 V ~ 50 Hz
Θερμοκρασία χρήσης - 20°C έως + 60°C
Δείκτης προστασίας IP 44
Μέγιστος αριθμός χειριστηρίων και
σχετικών αισθητήρων 9
Επίπεδο ασφαλείας Κατηγορία μόνωσης I
5069577C107-Pergola_io.indb 815069577C107-Pergola_io.indb 81 18/05/2022 18:47:0018/05/2022 18:47:00

Elinizdeki bu belgeyle, belirtilen tüm talimatlara uygun olması ve bu talimatlarda belirtilen şekilde
kullanılıyor olması halinde Somfy Activités SA, üreticisi olma sıfatıyla sunmuş olduğu F-74300
CLUSES aletinin ve üzerindeki etikette 230V~50Hz akımla beslendiği belirtilen motorların
konuyla ilgili Avrupa Birliği direktierinin temel zorunluluklarına ve özellikle de 2006/42/EC tarih
ve sayılı Makineler Direktifi ile 2014/53/EU tarih ve sayılı Radyo Frekansı Yayını Yapan Aletler
Direktifine uygun olduğunu kabul ve beyan eder.
Avrupa Birliği direktierine uygunluk açıklamasının tam metnini www.somfy.com/ce internet
adresinden temin edebilirsiniz.
Christian Rey, onay belgeleri sorumlusu, Faaliyetler Müdürü adına yetkili kişi olarak, Cluses,
05/2022.
Bu kılavuz halen yürürlükte olan katalogda önerilen tüm Pergola 50 ve Pergola 60 motor seçenekleri
için geçerlidir.
Uygulama alanı
Pergola 50 ve Pergola 60 motor seçenekleri, yönlendirilebilir bantlı Pergola tipi olanlar hariç her tipten
Pergola tipi storlar.
Bu tür mekanizmalar ve ev otomasyonu konusunda uzmanlık sahibi olması gereken tesisatçı, motorlu
ürünün monte edilmesinden sonra sistemin ve mekanizmaların kullanıldığı ülkede yürürlükte olan
yönetmeliklere uygun şekilde monte edilmiş olduğunu ve özellikle de montajın dış storlarla ilgili EN
13561 standartlarına uygun şekilde gerçekleştirilmiş olduğunun garantisini vermekle yükümlüdür.
Sorumluluk
Motor ve düzeneklerini kurmadan ve kullanmadan önce mutlaka bu kılavuzu dikkatlice okuyunuz.
Bu kılavuzda belirtilen talimatlara ilaveten ekteki Güvenlik talimatları belgesinde ayrıntılı olarak
açıklanmış tüm talimatlara da aynı şekilde uyulması zorunludur.
Motorun ve ilgili mekanizmaların montajı, bu tür mekanizmalar ve ev otomasyonu konusunda uzman
bir tesisatçı tarafından ve Somfy’nin şart koştuğu talimatların öngördüğü şekilde ve ürünün kullanıma
sunulduğu ve çalıştırıldığı ülkede yürürlükte olan yönetmeliklere uygun olarak gerçekleştirilmelidir.
Motorun ve ilgili mekanizmaların yukarıda belirtilen kullanım alanı dışında kullanılması kesinlikle
yasaktır. Böyle bir durumda, bu kılavuzda belirtilen talimatlara ve Güvenlik talimatları adını taşıyan
ekli belgedeki talimatlara uyulmaması durumunda, Somfy’nin her türden sorumluluğu ve garantisi
sona erer.
Motorun ve düzeneklerinin montajını yapan tesisatçı, müşterilerine kullanım koşulları ve bakımla
ilgili bilgileri bildirmekle ve kullanım ve bakımla ilgili talimatları aktarmakla yükümlüdür, aynı şekilde
kullanım kılavuzuna ekli Güvenlik talimatları adını taşıyan belgeyi de motorun ve onun düzeneklerinin
montajını yaptıktan sonra teslim etmek zorundadır. Motora ve onun düzeneklerine yapılacak her
türden Satış Sonrası Servis işlemleri bu tür mekanizmalar ve ev otomasyonu konusunda profesyonel
bir tesisatçı tarafından gerçekleştirilmesi zorunludur.
Motorun ve mekanizmalarının montajı sırasında bir tereddüt oluşursa veya daha fazla bilgi gerektiğinde
bir Somfy yetkilisine başvurunuz veya www.somfy.com adresindeki internet sitemizi ziyaret ediniz.
Özel güvenlik talimatları
Metalik bir yüzeyden geçen kablo tesisatının bir manşon veya kablo kılıfı ile korunması ve izole
edilmesi zorunludur.
Hareket halindeki bir parça ile temas etmemesi için kabloları kesinlikle bağlayınız.
Motor düzeneğinin dış ortamda kullanılıyor olması ve besleme kablosunun da H05-VVF tipi
olması halinde, kabloyu UV ışınlarına dayanıklı bir kanalın içine örneğin bir kablo kılıfı içine
almanız zorunludur.
Motor ve düzeneklerinin kablo tesisatı mutlaka erişilebilir şekilde monte edilmelidir: kolaylıkla
değiştirilmesi mümkün olmalıdır.
Motor ve düzeneklerine su kaçmasını önlemek için her zaman besleme kablosuna bir düğüm
atınız!
Ø 50/60 mm çapında boru tipi motorlar için:
Çarkın hareket halindeki borunun içinde bloke edilmesi gerekir:
- Sargı borusunun türü ne olursa olsun, çarkın dış ucundan 5 mm ile 15 mm arasında bir
yere konumlandıracak şekilde, sargı borusunun 4 adet vidayla veya 4 adet pop çelik perçin
ile sabitlenmesi gerekir. Vidalar veya pop perçinler kesinlikle motor üzerine değil sadece çark
üzerine sabitlenmelidir.
- Ya da iç yüzeyleri pürüzsüz olmayan borular için bir stop elemanı kullanmak yoluyla sabitlenmelidir.
TERCÜME TALIMATLAR
Copyright © 2010-2022 Somfy Activités SA, Société Anonyme. All rights reserved. 82
5069577C107-Pergola_io.indb 825069577C107-Pergola_io.indb 82 18/05/2022 18:47:0118/05/2022 18:47:01

Pergola io
83
TR
Copyright © 2010-2022 Somfy Activités SA,Société Anonyme. All rights reserved.
1. Giriş 83
2. Güvenlik 84
Özel güvenlik talimatları 84
3. Montaj 84
3.1. Motorun hazırlanması 84
3.2. Borunun hazırlanması 84
3.3. Motor-boru montajı 85
3.4. Boru-motor grubunun montajı 85
4. Kablo tesisatı 85
5. Çalıştırma 86
5.1. Önceden yapılmış ayar aşamalarının
tanıtımı 86
5.2. io Somfy yerel kumanda noktasının ön
kaydı 86
5.3. Motor dönüş yönü kontrolü 86
5.4. Çevrim sonlarının ayarlanması 87
5.5. io Somfy ilk yerel kumanda noktasının
kaydı 88
5.6. Ayarların kontrolü 88
6. Kullanım 88
6.1. Standart çalışma 88
6.2. io Somfy algılayıcı ile çalışma 89
6.3. Bilgi geri bildirimi 89
7. Ek ayarlar 89
7.1. Favori konum (my) 89
7.2. io kumanda noktalarının ve io Somfy
algılayıcıların eklenmesi/çıkarılması 89
7.3. Çevrim sonlarında değişiklik 89
7.4. Gelişmiş fonksiyonlar 90
8. İpuçları ve tavsiyeler 90
8.1. Pergola io ile ilgili sorunuz mu var? 90
8.2. Kaybedilmiş veya kırılmış io Somfy
kumanda noktasının değiştirilmesi 91
8.3. İlk ayarlara geri dönüş 91
9. Teknik veriler 91
io-homecontrol® nedir?
Pergola io, ev dünyasının büyük üreticilerince paylaşılmakta olan global ve güvenli yeni kablosuz
iletişim protokolü io-homecontrol® ürününü kullanır. io-homecontrol® sayesinde tüm konfor ve
güvenlik ekipmanlarının kendi aralarında iletişim kurmaları sağlanmış olur ve tek bir kumanda
noktasında tarafından yönetilebilir.
io-homecontrol® sisteminin esnekliği ve mükemmel uyumu sayesinde ihtiyaçlarınızdaki artışa cevap
bulunur. Önce hareketli kepenkleri ve giriş kapısını otomatik sisteme geçirin, daha sonra
dış storlarda, kapı ve garaj kapısında veya bahçe aydınlatmasında io-homecontrol® sistemini kullanın.
Zamanla gelişen bu ekipmanlar mevcut tesisatla tam uyumlu şekilde çalışmayı io-homecontrol®
teknolojisi sayesinde başarabilmektedir.
Daha detaylı bilgi için lütfen internet sitesine göz atın: www.io-homecontrol.com.
İÇİNDEKİLER
1. GIRIŞ
5069577C107-Pergola_io.indb 835069577C107-Pergola_io.indb 83 18/05/2022 18:47:0118/05/2022 18:47:01

Pergola io
84
TR
Copyright © 2010-2022 Somfy Activités SA, Société Anonyme. All rights reserved.
Özel güvenlik talimatları
1) Stor etrafında herhangi bir bakım işlemi yapmadan önce stora ait şebeke beslemesini kesiniz.
Ürüne zarar vermemek için:
2) Asla ıslatmayınız!
3) Darbelere maruz bırakmayınız!
4) Düşürmeyiniz!
5) Delmeyiniz!
6) Storda buzlanma olması halinde hareket ettirmeyiniz.
1
3
5 6
2
4
OFF
3. MONTAJ
Pergola io hava şartlarından etkilenmeyecek bir yere monte
edilmelidir.
3.1. Motorun hazırlanması
1) Halkayı (A) ve tekerleği (B) motora takınız.
2) Motor kafasının iç kenarı ile tekerleğin ucu arasındaki
uzunluğu (L1) ölçünüz.
1
2
AB
L1
L1 = …
3.2. Borunun hazırlanması
1) Sargı borusunu istenilen uzunlukta kesiniz.
2) Sargı borusunun çapağını alınız ve talaşları temizleyiniz.
3) Düz sargı boruları için aşağıdaki ölçülerde delik açınız:
- e = 4 mm
- e = 28 mm
Ø > 47
1
3
2
eh
2. GÜVENLIK
5069577C107-Pergola_io.indb 845069577C107-Pergola_io.indb 84 18/05/2022 18:47:0318/05/2022 18:47:03

Pergola io
85
TR
Copyright © 2010-2022 Somfy Activités SA,Société Anonyme. All rights reserved.
3.3. Motor-boru montajı
1) Motoru sargı borusu içine kaydırınız.
Düz sargı boruları için açılan deliği halkaya göre
konumlandırınız.
2) Güvenlik nedeniyle, sargı borusunu tekerlek üzerine
aşağıda belirtilen şekilde monte edilecek 4 adet Ø 5 mm
vidayla veya 4 adet pop çelik Ø 4,8 perçinle sabitleyiniz:
- tekerleğin dış ucundan 5 mm daha az mesafe: L1 - 5,
ve
- tekerleğin dış ucundan 15 mm daha fazla mesafe: L1
- 15.
Vidalar veya pop perçinler motor üzerine değil sadece
tekerlek üzerine sabitlenmelidir.
3.4. Boru-motor grubunun montajı
1) Boru-motor grubunu uç mesnedi (C) üzerine takınız.
2) Boru-motor grubunu motor mesnedi (D) üzerine takınız.
3) Mesnet türüne göre, durdurma halkasını (E) yerine
yerleştiriniz (Durdurma halkalı ≥ 85 Nm motorlarda,
mutlaka kilitlenebilir durdurma halkası (F) kullanınız.)
15 mm
5 mm
20 mm
L1
1
2
C
D
E
F
1
2
3
- Şebeke beslemesini kesiniz.
- Aşağıdaki tabloda verilen bilgiler doğrultusunda motoru
bağlayınız:
230 V ~ 50 Hz Motor kablosu
1Kahverengi Faz (P)
2Mavi Nötr (N)
3Yeşil-Sarı Toprak ( )
1
2
3
1
2
3
OFF
230 V
~
50
3 x 1,5 mm2
3 x 0,75 mm2
4. KABLO TESISATI
5069577C107-Pergola_io.indb 855069577C107-Pergola_io.indb 85 18/05/2022 18:47:0518/05/2022 18:47:05

Pergola io
86
TR
Copyright © 2010-2022 Somfy Activités SA, Société Anonyme. All rights reserved.
Kılavuzda sadece Situo io türü bir io Somfy yerel kumanda noktası yardımıyla çalıştırma açıklanmıştır.
Diğer io kumanda noktası yardımıyla çalıştırma işlemi için ilgili kılavuza bakınız.
5.1. Önceden yapılmış ayar aşamalarının tanıtımı
Bir defada tek bir motor beslenmelidir.
Gerilimi veriniz ve storun tepkisine göre «a» veya «b»
prosedürünü uygulayınız:
aStor kısa süreli hareket ediyor
Çevrim sonları ayarlanmıştır ve hiçbir io Somfy
kumanda noktası kaydedilmemiştir.
«io Somfy ilk yerel kumanda noktası nı n kaydı »
bölümüne geçiniz.
veya
bStor hareket etmiyor
Kaldır veya İndir tuşuna basınız ve storun tepkisine
göre «c» veya «d» prosedürünü uygulayınız:
cStor hala hareket etmiyor
Çevrim sonları ayarlanmamıştır ve hiçbir io Somfy
kumanda noktası kaydedilmemiştir.
«io Somfy yerel kumanda noktası nı n ön kaydı »
bölümüne geçiniz.
veya
dStor tamamen kalkıyor veya iniyor
Çevrim sonları ayarlanmıştır ve io Somfy kumanda
noktası kaydedilmiştir.
«Kullanı m» bölümüne geçiniz.
5.2. io Somfy yerel kumanda noktasının ön kaydı
- Kaldır ve İndir tuşlarına aynı anda basınız: Stor kısa
süreli hareket eder, motorda io Somfy yerel kumanda
noktasının ön kaydı gerçekleşir.
5.3. Motor dönüş yönü kontrolü
1) Kaldır tuşuna basınız:
a) Stor kalkarsa, dönüş yönü doğrudur: «Çevrim
sonları nı n ayarlanması » bölümüne geçiniz.
b) Stor inerse, dönüş yönü doğru değildir: Stor kısa
süreli hareket edene kadar «my» tuşuna basınız, dönüş
yönü değişir.
2) Dönüş yönünü kontrol etmek için Kaldır tuşuna basınız:
ON
io Somfy ilk yerel
kumanda noktası nı n
kaydı
cveya d
io Somfy yerel
kumanda noktası nı n
ön kaydı .
Kullanı m.
a
b
Çevrim sonları nı n
ayarlanması
2 sn
1
2
5. ÇALIŞTIRMA
5069577C107-Pergola_io.indb 865069577C107-Pergola_io.indb 86 18/05/2022 18:47:0718/05/2022 18:47:07

Pergola io
87
TR
Copyright © 2010-2022 Somfy Activités SA,Société Anonyme. All rights reserved.
5.4. Çevrim sonlarının ayarlanması
Çevrim sonlarının ayarlanması stor türüne bağlıdır.
5.4.1. Gergin tenteli Pergola storlarda çevrim sonlarının otomatik ayarı
Üst ve alt çevrim sonları otomatik olarak ayarlanır.
1) Kaldır ve İndir tuşlarına aynı anda basınız: Stor kısa
süreli hareket eder.
2) Stor kısa süreli hareket edene kadar «my» tuşuna
basınız: Çevrim sonları kaydedilmiştir,«io Somfy ilk yerel
kumanda noktası nı n kaydı » bölümüne geçiniz.
5.4.2. Gergin tenteli Pergola storlarda çevrim sonlarının
yarı otomatik ayarı
Alt çevrim sonu otomatik olarak ayarlanırken üst çevrim sonu manuel olarak ayarlanmalıdır.
Kaydetmeden önce yeni bir üst çevrim sonu
tanımlanabilir.
Üst çevrim sonu ayarı
1) Storu üst çevrim sonuna getiriniz.
Kaldır tuşuna > 2 sn süre ile basılması storun devamlı
şekilde kalkmasını sağlar.
2) Storu istenilen yerde durdurunuz.
3) Gerekiyorsa storun konumunu Kaldır veya İndir tuşlarıyla
ayarlayınız.
4) «my» ve İndir tuşlarına aynı anda basınız: «my» ve İndir
tuşları bırakıldığında bile stor devamlı şekilde iner.
5) Storu durdurmak için yarı yükseklikte «my» tuşuna kısa
süreli basınız.
6) Stor kısa süreli hareket edene kadar «my» tuşuna
yeniden basınız: Çevrim sonları kaydedilmiştir,«io Somfy
ilk yerel kumanda noktası nı n kaydı » bölümüne geçiniz.
5.4.3. Gergin olmayan tenteli Pergola storlarda çevrim sonlarının manuel ayarı
Gergin olmayan tenteli Pergola storlarda üst ve alt çevrim sonları ayarlanmalıdır.
Kaydetmeden önce yeni bir üst veya alt çevrim sonu tanımlanabilir.
Üst çevrim sonu ayarı
1) Storu üst çevrim sonuna getiriniz.
Kaldır tuşuna > 2 sn süre ile basılması storun devamlı
şekilde kalkmasını sağlar.
2) Storu istenilen yerde durdurunuz.
3) Gerekiyorsa storun konumunu Kaldır veya İndir tuşlarıyla
ayarlayınız.
4) «my» ve İndir tuşlarına aynı anda basınız: «my» ve İndir
tuşları bırakıldığında bile stor devamlı şekilde iner.
5) Storu durdurmak için yarı yükseklikte «my» tuşuna kısa
süreli basınız ve « Alt çevrim sonu ayarı » aşamasına
geçiniz.
12
2 sn
1
3
2
4
5 6
2 sn
1
3
5
2
4
Alt çevrim sonu
ayarı .
5069577C107-Pergola_io.indb 875069577C107-Pergola_io.indb 87 18/05/2022 18:47:0818/05/2022 18:47:08

Pergola io
88
TR
Copyright © 2010-2022 Somfy Activités SA, Société Anonyme. All rights reserved.
6. KULLANIM
Alt çevrim sonu ayarı
1) Storu alt çevrim sonu konumuna getiriniz.
İndir tuşuna > 2 sn süre ile basılması storun devamlı
şekilde inmesini sağlar.
2) Storu istenilen yerde durdurunuz.
3) Gerekiyorsa storun konumunu Kaldır veya İndir tuşlarıyla
ayarlayınız.
4) «my» ve Kaldır tuşlarına aynı anda basınız: «my» ve
Kaldır tuşları bırakıldığında bile stor devamlı şekilde
kalkar.
5) Storu durdurmak için yarı yükseklikte «my» tuşuna kısa
süreli basınız.
6) Stor kısa süreli hareket edene kadar «my» tuşuna
yeniden basınız: Çevrim sonları kaydedilmiştir. «io Somfy
ilk yerel kumanda noktası nı n kaydı » bölümüne geçiniz.
5.5. io Somfy ilk yerel kumanda noktasının
kaydı
5.5.1. Bir kayıtlı io Somfy yerel kumanda noktası
yardımıyla
- Bu kumanda noktasının (G) PROG butonuna kısa süreli
basınız: Stor kısa süreli hareket eder, kumanda noktası
kaydedilmiştir.
veya
5.5.2. Beslemenin normal kesilmesi sonrası
Gerilim verildiğindestor kısa süreli hareket ediyor.
1) Stor kısa süreli hareket edene kadar yeni kumanda
noktasının (H) Kaldır ve İndir tuşlarına aynı anda basınız.
2) Bu kumanda noktasının (H) PROG butonuna kısa süreli
basınız: Stor kısa süreli hareket eder, kumanda noktası
kaydedilmiştir.
5.6. Ayarların kontrolü
- Üst ve alt çevrim sonlarının ayarını io Somfy yerel kumanda noktası yardımıyla kontrol ediniz.
1
3
5
2
4
6
2 sn
2
H
1
6.1. Standart çalışma
6.1.1. Kaldır ve İndir Tuşları
Kaldır veya İndir tuşuna kısa süreli basılması storun tamamen
kalmasına veya inmesine neden olur.
Gergin tenteli Pergola storlarda engel algılama tüm
inme veya kaldırma işlemi boyunca devrededir.
6.1.2. DURDUR fonksiyonu
Stor hareket halinde.
- «my» tuşuna kısa süreli basınız: Stor durur.
6.1.3. Favori konum (my)
Tanım
Üst konum veya alt konum dışında «favori konum (my)» adı
verilen bir ara konum motorda kaydedilebilir.
Kaydetmek için favori konum (my) değiştirilmeli veya
silinmelidir, «Ek ayarlar» bölümüne bakınız.
Favori konum (my) kullanımı için:
- «my» tuşuna kısa süreli basınız: Stor hareket eder ve favori konumda (my) durur.
5069577C107-Pergola_io.indb 885069577C107-Pergola_io.indb 88 18/05/2022 18:47:1018/05/2022 18:47:10

Pergola io
89
TR
Copyright © 2010-2022 Somfy Activités SA,Société Anonyme. All rights reserved.
7. EK AYARLAR
6.2. io Somfy algılayıcı ile çalışma
İlgili kılavuza bakınız.
6.3. Bilgi geri bildirimi
Her komuttan sonra Pergola io bir mesaj gönderir. Bu bilgi çift yönlü io kumanda noktalarında ele
alınır.
7.1. Favori konum (my)
7.1.1 Favori konumun (my) kaydedilmesi veya değiştirilmesi
Favori konumun (my) kaydedilmesi veya değiştirilmesi
işlemlerinde izlenecek prosedür aynıdır.
1) Storu istenilen favori konuma (my) getiriniz.
2) Stor kısa süreli hareket edene kadar «my» tuşuna basınız:
Favori konum (my) kaydedilmiştir.
7.1.2. Favori konumun (my) silinmesi
1) «my» tuşuna basınız: Stor hareket eder ve favori
konumda (my) durur.
2) Stor kısa süreli hareket edene kadar «my» tuşuna
yeniden basınız: Favori konum (my) silinmiştir.
7.2. io kumanda noktalarının ve io Somfy
algılayıcıların eklenmesi/çıkarılması
İlgili kılavuza bakınız.
7.3. Çevrim sonlarında değişiklik
Çevrim sonlarında yapılacak değişiklik stor türüne bağlıdır.
7.3.1. Gergin tenteli Pergola storlarda değişiklik
Gergin tenteli Pergola storlarda, üst çevrim sonu yarı otomatik çevrim sonu ayarında değiştirilebilir.
Yarı otomatik modda üst çevrim sonunun yeniden ayarı
1) Storu üst çevrim sonuna getiriniz.
2) Stor kısa süreli hareket edene kadar Kaldır ve İndir
tuşlarına aynı anda basınız: Motor ayar modundadır.
3) Storun üst konumunu Kaldır veya İndir tuşlarıyla
ayarlayınız.
4) Stor kısa süreli hareket edene kadar «my» tuşuna
basınız: Yeni üst çevrim sonu kaydedilmiştir.
7.3.2. Gergin olmayan tenteli Pergola storlarda değişiklik
Gergin olmayan tenteli Pergola storlarda üst ve alt çevrim sonları değiştirilebilir. Üst çevrim sonunun
yeniden ayarı
1) Storu üst çevrim sonuna getiriniz.
2) Stor kısa süreli hareket edene kadar Kaldır ve İndir
tuşlarına aynı anda basınız: Motor ayar modundadır.
3) Storun üst konumunu Kaldır veya İndir tuşlarıyla
ayarlayınız.
4) Stor kısa süreli hareket edene kadar «my» tuşuna
basınız: Yeni üst çevrim sonu kaydedilmiştir.
12
my
5 sn
veya
12
my
5 sn
1
veya
3
2
4
2 sn
5 sn
1
veya
3
2
4
2 sn
5 sn
5069577C107-Pergola_io.indb 895069577C107-Pergola_io.indb 89 18/05/2022 18:47:1118/05/2022 18:47:11

Pergola io
90
TR
Copyright © 2010-2022 Somfy Activités SA, Société Anonyme. All rights reserved.
Alt çevrim sonunun yeniden ayarı
1) Storu alt çevrim sonuna getiriniz.
2) Stor kısa süreli hareket edene kadar Kaldır ve İndir
tuşlarına aynı anda basınız: Motor ayar modundadır.
3) Storun alt konumunu Kaldır veya İndir tuşlarıyla
ayarlayınız.
4) Stor kısa süreli hareket edene kadar «my» tuşuna
basınız: Yeni alt çevrim sonu kaydedilmiştir.
7.4. Gelişmiş fonksiyonlar
Tesisatınızla uyumunu onaylatmak için bu fonksiyonları kullanmadan önce üreticinizden bilgi
alınız.
7.4.3. Sadece gergin tenteli Pergola storlar için "Tente gerilimi" fonksiyonu
Bu fonksiyon sayesinde tente üzerindeki gerilim 3 eşik değerinde (yüksek-orta-zayıf) yükseltilebilir
veya azaltılabilir.
Motor, fabrika çıkışı varsayılan ayar olarak orta seviyede konumlandırılmıştır.
Güvenlik nedeniyle bu fonksiyona io Somfy kumanda noktasından sadece aşağıdaki 3 durumda
erişim mevcuttur:
• Ayarların onaylanmasından sonra ve io Somfy ilk yerel kumanda noktasının kaydından önce.
• io Somfy ilk yerel kumanda noktasının kaydından sonra ve sonraki 4 çevrim boyunca.
• Beslemenin normal kesilmesi sonrası ve sonraki 4 çevrim boyunca.
Bu fonksiyonu devreye almak için:
1) Storu orta konuma getiriniz.
2) «my» ve İndir tuşlarına aynı anda kısa süreli basınız,
daha sonra stor kısa süreli hareket edene kadar «my»
ve İndir tuşlarına aynı anda ve uzun süreli basınız.
Motor sadece 10 sn boyunca programlama modunda
kalacaktır.
3) Tente gerginliğini Kaldır veya İndir tuşlarıyla ayarlayınız.
- Tentenin gerginliğini yükseltmek için stor yavaş hareket
edene kadar Kaldır tuşuna basınız: Tente gerginliği üst
eşik değerine geçer.
- Tentenin gerginliğini azaltmak için stor yavaş hareket edene kadar İndir tuşuna basınız: Tente
gerginliği alt eşik değerine geçer.
4) Stor kısa süreli hareket edene kadar «my» tuşuna basınız: Tentenin yeni gerginlik değeri
kaydedilmiştir.
2 sn
5 sn
12
4
3
veya
veya
veya
0,5 sn 5 sn
12
3 4
8. İPUÇLARI VE TAVSIYELER
8.1. Pergola io ile ilgili sorunuz mu var?
Gözlemler Olası nedenler Çözümler
Stor çalışmıyor. Kablo bağlantısı yanlış. Kablo bağlantısını kontrol ediniz ve
gerekiyorsa değiştiriniz.
Motor termik modda. Motorun soğumasını bekleyiniz.
Kullanılan kablo uygun değil. Kullanılan kabloyu kontrol ediniz ve 3 küçük
kablo içerdiğinden emin olunuz.
io Somfy kumanda noktası pili zayıf. Pilin zayıf olup olmadığını kontrol ediniz ve
gerekiyorsa değiştiriniz.
Kumanda noktası uyumlu değil. Uyumluluğu kontrol ediniz ve gerekiyorsa
kumanda noktasını değiştiriniz.
Kullanılan io Somfy kumanda noktası
motorda kayıtlı değil. Kayıtlı bir kumanda noktası kullanınız veya
bu kumanda noktasını kaydediniz.
Stor çok erken
duruyor. Halka yanlış yerleştirilmiş. Halkayı doğru yerine takınız.
Çevrim sonları yanlış ayarlanmış. Çevrim sonlarını yeniden ayarlayınız.
5069577C107-Pergola_io.indb 905069577C107-Pergola_io.indb 90 18/05/2022 18:47:1218/05/2022 18:47:12

Pergola io
91
TR
Copyright © 2010-2022 Somfy Activités SA,Société Anonyme. All rights reserved.
8.2. Kaybedilmiş veya kırılmış io Somfy kumanda noktasının değiştirilmesi
İlgili kılavuza bakınız.
8.3. İlk ayarlara geri dönüş
Bu sıfırlama işlemiyle tüm kumanda noktaları, tüm algılayıcılar, tüm çevrim sonu ayarları silinir ve
motorun dönüş yönü ve favori konum (my) yeniden başlatılır. Bununla birlikte tente gerilim ayarı
sadece gergin tenteli Pergola storlar için değişmeden kalır.
Çift akım kesme işlemini sadece sıfırlanacak motorda gerçekleştiriniz.
1) Storu orta konuma getiriniz (mümkünse).
2) Şebeke beslemesini 2 sn. boyunca kesiniz.
3) Şebeke beslemesini 5 sn ila 15 sn arasında veriniz.
4) Şebeke beslemesini 2 sn. boyunca kesiniz.
5) Şebeke beslemesini veriniz: Stor bir kaç saniye boyunca
hareket eder.
Stor üst veya alt çevrim sonundaysa, kısa süreli
hareket edecektir.
6) PROG butonunu basılı tutunuz: Stor önce kısa süreli,
daha sonra bir saniye süreyle hareket eder. Motor fabrika
ayarı modundadır.
- «Çalı ştı rma» bölümündeki prosedürleri yeniden
uygulayınız
2 sn
2 sn
15 sn
5 sn
1
6
5
3
2
4
OFF
OFF
ON
ON
7 sn 7 sn2 sn
9. TEKNIK VERILER
Radyofrekansı 868-870 MHz io-homecontrol® çift yönlü Tri-bant
Frekans bantları ve maksimum güç
kullanıldı
868,000 MHz - 868.600 MHz e.r.p. <25 mW
868,700 MHz - 869.200 MHz e.r.p. <25 mW
869,700 MHz - 870.000 MHz e.r.p. <25 mW
Besleme 230 V ~ 50 Hz
Kullanım sıcaklığı - 20°C - + 60°C
Koruma endisi IP 44
Maksimum kumanda noktası ve ilgili
algılayıcı sayısı 9
Güvenlik seviyesi Sınıf I
5069577C107-Pergola_io.indb 915069577C107-Pergola_io.indb 91 18/05/2022 18:47:1318/05/2022 18:47:13

SOMFY ACTIVITES SA
50 avenue du Nouveau Monde
74300 Cluses FRANCE
www.somfy.com
5069577C
SOMFY ACTIVITES SA, Société Anonyme, capital 35.000.000 Euros, RCS Annecy, 303.970.230 - 05/2022 Images not contractually binding
5069577C107-Pergola_io.indb 925069577C107-Pergola_io.indb 92 18/05/2022 18:47:1518/05/2022 18:47:15
-
 1
1
-
 2
2
-
 3
3
-
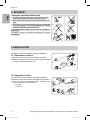 4
4
-
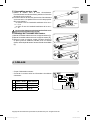 5
5
-
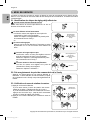 6
6
-
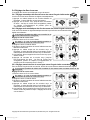 7
7
-
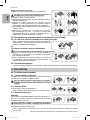 8
8
-
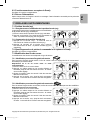 9
9
-
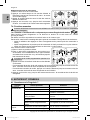 10
10
-
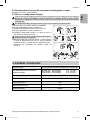 11
11
-
 12
12
-
 13
13
-
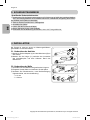 14
14
-
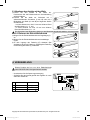 15
15
-
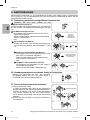 16
16
-
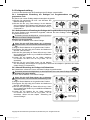 17
17
-
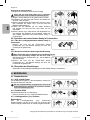 18
18
-
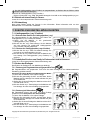 19
19
-
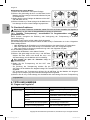 20
20
-
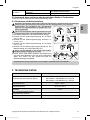 21
21
-
 22
22
-
 23
23
-
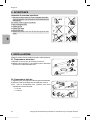 24
24
-
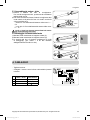 25
25
-
 26
26
-
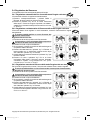 27
27
-
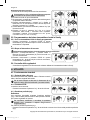 28
28
-
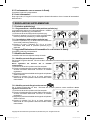 29
29
-
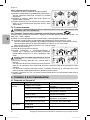 30
30
-
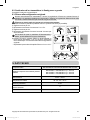 31
31
-
 32
32
-
 33
33
-
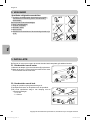 34
34
-
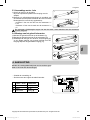 35
35
-
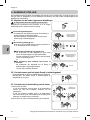 36
36
-
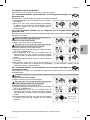 37
37
-
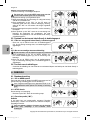 38
38
-
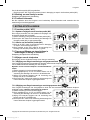 39
39
-
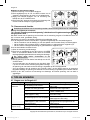 40
40
-
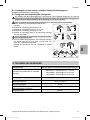 41
41
-
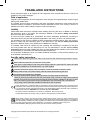 42
42
-
 43
43
-
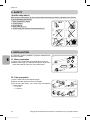 44
44
-
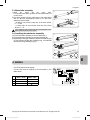 45
45
-
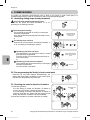 46
46
-
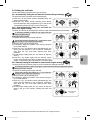 47
47
-
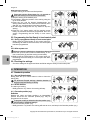 48
48
-
 49
49
-
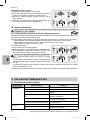 50
50
-
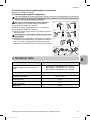 51
51
-
 52
52
-
 53
53
-
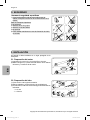 54
54
-
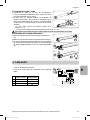 55
55
-
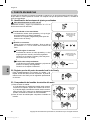 56
56
-
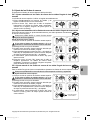 57
57
-
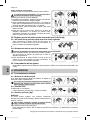 58
58
-
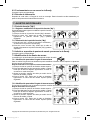 59
59
-
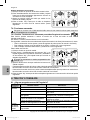 60
60
-
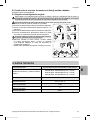 61
61
-
 62
62
-
 63
63
-
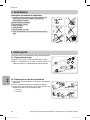 64
64
-
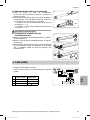 65
65
-
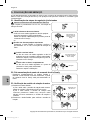 66
66
-
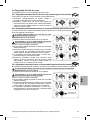 67
67
-
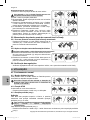 68
68
-
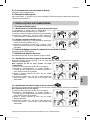 69
69
-
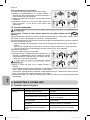 70
70
-
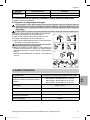 71
71
-
 72
72
-
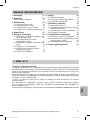 73
73
-
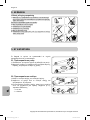 74
74
-
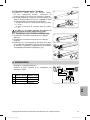 75
75
-
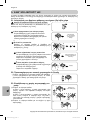 76
76
-
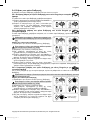 77
77
-
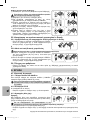 78
78
-
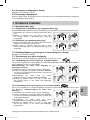 79
79
-
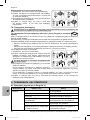 80
80
-
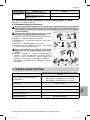 81
81
-
 82
82
-
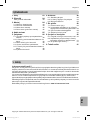 83
83
-
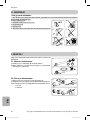 84
84
-
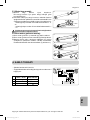 85
85
-
 86
86
-
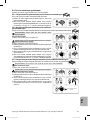 87
87
-
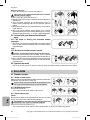 88
88
-
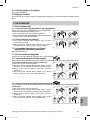 89
89
-
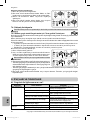 90
90
-
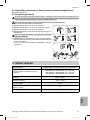 91
91
-
 92
92


in andere talen
- italiano: Somfy Pergola io Istruzioni per l'uso
- français: Somfy Pergola io Mode d'emploi
- español: Somfy Pergola io Instrucciones de operación
- Deutsch: Somfy Pergola io Bedienungsanleitung
- português: Somfy Pergola io Instruções de operação
- Türkçe: Somfy Pergola io Kullanma talimatları
Gerelateerde papieren
-
Somfy SUNEA IO de handleiding
-
Somfy sonesse 40 Handleiding
-
-
-
Somfy OXIMO IO de handleiding
-
-
-
-
-