DELTA DORE TTGSM TYXAL+ EU Gebruikershandleiding
- Categorie
- Deur intercom systemen
- Type
- Gebruikershandleiding
Deze handleiding is ook geschikt voor

IT
EN
DE
ES
NL
PL
TTRTC TYXAL+ / TTGSM TYXAL+
Combinatore telefonico RTC-PSTN/GSM
Guida d’uso 2
PSTN/GSM telephone transmitter
User guide 26
Festnetz-/GSM-Telefonmodem
Bedienungsanleitung 50
Transmisor telefónico RTC/GSM
Manual de utilización 74
RTC- en gsm-telefonische overdrager
Gebruikershandleiding 98
Nadajnik telefoniczny RTC / GSM
Instrukcja użytkowania 122
IT
EN
DE
ES
NL
PL

2
Lessico
TTRTC TYXAL+ è un dispositivo che utilizza la
linea telefonica lare dell'impianto.
TTGSM TYXAL+ è collegato a una rete
telefonica senza li.
RTC/PSTN:
Rete telefonica commutata.
Un combinatore telefonico RTC/PSTN è
collegato alla linea telefonica lare dell'impianto.
GSM:
Sistema globale per la comunicazione mobile.
Un combinatore telefonico GSM è collegato a
una rete telefonica senza li.
- Modem 2G
SOS discreto:
La funzione "SOS discreto" permette di avvisare
l'esterno all'insaputa di un eventuale aggressore
attraverso una chiamata discreta.
SOS acustico:
La funzione "SOS acustico" permette di avvisare
immediatamente il vicinato, attivando nello
stesso tempo una chiamata telefonica e uno
squillo degli avvisatori associati.
Modalità Manutenzione:
La modalità Manutenzione permette di effettuare
le operazioni di attivazione, manutenzione e
diagnosi. Per accedere a questa modalità, la
sorveglianza deve essere in arresto.
La centrale viene disposta in modalità
Manutenzione per mezzo di una tastiera (touch o
semplice), un telecomando o un lettore di badge.
(vedere istruzioni sistema)
Autoprotezione:
i prodotti sono protetti contro l’apertura e gli atti
di vandalismo.
Se un ladro tenta di aprire o di danneggiare uno
dei prodotti, un messaggio viene inviato alla
centrale che attiva la sua sirena interna e gli
avvisatori dell’impianto (sirena interna o esterna,
trasmettitore telefonico).
L’autoprotezione è attiva in modo permanente,
anche quando il sistema è in arresto. È possibile
disattivarla usando una tastiera tattile CLT 8000
TYXAL+.
DTMF
Doppia tonalità multi-frequenza
SMS
Servizio di messaggeria (Short Message
Service)
Disaggregazione parziale
Le comunicazioni passano attraverso la rete di
Telecom Italia. I dati Internet e gli altri servizi
come la TV transitano attraverso la rete del
gestore.
Disaggregazione totale
Non siete più abbonati a Telecom Italia.
I dati e le comunicazioni transitano attraverso la
rete del gestore.
Ciclo di chiamate:
Il combinatore compone il 1° numero registrato.
Se l'interlocutore corrispondente non risponde
o non conferma la chiamata, il combinatore
compone allora il n. 2, poi il n. 3, e così di
seguito no al 6° numero.
Se nessun interlocutore corrispondente ha
risposto, il combinatore riprende il suo ciclo: n.
1, n. 2, n. 3, ecc. Il combinatore procede quindi
no a 16 chiamate consecutive o a 4 cicli al
massimo.
Operazione da effettuare in modalità
Manutenzione (vedere istruzioni della
centrale CS 8000 TYXAL+ § Modalità
manutenzione)
Utilizzate questo dispositivo in conformità
alla legislazione in vigore e alle restrizioni
locali. Queste ultime possono applicarsi,
ad esempio, alle stazioni di servizio, agli
ospedali, ecc.
Questo dispositivo può disturbare il
funzionamento di dispositivi medicali
(protesi uditive, stimolatori cardiaci).
Per maggiori informazioni, consultate il
vostro medico.
Questo dispositivo può provocare disturbi
in prossimità di televisori, postazioni radio
e computer.
Non utilizzate il dispositivo in un locale
che presenta un rischio di esplosione
(es.: vicinanza di una sorgente di gas, di
carburanti o di prodotti chimici).

3
IT
Sommario
1. Come funziona il vostro combinatore? .................................................................................4
1.1 Presentazione .....................................................................................................................4
1.2 Principio ..............................................................................................................................4
1.3 Funzionamento in modalità autonoma ................................................................................4
1.4 Funzioni domotiche .............................................................................................................5
1.5 Gestione dell'anomalia di alimentazione di rete
(Solo combinatore TTGSM TYXAL+) ........................................................................................5
2. Funzionamento con un sistema di allarme ...........................................................................6
2.1 Essere avvertiti in caso di allarme .......................................................................................6
2.3 Comandare l'allarme a distanza ..........................................................................................8
2.4 Impianti dotati del TTGSM TYXAL+ ....................................................................................9
2.5 Personalizzare il combinatore con un codice utente .........................................................10
2.6 Denominare il combinatore ...............................................................................................10
2.7 Numeri da chiamare ..........................................................................................................11
2.8 SMS avviso ai n. predef. (solo per il combinatore TTGSM TYXAL+) ................................12
2.9 Scheda SIM (solo per il combinatore TTGSM TYXAL+) ...................................................12
2.10 Aiuto vocale .....................................................................................................................13
3. Funzioni domotiche ..............................................................................................................14
3.1 Comandare il proprio riscaldamento a distanza ................................................................14
3.2 Comandare degli automatismi a distanza .........................................................................15
3.3 Menù Scenario ..................................................................................................................16
4. Funzionamento in modalità autonoma ...............................................................................17
4.1 Sensori e telecomandi compatibili ....................................................................................17
4.2 Effettuazione di una chiamata in caso di anomalia tecnica ...............................................17
4.3 Personalizzare il combinatore ...........................................................................................18
4.4 Menù personalizzazione ...................................................................................................19
5. Prova di corretto funzionamento .........................................................................................20
6. Stato della spia linea telefonica ...........................................................................................21
6.1 Combinatore TTRTC TYXAL+ ..........................................................................................21
6.2 Combinatore TTGSM TYXAL+ ..........................................................................................21
7. Sostituzione della pila ..........................................................................................................22
8. Inizializzazione del codice di accesso ...............................................................................23
9. Inizializzazione (ripristino della configurazione di fabbrica) ...........................................23
10. Assistenza ...........................................................................................................................24
La dichiarazione di conformità CE di questo equipaggiamento è disponibile, su richiesta, presso:
Servizio “Informazioni tecniche”
DELTA DORE - Bonnemain - 35270 Combourg (Francia)
E-Mail: [email protected]

4
1. Come funziona il vostro combinatore?
1.3 Funzionamento in modalità autonoma
Funzionamento con una centrale CS 8000 TYXAL+
1.1 Presentazione
1.2 Principio
Se il vostro impianto comprende una centrale di allarme CS 8000 TYXAL+ , il combinatore e gli altri
prodotti della gamma TYXAL+ sono associati alla centrale CS 8000 TYXAL+ (50 prodotti max.).
TTRTC TYXAL+
DO TYXAL+ DMB TYXAL+
CS 8000 TYXAL+
TTGSM TYXAL+
CLT 8000 TYXAL+TL 2000 TYXAL+
DVR TYXAL+
DFR TYXAL+ DU TYXAL+ DF TYXAL+
DCS TYXAL+
DO TYXAL+
Comandare
Rilevare Rilevare
Avvisare / Segnalare
Centralizzare
Sensori di intrusione Sensori tecnici
TTRTC TYXAL+ TTGSM TYXAL+
T
L 2000 TYXAL+
DFR TYXAL+ DU TYXAL+ DF TYXAL+
DCS TYXAL+
Sensori tecnici
Il combinatore può funzionare in modo autonomo.
In questo caso, i sensori tecnici (sensore di fumo
DFR TYXAL+, sensore tecnico universale DU
TYXAL+ o di perdita di acqua DF TYXAL+, ecc.)
sono direttamente associati al combinatore.
È possibile associare un telecomando TL 2000
TYXAL+ che dispone della funzione SOS per
inviare una chiamata di emergenza ai vostri vicini.
(Premere 2 secondi il pulsante 1 o 2 del
telecomando in funzione della congurazione).
Avvisare / Segnalare
Il combinatore di allarme TTRTC TYXAL+ utilizza
la linea telefonica lare dell'impianto, il TTGSM
TYXAL+ è collegato a una rete telefonica senza li.
I due dispositivi permettono:
- di comandare l'allarme a distanza (attraverso la
sintesi vocale del combinatore),
- di essere avvertiti in caso di allarme attraverso
una chiamata verso un altro telefono, o verso un
centro di telesorveglianza (secondo dei protocolli
standard: 200 Bauds FSK, Contact ID, ecc.) (è
necessario un abbonamento),
- di comandare a distanza il vostro riscaldamento
e 5 gruppi di automatismi, se il vostro impianto è
dotato di prodotti X3D,
- di realizzare degli scenari. Esempio:
"Partenza" = luci spente, tapparelle chiuse,
"Arrivo" = luci accese, tapparelle aperte,
- di conoscere la temperatura ambiente
dell'impianto.
In caso di allarme, la chiamata in uscita (anche
in caso di interruzione di alimentazione di rete)
permette:
- di descrivere l'allarme,
- di ascoltare cosa succede nei locali sorvegliati
e di parlare simultaneamente,
- di arrestare il ciclo di chiamate,
- di spegnere le sirene.

5
IT
1.4 Funzioni domotiche
1.5 Gestione dell'anomalia di alimentazione di rete
(Solo combinatore TTGSM TYXAL+)
Quando il combinatore non ha più alimentazione di rete:
- Emette 1 bip ogni 10 secondi per 5 minuti.
- Trascorsi 30 minuti, la centrale genera un'anomalia tecnica inviata dal combinatore dopo un intervallo di
30 secondi.
Ricevitore
di cancello X3D
Ricevitori
di illuminazione X3D
Prodotti compatibili
TYBOX 5100
Termostato
ROLLIA / TYMOOV X3D
Motori di tapparelle
Ricevitori di tapparelle
Le funzioni domotiche permettono a distanza:
- di comandare il proprio riscaldamento,
- di comandare 5 gruppi di automatismi (2 canali
di tapparelle ROLLIA / TYMOOV o ricevitori di
tapparelle,
2 canali di illuminazione, 1 canale di cancello),
- di comandare 4 scenari.
Queste funzioni possono essere realizzate
se i dispositivi lo permettono (ricevitori X3D).
Potete vericarlo presso i nostri servizi.
Le associazioni possono essere di 2 tipi:
• associazione diretta
• ripetitore: in questo caso, il o i ricevitori fungono
da relè per estendere il segnale verso altri ricevitori
normalmente fuori portata radio (impianti estesi,
muri spessi in cemento, ecc.).
mode

6
2. Funzionamento con un sistema di allarme
Effettuazione di un ciclo di chiamate in caso di allarme intrusione o di un'anomalia tecnica
In caso di allarme (allarme intrusione o anomalia tecnica), il combinatore telefonico chiama i numeri
registrati (6 max.) a turno, no a quando un interlocutore arresta il ciclo di chiamate.
Nel caso del combinatore TTGSM TYXAL+,
potete scegliere chiamata vocale
e SMS
per ogni numero registrato.
La scelta Vocale / SMS è congurabile usando la tastiera
touch CLT 8000 TYXAL+.
Associato ad un sistema di allarme, il combinatore permette:
- di essere avvertiti in caso di allarme,
- di comandare l'allarme a distanza.
2.1 Essere avvertiti in caso di allarme
1
n°1
n°2
2
n°3
3
n°4
4
n°5
5
n°6
6
7
n°1
n°2
8
n°3
9
n°4
10
n°5
11
n°6
12
13
n°1
n°2
14
n°3
15
n°4
16
Ê Il combinatore compone il 1° numero registrato,
se l'interlocutore corrispondente non risponde o non
conferma la chiamata, il combinatore compone allora il n. 2,
poi il n. 3, ecc. no al 6° numero.
Ë Se nessun interlocutore corrispondente ha risposto, il
combinatore riprende il suo ciclo: n. 1, n. 2, n. 3, ecc.
Il combinatore procede quindi no a 16 chiamate consecutive.
Il ciclo si interrompe automaticamente dopo 16 chiamate.
Per arrestare il ciclo di chiamate, premete il tasto .
Chiamata vocale
Nel caso di un'anomalia tecnica (eccetto per i sensori di fumo),
la chiamata viene attivata dopo un intervallo di 30 secondi.
1
n°1
n°2
2
n°3
3
n°4
4
n°5
5
6
n°1
7
n°3
8
n°5
9
n°1
10
n°3
11
n°5
n°1
12
n°3
13
14
n°5
Arresto
automatico
Ê Il combinatore compone il 1° numero registrato, se
l'interlocutore corrispondente non risponde o non
conferma la chiamata, il combinatore invia un SMS al n. 2.
l combinatore continua il suo ciclo e chiama il n. 3, invia
un SMS al n. 4, poi compone il 5° numero registrato se
nessuno risponde.
Ë Se nessun interlocutore corrispondente ha risposto, il
combinatore riprende il suo ciclo: n. 1, n. 2, n. 3, ecc.
Il TTGSM TYXAL+ non invia altri SMS durante i cicli
seguenti.
Il combinatore si interrompe automaticamente dopo 4 cicli
consecutivi.
Esempio: avete 5 numeri registrati, di cui 2 come SMS. (n. 2 e n. 4)
2.2 Caso del combinatore TTGSM TYXAL+
Chiamata
vocale
SMS
TTRTC TYXAL+
4
-
TTGSM TYXAL+
4 4
Ê Ë
Ê Ë

7
IT
Esempio di un'autoprotezione:
Dovete obbligatoriamente premere il tasto prima di riagganciare per arrestare il ciclo di
chiamate, afnché il combinatore non chiami gli altri numeri.
123
456
789
0
1
2
3
123
456
789
0
123
456
7
*
#
89
0
Per consultare il dettaglio
delle anomalie, premete 1
Per disattivare il prodotto,
premete 2
Siete in comunicazione
con un combinatore
telefonico.
Anomalia autoprotezione
il 04/04/2014
Per arrestare il ciclo di
chiamate, premete
Se il sistema è in funzione
- Per disporre il sistema in
arresto, premete 1.
Se il sistema è in arresto
- Per arrestare lo squillo,
premete 1.
- per ascoltare, premete 2
- per ascoltare e parlare
simultaneamente, pre-
mete 3
- per riagganciare,
premete 2 volte su
Allarme autoprotezione sul
sensore salotto, zona 1,
il 22/04/2014.
*
Da quel momento in poi, il
combinatore non chiamerà
più gli altri numeri.
* Esempio di nome di stanza e di zona.
L'enunciato dipende dal modo in cui avete configurato il vostro impianto.

8
2.3 Comandare l'allarme a distanza
Potete mettere in funzione o in arresto utilizzando i menù proposti dalla sintesi vocale del combinatore.
Chiamate il combinatore
- Per il combinatore GSM la presa di linea è immediata.
- Per il combinatore RTC /PSTN utilizzate uno dei 2 metodi indicati sotto.
Mettere il sistema in funzione o in arresto (totale o per zona) a distanza.
Per evitare la presa di linea involontaria del combinatore quando 2 chiamate si susseguono, potete
disattivare il metodo 2, componendo la seguente sequenza a partire dal menù principale: #82 6 1.
Digitate #82 6 0 per riattivarlo.
Metodo 1, a partire da un'altra linea telefonica (mobile o ssa)
Componete il numero di
chiamata dell'impianto.
Componete di nuovo il numero di
chiamata dell'impianto.
Il combinatore risponde
dopo 1 o 2 squilli
Attendete 2 squilli
1
2
abc
3
def
4
ghi
5
jkl
6
mno
7
pqrs
8
tuv
9
wxyz
*
#
0
1
2
abc
3
def
4
ghi
5
jkl
6
mno
7
pqrs
8
tuv
9
wxyz
*
#
0
Tuu Tuu... Tuu
Metodo 2 da usare nei seguenti casi:
- se chiamate da un telefono mobile (se quest'ultimo riaggancia prima del 10° squillo),
- se il combinatore coabita con un risponditore telefonico
o un servizio di messaggeria.
1
2
abc
3
def
4
ghi
5
jkl
6
mno
7
pqrs
8
tuv
9
wxyz
*
#
0
1
2
abc
3
def
4
ghi
5
jkl
6
mno
7
pqrs
8
tuv
9
wxyz
*
#
0
Tuu Tuu... Tuu
Componete il numero da
chiamare dell'impianto.
Il combinatore prende la linea dopo
circa 10 squilli in modo predenito
(numero di squilli modicabile).
Attendete
10 secondi
Attendete
10 squilli
Per scegliere l'italiano,
premete 1...
Per scegliere l'italiano,
premete 1...
Riagganciate
2. Funzionamento con un sistema di allarme

9
IT
123
456
789
0
1
2
1
3
4
Buongiorno, componete il
vostro codice di accesso.
Menù principale
- Per l’allarme, premete 1.
- Per il comfort termico, premete 2.
- Per gli automatismi, premete 3.
- Per gli scenari, premete 4.
- Per personalizzare il combinatore,
premete 5
- Per riagganciare,
premete 2 volte su #
In base al vostro impianto,
alcuni menù non vi saranno
proposti.
Ad esempio, se non avete
registrato degli scenari,
il menù 4 non apparirà.
Per l’allarme, premete 1.
Menù allarme
Il sistema è in modalità funzionamento totale.
- Per disporre il sistema in modalità arresto totale,
premete 1.
- Per ascoltare premete 2.
- Per ascoltare e parlare simultaneamente, premete 3.
- Per riagganciare, premete 2 volte su #.
- Per riagganciare,
premete 2 volte su
.
- Arrivederci.
2.4 Impianti dotati del TTGSM TYXAL+
Se non disponete di un'alimentazione di rete sull'impianto
(seconda casa, camper, barca, ecc.), il TTGSM TYXAL+ trasmette gli
allarmi ma non è comandabile a distanza. Tuttavia, è possibile contattarlo
per 30 minuti dopo un'intrusione.
Nota: Se il blocco di alimentazione di rete non è mai stato collegato al combinatore, l'anomalia di
alimentazione di rete non sarà segnalata.
Lasciatevi guidare dalla sintesi vocale del combinatore.
In qualsiasi momento:
- Per tornare al menù precedente, premete
- Per riagganciare, premete 2 volte su

10
(1): Con un combinatore telefonico GSM, potete selezionare i numeri da
chiamare che riceveranno, in caso di evento, un avviso tramite SMS.
(2): Esempio: un glio rientra a casa e disattiva il sistema usando il
telecomando o il lettore di badge, il combinatore telefonico GSM
invia un SMS ai genitori.
Combinatore
TTRTC
TYXAL+
Combinatore
TTGSM
TYXAL+
Denominare i prodotti
4 4
Numeri da chiamare
4 4
Opzione di recapito
vocale / SMS (1)
-
4
SMS avviso ai n.
predef. (2)
-
4
Scheda SIM -
4
Aiuto vocale
4 4
2.5 Personalizzare il combinatore con un codice utente
• A partire dalla tastiera touch
Approttate dell'interfaccia della tastiera touch
per impostare in modo ancora più semplice il
vostro combinatore.
La tabella a lato presenta le funzioni
personalizzabili dei combinatori TTRTC TYXAL+
e TTGSM TYXAL+ usando la tastiera touch CLT
8000 TYXAL+.
(Menù: Utilizzo > Prodotti > Imp. Param.).
• Senza tastiera touch
Disponete la centrale in modalità manutenzione
(vedere istruzioni sistema)
Chiamate il combinatore e lasciatevi guidare
dalla sintesi vocale.
2. Funzionamento con un sistema di allarme
2.6 Denominare il combinatore
Ê Componete il vostro codice di accesso utente e confermate premendo OK.
Ë Premete su Impostazioni e selezionate il menù:
Utilizzo > Prodotti > Imp. Param.
Ì Premete il tasto del prodotto da rinominare, oppure
sceglietelo nell'elenco dei prodotti cliccando su
"Sfogliare" (vedere tabella di seguito)
Í Una volta identicato il prodotto, selezionate il menù
"Denominare".
Î Potete scegliere una denominazione nell'elenco
(consigliato), poi un numero (facoltativo)
oppure personalizzare (Ï) il nome del prodotto
digitando un nuovo nome.
Ï Confermate premendo OK.
Vi consigliamo di utilizzare una delle denominazioni
proposte nell'elenco.
In questo modo, in caso di allarme la denominazione
pre-registrata scelta sarà enunciata.
Questo menù permette di scegliere una denominazione specica per il vostro combinatore.
Installazione
Zone
Campanello
Ok
Prodotti
Indietro
O
Denominare
Cam. genitori
Ok
Camera
Cam. bambino
Indietro
Imp. Param.
Sfogliare
Indietro
Premere il tasto
del prodotto
Prodotti
Ok
Attivare/disattivare
Indietro
Aggiungere
Imp. Param.
Denominare
Accoglienza
Viale
Personalizzare
Indietro
RTC 0 03 01
Ok
Indietro
Autoprotezione
Ritardo all'ingresso
Denominare
4
5
6
Orologio
Lingue
Ok
Indietro
Installazione
Ok
Codice di accesso
XXXXXX
Ok
SOS
o Sfogliare
Imp. Param.
Ok
Indietro
CLT 0 54 22
DMB 0 AD AD
1
3
2
TRC 0 03 01
Numero
0 0
Ok
Indietro
Denominare
C am e r a
Ok
Indietro
25/11/14 12:48
SOS
Impostazioni
Impostazioni
OFF
Inserite il vostro codice
Info
Impostazioni
La mia casa
OFF
25/11/14 12:48
c a t e r i n a

11
IT
2.7 Numeri da chiamare
Ê Componete il vostro codice di accesso utente e confermate premendo OK.
Ë Premete su Impostazioni e selezionate il menù:
Utilizzo > Prodotti > Imp. Param.
Ì Premete il tasto del combinatore,
oppure selezionatelo nell'elenco dei prodotti
cliccando su “Sfogliare”.
Í Selezionate il menù “Numeri da chiamare”.
Î Il combinatore è del tipo RTC/PSTN
Selezionate il numero da chiamare e da programmare
(N. tel. 1 - 6), e confermate premendo OK.
Inserite il numero da chiamare desiderato.
Il combinatore è di tipo GSM
Selezionate il numero da chiamare da programmare
(N. tel. 1 - 6), poi confermate premendo OK.
Inserite il numero da chiamare desiderato.
Confermate premendo OK.
Scegliete l'opzione di recapito, vale a dire il modo
in cui desiderate essere avvisati in caso di intrusione:
vocale o SMS.
Confermate premendo OK.
Questo menù permette di programmare i numeri che saranno chiamati in caso di allarme o di anomalia
tecnica.
Se necessario, potete inserire una pausa nella numerazione componendo #.
Programmare una chiamata dall'estero verso l’italia:
Risiedete in un paese limitrofo all’Italia e volete programmare il numero 345 6789100 situato in
Italia, componete il numero: 0039 345 6789100.
OU
4
5
RTC 0 03 01
Autoprotezione
Telesorveglianza
Chiamate in arrivo
Aiuto vocale
Supervisione centrale
Ok
Indietro
Denominare
Numeri da chiamare
Numeri da chiamare
Ok
N. tel. 2
N. tel. 3
Indietro
N. tel. 1
N. tel. 1
Ok
0
Indietro
GSM 0 15 02
Autoprotezione
Telesorveglianza
SMS avviso ai n. predef.
Scheda SIM
Aiuto vocale
Supervisione centrale
Ok
Indietro
Denominare
Numeri da chiamare
Numeri da chiamare
Ok
N. tel. 2
N. tel. 3
Indietro
N. tel. 1
N. tel. 1
Ok
0
Indietro
Opzione di recapito
Numero tel. 1
Ok
Vocale
Indietro
Opzione di recapito
Numero tel. 1
Ok
SMS
Indietro
Installazione
Zone
Campanello
Ok
Prodotti
Indietro
Imp. Param.
Sfogliare
Indietro
Premere il tasto
del prodotto
Prodotti
Ok
Attivare/disattivare
Indietro
Aggiungere
Imp. Param.
Impostazioni
Orologio
Lingue
Ok
Indietro
Codice di accesso
XXXXXX
Ok
SOS
o Sfogliare
Imp. Param.
Ok
Indietro
CLT 0 54 22
DMB 0 AD AD
1
3
2
CS 0 54 89
25/11/14 12:48
SOS
Impostazioni
OFF
Inserite il vostro codice
Info
Impostazioni
La mia casa
OFF
25/11/14 12:48
Installazione

12
Ê Componete il vostro codice di accesso utente
e confermate premendo OK.
Ë Premete su Impostazioni e selezionate il menù:
Utilizzo > Prodotti > Imp. Param.
Ì Premete il tasto del combinatore, oppure selezionatelo
nell'elenco degli identicativi
cliccando su "Sfogliare".
Í Selezionate il menù “SMS avviso ai n. predef.”.
Î Nell'elenco, selezionate il o i numeri interessati dall'avviso
SMS premendo su Selez.
Confermate premendo OK.
4
5
GSM 0 15 02
Telesorveglianza
Scheda SIM
Aiuto vocale
Supervisione centrale
Ok
Indietro
SMS avviso ai n. predef.
SMS avviso ai n. predef.
Ok
Selez.
Telecomando
Ok
Indietro
SMS avviso ai n. predef.
Denominare
SMS avviso ai n. predef.
Attivare >
Ok
Indietro
Questo menù permette di inviare un SMS a un numero programmato in caso di azionamento o di arresto
del sistema.
Esempio: vostro glio rientra a casa e disattiva il sistema per mezzo del telecomando o del lettore di
badge; il combinatore telefonico vi invia un SMS.
Vericate che l’opzione "SMS avviso ai n. predef." sia attivata correttamente nel menù "Impostazioni" del
telecomando o del badge associato alla funzione.
2.8 SMS avviso ai n. predef. (solo per il combinatore TTGSM TYXAL+)
- Opzione di recapito Vocale / SMS (solo per il combinatore TTGSM TYXAL+)
Consultate il paragrafo Numeri da chiamare
4
5
GSM 0 15 02
Telesorveglianza
Aiuto vocale
Supervisione centrale
Ok
Indietro
Numeri avvisi SMS
Scheda SIM
Scheda SIM
Inserite codice PUK
Ok
Retour
Inserite codice PIN
Inserite codice PIN
Ok
0
Retour
Inserite codice PUK
Ok
0
Indietro
2.9 Scheda SIM (solo per il combinatore TTGSM TYXAL+)
Ê Componete il codice utente e confermate premendo OK.
Ë Premete su Impostazioni e selezionate il menù:
Utilizzo > Prodotti > Imp. Param.
Ì Premete il tasto del combinatore, oppure selezionatelo
nell'elenco degli identicativi cliccando su “Sfogliare”.
Ì Selezionate il menù “Scheda SIM”.
Î Inserite i parametri della scheda SIM:
Inserite codice PIN
Inserite codice PUK
Questo menù permette di inserire il codice PIN della scheda SIM per attivarla.
2. Funzionamento con un sistema di allarme

13
IT
2.10 Aiuto vocale
Ê Componete il codice utente e confermate premendo OK.
Ë Premete su Impostazioni e selezionate il menù:
Utilizzo > Prodotti > Imp. Param.
Ì Premete il tasto del combinatore,
oppure selezionatelo nell'elenco degli identicativi
cliccando su “Sfogliare”.
Í Selezionate il menù “Aiuto vocale”, poi “Attivare”
o "Disattivare"(Î).
Confermate premendo OK.
Questo menù permette di attivare o disattivare l'altoparlante
del combinatore telefonico. Se è attivo, il combinatore vi
segnala vocalmente i vari eventi sull'impianto (Inserimento/
Arresto, problema di inserimento, ecc.).
4
5
RTC 0 03 01
Ok
Indietro
Chiamate in arrivo
Supervisione centrale
Aiuto vocale
Attivare >
Ok
Indietro
Aiuto vocale
Aiuto vocale
< Disattivare
Ok
Indietro

14
3.1 Comandare il proprio riscaldamento a distanza
123
456
789
0
1
4
5
2
3
2
123
456
789
0
1
4
5
2
3
2
- Buongiorno, componete il
vostro codice di accesso
Menù principale
- Per l’allarme, premete 1.
- Per il comfort termico, premete 2.
- Per gli automatismi, premete 3.
- Per gli scenari, premete 4.
- Per personalizzare il combinatore, premete 5
- Per ascoltare premete 6.
- Per ascoltare e parlare simultaneamente,
premete 7.
- Per riagganciare, premete 2 volte su #
In base al vostro impianto,
alcuni menù non vi
saranno proposti.
Ad esempio, se non avete
registrato degli scenari, il
menù 4 non apparirà.
Per il comfort tecnico, premete 2.
Il riscaldamento è in modalità
assenza
Il riscaldamento è in modalità
funzionamento
Il riscaldamento è in modalità
arresto
- Per disporre il riscaldamento in
modalità funzionamento , premete 1.
- Per disporre il riscaldamento in
modalità arresto, premete 2.
- Per disporre il riscaldamento in
modalità assenza, premete 1.
- Per disporre il riscaldamento in
modalità arresto, premete 2.
- Per disporre il riscaldamento in
modalità funzionamento, premete 1.
- Per disporre il riscaldamento in
modalità assenza, premete 2.
La climatizzazione è in modalità funzionamento. La climatizzazione è in modalità arresto.
- Per disporre la climatizzazione in modalità
arresto, premete 1.
- Per disporre la climatizzazione in modalità
funzionamento, premete 1.
Riscaldamento
Climatizzazione
123
456
789
0
1
4
5
2
3
2
Menù Termico
La temperatura interna è di 19,0 gradi.
La temperatura esterna è di 21,5 gradi.*
- Per disporre l'installazione in modalità riscaldamento, premete 1.
- Per disporre l'installazione in modalità climatizzazione, premete 2.
123
456
789
0
123
456
789
0
- Per riagganciare, premete
2 volte su .
Arrivederci.
Chiamate il combinatore
* Se una sirena esterna SEF TYXAL+
è associata al vostro impianto.
In qualsiasi momento:
- Per tornare al menù precedente, premete
- Per riagganciare, premete 2 volte su
3. Funzioni domotiche
4

15
IT
123
456
789
0
1
4
5
2
3
3
3.2 Comandare degli automatismi a distanza
- Buongiorno, componete il
vostro codice di accesso.
Menù principale
- Per l’allarme, premete 1.
- Per il comfort termico, premete 2.
- Per gli automatismi, premete 3.
- Per gli scenari, premete 4.
- Per personalizzare il combinatore, premete 5
- Per ascoltare premete 6.
- Per ascoltare e parlare simultaneamente,
premete 7.
- Per riagganciare, premete 2 volte su #
In base al vostro impianto,
alcuni menù non vi
saranno proposti.
Ad esempio, se non avete
registrato degli scenari, il
menù 4 non apparirà.
Per gli automatismi, premete 3.
Menù Automatismi
- Per comandare le tapparelle, premete 1.
- Per comandare le illuminazioni, premete 2.
- Per comandare il cancello, premete 3.
- Per comandare il gruppo 1, premete 1.
Tapparelle gruppo 1 chiuse
- Per aprire, premete 1.
Tapparelle gruppo 1 aperte
- Per chiudere, premete 2.
- Per comandare il gruppo 2, premete 2.
Tapparelle gruppo 2 chiuse
- Per aprire, premete 1.
Tapparelle gruppo 2 aperte
- Per chiudere, premete 2.
- Per comandare il gruppo 1, premete 1.
Illuminazioni gruppo 1
spente.
- Per accendere, premete 1.
Illuminazioni gruppo 1
accese.
- Per spegnere, premete 2.
Tapparelle
Illuminazioni
Cancello
- Per azionare il cancello, premete 1.
123
456
789
0
123
456
789
0
12
3
456
789
0
- Per riagganciare,
premete 2 volte su .
- Per comandare il gruppo 2, premete 2.
Illuminazioni gruppo 1
spente.
- Per accendere, premete 1.
Illuminazioni gruppo 1
accese.
- Per spegnere, premete 2.
Chiamate il combinatore
Arrivederci.
In qualsiasi momento:
- Per tornare al menù precedente, premete
- Per riagganciare, premete 2 volte su

16
Chiamate il combinatore
3.3 Menù Scenario
123
456
789
0
1
4
2
3
4
- Buongiorno, componete il
vostro codice di accesso.
Menù principale
- Per l’allarme, premete 1.
- Per il comfort termico, premete 2.
- Per gli automatismi, premete 3.
- Per gli scenari, premete 4.
- Per personalizzare il combinatore, premete 5
- Per ascoltare premete 6.
- Per ascoltare e parlare simultaneamente,
premete 7.
- Per riagganciare, premete 2 volte su #.
In base al vostro impianto,
alcuni menù non vi
saranno proposti.
Ad esempio, se non
avete registrato degli
automatismi, il menù 3
non apparirà.
Per gli scenari, premete 4.
Menù Automatismi
- Per attivare lo scenario 1, premete 1.
- Per attivare lo scenario 2, premete 2.
- Per attivare lo scenario 3, premete 3.
- Per attivare lo scenario 4, premete 4.
- Per riagganciare,
premete 2 volte su
.
Arrivederci.
In qualsiasi momento:
- Per tornare al menù precedente, premete
- Per riagganciare, premete 2 volte su
3. Funzioni domotiche

17
IT
4. Funzionamento in modalità autonoma
Il combinatore può funzionare in modalità
autonoma, senza essere associato ad una centrale.
In questo caso, i sensori tecnici (sensore di perdita
di acqua, fumo, ecc.) sono associati direttamente al
combinatore. Una chiamata viene attivata in caso di
rilevazione di un'anomalia tecnica.
È possibile associare anche un telecomando
TL 2000 TYXAL+ che dispone della funzione SOS
per attivare una chiamata di emergenza.
Le funzioni di telesorveglianza e di citofono sono
compatibili con questa modalità di funzionamento.
DFR TYXAL+
Sensore di fumo,
incendio
DF TYXAL+
Sensore di perdita
di acqua
DCS TYXAL+
Sensore di interruzione
di alimentazione di rete
DU TYXAL+
Sensore
universale
4.1 Sensori e telecomandi compatibili
4.2 Effettuazione di una chiamata in caso di anomalia tecnica
In caso di rilevazione di un'anomalia tecnica, il combinatore telefonico chiama i numeri programmati
(6 max.) a turno, no a quando un interlocutore arresta il ciclo di chiamate.
Esempio quando un interlocutore risponde:
123
456
789
0
1
2
3
123
456
789
0
123
456
7
*
#
89
0
Per consultare il dettaglio
delle anomalie, premete 1
Per disattivare il prodotto,
premete 2
Siete in
comunicazione con
un combinatore
telefonico.
Anomalia autoprotezione
il 04/04/2014
Per arrestare il ciclo di
chiamate, premete
- per ascoltare, premete 2
- per ascoltare e parlare
simultaneamente,
premete 3
- per riagganciare,
premete 2 volte su
Allarme autoprotezione sul
sensore salotto, zona 1,
il 22/04/2014.*
Da quel momento in poi, il
combinatore non chiamerà
più gli altri numeri.
* Esempio di nome di stanza e di zona.
L'enunciato dipende dal modo in cui
avete configurato il vostro impianto.
Dovete obbligatoriamente
premere il tasto prima di
riagganciare per arrestare
il ciclo di chiamate, afnché il
combinatore non chiami gli altri
numeri.
TL 2000 TYXAL+
Telecomando

18
4.3 Personalizzare il combinatore
Chiamate il combinatore
- Per il combinatore GSM la presa di linea è immediata.
- Per il combinatore RTC/PSPN utilizzate uno dei 2 metodi indicati sotto.
Per evitare la presa di linea involontaria del combinatore quando 2 chiamate si susseguono, potete
disattivare il metodo 2, componendo la seguente sequenza a partire dal menù principale: #82 6 1.
Digitate #82 6 0 per riattivarlo.
Metodo 1, a partire da un'altra linea telefonica (mobile o ssa)
Componete il numero di
chiamata dell'impianto.
Componete di nuovo il numero di
chiamata dell'impianto.
Il combinatore risponde
dopo 1 o 2 squilli
Attendete 2 squilli
1
2
abc
3
def
4
ghi
5
jkl
6
mno
7
pqrs
8
tuv
9
wxyz
*
#
0
1
2
abc
3
def
4
ghi
5
jkl
6
mno
7
pqrs
8
tuv
9
wxyz
*
#
0
Tuu Tuu... Tuu
Metodo 2 da usare nei seguenti casi:
- se chiamate da un telefono mobile (se quest'ultimo riaggancia prima del 10o squillo),
- se il combinatore coabita con un risponditore telefonico
o un servizio di messaggeria.
1
2
abc
3
def
4
ghi
5
jkl
6
mno
7
pqrs
8
tuv
9
wxyz
*
#
0
1
2
abc
3
def
4
ghi
5
jkl
6
mno
7
pqrs
8
tuv
9
wxyz
*
#
0
Tuu Tuu... Tuu
Componete il numero di
chiamata dell'impianto.
Il combinatore prende la linea dopo
circa 10 squilli in modo predenito
(numero di squilli modicabile).
Attendete
10 secondi
Attendete
10 squilli
Per scegliere l'italiano,
premete 1...
Per scegliere l'italiano,
premete 1...
Riagganciate
4. Funzionamento in modalità autonoma

19
IT
4.4 Menù personalizzazione
Per configurare i numeri di chiamata, premete 1
Menù configurazione
Inserite il nuovo numero di chiamata
e premete
Configurazione accettata
Menù configurazione
Inserite il nuovo numero di chiamata
e premete
Configurazione accettata
Per modificare il codice di accesso, premete 3
Menù configurazioneComponete il vostro codice di accesso Inserite il nuovo codice di accesso
Per personalizzare l'annuncio vocale, premete 2
Ecco l'annuncio vocale configurato:
“Siete in comunicazione con un
combinatore telefonico”
- Per modificare l’annuncio vocale,
premete 1.
- Per tornare al menù precedente,
premete
Ecco l'annuncio vocale configurato:
“Siete in comunicazione con un combinatore telefonico”
- Per modificare l’annuncio vocale,
premete 1.
- Per tornare all'annuncio vocale iniziale,
premete 2.
- Per tornare al menù precedente,
premete
Parlate dopo il bip, poi premete
un tasto per arrestare la registrazione.
Per modificare la data o l'ora, premete 4
Per configurare il numero di squilli, premete 5
(solo TTRTC TYXAL+)
Per modificare la lingua, premete 6
Per scegliere il francese, premete 1
Per scegliere l'inglese, premete 2
Per scegliere il spagnolo, premete 3
Per scegliere il francese, premete 4
Per scegliere l'italiano, premete 5
Per scegliere il polacco, premete 6
Per scegliere il olandese, premete 7
Per il numero 1, premete 1.
- Per il numero 2, premete 2.
- Per il numero 3, premete 3.
- Per il numero 4, premete 4.
- Per il numero 5, premete 5.
- Per il numero 6, premete 6.
- Per tornare al menù precedente,
Premete
Nessun Numero configurato.
Per configurarlo, premete 1.
- Per tornare al menù precedente,
premete
Il numero configurato è:
02.99.73.xx.xx
Per modificarlo, premete 1.
Per eliminarlo, premete 2.
- Per tornare al menù precedente,
premete
Ecco la data configurata:
29/11/2013,
Ecco l'ora configurata: 11:57.
- Per modificare la data, premete 1.
- Per modificare l'ora, premete 2.
- Per tornare al menù precedente,
premete
29/11/2013, 11:57.
- Per modificare la data, premete 1.
- Per modificare l'ora, premete 2.
- Per tornare al menù precedente,
premete
Inserite le 6 cifre della data
Inserite le 4 cifre dell'ora
Per scegliere il formato "del mattino", premete 1
Per scegliere il formato "del pomeriggio", premete 2
Ecco il numero di squilli configurato: 10
- Per modificarlo, premete 1.
- Per tornare al menù precedente,
premete
Inserite le 2 cifre del nuovo
numero di squilli
Configurazione accettata
Menù configurazioneConfigurazione accettata
Configurazione accettata
Componete il vostro codice di accesso
A partire dal menù principale, premete 5 per accedere al menù personalizzazione.
In qualsiasi momento:
- Per tornare al menù precedente, premete
- Per riagganciare, premete 2 volte su

20
5. Prova di corretto funzionamento
123
456
789
0
1
2
3
123
456
789
0
123
456
7
*
#
89
0
Con una centrale:
Mettete in funzione il sistema, e attivate un'intrusione.
In modalità autonoma:
Ad esempio, su un sensore di perdita di acqua, simulate
una perdita di acqua depositandovi sopra dell'acqua.
Sul combinatore:
1
n°1
n°2
2
n°3
3
n°4
4
n°5
5
n°6
6
7
n°1
n°2
8
n°3
9
n°4
10
n°5
11
n°6
12
13
n°1
n°2
14
n°3
15
n°4
16
Per consultare il dettaglio
delle anomalie, premete 1
Per disattivare il prodotto,
premete 1
Siete in comunicazione
con un combinatore
telefonico.
Anomalia tecnica
il04/04/2014
Per arrestare il ciclo di
chiamate, premete
- per arrestare lo squillo,
premete 1
- per ascoltare, premete 2
- per ascoltare e parlare
simultaneamente,
premete 3
- per riagganciare,
premete 2 volte su
Anomalia tecnica perdita
di acqua sul sensore
zona 2, il 04/04/2014.
Vericate che il combinatore telefonico chiami i numeri
programmati (6 al massimo) a turno no a quando un
interlocutore risponde:
- il combinatore chiede di premere il tasto ,
- legge l'annuncio vocale e indica il tipo di anomalia,
- propone di ascoltare cosa succede, di parlare con una
persona vicina al combinatore, di arrestare il ciclo di
chiamate e di ottenere il dettaglio delle anomalie se una
centrale è associata.
Provocate una rilevazione, al ne di vericare il corretto funzionamento dell'impianto.
Potete anche attivare un ciclo di chiamate di
prova premendo per 30 secondi il tasto del
combinatore.
>30s
Esempio ciclo completo
con 6 numeri programmati

21
IT
6. Stato della spia linea telefonica
6.2 Combinatore TTGSM TYXAL+
Tasto / spia
Per visualizzare lo
stato della vostra linea
telefonica, premete il
tasto sul lato anteriore.
Stato spia Descrizione
Rossa lampeggiante * Assenza di linea RTC/PSTN
Verde
ssa *
Presenza di linea RTC/PSTN
Verde
lampeggiante
Chiamata in corso
Spenta Funzionamento normale,
le chiamate in arrivo e in uscita sono
possibili.
Stato spia con
alimentazione
di rete
Stato spia senza
alimentazione
di rete
Descrizione
Rossa
lampeggiante
Spenta Nessuna ricezione GSM
Verde / Arancione
lampeggiante
Spenta Ricezione GSM debole
Verde
ssa
Spenta Buona ricezione GSM
Verde
lampeggiante
Spenta Chiamata in corso
(*) La spia resta accesa:
- per 5 minuti dopo la messa sotto tensione
- per 1 minuto alla pressione del tasto T1.
In assenza di alimentazione di rete, la spia resta accesa:
- per 5 minuti dopo la messa sotto tensione
- durante la trasmissione di un evento
- per 1 minuto alla pressione del tasto T1
- per 5 minuti dopo un'interruzione di alimentazione di rete
6.1 Combinatore TTRTC TYXAL+
In assenza di alimentazione
di rete, il TTGSM TYXAL+ conti-
nua a trasmettere gli allarmi, ma
non può più essere comandato a
distanza.
Il combinatore telefonico controlla costantemente la linea
telefonica.
In caso di anomalia della linea telefonica, questo simbolo appare
sulla tastiera touch. Per conoscere il dettaglio delle anomalie,
componete il vostro codice d’accesso.
25/11/15 12:48
Info
Impostazioni
OFF
Totale

22
7. Sostituzione della pila
2
1
1
2
2
1
4
2
1
3
5
Sbloccate la scatola. Togliete il coperchio
inferiore.
Usando un cacciavite, sollevate
le 2 clip che ssano il coperchio
superiore.
Togliete il coperchio superiore.
Sostituite la pila
Inserite la pila
rispettando la
polarità.
• Conservare fuori dalla portata dei bambini.
• Non invertire la polarità.
• Non aprire il sistema di pile.
• Non triturare o perforare gli elementi.
• Non mettere in cortocircuito i morsetti (+) o (-)
della pila usando degli elementi conduttori.
• Non sottoporre a sforzi meccanici eccessivi.
• Non esporre l'unità all'acqua
o alla condensazione.
• Non riscaldare direttamente a più di 100°C, non
saldare, né gettare nel fuoco.
Questi utilizzi non idonei possono provocare
delle perdite o dei getti di elettrolita vaporizzato,
nonché un incendio o un'esplosione.
• Non ricaricare
• Smaltire conformemente alla normativa in
vigore.
Manipolazione della pila
Rischio di incendio, di esplosione e di ustioni gravi.
Vi consigliamo l'utilizzo della pila SAFT LSH20 - 3,6V. Potete utilizzare una pila al litio 3,6V
di un'altra marca, in questo caso la durata di vita di 10 anni non sarà più garantita.
Disponete la centrale in modalità MANUTENZIONE (vedere istruzioni sistema)
Aprite la scatola del combinatore
L’usura della pila del combinatore viene segnalata:
•
In modalità sistema allarme:
Attraverso un messaggio sulla tastiera CLT 8000 TYXAL+. La centrale emette dei bip ad ogni messa in
funzione o arresto del sistema (o "anomalia pile" con la sua sintesi vocale; è necessario che l'aiuto vocale
sia attivato, vedere istruzioni CLT 8000 TYXAL+).
•
In modalità autonoma:
Attraverso un messaggio di accoglienza durante una chiamata in arrivo o in uscita provocata da
un'anomalia.
Staccare la presa telefonica del combinatore TTRTC TYXAL+.

23
IT
Per tornare ai parametri di fabbrica eliminando tutte le associazioni e tutte le anomalie in corso.
Se una centrale è associata al combinatore, disponetela in modalità manutenzione (vedere istruzioni sistema).
9. Inizializzazione (ripristino della congurazione di fabbrica)
con una centrale di allarme o in modalità autonoma.
Aprite la scatola del combinatore
Solo in modalità
autonoma
RESET OK
>30s
BIP... BIP
>30s
BIP BIIIIP
>5s >15s
T2 T2
Premete il tasto T2 per 30
secondi.
Il combinatore è nel suo stato iniziale, tutte le associazioni sono state eliminate insieme a
tutte le anomalie in corso.
Dopo 5 secondi, il combinatore emette 1 bip,
mantenete la pressione.
Dopo 15 secondi, il combinatore emette 2 bip,
mantenete la pressione.
Dopo 30 secondi il combinatore emette un bip lungo.
8. Inizializzazione del codice di accesso
con una centrale di allarme senza tastiera o in modalità autonoma.
Aprite la scatola del combinatore
>15s
BIP... BIP
BIP
>5s >15s
Solo in modalità
autonoma
T2 T2
Premete il tasto T2 per 15 secondi.
Dopo 5 secondi, il combinatore emette 1 bip,
mantenete la pressione.
Dopo 15 secondi, il combinatore emette 2 bip,
rilasciate.
Il codice di accesso è di nuovo 1 2 3 4 5 6.
Per tornare al codice di fabbrica 1 2 3 4 5 6.
Se una centrale è associata al combinatore, disponetela in modalità MANUTENZIONE (vedere istruzioni
sistema).

24
10. Assistenza
La comunicazione mediante il citofono
è di cattiva qualità
Un sensore dell'impianto provoca
delle attivazioni intempestive
La temperature ambiente annunciata
dal combinatore è inesatta
Un ciclo di chiamate in corso viene
interrotto e sostituito da un altro ciclo
di chiamate
Assicuratevi di non stare utilizzando la modalità
vivavoce
Allontanate al massimo l'antenna del TTGSM
TYXAL+
Dopo avere preso la chiamata e ascoltato
l'annuncio dell'anomalia, disattivate il prodotto
interessato.
Allontanate il combinatore da sorgenti di calore
(modem ADSL, ecc.), al ne di non disturbare
la presa di temperatura ambiente.
I sensori tecnici sono classicati per ordine di
priorità:
1 - Sensore di fumo, incendio (DFR TYXAL+),
2 - Sensore di perdita di acqua (DF TYXAL+),
3 - Sensore di interruzione di alimentazione
di rete (DCS TYXAL+),
4 - Sensore universale (DU TYXAL+).
Esempio: L'attivazione di un allarme di incendio
da parte di un DFR TYXAL+ sarà prioritaria
rispetto ad una attivazione di interruzione di
alimentazione di rete.
L'obiettivo di questo capitolo è di aiutarvi a risolvere rapidamente i problemi più ricorrenti che potreste
incontrare.
In caso di dubbio, se l'anomalia persiste o non viene trovata in questo elenco, contattate il vostro installatore.
A causa dell'evoluzione delle norme e del materiale, le caratteristiche indicate dal testo e le immagini di questo documento
sono da ritenersi per noi vincolanti solo a seguito di conferma da parte dei nostri servizi.

25
IT

26
TTRTC TYXAL+, is a device that uses the instal-
lation's landline.
TTGSM TYXAL+ is connected to a wireless
phone network.
PSTN:
Public Switched Telephone Network.
A PSTN telephone transmitter is connected to
the installation's landline.
GSM:
Global System for Mobile communications.
A GSM telephone transmitter is connected to a
wireless phone network.
- 2G modem
Discreet emergency alarm:
The "Discreet emergency alarm" function can
warn the outside of any aggressor by a discreet
call.
Emergency alarm with siren:
The "Emergency alarm with siren" function
immediately warns the neighbours by triggering
both a phone call as well as the sound of the
associated sirens.
Maintenance mode:
Maintenance mode is used to perform the acti-
vation, maintenance and diagnostic operations.
The monitoring must be off to access this mode.
The alarm control unit is switched to main-
tenance mode by a keypad (touch screen or
simple), a remote control or a badge reader.
(see system guide).
Tamper alarm:
The products are protected against being
opened or dislodged.
If a burglar tries to open or dislodge one of the
products, a message is sent to the alarm control
unit which triggers its indoor siren, and the instal-
lation's sirens (indoor or outdoor siren, telephone
transmitter).
The tamper alarm is permanently activated even
if the system is off.
It can be deactivated via a CLT 8000 TYXAL+
touch screen keypad.
To open a product, you must switch the system
to Maintenance mode.
DTMF
Dual-tone multi-frequency
SMS
Short Message Service
Partial unbundling
The calls use the France Télécom network. In-
ternet data and other services such as TV transit
through the ISP network.
Full unbundling
You no longer have a subscription with France
Télécom.
Data and calls transit through the ISP network.
Call cycle:
The transmitter dials the rst number recorded.
If the contact does not pick up or if they do not
acknowledge the call, the transmitter then dials
the 2nd number, then the 3rd... up to the 6th
number.
If no contact picks up, the transmitter repeats the
cycle: no.1, no.2, no.3, etc. Hence, the transmit-
ter makes 16 consecutive calls or 4 cycles at the
most.
Use this device in line with the regulations
in force and
local restrictions. They can be applicable
for example,
in petrol stations, hospitals...
This device can disrupt the operation of
medical devices
(hearing aids, pacemakers). Consult your
doctor for more information.
This device can cause disturbances near
television screens, radios and computers.
Do not use the device in a room with a risk
of explosion
(e.g. close to a source of gas, fuel or
chemicals).
Glossary
Operation to perform in Maintenance mode
(see guide for CS 8000 TYXAL+ alarm con-
trol unit § Maintenance mode)

27
EN
Contents
1. How does the transmitter work? .........................................................................................28
1.1 Presentation ......................................................................................................................28
1.2 Principle ............................................................................................................................28
1.3 Operation in autonomous mode ........................................................................................28
1.4 Home automation functions ..............................................................................................29
1.5 Management of the mains supply defect (TTGSM TYXAL+ transmitter only) ..................29
2. Operation with an alarm system .......................................................................................... 30
2.1 Be warned if there is an alert ............................................................................................30
2.3 Remotely control the alarm ...............................................................................................32
2.4 Installations tted with TTGSM TYXAL+ ...........................................................................33
2.5 Personalising the transmitter with a user code .................................................................34
2.6 Naming the transmitter ......................................................................................................34
2.7 Call numbers .....................................................................................................................35
2.8 SMS alert to relatives
(only for the TTGSM TYXAL+ transmitter) .........................36
2.9 SIM card (only for the TTGSM TYXAL+ transmitter) ...........................................36
2.10 Auto attendant .................................................................................................................37
3. Home automation functions .................................................................................................38
3.1 Remotely controlling the heating .......................................................................................38
3.2 Remote control of control systems ....................................................................................39
3.3 Scenario menu ..................................................................................................................40
4. Operation in autonomous mode .......................................................................................... 41
4.1 Compatible detectors and remote control ........................................................................41
4.2 Process of a call in the event of a technical defect ...........................................................41
4.3 Personalising the transmitter .............................................................................................42
4.4 Conguration menu ...........................................................................................................43
5. Correct operation test ...........................................................................................................44
6. Telephone line LED status .................................................................................................... 45
6.1 TTRTC TYXAL+ ................................................................................................................45
6.2 TTGSM TYXAL+ ...............................................................................................................45
7. Battery replacement..............................................................................................................46
8. Access code initialisation ...................................................................................................47
9. Initialisation (restoring factory settings) ...........................................................................47
10. Troubleshooting...................................................................................................................48
The CE conformity declaration for this equipment is available on request from:
Service “Infos techniques”
DELTA DORE - Bonnemain - 35270 Combourg (France)
E-mail: [email protected]

28
1. How does the transmitter work?
1.3 Operation in autonomous mode
Operation with a CS 8000 TYXAL+ alarm control unit
1.1 Presentation
1.2 Principle
If your installation has a CS 8000 TYXAL+ alarm control unit, the transmitter and other products of
the TYXAL+ range are associated with the CS 8000 TYXAL+ alarm control unit (50 products max.).
TTRTC TYXAL+
DO TYXAL+ DMB TYXAL+
CS 8000 TYXAL+
TTGSM TYXAL+
CLT 8000 TYXAL+TL 2000 TYXAL+
DVR TYXAL+
DFR TYXAL+ DU TYXAL+ DF TYXAL+
DCS TYXAL+
DO TYXAL+
To control
To detect To detect
To alert/signal
To centralise
Intrusion detectors Technical detectors
TTRTC TYXAL+ TTGSM TYXAL+
T
L 2000 TYXAL+
DFR TYXAL+ DU TYXAL+ DF TYXAL+
DCS TYXAL+
Technical detectors
The transmitter can operate autonomously.
For technical detectors (DFR TYXAL+ smoke
detector, DU TYXAL+ universal detector or DF
TYXAL+ water leak detector, etc.) are directly
associated with the transmitter.
A TL 2000 TYXAL+ remote control can be
associated that has the SOS function to send an
emergency call to relatives (press button 1 or 2
of the remote control for 2 seconds depending
on the conguration).
To alert/signal
The TTRTC TYXAL+ uses the landline of the
installation, the TTGSM TYXAL+ is connected to a
wireless phone network.
They are used to:
- remotely control the alarm (using the transmitter's
voice synthesis).
- be warned of an alert by a call to another tele-
phone, or a remote monitoring centre (according
to standard protocols: 200 Bauds FSK, ID contact,
etc. (requires a subscription)).
- remotely control your heating and 5 sets of control
system, if your installation includes X3D products.
- create scenarios. Example:
"Leaving"= lights off, roller shutters closed,
"Return" = lights on, roller shutters open
- know the room temperature
of the installation
For an alert, the outgoing call (even if there is a
mains power failure) is used to:
- describe the alarm
- listen to what is happening on the premises
monitored and to speak simultaneously
- stop the call cycle
- stop the sirens

29
EN
1.4 Home automation functions
1.5 Management of the mains supply defect (TTGSM TYXAL+ transmitter only)
When the transmitter is no longer supplied with mains power:
- It emits 1 beep every 10 seconds for 5 minutes.
- After 30 minutes, the control unit generates a technical defect sent by the transmitter after 30 seconds.
X3D portal
receiver
X3D lighting
receivers
Compatible products
CALYBOX 2020
WT
Energy manager
Scénarios
Réglages
11.5°C Lun. 23 Septembre
18:28
Autres
Conso Thermique
Volets
Ou
vr
a
n
t
31
Calendrier
Eau chaude
ROLLIA / TYMOOV X3D
Roller shutter motors
Roller shutter receivers
The home automation functions remotely enable
you to:
- control the heating.
- control 5 sets of control systems (2 channels for
ROLLIA / TYMOOV roller shutters or roller shutter
receivers,
2 lighting channels, 1 gate channel).
- control 4 scenarios.
These functions can be performed if the equipment
allows (X3D receivers).
You can check it with our customer services.
Associations can be of 2 types:
• direct association
• repeater: if the receiver or receivers are used as
relays to extend the signal to other
receivers normally out of wireless range
(extended installations, thick concrete walls, etc.).

30
2. Operation with an alarm system
Process of a call cycle in the event of an intruder alarm or technical defect
For an alert (intruder alarm or technical defect), the telephone transmitter calls the recorded numbers
(6 max.) in turn until a contact stops the call cycle.
For the TTGSM TYXAL+ transmitter,
you can select voice call
and SMS
for each number recorded.
The Voice/SMS choice can be congured from the
CLT 8000 TYXAL+ touch screen keypad.
Associated with an alarm system, the transmitter can:
- be warned if there is an alert,
- remotely control the alarm.
2.1 Be warned if there is an alert
1
n°1
n°2
2
n°3
3
n°4
4
n°5
5
n°6
6
7
n°1
n°2
8
n°3
9
n°4
10
n°5
11
n°6
12
13
n°1
n°2
14
n°3
15
n°4
16
Ê The transmitter dials the rst recorded number,
if the contact does not pick up or if they do not acknowledge
the call, the transmitter then dials the 2nd number, then the
3rd... up to the 6th number.
Ë If no contact picks up, the transmitter repeats the cycle:
no.1, no.2, no.3, etc.
Hence, the transmitter makes 16 consecutive calls.
The cycle stops automatically after 16 calls.
To stop the call cycle, press the button.
Voice call
For a technical defect (except for smoke detectors), the call is triggered after 30 seconds.
1
n°1
n°2
2
n°3
3
n°4
4
n°5
5
6
n°1
7
n°3
8
n°5
9
n°1
10
n°3
11
n°5
n°1
12
n°3
13
14
n°5
Automatic
shutdown
Ê The transmitter dials the rst recorded number,
if the contact does not pick up or if they do not acknowl-
edge the call, the transmitter then sends an SMS to no.2.
The transmitter continues the cycle and calls no.3, sends
an SMS to no.4 then dials the 5th number recorded if
no-one picks up.
Ë If no contact picks up, the transmitter repeats the cycle:
no.1, no.3, no.5, etc.
The TTGSM TYXAL+ does not send any other SMS during
the next cycles.
The transmitter automatically stops after 4 consecutive
cycles.
Example: you have 5 numbers recorded, of which 2 are SMS. (no.2 and no.4)
2.2 TTGSM TYXAL+ transmitter
Voice call SMS
TTRTC TYXAL+
4
-
TTGSM TYXAL+
4 4
Ê Ë
Ê Ë

31
EN
Tamper alarm example:
You must press the button before hanging up to stop the call cycle so that the transmitter does
not call the other numbers.
123
456
789
0
1
2
3
123
456
789
0
123
456
7
*
#
89
0
To view the defect details,
type 1
To disable the product,
press 2
"You are connected
with a telephone
transmitter"
Tamper alarm defect
04 April 2014
To stop the call cycle,
press
If the system is on
- To deactivate the system,
press 1.
If the system is off
- To stop the siren, press 1.
- to listen, press 2
- to listen whilst talking,
press 3
- to disconnect the call,
press
twice
Tamper alarm on the living
room detector, zone 1,
on 22 04 2014.
*
From that point on, the
transmitter will no longer call
the other numbers.
* Example of room and zone name.
The message depends on the way you have configured your installation.

32
2.3 Remotely control the alarm
You can activate or deactivate by using the menus suggested by the voice synthesis system
of the transmitter.
Call the transmitter
- The line pick up is immediate for the GSM transmitter.
- Use one of the following 2 methods for the PSTN transmitter.
Activate or deactivate (total or by zone) the system remotely.
To prevent the transmitter from accidentally picking up the line during 2 successive calls, you can deacti-
vate method 2 by entering the following sequence from the main menu: #82 6 1.
Enter #82 6 0 to reactivate it.
Method 1, from another telephone line (mobile or landline)
Dial the call number of
the installation.
Dial the call number of the installa-
tion again.
The transmitter picks up
after 1 or 2 rings
Wait for 2 rings
1
2
abc
3
def
4
ghi
5
jkl
6
mno
7
pqrs
8
tuv
9
wxyz
*
#
0
1
2
abc
3
def
4
ghi
5
jkl
6
mno
7
pqrs
8
tuv
9
wxyz
*
#
0
Ring Ring... Ring
Method 2 to be used in the following situations:
- when you call a mobile phone (if it hangs up before the 10th ring),
- when the transmitter cohabits with a telephone answering machine
or a message service.
1
2
abc
3
def
4
ghi
5
jkl
6
mno
7
pqrs
8
tuv
9
wxyz
*
#
0
1
2
abc
3
def
4
ghi
5
jkl
6
mno
7
pqrs
8
tuv
9
wxyz
*
#
0
Ring Ring... Ring
Dial the call number of the
installation.
The transmitter picks up the line after
about 10 rings by default (number of
rings can be changed).
Wait for
10 seconds
Wait for
10 rings
To select
French, press 1...
To select French,
press 1...
Hang up
2. Operation with an alarm system

33
EN
123
456
789
0
1
2
1
3
4
Hello, enter your
access code.
Main menu
- For the alarm, press 1.
- For thermal comfort, press 2.
- For control systems, press 3.
- For scenarios, press 4.
- To personalise the transmitter,
press 5.
- To disconnect the call,
press twice on #
Depending on your installation,
some menus will be unavailable
to you.
For example, if you did not
record any scenarios, menu 4
will not appear.
For the alarm, press 1.
Alarm menu
The system is fully activated.
- To set the system to full deactivation mode, press 1.
- To listen, press 2
- To listen whilst talking, press 3
- To disconnect the call, press twice on #.
- To disconnect the call,
press
twice.
- Goodbye.
2.4 Installations fitted with TTGSM TYXAL+
If you do not have a mains power supply on the installation
(second home, camper van, boat, etc.), the TTGSM TYXAL+ sends the
alarms but cannot be controlled remotely. However, it can be contacted
for 30 minutes after an intrusion.
Note: If the mains power unit has never been connected to the transmitter,
the mains supply defect will not be reported.
Let the transmitter's voice synthesis system guide you.
At any time:
- To return to the previous menu, press
- To disconnect the call, press twice on

34
(1): With a GSM telephone transmitter, you can select the call numbers
that will receive a warning by SMS if an event occurs.
(2): Example: a child comes home and deactivates the system via the
remote control or badge reader, the GSM telephone
transmitter sends an SMS to the parents.
TTRTC
TYXAL+
transmitter
TTGSM
TYXAL+
transmitter
Name the products
4 4
Call numbers
4 4
Voice/SMS
distribution option (1)
-
4
SMS alert to
relatives (2)
-
4
SIM card -
4
Auto attendant
4 4
2.5 Personalising the transmitter with a user code
• From the touch screen keypad
Use the touch screen interface to congure your
transmitter even more easily.
The table opposite shows the function that can be
personalised on the TTRTC TYXAL+ and TTGSM
TYXAL+ transmitters from the CLT 8000 TYXAL+
touch screen keypad.
(Menu: Use > Products > Configure).
• Without touch screen keypad
Set the alarm control unit to maintenance mode
(see system guide) Call the transmitter and let the
voice synthesis system guide you.
2. Operation with an alarm system
2.6 Naming the transmitter
Ê Enter your user access code and conrm with OK.
Ë Press Settings, then select the menu:
Use > Products > Configure
Ì Press the button of the product to rename
or select it from the list of products
by clicking on "Browse"(see table below)
Í Once the product is identied, select the
"Name"menu.
Î You can choose a name from the list
(recommended), then a number (optional)
or personalise (Ï) the product name
by entering a new name.
Ï Conrm with OK.
We recommend you use one of the labels proposed in the list.
In this way, the pre-recorded name will be announced in the event
of an alert.
This menu is used to select a specic name for the transmitter.
Installation
Zones
Door chime
Ok
Products
Return
OR
Name
Master bedrm
Ok
Bedroom
Child's bedrm
Return
Configure
Browse
Return
product
Press the button of the
Products
Ok
Activate/deactivate
Return
Add
Configure
Name
Reception
Alley
Personalise
Return
PSTN transmitter
Ok
Return
Tamper alarm
Entrance timer
Name
4
5
6
Settings
Clock
Languages
Ok
Return
Installation
Ok
Access code
XXXXXX
Ok
SOS
or Browse
Configure
Ok
Return
CLT 0 54 22
DMB 0 AD AD
1
3
2
RTC 0 03 01
Number
0 0
Ok
Return
Name
B e d r o m y a n no
Ok
Return
25/11/14 12:48
SOS
Settings
OFF
Enter your code
Info
Settings
My home
OFF
25/11/14 12:48

35
EN
2.7 Call numbers
Ê Enter your user access code and conrm with OK.
Ë Press Settings, then select the menu:
Use > Products > Configure
Ì Press the button of the transmitter
or select it from the list of products
by clicking on "Browse".
Í Select the "Call numbers"menu.
Î The transmitter is of the PSTN type
Select the call number to programme
(tel. no. 1 to 6), then conrm with OK.
Enter the call number required.
The transmitter is of the GSM type
Select the call number to programme
(tel. no. 1 to 6), then conrm with OK.
Enter the call number required.
Conrm with OK.
Choose the distribution option,
that is the way in which you want to be
alerted in the event of intrusion: voice or SMS.
Conrm with OK.
This menu is used to programme the numbers that will be called if there is an alarm or technical defect.
If necessary, you can insert a pause in the dialling by entering #.
Programming a call from abroad to France:
You are living in a country bordering on France, and want to programme
the 01 23 45 67 89 located in France, dial: 00 +33 1 23 45 67 89.
OR
4
5
PSTN transmitter
Tamper alarm
Remote monitoring
Incoming calls
Auto attendant
Alarm control unit monitoring
Ok
Return
Name
Call numbers
Configure
Ok
Return
CLT 0 54 22
CS 0 54 89
RTC 0 03 01
Call numbers
Ok
Tel. no. 2
Tel. no. 3
Return
Tel. no. 1
Tel. no. 1
Ok
0
Return
GSM transmitter
Tamper alarm
Remote monitoring
SMS alert to relatives
SIM card
Auto attendant
Alarm control unit monitoring
Ok
Return
Name
Call numbers
Call numbers
Ok
Tel. no. 2
Tel. no. 3
Return
Tel. no. 1
Tel. no. 1
Ok
0
Return
Distribution option
Tel. no. 1
Ok
Voice
Return
Distribution option
Tel. no. 1
Ok
SMS
Return
Installation
Zones
Door chime
Ok
Produits
Return
Configure
Browse
Return
product
Press the button of the
Products
Ok
Activate/deactivate
Return
Add
Configure
Settings
Clock
Languages
Ok
Return
Installation
Access code
XXXXXX
Ok
SOS
or Browse
1
3
2
25/11/14 12:48
SOS
Settings
OFF
Enter your code
Info
Settings
My home
OFF
25/11/14 12:48

36
Ê Enter the user code (e.g. 456789) and conrm with OK.
Ë Press Settings, select the menu:
Use > Products > Configure, then conrm with OK.
Ì Press the button T1 (external button) of the transmitter (refer
to the guide) or select it from the list of products by clicking on
"Browse", then conrm with OK.
Í Select the menu "SMS alert to relatives",
then conrm with OK.
Î From the list, select the number or numbers concerned by
the SMS warning by pressing Select.
Conrm with OK.
4
5
GSM transmitter
Remote monitoring
SIM card
Auto attendant
Alarm control unit monitoring
Ok
Return
SMS alert to relatives
SMS alert to relatives
Ok
Select.
Remote control
Ok
Return
SMS alert to relatives
Name
SMS alert to relatives
Activate >
Ok
Return
This menu is used to send an SMS to a programmed number if the system is switched on or off.
Example: your child comes home and deactivates the system via the remote control or badge reader,
the telephone transmitter sends you an SMS.
Check that the "SMS alert to relatives" option is activated in the "Settings" menu of the remote control or
badge associated with the function.
2.8 SMS alert to relatives (only for the TTGSM TYXAL+ transmitter)
- Voice/SMS distribution option (only for the TTGSM TYXAL+ transmitter)
Refer to the Call numbers section
4
5
GSM transmitter
Remote monitoring
Auto attendant
Alarm control unit monitoring
Ok
Return
SMS alert to relatives
SIM card
SIM card
Enter PUK code
Ok
Return
Enter PIN code
Enter PIN code
Ok
0
Return
Enter PUK code
Ok
0
Return
2.9 SIM card (only for the TTGSM TYXAL+ transmitter)
Ê Dial the user code and conrm with OK.
Ë Press Settings,
then select the menu: Use > Products > Configure
Ì Press the button of the transmitter or select it from
the list of identiers by clicking on "Browse".
Í Select the "SIM card"menu.
Î Enter the parameters of the SIM card:
Enter the PIN code
Enter the PUK code
This menu is used to enter the PIN code of the SIM card to activate it.
2. Operation with an alarm system

37
EN
2.10 Auto attendant
Ê Dial the user code and conrm with OK.
Ë Press Settings, then
select the menu: Use > Products > Configure
Ì Press the button of the transmitter
or select it from the list of identiers
by clicking on "Browse".
Í Select the "Auto attendant"menu, then "Activate" or
"Deactivate" (Î).
Conrm with OK.
This menu is used to activate or deactivate the loudspeak-
er of the telephone transmitter. If activated, the transmitter
vocally reports the different events on the installation (on/off,
activation denied, etc.).
4
5
PSTN transmitter
Ok
Return
Incoming calls
Alarm control unit monitoring
Auto attendant
Activate >
Ok
Return
Auto attendant
Auto attendant
< Deactivate
Ok
Return

38
3.1 Remotely controlling the heating
123
456
789
0
1
4
5
2
3
2
- Hello, enter your
access code
Main menu
- For the alarm, press 1.
- For thermal comfort, press 2.
- For control systems, press 3.
- For scenarios, press 4.
- To personalise the transmitter, press 5.
- To listen, press 6
- To listen whilst talking, press 7
- To disconnect the call, press twice on #
Depending on your instal-
lation, some menus will be
unavailable to you.
For example, if you did
not record any scenarios,
menu 4 will not appear.
For thermal comfort, press 2.
Thermal comfort menu
Indoor temperature is 19.0 degrees.
Outdoor temperature is 21.5 degrees.*
The heating is in absence mode The heating is on The heating is off
- To activate the system, press 1.
- To deactivate the system,
press 2.
- To switch the system to absence
mode, press 1.
- To deactivate the system, press 2.
- To activate the system, press 1.
- To switch the system to absence
mode, press 2.
The air conditioning is on. The air conditioning is off.
- To deactivate the air conditioning, press 1. - To activate the air conditioning, press 1.
Heating
Air-conditioning
- To set the installation to heating mode, press 1.
- To set the installation to cooling mode, press 2.
123
456
789
0
123
456
789
0
- To disconnect the call,
press twice.
Goodbye.
Call the transmitter
* If a TYXAL+ SEF outdoor siren
is associated with your installation.
At any time:
- To return to the previous menu, press
- To disconnect the call, press twice on
3. Home automation functions

39
EN
123
456
789
0
1
4
5
2
3
3
3.2 Remote control of control systems
- Hello, enter your
access code.
Main menu
- For the alarm, press 1.
- For thermal comfort, press 2.
- For control systems, press 3.
- For scenarios, press 4.
- To personalise the transmitter, press 5.
- To listen, press 6
- To listen whilst talking, press 7
- To disconnect the call, press twice on #
Depending on your
installation, some menus
will be unavailable to you.
For example, if you did
not record any scenarios,
menu 4 will not appear.
For control systems, press 3.
Control systems menu
- To control the roller shutters, press 1.
- For the lights, press 2.
- To control the gate, press 3.
- To control unit 1, press 1.
Unit 1 roller shutters
closed
- To open, press 1
Unit 1 roller shutters
open
- To close, press 2
- To control unit 2, press 2.
Unit 2 roller shutters
closed
- To open, press 1
Unit 2 roller shutters
open
- To close, press 2
- To control unit 1, press 1.
Unit 1 lighting off.
- To switch on, press 1
Unit 1 lighting on.
- To switch off, press 2
Roller shutters
Lighting
Gate
- To open the gate, press 1.
123
456
789
0
123
456
789
0
12
3
456
789
0
- To disconnect the call,
press twice.
- To control unit 2, press 2.
Unit 1 lighting off.
- To switch on, press 1
Unit 1 lighting on.
- To switch off, press 2
Call the transmitter
Goodbye.
At any time:
- To return to the previous menu, press
- To disconnect the call, press twice on

40
Call the transmitter
3.3 Scenario menu
123
456
789
0
1
4
2
3
4
- Hello, enter your
access code.
Main menu
- For the alarm, press 1.
- For thermal comfort, press 2.
- For control systems, press 3.
- For scenarios, press 4.
- To personalise the transmitter, press 5.
- To listen, press 6.
- To listen whilst talking, press 7
- To disconnect the call, press twice on #.
Depending on your instal-
lation, some menus will be
unavailable to you.
For example, if you did not
record any control system,
menu 3 will not appear.
For scenarios, press 4.
Control systems menu
- To enable scenario 1, press 1.
- To enable scenario 2, press 2.
- To enable scenario 3, press 3.
- To enable scenario 4, press 4.
- To disconnect the call,
press
twice.
Goodbye.
At any time:
- To return to the previous menu, press
- To disconnect the call, press twice on
3. Home automation functions

41
EN
4. Operation in autonomous mode
The transmitter can operate in autonomous mode
without being associated with an alarm control unit.
In this case, the technical detectors (leak detector,
smoke detector, etc.) are directly associated with
the transmitter. A call is made if a technical defect
is detected.
It is also possible to associate a
TL 2000 TYXAL+ remote control featuring the SOS
function to trigger an emergency call.
The remote monitoring and intercom functions are
compatible with this operating mode.
DFR TYXAL+
Smoke, re detector
DF TYXAL+
Leak detector
TYXAL+ DCS
Mains power failure
detector
TL 2000 TYXAL+
Remote control
DU TYXAL+
Universal
detector
4.1 Compatible detectors and remote control
4.2 Process of a call in the event of a technical defect
If a technical defect is detected, the telephone transmitter calls the recorded numbers
(6 max.) in turn until a contact stops the call cycle.
Example of when a contact picks up:
123
456
789
0
1
2
3
123
456
789
0
123
456
7
*
#
89
0
To view the defect details,
type 1
To disable the product,
press 2
"You are
connected with
a telephone
transmitter"
Tamper alarm defect
04 April 2014
To stop the call cycle,
press
- to listen, press 2
- to listen whilst talking,
press 3
- to disconnect the call,
press
twice
Tamper alarm on the living
room detector, zone 1,
on 22 04 2014.
*
From that point on, the
transmitter will no longer call
the other numbers.
* Example of room and zone name.
The message depends on the way
you have configured your installation.
You must press the
button before hanging up
to stop the call cycle so
that the transmitter does not call the
other numbers.

42
4.3 Personalising the transmitter
Call the transmitter
- The line pick up is immediate for the GSM transmitter.
- Use one of the following 2 methods for the PSTN transmitter.
To prevent the transmitter from accidentally picking up the line during 2 successive calls, you can
deactivate method 2 by entering the following sequence from the main menu: #82 6 1.
Enter #82 6 0 to reactivate it.
Method 1, from another telephone line (mobile or landline)
Dial the call number of the installation.
Dial the call number of the installation again.
The transmitter picks up
after 1 or 2 rings
Wait for 2 rings
1
2
abc
3
def
4
ghi
5
jkl
6
mno
7
pqrs
8
tuv
9
wxyz
*
#
0
1
2
abc
3
def
4
ghi
5
jkl
6
mno
7
pqrs
8
tuv
9
wxyz
*
#
0
Ring Ring... Ring
Method 2 to be used in the following situations:
- when you call a mobile phone (if it hangs up before the 10th ring),
- when the transmitter cohabits with a telephone answering machine
or a message service.
1
2
abc
3
def
4
ghi
5
jkl
6
mno
7
pqrs
8
tuv
9
wxyz
*
#
0
1
2
abc
3
def
4
ghi
5
jkl
6
mno
7
pqrs
8
tuv
9
wxyz
*
#
0
Ring Ring... Ring
Dial the call number of the
installation.
The transmitter picks up the line after
about 10 rings by default (number of
rings can be changed).
Wait for
10 seconds
Wait for
10 rings
To select
French, press 1...
To select
French, press 1...
Hang up
4. Operation in autonomous mode

43
EN
4.4 Configuration menu
Configuration menu
Enter the new call number and press
Configuration menu
Enter the new call number and press
Action accepted
To modify the access code, press 3
Configuration menuEnter your access code Enter the new access code
To personalise the voice message, press 2
This is the configured voice message:
“You are connected with a telephone
transmitter”
- To modify the voice message, press 1.
- To return to the previous menu, press
This is the configured voice message:
“You are connected with a telephone
transmitter”
- To modify the voice message, press 1.
- To return to the initial voice message,
press 2.
- To return to the previous menu, press
Please speak after the tone, then press
a key to stop recording.
To modify the date or time, press 4
To configure the number of rings, press 5
(TTRTC TYXAL+ only)
To change the language, press 6.
To select French, press 1.
To select English, press 2.
To select Spanish, press 3.
To select German, press 4.
To select Italian, press 5.
To select Polish, press 6.
To select Dutch, press 7.
- For the number 1, press 1.
- For the number 2, press 2.
- For the number 3, press 3.
- For the number 4, press 4.
- For the number 5, press 5.
- For the number 6, press 6.
- To return to the previous menu, press
No call number is configured.
To configure it, press 1.
- To return to the previous menu, press
This is the configured number:
02.99.73.xx.xx
To modify it, press 1.
To delete it, press 2.
- To return to the previous menu, press
This is the configured date:
29 November 2013,
This is the configured time: 11h57.
- To modify the date, press 1.
- To modify the time, press 2.
- To return to the previous menu, press
29 November 2013, 11h57.
- To modify the date, press 1.
- To modify the time, press 2.
- To return to the previous menu, press
Enter the 6 date digits
Enter the 4 time digits
To select the AM format, press 1
To select the PM format, press 2
This is the configured number of rings: 10
- To modify it, press 1.
- To return to the previous menu, press
Enter the 2 digits for the new number
of rings
Action accepted
Configuration menuAction accepted
Action accepted
Action accepted
This is the configured number...
Enter the 4 time digits
Enter your access code
From the main menu, press 5 to access the personalisation menu
At any time:
- To return to the previous menu, press
- To disconnect the call, press twice on

44
5. Correct operation test
123
456
789
0
1
2
3
123
456
789
0
123
456
7
*
#
89
0
With an alarm control unit:
Switch on the system, and trigger an intrusion.
In autonomous mode:
For example, on a water leak detector, simulate a water
leak by placing water above it.
On the transmitter:
1
n°1
n°2
2
n°3
3
n°4
4
n°5
5
n°6
6
7
n°1
n°2
8
n°3
9
n°4
10
n°5
11
n°6
12
13
n°1
n°2
14
n°3
15
n°4
16
To view the defect details,
type 1
To disable the product,
press 1
"You are
connected with
a telephone
transmitter"
Technical defect
04 April 2014
To stop the call cycle,
press
- to stop the siren, press 1
- to listen, press 2
- to listen whilst talking,
press 3
- to disconnect the call,
press
twice
Leak technical defect
on the detector
zone 2, on 04 April 2014.
Check that the telephone transmitter calls the programmed
numbers (6 at most) one after the other until a contact picks
up:
- the transmitter requires you to press the button,
- it reads the voice message and species the type of defect,
- It asks if you want to listen to what is happening, speak to a
person close to the transmitter, stop the call cycle and obtain
the details of the defects if an alarm control unit is associated.
Create a detection event to check that the installation works correctly.
You can also trigger a test call cycle by
pressing the transmitter's button for 30
seconds.
>30s
Example of a full cycle
with 6 programmed numbers

45
EN
6. Telephone line LED status
6.2 TTGSM TYXAL+
Button/LED
Press the button on the
front panel to view the
status of your telephone
line.
LED status Description
Flashing red * No PSTN line
Green on
and steady *
PSTN line present
Flashing
green
Call in progress
Off Normal operation,
incoming and outgoing calls are possible.
LED status
with mains power
LED status
without mains
power
Description
Flashing
red
Off No GSM reception
Flashing
green/orange
Off Weak GSM reception
Green
Steady
Off Good GSM reception
Green
ashing
Off Call in progress
(*) The LED remains on:
- for 5 minutes after switching on
- for 1 minute when pressing button T1.
If there is no mains power, the LED remains on for:
- 5 minutes after switching on
- the transmission of an event
- 1 minute when pressing button T1
- 5 minutes after a mains power failure
6.1 TTRTC TYXAL+
If there is no mains power, the
TTGSM TYXAL+ continues to
send the alarms but cannot be
controlled remotely.
The telephone transmitter permanently checks the telephone line.
For a telephone line defect, this symbol
is displayed on the touch screen keypad. Dial your access code to
discover the details of the defects.
25/11/15 12:48
Info
Settings
OFF
My house

46
7. Battery replacement
2
1
1
2
2
1
4
2
1
3
5
Unlock the unit. Remove the bottom cover. Using a screwdriver, lift the 2
clips holding the top cover.
Remove the top cover.
Change the battery
Insert the battery,
observing the right
polarity.
• Keep out of reach of children.
• Do not reverse the polarity.
• Do not open the battery system.
• Do not grind or pierce the parts.
• Do not short circuit the (+) or (-) terminals of
the battery by using conductive items.
• Do not subject to excessive mechanical stress.
• Do not expose the unit to water
or condensation.
• Do not heat directly to more than 100°C
(212°F), solder or throw into a re.
These unsuitable uses can cause leaks or
sprays of vaporised electrolyte as well as a re
or explosion.
• Do not recharge.
• Dispose in compliance with the regulations in
force.
Handling the battery
Risk of fire, explosion and serious burns.
We recommend using the SAFT LSH20 - 3.6 V battery. You can use a lithium 3.6 V battery of
another brand, but in this case the 10 year service life will no longer be guaranteed.
Switch the alarm control unit to MAINTENANCE mode (see system guide)
Open the transmitter unit
The wear of the transmitter battery is reported:
• In alarm system mode:
By a message on the CLT 8000 TYXAL+ keypad. The alarm control unit beeps each time the system is
activated or deactivated, (or “battery defect” with the voice synthesis system (requires the auto attendant
to be enabled, see CLT 8000 TYXAL+ guide).
• In autonomous mode:
By a welcome message during an incoming or outgoing call caused by a defect.
Disconnect the telephone socket of the TTRTC TYXAL+ transmitter

47
EN
To restore the factory settings while deleting all associations and all the current defects.
If an alarm control unit is associated with the transmitter, set it to maintenance mode (see system guide).
9. Initialisation (restoring factory settings)
with an alarm control unit or in autonomous mode.
Open the transmitter unit
Only in
autonomous mode
RESET OK
>30s
BIP... BIP
>30s
BIP BIIIIP
>5s >15s
T2 T2
Press the T2 button for 30
seconds
The transmitter is in its initial state, all the associations are deleted
as well as all the current defects.
After 5 seconds, the transmitter beeps once,
keep holding the button down.
After 15 seconds, the transmitter beeps twice,
keep holding the button down.
After 30 seconds, the transmitter emits a long beep.
8. Access code initialisation
with an alarm control unit without keypad or in autonomous mode
Open the transmitter unit
>15s
BIP... BIPBIP
>5s >15s
Only in
autonomous mode
T2 T2
Press the T2 button for 15 seconds After 5 seconds, the transmitter beeps once,
keep holding the button down.
After 15 seconds, the transmitter beeps twice,
release.
The access code is 1 2 3 4 5 6 again.
To restore the factory setting 1 2 3 4 5 6.
If an alarm control unit is associated with the transmitter, set it to MAINTENANCE mode (see system guide).

48
10. Troubleshooting
The intercom quality is poor
A detector in the installation causes
untimely triggering
The room temperature announced
by the transmitter is incorrect
A call cycle in progress
is interrupted and replaced by another
call cycle
Check that you are not using hands-free mode
Move the TTGSM TYXAL+ as far away from
the antenna as possible.
After taking the call and listening to the an-
nouncement, disable the relevant product.
Move the transmitter away from sources of
heat (ADSL box, etc.) so as not to disturb the
measurement of room temperature.
The technical detectors are classed in order of
priority:
1 - Smoke, re detector
(DFR TYXAL+),
2 - Water leak detector
(DF TYXAL+),
3 - Mains power failure detector
(TYXAL+ DCS),
4 - Universal detector
(DU TYXAL+).
Example: A re alert triggered by a
DFR TYXAL+ will take priority over the
triggering of a mains failure.
This section is intended to help you quickly solve the most common problems that you may encounter.
If in doubt, if the problem persists or if it is not in this list, please contact your installer.
Because of changes in standards and equipment, the characteristics given in the text
and the illustrations in this document are not binding unless conrmed.

49
EN

50
Das
TTRTC TYXAL+ ist ein Gerät, das die Fest-
netzleitung der Installation nutzt.
Das TTGSM TYXAL+ ist mit einem Mobilfunknetz
verbunden.
RTC:
Réseau Téléphonique Commuté (französisches
Festnetz).
Ein Festnetz-Telefonmodem ist mit Ihrer Telefonlei-
tung verbunden.
GSM:
Global System for Mobile communications.
Ein GSM-Telefonmodem ist mit einem Mobilfunk-
netz verbunden.
- 2G-Modem
Stummes SOS:
Die Funktion „Stummes SOS“ ermöglicht es, außer-
halb der überwachten Zonen Alarm zu schlagen,
ohne dass dies dem Einbrecher gemeldet wird.
SOS-Signal:
Die Funktion „SOS-Signal“ ermöglicht es, die
Nachbarschaft umgehend auf einen Einbruch
hinzuweisen, indem gleichzeitig die zugeordneten
Alarmgeber ausgelöst werden und ein Telefonmo-
dem extern den Einbruch meldet.
Wartungsmodus:
Der Wartungsmodus ermöglicht es, die für die Inbe-
triebnahme, Wartung und Diagnose nötigen Arbei-
ten auszuführen. Dieser Modus ist nur zugänglich,
wenn die Überwachung ausgeschaltet ist.
Der Übergang der Alarmzentrale in den Wartungs-
modus ist über eine Bedieneinheit (Tast- oder
einfache Bedieneinheit), eine Fernbedienung oder
einen RFID-Chipleser möglich.
(siehe System-Bedienungsanleitung).
Sabotageschutz:
Die Produkte werden gegen das gewaltsame Öff-
nen und Abreißen geschützt.
Falls ein Dieb eines der Produkte zu öffnen oder
abzureißen versucht, wird dies der Alarmzentrale
gemeldet, die Innenraumsirene ausgelöst und die
Alarmgeber der Alarmzentrale aktiviert (Außen-
oder Innenraumsirene, Telefonmodem).
Der Sabotageschutz ist auch bei ausgeschaltetem
System ständig aktiviert.
Der Sabotageschutz kann über eine Tast-Bedie-
neinheit CLT 8000 TYXAL+ deaktiviert werden.
Das System muss obligatorisch in den Wartungs-
modus geschaltet werden, um ein Produkt öffnen
zu können.
DTMF
Dual Tone Multi Frequency (Doppelton-Mehrfre-
quenz)
SMS
Short Message Service
Line Sharing (Leitungsteilung)
Die Kommunikationen geschehen über das Fes-
tnetz der Deutschen Telekom$$$. Die Daten und
sonstigen Dienstleistungen - wie der TV-Dienst -
werden über das Netzwerk des ISPs bereitgestellt.
Vollständige Entbündelung
Sie sind kein Kunde der Deutschen Telekom mehr.
Die Daten und sonstigen Kommunikationen werden
über das Netzwerk des ISPs bereitgestellt.
Anrufzyklus:
Das Telefonmodem wählt die 1. gespeicherte Ruf-
nummer. Wird der Anruf nicht entgegen genommen
oder quittiert, wählt das Telefonmodem die 2., 3.
usw. bis hin zur 6. Rufnummer.
Falls niemand den Anruf entgegen nimmt, beginnt
das Telefonmodem mit einem neuen Zyklus: 1.,
2., 3., usw. Rufnummer. Das Telefonmodem führt
somit bis zu 16 Anrufe nacheinander oder maximal
4 Zyklen durch.
Dieses Gerät muss unter Einhaltung der
gültigen Gesetzgebung und der ortsge-
bundenen Einsatzbeschränkungen genutzt
werden. Diese können sich beispielsweise
auf Tankstellen, Krankenhäusern usw.
anwenden.
Dieses Gerät kann die Funktionsfähigkeit
von medizinischen Geräten wie Hörprothe-
sen und Herzschrittmachern beeinträchti-
gen. Erkundigen Sie sich bei Ihrem Arzt.
Das Gerät kann beim Aufstellen in der
Nähe von Fernsehgeräten, Rundfun-
kempfängern und Computern Störungen
verursachen.
Das Gerät nicht in Räumen mit Explo-
sionsgefahr beispielsweise durch Gas-,
Treibstoff- oder Chemikalienvorräte
aufstellen.
Glossar
Vorgang im Wartungsmodus auszuführen
(siehe Bedienungsanleitung der Alarmzen-
trale CS 8000 TYXAL+,
Abschnitt „Wartungsmodus“)

51
DE
Inhalt
1. Wie funktioniert Ihr Telefonmodem? ...................................................................................52
1.1 Systembeschreibung .........................................................................................................52
1.2 Funktionsweise .................................................................................................................52
1.3Eigenständiger Betrieb ......................................................................................................52
1.4Haustechnische Einrichtungen..........................................................................................53
1.5Verwalten von Spannungsfehlern
(ausschließlich Telefonmodem TTGSM TYXAL+) ...................................................................53
2. Betrieb mit einem Alarmsystem ..........................................................................................54
2.1Warnmeldung im Alarmfall ................................................................................................54
2.3Steuern der Alarmzentrale aus der Ferne .........................................................................56
2.4Systeme mit TTGSM TYXAL+ ..........................................................................................57
2.5Individuelle Konguration des Telefonmodems mit einem Benutzercode .........................58
2.6Benennen des Telefonmodems .........................................................................................58
2.7Rufnummern .....................................................................................................................59
2.8Familien SMS Info
(nur für Telefonmodem TTGSMTYXAL+) ..............................60
2.9SIM-Karte (nur für Telefonmodem TTGSM TYXAL) ............................................60
2.10Sprachführung .................................................................................................................61
3. Haustechnische Einrichtungen ...........................................................................................62
3.1Steuern der Heizung aus der Ferne ..................................................................................62
3.2Steuern der Hausautomationen aus der Ferne .................................................................63
3.3Menü Szenario ..................................................................................................................64
4. Eigenständiger Betrieb .........................................................................................................65
4.1Kompatible Melder und Fernbedienungen .......................................................................65
4.2Ablauf eines Anrufes im Falle eines technischen Fehlers .................................................65
4.3Individuelle Konguration des Telefonmodems .................................................................66
4.4Menü Konguration ...........................................................................................................67
5. Betriebstest ...........................................................................................................................68
6. Zustand der Kontrollleuchte der Telefonleitung .................................................................69
6.1TTRTC TYXAL+ ................................................................................................................69
6.2TTGSM TYXAL+ ...............................................................................................................69
7. Batteriewechsel .....................................................................................................................70
8. Initialisieren des Zugangscodes .........................................................................................71
9. Initialisierung (Rückkehr zur Werkseinstellung) ...............................................................71
10. Hilfe ......................................................................................................................................72
Die EG-Konformitätserklärung dieser Ausrüstung ist auf Anfrage an folgender Stelle erhältlich:
Service „Technische Infos“
DELTA DORE Schlüter GmbH - Fichtenstraße 38 a - 76829 Landau (Deutschland)
E-Mail: [email protected]

52
1. Wie funktioniert Ihr Telefonmodem?
1.3 Eigenständiger Betrieb
Verwendung mit einer Alarmzentrale CS 8000 TYXAL+
1.1 Systembeschreibung
1.2 Funktionsweise
Verfügt Ihre Installation über eine Alarmzentrale CS 8000 TYXAL+, dann sind das Telefonmodem und die
sonstigen Produkte der Produktreihe TYXAL+ der Alarmzentrale CS 8000 TYXAL+ zugeordnet (max.
50 Produkte).
TTRTC TYXAL+
DO TYXAL+ DMB TYXAL+
CS 8000 TYXAL+
TTGSM TYXAL+
CLT 8000 TYXAL+TL 2000 TYXAL+
DVR TYXAL+
DFR TYXAL+ DU TYXAL+ DF TYXAL+
DCS TYXAL+
DO TYXAL+
Steuern
Erfassen Erfassen
Melden/Signalisieren
Zentralisieren
Einbruchmelder Technische Melder
TTRTC TYXAL+ TTGSM TYXAL+
T
L 2000 TYXAL+
DFR TYXAL+ DU TYXAL+ DF TYXAL+
DCS TYXAL+
Technische Melder
Das Telefonmodem kann eigenständig betrieben
werden.
In diesem Fall sind die technischen Melder
(Rauchmelder DFR RYXAL+, technischer Uni-
versalmelder DU TYXAL+ oder Leckagemelder
DF TYXAL+ usw.) direkt dem Telefonmodem
zugeordnet.
Es kann ebenfalls eine Fernbedienung TL 2000
TYXAL+ zugeordnet werden, die über die Not-
ruf-Funktion verfügt. Diese ermöglicht es, einen
Notruf an Ihre Anruferliste zu senden (Drücken
der Taste 1 oder 2 der Fernbedienung, je nach
Konguration).
Melden/Signalisieren
Das Telefonmodem TTRTC TYXAL+ der Alarmzent-
rale nutzt die Festnetzleitung der Installation.
Das Telefonmodem TTGSM TYXAL+ nutzt das
Mobilfunknetz.
Sie ermöglichen es:
- die Alarmzentrale aus der Ferne zu steuern (über
die Sprachführung des Telefonmodems).
- über eventuelle Meldungen per Telefon oder über
eine Fernüberwachungseinrichtung informiert zu
werden (Standard-Protokolle: 200 Baud FSK,
Kontakt ID usw. (Abo benötigt)).
- die Fernsteuerung der Heizung und von bis
zu 5 Hausautomationen, falls Ihr System über
X3D-Produkte verfügt.
- das Erstellen von Szenarien. Beispiel:
„Verlassen“= Beleuchtung aus, Rollläden geschlos-
sen, „Rückkehr“ = Beleuchtung ein, Rollläden
geöffnet
- die Raumtemperatur des Systems zu erfahren.
Im Alarmfall ermöglicht der ausgehende Anruf
(selbst bei Spannungsversorgungsunterbrechun-
gen) Folgendes:
- Die Beschreibung des Alarms.
- Die Verbindung mit den überwachten Räumen,
um zu hören was vor sich geht und gleichzeitig zu
sprechen.
- Die Unterbrechung des Alarmzyklus.
- Das Ausschalten der Sirenen.

53
DE
1.4 Haustechnische Einrichtungen
1.5 Verwalten von Spannungsfehlern
(ausschließlich Telefonmodem TTGSM TYXAL+)
Wenn das Telefonmodem nicht mehr vom Stromnetz versorgt wird:
- Piept es einmal alle 10 Sekunden, 5 Minuten lang.
- Nach 30 Minuten erzeugt die Alarmzentrale einen technischen Fehler, der vom Telefonmodem nach
30 Sekunden gesendet wird.
X3D-Empfänger
Tor
X3D-
Beleuchtungsempfänger
Kompatible Produkte
CALYBOX 2020
WT
Energieverbrauchs-
teuerungssystem
Scénarios
Réglages
11.5°C Lun. 23 Septembre
18:28
Autres
Conso Thermique
Volets
Ou
vr
a
n
t
31
Calendrier
Eau chaude
ROLLIA / TYMOOV X3D
Rollladenmotoren
Empfänger der Rollläden
Die haustechnischen Einrichtungen bieten folgende
Fernsteuerungsmöglichkeiten:
- Die Steuerung der Heizung.
- Die Steuerung von 5 Hausautomationen (2 Kanäle
für ROLLIA / TYMOOV-Rollläden oder Rollläden-
empfänger, 2 Kanäle für die Beleuchtung, 1 Kanal
für das Tor).
- Die Steuerung von 4 Szenarien.
Diese Funktionen sind je nach Ausrüstung verfügbar
(X3D-Empfänger).
Erkundigen Sie sich bei uns. Die Zuordnung kann
auf 2 unterschiedliche Art und Weisen geschehen:
• Direkte Zuordnung
• Repeater: In diesem Fall übernimmt/übernehmen
der/die Repeater die Rolle eines Relais, das das
Signal verstärkt und es an die Empfänger weiterlei-
tet, die normalerweise außerhalb der Funkreichweite
sind (weitläuge Anlagen, dicke Betonwände usw.).

54
2. Betrieb mit einem Alarmsystem
Ablauf eines Anrufzyklus im Falle eines Einbruchmeldealarms oder eines technischen
Fehlers
Im Alarmfall (Einbruchmeldealarm oder technischer Fehler) wählt das Telefonmodem nacheinander die
gespeicherten Rufnummern (max. 6), bis ein Korrespondent den Anruf entgegen nimmt und somit den
Anrufzyklus stoppt.
Im Falle eines Telefonmodems TTGSM TYXAL+,
kann für jede Rufnummer die Option Anruf
und
SMS gewählt werden.
Die Option Anruf/SMS kann über die Tast-Bedieneinheit
CLT 8000 TYXAL+ konguriert werden.
Das, einer Alarmzentrale zugeordnete, Telefonmodem ermöglicht Folgendes:
-Die Warnmeldung im Alarmfall.
-Die Steuerung der Alarmzentrale aus der Ferne.
2.1 Warnmeldung im Alarmfall
1
n°1
n°2
2
n°3
3
n°4
4
n°5
5
n°6
6
7
n°1
n°2
8
n°3
9
n°4
10
n°5
11
n°6
12
13
n°1
n°2
14
n°3
15
n°4
16
Ê Das Telefonmodem wählt die 1.gespeicherte Rufnummer.
Wird der Anruf nicht entgegen genommen oder nicht
quittiert, wählt das Telefonmodem die 2., 3. usw. bis hin zur
6.Rufnummer.
Ë Falls niemand den Anruf entgegen nimmt, beginnt das
Telefonmodem mit einem neuen Zyklus: 1., 2., 3., usw.
Rufnummer.
Das Telefonmodem führt somit bis zu 16Anrufe nacheinan-
der durch.
Der Zyklus wird automatisch nach 16Anrufen unterbrochen.
Um den Anrufzyklus zu stoppen, drücken Sie die .
Anruf
Im Falle eines technischen Fehlers (ausschließlich für Rauchmelder) wird ein Anruf nach
30Sekunden getätigt.
1
n°1
n°2
2
n°3
3
n°4
4
n°5
5
6
n°1
7
n°3
8
n°5
9
n°1
10
n°3
11
n°5
n°1
12
n°3
13
14
n°5
Aus
automatisch
Ê Das Telefonmodem wählt die 1.gespeicherte Rufnummer.
Wird der Anruf nicht entgegen genommen oder nicht quit-
tiert, sendet das Telefonmodem eine SMS an die 2.Rufnum-
mer.
Das Telefonmodem führt den Anrufzyklus fort und wählt die
3.Rufnummer, sendet eine SMS an die 4.Rufnummer und
wählt die 5.gespeicherte Rufnummer, falls niemand den
Anruf entgegen nimmt.
Ë Falls niemand den Anruf entgegen nimmt, beginnt das
Telefonmodem mit einem neuen Zyklus: Nr.1., Nr.3., Nr.5.
usw. Rufnummer.
Das TTGSM TYXAL+ sendet keine weiteren SMS bei den
folgenden Anrufzyklen.
Das Telefonmodem stoppt automatisch nach 4aufeinander
folgenden Anrufzyklen.
Beispiel: Sie haben 5gespeicherte Rufnummern, 2davon verfügen über die Option SMS. (Nr.2 und Nr.4)
2.2 Fall des Telefonmodems TTGSM TYXAL+
Anruf SMS
TTRTC TYXAL+
4
-
TTGSM TYXAL+
4 4
Ê Ë
Ê Ë

55
DE
Beispiel des Sabotageschutz:
Sie müssen vor dem Auegen unbedingt die Taste
drücken, um den Anrufzyklus zu unterbre-
chen, damit das Telefonmodem nicht die anderen Rufnummern anwählt.
123
456
789
0
1
2
3
123
456
789
0
123
456
7
*
#
89
0
Um den Fehlerbericht zu
öffnen, drücken Sie die 1.
Um das Produkt zu deakti-
vieren, drücken Sie die 2.
Sie sind mit einem Tele-
fonmodem verbunden.
Fehler Sabotage
am 4. April 2014
Um den Zyklus zu unterbre-
chen, drücken Sie
Das System ist
eingeschaltet
- Um das System auszu-
schalten, drücken Sie die 1.
Das System ist ausge-
schaltet
- Um die Sirene auszu-
schalten, drücken Sie die 1.
- Um zuzuhören, drücken
Sie die 2.
- Um zuzuhören und
gleichzeitig zu spre
-
chen, drücken Sie die 3.
- Um aufzulegen, drücken
Sie zweimal die
.
Sabotageschutzalarm am
Wohnzimmer-Melder, Zone 1,
am 22. April 2014.
*
Danach ruft das Telefonmo-
dem die anderen Rufnum-
mern nicht mehr an.
* Beispiel für den Namen eines Raumes oder einer Zone.
Die Aussprache hängt von der Konfiguration Ihres Systems ab.

56
2.3 Steuern der Alarmzentrale aus der Ferne
Sie können das System über das von der Sprachführung des Telefonmodems angebotene Menü ein-
bzw. ausschalten.
Rufen Sie das Telefonmodem an.
-Das GSM-Telefonmodem nimmt umgehend ab.
-Das Festnetz-Telefonmodem wendet eine der beiden folgenden Methoden an.
Ein- oder Ausschalten des Systems (ganzes oder einzelne Zonen) aus der Ferne.
Wenn 2Anrufe aufeinander folgen, und um das unerwünschte Belegen der Leitung zu vermeiden, können
Sie die 2.Methode deaktivieren, indem Sie die folgende Sequenz über das Hauptmenü eingeben: #82 6 1.
#82 6 0 eingeben, um erneut zu aktivieren.
1. Methode, über einen anderen Telefonanschluss (Festnetz oder Mobilfunk):
Geben Sie die Rufnum-
mer der Installation ein.
Geben Sie erneut die Rufnummer
der Installation ein.
Das Telefonmodem hebt nach 1
oder 2 Klingelzeichen ab.
Warten Sie 2 Klingelzeichen ab
1
2
abc
3
def
4
ghi
5
jkl
6
mno
7
pqrs
8
tuv
9
wxyz
*
#
0
1
2
abc
3
def
4
ghi
5
jkl
6
mno
7
pqrs
8
tuv
9
wxyz
*
#
0
Tüüt Tüüt ... Tüüt
2. Methode in folgenden Fällen anzuwenden:
- Wenn Sie von einem Mobiltelefon aus anrufen (und dieses noch vor dem 10. Klingelzeichen
die Verbindung unterbricht).
- Wenn außer dem Telefonmodem auch ein Anrufbeantworter oder eine Voicemail vorhanden ist.
1
2
abc
3
def
4
ghi
5
jkl
6
mno
7
pqrs
8
tuv
9
wxyz
*
#
0
1
2
abc
3
def
4
ghi
5
jkl
6
mno
7
pqrs
8
tuv
9
wxyz
*
#
0
Tüüt Tüüt ... Tüüt
Geben Sie die Rufnummer
der Installation ein.
Das Telefonmodem nimmt den Anruf werkssei-
tig nach ca. 10 Klingelzeichen an (die Anzahl
der Klingeltöne kann geändert werden).
Warten Sie
10 Sekunden.
Warten Sie 10
Klingeltöne ab.
Um Deutsch zu wählen,
drücken Sie die 4 ...
Um Deutsch zu wählen,
drücken Sie die 4 ...
Legen Sie auf
2. Betrieb mit einem Alarmsystem

57
DE
123
456
789
0
1
2
1
3
4
Guten Tag, geben Sie
Ihren Zugangscode ein.
Hauptmenü
- Für den Alarm, drücken Sie die 1.
- Für den Wärmekomfort, drücken Sie
die 2.
- Für die Automatismen, drücken Sie
die 3.
- Für die Szenarien, drücken Sie die 4.
- Um das Telefonmodem persönlich
einzustellen, drücken Sie die 5.
- Um Aufzulegen, drücken Sie zweimal
auf #.
Je nach Installation, sind einige
Menüs nicht verfügbar.
Haben Sie beispielsweise kein
Szenario gespeichert, wird das
4. Menü nicht angeboten.
Für den Alarm, drücken Sie die 1.
Alarmmenü
Das System ist komplett scharf geschaltet.
- Schalten Sie das System über die Taste 1 unscharf.
- Um zuzuhören, drücken Sie die 2.
- Um zuzuhören und gleichzeitig zu sprechen,
drücken Sie die 3.
- Um Aufzulegen, drücken Sie zweimal die #.
- Um Aufzulegen, drücken
Sie zweimal die
.
- Bis bald.
2.4 Systeme mit TTGSM TYXAL+
Falls Ihr System nicht über das Stromnetz versorgt wird (Zweithaus,
Wohnmobil, Boot usw.), meldet das TTGSM TYXAL+ die Alarme, kann
aber nicht aus der Ferne gesteuert werden. Es ist jedoch möglich, dieses
30 Minuten nach einem Einbruch zu kontaktieren.
Hinweis: Falls das Netzteil noch nie mit dem Telefonmodem verbunden wurde, wird der Fehler Netzspan-
nung nicht gemeldet.
Lassen Sie sich ganz einfach von der Sprachführung des Telefonmodems leiten.
Jederzeit:
- Um zum vorherigen Menü zurückzukehren, drücken Sie die
.
- Um Aufzulegen, drücken Sie zweimal die

58
(1): Sie haben die Möglichkeit, mit Ihrem GSM-Telefonmodem die Ruf-
nummern zu wählen, an die eine SMS gesendet werden soll.
(2): Beispiel: Ein Kind geht nach Hause und deaktiviert das System über
die Fernbedienung oder den RFID-Chipleser. Das GSM-Telefonmo-
dem sendet eine SMS an die Eltern.
Telefonmodem
TTRTC
TYXAL+
Telefonmodem
TTGSM
TYXAL+
Benennen der Produkte
4 4
Rufnummern
4 4
Optionen
Übertragung Anruf/SMS
(1)
-
4
Familien SMS Info (2) -
4
SIM-Karte -
4
Sprachführung
4 4
2.5 Individuelle Konfiguration des Telefonmodems
mit einem Benutzercode
• Mit der Tast-Bedieneinheit
Nutzen Sie die Tast-Bedieneinheit, um Ihr Te-
lefonmodem noch einfacher zu kongurieren.
Die nebenstehende Tabelle führt die über
die Tast-Bedieneinheit CLT 8000 TYXAL+
individuell kongurierbaren Funktionen der
Telefonmodems TTRTC TYXAL+ und TTGSM
TYXAL+ auf.
(Menü: Bedienung > Produkte > Konfig.).
• Ohne Tast-Bedieneinheit
Schalten Sie die Alarmzentrale in den War-
tungsmodus um (siehe System-Bedienungs-
anleitung)
Rufen Sie das Telefonmodem an und lassen
Sie sich von der Sprachführung führen.
2. Betrieb mit einem Alarmsystem
2.6 Benennen des Telefonmodems
Ê Geben Sie Ihren Zugangscode ein und bestätigen Sie mit OK.
Ë Drücken Sie auf Einstellung und wählen Sie folgendes Menü:
Bedienung > Produkte > Konfig.
Ì Drücken Sie die Taste am umzubenennenden Produkt
oder wählen Sie dieses Produkt in der Liste, indem Sie
auf „Durchs.“ (siehe nachstehende Tabelle) drücken.
Í Sobald das Produkt erkannt wurde, wählen Sie das
Menü „Benennen“.
Î Sie können einen Namen (empfohlen) sowie eine
Nummer (Option) aus der Liste wählen
oder den Produktnamen individuell kongurieren (Ï),
indem Sie einen neuen Namen eingeben.
Ï Bestätigen Sie mit OK.
Wir empfehlen es Ihnen, einen, der in der Liste aufgeführten,
Namen zu wählen.
Somit wird im Alarmfall der gewählte vorgespeicherte Name
genannt.
Dieses Menü ermöglicht es, Ihrem Telefonmodem einen bestimmten Namen zuzuordnen.
Installation
Zonen
Türgong
Ok
Produkte
Zurück
ODER
Benennen
Elternzimmer
Ok
Schlafzimmer
Kinderzimmer
Zurück
Konfig.
Durchs.
Zurück
produkt
Drücken Sis die Taste des
Produkte
Ok
Aktivieren/Deaktivieren
Zurück
Hinzufügen
Konfig.
Benennen
Empfang
Allee
Indiv. Konfiguration
Zurück
Festnetz-Telefonmodem
Ok
Zurück
Sabotageschutz
Verzöggszeit Eingang
Benennen
4
5
6
Einstellung.
Uhr
Sprachen
Ok
Zurück
Installation
Ok
Zugangscode
XXXXXX
Ok
Notruf
oder Durchs.
Konfig.
Ok
Zurück
CLT 0 54 22
DMB 0 AD AD
1
3
2
RTC 0 03 01
Nummer
0 0
Ok
Zurück
Benennen
S c h l a . y a n nf
Ok
Zurück
25/11/14 12:48
Notruf
Einstellung.
OFF
Ihren Code eingeben
Info
Einstellung.
Mein Haus
OFF
25/11/14 12:48

59
DE
2.7 Rufnummern
Ê Geben Sie Ihren Zugangscode ein und bestätigen Sie mit OK.
Ë Drücken Sie auf Einstellung und wählen Sie folgendes Menü:
Bedienung > Produkte > Konfig.
Ì Drücken Sie die Taste am Telefonmodem oder wählen
Sie dieses in der Produktliste, indem Sie auf „
Durchs. klicken.
Í Wählen Sie das Menü „Rufnummern“.
Î Das Telefonmodem eignet sich für das Festnetz
Wählen Sie die zu programmierende Rufnummer
(Nr.1 bis 6) und bestätigen Sie mit OK.
Geben Sie die gewünschte Rufnummer ein.
Das Telefonmodem eignet sich für GSM-Netze
Wählen Sie die zu programmierende Rufnummer
(Nr.1 bis 6) und bestätigen Sie mit OK.
Geben Sie die gewünschte Rufnummer ein.
Bestätigen Sie mit OK.
Wählen Sie die Option „Übertragung“, um zu
entscheiden, wie Sie im Falle eines Einbruchs
gewarnt werden möchten: Anruf oder SMS.
Bestätigen Sie mit OK.
Dieses Menü ermöglicht die Programmierung der Rufnummern, die im Falle der Alarmmeldung oder
bei technischen Fehlern angerufen werden sollen.
Sie können die Eingabe der Rufnummer zeitweise unterbrechen, indem Sie die # drücken.
Programmieren eines Anrufes aus dem Ausland nach Deutschland$$$:
Sie wohnen in einem deutschen Nachbarland und möchten die 030 12345-67 in Deutschland
wählen, geben Sie Folgendes ein: 00 +49 30 12345 67.$$$
ODER
4
5
Festnetz-Telefonmodem
Sabotageschutz
Wachdienst
Eingehende Anrufe
Sprachführung
Systemüberwachung
Ok
Zurück
Benennen
Rufnummern
Konfig.
Ok
Zurück
CLT 0 54 22
CS 0 54 89
RTC 0 03 01
Rufnummern
Ok
Rufnummer 2
Rufnummer 3
Zurück
Rufnummer 1
Rufnummer 1
Ok
0
Zurück
GSM-Telefonmodem
Sabotageschutz
Wachdienst
Familien SMS Info
SIM-Karte
Sprachführung
Systemüberwachung
Ok
Zurück
Benennen
Rufnummern
Rufnummern
Ok
Rufnummer 2
Rufnummer 3
Zurück
Rufnummer 1
Rufnummer 1
Ok
0
Zurück
Optionen Übertragung
Rufnummer 1
Ok
Anruf
Zurück
Optionen Übertragung
Rufnummer 1
Ok
SMS
Zurück
Installation
Zonen
Türgong
Ok
Produkte
Zurück
Konfig.
Parcourir
Zurück
produkt
Drücken Sis die Taste des
Produkte
Ok
Aktivieren/Deaktivieren
Zurück
Hinzufügen
Konfig.
Einstellung.
Uhr
Sprachen
Ok
Zurück
Installation
Zugangscode
XXXXXX
Ok
Notruf
oder Durchs.
1
3
2
25/11/14 12:48
Notruf
Einstellung.
OFF
Ihren Code eingeben
Info
Einstellung.
Mein Haus
OFF
25/11/14 12:48

60
Ê Geben Sie den Benutzercode ein (z.B.: 456789) und bestäti-
gen Sie mit OK.
Ë Drücken Sie auf Einstellung und wählen Sie folgendes
Menü:
Bedienung > Produkte > Konfig. und bestätigen Sie mit OK.
Ì Drücken Sie die Taste T1 (externe Taste) des Telefonmodems
(siehe Bedienungsanleitung) oder wählen Sie diesen in der
Liste, indem Sie auf „Durchs.“ klicken und mit OK bestätigen.
Í Wählen Sie das Menü „Familien SMS Info“ und bestätigen
Sie mit OK.
Î Wählen Sie die, von der SMS-Warnung betroffene(n), Num-
mer(n) in der Liste, indem Sie auf „Auswählen“ klicken.
Bestätigen Sie mit OK.
4
5
GSM-Telefonmodem
Wachdienst
SIM-Karte
Sprachführung
Systemüberwachung
Ok
Zurück
Familien SMS Info
Familien SMS Info
Ok
Ausw.
Fernbedienung
Ok
Zurück
Familien SMS Info
Benennen
Familien SMS Info
Aktivieren >
Ok
Zurück
Dieses Menü ermöglicht es, eine SMS an die programmierte Rufnummer zu senden, wenn das System
aus- oder eingeschaltet wird.
Beispiel: Ihr Kind geht nach Hause und deaktiviert das System über die Fernbedienung oder den RFID-
Chip. Das Telefonmodem sendet Ihnen eine SMS.
Stellen Sie sicher, dass die Option „Familien SMS Info“ im Menü „Einstellungen“ der dieser Funktion
zugeordneten Fernbedienung oder des RFID-Chips aktiviert wurde.
2.8 Familien SMS Info (nur für Telefonmodem TTGSM TYXAL+)
- Optionen Übertragung Anruf/SMS (nur für Telefonmodem TTGSM TYXAL+)
Siehe Abschnitt „Rufnummern“.
4
5
GSM-Telefonmodem
Wachdienst
Sprachführung
Systemüberwachung
Ok
Zurück
Familien SMS Info
SIM-Karte
SIM-Karte
PUK-Code eingeben
Ok
Zurück
PIN-Code eingeben
PIN-Code eingeben
Ok
0
Zurück
PUK-Code eingeben
Ok
0
Zurück
2.9 SIM-Karte (nur für Telefonmodem TTGSM TYXAL)
Ê Geben Sie den Benutzercode ein und bestätigen Sie mit OK.
Ë Drücken Sie auf Einstellung und wählen Sie folgendes Menü: Bedienung >
Produkte > Konfig.
Ì Drücken Sie die Taste am Telefonmodem oder wählen
Sie dieses in der Produktliste, indem Sie auf „Durchs. klicken.
Í Wählen Sie das Menü „SIM-Karte“.
➎ Geben Sie die Parameter der SIM-Karte ein:
PIN-Code eingeben
PUK-Code eingeben
Dieses Menü ermöglicht es Ihnen, den PIN-Code der SIM-Karte einzugeben.
2. Betrieb mit einem Alarmsystem

61
DE
2.10 Sprachführung
Ê Geben Sie den Benutzercode ein und bestätigen Sie mit OK.
Ë Drücken Sie auf Einstellung und wählen Sie folgendes
Menü: Bedienung > Produkte > Konfig.
Ì Drücken Sie die Taste am Telefonmodem oder wählen Sie
dieses in der Produktliste, indem Sie auf „Durchs. klicken.
Í Wählen Sie das Menü „Sprachführung“ und anschließend
„Aktivieren“ oder „Deaktivieren“ (➎).
Bestätigen Sie mit OK.
Dieses Menü ermöglicht es, den Lautsprecher des Telefon-
modems zu aktivieren bzw. zu deaktivieren. Ist dieser akti-
viert, dann werden Ihnen die unterschiedlichen Ereignisse
des Systems genannt (Ein-/Ausschalten, Keine Aktivierung
usw.).
4
5
Festnetz-Telefonmodem
Ok
Zurück
Eingehende Anrufe
Systemüberwachung
Sprachführung
Aktivieren >
Ok
Zurück
Sprachführung
Sprachführung
< Deaktivieren
Ok
Zurück

62
- Um die Heizung einzuschalten,
drücken Sie die 1.
- Um die Heizung auszuschal-
ten, drücken Sie die 2.
- Um in den Abwesenheitsbe-
trieb zu schalten, drücken Sie
die 1.
- Um die Heizung auszuschal-
ten, drücken Sie die 2.
- Um die Heizung einzuschalten,
drücken Sie die 1.
- Um in den Abwesenheitsbe-
trieb zu schalten, drücken Sie
die 2.
3.1 Steuern der Heizung aus der Ferne
123
456
789
0
1
4
5
2
3
2
- Guten Tag, geben Sie Ihren
Zugangscode ein.
Hauptmenü
- Für den Alarm, drücken Sie die 1.
- Für den Wärmekomfort, drücken Sie die 2.
- Für die Automatismen, drücken Sie die 3.
- Für die Szenarien, drücken Sie die 4.
- Um das Telefonmodem persönlich einzustellen,
drücken Sie die 5.
- Um zuzuhören, drücken Sie die 6.
- Um zuzuhören und gleichzeitig zu sprechen,
drücken Sie die 7.
- Um Aufzulegen, drücken Sie zweimal die #.
Je nach Installation,
sind einige Menüs nicht
verfügbar.
Haben Sie beispielsweise
kein Szenario gespeichert,
wird das 4. Menü nicht
angeboten.
Für den Wärmekomfort, drücken
Sie die 2.
Menü Wärmekomfort
Die Innentemperatur beträgt 19,0 Grad.
Die Außentemperatur beträgt 21,5 Grad.*
Die Heizung ist im Abwesen-
heitsbetrieb
Die Heizung läuft Die Heizung ist aus
Die Klimaanlage läuft. Die Klimaanlage ist aus.
- Um die Klimaanlage auszuschalten, drücken
Sie die 1.
- Um die Klimaanlage einzuschalten, drücken
Sie die 1.
Heizung
Klimaanlage
- Um das System in den Heizbetrieb zu schalten, drücken Sie die 1.
- Um das System in den Klimaanlagenbetrieb zu schalten, drücken
Sie die 2.
123
456
789
0
123
456
789
0
- Um Aufzulegen, drücken
Sie zweimal die .
Bis bald.
Rufen Sie das Telefonmodem an.
* Wenn eine Außensirene
SEF TYXAL+ Ihrem System
zugeordnet wurde.
Jederzeit:
- Um zum vorherigen Menü zurückzukehren, drücken
Sie die
.
- Um Aufzulegen, drücken Sie zweimal die
3. Haustechnische Einrichtungen

63
DE
- Um die Heizung einzuschalten,
drücken Sie die 1.
- Um die Heizung auszuschal-
ten, drücken Sie die 2.
- Um in den Abwesenheitsbe-
trieb zu schalten, drücken Sie
die 1.
- Um die Heizung auszuschal-
ten, drücken Sie die 2.
- Um die Heizung einzuschalten,
drücken Sie die 1.
- Um in den Abwesenheitsbe-
trieb zu schalten, drücken Sie
die 2.
123
456
789
0
1
4
5
2
3
3
3.2 Steuern der Hausautomationen aus der Ferne
- Guten Tag, geben Sie
Ihren Zugangscode ein.
Hauptmenü
- Für den Alarm, drücken Sie die 1.
- Für den Wärmekomfort, drücken Sie die 2.
- Für die Automatismen, drücken Sie die 3.
- Für die Szenarien, drücken Sie die 4.
- Um das Telefonmodem persönlich einzustellen,
drücken Sie die 5.
- Um zuzuhören, drücken Sie die 6.
- Um zuzuhören und gleichzeitig zu sprechen,
drücken Sie die 7.
- Um Aufzulegen, drücken Sie zweimal die #.
Je nach Installation,
sind einige Menüs nicht
verfügbar.
Haben Sie beispielsweise
kein Szenario gespeichert,
wird das 4. Menü nicht
angeboten.
Für die Automatismen, drücken
Sie die 3.
Menü Automationen
- Um die Rollläden zu steuern, drücken Sie die 1.
- Für die Beleuchtungen, drücken Sie die 2.
- Um das Tor zu steuern, drücken Sie die 3.
- Um die Gruppe 1 zu steuern, drücken Sie die 1.
Rollläden Gruppe 1
geschlossen
- Um zu öffnen, drücken
Sie die 1.
Rollläden Gruppe 1
offen
- Um zu schließen,
drücken Sie die 2.
- Um die Gruppe 2 zu steuern, drücken Sie die 2.
Rollläden Gruppe 2
geschlossen
- Um zu öffnen,
drücken Sie die 1.
Rollläden Gruppe 2 offen
- Um zu schließen,
drücken Sie die 2.
- Um die Gruppe 1 zu steuern, drücken Sie die 1.
Beleuchtungen Grup-
pe 1 aus.
- Um einzuschalten,
drücken Sie die 1.
Beleuchtungen Grup-
pe 1 ein.
- Um auszuschalten,
drücken Sie die 2.
Rollläden
Beleuchtungen
Tor
- Um das Tor betätigen, drücken Sie die 1.
123
456
789
0
123
456
789
0
12
3
456
789
0
- Um Aufzulegen, drücken
Sie zweimal die .
- Um die Gruppe 2 zu steuern, drücken Sie die 2.
Beleuchtungen Grup-
pe 1 aus.
- Um einzuschalten,
drücken Sie die 1.
Beleuchtungen Grup-
pe 1 ein.
- Um auszuschalten,
drücken Sie die 2.
Rufen Sie das Telefonmodem an.
Bis bald.
Jederzeit:
- Um zum vorherigen Menü zurückzukehren, drücken
Sie die
.
- Um Aufzulegen, drücken Sie zweimal die

64
Rufen Sie das Telefonmodem an.
3.3 Menü Szenario
123
456
789
0
1
4
2
3
4
- Guten Tag, geben Sie
Ihren Zugangscode ein.
Hauptmenü
- Für den Alarm, drücken Sie die 1.
- Für den Wärmekomfort, drücken Sie die 2.
- Für die Automatismen, drücken Sie die 3.
- Für die Szenarien, drücken Sie die 4.
- Um das Telefonmodem persönlich einzustellen,
drücken Sie die 5.
- Um zuzuhören, drücken Sie die 6.
- Um zuzuhören und gleichzeitig zu sprechen,
drücken Sie die 7.
- Um Aufzulegen, drücken Sie zweimal die #.
Je nach Installation,
sind einige Menüs nicht
verfügbar.
Haben Sie beispielsweise
keine Hausautomation
gespeichert, wird das
3. Menü nicht angeboten.
Für die Szenarien, drücken
Sie auf 4.
Menü Automationen
- Um das Szenario 1 zu steuern, drücken Sie die 1.
- Um das Szenario 2 zu steuern, drücken Sie die 2.
- Um das Szenario 3 zu steuern, drücken Sie die 3.
- Um das Szenario 4 zu steuern, drücken Sie die 4.
- Um Aufzulegen, drücken
Sie zweimal die
.
Bis bald.
Jederzeit:
- Um zum vorherigen Menü zurückzukehren,
drücken Sie die
.
- Um Aufzulegen, drücken Sie zweimal die
3. Haustechnische Einrichtungen

65
DE
4. Eigenständiger Betrieb
Das Telefonmodem kann eigenständig betrieben
werden, ohne einer Alarmzentrale zugeordnet zu
werden.
In diesem Fall sind die technischen Melder (Leck-
agemelder, Rauchmelder usw.) direkt dem Telefon-
modem zugeordnet. Ein Anruf wird bei der Meldung
eines technischen Fehlers getätigt.
Es kann ebenfalls eine Fernbedienung TL 2000
TYXAL+ zugeordnet werden, die über die Not-
ruf-Funktion verfügt, um einen Notruf zu tätigen.
Die Überwachungsfunktionen sowie die Gegen-
sprechanlage sind mit diesem Betriebsmodus
kompatibel.
DFR TYXAL+
Rauch-, Brandmelder
DF TYXAL+
Leckagemelder
DCS TYXAL+
Netzausfallmelder
TL 2000 TYXAL+
Fernbedienung
DU TYXAL+
Universalmelder
4.1 Kompatible Melder und Fernbedienungen
4.2 Ablauf eines Anrufes im Falle eines technischen Fehlers
Bei der Meldung eines technischen Fehlers, wählt das Telefonmodem nacheinander die gespeicherten
Rufnummern (max. 6), bis ein Korrespondent den Anruf entgegen nimmt und somit den Anrufzyklus stoppt.
Beispiel: Ein Teilnehmer nimmt den Anruf entgegen:
123
456
789
0
1
2
3
123
456
789
0
123
456
7
*
#
89
0
Um den Fehlerbericht zu
öffnen, drücken Sie die 1.
Um das Produkt zu deakti-
vieren, drücken Sie die 2.
Sie sind mit einem Tele-
fonmodem verbunden.
Fehler Sabotage
am 4. April 2014
Um den Zyklus zu unterbre-
chen, drücken Sie
- Um zuzuhören, drücken
Sie die 2.
- Um zuzuhören und
gleichzeitig zu sprechen,
drücken Sie die 3.
- Um aufzulegen, drücken
Sie zweimal die
.
Sabotageschutzalarm am
Wohnzimmer-Melder, Zone 1,
am 22. April 2014.
*
Danach ruft das Telefonmo-
dem die anderen Rufnum-
mern nicht mehr an.
* Beispiel für den Namen eines
Raumes oder einer Zone. Die Aus-
sprache hängt von der Konfiguration
Ihres Systems ab.
Sie müssen vor dem Aue-
gen unbedingt die Taste
drücken, um den Anrufzy-
klus zu unterbrechen, damit das
Telefonmodem nicht die anderen
Rufnummern anwählt.

66
4.3 Individuelle Konfiguration des Telefonmodems
Rufen Sie das Telefonmodem an.
-Das GSM-Telefonmodem nimmt umgehend ab.
-Das Festnetz-Telefonmodem wendet eine der beiden folgenden Methoden an.
Wenn 2Anrufe aufeinander folgen, und um das unerwünschte Belegen der Leitung zu vermeiden, können
Sie die 2.Methode deaktivieren, indem Sie die folgende Sequenz über das Hauptmenü eingeben: #82 6 1.
#82 6 0 eingeben, um erneut zu aktivieren.
1. Methode, über einen anderen Telefonanschluss (Festnetz oder Mobilfunk):
Geben Sie die Rufnum-
mer der Installation ein.
Geben Sie erneut die Rufnummer
der Installation ein.
Das Telefonmodem hebt nach 1
oder 2 Klingelzeichen ab.
Warten Sie 2 Klingelzeichen ab
1
2
abc
3
def
4
ghi
5
jkl
6
mno
7
pqrs
8
tuv
9
wxyz
*
#
0
1
2
abc
3
def
4
ghi
5
jkl
6
mno
7
pqrs
8
tuv
9
wxyz
*
#
0
Tüüt Tüüt ... Tüüt
2. Methode in folgenden Fällen anzuwenden:
- Wenn Sie von einem Mobiltelefon aus anrufen (und dieses noch vor dem 10. Klingelzeichen die
Verbindung unterbricht).
- Wenn außer dem Telefonmodem auch ein Anrufbeantworter oder eine Voicemail vorhanden ist.
1
2
abc
3
def
4
ghi
5
jkl
6
mno
7
pqrs
8
tuv
9
wxyz
*
#
0
1
2
abc
3
def
4
ghi
5
jkl
6
mno
7
pqrs
8
tuv
9
wxyz
*
#
0
Tüüt Tüüt ... Tüüt
Geben Sie die Rufnummer
der Installation ein.
Das Telefonmodem nimmt den Anruf werkssei-
tig nach ca. 10 Klingelzeichen an (die Anzahl
der Klingeltöne kann geändert werden).
Warten Sie
10 Sekunden.
Warten Sie 10
Klingeltöne ab.
Um Deutsch zu wählen,
drücken Sie die 4 ...
Um Deutsch zu wählen,
drücken Sie die 4 ...
Legen Sie auf
4. Eigenständiger Betrieb

67
DE
4.4 Menü Konfiguration
Menü Konfiguration
Geben Sie die Rufnummer, ein und drücken
Sie die
Menü Konfiguration
Geben Sie die Rufnummer, ein und drücken
Sie die
Vorgang angenommen
Um den Zugangscode zu ändern, drücken Sie die 3.
Menü KonfigurationGeben Sie Ihren Zugangscode ein. Geben Sie den neuen Zugangscode ein
Um die Ansage anzupassen, drücken Sie die 2.
Die Sprachmitteilung lautet :
“Sie sind mit einem Telefonmodem verbunden.”
- Zur Änderung der Sprachmitteilung,
drücken Sie die 1.
- Um zum vorherigen Menü zurückzukehren,
drücken Sie die
Die Sprachmitteilung lautet :
“Sie sind mit einem Telefonmodem verbunden.”
- Zur Änderung der Sprachmitteilung,
drücken Sie die 1.
- Um zum Sprachmitteilung zurückzukehren,
drücken Sie die 2.
- Um zum vorherigen Menü zurückzukehren,
drücken Sie die
Sprechen Sie nach dem Ton, drücken Sie
eine beliebige Taste Aufnahme zu beenden.
Um das Datum und die Uhrzeit zu ändern, drücken Sie die 4.
Um die Anzahl der Klingeltöne zu konfigurieren, drücken Sie die 5
(nur TTRTC TYXAL+).
Um die Sprache zu wählen, drücken Sie die 6.
Um Französischzu wählen, drücken Sie die 1.
Um Englisch zu wählen, drücken Sie die 2.
Um Spanisch zu wählen, drücken Sie die 3.
Um Deutsch zu wählen, drücken Sie die 4.
Um Italienisch zu wählen, drücken Sie die 5.
Um Polnisch zu wählen, drücken Sie die 6.
Um Holländisch zu wählen, drücken Sie die 7.
- Für die Nummer 1, drücken Sie die 1.
- Für die Nummer 2, drücken Sie die 2.
- Für die Nummer 3, drücken Sie die 3.
- Für die Nummer 4, drücken Sie die 4.
- Für die Nummer 5, drücken Sie die 5.
- Für die Nummer 6, drücken Sie die 6.
- Um zum vorherigen Menü
zurückzukehren, drücken Sie die
Aucun numéro d’appel configuré.
Um sie zu konfigurieren, drücken Sie die 1.
- Um zum vorherigen Menü zurückzukehren,
drücken Sie die
Die konfigurierte Rufnummer ist :
02.99.73.xx.xx
So ändern Sie eine Rufnummer, drücken Sie die 1.
So löschen Sie eine Rufnummer, drücken Sie die 2.
- Um zum vorherigen Menü zurückzukehren,
drücken Sie die
Es ist : 29. November 2013,
Es ist : 11h57.
- Zur Änderung des Datums, drücken Sie die 1.
- Zur Änderung der Uhrzeit, drücken Sie die 2.
- Um zum vorherigen Menü zurückzukehren,
drücken Sie die
29 Novembre 2013, 11h57.
- Zur Änderung des Datums, drücken Sie die 1.
- Zur Änderung der Uhrzeit, drücken Sie die 2.
- Um zum vorherigen Menü zurückzukehren,
drücken Sie die
Geben Sie das 6-stellige neue Datum ein
Geben Sie die 4-stellige neue Uhrzeit ein
Um das Format AM zu wählen,
drücken Sie die 1
Um das Format PM zu wählen,
drücken Sie die 2
Werkseitig liegt die Anzahl der Klingelzeichen
vor dem Herstellen der Verbindung bei 10.
- Zur Änderung der Anzahl Klingeltöne,
drücken Sie die 1.
- Um zum vorherigen Menü zurückzukehren,
drücken Sie die
Geben Sie die 2 Ziffern für die
gewünschte Anzahl Klingelzeichen ein
Vorgang angenommen
Menü KonfigurationVorgang angenommen
Vorgang angenommen
Vorgang angenommen
Die konfigurierte Rufnummer ist...
Eingeben Ihres Zugangscodes
Drücken Sie im Hauptmenü die 5, um auf das Menü Indiv. Konguration zuzugreifen.
Jederzeit:
- Um zum vorherigen Menü zurückzukeh-
ren, drücken Sie die
.
- Um Aufzulegen, drücken Sie zweimal
die

68
5. Betriebstest
123
456
789
0
1
2
3
123
456
789
0
123
456
7
*
#
89
0
Mit einer Alarmzentrale:
Schalten Sie das System ein und täuschen Sie einen Einbruch vor.
Eigenständiger Betrieb:
Bei einem Leckagemelder muss beispielsweise ein Wasserleck vor-
getäuscht werden, indem Sie Wasser auf diesen tröpfeln.
Am Telefonmodem:
1
n°1
n°2
2
n°3
3
n°4
4
n°5
5
n°6
6
7
n°1
n°2
8
n°3
9
n°4
10
n°5
11
n°6
12
13
n°1
n°2
14
n°3
15
n°4
16
Um den Fehlerbericht zu
öffnen, drücken Sie die 1.
Um das Produkt zu deakti-
vieren, drücken Sie die 1.
Sie sind mit einem Tele-
fonmodem verbunden.
Technischer Fehler
am 4. April 2014
Um den Zyklus zu unter-
brechen, drücken Sie
- Um die Sirene auszuschal-
ten, drücken Sie die 1.
- Um zuzuhören, drücken
Sie die 2.
- Um zuzuhören und gleich-
zeitig zu sprechen, drücken
Sie die 3.
- Um aufzulegen, drücken
Sie zweimal die
.
Technischer Fehler
(Wasserleck) am Melder
Zone 2, am 4. April 2014.
Vergewissern Sie sich, dass das Telefonmodem die gespeicherten
Rufnummern (maximal 6) nacheinander anwählt, bis am anderen
Ende abgenommen wird:
- Der Sender fordert Sie auf, die Taste zu drücken.
- Das Telefonmodem liest die persönliche Sprachmitteilung vor und
gibt die Art des Alarms an.
- Sie haben die Möglichkeit, mit einer Person in der Nähe des
Telefonmodems zu sprechen, den Anrufzyklus zu stoppen und
genauere Angaben in Bezug auf den Fehler zu erhalten, falls eine
Alarmzentrale zugeordnet wurde.
Lösen Sie einen Alarm aus, um den korrekten Betrieb des Systems zu testen.
Sie können ebenfalls einen Test-Anrufzyklus
starten, indem Sie 30 Sekunden lang die
Taste des Telefonmodems drücken.
>30s
Beispiel eines vollständigen Zyklus
mit 6 programmierten Rufnummern.

69
DE
6. Zustand der Kontrollleuchte der Telefonleitung
6.2 TTGSM TYXAL+
Taste/Kontrollleuchte
Drücken Sie die Taste auf
der Vorderseite, um den
Zustand der Telefonlei-
tung abzufragen.
Zustand der Kont-
rollleuchte
Beschreibung
Blinkt rot * Keine Festnetzleitung
Leuchtet grün * Festnetzleitung vorhanden
Blinkt grün Anruf läuft
Aus Normalbetrieb. Es können Anrufe getätigt und
angenommen werden.
Zustand der Kon-
trollleuchte
mit Stromnetzver-
sorgung
Zustand der
Kontrollleuchte
ohne Strom-
netzversorgung
Beschreibung
Blinkt rot Aus Kein GSM-Signal
Blinkt grün/orange Aus Schwaches GSM-Signal
Grün
Leuchtet
Aus Starkes GSM-Signal
Grün
blinkt
Aus Anruf läuft
(*) Die Kontrollleuchte leuchtet weiterhin:
- 5 Minuten nach dem Einschalten.
- 1 Minuten lang, beim Drücken der Taste T1.
Wird es nicht über das Stromnetz versorgt, leuchtet die
Kontrollleuchte weiterhin:
- 5 Minuten nach dem Einschalten.
- bei der Übertragung eines Ereignisses.
- 1 Minute lang, beim Drücken der Taste T1.
- 5 Minuten nach einem Stromausfall.
6.1 TTRTC TYXAL+
Wird das TTGSM TYXAL+ nicht
über das Stromnetz versorgt,
sendet dieses weiterhin Alarm-
meldungen, kann jedoch nicht
mehr aus der Ferne gesteuert
werden.
Das Telefonmodem verwaltet dauerhaft die Telefonleitung.
Bei Fehlern an der Telefonleitung, wird dieses Symbol
auf der Tast-Bedieneinheit angezeigt. Geben Sie Ihren
Zugangscode ein, um genauere Angaben in Bezug auf die Fehler
zu erhalten.
25/11/15 12:48
Info Einstellung.
OFF
Mein Haus

70
7. Batteriewechsel
2
1
1
2
2
1
4
2
1
3
5
Entriegeln Sie das Gehäuse. Entfernen Sie die untere
Abdeckung.
Heben Sie mit einem Schrau-
benzieher die 2 Clips an, die die
obere Abdeckung befestigen.
Entfernen Sie die obere Abdeckung.
Tauschen Sie die Batterie aus.
Legen Sie die Batterie
unter Beachtung der
Polung ein.
• Außerhalb der Reichweite von Kindern aufbe-
wahren.
• Die Polung nicht umkehren.
• Die Batterien nicht öffnen.
• Die Bauteile nicht zerquetschen oder
aufbohren.
• Die Plus- und Minus-Pole (+/-) nicht mit leiten-
den Elementen kurzschließen.
• Keine übermäßigen mechanischen Belastung
aussetzen.
• Die Komponente nicht mit Wasser oder Feuch-
tigkeit in Kontakt bringen.
• Nicht direkt auf 100 °C (212 °F) erhitzen,
verlöten oder verbrennen.
Diese ungeeigneten Handhabungen können
zum Austreten oder Ausspritzen von Elektroly-
ten bzw. zu Bränden oder Explosionen führen.
• Nicht wieder auaden.
• Nach den geltenden Rechtsvorschriften
entsorgen.
Handhabung der Batterie
Explosions- und schwere Verbrennungsgefahr.
Wir empfehlen es Ihnen, eine SAFT-Batterie vom Typ LSH20, 3,6 V zu verwenden. Sie können
ebenfalls eine 3,6V-Lithium-Batterie einer anderen Marke verwenden. In diesem Fall kann die
Lebensdauer von 10 Jahren nicht gewährleistet werden.
Schalten Sie die Alarmzentrale in den WARTUNGSMODUS (siehe System-Be-
dienungsanleitung)
Öffnen Sie das Gehäuse des Telefonmodems.
Der kritische Batterieladestand des Telefonmodems wird wie folgt angezeigt:
• Im Modus Alarmzentrale:
Durch eine Nachricht auf der Bedieneinheit CLT 8000 TYXAL+. Die Alarmzentrale piept immer beim Ein- bzw.
Ausschalten des Systems (oder die Sprachführung sagt „Fehler Batterie“ (diese muss hierfür aktiviert sein, siehe
Bedienungsanleitung CLT 8000 TYXAL+)).
• Im eigenständigen Betrieb:
Durch eine Willkommensnachricht bei ein- oder, durch einen Fehler hervorgerufenen, ausgehenden Anrufen.
Entfernen Sie den Telefonstecker vom Telefonmodem TTRTC TYXAL+.

71
DE
Um zur Werkseinstellung zurückzukehren müssen alle Verbindungen und aktuellen Fehlermeldungen
gelöscht werden.
Wenn das Telefonmodem einer Alarmzentrale zugeordnet wurde, schalten Sie diese in den Wartungsmodus
(siehe System-Bedienungsanleitung).
9. Initialisierung (Rückkehr zur Werkseinstel- lung)
mit einer Alarmzentrale oder im eigenständigen Betrieb.
Öffnen Sie das Gehäuse des Telefonmodems.
Ausschließlich im
eigenständigen Betrieb
RESET OK
>30s
BIP... BIP
>30s
BIP BIIIIP
>5s >15s
T2 T2
Drücken Sie 30 Sekunden
lang die Taste T2.
Das Telefonmodem bendet sich in seinem ursprünglichen Zustand, alle Zuordnungen
sowie laufenden Fehler wurden gelöscht.
Das Telefonmodem piept nach 5 Sekunden einmal.
Halten Sie die Taste gedrückt.
Das Telefonmodem piept nach 15 Sekunden zweimal.
Halten Sie die Taste gedrückt.
Das Telefonmodem piept nach 30 Sekunden einmal lange.
8. Initialisieren des Zugangscodes
mit einer Alarmzentrale ohne Bedieneinheit oder im eigenständigen Betrieb.
Öffnen Sie das Gehäuse des Telefonmodems.
>15s
BIP... BIP
BIP
>5s >15s
Ausschließlich im
eigenständigen Betrieb
T2 T2
Drücken Sie 15 Sekunden lang die
Taste T2.
Das Telefonmodem piept nach 5 Sekunden
einmal. Halten Sie die Taste gedrückt.
Das Telefonmodem piept nach 15 Sekunden
zweimal. Lassen Sie die Taste los.
Der Zugangscode entspricht erneut 1 2 3 4 5 6.
Rückkehr zum werksseitig eingestellten Code 1 2 3 4 5 6.
Wenn das Telefonmodem einer Alarmzentrale zugeordnet wurde, schalten Sie diese in den
WARTUNGSMODUS (siehe System-Bedienungsanleitung).

72
10. Hilfe
Die Tonqualität ist schlecht
Ein Melder des Systems führt zu feh-
lerhaften Meldungen
Die vom Telefonmodem genannte
Raumtemperatur ist falsch
Ein laufender Anrufzyklus wird un-
terbrochen und durch einen neuen
Anrufzyklus ersetzt
Stellen Sie sicher, dass die Freisprechfunktion
nicht aktiviert wurde.
Entfernen Sie so weit wie möglich die Antenne
des TTGSM TYXAL+.
Nachdem der Anruf entgegen genommen und
die Ansage abgehört wurde, deaktivieren Sie
das fehlerhafte Produkt.
Entfernen Sie das Telefonmodem von Wärme-
quellen (ADSL-Modem usw.), um die lokale
Erhöhung der Raumtemperatur zu verhindern.
Die technischen Melder sind je nach Rang
angeordnet:
1 - Rauch-, Brandmelder
(DFR TYXAL+),
2 - Leckagemelder
(DF TYXAL+),
3 - Netzausfallmelder
(DCS TYXAL+),
4 - Universalmelder
(DU TYXAL+).
Beispiel: Die Meldung eines Rauchalamrs vom
DFR TYXAL+ geschieht vor der eines Strom-
ausfalls.
Ziel dieses Kapitels ist es, Ihnen bei der Lösung der häugsten Probleme zu helfen, die auch bei Ihnen auftre-
ten könnten.
Bei Unklarheiten, wenn das Problem erneut auftritt oder nachfolgend nicht beschrieben wird, bitten wir Sie,
Kontakt mit Ihrem Installateur aufzunehmen
Aufgrund möglicher Weiterentwicklungen von Normen und Produkten sind die in der vorliegenden Dokumentation
aufgeführten Angaben und Abbildungen nur bei entsprechender Bestätigung von uns verbindlich.

73
DE

74
TTRTC TYXAL+ es un dispositivo que utiliza la
línea telefónica lar de la instalación.
TTGSM TYXAL+ se conecta a una red telefóni-
ca inalámbrica.
RTC:
Red telefónica conmutada.
Un transmisor telefónico RTC se conecta a la
línea telefónica lar de la instalación.
GSM:
Global System for Mobile communications.
Un transmisor telefónico GSM se conecta a una
red telefónica inalámbrica.
- Modem 2G
SOS discreta:
La función «SOS discreta» permite alertar al
exterior sin el conocimiento de un potencial
agresor mediante una llamada discreta.
SOS sonora:
La función «SOS sonora» permite alertar inme-
diatamente al vecindario activando a la vez una
llamada telefónica y el sonido de las alarmas
asociadas.
Modo Mantenimiento:
El modo Mantenimiento permite realizar las ope-
raciones de puesta en servicio, mantenimiento
y diagnóstico. Para acceder a este modo, la
vigilancia debe estar desactivada.
El paso de la central a modo Mantenimiento se
realiza con un teclado (táctil o simple), un tele-
mando o un lector de chapa de identicación.
(ver instrucciones del sistema).
Autoprotección:
Los productos están protegidos contra apertura
y arranque.
En caso de que un ladrón intente abrir o
arrancar uno de los productos, se enviará un
mensaje a la central que activa su sirena interna
y las alarmas de la instalación (sirena interior o
exterior, transmisor telefónico).
La autoprotección está activa permanentemente,
incluso cuando el sistema está en parada.
Puede desactivarla mediante un teclado táctil
CLT 8000 TYXAL+.
Para abrir un producto, debe pasar el sistema a
modo Mantenimiento imperativamente.
DTMF
Doble tono multifrecuencia
SMS
Servicio de mensajería (Short Message Service)
Desagregación parcial
Las comunicaciones pasan por la red de France
Télécom. Los datos de Internet y otros servicios
como la televisión transitan por la red del ISP.
Desagregación total
No es abonado de France Télécom.
Los datos y las comunicaciones transitan por la
red del ISP.
Ciclo de llamadas:
El transmisor marca el primer número grabado.
Si el interlocutor no descuelga o si no valida
la llamada, el transmisor marca entonces el
segundo número, después el tercero, etc. hasta
el sexto número.
Si ningún interlocutor ha descolgado, el transmi-
sor reanuda su ciclo: n.º 1, n.º 2, n.º 3, etc. Así,
el transmisor realiza hasta 16 llamadas consecu-
tivas o 4 ciclos como máximo.
Utilice este dispositivo conforme a la legis-
lación vigente y a las restricciones locales.
Estas pueden aplicarse, por ejemplo, en
estaciones de servicio, hospitales…
Este dispositivo puede perturbar el
funcionamiento de dispositivos médicos
(prótesis auditivas y marcapasos). Para
más información, consulte a su médico
Este dispositivo puede provocar pertur-
baciones cerca de televisores, radios y
ordenadores.
No utilizar el dispositivo en un local con
riesgo de explosiones (p. ej.: cerca de
una fuente de gas, de carburantes o de
productos químicos).
Léxico
Operación a realizar en modo Mantenimien-
to (ver instrucciones de la central CS 8000
TYXAL+, apartado Modo mantenimiento)

75
ES
Sumario
1. ¿Cómo funciona su transmisor? ......................................................................................... 76
1.1 Presentación .....................................................................................................................76
1.2 Principio ............................................................................................................................76
1.3 Funcionamiento en modo autónomo.................................................................................76
1.4 Funciones domóticas ........................................................................................................77
1.5 Gestión del fallo de corriente (solo transmisor TTGSM TYXAL+) .....................................77
2. Funcionamiento con un sistema de alarma .......................................................................78
2.1 Ser avisado en caso de alerta...........................................................................................78
2.3 Controlar la alarma a distancia .........................................................................................80
2.4 Instalaciones equipadas con TTGSM TYXAL+ .................................................................81
2.5 Personalizar el transmisor con un código de usuario .......................................................82
2.6 Nombrar el transmisor .......................................................................................................82
2.7 Números de teléfono .........................................................................................................83
2.8 Alerta familiares SMS (solo para el transmisor TTGSM TYXAL+) ....................................84
2.9 Tarjeta SIM (solo para el transmisor TTGSM TYXAL+) ....................................................84
2.10 Ayuda de voz ...................................................................................................................85
3. Funciones domóticas ...........................................................................................................86
3.1 Controlar su calefacción a distancia .................................................................................86
3.2 Controlar los automatismos a distancia ............................................................................87
3.3 Menú escenario .................................................................................................................88
4. Funcionamiento en modo autónomo ..................................................................................89
4.1 Detectores y telemando compatibles ...............................................................................89
4.2 Desarrollo de una llamada en caso de fallo técnico..........................................................89
4.3 Personalizar el transmisor .................................................................................................90
4.4 Menú conguración ...........................................................................................................91
5. Prueba de funcionamiento correcto ....................................................................................92
6. Estado del testigo de línea telefónica .................................................................................93
6.1 TTRTC TYXAL+ ................................................................................................................93
6.2 TTGSM TYXAL+ ...............................................................................................................93
7. Cambio de la pila ...................................................................................................................94
8. Inicialización del código de acceso ...................................................................................95
9. Inicialización (volver a la configuración de fábrica) .........................................................95
10. Ayuda ...................................................................................................................................96
La declaración de conformidad CE de este equipo está disponible, bajo demanda, en:
Service “Infos techniques”
DELTA DORE - Bonnemain - 35270 Combourg (Francia)
E-mail: [email protected]

76
1. ¿Cómo funciona su transmisor?
1.3 Funcionamiento en modo autónomo
Funcionamiento con una central CS 8000 TYXAL+
1.1 Presentación
1.2 Principio
Si su instalación dispone de una central de alarma CS 8000 TYXAL+, el transmisor y los otros pro-
ductos de la gama TYXAL+ se asocian a la central CS 8000 TYXAL+ (50 productos máx.).
TTRTC TYXAL+
DO TYXAL+ DMB TYXAL+
CS 8000 TYXAL+
TTGSM TYXAL+
CLT 8000 TYXAL+TL 2000 TYXAL+
DVR TYXAL+
DFR TYXAL+ DU TYXAL+ DF TYXAL+
DCS TYXAL+
DO TYXAL+
Controlar
Detectar Detectar
Alertar/señalar
Centralizar
Detectores de intrusión Detectores técnicos
TTRTC TYXAL+ TTGSM TYXAL+
T
L 2000 TYXAL+
DFR TYXAL+ DU TYXAL+ DF TYXAL+
DCS TYXAL+
Detectores técnicos
El transmisor puede funcionar de forma autó-
noma.
En este caso, los detectores técnicos (detec-
tor de humo DFR TYXAL+, detector técnico
universal DU TYXAL+ o de escape de agua
DF TYXAL+, ...) se asocian directamente al
transmisor.
Se puede asociar un telemando TL 2000
TYXAL+ con la función SOS para enviar una
llamada de emergencia a sus familiares (pulse 2
segundos la tecla 1 o 2 del telemando según la
conguración).
Alertar/señalar
El transmisor de alarma TTRTC TYXAL+ utiliza la
línea telefónica lar de la instalación, el TTGSM
TYXAL+ se conecta a una red telefónica inalámbrica.
Permiten:
- controlar la alarma a distancia (con ayuda de la
síntesis vocal del transmisor).
- ser avisado en caso de alerta por una llamada a
otro teléfono, o un centro de televigilancia (según
los protocolos estándar: 200 baudios FSK, contacto
ID, ... (requiere una suscripción)).
- controlar a distancia su calefacción y 5 conjuntos
de automatismos, si su instalación está equipada
con productos X3D.
- crear escenarios. Ejemplo:
«Salida»= luces apagadas, persianas cerradas
«Llegada» = luces encendidas, persianas abiertas
- conocer la temperatura ambiente de la instalación.
En caso de alerta, la llamada saliente (incluso en
caso de corte del suministro eléctrico) permite:
- describir la alarma
- escuchar lo que ocurre en los locales vigilados y
hablar simultáneamente
- detener el ciclo de llamadas
- detener las sirenas

77
ES
1.4 Funciones domóticas
1.5 Gestión del fallo de corriente (solo transmisor TTGSM TYXAL+)
Cuando el transmisor no tiene alimentación de red:
- Emite 1 bip cada 10 segundos durante 5 minutos.
- Al cabo de 30 minutos, la central genera un fallo técnico enviado por el transmisor después
de un plazo de 30 segundos.
Receptor
de portal X3D
Receptores
de iluminación X3D
Productos compatibles
CALYBOX 2020
WT
Gestor de energía
Scénarios
Réglages
11.5°C Lun. 23 Septembre
18:28
Autres
Conso Thermique
Volets
Ou
vr
a
n
t
31
Calendrier
Eau chaude
ROLLIA / TYMOOV X3D
Motores de persianas enrollables
Receptores de persianas enrollables
Las funciones domóticas, a distancia, permiten:
- controlar su calefacción
- controlar 5 conjuntos de automatismos (2 vías
de persianas enrollables ROLLIA / TYMOOV o
receptores de persianas enrollables, 2 vías de
iluminación, 1 vía de portal).
- controlar 4 escenarios
Estas funciones se pueden realizar si los equipos lo
permiten (receptores X3D).
Puede consultar con nuestros servicios.
Las asociaciones pueden ser de 2 tipos:
• asociación directa
• repetidor: en este caso el(los) receptor(es)
actúa(n) como relé para prolongar la señal hacia
otros receptores, normalmente fuera de alcance
radio (instalaciones extensas, muros gruesos de
hormigón...).

78
2. Funcionamiento con un sistema de alarma
Desarrollo de un ciclo de llamadas en caso de alarma de intrusión o de un fallo técnico
En caso de alerta (alarma de intrusión o fallo técnico), el transmisor telefónico llama a los números
registrados (6 máx.) por turnos hasta que un interlocutor detiene el ciclo de llamadas.
En el caso del transmisor TTGSM TYXAL+, puede elegir
llamada de voz
y SMS para cada número
registrado.
La elección Vocal/SMS es congurable desde
el teclado táctil CLT 8000 TYXAL+.
Asociado a un sistema de alarma, el transmisor permite:
- ser avisado en caso de alerta
- controlar la alarma a distancia
2.1 Ser avisado en caso de alerta
1
n°1
n°2
2
n°3
3
n°4
4
n°5
5
n°6
6
7
n°1
n°2
8
n°3
9
n°4
10
n°5
11
n°6
12
13
n°1
n°2
14
n°3
15
n°4
16
Ê El transmisor marca el primer número grabado,
si el interlocutor no descuelga o si no valida la llamada, el
transmisor marca entonces el segundo número, después el
tercero, etc. hasta el sexto número.
Ë Si ningún interlocutor ha descolgado, el transmisor reanuda
su ciclo: n.º 1, n.º 2, n.º 3, etc.
Así, el transmisor realiza hasta 16 llamadas consecutivas.
El ciclo se detiene automáticamente al cabo de 16 llamadas.
Para detener el ciclo de llamadas, pulse la tecla .
Llamada de voz
En caso de un fallo técnico (salvo para los detectores de humo), la llamada se activa después de un
plazo de 30 segundos.
1
n°1
n°2
2
n°3
3
n°4
4
n°5
5
6
n°1
7
n°3
8
n°5
9
n°1
10
n°3
11
n°5
n°1
12
n°3
13
14
n°5
Parada
automática
Ê El transmisor marca el primer número grabado,
si el interlocutor no descuelga o si no valida la llamada,
el transmisor envía un SMS al n.º 2.
El transmisor continúa su ciclo y llama al número 3,
envía un SMS al número 4 y, a continuación, marca el
quinto número grabado, si nadie descuelga.
Ë Si ningún interlocutor ha descolgado, el transmisor
reanuda su ciclo: n.º 1, n.º 3, n.º 5, etc.
El TTGSM TYXAL+ no envía otro SMS en los siguientes
ciclos.
El transmisor de detiene automáticamente después de 4
ciclos consecutivos.
Ejemplo: tiene 5 número registrados, de los cuales 2 en SMS. (n.° 2 y n.° 4)
2.2 Caso del transmisor TTGSM TYXAL+
Llamada de voz SMS
TTRTC TYXAL+
4
-
TTGSM TYXAL+
4 4
Ê Ë
Ê Ë

79
ES
Ejemplo de una autoprotección:
Debe pulsar obligatoriamente la tecla antes de colgar para detener el ciclo de llamadas para
que el transmisor no llame a los otros números.
123
456
789
0
1
2
3
123
456
789
0
123
456
7
*
#
89
0
Para consultar el detalle
de los fallos, pulse 1
Para desactivar el
producto, pulse 2
Está en comunicación
con un transmisor
telefónico.
Fallo de autoprotección
el 04 de abril de 2014
Para detener el ciclo de
llamadas, pulse
Si el sistema está en
marcha
- Para poner el sistema en
parada pulse 1.
Si el sistema está en
parada
- Para detener el sonido,
pulse 1
- Para escuchar, pulse 2
- Para escuchar y hablar
simultáneamente, pulse 3
- Para colgar, pulse 2 veces
Alarma de autoprotección en
el detector del salón, zona 1,
el 22 04 2014.
*
A partir de ahí, el transmisor
ya no llamará a otros
números.
* Ejemplo de nombre de estancia y zona.
El enunciado depende de la forma en la que haya configurado su instalación.

80
2.3 Controlar la alarma a distancia
Lo puede poner en marcha o parada con los menús propuestos por la síntesis vocal del transmisor.
Llamar al transmisor
- Para el transmisor GSM, la toma de línea es inmediata.
- Para el transmisor RTC utilice uno de los dos métodos siguientes.
Poner en marcha o parada (total o por zona) el sistema a distancia.
Para evitar la toma de línea involuntaria del transmisor cuando se realizan 2 llamadas, puede desactivar el
método 2 marcando la siguiente secuencia desde el menú principal: #82 6 1.
Marque #82 6 0 para reactivarlo.
Método 1, desde otra línea telefónica (móvil o ja)
Marque el número de teléfono
de la instalación.
Vuelva a marcar el número de
teléfono de la instalación.
El transmisor descuelga
después de 1 o 2 tonos
Espere 2 tonos
1
2
abc
3
def
4
ghi
5
jkl
6
mno
7
pqrs
8
tuv
9
wxyz
*
#
0
1
2
abc
3
def
4
ghi
5
jkl
6
mno
7
pqrs
8
tuv
9
wxyz
*
#
0
Tuu Tuu ... Tuu
Método 2 para utilizar en los siguientes casos:
- cuando llama desde un teléfono móvil (si este cuelga antes del décimo tono)
- cuando el transmisor "convive" con un contestador o un servicio de mensajería
1
2
abc
3
def
4
ghi
5
jkl
6
mno
7
pqrs
8
tuv
9
wxyz
*
#
0
1
2
abc
3
def
4
ghi
5
jkl
6
mno
7
pqrs
8
tuv
9
wxyz
*
#
0
Tuu Tuu ... Tuu
Marque el número de telé-
fono de la instalación.
El transmisor toma la línea después de
unos 10 tonos por defecto (número de
tonos modicable).
Espere
10 segundos
Espere
10 tonos
Para seleccionar
francés, pulse 1...
Para seleccionar
francés, pulse 1...
Cuelgue
2. Funcionamiento con un sistema de alarma

81
ES
123
456
789
0
1
2
1
3
4
Buenos días, introduzca su
código de acceso.
Menú principal
- Para la alarma, pulse 1
- Para el confort térmico, pulse 2
- Para los automatismos, pulse 3
- Para los escenarios, pulse 4
- Para personalizar el transmisor,
pulse 5
- Para colgar, pulse 2 veces #
Dependiendo de su instalación,
algunos menús no estarán
disponibles.
Por ejemplo, si no ha registrado
escenarios, el menú 4 no
aparecerá.
Para la alarma, pulse 1.
Menú alarma
Sistema está en marcha total.
- Para poner el sistema en parada total, pulse 1.
- Para escuchar, pulse 2.
- Para escuchar y hablar simultáneamente, pulse 3.
- Para colgar, pulse 2 veces #.
- Para colgar,
pulse 2 veces
.
- Adiós
2.4 Instalaciones equipadas con TTGSM TYXAL+
Si no dispone de una alimentación de red en la instalación
(segunda residencia, autocaravana, barco...), el TTGSM TYXAL+ trans-
mite las alarmas pero no se puede controlar a distancia. Sin embargo, es
posible ponerse en contacto con él durante 30 minutos después de una
intrusión.
Nota: Si la fuente de alimentación no se ha conectado nunca al transmisor, no se señalará el fallo de
corriente.
Déjese guiar por la síntesis vocal del transmisor.
En todo momento:
- Para volver al menú anterior pulse
- Para colgar, pulse 2 veces

82
(1): Con un transmisor telefónico GSM, puede seleccionar los números
de teléfono que recibirán, en caso de evento, una alerta por SMS.
(2): Ejemplo: un niño llega a casa y desactiva el sistema mediante el
telemando o el lector de chapa de identicación, el transmisor
telefónico GSM envía un SMS a los padres.
Transmisor
TTRTC
TYXAL+
Transmisor
TTGSM
TYXAL+
Nombrar los productos
4 4
Números de teléfono
4 4
Opciones de envío
vocal/SMS (1)
-
4
Alerta próximo
SMS (2)
-
4
Tarjeta SIM -
4
Ayuda de voz
4 4
2.5 Personalizar el transmisor con un código de usuario
• Desde el teclado táctil
Aproveche la interfaz del teclado táctil para con-
gurar de forma todavía más fácil su transmisor.
La tabla adjunta presenta las funciones perso-
nalizables de los transmisores TTRTC TYXAL+
y TTGSM TYXAL+ desde el teclado táctil CLT
8000 TYXAL+.
(Menú: Utilización > Productos > Configurar).
• Sin teclado táctil
Pase la central a modo mantenimiento
(ver instrucciones del sistema)
Llame al transmisor y déjese guiar por la síntesis
vocal.
2. Funcionamiento con un sistema de alarma
2.6 Nombrar el transmisor
Ê Introduzca su código de acceso de usuario y valide con OK.
Ë Pulse Ajustes y seleccione el menú:
Utilización > Productos > Configurar
Ì Pulse la tecla del producto por renombrar o selecciónelo
en la lista de productos haciendo clic en «Examinar»
(ver tabla a continuación)
Í Una vez identicado el producto, seleccione el menú
«Nombrar».
Î Puede seleccionar un texto de la lista
(recomendado) y, a continuación, un número (facultativo)
o personalizar (Ï) el nombre del producto
escribiendo un nombre nuevo.
Ï Valide con OK.
Le aconsejamos utilizar uno de los textos propuestos en la
lista.
De esta forma, en caso de alerta, el texto predeterminado
seleccionado se enunciará.
Este menú permite seleccionar un texto especíco para su transmisor.
Instalación
Zonas
Timbre
Ok
Productos
Volver
O
Nombrar
Habit. padres
Ok
Habitación
Habit. niños
Volver
Configurar
Recorrer
Volver
producto
Pulsar la tecla de
Productos
Ok
Activar/desactivar
Volver
Añadir
Configurar
Nombrar
Inicio
Pasadizo
Personalizar
Volver
Transmisor RTC
Ok
Volver
Autoprotección
Plazo de entrada
Nombrar
4
5
6
Ajustes
Reloj
Idiomas
Ok
Volver
Instalación
Ok
Código de acceso
XXXXXX
Ok
SOS
o Recorrer
Configurar
Ok
Volver
CLT 0 54 22
DMB 0 AD AD
1
3
2
RTC 0 03 01
Número
0 0
Ok
Volver
Nombrar
H a b i t . y a n na
Ok
Volver
25/11/14 12:48
SOS
Ajustes
OFF
Introducir su código
Info
Ajustes
Mi casa
OFF
25/11/14 12:48

83
ES
2.7 Números de teléfono
Ê Introduzca su código de acceso de usuario y valide con OK.
Ë Pulse Ajustes y seleccione el menú:
Utilización > Productos > Configurar
Ì Pulse la tecla del transmisor o selecciónelo en la lista
de productos haciendo clic en «Examinar».
Í Seleccione el menú «Números de teléfono».
Î Si el transmisor es de tipo RTC
Seleccione el número de teléfono por programar (N.° tel. 1 a 6),
a continuación valide con OK.
Introduzca el número de teléfono deseado.
Si el transmisor es de tipo GSM
Seleccione el número de teléfono por programar
(N.° tel. 1 a 6), a continuación valide con OK.
Introduzca el número de teléfono deseado.
Valide con OK.
Seleccione la opción de envío, es decir, la forma en la
que desea ser avisado en caso de intrusión:
por voz o SMS. Valide con OK.
Este menú permite programar los números a los que llamará en caso de alarma o fallo técnico.
Si fuera necesario, puede insertar una pausa en la marcación introduciendo #.
Programar una llamada desde el extranjero a Francia:
Si reside en un país limítrofe con Francia y desea programar el 01 23 45 67 89 situado en Francia,
marque el: 00 +33 1 23 45 67 89.
O
4
5
Transmisor RTC
Autoprotección
Televigilancia
Llamadas entrantes
Ayuda de voz
Supervisión central
Ok
Volver
Nombrar
Números de teléfono
Configurar
Ok
Volver
CLT 0 54 22
CS 0 54 89
RTC 0 03 01
Números de teléfono
Ok
N° tel 2
N° tel 3
Volver
N° tel 1
N° tel 1
Ok
0
Volver
Transmisor GSM
Autoprotección
Televigilancia
Alerta familiares SMS
Tarjeta SIM
Ayuda de voz
Supervisión central
Ok
Volver
Nombrar
Números de teléfono
Números de teléfono
Ok
N° tel 2
N° tel 3
Volver
N° tel 1
N° tel 1
Ok
0
Volver
Opciones de envío
Número tel.1
Ok
Vocal
Volver
Opciones de envío
Número tel.1
Ok
SMS
Volver
Instalación
Zonas
Timbre
Ok
Productos
Volver
Configurar
Recorrer
Volver
producto
Pulsar la tecla de
Productos
Ok
Activar/desactivar
Volver
Añadir
Configurar
Ajustes
Reloj
Idiomas
Ok
Volver
Instalación
Código de acceso
XXXXXX
Ok
SOS
o Recorrer
1
3
2
25/11/14 12:48
SOS
Ajustes
OFF
Introducir su código
Info
Ajustes
Mi casa
OFF
25/11/14 12:48

84
Ê Escriba el código de usuario (ej.: 456789) y valide con OK.
Ë Pulse Ajustes, seleccione el menú:
Utilización > Productos > Configurar y, a continuación,
valide con OK.
Ì Pulse la tecla T1 (tecla externa) del transmisor (ver sus
instrucciones) o selecciónelo en la lista de productos haciendo
clic en «Examinar», después valide con OK.
Í Seleccione el menú «Alerta familiares SMS»,
a continuación valide con OK.
Î En la lista, seleccione el(los) número(s) relacionado(s) con
la alerta por SMS pulsando Seleccionar.
Valide con OK.
4
5
Transmisor GSM
Televigilancia
Tarjeta SIM
Ayuda de voz
Supervisión central
Ok
Volver
Alerta familiares SMS
Alerta familiares SMS
Ok
Select.
Telemando
Ok
Volver
Alerta familiares SMS
Nombrar
Alerta familiares SMS
Activar >
Ok
Volver
Este menú permite enviar un SMS a un número programado en caso de puesta en marcha o en parada
del sistema.
Ejemplo: su hijo llega a casa y desactiva el sistema mediante el telemando o la chapa de identicación,
el transmisor telefónico le envía un SMS.
Compruebe que la opción «Alerta familiares SMS» se ha activado correctamente en el menú «Ajustes»
del telemando o la chapa de identicación asociada a la función.
2.8 Alerta familiares SMS (solo para el transmisor TTGSM TYXAL+)
- Opciones de envío vocal/SMS (solo para el transmisor TTGSM TYXAL+)
Consulte el párrafo Números de teléfono
4
5
Transmisor GSM
Televigilancia
Ayuda de voz
Supervisión central
Ok
Volver
Alerta familiares SMS
Tarjeta SIM
Tarjeta SIM
Introducir código PUK
Ok
Volver
Introducir código PIN
Introducir código PIN
Ok
0
Volver
Introducir código PUK
Ok
0
Volver
2.9 Tarjeta SIM (solo para el transmisor TTGSM TYXAL+)
Ê Marque el código de usuario y valide con OK.
Ë Pulse Ajustes y
seleccione el menú: Utilización > Productos > Configurar
Ì Pulse la tecla del transmisor o selecciónelo en la lista de identicadores
haciendo clic en «Examinar».
Í Seleccione el menú «Tarjeta SIM».
Î Introduzca los ajustes de la tarjeta SIM:
Introducir el código PIN
Introducir el código PUK
Este menú permite introducir el código PIN de la tarjeta SIM para activarla.
2. Funcionamiento con un sistema de alarma

85
ES
Ê Escriba el código de usuario (ej.: 456789) y valide con OK.
Ë Pulse Ajustes, seleccione el menú:
Utilización > Productos > Configurar y, a continuación,
valide con OK.
Ì Pulse la tecla T1 (tecla externa) del transmisor (ver sus
instrucciones) o selecciónelo en la lista de productos haciendo
clic en «Examinar», después valide con OK.
Í Seleccione el menú «Alerta familiares SMS»,
a continuación valide con OK.
Î En la lista, seleccione el(los) número(s) relacionado(s) con
la alerta por SMS pulsando Seleccionar.
Valide con OK.
2.10 Ayuda de voz
Ê Marque el código de usuario y valide con OK.
Ë Pulse Ajustes y
seleccione el menú: Utilización > Productos > Configurar
Ì Pulse la tecla del transmisor o selecciónelo en la lista de
identicadores haciendo clic en «Examinar».
Í Seleccione el menú «Ayuda de voz», después «Activar» o
«Desactivar»(Î).
Valide con OK.
Este menú permite activar o desactivar el altavoz del
transmisor telefónico. Si está activo, el transmisor le señala
vocalmente los diferentes eventos de la instalación (marcha/
parada, rechazo de puesta en marcha...).
4
5
Transmisor RTC
Ok
Volver
Llamadas entrantes
Supervisión central
Ayuda de voz
Activar >
Ok
Volver
Ayuda de voz
Ayuda de voz
< Desactivar
Ok
Volver

86
- Para poner la calefacción en
marcha, pulse 1.
- Para poner la calefacción en
parada, pulse 2.
- Para poner la calefacción en
modo ausencia, pulse 1.
- Para poner la calefacción en
parada, pulse 2.
- Para poner la calefacción en
marcha, pulse 1.
- Para poner la calefacción en
modo ausencia, pulse 2.
3.1 Controlar su calefacción a distancia
123
456
789
0
1
4
5
2
3
2
- Buenos días, introduzca
su código de acceso
Menú principal
- Para la alarma, pulse 1
- Para el confort térmico, pulse 2
- Para los automatismos, pulse 3
- Para los escenarios, pulse 4
- Para personalizar el transmisor, pulse 5
- Para escuchar, pulse 6
- Para escuchar y hablar simultáneamente,
pulse 7
- Para colgar, pulse 2 veces #
Dependiendo de su insta-
lación, algunos menús no
estarán disponibles.
Por ejemplo, si no ha
registrado escenarios,
el menú 4 no aparecerá.
Para el confort térmico, pulse 2.
Menú Confort térmico
La temperatura interior es de 19,0 grados.
La temperatura exterior es de 21,5 grados.*
La calefacción está en modo
ausencia
La calefacción está en marcha La calefacción está en parada
La climatización está en marcha. La climatización está en parada.
- Para poner la climatización en parada, pulse 1. - Para poner la climatización en marcha, pulse 1.
Calefacción
Climatización
- Para poner la instalación en modo calefacción, pulse 1.
- Para poner la instalación en modo climatización, pulse 2.
123
456
789
0
123
456
789
0
- Para colgar, pulse 2 veces
.
Adiós.
Llamar al transmisor
* Si se asocia una sirena exterior
SEF TYXAL+ a su instalación.
En todo momento:
- Para volver al menú anterior pulse
- Para colgar, pulse 2 veces
3. Funciones domóticas

87
ES
123
456
789
0
1
4
5
2
3
3
3.2 Controlar los automatismos a distancia
- Buenos días, introduzca
su código de acceso.
Menú principal
- Para la alarma, pulse 1
- Para el confort térmico, pulse 2
- Para los automatismos, pulse 3
- Para los escenarios, pulse 4
- Para personalizar el transmisor, pulse 5
- Para escuchar, pulse 6
- Para escuchar y hablar simultáneamente,
pulse 7
- Para colgar, pulse 2 veces #
Dependiendo de su insta-
lación, algunos menús no
estarán disponibles.
Por ejemplo, si no ha
registrado
escenarios, el menú 4 no
aparecerá.
Para los automatismos, pulse 3.
Menú Automatismos
- Para controlar las persianas, pulse 1.
- Para la iluminación, pulse 2.
- Para controlar el portal, pulse 3.
- Para controlar el grupo 1, pulse 1.
Persianas del grupo 1
cerradas
- Para abrir, pulse 1.
Persianas del grupo 1
abiertas
- Para cerrar, pulse 2.
- Para controlar el grupo 2, pulse 2.
Persianas del grupo 2
cerradas
- Para abrir, pulse 1.
Persianas del grupo 2
abiertas
- Para cerrar, pulse 2.
- Para controlar el grupo 1, pulse 1.
Luces del grupo 1
apagadas.
- Para encender, pulse 1.
Luces del grupo 1
encendidas.
- Para apagar, pulse 2.
Persianas
Iluminación
Portal
- Para accionar el portal, pulse 1.
123
456
789
0
123
456
789
0
12
3
456
789
0
- Para colgar,
pulse 2 veces .
- Para controlar el grupo 2, pulse 2.
Luces del grupo 1 apa-
gadas.
- Para encender, pulse 1.
Luces del grupo 1
encendidas.
- Para apagar, pulse 2.
Llamar al transmisor
Adiós.
En todo momento:
- Para volver al menú anterior pulse
- Para colgar, pulse 2 veces

88
Llamar al transmisor
3.3 Menú escenario
123
456
789
0
1
4
2
3
4
- Buenos días, introduzca
su código de acceso.
Menú principal
- Para la alarma, pulse 1
- Para el confort térmico, pulse 2
- Para los automatismos, pulse 3
- Para los escenarios, pulse 4
- Para personalizar el transmisor, pulse 5.
- Para escuchar, pulse 6.
- Para escuchar y hablar simultáneamente,
pulse 7.
- Para colgar, pulse 2 veces #.
Dependiendo de su insta-
lación, algunos menús no
estarán disponibles.
Por ejemplo, si no ha
registrado automatismos,
el menú 3 no aparecerá.
Para los escenarios, pulse 4.
Menú Automatismos
- Para activar el escenario 1, pulse 1.
- Para activar el escenario 2, pulse 2.
- Para activar el escenario 3, pulse 3.
- Para activar el escenario 4, pulse 4.
- Para colgar,
pulse 2 veces
.
Adiós.
En todo momento:
- Para volver al menú anterior pulse
- Para colgar, pulse 2 veces
3. Funciones domóticas

89
ES
4. Funcionamiento en modo autónomo
El transmisor puede funcionar en modo autónomo,
sin estar asociado a una central.
En este caso, los detectores técnicos (detector de
escape de agua, humo, etc.) se asocian directa-
mente al transmisor. Se activa una llamada en caso
de detección de un fallo técnico.
También se puede asociar un telemando TL 2000
TYXAL+ con la función SOS para activar una
llamada de emergencia.
Las funciones de televigilancia y de interfonía son
compatibles con este modo de funcionamiento.
DFR TYXAL+
Detector de humo,
incendio
DF TYXAL+
Detector de escape
de agua
DCS TYXAL+
Detector de corte del
suministro eléctrico
TL 2000 TYXAL+
Telemando
DU TYXAL+
Detector
universal
4.1 Detectores y telemando compatibles
4.2 Desarrollo de una llamada en caso de fallo técnico
En caso de detección de un fallo técnico, el transmisor telefónico llama a los números programados
(6 máx.) por turnos hasta que un interlocutor detiene el ciclo de llamadas.
Ejemplo de cuando un interlocutor descuelga:
123
456
789
0
1
2
3
123
456
789
0
123
456
7
*
#
89
0
Para consultar el detalle
de los fallos, pulse 1
Para desactivar el
producto, pulse 2
Está en comunicación
con un transmisor
telefónico.
Fallo de autoprotección
el 04 de abril de 2014
Para detener el ciclo de
llamadas, pulse
- Para escuchar, pulse 2
- Para escuchar y hablar
simultáneamente, pulse 3
- Para colgar, pulse 2
veces
Alarma de autoprotección en
el detector del salón, zona 1,
el 22 04 2014.
*
A partir de ahí, el transmisor
ya no llamará a otros
números.
* Ejemplo de nombre de estancia y
zona. El enunciado depende de la
forma en la que haya configurado su
instalación.
Debe pulsar obligatoria-
mente la tecla
antes
de colgar para detener el ciclo de
llamadas para que el transmisor no
llame a los otros números.

90
4.3 Personalizar el transmisor
Llamar al transmisor
- Para el transmisor GSM, la toma de línea es inmediata.
- Para el transmisor RTC utilice uno de los dos métodos siguientes.
Para evitar la toma de línea involuntaria del transmisor cuando se realizan 2 llamadas, puede desactivar
el método 2 marcando la siguiente secuencia desde el menú principal: #82 6 1.
Marque #82 6 0 para reactivarlo.
Método 1, desde otra línea telefónica (móvil o ja)
Marque el número de teléfono
de la instalación.
Vuelva a marcar el número de
teléfono de la instalación.
El transmisor descuelga
después de 1 o 2 tonos
Espere 2 tonos
1
2
abc
3
def
4
ghi
5
jkl
6
mno
7
pqrs
8
tuv
9
wxyz
*
#
0
1
2
abc
3
def
4
ghi
5
jkl
6
mno
7
pqrs
8
tuv
9
wxyz
*
#
0
Tuu Tuu ... Tuu
Método 2 para utilizar en los siguientes casos:
- cuando llama desde un teléfono móvil (si este cuelga antes del décimo tono)
- cuando el transmisor "convive" con un contestador o un servicio de mensajería
1
2
abc
3
def
4
ghi
5
jkl
6
mno
7
pqrs
8
tuv
9
wxyz
*
#
0
1
2
abc
3
def
4
ghi
5
jkl
6
mno
7
pqrs
8
tuv
9
wxyz
*
#
0
Tuu Tuu ... Tuu
Marque el número de
teléfono de la instalación.
El transmisor toma la línea después de
unos 10 tonos por defecto (número de
tonos modicable).
Espere
10 segundos
Espere
10 tonos
Para seleccionar
francés, pulse 1...
Para seleccionar
francés, pulse 1...
Cuelgue
4. Funcionamiento en modo autónomo

91
ES
4.4 Menú configuración
Menú configuración
Introduzca el nuevo número de teléfono
y pulse
Menú configuración
Introduzca el nuevo número de teléfono
y pulse
Acción aceptada
Para modificar el código de acceso, pulse 3
Menú configuraciónIntroduzca su código de acceso Introduzca el nuevo código de acceso
Para personalizar el anuncio oral, pulse 2
El mensaje de voz es :
“Está en comunicación con un transmisor
telefónico”.
- Para modificar el mensaje de voz, pulse 1.
- Para volver al menú anterior, pulse
El mensaje de voz es :
“Está en comunicación con un transmisor
telefónico”.
- Para modificar el mensaje de voz, pulse 1.
- Para volver al mensaje de voz inicial, pulse 2.
- Para volver al menú anterior, pulse
Hable después de la señal y pulse una tecla
para anular el guardado.
Para modificar la fecha o la hora, pulse 4
Para configurar el número de tonos, pulse 5
(solo TTRTC TYXAL+)
Para modificar el idioma, pulse 6
Para eligir Francés, pulse 1.
Para eligir Inglés, pulse 2.
Para eligir Español, pulse 3.
Para eligir Alemán, pulse 4.
Para eligir Italiano, pulse 5.
Para eligirle Polaco, pulse 6.
Para eligir le Neerlandés, pulse 7.
- Para el número 1, pulse 1.
- Para el número 2, pulse 2.
- Para el número 3, pulse 3.
- Para el número 4, pulse 4.
- Para el número 5, pulse 5.
- Para el número 6, pulse 6.
- Para volver al menú anterior, pulse
No se ha registrado ningún número de
teléfono. Para configurarlo, pulse 1.
- Para volver al menú anterior, pulse
El número configurado es :
02.99.73.xx.xx
Para modificarlo, pulse 1.
Para suprimirlo, pulse2.
- Para volver al menú anterior, pulse
La fecha configurada es :
29 Noviembre2013,
La hora configurada es : 11h57.
- Para modificar la fecha, pulse 1.
- Para modificar la hora, pulse 2.
- Para volver al menú anterior, pulse
29 Noviembre 2013, 11h57.
- Para modificar la fecha, pulse 1.
- Para modificar la hora, pulse 2.
- Para volver al menú anterior, pulse
Introduzca las 6 cifras de la fecha.
Introduzca las 4 cifras de la hora.
Para eligir el formato “AM”, pulse 1
Para eligir el formato “PM”, pulse 2
El número de tonos configurado es : 10.
- Para modificarlo, pulse 1.
- Para volver al menú anterior, pulse
Introduzca las 2 cifras del nuevo
número de tonos
Acción aceptada
Menú configuraciónAcción aceptada
Acción aceptada
Acción aceptada
El número configurado es..
Introduzca su código de acceso
Desde el menú principal, pulse 5 para acceder al menú de personalización.
En todo momento:
- Para volver al menú anterior pulse
- Para colgar, pulse 2 veces

92
5. Prueba de funcionamiento correcto
123
456
789
0
1
2
3
123
456
789
0
123
456
7
*
#
89
0
Con una central:
Ponga el sistema en marcha y active una intrusión.
En autónomo:
Por ejemplo, en un detector de escape de agua, simule un
escape de agua depositando agua encima.
En el transmisor:
1
n°1
n°2
2
n°3
3
n°4
4
n°5
5
n°6
6
7
n°1
n°2
8
n°3
9
n°4
10
n°5
11
n°6
12
13
n°1
n°2
14
n°3
15
n°4
16
Para consultar el detalle
de los fallos, pulse 1
Para desactivar el produc-
to, pulse 1
Está en comunicación
con un transmisor
telefónico.
Fallo técnico
el 04 de abril de 2014
Para detener el ciclo de
llamadas, pulse
- Para detener el sonido,
pulse 1
- Para escuchar, pulse 2
- Para escuchar y hablar
simultáneamente, pulse 3
- Para colgar, pulse 2 veces
Fallo técnico de escape
de agua en el detector
de la zona 2, el 04 de abril
de 2014.
Compruebe que el transmisor telefónico llama a los números
programados (6 como máximo) por turnos hasta que un
interlocutor descuelgue:
- el transmisor solicita la pulsación de la tecla
- emite el anuncio oral e informa del tipo de fallo
- ofrece escuchar lo que ocurre, hablar con una persona
próxima al transmisor, detener el ciclo de llamadas y obte-
ner el detalle de los fallos si hay asociada una central.
Provoque una detección para comprobar el funcionamiento correcto de la
instalación.
También puede activar un ciclo de llamadas
de prueba pulsando 30 segundos la tecla
del transmisor.
>30s
Ejemplo de ciclo completo
con 6 números programados

93
ES
6. Estado del testigo de línea telefónica
6.2 TTGSM TYXAL+
Tecla/testigo
Para visualizar el estado
de su línea telefónica,
pulse la tecla de la parte
frontal.
Estado del testigo Descripción
Rojo parpadeante* Ausencia de línea RTC
Verde
jo*
Presencia de línea RTC
Verde
parpadeante
Llamada en curso
Apagada Funcionamiento normal, se pueden realizar
llamadas entrantes y salientes.
Estado del
testigo
con alimentación
Estado del
testigo
sin alimenta-
ción
Descripción
Rojo
parpadeante
Apagada No hay recepción GSM
Verde/naranja
parpadeante
Apagada Recepción GSM débil
Verde
Fijo
Apagada Buena recepción GSM
Verde
parpadeante
Apagada Llamada en curso
(*) El testigo permanece encendido:
- durante 5 minutos después del encendido
- durante 1 minuto cuando se pulsa la tecla T1
Sin alimentación de red, el testigo permanece encendido durante:
- 5 minutos después del encendido
- la transmisión de un evento
- 1 minuto cuando se pulsa la tecla T1
- 5 minutos después de un corte del suministro eléctrico
6.1 TTRTC TYXAL+
Sin alimentación de red, el
TTGSM TYXAL+ sigue transmi-
tiendo las alarmas, pero ya no
es controlable a distancia.
El transmisor telefónico controla permanentemente la línea
telefónica.
En caso de fallo de línea telefónica, este símbolo
se muestra en el teclado táctil. Para conocer el detalle de los fallos
introduzca su código de acceso.
25/11/15 12:48
Info
Ajustes
OFF
Mi casa

94
7. Cambio de la pila
2
1
1
2
2
1
4
2
1
3
5
Abra la caja. Retire la tapa inferior. Con ayuda de un destornillador,
levante los 2 clips que sujetan la
tapa superior.
Retire la tapa superior.
Reemplace la pila
Introduzca la pila
respetando la
polaridad.
• Mantener fuera del alcance de los niños.
• No invertir la polaridad.
• No abrir el sistema de pilas.
• No aplastar o perforar los elementos.
• No cortocircuitar los bornes (+) o (-) de la pila
por medio de elementos conductores.
• No someter a una tensión mecánica excesiva.
• No exponer la unidad al agua
o a la condensación.
• No calentar directamente por encima de los
100°C (212°F), soldar o tirar al fuego.
Estos usos inadecuados pueden provocar
fugas o escapes de electrolito vaporizado, así
como un incendio o una explosión.
• No recargar
• Eliminar conforme a la reglamentación vigente.
Manipulación de la pila
Riesgo de incendio, explosión y quemaduras graves.
Nosotros le recomendamos que utilice la pila SAFT LSH20 - 3,6 V. Puede utilizar una pila de litio
de 3,6 V de otra marca, en este caso la vida útil de 10 años no estará garantizada.
Pase la central a modo MANTENIMIENTO (ver instrucciones del sistema)
Abra la caja del transmisor
El desgaste de la pila del transmisor se indica:
• En modo sistema de alarma:
Por un mensaje en el teclado CLT 8000 TYXAL+. La central emite bips en cada puesta en marcha o
parada del sistema, (o «fallo de pilas» con su síntesis vocal, necesita que la ayuda de voz esté activada,
ver instrucciones del CLT 8000 TYXAL+).
• En modo autónomo:
Por un mensaje de inicio durante una llamada entrante o saliente provocada por un fallo.
Desconecte la toma telefónica del transmisor TTRTC TYXAL+.

95
ES
Para volver a la conguración de fábrica suprimiendo todas las asociaciones y todos los fallos en curso.
Si una central está asociada al transmisor, póngala en modo mantenimiento (ver instrucciones del sistema).
9. Inicialización (volver a la conguración de fábrica)
con una central de alarma o en modo autónomo.
Abra la caja del transmisor
Solo en modo
autónomo
RESET OK
>30s
BIP... BIP
>30s
BIP BIIIIP
>5s >15s
T2 T2
Pulse la tecla T2 durante
30 segundos.
El transmisor se encuentra en su estado inicial, se suprimen todas las asociaciones y
todos los fallos en curso.
Después de 5 segundos, el transmisor emite 1 bip,
manténgala pulsada.
Después de 15 segundos, el transmisor emite 2 bips,
manténgala pulsada.
Después de 30 segundos, el transmisor emite un bip largo.
8. Inicialización del código de acceso
con una central de alarma sin teclado o en modo autónomo.
Abra la caja del transmisor
>15s
BIP... BIP
BIP
>5s >15s
Solo en
modo autónomo
T2 T2
Pulse la tecla T2 durante 15
segundos.
Después de 5 segundos, el transmisor
emite 1 bip, manténgala pulsada.
Después de 15 segundos, el transmisor
emite 2 bips, suelte.
El código de acceso vuelve a ser 1 2 3 4 5 6.
Para volver al código de fábrica 1 2 3 4 5 6.
Si una central está asociada al transmisor, póngala en modo MANTENIMIENTO
(ver instrucciones del sistema).

96
10. Ayuda
La interfonía es de mala calidad
Un detector de la instalación provoca
activaciones intempestivas
La temperatura ambiente indicada
por el transmisor es inexacta
Un ciclo de llamadas en curso se
interrumpe y reemplaza por otro ciclo
de llamadas
Compruebe que no está utilizando el modo
manos libres.
Aleje al máximo la antena del TTGSM TYXAL+
Después de haber cogido la llamada y escu-
chado el anuncio del fallo, desactive el produc-
to en cuestión.
Aleje el transmisor de las fuentes de calor (rou-
ter ADSL...) para no perturbar la medición de la
temperatura ambiente.
Los detectores técnicos se clasican por orden
de prioridad:
1 - Detector de humo, incendio
(DFR TYXAL+)
2 - Detector de escape de agua
(DF TYXAL+)
3 - Detector de corte del suministro eléctrico
(DCS TYXAL+)
4 - Detector universal
(DU TYXAL+)
Ejemplo: La activación de una alerta de incendio
por un DFR TYXAL+ tendrá prioridad con res-
pecto a una activación de corte del suministro
eléctrico.
El objetivo de este capítulo es ayudarle a resolver rápidamente los problemas más habituales que puede
encontrar.
En caso de duda, si el problema persiste o no aparece en esta lista, póngase en contacto con su instalador.
Debido a la evolución de las normas y del material, las características indicadas en el texto y las imágenes de este
documento solamente podrán comprometernos después de ser conrmadas por nuestros servicios.

97
ES

98
TTRTC TYXAL+ is een apparaat dat de bedrade
telefoonlijn van de installatie gebruikt.
TTGSM TYXAL+ wordt aangesloten op een
draadloos telefoonnetwerk.
PSTN:
Public switched telephone network, wereldwijd
gebruikte telefonienetwerk.
Een telefonische overdrager die wordt aangeslo-
ten op de telefoonlijn van uw woning.
GSM:
Global System for Mobile communications.
Een GSM telefonische overdrager wordt aange-
sloten op de telefoonlijn van uw woning.
- 2G-modem
Stil alarm:
wordt gebruikt om de buitenwereld op de hoogte
te brengen van een potentiële indringer, door
een stil alarm te geven.
Geluidsalarm:
de functie "Geluidsalarm" zal
onmiddellijk de buurt waarschuwen, en zal ook
een telefonisch oproep maken, via een zender,
alsook de verbonden alarmen activeren.
Onderhoudsmodus:
De onderhoudsmodus dient voor de inbedrijfstel-
ling, het onderhoud en diagnostiek. Om toegang
te krijgen tot deze functie, moet de bewaking
worden uitgeschakeld.
De centrale in de onderhoudsmodus zetten,
wordt uitgevoerd met een toetsenbord (touch
of eenvoudig), een afstandsbediening of een
badgelezer.
(zie gebruiksaanwijzing van het systeem)
Zelfbeveiliging:
de producten worden beschermd tegen
openen en verwijderen.
Als een inbreker een van de producten pro-
beert open te maken of los te trekken wordt er
een boodschap verzonden naar de centrale,
waardoor de interne sirene en de melders van
de installatie afgaan (interne of buitensirene,
telefonische overdrager).
De zelfbeveiliging is permanent ingeschakeld,
zelfs wanneer het systeem uitstaat.
Het is mogelijk om deze uit te schakelen via een
touch-toetsenbord CLT 8000 TYXAL+.
Om een product te openen, moet u het systeem
in de onderhoudsmodus zetten.
DTMF
Dubbele toon, multifrequentie
SMS
Short Message Service
Gedeeltelijke splitsing
De communicatie verloopt via het netwerk van
France Télécom. De gegevens van het internet
en andere services zoals tv verlopen via het
ISP-netwerk.
Totale splitsing
U bent geen klant meer bij France Télécom.
De gegevens en de communicatie verlopen via
het FAI-netwerk.
Oproepcyclus:
De zender vormt het eerste geregistreerde num-
mer. Als de ontvanger niet opneemt of de oproep
niet beantwoordt, dan zal de overdrager het
tweede nummer vormen, vervolgens het derde
enz... tot het zesde nummer.
Als er niemand opneemt, dan hervat de overdra-
ger zijn cyclus: nr. 1, nr. 2, nr. 3 enz. De overdra-
ger probeert 16 oproepen of max. 4 cycli.
Gebruik dit apparaat alleen in overeen-
stemming met de geldende wetgeving
en de lokale regelgeving. Deze kunnen
bijvoorbeeld van toepassing zijn in tank-
stations, ziekenhuizen ...
Dit apparaat kan de werking van medische
apparatuur verstoren (gehoorapparaten,
pacemakers). Neem voor meer informatie
contact op met uw huisarts.
Dit apparaat kan storingen veroorzaken
indien het dichtbij televisies, radio's of
computers gebruikt wordt.
Gebruik het toestel niet in ruimtes waar
ontplofngsgevaar mogelijk is (bv.: in de
nabijheid van een gasbron, brandstoffen
of chemische producten).
Lexicon
De bewerking moet in onderhoudsmodus
worden uitgevoerd (zie handleiding van de
centrale CS 8000 TYXAL+
§ Onderhoudsmodus)

99
NL
Inhoudsopgave
1. Hoe werkt de overdrager? ..................................................................................................100
1.1 Voorstelling ......................................................................................................................100
1.2 Principe ...........................................................................................................................100
1.3 Werking in autonome modus ..........................................................................................100
1.4 Domoticafuncties .............................................................................................................101
1.5 Beheer van storing netspanning (Alleen zender TTGSM TYXAL+) ................................101
2. Werking met een alarmsysteem .........................................................................................102
2.1 Worden gewaarschuwd in geval van nood, ....................................................................102
2.3 Het alarm op afstand bedienen .......................................................................................104
2.4 Installaties uitgerust met TTGSM TYXAL+ .....................................................................105
2.5 De overdrager met een gebruikerscode personaliseren .................................................106
2.6 De overdrager een naam geven .....................................................................................106
2.7 Oproepnummers .............................................................................................................107
2.8 SMS-melding familie (alleen met een TTGSM TYXAL+ zender) ....................................108
2.9 SIM-kaart (alleen met een TTGSM TYXAL+ overdrager) ...............................................108
2.10 Stemhulp .......................................................................................................................109
3. Domoticafuncties ................................................................................................................110
3.1 De verwarming op afstand bedienen ..............................................................................110
3.2 Op afstand automatismen bedienen ............................................................................... 111
3.3 Het menu Scenario .........................................................................................................112
4. Werking in autonome modus .............................................................................................113
4.1 Detectoren en compatibele afstandsbediening ..............................................................113
4.2 Afhandeling van een oproep in geval van een technische storing .................................. 113
4.3 De overdrager personaliseren .........................................................................................114
4.4 Het conguratiemenu ......................................................................................................115
5. De goede werking testen .................................................................................................... 116
6. Status van lampje van telefoonlijn ....................................................................................117
6.1 TTRTC TYXAL+ ..............................................................................................................117
6.2 TTGSM TYXAL+ ............................................................................................................. 117
7. Batterij vervangen ...............................................................................................................118
8. Initialisatie van de toegangscode .....................................................................................119
9. Initialisatie (de fabrieksinstellingen herstellen) ..............................................................119
10. Ondersteuning ................................................................................................................... 120
De CE-conformiteitsverklaring van dit toestel kan op aanvraag verkregen worden bij:
De dienst “Technische inlichtingen”
DELTA DORE - Bonnemain - 35270 Combourg (Frankrijk)
E-mail: [email protected]

100
1. Hoe werkt de overdrager?
1.3 Werking in autonome modus
Werking met een centrale CS 8000 TYXAL+
1.1 Voorstelling
1.2 Principe
Als uw installatie over een alarmcentrale CS 8000 TYXAL+ beschikt, dan worden de overdrager en de
andere producten van het assortiment TYXAL+ verbonden met de centrale CS 8000 TYXAL+ (max. 50
producten.).
TTRTC TYXAL+
DO TYXAL+ DMB TYXAL+
CS 8000 TYXAL+
TTGSM TYXAL+
CLT 8000 TYXAL+TL 2000 TYXAL+
DVR TYXAL+
DFR TYXAL+ DU TYXAL+ DF TYXAL+
DCS TYXAL+
DO TYXAL+
Bedienen
Detecteren Detecteren
Waarschuwen/signaleren
Centraliseren
Inbraakdetectoren Technische detectoren
TTRTC TYXAL+ TTGSM TYXAL+
T
L 2000 TYXAL+
DFR TYXAL+ DU TYXAL+ DF TYXAL+
DCS TYXAL+
Technische detectoren
De overdrager kan zelfstandig werken.
In dit geval zijn de technische detectoren
(rookdetector DFR TYXAL+, universele techni-
sche detector DU TYXAL+ of waterlekkage DF
TYXAL+, ...) rechtstreeks verbonden met de
overdrager.
Het is mogelijk om een TL 2000 TYXAL+ af-
standsbediening te verbinden met de SOS-func-
tie om een noodoproep naar uw familie uit te
voeren (2 seconden drukken op de knop 1 of 2
van de afstandsbediening, afhankelijk van de
conguratie).
Waarschuwen/signaleren
De overdrager van het alarm TTRTC TYXAL+ ge-
bruikt de bedrade telefoonlijn van de installatie,
de TTGSM TYXAL+ is verbonden met een draadloos
telefoonnetwerk.
Hiermee kunt u:
- op afstand het alarm bedienen (met behulp van de
spraaksamenvatting van de overdrager).
- een melding ontvangen in geval van een oproep
naar een andere telefoon of meldkamer (volgens
de standaard protocollen: 200 Bauds FSK, Contact
ID, ... (vereist een abonnement)).
- op afstand uw verwarming bedienen
en 5 automatismen,
op voorwaarde dat uw installatie is voorzien van
X3D-producten.
- scenario's uitvoeren. Voorbeeld:
"Vertrek"= lichten uit, rolluiken gesloten,
"Aankomst" = lichten aan, rolluiken open
- de omgevingstemperatuur van de installatie kennen
In geval van alarm, de uitgaande oproep (zelfs in
geval van een stroomstoring) kan:
- het alarm beschrijven,
- luisteren wat er in de bewaakte ruimtes gebeurt en
gelijktijdig praten.
- een oproepcyclus stoppen
- de sirenes stoppen

101
NL
1.4 Domoticafuncties
1.5 Beheer van storing netspanning (Alleen zender TTGSM TYXAL+)
Wanneer de zender geen stroom meer krijgt:
- zal deze gedurende 5 minuten elke 10 seconden een pieptoon laten horen.
- na 30 minuten genereert de centrale een technische storing die na 30 seconden door de overdrager
wordt verzonden.
Ontvanger
van portaal X3D
Ontvangers voor verlichting
X3D
Compatibele producten
CALYBOX 2020
WT
Energiemanager
Scénarios
Réglages
11.5°C Lun. 23 Septembre
18:28
Autres
Conso Thermique
Volets
Ou
vr
a
n
t
31
Calendrier
Eau chaude
ROLLIA / TYMOOV X3D
Motors van rolluiken
Ontvangers van rolluiken
De domoticafuncties maken het mogelijk om op
afstand:
- de verwarming te regelen.
- 5 automatismen te sturen
(2 kanalen rolluiken ROLLIA / TYMOOV of ontvanger
van rolluiken, 2 kanalen verlichting, 1 kanaal portaal).
- 4 scenario's te bedienen.
Deze functies kunnen worden uitgevoerd als de appa-
ratuur dit mogelijk maakt (X3D-ontvangers).
Neem hiervoor contact op met onze diensten.
De verbindingen kunnen van 2 types zijn:
• directe verbinding
• herhaler: in dit geval dient de herhaler als relais om
het signaal naar andere ontvangers door te
sturen, die zich buiten het radiobereik bevinden (grote
installaties, dikke betonnen muren,...)

102
2. Werking met een alarmsysteem
Verloop van een oproepcyclus bij inbraakalarm of technische storing
Indien er een inbraak- of systeembewakingsalarm wordt gedetecteerd, belt de telefoonzender de gepro-
grammeerde oproepnummers (maximaal 6) om de beurt totdat er opgenomen wordt:
In het geval van de overdrager TTGSM TYXAL+,
kunt u voor elk geregistreerd nummer kiezen tussen
spraakoproep
en SMS .
De optie Spraak/SMS kunt u via het touch-toetsenbord
CLT 8000 TYXAL+ instellen.
Verbonden met een alarmsysteem kan de overdrager:
- worden gewaarschuwd in geval van nood,
- het alarm op afstand bedienen.
2.1 Worden gewaarschuwd in geval van nood,
1
n°1
n°2
2
n°3
3
n°4
4
n°5
5
n°6
6
7
n°1
n°2
8
n°3
9
n°4
10
n°5
11
n°6
12
13
n°1
n°2
14
n°3
15
n°4
16
Ê De overdrager vormt het nummer dat het eerst werd gere-
gistreerd. Als de ontvanger niet opneemt of de oproep niet
beantwoordt, dan zal de overdrager het tweede nummer
vormen, vervolgens het derde enz... tot het zesde nummer.
Ë Als geen enkele ontvanger opneemt, dan hervat de overdra-
ger zijn cyclus: eerste nummer, tweede nummer enz...
De overdrager voert tot 16 opeenvolgende oproepen.
De cyclus wordt automatisch na 16 oproepen gestopt.
Om de oproepcyclus te beëindigen, druk op de toets .
Spraakoproep
In het geval van een technische storing (behalve rookmelders), wordt de oproep na een vertraging van
30 seconden geactiveerd.
1
n°1
n°2
2
n°3
3
n°4
4
n°5
5
6
n°1
7
n°3
8
n°5
9
n°1
10
n°3
11
n°5
n°1
12
n°3
13
14
n°5
Stopt
automatisch
Ê De overdrager vormt het nummer dat het eerst werd
geregistreerd. Als de ontvanger niet opneemt of de op-
roep niet beantwoordt, dan zal de overdrager een SMS
verzenden naar het tweede nummer.
De overdrager zet de cyclus voort en belt naar het derde
nummer, stuurt een SMS naar het vierde nummer en
vormt het vijfde geregistreerde nummer als er niemand
opneemt.
Ë Als geen enkele ontvanger opneemt, dan hervat de
overdrager zijn cyclus: eerste nummer, derde nummer,
vijfde nummer...
De TTGSM TYXAL+ stuurt in de volgende cycli geen SMS
meer.
De overdrager stopt automatisch na 4 cycli.
Bijvoorbeeld: u hebt 5 nummers geregistreerd, waarvan 2 SMS. (nr 2 en nr 4)
2.2 De overdrager TTGSM TYXAL+
Spraakoproep Sms
TTRTC TYXAL+
4
-
TTGSM TYXAL+
4 4
Ê Ë
Ê Ë

103
NL
Voorbeeld van een zelfbeveiliging:
- U móet op toets voordat u ophangt, om te voorkomen dat de zender de andere oproepnum-
mers belt.
123
456
789
0
1
2
3
123
456
789
0
123
456
7
*
#
89
0
Om het detail van de
defecten te raadplegen,
druk op 1.
Om het product te deacti-
veren, druk op 2.
U bent in gesprek met
een telefonische over-
drager.
Storing zelfbeveiliging
op 4 april 2014
Om de oproepcyclus stop
te zetten, druk op
Als het systeem is inge-
schakeld
- Om het systeem uit te
schakelen, druk op 1.
Als het systeem is uitge-
schakeld
- Om het loeien te
deactiveren, druk op 1.
- Om te luisteren, druk op 2
- Om gelijktijdig te luisteren
en te praten, druk op 3
- Om op te hangen,
druk twee keer op
Zelfbeschermingsalarm voor
de detector Salon, zone 1
op 22 04 2014.
*
Vanaf dit moment belt de
overdrager geen enkel ander
nummer.
* Voorbeeld van naam van kamer en zone.
De melding is afhankelijk van de wijze waarop u uw installatie hebt geconfigureerd.

104
2.3 Het alarm op afstand bedienen
U kunt inschakelen of uitschakelen met behulp van de menu's die door de spraaksynthese van de
overdrager worden voorgesteld.
De overdrager bellen
- Met een GSM-overdrager wordt de lijn onmiddellijk aangenomen.
- Voor de RTC-overdrager moet u een van de twee onderstaande methoden gebruiken.
Het systeem op afstand inschakelen/uitschakelen (volledig of per zone).
Om te vermijden dat de overdrager onbedoeld na 2 oproepen de lijn aanneemt, moet u methode 2 uitscha-
kelen door de volgende cijfers via het hoofdmenu te vormen: #82 6 1.
Druk op #82 6 0 om deze opnieuw te activeren.
Methode 1, vanaf een andere telefoonlijn (mobiel of vast)
Vorm het oproepnum-
mer van de installatie.
Vorm het oproepnummer van de
installatie opnieuw.
De zender neemt na 1 of 2 keer
overgaan op.
Wacht gedurende 2 belsignalen
1
2
abc
3
def
4
ghi
5
jkl
6
mno
7
pqrs
8
tuv
9
wxyz
*
#
0
1
2
abc
3
def
4
ghi
5
jkl
6
mno
7
pqrs
8
tuv
9
wxyz
*
#
0
Tuu Tuu ... Tuu
Methode 2 te gebruiken in de volgende gevallen:
- Als u belt vanaf een mobiele telefoon (als deze opneemt vóór het 10e belsignaal),
- als de zender verbonden is met een antwoordapparaat of voicemail
1
2
abc
3
def
4
ghi
5
jkl
6
mno
7
pqrs
8
tuv
9
wxyz
*
#
0
1
2
abc
3
def
4
ghi
5
jkl
6
mno
7
pqrs
8
tuv
9
wxyz
*
#
0
Tuu Tuu ... Tuu
Vorm het het oproepnum-
mer van de installatie.
De overdrager neemt standaard de lijn
na 10 beltonen aan (aantal beltonen
kunnen worden gewijzigd).
Wacht 10
seconden
Wacht gedurende
10 belsignalen
Voor Frans, druk op
1 ...
Voor Frans, druk op 1 ...
Haak terug in.
2. Werking met een alarmsysteem

105
NL
123
456
789
0
1
2
1
3
4
Goeiedag, vorm uw
toegangscode .
Hoofdmenu
- Voor alarm, druk op 1
- Voor het thermisch comfort, druk op 2.
- Voor de automatismen, druk op 3.
- Voor de scenario's, druk op 4.
- Om de overdrager te personaliseren,
druk op 5.
- Om op te hangen,
druk 2 keer op #
Het is mogelijk dat bepaalde
menu's niet worden aangebo-
den, naargelang uw installatie.
Bijvoorbeeld, u hebt geen
scenario's geregistreerd, menu
4 zal niet worden weergegeven.
Voor alarm, druk op 1
Alarmmenu
Het systeem is volledig ingeschakeld.
- Om het systeem volledig uit te schakelen,
druk op 1.
- Om te luisteren, druk op 2
- Om gelijktijdig te luisteren en te praten, druk op 3
- Druk 2 keer op # om op te hangen.
- Om op te hangen,
druk 2 keer op
.
- Tot ziens.
2.4 Installaties uitgerust met TTGSM TYXAL+
Als uw installatie niet beschikt over voeding
(bijgebouw, camper, boot...), dan zal de TTGSM TYXAL+ alarmen
verzenden, maar kan niet op afstand worden bediend. U kunt de
installatie wel 30 minuten na een inbraak contacteren.
Opmerking: Als de voeding niet is aangesloten op de zender, zal de stroomstoring niet worden gemeld.
Hier gaan we even de spraaksynthese van de overdrager toelichten.
Op elk moment:
- Om terug te keren naar het vorige menu druk op
- Om op te hangen, druk 2 keer op

106
(1): U kunt met uw GSM telefonische overdrager, selecteren welke
telefoonnummers de oproep - via SMS - ontvangen, in geval van
een gebeurtenis.
(2): Bijvoorbeeld: uw kind komt thuis en schakelt het systeem via de
afstandsbediening of kaartlezer uit, de GSM telefonische overdrager
stuurt een SMS naar de ouders.
Overdrager
TTRTC
TYXAL+
Overdrager
TTGSM
TYXAL+
De producten benoemen
4 4
Telefoonnummers
4 4
Meldoptie
spraak/SMS (1)
-
4
SMS-melding familie (2) -
4
Sim-kaart -
4
Stemhulp
4 4
2.5 De overdrager met een gebruikerscode
personaliseren
• Vanaf het touch-toetsenbord
Met de interface van het touch-toetsenbord kunt
u nog gemakkelijker uw overdrager programme-
ren.
De onderstaande tabel vermeldt de functies van
de overdragers TTRTC TYXAL+ en TTGSM TY-
XAL+ die vanaf een touch-toetsenbord CLT 8000
TYXAL+ kunnen worden gepersonaliseerd.
(Menu: Gebruik> Producten> Instellen).
• Zonder touch-toetsenbord
Zet de centrale in onderhoudsmodus
(zie handleiding systeem)
Bel de overdrager en laat u begeleiden door de
spraaksynthese.
2. Werking met een alarmsysteem
2.6 De overdrager een naam geven
Ê Vorm uw toegangscode en druk op OK.
Ë Druk op Instellingen, selecteer het menu:
Gebruik> Producten> Instellen
Ì Druk op de toets van het product waarvan u de naam
wilt wijzigen of selecteer het product in de lijst met producten
door te klikken op "Bladeren" (zie tabel)
Í Zodra het product is geïdenticeerd, selecteert u het menu
"Naam geven".
Î In de lijst kunt u een label kiezen
(aanbevolen), vervolgens een nummer (optioneel)
of u kunt de (Ï) naam van het product aanpassen
door een nieuwe naam in te voeren.
Ï Bevestig door op OK te drukken.
We raden aan om een van de labels in de lijst te gebruiken.
Op deze manier zal bij een alarm het vooraf geregistreerde
label worden vermeld.
Met dit menu kunt u een speciek label voor uw overdrager kiezen.
Installatie
Zones
Deurbel
Ok
Producten
Terug
U
Naam geven
Kamer ouders
Ok
Slaapkamer
Kinderkamer
Terug
Instellen
Bladeren
Terug
product
Druk op de toets van het
Producten
Ok
In-/uitschakelen
Terug
Toevoegen
Instellen
Nummer
Onthaal
Pad
Personaliseren
Terug
PSTN-telefoonkiezer
Ok
Terug
Zelfbeveiliging
Vertraging binnenkomst
Naam geven
4
5
6
Instellingen
Klok
Talen
Ok
Terug
Installatie
Ok
De toegangscode
XXXXXX
Ok
SOS
u Bladeren
Instellen
Ok
Terug
CLT 0 54 22
DMB 0 AD AD
1
3
2
RTC 0 03 01
Nummer
0 0
Ok
Terug
Nummer
S l a a p . y a n nk
Ok
Terug
25/11/14 12:48
SOS
Instellingen
UIT
Voer uw code in
Info
Instellingen
Mijn huis
UIT
25/11/14 12:48

107
NL
2.7 Oproepnummers
Ê Vorm uw toegangscode en druk op OK.
Ë Druk op Instellingen, selecteer het menu:
Gebruik> Producten> Instellen
Ì Druk op de toets van de zender
of selecteer deze in de lijst met producten
door te klikken op "Bladeren"
Í Selecteer het menu "Oproepnummers".
Î De overdrager is van het type PSTN
Selecteer het oproepnummer dat u wilt programmeren
(telefoonnummer 1 tot 6), vervolgens bevestigen met OK.
Voer het gewenste oproepnummer in.
De overdrager is van het type GSM
Selecteer het oproepnummer dat u wilt programmeren
(telefoonnummer 1 tot 6), vervolgens bevestigen met OK.
Voer het gewenste oproepnummer in.
Bevestig door op OK te drukken.
Kies de meldoptie, dit wil zeggen de wijze
waarop u wilt worden gewaarschuwd: spraak of SMS.
Bevestig door op OK te drukken.
Met dit menu kunt u de nummers programmeren die worden gebeld in geval van een alarm of
technische storing.
Indien nodig kunt u in de nummers een pauze invoegen door op # te drukken.
Een oproep vanuit het buitenland naar Frankrijk programmeren:
U woont in een land dat grenst aan Frankrijk en u wilt
het Franse nummer 01 23 45 67 89 programmeren, dan voert u in: 00 +33 1 23 45 67 89.
U
4
5
PSTN-telefoonkiezer
Zelfbeveiliging
Toezicht op afstand
Binnenkomende oproepen
Stemhulp
Bewaking van centrale
Ok
Terug
Naam geven
Oproepnummers
Instellen
Ok
Terug
CLT 0 54 22
CS 0 54 89
RTC 0 03 01
Oproepnummers
Ok
Telefoonnummer 2
Telefoonnummer 3
Terug
Telefoonnummer 1
Telefoonnummer 1
Ok
0
Terug
Gsm-telefoonkiezer
Zelfbeveiliging
Toezicht op afstand
SMS-melding familie
SIM-kaart
Stemhulp
Bewaking van centrale
Ok
Terug
Naam geven
Oproepnummers
Oproepnummers
Ok
Telefoonnummer 2
Telefoonnummer 3
Terug
Telefoonnummer 1
Telefoonnummer 1
Ok
0
Terug
Meldoptie
Telefoonnummer 1
Ok
Spraak
Terug
Meldoptie
Telefoonnummer 1
Ok
SMS
Terug
Installatie
Zones
Deurbel
Ok
Produits
Terug
Instellen
Bladeren
Terug
product
Druk op de toets van het
Producten
Ok
In-/uitschakelen
Terug
Toevoegen
Instellen
Instellingen
Klok
Talen
Ok
Terug
Installatie
De toegangscode
XXXXXX
Ok
SOS
u Bladeren
1
3
2
25/11/14 12:48
SOS
Instellingen
UIT
Voer uw code in
Info
Instellingen
Mijn huis
UIT
25/11/14 12:48

108
Ê Voer de gebruikerscode in (bijv.: 456789) en druk op OK.
Ë Druk op Instellingen, selecteer het menu:
Gebruik> Producten> Instellen en druk op OK.
Ì Druk op de toets T1 (externe toets) van de zender (zie
handleiding) of selecteer deze in de lijst met producten door op
"Bladeren" te klikken en vervolgens op OK.
Í Selecteer het menu "SMS-melding familie",
vervolgens bevestigen met OK.
Î In de lijst selecteert u het/de nummer(s)
voor de SMS-waarschuwing door op Select. te drukken.
Bevestig door op OK te drukken.
4
5
Gsm-telefoonkiezer
Toezicht op afstand
SIM-kaart
Stemhulp
Bewaking van centrale
Ok
Terug
SMS-melding familie
SMS-melding familie
Ok
Select.
Afstandbediening
Ok
Terug
SMS-melding familie
Naam geven
SMS-melding familie
Inschakelen >
Ok
Terug
Met dit menu kunt u een SMS sturen naar een vooraf ingesteld nummer bij het starten of stoppen van het
systeem.
Bijvoorbeeld: uw kind komt thuis en schakelt het systeem via de afstandsbediening of kaartlezer uit, de
telefonische overdrager stuurt een SMS.
Controleer of de optie "SMS-melding familie" is geactiveerd in het menu "Instellingen" van de
afstandsbediening of badge die aan de functie is gekoppeld.
2.8 SMS-melding familie (alleen met een TTGSM TYXAL+ zender)
- Meldoptie Spraak/SMS (alleen voor de overdrager TTGSM TYXAL+)
Raadpleeg de paragraaf Oproepnummers
4
5
Gsm-telefoonkiezer
Toezicht op afstand
Stemhulp
Bewaking van centrale
Ok
Terug
SMS-melding familie
SIM-kaart
SIM-kaart
Voer de PUK-code in
Ok
Terug
Voer de PIN-code in
Voer de PIN-code in
Ok
0
Terug
Voer de PUK-code in
Ok
0
Terug
2.9 SIM-kaart (alleen met een TTGSM TYXAL+ overdrager)
Ê Voer de gebruikerscode in en druk op OK.
Ë Druk op Instellingen, selecteer het menu: Gebruik> Producten> Instellen
Ì Druk op de toets van de zender
of selecteer deze in de lijst met identicatienummers
door te klikken op "Bladeren"
Í Selecteer het menu "SIM-kaart".
Î Voer de instellingen van de SIM-kaart in:
Voer de PIN-code in
Voer de PUK-code in
Met dit menu kunt u de PIN-code van de SIM-kaart invoeren om deze te activeren.
2. Werking met een alarmsysteem

109
NL
Ê Voer de gebruikerscode in (bijv.: 456789) en druk op OK.
Ë Druk op Instellingen, selecteer het menu:
Gebruik> Producten> Instellen en druk op OK.
Ì Druk op de toets T1 (externe toets) van de zender (zie
handleiding) of selecteer deze in de lijst met producten door op
"Bladeren" te klikken en vervolgens op OK.
Í Selecteer het menu "SMS-melding familie",
vervolgens bevestigen met OK.
Î In de lijst selecteert u het/de nummer(s)
voor de SMS-waarschuwing door op Select. te drukken.
Bevestig door op OK te drukken.
2.10 Stemhulp
Ê Voer de gebruikerscode in en druk op OK.
Ë Druk op Instellingen, selecteer het menu:
Gebruik> Producten> Instellen
Ì Druk op de toets van de zender
of selecteer deze in de lijst met identicatienummers
door te klikken op "Bladeren"
Í Selecteer het menu "Stemhulp", vervolgens "Inschakelen"
of "Uitschakelen"(Î).
Bevestig door op OK te drukken.
Met dit menu kunt u de luidspreker van de telefonische
overdrager inschakelen of uitschakelen. Indien actief zal de
overdrager u via spraak de verschillende gebeurtenissen
melden (inschakelen/uitschakelen, inschakelen geweigerd...).
4
5
PSTN-telefoonkiezer
Ok
Terug
Binnenkomende oproepen
Bewaking van centrale
Stemhulp
Inschakelen >
Ok
Terug
Stemhulp
Stemhulp
< Uitschakelen
Ok
Terug

110
3.1 De verwarming op afstand bedienen
123
456
789
0
1
4
5
2
3
2
- Goeiedag, vorm uw
toegangscode.
Hoofdmenu
- Voor alarm, druk op 1
- Voor het thermisch comfort, druk op 2.
- Voor de automatismen, druk op 3.
- Voor de scenario's, druk op 4.
- Om de overdrager te personaliseren, druk op 5.
- Om te luisteren, druk op 6
- Om gelijktijdig te luisteren en te praten,
druk op 7
- Druk 2 keer op # om op te hangen.
Het is mogelijk dat bepaal-
de menu's niet worden
aangeboden, naargelang
uw installatie.
Bijvoorbeeld, u hebt geen
scenario's geregistreerd,
menu 4 zal niet worden
weergegeven.
Voor het thermisch comfort,
druk op 2.
Het menu Thermisch comfort
De binnentemperatuur bedraagt 19,0 graden
De buitentemperatuur bedraagt 21,5 graden
De verwarming staat in afwezig De verwarming is ingeschakeld. De verwarming is stopgezet
- Om de verwarming aan te
zetten, druk op 1.
- Om de verwarming te laten
stoppen, druk op 2.
- Om de verwarming in afwezig
te zetten, druk op 1.
- Om de verwarming te laten
stoppen, druk op 2.
- Om de verwarming aan te
zetten, druk op 1.
- Om de verwarming in afwezig
te zetten, druk op 2.
De airconditioning werkt. De airconditioning is stopgezet.
- Om de airconditioning stop te zetten, druk op 1. - Om de airconditioning aan te zetten, druk op 1.
Verwarming
Airco
- Om de installatie in de modus verwarming te zetten, druk op 1.
- Om de installatie in de modus airconditioning te zetten,
druk op 2.
123
456
789
0
123
456
789
0
- Om op te hangen,
druk 2 keer op .
Tot ziens.
De overdrager bellen
* Als uw installatie over een
buitensirene SEF TYXAL+
beschikt.
Op elk moment:
- Om terug te keren naar het vorige menu druk op
- Om op te hangen, druk 2 keer op
3. Domoticafuncties

111
NL
123
456
789
0
1
4
5
2
3
3
3.2 Op afstand automatismen bedienen
- Goeiedag, vorm uw toe-
gangscode .
Hoofdmenu
- Voor alarm, druk op 1
- Voor het thermisch comfort, druk op 2.
- Voor de automatismen, druk op 3.
- Voor de scenario's, druk op 4.
- Om de overdrager te personaliseren, druk op 5.
- Om te luisteren, druk op 6
- Om gelijktijdig te luisteren en te praten, druk op 7
- Druk 2 keer op # om op te hangen.
Het is mogelijk dat
bepaalde menu's niet
worden aangeboden,
naargelang uw installatie.
Bijvoorbeeld, u hebt nog
geen
scenario's geregistreerd,
menu 4 zal niet worden
weergegeven.
Voor de automatismen, druk op 3.
Menu Automatismen
- Om de rolluiken te bedienen, druk op 1.
- Voor de verlichting, druk op 2.
- Om het portaal aan te sturen, druk op 3.
- Om groep 1 aan te sturen, druk op 1.
Rolluiken groep 1
gesloten
- Om te openen , druk
op 1
Rolluiken groep 1 open
- Om te sluiten, druk
op 2
- Om groep 2 aan te sturen, druk op 2.
Rolluiken groep 2 gesloten
- Om te openen , druk
op 1
Rolluiken groep 2 open
- Om te sluiten, druk
op 2
- Om groep 1 aan te sturen, druk op 1.
Lichten groep 1 uit.
- Om aan te doen, druk
op 1
Lichten groep 1 aan.
- Om uit te doen, druk
op 2
Rolluiken
Verlichting
Portaal
- Om het portaal te activeren, druk op 1.
123
456
789
0
123
456
789
0
12
3
456
789
0
- Om op te hangen,
druk 2 keer op .
- Om groep 2 aan te sturen, druk op 2.
Lichten groep 1 uit.
- Om aan te doen, druk
op 1
Lichten groep 1 aan.
- Om uit te doen, druk
op 2
De overdrager bellen
Tot ziens.
Op elk moment:
- Om terug te keren naar het vorige menu druk op
- Om op te hangen, druk 2 keer op

112
De overdrager bellen
3.3 Het menu Scenario
123
456
789
0
1
4
2
3
4
- Goeiedag, vorm uw toe-
gangscode .
Hoofdmenu
- Voor alarm, druk op 1
- Voor het thermisch comfort, druk op 2.
- Voor de automatismen, druk op 3.
- Voor de scenario's, druk op 4.
- Om de overdrager te personaliseren, druk op 5.
- Om te luisteren, druk op 6
- Om gelijktijdig te luisteren en te praten,
druk op 7
- Druk 2 keer op # om op te hangen.
Het is mogelijk dat bepaal-
de menu's niet worden
aangeboden, naargelang
uw installatie.
Bijvoorbeeld, u hebt geen
automatismen geregi-
streerd, menu 3 zal niet
worden weergegeven.
Voor de scenario's, druk op 4.
Menu Automatismen
- Om het scenario 1 te activeren, druk op 1.
- Om het scenario 2 te activeren, druk op 2.
- Om het scenario 3 te activeren, druk op 3.
- Om het scenario 4 te activeren, druk op 4.
- Om op te hangen,
druk 2 keer op
.
Tot ziens.
Op elk moment:
- Om terug te keren naar het vorige menu druk op
- Om op te hangen, druk 2 keer op
3. Domoticafuncties

113
NL
4. Werking in autonome modus
De zender kan autonoom werken zonder met een
centrale te zijn verbonden.
In dit geval worden de technische detectoren (wa-
terlekdetector, rookdetector, enz ...) rechtstreeks
verbonden met de overdrager. Een oproep wordt
geactiveerd bij detectie van een technische storing.
Het is mogelijk om een afstandsbediening
TL 2000 TYXAL+ te verbinden, die over de
SOS-functie beschikt om een noodoproep te
maken.
De functies van het toezicht op afstand zijn
compatibel met deze modus.
DFR TYXAL+
Rook- en brandde-
tector
DF TYXAL+
Lekkagedetector
DCS TYXAL+
Stroomuitvalmelder
TL 2000 TYXAL+
Afstandsbediening
DU TYXAL+
Universele
detector
4.1 Detectoren en compatibele afstandsbediening
4.2 Afhandeling van een oproep in geval van een technische storing
Indien er een technische storing wordt gedetecteerd, belt de telefonische overdrager de geprogrammeerde
oproepnummers (maximaal 6) om de beurt totdat er iemand de oproepcyclus stopt.
Bijvoorbeeld als er iemand opneemt:
123
456
789
0
1
2
3
123
456
789
0
123
456
7
*
#
89
0
Om het detail van de
defecten te raadplegen,
druk op 1.
Om het product te
deactiveren, druk op 2.
U bent in gesprek met
een telefonische over-
drager.
Storing zelfbeveiliging
op 4 april 2014
Om de oproepcyclus stop
te zetten, druk op
- Om te luisteren, druk op 2
- Om gelijktijdig te luisteren
en te praten, druk op 3
- Om op te hangen,
druk twee keer op
Zelfbeschermingsalarm voor
de detector Salon, zone 1
op 22 04 2014.
*
Vanaf dit moment belt de
overdrager geen enkel ander
nummer.
* Voorbeeld van naam van kamer en zone.
De melding is afhankelijk van de wijze
waarop u uw installatie hebt geconfigu-
reerd.
- U móet op toets
voordat u ophangt, om te
voorkomen dat de zender de ande-
re oproepnummers belt.

114
4.3 De overdrager personaliseren
De overdrager bellen
- Met een GSM-overdrager wordt de lijn onmiddellijk aangenomen.
- Voor de RTC-overdrager moet u een van de twee onderstaande methoden gebruiken.
Om te vermijden dat de overdrager onbedoeld na 2 oproepen de lijn aanneemt, moet u methode 2 uit-
schakelen door de volgende cijfers via het hoofdmenu te vormen: #82 6 1.
Druk op #82 6 0 om deze opnieuw te activeren.
Methode 1, vanaf een andere telefoonlijn (mobiel of vast)
Vorm het oproepnum-
mer van de installatie.
Vorm het oproepnummer van de
installatie opnieuw.
De zender neemt na 1 of 2 keer
overgaan op.
Wacht gedurende 2 belsignalen
1
2
abc
3
def
4
ghi
5
jkl
6
mno
7
pqrs
8
tuv
9
wxyz
*
#
0
1
2
abc
3
def
4
ghi
5
jkl
6
mno
7
pqrs
8
tuv
9
wxyz
*
#
0
Tuu Tuu ... Tuu
Methode 2 te gebruiken in de volgende gevallen:
- Als u belt vanaf een mobiele telefoon (als deze opneemt vóór het 10e belsignaal),
- als de zender verbonden is met een antwoordapparaat of voicemail
1
2
abc
3
def
4
ghi
5
jkl
6
mno
7
pqrs
8
tuv
9
wxyz
*
#
0
1
2
abc
3
def
4
ghi
5
jkl
6
mno
7
pqrs
8
tuv
9
wxyz
*
#
0
Tuu Tuu ... Tuu
Vorm het oproepnummer
van de installatie.
De overdrager neemt standaard de lijn
na 10 beltonen aan (aantal beltonen
kunnen worden gewijzigd).
Wacht 10
seconden
Wacht gedurende
10 belsignalen
Voor Frans, druk op
1 ...
Voor Frans, druk op
1 ...
Haak terug in.
4. Werking in autonome modus

115
NL
4.4 Het configuratiemenu
Configuratiemenu
Voer het oproepnummer in en druk op
Configuratiemenu
Voer het oproepnummer in en druk op
Actie aanvaard
Om de toegangscode te wijzigen, druk op 3
ConfiguratiemenuVoer de toegangscode in Voer de nieuwe toegangscode in
Om de stemaankondiging te personaliseren, druk op 2
Het vocale bericht is:
“U bent verbonden met een telefoonzender.”
- Om het vocale bericht te wijzigen, druk op 1.
- Om terug te keren naar het vorige menu
druk op
Het vocale bericht is:
“U bent verbonden met een telefoonzender.”
- Om het vocale bericht te wijzigen, druk op 1.
- Pour revenir à l’annonce vocale initiale,
tapez 2.
- Om terug te keren naar het vorige menu
druk op
Praat na de pieptoon en, drukt u op een
toets om de opname te stoppen.
Om de datum of de tijd te wijzigen, druk op 4
Om het aantal beltonen te configureren, druk op 5
(alleen TTRTC TYXAL+)
Om de taal te wijzigen, druk op 6
Frans, druk op 1.
Engels, druk op 2.
Spaans, druk op 3.
Duitse, druk op 4.
Italiaans, druk op 5.
Pools, druk op 6.
Nederlands, druk op 7.
- Voor Nummer 1, druk op 1.
- Voor Nummer 2, druk op 2.
- Voor Nummer 3, druk op 3.
- Voor Nummer 4, druk op 4.
- Voor Nummer 5, druk op 5.
- Voor Nummer 6, druk op 6.
- Om terug te keren naar het vorige menu
druk op
Geen oproepnummer.
Om een oproepnummer te configureren, druk op 1.
- Om terug te keren naar het vorige menu
druk op
Oproepnummer is:
02.99.73.xx.xx
Om de oproepnummers te wijzigen, druk op 1.
Om een oproepnummer te wissen, druk op 2.
- Om terug te keren naar het vorige menu
druk op
De datum is :
29 November 2013,
Het is : 11h57.
- Om de datum te wijzigen, druk op 1.
- Om de tijd te wijzigen, druk op 2.
- Om terug te keren naar het vorige menu
druk op
29 November 2013, 11h57.
- Om de datum te wijzigen, druk op 1.
- Om de tijd te wijzigen, druk op 2.
- Om terug te keren naar het vorige menu
druk op
Voer de 6 cijfers van de datum in
Voer de 4 cijfers van het uur in
De tijdweergave (AM), druk op 1
De tijdweergave (PM), druk op 2
Aantal belsignalen: 10
- Om de Aantal belsignalen te wijzigen,
druk op 1.
- Om terug te keren naar het vorige menu
druk op
Toets de 2 cijfers van het gewenste
aantal belsignalen in
Actie aanvaard
ConfiguratiemenuActie aanvaard
Actie aanvaard
Actie aanvaard
Oproepnummer is...
Voer de toegangscode in.
Vanuit het hoofdmenu, druk op 5 om naar het menu Personaliseren te gaan.
Op elk moment:
- Om terug te keren naar het vorige menu druk
op
- Om op te hangen, druk 2 keer op

116
5. De goede werking testen
123
456
789
0
1
2
3
123
456
789
0
123
456
7
*
#
89
0
Met een centrale:
Schakel het systeem in en veroorzaak een inbraak.
In autonome modus:
Bijvoorbeeld een waterlekdetector simuleer een waterlek
door deze te bevochtigen.
Op de overdrager:
1
n°1
n°2
2
n°3
3
n°4
4
n°5
5
n°6
6
7
n°1
n°2
8
n°3
9
n°4
10
n°5
11
n°6
12
13
n°1
n°2
14
n°3
15
n°4
16
Om het detail van de
defecten te raadplegen,
druk op 1.
Om het product te deacti-
veren, druk op 1.
U bent in gesprek met
een telefonische over-
drager.
Technische storing
op 4 april 2014
Om de oproepcyclus stop
te zetten, druk op
- Om het loeien te deacti-
veren, druk op 1.
- Om te luisteren, druk op 2
- Om gelijktijdig te luisteren
en te praten, druk op 3
- Om op te hangen,
druk twee keer op
Technische storing
waterlek op de detector
zone 2, 4 april 2014.
Controleer of de telefonische overdrager de geprogrammeerde
oproepnummers (maximaal 6) om de beurt belt totdat er opgenomen
wordt:
- de overdrager vraagt om op toets te drukken,
- de overdrager doet een stemaankondiging en geeft de aard van
het alarm aan,
- de overdrager stelt voor om te luisteren wat er gebeurt, met een
persoon in de buurt van de overdrager te spreken, de oproepcyclus
te stoppen en informatie over de storingen te verkrijgen als er een
centrale is verbonden.
Veroorzaak een detectie om de goede werking van de installatie te controleren.
U kunt ook een testoproep activeren door
30 seconden op de toets van de overdrager
te duwen.
>30s
Bijvoorbeeld volledige cyclus
met 6 geprogrammeerde nummers

117
NL
6. Status van lampje van telefoonlijn
6.2 TTGSM TYXAL+
Toets / lampje
Om de status van uw
telefoonlijn visueel weer
te geven druk op de knop
op het voorpaneel.
Status lampje Omschrijving
Rood knipperen * Geen PSTN-lijn
Continu groen * PSTN-lijn aanwezig
Knipperend groen Oproep aan de gang
Gedoofd Normale werking, inkomende en uitgaande
gesprekken zijn mogelijk.
Status lampje
met stroom
Status lampje
zonder stroom
Omschrijving
Rood knipperen Gedoofd Geen gsm-ontvangst
Groen/oranje
knippert
Gedoofd Zwakke GSM-ontvangst
Groen
Continu
Gedoofd Goede GSM-ontvangst
Groen
knipperend
Gedoofd Oproep aan de gang
(*) Het lampje blijft branden:
- gedurende 5 minuten na het opstarten
- gedurende 1 minuut na het indrukken van de knop T1.
Als er geen stroom is, dan blijft het lampje branden:
- gedurende 5 minuten na het opstarten
- gedurende het verzenden van een gebeurtenis
- gedurende 1 minuut na het indrukken van de knop T1
- gedurende 5 minuten na een stroomuitval
6.1 TTRTC TYXAL+
Als er geen stroom is, dan blijft
de TTGSM TYXAL+ alarmen
verzenden, maar deze kunnen
niet op afstand worden gestuurd.
De telefonische overdrager controleert permanent de telefoonlijn.
In het geval dat de telefoonlijn is gestoord, wordt
dit symbool op het touch-toetsenbord weergegeven. Voor details
van de storingen moet u uw toegangscode vormen.
25/11/15 12:48
Info Instellingen
UIT
Mijn huis

118
7. Batterij vervangen
2
1
1
2
2
1
4
2
1
3
5
Open de behuizing. Verwijder de onderkant. Met behulp van een schroe-
vendraaier, til
de twee clips van de boven-
klep op.
Verwijder de bovenkant
Vervang de batterij
Plaats de batterij,
rekening houdend
met de polariteit.
• Buiten het bereik van kinderen bewaren.
• Keer de polariteit niet om.
• Open de batterijen niet.
• Beschadig of vervorm de elementen niet.
• Veroorzaak geen kortsluiting in de (+) of (-)
van de batterij door middel van geleidende
elementen.
• Stel de batterijen niet bloot aan overmatige
mechanische belasting.
• Stel het apparaat niet bloot aan water of con-
densatie.
• Niet verhitten tot 100 °C (212°F), solderen of
verbranden.
Verkeerd gebruik kan leiden tot lekken of
stralen verstuifde elektrolyten, alsook brand of
explosie.
• Niet herladen
• Verwijderen volgens de wetgeving van kracht.
Batterij hanteren
Risico op brand, explosie en brandwonden.
Wij raden u aan de batterij SAFT LSH20 - 3.6V te gebruiken. U kunt een 3,6V lithiumbatterij van
een ander merk gebruiken, maar in dit geval kan de levensduur van 10 jaar niet meer worden
gegarandeerd.
Zet de centrale in de ONDERHOUDSMODUS (zie handleiding).
Open de behuizing van de overdrager
Het batterijniveau van de overdrager wordt vermeld:
• In de modus Alarmsysteem:
Via een bericht op het toetsenbord CLT 8000 TYXAL+. De centrale piept elke keer dat het systeem wordt
ingeschakeld of uitgeschakeld (of "Storing batterij" met spraaksynthese (stemhulp moet geactiveerd zijn,
zie handleiding CLT 8000 TYXAL+).
• In Autonome modus:
Via een melding bij een inkomende of uitgaande oproep die door een storing werd veroorzaakt.
Ontkoppel de telefoonaansluiting van de overdrager TTRTC TYXAL+.

119
NL
Om de fabrieksinstellingen te herstellen door alle verenigingen en actuele storingen te verwijderen.
Als een centrale wordt verbonden met de zender, moet u deze in ONDERHOUDSMODUS zetten
(zie handleiding systeem).
9. Initialisatie (de fabrieksinstellingen herstellen)
met een alarmcentrale of in autonome modus.
Open de behuizing van de overdrager
Alleen in
autonome modus
RESET OK
>30s
BIP... BIP
>30s
BIP BIIIIP
>5s >15s
T2 T2
Druk gedurende 30 seconden
op de toets T2.
De overdrager bevindt zich in zijn oorspronkelijke staat, alle verbindingen zijn verwijderd
alsook alle storingen.
Na 5 seconden, de overdrager
piept een keer, blijf de toets indrukken.
Na 15 seconden, de overdrager
piept twee keer, blijf de toets indrukken.
Na 30 seconden, de overdrager
piept een keer lang.
8. Initialisatie van de toegangscode
met een alarmcentrale zonder toetsenbord of in autonome modus.
Open de behuizing van de overdrager
>15s
BIP... BIP
BIP
>5s >15s
Alleen in
autonome modus
T2 T2
Druk gedurende 15 seconden op
de toets T2.
Na 5 seconden, de overdrager
piept een keer, blijf de toets indrukken.
Na 15 seconden, de overdrager
piept twee keer, laat de toets los.
De toegangscode is opnieuw 1 2 3 4 5 6.
Om terug te keren naar de fabriekscode 1 2 3 4 5 6.
Als een centrale wordt verbonden met de zender, moet u deze in ONDERHOUDSMODUS zetten (zie hand-
leiding systeem).

120
10. Ondersteuning
Intercom is van slechte kwaliteit
Een detector van de installatie veroor-
zaakt incorrecte activeringen
De kamertemperatuur die de overdra-
ger aanduidt, is incorrect
Een oproepcyclus wordt onderbroken
en vervangen door een andere oproep-
cyclus
Zorg ervoor dat u niet de handsfreemodus
gebruikt
Verleng de antenne van de TTGSM TYXAL+ tot
het maximum
Na het gesprek en de standaard mededeling
te hebben beluistert, schakelt u het product in
kwestie uit.
Zorg dat de overdrager zich niet in de buurt van
warmtebronnen (ADSL-doos ...) bevindt om het
registreren van de kamertemperatuur niet te
verstoren.
De technische detectoren worden ingedeeld in
volgorde van prioriteit:
1 - Rook-, branddetector
(DFR TYXAL+),
2 - Waterlekdetector
(DF TYXAL+),
3 - Stroomuitvaldetector
(DCS TYXAL+),
4 - Universele detector
(DU TYXAL+).
Voorbeeld: Het activeren van een brandalarm
door DFR TYXAL + zal prioriteit krijgen ten
opzichte van stroomuitval.
Het doel van dit hoofdstuk is om u te helpen om de meest voorkomende problemen, die u kunt tegenkomen,
snel op te lossen.
Neem, in geval van twijfel, wanneer het probleem blijft bestaan of wanneer het probleem niet in deze lijst
voorkomt, contact op met uw installateur
Vanwege de evolutie van de normen en van het materiaal verplichten de kenmerken, zoals aangegeven
in de teksten en afbeeldingen van dit document, ons pas na bevestiging door onze diensten.

121
NL

122
TTRTC TYXAL+ jest urządzeniem, które wyko-
rzystuje przewodową linię telefoniczną instalacji.
TTGSM TYXAL+ jest podłączony do bezprzewo-
dowej sieci telefonicznej.
RTC:
Komutowana sieć telefoniczna.
Nadajnik telefoniczny RTC jest podłączony do
przewodowej linii telefonicznej instalacji.
GSM:
Global System for Mobile communications.
Nadajnik telefoniczny GSM podłączony do bez-
przewodowej sieci telefonicznej.
- Modem 2G
Dyskretny sygnał SOS:
Dzięki dyskretnemu połączeniu funkcja "dyskret-
ny sygnał SOS" pozwala wysłać ostrzeżenie na
zewnątrz bez wiedzy potencjalnego włamywa-
cza.
Dźwiękowy sygnał SOS:
Funkcja "Dźwiękowy sygnał SOS" pozwala
natychmiast zaalarmować otoczenie, wywołując
zarówno połączenia telefoniczne, jak i włączenie
przypisanych alarmów.
Tryb Konserwacji:
Tryb Konserwacji pozwala na wykonywanie
czynności związanych z włączaniem, konserwa-
cją i diagnostyką. Aby uzyskać dostęp do tego
trybu, należy wyłączyć dozór.
Przejście centrali w tryb Konserwacji odbywa się
przy pomocy klawiatury (dotykowej lub zwykłej),
pilota zdalnego sterowania lub czytnika identy-
katorów.
(patrz podręcznik systemowy).
Zabezpieczenie własne:
Urządzenia są zabezpieczone przed otwarciem
i zerwaniem.
Jeżeli złodziej próbuje otworzyć lub zerwać jed-
no z urządzeń, do centrali sterującej wysyłany
jest komunikat. Pozwala on uruchomić syrenę
wewnętrzną oraz urządzenia ostrzegające
(syrena wewnętrzna lub zewnętrzna, nadajnik
telefoniczny).
Zabezpieczenie własne jest ciągle włączone,
nawet wtedy, gdy system jest wyłączony.
Można je wyłączyć przy pomocy klawiatury
dotykowej CLT 8000 TYXAL+.
Aby otworzyć urządzenie, należy koniecznie
ustawić system w trybie Konserwacji.
DTMF
Sygnalizacja tonowa wieloczęstotliwościowa
SMS
Usługa przesyłania krótkich wiadomości (Short
Message Service
Częściowy dostęp do lokalnej pętli abonenckiej
Połączenia przechodzą przez sieć France
Télécom. Dane internetowe oraz inne usługi,
takie jak telewizja, przechodzą przez sieć dost-
awcy usług internetowych.
Pełny dostęp do lokalnej pętli abonenckiejUżyt-
kownik nie jest już abonentem France Telecom.
Dane i połączenia przechodzą przez sieć dost-
awcy usług internetowych.
Cykl połączeń:
Nadajnik wybiera 1. zarejestrowany numer. Jeśli
abonent nie odpowiada, lub jeśli nie można się z
nim połączyć, nadajnik wybiera nr 2 i nr 3 numer
itd ... aż do numeru 6.
Jeśli żaden numer nie odpowiada, nadajnik
wznawia cykl : nr 1, nr 2, nr 3 itd. Nadajnik wy-
wołuje do16 kolejnych połączeń lub do 4 cykli.
Urządzeń tych należy używać zgodnie z
obowiązującymi przepisami i lokalnymi
ograniczeniami. Te ostatnie mogą mieć
zastosowanie na przykład, na stacjach
obsługi, w szpitalach itp.
Urządzenie to może zakłócać pracę
aparatury medycznej (aparatów słucho-
wych, rozruszników serca). Aby uzyskać
więcej informacji, należy skontaktować się
z lekarzem.
To urządzenie może powodować zakłó-
cenia w pobliżu telewizorów, odbiorników
radiowych i komputerów.
Nie korzystać z urządzenia w pomieszcze-
niu, w którym występuje ryzyko wybuchu
(np. w pobliżu źródła gazu, paliwa lub
substancji chemicznych).
Słowniczek
Czynność do wykonania w trybie Kon-
serwacji (patrz instrukcja centrali CS 8000
TYXAL+ § Tryb Konserwacji)

123
PL
Spis treści
1. Jak działa nadajnik? ...........................................................................................................124
1.1. Opis ................................................................................................................................124
1.2 Zasada ............................................................................................................................124
2. Praca z systemem alarmowym..........................................................................................126
2.1 Powiadomienia w razie alarmu .......................................................................................126
2.3 Zdalne kierowanie alarmem ............................................................................................ 128
2.4 Instalacje wyposażone w TTGSM TYXAL+ ......................................................................129
2.5 Dostosowywanie nadajnika
kodem użytkownika ..............................................................................................................130
2.6 Nazywanie nadajnika ......................................................................................................130
2.7 Wybierane numery .......................................................................................................... 131
2.8 Alarmowanie SMS najbliższych (tylko dla nadajnika TTGSM TYXAL+) ...........................132
2.9 Karta SIM
(tylko dla nadajnika TTGSM TYXAL+) ...............................................132
2.10 Pomoc głosowa .............................................................................................................133
3. Funkcje automatyki domowej ...........................................................................................134
3.1 Zdalne sterowanie ogrzewaniem .....................................................................................134
3.2 Zdalna obsługa automatyki .............................................................................................135
3.3 Menu Scenariusz ............................................................................................................136
4. Praca w trybie autonomicznym .........................................................................................137
4.1 Zgodne czujniki i pilot ....................................................................................................137
4.2 Przebieg połączenia w razie usterki technicznej .............................................................137
4.3 Dostosowywanie nadajnika .............................................................................................138
4.4 Menu ustawień ................................................................................................................ 139
5. Próba prawidłowego funkcjonowania ..............................................................................140
6. Stan lampki sygnalizacyjnej linii telefonicznej .................................................................141
6.1 TTRTC TYXAL+ ................................................................................................................141
6.2 TTGSM TYXAL+ ...............................................................................................................141
7. Wymiana baterii ..................................................................................................................142
8. Przywracanie pierwotnej wersji kodu dostępu ...............................................................143
Otworzyć obudowę nadajnika ........................................................................................143
9. Przywracanie ustawień początkowych (fabrycznych) ...................................................143
10. Pomoc ................................................................................................................................144
Deklaracja zgodności WE tego urządzenia jest dostępna na żądanie w:
Dziale „Informacje Techniczne”
DELTA DORE - Bonnemain - 35270 Combourg (Francja)
E-Mail: info[email protected]

124
1. Jak działa nadajnik?
1.3 Praca w trybie autonomicznym
Praca z centralą CS 8000 TYXAL+
1.1. Opis
1.2 Zasada
Jeśli instalacja użytkownika obejmuje centralę CS 8000 TYXAL+, nadajnik i inne urządzenia z gamy
TYXAL+, są przypisane do centrali CS 8000 TYXAL+ (maks. 50 urządzeń).
TTRTC TYXAL+
DO TYXAL+ DMB TYXAL+
CS 8000 TYXAL+
TTGSM TYXAL+
CLT 8000 TYXAL+TL 2000 TYXAL+
DVR TYXAL+
DFR TYXAL+ DU TYXAL+ DF TYXAL+
DCS TYXAL+
DO TYXAL+
Sterowanie
Wykrywanie Wykrywanie
Alarm / Sygnalizacja
Centralizacja
Czujniki włamaniowe Czujniki techniczne
TTRTC TYXAL+ TTGSM TYXAL+
T
L 2000 TYXAL+
DFR TYXAL+ DU TYXAL+ DF TYXAL+
DCS TYXAL+
Czujniki techniczne
Nadajnik może pracować
w sposób autonomiczny.
W tym przypadku czujniki techniczne
(czujnik dymu DFR TYXAL+, uniwersalny czujnik
techniczny DU TYXAL+ lub czujnik wycieku
wody DF TYXAL+ itp.) są bezpośrednio
przypisane do nadajnika.
Aby wysyłać połączenia alarmowe do najbliż-
szych, możliwe jest przypisanie pilota TL 2000
TYXAL+ wyposażonego w funkcję SOS (w
zależności od ustawień, nacisnąć na 2 sekundy
przycisk 1 lub 2 na pilocie zdalnego sterowania).
Alarm / Sygnalizacja
Nadajnik alarmowy TTRTC TYXAL+ wykorzystuje
instalację przewodową linii telefonicznej, TTGSM
TYXAL+ jest podłączony do bezprzewodowej sieci
telefonicznej.
Nadajniki te umożliwiają:
- zdalne sterowania alarmem (przy użyciu synteza-
tora mowy nadajnika).
- uzyskanie powiadomienia o alarmie poprzez połą-
czenie z innym telefonem lub stacją nadzoru zdal-
nego (zgodnie ze standardowymi protokołami: 200
bodów FSK, Contact ID, ... (wymaga subskrypcji)).
- zdalne sterowanie ogrzewaniem i 5 zespołami
automatyki, o ile instalacja użytkownika jest wypo-
sażona w urządzenia X3D.
- realizację scenariuszy. Na przykład:
"Wyjazd" = światła wyłączone, okiennice zamknię-
te,
"Przyjazd" = światła zapalone, okiennice otwarte
- uzyskanie pomiaru temperatury otoczenia
instalacji
W przypadku alarmu, połączenie wychodzące (na-
wet w przypadku braku zasilania) pozwala:
- opisać alarm,
- słuchać, co dzieje się w monitorowanych pomiesz-
czeniach i jednocześnie mówić.
- zatrzymać cykl połączeń
- wyłączyć syreny

125
PL
1.4 Funkcje automatyki domowej
1.5 Zarządzanie błędami zasilania (tylko nadajnik TTGSM TYXAL+)
Gdy nadajnik nie ma zasilania sieciowego:
- przez 5 minut emituje on 1 sygnał bip w odstępach co 10 sekund.
- Po 30 minutach centrala generuje błąd techniczny wysyłany przez nadajnik po upływie 30 sekund.
Odbiornik
bramy X3D
Odbiorniki
oświetlenia X3D
Produkty kompatybilne
CALYBOX 2020 WT
Sterownik energii
Scenariusze
Ustawienia
11.5°C Pon. 23 września
18:28
Inne
Zużycie Ogrzewanie
Rolety
Ouvrant
31
Kalendarz
Ciepła woda
ROLLIA / TYMOOV X3D
Napędy rolet zewnętrznych
Odbiorniki rolet
Funkcje automatyki domowej pozwalają zdalnie:
- sterować ogrzewaniem.
- sterować 5 zespołami automatyki (2 kanały rolet
zewnętrznych ROLLIA / TYMOOV lub odbiorników
rolet zewnętrznych, 2 kanały oświetlenia, 1 kanał
bramy).
- sterować 4 scenariuszami.
Funkcje te mogą być realizowane, o ile urządzenia
na to pozwalają (odbiorniki X3D).
Można to sprawdzić, kontaktując się z naszymi
serwisami.
Przypisania mogą być dwojakiego rodzaju:
• przypisanie bezpośrednie
• przekaźnikowe: w tym przypadku odbiornik(i)
służy(-ą) jako przekaźnik(i) podający(-e) sygnał
do innych odbiorników, zwykle spoza zasięgu
łączności radiowej (rozległe instalacje, grube ściany
betonowe itp.)

126
2. Praca z systemem alarmowym
Przebieg cyklu połączeń w razie alarmu włamaniowego lub usterki technicznej
W razie alarmu (alarm włamaniowy lub usterka techniczna) nadajnik wywołuje kolejno połączenia z zare-
jestrowanymi numerami (do 6 numerów), do czasu, gdy któryś z numerów zatrzyma cykl połączeń.
W przypadku nadajnika TTGSM TYXAL+, można wybrać
połączenie głosowe
i SMS dla każdego zareje-
strowanego numeru.
Wybieranie głosowe / SMS jest kongurowalny z pozio-
mu klawiatury dotykowej CLT 8000 TYXAL+.
Nadajnik przypisany do systemu alarmowego pozwala na:
- uzyskanie powiadomienia w przypadku alarmu
- zdalne sterowanie alarmem.
2.1 Powiadomienia w razie alarmu
1
n°1
n°2
2
n°3
3
n°4
4
n°5
5
n°6
6
7
n°1
n°2
8
n°3
9
n°4
10
n°5
11
n°6
12
13
n°1
n°2
14
n°3
15
n°4
16
Ê Nadajnik wybiera pierwszy zarejestrowany numer,
jeśli numer nie odpowiada, lub jeśli nie można się z nim
połączyć, nadajnik wybiera nr 2, nr 3 itd., aż do nr 6.
Ë Jeśli żaden z numerów nie odbiera, nadajnik wznawia cykl:
nr 1, nr 2, nr 3 itd.
Nadajnik wykonuje w ten sposób do 16 kolejnych połączeń
Cykl kończy się automatycznie po 16 próbach połączenia.
Aby zatrzymać cykl połączeń, nacisnąć przycisk .
Połączenie
głosowe
W razie usterki technicznej (za wyjątkiem czujników dymu) połączenie jest wywoływane po upływie 30
sekund.
1
n°1
n°2
2
n°3
3
n°4
4
n°5
5
6
n°1
7
n°3
8
n°5
9
n°1
10
n°3
11
n°5
n°1
12
n°3
13
14
n°5
Wyłączenie
automatyczne
Ê Nadajnik wybiera pierwszy zarejestrowany numer,
jeśli numer nie odpowiada, lub jeśli nie można się z nim
połączyć, nadajnik wysyła SMS do numeru 2.
Nadajnik kontynuuje wykonywanie cyklu i wywołuje po-
łączenie z nr. 3., wysyła wiadomość SMS na nr 4, potem,
jeśli nikt nie odbierze, wybiera 5. zarejestrowany numer.
Ë Jeśli żaden z numerów nie odbiera, nadajnik wznawia
cykl: nr 1, nr 3, nr 5 itd.
TTGSM TYXAL+ nie wysyła kolejnego SMS w kolejnych
cyklach.
Nadajnik automatycznie zatrzymuje się po 4 kolejnych
cyklach.
Przykład: użytkownik ma do dyspozycji 5 numerów telefonów, w tym 2 numery SMS. (nr 2 i nr 4)
2.2 Przypadek nadajnika TTGSM TYXAL+
Połączen
łosowe
SMS
TTRTC TYXAL+
4
-
TTGSM TYXAL+
4 4
Ê Ë
Ê Ë

127
PL
Przykład zabezpieczenia własnego:
Należy bezwzględnie nacisnąć przycisk przed rozłączeniem się, aby zatrzymać cykl połączeń
tak, by nadajnik nie łączył się już z pozostałymi numerami.
123
456
789
0
1
2
3
123
456
789
0
123
456
7
*
#
89
0
Aby poznać szczegóły
błędu, wybrać 1
Aby zdezaktywować urzą-
dzenie, wybrać 2
Jesteś
połączony z
nadajnikiem
telefonicznym.
Błąd zabezpieczenia
własnego
4 kwietnia 2014 r.
Aby przerwać cykl
połączeń, wybrać
Jeśli system jest włączony.
- Aby wyłączyć system,
wybrać 1.
Jeśli system jest wyłączony.
- Aby zatrzymać wycie syre-
ny, wybrać 1.
- aby słuchać, wybrać 2
- aby słuchać i rozmawiać
jednocześnie, wybrać 3.
- aby zakończyć połączenie,
nacisnąć dwukrotnie
Alarm zabezpieczenia wła-
snego czujnika w salonie,
strefa 1, 22.04.2014
*
Odtąd nadajnik nie wywoła
już żadnych innych nume-
rów.
* Przykładowa nazwa pomieszczenia i strefy.
Sformułowanie zależy od ustawień instalacji.

128
2.3 Zdalne kierowanie alarmem
Można włączyć lub wyłączyć za pomocą menu oferowanych przez syntezator mowy nadajnika.
Wywołać numer nadajnika
- W przypadku nadajnika GSM wejście na linię jest natychmiastowe.
- W przypadku nadajnika RTC zastosować jedną z dwóch poniższych metod.
Zdalne włączanie lub wyłączanie (całościowe lub strefowe) systemu.
Aby uniknąć przypadkowego wejścia nadajnika na linię, gdy 2 kolejne połączenia następują jedno po dru-
gim, można zdezaktywować metodę 2, wprowadzając następującą sekwencję z poziomu menu głównego:
#82 6 1.
Wprowadzić #82 6 0, aby ją ponownie aktywować.
Metoda 1: z innego telefonu (komórkowego lub stacjonarnego)
Wybrać numer wywo-
ławczy instalacji.
Ponownie wybrać numer wywo-
ławczy instalacji.
Nadajnik odbiera połączenie
po 1 lub 2 dzwonkach.
Odczekać 2 dzwonki.
1
2
abc
3
def
4
ghi
5
jkl
6
mno
7
pqrs
8
tuv
9
wxyz
*
#
0
1
2
abc
3
def
4
ghi
5
jkl
6
mno
7
pqrs
8
tuv
9
wxyz
*
#
0
Dryń Dryń... Dryń
Metoda 2: należy ją stosować w następujących przypadkach:
- podczas połączenia z telefonu komórkowego (jeśli ten rozłączy się przed 10. dzwonkiem),
- gdy nadajnik współpracuje z automatyczną sekretarką lub usługą poczty głosowej.
1
2
abc
3
def
4
ghi
5
jkl
6
mno
7
pqrs
8
tuv
9
wxyz
*
#
0
1
2
abc
3
def
4
ghi
5
jkl
6
mno
7
pqrs
8
tuv
9
wxyz
*
#
0
Dryń Dryń... Dryń
Wybrać numer wywoław-
czy instalacji.
Domyślnie nadajnik zajmuje linię po
około 10 dzwonkach (liczbę dzwonków
można zmienić).
Odczekać
10 sekund
Odczekać 10
dzwonków.
Aby wybrać język
francuski, wybrać 1 ...
Aby wybrać język
francuski, wybrać 1 ...
Zakończyć
połączenie
2. Praca z systemem alarmowym

129
PL
123
456
789
0
1
2
1
3
4
Dzień dobry, wprowadź
swój kod dostępu.
Menu główne
- Dla alarmu, wybrać 1.
- Dla komfortu cieplnego, wybrać 2.
- Dla automatyki, wybrać 3.
- Dla scenariuszy, wybrać 4.
- Aby dostosować nadajnik, wybrać 5.
- Aby zakończyć połączenie,
nacisnąć dwukrotnie #
W zależności od rodzaju
instalacji niektóre menu nie są
oferowane.
Przykładowo, jeśli nie zapisano
scenariuszy, menu 4 nie będzie
wyświetlane.
Aby przejść do alarmu, wybrać 1
Menu alarm
System jest włączony całościowo.
- Aby wyłączyć system całościowo, wybrać 1.
- Aby słuchać, wybrać 2.
- Aby słuchać i rozmawiać jednocześnie, wybrać 3.
- Aby zakończyć połączenie, nacisnąć dwukrotnie #
- Aby zakończyć
połączenie,
nacisnąć dwukrotnie
.
- Do widzenia.
2.4 Instalacje wyposażone w TTGSM TYXAL+
Jeśli instalacja nie ma zasilania sieciowego(domek letniskowy, kamper,
łódka itp.), TTGSM TYXAL+ przekazuje alarmy, lecz nie można sterować
nim zdalnie. Można jednak skontaktować się z nim w ciągu 30 minut od
włamania.
Uwaga! Jeśli zasilacz nie był nigdy podłączony do nadajnika,
awaria zasilania nie zostanie zgłoszona.
Należy postępować zgodnie z instrukcjami syntezatora mowy nadajnika.
W każdej chwili:
- Aby powrócić do poprzedniego menu, wybrać
- Aby zakończyć połączenie, nacisnąć dwukrotnie

130
Instalacja
Strefy
Dzwonek
Ok
Produkty
Powrót
LUB
Nazwij
Pok. rodziców
Ok
Pokój
Pok. dziecinny
Powrót
Ustaw param
Przeglądaj
Powrót
produktu
Naciśnij przycisk
Produkty
Ok
Aktywuj/dezaktywuj
Powrót
Dodaj
Ustaw param
Nazwij
Recepcja
Aleja
Dostosuj
Powrót
Nadajnik RTC
Ok
Powrót
Antysabotaż
Opóźnienie wejścia
Nazwij
4
5
6
Ustawienia
Zegar
Języki
Ok
Powrót
Instalacja
Ok
Kod dostępu
XXXXXX
Ok
SOS
lub Przeglądaj
Ustaw param
Ok
Powrót
CLT 0 54 22
DMB 0 AD AD
1
3
2
RTC 0 03 01
Numer
0 0
Ok
Powrót
Nazwij
P o k ó j y a n n
Ok
Powrót
25/11/14 12:48
SOS
Ustawienia
OFF
Wprowadź swój kod
Info
Ustawienia
Mój dom
OFF
25/11/14 12:48
(1): Przy pomocy nadajnika GSM można wybrać numery telefonów, które
w razie jakiegoś zdarzenia będą odbierać powiadomienia alarmowe
SMS.
(2): Przykład: dziecko wraca do domu i wyłącza system pilotem lub
czytnikiem identykatorów, nadajnik
telefoniczny GSM wysyła SMS do rodziców.
Nadajnik
TTRTC
TYXAL+
Nadajnik
TTGSM
TYXAL+
Nazywanie urządzeń
4 4
Powiadamiane
numery
4 4
Opcja powiadamia-
nia głosowo / SMS (1)
-
4
Alarmowanie SMS
najbliższych (2)
-
4
Karta SIM -
4
Pomoc głosowa
4 4
2.5 Dostosowywanie nadajnika
kodem użytkownika
• Z poziomu klawiatury dotykowej
Użytkownik może skorzystać z interfejsu
klawiatury dotykowej, aby jeszcze łatwiej
skongurować swój nadajnik.
Poniższa tabela przedstawia funkcje nadajników
TTRTC TYXAL+ i TTGSM TYXAL+, które można
dostosowywać z poziomu klawiatury dotykowej
CLT 8000 TYXAL+.
(Menu: Eksploatacja > Urządzenia >
Konguracja).
• Bez klawiatury dotykowej
Przestawić centralę w tryb konserwacji
(patrz podręcznik systemu)
Wywołać numer nadajnika i postępować zgodnie
ze wskazówkami syntezatora mowy.
2. Praca z systemem alarmowym
2.6 Nazywanie nadajnika
Ê Wprowadzić kod dostępu i nacisnąć przycisk OK.
Ë Nacisnąć przycisk Ustawienia, a następnie wybrać menu:
Eksploatacja > Urządzenia > Konguracja
Ì Nacisnąć przycisk urządzenia, którego nazwa ma być
zmieniona, lub wybrać je z listy urządzeń, klikając na
"Przeglądaj" (patrz tabela poniżej).
Í Po zidentykowaniu urządzenia, wybrać menu
"Nadawanie nazwy".
Î Można wybrać etykietę z listy (zalecane),
a następnie numer (opcjonalnie)
lub dostosować (Ï) nazwę urządzenia,
wprowadzając nową nazwę.
Ï Zatwierdzić przyciskiem OK.
Zaleca się użycie jednej z etykiet proponowanych na liście.
W ten sposób, w przypadku alarmu podana zostanie wstęp-
nie zarejestrowana etykieta.
To menu pozwala wybrać konkretną etykietę dla nadajnika.

131
PL
LUB
4
5
Nadajnik RTC
Antysabotaż
Nadzór zdalny
Połączenia przych.
Pomoc głosowa
Nadzór centralny
Ok
Powrót
Nazwij
Wywoływane numery
Ustaw param
Ok
Powrót
CLT 0 54 22
CS 0 54 89
RTC 0 03 01
Wywoływane numery
Ok
Numer tel. 2
Numer tel. 3
Powrót
Numer tel. 1
Numer tel. 1
Ok
0
Powrót
Nadajnik GSM
Antysabotaż
Nadzór zdalny
Alarm zbliżenia SMS
Karta SIM
Pomoc głosowa
Nadzór centralny
Ok
Powrót
Nazwij
Wywoływane numery
Wywoływane numery
Ok
Numer tel. 2
Numer tel. 3
Powrót
Numer tel. 1
Numer tel. 1
Ok
0
Powrót
Opcja nadawania
Numer tel.1
Ok
Głosowy
Powrót
Opcja nadawania
Numer tel.1
Ok
SMS
Powrót
Instalacja
Strefy
Dzwonek
Ok
Produkty
Powrót
Ustaw param
Przeglądaj
Powrót
produktu
Naciśnij przycisk
Produkty
Ok
Aktywuj/dezaktywuj
Powrót
Dodaj
Ustaw param
Ustawienia
Zegar
Języki
Ok
Powrót
Instalacja
Kod dostępu
XXXXXX
Ok
SOS
lub Przeglądaj
1
3
2
25/11/14 12:48
SOS
Ustawienia
OFF
Wprowadź swój kod
Info
Ustawienia
Mój dom
OFF
25/11/14 12:48
2.7 Wybierane numery
Ê Wprowadzić kod dostępu i nacisnąć przycisk OK.
Ë Nacisnąć przycisk Ustawienia, a następnie wybrać menu:
Eksploatacja > Urządzenia > Konguracja
Ì Nacisnąć przycisk nadajnika
lub wybrać go z listy urządzeń,
klikając na "Przeglądaj".
Í Wybrać menu "Powiadamiane numery".
Î Nadajnik typu RTC
Wybrać numer telefonu do zaprogramowania (Nr tel. 1-6),
a następnie zatwierdzić przyciskiem OK.
Wprowadzić żądany numer.
Nadajnik typu GSM
Wybrać numer telefonu do zaprogramowania (Nr tel. 1-6),
a następnie zatwierdzić przyciskiem OK.
Wprowadzić żądany numer.
Zatwierdzić przyciskiem OK.
Wybrać opcję nadawania, czyli sposób, w jaki
system będzie powiadamiać w razie włamania:
głosowo lub SMS.
Zatwierdzić przyciskiem OK.
To menu pozwala zaprogramować numery powiadamiane w razie alarmu
lub usterki technicznej.
Jeśli to konieczne, można wstawić pauzę w numerację poprzez wybranie #.
Programowanie połączenia z Francją z zagranicy:
Jeśli użytkownik mieszka w kraju sąsiadującym z Francją i chce zaprogramować 01 23 45 67 89 we
Francji, należy wybrać: 00 +33 1 23 45 67 89.

132
Ê Wprowadzić kod użytkownika (np.: 456789) i zatwierdzić
przyciskiem OK.
Ë Nacisnąć przycisk Ustawienia, wybrać menu:
Eksploatacja > Urządzenia > Konguracja, a następnie za-
twierdzić przyciskiem OK.
Ì Nacisnąć przycisk T1 (przycisk zewnętrzny) nadajnika (patrz
instrukcja) lub wybrać go z listy urządzeń, klikając na przycisk
"Przeglądaj", a następnie zatwierdzić przyciskiem OK.
Í Wybrać menu "Alarmowanie SMS najbliższych",
a następnie zatwierdzić przyciskiem OK.
Î Z listy wybrać numer(y), którego(których) dotyczy
alarm SMS, naciskając Select.
Zatwierdzić przyciskiem OK.
4
5
Nadajnik GSM
Nadzór zdalny
Karta SIM
Pomoc głosowa
Nadzór centralny
Ok
Powrót
Alarm zbliżenia SMS
Alarm zbliżenia SMS
Ok
Wybierz
Pilot
Ok
Powrót
Alarm zbliżenia SMS
Nazwij
Alarm zbliżenia SMS
Aktywuj >
Ok
Powrót
To menu pozwala na wysyłanie wiadomości SMS do zaprogramowanego numeru w przypadku włączenia
lub wyłączenia systemu.
Przykład: dziecko wraca do domu i wyłącza system za pomocą pilota zdalnego sterowania lub identy-
katora, nadajnik telefoniczny wysyła użytkownikowi wiadomość SMS.
Upewnić się, że opcja "Alarmowanie SMS najbliższych" jest włączona w menu "Ustawienia" pilota lub
identykatora przypisanego do funkcji.
2.8 Alarmowanie SMS najbliższych (tylko dla nadajnika TTGSM TYXAL+)
- Opcja powiadamiania Głosowo / SMS (tylko dla nadajnika TTGSM TYXAL+)
Odnieść się do akapitu Powiadamiane numery
4
5
Nadajnik GSM
Nadzór zdalny
Pomoc głosowa
Nadzór centralny
Ok
Powrót
Numery alarm SMS
Karta SIM
Karta SIM
Wprowadzić kod PUK
Ok
Powrót
Wprowadzić kod PIN
Wprowadzić kod PIN
Ok
0
Powrót
Wprowadzić kod PUK
Ok
0
Powrót
2.9 Karta SIM (tylko dla nadajnika TTGSM TYXAL+)
Ê Wprowadzić kod użytkownika i zatwierdzić przyciskiem OK.
Ë Nacisnąć przycisk Ustawienia,
a następnie wybrać menu: Eksploatacja > Urządzenia > Konguracja
Ì Nacisnąć przycisk nadajnika lub wybrać go z listy urządzeń,
klikając na "Przeglądaj".
Í Wybrać menu "Karta SIM".
Î Wprowadzić parametry karty SIM:
Wprowadzić kod PIN
Wprowadzić kod PUK
To menu pozwala na uzyskanie informacji o kodzie PIN karty SIM potrzebnym
do jej aktywacji.
2. Praca z systemem alarmowym

133
PL
2.10 Pomoc głosowa
Ê Wprowadzić kod użytkownika i zatwierdzić przyciskiem OK.
Ë Nacisnąć przycisk Ustawienia,
a następnie wybrać menu: Eksploatacja > Urządzenia >
Konguracja
Ì Nacisnąć przycisk nadajnika
lub wybrać go z listy urządzeń,
klikając na "Przeglądaj".
Í Wybrać menu "Pomoc głosowa", potem "Aktywuj" lub
"Dezaktywuj"(Î).
Zatwierdzić przyciskiem OK.
To menu pozwala włączyć lub wyłączyć głośnik nadajnika
telefonicznego. Jeśli nadajnik jest aktywny, sygnalizuje
głosowo różne wydarzenia w obrębie instalacji (włączanie /
wyłączanie, odmowę włączenia itp.).
4
5
Nadajnik RTC
Ok
Powrót
Połączenia przych.
Nadzór centralny
Pomoc głosowa
Aktywuj >
Ok
Powrót
Pomoc głosowa
Pomoc głosowa
< Dezaktywuj
Ok
Powrót

134
3.1 Zdalne sterowanie ogrzewaniem
123
456
789
0
1
4
5
2
3
2
- Dzień dobry,
wprowadź swój kod
dostępu.
Menu główne
- Dla alarmu, wybrać 1.
- Dla komfortu cieplnego, wybrać 2.
- Dla automatyki, wybrać 3.
- Dla scenariuszy, wybrać 4.
- Aby dostosować nadajnik, wybrać 5.
- Aby słuchać, wybrać 6.
- Aby słuchać i rozmawiać jednocześnie, wybrać 7.
- Aby zakończyć połączenie, nacisnąć dwukrotnie #
W zależności od rodzaju
instalacji niektóre menu nie
są oferowane.
Przykładowo, jeśli nie
zapisano
scenariuszy, menu 4
nie będzie wyświetlane.
- Dla komfortu cieplnego, wybrać 2.
Menu Komfort cieplny
Temperatura wewnątrz wynosi 19°C.
Temperatura na zewnątrz wynosi 21,5°C.*
Ogrzewanie jest w trybie nie-
obecność.
Ogrzewanie jest włączone Ogrzewanie jest wyłączone
- Aby włączyć ogrzewanie,
wybrać 1.
- Aby wyłączyć ogrzewanie,
wybrać 2.
- Aby ustawić ogrzewanie w
trybie nieobecność, wybrać 1.
- Aby wyłączyć ogrzewanie,
wybrać 2.
- Aby włączyć ogrzewanie,
wybrać 1.
- Aby przestawić ogrzewanie w
tryb nieobecność, wybrać 2.
Klimatyzacja jest włączona. Klimatyzacja jest wyłączona.
- Aby wyłączyć klimatyzację, wybrać 1. - Aby włączyć klimatyzację, wybrać 1.
Ogrzewanie
Klimatyzacja
- Aby przestawić system w tryb ogrzewanie, wybrać 1.
- Aby przestawić system w tryb klimatyzacja, wybrać 2.
123
456
789
0
123
456
789
0
- Aby zakończyć połączenie,
nacisnąć dwukrotnie .
Do widzenia.
Wywołać numer nadajnika
* Jeśli zewnętrzna syrena SEF TYXAL+
została przypisana do instalacji.
W każdej chwili:
- Aby powrócić do poprzedniego menu, wybrać
- Aby zakończyć połączenie, nacisnąć dwukrotnie
3. Funkcje automatyki domowej

135
PL
123
456
789
0
1
4
5
2
3
3
3.2 Zdalna obsługa automatyki
- Dzień dobry, wprowadź
swój kod dostępu.
Menu główne
- Dla alarmu, wybrać 1.
- Dla komfortu cieplnego, wybrać 2.
- Dla automatyki, wybrać 3.
- Dla scenariuszy, wybrać 4.
- Aby dostosować nadajnik, wybrać 5.
- Aby słuchać, wybrać 6.
- Aby słuchać i rozmawiać jednocześnie, wybrać 7.
- Aby zakończyć połączenie, nacisnąć dwukrotnie #
W zależności od rodzaju
instalacji niektóre menu
nie są oferowane.
Przykładowo, jeśli nie
zapisano
scenariuszy, menu 4 nie
będzie wyświetlane.
- Dla automatyki, wybrać 3.
Menu Automatyka
- Dla sterowania roletami zewnętrznymi, wybrać 1.
- Dla oświetlenia, wybrać 2.
- Dla zdalnego sterowania bramą, wybrać 3.
- Aby sterować grupą 1, wybrać 1.
Rolety grupy 1 zamknięte
- Aby otworzyć, wybrać 1.
Rolety grupy 1 otwarte
- Aby zamknąć, wybrać 2.
- Aby sterować grupą 2, wybrać 2.
Rolety grupy 2 zamknięte
- Aby otworzyć, wybrać 1.
Rolety grupy 2 otwarte
- Aby zamknąć, wybrać 2.
- Aby sterować grupą 1, wybrać 1.
- Oświetlenie grupy 1
zgaszone.
- Aby zaświecić, wybrać 1.
- Oświetlenie grupy 1
włączone.
- Aby zgasić, wybrać 2.
Rolety
Oświetlenie
Brama
- Aby uruchomić bramę, wybrać 1.
123
456
789
0
123
456
789
0
12
3
456
789
0
- Aby zakończyć połączenie,
nacisnąć dwukrotnie .
- Aby sterować grupą 2, wybrać 2.
- Oświetlenie grupy 1
zgaszone.
- Aby zaświecić, wybrać 1.
- Oświetlenie grupy 1
włączone.
- Aby zgasić, wybrać 2.
Wywołać numer nadajnika
Do widzenia.
W każdej chwili:
- Aby powrócić do poprzedniego menu, wybrać
- Aby zakończyć połączenie, nacisnąć dwukrotnie

136
Wywołać numer nadajnika
3.3 Menu Scenariusz
123
456
789
0
1
4
2
3
4
- Dzień dobry,
wprowadź swój kod dostępu.
Menu główne
- Dla alarmu, wybrać 1.
- Dla komfortu cieplnego, wybrać 2.
- Dla automatyki, wybrać 3.
- Dla scenariuszy, wybrać 4.
- Aby dostosować nadajnik, wybrać 5.
- Aby słuchać, wybrać 6.
- Aby słuchać i rozmawiać jednocześnie, wybrać 7.
- Aby zakończyć połączenie, nacisnąć dwukrotnie #
W zależności od rodzaju
instalacji niektóre menu nie
są oferowane.
Przykładowo, jeśli nie
zapisano automatyki,
menu 3 nie będzie wyświe-
tlane.
- Dla scenariuszy, wybrać 4.
Menu Automatyka
- Aby uruchomić scenariusz 1, wybrać 1.
- Aby uruchomić scenariusz 2, wybrać 2.
- Aby uruchomić scenariusz 3, wybrać 3.
- Aby uruchomić scenariusz 4, wybrać 4.
- Aby zakończyć połączenie,
nacisnąć dwukrotnie
.
Do widzenia.
W każdej chwili:
- Aby powrócić do poprzedniego menu, wybrać
- Aby zakończyć połączenie, nacisnąć dwukrotnie
3. Funkcje automatyki domowej

137
PL
4. Praca w trybie autonomicznym
Nadajnik może pracować w trybie autonomicznym,
bez przypisania do centrali.
W takim przypadku czujniki techniczne (czujnik
wycieku wody, dymu itp.) są bezpośrednio przypi-
sane do nadajnika. Połączenie jest wyzwalane po
wykryciu usterki technicznej.
Aby wywołać połączenie alarmowe, można także
przypisać pilota TL 2000 TYXAL+ wyposażonego w
funkcję SOS.
Funkcje nadzoru zdalnego i domofonu są kompaty-
bilne z tym trybem pracy.
DFR TYXAL+
Czujnik dymu,
pożaru
DF TYXAL+
Czujnik wycieku wody
DCS TYXAL+
Czujnik odcięcia
dopływu prądu
TL 2000 TYXAL+
Pilot
DU TYXAL+
Uniwersalny
czujnik
4.1 Zgodne czujniki i pilot
4.2 Przebieg połączenia w razie usterki technicznej
W przypadku wykrycia usterki technicznej nadajnik łączy się kolejno z zaprogramowanymi numerami (do 6
numerów) do czasu, gdy połączenie z którymś z nich zatrzyma cykl.
Przykład, gdy rozmówca odbiera połączenie:
123
456
789
0
1
2
3
123
456
789
0
123
456
7
*
#
89
0
Aby poznać szczegóły
błędu, wybrać 1
Aby zdezaktywować urzą-
dzenie, wybrać 2
Jesteś
połączony z
nadajnikiem
telefonicznym.
Błąd zabezpieczenia
własnego
4 kwietnia 2014 r.
Aby przerwać cykl
połączeń, wybrać
- aby słuchać, wybrać 2
- aby słuchać i rozmawiać
jednocześnie, wybrać 3.
- aby zakończyć połączenie,
nacisnąć dwukrotnie
Alarm zabezpieczenia
własnego czujnika w salonie,
strefa 1, 22.04.2014
*
Odtąd nadajnik nie wywoła
już żadnych innych nume-
rów.
*Przykładowa nazwa pomieszczenia
i strefy.
Sformułowanie zależy od ustawień
instalacji.
Należy bezwzględnie
nacisnąć przycisk przed
rozłączeniem się, aby
zatrzymać cykl połączeń tak, by
nadajnik nie łączył się już z pozo-
stałymi numerami.

138
4.3 Dostosowywanie nadajnika
Wywołać numer nadajnika
- W przypadku nadajnika GSM wejście na linię jest natychmiastowe.
- W przypadku nadajnika RTC zastosować jedną z dwóch poniższych metod.
Aby uniknąć przypadkowego wejścia nadajnika na linię, gdy 2 kolejne połączenia następują jedno po
drugim, można zdezaktywować metodę 2, wprowadzając następującą sekwencję z poziomu menu głów-
nego: #82 6 1.
Wprowadzić #82 6 0, aby ją ponownie aktywować.
Metoda 1: z innego telefonu (komórkowego lub stacjonarnego)
Wybrać numer wywo-
ławczy instalacji.
Ponownie wybrać numer wywo-
ławczy instalacji.
Nadajnik odbiera połączenie
po 1 lub 2 dzwonkach.
Odczekać 2 dzwonki.
1
2
abc
3
def
4
ghi
5
jkl
6
mno
7
pqrs
8
tuv
9
wxyz
*
#
0
1
2
abc
3
def
4
ghi
5
jkl
6
mno
7
pqrs
8
tuv
9
wxyz
*
#
0
Dryń Dryń... Dryń
Metoda 2: należy ją stosować w następujących przypadkach:
- podczas połączenia z telefonu komórkowego (jeśli ten rozłączy się przed 10. dzwonkiem),
- gdy nadajnik współpracuje z automatyczną sekretarką lub
usługą poczty głosowej.
1
2
abc
3
def
4
ghi
5
jkl
6
mno
7
pqrs
8
tuv
9
wxyz
*
#
0
1
2
abc
3
def
4
ghi
5
jkl
6
mno
7
pqrs
8
tuv
9
wxyz
*
#
0
Dryń Dryń... Dryń
Wybrać numer wywoław-
czy instalacji.
Domyślnie nadajnik zajmuje linię po
około 10 dzwonkach (liczbę dzwonków
można zmienić).
Odczekać
10 sekund
Odczekać
10 dzwonków.
Aby wybrać język
francuski, wybrać 1 ...
Aby wybrać język
francuski, wybrać 1 ...
Zakończyć
połączenie
4. Praca w trybie autonomicznym

139
PL
4.4 Menu ustawień
Aby ustawiæ powiadamiane numery, wcisn¹æ 1
Menu ustawieñ
Wprowadziæ nowy powiadamiany
numer i wcisn¹æ
Menu ustawieñ
Wprowadziæ nowy powiadamiany numer
i wcisn¹æ
Dzia³anie przyjête
Aby zmieniæ kod dostêpu, wcisn¹æ 3
Menu ustawieñWpisaæ kod dostêpu Wprowadziæ nowy kod dostêpu
Aby dostosowaæ komunikat g³osowy, wcisn¹æ 2
Wstêpnie nagrany komunikat g³osowy:
"Po³¹czono z nadajnikiem telefonicznym"
- Aby zmieniæ komunikat g³osowy,
wcisn¹æ 1
- Aby powróciæ do poprzedniego menu,
wcisn¹æ
Wstêpnie nagrany komunikat g³osowy:
"Po³¹czono z nadajnikiem telefonicznym"
- Aby zmieniæ komunikat g³osowy,
wcisn¹æ 1.
- Aby powróciæ do pierwotnego
komunikatu g³osowego, wcisn¹æ 2.
- Aby powróciæ do poprzedniego menu,
wcisn¹æ
Po sygnale nagraæ komunikat i nacisn¹æ
przycisk, aby zakoñczyæ nagrywanie.
Aby ustawiæ datê lub godzinê, wcisn¹æ 4
Aby ustawiæ liczbê dzwonków, wcisn¹æ 5
(tylko dla TTRTC TYXAL+)
Aby zmieniæ jêzyk, wcisn¹æ 6
Aby wybraæ jêzyk francuski, wcisn¹æ 1.
Aby wybraæ jêzyk angielski, wcisn¹æ 2.
Aby wybraæ jêzyk hiszpañski, wcisn¹æ 3.
Aby wybraæ jêzyk niemiecki, wcisn¹æ 4.
Aby wybraæ jêzyk w³oski, wcisn¹æ 5.
Aby wybraæ jêzyk holenderski, wcisn¹æ 6.
Aby wybraæ jêzyk polski, wcisn¹æ 7.
- Dla numeru 1, wcisn¹æ 1.
- Dla numeru 2, wcisn¹æ 2.
- Dla numeru 3, wcisn¹æ 3.
- Dla numeru 4, wcisn¹æ 4.
- Dla numeru 5, wcisn¹æ 5.
- Dla numeru 6, wcisn¹æ 6.
- Aby powróciæ do poprzedniego menu,
wcisn¹æ
Nie ustawiono ¿adnych powiadamianych numerów.
Aby ustawiæ numer, wcisn¹æ 1.
- Aby powróciæ do poprzedniego menu,
wcisn¹æ
Wstêpnie ustawiony numer :
02.99.73.xx.xx
Aby edytowaæ numer, wcisn¹æ 1.
Aby usun¹æ numer, wcisn¹æ 2.
- Aby powróciæ do poprzedniego menu,
wcisn¹æ
Wstêpnie ustawiona data:
29 listopada 2013 r.
Wstêpnie ustawiona godzina: 11:57.
- Aby zmieniæ datê, wcisn¹æ 1.
- Aby zmieniæ godzinê, wcisn¹æ 2.
- Aby powróciæ do poprzedniego menu,
wcisn¹æ
29 listopada 2013 r., 11:57.
- Aby zmieniæ datê, wcisn¹æ 1.
- Aby zmieniæ godzinê, wcisn¹æ 2.
- Aby powróciæ do poprzedniego menu,
wcisn¹æ
Wprowadziæ 6 cyfr odpowiadaj¹cych dacie
Wprowadziæ 4 cyfry odpowiadaj¹ce godzinie
Aby wybraæ format AM, wcisn¹æ 1
Aby wybraæ format PM, wcisn¹æ 2
Wstêpnie ustawiona liczba dzwonków: 10
- Aby edytowaæ numer, wcisn¹æ 1.
- Aby powróciæ do poprzedniego menu,
wcisn¹æ
Wprowadziæ 2 cyfry odpowiadaj¹ce
nowej liczbie dzwonków
Dzia³anie przyjête
Menu ustawieñDzia³anie przyjête
Dzia³anie przyjête
Dzia³anie przyjête
Wstêpnie ustawiony numer ...
Wprowadzić kod dostępu.
Z poziomu menu głównego wybrać 5, aby uzyskać dostęp do menu dostosowywania.
W każdej chwili:
- Aby powrócić do poprzedniego menu, wybrać
- Aby zakończyć połączenie, nacisnąć dwukrotnie

140
5. Próba prawidłowego funkcjonowania
123
456
789
0
1
2
3
123
456
789
0
123
456
7
*
#
89
0
Z centralą:
Włączyć system i spowodować wykrycie włamania.
W trybie autonomicznym:
Na przykład, przeprowadzić symulację wycieku na czujniku
wycieku wody, rozpylając na nim nieco wody.
Na nadajniku:
1
n°1
n°2
2
n°3
3
n°4
4
n°5
5
n°6
6
7
n°1
n°2
8
n°3
9
n°4
10
n°5
11
n°6
12
13
n°1
n°2
14
n°3
15
n°4
16
Aby poznać szczegóły
błędu, wybrać 1
Aby zdezaktywować urzą-
dzenie, wybrać 1
Jesteś
połączony z
nadajnikiem
telefonicznym.
Błąd techniczny
4 kwietnia 2014 r.
Aby przerwać cykl
połączeń, wybrać
- Aby zatrzymać wycie
syreny, wybrać 1.
- aby słuchać, wybrać 2
- aby słuchać i rozmawiać
jednocześnie, wybrać 3.
- aby zakończyć połączenie,
nacisnąć dwukrotnie
Usterka techniczna wyciek
wody na czujniku
strefa 2, 4 kwietnia 2014 r.
Upewnić się, że nadajnik wywołuje kolejno zaprogramowa-
ne numery (do 6 numerów), do czasu, gdy jeden z nich się
zgłosi:
- nadajnik domaga się naciśnięcia przycisku ,
- odczytuje komunikat głosowy i wskazuje charakter usterki,
- proponuje, aby wysłuchać tego, co się dzieje, porozma-
wiać z osobą blisko nadajnika, zatrzymać cykl połączeń
i uzyskać informacje szczegółowe na temat usterki, jeśli
przypisana została centrala.
Spowodować wykrycie w celu sprawdzenia prawidłowego funkcjonowania
instalacji.
Można również wywołać testowy cykl
połączeń, przytrzymując przez 30 sekund
wciśnięty przycisk nadajnika.
>30s
Przykład pełnego cyklu
z 6 zaprogramowanymi numerami

141
PL
6. Stan lampki sygnalizacyjnej linii telefonicznej
6.2 TTGSM TYXAL+
Przycisk / lampka sygnali-
zacyjna
Aby wyświetlić stan linii
telefonicznej, nacisnąć
przycisk na panelu
przednim.
Stan lampki sygnali-
zacyjnej
Opis
Miga na czerwono * Brak linii RTC
Świeci się
stałym zielonym
światłem *
Obecność linii RTC
Miga
na zielono
Trwa połączenie
Zgaszona Normalna praca,
rozmowy wychodzące i przychodzące są
możliwe.
Stan lampki sygnaliza-
cyjnej
z zasilaniem
Stan lampki
sygnalizacyjnej
bez zasilania
Opis
Miga
na czerwono
Zgaszona Brak odbioru GSM
Zielony / Pomarańczowy
migający
Zgaszona Słaby odbiór GSM
Zielony
Stały
Zgaszona Dobry odbiór GSM
Zielony
migający
Zgaszona Trwa połączenie
(*) Lampka sygnalizacyjna wciąż się świeci:
- przez 5 minut po włączeniu zasilania
- przez 1 minutę po naciśnięciu przycisku T1.
W przypadku braku zasilania sieciowego lampka sygnalizacyjna
świeci się:
- przez 5 minut po podłączeniu do napięcia
- w czasie przekazywania informacji o zdarzeniu
- przez 1 minutę po naciśnięciu przycisku T1
- przez 5 minut po odcięciu zasilania
6.1 TTRTC TYXAL+
W przypadku braku zasilania
TTGSM TYXAL+ nadal prze-
kazuje alarmy, lecz nie można
już sterować nim zdalnie.
Nadajnik telefoniczny stale monitoruje linię telefoniczną.
W przypadku usterki linii telefonicznej, na klawiaturze dotykowej
pojawia się
następujący symbol. Aby uzyskać szczegółowe informacje na
temat usterek, wprowadzić kod dostępu.
25/11/15 12:48
Info
Ustawienia
OFF
Mój dom

142
7. Wymiana baterii
2
1
1
2
2
1
4
2
1
3
5
Odblokować obudowę. Zdjąć pokrywę dolną. Za pomocą wkrętaka unieść 2
zatrzaski pokrywy górnej.
Zdjąć pokrywę górną.
Wymienić baterię
Włożyć baterię,
przestrzegając
polaryzacji.
• Przechowywać w miejscu niedostępnym dla dzieci.
• Nie zmieniać polaryzacji.
• Nie otwierać zestawu baterii.
• Nie miażdżyć ani nie dziurawić elementów.
• Nie zwierać (+) lub (-) baterii za pomocą
elementów przewodzących.
• Nie narażać na nadmierne obciążenia
mechaniczne.
• Nie wystawiać jednostki na działanie wody
lub kondensacji.
• Nie nagrzewać bezpośrednio do temperatury po-
wyżej 100°C (212°F), nie lutować ani nie wrzucać
do ognia.
Niewłaściwe zastosowania mogą powodować
wycieki lub pryskanie parującego elektrolitu, jak
również mogą być przyczyną pożaru lub wybuchu.
• Nie ładować
• Usuwać zgodnie z obowiązującymi
przepisami.
Sposób obchodzenia się z baterią
Ryzyko pożaru, wybuchu i poważnych oparzeń.
Zalecamy stosowanie baterii SAFT LSH20 - 3.6V. Można stosować baterię litową 3.6 V innej marki,
lecz w tym przypadku dziesięcioletni czas pracy nie może być zagwarantowany.
Przestawić centralę w tryb KONSERWACJI (patrz podręcznik systemu).
Otworzyć obudowę nadajnika
Stopień zużycia baterii nadajnika sygnalizowany jest:
• W trybie systemu alarmowego:
Komunikatem na klawiaturze CLT 8000 TYXAL+. Centrala emituje sygnały bip przy każdym włączeniu lub
wyłączeniu systemu (lub "błąd baterii" z syntezatora mowy (wymaga aktywacji pomocy głosowej, patrz
instrukcja CLT 8000 TYXAL+).
• W trybie autonomicznym:
Komunikatem powitalnym w momencie połączenia przychodzącego lub wychodzącego spowodowanego
usterką.
Odłączyć gniazdo telefoniczne nadajnika TTRTC TYXAL+.

143
PL
Aby przywrócić ustawienia fabryczne poprzez usunięcie wszystkich przypisań i bieżących błędów.
Jeśli do nadajnika przypisano centralę, ustawić ją w trybie KONSERWACJI (patrz podręcznik systemu).
9. Przywracanie ustawień początkowych (fabrycznych)
z centralą alarmową lub w trybie autonomicznym
Otworzyć obudowę nadajnika
Tylko w trybie
autonomicznym
RESET OK
>30s
BIP... BIP
>30s
BIP BIIIIP
>5s >15s
T2 T2
Nacisnąć na 30 sekund
przycisk T2.
Nadajnik znajduje się w stanie początkowym, wszystkie przypisania oraz wszystkie bieżą-
ce błędy są usunięte.
Po 5 sekundach nadajnik emituje 1 sygnał bip, nie
zwalniać przycisku.
Po 15 sekundach nadajnik emituje 2 sygnały bip,
nie zwalniać przycisku.
Po 30 sekundach nadajnik emituje długi sygnał bip.
8. Przywracanie pierwotnej wersji kodu dostępu
z centralą alarmową bez klawiatury lub w trybie autonomicznym.
Otworzyć obudowę nadajnika
>15s
BIP... BIP
BIP
>5s >15s
Tylko w trybie
autonomicznym
T2 T2
Nacisnąć na 15 sekund przycisk T2. Po 5 sekundach nadajnik emituje 1 sygnał bip, nie
zwalniać przycisku.
Po 15 sekundach nadajnik emituje 2 sygnały bip,
zwolnić przycisk.
Kodem dostępu znów jest 1 2 3 4 5 6.
Aby powrócić do kodu fabrycznego 1 2 3 4 5 6.
Jeśli do nadajnika przypisano centralę, ustawić ją w trybie KONSERWACJI (patrz podręcznik systemu).

144
10. Pomoc
Słaba jakość połączenia przez domofon
Czujnik instalacji wywołuje niewłaściwe
alarmy
Temperatura otoczenia podawana
przez nadajnik jest niedokładna
Bieżący cykl połączeń
jest przerwany i zastąpiony innym cyklem
połączeń
Upewnić się, że nie jest włączony tryb głośno-
mówiący
Oddalić maksymalnie antenę urządzenia
TTGSM TYXAL+
Po odebraniu połączenia i odsłuchaniu
komunikatu o usterce, zdezaktywować dane
urządzenie.
Umieścić nadajnik z dala od źródeł ciepła
(router ADSL ...), aby nie zakłócać odczytów
temperatury otoczenia.
Czujniki techniczne są klasykowane według
hierarchii priorytetów:
1 - Czujnik dymu, pożaru
(DFR TYXAL+),
2 - Czujnik wycieków wody
(DF TYXAL+),
3 - Czujnik odcięcia dopływu prądu
(DCS TYXAL+),
4 - Uniwersalny czujnik
(DU TYXAL+).
Na przykład: Wyzwalanie alarmu pożarowego
przez DFR TYXAL+ będzie miało pierwszeństwo
w stosunku do alarmu związanego z odcięciem
dopływu prądu.
Celem tego rozdziału jest pomoc w szybkim znalezieniu rozwiązania najczęściej występujących problemów.
W razie wątpliwości, jeżeli problem ma charakter uporczywy lub nie znajduje się na tej liście, należy skon-
taktować się z instalatorem.
Z uwagi na możliwe zmiany norm i sprzętu, parametry podane w tekście lub na ilustracjach zawartych w niniejszym
dokumencie są dla nas wiążące dopiero po uzyskaniu potwierdzenia ze strony naszych serwisów.

145
PL

146

147

www.deltadore.com
-
 1
1
-
 2
2
-
 3
3
-
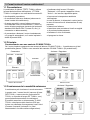 4
4
-
 5
5
-
 6
6
-
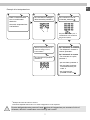 7
7
-
 8
8
-
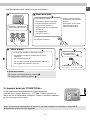 9
9
-
 10
10
-
 11
11
-
 12
12
-
 13
13
-
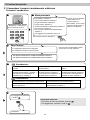 14
14
-
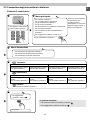 15
15
-
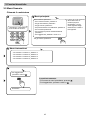 16
16
-
 17
17
-
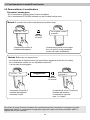 18
18
-
 19
19
-
 20
20
-
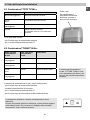 21
21
-
 22
22
-
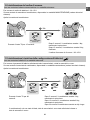 23
23
-
 24
24
-
 25
25
-
 26
26
-
 27
27
-
 28
28
-
 29
29
-
 30
30
-
 31
31
-
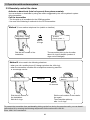 32
32
-
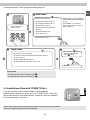 33
33
-
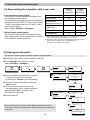 34
34
-
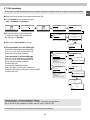 35
35
-
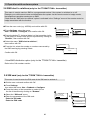 36
36
-
 37
37
-
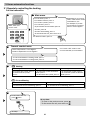 38
38
-
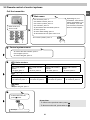 39
39
-
 40
40
-
 41
41
-
 42
42
-
 43
43
-
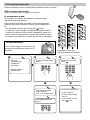 44
44
-
 45
45
-
 46
46
-
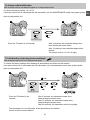 47
47
-
 48
48
-
 49
49
-
 50
50
-
 51
51
-
 52
52
-
 53
53
-
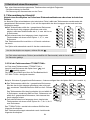 54
54
-
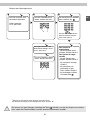 55
55
-
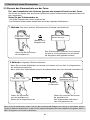 56
56
-
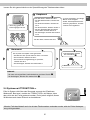 57
57
-
 58
58
-
 59
59
-
 60
60
-
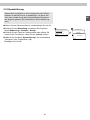 61
61
-
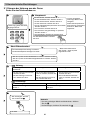 62
62
-
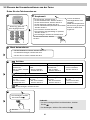 63
63
-
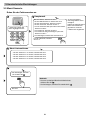 64
64
-
 65
65
-
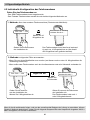 66
66
-
 67
67
-
 68
68
-
 69
69
-
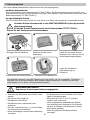 70
70
-
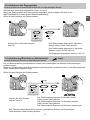 71
71
-
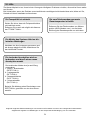 72
72
-
 73
73
-
 74
74
-
 75
75
-
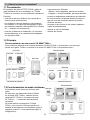 76
76
-
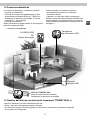 77
77
-
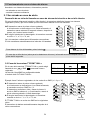 78
78
-
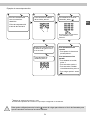 79
79
-
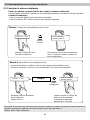 80
80
-
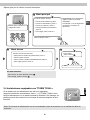 81
81
-
 82
82
-
 83
83
-
 84
84
-
 85
85
-
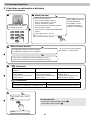 86
86
-
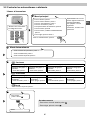 87
87
-
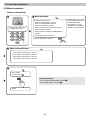 88
88
-
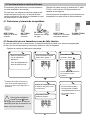 89
89
-
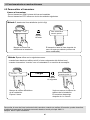 90
90
-
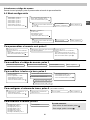 91
91
-
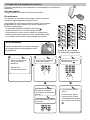 92
92
-
 93
93
-
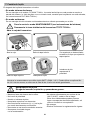 94
94
-
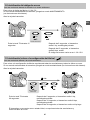 95
95
-
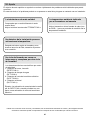 96
96
-
 97
97
-
 98
98
-
 99
99
-
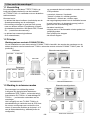 100
100
-
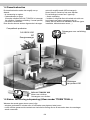 101
101
-
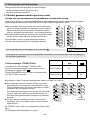 102
102
-
 103
103
-
 104
104
-
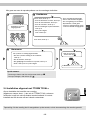 105
105
-
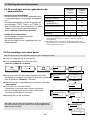 106
106
-
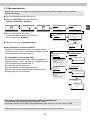 107
107
-
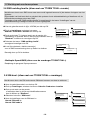 108
108
-
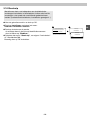 109
109
-
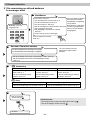 110
110
-
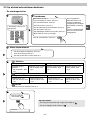 111
111
-
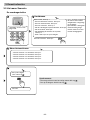 112
112
-
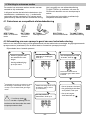 113
113
-
 114
114
-
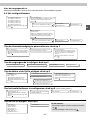 115
115
-
 116
116
-
 117
117
-
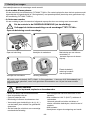 118
118
-
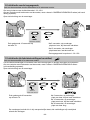 119
119
-
 120
120
-
 121
121
-
 122
122
-
 123
123
-
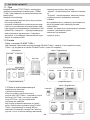 124
124
-
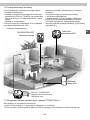 125
125
-
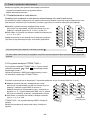 126
126
-
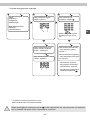 127
127
-
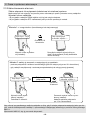 128
128
-
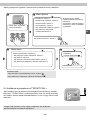 129
129
-
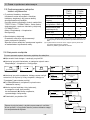 130
130
-
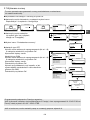 131
131
-
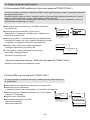 132
132
-
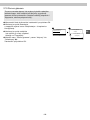 133
133
-
 134
134
-
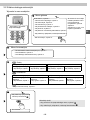 135
135
-
 136
136
-
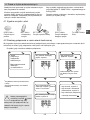 137
137
-
 138
138
-
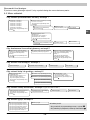 139
139
-
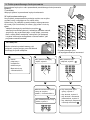 140
140
-
 141
141
-
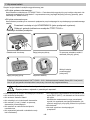 142
142
-
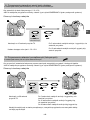 143
143
-
 144
144
-
 145
145
-
 146
146
-
 147
147
-
 148
148


DELTA DORE TTGSM TYXAL+ EU Gebruikershandleiding
- Categorie
- Deur intercom systemen
- Type
- Gebruikershandleiding
- Deze handleiding is ook geschikt voor
in andere talen
Gerelateerde papieren
-
DELTA DORE Tyxal+ TTGSM Gebruikershandleiding
-
DELTA DORE TTRTC TYXAL+ Installatie gids
-
-
-
-
-
-
-
-