
SENSOR-LICHTBAND 3 M / 3M LIGHT STRIP WITH
SENSOR / RUBAN LUMINEUX 3 M AVEC CAPTEUR
SENSOR-LICHTB AND 3 M
Montage-, Bedienungs- und Sicherheitshinweise
3M LIGHT STRIP WITH SENSOR
Assembly, operating and safety instructions
RUBAN LUMINEUX 3 M AVEC CAPTEUR
Instructions de montage, d‘utilisation et consignes de sécurité
SENSORLICHTBAND 3 M
Montage-, bedienings- en veiligheidsinstructies
IAN 321921_1901
SVETELNÝ PÁS SO SENZOROM 3 M
Pokyny k montáži, obsluze a bezpečnostní pokyny
TAŚMA ŚWIETLNA Z CZUJNIKIEM
RUCHU, 3 METRY DŁUGOŚCI
Wskazówki montażu, obsługi i bezpieczeństwa
SVETELNÝ PÁS SO SENZOROM 3 M
Pokyny pre montáž, obsluhu a bezpečnostné pokyny

DE / AT / CH Montage-, Bedienungs- und Sicherheitshinweise Seite 5
GB / IE Assembly, operating and safety instructions Page 15
FR / BE Instructions de montage, d‘utilisation et consignes de sécurité Page 25
NL / BE Montage-, bedienings- en veiligheidsinstructies Pagina 35
PL Wskazówki montażu, obsługi i bezpieczeństwa Strona 45
CZ Pokyny k montáži, obsluze a bezpečnostní pokyny Strana 55
SK Pokyny pre montáž, obsluhu a bezpečnostné pokyny Strana 65
Klappen Sie vor dem Lesen die beiden Seiten mit den Abbildungen aus und machen Sie sich anschließend mit
allen Funktionen des Gerätes vertraut.
Before reading, unfold both pages containing illustrations and familiarise yourself with all functions of
the device.
Avant de lire le mode d‘emploi, ouvrez les deux pages contenant les illustrations et familiarisez-vous
ensuite avec toutes les fonctions de l‘appareil.
Vouw vóór het lezen de beide pagina‘s met de afbeeldingen open en maak u vertrouwd met alle functies van
het apparaat.
Przed przeczytaniem proszę rozłożyć obie strony z ilustracjami, a następnie proszę zapoznać się z
wszystkimi funkcjami urządzenia.
Před čtením si odklopte obě dvě strany s obrázky a potom se seznamte se všemi funkcemi přístroje.
Pred čítaním si odklopte obidve strany s obrázkami a potom sa oboznámte so všetkými funkciami prístroja.

+
12V
BLUE
RED
GREEN
+
12V
BLUE
RED
GREEN
+
12V
BLUE
RED
GREEN
+
12V
BLUE
RED
GREEN
+
12V
BLUE
RED
GREEN
+
12V
BLUE
RED
GREEN
100mm
B
+
12V
BLUE
RED
GREEN
+
12V
BLUE
RED
GREEN
(x2) (x4)
+ 12V
BLUE
RED
GREEN
(1)
(2)
(3)
(4)
(5)
+
12V
BLUE
RED
GREEN
+
12V
BLUE
RED
GREEN
+
12V
BLUE
RED
GREEN
+
12V
BLUE
RED
GREEN
+
12V
BLUE
RED
GREEN
+
12V
BLUE
RED
GREEN
!
+ 12V
BLUE
RED
GREEN
C
E
5
1500mm
500cm
300cm 300cm
120
+
12V
BLUE
RED
GREEN
+
12V
BLUE
RED
GREEN
+
12V
BLUE
RED
GREEN
+
12V
BLUE
RED
GREEN
3000mm
10mm
100mm
+
CR2025
3 V
+
CR2025
3 V
+
CR2025
3V
+
CR2025
3 V
OFF
WHITE
ON
BLUE
GREE N
RED
PURPLE
CYAN
YELLO W
ORANG E
FADE7
FADE3
JUMP 7
JUMP3
1234
A14125106L
1
2
3
5
O F F
WH IT E
ON
B LUE
G R E E N
R E D
PU R PL E
CYAN
YELLO W
OR AN GE
F ADE 7
FADE3
J UMP 7
J U MP 3
1234
+
CR2025
3V
-
CR2025
3V
+
CR2025
3V
+
CR2025
3V
F
413 1514
4
D
10
11
12
6
8 9
7

100mm
+
-
+
-
+ +
- -
+12V
GND
+12V
GND
B
3000mm
100mm
1500mm
mm 150
+
+12V
GND
L2
+
- -
+12V
GND
8mm
A14125206L
3
2
1
17716
6
(x2) (x4)
+
(1)
(2)
(3)
(4)
(5)
+12V
GND
+ +
- -
+
-
+12V
GND
!
+
- -
+12V
GND
+
-
+12V
GND
C
30sec 10min
E
D
10
11
8 9

5 DE/AT/CH
Inhaltsverzeichnis
Legende der verwendeten Piktogramme ........................................................... Seite 6
Einleitung ......................................................................................................................................... Seite 7
Bestimmungsgemäße Verwendung ....................................................................................................Seite 7
Lieferumfang ........................................................................................................................................ Seite 7
Teilebeschreibung ...............................................................................................................................Seite 7
Technische Daten ................................................................................................................................Seite 8
Sicherheit ......................................................................................................................................... Seite 8
Sicherheitshinweise .............................................................................................................................Seite 8
Sicherheitshinweise für Batterien / Akkus ........................................................................................... Seite 9
Inbetriebnahme ......................................................................................................................... Seite 10
Batterien einlegen / wechseln .............................................................................................................Seite 10
LED-Band kürzen / verbinden .............................................................................................................Seite 10
LED-Band montieren ............................................................................................................... Seite 11
LED-Band ein- / ausschalten ................................................................................................................ Seite 12
Leuchteffekte mit Hilfe der Fernbedienung steuern ...........................................................................Seite 12
Wartung und Reinigung .....................................................................................................Seite 13
Entsorgung .....................................................................................................................................Seite 13
Garantie und Service ............................................................................................................Seite 13
Garantieerklärung ...............................................................................................................................Seite 13
Serviceadresse ....................................................................................................................................Seite 13
Konformitätserklärung .........................................................................................................................Seite 14
Hersteller ..............................................................................................................................................Seite 14

6 DE/AT/CH
Legende der verwendeten Piktogramme
Bedienungsanleitung lesen! Die verwendeten Leuchtmittel sind
nicht dimmbar (14125206L).
Diese Leuchte ist ausschließlich für den
Betrieb im Innenbereich, in trockenen
und geschlossenen Räumen geeignet. Explosionsgefahr!
Nur 14125106L: Bei diesem Artikel
handelt es sich um eine Leuchtdekoration.
Verwenden Sie diese Leuchte nicht zur
Raumbeleuchtung oder als Nachtlicht.
Es handelt sich um ein Spezialprodukt,
da die Farbwertanteile außerhalb der in
Klammern aufgeführten Bereiche sind.
Farbwertanteil: (x<0,270 oder
x > 0,530); (y<-2,172 x² oder y
>-2,3172 x² + 2,3653 x -0,1595).
Schutzhandschuhe tragen!
So verhalten Sie sich richtig
Kurzschlussfester
Sicherheitstrans formator
Unabhängiges Betriebsgerät
Abstrahlwinkel Reichweite
Volt (Wechselspannung) Polarität des Netzanschlusses
Hertz (Frequenz) d.c. DC Gleichspannung D.C.
Watt (Wirkleistung) b
a
Entsorgen Sie Verpackung und
Gerät umweltgerecht!
Schutzklasse II Lebensdauer
Schutzklasse III ON OFF Schaltzyklen
IP20 Schutzart ta Umgebungstemperatur
Warn- und Sicherheitshinweise beachten! tc Gehäusetemperatur am angegebenen
Punkt
Lebens- und Unfallgefahr für
Kleinkinder und Kinder Warnung!
Gefahr von elektrischem Schlag
Umweltschäden durch falsche
Entsorgung der Batterien / Akkus! Batterien ausserhalb der Reichweite
von Kindern aufbewahren!
Energieeffizienz externer Netzteile
Klasse V Die Verpackung besteht aus
100 % recyceltem Papier.
Legende der verwendeten Piktogramme Einleitung

7 DE/AT/CH
Legende der verwendeten Piktogramme
Sensor-Lichtband 3 m
Einleitung
Bitte lesen Sie diese Bedienungsanleitung
vollständig und sorgfältig durch. Diese
Anleitung gehört zu diesem Produkt und
enthält wichtige Hinweise zur Inbetriebnahme und
Handhabung. Beachten Sie immer alle Sicherheits-
hinweise. Prüfen Sie vor der Inbetriebnahme, ob
die korrekte Spannung vorhanden ist und ob alle
Teile richtig montiert sind. Sollten Sie Fragen haben
oder unsicher in Bezug auf die Handhabung des
Gerätes sein, setzen Sie sich bitte mit Ihrem Händ-
ler oder der Servicestelle in Verbindung. Bewahren
Sie diese Anleitung bitte sorgfältig auf und geben
Sie sie ggf. an Dritte weiter.
Bestimmungsgemäße
Verwendung
Diese Leuchte ist ausschließlich für den
Betrieb im Innenbereich, in trockenen
und geschlossenen Räumen geeignet.
Dieses Gerät ist nur für den Einsatz in privaten
Haushalten und nicht für den kommerziellen Ge-
brauch vorgesehen. Eine andere Verwendung als
zuvor beschrieben ist nicht zulässig und führt zur
Beschädigung dieses Produktes. Darüber hinaus ist
dies mit Gefahren, wie z. B. Kurzschluss, Brand,
elektrischem Schlag etc. verbunden.
Nur für 14125106L:
Bei diesem Artikel handelt es sich um eine
Leuchtdekoration. Verwenden Sie diese
Leuchte nicht zur Raumbeleuchtung oder
als Nachtlicht. Es handelt sich um ein Spezialprodukt,
da die Farbwertanteile außerhalb der in Klammern
aufgeführten Bereiche sind.
Farbwertanteil: (x<0,270 oder x > 0,530); (y<-2,172
x² oder y >-2,3172 x² + 2,3653 x -0,1595).
Lieferumfang
Kontrollieren Sie unmittelbar nach dem Auspacken
immer den Lieferumfang auf Vollständigkeit sowie
den einwandfreien Zustand des Gerätes.
1 LED-Band, Modell 14125106L / 14125206L
1 Netzadapter
1 Musiksensor (14125106L)
2 Verbinder
4 Abschlusskappen
2 Kabelhalterungen
1 Klebestreifen
2 Schrauben für Sensoreinheit (14125106L)
1 Fernbedienung (14125106L)
1 Bedienungsanleitung
Teilebeschreibung
1 Netzanschlussleitung
2 Netzadapter
3 LED-Band
4 Fernbedienung (14125106L)
5 Musiksensor (14125106L)
6 Buchse
7 Stecker
8 Steckverbinder
9 Abschlusskappe
10 Schutzfolie
11 Kabelhalterung
12 Empfänger (14125106L)
13 Batteriefach (14125106L)
14 Isolierstreifen (14125106L)
15 Batterie (14125106L)
16 Regler (14125206L)
17 Sensor (14125206L)
18 Klebestreifen
Einleitung

8 DE/AT/CH
Technische Daten
Art.-Nr.: 14125106L
Betriebsspannung: 220–240 V~ 50 / 60 Hz
Gesamtleistung: LED / max. 17 W
LED-Band:
Betriebsspannung: 12 V
Leistung (LED-Band): 14 W
Schutzklasse: III
Schutzgrad: IP20
Netzteil:
Betriebsspannung: 220–240 V~ 50 / 60 Hz
Ausgangsstrom: 1,5 A
Schutzklasse: II
Schutzgrad: IP20
Batterie für
Fernbedienung:
Typ: CR 2025
Art.-Nr.: 14125206L
Betriebsspannung: 220–240 V~ 50 / 60 Hz
Gesamtleistung: LED / max. 6 W
LED-Band:
Betriebsspannung: 12 V
Leistung (LED-Band): 4,5 W
Schutzklasse: III
Schutzgrad: IP20
Netzteil:
Betriebsspannung: 220–240 V ~ 50 / 60 Hz
Ausgangsstrom: 0,5 A
Schutzklasse: II
Schutzgrad: IP20
Sicherheit
Sicherheitshinweise
Bei Schäden, die durch Nichtbeachtung dieser
Bedienungsanleitung verursacht werden, erlischt der
Garantieanspruch! Für Folgeschäden wird keine
Haftung übernommen! Bei Sach- oder Personen-
schäden, die durch unsachgemäße Handhabung
oder Nichtbeachtung der Sicherheitshinweise verur-
sacht werden, wird keine Haftung übernommen!
LEBENS-
UND UNFALLGEFAHR FÜR
KLEINKINDER UND KINDER!
Lassen Sie Kinder niemals unbeaufsichtigt mit dem
Verpackungsmaterial. Es besteht Erstickungsge-
fahr durch Verpackungsmaterial. Kinder unter-
schätzen häufig die Gefahren. Halten Sie Kinder
stets vom Produkt fern.
Dieses Gerät kann von Kindern ab 8 Jahren und
darüber sowie von Personen mit verringerten
physischen, sensorischen oder mentalen Fähig-
keiten oder Mangel an Erfahrung und Wissen
benutzt werden, wenn sie beaufsichtigt oder
bezüglich des sicheren Gebrauchs des Gerätes
unterwiesen wurden und die daraus resultieren-
den Gefahren verstehen. Kinder dürfen nicht
mit dem Gerät spielen. Reinigung und Benut-
zerwartung dürfen nicht von Kindern ohne
Beaufsichtigung durchgeführt werden.
Vermeiden Sie Lebensgefahr
durch elektrischen Schlag
Überprüfen Sie vor jedem Gebrauch das LED-
Band auf etwaige Beschädigungen. Benutzen
Sie Ihr LED-Band niemals, wenn Sie irgendwelche
Beschädigungen feststellen.
Eine beschädigte Netzanschlussleitung bedeutet
Lebensgefahr durch elektrischen Schlag. Wenden
Sie sich bei Beschädigungen, Reparaturen oder
anderen Problemen an die Servicestelle oder
eine Elektrofachkraft. Die Netzanschlussleitung
dieses Gerätes kann nicht ersetzt werden. Bei
Beschädigung der Leitung ist das Gerät zu ver-
schrotten. Das Gerät enthält keine Teile, welche
vom Verbraucher gewartet werden können.
Vergewissern Sie sich vor der Benutzung, dass
die vorhandene Netzspannung mit der benötigten
Betriebsspannung des Artikels übereinstimmt
(siehe “Technische Daten“).
Einleitung / Sicherheit Sicherheit

9 DE/AT/CH
Einleitung / Sicherheit
Vermeiden Sie unbedingt die Berührung der
netzspannungsführenden Leitungen und Kon-
takte mit Wasser oder anderen Flüssigkeiten.
Öffnen Sie niemals eines der elektrischen Betriebs-
mittel oder stecken irgendwelche Gegenstände
in dieselben. Derartige Eingriffe bedeuten Lebens-
gefahr durch elektrischen Schlag.
Benutzen Sie das LED-Band nicht, wenn es mit
Gegenständen abgedeckt oder in eine Ober-
fläche eingelegt ist.
Montieren Sie die Leuchte nicht auf feuchten
oder leitenden Untergründen.
Dieses LED-Band darf mit einem anderen
LED-Band nicht elektrisch verbunden werden.
Nicht mit scharfen Klammern oder Nägeln
befestigen.
Ziehen Sie immer den Netzstecker vor der
Montage, Demontage oder Reinigung aus der
Steckdose.
Fassen Sie niemals den Netzstecker oder das
LED-Band mit nassen Händen an.
Verwenden Sie ausschließlich die mitgelieferten
Einzelteile, ansonsten erlöschen alle Gewähr-
leistungsansprüche.
Öffnen Sie den Lichtschlauch nicht und schneiden
Sie ihn nicht auf.
Verbinden Sie diesen Lichtschlauch nicht mit
dem Produkt eines anderen Herstellers.
Eine Zwischenverbindung darf nur mit Hilfe der
mitgelieferten Steckverbinder hergestellt werden.
Alle offenliegenden Enden müssen vor der Ver-
wendung isoliert werden.
Verwenden Sie den Lichtschlauch nicht, wenn
er durch etwas anderes abgedeckt ist.
Das LED-Band darf nicht mit dem Stromnetz
verbunden werden, während es in der Verpa-
ckung ist. Legen Sie den Artikel vollständig aus,
bevor Sie ihn an das Stromnetz anschließen.
Modell 14125106L
Bei manchen Personen kann es zu epileptischen
Anfällen oder Bewusstseinsstörungen kommen,
wenn Sie bestimmten Blitzlichtern oder Licht-
effekten ausgesetzt werden. Suchen Sie bei
epileptischen Symptomen umgehend einen
Arzt auf.
Vermeiden Sie Brand- und
Verletzungsgefahr
Dieser Artikel enthält keine Teile, die vom
Verbraucher gewartet werden können. Die
LEDs können nicht ausgetauscht werden.
Sollten die LEDs am Ende ihrer Lebensdauer
ausfallen, muss der ganze Artikel ersetzt werden.
Die verbauten LEDs sind nicht geeig-
net für Dimmer und elektronische
Schalter (14125206L).
Bei Betrieb nicht aus kurzem Abstand in die
LED schauen.
Die LED nicht mit einem optischen Instrument
(z. B. Lupe) betrachten.
So verhalten Sie sich richtig
Montieren Sie das LED-Band so, dass es vor
Verschmutzung und zu starker Erwärmung
geschützt ist.
Seien Sie stets aufmerksam! Achten Sie immer
darauf, was Sie tun und gehen Sie stets mit
Vernunft vor. Verwenden Sie das LED-Band in
keinem Fall, wenn Sie unkonzentriert sind oder
sich unwohl fühlen.
Machen Sie sich vor der Verwendung mit allen
Anweisungen und Abbildungen in dieser Anlei-
tung sowie mit dem LED-Band selbst vertraut.
Um das LED-Band vollständig von der Strom-
versorgung zu trennen, muss der Netzadapter
aus der Steckdose gezogen werden.
Sicherheitshinweise für
Batterien / Akkus
BATTERIEN AUSSERHALB DER
REICHWEITE VON KINDERN
AUFBEWAHREN! Das Verschlucken
kann chemische Verbrennungen, Perforation von
Weichteilgewebe und den Tod verursachen.
Schwere Verbrennungen können innerhalb von
2 Stunden nach dem Verschlucken auftreten.
Sofort einen Arzt aufsuchen.
Sicherheit

10 DE/AT/CH
Inbetriebnahme / LED-Band montierenSicherheit / Inbetriebnahme
LEBENSGEFAHR!
Halten Sie Batterien / Akkus außer Reichweite
von Kindern. Suchen Sie im Falle eines Ver-
schluckens sofort einen Arzt auf!
EXPLOSIONSGEFAHR!
Laden Sie nicht aufladbare Batterien niemals
wieder auf. Schließen Sie Batterien / Akkus
nicht kurz und / oder öffnen Sie diese nicht.
Überhitzung, Brandgefahr oder Platzen können
die Folge sein.
Werfen Sie Batterien / Akkus niemals in Feuer
oder Wasser.
Setzen Sie Batterien / Akkus keiner mechani-
schen Belastung aus.
Risiko des Auslaufens von Batterien / Akkus
Vermeiden Sie extreme Bedingungen und Tem-
peraturen, die auf Batterien / Akkus einwirken
können, z. B. auf Heizkörpern / direkte Sonnen-
einstrahlung.
Wenn Batterien / Akkus ausgelaufen sind, ver-
meiden Sie den Kontakt von Haut, Augen und
Schleimhäuten mit den Chemikalien! Spülen
Sie die betroffenen Stellen sofort mit klarem
Wasser und suchen Sie einen Arzt auf!
SCHUTZHANDSCHUHE
TRAGEN!
Ausgelaufene oder beschädigte Batterien /
Akkus können bei Berührung mit der Haut Ver-
ätzungen verursachen. Tragen Sie deshalb in
diesem Fall geeignete Schutzhandschuhe.
Im Falle eines Auslaufens der Batterien / Akkus
entfernen Sie diese sofort aus dem Produkt, um
Beschädigungen zu vermeiden.
Verwenden Sie nur Batterien / Akkus des
gleichen Typs. Mischen Sie nicht alte Batterien /
Akkus mit neuen!
Entfernen Sie die Batterien / Akkus, wenn das
Produkt längere Zeit nicht verwendet wird.
Risiko der Beschädigung des Produkts
Verwenden Sie ausschließlich den angegebenen
Batterietyp / Akkutyp!
Setzen Sie Batterien / Akkus gemäß der Polari-
tätskennzeichnung (+) und (-) an Batterie / Akku
und des Produkts ein.
Reinigen Sie Kontakte an Batterie / Akku und
im Batteriefach vor dem Einlegen!
Entfernen Sie erschöpfte Batterien / Akkus
umgehend aus dem Produkt.
Inbetriebnahme
Entfernen Sie alle Verpackungsmaterialien vor
dem ersten Gebrauch.
Das LED-Band darf nicht mit dem Versorgungs-
netz verbunden werden, während es sich in
der Verpackung befindet und aufgerollt ist.
Hinweis: Achten Sie darauf, dass sich in
unmittelbarer Nähe zur Montagefläche eine
Steckdose befindet.
Batterien einlegen / wechseln
(14125106L)
Hinweis: Ziehen Sie vor dem ersten Gebrauch
den Isolierstreifen
14 aus dem Batteriefach 13 .
Wenn die Reichweite der Fernbedienung 4
nachlässt, müssen Sie die Batterie
15
auswechseln
.
Ziehen Sie dazu die Batterieschublade aus der
Fernbedienung 4. Entnehmen Sie die Batterie
15 und legen Sie die neue Batterie ein.
Hinweis: Die richtige Polarität wird auf der
Rückseite der Fernbedienung 4 angezeigt.
Schieben Sie das Batteriefach 13 wieder in die
Fernbedienung 4.
LED-Band kürzen / verbinden
Sie haben die Möglichkeit, das LED-Band individuell
zu kürzen und zu verbinden.
LEBENSGEFAHR DURCH
ELEKTRISCHEN SCHLAG!
Trennen Sie die Leuchte vor sämtlichen Arbeiten am
LED-Band 3 vom Stromnetz. Ziehen Sie dazu den
Netzadapter 2 aus der Steckdose.
Wählen Sie die gewünschte Länge des
LED-Bandes aus.

11 DE/AT/CH
Inbetriebnahme / LED-Band montieren
Hinweis: Achten Sie darauf, dass Sie das
LED-Band an der richtigen Stelle kürzen. Die
Schnittstelle liegt genau in der Mitte der Pole
und ist mit einer schwarzen Linie gekennzeich-
net (14125106L: + 12 V, Blue, Red, Green -
; 14125206L: +, -) (siehe Abb. C).
Kürzen Sie das LED-Band 3 mittels einer Schere.
Drücken Sie anschließend die beiden Enden
des LED-Bandes 3 auf die Schneidkontakte
des Steckverbinders 8 (siehe Abb. C).
Achten Sie beim Anschluss des LED-Bandes 3
auf die korrekte Polung der Verbindung
(14125106L: +12V, Blue, Red, Green <> +12 V,
Blue, Red, Green; 14125206L: +, - <> +, -)
(siehe Abb. C).
Drücken Sie anschließend jeweils eine Abschluss-
kappe
9
auf die Enden des Steckverbinders
8
(siehe Abb. C).
Überprüfen Sie den richtigen Sitz.
Achten Sie darauf, dass Sie vor der Benutzung
das offene Ende des LED-Bandes 3 mit dem
Klebestreifen 18 abkleben, falls Sie nach einer
Kürzung des Bandes keine Verbindung herstellen
möchten (siehe unten Abb. 1–4).
+
12V
BLUE
RED
GREEN
+
12V
BLUE
RED
GREEN
+
12V
BLUE
RED
GREEN
+
12V
BLUE
RED
GREEN
1. 2. 3. 4.
18
LED-Band montieren
Hinweis: Achten Sie darauf, dass die Montage-
fläche sauber, fettfrei und trocken ist. Andernfalls
können die Hafteigenschaften des Klebebands
beeinträchtigt sein.
Hinweis: Achten Sie darauf, dass sich in unmittelbarer
Nähe zur Montagefläche eine Steckdose befindet.
Hinweis: Lichteinfall beeinflusst die Sensoreinheit
17
(14125206L).
Modell 14125106L (siehe Abb. A):
Verbinden Sie die Netzanschlussleitung 1 mit
dem Musiksensor 5, indem Sie den Stecker 7
direkt in die Buchse 6 des Musiksensors 5
stecken, sofern diese noch nicht vormontiert
sind. Verbinden Sie nun den Musiksensor 5
mit dem LED-Band 3.
Achten Sie beim Anschluss des LED-Bandes 3
auf die korrekte Polung der Verbindung (siehe
unten, <> + 12 V, Blue, Red, Green).
14125206L (siehe Abb. A):
Verbinden Sie die Netzanschlussleitung 1 mit
Hilfe des Steckers 7 direkt mit der Buchse 6
des Sensors 17 und dem LED-Band 3.
Wählen Sie eine geeignete Montagefläche aus.
Hinweis (14125206L): Fremdlichtquellen,
z. B. Straßenlaternen, beeinflussen den Däm-
merungssensor.
Entfernen Sie die Schutzfolie von der Rückseite
des LED-Bandes 3 (siehe Abb. B).
Kleben Sie das LED-Band 3 mit dem Klebe-
band auf die Montagefläche und drücken Sie
es fest an (siehe Abb. B).
Entfernen Sie die Schutzfolie 10 (siehe Abb. D)
von der Rückseite der Kabelhalterung 11 .
Kleben Sie die Kabelhalterung 11 an die
gewünschte Stelle (siehe Abb. D).
Entfernen Sie die Schutzfolie von der Rückseite
des Musiksensors 5 / Sensors 17 .
Kleben Sie den Sensor 17 (14125206L) / den
Musiksensor 5 (14125106L) an die ge-
wünschte Stelle.
Verschrauben Sie den Musiksensor 5 mit
Hilfe der Schrauben (14125106L).
Klemmen Sie die Netzanschlussleitung 1 in
die Kabelhalterung 11 (siehe Abb. D).
Sicherheit / Inbetriebnahme

12 DE/AT/CH
LED-Band ... / Wartung und Reinigung / Entsorgung / Garantie und ServiceLED-Band montieren
Stecken Sie den Netzadapter
2
in die Steckdose.
Ihre Leuchte ist nun betriebsbereit.
LED-Band ein- / ausschalten
14125106L:
Drücken Sie die ON-Taste der Fernbedienung
4, um das LED-Band 3 einzuschalten.
Drücken Sie die OFF-Taste der Fernbedienung
4, um das LED-Band 3 auszuschalten.
Hinweis: Die OFF-Taste der Fernbedienung 4
ist nur für kurzfristiges Ausschalten des LED-Bands
3 geeignet. Ziehen Sie den Netzadapter 2
aus der Steckdose, um das LED-Band 3 dauer-
haft auszuschalten.
14125206L (siehe Abb. E):
Das LED-Band besitzt einen Tageslichtsensor /
Bewegungssensor 17 . Die Reichweite des
Bewegungssensors beträgt max. 5 m.
Während der Dunkelheit wird das LED-Band
durch Bewegung innerhalb des Erfassungsbe-
reiches automatisch eingeschaltet. Das Licht
schaltet sich für ca. 30 Sekunden bis 10 Minuten
ein. Die Leuchtdauer ist mit dem Regler 16
stufenlos einstellbar.
Leuchteffekte mit Hilfe der
Fernbedienung steuern
(14125106L)
Hinweis: Der Sender der Fernbedienung 4
befindet sich auf der entgegengesetzten Seite des
Batteriefachs 13 .
Sorgen Sie dafür, dass sich zwischen Fernbedienung
4 und Empfänger 12 keine Hindernisse befinden.
Die Reichweite der Fernbedienung 4 beträgt
ca. 5 m.
Folgende Funktionen stehen Ihnen zur
Verfügung:
: Lichtstärke erhöhen / Geschwindigkeit
Farbwechsel erhöhen / Empfindlichkeit
Musiksensor steigern
: Lichtstärke verringern / Geschwindigkeit
Farbwechsel verringern / Empfindlichkeit
Musiksensor verringern
ON : LED-Band einschalten
OFF : LED-Band ausschalten
RED : rotes Licht einstellen
GREEN
: grünes Licht einstellen
BLUE : blaues Licht einstellen
WHITE : weißes Licht einstellen
ORANGE
: orangenes Licht einstellen
YELLOW
: gelbes Licht einstellen
CYAN : türkises Licht einstellen
PURPLE
: lilanes Licht einstellen
JUMP3 : Farbwechsel (3 Farben)
JUMP7 : Farbwechsel (7 Farben)
FADE3 : fließender Farbwechsel (3 Farben)
FADE7 : fließender Farbwechsel (7 Farben)
1: Musikprogramm 1 = langsamer fließender
Farbwechsel mit Lichtreflex bei Geräuschen
2: Musikprogramm 2 = fließender Farbwechsel
mit Lichtreflex bei Geräuschen
3: Musikprogramm 3 = Farbwechsel nur
bei Geräuschen

13 DE/AT/CH
LED-Band ... / Wartung und Reinigung / Entsorgung / Garantie und Service
4: Musikprogramm 4 = LED-Band wird nur
bei Geräuschen aktiv.
Wartung und Reinigung
LEBENSGEFAHR DURCH
ELEKTRISCHEN SCHLAG!
Trennen Sie die Leuchte vor sämtlichen Arbeiten am
LED-Band 3 vom Stromnetz. Ziehen Sie dazu den
Netzadapter 2 aus der Steckdose.
Benutzen Sie keine Lösungsmittel, Benzin o. Ä.
Die Leuchte würde hierbei Schaden nehmen.
Verwenden Sie zur Reinigung des LED-Bandes
3 ein trockenes, fusselfreies Tuch.
Entsorgung
Die Verpackung besteht aus umweltfreundlichen
Materialien, die Sie über die örtlichen Recyclingstellen
entsorgen können.
b
a
Beachten Sie die Kennzeichnung der
Verpackungsmaterialien bei der Abfall-
trennung, diese sind gekennzeichnet mit
Abkürzungen (a) und Nummern (b) mit
folgender Bedeutung: 1–7: Kunststoffe /
20–22: Papier und Pappe / 80–98:
Verbundstoffe.
Werfen Sie Ihr Produkt, wenn es ausge-
dient hat, im Interesse des Umweltschutzes
nicht in den Hausmüll, sondern führen
Sie es einer fachgerechten Entsorgung
zu. Über Sammelstellen und deren Öff-
nungszeiten können Sie sich bei Ihrer
zuständigen Verwaltung informieren.
Defekte oder verbrauchte Batterien / Akkus müssen
gemäß Richtlinie 2006/66/EG und deren Änderungen
recycelt werden. Geben Sie Batterien / Akkus und /
oder das Produkt über die angebotenen Sammel-
einrichtungen zurück.
Umweltschäden durch falsche
Entsorgung der Batterien / Akkus!
Batterien / Akkus dürfen nicht über den Hausmüll
entsorgt werden. Sie können giftige Schwermetalle
enthalten und unterliegen der Sondermüllbehand-
lung. Die chemischen Symbole der Schwermetalle
sind wie folgt: Cd = Cadmium, Hg = Quecksilber,
Pb = Blei. Geben Sie deshalb verbrauchte Batterien /
Akkus bei einer kommunalen Sammelstelle ab.
Garantie und Service
Garantieerklärung
Sie erhalten zum Zeitpunkt des Kaufs auf dieses Gerät
36 Monate Garantie. Das Gerät wurde sorgfältig
produziert und einer genauen Qualitätskontrolle
unterzogen. Innerhalb der Garantiezeit beheben
wir kostenlos alle Material- oder Herstellerfehler.
Sollten sich dennoch während der Garantiezeit
Mängel herausstellen, senden Sie das Gerät bitte
an die aufgeführte Service-Adresse unter Angabe
folgender Artikel-Nummer: 14125106L /
14125206L.
Von der Garantie ausgeschlossen sind Schäden
durch nicht sachgemäße Handhabung, Nichtbeach-
tung der Bedienungsanleitung oder Eingriff durch nicht
autorisierte Personen sowie Verschleißteile (wie z. B.
Leuchtmittel).
Durch die Garantieleistung wird die Garantiezeit
weder verlängert noch erneuert.
Serviceadresse
Briloner Leuchten GmbH & Co. KG
Im Kissen 2
DE-59929 Brilon
DEUTSCHLAND
Tel.: +49 29 61 / 97 12‒800
Fax: +49 29 61 / 97 12‒199
E-Mail: kundenservice@briloner.com
www.briloner.com
IAN 321921_1901
LED-Band montieren

14 DE/AT/CH
Garantie und Service
Bitte halten Sie für alle Anfragen den Kassenbon
und die Artikelnummer (z. B. IAN 123456_7890)
als Nachweis für den Kauf bereit.
Konformitätserklärung
Dieses Produkt erfüllt die Anforderungen der geltenden
europäischen und nationalen Richtlinien. Die Konfor-
mität wurde nachgewiesen. Entsprechende Erklärungen
und Unterlagen sind beim Hersteller hinterlegt.
Hersteller
Briloner Leuchten GmbH & Co. KG
Im Kissen 2
DE-59929 Brilon
DEUTSCHLAND
Table of contents

15 GB/IE
Garantie und Service
List of pictograms used ........................................................................................................ Page 16
Introduction ................................................................................................................................... Page 17
Intended use ........................................................................................................................................ Page 17
Scope of delivery ................................................................................................................................Page 17
Parts description ..................................................................................................................................Page 17
Technical data ..................................................................................................................................... Page 17
Safety .................................................................................................................................................Page 18
Safety instructions ................................................................................................................................Page 18
Safety instructions for batteries / rechargeable batteries .................................................................Page 19
Initial use .........................................................................................................................................Page 20
Replacing / Inserting batteries ............................................................................................................Page 20
Trimming / connecting the LED tape ...................................................................................................Page 20
Installing the LED strip ..........................................................................................................Page 21
Switching the LED strip on / off ...........................................................................................................Page 21
Controlling light effects with the remote control ................................................................................ Page 21
Maintenance and cleaning ............................................................................................... Page 22
Disposal ............................................................................................................................................Page 22
Warranty and service ...........................................................................................................Page 23
Warranty .............................................................................................................................................Page 23
Service address ................................................................................................................................... Page 23
Declaration of conformity ...................................................................................................................Page 23
Manufacturer .......................................................................................................................................Page 23
Table of contents

16 GB/IE
IntroductionList of pictograms used
List of pictograms used
Please read the operating instructions! The light bulbs used are not
dimmable
(14125206L)
.
This light is only suitable for indoor use in
dry and enclosed spaces. Danger of explosion!
Only for 14125106L: This product is
an illuminated decoration. Do not use
these lights for room lighting or as a
night light. This is a special product, as
the colour value amounts are beyond
the ranges listed in the brackets. Colour
value amounts: (x<0.270 or x > 0.530);
(y<-2.172 x² or y >-2.3172 x² + 2.3653
x -0.1595).
Wear safety gloves!
For your safety
Short-circuit proof safety transformer
Separate control unit
Angle of radiation Range
Volt (AC) Polarity of the power supply
Hertz (frequency) d.c. DC Direct current D.C.
Watt (effective power) b
a
Dispose of the packaging and
product in an environmentally-
friendly manner!
Protection class II Operating life
Protection class III ON OFF Switching cycles
IP20 Protection type ta Ambient temperature
Observe the warnings and safety
notices! tc Housing temperature at stated point
Danger to life and risk of accidents
for infants and children Warning!
Risk of electric shock
Environmental damage through
incorrect disposal of the batteries /
rechargeable batteries!
Keep batteries out of the reach
of children!
Energy-efficient external power supply
Class V The packaging is made from
100 % recycled paper.

17 GB/IE
IntroductionList of pictograms used
3 m Light strip with sensor
Introduction
Please be sure to carefully read the com-
plete instructions for use. These instructions
are part of the product and contain im-
portant information on setup and handling. Always
follow all safety instructions. Before using this prod-
uct for the first time verify the correct voltage and
that all parts are properly installed. If you have any
questions or you are unsure about operating the
product, please contact the distributor or service
centre. Please keep these instructions in a safe place
and pass them on to third parties if necessary.
Intended use
This luminaire is only suitable for indoor
use, in dry and enclosed rooms. This
product is suitable for indoors and out-
door use. This device is only intended for use in a
private domestic environment, not for commercial
use. Any use other than that described above is
prohibited and will result in product damage. It is
further associated with dangers, e.g. short circuit,
fire, electric shock, etc.
Only for 14125106L:
This product is an illuminated decoration.
Do not use these lights for room lighting
or as a night light.
This is a special product, as the colour value amounts
are beyond the ranges listed in the brackets. Colour
value amounts: (x<0.270 or x > 0.530); (y<-2.172 x²
or y >-2.3172 x² + 2.3653 x -0.1595).
Scope of delivery
Check immediately after unpacking that the parts
are complete and that the product is in proper
condition.
1 LED strip, model 14125106L / 14125206L
1 mains adapter
1 music sensor (14125106L)
2 connectors
4 end caps
2 cable holder
1 adhesive strip
2 screws for sensor unit (14125106L)
1 remote control (14125106L)
1 set of instructions for use
Parts description
1 Supply cable
2 Mains adapter
3 LED strip
4 Remote control (14125106L)
5 Music sensor (14125106L)
6 Socket
7 Plug
8 Plug connection
9 End cap
10 Protective film
11 Cable holder
12 Receiver (14125106L)
13 Battery compartment (14125106L)
14 Insulating strip (14125106L)
15 Battery (14125106L)
16 Control (14125206L)
17 Sensor (14125206L)
18 Adhesive strip
Technical data
Art. no.: 14125106L
Operating voltage: 220–240 V~ 50 / 60 Hz
Total capacity: LED / max. 17 W
LED strip:
Operating voltage: 12 V
Performance (LED strip): 14 W
Protection category: III
Level of protection: IP20

18 GB/IE
SafetyIntroduction / Safety
Mains adapter:
Operating voltage: 220–240 V~ 50 / 60 Hz
Output current: 1.5 A
Protection category: II
Level of protection: IP20
Battery for remote
control:
Type: CR 2025
Art. no.: 14125206L
Operating voltage: 220
–240 V ~ 50 / 60 Hz
Total capacity: LED / max. 6 W
LED strip:
Operating voltage: 12 V
Performance (LED strip): 4.5 W
Protection category: III
Level of protection: IP20
Mains adapter:
Operating voltage: 220–240 V~ 50 / 60 Hz
Output current: 0.5 A
Protection category: II
Level of protection: IP20
Safety
Safety instructions
Damage due to failure to comply with these instruc-
tions for use will void the warranty! We assume no
liability for consequential damages! We assume
no liability for property damage or personal injury
due to improper handling or failure to comply with
the safety instructions!
RISK OF FATA
L
INJURY AND ACCIDENT HAZ-
ARD FOR TODDLERS AND
SMALL CHILDREN!
Never leave children unsupervised with the
packaging material. The packaging material
poses a suffocation hazard. Children frequently
underestimate the dangers. Please always keep
the product out of the reach of children.
This device may be used by children aged
8 years and up, as well as by persons with
reduced physical, sensory or mental capacities,
or lacking experience and/or knowledge, so
long as they are supervised or instructed in the
safe use of the device and understand the
associated risks. Do not allow children to play
with the product. Cleaning and user maintenance
must not be performed by children without
supervision.
Avoid the risk of fatal injury
from electric shock
Check the LED strip for damage before every
use. Never use the LED strip if any damage is
detected.
A damaged mains cable poses a risk of fatal
injury from electrical shock. In the case of dam-
age, repairs or other problems, please contact
the service centre or a qualified electrician. The
supply cable of this appliance cannot be re-
placed. If the cable is damaged, the appliance
must be disposed of. The appliance contains no
parts which may be serviced by the consumer.
Make sure before use that the available supply
voltage corresponds to the required operating
voltage of the item (see “Technical data“).
Never allow the live power leads and contacts
to come into contact with water or other liquids.
Never open any of the components of the elec-
trical equipment or insert any objects into the
same components. This will pose a risk of fatal
injury from electric shock.
Do not use the LED strip if it is covered with
objects or is inlaid into a surface.
Do not install the lamp on damp or conductive
surfaces.
This LED strip must not be connected electroni-
cally with other LED strips.
Do not secure with sharp staples or nails.
Always unplug the mains plug from the socket
before assembly, disassembly or cleaning.
Never catch hold of the mains plug or the LED
strip with wet hands.
Only use the individual parts supplied, other-
wise all warranty claims will become invalid.

19 GB/IE
Safety
Do not open or cut the rope light.
Do not connect this rope light to another manu-
facturer´s product.
Interconnection shall be made only by the use
of the supplied connectors. Any open ends
must be sealed-off before use.
Do not use the rope light when covered or c
recessed into a surface.
Never connect the LED strip to the power sup-
ply while it is in the packaging. Lay out the item
completely before you connect it to the power
supply. Lay out the item completely before you
connect it to the power supply.
Model 14125106L
For some people, this can lead to epileptic
seizures or disturbances of consciousness if
they are exposed to certain flashes or light
effects. Immediately visit a doctor if you experi-
ence epileptic symptoms.
Prevent fire and injury
hazards
This product does not contain any parts that
can be serviced by the user. The LEDs cannot
be replaced.
If the LEDs cease to function at the end of their
operational life, the entire item must be replaced.
The installed LEDs are not suitable
for dimmers or electronic switches
(14125206L).
Do not look into the LED from a close distance
during operation.
Do not look at the LED with an optical instrument
(e.g. magnifier).
Safe working
Install the light so that it is protected from dirt
and excessive heating.
Always be attentive! Always pay attention to
what you are doing and use common sense.
Never use the LED strip if you are having
difficulty concentrating or do not feel well.
Before use, familiarise yourself with all the
instructions and diagrams in these instructions,
as well as with the LED strip itself.
To completely disconnect the LED strip from
the power supply, the mains adapter must be
removed from the mains socket.
Safety instructions for
batteries / rechargeable
batteries
KEEP BATTERIES OUT OF THE
REACH OF CHILDREN! Swallo-
wing batteries can cause chemical
burns, perforation of soft tissue, and death. Se-
vere burns may occur within 2 hours of swallow
ing
batteries. Seek immediate medical attention.
DANGER TO LIFE! Keep batteries / recharge-
able batteries out of reach of children. If acci-
dentally swallowed seek immediate medical
attention.
DANGER OF EXPLOSION!
Never recharge non-rechargeable batteries.
Do not short-circuit batteries / rechargeable
batteries and / or open them. Overheating,
fire or bursting can be the result.
Never throw batteries / rechargeable batteries
into fire or water.
Do not exert mechanical loads to batteries /
rechargeable batteries.
Risk of leakage of batteries /
rechargeable batteries
Avoid extreme environmental conditions and
temperatures, which could affect batteries /
rechargeable batteries, e.g. radiators / direct
sunlight.
If batteries / rechargeable batteries have leaked,
avoid contact with skin, eyes and mucous mem-
branes with the chemicals! Flush immediately
the affected areas with fresh water and seek
medical attention!
WEAR PROTECTIVE GLOVES!
Leaked or damaged batteries / rechargeable
Introduction / Safety

20 GB/IE
Installing the LED stripSafety / Initial use
batteries can cause burns on contact with the
skin. Wear suitable protective gloves at all times
if such an event occurs.
In the event of a leakage of batteries /
rechargeable batteries, immediately remove
them from the product to prevent damage.
Only use the same type of batteries / recharge-
able batteries. Do not mix used and new
batteries / rechargeable batteries.
Remove batteries / rechargeable batteries if the
product will not be used for a longer period.
Risk of damage of the product
Only use the specified type of battery /
rechargeable battery!
Insert batteries / rechargeable batteries according
to polarity marks (+) and (-) on the battery /
rechargeable battery and the product.
Clean the contacts on the battery / rechargea-
ble battery and in the battery compartment
before inserting!
Remove exhausted batteries / rechargeable
batteries from the product immediately.
Initial use
Remove all packaging materials before first use.
Never connect the LED strip to the mains power
supply while it is in the packaging and rolled up.
Note: Ensure that a plug socket is located in
close proximity to the installation area.
Replacing / Inserting batteries
(14125106L)
Note: Before first use, pull the insulating strip
14 out of the battery compartment 13 .
If the range of the remote control
4
reduces,
the battery
15
needs to be replaced.
To do so,
slide the battery compartment out of the remote
control 4. Remove the old battery 15 and in-
sert a new one.
Note: The correct polarity is indicated on the
reverse side of the remote control 4.
Slide the battery compartment 13 back into
the remote control 4.
Trimming / connecting
the LED tape
The LED tape may be trimmed to size or connected.
DANGER TO LIFE BY
ELECTRIC SHOCK!
Disconnect the lights from the power supply before
performing any work on the LED strip 3. Unplug
the mains adapter 2 from the socket to do so.
Choose the desired LED strip length.
Note Ensure that you cut the LED strip at the
right place. The cutting point lies exactly be-
tween the plus and minus pole and is marked
with a black line (14125106L: + 12 V, blue,
red, green - ; 14125206L: +, -) (see Fig. C).
Shorten the LED strip 3 using a pair of scissors.
Then press both ends of the LED strip 3 onto
the displacement contact of the plug connec-
tion 8 (see Fig. C).
Ensure the correct polarity of the connector
when connecting the LED strip 3 (14125106L:
+12 V, blue, red, green <> +12 V, blue, red,
green; 14125206L: +, - <> +, -) (see Fig. C).
Then press one end cap 9 at a time onto the
ends of the plug connection 8 (see Fig. C).
Check the correct positioning.
Be sure to cover the open end of the LED tape
3 with the adhesive strip 18 if you do not wish
to connect the end after trimming the tape (see
below Fig. 1–4).
+
12V
BLUE
RED
GREEN
+
12V
BLUE
RED
GREEN
+
12V
BLUE
RED
GREEN
+
12V
BLUE
RED
GREEN
1. 2. 3. 4.
18

21 GB/IE
Installing the LED strip
Installing the LED strip
Note: Ensure that the installation area is clean,
grease-free and dry. Otherwise the functionality of
the adhesive strip may be impaired.
Note: Ensure that a plug socket is located in close
proximity to the installation area.
Note: Light incidence affects the sensor unit 17
(14125206L).
14125106L (see Fig. A):
Connect the mains cable 1 with the music
sensor 5 by inserting the plug 7 directly into
the socket 6 on the music sensor 5, if it has
not been pre-installed. Then connect the music
sensor 5 to the LED strip 3.
Ensure the correct polarity of the connector
when connecting the LED strip 3 (see below,
<> + 12 V, blue, red, green).
14125206L (see Fig. A):
Using the plug 7, connect the mains cable 1
directly with the socket 6 on the the sensor 17
and the LED strip 3.
Choose a suitable installation area.
Note (14125206L): Foreign sources of light
e.g. street lights interfere with the twilight sensor.
Remove the protective film from the reverse side
of the LED strip 3 (see fig. B).
Stick the LED strip 3 with the adhesive strip
onto the installation area and press it on firmly
(see fig. B).
Remove the protective foil 10 (see Fig. D) from
the reverse side of the cable holder 11 .
Stick the cable holder 11 onto the desired
position (see Fig. D).
Remove the protective film from the reverse side
of the music sensor 5 / sensor 17 .
Stick the sensor 17 (14125206L) / the music
sensor 5 (14125106L) onto the desired
location.
Screw down the music sensor 5 using the
screws (14125106L).
Insert the mains cable 1 into the cable holder
11 (see fig. D).
Insert the mains adapter 2 into the plug socket.
Your light is now ready to use.
Switching the LED strip on / off
14125106L:
Press the ON button on the remote control 4,
to switch on the LED strip 3. Press the OFF
button on the remote control 4, to switch off
the LED strip 3.
Note: The OFF button on the remote control
4
is only suitable to temporarily switch off the
LED strip 3. Unplug the mains adapter 2
from the socket to switch off the LED strip 3
permanently.
14125206L (see Fig. E):
The LED strip has a daylight sensor / movement
sensor 17 . The motion sensor has a maximum
range of max. 5 m.
During darkness, the LED strip will automatically
turn on when it detects movement in the detection
zone. The light turns on for approx. 30 seconds
to 10 minutes. The lighting period can be conti-
nuously adjusted using the controler 16 .
Controlling light effects with the
remote control (14125106L)
Note: The transmitter for the remote control 4 is
located on the opposite end of the battery com-
partment 13 .
Ensure there are no obstacles between the remote
control 4 and the receiver 12 .
The range of the remote control 4 is approx. 5 m.
Choose from the following functions:
: Increase brightness / increase speed of
colour changes / increase music sensor
sensitivity
Safety / Initial use

22 GB/IE
Disposal / Warranty and serviceInstalling the LED strip / Maintenance and cleaning / Disposal
: Decrease brightness / decrease speed of
colour changes / decrease music sensor
sensitivity
ON : Switch on LED strip
OFF : Switch off LED strip
RED : set red light
GREEN
: set green light
BLUE : set blue light
WHITE : set white light
ORANGE
: set orange light
YELLOW
: set yellow light
CYAN : set turquoise light
PURPLE
: set purple light
JUMP3 : colour change (3 colours)
JUMP7 : colour change (7 colours)
FADE3 : flowing colour change (3 colours)
FADE7 : flowing colour change (7 colours)
1: Music programme 1 = slow, flowing colour
change with sound induced light reflex
2: Music programme 2 = flowing colour
change with sound induced light reflex
3: Music programme 3 = colour changes
only with sound
4: Music programme 4 = LED strip will only
activate when there's sound.
Maintenance and cleaning
DANGER TO LIFE BY
ELECTRIC SHOCK!
Disconnect the lights from the power supply before
performing any work on the LED strip 3. Unplug
the mains adapter 2 from the socket to do so.
Do not use solvents, benzene or similar subst
ances.
They could damage the light.
Use a dry, lint-free cloth to clean the LED strip 3.
Disposal
The packaging is made entirely of recyclable mate-
rials, which you may dispose of at local recycling
facilities.
b
a
Observe the marking of the packaging
materials for waste separation, which
are marked with abbreviations (a) and
numbers (b) with following meaning:
1–7: plastics / 20–22: paper and fibre-
board / 80–98: composite materials.
To help protect the environment, please
dispose of the product properly when it
has reached the end of its useful life and
not in the household waste. Information
on collection points and their opening
hours can be obtained from your local
authority.
Faulty or used batteries / rechargeable batteries
must be recycled in accordance with Directive
2006/66/EC and its amendments. Please return
the batteries / rechargeable batteries and / or the
product to the available collection points.
Environmental damage through
incorrect disposal of the batteries /
rechargeable batteries!
Batteries / rechargeable batteries may not be dis-
posed of with the usual domestic waste. They may
contain toxic heavy metals and are subject to haz-
ardous waste treatment rules and regulations. The

23 GB/IE
Disposal / Warranty and serviceInstalling the LED strip / Maintenance and cleaning / Disposal
chemical symbols for heavy metals are as follows:
Cd = cadmium, Hg = mercury, Pb = lead. That is why
you should dispose of used batteries / rechargeable
batteries at a local collection point.
Warranty and service
Warranty
You receive a 36 month warranty on this product,
valid from the date of purchase. The appliance has
been carefully produced under strict quality control.
Within the warranty period we shall rectify without
charge all material and manufacturing defects. In
the event of a defect during the warranty period,
please send the appliance to the listed Service
Centre address, referencing the following item
number: 14125106L / 14125206L.
Wear parts (such as bulbs) and damage caused
by improper handling, non-observance of the oper-
ating instructions or unauthorised interference are
excluded from the warranty.
The performance of services under the warranty
does not extend or renew the warranty period.
Service address
Briloner Leuchten GmbH & Co. KG
Im Kissen 2
DE-59929 Brilon
GERMANY
Tel.: +49 29 61 / 97 12–800
Fax: +49 29 61 / 97 12–199
E-Mail: [email protected]
www.briloner.com
IAN 321921_1901
Please have your receipt and the product number
(e.g. IAN 123456_7890) available for all queries
as proof of purchase.
Declaration of conformity
This product fulfils the requirements of the applicable
European and national directives. Conformity has
been demonstrated. The relevant declarations and
documents are held by the manufacturer.
Manufacturer
Briloner Leuchten GmbH & Co. KG
Im Kissen 2
DE-59929 Brilon
GERMANY

24
Table des matières

25 FR/BE
Légende des pictogrammes utilisés .......................................................................... Page 26
Introduction ................................................................................................................................... Page 27
Utilisation conforme ............................................................................................................................Page 27
Contenu de la livraison .......................................................................................................................Page 27
Descriptif des pièces ...........................................................................................................................Page 27
Caractéristiques techniques ................................................................................................................Page 28
Sécurité .............................................................................................................................................Page 28
Indications de sécurité ........................................................................................................................Page 28
Consignes de sécurité relatives aux piles / aux piles rechargeables ...............................................Page 29
Mise en service ...........................................................................................................................Page 30
Insérer / remplacer les piles ................................................................................................................Page 30
Raccourcir / connecter la bande LED.................................................................................................Page 31
Montage de la bande à LED ............................................................................................Page 31
Mise en marche / Arrêt du ruban LED ...............................................................................................Page 32
Contrôler les effets de lumière avec la télécommande .....................................................................Page 32
Entretien et nettoyage..........................................................................................................Page 33
Mise au rebut ............................................................................................................................... Page 33
Garantie et service après-vente ..................................................................................Page 33
Garantie ..............................................................................................................................................Page 33
Adresse du service après-vente .......................................................................................................... Page 34
Déclaration de conformité .................................................................................................................. Page 34
Fabricant ..............................................................................................................................................Page 34
Table des matières

26 FR/BE
Légende des pictogrammes utilisés / IntroductionLégende des pictogrammes utilisés
Légende des pictogrammes utilisés
Lire le mode d'emploi !
Les ampoules utilisées ne sont
pas variables (14125206L).
Cette lampe est exclusivement conçue
pour un usage intérieur, dans des
locaux secs et fermés. Risque d'explosion !
Seulement pour 14125106L :
Ce produit est une décoration lumineuse.
N'utilisez pas cette lampe comme éclai-
rage de pièce ou comme veilleuse.
Il s'agit d'un produit spécial, car les
coordonnées chromatiques se situent
au-delà des plages mentionnées entre
parenthèses.
Coordonnées chromatiques :
(x<0,270 ou x > 0,530); (y<-2,172 x²
ou y >-2,3172 x² + 2,3653 x -0,1595).
Porter des gants de protection !
Conduite à tenir
Transformateur de sécurité
anti-court-circuit
Appareil de fonctionnement
indépendant
Angle de rayonnement Portée
Volt (tension alternative) Polarité de l'alimentation
électrique
Hertz (fréquence) d.c. DC Tension continue D.C.
Watt (puissance active) b
a
Mettez l’emballage et l’appareil
au rebut dans le respect de
l'environnement !
Classe de protection II Durée de vie
Classe de protection III ON OFF Cycles de commutation
IP20 Type de protection ta Température ambiante
Respecter les avertissements et
consignes de sécurité ! tc Température du logement à
l'endroit indiqué
Danger de mort et risque d'accident
pour les enfants en bas âge et les
enfants
Avertissement !
Attention, risque d'électrocution
Pollution de l’environnement par la
mise au rebut incorrecte des piles /
piles rechargeables !
Conserver les piles hors de portée
des enfants !
Efficacité énergétique des sources
d'alimentation externes de classe V L'emballage est composé à
100 % de papier recyclé.

27 FR/BE
Légende des pictogrammes utilisés / IntroductionLégende des pictogrammes utilisés
Ruban lumineux 3 m avec capteur
Introduction
Veuillez lire ce mode d'emploi intégrale-
ment et attentivement. Ce mode d'emploi
fait partie du produit et contient des ins-
tructions essentielles pour sa mise en service et sa
manipulation. Respectez toujours toutes les consignes
de sécurité. Avant la mise en service, vérifiez si la
tension est correcte et si toutes les pièces sont cor-
rectement montées. Si vous avez des questions ou
des doutes concernant la manipulation de l'appareil,
veuillez contacter votre revendeur ou le service
après-vente. Veuillez conserver soigneusement ce
mode d'emploi et remettez-le aux autres utilisateurs.
Utilisation conforme
Cette lampe est exclusivement conçue
pour un usage intérieur, dans des locaux
secs et fermés. Cet appareil est unique-
ment conçu pour un usage domestique privé et non
pas pour un usage commercial. Toute utilisation autre
que celle décrite ci-dessus est interdite et entraîne
l’endommagement du produit. De plus, ceci com-
porte des risques tels que par ex. un court-circuit,
un incendie, un choc électrique etc.
Seulement pour 14125106L :
Ce produit est une décoration lumineuse.
N'utilisez pas cette lampe comme éclai-
rage de pièce ou comme veilleuse.
Il s'agit d'un produit spécial, car les coordonnées
chromatiques se situent au-delà des plages men-
tionnées entre parenthèses.
Coordonnées chromatiques : (x<0,270 ou x
> 0,530); (y<-2,172 x² oder y >-2,3172 x²
+ 2,3653 x -0,1595).
Contenu de la livraison
Après le déballage du produit, contrôlez toujours
et immédiatement que le contenu de la livraison est
complet et que l’appareil se trouve en parfait état.
1 ruban LED, modèle 14125106L / 14125206L
1 adaptateur secteur
1 capteur de musique (14125106L)
2 connecteurs
4 bouchons de fermeture
2 supports de câble
1 bande adhésive
2 vis pour dispositif détecteur (14125106L)
1 télécommande (14125106L)
1 mode d'emploi
Descriptif des pièces
1 Câble de raccordement
2 Adaptateur secteur
3 Ruban LED
4 Télécommande (14125106L)
5 Capteur de musique (14125106L)
6 Prise
7 Fiche
8 Connecteur
9 Cache
10 Film de protection
11 Support de câble
12 Récepteur (14125106L)
13 Compartiment à pile (14125106L)
14 Bande isolante (14125106L)
15 Pile (14125106L)
16 Régulateur (14125206L)
17 Capteur (14125206L)
18 Bande adhésive

28 FR/BE
SécuritéIntroduction / Sécurité
Caractéristiques techniques
Réf. d'art. : 14125106L
Tension de service : 220–240 V~ 50 / 60 Hz
Puissance totale : LED / max. 17 W
Ruban LED :
Tension de service : 12 V
Puissance (ruban LED) : 14 W
Classe de protection : III
Indice de protection : IP20
Alimentation
électrique :
Tension de service : 220–240 V~ 50 / 60 Hz
Courant de sortie : 1,5 A
Classe de protection : II
Indice de protection : IP20
Pile pour la
télécommande :
Type : CR 2025
Réf. d'art. : 14125206L
Tension de service : 220–240 V~ 50 / 60 Hz
Puissance totale : LED / max 6 W
Ruban LED :
Tension de service : 12 V
Puissance (ruban LED) : 4,5 W
Classe de protection : III
Indice de protection : IP20
Alimentation
électrique :
Tension de service : 220–240 V~ 50 / 60 Hz
Coura nt de sortie : 0,5 A
Classe de protection : II
Indice de protection : IP20
Sécurité
Indications de sécurité
Les droits de recours en garantie sont annulés en
cas de dommages résultant du non-respect du
présent mode d’emploi! Le fabricant décline toute
responsabilité pour les dommages consécutifs!
Toute responsabilité est déclinée pour les dommages
matériels ou corporels causés par une manipulation
incorrecte du produit ou par le non-respect des
consignes de sécurité!
DANGER DE MORT ET RISQUE
D'ACCIDENT POUR LES EN-
FANTS EN BAS ÂGE ET LES ENFANTS !
Ne jamais laisser les enfants manipuler sans
surveillance le matériel d'emballage. L'emballage
présente un risque d'étouffement. Les enfants
sous-estiment souvent les dangers. Toujours
tenir le produit à l'écart des enfants.
Ce produit peut être utilisé par des enfants âgés
de 8 ans et plus ainsi que par des personnes
ayant des capacités physiques, sensorielles ou
mentales réduites ou manquant d'expérience
ou de connaissances, s'ils sont surveillés ou s'ils
ont été informés de l'utilisation sûre du produit
et comprennent les risques liés à son utilisation.
Les enfants ne doivent pas jouer avec ce pro-
duit. Le nettoyage et l'entretien du produit ne
doivent pas être effectués par des enfants lais-
sés sans surveillance.
Prévention de risques mortels
par électrocution
Avant chaque utilisation, contrôlez le bon état
de la bande à LED afin de détecter la présence
d'éventuels dommages. N'utilisez jamais votre
bande à LED si vous détectez le moindre en-
dommagement.
Un branchement électrique endommagé im-
plique un danger de mort par électrocution. En
cas d’endommagements, pour toutes réparations
ou tout autre problème, adressez-vous au S.A.V.
ou à un électricien. Le branchement électrique
de cet appareil ne peut être remplacé. Si le câble
est endommagé, l'appareil doit être mis au re-
but. Cet appareil ne comporte pas de pièces
pouvant être soumises à une maintenance par
le consommateur.

29 FR/BE
Sécurité
Assurez-vous avant l’utilisation que la tension
secteur fournie correspond à la tension de ser-
vice nécessaire pour l'article (voir “Caractéris-
tiques techniques“).
Évitez impérativement tout contact entre les
câbles et contacts conducteurs de tension
électrique et l'eau ou d'autres liquides.
N'ouvrez jamais les composants électriques,
et n'insérez jamais d'objets quelconques dans
ceux-ci. De telles interventions impliquent un
danger de mort par électrocution.
Ne pas utiliser le ruban à LED lorsqu'il est
recouvert par des objets ou lorsqu'il est inséré
dans une surface.
Ne montez pas la lampe sur des surfaces
support humides ou conductrices.
Cette bande à LED ne doit pas être raccordée
électriquement à une autre bande à LED.
Ne pas fixer le produit avec des agrafes poin-
tues, ni des clous.
Débranchez toujours la fiche secteur de la prise
de courant avant le montage, le démontage ou
le nettoyage du produit.
Ne jamais toucher la fiche secteur ou la bande
à LED avec des mains mouillées.
Utilisez exclusivement les éléments fournis, sans
quoi toute réclamation de garantie sera nulle
et non advenue.
Ne pas ouvrir ou couper le cordon lumineux.
Ne pas brancher ce cordon lumineux sur un
autre produit du fabricant.
Toute interconnexion doit être uniquement réali-
sée avec les connecteurs fournis. Toute extrémité
ouverte doit être hermétiquement fermée avant
utilisation.
Ne pas utiliser le cordon lumineux s'il est
recouvert ou encastré dans une surface.
Le ruban LED ne doit pas être raccordé au réseau
d'alimentation lorsqu'il se trouve dans l'emballage.
Déballez complètement l'article avant de le re-
lier au réseau électrique. Interprétez cet article
avant de le brancher sur secteur.
Modèle 14125106L
Certaines personnes peuvent être sujettes à l'épi-
lepsie ou à des pertes de conscience lorsqu'elles
sont soumises à des flash de lumière ou à des effets
lumineux. En cas de symptômes épileptiques, veuillez
immédiatement appeler un médecin.
Prévention de risque
d'incendies et de blessures
Cet article ne contient aucune pièce nécessitant
une maintenance de la part de l’utilisateur. Les
LED ne peuvent pas être remplacées.
Si les LED arrivent à la fin de leur durée de vie,
tout l'article doit être remplacé.
Les LED incorporées ne sont pas
appropriées aux variateurs ou aux
commutateurs électroniques
(14125206L).
Lorsque les LED sont allumées, évitez de les
regarder de trop près.
Ne pas observer les LED à l'aide d'un instrument
optique (par exemple une loupe).
Conduite à tenir
Montez la bande à LED de manière à le proté-
ger de la poussière et d'un niveau de chaleur
trop élevé.
Soyez toujours vigilant! Faites toujours attention
à ce que vous faites et agissez raisonnablement.
N'utilisez en aucun cas la bande à LED si vous
n'êtes pas concentré ou si vous ne vous sentez
pas bien.
Avant l'utilisation du produit, prenez bien connais-
sance de toutes les consignes et figures indiquées
dans le présent manuel et familiarisez-vous
avec la bande à LED.
Pour mettre la bande à LED complètement hors-
tension, le bloc d'alimentation doit être
débranché de la prise.
Consignes de sécurité
relatives aux piles / aux
piles rechargeables
CONSERVER LES PILES HORS
DE LA PORTÉE DES ENFANTS !
L‘ingestion des piles peut provoquer
Introduction / Sécurité

30 FR/BE
Mise en service / Montage de la bande à LEDSécurité / Mise en service
des brûlures chimiques, une perforation du tissu
mou et entraîner la mort. Des blessures lourdes
peuvent apparaître en l‘espace de 2 heures
après l‘ingestion des piles. Consulter immédia-
tement un médecin.
DANGER DE MORT! Rangez les piles /
piles rechargeables hors de la portée des en-
fants. En cas d’ingestion, consultez immédiate-
ment un médecin !
RISQUE D‘EXPLOSION !
Ne rechargez jamais des piles non rechar-
geables. Ne court-circuitez pas les piles / piles
rechargeables et / ou ne les ouvrez pas !
Autrement, vous risquez de provoquer une sur-
chauffe, un incendie ou une explosion.
Ne jetez jamais des piles / piles rechargeables
au feu ou dans l’eau.
Ne pas soumettre les piles / piles rechargeables
à une charge mécanique.
Risque de fuite des piles / piles
rechargeables
Évitez d’exposer les piles / piles rechargeables
à des conditions et températures extrêmes sus-
ceptibles de les endommager, par ex. sur des
radiateurs / exposition directe aux rayons du soleil.
Lorsque les piles / piles rechargeables fuient,
évitez tout contact du produit chimique avec la
peau, les yeux ou les muqueuses! Rincez les
zones touchées à l‘eau claire et consultez im-
médiatement un médecin !
PORTER DES GANTS
DE PROTECTION!
Les piles / piles rechargeables endommagées
ou sujettes à des fuites peuvent provoquer des
brûlures au contact de la peau. Vous devez donc
porter des gants adéquats pour les manipuler.
En cas de fuite des piles / piles rechargeables,
retirez-les aussitôt du produit pour éviter tout
endommagement.
Utilisez uniquement des piles / piles rechar-
geables du même type. Ne mélangez pas des
piles / piles rechargeables usées et neuves !
Retirez les piles / piles rechargeables, si vous
ne comptez pas utiliser le produit pendant une
période prolongée.
Risque d‘endommagement du produit
Exclusivement utiliser le type de pile / pile
rechargeable spécifié.
Insérez les piles / piles rechargeables conformé-
ment à l‘indication de polarité (+) et (-) indiquée
sur la pile / pile rechargeable et sur le produit.
Nettoyez les contacts de la pile / pile recharg
eable
et du compartiment à pile avant d‘insérer la pile !
Retirez immédiatement les piles / piles rechar-
geables usées du produit.
Mise en service
Retirez tous les matériaux d'emballage avant la
première utilisation.
Le ruban LED ne doit pas être raccordé au
réseau d'alimentation lorsqu'il se trouve dans
l'emballage et enroulé.
Remarque: Veillez à ce qu'une prise de
courant se trouve à proximité immédiate de la
surface de montage.
Insérer / remplacer les piles
(14125106L)
Remarque : Avant la première utilisation,
retirez la bande isolante 14 du compartiment
à pile 13 .
Lorsque la portée de la télécommande
4
dimi-
nue, vous devez changer la pile
15
.
Pour ce faire,
retirez le compartiment à pile de la télécom-
mande 4. Retirez la pile 15 , et insérez la pile
neuve.
Remarque : La polarité correcte est indiquée
sur l'arrière de la télécommande 4.
Glissez à nouveau le compartiment à pile 13
dans la télécommande 4.

31 FR/BE
Mise en service / Montage de la bande à LED
Raccourcir / connecter
la bande LED
Vous avez la possibilité de raccourcir et de connecter
individuellement la bande LED.
DANGER DE MORT
PAR ÉLECTROCUTION!
Débranchez la lampe du secteur avant tous tra-
vaux sur la bande à LED 3. Débranchez à cet ef-
fet l'adaptateur secteur 2 de la prise de courant.
Choisissez la longueur de la bande à LED
souhaitée.
Remarque: Veillez à raccourcir la bande à
LED au bon endroit. L‘interface se trouve exac-
tement au milieu du pôle et est identifiée par
une ligne noire (14125106L : + 12 V, bleu,
rouge, vert - ; 14125206L : +, -) (voir Ill. C).
Raccourcissez la bande à LED 3 avec un
ciseau.
Appuyez ensuite les deux extrémités de la bande
à LED 3 sur les contacts de sectionnement du
connecteur 8 (voir fig. C).
Lors du raccordement du ruban LED 3, veuil-
lez respecter la polarité (14125106L : +12 V,
bleu, rouge, vert <> +12 V, bleu, rouge, vert ;
14125206L : +, - <> +, -) (voir Ill. C).
Enfoncez ensuite les bouchons de fermeture 9
sur les deux extrémités du connecteur 8 (voir
fig. C).
Contrôlez la position de montage.
Avant utilisation, veillez à ce que l'extrémité
ouverte de la bande LED 3 soit collée avec la
bande adhésive 18 , si vous ne souhaitez pas
connecter cette extrémité après avoir raccourci
la bande (voir ill. 1 à 4 ci-dessous).
+
12V
BLUE
RED
GREEN
+
12V
BLUE
RED
GREEN
+
12V
BLUE
RED
GREEN
+
12V
BLUE
RED
GREEN
1. 2. 3. 4.
18
Montage de la bande à LED
Remarque: Veillez à ce que la surface de mon-
tage soit propre, exempte de graisse et sèche. Sinon,
l'adhérence de la bande adhésive peut être réduite.
Remarque: Veillez à ce qu'une prise de courant
se trouve à proximité immédiate de la surface de
montage.
Remarque : La lumière incidente influence le
dispositif de détection 17 (14125206L).
14125106L (voir Ill. A) :
Reliez le câble de raccordement 1 au cap-
teur de musique 5 en branchant la fiche 7
directement dans la prise 6 du capteur de
musique 5, à moins que le montage n'ait été
effectué au préalable. Connectez ensuite le
capteur de musique 5 avec le ruban LED 3.
Lors du raccordement du ruban LED 3,
veuillez respecter la polarité (voir ci-dessous,
<> + 12 V, bleu, rouge, vert).
14125206L (voir Ill. A) :
Connectez le câble de raccordement 1 à
l'aide de la fiche 7 directement à la prise 6
du capteur 17 et du ruban LED 3.
Choisissez une surface de montage adaptée.
Remarque (14125206L) : Les sources de
lumière extérieures, p. ex. l'éclairage public,
influencent le capteur crépusculaire.
Retirez le film de protection de la face arrière
du ruban LED 3 (voir Fig. B).
Collez la bande à LED 3 avec du ruban
adhésif
sur la surface de montage et appuyez
fort pour fixer
(voir Fig. B)
.
Retirez le film de protection 10 (voir ill. D) de
l‘arrière du support de câble 11 .
Collez le support de câble 11 à l'emplacement
souhaité (voir ill. D).
Sécurité / Mise en service

32 FR/BE
… / Entretien et nettoyage / Mise au rebut / Garantie et service après-venteMontage de la bande à LED
Retirez le film de protection de la face arrière
du capteur de musique 5 / du capteur 17 .
Collez le capteur 17 (14125206L) / le capteur
musique 5 (14125106L) à l‘endroit voulu.
Vissez le capteur musique 5 à l'aide des vis
(14125106L).
Fixez le câble de raccordement 1 dans le
support de câble 11 (voir Fig. D).
Branchez l'adaptateur secteur 2 dans la prise.
Votre lampe est alors prête à l'emploi.
Mise en marche / Arrêt du
ruban LED
14125106L :
Appuyez sur la touche ON de la télécommande
4 pour allumer le ruban LED 3. Appuyez
sur la touche OFF de la télécommande 4
pour éteindre le ruban LED 3.
Remarque : La touche OFF de la télécom-
mande 4 sert à éteindre le ruban LED 3 lors
d'une non utilisation à court terme. Débranchez
l'adaptateur secteur 2 de la prise de courant
pour éteindre durablement le ruban LED 3.
14125206L (voir Ill. E) :
Le ruban LED possède un capteur de lumière
du jour / détecteur de mouvement 17 . La portée
du détecteur de mouvement est de maximum 5 m.
Dans l'obscurité, le ruban LED est automatique-
ment allumé en cas de mouvement dans le zone
de détection. La lumière s'allume durant env.
30 secondes, jusqu'à 10 minutes. La durée
d'éclairage est réglable en continu à l'aide du
boîtier de commande 16 .
Contrôler les effets de lumière
avec la télécommande
(14125106L)
Remarque : L'émetteur de la télécommande 4
se trouve sur le côté opposé du compartiment à
pile 13 .
Assurez-vous qu'aucun obstacle ne perturbe la liai-
son entre la télécommande 4 et le récepteur 12 .
La portée de la télécommanden 4 est d'env. 5 m.
Les fonctions suivantes sont disponibles :
: Augmenter l'intensité lumineuse / Augmenter
la vitesse de la variation de couleur / Aug-
menter la sensibilité du capteur de musique
: Réduire l'intensité lumineuse / Réduire la
vitesse de la variation de couleur / Réduire
la sensibilité du capteur de musique
ON : allumer le ruban LED
OFF : éteindre le ruban LED
RED : régler la lumière rouge
GREEN
: régler la lumière verte
BLUE : régler la lumière bleue
WHITE : régler la lumière blanche
ORANGE
: régler la lumière orange
YELLOW
: régler la lumière jaune
CYAN : régler la lumière turquoise
PURPLE
: régler la lumière lilas
JUMP3 : variation de couleur (3 couleurs)
JUMP7 : variation de couleur (7 couleurs)
FADE3 : variation de couleur en dégradé (3 couleurs)
FADE7 : variation de couleur en dégradé (7 couleurs)
1 : Programme musical 1 = changement de cou-
leur lent et dégradé avec reflets de lumière
en cas de bruit

33 FR/BE
… / Entretien et nettoyage / Mise au rebut / Garantie et service après-venteMontage de la bande à LED
2 : Programme musical 2 = changement de
couleur dégradé avec reflets de lumière en
cas de bruit
3 : Programme musical 3 = changement de
couleur uniquement en cas de bruit
4 : Programme musical 4 = ruban LED actif
uniquement en cas de bruit.
Entretien et nettoyage
DANGER DE MORT
PAR ÉLECTROCUTION!
Débranchez la lampe du secteur avant tous travaux
sur la bande à LED 3. Débranchez à cet effet
l'adaptateur secteur 2 de la prise de courant.
N'utilisez ni solvants, ni benzine, ni autres pro-
duits similaires. Ceci endommagerait la lampe.
Utilisez uniquement un chiffon sec et non pelu-
cheux pour nettoyer la bande à LED 3.
Mise au rebut
L’emballage se compose de matières recyclables
pouvant être mises au rebut dans les déchetteries
locales.
b
a
Veuillez respecter l‘identification des
matériaux d‘emballage pour le tri sélectif,
ils sont identifiés avec des abbréviations
(a) et des chiffres (b) ayant la signification
suivante : 1–7 : plastiques / 20–22 :
papiers et cartons / 80–98 : matériaux
composite.
Afin de contribuer à la protection de
l'environnement, veuillez ne pas jeter votre
produit usagé dans les ordures ména-
gères, mais éliminez-le de manière ap-
propriée. Pour obtenir des renseignements
concernant les points de collecte et leurs
horaires d’ouverture, vous pouvez
contacter votre municipalité.
Les piles / piles rechargeables défectueuses ou
usagées doivent être recyclées conformément à la
directive 2006/66/CE et ses modifications. Les piles
et / ou piles rechargeables et / ou le produit doivent
être retournés dans les centres de collecte proposés.
Pollution de l’environnement
par la mise au rebut incorrecte
des piles / piles rechargeables !
Les piles / piles rechargeables ne doivent pas être
mises au rebut avec les ordures ménagères. Elles
peuvent contenir des métaux lourds toxiques et
doivent être considérées comme des déchets spé-
ciaux. Les symboles chimiques des métaux lourds
sont les suivants : Cd = cadmium, Hg = mercure, Pb =
plomb. Pour cette raison, veuillez toujours déposer
les piles / piles rechargeables usagées dans les
conteneurs de recyclage communaux.
Garantie et service après-vente
Garantie
Vous bénéficiez d’une garantie de 36 mois à partir
de la date d’achat de l’appareil. Cet appareil a été
fabriqué avec soin et soumis à un contrôle qualité
minutieux. Pendant la durée de la garantie, nous
réparons gratuitement tous les défauts de matériaux
ou de fabrication. Si vous deviez constater des dé-
fauts pendant la période de garantie, envoyez-nous
l‘appareil à l‘adresse du SAV mentionnée ci-dessous
en mentionnant le numéro d‘article : 14125106L /
14125206L.
La garantie exclut les dommages dus à une mani-
pulation incorrecte, au non-respect des instructions
du mode d’emploi ou à une intervention par une
personne non autorisée, ainsi que les pièces d’usure
(p. ex. les ampoules).
La durée de garantie n’est aucunement prolongée
ou renouvelée par une prestation de garantie.

34 FR/BE
Garantie et service après-vente
Adresse du service après-vente
Briloner Leuchten GmbH & Co. KG
Im Kissen 2
DE-59929 Brilon
ALLEMAGNE
Tél. : +49 29 61 / 97 12–800
Fax : +49 29 61 / 97 12–199
Courriel : [email protected]
www.briloner.com
IAN 321921_1901
Veuillez conserver le ticket de caisse et le numéro de
référence de l’article (par ex. IAN 123456_7890)
afin de les produire à titre de preuves d’achat pour
toute demande.
Déclaration de conformité
Ce produit est conforme aux exigences des directives
européennes et nationales applicables. La conformité
a été attestée. Les déclarations et documents respec-
tifs sont en possession du fabricant.
Fabricant
Briloner Leuchten GmbH & Co. KG
Im Kissen 2
DE-59929 Brilon
ALLEMAGNE
Inhoudsopgave

35 NL/BE
Garantie et service après-vente Inhoudsopgave
Legenda van de gebruikte pictogrammen ..................................................... Pagina 36
Inleiding ....................................................................................................................................... Pagina 37
Correct gebruik ............................................................................................................................... Pagina 37
Omvang van de levering ................................................................................................................ Pagina 37
Beschrijving van de onderdelen ..................................................................................................... Pagina 37
Technische gegevens ...................................................................................................................... Pagina 37
Veiligheid .................................................................................................................................... Pagina 38
Veiligheidsinstructies ....................................................................................................................... Pagina 38
Veiligheidsinstructies voor batterijen / accu‘s ................................................................................ Pagina 39
Ingebruikname ...................................................................................................................... Pagina 40
Batterijen plaatsen / vervangen ...................................................................................................... Pagina 40
LED-Band inkorten / verbinden ....................................................................................................... Pagina 40
LED-band monteren ............................................................................................................ Pagina 41
Led-band aan- / uitschakelen .......................................................................................................... Pagina 41
Lichteffecten met behulp van de afstandsbediening instellen ...................................................... Pagina 42
Onderhoud en reiniging ................................................................................................. Pagina 42
Afvoer ............................................................................................................................................ Pagina 42
Garantie en service ............................................................................................................ Pagina 43
Garantie .......................................................................................................................................... Pagina 43
Serviceadres .................................................................................................................................... Pagina 43
Conformiteitsverklaring ................................................................................................................... Pagina 43
Fabrikant .......................................................................................................................................... Pagina 43

36 NL/BE
InleidingLegenda van de gebruikte pictogrammen
Legenda van de gebruikte pictogrammen
Lees de gebruiksaanwijzing! De gebruikte verlichtingsmiddelen zijn
niet dimbaar
(14125206L)
.
Deze lamp is uitsluitend bedoeld voor
gebruik binnenshuis, in droge en
gesloten ruimtes. Explosiegevaar!
Alleen voor 14125106L: Dit product
behoort tot de decoratieve verlichting.
Gebruik deze lamp niet als normale
verlichting of als nachtlicht.
Het is een speciaal product, aangezien
de kleurcoördinaten buiten de in haakjes
vermelde bereiken liggen.
Kleurcoördinaat: (x<0,270 of x
> 0,530); (y<-2,172 x² of y >-2,3172 x²
+
2,3653 x -0,1595).
Veiligheidshandschoenen dragen!
Zo handelt u correct
Tegen kortsluitingen bestendige
veiligheidstransformator
Onafhankelijk voorschakelapparaat
Verlichtingshoek Reikwijdte
Volt (wisselspanning) Polariteit van de stroomaansluiting
Hertz (frequentie) d.c. DC Gelijkspanning D.C.
Watt (nuttig vermogen) b
a
Voer verpakking en apparaat op een
milieuvriendelijke manier af!
Beschermingsklasse II Levensduur
Beschermingsklasse III ON OFF Schakelcycli
IP20 Beschermingsgraad ta Omgevingstemperatuur
Waarschuwingen en veiligheidsinstructies
in acht nemen! tc Temperatuur van de behuizing op
het aangegeven punt
Levensgevaar en kans op ongevallen
bij kleuters en kinderen Waarschuwing!
Kans op een elektrische schok
Milieuschade door onjuiste afvoer
van de batterijen / accu's! Batterijen buiten het bereik van
kinderen bewaren!
Energie-efficiëntie externe netadapters
klasse V De verpakking bestaat uit
100 % gerecycled papier.

37 NL/BE
InleidingLegenda van de gebruikte pictogrammen
Sensorlichtband 3 m
Inleiding
Lees deze gebruiksaanwijzing volledig
en zorgvuldig door. Deze gebruiksaan-
wijzing hoort bij dit product en bevat be-
langrijke aanwijzingen voor de ingebruikname en
bediening. Neem altijd de veiligheidsinstructies in
acht. Controleer vóór de ingebruikname of de juiste
spanning beschikbaar is en of alle onderdelen goed
gemonteerd zijn. Wanneer u vragen hebt of onzeker
bent in verband met de bediening van het apparaat,
kunt u contact opnemen met uw leverancier of met
het servicepunt. Bewaar deze handleiding op een
veilige plaats en geef hem evt. aan derden door.
Correct gebruik
Deze lamp is uitsluitend bedoeld voor
gebruik binnenshuis, in droge en geslo-
ten ruimtes. Dit apparaat is alleen bedoeld
voor privé gebruik en niet voor commercieel gebruik.
Een ander gebruik dan tevoren beschreven is niet toe-
gestaan en leidt tot beschadigingen aan het product.
Bovendien staat dit in verbinding met gevaren, zoals
bijv. kortsluiting, brand, elektrische schok etc.
Alleen voor 14125106L:
Dit product behoort tot de decoratieve
verlichting. Gebruik deze lamp niet als
normale verlichting of als nachtlicht.
Het is een speciaal product, aangezien de kleurcoör-
dinaten buiten de in haakjes vermelde bereiken
liggen. Kleurcoördinaat: (x<0,270 of x > 0,530);
(y<-2,172 x² of y >-2,3172 x² + 2,3653 x -0,1595).
Omvang van de levering
Controleer de levering altijd direct na het uitpakken
op volledigheid en optimale staat van het product.
1 LED-band, model 14125106L / 14125206L
1 netadapter
1 muzieksensor (14125106L)
2 verbinders
4 afsluitkappen
2 kabelhouders
1 kleefband
2 schroeven voor de sensor-eenheid (14125106L)
1 afstandsbediening (14125106L)
1 gebruiksaanwijzing
Beschrijving van de onderdelen
1 Stroomkabel
2 Netspanningsadapter
3 Led-strip
4 Afstandsbediening (14125106L)
5 Muzieksensor (14125106L)
6 Contrastekker
7 Stekker
8 Stekkerverbinding
9 Afsluitkapje
10 Beschermfolie
11 Kabelhouder
12 Ontvanger (14125106L)
13 Batterijvak (14125106L)
14 Isolatiestrip (14125106L)
15 Batterij (14125106L)
16 Regelaar (14125206L)
17 Sensor (14125206L)
18 Plakstrip
Technische gegevens
Artikelnr.: 14125106L
Voedingsspanning: 220–240 V~ 50 / 60 Hz
Totaal vermogen: LED / max. 17 W
Led-band:
Voedingsspanning: 12 V
Vermogen (led-band): 14 W
Beschermingsklasse: III
Beschermingsgraad: IP20
Adapter:
Voedingsspanning: 220–240 V~ 50 / 60 Hz
Uitgangsstroom: 1,5 A
Beschermingsklasse: II
Beschermingsgraad: IP20

38 NL/BE
Inleiding / Veiligheid
Batterij voor
afstandsbediening:
Type: CR 2025
Artikelnr.: 14125206L
Voedingsspanning: 220–240 V~ 50 / 60 Hz
Totaal vermogen: LED / max. 6 W
Led-band:
Voedingsspanning: 12 V
Vermogen (led-band): 4,5 W
Beschermingsklasse: III
Beschermingsgraad: IP20
Adapter:
Voedingsspanning: 220–240 V~ 50 / 60 Hz
Uitgangsstroom: 0,5 A
Beschermingsklasse: II
Beschermingsgraad: IP20
Veiligheid
Veiligheidsinstructies
Bij beschadigingen die worden veroorzaakt door
het niet in acht nemen van deze gebruiksaanwijzing
vervalt de garantie! Wij zijn niet aansprakelijk voor
gevolgschade! Bij materiële schade of persoonlijk
letsel dat wordt veroorzaakt door onjuist gebruik of
het niet in acht nemen van de veiligheidsinstructies
zijn wij niet aansprakelijk!
LEVENSGEVAAR EN GEVAAR
VOOR ONGEVALLEN VOOR
KLEUTERS EN KINDEREN!
Laat kinderen nooit zonder toezicht bij het
verpakkingsmateriaal. Er bestaat gevaar voor
verstikking door verpakkingsmateriaal. Kinderen
onderschatten de gevaren vaak. Houd kinderen
altijd uit de buurt van het product.
Dit apparaat kan door kinderen vanaf 8 alsmede
door personen met verminderde fysieke, senso-
rische of mentale vaardigheden of een gebrek
aan ervaring en kennis worden gebruikt, als zij
onder toezicht staan of geïnstrueerd werden
met betrekking tot het veilige gebruik van het
apparaat en zij de hieruit voortvloeiende geva-
ren begrijpen. Kinderen mogen niet met het ap-
paraat spelen. Reiniging en onderhoud mag
niet door kinderen zonder toezicht worden uit-
gevoerd.
Vermijd levensgevaar door
elektrische schok
Controleer de LED-band voor ieder gebruik op
eventuele beschadigingen. Gebruik uw LED-band
nooit, als u een beschadiging hebt geconstateerd.
Een beschadigde stroomkabel betekent levens-
gevaar door een elektrische schok. Neem in
geval van beschadigingen, reparaties of andere
problemen contact op met de klantenservice of
met een elektricien. De stroomkabel van dit ap-
paraat kan niet worden vervangen. Bij bescha-
diging van de kabel moet het apparaat worden
verwijderd. Het apparaat bevat geen onderde-
len, die door de gebruiker kunnen worden on-
derhouden.
Overtuig u er voor het gebruik van, dat de
bestaande netspanning overeenstemt met de
vereiste bedrijfsspanning van het artikel (zie
'Technische gegevens').
Vermijd in alle gevallen het contact met span-
ningvoerende leidingen en contact met water
of andere vloeistoffen.
Open nooit een van de elektrische delen en
steek er geen voorwerpen in. Bij dergelijke
handelingen bestaat levensgevaar door
elektrische schokken.
Gebruik de LED-band niet als het door voor-
werpen wordt afgedekt of in een oppervlak is
verzonken.
Monteer de lamp niet op een vochtige of
geleidende ondergrond.
Dit LED-band mag niet elektrisch verbonden
worden met een andere LED-band.
Bevestig het artikel niet met scherpe klemmen
of spijkers.
Trek voor de montage, demontage of reiniging
altijd eerst de stekker uit de contactdoos.
Raak de stekker of de LED-band nooit met natte
handen aan.
Veiligheid

39 NL/BE
Inleiding / Veiligheid
Gebruik uitsluitend de meegeleverde onderdelen,
anders vervalt de garantie.
Open de lichtslang niet en knip hem niet door.
Verbind deze lichtslang niet met een product
van een andere fabrikant.
De verbinding mag alleen tot stand worden
gebracht door middel van de meegeleverde
stekkers. Open uiteinden moeten voor gebruik
worden verzegeld.
Gebruik de lichtslang niet als deze wordt
afgedekt of is verzonken in het oppervlak.
De led-band mag niet worden aangesloten op
het stroomnet als deze zich in de verpakking
bevindt. Rol het artikel volledig uit voordat u
het op het stroomnet aansluit. Rol het artikel
volledig uit, voordat u het aan het stroomnet
aansluit.
Model 14125106L
Bij sommige personen kunnen epileptische
aanvallen of bewustzijnsstoringen plaatsvinden,
wanneer ze worden blootgesteld aan bepaalde
lichtflitsen of lichteffecten. Raadpleeg bij epilep-
tische symptomen direct een arts.
Vermijd brandgevaar
en kans op letsel
Dit artikel bevat geen delen die door de ver-
bruiker kunnen worden onderhouden. De LED's
kunnen niet worden vervangen.
Mochten de LED's aan het einde van hun levens-
duur uitvallen, moet het complete artikel worden
vervangen.
De vast gemonteerde LED's zijn niet
geschikt voor dimmers en elektroni-
sche schakelaars (14125206L).
Tijdens het gebruik niet van dichtbij in de LED
kijken.
De LED niet met behulp van een optisch instru-
ment (bijv. vergrootglas) bekijken.
Zo handelt u correct
Monteer de LED-band zo, dat hij tegen veront-
reiniging en oververhitting beschermd is.
Wees altijd alert! Let er altijd op wat u doet en
ga steeds bedachtzaam te werk. Gebruik de
LED-band in geen geval als u niet geconcentreerd
bent of u zich niet lekker voelt.
Maak uzelf voor het gebruik vertrouwd met
alle aanwijzingen en afbeeldingen in deze
gebruiksaanwijzing en met de LED-band zelf.
Om de LED-band volledig te scheiden van het
stroomnet, moet de transformator uit het stop-
contact worden getrokken.
Veiligheidsinstructies voor
batterijen / accu‘s
BATTERIJEN BUITEN HET BEREIK
VAN KINDEREN BEWAREN!
Het inslikken kan chemische brand-
wonden, perforatie van zacht weefsel en de
dood tot gevolg hebben. Ernstige brandwonden
kunnen binnen 2 uur na het inslikken optreden.
Direct een arts raadplegen.
LEVENSGEVAAR! Houd batterijen / accu‘s
buiten het bereik van kinderen. Raadpleeg bij
inslikken onmiddellijk een arts!
EXPLOSIEGEVAAR!
Laad niet oplaadbare batterijen nooit op. Sluit
de batterijen / accu‘s niet kort en /of open
deze niet. Daardoor kan de batterij oververhit
raken, in brand vliegen of exploderen.
Gooi batterijen / accu‘s nooit in het vuur of water.
Stel batterijen / accu‘s nooit bloot aan mecha-
nische belastingen.
Risico dat de batterijen / accu’s lekken
Vermijd extreme omstandigheden en tempera-
turen die invloed op de batterijen / accu‘s zou-
den kunnen hebben bijv. radiatoren / direct
zonlicht.
Bij lekkende batterijen / accu‘s het contact van
de chemicaliën met de huid, ogen en slijmvlie-
zen vermijden! Spoel de desbetreffende plek-
ken direct af met schoon water en raadpleeg
onmiddellijk een arts!
DRAAG VEILIGHEIDSHAND-
SCHOENEN!
Veiligheid

40 NL/BE
Ingebruikname / LED-band monterenVeiligheid / Ingebruikname
Lekkende of beschadigde batterijen / accu‘s
kunnen in geval van huidcontact chemische
brandwonden veroorzaken. Draag daarom in
dit geval geschikte veiligheidshandschoenen.
Als de batterijen / accu‘s lekken, dient u deze
direct uit het product te halen om beschadigin-
gen te vermijden.
Gebruik alleen batterijen / accu‘s van hetzelfde
type. Gebruik nooit nieuwe en oude batterijen /
accu‘s door elkaar!
Verwijder de batterijen / accu‘s, als u het product
gedurende een langere periode niet gebruikt.
Risico op beschadiging van het product
Gebruik uitsluitend het aangegeven type
batterij / accu!
Plaats de batterijen / accu‘s volgens de weer-
gegeven polariteit (+) en (-) op batterij / accu
en op product.
Reinig de contacten van de batterij / accu en
die in het batterijvak, voordat u deze plaatst!
Verwijder verbruikte batterijen / accu‘s direct
uit het product.
Ingebruikname
Verwijder al het verpakkingsmateriaal voor de
eerste ingebruikname.
De led-strip mag niet worden aangesloten op
het stroomnet terwijl deze zich in de verpakking
bevindt en opgerold is.
Opmerking: let erop, dat zich in de directe
omgeving van de montageplek een stopcontact
bevindt.
Batterijen plaatsen /
vervangen (14125106L)
Opmerking: trek voor de eerste ingebruik-
name de isolatiestrip 14 uit het batterijvak 13 .
Als de reikwijdte van de afstandsbediening 4
afneemt, moet de batterij 15 worden vervangen.
Trek hiervoor de batterijlade uit de afstandsbe-
diening 4. Haal de batterij 15 eruit en plaats
een nieuwe batterij.
Opmerking: de juiste polariteit wordt op de
achterkant van de afstandsbediening 4 weer-
gegeven.
Schuif het batterijvak 13 weer in de afstands-
bediening 4.
LED-Band inkorten / verbinden
U heeft de mogelijkheid, de LED-band individueel
op maat te maken en te verbinden.
LEVENSGEVAAR
DOOR ELEKTRISCHE SCHOKKEN!
Verbreek voor alle werkzaamheden de verbinding
van de LED-band 3 met het stroomnet. Trek hier-
voor de netspanningsadapter 2 uit het stopcontact.
Kies de gewenste lengte van de LED-band.
Opmerking: Let erop, dat u de LED-band op
de juiste plek inkort. Het punt waar u kunt
knippen ligt precies in het midden van de po-
len en is met een zwarte streep gemarkeerd
(14125106L: +12V, Blue, Red, Green – ;
14125206L: +, -) (zie afb. C).
Kort de LED-band 3 met behulp van een
schaar in.
Druk vervolgens de beide uiteinden van de
LED-band 3 op de snijdcontacten van de
stekkerverbinder 8 (zie afb. C).
Let bij het aansluiten van de led-band 3 op
de juiste polen van de verbinding (14125106L:
+
12V
BLUE
RED
GREEN
+
12V
BLUE
RED
GREEN
+
12V
BLUE
RED
GREEN
+
12V
BLUE
RED
GREEN
1. 2. 3. 4.
18

41 NL/BE
Ingebruikname / LED-band monteren
+12 V, Blue, Red, Green <> +12 V, Blue, Red,
Green; 14125206L: +, - <> +, -) (zie afb. C).
Druk vervolgens elk een afsluitkap 9 op de uit-
einden van de stekkerverbinding 8 (zie afb. C).
Controleer de juiste montage.
Let erop, dat u voor het gebruik het open ui-
teinde van de LED-band 3 met de kleefband
18 dicht plakt, indien u na het inkorten van de
band geen verbinding tot stand wilt brengen
(zie onder afb. 1–4).
LED-band monteren
Opmerking: let erop, dat het montagevlak schoon,
vetvrij en droog is. Anders kan de adhesie van de
plakband worden beperkt.
Opmerking: let erop, dat er zich in de directe
omgeving van de montageplek een stopcontact
bevindt.
Opmerking: lichtinval beïnvloedt de sensor 17
(14125206L).
14125106L (zie afb. A):
Verbind de stroomkabel 1 met de muzieksen-
sor 5 door de stekker 7 direct in de contras-
tekker 6 van de muzieksensor 5 te steken,
voor zover deze nog niet voorgemonteerd zijn.
Sluit vervolgens de muzieksensor 5 aan op de
led-band 3. Let bij het aansluiten van de led-
band 3 op de juiste polen van de verbinding
(zie onder, <> + 12 V, Blue, Red, Green).
14125206L (zie afb. A):
Verbind de stroomkabel 1 met behulp van de
stekker 7 direct met de contrastekker 6 van
de sensor 17 en de led-strip 3.
Kies een geschikte montageplek.
Opmerking (14125206L): andere licht-
bronnen, bijv. straatverlichting, beïnvloeden de
schemersensor.
Verwijder de beschermfolie van de achterzijde
van de led-strip 3 (zie afb. B).
Plak de LED-band 3 met de plakband op het
montagevlak en druk het stevig vast (zie afb. B).
Verwijder de beschermende folie 10 (zie afb. D)
van de achterkant van de kabelhouder 11 .
Plak de kabelhouder 11 op de gewenste plek
(zie afb. D).
Verwijder de beschermfolie van de achterzijde
van de muzieksensor 5 / sensor 17 .
Plak de sensor 17 (14125206L) / muzieksen-
sor 5 (14125106L) op de gewenste plek.
Schroef de muzieksensor 5 vast met behulp
van de schroeven (14125106L).
Klem de stroomkabel 1 in de kabelhouder 11
(zie afb. D).
Steek de netspanningsadapter 2 in het
stopcontact.
Uw lamp is nu gereed voor gebruik.
LED-band aan- / uitschakelen
14125106L:
Druk op de ON-knop op de afstandsbediening
4 om de led-band 3 in te schakelen. Druk
op de OFF-knop van de afstandsbediening 4
om de led-band 3 uit te schakelen.
Opmerking: De OFF-knop van de afstands-
bediening 4 is uitsluitend geschikt voor het kor-
tstondig uitschakelen van de led-band 3. Trek
de netspanningsadapter 2 uit het stopcontact
om de led-band 3 blijvend uit te schakelen.
14125206L (zie afb. E):
De LED-band bezit een daglichtsensor / bewe-
gingssensor 17 . De reikwijdte van de bewe-
gingssensor bedraagt maximaal 5 m.
Tijdens het donker wordt de led-band door
beweging binnen het registratiebereik automa-
tisch ingeschakeld. Het licht gaat gedurende
ca. 30 seconden tot 10 minuten aan. De ver-
lichtingsduur kan traploos worden ingesteld
met de regelaar 16 .
Veiligheid / Ingebruikname

42 NL/BE
Afvoer / Garantie en serviceLED-band monteren / Onderhoud en reiniging / Afvoer
Lichteffecten met behulp van
de afstandsbediening instellen
(14125106L)
Opmerking: de zender van de afstandsbediening
4 bevindt zich op de tegengestelde zijde van het
batterijvak 13 .
Zorg ervoor dat er zich tussen afstandsbediening
4 en ontvanger 12 geen hindernissen bevinden.
De reikwijdte van de afstandsbediening 4 bedraagt
ca. 5 m.
De volgende functies staan ter beschikking:
: Lichtsterkte verhogen / snelheid kleurwissel ver-
hogen / gevoeligheid muzieksensor verhogen
: Lichtsterkte verlagen / snelheid kleurwissel ver-
lagen / gevoeligheid muzieksensor verlagen
ON : LED-band inschakelen
OFF : LED-band uitschakelen
RED : rood licht instellen
GREEN
: groen licht instellen
BLUE : blauw licht instellen
WHITE : wit licht instellen
ORANGE
: oranje licht instellen
YELLOW
: geel licht instellen
CYAN : turquoise licht instellen
PURPLE
: lila licht instellen
JUMP3 : Kleurwissel (3 kleuren)
JUMP7 : kleurwissel (7 kleuren)
FADE3 : vloeiende kleurwissel (3 kleuren)
FADE7 : vloeiende kleurwissel (7 kleuren)
1: Muziekprogramma 1 = langzame,
vloeiende kleurwisseling met lichtreflex bij
geluiden
2: Muziekprogramma 2 = vloeiende kleurwis-
seling met lichtreflex bij geluiden
3: Muziekprogramma 3 = kleurwisseling
alleen bij geluiden
4: Muziekprogramma 4 = led-band wordt
alleen geactiveerd bij geluiden
Onderhoud en reiniging
LEVENSGEVAAR
DOOR ELEKTRISCHE SCHOKKEN!
Verbreek voor alle werkzaamheden aan de LED-band
3 de verbinding van de lamp met het stroomnet.
Trek hiervoor de netspanningsadapter 2 uit het
stopcontact.
Gebruik geen oplosmiddel, benzine e.d. De
lichten zullen hierdoor beschadigd raken.
Gebruik voor de reiniging van de LED-band 3
een droge, pluisvrije doek.
Afvoer
De verpakking bestaat uit milieuvriendelijke grond-
stoffen die u via de plaatselijke recyclingcontainers
kunt afvoeren.
b
a
Neem de aanduiding van de verpakkings-
materialen voor de afvalscheiding in
acht. Deze zijn gemarkeerd met de af-
kortingen (a) en een cijfers (b) met de
volgende betekenis: 1–7: kunststoffen /
20–22: papier en vezelplaten / 80–98:
composietmaterialen.
Gooi het afgedankte product omwille
van het milieu niet weg via het huisvuil,
maar geef het af bij het daarvoor bestemde
depot of het gemeentelijke milieupark.
Over afgifteplaatsen en hun openingstij-

43 NL/BE
Afvoer / Garantie en serviceLED-band monteren / Onderhoud en reiniging / Afvoer
den kunt u zich bij uw aangewezen
instantie informeren.
Defecte of verbruikte batterijen / accu‘s moeten
volgens de richtlijn 2006/66/EG en veranderingen
daarop worden gerecycled. Geef batterijen / accu‘s
en / of het product af bij de daarvoor bestemde
verzamelstations.
Milieuschade door foutieve verwij-
dering van de batterijen / accu‘s!
Batterijen / accu‘s mogen niet via het huisvuil worden
weggegooid. Ze kunnen giftige zware metalen
bevatten en vallen onder het chemisch afval. De che-
mische symbolen van de zware metalen zijn: Cd =
cadmium, Hg = kwik, Pb = lood. Geef verbruikte
batterijen / accu‘s daarom af bij een gemeentelijk
inzamelpunt.
Garantie en service
Garantie
Op dit product verlenen wij 36 maanden garantie
vanaf koopdatum. Het apparaat werd zorgvuldig
vervaardigd en aan een nauwkeurige kwaliteits-
controle onderworpen. Binnen de garantieperiode
herstellen wij kosteloos alle materiaal- of productie-
fouten. Indien tijdens de garantieperiode gebreken
worden vastgesteld, kunt u het product naar het on-
derstaande serviceadres
sturen met vermelding van het
volgende artikelnummer
: 14125106L / 14125206L.
Beschadigingen door ondeskundig gebruik, negeren
van de handleiding of ingrepen door niet-geautori-
seerde personen zijn van de garantieverlening
uitgesloten. Dit geldt eveneens voor slijtende delen
(zoals bijv. gloeilampen).
Door de garantieservice wordt de garantieperiode
noch verlengd noch vernieuwd.
Serviceadres
Briloner Leuchten GmbH & Co. KG
Im Kissen 2
DE-59929 Brilon
DUITSLAND
Tel.: +49 29 61 / 97 12–800
Fax: +49 29 61 / 97 12–199
E-Mail: [email protected]
www.briloner.com
IAN 321921_1901
Houd a.u.b. bij alle aanvragen de kassabon en het
artikelnummer (bijv. IAN 123456_7890) als bewijs
voor de aankoop bij de hand.
Conformiteitsverklaring
Dit product voldoet aan de eisen van de van
toepassing zijnde Europese en nationale richtlijnen.
De conformiteit
werd aangetoond. Desbetreffende
verklaringen liggen ter inzage bij de fabrikant.
Fabrikant
Briloner Leuchten GmbH & Co. KG
Im Kissen 2
DE-59929 Brilon
DUITSLAND

44
Spis zawartości

45 PL
Legenda zastosowanych piktogramów ...........................................................Strona 46
Instrukcja ......................................................................................................................................Strona 47
Zastosowanie zgodne z przeznaczeniem .....................................................................................Strona 47
Zawartość .........................................................................................................................................Strona 47
Opis części ....................................................................................................................................... Strona 47
Dane techniczne ..............................................................................................................................Strona 47
Bezpieczeństwo ......................................................................................................................Strona 48
Wskazówki bezpieczeństwa...........................................................................................................Strona 48
Wskazówki bezpieczeństwa dla baterii / akumulatorów ............................................................. Strona 49
Uruchomienie............................................................................................................................Strona 50
Wkładanie / wymiana baterii ..........................................................................................................Strona 50
Skracanie / łączenie taśmy świetlnej LED ....................................................................................... Strona 50
Montaż taśmy świetlnej LED ........................................................................................Strona 51
Włączanie / Wyłączanie taśmy świetlnej LED ............................................................................... Strona 51
Sterowanie efektami oświetleniowymi za pomocą pilota .............................................................Strona 52
Konserwacja i czyszczenie............................................................................................Strona 52
Utylizacja .....................................................................................................................................Strona 52
Gwarancja i serwis ..............................................................................................................Strona 53
Oświadczenie gwarancyjne ...........................................................................................................Strona 53
Adres serwisu ...................................................................................................................................Strona 53
Deklaracja zgodności ......................................................................................................................Strona 53
Producent ..........................................................................................................................................Strona 53
Spis zawartości

46 PL
Legenda zastosowanych piktogramów Instrukcja
Legenda zastosowanych piktogramów
Przeczytać instrukcję obsługi!
Użytych elementów świetlnych nie
można ściemniać (14125206L).
Niniejsza lampa nadaje się wyłącznie
do pracy wewnątrz, w suchych i
zamkniętych pomieszczeniach. Niebezpieczeństwo wybuchu!
Tylko 14125106L: w przypadku tego
artykułu chodzi o dekorację świetlną.
Nie należy używać tej lampy do oświetla-
nia pomieszczeń lub jako lampki nocnej.
Chodzi tu o specjalny produkt, ponieważ
zakresy barw znajdują się poza zakre-
sami wymienionymi w nawiasach.
Zakres barw: (x <0,270 lub x > 0,530);
(y <-2,172 x² lub y >-2,3172 x² +
2,3653 x -0,1595).
Zakładać rękawice ochronne!
Prawidłowy sposób postępowania
Transformator bezpieczeństwa
odporny na zwarcie
Niezależne urządzenie sterujące
Kąt świecenia Zasięg
Wolt (napięcie przemienne) Biegunowość przyłącza sieciowego
Herc (częstotliwość) d.c. DC Napięcie stałe D.C.
Wat (moc czynna) b
a
Opakowanie i urządzenie przekazać
do utylizacji zgodnie z przepisami o
ochronie środowiska!
Klasa ochrony II Żywotność
Klasa ochrony III ON OFF Cykle włączania
IP20 Rodzaj ochrony ta Temperatura otoczenia
Należy przestrzegać ostrzeżeń i
wskazówek bezpieczeństwa! tc Temperatura obudowy w danym
punkcie
Niebezpieczeństwo utraty życia i
odniesienia obrażeń przez dzieci
Ostrzeżenie!
Niebezpieczeństwo porażenia
prądem
Niewłaściwa utylizacja baterii /
akumulatorów stwarza zagrożenie
dla środowiska naturalnego!
Baterie należy przechowywać poza
zasięgiem dzieci!
Wydajność energetyczna zasilaczy
zewnętrznych klasa V Opakowanie składa się w 100 %
ze zutylizowanego papieru.

47 PL
Legenda zastosowanych piktogramów Instrukcja
Taśma świetlna z czujnikiem
ruchu, 3 metry długości
Instrukcja
Proszę dokładnie przeczytać całą niniej-
szą instrukcję obsługi. Niniejsza instrukcja
obsługi należy do produktu. Zawiera ona
ważne wskazówki dotyczące uruchamiania i posłu-
giwania się nim. Zawsze należy przestrzegać wszyst-
kich wskazówek dotyczących bezpieczeństwa. Przed
uruchomieniem proszę sprawdzić, czy występuje
prawidłowe napięcie i czy wszystkie części są pra-
widłowo zamontowane. W przypadku zapytań lub
niepewności odnośnie obchodzenia się z urządze-
niem prosimy o kontakt ze sprzedawcą lub punktem
serwisowym. Proszę starannie przechowywać niniej-
szą instrukcję obsługi i ewentualnie przekazać ją
osobom trzecim.
Zastosowanie zgodne
z przeznaczeniem
Niniejsza lampa nadaje się wyłącznie
do pracy wewnątrz, w suchych i zamknię-
tych pomieszczeniach. Urządzenie to
przeznaczone jest do zastosowania jedynie w pry-
watnych gospodarstwach domowych, a nie w celach
komercyjnych. Inne zastosowanie niż opisane po-
wyżej jest niedozwolone i prowadzi do uszkodze-
nia produktu. Ponadto łączy się to z zagrożeniami,
takimi jak np. zwarcie, pożar, porażenie prądem itp.
Tylko dla 14125106L:
W przypadku tego artykułu chodzi o
dekorację świetlną. Nie należy używać
tej lampy do oświetlania pomieszczeń
lub jako lampki nocnej. Chodzi tu o specjalny pro-
dukt, ponieważ zakresy barw znajdują się poza
zakresami wymienionymi w nawiasach.
Zakres barw: (x <0,270 lub x > 0,530); (y <-2,172
x²
lub y >-2,3172 x² + 2,3653 x -0,1595).
Zawartość
Bezpośrednio po wypakowaniu należy sprawdzić,
czy zestaw jest kompletny oraz czy urządzenie jest
w nienagannym stanie.
1 taśma LED, model 14125106L / 14125206L
1 adapter sieciowy
1 czujnik muzyczny (14125106L)
2 łączniki
4 zaślepki
2 uchwyty kablowe
1 pasek klejący
2 śruby do jednostki czujnika (14125106L)
1 pilot (14125106L)
1 instrukcja obsługi
Opis części
1 Przewód zasilający
2 Adapter sieciowy
3 Taśma świetlna LED
4 Pilot (14125106L)
5 Czujnik muzyczny (14125106L)
6 Gniazdo
7 Wtyczka
8 Złącze wtykowe
9 Zaślepka
10 Folia ochronna
11 Uchwyt kabla
12 Odbiornik (14125106L)
13 Komora na baterie (14125106L)
14 Pasek izolacyjny (14125106L)
15 Bateria (14125106L)
16 Regulator (14125206L)
17 Czujnik (14125206L)
18 Pasek klejący
Dane techniczne
Nr art.: 14125106L
Napięcie robocze: 220–240 V~ 50 / 60 Hz
Moc całkowita: LED / maks. 17 W

48 PL
BezpieczeństwoInstrukcja / Bezpieczeństwo
Taśma świetlna LED:
Napięcie robocze: 12 V
Moc (taśma LED): 14 W
Klasa ochrony: III
Stopień ochrony: IP20
Zasilacz:
Napięcie robocze: 220–240 V~ 50 / 60 Hz
Prąd wyjściowy: 1,5 A
Klasa ochrony: II
Stopień ochrony: IP20
Bateria do pilota:
Typ: CR 2025
Nr art.: 14125206L
Napięcie robocze: 220–240 V~ 50 / 60 Hz
Moc całkowita: LED / maks. 6 W
Taśma świetlna LED:
Napięcie robocze: 12 V
Moc (taśma LED): 4,5 W
Klasa ochrony: III
Stopień ochrony: IP20
Zasilacz:
Napięcie robocze: 220–240 V~ 50 / 60 Hz
Prąd wyjściowy: 0,5 A
Klasa ochrony: II
Stopień ochrony: IP20
Bezpieczeństwo
Wskazówki
bezpieczeństwa
W przypadku szkód spowodowanych nieprzestrze-
ganiem niniejszej instrukcji obsługi wygasa prawo
do gwarancji! Za szkody pośrednie producent nie
ponosi odpowiedzialności! W przypadku szkód
materialnych lub osobowych, które powstały wskutek
niewłaściwego obchodzenia się lub nieprzestrze-
gania wskazówek dotyczących bezpieczeństwa,
nie ponosimy żadnej odpowiedzialności!
ZAGROŻE-
NIE ŻYCIA I NIEBEZPIECZEŃ-
STWO WYPADKU DLA DZIECI!
Nigdy nie należy pozostawiać dzieci bez nad-
zoru z materiałem opakowaniowym. Istnieje
zagrożenie uduszeniem spowodowane przez
materiał opakowaniowy. Dzieci często nie do-
strzegają niebezpieczeństwa. Należy zawsze
trzymać dzieci z dala od produktu.
Niniejsze urządzenie może być używane przez
dzieci od lat 8 oraz przez osoby z obniżonymi
zdolnościami fizycznymi, sensorycznymi lub
mentalnymi lub brakiem doświadczenia i / lub
wiedzy, jeśli pozostają pod nadzorem lub zo-
stały pouczone w kwestii bezpiecznego użycia
urządzenia i rozumieją wynikające z niego za-
grożenia. Dzieci nie mogą bawić się urządze-
niem. Czyszczenie i konserwacja nie mogą być
wykonywane przez dzieci bez nadzoru.
Porażenie prądem
elektrycznym grozi śmiercią
Przed każdym zastosowaniem należy sprawdzić
taśmę świetlną LED pod kątem ewentualnych
uszkodzeń. Nie używać taśmy świetlnej LED w
razie stwierdzenia jakichkolwiek uszkodzeń.
Uszkodzony przewód zasilający oznacza za-
grożenie dla życia wskutek porażenia prądem.
W przypadku uszkodzeń, konieczności naprawy
lub innych problemów zwrócić się do punktu
serwisowego lub elektryka. Nie można wymienić
przewodu zasilającego tego urządzenia. W
razie
uszkodzenia przewodu urządzenie należy od
dać
na złom. Urządzenie nie zawiera elementów wy-
magających konserwacji przez użytkownika.
Przed użyciem upewnić się, że dostępne napięcie
sieciowe jest zgodne z wymaganym napięciem
roboczym artykułu (patrz „Dane techniczne“).
Bezwzględnie unikać kontaktu przewodzących
napięcie przewodów z wodą lub innymi cieczami.
Nigdy nie otwierać elementów elektrycznych i
nie wkładać do nich jakichkolwiek przedmiotów.
Taka ingerencja oznacza zagrożenie życia
poprzez porażenie prądem.
Nie używać taśmy świetlnej LED, jeśli jest
przykryta przedmiotami lub umieszczona w
powierzchni.

49 PL
BezpieczeństwoInstrukcja / Bezpieczeństwo
Nie należy montować lampy na wilgotnej lub
przewodzącej powierzchni.
Taśmy świetlnej LED nie wolno łączyć elektrycznie
z innymi taśmami świetlnymi LED.
Nie mocować za pomocą ostrych klamer lub
gwoździ.
Przed przystąpieniem do montażu, demontażu
bądź czyszczenia produktu należy zawsze
wyciągnąć wtyczkę z gniazda sieciowego.
Nigdy nie należy dotykać wtyczki sieciowej
ani taśmy świetlnej LED mokrymi rękoma.
Stosować wyłącznie dołączone elementy, w
przeciwnym razie wygaśnie gwarancja.
Nie otwieraj lub przecinaj węża świetlnego.
Nie łącz jednego węża świetlnego z innym
produktem producenta.
Połączenie wzajemne może być wykonane
tylko przy użyciu dostarczonych złączy. Wszel-
kie otwarte końce muszą zostać uszczelnione
przed użyciem.
Nie używaj węża świetlnego, gdy jest zakryty
lub wpuszczony w powierzchnię.
Nie należy włączać taśmy świetlnej LED do sieci
elektrycznej, jeśli znajduje się w opakowaniu.
Przed podłączeniem do sieci elektrycznej cał-
kowicie rozłożyć artykuł.
Model 14125106L
U niektórych osób może dojść do napadów
epileptycznych lub utraty przytomności, jeśli
będą narażone na określone błyski lub efekty
świetlne. W razie symptomów epilepsji należy
niezwłocznie skonsultować się z lekarzem.
Jak uniknąć zagrożenia
pożarowego i obrażeń ciała
Artykuł ten nie zawiera elementów wymagają-
cych konserwacji przez użytkownika. Diod LED
nie można wymienić.
Jeśli diody LED przestaną działać z powodu
zużycia, należy wymienić cały artykuł.
Wbudowane diody LED nie nadają
się do użycia w połączeniu z regu-
latorami jasności światła lub wyłącz-
nikami elektronicznymi (14125206L).
Podczas uruchomienia nie patrzeć w diody LED
z bliskiej odległości.
Diod LED nie należy oglądać za pomocą
optycznego instrumentu (np. lupy).
Prawidłowy sposób
postępowania
Taśmę świetlną LED zamontować w taki sposób,
aby była zabezpieczona przed zanieczyszcze-
niami i wysoką temperaturą.
Zachować ostrożność! Zwracać uwagę na
wykonywane czynności i zawsze kierować się
rozsądkiem. Nie używać taśmy świetlnej LED
w przypadku braku koncentracji lub złego
samopoczucia.
Przed instalacją należy zapoznać się ze wszyst-
kimi instrukcjami i rysunkami zawartymi w niniej-
szej instrukcji oraz z samą taśmą świetlną LED.
Aby taśmę świetlną LED całkowicie oddzielić
od źródła zasilania, należy wyjąć zasilacz z
gniazda wtykowego.
Wskazówki
bezpieczeństwa dla
baterii / akumulatorów
BATERIE NALEŻY PRZECHO-WY-
WAĆ POZA ZASIĘGIEM DZIECI!
Połknięcie może spowodować opa-
rzenia chemiczne, perforację tkanki miękkiej i
śmierć. Ciężkie oparzenia mogą wystąpić w ciągu
2 godzin po połknięciu. Natychmiast udać się
do lekarza.
ZAGROŻENIE ŻYCIA!
Baterie / akumulatory należy trzymać poza
zasięgiem dzieci. W przypadku połknięcia
należy natychmiast udać się do lekarza!
NIEBEZPIECZEŃSTWO
WYBUCHU!
Baterii jednorazowego użytku nie wolno łado-
wać ponownie. Baterii / akumulatorów nie należy
zwierać i / lub otwierać. Może to doprowadzić
do przegrzania, pożaru lub wybuchu.
Nigdy nie należy wrzucać baterii / akumulatorów
do ognia lub wody.
Nigdy nie należy narażać baterii / akumulatorów
na obciążenia mechaniczne.

50 PL
Uruchomienie / Montaż taśmy świetlnej LEDBezpieczeństwo / Uruchomienie
Ryzyko wycieku kwasu z baterii /
akumulatorów
Należy unikać ekstremalnych warunków i tem-
peratur, które mogą oddziaływać na baterie /
akumulatory, np. kaloryferów / bezpośredniego
działania promieniowania słonecznego.
Jeśli wyciekną baterie / akumulatory, należy
unikać kontaktu skóry, oczu i błon śluzowych z
chemikaliami! Dotknięte miejsca natychmiast
przepłukać czystą wodą i udać się do lekarza!
ZAKŁADAĆ RĘKAWICE
OCHRONNE!
Wylane lub uszkodzone baterie / akumulatory po
dotknięciu skóry mogą spowodować poparzenia
chemiczne. Dlatego należy w takim przypadku
nakładać odpowiednie rękawice ochronne.
W przypadku wycieku baterii / akumulatorów
natychmiast usunąć je z produktu, aby uniknąć
uszkodzeń.
Używać wyłącznie baterii / akumulatorów tego
samego typu. Nie zakładać razem nowych oraz
zużytych baterii / akumulatorów!
Jeżeli produkt nie jest przez dłuższy czas uży-
wany, baterie / akumulatorynależy wyjąć.
Ryzyko uszkodzenia produktu
Używać wyłącznie zalecanego rodzaju baterii /
akumulatora!
Włożyć baterie / akumulatory zgodnie z ozna-
czeniem biegunów (+) i (-) na baterii / akumu-
latorze i produkcie.
Jeśli to konieczne, oczyścić styki baterii / akumula-
tora i w komorze baterii przed włożeniem baterii!
Zużyte baterie / akumulatory wyjąć jak najszyb-
ciej z produktu.
Uruchomienie
Przed pierwszym użyciem usunąć wszystkie
materiały opakowaniowa.
Nie należy podłączać taśmy świetlnej LED do
sieci zasilania, jeśli znajduje się ona w opako-
waniu i jest zwinięta.
Wskazówka: należy pamiętać o tym, aby
w bezpośrednim miejscu montażu znajdowało
się gniazdo wtykowe.
Wkładanie / wymiana
baterii (14125106L)
Wskazówka: przed pierwszym użyciem z
djąć
pasek izolacyjny 14 z komory na baterie 13 .
Jeśli zasięg pilota 4 osłabnie, należy wymie-
nić baterie 15 . W tym celu należy wyciągnąć
szufladkę na baterię z pilota 4. Wyjąć baterię
15 i włożyć nową.
Wskazówka: poprawne ułożenie biegunów
jest pokazane na odwrotnej stronie pilota 4.
Ponownie wsunąć komorę na baterie 13 do
pilota 4.
Skracanie / łączenie taśmy
świetlnej LED
Istnieje możliwość indywidualnego skracania i
łączenia taśmy świetlnej LED.
ZAGROŻENIE ŻYCIA
PRZEZ PORAŻENIE PRĄDEM ELEKTRYCZ-
NYM!
Przed wszystkimi pracami odłączyć oświetlenie przy
taśmie świetlnej LED 3 od sieci elektrycznej. W tym
celu należy wyjąć adapter sieciowy 2 z gniazdka.
Wybrać wymaganą długość taśmy świetlnej LED.
Wskazówka: należy uważać na to, aby skra-
cać taśmę świetlną LED we właściwym miejscu.
Miejsce przecięcia leży dokładnie po środku
biegunów i jest oznaczone czarną linią
(14125106L: + 12 V, niebieski, czerwony, zie-
lony - ; 14125206L: +, -) (patrz rys. C).
Skrócić taśmę świetlną LED 3 przy pomocy
nożyczek.
Następnie wcisnąć oba końce taśmy świetlnej
LED 3 na styki przecięcia złącza wtykowego
8 (patrz rys. C).
Przy podłączaniu taśmy świetlnej LED 3 należy
przestrzegać właściwej biegunowości połącze-
nia (14125106L: +12V, niebieski, czerwony,
zielony <> +12 V, niebieski, czerwony, zielony;
14125206L: +, - <> +, -) (patrz rys. C).
Następnie wcisnąć zaślepkę 9 na każdy z
końców złącza wtykowego 8 (patrz rys. C).
Sprawdzić, czy zamocowanie jest prawidłowe.
Należy pamiętać, aby przed użyciem obkleić
otwarte końce taśmy świetlnej LED 3 paskiem

51 PL
Uruchomienie / Montaż taśmy świetlnej LEDBezpieczeństwo / Uruchomienie
klejącym 18 , jeśli po skróceniu taśmy nie ma być
utworzone połączenie (patrz poniżej rys. 1–4).
Montaż taśmy świetlnej LED
Wskazówka: zwrócić uwagę na to, aby po-
wierzchnia montażu była czysta, wolna od tłuszczu
i sucha. W przeciwnym wypadku może dojść do
zmniejszenia przyczepności taśmy klejącej.
Wskazówka: należy pamiętać o tym, aby w
bezpośrednim miejscu montażu znajdowało się
gniazdo wtykowe.
Wskazówka: padanie światła wpływa na czujnik
17 (14125206L).
Model 14125106L (patrz rys. A):
Przewód zasilający 1 połączyć z czujnikiem
muzycznym 5, w tym celu należy wetknąć
wtyczkę 7 bezpośrednio do gniazdka 6
czujnika muzycznego 5, o ile nie jest już on
zamontowany. Teraz czujnik muzyczny 5
połączyć z taśmą LED 3.
Przy podłączaniu taśmy świetlnej LED 3 należy
przestrzegać właściwej biegunowości połącze-
nia (patrz poniżej, <> +12 V, niebieski,
czerwony, zielony).
14125206L (patrz rys. A):
Przewód zasilający 1 połączyć przy pomocy
wtyczki 7 bezpośrednio z gniazdkiem 6
czujnika 17 i taśmą LED 3.
Wybrać odpowiednią powierzchnię montażową.
Wskazówka (14125206L): zewnętrzne
źródła światła np. latarnie uliczne wpływają
na czujnik zmierzchu.
Zdjąć folię ochronną z odwrotnej strony taśmy
świetlnej LED 3 (patrz rys. B).
Przykleić taśmę świetlną LED 3 przy użyciu
taśmy samoprzylepnej na powierzchnię mon-
tażu i przycisnąć ją (patrz rys. B).
Zdjąć folię ochronną 10 (patrz rys. D) z od-
wrotnej strony uchwytu na kabel 11 .
W wybranym miejscu przykleić uchwyt kabla 11
(patrz rys. D).
Zdjąć folię ochronną z odwrotnej strony czujnika
muzycznego 5 /czujnika 17 .
W wybranym miejscu przykleić czujnik 17
(14125206L) / czujnik muzyczny 5
(14125106L).
Czujnik muzyczny 5 przymocować przy
pomocy śrub (14125106L).
Zacisnąć przewód zasilający 1 w uchwycie
kabla 11 (patrz rys. D).
Włożyć zasilacz 2 do gniazdka.
Lampa jest gotowa do zastosowania.
Włączanie / Wyłączanie
taśmy świetlnej LED
14125106L:
Nacisnąć przycisk ON na pilocie 4, aby włą-
czyć taśmę LED 3. Nacisnąć przycisk OFF na
pilocie 4, aby wyłączyć taśmę LED-Band 3.
Wskazówka: przycisk OFF na pilocie 4
przeznaczony jest jedynie do krótkotrwałego
wyłączania taśmy LED 3. Aby taśmę LED 3
wyłączyć na stałe, należy odłączyć adapter
sieciowy 2 z gniazdka.
14125206L (patrz rys. E):
Taśma świetlna LED posiada czujnik światłą
dziennego / ruchu 17 . Zasięg czujnika ruchu
wynosi maks. 5 m.
+
12V
BLUE
RED
GREEN
+
12V
BLUE
RED
GREEN
+
12V
BLUE
RED
GREEN
+
12V
BLUE
RED
GREEN
1. 2. 3. 4.
18

52 PL
Utylizacja / Gwarancja i serwisMontaż taśmy świetlnej LED / Konserwacja i czyszczenie / Utylizacja
W ciemności taśma świetlna LED włącza się
automatycznie w wskutek ruchu w obszarze
wykrywania. Światło włącza się na ok 30 sekund
do 10 minut. Czas świecenia można płynnie
ustawiać przy pomocy regulatora 16 .
Sterowanie efektami
oświetleniowymi za pomocą
pilota (14125106L)
Wskazówka: nadajnik pilota 4 znajduje się
na odwrotnej stronie komory na baterie 13 .
Należy zatroszczyć się o to, aby między pilotem 4
a odbiornikiem 12 nie znajdowały się żadne prze-
szkody.
Zasięg pilota 4 wynosi ok. 5 m.
Dostępne są następujące funkcje:
: Zwiększanie natężenia światła / zwiększa-
nie prędkości zmiany barwy / zwiększanie
czułości czujnika muzycznego
: Zmniejszanie natężenia światła / zmniejsza-
nie prędkości zmiany barwy / zmniejszanie
czułości czujnika muzycznego
ON : Włączanie taśmy LED
OFF : Wyłączanie taśmy LED
RED : ustawienie czerwonego światła
GREEN
: ustawienie zielonego światła
BLUE : ustawienie niebieskiego światła
WHITE : ustawienie białego światła
ORANGE
: ustawienie pomarańczowego światła
YELLOW
: ustawienie żółtego światła
CYAN : ustawienie turkusowego światła
PURPLE
: ustawienie fioletowego światła
JUMP3 : zmiana koloru (3 kolorów)
JUMP7 : zmiana koloru (7 kolorów)
FADE3 : płynna zmiana kolorów (3 kolorów)
FADE7 : płynna zmiana kolorów (7 kolorów)
1: Program muzyczny 1 = powoli płynąca
zmiana kolorów z refleksem świetlnym przy
dźwiękach
2: Program muzyczny 2 = powoli płynąca
zmiana kolorów z refleksem świetlnym przy
dźwiękach
3: Program muzyczny 3 = zmiana kolorów
tylko przy dźwiękach
4: Program muzyczny 4 = taśma świetlna
LED aktywuje się tylko przy dźwiękach.
Konserwacja i czyszczenie
ZAGROŻENIE ŻYCIA
PRZEZ PORAŻENIE PRĄDEM ELEKTRYCZ-
NYM!
Przed wszystkimi pracami odłączyć oświetlenie
przy taśmie świetlnej LED 3 od sieci elektrycznej.
W tym celu należy wyjąć adapter sieciowy 2 z
gniazdka.
Nie używać rozpuszczalników, benzyny itp.
Mogłoby to spowodować uszkodzenie lampy.
Do czyszczenia taśmy świetlnej LED 3 należy
używać suchej, niestrzępiącej się szmatki.
Utylizacja
Opakowanie wykonane jest z materiałów przyja-
znych dla środowiska, które można przekazać do
utylizacji w lokalnym punkcie przetwarzania surow-
ców wtórnych.
b
a
Przy segregowaniu odpadów prosimy
zwrócić uwagę na oznakowanie mate-

53 PL
Utylizacja / Gwarancja i serwisMontaż taśmy świetlnej LED / Konserwacja i czyszczenie / Utylizacja
riałów opakowaniowych, oznaczone
są one skrótami (a) i numerami (b) o na-
stępującym znaczeniu: 1–7: Tworzywa
sztuczne / 20–22: Papier i tektura /
80–98: Materiały kompozytowe.
Z uwagi na ochronę środowiska nie wy-
rzucać urządzenia po zakończeniu eks-
ploatacji do odpadów domowych, lecz
prawidłowo zutylizować. Informacji o
punktach zbiorczych i ich godzinach
otwarcia udziela odpowiedni urząd.
Uszkodzone lub zużyte baterie / akumulatory muszą
być poddane recyklingowi zgodnie z dyrektywą
2006/66/WE i jej zmianami. Oddać baterie /
akumulatory i / lub produkt w dostępnych punktach
zbiórki.
Niewłaściwa utylizacja baterii /
akumulatorów stwarza zagroże-
nie dla środowiska naturalnego!
Baterii / akumulatorów nie należy wyrzucać razem
z odpadami domowymi. Mogą one zawierać szkod-
liwe metale ciężkie i należy je traktować jak odpady
specjalne. Symbole chemiczne metali ciężkich są
następujące: Cd = kadm, Hg = rtęć, Pb = ołów.
Dlatego też zużyte baterie / akumulatory należy
przekazywać do komunalnych punktów gromadze-
nia odpadów niebezpiecznych.
Gwarancja i serwis
Oświadczenie gwarancyjne
W momencie zakupu otrzymują Państwo na to
urządzenie 36 miesięcy gwarancji. Urządzenie
wyprodukowano starannie i poddano dokładnej
kontroli jakości. W okresie gwarancji usuwamy
bezpłatnie wszystkie wady materiałowe lub fa-
bryczne. Jeśli mimo to w okresie gwarancji pojawią
się usterki, urządzenie należy przesłać na podany
adres serwisowy, podając następujący numer arty-
kułu: 14125106L / 14125206L.
Gwarancji nie podlegają uszkodzenia spowodowane
przez nieprawidłowe użytkowanie, nieprzestrzega-
nie instrukcji obsługi lub ingerencję nieautoryzowa-
nych osób, a także części szybko zużywające się
(jak np. elementy świetlne).
Usługa gwarancyjna nie przedłuża ani nie odnawia
okresu gwarancji.
Zgodnie z Kodeksem Cywilnym art. 581 §1 wraz
z wymianą urządzenia lub ważnej części czas
gwarancji rozpoczyna się na nowo.
Adres serwisu
Briloner Leuchten GmbH & Co. KG
Im Kissen 2
DE-59929 Brilon
NIEMCY
Tel.: +49 29 61 / 97 12‒800
Faks: +49 29 61 / 97 12‒199
E-mail: kundenservice@briloner.com
www.briloner.com
IAN 321921_1901
Przed skontaktowaniem się z działem serwisowym
należy przygotować paragon i numer artykułu
(np. IAN 123456_7890) jako dowód zakupu.
Deklaracja zgodności
Niniejszy produkt spełnia wymagania obowiązują-
cych dyrektyw europejskich i krajowych. Zgodność
została wykazana. Odpowiednie deklaracje i do-
kumenty są przechowywane przez producenta.
Producent
Briloner Leuchten GmbH & Co. KG
Im Kissen 2
DE-59929 Brilon
NIEMCY

54
Seznam obsahu

55 CZ
Seznam obsahu
Vysvětlení použitých piktogramů ...........................................................................Strana 56
Úvod .................................................................................................................................................Strana 57
Použití ke stanovenému účelu..........................................................................................................Strana 57
Obsah dodávky ............................................................................................................................... Strana 57
Popis dílů ..........................................................................................................................................Strana 57
Technické údaje ...............................................................................................................................Strana 57
Bezpečnost ..................................................................................................................................Strana 58
Bezpečnostní pokyny .......................................................................................................................Strana 58
Bezpečnostní pokyny pro baterie a akumulátory .......................................................................... Strana 59
Uvedení do provozu ...........................................................................................................Strana 60
Vložení a výměna baterií .................................................................................................................Strana 60
Zkracování a spojování LED pásku .................................................................................................Strana 60
Montáž LED pásku ................................................................................................................ Strana 60
Zapínání a vypínání světelného LED pásku ....................................................................................Strana 61
Řízení světelných efektů pomocí dálkového ovládání ................................................................... Strana 61
Údržba a čištění ......................................................................................................................Strana 62
Zlikvidování ...............................................................................................................................Strana 62
Záruka a servis ....................................................................................................................... Strana 62
Záruka ..............................................................................................................................................Strana 62
Adresa servisu .................................................................................................................................. Strana 63
Evropské prohlášení o shodě ..........................................................................................................Strana 63
Výrobce ............................................................................................................................................Strana 63

56 CZ
Vysvětlení použitých piktogramů
Vysvětlení použitých piktogramů
Přečtěte si návod kobsluze! Použité osvětlovací prostředky nelze
tlumit
(14125206L)
.
Toto svítidlo je určené výhradně pro
provoz vinteriérech, vsuchých a
uzavřených místnostech. Nebezpečí výbuchu!
Jen pro 14125106L: U tohoto
výrobku se jedná o světelnou dekoraci.
Nepoužívejte toto svítidlo k osvětlení
místnosti nebo jako noční světlo.
Jedná se o speciální výrobek, protože
se hodnoty podílů barev nachází mimo
oblasti uvedené v závorkách.
Podíl hodnoty barvy: (x < 0,270 nebo
x > 0,530); (y < -2,172 x² nebo y
> -2,3172 x² + 2,3653 x -0,1595).
Noste ochranné rukavice!
Tak postupujete správně
Před zkratem chráněný bezpečnostní
transformátor
Nezávislý provozní výrobek
Vyzařovací úhel Dosah
Volt (střídavé napětí) Polarita přípojky na síť elektrického
proudu
Hertz (kmitočet) d.c. DC Stejnosměrné napětí D.C.
Watt (činný výkon) b
a
Obal i výrobek odstraňujte do
odpadu ekologicky!
Třída ochrany II Životnost
Třída ochrany III ON OFF Spínací cykly
IP20 Druh ochrany ta Teplota okolního prostředí
Dbejte na výstrahy a řiďte se
bezpečnostními pokyny! tc Teplota tělesa v udaném bodě
Nebezpečí ohrožení života a zranění
malých i větších dětí
Výstraha!
Nebezpečí zásahu elektrickým
proudem
Ekologické škody v důsledku chybné
likvidace baterií / akumulátorů! Uchovávejte baterie mimo dosah
dětí!
Energetická efektivita externích síťových
dílů třídy V Obal je vyroben ze 100 %
recyklovatelného papíru.
Úvod

57 CZ
Vysvětlení použitých piktogramů Úvod
Světelný pás se senzorem 3 m
Úvod
Přečtěte si laskavě kompletně a pečlivě
tento návod k obsluze. Tento návod je
součástí tohoto výrobku a obsahuje dů-
ležité informace ouvedení zařízení do provozu a
kzacházení sním. Řiďte se vždy bezpečnostními
pokyny. Před uvedením do provozu zkontrolujte,
jestli je kdispozici správné napětí a jestli jsou všechny
díly správně namontované. Jestliže máte ještě otázky
nebo jste si nejistí při ovládání přístroje, kontaktujte
vašeho prodejce nebo servis. Návod pečlivě uscho-
vejte a případně jej předejte třetí osobě.
Použití ke stanovenému účelu
Svítidlo je určeno výhradně pro provoz
vinteriéru, vsuchých a uzavřených míst-
nostech. Tento přístroj je určen pouze
pro privátní použití v domácnosti, není vhodný pro
komerční účely. Jiné než popsané použití nebo změna
na výrobku není dovolena a může vést k jeho poško-
zení. Navíc je to spojeno s nebezpečím, jako je např.
zkrat, požár, zásah elektrickým proudem.
Jen pro 14125106L:
U tohoto výrobku se jedná o světelnou
dekoraci. Nepoužívejte toto svítidlo k os-
větlení místnosti nebo jako noční světlo.
Jedná se o speciální výrobek, protože se hodnoty
podílů barev nachází mimo oblasti uvedené v zá-
vorkách. Podíl hodnoty barvy: (x < 0,270 nebo
x > 0,530); (y < -2,172 x² nebo y > -2,3172 x² +
2,3653 x -0,1595).
Obsah dodávky
Bezprostředně po vybalení vždy zkontrolujte úplnost
dodávky a bezvadný stav zařízení.
1 LED pásek, model 14125106L / 14125206L
1 síťový adaptér
1 hudební senzor (14125106L)
2 spojky
4 koncové krytky
2 držáky kabelu
1 lepící pásek
2 šrouby pro senzorovou jednotku (14125106L)
1 dálkové ovládání (14125106L)
1 návod kobsluze
Popis dílů
1 Přívodní síťový kabel
2 Síťový adaptér
3 LED pásek
4 Dálkové ovládání (14125106L)
5 Hudební senzor (14125106L)
6 Zdířka
7 Zástrčka
8 Spojka
9 Koncová krytka
10 Ochranná fólie
11 Držák kabelu
12 Přijímač (14125106L)
13 Schránka na baterie (14125106L)
14 Izolační proužek (14125106L)
15 Baterie (14125106L)
16 Regulátor (14125206L)
17 Senzor (14125206L)
18 Lepicí páska
Technické údaje
Výr. č.: 14125106L
Provozní napětí: 220–240 V~ 50 / 60 Hz
Celkový výkon: LED / max. 17 W
LED pásek:
Provozní napětí: 12 V
Příkon (LED pásek): 14 W
Ochranná třída: III
Třída krytí: IP20
Síťový adaptér:
Provozní napětí: 220–240 V~ 50 / 60 Hz
Výchozí proud: 1,5 A
Ochranná třída: II
Třída krytí: IP20

58 CZ
Úvod / Bezpečnost
Baterie pro
dálkové ovládání:
Typ: CR 2025
Výr. č.: 14125206L
Provozní napětí: 220–240 V~ 50 / 60 Hz
Celkový výkon: LED / max. 6 W
LED pásek:
Provozní napětí: 12 V
Příkon (LED pásek): 4,5 W
Ochranná třída: III
Třída krytí: IP20
Síťový adaptér:
Provozní napětí: 220–240 V~ 50 / 60 Hz
Výchozí proud: 0,5 A
Ochranná třída: II
Třída krytí: IP20
Bezpečnost
Bezpečnostní pokyny
Při škodách způsobených nedodržením tohoto ná-
vodu k obsluze zaniká záruka! Za následné škody
se neručí! Za věcné nebo osobní škody, způsobené
neodborným zacházením nebo nerespektováním
bezpečnostních pokynů, se neručí!
NEBEZPEČÍ
OHROŽENÍ ŽIVOTA A ZRANĚNÍ
MALÝCH I VĚTŠÍCH DĚTÍ!
Nenechávejte děti nikdy samotné s obalovým
materiálem. Hrozí nebezpečí udušení obalovým
materiálem. Děti často podcení nebezpečí.
Výrobek chraňte před dětmi.
Tento výrobek mohou používat děti od 8 let,
osoby se sníženými fyzickými, smyslovými nebo
duševními schopnosti nebo s nedostatečnými
zkušenostmi a znalostmi, jestliže budou pod
dohledem nebo byly poučeny o bezpečném
používání výrobku a chápou nebezpečí, která
z jeho používání vyplývají. S výrobkem si děti
nesmí hrát. Děti nesmí bez dohledu provádět
čištění ani uživatelskou údržbu.
Zabraňte ohrožení života v
důsledku zásahu elektrickým
proudem
Před každým použitím zkontrolujte LED pásek,
jestli není poškozený. Nikdy LED pásek nepou-
žívejte, pokud jste zjistili nějaká poškození.
Poškozený přívodní kabel znamená ohrožení
života elektrickým proudem. Při poškozeních,
opravách nebo jiných problémech se obraťte
na servis nebo na kvalifikovaného elektrikáře.
Přívodní síťový kabel tohoto přístroje nelze vy-
měnit. Po poškození kabelu se přístroj musí od-
stranit do odpadu. Tento přístroj neobsahuje
žádné díly u nichž by spotřebitel musel prová-
dět údržbu.
Před použitím se ujistěte, že dané síťové napětí
souhlasí spotřebným provozním napětím artiklu
(viz „ Technické údaje“).
Bezpodmínečně se vyvarujte kontaktu s vodiči
a kontakty pod napětím a svodou nebo jinými
kapalinami.
Nikdy neotvírejte žádný z elektrických dílů vý-
robku, ani do nich nestrkejte žádné předměty.
Takové zásahy znamenají nebezpečí ohrožení
života elektrickým proudem.
Nepoužívejte LED pásek přikrytý předměty nebo
vožený do plochy.
Nestavte lampu na vlhké nebo vodivé podklady.
Tento LED pásek se nesmí elektricky spojovat s
jinými LED pásky.
Nepřipevňujte výrobek ostrými svorkami nebo
hřebíky.
Síťovou zástrčku před montáží, demontáží nebo
čištěním vytáhněte ze zásuvky.
Nikdy se nedotýkejte síťové zástrčky nebo LED
pásku mokrýma rukama.
Používejte výhradně dodané součástky, jinak
zanikají všechny nároky ze záruky.
LED pásek v obalu se nesmí připojovat na přívod
elektrického proudu. Před připojením artiklu na
síť elektrického proudu artikl úplně rozviňte. Před
připojením artiklu na síť elektrického proudu
artikl úplně rozviňte.
Neotevírejte ani nerozřezávejte světelný kabel.
Nespojujte tento světelný kabel svýrobky jiných
výrobců.
Bezpečnost

59 CZ
Úvod / Bezpečnost Bezpečnost
Připojení musí být provedeno pouze při použití
dodaných konektorů. Před použitím utěsněte
všechny volné konce.
Světelný kabel nepoužívejte, pokud je zakrytý
nebo zapuštěný do povrchu.
Model 14125106L
Uněkterých osob může dojít kepileptickým
záchvatům nebo poruchám vědomí působením
blesků nebo jiných světelných efektů. Při epilep-
tických symptomech ihned vyhledejte lékařskou
pomoc.
Vyvarujte se nebezpečí
požáru a poranění
Tento artikl neobsahuje žádné díly, u nichž by
spotřebitel musel provádět údržbu. LED nelze
vyměnit.
Po výpadku LED na konci jejich životnosti se
musí celý artikl vyměnit.
Integrované LED nejsou vhodné pro
provoz se stmívači a elektronickými
spínači (14125206L).
Nedívejte se za provozu zblízka do LED.
Nedívejte se na LED optickou pomůckou (např.
lupou).
Tak postupujete správně
Instalujte LED pásek tak, aby byl chráněn před
znečištěním a silném zahřátím.
Buďte vždy pozorní! Dbejte vždy na to, co dě-
láte, a postupujte vždy srozumem. V žádném
případě LED pásek nepoužívejte, pokud se cítíte
nesoustředění nebo je Vám nevolno.
Před použitím se seznamte se všemi pokyny
a zobrazeními vtomto návodu a rovněž se
samotným LED páskem.
K úplnému odpojení LED pásku od přívodu
elektrického proudu se musí síťový adaptér
vytáhnout ze zástrčky.
Bezpečnostní pokyny pro
baterie a akumulátory
DRŽTE BATERIE MIMO DOSAH
DĚTÍ! Spolknutí může způsobit che-
mická popálení, proděravění měkkých
tkání a smrt. Těžké popáleniny se mohou projevit
během 2 hodin po požití. Ihned vyhledat lékaře.
NEBEZPEČÍ OHROŽENÍ ŽIVOTA! Ucho-
vávejte baterie a akumulátory mimo dosah dětí.
V případě spolknutí okamžitě vyhledejte lékař-
skou pomoc!
NEBEZPEČÍ VÝBUCHU!
Nenabíjecí baterie nikdy znovu nenabíjejte.
Baterie nebo akumulátory nezkratujte ani je
neotevírejte. Hrozí přehřátí, nebezpečí požáru
nebo jejich prasknutí.
Nikdy neházejte baterie nebo akumulátory do
ohně ani do vody.
Nevystavujte baterie nebo akumulátory mecha-
nickému zatížení.
Nebezpečí vytečení baterií / akumulátorů
Zabraňte extrémním podmínkám a teplotám,
např. na topení anebo na slunci, které mohou
negativně ovlivnit funkci baterií nebo akumulá-
torů.
Vpřípadě vytečení baterií / akumulátorů zabraňte
kontaktu chemikálií spokožkou, očima a slizni-
cemi! Omyjte ihned postižená místa dostatečným
množstvím čisté vody a vyhledejte lékařskou
pomoc!
NOSTE OCHRANNÉ
RUKAVICE!
Vyteklé i poškozené baterie nebo akumulátory
mohou při kontaktu s pokožkou způsobit její
poleptání. Noste proto vhodné rukavice.
V případě vytečení ihned odstraňte baterie nebo
akumulátory z výrobku, abyste zabránili jeho
poškození!
Používejte jen baterie nebo akumulátory stejného
typu. Nekombinujte staré baterie nebo akumu-
látory s novými!
Odstraňte baterie nebo akumulátory při delším
nepoužívání z výrobku.

60 CZ
Bezpečnost / Uvedení do provozu / Montáž LED pásku
Nebezpečí poškození výrobku
Používejte jen udaný typ baterie nebo akumu-
látoru!
Nasazujte baterie nebo akumulátory podle
označení polarity (+) a (-) na bateriích nebo
akumulátorech a na výrobku.
Vyčistěte před vložením kontakty baterie nebo
akumulátoru a kontakty v přihrádce na baterie!
Vybité baterie nebo akumulátory ihned vyjměte
z výrobku.
Uvedení do provozu
Před prvním použitím odstraňte veškerý obalový
materiál.
LED pásek v obalu se nesmí připojit na přívod
elektrického proudu.
Upozornění: Dbejte na to, aby se vbezpro-
střední blízkosti místa montáže nacházela
zásuvka.
Vložení a výměna baterií
(14125106L)
Upozornění: Před prvním použitím vytáhněte
izolační proužek 14 z přihrádky na baterie 13 .
Jestliže se zkrátí dosah dálkového ovládání
4
,
je třeba vyměnit jeho baterii
15
.
K tomu vytáhněte
zásuvku na baterie z dálkového ovládání 4.
Vyjměte baterie 15 a vložte dovnitř nové.
Upozornění: Správná polarita je vyznačená
na zadní straně dálkového ovládání 4.
Zasuňte schránku na baterie 13 zase do
dálkového ovládání 4.
Zkracování a spojování
LED pásku
Máte možnost LED pásek individuálně zkrátit a spojit.
NEBEZPEČÍ OHROŽENÍ ŽI-
VOTA ÚRAZEM ELEKTRICKÝM PROUDEM!
Před veškerými pracemi na LED pásku 3 odpojte
přívod elektrického proudu. Za tímto účelem vytáh-
něte síťový adaptér 2 ze zásuvky.
Zvolte si požadovanou délku LED pásku.
Upozornění: Dbejte na to, abyste LED pásek
zkrátili na správném místě. Rozhraní leží přesně
uprostřed pólů a je označeno černou linií
(14125106L: + 12V, modrá, červená, zelená -
- ; 14125206L: +, -) (viz obr. C).
Zkraťte světelný LED pásek 3 nůžkami.
Nakonec přitlačte oba konce LED pásku 3 na
kontakty spojky 8 (viz obr. C).
Při připojování pásku LED 3 pamatujte na
správnou polaritu spojení (14125106L: +12 V,
modrá, červená, zelená <> +12 V, modrá,
červená, zelená; 14125206L: +, - <> +, -)
(viz obr. C).
Montáž LED pásku
+
12V
BLUE
RED
GREEN
+
12V
BLUE
RED
GREEN
+
12V
BLUE
RED
GREEN
+
12V
BLUE
RED
GREEN
1. 2. 3. 4.
18
Nakonec zatlačte na oba konce spojky 8 vždy
jednu krytku 9 (viz obr. C).
Zkontrolujte správné usazení.
Jestliže nechcete po zkrácení pásku připojit
další díl, nezapomeňte před použitím artiklu
přelepit volný konec LED pásku 3 lepícím
páskem 18 (viz dole obr. 1–4).
Montáž LED pásku
Upozornění: Dbejte na to, aby montážní plocha
byla čistá, bez mastnoty a suchá. V opačném případě
může být narušena přilnavost lepicí pásky.
Upozornění: Dbejte na to, aby se vbezprostřední
blízkosti montážní plochy nacházela zásuvka.

61 CZ
Bezpečnost / Uvedení do provozu / Montáž LED pásku Montáž LED pásku
Upozornění: Dopad světla ovlivňuje senzorovou
jednotku 17 (14125206L).
14125106L (viz obr. A):
Spojte síťový připojovací kabel 1 s hudebním
senzorem 5 zastrčením zástrčky 7 do zdířky
6 hudebního senzoru 5, pokud ještě není
toto spojení provedené. Propojte nyní snímač
hudby 5 spáskou LED 3.
Při připojování pásku LED 3 pamatujte na
správnou polaritu spojení (viz dole, <> +
12 V, modrá, červená, zelená).
14125206L (viz obr. A):
Spojte síťový připojovací kabel 1 pomocí
zástrčky 7 se zdířkou 6 senzoru 17 a LED
páskem 3.
Zvolte si vhodnou montážní plochu.
Upozornění (14125206L): Cizí světelné
zdroje, např. pouliční osvětlení, ovlivňují soum-
rakový senzor.
Stáhněte ochrannou fólii ze zadní strany LED
pásku 3 (viz obr. B).
Nalepte světelný LED pásek 3 pomocí lepicí
pásky na montážní plochu a přitlačte ho (viz
obr. B).
Stáhněte ochranou fólii 10 (viz obr. D) ze zadní
strany držáku kabelu 11 .
Nalepte kabelový držák 11 na vyhlédnuté
místo (viz obr. D).
Stáhněte ochrannou fólii ze zadní strany
hudebního senzoru 5 / senzoru 17 .
Přilepte senzor 17 (14125206L) / hudebním sen-
zorem 5 (14125106L) na požadované místo.
Přišroubujte hudebním senzorem 5 šrouby
(14125106L).
Upněte síťový přívodní kabel 1 do držáku
kabelu 11 (viz obr. D).
Zastrčte síťový adaptér 2 do zásuvky.
Vaše svítidlo je nyní připraveno kprovozu.
Zapínání a vypínání
světelného LED pásku
14125106L:
Pro zapnutí LED pásku 3 stiskněte tlačítko
ON na dálkovém ovládání 4. Pro vypnutí LED
pásku 3 stiskněte tlačítko OFF na dálkovém
ovládání 4.
Upozornění: Tlačítko OFF na dálkovém
ovládání 4 je vhodné jen ke krátkodobému
vypnutí LED pásku 3. Pro dlouhodobé vypnutí
LED pásku 3 vytáhněte síťový adaptér 2 ze
zásuvky.
14125206L (viz obr. E):
Páska LED je vybavena snímačem denního
světla / pohybovým snímačem 17 . Dosah
pohybového snímače je maximálně 5 m.
Za tmy se páska LED automaticky rozsvěcuje
pohybem ve snímaném prostoru. Světlo se roz-
svěcuje na cca 30vteřin až 10minut. Doba
svícení je plynule nastavitelná pomocí regulá-
toru 16 .
Řízení světelných efektů
pomocí dálkového ovládání
(14125106L)
Upozornění: Vysílač dálkového ovládání 4
je na opačné straně než přihrádka na baterie 13 .
Zajistěte, aby se mezi dálkovým ovládáním 4 a
přijímačem 12 nenacházely žádné překážky.
Dosah dálkového ovládání 4 činí cca 5 m.
K dispozici máte následující funkce:
: Zvýšit intenzitu světla / zvýšit rychlost změny
barev / zvýšit citlivost hudebního senzoru
: Snížit intenzitu světla / snížit rychlost změny
barev / snížit citlivost hudebního senzoru
ON : zapnutí LED pásku
OFF : vypnutí LED pásku

62 CZ
Montáž LED pásku / Údržba a čištění / Zlikvidování / Záruka a servis
RED : nastavení červeného světla
GREEN
: nastavení zeleného světla
BLUE : nastavení modrého světla
WHITE : nastavení bílého světla
ORANGE
: nastavení oranžového světla
YELLOW
: nastavení žlutého světla
CYAN : nastavení tyrkysového světla
PURPLE
: nastavení fialového světla
JUMP3 : měnění barev (3 barvy)
JUMP7 : měnění barev (7 barev)
FADE3 : plynulá změna barev (3 barvy)
FADE7 : plynulá změna barev (7 barev)
1: hudební program 1 = pomalá a plynulá
změna barev sreflexí světla podle zvuků
2: hudební program 2 = pomalá a plynulá
změna barev sreflexí světla podle zvuků
3: hudební program 3 = změna barev pouze
podle zvuků
4: hudební program 4 = páska LED je aktivní
pouze podle zvuků.
Údržba a čištění
NEBEZPEČÍ OHROŽENÍ ŽI-
VOTA ÚRAZEM ELEKTRICKÝM PROUDEM!
Před veškerými pracemi na LED pásku 3 odpojte
přívod elektrického proudu.
Za tímto účelem vytáhněte síťový adaptér 2 ze
zásuvky.
Nepoužívejte na čištění rozpouštědla, benzín
nebo podobné látky, lampu můžete poškodit.
Na čištění LED pásku 3 používejte suchý hadr,
který nepouští vlákna.
Zlikvidování
Obal se skládá zekologických materiálů, které
můžete zlikvidovat prostřednictvím místních sběren
recyklovatelných materiálů.
b
a
Při třídění odpadu se řiďte podle ozna-
čení obalových materiálů zkratkami (a)
a čísly (b), s následujícím významem:
1–7: umělé hmoty / 20–22: papír a
lepenka / 80–98: složené látky.
Vzájmu ochrany životního prostředí vy-
sloužilý výrobek nevyhazujte do domov-
ního odpadu, ale předejte k odborné
likvidaci. O sběrnách a jejich otevíracích
hodinách se můžete informovat u příslušné
správy města nebo obce.
Vadné nebo vybité baterie resp. akumulátory se musí,
podle směrnice 2006/66/ES a jejích příslušných
změn, recyklovat. Baterie, akumulátory i výrobek
odevzdejte zpět do nabízených sběren.
Ekologické škody v důsledku
chybné likvidace baterií /
akumulátorů!
Baterie / akumulátory se nesmí zlikvidovat v domá-
cím odpadu. Mohou obsahovat jedovaté těžké kovy
a musí se zpracovávat jako zvláštní odpad. Chemické
symboly těžkých kovů: Cd = kadmium, Hg = rtuť,
Pb = olovo. Proto odevzdejte opotřebované baterie /
akumulátory u komunální sběrny.
Záruka a servis
Záruka
Od okamžiku zakoupení dostáváte na výrobek zá-
ruku po dobu 36 měsíců. Zařízení bylo svědomitě
vyrobeno a podrobeno přesné kontrole jakosti. Bě-
hem záruční doby odstraníme bezplatně všechny
Záruka a servis

63 CZ
Montáž LED pásku / Údržba a čištění / Zlikvidování / Záruka a servis Záruka a servis
vady materiálu a výrobní vady. Vpřípadě, že se
během záruční doby vyskytnou nedostatky, zašlete
laskavě artikl na uvedenou adresu servisu a uveďte
následující číslo zboží: 14125106L / 14125206L.
Ze záruky vyloučeny škody způsobené neodborným
zacházením, nerespektováním návodu kobsluze
nebo zásahem neautorizovanou osobou, jakož i
poškození rychleopotřebitelných dílů (např. svíticí
prostředky).
Záručním výkonem se záruční doba neprodlouží
ani neobnoví.
Adresa servisu
Briloner Leuchten GmbH & Co. KG
Im Kissen 2
DE-59929 Brilon
NĚMECKO
Tel.: +49 29 61 / 97 12–800
Fax: +49 29 61 / 97 12–199
E-Mail: [email protected]
www.briloner.com
IAN 321921_1901
Pro všechny požadavky si připravte pokladní blok a číslo
výrobku (např. IAN 123456_7890) jako doklad o
nákupu.
Evropské prohlášení o shodě
Tento výrobek splňuje požadavky platných evropských
a národních směrnic. Shoda byla dokázána. Příslušné
vysvětlivky a podklady jsou deponovány u výrobce.
Výrobce
Briloner Leuchten GmbH & Co. KG
Im Kissen 2
DE-59929 Brilon
NĚMECKO

64
Obsah

65 SK
Obsah
Legenda použitých piktogramov ............................................................................ Strana 66
Úvod .................................................................................................................................................Strana 67
Používanie v súlade s určeným účelom ..........................................................................................Strana 67
Obsah dodávky ............................................................................................................................... Strana 67
Popis častí .........................................................................................................................................Strana 67
Technické údaje ...............................................................................................................................Strana 67
Bezpečnosť ................................................................................................................................. Strana 68
Bezpečnostné upozornenia .............................................................................................................Strana 68
Bezpečnostné upozornenia týkajúce sa batérií / akumulátorových batérií .................................. Strana 69
Uvedenie do prevádzky ................................................................................................. Strana 70
Vkladanie / výmena batérií ..............................................................................................................Strana 70
Skrátenie / spojenie LED pásu ......................................................................................................... Strana 70
Montáž LED pásu ...................................................................................................................Strana 71
Za- / vypnutie LED pásu ................................................................................................................... Strana 71
Ovládanie svetelných efektov pomocou diaľkového ovládania ..................................................Strana 71
Údržba a čistenie ...................................................................................................................Strana 72
Likvidácia .....................................................................................................................................Strana 72
Záruka a servis ....................................................................................................................... Strana 73
Garančné prehlásenie .....................................................................................................................Strana 73
Servisná adresa ................................................................................................................................Strana 73
Konformitné vyhlásenie ....................................................................................................................Strana 73
Výrobca ............................................................................................................................................ Strana 73

66 SK
Legenda použitých piktogramov
Legenda použitých piktogramov
Prečítajte si návod na obsluhu! Použité osvetľovacie prostriedky nie
je možné stmievať (14125206L).
Toto svietidlo je určené výhradne na
prevádzku v interiéri, v suchých a
uzatvorených priestoroch. Nebezpečenstvo explózie!
Iba 14125106L: V prípade tohto
výrobku ide o svetelnú dekoráciu. Toto
svietidlo nepoužívajte na osvetlenie
miestností alebo ako nočné svetlo.
Ide
o špeciálny výrobok, pretože podiely
farebnej hodnoty sa nachádzajú mimo
oblastí uvedených v zátvorkách.
Podiel farebnej hodnoty: (x<0,270
alebo x > 0,530); (y<-2,172 x² alebo y
>-2,3172 x² + 2,3653 x -0,1595).
Noste ochranné rukavice!
Takto postupujete správne
Skratuvzdorný bezpečnostný
transformátor
Nezávislý prevádzkový prístroj
Uhol vyžarovania Dosah
Volt (striedavé napätie) Polarita sieťového pripojenia
Hertz (frekvencia) d.c. DC Jednosmerné napätie D.C.
Watt (efektívny výkon) b
a
Obal a zariadenie ekologicky
zlikvidujte!
Trieda ochrany II Životnosť
Trieda ochrany III ON OFF Spínacie cykly
IP20 Druh ochrany ta Teplota okolia
Rešpektujte výstražné a bezpečnostné
upozornenia! tc Teplota schránky na uvedenom bode
Nebezpečenstvo ohrozenia života a
nebezpečenstvo nehody pre malé i
staršie deti
Výstraha!
Nebezpečenstvo zásahu
elektrickým prúdom
Nesprávna likvidácia batérií / akumuláto-
rových batérií ničí životné prostredie! Batérie skladujte mimo dosahu detí!
Energetická efektivita externých
sieťových dielov trieda V Obal je vyrobený zo 100 %
recyklovaného papiera.
Úvod

67 SK
Legenda použitých piktogramov Úvod
Svetelný pás so senzorom 3 m
Úvod
Dôkladne si prečítajte celý tento návod
na obsluhu. Tento návod patrí k tomuto
výrobku a obsahuje dôležité upozornenia
pre uvedenie do prevádzky a manipuláciu. Dodr-
žiavajte vždy všetky bezpečnostné upozornenia.
Pred uvedením do prevádzky prekontrolujte, či je k
dispozícii správne napätie a či sú všetky diely správne
namontované. V prípade otázok alebo neistoty ohľa-
dom manipulácie s prístrojom sa prosím spojte s Va-
ším predajcom alebo servisným pracoviskom. Tento
návod si starostlivo uschovajte a prípadne ho odo-
vzdajte tretej osobe.
Používanie v súlade
s určeným účelom
Toto svietidlo je určené výhradne na pre-
vádzku v interiéri, v suchých a uzatvore-
ných priestoroch. Tento prístroj je určený
iba pre nasadenie v súkromných domácnostiach a
nie pre komerčné využitie. Iné používanie ako vyššie
popísané je neprípustné a vedie k poškodeniu tohto
produktu. Okrem toho je to spojené s nebezpečen-
stvami ako napr. skrat, požiar, zásah elektrickým
prúdom atď.
Iba pre 14125106L:
V prípade tohto výrobku ide o svetelnú
dekoráciu. Toto svietidlo nepoužívajte
na osvetlenie miestností alebo ako nočné
svetlo. Ide o špeciálny výrobok, pretože podiely
farebnej hodnoty sa nachádzajú mimo oblastí
uvedených v zátvorkách.
Podiel farebnej hodnoty: (x<0,270 alebo x > 0,530);
(y<-2,172 x² alebo y >-2,3172 x² + 2,3653 x
-0,1595).
Obsah dodávky
Bezprostredne po vybalení vždy skontrolujte úplnosť
dodávky ako aj bezchybný stav zariadenia.
1 LED pás, model 14125106L / 14125206L
1 sieťový adaptér
1 hudobný senzor (14125106L)
2 spojky
4 uzatváracie uzávery
2 držiaky káblov
1 lepiaci pásik
2 skrutky pre jednotku senzora (14125106L)
1 diaľkové ovládanie (14125106L)
1 návod na používanie
Popis častí
1 Sieťové pripojovacie vedenie
2 Sieťový adaptér
3 LED pás
4 Diaľkové ovládanie (14125106L)
5 Hudobný senzor (14125106L)
6 Zásuvka
7 Zástrčka
8 Konektor
9 Uzatvárací uzáver
10 Ochranná fólia
11 Držiak káblov
12 Prijímač (14125106L)
13 Priečinok pre batérie (14125106L)
14 Izolačný pásik (14125106L)
15 Batéria (14125106L)
16 Regulátor (14125206L)
17 Senzor (14125206L)
18 Lepiaci pásik
Technické údaje
Č. výr.: 14125106L
Prevádzkové napätie: 220–240 V~ 50 / 60 Hz
Celkový výkon: LED/max. 17 W
LED pás:
Prevádzkové napätie: 12 V
Výkon (LED pás): 14 W
Trieda ochrany: III
Stupeň ochrany: IP20

68 SK
Úvod / Bezpečnosť
Sieťový diel:
Prevádzkové napätie: 220–240 V~ 50 / 60 Hz
Výstupný prúd: 1,5 A
Trieda ochrany: II
Stupeň ochrany: IP20
Batéria pre diaľkové
ovládanie:
Typ: CR 2025
Č. výr.: 14125206L
Prevádzkové napätie: 220–240 V~ 50 / 60 Hz
Celkový výkon: LED / max. 6 W
LED pás:
Prevádzkové napätie: 12 V
Výkon (LED pás): 4,5 W
Trieda ochrany: III
Stupeň ochrany: IP20
Sieťový diel:
Prevádzkové napätie: 220–240 V~ 50 / 60 Hz
Výstupný prúd: 0,5 A
Trieda ochrany: II
Stupeň ochrany: IP20
Bezpečnosť
Bezpečnostné
upozornenia
V prípade škôd, ktoré vzniknú nedodržiavaním tohto
návodu na obsluhu, zaniká garančný nárok! Pri ná-
sledných škodách nepreberá výrobca ručenie! V
prípade vecných škôd alebo poranenia osôb, ktoré
boli zapríčinené neodbornou manipuláciou alebo
nedodržiavaním bezpečnostných pokynov, nepreberá
výrobca ručenie!
NEBEZPE-
ČENSTVO OHROZENIA ŽIVOTA
A NEBEZPEČENSTVO ÚRAZU
PRE MALÉ I STARŠIE DETI!
Nikdy nenechávajte deti bez dozoru s obalovým
materiálom. Existuje nebezpečenstvo zadusenia
obalovým materiálom. Deti často podceňujú
nebezpečenstvo. Držte deti vždy v bezpečnej
vzdialenosti od výrobku.
Tento prístroj môžu používať deti od 8 rokov, ako
aj osoby so zníženými psychickými, senzoric-
kými alebo duševnými schopnosťami alebo s
nedostatkom skúseností a vedomostí, ak sú
pod dozorom, alebo ak boli poučené ohľadom
bezpečného používania prístroja, a ak porozu-
meli nebezpečenstvám spojeným s jeho použí-
vaním. Deti sa s prístrojom nesmú hrať. Čistenie
a údržbu nesmú vykonávať deti bez dozoru.
Zabráňte ohrozeniu života
zásahom elektrickým prúdom
Pred každým použitím skontrolujte prípadné
poškodenia LED pásu. Ak zistíte akékoľvek po-
škodenia, Váš LED pás za žiadnych okolností
nepoužívajte.
Poškodené sieťové pripojovacie vedenie znamená
ohrozenie života v dôsledku zásahu elektrickým
prúdom. V prípade poškodení, opráv alebo
iných problémov sa obráťte na servisné stredisko
alebo kvalifikovaného elektroodborníka. Sieťové
pripojovacie vedenie tohto prístroja nemôže
byť vymenené. V prípade poškodenia vedenia
je prístroj potrebné zlikvidovať. Prístroj neobsa-
huje diely, ktoré môže udržiavať spotrebiteľ.
Pred použitím sa ubezpečte, že sa sieťové napä-
tie v zásuvke zhoduje s potrebným prevádzkovým
napätím výrobku (pozri „Technické údaje“).
Bezpodmienečne zabráňte styku vedení a kon-
taktov vedúcich napätie s vodou alebo inými
kvapalinami.
Nikdy neotvárajte žiadny z elektrických pre-
vádzkových prostriedkov ani do nich nestrkajte
žiadne predmety. Takéto zásahy predstavujú
ohrozenie života v dôsledku zásahu elektrickým
prúdom.
Nepoužívajte LED pás, keď je prikrytý predmetmi
alebo vložený do určitého povrchu.
Svietidlo nemontujte na vlhkých alebo vodivých
podkladoch.
Tento LED pás nesmie byť elektricky spájaný s
iným LED pásom.
Neupevňujte pomocou ostrých svoriek alebo
klincov.
Bezpečnosť

69 SK
Úvod / Bezpečnosť Bezpečnosť
Pred montážou, demontážou alebo čistením
vždy vytiahnite zástrčku zo zásuvky.
Sieťovej zástrčky ani LED pásu sa nikdy nedo-
týkajte mokrými rukami.
Používajte výlučne priložené náhradné diely,
inak zanikajú všetky garančné nároky.
Neotvárajte ani neprerezávajte svetelnú hadicu.
Nepripájajte túto svetelnú hadicu na produkt
iného výrobcu.
Prepojenie smie byť vykonané iba s použitím
dodaných konektorov. Všetky otvorené konce
musia byť pred použitím utesnené.
Nepoužívajte svetelnú hadicu, ak je zakrytá
alebo zavedená do povrchu.
LED pás nemožno zapájať do elektrickej siete,
pokiaľ je v obale. Výrobok úplne rozviňte pred-
tým, ako ho zapojíte do prúdovej siete.
Model 14125106L
U niektorých osôb môže pri vystavení určitým
zábleskovým svetlám alebo svetelným efektom
dôjsť k epileptickému záchvatu alebo utrpeniu
poruchy vedomia. Pri epileptických príznakoch
ihneď vyhľadajte lekára.
Zabráňte nebezpečenstvu
požiaru a poranení
Tento výrobok neobsahuje diely, ktoré môže
udržiavať spotrebiteľ. LED-diódy nie je možné
vymeniť.
Ak LED na konci ich životnosti vypadnú, je
potrebné vymeniť celý výrobok.
Zabudované LED nie sú vhodné pre
tlmiče svetla a elektronické spínače
(14125206L).
Počas prevádzky nepozerajte z krátkej vzdiale-
nosti do LED.
Nepozerajte do LED pomocou optického nástroja
(napr. lupy).
Takto postupujete správne
LED pás namontujte tak, aby bol chránený pred
znečistením a príliš silným zahriatím.
Buďte neustále opatrný! Dávajte vždy pozor na
to, čo robíte, a vždy postupujte rozvážne. LED
pás v žiadnom prípade nepoužívajte, ak ste
práve nekoncentrovaný alebo sa necítite dobre.
Pred používaním sa oboznámte so všetkými
pokynmi a obrázkami v tomto návode, ako aj
so samotným LED pásom.
Ak chcete LED pás úplne odpojiť od zdroja
prúdu, musíte vytiahnuť sieťový adaptér z
elektrickej zásuvky.
Bezpečnostné upozornenia
týkajúce sa batérií /
akumulátorových batérií
BATÉRIE SKLADUJTE MIMO
DOSAHU DETÍ! Prehltnutie môže
spôsobiť chemické popáleniny, per-
forácie mäkkých častí tkaniva a smrť. Ťažké
popáleniny môžu nastať 2 hodiny po prehltnutí.
Ihneď vyhľadajte lekára.
NEBEZPEČENSTVO OHROZENIA ŽIV
OTA!
Batérie / akumulátorové batérie držte mimo
dosahu detí. V prípade prehltnutia okamžite
vyhľadajte lekára!
NEBEZPEČENSTVO EXPLÓZIE!
Nenabíjateľné batérie nikdy znova nenabíjajte.
Batérie / akumulátorové batérie neskratujte a /
alebo neotvárajte. Následkom môže byť pre-
hriatie, požiar alebo explózia.
Batérie / akumulátorové batérie nikdy nehádžte
do ohňa alebo vody.
Nevystavujte batérie / akumulátorové batérie
mechanickej záťaži.
Riziko vytečenia batérií / akumulátorových
batérií
Batérie / akumulátorové batérie nikdy nevysta-
vujte extrémnym podmienkam a teplotám, ktoré
by na ne mohli pôsobiť, napr. na vykurovacích
telesách / priamom slnečnom žiarení.
Ak batérie / akumulátorové batérie vytiekli,
zabráňte kontaktu pokožky, očí a slizníc s che-
mikáliami! Ihneď vypláchnite postihnuté miesta
väčším množstvom čistej vody a okamžite vy-
hľadajte lekára!

70 SK
Bezpečnosť / Uvedenie do prevádzky
NOSTE OCHRANNÉ RUKAVICE!
Vytečené alebo poškodené batérie / akumulá-
torové batérie môžu pri kontakte s pokožkou
spôsobiť poleptanie. V takom prípade preto
noste vhodné ochranné rukavice.
V prípade vytečenia batérií / akumulátorových
batérií ich ihneď vyberte z výrobku, aby ste
predišli vzniku škôd.
Používajte iba batérie / akumulátorové batérie
rovnakého typu. Nekombinujte staré batérie /
akumulátorové batérie s novými!
Ak produkt dlhší čas nepoužívate, vyberte z
neho batérie / akumulátorové batérie.
Riziko poškodenia produktu
Používajte výhradne uvedený typ batérií /
akumulátorových batérií!
Vložte batérie / akumulátorové batérie podľa
označenia polarity (+) a (-) na batérii / akumu-
látorovej batérii a výrobku.
Pred vložením vyčistite kontakty na batérii /
akumulátorovej batérii a v priečinku pre batérie!
Vybité batérie / akumulátorové batérie ihneď
vyberte z produktu.
Uvedenie do prevádzky
Pred prvým použitím odstráňte všetok obalový
materiál.
LED pás nemožno zapájať do elektrickej siete,
pokiaľ je v obale a je zvinutý.
Poznámka: Dbajte na to, aby sa v bezprostred-
nej blízkosti montážnej plochy nachádzala
zástrčka.
Vkladanie / výmena
batérií (14125106L)
Upozornenie: Pred prvým použitím odstráňte
izolačný pásik 14 z priečinka pre batérie 13 .
Keď dosah diaľkového ovládania 4 slabne,
je potrebné vymeniť batériu 15 . Vyberte preto
priečinok s batériou z diaľkového ovládania 4.
Vyberte batériu 15 a vložte novú batériu.
Poznámka: Správna polarita je zobrazená
na zadnej strane diaľkového ovládania 4.
Priečinok pre batérie 13 opäť zasuňte do
diaľkového ovládania 4.
Skrátenie / spojenie LED pásu
LED pás môžete individuálne skrátiť alebo spájať.
NEBEZPEČENSTVO
OHROZENIA ŽIVOTA V DÔSLEDKU ZÁSAHU
ELEKTRICKÝM PRÚDOM!
Pred každou prácou na LED páse 3 odpojte svie-
tidlo od elektrickej siete. Vytiahnite preto sieťový
adaptér 2 zo zásuvky.
Zvoľte želanú dĺžku LED pásu.
Poznámka: Dávajte pozor, aby ste LED pás
skrátili na správnom mieste. Miesto rezu sa na-
chádza presne v strede plusového a mínusového
pólu a je vyznačené čiernou líniou (14125106L
: +
12 V, Blue, Red, Green - ; 14125206L: +, -).
(pozri obr. C).
Skráťte LED pás 3 pomocou nožníc.
Následne zatlačte oba konce LED pásu 3 na
rezné kontakty konektora 8 (pozri obr. C).
Pri pripojovaní LED pásu 3 dbajte na správnu
polaritu spojenia (14125106L: +12V, Blue,
Red, Green <> +12 V, Blue, Red, Green;
14125206L: +, - <> +, -) (pozri obr. C).
Následne zatlačte vždy jeden uzatvárací uzá-
ver 9 na konce konektora 8 (pozri obr. C).
Uvedenie do prevádzky / Montáž LED pásu
+
12V
BLUE
RED
GREEN
+
12V
BLUE
RED
GREEN
+
12V
BLUE
RED
GREEN
+
12V
BLUE
RED
GREEN
1. 2. 3. 4.
18

71 SK
Bezpečnosť / Uvedenie do prevádzky Uvedenie do prevádzky / Montáž LED pásu
Skontrolujte správnosť osadenia.
Dbajte na to, aby ste pred použitím prelepili
otvorený koniec LED pásu 3 lepiacim pásikom
18 , ak po skrátení pásu nechcete vytvoriť
žiadne spojenie (pozri dole obr. 1–4).
Montáž LED pásu
Poznámka: Dbajte na to, aby bola montážna
plocha čistá, bez mastnôt a suchá. Inak môže byť
ovplyvnená priliehavosť lepiaceho pásika.
Poznámka: Dbajte na to, aby sa v bezprostred-
nej blízkosti montážnej plochy nachádzala zástrčka.
Poznámka: Dopad svetla má vplyv na jednotku
senzora 17 (14125206L).
Model 14125106L (pozri obr. A):
Spojte sieťové pripojovacie vedenie 1 s hudob-
ným senzorom 5 tak, že zástrčku 7 zastrčíte
priamo do zásuvky 6 hudobného senzora 5,
ak ešte nie je predmontovaná. Teraz spojte
hudobný senzor 5 s LED pásom 3.
Pri pripojovaní LED pásu 3 dbajte na správnu
polaritu spojenia (pozri dole, <> + 12 V,
Blue, Red, Green).
14125206L (pozri obr. A):
Spojte sieťové pripojovacie vedenie 1 pomo-
cou zástrčky 7 priamo so zásuvkou 6 senzora
17 a LED pásom 3.
Zvoľte vhodnú montážnu plochu.
Poznámka (14125206L): Vonkajšie zdroje
svetla, napr. pouličné osvetlenie ovplyvňujú
súmrakový senzor.
Odstráňte ochrannú fóliu zo zadnej strany
LED pásu 3 (pozri obr. B).
Nalepte LED pás 3 lepiacim pásikom na mon-
tážnu plochu a pevne ho pritlačte (pozri obr. B).
Odstráňte ochrannú fóliu 10 (pozri obr. D) zo
zadnej strany držiaka káblov 11 .
Nalepte držiak káblov 11 na želané miesto
(pozri obr. D).
Odstráňte ochrannú fóliu zo zadnej strany
hudobného senzora 5 / senzora 17 .
Nalepte senzor 17 (14125206L) / hudobný
senzor 5 (14125106L) na želané miesto.
Prišróbujte hudobný senzor 5 pomocou
skrutiek (14125106L).
Upnite sieťové pripojovacie vedenie 1 do
držiaka káblov 11 (pozri obr. D).
Zapojte sieťový adaptér 2 do sieťovej zásuvky.
Vaše svietidlo je teraz pripravené na prevádzku.
Za- / vypnutie LED pásu
14125106L:
Stlačte tlačidlo ON diaľkového ovládania 4
pre zapnutie LED pásu 3. Stlačte tlačidlo OFF
diaľkového ovládania 4 pre vypnutie LED
pásu 3.
Poznámka: Tlačidlo OFF diaľkového ovláda-
nia 4 je vhodné len pre krátkodobé vypínanie
LED pásu 3. Vytiahnite sieťový adaptér 2 zo
zásuvky, aby ste LED pás 3 trvale vypli.
14125206L (pozri obr. E):
LED pás disponuje senzorom denného svetla /
senzorom pohybu 17 . Dosah senzora pohybu
je maximálne 5 m.
Počas stmievania sa LED pás automaticky zapne
pohybom v oblasti snímania. Svetlo sa zapne
na cca. 30sekúnd až 10 minút. Dobu svietenia
môžete plynule nastaviť pomocou regulátora 16 .
Ovládanie svetelných efektov
pomocou diaľkového
ovládania (14125106L)
Poznámka: Senzor diaľkového ovládania 4
sa nachádza na protiľahlej strane priečinka pre
batérie 13 .
Zabezpečte, aby sa medzi diaľkovým ovládaním 4
a prijímačom 12 nenachádzali žiadne prekážky.
Diaľkové ovládanie 4 má dosah cca. 5 metrov.

72 SK
Montáž LED pásu / Údržba a čistenie / Likvidácia
K dispozícii máte nasledujúce funkcie:
: Zvýšiť intenzitu svetla / zvýšiť rýchlosť strieda-
nia farieb / zvýšiť citlivosť hudobného senzora
: Znížiť intenzitu svetla / znížiť rýchlosť strieda-
nia farieb / znížiť citlivosť hudobného senzora
ON : Zapnutie LED pásu
OFF : Vypnutie LED pásu
RED : nastavenie červeného svetla
GREEN
: nastavenie zeleného svetla
BLUE : nastavenie modrého svetla
WHITE : nastavenie bieleho svetla
ORANGE
: nastavenie oranžového svetla
YELLOW
: nastavenie žltého svetla
CYAN : nastavenie tyrkysového svetla
PURPLE
: nastavenie fialového svetla
JUMP3 : striedanie farieb (3 farby)
JUMP7 : striedanie farieb (7 farieb)
FADE3 : plynulé striedanie farieb (3 farby)
FADE7 : plynulé striedanie farieb (7 farieb)
1: Hudobný program 1 = pomalé plynulé strieda-
nie farieb so svetelným reflexom pri zvukoch
2: Hudobný program 2 = plynulé striedanie
farieb so svetelným reflexom pri zvukoch
3: Hudobný program 3 = striedanie farieb iba
pri zvukoch
4: Hudobný program 4 = LED pás je aktívny
iba pri zvukoch.
Údržba a čistenie
NEBEZPEČENSTVO
OHROZENIA ŽIVOTA V DÔSLEDKU ZÁSAHU
ELEKTRICKÝM PRÚDOM!
Pred každou prácou na LED páse 3 odpojte svie-
tidlo od elektrickej siete. Vytiahnite preto sieťový
adaptér 2 zo zásuvky.
Nepoužívajte žiadne rozpúšťadlá, benzín a. i.
Svietidlo by sa pritom poškodilo.
Na čistenie LED pásu 3 používajte suchú
handričku, ktorá nepúšťa vlákna.
Likvidácia
Obal pozostáva z ekologických materiálov, ktoré
môžete odovzdať na miestnych recyklačných zber-
ných miestach.
b
a
Všímajte si prosím označenie obalových
materiálov pre triedenie odpadu, sú
označené skratkami (a) a číslami (b) s
nasledujúcim významom: 1–7: Plasty /
20–22: Papier a kartón / 80–98: Spo-
jené látky.
Ak výrobok doslúžil, v záujme ochrany
životného prostredia ho neodhoďte do
domového odpadu, ale odovzdajte na
odbornú likvidáciu. Informácie o zber-
ných miestach a ich otváracích hodinách
získate na Vašej príslušnej správe.
Defektné alebo použité batérie / akumulátorové
batérie musia byť odovzdané na recykláciu podľa
smernice 2006/66/ES a jej zmien. Batérie / aku-
mulátorové batérie a / alebo výrobok odovzdajte
prostredníctvom dostupných zberných stredísk.
Nesprávna likvidácia batérií /
akumulátorových batérií ničí
životné prostredie!
Batérie / akumulátorové batérie sa nesmú likvidovať
spolu s domovým odpadom. Môžu obsahovať jedo-
vaté ťažké kovy a je potrebné zaobchádzať s nimi
Likvidácia / Záruka a servis

73 SK
Montáž LED pásu / Údržba a čistenie / Likvidácia Likvidácia / Záruka a servis
ako s nebezpečným odpadom. Chemické značky
ťažkých kovov sú nasledovné: Cd = kadmium, Hg =
ortuť, Pb = olovo. Opotrebované batérie / akumulá-
torové batérie preto odovzdajte v komunálnej zberni.
Záruka a servis
Garančné prehlásenie
Na tento prístroj poskytujeme záruku 36 mesiacov
od dátumu kúpy. Prístroj bol starostlivo vyrobený a
podrobený dôkladnej kontrole kvality. Vrámci zá-
ručnej doby bezplatne odstránime všetky chyby
materiálu a výrobné chyby. Ak by sa však počas
záručnej doby vyskytli nedostatky, odošlite prístroj
na uvedenú adresu servisu s uvedením nasledovného
čísla výrobku: 14125106L / 14125206L.
Zo záruky sú vylúčené škody spôsobené neodbor-
nou manipuláciou, nedodržaním návodu na obsluhu
alebo zásahom neautorizovanej osoby, ako aj diely
podliehajúce opotrebovaniu (napr. osvetľovacie
prostriedky).
Poskytnutím záruky sa záručná doba nepredlžuje
ani neobnovuje.
Servisná adresa
Briloner Leuchten GmbH & Co. KG
Im Kissen 2
DE-59929 Brilon
NEMECKO
Tel.: +49 29 61 / 97 12‒800
Fax: +49 29 61 / 97 12‒199
E-mail: kundenservice@briloner.com
www.briloner.com
IAN 321921_1901
Pre všetky otázky majte pripravený pokladničný
doklad a číslo výrobku (napr. IAN 123456_7890)
ako dôkaz o kúpe.
Konformitné vyhlásenie
Tento výrobok spĺňa požiadavky platných európskych
a národných smerníc. Konformita bola preukázaná.
Príslušné prehlásenia a podklady sú uložené u vý-
robcu.
Výrobca
Briloner Leuchten GmbH & Co. KG
Im Kissen 2
DE-59929 Brilon
NEMECKO

BRILONER LEUCHTEN GMBH & CO. KG
Im Kissen 2
DE-59929 Brilon
GERMANY
Stand der Informationen · Last Information
Update · Version des informations · Stand
van de informatie · Stan informacji · Stav
informací · Stav informácií: 05 / 2019
Ident.-No.: 14125106L / 14125206L052019-8
IAN 321921_1901
-
 1
1
-
 2
2
-
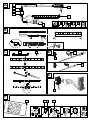 3
3
-
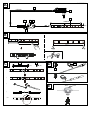 4
4
-
 5
5
-
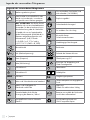 6
6
-
 7
7
-
 8
8
-
 9
9
-
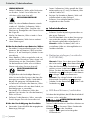 10
10
-
 11
11
-
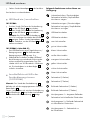 12
12
-
 13
13
-
 14
14
-
 15
15
-
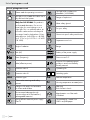 16
16
-
 17
17
-
 18
18
-
 19
19
-
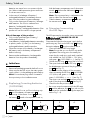 20
20
-
 21
21
-
 22
22
-
 23
23
-
 24
24
-
 25
25
-
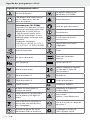 26
26
-
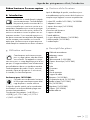 27
27
-
 28
28
-
 29
29
-
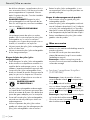 30
30
-
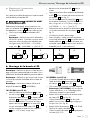 31
31
-
 32
32
-
 33
33
-
 34
34
-
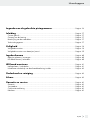 35
35
-
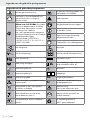 36
36
-
 37
37
-
 38
38
-
 39
39
-
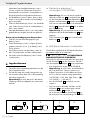 40
40
-
 41
41
-
 42
42
-
 43
43
-
 44
44
-
 45
45
-
 46
46
-
 47
47
-
 48
48
-
 49
49
-
 50
50
-
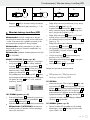 51
51
-
 52
52
-
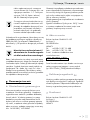 53
53
-
 54
54
-
 55
55
-
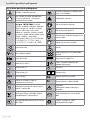 56
56
-
 57
57
-
 58
58
-
 59
59
-
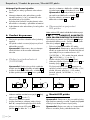 60
60
-
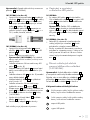 61
61
-
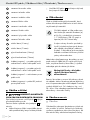 62
62
-
 63
63
-
 64
64
-
 65
65
-
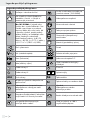 66
66
-
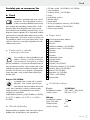 67
67
-
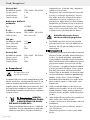 68
68
-
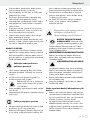 69
69
-
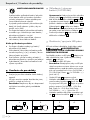 70
70
-
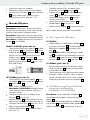 71
71
-
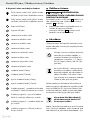 72
72
-
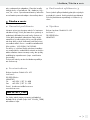 73
73
-
 74
74


in andere talen
- français: LIVARNO 321921 Le manuel du propriétaire
- Deutsch: LIVARNO 321921 Bedienungsanleitung
- slovenčina: LIVARNO 321921 Návod na obsluhu
- polski: LIVARNO 321921 Instrukcja obsługi