Hendi 271407 Handleiding
- Categorie
- Accessoires voor het maken van koffie
- Type
- Handleiding
Deze handleiding is ook geschikt voor

You should read this user manual carefully before
using the appliance
Bevor Sie das Gerät in Betrieb nehmen, sollten
Sie diese Gebrauchsanweisung aufmerksam lesen
Alvorens de apparatuur in gebruik te nemen dient
u deze gebruiksaanwijzing aandachtig te lezen
Przed uruchomieniem urządzenia należy koniecznie
dokładnie przeczytać niniejszą instrukcję obsługi
Lisez attentivement ce mode d’emploi avant d’utiliser
l’appareil .
Citiţi cu atenţie prezentul manual de utilizare înainte
de folosirea aparatului
User manual
Gebrauchsanweisung
Gebruiksaanwijzing
Instrukcja obsługi
Mode d’emploi
Instrucţiunile utilizatorului
Item: 271407
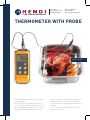
THERMOMETER WITH PROBE

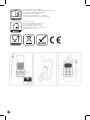
DESCRIPTION OF FUNCTIONS
1. LCD Display
2. “ON/OFF” - Power on/off
3. “H/T” - “Hold” flashes to retain reading for recording
4. ”°F/°C” - Select desired temperature unit (Fahrenheit, Celsius)
5. “MAX/MIN” - Press once for recalling minimum temperature tested. Press again for maximum
temperature tested. Testing mode will restore after 3 seconds.
6. “HI AL” - Press persistently for setting alarm that will beep when the testing temperature goes
higher than the temperature set.
7. “LOW AL” - Press persistently for setting alarm that will beep when the testing temperature goes
lower than the temperature set. Delete the set maximum/minimum temperature:
press °F/°C.
8. Removable sensor probe with handle.
9. Protective PVC holster and flip-out stand.
FEATURES AND SPECIFICATIONS
Length of stainless steel probe: 133 mm
Normal temperature sensing time: 1 second
Extensive plastic wire: 1 meter
Low battery indicator: If the internal battery has been consumed and the voltage drops,
the display shows: LB (low battery)
Measurement range: -50°C ~ + 300°C or -58°F ~ + 572°F
Resolution: 0,1°C or 1,0°C
Calibration: factory calibrated
Accuracy: ± 1°C in the range: -30°C / +250°C, otherwise more than ± 2°C
± 1,8°F in the range: -22°F / +482°F, otherwise more than ± 4°F
Environment temperature: -10°C / +50°C of +14°F / +122°F
Battery: 1x 1,5 volts “AAA” or equivalent.
Accessories: protective PVC holster and flip-out stand.
INSTALLATION
- Unpack the thermometer with care.
- Unscrew the battery cover.
- Install the “AAA” battery into the battery compartment.
- Screw the battery cover.
- Untie the plastic wire, the thermometer is now ready for use.
- Replace new batteries when the low battery indicator appears on the display.
PRECAUTIONS
- To obtain the best results: the probe tip should be immersed at least 10mm into the tested substance.
- Remove the battery from the battery compartment if the thermometer will not be used for long duration
of time or during storage.
- The thermometer cannot be used or put inside any oven or microwave.
- This appliance is splash proof. Keep the appliance away from water and any other liquids.
3
NLEN
2
Keep this manual with the appliance.
Diese Gebrauchsanweisung bitte beim Gerät aufbewahren.
Bewaar deze handleiding bij het apparaat.
Zachowaj instrukcję urządzenia.
Gardez ces instructions avec cet appareil.
Păstraţi manualul de utilizare alături de aparat.
For indoor use only.
Nur zur Verwendung im Innenbereich.
Alleen voor gebruik binnenshuis.
Do użytku wewnątrz pomieszczeń.
Pour l’usage à l’intérieur seulement.
Numai pentru uz casnic.

5
NL
FUNCTIEBESCHRIJVING
1. LCD Display
2. “ON/OFF” - Aan/Uit
3. “H/T” - Hold → knippert indien u de meting wilt opslaan.
4. “°F/°C” - Selecteer de gewenste temperatuureenheid (Fahrenheit, Celsius)
5. “MAX/MIN” - Druk één keer voor oproepen minimum temperatuur. Druk nogmaals voor oproepen
maximum temperatuur. Display herstelt na 3 seconden.
6. ”HI AL” - Ingedrukt houden voor het instellen van een maximum temperatuur waarbij het alarm
afgaat indien de temperatuur hoger is dan de ingestelde temperatuur.
7. “LOW AL” - Ingedrukt houden voor het instellen van een minimum temperatuur waarbij het alarm
afgaat indien de temperatuur lager is dan de ingestelde temperatuur. Verwijder de
ingestelde maximum/minimum temperatuur: druk °F/°C
8. Afneembare stiftsonde met handvat.
9. PVC beschermhoes en standaard.
KENMERKEN EN SPECIFICATIE
Lengte rvs stiftsonde: 133 mm
Waarneemtijd temperatuur: 1 seconde
Lengte snoer: 1 meter
Lege batterij aanwijzing: Indien de batterij leeg is en de kracht afneemt laat het display het
volgende teken zien: LB (low battery)
Temperatuurbereik: -50°C tot + 300°C of -58°F tot + 572°F
Resolutie: 0,1°C of 1,0°C
Kalibratie: Af fabriek geijkt
Nauwkeurigheid: ± 1°C in de reeks: -30°C / +250°C, anders meer dan ± 2°C
± 1,8°F in de reeks: -22°F / +482°F, anders meer dan ± 4°F
Omringende temperatuur: -10°C / +50°C of +14°F / +122°F
Batterij: 1x 1,5 volt (penlight AAA)
Accessoires: PVC beschermhoes en standaard.
INSTALLATIE
- Pak de thermometer voorzichtig uit.
- Schroef de batterijhouder los.
- Plaats 1 (penlight AAA) batterij in de batterijhouder.
- Schroef de batterijhouder dicht.
- Maak het plastic zakje los. De thermometer is nu klaar voor gebruik.
- Vervang de batterijen indien de lege batterij aanwijzing in het display verschijnt.
VOORZORGSMAATREGELEN
- Om de beste resultaten te bereiken, moet de punt van de stiftsonde ca. 10mm in het te meten voorwerp
worden gestoken.
- Verwijder de batterij uit de batterijhouder indien de thermometer voor een langere periode niet wordt
gebruikt of tijdens opslag.
- De thermometer mag niet worden gebruikt in een oven of magnetron.
- Het apparaat is spatwaterdicht. Dit houdt echter niet in dat het apparaat bestand is tegen waterstralen
en onderdompeling.
4
DE
BESCHREIBUNG DER FUNKTIONEN
1. LCD Display
2. “ON/OFF” - An/Aus
3. “H/T” - Halt blinkt, um Messung für Aufnahme zu behalten.
4. ”°F/°C” - Wählen Sie gewünschte Temperatureinheit aus (Fahrenheit, Celsius).
5. “MAX/MIN” - Drücken Sie ein Mal, um minimale geprüfte Temperatur zurück-zurufen. Drücken Sie
noch ein Mal um maximum Temperatur zurückzurufen. Testmodus wird automatisch
nach 3 Sekunden wiederhergestellt.
6. “HI AL” - Um den Alarm für die Höchste Temperatur einzustellen Taste gedrückt halten, wenn die
Temperatur höher ist als der eingestellte Alarm wird ein Signalton ausgegeben.
7. “LOW AL” - Um den Alarm für die Niedrigste Temperatur einzustellen Taste gedrückt halten, wenn
die Temperatur niedriger ist als der eingestellte Alarm wird ein Signalton ausgegeben.
Löschen Sie die eingestellte maximale/minimale Temperatur: drücken Sie °F/°C.
8. Abnehmbaren Sensor mit Griff.
9. PVC Schutzhalfter und Flip-Out Ständer.
EIGENSCHAFTEN UND SPEZIFIKATIONEN
Länge CNS Sensor: 133 mm
Temperatur Reaktionszeit: 1 Sekunde
Länge plastik Kabel: 1 Meter
Leere Batterie Hinweis: Wenn sich die Spannung der Batterie senkt und die Batterie fast leer ist
wird dieses Zeichen angezeigt: LB (low battery)
Temperaturbereich: -50°C bis + 300°C oder -58°F bis + 572°F
Resolution: 0,1°C oder 1,0°C
Kalibrierung: Ab Werk geeicht
Genauigkeit: ± 1°C im Bereich von: -30°C / +250°C, sonst mehr als ± 2°C
± 1,8°F im Bereich von: -22°F / +482°F, sonst mehr als ± 4°F
Umgebende Temperatur: -10°C / +50°C oder +14°F / +122°F
Batterie: 1x 1,5 Volt (Größe AAA)
Zubehör: PVC Schutzhalfter und Flip-Out Ständer.
INSTALLATION
- Entpacken Sie das Thermometer mit Vorsicht.
- Schrauben Sie die Batterie-Deckel los.
- Installieren Sie die Batterie (AAA) in das Batteriefach.
- Schrauben Sie das Batteriefach wieder fest.
- Befestigen Sie das plastik Kabel. Das Thermometer ist jetzt fertig für Gebrauch.
- Ersetzen Sie eine neue Batterie, wenn der leere Batterie Hinweis auf der Anzeige erscheint.
HINWEISE
- Um die besten Resultate zu erlangen, soll die Untersuchungsspitze von der Sensor mindestens 10mm
in die geprüfte Substanz versenkt werden.
- Entfernen Sie die Batterie vom Batteriefach, wenn das Thermometer für lange Dauer der Zeit oder
während Lagerung nicht verwendet wird.
- Das Thermometer kann nicht verwendet werden innerhalb Ofen oder Mikrowelle.
- Dieses Gerät ist Spritzwasserfest. Den Kontakt des Gerätes mit Wasser oder einer anderen Flüssigkeit
vermeiden.

DESCRIPTION DES FONCTIONS
1. Visuel LCD
2. “ON/OFF” - Arrêt/Marche
3. “H/T” - Hold → clignote si vous voulez mettre la température en mémoire.
4. ”°F/°C” - Sélectionne la gradation de température désirée (Fahrenheit, Celsius)
5. “MAX/MIN” - Appuyez une fois pour visualiser la température minimale. Appuyez encore une fois pour
visualiser la température maximale. Le visuel retrouve sa position initiale après 3 secondes.
6. “HI AL” - Appuyez en continu pour programmer une température maximale. Cette fonction est ac-
compagnée d’un signal d’alarme dans le cas où la température est supérieure à la tempé-
rature programmée.
7. “LOW AL” - appuyez en continu pour programmer une température minimale. Cette fonction est ac-
compagnée d’un signal d’alarme dans le cas où la température est inférieure à la tempéra-
ture programmée. Etanchez la température maximale/minimale: poussez °F/°C.
8. Sonde démontable avec poignée.
9. Support et housse de protection en pvc.
CARACTERISTIQUES ET SPECIFICATIONS
Longueur sonde en inox: 133 mm
Durée d’affichage de la température: 1 seconde
Longueur du fil: 1 mètre
Pile usée: L’indication LB (low battery) apparaît sur l’écran quand la pile est
usée.
Echelle de température: -50°C à + 300°C ou -58°F à + 572°F
Résolution: 0,1°C ou 1,0°C
Calibrage: Calibré au départ usine
Précision: ± 1°C dans la portée : -30°C / +250°C, pour le reste plus de ± 2°C
± 1,8°F dans la portée : -22°F / +482°F, pour le reste plus de ± 4°F
Température ambiante: -10°C / +50°C ou +14°F / +122°F
Pile: 1x 1,5 volt (pile crayon AAA)
Accessoires: Support et housse de protection en pvc,
INSTALLATION
- Retirez soigneusement le thermomètre de son emballage.
- Ouvrez le boîtier des piles en dévissant les vis.
- Placez 1 pile (pile crayon AAA) dans le boîtier.
- Refermez le boîtier.
- Enlevez le plastique. Le thermomètre est prêt à l’utilisation.
- Remplacez les piles dès que l’indication LB apparaît à l’écran.
MESURES DE PRECAUTION
- Pour obtenir les meilleurs résultats, enfoncez la pointe de la sonde environ 10 mm dans l’objet dont
vous voulez mesurer la température.
- Retirez la pile du boîtier si vous stockez le thermomètre ou ne l’utilisez pas pendant quelque temps.
- N’utilisez pas le thermomètre dans un four ou un micro-ondes.
- Cet appareil est étanche aux projections d’eau. Veillez à tenir l’appareil hors de portée de l’eau.
7
FR
6
PL
OPIS FUNKCJI
1. Wyświetlacz LCD.
2.
“ON/OFF”
- wł./wył.
3.
“H/T”
- Przycisk zapisujący pomiar, w momencie zapisu migotanie
4.
”°F/°C”
- Wybór dowolnej jednostki temperatury (Farenheit, Celsjusz).
5.
“MAX/MIN”
- Nacisnąć raz, w celu przywołania minimalnej sprawdzonej temperatury; ponownie
nacisnąć, by przywołać maksymalną temperaturę. Moduł testowy powróci po 3 se-
kundach.
6.
“HI AL”
- w celu nastawienia alarmu na najwyższą temperaturę należy trzymać wciśnięty przy-
cisk. Jeżeli temperatura przekracza tak ustawiony alarm, wówczas rozbrzmiewa sygnał.
7.
“LOW AL”
- w celu nastawienia alarmu na najniższą temperaturę należy trzymać wciśnięty
przycisk. Jeżeli temperatura jest niższa od tak nastawionego alarmu, wówczas roz-
brzmiewa sygnał. Wyjmij zestaw maksymalna/minimalna temperatura: nacisnąć ° F
/ ° C.
8. Sensor z uchwytem – możliwość odłączenia.
9. Podpórka i podstawa flip-out z PVC.
WŁAŚCIWOŚCI I SPECYFIKACJA
Długość sensora CNS: 133 mm
Czas reakcji na temperaturę: 1 sekunda.
Długość plastikowego kabla: 1 metr.
Wskaźnik wyczerpania baterii: Gdy zmniejsza się napięcie, a bateria jest prawie wyczerpana pojawia się na-
stępujące oznakowanie: LB (low battery).
Zakres temperatury: - 50° C do + 300° C lub -58° F do + 572° F
Pokazywane wielkości: 0,1° C lub 1,0° C
Kalibrowanie: wykonano w zakładzie
Dokładność: +/- 1°C w zakresie -30° C do + 250° C, w pozostałych powyżej +/- 2° C
+/- 1,8° F w zakresie -22° F do + 482° F, w pozostałych powyżej +/- 4° F
Temperatura otoczenia: - 10° C/+50°C lub + 14° F/ + 122° F
Bateria: 1x1,5 V (wielkość AAA)
Osprzęt: Podpórka i podstawa flip-out z PVC. Plastikowa torba oraz pasek nylonowy.
INSTALACJA
- Ostrożnie wypakować termometr.
- Odkręcić przykrywkę od baterii.
- Włożyć 1 baterii (AAA).
- Ponownie dokręcić przykrywkę.
- Przymocować plastikowy kabel. Termometr jest teraz gotowy do użytku.
- Wyczerpanie baterii sygnalizuje wskaźnik. Po wyczerpaniu baterii wymienić je na nowe.
WSKAZÓWKI
- Najlepsze rezultaty uzyskuje się nakłuwając badaną substancję na głębokość przynajmniej 10 mm.
- W czasie długiego okresu nie używania urządzenia, bądź jego magazynowania należy wyjąć baterii.
- Nie stosować termometru w piecyku lub mikrofalówce.
- Urządzenie jest zabezpieczone przed rozpryskującą się wodą. Nie należy dopuszczać do kontaktu urządzenia
z wodą i innymi płynami.

9
8
RO
DESCRIEREA FUNCŢIILOR
1. Ecran LCD
2. “ON/OFF” - Pornit/oprit
3. “H/T” - butonul “Hold” se aprinde intermitent pentru a marca începerea înregistrării
4. ”°F/°C” - Selectarea unităţii de măsură dorite a temperaturii (Fahrenheit, Celsius)
5. “MAX/MIN” - Apăsaţi o dată pentru a seta temperatura minimă testată. Apăsaţi încă o dată pentru
temperatura maximă testată. Modul de testare se va restabili după 3 secunde.
6. “HI AL” - Apăsaţi lung pentru a seta alarma care va suna atunci când temperatura pentru tes-
tare are o valoare mai ridicată decât temperatura setată.
7. “LOW AL” - Apăsaţi lung pentru a seta alarma care va suna atunci când temperatura pentru tes-
tare are o valoare mai scăzută decât temperatura setată. Scoateţi set maxim / tempe-
ratura minimă: apăsaţi ° F / ° C.
8. Sondă cu senzor detaşabil şi mâner
9. Toc de protecţie din PVC şi suport extensibil
CARACTERISTICI ŞI SPECIFICAŢII
Lungimea sondei din oţel inoxidabil: 133 mm
Timpul de detectare a temperaturii normale:
1 secundă
Cablu extensibil din plastic: 1 metru
Indicator pentru bateria descărcată: Dacă bateria internă a fost consumată şi voltajul scade, pe ecran se
poate observa: LB (baterie descărcată)
Gamă de măsurare: -50° C ~ + 300° C sau -58° F ~ + 572° F
Rezoluţie: 0,1° C sau 1,0° C
Calibrare: calibrare din fabricaţie
Acurateţe: ± 1° C în intervalul: -30° C / +250° C, în caz contrar mai mult de ± 2° C
± 1,8° F în intervalul : -22° F / +482° F, în caz contrar mai mult de ± 4° F
Temperatura atmosferei: -10° C / +50° C of +14° F / +122° F
Baterie: 1 x 1,5 volţi “AAA” sau echivalent.
Accesorii: toc de protecţie din PVC şi suport extensibil.
INSTALARE
- Despachetaţi termometrul cu atenţie.
- Deşurubaţi capacul bateriei.
- Introduceţi bateria “AAA” în compartimentul pentru baterii.
- Înşurubaţi capacul bateriei.
- Desfaceţi cablul din plastic, termometrul este gata de folosire.
- Înlocuiţi bateriile uzate cu altele noi atunci când indicatorul pentru baterie descărcată apare pe ecran.
PRECAUŢII
- Pentru a obţine cele mai bune rezultate: vârful sondei trebuie introdus cel puţin 10 mm în substanţa
testată
- Îndepărtaţi bateria din compartimentul pentru baterii dacă termometrul nu va fi utilizat pentru o peri-
oadă îndelungată de timp sau în timpul depozitării.
- Termometrul nu poate fi folosit sau introdus în nici un cuptor sau cuptor cu microunde.
- Acest aparat prezinta protectie impotriva stropirii. Mentineti aparatul la distanta fata de apa si orice alte
lichide.

11
10
NL

11
10
NL

Hendi B.V.
Steenoven 21
3911 TX Rhenen, The Netherlands
Tel: +31 (0)317 681 040
Fax: +31 (0)317 681 045
Email: infohendi.eu
Hendi Polska Sp. z o.o.
ul. Magazynowa 5
62-023 Gądki, Poland
Tel: +48 61 6587000
Fax: +48 61 6587001
Email: infohendi.pl
Hendi Food Service Equipment GmbH
Gewerbegebiet Ehring 15
5112 Lamprechtshausen, Austria
Tel: +43 (0) 6274 200 10 0
Fax: +43 (0) 6274 200 10 20
Email: offi[email protected]
Hendi Food Service Equipment Romania S.R.L.
Str. Zizinului nr. 106A, Complex Duplex 3 Hala G4
Brasov 500407 RO, Romania
Tel: +40 268 320330
Fax: +40 268 320335
Email: officehendi.ro
Hendi HK Ltd.
1603-5, Tower II, Enterprise Square
9 Sheung Yuet Road, Kowloon Bay, Hong Kong
Tel: +852 2801 5019
Fax: +852 2801 5057
Email: [email protected]
Find Hendi on internet:
www.hendi.eu
www.facebook.com/HendiFoodServiceEquipment
www.linkedin.com/company/hendi-food-service-equipment-b.v.
www.youtube.com/HendiEquipment
- Wijzigingen en drukfouten voorbehouden.
- Changes, printing and typesetting errors reserved.
- Änderungen und Druckfehler vorbehalten.
- Producent zastrzega sobie prawo do zmian oraz błędów drukars
-
kich w instrukcji.
- Variations et fautes d’impression réservés.
- Drepturi rezervate cu privire la modificări şi greşeli de imprimare.
© 2014 Hendi BV Rhenen - The Netherlands Ver: 11-12-2014
-
 1
1
-
 2
2
-
 3
3
-
 4
4
-
 5
5
-
 6
6
-
 7
7
-
 8
8
-
 9
9
-
 10
10
-
 11
11
-
 12
12


Hendi 271407 Handleiding
- Categorie
- Accessoires voor het maken van koffie
- Type
- Handleiding
- Deze handleiding is ook geschikt voor
in andere talen
- français: Hendi 271407 Manuel utilisateur
- Deutsch: Hendi 271407 Benutzerhandbuch
- polski: Hendi 271407 Instrukcja obsługi
- română: Hendi 271407 Manual de utilizare