
LED-BADLEUCHTE / LED BATHROOM CEILING
LIGHT / LAMPE DE SALLE DE BAINS À LED
LED-BADLEUCHTE
Montage-, Bedienungs- und Sicherheitshinweise
LED BATHROOM CEILING LIGHT
Assembly, operating and safety instructions
LAMPE DE SALLE DE BAINS À LED
Instructions de montage, d‘utilisation et consignes de sécurité
LED-BADKAMERLAMP
Montage-, bedienings- en veiligheidsinstructies
LED KÚPEĽŇOVÉ SVIETIDLO
Pokyny pre montáž, obsluhu a bezpečnostné pokyny
KOUPELNOVÉ LED SVÍTIDLO
Pokyny k montáži, obsluze a bezpečnostní pokyny
LAMPA ŁAZIENKOWA LED
Wskazówki montażu, obsługi i bezpieczeństwa
IAN 355071_2004

Klappen Sie vor dem Lesen die beiden Seiten mit den Abbildungen aus und machen Sie sich anschließend
mit allen Funktionen des Gerätes vertraut.
Before reading, unfold both pages containing illustrations and familiarise yourself with all functions of the
device.
Avant de lire le mode d‘emploi, ouvrez les deux pages contenant les illustrations et familiarisez-vous ensuite
avec toutes les fonctions de l‘appareil.
Vouw vóór het lezen de beide pagina‘s met de afbeeldingen open en maak u vertrouwd met alle functies
van het apparaat.
Przed przeczytaniem proszę rozłożyć obie strony z ilustracjami, a następnie proszę zapoznać się z
wszystkimi funkcjami urządzenia.
Před čtením si odklopte obě dvě strany s obrázky a potom se seznamte se všemi funkcemi přístroje.
Pred čítaním si odklopte obidve strany s obrázkami a potom sa oboznámte so všetkými funkciami prístroja.
DE / AT / CH Montage-, Bedienungs- und Sicherheitshinweise Seite 5
GB / IE Assembly, operating and safety instructions Page 11
FR / BE Instructions de montage, d‘utilisation et consignes de sécurité Page 17
NL / BE Montage-, bedienings- en veiligheidsinstructies Pagina 25
PL Wskazówki montażu, obsługi i bezpieczeństwa Strona 31
CZ Pokyny k montáži, obsluze a bezpečnostní pokyny Strana 37
SK Pokyny pre montáž, obsluhu a bezpečnostné pokyny Strana 43

14150306L
14
23
5
9 8
610
7
14150208L
14
23
5
9 8
610
7

14150409L
14
23
5
9 8
610
7

5 DE/AT/CH
Inhaltsverzeichnis
Legende der verwendeten Piktogramme ........................................................... Seite 6
Einleitung ......................................................................................................................................... Seite 6
Bestimmungsgemäße Verwendung ....................................................................................................Seite 6
Teilebeschreibung ...............................................................................................................................Seite 6
Lieferumfang ........................................................................................................................................ Seite 7
Technische Daten ................................................................................................................................Seite 7
Sicherheit ......................................................................................................................................... Seite 7
Sicherheitshinweise .............................................................................................................................Seite 7
Vorbereitung ................................................................................................................................Seite 8
Benötigtes Werkzeug und Material ...................................................................................................Seite 8
Vor der Installation .............................................................................................................................. Seite 8
Montage ...........................................................................................................................................Seite 8
Wartung und Reinigung .....................................................................................................Seite 9
Entsorgung .....................................................................................................................................Seite 9
Garantie und Service ............................................................................................................Seite 9
Garantie ..............................................................................................................................................Seite 9
Serviceadresse ....................................................................................................................................Seite 10
Konformitätserklärung .........................................................................................................................Seite 10
Hersteller ..............................................................................................................................................Seite 10

6 DE/AT/CH
Einleitung / SicherheitEinleitung
Legende der verwendeten Piktogramme
Bedienungsanleitung lesen! Schutzleiter
Warn- und Sicherheitshinweise
beachten! Lebens- und Unfallgefahr für
Kleinkinder und Kinder
Watt (Wirkleistung) Warnung vor elektrischem Schlag!
Lebensgefahr!
Hertz (Frequenz) Brand- und Verletzungsgefahr!
Volt Die Leuchte ist nicht geeignet für
externe Dimmer und elektronische
Schalter.
Wechselspannung
(Strom- und Spannungsart) Ra
Farbwiedergabeindex
LED-Lebensdauer ON OFF Schaltzyklen
Schutzart (spritzwassergeschützt) Montagerichtung
Diese Leuchte ist ausschließlich für den
Betrieb im Innenbereich geeignet. 20
PAP
Entsorgen Sie Verpackung
und Gerät umweltgerecht!
Lichttemperatur in Kelvin Die Verpackung besteht aus
100 % recyceltem Papier.
LED-Badleuchte
Einleitung
Wir beglückwünschen Sie zum Kauf Ihres
neuen Produkts. Sie haben sich damit für
ein hochwertiges Produkt entschieden.
Diese Anleitung gehört zu diesem Produ
kt und enthält
wichtige Hinweise zur Inbetriebnahme und Hand-
habung. Beachten Sie immer alle Sicherheitshinweise.
Prüfen Sie vor der Inbetriebnahme, ob die korrekte
Spannung vorhanden ist und ob alle Teile richtig
montiert sind. Sollten Sie Fragen haben oder unsicher
in Bezug auf die Handhabung des Gerätes sein,
setzen Sie sich bitte mit Ihrem Händler oder der
Servicestelle in Verbindung. Bewahren Sie diese
Anleitung bitte sorgfältig auf und geben Sie sie ggf.
an Dritte weiter.
Bestimmungsgemäße
Verwendung
Diese Leuchte ist nur für den Betrieb im Innenbereich
geeignet. Dieses Gerät ist für den Einsatz in priva
ten
Haushalten vorgesehen. Die Leuchte kann auf allen
normal entflammbaren Oberflächen befestigt wer
den.
Dieses Produkt ist vorgesehen für den normalen Be-
trieb und darf ausschließlich für die Deckenmontage
eingesetzt werden.
Teilebeschreibung
1 Dübel
2 Gummimembran
3 Schutzschlauch
4 Netzanschlusskabel
(extern)
5 Lüsterklemme
6 Anschlusskabel
der Leuchte
7 Unterlegscheibe
aus Silikon

7 DE/AT/CH
Einleitung / SicherheitEinleitung
8 Schrauben
9 Lampenschirm
10 Bodenplatte
Lieferumfang
1 LED-Badleuchte, Modell 14150208L /
14150306L / 14150409L
3 Dübel
3 Schrauben
2 Schutzschläuche
3 Unterlegscheiben aus Silikon
1 Montage- und Bedienungsanleitung
Technische Daten
Leuchte:
Modellnr.: 14150208L / 14150306L /
14150409L
Betriebsspannung: 230–240 V∼, 50 Hz
Nennleistung: max. LED 12,5 W
Schutzklasse: I
Schutzart: IP44 (spritzwassergeschützt)
LED-Modul:
Leuchtmittel: LED-Modul
Nennleistung: max. 11,5 W
Sicherheit
Sicherheitshinweise
Bei Schäden, die durch Nichtbeachtung dieser
Bedienungsanleitung verursacht werden, erlischt der
Garantieanspruch! Für Folgeschäden wird keine
Haftung übernommen! Bei Sach- oder Personen-
schäden, die durch unsachgemäße Handhabung
oder Nichtbeachtung der Sicherheitshinweise verur-
sacht werden, wird keine Haftung übernommen!
LEBENS-
UND UNFALLGEFAHR FÜR
KLEINKINDER UND KINDER!
Lassen Sie Kinder niemals unbeaufsichtigt mit
dem Verpackungsmaterial. Es besteht Erstic
kungs
-
gefahr durch Verpackungsmaterial. Lassen Sie
die Leuchte oder Verpackungsmaterial nicht acht-
los liegen. Plastikfolien / -tüten, Kunststoffteile,
etc. könnten für Kinder zu einem gefährlichen
Spielzeug werden. Kinder unterschätzen häufig
die Gefahren.
Halten Sie Kinder stets vom Produkt fern. Dieses
Produkt kann von Kindern ab 8 Jahren und darü
b
er
sowie von Personen mit verringerten physischen,
sensorischen oder mentalen Fähigkeiten oder
Mangel an Erfahrung und Wissen benutzt wer-
den, wenn sie beaufsichtigt oder bezüglich des
sicheren Gebrauchs des Produkts unterwiesen
wurden und die daraus resultierenden Gefahren
verstehen. Kinder dürfen nicht mit dem Produkt
spielen. Reinigung und Benutzerwartung dürfen
nicht von Kindern ohne Beaufsichtigung durch-
geführt werden.
Lebensgefahr durch
elektrischen Schlag!
Lassen Sie die Elektroinstallation durch einen
ausgebildeten Elektriker oder eine für Elektroin-
stallationen eingewiesene Person durchführen.
Die Leuchte ist ausschließlich für die Nutzung
in privaten Haushalten vorgesehen.
Benutzen Sie Ihre Leuchte niemals, wenn Sie
irgendwelche Beschädigungen feststellen.
Entfernen Sie vor der Montage die Sicherung
oder schalten Sie den Leitungsschutzschalter im
Sicherungskasten aus (0-Stellung). Stellen Sie
den Lichtschalter auf Position „Aus“.
Vergewissern Sie sich vor der Montage, dass
die vorhandene Netz spannung mit der benötig-
ten Betriebsspannung der Leuchte übereinstimmt
(230–240 V∼) (siehe „Technische Daten“).
Stellen Sie sicher, dass bei der Montage keine
Leitungen beschädigt werden.
Brand- und Verletzungsgefahr!
Montieren Sie die Leuchte nicht mit defektem
Lampenglas. Setzen Sie sich in diesem Fall für
Ersatz mit der Servicestelle in Verbindung.
Die Leuchte kann auf normal entflammbaren
Oberflächen installiert werden.

8 DE/AT/CH
Montage / Wartung und Reinigung / Entsorgung / Garantie und ServiceSicherheit / Vorbereitung / Montage
Stellen Sie sicher, dass die Leuchte ausgeschal-
tet und abgekühlt ist, bevor Sie diese berühren,
um Verbrennungen zu vermeiden. Leuchtmittel
entwickeln eine starke Hitze.
Befestigen Sie die Leuchte nicht auf feuchtem
oder leitendem Untergrund.
Die Lichtquelle dieser Leuchte ist nicht ersetzbar;
wenn die Lichtquelle ihr Lebensdauerende er-
reicht hat, ist die gesamte Leuchte zu ersetzten.
Die Leuchte ist nicht geeignet für
externe Dimmer und elektronische
Schalter.
Verwenden Sie ausschließlich die mitgelieferten
Einzelteile, ansonsten erlöschen alle Gewähr-
leistungsansprüche.
Die Leuchte nicht mit defektem Lampenglas
betreiben.
So verhalten Sie sich richtig
Seien Sie stets aufmerksam! Achten Sie immer
darauf was Sie tun und gehen Sie stets mit Ver-
nunft vor. Montieren Sie die Leuchte in keinem
Fall, wenn Sie unkonzentriert sind oder sich un-
wohl fühlen.
Nicht direkt in die Lichtquelle (Leuchtmittel, LED
etc.) hineinschauen.
Die Lichtquelle (Leuchtmittel, LED etc.) nicht mit
einem optischen Instrument (z. B. Lupe) betrach
ten.
Vorbereitung
Benötigtes Werkzeug
und Material
Die genannten Werkzeuge und Materialien sind nicht
im Lieferumfang enthalten. Es handelt sich hierbei um
unverbindliche Angaben und Werte zur Orientie
rung.
Die Beschaffenheit des Materials richtet sich nach
den individuellen Gegebenheiten vor Ort.
– Bleistift / Markierwerkzeug
– 2-poliger Spannungsprüfer
– Schraubendreher
– Bohrmaschine
– Seitenschneider
– Hammer
– Leiter
– Bohrer (ca. Ø 6 mm)
Vor der Installation
Wichtig: Lassen Sie die Elektroinstallation durch
einen ausgebildeten Elektriker oder eine für Elektro-
installationen eingewiesene Person durchführen.
Machen Sie sich vor der Installation mit allen
Anweisungen und Abbildungen in dieser
Anleitung sowie mit der Leuchte selbst vertraut.
Stellen Sie vor der Installation sicher, dass an
der Leitung, an der die Leuchte angeschlossen
werden soll, keine Spannung vorliegt. Entfernen
Sie hierfür die Sicherung oder schalten Sie den
Leitungsschutzschalter im Sicherungskasten aus
(0-Stellung).
Überprüfen Sie die Spannungsfreiheit mittels
2-poligem Spannungsprüfer.
Montage
Lösen Sie den Lampenschirm 9, indem Sie ihn
gegen den Uhrzeigersinn von der Bodenplatte
10 abdrehen.
Halten Sie die Bodenplatte gegen die Montage-
fläche und markieren Sie die Bohrlöcher mit Hilfe
der in der Bodenplatte
10
für die Schrauben
8
vorgesehenen Löcher.
Bohren Sie die Löcher (ca. Ø 6 mm, ca. 40 mm
tief). Stellen Sie sicher, dass Sie die Zuleitung
nicht beschädigen.
Stecken Sie die Dübel 1 in die Bohrlöcher.
Nehmen Sie, falls notwendig, einen Hammer
zur Hilfe.
Öffnen Sie die Gummimembran 2 mit einem
spitzen Gegenstand (z. B. Schraubendreher).
Führen Sie das Netzanschlusskabel (extern)
4
durch die Gummimembran 2. Achten Sie auf
den richtigen Sitz.
Befestigen Sie die Bodenplatte 10 mittels der
Unterlegscheiben aus Silikon 7 und der Schrau-
ben 8 an der Montagefläche.

9 DE/AT/CH
Montage / Wartung und Reinigung / Entsorgung / Garantie und ServiceSicherheit / Vorbereitung / Montage
Führen Sie die einzelnen Adern L und N des
Netzanschlusskabels (extern) 4 durch die
Schutzschläuche 5.
Verbinden Sie nun das Anschlusskabel 6 der
Leuchte mittels Lüsterklemme 5 mit dem Netz-
anschlusskabel (extern) 4.
Achten Sie auf den farblichen Zusammenschluss
der angeschlossenen Leitungen (stromführender
Leiter, schwarz oder braun = Symbol L, Neutral-
leiter, blau = Symbol N).
Verbinden Sie nun den Schutzleiter (grün-gelb)
mit der am Anschlussgehäuse gekennzeichneten
Erdungsklemme .
Befestigen Sie den Lampenschirm 9, indem Sie
ihn im Uhrzeigersinn auf die Bodenplatte 10
schrauben. Achten Sie auf den richtigen Sitz.
Setzen Sie die Sicherung wieder ein oder schalte
n
Sie den Leitungsschutzschalter am Sicherungs-
kasten wieder ein (I-Stellung).
Ihre Leuchte ist nun betriebsbereit.
Wartung und Reinigung
STROMSCHLAGGEFAHR!
Trennen Sie zur Reinigung die Leuchte zuerst vom
Stromnetz. Entfernen Sie hierfür die Sicherung
oder schalten Sie den Leitungsschutzschalter im
Sicherungskasten aus (0-Stellung).
VORSICHT! VERBRENNUNGSGEFAHR
DURCH HEISSE OBERFLÄCHEN!
Lassen Sie die Leuchte vollständig abkühlen.
Verwenden Sie zur Reinigung nur ein trockenes,
fusselfreies Tuch. Benutzen Sie keine Lösungs-
mittel, Benzin o. Ä. Die Leuchte würde hierbei
Schaden nehmen.
Setzen Sie die Sicherung wieder ein oder
schalten Sie den Leitungsschutzschalter wieder
an (I-Stellung).
Entsorgung
Die Verpackung besteht aus umweltfreundlichen
Materialien, die Sie über die örtlichen Recycling-
stellen entsorgen können.
b
a
Beachten Sie die Kennzeichnung der
Verpackungsmaterialien bei der Abfall-
trennung, diese sind gekennzeichnet mit
Abkürzungen (a) und Nummern (b) mit
folgender Bedeutung: 1–7: Kunststoffe /
20–22: Papier und Pappe / 80–98:
Verbundstoffe.
Das Produkt und die Verpackungsmateri-
alien sind recycelbar, entsorgen Sie diese
getrennt für eine bessere Abfallbehandlung.
Das Triman-Logo gilt nur für Frankreich.
Werfen Sie Ihr Produkt, wenn es ausge-
dient hat, im Interesse des Umweltschutzes
nicht in den Hausmüll, sondern führen
Sie es einer fachgerechten Entsorgung
zu. Über Sammelstellen und deren Öff-
nungszeiten können Sie sich bei Ihrer
zuständigen Verwaltung informieren.
Garantie und Service
Garantie
Sie erhalten zum Zeitpunkt des Kaufs auf dieses
Gerät 36 Monate Garantie.
Das Gerät wurde sorgfältig produziert und einer
genauen Qualitätskontrolle unterzogen.
Innerhalb der Garantiezeit beheben wir kostenlos alle
Material- oder Herstellerfehler. Sollten sich dennoch
während der Garantiezeit Mängel herausstellen,
senden Sie das Gerät bitte an die aufgeführte
Service-Adresse unter Angabe folgender Modell-
Nummern: 14150208L / 14150306L / 14150409L.
Von der Garantie ausgeschlossen sind Schäden d
urch
nicht sachgemäße Handhabung, Nichtbeachtung
der Bedienungsanleitung oder Eingriff durch nicht
autorisierte Personen sowie Verschleißteile (wie z. B.
Leuchtmittel).
Durch die Garantieleistung wird die Garantiezeit
weder verlängert noch erneuert.

10 DE/AT/CH
Garantie und Service
Serviceadresse
Briloner Leuchten GmbH & Co. KG
Im Kissen 2
59929 Brilon
DEUTSCHLAND
Tel.: +49 29 61 / 97 12‒800
Fax: +49 29 61 / 97 12‒199
E-Mail: kundenservice@briloner.com
www.briloner.com
Kostenlose Servicenummer:
Tel.: 00800 / 27456637
IAN 355071_2004
Bitte halten Sie für alle Anfragen den Kassenbon
und die Artikelnummer (z. B. IAN 123456_7890)
als Nachweis für den Kauf bereit.
Konformitätserklärung
Dieses Produkt erfüllt die Anforderungen der gel-
tenden europäischen und nationalen Richtlinien.
Die Konformität wurde nachgewiesen. Entsprechende
Erklärungen und Unterlagen sind beim Hersteller
hinterlegt.
Hersteller
Briloner Leuchten GmbH & Co. KG
Im Kissen 2
59929 Brilon
DEUTSCHLAND
Table of contents

11 GB/IE
Garantie und Service
List of pictograms used ........................................................................................................ Page 12
Introduction ................................................................................................................................... Page 12
Intended use ........................................................................................................................................ Page 12
Parts description ..................................................................................................................................Page 12
Scope of delivery ................................................................................................................................Page 13
Technical data ..................................................................................................................................... Page 13
Safety .................................................................................................................................................Page 13
Safety notes ......................................................................................................................................... Page 13
Preparation ...................................................................................................................................Page 14
Required tools and material ...............................................................................................................Page 14
Prior to installation ...............................................................................................................................Page 14
Assembly .........................................................................................................................................Page 14
Maintenance and cleaning ............................................................................................... Page 15
Disposal ............................................................................................................................................Page 15
Warranty and service ...........................................................................................................Page 15
Warranty .............................................................................................................................................Page 15
Service address ................................................................................................................................... Page 15
Declaration of conformity ...................................................................................................................Page 16
Manufacturer .......................................................................................................................................Page 16
Table of contents

12 GB/IE
Introduction / SafetyIntroduction
List of pictograms used
Please read the instructions for use! Protective conductor
Observe the warnings and safety
instructions! Danger to life and risk of accidents
for infants and children
Watt (effective power) Electric shock warning!
Danger to life!
Hertz (frequency) Risk of burns and injury!
Volt This light is not suitable for external
dimmer and electronic switches.
Alternating voltage
(current and voltage type) Ra Colour rendering index
LED operating life ON OFF Switching cycles
Protection type (splash-proof) Mounting direction
This light is suitable for indoor use only. 20
PAP
Dispose of the packaging and de-
vice in an environmentally friendly
manner!
Light temperature in Kelvin The packaging is made from
100 % recycled paper.
LED bathroom ceiling light
Introduction
Congratulations on the purchase of your
new product. You have selected a high
quality product. These instructions are part
of the product and contain important information on
setup and handling. Always follow all safety instruc-
tions. Before using this product for the first time, verify
that the voltage is correct and that all parts are prop-
erly installed. Should you have any questions or you
are unsure about operating the product, please con-
tact the dealer or service centre. Please keep these
instructions in a safe place and pass them on to third
parties as applicable.
Intended use
This light is only suitable for indoor use. This device
is intended for private household use. The light can
be mounted to any surface of normal flammability.
This product is intended for normal operation and
may only be used for ceiling installation.
Parts description
1 Wall plug
2 Rubber membrane
3 Protective tube
4 Mains connection
cable (external)
5 Lustre terminal
6 Connection
cable (light)
7 Silicone washer
8 Screws
9 Lampshade
10 Base plate

13 GB/IE
Introduction / SafetyIntroduction
Scope of delivery
1 LED bathroom ceiling light, model 14150208L /
14150306L / 14150409L
3 Wall plugs
3 Screws
2 Protective tubes
3 Silicone washer
1 Set of installation instructions and instructions for use
Technical data
Light:
Model no.: 14150208L / 14150306L /
14150409L
Operating voltage: 230–240 V∼, 50 Hz
Rated power: max. LED 12.5 W
Protection class: I
Protection type: IP44 (splash-proof)
LED module:
Illuminant: LED module
Rated power: max. 11.5 W
Safety
Safety notes
Damage due to failure to comply with these opera-
ting instructions will void the warranty! We assume
no liability for consequential damages! We assume
no liability for property damage or personal injury
caused by improper handling or failure to observe
the safety notes!
DANGER TO
LIFE AND RISK OF ACCIDENT
F
OR INFANTS AND CHILDR
EN!
Never leave children unsupervised with the
packaging material. The packaging material
poses a suffocation hazard. Do not leave the
light or packaging material lying unattended.
Plastic film or bags, plastic parts, etc. can be
come
dangerous toys for children. Children frequently
underestimate the dangers.
Always keep children away from the product. This
product may be used by children aged 8 years
and up, as well as by persons with reduced
physical, sensory or mental capacities or lack-
ing experience and knowledge, so long as they
are supervised or instructed in the safe use of
the product and understand the associated risks.
Do not allow children to play with the product.
Cleaning and user maintenance must not be
performed by children without supervision.
Danger to life from
electric shock!
Ensure that a qualified electrician, or a person
trained to carry out electrical installations, per-
forms the electrical installation.
The light is exclusively intended for use in
private households.
Never use the light if any defects have been
identified.
Prior to installation, remove the fuse or switch
off the circuit breaker (0 setting) in the fuse box.
Set the light switch to the “Off“ position.
Prior to installation, verify that the mains voltage
on site corresponds with the operating voltage
required for the light (230–240 V∼) (see
“Technical data“).
Ensure that no cables are damaged when
installing.
Risk of burns and injury!
Do not install the light, if it has a defective lamp
glass. In this case contact the service centre for
a replacement.
The light may be installed on all normal inflam-
mable surfaces.
To prevent burns, ensure that the light is switched
o
ff and has cooled down before touching it. Lig
ht
bulbs develop a great deal of heat.
Do not attach the light to a damp or conductive
substrate.
The illuminant in this light is not replaceable;
when the illuminant reaches the end of its life,
replace the entire light.

14 GB/IE
Maintenance and cleaning / Disposal / Warranty and serviceSafety / Preparation / Assembly
This light is not suitable for external
dimmer and electronic switches.
Only use the individual parts supplied, other-
wise all warranty claims will become invalid.
Do not operate the lights with defective lamp
glass. Replace defective lamp glass.
For your safety
Always be attentive when working! Always pay
attention to what you are doing and act with
common sense. Never install the light if you are
h
aving difficulty concentrating or do not feel well
.
Do not look directly into the light source (light
bulb, LED etc.).
Do not look at the light source (light bulb, LED
etc.) with an optical instrument (e.g. magnifier).
Preparation
Required tools and material
The tools and materials specified are not included.
This information and these values are non-binding
and they are only for guidance. The nature of the ma-
terial is determined by the individual local conditions.
– Pencil / marking tool
– 2-pole circuit tester
– Screwdriver
– Power drill
– Side cutter
– Hammer
– Ladder
– Drill bit (approx. Ø 6 mm)
Prior to installation
Important: Have a trained electrician or someone
who has been instructed on how to install electrical
products install the electrical product.
Familiarise yourself with all instructions and fig-
ures in these instructions as well as with the light
before installation.
Before installation, ensure that the cable that the
lights are to be connected to is not live. For this,
remove the fuse or switch off the circuit breaker
in the fuse box (0 position).
Check that the power is off using a 2-pole
circuit tester.
Assembly
Remove the lampshade 9 by twisting it counter-
clockwise off the base plate 10 .
Hold the base plate against the installation sur-
face and mark the drill holes using the holes in
the base plate 10 intended for the screws 8.
Drill the holes (approx. Ø 6 mm, approx. 40 mm
deep). Be sure not to damage the power cable.
Insert the wall plugs 1 into the drilled holes.
If necessary, tap in with a hammer.
Open the rubber membrane 2 using a sharp
object (e.g. screwdriver).
Feed the mains connection cable (external) 4
through the rubber membrane 2. Make sure
it is correctly positioned.
Attach the base plate 10 to the installation
surface using the silicone washers 7 and the
screws 8.
Pass the individual strands L and N of the mains
connection cable (external) 4 through the
protective tubes 5.
Now use the lustre terminal 5 to connect the
light‘s connection cable 6 to the mains connec-
tion cable (external) 4.
Make sure that the colours of the connected w
ires
match (black or brown live wire = L symbol,
blue
neutral wire = N symbol).
Now connect the protective conductor (green-
yellow) to the earth terminal marked on the
connection housing.
Attach the lampshade 9 by screwing it clock-
wise onto the base plate 10 . Make sure it is
correctly positioned.
Replace the fuse or switch on the circuit breaker
in the fuse box (I setting).
Your light is now ready to use.

15 GB/IE
Maintenance and cleaning / Disposal / Warranty and serviceSafety / Preparation / Assembly
Maintenance and cleaning
RISK OF ELECTRIC SHOCK!
Disconnect the light from the mains circuit before
cleaning. To do this, remove the fuse or switch
off the circuit breaker in the fuse box (0 setting).
CAUTION! RISK OF BURNS DUE TO
HOT SURFACES!
Allow the light to cool completely.
Only use a dry, lint-free cloth for cleaning. Do
not use solvents, spirit or similar substances. They
could damage the light.
Reinsert the fuse or switch the circuit breaker
back on (I setting).
Disposal
The packaging is made entirely of recyclable mate-
rials, which you may dispose of at local recycling
facilities.
b
a
Observe the marking of the packaging
materials for waste separation, which
are marked with abbreviations (a) and
numbers (b) with following meaning:
1–7: plastics / 20–22: paper and fibre-
board / 80–98: composite materials.
The product and packaging materials are
recyclable, dispose of it separately for
better waste treatment. The Triman logo
is valid in France only.
To help protect the environment, please
dispose of the product properly when it
has reached the end of its useful life and
not in the household waste. Information on
collection points and their opening hours
can be obtained from your local authority.
Warranty and service
Warranty
You receive a 36 month warranty on this product,
valid from the date of purchase.
The appliance has been carefully produced under
strict quality control.
During the warranty period we will remedy any de-
fects in material or manufacture free of charge. In the
event that a defect arises during the warranty period,
please send the device to the listed service centre
address, quoting the following model numbers:
14150208L / 14150306L / 14150409L.
Wearing parts (such as light bulbs) and damage
caused by improper handling, non-observance of the
operating instructions or unauthorised interference
with the appliance are excluded from the warranty.
The performance of services under the warranty does
not extend or renew the warranty period.
Service address
Briloner Leuchten GmbH & Co. KG
Im Kissen 2
59929 Brilon
GERMANY
Tel.: +49 29 61 / 97 12‒800
Fax: +49 29 61 / 97 12‒199
E-Mail: kundenservice@briloner.com
www.briloner.com
Free service number:
Tel.: 00800 / 27456637
IAN 355071_2004
For all inquiries about your product, please have
your receipt and the article number (e.g. IAN
123456_7890) ready as your proof of purchase.

16 GB/IE
Declaration of conformity
This product fulfils the requirements of the applicable
European and national directives. Conformity has
been demonstrated. The relevant declarations and
documents are held by the manufacturer.
Manufacturer
Briloner Leuchten GmbH & Co. KG
Im Kissen 2
59929 Brilon
GERMANY
Warranty and service Table des matières

17 FR/BE
Warranty and service
Légende des pictogrammes utilisés .......................................................................... Page 18
Introduction ................................................................................................................................... Page 18
Utilisation conforme ............................................................................................................................Page 18
Descriptif des pièces ...........................................................................................................................Page 18
Contenu de la livraison .......................................................................................................................Page 19
Caractéristiques techniques ................................................................................................................Page 19
Sécurité .............................................................................................................................................Page 19
Consignes de sécurité ......................................................................................................................... Page 19
Préparation ...................................................................................................................................Page 20
Outils et matériel nécessaires ............................................................................................................. Page 20
Avant l‘installation ...............................................................................................................................Page 20
Montage ...........................................................................................................................................Page 20
Entretien et nettoyage..........................................................................................................Page 21
Mise au rebut ............................................................................................................................... Page 21
Garantie et service .................................................................................................................. Page 21
Garantie ..............................................................................................................................................Page 21
Adresse du SAV ..................................................................................................................................Page 22
Déclaration de conformité .................................................................................................................. Page 23
Fabricant ..............................................................................................................................................Page 23
Table des matières

18 FR/BE
Introduction / SécuritéIntroduction
Légende des pictogrammes utilisés
Lire le mode d'emploi! Conducteur de protection
Respectez les avertissements et les
consignes de sécurité ! Danger de mort et risque d'accident
pour les bébés et les enfants
Watt (puissance active) Attention au risque d'électrocution !
Danger de mort !
Hertz (fréquence) Danger d'incendie et de blessures !
Volt Cette lampe n'est pas adaptée aux
variateurs externes et aux interrup-
teurs électroniques.
Tension alternative
(type de courant et de tension) Ra Indice de restitution des couleurs
Durée de vie des LED ON OFF Cycles de commutation
Indice de protection (protection contre
les projections d'eau) Direction de montage
Cette lampe est exclusivement conçue
pour un usage en intérieur. 20
PAP
Mettez l'emballage et l'appareil
au rebut dans le respect de l'environ-
nement !
Température de lumière en Kelvin L'emballage est exclusivement
composé de papier recyclé.
Lampe de salle de bains à LED
Introduction
Nous vous félicitons de l‘achat de votre
nouveau produit. Vous avez opté pour
un produit de grande qualité. Ce mode
d‘emploi est rattaché au produit et contient des ins-
tructions essentielles pour sa mise en service et sa
manipulation. Respectez toujours l‘ensemble des
consignes de sécurité. Avant la mise en service, vé-
rifiez si la tension est correcte et si toutes les pièces
sont correctement montées. Si vous avez des ques-
tions ou des doutes concernant la manipulation de
l‘appareil, veuillez contacter votre revendeur ou le
service après-vente. Veuillez conserver soigneuse-
ment ce mode d‘emploi et remettez-le aux autres
utilisateurs.
Utilisation conforme
Cette lampe est uniquement conçue pour un usage
en intérieur. Cet appareil est uniquement destiné à
un usage domestique et privé. Cette lampe peut être
fi
xée sur toutes les surfaces normalement inflammab
les.
Ce produit est prévu pour un fonctionnement normal
et doit être utilisé uniquement pour un montage au
plafond.
Descriptif des pièces
1 Cheville
2 Membrane en
caoutchouc
3 Gaine de protection
4 Câble d‘alimentation
électrique (externe)
5 Domino
6 Câble de branche-
ment de la lampe
7 Rondelle en silicone
8 Vis
9 Abat-jour
10 Plaque de fond

19 FR/BE
Introduction / SécuritéIntroduction
Contenu de la livraison
1 lampe de salle de bains à LED, modèle
14150208L / 14150306L / 14150409L
3 chevilles
3 vis
2 gaines de protection
3 rondelles en silicone
1 notice de montage et d‘utilisation
Caractéristiques techniques
Lampe:
Nº de modèle: 14150208L /
14150306L /
14150409L
Tension de service: 230–240 V∼, 50 Hz
Puissance nominale: max. LED 12,5 W
Classe de protection: I
Indice de protection: IP44 (protégé contre les
projections d‘eau)
Module LED:
Ampoule: module LED
Puissance nominale: max. 11,5 W
Sécurité
Consignes de sécurité
Les réclamations de garantie sont annulées en cas
de dommages résultant du non-respect du présent
mode d‘emploi! Le fabricant décline toute responsa-
bilité pour les dommages consécutifs! Toute respon-
sabilité est déclinée pour les dommages matériels ou
corporels causés par une manipulation incorrecte
du produit ou par le non-respect des consignes de
sécurité!
DANGER DE MORT ET RISQUE
D‘ACCIDENT POUR LES NOUR-
RISSONS ET LES ENFANTS!
Ne laissez jamais les enfants manipuler sans
surveillance le matériel d‘emballage. Ils risquent
de s‘étouffer avec les matériaux d‘emballage.
Ne laissez pas la lampe ou le matériel d‘embal-
lage traîner sans surveillance. Les films et les
sachets en plastique, les éléments en plastique,
etc. peuvent constituer des jouets dangereux
pour les enfants. Les enfants sous-estiment sou-
vent les dangers.
Tenez toujours les enfants à l‘écart du produit.
Ce produit peut être utilisé par des enfants âgés
de 8 ans et plus ainsi que par des personnes
ayant des capacités physiques, sensorielles ou
mentales réduites ou manquant d‘expérience
ou de connaissances, à condition qu‘ils soient
surveillés ou qu‘ils aient été informés de l‘utili-
sation sûre du produit et qu‘ils en comprennent
les risques liés à son utilisation. Les enfants ne
doivent pas jouer avec le produit. Le nettoyage
et l‘entretien ne doivent pas être effectués par
des enfants laissés sans surveillance.
Danger de mort
par électrocution !
L‘installation électrique doit être effectuée par
un électricien ou par une personne dûment
formée à cet effet.
La lampe est prévue pour une utilisation privée
uniquement.
N’utilisez jamais votre lampe si vous constatez
le moindre endommagement.
Avant le montage, retirez le fusible ou coupez
le disjoncteur de la boîte à fusibles (position 0).
Mettez l‘interrupteur sur la position «OFF».
Assurez-vous avant le montage que la tension
du secteur existante correspond à la tension
de fonctionnement de la lampe (230–240 V~)
(voir «Caractéristiques techniques»).
Assurez-vous lors du montage qu‘aucun fil n‘est
endommagé.
Risque d‘incendie
et de blessures !
N‘assemblez pas la lampe si la lampe à gaz
est défectueuse. Dans ce cas, veuillez contacter
le service après-vente pour faire remplacer une
pièce défectueuse.

20 FR/BE
Montage / Entretien et nettoyage / Mise au rebut / Garantie et serviceSécurité / Préparation / Montage
La lampe peut être installée sur toutes les
surfaces normalement inflammables.
Afin d‘éviter toute brûlure, assurez-vous que la
lampe est éteinte et refroidie avant de la prendre
en main. L‘ampoule dégage une forte chaleur.
Ne fixez pas la lampe sur un support humide
et conducteur.
La source lumineuse de cette lampe n‘est pas
remplaçable ; lorsque la source de lumière ar-
rive en fin de vie, l‘ensemble de la lampe doit
être remplacé.
Cette lampe n‘est pas adaptée aux
variateurs externes et aux interrup-
teurs électriques.
Utilisez exclusivement les éléments fournis, sans
quoi toute réclamation de garantie sera nulle et
non advenue.
Ne pas utiliser la lampe avec un verre de
lampe défectueux. Remplacer le verre de
lampe défectueux.
Veuillez vous conformer
aux points suivants
Soyez toujours vigilant ! Faites toujours attention
à ce que vous faites et agissez raisonnablement.
N‘effectuez jamais le montage de la lampe si
vous n‘êtes pas concentré ou si vous vous sen-
tez mal.
Ne jamais regarder directement dans la source
lumineuse (ampoule, LED, etc.).
Ne pas observer la source lumineuse (ampoule,
LED etc.) à l‘aide d‘un instrument d‘optique
(loupe p. ex.).
Préparation
Outils et matériel nécessaires
Les outils et matériels indiqués ne sont pas inclus dans
le contenu de la livraison. Il s‘agit là de données et
de valeurs indicatives vous permettant de vous orien-
ter. Les caractéristiques du matériel dépendent des
conditions spécifiques dont vous disposez sur place.
– Crayon à papier / outil de marquage
– Détecteur de tension à 2 pôles
– Tournevis
– Perceuse
– Pince coupante
– Marteau
– Escabeau
– Foret (env. Ø6 mm)
Avant l‘installation
Important : Faites effectuer l’installation électrique
par un électricien qualifié ou toute autre personne
possédant les connaissances nécessaires à ce type
d’installation.
Veuillez vous familiariser avant l’installation avec
toutes les instructions et figures contenues dans
cette notice ainsi qu’avec le luminaire même.
Assurez-vous avant l’installation de l’absence
de tension sur la ligne électrique devant être
raccordée au luminaire. À cet effet, retirez le
fusible ou désactivez le disjoncteur automatique
dans le boîtier à fusibles (position 0).
Vérifiez l‘absence de tension au moyen d‘un
détecteur de tension à 2 pôles.
Montage
Détachez l‘abat-jour
9
de la plaque de fond
10
en le tournant dans le sens anti-horaire.
Maintenez la plaque de fond contre la surface
de montage et marquez les trous de perçage
à l‘aide des trous prévus pour les vis 8 sur la
plaque de fond 10 .
Percez les trous (Ø6mm, env. 40mm de pro-
fondeur). Assurez-vous de ne pas endommager
le câble d‘alimentation.
Enfoncez les chevilles 1 dans les trous de per-
çage. Si nécessaire, aidez-vous d‘un marteau.
Ouvrez la membrane en caoutchouc 2 avec
un objet pointu (par ex. un tournevis).
Introduisez le câble d‘alimentation électrique
(externe) 4 dans la membrane en caoutchouc
2
. Assurez-vous que le positionnement est correct.

21 FR/BE
Montage / Entretien et nettoyage / Mise au rebut / Garantie et serviceSécurité / Préparation / Montage
Fixez la plaque de fond 10 à la surface de
montage à l‘aide des rondelles en silicone 7
et des vis 8.
Guidez les fils L et N du câble d‘alimentation
électrique (externe) 4 à travers les gaines de
protection 5.
Reliez maintenant le câble de branchement 6
de la lampe au câble d‘alimentation électrique
(externe) 4 à l‘aide du domino 5.
Soyez attentif / attentive aux couleurs des fils rac-
cordés ensemble (fil conducteur, noir ou marron
= symbole L, fil de neutre, bleu = symbole N).
Reliez le conducteur de protection (vert-jaune)
avec la borne de mise à la terre marquée sur
le boîtier de raccordement .
Fixez l‘abat-jour 9 en le vissant sur la plaque
de fond 10 dans le sens horaire. Assurez-vous
que le positionnement est correct.
Remettez le fusible en place ou réenclenchez le
disjoncteur dans la boîte à fusibles (position I).
Votre lampe est maintenant prête à l‘emploi.
Entretien et nettoyage
RISQUE
D’ÉLECTROCUTION !
P
our procéder au nettoyage, coupez tout d‘ab
ord
l‘alimentation secteur de la lampe. Retirez ensuite
le fusible ou coupez le disjoncteur de la boîte
à fusible (position 0).
ATTENTION! RISQUE DE BRÛLURES À
CAUSE DE SURFACES TRÈS CHAUDES!
Laissez refroidir la lampe complètement.
Pour procéder au nettoyage, utilisez uniquement
un chiffon sec et non pelucheux. N‘utilisez ni
solvant, ni benzine ou autres produits similaires
qui endommageraient la lampe.
Remettez le fusible en place ou remettez en route
le disjoncteur (position I).
Mise au rebut
L’emballage se compose de matières recyclables
pouvant être mises au rebut dans les déchetteries
locales.
b
a
Veuillez respecter l‘identification des ma-
tériaux d‘emballage pour le tri sélectif,
ils sont identifiés avec des abbréviations
(a) et des chiffres (b) ayant la significa-
tion suivante : 1–7 : plastiques / 20–22 :
papiers et cartons / 80–98 : matériaux
composite.
Le produit et les matériaux d’emballage
sont recyclables, mettez-les au rebut sé-
parément pour un meilleur traitement des
déchets. Le logo Triman n’est valable
qu’en France.
Afin de contribuer à la protection de
l’environnement, veuillez ne pas jeter
votre produit usagé dans les ordures
ménagères, mais éliminez-le de manière
appropriée. Pour obtenir des renseigne-
ments concernant les points de collecte
et leurs horaires d’ouverture, vous pouvez
contacter votre municipalité.
Garantie et service
Garantie
Article L217-16 du Code de la consommation
Lorsque l‘acheteur demande au vendeur, pendant
le cours de la garantie commerciale qui lui a été
consentie lors de l‘acquisition ou de la réparation
d‘un bien meuble, une remise en état couverte par la
garantie, toute période d‘immobilisation d‘au moins
sept jours vient s‘ajouter à la durée de la garantie
qui restait à courir. Cette période court à compter
de la demande d‘intervention de l‘acheteur ou de
la mise à disposition pour réparation du bien en
cause, si cette mise à disposition est postérieure à
la demande d‘intervention.
Indépendamment de la garantie commerciale sous-
crite, le vendeur reste tenu des défauts de conformité
du bien et des vices rédhibitoires dans les conditions
prévues aux articles L217-4 à L217-13 du Code de
la consommation et aux articles 1641 à 1648 et
2232 du Code Civil.

22 FR/BE
Garantie et serviceGarantie et service
Article L217-4 du Code de la consommation
Le vendeur livre un bien conforme au contrat et
répond des défauts de conformité existant lors de
la délivrance.
Il répond également des défauts de conformité ré-
sultant de l‘emballage, des instructions de montage
ou de l‘installation lorsque celle-ci a été mise à sa
charge par le contrat ou a été réalisée sous sa res-
ponsabilité.
Article L217-5 du Code de la consommation
Le bien est conforme au contrat :
1° S´il est propre à l‘usage habituellement attendu
d‘un bien semblable et, le cas échéant :
- s‘il correspond à la description donnée par le
vendeur et posséder les qualités que celui-ci a
présentées à l‘acheteur sous forme d‘échantil-
lon ou de modèle ;
- s‘il présente les qualités qu‘un acheteur peut lé-
gitimement attendre eu égard aux déclarations
publiques faites par le vendeur, par le produc-
teur ou par son représentant, notamment dans
la publicité ou l‘étiquetage ;
2° Ou s‘il présente les caractéristiques définies d‘un
commun accord par les parties ou être propre
à tout usage spécial recherché par l‘acheteur,
porté à la connaissance du vendeur et que ce
dernier a accepté.
Article L217-12 du Code de la consommation
L‘action résultant du défaut de conformité se prescrit
par deux ans à compter de la délivrance du bien.
Article 1641 du Code civil
Le vendeur est tenu de la garantie à raison des
défauts cachés de la chose vendue qui la rendent
impropre à l‘usage auquel on la destine, ou qui
diminuent tellement cet usage que l‘acheteur ne
l‘aurait pas acquise, ou n‘en aurait donné qu‘un
moindre prix, s‘il les avait connus.
Article 1648 1er alinéa du Code civil
L‘action résultant des vices rédhibitoires doit être
intentée par l‘acquéreur dans un délai de deux ans
à compter de la découverte du vice.
Les pièces détachées indispensables à l’utilisation
du produit sont disponibles pendant la durée de la
garantie du produit.
Vous bénéficiez d’une garantie de 36 mois à partir
de la date d’achat de cet appareil. Cet appareil
a été fabriqué avec soin et soumis à un contrôle
qualité minutieux.
Pendant la durée de la garantie, nous réparons
gratuitement tous les défauts de matériaux ou de
fabrication. Si cependant des défauts devaient ap-
paraître pendant la période de garantie, veuillez
expédier l‘appareil à l‘adresse du SAV indiquée,
en mentionnant le numéro de modèle suivant:
14150208L / 14150306L / 14150409L.
La garantie exclut les dommages dus à une mani-
pulation incorrecte, au non-respect des instructions
du mode d’emploi ou à une intervention par une
personne non autorisée, ainsi que le remplacement
des pièces d’usure (par ex. ampoule). La période
de garantie n’est aucunement prolongée ou renou-
velée par une prestation de garantie.
Adresse du SAV
Briloner Leuchten GmbH & Co. KG
Im Kissen 2
59929 Brilon
ALLEMAGNE
Tél. : +49 29 61 / 97 12‒800
Fax : +49 29 61 / 97 12‒199
E-Mail : [email protected]
www.briloner.com
Numero de service gratuit :
Tél. : 00800 / 27456637
IAN 355071_2004
Veuillez conserver le ticket de caisse et la référence
de l’article (par ex. IAN 123456_7890) à titre de
preuves d’achat pour effectuer toute demande.

23 FR/BE
Déclaration de conformité
Ce produit remplit les critères des réglementations
européennes et nationales. La conformité a été
attestée. Les déclarations et documents respectifs
sont en possession du fabricant.
Fabricant
Briloner Leuchten GmbH & Co. KG
Im Kissen 2
59929 Brilon
ALLEMAGNE
Garantie et serviceGarantie et service

24
Inhoudsopgave

25 NL/BE
Legenda van de gebruikte pictogrammen ..................................................... Pagina 26
Inleiding ....................................................................................................................................... Pagina 26
Correct en doelmatig gebruik ........................................................................................................ Pagina 26
Beschrijving van de onderdelen ..................................................................................................... Pagina 26
Omvang van de levering ................................................................................................................ Pagina 27
Technische gegevens ...................................................................................................................... Pagina 27
Veiligheid .................................................................................................................................... Pagina 27
Veiligheidsinstructies ....................................................................................................................... Pagina 27
Voorbereiding ........................................................................................................................ Pagina 28
Benodigde werktuigen en materiaal .............................................................................................. Pagina 28
Voor de installatie ........................................................................................................................... Pagina 28
Montage ....................................................................................................................................... Pagina 28
Onderhoud en reiniging ................................................................................................. Pagina 29
Afvoer ............................................................................................................................................ Pagina 29
Garantie en service ............................................................................................................ Pagina 29
Garantie .......................................................................................................................................... Pagina 29
Serviceadres .................................................................................................................................... Pagina 29
Verklaring van conformiteit ............................................................................................................. Pagina 30
Fabrikant .......................................................................................................................................... Pagina 30
Inhoudsopgave

26 NL/BE
Inleiding
Legenda van de gebruikte pictogrammen
Lees a.u.b. de gebruiksaanwijzing! Aardedraad
Neem de waarschuwingen en
veiligheidsinstructies in acht! Levensgevaar en kans op ongevallen
bij kleuters en kinderen
Watt (nuttig vermogen) Waarschuwing voor elektrische
schokken! Levensgevaar!
Hertz (frequentie) Brand- en letselgevaar!
Volt De lamp is niet geschikt voor een
externe dimmer en elektronische
schakelaar.
Wisselspanning
(stroom- en spanningstype) Ra Kleurweergave-index
Led-levensduur ON OFF Schakelcycli
Beschermingsgraad (spatwaterdicht) Montagerichting
Deze lamp is uitsluitend bedoeld voor
gebruik binnenshuis. 20
PAP
Voer de verpakking en het apparaat
op een milieuvriendelijke manier af!
Lichttemperatuur in Kelvin De verpakking bestaat uit 100 %
gerecycled papier.
LED-badkamerlamp
Inleiding
Gefeliciteerd met de aankoop van uw
nieuwe apparaat. U hebt voor een hoog-
waardig product gekozen. Deze gebruiks-
aanwijzing hoort bij dit product en bevat belangrijke
aanwijzingen voor de ingebruikname en de bedie-
ning. Neem altijd de veiligheidsinstructies in acht.
Controleer vóór de ingebruikname of de juiste span-
ning beschikbaar is en of alle onderdelen goed ge-
monteerd zijn. Wanneer u vragen hebt of onzeker
bent in verband met de bediening van het apparaat,
kunt u contact opnemen met uw leverancier of met
het servicepunt. Bewaar deze handleiding op een
veilige plaats en geef hem evt. aan derden door.
Correct en doelmatig gebruik
Deze lamp is uitsluitend geschikt voor gebruik bin-
nenshuis. Dit apparaat is bedoeld voor gebruik in
privé-huishoudens. De lamp kan op alle normaal
ontvlambare oppervlakken worden bevestigd. Dit
product is bedoeld voor normaal gebruik en mag
uitsluitend aan het plafond worden gemonteerd.
Beschrijving van de onderdelen
1 Plug
2 Rubbermembraan
3 Isolatiekous
4 Stroomkabel
(extern)
5 Kroonsteentje
6 Aansluitkabel
van de lamp
7 Tussenring van
silicoon
8 Schroeven
9 Lampenkap
10 Bodemplaat
Inleiding / Veiligheid

27 NL/BE
Inleiding Inleiding / Veiligheid
Omvang van de levering
1 LED-badkamerlamp, model 14150208L /
14150306L / 14150409L
3 pluggen
3 schroeven
2 isolatiekousen
3 tussenringen van silicoon
1 montagehandleiding en gebruiksaanwijzing
Technische gegevens
Lamp:
Modelnr.: 14150208L / 14150306L /
14150409L
Bedrijfsspanning: 230–240 V∼, 50 Hz
Nominaal vermogen: max. LED 12,5 W
Beschermingsklasse: I
Beschermingsgraad: IP44 (spatwaterdicht)
Led-module:
Verlichtingsmiddel: led-module
Nominaal vermogen: max. 11,5 W
Veiligheid
Veiligheidsinstructies
Bij schade die is ontstaan door het negeren van
deze gebruiksaanwijzing komt de garantie te ver-
vallen! Wij zijn niet aansprakelijk voor gevolgschade!
Voor materiële schade of persoonlijk letsel dat wordt
veroorzaakt door onjuist gebruik of het negeren van
de veiligheidsinstructies zijn wij niet aansprakelijk!
LEVENSGEVAAR EN RISICO
OP ONGEVALLEN VOOR
KLEUTERS EN KINDEREN!
Laat kinderen nooit zonder toezicht bij het ver-
pakkingsmateriaal. Er bestaat verstikkingsgevaar
door het verpakkingsmateriaal. Laat de lamp of
het verpakkingsmateriaal niet achteloos liggen.
Plastic folie / -zakken, kunststof delen etc. kunnen
een gevaarlijk speelgoed vormen voor kinderen.
Kinderen onderschatten vaak de gevaren.
Houd kinderen altijd uit de buurt van het product.
Dit product kan door kinderen vanaf 8 jaar en
ouder alsmede door personen met verminderde
fysieke, sensorische of mentale vaardigheden
of een gebrek aan ervaring en kennis worden
gebruikt, als zij onder toezicht staan of geïnstru-
eerd werden met betrekking tot het veilige gebr
uik
van het product en zij de hieruit voortvloeiende
gevaren begrijpen. Kinderen mogen niet met het
product spelen. Reiniging en onderhoud mogen
niet door kinderen zonder toezicht worden uit-
gevoerd.
Levensgevaar door
elektrische schokken!
Laat de elektronische installatie door een opge-
leide elektricien of een voor elektrische installa-
ties aangewezen persoon uitvoeren.
De lamp is uitsluitend bestemd voor het gebruik
in privéhuishoudens.
Gebruik de lamp niet als u een beschadiging
hebt geconstateerd.
Verwijder voor de montage de beveiliging of
schakel de beschermingsschakelaar in de stop-
penkast uit (0-stand). Zet de lichtschakelaar op
positie ‚Uit‘.
Wees er voor de montage zeker van dat de
beschikbare netspanning overeenkomt met de
benodigde voedingsspanning van de lampen
(230–240 V∼) (zie „Technische gegevens“).
Wees er zeker van dat er bij de montage geen
leidingen worden beschadigd.
Brand- en letselgevaar!
Monteer de lamp niet met een defect lampglas.
Neem in dit geval contact op met het klanten-
service.
De lamp kan op normaal ontvlambare opper-
vlakken geïnstalleerd worden.
Zorg ervoor dat de lamp uitgeschakeld en af-
gekoeld is voordat u deze aanraakt om brand-
wonden te vermijden. Lampen ontwikkelen een
grote hitte.

28 NL/BE
Veiligheid / Voorbereiding / Montage
Bevestig de lamp niet op een vochtige of
geleidende ondergrond.
De lichtbron van deze lamp kan niet worden
vervangen; als de lichtbron het einde van zijn
levensduur heeft bereikt, dient de complete lamp
te worden vervangen.
De lamp is niet geschikt voor een
externe dimmer en elektronische
schakelaar.
Gebruik uitsluitend de meegeleverde onderdelen,
anders vervalt de garantie.
Gebruik de lamp niet met een defect lampglas.
Defect lampglas vervangen.
Zo handelt u correct
Wees altijd alert. Let er altijd op wat u doet en
gebruik altijd uw volledig verstand. Monteer de
lamp niet als u ongeconcentreerd bent of zich
niet lekker voelt.
Niet direct in de lichtbron (lamp, LED etc.) kijken.
De lichtbron (verlichtingsmiddel, LED etc.) niet
met een optisch instrument (bijv. vergrootglas)
bekijken.
Voorbereiding
Benodigde werktuigen
en materiaal
De genoemde werktuigen en materialen worden niet
meegeleverd. Het gaat hierbij om niet-verbindelijke
informatie en waarden ter oriëntatie. De hoedanig-
heid van het materiaal is afhankelijk van de indivi-
duele omstandigheden ter plekke.
– Potlood / markeerstift
– 2-polige spanningzoeker
– Schroevendraaier
– Boormachine
– Zijkniptang
– Hamer
– Ladder
– Boor (ca. Ø 6 mm)
Voor de installatie
Belangrijk: Laat de elektrische installatie uitvoeren
door een opgeleide elektricien of een persoon die is
bevoegd voor het werken aan elektrische installaties.
Maak uzelf vóór de installatie vertrouwd met alle
instructies en afbeeldingen in deze handleiding
evenals met de lamp zelf.
Controleer vóór de installatie of er geen span-
ning staat op leiding waarop de lamp moet
worden aangesloten. Verwijder hiervoor de
zekering of schakel de installatieautomaat in
de zekeringkast uit (0-stand).
Controleer met een 2-polige spanningzoeker
of de leiding spanningsloos is.
Montage
Maak de lampenkap 9 los door hem tegen
de klok in van de bodemplaat 10 te draaien.
Houd de bodemplaat tegen het montagevlak en
markeer de boorgaten met behulp van de in
de bodemplaat 10 gemaakte gaten voor de
schroeven 8.
Boor de gaten (ca. Ø 6 mm, ca. 40 mm diep). Zorg
ervoor dat u de stroomkabel niet beschadigt.
Steek de pluggen 1 in de boorgaten. Gebruik,
indien nodig, een hamer.
Open het rubbermembraan 2 met een puntig
voorwerp (bijv. schroevendraaier).
Steek de stroomkabel (extern) 4 door het
rubbermembraan 2. Controleer of alles goed
vast zit.
Bevestig de bodemplaat 10 met behulp van de
tussenringen van silicoon
7
en de schroeven
8
aan het montagevlak.
Voer de afzonderlijke draden L en N van
de stroomkabel (extern) 4 door de isolatie-
kousen 5.
Verbind vervolgens de aansluitkabel 6 van de
lamp met behulp van het kroonsteentje 5 met
de stroomkabel (extern) 4.
Let ook op de gekleurde aansluiting van de aan-
gesloten kabels (fasedraad, zwart of bruin =
symbool L, nuldraad, blauw = symbool N).
Montage / Onderhoud en reiniging / Afvoer / Garantie en service

29 NL/BE
Veiligheid / Voorbereiding / Montage Montage / Onderhoud en reiniging / Afvoer / Garantie en service
Verbind de aardedraad (groen-geel) met de
aan de aansluitbehuizing gemarkeerde aar-
dingsklem .
Bevestig de lampenkap 9 door hem met de
klok mee op de bodemplaat 10 te draaien.
Controleer of alles goed vast zit.
Plaats de zekering weer terug of schakel de
aardlekschakelaar in de zekeringskast weer
in (I-stand).
Uw lamp is nu gereed voor gebruik.
Onderhoud en reiniging
GEVAAR VOOR
ELEKTRISCHE SCHOK!
Verbreek voor de reiniging eerst de verbinding
van de lamp met het stroomnet. Verwijder hier-
voor de zekering of schakel het betreffende
stroomcircuit in de zekeringenkast uit (0-stand).
PAS OP! KANS OP BRANDWONDEN
DOOR HETE OPPERVLAKKEN!
Laat de lamp volledig afkoelen.
Gebruik voor de reiniging uitsluitend een droge,
pluisvrije doek. Gebruik geen oplosmiddel,
benzine e.d. De lamp zal hierdoor schade
ondervinden.
Plaats de zekering weer terug en schakel de
leidingbeschermende schakelaar weer aan
(I-stand).
Afvoer
De verpakking bestaat uit milieuvriendelijke grond-
stoffen die u via de plaatselijke recyclingcontainers
kunt afvoeren.
b
a
Neem de aanduiding van de verpakkings-
materialen voor de afvalscheiding in acht.
Deze zijn gemarkeerd met de afkortingen
(a) en een cijfers (b) met de volgende
betekenis: 1–7: kunststoffen / 20–22:
papier en vezelplaten / 80–98: compo-
sietmaterialen.
Het product en de verpakkingsmaterialen
zijn recyclebaar; verwijder deze afzonder-
lijk voor een betere afvalbehandeling. Het
Triman-logo geldt alleen voor Frankrijk.
Gooi het afgedankte product omwille van
het milieu niet weg via het huisvuil, maar
geef het af bij het daarvoor bestemde
depot of het gemeentelijke milieupark.
Over afgifteplaatsen en hun openingstij-
den kunt u zich bij uw aangewezen
instantie informeren.
Garantie en service
Garantie
Op dit product verlenen wij 36 maanden garantie
vanaf koopdatum.
Het apparaat werd zorgvuldig vervaardigd en aan
een nauwkeurige kwaliteitscontrole onderworpen.
Binnen de garantieperiode herstellen wij kosteloos
alle materiaal- of productiefouten. Mocht u deson-
danks tijdens de garantieperiode mankementen
aantreffen, stuur het apparaat dan alstublieft naar
het aangegeven serviceadres met vermelding van
de volgende modelnummers: 14150208L /
14150306L / 14150409L.
Beschadigingen door ondeskundig gebruik, negeren
van de handleiding of ingrepen door niet-geautori-
seerde personen zijn van de garantieverlening uitge-
sloten. Dit geldt eveneens voor slijtende delen (zoals
bijv. gloeilampen).
Door de garantieservice wordt de garantieperiode
noch verlengd noch vernieuwd.
Serviceadres
Briloner Leuchten GmbH & Co. KG
Im Kissen 2
59929 Brilon
DUITSLAND
Tel.: +49 29 61 / 97 12‒800
Fax: +49 29 61 / 97 12‒199
E-Mail: kundenservice@briloner.com
www.briloner.com

30 NL/BE
Spis zawartościGarantie en service
Gratis servicenummer:
Tel.: 00800 / 27456637
IAN 355071_2004
Houd alstublieft de kassabon en het artikelnummer
(bijv. IAN 123456_7890) voor alle aanvragen als
bewijs voor de koop gereed.
Verklaring van conformiteit
Dit product voldoet aan de eisen van de van
toepassing zijnde Europese en nationale richtlijnen.
De conformiteit is aangetoond. Desbetreffende
verklaringen liggen ter inzage bij de fabrikant.
Fabrikant
Briloner Leuchten GmbH & Co. KG
Im Kissen 2
59929 Brilon
DUITSLAND

31 PL
Spis zawartości
Legenda zastosowanych piktogramów ...........................................................Strona 32
Instrukcja ......................................................................................................................................Strona 32
Zastosowanie zgodne z przeznaczeniem .....................................................................................Strona 32
Opis części ....................................................................................................................................... Strona 33
Zawartość .........................................................................................................................................Strona 33
Dane techniczne ..............................................................................................................................Strona 33
Bezpieczeństwo ......................................................................................................................Strona 33
Wskazówki bezpieczeństwa...........................................................................................................Strona 33
Przygotowanie .......................................................................................................................Strona 34
Potrzebne narzędzia i materiały .....................................................................................................Strona 34
Przed instalacją ................................................................................................................................Strona 34
Montaż ........................................................................................................................................... Strona 35
Konserwacja i czyszczenie............................................................................................Strona 35
Utylizacja .....................................................................................................................................Strona 35
Gwarancja i serwis ..............................................................................................................Strona 36
Gwarancja .......................................................................................................................................Strona 36
Adres serwisu ...................................................................................................................................Strona 36
Deklaracja zgodności ......................................................................................................................Strona 36
Producent ..........................................................................................................................................Strona 36
Garantie en service

32 PL
Instrukcja / BezpieczeństwoInstrukcja
Legenda zastosowanych piktogramów
Przeczytać instrukcję obsługi! Przewód ochronny
Przestrzegać wskazówek ostrzegawczych
i bezpieczeństwa! Niebezpieczeństwo utraty życia i
odniesienia wypadku przez dzieci
Wat (moc czynna) Ostrzeżenie o możliwości porażenia
prądem! Niebezpieczeństwo utraty
życia!
Herc (częstotliwość) Niebezpieczeństwo pożaru i
odniesienia obrażeń ciała!
Wolt
Lampa nie nadaje się do użycia w
połączeniu z zewnętrznymi regulato-
rami jasności światła lub wyłącznikami
elektronicznymi.
Napięcie przemienne
(rodzaj prądu i napięcia) Ra Współczynnik oddawania barw
Żywotność diod LED ON OFF Cykle włączania
Stopień ochrony (ochrona przed
pryskającą wodą) Kierunek montażu
Niniejsza lampa nadaje się wyłącznie
do zastosowania w pomieszczeniach
wewnętrznych. 20
PAP
Opakowanie i urządzenie przekazać
do utylizacji zgodnie z przepisami o
ochronie środowiska!
Temperatura barwowa w kelwinach Opakowanie składa się w 100 %
ze zutylizowanego papieru.
Lampa łazienkowa LED
Instrukcja
Gratulujemy Państwu zakupu nowego
produktu. Zdecydowali się Państwo na
zakup produktu najwyższej jakości. Niniej-
sza instrukcja obsługi należy do produktu i zawiera
ważne wskazówki dotyczące uruchamiania i posługi-
wania się nim. Zawsze należy przestrzegać wszyst-
kich wskazówek dotyczących bezpieczeństwa. Przed
uruchomieniem proszę sprawdzić, czy występuje
prawidłowe napięcie i czy wszystkie części są pra-
widłowo zamontowane. W przypadku zapytań lub
niepewności odnośnie obchodzenia się z urządze-
niem prosimy o kontakt ze sprzedawcą lub punktem
serwisowym. Proszę starannie przechowywać niniej-
szą instrukcję obsługi i ewentualnie przekazać ją
osobom trzecim.
Zastosowanie zgodne
z przeznaczeniem
Niniejsza lampa nadaje się wyłącznie do zastosowa-
nia w pomieszczeniach. To urządzenie przewid
ziano
do użytku w prywatnym gospodarstwie domowym.
L
ampa może być mocowana na wszystkich powi
erzch-
niach o normalnym stopniu palności. Ten produkt
jest przeznaczony do normalnego użytku i może
być zastosowany wyłącznie do montażu na suficie.

33 PL
Instrukcja / BezpieczeństwoInstrukcja
Opis części
1 Kołki
2 Gumowa membrana
3 Wężyk ochronny
4 Przewód zasilający
(zewnętrzny)
5 Kostka zaciskowa
6 Kabel zasilający
lampy
7 Podkładka z sylikonu
8 Śruby
9 Klosz lampy
10 Płyta dolna
Zawartość
1 lampa łazienkowa LED, model 14150208L /
14150306L / 14150409L
3 kołki
3 śruby
2 wężyki ochronne
3 podkładki z silikonu
1 instrukcja montażu i obsługi
Dane techniczne
Lampa:
Nr modelu: 14150208L / 14150306L /
14150409L
Napięcie robocze: 230–240 V∼, 50 Hz
Moc znamionowa: maks. LED 12,5 W
Klasa ochrony: I
Stopień ochrony: IP44 (zabezpieczenie przed
zachlapaniem)
Moduł LED:
Żarówka: moduł LED
Moc znamionowa: maks. 11,5 W
Bezpieczeństwo
Wskazówki bezpieczeństwa
W przypadku szkód spowodowanych nieprzestrze-
ganiem niniejszej instrukcji obsługi wygasa prawo
do gwarancji! Za szkody pośrednie producent nie
ponosi odpowiedzialności! W przypadku szkód ma-
terialnych lub osobowych, które powstały wskutek
niewłaściwego obchodzenia się lub nieprzestrzegan
ia
wskazówek dotyczących bezpieczeństwa, nie pono-
simy żadnej odpowiedzialności!
NIEBEZPIE-
CZEŃSTWO UTRATY ŻYCIA
I WYPADKU DLA DZIECI!
Nigdy nie należy pozostawiać dzieci bez nad-
zoru z materiałem opakowaniowym. Istnieje
zagrożenie uduszeniem spowodowane przez
materiał opakowaniowy. Lamp i opakowań nie
pozostawiać w nieodpowiednich miejscach.
Folie / woreczki plastikowe, elementy z twor
zywa
sztucznego itp. mogą zostać użyte przez dzieci
jako niebezpieczna zabawka. Dzieci często nie
dostrzegają niebezpieczeństwa.
Dzieci nie powinny mieć dostępu do produktu.
Niniejszy produkt może być używany przez
dzieci od lat 8 oraz przez osoby z obniżonymi
zdolnościami fizycznymi, sensorycznymi lub
mentalnymi lub brakiem doświadczenia i / lub
wiedzy, jeśli pozostają pod nadzorem lub zo-
stały pouczone w kwestii bezpiecznego użycia
produktu i rozumieją wynikające z niego zagro-
żenia. Dzieci nie mogą bawić się produktem.
Czyszczenie i konserwacja nie mogą być wy-
konywane przez dzieci bez nadzoru.
Zagrożenie życia przez poraże
nie
prądem elektrycznym!
Wykonanie instalacji elektrycznej należy zlecić
wykwalifikowanemu elektrykowi lub osobie prze-
szkolonej w zakresie wykonywania instalacji
elektrycznych.
Lampa przeznaczona jest wyłącznie do użytko-
wa
nia w prywatnych gospodarstwach domowych.

34 PL
Montaż / Konserwacja i czyszczenie / UtylizacjaBezpieczeństwo / Przygotowanie
Nigdy nie należy używać lampy w przypadku
stwierdzenia jakichkolwiek uszkodzeń.
Przed rozpoczęciem montażu wyjąć bezpiecz-
nik lub wyłączyć wyłącznik nadmiarowo-prądow
y
w skrzynce bezpiecznikowej (położenie 0). Usta-
wić przełącznik na pozycji „wył.“.
Przed montażem należy upewnić się, że istnie-
jące napięcie sieci jest zgodne z wymaganym
napięciem roboczym lampy (230–240 V∼)
(patrz „Dane techniczne“).
Należy się upewnić, że przy montażu nie
zostaną uszkodzone żadne przewody.
Niebezpieczeństwo pożaru
i odniesienia obrażeń ciała!
Nie montować lampy z uszkodzonym szklanym
abażurem. W takim przypadku należy skontak-
tować się z punktem serwisowym w celu wymiany.
Lampa może być zamontowana na wszystkich
zwykłych łatwopalnych powierzchniach.
Aby uniknąć oparzenia, należy upewnić się
przed dotknięciem lampy, że jest ona wyłączona
i schłodzona. Źródła światła wydzielają dużo
ciepła.
Lampy nie należy mocować na wilgotnym lub
przewodzącym prąd podłożu.
Źródło światła tej lampy nie podlega wymianie;
jeśli źródło światła zakończy swoje działanie,
należy wymienić całą lampę.
Lampa nie nadaje się do użycia
w połączeniu z zewnętrznymi regu-
latorami jasności światła lub wyłącz-
nikami elektronicznymi.
Stosować wyłącznie dołączone elementy, w
przeciwnym razie wygaśnie gwarancja.
Nie montować lampy z uszkodzonym szklanym
abażurem.
Prawidłowy sposób
postępowania
Zawsze zachowywać ostrożność! Zawsze
zwracać uwagę na wykonywane czynności i
kierować się rozsądkiem. Nie należy wykony-
wać montażu lampy w przypadku braku kon-
centracji lub złego samopoczucia.
Nie należy bezpośrednio wpatrywać się w
źródło światła (żarówki, LED itp.).
Źródła światła (żarówki, diody LED) nie należy
oglądać za pomocą optycznego instrumentu
(np. lupy).
Przygotowanie
Potrzebne narzędzia i materiały
Wymienione narzędzia i materiały nie są częścią
zestawu. Stanowią jedynie niewiążące informacje
i wartości orientacyjne. Właściwości materiału zależą
od indywidualnych warunków w pomieszczeniu.
– Ołówek / narzędzie do oznaczania
– 2-biegunowy detektor napięcia
– Śrubokręt
– Wiertarka
– Szczypce do cięcia drutu
– Młotek
– Drabina
– Wiertło (Ø ok. 6 mm)
Przed instalacją
Ważne: wykonanie instalacji elektrycznej należy
zlecić wykwalifikowanemu elektrykowi lub osobie
przeszkolonej w zakresie wykonywania instalacji
elektrycznych.
Przed instalacją należy zapoznać się ze wszyst-
kimi instrukcjami i rysunkami zawartymi w niniej-
szej instrukcji oraz z samą lampą.
Przed instalacją należy upewnić się, że prze-
wód, do którego ma być podłączona lampa,
nie znajduje się pod napięciem. W tym celu
należy wyjąć bezpiecznik lub wyłączyć wyłącz-
nik nadmiarowo-prądowy w skrzynce bezpiecz-
nikowej (pozycja 0).
Sprawdzić brak napięcia za pomocą 2-biegu-
nowego detektora napięcia.

35 PL
Montaż / Konserwacja i czyszczenie / UtylizacjaBezpieczeństwo / Przygotowanie
Montaż
Zdjąć klosz lampy 9 odkręcając go od płyty
dolnej 10 w kierunku przeciwnym do ruchu
wskazówek zegara.
Płytę dolną przytrzymać przyłożoną do po-
wierzchni montażowej i zaznaczyć otwory do
wiercenia za pomocą otworów przewidzianych
na śruby 8 w płycie dolnej 10 .
Wywiercić otwory (ok. Ø 6 mm, głębokość ok.
40 mm). Uważać na to, aby nie uszkodzić prze-
wodu doprowadzającego.
Do wywierconych otworów włożyć kołki 1.
W razie konieczności należy użyć młotka.
Otworzyć gumową membranę 2 przy pomocy
zaostrzonego przedmiotu (np. śrubokręt).
Przeprowadzić przewód zasilający (zewnętrzny)
4 przez gumową membranę 2. Należy
uważać na właściwe ułożenie.
Z
amocować płytę dolną
10
do powierzchni m
on-
tażowej za pomocą podkładek z sylikonu 7 i
śrub 8.
Pojedyncze żyłki L i N przewodu zasilającego
(zewnętrznego) 4 przeprowadzić przez wę-
żyki ochronne 5.
Za pomocą zaciskowej kostki elektrycznej 5
połączyć kabel zasilający lampy 6 z przewo-
dem zasilającym (zewnętrznym) 4.
Uważać na kolorowe złączenie podłączonych
p
rzewodów (przewód przewodzący prąd, czarn
y
lub brązowy = symbol L, przewód neutralny,
niebieski = symbol N).
Połączyć przewód ochronny (zielono-żółty)
z zaznaczonym w obudowie połączeniowej
zaciskiem uziemiającym .
Zamocować klosz lampy 9 przykręcając go
do płyty dolnej 10 w kierunku zgodnym z ru-
chem wskazówek zegara. Należy uważać na
właściwe ułożenie.
Ponownie włożyć bezpiecznik lub włączyć
wyłącznik nadmiarowo-prądowy na skrzynce
bezpiecznikowej (pozycja I).
Lampa jest gotowa do zastosowania.
Konserwacja i czyszczenie
NIEBEZPIECZEŃSTWO
PORAŻENIA PRĄDEM ELEKTRYCZNYM!
Przed rozpoczęciem czyszczenia najpierw
odłączyć lampę od sieci elektrycznej. W tym
celu należy wyjąć bezpiecznik lub wyłączyć
wyłącznik nadmiarowo-prądowy w skrzynce
bezpiecznikowej (pozycja 0).
OSTROŻNIE! NIEBEZPIECZEŃSTWO
POPARZENIA GORĄCYMI POWIERZCH-
NIAMI!
Odczekać, aż lampa całkowicie ostygnie.
Do czyszczenia należy używać wyłącznie such
ej,
niestrzępiącej się szmatki. Nie używać rozpusz-
czalników, benzyny itp. Mogłoby to spowodo-
wać uszkodzenie lampy.
Ponownie nałożyć zabezpieczenie lub ponow-
nie uruchomić włącznik instalacyjny (pozycja I).
Utylizacja
Opakowanie wykonane jest z materiałów przyja-
znych dla środowiska, które można przekazać do
utylizacji w lokalnym punkcie przetwarzania surow-
ców wtórnych.
b
a
Przy segregowaniu odpadów prosimy
zwrócić uwagę na oznakowanie mate-
riałów opakowaniowych, oznaczone są
one skrótami (a) i numerami (b) o nastę-
pującym znaczeniu: 1–7: Tworzywa
sztuczne / 20–22: Papier i tektura /
80–98: Materiały kompozytowe.
Produkt i materiał opakowania nadają się
do ponownego przetworzenia, należy
je zutylizować osobno w celu lepszego
przetworzenia odpadów. Logo Triman
jest ważne tylko dla Francji.
Z uwagi na ochronę środowiska nie wy-
rzucać urządzenia po zakończeniu eks-
ploatacji do odpadów domowych, lecz
prawidłowo zutylizować. Informacji o
punktach zbiorczych i ich godzinach
otwarcia udziela odpowiedni urząd.

36 PL
Gwarancja i serwis
Gwarancja i serwis
Gwarancja
W momencie zakupu otrzymują Państwo na to
urządzenie 36 miesięcy gwarancji.
Urządzenie wyprodukowano starannie i poddano
dokładnej kontroli jakości.
W okresie gwarancji usuwamy bezpłatnie wszystkie
wady materiałowe lub fabryczne. Jeśli mimo to w
okresie gwarancji pojawią się usterki, urządzenie na-
leży przesłać na podany adres serwisowy, podając
następujący numer modelu: 14150208L /
14150306L / 14150409L.
Gwarancji nie podlegają uszkodzenia spowodowane
p
rzez nieprawidłowe użytkowanie, nieprzestrzegan
ie
instrukcji obsługi lub ingerencję nieautoryzowanych
osób, a także części szybko zużywające się (jak np.
elementy świetlne).
Usługa gwarancyjna nie przedłuża ani nie odnawia
okresu gwarancji.
Zgodnie z Kodeksem Cywilnym art. 581 §1 wraz z
wymianą urządzenia lub ważnej części czas gwa-
rancji rozpoczyna się na nowo.
Adres serwisu
Briloner Leuchten GmbH & Co. KG
Im Kissen 2
59929 Brilon
NIEMCY
Tel.: +49 29 61 / 97 12‒800
Faks: +49 29 61 / 97 12‒199
E-mail: kundenservice@briloner.com
www.briloner.com
Bezpłatny numer serwisu:
Tel.: 00800 / 27456637
IAN 355071_2004
Przed skontaktowaniem się z działem serwisowym
należy przygotować paragon i numer artykułu
(np. IAN 123456_7890) jako dowód zakupu.
Deklaracja zgodności
Niniejszy produkt spełnia wymagania obowiązują-
cych dyrektyw europejskich i krajowych. Zgodność
została wykazana. Odpowiednie deklaracje i do-
kumenty są przechowywane przez producenta.
Producent
Briloner Leuchten GmbH & Co. KG
Im Kissen 2
59929 Brilon
NIEMCY
Obsah

37 CZ
Gwarancja i serwis Obsah
Legenda použitých piktogramů ...............................................................................Strana 38
Úvod .................................................................................................................................................Strana 38
Použití ke stanovenému účelu..........................................................................................................Strana 38
Popis dílů ..........................................................................................................................................Strana 38
Obsah dodávky ............................................................................................................................... Strana 39
Technická data .................................................................................................................................Strana 39
Bezpečnost ..................................................................................................................................Strana 39
Bezpečnostní upozornění ................................................................................................................ Strana 39
Příprava ........................................................................................................................................Strana 40
Potřebné nářadí a materiál ..............................................................................................................Strana 40
Před instalací .................................................................................................................................... Strana 40
Montáž ........................................................................................................................................... Strana 40
Údržba a čištění ......................................................................................................................Strana 41
Zlikvidování ...............................................................................................................................Strana 41
Záruka a servis ....................................................................................................................... Strana 41
Prohlášení k záruce ..........................................................................................................................Strana 41
Adresa servisu .................................................................................................................................. Strana 41
Prohlášení oshodě ...........................................................................................................................Strana 42
Výrobce ............................................................................................................................................Strana 42

38 CZ
Úvod / BezpečnostÚvod
Legenda použitých piktogramů
Přečtěte si návod kobsluze! Ochranný vodič
Dbejte na výstrahy a řiďte se
bezpečnostními pokyny! Nebezpečí ohrožení života a
zranění malých i větších dětí
Watt (činný výkon) Varování před zasažením elektrickým
proudem! Ohrožení života!
Herz (frekvence) Nebezpečí požáru a zranění!
Volt Tato svítidlo není vhodné na tlumení
a pro elektronické spínače.
Střídavé napětí
(druh proudu a napětí) Ra Index podáníbarev
Životnost LED ON OFF Spínací cykly
Druh ochrany (ochrana proti
stříkající vodě) Smìr montáže
Svítidlo se hodí výhradně kpoužití
ve vnitřních prostorách. 20
PAP
Obal i výrobek odstraňujte do
odpadu ekologicky!
Teplota světla vkelvinech Obal je vyroben ze 100 % recyklo-
vaného papíru.
Koupelnové LED svítidlo
Úvod
Blahopřejeme vám ke koupi nového vý-
robku. Rozhodli jste se tím pro vysoce
kvalitní výrobek. Tento návod je součástí
tohoto výrobku a obsahuje důležité informace k jeho
uvedení do provozu a k zacházení s ním. Řiďte se
vždy všemi bezpečnostními pokyny. Před uvedením
do provozu zkontrolujte, jestli je k dispozici správné
napětí a jestli jsou všechny díly správně namontované.
Jestliže máte ještě otázky nebo jste si nejistí při ovlá-
dání přístroje, kontaktujte vašeho prodejce nebo
servis. Návod pečlivě uschovejte a případně ho
předejte třetí osobě.
Použití ke stanovenému účelu
Toto svítidlo je vhodné kpoužití pouze ve vnitřních
prostorách. Tento přístroj je určen kpoužití pouze
vdomácnostech. Svítidlo lze upevnit na jakýkoliv
povrch sběžnou hořlavostí. Tento výrobek je určen
k normálnímu provozu a smí se použít jen kmontáži
na strop.
Popis dílů
1 Hmoždinky
2 Gumová membrána
3 Ochranná hadička
4 Síťový připojovací
kabel (externí)
5 Lustrová svorka
6 Připojovací kabel
svítidla
7 Silikonová podložka
8 Šrouby
9 Stínítko
10 Základová deska

39 CZ
Úvod / Bezpečnost
Obsah dodávky
1 koupelnové LED svítidlo, model 14150208L /
14150306L / 14150409L
3 hmoždinky
3 šrouby
2ochranné hadičky
3 silikonové podložky
1 návod kmontáži a použití
Technická data
Svítidlo:
Model č.: 14150208L /
14150306L /
14150409L
Provozní napětí: 230–240 V∼, 50 Hz
Jmenovitý příkon: max. LED 12,5 W
Třída ochrany: I
Druh ochrany: IP44 (ochrana proti
stříkající vodě)
LED modul:
Osvětlovací prostředek: LEDmodul
Jmenovitý příkon: max. 11,5 W
Bezpečnost
Bezpečnostní upozornění
Vpřípadě poškození, která jsou způsobena nedo-
držením tohoto návodu kobsluze, zaniká nárok na
záruku! Za následné škody nelze přebrat žádné ru-
čení! Za hmotné škody nebo úrazy osob, způsobené
nesprávnou manipulací nebo nedodržováním bez-
pečnostních pokynů, neručíme!
NEBEZPEČÍ
OHROŽENÍ ŽIVOTA A NEHODY
PRO MALÉ A VELKÉ DĚTI!
Děti nikdy nenechávejte bez dozoru sobalovým
materiálem. Hrozí nebezpečí udušení obalovým
materiálem. Nenechávejte svítidlo nebo oba-
lový materiál ležet bez dohledu. Umělohmotné
fólie / sáčky, umělohmotné díly atd. by mohly
být pro děti nebezpečnou hračkou. Děti často
podceňují nebezpečí.
Uchovávejte výrobek mimo dosah dětí. Tento
výrobek mohou používat děti od 8 let, osoby se
sníženými fyzickými, smyslovými nebo duševními
schopnosti nebo snedostatečnými zkušenostmi
a znalostmi, jestliže budou pod dohledem nebo
byly poučeny obezpečném používání výrobku
a chápou nebezpečí, která zjeho používání
vyplývají. Děti si nesmí s výrobkem hrát. Děti
nesmí bez dohledu provádět čištění ani uživa-
telskou údržbu výrobku.
Nebezpečí ohrožení života při
zasažení elektrickým proudem!
Elektrickou instalaci nechte provádět jen vyuče-
ného elektrikáře nebo osobu s odpovídajícími
zkušenostmi.
Svítidlo je určené jen k používání v domácnosti.
Nepoužívejte výrobek pokud jste zjistili že je
poškozený.
Před montáží odstraňte pojistku nebo vypněte
jistič v pojistkové skříni (poloha 0). Nastavte
vypínač do polohy „VYP“.
Před montáží se přesvědčte, zda se shoduje
napětí elektrického proudu, které máte k
dispozici, s napětím potřebným pro svítidlo
(230–240 V∼) (viz „Technická data“).
Zajistěte, aby se při montáži nepoškodily
žádné vodiče.
Nebezpečí požáru a zranění!
Nemontujte svítidlo s poškozeným sklem. V tako-
vém případě se obraťte na servis se žádostí o
náhradu.
Výrobek lze upevnit na všechny běžně hořlavé
povrchy.
Před dotykem se ujistěte, že je svítidlo vypnuté a
vychladlé, abyste se vyhnuli popálení. Osvětlo-
vací prostředky se zahřívají na vysokou teplotu.
Výrobek nemontujte na vlhké nebo vodivé
podklady.
Úvod

40 CZ
Montáž / Údržba a čištění / Zlikvidování / Záruka a servisBezpečnost / Příprava / Montáž
Osvětlovací prostředek tohoto svítidla nelze
vyměnit; na konci jeho životnosti se musí celé
svítidlo vyměnit.
Toto svítidlo není vhodné pro externí
tlumení a pro elektronické spínače.
Používejte výhradně dodané součásti, v opačném
případě zanikají veškeré nároky ze záruky.
Světlo nemontujte se závadnými svíticími pro-
středky a / nebo se závadným sklem světla.
Takto postupujete správně
Buďte vždy pozorní! Dávejte vždy pozor na to,
co děláte, a postupujte s rozvahou. V žádném
případě nemontujte svítidlo, jestliže jste nesou-
středění nebo se necítíte dobře.
Nedívejte se přímo do zdroje světla (žárovka
LED atd.).
Nedívejte se na zdroj světla (osvětlovací
prostředek, LED, atd.) optickou pomůckou
(např. lupou).
Příprava
Potřebné nářadí a materiál
Uvedené nářadí a materiály nejsou součástí dodávky.
Jedná se zde o nezávazné údaje a orientační hod-
noty. Vlastnosti materiálu jsou závislé na individuál-
ních místních podmínkách.
– tužka / pomůcka koznačení
– 2pólová zkoušečka napětí
– šroubovák
– vrtačka
– štípací kleště
– kladivo
– žebřík
– vrták (cca Ø 6 mm)
Před instalací
Důležité: Instalaci nechte provést vyučeným elek-
trikářem nebo pro elektrické instalace vyškolenou
osobou.
Před instalací svítidla se seznamte se všemi
pokyny a obrázky v tomto návodu.
Před instalací se ujistěte, že je přívodní vedení,
na které se má svítidlo připojit, bez napětí. K
tomu vyjměte pojistku nebo vypněte jistič v
pojistkové skříňce (poloha 0).
Zkontrolujte 2pólovou zkoušečkou napětí, jestli
je vypnutý proud.
Montáž
Odšroubujte stínítko 9 ze základové desky 10
otáčením proti směru hodinových ručiček.
Přidržte základovou desku na montážní ploše a
označte si pomocí otvorů vzákladové desce 10
místa kvyvrtání otvorů pro šrouby 8.
Vyvrtejte otvory (Ø 6 mm, cca 40 mm hluboké).
Dávejte pozor, abyste nepoškodili vodiče přívodu
elektrického proudu.
V
ložte do vyvrtaných otvorů hmoždinky
1
. Pod
le
potřeby použijte kladivo.
Otevřete gumovou membránu 2 špičatým před-
mětem (např. šroubovákem).
Provlékněte síťový připojovací kabel (externí) 4
gumovou membránou 2. Dbejte na správné
usazení.
Upevněte základovou desku 10 použitím siliko-
nových podložek 7 a šroubů 8 kmontážní
ploše.
Protáhněte vodiče L a N síťového připojovacího
kabelu (externího)
4
ochrannými hadičkami
5
.
Spojte připojovací kabel svítidla 6 pomocí
lustrové svorky 5 se síťovým připojovacím
kabelem (externím) 4.
Dbejte přitom na spojení vodičů se stejnou bar-
vou (vodič vedoucí proud, černý nebo hnědý =
symbol L, neutrální vodič, modrý = symbol N).
Nyní připojte ochranný vodič (zelenožlutý)
soznačenou svorkou uzemnění vpřipojovací
krabici .

41 CZ
Montáž / Údržba a čištění / Zlikvidování / Záruka a servis
Upevněte stínítko 9 kzákladové desce 10 tím,
že ho našroubujte ve směru hodinových ručiček.
Dbejte na správné usazení.
Nasaďte opět pojistku nebo zapněte jistič vpo-
jistkové skříni (do polohy I).
Nyní je svítidlo připravené kpoužití.
Údržba a čištění
NEBEZPEČÍ ZÁSAHU
ELEKTRICKÝM PROUDEM!
Před čištěním nejprve výrobek odpojte od
elektrické sítě. Za tímto účelem vyjměte pojistku
nebo vypněte jistič v pojistkové skříni (poloha 0).
OPATRNĚ! NEBEZPEČÍ POPÁLENÍ
HORKÝMI POVRCHY!
Nechte svítidlo zcela vychladnout.
K čištění používejte jen suchý hadr, který nepou-
ští vlákna. Nepoužívejte na čištění rozpouštědla,
benzín nebo podobné látky, lampu můžete
poškodit.
Nasaďte pojistku nebo opět zapněte jistič
(polohaI).
Zlikvidování
Obal se skládá zekologických materiálů, které
můžete zlikvidovat prostřednictvím místních sběren
recyklovatelných materiálů.
b
a
Při třídění odpadu se řiďte podle ozna-
čení obalových materiálů zkratkami (a)
a čísly (b), s následujícím významem:
1–7: umělé hmoty / 20–22: papír a
lepenka / 80–98: složené látky.
Výrobek a obalové materiály jsou recy-
klovatelné, zlikvidujte je odděleně pro
lepší odstranění odpadu. Logo Triman
platí jen pro Francii.
Vzájmu ochrany životního prostředí vy-
sloužilý výrobek nevyhazujte do domov-
ního odpadu, ale předejte k odborné
likvidaci. O sběrnách a jejich otevíracích
hodinách se můžete informovat u pří
slušné
správy města nebo obce.
Záruka a servis
Prohlášení k záruce
K okamžiku koupě obdržíte na toto zařízení záruku
po dobu 36 měsíců. Zařízení bylo svědomitě vyrobe
no
a podrobeno přesné kontrole jakosti.
Během záruční lhůty odstraníme bezplatně všechny
vady materiálu a opravíme závady zvýroby. Jestliže
se přesto během záruční doby vyskytnou závady,
zašlete nám přístroj na udanou servisní adresu spolu
sodpovídajícím číslem modelu: 14150208L /
14150306L / 14150409L.
Ze záruky vyloučeny škody vzhledem k neodbor-
nému zacházení, nedbání na návod k obsluze nebo
zásahu neautorizovanou osobou, jakož i poškození
rychleopotřebitelných dílů (např. svíticí prostředky).
Záručním výkonem se záruční doba ani neprodlouží
ani neobnoví.
Adresa servisu
Briloner Leuchten GmbH & Co. KG
Im Kissen 2
59929 Brilon
NĚMECKO
Tel.: +49 29 61 / 97 12–800
Fax: +49 29 61 / 97 12–199
E-Mail: [email protected]
www.briloner.com
Servisní číslo zdarma:
Tel.: 00800 / 27456637
IAN 355071_2004
Pro všechny požadavky si připravte pokladní blok
a číslo výrobku (např. IAN 123456_7890) jako
doklad o nákupu.
Bezpečnost / Příprava / Montáž

42 CZ
ObsahZáruka a servis
Prohlášení oshodě
Tento výrobek splňuje požadavky platných evrop-
ských a národních směrnic. Shoda byla prokázána.
Příslušná prohlášení a dokumentace jsou uloženy
uvýrobce.
Výrobce
Briloner Leuchten GmbH & Co. KG
Im Kissen 2
59929 Brilon
NĚMECKO

43 SK
Obsah
Legenda použitých piktogramov ............................................................................ Strana 44
Úvod .................................................................................................................................................Strana 44
Používanie v súlade s určeným účelom ..........................................................................................Strana 44
Popis častí .........................................................................................................................................Strana 44
Obsah dodávky ............................................................................................................................... Strana 45
Technické údaje ...............................................................................................................................Strana 45
Bezpečnosť ................................................................................................................................. Strana 45
Bezpečnostné upozornenia .............................................................................................................Strana 45
Príprava ........................................................................................................................................Strana 46
Potrebné náradie a materiál ...........................................................................................................Strana 46
Pred inštaláciou ................................................................................................................................ Strana 46
Montáž ........................................................................................................................................... Strana 46
Údržba a čistenie ...................................................................................................................Strana 47
Likvidácia .....................................................................................................................................Strana 47
Záruka a servis ....................................................................................................................... Strana 47
Záruka ..............................................................................................................................................Strana 47
Servisná adresa ................................................................................................................................Strana 47
Konformitné vyhlásenie ....................................................................................................................Strana 48
Výrobca ............................................................................................................................................ Strana 48
Záruka a servis

44 SK
Úvod / BezpečnosťÚvod
Legenda použitých piktogramov
Prečítajte si návod na používanie! Ochranný vodič
Rešpektujte výstražné a bezpečnostné
upozornenia!
Nebezpečenstvo ohrozenia života
a nebezpečenstvo nehody pre malé
i staršie deti
Watt (efektívny výkon) Pozor na zásah elektrickým prúdom!
Nebezpečenstvo ohrozenia života!
Hertz (frekvencia)
Nebezpečenstvo požiaru a poranenia!
Volt
Toto svietidlo nie je vhodné pre externé
stmievače a elektronické spínače.
Striedavé napätie
(druh prúdu a druh napätia) Ra Index reprodukcie farieb
Životnosť LED ON OFF Spínacie cykly
Druh ochrany (s ochranou proti
striekajúcej vode) Montážny smer
Toto svietidlo je vhodné výlučne na
používanie vo vnútorných priestoroch. 20
PAP
Obal a zariadenie ekologicky
zlikvidujte!
Teplota svetla v Kelvin Obal je vyrobený zo 100 % recyklo-
vaného papiera.
LED kúpeľňové svietidlo
Úvod
Blahoželáme Vám ku kúpe Vášho nového
výrobku. Rozhodli ste sa tým pre vyso-
kokvalitný výrobok. Tento návod patrí k
tomuto výrobku a obsahuje dôležité upozornenia
pre uvedenie do prevádzky a manipuláciu. Dodržia-
vajte vždy všetky bezpečnostné upozornenia. Pred
uvedením do prevádzky prekontrolujte, či je k dispo-
zícii správne napätie a či sú všetky diely správne na-
mo
ntované. V prípade otázok alebo neistoty ohľadom
manipulácie s prístrojom sa prosím spojte s Vaším
predajcom alebo servisným pracoviskom. Tento ná-
v
od si starostlivo uschovajte a prípadne ho odovzd
ajte
tretej osobe.
Používanie v súlade
s určeným účelom
Toto svietidlo je vhodné iba na prevádzku vo vnútor-
ných priestoroch. Tento prístroj je určený na používa-
nie v súkromných domácnostiach. Svietidlo možno
pripevniť na všetky normálne zápalné povrchy. Tento
v
ýrobok je určený na normálnu prevádzku a smie b
yť
nasadený výlučne pre stropnú montáž.
Popis častí
1 Hmoždinka
2 Gumená membrána
3 Ochranná hadička
4 Sieťový pripojovací
kábel (externý)
5 Svorka svietidla
6 Pripojovací kábel
svietidla
7 Podložné koliesko
zo silikónu
8 Skrutky
9 Tienidlo lampy
10 Podložná doska

45 SK
Úvod / Bezpečnosť
Obsah dodávky
1 LED kúpeľňové svietidlo, model 14150208L /
14150306L / 14150409L
3 hmoždinky
3 skrutky
2 ochranné hadičky
3 podložné kolieska zo silikónu
1 návod na montáž a používanie
Technické údaje
Svietidlo:
Model č.: 14150208L /
14150306L /
14150409L
Prevádzkové napätie: 230–240 V∼, 50 Hz
Menovitý výkon: max. LED 12,5 W
Trieda ochrany: I
Druh ochrany: IP44 (s ochranou proti
striekajúcej vode)
LED modul:
Osvetľovací prostriedok: LED modul
Menovitý výkon: max. 11,5 W
Bezpečnosť
Bezpečnostné upozornenia
V prípade škôd, ktoré vzniknú nedodržiavaním tohto
návodu na používanie, zaniká garančný nárok! Pri
následných škodách nepreberá výrobca ručenie! V
prípade vecných škôd alebo poranenia osôb, ktoré
boli zapríčinené neodbornou manipuláciou alebo
nedodržiavaním bezpečnostných pokynov, nepre-
berá výrobca ručenie!
NEBEZPE-
ČENSTVO OHROZENIA ŽI-
VOTA A NEBEZPEČENSTVO
NEHODY PRE MALÉ A STARŠIE DETI!
Nikdy nenechávajte deti bez dozoru s obalovým
materiálom. Existuje nebezpečenstvo zadusenia
obalovým materiálom. Svietidlo alebo obalový
materiál nenechávajte voľne ležať bez povšim-
nutia. Plastové fólie / plastové vrecúška, ume-
lohmotné diely atď. by sa mohli stať nebezpečnou
hračkou pre deti. Deti často podceňujú nebez-
pečenstvá.
Držte deti vždy v bezpečnej vzdialenosti od
výrobku. Tento výrobok môžu používať deti od
8 rokov, ako aj osoby so zníženými psychick
ými,
senzorickými alebo mentálnymi schopnosťami
alebo s nedostatkom skúseností a vedomostí,
ak sú pod dozorom, alebo ak boli poučené
ohľadom bezpečného používania výrobku, a
ak porozumeli nebezpečenstvám spojeným s
jeho používaním. Deti sa s výrobkom nesmú
hrať. Čistenie a údržbu nesmú vykonávať deti
bez dozoru.
Nebezpečenstvo ohrozenia živo
ta
zásahom elektrickým prúdom!
Elektrickú inštaláciu prenechajte kvalifikovanému
elektrikárovi alebo osobe zaškolenej pre elek-
troinštalácie.
Svietidlo je určené výlučne na používanie v
súkromných domácnostiach.
Svietidlo nikdy nepoužívajte v prípade, že
zistíte akékoľvek poškodenia.
Pred montážou odstráňte poistku alebo vypnite
istič vedenia v poistkovej skrinke (poloha 0).
Nastavte svetelný spínač do polohy „Vypnuté“.
Pred montážou sa uistite, že sa existujúce sieťové
napätie zhoduje s potrebným prevádzkovým
napätím svietidla (230–240 V∼) (pozri „Tech-
nické údaje“).
Zabezpečte, aby pri montáži neboli poškodené
žiadne vedenia.
Nebezpečenstvo
požiaru a poranenia!
Nemontujte svietidlo s defektným sklom lampy.
V takom prípade sa spojte so servisným stredis-
kom kvôli výmene.
Svietidlo možno nainštalovať na všetky normálne
horľavé povrchy.
Z
abezpečte, aby bolo svietidlo vypnuté a vychla
d-
nuté skôr, ako sa ho budete dotýkať, pretože
inak hrozí nebezpečenstvo popálenia. Osvetľo-
vacie prostriedky vytvárajú silné teplo.
Úvod

46 SK
Montáž / Údržba a čistenie / Likvidácia / Záruka a servisBezpečnosť / Príprava / Montáž
Svietidlo neupevňujte na vlhký alebo vodivý
podklad.
Svetelný zdroj tohto svietidla nie je možné
vymeniť; keď dosiahne koniec svojej životnosti,
je potrebné vymeniť celé svietidlo.
Svietidlo nie je vhodné pre externé
stmievače a elektronické spínače.
Používajte výlučne priložené náhradné diely,
inak zanikajú všetky garančné nároky.
Svietidlo nikdy neprevádzkujte s defektným
sklom lampy.
Takto postupujete správne
Buďte neustále opatrný! Dávajte vždy pozor na
to, čo robíte, a vždy konajte rozvážne. Svietidlo
v žiadnom prípade nemontujte, ak ste práve ne-
sústredený alebo sa necítite dobre.
Nepozerajte sa priamo do svetelného zdroja
(osvetľovací prostriedok, LED atď.).
Svetelný zdroj (osvetľovací prostriedok, LED atď.)
nepozorujte optickým nástrojom (napr. lupa).
Príprava
Potrebné náradie a materiál
Uvedené náradie a materiál nie je súčasťou dodávky.
Ide tu o nezáväzné údaje a hodnoty pre orientáciu.
Charakter materiálu sa riadi podľa individuálnych
daností na mieste.
– ceruzka / označovací nástroj
– 2-pólová skúšačka napätia
– skrutkovač
– vŕtačka
– bočné štipacie kliešte
– kladivo
– rebrík
– vrták (cca. Ø 6mm)
Pred inštaláciou
Dôležité: Elektrickú inštaláciu prenechajte kvalifi-
kovanému elektrikárovi alebo osobe zaškolenej pre
elektroinštalácie.
Pred inštaláciou sa oboznámte so všetkými
pokynmi a obrázkami v tomto návode, ako
aj so samotným svietidlom.
Pred inštaláciou zabezpečte, aby bolo vedenie,
na ktoré bude svietidlo pripojené, bez napätia.
Z tohto dôvodu odstráňte poistku alebo vypnite
istič vedenia v skrinke na poistky (poloha 0).
Beznapäťový stav prekontrolujte pomocou
2-pólovej skúšačky napätia.
Montáž
Uvoľnite tienidlo lampy 9 jeho otáčaním proti
smeru hodinových ručičiek z podložnej dosky 10 .
Pridržte podložnú dosku oproti montážnej ploche
a označte otvory pre vŕtanie pomocou dier ur-
čených pre skrutky 8 v podložnej doske 10 .
Vyvŕtajte otvory (cca. Ø 6 mm, cca. 40 mm
hlboké). Zabezpečte, aby ste nepoškodili prí-
vodové vedenie.
Do vyvŕtaných otvorov zasuňte hmoždinky 1.
V prípade potreby si pomôžte kladivom.
Otvorte gumenú membránu 2 ostrým predme-
tom (napr. šrobovák).
Preveďte sieťový pripojovací kábel (externý) 4
cez gumenú membránu 2. Dbajte na správne
priliehanie.
Upevnite podložnú dosku 10 pomocou podlož-
ných koliesok zo silikónu 7 a skrutiek 8 na
montážnej ploche.
Preveďte jednotlivé žily L a N sieťového pripo-
jovacieho kábla (externý) 4 cez ochranné
hadičky 5.
Teraz spojte pripojovací kábel 6 svietidla
pomocou svorky svietidla 5 so sieťovým
pripojovacím káblom (externý) 4.
Dbajte aj na farebné prepojenie zapojených
vedení (kábel vedúci prúd, čierny alebo hnedý =
symbol L, neutrálny kábel, modrý = symbol N).

47 SK
Montáž / Údržba a čistenie / Likvidácia / Záruka a servis
Teraz spojte ochranný vodič (zeleno-žltý) s
uzemňovacou svorkou označenou na pripo-
jovacej schránke.
Upevnite tienidlo lampy 9 tak, že ho prišróbu-
jete v smere hodinových ručičiek na podložnú
dosku 10 . Dbajte na správne priliehanie.
Opäť nasaďte poistku alebo opäť zapnite istič
vedenia v skrinke s poistkami (poloha I).
Vaše svietidlo je teraz pripravené na prevádzku.
Údržba a čistenie
NEBEZPEČENSTVO
ZÁSAHU ELEKTRICKÝM PRÚDOM!
Pred čistením najskôr odpojte svietidlo od elek-
trickej siete. Z tohto dôvodu odstráňte poistku
alebo vypnite istič vedenia v skrinke na poistky
(poloha 0).
OPATRNE! NEBEZPEČENSTVO POPÁLE-
NIA SKRZE HORÚCE POVRCHY!
Nechajte svietidlo úplne vychladnúť.
Na čistenie používajte iba suchú handričku, ktorá
nepúšťa vlákna. Nepoužívajte rozpúšťadlá, ben-
zín a pod. Svietidlo by sa pritom poškodilo.
Opäť nasaďte poistku alebo zapnite istič vede-
nia (Poloha I).
Likvidácia
Obal pozostáva z ekologických materiálov, ktoré
môžete odovzdať na miestnych recyklačných zber-
ných miestach.
b
a
Všímajte si prosím označenie obalových
materiálov pre triedenie odpadu, sú ozna-
čené skratkami (a) a číslami (b) s nasledu-
júcim významom: 1–7: Plasty / 20–22:
Papier a kartón / 80–98: Spojené látky.
Výrobok a obalové materiály sú recyklo-
vateľné, zlikvidujte ich oddelene pre lepšie
spracovanie odpadu. Triman-Logo platí
iba pre Francúzsko.
Ak výrobok doslúžil, v záujme ochrany
životného prostredia ho neodhoďte do
domového odpadu, ale odovzdajte na
odbornú likvidáciu. Informácie o zber-
ných miestach a ich otváracích hodinách
získate na Vašej príslušnej správe.
Záruka a servis
Záruka
Na tento prístroj poskytujeme záruku 36 mesiacov
od dátumu kúpy.
Prístroj bol starostlivo vyrobený a podrobený dôklad-
nej kontrole kvality.
Vrámci záručnej doby bezplatne odstránime všetky
chyby materiálu a výrobné chyby. Ak by sa však
počas záručnej doby vyskytli nedostatky, odošlite
prístroj na uvedenú adresu servisu s uvedením nasle-
dovného čísla modelu: 14150208L / 14150306L /
14150409L.
Zo záruky sú vylúčené škody spôsobené neodbor-
nou manipuláciou, nedodržaním návodu na obsluhu
alebo zásahom neautorizovanej osoby, ako aj diely
podliehajúce opotrebovaniu (napr. osvetľovacie
prostriedky).
Poskytnutím záruky sa záručná doba nepredlžuje
ani neobnovuje.
Servisná adresa
Briloner Leuchten GmbH & Co. KG
Im Kissen 2
59929 Brilon
NEMECKO
Tel.: +49 29 61 / 97 12‒800
Fax: +49 29 61 / 97 12‒199
E-mail: [email protected]
www.briloner.com
Bezplatné servisné číslo:
Tel.: 00800 / 27456637
Bezpečnosť / Príprava / Montáž

48 SK
Záruka a servis
IAN 355071_2004
Pre všetky otázky majte pripravený pokladničný
doklad a číslo výrobku (napr. IAN 123456_7890)
ako dôkaz o kúpe.
Konformitné vyhlásenie
Tento výrobok spĺňa požiadavky platných európskych
a národných smerníc. Konformita bola preukázaná.
Príslušné prehlásenia a podklady sú uložené u výrobcu
.
Výrobca
Briloner Leuchten GmbH & Co. KG
Im Kissen 2
59929 Brilon
NEMECKO

BRILONER LEUCHTEN GMBH & CO. KG
Im Kissen 2
59929 Brilon
GERMANY
Stand der Informationen · Last Information
Update · Version des informations · Stand van
de informatie · Stan informacji · Stav informací
Stav informácií: 08 / 2020 · Ident.-No.:
14150208L / 14150306L / 14150409L082020-8
IAN 355071_2004
-
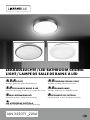 1
1
-
 2
2
-
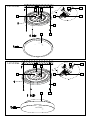 3
3
-
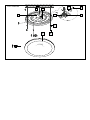 4
4
-
 5
5
-
 6
6
-
 7
7
-
 8
8
-
 9
9
-
 10
10
-
 11
11
-
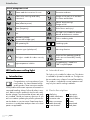 12
12
-
 13
13
-
 14
14
-
 15
15
-
 16
16
-
 17
17
-
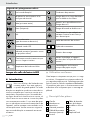 18
18
-
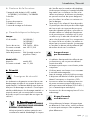 19
19
-
 20
20
-
 21
21
-
 22
22
-
 23
23
-
 24
24
-
 25
25
-
 26
26
-
 27
27
-
 28
28
-
 29
29
-
 30
30
-
 31
31
-
 32
32
-
 33
33
-
 34
34
-
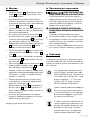 35
35
-
 36
36
-
 37
37
-
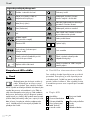 38
38
-
 39
39
-
 40
40
-
 41
41
-
 42
42
-
 43
43
-
 44
44
-
 45
45
-
 46
46
-
 47
47
-
 48
48
-
 49
49


in andere talen
- français: LIVARNO 355071 Le manuel du propriétaire
- Deutsch: LIVARNO 355071 Bedienungsanleitung
- slovenčina: LIVARNO 355071 Návod na obsluhu
- polski: LIVARNO 355071 Instrukcja obsługi
Gerelateerde papieren
-
LIVARNO 391610 de handleiding
-
-
-
-
-
-
-
-
-