
Bedienungsanleitung
Instructions for use | Notice d´utilisation
Gebruiksaanwijzing
| Istruzioni per l’uso
Instrucciones de uso
| Instrukcja obsługi
Modell 86870
STANDVENTILATOR AKKU
Copyright UNOLD AG | www.unold.de

Impressum:
Bedienungsanleitung Modell 86870
Stand: Juni 2018 /nr
Copyright ©
Mannheimer Straße 4
68766 Hockenheim
Telefon +49 (0) 62 05/94 18-0
Telefax +49 (0) 62 05/94 18-12
E-Mail [email protected]
Internet www.unold.de 86870_7
Copyright UNOLD AG | www.unold.de

Weitere Informationen zu unserem Sortiment erhalten Sie unter www.unold.de
Copyright UNOLD AG | www.unold.de

INHALTSVERZEICHNIS
Bedienungsanleitung Modell 86870
Technische Daten ..................................6
Symbolerklärung ....................................6
Für Ihre Sicherheit .................................6
Montieren .............................................12
Powerbank/Akku ....................................13
Fernbedienung ......................................15
Display .................................................16
Bedienen ..............................................16
Reinigen und Pflegen ............................. 18
Garantiebestimmungen ..........................19
Entsorgung / Umweltschutz ....................19
Informationen für den Fachhandel ...........19
Service-Adressen ...................................20
Instructions for use Model 86870
Technical Specifications ......................... 21
Explanation of the symbols .....................21
For your safety .......................................21
Assembly ..............................................26
Powerbank/rechargeable battery ..............27
Remote control unit ...............................29
Display .................................................30
Operation .............................................. 30
Cleaning and care .................................. 32
Guarantee Conditions ............................. 33
Waste Disposal/Environmental Protection .33
Service .................................................20
Notice d´utilisation Modèle 86870
Spécification technique .........................34
Explication des symboles ........................34
Pour votre sécurité ................................. 34
Montage ...............................................40
Chargeur portatif / Accu .........................41
Télécommande ......................................43
Écran ...................................................44
Utilisation ............................................. 44
Nettoyage et entretien ............................ 46
Conditions de Garantie ...........................47
Traitement des déchets /
Protection de l’environnement .................47
Service .................................................20
Gebruiksaanwijzing Model 86870
Technische gegevens .............................48
Verklaring van de symbolen .....................48
Voor uw veiligheid .................................. 48
Montage ...............................................54
Powerbank/accu ....................................55
Afstandsbediening .................................57
Display .................................................57
Bedienen ..............................................58
Reinigen en onderhouden .......................60
Garantievoorwaarden .............................. 60
Verwijderen van afval/Milieubescherming .60
Service .................................................20
Copyright UNOLD AG | www.unold.de

INHALTSVERZEICHNIS
Istruzioni per l’uso Modello 86870
Dati tecnici ..........................................61
Significato dei simboli ...........................61
Per la vostra sicurezza ............................ 61
Montaggio ............................................. 67
Power bank/accumulatore ....................... 68
Telecomando ......................................... 70
Display .................................................71
Comando ..............................................71
Pulizia e cura ........................................73
Norme die garanzia ................................ 74
Smaltimento / Tutela dell’ambiente .........74
Service .................................................20
Manual de instrucciones Modelo 86870
Datos técnicos ...................................... 75
Explicación de símbolos .........................75
Para su seguridad ..................................75
Montaje ................................................81
Power bank/acumulador .........................82
Control remoto.......................................84
Pantalla ................................................ 84
Manejo .................................................85
Limpieza y cuidado ................................ 87
Condiciones de Garantia ......................... 87
Disposición/Protección del
medio ambiente ....................................87
Service .................................................20
Instrukcja obsługi Model 86870
Dane techniczne .................................... 88
Objaśnienie symboli ............................... 88
Dla bezpieczeństwa użytkownika .............88
Montaż .................................................94
Bank energii / akumulator .......................95
Pilot .....................................................97
Wyświetlacz ..........................................98
Obsługa ................................................98
Czyszczenie i pielęgnacja .......................100
Warunki gwarancji..................................101
Utylizacja / ochrona środowiska ............... 101
Service .................................................20
Copyright UNOLD AG | www.unold.de

6
Leistung: 30 Watt, (12VDC)
Netzteiladapter 100–240 V, 50/60 Hz, 1,2 A
USB-Energieversorgung 5 V 2 A
Maße: Ca. 40 x 40 x 120/140 cm (T/B/H)
Gewicht: Ca. 7,5 kg
Zuleitung: Ca. 2,0 m
Durchmesser: Ca. 40 cm
Geräuschpegel: ≤ 63 db
Luft-
geschwindigkeit: ≥ 320 m/min
Ladezeit: Erstes Aufladen ca. 10 Stunden
Netzanschluss ca. 7 Stunden
Technische Daten
Akku/Powerbank: 4.400 mAh, 11,1 V. Ausgangsstrom USB: DC-5V-2,1 A,
USB-Ladestrom 800-1.000 mA, Standby-Ladestrom 900–
1.000 mA, Lithium-Ionen-Akku
Ausstattung: Akkubetriebener Standventilator für innen und außen,
6 Geschwindigkeitsstufen, Fernbedienung, Akkulaufzeit bis
ca. 21 Stunden auf kleinster Stufe (ca. 3 Stunden auf höchster
Stufe), automatische Abschaltung, höhenverstellbar, mit
Zeitvorwahl
Zubehör: Bedienungsanleitung, USB-Ladekabel, Netzteil mit An-
schlusskabel, Fernbedienung, 2 x Batterien Typ AAA 1,5 V.
Änderungen und Irrtümer in Ausstattungsmerkmalen, Technik, Farben und Design
vorbehalten
BEDIENUNGSANLEITUNG MODELL 86870
FÜR IHRE SICHERHEIT
TECHNISCHE DATEN
Bitte lesen Sie die folgenden Anweisungen und bewahren Sie diese auf.
Personen im Haushalt
1. Dieses Gerät kann von Kindern ab 8 Jahren sowie von Personen
mit reduzierten physischen, sensorischen oder mentalen
Fähigkeiten oder Mangel an Erfahrung und/oder Wissen benutzt
werden, wenn sie beaufsichtigt oder bezüglich des sicheren
SYMBOLERKLÄRUNG
Dieses Symbol kennzeichnet eventuelle Gefahren, die Verletzungen
nach sich ziehen können oder zu Schäden am Gerät führen.
Copyright UNOLD AG | www.unold.de

7
Gebrauchs des Geräts unterwiesen wurden und die daraus
resultierenden Gefahren verstanden haben.
2. Kinder dürfen nicht mit dem Gerät spielen.
3. Reinigung und benutzerseitige Wartung dürfen nicht von Kindern
durchgeführt werden, es sei denn, sie sind älter als 8 Jahre und
werden beaufsichtigt.
4. Bewahren Sie das Gerät und das Kabel außerhalb der Reichweite
von Kindern unter 8 Jahren auf.
Sicherheitshinweise zum Aufstellen und Betrieb des Gerätes
5. Schalten Sie das Gerät nur ein, wenn es ordnungsgemäß mon
-
tiert wurde.
6.
Achten Sie auf ausreichend Platz am Standort des Gerätes. Es
müssen mindestens 50 cm zwischen dem Gerät und anderen
Gegenständen eingehalten werden.
7. Verwenden Sie das Gerät nicht in besonders staubhaltigen Räu
-
men oder in der Nähe brennbarer Substanzen.
8.
Gerät nur an Spannung gemäß Typenschild anschließen.
9. Dieses Gerät darf nicht mit einer externen Zeitschaltuhr oder
einem Fernbedienungssystem betrieben werden.
10. Tauchen Sie das Gerät oder die Zuleitung keinesfalls in Wasser
oder andere Flüssigkeiten ein – es besteht Lebensgefahr!
11. Öffnen Sie auf keinen Fall das Gehäuse des Gerätes, es besteht
die Gefahr eines Stromschlages!
12. Das Gerät ist ausschließlich für den Haushaltsgebrauch oder
ähnliche Verwendungszwecke bestimmt, z. B.
in Teeküchen in Geschäften, Büros oder sonstigen Arbeitsstät
-
ten,
zur Verwendung durch Gäste in Hotels, Motels oder sonstigen
Beherbergungsbetrieben,
in Privatpensionen oder Ferienhäusern.
13. Achten Sie darauf, dass die Zuleitung so verlegt wird, dass ein
Stolpern über die Zuleitung ausgeschlossen ist.
14. Um Schäden am Kabel zu vermeiden, wickeln Sie die Zuleitung
nie um das Gerät.
15. Um Schäden am Kabel zu vermeiden, ziehen Sie den Netzstecker
immer am Stecker aus der Steckdose, ziehen Sie dabei nie an
der Zuleitung.
Copyright UNOLD AG | www.unold.de

8
16. Achten Sie darauf, dass die verwendete Steckdose leicht zugäng-
lich ist, damit der Stecker bei Gefahr schnell herausgezogen
werden kann.
17.
Achten Sie darauf, die Zuleitung nicht einzuklemmen oder über
Ecken zu ziehen, um Schäden an der Zuleitung zu vermeiden.
18. Verwenden Sie nach Möglichkeit kein Verlängerungskabel. Wenn
dies nicht vermeidbar ist, wickeln Sie das Verlängerungskabel
bitte vollständig ab und beachten Sie die Leistungsgrenzen des
jeweiligen Kabels.
19. Das Gerät darf nicht in nassen/nasskalten oder feuchten Räu
-
men betrieben werden – Stromschlaggefahr!
20.
Vermeiden Sie starke Sonneneinstrahlung auf das Gerät.
21. Es dürfen niemals Gegenstände wie Finger, Nadeln, Stifte etc.
durch das Korbgitter in das Innere des Gerätes gesteckt werden
– Verletzungsgefahr!
22. Das Gerät kann im Außenbereich genutzt werden, muss jedoch
vor Feuchtigkeit und Nässe geschützt werden, um die Gefahr
eines Stromschlages zu vermeiden. Nicht bei Regen im Außen
-
bereich anwenden!
23.
Achten Sie darauf, dass sich lange Haare nicht im Flügelrad
verfangen können.
24. Prüfen Sie regelmäßig das Gerät, den Stecker und die Zuleitung
auf Verschleiß oder Beschädigungen. Bei Beschädigung senden
Sie das Gerät bitte zur Überprüfung und Reparatur an unseren
Kundendienst. Unsachgemäße Reparaturen können zu erhebli
-
chen Gefahren für den Benutzer führen und haben den Aus-
schluss der Garantie zur Folge.
25.
Wenn die Zuleitung beschädigt ist, darf diese ausschließlich
durch den Hersteller bzw. dessen Kundenservice oder einer
anderen, entsprechend fachlich qualifizierten Person ausge
-
tauscht werden, um Gefahren zu vermeiden.
26.
Um Schäden zu vermeiden, darf das Gerät nicht mit Zubehör
anderer Hersteller oder Marken benutzt werden.
27. Nach Gebrauch sowie vor dem Reinigen den Netzstecker aus
der Steckdose ziehen. Das Gerät niemals unbeaufsichtigt las
-
sen, wenn der Netzstecker eingesteckt ist.
Copyright UNOLD AG | www.unold.de

9
Spezielle Sicherheitshinweise für den Akku/die Powerbank
28. Halten Sie die Powerbank grundsätzlich von Kindern fern.
29. Verwenden Sie ausschließlich die mitgelieferte Powerbank, um
Schäden am Gerät zu vermeiden.
30. Betreiben Sie das Gerät nie, wenn es von einer kalten in eine
wärmere Umgebung gebracht wird. Dabei entsteht Kondenswas
-
ser, welches Schäden am Gerät verursachen kann. Lassen Sie
das Gerät zunächst einige Zeit stehen, bis es die aktuelle Zim-
mertemperatur erreicht hat. Dies kann unter Umständen einige
Stunden dauern!
31.
Die Powerbank darf nicht umgebaut oder für andere als die hier
beschriebenen Zwecke genutzt werden. Unsachgemäße Verwen
-
dung kann zu Bränden, Stromschlägen, Personenschäden usw.
führen.
32.
Vermeiden Sie den Betrieb des Gerätes in der Nähe starker Mag
-
netfelder (wie z. B. Lautsprechern, Maschinen usw.).
33.
Das Gerät und die Powerbank dürfen niemals in der Nähe von
Hitzequellen platziert werden, auch direkte Sonneneinstrahlung
muss vermieden werden, um Schäden am Gerät zu vermeiden.
34. Achten Sie darauf, die Powerbank immer in der korrekten Polung
in das Gerät einzusetzen.
35. Die ideale Umgebungstemperatur für den Betrieb liegt bei
20–30 °C.
36. Die Ausgangsspannung und der Strom des integrierten Akkus
betragen 5 V/2,1 A, diese Werte dürfen nicht überschritten wer
-
den.
37.
Die Powerbank darf niemals in Flüssigkeiten eingetaucht wer-
den, um Schäden am innenliegenden Akku zu vermeiden.
38.
Werfen Sie die Powerbank niemals in offene Flammen – Explo-
sionsgefahr!
39.
Beachten Sie grundsätzlich die Hinweise zum Aufladen der
Powerbank und halten Sie diese ein.
40. Achten Sie darauf, dass die Powerbank nicht durch Sturz, Schlag,
starke Vibrationen oder andere Einflüsse beschädigt wird. Eine
beschädigte Powerbank oder einen beschädigten Akku dürfen
Sie nicht verwenden! Nehmen Sie in diesem Fall Kontakt mit
unserem Kundenservice auf.
Copyright UNOLD AG | www.unold.de

10
41. Laden Sie die Powerbank regelmäßig auf, auch wenn Sie das
Gerät nicht nutzen, um eine Tiefentladung des Akkus und damit
einen Defekt zu vermeiden. Lagern Sie die Powerbank bei Zim
-
mertemperatur.
42.
Achtung: Das mitgelieferte USB-Kabel eignet sich nicht zum
Transfer von Daten!
43. Verwenden Sie nur das mitgelieferte USB-Kabel zum Laden der
Powerbank, niemals andere Kabel.
44. Wenn Sie die Powerbank über eine USB-Stromquelle aufladen,
müssen Sie zunächst sicherstellen, dass die Stromquelle ausrei
-
chend Ladestrom bereitstellt. Andernfalls kann es zu Schäden
am Gerät und der USB-Stromquelle kommen. Weitere Hinweise
enthält das Kapitel „Akku laden“.
45.
Auch wenn die Powerbank im Ventilator eingesetzt ist, sollte der
Ladezustand regelmäßig geprüft und die Powerbank ggf. aufge
-
laden werden.
46.
Blicken Sie niemals direkt in den Lichtstrahl der integrierten
LED, es besteht Verletzungsgefahr für die Augen! Betrachten
Sie den Lichtstrahl auch niemals mit optischen Instrumenten!
47. Decken Sie die Powerbank beim Aufladen niemals mit Gegen
-
ständen ab.
48.
Schließen Sie die Powerbank niemals kurz.
49. Achtung: Sollte Flüssigkeit aus der Powerbank austreten, sofort
geeignete Schutzhandschuhe beim Umgang mit dem Gerät tra
-
gen. Haut- und Augenkontakt mit der Flüssigkeit meiden, da
diese sehr aggressiv ist und zu Personenschäden führen kann.
Sollte es dennoch zu Haut- oder Augenkontakt kommen, sofort
ärztliche Hilfe aufsuchen. Achten Sie auch darauf, dass die
Flüssigkeit nicht mit Oberflächen oder
Gegenständen in Berüh
-
rung kommt, diese könnten beschädigt werden. W
enden Sie sich
umgehend an unseren Kundenservice.
Sicherheitshinweise Batterien Fernbedienung
50.
Halten Sie die Batterien grundsätzlich von Kindern fern.
51. Wenn Batterien verschluckt werden, sofort ärztliche Hilfe auf
-
suchen!
52.
Achtung: Sollte Flüssigkeit aus den Batterien austreten, sofort
geeignete Schutzhandschuhe beim Umgang mit dem Gerät tra
-
Copyright UNOLD AG | www.unold.de

11
gen. Haut- und Augenkontakt mit der Flüssigkeit meiden, da
diese sehr aggressiv ist und zu Personenschäden führen kann.
Sollte es dennoch zu Haut- oder Augenkontakt kommen, sofort
ärztliche Hilfe aufsuchen. Achten Sie auch darauf, dass die
Flüssigkeit nicht mit Oberflächen oder Gegenständen in Berüh
-
rung kommt, diese könnten beschädigt werden.
53.
Bewahren Sie die Batterien in trockener Umgebung auf.
54. Achten Sie darauf, die Batterien immer in der korrekten Polung
in die Fernbedienung einzusetzen.
55. Wenn Sie die Fernbedienung längere Zeit nicht nutzen, müssen
die Batterien entnommen werden.
56. Wenn Sie aufladbare Batterien verwenden, beachten Sie die
Herstellerhinweise zum korrekten Aufladen der Batterien.
57. Öffnen Sie niemals Batterien – Verletzungsgefahr!
58. Verwenden Sie immer nur Batterien des gleichen Typs. Setzen
Sie nie Batterien verschiedener Hersteller, Größe oder Spannung
ein, um Personen- und Geräteschäden zu vermeiden.
59. Achten Sie darauf, die Batterien nicht direkter Sonneneinstrah
-
lung oder anderen Hitzequellen auszusetzen. Werfen Sie Batte-
rien nie in offene Flammen – Explosionsgefahr!
Der Hersteller übernimmt keine Haftung bei fehlerhafter Montage, bei unsachgemäßer oder fehlerhafter
Verwendung oder nach Durchführung von Reparaturen durch nicht autorisierte Dritte.
Es dürfen niemals Gegenstände wie Finger, Nadeln, Stifte etc.
durch das Korbgitter in das Innere des Gerätes gesteckt werden
– Verletzungsgefahr!
Das Gerät nur auf einem ebenen, stabilen Untergrund betreiben,
damit dieses nicht umkippt.
Copyright UNOLD AG | www.unold.de

12
MONTIEREN
1 Befestigungsring
2 Vordere Korbabdeckung
3 Mutter
4 Flügelrad
5 Mutter
6
Hintere Korbabdeckung
7 Bedienelement mit
Motorgehäuse
8 Standrohr
9 Sockel
10 Schrauben (3 Stück)
11 Fernbedienung
12 Batterien
13 USB-Ladekabel
14 Netzteil
1. Stellen Sie vor der Montage sicher, dass Sie das Gerät auf einem ebenen,
trockenen Platz montieren.
2. Entfernen Sie alle Verpackungsmaterialien und Transportsicherungen. Hal-
ten Sie Verpackungsmaterial wie z. B. Kunststoffbeutel oder Styropor von
Kleinkindern fern – Erstickungsgefahr!
3. Prüfen Sie, ob alle benötigten Teile vorhanden sind.
4. Drehen Sie ggf. die Schrauben (10) etwas aus dem Sockel.
Copyright UNOLD AG | www.unold.de

13
5. Setzen Sie das Standrohr (8) passgenau in den Sockel und befestigen Sie es
mit den drei Schrauben (diese im Uhrzeigersinn festdrehen).
6. Stecken Sie das Bedienelement (7) auf das Standrohr (8). Vergewissern Sie
sich dabei, dass das untere Ende des Bedienelementes genau auf die dafür
vorgesehenen Löcher passt. Fixieren Sie beide Bauteile mit der Schraube.
7. Sie können die gewünschte Höhe einstellen, indem Sie die Feststellschraube
lösen, das Rohr bis zur gewünschten Höhe verschieben und mit der
Feststellschraube fixieren.
8. Befestigen Sie die hintere Korbabdeckung (6) am Motorgehäuse (7), indem
Sie die Abdeckung mit der Mutter (5) fixieren.
9. Setzen Sie das Flügelrad (4) auf die Achse am Motorgehäuse (7) ein.
Flügelrad (4) mit der Mutter (3) fixieren. Achtung: Linksgewinde!
10. Verbinden Sie die vordere Korbabdeckung (2) mit der hinteren Korbabdeckung
(6). Prüfen Sie, ob der Befestigungsring (1) in der richtigen Position ist
(beide Korbhälften müssen exakt im Ring sitzen), und fixieren Sie diesen
mit der Klammer.
11. Prüfen Sie, ob alle Teile korrekt montiert und fixiert wurden.
POWERBANK/AKKU
1
3
4
6
5
1 LEDs Ladezustand
2 Bedientaste
3 USB Ladeeingang
4 USB Ladeausgang
5 Anschluss-Schnittstelle
Ventilator
6
LED/Taschenlampe
2
1. Hinweis: Der Ventilator kann auch ohne eingesetzte Powerbank betrieben
werden!
2. Ihr neuer Ventilator bietet die Möglichkeit, unabhängig von einer Stromquelle
betrieben zu werden, wenn die enthaltene Powerbank vorher entsprechend
aufgeladen wurde. Wenn Sie die Powerbank im Gerät lassen und das Gerät
über das Stromnetz anschließen, wird der Akku der Powerbank aufgeladen.
3. Alternativ dazu ist das Aufladen über einen USB-Anschluss möglich.
Copyright UNOLD AG | www.unold.de

14
4. Die Powerbank kann entnommen wer-
den, wenn Sie an der Geräterückseite das
entsprechende Fach öffnen (siehe Abbil-
dung).
5. Um den aktuellen Ladezustand zu
überprüfen, drücken Sie kurz die Bedien-
taste auf der Powerbank (siehe Abbildung).
6. Die LEDs zeigen den aktuellen Lade-
stand an, bei vier LEDs ist die Powerbank
voll aufgeladen (die LEDs stehen jeweils für
25, 50, 75 und 100%).
7. Verbinden Sie Powerbank und den USB-Ladeport mit dem mitgeliefer-
ten USB-Kabel. Beachten Sie dabei unbedingt folgenden Hinweis: Wenn
Sie den Akku über eine USB-Stromquelle aufladen, müssen Sie zunächst
sicherstellen, dass die Stromquelle ausreichend Ladestrom bereitstellt.
Andernfalls kann es zu Schäden am Gerät und der USB-Stromquelle kom-
men. Verwenden Sie daher nie z. B. den USB-Port eines Computers oder
USB-Hubs, außer es handelt sich um spezielle Ladeports mit einem Aus-
gangsstrom von mindestens 2 A.
8. Während der Akku aufgeladen wird, blinken die LEDs. Die Ladedauer hängt
vom jeweiligen Ladezustand ab und kann mehrere Stunden betragen.
9. Verwenden Sie bitte niemals den Ladeausgang und den Ladeeingang gleich-
zeitig. Sie können die Powerbank auch nutzen, um mobile Geräte (z. B.
Smartphones) aufzuladen. Prüfen Sie zunächst, ob die Powerbank komplett
aufgeladen ist. Verbinden Sie den Stecker des mitgelieferten Kabels mit
dem USB-Ladeausgang und verbinden Sie dann den Micro-USB-Stecker
mit der Micro-USB-Buchse des mobilen Gerätes. Der Ladevorgang beginnt.
Die Powerbank kann insgesamt 2,1 A Ausgangsstrom liefern. Über die blin-
kenden LEDs können Sie während des Ladevorgangs den Ladezustand der
Powerbank prüfen. Bitte überwachen Sie den Ladevorgang. Wenn dieser
unterbrochen oder beendet werden soll, trennen Sie das Kabel vom mobilen
Gerät.
10. Sobald der Akku voll aufgeladen ist, trennen Sie die Powerbank von der
USB-Stromquelle.
11. Setzen Sie die Powerbank anschließend ins Gerät (die Anschlüsse müssen
nach unten zeigen, die LEDs nach vorn). Sobald die Powerbank richtig ein-
gesetzt ist, wird dies durch einen Signalton bestätigt.
Copyright UNOLD AG | www.unold.de

15
12. Auch wenn die Powerbank im Ventilator eingesetzt ist,
sollte der Ladezustand regelmässig geprüft und die Power-
bank ggf. aufgeladen werden.
13. Tipp: Sie können den Ladezustand der Powerbank auch
prüfen, wenn diese im Gerät eingesetzt ist. An der Geräte-
rückseite befinden sich kleine Aussparungen, durch welche
Sie die Lade-LEDs der Powerbank erkennen können.
14. Und wenn Sie einmal eine kleine, zusätzliche Licht-
quelle benötigen, auch dies kann die mitgelieferte Power-
bank: Drücken Sie die Bedientaste so lange, bis die helle
LED zwischen den beiden USB-Anschlüssen aufleuchtet.
Um das Licht wieder auszuschalten, halten Sie die Taste
erneut gedrückt, bis die LED erlischt.
FERNBEDIENUNG
1. Entfernen Sie vorsichtig die Abdeckung des Batteriefachs.
2. Setzen Sie die Batterien ein. Achten Sie hierbei bitte unbedingt auf die
richtige Polung. Zur Orientierung sind entsprechende Markierungen in dem
Batteriefach angebracht.
3. Verwenden Sie nur Batterien vom Typ AAA, 1,5 V.
4. Schließen Sie die Abdeckung.
5. Wenn Sie das Gerät mit der Fernbedienung einstellen, achten Sie darauf,
diese während der Einstellungen immer in Richtung des Ventilators zu hal-
ten.
6. Die Bezeichnungen auf der Fernbedienung sind identisch mit den Tasten
am Gerät.
7. Um Schäden zu vermeiden, lassen Sie die Fernbedienung bitte nicht aus
großer Höhe fallen.
8. Die Reichweite der Fernbedienung beträgt 7 Meter.
9. Zur einfachen Aufbewahrung ist die Fernbedienung magnetisch und kann
einfach an die Abdeckung des Akkufaches an der Geräterückseite gehängt
werden.
Copyright UNOLD AG | www.unold.de

16
DISPLAY
1 Zeitanzeige
2 Geschwindigkeitsanzeige
3 Taste Kontrollleuchten ein-/ausschalten
4 Taste Zeitvorwahl
5 Kontrollleuchte BEREIT
6
Taste für Geschwindigkeit
7 Taste für Oszillation
8 EIN/AUS-Taste
BEDIENEN
1. Vergewissern Sie sich, dass das Gerät auf einem geeigneten, ebenen Unter-
grund steht und sicher und stabil aufgestellt wurde.
Betrieb am Stromnetz
2. Verbinden Sie den Hohlstecker der Zuleitung mit der Buchse an der Geräte-
rückseite. Stecken Sie das Netzteil in eine Steckdose und schalten Sie das
Gerät an der EIN/AUS-Taste (8) ein.
Akkubetrieb
3. Prüfen Sie, ob die Powerbank ordnungsgemäß im Fach an der Geräterück-
seite eingesetzt ist.
4. Trennen Sie das Gerät ggf. von der Stromversorgung.
5. Wie lange eine Akkuladung ausreicht, hängt unter anderem davon ab, wel-
che Geschwindigkeit Sie ausgewählt haben. Bei Stufe 1 reicht die Akkula-
dung für ca. 21 Stunden, bei Stufe 6 für ca. 3 Stunden.
6. Tipp: Sie können den Ladezustand der Powerbank jederzeit prüfen. An der
Geräterückseite befinden sich kleine Aussparungen, durch welche Sie die
Lade-LEDs der Powerbank erkennen können.
Geschwindigkeit einstellen
7. Drücken Sie die Taste für die Geschwindigkeit (6) so oft, bis die von Ihnen
gewünschte Windgeschwindigkeit erreicht ist. Sie können zwischen sechs
verschiedenen Stufen wählen:
Stufe 1: leichter Wind
Stufe 2: mittlerer Wind
Stufe 3: Schlaf-Modus (wechselnde, niedrige Geschwindigkeit)
Copyright UNOLD AG | www.unold.de

17
Stufe 4: naturnaher Wind (wechselnde Geschwindigkeit, die sich wie natür-
liche Luftbewegung anfühlt)
Stufe 5: starker Wind
Stufe 6: sehr starker Wind
8. Sie können jederzeit zwischen den verschiedenen Geschwindigkeitsstufen
wechseln.
Zeitvorwahl
9. Über die Taste Zeitvorwahl (4) können Sie die gewünschte Laufzeit des
Gerätes auswählen. Dies ist zwischen einer und sechs Stunden Laufdauer
möglich. Drücken Sie die Taste für die Zeitprogrammierung (4) und achten
Sie dabei auf die Zeitanzeige (1). Die LEDs zeigen die aktuell gewählte
Laufdauer an (1 LED leuchtet: Laufdauer 1 Stunde, 2 LEDs leuchten: Lauf-
dauer 2 Stunden usw.). Sie müssen also, um das Gerät für eine Laufdauer
von zwei Stunden zu programmieren, die Taste (4) zweimal hintereinander
drücken. Nach Ablauf dieser gewählten Zeit schaltet sich das Gerät aus.
10. Selbstverständlich können Sie auch beim Nutzen der Zeitvorwahl die
Geschwindigkeit des Gerätes auswählen bzw. ändern.
Schwenkfunktion/Oszillation
11. Drücken Sie die Taste für die Oszillation (7). Das Gerät schwenkt nun selbst-
ständig.
12. Wenn Sie die Schwenkfunktion wieder ausschalten möchten, drücken Sie
die Taste für Oszillation erneut.
Kontrollleuchten ein-/ausschalten
13. Alle Kontrollleuchten können ausgeschaltet werden, um Strom zu sparen,
oder falls die Beleuchtung z. B. beim Schlafen stört.
14. Um die Kontrollleuchten ein- oder auszuschalten, drücken Sie die Taste
3. Alle Kontrollleuchten erlöschen, das Gerät bleibt jedoch weiterhin in
Betrieb. Möchten Sie die Kontrollleuchten wieder einschalten, drücken Sie
einfach eine beliebige Taste.
Neigewinkel einstellen
15. Sie können das Motorgehäuse in gewissem Umfang (ca.
20°) vertikal neigen. Neigen Sie die Korbabdeckung bis zum
gewünschten Winkel. Achtung: Neigen Sie die Abdeckung
nur im vorgesehenen Bereich und nicht über den spürbaren
Widerstand hinaus, um das Gerät nicht zu beschädigen.
Copyright UNOLD AG | www.unold.de

18
Höhenverstellung
16. Drehen Sie die Feststellschraube an der Gerätevorderseite
(siehe Abbildung) etwas nach links. Schieben Sie den oberen Teil
des Gerätes in die gewünschte Höhe. Fixieren Sie anschließend diese
Höhe, indem Sie die Feststellschraube nach rechts festdrehen.
Ausschalten
17. Drücken Sie die EIN/AUS-Taste (8), um das Gerät auszuschal-
ten. Ziehen Sie den Stecker aus der Steckdose, wenn Sie das Gerät
nicht mehr verwenden.
18. Wenn der Stecker nicht gezogen wird und das Gerät nicht aus-
geschaltet ist, schaltet sich das Gerät nach 12 Stunden automatisch
aus.
Schalten Sie das Gerät an der EIN/AUS-Taste aus und ziehen Sie den
Stecker aus der Steckdose.
Achten Sie darauf, das Gerät niemals in Wasser zu tauchen. Motor oder
elektrische Bauteile des Gerätes dürfen nicht feucht werden.
1. Verwenden Sie grundsätzlich keine scharfen Scheuermittel, Stahlwolle,
metallischen Gegenstände, heiße Reinigungsmittel oder Desinfektionsmit-
tel.
2. Wischen Sie Standrohr und Gitter des Ventilators mit einem leicht feuchten
Tuch ab.
3. Bewahren Sie den Ventilator an einem trockenen und sicheren Ort auf, um
ihn vor Staub, Stößen, Hitze und Feuchtigkeit zu schützen.
REINIGEN UND PFLEGEN
Copyright UNOLD AG | www.unold.de

19
GARANTIEBESTIMMUNGEN
ENTSORGUNG / UMWELTSCHUTZ
Unsere Geräte werden auf hohem Qualitätsniveau für eine lange Nutzungsdauer her ge stellt.
Regelmäßige Wartung und fachge rechte Reparaturen durch unseren Kunden dienst können die
Nutzungsdauer des Gerätes verlängern. Wenn ein Gerät defekt und nicht mehr zu reparieren ist,
beachten Sie bitte: Dieses Produkt darf nicht zusammen mit dem normalen Hausmüll entsorgt
werden. Sie müssen dieses Produkt an einer ausgewiesenen Sammelstelle zum Recycling von
elektrischen oder elektronischen Geräten ab liefern. Durch das separate Sammeln und Recyceln
von Abfallprodukten helfen Sie mit, die natürlichen Ressourcen zu schonen und stellen sicher,
dass das Produkt in gesundheits- und umweltverträglicher Weise entsorgt wird.
Verbrauchte Batterien gehören nicht in den Hausmüll. Bitte entsorgen Sie diese über Ihren
Elektrohändler oder die jeweilige kommunale Sammelstelle.
Wir gewähren auf unsere Geräte eine Garantie von 24 Monaten, bei gewerblichem Gebrauch 12 Monate, ab dem
Kaufdatum für Schäden, die bei bestimmungsgemäßem Gebrauch nachweislich auf Werksfehler zurückzufüh-
ren sind. Innerhalb der Garantiezeit beheben wir Material- und Herstellungsfehler nach unserem Ermessen
durch Reparatur oder Umtausch. Unsere Garantieleistungen gelten ausschließlich für in Deutschland und
Österreich verkaufte Geräte. Bei anderen Ländern wenden Sie sich bitte an den zuständigen Importeur. Geräte,
für die eine Mängelbeseitigung beansprucht wird, senden Sie bitte zusammen mit einer Kopie des maschi-
nell erstellten Kauf belegs, aus dem das Kaufdatum ersichtlich sein muss, sowie einer Fehlerbeschreibung gut
verpackt und freigemacht an unseren Kundendienst. Im Garantiefall werden dem Kunden in Deutschland und
Österreich entstandene Versandkosten zurückerstattet. Von der Garantie ausgeschlossen sind Schäden durch
Verschleiß, unsachgemäße Handhabung und Nichteinhaltung der Wartungs- und Pflegeanweisungen. Der Ga-
rantieanspruch erlischt, wenn Reparaturen oder Eingriffe am Gerät von dritter Stelle vorgenommen werden.
Eventuelle Ansprüche des Endverbrauchers gegenüber dem Verkäufer oder Händler werden durch diese Garantie
nicht eingeschränkt.
INFORMATIONEN FÜR DEN FACHHANDEL
Hiermit erklärt die UNOLD AG, dass sich der Ventilator 86870 in Übereinstimmung mit den
grundlegenden Anforderungen der europäischen Richtlinie für elektromagnetische Verträglichkeit
(2014/30/EU) und der Niederspannungsrichtlinie (2014/35/EC) bendet.
Die Übereinstimmung mit den Regularien bezieht sich auf den Tag der Erstellung dieser Erklärung.
Hockenheim, 28.5.2017
UNOLD AG, Mannheimer Straße 4, 68766 Hockenheim
Copyright UNOLD AG | www.unold.de

20
Diese Anleitung kann im Internet unter www.unold.de als pdf-Datei heruntergeladen werden.
SERVICE-ADRESSEN
DEUTSCHLAND
SCHWEIZ ÖSTERREICH
POLEN
Mannheimer Straße 4
68766 Hockenheim
Kundendienst
Telefon +49 (0) 62 05/94 18-27
Telefax +49 (0) 62 05/94 18-22
E-Mail [email protected]
Internet www.unold.de
Sie möchten innerhalb der Garantiezeit ein Gerät zur Reparatur einsenden? Auf unserer
Internetseite www.unold.de/ruecksendung können Sie sich einen Rücksendeschein ausdrucken,
um damit das Paket kostenlos bei der Post abzugeben (nur für Einsendungen aus Deutschland
und Österreich).
MENAGROS AG
Hauptstr. 23
CH 9517 Mettlen
Telefon +41 (0) 71 6346015
Telefax +41 (0) 71 6346011
E-Mail [email protected]
Internet www.bamix.ch
Quadra-Net
Dziadoszanska 10
61-248 Poznań
Internet www.quadra-net.pl
DEC
Digital Electronic Center Service GmbH
Kelsenstraße 2
A-1030 Wien
Telefon +43 (0) 1/9616633-0
Telefax +43 (0) 1/9616633-22
E-Mail [email protected]
Internet www.decservice.at
Copyright UNOLD AG | www.unold.de

21
INSTRUCTIONS FOR USE MODEL 86870
TECHNICAL SPECIFICATIONS
EXPLANATION OF THE SYMBOLS
This symbol indicates potential hazards that may result in injury or
damage to the appliance.
Please read the following instructions and keep them on hand for later
reference.
Instructions for persons in the household
1. This appliance can be used by children 8 years and older, as
well as by persons with reduced physical, sensory or mental
abilities or with lack of experience and/or knowledge, if they are
supervised or if they have been instructed with regard to safe
use of the appliance and have understood the dangers that can
result from use of the appliance.
FOR YOUR SAFETY
Power: 30 watt, (12 VDC)
Power supply adapter 100-240 V, 50/60 Hz, 1.2 A
USB energy supply 5 V
2 A
Dimensions: Approx 40 x 40 x 120/140 cm (D/W/H)
Weight: Approx. 7.5 kg
Power cord: Approx. 2.0 m
Diameter: Approx. 40 cm
Noise level: ≤ 63 dB
Air speed: ≥ 320 m/min
Charging time: First charging approx. 10 hours, grid connection approx.
7 hours
Technical data
Rech. battery/
Powerbank: 4,400 mAh, 11.1 V. Output voltage USB: DC-5V-2,1 A, USB
charging current 800-10,00 mA, standby charging current
900-1,000 mA, lithium-ion
Features: Rechargeable battery operated pedestal fan for indoor and
outdoor use, 6 speed levels, remote control, rechargeable
battery runtime up to approx. 21 hours at lowest level (approx. 3
hours at highest level), automatic switch-off, height adjustable,
with time preselect
Accessories: Operating instructions, USB charging cable, power supply unit
with power cord, remote control, 2x battery, type AAA 1.5 V.
Equipment features, technology, colours and design are subject to change without
notice.
Copyright UNOLD AG | www.unold.de

22
2. Children must not play with the appliance.
3. Children are not allowed to perform cleaning and user
maintenance, unless they are 8 years of age or older and are
supervised.
4. Keep the appliance and the power cord out of the reach of
children under 8 years of age.
Safety instructions for set-up and operation of the appliance
5. Only switch the appliance on when it has been properly assem
-
bled.
6.
Ensure that there is sufficient space where the appliance is
located. A minimum distance of 50 cm must be maintained
between the appliance and other objects.
7. Do not use the appliance in rooms that are extremely dusty or in
the vicinity of flammable substances.
8. Only connect the appliance to alternating current with voltage in
accordance with the rating plate.
9. This appliance may not be operated with an external timer or a
remote control system.
10. Never immerse the appliance or the power cord in water or other
liquids - life-threatening danger!
11. Do not open the motor housing under any circumstances, there
is danger of electric shock!
12. The appliance is intended for household use only, or for similar
areas of use, such as,
in kitchenettes in businesses, offices or other workplaces,
for use by guests in hotels, motels or other lodgings,
in private guest houses or holiday homes.
13. Ensure that the power cord is laid out in such a manner that
there is no possibility of stumbling over it.
14. To avoid damage to the cord, never wrap the power cord around
the appliance.
15. To avoid damage to the cord, always unplug the mains plug from
the electrical outlet by grasping the plug, never pull the power
cord to unplug the appliance.
16. Ensure that the electrical outlet used is easily accessible, in
order to unplug the appliance in an emergency.
Copyright UNOLD AG | www.unold.de

23
17. To avoid damage to the power cord, ensure that it is not pinched
or pulled over corners.
18. If possible, do not use an extension cord. If you must use an
extension cord, completely unwind the extension cord and com
-
ply with the power limits of the respective extension cord.
19.
The appliance must never be used in wet/wet and cold rooms -
danger of electric shock!
20. Keep the appliance out of direct sunlight.
21. Never stick objects such as fingers, needles, pins, etc. through
the basket grille into the interior of the appliance - danger of
injury!
22. Ensure that long hair cannot be caught by the impeller.
23. Regularly check the appliance, the plug and the power cord for
wear or damage. In case of damage, please send the appliance
for inspection and repair to our customer service department.
Unauthorised repairs can result in serious hazards for the user
and void the warranty.
24. If the supply cord is damaged, it must be replaced by the manu
-
facturer, its service agent or similarly qualified persons to avoid
a hazard.
25.
To avoid damage, do not use the appliance with accessories of
other manufacturers or brands.
26. Pull the mains plug out of the socket after use, as well as before
cleaning. Never leave the appliance unattended if the mains
plug is plugged in.
27. The appliance can be used outdoors, however it must be pro
-
tected against moisture and water, to prevent danger of electric
shock. Do not use outdoors in the rain!
Special safety instructions for the rechargeable battery/the Powerbank
28.
Always keep the Powerbank away from children.
29. To avoid damage to the appliance, only use the provided power
bank.
30. Never operate the appliance if it has been brought from a cold
environment into a warmer environment. In such a situation con
-
densation can occur that can damage the appliance. Do not use
the appliance until it has reached the actual room temperature.
Under some circumstances, this can take several hours!
Copyright UNOLD AG | www.unold.de

24
31. Do not convert the Powerbank or use it for purposes other than
the purposes described here. Non-intended use can result in
fire, electric shock, personal injury, etc.
32. Avoid operating the appliance in the vicinity of strong magnetic
fields, (e.g. speakers, machines, etc.).
33. To prevent appliance damage, the appliance and the Powerbank
must never be placed in the vicinity of heat sources, even direct
sunlight must be avoided.
34. Ensure that the Powerbank is always inserted in the appliance
with the correct polarity.
35. The ideal ambient temperature for operation is between 20-30°C.
36. The output voltage and the current of the integrated recharge
-
able battery are 5 V/2.1 A; these values must not be exceeded.
37.
To prevent damage to the interior rechargeable battery, the Pow-
erbank must never be immersed in liquids.
38.
Never toss the Powerbank into open flames – danger of explo-
sion!
39.
Always read the instructions for charging the Powerbank and
comply with these instructions.
40. Ensure that the Powerbank is not damaged due to falling, impact,
strong vibration or other influences. Never use a damaged
Powerbank or a damaged rechargeable battery! In this case,
contact our customer service organization.
41. To prevent deep discharge of the rechargeable battery and thus
a defect, recharge the Powerbank on a regular basis, even when
you are not using the appliance.
42. Caution: The provided USB cable is not suitable for transferring
data!
43. Only use the provided USB cable to charge the Powerbank, never
use the other cables.
44. If you charge the Powerbank via a USB power source, you must
first ensure that the power source provides sufficient charging
current. If not the appliance and the USB power source can
be damaged. Additional instructions are provided in the section
„Charging the rechargeable battery“.
45. Never gaze directly into the light beam of the integrated LED –
danger of eye injury! Never examine the light beam with optical
instruments!
Copyright UNOLD AG | www.unold.de

25
46. Even if the powerbank is installed in the fan, the charge level
should be checked regularly and the powerbank should be
charged if necessary.
47. Never cover the Powerbank with objects when it is charging.
48. Never short-circuit the Powerbank.
49. Caution: If liquid should escape from the Powerbank, put on pro
-
tective gloves immediately before handling the appliance. Avoid
skin and eye contact with the liquid; it is extremely aggressive
and can cause personal injury. Should skin or eye contact never
-
theless occur, seek medical attention immediately. Ensure that
the
liquid
does not come into contact with surfaces or objects,
surfaces or objects could be damaged. Contact our customer
service organisation immediately.
Safety instructions – batteries, remote control unit
50. Always keep the batteries away from children.
51. If batteries are swallowed, seek medical attention immediately!
52. Caution: If liquid should escape from the batteries, put on pro
-
tective gloves immediately before handling the appliance. Avoid
skin and eye contact with the liquid; it is extremely aggressive
and can cause personal injury. Should skin or eye contact never
-
theless occur, seek medical attention immediately. Ensure that
the
liquid
does not come into contact with surfaces or objects,
surfaces or objects could be damaged.
53. Store batteries in a dry environment.
54. Ensure that batteries are always inserted in the appliance with
the correct polarity.
55. I you will not be using the remote control unit for an extended
period of time, the batteries must be removed.
56. If you are using rechargeable batteries, comply with the manu
-
facturer‘s instructions for correct charging of the batteries.
57.
Never open batteries – danger of injury!
58. Always use batteries of the same type only. To prevent personal
injury or appliance damage, never use batteries from different
manufacturers, batteries of different sizes or different voltages.
59. Ensure that batteries are not exposed to direct sunlight or other
heat sources. Never toss batteries into open flames – danger of
explosion!
Copyright UNOLD AG | www.unold.de

26
Never stick objects such as fingers, needles, pins, etc. through
the basket grille into the interior of the appliance - danger of
injury!
Only operate the appliance on a level, stable substrate, so that
it does not tip over.
The manufacturer will not be liable in the event of incorrect assembly, improper or incorrect use or if
repairs are carried out by unauthorized third parties.
ASSEMBLY
1 Fastening ring
2 Front basket cover
3 Nut
4 Impeller
5 Nut
6
Rear basket cover
7 Operating element with
motor housing
8 Upper stand tube
9 Base
10 Screws (3 screws)
11 Remote control unit
12 Batteries
13 USB charging cable
14 Power supply unit
Copyright UNOLD AG | www.unold.de

27
1. Before assembling, ensure that you are assembling the appliance in a place
that is level and dry.
2. Remove all packaging materials and transport safeguards. Keep the
packaging material, such as plastic bags or Styrofoam away from small
children - danger of suffocation!
3. Check whether all needed parts are present.
4. If necessary, unscrew the screws (10) slightly out of the base.
5. Precisely insert the stand tube (8) into the base and fasten it with the three
screws (firmly tighten the screws clockwise).
6. Fit the operating element (7) onto the stand tube (8). In this process, ensure
that the lower end of the operating element fits precisely onto the holes
intended for this purpose. Fix the two components in place with the screw.
7. You can adjust the desired height by unscrewing the fixing screw, sliding
the tube to the desired height, and fixing it in place with the fixing screw.
8. Fasten the rear basket cover (6) on the motor housing (7), by fixing the cover
in place with the nut (5).
9. Place the impeller (4) on the axle on the motor housing (7). Fix the impeller
(4) in place with the nut (3). Caution: Left-hand thread!
10. Connect the front basket cover (2) to the rear basket cover (6). Check
whether the fastening ring (1) is in the right position (both halves of the
basket must sit precisely in the ring) and fix them in place with the clamp.
11. Check whether all parts have been correctly assembled and fixed in place.
POWERBANK/RECHARGEABLE BATTERY
1
3
4
6
5
1 LEDs – charge status
2 Operating button
3 USD charging input
4 USD charging output
5 Connection, interface –
fan
6
LED/torch
2
Copyright UNOLD AG | www.unold.de

28
1. Note: The fan can also be operated
without the Powerbank inserted!
2. Your new fan offers the possibility of
operation without a power source, if the
included Powerbank has been appropriately
charged beforehand. If you leave the Power-
bank in the appliance and connect the appli-
ance via the power grid, the rechargeable
battery of the Powerbank will be recharged.
3. Alternatively, charging is possible via a USD connection.
4. The Powerbank can be removed, if you open the appropriate
compartment on the rear of the appliance (see illustration).
5. To check the actual charge status, briefly press the operating button on the
Powerbank (see illustration).
6. The LEDs show the actual charge status, four LEDs indicate that the
Powerbank is completely charged (respectively the LEDs stand for 25, 50,
75, and 100%).
7. Connect the Powerbank to the USD charging port with the provided USB
cable. In this regard, always comply with the following instruction. If you
charge the rechargeable battery via a USB power source, you must first
ensure that the power source provides sufficient charging current. If not,
the appliance and the USB power source can be damaged. Consequently,
for example, never use the USB port of a computer or USB hub unless these
are special charging ports with an output current of at least 2 A.
8. The LEDs are flashing while the rechargeable battery is being charged. The
charging time depends on the particular charge status, and can be several
hours.
9. Never use the charge output and the charge input at the same time. You can
also use the Powerbank to charge mobile devices (such as smart phones).
First check whether the Powerbank is completely charged. Connect the plug
of the provided cable to the USB charging output, and then connect the
micro USB plug to the micro USB socket of the mobile device. The charging
process begins. The Powerbank can supply a total of 2.1 A output current.
Via the flashing LEDs you can check the charge status of the Powerbank
during the charging process. Monitor the charging process. If the charg-
ing process should be interrupted or ended, disconnect the cable from the
mobile device.
Copyright UNOLD AG | www.unold.de

29
10. As soon as the rechargeable battery is fully charged,
disconnect the Powerbank from the USB power source.
11. Then insert the Powerbank into the appliance (the
connections must point downward; the LEDs are in front).
As soon as the Powerbank is correctly inserted, this is con-
firmed via a signal tone.
12. Tip: You can also check the charge status of the Power-
bank when it is inserted in the appliance. On the rear of the
appliance, there are small apertures through which you can
see the charging LEDs of the Powerbank.
13. And if you should need a small, additional light source,
this can also be provided by the provided Powerbank: Press
the operating button and keep it depressed until the bright LED between
the two USD connections is illuminated. To switch this light off, press the
button again and keep it depressed until the LED goes out.
REMOTE CONTROL UNIT
1. Carefully remove the cover of the battery compartment.
2. Insert the batteries. In this regard, strictly ensure that the polarity is correct.
For orientation, there are appropriate markings in the battery compartment.
3. Only use type AAA batteries, 1.5 V.
4. Close the cover.
5. If you adjust the appliance with the remote control unit, ensure that you
always hold it in the direction of the fan while you are making the settings.
6. The designations on the remote control unit are identical to the designations
of the buttons on the appliance.
7. To avoid damage, never allow the remote control unit to fall from a signifi-
cant height.
8. The remote control unit has a range of 7 meters.
9. The remote control unit is magnetic for easy storage and can simply be
affixed on the cover of the rechargeable battery compartment on the rear of
the appliance.
Copyright UNOLD AG | www.unold.de

30
DISPLAY
1 Time display
2 Speed display
3 Button – switch indicator lights on/off
4 Button – timer
5 Indicator light – ready
6
Button for speed
7 Button for oscillation
8 ON/OFF button
OPERATION
1. Ensure that the appliance is standing on a suitable, level substrate, and has
been set up so that it is safe and stable.
Operation via the power grid
2. Connect the barrel connector of the power cord to the socket on the rear
of the appliance. Plug the power supply unit into an electrical outlet and
switch on the appliance via the ON/OFF button (8).
Operation via rechargeable battery
3. Check whether the Powerbank is properly inserted in the compartment on
the rear of the appliance.
4. Disconnect the appliance from the power supply.
5. How long a charge of the rechargeable battery lasts depends on the speed
you have selected, among other things. At level 1 the charge of the recharge-
able battery lasts for approx. 21 hours, at level 6, it lasts for approx. 3 hours.
6. Tip: You can check the charge status of the Powerbank at any time. On the
rear of the appliance, there are small apertures through which you can see
the charging LEDs of the Powerbank.
Setting the speed
7. Press the button for speed (6) until the breeze speed you desire is reached.
You can select from between six different levels:
Level 1: Light breeze
Level 2: Moderate breeze
Level 3: Sleep mode (alternating, low speed)
Level 4: Near-natural breeze (alternating speed that feels like natural air
movement)
Copyright UNOLD AG | www.unold.de

31
Level 5: Strong breeze
Level 6: Very strong breeze
8. You can change between the different speed levels at any time.
Timer
9. Via the Timer button (4) you can select the desired runtime of the appli-
ance. This is possible between a run duration of on hour and six hours. Press
the button to program the timer (4) and observe the time display (1). The
LEDs show the currently selected run duration (1 LED is illuminated: Run
duration 1 hour, 2 LEDs are illuminated: Run duration 2 hours, etc.). Thus
to program the appliance for a run duration of two hours, press the button
(4) two times in succession. After this selected time elapses the appliance
switches off.
10. Naturally you can also use the timer to select or change the speed of the
appliance.
Swing function/oscillation function
11. Press the button for oscillation (7). The appliance now swings autonomously.
12. If you want to switch off the swing function, press the oscillation button
again.
Indicator lights – switch on/off
13. All indicator lights can be switched off to save power, or if the light is dis-
turbing, e.g. when you are want to sleep.
14. To switch the indicator lights on or off, press button 3. All indicator lights
go out, however the appliance still remains in operation. If you want to turn
the indicator lights back on again, simply press any button.
Setting the tilt angle
15. You can tilt the motor housing vertically to a certain
extent (approx. 20°). Tilt the basket cover to the desired
angle. Caution: Only tilt the cover in the intended range
and not beyond the point of tangible resistance, to avoid
damaging the appliance.
Copyright UNOLD AG | www.unold.de

32
Switch off the appliance via the ON/OFF button and unplug the power cord
from the electrical outlet.
Never immerse the appliance in water. The motor or electrical components
of the appliance must not get wet.
1. Never use any abrasive scouring agents, steel wool, metal objects, hot clean-
ing agents or disinfectants.
2. Wipe off the stand tube and grille of the fan with a slightly damp cloth.
3. Store the fan in a dry, safe place so that it is protected from dust, impact,
heat and moisture.
CLEANING AND CARE
Height-adjustment
16. Turn the fixing screw on the front of the appliance (see illustra-
tion) slightly to the left. Slide the upper part of the appliance to
the desired height. Then fix the appliance in place at this height by
firmly tightening the fixing screw by turning it to the right.
Switching off
17. Press the ON/OFF button (8) to switch the appliance off. When
you are no longer using the appliance, unplug the plug from the
electrical outlet.
18. If the plug is not unplugged, and the appliance is not switched
off, the appliance will switch off automatically after 12 hours.
Copyright UNOLD AG | www.unold.de

33
WASTE DISPOSAL / ENVIRONMENTAL PROTECTION
Our appliances are produced on a high quality level for a long lifetime. Regular maintenance
and expert repairs by our after-sales service can extend the useful life of the appliance. If an
appliance is defective and repair is not possible we ask you to follow the following instructions
for disposal. Do not dispose this appliance together with your standard household waste. Please
bring this product to an approved collection point for recycling of electric and electronic prod-
ucts. By separate collection and disposal of waste products you help to protect natural resources
and ensure, that the product is disposed in an adequate way to protect health and environment.
Do not dispose of used batteries as household waste. Dispose of this product via your appli-
ance dealer or take it to the municipal collection point.
GUARANTEE CONDITIONS
We grant a 24 months guarantee, and in case of commercial use a 12 months guarantee, starting from the
date of purchase for any damage demonstrably due to manufacturing defects and when the appliance has been
used according to its intended use. Within the warranty period we will remedy defective materials or workman-
ship through repair or replacement, at our option. Our warranty terms apply only to appliances sold in Germany
and Austria. For other countries, please contact the responsible importer. In the event of a claim for remedy of
defects, please send the appliance to our after sales service, properly packaged and postage paid, together with
a copy of the automatically generated sales receipt, which must show the date of purchase, and a description
of the defect. If the defect is covered by the warranty, the customer will be reimbursed for the shipping costs
only in Germany and Austria. The warranty does not cover damage from normal wear, improper handling and
failure to comply with the maintenance and care instructions. The warranty is void if repairs or modifications
are made to the appliance by third parties. Any claims of the end consumer vis-à-vis the retailer are not limited
by this warranty.
The instruction booklet is also available for download: www.unold.de
Copyright UNOLD AG | www.unold.de

34
NOTICE D´UTILISATION MODÈLE 86870
POUR VOTRE SÉCURITÉ
SPÉCIFICATION TECHNIQUE
Puissance : 30 watts, (12 VDC)
Adaptateur secteur 100-240 VAC, 50/60 Hz, 1,2 A
Alimentation électrique USB 5 V 2 A
Dimensions : Env. 40 x 40 x 120/140 cm (p/l/h)
Poids : Env. 7,5 kg
Câble d’alimentation : Env. 2,0 m
Diamètre : Env. 40 cm
Niveau sonore : ≤ 63 db
Vitesse de l‘air : ≥ 320 m/min
Temps de charge : Première charge env. 10 heures, branchement secteur
env. 7 heures
Caractéristiques
techniques
Accu / Chargeur portatif : 4 400 mAh, 11,1V. Courant de sortie USB : DC-5V-2,1 A,
courant de charge USB 800-1 000 mA, courant de
charge en veille 900-1 000 mA, accu lithium-ion
Équipement : Ventilateur sur pied fonctionnant sur piles pour intérieur
et extérieur, 6 niveaux de vitesse, télécommande, durée
de fonctionnement sur piles jusqu‘à 21 heures env. sur
le niveau le plus faible (env. 3 heures sur le niveau le
plus élevé), arrêt automatique, hauteur réglabe, avec
présélection de durée
Accessoires : Mode d‘emploi, câble de charge USB, bloc d‘alimentation
avec câble de branchement, télécommande, 2 x piles
type AAA 1,5 V.
Modifications et erreurs des caractéristiques de l‘équipement, de la technique, des
couleurs et du design réservées
Veuillez lire les indications suivantes et les conserver.
Personnes dans le foyer
1. Cet appareil peut être utilisé par des enfants de plus de 8 ans
et par des personnes dont les capacités physiques, sensorielles
ou intellectuelles sont limitées ou dont l’expérience et/ou les
connaissances sont insuffisantes, si ceux-ci sont surveillés ou
s’ils ont été formés à une utilisation sûre de l’appareil et aux
dangers pouvant en résulter.
EXPLICATION DES SYMBOLES
Ce symbole vous indique des risques possibles qui puissent entraîner
des lésions ou des endommagements de l’appareil.
Copyright UNOLD AG | www.unold.de

35
2. Les enfants ne doivent pas jouer avec l’appareil.
3. Le nettoyage et la maintenance incombant à l’utilisateur ne
doivent pas être effectués par des enfants, à moins qu’ils soient
âgés de plus de 8 ans et qu’ils soient surveillés.
4. Conserver l’appareil ainsi que le câble hors de portée des enfants
de moins de 8 ans.
Remarques de sécurité relatives à l‘installation et au fonctionnement de
l‘appareil
5. Allumer l‘appareil uniquement s‘il a été monté correctement.
6. S‘assurer que l‘espace est suffisant à l‘endroit où l‘appareil est
installé. Dégager au moins 50 cm entre l‘appareil et les autres
objets.
7. Ne pas utiliser l‘appareil dans des espaces poussiéreux ou à
proximité de substances inflammables.
8. Raccorder exclusivement l’appareil au courant alternatif à la
tension se conformant au panneau signalétique.
9. Cet appareil ne doit pas être utilisé avec un minuteur externe ou
un système de commande à distance.
10. Ne plonger en aucun cas l’appareil ou son cordon d’alimentation
dans l’eau ou dans tout autre liquide : danger de mort !
11. N‘ouvrir en aucun cas le boîtier de l‘appareil : risque
d‘électrocution !
12. L‘appareil est exclusivement destiné à un usage ménager ou à
des fins similaires, par ex.
dans une kitchenette dans des boutiques, des bureaux ou
d‘autres lieux de travail,
à l‘usage des clients dans des hôtels, motels ou autres lieux
d‘hébergement,
dans des pensions privées ou des résidences de vacances.
13. Veiller à ce que le cordon d‘alimentation ne puisse pas être
source de trébuchement.
14. Afin de ne pas endommager le cordon, ne l‘enroulez jamais
autour de l‘appareil.
15. Afin de ne pas endommager le cordon, débranchez toujours au
niveau de la prise de courant. Ne tirez jamais sur le cordon.
Copyright UNOLD AG | www.unold.de

36
16. Attention : la prise de courant utilisée doit être aisément
accessible afin de pouvoir débrancher rapidement l‘appareil en
cas de danger.
17. Attention : ne pas pincer le cordon ou le faire passer sur des
angles afin d‘éviter toute détérioration.
18. Si besoin, utiliser une rallonge. Si cela ne peut pas être évité,
dérouler totalement la rallonge et respecter les puissances
maximales admissibles du câble en question.
19. L‘appareil ne doit pas être utilisé dans des locaux humides /
froids ou moites : risque d‘électrocution !
20. Évitez tout rayonnement intense du soleil sur l‘appareil.
21. Ne jamais introduire des objets comme des doigts, des ongles,
des crayons, etc. à travers la grille de la cage à l‘intérieur de
l‘appareil : risque de blessure !
22. Attention à ne pas coincer des cheveux longs dans l‘hélice.
23. Vérifiez régulièrement l’usure et la détérioration de l’appareil, de
la prise et du câble. Si l’appareil est abîmés, envoyer l’appareil
pour contrôle et réparation à notre service après-vente. Toute
réparation non-conforme peut provoquer des risques importants
pour l’utilisateur et entraîner l’exclusion de la garantie.
24. Si le câble est endommagé, il doit être remplacé par le fabricant
ou son agent de service ou toute autre personne professionnel
qualifié afin d‘éviter un danger.
25. L’appareil ne doit pas être utilisé avec des accessoires d‘autres
fabricants ou marques, afin d’éviter des détériorations.
26. Débrancher l’appareil du secteur après utilisation et avant le
nettoyage. Ne jamais laisser l’appareil sans surveillance lorsque
la prise est branchée.
27. L‘appareil peut être utilisé en extérieur, mais il doit cependant
être protégé de l‘humidité afin d‘éviter tout risque d‘électrocution.
Ne pas utiliser en extérieur en cas de pluie !
Consignes de sécurité spéciales pour l‘accu / le chargeur portatif
28. Tenir le chargeur portatif hors de portée des enfants.
29. Utiliser exclusivement le chargeur portatif fourni afin d‘éviter
d‘endommager l‘appareil.
30. Ne jamais utiliser l‘appareil lorsqu‘il est transféré d‘un
environnement froid à un environnement plus chaud. De l‘eau
Copyright UNOLD AG | www.unold.de

37
de condensation se forme dans ce cas et peut endommager
l‘appareil. Laisser tout d‘abord l‘appareil au repos un certain
temps jusqu‘à ce que la température ambiante actuelle soit
atteinte. Selon les circonstances, cela peut demander quelques
heures !
31. Le chargeur portatif ne doit pas être transformé ou utilisé à
d‘autres fins que celles décrites ici. Une utilisation incorrecte
peut entraîner des incendies, des électrocutions, des lésions
corporelles, etc.
32. Éviter d‘utiliser l‘appareil à proximité de champs magnétiques
puissants (comme par ex. haut-parleurs, machines, etc.).
33. L‘appareil et le chargeur portatif ne doivent jamais être installés
à proximité de sources de chaleur ; même le rayonnement direct
du soleil doit être évité afin de préserver l‘appareil.
34. Attention : le chargeur portatif doit toujours être utilisé en
respectant la polarité de l‘appareil.
35. La température ambiante idéale pour l‘utilisation se situe entre
20 et 30 °C.
36. La tension de sortie et l‘intensité de l‘accumulateur intégré sont
de 5 V / 2,1 A ; ces valeurs ne doivent pas être dépassées.
37. Le chargeur portatif ne doit jamais être plongé dans des liquides
afin d‘éviter toute détérioration de l‘accu qu‘ilcontient.
38. Ne jamais jeter le chargeur portatif dans un feu : risque
d‘explosion !
39. En principe, veuillez observer les consignes pour le chargement
du chargeur portatif et les respecter.
40. Attention : le chargeur ne doit pas être endommagé par une
chute, un choc, de fortes vibrations ou d‘autres influences. Ne
pas utiliser un chargeur portatif endommagé ou un accumulateur
détérioré ! Dans ce cas, veuillez contacter notre service après-
vente.
41. Même si le chargeur portatif est utilisée dans le ventilateur,
le niveau de charge doit être vérifié régulièrement et, le cas
échéant, le chargeur portatif chargé.
42. Charger régulièrement le chargeur portatif, même si vous
n‘utilisez pas l‘appareil, afin d‘éviter une décharge profonde de
l‘accumulateur et donc une défaillance.
Copyright UNOLD AG | www.unold.de

38
43. Attention : le câble USB fourni n‘est pas adapté au transfert de
données !
44. Utiliser uniquement le câble USB fourni pour charger le chargeur
portatif, et jamais un autre câble.
45. Si vous chargez le chargeur portatif par le biais d‘une source
d‘alimentation USB, vous devrez d‘abord vous assurer que la
source électrique fournit un courant de charge suffisant. Dans
le cas contraire, l‘appareil et la source d‘alimentation USB
pourraient subir des détériorations. Le chapitre « Charger
l‘accumulateur » contient des consignes supplémentaires.
46. Ne jamais regarder directement le faisceau lumineux de la LED
intégrée : risque de lésions oculaires ! Ne jamais observer non
plus le faisceau lumineux avec des instruments optiques !
47. Lors de la charge, ne jamais couvrir le chargeur portatif avec des
objets.
48. Ne jamais court-circuiter le chargeur portatif.
49. Attention : si du fluide s‘échappe du chargeur portatif, porter
immédiatement des gants de protection pour manipuler
l‘appareil. Éviter tout contact de la peau et des yeux avec le
fluide ; celui-ci est extrêmement agressif et peut entraîner des
lésions corporelles. Cependant, en cas de contact avec la peau
ou les yeux, consulter immédiatement un médecin. Attention :
le fluide ne doit pas entrer en contact avec des surfaces ou
des objets, car cela pourrait les endommager. Contacter
immédiatement notre service après-vente.
Consignes de sécurité des piles de la télécommande
50. Tenir les piles hors de portée des enfants.
51. En cas d‘ingestion des piles, consulter immédiatement un
médecin !
52. Attention : si du fluide s‘échappe des piles, porter immédiatement
des gants de protection pour manipuler l‘appareil. Éviter tout
contact de la peau et des yeux avec le fluide ; celui-ci est
extrêmement agressif et peut entraîner des lésions corporelles.
Cependant, en cas de contact avec la peau ou les yeux, consulter
immédiatement un médecin. Attention : le fluide ne doit pas
entrer en contact avec des surfaces ou des objets, car cela
pourrait les endommager.
Copyright UNOLD AG | www.unold.de

39
Ne jamais introduire des objets comme des doigts, des ongles,
des crayons, etc. à travers la grille de la cage à l‘intérieur de
l‘appareil : risque de blessure !
L‘appareil doit uniquement être utilisé sur un support stable et
plat afin qu‘il ne bascule pas.
Le fabricant n’est nullement responsable en cas de montage non conforme, d‘utilisation irrégulière ou non
conforme ou suite à l’exécution de réparations par des tiers non autorisés.
53. Conserver les piles dans un environnement sec.
54. Attention : les piles doivent toujours être utilisées en respectant
la polarité de la télécommande.
55. Si vous n‘utilisez pas la télécommande pendant une période
prolongée, les piles doivent être retirées.
56. Si vous utilisez des piles rechargeables, veuillez respecter les
consignes du fabricant pour recharger correctement les piles.
57. Ne jamais ouvrir les piles : risque de blessures !
58. Toujours utiliser exclusivement des piles du même type. Ne
jamais installer des piles d‘un fabricant, d‘une taille ou d‘une
tension différents afin d‘éviter des lésions corporelles et des
dégâts matériels.
59. Veiller à ne pas exposer les piles au rayonnement direct du soleil
ou à d‘autres sources de chaleur. Ne jamais jeter les piles dans
un feu : risque d‘explosion !
Copyright UNOLD AG | www.unold.de

40
MONTAGE
1 Anneau de fixation
2 Capot de cage avant
3 Écrou
4 Hélice
5 Écrou
6
Capot de cage arrière
7 Élément de commande
avec carter moteur
8 Tube vertical
9 Socle
10 Vis (3 pièces)
11 Télécommande
12 Piles
13 Câble de charge USB
14 Bloc d'alimentation
1. Avant le montage, s‘assurer que l‘appareil sera installé sur un support sec
et plat.
2. Retirer tous les matériaux d‘emballage et les protections de transport. Tenir
les matériaux d‘emballage, comme les sacs en plastique ou le polystyrène,
hors de portée des enfants en bas âge : risque d‘asphyxie !
3. Vérifier si toutes les pièces nécessaires sont présentes.
4. Le cas échéant, desserrer légèrement les vis (10) du socle.
5. Positionner exactement le tube vertical (8) dans le socle et le fixer avec les
trois vis (les serrer dans le sens des aiguilles d‘une montre).
Copyright UNOLD AG | www.unold.de

41
6. Enfoncer l‘élément de commande (7) sur le tube vertical (8). Ce faisant,
s‘assurer que l‘extrémité inférieure de l‘élément de commande est
exactement placé sur les trous prévus à cet effet. Fixer les deux éléments à
l‘aide de la vis.
7. Vous pouvez régler la hauteur souhaitée en desserrant la vis de fixation, en
faisant glisser le tube jusqu‘à la hauteur souhaitée et en le fixant avec la
vis de fixation.
8. Fixer le capot de cage arrière (6) sur le carter moteur (7), en fixant le capot
à l‘aide de l‘écrou (5).
9. Placer l‘hélice (4) sur l‘axe au niveau du carter moteur (7). Fixer l‘hélice (4)
avec l‘écrou (3). Attention : filetage à gauche !
10. Relier le capot de cage avant (2) avec le capot de cage arrière (6). Vérifier
si l‘anneau de fixation (1) est dans la bonne position (les deux demi-cages
doivent être exactement placées sur l‘anneau) et fixer ce dernier à l‘aide de
l‘attache.
11. Vérifier que toutes les pièces ont été montées et fixées correctement.
CHARGEUR PORTATIF / ACCU
1
3
4
6
5
1 LED de statut de charge
2 Touche de commande
3 Entrée de charge USB
4 Sortie de charge USB
5 Interface de branchement
du ventilateur
6
LED / Lampe de poche
2
1. Remarque : le ventilateur peut également être utilisé sans que le chargeur
portatif soit installé !
2. Votre nouveau ventilateur offre la possibilité de fonctionner indépendam-
ment d‘une source électrique si le chargeur portatif qu‘il contient a été
chargé au préalable. Si vous laissez le chargeur portatif dans l‘appareil et
que vous branchez l‘appareil sur le secteur, l‘accu du chargeur portatif est
chargé.
3. Autrement, il est possible de charger par le biais d‘un port USB.
Copyright UNOLD AG | www.unold.de

42
4. Le chargeur portatif peut être retiré si
vous ouvrez le compartiment correspondant
sur la face arrière de l‘appareil (voir illus-
tration).
5. Pour contrôler le niveau de charge
actuel, appuyer brièvement sur la touche
de commande sur le chargeur portatif (voir
illustration).
6. Les LED indiquent le niveau de charge
actuel ; si les quatre LED sont allumées, le chargeur portatif est intégrale-
ment chargé (les LED indiquent respectivement 25, 50, 75 et 100 %).
7. Relier le chargeur portatif et le port de charge USB à l‘aide du câble USB
fourni. Ce faisant, respecter impérativement la consigne suivante : si vous
chargez l‘accumulateur par le biais d‘une source d‘alimentation USB, vous
devrez d‘abord vous assurer que la source électrique fournit un courant de
charge suffisant. Dans le cas contraire, l‘appareil et la source d‘alimentation
USB pourraient subir des détériorations. Par conséquent, vous ne devez
jamais utiliser, par exemple, le port USB d‘un ordinateur ou d‘un concen-
trateur USB, sauf s‘il s‘agit de ports de charge spéciaux avec un courant de
sortie de 2 A au minimum.
8. Les LED clignotent durant le chargement de l‘accumulateur. La durée de
charge dépend du niveau de charge actuel et peut nécessiter plusieurs
heures.
9. Ne jamais utiliser la sortie de charge et l‘entrée de charge simultanément.
Vous pouvez également utiliser le chargeur portatif pour recharger des appa-
reils mobiles (par ex. smartphone). Commencer par vérifier si le chargeur
portatif est complètement chargé. Brancher la prise du câble fourni sur
la sortie de charge ISB et brancher ensuite la prise mâle micro-USB sur
la prise femelle micro-USB de l‘appareil mobile. Le processus de charge
démarre. Le chargeur portatif peut fournir un courant de
sortie total de 2,1 A. Les LED clignotantes permettent de
contrôler le statut de charge du chargeur portatif durant
le processus de charge. Veuillez surveiller le processus de
charge. S‘il doit être interrompu ou arrêté, débrancher le
câble de l‘appareil mobile.
10. Dès que l‘accumulateur est totalement chargé, débran-
cher le chargeur portatif de la source d‘alimentation USB.
Copyright UNOLD AG | www.unold.de

43
11. Ensuite, installer le chargeur portatif dans l‘appareil (les raccords doivent
être tournés vers le bas, les LED vers l‘avant). Dès que le chargeur portatif
est correctement positionné, un signal sonore le confirme.
12. Conseil : vous pouvez également contrôler le niveau de charge du char-
geur portatif lorsqu‘il est positionné dans l‘appareil. De petits évidements
à travers lesquels les LED de charge du chargeur portatif sont visibles se
trouvent sur la face arrière de l‘appareil.
13. Et si vous avez besoin d‘une petite source lumineuse supplémentaire, le
chargeur portatif fourni en propose également une : Presser la touche de
commande jusqu‘à ce que la LED claire entre les deux ports USB s‘allume.
Afin de rééteindre la lumière, maintenir à nouveau la touche enfoncée
jusqu‘à ce que la LED s‘éteigne.
TÉLÉCOMMANDE
1. Retirer avec précaution le couvercle du compartiment à piles.
2. Installer les piles. Ce faisant, respecter impérativement la polarité. Pour
s‘en assurer, se conformer aux marquages correspondants dans le compar-
timent à piles.
3. Utiliser uniquement des piles de type AAA 1,5 V.
4. Fermer le couvercle.
5. Si vous réglez l‘appareil avec la télécommande, assurez-vous de toujours la
pointer sur le ventilateur durant les réglages.
6. Les mentions sur la télécommande sont identiques aux touches situées sur
l‘appareil.
7. Afin d‘éviter toute détérioration, ne laissez pas la télécommande chuter de
grande hauteur.
8. La portée de la télécommande est de 7 mètres.
9. Pour un rangement facile, la télécommande est aimantée et peut simple-
ment être accrochée au couvercle du compartiment à piles sur la face arrière
de l‘appareil.
Copyright UNOLD AG | www.unold.de

44
ÉCRAN
1 Affichage de durée
2 Affichage de vitesse
3 Touche Allumer / Éteindre témoins lumineux
4 Touche Présélection de durée
5 Témoin lumineux PRÊT
6
Touche pour la vitesse
7 Touche pour l'oscillation
8 Touche MARCHE / ARRÊT
UTILISATION
1. S‘assurer que l‘appareil est placé sur une surface plane et appropriée, et
qu‘il est parfaitement stable et immobile.
Fonctionnement sur secteur
2. Brancher le connecteur coaxial du cordon d‘alimentation sur la prise femelle
située sur la face arrière de l‘appareil. Brancher le bloc d‘alimentation dans
une prise de courant et allumer l‘appareil à partir de l‘interrupteur MARCHE
/ ARRÊT (8).
Fonctionnement sur accu
3. Vérifie si le chargeur portatif est correctement installé dans le compartiment
à l‘arrière de l‘appareil.
4. Le cas échéant, débrancher l‘appareil de l‘alimentation électrique.
5. La durée d‘une charge de l‘accumulateur dépend, entre autres, de la vitesse
que vous avez sélectionnée. Sur le niveau 1, la charge de l‘accumulateur
couvre 21 heures d‘utilisation environ ; sur le niveau 6, la charge permet
environ 3 heures de fonctionnement.
6. Conseil : vous pouvez contrôler à tout moment le niveau de charge du char-
geur portatif. De petits évidements à travers lesquels les LED de charge du
chargeur portatif sont visibles se trouvent sur la face arrière de l‘appareil.
Régler la vitesse
7. Presser la touche pour la vitesse (6) plusieurs fois, jusqu‘à ce que la vitesse
de ventilation souhaitée soit atteinte. Vous pouvez choisir entre six niveaux
différents :
Copyright UNOLD AG | www.unold.de

45
Niveau 1 : vent léger
Niveau 2 : vent moyen
Niveau 3 : mode sommeil (vitesse variable, faible)
Niveau 4 : vent naturel (vitesse variable qui ressemble au mouvement natu-
rel de l‘air)
Niveau 5 : vent fort
Niveau 6 : vent très fort
8. Vous pouvez changer de vitesse à tout moment.
Présélection de la durée
9. La touche de présélection de durée (4) permet de sélectionner la durée
de fonctionnement de l‘appareil souhaitée. Une durée de fonctionnement
comprise entre une et six heures est possible. Presser la touche pour la
programmation de durée (4) et observer ce faisant l‘indication de durée (1).
Les LED indiquent la durée d‘utilisation actuellement choisie (1 LED est
allumée : durée de fonctionnement 1 heure, 2 LED sont allumées : durée de
fonctionnement 2 heures, etc.). Vous devez donc presser la touche (4) deux
fois consécutivement pour programmer l‘appareil pour une durée de fonc-
tionnement de deux heures. Une fois ce temps écoulé, l‘appareil s‘éteint.
10. Naturellement, vous pouvez également sélectionner ou modifier la vitesse
de l‘appareil en cas d‘utilisation de la présélection de durée.
Fonction de pivotement / Oscillation
11. Presser la touche pour l‘oscillation (7). L‘appareil pivote maintenant auto-
matiquement.
12. Si vous souhaitez à nouveau désactiver la fonction de pivotement, appuyer
à nouveau sur la touche pour l‘oscillation.
Allumer / Éteindre témoins lumineux
13. Tous les témoins lumineux peuvent être éteints afin d‘économiser de l‘élec-
tricité ou si l‘éclairage dérange, par ex. durant votre sommeil.
14. Afin d‘activer ou de désactiver les témoins lumineux, presser la touche 3.
Tous les témoins lumineux s‘éteignent et l‘appareil reste malgré tout en
fonctionnement. Si vous souhaitez rallumer les témoins lumineux, appuyer
simplement sur n‘importe quelle touche.
Régler l‘angle d‘inclinaison
15. Vous pouvez incliner le carter moteur verticalement
dans une certaine mesure (env. 20°). Incliner le capot de cage
jusqu‘à l‘angle souhaité. Attention : incliner le capot dans le
Copyright UNOLD AG | www.unold.de

46
rayon prévu uniquement et pas au-delà d‘une résistance sensible, afin de ne
pas endommager l‘appareil.
Réglage de la hauteur
16. Serrer légèrement la vis de fixation sur la face avant de l‘appa-
reil (voir illustration) vers la gauche. Faire glisser la partie supérieure
de l‘appareil à la hauteur souhaitée. Bloquer ensuite cette hauteur
en serrant la vis de fixation vers la droite.
Éteindre
17. Appuyer sur la touche MARCHE / ARRÊT (8) pour éteindre l‘ap-
pareil. Débrancher l‘appareil si vous ne devez plus l‘utiliser.
18. Si la prise n‘est pas débranchée et que l‘appareil n‘est pas
éteint, l‘appareil s‘éteint automatiquement au bout de 12 heures.
Éteindre l‘appareil à partir de l‘interrupteur MARCHE / ARRÊT et débrancher
la prise.
Attention : ne jamais plonger l‘appareil dans l‘eau. Le moteur ou les
éléments électriques de l‘appareil ne doivent jamais être humides.
1. En principe, n‘utiliser aucun abrasif puissant, pas de laine de verre, d’objets
métalliques, pas de détergent chaud ou de désinfectant.
2. Essuyer le tube et la grille du ventilateur avec un chiffon légèrement humi-
difié.
3. Conserver le ventilateur dans un endroit sec et sûr, à l’abri de la poussière,
des chocs, de la chaleur et de l’humidité.
NETTOYAGE ET ENTRETIEN
Copyright UNOLD AG | www.unold.de

47
CONDITIONS DE GARANTIE
TRAITEMENT DES DÉCHETS / PROTECTION DE L’ENVIRONNEMENT
Nos appareils sont produits selon un standard élevé de qualité pour une longue durée d’uti-
lisation. Un entretien régulier et des réparations compétentes par notre service après-vente
prolongent cette durée d’utilisation. Si néanmoins l’appareil est endommagé et ne peut plus
être réparé, veuillez suivre les instructions suivantes. Ne jamais disposer ce produit avec les
dégâts de ménage. Apportez ce produit à une station de collection pour récupération de produits
électriques et électroniques. Par la collection séparée vous aidez à protéger les ressources natu-
relles et prenez soin, que le produit est démonté sans risque pour la santé et l’environnement.
Ne pas jeter les piles usées dans les ordures ménagères. Veuillez les éliminer
chez un revendeur en électricité ou dans votre déchetterie communale.
En cas d’utilisation conforme et lors de dégâts manifestement dus à des défauts de fabrication, nos appareils
sont garantis 24 mois, lors d’utilisation professionnelles 12 mois, à dater de l’achat. Notre garantie n’est
valide que pour les appareils vendus en Allemagne et en Autriche. Dans tout autre pays veuillez contacter
l’importateur. Veuillez envoyer à notre adresse les appareils, pour lesquels vous réclamez une suppression de
défauts, avec le bon d’achat montrant la date d’achat, port payé et proprement emballé. Les coûts de transport
seront remboursés en cas de garantie en Allemagne et en Autriche. Les défauts causés par usure, utilisation
incorrecte ou non-respect des instructions de maintenance sont exclus. Notre obligation de garantie cesse, si
de réparations ou des interventions sont accomplies par des tiers. Cette garantie n’affecte pas les droits du
consommateur contre le commerçant.
Copyright UNOLD AG | www.unold.de

48
GEBRUIKSAANWIJZING MODEL 86870
VOOR UW VEILIGHEID
TECHNISCHE GEGEVENS
Vermogen: 30 watt, (12VDC)
Voedingsadapter 100-240 V, 50/60 Hz, 1,2 A
USB-voeding 5 V 2 A
Afmetingen: Ca. 40 x 40 x 120/140 cm (dxbxh)
Gewicht: Ca. 7,5 kg
Aansluitkabel: Ca. 2,0 m
Diameter: Ca. 40 cm
Geluidsniveau: ≤ 63 db
Luchtsnelheid: ≥ 320 m/min
Laadduur: Eerste keer opladen ca. 10 uur, bij aansluiting op voeding ca.
7 uur
Technische
gegevens
Accu/powerbank: 4.400 mAh, 11,1 V. Uitgangsstroom USB: DC-5V-2,1 A,
USB-laadstroom 800-1.000 mA, stand-by-laadstroom 900-
1.000 mA, lithium-ion accu
Uitvoering: Accugevoede staande ventilator voor binnen en buiten, 6
snelheden, afstandsbediening, werkingsduur accu tot ca. 21
uur bij laagste stand (ca. 3 uur bij hoogste stand), automatische
uitschakeling, in hoogte verstelbaar, met tijdprogrammering
Toebehoren: Gebruiksaanwijzing, USB-laadkabel, voedingseenheid met
aansluitkabel, afstandsbediening, 2 x batterijen type AAA
1,5 V.
Wijzigingen en vergissingen in de uitrustingskenmerken, techniek, kleuren en design
voorbehouden
Lees de volgende aanwijzingen a.u.b. door en bewaar ze goed.
Personen in het huishouden
1. Dit apparaat kan door kinderen vanaf 8 jaar worden gebruikt
en door personen die over gebrekkige fysieke, sensorische of
geestelijke vaardigheden of gebrek aan ervaring en/of kennis
beschikken, mits zij onder toezicht staan of instructies hebben
gekregen aangaande het veilige gebruik van dit apparaat en de
hieruit resulterende gevaren begrepen hebben.
VERKLARING VAN DE SYMBOLEN
Dit symbool wijst op eventuele gevaren die letsel tot gevolg kunnen
hebben of tot schade aan het apparaat leiden.
Copyright UNOLD AG | www.unold.de

49
2. Kinderen mogen niet met het apparaat spelen.
3. Reiniging en onderhoud door de gebruiker mogen niet door
kinderen worden uitgevoerd, tenzij deze ouder dan 8 jaar zijn en
onder toezicht staan.
4. Berg het apparaat en de kabel op buiten bereik van kinderen
onder de 8 jaar.
Veiligheidsinstructies voor het opstellen en gebruik van het apparaat
5. Schakel het apparaat pas in, als het volgens de voorschriften
gemonteerd werd.
6. Let op dat er genoeg ruimte voorhanden is op de plaats waar het
apparaat opgesteld is. Er moet minstens 50 cm afstand tussen
het apparaat en andere voorwerpen aangehouden worden.
7. Gebruik het apparaat niet in bijzonder stoffige ruimtes of in de
buurt van brandbare substanties.
8. Sluit het apparaat uitsluitend aan op wisselstroom met spanning
overeenkomstig het typeplaatje.
9. Dit apparaat mag niet met een externe tijdklok of met een
afstandsbediening bediend worden.
10. Dompel het apparaat of de aansluitkabel nooit in water of andere
vloeistoffen – er bestaat levensgevaar!
11. Open de behuizing van het apparaat nooit, er bestaat gevaar voor
een elektrische schok!
12. Het apparaat is uitsluitend bestemd voor huishoudelijk gebruik
of voor soortgelijke doeleinden, bijv.
in kitchenettes in winkels, kantoren of andere werkplaatsen,
voor gebruik door gasten van hotels, motels of andere overnach
-
tingsbedrijven,
in particuliere pensions of vakantiehuisjes.
13. Let op dat de aansluitkabel zodanig gelegd wordt dat er niemand
over kan struikelen.
14. Wikkel de aansluitkabel nooit om het apparaat, om schade aan
de kabel te vermijden.
15. Trek de netstekker steeds direct aan de stekker uit het stopcon
-
tact en trek nooit aan de aansluitkabel, om schade aan de kabel
te vermijden.
Copyright UNOLD AG | www.unold.de

50
16. Let op dat het gebruikte stopcontact gemakkelijk toegankelijk is,
zodat de stekker bij gevaar snel uit het stopcontact kan worden
getrokken.
17. Let op dat de aansluitkabel niet ingeklemd wordt of langs een
hoek wordt gelegd, om schade aan de kabel te vermijden.
18. Maak zo mogelijk geen gebruik van een verlengkabel. Als dit
onvermijdelijk is, rol de verlengkabel dan a.u.b. helemaal af en
neem de prestatiegrenzen van de betreffende kabel in acht.
19. Het apparaat mag niet in natte/natkoude of vochtige ruimtes
worden gebruikt – gevaar voor een elektrische schok!
20. Stel het apparaat niet bloot aan sterk zonlicht.
21. Er mogen nooit voorwerpen door het rooster heen in het binnen
-
ste van de ventilator worden gestoken, zoals vingers, naalden,
pennen enz. – verwondingsgevaar!
22.
Let op dat lange haren niet in het schoepenwiel verstrikt kunnen
raken.
23. Controleer het apparaat, de stekker en de aansluitkabel regel
-
matig op slijtage of beschadiging. Als de apparaat beschadigd
zijn, stuur het apparaat dan a.u.b. ter controle en reparatie naar
onze klantenservice. Ondeskundige reparaties kunnen ernstige
gevaren voor
de gebruiker veroorzaken en hebben uitsluiting van
de garantie tot gevolg.
24. Als de kabel is beschadigd, moet deze alleen worden vervangen
door de fabrikant of zijn vertegenwoordiger of een andere gekwa
-
lificeerde professional persoon om gevaar te voorkomen.
25.
Om schade te vermijden, mag het apparaat niet met toebehoren
van andere fabrikanten of andere merken worden gebruikt.
26. Trek de netstekker uit het stopcontact nadat u het apparaat
heeft gebruikt en voordat u het gaat reinigen. Laat het apparaat
nooit zonder toezicht achter, als de netstekker in het stopcontact
steekt.
27. Het apparaat kan buiten worden gebruikt, dient echter tegen
vochtigheid en vocht te worden beschermd om de kans op een
elektrische schok te voorkomen. Niet bij regen buiten gebruiken!
Speciale veiligheidsaanwijzingen voor de accu/de powerbank
28. Houd de powerbank altijd verwijderd van kinderen.
Copyright UNOLD AG | www.unold.de

51
29. Gebruik uitsluitend de meegeleverde powerbank om schade aan
het apparaat te voorkomen.
30. Gebruik het apparaat nooit als dit van een koude in een war
-
mere omgeving wordt gebracht. Daarbij ontstaat condenswater
dat schade aan het apparaat kan veroorzaken. Laat het appa-
raat eerst een tijdje staan tot de huidige kamertemperatuur is
bereikt. Dit kan eventueel enkele uren duren!
31.
De powerbank mag niet worden omgebouwd of voor andere doel
-
einden dan de hier beschreven doeleinden worden gebruikt. Een
onjuist gebruik kan leiden tot brand, elektrische schok, letsel,
enz.
32.
Voorkom het gebruik van het apparaat in de buurt van sterke
magneetvelden (zoals bv. speakers, machines, enz.).
33. Het apparaat en de powerbank mogen nooit in de buurt van
warmtebronnen worden geplaatst, ook directe zonnestraling
dient te worden voorkomen om schade aan het apparaat te voor
-
komen.
34.
Let erop dat de powerbank altijd met de juiste polariteit in het
apparaat wordt geplaatst.
35. De ideale omgevingstemperatuur voor het gebruik ligt bij
20-30 °C.
36. De uitgangsspanning en de stroom van de geïntegreerde accu
bedragen 5 V/2,1 A, deze waarden mogen niet worden over
-
schreden.
37.
De powerbank mag nooit in vloeistoffen worden gedompeld om
schade aan de interne accu te voorkomen.
38. Gooi de powerbank nooit in open vuur – explosiegevaar!
39. Neem altijd de aanwijzingen voor het opladen van de powerbank
in acht en volg deze op.
40. Zelfs als de powerbank wordt gebruikt in de ventilator moet het
laadniveau regelmatig worden gecontroleerd en, indien nodig,
powerbank gebracht.
41. Let erop dat de powerbank niet door vallen, schokken, sterke tril
-
lingen of andere invloeden beschadigd raakt. Een beschadigde
powerbank of een beschadigde accu mag niet worden gebruikt!
Neem in dat geval contact op met onze klantenservice.
Copyright UNOLD AG | www.unold.de

52
42. Laad de powerbank regelmatig op, ook als u het apparaat niet
gebruikt, om een diepe ontlading van de accu en dus een defect
te voorkomen.
43. Let op: De meegeleverde USB-kabel is niet geschikt voor de
overdracht van gegevens!
44. Gebruik alleen de meegeleverde USB-kabel voor het opladen van
de powerbank, nooit andere kabels.
45. Als u de powerbank via een USB-voedingsbron oplaadt, moet u
eerst controleren of de voedingsbron voldoende laadstroom ter
beschikking stelt. Anders kan er schade aan het apparaat en de
USB-voedingsbron ontstaan. Zie voor verdere aanwijzingen het
hoofdstuk „Accu opladen“.
46. Kijk nooit direct in de lichtstraal van de geïntegreerde led – kans
op oogletsel! Bekijk de lichtstraal ook nooit met optische instru
-
menten!
47.
Dek de powerbank bij het opladen nooit af met voorwerpen.
48. Sluit de powerbank nooit kort.
49. Let op: Mocht er vloeistof uit de powerbank komen, draag dan
direct geschikte veiligheidshandschoenen bij de omgang met
het apparaat. Contact van de huid en ogen met de vloeistof voor
-
komen, omdat deze zeer agressief is en letsel kan veroorzaken.
Mocht er desondanks contact met de huid of ogen zijn, raad-
pleeg dan direct een arts. Let er ook op dat de vloeistof niet
met oppervlakken of voorwerpen in aanraking komt, deze zouden
daardoor beschadigd kunnen raken. Neem dan direct contact op
met onze klantenservice.
V
eiligheidsaanwijzingen batterijen afstandsbediening
50.
Houd de batterijen altijd verwijderd van kinderen.
51. Als batterijen worden ingeslikt, direct een arts raadplegen!
52. Let op: Mocht er vloeistof uit de batterijen komen, draag dan
direct geschikte veiligheidshandschoenen bij de omgang met
het apparaat. Contact van de huid en ogen met de vloeistof voor
-
komen, omdat deze zeer agressief is en letsel kan veroorzaken.
Mocht er desondanks contact met de huid of ogen zijn, raad-
pleeg dan direct een arts. Let er ook op dat de vloeistof niet
met oppervlakken of voorwerpen in aanraking komt, deze zouden
daardoor beschadigd kunnen raken.
Copyright UNOLD AG | www.unold.de

53
De fabrikant is niet aansprakelijk, indien het apparaat verkeerd gemonteerd, ondeskundig of foutief
gebruikt of door niet geautoriseerde derden gerepareerd werd.
Er mogen nooit voorwerpen door het rooster heen in het binnen-
ste van de ventilator worden gestoken, zoals vingers, naalden,
pennen enz. – verwondingsgevaar!
Het apparaat uitsluitend op een effen, stabiele ondergrond ge
-
bruiken, zodat het niet kan omvallen.
53. Bewaar de batterijen in een droge omgeving.
54. Let erop dat de batterijen altijd met de juiste polariteit in de
afstandsbediening worden geplaatst.
55. Als de afstandsbediening langere tijd niet worden gebruikt, moe
-
ten de batterijen worden uitgenomen.
56.
Als u oplaadbare batterijen gebruikt, let dan op de aanwijzingen
van de fabrikant m.b.t. het opladen van de batterijen.
57. Open nooit de batterijen – kans op letsel!
58. Gebruik altijd alleen batterijen van hetzelfde type. Plaats nooit
batterijen van verschillende fabrikanten, maat of spanning om
letsel en schade aan het apparaat te voorkomen.
59. Let erop dat de batterijen niet aan direct zonnestraling of andere
warmtebronnen worden blootgesteld. Gooi de batterijen nooit in
open vuur – explosiegevaar!
Copyright UNOLD AG | www.unold.de

54
MONTAGE
1 Bevestigingsring
2 Voorste korfafdekking
3 Moer
4 Waaierblad
5 Moer
6
Achterste korfafdekking
7 Bedieningselement met
motorbehuizing
8 Standbuis
9 Sokkel
10 Schroeven (3 stuks)
11 Afstandsbediening
12 Batterijen
13 USB-laadkabel
14 Voedingseenheid
1. Zorg er vóór de montage voor dat u het apparaat op een vlakke, droge plek
monteert.
2. Verwijder alle verpakkingsmaterialen en transportbeveiligingen. Houd ver-
pakkingsmaterialen, zoals bijv. kunststofzakken of piepschuim uit de buurt
van kleine kinderen – verstikkingsgevaar!
3. Controleer of alle vereiste onderdelen aanwezig zijn.
4. Draai evt. de schroeven (10) een beetje uit de sokkel.
5. Plaats de standbuis (8) precies in de sokkel en bevestig deze met de drie
schroeven (met de klok mee vastdraaien).
Copyright UNOLD AG | www.unold.de

55
6. Steek het bedieningselement (7) op de standbuis (8). Controleer of het
onderste uiteinde van het bedieningselement precies op de hiervoor
voorziene gaten past. Bevestig de beide componenten met behulp van de
schroef.
7. U kunt de gewenste hoogte instellen door de vastzetschroef los te draaien,
de buis tot de gewenste hoogte te verschuiven en weer met de vastzetschroef
te fixeren.
8. Bevestig de achterste roosterafdekking (6) aan de motorbehuizing (7) door
de afdekking met de moer (5) te bevestigen.
9. Plaats het waaierblad (4) op de as aan de motorbehuizing (7). Bevestig het
waaierblad (4) met de moer (3). Let op: linkse schroefdraad!
10. Verbind de voorste roosterafdekking (2) met de achterste roosterafdekking
6). Controleer of de bevestigingsring (1) zich in de juiste positie bevindt
(beide helften van de roosterafdekking moeten zich exact in de ring bevin-
den) en bevestig deze met de klem.
11. Controleer of alle onderdelen correct gemonteerd en bevestigd werden.
POWERBANK/ACCU
1
3
4
6
5
1 Leds laadtoestand
2 Bedieningsknop
3 USB-laadingang
4 USB-laaduitgang
5 Aansluitingsinterface
ventilator
6
Led/zaklamp
2
1. Aanwijzing: De ventilator kan ook zonder geplaatste powerbank worden
gebruikt!
2. Uw nieuwe ventilator biedt de mogelijkheid om onafhankelijk van een voe-
dingsbron te worden gebruikt als de geplaatste powerbank van tevoren vol-
doende is opgeladen. Als u de powerbank in het apparaat laat en het appa-
raat aansluit op de voeding, wordt de accu van de powerbank opgeladen.
Copyright UNOLD AG | www.unold.de

56
3. Daarnaast kan de powerbank ook via een USB-
aansluiting worden opgeladen.
4. De powerbank kan worden uitgenomen door
aan de achterkant van het apparaat het betref-
fende vak te openen (zie afbeelding).
5. Om de huidige laadtoestand te controleren,
drukt u kort op de bedieningsknop op de power-
bank (zie afbeelding).
6. De leds geven de huidige laadtoestand aan, bij vier leds is de powerbank
volledig opgeladen (de leds staan telkens voor 25, 50, 75 en 100%).
7. Verbindt de powerbank en de USB-laadpoort met de meegeleverde USB-
kabel. Let daarbij altijd op de volgende aanwijzing: Als u de accu via een
USB-voedingsbron oplaadt, moet u eerst controleren of de voedingsbron
voldoende laadstroom ter beschikking stelt. Anders kan er schade aan het
apparaat en de USB-voedingsbron ontstaan. Gebruik daarom nooit bv. de
USB-poort van een pc of USB-hub, behalve als het gaat om een speciale
laadpoort met een uitgangsstroom van tenminste 2 A.
8. Terwijl de accu wordt opgeladen, knipperen de leds. De oplaadduur hangt af
van de betreffende laadtoestand en kan meerdere uren bedragen.
9. Gebruik nooit tegelijkertijd de laaduitgang en de laadingang. U kunt de
powerbank ook gebruiken om mobiele apparaten (bv. smartphones) op te
laden. Controleer eerst of de powerbank volledig is opgeladen. Verbind de
stekker van de meegeleverde kabel met de USB-laaduitgang en verbind
daarna de micro-USB-stekker met de micro-USB-bus van het mobiele appa-
raat. Het opladen begint. De powerbank kan een uitgangsstroom leveren
van in totaal 2,1 A. Via de knipperende leds kunt u tijdens het opladen de
laadtoestand van de powerbank controleren. Let goed op bij het opladen. Als
het opladen moet worden onderbroken of beëindigd, koppel dan de kabel los
van het mobiele apparaat.
10. Zodra de accu volledig is opgeladen, koppelt u de
powerbank los van de USB-voedingsbron.
11. Plaats de powerbank vervolgens in het apparaat (de
aansluitingen moeten omlaag wijzen, de leds naar voren).
Zodra de powerbank juist is geplaatst, wordt dit bevestigd
met een signaal.
12. Tip: U kut de laadtoestand van de powerbank ook con-
troleren als deze in het apparaat is geplaatst. Aan de ach-
Copyright UNOLD AG | www.unold.de

57
terkant van het apparaat bevinden zich kleine uitsparingen, waardoorheen u
de laad-leds van de powerbank kunt herkennen.
13. En als u een keer een kleine, extra bron van licht nodig hebt, kan ook
hiervoor de meegeleverde powerbank worden gebruikt: Druk zolang op de
bedieningsknop tot de heldere LED tussen de beide USB-aansluitingen gaat
branden. Om het licht weer uit te schakelen, houdt u de knop opnieuw inge-
drukt tot de led uitgaat.
AFSTANDSBEDIENING
1. Verwijder voorzichtig het deksel van het batterijvak.
2. Plaats de batterijen in het vak. Let daarbij altijd op de juiste polariteit. Ter
oriëntatie zijn hiervoor markeringen aangebracht in het batterijvak.
3. Gebruik alleen batterijen van het type AAA, 1,5 V.
4. Sluit het deksel.
5. Als u het apparaat met de afstandsbediening wilt instellen, let er dan op dat
u deze tijdens de instellingen steeds in de richting van de ventilator houdt.
6. De aanduidingen op de afstandsbediening zijn identiek aan de knoppen op
het apparaat.
7. Laat de afstandsbediening niet van grote hoogte naar beneden vallen om
schade te voorkomen.
8. De reikwijdte van de afstandsbediening bedraagt 7 meter.
9. Om de afstandsbediening makkelijk te kunnen opbergen, is deze magne-
tisch en kan eenvoudig aan het deksel van het accuvak aan de achterkant
van de apparaat worden gehangen.
DISPLAY
1 Tijdweergave
2 Snelheidsaanduiding
3 Knop controlelampjes in-/uitschakelen
4 Knop tijdvoorkeuze
5 Controlelampje GEREED
6
Knop voor snelheid
7 Knop voor oscillatie
8 AAN/UIT-knop
Copyright UNOLD AG | www.unold.de

58
BEDIENEN
1. Controleer of het apparaat op een geschikte, vlakke ondergrond staat en
veilig en stabiel is opgesteld.
Gebruik via de voeding
2. Verbind de holle stekker van de voedingskabel met de bus aan het achter-
kant van het apparaat. Plaats de voedingseenheid in een stopcontact en
schakel het apparaat met de AAN/UIT-knop (8) in.
Accuvoeding
3. Controleer of de powerbank op de juiste wijze in het vak aan de achterkant
van het apparaat is geplaatst.
4. Koppel het apparaat evt. los van de stroomvoorziening.
5. Hoe lang een acculading meegaat, hangt onder andere af van welke snel-
heid u hebt gekozen. Bij trap 1 gaat de acculading ca. 21 uur mee, bij trap
6 ca. 3 uur.
6. Tip: U kunt de laadtoestand van de powerbank op elk moment controle-
ren. Aan de achterkant van het apparaat bevinden zich kleine uitsparingen,
waardoorheen u de laad-leds van de powerbank kunt herkennen.
Snelheid instellen
7. Druk zo vaak op de knop voor de snelheid (6) tot de door u gewenste wind-
snelheid is bereikt. U kunt kiezen uit zes verschillende standen:
Stand 1: lichte wind
Stand 2: middelmatige wind
Stand 3: Slaap-modus (wisselende, lage snelheid)
Stand 4: natuurgetrouwe wind (wisselende snelheid die net voelt als natuur-
lijke luchtbeweging)
Stand 5: sterke wind
Stand 6: zeer sterke wind
8. U kunt te allen tijde wisselen tussen de verschillende snelheidsstanden.
Tijdprogrammering
9. Via de knop Tijdvoorkeuze (4) kunt u de gewenste werkingsduur van het
apparaat instellen. Deze kan tussen één en zes uur worden ingesteld. Druk
op de knop voor de tijdprogrammering (4) en let daarbij op de tijdweergave
(1). De leds geven de gekozen gebruiksduur weer (1 led brandt: gebruiks-
duur 1 uur, 2 led branden: gebruiksduur 2 uur, enz.). Om het apparaat voor
een gebruiksduur van twee uur te programmeren, moet u dus twee keer ach-
Copyright UNOLD AG | www.unold.de

59
ter elkaar op de knop (4) drukken. Na afloop van deze gekozen tijd schakelt
het apparaat uit.
10. Natuurlijk kunt u ook bij het gebruik van de tijdprogrammering de snelheid
van het apparaat kiezen resp. wijzigen.
Draaifunctie/oscillatie
11. Druk op de knop voor de oscillatie (7). Het apparaat draait nu zelfstandig.
12. Als u de draaifunctie weer wilt uitschakelen, drukt u opnieuw op de knop
voor oscillatie.
Controlelampjes in-/uitschakelen
13. Alle controlelampjes kunnen worden uitgeschakeld om stroom te besparen
of als de verlichting bv. bij het slapen stoort.
14. Om de controlelampjes in- of uit te schakelen, drukt u op knop 3. Alle
controlelampjes gaan uit, het apparaat blijft echter nog in bedrijf. Als u de
controlelampjes weer wilt inschakelen, drukt u gewoon op een willekeurige
knop.
Hellingshoek instellen
15. U kunt de motorbehuizing in een bepaalde omvang
(ca. 20°) verticaal kantelen. Kantel de korfafdekking tot de
gewenste hoek. Let op: Kantel de afdekking slechts binnen
het voorziene bereik en niet verder dan de merkbare weer-
stand, om het apparaat niet te beschadigen.
Hoogteverstelling
16. Draai de vastzetschroef aan de voorkant van het apparaat (zie
afbeelding) een beetje naar links. Schuif het bovenste gedeelte van
het apparaat naar de gewenste hoogte. Fixeer vervolgens deze hoogte
door de vastzetschroef naar rechts vast te draaien.
Uitschakelen
17. Druk op de AAN/UIT-knop (8) om het apparaat uit te schakelen.
Trek de stekker uit het stopcontact als u het apparaat niet meer
gebruikt.
18. Als de stekker niet uit het stopcontact wordt getrokken en het
apparaat niet is uitgeschakeld, schakelt het apparaat na 12 uur
automatisch uit.
Copyright UNOLD AG | www.unold.de

60
Schakel het apparaat met de AAN/UIT-knop uit en trek de stekker uit het
stopcontact.
Denk eraan dat u het apparaat nooit in water dompelt. De motor of de
elektrische componenten mogen niet vochtig worden.
1. Gebruik nooit scherpe schuurmiddelen, staalwol, metalen voorwerpen, hete
schoonmaakmiddelen of desinfecterende middelen.
2. Veeg de standbuis en het rooster van de ventilator af met een licht vochtige
doek.
3. Sla de ventilator op een droge en veilige plaats op om hem te beschermen
tegen stof, schokken, hitte en vocht.
REINIGEN EN ONDERHOUDEN
VERWIJDEREN VAN AFVAL / MILIEUBESCHERMING
Onze apparaten zijn geproduceerd met een hoge qualiteit voor een lange gebruik. Regelmatige onderhoud
en vakkundig reparaties door onze klantenservice verlengt de gebruiksduur. Wanneer het apparat defekt is
en kan niet meer gerepareerd worden, let op de volgende instructies. Dit product mag niet samen met het
normale huishoudelijke afval worden afgevoerd. U dient dit product bij een voor het recycleren van elektri-
sche of elektronische apparaten aangewezen verzamelplaats in te leveren. Door het separaat inzamelen en
recycleren van afvalproducten helpt u mee bij het zuinig omgaan met de natuurlijke hulpbronnen en zorgt
u ervoor dat het product op een gezondheids- en milieuvriendelijke manier afgevoerd wordt.
GARANTIEVOORWAARDEN
Wij geven op onze apparaten een garantietermijn van 24 maanden (12 maanden bij commerciële gebruik), gerekend vanaf
de dag van aanschaf. Deze garantie geldt voor schade, die bij correct gebruik aantoonbaar is veroorzaakt door een fout in
de productie. Binnen de garantietermijn verhelpen wij materiaal- en productiefouten door herstelling of vervanging naar
onze keuze. Onze garantie is slechts geldig voor in Duitsland en Oostenrijk verkopte apparaten. In andere landen a.u.b. de
importeur aanspreken. Apparaaten, waarvoor garantie in aanspraak wordt genomen, moeten ons samen met een kopie van de
machineel gegenereerde kassabon waaruit de koopdatum duidelijk wordt, alsmede een beschrijving van de fout goed verpakt
aan onze klantenservice worden toegezonden, porto betaald. Als er sprake van garantie is, worden de verzendingskosten in
Duitsland en Oostenrijk aan de klant vergoed. De garantie dekt geen schade veroorzaakt door slijtage, onbehoorlijk gebruik/
foutieve handelingen en niet-naleving van de onderhouds- en reinigingsaanwijzingen. Het recht op garantie vervalt, wanneer
reparaties of manipulaties aan het apparaat door derden worden doorgevoerd. Eventuele rechten van de eindgebruiker t.o.v.
de verkoper of distributeur worden door deze garantie niet aangetast.
Verbruikte batterijen horen niet bij het gewone huisvuil. Geef uw verbruikte batterijen alstublieft af bij uw
elektrohandelaar of bij de desbetreffende gemeentelijke inzamelplaats.
Copyright UNOLD AG | www.unold.de

61
ISTRUZIONI PER L’USO MODELLO 86870
PER LA VOSTRA SICUREZZA
DATI TECNICI
Potenza: 30 Watt, (12VDC)
Adattatore-alimentatore 100-240 V, 50/60 Hz, 1,2 A
Alimentazione elettrica tramite USB 5 V
2 A
Misure: Circa 40 x 40 x 120/140 cm (P/L/A)
Peso: Circa 7,5 kg
Cavo di
alimentazione: Circa 2,0 m
Diametro: Circa 40 cm
Livello di rumore: ≤ 63 db
Velocità dell‘aria: ≥ 320 m/min
Tempo di carica: Prima carica circa 10 ore, collegamento alla rete circa 7 ore
Dati tecnici
Accumulatore/
power bank: 4.400 mAh, 11,1 V. Corrente di uscita USB: DC-5V-2,1 A,
corrente di carica USB 800-1.000 mA, corrente di carica in
standby 900-1.000 mA, accumulatore agli ioni di litio
Dotazioni: Ventilatore a piantana alimentato a batteria per interni
ed esterni, 6 livelli di velocità, telecomando, durata del
funzionamento a batteria fino a 21 ore circa al livello minimo
(circa 3 ore a quello massimo), disattivazione automatica,
regolabile in altezza, con temporizzazione
Accessori: Istruzioni per l‘uso, cavo di carica USB, alimentatore con
cavo di collegamento, telecomando, 2 batterie tipo AAA
1,5 V.
Con riserva di modifiche ed errori relativi a caratteristiche delle dotazioni, tecnica,
colore e design
Si raccomanda di leggere e conservare le presenti istruzioni.
Persone in ambito domestico
1. Questo apparecchio può essere utilizzato da bambini a partire
dagli 8 anni di età e da persone che presentano ridotte capacità
fisiche, sensoriali o mentali o che difettano della necessaria
esperienza e/o conoscenze solo se adeguatamente sorvegliati
SIGNIFICATO DEI SIMBOLI
Questo simbolo segnala possibili pericoli in grado di provocare lesioni a
persone o danni all‘apparecchio.
Copyright UNOLD AG | www.unold.de

62
o addestrati sull’uso in sicurezza dell’apparecchio e se a
conoscenza dei rischi correlati.
2. I bambini non devono giocare con l’apparecchio.
3. La pulizia e la manutenzione dell’utente non devono essere
eseguite da bambini, a meno che non abbiano più di 8 anni e
non vengano sorvegliati.
4. Conservare l’apparecchio e il cavo fuori dalla portata dei bambini
di età inferiore agli 8 anni.
Avvertenze di sicurezza per l‘installazione e l‘esercizio dell‘apparecchio
5. Accendere l‘apparecchio soltanto se è stato correttamente mon
-
tato.
6.
Fare attenzione che nel posto in cui l‘apparecchio è installato
sia disponibile uno spazio sufficiente. Tra l‘apparecchio e altri
oggetti deve essere mantenuta una distanza di almeno 50 cm.
7. Non utilizzare l‘apparecchio in spazi particolarmente polverosi o
nelle vicinanze di sostanze infiammabili.
8. Collegare l’apparecchio soltanto a corrente alternata con la ten
-
sione indicata sulla targhetta.
9.
Questo apparecchio non deve essere comandato tramite timer
esterni o sistemi di telecomando.
10. Non immergere mai l‘apparecchio o il cavo di alimentazione in
acqua o altri liquidi – sussiste pericolo di morte!
11. Non aprire mai la scocca dell‘apparecchio, sussiste il pericolo di
scosse elettriche!
12. L’apparecchio è progettato esclusivamente per l’uso domestico o
per impieghi similari, ad es.
in aree cucina di negozi, uffici o altri luoghi di lavoro,
per l‘uso da parte degli ospiti di hotel, motel o altre strutture
ricettive,
in pensioni private o case di vacanza.
13. Fare attenzione che il cavo di alimentazione sia posato in modo
da escludere che si possa inciamparvi sopra.
14. Per evitare danni al cavo, non avvolgere mai il cavo di alimenta
-
zione attorno all‘apparecchio.
15.
Per evitare danni al cavo, staccare la spina di rete dalla presa
elettrica afferrando sempre la spina, mai il cavo di alimenta
-
zione.
Copyright UNOLD AG | www.unold.de

63
16. Fare attenzione che la presa elettrica usata sia facilmente acces-
sibile, in modo che in caso di pericolo la spina possa essere
staccata velocemente.
17.
Prestare attenzione a non incastrare il cavo di alimentazione o a
non tirarlo sugli spigoli, al fine di evitare di danneggiarlo.
18. Se possibile, non usare prolunghe. Se ciò è inevitabile, si racco
-
manda di srotolare completamente la prolunga e di osservare i
limiti prestazionali del relativo cavo.
19.
Non far funzionare l‘apparecchio in ambienti umidi o umidi e
freddi – pericolo di scossa elettrica!
20. Evitare radiazioni solari intense sull‘apparecchio.
21. Non introdurre mai oggetti come dita, aghi, spine ecc. attraverso
la griglia all‘interno dell‘apparecchio – pericolo di ferirsi!
22. Prestare attenzione che i capelli lunghi non possano impigliarsi
nella ruota a pale.
23. Controllare regolarmente che l’apparecchio, la spina e il cavo di
alimentazione non presentino tracce di usura o danni. Qualora
l‘apparecchio è danneggiato inviare l‘apparecchio alla nostra
assistenza clienti per la verifica e la riparazione. Riparazioni non
idonee possono infatti causare notevoli pericoli per l‘utente e
comportano il decadere della garanzia.
24. Se il cavo è danneggiato, deve essere sostituito solo dal costrut
-
tore o dal suo agente di servizio o qualsiasi altra persona profes-
sionista qualificato al fine di evitare situazioni pericolose.
25.
Per evitare danni, l‘apparecchio non deve essere utilizzato con
accessori di altri produttori o altri marchi.
26. Dopo l’utilizzo, nonché prima della pulizia, staccare la spina
dalla presa elettrica. Non lasciare mai l’apparecchio incustodito
quando la spina è inserita.
27. L‘apparecchio può essere utilizzato in esterni purché sia protetto
dall‘umidità e dal bagnato, al fine di evitare il pericolo di scosse
elettriche. Non usare in esterni quando piove!
Avvertenze di sicurezza speciali per la batteria/il power bank
28. In linea di principio il power bank deve essere tenuto fuori dalla
portata dei bambini.
29. Per evitare di danneggiare l‘apparecchio usare esclusivamente il
power bank fornito in dotazione.
Copyright UNOLD AG | www.unold.de

64
30. Non far funzionare mai l‘apparecchio quando questo è spostato
da un ambiente freddo a uno più caldo. In questo caso si forma
infatti condensa, che può danneggiare l‘apparecchio. Prima
lasciar assestare l‘apparecchio sulla temperatura dell‘ambiente
attuale. Ciò può eventualmente richiedere qualche ora!
31. Il power bank non deve essere modificato e non deve essere
utilizzato per scopi diversi da quelli illustrati nel presente. Uti
-
lizzi erronei possono causare incendi, scosse elettriche, lesioni
fisiche ecc.
32.
Evitare di far funzionare l‘apparecchio nelle vicinanze di forti
campi magnetici (come ad es. altoparlanti, macchine ecc.).
33. Per prevenire danni all‘apparecchio, l‘apparecchio e il power
bank non devono mai venir posizionati nei pressi di fonti di
calore, inoltre vanno evitate anche le radiazioni solari dirette.
34. Prestare attenzione a inserire il power bank nell‘apparecchio
sempre con la polarità corretta.
35. La temperatura ambiente ideale per il funzionamento è di
20-30 °C.
36. La tensione di uscita e la corrente dell‘accumulatore integrato
sono di 5 V/2,1 A. Questi valori non devono mai venir superati.
37. Il power bank non deve mai venir immerso in liquidi al fine di
evitare danni all‘accumulatore posto al suo interno.
38. Anche se la power bankè utilizzato nel ventilatore, il livello di
carica deve essere controllato regolarmente e, se necessario,
power bank carica.
39. Non gettare mai il power bank nelle fiamme – pericolo di esplo
-
sioni!
40.
Osservare e rispettare le avvertenze per la ricarica del power
bank.
41. Prestare attenzione che il power bank non sia danneggiato da
cadute, urti, vibrazioni forti o altro. I power bank o gli accumu
-
latori danneggiati non devono essere utilizzati! In questo caso
contattare la nostra assistenza clienti.
42.
Ricaricare regolarmente il power bank anche quando l‘apparec
-
chio non è utilizzato in modo da evitare scariche profonde e
quindi guasti dell‘accumulatore.
Copyright UNOLD AG | www.unold.de

65
43. Attenzione: il cavo USB fornito in dotazione non è adatto per la
trasmissione dati!
44. Per ricaricare il power bank utilizzare solamente il cavo USB
fornito in dotazione, mai altri cavi.
45. Se si ricarica il power bank tramite una sorgente elettrica USB,
occorre prima assicurarsi che questa eroghi una corrente di
carica sufficiente. Altrimenti si possono verificare danni all‘ap
-
parecchio e alla sorgente elettrica USB. Per ulteriori avvertenze
vedere il capitolo „Carica dell‘accumulatore“.
46.
Non guardare mai direttamente il fascio di luce dei LED integrati
– pericolo di lesioni agli occhi! Non osservare mai il fascio di
luce nemmeno con strumenti ottici!
47. Durante la ricarica non coprire mai il power bank con oggetti.
48. Non cortocircuitare mai il power bank.
49. Attenzione: nel caso del liquido fuoriesca dal power bank, per
maneggiare il dispositivo indossare immediatamente guanti pro
-
tettivi adatti. Evitare il contatto della cute e degli occhi con il
fluido, che è molto aggressivo e può causare lesioni fisiche. Nel
caso si verifichino comunque contatti con la cute o gli occhi,
consultare immediatamente un medico. Inoltre fare attenzione
che i fluidi non entrino in contatto con superfici od oggetti, in
quanto potrebbero danneggiarli. Rivolgersi immediatamente alla
nostra assistenza clienti.
Avvertenze di sicurezza relative alle batterie del telecomando
50.
In linea di principio le batterie devono essere tenute fuori dalla
portata dei bambini.
51. Nel caso le batterie vengano ingerite, consultare immediata
-
mente un medico!
52.
Attenzione: nel caso dalla batteria fuoriesca del fluido, per
maneggiare il dispositivo indossare immediatamente guanti pro
-
tettivi adatti. Evitare il contatto della cute e degli occhi con il
fluido, che è molto aggressivo e può causare lesioni fisiche. Nel
caso si verifichino comunque contatti con la cute o gli occhi,
consultare immediatamente un medico. Inoltre fare attenzione
che i fluidi non entrino in contatto con superfici od oggetti, in
quanto potrebbero danneggiarli.
53.
Conservare le batterie in ambiente asciutto.
Copyright UNOLD AG | www.unold.de

66
Non introdurre mai oggetti come dita, aghi, spine ecc. attraverso
la griglia all‘interno dell‘apparecchio – pericolo di ferirsi!
Far funzionare l‘apparecchio soltanto su un sottofondo piano e
stabile, di modo che non si rovesci.
Il produttore declina qualunque responsabilità in caso di montaggio errato, utilizzi errati o non idonei o
qualora le riparazioni siano eseguite da terzi non autorizzati.
54. Accertarsi di inserire le batterie nel telecomando sempre con la
polarità corretta.
55. Se il telecomando non viene utilizzato per lungo tempo, occorre
rimuovere le batterie.
56. Se si utilizzano batterie ricaricabili, osservare le avvertenze del
produttore per la corretta ricarica delle batterie.
57. Non aprire mai le batterie – pericolo di ferite!
58. Utilizzare sempre soltanto batterie dello stesso tipo. Non utiliz
-
zare mai batterie di produttori diversi o con dimensioni o ten-
sioni differenti al fine di evitare lesioni fisiche e danni all‘appa-
recchio.
59.
Prestare attenzione a non esporre le batterie alle radiazioni solari
dirette o ad altre fonti di calore. Non gettare mai le batterie nelle
fiamme – pericolo di esplosioni!
Copyright UNOLD AG | www.unold.de

67
MONTAGGIO
1 Anello di fissaggio
2 Griglia di copertura
anteriore
3 Dado
4 Ruota a pale
5 Dado
6
Griglia di copertura
posteriore
7 Elemento di comando con
scocca del motore
8 Montante
9 Base
10 Viti (3 pezzi)
11 Telecomando
12 Batterie
13 Cavo di carica USB
14 Alimentatore
1. Prima del montaggio accertarsi di installare l‘apparecchio in un luogo piano
e asciutto.
2. Rimuovere tutti i materiali da imballo e le protezioni da trasporto. Tenere
i materiali da imballo, come ad es. sacchetti in plastica o polistirolo, fuori
dalla portata dei bambini – pericolo di soffocamento!
3. Controllare che tutte le parti richieste siano presenti.
4. Eventualmente svitare leggermente le viti (10) della base.
Copyright UNOLD AG | www.unold.de

68
5. Posizionare il montante (8) nella base in modo che si inserisca perfettamente
e fissarlo con le tre viti (serrandole in senso orario).
6. Inserire l‘elemento di comando (7) sul montante (8) accertandosi che
l‘estremità inferiore dell‘elemento di comando vada a inserirsi esattamente
negli appositi fori. Fissare i due componenti con la vite.
7. E‘ possibile regolare l‘altezza desiderata allentando la vite di arresto,
allungando il tubo sull‘altezza desiderata e quindi fissandolo con la vite
d‘arresto.
8. Agganciare la copertura posteriore della griglia (6) alla scocca del motore
(7) fissandola con il dado (5).
9. Infilare la ruota a pale (4) sull‘asse della scocca del motore (7). Fissare la
ruota a pale (4) con il dado (3). Attenzione: filettatura sinistrorsa!
10. Collegare la griglia di copertura anteriore (2) con quella posteriore (6).
Verificare che l‘anello di fissaggio (1) sia in posizione corretta (le due metà
della griglia devono essere perfettamente inserite nell‘anello) e fissarlo con
la graffa.
11. Verificare che tutte le parti siano state correttamente montate e fissate.
POWER BANK/ACCUMULATORE
1
3
4
6
5
1 LED condizione di carica
2 Tasto di comando
3 Entrata di carica USB
4 Uscita di carica USB
5 Interfaccia di
collegamento del
ventilatore
6
LED/torcia
2
1. Avvertenza: Il ventilatore può essere fatto funzionare anche senza il power
bank inserito!
2. Il vostro nuovo ventilatore può funzionare anche indipendentemente da una
sorgente elettrica purché il power bank incluso sia stato precedentemente
ricaricato. Se il power bank è lasciato nell‘apparecchio e questo è collegato
Copyright UNOLD AG | www.unold.de

69
alla rete elettrica, l‘accumulatore del power
bank è ricaricato.
3. Alternativamente è possibile effettuare
la ricarica tramite una porta USB.
4. Il power bank può essere rimosso
aprendo l‘apposito vano sul retro dell‘appa-
recchio (vedere la figura).
5. Per verificare lo stato di carica attuale
premere brevemente il tasto di comando del
power bank (vedere la figura).
6. I LED segnalano lo stato di carica attuale, quattro LED indicano
che il power bank è completamente carico (i LED significano rispettiva-
mente il 25, 50, 75 e 100%).
7. Collegare il power bank e la porta di carica USB mediante il cavo USB
fornito in dotazione. Osservare tassativamente la seguente avvertenza: Se
si ricarica il power bank tramite una sorgente elettrica USB, prima occorre
assicurarsi che questa eroghi una corrente di carica sufficiente. Altrimenti
si possono verificare danni all‘apparecchio e alla sorgente elettrica USB.
Pertanto non utilizzare mai ad es. la porta USB di un computer o un hub
USB, a meno che non si tratti di porte speciali per carica con una corrente
di uscita di almeno 2 A.
8. Mentre l‘accumulatore è caricato i LED lampeggiano. La durata della carica
dipende dalla condizione di carica e può richiedere diverse ore.
9. Non usare mai l‘uscita di carica e l‘entrata di carica contemporaneamente.
Il power bank può essere utilizzato anche per caricare dispositivi mobili (ad
es. smartphone). Per prima cosa verificare che il power bank sia comple-
tamente carico. Collegare il connettore del cavo fornito in dotazione con
l‘uscita di carica USB e poi collegare il connettore Micro-USB con la presa
Micro-USB dell‘apparecchio mobile. Il processo di carica ha inizio. Il power
bank può erogare complessivamente 2,1 A di corrente di uscita. E‘ possi-
bile riconoscere la condizione di carica del power bank durante il processo
di carica sulla base dei LED lampeggianti. Si raccomanda di monitorare il
processo di carica. Se questo deve essere interrotto o terminato staccare il
cavo dall‘apparecchio mobile.
10. Non appena l‘accumulatore è completamente carico disconnettere il power
bank dalla sorgente elettrica USB.
Copyright UNOLD AG | www.unold.de

70
TELECOMANDO
1. Rimuovere cautamente la copertura del vano batterie.
2. Inserire le batterie. Prestare assolutamente attenzione alla polarità corretta.
Quale riferimento nel vano batterie sono presenti apposite marcature.
3. Usare solamente batterie di tipo AAA, 1,5 V.
4. Chiudere il coperchio.
5. Nel regolare l‘apparecchio con il telecomando, stare attenti che durante le
regolazioni questo sia puntato sempre in direzione del ventilatore.
6. Le designazioni sul telecomando sono identiche ai tasti dell‘apparecchio.
7. Per evitare danni, non far cadere il telecomando da grandi altezze.
8. La portata del telecomando è di 7 metri.
9. Per poterlo riporre in tutta semplicità il telecomando è magnetico e può
quindi essere agganciato alla copertura del vano batterie sul retro dell‘ap-
parecchio.
11. Quindi inserire il power bank nell‘apparecchio (i col-
legamenti devono essere rivolti verso il basso, i LED verso
avanti). Non appena il power bank è correttamente inserito,
ciò è confermato da un segnale acustico.
12. Consigli: E‘ possibile verificare lo stato di carica del
power bank anche quando questo è inserito nell‘apparec-
chio. Sul retro dell‘apparecchio sono presenti delle piccole
feritoie tramite cui è possibile vedere i LED di carica del
power bank.
13. Se serve una piccola sorgente luminosa aggiuntiva, il
power bank fornito in dotazione può mettere a disposizione
anche questa: Premere il tasto di comando finché il LED
luminoso posto tra le due porte USB si illumina. Per rispegnere la luce
tenere nuovamente premuto il tasto finché il LED si spegne.
Copyright UNOLD AG | www.unold.de

71
DISPLAY
1 Indicatore dell'ora
2 Indicatore di velocità
3 Tasto accensione/spegnimento spie di controllo
4 Tasto temporizzazione
5 Spia di controllo PRONTO
6
Tasto per la velocità
7 Tasto per l'oscillazione
8 Tasto ON/OFF
COMANDO
1. Assicurarsi che l‘apparecchio sia posizionato su un sottofondo piano idoneo
e che sia stato installato in maniera stabile e sicura.
Funzionamento da rete elettrica
2. Collegare la spina cava del cavo di alimentazione alla presa sul retro dell‘ap-
parecchio. Collegare l‘alimentatore a una presa elettrica e accendere l‘appa-
recchio tramite il tasto ON/OFF (8).
Funzionamento a batteria
3. Controllare che il power bank sia correttamente inserito nel vano sul retro
dell‘apparecchio.
4. Eventualmente staccare l‘apparecchio dall‘alimentazione elettrica.
5. La durata di una carica dell‘accumulatore dipende tra l‘altro dalla velocità
selezionata. Al livello 1 la carica della batteria è sufficiente per circa 21 ore,
al livello 6 per circa 3 ore.
6. Consigli: E‘ possibile verificare lo stato di carica del power bank in qualun-
que momento. Sul retro dell‘apparecchio sono presenti delle piccole feritoie
tramite cui è possibile vedere i LED di carica del power bank.
Regolazione della velocità
7. Premere il tasto della velocità (6) fino a raggiungere la velocità del flusso
d‘aria desiderata. E‘ possibile scegliere tra sei livelli diversi:
Livello 1: flusso d‘aria leggero
Livello 2: flusso d‘aria medio
Livello 3: Modalità sonno (velocità bassa, alternata)
Copyright UNOLD AG | www.unold.de

72
Livello 4: flusso d‘aria simil-naturale (velocità mutevole simile al movi-
mento dell‘aria naturale)
Livello 5: flusso d‘aria forte
Livello 6: flusso d‘aria molto forte
8. E‘ possibile commutare tra le differenti velocità in qualunque momento.
Temporizzazione
9. Tramite il tasto temporizzazione (4) è possibile selezionare il tempo di
funzionamento desiderato per l‘apparecchio. E‘ possibile selezionare una
durata del funzionamento compresa tra una e sei ore. Premere il tasto di
programmazione del tempo (4) e fare attenzione all‘indicatore del tempo (1).
I LED indicano la durata di funzionamento attualmente selezionata (1 LED
acceso: durata di funzionamento 1 ora, 2 LED accesi: durata di funziona-
mento 2 ore ecc.). Pertanto per programmare l‘apparecchio per una durata
di funzionamento di due ore premere il tasto (4) due volte in sequenza. Una
volta trascorso il tempo selezionato l‘apparecchio si spegne.
10. Ovviamente è possibile selezionare o modificare la velocità dell‘apparecchio
anche quando si usa la temporizzazione.
Funzione Swing/oscillazione
11. Premere il tasto per l‘oscillazione (7). Così facendo l‘apparecchio oscilla
autonomamente.
12. Se si desidera disattivare nuovamente la funzione Swing ripremere il tasto
di oscillazione.
Accensione/spegnimento delle spie di controllo
13. Tutte le spie di controllo possono essere spente in modo da risparmiare cor-
rente oppure se l‘illuminazione dà fastidio, ad es. quando si dorme.
14. Per accendere o spegnere le spie di controllo premere il tasto 3. Tutte le
spie di controllo si spengono, ma l‘apparecchio rimane in funzione. Per
riaccendere le spie di controllo premere semplicemente un tasto qualunque.
Impostazione dell‘angolo di inclinazione
15. La scocca del motore può essere inclinata verticalmente
in una certa misura (circa 20°). Inclinare la griglia di copertura
fino all‘angolo desiderato. Attenzione: Inclinare la copertura sol-
tanto nell‘intervallo previsto e senza forzare oltre alla resistenza
percettibile, in modo da non danneggiare l‘apparecchio.
Copyright UNOLD AG | www.unold.de

73
Regolazione dell‘altezza
16. Girare leggermente verso sinistra la vite d‘arresto pre-
sente sul lato frontale dell‘apparecchio (vedere la figura). Por-
tare la parte superiore dell‘apparecchio all‘altezza desiderata.
Quindi fissare tale altezza serrando verso destra la vite d‘arresto.
Spegnimento
17. Per spegnere l‘apparecchio premere il tasto ON/OFF
(8). Quando l‘apparecchio non viene più utilizzato staccare la
spina dalla presa elettrica.
18. Se la spina non viene staccata e l‘apparecchio non
viene spento, esso è automaticamente disattivato dopo 12 ore.
Spegnere l‘apparecchio tramite il tasto ON/OFF e staccare la spina dalla
presa elettrica.
Prestare attenzione a non immergere mai l‘apparecchio in acqua. Il motore
o i componenti elettrici dell‘apparecchio non devono inumidirsi.
1. In linea di principio non bisogna usare prodotti abrasivi, lana d’acciaio,
oggetti metallici, disinfettanti o detergenti caldi.
2. Strofinare il montante e la griglia del ventilatore con un panno leggermente
inumidito.
3. Conservare il ventilatore in un luogo asciutto e sicuro al riparo da polvere,
urti, calore e umidità.
PULIZIA E CURA
Copyright UNOLD AG | www.unold.de

74
NORME DIE GARANZIA
SMALTIMENTO / TUTELA DELL’AMBIENTE
I nostri apparecchi vengono prodotti rispettando un elevato standard qualitativo per una lunga
durata di utilizzo. Una corretta manutenzione e riparazioni adeguate a cura dal nostro servizio
clienti possono prolungare la durata di utilizzo del prodotto. Se un apparecchio è difettoso e non
più riparabile, per il suo smaltimento si presti attenzione ai punti che seguono. Questo prodotto
non deve essere smaltito unitamente ai comuni rifiuti domestici. Consegnare il prodotto a un
centro di raccolta per il riciclaggio dei rifiuti elettrici o elettronici. Con la raccolta differenziata
dei rifiuti e dei prodotti riciclabili è possibile contribuire alla tutela delle risorse naturali e far
smaltire il prodotto nel rispetto dell’ambiente e della salute.
Le batterie esauste non devono essere smaltite tramite i rifiuti domestici. Si
raccomanda di smaltirle tramite il rivenditore di forniture elettriche di fiducia
oppure tramite il punto di raccolta municipale.
I nostri prodotti sono garantiti per 24 mesi, 12 mesi in caso di uso professionale, dalla data di acquisto per i
guasti manifestatisi durante un utilizzo conforme alle disposizioni e attribuibili in modo dimostrabile a difetti
di fabbricazione. Nel periodo di garanzia porremo rimedio ai difetti materiali e di produzione secondo la nostra
valutazione, procedendo alla riparazione o alla sostituzione dell’apparecchio. Le nostre prestazioni di garanzia
valgono esclusivamente per gli apparecchi venduti in Germania e Austria. In tutti gli altri casi rivolgersi all‘im-
portatore. Gli apparecchi per i quali si richiede la riparazione di guasti ci devono essere inviati con spedizione
affrancata e debitamente imballati, unitamente a una copia del documento di acquisto redatto a macchina dal
quale risulti la data di vendita, nonché la descrizione del guasto. In caso di garanzia al cliente verranno rimbor-
sati i costi di spedizione sostenuti in Germania e Austria. Sono esclusi dalla garanzia i guasti dovuti all’usura,
all’uso inappropriato o al mancato rispetto delle regole di manutenzione. Il diritto di garanzia decade qualora
siano state effettuate riparazioni o interventi da parte di terzi. Eventuali diritti del consumatore finale verso il
venditore o negoziante non vengono limitati dalla presente garanzia.
Copyright UNOLD AG | www.unold.de

75
MANUAL DE INSTRUCCIONES MODELO 86870
PARA SU SEGURIDAD
DATOS TÉCNICOS
Potencia: 30 vatios (12 VDC)
Adaptador de la fuente de alimentación 100-240 V,
50/60 Hz, 1,2 A
Suministro de energía por USB 5 V 2 A
Medidas: Aprox. 40 x 40 x 120/140 cm (P/An/Al)
Peso: Aprox. 7,5 kg
Cable de
alimentación: Aprox. 2,0 m
Diámetro: Aprox. 40 cm
Nivel de ruido: ≤ 63 db
Velocidad de aire: ≥ 320 m/min
Tiempo de carga: Primera carga aprox. 10 horas, conexión de red aprox. 7
horas
Datos técnicos
Acumulador/batería
Power bank: 4 400 mAh, 11,1 V. de corriente de salida USB: DC-5V-2,1
A, corriente de carga USB 800-1 000 mA, corriente de carga
standby 900-1 000 mA, batería de litio-ion
Equipamiento: Ventilador de pie accionado por acumulador para interiores y
exteriores, 6 niveles de velocidad, control remoto, duración
del acumulador hasta aprox. 21 horas en nivel inferior
(aprox. 3 horas en nivel superior), desconexión automática,
regulación de altura, con preselección de tiempo
Accesorios: Instrucciones de servicio, cable de carga USB, fuente de
alimentación con cable de conexión, control remoto, 2 pilas
de tipo AAA 1,5 V.
Salvo modificaciones y errores a nivel de las características de equipamiento, la
tecnología, los colores y el diseño
Lea y conserve las siguientes instrucciones.
Personas en el hogar
1. Este aparato puede ser usado por niños a partir de 8 años, así
como por personas con una capacidad física, mental o sensorial
reducida o carentes de experiencia y/o conocimientos siempre
que estén supervisados o hayan sido correspondientemente
EXPLICACIÓN DE SÍMBOLOS
Este símbolo se asocia con riesgos eventuales que pueden provocar
lesiones o daños en el aparato.
Copyright UNOLD AG | www.unold.de

76
instruidos en el manejo seguro de dicho aparato y comprendan
los peligros que conlleva.
2. El aparato no es un juguete.
3. No está permitido que los niños lleven a cabo la limpieza o el
mantenimiento del usuario a no ser que tengan más de 8 años y
estén supervisados.
4. Guarde el aparato y el cable fuera del alcance de niños menores
de 8 años.
Indicaciones de seguridad para la colocación y el uso del aparato
5. Conecte el aparato solamente si está correctamente montado.
6. Asegúrese de que haya espacio suficiente en el lugar de
emplazamiento del aparato. Como mínimo debe haber 50 cm
entre el aparato y otros objetos.
7. No utilice el aparato en recintos con mucho polvo o cerca de
sustancias inflamables.
8. Conecte el aparato solo a corriente alterna con una tensión de
acuerdo con la placa de características.
9. Este aparato no debe utilizarse con un reloj programador externo
ni con un sistema de mando a distancia.
10. No sumerja nunca el aparato o el cable de alimentación en agua
o en otros líquidos. ¡Peligro mortal!
11. De ninguna manera abra la carcasa del aparato. ¡Existe peligro
de descarga eléctrica!
12. El aparato está destinado exclusivamente a un uso doméstico o
similares, p. ej.
en cocinas tipo office en comercios, oficinas u otros lugares de
trabajo,
para el uso por parte de clientes en hoteles, moteles u otros
establecimientos de alojamiento colectivo,
en pensiones privadas o en casas vacacionales.
13. Asegúrese de tender el cable de alimentación de manera que
quede excluido el riesgo de tropiezos.
14. No enrolle nunca el cable de alimentación alrededor del aparato
para evitar daños en el mismo.
15. Con el fin de evitar daños en el cable, desenchufe el aparato
sujetando siempre la clavija. No tire nunca del cable de
alimentación.
Copyright UNOLD AG | www.unold.de

77
16. Asegúrese de que la toma de corriente utilizada sea fácilmente
accesible, de manera que pueda desenchufar rápidamente el
aparato en caso de peligro.
17. Preste atención a que el cable de alimentación no quede
aprisionado ni tendido en las esquinas para evitar daños en el
mismo.
18. De ser posible, no use ningún cable de prolongación. Si fuera
inevitable hacerlo, desenrolle completamente el cable de
prolongación y observe los límites de potencia del cable en
cuestión.
19. El aparato no se debe operar en ambientes húmedos, mojados y
fríos. ¡Peligro de descarga eléctrica!
20. Evite exponer el aparato a la radiación solar excesiva.
21. No se deben introducir nunca los dedos ni objetos como agujas,
bolígrafos, etc. por la rejilla hasta el interior del aparato. ¡Peligro
de lesiones!
22. Asegúrese de que el cabello largo no pueda enredarse en la
rueda de aletas.
23. Controle periódicamente si el aparato, el enchufe y el cable de
alimentación presentan desgaste o daños. En caso de daños
en el aparato envíe el aparato para su verificación y reparación
a nuestro servicio de atención al cliente. Las reparaciones
inadecuadas pueden ocasionar considerables peligros para el
usuario y tienen como consecuencia la exclusión de la garantía.
24. Si el cable está dañado, debe ser sustituido por el fabricante o
su agente de servicio o cualquier otro profesional cualificado con
el fin de evitar situaciones de peligro.
25. Para evitar daños en el aparato, este no debe ser usado con
accesorios de otros fabricantes o marcas.
26. Desenchufe el aparato después de su uso y antes de la limpieza.
No deje nunca el aparato sin vigilancia cuando esté enchufado.
27. El aparato se puede utilizar en el exterior. Sin embargo, se debe
proteger contra humedad y agua para evitar el peligro de una
descarga eléctrica. ¡No utilizar en el exterior con lluvia!
Copyright UNOLD AG | www.unold.de

78
Indicaciones especiales de seguridad para el acumulador/la batería
Power bank
28. Mantenga siempre la batería Power bank fuera del alcance de
los niños.
29. Utilice exclusivamente la batería Power bank suministrada para
evitar daños en el aparato.
30. No utilice nunca el aparato si se traslada de un entorno frío
a un entorno caliente. Al hacerlo, se genera agua condensada
que puede causar daños en el aparato. Primero, deje el aparato
en su lugar durante algún tiempo hasta que haya alcanzado
la temperatura actual de la habitación. ¡En determinadas
circunstancias puede tardar unas horas!
31. Power bank no se debe modificar ni utilizar para otros fines
distintos a los aquí descritos. Un uso inadecuado puede provocar
incendios, descargas eléctricas, daños a la personas, etc.
32. Evite el funcionamiento del aparato cerca de fuertes campos
magnéticos (como, p. ej., altavoces, máquinas, etc.).
33. El aparato y el Power bank no se deben colocar nunca cerca de
fuentes de calor, incluso se debe evitar la radiación solar directa
para que no se produzcan daños en el aparato.
34. Asegúrese de insertar siempre la batería Power bank en el
aparato respetando la polaridad correcta.
35. Incluso si la Power bank se utiliza en el ventilador, el nivel de
carga debe ser revisado periódicamente y, si es necesario, la
Power bank cargada.
36. La temperatura ambiente ideal para el funcionamiento es de
20-30 °C.
37. La tensión de salida y la corriente del acumulador integrado son
5 V/2,1 A. Estos valores no se deben sobrepasar.
38. La batería Power bank no se debe sumergir nunca en líquidos
para evitar daños en el acumulador interior.
39. ¡No arroje nunca la batería Power bank a llamas abiertas! ¡Peligro
de explosión!
40. Observe siempre las indicaciones sobre la carga de la batería
Power bank y respételas.
41. Asegúrese de que la batería Power bank no se deteriore por caída,
golpe, fuertes vibraciones u otras influencias. ¡No debe utilizar
Copyright UNOLD AG | www.unold.de

79
una batería Power bank ni un acumulador deteriorados! En este
caso, contacte con nuestro servicio de atención al cliente.
42. Cargue la batería Power bank periódicamente, incluso si no
utiliza el aparato, para evitar una descarga total del acumulador
y, con ello, un fallo.
43. Atención: ¡El cable USB suministrado no es apto para la
transferencia de datos!
44. Para cargar la batería Power bank, utilice solo el cable USB
suministrado, nunca otros cables.
45. Si carga la batería Power bank a través de una fuente de corriente
USB, debe asegurarse primero de que la fuente de corriente
dispone de suficiente corriente de carga. De lo contrario, se
podrían producir daños en el aparato y en la fuente de corriente
USB. Encontrará más indicaciones en el capítulo „Cargar el
acumulador“.
46. No mire nunca directamente el rayo de luz del LED integrado.
¡Peligro de lesiones oculares! ¡Tampoco observe el rayo de luz
con instrumentos ópticos!
47. No tape nunca la batería Power bank con objetos durante la
carga.
48. No cortocircuite nunca la batería Power bank.
49. Atención: Si sale líquido de la batería Power bank, utilice de
inmediato guantes de protección adecuados para el manejo con
el aparato. Evite el contacto de la piel y de los ojos con el líquido,
dado que pueden ser muy agresivos y causar daños a la persona.
Si a pesar de ello, entrara en contacto con la piel o con los ojos,
consulte de inmediato a un médico. Asegúrese también de que
el líquido no entre en contacto con superficies ni objetos, pues
podrían deteriorarse. Póngase inmediatamente en contacto con
nuestro servicio de atención al cliente.
Indicaciones de seguridad de las pilas del control remoto
50. Mantenga siempre las pilas fuera del alcance de los niños.
51. ¡Si se tragan las pilas, consulte de inmediato a un médico!
52. Atención: Si sale líquido de las pilas, utilice de inmediato
guantes de protección adecuados para el manejo con el aparato.
Evite el contacto de la piel y de los ojos con el líquido, dado que
pueden ser muy agresivos y causar daños a la persona. Si a pesar
Copyright UNOLD AG | www.unold.de

80
No se deben introducir nunca los dedos ni objetos como agu-
jas, bolígrafos, etc. por la rejilla hasta el interior del aparato.
¡Peligro de lesiones!
Operar el aparato solo sobre una base plana y estable para que
no vuelque.
El fabricante no es responsable en caso de montaje erróneo, uso inapropiado o equivocado o después de
haber sido efectuadas reparaciones por terceros no autorizados.
de ello, entrara en contacto con la piel o con los ojos, consulte
de inmediato a un médico. Asegúrese también de que el líquido
no entre en contacto con superficies ni objetos, pues podrían
deteriorarse.
53. Guarde las pilas en un lugar seco.
54. Asegúrese de insertar siempre las pilas en el control remoto res
-
petando la polaridad correcta.
55.
Si no utiliza el control remoto durante un tiempo prolongado, se
deben retirar las pilas.
56. Si utiliza pilas recargables, observe las indicaciones del
fabricante sobre la carga correcta de las mismas.
57. No abra nunca las pilas. ¡Peligro de lesiones!
58. Utilice siempre pilas del mismo tipo. No inserte nunca pilas de
diferentes fabricantes, tamaño o tensión para evitar daños a las
personas y al aparato.
59. Asegúrese de no someter las pilas a la radiación solar directa
ni a otras fuentes de calor. ¡No arroje nunca las pilas a llamas
abiertas! ¡Peligro de explosión!
Copyright UNOLD AG | www.unold.de

81
MONTAJE
1 Anillo de fijación
2 Rejilla delantera
3 Tuerca
4 Rueda de aletas
5 Tuerca
6
Rejilla trasera
7 Elemento de mando con
carcasa del motor
8 Tubo vertical
9 Base
10 Tornillos (3 unidades)
11 Control remoto
12 Pilas
13 Cable de carga USB
14 Fuente de alimentación
1. Antes del montaje, asegúrese de montar el aparato sobre un lugar plano y
seco.
2. Retire todos los materiales de embalaje y los seguros de transporte. Mantenga
el material de embalaje como, p. ej., bolsas de plástico o poliestireno, fuera
del alcance de los niños. ¡Peligro de asfixia!
3. Compruebe que todas las piezas necesarias estén disponibles.
4. En caso necesario, desenrosque ligeramente los tornillos (10) de la base.
5. Coloque el tubo vertical (8) en la base con precisión y fíjelo con los tres
tornillos (apretarlos en el sentido de las agujas del reloj).
Copyright UNOLD AG | www.unold.de

82
6. Coloque el elemento de mando (7) sobre el tubo vertical (8). Asegúrese de
que el extremo inferior del elemento de mando encaje perfectamente sobre
los agujeros previstos para ello. Fije los dos componentes con el tornillo.
7. Puede ajustar la altura deseada aflojando el tornillo de sujeción, desplazando
el tubo hasta la altura deseada y fijándolo con el tornillo de sujeción.
8. Fije la rejilla trasera (6) en la carcasa del motor (7) bloqueando la rejilla con
la tuerca (5).
9. Coloque la rueda de aletas (4) sobre el eje de la carcasa del motor (7). Fije
la rueda de aletas (4) con la tuerca (3). Atención: ¡Rosca izquierda!
10. Una la rejilla delantera (2) con la rejilla trasera (6). Compruebe si el anillo
de fijación (1) se encuentra en la posición correcta (las dos mitades de la
rejilla deben quedar exactamente en el anillo) y fíjelo con la abrazadera.
11. Compruebe si todas las piezas están correctamente montadas y fijadas.
POWER BANK/ACUMULADOR
1
3
4
6
5
1 Estado de carga del LED
2 Tecla de mando
3 Entrada de carga USB
4 Salida de carga USB
5 Conexión de la interfaz del
ventilador
6
LED/linterna
2
1. Nota: ¡El ventilador también se puede utilizar sin insertar la Power bank!
2. Su nuevo ventilador también puede funcionar independientemente de una
fuente de corriente si previamente se ha cargado la batería Power bank. Si
deja la batería Power bank en el aparato y lo
conecta a través de la red de alimentación, se
cargará el acumulador de la batería Power bank.
3. Otra opción es cargarlo a través de una
conexión USB.
4. La batería Power bank se puede extraer
abriendo el compartimento correspondiente en
el lado trasero del aparato (véase figura).
Copyright UNOLD AG | www.unold.de

83
5. Para comprobar el estado de carga actual, pulse brevemente la tecla de
mando situada en la batería Power bank (véase figura).
6. Los LED indican el estado de carga actual. Con cuatro LED la batería Power
bank está completamente cargada (los LED significan 25, 50, 75 y 100 %
correspondientemente).
7. Conecte la batería Power bank y el puerto de carga USB con el cable USB
suministrado. Al hacerlo, es imprescindible observar la siguiente indica-
ción: Si carga el acumulador a través de una fuente de corriente USB,
debe asegurarse primero de que la fuente de corriente dispone de suficiente
corriente de carga. De lo contrario, se podrían producir daños en el aparato
y en la fuente de corriente USB. Por esta razón, no utilice nunca, p. ej., el
puerto USB de un ordenador o un hub USB, excepto si se trata de puertos
de carga especiales con una corriente de salida de mínimo 2 A.
8. Mientras se está cargando el acumulador, parpadean los LED. La duración
de carga depende del estado de carga correspondiente y puede tardar varias
horas.
9. No utilice nunca la salida y entrada de carga simultáneamente. También
puede utilizar la batería Power bank para cargar dispositivos móviles (p. ej.,
smartphones). Primero compruebe si la batería Power bank está completa-
mente cargada. Conecte el conector del cable suministrado con la salida
de carga USB y, después, conecte el conector micro USB con la hembrilla
micro USB del dispositivo móvil. Se inicia el proceso de carga. La batería
Power bank puede suministrar un total de 2,1 A de corriente de salida. A
través de los LED parpadeantes puede comprobar el estado de carga de la
Power bank durante el proceso de carga. Supervise el proceso de carga. Si
desea interrumpirlo o finalizarlo, extraiga el cable del dispositivo móvil.
10. En cuanto el acumulador esté completamente cargado, retire la Power bank
de la fuente de corriente USB.
11. A continuación, inserte la Power bank en el dispositivo (las conexiones deben
apuntar hacia abajo; los LED, hacia delante). En cuanto la Power bank esté
correctamente insertada, sonará una señal acústica.
12. Consejo: También puede comprobar el estado de carga
de la Power bank si está insertada en el dispositivo. En
el lado posterior del aparato hay pequeñas entalladuras, a
través de las cuales puede ver los LED de carga de la Power
bank.
Copyright UNOLD AG | www.unold.de

84
13. Si alguna vez necesita una pequeña fuente de luz adicional, también puede
utilizar para ello la Power bank suministrada: pulse la tecla de mando hasta
que se ilumine el LED claro entre las dos conexiones USB. Para volver a
apagar la luz, mantenga de nuevo pulsada la tecla hasta que el LED se
apague.
CONTROL REMOTO
1. Retire con cuidado la cubierta del compartimento de pilas.
2. Coloque las pilas. Preste especial atención a la polaridad correcta. Para la
orientación de las pilas, fíjese en las marcas situadas en el compartimento
de pilas.
3. Utilice solo pilas de tipo AAA, 1,5 V.
4. Cierre la cubierta.
5. Si ajusta el aparato con el control remoto, asegúrese de mantener siempre el
control remoto en la dirección del ventilador durante los ajustes.
6. Las denominaciones de las teclas del control remoto son idénticas a las de
las teclas del aparato.
7. Para evitar daños, no deje caer el control remoto desde una gran altura.
8. El alcance del control remoto es de 7 metros.
9. Para facilitar el almacenaje, el control remoto es magnético y se puede col-
gar fácilmente en la cubierta del compartimento del acumulador en la parte
posterior del aparato.
PANTALLA
1 Indicación de tiempo
2 Indicación de velocidad
3 Tecla para conectar/desconectar los pilotos de
control
4 Tecla de preselección de tiempo
5 Piloto de control LISTO
6
Tecla de velocidad
7 Tecla de oscilación
8 Tecla CON/DES
Copyright UNOLD AG | www.unold.de

85
MANEJO
1. Asegúrese de que el aparato esté sobre una base adecuada y plana y de que
se haya colocado de forma segura y estable.
Funcionamiento en la red eléctrica
2. Conecte el conector hueco del cable de alimentación con la hembrilla en
la parte posterior del aparato. Introduzca la fuente de alimentación en una
caja de enchufe y conecte el aparato con la tecla CON/DES (8).
Funcionamiento con acumulador
3. Compruebe si la Power bank está correctamente insertada en el comparti-
mento en el lado posterior del aparato.
4. En caso necesario, desconecte el aparato del suministro eléctrico.
5. La duración de una carga del acumulador depende, entre otras cosas, de la
velocidad seleccionada. En el nivel 1, la carga del acumulador dura aprox.
21 horas; en el nivel 6, aprox. 3 horas.
6. Consejo: Puede comprobar en cualquier momento el estado de carga de la
Power bank. En el lado posterior del aparato hay pequeñas entalladuras, a
través de las cuales puede ver los LED de carga de la Power bank.
Ajuste de velocidad
7. Pulse la tecla de velocidad (6) tantas veces como sea necesario hasta que
obtenga la velocidad de aire deseada. Puede elegir entre seis niveles dife-
rentes.
Nivel 1: aire suave
Nivel 2: aire medio
Nivel 3: modo de reposo (velocidad baja variable)
Nivel 4: aire natural (velocidad variable que imita los movimientos natura-
les del aire)
Nivel 5: aire potente
Nivel 6: aire muy potente
8. Puede pasar de un nivel de velocidad a otro en cualquier momento.
Preselección de tiempo
9. Mediante la tecla „Preselección de tiempo“ (4) puede seleccionar el tiempo
de ejecución deseado del aparato, que puede variar entre una y seis horas
de duración. Pulse la tecla para la programación de tiempo (4) prestando
atención a la indicación de tiempo (1). Los LED indican la duración de
funcionamiento actual seleccionada (1 LED encendido: duración de 1 hora;
2 LED encendidos: duración de 2 horas, etc.). Es decir: para programar el
Copyright UNOLD AG | www.unold.de

86
aparato con una duración de funcionamiento de dos horas, debe pulsar la
tecla (4) dos veces consecutivamente. Una vez transcurrido el tiempo selec-
cionado, el aparato se desconecta.
10. Por supuesto, también puede seleccionar o cambiar la velocidad del aparato
utilizando la preselección de tiempo.
Función de giro/oscilación
11. Pulse la tecla de oscilación (7). Ahora, el aparato gira automáticamente.
12. Si desea desconectar de nuevo la función de giro, pulse de nuevo la tecla
de oscilación.
Conexión/desconexión de los pilotos de control
13. Todos los pilotos de control se pueden desconectar para ahorrar corriente o
si la iluminación molesta, p. ej., a la hora de dormir.
14. Para conectar o desconectar los pilotos de control, pulse la tecla 3. Se apa-
garán todos los pilotos de control, pero el aparato seguirá funcionando. Si
desea volver a conectar los pilotos de control, pulse simplemente cualquier
tecla.
Ajuste del ángulo de inclinación
15. Puede inclinar la carcasa de motor verticalmente hasta
cierto nivel (aprox. 20°). Incline la rejilla hasta el ángulo
deseado. Atención: Incline la rejilla solo en el área prevista y
no sobrepase la resistencia notable para no dañar el aparato.
Ajuste de altura
16. Gire un poco hacia la izquierda el tornillo de sujeción situado en
el lado delantero del aparato (véase figura). Coloque la parte superior
del aparato a la altura deseada. A continuación, fije esta altura apre-
tando el tornillo de sujeción hacia la derecha.
Desconectar
17. Pulse la tecla CON/DES (8) para desconectar el aparato. Retire
el enchufe de la toma de corriente cuando no utilice el aparato.
18. Si no se retira el enchufe y el aparato no está apagado, se des-
conectará automáticamente después de 12 horas.
Copyright UNOLD AG | www.unold.de

87
Desconecte el aparato con la tecla CON/DES y retire el enchufe de la toma
de corriente.
Procure no sumergir nunca el aparato en agua. Ni el motor ni los
componentes eléctricos del aparato se deben mojar nunca.
1. No utilice productos de limpieza agresivos, lana o estopa de acero, objetos
metálicos, productos de limpieza calientes ni desinfectantes.
2. Limpie el tubo vertical y la rejilla del ventilador con un paño ligeramente
húmedo.
3. Guarde el ventilador en un lugar seco y seguro para protegerlo contra el
polvo, los golpes, el calor y la humedad.
LIMPIEZA Y CUIDADO
CONDICIONES DE GARANTIA
DISPOSICIÓN/PROTECCIÓN DEL MEDIO AMBIENTE
Nuestros aparatos se fabrican con un alto nivel de calidad por un largo período de uso. El mantenimiento
regular y las reparaciones de tipo técnico a través de nuestro servicio al cliente pueden prolongar la dura-
ción del aparato. Cuando un aparato está defectuoso y ya no puede repararse, por favor considere en la dis-
posición final los siguientes puntos: Este producto no puede ser eliminado junto a la basura domiciliaria.
Usted debe entregar este producto a un lugar oficial para el reciclaje de aparatos eléctricos o electrónicos.
Mediante la clasificación por separado y el reciclaje de productos residuales, Usted contribuye a proteger
los recursos naturales y asegura que el producto sea eliminado de forma salubre y acorde con el medio
ambiente. No deseche las pilas agotadas en la basura doméstica. Elimínelas a través de las
tiendas de artículos eléctricos o el punto de recogida local correspondiente.
La garantía para nuestros equipos es de 24 meses, y de 12 meses en el caso de uso comercial, a partir de la fecha de
compra, cubriendo los daños que con un uso acorde a lo prescrito pueden atribuirse fehacientemente a defectos de fabri-
cación. Dentro del período de garantía, solucionamos errores de material y de fabricación a consideración nuestra mediante
reparación o cambio. Nuestros servicios de garantía son válidos únicamente para los aparatos que han sido vendidos en
Alemania y Austria. Para todos los demás casos diríjase por favor al importador correspondiente. Aquellos aparatos que se
presentan para eliminar errores, por favor enviarlos junto a una copia del comprobante de compra extendido a máquina, del
cual debe desprenderse la fecha de compra, así como una breve descripción de las deficiencias, apropiadamente embalado
y con los sellos correspondientes a nuestro servicio al cliente. En caso de garantía, los gastos de envío serán restituidos al
cliente solamente en Alemania y Austria. Aquellos daños causados por desgaste están excluidos de la garantía, así como
manipulación incorrecta, e incumplimiento de las condiciones de mantenimiento y cuidado. El derecho a garantía expira si las
reparaciones o mantenimiento son realizadas por terceros. Todo reclamo del consumidor final ante el vendedor, comerciante
no se ve afectado por esta garantía.
Copyright UNOLD AG | www.unold.de

88
Moc: 30 W (12 V DC)
Zasilacz 100-240 V, 50/60 Hz, 1,2 A
Zasilanie USB 5 V 2 A
Wymiary: Ok. 40 x 40 x 120/140 cm (gł./sz./wys.)
Ciężar: Ok. 7,5 kg
Przewód zasilający: Ok. 2,0 m
Średnica: Ok. 40 cm
Poziom hałasu: ≤ 63 dB
Prędkość powietrza: ≥ 320 m/min
Czas ładowania: Pierwsze ładowanie ok. 10 godzin, zasilanie sieciowe ok.
7 godzin
Dane techniczne
Akumulator / bank
energii: 4,400 mAh, 11,1 V, prąd wyjściowy USB: DC-5V-2,1
A, prąd ładowania USB 800-1000 mA, prąd ładowania
podtrzymującego 900-1000 mA, akumulator litowo-jonowy
Wyposażenie: Zasilany akumulatorem wentylator stojący do pomieszczeń
i na zewnątrz, 6 stopni prędkości, pilot, czas pracy
akumulatora do 21 godzin na najniższym stopniu prędkości
(ok. 3 godzin na najwyższym stopniu), automatyczne
wyłączanie, regulacja wysokości, wybór wstępny czasu
Akcesoria: Instrukcja obsługi, kabel do ładowania z USB, zasilacz z
kablem instalacyjnym, pilot, 2 baterie typu AAA 1,5 V
Zmiany i błędy w opisie wyposażenia, technice, kolorach i konstrukcji są zastrzeżone.
INSTRUKCJA OBSŁUGI MODEL 86870
DLA BEZPIECZEŃSTWA UŻYTKOWNIKA
DANE TECHNICZNE
Prosimy przeczytać poniższe instrukcje i zachować je do użytku w
przyszłości.
Wskazówki dotyczące osób w gospodarstwie domowym
1. Urządzenie może być używane przez dzieci w wieku powyżej 8
lat oraz osoby o ograniczonej sprawności fizycznej, sensorycznej
czy umysłowej lub osoby nie posiadające doświadczenia i/lub
wiedzy, jeśli są one nadzorowane lub zostały przeszkolone w
zakresie bezpiecznego użytkowania i zrozumiały wynikającego z
tego zagrożenia.
OBJAŚNIENIE SYMBOLI
Symbol ten oznacza ewentualne niebezpieczeństwa, które mogą prowadzić do
obrażeń lub uszkodzenia urządzenia.
Copyright UNOLD AG | www.unold.de

89
2. Nie wolno dzieciom bawić się urządzeniem.
3. Czyszczenia i konserwacji, które powinien wykonać użytkownik,
nie mogą wykonywać dzieci poniżej 8 lat. Dzieci w wieku powyżej
8 lat mogą robić to pod nadzorem.
4. Urządzenie z przewodem przechowywać w miejscu niedostępnym
dla dzieci w wieku poniżej 8 lat.
Wskazówki bezpieczeństwa dotyczące ustawienia i obsługi urządzenia
5. Włączać urządzenie tylko wtedy, gdy zostało ono prawidłowo
zmontowane.
6. Zwrócić uwagę na wystarczającą ilość miejsca w miejscu usta
-
wienia urządzenia. Między urządzeniem a innymi przedmiotami
zachowany musi być odstęp min. 50 cm.
7.
Nie używać urządzenia w bardzo zakurzonych pomieszczeniach
lub w pobliżu substancji palnych.
8. Urządzenie należy podłączać wyłącznie do prądu zmiennego o
napięciu podanym na tabliczce znamionowej.
9. Urządzenie nie może pracować z zewnętrznym programatorem
czasowym lub systemem zdalnego sterowania.
10. W żadnym wypadku nie zanurzać urządzenia lub przewodu w
wodzie lub w innych płynach – istnieje zagrożenie dla życia!
11. W żadnym wypadku nie otwierać obudowy urządzenia, istnieje
niebezpieczeństwo porażenia prądem elektrycznym!
12. Urządzenie przeznaczone jest wyłącznie do użycia w gospodar
-
stwie domowym lub w podobnych zastosowaniach, np.
aneksach kuchennych w sklepach, biurach lub innych zakładach,
do użycia przez gości w hotelach, motelach lub innych
noclegowniach,
w prywatnych pensjonatach lub domach letniskowych.
13. Zwrócić uwagę na to, aby przewód zasilający był ułożony w spo
-
sób wykluczający potknięcie się o niego.
14.
Aby uniknąć uszkodzenia kabla, nigdy nie należy owijać kabla
wokół urządzenia.
15. Aby uniknąć uszkodzenia kabla, wtyczkę należy wyciągać z
gniazdka zawsze trzymając za wtyczkę, a nie ciągnąc za przewód.
16. Zwrócić uwagę na to, aby używane gniazdko było łatwo dostępne,
aby w razie niebezpieczeństwa wtyczkę można było łatwo wyciąg
-
nąć.
Copyright UNOLD AG | www.unold.de

90
17. Aby uniknąć uszkodzenia kabla, należy zwrócić uwagę na to, aby
nie zakleszczać przewodu i nie przeciągać go po narożnikach.
18. W miarę możliwości nie używać przewodów przedłużających. Jeśli
nie można tego uniknąć, odwinąć całkowicie przewód przedłuża
-
jący i nie przekraczać mocy maksymalnej dla każdego kabla.
19.
Nie używać urządzenia w mokrych / mokrych i zimnych lub wil-
gotnych pomieszczeniach – niebezpieczeństwo porażenia prą-
dem elektrycznym!
20.
Unikać silnego nasłonecznienia urządzenia.
21. Nigdy nie wkładać do osłony wentylatora palców lub przedmio
-
tów takich jak igły, długopisy itp. – niebezpieczeństwo obrażeń!
22.
Uważać na to, aby w wirnik nie zaplątały się długie włosy.
23. Regularnie sprawdzać urządzenie, wtyczkę i kabel pod kątem
śladów zużycia lub uszkodzenia. Gdy uszkodzony jest kabel
lub inne części, prosimy odesłać urządzenie do sprawdzenia i
naprawy do naszego serwisu klienta. Nieprawidłowo wykonane
naprawy mogą powodować znaczne niebezpieczeństwo dla użyt
-
kownika i prowadzą do unieważnienia gwarancji.
24.
Jeśli kabel jest uszkodzony, musi być wymieniony wyłącznie
przez producenta lub jego przedstawiciela serwisu lub jakiejkol
-
wiek innej osoby wykwalifikowanej zawodowej w celu uniknięcia
zagrożenia.
25.
Aby uniknąć szkód, nie wolno urządzenia używać z akcesoriami
innych producentów lub marek.
26. Po użyciu i przed czyszczeniem wyjąć wtyczkę z gniazdka. Nigdy
nie pozostawiać urządzenia bez nadzoru, gdy wtyczka włożona
jest do gniazdka sieciowego.
27. Urządzenie może być użytkowane na zewnątrz, ale musi być
chronione przed wilgocią, aby uniknąć porażenia prądem elek
-
trycznym. Nie używać w obszarze na zewnątrz, gdy pada deszcz!
Specjalne wskazówki
bezpieczeństwa dotyczące akumulatora / banku
energii
28. Bank energii należy zasadniczo przechowywać z dala od dzieci.
29. Używać wyłącznie dostarczonego banku energii, aby uniknąć
uszkodzenia urządzenia.
30. Nie użytkować urządzenia, które zostało przeniesione z zimnego
w cieplejsze otoczenie. Dochodzi wówczas do powstawania skrop
-
Copyright UNOLD AG | www.unold.de

91
lin, które mogą prowadzić do uszkodzenia urządzenia. Zaczekać
najpierw przez jakiś czas, aż urządzenie osiągnie temperaturę
pokojową. Może to potrwać nawet kilka godzin!
31. Nie wolno dokonywać przebudowy banku energii lub używać go
do celów innych od tutaj opisanych. Nieprawidłowe użycie może
prowadzić do pożaru, porażenia prądem elektrycznym, szkód
osobowych itp.
32. Unikać użytkowania urządzenia w pobliżu silnych pól magne
-
tycznych (np. głośników, maszyn itp.).
33.
Urządzenia i banku energii nie należy nigdy umieszczać w
pobliżu źródeł ciepła, unikać również bezpośredniego nasłonecz
-
nienia, aby uniknąć uszkodzenia urządzenia.
34.
Podczas wkładania banku energii do urządzenia zawsze zwracać
na prawidłową biegunowość.
35. Idealna temperatura otoczenia podczas użytkowania urządzenia
wynosi 20- 30 °C.
36. Napięcie wyjściowe i natężenie prądu zintegrowanego akumu
-
latora wynosi 5
V / 2,1 A, tych wartości nie wolno przekraczać.
37. Nigdy nie zanurzać banku energii w cieczach, aby uniknąć uszko-
dzenia znajdującego się wewnątrz akumulatora.
38.
Nigdy nie wrzucać banku energii do otwartego ognia – niebezpie-
czeństwo wybuchu!
39.
Zasadniczo przestrzegać informacji dotyczących ładowania
banku energii.
40. Zwrócić uwagę na to, aby nie uszkodzić banku energii przez
upuszczenie, uderzenie, silne wibracje lub inne czynniki. Nie
używać uszkodzonego banku energii lub uszkodzonego akumu
-
latora! Proszę wówczas skontaktować się z naszym serwisem
klienta.
41.
Nawet jeśli bank moc jest wykorzystywana w wentylatorze,
poziom naładowania powinny być regularnie sprawdzane i, jeśli
to konieczne, bank energii naładowany.
42. Regularnie ładować bank energii, również w przypadku nieuży
-
wania urządzenia, aby uniknąć głębokiego rozładowania akumu-
latora i tym samym jego uszkodzenia.
43.
Uwaga: Załączony kabel USB nie nadaje się do przesyłania
danych!
Copyright UNOLD AG | www.unold.de

92
44. Do ładowania banku energii należy używać wyłącznie załączo-
nego kabla USB, nigdy nie używać innych kabli.
45.
Gdy bank energii ładowany jest z USB jako źródła prądu, należy
się najpierw upewnić, że źródło prądu udostępnia wystarczający
prąd ładowania. W innym przypadku może dojść do uszkodzenia
urządzenia i źródła prądu USB. Dalsze informacje zawiera roz
-
dział „Ładowanie akumulatora“.
46.
Nigdy nie patrzeć bezpośrednio w promień świetlny zintegrowa-
nej diody LED – ryzyko uszkodzenia oczu! Również nigdy nie
należy
patrzeć
na promień świetlny przy użyciu instrumentów
optycznych!
47. Nigdy nie przykrywać banku energii podczas ładowania innymi
przedmiotami.
48. Nigdy nie zwierać banku energii.
49. Uwaga: Jeżeli z banku energii wycieka płyn, należy natychmiast
założyć odpowiednie rękawice. Unikać kontaktu skóry i oczu z
płynem, gdyż jest on bardzo agresywny i szkodliwy dla zdrowia.
W przypadku kontaktu ze skórą lub oczami natychmiast udać się
do lekarza. Zwrócić uwagę na to, aby ciecz nie weszła w kontakt
z powierzchniami lub przedmiotami, gdyż może ona prowadzić
do ich uszkodzenia. Zwrócić się niezwłocznie do naszego serwisu
klienta.
Wskazówki bezpieczeństwa dotyczące baterii pilota
50. Baterie należy zasadniczo przechowywać z dala od dzieci.
51. W przypadku połknięcia baterii natychmiast udać się do lekarza!
52. Uwaga: Jeżeli z baterii wycieka płyn, należy natychmiast założyć
odpowiednie rękawice. Unikać kontaktu skóry i oczu z płynem,
gdyż jest on bardzo agresywny i szkodliwy dla zdrowia. W przy
-
padku kontaktu ze skórą lub oczami natychmiast udać się do
lekarza.
Zwrócić
uwagę na to, aby ciecz nie weszła w kontakt z
powierzchniami lub przedmiotami, gdyż może ona prowadzić do
ich uszkodzenia.
53. Przechowywać baterie w suchym otoczeniu.
54. Podczas wkładania baterii do pilota zawsze zwracać na prawid
-
łową biegunowość.
55.
W przypadku nieużywania pilota przez dłuższy czas, należy wyjąć
baterie.
Copyright UNOLD AG | www.unold.de

93
Producent nie przejmuje odpowiedzialności za nieodpowiednie bądź wadliwe użytkowanie lub po
przeprowadzonych naprawach przez nieautoryzowane zakłady bądź niekompetentne osoby.
Nigdy nie wkładać do osłony wentylatora palców lub przedmio-
tów takich jak igły, długopisy itp. – niebezpieczeństwo obrażeń!
Używać urządzenia
tylko ustawionego na równym, stabilnym
podłożu, aby uniknąć jego przewrócenia się.
56. W przypadku użycia akumulatorków przystosowanych do powtór-
nego ładowania, należy przestrzegać informacji producenta
odnośnie prawidłowego ładowania akumulatorków.
57.
Nigdy nie otwierać baterii – ryzyko obrażeń!
58. Używać zawsze baterii tego samego typu. Nigdy nie wkładać bate
-
rii różnych producentów, różnej wielkości lub o różnym napięciu,
aby uniknąć uszkodzenia urządzenia i szkód osobowych.
59.
Zwrócić uwagę na to, aby nie narażać baterii na bezpośrednie
nasłonecznienie lub inne źródła ciepła. Nigdy nie wrzucać bate
-
rii do otwartego ognia – niebezpieczeństwo wybuchu!
Copyright UNOLD AG | www.unold.de

94
MONTAŻ
1. Przed montażem należy upewnić się, że urządzenie jest montowane na
równym, suchym podłożu.
2. Usunąć wszystkie materiały opakowaniowe i zabezpieczenia transportowe.
Przechowywać materiał opakowaniowy, np. plastykowe worki lub styropian,
z dala od małych dzieci – niebezpieczeństwo uduszenia!
3. Sprawdzić, czy obecne są wszystkie potrzebne części.
4. W razie potrzeby wykręcić nieco śruby (10) z podstawy.
1 Pierścień mocujący
2 Przednia osłona wentylatora
3 Nakrętka
4 Wirnik
5 Nakrętka
6
Tylna osłona wentylatora
7 Element do obsługi z
obudową silnika
8 Rura
9 Podstawa
10 Śruby (3 sztuki)
11 Pilot
12 Baterie
13 Kabel do ładowania z USB
14 Zasilacz
Copyright UNOLD AG | www.unold.de

95
5. Włożyć rurę (8) precyzyjnie do podstawy i przymocować trzema śrubami
(przykręcić je w kierunku zgodnym z ruchem wskazówek zegara).
6. Nałożyć element do obsługi (7) na rurę (8). Upewnić się, że dolny
koniec elementu do obsługi dokładnie pasuje do odpowiednich otworów.
Przymocować obydwie części śrubą.
7. Aby ustawić żądaną wysokość, wystarczy poluzować śrubę mocującą,
przesunąć rurę na żądaną wysokość i ponownie zablokować śrubę mocującą.
8. Przymocować do obudowy silnika (7) tylną osłonę wentylatora (6) przez
przykręcenie nakrętki (5) na osłonie wentylatora.
9. Nałożyć wirnik (4) na oś na obudowie silnika (7). Przymocować wirnik (4)
nakrętką (3). Uwaga: Gwint lewoskrętny!
10. Połączyć przednią część osłony wentylatora (2) z tylną częścią osłony (6).
Sprawdzić, czy pierścień mocujący (1) jest ustawiony w prawidłowej pozycji
(obydwie części osłony muszą być dokładnie osadzone w pierścieniu) i
przymocować go klamrą.
11. Sprawdzić, czy wszystkie części zostały prawidłowo zamontowane i
przymocowane.
BANK ENERGII / AKUMULATOR
1
3
4
6
5
1 Diody LED stanu ładowania
2 Przycisk do obsługi
3 Wejście USB
4 Wyjście USB
5 Złącze na wentylator
6
Dioda LED / lampa
kieszonkowa
2
1. Wskazówka: Wentylator można użytkować również bez włożonego banku
energii!
2. Państwa nowy wentylator oferuje możliwość użytkowania niezależnie od
źródła prądu pod warunkiem, że załączony bank energii został wcześniej
odpowiednio naładowany. Gdy bank energii jest włożony do urządzenia,
które z kolei jest podłączone do sieci elektrycznej, akumulator banku energii
jest ładowany.
Copyright UNOLD AG | www.unold.de

96
3. Alternatywnie możliwe jest ładowanie
poprzez złącze USB.
4. Bank energii można wyjąć przez otwar-
cie odpowiedniego schowka z tyłu urządze-
nia (patrz rysunek).
5. Aby sprawdzić aktualny stan nałado-
wania, należy krótko nacisnąć przycisk do
obsługi banku energii (patrz rysunek).
6. Diody LED wskazują aktualny stan naładowania, gdy świecą się
cztery diody LED, bank energii jest całkowicie naładowany (diody
energii oznaczają stan naładowania odpowiednio 25, 50, 75 i 100%).
7. Połączyć bank energii i port do ładowania USB z załączonym kablem USB.
Przestrzegać przy tym koniecznie następujących informacji: Gdy akumulator
ładowany jest poprzez USB jako źródło prądu, należy się najpierw upewnić,
że źródło prądu udostępnia wystarczający prąd ładowania. W innym przy-
padku może dojść do uszkodzenia urządzenia i źródła prądu USB. Z tego
względu nie należy nigdy używać np. portu USB komputera lub rozdzielacza
USB, chyba że jest to specjalny port do ładowania o prądzie wyjściowym o
natężeniu min. 2 A.
8. Gdy akumulator się ładuje, migają diody LED. Czas ładowania zależy od
stanu naładowania i może potrwać kilka godzin.
9. Nigdy nie używać jednocześnie wyjścia ładowania i wejścia ładowania. Banku
energii można używać również do ładowania urządzeń mobilnych (np. smart-
fonów). Sprawdzić najpierw, czy bank energii jest całkowicie naładowany.
Połączyć wtyczkę dostarczonego kabla z wyjściem USB, a potem połączyć
wtyczkę micro USB z gniazdem micro USB urządzenia mobilnego. Rozpo-
czyna się ładowanie. Bank energii dostarcza prądu wyjściowego o natężeniu
2,1 ampera. Poprzez migające diody LED można podczas ładowania spraw-
dzić stan naładowania banku energii. Procedurę ładowania należy nadzoro-
wać. Gdy ładowanie ma zostać przerwane lub zakończone, należy odłączyć
kabel od urządzenia mobilnego.
10. Gdy akumulator jest całkowicie naładowany, odłączyć bank energii od źródła
prądu USB.
11. Następnie włożyć bank energii do urządzenia (przyłącza muszą być skiero-
wane na dół, diody LED do przodu). Gdy bank energii jest włożony prawid-
łowo, rozbrzmiewa sygnał dźwiękowy.
Copyright UNOLD AG | www.unold.de

97
12. Porada: Stan naładowania banku energii można spraw-
dzić również wtedy, gdy jest on włożony do urządzenia. Z
tyłu urządzenia znajdują się małe otwory, przez które można
zobaczyć diody LED banku energii.
13. Bank energii przydatny jest również wtedy, gdy potrzebne
jest małe, dodatkowe źródło światła: Naciskać na przycisk
do obsługi tak długo, aż między przyłączami USB zapali się
jasna dioda LED. Aby ponownie wyłączyć światło, należy
ponownie naciskać na przycisk aż do zgaśnięcia diody LED.
PILOT
1. Ostrożnie zdjąć osłonę schowka na baterie.
2. Włożyć baterie. Zwrócić koniecznie uwagę na prawidłową biegunowość. Dla
orientacji w schowku na baterie znajdują się odpowiednie oznaczenia.
3. Używać tylko baterii typu AAA, 1,5 V.
4. Zamknąć osłonę.
5. Gdy urządzenie ustawia się pilotem, należy podczas ustawiania trzymać
pilota skierowanego zawsze w kierunku wentylatora.
6. Oznaczenia przycisków na pilocie są identyczne z oznaczeniami na urządze-
niu.
7. Aby uniknąć szkód, nie należy upuścić pilota z większej wysokości.
8. Zakres działania pilota wynosi 7 metrów.
9. Dla ułatwienia przechowywania pilot jest magnetyczny i można go po prostu
zawiesić na osłonie schowka na akumulator z tyłu urządzenia.
Copyright UNOLD AG | www.unold.de

98
WYŚWIETLACZ
1 Wskazanie czasu
2 Wskazanie prędkości
3 Przycisk do włączania i wyłączania lampek
kontrolnych
4 Przycisk do wstępnego ustawiania czasu
5 Lampka kontrolna GOTOWE
6
Przycisk do ustawiania prędkości
7 Przycisk do ustawiania oscylacji
8 Przycisk WŁ./WYŁ.
OBSŁUGA
1. Upewnić się, że urządzenie stoi na odpowiednim, równym podłożu i jest
ustawione w sposób pewny i stabilny.
Tryb sieciowy
2. Podłączyć wtyk rurkowy przewodu zasilającego do gniazdka w tyle urządze-
nia. Włożyć zasilacz do gniazdka i włączyć urządzenie przyciskiem WŁ./WYŁ.
(8).
Tryb akumulatorowy
3. Sprawdzić, czy bank energii jest prawidłowo włożony do schowka w tyle
urządzenia.
4. Ewentualnie odłączyć urządzenie od prądu.
5. Na jak długo wystarczy stan naładowania akumulatora, zależy między innymi
od wybranej prędkości. Dla stopnia prędkości 1 stan naładowania akumula-
tora wystarcza na ok. 21 godzin, dla stopnia 6 na ok. 3 godzin.
6. Porada: Stan naładowania banku energii można w każdej chwili sprawdzić. Z
tyłu urządzenia znajdują się małe otwory, przez które można zobaczyć diody
LED banku energii.
Ustawianie prędkości
7. Naciskać przycisk do ustawiania prędkości (6) tak często, aż osiągnięta
zostanie żądana prędkość nadmuchu. Można wybrać między sześcioma
stopniami prędkości:
Stopień 1: lekki nawiew
Stopień 2: średni nawiew
Copyright UNOLD AG | www.unold.de

99
Stopień 3: tryb spania (zmieniająca się, niska prędkość)
Stopień 4: nawiew podobny do wiatru (zmieniająca się prędkość, podobna
do naturalnego ruchu powietrza)
Stopień 5: mocny nawiew
Stopień 6: bardzo mocny nawiew
8. Między poszczególnymi prędkościami można w każdej chwili przełączać.
Wybór czasu
9. Za pomocą przycisku wyboru wstępnego czasu (4) można ustawić żądany
czas pracy urządzenia. Można wybrać między jedną a sześcioma godzinami.
Nacisnąć przycisk do programowania czasu (4), zwracając przy tym uwagę
na wskazanie czasu (1). Diody LED wskazują aktualnie wybrany czas pracy
wentylatora (1 dioda LED oznacza: 1 godzinę, 2 diody LED oznaczają: 2
godziny itd.) Aby więc zaprogramować urządzenie na czas pracy przez dwie
godziny, należy dwukrotnie nacisnąć przycisk (4). Po upływie wybranego
czasu urządzenie wyłącza się.
10. Oczywiście można również po ustawieniu czasu wstępnego pracy wybrać lub
zmienić prędkość wentylatora.
Funkcja obracania/oscylacji
11. Nacisnąć przycisk do ustawiania oscylacji (7). Urządzenie obraca się auto-
matycznie.
12. Aby wyłączyć funkcję oscylacji, należy ponownie nacisnąć przycisk oscylacji.
Włączenie/wyłączenie lampek kontrolnych
13. Wszystkie lampki kontrolne można wyłączyć, aby oszczędzić prąd lub jeżeli
przeszkadzają one np. podczas spania.
14. Aby włączyć lub wyłączyć lampki kontrolne, należy nacisnąć przycisk 3.
Wszystkie lampki kontrolne gasną, ale urządzenie nadal pracuje. Aby ponow-
nie włączyć lampki kontrolne, wystarczy nacisnąć dowolny przycisk.
Ustawianie kąta pochylenia
15. Obudowa silnika daje się w określonym zakresie (ok.
20°) pochylić pionowo. Pochylić osłonę wentylatora pod
żądanym kątem. Uwaga: Osłonę należy pochylać tylko w prze-
widzianym obszarze i nie przekraczać odczuwalnego oporu,
żeby nie uszkodzić urządzenia.
Copyright UNOLD AG | www.unold.de

100
Wyłączyć urządzenie naciskając przycisk WŁ./WYŁ. i wyciągnąć wtyczkę
z gniazdka.
Nigdy nie zanurzać urządzenia w wodzie. Silnik i podzespoły elektryczne
urządzenia nie mogą się zmoczyć.
1. Zasadniczo nie należy używać ostrych środków szorujących, wełny stalo-
wej, metalowych przedmiotów, gorących środków czyszczących lub środków
dezynfekujących.
2. Rurkę i kratkę wentylatora wystarczy wytrzeć lekko zwilżoną szmatką.
3. Przechowywać wentylator w suchym i bezpiecznym miejscu, zabezpieczo-
nym przed kurzem, wstrząsami, wysoką temperaturą i wilgocią.
CZYSZCZENIE I PIELĘGNACJA
Regulacja wysokości
16. Przekręcić śrubę ustalającą z przodu urządzenia (patrz rysunek)
nieco w lewą stronę. Przesunąć górną część urządzenia na żądaną
wysokość. Ustalić wysokość przez przekręcenie śruby mocującej w
prawo.
Wyłączenie
17. Nacisnąć przycisk WŁ./WYŁ. (8), aby wyłączyć urządzenie.
Wyciągnąć wtyczkę z gniazdka, gdy urządzenie nie jest używane.
18. Jeżeli wtyczka nie jest wyciągnięta, a urządzenie nie jest wyłą-
czone, wyłączy się ono automatycznie po upływie 12 godzin.
Copyright UNOLD AG | www.unold.de

101
Nasze urządzenia wyprodukowane zostały na wysokim poziomie do długiego użytkowania. Regu-
larna konserwacja i fachowe naprawy poprzez nasz serwis mogą wydłużyć pracę urządzenia. W
razie kiedy urządzenie jest uszkodzone i nie nadaje się do naprawy, proszę przestrzegać zaleceń:
Ten produkt nie może być zutylizowany razem z normalnymi odpadami domowymi. Muszą Pań-
stwo dostarczyć ten produkt do zbiorczego punktu recyklingowego dla urządzeń elektrycznych i
elektronicznych. Poprzez oddzielne zbieranie i recykling odpadów pomagają Państwo chronić na-
turalne zasoby i sprawiają, że ten produkt będzie zutylizowany w sposób bezpieczny dla zdrowia
i środowiska naturalnego.
Zużyte baterie nie należą do śmieci i odpadów z gospodarstw domowych. Należy
je usuwać za pośrednictwem sklepów elektronicznych lub komunalnych placó-
wek zbiorczych.
WARUNKI GWARANCJI
UTYLIZACJA / OCHRONA ŚRODOWISKA
Udzielamy na nasze produkty 24 miesięcznej gwarancji od daty zakupu (warunkiem jest zachowanie faktury
zakupu lub paragonu) na szkody, które przy użytkowaniu zgodnym z przeznaczeniem wskazują na wadę fabrycz-
ną. W czasie trwania gwarancji usuniemy wady materiałowe bądź fabryczne zgodnie z naszym osądem poprzez
naprawę lub wymianę. Gwarancja udzielana jest na produkty sprzedawane na terenie Niemiec i Austrii. W innych
krajach proszę zwrócić się do właściwego Importera. Urządzenia, w których wymagane jest usunięcie wady,
proszę przesłać razem z kopią faktury zakupu, na której musi być widoczna data zakupu, z załączonym opisem
wady, w oryginalnym pudełku, dobrze zapakowane i na własny koszt na adres serwisu. Gwarancja nie obejmuje
szkód wynikających ze zużycia, użytkowania niezgodnie z przeznaczeniem i nieprzestrzegania wskazówek doty-
czących konserwacji i pielęgnacji. Roszczenie gwarancji wygasa, jeżeli naprawa bądź otwarcie przedmiotu będą
przeprowadzone przez stronę trzecią. Ewentualne roszczenia użytkownika końcowego wobec sprzedawcy/dealera
nie są ograniczone tą gwarancją.
Copyright UNOLD AG | www.unold.de

102
Copyright UNOLD AG | www.unold.de

103
Copyright UNOLD AG | www.unold.de

Aus dem Hause
Aus dem Hause
Copyright UNOLD AG | www.unold.de
-
 1
1
-
 2
2
-
 3
3
-
 4
4
-
 5
5
-
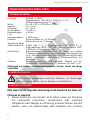 6
6
-
 7
7
-
 8
8
-
 9
9
-
 10
10
-
 11
11
-
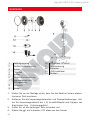 12
12
-
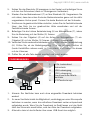 13
13
-
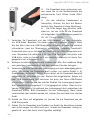 14
14
-
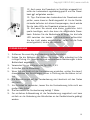 15
15
-
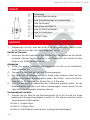 16
16
-
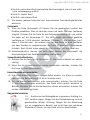 17
17
-
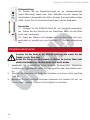 18
18
-
 19
19
-
 20
20
-
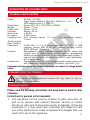 21
21
-
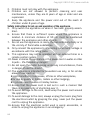 22
22
-
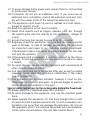 23
23
-
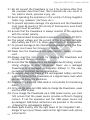 24
24
-
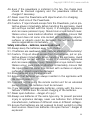 25
25
-
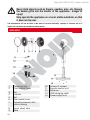 26
26
-
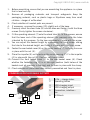 27
27
-
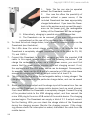 28
28
-
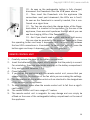 29
29
-
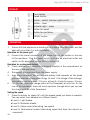 30
30
-
 31
31
-
 32
32
-
 33
33
-
 34
34
-
 35
35
-
 36
36
-
 37
37
-
 38
38
-
 39
39
-
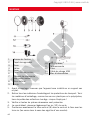 40
40
-
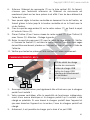 41
41
-
 42
42
-
 43
43
-
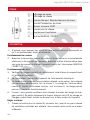 44
44
-
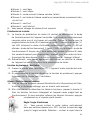 45
45
-
 46
46
-
 47
47
-
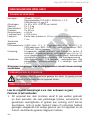 48
48
-
 49
49
-
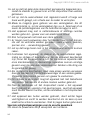 50
50
-
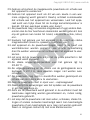 51
51
-
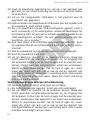 52
52
-
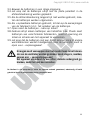 53
53
-
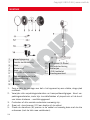 54
54
-
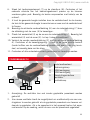 55
55
-
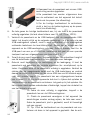 56
56
-
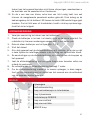 57
57
-
 58
58
-
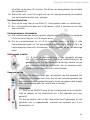 59
59
-
 60
60
-
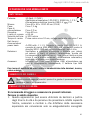 61
61
-
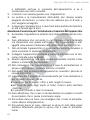 62
62
-
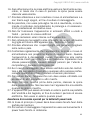 63
63
-
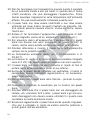 64
64
-
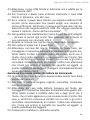 65
65
-
 66
66
-
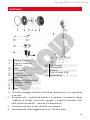 67
67
-
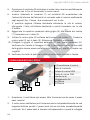 68
68
-
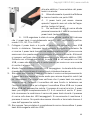 69
69
-
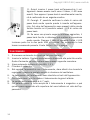 70
70
-
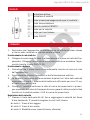 71
71
-
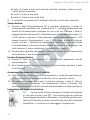 72
72
-
 73
73
-
 74
74
-
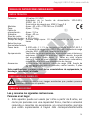 75
75
-
 76
76
-
 77
77
-
 78
78
-
 79
79
-
 80
80
-
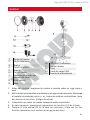 81
81
-
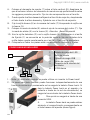 82
82
-
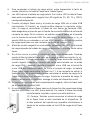 83
83
-
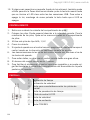 84
84
-
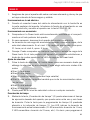 85
85
-
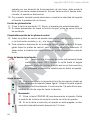 86
86
-
 87
87
-
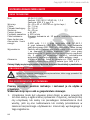 88
88
-
 89
89
-
 90
90
-
 91
91
-
 92
92
-
 93
93
-
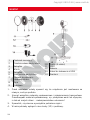 94
94
-
 95
95
-
 96
96
-
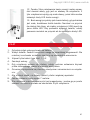 97
97
-
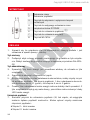 98
98
-
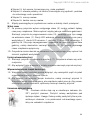 99
99
-
 100
100
-
 101
101
-
 102
102
-
 103
103
-
 104
104


in andere talen
- italiano: Unold 86870 Manuale del proprietario
- français: Unold 86870 Le manuel du propriétaire
- español: Unold 86870 El manual del propietario
- Deutsch: Unold 86870 Bedienungsanleitung
- polski: Unold 86870 Instrukcja obsługi
Gerelateerde papieren
Andere documenten
-
VOLTCRAFT PB-14 Operating Instructions Manual
-
-
-
VOLTCRAFT PB-15 Operating Instructions Manual
-
MOB MO8602 Handleiding
-
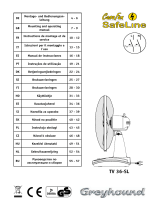 Casa Fan SafeLine GreyHound TV 36-SL Mounting And Operating Manual
-
MOB MO9231 Handleiding
-
MOB MO9232 Handleiding
-
EINHELL TE-CP 18 Li USB-Solo Handleiding
-
Honeywell HO-1100RE Handleiding
