Tefal FAMILY PRO ACCESS 4L de handleiding
- Categorie
- Frituurpannen
- Type
- de handleiding

S.A. SEB SELONGEY CEDEX • RC. DIJON B 302 412 226 •
REF. 5085657
mise à jour Dec. 2008 par : Batoteam - www.batoteam.fr
5085657 Oleoclean.qxp 14/01/09 16:04 Page 1

Mode d’emploi, Instructions for use, Gebruiksaanwijzing,
Gebrauchsanleitung, Istruzioni d'uso, Modo de empleo,
Manual de instruções
5085657 Oleoclean.qxp 14/01/09 16:04 Page 2

MAX
MIN
MAX
2
1.
3.
4.
6.
7.
9.
11.
11.a
11.b
3.a
3.b
2.
1.a 1.b 1.c
5.
8.
10.
12.
5085657 Oleoclean.qxp 14/01/09 16:04 Page 3

OK
CLICKCLICK
1 2 3 4
5 6 7 8
9 10 11 12
13 14 15 16
17 18 19 20
5085657 Oleoclean.qxp 14/01/09 16:04 Page 4

21 22 23 24
25 26 27
28
29 30 31
31 32
33 34
35 36
37
5085657 Oleoclean.qxp 14/01/09 16:04 Page 5

5085657 Oleoclean.qxp 14/01/09 16:04 Page 6

Français............................................................................................................................................................................................... 6
English
................................................................................................................................................................................................... 15
Nederlands
.................................................................................................................................................................................. 24
Deutsch
............................................................................................................................................................................................... 33
Italiano
................................................................................................................................................................................................... 42
Español
................................................................................................................................................................................................ 51
Português
....................................................................................................................................................................................... 60
5085657 Oleoclean.qxp 14/01/09 16:04 Page 7

6
Fra
CONSIGNES DE SÉCURITÉ
Lire attentivement ces instructions et les conserver soigneusement.
Consignes de sécurité
Pour votre sécurité, cet appareil est conforme aux normes et règlementations applicables (Directives
Basse Tension, compatibilité Electromagnétique, matériaux en contact des aliments, environnement...).
Vérifier que la tension du réseau correspond bien à celle indiquée sur l’appareil (courant alternatif).
Compte tenu de la diversité des normes en vigueur, si l’appareil est utilisé dans un autre pays que
celui de l’achat, le faire vérifier par un Centre Service Agréé.
Cet appareil a été conçu pour un usage domestique uniquement et à l'intérieur de votre habitation, toute
utilisation professionnelle, non appropriée ou non conforme au mode d’emploi n’engage ni la
responsabilité, ni la garantie du constructeur.
Branchement
• Ne pas utiliser l’appareil si celui-ci ou son cordon est défectueux, si l’appareil est tombé et
présente des détériorations visibles ou anomalies de fonctionnement. Dans ce cas, l’appareil doit
être envoyé à un Centre Service Agréé.
• Toujours brancher l’appareil sur une prise reliée à la terre.
• Ne pas utiliser de rallonge. Si vous en prenez la responsabilité, utiliser une rallonge en bon état
reliée à la terre et adaptée à la puissance de l’appareil.
• Si le câble de cet appareil est endommagé, il doit être remplacé par le fabricant, son service
après-vente ou des personnes de qualification similaire afin d’éviter un danger.
• Ne pas laisser pendre le cordon.
• Ne pas débrancher l’appareil en tirant sur le cordon.
• Toujours débrancher l’appareil : après utilisation, ou pour le déplacer, ou pour le nettoyer.
Fonctionnement
• Cet appareil n’est pas prévu pour être utilisé par des personnes (y compris les enfants) dont les
capacités physiques, sensorielles ou mentales sont réduites, ou des personnes dénuées d’ex-
périence ou de connaissance, sauf si elles ont pu bénéficier, par l’intermédiaire d’une personne
responsable de leur sécurité, d’une surveillance ou d’instructions préalables concernant l’utili-
sation de l’appareil.
• Il convient de surveiller les enfants pour s’assurer qu’ils ne jouent pas avec l’appareil.
• Ne jamais laisser l’appareil fonctionner sans surveillance. Ne pas le laisser à la portée des
enfants.
• Utiliser une surface de travail stable, plane, à l’abri des projections d’eau.
• Cet appareil électrique fonctionne à des températures élevées qui peuvent provoquer des brûlures.
Ne pas toucher les surfaces chaudes de l’appareil (filtre, hublot, parties métalliques apparentes…).
• Ne pas faire fonctionner l’appareil à proximité de matériaux inflammables (stores, rideaux…),
ni à proximité d’une source de chaleur extérieure (gazinière, plaque chauffante…).
• En cas d’incendie, ne jamais tenter d’éteinde les flammes avec de l’eau. Fermer le couvercle.
Etouffer les flammes avec un linge humide.
• Ne pas déplacer l’appareil contenant des liquides ou des aliments chauds.
5085657 Oleoclean.qxp 14/01/09 16:04 Page 8

7
Fra
Participons à la protection de l’environnement !
Votre appareil contient de nombreux matériaux valorisables ou recyclables.
Confiez celui-ci dans un point de collecte ou à défaut dans un centre service agréé
pour que son traitement soit effectué.
• Si vous avez une cuve amovible, ne jamais la retirer lorsque votre friteuse est en fonctionnement.
• Ne jamais plonger le boîtier électrique dans l'eau !
Cuisson
• Ne jamais brancher votre friteuse vide (sans matière grasse). Respecter les quantités mini et maxi
d’huile.
• Si vous utilisez une matière grasse solide, coupez-la en morceaux et faites-la fondre à feu doux
dans un récipient à part puis versez-la lentement dans la cuve. Ne jamais mettre la matière grasse
solide directement dans la cuve ou le panier, sinon l’appareil risque d’être détérioré.
• Ne jamais mettre la matière grasse solide directement dans le panier sinon l’appareil risque d’être
détérioré.
• Ne pas mélanger plusieurs sortes de matières grasses.
• Ne pas surcharger votre panier, respecter les quantités limites de sécurité.
Recommandations
• Limiter la température de cuisson à 170°C spécialement pour les pommes de terre.
• Utiliser le panier pour cuire les frites.
• Contrôler la cuisson : ne pas manger les aliments frits lorsqu’ils sont brûlés et préférer une friture
légèrement dorée.
• Filtrer l’huile après chaque utilisation pour éviter que les résidus ne brûlent et la changer
régulièrement.
• Ne pas stocker votre friteuse à l'extérieur, vous évitez ainsi un apport d'eau indésirable dans
votre bain d'huile. Préférer un endroit sec et aéré.
• Avoir un régime équilibré et varié comportant au moins 5 fruits et légumes par jour.
• Stocker les pommes de terre au-dessus de 8°C.
• Pour une cuisson rapide et réussie, limiter la quantité de frites à 1/2 panier par bain.
• La plongée d’un panier plein fait baisser très rapidement la température de l’huile.
Lors de la cuisson, celle-ci ne dépasse jamais 175°C même si le thermostat est réglé sur 190°C
(= température stabilisée avant plongée).
Pour tout problème, contacter votre Centre Service Agréé ou l’adresse internet groupeseb.com.
Toute intervention doit être effectuée uniquement par un Centre Service Agréé avec des pièces détachées
d’origine.
5085657 Oleoclean.qxp 14/01/09 16:04 Page 9

8
Fra
Description
1. Couvercle
a. Filtre permanent
b. Poignée
c. Hublot
2. Boîtier électrique amovible
3. Panier
a. Poignée
b. Niveau maxi pour les aliments
4. Cuve amovible
5. Repères de remplissage de cuve
6. Patte d’accrochage du panier en
position haute
7. Grille fixe de filtration de la matière
grasse
8. Poignées de transport
9. Bouton de commande Oil box
10. Jupe
11. Oil box : bac à huile
a. Couvercle
b. Bouchon
12. Pieds anti-dérapants
13. Tableau de bord
a. Bouton marche/arrêt (O/I)
b. Thermostat variable
c. Voyant de température
14. Bouton Reset
13. 13.
a
13.
c
Fonction RESET : Votre appareil est équipé d'une sécurité. Si la sécurité se
déclenche, l'appareil ne fonctionne plus.
Débranchez l’appareil, laissez-le refroidir et branchez à
nouveau l’appareil.
Pour remettre en fonctionnement votre appareil, appuyez sur
le bouton RESET, situé à l'arrière du boîtier de commande à
l’aide d’une pointe non métallique. (fig.35)
Si la sécurité se déclenche à nouveau, rapportez votre appareil
à un centre service agréé.
14
13.
b
5085657 Oleoclean.qxp 14/01/09 16:04 Page 10

9
Fra
Filtration, vidange et stockage automatique de l’huile
La friteuse est équipée d’un système exclusif et breveté de filtration et de vidange
automatique, adapté à tous les types de matières grasses alimentaires.
l La vidange de l’huile est automatique et totalement sécuritaire.
l Grâce à la filtration automatique, votre matière grasse est propre et dure plus
longtemps pour une friture plus saine. Débarrassée des résidus de friture, elle
dégage moins d’odeurs.
l Le stockage de votre matière grasse dans le bac à huile OIL BOX vous permet
de préserver le goût de vos aliments (frites, poisson, beignets…) et de ne pas
mélanger les saveurs.
Nettoyage ultra facile
Votre friteuse est facile à manipuler et à démonter.
l Toutes les pièces passent au lave-vaisselle à l’exception du boîtier électrique.
l Grâce à la filtration et au stockage de l’huile, la friteuse est vidée de son huile et
passe au lave-vaisselle après chaque cuisson. Propre comme neuve après chaque
utilisation.
Utilisation du bouton de commande Oil box
• Le bouton de commande Oil box possède 3 positions. (fig.1)
Position Fry : pour frire. (fig.2)
Position Automatic Oil Filtration : pour vider et filtrer l'huile dans le bac à
huile. (fig.3)
Position Oil Box : pour mettre en place ou retirer le bac à huile. (fig.4)
Avant la première utilisation
• La friteuse peut être complètement démontée. (fig.5)
Enlevez le couvercle. Retirez le panier, le boîtier électrique et la cuve. Retirez le
bac à huile en positionnant le bouton de commande Oil box sur la position
Oil box . (fig.4)
Ne plongez jamais le boîtier électrique dans l'eau.
• Nettoyez le couvercle, la cuve, la jupe, le panier et le bac à huile avec une
éponge humide et du liquide vaisselle ou dans un lave-vaisselle. (fig.6)
Nettoyez le boîtier électrique avec une éponge humide. (fig.7)
Séchez bien.
• Après chaque nettoyage, appuyez sur le bouton rouge situé sous la cuve pour
laisser échapper l’eau restée à l’intérieur. (fig.8)
!
5085657 Oleoclean.qxp 14/01/09 16:04 Page 11

Vérifiez que le bouton rouge est revenu dans la bonne position.
• Mettez en place la cuve et le boîtier électrique. (fig.9-10)
Vérifiez que le boîtier électrique est placé correctement sinon la friteuse ne
fonctionnera pas.
• Mettez le bouton de commande Oil box sur la position Oil box et placez le bac
à huile vide dans la friteuse. (fig.4-11)
• Dépliez complètement la poignée du panier : un " clic " indique qu'elle est en
place. (fig.12)
Votre friteuse doit toujours être utilisée à l'intérieur de votre habitation.
Préparation
• Remplissez la cuve de matière grasse. (fig.13)
Le niveau de matière grasse doit toujours se situer entre les
repères mini et maxi de la cuve (fig.14) . Ne remplissez jamais
la cuve au-delà du niveau maximum indiqué dans la cuve.
Ne mélangez pas différentes sortes de matières grasses,cela peut causer des
débordements.
Utilisez une matière grasse alimentaire liquide recommandée pour la friture.
Suivez les recommandations du fabricant pour la cuisson.
Vérifier avant chaque cuisson le niveau de matière grasse et rectifiez si
nécessaire avec la même matière grasse.
Si vous utilisez une matière grasse solide, coupez-la en
morceaux et faites-la fondre dans une casserole à part pour
ensuite la verser dans la cuve. (fig.15-16)
Ne faites jamais fondre la matière grasse solide sur l'élément chauffant ou dans le panier.
Cuisson
• Mettez le bouton de commande Oil box sur la position Fry. (fig.17)
• Après avoir rempli la cuve avec de l'huile, branchez votre friteuse sans le panier.
(fig.18)
!
!
!
!
!
!
10
Fra
Maxi 3,5 L
Mini 2,8 L
Maxi 3060 g
Mini 2450 g
5085657 Oleoclean.qxp 14/01/09 16:04 Page 12

11
Fra
Ne branchez jamais la friteuse sans matière grasse.
• Mettez le bouton marche/arrêt en position I, le voyant lumineux du bouton
s'allume. Tournez le bouton du thermostat à la température désirée (voir tableau
de cuisson p.12). (fig. 19-20)
• La friteuse est en chauffe.
Le voyant de température s'éteint lorsque la température désirée est atteinte.
• Placez les aliments dans le panier sans le surcharger. Ne dépassez pas le niveau
maximum indiqué sur le panier " MAX ". Réduisez les quantités pour les
surgelés. (fig.21)
Pour éviter les débordements et prolonger la durée de vie de l'huile, essuyez
soigneusement les aliments avant de les faire cuire.
• Lorsque l’huile a atteint la bonne température, le voyant de température s'éteint,
placez et descendez doucement le panier dans l'huile. Le fait de descendre le
panier trop vite pourrait causer des débordements. (fig.22-23)
En cours de cuisson, il est normal que le voyant de température s'allume et s'éteigne.
Ne touchez pas l'appareil pendant son fonctionnement. Certaines parties très
chaudes pourraient causer de sérieuses brûlures. La vapeur qui sort du couvercle
est brûlante.
(fig.24)
• Replacez le couvercle sur votre friteuse.
La cuisson est terminée quand le temps de cuisson est écoulé et que les
aliments ont atteint la couleur et la texture désirées.
• Retirez le couvercle.
Pour éviter des éclaboussures, ne faites pas retomber les condensats du couvercle
dans votre bain d'huile mais égoutter soigneusement au dessus d'un linge ou d'un
papier absorbant placé à coté de votre friteuse.Egouttez les aliments en plaçant le
panier sur la fixation prévue à cet effet. (fig.25)
!
!
!
!
!
Frites fraîches Frites surgelées
Quantité limite de sécurité 1.2 kg en 2 bains 900 g
Quantité recommandée 600 g 450 g
5085657 Oleoclean.qxp 14/01/09 16:04 Page 13

• Servez (fig.26)
Une fois la friture terminée, réglez le thermostat à la position minimale et le bouton
marche/arrêt sur O.
Débranchez l'appareil et laissez-le refroidir environ 3 heures.
• Pour filtrer et vidanger la matière grasse, reportez-vous au chapitre Entretien.
Tableaux de cuisson
Les temps de cuisson sont donnés à titre indicatif. Ils peuvent varier en fonction
des quantités et du goût de chacun.
Pour obtenir de meilleurs résultats et éviter les débordements lors de la cuisson
des frites fraîches, une cuisson en deux bains est recommandée :
- le premier, à 160 °C
- le second, à 190 °C
Entretien et Nettoyage
• Tournez le bouton de commande Oil box sur la position Automatic oil filtration. (fig.27-28)
• Pour votre sécurité, le produit assure automatiquement la vidange quand la matière
grasse a suffisamment refroidi (environ 3 heures après la dernière cuisson).
Assurez-vous que le bac à huile est vide avant de vidanger la cuve.
• Une fois la filtration terminée, vous pouvez stocker le bac à huile:
- Dans l'appareil : tournez le bouton de commande Oil box sur la position Fry.
(fig.17). L’appareil doit être transporté et rangé à plat.
- Hors de l'appareil : Attendez 3 heures, tournez le bouton de commande Oil box
en position Oil box et retirez le bac à huile. (fig.29-30)
Lorsque le bac à huile est rempli, ne le passez pas sous l'eau. Pour le nettoyer, utilisez
du papier absorbant ou une éponge humide.
Stockez toujours le bac à huile horizontalement couvercle sur le dessus dans un
endroit sec et tempéré à l'abri de la lumière
.
!
!
!
12
Fra
Quantité Température Temps Quantité Température Temps
Frites (quantité limite
de sécurité)
1200 g
1
e
bain 160°C
2
eme
bain 190°C
10-12 min
5-8 min
900 g 190°C 8-13 min
Frites (quantité
max.recommandée)
600 g 170°C 9-13 min 450 g 170°C 6-9 min
Nuggets de volailles
400 g 180°C 14-15 min 400 g 190°C 5-7 min
Beignets de fruits
8-9 170°C 5-6 min 8-9 190°C 5-7 min
Champignons
400 g 160°C 10-12 min 8-9 190°C 7-8 min
Filets de poisson
400 g 160°C 6-7 min 8-9 190°C 5-6 min
Aliments frais
Aliments surgelés
5085657 Oleoclean.qxp 14/01/09 16:04 Page 14

13
Fra
• Transportez le bac à huile avec soin.
• Pour réutiliser la matière grasse, prenez le bac à huile avec précaution.
Dévissez le bouchon, puis videz l'huile dans la cuve.(fig.31-32)
• Pour la matière grasse solide, retirez le couvercle. Retourner le bac à huile et
appuyez dessus afin de décoller la matière grasse. Coupez la matière grasse en
morceaux puis versez-la dans une casserole pour la faire fondre. Versez-la
ensuite dans la cuve. (fig.33-34)
Ne passez jamais le bac à huile au micro-ondes.
• Mettez en place le bac à huile vide, équipé de son couvercle et du bouchon.
Remettez le bouton de commande Oil box sur la position Fry. (fig.17)
Ne versez pas la matière grasse usagée dans l'évier. Laissez-la refroidir et
mettez-la avec les ordures ménagères.
Changement d'huile :
• Ne versez jamais la matière grasse usagée dans l’évier. Laissez-la refroidir puis
jetez-la avec les ordures ménagères, conformément aux réglementations
locales en vigueur.
Attention :
•Changez la matière grasse au moins toutes les 10 à 12 utilisations. Si vous
utilisez de l'huile de tournesol, changez-la toutes les 5 utilisations.
Magiclean : Très facile à nettoyer.
• Le couvercle, la cuve, la jupe, le panier et le bac à huile passent au lave-
vaisselle. (fig.36)
• La grille de filtration située dans la cuve est fixe.
Ne la démontez pas. (fig.37)
• Après chaque nettoyage, appuyez sur le bouton rouge situé sous la cuve pour
laisser échapper l’eau restée à l’intérieur. (fig.8)
Avant de remplir la cuve, vérifiez que le bouton rouge est revenu dans la bonne
position.
!
!
!
5085657 Oleoclean.qxp 14/01/09 16:04 Page 15

Problèmes et causes possibles Solutions
La friteuse ne chauffe pas
L’appareil n’est pas branché. Branchez l’appareil.
Le bain de friture déborde
Le repère Max de remplissage de la cuve a été Vérifiez le niveau du bain et enlevez le surplus.
dépassé.
Le repère Max de remplissage du panier a été Vérifiez le niveau du panier et enlevez le surplus.
dépassé.
Les aliments sont humides ou contiennent trop Retirez la glace et séchez bien les aliments.
d’eau (ex. Surgelés). Descendez très lentement le panier.
Mélange d’huiles et/ou de graisses différentes Jetez la matière grasse et nettoyez la cuve.
Remplissez avec une seule nature de matière
grasse.
La cuve ne vidange pas
La matière grasse est trop chaude. Attendez que la matière grasse refroidisse
(environ 3h).
Le bouton de commande Oil box n’est pas sur la Placez le bouton de commande Oil box sur la
position Automatic oil filtration. position Automatic oil filtration.
La grille de filtration est bouchée ou colmatée. Videz la cuve dans un récipient et nettoyez la
grille à l’aide d’une brosse non métallique.
La matière grasse est figée ou solidifiée. Faites chauffer (4 à 5 min) la friteuse.
Fuites d’huile
Le repère correspondant à 3.5 L de remplissage de Respectez le niveau maxi (3,5L) de remplissage de
cuve. la cuve a été dépassé.Nettoyez la friteuse avant
tout autre utilisation.
Il reste de l’huile dans le bac à huile ou celui-ci Placez le bouton de commande Oil box sur la
est plein. position Oil box, retirez le bac à huile et videz-le.
Dégagement de mauvaises odeurs
La matière grasse est dégradée. Renouvelez le bain de friture (10 à 12 utilisations).
La matière grasse n’est pas appropriée.
Utilisez une matière grasse végétale pour une friture
de bonne qualité.
Les aliments ne dorent pas et restent mous
Ils sont trop épais et contiennent beaucoup d’eau. A titre d’essai, prolongez le temps de cuisson.
Trop d’aliments sont cuits à la fois et le bain de Faites frire les aliments en petites quantités (surtout
cuisson n’est plus à la bonne température. les surgelés).
La température du bain de friture peut être Réglez le thermostat sur la température conseillée.
insuffisante : le thermostat est mal réglé.
Les frites collent
Les frites fraîches ne sont pas lavées avant d’être Lavez et séchez soigneusement les frites fraîches
plongées dans l’huile. avant la cuisson.
La sécurité est activée : la friteuse ne fonctionne plus
Le niveau d’huile est insuffisant. Débranchez l’appareil, laissez-le refroidir et suivez
La matière grasse solide a été mise
directement
les instructions du mode d’emploi. Si le code
dans la cuve. erreur apparaît à nouveau, appuyez sur le bouton
Reset situé à l’arrière de lun Centre Service Agréé.
Autres problèmes
Le voyant de température ne s'allume pas. Contactez le Centre Service Agrée.
Si votre friteuse ne fonctionne pas bien
La matière grasse est trop chaude.
Débranchez l’appareil, laissez-le refroidir. Appuyez
sur le bouton Reset situé à l’arrière de l’appareil.
Si la sécurité se déclenche à nouveau, rapportez
votre appareil à un Centre Service Agréé.
Fra
14
5085657 Oleoclean.qxp 14/01/09 16:04 Page 16

15
Eng
SAFETY INSTRUCTIONS
Read and follow the instructions for use carefully.
Safety instructions
For your safety, this appliance complies with the safety regulations and directives in effect at the time of
manufacture (Low-voltage Directive, Electromagnetic Compatibility, Food Contact Materials Regulations,
Environment…).
Check that the power supply voltage corresponds to that shown on the appliance (alternating current).
Given the diverse standards in effect, if the appliance is used in a country other than that in which it is
purchased, have it checked by an approved Service Centre.
This appliance is designed for domestic use only and not outdoors. In case of professional use,
inappropriate use or failure to comply with the instructions, the manufacturer accepts no responsibility
and the guarantee does not apply.
Read and follow the instructions for use. Keep them safe.
Connecting to the power supply
• Do not use the appliance if the appliance or the cord is damaged, if the appliance has fallen or
shows visible damage or does not work properly. In the event of the above, the appliance must
be sent to an approved Service Centre. Do not take the appliance apart yourself.
• Always plug the appliance into an earthed socket.
• Do not use an extension lead. If you accept liability for doing so, only use an extension lead
which is in good condition, has an earthed plug and is suited to the power of the appliance.
• If the power supply cord is damaged, it must be replaced by the manufacturer or its service
agent or a similarly qualified person in order to avoid a hazard.
• Do not leave the cord hanging.
• Do not unplug the appliance by pulling on the cord.
• Always unplug the appliance: immediately after use, when moving it, prior to any cleaning or
maintenance.
Using
• This appliance is not designed to be used by people (including children) with a physical, sen-
sory or mental impairment, or people without knowledge or experience, unless they are
supervised or given prior instructions concerning the use of the appliance by someone respon-
sible for their safety.
• Children must be supervised to ensure that they do not play with the appliance.
• Never leave the appliance within reach of children without supervision.
• Use a flat, stable, heat-resistant surface, away from any water splashes and other heat sources.
• Do not place on an oven hob/cooker top.
• This electrical equipment operates at high temperatures which may cause burns. Do not touch
the apparent metal parts, filter or window….
• Do not switch on the appliance near to flammable materials (blinds, curtains….) or close to an
external heat source (gas stove, hot plate etc.).
• In the event of fire, never try to extinguish the flames with water. Close the lid. Smother the
flames with a damp cloth.
• Do not move the appliance when it is full of oil or hot food.
5085657 Oleoclean.qxp 14/01/09 16:04 Page 17

Environment protection first !
Your appliance contains valuable materials which can be recovered or recycled.
Leave it at a local civic waste collection point.
• If the fryer has a removable bowl, never take it out when the fryer is switched on.
• Never immerse the appliance or the electrical control unit in water!
Cooking
• Never plug in the deep fat fryer without oil or fat inside. The oil level must always be between
the min and max markers.
• If you use solid vegetable fat, cut it into pieces and melt it over a low heat in a separate pan
beforehand, then slowly pour it into the deep fryer bowl. Never put solid fat directly into the
deep fryer bowl or fryer basket as this will lead to deterioration of the appliance.
• Do not leave the appliance unattended whilst in use.
• Do not mix different types of oil or fat.
• Do not over fill the basket with food, never exceed the maximum capacity.
Preparing food for frying
• Limit the cooking temperature to 170°C, especially for potatoes.
• Use the basket for chips.
• Control the cooking: Do not eat burnt food.
• Filter your oil after every use to avoid crumbs burning and change the oil regularaly.
• Never store your deep fryer outside, in order to avoid water getting into the oil. Choose a dry
and well-ventilated place.
• Eat a balanced and varied diet which includes plenty of fruits and vegetables.
• Store your fresh potatoes in a room above 8°C.
• For crisp chips and fast cooking, we recommend that you limit the quantity of chips to 1/2 basket per frying.
• With a larger quantity of food or potatoes, the temperature drops very fast just after having
lowered the basket. This lowers the oil temperature considerably and it is normal for the oil to
take a long time to return to 190°C.
• Cut food into similar-sized pieces so that they cook evenly. Avoid using pieces that are too thick.
• Not all frozen foods are ready to use and some require thawing first. Check the manufacturer’s
instructions.
• With recipes made from raw potatoes (chips, crisps, etc) wash them in cold water to remove
the starch and then dry them throughly. This will stop them from sticking together.
• No matter what the recipe, whether preparing fresh or frozen food, it must be perfectly dry. Dry
the food thoroughly with paper kitchen towel or a clean tea towel before frying. This will prevent
the oil from splattering and/or overflowing and will extend the life of the oil.
• Regularly check the cooking progress to avoid overcooking: do not eat very brown or burnt
food, only eat golden brown food.
• For crispy fried food, open the lid as soon as you have finished cooking to prevent steam softening the food.
Any repairs must only be carried out by a Tefal Approved Service Centre with the manufacturer’s own replacement parts.
HELPLINE:
If you have any problems or queries, please contact our Customer Relations Team first for expert
help and advice:0845 602 1454 - UK / (01) 677 4003 - Ireland
or consult our web site - www.tefal.co.uk
16
Eng
5085657 Oleoclean.qxp 14/01/09 16:04 Page 18

Description
1. Lid
a. Permanent filter
b. Handle
c. Viewing window
2. Removable control unit
3. Frying basket
a. Handle
b. MAX. food level marking
4. Removable bowl
5. Min. and Max. oil level markers
6. Basket high position
7. Fixed oil filter grid
8. Safety carrying handles
9. Oil box control switch
10. Body
11. Oil box
a. Lid
b. Oil box cap
12. Feet
13. Control Unit
a. ON/Off switch (O/I)
b. Adjustable thermostat
c. Temperature indicator light
14. Safety cut-out reset button
RESET function: Your fryer is equipped with safety features, which operate if you
use your fryer without any oil. If the safety cut-out is activated, the appliance will
shut off automatically.
Unplug the appliance, let it cool and plug in the appliance again.
To reset the fryer, push the RESET button (found on the back
of the control unit) with a toothpick or similar non-metallic
item (fig.35). If the problem with the safety cut-out persists,
please contact a TEFAL Approved Service Centre for
assistance.
14
17
Eng
13. 13.
a
13.
c
13.
b
5085657 Oleoclean.qxp 14/01/09 16:04 Page 19

Filtration, drainage and automatic storage of oil/fat
Your fryer is fitted with an exclusive and patented system for filtration and automatic
drainage, suitable for most types of oils and fats used for cooking.
l The drainage of oil is completely automatic and safe.
l The automatic patented filtration system ensures your oil/fat stays clean and lasts
longer for healthier frying. No crumbs guarantees less odours.
l The Oil Box container enables you to store your oil or fat and keep it until you next
want to use it and avoid any transfer of flavours.
Ultra easy cleaning
Your fryer is easy to handle and to dismantle.
l All the parts (except the electrical control unit) are dishwasher safe.
l Thanks to the patented automatic filtration and oil storage system, some parts
of your fryer can go into the dishwasher after each use.
Clean as new after each use.
Using the Oil Box control switch
• The Oil Box control switch has 3 positions. (fig.1)
Fry Position: to fry. (fig.2)
Automatic Oil Filtration Position: to drain and filter the oil into the oil box. (fig.3)
Oil Box Position: to push back or pull out the oil box. (fig.4)
Before first use
• The fryer can be completely dismantled. (fig.5)
Remove the lid. Remove the frying basket, the control unit and the bowl.
Remove the oil box by positioning the Oil Box control switch on the Oil box
position. (fig.4)
Do not immerse the control unit with the heating element in water.
• Clean the lid, the bowl, the body, the frying basket and the Oil Box with a damp
cloth, warm water and washing-up liquid or put them in the dishwasher. (fig.6)
Clean the control unit and the heating element with a damp cloth. (fig.7)
Dry thoroughly.
• After cleaning, press on the red button under the fryer to release any water in
the bowl. (fig.8)
!
18
Eng
5085657 Oleoclean.qxp 14/01/09 16:04 Page 20

19
Eng
Check that the red button has gone back to its original position.
• Place the bowl and the electronic control unit in position. (fig.9-10)
Make sure that the control unit is correctly positioned otherwise the fryer cannot
function.
• Place the Oil Box control switch on the Oil box position and insert the empty
Oil Box in to the fryer. (fig.4-11)
• Completely unfold the basket handle; a “click” indicates that it is correctly
positioned. (fig.12)
Your deep fryer must always be used indoors.
Preparing the fryer
• Fill the bowl with oil. (fig.13)
The oil level should always be between the Min. and Max. level of
the bowl (fig.14). Do not exceed the maximum level line as boiling
oil may overflow during frying and can cause severe burns. Check
the oil level each time before cooking and add some more of the
same oil or melted fat if necessary.
Never use different types of oil at the same time as this may cause the oil to overflow.
Types of Oil to use :
For best results we recommend using a good quality blended vegetable oil. If using
sunflower oil ensure the oil is changed every 5 uses. Oils which should NOT be used
under any circumstances and may cause overflowing/smoking/risk of fire are: ground
nut oil, soya oil, olive oil, lard or dripping.
Follow the manufacturer's cooking recommendations.
Be sure that the oil level is between the Min. and Max. level of the bowl
otherwise the safety cut-out will activate (see page 17).
• If you use solid vegetable fat: cut it into small pieces, melt it in a
separate pan then pour the melted fat into the fryer bowl. (fig.15-16)
Never melt the fat in the bowl or in the frying basket, otherwise the safety cut-out
will be activated (see page 17).
!
!
!
!
!
!
Maxi 3,5 L
Mini 2,8 L
Maxi 3060 g
Mini 2450 g
5085657 Oleoclean.qxp 14/01/09 16:04 Page 21

20
Eng
Frying process
• Place the Oil Box control switch on the Fry position. (fig.17)
• After the bowl has been filled with oil, plug in the fryer without the frying basket. (fig.18)
Do not plug in the fryer without oil.
• Set the On/Off switch to position I and the temperature indicator light will switch on.
Turn the adjustable thermostat to the desired temperature (see cooking
tables p.21). (fig.19-20)
• The fryer will now start to heat the oil. Wait for the oil to preheat.
The temperature indicator light will go out off when the desired temperature is reached.
* see cooking table page 21 for details of how to cook in 2 fryings.
• Place the basket on a work surface and fill the basket with food, without
overfilling. Do not exceed the Max. food level marking on the basket. Reduce
the quantities for frozen foods. (fig.21)
No matter what the recipe, food must be dried thoroughly before frying. This will
prevent the oil overflowing and extend the life of the oil.
• After the temperature indicator light has gone off, gently and lower the basket
slowly into the frying oil. Plunging the basket too rapidly in the oil may cause it
to overflow (fig.22-23). Start timing the food.
During cooking, it is normal for the temperature light to go on and off.
Do not touch the fryer when it is in use as it will be extremely hot and can cause
severe burns. Steam coming from the filter is also extremely hot. (fig.24)
• Put the lid on the fryer.
Frying is complete when the cooking time has elapsed and when food is of the
desired colour and texture.
• Remove the lid.
In order to avoid any oil splashes, never let condensation drops from the lid fall
into the oil. Instead drain the lid on a cloth or paper towel placed near the fryer.
Allow excess oil from the food to drain by hooking the basket on the support
on the inner bowl. (fig.25)
• Serve. (fig.26)
!
!
!
!
!
Fresh potato chips Frozen potato chips
Maximum quantity 1.2 kg (in 2 fryings*) 900 g
Recommended quantity 600 g 450 g
5085657 Oleoclean.qxp 14/01/09 16:04 Page 22

• When you have finished frying, turn the thermostat down to the lowest setting and
turn the ON/Off switch to the “O” position. Unplug the fryer and replace the lid.
• For filtering and draining the oil or fat, see the chapter on Maintenance.
Cooking tables
The cooking times and temperatures are only a guide, they may require adjustment
depending on the quantity and size of food, and personal taste.
For crispier results and to prevent oil overflowing, it is important home made chips
are cooked in two fryings: a first frying at 160 °C, then a second frying at 190 °C.
After the first frying, set the adjustable thermostat to 190°C and wait for the tem-
perature indicator light to go out before lowering the chips into the oil for the
second frying.
When cooking battered food and doughnuts, remove the wire basket to prevent food
sticking to it and use tongs to slowly lower the food into the hot oil.Gradually place
the food into the hot oil, submerging it an inch at a time to prevent it from sinking
straight away.
Cleaning and Maintenance
Filtering the oil
• At the end of the last frying, turn the Oil Box control switch on the Automatic oil
filtration position. (fig.27-28)
• For your safety, the appliance automatically drains all kinds of fat (oil or solid fat)
when it is cool enough (approximatively 3 hours after the last frying).
Make sure that the oil container is empty before draining the fryer.
• Once the filtration is finished, you can store the container :
- In the appliance: Turn the Oil Box control switch on Fry position. (fig.17). The
appliance must be carried and transported flat.
!
21
Eng
Quantity Temp Time Quantity Temp Time
Chips
(maximum capacity)
1200 g
1st frying 160°C
2nd frying 190°C
10-12 min
5-8 min
900 g 190°C 8-13 min
Chips
(recommended quantity)
600 g 170°C 9-13 min 450 g 190°C 6-9 min
Chicken Nuggets
400 g 180°C 14-15 min 400 g 190°C 5-7 min
Battered Fruit fritters
8-9 170°C 5-6 min 8-9 190°C 5-7 min
Breaded Mushrooms
400 g 160°C 10-12 min 8-9 190°C 7-8 min
Breaded Fish fillets
400 g 160°C 6-7 min 8-9 190°C 5-6 min
Fresh foods
Frozen foods
5085657 Oleoclean.qxp 14/01/09 16:04 Page 23

22
Eng
- Outside the appliance: Leave the oil to cool for approximately 3 hours, then turn
the Oil Box control switch to Oil box position and take out the container.
(fig.29-30)
When the oil container is full of oil do not submerge it under water. To clean it,
wipe it with a kitchen paper towel or damp cloth.
Carry the container with both hands. Store it in a cool dry place away from the light.
• Wait at least 3 hours before taking the full container out of the appliance.
Transport it with care.
• To re-use the oil, take out the container with care.
Unscrew the oil box cap and empty the oil in the fryer bowl. (fig.31-32)
• For solid fat, remove the lid from the container. Turn the container over and
press it to loosen the fat. Cut it into pieces and melt it in a separate pan. Then,
pour it into the bowl. (fig.33-34)
Never put the OIL BOX in a microwave oven.
• Insert the empty container in the fryer, with its lid and cap in position. Place the
Oil Box control switch on the Fry position. (fig.17)
Do not pour used oil down the sink. Drain it into a suitable container.
Changing oil:
• Do not pour used oil/fat into the sink. Leave it to cool, and throw it away with
household waste-according to the local community regulations.
CAUTION
• We recommend changing the oil/fat after a maximum of 10 to 12 uses.
If using sunflower oil, ensure the oil is changed after every 5 uses.
Magiclean: very easy to clean.
• The lid, the bowl, the housing, the frying basket and the Oil Box are dishwasher
safe. (fig.36)
• The oil filter grid located in the removable bowl is fixed.
Do not try to dismantle it. (fig.37)
• After cleaning, press on the red button under the fryer to release any water in
the bowl. (fig.8)
Before filling the fryer bowl, always check to ensure the red button under the
fryer is in the correct position.
!
!
!
!
!
5085657 Oleoclean.qxp 14/01/09 16:04 Page 24

Problems and possible causes Solutions
The fryer is not heating
The appliance is not plugged in. Plug in the appliance.
The thermostat knob is not set to I. Set the thermostat knob to I.
The frying oil overflows
The Max. marker for filling the bowl Check the oil level (Max.), and remove the excess.
has been exceeded. The basket has been over filled with food.
The Max. marker for filling the frying basket Check the Max. level of the frying basket, and
has been exceeded. remove the excess.
Food is wet or contains too much water Remove any ice and dry the food thoroughly.
(frozen food) Lower the basket slowly.
Different types of oil/fat have been mixed. Empty and clean the bowl. Refill the bowl with
one type of oil.
The bowl does not drain
The oil temperature is still too high. Wait for the temperature to go down
(approximately 3 hours).
The Oil Box control switch is not on the Turn the Oil Box control switch on the
Automatic Oil Filtration position Automatic Oil Filtration position.
The filter grid is blocked or clogged. Empty the bowl into a container and clean the
filter grid with warm water, washing-up liquid
and a non-metallic brush. Press on the red
button under the fryer to release any water.
The fat is set or solidified. Warm the fryer for 4 to 5 min.
Oil leaks
The max (3.5 l) fill mark for the bowl has been Respect the oil level (3.5 L). Clean the fryer before
exceeded. each use.
There is some oil left in the container or it is Place the Oil Box control switch on the Oil Box
full. position, take out the container and empty it.
Emits unpleasant smells
The fat/oil has deteriorated. Renew the frying oil (after a maximum of 10 to 12
uses), more frequently depending on the oil.
The fat/oil is unsuitable.
Use a good quality blended vegetable oil. See Page 19.
The food does not become golden, and remains soft
Pieces are too thick and contain too much water. Dry food thoroughly. Experiment by lengthening
the cooking time or cutting food into smaller or
thinner pieces.
Too much food being cooked at the same time Fry food in small quantities (especially when frozen).
and the cooking oil is not at the right temperature. Set to the recommended temperature or try using
The temperature of the frying oil may not be high a slightly higher temperature.
enough: the temperature is set incorrectly. Remember to wait until the tempertaure indica-
tor light goes out before lowering the basket.
The chips stick together
Potatoes have not been washed before Cut potatoes and rinse well to remove
immersed in hot oil. excess starch, and dry them thoroughly.
The safety cut out has activated : the fryer does not work
The oil level is not sufficient. Unplug the appliance, let it cool and follow the
Solid fat has been put directly in the fryer.
instructions for use. If the error code still appears,
The oil temperature is still too high.
press the Safety cut-out Reset button, which is
located at the a back of the fryer. If the problem
persists, please contact our Customer Relations Team.
Others problems
The temperature indicator light does not come on. Please contact our Customer Relations Team or an
Approved Service Centre.
If your fryer does not work properly
Eng
Unplug the appliance, let it cool. Press the Safety
cut-out Reset button (found on the back of the
control unit) with a toothpick or similar non-metal-
lic item. If the problem persists, please contact
our Customer Relations Team or an Approved
Service Centre.
23
5085657 Oleoclean.qxp 14/01/09 16:04 Page 25

24
Ned
VEILIGHEIDSVOORSCHRIFTEN
Lees deze instructies aandachtig door en bewaar ze zorgvuldig.
Veiligheidsvoorschriften
Voor uw veiligheid voldoet dit apparaat aan de toepasselijke normen en regelgevingen (Richtlijnen
Laagspanning, Elektromagnetische Compatibiliteit, Materialen in contact met voedingswaren, Milieu…).
Controleer of de netspanning overeenkomt met die op het apparaat vermeld staat (wisselstroom).
Rekening houdend met de grote verscheidenheid aan geldende normen, dient u het apparaat door een
erkende Servicedienst te laten controleren als u het in een ander land gebruikt dan waar u het gekocht
heeft.
Dit apparaat is uitsluitend ontworpen voor huishoudelijk gebruik en ook alleen voor binnenshuis. In geval
van bedrijfsmatig gebruik of een gebruik waarvoor het apparaat niet geschikt is, of dat niet overeenkomt
met de gebruiksaanwijzing kan de aansprakelijkheid van de fabrikant niet in het geding zijn en is de
garantie niet geldig.
Aansluiting
• Het apparaat niet gebruiken wanneer dit, of het snoer, defect is of wanneer het apparaat
gevallen is, zichtbare schade of functiestoringen vertoont. In dat geval moet het apparaat naar
een erkende Servicedienst gestuurd worden.
• Steek de stekker altijd in een geaard stopcontact.
• Geen verlengsnoer gebruiken. Indien u hiervoor de verantwoordelijkheid op u neemt, gebruik
dan een in goede staat verkerend verlengsnoer met randaarding dat voor het vermogen van het
apparaat geschikt is.
• Wanneer het netsnoer is beschadigd dient deze te worden vervangen door de fabrikant, zijn
servicedienst of een gelijkwaardig gekwalificeerd persoon om een gevaarlijke situatie te
voorkomen.
• Het snoer niet laten hangen.
• Niet aan het snoer trekken om de stekker uit het stopcontact te halen.
• Altijd de stekker van het apparaat uit het stopcontact halen: na gebruik, om het apparaat te
verplaatsen of om het schoon te maken.
Werking
• Dit apparaat is niet bedoeld om zonder hulp of toezicht gebruikt te worden door kinderen of
andere personen, indien hun fysieke, zintuiglijke of mentale vemogen hen niet in staat stellen dit
apparaat op een veilige wijze te gebruiken, tenzij zij van tevoren instructies hebben ontvangen
betreffende het gebruik van het apparaat door een verantwoordelijk persoon.
• Er moet toezicht zijn op jonge kinderen zodat zij niet met het apparaat kunnen spelen.
• Nooit het apparaat zonder toezicht laten werken. Buiten bereik van kinderen houden.
• Gebruik het apparaat op een stevige, vlakke ondergrond, ver van opspattend water.
• Dit elektrische apparaat werkt op hoge temperaturen, wat tot brandwonden kan leiden. Raak de
warme oppervlakken van het apparaat niet aan (filter, kijkvenster, zichtbare metalen delen…).
• Laat het apparaat niet in de buurt van brandbare materialen werken (jaloezieën, gordijnen…),
noch in de buurt van een externe warmtebron (gasfornuis, warmhoudplaatje…).
5085657 Oleoclean.qxp 14/01/09 16:04 Page 26

Wees vriendelijk voor het milieu !
Uw apparaat bevat materialen die geschikt zijn voor hergebruik.
Lever het in bij het milieustation in uw gemeente of bij onze technische dienst.
• In geval van brand nooit proberen de vlammen met water te blussen. Sluit het deksel. Doof de
vlammen met een vochtige doek.
• Het apparaat niet verplaatsen wanneer het warme vloeistoffen of etenswaren bevat.
• Indien u een uitneembare binnenpan heeft, verwijder deze dan nooit terwijl de friteuse werkt.
• Nooit het elektrische gedeelte in water dompelen!
Bereiding
• Nooit de stekker in het stopcontact steken wanneer de friteuse leeg is (geen vet). Neem de
minimale en maximale hoeveelheid vet in acht.
• Indien u niet-vloeibaar vet gebruikt, snijd dit dan in stukken en laat het op zacht vuur in een aparte
pan smelten en giet het daarna langzaam in de binnenpan. Nooit het niet-vloeibare vet rechtstreeks
in de binnenpan of het mandje doen, hierdoor zou het apparaat kunnen beschadigen.
• Nooit het niet-vloeibare vet rechtstreeks in het mandje doen, hierdoor zou het apparaat kunnen
beschadigen.
• Nooit verschillende soorten vet met elkaar mengen.
• Doe niet teveel in het mandje, houd u aan de voor de veiligheid aangegeven maximale
hoeveelheden.
Instructies
• Beperk de baktemperatuur tot 170°C, met name voor aardappelproducten.
• Gebruik het mandje voor het bakken van patat.
• Houd het frituren in de gaten: eet geen gefrituurd voedsel dat verbrand is en geef de voorkeur
aan licht goudbruine frituur.
• Filter het vet na ieder gebruik om te voorkomen dat achtergebleven restjes verbranden en ver-
vang het vet regelmatig.
• Berg de friteuse niet buiten op, u voorkomt zo dat er ongewenst water in het vet terecht komt.
Geef de voorkeur aan een droge, goed geventileerde ruimte.
• Zorg voor een evenwichtige, gevarieerde voeding met minstens 2 stuks fruit en groente per dag.
• Bewaar aardappelen bij een temperatuur boven 8°C.
• Beperk voor een snelle, geslaagde bereiding de hoeveelheid patat tot een 1/2 mandje per beurt.
• Wanneer een vol mandje ondergedompeld wordt, daalt de temperatuur van het vet zeer snel.
Tijdens het bakken overschrijdt de temperatuur nooit 175°C, zelfs wanneer de temperatuur is
ingesteld op 190°C (= gestabiliseerde temperatuur vóór het onderdompelen).
Neem in geval van problemen contact op met de Klantenservice van Tefal of ga naar de website
www.tefal.nl.
Reparaties mogen uitsluitend worden uitgevoerd door een erkende Servicedienst, met behulp van originele
onderdelen.
25
Ned
5085657 Oleoclean.qxp 14/01/09 16:04 Page 27

26
Ned
Omschrijving
1. Deksel
a. Permanent filter
b. Handgreep
c. Kijkvenster
2. Afneembaar elektrisch gedeelte
3. Mandje
a. Handgreep
b. Max. niveau voor het voedsel
4. Uitneembare binnenpan
5. Aanduiding voor het vullen van de
binnenpan
6. Haakje voor het mandje in de hoge
stand
7. Vast filter voor het filteren van het
vet
8. Koele handgrepen
9. Bedieningsknop filterbak
10. Behuizing
11. Filterbak
a. Deksel
b. Dop
12. Anti-slipvoetjes
13. Bedieningspaneel
a. Aan-/uitschakelen (O/I)
b. Temperatuurregelaar
c. Controlelampje temperatuur
14. Resetknop
Resetfunctie: Uw friteuse is voorzien van een ingebouwde veiligheidsfunctie.
Wanneer deze in werking treedt, schakelt uw friteuse automatisch uit.
Haal de stekker uit het stopcontact, laat hem afkoelen en steek
vervolgens de stekker weer in het stopcontact.
Om de friteuse weer in te schakelen, moet u de RESET knop (aan
de achterzijde van het bedieningspaneel) indrukken d.m.v. een
puntig voorwerp (fig.35). Indien dit probleem zich blijft
voordoen, moet u contact opnemen met de Tefal klantenservice.
14
13. 13.
a
13.
c
13.
b
5085657 Oleoclean.qxp 14/01/09 16:04 Page 28

27
Ned
Automatisch filteren/verversen en bewaren van het vet
De friteuse is voorzien van een gepatenteerd automatisch filter- en ververssysteem
dat geschikt is voor alle soorten vet.
l Het vet wordt op volkomen veilige wijze automatisch gefilterd.
l Dankzij het automatische filteren blijft het vet schoon en gaat het langer mee:
gezonder en voordeliger.
l Door het vet te bewaren in verschillende filterbakken, behouden de etenswaren
hun smaak (frites, vis, oliebollen…) en worden deze niet met elkaar vermengd.
Zeer eenvoudige reiniging
De friteuse is eenvoudig te gebruiken en te demonteren.
l Alle onderdelen kunnen in de vaatwasser, met uitzondering van het elektrische
gedeelte.
l Dankzij het filteren en bewaren van het vet wordt het vet uit de friteuse gehaald
en kan deze na iedere frituurbeurt in de vaatwasmachine schoongemaakt wor-
den. Na ieder gebruik schoon en als nieuw.
De bedieningsknop van de filterbak gebruiken
• De bedieningsknop van de filterbak heeft 3 standen. (fig.1)
Stand Fry:om te frituren. (fig.2)
Stand Automatic Oil Filtration: om het vet te filteren. (fig.3)
Stand Oil Box: om de filterbak op zijn plaats te zetten of te verwijderen. (fig.4)
Vóór de eerste ingebruikname
• De friteuse kan volledig gedemonteerd worden. (fig.5)
Verwijder het deksel, het mandje, het elektrische gedeelte en de binnenpan.
Verwijder de filterbak door de bedieningsknop op de stand Oil box te zetten.
(fig.4)
Nooit het elektrische gedeelte onder water dompelen.
• Reinig het deksel, de binnenpan, de behuizing, het mandje en de filterbak met
een vochtige spons en afwasmiddel of in de vaatwasmachine. (fig.6)
Reinig het elektrische gedeelte met een vochtige doek of spons. (fig.7)
Goed afdrogen.
• Druk na iedere reinigingsbeurt op de rode knop onder de binnenpan, zodat het
achtergebleven water eruit kan lopen. (fig.8)
Controleer of de rode knop in de goede stand teruggekeerd is.
!
!
5085657 Oleoclean.qxp 14/01/09 16:04 Page 29

28
Ned
• Zet de binnenpan en het elektrische gedeelte op hun plaats. (fig.9-10)
Controleer of het elektrische gedeelte goed geplaatst is, omdat anders de friteuse
niet werkt.
• Zet de bedieningsknop op de stand Oil box en zet de lege filterbak in de
friteuse. (fig.4-11)
• Klap de handgreep van het mandje volledig uit: een " klik " geeft aan dat deze
op zijn plaats zit. (fig.12)
Uw friteuse moet altijd binnenshuis gebruikt worden.
Voorbereiding
• Vul de binnenpan met vet. (fig.13)
Het vetniveau moet zich altijd tussen de min. en max. streep van de
binnenpan bevinden (fig.14). Vul de binnenpan nooit tot boven het
maximaal niveau, dit kan namelijk tot overlopen en ernstige
brandwonden leiden.
Meng nooit verschillende soorten vet met elkaar, hierdoor kan het vet overlopen.
Gebruik één van de voor het frituren aanbevolen vloeibare vetten.
Volg de aanbevelingen van de fabrikant voor het bakken.
Controleer voor ieder gebruik het vetniveau en pas dit, indien nodig, aan met
hetzelfde vet.
• Indien u niet-vloeibaar vet gebruikt, snijd dit dan in stukken en
laat het in een apart steelpannetje smelten, voordat u het in de
binnenpan giet. (fig.15-16)
Laat niet-vloeibaar vet nooit rechtstreeks op het verwarmingselement of in het
mandje smelten.
Bakken
• Zet de bedieningsknop op de stand Fry. (fig.17)
• Steek na het vullen van de binnenpan met vet de stekker van uw friteuse zonder
mandje in het stopcontact. (fig.18)
Nooit de friteuse inschakelen als er geen vet in zit.
!
!
!
!
!
!
Max. 3,5 L
Min. 2,8 L
Max. 3060 g
Min. 2450 g
5085657 Oleoclean.qxp 14/01/09 16:04 Page 30

29
Ned
• Zet de aan/uit-schakelaar in de I positie en het controlelampje van de temperatuur gaat
aan. Zet de regelbare thermostaat op de gewenste temperatuur (zie tabellen p. 30).
(fig.19-20)
• De friteuse wordt warm.
Het controlelampje van de temperatuur gaat uit zodra de gewenste temperatuur
is bereikt.
• Doe een niet te grote hoeveelheid voedsel in het mandje. Zorg dat u het op het
mandje aangegeven maximum niveau "MAX" niet overschrijdt. Neem een
minder grote hoeveelheid indien het om bevroren voedsel gaat. (fig.21)
Om overlopen te voorkomen en de levensduur van het vet te verlengen, kunt u
voor het bakken de kruimels en/of het ijs van het voedsel zorgvuldig afvegen.
• Zodra het controlelampje van de temperatuur uit is gegaan, laat u het
frituurmandje langzaam in het vet zakken. Wanneer het mandje te snel zakt, kan het
vet overlopen. (fig.22-23)
Het is normaal dat tijdens het bakken het controlelampje temperatuur gaat
branden en vervolgens weer uit gaat.
Raak het apparaat tijdens het gebruik niet aan. Sommige zeer hete delen
kunnen ernstige brandwonden veroorzaken. De stoom die uit het deksel komt
is zeer heet. (fig.24)
• Zet het deksel terug op uw friteuse.
Het bakken is klaar wanneer de baktijd verstreken is en het voedsel de gewenste
kleur en textuur verkregen heeft.
• Verwijder het deksel.
Zorg, om spatten te voorkomen, dat er geen condenswater uit het deksel in het
vet terecht komt, door dit goed uit te laten lekken boven een doek of een stuk
keukenpapier dat u naast de friteuse heeft gelegd.
Laat het voedsel uitlekken door het mandje op het hiervoor bedoelde haakje te
plaatsen. (fig.25)
!
!
!
!
Verse patat Diepvries patat
Maximale hoeveelheid 1.2 kg in 2 beurten 900 g
Aanbevolen hoeveelheid 600 g 450 g
5085657 Oleoclean.qxp 14/01/09 16:04 Page 31

• Dien het voedsel op. (fig.26)
Wanneer u klaar bent met frituren draait u de thermostaat naar de minimale stand
en zet u de knop op « O ».
Haal de stekker uit het stopcontact en laat het apparaat ca. 3 uur afkoelen.
• Let op: klap na het frituren de handgreep van het mandje niet in. Dit om de kans
op smelten bij de volgende frituurbeurt te voorkomen als vergeten wordt de
handgreep weer uit te klappen.
• Zie voor het filteren en verwijderen van het vet het hoofdstuk Onderhoud.
Bereidingstabellen
Onderstaande bereidingstijden zijn slechts een indicatie. Deze kunnen variëren
aan de hand van de hoeveelheden en uw smaak.
Voor het beste resultaat en om overlopen te vermijden wanneer u verse frites
bakt, is het traditionele bakken in twee fases aanbevolen:
- eerste, op 160 °C
- tweede, op 190 °C
Onderhoud en Reiniging
• Draai de bedieningsknop op de stand Automatic oil filtration. (fig.27-28)
• Voor optimale veiligheid zorgt het apparaat zelf voor het automatisch filteren
wanneer het vet voldoende afgekoeld is (ongeveer 3 uur na de laatste bakbeurt).
Controleer of de filterbak leeg is voordat u de binnenpan leeg laat lopen.
• Wanneer het vet gefilterd is, kunt u de filterbak opbergen:
- In het apparaat: draai de bedieningsknop op de stand Fry. (fig.17). Het apparaat
moet plat vervoerd en opgeborgen worden.
- Buiten het apparaat: wacht 3 uur, draai de bedieningsknop in de stand Oil box
en verwijder de filterbak. (fig.29-30)
!
30
Ned
Hoeveelheid Temperatuur Tijd Hoeveelheid Temperatuur Tijd
Patat (maximale hoe-
veelheid)
1200 g
1
e
beurt 160°C
2
e
beurt 190°C
10-12 min
5-8 min
900 g 190°C 8-13 min
Patat (aanbev. max.
hoeveelheid)
600 g 170°C 9-13 min 450 g 170°C 6-9 min
Kipnuggets
400 g 180°C 14-15 min 400 g 190°C 5-7 min
Fruitbeignets
8-9 170°C 5-6 min 8-9 190°C 5-7 min
Paddestoelen
400 g 160°C 10-12 min 8-9 190°C 7-8 min
Visfilets
400 g 160°C 6-7 min 8-9 190°C 5-6 min
Verse producten
Diepvries producten
5085657 Oleoclean.qxp 14/01/09 16:04 Page 32

31
Ned
Wanneer de filterbak vol is deze niet onder water afspoelen. Om hem schoon te maken kunt
u hem afvegen met keukenrol of een vochtige doek.
Berg de filterbak altijd horizontaal op met het deksel er bovenop, in een droge, donkere ruimte
op kamertemperatuur.
Wacht minstens 3 uur voordat u de filterbak verwijderd. Vervoer het voorzichtig.
• Ga voorzichtig te werk met de filterbak indien u het vet opnieuw wilt gebruiken.
Draai de dop los en schenk het vet in de binnenpan. (fig.31-32)
• Verwijder bij niet-vloeibaar vet het deksel. Draai de filterbak om en druk er op
om het vet er uit te drukken. Snijd het vet in stukken en doe deze in een
steelpannetje om het te laten smelten. Giet het vervolgens in de binnenpan.
(fig.33-34)
Nooit de filterbak in de magnetron of oven doen.
• Zet de lege filterbak met zijn deksel en dop op zijn plaats. Zet de bedieningsknop
op de stand Fry terug. (fig.17)
Giet geen oud vet in de gootsteen. Laat het afkoelen en doe het bij het huisvuil.
Vet vervangen :
• Giet gebruikt vet nooit in de spoelbak. Laat het afkoelen en doe het vervolgens bij het
huishoudelijk afval waarbij u de plaatselijke regelgeving in acht dient te houden.
OPMERKING :
• Vervang de olie tenminste elke 10 tot 12 bakbeurten.
Indien u zonnebloemolie gebruikt, dient u deze iedere 5 bakbeurten te
vervangen.
Magiclean : Zeer eenvoudig te reinigen.
• Het deksel, de binnenpan, de behuizing, het mandje en de filterbak kunnen in de
vaatwasmachine. (fig.36)
• Het filter in de binnenpan zit vast.
U moet dit niet demonteren. (fig.37)
• Druk na iedere reinigingsbeurt op de rode knop onder de binnenpan, zodat het
achtergebleven water eruit kan lopen. (fig.8)
Controleer voordat u de binnenpan vult of de rode knop in de goede stand is
teruggekeerd.
!
!
!
!
!
5085657 Oleoclean.qxp 14/01/09 16:04 Page 33

Ned
Problemen en mogelijke oorzaken Oplossingen
De friteuse wordt niet warm
De stekker zit niet in het stopcontact. Steek de stekker in het stopcontact.
Het frituurvet loopt over
De max. hoeveelheid vet is overschreden. Controleer het vetniveau en verwijder het overtollige
vet.
De max. hoeveelheid in het mandje is Controleer het niveau in het mandje en verwijder
overschreden. het overtollige.
Het voedsel is vochtig of bevat teveel water Verwijder het ijs en maak het voedsel goed droog.
(bijv. diepvries producten). Laat het mandje langzaam zakken.
Er zijn verschillende vetten en/of olie met elkaar Haal het vet uit de binnenpan en maak hem
vermengd. schoon. Vul de binnenpan uitsluitend met één
soort vet/olie.
De binnenpan wordt niet geleegd
Het vet is te warm. Wacht tot het vet is afgekoeld (ca. 3 uur).
De bedieningsknop staat niet op de stand Automatic Zet de bedieningsknop op de stand Automatic
oil filtration. oil filtration.
Het filter is verstopt. Giet de inhoud van de binnenpan in een bak en
reinig het filter met een niet-metalen borstel.
Het vet is gestold of niet-vloeibaar. Laat de friteuse warm worden (4 tot 5 minuten).
Het vet lekt
De streep van 3,5 L in de binnenpan is Neem het max. (3,5L) vulniveau in de binnenpan in
overschreden. acht.
Er zit nog vet in de filterbak of dit is vol. Maak de friteuse na ieder gebruik schoon.
Zet de bedieningsknop op de stand Oil box, ver-
wijder de filterbak en maak dit leeg.
Er komen nare geurtjes vrij
Het vet is niet goed meer. Ververs het frituurvet (10 tot 12 beurten).
Het vet is niet geschikt.
Gebruik plantaardig vet voor een goede bakkwaliteit.
Het voedsel wordt niet goudbruin en blijft zacht
Het is te dik en bevat veel water. Probeer de baktijd te verlengen.
Er zit teveel voedsel in het mandje en het vet Frituur slechts kleine hoeveelheden (vooral bij
heeft niet de juiste temperatuur meer. bevroren producten).
De temperatuur van het vet kan onvoldoende Stel de thermostaat af op de aanbevolen temperatuur.
zijn: de thermostaat is verkeerd afgesteld.
De patat plakt aan elkaar
De verse patat is niet gewassen voordat u deze Was de verse patat en dep deze zorgvuldig
in het vet ondergedompeld heeft. droog alvorens deze te bakken.
De veiligheidsfunctie is geactiveerd: de friteuse werkt niet.
Het vetniveau is te laag. Haal de stekker uit het stopcontact, laat het apparaat
Het niet-vloeibare vet is rechtstreeks in het afkoelen en volg de instructies van de gebruiksaan
apparaat gedaan. wijzing Indien de foutcode opnieuw verschijnt, druk dan
op de RESET-knop aan de achterzijde van het apparaat.
Indien de beveiliging opnieuw inschakelt, breng uw
apparaat dan naar een erkende Servicedienst.
Andere problemen
Het controlelampje van de temperatuur gaat Neem contact op met de Consumentenservice.
niet aan.
Wanneer uw friteuse niet goed werkt
Het vet is te warm.
Haal de stekker uit het stopcontact en laat de fri-
teuse afkoelen. Druk op de RESET knop die zich
aan de achterzijde van het bedieningspaneel
bevindt. Indien dit probleem zich blijft voordoen,
moet u contact opnemen met de Tefal klantenser-
vice.
32
5085657 Oleoclean.qxp 14/01/09 16:04 Page 34

33
Deu
SICHERHEITSHINWEISE
Lesen Sie diese Anweisungen aufmerksam durch und heben Sie sie gut auf.
Sicherheitshinweise
Um Ihre Sicherheit zu gewährleisten, entspricht dieses Gerät den jeweils anwendbaren Normen und
Bestimmungen (Niederspannung, Elektromagnetische Verträglichkeit, Materialien in Kontakt mit
Lebensmitteln, Umweltverträglichkeit…).
Die Spannung gemäß dem Typenschild des Gerätes prüfen (Wechselstrom).
Aufgrund der Vielzahl geltender Vorschriften ist es ratsam, bei der Benutzung im Ausland, das Gerät
durch ein zugelassenes Service Center prüfen zu lassen.
Dieses Gerät wurde ausschließlich für den Hausgebrauch in geschlossenen Räumen konzipiert. Jede
Verwendung für gewerbliche Zwecke, unsachgemäße Handhabung oder Inbetriebnahme, bei der die
Gebrauchsanleitung nicht beachtet wurde, befreit den Hersteller von jeder Verantwortung oder Garantie.
Dieses Gerät ist nicht dazu bestimmt, mit einem externen Timer oder einem separaten
Fernbedienungssystem in Betrieb genommen zu werden.
Anschluss
• Das Gerät nicht benutzen, wenn das Gerät oder seine Zuleitung defekt sind, das Gerät herunter-
gefallen ist und einen sichtbaren Schaden oder Funktionsstörungen aufweist. In diesem
Fall das Gerät zum nächstliegenden zugelassenen Service Center bringen.
• Das Gerät immer an eine geerdete Steckdose anschließen.
• Kein Verlängerungskabel benutzen. Wenn Sie doch eines benutzen, muss es sich in gutem
Zustand befinden, geerdet sein und der Stromstärke des Geräts entsprechen, sowie so verlegt
werden, dass niemand darüber stolpern kann.
• Bei Beschädigung der Zuleitung muss diese unbedingt durch den Hersteller, ein zugelassenes
Service Center oder einen Fachmann ersetzt werden, um jegliche Gefahr auszuschließen. Das
Gerät in keinem Fall selbst auseinander nehmen.
• Die Zuleitung nicht herunterhängen lassen, nicht mit den heißen Teilen das Gerätes in Berührung
kommen lassen und nie über eine scharfe Kante legen oder ziehen.
• Niemals den Stecker an der Zuleitung aus der Steckdose ziehen.
• In folgenden Situationen immer den Netzstecker ziehen: nach jeder Benutzung, zum Transport des
Gerätes und vor jeder Reinigung. Entfernen Sie vor der ersten Inbetriebnahme alle Verpackungen
und Aufkleber innerhalb und außerhalb des Gerätes und entnehmen Sie das Zubehör.
Betrieb
• Dieses Gerät darf nicht von Personen (inbegriffen Kindern) mit eingeschränkten körperlichen,
sensorischen oder geistigen Fähigkeiten benutzt werden. Das Gleiche gilt für Personen, die keine
Erfahrung mit dem Gerät besitzen oder sich mit ihm nicht auskennen, außer wenn sie von einer
für ihre Sicherheit verantwortlichen Person beaufsichtigt werden oder von dieser mit dem
Gebrauch des Gerät vertraut gemacht wurden.
• Kinder müssen beaufsichtigt werden, damit sie nicht mit dem Gerät spielen.
• Das Gerät niemals ohne Aufsicht in Betrieb nehmen.
• Eine stabile, waagerechte und vor Wasserspritzern geschützte Abstellfläche benutzen.
• Dieses Gerät erreicht bei seiner Benutzung sehr hohe Temperaturen, die Verbrennungen
5085657 Oleoclean.qxp 14/01/09 16:04 Page 35

Denken Sie an den Schutz der Umwelt !
Ihr Gerät enthält wertvolle Rohstoffe, die wieder verwertet werden können.
Geben Sie Ihr Gerät deshalb bitte bei einer Sammelstelle Ihrer Stadt oder Gemeinde ab.
34
Deu
verursachen können. Niemals an die heißen Flächen des Gerätes greifen (Filter, Sichtfenster,
außen liegende Metallteile…).
• Betreiben Sie das Gerät nicht in der Nähe von brennbaren Materialien (Gardinen, Vorhänge,…)
und von Hitzequellen (Gasofen, Ofenplatten…).
• Versuchen Sie im Brandfall keinesfalls, das Feuer mit Wasser zu löschen. Schließen Sie den
Deckel, ziehen Sie den Netzstecker und ersticken Sie die Flammen mit einem feuchten Tuch.
• Niemals das mit heißer Flüssigkeit oder heißen Speisen gefüllte Gerät transportieren.
• Versuchen Sie niemals, den Frittierbehälter aus dem Gerät zu nehmen, solange die Fritteuse eingeschaltet ist.
Geben Sie niemals Wasser in Öl oder andere Fettstoffe.
• Das elektrische Bedienelement, das Kabel und den Stecker niemals in Wasser tauchen!
Garen
• Schließen Sie das Gerät nicht leer (ohne Fett) an das Stromnetz an. Halten Sie die Mindest- und
Höchstmengen für Öl ein.
• Falls Sie festes Fett benutzen, muss dieses in Stücke geschnitten, bei niedrigen Temperaturen in
einem gesonderten Gefäß geschmolzen und anschließend langsam in den Frittierbehälter
gegossen werden. Geben Sie das feste Fett niemals direkt in den Frittierbehälter oder den
Frittierkorb, da dies Schäden am Gerät hervorrufen könnte.
• Mischen Sie keine unterschiedlichen Fettsorten.
• Überladen Sie den Frittierkorb nicht und überschreiten Sie die max. Sicherheitsgrenze nicht.
Empfehlungen
• Begrenzen Sie besonders für Kartoffeln die Gartemperatur auf 170°C.
• Benutzen Sie zur Zubereitung von Pommes Frites den Frittierkorb.
• Kontrollieren Sie den Garvorgang: verzehren Sie keine angebrannten frittierten Lebensmittel und
frittieren Sie die Lebensmittel vorzugsweise goldgelb.
• Filtern Sie das Öl nach jeder Benutzung, damit es nicht durch verbrannte Krümel verschmutzt
wird und erneuern Sie es regelmäßig.
• Bewahren Sie die Fritteuse nicht im Freien auf, um zu verhindern, dass unerwünschterweise Wasser in
das Frittierbad gerät. Bewahren Sie die Fritteuse an einem trockenen und gut gelüfteten Ort auf.
• Ernähren Sie sich ausgewogen und abwechslungsreich und nehmen Sie täglich 5 verschiedene
Obst- oder Gemüsearten zu sich.
• Kartoffeln müssen bei Temperaturen unter 8°C gelagert werden.
• Füllen Sie den Frittierkorb pro Frittiervorgang nur zur Hälfte mit Pommes Frites, um diese schnell
und gut zu garen.
• Beim Eintauchen des gefüllten Frittierkorbs sinkt die Öltemperatur sehr schnell. Während des
Garvorgangs übersteigt diese niemals 175°C, selbst wenn sie auf 190°C (= stabilisierte
Temperatur vor dem Eintauchen) eingestellt ist.
• Die Kochdämpfe können für Tiere mit einem besonders empfindlichen Atemsystem wie Vögel
eine Gefahr darstellen. Vogelhaltern wird empfohlen,die Tiere vom Kochplatz entfernt zu halten.
Jeglicher Eingriff darf nur bei einem zugelassenen Service Center mit Original-Ersatzteilen erfolgen.
5085657 Oleoclean.qxp 14/01/09 16:04 Page 36

Deu
Beschreibung
1. Deckel
a. Dauerfilter
b. Filtergriff
c. Sichtfenster
2. Abnehmbares elektrisches
Bedien- und Heizelement
3. Frittierkorb
a. Griff
b. Max. Füllmenge für Lebensmittel
4. Herausnehmbarer Frittierbehälter
5. Füllstandsanzeige des
Frittierbehälters
6. Haken zum Einhängen des
Frittierkorbs
7. Metall Feinöl-Filter
8. Transportgriffe
9. Entleerungsregler
10. Thermogehäuse
11. Oil Box: Öl-Aufbewahrungsbox
a. Deckel
b. Verschluss
12. Anti-Rutsch Füße
13. Abnehmbares Bedienelement
a. An/Aus-Schalter (O/I)
b. Temperaturregler
c. Temperaturkontrolllämpchen
14. Reset Taste (bei Fehleranzeige)
Funktion RESET: Ihr Gerät ist mit einer Sicherheitsabschaltung ausgestattet.
Wenn die Sicherheitsabschaltung auslöst, schaltet das Gerät automatisch ab.
Ziehen Sie den Netzstecker, lassen Sie es abkühlen und schließen
Sie es anschließend wieder an.
Um ihr Gerät wieder funktionsfähig zu machen, drücken Sie mit
einem spitzen, nichtmetallischen Gegenstand (z.B. einem
Zahnstocher) die RESET-Taste (an der Rückseite des Bedienteils)
(abb.35). Wenn die Sicherheitsabschaltung erneut auslöst,
müssen Sie das Gerät zu einem zugelassenen Service Center
bringen.
14
13. 13.
a
13.
c
13.
b
35
5085657 Oleoclean.qxp 14/01/09 16:04 Page 37

36
Deu
Automatische Öl-Filtration, Öl-Entleerung und Öl-Aufbewahrung
Die Fritteuse ist mit einem exklusiven und patentierten automatischen System zur
Filtration, Entleerung und Aufbewahrung des Öls ausgestattet, das an alle
Speisefette angepasst ist.
l Die Entleerung des Frittierbehälters erfolgt automatisch und ist völlig sicher.
l Dank der automatischen Filterung bleibt Ihr Frittierfett sauber, Sie können es über
längere Zeit benutzen und Ihre Speisen bleiben bekömmlich. Bei von gelösten
Teilchen gereinigtem Frittierfett wird die Geruchsentwicklung vermindert.
l Die Aufbewahrung des Frittierfettes in der Öl-Aufbewahrungsbox garantiert die
Geschmacksbewahrung der Speisen (Pommes-Frites, Fisch, Krapfen…) und
schließt Geschmacksübertragungen aus.
Superleichte Reinigung
Die Fritteuse lässt sich leicht bedienen und demontieren.
l Alle Teile außer dem elektrischen Bedienelement sind spülmaschinenfest.
l Dank der Öl-Filtration und der Öl-Aufbewahrung wird die Fritteuse nach jeder
Benutzung geleert und kann dann in der Spülmaschine gereinigt werden. Das
Gerät wird nach jeder Benutzung sauber wie neu.
Gebrauch des Entleerungsreglers
• Der Entleerungsregler kann auf 3 verschiedene Positionen gestellt werden. (abb. 1)
Position Fry „Fry“: Frittieren. (abb. 2)
Position Automatic Oil Filtration „Automatic Oil Filtration“: Automatisches
Entleeren und Filtern des Öls in die Öl-Aufbewahrungsbox. (abb. 3)
Position Oil Box „Oil Box“: Einsetzen oder Abnehmen der Öl-Aufbewahrungsbox.
(abb. 4)
Vor der ersten Inbetriebnahme
• Die Fritteuse kann vollständig demontiert werden. (abb. 5)
Nehmen Sie den Deckel ab. Nehmen Sie den Frittierkorb, das elektrische
Bedienelement und den Frittierbehälter ab. Stellen Sie den Entleerungsregler auf
die Position „Oil Box“ und nehmen Sie die Öl-Aufbewahrungsbox ab. (abb. 4)
Tauchen Sie das elektrische Bedienelement niemals ins Wasser.
• Reinigen Sie den Deckel, den Frittierbehälter, das Thermogehäuse, den Frittierkorb
und die Öl-Aufbewahrungsbox mit einem Schwamm unter Zusatz von Spülmittel
oder in der Geschirrspülmaschine. (abb. 6)
Reinigen Sie das elektrische Bedienelement mit einem feuchten Schwamm. (abb. 7)
Lassen Sie die Teile gut trocknen.
!
5085657 Oleoclean.qxp 14/01/09 16:04 Page 38

37
Deu
• Drücken Sie nach jeder Reinigung auf den roten Knopf unter dem
Frittierbehälter, um das im Inneren verbliebene Wasser abzulassen. (abb. 8)
Versichern Sie sich, dass der rote Knopf wieder in seine ursprüngliche Stellung
zurückgegangen ist.
• Setzen Sie den Frittierbehälter und das elektrische Bedienelement ein. (abb. 9-10)
Versichern Sie sich, dass das elektrische Bedienelement richtig eingesetzt ist,
andernfalls funktioniert die Fritteuse nicht.
• Stellen Sie den Entleerungsregler auf die Position„Oil Box“ und geben Sie die
leere Öl-Aufbewahrungsbox in die Fritteuse. (abb. 4-11)
• Klappen Sie den Griff des Frittierkorbes ganz auf, bis er hörbar einrastet. (abb. 12)
Ihre Fritteuse ist ausschließlich für den Hausgebrauch in geschlossenen Räumen
geeignet.
Vorbereitung
• Füllen Sie den Frittierbehälter mit Fett. (abb. 13)
Über- und unterschreiten Sie dabei nicht die Füllstandsanzeigen im
Innern des Frittierbehälters (abb. 14). Befüllen Sie den Innenbehälter nie
über die Max.-Anzeige hinaus mit Fett, da dies zum Überlaufen der
Fritteuse und zu schweren Verbrennungen führen könnte.
Mischen Sie keine unterschiedlichen Fettsorten, dies kann zum Überlaufen des
Frittierbehälters führen.
Benutzen Sie vorzugsweise spezielles Frittier-Speisefett.
Befolgen Sie zum Frittieren der Speisen die Angaben des Fettfabrikanten.
Überprüfen Sie vor dem Frittiervorgang den Fett-Füllstand und geben Sie
gegebenenfalls Fett dazu.
• Falls Sie festes Fett benutzen, muss dieses in Stücke geschnitten,
in einem gesonderten Gefäß geschmolzen und anschließend in
den Frittierbehälter gegossen werden. (abb. 15-16)
Lassen Sie festes Fett niemals auf dem Heizelement oder im Frittierkorb schmelzen.
!
!
!
!
!
!
Maxi 3,5 L
Mini 2,8 L
Maxi 3060 g
Mini 2450 g
5085657 Oleoclean.qxp 14/01/09 16:04 Page 39

38
Deu
Garen
• Stellen Sie den Entleerungsregler auf die Position „Fry“. (abb. 17)
• Befüllen Sie den Innenbehälter mit Öl, setzen Sie den Deckel auf und schließen Sie die
Fritteuse ohne den Einsatz an. (abb.18)
Schließen Sie die Fritteuse niemals ohne vorheriges Einfüllen von Fett ans Stromnetz an.
• Schalten Sie das Gerät ein, die Temperatur Kontrolllampe leuchtet auf. Stellen
Sie die gewünschte Temperatur mit dem Temperaturregler ein.(Siehe
Frittiertabelle Seite 39). (abb.19-20)
Die Temperatur Kontrollleuchte erlischt wenn die eingestellte Temperatur erreicht ist.
• Geben Sie die Speisen in den Frittierkorb, ohne diesen zu überladen.
Überschreiten Sie den am Frittierkorb angegebenen „MAX” Höchststand nicht.
Reduzieren Sie die Mengen bei Tiefkühlkost. (abb. 21)
Um Überlaufen zu verhindern und damit das Öl länger hält, müssen die zu frittierenden
Lebensmittel gut abgetrocknet werden.
• Wenn die Kontrolllampe erlischt, senken Sie den Frittierkorb langsam in das Öl ab.
Zu schnelles Absenken des Frittierkorbs kann zum Überlaufen führen. (abb.22-23)
Es ist normal, dass die Temperaturkontrolllämpchen Anzeige während des
Frittiervorgangs an- und ausgeht.
Fassen Sie das Gerät nicht an, wenn es in Betrieb ist. Manche Teile werden sehr heiß
und können ernste Verbrennungen hervorrufen. Der aus dem Deckel austretende
Dampf ist kochend heiß.
(abb.24)
• Setzen Sie den Deckel wieder auf die Fritteuse.
Der Frittiervorgang ist beendet, wenn die Frittierzeit abgelaufen ist und die
Speisen die gewünschte Farbe und Konsistenz erreicht haben.
• Nehmen Sie den Deckel ab.
Lassen Sie das Kondenswasser nicht vom Deckel in das Frittierbad tropfen, um
das Auftreten von Spritzern zu verhindern. Lassen Sie den Deckel vielmehr gut
auf einem Tuch oder Küchenkrepp neben der Fritteuse abtropfen.
Hängen Sie den Frittierkorb an die dazu vorgesehene Halterung und lassen sie
das Frittiergut abtropfen. (abb. 25)
!
!
!
!
!
Frische Pommes Frites Tiefgefrorene Pommes Frites
Max. Sicherheitsmenge 1.2 kg in 2 Frittierdurchgängen 900 g
Empfohlene Menge 600 g 450 g
5085657 Oleoclean.qxp 14/01/09 16:04 Page 40

39
Deu
• Servieren Sie die Speisen (abb. 26)
Stellen Sie das Thermostat auf die Minimal Position und den An/Aus Schalter auf
« O », sobald der Frittiervorgang beendet ist.
Ziehen Sie den Stecker aus der Steckdose und lassen Sie es etwa 3 Stunden lang
abkühlen.
• Filtern und Entleeren des Fetts siehe Kapitel „Pflege und Reinigung“.
Frittiertabelle
Die angegebenen Frittierzeiten und Fettmengen sind Richtwerte, sie können je
nach Menge und persönlichen Geschmacks variieren.
Für frische Fritten sollte die herkömmliche Garmethode in zwei nacheinander
folgenden Frittiergängen angewendet werden, mit welcher man bessere
Ergebnisse erzielt und das Überlaufen der Fritteuse vermeidet:
- der erste Gang bei 160 °C
- der zweite Gang bei 170 °C.
Pflege und Reinigung
Stellen Sie den Entleerungsregler auf die Position „Automatic Oil Filtration“. (abb. 27-28)
• Zu Ihrer eigenen Sicherheit erfolgt der Entleerungsvorgang automatisch, sobald das
Fett genügend abgekühlt ist (ca. 3 Stunden nach dem letzten Frittiervorgang).
Versichern Sie sich vor dem Entleeren des Frittierbehälters, dass die Öl-
Aufbewahrungsbox leer ist.
• Nach dem Filtervorgang kann die Öl-Aufbewahrungsbox aufbewahrt werden:
- im Gerät: stellen Sie den Entleerungsregler auf die Position „Fry“. (abb. 17). Das Gerät
muss in diesem Fall in waagrechter Stellung transportiert und aufbewahrt werden.
- außerhalb des Geräts: Warten Sie 3 Stunden, stellen Sie den Entleerungsregler auf
Position „Oil Box“ und entnehmen Sie die Öl-Aufbewahrungsbox. (abb. 29-30)
!
Menge Temperatur Garzeit Menge Temperatur Garzeit
Pommes Frites (max.
Sicherheitsgrenze)
1200 g
1 Frittiervorgang 160°C
2 Frittiervorgang 190°C
10-12 Min
5-8 Min
900 g 190°C 8-13 Min
Pommes Frites (emp-
fohlene Menge)
600 g 170°C 9-13 Min 450 g 170°C 6-9 Min
Geflügel-Kroketten
400 g 180°C 14-15 Min 400 g 190°C 5-7 Min
Obstkrapfen
8-9 170°C 5-6 Min 8-9 190°C 5-7 Min
Pilze
400 g 160°C 10-12 Min 8-9 190°C 7-8 Min
Fischfilets
400 g 160°C 6-7 Min 8-9 190°C 5-6 Min
Frische Lebensmittel
Tiefgefrorene Lebensmittel
5085657 Oleoclean.qxp 14/01/09 16:04 Page 41

40
Deu
Wenn sich Öl im Behälter befindet, waschen Sie ihn nicht unter fließendem
Wasser ab. Reinigen Sie ihn in diesem Fall mit einem Stück Küchenrolle oder
einem feuchten Tuch.
Bewahren Sie die Öl-Aufbewahrungsbox immer waagerecht und mit geschlossenem
Deckel an einem kühlen Ort ohne Lichteinwirkung auf.
• Warten Sie mindestens 2 Stunden, bevor Sie die Öl-Aufbewahrungsbox
herausnehmen. Transportieren Sie sie vorsichtig.
• Zur Wiederverwendung des Fetts: nehmen Sie die Öl-Aufbewahrungsbox
vorsichtig auf. Schrauben Sie den Verschluss auf und gießen Sie das Öl in den
Frittierbehälter. (abb. 31-32)
• Bei festem Fett nehmen Sie den Deckel ab. Drehen Sie die Öl-
Aufbewahrungsbox um und drücken Sie auf den Boden der Box, um das Fett
abzulösen. Schneiden Sie das Fett in Stücke und geben Sie sie zum Schmelzen
in einen Topf. Gießen Sie es anschließend in den Frittierbehälter. (abb. 33-34)
Stellen Sie die Öl-Aufbewahrungsbox niemals in eine Mikrowelle.
• Schieben Sie die leere Oil Box mit ihrem Deckel und ihrem Verschluss an ihren
Platz. Stellen Sie den Entleerungsregler erneut auf die Position Fry. (abb. 17)
Austauschen des Öls :
• Giessen Sie das verbrauchte Fett niemals in den Ausguss. Lassen Sie es
abkühlen und entsorgen Sie es entsprechend den lokalen Bestimmungen mit
dem Hausmüll.
ACHTUNG :
• Das Öl muss mindestens alle 10 bis 12 Frittiergänge ausgewechselt werden.
Wenn Sie Sonnenblumenöl verwenden, muss dieses nach 5 Verwendungen
ausgetauscht werden.
Total Magiclean : Ganz einfach zu Reinigen.
• Der Deckel, der Frittierbehälter, das Thermogehäuse, der Frittierkorb und die Öl-
Aufbewahrungsbox können in der Spülmaschine gereinigt werden. (abb. 36)
• Der im Frittierbehälter befindliche Metall Feinöl-Filter ist fest installiert.
Versuchen Sie nicht, ihn abzunehmen. (abb. 37)
• Drücken Sie nach jeder Reinigung auf den roten Knopf unter dem
Frittierbehälter, um das im Inneren verbliebene Wasser abzulassen. (abb. 8)
Versichern Sie sich vor dem Befüllen des Frittierbehälters, dass der rote Knopf
wieder in seine ursprüngliche Stellung zurückgegangen ist.
!
!
!
!
5085657 Oleoclean.qxp 14/01/09 16:04 Page 42

Probleme und mögliche Ursachen Lösungen
Die Fritteuse funktioniert nicht
Das Gerät ist nicht angeschlossen. Schließen Sie das Gerät an.
Das Frittierfett läuft über
Die max. Einfüllmenge des Frittierbehälters Prüfen Sie den Füllstand und entfernen Sie die
wurde überschritten. überschüssige Menge.
Die max. Einfüllmenge des Frittierkorbs Prüfen Sie den Füllstand des Frittierkorbs und
wurde überschritten. entfernen Sie die überschüssige Menge.
Die Speisen sind feucht oder enthalten zu viel Entfernen Sie das Eis und trocknen Sie die Lebensmittel
Wasser (beispielsweise Tiefkühlkost) gut ab.Tauchen Sie den Frittierkorb sehr langsam in
das Fett.
Mischung von verschiedenen Öl- und Fettsorten Leeren und reinigen Sie den Frittierbehälter.
Es wurden unterschiedliche Fettsorten gemischt. Füllen Sie den Frittierbehälter mit einer einzigen
Fettsorte.
Der Frittierbehälter entleert sich nicht
Das Fett ist noch zu heiß. Lassen Sie das Fett abkühlen (etwa 3 Stunden).
Die Entleerungsregler ist nicht auf Automatic Oil Stellen Sie den Entleerungsregler auf die Position
Filtration eingestellt. Automatic Oil Filtration.
Der Metall Feinöl-Filter ist verstopft oder gesättigt. Leeren Sie das Fett in ein Gefäß und reinigen Sie
den Metall Feinöl-Filter mit einer weichen Bürste.
Das Fett ist erstarrt oder gehärtet. Heizen Sie das Gerät für kurze Zeit auf (4-5 min)
Öl läuft aus
Die 3.5 L Füllstands-Markierung im Frittierbehälter Überschreiten Sie den Max. (3,5L) Füllstand des
ist überstiegen. Frittierbehälters
nicht. Reinigen Sie die Fritteuse vor jeder Benutzung.
In der Öl-Aufbewahrungsbox befindet sich noch Öl Stellen Sie den Entleerungsregler auf die Position
oder sie ist voll. Oil Box, entnehmen Sie die Öl-Aufbewahrungsbox
und leeren Sie sie.
Entweichen von unangenehmen Gerüchen
Das Fett ist zu alt. Erneuern Sie das Öl (10-12 Anwendungen).
Das Fett eignet sich nicht zum Frittieren.
Verwenden Sie für ein gutes Frittierergebnis
Pflanzenfett.
Speisen werden nicht goldbraun und bleiben weich
Die Speisen sind zu dick und enthalten zu viel Wasser. Versuchen Sie es mit einer etwas längeren Garzeit
Sie frittieren zu große Mengen und das Öl hat Frittieren Sie die Speisen in kleinen Mengen
nicht die richtige Temperatur. (besonders Tiefkühlkost).
Die Temperatur des Öls ist möglicherweise nicht hoch Stellen Sie den Thermostat auf die angegebene
genug: der Thermostat ist nicht richtig eingestellt. Temperatur ein.
Die Pommes Frites sind klebrig
Sie haben die frischen Pommes Frites vor dem Waschen und trocknen Sie die frischen Pommes
Eintauchen ins Öl nicht gewaschen. Frites vor dem Frittieren.
Die Sicherheitsabschaltung ist aktiviert: Ihre Gerät funktioniert nicht
Der Öl-Füllstand ist nicht hoch genug. Stecken Sie das Gerät aus, lassen Sie es abkühlen
Sie haben direkt festes Fett eingefüllt.
und befolgen Sie die Anweisungen in der
Gebrauchsanleitung. Wenn der Fehlercode erneut
angezeigt wird, drücken Sie die Reset-Taste an der
Rückseite des Geräts. Wenn das Sicherheitssystem
erneut anspringt, müssen Sie das Gerät zu einem
Andere Probleme
Wenn die Kontrolllampe nicht leuchtet. Wenden Sie sich an ein zugelassenes Service Center.
Falls Ihre Fritteuse nicht richtig funktioniert
41
Deu
Das Fett ist noch zu heiß.
Ziehen Sie den Netzstecker, lassen Sie es abküh-
len. Drücken Sie mit einem spitzen, nichtmetalli-
schen Gegenstand (z.B. einem Zahnstocher) die
RESET-Taste (an der Rückseite des Bedienteils).
Wenn die Sicherheitsabschaltung erneut auslöst,
müssen Sie das Gerät zu einem zugelassenen
Service Center bringen.
5085657 Oleoclean.qxp 14/01/09 16:04 Page 43

42
Ita
NORME DI SICUREZZA
Leggere attentamente queste istruzioni e conservarle con cura.
Norme di sicurezza
La sicurezza del presente apparecchio è conforme alle specifiche tecniche e alle norme vigenti
(compatibilità elettromagnetica, bassa tensione, materiali a contatto con alimenti, ambiente…).
Verificare che la tensione di rete corrisponda a quella indicata sull'apparecchio (corrente alternata).
Tenuto conto della differenza delle norme in vigore, se questo apparecchio viene utilizzato in un
paese diverso da quello nel quale è stato acquistato, è necessario farlo verificare da un centro di
assistenza autorizzato.
Questo apparecchio è stato creato per uso esclusivamente domestico all'interno dell'abitazione;
qualsiasi utilizzo professionale, non appropriato o non conforme alle istruzioni d'uso non vincolerà il
produttore ad alcuna responsabilità o garanzia.
Collegamento
• Non utilizzare l'apparecchio se lo stesso o il cavo di alimentazione sono danneggiati o se l'appa-
recchio è caduto e presenta danni visibili o anomalie di funzionamento. In questi casi,
l'apparecchio dovrà essere inviato presso un centro di assistenza autorizzato.
• Collegare sempre l'apparecchio ad una presa di corrente con messa a terra.
• Non utilizzare prolunghe elettriche. Assumendosene la responsabilità, utilizzare una prolunga in
buono stato, con messa a terra e adatta alla potenza dell'apparecchio.
• Se il cavo di alimentazione e’ danneggiato, esso deve essere sostituito dal costruttore o dal suo
servizio assistenza tecnica o comunque da una persona con qualifica similare, in modo da
prevenire ogni rischio.
• Non lasciare pendere il cavo di alimentazione.
• Non scollegare l'apparecchio tirando il cavo.
• Scollegare sempre l'apparecchio dopo l'uso, per spostarlo o per pulirlo.
Funzionamento
• Questo apparecchio non deve essere utilizzato da persone (compresi i bambini) le cui capacità
fisiche, sensoriali o mentali sono ridotte, o da persone prive di esperienza o di conoscenza,
tranne se hanno potuto beneficiare, tramite una persona responsabile della loro sicurezza, di
una sorveglianza o di istruzioni preliminari relative all’uso dell’apparecchio.
• È opportuno sorvegliare i bambini per assicurarsi che non giochino con l’apparecchio.
• Non lasciare mai l'apparecchio in funzione senza sorveglianza. Non lasciare l'apparecchio alla
portata dei bambini.
• Utilizzare una superficie di lavoro stabile, piana e al riparo da eventuali schizzi d'acqua.
• Il presente apparecchio elettrico funziona a temperature elevate suscettibili di causare eventuali
bruciature. Non toccare le superfici calde dell'apparecchio (filtro, oblò, parti metalliche in
vista...).
• Non mettere in funzione l'apparecchio in prossimità di materiale infiammabile (tende), o nelle
vicinanze di fonti di calore esterne (cucina a gas, piastra riscaldante...).
• In caso di incendio, non tentare in nessun caso di spegnere con acqua le fiamme. Chiudere il
coperchio. Soffocare le fiamme con un panno umido.
• Non spostare l'apparecchio quando contiene olii o alimenti caldi.
5085657 Oleoclean.qxp 14/01/09 16:04 Page 44

Ita
Partecipiamo alla protezione dell’ambiente !
Il vostro apparecchio è composto da diversi materiali che possono essere riciclati.
Lasciatelo in un punto di raccolta o presso un Centro Assistenza Autorizzato.
• Se l'apparecchio è dotato di vasca amovibile, non rimuoverla in nessun caso mentre la
friggitrice è in funzione.
• Non immergere in nessun caso l'unità elettrica nell'acqua!
Cottura
• Non collegare mai il cavo di alimentazione se la friggitrice è vuota (senza grasso/olio).
Rispettare le quantità minime e massime di olio.
• In caso di utilizzo di grassi solidi, questi devono essere tagliati a pezzetti e fatti fondere a fuoco
moderato in un recipiente a parte e successivamente versati lentamente nella vasca. Non
introdurre in nessun caso grassi solidi direttamente nella vasca o nel cestello per non
danneggiare l'apparecchio.
• Non introdurre in nessun caso grassi solidi direttamente nel cestello per non danneggiare
l'apparecchio.
• Non mescolare grassi di diverso tipo.
• Non sovraccaricare il cestello e rispettare le quantità di sicurezza.
Raccomandazioni
• Limitare la temperatura di frittura a 170° C specialmente per le patate.
• Per le patatine utilizzare il cestello.
• Controllare la cottura: evitare di mangiare gli alimenti fritti se sono bruciati e preferire fritture
leggermente dorate.
• Per evitare che i residui brucino, filtrare l'olio dopo ogni utilizzo e cambiarlo regolarmente.
• Non conservare la friggitrice all'esterno per evitare un indesiderabile apporto d'acqua nell'olio.
Preferire un luogo asciutto e areato.
• Seguire una dieta equilibrata e diversificata, che comprenda almeno 5 porzioni di frutta e
verdura al giorno.
• Conservare le patate a una temperatura superiore a 8° C.
• Per una frittura rapida e di qualità, ridurre la quantità di alimenti a 1/2 cestello per ogni
immersione.
• Se il cestello viene immerso pieno di alimenti, la temperatura dell'olio si abbassa troppo
rapidamente. Durante la frittura, questa non supera mai i 175° C anche se il termostato è
regolato su 190° C (= temperatura stabilizzata prima dell'immersione).
Per qualsiasi problema, contattare il centro di assistenza autorizzato o consultare l'indirizzo
Internet groupeseb.com.
Qualsiasi intervento deve essere effettuato esclusivamente da un centro di assistenza autorizzato con pezzi
di ricambio originali.
43
5085657 Oleoclean.qxp 14/01/09 16:04 Page 45

Descrizione
1. Coperchio
a. Filtro permanente
b. Maniglia
c. Oblò
2. Unità elettrica amovibile
3. Cestello
a. Maniglia
b. Livello massimo per gli alimenti
4. Vasca amovibile
5. Riferimenti di riempimento della
vasca
6. Patta di aggancio del cestello in
posizione alta
7. Griglia fissa di filtraggio del
grasso/olio
8. Maniglie per il trasporto
9. Manopola Oil box
10. Base
11. Oil box: contenitore per olio/grassi
a. Coperchio
b. Tappo
12. Piedini anti-scivolo
13. Pannello di controllo
a. Interruttore «on/off» (O/I)
b. Comando del termostato
c. Spia luminosa della temperatura
14. Tasto Reset
Funzione RESET: l'apparecchio è dotato di un dispositivo di sicurezza. Se questo si
attiva, l'apparecchio smette di funzionare.
Scollegare l'apparecchio, lasciarlo raffreddare e ricollegare
l’apparecchio.
Per rimettere in funzione la friggitrice, premere il tasto RESET
situato nella parte posteriore dell'apparecchio servendosi di un
oggetto appuntito (non metallico). (fig.35)
Se il dispositivo di sicurezza si attiva nuovamente, portare
l'apparecchio in un centro di assistenza autorizzato.
14
44
Ita
13. 13.
a
13.
c
13.
b
5085657 Oleoclean.qxp 14/01/09 16:04 Page 46

Filtraggio, drenaggio e conservazione automatica dell'olio
La friggitrice è dotato di un sistema esclusivo e brevettato di filtraggio e drenaggio
automatico adatto a tutti i tipi di olii e grassi alimentari.
l Il drenaggio dell'olio è automatico e totalmente sicuro.
l Grazie al sistema di filtraggio automatico, l'olio rimane pulito e dura più a lungo
per una frittura più sana. Infatti eliminando i residui di fritto si sviluppano meno
odori.
l La conservazione dei diversi olii/grassi nei contenitori OIL BOX permette di preser-
vare il gusto degli alimenti (patatine, pesce, frittelle) e di impedire che i sapori
si mescolino.
Pulizia semplicissima
La friggitrice è semplicissima da manipolare e da smontare.
l Tutti i pezzi, eccetto l'unità elettrica, possono essere messi in lavastoviglie.
l Grazie al sistema di filtraggio e di conservazione dell'olio, la friggitrice può
essere vuotata e messa in lavastoviglie dopo ogni frittura. Pulita come nuova
dopo ogni utilizzo.
Utilizzo della manopola Oil box
• La manopola Oil box presenta 3 posizioni. (fig. 1)
Posizione Fry: per friggere. (fig. 2)
Posizione Automatic Oil Filtration: per svuotare e filtrare il contenitore per
l'olio. (fig. 3)
Posizione Oil Box: per inserire o rimuovere il contenitore per olio. (fig. 4)
Al primo utilizzo
• La friggitrice può essere completamente smontata. (fig. 5)
Rimuovere il coperchio. Rimuovere il cestello, l'unità elettrica e la vasca.
Rimuovere il contenitore per l'olio portando la manopola Oil box sulla posizione
Oil box. (fig. 4)
Non immergere in nessun caso l'unità elettrica nell'acqua!
• Lavare il coperchio, la vasca, la base, il cestello e il contenitore per l'olio con una
spugna umida e detergente per i piatti o in lavastoviglie. (fig. 6)
Pulire l'unità elettrica con una spugna umida. (fig. 7)
Asciugare con cura.
• Dopo la pulizia, premere il tasto rosso posto sotto la vasca per far uscire
l'acqua rimasta all'interno. (fig. 8)
Verificare che il tasto rosso sia ritornato in posizione corretta.
!
!
45
Ita
5085657 Oleoclean.qxp 14/01/09 16:04 Page 47

46
Ita
• Reinserire la vasca e l'unità elettrica. (fig. 9-10)
Verificare che l'unità elettrica sia posizionata correttamente altrimenti la friggitrice
non funziona.
• Portare la manopola Oil box nella posizione Oil box e inserire il contenitore
per l'olio vuoto nella friggitrice. (fig. 4-11)
• Sollevare completamente la maniglia del cestello fino a sentire un "clic" che ne
indica il corretto posizionamento. (fig. 12)
La vostra firggitrice deve essere utilizzata sempre all'interno dell'abitazione.
Preparazione
• Riempire la vasca con grasso/olio. (fig. 13)
Il livello del grasso/olio deve sempre situarsi tra le tacche "min"
e "max" della vasca (fig. 14). Non riempite mai la vasca oltre il
livello massimo, perché questo potrebbe far traboccare la vasca
e provocare gravi bruciature.
Non mescolare grassi di diverso tipo per non causare fuoriuscite.
Utilizzare un grasso alimentare liquido specifico per friggere.
Per la frittura seguire le indicazioni del produttore.
Prima di ogni frittura verificare il livello di olio e se necessario aggiungerne dello
stesso tipo.
• In caso di utilizzo di grassi solidi, questi devono essere tagliati a
pezzetti, fatti fondere in un recipiente a parte e successivamente
versati nella vasca. (fig. 15-16)
In ogni caso evitare di far fondere grasso solido sulla resistenza o nel cestello.
Cottura
• Portare la manopola Oil box in posizione Fry. (fig. 17)
• Dopo aver riempito la vasca con olio, collegare la friggitrice senza il. (fig. 18)
Non collegare mai il cavo di alimentazione quando la friggitrice è senza olio o grasso.
!
!
!
!
!
!
Max 3,5 L
Min 2,8 L
Max 3060 g
Min 2450 g
5085657 Oleoclean.qxp 14/01/09 16:04 Page 48

47
Ita
• Posiziona il pulsante On/Off sulla posizione I e si accenderà l’indicatore
luminoso. Regola il termostato variabile sulla temperatura desiderata (vedi le
tabelle di cottura p.48). (fig.19-20)
• La friggitrice si sta scaldando.
L’indicatore luminoso della temperatura si spegnerà al raggiungimento
della temperatura desiderata.
• Posizionare gli alimenti surgelati nel cestello senza sovraccaricarlo. Non
oltrepassare mai il livello massimo indicato sul cestello ("MAX"). Per i surgelati
ridurre le quantità. (fig. 21)
Per evitare fuoriuscite e prolungare la durata dell'olio, asciugare con cura gli
alimenti prima di farli friggere
• Dopo che l’indicatore luminoso della temperatura si è spento, posiziona e abbassa
il cestello nell’olio che frigge. Immergere il cestello troppo velocemente può
provocare fuoriuscite. (fig.22-23)
Durante la cottura, il fatto che la spia luminosa della temperatura si accenda e si
spenga è del tutto normale.
Non toccare l'apparecchio quando è in funzione. Alcune parti molto calde
potrebbero provocare gravi bruciature. Anche il vapore che esce dal coperchio ha
una temperatura estremamente elevata
(fig.24)
• Riposizionare il coperchio sulla friggitrice
La frittura è pronta allo scadere del tempo impostato e quando gli alimenti
hanno raggiunto il colore e la consistenza desiderata.
• Rimuovere il coperchio.
Per evitare spruzzi, non fate ricadere la condensa del coperchio nell'olio ma fatela
sgocciolare accuratamente sopra un panno o una carta assorbente messa accanto
alla friggitrice.
Far sgocciolare gli alimenti posizionando il cestello sull'apposito supporto. (fig. 25)
• Servire (fig. 26)
Una volta terminata la frittura, impostate i termostato sulla posizione minima e
l’interruttore su «O».
!
!
!
!
Patatine fresche Patatine surgelate
Quantità di sicurezza 1,2 kg in 2 immersioni 900 g
Quantità raccomandata 600 g 450 g
5085657 Oleoclean.qxp 14/01/09 16:04 Page 49

48
Ita
Scollegare l'apparecchio e lasciarlo raffreddare per circa 3 ore.
• Per filtrare e travasare il grasso/olio, consultare il capitolo Manutenzione.
Tabella di cottura
I tempi di cottura sono forniti a titolo indicativo. Possono variare a seconda delle
quantità e dei gusti.
Per ottenere i migliori risultati ed evitare che li liquido trabocchi durante la
cottura di patatine fresche, si raccomanda la cottura tradizionale in due bagni:
- primo, a 160 °C
- secondo, a 190 °C
Manutenzione e Pulizia
• Portare la manopola Oil box in posizione Automatic Oil Filtration. (fig. 27-28)
• Per la vostra sicurezza, l'apparecchio garantisce automaticamente il dernaggio
quando l'olio è sufficientemente freddo (circa 3 ore dopo l'ultima frittura).
Prima di svuotare la vasca assicurarsi che il contenitore per l'olio sia vuoto.
• Quando il filtraggio è terminato, il contenitore per l'olio può essere conservato:
- nell'apparecchio: ruotare la manopola Oil box in posizione Fry. (fig.17).
L'apparecchio deve essere trasportato e conservato in piano.
- fuori dall'apparecchio: attendere 3 ore, ruotare la manopola Oil box in posizione
Oil box e rimuovere il contenitore per l'olio. (fig. 29-30)
Quando il contenitore dell'olio è pieno, non lavatelo sotto l'acqua. Per pulirlo utilizzate
la carta assorbente o una spugna umida.
Il contenitore per l'olio deve sempre essere conservato coperto, in pozione orizzontale,
in luogo fresco e asciutto e al riparo dalla luce
!
!
!
Quantità Temperatura Tempo Quantità Temperatura Tempo
Patatine (quantità di
sicurezza)
1200 g
1a immersione 160°C
2a immersione 190°C
10-12 min
5-8 min
900 g 190°C 8-13 min
Patatine (quantità
max. raccomandata)
600 g 170°C 9-13 min 450 g 170°C 6-9 min
Crocchette di pollo
400 g 180°C 14-15 min 400 g 190°C 5-7 min
Frittelle di frutta
8-9 170°C 5-6 min 8-9 190°C 5-7 min
Funghi
400 g 160°C 10-12 min 8-9 190°C 7-8 min
Filetti di pesce
400 g 160°C 6-7 min 8-9 190°C 5-6 min
Alimenti freschi
Alimenti surgelati
5085657 Oleoclean.qxp 14/01/09 16:04 Page 50

49
Ita
• Prima di rimuovere il contenitore per l'olio attendere almeno 2 ore. Trasportarlo
con attenzione.
• Per riutilizzare il grasso/olio, prendere in mano il contenitore con attenzione.
Svitare il tappo, poi vuotare l'olio nella vasca. (fig. 31-32)
• Per grassi solidi, rimuovere il coperchio. Capovolgere il contenitore e far
pressione per liberare il grasso. Tagliare il grasso a pezzetti quindi versarlo in un
recipiente per farlo fondere. Successivamente versarlo nella vasca. (fig. 33-34)
Non introdurre mai il contenitore per l'olio nel microonde.
• Inserire nell'apparecchio il contenitore Oil box vuoto con il coperchio e il tappo.
Riportare la manopola Oil box in posizione Fry. (fig. 17)
Non versare il grasso usato nel lavandino. Lasciarlo raffreddare e gettarlo nei rifiuti
casalinghi.
Cambio dell’olio :
• Non versate mai il grasso usato nel lavello. Lasciatelo raffreddare poi buttatelo
con i rifiuti domestici, conformemente alle normative locali.
ATTENZIONE:
• Cambiate l’olio almeno ogni 10/12 utilizzi.
• Se stai usando olio di girasoli, assicurati di cambiare l’olio ogni 5 utilizzi.
Magiclean : facilissima da pulire.
• Il coperchio, la vasca, la base, il cestello e il contenitore per l'olio possono
essere lavati in lavastoviglie. (fig. 36)
• La griglia di filtraggio situata nella vasca è fissa.
Non smontarla. (fig. 37)
• Dopo la pulizia, premere il tasto rosso posto sotto la vasca per far uscire l'acqua
rimasta all'interno. (fig. 8)
Prima di riempire la vasca, verificare che il tasto rosso sia ritornato in posizione
corretta.
!
!
!
5085657 Oleoclean.qxp 14/01/09 16:04 Page 51

50
Ita
Problemi e possibili cause Soluzioni
La friggitrice non si scalda
L'apparecchio non è collegato. Collegare la spina.
L'olio che frigge fuoriesce
Si è superato il livello massimo di riempimento Verificare il livello dell'olio e rimuovere l'eccedenza.
della vasca.
Si è superato il livello massimo di riempimento Verificare il livello cestello e rimuovere l'eccedenza.
del cestello.
Gli alimenti sono umidi o contengono troppa Togliere il ghiaccio e asciugare bene gli alimenti.
acqua (ex. surgelati). Immergere il cestello molto lentamente.
Miscela di olii e/o grassi diversi Gettare il grasso/olio e pulire la vasca.
Riempire con grasso/olio di uno stesso tipo.
La vasca non si svuota
Il grasso/olio è troppo caldo. Attendere che il grasso/olio si raffreddi (circa 3 ore).
La manopola Oil box non si trova in posizione Portare la manopola Oil box in posizione
Automatic Oil Filtration. Automatic Oil Filtration.
La griglia di filtraggio è tappata o intasata. Vuotare la vasca in un recipiente e pulire la
griglia servendosi di una spazzola non metallica.
Il grasso è incastrato o solidificato. Far scaldare (da 4 a 5 minuti) la friggitrice.
Perdite di olio
Si è superato il livello di riempimento della vasca Rispettare il livello di riempimento massimo (3,5
corrispondente a 3,5 Litri. Litri)della vasca. Pulire la friggitrice prima di uti-
lizzarla ulteriormente.
Il recipiente per l'olio è pieno o contiene altro olio Portare la manopola Oil box nella posizione Oil box,
rimuovere il contenitore per l'olio e svuotarlo.
Emissione di cattivi odori
Il grasso/olio deve essere sostituito. Rinnovare l'olio di frittura (10 a 12 utilizzi).
Il grasso/olio non è adatto.
Utilizzare un olio vegetale raccomandato per una frit-
tura di buona qualità.
Gli alimenti non si dorano e rimangono molli
Sono troppo spessi e contengono troppa acqua. Provare a prolungare il tempo di frittura.
Si stanno friggendo contemporaneamente troppi Friggere gli alimenti in piccole quantità special-
alimenti e l'olio di frittura non è alla giusta temperatura. mente se surgelate).
La temperatura dell'olio di frittura non è abbastanza Regolare il termostato alla temperatura consigliata.
alta: il termostato è regolato scorrettamente.
Le patatine fritte si incollano
Le patatine fresche non sono state lavate prima Lavare e asciugare con cura le patatine fresche
di essere immerse nell'olio. prima di friggerle.
Il dispositivo di sicurezza si è attivato: la friggitrice non funziona
Il livello di olio è insufficiente. Scollegare l'apparecchio, lasciarlo raffreddare
grasso è stato inserito direttamente ancora solido
. e seguire le indicazioni riportate nelle istruzioni
d'uso. Se il codice di errore appare di nuovo, pre-
mere il tasto RESET situato nella parte posteriore
dell'apparecchio. Se il dispositivo di sicurezza si
attiva nuovamente, po
Altri problemi
L’indicatore luminoso non si accende. Prego contattare il nostro Servizio Assistenza.
Cosa fare se la friggitrice non funziona?
Il grasso/olio è troppo caldo.
Scollegare l'apparecchio, lasciarlo raffreddare e
ricollegare l’apparecchio. Premere il tasto RESET
situato nella parte posteriore dell'apparecchio.
Se il dispositivo di sicurezza si attiva nuovamente,
portare l'apparecchio in un centro di assistenza
autorizzato.
5085657 Oleoclean.qxp 14/01/09 16:04 Page 52

51
Esp
INSTRUCCIONES DE SEGURIDAD
Leer atentamente estas instrucciones y conservarlas cuidadosamente.
Instrucciones de seguridad
La seguridad de este aparato es conforme a las reglas técnicas y a las normas en vigor (Compatibilidad
Electromagnética, Baja Tensión, materiales en contacto con alimentos, medio ambiente…).
Compruebe que el voltaje corresponde correctamente con el mostrado en el aparato (corriente alterna).
Debido a la diversidad de las normas en vigor, si el aparato se va a utilizar en otro país diferente al de
su compra, deberá llevarlo a revisar a un Servicio Técnico Autorizado.
Este aparato ha sido diseñado exclusivamente para uso doméstico. No utilice el aparato en el exterior.
Toda utilización de tipo profesional o comercial, inadecuada o en desacuerdo con las instrucciones de
uso, anula la responsabilidad y la garantía del fabricante.
Conexión
• No utilice el aparato si éste o su cable está defectuoso, si el aparato se ha caído y presenta
daños visibles o anomalías de funcionamiento. En este caso, deberá llevar el aparato a un
Servicio Técnico Autorizado.
• Siempre conecte el aparato a un enchufe con toma de tierra.
• No utilice alargador. Si asume la responsabilidad, utilice un alargador en buen estado con toma
de tierra y adaptado a la potencia del aparato.
• Si el cable de alimentación está dañado, éste tiene que ser sustituido por el fabricante, o en un
Servicio Técnico autorizado, o una persona cualificada, para evitar cualquier peligro.
• No deje el cable colgando.
• No desenchufe el aparato tirando del cable.
• Siempre desenchufe el aparato: después de su utilización, para desplazarlo o para limpiarlo.
Funcionamiento
• Este aparato no está previsto para que lo utilicen personas (incluso niños) cuya capacidad
física, sensorial o mental esté disminuida, o personas sin experiencia o conocimientos, excepto
si pueden recibir a través de otra persona responsable de su seguridad, una vigilancia
adecuada o instrucciones previas relativas a la utilización del aparato.
• Conviene vigilar a los niños para asegurarse de que no juegan con el aparato.
• No deje nunca el aparato funcionando sin vigilancia. No lo deje al alcance de los niños.
• Utilice una superficie de trabajo estable, plana protegida de las salpicaduras de agua.
• Este aparato eléctrico funciona a altas temperaturas que pueden provocar quemaduras. No
toque las superficies calientes del aparato (filtro, ventana, partes metálicas visibles…).
• No ponga a funcionar el aparato cerca de materiales inflamables (estores, cortinas…), ni cerca
de una fuente de calor exterior (cocina de gas, placa calentadora…).
• En caso de incendio, no intente nunca apagar las llamas con agua. Cierre la tapa. Apague las
llamas con un paño húmedo.
• No desplace el aparato si contiene líquidos o alimentos calientes.
• Si tiene una cuba extraíble, no la retire nunca cuando la freidora esté funcionando.
• ¡No sumerja nunca la resistencia eléctrica en agua!
5085657 Oleoclean.qxp 14/01/09 16:04 Page 53

52
Esp
¡ ¡ Participe en la conservación del medio ambiente ! !
Su electrodoméstico contiene materiales recuperables y/o reciclables.
Entréguelo al final de su vida útil, en un Centro de Recogida Específico o en uno de
nuestros Servicios Oficiales Post Venta donde será tratado de forma adecuada.
Cocción
• No conecte nunca la freidora vacía (sin grasa/aceite). Respete las cantidades mínimas y
máximas de aceite.
• Si utiliza grasa sólida, córtela en trozos y derrítala a fuego lento en un recipiente aparte y a
continuación viértala lentamente en la cuba. No ponga nunca la grasa sólida directamente en la
cuba o en el cestillo, si lo hace el aparato podría dañarse.
• No ponga nunca la grasa sólida directamente en la cuba o en el cestillo, si lo hace el aparato
podría dañarse.
• No mezcle diferentes tipos de grasa.
• No sobrecargue el cestillo, respete la cantidad límite de seguridad.
Recomendaciones
• Limite la temperatura de cocción a 170°C en especial para las patatas fritas.
• Utilice el cestillo para freír las patatas fritas.
• Controle la cocción: no coma los alimentos fritos cuando estén quemados y elija una fritura
ligeramente dorada.
• Filtre el aceite después de cada utilización para evitar que los residuos se quemen y cámbielo
con regularidad.
• No almacene la freidora en el exterior, de este modo evitará una cantidad de agua no deseable
en el baño de aceite. Es mejor un lugar seco y ventilado.
• Siga una dieta equilibrada y variada que se componga de al menos 5 frutas y verduras al día.
• Almacene las patatas por encima de los 8°C.
• Para una cocción rápida y satisfactoria, limite la cantidad de patatas a 1/2 cestillo por baño.
• La inmersión del cestillo lleno hace disminuir muy rápidamente la temperatura del aceite.
Durante la cocción, éste no sobrepasa nunca los 175°C, incluso si el termostato está regulado
a 190°C (= temperatura estabilizada antes de inmersión).
Para cualquier tipo de problema, póngase en contacto con su Servicio Técnico Autorizado o
contacte con nuestro Servicio Consumidor 902312400
Cualquier intervención debe ser realizada únicamente por un Servicio Técnico Autorizado con piezas sueltas
originales.
5085657 Oleoclean.qxp 14/01/09 16:04 Page 54

53
Esp
Descripción
1. Tapa
a. Filtro permanente
b. Asa
c. Ventana
2. Resistencia extraíble
3. Cestillo
a. Asa
b. Nivel máximo para los alimentos
4. Cuba extraíble
5. Indicaciones de niveles de la cuba
6. Ranura de enganche del cestillo en
posición alta
7. Rejilla fija de filtración de la
grasa/aceite
8. Asas de transporte
9. Botón de mando Oil box
10. Cuerpo del aparato
11. Oil box: contenedor de aceite
a. Tapa
b. Tapón
12. Pies anti-deslizantes
13. Panel de control
a. Botón de marcha/parada (O/I)
b. Termostato variable
c. Indicador luminoso de
temperatura
14. Botón Reset
Función RESET: El aparato está equipado de un sistema de seguridad. Cuando el
sistema de seguridad se activa, el aparato deja de funcionar.
Desconecte el aparato, déjelo enfriar y vuelva a conectar la
freidora.
Para reinicializar la freidora, presione el botón RESET situado en
la parte posterior del panel de control con un objeto puntiagudo
no metálico (un palillo de dientes o algo similar). (fig.35)
Si el sistema de seguridad se activa de nuevo, lleve su aparato
a un Servicio Técnico Autorizado.
14
13. 13.
a
13.
c
13.
b
5085657 Oleoclean.qxp 14/01/09 16:04 Page 55

54
Esp
Filtración, vaciado y almacenamiento automático del aceite
La freidora está equipada con un sistema exclusivo y patentado de filtración y dre-
naje automático, recomendado para todos los tipos de aceites y grasas alimenta-
rias.
l El vaciado de aceite/grasa es automático y totalmente seguro.
l Gracias a la filtración automática, el aceite/grasa está limpio y dura más tiempo
para una fritura más sana. Si retira los residuos de la fritura, despedirá menos olor.
l El almacenamiento del aceite/grasa en el contenedor OIL BOX le permitirá pre-
servar el sabor de los alimentos (patatas fritas, pescado, buñuelos…) y no mez-
clar los sabores.
Limpieza ultra fácil
PRO FRY OLEOCLEAN es fácil de manejar y desmontar.
l Todas las piezas se pueden lavar en el lavavajillas excepto la resistencia eléctrica.
l Gracias al sistema de filtración y al almacenaje de aceite, la freidora queda vacía
de aceite y se puede lavar en el lavavajillas después de cada cocción. Limpia
como nueva después de cada utilización.
Utilización del botón de mando Oil box
• El botón de mando Oil box posee 3 posiciones. (fig.1)
Posición Fry: para freír. (fig.2)
Posición Automatic Oil Filtration: para vaciar y filtrar el aceite en el conte-
nedor de aceite. (fig.3)
Posición Oil Box: para colocar o retirar el contenedor de aceite. (fig.4)
Antes de la primera utilización
• La freidora puede desmontarse por completo. (fig.5)
Retire la tapa. Retire el cestillo, la resistencia eléctrica y la cuba. Retire el
contenedor de aceite presionando el botón de mando Oil box en la posición Oil
box. (fig.4)
No sumerja nunca la resistencia eléctrica en agua.
• Limpie la tapa, la cuba, el cuerpo del aparato, el cestillo y el contenedor de
aceite con una esponja húmeda y jabón líquido para vajillas o lávelos en el
lavavajillas. (fig.6)
Limpie la resistencia eléctrica con una esponja húmeda. (fig.7)
Seque bien.
• Después de cada limpieza, presione el botón rojo situado debajo de la cuba
para permitir que salga el agua que queda en el interior. (fig.8)
!
5085657 Oleoclean.qxp 14/01/09 16:04 Page 56

55
Esp
Compruebe que el botón rojo ha vuelto a la posición correcta.
• Coloque en su sitio la cuba y la resistencia eléctrica. (fig.9-10)
Compruebe que la resistencia eléctrica esté colocada correctamente, si no la
freidora no funcionará.
• Coloque el botón de mando Oil box en la posición Oil box y ponga el
contenedor de aceite vacío en la freidora. (fig.4-11)
• Despliegue por completo el asa del cestillo: un "clic" le indicará que ya está
colocada. (fig.12)
La freidora debe de ser siempre utilizada al interior de la habitación.
Preparación
• Llene la cuba con aceite/grasa. (fig.13)
El nivel de aceite/grasa debe estar siempre entre las marcas míni
y máxi de la cuba (fig.14). Nunca exceda el nivel máximo de
llenado marcado en el tanque.
No mezcle diferentes tipos de aceites/grasas, esto podría causar desbordamientos.
Utilice aceite/grasa alimentaria líquida recomendada para la fritura.
Siga las recomendaciones del fabricante para la cocción.
Compruebe antes de cada cocción el nivel de aceite/grasa y rectifique si fuera
necesario con el mismo aceite.
• Si utiliza grasa sólida, córtela en pedazos y derrítala en una
cacerola aparte, a continuación viértala en la cuba. (fig.15-16)
No derrita nunca la grasa sólida sobre la resistencia o en el cestillo.
!
!
!
!
!
!
Máxi 3,5 L
Míni 2,8 L
Máxi 3060 g
Míni 2450 g
5085657 Oleoclean.qxp 14/01/09 16:04 Page 57

56
Esp
Cocción
• Coloque el botón de mando Oil box en la posición Fry. (fig.17)
• Después de que haya llenado la cuba con aceite, conecte la freidora sin el cestillo.
(fig. 18)
No conecte nunca la freidora sin aceite/grasa.
• Presione el botón marcha/parada hasta la posición I y el indicador luminoso de
temperatura se encenderá. Con el termostato, seleccione la temperatura que
desea ( vea tablas de cocción p. 57 ). (fig.19-20)
• La freidora está calentando.
• Coloque los alimentos en el cestillo sin sobrecargarlo. No sobrepase el nivel
máximo indicado en el cestillo "MÁX". Reduzca las cantidades para los
congelados. (fig.21)
Para evitar los desbordamientos y prolongar la vida del aceite, seque cuidadosamente
los alimentos antes de cocinarlos.
• Cuando la luz del indicador de temperatura se apaga, ponga y baje el cesto
lentamente en el aceite friendo. Bajar el cestillo demasiado rápido podría causar
desbordamientos.(fig.22-23)
Durante la cocción es normal que el indicador luminoso de temperatura se encienda y
se apague.
No toque el aparato mientras esté funcionando. Algunas partes muy calientes
podrían causar serias quemaduras. El vapor que sale por la tapa está
ardiendo (fig.24)
• Vuelva a poner la tapa a la freidora.
La cocción habrá terminado cuando el tiempo de cocción haya transcurrido y
los alimentos hayan alcanzado el color y la textura deseados.
• Retire la tapa.
Para evitar salpicaduras, no deje caer el vapor condensado de la tapa en el baño de aceite.
!
!
!
!
Patatas fritas frescas Patatas fritas congeladas
Cantidad límite de seguridad 1.2 kg en 2 baños 900 g
Cantidad recomendada 600 g 450 g
5085657 Oleoclean.qxp 14/01/09 16:04 Page 58

57
Esp
Escurra cuidadosamente encima de un paño o de un papel absorbente colocado al lado
de la freidora.
Escurra los alimentos colocando el cestillo en la fijación prevista a este efecto. (fig.25)
• Sirva (fig.26)
Cuando la fritura está terminada, presione el botón marcha/parada hasta la posición O.
Desconecte el aparato y déjelo enfriar aproximadamente 3 horas.
• Para filtrar y vaciar el aceite/grasa, diríjase al capítulo Mantenimiento.
Cuadro de cocción
Los tiempos de cocción se dan sólo a título indicativo. Pueden variar en función
de las cantidades y los gustos personales.
Para obtener mejores resultados y evitar los desbordamientos durante la cocción de pata-
tas fritas frescas, se recomienda la cocción tradicional en dos baños:
- primero, a 160 °C
- segundo, a 190 °C
Mantenimiento y Limpieza
• Gire el botón de mando Oil box en la posición Automatic oil filtration. (fig.27-28)
• Para su seguridad, el producto asegura de manera automática el vaciado
cuando el aceite/grasa ha enfriado lo suficiente (aproximadamente 3 horas
después de la última cocción).
Asegúrese de que el contenedor de aceite está vacío antes de vaciar la cuba.
• Una vez que la filtración haya terminado, puede guardar el contenedor de aceite:
- En el aparato: gire el botón de mando Oil box en la posición Fry. (fig.17). El
aparato debe transportarse y guardarse en posición horizontal.
- Fuera del aparato: Espere 3 horas, gire el botón de mando Oil box en posición
Oil box y retire el contenedor de aceite. (fig.29-30)
!
Cantidad Temperatura Tiempo Cantidad Temperatura Tiempo
Patatas fritas (cantidad
límite de seguridad)
1200 g
1
er
baño 160°C
2
º
baño 190°C
10-12 min.
5-8 min.
900 g 190°C 8-13 min.
Patatas fritas (cantidad
máx. recomendada)
600 g 170°C 9-13 min. 450 g 170°C 6-9 min.
Nuggets de pollo
400 g 180°C 14-15 min. 400 g 190°C 5-7 min.
Buñuelos de fruta
8-9 170°C 5-6 min. 8-9 190°C 5-7 min.
Setas
400 g 160°C 10-12 min. 8-9 190°C 7-8 min.
Filetes de pescado
400 g 160°C 6-7 min. 8-9 190°C 5-6 min.
Alimentos frescos
Alimentos congelados
5085657 Oleoclean.qxp 14/01/09 16:04 Page 59

58
Esp
Cuando el tanque para el aceite está lleno (de aceite), no lo pase bajo el agua.
Para limpiarlo, utilise papel absorbente o una esponja húmeda.
Guarde siempre el contenedor de aceite en posición horizontal con la tapa y en un
lugar seco y templado protegido de la luz.
• Espere al menos 2 horas antes de retirar el contenedor de aceite. Transpórtelo
con precaución.
• Para reutilizar el aceite/grasa, coja el contenedor de aceite con cuidado.
Desenrosque el botón, y vacíe el aceite en la cuba.(fig.31-32)
• Para la grasa sólida, retire la tapa. Déle la vuelta al contenedor de aceite y presione
por arriba para despegar la grasa. Corte la grasa en pedazos y a continuación
viértala en una cacerola para derretirla. Entonces viértala en la cuba. (fig.33-34)
No coloque nunca el contenedor de aceite en el microondas.
• Coloque el contenedor vacío Oil box, provisto de su tapa y del botón.
Coloque el botón de mando Oil box en la posición Fry. (fig.17)
No vierta el aceite/grasa utilizado por el fregadero. Déjelo enfriar y tírelo a la
basura.
Cambio del aceite :
• Nunca vierta la materia grasa usada por el fregadero. Déjela enfriar y tírela con
la basura doméstica, según las reglamentaciones locales.
PRECAUCIONES :
• Cambie la materia grasa al menos cada 10 a 12 utilizaciones.
Si utiliza aceite de girasol, cámbielo cada 5 utilizaciones.
Magiclean : Muy fácil de limpiar.
• La tapa, la cuba, el cuerpo del aparato, el cestillo y el contenedor de aceite
pueden ir al lavavajillas. (fig.36)
• La rejilla de filtración situada en la cuba está fija.
No la desmonte. (fig.37)
• Después de cada limpieza, presione el botón rojo situado en la cuba para dejar
salir el agua que queda en el interior. (fig.8)
Antes de llenar la cuba, compruebe que el botón rojo ha vuelto a la posición
correcta.
!
!
!
!
!
5085657 Oleoclean.qxp 14/01/09 16:04 Page 60

59
Esp
Problemas y causas posibles Soluciones
La freidora no calienta
El aparato no está conectado. Conecte el aparato.
El baño de fritura se desborda
La marca Máx de llenado de la cuba se ha Compruebe el nivel del aceite y retire el sobrante.
sobrepasado.
La marca Máx de llenado del cestillo se ha Compruebe el nivel del cestillo y retire el sobrante
sobrepasado.
Los alimentos están húmedos o contienen Retire el hielo y seque bien los alimentos.
demasiada agua (ej. Congelados). Baje el cestillo con cuidado.
Mezcla de aceites y/o grasas diferentes. Tire el aceite/grasa y limpie la cuba.
Rellene la cuba con un solo tipo de aceite/grasa.
La cuba no se vacía
El aceite/grasa está demasiado caliente. Espere a que el aceite/grasa se enfríe
(aproximadamente 3h).
El botón de mando Oil box no está en la Coloque el botón de mando Oil box en la
posición Automatic oil filtration. posición Automatic oil filtration.
La rejilla de filtración está taponada u obstruida. Vacíe la cuba en un recipiente y limpie la rejilla
con un cepillo no metálico.
El aceite/grasa está cuajada o solidificada. Ponga a calentar (de 4 a 5 min.) la freidora.
Fugas de aceite
Le marca correspondiente a 3.5L de llenado Respete el nivel máx. (3,5L) de llenado de la cuba.
la cuba se ha sobrepasado. Limpie la freidora antes de volverla a utilizar.
Queda aceite en el contenedor de aceite Coloque el botón de mando Oil box en la posición
o éste está lleno. Oil box, retire el contenedor de aceite y vacíelo.
Emite olores desagradables
El aceite/grasa se ha deteriorado. Renueva el aceite/grasa de fritura (10 a 12 utilizaciones).
El aceite/grasa no es apto.
Utilice aceite/grasa vegetal para una fritura de buena
calidad.
Los alimentos no se doran y se quedan blandos
Son demasiado gruesos y contienen mucha agua. A título de prueba, prolongue el tiempo de cocción.
Se cocinan demasiados alimentos a la vez y el baño de Fría los alimentos en cantidades pequeñas
de aceite ya no se encuentra a una temperatura (especialmente cuando estén congelados).
adecuada.
La temperatura del baño de fritura puede ser Ajuste el termostato a la temperatura.
insuficiente: el termostato está mal ajustado. recomendada.
Las patatas fritas se pegan
Las patatas fritas frescas no se han lavado antes Lave y seque cuidadosamente las patatas fritas
de sumergirlas en el aceite. frescas antes de la cocción.
El sistema de seguridad se ha activado: la freidora no funciona
El nivel de aceite es insuficiente. Desconecte el aparato, déjelo enfriar y siga las
La grasa sólida se ha introducido directamente.
linstrucciones del modo de empleo. Si el código
error aparece de nuevo, presione el botón Reset
situado en la parte posterior del aparato. Si el sis-
tema de seguridad se activa de nuevo, lleve el
Otros problemas
La luz del indicador luminoso no prende. Por favor contacte con su Centro de Servicio
Autorizado.
Si su freidora no funciona bien
El aceite/grasa está demasiado caliente.
Desconecte el aparato, déjelo enfriar. Presione el
botón Reset situado en la parte posterior del apa-
rato. Si el sistema de seguridad se activa de
nuevo, lleve el aparato a un Servicio Técnico
Autorizado.
5085657 Oleoclean.qxp 14/01/09 16:04 Page 61

60
Por
CONSELHOS DE SEGURANÇA
Leia atentamente o manual de instruções e guarde-o para futuras utilizações.
Conselhos de segurança
Para a sua segurança, este aparelho encontra-se em conformidade com as normas e regulamentações
aplicáveis (Directivas de Baixa Tensão, Compatibilidade Electromagnética, Materiais em contacto com
os alimentos, ambiente, ...).
Certifique-se que a tensão da sua instalação eléctrica está em conformidade com a tensão indicada no
aparelho (corrente alterna).
Dada a diversidade das normas em vigor, se o aparelho for utilizado num país que não aquele onde o aparelho
foi adquirido, leve-o a um Serviço de Assistência Técnica autorizado para proceder à sua verificação.
Este aparelho foi concebido para um uso doméstico e no interior de casa. Qualquer utilização para fins
profissionais, não adequada ou não conforme ao manual de instruções liberta o fabricante de qualquer
responsabilidade e anula a garantia.
Ligação
• Não utilize o aparelho se este ou o cabo de alimentação se encontrar de alguma forma danifi-
cado, se o aparelho tiver caído ou apresentar danos visíveis ou problemas de funcionamento.
Neste caso, dirija-se ao Serviço de Assistência Técnica autorizado.
• Ligue sempre o aparelho numa tomada com ligação à terra.
• Se necessitar de utilizar uma extensão, certifique-se que esta se encontra em bom estado, isto
é, com ligação à terra e adaptada à potência do aparelho.
• Se o cabo de alimentação se encontrar de alguma forma danificado, deverá ser substituído pelo
fabricante, Serviço de Assistência Técnica autorizado ou por uma pessoa qualificada por forma
a evitar qualquer tipo de perigo para o utilizador.
• Não deixe o cabo de alimentação pendurado.
• Nunca desligue o aparelho puxando pelo cabo de alimentação.
• Desligue sempre o aparelho: logo após a sua utilização, para deslocá-lo, ou antes de proceder
à sua limpeza.
Funcionamento
• Este aparelho não foi concebido para ser utilizado por pessoas (incluindo crianças) cujas capa-
cidades físicas, sensoriais ou mentais se encontram reduzidas, ou por pessoas com falta de
experiência ou conhecimento, a não ser que tenham sido devidamente acompanhadas e
instruídas sobre a correcta utilização do aparelho, pela pessoa responsável pela sua segurança.
• É importante vigiar as crianças por forma a garantir que as mesmas não brinquem com o
aparelho.
• Nunca deixe o aparelho a funcionar sem vigilância, nem ao alcance das crianças.
• Utilize sempre o aparelho sobre uma superfície estável, plana, ao abrigo das projecções de
água.
• Este aparelho eléctrico funciona a altas temperaturas que podem provocar queimaduras. Não
toque nas zonas quentes do aparelho (filtro, visor de observação, peças metálicas visíveis...).
• Não coloque o aparelho a funcionar próximo de materiais inflamáveis (estores, cortinados…)
ou fontes de calor externas (fogão a gás, placa de aquecimento…).
5085657 Oleoclean.qxp 14/01/09 16:04 Page 62

61
Por
Protecção do ambiente em primeiro lugar!
O seu produto contém materiais que podem ser recuperados ou reciclados.
Entregue-o num ponto de recolha para possibilitar o seu tratamento
• No caso da ocorrência de um incêndio, nunca tente apagar as chamas com água. Feche a
tampa e abafe as chamas com a ajuda de um pano húmido.
• Nunca desloque o aparelho com líquidos ou alimentos quentes no seu interior.
• Nunca tente retirar a cuba amovível (consoante o modelo) da fritadeira enquanto esta estiver
em funcionamento.
• Nunca mergulhe o painel de comandos dentro de água!
Cozedura
• Nunca ligue a sua fritadeira vazia (sem matéria gorda). Respeite as quantidades mín. e máx. de
óleo.
• Se utilizar uma matéria gorda sólida, corte-a aos pedaços, derrete-a em lume brando, num
recipiente à parte e, de seguida, deite-a lentamente na cuba.
• Nunca coloque a matéria gorda sólida directamente no cesto por forma a não danificar o
aparelho.
• Não misture vários tipos de matéria gorda.
• Não sobrecarregue o cesto; respeite as quantidades limites de segurança.
Recomendações
• Limite a temperatura de cozedura a 170°C, sobretudo no caso das batatas.
• Utilize sempre o cesto para fritar batatas.
• Controle a cozedura: não coma os alimentos fritos quando estes ficarem queimados,
preferindo, sempre, uma fritura ligeiramente dourada.
• Filtre sempre o óleo depois de cada utilização por forma a evitar que os resíduos queimem.
Mude regularmente o óleo.
• Nunca guarde a fritadeira no exterior por forma a evitar uma acumulação indesejável de água
no óleo. Prefira um ambiente seco e arejado.
• Siga uma dieta equilibrada e variada, que inclua pelo menos 5 peças de fruta e legumes por
dia.
• Guarde as batatas a temperaturas superiores a 8°C.
• Para uma cozedura rápida e bem sucedida, limite a quantidade de batatas fritas a 1/2 cesto por
cada fritura.
• Sempre que um cesto cheio é mergulhado no óleo, a sua temperatura desce muito rapida-
mente. No decorrer da cozedura, a temperatura do óleo nunca ultrapassa os 175°C, mesmo
que o termóstato esteja regulado para 190°C (= temperatura estabilizada antes de o cesto ser
mergulhado no óleo).
No caso de qualquer problema, contacte um Serviço de Assistência Técnica autorizado ou o
nosso Clube Consumidor – E-mail : [email protected]
Qualquer intervenção deve ser feita apenas por um Serviço de Assistência Técnica autorizado e com peças
separadas de origem.
5085657 Oleoclean.qxp 14/01/09 16:04 Page 63

Descrição
1. Tampa
a. Filtro permanente
b. Pega
c. Visor de observação
2. Painel de comandos amovível
3. Cesto
a. Pega
b. Capacidade máx. para alimentos
4. Cuba amovível
5. Marcas de enchimento da cuba
6. Encaixe de fixação do cesto na posi-
ção alta
7. Grelha fixa de filtragem da matéria
gorda
8. Pegas de transporte
9. Botão de comando Oil box
10. Corpo da fritadeira
11. Oil box: reservatório para matéria
gorda
a. Tampa
b. Rolha
12. Pés anti-derrapantes
13. Painel de comandos
a. Interruptor «ligar/desligar» (O/I)
b. Termóstato
c. Luz piloto da temperatura
14. Botão Reset
Função RESET: A sua fritadeira está equipada com um mecanismo de segurança.
Caso este mecanismo seja activado, o aparelho deixa de funcionar.
Desligue o aparelho, deixe-o arrefecer e volte a ligar o aparelho.
Para voltar a colocar o seu aparelho em funcionamento, prima o
botão “RESET” situado na parte de trás do aparelho com a ajuda
de um objecto pontiagudo. (fig.35)
Caso o sistema de segurança volte a activar-se, dirija-se a um
Serviço de Assistência Técnica autorizado.
14
62
Por
13. 13.
a
13.
c
13.
b
5085657 Oleoclean.qxp 14/01/09 16:04 Page 64

63
Por
Filtragem, purga e armazenamento automático do óleo
A fritadeira está equipada com um sistema exclusivo e patenteado de filtragem e
purga automática do óleo, adaptado a qualquer tipo de matéria gorda alimentar.
l O escoamento do óleo é automático e totalmente seguro.
l Graças à filtragem automática, a matéria gorda mantém-se limpa e dura mais
tempo para garantir frituras mais saudáveis. Sem resíduos de fritura, a matéria
gorda liberta menos cheiro.
l O armazenamento da matéria gorda no reservatório OIL BOX permite preser-
var o sabor dos alimentos (batatas fritas, peixe, rissóis, ....) sem misturar os
sabores.
Limpeza ultra-fácil
A fritadeira é fácil de manusear e de desmontar.
l Todas as peças são compatíveis com a máquina de lavar a loiça, à excepção do
painel de comandos.
l Graças ao sistema de filtragem e armazenamento do óleo da fritadeira, este pode
ser facilmente retirado da fritadeira, facilitando a sua limpeza.
Utilização do botão de comando Oil box
• O botão de comando Oil box possui 3 posições. (fig.1)
Posição Fry: para fritar. (fig.2)
Posição Automatic Oil Filtration: para escoar e filtrar o óleo no reservató-
rio. (fig.3)
Posição Oil Box: Retirar ou colocar no lugar o reservatório de óleo. (fig.4)
Antes da primeira utilização
• A fritadeira pode ser totalmente desmontada. (fig.5)
Retire a tampa e o cesto, o painel de comandos e a cuba. Por fim, retire o
reservatório de óleo, posicionando o botão de comando na posição Oil box. (fig.4)
Nunca mergulhe o painel de comandos na água.
• Limpe a tampa, a cuba, o corpo do aparelho, o cesto e o reservatório de óleo
com uma esponja húmida e detergente para a loiça ou coloque-os na máquina
de lavar a loiça. (fig.6)
Limpe o painel de comandos com uma esponja húmida. (fig.7)
Seque todas as partes cuidadosamente.
• Após cada limpeza, prima o botão vermelho situado por baixo da cuba para
libertar a água que permaneceu no seu interior. (fig.8)
!
5085657 Oleoclean.qxp 14/01/09 16:04 Page 65

Certifique-se que o botão vermelho voltou à posição apropriada.
• Volte a colocar a cuba e o painel de comandos no lugar. (fig.9-10)
Certifique-se que o painel de comandos está correctamente colocado pois, caso
contrário, a fritadeira não funciona correctamente.
• Ajuste o botão de comando para a posição Oil box e coloque o reservatório
de óleo vazio na fritadeira. (fig.4-11)
• Abra completamente a pega do cesto: um "clic" indica que está no devido lugar. (fig.12)
A sua fritadeira deve sempre ser utilizada no interior da sua casa.
Preparação
• Encha a cuba com matéria gorda. (fig.13)
O nível de matéria gorda tem de se situar sempre entre as
marcas mín. e máx. da cuba (fig.14). Nunca encha a cuba acima
do nível máximo por forma a evitar qualquer tipo de
transbordamento e queimaduras graves.
Nunca misture vários tipos de matérias gordas
Utilize sempre matéria gorda alimentar líquida recomendada para fritura. Siga
as recomendações do fabricante para a cozedura dos alimentos.
Antes de cada cozedura, verifique o nível da matéria gorda e, se necessário,
rectifique a sua quantidade
• Se utilizar uma matéria gorda sólida, corte-a aos pedaços,
derreta-a num tacho à parte e em seguida, deite-a na cuba. (fig.15-16)
Nunca derreta a matéria gorda sólida no elemento de aquecimento nem no cesto.
Cozedura
• Regule o botão de comando Oil box para a posição Fry. (fig.17)
• Depois de ter enchido a cuba com óleo, ligue a sua fritadeira sem o cesto. (fig.18)
!
!
!
!
!
!
Máx 3,5 L
Mín 2,8 L
Máx 3060 g
Mín 2450 g
64
Por
5085657 Oleoclean.qxp 14/01/09 16:04 Page 66

Nunca ligue a fritadeira sem matéria gorda.
• Coloque o interruptor na posição « I » (ligar), o indicador luminoso do botão
acende Rode o botão do termóstato para a temperatura pretendida (consultar
tabela de fritura p.66). (fig.19-20)
• A fritadeira está quente.
A luz piloto da temperatura desliga-se quando a temperatura desejada for
atingida.
• Coloque os alimentos no cesto sem o sobrecarregar. Não exceda o nível
máximo indicado no cesto " MÁX. ". As quantidades devem ser inferiores ao
nível máximo para alimentos congelados. (fig.21)
Para evitar que o óleo transborde e prolongar a sua vida útil, seque cuidadosamente
os alimentos antes de os fritar.
• Uma vez desligada a luz piloto da temperatura, coloque e desça o cesto devagar
no óleo quente. Descer o cesto muito rapidamente pode fazer com que o óleo
transborde. (fig.22-23)
Durante a cozedura, é normal que a luz piloto da temperatura se acenda e se apague.
Não toque no aparelho no decorrer do funcionamento. Certas zonas extremamente
quentes podem provocar queimaduras graves. O vapor libertado pela tampa pode
queimar.
(fig.24)
• Volte a colocar a tampa na fritadeira.
A cozedura chega ao fim depois de decorrido o tempo estipulado e depois de
os alimentos alcançarem a cor e a textura pretendidas.
• Retire a tampa.
Para evitar salpicos, não deixe cair a água condensada na tampa para o interior
do óleo. Limpe cuidadosamente a tampa com um pano ou papel absorvente
colocado ao lado da sua fritadeira.
Deixe os alimentos escorrer colocando o cesto na fixação prevista para este efeito. (fig.25)
!
!
!
!
!
Batatas fritas frescas Batatas fritas congeladas
Quantidade limite de segurança 1,2 kg em 2 cozeduras 900 g
Quantidade recomendada 600 g 450 g
65
Por
5085657 Oleoclean.qxp 14/01/09 16:04 Page 67

66
Por
• Sirva (fig.26)
Uma vez a fritura terminada, regule o termóstato para a posição mínima e rode o
interruptor para a posição «O» (desligar).
Desligue o aparelho e deixe-o arrefecer durante cerca de 3 horas.
• Para filtrar e retirar a matéria gorda, consulte o capítulo Manutenção.
Quadro dos tempos de cozedura
Os tempos de cozedura são fornecidos a título indicativo. Podem variar consoante as
quantidades e o gosto de cada um.
Para obter os melhores resultados possíveis e evitar os transbordamentos no
decorrer da fritura de batatas fritas frescas, recomenda-se a fritura tradicional
em dois banhos :
- primeiro, a 160 °C
- segundo, a 190 °C
Manutenção e limpeza
• Rode o botão de comando Oil box para a posição Automatic oil filtration. (fig.27-28)
• Para a sua segurança, o produto assegura automaticamente o escoamento
quando a matéria gorda está suficientemente fria (cerca de 3 horas após a
última cozedura).
Certifique-se que o reservatório de óleo está vazio antes de escoar a cuba.
• Uma vez concluída a filtragem, pode guardar o reservatório de óleo:
- no aparelho: coloque o botão de comando Oil Box na posição Fry. (fig.17). O
aparelho deve ser transportado e arrumado direito.
- fora do aparelho: aguarde 3 horas, coloque o botão de comando na posição
Oil Box e retire o reservatório de óleo. (fig.29-30)
!
Quantidade Temperatura Tempo Quantidade Temperatura Tempo
Batatas fritas (capa-
cidade limite
de segurança)
1200 g
1.
ª
cozedura 160°C
2.
ª
cozedura 190°C
10-12 min
5-8 min
900 g 190°C 8-13 min
Batatas fritas (capaci-
dade máx.
recomendada)
600 g 170°C 9-13 min 450 g 170°C 6-9 min
Croquetes de frango
400 g 180°C 14-15 min 400 g 190°C 5-7 min
Filhós de frutos
8-9 170°C 5-6 min 8-9 190°C 5-7 min
Cogumelos
400 g 160°C 10-12 min 8-9 190°C 7-8 min
Filetes de peixe
400 g 160°C 6-7 min 8-9 190°C 5-6 min
Alimentos frescos
Alimentos congelados
5085657 Oleoclean.qxp 14/01/09 16:04 Page 68

67
Por
Quando o recipiente para óleo se encontrar cheio, nunca o passe por água. Para
proceder à sua limpeza, utilize papel absorvente ou uma esponja húmida.
Guarde sempre o reservatório de óleo na horizontal, com a tampa sobre a parte de
cima, num local seco e temperado e ao abrigo da luz.
• Aguarde pelo menos 3 horas antes de retirar o reservatório de óleo.
Transporte-o com cuidado.
• Para reutilizar a matéria gorda, pegue no reservatório de óleo com precaução.
Desaperte a rolha e verta o óleo na cuba. (fig.31-32)
• Para a matéria gorda sólida, retire a tampa do reservatório. Vire o reservatório de
óleo e carregue para descolar a matéria gorda. Corte a matéria gorda aos pedaços
e, coloque-a num tacho para derreter. Coloque-a de seguida na cuba. (fig.33-34)
Nunca leve o reservatório de óleo ao micro-ondas.
• Coloque no lugar o reservatório vazio Oil Box, equipado com a tampa e a rolha.
Volte a colocar o botão de comando Oil Box na posição Fry. (fig.17)
Não despeje a matéria gorda usada no lava-loiça. Deixe-a arrefecer e junte-a ao
restante lixo doméstico.
Substituição do óleo :
• Nunca despeje os restos de matéria gorda, no lava loiça. Deixe-a arrefecer e junte-
a ao lixo doméstico, em conformidade com as normas locais.
ATENÇÃO :
• Mude o óleo pelo menos todas as 10 a 12 utilizações.
Se utilizar óleo de girassol, proceda à sua substituição a cada 5 utilizações.
Magiclean : Extremamente fácil de limpar.
• A tampa, a cuba, o corpo do aparelho, o cesto e reservatório de óleo são
compatíveis com a máquina de lavar a loiça. (fig.36)
• A grelha de filtragem situada na cuba é fixa.
Não a desmonte. (fig.37)
• Depois de cada limpeza, carregue no botão vermelho situado por baixo da cuba
para deixar escoar a água que permaneceu no seu interior. (fig.8)
Antes de encher a cuba, certifique-se que o botão vermelho voltou para a posição
correcta.
!
!
!
!
!
5085657 Oleoclean.qxp 14/01/09 16:04 Page 69

68
Por
Problemas e causas possíveis Soluções
A fritadeira não aquece
O aparelho não está ligado. Ligue o aparelho.
O óleo transborda
A marca máxima de enchimento da cuba foi Verifique o nível do óleo e retire a quantidade em
ultrapassada. excesso.
A marca máxima de enchimento do cesto foi Certifique-se que o cesto não está demasiado
ultrapassada. cheio.
Os alimentos estão húmidos ou contêm água em Retire o gelo e seque bem os alimentos.
demasia (p. ex., congelados). Desça muito lentamente o cesto.
Óleos e matéria gorda diferentes foram misturados. Despeje a matéria gorda e limpe a cuba.
Encha a cuba com um único tipo de matéria gorda.
A cuba não efectua o escoamento
A temperatura da matéria gorda está Aguarde o arrefecimento da matéria gorda
demasiado quente. (cerca de 3h).
O botão de comando Oil box não está na posição Coloque o botão de comando Oil box na posição
Automatic oil filtration. Automatic oil filtration.
A grelha de filtragem está entupida. Despeje a cuba num recipiente e limpe a grelha
com a ajuda de uma escova não-metálica.
A matéria gorda solidificou. Deixe a fritadeira aquecer durante (4 a 5 min).
Fugas de óleo
A marca que corresponde a 3,5 l de enchimento Respeite o nível máx. (3,5L) de enchimento da cuba.
cuba da foi ultrapassada. Limpe a fritadeira antes de ser utilizada.
Sobrou óleo no reservatório de óleo ou este Coloque o botão de comando Oil box na posição
está cheio. Oil box, retire o reservatório de óleo e despeje-o
Emanação de maus cheiros
A matéria gorda está queimada. Substitua a matéria gorda (10 a 12 utilizações).
A matéria gorda não é apropriada.
Utilize uma matéria gorda vegetal para obter frituras
de boa qualidade.
Os alimentos não ficam dourados e ficam moles
São demasiado espessos e contêm muita água. Tente prolongar o tempo da cozedura.
Demasiada quantidade de alimentos ao mesmo Frite os alimentos em pequenas quantidades
tempo e o óleo não está à temperatura adequada. (sobretudo os congelados).
A temperatura do óleo pode ser insuficiente: Coloque o termóstato na temperatura aconselhada.
o termóstato está mal ajustado.
As batatas fritas colam
As batatas fritas frescas não são lavadas antes de Lave e seque cuidadosamente as batatas fritas
serem mergulhadas no óleo. antes da cozedura.
O sistema de segurança foi activado: A fritadeira não funciona
O nível de óleo é insuficiente. Desligue o aparelho, deixe-o arrefecer e siga as
A matéria gorda sólida foi colocada directamente.
instruções do manual. Se o código de erro apare-
cer de novo, carregue no botão Reset situado na
parte de trás do aparelho. Se a segurança for
novamente activada, confie o seu aparelho a um
Serviço Ade Assistência Técnica autorizado.
Outros problemas
A luz piloto da temperatura não acende. Contacte um Serviço de Assitência
Técnica autorizado ou o nosso Clube Consumidor.
A sua fritadeira não funciona correctamente
A temperatura da matéria gorda está
demasiado quente.
Desligue o aparelho e deixe-o arrefecer.
Prima o botão RESET situado na parte de trás do
aparelho.
Se o mecanismo de segurança for novamente
activado, dirija-se a um Serviço de Assistência
Técnica.
5085657 Oleoclean.qxp 14/01/09 16:04 Page 70
Documenttranscriptie
5085657 Oleoclean.qxp 14/01/09 16:04 Page 1 S.A. SEB SELONGEY CEDEX • RC. DIJON B 302 412 226 • REF. 5085657 mise à jour Dec. 2008 par : Batoteam - www.batoteam.fr 5085657 Oleoclean.qxp 14/01/09 16:04 Page 2 Mode d’emploi, Instructions for use, Gebruiksaanwijzing, Gebrauchsanleitung, Istruzioni d'uso, Modo de empleo, Manual de instruções 5085657 Oleoclean.qxp 14/01/09 1. 16:04 1.a Page 3 1.b 1.c 2. 3. 3.a 3.b MAX 4. 5. 6. 7. MA X MIN 8. 9. 10. 11. 11.b 11.a 12. 2 5085657 Oleoclean.qxp 1 14/01/09 2 16:04 Page 4 3 4 OK 5 6 7 8 K CLIC 9 10 11 12 13 14 15 16 17 18 19 20 5085657 Oleoclean.qxp 14/01/09 16:04 Page 5 21 22 23 24 25 26 27 28 29 30 31 32 31 33 34 35 36 37 5085657 Oleoclean.qxp 14/01/09 16:04 Page 6 5085657 Oleoclean.qxp 14/01/09 16:04 Page 7 Français............................................................................................................................................................................................... 6 English................................................................................................................................................................................................... 15 Nederlands.................................................................................................................................................................................. 24 Deutsch............................................................................................................................................................................................... 33 Italiano................................................................................................................................................................................................... 42 Español................................................................................................................................................................................................ 51 Português....................................................................................................................................................................................... 60 5085657 Oleoclean.qxp 14/01/09 16:04 Page 8 Fra CONSIGNES DE SÉCURITÉ Lire attentivement ces instructions et les conserver soigneusement. Consignes de sécurité Pour votre sécurité, cet appareil est conforme aux normes et règlementations applicables (Directives Basse Tension, compatibilité Electromagnétique, matériaux en contact des aliments, environnement...). Vérifier que la tension du réseau correspond bien à celle indiquée sur l’appareil (courant alternatif). Compte tenu de la diversité des normes en vigueur, si l’appareil est utilisé dans un autre pays que celui de l’achat, le faire vérifier par un Centre Service Agréé. Cet appareil a été conçu pour un usage domestique uniquement et à l'intérieur de votre habitation, toute utilisation professionnelle, non appropriée ou non conforme au mode d’emploi n’engage ni la responsabilité, ni la garantie du constructeur. Branchement • Ne pas utiliser l’appareil si celui-ci ou son cordon est défectueux, si l’appareil est tombé et présente des détériorations visibles ou anomalies de fonctionnement. Dans ce cas, l’appareil doit être envoyé à un Centre Service Agréé. • Toujours brancher l’appareil sur une prise reliée à la terre. • Ne pas utiliser de rallonge. Si vous en prenez la responsabilité, utiliser une rallonge en bon état reliée à la terre et adaptée à la puissance de l’appareil. • Si le câble de cet appareil est endommagé, il doit être remplacé par le fabricant, son service après-vente ou des personnes de qualification similaire afin d’éviter un danger. • Ne pas laisser pendre le cordon. • Ne pas débrancher l’appareil en tirant sur le cordon. • Toujours débrancher l’appareil : après utilisation, ou pour le déplacer, ou pour le nettoyer. Fonctionnement • Cet appareil n’est pas prévu pour être utilisé par des personnes (y compris les enfants) dont les capacités physiques, sensorielles ou mentales sont réduites, ou des personnes dénuées d’expérience ou de connaissance, sauf si elles ont pu bénéficier, par l’intermédiaire d’une personne responsable de leur sécurité, d’une surveillance ou d’instructions préalables concernant l’utilisation de l’appareil. • Il convient de surveiller les enfants pour s’assurer qu’ils ne jouent pas avec l’appareil. • Ne jamais laisser l’appareil fonctionner sans surveillance. Ne pas le laisser à la portée des enfants. • Utiliser une surface de travail stable, plane, à l’abri des projections d’eau. • Cet appareil électrique fonctionne à des températures élevées qui peuvent provoquer des brûlures. Ne pas toucher les surfaces chaudes de l’appareil (filtre, hublot, parties métalliques apparentes…). • Ne pas faire fonctionner l’appareil à proximité de matériaux inflammables (stores, rideaux…), ni à proximité d’une source de chaleur extérieure (gazinière, plaque chauffante…). • En cas d’incendie, ne jamais tenter d’éteinde les flammes avec de l’eau. Fermer le couvercle. Etouffer les flammes avec un linge humide. • Ne pas déplacer l’appareil contenant des liquides ou des aliments chauds. 6 5085657 Oleoclean.qxp 14/01/09 16:04 Page 9 Fra • Si vous avez une cuve amovible, ne jamais la retirer lorsque votre friteuse est en fonctionnement. • Ne jamais plonger le boîtier électrique dans l'eau ! Cuisson • Ne jamais brancher votre friteuse vide (sans matière grasse). Respecter les quantités mini et maxi d’huile. • Si vous utilisez une matière grasse solide, coupez-la en morceaux et faites-la fondre à feu doux dans un récipient à part puis versez-la lentement dans la cuve. Ne jamais mettre la matière grasse solide directement dans la cuve ou le panier, sinon l’appareil risque d’être détérioré. • Ne jamais mettre la matière grasse solide directement dans le panier sinon l’appareil risque d’être détérioré. • Ne pas mélanger plusieurs sortes de matières grasses. • Ne pas surcharger votre panier, respecter les quantités limites de sécurité. Recommandations • Limiter la température de cuisson à 170°C spécialement pour les pommes de terre. • Utiliser le panier pour cuire les frites. • Contrôler la cuisson : ne pas manger les aliments frits lorsqu’ils sont brûlés et préférer une friture légèrement dorée. • Filtrer l’huile après chaque utilisation pour éviter que les résidus ne brûlent et la changer régulièrement. • Ne pas stocker votre friteuse à l'extérieur, vous évitez ainsi un apport d'eau indésirable dans votre bain d'huile. Préférer un endroit sec et aéré. • Avoir un régime équilibré et varié comportant au moins 5 fruits et légumes par jour. • Stocker les pommes de terre au-dessus de 8°C. • Pour une cuisson rapide et réussie, limiter la quantité de frites à 1/2 panier par bain. • La plongée d’un panier plein fait baisser très rapidement la température de l’huile. Lors de la cuisson, celle-ci ne dépasse jamais 175°C même si le thermostat est réglé sur 190°C (= température stabilisée avant plongée). Pour tout problème, contacter votre Centre Service Agréé ou l’adresse internet groupeseb.com. Toute intervention doit être effectuée uniquement par un Centre Service Agréé avec des pièces détachées d’origine. Participons à la protection de l’environnement ! Votre appareil contient de nombreux matériaux valorisables ou recyclables. Confiez celui-ci dans un point de collecte ou à défaut dans un centre service agréé pour que son traitement soit effectué. 7 5085657 Oleoclean.qxp 14/01/09 16:04 Page 10 Fra 13. 13.a 13.b Description 1. Couvercle a. Filtre permanent b. Poignée c. Hublot 2. Boîtier électrique amovible 3. Panier a. Poignée b. Niveau maxi pour les aliments 4. Cuve amovible 5. Repères de remplissage de cuve 6. Patte d’accrochage du panier en position haute 7. Grille fixe de filtration de la matière grasse 8. Poignées de transport 9. Bouton de commande Oil box 13.c 10. Jupe 11. Oil box : bac à huile a. Couvercle b. Bouchon 12. Pieds anti-dérapants 13. Tableau de bord a. Bouton marche/arrêt (O/I) b. Thermostat variable c. Voyant de température 14. Bouton Reset Fonction RESET : Votre appareil est équipé d'une sécurité. Si la sécurité se déclenche, l'appareil ne fonctionne plus. Débranchez l’appareil, laissez-le refroidir et branchez à 14 nouveau l’appareil. Pour remettre en fonctionnement votre appareil, appuyez sur le bouton RESET, situé à l'arrière du boîtier de commande à l’aide d’une pointe non métallique. (fig.35) Si la sécurité se déclenche à nouveau, rapportez votre appareil à un centre service agréé. 8 5085657 Oleoclean.qxp 14/01/09 16:04 Page 11 Fra Filtration, vidange et stockage automatique de l’huile La friteuse est équipée d’un système exclusif et breveté de filtration et de vidange automatique, adapté à tous les types de matières grasses alimentaires. l La vidange de l’huile est automatique et totalement sécuritaire. l Grâce à la filtration automatique, votre matière grasse est propre et dure plus longtemps pour une friture plus saine. Débarrassée des résidus de friture, elle dégage moins d’odeurs. l Le stockage de votre matière grasse dans le bac à huile OIL BOX vous permet de préserver le goût de vos aliments (frites, poisson, beignets…) et de ne pas mélanger les saveurs. Nettoyage ultra facile Votre friteuse est facile à manipuler et à démonter. l Toutes les pièces passent au lave-vaisselle à l’exception du boîtier électrique. l Grâce à la filtration et au stockage de l’huile, la friteuse est vidée de son huile et passe au lave-vaisselle après chaque cuisson. Propre comme neuve après chaque utilisation. Utilisation du bouton de commande Oil box • Le bouton de commande Oil box possède 3 positions. (fig.1) Position Fry : pour frire. (fig.2) Position Automatic Oil Filtration : pour vider et filtrer l'huile dans le bac à huile. (fig.3) Position Oil Box : pour mettre en place ou retirer le bac à huile. (fig.4) Avant la première utilisation • La friteuse peut être complètement démontée. (fig.5) Enlevez le couvercle. Retirez le panier, le boîtier électrique et la cuve. Retirez le bac à huile en positionnant le bouton de commande Oil box sur la position Oil box . (fig.4) ! Ne plongez jamais le boîtier électrique dans l'eau. • Nettoyez le couvercle, la cuve, la jupe, le panier et le bac à huile avec une éponge humide et du liquide vaisselle ou dans un lave-vaisselle. (fig.6) Nettoyez le boîtier électrique avec une éponge humide. (fig.7) Séchez bien. • Après chaque nettoyage, appuyez sur le bouton rouge situé sous la cuve pour laisser échapper l’eau restée à l’intérieur. (fig.8) 9 5085657 Oleoclean.qxp 14/01/09 16:04 Page 12 Fra ! Vérifiez que le bouton rouge est revenu dans la bonne position. • Mettez en place la cuve et le boîtier électrique. (fig.9-10) ! Vérifiez que le boîtier électrique est placé correctement sinon la friteuse ne fonctionnera pas. • Mettez le bouton de commande Oil box sur la position Oil box et placez le bac à huile vide dans la friteuse. (fig.4-11) • Dépliez complètement la poignée du panier : un " clic " indique qu'elle est en place. (fig.12) ! Votre friteuse doit toujours être utilisée à l'intérieur de votre habitation. Préparation • Remplissez la cuve de matière grasse. (fig.13) Maxi Mini 3,5 L 2,8 L Le niveau de matière grasse doit toujours se situer entre les repères mini et maxi de la cuve (fig.14) . Ne remplissez jamais la cuve au-delà du niveau maximum indiqué dans la cuve. ! Ne mélangez pas différentes sortes de matières grasses,cela peut causer des débordements. Utilisez une matière grasse alimentaire liquide recommandée pour la friture. Suivez les recommandations du fabricant pour la cuisson. ! Vérifier avant chaque cuisson le niveau de matière grasse et rectifiez si nécessaire avec la même matière grasse. Maxi 3060 g Mini 2450 g Si vous utilisez une matière grasse solide, coupez-la en morceaux et faites-la fondre dans une casserole à part pour ensuite la verser dans la cuve. (fig.15-16) ! Ne faites jamais fondre la matière grasse solide sur l'élément chauffant ou dans le panier. Cuisson • Mettez le bouton de commande Oil box sur la position Fry. (fig.17) • Après avoir rempli la cuve avec de l'huile, branchez votre friteuse sans le panier. (fig.18) 10 5085657 Oleoclean.qxp 14/01/09 16:04 Page 13 Fra ! Ne branchez jamais la friteuse sans matière grasse. • Mettez le bouton marche/arrêt en position I, le voyant lumineux du bouton s'allume. Tournez le bouton du thermostat à la température désirée (voir tableau de cuisson p.12). (fig. 19-20) • La friteuse est en chauffe. ! Le voyant de température s'éteint lorsque la température désirée est atteinte. Quantité limite de sécurité Quantité recommandée Frites fraîches Frites surgelées 1.2 kg en 2 bains 900 g 600 g 450 g • Placez les aliments dans le panier sans le surcharger. Ne dépassez pas le niveau maximum indiqué sur le panier " MAX ". Réduisez les quantités pour les surgelés. (fig.21) ! Pour éviter les débordements et prolonger la durée de vie de l'huile, essuyez soigneusement les aliments avant de les faire cuire. • Lorsque l’huile a atteint la bonne température, le voyant de température s'éteint, placez et descendez doucement le panier dans l'huile. Le fait de descendre le panier trop vite pourrait causer des débordements. (fig.22-23) ! En cours de cuisson, il est normal que le voyant de température s'allume et s'éteigne. ! Ne touchez pas l'appareil pendant son fonctionnement. Certaines parties très chaudes pourraient causer de sérieuses brûlures. La vapeur qui sort du couvercle est brûlante. (fig.24) • Replacez le couvercle sur votre friteuse. La cuisson est terminée quand le temps de cuisson est écoulé et que les aliments ont atteint la couleur et la texture désirées. • Retirez le couvercle. Pour éviter des éclaboussures, ne faites pas retomber les condensats du couvercle dans votre bain d'huile mais égoutter soigneusement au dessus d'un linge ou d'un papier absorbant placé à coté de votre friteuse.Egouttez les aliments en plaçant le panier sur la fixation prévue à cet effet. (fig.25) 11 5085657 Oleoclean.qxp 14/01/09 16:04 Page 14 Fra • Servez (fig.26) Une fois la friture terminée, réglez le thermostat à la position minimale et le bouton marche/arrêt sur O. Débranchez l'appareil et laissez-le refroidir environ 3 heures. • Pour filtrer et vidanger la matière grasse, reportez-vous au chapitre Entretien. Tableaux de cuisson Les temps de cuisson sont donnés à titre indicatif. Ils peuvent varier en fonction des quantités et du goût de chacun. Pour obtenir de meilleurs résultats et éviter les débordements lors de la cuisson des frites fraîches, une cuisson en deux bains est recommandée : - le premier, à 160 °C - le second, à 190 °C Aliments surgelés Aliments frais Quantité Frites (quantité limite 1200 g de sécurité) Température Temps 1e bain 160°C 10-12 min 2eme bain 190°C 5-8 min Quantité Température Temps 900 g 190°C 8-13 min Frites (quantité max.recommandée) 600 g 170°C 9-13 min 450 g 170°C 6-9 min Nuggets de volailles 400 g 180°C 14-15 min 400 g 190°C 5-7 min Beignets de fruits 8-9 170°C 5-6 min 8-9 190°C 5-7 min Champignons 400 g 160°C 10-12 min 8-9 190°C 7-8 min Filets de poisson 400 g 160°C 6-7 min 8-9 190°C 5-6 min Entretien et Nettoyage • Tournez le bouton de commande Oil box sur la position Automatic oil filtration. (fig.27-28) • Pour votre sécurité, le produit assure automatiquement la vidange quand la matière grasse a suffisamment refroidi (environ 3 heures après la dernière cuisson). ! Assurez-vous que le bac à huile est vide avant de vidanger la cuve. • Une fois la filtration terminée, vous pouvez stocker le bac à huile: - Dans l'appareil : tournez le bouton de commande Oil box sur la position Fry. (fig.17). L’appareil doit être transporté et rangé à plat. - Hors de l'appareil : Attendez 3 heures, tournez le bouton de commande Oil box en position Oil box et retirez le bac à huile. (fig.29-30) ! Lorsque le bac à huile est rempli, ne le passez pas sous l'eau. Pour le nettoyer, utilisez du papier absorbant ou une éponge humide. ! Stockez toujours le bac à huile horizontalement couvercle sur le dessus dans un endroit sec et tempéré à l'abri de la lumière. 12 5085657 Oleoclean.qxp 14/01/09 16:04 Page 15 Fra • Transportez le bac à huile avec soin. • Pour réutiliser la matière grasse, prenez le bac à huile avec précaution. Dévissez le bouchon, puis videz l'huile dans la cuve.(fig.31-32) • Pour la matière grasse solide, retirez le couvercle. Retourner le bac à huile et appuyez dessus afin de décoller la matière grasse. Coupez la matière grasse en morceaux puis versez-la dans une casserole pour la faire fondre. Versez-la ensuite dans la cuve. (fig.33-34) ! Ne passez jamais le bac à huile au micro-ondes. • Mettez en place le bac à huile vide, équipé de son couvercle et du bouchon. Remettez le bouton de commande Oil box sur la position Fry. (fig.17) ! Ne versez pas la matière grasse usagée dans l'évier. Laissez-la refroidir et mettez-la avec les ordures ménagères. Changement d'huile : • Ne versez jamais la matière grasse usagée dans l’évier. Laissez-la refroidir puis jetez-la avec les ordures ménagères, conformément aux réglementations locales en vigueur. Attention : •Changez la matière grasse au moins toutes les 10 à 12 utilisations. Si vous utilisez de l'huile de tournesol, changez-la toutes les 5 utilisations. Magiclean : Très facile à nettoyer. • Le couvercle, la cuve, la jupe, le panier et le bac à huile passent au lavevaisselle. (fig.36) • La grille de filtration située dans la cuve est fixe. Ne la démontez pas. (fig.37) • Après chaque nettoyage, appuyez sur le bouton rouge situé sous la cuve pour laisser échapper l’eau restée à l’intérieur. (fig.8) ! Avant de remplir la cuve, vérifiez que le bouton rouge est revenu dans la bonne position. 13 5085657 Oleoclean.qxp 14/01/09 16:04 Page 16 Fra Si votre friteuse ne fonctionne pas bien Problèmes et causes possibles Solutions La friteuse ne chauffe pas L’appareil n’est pas branché. Branchez l’appareil. Le bain de friture déborde Le repère Max de remplissage de la cuve a été dépassé. Le repère Max de remplissage du panier a été dépassé. Les aliments sont humides ou contiennent trop d’eau (ex. Surgelés). Mélange d’huiles et/ou de graisses différentes Vérifiez le niveau du bain et enlevez le surplus. Vérifiez le niveau du panier et enlevez le surplus. Retirez la glace et séchez bien les aliments. Descendez très lentement le panier. Jetez la matière grasse et nettoyez la cuve. Remplissez avec une seule nature de matière grasse. La cuve ne vidange pas La matière grasse est trop chaude. Le bouton de commande Oil box n’est pas sur la position Automatic oil filtration. Attendez que la matière grasse refroidisse (environ 3h). Placez le bouton de commande Oil box sur la position Automatic oil filtration. La grille de filtration est bouchée ou colmatée. La matière grasse est figée ou solidifiée. Videz la cuve dans un récipient et nettoyez la grille à l’aide d’une brosse non métallique. Faites chauffer (4 à 5 min) la friteuse. Fuites d’huile Le repère correspondant à 3.5 L de remplissage de cuve. Respectez le niveau maxi (3,5L) de remplissage de la cuve a été dépassé.Nettoyez la friteuse avant tout autre utilisation. Il reste de l’huile dans le bac à huile ou celui-ci Placez le bouton de commande Oil box sur la est plein. position Oil box, retirez le bac à huile et videz-le. Dégagement de mauvaises odeurs La matière grasse est dégradée. La matière grasse n’est pas appropriée. Renouvelez le bain de friture (10 à 12 utilisations). Utilisez une matière grasse végétale pour une friture de bonne qualité. Les aliments ne dorent pas et restent mous Ils sont trop épais et contiennent beaucoup d’eau. A titre d’essai, prolongez le temps de cuisson. Trop d’aliments sont cuits à la fois et le bain de Faites frire les aliments en petites quantités (surtout cuisson n’est plus à la bonne température. les surgelés). La température du bain de friture peut être Réglez le thermostat sur la température conseillée. insuffisante : le thermostat est mal réglé. Les frites collent Les frites fraîches ne sont pas lavées avant d’être Lavez et séchez soigneusement les frites fraîches plongées dans l’huile. avant la cuisson. La sécurité est activée : la friteuse ne fonctionne plus Le niveau d’huile est insuffisant. Débranchez l’appareil, laissez-le refroidir suivez refroidir. et Appuyez La matière grasse solide a été mise directement les du mode code sur instructions le bouton Reset situé d’emploi. à l’arrière Si delel’appareil. dans la cuve. erreur apparaît nouveau, appuyez surrapportez le bouton Si la sécurité seàdéclenche à nouveau, Reset situé à l’arrière de lunService CentreAgréé. Service Agréé. votre appareil à un Centre La matière grasse est trop chaude. Autres problèmes Le voyant de température ne s'allume pas. 14 Contactez le Centre Service Agrée. 5085657 Oleoclean.qxp 14/01/09 16:04 Page 17 Eng SAFETY INSTRUCTIONS Read and follow the instructions for use carefully. Safety instructions For your safety, this appliance complies with the safety regulations and directives in effect at the time of manufacture (Low-voltage Directive, Electromagnetic Compatibility, Food Contact Materials Regulations, Environment…). Check that the power supply voltage corresponds to that shown on the appliance (alternating current). Given the diverse standards in effect, if the appliance is used in a country other than that in which it is purchased, have it checked by an approved Service Centre. This appliance is designed for domestic use only and not outdoors. In case of professional use, inappropriate use or failure to comply with the instructions, the manufacturer accepts no responsibility and the guarantee does not apply. Read and follow the instructions for use. Keep them safe. Connecting to the power supply • Do not use the appliance if the appliance or the cord is damaged, if the appliance has fallen or shows visible damage or does not work properly. In the event of the above, the appliance must be sent to an approved Service Centre. Do not take the appliance apart yourself. • Always plug the appliance into an earthed socket. • Do not use an extension lead. If you accept liability for doing so, only use an extension lead which is in good condition, has an earthed plug and is suited to the power of the appliance. • If the power supply cord is damaged, it must be replaced by the manufacturer or its service agent or a similarly qualified person in order to avoid a hazard. • Do not leave the cord hanging. • Do not unplug the appliance by pulling on the cord. • Always unplug the appliance: immediately after use, when moving it, prior to any cleaning or maintenance. Using • This appliance is not designed to be used by people (including children) with a physical, sensory or mental impairment, or people without knowledge or experience, unless they are supervised or given prior instructions concerning the use of the appliance by someone responsible for their safety. • Children must be supervised to ensure that they do not play with the appliance. • Never leave the appliance within reach of children without supervision. • Use a flat, stable, heat-resistant surface, away from any water splashes and other heat sources. • Do not place on an oven hob/cooker top. • This electrical equipment operates at high temperatures which may cause burns. Do not touch the apparent metal parts, filter or window…. • Do not switch on the appliance near to flammable materials (blinds, curtains….) or close to an external heat source (gas stove, hot plate etc.). • In the event of fire, never try to extinguish the flames with water. Close the lid. Smother the flames with a damp cloth. • Do not move the appliance when it is full of oil or hot food. 15 5085657 Oleoclean.qxp 14/01/09 16:04 Page 18 Eng • If the fryer has a removable bowl, never take it out when the fryer is switched on. • Never immerse the appliance or the electrical control unit in water! Cooking • Never plug in the deep fat fryer without oil or fat inside. The oil level must always be between the min and max markers. • If you use solid vegetable fat, cut it into pieces and melt it over a low heat in a separate pan beforehand, then slowly pour it into the deep fryer bowl. Never put solid fat directly into the deep fryer bowl or fryer basket as this will lead to deterioration of the appliance. • Do not leave the appliance unattended whilst in use. • Do not mix different types of oil or fat. • Do not over fill the basket with food, never exceed the maximum capacity. Preparing food for frying • Limit the cooking temperature to 170°C, especially for potatoes. • Use the basket for chips. • Control the cooking: Do not eat burnt food. • Filter your oil after every use to avoid crumbs burning and change the oil regularaly. • Never store your deep fryer outside, in order to avoid water getting into the oil. Choose a dry and well-ventilated place. • Eat a balanced and varied diet which includes plenty of fruits and vegetables. • Store your fresh potatoes in a room above 8°C. • For crisp chips and fast cooking, we recommend that you limit the quantity of chips to 1/2 basket per frying. • With a larger quantity of food or potatoes, the temperature drops very fast just after having lowered the basket. This lowers the oil temperature considerably and it is normal for the oil to take a long time to return to 190°C. • Cut food into similar-sized pieces so that they cook evenly. Avoid using pieces that are too thick. • Not all frozen foods are ready to use and some require thawing first. Check the manufacturer’s instructions. • With recipes made from raw potatoes (chips, crisps, etc) wash them in cold water to remove the starch and then dry them throughly. This will stop them from sticking together. • No matter what the recipe, whether preparing fresh or frozen food, it must be perfectly dry. Dry the food thoroughly with paper kitchen towel or a clean tea towel before frying. This will prevent the oil from splattering and/or overflowing and will extend the life of the oil. • Regularly check the cooking progress to avoid overcooking: do not eat very brown or burnt food, only eat golden brown food. • For crispy fried food, open the lid as soon as you have finished cooking to prevent steam softening the food. Any repairs must only be carried out by a Tefal Approved Service Centre with the manufacturer’s own replacement parts. HELPLINE: If you have any problems or queries, please contact our Customer Relations Team first for expert help and advice: 0845 602 1454 - UK / (01) 677 4003 - Ireland or consult our web site - www.tefal.co.uk Environment protection first ! Your appliance contains valuable materials which can be recovered or recycled. Leave it at a local civic waste collection point. 16 5085657 Oleoclean.qxp 14/01/09 16:04 Page 19 Eng 13. 13.a Description 1. Lid a. Permanent filter b. Handle c. Viewing window 2. Removable control unit 3. Frying basket a. Handle b. MAX. food level marking 4. Removable bowl 5. Min. and Max. oil level markers 6. Basket high position 7. Fixed oil filter grid 13.b 13.c 8. Safety carrying handles 9. Oil box control switch 10. Body 11. Oil box a. Lid b. Oil box cap 12. Feet 13. Control Unit a. ON/Off switch (O/I) b. Adjustable thermostat c. Temperature indicator light 14. Safety cut-out reset button RESET function: Your fryer is equipped with safety features, which operate if you use your fryer without any oil. If the safety cut-out is activated, the appliance will shut off automatically. 14 Unplug the appliance, let it cool and plug in the appliance again. To reset the fryer, push the RESET button (found on the back of the control unit) with a toothpick or similar non-metallic item (fig.35). If the problem with the safety cut-out persists, please contact a TEFAL Approved Service Centre for assistance. 17 5085657 Oleoclean.qxp 14/01/09 16:04 Page 20 Eng Filtration, drainage and automatic storage of oil/fat Your fryer is fitted with an exclusive and patented system for filtration and automatic drainage, suitable for most types of oils and fats used for cooking. l The drainage of oil is completely automatic and safe. l The automatic patented filtration system ensures your oil/fat stays clean and lasts longer for healthier frying. No crumbs guarantees less odours. l The Oil Box container enables you to store your oil or fat and keep it until you next want to use it and avoid any transfer of flavours. Ultra easy cleaning Your fryer is easy to handle and to dismantle. l All the parts (except the electrical control unit) are dishwasher safe. l Thanks to the patented automatic filtration and oil storage system, some parts of your fryer can go into the dishwasher after each use. Clean as new after each use. Using the Oil Box control switch • The Oil Box control switch has 3 positions. (fig.1) Fry Position: to fry. (fig.2) Automatic Oil Filtration Position: to drain and filter the oil into the oil box. (fig.3) Oil Box Position: to push back or pull out the oil box. (fig.4) Before first use • The fryer can be completely dismantled. (fig.5) Remove the lid. Remove the frying basket, the control unit and the bowl. Remove the oil box by positioning the Oil Box control switch on the Oil box position. (fig.4) ! Do not immerse the control unit with the heating element in water. • Clean the lid, the bowl, the body, the frying basket and the Oil Box with a damp cloth, warm water and washing-up liquid or put them in the dishwasher. (fig.6) Clean the control unit and the heating element with a damp cloth. (fig.7) Dry thoroughly. • After cleaning, press on the red button under the fryer to release any water in the bowl. (fig.8) 18 5085657 Oleoclean.qxp 14/01/09 16:04 Page 21 Eng ! Check that the red button has gone back to its original position. • Place the bowl and the electronic control unit in position. (fig.9-10) ! Make sure that the control unit is correctly positioned otherwise the fryer cannot function. • Place the Oil Box control switch on the Oil box position and insert the empty Oil Box in to the fryer. (fig.4-11) • Completely unfold the basket handle; a “click” indicates that it is correctly positioned. (fig.12) ! Your deep fryer must always be used indoors. Preparing the fryer • Fill the bowl with oil. (fig.13) Maxi Mini 3,5 L 2,8 L The oil level should always be between the Min. and Max. level of the bowl (fig.14). Do not exceed the maximum level line as boiling oil may overflow during frying and can cause severe burns. Check the oil level each time before cooking and add some more of the same oil or melted fat if necessary. ! Never use different types of oil at the same time as this may cause the oil to overflow. Types of Oil to use : For best results we recommend using a good quality blended vegetable oil. If using sunflower oil ensure the oil is changed every 5 uses. Oils which should NOT be used under any circumstances and may cause overflowing/smoking/risk of fire are: ground nut oil, soya oil, olive oil, lard or dripping. Follow the manufacturer's cooking recommendations. ! Be sure that the oil level is between the Min. and Max. level of the bowl otherwise the safety cut-out will activate (see page 17). Maxi 3060 g • If you use solid vegetable fat: cut it into small pieces, melt it in a Mini 2450 g separate pan then pour the melted fat into the fryer bowl. (fig.15-16) ! Never melt the fat in the bowl or in the frying basket, otherwise the safety cut-out will be activated (see page 17). 19 5085657 Oleoclean.qxp 14/01/09 16:04 Page 22 Eng Frying process • Place the Oil Box control switch on the Fry position. (fig.17) • After the bowl has been filled with oil, plug in the fryer without the frying basket. (fig.18) ! Do not plug in the fryer without oil. • Set the On/Off switch to position I and the temperature indicator light will switch on. Turn the adjustable thermostat to the desired temperature (see cooking tables p.21). (fig.19-20) • The fryer will now start to heat the oil. Wait for the oil to preheat. ! The temperature indicator light will go out off when the desired temperature is reached. Maximum quantity Recommended quantity Fresh potato chips Frozen potato chips 1.2 kg (in 2 fryings*) 900 g 600 g 450 g * see cooking table page 21 for details of how to cook in 2 fryings. • Place the basket on a work surface and fill the basket with food, without overfilling. Do not exceed the Max. food level marking on the basket. Reduce the quantities for frozen foods. (fig.21) ! No matter what the recipe, food must be dried thoroughly before frying. This will prevent the oil overflowing and extend the life of the oil. • After the temperature indicator light has gone off, gently and lower the basket slowly into the frying oil. Plunging the basket too rapidly in the oil may cause it to overflow (fig.22-23). Start timing the food. ! During cooking, it is normal for the temperature light to go on and off. ! Do not touch the fryer when it is in use as it will be extremely hot and can cause severe burns. Steam coming from the filter is also extremely hot. (fig.24) • Put the lid on the fryer. Frying is complete when the cooking time has elapsed and when food is of the desired colour and texture. • Remove the lid. In order to avoid any oil splashes, never let condensation drops from the lid fall into the oil. Instead drain the lid on a cloth or paper towel placed near the fryer. Allow excess oil from the food to drain by hooking the basket on the support on the inner bowl. (fig.25) • Serve. (fig.26) 20 5085657 Oleoclean.qxp 14/01/09 16:04 Page 23 Eng • When you have finished frying, turn the thermostat down to the lowest setting and turn the ON/Off switch to the “O” position. Unplug the fryer and replace the lid. • For filtering and draining the oil or fat, see the chapter on Maintenance. Cooking tables The cooking times and temperatures are only a guide, they may require adjustment depending on the quantity and size of food, and personal taste. For crispier results and to prevent oil overflowing, it is important home made chips are cooked in two fryings: a first frying at 160 °C, then a second frying at 190 °C. After the first frying, set the adjustable thermostat to 190°C and wait for the temperature indicator light to go out before lowering the chips into the oil for the second frying. Frozen foods Fresh foods Quantity Chips (maximum capacity) 1200 g Chips (recommended quantity) Temp Time 1st frying 160°C 10-12 min Quantity Temp Time 900 g 190°C 8-13 min 2nd frying 190°C 5-8 min 600 g 170°C 9-13 min 450 g 190°C 6-9 min Chicken Nuggets 400 g 180°C 14-15 min 400 g 190°C 5-7 min Battered Fruit fritters 8-9 170°C 5-6 min 8-9 190°C 5-7 min Breaded Mushrooms 400 g 160°C 10-12 min 8-9 190°C 7-8 min Breaded Fish fillets 400 g 160°C 6-7 min 8-9 190°C 5-6 min When cooking battered food and doughnuts, remove the wire basket to prevent food sticking to it and use tongs to slowly lower the food into the hot oil.Gradually place the food into the hot oil, submerging it an inch at a time to prevent it from sinking straight away. Cleaning and Maintenance Filtering the oil • At the end of the last frying, turn the Oil Box control switch on the Automatic oil filtration position. (fig.27-28) • For your safety, the appliance automatically drains all kinds of fat (oil or solid fat) when it is cool enough (approximatively 3 hours after the last frying). ! Make sure that the oil container is empty before draining the fryer. • Once the filtration is finished, you can store the container : - In the appliance: Turn the Oil Box control switch on Fry position. (fig.17). The appliance must be carried and transported flat. 21 5085657 Oleoclean.qxp 14/01/09 16:04 Page 24 Eng - Outside the appliance: Leave the oil to cool for approximately 3 hours, then turn the Oil Box control switch to Oil box position and take out the container. (fig.29-30) ! When the oil container is full of oil do not submerge it under water. To clean it, wipe it with a kitchen paper towel or damp cloth. ! Carry the container with both hands. Store it in a cool dry place away from the light. • Wait at least 3 hours before taking the full container out of the appliance. Transport it with care. • To re-use the oil, take out the container with care. Unscrew the oil box cap and empty the oil in the fryer bowl. (fig.31-32) • For solid fat, remove the lid from the container. Turn the container over and press it to loosen the fat. Cut it into pieces and melt it in a separate pan. Then, pour it into the bowl. (fig.33-34) ! Never put the OIL BOX in a microwave oven. • Insert the empty container in the fryer, with its lid and cap in position. Place the Oil Box control switch on the Fry position. (fig.17) ! Do not pour used oil down the sink. Drain it into a suitable container. Changing oil: • Do not pour used oil/fat into the sink. Leave it to cool, and throw it away with household waste-according to the local community regulations. CAUTION • We recommend changing the oil/fat after a maximum of 10 to 12 uses. If using sunflower oil, ensure the oil is changed after every 5 uses. Magiclean: very easy to clean. • The lid, the bowl, the housing, the frying basket and the Oil Box are dishwasher safe. (fig.36) • The oil filter grid located in the removable bowl is fixed. Do not try to dismantle it. (fig.37) • After cleaning, press on the red button under the fryer to release any water in the bowl. (fig.8) ! Before filling the fryer bowl, always check to ensure the red button under the fryer is in the correct position. 22 5085657 Oleoclean.qxp 14/01/09 16:04 Page 25 Eng If your fryer does not work properly Problems and possible causes Solutions The fryer is not heating The appliance is not plugged in. The thermostat knob is not set to I. Plug in the appliance. Set the thermostat knob to I. The frying oil overflows The Max. marker for filling the bowl has been exceeded. The Max. marker for filling the frying basket has been exceeded. Food is wet or contains too much water (frozen food) Different types of oil/fat have been mixed. Check the oil level (Max.), and remove the excess. The basket has been over filled with food. Check the Max. level of the frying basket, and remove the excess. Remove any ice and dry the food thoroughly. Lower the basket slowly. Empty and clean the bowl. Refill the bowl with one type of oil. The bowl does not drain The oil temperature is still too high. The Oil Box control switch is not on the Automatic Oil Filtration position The filter grid is blocked or clogged. The fat is set or solidified. Wait for the temperature to go down (approximately 3 hours). Turn the Oil Box control switch on the Automatic Oil Filtration position. Empty the bowl into a container and clean the filter grid with warm water, washing-up liquid and a non-metallic brush. Press on the red button under the fryer to release any water. Warm the fryer for 4 to 5 min. Oil leaks The max (3.5 l) fill mark for the bowl has been Respect the oil level (3.5 L). Clean the fryer before exceeded. each use. There is some oil left in the container or it is Place the Oil Box control switch on the Oil Box full. position, take out the container and empty it. Emits unpleasant smells The fat/oil has deteriorated. Renew the frying oil (after a maximum of 10 to 12 uses), more frequently depending on the oil. The fat/oil is unsuitable. Use a good quality blended vegetable oil. See Page 19. The food does not become golden, and remains soft Pieces are too thick and contain too much water. Dry food thoroughly. Experiment by lengthening the cooking time or cutting food into smaller or thinner pieces. Too much food being cooked at the same time Fry food in small quantities (especially when frozen). and the cooking oil is not at the right temperature. Set to the recommended temperature or try using The temperature of the frying oil may not be high a slightly higher temperature. enough: the temperature is set incorrectly. Remember to wait until the tempertaure indicator light goes out before lowering the basket. The chips stick together Potatoes have not been washed before Cut potatoes and rinse well to remove immersed in hot oil. excess starch, and dry them thoroughly. The safety cut out has activated : the fryer does not work Unplug the the appliance, appliance, let let itit cool cool.and Press the Safety The oil level is not sufficient. Unplug follow the cut-out Reset oncode the back of the Solid fat has been put directly in the fryer. instructions forbutton use. If (found the error still appears, control unit) with a toothpick or similar non-metalThe oil temperature is still too high. press the Safety cut-out Reset button, which is lic item.atIf the theaproblem persists, contact located back of the fryer. Ifplease the problem our Customer Relations Team or an Approved Service Centre. persists, please contact our Customer Relations Team. Others problems The temperature indicator light does not come on. Please contact our Customer Relations Team or an Approved Service Centre. 23 5085657 Oleoclean.qxp 14/01/09 16:04 Page 26 Ned VEILIGHEIDSVOORSCHRIFTEN Lees deze instructies aandachtig door en bewaar ze zorgvuldig. Veiligheidsvoorschriften Voor uw veiligheid voldoet dit apparaat aan de toepasselijke normen en regelgevingen (Richtlijnen Laagspanning, Elektromagnetische Compatibiliteit, Materialen in contact met voedingswaren, Milieu…). Controleer of de netspanning overeenkomt met die op het apparaat vermeld staat (wisselstroom). Rekening houdend met de grote verscheidenheid aan geldende normen, dient u het apparaat door een erkende Servicedienst te laten controleren als u het in een ander land gebruikt dan waar u het gekocht heeft. Dit apparaat is uitsluitend ontworpen voor huishoudelijk gebruik en ook alleen voor binnenshuis. In geval van bedrijfsmatig gebruik of een gebruik waarvoor het apparaat niet geschikt is, of dat niet overeenkomt met de gebruiksaanwijzing kan de aansprakelijkheid van de fabrikant niet in het geding zijn en is de garantie niet geldig. Aansluiting • Het apparaat niet gebruiken wanneer dit, of het snoer, defect is of wanneer het apparaat gevallen is, zichtbare schade of functiestoringen vertoont. In dat geval moet het apparaat naar een erkende Servicedienst gestuurd worden. • Steek de stekker altijd in een geaard stopcontact. • Geen verlengsnoer gebruiken. Indien u hiervoor de verantwoordelijkheid op u neemt, gebruik dan een in goede staat verkerend verlengsnoer met randaarding dat voor het vermogen van het apparaat geschikt is. • Wanneer het netsnoer is beschadigd dient deze te worden vervangen door de fabrikant, zijn servicedienst of een gelijkwaardig gekwalificeerd persoon om een gevaarlijke situatie te voorkomen. • Het snoer niet laten hangen. • Niet aan het snoer trekken om de stekker uit het stopcontact te halen. • Altijd de stekker van het apparaat uit het stopcontact halen: na gebruik, om het apparaat te verplaatsen of om het schoon te maken. Werking • Dit apparaat is niet bedoeld om zonder hulp of toezicht gebruikt te worden door kinderen of andere personen, indien hun fysieke, zintuiglijke of mentale vemogen hen niet in staat stellen dit apparaat op een veilige wijze te gebruiken, tenzij zij van tevoren instructies hebben ontvangen betreffende het gebruik van het apparaat door een verantwoordelijk persoon. • Er moet toezicht zijn op jonge kinderen zodat zij niet met het apparaat kunnen spelen. • Nooit het apparaat zonder toezicht laten werken. Buiten bereik van kinderen houden. • Gebruik het apparaat op een stevige, vlakke ondergrond, ver van opspattend water. • Dit elektrische apparaat werkt op hoge temperaturen, wat tot brandwonden kan leiden. Raak de warme oppervlakken van het apparaat niet aan (filter, kijkvenster, zichtbare metalen delen…). • Laat het apparaat niet in de buurt van brandbare materialen werken (jaloezieën, gordijnen…), noch in de buurt van een externe warmtebron (gasfornuis, warmhoudplaatje…). 24 5085657 Oleoclean.qxp 14/01/09 16:04 Page 27 Ned • In geval van brand nooit proberen de vlammen met water te blussen. Sluit het deksel. Doof de vlammen met een vochtige doek. • Het apparaat niet verplaatsen wanneer het warme vloeistoffen of etenswaren bevat. • Indien u een uitneembare binnenpan heeft, verwijder deze dan nooit terwijl de friteuse werkt. • Nooit het elektrische gedeelte in water dompelen! Bereiding • Nooit de stekker in het stopcontact steken wanneer de friteuse leeg is (geen vet). Neem de minimale en maximale hoeveelheid vet in acht. • Indien u niet-vloeibaar vet gebruikt, snijd dit dan in stukken en laat het op zacht vuur in een aparte pan smelten en giet het daarna langzaam in de binnenpan. Nooit het niet-vloeibare vet rechtstreeks in de binnenpan of het mandje doen, hierdoor zou het apparaat kunnen beschadigen. • Nooit het niet-vloeibare vet rechtstreeks in het mandje doen, hierdoor zou het apparaat kunnen beschadigen. • Nooit verschillende soorten vet met elkaar mengen. • Doe niet teveel in het mandje, houd u aan de voor de veiligheid aangegeven maximale hoeveelheden. Instructies • Beperk de baktemperatuur tot 170°C, met name voor aardappelproducten. • Gebruik het mandje voor het bakken van patat. • Houd het frituren in de gaten: eet geen gefrituurd voedsel dat verbrand is en geef de voorkeur aan licht goudbruine frituur. • Filter het vet na ieder gebruik om te voorkomen dat achtergebleven restjes verbranden en vervang het vet regelmatig. • Berg de friteuse niet buiten op, u voorkomt zo dat er ongewenst water in het vet terecht komt. Geef de voorkeur aan een droge, goed geventileerde ruimte. • Zorg voor een evenwichtige, gevarieerde voeding met minstens 2 stuks fruit en groente per dag. • Bewaar aardappelen bij een temperatuur boven 8°C. • Beperk voor een snelle, geslaagde bereiding de hoeveelheid patat tot een 1/2 mandje per beurt. • Wanneer een vol mandje ondergedompeld wordt, daalt de temperatuur van het vet zeer snel. Tijdens het bakken overschrijdt de temperatuur nooit 175°C, zelfs wanneer de temperatuur is ingesteld op 190°C (= gestabiliseerde temperatuur vóór het onderdompelen). Neem in geval van problemen contact op met de Klantenservice van Tefal of ga naar de website www.tefal.nl. Reparaties mogen uitsluitend worden uitgevoerd door een erkende Servicedienst, met behulp van originele onderdelen. Wees vriendelijk voor het milieu ! Uw apparaat bevat materialen die geschikt zijn voor hergebruik. Lever het in bij het milieustation in uw gemeente of bij onze technische dienst. 25 5085657 Oleoclean.qxp 14/01/09 16:04 Page 28 Ned 13. 13.a 13.b Omschrijving 1. Deksel a. Permanent filter b. Handgreep c. Kijkvenster 2. Afneembaar elektrisch gedeelte 3. Mandje a. Handgreep b. Max. niveau voor het voedsel 4. Uitneembare binnenpan 5. Aanduiding voor het vullen van de binnenpan 6. Haakje voor het mandje in de hoge stand 7. Vast filter voor het filteren van het vet 13.c 8. 9. 10. 11. Koele handgrepen Bedieningsknop filterbak Behuizing Filterbak a. Deksel b. Dop 12. Anti-slipvoetjes 13. Bedieningspaneel a. Aan-/uitschakelen (O/I) b. Temperatuurregelaar c. Controlelampje temperatuur 14. Resetknop Resetfunctie: Uw friteuse is voorzien van een ingebouwde veiligheidsfunctie. Wanneer deze in werking treedt, schakelt uw friteuse automatisch uit. Haal de stekker uit het stopcontact, laat hem afkoelen en steek 14 vervolgens de stekker weer in het stopcontact. Om de friteuse weer in te schakelen, moet u de RESET knop (aan de achterzijde van het bedieningspaneel) indrukken d.m.v. een puntig voorwerp (fig.35). Indien dit probleem zich blijft voordoen, moet u contact opnemen met de Tefal klantenservice. 26 5085657 Oleoclean.qxp 14/01/09 16:04 Page 29 Ned Automatisch filteren/verversen en bewaren van het vet De friteuse is voorzien van een gepatenteerd automatisch filter- en ververssysteem dat geschikt is voor alle soorten vet. l Het vet wordt op volkomen veilige wijze automatisch gefilterd. l Dankzij het automatische filteren blijft het vet schoon en gaat het langer mee: gezonder en voordeliger. l Door het vet te bewaren in verschillende filterbakken, behouden de etenswaren hun smaak (frites, vis, oliebollen…) en worden deze niet met elkaar vermengd. Zeer eenvoudige reiniging De friteuse is eenvoudig te gebruiken en te demonteren. l Alle onderdelen kunnen in de vaatwasser, met uitzondering van het elektrische gedeelte. l Dankzij het filteren en bewaren van het vet wordt het vet uit de friteuse gehaald en kan deze na iedere frituurbeurt in de vaatwasmachine schoongemaakt worden. Na ieder gebruik schoon en als nieuw. De bedieningsknop van de filterbak gebruiken • De bedieningsknop van de filterbak heeft 3 standen. (fig.1) Stand Fry:om te frituren. (fig.2) Stand Automatic Oil Filtration: om het vet te filteren. (fig.3) Stand Oil Box: om de filterbak op zijn plaats te zetten of te verwijderen. (fig.4) Vóór de eerste ingebruikname • De friteuse kan volledig gedemonteerd worden. (fig.5) Verwijder het deksel, het mandje, het elektrische gedeelte en de binnenpan. Verwijder de filterbak door de bedieningsknop op de stand Oil box te zetten. (fig.4) ! Nooit het elektrische gedeelte onder water dompelen. • Reinig het deksel, de binnenpan, de behuizing, het mandje en de filterbak met een vochtige spons en afwasmiddel of in de vaatwasmachine. (fig.6) Reinig het elektrische gedeelte met een vochtige doek of spons. (fig.7) Goed afdrogen. • Druk na iedere reinigingsbeurt op de rode knop onder de binnenpan, zodat het achtergebleven water eruit kan lopen. (fig.8) ! Controleer of de rode knop in de goede stand teruggekeerd is. 27 5085657 Oleoclean.qxp 14/01/09 16:04 Page 30 Ned • Zet de binnenpan en het elektrische gedeelte op hun plaats. (fig.9-10) ! Controleer of het elektrische gedeelte goed geplaatst is, omdat anders de friteuse niet werkt. • Zet de bedieningsknop op de stand Oil box en zet de lege filterbak in de friteuse. (fig.4-11) • Klap de handgreep van het mandje volledig uit: een " klik " geeft aan dat deze op zijn plaats zit. (fig.12) ! Uw friteuse moet altijd binnenshuis gebruikt worden. Voorbereiding • Vul de binnenpan met vet. (fig.13) Max. Min. 3,5 L 2,8 L Het vetniveau moet zich altijd tussen de min. en max. streep van de binnenpan bevinden (fig.14). Vul de binnenpan nooit tot boven het maximaal niveau, dit kan namelijk tot overlopen en ernstige brandwonden leiden. ! Meng nooit verschillende soorten vet met elkaar, hierdoor kan het vet overlopen. Gebruik één van de voor het frituren aanbevolen vloeibare vetten. Volg de aanbevelingen van de fabrikant voor het bakken. ! Controleer voor ieder gebruik het vetniveau en pas dit, indien nodig, aan met hetzelfde vet. Max. 3060 g • Indien u niet-vloeibaar vet gebruikt, snijd dit dan in stukken en Min. 2450 g laat het in een apart steelpannetje smelten, voordat u het in de binnenpan giet. (fig.15-16) ! Laat niet-vloeibaar vet nooit rechtstreeks op het verwarmingselement of in het mandje smelten. Bakken • Zet de bedieningsknop op de stand Fry. (fig.17) • Steek na het vullen van de binnenpan met vet de stekker van uw friteuse zonder mandje in het stopcontact. (fig.18) ! Nooit de friteuse inschakelen als er geen vet in zit. 28 5085657 Oleoclean.qxp 14/01/09 16:04 Page 31 Ned • Zet de aan/uit-schakelaar in de I positie en het controlelampje van de temperatuur gaat aan. Zet de regelbare thermostaat op de gewenste temperatuur (zie tabellen p. 30). (fig.19-20) • De friteuse wordt warm. ! Het controlelampje van de temperatuur gaat uit zodra de gewenste temperatuur is bereikt. Maximale hoeveelheid Aanbevolen hoeveelheid Verse patat Diepvries patat 1.2 kg in 2 beurten 900 g 600 g 450 g • Doe een niet te grote hoeveelheid voedsel in het mandje. Zorg dat u het op het mandje aangegeven maximum niveau "MAX" niet overschrijdt. Neem een minder grote hoeveelheid indien het om bevroren voedsel gaat. (fig.21) ! Om overlopen te voorkomen en de levensduur van het vet te verlengen, kunt u voor het bakken de kruimels en/of het ijs van het voedsel zorgvuldig afvegen. • Zodra het controlelampje van de temperatuur uit is gegaan, laat u het frituurmandje langzaam in het vet zakken. Wanneer het mandje te snel zakt, kan het vet overlopen. (fig.22-23) ! Het is normaal dat tijdens het bakken het controlelampje temperatuur gaat branden en vervolgens weer uit gaat. ! Raak het apparaat tijdens het gebruik niet aan. Sommige zeer hete delen kunnen ernstige brandwonden veroorzaken. De stoom die uit het deksel komt is zeer heet. (fig.24) • Zet het deksel terug op uw friteuse. Het bakken is klaar wanneer de baktijd verstreken is en het voedsel de gewenste kleur en textuur verkregen heeft. • Verwijder het deksel. Zorg, om spatten te voorkomen, dat er geen condenswater uit het deksel in het vet terecht komt, door dit goed uit te laten lekken boven een doek of een stuk keukenpapier dat u naast de friteuse heeft gelegd. Laat het voedsel uitlekken door het mandje op het hiervoor bedoelde haakje te plaatsen. (fig.25) 29 5085657 Oleoclean.qxp 14/01/09 16:04 Page 32 Ned • Dien het voedsel op. (fig.26) Wanneer u klaar bent met frituren draait u de thermostaat naar de minimale stand en zet u de knop op « O ». Haal de stekker uit het stopcontact en laat het apparaat ca. 3 uur afkoelen. • Let op: klap na het frituren de handgreep van het mandje niet in. Dit om de kans op smelten bij de volgende frituurbeurt te voorkomen als vergeten wordt de handgreep weer uit te klappen. • Zie voor het filteren en verwijderen van het vet het hoofdstuk Onderhoud. Bereidingstabellen Onderstaande bereidingstijden zijn slechts een indicatie. Deze kunnen variëren aan de hand van de hoeveelheden en uw smaak. Voor het beste resultaat en om overlopen te vermijden wanneer u verse frites bakt, is het traditionele bakken in twee fases aanbevolen: - eerste, op 160 °C - tweede, op 190 °C Diepvries producten Verse producten Hoeveelheid Temperatuur Tijd Hoeveelheid Temperatuur Tijd e Patat (maximale hoeveelheid) 1200 g Patat (aanbev. max. hoeveelheid) 1 beurt 160°C 10-12 min 900 g 190°C 8-13 min 9-13 min 450 g 170°C 6-9 min 180°C 14-15 min 400 g 190°C 5-7 min 8-9 170°C 5-6 min 8-9 190°C 5-7 min Paddestoelen 400 g 160°C 10-12 min 8-9 190°C 7-8 min Visfilets 400 g 160°C 6-7 min 8-9 190°C 5-6 min 2e beurt 190°C 5-8 min 600 g 170°C Kipnuggets 400 g Fruitbeignets Onderhoud en Reiniging • Draai de bedieningsknop op de stand Automatic oil filtration. (fig.27-28) • Voor optimale veiligheid zorgt het apparaat zelf voor het automatisch filteren wanneer het vet voldoende afgekoeld is (ongeveer 3 uur na de laatste bakbeurt). ! Controleer of de filterbak leeg is voordat u de binnenpan leeg laat lopen. • Wanneer het vet gefilterd is, kunt u de filterbak opbergen: - In het apparaat: draai de bedieningsknop op de stand Fry. (fig.17). Het apparaat moet plat vervoerd en opgeborgen worden. - Buiten het apparaat: wacht 3 uur, draai de bedieningsknop in de stand Oil box en verwijder de filterbak. (fig.29-30) 30 5085657 Oleoclean.qxp 14/01/09 16:04 Page 33 Ned ! Wanneer de filterbak vol is deze niet onder water afspoelen. Om hem schoon te maken kunt u hem afvegen met keukenrol of een vochtige doek. ! Berg de filterbak altijd horizontaal op met het deksel er bovenop, in een droge, donkere ruimte op kamertemperatuur. Wacht minstens 3 uur voordat u de filterbak verwijderd. Vervoer het voorzichtig. • Ga voorzichtig te werk met de filterbak indien u het vet opnieuw wilt gebruiken. Draai de dop los en schenk het vet in de binnenpan. (fig.31-32) • Verwijder bij niet-vloeibaar vet het deksel. Draai de filterbak om en druk er op om het vet er uit te drukken. Snijd het vet in stukken en doe deze in een steelpannetje om het te laten smelten. Giet het vervolgens in de binnenpan. (fig.33-34) ! Nooit de filterbak in de magnetron of oven doen. • Zet de lege filterbak met zijn deksel en dop op zijn plaats. Zet de bedieningsknop op de stand Fry terug. (fig.17) ! Giet geen oud vet in de gootsteen. Laat het afkoelen en doe het bij het huisvuil. Vet vervangen : • Giet gebruikt vet nooit in de spoelbak. Laat het afkoelen en doe het vervolgens bij het huishoudelijk afval waarbij u de plaatselijke regelgeving in acht dient te houden. OPMERKING : • Vervang de olie tenminste elke 10 tot 12 bakbeurten. Indien u zonnebloemolie gebruikt, dient u deze iedere 5 bakbeurten te vervangen. Magiclean : Zeer eenvoudig te reinigen. • Het deksel, de binnenpan, de behuizing, het mandje en de filterbak kunnen in de vaatwasmachine. (fig.36) • Het filter in de binnenpan zit vast. U moet dit niet demonteren. (fig.37) • Druk na iedere reinigingsbeurt op de rode knop onder de binnenpan, zodat het achtergebleven water eruit kan lopen. (fig.8) ! Controleer voordat u de binnenpan vult of de rode knop in de goede stand is teruggekeerd. 31 5085657 Oleoclean.qxp 14/01/09 16:04 Page 34 Ned Wanneer uw friteuse niet goed werkt Problemen en mogelijke oorzaken Oplossingen De friteuse wordt niet warm De stekker zit niet in het stopcontact. Steek de stekker in het stopcontact. Het frituurvet loopt over De max. hoeveelheid vet is overschreden. Controleer het vetniveau en verwijder het overtollige vet. De max. hoeveelheid in het mandje is Controleer het niveau in het mandje en verwijder overschreden. het overtollige. Het voedsel is vochtig of bevat teveel water Verwijder het ijs en maak het voedsel goed droog. (bijv. diepvries producten). Laat het mandje langzaam zakken. Er zijn verschillende vetten en/of olie met elkaar Haal het vet uit de binnenpan en maak hem vermengd. schoon. Vul de binnenpan uitsluitend met één soort vet/olie. De binnenpan wordt niet geleegd Het vet is te warm. De bedieningsknop staat niet op de stand Automatic oil filtration. Het filter is verstopt. Wacht tot het vet is afgekoeld (ca. 3 uur). Zet de bedieningsknop op de stand Automatic oil filtration. Giet de inhoud van de binnenpan in een bak en reinig het filter met een niet-metalen borstel. Laat de friteuse warm worden (4 tot 5 minuten). Het vet lekt Het vet is gestold of niet-vloeibaar. De streep van 3,5 L in de binnenpan is overschreden. Er zit nog vet in de filterbak of dit is vol. Neem het max. (3,5L) vulniveau in de binnenpan in acht. Maak de friteuse na ieder gebruik schoon. Zet de bedieningsknop op de stand Oil box, verwijder de filterbak en maak dit leeg. Er komen nare geurtjes vrij Het vet is niet goed meer. Ververs het frituurvet (10 tot 12 beurten). Het vet is niet geschikt. Gebruik plantaardig vet voor een goede bakkwaliteit. Het voedsel wordt niet goudbruin en blijft zacht Het is te dik en bevat veel water. Probeer de baktijd te verlengen. Er zit teveel voedsel in het mandje en het vet Frituur slechts kleine hoeveelheden (vooral bij heeft niet de juiste temperatuur meer. bevroren producten). De temperatuur van het vet kan onvoldoende Stel de thermostaat af op de aanbevolen temperatuur. zijn: de thermostaat is verkeerd afgesteld. De patat plakt aan elkaar De verse patat is niet gewassen voordat u deze Was de verse patat en dep deze zorgvuldig in het vet ondergedompeld heeft. droog alvorens deze te bakken. De veiligheidsfunctie is geactiveerd: de friteuse werkt niet. Haal de stekker stekker uit uithet hetstopcontact, stopcontact laat en laat friHet vetniveau is te laag. het de apparaat teuse afkoelen. op de RESET knop die zich Het niet-vloeibare vet is rechtstreeks in het afkoelen en volgDruk de instructies van de gebruiksaan aan de Indien achterzijde van het bedieningspaneel apparaat gedaan. wijzing de foutcode opnieuw verschijnt, druk dan bevindt. Indien ditaan probleem zich blijft voordoen, op de RESET-knop de achterzijde van het apparaat. Het vet is te warm. moet u contact opnemen met de Tefal klantenserIndien de beveiliging opnieuw inschakelt, breng uw vice. apparaat dan naar een erkende Servicedienst. Andere problemen Het controlelampje van de temperatuur gaat niet aan. 32 Neem contact op met de Consumentenservice. 5085657 Oleoclean.qxp 14/01/09 16:04 Page 35 Deu SICHERHEITSHINWEISE Lesen Sie diese Anweisungen aufmerksam durch und heben Sie sie gut auf. Sicherheitshinweise Um Ihre Sicherheit zu gewährleisten, entspricht dieses Gerät den jeweils anwendbaren Normen und Bestimmungen (Niederspannung, Elektromagnetische Verträglichkeit, Materialien in Kontakt mit Lebensmitteln, Umweltverträglichkeit…). Die Spannung gemäß dem Typenschild des Gerätes prüfen (Wechselstrom). Aufgrund der Vielzahl geltender Vorschriften ist es ratsam, bei der Benutzung im Ausland, das Gerät durch ein zugelassenes Service Center prüfen zu lassen. Dieses Gerät wurde ausschließlich für den Hausgebrauch in geschlossenen Räumen konzipiert. Jede Verwendung für gewerbliche Zwecke, unsachgemäße Handhabung oder Inbetriebnahme, bei der die Gebrauchsanleitung nicht beachtet wurde, befreit den Hersteller von jeder Verantwortung oder Garantie. Dieses Gerät ist nicht dazu bestimmt, mit einem externen Timer oder einem separaten Fernbedienungssystem in Betrieb genommen zu werden. Anschluss • Das Gerät nicht benutzen, wenn das Gerät oder seine Zuleitung defekt sind, das Gerät heruntergefallen ist und einen sichtbaren Schaden oder Funktionsstörungen aufweist. In diesem Fall das Gerät zum nächstliegenden zugelassenen Service Center bringen. • Das Gerät immer an eine geerdete Steckdose anschließen. • Kein Verlängerungskabel benutzen. Wenn Sie doch eines benutzen, muss es sich in gutem Zustand befinden, geerdet sein und der Stromstärke des Geräts entsprechen, sowie so verlegt werden, dass niemand darüber stolpern kann. • Bei Beschädigung der Zuleitung muss diese unbedingt durch den Hersteller, ein zugelassenes Service Center oder einen Fachmann ersetzt werden, um jegliche Gefahr auszuschließen. Das Gerät in keinem Fall selbst auseinander nehmen. • Die Zuleitung nicht herunterhängen lassen, nicht mit den heißen Teilen das Gerätes in Berührung kommen lassen und nie über eine scharfe Kante legen oder ziehen. • Niemals den Stecker an der Zuleitung aus der Steckdose ziehen. • In folgenden Situationen immer den Netzstecker ziehen: nach jeder Benutzung, zum Transport des Gerätes und vor jeder Reinigung. Entfernen Sie vor der ersten Inbetriebnahme alle Verpackungen und Aufkleber innerhalb und außerhalb des Gerätes und entnehmen Sie das Zubehör. Betrieb • Dieses Gerät darf nicht von Personen (inbegriffen Kindern) mit eingeschränkten körperlichen, sensorischen oder geistigen Fähigkeiten benutzt werden. Das Gleiche gilt für Personen, die keine Erfahrung mit dem Gerät besitzen oder sich mit ihm nicht auskennen, außer wenn sie von einer für ihre Sicherheit verantwortlichen Person beaufsichtigt werden oder von dieser mit dem Gebrauch des Gerät vertraut gemacht wurden. • Kinder müssen beaufsichtigt werden, damit sie nicht mit dem Gerät spielen. • Das Gerät niemals ohne Aufsicht in Betrieb nehmen. • Eine stabile, waagerechte und vor Wasserspritzern geschützte Abstellfläche benutzen. • Dieses Gerät erreicht bei seiner Benutzung sehr hohe Temperaturen, die Verbrennungen 33 5085657 Oleoclean.qxp 14/01/09 16:04 Page 36 Deu verursachen können. Niemals an die heißen Flächen des Gerätes greifen (Filter, Sichtfenster, außen liegende Metallteile…). • Betreiben Sie das Gerät nicht in der Nähe von brennbaren Materialien (Gardinen, Vorhänge,…) und von Hitzequellen (Gasofen, Ofenplatten…). • Versuchen Sie im Brandfall keinesfalls, das Feuer mit Wasser zu löschen. Schließen Sie den Deckel, ziehen Sie den Netzstecker und ersticken Sie die Flammen mit einem feuchten Tuch. • Niemals das mit heißer Flüssigkeit oder heißen Speisen gefüllte Gerät transportieren. • Versuchen Sie niemals, den Frittierbehälter aus dem Gerät zu nehmen, solange die Fritteuse eingeschaltet ist. Geben Sie niemals Wasser in Öl oder andere Fettstoffe. • Das elektrische Bedienelement, das Kabel und den Stecker niemals in Wasser tauchen! Garen • Schließen Sie das Gerät nicht leer (ohne Fett) an das Stromnetz an. Halten Sie die Mindest- und Höchstmengen für Öl ein. • Falls Sie festes Fett benutzen, muss dieses in Stücke geschnitten, bei niedrigen Temperaturen in einem gesonderten Gefäß geschmolzen und anschließend langsam in den Frittierbehälter gegossen werden. Geben Sie das feste Fett niemals direkt in den Frittierbehälter oder den Frittierkorb, da dies Schäden am Gerät hervorrufen könnte. • Mischen Sie keine unterschiedlichen Fettsorten. • Überladen Sie den Frittierkorb nicht und überschreiten Sie die max. Sicherheitsgrenze nicht. Empfehlungen • Begrenzen Sie besonders für Kartoffeln die Gartemperatur auf 170°C. • Benutzen Sie zur Zubereitung von Pommes Frites den Frittierkorb. • Kontrollieren Sie den Garvorgang: verzehren Sie keine angebrannten frittierten Lebensmittel und frittieren Sie die Lebensmittel vorzugsweise goldgelb. • Filtern Sie das Öl nach jeder Benutzung, damit es nicht durch verbrannte Krümel verschmutzt wird und erneuern Sie es regelmäßig. • Bewahren Sie die Fritteuse nicht im Freien auf, um zu verhindern, dass unerwünschterweise Wasser in das Frittierbad gerät. Bewahren Sie die Fritteuse an einem trockenen und gut gelüfteten Ort auf. • Ernähren Sie sich ausgewogen und abwechslungsreich und nehmen Sie täglich 5 verschiedene Obst- oder Gemüsearten zu sich. • Kartoffeln müssen bei Temperaturen unter 8°C gelagert werden. • Füllen Sie den Frittierkorb pro Frittiervorgang nur zur Hälfte mit Pommes Frites, um diese schnell und gut zu garen. • Beim Eintauchen des gefüllten Frittierkorbs sinkt die Öltemperatur sehr schnell. Während des Garvorgangs übersteigt diese niemals 175°C, selbst wenn sie auf 190°C (= stabilisierte Temperatur vor dem Eintauchen) eingestellt ist. • Die Kochdämpfe können für Tiere mit einem besonders empfindlichen Atemsystem wie Vögel eine Gefahr darstellen. Vogelhaltern wird empfohlen,die Tiere vom Kochplatz entfernt zu halten. Jeglicher Eingriff darf nur bei einem zugelassenen Service Center mit Original-Ersatzteilen erfolgen. Denken Sie an den Schutz der Umwelt ! Ihr Gerät enthält wertvolle Rohstoffe, die wieder verwertet werden können. Geben Sie Ihr Gerät deshalb bitte bei einer Sammelstelle Ihrer Stadt oder Gemeinde ab. 34 5085657 Oleoclean.qxp 14/01/09 16:04 Page 37 Deu 13. 13.a 13.b Beschreibung 1. Deckel a. Dauerfilter b. Filtergriff c. Sichtfenster 2. Abnehmbares elektrisches Bedien- und Heizelement 3. Frittierkorb a. Griff b. Max. Füllmenge für Lebensmittel 4. Herausnehmbarer Frittierbehälter 5. Füllstandsanzeige des Frittierbehälters 6. Haken zum Einhängen des Frittierkorbs 7. Metall Feinöl-Filter 13.c 8. 9. 10. 11. Transportgriffe Entleerungsregler Thermogehäuse Oil Box: Öl-Aufbewahrungsbox a. Deckel b. Verschluss 12. Anti-Rutsch Füße 13. Abnehmbares Bedienelement a. An/Aus-Schalter (O/I) b. Temperaturregler c. Temperaturkontrolllämpchen 14. Reset Taste (bei Fehleranzeige) Funktion RESET: Ihr Gerät ist mit einer Sicherheitsabschaltung ausgestattet. Wenn die Sicherheitsabschaltung auslöst, schaltet das Gerät automatisch ab. Ziehen Sie den Netzstecker, lassen Sie es abkühlen und schließen 14 Sie es anschließend wieder an. Um ihr Gerät wieder funktionsfähig zu machen, drücken Sie mit einem spitzen, nichtmetallischen Gegenstand (z.B. einem Zahnstocher) die RESET-Taste (an der Rückseite des Bedienteils) (abb.35). Wenn die Sicherheitsabschaltung erneut auslöst, müssen Sie das Gerät zu einem zugelassenen Service Center bringen. 35 5085657 Oleoclean.qxp 14/01/09 16:04 Page 38 Deu Automatische Öl-Filtration, Öl-Entleerung und Öl-Aufbewahrung Die Fritteuse ist mit einem exklusiven und patentierten automatischen System zur Filtration, Entleerung und Aufbewahrung des Öls ausgestattet, das an alle Speisefette angepasst ist. l Die Entleerung des Frittierbehälters erfolgt automatisch und ist völlig sicher. l Dank der automatischen Filterung bleibt Ihr Frittierfett sauber, Sie können es über längere Zeit benutzen und Ihre Speisen bleiben bekömmlich. Bei von gelösten Teilchen gereinigtem Frittierfett wird die Geruchsentwicklung vermindert. l Die Aufbewahrung des Frittierfettes in der Öl-Aufbewahrungsbox garantiert die Geschmacksbewahrung der Speisen (Pommes-Frites, Fisch, Krapfen…) und schließt Geschmacksübertragungen aus. Superleichte Reinigung Die Fritteuse lässt sich leicht bedienen und demontieren. l Alle Teile außer dem elektrischen Bedienelement sind spülmaschinenfest. l Dank der Öl-Filtration und der Öl-Aufbewahrung wird die Fritteuse nach jeder Benutzung geleert und kann dann in der Spülmaschine gereinigt werden. Das Gerät wird nach jeder Benutzung sauber wie neu. Gebrauch des Entleerungsreglers • Der Entleerungsregler kann auf 3 verschiedene Positionen gestellt werden. (abb. 1) Position Fry „Fry“: Frittieren. (abb. 2) Position Automatic Oil Filtration „Automatic Oil Filtration“: Automatisches Entleeren und Filtern des Öls in die Öl-Aufbewahrungsbox. (abb. 3) Position Oil Box „Oil Box“: Einsetzen oder Abnehmen der Öl-Aufbewahrungsbox. (abb. 4) Vor der ersten Inbetriebnahme • Die Fritteuse kann vollständig demontiert werden. (abb. 5) Nehmen Sie den Deckel ab. Nehmen Sie den Frittierkorb, das elektrische Bedienelement und den Frittierbehälter ab. Stellen Sie den Entleerungsregler auf die Position „Oil Box“ und nehmen Sie die Öl-Aufbewahrungsbox ab. (abb. 4) ! Tauchen Sie das elektrische Bedienelement niemals ins Wasser. • Reinigen Sie den Deckel, den Frittierbehälter, das Thermogehäuse, den Frittierkorb und die Öl-Aufbewahrungsbox mit einem Schwamm unter Zusatz von Spülmittel oder in der Geschirrspülmaschine. (abb. 6) Reinigen Sie das elektrische Bedienelement mit einem feuchten Schwamm. (abb. 7) Lassen Sie die Teile gut trocknen. 36 5085657 Oleoclean.qxp 14/01/09 16:04 Page 39 Deu • Drücken Sie nach jeder Reinigung auf den roten Knopf unter dem Frittierbehälter, um das im Inneren verbliebene Wasser abzulassen. (abb. 8) ! Versichern Sie sich, dass der rote Knopf wieder in seine ursprüngliche Stellung zurückgegangen ist. • Setzen Sie den Frittierbehälter und das elektrische Bedienelement ein. (abb. 9-10) ! Versichern Sie sich, dass das elektrische Bedienelement richtig eingesetzt ist, andernfalls funktioniert die Fritteuse nicht. • Stellen Sie den Entleerungsregler auf die Position„Oil Box“ und geben Sie die leere Öl-Aufbewahrungsbox in die Fritteuse. (abb. 4-11) • Klappen Sie den Griff des Frittierkorbes ganz auf, bis er hörbar einrastet. (abb. 12) ! Ihre Fritteuse ist ausschließlich für den Hausgebrauch in geschlossenen Räumen geeignet. Vorbereitung • Füllen Sie den Frittierbehälter mit Fett. (abb. 13) Maxi Mini 3,5 L 2,8 L Über- und unterschreiten Sie dabei nicht die Füllstandsanzeigen im Innern des Frittierbehälters (abb. 14). Befüllen Sie den Innenbehälter nie über die Max.-Anzeige hinaus mit Fett, da dies zum Überlaufen der Fritteuse und zu schweren Verbrennungen führen könnte. ! Mischen Sie keine unterschiedlichen Fettsorten, dies kann zum Überlaufen des Frittierbehälters führen. Benutzen Sie vorzugsweise spezielles Frittier-Speisefett. Befolgen Sie zum Frittieren der Speisen die Angaben des Fettfabrikanten. ! Überprüfen Sie vor dem Frittiervorgang den Fett-Füllstand und geben Sie gegebenenfalls Fett dazu. Maxi 3060 g Mini 2450 g • Falls Sie festes Fett benutzen, muss dieses in Stücke geschnitten, in einem gesonderten Gefäß geschmolzen und anschließend in den Frittierbehälter gegossen werden. (abb. 15-16) ! Lassen Sie festes Fett niemals auf dem Heizelement oder im Frittierkorb schmelzen. 37 5085657 Oleoclean.qxp 14/01/09 16:04 Page 40 Deu Garen • Stellen Sie den Entleerungsregler auf die Position „Fry“. (abb. 17) • Befüllen Sie den Innenbehälter mit Öl, setzen Sie den Deckel auf und schließen Sie die Fritteuse ohne den Einsatz an. (abb.18) ! Schließen Sie die Fritteuse niemals ohne vorheriges Einfüllen von Fett ans Stromnetz an. • Schalten Sie das Gerät ein, die Temperatur Kontrolllampe leuchtet auf. Stellen Sie die gewünschte Temperatur mit dem Temperaturregler ein.(Siehe Frittiertabelle Seite 39). (abb.19-20) ! Die Temperatur Kontrollleuchte erlischt wenn die eingestellte Temperatur erreicht ist. Max. Sicherheitsmenge Frische Pommes Frites Tiefgefrorene Pommes Frites 1.2 kg in 2 Frittierdurchgängen 900 g 600 g 450 g Empfohlene Menge • Geben Sie die Speisen in den Frittierkorb, ohne diesen zu überladen. Überschreiten Sie den am Frittierkorb angegebenen „MAX” Höchststand nicht. Reduzieren Sie die Mengen bei Tiefkühlkost. (abb. 21) ! Um Überlaufen zu verhindern und damit das Öl länger hält, müssen die zu frittierenden Lebensmittel gut abgetrocknet werden. • Wenn die Kontrolllampe erlischt, senken Sie den Frittierkorb langsam in das Öl ab. Zu schnelles Absenken des Frittierkorbs kann zum Überlaufen führen. (abb.22-23) ! Es ist normal, dass die Temperaturkontrolllämpchen Anzeige während des Frittiervorgangs an- und ausgeht. ! Fassen Sie das Gerät nicht an, wenn es in Betrieb ist. Manche Teile werden sehr heiß und können ernste Verbrennungen hervorrufen. Der aus dem Deckel austretende Dampf ist kochend heiß. (abb.24) • Setzen Sie den Deckel wieder auf die Fritteuse. Der Frittiervorgang ist beendet, wenn die Frittierzeit abgelaufen ist und die Speisen die gewünschte Farbe und Konsistenz erreicht haben. • Nehmen Sie den Deckel ab. Lassen Sie das Kondenswasser nicht vom Deckel in das Frittierbad tropfen, um das Auftreten von Spritzern zu verhindern. Lassen Sie den Deckel vielmehr gut auf einem Tuch oder Küchenkrepp neben der Fritteuse abtropfen. Hängen Sie den Frittierkorb an die dazu vorgesehene Halterung und lassen sie das Frittiergut abtropfen. (abb. 25) 38 5085657 Oleoclean.qxp 14/01/09 16:04 Page 41 Deu • Servieren Sie die Speisen (abb. 26) Stellen Sie das Thermostat auf die Minimal Position und den An/Aus Schalter auf « O », sobald der Frittiervorgang beendet ist. Ziehen Sie den Stecker aus der Steckdose und lassen Sie es etwa 3 Stunden lang abkühlen. • Filtern und Entleeren des Fetts siehe Kapitel „Pflege und Reinigung“. Frittiertabelle Die angegebenen Frittierzeiten und Fettmengen sind Richtwerte, sie können je nach Menge und persönlichen Geschmacks variieren. Für frische Fritten sollte die herkömmliche Garmethode in zwei nacheinander folgenden Frittiergängen angewendet werden, mit welcher man bessere Ergebnisse erzielt und das Überlaufen der Fritteuse vermeidet: - der erste Gang bei 160 °C - der zweite Gang bei 170 °C. Frische Lebensmittel Menge Temperatur Garzeit Tiefgefrorene Lebensmittel Menge Temperatur Garzeit 1 Frittiervorgang 160°C 10-12 Min Pommes Frites (max. 1200 g Sicherheitsgrenze) 2 Frittiervorgang 190°C 5-8 Min 900 g 190°C 8-13 Min Pommes Frites (emp600 g fohlene Menge) 170°C 9-13 Min 450 g 170°C 6-9 Min Geflügel-Kroketten 400 g 180°C 14-15 Min 400 g 190°C 5-7 Min Obstkrapfen 8-9 170°C 5-6 Min 8-9 190°C 5-7 Min Pilze 400 g 160°C 10-12 Min 8-9 190°C 7-8 Min Fischfilets 400 g 160°C 6-7 Min 8-9 190°C 5-6 Min Pflege und Reinigung Stellen Sie den Entleerungsregler auf die Position „Automatic Oil Filtration“. (abb. 27-28) • Zu Ihrer eigenen Sicherheit erfolgt der Entleerungsvorgang automatisch, sobald das Fett genügend abgekühlt ist (ca. 3 Stunden nach dem letzten Frittiervorgang). ! Versichern Sie sich vor dem Entleeren des Frittierbehälters, dass die ÖlAufbewahrungsbox leer ist. • Nach dem Filtervorgang kann die Öl-Aufbewahrungsbox aufbewahrt werden: - im Gerät: stellen Sie den Entleerungsregler auf die Position „Fry“. (abb. 17). Das Gerät muss in diesem Fall in waagrechter Stellung transportiert und aufbewahrt werden. - außerhalb des Geräts: Warten Sie 3 Stunden, stellen Sie den Entleerungsregler auf Position „Oil Box“ und entnehmen Sie die Öl-Aufbewahrungsbox. (abb. 29-30) 39 5085657 Oleoclean.qxp 14/01/09 16:04 Page 42 Deu ! Wenn sich Öl im Behälter befindet, waschen Sie ihn nicht unter fließendem Wasser ab. Reinigen Sie ihn in diesem Fall mit einem Stück Küchenrolle oder einem feuchten Tuch. ! Bewahren Sie die Öl-Aufbewahrungsbox immer waagerecht und mit geschlossenem Deckel an einem kühlen Ort ohne Lichteinwirkung auf. • Warten Sie mindestens 2 Stunden, bevor Sie die Öl-Aufbewahrungsbox herausnehmen. Transportieren Sie sie vorsichtig. • Zur Wiederverwendung des Fetts: nehmen Sie die Öl-Aufbewahrungsbox vorsichtig auf. Schrauben Sie den Verschluss auf und gießen Sie das Öl in den Frittierbehälter. (abb. 31-32) • Bei festem Fett nehmen Sie den Deckel ab. Drehen Sie die ÖlAufbewahrungsbox um und drücken Sie auf den Boden der Box, um das Fett abzulösen. Schneiden Sie das Fett in Stücke und geben Sie sie zum Schmelzen in einen Topf. Gießen Sie es anschließend in den Frittierbehälter. (abb. 33-34) ! Stellen Sie die Öl-Aufbewahrungsbox niemals in eine Mikrowelle. • Schieben Sie die leere Oil Box mit ihrem Deckel und ihrem Verschluss an ihren Platz. Stellen Sie den Entleerungsregler erneut auf die Position Fry. (abb. 17) Austauschen des Öls : • Giessen Sie das verbrauchte Fett niemals in den Ausguss. Lassen Sie es abkühlen und entsorgen Sie es entsprechend den lokalen Bestimmungen mit dem Hausmüll. ACHTUNG : • Das Öl muss mindestens alle 10 bis 12 Frittiergänge ausgewechselt werden. Wenn Sie Sonnenblumenöl verwenden, muss dieses nach 5 Verwendungen ausgetauscht werden. Total Magiclean : Ganz einfach zu Reinigen. • Der Deckel, der Frittierbehälter, das Thermogehäuse, der Frittierkorb und die ÖlAufbewahrungsbox können in der Spülmaschine gereinigt werden. (abb. 36) • Der im Frittierbehälter befindliche Metall Feinöl-Filter ist fest installiert. Versuchen Sie nicht, ihn abzunehmen. (abb. 37) • Drücken Sie nach jeder Reinigung auf den roten Knopf unter dem Frittierbehälter, um das im Inneren verbliebene Wasser abzulassen. (abb. 8) ! Versichern Sie sich vor dem Befüllen des Frittierbehälters, dass der rote Knopf wieder in seine ursprüngliche Stellung zurückgegangen ist. 40 5085657 Oleoclean.qxp 14/01/09 16:04 Page 43 Deu Falls Ihre Fritteuse nicht richtig funktioniert Probleme und mögliche Ursachen Lösungen Die Fritteuse funktioniert nicht Das Gerät ist nicht angeschlossen. Schließen Sie das Gerät an. Das Frittierfett läuft über Die max. Einfüllmenge des Frittierbehälters Prüfen Sie den Füllstand und entfernen Sie die wurde überschritten. überschüssige Menge. Die max. Einfüllmenge des Frittierkorbs Prüfen Sie den Füllstand des Frittierkorbs und wurde überschritten. entfernen Sie die überschüssige Menge. Die Speisen sind feucht oder enthalten zu viel Entfernen Sie das Eis und trocknen Sie die Lebensmittel Wasser (beispielsweise Tiefkühlkost) gut ab.Tauchen Sie den Frittierkorb sehr langsam in das Fett. Mischung von verschiedenen Öl- und Fettsorten Leeren und reinigen Sie den Frittierbehälter. Es wurden unterschiedliche Fettsorten gemischt. Füllen Sie den Frittierbehälter mit einer einzigen Fettsorte. Der Frittierbehälter entleert sich nicht Das Fett ist noch zu heiß. Lassen Sie das Fett abkühlen (etwa 3 Stunden). Die Entleerungsregler ist nicht auf Automatic Oil Stellen Sie den Entleerungsregler auf die Position Filtration eingestellt. Automatic Oil Filtration. Der Metall Feinöl-Filter ist verstopft oder gesättigt. Leeren Sie das Fett in ein Gefäß und reinigen Sie den Metall Feinöl-Filter mit einer weichen Bürste. Das Fett ist erstarrt oder gehärtet. Heizen Sie das Gerät für kurze Zeit auf (4-5 min) Öl läuft aus Die 3.5 L Füllstands-Markierung im Frittierbehälter Überschreiten Sie den Max. (3,5L) Füllstand des ist überstiegen. Frittierbehälters nicht. Reinigen Sie die Fritteuse vor jeder Benutzung. In der Öl-Aufbewahrungsbox befindet sich noch Öl Stellen Sie den Entleerungsregler auf die Position oder sie ist voll. Oil Box, entnehmen Sie die Öl-Aufbewahrungsbox und leeren Sie sie. Entweichen von unangenehmen Gerüchen Das Fett ist zu alt. Erneuern Sie das Öl (10-12 Anwendungen). Das Fett eignet sich nicht zum Frittieren. Verwenden Sie für ein gutes Frittierergebnis Pflanzenfett. Speisen werden nicht goldbraun und bleiben weich Die Speisen sind zu dick und enthalten zu viel Wasser. Versuchen Sie es mit einer etwas längeren Garzeit Sie frittieren zu große Mengen und das Öl hat Frittieren Sie die Speisen in kleinen Mengen nicht die richtige Temperatur. (besonders Tiefkühlkost). Die Temperatur des Öls ist möglicherweise nicht hoch Stellen Sie den Thermostat auf die angegebene genug: der Thermostat ist nicht richtig eingestellt. Temperatur ein. Die Pommes Frites sind klebrig Sie haben die frischen Pommes Frites vor dem Waschen und trocknen Sie die frischen Pommes Eintauchen ins Öl nicht gewaschen. Frites vor dem Frittieren. Die Sicherheitsabschaltung ist aktiviert: Ihre Gerät funktioniert nicht Ziehen Sie lassen abkühDer Öl-Füllstand ist nicht hoch genug. Stecken Sieden das Netzstecker, Gerät aus, lassen SieSie eses abkühlen und befolgen Sie mit die Anweisungen der len. Drücken einem spitzen,innichtmetalliSie haben direkt festes Fett eingefüllt. Gebrauchsanleitung. Wenn der Fehlercode erneut schen Gegenstand (z.B. einem Zahnstocher) die Das Fett ist noch zu heiß. angezeigt wird, Sie die Reset-Taste an der RESET-Taste (andrücken der Rückseite des Bedienteils). Rückseite des Geräts. Wenn das Sicherheitssystem Wenn die Sicherheitsabschaltung erneut auslöst, erneut anspringt, müssen Sie das Gerät zu einem müssen Sie das Gerät zu einem zugelassenen Service Center bringen. Andere Probleme Wenn die Kontrolllampe nicht leuchtet. Wenden Sie sich an ein zugelassenes Service Center. 41 5085657 Oleoclean.qxp 14/01/09 16:04 Page 44 Ita NORME DI SICUREZZA Leggere attentamente queste istruzioni e conservarle con cura. Norme di sicurezza La sicurezza del presente apparecchio è conforme alle specifiche tecniche e alle norme vigenti (compatibilità elettromagnetica, bassa tensione, materiali a contatto con alimenti, ambiente…). Verificare che la tensione di rete corrisponda a quella indicata sull'apparecchio (corrente alternata). Tenuto conto della differenza delle norme in vigore, se questo apparecchio viene utilizzato in un paese diverso da quello nel quale è stato acquistato, è necessario farlo verificare da un centro di assistenza autorizzato. Questo apparecchio è stato creato per uso esclusivamente domestico all'interno dell'abitazione; qualsiasi utilizzo professionale, non appropriato o non conforme alle istruzioni d'uso non vincolerà il produttore ad alcuna responsabilità o garanzia. Collegamento • Non utilizzare l'apparecchio se lo stesso o il cavo di alimentazione sono danneggiati o se l'apparecchio è caduto e presenta danni visibili o anomalie di funzionamento. In questi casi, l'apparecchio dovrà essere inviato presso un centro di assistenza autorizzato. • Collegare sempre l'apparecchio ad una presa di corrente con messa a terra. • Non utilizzare prolunghe elettriche. Assumendosene la responsabilità, utilizzare una prolunga in buono stato, con messa a terra e adatta alla potenza dell'apparecchio. • Se il cavo di alimentazione e’ danneggiato, esso deve essere sostituito dal costruttore o dal suo servizio assistenza tecnica o comunque da una persona con qualifica similare, in modo da prevenire ogni rischio. • Non lasciare pendere il cavo di alimentazione. • Non scollegare l'apparecchio tirando il cavo. • Scollegare sempre l'apparecchio dopo l'uso, per spostarlo o per pulirlo. Funzionamento • Questo apparecchio non deve essere utilizzato da persone (compresi i bambini) le cui capacità fisiche, sensoriali o mentali sono ridotte, o da persone prive di esperienza o di conoscenza, tranne se hanno potuto beneficiare, tramite una persona responsabile della loro sicurezza, di una sorveglianza o di istruzioni preliminari relative all’uso dell’apparecchio. • È opportuno sorvegliare i bambini per assicurarsi che non giochino con l’apparecchio. • Non lasciare mai l'apparecchio in funzione senza sorveglianza. Non lasciare l'apparecchio alla portata dei bambini. • Utilizzare una superficie di lavoro stabile, piana e al riparo da eventuali schizzi d'acqua. • Il presente apparecchio elettrico funziona a temperature elevate suscettibili di causare eventuali bruciature. Non toccare le superfici calde dell'apparecchio (filtro, oblò, parti metalliche in vista...). • Non mettere in funzione l'apparecchio in prossimità di materiale infiammabile (tende), o nelle vicinanze di fonti di calore esterne (cucina a gas, piastra riscaldante...). • In caso di incendio, non tentare in nessun caso di spegnere con acqua le fiamme. Chiudere il coperchio. Soffocare le fiamme con un panno umido. • Non spostare l'apparecchio quando contiene olii o alimenti caldi. 42 5085657 Oleoclean.qxp 14/01/09 16:04 Page 45 Ita • Se l'apparecchio è dotato di vasca amovibile, non rimuoverla in nessun caso mentre la friggitrice è in funzione. • Non immergere in nessun caso l'unità elettrica nell'acqua! Cottura • Non collegare mai il cavo di alimentazione se la friggitrice è vuota (senza grasso/olio). Rispettare le quantità minime e massime di olio. • In caso di utilizzo di grassi solidi, questi devono essere tagliati a pezzetti e fatti fondere a fuoco moderato in un recipiente a parte e successivamente versati lentamente nella vasca. Non introdurre in nessun caso grassi solidi direttamente nella vasca o nel cestello per non danneggiare l'apparecchio. • Non introdurre in nessun caso grassi solidi direttamente nel cestello per non danneggiare l'apparecchio. • Non mescolare grassi di diverso tipo. • Non sovraccaricare il cestello e rispettare le quantità di sicurezza. Raccomandazioni • Limitare la temperatura di frittura a 170° C specialmente per le patate. • Per le patatine utilizzare il cestello. • Controllare la cottura: evitare di mangiare gli alimenti fritti se sono bruciati e preferire fritture leggermente dorate. • Per evitare che i residui brucino, filtrare l'olio dopo ogni utilizzo e cambiarlo regolarmente. • Non conservare la friggitrice all'esterno per evitare un indesiderabile apporto d'acqua nell'olio. Preferire un luogo asciutto e areato. • Seguire una dieta equilibrata e diversificata, che comprenda almeno 5 porzioni di frutta e verdura al giorno. • Conservare le patate a una temperatura superiore a 8° C. • Per una frittura rapida e di qualità, ridurre la quantità di alimenti a 1/2 cestello per ogni immersione. • Se il cestello viene immerso pieno di alimenti, la temperatura dell'olio si abbassa troppo rapidamente. Durante la frittura, questa non supera mai i 175° C anche se il termostato è regolato su 190° C (= temperatura stabilizzata prima dell'immersione). Per qualsiasi problema, contattare il centro di assistenza autorizzato o consultare l'indirizzo Internet groupeseb.com. Qualsiasi intervento deve essere effettuato esclusivamente da un centro di assistenza autorizzato con pezzi di ricambio originali. Partecipiamo alla protezione dell’ambiente ! Il vostro apparecchio è composto da diversi materiali che possono essere riciclati. Lasciatelo in un punto di raccolta o presso un Centro Assistenza Autorizzato. 43 5085657 Oleoclean.qxp 14/01/09 16:04 Page 46 Ita 13. 13.a 13.b Descrizione 1. Coperchio a. Filtro permanente b. Maniglia c. Oblò 2. Unità elettrica amovibile 3. Cestello a. Maniglia b. Livello massimo per gli alimenti 4. Vasca amovibile 5. Riferimenti di riempimento della vasca 6. Patta di aggancio del cestello in posizione alta 13.c 7. Griglia fissa di filtraggio del grasso/olio 8. Maniglie per il trasporto 9. Manopola Oil box 10. Base 11. Oil box: contenitore per olio/grassi a. Coperchio b. Tappo 12. Piedini anti-scivolo 13. Pannello di controllo a. Interruttore «on/off» (O/I) b. Comando del termostato c. Spia luminosa della temperatura 14. Tasto Reset Funzione RESET: l'apparecchio è dotato di un dispositivo di sicurezza. Se questo si attiva, l'apparecchio smette di funzionare. Scollegare l'apparecchio, lasciarlo raffreddare e ricollegare 14 l’apparecchio. Per rimettere in funzione la friggitrice, premere il tasto RESET situato nella parte posteriore dell'apparecchio servendosi di un oggetto appuntito (non metallico). (fig.35) Se il dispositivo di sicurezza si attiva nuovamente, portare l'apparecchio in un centro di assistenza autorizzato. 44 5085657 Oleoclean.qxp 14/01/09 16:04 Page 47 Ita Filtraggio, drenaggio e conservazione automatica dell'olio La friggitrice è dotato di un sistema esclusivo e brevettato di filtraggio e drenaggio automatico adatto a tutti i tipi di olii e grassi alimentari. l Il drenaggio dell'olio è automatico e totalmente sicuro. l Grazie al sistema di filtraggio automatico, l'olio rimane pulito e dura più a lungo per una frittura più sana. Infatti eliminando i residui di fritto si sviluppano meno odori. l La conservazione dei diversi olii/grassi nei contenitori OIL BOX permette di preservare il gusto degli alimenti (patatine, pesce, frittelle) e di impedire che i sapori si mescolino. Pulizia semplicissima La friggitrice è semplicissima da manipolare e da smontare. l Tutti i pezzi, eccetto l'unità elettrica, possono essere messi in lavastoviglie. l Grazie al sistema di filtraggio e di conservazione dell'olio, la friggitrice può essere vuotata e messa in lavastoviglie dopo ogni frittura. Pulita come nuova dopo ogni utilizzo. Utilizzo della manopola Oil box • La manopola Oil box presenta 3 posizioni. (fig. 1) Posizione Fry: per friggere. (fig. 2) Posizione Automatic Oil Filtration: per svuotare e filtrare il contenitore per l'olio. (fig. 3) Posizione Oil Box: per inserire o rimuovere il contenitore per olio. (fig. 4) Al primo utilizzo • La friggitrice può essere completamente smontata. (fig. 5) Rimuovere il coperchio. Rimuovere il cestello, l'unità elettrica e la vasca. Rimuovere il contenitore per l'olio portando la manopola Oil box sulla posizione Oil box. (fig. 4) ! Non immergere in nessun caso l'unità elettrica nell'acqua! • Lavare il coperchio, la vasca, la base, il cestello e il contenitore per l'olio con una spugna umida e detergente per i piatti o in lavastoviglie. (fig. 6) Pulire l'unità elettrica con una spugna umida. (fig. 7) Asciugare con cura. • Dopo la pulizia, premere il tasto rosso posto sotto la vasca per far uscire l'acqua rimasta all'interno. (fig. 8) ! Verificare che il tasto rosso sia ritornato in posizione corretta. 45 5085657 Oleoclean.qxp 14/01/09 16:04 Page 48 Ita • Reinserire la vasca e l'unità elettrica. (fig. 9-10) ! Verificare che l'unità elettrica sia posizionata correttamente altrimenti la friggitrice non funziona. • Portare la manopola Oil box nella posizione Oil box e inserire il contenitore per l'olio vuoto nella friggitrice. (fig. 4-11) • Sollevare completamente la maniglia del cestello fino a sentire un "clic" che ne indica il corretto posizionamento. (fig. 12) ! La vostra firggitrice deve essere utilizzata sempre all'interno dell'abitazione. Preparazione • Riempire la vasca con grasso/olio. (fig. 13) Max Min 3,5 L 2,8 L Il livello del grasso/olio deve sempre situarsi tra le tacche "min" e "max" della vasca (fig. 14). Non riempite mai la vasca oltre il livello massimo, perché questo potrebbe far traboccare la vasca e provocare gravi bruciature. ! Non mescolare grassi di diverso tipo per non causare fuoriuscite. Utilizzare un grasso alimentare liquido specifico per friggere. Per la frittura seguire le indicazioni del produttore. ! Prima di ogni frittura verificare il livello di olio e se necessario aggiungerne dello stesso tipo. Max 3060 g • In caso di utilizzo di grassi solidi, questi devono essere tagliati a Min 2450 g pezzetti, fatti fondere in un recipiente a parte e successivamente versati nella vasca. (fig. 15-16) ! In ogni caso evitare di far fondere grasso solido sulla resistenza o nel cestello. Cottura • Portare la manopola Oil box in posizione Fry. (fig. 17) • Dopo aver riempito la vasca con olio, collegare la friggitrice senza il. (fig. 18) ! Non collegare mai il cavo di alimentazione quando la friggitrice è senza olio o grasso. 46 5085657 Oleoclean.qxp 14/01/09 16:04 Page 49 Ita • Posiziona il pulsante On/Off sulla posizione I e si accenderà l’indicatore luminoso. Regola il termostato variabile sulla temperatura desiderata (vedi le tabelle di cottura p.48). (fig.19-20) • La friggitrice si sta scaldando. ! L’indicatore luminoso della temperatura si spegnerà al raggiungimento della temperatura desiderata. Quantità di sicurezza Quantità raccomandata Patatine fresche Patatine surgelate 1,2 kg in 2 immersioni 900 g 600 g 450 g • Posizionare gli alimenti surgelati nel cestello senza sovraccaricarlo. Non oltrepassare mai il livello massimo indicato sul cestello ("MAX"). Per i surgelati ridurre le quantità. (fig. 21) ! Per evitare fuoriuscite e prolungare la durata dell'olio, asciugare con cura gli alimenti prima di farli friggere • Dopo che l’indicatore luminoso della temperatura si è spento, posiziona e abbassa il cestello nell’olio che frigge. Immergere il cestello troppo velocemente può provocare fuoriuscite. (fig.22-23) ! Durante la cottura, il fatto che la spia luminosa della temperatura si accenda e si spenga è del tutto normale. ! Non toccare l'apparecchio quando è in funzione. Alcune parti molto calde potrebbero provocare gravi bruciature. Anche il vapore che esce dal coperchio ha una temperatura estremamente elevata (fig.24) • Riposizionare il coperchio sulla friggitrice La frittura è pronta allo scadere del tempo impostato e quando gli alimenti hanno raggiunto il colore e la consistenza desiderata. • Rimuovere il coperchio. Per evitare spruzzi, non fate ricadere la condensa del coperchio nell'olio ma fatela sgocciolare accuratamente sopra un panno o una carta assorbente messa accanto alla friggitrice. Far sgocciolare gli alimenti posizionando il cestello sull'apposito supporto. (fig. 25) • Servire (fig. 26) Una volta terminata la frittura, impostate i termostato sulla posizione minima e l’interruttore su «O». 47 5085657 Oleoclean.qxp 14/01/09 16:04 Page 50 Ita Scollegare l'apparecchio e lasciarlo raffreddare per circa 3 ore. • Per filtrare e travasare il grasso/olio, consultare il capitolo Manutenzione. Tabella di cottura I tempi di cottura sono forniti a titolo indicativo. Possono variare a seconda delle quantità e dei gusti. Per ottenere i migliori risultati ed evitare che li liquido trabocchi durante la cottura di patatine fresche, si raccomanda la cottura tradizionale in due bagni: - primo, a 160 °C - secondo, a 190 °C Alimenti surgelati Alimenti freschi Quantità Temperatura Tempo Quantità Temperatura Tempo 1a immersione 160°C 10-12 min Patatine (quantità di 1200 g sicurezza) 2a immersione 190°C 5-8 min 900 g 190°C 8-13 min Patatine (quantità max. raccomandata) 600 g 170°C 9-13 min 450 g 170°C 6-9 min Crocchette di pollo 400 g 180°C 14-15 min 400 g 190°C 5-7 min Frittelle di frutta 8-9 170°C 5-6 min 8-9 190°C 5-7 min Funghi 400 g 160°C 10-12 min 8-9 190°C 7-8 min Filetti di pesce 400 g 160°C 6-7 min 8-9 190°C 5-6 min Manutenzione e Pulizia • Portare la manopola Oil box in posizione Automatic Oil Filtration. (fig. 27-28) • Per la vostra sicurezza, l'apparecchio garantisce automaticamente il dernaggio quando l'olio è sufficientemente freddo (circa 3 ore dopo l'ultima frittura). ! Prima di svuotare la vasca assicurarsi che il contenitore per l'olio sia vuoto. • Quando il filtraggio è terminato, il contenitore per l'olio può essere conservato: - nell'apparecchio: ruotare la manopola Oil box in posizione Fry. (fig.17). L'apparecchio deve essere trasportato e conservato in piano. - fuori dall'apparecchio: attendere 3 ore, ruotare la manopola Oil box in posizione Oil box e rimuovere il contenitore per l'olio. (fig. 29-30) ! Quando il contenitore dell'olio è pieno, non lavatelo sotto l'acqua. Per pulirlo utilizzate la carta assorbente o una spugna umida. ! Il contenitore per l'olio deve sempre essere conservato coperto, in pozione orizzontale, in luogo fresco e asciutto e al riparo dalla luce 48 5085657 Oleoclean.qxp 14/01/09 16:04 Page 51 Ita • Prima di rimuovere il contenitore per l'olio attendere almeno 2 ore. Trasportarlo con attenzione. • Per riutilizzare il grasso/olio, prendere in mano il contenitore con attenzione. Svitare il tappo, poi vuotare l'olio nella vasca. (fig. 31-32) • Per grassi solidi, rimuovere il coperchio. Capovolgere il contenitore e far pressione per liberare il grasso. Tagliare il grasso a pezzetti quindi versarlo in un recipiente per farlo fondere. Successivamente versarlo nella vasca. (fig. 33-34) ! Non introdurre mai il contenitore per l'olio nel microonde. • Inserire nell'apparecchio il contenitore Oil box vuoto con il coperchio e il tappo. Riportare la manopola Oil box in posizione Fry. (fig. 17) ! Non versare il grasso usato nel lavandino. Lasciarlo raffreddare e gettarlo nei rifiuti casalinghi. Cambio dell’olio : • Non versate mai il grasso usato nel lavello. Lasciatelo raffreddare poi buttatelo con i rifiuti domestici, conformemente alle normative locali. ATTENZIONE: • Cambiate l’olio almeno ogni 10/12 utilizzi. • Se stai usando olio di girasoli, assicurati di cambiare l’olio ogni 5 utilizzi. Magiclean : facilissima da pulire. • Il coperchio, la vasca, la base, il cestello e il contenitore per l'olio possono essere lavati in lavastoviglie. (fig. 36) • La griglia di filtraggio situata nella vasca è fissa. Non smontarla. (fig. 37) • Dopo la pulizia, premere il tasto rosso posto sotto la vasca per far uscire l'acqua rimasta all'interno. (fig. 8) ! Prima di riempire la vasca, verificare che il tasto rosso sia ritornato in posizione corretta. 49 5085657 Oleoclean.qxp 14/01/09 16:04 Page 52 Ita Cosa fare se la friggitrice non funziona? Problemi e possibili cause Soluzioni La friggitrice non si scalda L'apparecchio non è collegato. Collegare la spina. L'olio che frigge fuoriesce Si è superato il livello massimo di riempimento della vasca. Si è superato il livello massimo di riempimento del cestello. Gli alimenti sono umidi o contengono troppa acqua (ex. surgelati). Miscela di olii e/o grassi diversi Verificare il livello dell'olio e rimuovere l'eccedenza. Verificare il livello cestello e rimuovere l'eccedenza. Togliere il ghiaccio e asciugare bene gli alimenti. Immergere il cestello molto lentamente. Gettare il grasso/olio e pulire la vasca. Riempire con grasso/olio di uno stesso tipo. La vasca non si svuota Il grasso/olio è troppo caldo. La manopola Oil box non si trova in posizione Automatic Oil Filtration. La griglia di filtraggio è tappata o intasata. Il grasso è incastrato o solidificato. Attendere che il grasso/olio si raffreddi (circa 3 ore). Portare la manopola Oil box in posizione Automatic Oil Filtration. Vuotare la vasca in un recipiente e pulire la griglia servendosi di una spazzola non metallica. Far scaldare (da 4 a 5 minuti) la friggitrice. Perdite di olio Si è superato il livello di riempimento della vasca corrispondente a 3,5 Litri. Rispettare il livello di riempimento massimo (3,5 Litri)della vasca. Pulire la friggitrice prima di utilizzarla ulteriormente. Il recipiente per l'olio è pieno o contiene altro olio Portare la manopola Oil box nella posizione Oil box, rimuovere il contenitore per l'olio e svuotarlo. Emissione di cattivi odori Il grasso/olio deve essere sostituito. Il grasso/olio non è adatto. Rinnovare l'olio di frittura (10 a 12 utilizzi). Utilizzare un olio vegetale raccomandato per una frittura di buona qualità. Gli alimenti non si dorano e rimangono molli Sono troppo spessi e contengono troppa acqua. Provare a prolungare il tempo di frittura. Si stanno friggendo contemporaneamente troppi Friggere gli alimenti in piccole quantità specialalimenti e l'olio di frittura non è alla giusta temperatura. mente se surgelate). La temperatura dell'olio di frittura non è abbastanza Regolare il termostato alla temperatura consigliata. alta: il termostato è regolato scorrettamente. Le patatine fritte si incollano Le patatine fresche non sono state lavate prima Lavare e asciugare con cura le patatine fresche di essere immerse nell'olio. prima di friggerle. Il dispositivo di sicurezza si è attivato: la friggitrice non funziona Scollegare l'apparecchio, lasciarlo raffreddare e Il livello di olio è insufficiente. ricollegare Premere il tasto RESET e seguire lel’apparecchio. indicazioni riportate nelle istruzioni grasso è stato inserito direttamente ancora solido. situatoSe nella parte posteriore dell'apparecchio. d'uso. il codice di errore appare di nuovo, preSe il dispositivo di sicurezza si attiva nuovamente, mere il tasto RESET situato nella parte posteriore Il grasso/olio è troppo caldo. portare l'apparecchio un centrodi disicurezza assistenzasi dell'apparecchio. Se ilin dispositivo autorizzato. attiva nuovamente, po Altri problemi L’indicatore luminoso non si accende. 50 Prego contattare il nostro Servizio Assistenza. 5085657 Oleoclean.qxp 14/01/09 16:04 Page 53 Esp INSTRUCCIONES DE SEGURIDAD Leer atentamente estas instrucciones y conservarlas cuidadosamente. Instrucciones de seguridad La seguridad de este aparato es conforme a las reglas técnicas y a las normas en vigor (Compatibilidad Electromagnética, Baja Tensión, materiales en contacto con alimentos, medio ambiente…). Compruebe que el voltaje corresponde correctamente con el mostrado en el aparato (corriente alterna). Debido a la diversidad de las normas en vigor, si el aparato se va a utilizar en otro país diferente al de su compra, deberá llevarlo a revisar a un Servicio Técnico Autorizado. Este aparato ha sido diseñado exclusivamente para uso doméstico. No utilice el aparato en el exterior. Toda utilización de tipo profesional o comercial, inadecuada o en desacuerdo con las instrucciones de uso, anula la responsabilidad y la garantía del fabricante. Conexión • No utilice el aparato si éste o su cable está defectuoso, si el aparato se ha caído y presenta daños visibles o anomalías de funcionamiento. En este caso, deberá llevar el aparato a un Servicio Técnico Autorizado. • Siempre conecte el aparato a un enchufe con toma de tierra. • No utilice alargador. Si asume la responsabilidad, utilice un alargador en buen estado con toma de tierra y adaptado a la potencia del aparato. • Si el cable de alimentación está dañado, éste tiene que ser sustituido por el fabricante, o en un Servicio Técnico autorizado, o una persona cualificada, para evitar cualquier peligro. • No deje el cable colgando. • No desenchufe el aparato tirando del cable. • Siempre desenchufe el aparato: después de su utilización, para desplazarlo o para limpiarlo. Funcionamiento • Este aparato no está previsto para que lo utilicen personas (incluso niños) cuya capacidad física, sensorial o mental esté disminuida, o personas sin experiencia o conocimientos, excepto si pueden recibir a través de otra persona responsable de su seguridad, una vigilancia adecuada o instrucciones previas relativas a la utilización del aparato. • Conviene vigilar a los niños para asegurarse de que no juegan con el aparato. • No deje nunca el aparato funcionando sin vigilancia. No lo deje al alcance de los niños. • Utilice una superficie de trabajo estable, plana protegida de las salpicaduras de agua. • Este aparato eléctrico funciona a altas temperaturas que pueden provocar quemaduras. No toque las superficies calientes del aparato (filtro, ventana, partes metálicas visibles…). • No ponga a funcionar el aparato cerca de materiales inflamables (estores, cortinas…), ni cerca de una fuente de calor exterior (cocina de gas, placa calentadora…). • En caso de incendio, no intente nunca apagar las llamas con agua. Cierre la tapa. Apague las llamas con un paño húmedo. • No desplace el aparato si contiene líquidos o alimentos calientes. • Si tiene una cuba extraíble, no la retire nunca cuando la freidora esté funcionando. • ¡No sumerja nunca la resistencia eléctrica en agua! 51 5085657 Oleoclean.qxp 14/01/09 16:04 Page 54 Esp Cocción • No conecte nunca la freidora vacía (sin grasa/aceite). Respete las cantidades mínimas y máximas de aceite. • Si utiliza grasa sólida, córtela en trozos y derrítala a fuego lento en un recipiente aparte y a continuación viértala lentamente en la cuba. No ponga nunca la grasa sólida directamente en la cuba o en el cestillo, si lo hace el aparato podría dañarse. • No ponga nunca la grasa sólida directamente en la cuba o en el cestillo, si lo hace el aparato podría dañarse. • No mezcle diferentes tipos de grasa. • No sobrecargue el cestillo, respete la cantidad límite de seguridad. Recomendaciones • Limite la temperatura de cocción a 170°C en especial para las patatas fritas. • Utilice el cestillo para freír las patatas fritas. • Controle la cocción: no coma los alimentos fritos cuando estén quemados y elija una fritura ligeramente dorada. • Filtre el aceite después de cada utilización para evitar que los residuos se quemen y cámbielo con regularidad. • No almacene la freidora en el exterior, de este modo evitará una cantidad de agua no deseable en el baño de aceite. Es mejor un lugar seco y ventilado. • Siga una dieta equilibrada y variada que se componga de al menos 5 frutas y verduras al día. • Almacene las patatas por encima de los 8°C. • Para una cocción rápida y satisfactoria, limite la cantidad de patatas a 1/2 cestillo por baño. • La inmersión del cestillo lleno hace disminuir muy rápidamente la temperatura del aceite. Durante la cocción, éste no sobrepasa nunca los 175°C, incluso si el termostato está regulado a 190°C (= temperatura estabilizada antes de inmersión). Para cualquier tipo de problema, póngase en contacto con su Servicio Técnico Autorizado o contacte con nuestro Servicio Consumidor 902312400 Cualquier intervención debe ser realizada únicamente por un Servicio Técnico Autorizado con piezas sueltas originales. ¡ ¡ Participe en la conservación del medio ambiente ! ! Su electrodoméstico contiene materiales recuperables y/o reciclables. Entréguelo al final de su vida útil, en un Centro de Recogida Específico o en uno de nuestros Servicios Oficiales Post Venta donde será tratado de forma adecuada. 52 5085657 Oleoclean.qxp 14/01/09 16:04 Page 55 Esp 13. 13.a 13.b Descripción 1. Tapa a. Filtro permanente b. Asa c. Ventana 2. Resistencia extraíble 3. Cestillo a. Asa b. Nivel máximo para los alimentos 4. Cuba extraíble 5. Indicaciones de niveles de la cuba 6. Ranura de enganche del cestillo en posición alta 7. Rejilla fija de filtración de la grasa/aceite 13.c 8. 9. 10. 11. Asas de transporte Botón de mando Oil box Cuerpo del aparato Oil box: contenedor de aceite a. Tapa b. Tapón 12. Pies anti-deslizantes 13. Panel de control a. Botón de marcha/parada (O/I) b. Termostato variable c. Indicador luminoso de temperatura 14. Botón Reset Función RESET: El aparato está equipado de un sistema de seguridad. Cuando el sistema de seguridad se activa, el aparato deja de funcionar. Desconecte el aparato, déjelo enfriar y vuelva a conectar la 14 freidora. Para reinicializar la freidora, presione el botón RESET situado en la parte posterior del panel de control con un objeto puntiagudo no metálico (un palillo de dientes o algo similar). (fig.35) Si el sistema de seguridad se activa de nuevo, lleve su aparato a un Servicio Técnico Autorizado. 53 5085657 Oleoclean.qxp 14/01/09 16:04 Page 56 Esp Filtración, vaciado y almacenamiento automático del aceite La freidora está equipada con un sistema exclusivo y patentado de filtración y drenaje automático, recomendado para todos los tipos de aceites y grasas alimentarias. l El vaciado de aceite/grasa es automático y totalmente seguro. l Gracias a la filtración automática, el aceite/grasa está limpio y dura más tiempo para una fritura más sana. Si retira los residuos de la fritura, despedirá menos olor. l El almacenamiento del aceite/grasa en el contenedor OIL BOX le permitirá preservar el sabor de los alimentos (patatas fritas, pescado, buñuelos…) y no mezclar los sabores. Limpieza ultra fácil PRO FRY OLEOCLEAN es fácil de manejar y desmontar. l Todas las piezas se pueden lavar en el lavavajillas excepto la resistencia eléctrica. l Gracias al sistema de filtración y al almacenaje de aceite, la freidora queda vacía de aceite y se puede lavar en el lavavajillas después de cada cocción. Limpia como nueva después de cada utilización. Utilización del botón de mando Oil box • El botón de mando Oil box posee 3 posiciones. (fig.1) Posición Fry: para freír. (fig.2) Posición Automatic Oil Filtration: para vaciar y filtrar el aceite en el contenedor de aceite. (fig.3) Posición Oil Box: para colocar o retirar el contenedor de aceite. (fig.4) Antes de la primera utilización • La freidora puede desmontarse por completo. (fig.5) Retire la tapa. Retire el cestillo, la resistencia eléctrica y la cuba. Retire el contenedor de aceite presionando el botón de mando Oil box en la posición Oil box. (fig.4) ! No sumerja nunca la resistencia eléctrica en agua. • Limpie la tapa, la cuba, el cuerpo del aparato, el cestillo y el contenedor de aceite con una esponja húmeda y jabón líquido para vajillas o lávelos en el lavavajillas. (fig.6) Limpie la resistencia eléctrica con una esponja húmeda. (fig.7) Seque bien. • Después de cada limpieza, presione el botón rojo situado debajo de la cuba para permitir que salga el agua que queda en el interior. (fig.8) 54 5085657 Oleoclean.qxp 14/01/09 16:04 Page 57 Esp ! Compruebe que el botón rojo ha vuelto a la posición correcta. • Coloque en su sitio la cuba y la resistencia eléctrica. (fig.9-10) ! Compruebe que la resistencia eléctrica esté colocada correctamente, si no la freidora no funcionará. • Coloque el botón de mando Oil box en la posición Oil box y ponga el contenedor de aceite vacío en la freidora. (fig.4-11) • Despliegue por completo el asa del cestillo: un "clic" le indicará que ya está colocada. (fig.12) ! La freidora debe de ser siempre utilizada al interior de la habitación. Preparación • Llene la cuba con aceite/grasa. (fig.13) Máxi Míni 3,5 L 2,8 L El nivel de aceite/grasa debe estar siempre entre las marcas míni y máxi de la cuba (fig.14). Nunca exceda el nivel máximo de llenado marcado en el tanque. ! No mezcle diferentes tipos de aceites/grasas, esto podría causar desbordamientos. Utilice aceite/grasa alimentaria líquida recomendada para la fritura. Siga las recomendaciones del fabricante para la cocción. ! Compruebe antes de cada cocción el nivel de aceite/grasa y rectifique si fuera necesario con el mismo aceite. Máxi 3060 g • Si utiliza grasa sólida, córtela en pedazos y derrítala en una Míni 2450 g cacerola aparte, a continuación viértala en la cuba. (fig.15-16) ! No derrita nunca la grasa sólida sobre la resistencia o en el cestillo. 55 5085657 Oleoclean.qxp 14/01/09 16:04 Page 58 Esp Cocción • Coloque el botón de mando Oil box en la posición Fry. (fig.17) • Después de que haya llenado la cuba con aceite, conecte la freidora sin el cestillo. (fig. 18) ! No conecte nunca la freidora sin aceite/grasa. • Presione el botón marcha/parada hasta la posición I y el indicador luminoso de temperatura se encenderá. Con el termostato, seleccione la temperatura que desea ( vea tablas de cocción p. 57 ). (fig.19-20) • La freidora está calentando. Cantidad límite de seguridad Patatas fritas frescas Patatas fritas congeladas 1.2 kg en 2 baños 900 g 600 g 450 g Cantidad recomendada • Coloque los alimentos en el cestillo sin sobrecargarlo. No sobrepase el nivel máximo indicado en el cestillo "MÁX". Reduzca las cantidades para los congelados. (fig.21) ! Para evitar los desbordamientos y prolongar la vida del aceite, seque cuidadosamente los alimentos antes de cocinarlos. • Cuando la luz del indicador de temperatura se apaga, ponga y baje el cesto lentamente en el aceite friendo. Bajar el cestillo demasiado rápido podría causar desbordamientos.(fig.22-23) ! Durante la cocción es normal que el indicador luminoso de temperatura se encienda y se apague. ! No toque el aparato mientras esté funcionando. Algunas partes muy calientes podrían causar serias quemaduras. El vapor que sale por la tapa está ardiendo (fig.24) • Vuelva a poner la tapa a la freidora. La cocción habrá terminado cuando el tiempo de cocción haya transcurrido y los alimentos hayan alcanzado el color y la textura deseados. • Retire la tapa. Para evitar salpicaduras, no deje caer el vapor condensado de la tapa en el baño de aceite. 56 5085657 Oleoclean.qxp 14/01/09 16:04 Page 59 Esp Escurra cuidadosamente encima de un paño o de un papel absorbente colocado al lado de la freidora. Escurra los alimentos colocando el cestillo en la fijación prevista a este efecto. (fig.25) • Sirva (fig.26) Cuando la fritura está terminada, presione el botón marcha/parada hasta la posición O. Desconecte el aparato y déjelo enfriar aproximadamente 3 horas. • Para filtrar y vaciar el aceite/grasa, diríjase al capítulo Mantenimiento. Cuadro de cocción Los tiempos de cocción se dan sólo a título indicativo. Pueden variar en función de las cantidades y los gustos personales. Para obtener mejores resultados y evitar los desbordamientos durante la cocción de patatas fritas frescas, se recomienda la cocción tradicional en dos baños: - primero, a 160 °C - segundo, a 190 °C Alimentos congelados Alimentos frescos Cantidad Patatas fritas (cantidad 1200 g límite de seguridad) Temperatura Tiempo 1er baño 160°C 10-12 min. 2º baño 190°C 5-8 min. Cantidad Temperatura Tiempo 900 g 190°C 8-13 min. Patatas fritas (cantidad máx. recomendada) 600 g 170°C 9-13 min. 450 g 170°C 6-9 min. Nuggets de pollo 400 g 180°C 14-15 min. 400 g 190°C 5-7 min. Buñuelos de fruta 8-9 170°C 5-6 min. 8-9 190°C 5-7 min. Setas 400 g 160°C 10-12 min. 8-9 190°C 7-8 min. Filetes de pescado 400 g 160°C 6-7 min. 8-9 190°C 5-6 min. Mantenimiento y Limpieza • Gire el botón de mando Oil box en la posición Automatic oil filtration. (fig.27-28) • Para su seguridad, el producto asegura de manera automática el vaciado cuando el aceite/grasa ha enfriado lo suficiente (aproximadamente 3 horas después de la última cocción). ! Asegúrese de que el contenedor de aceite está vacío antes de vaciar la cuba. • Una vez que la filtración haya terminado, puede guardar el contenedor de aceite: - En el aparato: gire el botón de mando Oil box en la posición Fry. (fig.17). El aparato debe transportarse y guardarse en posición horizontal. - Fuera del aparato: Espere 3 horas, gire el botón de mando Oil box en posición Oil box y retire el contenedor de aceite. (fig.29-30) 57 5085657 Oleoclean.qxp 14/01/09 16:04 Page 60 Esp ! Cuando el tanque para el aceite está lleno (de aceite), no lo pase bajo el agua. Para limpiarlo, utilise papel absorbente o una esponja húmeda. ! Guarde siempre el contenedor de aceite en posición horizontal con la tapa y en un lugar seco y templado protegido de la luz. • Espere al menos 2 horas antes de retirar el contenedor de aceite. Transpórtelo con precaución. • Para reutilizar el aceite/grasa, coja el contenedor de aceite con cuidado. Desenrosque el botón, y vacíe el aceite en la cuba.(fig.31-32) • Para la grasa sólida, retire la tapa. Déle la vuelta al contenedor de aceite y presione por arriba para despegar la grasa. Corte la grasa en pedazos y a continuación viértala en una cacerola para derretirla. Entonces viértala en la cuba. (fig.33-34) ! No coloque nunca el contenedor de aceite en el microondas. • Coloque el contenedor vacío Oil box, provisto de su tapa y del botón. Coloque el botón de mando Oil box en la posición Fry. (fig.17) ! No vierta el aceite/grasa utilizado por el fregadero. Déjelo enfriar y tírelo a la basura. Cambio del aceite : • Nunca vierta la materia grasa usada por el fregadero. Déjela enfriar y tírela con la basura doméstica, según las reglamentaciones locales. PRECAUCIONES : • Cambie la materia grasa al menos cada 10 a 12 utilizaciones. Si utiliza aceite de girasol, cámbielo cada 5 utilizaciones. Magiclean : Muy fácil de limpiar. • La tapa, la cuba, el cuerpo del aparato, el cestillo y el contenedor de aceite pueden ir al lavavajillas. (fig.36) • La rejilla de filtración situada en la cuba está fija. No la desmonte. (fig.37) • Después de cada limpieza, presione el botón rojo situado en la cuba para dejar salir el agua que queda en el interior. (fig.8) ! Antes de llenar la cuba, compruebe que el botón rojo ha vuelto a la posición correcta. 58 5085657 Oleoclean.qxp 14/01/09 16:04 Page 61 Esp Si su freidora no funciona bien Problemas y causas posibles Soluciones La freidora no calienta El aparato no está conectado. Conecte el aparato. El baño de fritura se desborda La marca Máx de llenado de la cuba se ha sobrepasado. La marca Máx de llenado del cestillo se ha sobrepasado. Los alimentos están húmedos o contienen demasiada agua (ej. Congelados). Mezcla de aceites y/o grasas diferentes. Compruebe el nivel del aceite y retire el sobrante. Compruebe el nivel del cestillo y retire el sobrante Retire el hielo y seque bien los alimentos. Baje el cestillo con cuidado. Tire el aceite/grasa y limpie la cuba. Rellene la cuba con un solo tipo de aceite/grasa. La cuba no se vacía El aceite/grasa está demasiado caliente. Espere a que el aceite/grasa se enfríe (aproximadamente 3h). El botón de mando Oil box no está en la Coloque el botón de mando Oil box en la posición Automatic oil filtration. posición Automatic oil filtration. La rejilla de filtración está taponada u obstruida. Vacíe la cuba en un recipiente y limpie la rejilla con un cepillo no metálico. El aceite/grasa está cuajada o solidificada. Ponga a calentar (de 4 a 5 min.) la freidora. Fugas de aceite Le marca correspondiente a 3.5L de llenado la cuba se ha sobrepasado. Queda aceite en el contenedor de aceite o éste está lleno. Emite olores Respete el nivel máx. (3,5L) de llenado de la cuba. Limpie la freidora antes de volverla a utilizar. Coloque el botón de mando Oil box en la posición Oil box, retire el contenedor de aceite y vacíelo. desagradables El aceite/grasa se ha deteriorado. El aceite/grasa no es apto. Renueva el aceite/grasa de fritura (10 a 12 utilizaciones). Utilice aceite/grasa vegetal para una fritura de buena calidad. Los alimentos no se doran y se quedan blandos Son demasiado gruesos y contienen mucha agua. A título de prueba, prolongue el tiempo de cocción. Se cocinan demasiados alimentos a la vez y el baño de Fría los alimentos en cantidades pequeñas de aceite ya no se encuentra a una temperatura (especialmente cuando estén congelados). adecuada. La temperatura del baño de fritura puede ser Ajuste el termostato a la temperatura. insuficiente: el termostato está mal ajustado. recomendada. Las patatas fritas se pegan Las patatas fritas frescas no se han lavado antes Lave y seque cuidadosamente las patatas fritas de sumergirlas en el aceite. frescas antes de la cocción. El sistema de seguridad se ha activado: la freidora no funciona enfriar.yPresione El nivel de aceite es insuficiente. Desconecte el aparato, déjelo enfriar siga las el botón Reset situado en ladeparte posterior del apalinstrucciones del modo empleo. Si el código La grasa sólida se ha introducido directamente. rato. Si el sistema de seguridad error aparece de nuevo, presioneseelactiva botónde Reset El aceite/grasa está demasiado caliente. nuevo, lleve aparato a un Servicio Técnico situado en la el parte posterior del aparato. Si el sisAutorizado. tema de seguridad se activa de nuevo, lleve el Otros problemas La luz del indicador luminoso no prende. Por favor contacte con su Centro de Servicio Autorizado. 59 5085657 Oleoclean.qxp 14/01/09 16:04 Page 62 Por CONSELHOS DE SEGURANÇA Leia atentamente o manual de instruções e guarde-o para futuras utilizações. Conselhos de segurança Para a sua segurança, este aparelho encontra-se em conformidade com as normas e regulamentações aplicáveis (Directivas de Baixa Tensão, Compatibilidade Electromagnética, Materiais em contacto com os alimentos, ambiente, ...). Certifique-se que a tensão da sua instalação eléctrica está em conformidade com a tensão indicada no aparelho (corrente alterna). Dada a diversidade das normas em vigor, se o aparelho for utilizado num país que não aquele onde o aparelho foi adquirido, leve-o a um Serviço de Assistência Técnica autorizado para proceder à sua verificação. Este aparelho foi concebido para um uso doméstico e no interior de casa. Qualquer utilização para fins profissionais, não adequada ou não conforme ao manual de instruções liberta o fabricante de qualquer responsabilidade e anula a garantia. Ligação • Não utilize o aparelho se este ou o cabo de alimentação se encontrar de alguma forma danificado, se o aparelho tiver caído ou apresentar danos visíveis ou problemas de funcionamento. Neste caso, dirija-se ao Serviço de Assistência Técnica autorizado. • Ligue sempre o aparelho numa tomada com ligação à terra. • Se necessitar de utilizar uma extensão, certifique-se que esta se encontra em bom estado, isto é, com ligação à terra e adaptada à potência do aparelho. • Se o cabo de alimentação se encontrar de alguma forma danificado, deverá ser substituído pelo fabricante, Serviço de Assistência Técnica autorizado ou por uma pessoa qualificada por forma a evitar qualquer tipo de perigo para o utilizador. • Não deixe o cabo de alimentação pendurado. • Nunca desligue o aparelho puxando pelo cabo de alimentação. • Desligue sempre o aparelho: logo após a sua utilização, para deslocá-lo, ou antes de proceder à sua limpeza. Funcionamento • Este aparelho não foi concebido para ser utilizado por pessoas (incluindo crianças) cujas capacidades físicas, sensoriais ou mentais se encontram reduzidas, ou por pessoas com falta de experiência ou conhecimento, a não ser que tenham sido devidamente acompanhadas e instruídas sobre a correcta utilização do aparelho, pela pessoa responsável pela sua segurança. • É importante vigiar as crianças por forma a garantir que as mesmas não brinquem com o aparelho. • Nunca deixe o aparelho a funcionar sem vigilância, nem ao alcance das crianças. • Utilize sempre o aparelho sobre uma superfície estável, plana, ao abrigo das projecções de água. • Este aparelho eléctrico funciona a altas temperaturas que podem provocar queimaduras. Não toque nas zonas quentes do aparelho (filtro, visor de observação, peças metálicas visíveis...). • Não coloque o aparelho a funcionar próximo de materiais inflamáveis (estores, cortinados…) ou fontes de calor externas (fogão a gás, placa de aquecimento…). 60 5085657 Oleoclean.qxp 14/01/09 16:04 Page 63 Por • No caso da ocorrência de um incêndio, nunca tente apagar as chamas com água. Feche a tampa e abafe as chamas com a ajuda de um pano húmido. • Nunca desloque o aparelho com líquidos ou alimentos quentes no seu interior. • Nunca tente retirar a cuba amovível (consoante o modelo) da fritadeira enquanto esta estiver em funcionamento. • Nunca mergulhe o painel de comandos dentro de água! Cozedura • Nunca ligue a sua fritadeira vazia (sem matéria gorda). Respeite as quantidades mín. e máx. de óleo. • Se utilizar uma matéria gorda sólida, corte-a aos pedaços, derrete-a em lume brando, num recipiente à parte e, de seguida, deite-a lentamente na cuba. • Nunca coloque a matéria gorda sólida directamente no cesto por forma a não danificar o aparelho. • Não misture vários tipos de matéria gorda. • Não sobrecarregue o cesto; respeite as quantidades limites de segurança. Recomendações • Limite a temperatura de cozedura a 170°C, sobretudo no caso das batatas. • Utilize sempre o cesto para fritar batatas. • Controle a cozedura: não coma os alimentos fritos quando estes ficarem queimados, preferindo, sempre, uma fritura ligeiramente dourada. • Filtre sempre o óleo depois de cada utilização por forma a evitar que os resíduos queimem. Mude regularmente o óleo. • Nunca guarde a fritadeira no exterior por forma a evitar uma acumulação indesejável de água no óleo. Prefira um ambiente seco e arejado. • Siga uma dieta equilibrada e variada, que inclua pelo menos 5 peças de fruta e legumes por dia. • Guarde as batatas a temperaturas superiores a 8°C. • Para uma cozedura rápida e bem sucedida, limite a quantidade de batatas fritas a 1/2 cesto por cada fritura. • Sempre que um cesto cheio é mergulhado no óleo, a sua temperatura desce muito rapidamente. No decorrer da cozedura, a temperatura do óleo nunca ultrapassa os 175°C, mesmo que o termóstato esteja regulado para 190°C (= temperatura estabilizada antes de o cesto ser mergulhado no óleo). No caso de qualquer problema, contacte um Serviço de Assistência Técnica autorizado ou o nosso Clube Consumidor – E-mail : [email protected] Qualquer intervenção deve ser feita apenas por um Serviço de Assistência Técnica autorizado e com peças separadas de origem. Protecção do ambiente em primeiro lugar! O seu produto contém materiais que podem ser recuperados ou reciclados. Entregue-o num ponto de recolha para possibilitar o seu tratamento 61 5085657 Oleoclean.qxp 14/01/09 16:04 Page 64 Por 13. 13.a 13.b Descrição 1. Tampa a. Filtro permanente b. Pega c. Visor de observação 2. Painel de comandos amovível 3. Cesto a. Pega b. Capacidade máx. para alimentos 4. Cuba amovível 5. Marcas de enchimento da cuba 6. Encaixe de fixação do cesto na posição alta 7. Grelha fixa de filtragem da matéria gorda 13.c 8. Pegas de transporte 9. Botão de comando Oil box 10. Corpo da fritadeira 11. Oil box: reservatório para matéria gorda a. Tampa b. Rolha 12. Pés anti-derrapantes 13. Painel de comandos a. Interruptor «ligar/desligar» (O/I) b. Termóstato c. Luz piloto da temperatura 14. Botão Reset Função RESET: A sua fritadeira está equipada com um mecanismo de segurança. Caso este mecanismo seja activado, o aparelho deixa de funcionar. Desligue o aparelho, deixe-o arrefecer e volte a ligar o aparelho. 14 Para voltar a colocar o seu aparelho em funcionamento, prima o botão “RESET” situado na parte de trás do aparelho com a ajuda de um objecto pontiagudo. (fig.35) Caso o sistema de segurança volte a activar-se, dirija-se a um Serviço de Assistência Técnica autorizado. 62 5085657 Oleoclean.qxp 14/01/09 16:04 Page 65 Por Filtragem, purga e armazenamento automático do óleo A fritadeira está equipada com um sistema exclusivo e patenteado de filtragem e purga automática do óleo, adaptado a qualquer tipo de matéria gorda alimentar. l O escoamento do óleo é automático e totalmente seguro. l Graças à filtragem automática, a matéria gorda mantém-se limpa e dura mais tempo para garantir frituras mais saudáveis. Sem resíduos de fritura, a matéria gorda liberta menos cheiro. l O armazenamento da matéria gorda no reservatório OIL BOX permite preservar o sabor dos alimentos (batatas fritas, peixe, rissóis, ....) sem misturar os sabores. Limpeza ultra-fácil A fritadeira é fácil de manusear e de desmontar. l Todas as peças são compatíveis com a máquina de lavar a loiça, à excepção do painel de comandos. l Graças ao sistema de filtragem e armazenamento do óleo da fritadeira, este pode ser facilmente retirado da fritadeira, facilitando a sua limpeza. Utilização do botão de comando Oil box • O botão de comando Oil box possui 3 posições. (fig.1) Posição Fry: para fritar. (fig.2) Posição Automatic Oil Filtration: para escoar e filtrar o óleo no reservatório. (fig.3) Posição Oil Box: Retirar ou colocar no lugar o reservatório de óleo. (fig.4) Antes da primeira utilização • A fritadeira pode ser totalmente desmontada. (fig.5) Retire a tampa e o cesto, o painel de comandos e a cuba. Por fim, retire o reservatório de óleo, posicionando o botão de comando na posição Oil box. (fig.4) ! Nunca mergulhe o painel de comandos na água. • Limpe a tampa, a cuba, o corpo do aparelho, o cesto e o reservatório de óleo com uma esponja húmida e detergente para a loiça ou coloque-os na máquina de lavar a loiça. (fig.6) Limpe o painel de comandos com uma esponja húmida. (fig.7) Seque todas as partes cuidadosamente. • Após cada limpeza, prima o botão vermelho situado por baixo da cuba para libertar a água que permaneceu no seu interior. (fig.8) 63 5085657 Oleoclean.qxp 14/01/09 16:04 Page 66 Por ! Certifique-se que o botão vermelho voltou à posição apropriada. • Volte a colocar a cuba e o painel de comandos no lugar. (fig.9-10) ! Certifique-se que o painel de comandos está correctamente colocado pois, caso contrário, a fritadeira não funciona correctamente. • Ajuste o botão de comando para a posição Oil box e coloque o reservatório de óleo vazio na fritadeira. (fig.4-11) • Abra completamente a pega do cesto: um "clic" indica que está no devido lugar. (fig.12) ! A sua fritadeira deve sempre ser utilizada no interior da sua casa. Preparação • Encha a cuba com matéria gorda. (fig.13) Máx Mín 3,5 L 2,8 L O nível de matéria gorda tem de se situar sempre entre as marcas mín. e máx. da cuba (fig.14). Nunca encha a cuba acima do nível máximo por forma a evitar qualquer tipo de transbordamento e queimaduras graves. ! Nunca misture vários tipos de matérias gordas Utilize sempre matéria gorda alimentar líquida recomendada para fritura. Siga as recomendações do fabricante para a cozedura dos alimentos. ! Antes de cada cozedura, verifique o nível da matéria gorda e, se necessário, rectifique a sua quantidade Máx 3060 g • Se utilizar uma matéria gorda sólida, corte-a aos pedaços, Mín 2450 g derreta-a num tacho à parte e em seguida, deite-a na cuba. (fig.15-16) ! Nunca derreta a matéria gorda sólida no elemento de aquecimento nem no cesto. Cozedura • Regule o botão de comando Oil box para a posição Fry. (fig.17) • Depois de ter enchido a cuba com óleo, ligue a sua fritadeira sem o cesto. (fig.18) 64 5085657 Oleoclean.qxp 14/01/09 16:04 Page 67 Por ! Nunca ligue a fritadeira sem matéria gorda. • Coloque o interruptor na posição « I » (ligar), o indicador luminoso do botão acende Rode o botão do termóstato para a temperatura pretendida (consultar tabela de fritura p.66). (fig.19-20) • A fritadeira está quente. ! A luz piloto da temperatura desliga-se quando a temperatura desejada for atingida. Quantidade limite de segurança Batatas fritas frescas Batatas fritas congeladas 1,2 kg em 2 cozeduras 900 g 600 g 450 g Quantidade recomendada • Coloque os alimentos no cesto sem o sobrecarregar. Não exceda o nível máximo indicado no cesto " MÁX. ". As quantidades devem ser inferiores ao nível máximo para alimentos congelados. (fig.21) ! Para evitar que o óleo transborde e prolongar a sua vida útil, seque cuidadosamente os alimentos antes de os fritar. • Uma vez desligada a luz piloto da temperatura, coloque e desça o cesto devagar no óleo quente. Descer o cesto muito rapidamente pode fazer com que o óleo transborde. (fig.22-23) ! Durante a cozedura, é normal que a luz piloto da temperatura se acenda e se apague. ! Não toque no aparelho no decorrer do funcionamento. Certas zonas extremamente quentes podem provocar queimaduras graves. O vapor libertado pela tampa pode queimar. (fig.24) • Volte a colocar a tampa na fritadeira. A cozedura chega ao fim depois de decorrido o tempo estipulado e depois de os alimentos alcançarem a cor e a textura pretendidas. • Retire a tampa. Para evitar salpicos, não deixe cair a água condensada na tampa para o interior do óleo. Limpe cuidadosamente a tampa com um pano ou papel absorvente colocado ao lado da sua fritadeira. Deixe os alimentos escorrer colocando o cesto na fixação prevista para este efeito. (fig.25) 65 5085657 Oleoclean.qxp 14/01/09 16:04 Page 68 Por • Sirva (fig.26) Uma vez a fritura terminada, regule o termóstato para a posição mínima e rode o interruptor para a posição «O» (desligar). Desligue o aparelho e deixe-o arrefecer durante cerca de 3 horas. • Para filtrar e retirar a matéria gorda, consulte o capítulo Manutenção. Quadro dos tempos de cozedura Os tempos de cozedura são fornecidos a título indicativo. Podem variar consoante as quantidades e o gosto de cada um. Para obter os melhores resultados possíveis e evitar os transbordamentos no decorrer da fritura de batatas fritas frescas, recomenda-se a fritura tradicional em dois banhos : - primeiro, a 160 °C - segundo, a 190 °C Alimentos frescos Quantidade Batatas fritas (capacidade limite de segurança) 1200 g Batatas fritas (capacidade máx. recomendada) Temperatura Tempo 1.ª cozedura 160°C 10-12 min Alimentos congelados Quantidade Temperatura Tempo 900 g 190°C 8-13 min 9-13 min 450 g 170°C 6-9 min 180°C 14-15 min 400 g 190°C 5-7 min 8-9 170°C 5-6 min 8-9 190°C 5-7 min Cogumelos 400 g 160°C 10-12 min 8-9 190°C 7-8 min Filetes de peixe 400 g 160°C 6-7 min 8-9 190°C 5-6 min 2.ª cozedura 190°C 5-8 min 600 g 170°C Croquetes de frango 400 g Filhós de frutos Manutenção e limpeza • Rode o botão de comando Oil box para a posição Automatic oil filtration. (fig.27-28) • Para a sua segurança, o produto assegura automaticamente o escoamento quando a matéria gorda está suficientemente fria (cerca de 3 horas após a última cozedura). ! Certifique-se que o reservatório de óleo está vazio antes de escoar a cuba. • Uma vez concluída a filtragem, pode guardar o reservatório de óleo: - no aparelho: coloque o botão de comando Oil Box na posição Fry. (fig.17). O aparelho deve ser transportado e arrumado direito. - fora do aparelho: aguarde 3 horas, coloque o botão de comando na posição Oil Box e retire o reservatório de óleo. (fig.29-30) 66 5085657 Oleoclean.qxp 14/01/09 16:04 Page 69 Por ! Quando o recipiente para óleo se encontrar cheio, nunca o passe por água. Para proceder à sua limpeza, utilize papel absorvente ou uma esponja húmida. ! Guarde sempre o reservatório de óleo na horizontal, com a tampa sobre a parte de cima, num local seco e temperado e ao abrigo da luz. • Aguarde pelo menos 3 horas antes de retirar o reservatório de óleo. Transporte-o com cuidado. • Para reutilizar a matéria gorda, pegue no reservatório de óleo com precaução. Desaperte a rolha e verta o óleo na cuba. (fig.31-32) • Para a matéria gorda sólida, retire a tampa do reservatório. Vire o reservatório de óleo e carregue para descolar a matéria gorda. Corte a matéria gorda aos pedaços e, coloque-a num tacho para derreter. Coloque-a de seguida na cuba. (fig.33-34) ! Nunca leve o reservatório de óleo ao micro-ondas. • Coloque no lugar o reservatório vazio Oil Box, equipado com a tampa e a rolha. Volte a colocar o botão de comando Oil Box na posição Fry. (fig.17) ! Não despeje a matéria gorda usada no lava-loiça. Deixe-a arrefecer e junte-a ao restante lixo doméstico. Substituição do óleo : • Nunca despeje os restos de matéria gorda, no lava loiça. Deixe-a arrefecer e juntea ao lixo doméstico, em conformidade com as normas locais. ATENÇÃO : • Mude o óleo pelo menos todas as 10 a 12 utilizações. Se utilizar óleo de girassol, proceda à sua substituição a cada 5 utilizações. Magiclean : Extremamente fácil de limpar. • A tampa, a cuba, o corpo do aparelho, o cesto e reservatório de óleo são compatíveis com a máquina de lavar a loiça. (fig.36) • A grelha de filtragem situada na cuba é fixa. Não a desmonte. (fig.37) • Depois de cada limpeza, carregue no botão vermelho situado por baixo da cuba para deixar escoar a água que permaneceu no seu interior. (fig.8) ! Antes de encher a cuba, certifique-se que o botão vermelho voltou para a posição correcta. 67 5085657 Oleoclean.qxp 14/01/09 16:04 Page 70 Por A sua fritadeira não funciona correctamente Problemas e causas possíveis Soluções A fritadeira não aquece O aparelho não está ligado. Ligue o aparelho. O óleo transborda A marca máxima de enchimento da cuba foi ultrapassada. A marca máxima de enchimento do cesto foi ultrapassada. Os alimentos estão húmidos ou contêm água em demasia (p. ex., congelados). Óleos e matéria gorda diferentes foram misturados. Verifique o nível do óleo e retire a quantidade em excesso. Certifique-se que o cesto não está demasiado cheio. Retire o gelo e seque bem os alimentos. Desça muito lentamente o cesto. Despeje a matéria gorda e limpe a cuba. Encha a cuba com um único tipo de matéria gorda. A cuba não efectua o escoamento A temperatura da matéria gorda está demasiado quente. O botão de comando Oil box não está na posição Automatic oil filtration. A grelha de filtragem está entupida. A matéria gorda solidificou. Aguarde o arrefecimento da matéria gorda (cerca de 3h). Coloque o botão de comando Oil box na posição Automatic oil filtration. Despeje a cuba num recipiente e limpe a grelha com a ajuda de uma escova não-metálica. Deixe a fritadeira aquecer durante (4 a 5 min). Fugas de óleo A marca que corresponde a 3,5 l de enchimento cuba da foi ultrapassada. Sobrou óleo no reservatório de óleo ou este está cheio. Emanação de Respeite o nível máx. (3,5L) de enchimento da cuba. Limpe a fritadeira antes de ser utilizada. Coloque o botão de comando Oil box na posição Oil box, retire o reservatório de óleo e despeje-o maus cheiros A matéria gorda está queimada. A matéria gorda não é apropriada. Substitua a matéria gorda (10 a 12 utilizações). Utilize uma matéria gorda vegetal para obter frituras de boa qualidade. Os alimentos não ficam dourados e ficam moles São demasiado espessos e contêm muita água. Demasiada quantidade de alimentos ao mesmo tempo e o óleo não está à temperatura adequada. A temperatura do óleo pode ser insuficiente: o termóstato está mal ajustado. As batatas Tente prolongar o tempo da cozedura. Frite os alimentos em pequenas quantidades (sobretudo os congelados). Coloque o termóstato na temperatura aconselhada. fritas colam As batatas fritas frescas não são lavadas antes de Lave e seque cuidadosamente as batatas fritas serem mergulhadas no óleo. antes da cozedura. O sistema de segurança foi activado: A fritadeira não funciona aparelho edeixe-o deixe-oarrefecer arrefecer. O nível de óleo é insuficiente. Desligue o aparelho, e siga as Prima o botão RESET situado na parte de trás do instruções do manual. Se o código de erro apareA matéria gorda sólida foi colocada directamente. aparelho. cer de novo, carregue no botão Reset situado na Se o mecanismo de segurança for novamente A temperatura da matéria gorda está parte de trás do aparelho. Se a segurança for activado, dirija-se a um Serviço deaparelho Assistência demasiado quente. novamente activada, confie o seu a um Técnica.Ade Assistência Técnica autorizado. Serviço Outros problemas A luz piloto da temperatura não acende. 68 Contacte um Serviço de Assitência Técnica autorizado ou o nosso Clube Consumidor.-
 1
1
-
 2
2
-
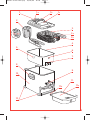 3
3
-
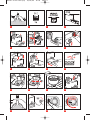 4
4
-
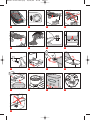 5
5
-
 6
6
-
 7
7
-
 8
8
-
 9
9
-
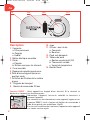 10
10
-
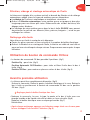 11
11
-
 12
12
-
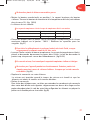 13
13
-
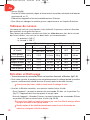 14
14
-
 15
15
-
 16
16
-
 17
17
-
 18
18
-
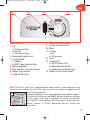 19
19
-
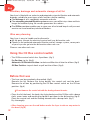 20
20
-
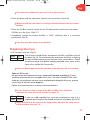 21
21
-
 22
22
-
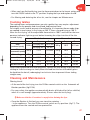 23
23
-
 24
24
-
 25
25
-
 26
26
-
 27
27
-
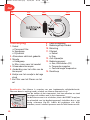 28
28
-
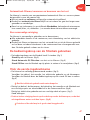 29
29
-
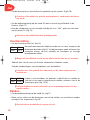 30
30
-
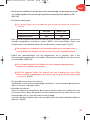 31
31
-
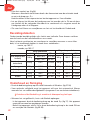 32
32
-
 33
33
-
 34
34
-
 35
35
-
 36
36
-
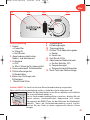 37
37
-
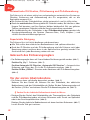 38
38
-
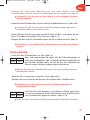 39
39
-
 40
40
-
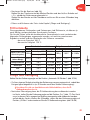 41
41
-
 42
42
-
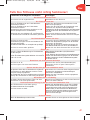 43
43
-
 44
44
-
 45
45
-
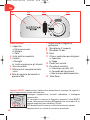 46
46
-
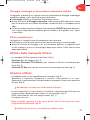 47
47
-
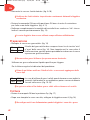 48
48
-
 49
49
-
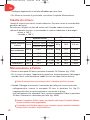 50
50
-
 51
51
-
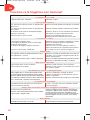 52
52
-
 53
53
-
 54
54
-
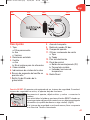 55
55
-
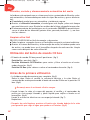 56
56
-
 57
57
-
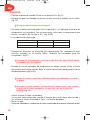 58
58
-
 59
59
-
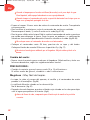 60
60
-
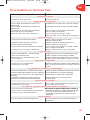 61
61
-
 62
62
-
 63
63
-
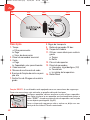 64
64
-
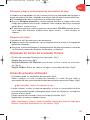 65
65
-
 66
66
-
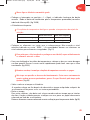 67
67
-
 68
68
-
 69
69
-
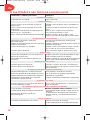 70
70


Tefal FAMILY PRO ACCESS 4L de handleiding
- Categorie
- Frituurpannen
- Type
- de handleiding
in andere talen
- English: Tefal FAMILY PRO ACCESS 4L Owner's manual
- italiano: Tefal FAMILY PRO ACCESS 4L Manuale del proprietario
- français: Tefal FAMILY PRO ACCESS 4L Le manuel du propriétaire
- español: Tefal FAMILY PRO ACCESS 4L El manual del propietario
- Deutsch: Tefal FAMILY PRO ACCESS 4L Bedienungsanleitung
- português: Tefal FAMILY PRO ACCESS 4L Manual do proprietário
Gerelateerde papieren
-
Tefal FR700930 Handleiding
-
-
-
Tefal FR804015 Handleiding
-
-
-
-
-
-
Andere documenten
-
Tristar FR-6933 de handleiding
-
Tristar FR-6930 de handleiding
-
Tristar FR-6931 de handleiding
-
-
SEB FR8040 OLEOCLE de handleiding
-
Princess SEMI PRO DOUBLE 2 X 1 KG 183123-01-001 de handleiding
-
SEB VERSALIO de handleiding
-
Solac FG6940 de handleiding
-
H Koenig DFX500 Handleiding
-
Solac FL6410 de handleiding