
EINHEBEL-SPÜLTISCHARMATUR / KITCHEN MIXER TAP /
MITIGEUR DE CUISINE MONOCOMMANDE
IAN 368455_2010
EINHEBEL-SPÜL TISCHARMATUR
Montage-, Bedienungs- und Sicherheitshinweise
KITCHEN MIXER TAP
Assembly, operating and safety instructions
MITIGEUR DE CUISINE MONOCOMMANDE
Instructions de montage, d‘utilisation et consignes de sécurité
MENGKRAAN
Montage-, bedienings- en veiligheidsinstructies
JEDNOPÁKOVÁ DREZOVÁ BATÉRIA
Pokyny pre montáž, obsluhu a bezpečnostné pokyny
P ÁKO V Á BA TERIE
Pokyny k montáži, obsluze a bezpečnostní pokyny
BA TERIA ZLEWOZMYWAK OWA
Wskazówki montażu, obsługi i bezpieczeństwa
GRIFO MONOMANDO DE COCINA
Instrucciones de montaje, de uso y de seguridad
1-GREBS KØKKENARMATUR
Monterings-, betjenings- og sikkerhedshenvisninger

EINHEBEL-SPÜLTISCHARMATUR / KITCHEN MIXER TAP /
MITIGEUR DE CUISINE MONOCOMMANDE
DE / AT / CH Montage-, Bedienungs- und Sicherheitshinweise Seite 5
GB / IE Assembly, operating and safety instructions Page 11
FR / BE Instructions de montage, d‘utilisation et consignes de sécurité Page 16
NL / BE Montage-, bedienings- en veiligheidsinstructies Pagina 22
PL Wskazówki montażu, obsługi i bezpieczeństwa Strona 28
CZ Pokyny k montáži, obsluze a bezpečnostní pokyny Strana 34
SK Pokyny pre montáž, obsluhu a bezpečnostné pokyny Strana 39
ES Instrucciones de montaje, de uso y de seguridad Página 44
DK Monterings-, betjenings- og sikkerhedshenvisninger Side 50

Sie benötigen · You need · Il vous faut · U hebt nodig · Wymagane · Potřebujete · Potrebujete · Necesita · Du skal bruge:
BA
1
C
1
2
3
4
5
6 b 6 a

E
8
15
9
10
11
12
13
14
F
D
7
G
H
16
13

5 DE/AT/CH
Einleitung ......................................................................................................................................... Seite 6
Bestimmungsgemäße Verwendung ....................................................................................................Seite 6
Teilebeschreibung ...............................................................................................................................Seite 6
Technische Daten ................................................................................................................................Seite 6
Sicherheitshinweise ................................................................................................................Seite 6
Montage ...........................................................................................................................................Seite 7
Armatur installieren .............................................................................................................................Seite 7
Armatur durchspülen ...........................................................................................................................Seite 7
Bedienung ......................................................................................................................................Seite 7
In Betrieb nehmen ...............................................................................................................................Seite 7
Temperaturbegrenzung einstellen ...................................................................................................... Seite 7
Wasserspar-Funktion ...........................................................................................................................Seite 8
Energiespar-Funktion ........................................................................................................................... Seite 8
Wartung und Reinigung .....................................................................................................Seite 8
Armatur pflegen und reinigen ............................................................................................................Seite 8
Entsorgung .....................................................................................................................................Seite 8
Informationen .............................................................................................................................Seite 9
Trinkbarkeit von Leitungswasser ......................................................................................................... Seite 9
Garantie ........................................................................................................................................... Seite 9
Abwicklung im Garantiefall ................................................................................................................Seite 9
Service .................................................................................................................................................Seite 10

6 DE/AT/CH
Einhebel-Spültischarmatur
Einleitung
Wir beglückwünschen Sie zum Kauf Ihres neuen
Produkts. Sie haben sich damit für ein hochwertiges
Produkt entschieden. Machen Sie sich vor der ersten
Inbetriebnahme mit dem Produkt vertraut. Lesen Sie
hierzu aufmerksam die nachfolgende Bedienungs-
anleitung und die Sicherheitshinweise. Benutzen Sie
das Produkt nur wie beschrieben und für die ange-
gebenen Einsatzbereiche. Bewahren Sie diese An-
leitung an einem sicheren Ort auf. Händigen Sie alle
Unterlagen bei Weitergabe des Produktes an Dritte
mit aus.
Bestimmungsgemäße
Verwendung
Dieses Produkt ist für alle druckfesten Warmwasser-
systeme wie Zentralheizung, Durchlauferhitzer,
Druckboiler o. Ä. geeignet. Nicht geeignet ist es für
Niederdruck-Warmwasserbereiter wie z. B. Holz-
oder Kohlebadeöfen, Öl- oder Gasbadeöfen, offene
Elektrospeicher. Im Zweifelsfall wenden Sie sich bitte
an einen Installateur oder Fachberater. Eine andere
Verwendung als zuvor beschrieben oder eine Ver-
änderung des Produkts ist nicht zulässig und führt
zur Beschädigung. Darüber hinaus können weitere
lebensgefährliche Gefahren und Verletzungen die
Folgen sein. Das Produkt ist nur zur Eigenanwendung,
nicht für den medizinischen oder kommerziellen
Gebrauch vorgesehen. Für durch unsachgemäße
Verwendung entstandene Schäden übernimmt der
Hersteller keine Haftung.
Teilebeschreibung
1 1 Dichtung
2 1 Gewindestange
3 1 Unterlegscheibe (Plastik)
4 1 Unterlegscheibe (Metall)
5 1 Mutter
6a 1 Flexschlauch Kaltwasser
6b 1 Flexschlauch Warmwasser
7 1 Mischdüse
8 1 Einstellhebel
9 1 Arretierungsschraube
10 1 Abdeckkappe
11 1 Kartuschen-Abdeckring
12 1 Kartuschen-Sicherungsring
13 1 Kartusche
14 1 Armaturenkörper
15 1 Innensechskantschlüssel
16 1 Kartuschen-Einstellring
Technische Daten
Anschlüsse: G⅜ (ca. 17 mm)
Mutter (Wasseranschluss): ca. 19 mm
Sicherheitshinweise
LEBENS-
UND UNFALLGEFAHR FÜR
KLEINKINDER UND KINDER!
Lassen Sie Kinder niemals unbeaufsichtigt mit
dem Verpackungsmaterial. Es besteht Erstickungs-
gefahr. Halten Sie das Produkt von Kindern fern.
Das Produkt ist kein Spielzeug.
VORSICHT VOR ELEKTRISCHEM
SCHLAG! Undichtigkeiten oder
Wasseraustritt können zu Lebensgefahr
durch elektrischen Schlag führen. Prüfen Sie alle
Verbindungen sorgfältig auf Dichtigkeit. Stellen
Sie zudem sicher, dass alle Leitungen von elek-
trischen Geräten korrekt und sicher installiert sind.
VORSICHT! VERLETZUNGSGEFAHR!
Stellen Sie sicher, dass alle Teile unbeschädigt
und sachgerecht montiert sind. Bei unsachge-
mäßer Montage besteht Verletzungsgefahr.
Bitte beachten Sie, dass Unterlegscheiben und
Dichtungen Verschleißteile sind, welche von
Zeit zu Zeit ausgetauscht werden müssen.
Beschädigte Teile können die Sicherheit und
Funktion beeinflussen.
ACHTUNG! GEFAHR DER SACHBESCHÄ-
DIGUNG! Lassen Sie die Montage nur durch
fachkundige Personen durchführen.

7 DE/AT/CH
Undichtigkeiten oder Wasseraustritt können zu
erheblichen Sachschäden an Gebäude oder
Hausrat führen. Prüfen Sie daher alle Verbin-
dungen sorgfältig auf Dichtigkeit.
Achten Sie darauf, dass alle Dichtungen den
korrekten Sitz haben, um Wasseraustritt durch
Undichtigkeit zu verhindern.
Drehen Sie das Abflussrohr in die von Ihnen
gewünschte Position, achten Sie aber darauf, das
Rohr auf den Spültisch zu richten. Andernfalls
kann Wasseraustritt zu erheblichen Wasser-
schäden am Gebäude führen.
VORSICHT! VERBRÜHUNGSGEFAHR!
Achten Sie bei der Warmwassereinstellung
darauf, dass die Temperatur des Wassers nicht
zu heiß eingestellt ist.
Machen Sie sich vor der Installation mit allen
Gegebenheiten vor Ort vertraut, z. B. Wasser-
anschluss und Absperrvorrichtung.
Bitte lesen Sie diese Bedienungsanleitung vor
Montage und Gebrauch aufmerksam durch.
Bewahren Sie alle Sicherheitshinweise und
Anweisungen für die Zukunft auf!
Montage
Armatur installieren
Stellen Sie die Haupt-Wasserzufuhr ab, um
Wasseraustritt durch Undichtigkeit zu verhindern.
Lassen Sie das restliche Leitungswasser ablaufen.
Installieren Sie die Armatur, wie in Abbildung
A–C dargestellt.
VORSICHT! Verbiegen Sie die Flexschläuche
nicht und bringen Sie sie nicht unter Spannung.
Ansonsten besteht die Gefahr der Sachbeschädi-
gung.
Armatur durchspülen
Um mögliche Verunreinigungen zu beseitigen,
muss die Armatur vor dem ersten Gebrauch
gespült werden. Gehen Sie dazu wie folgt vor
(s. Abb. D):
Schrauben Sie die Mischdüse 7 ab.
Öffnen Sie die Haupt-Wasserzufuhr und lassen
Sie das Wasser zwei Minuten lang laufen.
Schrauben Sie die Mischdüse anschließend
wieder an.
Bedienung
In Betrieb nehmen
Hinweis: Spülen Sie nach längerem Nichtgebrauch
der Armatur die Leitungen zunächst gründlich durch,
um Trinkwasser-Stagnation und Rückstände aufzulösen.
Öffnen Sie die Haupt-Wasserzufuhr.
Heben Sie den Einstellhebel 8 an und schwen-
ken Sie ihn nach rechts oder links, um die Stärke
bzw. Temperatur des Wasserflusses zu regulieren.
Heißwasser:
Schwenken Sie den Einstellhebel nach links.
Kaltwasser:
Schwenken Sie den Einstellhebel nach rechts.
Prüfen Sie den Betrieb der Mischbatterie.
Schwenken Sie dafür den Einstellhebel in
alle erlaubten Positionen. Bitte prüfen Sie die
Anschlüsse regelmäßig auf Dichtigkeit.
Temperaturbegrenzung
einstellen
Die Kartusche 13
dieser Armatur verfügt über eine
Temperaturbegrenzung. Diese Funktion ist werksseitig
nicht aktiviert (neutrale Einstellung).
VORSICHT! Verändern Sie die Einstellung
der Temperaturbegrenzung erst, nachdem Sie
die Armatur montiert haben.
Folgen Sie Abbildung E, um die Temperaturbe-
grenzung einzustellen.
Stellen Sie die Haupt-Wasserzufuhr ab.
Entfernen Sie die Abdeckkappe 10 vorsichtig
mit einem kleinen, flachen Schraubendreher.

8 DE/AT/CH
Lösen Sie die Arretierungsschraube 9
mit dem
Innensechskantschlüssel 15 durch Drehen gegen
den Uhrzeigersinn.
VORSICHT! Schraube nicht vollständig her-
ausdrehen. Nur lösen, bis sich der Einstellhebel
8 leicht abnehmen lässt.
Entnehmen Sie den Einstellhebel 8.
Lösen Sie den Kartuschen-Abdeckring 11 von
Hand. Schrauben Sie dann den
Kartuschen-
Sicherungsring 12
mit einer Rohrzange ab.
Ziehen Sie nun den Kartuschen-Einstellring 16
mit einem Schraubendreher nach oben.
Hinweis: Entfernen Sie nicht die Kartusche 13 .
Platzieren Sie den Kartuschen-Einstellring 16 in
gewünschter Position (s. Abb. F).
Hinweis: Der Kartuschen-Einstellring 16 kann
den Drehwinkel des Griffs einschränken, so-
dass die Durchflussmenge von Warmwasser
begrenzt werden kann.
Ziehen Sie den Kartuschen-Sicherungs ring 12
mit der Rohrzange wieder am Armaturenkörper
14 fest. Befestigen Sie den Kartuschen-Abdeck-
ring 11 von Hand.
Setzen Sie den Einstellhebel 8 wieder auf den
Armaturenkörper 14 . Ziehen Sie die Arretierungs-
schraube 9 mit dem Innen sechs kant schlüssel 15
durch Drehen im Uhrzeigersinn fest.
Drücken Sie die Abdeckkappe 10 in die Öffnung.
Stellen Sie die Haupt-Wasserzufuhr an und
überprüfen Sie die Temperaturbegrenzung.
Wasserspar-Funktion
Die Kartusche 13 in dieser Armatur verfügt
über eine Ökofunktion. Diese vermindert die
Durchflussmenge durch den Wasserhahn.
Dadurch können Sie bis zu 50 % Wasser
einsparen (s. Abb. G).
Heben Sie den Einstellhebel 8 an, bis Sie
einen leichten Widerstand spüren. In dieser
Einstellung wird der Wasserfluss begrenzt.
Wenn Sie den Wasserfluss erhöhen wollen,
heben Sie den Einstellhebel 8 weiter an, bis
Sie den Widerstand überwunden haben.
Energiespar-Funktion
Die Kartusche 13 dieser Armatur verfügt über
eine Energiespar-Funktion.
Es fließt nur kaltes Wasser, wenn der Einstell-
hebel 8 auf die mittlere Position eingestellt ist.
Der Energieverbrauch wird dadurch reduziert
(siehe Abb. H).
Wartung und Reinigung
Armatur pflegen und reinigen
Beachten Sie, dass Sanitärarmaturen einer beson-
deren Pflege bedürfen. Beachten Sie daher die
folgenden Anweisungen:
Verwenden Sie keine ätzenden oder alkohol-
haltigen Mittel zur Reinigung, da diese das
Produkt beschädigen könnten.
Reinigen Sie Ihre Armaturen nur mit klarem
Wasser, milden Reinigungsmitteln und einem
weichen Tuch bzw. Leder.
Schrauben Sie die Mischdüse 7 in regel-
mäßigen Abständen heraus und entfernen
Sie kalkhaltige Rückstände oder Fremdkörper.
Bei Nichtbeachtung der Pflegeanleitung muss mit
Schäden an der Oberfläche gerechnet werden.
Garantieansprüche können dann nicht geltend
gemacht werden.
Entsorgung
Die Verpackung besteht aus umweltfreundlichen
Materialien, die Sie über die örtlichen Recycling-
stellen entsorgen können.
Möglichkeiten zur Entsorgung des ausgedienten
Produkts erfahren Sie bei Ihrer Gemeinde- oder
Stadtverwaltung.

9 DE/AT/CH
Informationen
Trinkbarkeit von Leitungswasser
Informieren Sie sich bei Ihren örtlichen Behörden
über die Trinkbarkeit des Wassers in Ihrer Stadt /
Gemeinde.
Generell gilt für die Trinkbarkeit von
Leitungswasser folgende Empfehlung:
Lassen Sie Wasser aus Leitungen eine kurze
Zeit laufen, wenn es länger als vier Stunden in
den Leitungen stagniert hat. Verwenden Sie
kein Stagnationswasser zur Zubereitung von
Speisen und Getränken, besonders nicht bei
der Ernährung von Säuglingen. Andernfalls
können gesundheitliche Beschwerden auftreten.
Frisches Wasser können Sie daran erkennen,
dass es spürbar kühler die Leitung verlässt, als
Stagnationswasser.
Verwenden Sie kein Stagnationswasser aus
verchromten Leitungen zur Ernährung und /
oder zur Körperpflege, wenn Sie gegen Nickel
allergisch sind. Solches Wasser kann stark
nickelhaltig sein und eine allergische Reaktion
hervorrufen.
Nutzen Sie kein Trinkwasser aus Bleileitungen
für die Zubereitung von Säuglingsnahrung und /
oder während der Schwangerschaft für die
Zubereitung von Lebensmitteln. Blei wird ins
Trinkwasser abgegeben und ist für Säuglinge
und Kleinkinder besonders gesundheitsschädlich.
Garantie
Das Produkt wurde nach strengen Qualitätsrichtli-
nien sorgfältig produziert und vor Anlieferung ge-
wissenhaft geprüft. Im Falle von Mängeln dieses
Produkts stehen Ihnen gegen den Verkäufer des
Produkts gesetzliche Rechte zu. Diese gesetzlichen
Rechte werden durch unsere im Folgenden darge-
stellte Garantie nicht eingeschränkt.
Sie erhalten auf dieses Produkt 3 Jahre Garantie
ab Kaufdatum. Die Garantiefrist beginnt mit dem
Kaufdatum. Bitte bewahren Sie den Original-Kas-
senbon gut auf. Diese Unterlage wird als Nach-
weis für den Kauf benötigt.
Tritt innerhalb von 3 Jahren ab dem Kaufdatum die-
ses Produkts ein Material- oder Fabrikationsfehler
auf, wird das Produkt von uns – nach unserer Wahl
– für Sie kostenlos repariert oder ersetzt. Diese Ga-
rantie verfällt, wenn das Produkt beschädigt, nicht
sachgemäß benutzt oder gewartet wurde.
Die Garantieleistung gilt für Material- oder Fabrika-
tionsfehler. Diese Garantie erstreckt sich nicht auf
Produktteile, die normaler Abnutzung ausgesetzt
sind (z. B. Batterien) und daher als Verschleißteile
angesehen werden können oder Beschädigungen
an zerbrechlichen Teilen, z. B. Schalter, Akkus oder
die aus Glas gefertigt sind.
Abwicklung im Garantiefall
Um eine schnelle Bearbeitung Ihres Anliegens zu
gewährleisten, folgen Sie bitte den folgenden Hin-
weisen:
Bitte halten Sie für alle Anfragen den Kassenbon
und die Artikelnummer (z. B. IAN 123456_7890)
als Nachweis für den Kauf bereit.
Die Artikelnummer entnehmen Sie bitte dem Typen-
schild, einer Gravur, auf dem Titelblatt Ihrer Bedie-
nungsanleitung (unten links) oder als Aufkleber auf
der Rück- oder Unterseite des Produkts.
Sollten Funktionsfehler oder sonstige Mängel auf-
treten, kontaktieren Sie zunächst die nachfolgend
benannte Serviceabteilung telefonisch oder per E-
Mail.
Ein als defekt erfasstes Produkt können Sie dann
unter Beifügung des Kaufbelegs (Kassenbon) und
der Angabe, worin der Mangel besteht und wann
er aufgetreten ist, für Sie portofrei an die Ihnen mit-
geteilte Service-Anschrift übersenden.

10 DE/AT/CH
Service
Service Deutschland
Tel.: 0800 5435 111
E-Mail: [email protected]
Service Österreich
Tel.: 0800 292726
E-Mail: [email protected]
Service Schweiz
Tel.: 0800562153
E-Mail: [email protected]

11 GB/IE
Introduction ................................................................................................................................... Page 12
Proper use ............................................................................................................................................Page 12
Description of parts ............................................................................................................................. Page 12
Technical data ..................................................................................................................................... Page 12
Safety advice ...............................................................................................................................Page 12
Installation .....................................................................................................................................Page 13
Installing the tap .................................................................................................................................. Page 13
Flushing the tap ...................................................................................................................................Page 13
Operation .......................................................................................................................................Page 13
Bringing into use ..................................................................................................................................Page 13
Setting the temperature limiter ............................................................................................................Page 13
Water-saving function ......................................................................................................................... Page 14
Energy-saving function ........................................................................................................................ Page 14
Maintenance and cleaning ............................................................................................... Page 14
Tap care and cleaning .......................................................................................................................Page 14
Disposal ............................................................................................................................................Page 14
Information....................................................................................................................................Page 14
Potability of mains water ....................................................................................................................Page 14
Warranty ......................................................................................................................................... Page 15
Warranty claim procedure ................................................................................................................. Page 15
Service .................................................................................................................................................Page 15

12 GB/IE
Kitchen mixer tap
Introduction
We congratulate you on the purchase of your new
product. You have chosen a high quality product.
Familiarise yourself with the product before using it
for the first time. In addition, please carefully refer
to the operating instructions and the safety advice
below. Only use the product as instructed and only
for the indicated field of application. Keep these in-
structions in a safe place. If you pass the product on
to anyone else, please ensure that you also pass on
all the documentation with it.
Proper use
This product is suitable for all pressure-tight hot water
systems such as central heating boilers, instantaneous
water heaters, pressurised boilers and the like. It is
not suitable for low-pressure water heaters such as
wood or coal burning bath geysers, oil or gas bath
geysers, open electrically heated water tanks. If in
doubt please seek the advice of a plumber or heating
engineer. Any use other than that described here or
modification to the product is not permitted and may
lead to damage to persons or property. There is
also the risk of injury and loss of life. The product is
intended for personal use only and not for medical or
commercial use. The manufacturer accepts no liability
for loss or damage arising from improper use.
Description of parts
1 1 Seal
2 1 Threaded rod
3 1 Washer (plastic)
4 1 Washer (metal)
5 1 Nut
6a 1 Flexible hose cold water
6b 1 Flexible hose hot water
7 1 Mixer nozzle
8 1 Control lever
9 1 Locking screw
10 1 Cap
11 1 Cartridge covering ring
12 1 Cartridge locking ring
13 1 Cartridge
14 1 Tap body
15 1 Hexagonal key
16 1 Cartridge setting ring
Technical data
Connections: G⅜ (approx. 17 mm)
Water connection nut: approx. 19 mm
Safety advice
RISK OF LOSS
OF LIFE OR ACCIDENT TO IN-
FANTS AND CHILDREN! Never
leave children unsupervised with the packaging
materials. Danger of suffocation. Keep the product
away from children. The product is not a toy.
CAUTION - RISK OF ELECTRIC
SHOCK! Leaks or the escape of
water can lead to danger to life from
electric shock. Check all connections for leaks
carefully. In addition, ensure that all cables from
electrical devices are correctly and safely installed.
CAUTION! RISK OF INJURY! Please ensure
that no parts are damaged and that all parts are
correctly assembled. Incorrect assembly could
lead to injury.
Please note that seals are wear parts and there-
fore will require to be replaced from time to time.
Damaged parts could adversely affect safety
and proper function.
CAUTION! RISK OF DAMAGE TO
PROPERTY! Have the installation done by
experienced persons only. Leaks or escape of
water can lead to serious damage to buildings
or household fittings and furniture. Check all
connections for leaks carefully.
Ensure that all seals are correctly seated to
prevent leakage of water.
The spout can be swiveled to your desired
position, but please make sure the spout is

13 GB/IE
always positioned within the area of the sink,
otherwise escape of water can lead to serious
flooding to your house or building.
CAUTION! DANGER OF SCALDING!
When making the hot water setting please ensure
that the temperature of the water is not too high.
Before installation, make yourself familiar with
all the existing services, e.g. water connection
and stopcocks.
Please read carefully through these operating
instructions before installing and using the product.
Keep all the safety advice and instructions in a
safe place for future reference!
Installation
Installing the tap
Turn off the main water supply to prevent serious
leakage of water. Allow any remaining water
in the pipework to drain.
Install the tap as shown in figs. A–C.
CAUTION! Do not bend the hoses or place
them under tension. Otherwise material damage
could result.
Flushing the tap
The tap must be flushed through before first use
to remove any dirt. To do this, follow these steps
(see fig. D):
Screw the mixer nozzle 7 off.
Open the main water supply and allow the
water to run for two minutes.
Then screw the mixer nozzle on again.
Operation
Bringing into use
Note: If the tap has not been used for a long period
flush the pipes through thoroughly in order to avoid
stagnation and build-up of residues in the drinking
water supply.
Open the main water supply.
Lift the control lever 8 and swivel it to the right
or left to regulate the strength or temperature
of the water flow.
Hot water:
Swivel the control lever to the left.
Cold water:
Swivel the control lever to the right.
Check that the mixer tap is working properly.
To do this, swivel the lever into all the possible
positions. Please check the connections regularly
for leaks.
Setting the temperature limiter
The cartridge 13 in this unit has a temperature
limiter. This function is not activated in the factory
(neutral setting).
CAUTION! Change the temperature limiter
setting only after the tap has been installed.
Follow fig E. to set the temperature limitation.
Turn off the main water supply.
Remove the cap 10 carefully by a small flat
screwdriver.
Release the locking screw 9 by turning it
anticlockwise using the Hexagonal key 15 .
CAUTION! Do not take the screw completely
out; just loosen it until the control lever 8 can
be easily taken off.
Take off the control lever 8.
Loosen the cartridge covering ring 11 by hand.
Then, screw off the cartridge locking ring 12 by
using a pipe wrench.
Now pull the cartridge setting ring 16 upwards
with the help of a screwdriver.
Note: Do not remove the cartridge 13 .
Place the cartridge setting ring 16 in the desired
position (see fig. F).
Note: The cartridge setting ring 16 can limit
the turning angle of the handle, so that the
amount of hot water can be limited.

14 GB/IE
Tighten the cartridge retaining ring 12 onto the
tap body
14
again by using a pipe wrench.
Then,
tighten the cartridge covering ring 11 by hand.
Place the control lever 8 back on to the tap
body 14 . Tighten the locking screw 9 by turn-
ing it clockwise using the Hexagonal key 15 .
Press the cap 10 into the opening.
Turn on the main water supply and check the
temperature limiter.
Water-saving function
The cartridge 13 in this tap has an Eco-Click
function. This feature limits the water flow through
the tap. This means you can save up to 50 %
water (see fig. G).
Lift the lever 8 until you notice a slight resist-
ance. This resistance will cause a stop in case
of partial opening and will therefore simply limit
the flow of water.
If you want to increase the flow rate, exert slight
pressure on the lever 8 until you overcome the
resistance.
Energy-saving function
The cartridge 13 in this tap has an energy
saving function.
Only cold water will flow out when the control
lever 8 is set to the middle position, and thus
reduce energy comsumption (see fig. H).
Maintenance and cleaning
Tap care and cleaning
Please note that sanitary fittings require special
care and attention. Therefore you should follow
the following advice:
Never use corrosive or alcohol-based materials
for cleaning, as these could damage the product.
Clean your fittings with clean water, mild detergent
and a soft cloth or leather only.
Screw out the mixer nozzle 7 at regular intervals
and remove lime deposits or foreign bodies.
Non-observance of the above care advice can be
expected to result in damage to the surface of the
fittings. In this event your rights under the warranty
may be invalidated.
Disposal
The packaging is made entirely of recyclable mate-
rials, which you may dispose of at local recycling
facilities.
Contact your local refuse disposal authority for more
details of how to dispose of your worn-out product.
Information
Potability of mains water
Find out about the potability of your mains water
supply. Your local water authority or water supply
company will be able to inform you.
The following general recommendations
apply to the potability of the water from
your pipework:
Let the water run freely for a short time if it has
been stagnating in the pipework for more than
four hours. Do not use any of this stagnant water
in the preparation of food or for drinking. This
applies particularly as far as babies and infants
are concerned. Failure to observe this advice
may result in risks to health. Fresh water can
be readily distinguished from stagnant as fresh
water is noticeably cooler.
Do not use stagnant water from chromium-plated
pipework for the preparation of food or for drink-
ing or for personal hygiene if you are allergic
to nickel. This water may contain high quantities
of nickel and trigger an allergic reaction.
Do not use water from lead pipework for pre-
paring food or drink for babies or infants. Do

15 GB/IE
not use it for preparing food or drink during
pregnancy. Lead dissolves in drinking water
and is particularly damaging to the health of
babies and young children.
Warranty
The product has been manufactured to strict quality
guidelines and meticulously examined before deliv-
ery. In the event of product defects you have legal
rights against the retailer of this product. Your legal
rights are not limited in any way by our warranty
detailed below.
The warranty for this product is 3 years from the
date of purchase. The warranty period begins on
the date of purchase. Please keep the original sales
receipt in a safe location. This document is required
as your proof of purchase.
Should this product show any fault in materials or
manufacture within 3 years from the date of pur-
chase, we will repair or replace it – at our choice
– free of charge to you. This warranty becomes
void if the product has been damaged, or used or
maintained improperly.
The warranty applies to defects in material or man-
ufacture. This warranty does not cover product
parts subject to normal wear, thus possibly consid-
ered consumables (e.g. batteries) or for damage to
fragile parts, e.g. switches, rechargeable batteries
or glass parts.
Warranty claim procedure
To ensure quick processing of your case, please
observe the following instructions:
Please have the till receipt and the item number
(e.g. IAN 123456_7890) available as proof of
purchase.
You will find the item number on the rating plate,
an engraving on the front page of the instructions
for use (bottom left), or as a sticker on the rear or
bottom of the product.
If functional or other defects occur, please contact
the service department listed either by telephone or
by e-mail.
You can return a defective product to us free of charge
to the service address that will be provided to you.
Ensure that you enclose the proof of purchase (till
receipt) and information about what the defect is
and when it occurred.
Service
Service Great Britain
Tel.: 08000569216
E-Mail: [email protected]
Service Ireland
Tel.: 1800 200736
E-Mail: [email protected]

16 FR/BE
Introduction ................................................................................................................................... Page 17
Utilisation conforme ............................................................................................................................Page 17
Description des pièces ........................................................................................................................ Page 17
Caractéristiques techniques ................................................................................................................Page 17
Consignes de sécurité ...........................................................................................................Page 17
Montage ...........................................................................................................................................Page 18
Installation du robinet .........................................................................................................................Page 18
Rinçage du robinet ..............................................................................................................................Page 18
Utilisation ........................................................................................................................................Page 18
Mise en service ...................................................................................................................................Page 18
Réglage de la limitation de la température ....................................................................................... Page 18
Fonction d‘économie d’eau ................................................................................................................Page 19
Fonction d‘économie d‘énergie .........................................................................................................Page 19
Maintenance et nettoyage ...............................................................................................Page 19
Entretien et nettoyage du robinet ....................................................................................................... Page 19
Recyclage ........................................................................................................................................ Page 19
Informations .................................................................................................................................Page 20
Potabilité de l’eau du robinet .............................................................................................................Page 20
Garantie ........................................................................................................................................... Page 20
Faire valoir sa garantie .......................................................................................................................Page 21
Service après-vente .............................................................................................................................Page 21

17 FR/BE
Mitigeur de cuisine
monocommande
Introduction
Nous vous félicitons pour l‘achat de votre nouveau
produit. Vous avez opté pour un produit de grande
qualité. Avant la première mise en service, vous deve
z
vous familiariser avec toutes les fonctions du produit.
Veuillez lire attentivement le mode d’emploi ci-des-
sous et les consignes de sécurité. N’utilisez le produit
que pour l’usage décrit et les domaines d’applica-
tion cités. Conserver ces instructions dans un lieu sûr.
Si vous donnez le produit à des tiers, remettez-leur
également la totalité des documents.
Utilisation conforme
Ce produit convient à tout type de système d’eau
chaude résistant à la pression tel que le chauffage
central, un chauffe-eau instantané, un chauffe-eau
à pression, etc. Il ne convient pas aux chauffe-eau
à basse pression tels que les chauffe-eau pour bains
à bois ou à charbon, les chauffe-eau pour bains à
mazout ou à gaz, les fourneaux électriques à accu-
mulation ouverts. En cas de doute, veuillez consulter
un installateur ou un spécialiste. Tout autre utilisation
que celle décrite plus haut et toute modification de
ce produit est interdite et peut causer des dégrada-
tions sur celui-ci. Cela peut en outre conduire à des
des risques mortels ou des blessures. Le produit est
uniquement destiné à un usage domestique, il n‘est
pas prévu pour une utilisation médicale ou commer-
ciale. Le fabricant décline toute responsabilité quant
aux dommages survenant suite à une utilisation non
conforme à l’usage prévu.
Description des pièces
1 1 joint
2 1 tige filetée
3 1 rondelle (plastique)
4 1 rondelle (métal)
5 1 écrou
6a 1 flexible d’eau froide
6b 1 flexible d’eau chaude
7 1 buse de mélange
8 1 poignée de réglage
9 1 vis de serrage
10 1 cache
11 1 bague de recouvrement de cartouche
12 1 bague de blocage de cartouche
13 1 cartouche
14 1 corps de robinetterie
15 1 clé à six pans creux
16 1 bague de réglage de cartouche
Caractéristiques techniques
Raccords: G⅜ (env. 17 mm)
Écrou (raccord d’eau): env. 19 mm
Consignes de sécurité
DAN-
GER DE MORT ET D’ACCIDENT
POUR LES ENFANTS EN BAS
ÂGE ET LES ENFANTS ! Ne laissez jamais
les enfants sans surveillance avec le matériel
d’emballage. Risque d’étouffement. Tenir hors de
portée des enfants. Cet article n’est pas un jouet !
ATTENTION AU RISQUE
D’ÉLECTROCUTION ! Toute fuite
ou écoulement d’eau peut représenter
un danger de mort par décharge électrique.
Contrôlez minutieusement l’étanchéité de tous
les raccords. Il faut en outre vous assurer que
tous les câbles des appareils électriques sont
installés correctement et en toute sécurité.
PRUDENCE ! RISQUE DE BLESSURES!
Vérifiez que toutes les pièces sont en parfait
état et sont correctement montées. Risque de
blessures en cas de montage incorrect.
N’oubliez pas que les rondelles et garnitures sont
des pièces d’usure qui doivent être remplacées
de temps en temps.
Les pièces endommagées peuvent affecter la
sécurité et le fonctionnement.

18 FR/BE
ATTENTION! RISQUE DE DÉGÂTS
MATÉRIELS ! Confiez exclusivement le mon-
tage à des techniciens qualifiés. Les fuites ou
ruptures de conduites d’eau peuvent occasionner
d’importants dégâts matériels du bâtiment ou des
équipements ménagers. Veuillez donc contrôler
soigneusement l’étanchéité de tous les raccords.
Veillez à ce que les joints soient correctement
placés pour éviter que de l’eau ne s’écoule par
les zones non étanches.
Tournez le tuyau d’écoulement dans la position
désirée et veillez ce faisant à orienter le tuyau
sur l’évier. Dans le cas contraire, l’eau s’écoulant
peut provoquer des dégâts des eaux importants
dans le bâtiment.
PRUDENCE ! RISQUE D’ÉBOUILLANTE-
MENT ! Veillez lors du réglage de l’eau chaude
à ce que la température de celle-ci ne soit pas
trop chaude.
Avant l‘installation, familiarisez-vous avec les
conditions du lieu, p. ex. raccord d‘eau et
dispositif d‘arrêt.
Veuillez lire attentivement le mode d’emploi
avant le montage et l’utilisation du produit.
Conservez toutes les consignes de sécurité et
instructions pour consultation ultérieure !
Montage
Installation du robinet
Coupez l’alimentation principale en eau pour
éviter que de l’eau ne s’écoule par les zones
non étanches. Laissez s‘écouler le reste d‘eau
du robinet.
Installez le robinet, comme indiqué sur les
illustrations A–C.
PRUDENCE ! Ne tordez pas les flexibles et ne
les mettez pas sous tension. Dans le cas contraire,
il existe un risque de dégâts matériels.
Rinçage du robinet
Afin d’éliminer les éventuelles impuretés, il
convient de rincer le robinet avant la première
utilisation. Procédez comme suit (voir ill. D):
Dévissez la buse de mélange 7.
Ouvrez l’alimentation principale en eau et
laissez l’eau couler pendant deux minutes.
Revissez la buse de mélange.
Utilisation
Mise en service
Remarque: Si le robinet n’est pas utilisé pendant
une période prolongée, commencez par laisser couler
l’eau un certain temps pour éliminer les résidus et
l’eau stagnante accumulés dans les conduites.
Ouvrez l’alimentation principale en eau.
Remontez le levier de réglage 8 et tournez-le
à droite ou à gauche pour régler l‘intensité du
jet et la température de l‘eau.
Eau chaude:
Tournez le levier de réglage vers la gauche.
Eau froide:
Tournez le levier de réglage vers la droite.
Contrôlez le fonctionnement du mitigeur. Tournez
le levier de réglage dans toutes les positions
possibles. Contrôlez régulièrement l’étanchéité
de tous les raccords.
Réglage de la limitation
de la température
La cartouche 13 de cette robinetterie est équipée
d’une limitation de la température. Cette fonction
n’est pas activée d’usine (réglage neutre).
ATTENTION ! Le réglage de la limitation de
la température ne doit être effectué qu’après
avoir monté la robinetterie.

19 FR/BE
Suivez la fig E. pour régler la limitation de tem-
pérature.
Coupez l’arrivée d‘eau principale.
Retirez le cache 10 avec précaution à l‘aide
d‘un petit tournevis plat.
Desserrez la vis de serrage 9 avec la clé à
six pans creux 15 en tournant dans le sens anti
horaire.
ATTENTION ! Ne dévissez pas complètement
la vis, desserrez-la seulement jusqu’à ce que le
levier de contrôle 8 puisse être retiré facilement.
Retirez le levier de contrôle 8.
Desserrez la bague de fin de cartouche 11 et
dévissez ensuite le bague de verrouillage de
cartouche 12 à l‘aide d‘une pince à tubes.
Tirez à présent la bague de réglage de car-
touche 16 vers le haut en vous aidant d’un
tournevis.
Remarque : Ne retirez pas la cartouche 13 .
Placez la bague de réglage de cartouche 16
dans la position souhaitée (voir Fig F.)
Remarque : La bague de réglage de car-
touche 16 peut restreindre l’angle de rotation
de la poignée permettant ainsi une limitation
du débit d’eau chaude.
Serrez à nouveau bague de verrouillage de
cartouche 12 sur le corps de mitigeur 14 à
l’aide d’une clé à pipe. Serrez ensuite bague
de fin de cartouche 11 à la main.
Replacez le levier de contrôle 8 sur le corps
de mitigeur 14 . Serrez la vis de blocage 9
en la tournant dans le sens des aiguilles d’une
montre à l’aide de la clé hexagonale 15 .
Pressez le cache 10 dans l‘ouverture.
Ouvrir l‘alimentation principale en eau et véri-
fier la limitation de température.
Fonction d‘économie d’eau
La cartouche 13 de cette robinetterie est équi-
pée d’une fonction Éco. Cette fonction diminue
le débit d‘écoulement grâce au robinet. Elle
vous permet d‘économiser jusqu‘à 50 % d‘eau
(voir fig. G).
Levez le levier de réglage 8 jusqu‘à ce que
vous sentiez une légère résistance. Grâce à ce
réglage, le débit de l‘eau est limité.
Si vous souhaitez augmenter le débit de l‘eau,
continuez à lever le levier de réglage 8,
jusqu‘à dépasser la résistance rencontrée.
Fonction d‘économie d‘énergie
La cartouche 13 de cette robinetterie est équi-
pée d’une fonction d‘économie d‘énergie.
Uniquement de l‘eau froide coule lorsque le
levier de réglage 8 est en position centrale.
La consommation d‘énergie en est ainsi réduite
(voir Fig. H).
Maintenance et nettoyage
Entretien et nettoyage du robinet
Les robinets sanitaires requièrent un entretien
particulier. Veuillez donc respecter les instructions
suivantes :
N’utilisez aucun produit corrosif ou à base
d’alcool pour le nettoyage, car ces produits
peuvent endommager les robinets.
Nettoyez uniquement votre robinet à l‘eau
claire avec un détergent neutre et un chiffon
doux ou une peau de chamois.
Dévissez régulièrement la buse de mélange 7
et éliminez les dépôts de calcaire ou les corps
étrangers.
Le non-respect de l‘instruction d‘entretien peut
entraîner des dommages sur la surface. Il est alors
impossible de revendiquer les droits de garantie.
Recyclage
L’emballage se compose de matières recyclables
pouvant être mises au rebut dans les déchetteries
locales.

20 FR/BE
Le produit est recyclable, soumis à la
responsabilité élargie du fabricant et
collecté séparément.
Votre mairie ou votre municipalité vous renseigne-
ront sur les possibilités de mise au rebut des produits
usagés.
Informations
Potabilité de l’eau du robinet
Informez-vous auprès des autorités locales sur
la potabilité de l’eau dans votre ville / commune.
D’une façon générale, pour la potabilité
de l’eau du robinet, nous recommandons:
Laissez couler l’eau un bref moment si elle a
stagné plus de quatre heures dans les tuyaux.
N’utilisez pas l’eau stagnante pour préparer
les repas et les boissons et surtout pas dans la
préparation des aliments pour nourrissons. Dans
le cas contraire, il existe des risques pour la santé.
L’eau qui sort du robinet est bonne lorsqu’elle
est nettement plus fraîche que l’eau stagnante.
N’utilisez pas d’eau stagnante venant de
tuyauteries chromées pour la nourriture et / ou
les soins corporels si vous êtes allergique au
nickel. Une telle eau peut contenir une grande
quantité de nickel et provoquer des réactions
allergiques.
N’utilisez pas d’eau potable venant de tuyau-
teries de plomb pour la préparation d’aliments
pour nourrisson et / ou pendant la grossesse pour
la préparation des aliments. Le plomb pénètre
dans l’eau potable, ce qui est particulièrement
dangereux pour la santé des nourrissons et des
jeunes enfants.
Garantie
Article L217-16 du Code de la
consommation
Lorsque l‘acheteur demande au vendeur, pendant
le cours de la garantie commerciale qui lui a été
consentie lors de l‘acquisition ou de la réparation
d‘un bien meuble, une remise en état couverte par
la garantie, toute période d‘immobilisation d‘au
moins sept jours vient s‘ajouter à la durée de la
garantie qui restait à courir. Cette période court à
compter de la demande d‘intervention de l‘acheteur
ou de la mise à disposition pour réparation du bien
en cause, si cette mise à disposition est postérieure
à la demande d‘intervention.
Indépendamment de la garantie commerciale sous-
crite, le vendeur reste tenu des défauts de conformité
du bien et des vices rédhibitoires dans les conditions
prévues aux articles L217-4 à L217-13 du Code
de la consommation et aux articles 1641 à 1648
et 2232 du Code Civil.
Article L217-4 du Code de la consommation
Le vendeur livre un bien conforme au contrat et ré-
pond des défauts de conformité existant lors de la
délivrance.
Il répond également des défauts de conformité ré-
sultant de l‘emballage, des instructions de montage
ou de l‘installation lorsque celle-ci a été mise à sa
charge par le contrat ou a été réalisée sous sa
responsabilité.
Article L217-5 du Code de la consommation
Le bien est conforme au contrat :
1° S´il est propre à l‘usage habituellement attendu
d‘un bien semblable et, le cas échéant :
- s‘il correspond à la description donnée par le
vendeur et posséder les qualités que celui-ci a
présentées à l‘acheteur sous forme d‘échantil-
lon ou de modèle ;
- s‘il présente les qualités qu‘un acheteur peut
légitimement attendre eu égard aux déclara-
tions publiques faites par le vendeur, par le
producteur ou par son représentant, notamment
dans la publicité ou l‘étiquetage ;

21 FR/BE
2° Ou s‘il présente les caractéristiques définies d‘un
commun accord par les parties ou être propre
à tout usage spécial recherché par l‘acheteur,
porté à la connaissance du vendeur et que ce
dernier a accepté.
Article L217-12 du Code de la
consommation
L‘action résultant du défaut de conformité se prescrit
par deux ans à compter de la délivrance du bien.
Article 1641 du Code civil
Le vendeur est tenu de la garantie à raison des
défauts cachés de la chose vendue qui la rendent
impropre à l‘usage auquel on la destine, ou qui
diminuent tellement cet usage que l‘acheteur ne
l‘aurait pas acquise, ou n‘en aurait donné qu‘un
moindre prix, s‘il les avait connus.
Article 1648 1er alinéa du Code civil
L‘action résultant des vices rédhibitoires doit être
intentée par l‘acquéreur dans un délai de deux ans
à compter de la découverte du vice.
Les pièces détachées indispensables à l’utilisation
du produit sont disponibles pendant la durée de la
garantie du produit.
Le produit a été fabriqué selon des critères de qua-
lité stricts et contrôlé consciencieusement avant sa
livraison. En cas de défaillance, vous êtes en droit
de retourner ce produit au vendeur. La présente ga-
rantie ne constitue pas une restriction de vos droits
légaux.
Ce produit bénéficie d‘une garantie de 3 ans à
compter de sa date d’achat. La durée de garantie
débute à la date d’achat. Veuillez conserver le
ticket de caisse original. Il fera office de preuve
d’achat.
Si un problème matériel ou de fabrication devait
survenir dans 3 ans suivant la date d‘achat de ce
produit, nous assurons à notre discrétion la répara-
tion ou le remplacement du produit sans frais sup-
plémentaires. La garantie prend fin si le produit est
endommagé suite à une utilisation inappropriée ou
à un entretien défaillant.
La garantie couvre les vices matériels et de fabrica-
tion. Cette garantie ne s’étend ni aux pièces du pro-
duit soumises à une usure normale (p. ex. des piles)
et qui, par conséquent, peuvent être considérées
comme des pièces d’usure, ni aux dommages sur
des composants fragiles, comme des interrupteurs,
des batteries ou des éléments fabriqués en verre.
Faire valoir sa garantie
Pour garantir la rapidité d’exécution de la procédure
de garantie, veuillez respecter les indications sui-
vantes :
Veuillez conserver le ticket de caisse et la référence
du produit (par ex. IAN 123456_7890) à titre de
preuve d’achat pour toute demande.
Le numéro de référence de l’article est indiqué sur
la plaque d’identification, gravé sur la page de titre
de votre manuel (en bas à gauche) ou sur un auto-
collant apposé sur la face arrière ou inférieure du
produit.
En cas de dysfonctionnement du produit, ou de tout
autre défaut, contactez en premier lieu le service
après-vente par téléphone ou par e-mail aux coor-
données indiquées ci-dessous.
Vous pouvez alors envoyer franco de port tout
produit considéré comme défectueux au service
clientèle indiqué, accompagné de la preuve d’achat
(ticket de caisse) et d’une description écrite du dé-
faut avec mention de sa date d’apparition.
Service après-vente
Service après-vente France
Tél. : 0800904879
E-Mail : [email protected]
Service après-vente Belgique
Tél. : 080071011
Tél. : 80023970 (Luxembourg)
E-Mail : [email protected]

22 NL/BE
Inleiding ....................................................................................................................................... Pagina 23
Correct gebruik ............................................................................................................................... Pagina 23
Beschrijving van de onderdelen ..................................................................................................... Pagina 23
Technische gegevens ...................................................................................................................... Pagina 23
Veiligheidsinstructies ........................................................................................................ Pagina 23
Montage ....................................................................................................................................... Pagina 24
Armatuur installeren ........................................................................................................................ Pagina 24
Armatuur doorspoelen .................................................................................................................... Pagina 24
Bediening .................................................................................................................................... Pagina 24
Ingebruikname ................................................................................................................................ Pagina 24
Temperatuurbegrenzing instellen ................................................................................................... Pagina 24
Waterspaarfunctie .......................................................................................................................... Pagina 25
Energiespaarfunctie ........................................................................................................................ Pagina 25
Onderhoud en reiniging ................................................................................................. Pagina 25
Armatuur onderhouden en reinigen ............................................................................................... Pagina 25
Afvoer ............................................................................................................................................ Pagina 25
Informatie ................................................................................................................................... Pagina 26
Drinkbaarheid van leidingwater .................................................................................................... Pagina 26
Garantie ....................................................................................................................................... Pagina 26
Afwikkeling in geval van garantie ................................................................................................. Pagina 26
Service ............................................................................................................................................. Pagina 27

23 NL/BE
Mengkraan
Inleiding
Hartelijk gefeliciteerd met de aankoop van uw
nieuwe product. U hebt voor een hoogwaardig
product gekozen. Maak u voor de eerste ingebruik-
name vertrouwd met het product. Lees hiervoor
aandachtig de volgende gebruiksaanwijzing en de
veiligheidsvoorschriften. Gebruik het product alleen
zoals beschreven en voor de aangegeven toepas-
singsgebieden. Bewaar deze gebruiksaanwijzing
op een veilige plek. Geef, wanneer u het product
doorgeeft aan derden, ook alle documenten mee.
Correct gebruik
Dit product is geschikt voor alle warmwatersystemen
met constante druk zoals centrale verwarmingen,
geisers, doorstroomboilers e.d. Het product is niet
geschikt voor lagedruk-waterboilers zoals bijv. hout-,
kolen-, olie- of gasgestookte badboilers en drukloze
elektrische boilers. Neem in geval van twijfel con-
tact op met een installateur of een deskundige. Een
ander gebruik dan het tevoren beschreven gebruik
of een verandering aan het product is niet toegestaan
en leidt tot schade aan het product. Bovendien kan
dit leiden tot levensgevaar en letsel. Het product is
alleen bedoeld voor eigen gebruik, niet voor medi-
sche of commerciële doeleinden. De fabrikant is niet
aansprakelijk voor schade die terug te voeren is op
ondeskundig gebruik.
Beschrijving van de
onderdelen
1 1 afdichting
2 1 schroefdraadstang
3 1 sluitring (kunststof)
4 1 sluitring (metaal)
5 1 moer
6a 1 flexibele slang koud water
6b 1 flexibele slang warm water
7 1 perlator
8 1 mengarm
9 1 borgschroef
10 1 afdekkap
11 1 afdekring cartouche
12 1 borgring cartouche
13 1 cartouche
14 1 kraanarmatuur
15 1 binnenzeskantsleutel
16 1 instelring cartouche
Technische gegevens
Aansluitingen: G⅜ (ca. 17 mm)
Moer (wateraansluiting): ca. 19 mm
Veiligheidsinstructies
LE-
VENSGEVAAR EN KANS OP
ONGEVALLEN BIJ KLEUTERS
EN KINDEREN! Laat kinderen nooit zonder
toezicht bij het verpakkingsmateriaal. Er bestaat
verstikkingsgevaar. Houd het product buiten
bereik van kinderen. Dit product is geen speel-
goed.
PAS OP VOOR ELEKTRISCHE
SCHOKKEN! Ondichtheden of
waterlekkages kunnen tot levensge-
vaar door elektrische schokken leiden. Contro-
leer alle verbindingen zorgvuldig op dichtheid.
Zorg er bovendien voor, dat alle kabels van
elektrische apparaten correct en veilig geïnstal-
leerd zijn.
VOORZICHTIG! GEVAAR VOOR LETSEL!
Zorg ervoor dat alle onderdelen intact en des-
kundig gemonteerd zijn. Bij ondeskundige
montage bestaat gevaar voor letsel.
Houd er rekening mee dat de onderlegringen
en de afdichtingen aan slijtage onderhevig zijn
en regelmatig moeten worden vervangen.
Beschadigde delen kunnen de veiligheid en de
werking beïnvloeden.
ATTENTIE! KANS OP MATERIËLE SCHADE!
Laat de montage uitsluitend door deskundige
personen uitvoeren. Ondichtheden of

24 NL/BE
waterlekkages kunnen aanzienlijke materiële
schade aan bouwwerken of inboedel veroor-
zaken. Controleer daarom alle verbindingen
zorgvuldig op dichtheid.
Let erop, dat alle borgmiddelen correct gemon-
teerd zijn, om te voorkomen dat water door
een ondichte verbinding kan lekken.
Draai de afvoerbuis in de gewenste positie, let
erop, dat de buis in de richting van de spoelta-
fel wijst. Anders kan vrijkomend water tot aan-
zienlijke waterschade aan bouwwerken leiden.
VOORZICHTIG! GEVAAR VOOR VER-
BRANDINGEN! Let er bij de warmwaterin-
stelling op dat u de watertemperatuur niet te
heet instelt.
Maak uzelf vóór de montage vertrouwd met
alle omstandigheden ter plekke, bijv. wateraan-
sluitingen en afsluitinrichtingen.
Lees de gebruiksaanwijzing alstublieft vooraf-
gaande aan montage en het gebruik aandach-
tig door. Bewaar alle veiligheidsinstructies en
aanwijzingen voor later gebruik!
Montage
Armatuur installeren
Draai de hoofdkraan dicht, om het vrijkomen
van water door ondichte plekken te voorkomen.
Laat het in de leiding achtergebleven water
weglopen.
Installeer de armatuur zoals weergegeven in
afbeeldingen A–C.
VOORZICHTIG! Verbuig de flexibele slangen
niet en zet deze niet onder spanning. Anders
bestaat gevaar voor materiële schade.
Armatuur doorspoelen
Om mogelijke verontreinigingen te verwijderen,
moet de armatuur voor het eerste gebruik wor-
den doorgespoeld. Ga hiervoor als volgt te
werk (zie afb. D):
Schroef de perlator 7 eraf.
Open de hoofdwaterkraan en laat het water
twee minuten lang lopen.
Schroef de perlator vervolgens weer vast.
Bediening
Ingebruikname
Opmerking: wanneer u de armatuur gedurende
een langere periode niet heeft gebruikt, dient u de
leidingen eerst goed door te spoelen om drinkwa-
terstagnatie en resten op te lossen.
Open de hoofdkraan.
Til de mengarm 8 omhoog en zwenk deze
naar rechts of links, om de hoeveelheid water
c.q. de temperatuur van het water te regelen.
Warm water:
Draai de mengarm naar links.
Koud water:
Draai de mengarm naar rechts.
Controleer de functie van de mengkraan.
Draai hiervoor de mengarm in alle toegestane
richtingen. Controleer alstublieft alle aansluitin-
gen regelmatig op dichtheid.
Temperatuurbegrenzing
instellen
De patroon 13 van deze armatuur bezit een tem-
peratuurbegrenzing. Deze functie is fabrieksmatig
niet geactiveerd (neutrale instelling).
VOORZICHTIG! Verander de instelling van
de temperatuurbegrenzing pas nadat u de ar-
matuur hebt gemonteerd.
Volg afb E. om de temperatuurgrens in te stellen.
Draai de hoofdwaterkraan dicht.
Verwijder het afdekkapje 10 voorzichtig met
een kleine, platte schroevendraaier.
Draai de borgschroef 9 met een binnenzes-
kantsleutel 15 tegen de klok in los.

25 NL/BE
VOORZICHTIG! Draai de schroef niet volle-
dig uit; maak deze los totdat de regelhendel 8
eenvoudig verwijderd kan worden.
Verwijder de
regelhendel
8
.
Maak de
eindring voor patroon
11
met de
hand los en schroef vervolgens de
vastzetring
voor patroon 12
met behulp van een pijptang los.
Trek de instelring van de cartouche 16 vervol-
gens met een schroevendraaier naar boven.
Opmerking: verwijder de cartouche 13 niet.
Plaats de instelring van de cartouche 16 in de
gewenste positie (zie afb. F).
Opmerking: de instelring van de cartouche 16
kan de draaihoek van de greep beperken, zodat
de debiet van warm water kan worden begrensd.
Maak de
vastzetring
van het patroon
12
opnieuw
op de kraanbehuizing
14
vast met behulp van
een pijptang. Draai vervolgens de
eindring
van
het patroon
11
met de hand vast.
Plaats de regelhendel
8
terug op de kraanbehui-
zing
14
. Draai de vastzetschroef
9
met de klok
mee vast met behulp van de inbussleutel
15
.
Druk het afdekkapje 10 in de opening.
Draai de hoofdwaterkraan open en controleer de
temperatuurbegrenzing.
Waterspaarfunctie
De cartouche 13 in deze armatuur bezit een
ecofunctie. Deze vermindert de debiet door de
waterkraan. Hierdoor kan tot wel 50% water
worden bespaard (zie afb. G).
Til de mengarm 8 op, totdat u een lichte
weerstand voelt. In deze stand wordt de debiet
begrensd.
Als u de debiet wilt verhogen, tilt u de mengarm
8 weer omhoog, totdat u de weerstand heeft
overwonden.
Energiespaarfunctie
De cartouche 13 van deze kraan beschikt over
een energiespaarfunctie.
Er stroomt alleen koud water uit de kraan als de
kraanhendel 8 in de middelste positie staat.
Het energieverbruik wordt daardoor geredu-
ceerd (zie afb. H).
Onderhoud en reiniging
Armatuur onderhouden en
reinigen
Houd er a.u.b. rekening mee dat sanitaire armaturen
speciaal onderhoud vergen. Neem daarom de
volgende instructies in acht:
Gebruik geen bijtende of alcoholhoudende
middelen voor de reiniging, omdat deze het
product kunnen beschadigen.
Reinig uw armaturen alleen met schoon water,
een mild reinigingsmiddel en een zachte doek
c.q. zeem.
Schroef de perlator 7 regelmatig eraf en ver-
wijder kalkhoudende resten of vreemde voor-
werpen.
Bij het niet in acht nemen van de onderhoudsin-
structies dient u rekening te houden met beschadi-
gingen aan het oppervlak. In dit geval komen
garantieclaims te vervallen.
Afvoer
De verpakking bestaat uit milieuvriendelijke grond-
stoffen die u via de plaatselijke recyclingcontainers
kunt afvoeren.
Informatie over de mogelijkheden om het uitgedie
nde
product na gebruik te verwijderen, verstrekt uw ge-
meentelijke overheid.

26 NL/BE
Informatie
Drinkbaarheid van
leidingwater
Informeer bij uw gemeente over de drinkbaar-
heid van het water in uw stad / gemeente.
Principieel gelden de volgende adviezen
voor de drinkbaarheid van leidingwater:
Laat water uit leidingen even lopen wanneer
het langer dan vier uur in de leidingen heeft stil
gestaan. Gebruik geen stagnatiewater voor het
bereiden van voeding en drank, vooral niet
voor de voeding van zuigelingen. Anders kan
gevaar voor de gezondheid ontstaan. Vers wa-
ter kunt u daaraan herkennen dat het duidelijk
kouder uit de leiding komt dan stagnatiewater.
Gebruik geen stagnatiewater uit verchroomde
leidingen voor de voeding en / of lichamelijke
verzorging wanneer u allergisch op nikkel rea-
geert. Dergelijk water kan sterk nikkelhoudend
zijn en een allergische reactie veroorzaken.
Gebruik geen drinkwater uit loden leidingen
voor de bereiding van voeding voor zuigelingen
en / of voor de bereiding van levensmiddelen
tijdens het zwangerschap. Lood wordt aan het
drinkwater afgegeven en is vooral voor zuige-
lingen en kleine kinderen uiterst schadelijk voor
de gezondheid.
Garantie
Het product wordt volgens strenge kwaliteitsrichtlijnen
zorgvuldig geproduceerd en voor levering grondig
getest. In geval van schade aan het product kunt
u rechtmatig beroep doen op de verkoper van het
product. Deze wettelijke rechten worden door onze
hierna vermelde garantie niet beperkt.
Op dit product verlenen wij 3 jaar garantie vanaf
aankoopdatum. De garantieperiode start op de
dag van aankoop. Bewaar de originele kassabon
alstublieft. Dit document is nodig als bewijs voor
aankoop.
Wanneer binnen 3 jaar na de aankoopdatum van
dit product een materiaal- of productiefout optreedt,
dan wordt het product door ons – naar onze keuze
– gratis voor u gerepareerd of vervangen. Deze
garantie komt te vervallen als het product beschadigd
wordt, niet correct gebruikt of onderhouden wordt.
De garantie geldt voor materiaal- en productiefouten.
Deze garantie is niet van toepassing op producton-
derdelen, die onderhevig zijn aan normale slijtage
en hierdoor als aan slijtage onderhevige onderdelen
gelden (bijv. batterijen) of voor beschadigingen aan
breekbare onderdelen, zoals bijv. schakelaars, accu’s
of dergelijke onderdelen, die gemaakt zijn van glas.
Afwikkeling in geval
van garantie
Om een snelle afhandeling van uw reclamatie te
waarborgen dient u de volgende instructies in acht
te nemen:
Houd bij alle vragen alstublieft de kassabon en het
artikelnummer (bijv. IAN 123456_7890) als bewijs
van aankoop bij de hand.
Het artikelnummer vindt u op de typeplaat, inge-
graveerd, op het titelblad van uw handleiding
(linksonder) of als sticker op de achter- of onder-
zijde.
Wanneer er storingen in de werking of andere
gebreken optreden, dient u eerst telefonisch of per
e-mail contact met de onderstaande service-afdeling
op te nemen.
Een als defect geregistreerd product kunt u dan sa-
men met uw aankoopbewijs (kassabon) en vermel-
ding van de concrete schade alsmede het tijdstip
van optreden voor u franco aan het u meegedeelde
servicepunt verzenden.

27 NL/BE
Service
Service Nederland
Tel.: 08000225537
E-Mail: [email protected]
Service Belgiё
Tel.: 080071011
Tel.: 80023970 (Luxemburg)
E-Mail: [email protected]

28 PL
Wstęp ..............................................................................................................................................Strona 29
Zastosowanie zgodne zprzeznaczeniem .....................................................................................Strona 29
Opis części ....................................................................................................................................... Strona 29
Dane techniczne ..............................................................................................................................Strona 29
Wskazówki dotyczące bezpieczeństwa ........................................................... Strona 29
Montaż ........................................................................................................................................... Strona 30
Instalacja armatury ..........................................................................................................................Strona 30
Przepłukanie armatury .....................................................................................................................Strona 30
Obsługa .........................................................................................................................................Strona 30
Uruchomienie ...................................................................................................................................Strona 30
Ustawianie ograniczenia temperatury............................................................................................Strona 31
Funkcja oszczędzania wody ...........................................................................................................Strona 31
Funkcja oszczędzania energii .........................................................................................................Strona 31
Konserwacja iczyszczenie............................................................................................Strona 31
Pielęgnacja i czyszczenie armatury ................................................................................................Strona 31
Utylizacja .....................................................................................................................................Strona 32
Informacje ...................................................................................................................................Strona 32
Zdatność do picia wody wodociągowej .......................................................................................Strona 32
Gwarancja ..................................................................................................................................Strona 32
Sposób postępowania w przypadku naprawy gwarancyjnej......................................................Strona 32
Serwis ...............................................................................................................................................Strona 33

29 PL
Bateria zlewozmywakowa
Wstęp
Gratulujemy Państwu zakupu nowego produktu.
Zdecydowali się Państwo na zakup produktu najwyż-
szej jakości. Przed uruchomieniem urządzenia po raz
pierwszy zapoznaj się z nim. W tym celu przeczytaj
uważnie poniższą instrukcję obsługi oraz wskazówki
dotyczące bezpieczeństwa. Produkt należy użytko-
wać w sposób tu opisany i zgodnie z określonym
zakresem zastosowania. Należy przechowywać
tę instrukcję w bezpiecznym miejscu. Przekazując
produkt innej osobie, należy również przekazać
wszystkie dokumenty.
Zastosowanie zgodne
zprzeznaczeniem
Niniejszy produkt nadaje się dla wszystkich wytrzy-
małych na ciśnienie systemόw ciepłej wody, jak
centralne ogrzewanie, podgrzewacze, bojlery
ciśnieniowe oraz podobne. Nie nadaje się natomiast
do montażu w instalacjach z niskociśnieniowymi
termami wody np. piece kąpielowe opalane drewnem,
węglem, olejem opałowym lub gazem, nie nadaje
się też do współpracy z otwartymi bojlerami elek-
trycznymi. W razie wątpliwości proszę zwrócić się
do instalatora lub o poradę fachowca. Inne zasto-
sowanie, aniżeli opisane lub dokonywanie zmian
na produkcie nie jest dozwolone oraz prowadzi do
jego uszkodzenia. Poza tym mogą jeszcze wystąpić
dalsze niebezpieczeństwa zagrażające życiu oraz
obrażenia. Niniejszy produkt przeznaczony jest
jedynie do zastosowania we własnych potrzebach,
nie dla potrzeb medycznych lub komercyjnych. Za
szkody powstałe na wskutek niewłaściwego zastoso-
wania, producent nie przejmuje odpowiedzialności.
Opis części
1 1 uszczelka
2 1 pręt gwintowany
3 1 podkładka (plastikowa)
4 1 podkładka (metalowa)
5 1 nakrętka
6a 1 wąż elastyczny do zimnej wody
6b 1 wąż elastyczny do ciepłej wody
7 1 perlator
8 1 dźwignia nastawcza
9 1 śruba blokująca
10 1 zaślepka
11 1 pierścień osłonowy głowicy
12 1 pierścień zabezpieczający głowicę
13 1 głowica
14 1 korpus baterii
15 1 klucz trzpieniowy sześciokątny
16 1 pierścień nastawczy głowicy
Dane techniczne
Złącza: G⅜ (ok. 17 mm)
Nakrętka (podłączenie wody): ok. 19 mm
Wskazówki dotyczące
bezpieczeństwa
NIEBEZPIE-
CZEŃSTWO UTRATY ŻYCIA I
NIESZCZĘŚLIWEGO WYPADKU
DLA MAŁYCH DZIECI I DZIECI! Nigdy
nie należy pozostawiać bez nadzoru dzieci z
materiałem do opakowania. Istnieje zagrożenie
uduszeniem. Uważać, aby artykuł nie znajdował
się w zasięgu dzieci. Ten artykuł nie jest zabawką.
UWAGA PRZED PORAŻENIEM
PRĄDEM ELEKTRYCZNYM!
Nieszczelności oraz wyciek wody
mogą doprowadzić do zagrożenia życia, spo-
wodowanego porażeniem prądem elektrycznym.
Należy dokładnie sprawdzić wszystkie połą-
czenia pod względem ich szczelności.
Należy rόwnież się upewnić, że wszystkie
przewody urządzeń elektrycznych zostały
właściwie oraz bezpiecznie zainstalowane.
OSTROŻNIE! NIEBEZPIECZEŃSTWO
ODNIESIENIA OBRAŻEŃ CIAŁA! Upewnić
się, czy wszystkie części są nieuszkodzone i
prawidłowo zamontowane. W przypadku

30 PL
nieprawidłowego montażu zachodzi niebez-
pieczeństwo obrażeń. Należy zwrócić uwagę,
że wszystkie podkładki oraz uszczelki są czę-
ściami zużywającymi się i należy od czasu do
czasu dokonać ich wymiany. Uszkodzone czę-
ści mogą wpłynąć negatywnie na bezpieczeń-
stwo i funkcję produktu.
UWAGA! NIEBEZPIECZEŃSTWO
USZKODZENIA RZECZY! Dokonania
montażu należy zlecić jedynie osobie fachowej.
Nieszczelności lub wyciek wody mogą prowadzić
do poważnych szkód rzeczowych w budynku
lub sprzętach domowych. Dlatego też proszę
starannie skontrolować wszystkie złącza pod
względem szczelności.
Należy zwrócić uwagę, aby wszystkie uszczelki
były prawidłowo osadzone, w celu uniknięcia
wycieku wody, spowodowanego nieszczelnością.
Rurę odpływową należy przekręcić w wybranym
kierunku i zwrócić uwagę, aby była skierowana
w kierunu zlewozmywaka. W innym przypadku
wyciek wody może spowodować poważne
szkody w budynku.
OSTROŻNIE! ZAGROŻENIE POPARZE-
NIEM! Podczas regulacji ciepłej wody należy
zwracać uwagę, aby temperaura wody nie
została za wysoko nastawiona.
Przed zainstalowaniem proszę zapoznać się ze
wszystkimi warunkami panującymi w miejscu
zainstalowania, np. przyłącza wody i urządzenie
odcinające dopływ wody.
Przed użyciem urządzenia należy dokładnie
przeczytać niniejszą instrukcję montażu i obsługi.
Przechowuj wszystkie wskazówki dotyczące
bezpieczeństwa oraz instrukcje na przyszłość!
Montaż
Instalacja armatury
Zamknąć ogólny dopływ wody, aby uniknąć
wycieku wody, spowodowanego nieszczelno-
ścią. Spuścić pozostałą wodę z przewodów.
Armaturę należy zainstalować, tak jak ukazano
na rys. A–C.
OSTROŻNIE! Nie przekręciać ani nie naprężać
węży elastycznych. Może prowadzić to do
uszkodzenia artykułu.
Przepłukanie armatury
Przed pierwszym zastosowaniem należy
przepłukać armaturę, aby usunąć możliwe
zanieczyszczenia. Proszę przy tym postępować,
jak następuje (patrz rys. D):
Proszę odkręcić dyszę 7.
Proszę otworzyć główny dopływ wody i
otworzyć baterię, aby woda z niej spływała
przez dwie minuty.
Proszę następnie przykręcić znowu dyszę.
Obsługa
Uruchomienie
Wskazówka: Po dłuższym nieużywaniu
armatury należy najpierw gruntownie przepłukać
przewody, aby usunąć zastoje i pozostałości.
Otworzyć główne doprowadzenie wody.
Podnieść uchwyt 8 i przekręcić go w prawo
lub w lewo, aby wyregulować natężenie
względnie temperaturę strumienia wody.
Woda gorąca:
Uchwyt przekęcić w lewo.
Woda zimna:
Uchwyt przekręcić w prawo.
Proszę skontrolować pracę baterii mieszakowej.
W tym celu proszę przekręcić uchwyt we
wszystkie dowolne pozycji. Należy regularnie
kontrolować wszystkie złącza pod względem
szczelności.

31 PL
Ustawianie ograniczenia
temperatury
Głowica 13 niniejszej armatury posiada ochronę
przed poparzeniem. Funkcja ta nie jest fabrycznie
aktywowana (ustawienie neutralne).
OSTROŻNIE! Regulację temperatury wody
należy zmienić dopiero po zamontowaniu
armatury.
Przestrzegać informacji zawartych na rysunku
E, aby ustawić ograniczenie temperatury.
Zamknąć głóeny dopływ wody.
Ostrożnie zdjąć osłonę 10 małym, płaskim
śrubokrętem.
Poluzować śrubę ustalającą 9 za pomocą
klucza trzpieniowego sześciokątnego 15 prze-
kręcając go w kierunku odwrotnym do ruchu
wskazówek zegara.
OSTROŻNIE! Nie należy całkowicie wykręcać
śruby, jedynie poluzować, aby można było lekko
wyjąć dźwignię 8.
Należy zdjąć dźwignię nastawczą 8.
Ręką zdjąć pierścień głowicy 11 i przykręcić
pierścień zabezpieczający 12 przy pomocy
obcęg.
Pociągnąć pierścień nastawczy głowicy 16 w
górę przy pomocy śrubokręta.
Wskazówka: nie usuwać głowicy 13 .
Umieścić pierścień nastawczy głowicy 16 w
wybranej pozycji (patrz rys. F).
Wskazówka: pierścień nastawczy głowicy 16
może ograniczać kąt obrotu uchwytu tak, że ilość
przepływu ciepłej wody zostanie ograniczona.
Ponownie zaciągnąć pieścień zabezpieczający
głowicę 12 przy użyciu obcęgów na korpusie
baterii 14 . Należy ręcznie umocować pierścień
głowicy 11 .
Ponownie założyć dźwignię nastawczą 8 na
korpus baterii 14 i zaciągnąć śrubę blokującą
9 kluczem imbusowym 15 przykręcając ją w
kierunku ruchu wskazówek zegara.
Wcisnąć osłonę 10 w otwór.
Zamknąć główny dopływ wody i sprawdzić
funkcję ograniczania temperatury.
Funkcja oszczędzania wody
Wkład 13 tej baterii wyposażony jest w funkcję
Eko. Zmniejsza ona ilość przepływu wody
przez kran. Dzięki temu można zaoszczędzić
do 50 % wody (patrz rys. G).
Podnieść dźwignię nastawczą 8 aż do poczu-
cia lekkiego oporu. W tym ustawieniu przepływ
wody zostanie ograniczony.
Jeśli chce się zwiększyć przepływ wody, należy
dalej podnosić dźwignię nastawczą 8, aż
pokona się opór.
Funkcja oszczędzania energii
Głowica 13 tej baterii posiada funkcję oszczę-
dzania energii.
Płynie tylko zimna woda, jeśli dźwignia nastaw-
cza 8 jest ustawiona na środkowej pozycji.
Zużycie energii jest przez to zredukowane
(patrz rys. H).
Konserwacja iczyszczenie
Pielęgnacja i czyszczenie
armatury
Proszę pamiętać o tym, ze armatury sanitarne
wymagają szczególnej pielęgnacji. Proszę zatem
o przestrzeganie następujących zaleceń:
Nie należy stosować przy czyszczeniu żadnych
środków żrących, ponieważ mogą one uszkodzić
produkt.
Czyścić armaturę tylko czystą wodą, łagodnymi
środkami czystości i miękką szmatką względnie
irchą.
Proszę w regularnych odstępach odkręcić
dyszę 7 oraz usunąć zwapnione pozostałości
lub ciała obce.
W razie nieprzestrzegania instrukcji czyszczenia na-
leży liczyć się z uszkodzeniami powierzchni. Wów-
czas nie można dochodzić roszczeń gwarancyjnych.

32 PL
Utylizacja
Opakowanie wykonane jest z materiałów przyja-
znych dla środowiska, które można przekazać
do utylizacji w lokalnym punkcie przetwarzania
surowców wtórnych.
Informacji na temat możliwości utylizacji wyeksplo-
atowanego produktu udziela urząd gminy lub miasta.
Informacje
Zdatność do picia wody
wodociągowej
Zasięgnąć informacji u miejscowych władz
gminnych / miejskich odnośnie zdatności do
picia wody wodociągowej.
Generalnie odnośnie zdatności do
picia wody wodociągowej obowiązuje
następujące zalecenie:
Odkręcić kurek wypływu wody na pewien krótki
okres czasu, jeśli wodociąg nie był używany
przez okres dłuższy niż 4 godziny. Nie należy
używać wody pochodzącej z zastoju do przy-
gotowania posiłków i napojów, szczególnie do
karmienia niemowląt. W przeciwnym razie mogą
wystąpić dolegliwości zdrowotne. Świeżą wodę
można rozpoznać po tym, iż podczas wypływu
z kranu jest odczuwalnie zimniejsza niż woda
zastojowa.
Nie używać wody zastojowej z chromowanych
przewodów do konsumpcji i / lub mycia w
przypadku uczulenia alergicznego na nikiel.
Woda taka może zawierać nikiel i wywołać
reakcję alergiczną.
Nie należy używać wody pitnej z przewodów
ołowiowych do przyrządzania pokarmu dla
niemowląt i / lub dla kobiet w okresie ciąży do
przyrządzania posiłków. Ołów rozpuszcza się
w wodzie i jest szczególnie niebezpieczny dla
zdrowia niemowląt i małych dzieci.
Gwarancja
Produkt wyprodukowano według wysokich standar-
dów jakości i poddano skrupulatnej kontroli przed
wysyłką. W przypadku wad produktu nabywcy przy-
sługują
ustawowe prawa. Gwarancja nie ogranicza
ustawowych praw nabywcy produktu.
Produkt objęte jest 3 gwarancją, licząc od daty za-
kupu. Gwarancja wygasa w razie zawinionego przez
użytkownika uszkodzenia produktu, niewłaściwego
użycia lub konserwacji.
W przypadku wystąpienia w ciągu 3 lat od daty za-
kupu wad materiałowych lub fabrycznych, dokonu-
jemy – według własnej oceny – bezpłatnej naprawy
lub wymiany produktu.
Świadczenie gwarancyjne obejmuje wady materia-
łowe i fabryczne. Gwarancja nie obejmuje części
produktu ulegających normalnemu zużyciu, uzna-
wanych za części zużywalne (np. baterie) oraz
uszkodzeń części łamliwych, np. przełączników,
akumulatorów lub wykonanych ze szkła.
Zgodnie z Kodeksem Cywilnym art. 581 §1 wraz
z wymianą urządzenia lub ważnej części czas
gwarancji rozpoczyna się na nowo.
Sposób postępowania w
przypadku naprawy
gwarancyjnej
Aby zapewnić szybkie rozpatrzenie Państwa
wniosku, prosimy stosować się do następujących
wskazówek:
Przed skontaktowaniem się z działem serwisowym
należy przygotować paragon i numer artykułu (np.
IAN 123456_7890) jako dowód zakupu.
Numery artykułów można znaleźć na tabliczce
znamionowe, na grawerunku, na stronie tytułowej
jego instrukcji (na dole po lewej stronie) lub jako
naklejkę na stronie odwrotnej lub spodniej.
W razie wystąpienia błędów w działaniu lub innych
wad, należy skontaktować się najpierw z

33 PL
wymienionym poniżej działem serwisowym telefo-
nicznie lub pocztą elektroniczną.
Produkt uznany za uszkodzony można następnie z
dołączeniem dowodu zakupu (paragonu) i poda-
niem, na czym polega wada i kiedy wystąpiła,
przesłać bezpłatnie na podany Państwu adres
serwisu.
Serwis
Serwis Polska
Tel.: 008004911946
E-Mail: [email protected]

34 CZ
Úvod .................................................................................................................................................Strana 35
Použití ke stanovenému účelu..........................................................................................................Strana 35
Popis dílů ..........................................................................................................................................Strana 35
Technické údaje ...............................................................................................................................Strana 35
Bezpečnost ..................................................................................................................................Strana 35
Montáž ........................................................................................................................................... Strana 36
Instalace baterie ...............................................................................................................................Strana 36
Propláchnutí armatury ......................................................................................................................Strana 36
Obsluha .........................................................................................................................................Strana 36
Uvedení do provozu ........................................................................................................................ Strana 36
Nastavení omezení teploty ..............................................................................................................Strana 36
Funkce úspory vody ......................................................................................................................... Strana 37
Funkce úspory energie .....................................................................................................................Strana 37
Údržba a čištění ......................................................................................................................Strana 37
Ošetřování a čistění armatury .........................................................................................................Strana 37
Zlikvidování ...............................................................................................................................Strana 37
Informace .....................................................................................................................................Strana 37
Pitnost vodovodní vody ....................................................................................................................Strana 37
Záruka ............................................................................................................................................Strana 38
Postup v případě uplatňování záruky ............................................................................................. Strana 38
Servis .................................................................................................................................................Strana 38

35 CZ
Páková baterie
Úvod
Blahopřejeme Vám ke koupi nového výrobku. Rozh
odli
jste se pro kvalitní výrobek. Před prvním uvedením
do provozu se seznamte s výrobkem. K tomu si po-
zorně přečtěte následující návod k obsluze a bezpeč-
nostní pokyny. Používejte výrobek jen popsaným
způsobem a pouze pro uvedené oblasti použití.
Uschovejte si tento návod na bezpečném místě.
Všechny podklady vydejte při předání výrobku i
třetí osobě.
Použití ke stanovenému účelu
Tento výrobek se hodí pro všechny teplovodní
systémy spevným tlakem, jako jsou ústřední topení,
průtokové ohřívače, tlakové bojlery apod. Nehodí
se pro nízkotlaké zařízení na přípravu vody, jako jsou
např. koupelnová kamna dřevo a na uhlí, olejová
nebo plynová koupelnová kamna, otevřená elektrická
akumulační kamna. Vpřípadě pochyb se obraťte
laskavě na instalatéra nebo odborného poradce.
Jiné než předtím popsané použití nebo změna na
výrobku není přípustné a vede kpoškození. Mimo
to mohou být následkem toho další ohrožení života
a poranění. Výrobek je určen jen k osobnímu použití,
není určen pro použití v lékařské oblasti nebo pro
komerční účely. Za škody vzniklé z použití k nesta-
novenému účelu nepřevezme výrobce ručení.
Popis dílů
1 1 těsnění
2 1 závitová tyč
3 1podložka (umělohmotná)
4 1podložka (kovová)
5 1matice
6a 1pružná hadice pro studenou vodu
6b 1pružná hadice pro teplou vodu
7 1směšovací tryska
8 1nastavovací páka
9 1aretační šroub
10 1krytka
11 1krycí kroužek kartuše
12 1pojistný kroužek kartuše
13 1kartuše
14 1těleso armatury
15 1klíč na vnitřní šestihran
16 1nastavovací kroužek kartuše
Technické údaje
Přípojky: G⅜ (cca 17 mm)
Matice (přípojka vody): cca 19 mm
Bezpečnost
NEBEZPEČÍ
OHROŽENÍ ŽIVOTA A ÚRAZU
PRO MALÉ DĚTI A DĚTI! Nikdy
nenechejte děti bez dozoru s obalovým materi-
álem. Existuje nebezpečí udušení. Nepatří do
rukou dětem. Tento výrobek není hračka.
POZOR PŘED ÚRAZEM ELEK-
TRICKÝM PROUDEM! Netěsnosti
nebo výstup vody mohou způsobit
nebezpečí ohrožení života úrazem elektrickým
proudem. Přezkoušejte pečlivě všechna spojení
vzhledem k těsnosti. Kromě toho zajistěte, aby
byla všechna vedení elektrických spotřebičů
správně a bezpečně instalována.
POZOR! NEBEZBEČÍ PORANĚNÍ! Ujistěte
se, že jsou všechny díly nepoškozené a odborně
namontovány. Při neodborné montáži existuje
nebezpečí poranění.
Mějte na paměti, že podložky jsou rychleopotře-
bitelné díly, které se musí čas od času vyměnit.
Poškozené díly mohou ovlivnit bezpečnost a
funkci výrobku.
POZOR! NEBEZPEČÍ POŠKOZENÍ VĚCÍ!
Montáž nechejte vykonat jen odborníky!
Netěsnosti či průlom vody mohou způsobit
značné věcné škody na budově nebo domácnosti.
Proto všechna spojení pečlivě přezkoušejte
vzhledem k těsnosti.

36 CZ
Dbejte na to, aby byla všechny těsnění správně
usazena, aby jste zabránili úniku vody díky
nětěsnosti.
Otočte odpadní trubku do vámií požadované
polohy, dbejte ale na to, aby trubka směřovala
k dřezu. V opačném případě může únik vody
vést k závažným poškozením budovy vodou.
POZOR! NEBEZPEČÍ OPAŘENÍ! Při nasta-
vení teplé vody dbejte na to, aby nebyla teplota
vody příliš horká.
Před instalací se seznamte se všemi podmínkami
na místě, např. vodními přípojkami a zařízením
k odpojení.
Před montáží si laskavě pozorně přečtěte návod
kobsluze. Uschovejte bezpečnostní pokyny a
návody pro budoucnost!
Montáž
Instalace baterie
Odpojte hlavní přívod vody, abyste zamezili
úniku vody díky netěsnostem. Nechejte zbytkový
obsah vody z vodovodu odtéci.
Instalujte armaturu tak, jak je popsáno na
obrázku A–C.
POZOR! Neohýbejte pružné hadice a
nevystavujte je napětí. Jinak hrozí nebezpečí
věcných šlod.
Propláchnutí armatury
K odstranění možných nečistot se musí armatura
před prvním použitím propláchnout. Postupujte
následujícím způsobem (viz obr. D):
Směšovací trysku 7 odšroubujte.
Otevřete hlavní přívod vody a nechejte vodu
po dobu dvou minut téci.
Směšovací trysku pak znovu přišroubujte.
Obsluha
Uvedení do provozu
Upozornění: Po delším nepoužívání armatury
nejprve potrubí důkladně propláchněte, aby se
uvolnily stagnace pitné vody a zbytky.
Otevřete hlavní přívod vody.
Nadzvedněte nastavovací páku 8 a otočte
jí doprava nebo doleva, aby se regulovala
intenzita, popř. teplota vodního proudu.
Horká voda:
Otočte nastavovací páku doleva.
Studená voda:
Otočte nastavovací páku doprava.
Přezkoušejte provoz mísicí baterie. K tomu
otočte nastavovací páku do všech povolených
poloh. Přezkoušejte laskavě přípojky pravidelně
vzhledem k těsnosti.
Nastavení omezení teploty
Patrona
13
armatury má omezení teploty. Tato funkce
není při výrobě aktivována (neutrální nastavení).
POZOR! Nastavení omezení teploty změňte
teprve až po namontování armatury.
Postupujte podle obr. E. a nastavte omezení
teploty.
Uzavřete hlavní přívod vody.
Odstraňte opatrně krytku 10 malým plochým
šroubovákem.
Povolte aretační šroub 9 klíčem na vnitřní šes-
tihran 15 proti směru hodinových ručiček.
POZOR! Nevyjímejte šroub úplně ven; jen ho
uvolněte tak, aby šla ovládací páka 8 snadno
vyjmout.
Sundejte ovládací páka 8.
Povolte rukou kroužek kryjící patronu 11 . A kleš-
těmi odšroubujte kroužek upevňující patronu 12 .
Nyní vytáhněte nastavovací kroužek kartuše 16
šroubovákem směrem nahoru.

37 CZ
Upozornění: Neodstraňujte kartuši 13 .
Umístěte nastavovací kroužek kartuše 16 do
požadované polohy (viz obr. F).
Upozornění: Nastavovací kroužek kartuše 16
může omezit rozsah otáčení páky, a tím omezit
i průtočné množství teplé vody.
Upevněte znovu kroužek upevňující patronu 12
k tělesu armatury
14
s pomocí hasáku. Potom
11
ručně dotáhněte kroužek zakrývající patronu.
Dejte ovládací páku 8 zpět na těleso arma-
tury 14 . Dotáhněte jistící šroub 9 tak, že ho
otočíte ve směru hodinových ručiček s pomocí
Imbusového klíče 15 .
Zatlačte krytku 10 do otvoru.
Otevřete hlavní přívod vody a zkontrolujte
omezení teploty.
Funkce úspory vody
Kartuše 13 této armatury má úspornou funkci.
Redukuje průtokové množství vody. Tím je
možné uspořit až 50 % vody (viz obr. G).
Nadzvedněte páku 8 až ucítíte mírný odpor.
V této poloze je průtok vody redukován.
Pro zvýšení průtoku vody nadzvedněte páku 8
ještě více, přes výše popsaný odpor.
Funkce úspory energie
Kartuše 13 této armatury je vybavena funkcí
úspory vody.
Při nastavení páky 8 do střední polohy protéká
jen studená voda. Tím se redukuje spotřeba
energie (viz obr. H).
Údržba a čištění
Ošetřování a čistění armatury
Dbejte na to, že armatury vyžadují zvláštního
ošetřování. Dbejte proto na následující instrukce:
Nikdy nepoužívejte žíravých prostředků nebo
prostředků obsahujících alkohol k čistění,
protože by výrobek mohly poškodit.
Čistěte své armatury jen čistou vodou, jemným
čisticím prostředkem a měkkou tkaninou, popř.
kůží.
Směšovací trysku 7 v pravidelných intervalech
vyšroubujte a odstraňte zbytky vápníku nebo
cizí tělesa.
Při nedodržování návodu k ošetřování se musí
počítat s poškozením povrchu. Nároky na záruku
nelze uplatňovat.
Zlikvidování
Obal se skládá zekologických materiálů, které
můžete zlikvidovat prostřednictvím místních sběren
recyklovatelných materiálů.
O možnostech likvidace vysloužilých zařízení se
informujte u správy vaší obce nebo města.
Informace
Pitnost vodovodní vody
O pitnosti vody se informujte u místních úřadů
ve vašem městě / obce.
Pro pitnost vodovodní vody platí zásadně
následující doporučení:
Nechejte vodu z potrubí krátkou dobu téci,
stagnovala-li více než čtyři hodiny v potrubí.
Stagnovanou vodu zejména nepoužívejte k
přípravě jídel a nápojů při výživě kojenců. Jinak
mohou vzniknout zdravotní potíže. Čerstvou
vodu můžete rozpoznat tím, že citelně chladnější
opustí potrubí, než stagnovaná voda.
Stagnovanou bodu z pochromovaných potrubí
nepoužívejte k potravě a / nebo k péči o tělo, jste-li
alergičtí na nikl. Taková voda může obsahovat
velké množství niklu a vyvolat alergické reakce.

38 CZ
Pitnou vodu z olovnatých potrubí nepoužívejte
k přípravě kojenecké výživy a / nebo během
těhotenství k přípravě potravin. Olovo vnikne
do pitné vody a zejména škodí zdraví kojenců
a malých dětí.
Záruka
Výrobek byl vyroben s nejvyšší pečlivostí podle
přísných kvalitativních směrnic a před odesláním
prošel výstupní kontrolou. V případě závad máte
možnost uplatnění zákonných práv vůči prodejci.
Vaše práva ze zákona nejsou omezena naší níže
uvedenou zárukou.
Na tento artikl platí 3 záruka od data zakoupení.
Záruční lhůta začíná od data zakoupení. Uschovejte
si dobře originál pokladní stvrzenky. Tuto stvrzenku
budete potřebovat jako doklad o zakoupení.
Pokud se do 3 let od data zakoupení tohoto výrobku
vyskytne vada materiálu nebo výrobní vada, výrobek
Vám – dle našeho rozhodnutí – bezplatně opravíme
nebo vyměníme. Tato záruka zaniká, jestliže se vý-
robek poškodí, neodborně použil nebo neobdržel
pravidelnou údržbu.
Záruka platí na vady materiálu a výrobní vady. Tato
záruka se nevztahuje na díly výrobku podléhající
opotřebení (např. na baterie), dále na poškození
křehkých, choulostivých dílů, např. vypínačů, aku-
mulátorů nebo dílů zhotovených ze skla.
Postup v případě
uplatňování záruky
Pro zajištění rychlého zpracování Vašeho případu
se řiďte následujícími pokyny:
Pro všechny požadavky si připravte pokladní stvr-
zenku a číslo artiklu (např. IAN 123456_7890)
jako doklad o zakoupení.
Číslo artiklu najdete na typovém štítku, gravuře, titulní
stránce návodu (vlevo dole) nebo na nálepce na
zadní nebo spodní straně.
V případě poruch funkce nebo jiných závad nejdříve
kontaktujte, telefonicky nebo e-mailem, v následují-
cím textu uvedené servisní oddělení.
Výrobek registrovaný jako vadný potom můžete s
přiloženým dokladem o zakoupení (pokladní stvr-
zenkou) a údaji k závadě a kdy k ní došlo, bezplatně
zaslat na adresu servisu, která Vám byla sdělena.
Servis
Servis Česká republika
Tel.: 800600632
E-Mail: [email protected]

39 SK
Úvod .................................................................................................................................................Strana 40
Používanie v súlade s určením ........................................................................................................Strana 40
Popis dielov ......................................................................................................................................Strana 40
Technické údaje ...............................................................................................................................Strana 40
Bezpečnostné pokyny .......................................................................................................Strana 40
Montáž ........................................................................................................................................... Strana 41
Inštalácia vodovodnej batérie .........................................................................................................Strana 41
Prepláchnutie vodovodnej batérie .................................................................................................. Strana 41
Obsluha .........................................................................................................................................Strana 41
Uvedenie do prevádzky .................................................................................................................. Strana 41
Nastavenie ohraničenia teploty ......................................................................................................Strana 41
Funkcia šetrenia vody ...................................................................................................................... Strana 42
Funkcia šetrenia energie ..................................................................................................................Strana 42
Údržba a čistenie ...................................................................................................................Strana 42
Ošetrovanie a čistenie vodovodnej batérie ...................................................................................Strana 42
Likvidácia .....................................................................................................................................Strana 42
Informácie ...................................................................................................................................Strana 42
Pitnosť vody z vodovodu ................................................................................................................. Strana 42
Záruka ............................................................................................................................................Strana 43
Postup v prípade poškodenia v záruke .......................................................................................... Strana 43
Servis .................................................................................................................................................Strana 43

40 SK
Jednopáková drezová batéria
Úvod
Blahoželáme Vám ku kúpe Vášho nového výrobku.
Kúpou ste sa rozhodli pre vysoko kvalitný produkt.
Pred prvým uvedením do prevádzky sa oboznámte
s výrobkom. Za týmto účelom si pozorne prečítajte
nasledujúci návod na obsluhu a bezpečnostné po-
kyny. Výrobok používajte iba v súlade s popisom
a v uvedených oblastiach používania. Tento návod
uschovajte na bezpečnom mieste. Ak výrobok odo-
vzdáte ďalšej osobe, priložte k nemu aj všetky pod-
klady.
Používanie v súlade s určením
Tento výrobok je vhodný pre všetky systémy teplej
vody odolné voči tlaku, ako je ústredné kúrenie,
prietokový ohrievač, tlakový bojler a pod. Nie je
vhodný pre nízkotlakové ohrievače teplej vody ako
napr. kúpeľňové kachle na drevo alebo uhlie, kúpeľ-
ňové kachle na olej alebo plyn, otvorené elektrické
zásobníkové ohrievače vody. V prípade pochybností
sa obráťte na inštalatéra alebo odborného poradcu.
Iné použitie ako je vyššie popísané alebo úpravy
výrobku nie sú dovolené a vedú k poškodeniam.
Dôsledkom môžu byť i ďalšie životunebezpečné
riziká a poranenia. Výrobok je určený len na súkromné
používanie, nie na medicínske alebo komerčné účely.
Výrobca nepreberá ručenie za škody vzniknuté v
dôsledku neprimeraného používania.
Popis dielov
1 1 tesnenie
2 1 závitová tyč
3 1 podložné koliesko (plast)
4 1 podložné koliesko (kov)
5 1 matica
6a 1 flex hadica studená voda
6b 1 flex hadica teplá voda
7 1 zmiešavacia tryska
8 1 regulačná páka
9 1 aretačná skrutka
10 1 odnímateľný kryt
11 1 krycí krúžok kartuše
12 1 poistný krúžok kartuše
13 1 kartuša
14 1 telo batérie
15 1 kľúč s vnútorným šesťhranom
16 1 nastavovací krúžok kartuše
Technické údaje
Pripojenie: G⅜ (cca. 17 mm)
Matica (vodovodná prípojka): cca. 19 mm
Bezpečnostné pokyny
NEBEZPE-
ČENSTVO OHROZENIA ŽIVOTA
A NEBEZPEČENSTVO ÚRAZU
PRE MALÉ DETI A DETI! Nikdy nenechávajte
deti bez dozoru s obalovým materiálom. Hrozí
nebezpečenstvo zadusenia. Držte produkt v
bezpečnej vzdialenosti od detí. Tento výrobok
nie je detská hračka.
POZOR NA ZÁSAH ELEKTRIC-
KÝM PRÚDOM! Netesnosti alebo
únik vody môžu viesť k nebezpečen-
stvu ohrozenia života v dôsledku zásahu elek-
trickým prúdom. Dôkladne skontrolujte tesnenie
všetkých spojov. Okrem toho zabezpečte, aby
boli všetky vedenia elektrických zariadení nain-
štalované správne a bezpečne.
POZOR! NEBEZPEČENSTVO PORANE-
NIA! Ubezpečte sa, že sú všetky diely nepo-
škodené a správne namontované. V prípade
neodbornej montáže hrozí nebezpečenstvo
poranenia.
Nezabúdajte prosím na to, že podložky pod m
a-
tice a tesnenia sú diely podliehajúce opotrebo-
vaniu, ktoré je potrebné z času na čas vymeniť.
Poškodené časti môžu ovplyvniť bezpečnosť a
funkčnosť.
POZOR! NEBEZPEČENSTVO VECNÝCH
ŠKÔD! Vykonanie montáže prenechajte odbor-
níkom. Netesnosti alebo únik vody môžu spôsobiť

41 SK
značné hmotné škody na budovách alebo na
vybavení domácností. Preto dôkladne skontrolujte
tesnenie všetkých spojov.
Dbajte na to, aby boli všetky tesnenia správne
osadené, aby ste predišli úniku vody v dôsledku
netesnosti.
Otočte odtokovú rúru do želanej polohy, ale
dbajte na to, aby bola rúra nasmerovaná na
dres. V opačnom prípade môže únik vody
spôsobiť značné vecné škody na budove.
POZOR! NEBEZPEČENSTVO OBARENIA!
Pri nastavovaní teplej vody dbajte na to, aby
teplota vody nebola nastavená príliš vysoko.
Pred inštaláciou sa priamo na mieste oboznámte
so všetkými danosťami, napr. s prípojkami vody
a uzatváracím zariadením.
Pred montážou a používaním si prosím dôkladne
prečítajte tento návod na obsluhu. Všetky bez-
pečnostné pokyny a inštrukcie si uschovajte pre
prípad potreby v budúcnosti!
Montáž
Inštalácia vodovodnej batérie
Uzatvorte hlavný prívod vody, aby ste zabránili
úniku vody v dôsledku netesnosti. Zvyšnú vodu
nechajte z potrubia vytiecť.
Nainštalujte vodovodnú batériu podľa obrázkov
A–C.
POZOR! Nepretáčajte Flex hadice a nenapí-
najte ich. V opačnom prípade hrozí nebezpe-
čenstvo vecných škôd.
Prepláchnutie vodovodnej batérie
Aby sa ostránili prípadné nečistoty, je potrebné
vodovodnú batériu pred prvým použitím preplách-
nuť. Postupujte pritom nasledovne (pozri obr. D):
Odskrutkujte zmiešavaciu trysku 7.
Otvorte hlavný prívod vody a nechajte vodu
tiecť dve minúty.
Následne znovu priskrutkujte zmiešavaciu trysku.
Obsluha
Uvedenie do prevádzky
Poznámka: Ak vodovodnú batériu dlhší čas
nepoužívate, najskôr dôkladne prepláchnite potrubie,
aby ste odstránili usadeniny a pitnú vodu, ktorá v
ňom ostala.
Otvorte hlavný prívod vody.
Nadvihnite regulačnú páku 8 a otočte ju
doprava alebo doľava pre nastavenie intenzity
príp. teploty vodného toku.
Teplá voda:
Otočte regulačnú páku doľava.
Studená voda:
Otočte regulačnú páku doprava.
Skontrolujte prevádzku miešacej vodovodnej
batérie. Za týmto účelom otáčajte regulačnú
páku do všetkých povolených polôh. Pravidelne
kontrolujte tesnenie prípojek.
Nastavenie ohraničenia teploty
Kartuša 13 tejto vodovodnej batérie disponuje
ohraničením teploty. Táto funkcia nie je vo výrobe
aktivovaná (neutrálne nastavenie).
P
OZOR! Nastavenie ohraničenia teploty zm
eňte
až po namontovaní vodovodnej batérie.
Riaďte sa obrázkom E, aby ste nastavili ohrani-
čenie teploty.
Uzatvorte hlavný prívod vody.
Opatrne odstráňte odnímateľný kryt 10 pomocou
malého plochého skrutkovača.
Uvoľnite aretačnú skrutku 9 pomocou kľúča s
vnútorným šesťhranom 15 otáčaním proti
smeru hodinových ručičiek.
POZOR! Skrutku úplne nevyskrutkujte, len ju
povoľte tak, aby bolo možné regulačnú páku 8
ľahko vybrať.
Vyberte regulačnú páku 8.

42 SK
Rukou uvoľnite krycí krúžok kartuše 11 a nás-
ledne odskrutkujte poistný krúžok kartuše 12
pomocou rúrkových klieští.
Teraz potiahnite nastavovací krúžok kartuše 16
šrobovákom smerom nahor.
Poznámka: Nevyberajte kartušu 13 .
Umiestnite nastavovací krúžok kartuše 16 do
želanej polohy (p. obr. F).
Poznámka: Nastavovací krúžok kartuše 16
môže obmedziť otočný uhol rukoväte, čím bude
obmedzené prietokové množstvo teplej vody.
Poistný krúžok kartuše 12 opäť pevne zatiahnite
pomocou rúrkových klieští na tele vodovodnej ba-
térie 14 . Rukou upevnite krycí krúžok kartuše 11 .
Regulačnú páku 8 opäť nasaďte na telo vodo-
vodnej batérie 14 a aretačnú skrutku 9 pevne
utiahnite pomocou šesťhranného imbusového
kľúča 15 otáčaním v smere hodinových ručičiek.
Zatlačte odnímateľný kryt 10 do otvoru.
Otvorte hlavný prívod vody a skontrolujte
ohraničenie teploty.
Funkcia šetrenia vody
Kartuša 13 v tejto armatúre disponuje funkciou
eko. Táto znižuje prietokové množstvo cez vo-
dovodný kohútik. Tým môžete ušetriť až 50 %
vody (p. obr. G).
Nadvihnite nastavovaciu páku 8, až kým
pocítite ľahký odpor. Pri tomto nastavení bude
prietok vody obmedzený.
Ak chcete zvýšiť prietok vody, ďalej nadvihnite
nastavovaciu páku 8, až kým nie je odpor
prekonaný.
Funkcia šetrenia energie
Kartuša 13 tejto armatúry disponuje funkciou
šetrenia energie.
Keď je nastavovacia páka 8 nastavená v
strednej polohe, tečie len studená voda. Tým
sa zníži spotreba energie (pozri obr. H).
Údržba a čistenie
Ošetrovanie a čistenie
vodovodnej batérie
Nezabúdajte na to, že sanitárne batérie si vyžadujú
osobitnú starostlivosť. Dodržiavajte preto nasledujúce
pokyny:
Na čistenie nepoužívajte žiadne leptajúce
prostriedky alebo prostriedky obsahujúce alkohol,
mohli by produkt poškodiť.
Vodovodné batérie čistite iba čistou vodou,
jemnými čistiacimi prostriedkami a mäkkou
handričkou príp. kožou.
Zmiešavaciu trysku 7 v pravidelných časových
intervaloch vyskrutkujte a odstráňte vápenaté
zvyšky alebo cudzie telesá.
Pri nedodržiavaní návodu na ošetrovanie je potrebné
počítať s poškodením povrchu. V takom prípade
nie je možné uplatniť garančný nárok.
Likvidácia
Obal pozostáva z ekologických materiálov, ktoré
môžete odovzdať na miestnych recyklačných zber-
ných miestach.
O možnostiach likvidácie opotrebovaného výrobku
sa môžete informovať na Vašej obecnej alebo mest-
skej
správe.
Informácie
Pitnosť vody z vodovodu
O pitnosti vody Vo Vašom meste / obci sa infor-
mujte na Vašom mestskom / obecnom úrade.
Pre pitnosť vody z vodovodu všeobecne
platí nasledujúce odporúčanie:
Ak voda v potrubiach stála dlhšie ako štyri
hodiny, nechajte ju chvíľu odtiecť. Vodu, ktorá

43 SK
stála vpotrubí, nepoužívajte na prípravu jedál
a nápojov, najmä ak ide o výživu dojčiat. V
opačnom prípade sa môžu vyskytnúť zdravotné
ťažkosti. Čerstvú vodu rozoznáte podľa toho, že
je po vypustení z potrubia citeľne chladnejšia
ako voda, ktorá v ňom stála.
Nepoužívajte vodu, ktorá stála v pochrómova-
ných potrubiach, na výživu a / alebo na telesnú
hygienu, ak ste alergický na nikel. Táto voda
môže obsahovať zvýšené množstvo niklu a
vyvolať alergickú reakciu.
Nepoužívajte pitnú vodu z olovených potrubí
na prípravu výživy pre dojčatá a / alebo na
prípravu potravín počas tehotenstva. Olovo
prechádza do pitnej vody a je obzvlášť škod-
livé pre zdravie dojčiat a malých detí.
Záruka
Tento výrobok bol dôkladne vyrobený podľa prísnych
akostných smerníc a pred dodaním svedomito tes-
tovaný. V prípade nedostatkov tohto výrobku Vám
prináležia zákonné práva voči predajcovi produktu.
Tieto zákonné práva nie sú našou nižšie uvedenou
zárukou obmedzené.
Na tento produkt poskytujeme 3-ročnú záruku od
dátumu nákupu. Záručná doba začína plynúť dátu-
mom kúpy. Starostlivo si prosím uschovajte originálny
pokladničný lístok. Tento doklad je potrebný ako
dôkaz o kúpe.
Ak sa v rámci 3 rokov od dátumu nákupu tohto vý-
robku vyskytne chyba materiálu alebo výrobná chyba
,
výrobok Vám bezplatne opravíme alebo vymeníme
– podľa nášho výberu. Táto záruka zaniká, ak bol
produkt poškodený, neodborne používaný alebo
neodborne udržiavaný.
Poskytnutie záruky sa vzťahuje na chyby materiálu
a výrobné chyby. Táto záruka sa nevzťahuje na časti
produktu, ktoré sú vystavené normálnemu opotrebova-
niu, a preto ich je možné považovať za opotrebova-
teľné diely (napr. batérie) alebo na poškodenia na
rozbitných dieloch, napr. na spínači, akumulátorových
batériach alebo častiach, ktoré sú zhotovené zo skla.
Postup v prípade
poškodenia v záruke
Pre zaručenie rýchleho spracovania Vašej požia-
davky dodržte prosím nasledujúce pokyny:
Pre všetky otázky majte pripravený pokladničný
doklad a číslo výrobku (napr. IAN 123456_7890)
ako dôkaz o kúpe.
Číslo výrobku nájdete na typovom štítku, gravúre,
na prednej strane Vášho návodu (dole vľavo) alebo
ako nálepku na zadnej alebo spodnej strane.
Ak sa vyskytnú funkčné poruchy alebo iné nedostatky,
najskôr telefonicky alebo e-mailom kontaktujte ná-
sledne uvedené servisné oddelenie.
Produkt označený ako defektný potom môžete s
priloženým dokladom o kúpe (pokladničný lístok) a
uvedením, v čom spočíva nedostatok a kedy sa vy-
skytol, bezplatne odoslať na Vám oznámenú adresu
servisného pracoviska.
Servis
Servis Slovensko
Tel.: 0800 008158
E-pošta: [email protected]

44 ES
Introducción .............................................................................................................................. Página 45
Uso adecuado ................................................................................................................................ Página 45
Descripción de los componentes ................................................................................................... Página 45
Características técnicas .................................................................................................................. Página 45
Indicaciones de seguridad ............................................................................................ Página 45
Montaje ........................................................................................................................................ Página 46
Instalación de la grifería ................................................................................................................. Página 46
Cómo limpiar el grifo ...................................................................................................................... Página 46
Manejo .......................................................................................................................................... Página 46
Puesta en funcionamiento ............................................................................................................... Página 46
Regulación de la temperatura ........................................................................................................ Página 46
Función de ahorro de agua ........................................................................................................... Página 47
Función de ahorro de energía ....................................................................................................... Página 47
Mantenimiento y limpieza............................................................................................ Página 47
Cuidado y limpieza del grifo ......................................................................................................... Página 47
Eliminación ................................................................................................................................. Página 47
Informaciones ......................................................................................................................... Página 48
Potabilidad del agua del grifo ....................................................................................................... Página 48
Garantía ....................................................................................................................................... Página 48
Tramitación de la garantía ............................................................................................................. Página 48
Asistencia ......................................................................................................................................... Página 49

45 ES
Grifo monomando de cocina
Introducción
Enhorabuena por la adquisición de su nuevo pro-
ducto. Ha elegido un producto de alta calidad.
Familiarícese con el producto antes de la primera
puesta en funcionamiento. Lea detenidamente el si-
guiente manual de instrucciones y las indicaciones
de seguridad. Utilice el producto únicamente como
se describe a continuación y para las aplicaciones
indicadas. Guarde estas instrucciones en un lugar
seguro. En caso de transferir el producto a terceros,
entregue también todos los documentos correspon-
dientes.
Uso adecuado
Este producto está indicado para todos los sistemas
de agua caliente resistentes a la presión, tales como
calefacción central, calentadores de paso, caldera
a presión u otros. No está diseñado para calenta-
dores de agua a baja presión, por ejemplo calen-
tadores de baño con madera o carbón, calentadores
de baño con aceite o gas u hornos eléctricos abier-
tos. En caso de duda diríjase a un instalador o ase-
sor especializado. Queda prohibido cualquier uso
distinto al indicado o modificación del producto,
ya que esto podría dañarlo. Además, como conse-
cuencia podrían darse lesiones y riesgos mortales.
El producto ha sido concebido para uso privado y
no para fines médicos o comerciales. El fabricante
no se hace responsable de los daños que puedan
derivarse del uso indebido.
Descripción de los componentes
1 1 junta
2 1 varilla roscada
3 1 arandela (plástico)
4 1 arandela (metal)
5 1 tuerca
6a 1 tubo flexible para agua fría
6b 1 tubo flexible para agua caliente
7 1 difusor mezclador
8 1 palanca de ajuste
9 1 tornillo de ajuste
10 1 cubierta de protección
11 1 anillo de protección del cartucho
12 1 anillo de seguridad del cartucho
13 1 cartucho
14 1 grifo
15 1 llave hexagonal macho
16 1 anillo de ajuste del cartucho
Características técnicas
Conexiones: G⅜ (aprox. 17 mm)
Tuerca (conexión de agua): aprox. 19 mm
Indicaciones de seguridad
¡PELIGRO
DE MUERTE Y DE ACCIDENTE
PARA BEBÉS Y NIÑOS! No deje
nunca a los niños sin vigilancia con el material de
embalaje. Existe peligro de asfixia. Mantenga
el producto fuera del alcance de los niños.
Este producto no es un juguete.
¡PELIGRO DE DESCARGA ELÉC-
TRICA! Los escapes o fugas de a
gua
pueden suponer un peligro mortal
por descarga eléctrica. Revise cuidadosamente
que todas las uniones están cerradas herméti-
camente. Además, asegúrese de que todas las
conducciones de los aparatos eléctricos están
instaladas correctamente y de manera segura.
¡CUIDADO! ¡PELIGRO DE LESIONES!
Asegúrese de que todas las piezas están mon-
tadas correctamente y de la forma debida. Si
no se monta tal y como se indica en las instruc-
ciones, podrían producirse lesiones.
Por favor, tenga en cuenta que las arandelas y
juntas son piezas piezas que se desgastan y
que deben ser cambiadas cada cierto tiempo.
Las piezas dañadas pueden influir en la seguri-
dad y el funcionamiento.
¡ATENCIÓN! ¡PELIGRO DE DAÑOS MA-
TERIALES! El montaje únicamente deberá

46 ES
realizarse por personal especializado. Las
fugas o los escapes de agua pueden causar
diversos daños materiales tanto en el edificio
como en el mobiliario. Por lo tanto, le recomen-
damos que compruebe que todas las conexiones
estén selladas herméticamente.
Compruebe que las juntas están bien colocadas
para evitar fugas o escapes de agua.
Enrosque la cañería de desagüe en la posición
deseada teniendo en cuenta que debe dirigirla
hacia el fregadero. En caso contrario, el escape
de agua podría provocar numerosos daños
materiales en el edificio.
¡CUIDADO! ¡RIESGO DE QUEMADURAS!
Al ajustar la temperatura del agua caliente, asegú-
rese de que el agua no esté demasiado caliente.
Antes de la instalación familiarícese con el lugar
de montaje, observe por ejemplo las conexiones
de agua y el dispositivo de cierre.
Lea atentamente las instrucciones de uso antes
de montar y utilizar el grifo. ¡Guarde todas las
advertencias e indicaciones de seguridad por
si las necesita en un futuro!
Montaje
Instalación de la grifería
Cierre el suministro principal de agua corriente
para evitar fugas y escapes de agua. Deje
correr el agua restante de la tubería.
Instale el grifo en la conexión de pared, tal y
como se muestra en las figuras A–C.
¡CUIDADO! No retuerza los tubos flexibles
ni los someta a tensión. De lo contrario pueden
producirse daños materiales.
Cómo limpiar el grifo
Para eliminar impurezas hay que dejar circular
agua a través del grifo antes del primer uso.
Para ello proceda de tal modo (véase fig. D):
Desenrosque el difusor mezclador 7.
Abra el suministro principal de agua y deje
circular agua durante dos minutos.
A continuación vuelva a enroscar el difusor
mezclador.
Manejo
Puesta en funcionamiento
Nota: Tras largos periodos de inactividad del grifo,
deje circular agua abundantemente para eliminar
el agua estancada y posibles restos en la tubería.
Abra el suministro principal de agua corriente.
Para regular la temperatura y la intensidad del
agua levante la palanca de ajuste 8 y gírela
a la derecha o a la izquierda.
Agua caliente:
Gire la palanca de ajuste del grifo hacia la
izquierda.
Agua fría:
Gire la palanca de ajuste del grifo hacia la
derecha.
Compruebe que el grifo mezclador funciona
correctamente. Para ello gire la palanca de
ajuste en todas las direcciones posibles. Le re-
comendamos que compruebe periódicamente
que todas las uniones estén bien selladas.
Regulación de la temperatura
El cartucho 13 de este grifo dispone de un limitador
de temperatura. Esta función no se encuentra acti-
vada de fábrica (ajuste neutral).
¡CUIDADO! No modifique el ajuste de la li-
mitación de temperatura hasta haber montado
el grifo.
Observe la figura E para ajustar el limitador
de temperatura.
Cierre el suministro principal de agua.
Retire cuidadosamente la cubierta 10 mediante
un destornillador pequeño y plano.

47 ES
Afloje el tornillo de ajuste 9 con la llave he-
xagonal macho 15 girando en sentido contra-
rio a las agujas del reloj.
¡CUIDADO! No saque completamente el tor-
nillo, solo debe aflojarlo hasta que la palanca
de ajuste 8 se pueda extraer fácilmente.
Retire la palanca de ajuste 8.
Retire el anillo de protección del cartucho 11
con la mano y con ayuda de unos alicates
para tubos desenrosque el anillo de seguridad
del cartucho 12 .
A continuación, tire hacia arriba del anillo de
ajuste del cartucho 16 con un destornillador.
Nota: No retire el cartucho 13 .
Coloque el anillo de ajuste del cartucho 16 en
la posición deseada (véase fig. F).
Nota: El anillo de ajuste del cartucho 16
puede limitar el ángulo de giro del mango de
manera que se puede regular la cantidad de
agua caliente.
Vuelva a colocar el anillo de seguridad del
cartucho 12 en el grifo 14 con los alicates
para tubos. Fije el anillo de protección del
cartucho 11 con la mano.
Vuelva a colocar la palanca de ajuste 8 en
el grifo 14 y apriete el tornillo de ajuste 9
con una llave Allen 15 girando en el sentido
de las agujas del reloj.
Introduzca la cubierta 10 en el orificio.
Abra el suministro principal de agua y com-
pruebe la limitación de temperatura.
Función de ahorro de agua
El cartucho 13 de esta grifería dispone de una
función ecológica. Esta reduce el caudal de
agua que sale del grifo. Ello permite un ahorro
de agua de hasta el 50% (véase fig. G).
Levante la palanca de ajuste 8 hasta que
note una ligera resistencia. En esta posición se
limita el caudal de agua.
Si quiere aumentar el caudal, levante la palanca
de ajuste 8 hasta que supere la resistencia.
Función de ahorro de energía
El cartucho 13 de esta grifería dispone de una
función de ahorro de energía.
Fluye únicamente agua fría cuando se coloca la
palanca de ajuste
8
en la posición intermedia.
De este modo se reduce el consumo de energía
(véase fig. H).
Mantenimiento y limpieza
Cuidado y limpieza del grifo
Tenga en cuenta que los equipos de grifería requieren
un cuidado especial. Para ello tenga presente las
siguientes indicaciones:
Para la limpieza no utilice nunca productos
corrosivos o que contengan alcohol, ya que
podrían deteriorar el producto.
Limpie los grifos solamente con agua corriente,
con un limpiador suave o con un paño de tela
o de cuero.
Desenrosque periódicamente el difusor mez-
clador 7 y limpie los restos de cal o cuerpos
extraños que puedan haber en él.
Si no se cumplen las indicaciones de mantenimiento
cabe esperar daños en la superficie. En este caso
la garantía perdería su validez.
Eliminación
El embalaje está compuesto por materiales no con-
taminantes que pueden ser desechados en el centro
de reciclaje local.
Para obtener información sobre las posibilidades
de desecho del producto al final de su vida útil,
acuda a la administración de su comunidad o
ciudad.

48 ES
Informaciones
Potabilidad del agua del grifo
Consulte a las autoridades locales si el agua
de su ciudad o municipio es potable.
Generalmente puede seguir las siguientes
indicaciones para comprobar la potabili-
dad del agua:
Deje correr brevemente el agua por las tuberías
si ha estado estancada durante más de cuatro
horas. No utilice nunca agua estancada para
la preparación de comidas y bebidas, en parti-
cular para la alimentación de lactantes. De lo
contrario podría resultar perjudicial para la sa-
lud. Podrá distinguir cuando el agua está
fresca porque saldrá notablemente más fría de
la tubería que el agua estancada.
Si es alérgico al níquel, no utilice agua estan-
cada de tuberías cromadas para la alimenta-
ción y / o para la higiene corporal. Esta agua
puede tener un alto contenido en níquel y pro-
ducir una reacción alérgica.
No utilice agua potable de tuberías de plomo
para la preparación de alimentos para lactantes
y / o para la preparación de alimentos durante
el embarazo. El plomo se transmite al agua y
es especialmente perjudicial para la salud de
los lactantes y los niños pequeños.
Garantía
El producto ha sido fabricado cuidadosamente
siguiendo exigentes normas de calidad y ha sido
probado antes de su entrega. En caso de defecto
del producto, usted tiene derechos legales frente
al vendedor del mismo. Nuestra garantía (abajo
indicada) no supone una restricción de dichos
derechos legales.
Este producto dispone de una garantía de 3 años
desde la fecha de compra. El plazo de garantía
comienza a partir de la fecha de compra. Por favor,
conserve adecuadamente el justificante de compra
original. Este documento se requerirá como prueba
de que se realizó la compra.
Si en el plazo de 3 años a partir de la fecha de
compra se produce un fallo de material o fabrica-
ción en este producto, repararemos el producto o
lo sustituiremos gratuitamente por un producto nu-
evo (según nuestra elección). La garantía quedará
anulada si el producto resulta dañado o es utiliz-
ado o mantenido de forma inadecuada.
La garantía cubre defectos de materiales o de
fabricación. Esta garantía no cubre aquellos com-
ponentes del producto sometidos a un desgaste
normal y que, por ello, puedan considerarse piezas
de desgaste (por ej. las pilas). Tampoco cubre da-
ños de componentes frágiles como, por ejemplo,
los interruptores, baterías y piezas de cristal.
Tramitación de la garantía
Para garantizar una rápida tramitación de su con-
sulta, tenga en cuenta las siguientes indicaciones:
Para realizar cualquier consulta, tenga a mano el
recibo y el número de artículo (por ej. IAN
123456_7890) como justificante de compra.
Encontrará el número de artículo en una inscripción
de la placa indentificativa, en la portada de las
instrucciones (abajo a la izquierda) o en una pe-
gatina en la parte posterior o inferior.
Si el producto fallase o presentase algún defecto,
póngase primero en contacto con el departamento
de asistencia indicado, ya sea por teléfono o correo
electrónico.
Puede enviarnos el producto defectuoso libre de
franqueo adjuntando el recibo de compra (tícket
de compra) e indicando dónde está y cuándo ha
ocurrido el fallo a la dirección de asistencia que le
indicamos.


50 DK
Indledning .......................................................................................................................................Side 51
Formålsbestemt anvendelse ................................................................................................................Side 51
Beskrivelse af de enkelte dele .............................................................................................................Side 51
Tekniske data........................................................................................................................................Side 51
Sikkerhedshenvisninger .....................................................................................................Side 51
Montage ............................................................................................................................................Side 52
Installation af armaturet .......................................................................................................................Side 52
Gennemskylning af armaturet .............................................................................................................Side 52
Betjening ...........................................................................................................................................Side 52
Ibrugtagning .........................................................................................................................................Side 52
Indstilling af temperaturbegrænsning .................................................................................................Side 52
Vandspare-funktion ..............................................................................................................................Side 53
Energispare-funktion .............................................................................................................................Side 53
Vedligeholdelse og rengøring .......................................................................................Side 53
Pleje og rengøring af armaturet ..........................................................................................................Side 53
Bortskaffelse .................................................................................................................................Side 53
Informationer ...............................................................................................................................Side 53
Postevandets drikkevandskvalitet ........................................................................................................Side 53
Garanti ...............................................................................................................................................Side 54
Afvikling af garantisager .....................................................................................................................Side 54
Service ..................................................................................................................................................Side 54

51 DK
1-grebs køkkenarmatur
Indledning
Hjerteligt tillykke med købet af deres nye produkt. Du
har besluttet dig for et produkt af høj kvalitet. Gør
Dem fortrolig med apparatet inden første ibrugtag-
ning. Læs derfor den efterfølgende brugsvejledning
og sikkerhedsanvisningerne omhyggeligt. Brug kun
produktet som beskrevet og kun til de angivne anven-
delsesområder. Opbevar denne vejlledning på et
sikkert sted. Hvis De giver produktet videre til andre,
skal alle dokumenter følge med.
Formålsbestemt anvendelse
Dette produkt er egnet til alle tryksikre varmtvands-
systemer som centralvarme, gennemstrømningsvan-
dvarmere, trykboilere o.l. Produktet er ikke egnet til
lavtryks-vandvarmere som fx træ- eller kulbadeovne,
olie- eller gasbadeovne, åbne elektriske lagerenhed
er.
I tvivlstilfælde henvend dig venligst til en installatør
eller fagmand. En anden anvendelse end før bes-
krevet eller ændring af produktet er ikke tilladt og
fører til skader. Derudover kan der opstå risiko for
livstruende situationer og tilskadekomst. Produktet er
kun beregnet til privat anvendelse og ikke til medicin
sk
eller kommerciel brug. Producenten fralægger sig
ethvert ansvar for skader som følge af uhensigts-
mæssig anvendelse.
Beskrivelse af de enkelte dele
1 1 pakning
2 1 gevindstang
3 1 mellemlægsskive (plastik)
4 1 mellemlægsskive (metal)
5 1 møtrik
6a 1 fleksslange til koldt vand
6b 1 fleksslange til vamrt vand
7 1 blandingsdyse
8 1 indstillingshåndtag
9 1 låseskrue
10 1 afdækningshætte
11 1 patron-afdækningsring
12 1 patronsikringsring
13 1 patron
14 1 armaturlegeme
15 1 indvendig sekskantnøgle
16 1 patronens indstillingsring
Tekniske data
Tilslutninger: G⅜ (ca. 17 mm)
Møtrik (vandtilslutning): ca. 19 mm
Sikkerhedshenvisninger
LIVS- OG
ULYKKESFARE FOR SMÅBØRN
OG BØRN! Lad aldrig børn være
uden opsyn med emballagen. Der er fare for
kvælning. Hold produktet udenfor børns række-
vidde. Produktet er ikke legetøj.
PAS PÅ ELEKTRISK STØD!
Utætheder eller udtrædende vand
kan medføre livsfare gennem elektrisk
stød. Kontrollér derfor alle samlinger omhyggeligt
for tæthed. Kontrollér ligeledes, at alle ledninger
af elektriske apparater er installeret korrekt og
sikkert.
ADVARSEL! FARE FOR TILSKADEKOMST!
Kontrollér at alle dele er ubeskadigede og mon-
teret korrekt. Ved uhensigtsmæssig montering
er der fare for personskader.
Bemærk, at mellemlægsskiverne og pakningerne
er sliddele, som skal skiftes ud fra tid til anden.
Beskadigede dele kan have indflydelse på
sikkerheden og funktionen.
OBS! RISIKO FOR MATERIEL SKADE!
Lad montagen kun udføres af fagkyndige per-
soner. Lækager og vandudslip kan medføre
betydelige materielle skader på bygning og in-
dbo. Kontrollér derfor alle samlinger omhygge-
ligt for tæthed.
Vær opmærksom på at alle pakninger sidder
korrekt, for at forhindre vandudslip på grund
af lækage.

52 DK
Drej afløbsrøret i den af dig ønskede position,
men vær opmærksom på, at rette røret mod
håndvasken. Ellers kan vandudslip forårsage
betydelige skader på bygningen.
ADVARSEL! RISIKO FOR SKOLDNING!
Sørg for, at vandet ikke er for varmt, når du
indstiller det varme vand.
Sæt dig inden installationen ind i alle forholdene
på stedet, fx vandtilslutninger og lukkemekanismer.
Læs denne betjeningsvejledning grundigt igen-
nem inden montering og brug. Opbevar alle
sikkerhedshenvisninger og vejledninger til frem-
tidig brug!
Montage
Installation af armaturet
Sluk for hovedvandtilførslen for at undgå van-
dudslip på grund af lækage. Lad det resterende
postevand løbe ud.
Installér armaturet, som vist i afbildning A–C.
ADVARSEL! Fleksslangerne må ikke bøjes eller
sættes under spænding. Ellers er der risiko for
materiel skade.
Gennemskylning af armaturet
For at fjerne eventuel forurening, skal armaturet
skylles inden første ibrugtagning. Gå dertil
frem på følgende måde (se afbildning D):
Skru blandingsdysen 7 af.
Åbn for hovedvandtilførslen, og lad vandet
løbe i to minutter.
Skru derefter blandingsdysen på igen.
Betjening
Ibrugtagning
Bemærk: Skyl efter længere tids manglende brug
af armaturet ledningerne grundigt igennem, for at
opløse aflejringer fra drikkevandet og rester.
Åbn for hovedvandtilførslen.
Løft indstillingshåndtaget 8 og sving det mod
højre eller venstre for at regulere styrken, hen-
holdsvis vandgennemstrømningens temperatur.
Varmt vand:
Sving indstillingshåndtaget til venstre.
Koldt vand:
Sving indstillingshåndtaget til højre.
Kontrollér blandingsbatteriets drift. Sving til
dette formål indstillingshåndtaget i alle tilladte
positioner. Kontrollér regelmæssigt tilslutningerne
for tæthed.
Indstilling af
temperaturbegrænsning
Dette armaturs patron 13 er udstyret med en tempe-
raturbegrænsning. Denne funktion er ikke aktiveret
fra fabrikken (neutral indstilling).
ADVARSEL! Foretag først en ændring på ind-
stillingen af temperaturbegrænsningen, når du
har monteret armaturet.
Overhold afbildning E, for at indstille tempera-
turbegrænsningen.
Sluk for hovedvandtilførslen.
Fjern afdækningshætten 10 forsigtigt med en
lille, flad skruetrækker.
Låseskruen 9 løsnes med en indvendig seks-
kantnøgle 15 ved at dreje mod urets retning.
ADVARSEL! Drej ikke skruen helt ud, bare løsn
den, indtil indstillingshåndtaget 8 kan tages
nemt af.
Tag indstillingshåndtaget 8 af.
Løsn patron-afdækningsringen 11 med hånden.
Skru patronsikringsringen 12 af med en rørtang.
Træk nu patronens indstillingsring 16 opad
med en skruetrækker.
Bemærk: Fjern ikke patronen 13 .
Anbring patronens indstillingsring 16 i den
ønskede position (se afbildning F).
Bemærk: Patronens indstillingsring 16 kan
indskrænke drejevinklen af håndtaget, så at

53 DK
gennemstrømningsmængden af det varme
vand begrænses.
Spænd patronsikringsringen 12 igen fast på
armaturlegemet 14 ved hjælp af rørtangen. Fast-
gør patron-afdækningsringen 11 med hånden.
Sæt indstillingshåndtaget 8 igen på armatur-
legemet 14 . Spænd låseskruen 9 fast med
unbrakonøglen 15 ved at dreje med urets retning.
Tryk afdækningshætten 10 ind i åbningen.
Tænd for hovedvandtilførslen, og kontrollér
temperaturbegrænsningen.
Vandspare-funktion
Patronen 13 i dette armatur har en besparel-
sesfunktion. Denne mindsker gennemstrømnings-
mængden gennem vandhanen. Derved kan du
spare op til 50 % vand (se afbildning G).
Løft indstillingshåndtaget 8, til du mærker let
modstand. I denne indstilling bliver vandgen-
nemstrømningen begrænset.
Hvis du vil øge vandgennemstrømningen, løft
indstillingshåndtaget 8 mere, indtil du har
overvundet modstanden.
Energispare-funktion
Dette armaturs patron 13 har en energispare-
funktion.
Der løber kun koldt vand, når indstillingshånd-
taget 8 er indstillet til den midterste position.
Energiforbruget reduceres derigennem
(se afbildning H).
Vedligeholdelse og rengøring
Pleje og rengøring af armaturet
Vær opmærksom på, at sanitetsinstallationer kræver
en særlig pleje. Vær derfor opmærksom på følgende
henvisninger:
Anvend ingen ætsende eller alkoholholdige
midler til rengøringen, da disse kan beskadige
produktet.
Rens armaturet kun med klart vand, milde ren-
gøringsmidler og en blød klud hhv. læder.
Skru blandingsdysen 7 af i regelmæssige
intervaller og fjern kalkholdige rester eller
fremmedlegemer.
Ved ikke-overholdelse af plejevejledningen må man
forvente skader på overfladen. Garantikrav kan i
dette tilfælde ikke gøres gældende.
Bortskaffelse
Indpakningen består af miljøvenlige materialer, som
De kan bortskaffe over de lokale genbrugssteder.
De får oplyst muligheder til bortskaffelse af det ud-
tjente produkt hos deres lokale myndigheder eller
bystyre.
Informationer
Postevandets
drikkevandskvalitet
Informer dig hos din lokale kommune om
drikkevandskvaliteten.
Generelt gælder følgende anbefalinger
for drikkevandskvalitet af postevand:
Lad vandet løbe i kort tid, hvis det har stået stille
i ledningerne i mere end fire timer. Brug ikke
stagnationsvand til tilberedning af fødevarer og
drikkevarer, især ikke til ernæring af spædbørn.
Ellers kan det resultere i sundhedsmæssige pro-
blemer. Du kan kende frisk vand på, at det er
mærkbart koldere end stagnationsvand, når
det kommer ud af ledningen.
Brug ikke stagnationsvand fra forkromede led-
ninger til ernæring og / eller kropspleje, hvis du
er allergisk overfor nikkel. Dette vand kan være

54 DK
stærkt nikkelholdigt og resultere i allergiske re-
aktioner.
Brug ikke drikkevand fra blyholdige ledninger til
tilberedning af spædbørnsmad og / eller under
graviditeten til tilberedning af fødevarer. Bly af-
gives til drikkevandet og er meget sundhedsska-
deligt for spædbørn og småbørn.
Garanti
Produktet blev produceret omhyggeligt efter de
strengeste kvalitetskrav og kontrolleret grundigt in-
den levering. Hvis der forekommer mangler ved
dette produkt, så har de juridiske rettigheder over
for sælgeren af dette produkt. Disse juridiske rettig-
heder indskrænkes ikke af vores garanti, der beskri-
ves i det følgende.
De får 3 års garanti fra købsdatoen på dette produkt.
Garantifristen begynder med købsdatoen. Opbe-
var den originale kassebon på et sikkert sted. Denne
kassebon behøves som dokumentation for købet.
Hvis der inden for 3 år fra købsdatoen af for dette
produkt opstår en materiale- eller fabrikationsfejl,
bliver produktet repareret eller erstattet – efter vores
valg – af os uden omkostninger for dem. Garantien
bortfalder, hvis produktet bliver beskadiget eller ikke
anvendes eller vedligeholdes korrekt.
Garantien gælder for materiale- eller fabrikations-
fejl. Denne garanti dækker ikke produktdele, som
er udsat for normalt slid og derfor kan betragtes
som normale sliddele (f.eks. batterier) eller ved ska-
der på skrøbelige dele; f.eks. kontakter, akkumula-
torer som er fremstillet af glas.
Afvikling af garantisager
For at kunne garantere en hurtig sagsbehandling af
deres forespørgsel, bedes De følge følgende anvis-
ninger:
Opbevar kassebon og artikelnummer (f. eks. IAN
123456_7890) som købsdokumentation, så disse
kan fremlægges på forespørgsel. Artikelnumrene er
angivet på typeskiltet, ved en indgravering, på for-
siden af vejledningen (nederst til venstre) eller på et
mærkat på bag- eller undersiden. Hvis der forekom-
mer funktionsfejl eller andre mangler, skal De først
kontakte nedenstående serviceafdeling telefonisk
eller via e-mail.
Et produkt, der er registreret som defekt, kan De
derefter sende portofrit til den meddelte service-
adresse ved vedlæggelse af købsbeviset (kassebon)
og angivelsen af, hvori manglen består, og hvornår
den er opstået.
Service
Service Danmark
Tel.: 80253972
E-Mail: [email protected]

OWIM GmbH & Co. KG
Stiftsbergstraße 1
74167 Neckarsulm
GERMANY
Model-No.: HG02525
Version: 04 / 2021
Stand der Informationen · Last Information
Update · Version des informations · Stand
van de informatie · Stan informacji · Stav
informací · Stav informácií · Estado de las
informaciones · Tilstand af information: 03 / 2021
Ident.-No.: HG02525032021-8
IAN 368455_2010
-
 1
1
-
 2
2
-
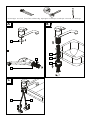 3
3
-
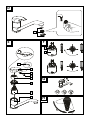 4
4
-
 5
5
-
 6
6
-
 7
7
-
 8
8
-
 9
9
-
 10
10
-
 11
11
-
 12
12
-
 13
13
-
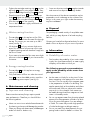 14
14
-
 15
15
-
 16
16
-
 17
17
-
 18
18
-
 19
19
-
 20
20
-
 21
21
-
 22
22
-
 23
23
-
 24
24
-
 25
25
-
 26
26
-
 27
27
-
 28
28
-
 29
29
-
 30
30
-
 31
31
-
 32
32
-
 33
33
-
 34
34
-
 35
35
-
 36
36
-
 37
37
-
 38
38
-
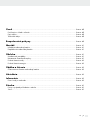 39
39
-
 40
40
-
 41
41
-
 42
42
-
 43
43
-
 44
44
-
 45
45
-
 46
46
-
 47
47
-
 48
48
-
 49
49
-
 50
50
-
 51
51
-
 52
52
-
 53
53
-
 54
54
-
 55
55


in andere talen
- français: LIVARNO 368455 Le manuel du propriétaire
- español: LIVARNO 368455 El manual del propietario
- Deutsch: LIVARNO 368455 Bedienungsanleitung
- slovenčina: LIVARNO 368455 Návod na obsluhu
- dansk: LIVARNO 368455 Brugervejledning
- polski: LIVARNO 368455 Instrukcja obsługi


