FläktGroup CAIRplus Installation and Maintenance Manual
- Type
- Installation and Maintenance Manual

INSTALLATION | INSTALLAZIONE | INSTALLATIE
INSTALACJA | INSTALARE | YERLEŞTIRME
CAIRplus
WITH ISYteq

LIMITS OF RESPONSIBILITIES
Although FläktGroup has tested and reviewed the documentation contained in this manual, FläktGroup makes no warranty, neither expressed nor
implied, with respect to this manual, including its quality, performance, or fitness for a particular purpose. FläktGroup shall under no circumstances
be liable for direct, indirect, special, incidental or consequential damage arising from the use or the inability to use information contained in this
manual. FläktGroup reserves the right to revise this publication at any time and to make changes to its content without prior notice and has no
duty to provide notice to previous or current owners with respect to such revisions or changes.

CAIRplus with ISYteq – Installation manual
We reserve the right to make changes without prior notice
FläktGroup DC-10662-UN_Europa_CAIRplus_IN-MA_2023-11-27_RO
1. Key to symbols .................................................................................5
2. Tools for assembly ..........................................................................6
3. Included components ....................................................................7
4. General safety risks ...................................................................... 11
5. Unloading and lifting –
where to find loose supplied accessories ........................... 14
6. Positioning of the unit ..................................................................16
7. Foundation requirements ...........................................................17
8. Docking (Mechanical and electrical) ......................................21
9. Loose, provided material ...........................................................25
10. Mounting of the rain roof ............................................................29
11. Connecting of coils ........................................................................31
12. Connection to ducts .....................................................................35
13. Installation of included components ......................................36
14. Connecting of incoming supply ...............................................48
15. Control cabinet ..............................................................................53
1. Symbolerklärung .............................................................................. 5
2. Montagewerkzeuge ........................................................................6
3. Lose gelieferte Komponenten .....................................................7
4. Allgemeine Sicherheitsrisiken .................................................. 11
5. Entladen und Heben –
Lage von losen Komponenten ..................................................14
6. Anlage positionieren .....................................................................16
7. Anforderungen an das Fundament ......................................... 17
8. Blockverbindung (mechanisch und elektrisch) ..................21
9. Lose, beigestelltes Material ...................................................... 25
10. Montage des Regendachs ........................................................29
11. Anschluss der Register ............................................................... 31
12. Kanalanschluss .............................................................................35
13. Lose gelieferte Komponenten installieren ...........................36
14. Stromzuleitung anschließen ..................................................... 48
15. Schaltschrank ................................................................................ 53
1. Legenda dei simboli .......................................................................5
2. Attrezzi necessari per l'assemblaggio ....................................6
3. Componenti forniti ...........................................................................7
4. Norme generali di sicurezza ..................................................... 11
5. Scarico e sollevamento - posizione degli accessori
forniti separatamente ...................................................................14
6. Posizionamento dell’unità ...........................................................16
7. Requisiti per la fondazione .........................................................17
8. Attacco (meccanico ed elettrico) ............................................. 21
9. Materiale sciolto e fornito .......................................................... 25
10. Montaggio del tettuccio antipioggia .......................................29
11. Collegamento delle batterie .......................................................31
12. Collegamento ai condotti ........................................................... 35
13. Installazione dei componenti forniti ....................................... 36
14. Collegamento dell'alimentazione ............................................48
15. Quadro di comando .....................................................................53
1. Symboles utilisés dans ce manuel ........................................... 5
2. Outils requis pour l’assemblage ................................................6
3. Accessoires non montés ..............................................................7
4. Consignes générales de sécurité ............................................ 11
5. Déchargement et levage –
Les accessoires non montés sont à l’intérieur .................. 14
6. Mise en place de la centrale .....................................................16
7. Exigences de base .......................................................................17
8. Assemblage (mécanique et électrique) ................................21
9. Matériel en vrac, fourni ...............................................................25
10. Montage de la toiture .................................................................. 29
11. Raccordement des batteries ..................................................... 31
12. Raccordement aux gaines ........................................................ 35
13. Installation des accessoires non montés ...........................36
14. Raccordement de l’alimentation électrique ........................ 48
15. Armoire de commande ..............................................................53
GB - CONTENTS DE - INHALT
IT- INDICE FR - TABLE DES MATIÈRES

CAIRplus with ISYteq – Installation manual
We reserve the right to make changes without prior notice
FläktGroup DC-10662-UN_Europa_CAIRplus_IN-MA_2023-11-27_RO
1. Symbolen ............................................................................................ 5
2. Gereedschap voor montage ........................................................6
3. Meegeleverde onderdelen ............................................................ 7
4. Algemene veiligheidsrisico’s ..................................................... 11
5. Uitladen en heffen -
plaats van meegeleverde onderdelen ....................................14
6. Plaatsing van de unit ....................................................................16
7. Eisen aan het fundament ............................................................17
8. Samenbouwen (mechanisch en elektrisch) ........................21
9. Los, verstrekt materiaal .............................................................25
10. Montage van het regendak .......................................................29
11. Aansluiten van batterijen ............................................................31
12. Aansluiting op de kanalen ......................................................... 35
13. Installatie van meegeleverde onderdelen ............................36
14. Aansluiting van de voeding ....................................................... 48
15. Regelkast .........................................................................................53
NL - INHOUD
1. Objaśnienie symboli .......................................................................5
2. Narzędzia do montażu ...................................................................6
3. Dołączone komponenty .................................................................7
4. Ogólne zagrożenia bezpieczeństwa ....................................... 11
5. Rozładunek i podnoszenie - gdzie można znaleźć
luźno zamocowane akcesoria .................................................. 14
6. Ustawienie urządzenia ................................................................16
7. Wymogi dotyczące fundamentów ...........................................17
8. Dokowanie (mechaniczne i elektryczne) ..............................21
9. Luźny, dostarczony materiał .....................................................25
10. Montaż dachu przeciwdeszczowego .................................... 29
11. Podłączanie cewek .......................................................................31
12. Połączenie z kanałami ................................................................35
13. Instalacja dołączonych komponentów .................................36
14. Podłączanie zasilania wejściowego ......................................48
15. Szafa sterownicza ........................................................................53
1. Explicația simbolurilor ...................................................................5
2. Unelte pentru asamblare ..............................................................6
3. Componente incluse .......................................................................7
4. Riscuri de siguranță generală ................................................. 11
5. Descărcarea și ridicarea - unde se găsesc accesoriile
furnizate în vrac .............................................................................14
6. Poziționarea aparatului ................................................................ 16
7. Cerințe privind fundația ...............................................................17
8. Andocare (mecanică și electrică) ...........................................21
9. Material liber, furnizat .................................................................. 25
10. Montarea acoperișului de ploaie .............................................29
11. Conectarea bobinelor ...................................................................31
12. Racordarea la conducte .............................................................35
13. Instalarea componentelor incluse ..........................................36
14. Conectarea alimentării de intrare ...........................................48
15. Dulap de control ............................................................................53
1. Sembol açıklaması..........................................................................5
2. Montaj için aletler ............................................................................6
3. Dahil edilen parçalar ......................................................................7
4. Genel güvenlik riskleri .................................................................. 11
5. Boşaltma ve kaldırma — gevşek tedarik edilen
aksesuarların nerede bulunacağı ............................................ 14
6. Ünitenin konumlandırılması .......................................................16
7. Temel gereksinimleri ....................................................................17
8. Yerleştirme (Mekanik ve elektriksel) ......................................21
9. Gevşek, sağlanan malzeme ......................................................25
10. Yağmur çatısının montajı ........................................................... 29
11. Bobinlerin bağlanması .................................................................31
12. Kanallara bağlantı .........................................................................35
13. Dahil edilen bileşenlerin montajı .............................................36
14. Gelen arzın bağlanması .............................................................48
15. Kontrol kabini .................................................................................53
PL - SPIS TREŚCI
RO- CUPRINS TR - İÇİNDEKİLER

5
CAIRplus with ISYteq – Installation manual
We reserve the right to make changes without prior noticeFläktGroup DC-10662-UN_Europa_CAIRplus_IN-MA_2023-11-27_RO
GB – Key to symbols
IT – Legenda dei simboli
NL – Symbolen
RO – Explicația simbolurilor
DE – Symbolerklärung
FR – Symboles utilisés dans ce manuel
PL – Objaśnienie symboli
TR – Sembol açıklaması
GB DE IT FR NL PL RO TR
Do NOT throw
the manual
away
Handbuch
aufbewahren NON gettare il
manuale NE PAS jeter le
manuel BEWAAR de
handleiding NIE wyrzucaj
podręcznika
NU aruncați
manualul la
gunoi
Kılavuzunu
atmayın
Warning Allgemeine
Warnung Avvertenza Précaution Waarschuwing Ostrzeżenie
ogólne Avertisment
general Genel uyarı
High voltage
warning Warnung vor
Hochspannung Alta tensione Attention –
Haute tension Waarschuwing
hoge spanning
Ostrzeżenie
o wysokim
napięciu
Avertizare de
înaltă tensiune Yüksek gerilim
uyarısı
Kg
See weight,
heavy Schweres
Gewicht Componente
pesante Élément lourd Zie gewicht,
zwaar Patrz waga,
ciężki A se vedea
greutate, greu Bkz. Ağırlık,
ağır
Outdoors Außenbereich Esterni Extérieur Buiten Na zewnątrz În aer liber Ev dışında
Humidity /
Rain Feuchtigkeit/
Regen Umidità /
Pioggia Humidité /
Pluie Vocht / regen Wilgotność /
deszcz Umiditate /
Ploaie Nem/ Yağmur
Indoors Innenbereich Interni Intérieur Binnen Wewnątrz
budynków În interior Içeriye
Electrician Elektriker Elettricista Électricien Elektricien Elektryk Electricist Elektrikçi
Refrigeration
technician Kältetechniker Tecnico
frigorista Technicien
Frigoriste Koeltechnicus Technik
chłodnictwa Tehnician de
refrigerare Soğutma
teknisyeni
11

6
CAIRplus with ISYteq – Installation manual
We reserve the right to make changes without prior noticeFläktGroup DC-10662-UN_Europa_CAIRplus_IN-MA_2023-11-27_RO
12
GB – Tools for assembly
IT – Attrezzi necessari per l'assemblaggio
NL – Gereedschap voor montage
RO – Unelte pentru asamblare
DE – Montagewerkzeuge
FR – Outils requis pour l’assemblage
PL – Narzędzia do montażu
TR – Montaj için aletler

7
CAIRplus with ISYteq – Installation manual
6.
2. 4. 5.
3.
1.
8. 10.9.7.
15.
11. 12
17.
14.13.
18.16. 20.
19.
21. 22. 23. 24. 25.
26. 27.
We reserve the right to make changes without prior noticeFläktGroup DC-10662-UN_Europa_CAIRplus_IN-MA_2023-11-27_RO
13
GB – Included components
IT – Componenti forniti
NL – Meegeleverde onderdelen
RO – Componente incluse
DE – Lose gelieferte Komponenten
FR – Accessoires non montés
PL – Dołączone komponenty
TR – Dahil edilen parçalar

8
CAIRplus with ISYteq – Installation manual
We reserve the right to make changes without prior noticeFläktGroup DC-10662-UN_Europa_CAIRplus_IN-MA_2023-11-27_RO
²3
1. GB Duct temperature sensor 2. GB Room temperature sensor
DE Kanaltemperaturfühler DE Raumtemperaturfühler
IT Sensore temperatura condotto IT Sensore temperatura ambiente
FR Sonde de température pour gaine FR Sonde de température ambiante
NL Sensor kanaaltemperatuur NL Kamertemperatuursensor
PL Kanałowy czujnik temperatury PL Czujnik temperatury pomieszczenia
RO Senzor de temperatură a conductei RO Senzor de temperatură a camerei
TR Kanal sıcaklık sensörü TR Oda sıcaklık sensörü
3. GB Outdoor temperature sensor (fasade sensor) 4. GB Freeze protection sensor (immersion)
DE Außentemperaturfühler (Fassadenfühler) DE Frostschutzsensor (Tauchfühler)
IT Sensore temperatura esterna (facciata) IT Sensore di protezione antigelo (sensore a immersione)
FR Sonde de température extérieure (sonde de façade) FR Sonde de protection antigel (sonde d'immersion)
NL Buitentemperatuursensor (gevelsensor) NL Vorstbeveiligingssensor (dompelsensor)
PL Czujnik temperatury zewnętrznej (czujnik fasady) PL Czujnik ochrony przed zamarzaniem (zanurzeniowy)
RO Senzor de temperatură exterioară (senzor fasade) RO Senzor de protecție la îngheț (imersie)
TR Dış mekan sıcaklık sensörü (fasade sensörü) TR Donma koruma sensörü (daldırma)
5. GB Change over (heating/cooling) sensor (immersion) 6. GB Duct pressure sensor
DE Umschaltsensor (Heizung/Kühlung) (Tauchfühler) DE Kanaldrucksensor
IT Sensore di commutazione (riscaldamento/raffreddamento)
(sensore a immersione) IT Sensore di pressione del condotto
FR Sonde change-over (chauffage/refroidissement) (sonde
d'immersion) FR Capteur de pression de gaine
NL Change over (verwarmen/koelen) sensor (dompelsensor) NL Kanaaldruksensor
PL Czujnik zmiany (ogrzewania/chłodzenia) (zanurzeniowy) PL Czujnik ciśnienia w kanale
RO Senzor de comutare (încălzire/răcire) (imersie) RO Senzor de presiune în conductă
TR Değiştirme (ısıtma/soğutma) sensörü (daldırma) TR Kanal basınç sensörü
7. GB Timer 8. GB Push button
DE Timer DE Drucktaste
IT Timer IT Pulsante
FR Minuterie FR Bouton poussoir
NL Timer NL Drukknop
PL Timer PL Przycisk
RO Cronometru RO Buton de apăsare
TR Süre ölçer TR Basma düğmesi
9. GB Presence detector 10. GB CO2/VOC sensor (Room)
DE Anwesenheitssensor DE CO2/VOC Fühler (Raum)
IT Rilevatore di presenza IT Sensore CO2/VOC (ambiente)
FR Détecteur de présence FR Sonde CO2/VOC (pièce)
NL Aanwezigheidsdetector NL CO2/VOC-sensor (kamer)
PL Detektor obecności PL Czujnik CO2/VOC (pomieszczenie)
RO Detector de prezență RO Senzor CO2/VOC (cameră)
TR Varlık dedektörü TR CO2/VOC sensörü (Oda)
11 GB CO2/VOC sensor (Duct) 12 GB Valve
DE CO2/VOC Fühler (Kanal) DE Ventil
IT Sensore CO2/VOC (condotto) IT Valvola
FR Sonde CO2/VOC (gaine) FR Vanne
NL CO2/VOC-sensor (leiding) NL Ventiel
PL Czujnik CO2/VOC (kanałowy) PL Zawór
RO Senzor CO2/VOC (conductă) RO Supapă
TR CO2/VOC sensör (Kanal) TR Valf

9
CAIRplus with ISYteq – Installation manual
We reserve the right to make changes without prior noticeFläktGroup DC-10662-UN_Europa_CAIRplus_IN-MA_2023-11-27_RO
13. GB Pressure independent valve 14. GB Valve actuator
DE Druckunabhängiges Ventil DE Ventilstellantrieb
IT Valvola indipendente dalla pressione IT Attuatore valvola
FR Vanne indépendante de la pression FR Actionneur de vanne
NL Drukonafhankelijk ventiel NL Ventielaandrijving
PL Zawór niezależny od ciśnienia PL Siłownik zaworu
RO Supapă independentă de presiune RO Actuator de supapă
TR Basınç bağımsız valf TR Valf aktüatörü
15. GB Pressure independent valve actuator 16. GB Control panel, ISYteq touch 7.1
DE Stellantrieb Druckunabhängiges Ventil DE Bediengerät, ISYteq touch 7.1
IT Attuatore della valvola indipendente dalla pressione IT Pannello di controllo, ISYteq touch 7.1
FR Actionneur vanne indépendante de la pression FR Boîtier de commande, ISYteq touch 7.1
NL Servomotor Drukonafhankelijk ventiel NL Bedieningspaneel, ISYteq touch 7.1
PL Niezależny od ciśnienia siłownik zaworu PL Panel sterowania, ISYteq touch 7.1
RO Actuator de supapă independent de presiune RO Panou de control, ISYteq touch 7.1
TR Basınç bağımsız valf aktüatörü TR Kontrol paneli, ISYteq touch 7.1
17. GB Water trap 18. GB Control panel, ISYteq touch 2.1
DE Siphon DE Bediengerät, ISYteq touch 2.1
IT Sifone IT Pannello di controllo, ISYteq touch 2.1
FR Siphon FR Boîtier de commande, ISYteq touch 2.1
NL Sifon NL Bedieningspaneel, ISYteq touch 2.1
PL Syfon PL Panel sterowania, ISYteq touch 2.1
RO Sifon RO Panou de control, ISYteq touch 2.1
TR Sifon TR Kontrol paneli, iSyteq touch 2.1
19. GB Docking kit 20. GB Sealing strip
DE Verbindungsset DE Dichtungsband
IT Kit di collegamento IT Guarnizione di tenuta
FR Kit de connexion FR Joint d’étanchéité
NL Verbindingsset NL Afdichtstrip
PL Zestaw dokujący PL Listwa uszczelniająca
RO Kit de andocare RO Bandă de etanșare
TR Yerleştirme kiti TR Sızdırmazlık bandı
21. GB Supply air temperature/humidity sensor 22 GB High efficiency pump
DE Zulufttemperaturfühler/Feuchtefühler DE Hocheffizienzpumpe
IT Sensore temperatura/umidità aria mandata IT Pompa ad alta efficienza
FR Capteur de température d’air soufflé/d’humidité FR Pompe à haute efficacité
NL Temperatuur toevoerlucht/vochtigheidssensor NL Hoogrendementspomp
PL Czujnik temperatury i wilgotności powietrza nawiewanego PL Pompa o wysokiej wydajności
RO Senzor de temperatură/umiditate a aerului de alimentare RO Pompă de înaltă eficiență
TR Besleme havası sıcaklığı/nem sensörü TR Yüksek verimli pompa
23 GB Cable duct standard 24 GB Cable duct cover
DE Kabelkanal Standard DE Deckel Kabelkanal
IT Canalizzazioni standard IT Coperchio della canalina per cavi
FR Gaine de câble standard FR Couvercle de gaine de câble
NL Kabelgoot standaard NL Afdekking voor kabelkanaal
PL Kanał kablowy standard PL Pokrywa kanału kablowego
RO Conducta de cablu standard RO Capacul conductei de cablu
TR Kablo kanalı standardı TR Kablo kanalı kapağı
13

10
CAIRplus with ISYteq – Installation manual
We reserve the right to make changes without prior noticeFläktGroup DC-10662-UN_Europa_CAIRplus_IN-MA_2023-11-27_RO
25. GB Cable duct for outdoor installation (with housing overhang on
operator side, side-by-side or double deck) 26. GB For outdoor installation: roof superstructures (roof plate, angle,
stand)
DE Kabelkanal für Außenaufstellung (bei Gehäuseüber-stand
bedienseitig, side-by-side oder double deck) DE Für Außenaufstellung: Dachaufbauten (Dachplatte, Winkel,
Aufsteller)
IT Canalina passacavi per installazione all'esterno (con sporgenza
della custodia sul lato operatore, affiancata o a due piani) IT Per l'installazione all'esterno: sovrastrutture per tetti (piastra,
angolo, supporto)
FR Goulotte pour installation à l'extérieur (avec porte-à-faux du
boîtier du côté opérateur, côte à côte ou double étage) FR Pour une installation à l'extérieur : superstructures de toit
(plaque de toit, angle, support)
NL Kabelgoot voor installatie buitenshuis (met overhangende
behuizing aan de kant van de operator, zij-aan-zij of dubbeldeks) NL Voor buitenopstelling: dakopbouwen (dakplaat, hoek, staander)
PL Kanał kablowy do montażu na zewnątrz (z wysięgiem obudowy
po stronie operatora, side-by-side lub double deck) PL Do montażu na zewnątrz: nadbudowy dachowe (płyta dachowa,
kątownik, stojak)
RO Conductă de cabluri pentru instalare în exterior (cu carcasă în
consolă pe partea operatorului, side-by-side sau double deck) RO Pentru instalare în exterior: suprastructuri de acoperiș (placă de
acoperiș, unghi, suport)
TR Dış mekanda kurulum için kablo kanalı (operatör tarafında gövde
çıkıntısı ile, yan yana veya çift katlı) TR Dış mekan kurulumu için: çatı üst yapıları (çatı plakası, köşebent,
ayak)
27. GB Separable gland for Ethernet cable
DE Teilbare Verschraubung für Ethernet-Kabel
IT Pressacavo separabile per cavo Ethernet
FR Presse-étoupe séparable pour le câble Ethernet
NL Scheidbare wartel voor Ethernet-kabel
PL Oddzielna dławnica dla kabla Ethernetowego
RO Garnitura separabilă pentru cablu Ethernet
TR Ethernet kablosu için ayrılabilir rakor
²3

11
CAIRplus with ISYteq – Installation manual
• Local provisions and regulations shall ALWAYS be observed.
• Follow separate instruction for replacement of components.
• Planning for work of this type is a condition that must be
complied with in order for the air handling unit to meet national
standards.
• No unauthorized person shall be allowed to work with the air
handling unit. Only qualified personnel.
• Read and understand these instructions before you begin
installing the air handling unit. The owner or the fitter of the
air handling unit is responsible for seeing to it that the safety
regulations in force are followed.
GB – General safety risks
IT – Norme generali di sicurezza
NL – Algemene veiligheidsrisico’s
RO – Riscuri de siguranță generală
GB
WARNING!
• The air handling unit must not be taken into operation before all
electrical and mechanical safety devices have been installed.
Take great care when opening the air vent of the heating coil
(hot water).
• Wear suitable protective equipment during installation or other
work on the product.
• If the air handling unit is disassembled prior to installation,
FläktGroup declines any responsibility for conformance of the
unit to its rated tightness class.
• The air handling unit doors are equipped with lockable handles.
Be sure that you always leave the unit with the doors locked
and keep the keys inaccessible to unauthorized persons.
DE
WARNUNG!
• Die Lüftungseinheit darf erst in Betrieb genommen
werden, wenn sämtliche elektrische und mechanische
Sicherheitsvorrichtungen installiert wurden. Gehen Sie beim
Öffnen des Lüftungsanschlusses für den Heizkonvektor
(Warmwasser) besonders vorsichtig vor.
• Tragen Sie bei der Installation und anderen Arbeiten am Gerät
geeignete Schutzausrüstung.
• Wird die Lüftungseinheit vor der Installation demontiert,
übernimmt FläktGroup keine Verantwortung dafür, dass die
Einheit mit der angegebenen Dichtheitsklasse übereinstimmt.
• Die Türen der Lüftungseinheit sind mit verschließbaren Griffen
ausgestattet. Vergewissern Sie sich stets, dass Sie die Einheit
mit verriegelten Türen verlassen und die Schlüssel nicht in
unbefugte Hände gelangen können.
• Lokale Bestimmungen und Regelungen sind STETS einzuhalten.
• Befolgen Sie die separate Anleitung zum Austausch von
Komponenten.
• Die Planung von Arbeiten dieser Art ist eine Bedingung, die
erfüllt werden muss, damit das Lüftungsgerät den nationalen
Normen entspricht.
• Die Lüftungseinheit darf nur von qualifiziertem Fachpersonal
bedient werden.
• Lesen Sie diese Anleitung sorgfältig, bevor Sie mit der
Installation der Lüftungseinheit beginnen. Der Eigentümer oder
Monteur der Lüftungseinheit ist dafür verantwortlich, dass die
geltenden Sicherheitsbestimmungen eingehalten werden.
DE – Allgemeine Sicherheitsrisiken
FR – Consignes générales de sécurité
PL – Ogólne zagrożenia bezpieczeństwa
TR – Genel güvenlik riskleri
AVVERTENZA!
• L’unità di trattamento aria non deve essere messa in funzione
finché non sono stati installati tutti i dispositivi di sicurezza elettrici
e meccanici. Prestare molta attenzione in sede di apertura delle
valvole e/o dei collegamenti idraulici della batteria calda.
• Indossare dispositivi di protezione adeguati durante l'installazione o
altri lavori sul prodotto.
• Qualora l’unità di trattamento aria sia stata smontata prima
dell’installazione, FläktGroup declina ogni responsabilità
relativamente alla conformità alla classe di tenuta specificata.
• Gli sportelli dell’unità di trattamento aria sono dotati di serrature.
Si raccomanda di chiudere sempre a chiave gli sportelli e di
conservare le chiavi in un luogo inaccessibile ad eventuale
personale non autorizzato.
• Rispettare SEMPRE i regolamenti e le norme locali.
• Seguire le istruzioni separate per la sostituzione dei componenti.
• La pianificazione di lavori di questo tipo è una condizione che deve
essere rispettata per far sì che l'unità di trattamento dell'aria sia
conforme alle norme nazionali.
• I lavori sull’unità di trattamento aria non devono essere effettuati da
personale non autorizzato. Solamente personale qualificato.
• Leggere attentamente le presenti istruzioni prima di installare
l’unità di trattamento aria. Il proprietario o l’installatore dell’unità
di trattamento aria è responsabile dell’osservanza delle norme di
sicurezza vigenti.
IT
We reserve the right to make changes without prior noticeFläktGroup DC-10662-UN_Europa_CAIRplus_IN-MA_2023-11-27_RO
14

12
CAIRplus with ISYteq – Installation manual
We reserve the right to make changes without prior noticeFläktGroup DC-10662-UN_Europa_CAIRplus_IN-MA_2023-11-27_RO
AVERTISSEMENT!
• La centrale de traitement de l’air ne doit pas être mise en
service avant que tous les dispositifs de sécurité électriques et
mécaniques n’aient été installés. Attention en ouvrant le robinet de
purge des batteries de chauffage (eau brûlante).
• Portez un équipement de protection approprié pendant l'installation
ou toute autre intervention sur le produit.
• FläktGroup décline toute responsabilité quant à la conformité de la
centrale de traitement de l’air en matière de classe d’étanchéité
nominale dans le cas où celle-ci serait démontée avant installation.
• Les portes de la centrale de traitement d’air sont équipés de
poignées verrouillables. Toujours s’assurer que les portes de la
centrale sont correctement verrouillés et conserver les clés hors
de portée de toute personne non autorisée.
WAARSCHUWING!
• De luchtbehandelingsunit mag pas in bedrijf worden genomen
als alle elektrische en mechanische veiligheidsvoorzieningen
zijn geïnstalleerd. Wees zeer voorzichtig bij het openen van de
luchtopening voor het verwarmingselement (heet water).
• Draag geschikte beschermingsmiddelen tijdens de installatie of
andere werkzaamheden aan het product.
• Als de luchtbehandelingsunit vóór installatie uit elkaar wordt
gehaald, aanvaardt FläktGroup geen aansprakelijkheid voor het
voldoen aan de aangegeven dichtheidsklasse.
• De deuren van de luchtbehandelingsunit zijn voorzien van
vergrendelbare handgrepen. Zorg ervoor dat de deuren van de
unit vergrendeld zijn als u er niet bent en dat onbevoegden niet
FR
• L’ensemble des dispositions et des réglementations locales doit
toujouis être respecté.
• Suivre les instructions spécifiques pour le remplacement des
composants.
• La planification de ce type de travaux est une condition à respecter
pour que la centrale de traitement d'air soit conforme aux normes
nationales.
• L’utilisation de la centrale de traitement d’air est strictement
interdite aux personnes non autorisées. Personnel qualifié
uniquement.
• Il est indispensable de lire et de comprendre les présentes
instructions avant de procéder à l’installation de la centrale de
traitement d’air. Le propriétaire ou l’installateur de la centrale de
traitement d’air est tenu de s’assurer du respect de l’ensemble des
réglementations de sécurité en vigueur.
bij de sleutels kunnen.
• Lokale wet- en regelgeving moet ALTIJD worden nageleefd.
• Volg de aparte instructies voor het vervangen van onderdelen.
• Het plannen van dit soort werkzaamheden is een voorwaarde
waaraan moet worden om ervoor te zorgen dat de
luchtbehandelingskast voldoet aan de nationale normen.
• Laat onbevoegden niet met de luchtbehandelingsunit werken.
Zet alleen gekwalificeerd personeel in.
• Zorg ervoor dat u deze instructies hebt doorgelezen
en begrepen voordat u begint met de installatie van de
luchtbehandelingsunit. De eigenaar of installateur van de
luchtbehandelingsunit is verantwoordelijk voor de naleving van
de van kracht zijnde veiligheidsvoorschriften.
NL
OSTRZEŻENIE!
• Nie wolno uruchamiać centrali wentylacyjnej przed
zainstalowaniem wszystkich elektrycznych i mechanicznych
urządzeń zabezpieczających. Zachować szczególną ostrożność
przy otwieraniu otworu wentylacyjnego nagrzewnicy (gorącej
wody).
• Podczas instalacji lub innych prac wykonywanych na urządzeniu
należy nosić odpowiednie wyposażenie ochronne.
• Jeśli centrala wentylacyjna zostanie zdemontowana przed
montażem, FläktGroup nie ponosi żadnej odpowiedzialności za
zgodność urządzenia z jego znamionową klasą szczelności
• Drzwi centrali wentylacyjnej są wyposażone w zamykane
klamki. Należy pamiętać, aby zawsze pozostawiać urządzenie
z zamkniętymi drzwiami, a klucze przechowywać w miejscu
niedostępnym dla osób nieupoważnionych.
• ZAWSZE należy przestrzegać lokalnych przepisów i regulacji.
• W przypadku wymiany podzespołów należy postępować
zgodnie z oddzielną instrukcją.
• Zaplanowanie tego typu prac jest warunkiem, który musi być
spełniony, aby urządzenie Aby centrala wentylacyjna spełniała
standardy krajowe, należy zaplanować tego typu prace.
• Żadna nieupoważniona osoba nie może pracować przy
urządzeniu wentylacyjnym. Pracę może wykonywać tylko
wykwalifikowany personel.
• Przed przystąpieniem do montażu centrali wentylacyjnej
należy przeczytać i zrozumieć niniejszą instrukcję. Właściciel
lub monter centrali wentylacyjnej jest odpowiedzialny za
przestrzeganie obowiązujących przepisów bezpieczeństwa.
PL
²4

13
CAIRplus with ISYteq – Installation manual
We reserve the right to make changes without prior noticeFläktGroup DC-10662-UN_Europa_CAIRplus_IN-MA_2023-11-27_RO
ATENȚIE!
• Unitatea de tratare a aerului nu trebuie pusă în funcțiune înainte de
a fi instalate toate dispozitivele de siguranță electrice și mecanice.
Aveți mare grijă când deschideți gura de aerisire a serpentinei de
încălzire (apă caldă).
• Purtați echipament de protecție adecvat în timpul instalării sau al
altor lucrări asupra produsului.
• În cazul în care unitatea de tratare a aerului este dezasamblată
înainte de instalare, FläktGroup își declină orice responsabilitate
pentru conformitatea unității cu clasa de etanșeitate nominală.
• Ușile unității de tratare a aerului sunt echipate cu mânere care
se pot bloca. Asigurați-vă că lăsați întotdeauna unitatea cu ușile
încuiate și păstrați cheile inaccesibile persoanelor neautorizate.
• Trebuie respectate ÎNTOTDEAUNA prevederile și reglementările
locale.
RO
• Urmați instrucțiunile separate pentru înlocuirea componentelor.
• Planificarea lucrărilor de acest tip este o condiție care trebuie
respectată pentru ca unitatea de tratare a aerului să respecte
standardele naționale.
• Nicio persoană neautorizată nu trebuie să aibă voie să lucreze
cu unitatea de tratare a aerului. Numai personalul calificat.
• Citiți și înțelegeți aceste instrucțiuni înainte de a începe
instalarea unității de tratare a aerului. Proprietarul sau
instalatorul unității de tratare a aerului este responsabil pentru a
se asigura că sunt respectate normele de siguranță în vigoare.
UYARI!
• Tüm elektrikli ve mekanik emniyet cihazları kurulmadan önce klima
kontrol ünitesi devreye alınmamalıdır. Isıtma bobininin hava deliğini
açarken büyük özen gösterin (sıcak su).
• Kurulum sırasında veya ürün üzerinde başka çalışmalar
sırasında uygun koruyucu ekipman giyin.
• Hava taşıma ünitesi kurulumdan önce sökülürse FläktGroup
ünitenin nominal sıkılık sınıfına uyumu konusunda herhangi bir
sorumluluğu reddediyor.
• Klima ünitesi kapıları kilitlenebilir kulplar ile donatılmıştır. Üniteyi
her zaman kapılar kilitli olarak terk ettiğinizden ve anahtarları
yetkisiz kişiler için erişilemez tuttuğunuzdan emin olun.
• Yerel hükümler ve yönetmeliklere HER ZAMAN uyulmalıdır.
• Bileşenlerin değiştirilmesi için ayrı talimatları izleyin.
TR
• Bu tip çalışmaların planlanması, klima kontrol ünitesinin ulusal
standartları karşılaması için uyulması gereken bir koşuldur.
• Hiçbir yetkisiz kişinin klima ünitesiyle çalışmasına izin
verilmemektedir. Sadece nitelikli personel.
• Hava taşıma ünitesini kurmaya başlamadan önce bu talimatları
okuyun ve anlayın. Hava taşıma ünitesinin sahibi veya tesisatçısı,
yürürlükteki güvenlik yönetmeliklerine uyulduğunu görmekten
sorumludur.
14

14
CAIRplus with ISYteq – Installation manual
90 - 120°
max. 1500 kg
Kg
A
max. 4000 kg
A = max. 60°
Kg
We reserve the right to make changes without prior noticeFläktGroup DC-10662-UN_Europa_CAIRplus_IN-MA_2023-11-27_RO
GB – Unloading and lifting – where to fi nd loose supp-
lied accessories
IT – Scarico e sollevamento - posizione degli access-
ori forniti separatamente
NL – Uitladen en heffen - plaats van meegeleverde
onderdelen
RO – Descărcarea și ridicarea - unde se găsesc ac-
cesoriile furnizate în vrac
DE – Entladen und Heben – Lage von losen Komponen-
ten
FR – Déchargement et levage – Les accessoires non
montés sont à l’intérieur
PL – Rozładunek i podnoszenie - gdzie można znaleźć
luźno zamocowane akcesoria
TR – Boşaltma ve kaldırma — gevşek tedarik edilen
aksesuarların nerede bulunacağı
²5

15
CAIRplus with ISYteq – Installation manual
GB – stored inside device
DE – platziert im Gerät
IT – posizionato all'interno
dell'unità
FR – stocké dans l'unité
NL – opgeslagen in de unit
PL – umieszczone w jednostce
RO – stocate în interiorul
dispozitivului
TR – cihazın içinde saklanır
GB - Use transport lugs only once. Units with roof:
Ensure that the roof sheets are not damaged.
DE - Transportösen nur einmal verwenden. Geräte mit Dach:
Darauf achten, dass die Dachbleche nicht beschädigt werden.
IT - Usare gli occhielli di trasporto solo una volta. Unità con tetto:
Assicurarsi che le lamiere del tetto non siano danneggiate.
FR - N'utilisez les œillets de transport qu'une seule fois. Unités avec
toit: Assurez-vous que les tôles du toit ne soient pas endommagées.
NL - Gebruik de transportogen slechts één keer. Units met dak:
Zorg ervoor dat de dakplaten niet beschadigd worden.
PL - Uchwyty transportowe należy użyć tylko raz. Jednostki z dachem:
Upewnić się, że blachy dachowe nie są uszkodzone.
RO - Utilizați urechile de transport o singură dată. Unități cu acoperiș:
Asigurați-vă că foile de acoperiș nu sunt deteriorate.
TR - Taşıma paçalarını sadece bir kez kullanın. Çatılı birimler:
Çatı levhalarının hasar görmediğinden emin olun.
GB - Use transport gear only once! Use provided timber spacers!
Units with roof: Ensure that the roof sheets are not damaged! Remove
slanting roof fastening device before lifting unit by crane!
DE - Transportmittel nur einmal verwenden!
Mitgelieferte Abstandshalter aus Holz verwenden! Geräte mit Dach:
Darauf achten, dass die Dachbleche nicht beschädigt werden!
Schrägdachbefestigung vor dem Anheben des Gerätes mit dem Kran
entfernen!
IT - Usare l'attrezzatura di trasporto solo una volta!
Utilizzare i distanziatori in legno forniti! Unità con tetto: Assicurarsi che
le lamiere del tetto non siano danneggiate! Rimuovere il dispositivo di
fissaggio del tetto inclinato prima di sollevare l'unità con la gru!
FR - N'utilisez qu'une seule fois le dispositif de transport!
Utilisez les entretoises en bois fournies ! Unités avec toit : Veiller à ce
que les tôles du toit ne soient pas endommagées ! Retirer le dispositif
de fixation du toit incliné avant de soulever l'unité à la grue!
NL - Gebruik het transportmateriaal slechts één keer!
Gebruik de meegeleverde houten afstandhouders! Eenheden met dak:
Zorg ervoor dat de dakplaten niet beschadigd worden! Voor het hijsen
met de kraan de schuine dakbevestiging verwijderen!
PL - Urządzenia transportowego należy użyć tylko raz! Stosować
dostarczone podkładki drewniane! Jednostki z dachem: Upewnić się,
że blachy dachowe nie są uszkodzone! Przed podniesieniem jednostki
za pomocą dźwigu usunąć element mocujący dach skośny!
RO - Folosiți echipamentul de transport o singură dată! Folosiți
distanțierele de lemn furnizate! Unități cu acoperiș: Asigurați-vă că
foile de acoperiș nu sunt deteriorate! Îndepărtați dispozitivul de fixare a
acoperișului înclinat înainte de a ridica unitatea cu macaraua!
TR - Taşıma takımını sadece bir kez kullanın! Sağlanan kereste ara
parçaları kullanın! Çatılı birimler: Çatı levhalarının hasar görmediğinden
emin olun! Vinç ile üniteyi kaldırmadan önce eğimli çatı sabitleme
cihazını çıkarın!
We reserve the right to make changes without prior noticeFläktGroup DC-10662-UN_Europa_CAIRplus_IN-MA_2023-11-27_RO
15

16
CAIRplus with ISYteq – Installation manual
GB – Service area: Ensure that the rear device connectors
can be mounted.
IT – Area di servizio: assicurarsi che i connettori posteriori del
dispositivo possano essere montati.
NL – Onderhoudsgebied: Zorg ervoor dat de achterste
apparaatconnectoren kunnen worden aangebracht.
RO – Zona de service: Asigurați-vă că se pot monta conectorii
din spate ai dispozitivului.
DE – Servicebereich: Sicherstellen, dass die rückseitigen
Geräteverbinder montiert werden können.
FR – Zone de service: S'assurer que les connecteurs arrière
de l'appareil peuvent être montés.
PL – Obszar serwisowy: Upewnij się, że można zamontować
tylne złącza urządzenia.
TR – Servis alanı: Arka cihaz konektörlerinin takılabildiğinden
emin olun.
B > A + 500 mm B > A + 500 mm
GB – with rotary heatexchanger
DE – mit Rotationswärmeaustauscher
IT – con scambiatore di calore a rotore
FR – avec échangeur de chaleur à rotor
NL – met rotor warmtewisselaa
PL – z wymiennikiem ciepła w wirniku
RO – cu schimbător de căldură cu rotor
TR – rotorlu Isı Eşanjörü ile
GB – with plate heateexchanger
DE – mit Plattenwärmetauscher
IT – con scambiatore di calore a piastre
FR – avec échangeur de chaleur à plaques
NL – met platenwarmtewisselaar
PL – z płytowym wymiennikiem ciepła
RO – cu schimbător de căldură cu plăci
TR – plakalı ısı eşanjörü ile
GB – with run around coil
DE – mit Kreislaufverbundsystem
IT – con bobina di scorrimento
FR – avec bobine d'enroulement
NL – met rondlopende spoel
PL – z biegiem wokół cewki
RO – cu bobina în jurul valorii de rulare
TR – bobin etrafında çalışma ile
B > A + 500 mm
We reserve the right to make changes without prior noticeFläktGroup DC-10662-UN_Europa_CAIRplus_IN-MA_2023-11-27_RO
GB – Positioning of the unit
IT – Posizionamento dell’unità
NL – Plaatsing van de unit
RO – Poziționarea aparatului
DE – Anlage positionieren
FR – Mise en place de la centrale
PL – Ustawienie urządzenia
TR – Ünitenin konumlandırılması
²6

17
CAIRplus with ISYteq – Installation manual
GB – Service area: Ensure that the rear device connectors
can be mounted.
IT – Area di servizio: assicurarsi che i connettori posteriori del
dispositivo possano essere montati.
NL – Onderhoudsgebied: Zorg ervoor dat de achterste
apparaatconnectoren kunnen worden aangebracht.
RO – Zona de service: Asigurați-vă că se pot monta conectorii
din spate ai dispozitivului.
DE – Servicebereich: Sicherstellen, dass die rückseitigen
Geräteverbinder montiert werden können.
FR – Zone de service: S'assurer que les connecteurs arrière
de l'appareil peuvent être montés.
PL – Obszar serwisowy: Upewnij się, że można zamontować
tylne złącza urządzenia.
TR – Servis alanı: Arka cihaz konektörlerinin takılabildiğinden
emin olun.
We reserve the right to make changes without prior noticeFläktGroup DC-10662-UN_Europa_CAIRplus_IN-MA_2023-11-27_RO
GB – Foundation requirements
IT – Requisiti per la fondazione
NL – Eisen aan het fundament
RO – Cerințe privind fundația
DE – Anforderungen an das Fundament
FR – Exigences de base
PL – Wymogi dotyczące fundamentów
TR – Temel gereksinimleri
GB - Ensure site base is stable and leveled.
Deflection ≤ 4mm/m.
DE - Sicherstellen, dass der Untergrund der Baustelle stabil und
eben ist. Durchbiegung ≤ 4 mm/m.
IT - Assicurarsi che la base del sito sia stabile e livellata.
Deformazione ≤ 4 mm/m.
FR - S'assurer que la base du site est stable et nivelée.
Déflexion ≤ 4 mm/m.
NL - Zorg ervoor dat de ondergrond stabiel en waterpas is.
Doorbuiging ≤ 4 mm/m.
PL - Upewnij się, że podłoże jest stabilne i wypoziomowane.
Odchylenie ≤ 4 mm/m.
RO - Asigurați-vă că baza amplasamentului este stabilă și nivelată.
Deflecție ≤ 4 mm/m.
TR - Site tabanının dengeli ve düzleştirildiğinden emin olun. Sapma ≤ 4
mm/m.
GB - The foundation/bottom base may protrude a maximum of 20 mm
beyond the outer edge of the unit to enable the fitting of cover plates or
accessories, such as condensate traps. The supporting points of the
foundation must be located at every unit sub-division; ensure that the
maximum distance measured between these points lengthways over
the unit does not exceed 1,600 mm [see 1].
DE - Das Fundament/der Boden darf maximal 20 mm über
die Außenkante des Geräts hinausragen, um die Montage von
Abdeckplatten oder Zubehör, wie z. B. Kondensatsammlern, zu
ermöglichen. Die Auflagepunkte des Fundaments müssen sich an
jeder Geräteunterteilung befinden; es ist darauf zu achten, dass der
maximale Abstand zwischen diesen Punkten in Längsrichtung über
das Gerät gemessen 1.600 mm nicht überschreitet [siehe 1].
IT - La fondazione/base può sporgere al massimo di 20 mm oltre
il bordo esterno dell'unità per consentire il montaggio di piastre
di copertura o accessori, come i sifoni per la condensa. I punti di
appoggio della fondazione devono essere situati in ogni suddivisione
dell'unità; assicurarsi che la distanza massima misurata tra questi
punti nel senso della lunghezza dell'unità non superi i 1.600 mm [1].
FR - La fondation/le socle inférieur peut dépasser de 20 mm
maximum le bord extérieur de l'appareil pour permettre le montage
de plaques de recouvrement ou d'accessoires, tels que les purgeurs
de condensats. Les points d'appui de la fondation doivent être situés à
chaque subdivision de l'appareil ; veiller à ce que la distance maximale
mesurée entre ces points dans le sens de la longueur de l'appareil ne
dépasse pas 1 600 mm [voir 1].
NL - De fundering/bodemvoet mag maximaal 20 mm buiten de
buitenrand van het toestel uitsteken om het aanbrengen van
afdekplaten of accessoires, zoals condensaatvangers, mogelijk
te maken. De steunpunten van de fundering moeten bij elke
onderverdeling van de eenheid worden aangebracht; zorg ervoor dat
de maximale afstand gemeten tussen deze punten in de lengterichting
over de eenheid niet meer dan 1.600 mm bedraagt [zie 1].
17

18
CAIRplus with ISYteq – Installation manual
We reserve the right to make changes without prior noticeFläktGroup DC-10662-UN_Europa_CAIRplus_IN-MA_2023-11-27_RO
PL - Fundament/podstawa dolna może wystawać maksymalnie 20
mm poza zewnętrzną krawędź urządzenia, aby umożliwić montaż płyt
pokrywowych lub akcesoriów, takich jak syfony kondensatu. Punkty
podparcia fundamentu muszą znajdować się na każdym podziale
urządzenia; należy dopilnować, aby maksymalna odległość mierzona
między tymi punktami wzdłuż urządzenia nie przekraczała 1600 mm
[patrz 1].
RO - Baza de fundație/baza inferioară poate depăși cu maximum 20
mm marginea exterioară a unității pentru a permite montarea plăcilor
de acoperire sau a accesoriilor, cum ar fi sifoanele de condens.
Punctele de susținere ale fundației trebuie să fie amplasate la fiecare
subdiviziune a unității; asigurați-vă că distanța maximă măsurată între
aceste puncte pe lungimea unității nu depășește 1.600 mm [a se
vedea 1].
TR - Kondens kapanları gibi kapak plakalarının veya aksesuarların
takılmasını sağlamak için temel/alt taban ünitenin dış kenarının en
fazla 20 mm ötesine çıkıntı yapabilir. Vakfın destek noktaları her birim
alt bölümünde yer almalıdır; bu noktalar arasında ölçülen maksimum
mesafenin ünitenin 1.600 mm'yi geçmediğinden emin olun [bkz. 1].
GB - Units arranged side-by-side and single units with an overall width
of more than 2,520 mm must be supported in the centre [see 2 and 3].
DE - Nebeneinander angeordnete Geräte und Einzelgeräte mit einer
Gesamtbreite von mehr als 2.520 mm müssen in der Mitte abgestützt
werden [siehe 2 und 3].
IT - Le unità affiancate e le unità singole con una larghezza
complessiva superiore a 2.520 mm devono essere sostenute al centro
[vedi 2 e 3].
FR - Les appareils disposés côte à côte et les appareils individuels
dont la largeur totale est supérieure à 2 520 mm doivent être soutenus
au centre [voir 2 et 3].
NL - Naast elkaar geplaatste units en solitaire units met een totale
breedte van meer dan 2.520 mm moeten in het midden worden
ondersteund [zie 2 en 3].
PL - Urządzenia ustawione obok siebie oraz urządzenia pojedyncze
o szerokości całkowitej większej niż 2520 mm muszą być podparte
pośrodku [patrz 2 i 3].
RO - Unitățile dispuse unul lângă altul și unitățile individuale cu o lățime
totală mai mare de 2 520 mm trebuie să fie susținute în centru [a se
vedea 2 și 3].
TR - Toplam genişliği 2,520 mm'den fazla olan yan yana düzenlenmiş
birimler ve tek üniteler merkezde desteklenmelidir [bkz. 2 ve 3].
²7

19
CAIRplus with ISYteq – Installation manual
We reserve the right to make changes without prior noticeFläktGroup DC-10662-UN_Europa_CAIRplus_IN-MA_2023-11-27_RO
GB - On-site steel beam
DE - Stahlträger
IT - Trave di acciaio
FR - Poutre en acier
NL - Stalen ligger
PL - Belka stalowa na miejscu
RO - Grindă de oțel la fața locului
TR - Yerinde çelik kiriş
GB - Concrete base
DE - Betonfundament
IT - Base in cemento
FR - Base en béton
NL - Betonsokkel
PL - Fundament betonowy
RO - Fundație din beton
TR - Beton taban
GB - Do not mount air intakes towards prevailing wind direction. Check load-bearing capacity of roof (incl. snow weight). Prevent
on-site roof frame condensation.
DE - Lufteinlässe nicht gegen die vorherrschende Windrichtung montieren. Tragfähigkeit des Daches prüfen (inkl. Schneelast).
Verhindern Sie bauseitige Dachstuhlkondensation.
IT - Non montare le prese d'aria verso la direzione prevalente del vento. Controllare la capacità portante del tetto (compreso il
peso della neve). Prevenire la condensazione del telaio del tetto in loco.
FR - Ne pas monter les prises d'air dans le sens du vent dominant. Vérifiez la capacité de charge du toit (y compris le poids de
la neige). Empêchez la condensation du cadre de la toiture sur place.
NL - Monteer de luchtinlaten niet in de richting van de heersende windrichting. Controleer de draagkracht van het dak (incl.
sneeuwgewicht). Voorkom condensatie ter plaatse van het dakframe.
PL - Nie należy montować wlotów powietrza w kierunku przeważającego wiatru. Sprawdzić nośność dachu (z uwzględnieniem
ciężaru śniegu). Zapobiegać kondensacji pary wodnej na ramie dachu w miejscu montażu.
RO - Nu montați prizele de aer în direcția vântului predominant. Verificați capacitatea portantă a acoperișului (inclusiv greutatea
zăpezii). Preveniți condensarea cadrului acoperișului la fața locului.
TR - Hava girişlerini hakim rüzgar yönüne monte etmeyin. Çatının yük taşıma kapasitesini kontrol edin (Kar ağırlığı dahil). Yerde
çatı çerçevesi yoğuşmasını önleyin.
GB - Various fixing systems are available for installation on the ceiling. The dimensioning of the ceiling anchor must be
determined on-site. Please use the suspension point provided for you on the relevant unit.
DE - Für die Montage an der Decke stehen verschiedene Befestigungssysteme zur Verfügung. Die Dimensionierung des
Deckenankers muss vor Ort ermittelt werden. Bitte verwenden Sie den vorgesehenen Aufhängepunkt am jeweiligen Gerät.
IT - Sono disponibili diversi sistemi di fissaggio per l'installazione a soffitto. Il dimensionamento dell'ancoraggio al soffitto deve
essere determinato sul posto. Si prega di utilizzare il punto di sospensione fornito sulla relativa unità.
FR - Différents systèmes de fixation sont disponibles pour l'installation au plafond. Le dimensionnement de l'ancrage au plafond
doit être déterminé sur place. Veuillez utiliser le point de suspension prévu sur l'appareil concerné.
NL - Voor montage aan het plafond zijn verschillende bevestigingssystemen beschikbaar. De dimensionering van het
plafondanker moet ter plaatse worden bepaald. Gebruik a.u.b. het ophangpunt dat op het betreffende toestel is aangebracht.
PL - Do montażu na suficie dostępne są różne systemy mocowania. Wymiary kotwy sufitowej należy określić na miejscu.
Należy użyć punktu zawieszenia znajdującego się na danym urządzeniu.
RO - Pentru instalarea pe tavan sunt disponibile diferite sisteme de fixare. Dimensionarea ancorajului pentru tavan trebuie să fie
determinată la fața locului. Vă rugăm să folosiți punctul de suspendare prevăzut pe unitatea respectivă.
TR - Tavana montaj için çeşitli sabitleme sistemleri mevcuttur. Tavan çapasının boyutlandırması yerinde belirlenmelidir. Lütfen
ilgili ünitede sağlanan süspansiyon noktasını kullanın.w
17
GB - On-site steel support
DE - Stahlträgerfundament
IT - Fondazione con travi in acciaio
FR - Fondations en poutres d'acier
NL - Fundering met stalen balken
PL - Fundering met stalen balken
RO - Fundering met stalen balken
TR - Fundering met stalen balken

20
CAIRplus with ISYteq – Installation manual
We reserve the right to make changes without prior noticeFläktGroup DC-10662-UN_Europa_CAIRplus_IN-MA_2023-11-27_RO
GB - We recommend rubber pads for level installation on the ground to insulate the unit from the foundations.
For ceiling installation we recommend the use of commercially available springbased elements.
Where there are special acoustic requirements, an acoustic engineer must be consulted.
DE - Für die ebene Aufstellung auf dem Boden empfehlen wir Gummipuffer, um das Gerät vom Untergrund zu isolieren.
Für die Deckenmontage empfehlen wir die Verwendung von handelsüblichen Federelementen.
Bei besonderen akustischen Anforderungen muss ein Akustiker hinzugezogen werden.
IT - Per l'installazione a livello del suolo raccomandiamo l'uso di cuscinetti di gomma per isolare l'unità dalle fondamenta.
Per l'installazione a soffitto raccomandiamo l'uso di elementi a molla disponibili in commercio.
In caso di requisiti acustici speciali, è necessario consultare un ingegnere acustico.
FR - Pour une installation de plain-pied sur le sol, nous recommandons l'utilisation de patins en caoutchouc pour isoler l'appareil
des fondations.
Pour une installation au plafond, nous recommandons l'utilisation d'éléments à ressort disponibles dans le commerce.
En cas d'exigences acoustiques particulières, un ingénieur acousticien doit être consulté.
NL - Voor vlakke installatie op de grond raden wij rubber pads aan om het toestel te isoleren van de funderingen.
Voor plafondmontage bevelen wij het gebruik aan van in de handel verkrijgbare verende elementen.
Bij speciale akoestische vereisten moet een akoestisch ingenieur worden geraadpleegd.
PL - Do instalacji na równym podłożu zalecamy stosowanie gumowych podkładek, aby odizolować urządzenie od fundamentów.
W przypadku montażu sufitowego zaleca się stosowanie dostępnych w handlu elementów sprężystych.
W przypadku specjalnych wymagań akustycznych należy skonsultować się z inżynierem akustykiem.
RO - Recomandăm plăcuțe de cauciuc pentru instalarea la nivel pe sol pentru a izola unitatea de fundații.
Pentru instalarea pe tavan, recomandăm utilizarea unor elemente pe bază de arc disponibile în comerț.
În cazul în care există cerințe acustice speciale, trebuie consultat un inginer acustic.
TR - Üniteyi temellerden izole etmek için zemine düz kurulum için kauçuk pedleri öneriyoruz.
Tavan montajı için ticari olarak mevcut yaylı elemanların kullanılmasını öneririz.
Özel akustik gereksinimlerin olduğu yerlerde, bir akustik mühendisine danışılmalıdır.
GB - Overhangs of more than 0.5 m on CAIR units must be
adequately supported on site.
DE - Überhänge von mehr als 0,5 m an CAIR-Einheiten müssen
bauseits ausreichend abgestützt werden.
IT - Le sporgenze superiori a 0,5 m delle unità CAIR devono essere
adeguatamente sostenute in loco.
FR - Les porte-à-faux de plus de 0,5 m sur les unités CAIR doivent
être suffisamment soutenus par le client.
NL - Overstekken van meer dan 0,5 m op CAIR-units moeten ter
plaatse adequaat worden ondersteund.
PL - Występy powyżej 0,5 m na jednostkach CAIR muszą być
odpowiednio podparte na miejscu.
RO - Supraînălțările mai mari de 0,5 m la unitățile CAIR trebuie să fie
susținute în mod adecvat la fața locului.
TR - CAIR ünitelerindeki 0,5 m'den fazla çıkıntılar sahada yeterince
desteklenmelidir.
²7

21
CAIRplus with ISYteq – Installation manual
We reserve the right to make changes without prior noticeFläktGroup DC-10662-UN_Europa_CAIRplus_IN-MA_2023-11-27_RO
GB – Docking (Mechanical and electrical)
IT – Attacco (meccanico ed elettrico)
NL – Samenbouwen (mechanisch en elektrisch)
RO – Andocare (mecanică și electrică)
DE – Blockverbindung (mechanisch und elektrisch)
FR – Assemblage (mécanique et électrique)
PL – Dokowanie (mechaniczne i elektryczne)
TR – Yerleştirme (Mekanik ve elektriksel)
18

22
CAIRplus with ISYteq – Installation manual
➌
➊ ➋
We reserve the right to make changes without prior noticeFläktGroup DC-10662-UN_Europa_CAIRplus_IN-MA_2023-11-27_RO
²8

23
CAIRplus with ISYteq – Installation manual
➎ ➏
M8 x 30
➍
GB – Pulling together with base frame
IT – Montaggio con il telaio di base
NL – Samenbouwen met basisframe
RO – Tragerea împreună cu cadrul de bază
DE – Zusammenziehen mit Grundrahmen
FR – Assemblage avec le cadre de base
PL – Łączenie z ramą podstawy
TR – Taban çerçevesi ile birlikte çekme
We reserve the right to make changes without prior noticeFläktGroup DC-10662-UN_Europa_CAIRplus_IN-MA_2023-11-27_RO
max. 100 mm
18

24
CAIRplus with ISYteq – Installation manual
eQ 005-018 eQ 023-050
EQKR (ReCooler HP)
eQ 005-018 eQ 023-050
EQKR (ReCooler HP)
➑
➐
GB - Seal pipe and cable ducts
DE - Abdichtung von Rohr- und Kabelkanälen
IT - Sigillare tubi e condotti per cavi
FR - Sceller les tuyaux et les conduits de câbles
NL - Pijp- en kabelkanaal afdichten
PL - Uszczelnianie rur i kanałów kablowych
RO - Etanșarea conductelor de țevi și cabluri
TR - Boru ve kablo kanallarını kapatın
Red Green Blue Yellow White
F-bus Modbus Analog signal
(no bus) 1 Phase
230 V 3 Phase
400 V
We reserve the right to make changes without prior noticeFläktGroup DC-10662-UN_Europa_CAIRplus_IN-MA_2023-11-27_RO
²8
GB - Align cables correctly with each other and pay attention to the color coding on
the connector.
DE - Die Kabel richtig zueinander ausrichten und auf die Farbcodierung am Stecker
achten.
IT - Allineare correttamente i cavi tra loro e prestare attenzione al codice colore della
spina.
FR - Alignez correctement les câbles les uns par rapport aux autres et faites attention
au code couleur de la fiche.
NL - Lijn de kabels correct uit en let op de kleurcode op de stekker.
PL - Wyrównaj prawidłowo kable względem siebie i zwróć uwagę na oznaczenia
kolorów na wtyczce.
RO - Aliniați corect cablurile între ele și acordați atenție codului de culori de pe fișă.
TR - Kabloları birbirleriyle doğru şekilde hizalayın ve fiş üzerindeki renk kodlamasına
dikkat edin.

25
CAIRplus with ISYteq – Installation manual
GB – Mounting the cable duct
IT – Montaggio della canalina per cavi
NL – Montage van de kabelgoot
RO – Montarea conductei pentru cabluri
DE – Montage des Kabelkanals
FR – Montage du conduit de câbles
PL – Montaż kanału kablowego
TR – Kablo kanalının montajı
We reserve the right to make changes without prior noticeFläktGroup DC-10662-UN_Europa_CAIRplus_IN-MA_2023-11-27_RO
GB
A = short cable duct
B = medium cable duct
C = long cable duct
DE
A = kurzer Kabelkanal
B = mittlerer Kabelkanal
C = langer Kabelkanal
IT
A = canalina corta
B = canalina media
C = canalina lunga
FR
A = conduit de câbles court
B = conduit de câbles moyen
C = conduit de câbles long
NL
A = korte kabelgoot
B = middelgrote kabelgoot
C = lange kabelgoot
PL
A = krótki kanał kablowy
B = średni kanał kablowy
C = długi kanał kablowy
RO
A = conductă de cablu scurtă
B = conductă de cablu medie
C = conductă de cablu lungă
TR
A = kısa kablo kanalı
B = orta kablo kanalı
C = uzun kablo kanalı
GB - Assemble the components provided. Fasten the cable duct to the profile with the drilling screw. Use the center countersunk hole for this
purpose.
DE - Die beigestellten Komponenten montieren. Mit der Bohrschraube den Kabelkanal am Profil befestigen. Dazu das mittlere Senkloch verwenden.
IT - Assemblare i componenti forniti. Fissare la canalina al profilo con la vite di foratura. A tale scopo, utilizzare il foro svasato centrale.
FR - Assemblez les composants fournis. Fixez le conduit de câbles au profilé à l'aide de la vis de perçage. Utilisez le trou central fraisé à cet effet
NL - Monteer de meegeleverde onderdelen. Bevestig de kabelgoot aan het profiel met de boorschroef. Gebruik hiervoor het middelste verzonken gat.
PL - Zmontować dostarczone elementy. Zamocować kanał kablowy na profilu za pomocą śruby wiercącej. Wykorzystać do tego celu środkowy
otwór z łbem stożkowym.
RO - Asamblați componentele furnizate. Fixați conducta de cabluri la profil cu ajutorul șurubului de găurire. Folosiți în acest scop orificiul central cu
locașul spart.
TR - Sağlanan bileşenleri birleştirin. Kablo kanalını delme vidası ile profile sabitleyin. Bunun için ortadaki havşa deliğini kullanın.
GB – Loose, provided material
IT – Materiale sciolto e fornito
NL – Los, verstrekt materiaal
RO – Material liber, furnizat
DE – Lose, beigestelltes Material
FR – Matériel en vrac, fourni
PL – Luźny, dostarczony materiał
TR – Gevşek, sağlanan malzeme
19

26
CAIRplus with ISYteq – Installation manual
GB
A = Upper part cable duct
B = Lower part cable duct
DE
A = Oberer Teil des Kabelkanals
B = Unterer Teil des Kabelkanals
IT
A = parte superiore della canalina per cavi
B = parte inferiore della canalina per cavi
FR
A = Partie supérieure du chemin de câbles
B = Partie inférieure du passage de câbles
NL
A = bovenste deel kabelkanaal
B = onderste deel kabelkanaal
PL
A = Górna część kanału kablowego
B = dolny kanał kablowy
RO
A = Partea superioară a conductei pentru cabluri
B = Partea inferioară a conductei pentru cabluri
TR
A = Üst kısım kablo kanalı
B = Alt kısım kablo kanalı
GB - Mount the cable duct cover on the upper (A) and lower (B) parts of the cable duct as shown in the figure.
DE - Den Kabelkanaldeckel, wie in der Abbildung dargestellt, auf den oberen (A) und unteren (B) Teil des Kabelkanals montieren.
IT - Montare il coperchio della canalina sulle parti superiore (A) e inferiore (B) della canalina come mostrato in figura.
FR - Montez le couvercle du conduit de câbles sur les parties supérieure (A) et inférieure (B) du conduit de câbles comme indiqué sur la figure.
NL - Monteer het kabelkanaaldeksel op het bovenste (A) en onderste (B) deel van het kabelkanaal zoals aangegeven in de figuur.
PL - Zamontować osłonę kanału kablowego na górnej (A) i dolnej (B) części kanału kablowego, jak pokazano na rysunku.
RO - Montați capacul conductei de cabluri pe părțile superioară (A) și inferioară (B) ale conductei de cabluri, așa cum se arată în figură.
TR - Kablo kanalı kapağını kablo kanalının üst (A) ve alt (B) kısımlarına şekilde gösterildiği gibi monte edin.
We reserve the right to make changes without prior noticeFläktGroup DC-10662-UN_Europa_CAIRplus_IN-MA_2023-11-27_RO
²9

27
CAIRplus with ISYteq – Installation manual
GB
A = Cable duct on the side (operating side)
B = Cable duct lateral
DE
A = Kabelkanal seitlich (Bedienseite)
B = Kabelkanal seitlich
IT
A = canalina laterale (lato operativo)
B = canalina laterale
FR
A = Gaine de câbles latérale (côté service)
B = Gaine de câbles latérale
NL
A = Kabelkanaal aan de zijkant (bedieningszijde)
B = Kabelkanaal zijdelings
PL
A = Kanał kablowy z boku (strona robocza)
B = Kanał kablowy z boku
RO
A = Conducta de cabluri pe partea laterală (partea de operare)
B = Canal de cabluri lateral
TR
A = Yan taraftaki kablo kanalı (çalışma tarafı)
B = Kablo kanalı yanal
GB - Use the drilling screw to fasten the cable duct to the profile. Use the center countersunk hole for this purpose.
DE - Mit der Bohrschraube den Kabelkanal am Profil befestigen. Dazu das mittlere Senkloch verwenden.
IT - Utilizzare la vite di foratura per fissare la canalina al profilo. A tale scopo, utilizzare il foro svasato centrale.
FR - Utilisez la vis de perçage pour fixer le conduit de câbles au profilé. Utilisez le trou central fraisé à cet effet.
NL - Gebruik de boorschroef om de kabelgoot aan het profiel te bevestigen. Gebruik hiervoor het middelste verzonken gat.
PL - Użyj śruby wiercącej do zamocowania kanału kablowego do profilu. Wykorzystaj do tego celu środkowy otwór z łbem stożkowym.
RO - Folosiți șurubul de găurire pentru a fixa conducta de cabluri la profil. Folosiți în acest scop orificiul central cu locașuri adâncite.
TR - Kablo kanalını profile sabitlemek için delme vidasını kullanın. Bunun için ortadaki havşa deliğini kullanın.
We reserve the right to make changes without prior noticeFläktGroup DC-10662-UN_Europa_CAIRplus_IN-MA_2023-11-27_RO
19

28
CAIRplus with ISYteq – Installation manual
GB – Mounting the roof attachments
IT – Montaggio degli attacchi sul tetto
NL - Montage van de dakbevestigingen
RO – Montarea dispozitivelor de fixare a acoperișului
DE – Montage der Dachaufbauten
FR – Montage des fixations de toit
PL – Montaż elementów mocujących na dachu
TR – Tavan bağlantılarının montajı
GB - Mount the roof extensions as shown in the illustration. To do this, fasten the roof elevation (B) to the frame profile (C) using the drilling screws.
Then mount the roof plate (A) on the roof extension (B).
DE - Die Dachaufbauten wie in der Abbildung dargestellt montieren. Dazu die Dacherhöhung (B) mit den Bohrschrauben am Rahmenprofil (C)
befestigen. Anschließend die Dachblech (A) auf die Dacherhöhung (B) montieren.
IT - Montare le estensioni del tetto come indicato nella figura. A tal fine, fissare l'estensione del tetto (B) al profilo del telaio (C) con le viti di foratura.
Montare quindi la lamiera del tetto (A) sul prolungamento del tetto (B).
FR - Monter les rehausses de toit comme indiqué sur l'illustration. Pour ce faire, fixer la rehausse de toit (B) au profilé de cadre (C) à l'aide des vis
autoforeuses. Monter ensuite la tôle de toit (A) sur la rehausse de toit (B).
NL - Monteer de dakuitbreidingen zoals aangegeven in de illustratie. Bevestig daartoe de dakverlenging (B) met de boorschroeven aan het
kozijnprofiel (C). Monteer vervolgens de dakplaat (A) op het dakverlengstuk (B).
PL - Zamontować przedłużenia dachu w sposób pokazany na rysunku. W tym celu przymocować przedłużenie dachu (B) do profilu ramy (C) za
pomocą śrub wierconych. Następnie zamontować blachę dachową (A) na przedłużeniu dachu (B).
RO - Montați extensiile de acoperiș așa cum se arată în ilustrație. În acest scop, fixați prelungirea acoperișului (B) pe profilul cadrului (C) cu ajutorul
șuruburilor de găurire. Apoi montați tabla de acoperiș (A) pe prelungirea acoperișului (B).
TR - Tavan uzantılarını şekilde gösterildiği gibi monte edin. Bunun için çatı uzantısını (B) delme vidaları ile çerçeve profiline (C) sabitleyin. Ardından
çatı sacını (A) çatı uzantısına (B) monte edin.
GB
A = roof plate, B = roof elevation,
C = frame profile
DE
A = Dachblech, B = Dacherhöhung,
C = Rahmenprofil
IT
A = Piastra del tetto, B = Prospetto del tetto,
C = profilo del telaio
FR
A = tôle de toit, B = surélévation de toit,
C = profilé de cadr
NL
A = dakplaat, B = dakverhoging,
C = frame profie
PL
A = Płyta dachowa, B = Elewacja dachu,
C = profil ramy
RO
A = placa acoperișului, B = elevația
acoperișului, C = profilul cadrului
TR
A = Çatı plakası, B = Çatı yüksekliği,
C = çerçeve profili
We reserve the right to make changes without prior noticeFläktGroup DC-10662-UN_Europa_CAIRplus_IN-MA_2023-11-27_RO
²9

29
CAIRplus with ISYteq – Installation manual
We reserve the right to make changes without prior noticeFläktGroup DC-10662-UN_Europa_CAIRplus_IN-MA_2023-11-27_RO
GB – Mounting of the rain roof
IT – Montaggio del tettuccio antipioggia
NL – Montage van het regendak
RO – Montarea acoperișului de ploaie
DE – Montage des Regendachs
FR – Montage de la toiture
PL – Montaż dachu przeciwdeszczowego
TR – Yağmur çatısının montajı
➊ ➋ GB - Insert sealing washers below all screws.
DE - Dichtungsscheiben unter alle Schrauben legen.
IT - Inserire le rondelle di tenuta sotto tutte le viti.
FR - Insérez des rondelles d'étanchéité sous toutes les vis.
NL - Plaats afdichtingsringen onder alle schroeven.
PL - Pod wszystkie śruby włóż podkładki uszczelniające.
RO - Introduceți șaibe de etanșare sub toate șuruburile.
TR - Sızdırmazlık rondelalarını tüm vidaların altına
yerleştirin.
GB - Remove snow/ice
DE - Schnee/Eis entfernen
IT - Rimuovere neve/ghiaccio
FR - Enlever la neige/glace
NL - Sneeuw/ijs verwijderen
PL - Usuwanie śniegu/oblodzenia
RO - Îndepărtați zăpada/gheața
TR - Kar/buz çıkarın
GB - Max. Zone 2
DE - Max. Zone 2
IT - Max. Zona 2
FR - Max. Zone 2
NL - Max. Zone 2
PL - Max. Zone 2
RO - Max. Zona 2
TR - Max. Bölge 2
110

30
CAIRplus with ISYteq – Installation manual
We reserve the right to make changes without prior noticeFläktGroup DC-10662-UN_Europa_CAIRplus_IN-MA_2023-11-27_RO
➌
➍
GB - Attach the separately supplied block joint sheet metal.
DE - Befestigen Sie das separat mitgelieferte Teilungsstoßblech.
IT - Fissare la lamiera di giunzione del blocco fornita
separatamente.
FR - Fixez la tôle de joint de bloc fournie séparément.
NL - Bevestig het apart geleverde plaatwerk van de blokverbinding.
PL - Zamocować dostarczoną oddzielnie blachę przegubu
blokowego.
RO - Atașați tabla de îmbinare a blocurilor furnizată separat.
TR - Ayrı olarak temin edilen blok bağlantı sacını takın.
GB - Apply sealing compound (1), mount the sliding strip (2) and
bend the tab (3).
DE - Dichtmasse auftragen (1), Schiebeleiste montieren (2) und die
Lasche (3) umbiegen.
IT - Applicare il mastice (1), montare il nastro scorrevole (2) e
piegare la linguetta (3).
FR - Appliquer le mastic d'étanchéité (1), monter la bande
coulissante (2) et plier la languette (3).
NL - Breng afdichtmiddel (1) aan, monteer de glijstrip (2) en buig het
lipje (3).
PL - Nałożyć masę uszczelniającą (1), zamontować listwę
ślizgową (2) i odgiąć wypustkę (3).
RO - Aplicați pasta de etanșare (1), montați banda de alunecare (2)
și îndoiți fila (3).
TR - Sızdırmazlık macunu (1) uygulayın, kayar şeridi (2) monte edin
ve tırnağı (3) bükün.
²10

31
CAIRplus with ISYteq – Installation manual
GB – Counter-hold when connecting. Avoid mechanical tension on the fitting.
DE – Halten Sie beim Anschließen gegen. Vermeiden Sie mechanische Spannungen an der Verbindung.
IT – Tenere contro quando si collega. Evitare le tensioni meccaniche sulla connessione.
FR – Maintenez le contrepoids lors de la connexion. Évitez toute tension mécanique sur le raccord.
NL – Tegenhouden bij het aansluiten. Vermijd mechanische spanning op de aansluiting.
We reserve the right to make changes without prior noticeFläktGroup DC-10662-UN_Europa_CAIRplus_IN-MA_2023-11-27_RO
GB – Connecting of coils
IT – Collegamento delle batterie
NL – Aansluiten van batterijen
RO – Conectarea bobinelor
DE – Anschluss der Register
FR – Raccordement des batteries
PL – Podłączanie cewek
TR – Bobinlerin bağlanması
GB - Any work on the refrigeration circuit may only be performed by certified personnel in accordance with the current version of
Regulation [EU] No 517/2014 and Regulation [EU] No 2015/2067.
DE - Alle Arbeiten am Kältekreislauf dürfen nur von zertifiziertem Personal gemäß der aktuellen Fassung der Verordnung [EU] Nr.
517/2014 und der Verordnung [EU] Nr. 2015/2067 durchgeführt werden.
IT - Qualsiasi lavoro sul circuito di refrigerazione può essere eseguito solo da personale certificato secondo la versione attuale
del regolamento [UE] n. 517/2014 e del regolamento [UE] n. 2015/2067.
FR - Toute intervention sur le circuit frigorifique ne peut être effectuée que par du personnel certifié, conformément à la version
actuelle du règlement [UE] n° 517/2014 et du règlement [UE] n° 2015/2067.
NL - Werkzaamheden aan het koelcircuit mogen alleen worden uitgevoerd door gecertificeerd personeel in overeenstemming
met de huidige versie van Verordening [EU] nr. 517/2014 en Verordening [EU] nr. 2015/2067.
PL - Wszelkie prace przy obiegu chłodniczym mogą być wykonywane wyłącznie przez certyfikowany personel zgodnie z
aktualną wersją rozporządzenia [UE] nr 517/2014 i rozporządzenia [UE] nr 2015/2067.
RO - Orice lucrare asupra circuitului de refrigerare poate fi efectuată numai de personal certificat în conformitate cu versiunea
actuală a Regulamentului [UE] nr. 517/2014 și a Regulamentului [UE] nr. 2015/2067.
TR - Soğutma devresi üzerindeki her türlü çalışma, yalnızca 517/2014 Sayılı Yönetmelik ve Yönetmelik [AB] Sayılı 2015/2067
sayılı Yönetmelik uyarınca sertifikalı personel tarafından gerçekleştirilebilir.
111

32
CAIRplus with ISYteq – Installation manual
We reserve the right to make changes without prior noticeFläktGroup DC-10662-UN_Europa_CAIRplus_IN-MA_2023-11-27_RO
GB - MultiFlow (see separate operation Manual)
Install the on-site hydraulics according the diagram when this is not supplied with the unit. Mount separated heate exchangers
in parallel and insulate pipework and fittings with non-permeable insulation.
DE - MultiFlow (siehe separate Betriebsanleitung)
Installieren Sie die bauseitige Hydraulik gemäß dem Schema, wenn diese nicht mit dem Gerät geliefert wurde. Getrennte
Wärmetauscher parallel montieren und Rohrleitungen und Armaturen mit undurchlässiger Isolierung isolieren.
IT - MultiFlow (vedere il manuale operativo separato)
Installare l'impianto idraulico in loco secondo lo schema, quando questo non è fornito con l'unità. Montare gli scambiatori di
calore separati in parallelo e isolare le tubazioni e i raccordi con un isolamento non permeabile.
FR - MultiFlow (voir le manuel d'utilisation séparé)
Installez le système hydraulique sur site conformément au schéma si celui-ci n'est pas fourni avec l'unité. Montez les
échangeurs de chaleur séparés en parallèle et isolez la tuyauterie et les raccords avec une isolation non perméable.
NL - MultiFlow (zie aparte bedieningshandleiding)
Installeer het hydraulisch systeem ter plaatse volgens het schema indien dit niet met de unit wordt meegeleverd. Monteer
gescheiden warmtewisselaars parallel en isoleer leidingwerk en appendages met niet-doorlatende isolatie.
PL - MultiFlow (patrz oddzielna instrukcja obsługi)
Zainstalować układ hydrauliczny na miejscu zgodnie ze schematem, jeśli nie jest on dostarczony z urządzeniem. Zamontować
oddzielne wymienniki ciepła w układzie równoległym i zaizolować rurociągi i armaturę izolacją nieprzepuszczalną.
RO - MultiFlow (a se vedea manualul de utilizare separat)
Instalați sistemul hidraulic la fața locului conform diagramei, dacă acesta nu este furnizat împreună cu unitatea. Montați
schimbătoarele de căldură separate în paralel și izolați conductele și fitingurile cu izolație nepermeabilă.
TR - MultiFlow (bkz. ayrı kullanım kılavuzu)
Bu üniteyle birlikte verilmediğinde sahada hidroliği şemaya göre takın. Ayrı ısı eşanjörlerini paralel olarak monte edin ve geçirgen
olmayan yalıtım ile boru ve bağlantı parçalarını izole edin.
GB - Mount automatic venting device suitable for Glycol on heat exchangers with external outlets together with shut off valve.
DE - Montieren Sie eine automatische Entlüftungsvorrichtung, die für Glykol geeignet ist, an Wärmetauschern mit externen
Abgängen zusammen mit einem Absperrventil.
IT - Montare un dispositivo di sfiato automatico adatto a Glycol su scambiatori di calore con uscite esterne insieme a una
valvola di chiusura.
FR - Monter un dispositif de ventilation automatique adapté au Glycol sur les échangeurs de chaleur avec sorties externes, ainsi
qu'une vanne d'arrêt.
NL - Monteer een automatische ontluchter geschikt voor Glycol op warmtewisselaars met externe uitlaten, samen met een
afsluitklep.
PL - Zamontować automatyczne urządzenie odpowietrzające odpowiednie dla glikolu na wymiennikach ciepła z wylotami
zewnętrznymi wraz z zaworem odcinającym.
RO - Montați un dispozitiv automat de aerisire adecvat pentru glicol pe schimbătoarele de căldură cu ieșiri externe, împreună cu
o supapă de închidere.
TR - Kapama valfi ile birlikte harici çıkışlara sahip ısı eşanjörlerinde Glikol için uygun montaj otomatik havalandırma cihazı.
²11

33
CAIRplus with ISYteq – Installation manual
We reserve the right to make changes without prior noticeFläktGroup DC-10662-UN_Europa_CAIRplus_IN-MA_2023-11-27_RO
GB - Hydraulics diagram for ECOflow, example unsplit heat
exchanger.
DE - Hydraulikschema für ECOflow, Beispiel ungeteilter
Wärmetauscher.
IT - Schema idraulico per ECOflow, esempio di scambiatore di
calore non splittato.
FR - Schéma hydraulique pour ECOflow, exemple d'échangeur de
chaleur non fractionné.
NL - Hydraulisch schema voor ECOflow, voorbeeld ongesplitste
warmtewisselaar.
PL - Schemat hydrauliczny dla ECOflow, przykładowy nie dzielony
wymiennik ciepła.
RO - Diagramă hidraulică pentru ECOflow, exemplu de schimbător de
căldură neîmpărțit.
TR - ECOflow için hidrolik diyagramı, örnek bölünmemiş ısı eşanjörü.
DE - Hydraulikschema ECOFLOWplus, Beispiel ungeteilter
Wärmetauscher.
FR - Schéma hydraulique pour ECOFLOWplus, exemple d'échangeur de
chaleur non fractionné.
PL - Schemat hydrauliczny dla ECOFLOWplus, przykładowy nie dzielony
wymiennik ciepła.
TR - ECOFLOWplus için hidrolik diyagramı, örnek bölünmemiş ısı
eşanjörü.
GB - Hydraulics diagram for ECOFLOWplus, example unsplit heat
exchanger.
IT - Schema idraulico per ECOFLOWplus, esempio di scambiatore di
calore non splittato.
NL - Hydraulisch schema voor ECOFLOWplus, voorbeeld ongesplitste
warmtewisselaar.
RO - Diagramă hidraulică pentru ECOFLOWplus, exemplu de
schimbător de căldură neîmpărțit.
111

34
CAIRplus with ISYteq – Installation manual
GB - Pressure Gauge
DE - Manometer
IT - Misuratore di pressione
FR - Manomètre de pression
NL - Drukmeter
PL - Manometr ciśnieniowy
RO - Manometru de presiune
TR - Basınç göstergesi
GB - Saftey valve
DE - Sicherheitsventil
IT - Valvola di sicurezza
FR - Soupape de sécurité
NL - Veiligheidsklep
PL - Zawór bezpieczeństwa
RO - Supapă de siguranță
TR - Saftey valfi
GB - Expansion vessel
DE - Ausdehnungsgefäß
IT - Vaso d'espansione
FR - Vase d'expansion
NL - Expansievat
PL - Naczynie wzbiorcze
RO - Vas de expansiun
TR - Genleşme kabı
GB - Shut-off valves for rapid venting devices
DE - Absperrventile für Schnellentlüftungsgeräte
IT - Valvole di chiusura per dispositivi di sfiato rapido
FR - Valve d'arrêt pour les dispositifs de ventilation
rapide
NL - Afsluitkleppen voor snelontluchters
PL - Zawory odcinające do urządzeń szybkiego
odpowietrzania
RO - Supape de închidere pentru dispozitive de aerisire
rapidă
TR - Hızlı havalandırma cihazları için kapatma vanaları
GB - Drain / Charge Valve
DE - Ablass / Füllventil
IT - Valvola di scarico/carica
FR - Valve de vidange / de charge
NL - Aftap-/ontlaadklep
PL - Zawór spustowy/doładowujący
RO - Valvă de golire / încărcare
TR - Boşaltma/Şarj Valfi
GB - Automatic rapid venting device
DE - Automatische Schnellentlüftungsvorrichtung
IT - VDispositivo automatico di sfiato rapido
FR - Dispositif automatique d'aération rapide
NL - Automatische snelle ontluchter
PL - Automatyczne urządzenie do szybkiego
odpowietrzania
RO - Dispozitiv automat de aerisire rapidă
TR - Otomatik hızlı havalandırma cihazı
GB - Motorised 2-way or 3-way valve (frost protection)
DE - Motorisiertes 2-Wege- oder 3-Wege-Ventil
(Frostschutz)
IT - Valvola motorizzata a 2 o 3 vie (protezione
antigelo)
FR - Vanne motorisée à 2 ou 3 voies (protection contre
le gel)
NL - Veiligheidsklep (A.u.b. correct dimensioneren!)
PL - Zawór dwudrożny lub trójdrożny z napędem
silnikowym (ochrona przed zamarzaniem)
RO - Supapă motorizată cu 2 sau 3 căi (protecție la
îngheț)
TR - Motorlu 2 yönlü veya 3 yönlü valf (donma
koruması)
We reserve the right to make changes without prior noticeFläktGroup DC-10662-UN_Europa_CAIRplus_IN-MA_2023-11-27_RO
GB - Drain Valve
DE - Ablassventil
IT - Valvola di scarico
FR - Valve de vidange
NL - Afvoerklep
PL - Zawór spustowy
RO - Valvă de golire
TR - Boşaltma Valfi
²11

35
CAIRplus with ISYteq – Installation manual
GB - A: CAIRplus, B: Seal, C: Hygiene duct connection frame, D: Duct
DE - A: CAIRplus, B: Dichtung, C: Hygiene Kanal Anschluss Rahmen, D: Kanal
IT - A: CAIRplus, B: Guarnizione, C: Telaio di collegamento del condotto igienico, D: Condotto
FR - A : CAIRplus, B : Joint, C : Cadre de raccordement du conduit d'hygiène, D : Conduit
NL - A: CAIRplus, B: afdichting, C: Aansluitframe voor hygiënekanaal, D: kanaal
PL - A: CAIRplus, B: Uszczelka, C: Ramka przyłączeniowa kanału higienicznego, D: Kanał
RO - A: CAIRplus, B: Etanșare, C: Cadru de conectare a conductei de igienă, D: Conducta
TR - A: CAIRplus, B: Conta, C: Hijyen kanalı bağlantı çerçevesi, D: Kanal
We reserve the right to make changes without prior noticeFläktGroup DC-10662-UN_Europa_CAIRplus_IN-MA_2023-11-27_RO
GB – Connection to ducts
IT – Collegamento ai condotti
NL – Aansluiting op de kanalen
RO – Racordarea la conducte
DE – Kanalanschluss
FR – Raccordement aux gaines
PL – Połączenie z kanałami
TR – Kanallara bağlantı
112

36
CAIRplus with ISYteq – Installation manual
We reserve the right to make changes without prior noticeFläktGroup DC-10662-UN_Europa_CAIRplus_IN-MA_2023-11-27_RO
GB – Installation of loose delivered components
IT – Installazione dei componenti forniti sfusi
NL – Installatie van los geleverde componenten
RO – Instalarea componentelor livrate în vrac
DE – Einbau von lose gelieferten Komponenten
FR – Installation des composants livrés en vrac
PL – Montaż dostarczonych luzem komponentów
TR – Gevşek teslim edilen bileşenlerin montajı
GB – Connecting ISYteq touch 7.1
IT – Collegamento di ISYteq touch 7.1
NL – Aansluiten ISYteq touch 7.1
RO – Conectarea ISYteq touch 7.1
DE – Anschließen der Regelung ISYteq touch 7.1
FR – Connexion de ISYteq touch 7.1
PL – Podłączanie ISYteq touch 7.1
TR – ISYteq touch 7.1'i bağlama
GB – Control panel ISYteq touch 2.1 DE – Bedienfeld ISYteq touch 2.1 IT – Pannello di controllo ISYteq touch 2.1
FR – Panneau de commande ISYteq touch 2.1 NL – Bedieningspaneel ISYteq touch 2.1 PL – Panel sterowania ISYteq touch 2.1
RO – Panou de control ISYteq touch 2.1 TR – Kontrol paneli ISYteq touch 2.1
²13

37
CAIRplus with ISYteq – Installation manual
GB - Outdoor temperature sensor (fasade sensor) DE - Außentemperaturfühler (Fassadenfühler)
IT - Sensore temperatura esterna (facciata) FR - Sonde de température extérieure (sonde de façade)
NL - Buitentemperatuursensor (gevelsensor) PL - Czujnik temperatury zewnętrznej (czujnik fasady)
RO - Senzor de temperatură exterioară (senzor fasade) TR - Dış mekan sıcaklık sensörü (fasade sensörü)
We reserve the right to make changes without prior noticeFläktGroup DC-10662-UN_Europa_CAIRplus_IN-MA_2023-11-27_RO
>2,5m
GB – Room temperature sensor DE – Raumtemperaturfühler IT – Sensore temperatura ambiente
FR – Sonde de température ambiante NL – Kamertemperatuursensor PL – Czujnik temperatury pomieszczenia
RO – Senzor de temperatură a camerei TR – Oda sıcaklık sensörü
113

38
CAIRplus with ISYteq – Installation manual
GB - Freeze protection (immersion and thermostat sensor) DE - Frostschutzsensor (Tauchfühler)
IT - Sensore di protezione antigelo (sensore a immersione) FR - Sonde de protection antigel (sonde d'immersion)
NL - Vorstbeveiligingssensor (dompelsensor) PL - Ochrona przed zamarzaniem (czujnik zanurzeniowy i termostat)
RO - Protecție la îngheț (imersie și senzor de termostat) TR - Donma koruması (daldırma ve termostat sensörü)
We reserve the right to make changes without prior noticeFläktGroup DC-10662-UN_Europa_CAIRplus_IN-MA_2023-11-27_RO
SW24
PTFE
➊ ➋
²13
GB – Change over (heating/cooling) sensor (immersion) DE – Umschaltsensor (Heizung/Kühlung) (Tauchfühler)
IT – Sensore di commutazione (riscaldamento/raffreddamento)
(sensore a immersione)
FR – Sonde change-over (chauffage/refroidissement) (sonde d'immersion)
PL – Czujnik zmiany (ogrzewania/chłodzenia) (zanurzeniowy) NL – Change over (verwarmen/koelen) sensor (dompelsensor)
TR – Değiştirme (ısıtma/soğutma) sensörü (daldırma) RO – Senzor de comutare (încălzire/răcire) (imersie)

39
CAIRplus with ISYteq – Installation manual
A
B
GB - Duct pressure sensor DE - Kanaldrucksensor IT - Sensore di pressione del condotto
FR - Capteur de pression de gaine NL - Kanaaldruksensor PL - Czujnik ciśnienia w kanale
RO - Senzor de presiune în conductă TR - Kanal basınç sensörü
➊ ➋ ➌
➍ ➎
GB - Please refer to the circuit diagram for the
electrical connections for CAIRplus.
DE - Die elektrischen Anschlüsse für
CAIRplus bitte dem Schaltplan entnehmen.
IT - Per i collegamenti elettrici di CAIRplus,
consultare lo schema elettrico.
FR - Veuillez vous référer au schéma électrique
pour les connexions électriques du CAIRplus.
NL - Zie het schakelschema voor de
elektrische aansluitingen voor CAIRplus.
PL - Połączenia elektryczne dla CAIRplus
znajdują się na schemacie elektrycznym.
RO - Vă rugăm să consultați diagrama de circuit
pentru conexiunile electrice pentru CAIRplus.
TR - Elektrik bağlantıları için CAIRplus kablo
bağlantı şemasında bulunabilir.
GB –
*1)
Pressure measuring nipple is not included in the scope of delivery.
DE –
*1)
Der Druckmessnippel ist nicht im Lieferumfang enthalten.
IT –
*1)
Il nipplo di misurazione della pressione non è incluso nella fornitura.
FR –
*1)
L'embout de mesure de la pression n'est pas inclus dans la livraison.
NL –
*1)
Drukmeetnippel wordt niet meegeleverd.
PL –
*1)
Nypel do pomiaru ciśnienia nie wchodzi w zakres dostawy.
RO –
*1)
Niplul de măsurare a presiunii nu este inclus în pachetul de livrare.
TR –
*1)
Basınç ölçüm nipeli teslimat kapsamına dahil değildir.
We reserve the right to make changes without prior noticeFläktGroup DC-10662-UN_Europa_CAIRplus_IN-MA_2023-11-27_RO
113

40
CAIRplus with ISYteq – Installation manual
GB – Water trap DE – Siphon IT – Sifone
FR – Siphon NL – Sifon PL – Syfon
RO – Capcană de apă TR – Su tuzağı
> PATM
GB - Trap needed for each section with condensate drainage or overflow pipe. Discharge water from siphon into sewer system only. Note
additional documentation of the siphon!
DE - Siphon für jeden Abschnitt mit Kondensatabfluss oder Überlaufrohr erforderlich. Das Wasser aus dem Siphon darf nur in die Kanalisation
abgeleitet werden. Zusätzliche Dokumentation des Siphon beachten!
IT - Sifone richiesto per ogni sezione con scarico della condensa o tubo di troppo pieno. Scaricare l'acqua dal sifone solo nella rete fognaria.
Osservare la documentazione aggiuntiva del sifone!
FR - Un siphon est nécessaire pour chaque section équipée d'un tuyau d'évacuation ou de débordement des condensats. Ne rejeter l'eau du
siphon que dans les égouts. Notez la documentation supplémentaire du siphon!
NL - Sifon nodig voor elke sectie met condensafvoer of overloopleiding. Loos het water van de sifon alleen in de riolering. Let op extra
documentatie van de hevel!
PL - Syfon potrzebny dla każdej sekcji z przewodem odprowadzania kondensatu lub przewodem przelewowym. Wodę z syfonu należy
odprowadzać wyłącznie do kanalizacji. Uwaga dodatkowa dokumentacja syfonu!
RO - Este nevoie de un sifon pentru fiecare secțiune cu scurgere a condensului sau țeavă de revărsare. Evacuați apa din sifon numai în sistemul
de canalizare. Rețineți documentația suplimentară a sifonului!
TR - Kondens drenajı veya taşma borusu ile her bölüm için gerekli tuzak. Suyu sifondan sadece kanalizasyon sistemine boşaltın. Sifonla ilgili ek
belgelere dikkat edin!
,
1,5 H
0
< PATM
GB – Observe additional documentation of the siphon.
DE – Zusätzliche Dokumentation des Siphon beachten.
IT – Osservare la documentazione supplementare del sifone.
FR – Observez la documentation supplémentaire du siphon.
NL – Let op aanvullende documentatie van de hevel.
PL – Przestrzegać dodatkowej dokumentacji syfonu.
RO – Respectați documentația suplimentară a sifonului.
TR – Sifonun ek dokümantasyonunu gözlemleyin.
We reserve the right to make changes without prior noticeFläktGroup DC-10662-UN_Europa_CAIRplus_IN-MA_2023-11-27_RO
²13

41
CAIRplus with ISYteq – Installation manual
PICV-Modbus Heating/Cooling/Combi
24 V X16 : 16
0 V X16 : 7
A+ X4:RS485-2 10(A2)
B- X4:RS485-2 11(B2)
A
B
AB
GB - Valves, actuators and pumps, sensors DE - Ventile, Stellantriebe und Pumpen, Sensoren
IT - Valvole, attuatori e pompe, sensori FR - Vannes, actionneurs et pompes, détecteurs
NL - Ventielen, servomotoren en pompen, sensoren PL - Zawory, siłowniki i pompy, czujniki
RO - Supape, actuatoare și pompe, senzori TR - Vanalar, aktüatörler ve pompalar, sensörler
3-way valve Cooling/Combi
N1 X20 : 8
UB X20 : 4
YX2 : 14
3-way valve Heating
N1 X16 : 7
UB X16 : 16
YX2 : 13
We reserve the right to make changes without prior noticeFläktGroup DC-10662-UN_Europa_CAIRplus_IN-MA_2023-11-27_RO
113

42
CAIRplus with ISYteq – Installation manual
A
GB – High efficiency pump DE – Hocheffizienzpumpe IT – Pompa ad alta efficienza
FR – Pompe à haute efficacité NL – Hoogrendementspomp PL – Pompa o wysokiej wydajności
RO – Pompă de înaltă eficiență TR – Yüksek verimli pompa
B
A B
L1
N
PE
SSM X2: 2
SSM X2: 10
A B
L1
N
PE
SSM X2: 1
SSM X2: 9
GB – A: Pump, B: Heating
DE – A: Pumpe, B: Heizung
IT – A: Pompa, B: Riscaldamento
FR – A : Pompe, B : Chauffage
NL – A: Pomp, B: Verwarming
PL – A: Pompa, B: Ogrzewanie
RO – A: Pompă, B: Încălzire
TR – A: Pompa, B: ısıtma sistemi
A B
L1
N
PE
SSM X1: 20
SSM X1: 10
GB – A: Pump, B: Preheater
DE – A: Pumpe, B: Vorwärmer
IT – A: Pompa, B: Preriscaldatore
FR – A : Pompe, B : Préchauffeur
NL – A: Pomp, B: Voorverwarmer
PL – A: Pompa, B: Nagrzewnica wstępna
RO – A: Pompă, B: Preîncălzitor
TR – A: Pompa, B: Ön ısıtıcı
A B
L1
N
PE
SSM X17: 20
SSM X17: 10
GB – A: Pump, B: Re-Heater
DE – A: Pumpe, B: Nachheizen
IT – A: Pompa, B: Riscaldatore
FR – A : Pompe, B : Réchauffeur
NL – A: Pomp, B: Verwarmer
PL – A: Pompa, B: Ponowne nagrzewanie
RO – A: Pompă, B: Reîncălzire
TR – A: Pompa, B: Yeniden Isıtıcı
We reserve the right to make changes without prior noticeFläktGroup DC-10662-UN_Europa_CAIRplus_IN-MA_2023-11-27_RO
GB – A: Pump, B: Cooling/Combi
DE – A: Pumpe, B: Kühlung/Kombi
IT – A: Pompa, B: Raffreddamento/Combi
FR – A : Pompe, B : Refroidissement/Combi
NL – A: Pomp, B: Koeling/Combi
PL – A: Pompa, B: Chłodzenie/Combi
RO – A: Pompă, B: Răcire/Combi
TR – A: Pompa, B: Soğutma/Kombi
²13

43
CAIRplus with ISYteq – Installation manual
We reserve the right to make changes without prior noticeFläktGroup DC-10662-UN_Europa_CAIRplus_IN-MA_2023-11-27_RO
GB - Supply air temperature sensor and humidity sensor
IT - Sensore temperatura aria di mandata e sensore di umidità
NL - Sensor toevoerlucht-temperatuur en vochtigheidssensor
RO - Senzor de temperatură și umiditate a aerului de alimentare
DE - Zulufttemperaturfühler und Feuchtigkeitsfühler
FR - Capteur de température d’air soufflé et capteur d’humidité
PL - Czujnik temperatury powietrza nawiewanego i czujnik wilgotności
TR - Besleme hava sıcaklık sensörü ve nem sensörü
113

44
CAIRplus with ISYteq – Installation manual
GB - CO2/VOC sensor (Room) DE - CO
2
/VOC Fühler (Raum) IT - Sensore CO
2
/VOC (ambiente)
FR - Sonde CO2/VOC (pièce) NL - CO
2
/VOC-sensor (kamer) PL - Czujnik CO2/VOC (pomieszczenie)
RO - Senzor CO2/VOC (cameră) TR - CO2/VOC sensörü (Oda)
GB - Timer DE - Timer IT - Timer
FR - Minuterie NL - Timer PL - Programator czasowy
RO - Cronometru TR - Süre ölçer
GB - Push button DE - Drucktaster IT - Pulsante
FR - Bouton poussoir NL - Drukknop PL - Przycisk
RO - Buton de apăsare TR - Basma düğmesi
We reserve the right to make changes without prior noticeFläktGroup DC-10662-UN_Europa_CAIRplus_IN-MA_2023-11-27_RO
²13

45
CAIRplus with ISYteq – Installation manual
1.8-3.6 m
A B C D E F
ON 0 sec. 10 sec. 30 sec 1 min. 5 min. 10 min.
OFF 10 sec. 1 min. 5 min. 10 min. 20 min. 30 min.
2.4 m
2.5 m8 m 15 m
110˚
OR
GB - Presence detector DE - Anwesenheitssensor IT - Rilevatore di presenza
FR - Détecteur de présence NL - Bewegingsmelder PL - Czujnik obecności
RO - Detector de prezență TR - Varlık dedektörü
GB - ON: Delay before activating; OFF: Operating time after detection
DE - ON: Verzögerung vor der Aktivierung; OFF: Betriebszeit nach Erkennung
IT - ON: ritardo prima dell'attivazione; OFF: tempo di funzionamento dopo il rilevamento
FR - ON : Délai avant activation ; OFF : Temps de fonctionnement après détection
NL - ON: Vertraging voor activering; OFF: Werkingstijd na detectie
PL - WŁĄCZ: opóźnienie przed aktywacją; WYŁĄCZ: czas działania po wykryciu
RO - ON: Întârziere înainte de activare; OFF: Timp de funcționare după detectare
TR - AÇIK: Etkinleştirmeden önce gecikme; KAPALI: Algılandıktan sonra çalışma süresi
A
B
C
D
E
F
ON
A
B
C
D
E
F
OFF
We reserve the right to make changes without prior noticeFläktGroup DC-10662-UN_Europa_CAIRplus_IN-MA_2023-11-27_RO
113

46
CAIRplus with ISYteq – Installation manual
GB - Electrical heater DE - Elektrisches Heizregister IT - Batteria elettrica
FR - Batterie électrique de chauffage NL - Elektrische verwarmingsbatterij PL - Nagrzewnica elektryczna
RO - Încălzitor electric TR - Elektrikli ısıtıcı
²13
We reserve the right to make changes without prior noticeFläktGroup DC-10662-UN_Europa_CAIRplus_IN-MA_2023-11-27_RO
GB - Please refer to the device-specific documentation.
DE - Bitte beachten Sie die gerätespezifische Dokumentation.
IT - Consultare la documentazione specifica del dispositivo.
FR - Veuillez vous référer à la documentation spécifique à l'appareil.
NL - Raadpleeg de apparaatspecifieke documentatie.
PL - Należy zapoznać się z dokumentacją specyficzną dla danego urządzenia.
RO - Vă rugăm să consultați documentația specifică aparatului.
TR - Lütfen cihaza özgü belgelere bakın.

47
CAIRplus with ISYteq – Installation manual
GB - GSM antenna DE - GSM-Antenne IT - Antenna GSM
FR - Antenne GSM NL - GSM-antenne PL - Antena GSM
RO - Antena GSM TR - GSM anten
113
We reserve the right to make changes without prior noticeFläktGroup DC-10662-UN_Europa_CAIRplus_IN-MA_2023-11-27_RO

48
CAIRplus with ISYteq – Installation manual
²14
We reserve the right to make changes without prior noticeFläktGroup DC-10662-UN_Europa_CAIRplus_IN-MA_2023-11-27_RO
eQ 005-018 eQ 023-050
EQKR (ReCooler HP)
eQ 005-018 eQ 023-050
EQKR (ReCooler HP)
M12-power 3-phase
1Brown
2Black
3Grey
PE Green/yellow
M12- power 1-phase
1Brown
2Green/yellow
3Blue
M12- signal
1Brown
2White
3Blue
4Black
5Grey
1
3
2
3
2
1
Plug Socket
1
3
2
3
2 1
Plug Socket
5
4
4
5
PE
2
1
33
1
2
PE
Plug Socket
Red Green Blue Yellow White
F-bus Modbus Analog
signal
(no bus)
1 Phase
230 V 3 Phase
400 V
GB – Connecting of incoming supply
IT – Collegamento dell'alimentazione
NL – Aansluiting van de voeding
RO – Conectarea alimentării de intrare
DE – Stromzuleitung anschließen
FR – Raccordement de l’alimentation électrique
PL – Podłączanie zasilania wejściowego
TR – Gelen arzın bağlanması
GB – Electrical connection DE – Elektrische Anschlüsse IT – Collegamenti elettrici
FR – Raccordements électriques NL – Elektrische aansluitingen PL – Electrical connection
RO – Conexiune electrică TR – Elektriksel bağlantı
GB - Align cables correctly with each other and pay attention to the
color coding on the connector.
DE - Richten Sie die Kabel richtig zueinander aus und achten Sie auf
die Farbcodierung am Stecker.
IT - Allineare correttamente i cavi tra loro e prestare attenzione al
codice colore del connettore.
FR - Alignez correctement les câbles entre eux et faites attention au
code couleur sur le connecteur.
NL - Lijn de kabels correct uit en let op de kleurcode op de connector.
PL - Wyrównaj prawidłowo kable względem siebie i zwróć uwagę na
oznaczenia kolorów na złączu.
RO - Aliniați corect cablurile între ele și acordați atenție codului de
culori de pe conector.
TR - Kabloları birbirleriyle doğru şekilde hizalayın ve konektör
üzerindeki renk kodlamasına dikkat edin.

49
CAIRplus with ISYteq – Installation manual
114
We reserve the right to make changes without prior noticeFläktGroup DC-10662-UN_Europa_CAIRplus_IN-MA_2023-11-27_RO
GB - Fan data DE - Ventilatordaten IT - Dati ventilatore
FR - Caractéristiques ventilateur NL - Ventilatorgegevens PL - Dane wentylatora
RO - Date despre ventilator TR - Fan verileri
GB - The maximum cross-section and the external fuse can be found in the circuit diagram.
DE - Den maximalen Querschnitt und die externe Sicherung finden Sie im Schaltplan.
IT - La sezione massima e il fusibile esterno si trovano nello schema del circuito.
FR - La section maximale et le fusible externe sont indiqués dans le schéma électrique.
NL - De maximale doorsnede en de externe zekering zijn te vinden in het schakelschema.
PL - Maksymalny przekrój poprzeczny i bezpiecznik zewnętrzny można znaleźć na schemacie obwodu.
RO - Secțiunea transversală maximă și siguranța externă pot fi găsite în schema de circuit.
TR - Maksimum kesit ve harici sigorta devre şemasında bulunabilir.
GB - For further information, refer to the technical data of the unit.
DE - Weitere Informationen finden Sie in den technischen Daten des Geräts.
IT - Per ulteriori informazioni, fare riferimento ai dati tecnici dell'unità.
FR - Pour plus d'informations, reportez-vous aux caractéristiques techniques de l'appareil.
NL - Raadpleeg voor nadere informatie de technische gegevens van het toestel.
PL - Więcej informacji na ten temat można znaleźć w danych technicznych urządzenia.
RO - Pentru informații suplimentare, consultați datele tehnice ale unității.
TR - Daha fazla bilgi için ünitenin teknik verilerine bakın.

50
CAIRplus with ISYteq – Installation manual
²14
We reserve the right to make changes without prior noticeFläktGroup DC-10662-UN_Europa_CAIRplus_IN-MA_2023-11-27_RO
GB - Cable glands DE - Kabelverschraubungen IT - Pressacavi
FR - Passe-câbles à vis NL - Kabelwartels PL - Dławiki kablowe
RO - Prese de cablu TR - Kablo rakorları
GB - Loose or on-build control cabinet with cable entry from below.
DE - Loser oder bauseitiger Schaltschrank mit Kabeleinführung von unten.
IT - Armadio di comando sfuso o in costruzione con ingresso cavi dal basso.
FR - Armoire de commande en vrac ou sur mesure avec entrée de câbles par le bas.
NL - Losse of opgebouwde schakelkast met kabeldoorvoer van onderaf.
PL - Szafa sterownicza luzem lub na budowie z wejściem kablowym od dołu.
RO - Dulap de comandă liber sau la montaj, cu intrare a cablurilor de jos.
TR - Alttan kablo girişi olan gevşek veya yapım aşamasında kontrol kabini.
GB - Integrated cabinet smaller units.
Optional entries are available but are covered by blanking plugs. There is an area around
the glands for customer-side glands.
DE - Integrierter Schrank kleinere Einheiten.
Optionale Einführungen sind verfügbar, werden aber durch Blindstopfen abgedeckt.
Um die Verschraubungen herum gibt es einen Bereich für kundenseitige Verschraubungen.
IT - Armadio integrato più piccolo.
Sono disponibili ingressi opzionali, ma sono coperti da tappi di chiusura. Intorno ai
pressacavi è presente un'area per i pressacavi lato cliente.
FR - Armoire intégrée plus petites unités.
Des entrées optionnelles sont disponibles mais sont couvertes par des bouchons
d'obturation. Il existe une zone autour des presse-étoupes pour les presse-étoupes côté
client.
NL - Geïntegreerde kast kleinere eenheden.
Optionele ingangen zijn beschikbaar, maar worden afgedekt door blindstoppen. Er is een
ruimte rond de wartels voor wartels aan klantzijde.
PL - Zintegrowana szafka mniejsze jednostki.
Dostępne są opcjonalne wejścia, ale są one zakryte zaślepkami. Wokół dławnic znajduje
się obszar dla dławnic po stronie klienta.
RO - Dulap integrat unități mai mici.
Sunt disponibile intrări opționale, dar sunt acoperite de dopuri de obturare. Există o zonă în
jurul presetupei pentru presetupele din partea clientului.
TR - Entegre dolap daha küçük birimler.
İsteğe bağlı girişler mevcuttur ancak bunlar kör tapalarla kapatılmıştır. Müşteri tarafındaki
rakorlar için rakorların etrafında bir alan vardır.

51
CAIRplus with ISYteq – Installation manual
114
We reserve the right to make changes without prior noticeFläktGroup DC-10662-UN_Europa_CAIRplus_IN-MA_2023-11-27_RO
GB - Integrated cabinet larger units.
DE - Integrierter Schrank größere Einheiten.
IT - Armadio integrato più grande.
FR - Les unités plus grandes de l'armoire intégrée.
NL - Geïntegreerde kast grotere eenheden
PL - Zintegrowana szafa większe jednostki.
RO - Dulap integrat unități mai mari.
TR - Entegre dolap daha büyük üniteler.
GB - Cable gland mounted on the side of the device.
DE - Kabelverschraubung an der Seite des Geräts montiert.
IT - Pressacavo montato sul lato del dispositivo.
FR - Presse-étoupe monté sur le côté de l'appareil.
NL - Kabelwartel gemonteerd aan de zijkant van het apparaat.
PL - Dławik kablowy montowany z boku urządzenia.
RO - Presa de cablu montată pe partea laterală a dispozitivului.
TR - Cihazın yan tarafına monte edilmiş kablo rakoru.

52
CAIRplus with ISYteq – Installation manual
²14
We reserve the right to make changes without prior noticeFläktGroup DC-10662-UN_Europa_CAIRplus_IN-MA_2023-11-27_RO
GB - Splittable gland for ethernet cable (delivered loose)
DE - Teilbare Verschraubung für Ethernet-Kabel (lose geliefert)
IT - Pressacavo divisibile per cavo ethernet (consegnato sciolto)
FR - Presse-étoupe divisible pour câble ethernet (livré en vrac)
NL - Deelbare wartel voor ethernetkabel (los geleverd)
PL - Rozgałęziona dławnica do kabla ethernetowego (dostarczana luzem)
RO - Garnitura divizibilă pentru cablu ethernet (livrat în vrac)
TR - Ethernet kablosu için ayrılabilir bez (gevşek teslim edilir)
GB - Power supply cable gland (Size depends on main current calculation).
Power supply Fans (Size depends on main current fans).
DE - Stromversorgungskabelverschraubung (Größe hängt von der
Hauptstromberechnung ab).
Stromversorgungslüfter (Größe hängt von den Hauptstromlüftern ab).
IT - Pressacavo dell'alimentazione (la dimensione dipende dal calcolo della
corrente principale).
Ventole di alimentazione (la dimensione dipende dalle ventole della corrente
principale).
FR - Presse-étoupe de l'alimentation électrique (la taille dépend du calcul du
courant principal).
Ventilateurs d'alimentation (La taille dépend des ventilateurs de courant
principal).
NL - Voedingskabelwartel (Grootte afhankelijk van hoofdstroomberekening).
Voedingsventilatoren (Grootte afhankelijk van hoofdstroomventilatoren).
PL - Dławik kablowy zasilania (Rozmiar zależy od obliczeń głównego prądu).
Wentylatory zasilające (Rozmiar zależy od głównego prądu wentylatorów).
RO - Presă de cablu de alimentare (dimensiunea depinde de calculul curentului
principal).
Ventilatoare de alimentare (Dimensiunea depinde de ventilatoarele de curent
principal).
TR - Güç kaynağı kablo rakoru (Boyut ana akım hesaplamasına bağlıdır).
Güç kaynağı Fanları (Boyut ana akım fanlarına bağlıdır).
GB - Cable gland for customer wiring (Mounted).
DE - Kabelverschraubung für kundenseitige Verkabelung (montiert).
IT - Pressacavo per il cablaggio del cliente (montato).
FR - Presse-étoupe pour le câblage du client (Monté).
NL - Wartel voor bedrading van de klant (Gemonteerd).
PL - Dławik kablowy dla okablowania klienta (Zamontowany).
RO - Presă de cablu pentru cablajul clientului (Montat).
TR - Müşteri kabloları için kablo rakoru (Monte edilmiş).

53
CAIRplus with ISYteq – Installation manual
GB – Control cabinet
IT – Quadro di comando
NL – Regelkast
RO – Dulap de control
DE – Schaltschrank
FR – Armoire de commande
PL – Szafa sterownicza
TR – Kontrol kabini
115
We reserve the right to make changes without prior noticeFläktGroup DC-10662-UN_Europa_CAIRplus_IN-MA_2023-11-27_RO

54
CAIRplus with ISYteq – Installation manual
We reserve the right to make changes without prior noticeFläktGroup DC-10662-UN_Europa_CAIRplus_IN-MA_2023-11-27_RO
GB - FläktGroup support: www.flaktgroup.com
DE - FläktGroup Service: www.flaktgroup.de
IT - FläktGroup assistenza: www.flaktgroup.it
FR - FläktGroup assistance technique: www.flaktgroup.fr
NL - FläktGroup support: www.flaktgroup.nl
PL - FläktGroup wsparcie: www.flaktgroup.pl
RO - FläktGroup suport: www.flaktgroup.ro
TR - FläktGroup desteklemek: www.flaktgroup.tr

WWW.FLAKTGROUP.COM
» Learn more on www.fl aktgroup.com
or contact one of our offi ces
FläktGroup is the European market leader for smart and energy effi cient Indoor Air
and Critical Air solutions to support every application area. We offer our customers
innovative technologies, high quality and outstanding performance supported by more
than a century of accumulated industry experience. The widest product range in the
market, and strong market presence in 65 countries worldwide, guarantee that we
are always by your side, ready to deliver Excellence in Solutions.
PRODUCT FUNCTIONS BY FLÄKTGROUP
Air Treatment | Air Movement | Air Diffusion | Air Distribution | Air Filtration
Air Management | Air Conditioning & Heating | Controls | Service
FG_DC-10662-UN_Europa_CAIRplus_IN-MA_2023-11-27_R0_150dpi.pdf © Copyright 2023 FläktGroup
CAIRPLUS
-
 1
1
-
 2
2
-
 3
3
-
 4
4
-
 5
5
-
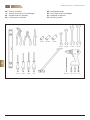 6
6
-
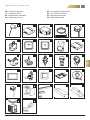 7
7
-
 8
8
-
 9
9
-
 10
10
-
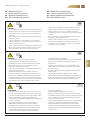 11
11
-
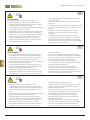 12
12
-
 13
13
-
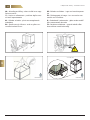 14
14
-
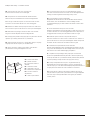 15
15
-
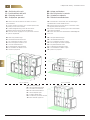 16
16
-
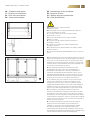 17
17
-
 18
18
-
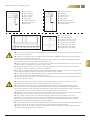 19
19
-
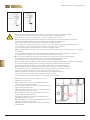 20
20
-
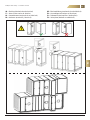 21
21
-
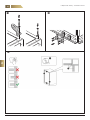 22
22
-
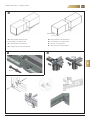 23
23
-
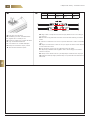 24
24
-
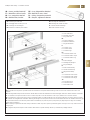 25
25
-
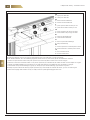 26
26
-
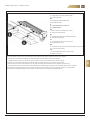 27
27
-
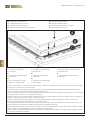 28
28
-
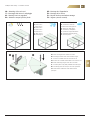 29
29
-
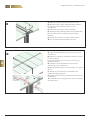 30
30
-
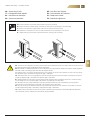 31
31
-
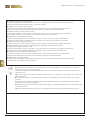 32
32
-
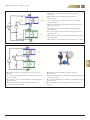 33
33
-
 34
34
-
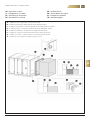 35
35
-
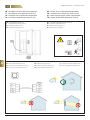 36
36
-
 37
37
-
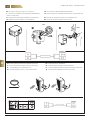 38
38
-
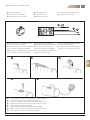 39
39
-
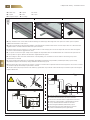 40
40
-
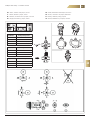 41
41
-
 42
42
-
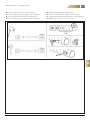 43
43
-
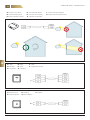 44
44
-
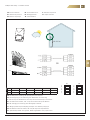 45
45
-
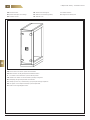 46
46
-
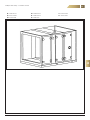 47
47
-
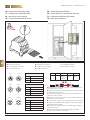 48
48
-
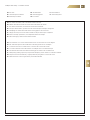 49
49
-
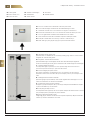 50
50
-
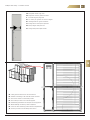 51
51
-
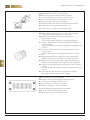 52
52
-
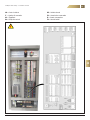 53
53
-
 54
54
-
 55
55


FläktGroup CAIRplus Installation and Maintenance Manual
- Type
- Installation and Maintenance Manual
in andere talen
- italiano: FläktGroup CAIRplus
- français: FläktGroup CAIRplus
- Deutsch: FläktGroup CAIRplus
- Türkçe: FläktGroup CAIRplus
- polski: FläktGroup CAIRplus
- română: FläktGroup CAIRplus
Andere documenten
-
Aldes Dee Fly Cube 550+ Installation Instructions Manual
-
 Hach ORBISPHERE 410 Basic User Manual
-
 Hach ORBISPHERE 510 Basic User Manual
-
 Hach ORBISPHERE 31 series Basic User Manual
-
Swegon Gold de handleiding
-
 Hach ORBISPHERE 6110 Handleiding
-
 Hach ORBISPHERE K-M1100 Basic User Manual
-
Mark GSX 55 Technical Manual
-
 Dantherm HCC 2 Handleiding
-
Ruck ETA K 600 H WOJL de handleiding


