OJ Electronics ICD3-1999 Handleiding
- Categorie
- Thermostaten
- Type
- Handleiding
Deze handleiding is ook geschikt voor

Type ICD3-1999
USER MANUAL - ENGLISH
Contents
1
. Introduction . . . . . . . . . . . . . . . . . . . . . . . 1
2. Getting started . . . . . . . . . . . . . . . . . . . . . . . 1
3
. General Display . . . . . . . . . . . . . . . . . . . . . . . 1
4
. LED . . . . . . . . . . . . . . . . . . . . . . . 2
5. Buttons . . . . . . . . . . . . . . . . . . . . . . . 2
6
. Menus for Setting Up the Thermostat . . . . . . . . . . . . . . . . . 2
6.1. Operation . . . . . . . . . . . . . . . . . . . . . . . 2
6
.1.1. Auto . . . . . . . . . . . . . . . . . . . . . . 2
6.1.2. Manual . . . . . . . . . . . . . . . . . . . . . 2
6
.1.3. Comfort . . . . . . . . . . . . . . . . . . . . . 2
6
.2. Setting 4-event . . . . . . . . . . . . . . . . . . . . . 2
6.2.1. Example of Scheduling 4-event Set-up . . . . . . . . . . . . . 2
6
.3. Programming . . . . . . . . . . . . . . . . . . . . . . 2
6.4. General Settings . . . . . . . . . . . . . . . . . . . . . 2
6
.4.1. Language . . . . . . . . . . . . . . . . . . . . . 2
6.4.2. Time . . . . . . . . . . . . . . . . . . . . . . 2
6
.4.3. Day . . . . . . . . . . . . . . . . . . . . . . 3
6.4.4. Temperature . . . . . . . . . . . . . . . . . . . . 3
6.4.5. Child lock . . . . . . . . . . . . . . . . . . . . . 3
6
.4.6. Heater . . . . . . . . . . . . . . . . . . . . . . 3
6.4.7. Covering . . . . . . . . . . . . . . . . . . . . . 3
6
.4.8. Sub Floor . . . . . . . . . . . . . . . . . . . . . 3
6
.4.9. Application . . . . . . . . . . . . . . . . . . . . 3
6.4.10 Energy monitoring. . . . . . . . . . . . . . . . . . . 3
6
.5. Service . . . . . . . . . . . . . . . . . . . . . . . 3
6.6. Contact Details . . . . . . . . . . . . . . . . . . . . . 3
6.7. Engineer Settings . . . . . . . . . . . . . . . . . . . . . 3
6
.7.1. Readout . . . . . . . . . . . . . . . . . . . . . 3
6.7.2. Temp. Settings . . . . . . . . . . . . . . . . . . . 3
6.7.3. Adaptive function . . . . . . . . . . . . . . . . . . . 3
6.7.4. Offset . . . . . . . . . . . . . . . . . . . . . . 4
6.7.6. Reset . . . . . . . . . . . . . . . . . . . . . . 4
7. Error Messages . . . . . . . . . . . . . . . . . . . . . . . 4
8. Factory settings . . . . . . . . . . . . . . . . . . . . . . . 4
9. Appendix . . . . . . . . . . . . . . . . . . . . . . . 4
9.1. Table of Compatibility . . . . . . . . . . . . . . . . . . . . 4
9.2. Heat Definitions . . . . . . . . . . . . . . . . . . . . . 4
1
6
7071 06/11 (MBC)
1. Introduction
The ICD3 thermostat can switch on your
heating system at pre-determined times on
different days of the week. It is possible to set 4
periods called events each day with different
temperatures. The thermostat comes with a
default schedule that is suitable for most
installations. Unless you change these settings,
the thermostat will operate to this default
program.
Working with lower temperatures during times
that the room is unoccupied will lower your
energy costs without reducing the comfort. The
thermostat has an adaptive function that
automatically changes the start time of a
heating period so that the desired temperature
is reached at the time that you set. After 3 days
the adaptive function has learned when the
heating must be switched on.
2. Getting started
Quick set-up:
The first time you connect the power or after a
reset, the display will show you “Welcome to
Warmup”.
Push ENTER button. Then you can select:
• Language
• Time
• Day
• Temperature
• Child lock
• Heater?
• Covering?
• Sub floor
• Application
• Energy monitoring
Use the navigation buttons for selecting /
changing in the menus.
Important:
You have, as minimum, to select “Heater” and
“covering” to define the type of heater and
covering, before you can start up the
thermostat.
For further information, see point:
5. Buttons.
6.4. General settings.
3. General Display
The display will normally
show the period (day, night,
home, out), the current
temperature, and the time.
The period is indicated by a symbol. Below you
can see a list of some of the symbols:
L
anguage
E
nglish . . . . . . page 1 - 4
Nederlands . . . . . page 5 - 8
Polski. . . . . . . page 9 - 12
The trademark is registered and belongs to OJ Electronics A/S · © 2011 OJ Electronics A/S
67071-06-11.qxd:skabelon-A4 29/06/11 9:22 Side 1

4
. LED
T
he LED is placed in the top right corner above
the display.
LED signal Indicates
C
onstant red light Relay is active
B
links System failure. (see error
m
essages)
No light Relay not active or
t
hermostat turned off
5. Buttons
Y
ou can use the standby button to turn display
a
nd regulation of temperature on/off. When the
thermostat is switched off, the relay
disengages. The clock will keep going, though.
W
hen you press the Reset button (use pen to
activate) for 3 seconds, a "Confirm factory
r
eset" text will be shown on the display. Then
press the ENTER button to reset the thermostat,
which will then start up with default values and
display the installation menu.
The buttons for navigating in the menus and
selecting/changing settings are placed in the middle.
Back/Cancel • Go back in the menus (i.e.
upwards in the menu
hierarchy).
• Cancel changes of current
value.
Forward • Move forward in the menus
(i.e. downwards in the
menu hierarchy).
• Quick steps upwards when
specifying values, e.g.
temperature.
Up • Move up in menu.
• Raise current value, e.g.
temperature.
Down • Move down in menu.
• Lower current value, e.g.
temperature.
ENTER/Change • Select item from menu to
see/change/set value.
• Accept new/changed
setting.
6. Menus for Setting Up
the Thermostat
You can program the thermostat and make
various settings by using the menu system. To
open the main menu, press the ENTER button.
In the sections below every item on the main
menu will be described in more detail.
6.1. Operation
H
ere you can choose between three different
w
ays of setting the temperature(s):
6
.1.1. Auto
S
elect Auto if you want the temperature to be
c
ontrolled and operated automatically via the 4-
event system.
6
.1.2. Manual
Here you can cancel the scheduled 4-event
program (e.g. during holidays) and set the
w
anted temperature manually. You may want to
a
djust the temperature to for example 5°C for
frost protection while you are away.
T
o set the temperature, do the following:
1
. Select Manual.
2. Use the up/down button to raise/lower the
t
emperature.
3
. Press the ENTER button to finish.
Please note: The temperature that you set
m
anually will be valid until you cancel the
m
anual mode again by selecting Auto.
6
.1.3. Comfort
Here you can set a temporary Comfort
temperature (so-called party mode) for a single
e
vent.
To set the temperature, do the following:
1
. Select Comfort.
2. Use the up/down button to raise/lower the
temperature.
3. Press the ENTER button to finish.
Please note: Comfort mode is a temporary,
manual setting that will be automatically
cancelled by the next event in the scheduled 4-
event system.
6.2. Setting 4-event
If Auto has been selected in the Operation
menu, the 4-event system can be set to
automatically control the temperature settings
for each day in a period of 7 days.
You can select the desired temperature for Day
and Night, for when you are Out and at Home,
and for the Weekend Day and Weekend Night.
Moreover, you can define when you want each
time period (Day, Night, Out, Home, Weekend
Day, and Weekend Night) to begin.
Please note: You need to use the Down button
to move to the end of the menu.
Finally you can specify temperatures and
periods (Day, Night, Out, Home) for each day of
the week. Mon-Sun, 4-events option should be
selected in the Programming menu (will be
shown as Programming: 7:0 on the display).
Please refer to section 6.3 about Programming.
6.2.1. Example of Scheduling 4-event Set-up
If you in the Programming menu have selected
Mon-Fri, Sat-Sun (shown as Programming: 5:2
on the display) you can set up the 4 periods
(called events) in the following way:
1. Choose Day.
• Specify when Day time begins.
Use the up/down button to mark the
wanted time.
Press the ENTER button to finish.
• Specify the wanted Day temperature.
U
se the up/down button to raise/lower the
t
emperature.
Press the ENTER button to finish.
2
. Choose Out.
•
Specify when Out time begins.
• Specify the wanted temperature when you
a
re out and away from home (Out temp).
3. Choose Home.
• Specify when Home time begins.
•
Specify the wanted temperature when you
a
re at home (Home temp).
4
. Choose Night.
•
Specify when Night time begins.
•
Specify the wanted Night temperature.
5
. Choose Weekend Day.
•
Specify when Day time begins on
weekends.
• Specify the wanted Day temperature on
w
eekends.
6. Choose Weekend Night.
• Specify when Night time begins on
w
eekends.
•
Specify the wanted Night temperature on
weekends.
6
.3. Programming
Here you can choose between various
p
rogramming options that are used in
c
onnection with scheduling the 4-event system:
•
Mon-Fri, Sat-Sun
Will be shown as 5:2 on the display. This
setting allows you to have 5 days with the
same 4-events, and 2 days with the same 2
events. The days 1-5 are controlled by the
settings for Day, Night, Out, Home and
day 6-7 is controlled by the settings for
Weekend Day and Weekend Night.
• Mon-Sat, Sun
Will be shown as 6:1 on the display. This
setting allows you to have 6 days with the
same 4-events, and 1 day with 2 events.
The days 1-6 are controlled by the settings
for Day, Night, Out, Home and day 7 is
controlled by the settings for Weekend Day
and Weekend Night.
• Mon-Sun, 4-events
Will be shown as 7:0 on the display. This
setting allows you to have 7 days with 4
different events (Day, Night, Out, Home).
The days 1-7 are controlled by individual
day settings (Monday – Sunday).
6.4. General Settings
6.4.1. Language
Here you can select the language you want to
be used on the display. You can choose
between the following languages:
• English
• German (Deutsch)
• French (Francais)
• Spanish (Espanol)
• Portuguese (Portogese)
6.4.2. Time
• Here you can select whether 12- or 24-hour
clock should be used.
• To set the time, select Set time. Then use
the up/down buttons to adjust the time, and
press the ENTER button to finish.
2
Standby
Navigation
LED
Reset
© 2011 OJ Electronics A/S
67071-06-11.qxd:skabelon-A4 29/06/11 9:22 Side 2

6.4.3. Day
H
ere you can set the day of the week:
•
Monday
• Tuesday
•
Wednesday
•
Thursday
•
Friday
• Saturday
•
Sunday
Please note: You need to use the Down button
to move to the end of the list of weekdays.
6
.4.4. Temperature
Scale
H
ere you can specify what temperature unit
s
hould be used in the display:
•
°C (Celsius, with a resolution of 0.5 degree)
• °F (Fahrenheit, with a resolution of 1
d
egree)
•
A scale from 1-10 (in steps of about 10°).
Display shows
H
ere you can decide whether the display shall
s
how the time, set point and/or air/floor
temperature.
•
Time (On/Off)
•
Set point (On/Off) (The current temperature
that the thermostat has been set to, for
i
nstance in the 4-event settings.)
•
Air Temp. (On/Off). The air/floor
temperature currently registered by the
sensor.
6.4.5. Child lock
By switching on the child lock you can lock the
menus (marked with a padlock symbol on the
display). Then it will no longer be possible to
select the sub-menus and change the settings.
You can still set a comfort temperature and the
time, though.
Please note: You can still use the Reset button
to return to factory settings, if the child lock has
been switched on.
6.4.6. Heater
Here you can define the type of heater that the
thermostat is attached to:
• Undertile
• Underlaminate
• Undercarpet
• Inscreed
• Type A
• Type B
• User Defined
Please refer to Appendix for configuration table
showing combinations of heater type and
covering.
6.4.7. Covering
Here you can enter the type of floor covering:
• Ceramic Tiles
• Stone
• Laminate
• Wood
• Carpet
• Vinyl
• Other
Please refer to Appendix for configuration table
showing combinations of heater type and
covering.
6.4.8. Sub Floor
H
ere you can enter the type of sub floor:
•
Concrete
• Screed
•
WBP Ply
•
Ins. Backer Board
•
Backer Board
6
.4.9. Application
H
ere you can select the type of regulator
application:
•
Floor Temp. Cont.: A floor sensor is used.
• Fl. Cont. 2 sensors: Both floor sensor and
l
imit sensor are used. A maximum
t
emperature limit can be set for the limit
s
ensor, so the thermostat will switch off if
the temperature at the place of the limit
s
ensor reaches the maximum temperature.
T
his set-up with a limit sensor can, for
instance, be used to avoid damage to some
delicate floor covering.
•
Air Temp. Control: The sensor is placed in
the thermostat.
•
Air Cont. Floor limit: Apart from the sensor
i
nside the thermostat an extra limit sensor
is used. A maximum temperature limit can
b
e set for the limit sensor, so the
t
hermostat will switch off if the temperature
at the position of the limit sensor reaches
the maximum temperature. This set-up with
a
n extra limit sensor can, for instance, be
u
sed to avoid damage to some delicate
floor covering.
• Regulator Control: No sensor is used here.
The thermostat will turn on in sequences of
20 minutes, and you can specify the length
of the sequences as a percentage of 20
minutes. If you, for example, set the
regulator to 50, the thermostat will turn on
for 10 minutes, switch off for 10 minutes,
and then turn on again for 10 minutes.
• External Control: Used in case of a set-up
with several thermostats being controlled
by an external master thermostat. Then the
thermostat will work as a slave, and you
cannot apply any settings at all since the
master thermostat controls it.
6.4.10. Energy monitoring
Here you can read-out the energy consumption
for the past:
• 2 Days
• 30 Days
• 360 Days
Press ENTER for the chosen period. The
value in percent (%) shows how much of
the time there has been heat. The following
calculates the cost for the selected period.
Ensure the price of heating is correct, if not,
check the settings for subsequent currency
price per kW/h and the load:
• Currency: Press ENTER and chose the
desired currency. Confirm with ENTER.
• Cost: Press ENTER and set the actual cost
of electricity. The cost must be inserted per
kW/h. Press ENTER.
• Load: Press ENTER and enter the
connected heating power. The value must
be in Watt (W). Press ENTER.
Leave the menu by Exit.
6.5. Service
If you need technical help then select Service
from the main menu to see the contact
information.
6.6. Contact Details
Select Contact Details from the main menu to
see the contact information.
OJ ELECTRONICS A/S
S
tenager 13B · DK-Sønderborg · Denmark
T
. +45 73 12 13 14 · F. +45 73 12 13 13
6
.7. Engineer Settings
T
o select Engineer settings, press the up and
down button at the same time for 5 seconds.
N
ote: Changes may invalidate warranty.
6.7.1. Readout
Here you see readouts of the following current
t
emperatures:
•
Room temp
• Floor temp
•
Floor limit temp
Y
ou can also get readouts of some statistics:
• Min daily: A percentage indicating the
m
inimum activated period within 24 hours
o
ver the last 14 days.
• Max daily: A percentage indicating the
m
aximum activated period within 24 hours
o
ver the last 14 days.
• Min Air: Minimum room temperature within
t
he last 48 hours.
• Mean Air: Average room temperature within
t
he last 48 hours.
• Max Air: Maximum room temperature
within the last 48 hours.
•
Min Floor: Minimum floor temperature
within the last 48 hours.
• Mean Floor: Average floor temperature
within the last 48 hours.
• Max Floor: Maximum floor temperature
within the last 48 hours.
• Cut out cnt: Number of relay connections
in the service life of the thermostat. This
value is never reset.
• Application: Here you can get readout for
the current application type that has been
selected in the General settings
- Floor
- Floor-2
- Air
- Air-Limit
- Reg.
- Ext.
• Software ver.: Indicates the current version
of the software.
6.7.2. Temp. Settings
Here you can specify the wanted minimum and
maximum temperatures for air, floor, or external
limit sensor.
Before you can select minimum and maximum
limits for air, floor or limit sensor, the application
for the regulator type in question must be chosen.
Please refer to section 6.4.9 about General
Settings – Application for more details.
Please note: If you do not specify any settings
here, the factory settings will be used.
• Air Temp. Range
- Max Temp
- Min Temp
• Floor Temp. Range
- Max Temp
- Min Temp
• Limit Sensor
- Max Temp
- Min Temp
3
A
ir/floor temperature
Set point
T
ime
© 2011 OJ Electronics A/S
67071-06-11.qxd:skabelon-A4 29/06/11 9:22 Side 3

6.7.3. Adaptive function
H
ere you can activate/deactivate (On/Off) the
a
daptive function. This function is only related
to the 4-event timer and only works in
c
onnection with going from one event to
a
nother where the temperature is going to be
r
aised. The adaptive function finds out when the
thermostat shall start heating to ensure that the
r
ight temperature is reached at the time that it
h
as been programmed for.
6.7.4. Offset
O
ffset is used to compensate for any difference
b
etween the thermostat and a room
thermometer. If the thermometer, for instance,
s
hows 1°C more than the thermostat, it is
p
ossible to adjust the offset by +/- 5°C. Then
t
he thermostat will show the same temperature
as the thermometer. If the thermostat for
e
xample shows 1 degree too much, offset
s
hould be set to +1. Then the temperature will
be set 1 degree lower.
O
ffset applies to both built-in and external
s
ensors whereas the limit sensor, if any, is not
affected.
6
.7.6. Reset
•
Reset 2: Reset values defined in Engineer
settings to factory settings.
•
Reset 3: Equal to Reset 2, except history
data are deleted. The number of relay
connections is not deleted, though.
7. Error Messages
I
f you get an error the LED is flashing red.
Internal failure The thermostat is defective,
replace thermostat
External failure External sensor or heating
unit is defective.
4
D
ay 1-5
E
vent
T
ime
W
ith floor sensor
W
ith air sensor
D
ay
0
6:00-08:00
2
5°C
2
0°C
O
ut
0
8:00-16:00
2
0°C
1
5°C
Home 16:00-22:30 25°C 22°C
N
ight
2
2:30-06:00
2
0°C
1
5°C
D
ay 6-7
E
vent
T
ime
W
ith floor sensor
W
ith air sensor
D
ay
0
8:00-23:00
2
5°C
2
2°C
Night 23:00-08:00 20°C 15°C
8
. Factory settings
T
he thermostat is delivered with factory set programs as follows:
Tiles Stone Laminate Wood Carpet Vinyl Other
U
ndertile
Y
ES
Y
ES
N
O
N
O
N
O
N
O
Y
ES
Underlaminate NO NO YES YES NO NO YES
U
ndercarpet
N
O
N
O
Y
ES
Y
ES
Y
ES
Y
ES
Y
ES
I
nscreed
Y
ES
Y
ES
Y
ES
Y
ES
Y
ES
Y
ES
Y
ES
Type A YES YES NO NO NO NO YES
Type B NO NO NO NO YES YES YES
U
ser Defined
Y
ES
Y
ES
Y
ES
Y
ES
Y
ES
Y
ES
Y
ES
Tiles Stone Laminate Wood Carpet Vinyl Other
Undertile A A n/a n/a n/a n/a E
Underlaminate n/a n/a B B n/a n/a E
Undercarpet n/a n/a B B C C E
Inscreed A A B B C C E
Type A D D n/a n/a n/a n/a E
Type B n/a n/a n/a n/a C C E
User Defined E E E E E E E
Configuration Control temperature Overheat
Room Floor
Min. Max.
Min. Max. Max.
A 5 30 5 40 40
B 5 27 5 27 27
C 5 25 5 25 27
D 5 30 5 50 55
E prog prog prog
9
. Appendix
9.1. Table of Compatibility
9.2. Heat Definitions
n/a = not available
© 2011 OJ Electronics A/S
67071-06-11.qxd:skabelon-A4 29/06/11 9:22 Side 4

5
1. Inleiding
De ICD3 thermostaat kan uw
verwarmingssysteem op vooringestelde
tijdstippen op verschillende dagen van de week
inschakelen. Het is mogelijk om elke dag 4
perioden (4 standen genoemd) met
verschillende temperaturen in te stellen. De
thermostaat wordt geleverd met een
standaardschema dat voor de meeste
installaties geschikt is. Tenzij u deze instellingen
wijzigt, zal de thermostaat op dit
standaardprogramma werken.
Indien u de temperatuur verlaagt wanneer u niet
in de kamer bent, zult u uw energiekosten
verlagen zonder dat dit ten koste van het
comfort gaat. De thermostaat heeft een
aanpassingsfunctie die de starttijd van de
verwarmingsperiode automatisch wijzigt zodat
de gewenste temperatuur bereikt wordt op de
door u ingestelde tijd. Na 3 dagen heeft de
aanpassingsfunctie geleerd wanneer de
verwarming moet worden ingeschakeld.
2. Een goed begin
Quick set-up
De eerste keer dat u de stroom inschakelt, of na
een reset, zal het display “Welkom bij Warmup”
melden.
Druk op ENTER. Daarna kunt u selecteren
• Taal
• Duur
• Dag
• Temperatuur
• Kinderslot
• Verwarming
• Bedekking
• Ondervloer
• Toepassing
• Energiebewaking
Gebruik de navigatieknoppen om de menu's te
selecteren / veranderen.
Belangrijk:
U moet minimaal “Verwarming” en “bedekking”
selecteren om het type verwarming en
bedekking aan te geven voordat u de
thermostaat kunt opstarten.
Meer inlichtingen vindt u onder punt:
5. Knoppen.
6.4. Algemene instellingen.
3. Hoofdscherm
Het display zal gewoonlijk
de periode (dag, nacht,
thuis, uit), de actuele
temperatuur en de tijd
aangeven.
De periode wordt als een symbool aangeduid.
Hieronder vindt u een lijst van enkele symbolen
Het OJ warenmerk is een geregistreerd warenmerk van OJ Electronics A/S · © 2011 OJ Electronics A/S
Verwarmingsthermostaat type ICD3-1999
GEBRUIKSHANDLEIDING - NEDERLANDS
Inhoud
1. Inleiding . . . . . . . . . . . . . . . . . . . . . . . . . . . . . . . . . . . . . . . . . . . . . . . . . . . . . . . . . . . . . . . . . . . . . . . 5
2
. Een goed begin . . . . . . . . . . . . . . . . . . . . . . . . . . . . . . . . . . . . . . . . . . . . . . . . . . . . . . . . . . . . . . . . . . . . . . 5
3. Hoofdscherm . . . . . . . . . . . . . . . . . . . . . . . . . . . . . . . . . . . . . . . . . . . . . . . . . . . . . . . . . . . . . . . . . . . . . . . 5
4
. LED . . . . . . . . . . . . . . . . . . . . . . . . . . . . . . . . . . . . . . . . . . . . . . . . . . . . . . . . . . . . . . . . . . . . . . . 6
5. Knoppen . . . . . . . . . . . . . . . . . . . . . . . . . . . . . . . . . . . . . . . . . . . . . . . . . . . . . . . . . . . . . . . . . . . . . . . 6
6
. Menu's voor het instellen van de thermostaat . . . . . . . . . . . . . . . . . . . . . . . . . . . . . . . . . . . . . . . . . . . . . . 6
6
.1. Werking . . . . . . . . . . . . . . . . . . . . . . . . . . . . . . . . . . . . . . . . . . . . . . . . . . . . . . . . . . . . . . . . . . . . . . 6
6.1.1. Auto. . . . . . . . . . . . . . . . . . . . . . . . . . . . . . . . . . . . . . . . . . . . . . . . . . . . . . . . . . . . . . . . . . . . 6
6
.1.2. Handbediening . . . . . . . . . . . . . . . . . . . . . . . . . . . . . . . . . . . . . . . . . . . . . . . . . . . . . . . . . . . 6
6.1.3. Comfort . . . . . . . . . . . . . . . . . . . . . . . . . . . . . . . . . . . . . . . . . . . . . . . . . . . . . . . . . . . . . . . . . 6
6
.2. Instelling 4-standen . . . . . . . . . . . . . . . . . . . . . . . . . . . . . . . . . . . . . . . . . . . . . . . . . . . . . . . . . . . . . 6
6.2.1. Voorbeeld van het plannen van een 4-standen instelling . . . . . . . . . . . . . . . . . . . . . . . . . . . 6
6
.3. Programmeren . . . . . . . . . . . . . . . . . . . . . . . . . . . . . . . . . . . . . . . . . . . . . . . . . . . . . . . . . . . . . . . . . 6
6.4. Algemene instellingen. . . . . . . . . . . . . . . . . . . . . . . . . . . . . . . . . . . . . . . . . . . . . . . . . . . . . . . . . . . . 6
6.4.1. Taal . . . . . . . . . . . . . . . . . . . . . . . . . . . . . . . . . . . . . . . . . . . . . . . . . . . . . . . . . . . . . . . . . . . . 6
6
.4.2. Duur. . . . . . . . . . . . . . . . . . . . . . . . . . . . . . . . . . . . . . . . . . . . . . . . . . . . . . . . . . . . . . . . . . . . 6
6.4.3. Dag . . . . . . . . . . . . . . . . . . . . . . . . . . . . . . . . . . . . . . . . . . . . . . . . . . . . . . . . . . . . . . . . . . . . 7
6
.4.4. Temperatuur . . . . . . . . . . . . . . . . . . . . . . . . . . . . . . . . . . . . . . . . . . . . . . . . . . . . . . . . . . . . . 7
6.4.5. Kinderslot . . . . . . . . . . . . . . . . . . . . . . . . . . . . . . . . . . . . . . . . . . . . . . . . . . . . . . . . . . . . . . . 7
6
.4.6. Verwarming . . . . . . . . . . . . . . . . . . . . . . . . . . . . . . . . . . . . . . . . . . . . . . . . . . . . . . . . . . . . . . 7
6.4.7. Bedekking . . . . . . . . . . . . . . . . . . . . . . . . . . . . . . . . . . . . . . . . . . . . . . . . . . . . . . . . . . . . . . . 7
6.4.8. Ondervloer . . . . . . . . . . . . . . . . . . . . . . . . . . . . . . . . . . . . . . . . . . . . . . . . . . . . . . . . . . . . . . 7
6
.4.9. Toepassing . . . . . . . . . . . . . . . . . . . . . . . . . . . . . . . . . . . . . . . . . . . . . . . . . . . . . . . . . . . . . . 7
6.4.10 Energiebewaking. . . . . . . . . . . . . . . . . . . . . . . . . . . . . . . . . . . . . . . . . . . . . . . . . . . . . . . . . . 7
6
.5. Service . . . . . . . . . . . . . . . . . . . . . . . . . . . . . . . . . . . . . . . . . . . . . . . . . . . . . . . . . . . . . . . . . . . . . . . 7
6.6. Contact details . . . . . . . . . . . . . . . . . . . . . . . . . . . . . . . . . . . . . . . . . . . . . . . . . . . . . . . . . . . . . . . . . 7
6
.7. Constructie-instellingen . . . . . . . . . . . . . . . . . . . . . . . . . . . . . . . . . . . . . . . . . . . . . . . . . . . . . . . . . . 7
6.7.1. Uitlezing . . . . . . . . . . . . . . . . . . . . . . . . . . . . . . . . . . . . . . . . . . . . . . . . . . . . . . . . . . . . . . . . 7
6.7.2. Temp. instellingen . . . . . . . . . . . . . . . . . . . . . . . . . . . . . . . . . . . . . . . . . . . . . . . . . . . . . . . . . 7
6.7.3. Aanpasfunctie . . . . . . . . . . . . . . . . . . . . . . . . . . . . . . . . . . . . . . . . . . . . . . . . . . . . . . . . . . . . 8
6.7.4. Offset. . . . . . . . . . . . . . . . . . . . . . . . . . . . . . . . . . . . . . . . . . . . . . . . . . . . . . . . . . . . . . . . . . . 8
6.7.6. Reset . . . . . . . . . . . . . . . . . . . . . . . . . . . . . . . . . . . . . . . . . . . . . . . . . . . . . . . . . . . . . . . . . . . 8
7. Foutmeldingen . . . . . . . . . . . . . . . . . . . . . . . . . . . . . . . . . . . . . . . . . . . . . . . . . . . . . . . . . . . . . . . . . . . . . . . 8
8. Fabrieksinstellingen . . . . . . . . . . . . . . . . . . . . . . . . . . . . . . . . . . . . . . . . . . . . . . . . . . . . . . . . . . . . . . . . . . . 8
9. Bijlage . . . . . . . . . . . . . . . . . . . . . . . . . . . . . . . . . . . . . . . . . . . . . . . . . . . . . . . . . . . . . . . . . . . . . . . 8
9.1. Compatibiliteitstabel. . . . . . . . . . . . . . . . . . . . . . . . . . . . . . . . . . . . . . . . . . . . . . . . . . . . . . . . . . . . . 8
9.2. Verwarmingsdefinities. . . . . . . . . . . . . . . . . . . . . . . . . . . . . . . . . . . . . . . . . . . . . . . . . . . . . . . . . . . . 8
Op werk
Thuis
Dag
Nacht
B
67071-06-11.qxd:skabelon-A4 29/06/11 9:22 Side 5

4
. LED
D
e LED zit rechtsboven in het display.
L
ED signaal Betekenis
B
randt constant rood Het relais is actief
K
nippert Systeemfout. (zie
foutmeldingen)
B
randt niet Het relais is niet actief of
d
e thermostaat staat uit
5. Knoppen
M
et de stand-by knop kunt u het display en de
t
emperatuurregeling aan/uit zetten. Wanneer de
thermostaat uitgeschakeld is, wordt het relais
uitgeschakeld. De klok zal wel blijven lopen.
W
anneer u gedurende 3 seconden (met een pen
activeren) op Reset drukt, zal een tekst
"
Fabrieksreset bevestigen" op het display
verschijnen. Druk daarna op ENTER om de
thermostaat te resetten. Deze zal daarna met de
standaardwaarden opstarten en het
installatiemenu tonen.
De knoppen voor de menu's doorlopen en
instellingen selecteren/wijzigen zitten in het
midden.
Terug/Annuleren • In de menu's teruggaan
(dwz. omhoog in de
menuhiërarchie).
• Wijzigingen in de actuele
waarde annuleren.
Vooruit • In de menu's verdergaan
(dwz. omlaag in de
menuhiërarchie).
• Snel omhooggaan als
waarden, bv. temperaturen,
gespecificeerd zijn.
Omhoog • In het menu omhooggaan.
• De actuele waarde, bv.
temperatuur verhogen.
Omlaag • In het menu omlaaggaan.
• De actuele waarde, bv.
temperatuur, verlagen.
ENTER/Wijzigen • Selecteer item uit menu om
een waarde te
bekijken/wijzigen/in te
stellen.
• Nieuwe/gewijzigde
instelling accepteren.
6. Menu's voor het instellen van de
thermostaat
U kunt de thermostaat programmeren en
verschillende instellingen in het menusysteem
invoeren. Druk op ENTER om het hoofdmenu te
openen. Hieronder worden alle items in het
h
oofdmenu gedetailleerder beschreven.
6.1. Werking
H
ier kunt u kiezen uit drie verschillende
m
anieren om de temperatuur/temperaturen in te
s
tellen.
6
.1.1. Auto
S
electeer Auto als u wilt dat de temperatuur
automatisch bewaakt en geregeld wordt via het
4-standensysteem.
6
.1.2. Handbediening
Hier kunt u het ingestelde 4-standen
p
rogramma annuleren (bv. tijdens de vakantie)
e
n de gewenste temperatuur handmatig
i
nstellen. U kunt de temperatuur bv. op 5°C
zetten voor bescherming tegen vorst terwijl u
a
fwezig bent.
U stelt de temperatuur als volgt af
1. Selecteer Handbediening.
2
. Gebruik de omhoog/omlaag knoppen om de
t
emperatuur te verhogen/verlagen.
3. Druk op ENTER om af te sluiten.
N
B: De temperatuur die u met de hand instelt,
z
al blijven gelden totdat u de stand van
handbediening weer op Auto zet.
6.1.3. Comfort
H
ier kunt u een tijdelijke Comfort temperatuur
voor een speciale gelegenheid instellen (de
zogenaamde feeststand).
U stelt de temperatuur als volgt af
1. Selecteer Comfort.
2. Gebruik de omhoog/omlaag knoppen om de
temperatuur te verhogen/verlagen.
3. Druk op ENTER om af te sluiten.
NB: De Comfort stand is een tijdelijke, met de
hand ingestelde stand die automatisch
geannuleerd wordt als de volgende stand in het
4-standensysteem start.
6.2. Instelling 4-standen
Indien Auto geselecteerd is in het
menu, kan het 4-standensysteem ingesteld
worden om de temperatuur dagelijks
automatisch te regelen voor een periode van 7
dagen.
U kunt de gewenste temperatuur selecteren
voor Dag en Nacht, Uit en Thuis en voor
Weekend dag en Weekend Nacht. U kunt ook
nog vaststellen wanneer u wilt dat elke periode
(Dag, Nacht, Uit, Thuis, Weekend Dag en
Weekend Nacht) moet beginnen.
NB: U moet de Omlaag knop gebruiken om
naar het einde van het menu te gaan.
Tenslotte kunt u temperaturen en perioden (Dag,
Nacht, Uit, Thuis) voor elke dag van de week
vastleggen. Kies de Ma-Zo, 4-standen optie in
het Programmeren menu (zal als
Programmeren: 7:0 op het display verschijnen).
Lees meer over Programmeren in hoofdstuk
6.3.
6.2.1. Voorbeeld van het plannen van een 4-
s
tanden instelling
A
ls u in het Programmeren menu Ma-Vr,
Za-Zo geselecteerd heeft (verschijnt als
P
rogrammeren: 5:2 op het display), kunt u de 4
p
erioden (standen genaamd) als volgt instellen
1. Kies Dag.
•
Geef aan wanneer de Dagtijd begint.
G
ebruik de omhoog/omlaag knoppen om
de gewenste tijd aan de geven.
Druk op ENTER om af te sluiten.
•
Geef de gewenste Dagtemperatuur aan.
G
ebruik de omhoog/omlaag knoppen om
de temperatuur te verhogen/verlagen.
D
ruk op ENTER om af te sluiten.
2
. Kies Uit.
• Geef aan wanneer de Uittijd begint.
•
Geef de gewenste temperatuur aan tijdens
u
w afwezigheid (Uittemp).
3. Kies Thuis.
•
Geef aan wanneer de Thuistijd begint.
•
Geef de gewenste temperatuur aan tijdens
uw aanwezigheid (Thuistemp).
4
. Kies Nacht.
•
Geef aan wanneer de Nachttijd begint.
• Geef de gewenste Nachttemperatuur aan.
5
. Kies Weekend Dag.
• Geef aan wanneer de Dagtijd tijdens de
weekends begint.
•
Geef de gewenste Dagtemperatuur in de
w
eekends aan.
6
. Kies Weekend Nacht.
• Geef aan wanneer de Nachttijd tijdens de
weekends begint.
• Geef de gewenste Nachttemperatuur
tijdens de weekends aan.
6.3. Programmeren
Hier kunt u uit verschillende programmeeropties
kiezen die gebruikt worden bij het plannen van
het 4-standensysteem
• Ma-Vr, Za-Zo
Verschijnt als 5:2 op het display. Met deze
instelling kunt u 5 dagen met dezelfde 4
standen, en 2 dagen met dezelfde 2 andere
standen bereiken. De dagen 1-5 worden
geregeld door de instellingen voor Dag,
Nacht, Uit, Thuis en de dagen 6-7 worden
geregeld door de instellingen voor
Weekend Dag en Weekend Nacht.
• Ma-Za, Zo
Verschijnt als 6:1 op het display. Met deze
instelling kunt u 6 dagen met dezelfde 4
standen, en 1 dag met 2 standen bereiken.
De dagen 1-6 worden geregeld door de
instellingen voor Dag, Nacht, Uit, Thuis en
dag 7 wordt geregeld door de instellingen
voor Weekend Dag en Weekend Nacht.
• Ma-Zo, 4-standen
Verschijnt als 7:0 op het display. Met deze
instelling kunt u 7 dagen met dezelfde 4
standen, en (Dag, Nacht, Uit, Thuis)
bereiken. De dagen 1-7 worden door
afzonderlijke daginstellingen (Maandag –
Zondag) geregeld.
6.4. Algemene instellingen
6.4.1. Taal
Hier kunt u de taal selecteren die u op het
display wilt zien. U kunt uit de volgende talen
kiezen
• Nederlands
• Duits (Deutsch)
• Frans (Francais)
• Spaans (Español)
• Portugees (Portogese)
6
Stand-by
Navigatie
LED
Reset
© 2011 OJ Electronics A/S
Terug/
Annuleren
Vooruit
Enter
Omhoog
Omlaag
BR961B03a-NL
67071-06-11.qxd:skabelon-A4 29/06/11 9:22 Side 6

6.4.2. Duur
•
Hier kunt u selecteren of u een 12 of 24
u
uraanduiding wenst.
• Selecteer Tijd instellen voor het instellen
v
an de tijd. Gebruik dan de mhoog/omlaag
k
noppen om de tijd in te stellen en druk op
E
NTER om af te sluiten.
6
.4.3. Dag
H
ier kunt u de weekdag instellen
• Maandag
• Dinsdag
•
Woensdag
•
Donderdag
• Vrijdag
•
Zaterdag
•
Zondag
NB: U moet de Omlaag knop gebruiken om
n
aar het einde van de dagenlijst te gaan.
6.4.4. Temperatuur
Schaal
H
ier kunt u aangeven welke
t
emperatuureenheid gebruikt moet worden in
het display:
• °C (Celsius, met een resolutie van
0
,5 graden)
•
°F (Fahrenheit, met een resolutie van
1 graad)
•
Een schaal van 1-10 (in stappen van
c
a. 10°).
Het display toont
H
ier kunt u beslissen of het display de tijd, de
i
nstelling en/of de lucht-/vloertemperatuur moet
tonen.
• Tijd (Aan/Uit)
• Instelpunt (Aan/Uit) (De actuele
temperatuur waarop de thermostaat
ingesteld is, bv. in de 4-standen instelling).
• Luchttemp. (Aan/Uit). De lucht-/vloer-
temperatuur die op het actuele moment
door de sensor geregistreerd wordt.
6.4.5. Kinderslot
Door het kinderslot in te schakelen (aangegeven
door het hangslotsymbool op het display) kunt
u de menu's vergrendelen. Dan zal het niet
langer mogelijk zijn om de ondermenu's te
selecteren en de instellingen te wijzigen. U kunt
echter wel een comforttemperatuur en de tijd
instellen.
NB: U kunt ook nog altijd de Reset knop
gebruiken om naar de fabriekinstellingen terug
te gaan als het kinderslot ingeschakeld is.
6.4.6. Verwarming
Hier kunt u het type verwarming aangeven
waarop de thermostaat is aangesloten.
• Onder tegels
• Onder laminaat
• Onder kleed
• Inscreed
• Type A
• Type B
• Gebruikerinstelling
Raadpleeg a.u.b. de bijlage met de
configuratietabel waarin de combinaties van
type verwarming en bedekking getoond
worden.
6.4.7. Bedekking
H
ier kunt u het type vloerbedekking invoeren
•
Keramische tegels
• Steen
•
Laminaat
•
Hout
•
Tapijt
• Vinyl
•
Overige
Raadpleeg a.u.b. de bijlage met de
configuratietabel waarin de combinaties van
t
ype verwarming en bedekking getoond
w
orden.
6
.4.8. Ondervloer
H
ier kunt u het type ondervloer invoeren
•
Beton
• Pleister
•
WBP Multiplex
•
Isolerende cementvezelplaat
• Cementvezelplaat
6
.4.9. Toepassing
H
ier kunt u het type regelaar invoeren:
• Vloertemp. Reg.: Met gebruik van een
vloersensor.
•
Vl. Reg. 2 sensors : Met gebruik van een
v
loersensor en een limietsensor. Voor de
limietsensor is een maximum
t
emperatuurlimiet in te stellen zodat de
t
hermostaat uit zal schakelen als de
temperatuur bij de limietsensor de
maximumtemperatuur bereikt. Deze
o
pstelling met een limietsensor kan bv.
g
ebruikt worden om te voorkomen dat
kwetsbare vloerbedekking beschadigd
w
ordt.
• Luchttemp. regeling : De sensor is in de
thermostaat geplaatst.
• Luchtreg. vloerlimiet : Naast de sensor in
de thermostaat kan een extra limietsensor
gebruikt worden. Voor de limietsensor is
een maximum temperatuurlimiet in te
stellen, zodat de thermostaat uit zal
schakelen als de temperatuur bij de
limietsensor de maximumtemperatuur
bereikt. Deze opstelling met een extra
limietsensor kan bv. gebruikt worden om te
voorkomen dat kwetsbare vloerbedekking
beschadigd wordt.
• Regelaar : Hiervoor wordt geen sensor
gebruikt. De thermostaat zal in perioden
van 20 minuten aangaan, en u kunt de
lengte van de perioden aangeven in
percentages van 20 minuten. Als u bv. de
regelaar op 50 zet, zal de thermostaat 10
minuten aangaan en dan weer 10 minuten
uitgaan.
• Externe regelaar : Wordt gebruikt als een
aantal thermostaten door een externe
hoofdthermostaat gestuurd worden. Dan
zal de thermostaat als een volger werken,
en dan kunt u geen van de instellingen
gebruiken omdat de hoofdthermostaat deze
regelt.
6.4.10. Energiebewaking
Hier kunt u het energieverbruik aflezen van de
afgelopen:
• 2 dagen
• 30 dagen
• 360 dagen
Druk op ENTER voor de gekozen periode.
De waarde in procenten (%) laat zien
hoeveel van de tijd er verwarmd is. Het
volgende berekent de kosten voor de
gekozen periode. Controleer of de
verwarmingsprijs correct is. Zo niet,
controleer de instellingen voor de
desbetreffende valutaprijs per kW/h en de
belasting:
• Valuta: Druk op ENTER en kies de
gewenste valuta. Bevestig met ENTER.
• Kosten: Druk op ENTER en voer de actuele
k
osten voor elektriciteit in. De kosten
m
oeten worden aangegeven per kW/h.
Druk op ENTER.
•
Belasting: Druk op ENTER en voer de
a
angesloten verwarmingsbron in. De
w
aarde moet in Watt (W) aangegeven
worden.
V
erlaat het menu met Exit.
6.5. Service
Als u technisch advies nodig heeft, selecteer
d
an Service in het hoofdmenu om informatie
o
ver contacten te krijgen.
6
.6. Contact Details
S
electeer Contactdetails in het hoofdmenu om
i
nformatie over contacten te krijgen.
O
J ELECTRONICS A/S
S
tenager 13B · DK-Sønderborg · Denmark
T. +45 73 12 13 14 · F. +45 73 12 13 13
6
.7. Constructie-instellingen
Druk 5 seconden gelijktijdig op de omhoog en
omlaag knoppen om Constructie-instellingen te
s
electeren.
N
B: Wijzigingen kunnen de garantie ongeldig
maken.
6
.7.1. Uitlezing
Hier kunt u de uitlezingen van de actuele
temperaturen zien
•
Kamertemp
• Vloertemp
•
Limiet vloertemp.
U kunt ook een aantal statische gegevens
uitlezen
• Min. dagelijks : Een percentage dat het
minimum van de geactiveerde periodes
gedurende 24 uur van de verlopen 14
dagen aangeeft.
• Max. dagelijks : Een percentage dat het
maximum van de geactiveerde periodes
gedurende 24 uur van de verlopen 14
dagen aangeeft.
• Min. lucht : Minimum kamertemperatuur
gedurende de verlopen 48 uur.
• Gem. lucht : Gemiddelde
kamertemperatuur gedurende de verlopen
48 uur.
• Max. lucht : Maximum kamertemperatuur
gedurende de verlopen 48 uur.
• Min. vloer : Minimum vloertemperatuur
gedurende de verlopen 48 uur.
• Gem. vloer : Gemiddelde vloertemperatuur
gedurende de verlopen 48 uur.
• Max vloer : Maximum vloertemperatuur
gedurende de verlopen 48 uur.
• Uitschakelteller : Aantal relaisverbindingen
tijdens de levensduur van de thermostaat.
Deze waarde wordt nooit gereset.
• Toepassing Hier kunt u het actuele type
toepassing aflezen dat gekozen is onder
Algemene instellingen
- Vloer
- Vloer-2
- Lucht
- Luchtlimiet
- Regel.
- Ext.
• Software ver.: Geeft de actuele versie van
de software aan.
6.7.2. Temp. instellingen
Hier kunt u de gewenste minimum- en
maximumtemperaturen voor lucht, vloer of
externe limietsensor aangeven.
7
© 2011 OJ Electronics A/S
Lucht-/vloertemperatuur
Instelpunt
Duur
67071-06-11.qxd:skabelon-A4 29/06/11 9:22 Side 7

Voordat u de minimum- en maximumlimieten
v
oor lucht, vloer of limietsensor kunt selecteren,
m
oet u eerst het desbetreffende type regelaar
kiezen. Voor meer details wordt verwezen naar
h
oofdstuk 6.4.9 over Algemene instellingen –
T
oepassing.
N
B: Indien u hier geen instellingen aangeeft,
zullen de fabrieksinstellingen gebruikt worden.
•
Luchttemp. bereik
-
Max Temp
- Min. Temp.
• Vloertemp. bereik
-
Max Temp
-
Min Temp
• Limietsensor
-
Max. Temp.
-
Min Temp
6.7.3. Aanpasfunctie
H
ier kunt u de aanpassingsfunctie
a
ctiveren/inactiveren (Aan/Uit). Deze functie
heeft alleen betrekking op de 4-standen timer
en werkt alleen als hij van één stand naar een
a
ndere gaat waar de temperatuur verhoogd zal
w
orden. De aanpassingsfunctie ontdekt
wanneer de thermostaat moet beginnen te
verwarmen om ervoor te zorgen dat de juiste
t
emperatuur bereikt wordt op het
g
eprogrammeerde tijdstip.
6
.7.4. Offset
D
e Offset wordt gebruikt om voor het verschil te
compenseren tussen de thermostaat en een
kamerthermometer. Als de thermometer bv. 1°C
m
eer aangeeft dan de thermostaat, is het
m
ogelijk de offset met +/- 5°C bij te stellen. Dan
zal de thermostaat dezelfde temperatuur als de
t
hermometer aangeven. Als de thermostaat bv.
1 graad te veel aangeeft, moet de offset op +1
gezet worden. Dan zal de temperatuur een
graad lager ingesteld worden.
Offset geldt voor zowel ingebouwde als externe
sensors terwijl de limietsensor hierdoor niet
beïnvloed wordt.
6.7.6. Reset
• Reset 2: Resetwaarden die in de
Constructieinstellingen als
fabriekinstellingen gedefinieerd zijn.
• Reset 3: Zoals Reset 2, behalve dat de
geschiedenisgegevens gewist zijn. Het
aantal relaisverbindingen is echter niet
gewist.
7. Foutmeldingen
Bij een fout zal de LED rood knipperen.
Interne fout De thermostaat is defect.
Vervang de thermostaat
Externe fout De externe sensor of de
verwarmingsunit is defect.
8
© 2011 OJ Electronics A/S
D
ag 1-5
S
tand
Duur Met vloersensor Met luchtsensor
D
ag
0
6:00-08:00
2
5°C
2
0°C
U
it
0
8:00-16:00
2
0°C
1
5°C
T
huis
1
6:00-22:30
2
5°C
2
2°C
Nacht 22:30-06:00 20°C 15°C
Dag 6-7
S
tand
D
uur
M
et vloersensor
M
et luchtsensor
D
ag
0
8:00-23:00
2
5°C
2
2°C
N
acht
2
3:00-08:00
2
0°C
1
5°C
8
. Fabrieksinstellingen
D
e thermostaat wordt geleverd met de volgende door de fabriek ingestelde programma's
Tegels Steen Laminaat Hout Tapijt Vinyl Overige
O
nder tegels
J
A
J
A
N
EE
N
EE
N
EE
N
EE
J
A
Onder laminaat NEE NEE JA JA NEE NEE JA
Onder kleed NEE NEE JA JA JA JA JA
I
nscreed
J
A
J
A
J
A
J
A
J
A
J
A
J
A
Type A JA JA NEE NEE NEE NEE JA
Type B NEE NEE NEE NEE JA JA JA
Gebruiker
instelling
JA JA JA JA JA JA JA
Tegel Steen Laminaat Hout Tapijt Vinyl Overige
Onder tegels A A n.v.t. n.v.t. n.v.t. n.v.t. E
Onder laminaat n.v.t. n.v.t. B B n.v.t. n.v.t. E
Onder kleed n.v.t. n.v.t. B B C C E
Inscreed A A B B C C E
Type A D D n.v.t. n.v.t. n.v.t. n.v.t. E
Type B n.v.t. n.v.t. n.v.t. n.v.t. C C E
Gebruiker
instelling
E E E E E E E
Configuratie Temperatuuregeling Oververhitting
Ruimte Vloer
Mín. Máx.
Mín. Máx.
Máx.
A 5 30 5 40 40
B 5 27 5 27 30
C 5 25 5 25 30
D 5 40 5 50 55
E prog prog prog
9
. Bijlage
9.1. Compatibiliteitstabel
9.2. Verwarmingsdefinities
n.v.t = niet van toepassing
67071-06-11.qxd:skabelon-A4 29/06/11 9:22 Side 8

9
1. Wprowadzenie
Termostat ICD3 umożliwia włączanie układu
grzewczego w ustalonych porach w określone
dni tygodnia. Każdy dzień można podzielić na 4
okresy (zwane zdarzeniami) i przyporządkować
im określone wartości temperatury. Urządzenie
posiada zaprogramowany, domyślny
harmonogram pracy, który jest odpowiedni dla
większości instalacji. Jeżeli ustawienia nie
zostaną zmienione, termostat będzie działał
zgodnie z wbudowanym programem.
Ustawienie niższej wartości temperatury na czas
niekorzystania z pomieszczenia, obniża koszty
ogrzewania bez ograniczania komfortu.
Termostat posiada funkcję adaptacyjną, która
automatycznie zmienia moment uruchomienia
źródło ciepła, tak aby pożądana temperatura
pomieszczenia została osiągnięta w
zaprogramowanym czasie. Proces "uczenia się"
przez urządzenie właściwego momentu
uruchomienia źródła ciepła trwa 3 dni.
2. Pierwsze uruchomienie
Szybka konfiguracja:
Przy pierwszym podłączeniu urządzenia do sieci
lub jego zresetowaniu, na wyświetlaczu pokazuje
się komunikat "Warmup wita".
Naciśnij przycisk ENTER. Następnie możesz
wybrać:
• Język
• Czas
• Dzień
• Temperatura
• Zabezpieczenie przed dziećmi
• Źródło ciepła?
• Pokrycie podłogi?
• Warstwa spodnia podłogi
• Rodzaj regulacji
• Monitorowanie zużycia energii
Wybór/zmiany w poszczególnych menu
umożliwiają przyciski nawigacyjne.
Ważne:
Przed uruchomieniem termostatu konieczne jest
przynajmniej określenie źródła ciepła i pokrycia
podłogi.
Dalsze informacje znajdziesz w punktach:
5. Przyciski.
6.4. Ustawienia ogólne.
3. Standardowy obraz wyświetlacza
W czasie normalnej pracy
wyświetlacz wskazuje okres
(dzień, noc, w domu, poza
domem), aktualną
temperaturę i czas.
Każdy okres przedstawiony jest za pomocą
symbolu. Część z nich znajduje się poniżej:
Znak towarowy jest zarejestrowany i stanowi własność OJ Electronics A/S· © 2011 OJ Electronics A/S
Termostat Warmup model ICD3-1999
INSTRUKCJA OBSŁUGI – JĘZYK POLSKI
S
pis treści
1
. Wprowadzenie . . . . . . . . . . . . . . . . . . . . . . . . . . . . . . . . . . . . . . . . . . . . . . . . . . . . . . . . . . . . . . . . . . . . . . . 9
2. Pierwsze uruchomienie . . . . . . . . . . . . . . . . . . . . . . . . . . . . . . . . . . . . . . . . . . . . . . . . . . . . . . . . . . . . . . . . 9
3
. Standardowy obraz wyświetlacza . . . . . . . . . . . . . . . . . . . . . . . . . . . . . . . . . . . . . . . . . . . . . . . . . . . . . . . . 9
4. Kontrolka LED . . . . . . . . . . . . . . . . . . . . . . . . . . . . . . . . . . . . . . . . . . . . . . . . . . . . . . . . . . . . . . . . . . . . . . 10
5
. Przyciski . . . . . . . . . . . . . . . . . . . . . . . . . . . . . . . . . . . . . . . . . . . . . . . . . . . . . . . . . . . . . . . . . . . . . . 10
6
. Menu ustawień termostatu . . . . . . . . . . . . . . . . . . . . . . . . . . . . . . . . . . . . . . . . . . . . . . . . . . . . . . . . . . . . . 10
6.1. Tryb działania . . . . . . . . . . . . . . . . . . . . . . . . . . . . . . . . . . . . . . . . . . . . . . . . . . . . . . . . . . . . . . . . . 10
6
.1.1. Tryb automatyczny. . . . . . . . . . . . . . . . . . . . . . . . . . . . . . . . . . . . . . . . . . . . . . . . . . . . . . . . 10
6.1.2. Tryb ręczny . . . . . . . . . . . . . . . . . . . . . . . . . . . . . . . . . . . . . . . . . . . . . . . . . . . . . . . . . . . . . 10
6
.1.3. Tryb "komfort". . . . . . . . . . . . . . . . . . . . . . . . . . . . . . . . . . . . . . . . . . . . . . . . . . . . . . . . . . . . 10
6
.2. Ustawianie programu 4 zdarzeń . . . . . . . . . . . . . . . . . . . . . . . . . . . . . . . . . . . . . . . . . . . . . . . . . . . 10
6.2.1. Przykłady ustawień programu 4 zdarzeń . . . . . . . . . . . . . . . . . . . . . . . . . . . . . . . . . . . . . . . 10
6
.3. Programowanie . . . . . . . . . . . . . . . . . . . . . . . . . . . . . . . . . . . . . . . . . . . . . . . . . . . . . . . . . . . . . . . . 10
6.4. Ustawienia ogólne. . . . . . . . . . . . . . . . . . . . . . . . . . . . . . . . . . . . . . . . . . . . . . . . . . . . . . . . . . . . . . 11
6
.4.1. Język . . . . . . . . . . . . . . . . . . . . . . . . . . . . . . . . . . . . . . . . . . . . . . . . . . . . . . . . . . . . . . . . . . 11
6.4.2. Czas . . . . . . . . . . . . . . . . . . . . . . . . . . . . . . . . . . . . . . . . . . . . . . . . . . . . . . . . . . . . . . . . . . 11
6
.4.3. Dzień . . . . . . . . . . . . . . . . . . . . . . . . . . . . . . . . . . . . . . . . . . . . . . . . . . . . . . . . . . . . . . . . . . 11
6.4.4. Temperatura. . . . . . . . . . . . . . . . . . . . . . . . . . . . . . . . . . . . . . . . . . . . . . . . . . . . . . . . . . . . . 11
6.4.5. Zabezpieczenie przed dziećmi . . . . . . . . . . . . . . . . . . . . . . . . . . . . . . . . . . . . . . . . . . . . . . 11
6
.4.6. Źródło ciepła . . . . . . . . . . . . . . . . . . . . . . . . . . . . . . . . . . . . . . . . . . . . . . . . . . . . . . . . . . . . 11
6.4.7. Pokrycie podłogi . . . . . . . . . . . . . . . . . . . . . . . . . . . . . . . . . . . . . . . . . . . . . . . . . . . . . . . . . 11
6
.4.8. Warstwa spodnia podłogi. . . . . . . . . . . . . . . . . . . . . . . . . . . . . . . . . . . . . . . . . . . . . . . . . . . 11
6
.4.9. Rodzaj regulacji. . . . . . . . . . . . . . . . . . . . . . . . . . . . . . . . . . . . . . . . . . . . . . . . . . . . . . . . . . 11
6.4.10 Monitorowanie zużycia energii. . . . . . . . . . . . . . . . . . . . . . . . . . . . . . . . . . . . . . . . . . . . . . . 11
6
.5. Serwis . . . . . . . . . . . . . . . . . . . . . . . . . . . . . . . . . . . . . . . . . . . . . . . . . . . . . . . . . . . . . . . . . . . . . . 11
6.6. Dane kontaktowe. . . . . . . . . . . . . . . . . . . . . . . . . . . . . . . . . . . . . . . . . . . . . . . . . . . . . . . . . . . . . . . 11
6.7. Ustawienia techniczne. . . . . . . . . . . . . . . . . . . . . . . . . . . . . . . . . . . . . . . . . . . . . . . . . . . . . . . . . . . 11
6
.7.1. Odczyty . . . . . . . . . . . . . . . . . . . . . . . . . . . . . . . . . . . . . . . . . . . . . . . . . . . . . . . . . . . . . . . . 11
6.7.2. Ustawienia temperatury. . . . . . . . . . . . . . . . . . . . . . . . . . . . . . . . . . . . . . . . . . . . . . . . . . . . 12
6.7.3. Funkcja adaptacyjna . . . . . . . . . . . . . . . . . . . . . . . . . . . . . . . . . . . . . . . . . . . . . . . . . . . . . . 12
6.7.4. Przesunięcie odczytu. . . . . . . . . . . . . . . . . . . . . . . . . . . . . . . . . . . . . . . . . . . . . . . . . . . . . . 12
6.7.6. Reset. . . . . . . . . . . . . . . . . . . . . . . . . . . . . . . . . . . . . . . . . . . . . . . . . . . . . . . . . . . . . . . . . . 12
7. Sygnalizacja błędów . . . . . . . . . . . . . . . . . . . . . . . . . . . . . . . . . . . . . . . . . . . . . . . . . . . . . . . . . . . . . . . . . . 12
8. Ustawienia fabryczne . . . . . . . . . . . . . . . . . . . . . . . . . . . . . . . . . . . . . . . . . . . . . . . . . . . . . . . . . . . . . . . . . 12
9. Załącznik . . . . . . . . . . . . . . . . . . . . . . . . . . . . . . . . . . . . . . . . . . . . . . . . . . . . . . . . . . . . . . . . . . . . . . . . . . 12
9.1. Tabela kompatybilności . . . . . . . . . . . . . . . . . . . . . . . . . . . . . . . . . . . . . . . . . . . . . . . . . . . . . . . . . . 12
9.2. Właściwości ogrzewania . . . . . . . . . . . . . . . . . . . . . . . . . . . . . . . . . . . . . . . . . . . . . . . . . . . . . . . . . 12
Poza domem
W domu
Dzień
Noc
67071-06-11.qxd:skabelon-A4 29/06/11 9:22 Side 9

4
. Kontrolka LED
K
ontrolka LED znajduje się w górnym prawym
rogu nad wyświetlaczem.
Sygnalizacja LED Znaczenie
S
tałe czerwone światło Przekaźnik jest
aktywny
Ś
wiatło pulsujące Błąd systemu. (patrz:
s
ygnalizacja błędów)
B
rak światła Przekaźnik nie jest
a
ktywny lub termostat
j
est wyłączony
5. Przyciski
Przycisk trybu gotowości służy do włączania i
w
yłączania wyświetlacza oraz regulacji
t
emperatury. Po wyłączeniu termostatu
przekaźnik rozłącza się. Zegar działa niezależnie
o
d tego, czy urządzenie jest włączone, czy nie.
Po naciśnięciu na przycisk resetu (przy użyciu
długopisu lub podobnego przedmiotu) i
przytrzymaniu przez 3 sekundy, na wyświetlaczu
pojawia się komunikat "Potwierdź reset
fabryczny". Naciśnij ENTER, by zresetować
urządzenie. Reset przywraca wartości domyślne
i po ponownym uruchomieniu urządzenia
pojawia się menu instalacyjne.
Przyciski nawigacyjne, umożliwiające poruszanie
się w menu i wybór/zmiany ustawień, znajdują
się pośrodku pod wyświetlaczem.
W tył/Anuluj • Pozwala na cofanie się w
menu (tj. przejście o poziom
wyżej w strukturze).
• Anuluje zmianę aktualnie
wybranej wartości.
W przód • Pozwala na poruszanie się do
przodu w menu (tj. przejście o
poziom niżej w strukturze).
• Skokowo podwyższa
ustawianą wartość, np.
temperatury.
W górę • Pozwala na poruszanie się w
górę menu.
• Podnosi aktualną wartość, np.
temperatury.
W dół • Pozwala na poruszanie się w
dół menu.
• Obniża aktualną wartość, np.
temperatury.
ENTER/Zmień • Umożliwia wybór pozycji
menu w celu
skontrolowania/zmiany/ustawi
enia żądanej wartości.
• Potwierdza nowe/zmienione
ustawienie.
6. Menu ustawień termostatu
Struktura menu termostatu umożliwia jego
p
rogramowanie i wprowadzanie zmian w
u
stawieniach. Naciśnięcie przycisku ENTER
otwiera menu główne. W niniejszym rozdziale
z
najduje się szczegółowy opis poszczególnych
p
ozycji tego menu.
6.1. Tryb działania
P
ozycja ta umożliwia wybór jednego z trzech
t
rybów ustawiania wartości temperatury:
6.1.1. Tryb automatyczny
W
ybierz Tryb automatyczny, jeśli wartość
t
emperatury ma być automatycznie kontrolowana
i zmieniana wg aktualnie ustawionego programu
4
zdarzeń.
6
.1.2. Tryb ręczny
Ta pozycja umożliwia anulowanie ustawień
p
rogramu 4 zdarzeń (np. na czas urlopu) i
r
ęczne ustawianie żądanej wartości temperatury.
Możesz np. na czas wyjazdu ustawić
temperaturę 5°C dla ochrony przed mrozem.
A
by ręcznie ustawić wartość temperatury:
1. Wybierz Tryb ręczny.
2. Użyj przycisków W górę/W dół, by
p
odnieść/obniżyć temperaturę.
3
. Aby zakończyć naciśnij ENTER.
U
waga: Ustawiona ręcznie wartość temperatury
b
ędzie obowiązywała do chwili anulowania trybu
ręcznego poprzez wybór funkcji Tryb
automatyczny.
6.1.3. Tryb "komfort"
Ta pozycja umożliwia wybór tymczasowego
trybu "komfort" – tzw. trybu imprezowego, czyli
najlepszej temperatury dla pojedynczego
zdarzenia.
Aby ręcznie ustawić wartość temperatury:
1. Wybierz Tryb "komfort".
2. Użyj przycisków W górę/W dół, by
podnieść/obniżyć temperaturę.
3. Aby zakończyć naciśnij ENTER.
Uwaga: Tryb "komfort" to tymczasowe, ręczne
ustawienie wartości temperatury, które
automatycznie zostanie anulowane z chwilą
rozpoczęcia następnego okresu w programie 4
zdarzeń.
6.2. Ustawianie programu 4 zdarzeń
Jeżeli w menu Tryb działania wybrano Tryb
automatyczny, program 4 zdarzeń można
ustawić tak, by automatycznie kontrolował on
ustawienia temperatury dla każdego dnia na
przestrzeni 7 dni.
Żądane wartości temperatury można określić dla
następujących okresów: Dzień i Noc, Poza
domem i W domu, a także Dzień weekendowy i
Noc weekendowa. Możliwe jest również
ustawienie momentu rozpoczęcia każdego z
okresów (Dzień, Noc, Poza domem, W domu,
Dzień weekendowy i Noc weekendowa).
Uwaga: Przewijanie menu do końca umożliwia
przycisk W dół.
Dodatkowo można zdefiniować wartości
temperatury oraz okresy (Dzień, Noc, Poza
domem, W domu) dla każdego dnia tygodnia
oddzielnie. W menu Programowanie należy
wybrać opcję Pon.-Niedz., 4 zdarzenia (na
w
yświetlaczu pokaże się Programowanie: 7:0).
D
alsze informacje znajdziesz w rozdziale 6.3
Programowanie.
6
.2.1. Przykłady ustawień programu 4 zdarzeń
J
eżeli w menu Programowanie wybrana
zostanie opcja Pon.-Pt., Sob.-Niedz. (na
w
yświetlaczu pokaże się Programowanie: 5:2),
u
stawienia dla 4 okresów (tzw. zdarzeń) można
wprowadzić w następujący sposób:
1. Wybierz Dzień.
•
Wybierz moment rozpoczęcia okresu
d
ziennego Dzień - czas.
Używając przycisków W górę/W dół zaznacz
ż
ądany czas.
A
by zakończyć naciśnij ENTER.
•
Określ żądaną wartość temperatury
Dzień - temperatura.
U
żyj przycisków W górę/W dół, by
p
odnieść/obniżyć temperaturę.
Aby zakończyć naciśnij ENTER.
2. Wybierz Poza domem.
•
Wybierz moment rozpoczęcia okresu Poza
d
omem - czas.
• Określ żądaną wartość temperatury na czas
nieobecności (Poza domem – temperatura).
3
. Wybierz W domu.
•
Wybierz moment rozpoczęcia okresu
W domu – czas.
•
Określ żądaną wartość temperatury w czasie
p
obytu w domu (W domu - temperatura).
4. Wybierz Noc.
• Wybierz moment rozpoczęcia okresu
n
ocnego Noc – czas.
•
Określ żądaną wartość temperatury
Noc - temperatura.
5
. Wybierz Dzień weekendowy.
• Wybierz moment rozpoczęcia okresu
dziennego Dzień – czas w dni weekendowe.
• Określ żądaną wartość temperatury dziennej
Dzień – temperatura w dni weekendowe.
6. Wybierz Noc weekendowa.
• Wybierz moment rozpoczęcia okresu
nocnego Noc – czas w czasie weekendów.
• Określ żądaną wartość temperatury nocnej
Noc – temperatura w czasie weekendów.
6.3. Programowanie
Ta pozycja umożliwia wybór różnych opcji
ustawiania programu 4 zdarzeń:
• Pon.-Pt., Sob.-Niedz.
Opcja ta będzie na wyświetlaczu pokazana
jako 5:2. Umożliwia ona zaprogramowanie
sekwencji identycznych 4 zdarzeń przez 5
dni i identycznych 2 zdarzeń przez kolejne 2
dni. Dni 1-5 są kontrolowane przez
ustawienia dla Dzień, Noc, Poza domem,
W domu, a dni 6-7 – przez ustawienia dla
Dzień weekendowy i Noc weekendowa.
• Pon.-Sob., Niedz.
Opcja ta będzie na wyświetlaczu pokazana
jako 6:1. Umożliwia ona zaprogramowanie
sekwencji identycznych 4 zdarzeń przez 6
dni i identycznych 2 zdarzeń przez kolejny 1
dzień. Dni 1-6 są kontrolowane przez
ustawienia dla Dzień, Noc, Poza domem,
W domu, a dzień 7 – przez ustawienia dla
Dzień weekendowy i Noc weekendowa.
• Pon.-Niedz., 4 zdarzenia
Opcja ta będzie na wyświetlaczu pokazana
jako 7:0. Ta pozycja umożliwia
zaprogramo?wanie sekwencji 4 zdarzeń
(Dzień, Noc, Poza domem, W domu) na
każdy dzień w okresie 7 dni. Dni 1-7 są
kontrolowane przez oddzielne ustawienia na
każdy dnia tygodnia (poniedziałek-
niedziela).
6.4. Ustawienia ogólne
6.4.1. Język
Ta pozycja umożliwia wybór języka używanego
na wyświetlaczu. Dostępne są następujące
języki:
10
Przycisk
trybu
g
otowości
Przyciski nawigacyjne
K
ontrolka
L
ED
R
eset
© 2011 OJ Electronics A/S
Enter
BR961B03a-PL
W tył/Anuluj
W górę
W dół
W przód
67071-06-11.qxd:skabelon-A4 29/06/11 9:22 Side 10

• Polski
•
Niemiecki (Deutsch)
•
Francuski (Francais)
• Hiszpański (EspaĖol)
•
Portugalski (Portogese)
6
.4.2. Czas
• Ta pozycja umożliwia wybór 12 lub 24
g
odzinnego trybu wyświetlania czasu.
•
Aby ustawić czas wybierz Ustaw czas.
Następnie ustaw właściwy czas przy
pomocy przycisków W górę/W dół i naciśnij
p
rzycisk ENTER aby zakończyć.
6.4.3. Dzień
T
a pozycja służy do ustawiania dnia tygodnia:
•
Poniedziałek
•
Wtorek
• Środa
•
Czwartek
•
Piątek
• Sobota
• Niedziela
U
waga: Przewijanie listy dni tygodnia do końca
umożliwia przycisk W dół.
6
.4.4. Skala temperatury
T
a pozycja umożliwia wybór jednostki
temperatury, w której będzie podawany odczyt na
w
yświetlaczu.
•
°C (skala Celsjusza, z dokładnością do 0,5
stopnia)
• °F (skala Fahrenheita, z dokładnością do 1
s
topnia)
•
Skala od 1 do 10 (skokowo, co około 10°).
W
skazania wyświetlacza
Ta pozycja umożliwia wybór wskazań, które będą
widoczne na wyświetlaczu (czas, wartość
zadana i/lub temperatura powietrza).
• Czas (włącz./wyłącz.)
• Wartość zadana (włącz./wyłącz.) (aktualna
wartość temperatury, na jaką termostat
został nastawiony, np. w ustawieniach
programu 4 zdarzeń)
• Temperatura powietrza/podłogi
(włącz./wyłącz.) Temperatura
powietrza/podłogi aktualnie rejestrowana
przez czujnik.
6.4.5. Zabezpieczenie przed dziećmi
Włączenie zabezpieczenia przed dziećmi
powoduje blokadę menu (na wyświetlaczu
pokazuje się symbol kłódki). Blokada
uniemożliwia wybór podmenu i zmianę ustawień.
Nadal jednak możliwe jest ustawianie
temperatury w trybie "komfort" oraz czasu.
Uwaga: Przy włączonej blokadzie można też
resetować urządzenie przy pomocy właściwego
przycisku (powrót do ustawień fabrycznych).
6.4.6. Źródło ciepła
Ta pozycja umożliwia określenie źródła ciepła,
do którego podłączony jest termostat:
• Podpłytkowe
• Podlaminatowe
• Poddywanowe
• Montowane w wylewce
• Typ A
• Typ B
• Określone przez użytkownika
W tabeli w załączniku przedstawiono możliwe
kombinacje poszczególnych typów elementów
grzejnych i pokrycia podłogi.
6
.4.7. Pokrycie podłogi
T
a pozycja umożliwia wprowadzenie rodzaju
pokrycia podłogi:
•
Płytki ceramiczne
•
Kamień
•
Laminat
• Drewno
•
Dywan/Wykładzina dywanowa
•
Winyl
• Inne
W tabeli w załączniku przedstawiono możliwe
k
ombinacje poszczególnych typów elementów
g
rzejnych i pokrycia podłogi.
6
.4.8. Warstwa spodnia podłogi
T
a pozycja umożliwia wprowadzenie rodzaju
w
arstwy spodniej podłogi:
• Beton
•
Gładź podłogowa
•
Sklejka wodoodporna
• Płyta poszyciowa z izolacją
• Płyta poszyciowa
6
.4.9. Rodzaj regulacji
Ta pozycja umożliwia wybór rodzaju regulacji
temperatury:
•
Kontrola temp. podłogi: Używany jest
c
zujnik podłogowy.
• Kontrola temp. podłogi 2 czujniki:
U
żywany jest zarówno czujnik podłogowy,
j
ak i czujnik limitu temperatury. Jeżeli
ustawiono wartość temperatury
maksymalnej dla czujnika limitu temperatury,
t
o po osiągnięciu tej wartości w miejscu
l
okalizacji czujnika, termostat odetnie
ogrzewanie. Funkcja ta może być przydatna,
n
p. dla uniknięcia uszkodzenia niektórych
pokryć podłogowych wykonanych z
delikatnych materiałów.
• Kontrola temp. powietrza: Czujnik jest
umieszczony w termostacie.
• Kontrola temp. powietrza, limit: Oprócz
czujnika umieszczonego w termostacie,
używany jest dodatkowo czujnik limitu
temperatury. Jeżeli ustawiono wartość
temperatury maksymalnej dla czujnika limitu
temperatury, to po osiągnięciu tej wartości w
miejscu lokalizacji czujnika, termostat
odetnie ogrzewanie. Funkcja ta może być
przydatna, np. dla uniknięcia uszkodzenia
niektórych pokryć podłogowych wykonanych
z delikatnych materiałów.
• Kontrola regulatora: Ta opcja nie wymaga
korzystania z czujników. Termostat włącza
się w 20-minutowych cyklach. Długość cyklu
można regulować, ustawiając wartość
procentową czasu, gdzie 20 minut = 100
procent. Przykładowo, jeżeli regulator
ustawiony jest na 50, to włącza się on na 10
minut, wyłącza na 10 minut i znowu włącza
na kolejne 10 minut.
• Kontrola zewnętrzna: Używana w
przypadku kontrolowania pracy kilku
termostatów przez jeden termostat główny
(master). Wtedy działają one w trybie slave i
nie można wprowadzać do nich żadnych
ustawień, gdyż są całkowicie
podporządkowane termostatowi głównemu.
6.4.10. Monitorowanie zużycia energii
Ta pozycja pozwala na odczytanie wartości
zużycia energii w ostatnich:
• 2 dniach
• 30 dniach
• 360 dniach
Wybierz żądany okres i naciśnij ENTER.
Wielkość podana w % pokazuje odsetek
czasu, w jakim włączone było ogrzewanie.
Następna wartość to koszt energii zużytej w
wybranym okresie. Sprawdź, czy podawana
przez urządzenie cena jest prawidłowa, jeśli
nie, sprawdź ustawienia w zakresie waluty,
ceny kWh oraz obciążenia:
• Waluta: Naciśnij ENTER i wybierz żądaną
walutę. Potwierdź naciskając ENTER.
• Koszt jedn.: Naciśnij ENTER i ustaw
w
łaściwy koszt energii elektrycznej.
W
ielkość ta powinna być podana w
przeliczeniu na 1 kWh. Naciśnij ENTER.
•
Obciążenie: Naciśnij ENTER i wprowadź
w
artość podłączonej mocy grzewczej.
W
artość ta musi być wyrażona w Wat (W).
Naciśnij ENTER.
W
yjdź z menu wybierając EXIT.
6.5. Serwis
Jeżeli konieczna jest pomoc techniczna, wybierz
S
erwis w menu głównym, aby uzyskać dostęp
d
o informacji kontaktowych.
6
.6. Dane kontaktowe
W
menu głównym wybierz Dane kontaktowe,
a
by uzyskać dostęp do danych kontaktowych.
O
J ELECTRONICS A/S
S
tenager 13B · DK-Sønderborg · Denmark
T. +45 73 12 13 14 · F. +45 73 12 13 13
6
.7. Ustawienia techniczne
Aby wybrać Ustawienia techniczne, naciskaj
jednocześnie przyciski W górę i W dół przez 5
s
ekund.
U
waga: Zmiana tych ustawień grozi utratą
ważności gwarancji.
6
.7.1. Odczyty
Tutaj uzyskasz odczyty aktualnej temperatury:
•
Temp. pomieszczenia
•
Temp. podłogi
• Limit temp. podłogi
Dostępne są również odczyty następujących
danych statystycznych:
• Min. dzienne: Wartość procentowa
oznaczająca najkrótszy okres aktywności
urządzenia w ciągu 24 godzin, na
przestrzeni ostatnich 14 dni.
• Maks. dzienne: Wartość procentowa
oznaczająca najdłuższy okres aktywności
urządzenia w ciągu 24 godzin, na
przestrzeni ostatnich 14 dni.
• Min. powietrza: Najniższa temperatura
powietrza na przestrzeni ostatnich 48
godzin.
• Średnia powietrza: Średnia temperatura
powietrza na przestrzeni ostatnich 48
godzin.
• Maks. powietrza: Najwyższa temperatura
powietrza na przestrzeni ostatnich 48
godzin.
• Min. podłogi: Najniższa temperatura
podłogi na przestrzeni ostatnich 48 godzin.
• Średnia podłogi: Średnia temperatura
podłogi na przestrzeni ostatnich 48 godzin.
• Maks. podłogi: Najwyższa temperatura
podłogi na przestrzeni ostatnich 48 godzin.
• Odc. połącz.: Liczba połączeń przekaźnika
w okresie eksploatacji termostatu. Tej
wartości nigdy się nie resetuje.
• Rodzaj regulacji: Tutaj dostępny jest odczyt
aktualnego rodzaju regulacji temperatury,
wybranego w Ustawieniach ogólnych
- Podłoga
- Podłoga-2
- Powietrze
- Powietrze-limit
- Reg.
- Zewnętrzna
• Wersja oprogramowania: Określa aktualnie
wykorzystywaną wersję oprogramowania.
6.7.2. Ustawienia temperatury
Ta pozycja umożliwia wprowadzenie pożądanych
wartości minimalnych i maksymalnych
temperatury powietrza i podłogi, a także wartości
dla zewnętrznego czujnika limitu temperatury.
11
© 2011 OJ Electronics A/S
Temperatura
powietrza/podłogi
Wartość zadana
Czas
67071-06-11.qxd:skabelon-A4 29/06/11 9:22 Side 11

Przed ich wprowadzeniem konieczne jest
o
kreślenie odpowiedniego rodzaju regulacji
t
emperatury. Dalsze informacje znajdziesz
w rozdziale 6.4.9 Ustawienia ogólne – Rodzaj
r
egulacji.
U
waga: Jeżeli nie wprowadzisz żadnych
ustawień, stosowane będą ustawienia fabryczne.
•
Zakres temp. powietrza
-
Maks. temp
- Min. temp.
• Zakres temp. podłogi
-
Maks. temp
-
Min. temp
• Czujnik limitu
-
Maks. temp.
-
Min. temp
6.7.3. Funkcja adaptacyjna
T
a pozycja umożliwia włączanie/wyłączanie
(
On/Off) funkcji adaptacyjnej. Funkcja ta jest
związana wyłącznie z regulatorem czasowym
programu 4 zdarzeń i działa tylko w sytuacjach,
w
których przejście od jednego zdarzenia do
n
astępnego jest związane z podniesieniem
temperatury. Funkcja adaptacyjna identyfikuje
właściwy moment uruchomienia źródło ciepła,
t
ak aby pożądana temperatura pomieszczenia
z
ostała osiągnięta w zaprogramowanym czasie.
6
.7.4. Przesunięcie odczytu
F
unkcja przesunięcia odczytu temperatury
używana jest w przypadku niezgodności odczytu
na wyświetlaczu termostatu z temperaturą
w
skazywaną przez termometr pokojowy. Jeżeli
n
a przykład termometr wskazuje temperaturę o
1°C wyższą niż termostat, to odczyt termostatu
m
ożna wyregulować (w zakresie +/- 5°C).
Wówczas termostat będzie wskazywał taką
samą temperaturę jak termometr. Jeżeli
termostat wskazuje o 1° za dużo, wartość
przesunięcia odczytu należy ustawić na +1.
Wówczas odczyt temperatury będzie o 1° niżej.
Przesunięcie odczytu ma wpływ na wbudowane i
zewnętrzne czujniki temperatury, nie wpływa
natomiast na pracę działanie ewentualnego
czujnika limitu temperatury.
6.7.6. Reset
• Reset 2: Przywraca wartości określone w
Ustawieniach technicznych do ustawień
fabrycznych.
• Reset 3: Jak Reset 2, z tym że jednocześnie
usuwa dane archiwalne. Usunięciu nie ulega
jednak liczba połączeń przekaźnika.
7. Sygnalizacja błędów
Błąd w pracy urządzenia sygnalizowany jest za
pomocą pulsującego, czerwonego światła
kontrolki LED.
Błąd wewnętrzny Uszkodzenie termostatu,
należy wymienić termostat.
Błąd zewnętrzny Uszkodzenie zewnętrznego
czujnika lub urządzenia
grzewczego.
The trademark is registered and belongs to OJ Electronics A/S · © 2011 OJ Electronics A/S
D
zień 1-5
Z
darzenie
C
zas
Z
czujnikiem temp. podłogi
Z
czujnikiem temp. powietrza
D
zień
06:00-08:00 25°C 20°C
Poza domem 08:00-16:00 20°C 15°C
W
domu
16:00-22:30 25°C 22°C
N
oc
2
2:30-06:00
2
0°C
1
5°C
D
zień 6-7
Phase
Czas
Z czujnikiem temp. podłogi
Z czujnikiem temp. powietrza
Dzień
08:00-23:00 25°C 22°C
N
oc
23:00-08:00 20°C 15°C
8
. Ustawienia fabryczne
T
ermostat dostarczany jest z następującymi fabrycznie wprowadzonymi ustawieniami programowymi:
P
łytki
K
amień
L
aminat
D
rewno
D
ywan/Wykład-
zina dywanowa
W
inyl
I
nne
P
odpłytkowe
T
AK
T
AK
N
IE
N
IE
N
IE
N
IE
T
AK
Podlaminatowe
NIE NIE TAK TAK NIE NIE TAK
P
oddywanowe
N
IE
N
IE
T
AK
T
AK
T
AK
T
AK
T
AK
Montowane w wylewce
T
AK
T
AK
T
AK
T
AK
T
AK
T
AK
T
AK
Typ A
TAK TAK NIE NIE NIE NIE TAK
Typ B
NIE NIE NIE NIE TAK TAK TAK
O
kreślone przez użytkownika
TAK TAK TAK TAK TAK TAK TAK
Płytki Kamień Laminat Drewno
Dywan/Wykładzin
a dywanowa
Winyl
Inne
Podpłytkowe
A A niedost. niedost. niedost. niedost. E
Podlaminatowe
niedost. niedost. B B niedost. niedost. E
Poddywanowe
niedost. niedost. B B C C E
Montowane w wylewce
A A B B C C E
Typ A
D D niedost. niedost. niedost. niedost. E
Typ B
niedost.. niedost. niedost. niedost. C C E
Określone przez użytkownika
E E E E E E E
Konfiguracja Zakres kontroli temperatury Przegrzanie
Pomieszczenie (powietrze) Podłoga
Min. Max. Min. Max. Max.
A 5 30 5 40 40
B 5 27 5 27 27
C 5 25 5 25 27
D 5 30 5 50 55
E
prog.
prog. prog.
9
. Załącznik
9.1. Tabela kompatybilności
9.2. Właściwości ogrzewania
niedost. = niedostępne
67071-06-11.qxd:skabelon-A4 29/06/11 9:22 Side 12
-
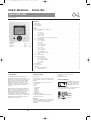 1
1
-
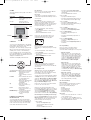 2
2
-
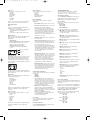 3
3
-
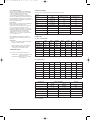 4
4
-
 5
5
-
 6
6
-
 7
7
-
 8
8
-
 9
9
-
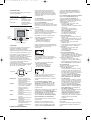 10
10
-
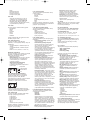 11
11
-
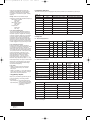 12
12


OJ Electronics ICD3-1999 Handleiding
- Categorie
- Thermostaten
- Type
- Handleiding
- Deze handleiding is ook geschikt voor
in andere talen
Gerelateerde papieren
Andere documenten
-
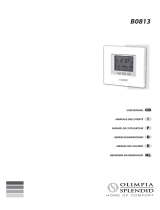 Olimpia Splendid thermostat - B0813 Handleiding
-
RADSON 51044 Handleiding
-
-
REMEHA Timer thermostat Handleiding
-
REMEHA iSense Handleiding
-
 De Dietrich RF Handleiding
-
-
Chaffoteaux EXPERT CONTROL Assembly And Operation Instructions Manual
-
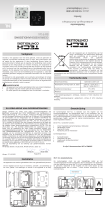 TECH EU-T-3.1 de handleiding
-
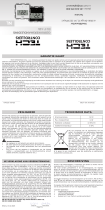 TECH EU-F-12b de handleiding


