Linn Classik Music de handleiding
- Categorie
- Versterker voor muziekinstrumenten
- Type
- de handleiding
Pagina laadt ...
Pagina laadt ...
Pagina laadt ...
Pagina laadt ...
Pagina laadt ...
Pagina laadt ...
Pagina laadt ...
Pagina laadt ...
Pagina laadt ...
Pagina laadt ...
Pagina laadt ...

x
Búsqueda y Exploración. . . . . . . . . . . . . . . . . . . . . . . . 30
Memorización de Presintonías y Memorización
Automática. . . . . . . . . . . . . . . . . . . . . . . . . . . . . . . . . . 31
Selección y Borrado de Presintonías . . . . . . . . . . . . . . 32
Búsqueda de la señal más fuerte . . . . . . . . . . . . . . . . . 33
Selección del umbral de silencio . . . . . . . . . . . . . . . . . 34
Funciones del amplificador . . . . . . . . . . . 35
Ajuste del volumen y del balance. . . . . . . . . . . . . . . . . 36
Ajuste de graves y agudos. . . . . . . . . . . . . . . . . . . . . . 37
Silenciamiento y selección de una fuente . . . . . . . . . . 38
Grabación . . . . . . . . . . . . . . . . . . . . . . . . . . . . . . . . . . 39
Funciones de alarma. . . . . . . . . . . . . . . . . 41
Ajuste del reloj. . . . . . . . . . . . . . . . . . . . . . . . . . . . . . . 42
Ajuste de la alarma. . . . . . . . . . . . . . . . . . . . . . . . . . . . 43
Ajuste del temporizador. . . . . . . . . . . . . . . . . . . . . . . . 45
Utilización de la salida conmutada. . . . . . . . . . . . . . . . 46
Tablas de opciones de usuario . . . . . . . . . 47
Programación de Opciones del Usuario. . . . . . . . . . . . 48
Opciones de Usuario . . . . . . . . . . . . . . . . . . . . . . . . . . 49
Linn CLASSIK Connect . . . . . . . . . . . . . . . 59
Linn CLASSIK Connect . . . . . . . . . . . . . . . . . . . . . . . . 60
Conexión del CLASSIK. . . . . . . . . . . . . . . . . . . . . . . . . 61
Uso del conector Linn CLASSIK . . . . . . . . . . . . . . . . . 62
Party Mode (Modo Fiesta) . . . . . . . . . . . . . . . . . . . . . . 63
Seleccinar el Party Mode . . . . . . . . . . . . . . . . . . . . . . . 64
Party Poop. . . . . . . . . . . . . . . . . . . . . . . . . . . . . . . . . . 65
Sistema CLASSIK KNEKT. . . . . . . . . . . . . . . . . . . . . . . 66
Mantenimiento y Soporte Técnico . . . . . . 67
Reparación y Limpieza. . . . . . . . . . . . . . . . . . . . . . . . . 68
Soporte técnico e información. . . . . . . . . . . . . . . . . . . 69
Características técnicas Linn CLASSIK . . . . . . . . . . . . 72
Inhoud
Voornaamste eigenschappen . . . . . . . . . . . . . . . . . . . . 2
Gebruiksklaar maken van de Linn CLASSIK . 3
Controleer of u ondergenoemde zaken bezit . . . . . . . . . 4
Opstellen van de Linn CLASSIK. . . . . . . . . . . . . . . . . . . 5
Waarschuwing! . . . . . . . . . . . . . . . . . . . . . . . . . . . . . . . 6
Aansluiten van de Linn CLASSIK. . . . . . . . . . . . . . . . . . 7
Opnieuw instellen van fabrieksinstellingen . . . . . . . . . . 9
Display en bedieningstoetsen . . . . . . . . . . . . . . . . . . . 11
Bedieningstoetsen handset . . . . . . . . . . . . . . . . . . . . . 12
Aan- en uitzetten . . . . . . . . . . . . . . . . . . . . . . . . . . . . . 13
CD-functies . . . . . . . . . . . . . . . . . . . . . . . 15
Wijzigen van het display . . . . . . . . . . . . . . . . . . . . . . . 16
Afspelen, onderbreken en stoppen van een CD . . . . . . 18
Het overslaan of uitzoeken van nummers. . . . . . . . . . 19
Het kiezen van een track . . . . . . . . . . . . . . . . . . . . . . . 20
Het herhalen van een aantal tracks . . . . . . . . . . . . . . . 21
Het programmeren van een aantal
tracks (mode A). . . . . . . . . . . . . . . . . . . . . . . . . . . . . . 22
Het programmeren door een aantal tracks weg
te laten (mode B). . . . . . . . . . . . . . . . . . . . . . . . . . . . . 23
Het programmeren van een willekeurige volgorde
(SHUFFLE en RANDOM) . . . . . . . . . . . . . . . . . . . . . . . 24
Gebruik van de intro . . . . . . . . . . . . . . . . . . . . . . . . . . 25
Indexeren . . . . . . . . . . . . . . . . . . . . . . . . . . . . . . . . . . 26
Tuner-functies . . . . . . . . . . . . . . . . . . . . . 27
Display en bedieningstoetsen . . . . . . . . . . . . . . . . . . . 28
Handmatig afstellen. . . . . . . . . . . . . . . . . . . . . . . . . . . 29
Zoeken en scannen . . . . . . . . . . . . . . . . . . . . . . . . . . . 30
Instellingen opslaan en automatisch opslaan . . . . . . . . 31
Instellingen selecteren en opheffen . . . . . . . . . . . . . . . 32
Het sterkste signaal zoeken . . . . . . . . . . . . . . . . . . . . . 33
Selecteren van de mute-drempel . . . . . . . . . . . . . . . . . 34
Versterkerfuncties. . . . . . . . . . . . . . . . . . . 35
Instellen van volume en balans. . . . . . . . . . . . . . . . . . . 36
Instellen van bas en treble . . . . . . . . . . . . . . . . . . . . . . 37
Muting en het kiezen van de bron. . . . . . . . . . . . . . . . . 38
Opnemen . . . . . . . . . . . . . . . . . . . . . . . . . . . . . . . . . . . 39
Wekkerfuncties . . . . . . . . . . . . . . . . . . . . . 41
Klok op tijd zetten. . . . . . . . . . . . . . . . . . . . . . . . . . . . . 42
De wekker zetten. . . . . . . . . . . . . . . . . . . . . . . . . . . . . . 43
Instellen van de timer . . . . . . . . . . . . . . . . . . . . . . . . . . 45
Gebruik maken van de geschakelde output. . . . . . . . . . 46
Gebruiksoverzicht . . . . . . . . . . . . . . . . . . . 47
Gebruiksmogelijkheden programmeren . . . . . . . . . . . . 48
Gebruiksoverzicht. . . . . . . . . . . . . . . . . . . . . . . . . . . . . 49
Linn CLASSIK Connect . . . . . . . . . . . . . . . 59
Linn CLASSIK Connect . . . . . . . . . . . . . . . . . . . . . . . . . 60
Aansluiten van de CLASSIK . . . . . . . . . . . . . . . . . . . . . 61
Het gebruik van de Linn CLASSIK connect . . . . . . . . . . 62
Party Mode . . . . . . . . . . . . . . . . . . . . . . . . . . . . . . . . . . 63
Kiezen van Party Mode . . . . . . . . . . . . . . . . . . . . . . . . . 64
Party Poop . . . . . . . . . . . . . . . . . . . . . . . . . . . . . . . . . . 65
CLASSIK KNEKT systeem. . . . . . . . . . . . . . . . . . . . . . . 66
Onderhoud en technische
ondersteuning . . . . . . . . . . . . . . . . . . . . . . 67
Onderhoud en reiniging . . . . . . . . . . . . . . . . . . . . . . . . 68
Technische ondersteuning en informatie . . . . . . . . . . . 69
Linn CLASSIK Specificaties . . . . . . . . . . . . . . . . . . . . . 74
Pagina laadt ...
Pagina laadt ...
Pagina laadt ...

2
Funzioni principali
❑
Eccellente qualità audio grazie all’alta qualità del lettore CD.
❑
Sintonizzatore AM/FM con 80 stazioni preselezionate e controllo
di soglia regolabile.
❑
Preamplificatore con due ingressi di linea per apparecchi
esterni, un’uscita per registratore ed un’uscita variabile
aggiuntiva.
❑
Amplificatore di potenza ad alte prestazioni (75W in 4 Ohm).
❑
Due terminali per l’altoparlante per collegare due paia di casse
acustiche simultaneamente o per collegarne un unico paio con
doppio cablaggio.
❑
Orologio, sveglia e timer.
❑
Funzione di stand-by per l’amplificatore di potenza per ridurre il
consumo energetico.
❑
Comandi individuali per i toni bassi ed alti e per il bilanciamento.
❑
Dispositivo “plug-and-play” multistanza che consente
all’utilizzatore finale di installare e collegare a casa propria un
Linn Classik con un numero massimo di altri quattro Classik.
❑
Dispositivo multistanza completo Linn Knekt che consente a un
Linn Classik di funzionare come pilota principale o come
ricevitore locale in un sistema Knekt.
❑
Presa elettrica comandata dal timer per l’alimentazione di
un’altra sorgente, di un’altra sorgente, di una lampada o di un
piccolo elettodomestico.
❑
Funzione di monitoraggio dei nastri.
❑
Funzionamento slave del processore AV surround per la facile
integrazione in un sistema AV.
❑
Opzioni configurabili dall’utente.
❑
Uscita ottica digitale CD
Características principales
❑
Excepcional calidad de audio debida al ata calidad del transporte
y del lectorde CD .
❑
Sintonizador FM/AM con 80 presintonias y control de umbral
ajustable.
❑
Etapa preamplificadora con 2 entradas externas de nivel, una
salida de grabación y una salida del preamplificador.
❑
Potente amplificador de potencia (75 W a 4 ohmios).
❑
Salidas dobles para altavoz para gobernar simultáneamente dos
parejas de cajas acústicas o para bi-cablear una pareja.
❑
Funciones de 10 reloj, alarma y temporizador.
❑
Funciónde reposo del amplificador de potencia para reducir el
consumo.
❑
Controles individuales para balance, graves y agudos.
❑
Capacidad Plug & play multi sala que permite que usted mismo
instale un equipo Linn Classik y conecte hasta un total de otros
cuatro equipos Classiks
❑
Capacidad completa para multisala del sistema Linn Knekt que
permite que uno de los equipos Linn Classik funcione como
emisor de señal de sala principal o receptor de señal en sala
secundaria o local mediante el sistema Knekt.
❑
Salida de red conmutada para alimentar otro dispositivo o
incluso una lámpara o una cafetera (máx. 440W).
❑
Función para monitoraje de cinta.
❑
Funcionamiento esclavo de procesador AV surround para su
fácil integración en un sistema AV.
❑
Opciones de usuario configurables.
❑
Señal óptica digital de salida de CD
Voornaamste eigenschappen
❑
Uitstekende geluidsweergave door de hoogwaardige CD-
aandrijving en laserkop.
❑
AM/FM Tuner met 80 voorkeuzezenders.
❑
eindversterker met 2 externe aansluitingen, een opname uitgang
en een aansluiting voor een aparte voorversterker.
❑
Versterker met hoog vermogen (75W / 4 Ohm).
❑
Dubbele luidsprekeraansluitingen om twee paar luidsprekers
aan te kunnen sluiten.
❑
Tijdklok, wekker en programmeerbaar.
❑
Versterker met wachtstand om stroomverbruik te
minimaliseren.
❑ Individuele bas-, treble- en balans-instelling.
❑
Plug and play multikamer mogelijkheden waarbij de Linn Classik
zelf kan worden geinstalleerd en aangesloten op maximaal vier
aanvullende Classiks.
❑
Complete Linn Knekt multikamer mogelijkheden waarbij een
Linn Classik binnen het KNEKT-systeem als driver op de
geluidsinstallatie of als ontvanger in een andere kamer fungeert
❑
Netstroomuitgang waar u andere toestellen op kunt aansluiten –
zelfs een schemerlamp of koffiezetapparaat.
❑
Cassettedeck-aansluiting.
❑
Video surround processor slave operation, om een
videorecorder aan te kunnen sluiten.
❑
Naar eigen wensen instelbaar.
❑
CD optische digitale output
Pagina laadt ...

4
English
EnglishEnglish
English
Français
FrançaisFrançais
Français
Deutsch
DeutschDeutsch
Deutsch
Italiano
ItalianoItaliano
Italiano
Español
EspañolEspañol
Español
Nederlands
NederlandsNederlands
Nederlands
LINN CLASSIK
Check you have
Remote handset
LR03, AAA
batteries (x 4)
AM aerial FM aerial Mains lead a, b or c
Vérifiez que vous avez
Télécommande
Piles LR03, AAA (x 4)
Antenne AM Amtenne FM Câble d'alimentation secteur a, b
ou c
Zubehör überprüfen
Fernbedienung
LR03, AAA
Batterien (x 4)
AM Antenne FM Antenne Hauptkabel a, b oder c
Verificare di avere disponibili
Telecomando
Batterie
LR03, AAA (x 4)
Antenna AM Antenna FM
Cavi di alimentazione a, b o c
Compruebe que tiene
Mando a distancia
Baterías
LR03, AAA (x 4)
Antena AM Antena FM
Cable de alimentación a, b o c
Controleer of u onderge-
noemde zaken bezit
Afstandsbediening
LR03, AAA
batterijen (x 4)
AM-antenne FM-antenne Netsnoer a, b of c
A
A
A
A
A
A
A
A
A
A
A
A
a
b
c

5 LINN CLASSIK
English
EnglishEnglish
English
Français
FrançaisFrançais
Français
Deutsch
DeutschDeutsch
Deutsch
Italiano
ItalianoItaliano
Italiano
Español
EspañolEspañol
Español
Nederlands
NederlandsNederlands
Nederlands
LINN CLASSIK
Positioning the Linn CLASSIK
Allow plenty of air circulation for
power amplifiers and other heat
generating components.
Keep infra-red sensor out of direct
sunlight.
Do not obscure infra-red sensor. Keep halogen lamps, low-energy
and fluorescent bulbs away from
infra-red sensor.
Position du Linn CLASSIK
Assurer une bonne circulation d'air
autour d'amplificateurs de
puissance et autres composants
produisant de la chaleur.
Garder le détecteur d'infrarouge à
l'abri de la lumière du soleil.
Ne rien placer devant le détecteur
d'infrarouge.
Eloigner les lampes halogènes et
ampoules à faible énergie et
fluorescentes du détecteur
d'infrarouge.
Aufstellung des Linn
CLASSIK
Verstärker und andere
wärmeerzeugende Geräte
benötigen ausreichend Luftumlauf.
Infrarotsensor vor direktem
Sonnenlicht schützen.
Infrarotsensor nicht verdecken . Halogenlampen und Glühlampen
vom Infrarotsensor fernhalten.
Posizione di Linn CLASSIK
Lasciare sufficiente spazio per la
circolazione dell’aria per gli
amplificatori di potenza e gli altri
componenti che generano calore.
Tenere il sensore infrarossi lontano
dalla luce solare diretta.
Non coprire il sensore infrarossi. Tenere le lampade alogene, le
lampadine a bassa energia e
quelle fluorescenti lontano dal
sensore infrarossi.
Colocación del Linn CLASSIK
Permita una circulación de aire
adecuada para los amplificadores
de potencia y demás componentes
generadores de calor.
Mantenga el sensor infrarrojo lejos
de la luz solar directa.
No cubra el sensor infrarrojo. Mantenga el sensor infrarrojo lejos
de las lámparas halógenas,
fluorescentes y bombillas de bajo
consumo.
Opstellen van de Linn
CLASSIK
Zorg voor voldoende ventilatie voor
elektronische versterkers en
andere onderdelen die warmte
afgeven.
Stel de infra-rood sensor niet bloot
aan direct zonlicht.
Scherm de infra-rood sensor niet af. Stel de infra-rood sensor niet bloot
aan halogeenlampen,
energiebesparende lampen of
tl-buizen.

6
English
EnglishEnglish
English
Français
FrançaisFrançais
Français
Deutsch
DeutschDeutsch
Deutsch
Italiano
ItalianoItaliano
Italiano
Español
EspañolEspañol
Español
Nederlands
NederlandsNederlands
Nederlands
LINN CLASSIK
Warning!
Always switch off all equipment
when changing connections.
Always connect mains lead to
earthed power outlet.
Always use earthed mains lead
supplied.
See back panel for correct fuse
ratings [FUSE TYPE].
If your Linn Classik fails, please
return to local Linn retailer.
Attention !
Prendre garde de toujours
débrancher tout l'équipement
avant de changer les
connexions.
Ne brancher le câble
d'alimentation secteur que dans
une prise de courant mise à la
terre.
N'utiliser que le câble
d'alimentation secteur fourni.
Voir panneau arrière pour vérifier la
valeur nominale des fusibles
[FUSE TYPE].En cas de panne de
votre Linn Classik, veuillez le
retourner à votre détaillant Linn
local.
Warnung!
Bei Anschlussänderungen stets
alle Geräte ausschalten.
Hauptkabel ausschließlich an
geerdete Stromausgabe
anschließen.
Ausschließlich mitgeliefertes,
geerdetes Netzkabel verwenden.
Korrekte Sicherungsgröße siehe
rückseitiges Bedienfeld [FUSE
TYPE].Bei Problemen mit Ihrem
Linn Classik bringen Sie ihn bitte zu
Ihrem Linn Händler vor Ort.
Avvertenza!
Spegnere sempre l’apparecchio
quando si modificano le
connessioni.
Collegare sempre i cavi di
alimentazione ad una presa di
corrente messa a terra.
Utilizzare sempre i cavi di
alimentazione messi a terra in
dotazione.
Vedere il pannello posteriore per la
scelta del fusibile corretto [FUSE
TYPE].Se Linn Classik non
funziona, rivolgersi al rivenditore di
zona dei prodotti Linn.
¡Advertencia!
Apague siempre el equipo para
cambiar las conexiones.
Conecte siempre el cable de red
a un enchufe con toma de tierra.
Utilice siempre el cable de red
con toma de tierra que se
suministra.
Véase el panel posterior para las
características correctas de los
fusibles [FUSE TYPE].Si fallara su
equipo Linn Classik, por favor,
devuélvalo a su proveedor.
Waarschuwing!
Schakel altijd alle apparaten uit
bij het veranderen van
verbindingen.
Sluit het netsnoer altijd aan op
een geaard stopcontact.
Gebruik altijd de bijgeleverde,
geaarde kabel.
Kijk op het achterpaneel voor de
juiste zekeringsterkte [FUSE
TYPE].Indien uw Linn Classik
gebreken vertoont dient u contact
op te nemen met uw Linn-dealer.
LINN PEKIN
a
b
c
USE CORRECT FUSE
SETTING: VOLTAGE RANGE: FUSE TYPE:
100 90-110V ~ 50/60Hz T6.3A
115 103-126V ~ 50/60Hz T6.3A
230 207-253V ~ 50/60Hz T3.15A

7 LINN CLASSIK
English
EnglishEnglish
English
Français
FrançaisFrançais
Français
Deutsch
DeutschDeutsch
Deutsch
Italiano
ItalianoItaliano
Italiano
Español
EspañolEspañol
Español
Nederlands
NederlandsNederlands
Nederlands
LINN CLASSIK
Connecting the Linn CLASSIK
Use the AUX (auxiliary) connection
to connect an external source,
such as a TV.
Use the TAPE 1 connections to
play an external tape deck through
the Linn Classik amplifier.
Use the TAPE 2 connections to
connect a tape deck to record from
the Linn Classik.
Use the PRE OUT to connect the
output of the preamplifier to a
separate power amplifier.
Branchement du Linn
CLASSIK
Utiliser la connexion AUX
(auxiliaire) pour brancher une
source externe, telle qu'une
télévision.
Utiliser les connexions TAPE 1
pour brancher une platine
cassettes externe par le biais de
l'amplificateur Linn Classik.
Utiliser les connexions TAPE 2
pour brancher une platine
cassettes à partir du Linn Classik.
Utiliser PRE OUT pour brancher la
sortie du préamplificateur à un
amplificateur séparé.
Anschluss des Linn CLASSIK
AUX-Anschluss (Zusatzger.) zum
Anschluss eines externen Gerätes
wie z.B. Fernseher.
TAPE 1 -Anschlüsse zur
Wiedergabe eines externen
Kassettendecks über den Linn
Classik Verstärker.
TAPE 2 -Anschlüsse zum
Anschluss eines Kassettendecks
zur Aufnahme vom Linn Classik.
PRE OUT zum Anschluss des
Vorverstärkerausgangs an eine
Endstufe.
Connessione di Linn CLASSIK
Utilizzare la presa AUX (ausiliaria)
per collegare una sorgente
esterna, ad es. un televisore.
Utilizzare l’ingresso TAPE 1 per
collegare un registratore esterno al
Linn Classik in sola riproduzione.
Utilizzare i connettori TAPE 2 per
collegare un registratore esterno al
Linn Classik in registrazione /
riproduzione.
Utilizzare la presa PRE OUT per
collegare l’output del
preamplificatore ad un
amplificatore di potenza diverso.
Conexión del Linn CLASSIK
Utilice los conectores AUX
(auxiliar) para conectar a una
fuente externa, tal como una TV.
Utilice los conectores TAPE 1 para
reproducir una pletina externa con
el Linn Classik.
Utilice los conectores TAPE 2 para
conectar una pletina para la
grabación desde el Linn Classik.
Utilice la salida PRE OUT para
conectar la salida de la etapa
preamplificadora a un amplificador
de potencia separado.
Aansluiten van de Linn
CLASSIK
Gebruik de AUX (auxiliary) ingang
voor de aansluiting van een ander
toestel, zoals b.v. een TV.
Gebruik de TAPE 1 ingangen om
via de Linn Classik versterker een
cassettedeck aan te sluiten.
Gebruik de TAPE 2 ingangen om
via de Linn Classik versterker met
een cassettedeck op te nemen.
Gebruik de PRE OUT om het
signaal van de voorversterker aan
te sluiten op een aparte versterker.
LEFT
RIGHT
AUX
L
R
ORRECT FUSE
VOLTAGE FUSE TYPE
11 50/60hz 125V T6.3A
11 50/60hz 125V T6.3A
11 50/60hz 250V T3.15A
SUMPTION 500W APPROX
ACC
MAIN
INPUT
ROOM OUTPUTS
AUX TAPE1 TAPE2 PRE AMP
RI
GND
IN OUT
IN
IN
OUT
IR OUT
TX
RX
CD
DIGTAL
OUT
TAPE 1
IN
L
R
ORRECT FUSE
VOLTAGE FUSE TYPE
11 50/60hz 125V T6.3A
11 50/60hz 125V T6.3A
11 50/60hz 250V T3.15A
SUMPTION 500W APPROX
ACC
MAIN
INPUT
ROOM OUTPUTS
AUX TAPE1 TAPE2 PRE AMP
RI
GND
IN OUT
IN
IN
OUT
IR OUT
TX
RX
CD
DIGTAL
OUT
TAPE 2
IN OUT
L
R
E CORRECT FUSE
NG VOLTAGE FUSE TYPE
90-11 50/60hz 125V T6.3A
90-11 50/60hz 125V T6.3A
90-11 50/60hz 250V T3.15A
CONSUMPTION 500W APPROX
ACC
MAIN
INPUT
ROOM OUTPUTS
AUX TAPE1 TAPE2 PRE AMP
RIGHT
GND
IN OUT
IN
IN
OUT
IR OUT
TX
RX
CD
DIGTAL
OUT
PRE OUT
L
R
E CORRECT FUSE
NG VOLTAGE FUSE TYPE
90-11 50/60hz 125V T6.3A
90-11 50/60hz 125V T6.3A
90-11 50/60hz 250V T3.15A
CONSUMPTION 500W APPROX
ACC
MAIN
INPUT
ROOM OUTPUTS
AUX TAPE1 TAPE2 PRE AMP
RIGHT
GND
IN OUT
IN
IN
OUT
IR OUT
TX
RX
CD
DIGTAL
OUT
Pagina laadt ...

9 LINN CLASSIK
English
EnglishEnglish
English
Français
FrançaisFrançais
Français
Deutsch
DeutschDeutsch
Deutsch
Italiano
ItalianoItaliano
Italiano
Español
EspañolEspañol
Español
Nederlands
NederlandsNederlands
Nederlands
LINN CLASSIK
Restoring factory default
settings
Switch power on while holding
VOL
for 10seconds.
Using highlighted buttons on the front
panel, select the area the tuner will
operate in: Europe, Japan or USA.
Press any other button on front to
store.
The factory default settings are
highlighted in grey in the Option
tables (pages 49-55).
Remise en mémoire des
réglages par défaut d'usine
Mettre sous tension tout en
maintenant
VOL
enfoncé
pendant dix secondes.
A l'aide des boutons éclairés sur le
panneau avant, choisir la zone où le
tuner va fonctionner : Europe,
Japon ou Etats-Unis.
Appuyer sur n'importe quel autre
bouton sur le devant pour
mémoriser.
Les réglages par défaut d'usine
sont surlignés en gris dans les
tableaux d'options (pages 49-55).
Rückstellung auf
Werkseinstellungen
Einschalten, während
VOL
10
Sekunden lang gedrückt wird.
Mit den hervorgehobenen Tasten
am vorderen Bedienfeld den
Betriebsbereich des Tuners wählen:
Europa, Japan oder USA.
Zum Speichern beliebige
vorderseitige Taste drücken.
Werkseinstellungen werden in der
Optionentabelle grau
hervorgehoben (Seite 49-55).
Ripristino delle impostazioni
predefinite in fabbrica
Accendere l’apparecchio tenendo
premuto
VOL
per 10 secondi.
Utilizzando i pulsanti evidenziati sul
pannello anteriore, selezionare la
regione in cui verrà utilizzato il sin-
tonizzatore: Europa, Giappone o USA.
Premere un qualsiasi altro tasto del
pannello anteriore per
memorizzare.
Le impostazioni predefinite in
fabbrica sono evidenziate in grigio
nelle tabelle Opzioni (pagina 49-55).
Restablecimiento de ajustes
predeterminados de fábrica
Encienda la unidad mientras
mantiene pulsado
VOL
durante 10 segundos.
Utilizando los botones señalados en
el panel de control, seleccione el
área en el que funcionará el
sintonizador: Europa, Japón o USA.
Pulse cualquier otro botón en el
panel frontal para memorizar.
Los valores predeterminados de
fábrica están señalados en gris en
las Tablas de Opciones (páginas
49-55).
Opnieuw instellen van
fabrieksinstellingen
Schakel het toestel aan door
VOL
gedurende tien
seconden in te drukken.
Met de verlichte knoppen op het
voorpaneel geeft u aan in welk
gebied u de tuner gebruikt: Europa,
Japan of USA.
Druk op een willekeurige toets aan
de voorkant om op te slaan.
De fabrieksinstellingen worden in
grijs weergegeven in de
optietabellen (pag. 49-55).
C0NF1G Eur Eur 3-0
+
+
+
+
+
+
Pagina laadt ...
Pagina laadt ...

12 LINN CLASSIK
LINN CLASSIK
Note: keys can operate a CD or tuner. If keys appear not to work press one of the
CD or tuner control keys.
Remarque: Les touches peuvent faire fonctionner le lecteur CD ou le tuner. Si les touches
ne semblent pas fonctionner, appuyer sur l'une des touches de la platine CD ou du tuner.
Hinweis: Tasten dienen für Tuner oder CD-Betrieb. Wenn Tasten nicht funktionieren,
drücken Sie eine der CD- oder Tuner-Steuerungstasten drücken.
Nota: I tasti consentono di comandare un CD o un sintonizzatore. Se sembra che i tasti
non funzionino, premere uno dei tasti di comando del CD o del sintonizzatore.
Nota: Las teclas pueden controlar el CD o el sintonizador. Si parece que las teclas
no responden, pulse primero una de las teclas de control del CD o del sintonizador.
NB: toetsen kunnen een CD of een tuner bedienen. Als toetsen niet schijnen te
werken, druk een van de CD- of tunerbedieningstoetsen in.
Handset controls
Standby key Preamplifier
keys
CD Player keys Number keys Clock, Timer, Alarm
keys
Tuner keys
Télécommande
Touche veille
Touches
préamplificateur
Touches lecteur
de CD
Touches
numériques
Touches horloge,
minuterie, réveil
Touches tuner
Handset-Steuerungen
Standby-Taste Vorverstärker-
tasten
CD-Player-
Tasten
Zifferntasten Uhr-, Timer-,
Alarmtasten
Tuner-Tasten
Comandi del
telecomando
Tasto di stand-
by
Tasti del
preamplifica-
tore
Tasti del lettore
di CD
Tasti numerici Tasti dell’orologio, del
timer e della sveglia
Tasti del
sintonizzatore
Controles del Mando a
Distancia
Tecla Reposo Teclas del
Preamplificador
Teclas del
Reproductor
de CD
Teclas
Numéricas
Teclas de Reloj,
Temporizador y Alarma
Teclas del
Sintonizador
Bedieningstoetsen
handset
Standby-toets Versterkertoetsen CD-
spelertoetsen
Nummertoetsen Toetsen voor de klok,
tijdsinstelling en
alarminstelling
Tunertoetsen
0...9 0...9
0...9 0...9
0...9 0...9
0...9
0...9
0...9 0...9
0...9 0...9
6321 4 5
6
3
2
1
4
5
+- TIMESTOREPRESET
TIMERALARM+-
0TUNESCAN
987MONO
654SIGNAL
321BAND
STOPINDEXDISPLAY
PAUSESEARCHREPEAT
PLAYSKIPINTRO
OPENSHUFFLERANDOMRECORD
+- BASSTP1TP2
+- TREBAUXTUN
RL BALCDLISTEN
+- VOLMUTE
CLOCK
TUNER
CD PLAYER PRE-AMP
LINN
O
” ’
<<
>>
<
>

13 LINN CLASSIK
English
EnglishEnglish
English
Français
FrançaisFrançais
Français
Deutsch
DeutschDeutsch
Deutsch
Italiano
ItalianoItaliano
Italiano
Español
EspañolEspañol
Español
Nederlands
NederlandsNederlands
Nederlands
LINN CLASSIK
Switching on and off
Press on the front panel. The time will be displayed. To change power up state see User
Options (see pages 49-55).
Allumer/Eteindre
Apppuyer sur sur le
panneau de devant.
L'heure va s'afficher.
Pour changer l’affichage obtenu à
la mise sous tension, se reporter
au chapitre Options de l'utilisateur
(voir pages 49-55).
Ein- und Ausschalten
Am vorderen Bedienfeld
drücken.
Zeit wird angezeigt.
Ändern der Startanzeige siehe
Benutzeroptionen (siehe Seite
49-55).
Accensione e spegnimento
Premere sul pannello
anteriore.
Viene visualizzata l’ora.
Per modificare lo stato di
accensione, consultare Opzioni
Utente (vedere pagina 49-55).
Encendido y apagado
Pulse en el panel frontal.
Se visualizará la hora.
Para cambiar el estado de
encendido, véase Opciones de
Usuario (véase páginas 49-55).
Aan- en uitzetten
Druk in op het voorpaneel.
De tijd wordt weergegeven.
Voor het wijzigen van power-up
status zie Gebruiksmogelijkheden
(zie pag. 49-55).
L
INN CLASSIK
11.06 4-0
0...9
POWER
0...9
POWER
0...9
POWER
0...9
POWER
0...9
POWER
0...9
POWER
Pagina laadt ...
Pagina laadt ...

16
English
EnglishEnglish
English
Français
FrançaisFrançais
Français
Deutsch
DeutschDeutsch
Deutsch
Italiano
ItalianoItaliano
Italiano
Español
EspañolEspañol
Español
Nederlands
NederlandsNederlands
Nederlands
LINN CLASSIK
Changing the display
Press to change the
information that appears on the
display.
TRACK: shows the number and
index number of the current track.
Example1:
There is no disc present.
Example2:
Track 3 index number 1 is playing.
Changement de l'affichage
Appuyer sur pour changer
les informations de l'affichage.
TRACK : montre le numéro et le
numéro d'index du morceau qui
passe.
Exemple 1 :
Aucun CD présent.
Exemple 2 :
Le morceau 3 numéro d'index 1
passe.
Display ändern
Zum Ändern der Info am Display
drücken.
TRACK: zeigt Nummer und
Indexnummer des aktuellen Titels
an.
Beispiel 1:
Keine CD eingelegt.
Beispiel 2:
Titel 3 Indexnummer 1 spielt.
Dati visualizzati nel display
Premere per modificare i
dati visualizzati sul display.
TRACK: indica il numero e il
numero d’indice del brano
attualmente riprodotto.
Esempio 1:
Nessun disco è inserito.
Esempio 2:
Il brano 3 con numero d’indice 1 è
in fase di riproduzione.
Modificación de la
visualización,
Pulse para cambiar la
información que aparece en el
visualizador.
TRACK: muestra el número y el
número de índice de la pista
actual.
Ejemplo1:
No hay ningún disco.
Ejemplo2:
Se está reproduciendo la pista 3 y
número de indice 1.
Wijzigen van het display
Druk op om de informatie
op het display te wijzigen.
TRACK: geeft het nummer en
indexnummer van de huidige track
aan.
Voorbeeld 1:
Er zit geen CD in de speler.
Voorbeeld 2:
Track 3 van indexnummer 1 wordt
afgespeeld.
1 1
TRACK
>
1 1
TRACK
>
00
TRACK
3 1
TRACK
>
DISPLAY
DISPLAY
DISPLAY
DISPLAY
DISPLAY
DISPLAY

17 LINN CLASSIK
Example3:
The disc is stopped.
The disc has 16 tracks.
Press .
TRACK TIME: shows the time
from the start of the current track.
Press .
REMAIN TRACK TIME: shows the
time remaining for the current track.
Press .
TOTAL TIME: shows the time from
start of disc.
Press .
TOTAL REMAIN TIME: Shows the
time remaining for the disc.
Exemple 3 :
Le CD est arrêté.
Le CD compte 16 morceaux.
Appuyer sur .
TRACK TIME : montre le temps
écoulé depuis le début du
morceau.
Appuyer sur .
REMAIN TRACK TIME : montre la
durée restante pour le morceau qui
passe.
Appuyer sur .
TOTAL TIME : montre la durée
écoulée depuis le début du CD.
Appuyer sur .
TOTAL REMAIN TIME : montre la
durée restante pour tout le CD.
Beispiel 3:
CD gestoppt.
CD enthält 16 Titel.
drücken.
TRACK TIME: zeigt die Zeit seit
Beginn des aktuellen Titels an.
drücken.
REMAIN TRACK TIME: zeigt die
restl. Spielzeit des aktuellen Titels an.
drücken.
TOTAL TIME: zeigt die Zeit ab
Beginn der CD.
drücken.
TOTAL REMAIN TIME: Zeigt die
restl. Spielzeit der CD an.
Esempio 3:
Il disco è fermo.
Il disco ha 16 brani.
Premere .
TRACK TIME: indica il tempo
trascorso dall’inizio del brano
riprodotto.
Premere .
REMAIN TRACK TIME: indica il
tempo residuo del brano riprodotto.
Premere .
TOTAL TIME: indica il tempo
trascorso dall’inizio del disco.
Premere .
TOTAL REMAIN TIME: indica il
tempo residuo del disco.
Ejemplo3:
El disco está parado.
El disco tiene 16 pistas.
Pulse .
TRACK TIME: muestra el tiempo
desde el inicio de la pista actual.
Pulse .
REMAIN TRACK TIME: muestra el
tiempo restante para la pista actual.
Pulse .
TOTAL TIME: muestra el tiempo
desde el inicio del disco.
Pulse .
TOTAL REMAIN TIME: Muestra el
tiempo restante para el disco.
Voorbeeld 3:
De CD is afgelopen.
De CD heeft 16 nummers.
Druk op .
TRACK TIME: Toont de verlopen
speeltijd vanaf het begin van het
huidige nummer.
Druk op .
REMAIN TRACK TIME: geeft de
nog resterende speeltijd van het
huidige nummer aan.
Druk op .
TOTAL TIME: Geeft de verlopen
tijd vanaf het begin van de CD aan.
Druk op .
TOTAL REMAIN TIME: Geeft de
resterende speeltijd van de CD
aan.
16
TRACK
0.38
TIME
TRACK
>
1.25
TIME
TRACK
REMAIN
>
25.14
TIME
TOTAL
>
12.54
TIME
REMAIN
TOTAL
>
DISPLAY DISPLAY DISPLAY DISPLAY
DISPLAY DISPLAY DISPLAY DISPLAY
DISPLAY DISPLAY DISPLAY DISPLAY
DISPLAY
DISPLAY DISPLAY DISPLAY
DISPLAY DISPLAY DISPLAY DISPLAY
DISPLAY DISPLAY DISPLAY DISPLAY

18
English
EnglishEnglish
English
Français
FrançaisFrançais
Français
Deutsch
DeutschDeutsch
Deutsch
Italiano
ItalianoItaliano
Italiano
Español
EspañolEspañol
Español
Nederlands
NederlandsNederlands
Nederlands
LINN CLASSIK
Playing, pausing and
stopping a disc
Press . Insert disc.
Press or nudge drawer to
close.
Press to play from the start
of the disc.
Press to pause.
Press or to resume.
Press to stop.
Pour passer, mettre sur
pause ou arrêter un disque
Appuyer sur . Insérer CD.
Appuyer sur ou donner une
légère poussée au tiroir du CD.
Appuyer sur pour passer le
début du CD.
Appuyer sur pour mettre sur
pause.
Appuyer sur ou pour
reprendre.
Appuyer sur pour arrêter.
CD wiedergeben, pausieren
u. stoppen
drücken. CD einlegen.
drücken oder Fach
zuschieben.
Für Wiedergabe ab Beginn der CD
drücken.
Zum Pausieren drücken.
Zur erneuten Wiederg. oder
drücken.
Zum Stoppen drücken.
Riproduzione, pausa ed
arresto del disco
Premere ed inserire il
disco.
Premere o spingere il
cassettino per chiuderlo..
Premere per iniziare la
riproduzione dall’inizio del disco.
Premere per interrompere
temporaneamente la riproduzione.
Premere o per
riprendere la riproduzione.
Premere per arrestare la
riproduzione.
Reproducción, pausa y
parada de un disco
Pulse . Introduzca el disco.
Pulse o empuje la bandeja
para cerrar.
Pulse para reproducir
desde el inicio del disco.
Pulse para pausa.
Pulse o para
continuar.
Pulse para parar.
Afspelen, onderbreken en
stoppen van een CD
Druk op . Leg de CD in.
Druk op of druk de lade
voorzichtig dicht.
Druk op om vanaf het begin
van de CD af te spelen.
Druk op om te onderbreken.
Druk op of om te
hervatten.
Druk op om te stoppen.
18
TRACK
1 1
TRACK
>
1 1
TRACK
=
TRACK
>
18
OPEN
OPEN
PLAY
PAUSE
PAUSE
PLAY
STOP
OPEN
OPEN
PLAY
PAUSE
PAUSE
PLAY
STOP
OPEN
OPEN
PLAY
PAUSE
PAUSE
PLAY
STOP
OPEN
OPEN
PLAY
PAUSE
PAUSE
PLAY
STOP
OPEN
OPEN
PLAY
PAUSE
PAUSE
PLAY
STOP
OPEN
OPEN
PLAY
PAUSE
PAUSE
PLAY
STOP

19 LINN CLASSIK
English
EnglishEnglish
English
Français
FrançaisFrançais
Français
Deutsch
DeutschDeutsch
Deutsch
Italiano
ItalianoItaliano
Italiano
Español
EspañolEspañol
Español
Nederlands
NederlandsNederlands
Nederlands
LINN CLASSIK
Skipping and searching
through tracks
Skip Forward:
Press to skip to the start
of the next track.
Skip Backward:
Press to return to start of
current track.
Press again to skip back
to the previous track.
Search:
Press to search forward.
Press to search backwards.
Sauter et rechercher des
morceaux
Saut vers l'avant :
Appuyer sur pour sauter
au début du prochain morceau.
Saut vers l'arrière :
Appuyer sur pour revenir
au début du morceau actuel.
Appuyer sur pour revenir
au morceau précédent.
Recherche :
Appuyer sur pour recherche avant.
Appuyer sur pour recherche
arrière.
Titel suchen und überspringen
Überspringen Vorw.:
Zum Springen an Beginn des
nächsten Titels drücken.
Überspringen Rückw.:
Zur Rückkehr an Beginn des
aktuellen Titels drücken.
Zum Springen auf vorherg. Titel
erneut drücken.
Suchen:
Zur Vorwärtssuche drücken.
Zur Rückwärtssuche drücken.
Avanzamento, riavvolgimento
e ricerca dei brani
Brano successivo:
Premere per passare
all’inizio del brano successivo.
Brano precedente:
Premere per passare
all’inizio del brano in fase di
riproduzione.
Premere nuovamente per
passare al brano precedente.
Ricerca:
Premere per avanzare.
Premere per riavvolgere.
Salto y búsqueda a través de
las pistas
Saltar adelante:
Pulse para saltar al inicio
de la siguiente pista.
Saltar atrás:
Pulse para volver al inicio
de la pista actual.
Pulse de nuevo para
saltar a la pista anterior.
Búsqueda:
Pulse para buscar hacia delante.
Pulse para buscar hacia atrás.
Het overslaan of uitzoeken van
nummers
Skip Voorwaarts :
Druk op om vanaf het
begin van het volgende nummer
over te slaan.
Skip achterwaarts:
Druk op om terug te gaan
naar het begin van het huidige
nummer.
Druk nogmaals op om
naar het voorgaande nummer te
gaan.
Zoeken:
Druk op om voorwaarts te zoeken.
Druk op om achterwaats te
zoeken.
6 1
TRACK
>
6 1
TRACK
>
5 1
TRACK
>
0.15
TIME
TRACK
>

20
English
EnglishEnglish
English
Français
FrançaisFrançais
Français
Deutsch
DeutschDeutsch
Deutsch
Italiano
ItalianoItaliano
Italiano
Español
EspañolEspañol
Español
Nederlands
NederlandsNederlands
Nederlands
LINN CLASSIK
Selecting a track by number
Selecting tracks 1-9:
Press to select required
track. The CD player can be playing,
stopped or open.
Selecting track 10 and above:
Press for first digit and hold
until the above display shows.
Press for the second digit.
The selected track plays
immediately.
Note: If track is not selected press
any CD control button and then start
again.
Choix d'un morceau par
numéro
Pour choisir un morceau de 1 à 9 :
Appuyer sur pour choisir le
morceau voulu. Le lecteur CD peut
être en marche, arrêté ou ouvert.
Pour choisir le morceau 10 et au-delà :
Appuyer sur pour obtenir le
premier chiffre et maintenir enfoncé
jusqu'à obtention de l'affichage ci-dessus.
Appuyer sur pour le
deuxième chiffre. Le morceau choisi
passe immédiatement.
Remarque : Si le morceau n'a pas
été sélectionné, appuyer sur
n'importe quel bouton du lecteur
puis recommencer.
Titelwahl mit Nummer
Titel 1-9 wählen:
Zur Wahl des gewünschten Titels
drücken. CD-Spieler kann gerade
spielen, gestoppt oder offen sein.
Titel 10 und höher wählen:
Für erste Ziffer drücken, bis
Display wie oben erscheint.
Für zweite Ziffer drücken.
Der gewählte Titel wird sofort
gespielt.
Hinweis: Wird Titel nicht gewählt,
beliebige CD-Steuertaste drücken
und erneut beginnen.
Selezione del numero di un
brano
Selezione dei brani 1-9:
Premere per selezionare il
brano voluto. Il lettore di CD può essere
in fase di riproduzione, fermo o aperto.
Selezione di brani dal 10 in poi:
Premere per selezionare la
prima cifra e tener premuto fino a
visualizzare il display riportato qui sopra.
Premere per selezionare la
seconda cifra. Il lettore inizia
immediatamente la riproduzione del
brano selezionato.
Nota: Se il brano non viene
selezionato, premere un qualsiasi
pulsante di comando del CD, quindi
iniziare nuovamente la selezione.
Selección de una pista por el
número
Selección de las pistas 1-9:
Pulse para seleccionar la pista
que desea. El reproductor CD puede
estar reproduciendo, parado o abierto.
Selección de la pista 10 y superior:
Pulse para el primer dígito y
mantenga hasta que aparezca la
visualización de la figura.
Pulse para el segundo
dígito. La pista seleccionada se
reproducirá inmediatamente.
Nota: Si no se selecciona ninguna
pista, pulse cualquier tecla de
control del CD y comience de
nuevo.
Het kiezen van een track op
nummer
Het kiezen van tracks 1-9:
Druk op om de gewenste track
te kiezen. Dit kan al den niet tijdens
het spelen of als de lade open staat.
Het kiezen van tracks 10 en hoger:
Druk op voor het eerste cijfer
en houd vast tot het bovenstaande
display verschijnt.
Druk op voor het tweede
cijfer. De gekozen track begint
meteen te spelen.
Opm.: Als er geen track wordt
gekozen dient u een willekeurige
knop op de CD-speler in te drukken
en opnieuw te beginnen.
7 1
TRACK
>
1- 1
TRACK
>
16 1
TRACK
>
18
TRACK
0...9 0...9
0...9
0...9 0...9
0...9
0...9 0...9
0...9
0...9 0...9
0...9
0...9 0...9
0...9
0...9 0...9
0...9

21 LINN CLASSIK
English
EnglishEnglish
English
Français
FrançaisFrançais
Français
Deutsch
DeutschDeutsch
Deutsch
Italiano
ItalianoItaliano
Italiano
Español
EspañolEspañol
Español
Nederlands
NederlandsNederlands
Nederlands
LINN CLASSIK
Repeating a sequence of
tracks
Press or
or to choose a start
point for the section required.
Press .
Press or
or to choose the end
point.
Press .
Press to play the selected
sequence.
Press again to cancel
repeat play.
Press once to repeat the
entire disc.
Press .
Répétition d'une séquence de
morceaux
Appuyer sur ou
ou pour
sélectionner le point de départ de la
sélection. Appuyer sur .
Appuyer sur ou
ou pour
choisir la fin de la sélection.
Appuyer sur .
Appuyer sur pour passer la
séquence choisie.
Appuyer à nouveau sur
pour annuler la répétition.
Appuyer une fois sur pour
réécouter tout le disque.
Appuyer sur .
Eine Titelfolge wiederholen
Zur Wahl des Beginns der Titelfolge
oder
oder drücken.
drücken.
Zur Wahl des Endpunkts
oder oder
drücken.
drücken.
Zur Wiedergabe der gewählten
Titelfolge drücken.
Zum Stornieren der wiederh.
Wiederg. drücken.
Zur Wiederholung der ganzen CD
einmal drücken.
drücken.
Ripetizione di una sequenza
di brani
Premere o
or per selezionare il
punto da cui iniziare la riproduzione
della sezione voluta.
Premere .
Premere o
o per selezionare il
punto in cui interrompere la
riproduzione della sezione voluta.
Premere .
Premere per riprodurre la
sequenza selezionata.
Premere nuovamente per
annullare la riproduzione ripetuta.
Premere una volta per
ripetere la riproduzione di tutto il
disco.
Premere .
Repetición de una secuencia
de pistas
Pulse o
o para seleccionar un punto
de inicio para la sección que desea.
Pulse .
Pulse o
o para seleccionar el
punto final.
Pulse .
Pulse para reproducir la
secuencia seleccionada.
Pulse de nuevo para
cancelar la reproducción repetitiva.
Pulse una vez para repetir
el disco entero.
Pulse .
Het herhalen van een aantal
tracks
Druk op of
of om het begin van
het gewenste onderdeel te kiezen.
Druk op .
Druk op of
of om het eind van
het gewenste onderdeel te kiezen.
Druk op .
Druk op om het
geselecteerde onderdeel af te spelen.
Druk nogmaals op om
herhaald afspelen op te heffen.
Druk eenmaal op om de
hele CD te herhalen.
Druk op .
7 1
TRACK REPEAT
>
10 1
TRACK REPEAT
>
12 1
TRACK REPEAT
>
1 1
TRACK
>
REPEAT
0...9
REPEAT
0...9
REPEAT
PLAY
REPEAT
REPEAT
PLAY
0...9
REPEAT
0...9
REPEAT
PLAY
REPEAT
REPEAT
PLAY
0...9
REPEAT
0...9
REPEAT
PLAY
REPEAT
REPEAT
PLAY
0...9
REPEAT
0...9
REPEAT
PLAY
REPEAT
REPEAT
PLAY
0...9
REPEAT
0...9
REPEAT
PLAY
REPEAT
REPEAT
PLAY
0...9
REPEAT
0...9
REPEAT
PLAY
REPEAT
REPEAT
PLAY

22
English
EnglishEnglish
English
Français
FrançaisFrançais
Français
Deutsch
DeutschDeutsch
Deutsch
Italiano
ItalianoItaliano
Italiano
Español
EspañolEspañol
Español
Nederlands
NederlandsNederlands
Nederlands
LINN CLASSIK
Programming a selection of
tracks (mode A)
Make sure disc is loaded but not
playing.
Hold until above display
appears then release. ‘
P 00
’. will
now be displayed
Now select the first track by using
or .
Press to save.
Select the second track in the same
way and press .
Repeat for further tracks.
Press to play selection.
To clear the programme open the
drawer.
Programmation d'une
sélection de morceaux
(mode A)
Vérifiez que vous avez chargé votre
disque mais sans le jouer.
Maintenir enfoncé jusqu'à ce
que l'affichage ci-dessus apparaisse
suivi de ‘
P 00
’.
Choisir le premier morceau en
utilisant ou .
Appuyer sur pour mettre en
mémoire.
Choisir le second morceau de la
même manière et appuyer sur .
Répéter l'opération pour les autres
morceaux.
Appuyer sur pour passer la
sélection.
Pour arrêter le programme ouvrir le
tiroir.
Eine Titelfolge
programmieren (Modus A)
Sicherstellen, das die Disc eingelegt
ist, jedoch nicht gespielt wird.
halten, bis Display wie oben
erscheint, gefolgt von ‘
P 00
’.
Ersten Titel mit oder
wählen.
Zum Speichern drücken.
Zweiten Titel in gleicher Weise
wählen und drücken.
Für weitere Titel wiederholen.
Zur Wiedergabe der Titelfolge
drücken.
Zum Löschen der Programmierung
CD-Fach öffnen.
Programmazione di una
selezione di brani (modo A)
Assicurarsi che il disco sia caricato
ma non sia in funzione.
Tener premuto fino alla
visualizzazione del display riportato
qui sopra, seguito da ‘
P 00
’.
Selezionare il primo brano con
o .
Premere per memorizzare.
Selezionare il secondo brano in
modo analogo, quindi premere
.
Ripetere per ciascun brano.
Premere per riprodurre la
selezione.
Per annullare la programmazione,
aprire il piatto disco.
Programación de una
selección de pistas (modo A)
Asegúrese de que el disco esté en el
cargador y de que la reproducción
no esté en marcha.
Mantenga hasta que aparezca
el display superior seguido de ‘
P 00
’.
Ahora, seleccione la primera pista
utilizando o .
Pulse para guardar.
Seleccione la segunda pista de la
misma forma y pulse .
Repítalo para las demás pistas.
Pulse para reproducir la
selección.
Para borrar el programa, abra la
bandeja.
Het programmeren van een
aantal tracks (mode A)
Controleer of de disc is geladen
maar niet speelt.
Houd vast tot het
bovenstaande display verschijnt en
wordt gevolgd door ‘
P 00
’.
Nu kiest u de eerste track via
of .
Druk op om op te slaan.
Kies de tweede track op dezelfde
wijze en druk op .
Dit herhaalt u voor volgende tracks.
Druk op om de selectie af te
spelen.
Om het programma op te heffen,
opent u de lade.
P--A
TRACK
P 01
TRACK
P 02
TRACK
7 1
TRACK
>
DISPLAY
0...9
DISPLAY
DISPLAY
PLAY
DISPLAY
0...9
DISPLAY
DISPLAY
PLAY
DISPLAY
0...9
DISPLAY
DISPLAY
PLAY
DISPLAY
0...9
DISPLAY
DISPLAY
PLAY
DISPLAY
0...9
DISPLAY
DISPLAY
PLAY
DISPLAY
0...9
DISPLAY
DISPLAY
PLAY

23 LINN CLASSIK
English
EnglishEnglish
English
Français
FrançaisFrançais
Français
Deutsch
DeutschDeutsch
Deutsch
Italiano
ItalianoItaliano
Italiano
Español
EspañolEspañol
Español
Nederlands
NederlandsNederlands
Nederlands
LINN CLASSIK
Programming a selection by
excluding tracks (mode B)
Make sure disc is loaded but not
playing.
Hold until above display
appears then release. ‘
P 00
’. will
now be displayed.
Now select the first track to exclude
by using or .
Press to save.
Select the second track in the
same way and press .
Repeat for further tracks.
Press to play selection.
To clear the programme open the
drawer.
Programmation d'une
sélection avec exclusion de
certains morceaux (mode B)
Vérifiez que vous avez chargé votre
disque mais sans le jouer.
Maintenir enfoncé jusqu'à
obtention de l'affichage ci-dessus
suivi de ‘
P-00
’.
Choisir le premier morceau à
exclure en utilisant
ou .
Appuyer sur pour
mémoriser.
Choisir le second morceau à
exclure de la même façon et
appuyer sur .
Répéter l'opération pour les autres
morceaux.
Appuyer sur pour passer la
sélection.
Pour arrêter le programme ouvrir le
tiroir.
Titelfolge mit Ausschluss von
Titeln programmieren
(Modus B)
Sicherstellen, das die Disc eingelegt
ist, jedoch nicht gespielt wird.
halten, bis Display wie oben
erscheint, gefolgt von ‘
P-00
’.
Ersten auszuschließenden Titel mit
oder wählen.
Zum Speichern drücken.
Zweiten Titel in gleicher Weise
wählen und drücken.
Für weitere Titel wiederholen.
Zur Wiedergabe der Titelfolge
drücken.
Zum Löschen der Programmierung
CD-Fach öffnen.
Programmazione di una
selezione escludendo i brani
(modo B)
Assicurarsi che il disco sia caricato
ma non sia in funzione.
Tener premuto fino alla
visualizzazione del display riportato
qui sopra, seguito da ‘
P -00
’.
Selezionare il primo brano da
escludere con o
.
Premere per memorizzare.
Selezionare il secondo brano in
modo analogo, quindi premere
.
Ripetere per ciascun brano.
Premere per riprodurre la
selezione.
Per annullare la programmazione,
aprire il piatto disco.
Programación de una
selección excluyendo pistas
(modo B)
Asegúrese de que el disco esté en el
cargador y de que la reproducción no
esté en marcha.Mantenga
hasta que aparezca la visualización
de arriba seguido de ‘
P-00
’.
Ahora seleccione la primera pista
descartar utilizando
o .
Pulse para guardar.
Seleccione la segunda pista de la
misma forma y pulse .
Repítalo para las demás pistas.
Pulse para reproducir la
selección.
Para borrar el programa, abra la
bandeja.
Het programmeren door een
aantal tracks weg te laten
(mode B)
Controleer of de disc is geladen
maar niet speelt.
Houd vast tot het
bovenstaande display verschijnt en
wordt gevolgd door ‘
P-00
’.
Nu selecteert u de eerste track die
overgeslagen moet worden via
of .
Druk op om op te slaan.
Selecteer de tweede track op
dezelfde wijze en druk op .
Herhaal dit voor andere tracks.
Druk op om de selectie af te
spelen.
Om het programma op te heffen,
opent u de lade.
P--b
TRACK
P-01
TRACK
P-02
TRACK
3 1
TRACK
>
DISPLAY
0...9
DISPLAY
DISPLAY
PLAY
DISPLAY
0...9
DISPLAY
DISPLAY
PLAY
DISPLAY
0...9
DISPLAY
DISPLAY
PLAY
DISPLAY
0...9
DISPLAY
DISPLAY
PLAY
DISPLAY
0...9
DISPLAY
DISPLAY
PLAY
DISPLAY
0...9
DISPLAY
DISPLAY
PLAY

24
English
EnglishEnglish
English
Français
FrançaisFrançais
Français
Deutsch
DeutschDeutsch
Deutsch
Italiano
ItalianoItaliano
Italiano
Español
EspañolEspañol
Español
Nederlands
NederlandsNederlands
Nederlands
LINN CLASSIK
Programming shuffle and
random playlists
NOTE: These functions can be
programmed when CD player is
playing, stopped or open.
Shuffle plays all the tracks on the
disc once in a random order.
Press .
Random plays all the tracks on
the disc randomly, repeating
when finished.
Press .
Alternative buttons: Press and hold
until above screen shows.
Press for SHUFFLE.
Press for RANDOM.
Programmation de listes
mélangées et au hasard
REMARQUE : Ces fonctions peuvent
être programmées lorsque le CD
marche, est arrêté ou ouvert.
Shuffle joue tous les morceaux
du disque une fois dans le
désordre.
Appuyer sur .
Random joue tous les morceaux
du disque au hasard, et répète
une fois terminé.
Appuyer sur .
Autre possibilité : Appuyer sur
et maintenir enfoncé jusqu'à
obtention du message ci-dessus.
Appuyer sur pour SHUFFLE.
Appuyer sur pour RANDOM.
Gemischte und zufällige
Spiellisten programmieren
HINWEIS: Diese Funktionen können
programmiert werden, wenn CD-
Spieler spielt, gestoppt oder offen ist.
Shuffle spielt alle Titel der CD
einmal in zufälliger Folge ab.
drücken.
Random spielt alle Titel der CD in
zufälliger Folge ab und wiederholt
danach die Wiedergabe.
drücken.
Alternative Tasten: drücken
und halten, bis Display wie oben erscheint.
Für SHUFFLE drücken.
Für RANDOM drücken.
Programmazione di sequenze
casuali e sequenze casuali
continue
NOTA: Queste funzioni possono
essere programmate con lettore di CD
in fase di riproduzione, fermo o
aperto.
Shuffle: tutti i brani di un disco
vengono riprodotti una volta in
sequenza casuale.
Premere
Random: tutti i brani di un disco
vengono riprodotti in sequenza
casuale, quindi ripetuti.
Premere
Pulsanti alternativi: Premere e tener
premuto fino a visualizzare il
display riportato qui sopra.
Premere per SHUFFLE.
Premere per RANDOM.
Programación de una lista de
reproducción aleatoria y
shuffle
NOTA: Estas funciones pueden
programarse cuando la unidad está
reproduciendo, parada o abierta.
Shuffle reproduce todas las
pistas del disco una vez en orden
aleatorio.
Pulse .
Random reproduce todas las
pistas del disco de forma
aleatoria, repitiendo cuando
finaliza.
Pulse .
Botones alternativos: Pulse y
mantenga pulsado hasta que
aparezca el display superior.
Pulse para SHUFFLE.
Pulse para RANDOM.
Het programmeren van een
willekeurige volgorde
(SHUFFLE en RANDOM)
Opm.: Deze functie kan worden
geprogrammeerd terwijl de CD-
speler in bedrijf, buiten bedrijf of
geopend is.
Shuffle speelt alle nummers van
de CD in willekeurige volgorde af.
Druk op .
Random speelt alle nummers van
de CD in willekeurige volgorde af
en herhaalt dit als alle nummers
zijn geweest.
Druk op .
Alternatieve bedieningsknoppen:
Druk op en houd vast tot het
bovenstaande display verschijnt.
Druk op voor SHUFFLE.
Druk op voor RANDOM.
00
TRACK
ShuF rand cd ?
SHUFFLE
RANDOM
PLAY
2
3
SHUFFLE
RANDOM
PLAY
2
3
SHUFFLE
RANDOM
PLAY
2
3
SHUFFLE
RANDOM
PLAY
2
3
SHUFFLE
RANDOM
PLAY
2
3
SHUFFLE
RANDOM
PLAY
2
3

25 LINN CLASSIK
English
EnglishEnglish
English
Français
FrançaisFrançais
Français
Deutsch
DeutschDeutsch
Deutsch
Italiano
ItalianoItaliano
Italiano
Español
EspañolEspañol
Español
Nederlands
NederlandsNederlands
Nederlands
LINN CLASSIK
Using intro mode
Intro plays the first 10 seconds of
each track on the disc in sequence.
Press .
Press when you hear the
track you want to listen to.
The disc plays on normally. Alternative buttons: Press and hold
until above screen shows.
Press for INTRO.
Utilisation du mode intro
Intro joue les premières dix
secondes de chaque morceau du
disque l'un après l'autre.
Appuyer sur .
Appuyer sur quand vous
entendez le morceau que vous
voulez écouter.
Le disque passe normalement. Autre possibilité : Appuyer sur
et maintenir enfoncé jusqu'à
obtention du message ci-dessus.
Appuyer sur pour INTRO.
Anspielmodus verwenden
Anspielen spielt die ersten 10
Sekunden jedes Titels der CD in
Folge an.
drücken.
drücken, wenn Sie einen
Titel ganz hören möchten.
CD spielt normal weiter. Alternative Tasten: drücken
und halten, bis Display wie oben
erscheint.
Für ANSPIELEN drücken.
Utilizzo del modo Intro
Intro riproduce in sequenza i primi
10 secondi di ciascun brano del
disco.
Premere .
Premere quando viene
riprodotto l’inizio del brano che si
desidera ascoltare.
Il disco viene riprodotto
normalmente.
Pulsanti alternativi: Premere e tener
premuto fino a visualizzare il
display riportato qui sopra.
Premere per INTRO.
Utilización del modo intro
Intro reproduce los primeros 10
segundos de cada pista del disco
de forma secuencial.
Pulse .
Pulse cuando escuche la
pista que desea escuchar.
El disco se reproducirá
normalmente.
Botones alternativos: Pulse y
mantenga hasta que
aparezca la pantalla superior.
Pulse para INTRO.
Gebruik van de intro
Intro laat op volgorde de eerste
10 sec. van elk nummer van de
CD horen.
Druk op .
Druk op als u het nummer
herkent dat u wilt beluisteren.
De CD wordt verder normaal
afgespeeld.
Alternatieve knoppen: Druk op
en houd vast tot het
bovenstaande display verschijnt.
Druk op voor INTRO.
Intro 5 1
TRACK
>
5 1
TRACK
>
cd ?
INTRO
PLAY
PLAY
1
INTRO
PLAY
PLAY
1
INTRO
PLAY PLAY
1
INTRO
PLAY
PLAY
1
INTRO
PLAY
PLAY
1
INTRO
PLAY
PLAY
1

26
English
EnglishEnglish
English
Français
FrançaisFrançais
Français
Deutsch
DeutschDeutsch
Deutsch
Italiano
ItalianoItaliano
Italiano
Español
EspañolEspañol
Español
Nederlands
NederlandsNederlands
Nederlands
LINN CLASSIK
Using index points
Some classical CDs have index
points within a track for example to
mark the start of a movement.
The above display shows the third
movement of track 5.
Press
INDEX
to skip
forward and backward through the
track to find the movement you
want.
Utilisation de numéros
d'index
Certains CD classiques ont des
numéros d'index au sein d'un
morceau pour marquer par
exemple le début d'un mouvement.
L'affichage indique le troisième
mouvement du morceau 5.
Appuyer sur
INDEX
pour avancer ou reculer dans le
morceau et trouver le mouvement
voulu.
Indexpunkte verwenden
Auf klassischen CDs sind eventuell
Indexpunkte innerhalb eines Titels
aufgezeichnet, die z.B. den Beginn
eines Satzes angeben.
Das Display oben zeigt den 3. Satz
von Titel 5.
INDEX
drücken, um
vorwärts oder rückwärts durch den
Titel nach dem gewünschten Satz
zu suchen.
Utilizzo dei numeri d’indice
Alcuni CD di musica classica
dispongono di numeri d’indice
all’interno del brano per indicare, ad
esempio, l’inizio di un movimento.
Nel display visualizzato qui sopra è
indicato il terzo movimento del
brano 5.
Premere
INDEX
per
avanzare o retrocedere lungo il
brano per trovare il movimento
desiderato.
Utilización de puntos de
índice
Algunos CDs de música clásica
poseen puntos de índice dentro de
una pista por ejemplo para indicar
el inicio de un movimiento.
El display superior muestra el
tercer movimiento de la pista 5.
Pulse
INDEX
para
saltar adelante y atrás a través de
la pista para buscar el movimiento
que desea.
Indexeren
Sommige klassieke CD’s hebben
binnen een track een verborgen
indexering om bijvoorbeeld een
tempowijziging te markeren.
Het bovenstaande display toont het
derde deel van track 5.
Druk op
INDEX
om
vooruit en achteruit door de track
te lopen en het onderdeel dat u
zoekt te vinden.
5 3
TRACK
>
5 3
TRACK
>
5 4
TRACK
>
Pagina laadt ...

28
LINN CLASSIK
l
Display and controls
Band select Mode Select:
Preset/Scan/Tune/Signal Strength
Minus Plus
Affichage et
commandes
Sélectionner bande
Sélectionner mode :
Préréglé/Balayage/Réglage automatique/
Force de signal
Moins Plus
Display und
Steuerungen
Bandbereich wählen Modus wählen:
Festsender/Scan/Sender einst./Signalstärke
Minus Plus
Display e comandi
Selezione della banda
Selezione della modalità:
Preselezione/Scansione/Sintonizzazione/
Forza segnale
Meno Più
Visualizador y Controles
Selección de banda
Selección de modo:
Presintonía/Exploración/Sintonizar
Nivel de señal
Menos Más
Display en
bedieningstoetsen
Bandbreedtekeuze Mode kiezen:
Voorkeuze/Scan/Afstemmen/Signaalsterkte
Minus Plus
8888
5
1
2
4
321 4
3
Pagina laadt ...

30
English
EnglishEnglish
English
Français
FrançaisFrançais
Français
Deutsch
DeutschDeutsch
Deutsch
Italiano
ItalianoItaliano
Italiano
Español
EspañolEspañol
Español
Nederlands
NederlandsNederlands
Nederlands
LINN CLASSIK
Searching and scanning
Searching:
Press .
Press or to search
through the channels.
Scanning:
Press .
Press and hold until
above display shows.
Press or to start
scan.
The Linn CLASSIK will scan all
stations and pause at each for 5
seconds.
Press or to exit.
Recherche et balayage
Recherche :
Appuyer sur .
Appuyer sur ou pour
faire une recherche parmi les canaux.
Balayage :
Appuyer sur .
Appuyer sur et maintenir
enfoncé jusqu'à ce que le
message ci-dessus soit affiché.
Appuyer sur ou
pour commencer recherche.
Le Linn CLASSIK effectuera un
balayage de toutes les stations et
s’arrêtera 5 sec. à chacune d'entre elles.
Appuyer sur ou pour
sortir.
Suchen und Scannen
Suchen:
drücken.
Zum Durchsuchen der Kanäle
oder drücken.
Scannen:
drücken.
gedrückt halten, bis Display
wie oben erscheint.
Zum Starten von Scan
oder drücken.
Der Linn CLASSIK tastet alle Sender
ab und pausiert 5 Sekunden auf
jedem Sender. Zum Beenden
oder drücken.
Ricerca e scansione
Ricerca:
Premere .
Premere o per
scorrere i canali.
Scansione:
Premere .
Premere e tener premuto fino a
visualizzare il display riportato qui sopra.
Premere o per
iniziare la scansione.
Linn CLASSIK eseguirà la scansione
di tutte le stazioni e si arresterà su
ciascuna di esse per 5 secondi.
Premere o per uscire.
Búsqueda y Exploración
Búsqueda:
Pulse .
Pulse o para
buscar a través de los canales.
Exploración:
Pulse .
Pulse y mantenga hasta
que aparezca la pantalla superior.
Pulse o para iniciar
el exploración.
El Linn CLASSIK explorará todas las
emisoras y hará una pausa de 5
segundos en cada una de ellas.
Pulse o para salir.
Zoeken en scannen
Zoeken:
Druk op .
Druk op of om de
kanalen af te zoeken.
Scannen:
Druk op .
ingedrukt houden totdat het
display bovenin verschijnt.
Druk op of om te
scannen.
Linn CLASSIK scant alle stations en
pauzeert 5 seconden bij elk station.
Druk op of om het
programma af te sluiten.
801
SCAN
AM
SCAN
SCAN
AM
1314
SCAN
AM
1215
SCAN
AM
SCAN
+
SCAN
SCAN
+
SCAN TUNE
SCAN
+
SCAN
SCAN
+
SCAN TUNE
SCAN
+
SCAN
SCAN
+
SCAN
TUNE
SCAN
+
SCAN
SCAN
+
SCAN TUNE
SCAN
+
SCAN
SCAN
+
SCAN TUNE
SCAN
+
SCAN
SCAN
+
SCAN TUNE

31 LINN CLASSIK
English
EnglishEnglish
English
Français
FrançaisFrançais
Français
Deutsch
DeutschDeutsch
Deutsch
Italiano
ItalianoItaliano
Italiano
Español
EspañolEspañol
Español
Nederlands
NederlandsNederlands
Nederlands
LINN CLASSIK
Storing presets and auto
storing
Storing:
Tune station to be stored.
Press .
Use or to key
in a preset number.
Press .
Auto storing multiple stations:
Press .
Press and hold until auto
store begins.
Press to skip past 5 second
pause and still store.
Press to skip past 5 second
pause and not store.
Mise en mémoire des
préréglages et préréglage
automatique
Mise en mémoire :
Régler la station devant être mise en
mémoire.
Appuyer sur .
Utiliser ou
pour saisir une fréquence
préréglée.
Appuyer sur .
Mise en mémoire autom. de
plusieurs stations :
Appuyer sur .
Appuyer sur jusqu'à ce que la
mise en mémoire autom. commence.
Appuyer sur pour sauter la
pause de 5 sec. mais mémoriser
Appuyer sur pour sauter la
pause de 5 sec. et ne pas mémoriser
Festsender Speichern und
Autom. Speichern
Speichern:
Zu speichernden Sender einstellen.
drücken.
Zur Eingabe einer Festnummer
oder
verwenden.
drücken.
Autom. Speichern mehrerer Sender:
drücken.
gedrückt halten, bis autom.
Speichern beginnt.
zum Überspringen der 5 Sek.
-Pause und weiterem Speichern.
zum Überspringen der 5-Sek.
-Pause und nicht Speichern.
Memorizzazione delle prese-
lezioni ed automemoria
Memorizzazione:
Sintonizzarsi sulla stazione da
memorizzare.
Premere .
Premere o
per immettere il numero della
preselezione.
Premere .
Automemoria di stazioni multiple:
Premere .
Premere e tener premuto
fino a che ha inizio l’automemoria.
Premere per saltare la pausa
di 5 secondi e memorizzare.
Premere per saltare la pausa
di 5 secondi e non memorizzare.
Memorización de Presintonías
y Memorización Automática
Memorización:
Sintonice la emisora que desea
guardar.
Pulse .
Utilice o para
introducir un número de presintonía.
Pulse .
Memorización automática de
múltiples emisoras:
Pulse .
Pulse y mantenga hasta que
comience la memorización automática.
Pulse para saltar tras una
pausa de 5 segundos y memorizar.
Pulse para saltar tras una
pausa de 5 segundos y no memorizar.
Instellingen opslaan en
automatisch opslaan
Opslaan:
Station afstellen om op te slaan.
Druk op .
Gebruik of om
een instellingsnummer in te toetsen.
Druk op .
Automatisch opslaan van
meerdere stations:
Druk op .
ingedrukt houden totdat
automatisch opslaan begint.
Druk op om de 5 seconden
pauze over te slaan en toch op te slaan.
Druk op om de 5 seconden
pauze over te slaan en niet op te slaan.
95.8
FM
STEREO
St 6
FM
STEREO
SCAN
FM
iiiiiiii
St 2
SCAN
FM
STEREO
STORE
+
0...9
STORE
STORE
STORE
+
STORE
+
0...9
STORE
STORE
STORE
+
STORE
+
0...9
STORE
STORE
STORE
+
STORE
+
0...9
STORE
STORE
STORE
+
STORE
+
0...9
STORE
STORE
STORE
+
STORE
+
0...9
STORE
STORE
STORE
+

32
English
EnglishEnglish
English
Français
FrançaisFrançais
Français
Deutsch
DeutschDeutsch
Deutsch
Italiano
ItalianoItaliano
Italiano
Español
EspañolEspañol
Español
Nederlands
NederlandsNederlands
Nederlands
LINN CLASSIK
Selecting and clearing
presets
Selecting:
Press .
Use or to
select the preset.
Clearing one preset:
Select preset to be cleared.
Press and hold .
Clearing all presets:
Switch the power on while holding
for 12 seconds.
Sélectionner et annuler les
préréglages
Sélection :
Appuyer sur .
Utiliser ou
pour sélectionner le préréglage.
Annuler un préréglage :
Sélectionner un préréglage devant
être annulé.
Appuyer en continu sur .
Annuler tous les préréglages :
Mettre sous tension tout en
appuyant en continu sur
pendant 12 sec.
Festsender Wählen und
Hören
Wählen:
drücken.
Zur Wahl des Festsenders
oder verwenden.
Einen Festsender löschen:
Zu löschenden Festsender wählen.
gedrückt halten.
Alle Festsender löschen:
Einschalten und gleichzeitig
12 Sek. gedrückt halten.
Selezione e cancellazione
delle preselezioni
Selezione:
Premere .
Premere o
per selezionare la preselezione.
Cancellazione di una preselezione:
Selezionare la preselezione da
cancellare.
Premere e tener premuto .
Cancellazione di tutte le
preselezioni:
Accendere l’apparecchio tenendo
premuto per 12 secondi.
Selección y Borrado de
Presintonías
Selección:
Pulse .
Utilice o para
seleccionar la presintonía.
Borrado de presintonía:
Seleccione la presintonía que
desea borrar.
Pulse y mantenga .
Borrado de todas las presintonías:
Encienda el equipo mientras
mantiene pulsado durante
12 segundos.
Instellingen selecteren en
opheffen
Selecteren:
Druk op .
Gebruik of
om een reeds gemaakte instelling
te selecteren.
Eén instelling opheffen:
Selecteer de op te heffen instelling.
ingedrukt houden.
Alle instellingen opheffen:
Stroom inschakelen terwijl u
12 seconden ingedrukt houdt.
P
FM
STEREO
P 5
FM
STEREO
CLr
FM
STEREO
CLr-
PRESET
+
0...9
PRESET PRESET
PRESET
+
0...9
PRESET
PRESET
PRESET
+
0...9
PRESET
PRESET
PRESET
+
0...9
PRESET PRESET
PRESET
+
0...9
PRESET
PRESET
PRESET
+
0...9
PRESET
PRESET

33 LINN CLASSIK
English
EnglishEnglish
English
Français
FrançaisFrançais
Français
Deutsch
DeutschDeutsch
Deutsch
Italiano
ItalianoItaliano
Italiano
Español
EspañolEspañol
Español
Nederlands
NederlandsNederlands
Nederlands
LINN CLASSIK
Finding the strongest signal
Press .
The strength of the present signal
is displayed.
A range of 0 to 50 is used.
50 is the strongest signal.
Use this when positioning the
aerial to get the best reception.
For more information on AM/FM
reception go to
www.linn.co.uk/amfmreception
Trouver le signal le plus
puissant
Appuyer sur .
L'intensité du signal trouvé est
affichée.
Une échelle allant de 0 à 50 est
utilisée.
50 indique le signal le plus
puissant.
L'utiliser pour positionner l'antenne
de façon à obtenir la meilleure
réception possible.
Pour plus de renseignements
concernant la réception en AM/FM,
consultez
www.linn.co.uk/amfmreception
Das Stärkste Signal Finden
drücken.
Die Stärke des aktuellen Signals
wird angezeigt.
Anzeige von 0 bis 50.
50 ist das stärkste Signal.
Bei Ausrichtung der Antenne zum
bestmöglichen Empfang
verwenden.
Weitere Informationen zum AM/FM
Empfang finden Sie unter
www.linn.co.uk/amfmreception
Ricerca del segnale più forte
Premere .
Viene visualizzata la forza del
segnale attualmente rilevato.
Viene utilizzato un intervallo
compreso tra 0 e 50.
50 è il segnale più forte.
Utilizzare questo indicazione per
posizionare l’antenna in modo da
ottenere la miglior ricezione.
Per ulteriori informazioni sulla
ricezione AM/FM, visitare il sito
www.linn.co.uk/amfmreception
Búsqueda de la señal más
fuerte
Pulse .
Se visualizará el nivel de la señal
actual.
Se utiliza una escala de 0 a 50.
50 es la señal más fuerte.
Utilice esto para obtener la mejor
recepción cuando se está
colocando la antena.
Para más información acerca de la
recepción AM/FM ir a
www.linn.co.uk/amfmreception
Het sterkste signaal zoeken
Druk op .
De sterkte van het aanwezige
signaal wordt weergegeven.
Er wordt een schaal van 0 tot 50
gebruikt.
50 is het sterkste signaal.
Gebruik dit bij het plaatsen van de
antenne voor de beste ontvangst.
Voor meer informatie over AM / FM
ontvangst kunt u terecht op
www.linn.co.uk/amfmreception
5 21
FM
5 50
FM
STEREO
5 49
FM
STEREO
SIGNAL
SIGNAL
SIGNAL
SIGNAL
SIGNAL
SIGNAL

34
English
EnglishEnglish
English
Français
FrançaisFrançais
Français
Deutsch
DeutschDeutsch
Deutsch
Italiano
ItalianoItaliano
Italiano
Español
EspañolEspañol
Español
Nederlands
NederlandsNederlands
Nederlands
LINN CLASSIK
Selecting a mute threshold
To reject weak signals during
search/scan mode:
Press .
Press and hold until the
threshold display shows.
Use or to set
threshold.
Set to 1 to receive all signals.
Set to 50 to receive only the
strongest signals.
Sélection d'un seuil de
sourdine
Rejet de signaux faibles pendant la
recherche/en mode balayage :
Appuyer sur .
Appuyer sur et maintenir
enfoncé jusqu'à ce que l'affichage
du seuil apparaisse.
Utiliser ou
pour régler le seuil.
Régler sur 1 pour recevoir tous les
signaux.
Régler sur 50 pour ne recevoir que
les signaux les plus puissants.
Stummschwelle Wählen
Abweisen schwacher Signale
während Suche/Scan:
drücken.
gedrückt halten, bis
Empfindlichkeitsanzeige erscheint.
Zum Einstellen der Empfindlichkeit
oder
verwenden.
Zum Empfang aller Signale auf 1
einstellen.
Zum ausschließlichen Empfang der
stärksten Signale auf 50 einstellen.
Selezione della soglia di
muting
Per scartare i segnali deboli
durante la modalità di ricerca/
scansione:
Premere .
Premere e tener premuto
fino a visualizzare il display di
soglia.
Premere o
per impostare la soglia.
Impostare su 1 per ricevere tutti i
segnali.
Impostare su 50 per ricevere solo i
segnali più forti.
Selección del umbral de
silenciamiento
Para rechazar las señales débiles
durante el modo de búsqueda/
exploración:
Pulse .
Pulse y mantenga hasta
que se muestre el umbral.
Utilice o para
ajustar el umbral.
Ajuste a 1 para recibir todas las
señales.
Ajuste a 50 para recibir solamente
las señales más fuertes.
Selecteren van de mute-
drempel
Het vermijden van zwakke signalen
tijdens zoeken en scannen:
Druk op .
Ingedrukt houden totdat de
drempeldisplay wordt getoond.
Gebruik of
om de drempel in te stellen.
Instellen op 1 om alle signalen te
ontvangen.
Instellen op 50 om alleen de
sterkste signalen te ontvangen.
5 21
FM
STEREO
th15
FM
STEREO
th22
FM
STEREO
th50
FM
STEREO
SIGNAL
SIGNAL
+
0...9
SIGNAL
SIGNAL
+
0...9
SIGNAL
SIGNAL
+
0...9
SIGNAL
SIGNAL
+
0...9
SIGNAL
SIGNAL
+
0...9
SIGNAL
SIGNAL
+
0...9
Pagina laadt ...

36
English
EnglishEnglish
English
Français
FrançaisFrançais
Français
Deutsch
DeutschDeutsch
Deutsch
Italiano
ItalianoItaliano
Italiano
Español
EspañolEspañol
Español
Nederlands
NederlandsNederlands
Nederlands
LINN CLASSIK
Adjusting the volume and
balance
Volume:
Press
VOL
to change
volume.
Balance:
Press ADJUST button on control
panel until the above display
shows.
Press to move the balance
to the left.
Press to move the balance
to the right.
Réglage du volume et de la
balance
Volume :
Appuyer sur
VOL
pour
changer le volume.
Balance :
Appuyer sur le bouton ADJUST sur
le panneau de commandes jusqu'à
obtention de l'affichage ci-dessus.
Appuyer sur pour déplacer
la balance vers la gauche.
Appuyer sur pour déplacer
la balance vers la droite.
Lautstärke und Balance
einstellen
Lautstärke:
Zum Ändern der Lautstärke
VOL
drücken.
Balance:
ADJUST-Taste am Bedienfeld
drücken, bis Display wie oben
erscheint.
drücken, um Balance nach
links zu bewegen.
drücken, um Balance nach
rechts zu bewegen.
Regolazione del volume e del
bilanciamento
Volume:
Premere
VOL
per
modificare il volume.
Bilanciamento:
Premere il pulsante ADJUST sul
pannello comandi fino a visualizzare
il display riportato qui sopra.
Premere per spostare il
bilanciamento verso sinistra.
Premere per spostare il
bilanciamento verso destra.
Ajuste del volumen y del
balance
Volumen:
Pulse
VOL
para
cambiar el volumen.
Balance:
Pulse el botón ADJUST en el panel
de control hasta que aparezca la
visualización de arriba.
Pulse para mover el
balance a la izquierda.
Pulse para mover el
balance a la derecha.
Instellen van volume en
balans
Volume:
Druk op
VOL
om het
volume te veranderen.
Balans:
Druk op de ADJUST-knop op het
bedieningspaneel tot het
bovenstaande display verschijnt.
Druk op om de balans naar
links te verschuiven.
Druk op om de balans naar
rechts te verschuiven.
23
VOLUME
--
BALANCE
--
2
BALANCE
-
-
-
-
-
-
BALANCE
2
+
L R
+
L R
+
L R
+
L R
+
L R
+
L R

37 LINN CLASSIK
English
EnglishEnglish
English
Français
FrançaisFrançais
Français
Deutsch
DeutschDeutsch
Deutsch
Italiano
ItalianoItaliano
Italiano
Español
EspañolEspañol
Español
Nederlands
NederlandsNederlands
Nederlands
LINN CLASSIK
Adjusting the bass and treble
Bass:
Press ADJUST button on control
panel until the above display
shows.
Press
BASS
to adjust
bass.
Treble:
Press ADJUST button on control
panel until the above display
shows.
Press
TREB
to adjust
treble.
Réglage basse et aigus
Basse :
Appuyer sur le bouton ADJUST du
panneau de commandes jusqu'à
obtention du l'affichage ci-dessus.
Appuyer sur
BASS
pour régler la basse.
Aigus :
Appuyer sur le bouton ADJUST du
panneau de commandes jusqu'à
obtention du de l'affichage ci-dessus.
Appuyer sur
TREB
pour régler les aigus.
Höhen und Bass einstellen
Bass:
ADJUST-Taste am Bedienfeld
drücken, bis Display wie oben
erscheint.
Zum Einstellen der Bässe
BASS
drücken.
Höhen:
ADJUST-Taste am Bedienfeld
drücken, bis Display wie oben
erscheint.
Zum Einstellen der Höhen
TREB
drücken.
Regolazione dei toni bassi e
alti
Toni bassi:
Premere il pulsante ADJUST sul
pannello comandi fino a visualizzare
il display riportato qui sopra.
Premere
BASS
per
regolare i toni bassi.
Toni alti:
Premere il pulsante ADJUST sul
pannello comandi fino a visualizzare
il display riportato qui sopra.
Premere
TREB
per
regolare i toni alti.
Ajuste de graves y agudos
Graves:
Pulse el botón ADJUST en el panel
de control hasta que aparezca la
visualización de arriba.
Pulse
BASS
para
ajustar los bajos.
Agudos:
Pulse el botón ADJUST en el panel
de control hasta que aparezca la
visualización de arriba.
Pulse
TREB
para
ajustar los agudos.
Instellen van bas en treble
Bas:
Druk de ADJUST-knop op het
bedieningspaneel in tot het
bovenstaande display verschijnt.
Druk op
BASS
om de
bas in te stellen.
Treble:
Druk de ADJUST-knop op het
bedieningspaneel in tot het
bovenstaande display verschijnt.
Druk op
TREB
om de
treble in te stellen.
b 0 b -3 t 0 t 3
+ +
+ +
+ +
+ +
+ +
+ +

38
English
EnglishEnglish
English
Français
FrançaisFrançais
Français
Deutsch
DeutschDeutsch
Deutsch
Italiano
ItalianoItaliano
Italiano
Español
EspañolEspañol
Español
Nederlands
NederlandsNederlands
Nederlands
LINN CLASSIK
Muting and selecting a
source
Muting:
Press to mute the output. Press or
VOL
to return the volume to its original
level.
Press
or to select source.
Mise en sourdine et sélection
de la source
Sourdine :
Appuyer sur pour mettre la
sortie en sourdine.
Appuyer sur ou
VOL
pour remettre le
volume à son niveau précédent.
Appuyer sur
ou pour choisir la
source.
Stummschalten und
Tonquelle wählen
Stummschalten:
Zur Tonstummschaltg.
drücken.
Zum Rückschalten der Lautst. auf
Originalhöhe oder
VOL
drücken.
Zum Wählen der Tonquelle
oder
drücken.
Muting e selezione sorgente
Disattivazione audio:
Premere per disattivare
l’output.
Premere o
VOL
per ripristinare il volume al livello
originale.
Premere
o per selezionare la
sorgente.
Silenciamiento y selección
de una fuente
Silencianiento:
Pulse para silenciar la
salida.
Pulse o
VOL
para volver el volumen a su nivel
original.
Pulse
o para seleccionar la fuente.
Muting en het kiezen van de
bron
Muting:
Druk op om het volume van
de output op 0 te zetten.
Druk op of
VOL
om het volume terug te brengen naar
de oorspronkelijk ingestelde waarde.
Druk op
of om de bron te
kiezen.
0
MUTE VOLUME
23
VOLUME
Cd
LISTEN
MUTE MUTE
+
CD TUN
AUX
TP1
TP2
MUTE
MUTE
+
CD TUN
AUX
TP1
TP2
MUTE
MUTE
+
CD
TUN
AUX
TP1
TP2
MUTE
MUTE
+
CD TUN
AUX
TP1
TP2
MUTE MUTE
+
CD TUN
AUX
TP1
TP2
MUTE
MUTE
+
CD TUN
AUX
TP1
TP2

39 LINN CLASSIK
English
EnglishEnglish
English
Français
FrançaisFrançais
Français
Deutsch
DeutschDeutsch
Deutsch
Italiano
ItalianoItaliano
Italiano
Español
EspañolEspañol
Español
Nederlands
NederlandsNederlands
Nederlands
LINN CLASSIK
Recording
Press or
to select source to be
recorded.
Press play on CD, tape or auxiliary
source.
Press .
Press to toggle the output
between the source and the
recording destination.
Enregistrement
Appuyer sur
ou pour choisir la source à
enregistrer.
Appuyer sur play sur le CD, la
platine cassettes ou la source
auxiliaire.
Appuyer sur .
Appuyer sur pour faire
basculer la sortie entre la source et
la destination d'enregistrement.
Aufnehmen
Zur Wahl der aufzunehmenden
Tonquelle
oder drücken.
An CD, Kassette oder Zusatzgerät
Wiedergabe starten.
drücken.
Zum Schalten zwischen
Tonausgabe der Tonquelle und des
Aufnahmeziels drücken.
Registrazione
Premere o
per selezionare la sorgente
da registrare.
Premere il tasto Play del lettore di
CD, registratore a nastri o della
sorgente ausiliaria.
Premere .
Premere per ascoltare
alternativamente l’audio
proveneinte dalla sorgente o dal
registratore in funzione.
Grabación
Pulse o
para seleccionar la fuente
que se va a grabar.
Pulse reproducir en el CD, casete
o fuente auxiliar.
Pulse .
Pulse para conmutar la
salida entre la fuente y el soporte
destino de la grabación.
Opnemen
Druk op of
om de op te nemen bron te
kiezen.
Druk op play van de CD of
alternatieve bron.
Druk op .
Druk op om de output
tussen de bron en de
opnameapparatuur af te stemmen.
Cd
LISTEN
1 1
TRACK
>
t2
RECORD >
CD TUN
AUX
TP1
REC
TP2
CD TUN
AUX
TP1
REC
TP2
CD TUN
AUX
TP1
REC
TP2
CD TUN
AUX
TP1
REC
TP2
CD TUN
AUX
TP1
REC
TP2
CD TUN
AUX
TP1
REC
TP2
Pagina laadt ...
Pagina laadt ...

42
English
EnglishEnglish
English
Français
FrançaisFrançais
Français
Deutsch
DeutschDeutsch
Deutsch
Italiano
ItalianoItaliano
Italiano
Español
EspañolEspañol
Español
Nederlands
NederlandsNederlands
Nederlands
LINN CLASSIK
Setting the clock
Press and hold until the
above display shows.
Press
TIME
to set the day
of the week. Select which number
represents which day e.g
1=Monday or 1=Sunday.
Press to store.
Press
TIME
to set hour.
Press to store.
Press
TIME
to set
minute.
Press to store.
Réglage de l'horloge
Appuyer sur et maintenir
enfoncé jusqu'à obtention du
message ci-dessus.
Appuyer sur
TIME
poser
le paramètre du jour de la semaine.
Choisissez quel chiffre représentera
quel jour de la semaine par ex 1=
lundi ou 1= dimanch. Appuyer sur
pour mémoriser
Appuyer sur
TIME
pour
régler l'heure.
Appuyer sur pour
mémoriser
Appuyer sur
TIME
pour
régler les minutes.
Appuyer sur pour
mémoriser
Zeit einstellen
drücken und halten, bis
Display wie oben erscheint.
Zum Einstellen des Wochentages
TIME
drücken. Wählen
Sie die den jeweiligen Tag
repräsentierende Zahl, z.B. 1=Montag
oder 1=Sonntag. Zum Speichern
drücken.
Zum Einstellen der Stunde
TIME
drücken.
Zum Speichern drücken.
Zum Einstellen der Minute
TIME
drücken.
Zum Speichern drücken.
Impostazione dell’ora
Premere e tener premuto
fino a visualizzare il display
riportato qui sopra.
Premere
TIME
.per
impostare il giorno della settimana.
Selezionare il numero che
rappresenta il giorno, ad esempio
1=Lunedì o 1=Domenica.Premere
per memorizzare.
Premere
TIME
per
impostare l’ora.
Premere per memorizzare.
Premere
TIME
per
impostare i minuti.
Premere per memorizzare.
Ajuste del reloj
Pulse y mantenga pulsado
hasta que aparezca la
visualización de arriba.
Pulse
TIME
para fijar el
día de la semana. Seleccione qué
número representa a cada día. v.g.
1=Lunes ó 1= Domingo.
Pulse para guardar.
Pulse
TIME
para
ajustar la hora.
Pulse para guardar.
Pulse
TIME
para
ajustar los minutos.
Pulse para guardar.
Klok op tijd zetten
Druk in en houd vast tot het
display oplicht.
Toets
TIME
om de dag
van de week in te stellen. Kies een
nummer voor elke dag (b.v.
1=maandag of 1=zondag).
Toets om op te slaan.
Druk op
TIME
om de
uren in te stellen.
Druk op om op te slaan.
Druk op
TIME
om de
minuten in te stellen.
Druk op om op te slaan.
Set CL
dAY3
10.23
AM
10.45
AM
+
+
+
+
+ +
+
+ +
+
+ +
+
+ +
+
+ +

43 LINN CLASSIK
English
EnglishEnglish
English
Français
FrançaisFrançais
Français
Deutsch
DeutschDeutsch
Deutsch
Italiano
ItalianoItaliano
Italiano
Español
EspañolEspañol
Español
Nederlands
NederlandsNederlands
Nederlands
LINN CLASSIK
Setting the alarm
Press and hold until
above display shows.
Set Time: Press
TIME
to set alarm hour.
Press to store.
Press
TIME
to set
alarm minutes.
Press to store.
Set Alarm Source: If source is CD or
tuner select track or preset using
TIME
buttons.
Press to store.
Réglage du réveil
Appuyer sur et maintenir
enfoncé jusqu'à obtention du
message ci-dessus.
Réglage de l'heure : Appuyer
sur
TIME
pour régler
l'heure du réveil.
Appuyer sur pour
mémoriser
Appuyer sur
TIME
pour régler les minutes du réveil.
Appuyer sur pour
mémoriser
Régler source du réveil : Si la source
est CD ou tuner choisir un morceau ou
un préréglage en utilisant
TIME
de l'heure.
Appuyer sur pour mémoriser
Wecker stellen
drücken und halten, bis
Display wie oben erscheint.
Zeit einst.: Zum Stellen der
Weckstunde
TIME
drücken.
Zum Speichern drücken.
Zum Stellen der Weckminute
TIME
drücken.
Zum Speichern drücken.
Wecker-Tonquelle stellen: Bei CD
oder Tuner Titel oder Festsender mit Hilfe
der Tasten
TIME
wählen.
Zum Speichern drücken.
Impostazione della sveglia
Premere e tener premuto
fino a visualizzare il display
riportato qui sopra.
Impostazione dell’ora: Premere
TIME
per impostare
l’ora della sveglia.
Premere per memorizzare.
Premere
TIME
per
impostare i minuti.
Premere per memorizzare.
Impostare la sorgente della funzione
Sveglia: Se la sorgente è un CD o il
sintonizzatore, selezionare il brano o la
preselezione con i tasti
TIME
.
Premere per memorizzare.
Ajuste de la alarma
Pulse y mantenga pulsado
hasta que aparezca la
visualización de arriba
Ajuste hora: Pulse
TIME
para ajustar la hora de la
alarma.
Pulse para guardar.
Pulse
TIME
para
ajustar los minutos de la alarma.
Pulse para almacenar.
Ajuste de fuente de alarma: Si la fuente
de la alarma es el CD o el sintonizador,
seleccione la pista o elija la sintonía
utilizando los botones
TIME
.
Pulse para guardar.
De wekker zetten
Druk in en houd vast tot
bovenstaand display verschijnt.
Tijd instellen: Druk op
TIME
om de uren in te stellen.
Druk op om op te slaan.
Druk op
TIME
om de
minuten in te stellen.
Druk op om op te slaan.
Wekkerbron kiezen: Als de bron CD of
tuner is, kiest u het gewenste nummer
of een radiostation d.m.v. de
TIME
-knoppen.
Druk om op te slaan.
Set AL 7.30
AM
7.10
AM
t? 1
ALARM
+
ALARM
+
ALARM
+
ALARM
ALARM
+
ALARM
+
ALARM
+
ALARM
ALARM
+
ALARM
+
ALARM
+
ALARM
ALARM
+
ALARM
+
ALARM
+
ALARM
ALARM
+
ALARM
+
ALARM
+
ALARM
ALARM
+
ALARM
+
ALARM
+
ALARM
continued
suite
Fortsetzung
continua
continuación
vervolg

44
English
EnglishEnglish
English
Français
FrançaisFrançais
Français
Deutsch
DeutschDeutsch
Deutsch
Italiano
ItalianoItaliano
Italiano
Español
EspañolEspañol
Español
Nederlands
NederlandsNederlands
Nederlands
LINN CLASSIK
l
Setting the alarm (continued)
Set Alarm Volume: Press
TIME
to set the
volume.
Press to store.
Set Alarm days: Use
TIME
to set alarm on and off.
Press to store.
Repeat for each day.
Turn the alarm on or off: Press
to turn alarm on and off.
Note: If the alarm is set
successfully will show on the
display in standby mode.
Réglage du réveil (suite)
Réglage volume réveil : Appuyer
sur
TIME
pour régler
le volume.
Appuyer sur pour
mémoriser.
Entrer jours du réveil : Utiliser
TIME
pour allumer
éteindre le réveil.
Appuyer sur pour mémoriser.
Répéter pour chaque jour.
Allumer ou éteindre le réveil :
Appuyer sur pour allumer
ou éteindre le réveil.
Remarque : Si le réveil est
correctement réglé apparaîtra à
l'affichage en mode veille.
Wecker stellen (Fortsetzung)
Weckerlautst. stellen: Zum
Einstellen der Lautstärke
TIME
drücken.
Zum Speichern drücken.
Wecktage stellen: Wecker mit
TIME
Ein oder Aus stellen.
Zum Speichern drücken.
Für jeden Tag wiederholen.
Wecker Ein oder Aus stellen: Mit
Ein oder Aus stellen.
Hinweis: Bei korrekter
Weckereinstellung zeigt das
Display in Standby an.
Impostazione della sveglia
(continua)
Impostare il volume della
Sveglia: Premere
TIME
per impostare il volume.
Premere per memorizzare.
Impostare i giorni della Sveglia:
Premere
TIME
per abilitare
e disabilitare la funzione Sveglia.
Premere per memorizzare.
Ripetere per ciascun giorno.
Abilitazione o disabilitazione
della Sveglia: Premere per
abilitare e disabilitare la funzione
Sveglia.
Nota: se la funzione è stata
impostata correttamente verrà
visualizzato sul display nello stato
di stand-by.
Ajuste de la alarma
(continuación)
Ajuste de volumen de alarma:
Pulse
TIME
para
ajustar el volumen.
Pulse para guardar.
Ajuste de días de alarma: Utilice
TIME
para activar y
desactivar la alarma.
Pulse para guardar.
Repita para cada día.
Activación y desactivación de la
alarma: Pulse para activar
y desactivar la alarma.
Nota: Si se ajusta correctamente
la alarma, en el visualizador
aparecerá en modo reponso.
De wekker zetten (vervolg)
Wekkervolume instellen: Druk op
TIME
om het volume in
te stellen.
Druk op om op te slaan.
Instellen van de dagen van de week:
Gebruik
TIME
om de
wekker aan en uit te schakelen.
Druk op om op te slaan. Herhaal
dit voor iedere dag van de week.
Aan- en uitzetten van de
wekkerfunctie: Druk op om
de wekkerfunctie aan- of uit te
zetten.
Opm.: Wanneer de wekkerfunctie
goed is ingesteld ziet u op het
display als hij in de wachtstand
staat.
43
1.0n AL On Cd
+
ALARM
+
ALARM
ALARM
+
ALARM
+
ALARM
ALARM
+
ALARM
+
ALARM
ALARM
+
ALARM
+
ALARM
ALARM
+
ALARM
+
ALARM
ALARM
+
ALARM
+
ALARM
ALARM

45 LINN CLASSIK
English
EnglishEnglish
English
Français
FrançaisFrançais
Français
Deutsch
DeutschDeutsch
Deutsch
Italiano
ItalianoItaliano
Italiano
Español
EspañolEspañol
Español
Nederlands
NederlandsNederlands
Nederlands
LINN CLASSIK
Setting the timer
The timer switches the product to
standby after a set time.
Press and hold until above
display shows.
Press
TIME
to set timer
duration.
Press to store. Note: If the timer is set
successfully will flash on the
display in operational mode.
Réglage de la minuterie
La minuterie remet le produit en veille
après un temps déterminé.
Appuyer sur et maintenir enfoncé
jusqu'à obtention du message ci-dessus.
Appuyer sur
TIME
pour
régler la durée de la minuterie.
Appuyer sur pour mettre en
mémoire.
Remarque : Si la minuterie est
correctement réglée clignotera
à l'affichage en mode marche.
Timer einstellen
Der Timer schaltet das Gerät nach
einer bestimmten Zeit auf Standby.
drücken und halten, bis
Display wie oben erscheint.
Zum Einstellen der Timer-
Zeitspanne
TIME
drücken.
Zum Speichern drücken. Hinweis: Bei korrekter Einst. des
Timers blinkt im Betriebsmodus
am Display.
Impostazione del timer
Il timer passa l’apparecchio nella
modalità di stand-by dopo un periodo
di tempo definito.
Premere e tener premuto fino a
visualizzare il display riportato qui sopra.
Premere
TIME
per
impostare la durata del timer.
Premere per memorizzare. Nota: se la funzione è stata
impostata correttamente
lampeggerà sul display nel modo
operativo.
Ajuste del temporizador
El temporizador coloca la unidad en
standby después de un intervalo
predeterminado. Pulse y mantenga
pulsado hasta que aparezca
la visualización de arriba.
Pulse
TIME
para fijar la
duración del temporizador.
Pulse para guardar. Nota: Si se ajusta correctamente
el temporizador, destelleará en
el visualizador, en modo operativo.
Instellen van de timer
De timer schakelt het toestel na een
bepaalde tijd over in de wachtstand.
Druk in en houd vast tot het
bovenstaand display verschijnt.
Druk op
TIME
om de
timer-duur in te stellen.
Druk op om op te slaan. Opm.: Als de timer goed is
ingesteld en in bedrijf is, ziet u
op het display knipperen.
SEt ti 0.30 ti On 11.50
AM
TIMER
+
TIMER
TIMER
+
TIMER
TIMER
+
TIMER
TIMER
+
TIMER
TIMER
+
TIMER
TIMER
+
TIMER
Pagina laadt ...

LINN CLASSIK
User Option Tables
Tableaux d'options de
l'utilisateur
Tabelle Benutzeroptionen
Tabelle delle opzioni utente
Tablas de opciones de usuario
Gebruiksoverzicht

48
English
EnglishEnglish
English
Français
FrançaisFrançais
Français
Deutsch
DeutschDeutsch
Deutsch
Italiano
ItalianoItaliano
Italiano
Español
EspañolEspañol
Español
Nederlands
NederlandsNederlands
Nederlands
LINN CLASSIK
Programming user options
Switch power on while holding
VOL
until the above display
shows (12 seconds).
Press
VOL
to select an
option.
Press
VOL
to change its
value.
(See tables on pages 49-55).
To exit:
Press and hold
VOL
for 5
seconds.
Programmation des options
de l'utilisateur
Mettre sous tension tout en
appuyant sur
VOL
et maintenir
enfoncé jusqu'à ce que l'affichage
ci-dessus apparaisse (12 sec.).
Appuyer sur
VOL
pour
sélectionner une option.
Appuyer sur
VOL
pour
changer sa valeur.
(cf. tableaux pages 49-55).
Pour sortir :
Appuyer sur
VOL
et maintenir
enfoncé pendant 5 sec.
Benutzeroptionen
Programmieren
Einschalten und gleichzeitig
VOL
gedrückt halten, bis
Display oben erscheint (12 Sek.).
Zur Wahl einer Option
VOL
drücken.
Zur Wertänderung
VOL
drücken.
(Siehe Tabellen Seite 49-55).
Beenden:
VOL
5 Sek. gedrückt halten.
Programmazione delle
opzioni utente
Accendere l’apparecchio tenendo
premuto
VOL
fino a
visualizzare il display riportato qui
sopra (12 secondi).
Premere
VOL
per selezionare
un’opzione.
Premere
VOL
per modificarne
il valore.
(Vedere le tabelle alle pagine 49-55).
Per uscire:
Premere e tener premuto
VOL
per 5 secondi.
Programación de Opciones
del Usuario
Encienda el equipo mientras
mantiene pulsado
VOL
hasta
que se visualice el mensaje
superior (12 segundos).
Pulse
VOL
para seleccionar
una opción.
Pulse
VOL
para modificar su
valor.
(Vea las tablas en las páginas 49-
55).
Para salir:
Pulse y mantenga
VOL
durante 5 segundos.
Gebruiksmogelijkheden
programmeren
Schakel de spanning in terwijl u
VOL
ingedrukt houdt totdat
bovengetoonde display zichtbaar
wordt (12 seconden).
Druk op
VOL
voor het
selecteren van een optie.
Druk op
VOL
om de waarde te
veranderen.
(Zie tabellen op pag. 49-55).
Het programma als volgt
afsluiten:
VOL
5 seconden ingedrukt
houden.
1-1 3-0 3-2
iiiiiiii
+
+
+
+
+
+

49 LINN CLASSIK
LINN CLASSIK
Greyed area is factory default. La zone grisée est définie par défaut à l’usine. Grauer Bereich ist Werkseinstellung L’area in grigio è un’impostazione predefinita La zona de color gris es el predeterminado de fábrica De gearceerde delen zijn niet voor u toegankelijk
Option Tables
1-0 0-1
Option 1
Sleep display
Sleep display enabled when product is left
idle.
✓ ✗
Change these operating options to suit your personal preferences. Further options are
shown on the following pages.
Option 1
Affichage du mode
Sleep (arrêt)
Le mode Sleep est affiché lorsque
l'appareil est à l'arrêt.
✓ ✗
Changer ces options de fonctionnement selon vos préférences personnelles. Les pages
suivantes indiquent d'autres options.
Option 1
Schlaf-Display
Schlaf-Display aktiviert, wenn Gerät nicht
benützt.
✓ ✗
Diese Betriebsoptionen können nach persönlichem Belieben eingestellt werden. Weitere
Optionen auf den folgenden Seiten.
Opzione 1
Display Sleep
Il display Sleep è abilitato,.e si attiva
quando l’apparecchio non riceve comandi
per alcuni secondi
✓ ✗
Modificare queste opzioni operative a seconda delle proprie preferenze. Ulteriori opzioni
sono riportate nelle pagine che seguono.
Opción 1
Visualizador en
reposo
El visualizador en reposo se activa
cuando se deja el equipo sin utilizar.
✓ ✗
Ajuste estas opciones de funcionamiento para adecuarse a sus gustos personales. En las
páginas siguientes se muestran más opciones de personalización.
Optie 1
Slaapdisplay
Slaapdisplay staat aan wanneer het
product niet wordt gebruikt.
✓ ✗
U kunt deze bedieningsmogelijkheden aanpassen aan uw persoonlijke voorkeur. Op de
volgende pagina’s worden meer mogelijkheden getoond.

50
LINN CLASSIK
l
2-0 2-1 2-2 3-0 3-1
Option 2
Standby display
Display when product is in standby
mode.
‘
. . .
’
Time Time/next
alarm day
Option3
Clock display
Clock displayed as a 12 or 24 hour
clock.
12 Hour 24 Hour
Option 2
Affichage veille
Affichage lorsque le produit est en
veille.
‘
. . .
’
Heure
Heure/
prochain
réveil
Option3
Affichage de
l'heure
Affichage à 12 ou 24 heures.
12 heures 24 heures
Option 2
Standby-Display
Display, wenn Gerät im Standby-
Modus.
‘
. . .
’
Uhrzeit
Uhrzeit/
Nächster
Wecktag
Option3
Zeitanzeige
Zeitanzeige im 12- oder 24-
Stundenformat.
12-Stunden 24-Stunden
Opzione 2
Display di stand-by
Che cosa mostra il display quando
l’apparecchio è nello stato di
stand-by.
‘
. . .
’
Ora
Ora/sveglia
giorno
successivo
Opzione 3
Display ora
L’ora è visualizzata nel formato 12
o 24 ore.
12 ore 24 ore
Opción 2
Visualizador en
standby
Visualizador cuando la unidad se
encuentra en modo reposo.
‘. . .
’
Hora
Hora/día
alarma
siguiente
Opción 3
Visualización de
reloj
El reloj es configurable como reloj
de 12 o 24 horas.
12 Horas 24 Horas
Optie 2
Wachtstand-
display
Display als het toestel in
wachtstand staat.
‘
. . .
’
Tijd
Tijd/
wekkerinstel-
ling
Optie 3
Tijdklok-display
Tijdklok als 12-of 24-uurs klok.
12-uurs 24-uurs

51 LINN CLASSIK
LINN CLASSIK
4-0 4-1 5-0 5-1
Option 4
Power up mode
Product in standby or operational
mode when turned on by main
power switch.
Standby Operational
Option 5
Power up CD
CD starts playing when product
enters operational mode.
✓ = Enabled.
✗ ✓
Option 4
Mode marche
Le produit se met en veille ou en
mode opérationnel lorsque mis
sous tension.
Veille Opérationnel
Option 5
Mise en marche du
CD
Le CD se met en marche lorsque
le produit se met en mode
opérationnel.
✓ = Actif.
✗ ✓
Option 4
Einschaltmodus
Gerät im Standby- oder
Betriebsmodus, wenn mit
Hauptschalter eingeschaltet.
Standby Betrieb
Option 5
CD-
Einschaltmodus
CD-Wiedergabe beginnt, sobald
Gerät in Betriebsmodus ist.
✓ = Aktiviert.
✗ ✓
Opzione 4
Stato
all’accensione
L’apparecchio è nello stato di
stand-by o nella modalità
operativa quando viene accesso.
Stand-by Operativo
Opzione 5
Accensione CD
Quando l’apparecchio entra nella
modalità operativa la riproduzione
del CD inizia automaticamente.
✓ = Abilitato.
✗ ✓
Opción 4
Modo de
encendido
El producto está en modo reposo
u operativo cuando se enciende
con el interruptor de red.
Standby Operativo
Opción 5
Encendido del CD
El CD inicia la reproducción
cuando la unidad pasa al modo
operativo.
✓ = Activado.
✗ ✓
Optie 4
In bedrijf
Het toestel is in wachtstand of in
bedrijf als de hoofdschakelaar aan
staat.
Wachtstand In bedrijf
Optie 5
De CD-speler
aanzetten
De CD-speler gaat lopen als het
toestel in bedrijf wordt gesteld.
✓
= Ingeschakeld.
✗ ✓

52
LINN CLASSIK
6-0 6-1 7-0 7-1
Option 6
CD settings
CD settings are always saved
when the product is turned off and
reloaded when the product is
turned on.
✗ ✓
Option 7
Amp memory
Grouped - All sources use the same volume,
balance, bass and treble settings.
Individual - Each source has individual
settings.
Grouped Individual
Option 6
Réglages du CD
Les réglages du CD sont auto-
matiquement enregistrés lorsque le
produit est éteint et rechargés
lorsqu'il est remis en marche.
✗ ✓
Option 7
Mémoire ampli
Groupée - Toutes les sources utilisent les mêmes
réglages de volume, balance, basse et aigus.
Individuelle - Chaque source a ses réglages
spécifiques.
Groupée Individuelle
Option 6
CD-Einstellungen
CD-Einstellungen beim
Ausschalten immer speichern und
beim Einschalten wieder
aktivieren.
✗ ✓
Option 7
Verst.-
Einstellungen
Gruppiert - Gleiche Lautstärke, Balance, Bass
und Höheneinst. für alle Tonquellen verwenden.
Individuell - Jede Tonquelle individuell
einstellen.
Gruppiert Individuell
Opzione 6
Impostazioni del
CD
Le impostazioni del lettore
vengono sempre memorizzate allo
spegnimento dell’apparecchio,
quindi ricaricate all’accensione.
✗ ✓
Opzione 7
Memoria
amplificatore
Raggruppate - Tutte le sorgenti hanno le
stesse impostazioni di bilanciamento e di toni
bassi e alti.
Individuale - Ciascuna sorgente dispone di
impostazioni individuali.
Raggruppate Individuale
Opción 6
Configuración del
CD
La configuración del CD queda
siempre guardada cuando se
apaga la unidad y se vuelve a
cargar cuando ésta se enciende.
✗ ✓
Opción 7
Memoria
amplificador.
Agrupado - Todas las fuentes utilizan la
misma configuración para el volumen, balance,
graves y agudos.
Individual - Cada fuente tiene su propia
configuración.
Agrupado Individual
Optie 6
CD-instellingen
CD-instellingen worden altijd
bewaard als het toestel wordt
uitgeschakeld en worden
geactiveerd als het toestel in
bedrijf wordt gesteld.
✗ ✓
Optie 7
Versterkergeheu-
gen
Gegroepeerd - Alle bronnen hebben dezelfde
volume-, balans-, bas- en treble-instellingen.
Individueel - Elke bron heeft eigen
instellingen.
Gegroepeerd Individueel

53 LINN CLASSIK
LINN CLASSIK
8-0 8-1
Option 8
Amp settings
✓ = Last saved settings used as default when the product is turned on.
✗ = Last default settings are used when the product is turned on.
✓ ✗
Option 8
Réglage ampli
✓ = Les derniers réglagles enregistrés seront utilisés par défaut lorsque le produit est mis en marche.
✗ = Les derniers réglages par défaut sont utilisés lorsque le produit est mis en marche.
✓ ✗
Option 8
Verst.-
Einstellungen
✓ = Zuletzt gespeicherte Einstellungen werden beim Einschalten des Geräts als Standard verwendet.
✗ = Letzte Standardeinstellungen beim Einschalten wieder aktivieren.
✓ ✗
Opzione 8
Impostazioni
amplificatore
✓ = All’accensione, dell’apparecchio, vengono utilizzat le ultime impostazioni memorizzate.
✗ = All’accensione, vengono utilizzate le impostazioni predefinite.
✓ ✗
Opción 8
Configuración
amplificador.
✓ = Por defecto se utilizará la última configuración guardada cuando se vuelva a encender el producto.
✗ = Cuando se enciende el aparato se utiliza la última configuración predeterminada.
✓ ✗
Optie 8
Versterkerinstelling-
en
✓ = Als het toestel wordt aangezet, worden de laatst opgeslagen instellingen als standaard gebruikt.
✗ = De vorige standaardinstellingen worden overgenomen als het toestel wordt aangezet.
✓ ✗

54
LINN CLASSIK
9-0 9-1 9-2 10-0 10-1
Option 9
Mute speed
Speed of muting when switching
sources.
Slow Medium Fast
Option 10
Unity gain
✗ = Unity gain is off
✓ = Unity gain for AUX is enabled
✗
✗✗
✗
✓
✓✓
✓
Option 9
Vitesse sourdine
Vitesse de la sourdine lorsqu'on
change la source.
Lente Moyenne Rapide
Option 10
Gain Unité
✗ = Gain d’unité inactif
✓ = Gain d’unité pour AUX actif
✗
✗✗
✗
✓
✓✓
✓
Option 9
Stumm-Geschw.
Geschw.für Stummschalten beim
Umschalten zw. Tonquellen.
Langsam Mittel Schnell
Option 10
Verstärkg.=1
✗ = Verstärkg.=1 ausgeschaltet
✓ = Verstärkg.=1 für AUX aktiviert
✗
✗✗
✗
✓
✓✓
✓
Opzione 9
Velocità Muting
Velocità del muting durante la
selezione delle sorgenti.
Bassa Media Veloce
Opzione 10
Guadagno Unitario
✗ = Il guadagno unitario è
disattivato
✓ = Il guadagno unitario è attivato
per l’ingresso AUX.
✗
✗✗
✗
✓
✓✓
✓
Opción 9
Velocidad de
silenciamiento
Velocidad de silenciamiento
cuando se conmuta entre fuentes.
Baja Media Rápida
Opción 10
Ganancia unidad
✗ = Ganancia unidad está
desactivada
✓ = Ganancia unidad para AUX
está activada
✗
✗✗
✗
✓
✓✓
✓
Optie 9
Mute-snelheid
De snelheid waarmee bij het
veranderen van bron de mute in
werking treedt.
Langzaam Medium Snel
Optie 10
Unity gain
✗ = Unity gain staat uit
✓ = Unity gain voor AUX staat aan
✗
✗✗
✗
✓
✓✓
✓

55 LINN CLASSIK
LINN CLASSIK
11-0 11-1
Option 11
Alarm mode
Manual: You set time, source, track (if using CD), preset (if using tuner) and volume.
Auto: Alarm uses last settings used before power down.
Note: You must always set time and alarm days.
Manual Auto
Option 11
Mode réveil
Manuel : Vous réglez l'heure, la source, le morceau (si réveil CD), le préréglage (si réveil radio) et le volume.
Auto : Le réveil prend les derniers réglages utilisés avant la dernière mise hors tension.
Remarque : Vous devez toujours régler l'heure et les jours de réveil.
Manuel Auto
Option 11
Weckmodus
Manuell: Sie stellen Uhrzeit, Tonquelle, Titel (bei CD), Festsender (beim Tuner) und Lautstärke ein.
Auto: Wecker verwendet Einstellungen vor letztem Ausschalten.
Hinweis: Uhrzeit und Wecktage müssen von Ihnen eingestellt werden.
Manuell Auto
Opzione 11
Modo Sveglia
Manuale: l’utente imposta l’ora, la sorgente, il brano (CD), preselezione (sintonizzatore) e il volume.
Auto: il modo Sveglia adotta le ultime impostazioni utilizzate prima dello spegnimento.
Nota: L’ora e i giorni vanno sempre impostati.
Manuale Auto
Opción 11
Modo alarma
Manual: Usted ajusta la hora, la fuente y la pista (si está utilizando el CD), presintonía (si utiliza el
sintonizador) y el volumen.
Auto: La alarma utiliza la última configuración que se utilizó antes de apagar el equipo.
Nota: Siempre se deben programar los días para la hora y la alarma.
Manual Auto
Optie 11
Wekker
Handmatig: U stelt tijd, bron, track (bij gebruik van CD), voorkeuzestation (bij gebruik van tuner) en volume in.
Auto: De wekker hanteert de laatst gebruikte instellingen.
Opm.: U moet altijd de tijd en de datum invoeren.
Handmatig Automatisch

56
LINN CLASSIK
12-0 12-16 12-U 13-0 13-56 13-U
Option 12
IR1 Infra Red Out 1
You can change the
frequency of the Infra red
controllers.
0 = 36 Frequency
ranges from
1 - 36
Frequency
has been
changed
Option 13
IR2 Infra Red Out 2
You can change the
frequency of the Infra red
controllers
0 = 56 Frequency
ranges from
1 - 56
Frequency
has been
changed
Option 12
IR1 Infra Red Out 1
Vous pouvez changer la
fréquence des contrôleurs
infrarouge.
0 = 36 Plages de
fréquences
de 1 à 36
La fréquence
a été
changée.
Option 13
IR2 Infra Red Out 2
Vous pouvez changer la
fréquence des contrôleurs
infrarouge.
0 = 56 Plages de
fréquences
de 1 à 56
La
fréquence a
été changée.
Option 12
IR1 Infrarot Aus 1
Die Frequenz der Infrarot-
Controller kann geändert
werden.
0 = 36 Der
Frequenzber
eich reicht
von 1 - 36
Frequenz
wurde
geändert.
Option 13
IR2 Infrarot Aus 2
Die Frequenz der Infrarot-
Controller kann geändert
werden.
0 = 56 Der
Frequenzber
eich reicht
von 1 - 56.
Frequenz
wurde
geändert.
Opzione 12
IR1 infrarossi
uscita 1
È possibile modificare la
frequenza dei controller a
infrarossi.
0 = 36 Gamme di
frequenza da
1 - 36
La frequenza
è stata
modificata
Opzione 13
IR2 infrarossi
uscita 2
È possibile modificare la
frequenza dei controller a
infrarossi.
0 = 56 Gamme di
frequenza da
1 -56
La frequenza
è stata
modificata
Opción 12 - IR1
Señal de Infrarojos
de salida 1
Usted puede modificar la
frecuencia de los
controladores de
infrarojos.
0 = 36 La
frecuencia
varia entre 1
- 36
Se ha
modificado
la frecuencia
Opción 13 - IR2
Señal de infrarojos
de salida 2
Usted puede modificar la
frecuencia de los
controladores de infrarojos
0 = 56 La
frecuencia
varía entre 1
- 56
La
frecuencia
ha sido
modificada
Optie 12
IR1 Infra Red Out 1
U kunt de frequentie van
de infraroodbediening
wijzigen.
0 = 36 Frequentieb
ereiken van
1 - 36
Frequentie is
gewijzigd
Optie 13
IR2 Infra Red Out 2
U kunt de frequentie van
de infraroodbediening
wijzigen
0 = 56 Frequentieb
ereik van 1 -
56
Frequentie is
gewijzigd

57 LINN CLASSIK
LINN CLASSIK
14-0 14-1 15-0 15-1
Option 14
Disable remote
control
You can disable the
infrared remote control.
0 -not
disabled
1 - disabled
Option 15
ACC socket
Select the item connected
to the ACC socket.
0 -
external
infrared
sensor
1 - for RCU
Option 14
Mise hors service de
la commande à
distance
Vous pouvez mettre hors
service la commande à
distance à infrarouge.
0 – n’est pas
hors service
1 – est hors
service
Option 15
Prise ACC
Sélectionnez l’élément
connecté à la prise pour
accessoires ACC.
0 -
capteur
extérieur
infrarouge
1 - pour le
dispositif de
commande
de la pièce
(RCU)
Option 14
Fernbedienung
ausschalten
Die Infrarot-
Fernbedienung kann
ausgeschaltet werden.
0 -
eingeschaltet
1 -
ausgeschalt
et
Option 15
ACC-Buchse
Wählen Sie den an die
ACC-Buchse
angeschlossenen
Geräteteil.
0 -
externer
Infrarot
Sensor
1 - für RCU
(Fernbedien
ung)
Opzione 14
Disattivare il
telecomando
È possibile disattivare il
telecomando a infrarossi.
0 – non
disattivato
1 -
disattivato
Opzione 15
Presa ACC
Selezionare l’elemento
collegato alla presa ACC.
0 -
sensore
esterno a
infrarossi
1 - per RCU
Opción 14
Desactivar el
control remoto
Usted puede desactivar el
control remoto.
0 - no
desactivado
1 -
desactivado
Opción 15
Toma de corriente
alterna
Seleccione el dispositivo
conectado a la toma de
corriente alterna.
0 -
sensor
infrarrojos
externo
1 - para
UCR (Unidad
de Control
Remoto)
Optie 14
Afstandsbediening
uitschakelen
De infrarode
afstandsbediening is uit te
schakelen.
0 – Niet
uitgeschakel
d
1 -
Uitgeschakel
d
Optie 15
ACC-aansluiting
Selecteer het item dat op
de ACC-aansluiting zit.
0 -
extern
infrarood
sensor
1 - voor
RCU
(Remote
Control Unit)

58
LINN CLASSIK
16-0 16-1 16-2
Option 16
Knekt/Connect
communication
Select the communication settings for the
Classik connect and the KNEKT system
For Classik
connect system
For Main Room
Classik in a Knekt
system
For local room
Classik in a Knekt
system
Option 16
Communication
Knekt/Connect
Sélectionnez les paramètres de
communications pour le Classik Connect
et le système KNEKT.
Pour le système
Classik Connect
Pour le Classik de
la pièce principale
dans un système
KNEKT
Pour le Classik
d’une pièce locale
dans un système
KNEKT
Option 16
Knekt/Kommunik
-ationsanschluss
Wählen Sie die
Kommunikationseinstellungen für den
Classik und das KNEKT-System.
Für das Classik
Anschluss-System
Für Classik
(Musikraum) in
einem Knekt-
System
Für Classik
(anderer Raum) in
einem Knekt-
System
Opzione 16
Comunicazione
Knekt/Connect
Selezionare le impostazioni di
comunicazione tra il Classik e il sistema
KNEKT.
Per il sistema
Classik
Per il Classik
principale in un
sistema Knekt
Per il Classik
secondario in un
sistema Knekt
Opción 16
Comunicaciones
conexión Knekt
Seleccione los parámetros de las
comunicaciones para la conexión entre el
equipo Classik y el sistema KNEKT
Para la conexión
del equipo Classik
Para el equipo
Classik de la Sala
Principal dentro de
un sistema Knekt
Para el equipo de
la sala secundaria
dentro de un
sistema Knekt
Optie 16
Knekt/Connect
communicatie
Selecteer de communicatie-instellingen
voor de Classik connect en het KNEKT
systeem
Voor Classik
connect systeem
Voor Main Room
Classik binnen een
Knekt systeem
Voor secundaire
kamer binnen een
Knekt systeem
Pagina laadt ...

60
English
EnglishEnglish
English
Français
FrançaisFrançais
Français
Deutsch
DeutschDeutsch
Deutsch
Italiano
ItalianoItaliano
Italiano
Español
EspañolEspañol
Español
Nederlands
NederlandsNederlands
Nederlands
LINN CLASSIK
Linn CLASSIK Connect
The Linn Classik can be connected to
up to four other Classiks so that you
can listen to the output from the Main
room Classik in secondary rooms.
One Linn Classik is situated in the
main room, this is called the driver.
Up to four other Linn Classiks can be
placed in secondary rooms, these
Linn Classiks are called receivers.
Using this system you can listen to
output from the main room in a
secondary room, However, you cannot
listen to output from the secondary
room in the main room or another
secondary room.
Linn CLASSIK Connect
Le Linn Classik peut se connecter
jusqu’à quatre autres dispositifs
Classik, pour vous permettre
d’écouter le son d’un Classik installé
dans une pièce principale dans des
pièces auxiliaires.
Un Linn Classik est placé dans la
pièce principale, c’est le haut-parleur.
Jusqu’à quatre autres Linn Classiks
peuvent être placés dans des pièces
auxiliaires, ce sont des récepteurs.
Grâce à ce système vous pouvez
écouter le son provenant de la pièce
principale dans une pièce auxiliaire.
Mais vous ne pouvez pas écouter le
son d’une pièce auxiliaire dans la
pièce principale ou dans une autre
pièce auxiliaire.
Linn CLASSIK Anschluss
Der Linn Classik kann an bis zu vier
weitere Classiks angeschlossen
werden, so dass Sie von dem in Ihrem
Musikraum aufgestellten Classik auch
in Nebenräumen Musik hören können.
Ein Linn Classik, der Treiber genannt
wird, wird im Musikraum aufgestellt.
Es können bis zu vier weitere Linn
Classiks, die als Empfänger
bezeichnet werden, in Nebenräumen
aufgestellt werden.
Mit diesem System können Sie die
Tonquellen vom Musikraum in den
Nebenräumen hören. Es ist allerdings
nicht möglich, die Tonquelle eines
Nebenraums im Musikraum oder in
einem anderen Nebenraum zu hören.
Connessione Linn CLASSIK
Linn Classik può essere collegato a
un numero massimo di altri quattro
Classik, per consentire l’ascolto da
una stanza principale ad altre stanze
secondarie.
Un Linn Classik è posto nella stanza
principale e viene definito pilota.
È possibile collocare altri quattro Linn
Classik nelle stanze secondarie, che
vengono definiti ricevitori.
Questo sistema consente di ascoltare
nelle stanze secondarie il suono
prodotto in quella principale. Tuttavia,
non è possibile il contrario, ossia
l’ascolto dalla stanza secondaria a
un’altra secondaria o alla principale.
Linn CLASSIK Connect
El Linn Classik-K se puede conectar a
otros cuatro Classik-K, de forma que
puede usted escuchar las fuentes del
Classik-K principal, en habitaciones
secundarias.
Se sitúa un Linn Classik-K en la
habitación principal; éste se llama
emisor.
Se pueden colocar hasta cuatro Linn
Classik-K en habitaciones
secundarias, éstos se llaman
receptores.
Mediante este sistema puede usted
escuchar en cualquiera de las
habitaciones secundarias, la señal
emitida desde la habitación principal.
Sin embargo, no puede escuchar en la
habitación principal, ni en las
secundarias, la señal emitida desde
otra habitación secundaria.
Linn CLASSIK Connect
Op de Linn Classik Connect kunnen
tot 4 andere Classik Connect's
aangesloten worden, zodat u in
andere ruimtes kunt luisteren naar de
output van die ene Classik Connect.
Eén Linn Classik wordt in de
'hoofdruimte' geplaatst. Deze wordt
de 'master' genoemd.
Maximaal vier aanvullende Linn
Classiks kunnen in andere kamers
worden geinstalleerd. Deze noemen
we ontvangers.
Door van dit systeem gebruik te maken
kunt u in andere kamers luisteren naar
de output van de geluidsinstallatie. Het
is echter niet mogelijk de output van
een andere kamer via de
geluidsinstallatie of via de overige
andere kamers te beluisteren.
LINN CLASSIK
LINN CLASSIK
LINN CLASSIKLINN CLASSIKLINN CLASSIK
LINN CLASSIK
LINN CLASSIKLINN CLASSIKLINN CLASSIK
LINN CLASSIKLINN CLASSIKLINN CLASSIK
LINN CLASSIK
LINN CLASSIK
Pagina laadt ...

62 LINN CLASSIK
Nederlands
NederlandsNederlands
Nederlands
Deutsch
DeutschDeutsch
Deutsch
Italiano
ItalianoItaliano
Italiano
Español
EspañolEspañol
Español
Français
FrançaisFrançais
Français
English
EnglishEnglish
English
LINN CLASSIK
Using the Linn CLASSIK
connect
To connect to the Main room Linn
Classik you must have “LISTEN”
showing on the display to do this
press SRC+,SRC - or Listen on the
handset.
Then press SRC+ and SCR- together
or press the Listen buton on the
handset, when “MAIN” is displayed,
the controls of the secondary room
Classik, now control the Linn Classik
in the main room.
If you have a IR repeater connected to
your Linn Classik, you can control one
external source in the main room by
pointing that source’s handset at the
Linn Classik in the secondary room.
(e.g. a satellite receiver)
To return to the local source Linn
Classik, press SRC + and SRC -
together or LISTEN button on the
handset.
Utilisation du Linn CLASSIK
Connect
Pour vous brancher sur le Linn Classik
de la pièce principale, le message «
LISTEN » doit être affiché sur l’écran.
Pour ce faire, appuyez sur « SRC + », «
SRC - » sur le panneau de commandes
frontal ou sur le bouton « LISTEN » de
votre télécommande.
Puis appuyez sur « SRC+ » et « SCR- »
ensemble ou appuyez sur le bouton «
LISTEN » de votre télécommande.
Lorsque « MAIN » s’affiche, les
commandes du Classik de la pièce
auxiliaire contrôlent maintenant le Linn
Classik qui se trouve dans la pièce
Si un répéteur infrarouge est connecté
sur votre Linn Classik, vous pouvez
commandez une source extérieure dans
la pièce principale en pointant la
télécommande de cette source sur le
Linn Classik de la pièce auxiliaire (par
ex. un récepteur satellite).
Pour revenir au Linn Classik de la
source locale, appuyez sur « SRC + »
et« SRC - » ensemble ou sur le bouton «
LISTEN » de votre télécommande.
Verwendung des Linn CLASSIK
Anschlusses
Zum Anschalten eines Nebenraum-
Classik an den Linn Classik im
Musikraum muss das Display
"LISTEN" anzeigen; drücken Sie dazu
auf SRC+, SRC- oder "LISTEN" an
der Fernbedienung.
Danach drücken Sie gleichzeitig auf
SRC+ und SCR- oder auf "LISTEN"
an der Fernbedienung; wenn "MAIN"
angezeigt wird, bedeutet dies, dass
das Bedienfeld des Classiks im
Nebenraum nun den Linn Classik im
Musikraum steuert
Wenn Sie einen IR-Repeater an Ihren
Linn Classik anschliessen, können
Sie ein externes Gerät im Musikraum
steuern, indem Sie die Fernbedienung
dieses Gerätes auf den Linn Classik
im Nebenraum richten (z.B. ein
Satellitenempfänger).
Zum Rückschalten auf den Linn
Classik als Tonquelle drücken Sie
gleichzeitig auf SRC+ und SRC- oder
auf "LISTEN" an der Fernbedienung.
Utilizzo della connessione Linn
CLASSIK
Per collegare il Linn Classik
principale, è necessario che sul
display sia visualizzato “listen”
(ascolto). A questo scopo, premere
SRC+, SRC – oppure il tasto Listen
del telecomando.
Quindi premere contemporaneamente
SRC+ e SCR- oppure il tasto Listen
del telecomando. Una volta
visualizzato MAIN, i comandi del
Classik della stanza secondaria
controllano il Classik di quella
principale.
Se al Linn Classik è collegato un
ripetitore a raggi infrarossi, è possibile
controllare una fonte esterna nella
stanza principale puntando il
telecomando della fonte verso il Linn
Classik della stanza secondaria (ad
esempio, un ricevitore satellitare).
Per tornare al Linn Classik della fonte
locale, premere contemporaneamente
SRC + e SRC – oppure il tasto
LISTEN del telecomando.
Uso del conector Linn CLASSIK
Para poder conectarse con el Classik-
K de la habitación principal, debe
aparecer "LISTEN" en la pantalla.
Para hacer que aparezca, pulse
SRC+, SRC - o LISTEN en el mando
a distancia.
Luego, en el Classik-K secundario, pulse
SRC+ y SCR- al mismo tiempo o pulse el
botón "LISTEN" ("escuchar") del mando
a distancia. Cuando aparece la palabra
"MAIN" ("PRINCIPAL"), los mandos de la
habitación secundaria pasan a controlar
el Classik-K de la habitación
principal.sala principal.
Si tiene usted un repetidor IR
conectado a su Classik-K principal,
podrá controlar una fuente externa de
la habitación principal, desde el
Classik-K de la habitación secundaria,
con el mando a distancia de dicha
fuente (p. ej. un receptor de satélite).
Para volver a la fuente local del Linn
Classik-K secundario, pulse SRC + y
SRC - al mismo tiempo o el botón
"LISTEN" del mando a distancia.
Het gebruik van de Linn
CLASSIK connect
Om de Linn Classik op de
hoofdopstelling aan te sluiten dient
“listen” op het display vermeld te
worden. Om dit te bereiken drukt u
SRC+,SRC - of LISTEN op de
afstandsbediening in.
Vervolgens drukt u de toetsen SRC+
en SCR- gelijktijdig in of drukt de listen-
toets in op de afstandsbediening. Als
het opschrift “MAIN” verschijnt,
besturen de bedieningsorganen van de
secundaire Classik de Classik op de
geluidsinstallatie.
Indien uw Linn Classik is voorzien van
een IR repeater, kunt u een externe
eenheid op de geluidsinstallatie (b.v.
een satellietontvanger) met de
afstandsbediening aansturen via de
Linn Classik in een andere kamer.
Om terug te keren naar de Linn
Classik in dezelfde kamer drukt u
SRC + en SRC – gelijktijdig, of de
LISTEN-toets op de
afstandsbediening in.
MAIN

63 LINN CLASSIK
Nederlands
NederlandsNederlands
Nederlands
Deutsch
DeutschDeutsch
Deutsch
Italiano
ItalianoItaliano
Italiano
Español
EspañolEspañol
Español
Français
FrançaisFrançais
Français
English
EnglishEnglish
English
LINN CLASSIK
Party Mode
Party Mode allows the selected music
source controlled from the main room
Linn Classik to be played through all
the secondary room Linn Classiks.
In party mode the Secondary room
Linn Classiks can only adjust the
volume, mute and switch to standby.
They cannot control the main room
Classik or control any local sources.
Party Mode (mode multipoint)
Le mode multipoint permet de faire
passer la source musicale que vous
avez sélectionnée et qui est
commandée à partir du Linn Classik
de la pièce principale sur tous les Linn
Classiks installés dans des pièces
auxiliaires.
Vous pouvez uniquement régler le
volume, mettre sur muet ou sur «
STANDBY » les Linn Classiks des
pièces auxiliaires en mode multipoint.
Vous ne pouvez ni contrôler le Classik
qui se trouve dans la pièce principale
ni des sources locales.
Party-Modus
Im Party-Modus wird die im
Musikraum gewählteTonquelle über
die Linn Classiks in allen
Nebenräumen abgespielt.
Im Party-Modus können an den
Classiks in den Nebenräumen nur
Lautstärkeregelungen,
Stummschalten oder Schalten auf
Standby durchgeführt werden.
Der Classik im Musikraum oder
Tonquellen im Nebenraum können im
Party-Modus nicht kontrolliert werden.
Modalità Party
La modalità Party consente di
diffondere la fonte musicale
selezionata controllata dal Linn
Classik principale ai Linn Classik delle
stanze secondarie.
In questa modalità i Linn Classik
secondari possono solo regolare il
volume, impostare il mute e lo
standby. Non possono quindi
controllare il Classik della stanza
principale o altre fonti locali.
Party Mode (Modo Fiesta)
El Party Mode permite que la fuente
de música seleccionada en el Classik-
K de la habitación principal suene en
todos los Linn Classik-K de las
habitaciones secundarias.
Cuando el Party Mode está activado,
los Linn Classik-K de las habitaciones
secundarias solamente pueden
regular el volumen, activar el modo
mute o pasar a standby.
No podrán controlar el equipo de
Classik-K de la habitación principal ni
ninguna otra fuente local en la
habitación secundaria.
Party Mode
Party Mode maakt het mogelijk de op
de geluidsinstallatie gekozen
muziekbron via alle overige Linn
Classiks ten gehore te brengen.
Bij ingeschakelde party mode kan op
de secundaire Linn Classiks
uitsluitend het volume en mute
worden bediend, of kunnen ze op
standby worden geschakeld.
Het is niet mogelijk de Classik van de
geluidsinstallatie af te regelen, noch
een eventuele externe eenheid aan te
sturen.
LINN CLASSIK
LINN CLASSIK
LINN CLASSIKLINN CLASSIK
LINN CLASSIK
LINN CLASSIK

64
English
EnglishEnglish
English
Français
FrançaisFrançais
Français
Deutsch
DeutschDeutsch
Deutsch
Italiano
ItalianoItaliano
Italiano
Español
EspañolEspañol
Español
Nederlands
NederlandsNederlands
Nederlands
LINN CLASSIK
Selecting Party Mode
To select Party Mode on the main
room Linn Classik you must have the
display showing “VOLUME”. Press
the adjust button until “VOLUME” is
displayed or press the volume + or -
on the handset.
Hold down the adjust button until the
display shows “Party On”
The secondary room Linn Classiks in
stand by mode are switched on and
volume aligned to the main room Linn
Classik.
The secondary room Linn Classik will
now replicate everything the main
room Classik does. To end Party
Mode either press STANDBY or
ADJUST on the main room Linn
Classik
Sélection du mode multipoint
Pour pouvoir sélectionner le mode
multipoint sur le Classik de la pièce
principale, le message «VOLUME» doit
s’afficher sur l’écran. Pour ce faire,
appuyez sur le bouton ADJUST jusqu’à
ce que le mot «VOLUME» s’affiche ou
appuyez sur la commande volume + ou –
sur votre télécommande.
Maintenez votre pression sur le bouton «
ADJUST » jusqu’à ce que le message «
Party On ».
Les Linn Classiks qui se trouvent dans
les pièces auxiliaires et qui sont sur le
mode « STANDBY » sont mis sous
tension et leur volume est aligné sur
celui du Linn Classik de la pièce
principale.
Le Linn Classik d’une pièce auxiliaire
reproduira alors tout ce que fait le
Classik qui se trouve dans la pièce
principale. Pour mettre fin au mode
multipoint appuyez sur « STANDBY » ou
sur « ADJUST » sur le Linn Classik de la
pièce principale.
Party-Modus wählen
Um den Party-Modus am Linn Classik
im Musikraum einzuschalten, muss
das Display "VOLUME" anzeigen.
Drücken Sie die "ADJUST"-Taste, bis
"VOLUME" angezeigt wird, oder
Lautstärke + oder - an der
Fernbedienung.
Halten Sie die "ADJUST"-Taste
gedrückt, bis das Display "Party on"
anzeigt.
Die auf Standby geschalteten Linn
Classiks in den Nebenräumen werden
eingeschaltet und die Lautstärke an
die des Linn Classiks im Musikraum
angeglichen.
Die Wiedergabe der Linn Classiks in
den Nebenräumen entspricht nun der
des Linn Classiks im Musikraum. Zum
Beenden des Party-Modus drücken
Sie am Linn Classik im Musikraum
entweder auf "STANDBY" oder
"ADJUST".
Selezione della modalità Party
Per selezionare la modalità Party nel
Linn Classik principale, è necessario
che sul display sia visualizzato
VOLUME. Premere il pulsante di
regolazione fino a visualizzare
VOLUME oppure premere Volume + o
– nel telecomando.
Tenere premuto il tasto fino a
visualizzare “Party On”.
I Linn Classik delle stanze secondarie
in modalità stand-by vengono accesi
e il relativo volume viene allineato a
quello del Linn Classik principale.
A questo punto, i Linn Classik
secondari duplicano tutto quanto
accade nel Classik principale. Per
interrompere la modalità Party,
premere STANDBY o ADJUST
(REGOLAZIONE) del Linn Classik
principale.
Seleccinar el Party Mode
Para poder seleccionar el Party Mode
en la habitación principal, el Classik-K
deberá mostrar la palabra "VOLUME"
en la pantalla. Pulse el botón "ADJUST"
hasta que aparezca la palabra
"VOLUME" o pulse el botón + ó - de
volumen en el mando a distancia.
Mantenga pulsado el botón "ADJUST"
hasta que en la pantalla aparezca el
mensaje "Party On" (Modo Fiesta
Activado).
Los Classik-K de las habitaciones
secundarias que estén en standby, se
pondrán en marcha y el volumen se
pondrá al nivel del Linn Classik-K de
la habitación principal.
En la habitación secundaria, el Linn
Classik-K duplicará todo lo que se
haga en la habitación principal. Para
desactivar el Party Mode, puede
pulsar STANDBY o ADJUST en el
Classik-K de la habitación principal.
Kiezen van Party Mode
Om Party Mode op de Classik van de
geluidsinstallatie te kiezen dient op
het display “VOLUME” vertoond te
worden. Druk de keuzetoets in totdat
“VOLUME” verschijnt of gebruik de
toetsen volume + of - van de
afstandsbediening.
Houd de keuzetoets ingedrukt totdat
“Party On” op het display verschijnt
De Linn Classiks die in de overige
kamers op standby zijn geschakeld,
worden aangezet en het volume wordt
aangepast aan die van de Linn
Classik op de geluidsinstallatie.
De secundaire Linn Classiks brengen
nu exact hetzelfde voort als de Linn
Classik op de geluidsinstallatie. Om
Party Mode uit te schakelen toetst u
STANDBY of ADJUST op de Linn
Classik van de geluidsinstallatie in.
VOLUME

65 LINN CLASSIK
Nederlands
NederlandsNederlands
Nederlands
Deutsch
DeutschDeutsch
Deutsch
Italiano
ItalianoItaliano
Italiano
Español
EspañolEspañol
Español
Français
FrançaisFrançais
Français
English
EnglishEnglish
English
LINN CLASSIK
Party Poop
Party Poop allows secondary room
Linn Classiks to exit Party Mode and
control their own sources.
Secondary room Linn Classiks can
exit Party Mode. In volume adjust
mode hold down the adjust button
until “Party Poop” appears, then hold
SRC + and SCR- until MAIN
disappears from display.
“Party Poop” can be turned off by
holding down the adjust button until
“Party On” is displayed
Secondary room Classiks can be
brought back into the party mode, by
holding down the adjust button on the
main room Linn Classik until “Party
off” appears, then turning the Party
Mode on again.
Party Poop
« Party Poop » permet de quitter le
mode multipoint sur les Linn Classiks
des pièces auxiliaires pour commander
leurs propres sources.
Vous pouvez quitter le mode multipoint
sur les Linn Classiks des pièces
auxiliaires. En mode «VOLUME
ADJUST » maintenez la pression sur le
bouton « ADJUST » jusqu’à ce que le
message « Party Poop » s’affiche.
Vous pouvez quitter « Party Poop » en
maintenant la pression sur le bouton «
ADJUST » jusqu’à ce que le message
« Party On » s’affiche.
Vous pouvez remettre les Classiks des
pièces auxiliaires sur le mode
multipoint en maintenant la pression
sur le bouton «ADJUST» sur le Classik
de la pièce principale jusqu’à ce que le
message «Party off» s’affiche. Vous
devez ensuite resélectionner le mode
multipoint (Party Mode on).
Party-Poop-Funktion
Mit der Party-Poop-Funktion kann der
Party-Modus der Linn Classiks in
individuellen Nebenräumen
ausgeschaltet werden, so dass sie
wieder getrennt gesteuert werden
können.
Der Party-Modus der Linn Classiks in
Nebenräumen kann ausgeschaltet
werden. Dazu halten Sie während der
Lautstärkeregelung die Reglertaste
gedrückt, bis "Party Poop" angezeigt
wird.
"Party Poop" kann ausgeschaltet
werden, indem die Reglertaste
gedrückt wird, bis "Party On"
angezeigt wird.
Die Linn Classiks in den
Nebenräumen können wieder auf
Party-Modus geschaltet werden,
indem Sie die Reglertaste am Linn
Classik im Musikraum gedrückt
halten, bis "Party Off" angezeigt wird
Party Poop
Party Poop consente ai Linn Classik
secondari di uscire dalla modalità
Party e controllare localmente le fonti.
Der Party-Modus der Linn Classiks in
den Nebenräumen kann unabhängig
ausgeschaltet werden. Dazu halten
Sie im Lautstärke-Modus die
"ADJUST"-Taste gedrückt, bis "Party
Poop" angezeigt wird.
"Party Poop" kann wieder
ausgeschaltet werden, indem die
"ADJUST"-Taste gedrückt wird, bis
"Party On" angezeigt wird.
Die Classiks in allen Nebenräumen
können auch wieder auf Party-Modus
geschaltet werden, indem Sie die
"ADJUST" Taste am Classik im
Musikraum gedrückt halten, bis "Party
Off" angezeigt wird, und dann wieder den
Party-Modus wählen (siehe Vorseite).
Party Poop
El modo Party Poop permite que la
habitación secundaria salga del Party
Mode y pueda controlar sus fuentes
locales.
Si desea sacar una de las
habitaciones secundarias equipadas
con Linn Classik-K, del Party Mode,
mantenga presionado el botón
ADJUST mientras el modo está en
regulación de volumen, hasta que
aparezca el texto "Party Poop".
Se puede desactivar nuevamente el
modo "Party Poop" manteniendo
pulsado el botón ADJUST hasta que
aparezca el texto "Party On" (Modo
Fiesta Activado).
Se puede hacer que los Classik-K de las
habitaciones secundarias vuelvan al
Party Mode manteniendo pulsado el
botón ADJUST del equipo Classik-K de
la habitación principal, hasta que
aparezca el texto "Party off"; a
continuación deberá volver a activar el
Party Mode.
Party Poop
Party Poop maakt het voor de
secundaire Linn Classiks mogelijk om
de Party Mode te verlaten en hun
eigen bron te kiezen.
Secundaire Linn Classiks kunnen
Party Mode verlaten. Houd de
regeltoets bij ingeschakelde “volume
adjust” ingedrukt totdat “Party Poop”
op het display verschijnt.
“Party Poop” kan worden
uitgeschakeld door de regeltoets
ingedrukt te houden totdat “Party On”
op het display verschijnt
De secundaire Classiks kunnen weer
in party mode worden geschakeld
door de regeltoets van de Linn Classik
op de geluidsinstallatie ingedrukt te
houden totdat “Party off” op het
display verschijnt, en daarna weer
Party Mode in te schakelen.
LINN CLASSIK
LINN CLASSIK
LINN CLASSIKLINN CLASSIK
LINN CLASSIK
LINN CLASSIK
VOLUME

66
English
EnglishEnglish
English
Français
FrançaisFrançais
Français
Deutsch
DeutschDeutsch
Deutsch
Italiano
ItalianoItaliano
Italiano
Español
EspañolEspañol
Español
Nederlands
NederlandsNederlands
Nederlands
LINN CLASSIK
CLASSIK KNEKT system
The Linn Classik can be used as part
of a Linn Knekt multi room system"
The Linn Classik should only be
connected to the KNEKT system by a
trained KNEKT installer.
Le système CLASSIK KNEKT
Vous pouvez utiliser le Linn Classik
dans le cadre d’un système KNEKT
de pièces mutiples.
Le Linn Classik doit uniquement être
connecté au système KNEKT par un
installeur KNEKT qualifié.
CLASSIK KNEKT-System
Der Linn Classik kann als Teil eines
Linn Knekt Mehrraumsystems
eingesetzt werden.
Der Anschluss des Linn Classik an
das KNEKT-System ist von einem
geschulten KNEKT-Installierer
durchzuführen.
Sistema CLASSIK KNEKT
Linn Classik può essere utilizzato
come elemento del sistema Linn
Knekt multistanza.
La connessione del Linn Classik al
sistema KNEKT deve essere
effettuata da un installatore
specializzato KNEKT.
Sistema CLASSIK KNEKT
El Linn Classik-K se puede usar como
parte de un sistema multi-habitación
Linn Knekt.
La conexión del Linn Classik-K al
sistema KNEKT sólo debería ser
realizada por un instalador de KNEKT
cualificado.
CLASSIK KNEKT systeem
De Linn Classik kan worden gebruikt
als onderdeel van het “Linn Knekt
multi room system"
De Linn Classik mag uitsluitend door
een door KNEKT erkende installateur
worden aangesloten op het KNEKT-
systeem.
LINN
LINN
LINN
LINN

LINN CLASSIK
Maintenance and Technical
Support
Support technique et
entretien
Wartung
Manutenzione ed assistenza
tecnica
Mantenimiento y Soporte
Técnico
Onderhoud en technische
ondersteuning

68
English
EnglishEnglish
English
Français
FrançaisFrançais
Français
Deutsch
DeutschDeutsch
Deutsch
Italiano
ItalianoItaliano
Italiano
Español
EspañolEspañol
Español
Nederlands
NederlandsNederlands
Nederlands
LINN CLASSIK
Servicing and cleaning
Always use an authorised dealer for
any servicing of your Linn
CLASSIK.
Switch off unit before cleaning. Remove dust and finger marks with
a soft damp cloth.
Avoid using domestic cleaning
products.
Révision et nettoyage
Ne confier l'entretien de votre Linn
CLASSIK qu'à un concessionnaire
agréé.
Débrancher l'appareil avant de le
nettoyer.
Utiliser un chiffon doux humide
pour enlever la poussière et les
traces de doigts.
Eviter d'utiliser des détergents
ménagers.
Service und Reinigung
Service Ihres Linn CLASSIK
ausschließlich durch autorisierten
Fachhändler.
Vor Reinigung ausschalten.
Staub und Fingerabdrücke mit
weichem feuchtem Tuch
abwischen.
Keine Haushaltsreiniger
verwenden.
Riparazione e pulizia
Rivolgersi sempre ad un
distributore autorizzato per
qualsiasi servizio di riparazione e
manutenzione di Linn CLASSIK.
Spegnere l’apparecchio prima di
pulirlo.
Rimuovere la polvere e le impronte
delle dita con un panno soffice e
inumidito.
Evitare di utilizzare prodotti
detergenti per uso domestico.
Reparación y Limpieza
Utilice siempre los servicios de un
distribuidor autorizado para
cualquier reparación de su Linn
CLASSIK.
Apague la unidad antes de
limpiarla.
Quite el polvo y las huellas con un
paño húmedo y suave.
Evite la utilización de productos
domésticos de limpieza.
Onderhoud en reiniging
Maak altijd gebruik van een
geautoriseerde dealer voor het
onderhoud van uw Linn CLASSIK.
Schakel alvorens te reinigen het
apparaat uit.
Verwijder stof en vingerafdrukken
met een zachte, vochtige doek.
Vermijd het gebruik van
huishoudelijke
schoonmaakmiddelen.
LINN
LINN
LINN
LINN
LINN PEKIN

69 LINN CLASSIK
LINN CLASSIK
Technical support and information For technical support, product queries and information please contact either your local retailer or the offices below.
Full details of your local retailer/distributor can be found at : www.linn.co.uk/buy_linn/find_retailer.cfm
Support technique et autres renseignements Prière de contacter le détaillant le plus proche ou les bureaux mentionnés ci-dessous pour tout support technique, informations concer-
nant les produits et autres renseignements.
Les détails complets de votre distributeur local se trouvent à l'adresse : www.linn.co.uk/buy_linn/find_retailer.cfm
Technische Beratung und Information Für technische Beratung, Produktanfragen und Information wenden Sie sich bitte an Ihren Händler vor Ort oder an die Adresse unten-
stehende.
Genaue Angaben zu Ihrem Händler vor Ort finden Sie unter: www.linn.co.uk/buy_linn/find_retailer.cfm
Assistenza tecnica e informazioni Per l’assistenza tecnica, domande ed informazioni sul prodotto, rivolgersi al rivenditore locale o agli uffici riportati di seguito.
Informazioni più dettaglate sul distributore di zona sono reperibili nel sito: www.linn.co.uk/buy_linn/find_retailer.cfm
Soporte técnico e información Para realizar cualquier consulta de productos, petición de información o solicitar soporte técnico, por favor póngase en contacto con
su distribuidor local o con cualquiera de las delegaciones siguientes.
La información correspondiente a su distribuidor local podrá encontrarla en: www.linn.co.uk/buy_linn/find_retailer.cfm
Technische ondersteuning en informatie Voor technische ondersteuning, vragen over het product of voor informatie kunt u terecht bij uw plaatselijke winkelier of de hieronder
genoemde kantoren.
Meer informatie over uw plaatselijke dealer kunt u vinden op :www.linn.co.uk/buy_linn/find_retailer.cfm
Technical support
Linn Products Limited
Floors Road
Waterfoot
Glasgow G76 0EP
Scotland, UK
Phone: +44 (0)141 307 7777
Fax: +44 (0)141 644 4262
Helpline: 0500 888909
Email: Helpline@Linn.co.uk
Website: http://www.linn.co.uk
Linn Incorporated
8787 Perimeter Park Boulevard
Jacksonville,
FL 32216
USA
Phone: +1 (904) 645 5242
Fax: +1 (904) 645 7275
Helpline: 888-671-LINN
Email: Helpline@LinnInc.com
Website: http://www.linninc.com
Linn Deutschland GmbH
Albert-Einstein-Ring 19
22761 Hamburg
Deutschland
Phone: +49-(0) 40-890 660-0
Fax: +49-(0) 40-890 660-29
Email: info@linn-deutschland.com
Website: http://www.linn.co.uk
Pagina laadt ...
Pagina laadt ...
Pagina laadt ...
Pagina laadt ...

Linn CLASSIK Specificaties
PACK 618 Rev.6
Algemeen
Afmetingen: 80mm H x 320mm B x 325mm D
Gewicht: 6 kg
Stroomverbruik: Maximaal 325W
25W bij gewoon gebruik
<3W in wachtstand
Hoofdzekering: 100V T6.3A Anti-surge
115V T6.3A Anti-surge
230V T3.15A Anti-surge
Netvoeding: Nominaal Voltage +/- 10%
Geschakelde
output:
440w maximaal
CD-aandrijving
Focussysteem: Drievoudige laserkop
Omvormingstech-
nologie:
Delta Sigma
Tuner
Tuner-bereik: VS: FM 87,5 tot 108,5MHz
AM 530 tot 1730kHz
Japan: FM 75,5 tot 108,5MHz
AM 530 tot 1629kHz
Europa: FM 87,5 tot 108,5MHz
AM 522 tot 1611kHz
Tuner-resolutie: FM TUNE-stand: 50kHz
FM SCAN-stand: 100kHz
AM TUNE-stand: 1kHz
AM SCAN-stand: 10kHz VS
9kHz Eur en Japan
Hoogafzwakking: Eur 75µ
USA y Japón 50µ
Instellingen vooraf: 80 door de gebruiker van tevoren te
bepalen instellingen
Signaalsterkte: Schaal van 0 tot 50
Mute-drempel: Schaal van 1 tot 50
Voorversterker
Input: AUX/Tape 1/Tape 2: -10dBV
(opnamesterkte)
10Ω (belasting)
Output: CD optische digitale output
Cassette-output: gelijk aan AUX input
Output impedantie: 100Ω
Voorversterker-output: track volume -∞ of
+10dB
Output-impedantie: 150Ω
Minimale outputbelasting: 5kΩ
Hoofdtelefoon: Output-impedantie: <8Ω
Output: gelijk aan voorversterker output
Stroomlimiet output: 60mA
Belastingimpedantie: 8Ω of 2kΩ
Versterkervermogen
Voltage toename: 28.5dB
Output vermogen: 75W per kanaal 4 Ω (nominale
stroomvoorziening)
Multi Room
RCU-aansluiting
Aansluitmogelijkheid voor een Linn
Remote Control Unit (RCU).
Room In
Aansluitmogelijkheid voor
uitgebalanceerde audio en
communicatie tussen andere Classiks
of het Linn Knekt systeem.
Kamer 1-4
Aansluitmogelijkheden voor
uitgebalanceerde audio en
communicatie tussen andere Classiks
of het Linn Knekt systeem.
IR Flasher 1 & 2 Aansluitmogelijkheid voor een IR diode
om andere apparatuur te bedienen.
6mA gestabiliseerde output.
Frequentiemodulatie kan worden
afgeregeld tussen 20kHz tot 450kHz.
Pagina laadt ...
Pagina laadt ...
Documenttranscriptie
31 32 33 34 30 60 61 62 63 64 65 66 Reparación y Limpieza . . . . . . . . . . . . . . . . . . . . . . . . . 68 Soporte técnico e información . . . . . . . . . . . . . . . . . . . 69 Características técnicas Linn CLASSIK . . . . . . . . . . . . 72 Mantenimiento y Soporte Técnico . . . . . . 67 Linn CLASSIK Connect . . . . . . . . . . . . . . . . . . . . . . . . Conexión del CLASSIK. . . . . . . . . . . . . . . . . . . . . . . . . Uso del conector Linn CLASSIK . . . . . . . . . . . . . . . . . Party Mode (Modo Fiesta) . . . . . . . . . . . . . . . . . . . . . . Seleccinar el Party Mode . . . . . . . . . . . . . . . . . . . . . . . Party Poop . . . . . . . . . . . . . . . . . . . . . . . . . . . . . . . . . . Sistema CLASSIK KNEKT. . . . . . . . . . . . . . . . . . . . . . . Linn CLASSIK Connect . . . . . . . . . . . . . . . 59 Programación de Opciones del Usuario. . . . . . . . . . . . 48 Opciones de Usuario . . . . . . . . . . . . . . . . . . . . . . . . . . 49 Tablas de opciones de usuario . . . . . . . . . 47 24 25 26 23 22 16 18 19 20 21 x Handmatig afstellen. . . . . . . . . . . . . . . . . . . . . . . . . . . 29 Zoeken en scannen . . . . . . . . . . . . . . . . . . . . . . . . . . . 30 Display en bedieningstoetsen . . . . . . . . . . . . . . . . . . . 28 Tuner-functies . . . . . . . . . . . . . . . . . . . . . 27 Wijzigen van het display . . . . . . . . . . . . . . . . . . . . . . . Afspelen, onderbreken en stoppen van een CD . . . . . . Het overslaan of uitzoeken van nummers. . . . . . . . . . Het kiezen van een track . . . . . . . . . . . . . . . . . . . . . . . Het herhalen van een aantal tracks . . . . . . . . . . . . . . . Het programmeren van een aantal tracks (mode A). . . . . . . . . . . . . . . . . . . . . . . . . . . . . . Het programmeren door een aantal tracks weg te laten (mode B). . . . . . . . . . . . . . . . . . . . . . . . . . . . . Het programmeren van een willekeurige volgorde (SHUFFLE en RANDOM) . . . . . . . . . . . . . . . . . . . . . . . Gebruik van de intro . . . . . . . . . . . . . . . . . . . . . . . . . . Indexeren . . . . . . . . . . . . . . . . . . . . . . . . . . . . . . . . . . CD-functies . . . . . . . . . . . . . . . . . . . . . . . 15 Aan- en uitzetten . . . . . . . . . . . . . . . . . . . . . . . . . . . . . 13 Ajuste del reloj . . . . . . . . . . . . . . . . . . . . . . . . . . . . . . . Ajuste de la alarma. . . . . . . . . . . . . . . . . . . . . . . . . . . . Ajuste del temporizador . . . . . . . . . . . . . . . . . . . . . . . . Utilización de la salida conmutada . . . . . . . . . . . . . . . . 42 43 45 46 Bedieningstoetsen handset . . . . . . . . . . . . . . . . . . . . . 12 36 37 38 39 Controleer of u ondergenoemde zaken bezit . . . . . . . . . 4 Opstellen van de Linn CLASSIK. . . . . . . . . . . . . . . . . . . 5 Waarschuwing! . . . . . . . . . . . . . . . . . . . . . . . . . . . . . . . 6 Aansluiten van de Linn CLASSIK . . . . . . . . . . . . . . . . . . 7 Opnieuw instellen van fabrieksinstellingen . . . . . . . . . . 9 Display en bedieningstoetsen . . . . . . . . . . . . . . . . . . . 11 Gebruiksklaar maken van de Linn CLASSIK . 3 Voornaamste eigenschappen . . . . . . . . . . . . . . . . . . . . 2 Inhoud Funciones de alarma. . . . . . . . . . . . . . . . . 41 Ajuste del volumen y del balance . . . . . . . . . . . . . . . . . Ajuste de graves y agudos . . . . . . . . . . . . . . . . . . . . . . Silenciamiento y selección de una fuente . . . . . . . . . . Grabación . . . . . . . . . . . . . . . . . . . . . . . . . . . . . . . . . . Funciones del amplificador . . . . . . . . . . . 35 Búsqueda y Exploración. . . . . . . . . . . . . . . . . . . . . . . . Memorización de Presintonías y Memorización Automática. . . . . . . . . . . . . . . . . . . . . . . . . . . . . . . . . . Selección y Borrado de Presintonías . . . . . . . . . . . . . . Búsqueda de la señal más fuerte . . . . . . . . . . . . . . . . . Selección del umbral de silencio . . . . . . . . . . . . . . . . . Onderhoud en reiniging . . . . . . . . . . . . . . . . . . . . . . . . 68 Technische ondersteuning en informatie . . . . . . . . . . . 69 Linn CLASSIK Specificaties . . . . . . . . . . . . . . . . . . . . . 74 Onderhoud en technische ondersteuning . . . . . . . . . . . . . . . . . . . . . . 67 Linn CLASSIK Connect . . . . . . . . . . . . . . . . . . . . . . . . . 60 Aansluiten van de CLASSIK . . . . . . . . . . . . . . . . . . . . . 61 Het gebruik van de Linn CLASSIK connect . . . . . . . . . . 62 Party Mode . . . . . . . . . . . . . . . . . . . . . . . . . . . . . . . . . . 63 Kiezen van Party Mode . . . . . . . . . . . . . . . . . . . . . . . . . 64 Party Poop . . . . . . . . . . . . . . . . . . . . . . . . . . . . . . . . . . 65 CLASSIK KNEKT systeem . . . . . . . . . . . . . . . . . . . . . . . 66 Linn CLASSIK Connect . . . . . . . . . . . . . . . 59 Gebruiksmogelijkheden programmeren . . . . . . . . . . . . 48 Gebruiksoverzicht . . . . . . . . . . . . . . . . . . . . . . . . . . . . . 49 Gebruiksoverzicht . . . . . . . . . . . . . . . . . . . 47 Klok op tijd zetten . . . . . . . . . . . . . . . . . . . . . . . . . . . . . 42 De wekker zetten. . . . . . . . . . . . . . . . . . . . . . . . . . . . . . 43 Instellen van de timer . . . . . . . . . . . . . . . . . . . . . . . . . . 45 Gebruik maken van de geschakelde output. . . . . . . . . . 46 Wekkerfuncties . . . . . . . . . . . . . . . . . . . . . 41 Instellen van volume en balans. . . . . . . . . . . . . . . . . . . 36 Instellen van bas en treble . . . . . . . . . . . . . . . . . . . . . . 37 Muting en het kiezen van de bron . . . . . . . . . . . . . . . . . 38 Opnemen . . . . . . . . . . . . . . . . . . . . . . . . . . . . . . . . . . . 39 Versterkerfuncties. . . . . . . . . . . . . . . . . . . 35 Instellingen opslaan en automatisch opslaan . . . . . . . . 31 Instellingen selecteren en opheffen . . . . . . . . . . . . . . . 32 Het sterkste signaal zoeken . . . . . . . . . . . . . . . . . . . . . 33 Selecteren van de mute-drempel . . . . . . . . . . . . . . . . . 34 ❑ ❑ ❑ Funzione di stand-by per l’amplificatore di potenza per ridurre il consumo energetico. Comandi individuali per i toni bassi ed alti e per il bilanciamento. Dispositivo “plug-and-play” multistanza che consente all’utilizzatore finale di installare e collegare a casa propria un Linn Classik con un numero massimo di altri quattro Classik. ❑ ❑ ❑ Funzione di monitoraggio dei nastri. Funzionamento slave del processore AV surround per la facile integrazione in un sistema AV. Opzioni configurabili dall’utente. Uscita ottica digitale CD ❑ ❑ ❑ ❑ ❑ ❑ ❑ ❑ Orologio, sveglia e timer. Dispositivo multistanza completo Linn Knekt che consente a un Linn Classik di funzionare come pilota principale o come ricevitore locale in un sistema Knekt. ❑ ❑ ❑ ❑ ❑ ❑ Due terminali per l’altoparlante per collegare due paia di casse acustiche simultaneamente o per collegarne un unico paio con doppio cablaggio. Amplificatore di potenza ad alte prestazioni (75W in 4 Ohm). Preamplificatore con due ingressi di linea per apparecchi esterni, un’uscita per registratore ed un’uscita variabile aggiuntiva. Sintonizzatore AM/FM con 80 stazioni preselezionate e controllo di soglia regolabile. Eccellente qualità audio grazie all’alta qualità del lettore CD. 2 Señal óptica digital de salida de CD Opciones de usuario configurables. Funcionamiento esclavo de procesador AV surround para su fácil integración en un sistema AV. Función para monitoraje de cinta. Salida de red conmutada para alimentar otro dispositivo o incluso una lámpara o una cafetera (máx. 440W). Capacidad completa para multisala del sistema Linn Knekt que permite que uno de los equipos Linn Classik funcione como emisor de señal de sala principal o receptor de señal en sala secundaria o local mediante el sistema Knekt. Capacidad Plug & play multi sala que permite que usted mismo instale un equipo Linn Classik y conecte hasta un total de otros cuatro equipos Classiks Controles individuales para balance, graves y agudos. Funciónde reposo del amplificador de potencia para reducir el consumo. Funciones de 10 reloj, alarma y temporizador. ❑ ❑ ❑ ❑ ❑ ❑ ❑ ❑ ❑ ❑ ❑ ❑ Potente amplificador de potencia (75 W a 4 ohmios). Salidas dobles para altavoz para gobernar simultáneamente dos parejas de cajas acústicas o para bi-cablear una pareja. ❑ ❑ ❑ CD optische digitale output Naar eigen wensen instelbaar. Video surround processor slave operation, om een videorecorder aan te kunnen sluiten. Cassettedeck-aansluiting. Netstroomuitgang waar u andere toestellen op kunt aansluiten – zelfs een schemerlamp of koffiezetapparaat. Complete Linn Knekt multikamer mogelijkheden waarbij een Linn Classik binnen het KNEKT-systeem als driver op de geluidsinstallatie of als ontvanger in een andere kamer fungeert Plug and play multikamer mogelijkheden waarbij de Linn Classik zelf kan worden geinstalleerd en aangesloten op maximaal vier aanvullende Classiks. Individuele bas-, treble- en balans-instelling. Versterker met wachtstand om stroomverbruik te minimaliseren. Tijdklok, wekker en programmeerbaar. Dubbele luidsprekeraansluitingen om twee paar luidsprekers aan te kunnen sluiten. Versterker met hoog vermogen (75W / 4 Ohm). eindversterker met 2 externe aansluitingen, een opname uitgang en een aansluiting voor een aparte voorversterker. AM/FM Tuner met 80 voorkeuzezenders. Uitstekende geluidsweergave door de hoogwaardige CDaandrijving en laserkop. Voornaamste eigenschappen Etapa preamplificadora con 2 entradas externas de nivel, una salida de grabación y una salida del preamplificador. Sintonizador FM/AM con 80 presintonias y control de umbral ajustable. Excepcional calidad de audio debida al ata calidad del transporte y del lectorde CD . Características principales Presa elettrica comandata dal timer per l’alimentazione di un’altra sorgente, di un’altra sorgente, di una lampada o di un piccolo elettodomestico. ❑ ❑ ❑ ❑ ❑ ❑ ❑ ❑ ❑ ❑ Funzioni principali LINN CLASSIK Controleer of u ondergenoemde zaken bezit Nederlands Compruebe que tiene Español Verificare di avere disponibili Italiano Zubehör überprüfen Deutsch Vérifiez que vous avez Français Check you have Afstandsbediening LR03, AAA batterijen (x 4) Mando a distancia Baterías LR03, AAA (x 4) Telecomando Batterie LR03, AAA (x 4) Fernbedienung LR03, AAA Batterien (x 4) Télécommande Piles LR03, AAA (x 4) Remote handset LR03, AAA batteries (x 4) AA English A AA AA A A A AA AM-antenne Antena AM Antenna AM AM Antenne Antenne AM AM aerial 4 FM-antenne Antena FM Antenna FM FM Antenne Amtenne FM FM aerial c b Netsnoer a, b of c Cable de alimentación a, b o c Cavi di alimentazione a, b o c Hauptkabel a, b oder c Câble d'alimentation secteur a, b ou c Mains lead a, b or c a Opstellen van de Linn CLASSIK Nederlands Colocación del Linn CLASSIK Español Posizione di Linn CLASSIK Italiano Aufstellung des Linn CLASSIK Deutsch Position du Linn CLASSIK Français Positioning the Linn CLASSIK English LINN CLASSIK Zorg voor voldoende ventilatie voor elektronische versterkers en andere onderdelen die warmte afgeven. 5 Stel de infra-rood sensor niet bloot aan direct zonlicht. Mantenga el sensor infrarrojo lejos de la luz solar directa. Tenere il sensore infrarossi lontano dalla luce solare diretta. Lasciare sufficiente spazio per la circolazione dell’aria per gli amplificatori di potenza e gli altri componenti che generano calore. Permita una circulación de aire adecuada para los amplificadores de potencia y demás componentes generadores de calor. Infrarotsensor vor direktem Sonnenlicht schützen. Garder le détecteur d'infrarouge à l'abri de la lumière du soleil. Keep infra-red sensor out of direct sunlight. Verstärker und andere wärmeerzeugende Geräte benötigen ausreichend Luftumlauf. Assurer une bonne circulation d'air autour d'amplificateurs de puissance et autres composants produisant de la chaleur. Allow plenty of air circulation for power amplifiers and other heat generating components. Scherm de infra-rood sensor niet af. No cubra el sensor infrarrojo. Non coprire il sensore infrarossi. Infrarotsensor nicht verdecken . Ne rien placer devant le détecteur d'infrarouge. Do not obscure infra-red sensor. LINN CLASSIK Stel de infra-rood sensor niet bloot aan halogeenlampen, energiebesparende lampen of tl-buizen. Mantenga el sensor infrarrojo lejos de las lámparas halógenas, fluorescentes y bombillas de bajo consumo. Tenere le lampade alogene, le lampadine a bassa energia e quelle fluorescenti lontano dal sensore infrarossi. Halogenlampen und Glühlampen vom Infrarotsensor fernhalten. Eloigner les lampes halogènes et ampoules à faible énergie et fluorescentes du détecteur d'infrarouge. Keep halogen lamps, low-energy and fluorescent bulbs away from infra-red sensor. Waarschuwing! Nederlands ¡Advertencia! Español Avvertenza! Italiano Warnung! Deutsch Attention ! Français Warning! English LINN CLASSIK Schakel altijd alle apparaten uit bij het veranderen van verbindingen. Apague siempre el equipo para cambiar las conexiones. Spegnere sempre l’apparecchio quando si modificano le connessioni. Bei Anschlussänderungen stets alle Geräte ausschalten. Prendre garde de toujours débrancher tout l'équipement avant de changer les connexions. Always switch off all equipment when changing connections. LINN PEKIN 6 Sluit het netsnoer altijd aan op een geaard stopcontact. Conecte siempre el cable de red a un enchufe con toma de tierra. Collegare sempre i cavi di alimentazione ad una presa di corrente messa a terra. Hauptkabel ausschließlich an geerdete Stromausgabe anschließen. Ne brancher le câble d'alimentation secteur que dans une prise de courant mise à la terre. Always connect mains lead to earthed power outlet. c b Gebruik altijd de bijgeleverde, geaarde kabel. Utilice siempre el cable de red con toma de tierra que se suministra. Utilizzare sempre i cavi di alimentazione messi a terra in dotazione. Ausschließlich mitgeliefertes, geerdetes Netzkabel verwenden. N'utiliser que le câble d'alimentation secteur fourni. Always use earthed mains lead supplied. a USE CORRECT FUSE 90-110V ~ 50/60Hz 103-126V ~ 50/60Hz 207-253V ~ 50/60Hz T6.3A T6.3A T3.15A Kijk op het achterpaneel voor de juiste zekeringsterkte [FUSE TYPE].Indien uw Linn Classik gebreken vertoont dient u contact op te nemen met uw Linn-dealer. Véase el panel posterior para las características correctas de los fusibles [FUSE TYPE].Si fallara su equipo Linn Classik, por favor, devuélvalo a su proveedor. Vedere il pannello posteriore per la scelta del fusibile corretto [FUSE TYPE].Se Linn Classik non funziona, rivolgersi al rivenditore di zona dei prodotti Linn. Korrekte Sicherungsgröße siehe rückseitiges Bedienfeld [FUSE TYPE].Bei Problemen mit Ihrem Linn Classik bringen Sie ihn bitte zu Ihrem Linn Händler vor Ort. Voir panneau arrière pour vérifier la valeur nominale des fusibles [FUSE TYPE].En cas de panne de votre Linn Classik, veuillez le retourner à votre détaillant Linn local. See back panel for correct fuse ratings [FUSE TYPE]. If your Linn Classik fails, please return to local Linn retailer. 100 115 230 SETTING: VOLTAGE RANGE: FUSE TYPE: Aansluiten van de Linn CLASSIK Nederlands Conexión del Linn CLASSIK Español Connessione di Linn CLASSIK Italiano Anschluss des Linn CLASSIK Deutsch Branchement du Linn CLASSIK Français Connecting the Linn CLASSIK English LINN CLASSIK ORRECT FUSE LEFT ACC MAIN INPUT TX DIGTAL OUT CD IR OUT RX L R IN AUX ROOM OUTPUTS IN TAPE1 IN TAPE2 OUT OUT PRE AMP GND RI Gebruik de AUX (auxiliary) ingang voor de aansluiting van een ander toestel, zoals b.v. een TV. Utilice los conectores AUX (auxiliar) para conectar a una fuente externa, tal como una TV. Utilizzare la presa AUX (ausiliaria) per collegare una sorgente esterna, ad es. un televisore. AUX-Anschluss (Zusatzger.) zum Anschluss eines externen Gerätes wie z.B. Fernseher. Utiliser la connexion AUX (auxiliaire) pour brancher une source externe, telle qu'une télévision. Use the AUX (auxiliary) connection to connect an external source, such as a TV. RIGHT AUX VOLTAGE FUSE TYPE 11 50/60hz 125V T6.3A 11 50/60hz 125V T6.3A 11 50/60hz 250V T3.15A SUMPTION 500W APPROX ORRECT FUSE ACC IN TAPE 1 MAIN INPUT TX DIGTAL OUT CD IR OUT RX L R IN AUX ROOM OUTPUTS IN TAPE1 IN TAPE2 OUT OUT PRE AMP GND RI 7 Gebruik de TAPE 1 ingangen om via de Linn Classik versterker een cassettedeck aan te sluiten. Utilice los conectores TAPE 1 para reproducir una pletina externa con el Linn Classik. Utilizzare l’ingresso TAPE 1 per collegare un registratore esterno al Linn Classik in sola riproduzione. TAPE 1 -Anschlüsse zur Wiedergabe eines externen Kassettendecks über den Linn Classik Verstärker. Utiliser les connexions TAPE 1 pour brancher une platine cassettes externe par le biais de l'amplificateur Linn Classik. Use the TAPE 1 connections to play an external tape deck through the Linn Classik amplifier. VOLTAGE FUSE TYPE 11 50/60hz 125V T6.3A 11 50/60hz 125V T6.3A 11 50/60hz 250V T3.15A SUMPTION 500W APPROX E CORRECT FUSE ACC MAIN INPUT IR OUT RX OUT DIGTAL OUT CD TAPE 2 IN TX L R IN AUX ROOM OUTPUTS IN TAPE1 IN TAPE2 OUT OUT PRE AMP GND RIGHT Gebruik de TAPE 2 ingangen om via de Linn Classik versterker met een cassettedeck op te nemen. Utilice los conectores TAPE 2 para conectar una pletina para la grabación desde el Linn Classik. Utilizzare i connettori TAPE 2 per collegare un registratore esterno al Linn Classik in registrazione / riproduzione. TAPE 2 -Anschlüsse zum Anschluss eines Kassettendecks zur Aufnahme vom Linn Classik. Utiliser les connexions TAPE 2 pour brancher une platine cassettes à partir du Linn Classik. Use the TAPE 2 connections to connect a tape deck to record from the Linn Classik. NG VOLTAGE FUSE TYPE 90-11 50/60hz 125V T6.3A 90-11 50/60hz 125V T6.3A 90-11 50/60hz 250V T3.15A CONSUMPTION 500W APPROX E CORRECT FUSE ACC MAIN INPUT TX DIGTAL OUT CD IR OUT RX PRE OUT L R IN AUX ROOM OUTPUTS IN TAPE1 IN TAPE2 OUT OUT PRE AMP GND RIGHT LINN CLASSIK Gebruik de PRE OUT om het signaal van de voorversterker aan te sluiten op een aparte versterker. Utilice la salida PRE OUT para conectar la salida de la etapa preamplificadora a un amplificador de potencia separado. Utilizzare la presa PRE OUT per collegare l’output del preamplificatore ad un amplificatore di potenza diverso. PRE OUT zum Anschluss des Vorverstärkerausgangs an eine Endstufe. Utiliser PRE OUT pour brancher la sortie du préamplificateur à un amplificateur séparé. Use the PRE OUT to connect the output of the preamplifier to a separate power amplifier. NG VOLTAGE FUSE TYPE 90-11 50/60hz 125V T6.3A 90-11 50/60hz 125V T6.3A 90-11 50/60hz 250V T3.15A CONSUMPTION 500W APPROX Opnieuw instellen van fabrieksinstellingen Nederlands Restablecimiento de ajustes predeterminados de fábrica Español Ripristino delle impostazioni predefinite in fabbrica Italiano Rückstellung auf Werkseinstellungen Deutsch Remise en mémoire des réglages par défaut d'usine Français Restoring factory default settings English LINN CLASSIK 10 Schakel het toestel aan door VOL + gedurende tien seconden in te drukken. Encienda la unidad mientras mantiene pulsado VOL + durante 10 segundos. Accendere l’apparecchio tenendo premuto VOL + per 10 secondi. Einschalten, während VOL + Sekunden lang gedrückt wird. Mettre sous tension tout en enfoncé maintenant VOL + pendant dix secondes. Switch power on while holding VOL + for 10seconds. C0NF1G 9 Met de verlichte knoppen op het voorpaneel geeft u aan in welk gebied u de tuner gebruikt: Europa, Japan of USA. Utilizando los botones señalados en el panel de control, seleccione el área en el que funcionará el sintonizador: Europa, Japón o USA. Utilizzando i pulsanti evidenziati sul pannello anteriore, selezionare la regione in cui verrà utilizzato il sintonizzatore: Europa, Giappone o USA. Mit den hervorgehobenen Tasten am vorderen Bedienfeld den Betriebsbereich des Tuners wählen: Europa, Japan oder USA. A l'aide des boutons éclairés sur le panneau avant, choisir la zone où le tuner va fonctionner : Europe, Japon ou Etats-Unis. Using highlighted buttons on the front panel, select the area the tuner will operate in: Europe, Japan or USA. Eur Druk op een willekeurige toets aan de voorkant om op te slaan. Pulse cualquier otro botón en el panel frontal para memorizar. Premere un qualsiasi altro tasto del pannello anteriore per memorizzare. Zum Speichern beliebige vorderseitige Taste drücken. Appuyer sur n'importe quel autre bouton sur le devant pour mémoriser. Press any other button on front to store. Eur LINN CLASSIK De fabrieksinstellingen worden in grijs weergegeven in de optietabellen (pag. 49-55). Los valores predeterminados de fábrica están señalados en gris en las Tablas de Opciones (páginas 49-55). Le impostazioni predefinite in fabbrica sono evidenziate in grigio nelle tabelle Opzioni (pagina 49-55). Werkseinstellungen werden in der Optionentabelle grau hervorgehoben (Seite 49-55). Les réglages par défaut d'usine sont surlignés en gris dans les tableaux d'options (pages 49-55). The factory default settings are highlighted in grey in the Option tables (pages 49-55). 3-0 LINN CLASSIK Bedieningstoetsen handset Controles del Mando a Distancia Comandi del telecomando Handset-Steuerungen Télécommande Handset controls 0...9 keys can operate a CD or tuner. If CD or tuner control keys. 0...9 keys appear not to work press one of the I tasti Nota: 2 Preamplifier keys Touches préamplificateur Vorverstärkertasten Tasti del preamplificatore Teclas del Preamplificador Versterkertoetsen 1 Standby key Touche veille Standby-Taste Tasto di standby Tecla Reposo Standby-toets CDspelertoetsen Teclas del Reproductor de CD Tasti del lettore di CD CD-PlayerTasten Touches lecteur de CD CD Player keys 3 Nummertoetsen Teclas Numéricas Tasti numerici Zifferntasten Touches numériques Number keys 4 5 Toetsen voor de klok, tijdsinstelling en alarminstelling Teclas de Reloj, Temporizador y Alarma Tasti dell’orologio, del timer e della sveglia Uhr-, Timer-, Alarmtasten Touches horloge, minuterie, réveil 12 0...9 Tunertoetsen Teclas del Sintonizador Tasti del sintonizzatore Tuner-Tasten Touches tuner Tuner keys 6 toetsen niet schijnen te Clock, Timer, Alarm keys 0...9 toetsen kunnen een CD of een tuner bedienen. Als werken, druk een van de CD- of tunerbedieningstoetsen in. NB: 0...9 Las teclas 0...9 pueden controlar el CD o el sintonizador. Si parece que las teclas no responden, pulse primero una de las teclas de control del CD o del sintonizador. Nota: 0...9 0...9 consentono di comandare un CD o un sintonizzatore. Se sembra che i tasti non funzionino, premere uno dei tasti di comando del CD o del sintonizzatore. Tasten dienen für Tuner oder CD-Betrieb. Wenn 0...9 Tasten nicht funktionieren, drücken Sie eine der CD- oder Tuner-Steuerungstasten drücken. 0...9 Hinweis: Remarque: Les touches 0...9 peuvent faire fonctionner le lecteur CD ou le tuner. Si les touches 0...9 ne semblent pas fonctionner, appuyer sur l'une des touches de la platine CD ou du tuner. Note: 6 1 CD AUX TP1 LISTEN TUN TP2 - BASS + - TREB + L BAL R - VOL + 4 7 TUNE + SIGNAL MONO SCAN - PRESET STORE 1 BAND 5 4 3 2 LINN CLASSIK TIMER 9 6 3 - TIME + ALARM 0 8 5 2 STOP DISPLAY < > PAUSE REPEAT << SEARCH >> INDEX PLAY INTRO ” SKIP ’ RECORD RANDOM SHUFFLE OPEN MUTE O LINN PRE-AMP CD PLAYER CLOCK TUNER Aan- en uitzetten Nederlands Encendido y apagado Español Accensione e spegnimento Italiano Ein- und Ausschalten Deutsch Allumer/Eteindre Français Switching on and off English LINN CLASSIK POWER 0...9 on the front panel. Druk Pulse POWER 0...9 sul pannello POWER 0...9 in op het voorpaneel. en el panel frontal. POWER 0...9 POWER 0...9 Premere anteriore. Am vorderen Bedienfeld drücken. 0...9 Apppuyer sur POWER sur le panneau de devant. Press LINN CLASSIK 13 De tijd wordt weergegeven. Se visualizará la hora. Viene visualizzata l’ora. Zeit wird angezeigt. L'heure va s'afficher. The time will be displayed. 11.06 Voor het wijzigen van power-up status zie Gebruiksmogelijkheden (zie pag. 49-55). Para cambiar el estado de encendido, véase Opciones de Usuario (véase páginas 49-55). Per modificare lo stato di accensione, consultare Opzioni Utente (vedere pagina 49-55). Ändern der Startanzeige siehe Benutzeroptionen (siehe Seite 49-55). Pour changer l’affichage obtenu à la mise sous tension, se reporter au chapitre Options de l'utilisateur (voir pages 49-55). To change power up state see User Options (see pages 49-55). 4-0 LINN CLASSIK Wijzigen van het display Nederlands Modificación de la visualización, Español Dati visualizzati nel display Italiano Display ändern Deutsch Changement de l'affichage Français Changing the display English LINN CLASSIK TRACK Druk op DISPLAY om de informatie op het display te wijzigen. Pulse DISPLAY para cambiar la información que aparece en el visualizador. Premere DISPLAY per modificare i dati visualizzati sul display. Zum Ändern der Info am Display DISPLAY drücken. Appuyer sur DISPLAY pour changer les informations de l'affichage. Press DISPLAY to change the information that appears on the display. 1 1 > TRACK 16 TRACK: geeft het nummer en indexnummer van de huidige track aan. TRACK: muestra el número y el número de índice de la pista actual. TRACK: indica il numero e il numero d’indice del brano attualmente riprodotto. TRACK: zeigt Nummer und Indexnummer des aktuellen Titels an. TRACK : montre le numéro et le numéro d'index du morceau qui passe. TRACK: shows the number and index number of the current track. 1 1 > TRACK Voorbeeld 1: Er zit geen CD in de speler. Ejemplo1: No hay ningún disco. Esempio 1: Nessun disco è inserito. Beispiel 1: Keine CD eingelegt. Exemple 1 : Aucun CD présent. Example1: There is no disc present. 00 TRACK Voorbeeld 2: Track 3 van indexnummer 1 wordt afgespeeld. Ejemplo2: Se está reproduciendo la pista 3 y número de indice 1. Esempio 2: Il brano 3 con numero d’indice 1 è in fase di riproduzione. Beispiel 2: Titel 3 Indexnummer 1 spielt. Exemple 2 : Le morceau 3 numéro d'index 1 passe. Example2: Track 3 index number 1 is playing. 3 1 > Appuyer sur DISPLAY . TRACK TIME : montre le temps écoulé depuis le début du morceau. DISPLAY drücken. TRACK TIME: zeigt die Zeit seit Beginn des aktuellen Titels an. Premere DISPLAY . TRACK TIME: indica il tempo trascorso dall’inizio del brano riprodotto. Pulse DISPLAY . TRACK TIME: muestra el tiempo desde el inicio de la pista actual. Druk op DISPLAY . TRACK TIME: Toont de verlopen speeltijd vanaf het begin van het huidige nummer. Beispiel 3: CD gestoppt. CD enthält 16 Titel. Esempio 3: Il disco è fermo. Il disco ha 16 brani. Ejemplo3: El disco está parado. El disco tiene 16 pistas. Voorbeeld 3: De CD is afgelopen. De CD heeft 16 nummers. TIME TRACK Exemple 3 : Le CD est arrêté. Le CD compte 16 morceaux. 0.38 Press DISPLAY . TRACK TIME: shows the time from the start of the current track. TRACK Example3: The disc is stopped. The disc has 16 tracks. 16 > TIME TRACK > 17 Druk op DISPLAY . REMAIN TRACK TIME: geeft de nog resterende speeltijd van het huidige nummer aan. Pulse DISPLAY . REMAIN TRACK TIME: muestra el tiempo restante para la pista actual. Premere DISPLAY . REMAIN TRACK TIME: indica il tempo residuo del brano riprodotto. DISPLAY drücken. REMAIN TRACK TIME: zeigt die restl. Spielzeit des aktuellen Titels an. Appuyer sur DISPLAY . REMAIN TRACK TIME : montre la durée restante pour le morceau qui passe. Press DISPLAY . REMAIN TRACK TIME: shows the time remaining for the current track. 1.25 REMAIN TIME > Druk op DISPLAY . TOTAL TIME: Geeft de verlopen tijd vanaf het begin van de CD aan. Pulse DISPLAY . TOTAL TIME: muestra el tiempo desde el inicio del disco. Premere DISPLAY . TOTAL TIME: indica il tempo trascorso dall’inizio del disco. DISPLAY drücken. TOTAL TIME: zeigt die Zeit ab Beginn der CD. Appuyer sur DISPLAY . TOTAL TIME : montre la durée écoulée depuis le début du CD. Press DISPLAY . TOTAL TIME: shows the time from start of disc. 25.14 TOTAL TIME > LINN CLASSIK Druk op DISPLAY . TOTAL REMAIN TIME: Geeft de resterende speeltijd van de CD aan. Pulse DISPLAY . TOTAL REMAIN TIME: Muestra el tiempo restante para el disco. Premere DISPLAY . TOTAL REMAIN TIME: indica il tempo residuo del disco. DISPLAY drücken. TOTAL REMAIN TIME: Zeigt die restl. Spielzeit der CD an. Appuyer sur DISPLAY . TOTAL REMAIN TIME : montre la durée restante pour tout le CD. Press DISPLAY . TOTAL REMAIN TIME: Shows the time remaining for the disc. 12.54 TOTAL REMAIN Afspelen, onderbreken en stoppen van een CD Nederlands Reproducción, pausa y parada de un disco Español Riproduzione, pausa ed arresto del disco Italiano CD wiedergeben, pausieren u. stoppen Deutsch Pour passer, mettre sur pause ou arrêter un disque Français Playing, pausing and stopping a disc English LINN CLASSIK OPEN OPEN OPEN . Insérer CD. or nudge drawer to . Insert disc. TRACK drücken. CD einlegen. OPEN ed inserire il OPEN . Introduzca el disco. OPEN . Leg de CD in. Druk op OPEN of druk de lade voorzichtig dicht. Druk op Pulse OPEN o empuje la bandeja para cerrar. Pulse Premere OPEN o spingere il cassettino per chiuderlo.. Premere disco. OPEN drücken oder Fach zuschieben. OPEN Appuyer sur OPEN ou donner une légère poussée au tiroir du CD. Appuyer sur Press close. Press 18 PLAY pour passer le to play from the start TRACK 18 Druk op PLAY om vanaf het begin van de CD af te spelen. Pulse PLAY para reproducir desde el inicio del disco. Premere PLAY per iniziare la riproduzione dall’inizio del disco. Für Wiedergabe ab Beginn der CD PLAY drücken. Appuyer sur début du CD. Press PLAY of the disc. 1 1 > PAUSE Press ou PAUSE oder PAUSE PAUSE para PLAY om te om te onderbreken. Druk op PAUSE of hervatten. Druk op PLAY para pausa. Pulse PAUSE o continuar. Pulse Premere PAUSE o PLAY per riprendere la riproduzione. Premere PAUSE per interrompere temporaneamente la riproduzione. Zur erneuten Wiederg. PLAY drücken. pour drücken. PLAY pour mettre sur PLAY PAUSE PAUSE PAUSE or to resume. TRACK to pause. Zum Pausieren Appuyer sur reprendre. Appuyer sur pause. PAUSE Press 1 1 = STOP STOP STOP Druk op Pulse drücken. pour arrêter. TRACK om te stoppen. para parar. per arrestare la STOP STOP to stop. Premere STOP riproduzione. Zum Stoppen Appuyer sur Press 18 > Het overslaan of uitzoeken van nummers Nederlands Salto y búsqueda a través de las pistas Español Avanzamento, riavvolgimento e ricerca dei brani Italiano Titel suchen und überspringen Deutsch Sauter et rechercher des morceaux Français Skipping and searching through tracks English LINN CLASSIK TRACK TRACK Skip achterwaarts: Druk op om terug te gaan naar het begin van het huidige nummer. Skip Voorwaarts : Druk op om vanaf het begin van het volgende nummer over te slaan. 19 Saltar atrás: Pulse para volver al inicio de la pista actual. Brano precedente: Premere per passare all’inizio del brano in fase di riproduzione. Überspringen Rückw.: Zur Rückkehr an Beginn des aktuellen Titels drücken. Saut vers l'arrière : Appuyer sur pour revenir au début du morceau actuel. Skip Backward: Press to return to start of current track. 6 1 > Saltar adelante: Pulse para saltar al inicio de la siguiente pista. Brano successivo: Premere per passare all’inizio del brano successivo. Überspringen Vorw.: Zum Springen an Beginn des nächsten Titels drücken. Saut vers l'avant : Appuyer sur pour sauter au début du prochain morceau. Skip Forward: Press to skip to the start of the next track. 6 1 > TRACK Druk nogmaals op om naar het voorgaande nummer te gaan. Pulse de nuevo para saltar a la pista anterior. Premere nuovamente per passare al brano precedente. Zum Springen auf vorherg. Titel erneut drücken. Appuyer sur pour revenir au morceau précédent. Press again to skip back to the previous track. 5 1 > per riavvolgere. per avanzare. Druk op zoeken. Zoeken: Druk op Pulse LINN CLASSIK om achterwaats te om voorwaarts te zoeken. para buscar hacia atrás. Búsqueda: Pulse para buscar hacia delante. Premere Ricerca: Premere drücken. drücken. pour recherche Zur Rückwärtssuche Suchen: Zur Vorwärtssuche Appuyer sur arrière. pour recherche avant. to search backwards. Press Recherche : Appuyer sur to search forward. TIME TRACK Search: Press 0.15 > Het kiezen van een track op nummer Nederlands Selección de una pista por el número Español Selezione del numero di un brano Italiano Titelwahl mit Nummer Deutsch Choix d'un morceau par numéro Français Selecting a track by number English LINN CLASSIK TRACK Het kiezen van tracks 1-9: Druk op 0...9 om de gewenste track te kiezen. Dit kan al den niet tijdens het spelen of als de lade open staat. Selección de las pistas 1-9: Pulse 0...9 para seleccionar la pista que desea. El reproductor CD puede estar reproduciendo, parado o abierto. Selezione dei brani 1-9: Premere 0...9 per selezionare il brano voluto. Il lettore di CD può essere in fase di riproduzione, fermo o aperto. Titel 1-9 wählen: Zur Wahl des gewünschten Titels 0...9 drücken. CD-Spieler kann gerade spielen, gestoppt oder offen sein. Pour choisir un morceau de 1 à 9 : Appuyer sur 0...9 pour choisir le morceau voulu. Le lecteur CD peut être en marche, arrêté ou ouvert. Selecting tracks 1-9: Press 0...9 to select required track. The CD player can be playing, stopped or open. 7 1 > TRACK 20 Het kiezen van tracks 10 en hoger: Druk op 0...9 voor het eerste cijfer en houd vast tot het bovenstaande display verschijnt. Selección de la pista 10 y superior: Pulse 0...9 para el primer dígito y mantenga hasta que aparezca la visualización de la figura. Selezione di brani dal 10 in poi: Premere 0...9 per selezionare la prima cifra e tener premuto fino a visualizzare il display riportato qui sopra. Titel 10 und höher wählen: Für erste Ziffer 0...9 drücken, bis Display wie oben erscheint. Pour choisir le morceau 10 et au-delà : Appuyer sur 0...9 pour obtenir le premier chiffre et maintenir enfoncé jusqu'à obtention de l'affichage ci-dessus. Selecting track 10 and above: Press 0...9 for first digit and hold until the above display shows. 1- 1 > TRACK Druk op 0...9 voor het tweede cijfer. De gekozen track begint meteen te spelen. Pulse 0...9 para el segundo dígito. La pista seleccionada se reproducirá inmediatamente. Premere 0...9 per selezionare la seconda cifra. Il lettore inizia immediatamente la riproduzione del brano selezionato. Für zweite Ziffer 0...9 drücken. Der gewählte Titel wird sofort gespielt. Appuyer sur 0...9 pour le deuxième chiffre. Le morceau choisi passe immédiatement. Press 0...9 for the second digit. The selected track plays immediately. 16 1 > TRACK Opm.: Als er geen track wordt gekozen dient u een willekeurige knop op de CD-speler in te drukken en opnieuw te beginnen. Nota: Si no se selecciona ninguna pista, pulse cualquier tecla de control del CD y comience de nuevo. Nota: Se il brano non viene selezionato, premere un qualsiasi pulsante di comando del CD, quindi iniziare nuovamente la selezione. Hinweis: Wird Titel nicht gewählt, beliebige CD-Steuertaste drücken und erneut beginnen. Remarque : Si le morceau n'a pas été sélectionné, appuyer sur n'importe quel bouton du lecteur puis recommencer. Note: If track is not selected press any CD control button and then start again. 18 Het herhalen van een aantal tracks Nederlands Repetición de una secuencia de pistas Español Ripetizione di una sequenza di brani Italiano Eine Titelfolge wiederholen Deutsch Répétition d'une séquence de morceaux Français Repeating a sequence of tracks English LINN CLASSIK TRACK REPEAT TRACK REPEAT drücken. drücken. 0...9 Druk op of of 0...9 om het begin van het gewenste onderdeel te kiezen. Druk op REPEAT . Pulse o o 0...9 para seleccionar un punto de inicio para la sección que desea. Pulse REPEAT . Premere o or 0...9 per selezionare il punto da cui iniziare la riproduzione della sezione voluta. Premere REPEAT . REPEAT oder drücken. drücken. o para seleccionar el 21 Druk op of of 0...9 om het eind van het gewenste onderdeel te kiezen. Druk op REPEAT . o 0...9 punto final. Pulse REPEAT . Pulse Premere o o 0...9 per selezionare il punto in cui interrompere la riproduzione della sezione voluta. Premere REPEAT . REPEAT 0...9 oder Druk op PLAY om het geselecteerde onderdeel af te spelen. Druk nogmaals op REPEAT om herhaald afspelen op te heffen. Pulse PLAY para reproducir la secuencia seleccionada. Pulse de nuevo REPEAT para cancelar la reproducción repetitiva. Premere PLAY per riprodurre la sequenza selezionata. Premere nuovamente REPEAT per annullare la riproduzione ripetuta. Zum Stornieren der wiederh. Wiederg. REPEAT drücken. Zur Wiedergabe der gewählten Titelfolge PLAY drücken. oder Zur Wahl des Endpunkts oder Zur Wahl des Beginns der Titelfolge Press PLAY to play the selected sequence. Press REPEAT again to cancel repeat play. 12 1 Appuyer sur PLAY pour passer la séquence choisie. Appuyer à nouveau sur REPEAT pour annuler la répétition. or to choose the end TRACK REPEAT > ou ou 0...9 pour choisir la fin de la sélection. Appuyer sur REPEAT . . 0...9 REPEAT or Appuyer sur point. Press Press 10 1 > ou ou 0...9 pour sélectionner le point de départ de la sélection. Appuyer sur REPEAT . Appuyer sur or or 0...9 to choose a start point for the section required. Press REPEAT . Press 7 1 > TRACK REPEAT drücken. LINN CLASSIK Druk eenmaal op REPEAT om de hele CD te herhalen. Druk op PLAY . Pulse una vez REPEAT para repetir el disco entero. Pulse PLAY . Premere una volta REPEAT per ripetere la riproduzione di tutto il disco. Premere PLAY . PLAY Zur Wiederholung der ganzen CD REPEAT einmal drücken. Appuyer une fois sur REPEAT pour réécouter tout le disque. Appuyer sur PLAY . Press REPEAT once to repeat the entire disc. Press PLAY . 1 1 > Het programmeren van een aantal tracks (mode A) Nederlands Programación de una selección de pistas (modo A) Español Programmazione di una selezione di brani (modo A) Italiano Eine Titelfolge programmieren (Modus A) Deutsch Programmation d'une sélection de morceaux (mode A) Français Programming a selection of tracks (mode A) English LINN CLASSIK drücken. PLAY pour passer la Houd DISPLAY vast tot het bovenstaande display verschijnt en wordt gevolgd door ‘P 00’. Controleer of de disc is geladen maar niet speelt. Om het programma op te heffen, opent u de lade. 22 om op te slaan. Dit herhaalt u voor volgende tracks. DISPLAY Druk op om de selectie af te Druk op spelen. Kies de tweede track op dezelfde wijze en druk op DISPLAY . Nu kiest u de eerste track via of 0...9 . PLAY para reproducir la Per annullare la programmazione, aprire il piatto disco. Para borrar el programa, abra la bandeja. para guardar. per memorizzare. Repítalo para las demás pistas. DISPLAY DISPLAY Pulse Mantenga DISPLAY hasta que aparezca el display superior seguido de ‘P 00’. Premere Pulse PLAY selección. per riprodurre la Seleccione la segunda pista de la misma forma y pulse DISPLAY . PLAY Ahora, seleccione la primera pista utilizando o 0...9 . Premere selezione. Zum Löschen der Programmierung CD-Fach öffnen. Zur Wiedergabe der Titelfolge PLAY drücken. Pour arrêter le programme ouvrir le tiroir. Appuyer sur sélection. Asegúrese de que el disco esté en el cargador y de que la reproducción no esté en marcha. Selezionare il secondo brano in modo analogo, quindi premere DISPLAY . Für weitere Titel wiederholen. Zweiten Titel in gleicher Weise wählen und DISPLAY drücken. Répéter l'opération pour les autres morceaux. Choisir le second morceau de la même manière et appuyer sur DISPLAY . to play selection. To clear the programme open the drawer. PLAY TRACK Ripetere per ciascun brano. Selezionare il primo brano con o 0...9 . Zum Speichern oder pour mettre en DISPLAY DISPLAY Ersten Titel mit 0...9 wählen. Appuyer sur mémoire. Choisir le premier morceau en utilisant ou 0...9 . to save. Press 7 1 Tener premuto DISPLAY fino alla visualizzazione del display riportato qui sopra, seguito da ‘P 00’. Assicurarsi che il disco sia caricato ma non sia in funzione. Sicherstellen, das die Disc eingelegt ist, jedoch nicht gespielt wird. DISPLAY halten, bis Display wie oben erscheint, gefolgt von ‘P 00’. Maintenir DISPLAY enfoncé jusqu'à ce que l'affichage ci-dessus apparaisse suivi de ‘P 00’. Vérifiez que vous avez chargé votre disque mais sans le jouer. DISPLAY Repeat for further tracks. TRACK Press P 02 Hold DISPLAY until above display appears then release. ‘P 00’. will now be displayed TRACK Select the second track in the same way and press DISPLAY . P 01 Now select the first track by using or 0...9 . TRACK Make sure disc is loaded but not playing. P--A > Het programmeren door een aantal tracks weg te laten (mode B) Nederlands Programación de una selección excluyendo pistas (modo B) Español Programmazione di una selezione escludendo i brani (modo B) Italiano Titelfolge mit Ausschluss von Titeln programmieren (Modus B) Deutsch Programmation d'une sélection avec exclusion de certains morceaux (mode B) Français Programming a selection by excluding tracks (mode B) English LINN CLASSIK Houd DISPLAY vast tot het bovenstaande display verschijnt en wordt gevolgd door ‘P-00’. Controleer of de disc is geladen maar niet speelt. Asegúrese de que el disco esté en el cargador y de que la reproducción no esté en marcha.Mantenga DISPLAY hasta que aparezca la visualización de arriba seguido de ‘P-00’. Tener premuto DISPLAY fino alla visualizzazione del display riportato qui sopra, seguito da ‘P -00’. Assicurarsi che il disco sia caricato ma non sia in funzione. Sicherstellen, das die Disc eingelegt ist, jedoch nicht gespielt wird. DISPLAY halten, bis Display wie oben erscheint, gefolgt von ‘P-00’. Maintenir DISPLAY enfoncé jusqu'à obtention de l'affichage ci-dessus suivi de ‘P-00’. Vérifiez que vous avez chargé votre disque mais sans le jouer. to save. Für weitere Titel wiederholen. PLAY to play selection. TRACK PLAY pour passer la Druk op DISPLAY 23 om op te slaan. Nu selecteert u de eerste track die overgeslagen moet worden via of 0...9 . para guardar. LINN CLASSIK Om het programma op te heffen, opent u de lade. Herhaal dit voor andere tracks. om de selectie af te Druk op spelen. Selecteer de tweede track op dezelfde wijze en druk op DISPLAY . PLAY Para borrar el programa, abra la bandeja. DISPLAY Repítalo para las demás pistas. Pulse Pulse PLAY selección. Seleccione la segunda pista de la misma forma y pulse DISPLAY . Ahora seleccione la primera pista descartar utilizando o 0...9 . para reproducir la Premere PLAY per riprodurre la selezione. Per annullare la programmazione, aprire il piatto disco. Selezionare il secondo brano in modo analogo, quindi premere DISPLAY . Ripetere per ciascun brano. Zum Löschen der Programmierung CD-Fach öffnen. Zur Wiedergabe der Titelfolge PLAY drücken. Pour arrêter le programme ouvrir le tiroir. Appuyer sur sélection. To clear the programme open the drawer. Press 3 1 Selezionare il primo brano da escludere con o 0...9 . Premere DISPLAY per memorizzare. drücken. Zum Speichern DISPLAY Zweiten Titel in gleicher Weise wählen und DISPLAY drücken. Choisir le second morceau à exclure de la même façon et appuyer sur DISPLAY . Répéter l'opération pour les autres morceaux. Ersten auszuschließenden Titel mit oder 0...9 wählen. Choisir le premier morceau à exclure en utilisant ou 0...9 . Appuyer sur DISPLAY pour mémoriser. DISPLAY Repeat for further tracks. TRACK Press P-02 Hold DISPLAY until above display appears then release. ‘P 00’. will now be displayed. TRACK Select the second track in the same way and press DISPLAY . P-01 Now select the first track to exclude by using or 0...9 . TRACK Make sure disc is loaded but not playing. P--b > Het programmeren van een willekeurige volgorde (SHUFFLE en RANDOM) Nederlands Programación de una lista de reproducción aleatoria y shuffle Español Programmazione di sequenze casuali e sequenze casuali continue Italiano Gemischte und zufällige Spiellisten programmieren Deutsch Programmation de listes mélangées et au hasard Français Programming shuffle and random playlists English LINN CLASSIK TRACK for SHUFFLE. Opm.: Deze functie kan worden geprogrammeerd terwijl de CDspeler in bedrijf, buiten bedrijf of geopend is. Pulse Pulse SHUFFLE . 24 Shuffle speelt alle nummers van de CD in willekeurige volgorde af. Druk op SHUFFLE . Pulse Botones alternativos: Pulse y mantenga pulsado PLAY hasta que aparezca el display superior. 2 Pulse para SHUFFLE. Random reproduce todas las pistas del disco de forma aleatoria, repitiendo cuando finaliza. . Random speelt alle nummers van de CD in willekeurige volgorde af en herhaalt dit als alle nummers zijn geweest. Druk op RANDOM . RANDOM 3 drücken. para RANDOM. Druk op 3 voor RANDOM. Alternatieve bedieningsknoppen: Druk op PLAY en houd vast tot het bovenstaande display verschijnt. 2 Druk op voor SHUFFLE. 3 Pulsanti alternativi: Premere e tener premuto PLAY fino a visualizzare il display riportato qui sopra. 2 Premere per SHUFFLE. 3 Premere per RANDOM. Für RANDOM drücken. Shuffle reproduce todas las pistas del disco una vez en orden aleatorio. drücken. 2 NOTA: Estas funciones pueden programarse cuando la unidad está reproduciendo, parada o abierta. RANDOM Für SHUFFLE Random: tutti i brani di un disco vengono riprodotti in sequenza casuale, quindi ripetuti. Premere RANDOM drücken. Shuffle: tutti i brani di un disco vengono riprodotti una volta in sequenza casuale. Premere SHUFFLE Alternative Tasten: PLAY drücken und halten, bis Display wie oben erscheint. NOTA: Queste funzioni possono essere programmate con lettore di CD in fase di riproduzione, fermo o aperto. Random spielt alle Titel der CD in zufälliger Folge ab und wiederholt danach die Wiedergabe. SHUFFLE Shuffle spielt alle Titel der CD einmal in zufälliger Folge ab. pour RANDOM. pour SHUFFLE. 3 Appuyer sur . 2 RANDOM Appuyer sur . Appuyer sur SHUFFLE Appuyer sur for RANDOM. Autre possibilité : Appuyer sur PLAY et maintenir enfoncé jusqu'à obtention du message ci-dessus. 3 Random joue tous les morceaux du disque au hasard, et répète une fois terminé. . 2 Shuffle joue tous les morceaux du disque une fois dans le désordre. RANDOM Press . Press SHUFFLE Press Press Random plays all the tracks on the disc randomly, repeating when finished. Shuffle plays all the tracks on the disc once in a random order. cd ? Alternative buttons: Press and hold PLAY until above screen shows. rand ShuF HINWEIS: Diese Funktionen können programmiert werden, wenn CDSpieler spielt, gestoppt oder offen ist. REMARQUE : Ces fonctions peuvent être programmées lorsque le CD marche, est arrêté ou ouvert. NOTE: These functions can be programmed when CD player is playing, stopped or open. 00 Gebruik van de intro Nederlands Utilización del modo intro Español Utilizzo del modo Intro Italiano Anspielmodus verwenden Deutsch Utilisation du mode intro Français Using intro mode English LINN CLASSIK Intro laat op volgorde de eerste 10 sec. van elk nummer van de CD horen. Druk op INTRO . Intro reproduce los primeros 10 segundos de cada pista del disco de forma secuencial. Pulse INTRO . Intro riproduce in sequenza i primi 10 secondi di ciascun brano del disco. Premere INTRO . Anspielen spielt die ersten 10 Sekunden jedes Titels der CD in Folge an. INTRO drücken. Intro joue les premières dix secondes de chaque morceau du disque l'un après l'autre. Appuyer sur INTRO . Intro plays the first 10 seconds of each track on the disc in sequence. Press INTRO . Intro TRACK 25 Druk op PLAY als u het nummer herkent dat u wilt beluisteren. Pulse PLAY cuando escuche la pista que desea escuchar. Premere PLAY quando viene riprodotto l’inizio del brano che si desidera ascoltare. PLAY drücken, wenn Sie einen Titel ganz hören möchten. Appuyer sur PLAY quand vous entendez le morceau que vous voulez écouter. Press PLAY when you hear the track you want to listen to. 5 1 > TRACK De CD wordt verder normaal afgespeeld. El disco se reproducirá normalmente. Il disco viene riprodotto normalmente. CD spielt normal weiter. Le disque passe normalement. The disc plays on normally. 5 1 > LINN CLASSIK Alternatieve knoppen: Druk op PLAY en houd vast tot het bovenstaande display verschijnt. 1 Druk op voor INTRO. Botones alternativos: Pulse y mantenga PLAY hasta que aparezca la pantalla superior. 1 Pulse para INTRO. Pulsanti alternativi: Premere e tener premuto PLAY fino a visualizzare il display riportato qui sopra. 1 Premere per INTRO. Alternative Tasten: PLAY drücken und halten, bis Display wie oben erscheint. 1 Für ANSPIELEN drücken. Autre possibilité : Appuyer sur PLAY et maintenir enfoncé jusqu'à obtention du message ci-dessus. 1 Appuyer sur pour INTRO. Alternative buttons: Press and hold PLAY until above screen shows. 1 Press for INTRO. cd ? Indexeren Nederlands Utilización de puntos de índice Español Utilizzo dei numeri d’indice Italiano Indexpunkte verwenden Deutsch Utilisation de numéros d'index Français Using index points English LINN CLASSIK TRACK Sommige klassieke CD’s hebben binnen een track een verborgen indexering om bijvoorbeeld een tempowijziging te markeren. Algunos CDs de música clásica poseen puntos de índice dentro de una pista por ejemplo para indicar el inicio de un movimiento. Alcuni CD di musica classica dispongono di numeri d’indice all’interno del brano per indicare, ad esempio, l’inizio di un movimento. Auf klassischen CDs sind eventuell Indexpunkte innerhalb eines Titels aufgezeichnet, die z.B. den Beginn eines Satzes angeben. Certains CD classiques ont des numéros d'index au sein d'un morceau pour marquer par exemple le début d'un mouvement. Some classical CDs have index points within a track for example to mark the start of a movement. 5 3 > TRACK 26 Het bovenstaande display toont het derde deel van track 5. El display superior muestra el tercer movimiento de la pista 5. Nel display visualizzato qui sopra è indicato il terzo movimento del brano 5. Das Display oben zeigt den 3. Satz von Titel 5. L'affichage indique le troisième mouvement du morceau 5. The above display shows the third movement of track 5. 5 3 > TRACK INDEX om Druk op vooruit en achteruit door de track te lopen en het onderdeel dat u zoekt te vinden. INDEX para Pulse saltar adelante y atrás a través de la pista para buscar el movimiento que desea. INDEX per Premere avanzare o retrocedere lungo il brano per trovare il movimento desiderato. INDEX drücken, um vorwärts oder rückwärts durch den Titel nach dem gewünschten Satz zu suchen. INDEX Appuyer sur pour avancer ou reculer dans le morceau et trouver le mouvement voulu. INDEX to skip Press forward and backward through the track to find the movement you want. 5 4 > Display en bedieningstoetsen Visualizador y Controles Display e comandi Bandbreedtekeuze Mode kiezen: Voorkeuze/Scan/Afstemmen/Signaalsterkte Selección de modo: Presintonía/Exploración/Sintonizar Nivel de señal Selección de banda Modus wählen: Festsender/Scan/Sender einst./Signalstärke Selezione della modalità: Preselezione/Scansione/Sintonizzazione/ Forza segnale Bandbereich wählen Display und Steuerungen Sélectionner mode : Préréglé/Balayage/Réglage automatique/ Force de signal Selezione della banda Sélectionner bande Mode Select: Preset/Scan/Tune/Signal Strength Band select 28 Minus Menos Meno Minus Moins Minus 3 4 Plus Más Più Plus Plus Plus 4 2 2 3 88885 1 1 Affichage et commandes Display and controls l LINN CLASSIK Zoeken en scannen Nederlands Búsqueda y Exploración Español Ricerca e scansione Italiano Suchen und Scannen Deutsch Recherche et balayage Français Searching and scanning English LINN CLASSIK Druk op + of kanalen af te zoeken. om de 30 SCAN ingedrukt houden totdat het display bovenin verschijnt. Scannen: Druk op SCAN . Zoeken: Druk op . Pulse y mantenga SCAN hasta que aparezca la pantalla superior. Pulse + o para buscar a través de los canales. SCAN Exploración: Pulse SCAN . Búsqueda: Pulse SCAN . Premere + o scorrere i canali. Premere e tener premuto SCAN fino a visualizzare il display riportato qui sopra. Scansione: Premere SCAN . Ricerca: Premere per SCAN gedrückt halten, bis Display wie oben erscheint. Zum Durchsuchen der Kanäle drücken. + oder . Scannen: SCAN drücken. Suchen: SCAN drücken. SCAN Appuyer sur SCAN et maintenir enfoncé jusqu'à ce que le message ci-dessus soit affiché. . Appuyer sur + ou pour faire une recherche parmi les canaux. SCAN Balayage : Appuyer sur Recherche : Appuyer sur . Press and hold SCAN until above display shows. Press + or to search through the channels. SCAN Scanning: Press SCAN . SCAN Searching: Press SCAN . AM AM 801 SCAN SCAN + or 1314 to start Druk op + scannen. Pulse + o el exploración. of Premere + o iniziare la scansione. per + om te para iniciar Zum Starten von Scan oder drücken. Appuyer sur + ou pour commencer recherche. Press scan. AM SCAN 1215 SCAN or TUNE to exit. SCAN ou TUNE pour SCAN o TUNE per uscire. SCAN o TUNE para salir. Druk op SCAN of TUNE om het programma af te sluiten. Linn CLASSIK scant alle stations en pauzeert 5 seconden bij elk station. Pulse El Linn CLASSIK explorará todas las emisoras y hará una pausa de 5 segundos en cada una de ellas. Premere Linn CLASSIK eseguirà la scansione di tutte le stazioni e si arresterà su ciascuna di esse per 5 secondi. Der Linn CLASSIK tastet alle Sender ab und pausiert 5 Sekunden auf jedem Sender. Zum Beenden SCAN oder TUNE drücken. Appuyer sur sortir. Le Linn CLASSIK effectuera un balayage de toutes les stations et s’arrêtera 5 sec. à chacune d'entre elles. Press The Linn CLASSIK will scan all stations and pause at each for 5 seconds. AM SCAN Instellingen opslaan en automatisch opslaan Nederlands Memorización de Presintonías y Memorización Automática Español Memorizzazione delle preselezioni ed automemoria Italiano Festsender Speichern und Autom. Speichern Deutsch Mise en mémoire des préréglages et préréglage automatique Français Storing presets and auto storing English LINN CLASSIK FM FM 31 Gebruik + of 0...9 om een instellingsnummer in te toetsen. Druk op STORE . Utilice + o 0...9 para introducir un número de presintonía. Pulse STORE . Memorización: Sintonice la emisora que desea guardar. Pulse STORE . Opslaan: Station afstellen om op te slaan. Druk op STORE . Premere + o 0...9 per immettere il numero della preselezione. Premere STORE . drücken. oder Memorizzazione: Sintonizzarsi sulla stazione da memorizzare. Premere STORE . STORE + verwenden. 0...9 0...9 Zur Eingabe einer Festnummer to key Speichern: Zu speichernden Sender einstellen. STORE drücken. 0...9 Utiliser + ou pour saisir une fréquence préréglée. Appuyer sur STORE . St 6 Mise en mémoire : Régler la station devant être mise en mémoire. Appuyer sur STORE . STEREO Use + or in a preset number. Press STORE . 95.8 Storing: Tune station to be stored. Press STORE . STEREO iiii iiii gedrückt halten, bis autom. Automatisch opslaan van meerdere stations: Druk op STORE . STORE ingedrukt houden totdat automatisch opslaan begint. Memorización automática de múltiples emisoras: Pulse STORE . Pulse y mantenga STORE hasta que comience la memorización automática. Automemoria di stazioni multiple: Premere STORE . Premere e tener premuto STORE fino a che ha inizio l’automemoria. Speichern beginnt. STORE Autom. Speichern mehrerer Sender: STORE drücken. Appuyer sur STORE jusqu'à ce que la mise en mémoire autom. commence. Mise en mémoire autom. de plusieurs stations : Appuyer sur STORE . Auto storing multiple stations: Press STORE . Press and hold STORE until auto store begins. FM SCAN St 2 zum Überspringen der 5 Sek. LINN CLASSIK Druk op + om de 5 seconden pauze over te slaan en toch op te slaan. Druk op om de 5 seconden pauze over te slaan en niet op te slaan. Pulse + para saltar tras una pausa de 5 segundos y memorizar. Pulse para saltar tras una pausa de 5 segundos y no memorizar. Premere + per saltare la pausa di 5 secondi e memorizzare. Premere per saltare la pausa di 5 secondi e non memorizzare. -Pause und nicht Speichern. zum Überspringen der 5-Sek. -Pause und weiterem Speichern. + Appuyer sur + pour sauter la pause de 5 sec. mais mémoriser Appuyer sur pour sauter la pause de 5 sec. et ne pas mémoriser Press + to skip past 5 second pause and still store. Press to skip past 5 second pause and not store. STEREO FM SCAN Instellingen selecteren en opheffen Nederlands Selección y Borrado de Presintonías Español Selezione e cancellazione delle preselezioni Italiano Festsender Wählen und Hören Deutsch Sélectionner et annuler les préréglages Français Selecting and clearing presets English LINN CLASSIK FM PRESET P Selecteren: Druk op PRESET . Selección: Pulse PRESET . Selezione: Premere PRESET . Wählen: PRESET drücken. Sélection : Appuyer sur Selecting: Press PRESET . STEREO . FM P 5 0...9 to para 32 Gebruik + of 0...9 om een reeds gemaakte instelling te selecteren. Utilice + o 0...9 seleccionar la presintonía. Premere + o 0...9 per selezionare la preselezione. Zur Wahl des Festsenders + oder 0...9 verwenden. Utiliser + ou 0...9 pour sélectionner le préréglage. Use + or select the preset. STEREO FM CLr Eén instelling opheffen: Selecteer de op te heffen instelling. PRESET ingedrukt houden. Borrado de presintonía: Seleccione la presintonía que desea borrar. Pulse y mantenga PRESET . Cancellazione di una preselezione: Selezionare la preselezione da cancellare. Premere e tener premuto PRESET . Einen Festsender löschen: Zu löschenden Festsender wählen. PRESET gedrückt halten. Annuler un préréglage : Sélectionner un préréglage devant être annulé. Appuyer en continu sur PRESET . Clearing one preset: Select preset to be cleared. Press and hold PRESET . STEREO PRESET Alle instellingen opheffen: Stroom inschakelen terwijl u PRESET 12 seconden ingedrukt houdt. Borrado de todas las presintonías: Encienda el equipo mientras mantiene pulsado PRESET durante 12 segundos. Cancellazione di tutte le preselezioni: Accendere l’apparecchio tenendo premuto PRESET per 12 secondi. Alle Festsender löschen: Einschalten und gleichzeitig 12 Sek. gedrückt halten. Annuler tous les préréglages : Mettre sous tension tout en appuyant en continu sur PRESET pendant 12 sec. Clearing all presets: Switch the power on while holding PRESET for 12 seconds. CLr- Het sterkste signaal zoeken Nederlands Búsqueda de la señal más fuerte Español Ricerca del segnale più forte Italiano Das Stärkste Signal Finden Deutsch Trouver le signal le plus puissant Français Finding the strongest signal English LINN CLASSIK 5 21 Druk op SIGNAL . De sterkte van het aanwezige signaal wordt weergegeven. Pulse SIGNAL . Se visualizará el nivel de la señal actual. Premere SIGNAL . Viene visualizzata la forza del segnale attualmente rilevato. SIGNAL drücken. Die Stärke des aktuellen Signals wird angezeigt. Appuyer sur SIGNAL . L'intensité du signal trouvé est affichée. Press SIGNAL . The strength of the present signal is displayed. FM FM 5 50 33 Er wordt een schaal van 0 tot 50 gebruikt. 50 is het sterkste signaal. Se utiliza una escala de 0 a 50. 50 es la señal más fuerte. Viene utilizzato un intervallo compreso tra 0 e 50. 50 è il segnale più forte. Anzeige von 0 bis 50. 50 ist das stärkste Signal. Une échelle allant de 0 à 50 est utilisée. 50 indique le signal le plus puissant. A range of 0 to 50 is used. 50 is the strongest signal. STEREO FM 5 49 Gebruik dit bij het plaatsen van de antenne voor de beste ontvangst. Utilice esto para obtener la mejor recepción cuando se está colocando la antena. Utilizzare questo indicazione per posizionare l’antenna in modo da ottenere la miglior ricezione. Bei Ausrichtung der Antenne zum bestmöglichen Empfang verwenden. L'utiliser pour positionner l'antenne de façon à obtenir la meilleure réception possible. Use this when positioning the aerial to get the best reception. STEREO LINN CLASSIK Voor meer informatie over AM / FM ontvangst kunt u terecht op www.linn.co.uk/amfmreception Para más información acerca de la recepción AM/FM ir a www.linn.co.uk/amfmreception Per ulteriori informazioni sulla ricezione AM/FM, visitare il sito www.linn.co.uk/amfmreception Weitere Informationen zum AM/FM Empfang finden Sie unter www.linn.co.uk/amfmreception Pour plus de renseignements concernant la réception en AM/FM, consultez www.linn.co.uk/amfmreception For more information on AM/FM reception go to www.linn.co.uk/amfmreception Selecteren van de mutedrempel Nederlands Selección del umbral de silenciamiento Español Selezione della soglia di muting Italiano Stummschwelle Wählen Deutsch Sélection d'un seuil de sourdine Français Selecting a mute threshold English LINN CLASSIK FM 5 21 Het vermijden van zwakke signalen tijdens zoeken en scannen: Druk op SIGNAL . Para rechazar las señales débiles durante el modo de búsqueda/ exploración: Pulse SIGNAL . Per scartare i segnali deboli durante la modalità di ricerca/ scansione: Premere SIGNAL . Abweisen schwacher Signale während Suche/Scan: SIGNAL drücken. Rejet de signaux faibles pendant la recherche/en mode balayage : Appuyer sur SIGNAL . To reject weak signals during search/scan mode: Press SIGNAL . STEREO FM th15 34 SIGNAL Ingedrukt houden totdat de drempeldisplay wordt getoond. Pulse y mantenga SIGNAL hasta que se muestre el umbral. Premere e tener premuto SIGNAL fino a visualizzare il display di soglia. SIGNAL gedrückt halten, bis Empfindlichkeitsanzeige erscheint. Appuyer sur SIGNAL et maintenir enfoncé jusqu'à ce que l'affichage du seuil apparaisse. Press and hold SIGNAL until the threshold display shows. STEREO FM or th22 ou 0...9 0...9 to set o 0...9 para 0...9 Gebruik + of 0...9 om de drempel in te stellen. Utilice + ajustar el umbral. Premere + o per impostare la soglia. Zum Einstellen der Empfindlichkeit oder 0...9 + verwenden. Utiliser + pour régler le seuil. Use + threshold. STEREO FM th50 Instellen op 1 om alle signalen te ontvangen. Instellen op 50 om alleen de sterkste signalen te ontvangen. Ajuste a 1 para recibir todas las señales. Ajuste a 50 para recibir solamente las señales más fuertes. Impostare su 1 per ricevere tutti i segnali. Impostare su 50 per ricevere solo i segnali più forti. Zum Empfang aller Signale auf 1 einstellen. Zum ausschließlichen Empfang der stärksten Signale auf 50 einstellen. Régler sur 1 pour recevoir tous les signaux. Régler sur 50 pour ne recevoir que les signaux les plus puissants. Set to 1 to receive all signals. Set to 50 to receive only the strongest signals. STEREO Instellen van volume en balans Nederlands Ajuste del volumen y del balance Español Regolazione del volume e del bilanciamento Italiano Lautstärke und Balance einstellen Deutsch Réglage du volume et de la balance Français Adjusting the volume and balance English LINN CLASSIK VOL VOL + + Volume: VOL Druk op + volume te veranderen. Volumen: VOL Pulse + cambiar el volumen. Volume: VOL Premere + modificare il volume. om het para per pour to change Lautstärke: Zum Ändern der Lautstärke VOL + drücken. Volume : Appuyer sur changer le volume. Volume: Press volume. VOLUME 23 BALANCE 36 Balans: Druk op de ADJUST-knop op het bedieningspaneel tot het bovenstaande display verschijnt. Balance: Pulse el botón ADJUST en el panel de control hasta que aparezca la visualización de arriba. Bilanciamento: Premere il pulsante ADJUST sul pannello comandi fino a visualizzare il display riportato qui sopra. Balance: ADJUST-Taste am Bedienfeld drücken, bis Display wie oben erscheint. Balance : Appuyer sur le bouton ADJUST sur le panneau de commandes jusqu'à obtention de l'affichage ci-dessus. Balance: Press ADJUST button on control panel until the above display shows. --- to move the balance L Druk op om de balans naar links te verschuiven. L Pulse para mover el balance a la izquierda. L Premere per spostare il bilanciamento verso sinistra. L drücken, um Balance nach links zu bewegen. L Appuyer sur pour déplacer la balance vers la gauche. L Press to the left. BALANCE 2 - -- to move the balance Druk op R om de balans naar rechts te verschuiven. Pulse R para mover el balance a la derecha. Premere R per spostare il bilanciamento verso destra. R drücken, um Balance nach rechts zu bewegen. Appuyer sur R pour déplacer la balance vers la droite. Press R to the right. BALANCE -- 2 Instellen van bas en treble Nederlands Ajuste de graves y agudos Español Regolazione dei toni bassi e alti Italiano Höhen und Bass einstellen Deutsch Réglage basse et aigus Français Adjusting the bass and treble English LINN CLASSIK Bas: Druk de ADJUST-knop op het bedieningspaneel in tot het bovenstaande display verschijnt. Graves: Pulse el botón ADJUST en el panel de control hasta que aparezca la visualización de arriba. Toni bassi: Premere il pulsante ADJUST sul pannello comandi fino a visualizzare il display riportato qui sopra. Bass: ADJUST-Taste am Bedienfeld drücken, bis Display wie oben erscheint. Basse : Appuyer sur le bouton ADJUST du panneau de commandes jusqu'à obtention du l'affichage ci-dessus. Bass: Press ADJUST button on control panel until the above display shows. b 0 BASS + 37 BASS Druk op bas in te stellen. BASS Pulse ajustar los bajos. + BASS Premere regolare i toni bassi. + + om de para per + to adjust Zum Einstellen der Bässe BASS + drücken. BASS Appuyer sur pour régler la basse. Press bass. b -3 Treble: Druk de ADJUST-knop op het bedieningspaneel in tot het bovenstaande display verschijnt. Agudos: Pulse el botón ADJUST en el panel de control hasta que aparezca la visualización de arriba. Toni alti: Premere il pulsante ADJUST sul pannello comandi fino a visualizzare il display riportato qui sopra. Höhen: ADJUST-Taste am Bedienfeld drücken, bis Display wie oben erscheint. Aigus : Appuyer sur le bouton ADJUST du panneau de commandes jusqu'à obtention du de l'affichage ci-dessus. Treble: Press ADJUST button on control panel until the above display shows. t 0 TREB + + + om de para per LINN CLASSIK TREB Druk op treble in te stellen. TREB Pulse + ajustar los agudos. TREB Premere regolare i toni alti. + to adjust Zum Einstellen der Höhen TREB + drücken. TREB Appuyer sur pour régler les aigus. Press treble. t 3 Muting en het kiezen van de bron Nederlands Silenciamiento y selección de una fuente Español Muting e selezione sorgente Italiano Stummschalten und Tonquelle wählen Deutsch Mise en sourdine et sélection de la source Français Muting and selecting a source English LINN CLASSIK MUTE to mute the output. MUTE Muting: Druk op MUTE om het volume van de output op 0 te zetten. Silencianiento: Pulse MUTE para silenciar la salida. Disattivazione audio: Premere MUTE per disattivare l’output. Stummschalten: Zur Tonstummschaltg. drücken. Sourdine : Appuyer sur MUTE pour mettre la sortie en sourdine. Press Muting: 0 MUTE VOLUME 38 VOL Druk op MUTE of + om het volume terug te brengen naar de oorspronkelijk ingestelde waarde. VOL Pulse MUTE o + para volver el volumen a su nivel original. VOL Premere MUTE o + per ripristinare il volume al livello originale. Zum Rückschalten der Lautst. auf Originalhöhe MUTE oder VOL + drücken. MUTE ou + pour remettre le volume à son niveau précédent. VOL Appuyer sur VOL Press MUTE or + to return the volume to its original level. VOLUME 23 TUN AUX kiezen. TP2 CD AUX TUN AUX TP1 per selezionare la TUN TP2 CD TP2 CD AUX om de bron te TUN para seleccionar la fuente. CD Druk op of TP1 Pulse o TP2 Premere o TP1 sorgente. drücken. AUX TP1 pour choisir la TUN Zum Wählen der Tonquelle TUN oder TP1 AUX CD to select source. CD Appuyer sur ou TP2 TP1 source. Press or TP2 Cd LISTEN Opnemen Nederlands Grabación Español Registrazione Italiano Aufnehmen Deutsch Enregistrement Français Recording English LINN CLASSIK TP1 CD TUN drücken. AUX o TUN AUX TUN AUX Druk op CD of TP1 om de op te nemen bron te kiezen. CD o para seleccionar la fuente TP1 que se va a grabar. Pulse TP1 per selezionare la sorgente da registrare. Premere oder Zur Wahl der aufzunehmenden CD TUN AUX Tonquelle drücken. 39 Druk op play van de CD of alternatieve bron. Druk op REC . Pulse reproducir en el CD, casete o fuente auxiliar. Pulse REC . CD, registratore a nastri o della sorgente ausiliaria. Premere REC . Premere il tasto Play del lettore di REC An CD, Kassette oder Zusatzgerät Wiedergabe starten. Appuyer sur play sur le CD, la platine cassettes ou la source auxiliaire. Appuyer sur REC . AUX TUN AUX Appuyer sur CD ou TP1 pour choisir la source à enregistrer. TUN TRACK Press play on CD, tape or auxiliary source. Press REC . CD 1 1 > or TP1 to select source to be recorded. Press Cd LISTEN > TP2 drücken. per ascoltare TP2 Druk op TP2 om de output tussen de bron en de opnameapparatuur af te stemmen. Pulse TP2 para conmutar la salida entre la fuente y el soporte destino de la grabación. alternativamente l’audio proveneinte dalla sorgente o dal registratore in funzione. Premere Aufnahmeziels Zum Schalten zwischen Tonausgabe der Tonquelle und des Appuyer sur TP2 pour faire basculer la sortie entre la source et la destination d'enregistrement. Press TP2 to toggle the output between the source and the recording destination. t2 RECORD LINN CLASSIK Klok op tijd zetten Nederlands Ajuste del reloj Español Impostazione dell’ora Italiano Zeit einstellen Deutsch Réglage de l'horloge Français Setting the clock English LINN CLASSIK Druk in en houd vast tot het display oplicht. Pulse y mantenga pulsado hasta que aparezca la visualización de arriba. Premere e tener premuto fino a visualizzare il display riportato qui sopra. drücken und halten, bis Display wie oben erscheint. Appuyer sur et maintenir enfoncé jusqu'à obtention du message ci-dessus. Press and hold until the above display shows. Set CL to store. Druk op Toets 42 per + para + om de om op te slaan. TIME Druk op uren in te stellen. Toets + om de dag van de week in te stellen. Kies een nummer voor elke dag (b.v. 1=maandag of 1=zondag). om op te slaan. + per memorizzare. TIME pour drücken. para guardar. Pulse para guardar. Pulse Premere Premere impostare l’ora. Zum Speichern Zum Einstellen der Stunde TIME + drücken. pour Appuyer sur mémoriser + to set hour. TIME TIME Pulse ajustar la hora. TIME + to store. TIME 10.23 Appuyer sur régler l'heure. Press Press AM TIME Pulse + para fijar el día de la semana. Seleccione qué número representa a cada día. v.g. 1=Lunes ó 1= Domingo. TIME Premere + .per impostare il giorno della settimana. Selezionare il numero che rappresenta il giorno, ad esempio 1=Lunedì o 1=Domenica.Premere per memorizzare. Zum Einstellen des Wochentages TIME + drücken. Wählen Sie die den jeweiligen Tag repräsentierende Zahl, z.B. 1=Montag oder 1=Sonntag. Zum Speichern drücken. TIME Appuyer sur + poser le paramètre du jour de la semaine. Choisissez quel chiffre représentera quel jour de la semaine par ex 1= lundi ou 1= dimanch. Appuyer sur pour mémoriser Press TIME Press + to set the day of the week. Select which number represents which day e.g 1=Monday or 1=Sunday. dAY3 pour TIME + to set Druk op per para om op te slaan. om de para guardar. TIME Druk op + minuten in te stellen. Pulse + drücken. pour per memorizzare. TIME Pulse + ajustar los minutos. Premere TIME Premere impostare i minuti. Zum Speichern Zum Einstellen der Minute TIME + drücken. Appuyer sur mémoriser + to store. TIME 10.45 Appuyer sur régler les minutes. Press Press minute. AM De wekker zetten Nederlands Ajuste de la alarma Español Impostazione della sveglia Italiano Wecker stellen Deutsch Réglage du réveil Français Setting the alarm English LINN CLASSIK Druk ALARM in en houd vast tot bovenstaand display verschijnt. Pulse y mantenga pulsado ALARM hasta que aparezca la visualización de arriba Premere e tener premuto ALARM fino a visualizzare il display riportato qui sopra. ALARM drücken und halten, bis Display wie oben erscheint. Appuyer sur ALARM et maintenir enfoncé jusqu'à obtention du message ci-dessus. Press and hold ALARM until above display shows. Set AL to store. ALARM drücken. ALARM per memorizzare. ALARM per memorizzare. ALARM ALARM 43 om op te slaan. ALARM om op te slaan. om de para almacenar. Druk op Pulse TIME Pulse + para ajustar los minutos de la alarma. Premere per drücken. + Druk op para guardar. ALARM TIME Premere impostare i minuti. Zum Speichern TIME Druk op + minuten in te stellen. ALARM to store. ALARM drücken. Fortsetzung Druk ALARM vervolg LINN CLASSIK om op te slaan. Wekkerbron kiezen: Als de bron CD of tuner is, kiest u het gewenste nummer TIME of een radiostation d.m.v. de + -knoppen. Ajuste de fuente de alarma: Si la fuente de la alarma es el CD o el sintonizador, seleccione la pista o elija la sintonía TIME + . utilizando los botones Pulse ALARM para guardar. continuación Impostare la sorgente della funzione Sveglia: Se la sorgente è un CD o il sintonizzatore, selezionare il brano o la TIME preselezione con i tasti + . continua ALARM Premere per memorizzare. Zum Speichern suite continued Wecker-Tonquelle stellen: Bei CD oder Tuner Titel oder Festsender mit Hilfe TIME der Tasten wählen. + ALARM Zum Stellen der Weckminute TIME + drücken. Press Set Alarm Source: If source is CD or tuner select track or preset using TIME + buttons. Régler source du réveil : Si la source est CD ou tuner choisir un morceau ou TIME un préréglage en utilisant + de l'heure. Appuyer sur ALARM pour mémoriser to store. to set t? 1 TIME Appuyer sur + pour régler les minutes du réveil. Appuyer sur ALARM pour mémoriser ALARM + TIME Tijd instellen: Druk op + om de uren in te stellen. Pulse TIME Ajuste hora: Pulse para ajustar la hora de la + alarma. Premere Impostazione dell’ora: Premere TIME + per impostare l’ora della sveglia. Zum Speichern Zeit einst.: Zum Stellen der TIME Weckstunde + drücken. Réglage de l'heure : Appuyer TIME sur + pour régler l'heure du réveil. Appuyer sur ALARM pour mémoriser ALARM Press 7.10 Press AM TIME Press alarm minutes. 7.30 TIME Set Time: Press + to set alarm hour. AM De wekker zetten (vervolg) Nederlands Ajuste de la alarma (continuación) Español Impostazione della sveglia (continua) Italiano Wecker stellen (Fortsetzung) Deutsch Réglage du réveil (suite) Français Setting the alarm (continued) English LINN CLASSIK Instellen van de dagen van de week: TIME Gebruik + om de wekker aan en uit te schakelen. Druk op ALARM om op te slaan. Herhaal dit voor iedere dag van de week. Wekkervolume instellen: Druk op TIME + om het volume in te stellen. Druk op ALARM om op te slaan. 44 Ajuste de días de alarma: Utilice TIME + para activar y desactivar la alarma. Pulse ALARM para guardar. Repita para cada día. Zum Speichern ALARM drücken. Für jeden Tag wiederholen. Ajuste de volumen de alarma: TIME Pulse + para ajustar el volumen. Pulse ALARM para guardar. drücken. Impostare i giorni della Sveglia: TIME Premere + per abilitare e disabilitare la funzione Sveglia. Premere ALARM per memorizzare. Ripetere per ciascun giorno. ALARM Impostare il volume della TIME Sveglia: Premere + per impostare il volume. Premere ALARM per memorizzare. Zum Speichern Wecktage stellen: Wecker mit TIME + Ein oder Aus stellen. Press ALARM to store. Repeat for each day. Weckerlautst. stellen: Zum Einstellen der Lautstärke TIME + drücken. to store. Entrer jours du réveil : Utiliser TIME + pour allumer éteindre le réveil. Appuyer sur ALARM pour mémoriser. Répéter pour chaque jour. ALARM l TIME Set Alarm days: Use + to set alarm on and off. 1.0n Réglage volume réveil : Appuyer TIME sur + pour régler le volume. Appuyer sur ALARM pour mémoriser. Press Set Alarm Volume: Press TIME + to set the volume. 43 Aan- en uitzetten van de wekkerfunctie: Druk op ALARM om de wekkerfunctie aan- of uit te zetten. Activación y desactivación de la alarma: Pulse ALARM para activar y desactivar la alarma. Abilitazione o disabilitazione della Sveglia: Premere ALARM per abilitare e disabilitare la funzione Sveglia. Wecker Ein oder Aus stellen: Mit ALARM Ein oder Aus stellen. Allumer ou éteindre le réveil : Appuyer sur ALARM pour allumer ou éteindre le réveil. Turn the alarm on or off: Press ALARM to turn alarm on and off. AL On Opm.: Wanneer de wekkerfunctie goed is ingesteld ziet u op het display als hij in de wachtstand staat. Nota: Si se ajusta correctamente la alarma, en el visualizador aparecerá en modo reponso. Nota: se la funzione è stata impostata correttamente verrà visualizzato sul display nello stato di stand-by. Hinweis: Bei korrekter Weckereinstellung zeigt das Display in Standby an. Remarque : Si le réveil est correctement réglé apparaîtra à l'affichage en mode veille. Note: If the alarm is set successfully will show on the display in standby mode. Cd Instellen van de timer Nederlands Ajuste del temporizador Español Impostazione del timer Italiano Timer einstellen Deutsch Réglage de la minuterie Français Setting the timer English LINN CLASSIK De timer schakelt het toestel na een bepaalde tijd over in de wachtstand. Druk TIMER in en houd vast tot het bovenstaand display verschijnt. El temporizador coloca la unidad en standby después de un intervalo predeterminado. Pulse y mantenga pulsado TIMER hasta que aparezca la visualización de arriba. Il timer passa l’apparecchio nella modalità di stand-by dopo un periodo di tempo definito. Premere e tener premuto TIMER fino a visualizzare il display riportato qui sopra. Der Timer schaltet das Gerät nach einer bestimmten Zeit auf Standby. TIMER drücken und halten, bis Display wie oben erscheint. La minuterie remet le produit en veille après un temps déterminé. Appuyer sur TIMER et maintenir enfoncé jusqu'à obtention du message ci-dessus. The timer switches the product to standby after a set time. Press and hold TIMER until above display shows. SEt ti TIME + to set timer 45 TIME Druk op + timer-duur in te stellen. om de TIME Pulse + para fijar la duración del temporizador. TIME Premere + per impostare la durata del timer. Zum Einstellen der TimerTIME Zeitspanne + drücken. TIME Appuyer sur + pour régler la durée de la minuterie. Press duration. 0.30 TIMER per memorizzare. TIMER om op te slaan. para guardar. TIMER TIMER Druk op Pulse Premere drücken. pour mettre en TIMER TIMER to store. Zum Speichern Appuyer sur mémoire. Press ti On 11.50 LINN CLASSIK Opm.: Als de timer goed is ingesteld en in bedrijf is, ziet u op het display knipperen. Nota: Si se ajusta correctamente el temporizador, destelleará en el visualizador, en modo operativo. Nota: se la funzione è stata impostata correttamente lampeggerà sul display nel modo operativo. Hinweis: Bei korrekter Einst. des Timers blinkt im Betriebsmodus am Display. Remarque : Si la minuterie est correctement réglée clignotera à l'affichage en mode marche. Note: If the timer is set successfully will flash on the display in operational mode. AM LINN CLASSIK Gebruiksoverzicht Tablas de opciones de usuario Tabelle delle opzioni utente Tabelle Benutzeroptionen Tableaux d'options de l'utilisateur User Option Tables Gebruiksmogelijkheden programmeren Nederlands Programación de Opciones del Usuario Español Programmazione delle opzioni utente Italiano Benutzeroptionen Programmieren Deutsch Programmation des options de l'utilisateur Français Programming user options English LINN CLASSIK Schakel de spanning in terwijl u VOL ingedrukt houdt totdat bovengetoonde display zichtbaar wordt (12 seconden). Encienda el equipo mientras VOL hasta mantiene pulsado que se visualice el mensaje superior (12 segundos). Accendere l’apparecchio tenendo VOL fino a premuto visualizzare il display riportato qui sopra (12 secondi). Einschalten und gleichzeitig VOL gedrückt halten, bis Display oben erscheint (12 Sek.). Mettre sous tension tout en VOL et maintenir appuyant sur enfoncé jusqu'à ce que l'affichage ci-dessus apparaisse (12 sec.). Switch power on while holding VOL until the above display shows (12 seconds). 1-1 VOL to select an VOL per selezionare VOL para seleccionar VOL 48 VOL voor het Druk op selecteren van een optie. Pulse una opción. Premere un’opzione. Zur Wahl einer Option drücken. VOL pour Appuyer sur sélectionner une option. Press option. 3-0 Druk op VOL + om de waarde te veranderen. (Zie tabellen op pag. 49-55). Pulse VOL + para modificar su valor. (Vea las tablas en las páginas 4955). Premere VOL + per modificarne il valore. (Vedere le tabelle alle pagine 49-55). Zur Wertänderung VOL + drücken. (Siehe Tabellen Seite 49-55). Appuyer sur VOL + pour changer sa valeur. (cf. tableaux pages 49-55). Press VOL + to change its value. (See tables on pages 49-55). 3-2 VOL for 5 VOL Het programma als volgt afsluiten: VOL 5 seconden ingedrukt houden. Para salir: Pulse y mantenga durante 5 segundos. Per uscire: Premere e tener premuto VOL per 5 secondi. Beenden: VOL 5 Sek. gedrückt halten. Pour sortir : VOL et maintenir Appuyer sur enfoncé pendant 5 sec. To exit: Press and hold seconds. iiii iiii La zone grisée est définie par défaut à l’usine. Le mode Sleep est affiché lorsque l'appareil est à l'arrêt. Schlaf-Display aktiviert, wenn Gerät nicht benützt. Il display Sleep è abilitato,.e si attiva quando l’apparecchio non riceve comandi per alcuni secondi El visualizador en reposo se activa cuando se deja el equipo sin utilizar. Slaapdisplay staat aan wanneer het product niet wordt gebruikt. Option 1 Affichage du mode Sleep (arrêt) Option 1 Schlaf-Display Opzione 1 Display Sleep Opción 1 Visualizador en reposo Optie 1 Slaapdisplay ✓ ✓ ✓ ✓ ✓ ✓ 1-0 Grauer Bereich ist Werkseinstellung Sleep display enabled when product is left idle. Option Tables Greyed area is factory default. Option 1 Sleep display LINN CLASSIK ✗ ✗ ✗ ✗ ✗ ✗ 0-1 49 La zona de color gris es el predeterminado de fábrica De gearceerde delen zijn niet voor u toegankelijk LINN CLASSIK U kunt deze bedieningsmogelijkheden aanpassen aan uw persoonlijke voorkeur. Op de volgende pagina’s worden meer mogelijkheden getoond. Ajuste estas opciones de funcionamiento para adecuarse a sus gustos personales. En las páginas siguientes se muestran más opciones de personalización. Modificare queste opzioni operative a seconda delle proprie preferenze. Ulteriori opzioni sono riportate nelle pagine che seguono. Diese Betriebsoptionen können nach persönlichem Belieben eingestellt werden. Weitere Optionen auf den folgenden Seiten. Changer ces options de fonctionnement selon vos préférences personnelles. Les pages suivantes indiquent d'autres options. Change these operating options to suit your personal preferences. Further options are shown on the following pages. L’area in grigio è un’impostazione predefinita l Che cosa mostra il display quando l’apparecchio è nello stato di stand-by. Visualizador cuando la unidad se encuentra en modo reposo. Display als het toestel in wachtstand staat. Option 2 Standby-Display Opzione 2 Display di stand-by Opción 2 Visualizador en standby Optie 2 Wachtstanddisplay ‘. ‘. . .’ . .’ . .’ . .’ ‘. Display, wenn Gerät im StandbyModus. ‘. . .’ ‘. Affichage lorsque le produit est en veille. Option 2 Affichage veille Tijd Hora Ora Uhrzeit Heure Time . .’ ‘. Display when product is in standby mode. 2-1 2-0 Option 2 Standby display LINN CLASSIK 50 Tijd/ wekkerinstelling Hora/día alarma siguiente Ora/sveglia giorno successivo Uhrzeit/ Nächster Wecktag Heure/ prochain réveil Time/next alarm day 2-2 Optie 3 Tijdklok-display Opción 3 Visualización de reloj Opzione 3 Display ora Option3 Zeitanzeige Option3 Affichage de l'heure Option3 Clock display Tijdklok als 12-of 24-uurs klok. El reloj es configurable como reloj de 12 o 24 horas. L’ora è visualizzata nel formato 12 o 24 ore. Zeitanzeige im 12- oder 24Stundenformat. Affichage à 12 ou 24 heures. Clock displayed as a 12 or 24 hour clock. 12-uurs 12 Horas 12 ore 12-Stunden 12 heures 12 Hour 3-0 24-uurs 24 Horas 24 ore 24-Stunden 24 heures 24 Hour 3-1 Standby Veille Standby Stand-by Standby Wachtstand Le produit se met en veille ou en mode opérationnel lorsque mis sous tension. Gerät im Standby- oder Betriebsmodus, wenn mit Hauptschalter eingeschaltet. L’apparecchio è nello stato di stand-by o nella modalità operativa quando viene accesso. El producto está en modo reposo u operativo cuando se enciende con el interruptor de red. Het toestel is in wachtstand of in bedrijf als de hoofdschakelaar aan staat. Option 4 Power up mode Option 4 Mode marche Option 4 Einschaltmodus Opzione 4 Stato all’accensione Opción 4 Modo de encendido Optie 4 In bedrijf 4-0 Product in standby or operational mode when turned on by main power switch. LINN CLASSIK In bedrijf Operativo Operativo Betrieb Opérationnel Operational 4-1 51 Optie 5 De CD-speler aanzetten Opción 5 Encendido del CD Opzione 5 Accensione CD Option 5 CDEinschaltmodus Option 5 Mise en marche du CD Option 5 Power up CD De CD-speler gaat lopen als het toestel in bedrijf wordt gesteld. ✓ = Ingeschakeld. El CD inicia la reproducción cuando la unidad pasa al modo operativo. ✓ = Activado. Quando l’apparecchio entra nella modalità operativa la riproduzione del CD inizia automaticamente. ✓ = Abilitato. CD-Wiedergabe beginnt, sobald Gerät in Betriebsmodus ist. ✓ = Aktiviert. Le CD se met en marche lorsque le produit se met en mode opérationnel. ✓ = Actif. CD starts playing when product enters operational mode. ✓ = Enabled. ✗ ✗ ✗ ✗ ✗ ✗ ✓ ✓ ✓ ✓ ✓ ✓ 5-1 LINN CLASSIK 5-0 CD settings are always saved when the product is turned off and reloaded when the product is turned on. Les réglages du CD sont automatiquement enregistrés lorsque le produit est éteint et rechargés lorsqu'il est remis en marche. CD-Einstellungen beim Ausschalten immer speichern und beim Einschalten wieder aktivieren. Le impostazioni del lettore vengono sempre memorizzate allo spegnimento dell’apparecchio, quindi ricaricate all’accensione. La configuración del CD queda siempre guardada cuando se apaga la unidad y se vuelve a cargar cuando ésta se enciende. CD-instellingen worden altijd bewaard als het toestel wordt uitgeschakeld en worden geactiveerd als het toestel in bedrijf wordt gesteld. Option 6 CD settings Option 6 Réglages du CD Option 6 CD-Einstellungen Opzione 6 Impostazioni del CD Opción 6 Configuración del CD Optie 6 CD-instellingen LINN CLASSIK ✗ ✗ ✗ ✗ ✗ ✗ 6-0 ✓ ✓ ✓ ✓ ✓ ✓ 6-1 52 Optie 7 Versterkergeheugen Opción 7 Memoria amplificador. Opzione 7 Memoria amplificatore Option 7 Verst.Einstellungen Option 7 Mémoire ampli Option 7 Amp memory Gegroepeerd - Alle bronnen hebben dezelfde volume-, balans-, bas- en treble-instellingen. Individueel - Elke bron heeft eigen instellingen. Agrupado - Todas las fuentes utilizan la misma configuración para el volumen, balance, graves y agudos. Individual - Cada fuente tiene su propia configuración. Raggruppate - Tutte le sorgenti hanno le stesse impostazioni di bilanciamento e di toni bassi e alti. Individuale - Ciascuna sorgente dispone di impostazioni individuali. Gruppiert - Gleiche Lautstärke, Balance, Bass und Höheneinst. für alle Tonquellen verwenden. Individuell - Jede Tonquelle individuell einstellen. Groupée - Toutes les sources utilisent les mêmes réglages de volume, balance, basse et aigus. Individuelle - Chaque source a ses réglages spécifiques. Grouped - All sources use the same volume, balance, bass and treble settings. Individual - Each source has individual settings. Gegroepeerd Agrupado Raggruppate Gruppiert Groupée Grouped 7-0 Individueel Individual Individuale Individuell Individuelle Individual 7-1 ✓ = All’accensione, dell’apparecchio, vengono utilizzat le ultime impostazioni memorizzate. ✗ = All’accensione, vengono utilizzate le impostazioni predefinite. ✓ = Por defecto se utilizará la última configuración guardada cuando se vuelva a encender el producto. ✗ = Cuando se enciende el aparato se utiliza la última configuración predeterminada. ✓ = Als het toestel wordt aangezet, worden de laatst opgeslagen instellingen als standaard gebruikt. ✗ = De vorige standaardinstellingen worden overgenomen als het toestel wordt aangezet. Opzione 8 Impostazioni amplificatore Opción 8 Configuración amplificador. Optie 8 Versterkerinstellingen 53 ✓ = Zuletzt gespeicherte Einstellungen werden beim Einschalten des Geräts als Standard verwendet. ✗ = Letzte Standardeinstellungen beim Einschalten wieder aktivieren. Option 8 Verst.Einstellungen ✓ ✓ ✓ ✗ ✗ ✗ ✗ ✗ ✓ ✓ = Les derniers réglagles enregistrés seront utilisés par défaut lorsque le produit est mis en marche. ✗ = Les derniers réglages par défaut sont utilisés lorsque le produit est mis en marche. Option 8 Réglage ampli ✓ ✗ ✓ ✓ = Last saved settings used as default when the product is turned on. ✗ = Last default settings are used when the product is turned on. 8-1 8-0 Option 8 Amp settings LINN CLASSIK LINN CLASSIK Lente Langsam Vitesse de la sourdine lorsqu'on change la source. Geschw.für Stummschalten beim Umschalten zw. Tonquellen. Velocità del muting durante la selezione delle sorgenti. Velocidad de silenciamiento cuando se conmuta entre fuentes. De snelheid waarmee bij het veranderen van bron de mute in werking treedt. Option 9 Vitesse sourdine Option 9 Stumm-Geschw. Opzione 9 Velocità Muting Opción 9 Velocidad de silenciamiento Optie 9 Mute-snelheid Langzaam Baja Bassa Slow Speed of muting when switching sources. 9-0 Option 9 Mute speed LINN CLASSIK Medium Media Media Mittel Moyenne Medium 9-1 Snel Rápida Veloce Schnell Rapide Fast 9-2 54 Optie 10 Unity gain Opción 10 Ganancia unidad Opzione 10 Guadagno Unitario Option 10 Verstärkg.=1 Option 10 Gain Unité Option 10 Unity gain ✗ = Unity gain staat uit ✓ = Unity gain voor AUX staat aan ✗ = Ganancia unidad está desactivada ✓ = Ganancia unidad para AUX está activada ✗ = Il guadagno unitario è disattivato ✓ = Il guadagno unitario è attivato per l’ingresso AUX. ✗ = Verstärkg.=1 ausgeschaltet ✓ = Verstärkg.=1 für AUX aktiviert ✗ = Gain d’unité inactif ✓ = Gain d’unité pour AUX actif ✗ = Unity gain is off ✓ = Unity gain for AUX is enabled ✗ ✗ ✗ ✗ ✗ ✗ 10-0 ✓ ✓ ✓ ✓ ✓ ✓ 10-1 Manuell Manuale Manuell: Sie stellen Uhrzeit, Tonquelle, Titel (bei CD), Festsender (beim Tuner) und Lautstärke ein. Auto: Wecker verwendet Einstellungen vor letztem Ausschalten. Hinweis: Uhrzeit und Wecktage müssen von Ihnen eingestellt werden. Manuale: l’utente imposta l’ora, la sorgente, il brano (CD), preselezione (sintonizzatore) e il volume. Auto: il modo Sveglia adotta le ultime impostazioni utilizzate prima dello spegnimento. Nota: L’ora e i giorni vanno sempre impostati. Manual: Usted ajusta la hora, la fuente y la pista (si está utilizando el CD), presintonía (si utiliza el sintonizador) y el volumen. Auto: La alarma utiliza la última configuración que se utilizó antes de apagar el equipo. Nota: Siempre se deben programar los días para la hora y la alarma. Handmatig: U stelt tijd, bron, track (bij gebruik van CD), voorkeuzestation (bij gebruik van tuner) en volume in. Auto: De wekker hanteert de laatst gebruikte instellingen. Opm.: U moet altijd de tijd en de datum invoeren. Option 11 Mode réveil Option 11 Weckmodus Opzione 11 Modo Sveglia Opción 11 Modo alarma Optie 11 Wekker 55 Manuel Manuel : Vous réglez l'heure, la source, le morceau (si réveil CD), le préréglage (si réveil radio) et le volume. Auto : Le réveil prend les derniers réglages utilisés avant la dernière mise hors tension. Remarque : Vous devez toujours régler l'heure et les jours de réveil. Handmatig Manual Manual Option 11 Alarm mode 11-0 Manual: You set time, source, track (if using CD), preset (if using tuner) and volume. Auto: Alarm uses last settings used before power down. Note: You must always set time and alarm days. LINN CLASSIK Automatisch Auto Auto Auto Auto Auto 11-1 LINN CLASSIK You can change the frequency of the Infra red controllers. Vous pouvez changer la fréquence des contrôleurs infrarouge. Die Frequenz der InfrarotController kann geändert werden. È possibile modificare la frequenza dei controller a infrarossi. Usted puede modificar la frecuencia de los controladores de infrarojos. U kunt de frequentie van de infraroodbediening wijzigen. Option 12 IR1 Infra Red Out 1 Option 12 IR1 Infra Red Out 1 Option 12 IR1 Infrarot Aus 1 Opzione 12 IR1 infrarossi uscita 1 Opción 12 - IR1 Señal de Infrarojos de salida 1 Optie 12 IR1 Infra Red Out 1 LINN CLASSIK 0 = 36 0 = 36 Frequenz wurde geändert. La fréquence a été changée. Frequency has been changed 12-U Frequentieb Frequentie is ereiken van gewijzigd 1 - 36 La Se ha frecuencia modificado varia entre 1 la frecuencia - 36 Gamme di La frequenza frequenza da è stata 1 - 36 modificata Der Frequenzber eich reicht von 1 - 36 0 = 36 0 = 36 Plages de fréquences de 1 à 36 Frequency ranges from 1 - 36 12-16 0 = 36 0 = 36 12-0 56 Optie 13 IR2 Infra Red Out 2 Opción 13 - IR2 Señal de infrarojos de salida 2 Opzione 13 IR2 infrarossi uscita 2 Option 13 IR2 Infrarot Aus 2 Option 13 IR2 Infra Red Out 2 Option 13 IR2 Infra Red Out 2 U kunt de frequentie van de infraroodbediening wijzigen Usted puede modificar la frecuencia de los controladores de infrarojos È possibile modificare la frequenza dei controller a infrarossi. Die Frequenz der InfrarotController kann geändert werden. Vous pouvez changer la fréquence des contrôleurs infrarouge. You can change the frequency of the Infra red controllers 0 = 56 0 = 56 0 = 56 0 = 56 0 = 56 0 = 56 13-0 Frequenz wurde geändert. La fréquence a été changée. Frequency has been changed 13-U La frecuencia ha sido modificada Frequentieb Frequentie is ereik van 1 gewijzigd 56 La frecuencia varía entre 1 - 56 Gamme di La frequenza frequenza da è stata 1 -56 modificata Der Frequenzber eich reicht von 1 - 56. Plages de fréquences de 1 à 56 Frequency ranges from 1 - 56 13-56 Vous pouvez mettre hors service la commande à distance à infrarouge. Die InfrarotFernbedienung kann ausgeschaltet werden. È possibile disattivare il telecomando a infrarossi. Usted puede desactivar el control remoto. De infrarode afstandsbediening is uit te schakelen. Option 14 Fernbedienung ausschalten Opzione 14 Disattivare il telecomando Opción 14 Desactivar el control remoto Optie 14 Afstandsbediening uitschakelen You can disable the infrared remote control. Mise hors service de la commande à distance Option 14 Option 14 Disable remote control LINN CLASSIK 1 – est hors service 1 - disabled 14-1 1desactivado 0 - no desactivado 10 – Niet uitgeschakel Uitgeschakel d d 1disattivato 0 – non disattivato 01eingeschaltet ausgeschalt et 0 – n’est pas hors service 0 -not disabled 14-0 57 Optie 15 ACC-aansluiting Opción 15 Toma de corriente alterna Opzione 15 Presa ACC Option 15 ACC-Buchse Option 15 Prise ACC Option 15 ACC socket 1 - voor RCU (Remote Control Unit) 0 extern infrarood sensor Seleccione el dispositivo conectado a la toma de corriente alterna. LINN CLASSIK 1 - para UCR (Unidad de Control Remoto) 0 sensor infrarrojos externo Selezionare l’elemento collegato alla presa ACC. Selecteer het item dat op de ACC-aansluiting zit. 1 - per RCU 0 sensore esterno a infrarossi 1 - pour le dispositif de commande de la pièce (RCU) 1 - für RCU (Fernbedien ung) 0 capteur extérieur infrarouge 1 - for RCU 0 external infrared sensor 0 externer Infrarot Sensor Wählen Sie den an die ACC-Buchse angeschlossenen Geräteteil. Sélectionnez l’élément connecté à la prise pour accessoires ACC. Select the item connected to the ACC socket. 15-1 15-0 Select the communication settings for the Classik connect and the KNEKT system Sélectionnez les paramètres de communications pour le Classik Connect et le système KNEKT. Wählen Sie die Kommunikationseinstellungen für den Classik und das KNEKT-System. Selezionare le impostazioni di comunicazione tra il Classik e il sistema KNEKT. Seleccione los parámetros de las comunicaciones para la conexión entre el equipo Classik y el sistema KNEKT Selecteer de communicatie-instellingen voor de Classik connect en het KNEKT systeem Option 16 Knekt/Connect communication Option 16 Communication Knekt/Connect Option 16 Knekt/Kommunik -ationsanschluss Opzione 16 Comunicazione Knekt/Connect Opción 16 Comunicaciones conexión Knekt Optie 16 Knekt/Connect communicatie LINN CLASSIK Voor Classik connect systeem 58 Voor Main Room Classik binnen een Knekt systeem Para el equipo Classik de la Sala Principal dentro de un sistema Knekt Für Classik (Musikraum) in einem KnektSystem Für das Classik Anschluss-System Para la conexión del equipo Classik Pour le Classik de la pièce principale dans un système KNEKT Pour le système Classik Connect Per il Classik principale in un sistema Knekt For Main Room Classik in a Knekt system For Classik connect system Per il sistema Classik 16-1 16-0 Voor secundaire kamer binnen een Knekt systeem Para el equipo de la sala secundaria dentro de un sistema Knekt Per il Classik secondario in un sistema Knekt Für Classik (anderer Raum) in einem KnektSystem Pour le Classik d’une pièce locale dans un système KNEKT For local room Classik in a Knekt system 16-2 Linn CLASSIK Connect Nederlands Linn CLASSIK Connect Español Connessione Linn CLASSIK Italiano Linn CLASSIK Anschluss Deutsch Linn CLASSIK Connect Français Linn CLASSIK Connect English LINN CLASSIK Op de Linn Classik Connect kunnen tot 4 andere Classik Connect's aangesloten worden, zodat u in andere ruimtes kunt luisteren naar de output van die ene Classik Connect. El Linn Classik-K se puede conectar a otros cuatro Classik-K, de forma que puede usted escuchar las fuentes del Classik-K principal, en habitaciones secundarias. Linn Classik può essere collegato a un numero massimo di altri quattro Classik, per consentire l’ascolto da una stanza principale ad altre stanze secondarie. Der Linn Classik kann an bis zu vier weitere Classiks angeschlossen werden, so dass Sie von dem in Ihrem Musikraum aufgestellten Classik auch in Nebenräumen Musik hören können. Le Linn Classik peut se connecter jusqu’à quatre autres dispositifs Classik, pour vous permettre d’écouter le son d’un Classik installé dans une pièce principale dans des pièces auxiliaires. The Linn Classik can be connected to up to four other Classiks so that you can listen to the output from the Main room Classik in secondary rooms. 60 Eén Linn Classik wordt in de 'hoofdruimte' geplaatst. Deze wordt de 'master' genoemd. Se sitúa un Linn Classik-K en la habitación principal; éste se llama emisor. Un Linn Classik è posto nella stanza principale e viene definito pilota. Ein Linn Classik, der Treiber genannt wird, wird im Musikraum aufgestellt. Un Linn Classik est placé dans la pièce principale, c’est le haut-parleur. One Linn Classik is situated in the main room, this is called the driver. LINN CLASSIK LINN CLASSIK LINN CLASSIK Maximaal vier aanvullende Linn Classiks kunnen in andere kamers worden geinstalleerd. Deze noemen we ontvangers. Se pueden colocar hasta cuatro Linn Classik-K en habitaciones secundarias, éstos se llaman receptores. È possibile collocare altri quattro Linn Classik nelle stanze secondarie, che vengono definiti ricevitori. Es können bis zu vier weitere Linn Classiks, die als Empfänger bezeichnet werden, in Nebenräumen aufgestellt werden. Jusqu’à quatre autres Linn Classiks peuvent être placés dans des pièces auxiliaires, ce sont des récepteurs. Up to four other Linn Classiks can be placed in secondary rooms, these Linn Classiks are called receivers. LINN CLASSIK LINN CLASSIK LINN CLASSIK Mediante este sistema puede usted escuchar en cualquiera de las habitaciones secundarias, la señal emitida desde la habitación principal. Sin embargo, no puede escuchar en la habitación principal, ni en las secundarias, la señal emitida desde otra habitación secundaria. Door van dit systeem gebruik te maken kunt u in andere kamers luisteren naar de output van de geluidsinstallatie. Het is echter niet mogelijk de output van een andere kamer via de geluidsinstallatie of via de overige andere kamers te beluisteren. Questo sistema consente di ascoltare nelle stanze secondarie il suono prodotto in quella principale. Tuttavia, non è possibile il contrario, ossia l’ascolto dalla stanza secondaria a un’altra secondaria o alla principale. Grâce à ce système vous pouvez écouter le son provenant de la pièce principale dans une pièce auxiliaire. Mais vous ne pouvez pas écouter le son d’une pièce auxiliaire dans la pièce principale ou dans une autre pièce auxiliaire. Mit diesem System können Sie die Tonquellen vom Musikraum in den Nebenräumen hören. Es ist allerdings nicht möglich, die Tonquelle eines Nebenraums im Musikraum oder in einem anderen Nebenraum zu hören. Using this system you can listen to output from the main room in a secondary room, However, you cannot listen to output from the secondary room in the main room or another secondary room. LINN CLASSIK LINN CLASSIK Utilisation du Linn CLASSIK Connect Using the Linn CLASSIK connect Uso del conector Linn CLASSIK Het gebruik van de Linn CLASSIK connect Nederlands Español Utilizzo della connessione Linn CLASSIK Italiano Verwendung des Linn CLASSIK Anschlusses Deutsch Français English LINN CLASSIK Luego, en el Classik-K secundario, pulse SRC+ y SCR- al mismo tiempo o pulse el botón "LISTEN" ("escuchar") del mando a distancia. Cuando aparece la palabra "MAIN" ("PRINCIPAL"), los mandos de la habitación secundaria pasan a controlar el Classik-K de la habitación principal.sala principal. Vervolgens drukt u de toetsen SRC+ en SCR- gelijktijdig in of drukt de listentoets in op de afstandsbediening. Als het opschrift “MAIN” verschijnt, besturen de bedieningsorganen van de secundaire Classik de Classik op de geluidsinstallatie. Para poder conectarse con el ClassikK de la habitación principal, debe aparecer "LISTEN" en la pantalla. Para hacer que aparezca, pulse SRC+, SRC - o LISTEN en el mando a distancia. Om de Linn Classik op de hoofdopstelling aan te sluiten dient “listen” op het display vermeld te worden. Om dit te bereiken drukt u SRC+,SRC - of LISTEN op de afstandsbediening in. 62 Danach drücken Sie gleichzeitig auf SRC+ und SCR- oder auf "LISTEN" an der Fernbedienung; wenn "MAIN" angezeigt wird, bedeutet dies, dass das Bedienfeld des Classiks im Nebenraum nun den Linn Classik im Musikraum steuert Quindi premere contemporaneamente SRC+ e SCR- oppure il tasto Listen del telecomando. Una volta visualizzato MAIN, i comandi del Classik della stanza secondaria controllano il Classik di quella principale. Zum Anschalten eines NebenraumClassik an den Linn Classik im Musikraum muss das Display "LISTEN" anzeigen; drücken Sie dazu auf SRC+, SRC- oder "LISTEN" an der Fernbedienung. Per collegare il Linn Classik principale, è necessario che sul display sia visualizzato “listen” (ascolto). A questo scopo, premere SRC+, SRC – oppure il tasto Listen del telecomando. Si un répéteur infrarouge est connecté sur votre Linn Classik, vous pouvez commandez une source extérieure dans la pièce principale en pointant la télécommande de cette source sur le Linn Classik de la pièce auxiliaire (par ex. un récepteur satellite). Puis appuyez sur « SRC+ » et « SCR- » ensemble ou appuyez sur le bouton « LISTEN » de votre télécommande. Lorsque « MAIN » s’affiche, les commandes du Classik de la pièce auxiliaire contrôlent maintenant le Linn Classik qui se trouve dans la pièce Pour vous brancher sur le Linn Classik de la pièce principale, le message « LISTEN » doit être affiché sur l’écran. Pour ce faire, appuyez sur « SRC + », « SRC - » sur le panneau de commandes frontal ou sur le bouton « LISTEN » de votre télécommande. Wenn Sie einen IR-Repeater an Ihren Linn Classik anschliessen, können Sie ein externes Gerät im Musikraum steuern, indem Sie die Fernbedienung dieses Gerätes auf den Linn Classik im Nebenraum richten (z.B. ein Satellitenempfänger). Se al Linn Classik è collegato un ripetitore a raggi infrarossi, è possibile controllare una fonte esterna nella stanza principale puntando il telecomando della fonte verso il Linn Classik della stanza secondaria (ad esempio, un ricevitore satellitare). Si tiene usted un repetidor IR conectado a su Classik-K principal, podrá controlar una fuente externa de la habitación principal, desde el Classik-K de la habitación secundaria, con el mando a distancia de dicha fuente (p. ej. un receptor de satélite). Indien uw Linn Classik is voorzien van een IR repeater, kunt u een externe eenheid op de geluidsinstallatie (b.v. een satellietontvanger) met de afstandsbediening aansturen via de Linn Classik in een andere kamer. If you have a IR repeater connected to your Linn Classik, you can control one external source in the main room by pointing that source’s handset at the Linn Classik in the secondary room. (e.g. a satellite receiver) Then press SRC+ and SCR- together or press the Listen buton on the handset, when “MAIN” is displayed, the controls of the secondary room Classik, now control the Linn Classik in the main room. To connect to the Main room Linn Classik you must have “LISTEN” showing on the display to do this press SRC+,SRC - or Listen on the handset. MAIN LINN CLASSIK Om terug te keren naar de Linn Classik in dezelfde kamer drukt u SRC + en SRC – gelijktijdig, of de LISTEN-toets op de afstandsbediening in. Para volver a la fuente local del Linn Classik-K secundario, pulse SRC + y SRC - al mismo tiempo o el botón "LISTEN" del mando a distancia. Per tornare al Linn Classik della fonte locale, premere contemporaneamente SRC + e SRC – oppure il tasto LISTEN del telecomando. Zum Rückschalten auf den Linn Classik als Tonquelle drücken Sie gleichzeitig auf SRC+ und SRC- oder auf "LISTEN" an der Fernbedienung. Pour revenir au Linn Classik de la source locale, appuyez sur « SRC + » et« SRC - » ensemble ou sur le bouton « LISTEN » de votre télécommande. To return to the local source Linn Classik, press SRC + and SRC together or LISTEN button on the handset. Party Mode (mode multipoint) Party Mode Party Mode (Modo Fiesta) Party Mode Nederlands Español Modalità Party Italiano Party-Modus Deutsch Français English LINN CLASSIK 63 Bij ingeschakelde party mode kan op de secundaire Linn Classiks uitsluitend het volume en mute worden bediend, of kunnen ze op standby worden geschakeld. Cuando el Party Mode está activado, los Linn Classik-K de las habitaciones secundarias solamente pueden regular el volumen, activar el modo mute o pasar a standby. El Party Mode permite que la fuente de música seleccionada en el ClassikK de la habitación principal suene en todos los Linn Classik-K de las habitaciones secundarias. Party Mode maakt het mogelijk de op de geluidsinstallatie gekozen muziekbron via alle overige Linn Classiks ten gehore te brengen. In questa modalità i Linn Classik secondari possono solo regolare il volume, impostare il mute e lo standby. Non possono quindi controllare il Classik della stanza principale o altre fonti locali. Im Party-Modus können an den Classiks in den Nebenräumen nur Lautstärkeregelungen, Stummschalten oder Schalten auf Standby durchgeführt werden. La modalità Party consente di diffondere la fonte musicale selezionata controllata dal Linn Classik principale ai Linn Classik delle stanze secondarie. Im Party-Modus wird die im Musikraum gewählteTonquelle über die Linn Classiks in allen Nebenräumen abgespielt. Vous pouvez uniquement régler le volume, mettre sur muet ou sur « STANDBY » les Linn Classiks des pièces auxiliaires en mode multipoint. Le mode multipoint permet de faire passer la source musicale que vous avez sélectionnée et qui est commandée à partir du Linn Classik de la pièce principale sur tous les Linn Classiks installés dans des pièces auxiliaires. LINN CLASSIK In party mode the Secondary room Linn Classiks can only adjust the volume, mute and switch to standby. They cannot control the main room Classik or control any local sources. LINN CLASSIK Party Mode allows the selected music source controlled from the main room Linn Classik to be played through all the secondary room Linn Classiks. LINN CLASSIK LINN CLASSIK LINN CLASSIK Het is niet mogelijk de Classik van de geluidsinstallatie af te regelen, noch een eventuele externe eenheid aan te sturen. No podrán controlar el equipo de Classik-K de la habitación principal ni ninguna otra fuente local en la habitación secundaria. Der Classik im Musikraum oder Tonquellen im Nebenraum können im Party-Modus nicht kontrolliert werden. Vous ne pouvez ni contrôler le Classik qui se trouve dans la pièce principale ni des sources locales. LINN CLASSIK Kiezen van Party Mode Nederlands Seleccinar el Party Mode Español Selezione della modalità Party Italiano Party-Modus wählen Deutsch Sélection du mode multipoint Français Selecting Party Mode English LINN CLASSIK Um den Party-Modus am Linn Classik im Musikraum einzuschalten, muss das Display "VOLUME" anzeigen. Drücken Sie die "ADJUST"-Taste, bis "VOLUME" angezeigt wird, oder Lautstärke + oder - an der Fernbedienung. Per selezionare la modalità Party nel Linn Classik principale, è necessario che sul display sia visualizzato VOLUME. Premere il pulsante di regolazione fino a visualizzare VOLUME oppure premere Volume + o – nel telecomando. Para poder seleccionar el Party Mode en la habitación principal, el Classik-K deberá mostrar la palabra "VOLUME" en la pantalla. Pulse el botón "ADJUST" hasta que aparezca la palabra "VOLUME" o pulse el botón + ó - de volumen en el mando a distancia. Om Party Mode op de Classik van de geluidsinstallatie te kiezen dient op het display “VOLUME” vertoond te worden. Druk de keuzetoets in totdat “VOLUME” verschijnt of gebruik de toetsen volume + of - van de afstandsbediening. Pour pouvoir sélectionner le mode multipoint sur le Classik de la pièce principale, le message «VOLUME» doit s’afficher sur l’écran. Pour ce faire, appuyez sur le bouton ADJUST jusqu’à ce que le mot «VOLUME» s’affiche ou appuyez sur la commande volume + ou – sur votre télécommande. To select Party Mode on the main room Linn Classik you must have the display showing “VOLUME”. Press the adjust button until “VOLUME” is displayed or press the volume + or on the handset. VOLUME 64 Houd de keuzetoets ingedrukt totdat “Party On” op het display verschijnt Mantenga pulsado el botón "ADJUST" hasta que en la pantalla aparezca el mensaje "Party On" (Modo Fiesta Activado). De Linn Classiks die in de overige kamers op standby zijn geschakeld, worden aangezet en het volume wordt aangepast aan die van de Linn Classik op de geluidsinstallatie. Los Classik-K de las habitaciones secundarias que estén en standby, se pondrán en marcha y el volumen se pondrá al nivel del Linn Classik-K de la habitación principal. I Linn Classik delle stanze secondarie in modalità stand-by vengono accesi e il relativo volume viene allineato a quello del Linn Classik principale. Die auf Standby geschalteten Linn Classiks in den Nebenräumen werden eingeschaltet und die Lautstärke an die des Linn Classiks im Musikraum angeglichen. Halten Sie die "ADJUST"-Taste gedrückt, bis das Display "Party on" anzeigt. Tenere premuto il tasto fino a visualizzare “Party On”. Les Linn Classiks qui se trouvent dans les pièces auxiliaires et qui sont sur le mode « STANDBY » sont mis sous tension et leur volume est aligné sur celui du Linn Classik de la pièce principale. The secondary room Linn Classiks in stand by mode are switched on and volume aligned to the main room Linn Classik. Maintenez votre pression sur le bouton « ADJUST » jusqu’à ce que le message « Party On ». Hold down the adjust button until the display shows “Party On” De secundaire Linn Classiks brengen nu exact hetzelfde voort als de Linn Classik op de geluidsinstallatie. Om Party Mode uit te schakelen toetst u STANDBY of ADJUST op de Linn Classik van de geluidsinstallatie in. Die Wiedergabe der Linn Classiks in den Nebenräumen entspricht nun der des Linn Classiks im Musikraum. Zum Beenden des Party-Modus drücken Sie am Linn Classik im Musikraum entweder auf "STANDBY" oder "ADJUST". A questo punto, i Linn Classik secondari duplicano tutto quanto accade nel Classik principale. Per interrompere la modalità Party, premere STANDBY o ADJUST (REGOLAZIONE) del Linn Classik principale. En la habitación secundaria, el Linn Classik-K duplicará todo lo que se haga en la habitación principal. Para desactivar el Party Mode, puede pulsar STANDBY o ADJUST en el Classik-K de la habitación principal. Le Linn Classik d’une pièce auxiliaire reproduira alors tout ce que fait le Classik qui se trouve dans la pièce principale. Pour mettre fin au mode multipoint appuyez sur « STANDBY » ou sur « ADJUST » sur le Linn Classik de la pièce principale. The secondary room Linn Classik will now replicate everything the main room Classik does. To end Party Mode either press STANDBY or ADJUST on the main room Linn Classik Party Poop Party Poop Nederlands Español Party Poop Italiano Party-Poop-Funktion Party Poop Party Poop Deutsch Français English LINN CLASSIK Si desea sacar una de las habitaciones secundarias equipadas con Linn Classik-K, del Party Mode, mantenga presionado el botón ADJUST mientras el modo está en regulación de volumen, hasta que aparezca el texto "Party Poop". Secundaire Linn Classiks kunnen Party Mode verlaten. Houd de regeltoets bij ingeschakelde “volume adjust” ingedrukt totdat “Party Poop” op het display verschijnt. El modo Party Poop permite que la habitación secundaria salga del Party Mode y pueda controlar sus fuentes locales. 65 Der Party-Modus der Linn Classiks in den Nebenräumen kann unabhängig ausgeschaltet werden. Dazu halten Sie im Lautstärke-Modus die "ADJUST"-Taste gedrückt, bis "Party Poop" angezeigt wird. Party Poop consente ai Linn Classik secondari di uscire dalla modalità Party e controllare localmente le fonti. Party Poop maakt het voor de secundaire Linn Classiks mogelijk om de Party Mode te verlaten en hun eigen bron te kiezen. Der Party-Modus der Linn Classiks in Nebenräumen kann ausgeschaltet werden. Dazu halten Sie während der Lautstärkeregelung die Reglertaste gedrückt, bis "Party Poop" angezeigt wird. Mit der Party-Poop-Funktion kann der Party-Modus der Linn Classiks in individuellen Nebenräumen ausgeschaltet werden, so dass sie wieder getrennt gesteuert werden können. Vous pouvez quitter le mode multipoint sur les Linn Classiks des pièces auxiliaires. En mode «VOLUME ADJUST » maintenez la pression sur le bouton « ADJUST » jusqu’à ce que le message « Party Poop » s’affiche. « Party Poop » permet de quitter le mode multipoint sur les Linn Classiks des pièces auxiliaires pour commander leurs propres sources. LINN CLASSIK Secondary room Linn Classiks can exit Party Mode. In volume adjust mode hold down the adjust button until “Party Poop” appears, then hold SRC + and SCR- until MAIN disappears from display. LINN CLASSIK Party Poop allows secondary room Linn Classiks to exit Party Mode and control their own sources. LINN CLASSIK LINN CLASSIK LINN CLASSIK Die Classiks in allen Nebenräumen können auch wieder auf Party-Modus geschaltet werden, indem Sie die "ADJUST" Taste am Classik im Musikraum gedrückt halten, bis "Party Off" angezeigt wird, und dann wieder den Party-Modus wählen (siehe Vorseite). Se puede hacer que los Classik-K de las habitaciones secundarias vuelvan al Party Mode manteniendo pulsado el botón ADJUST del equipo Classik-K de la habitación principal, hasta que aparezca el texto "Party off"; a continuación deberá volver a activar el Party Mode. De secundaire Classiks kunnen weer in party mode worden geschakeld door de regeltoets van de Linn Classik op de geluidsinstallatie ingedrukt te houden totdat “Party off” op het display verschijnt, en daarna weer Party Mode in te schakelen. "Party Poop" kann wieder ausgeschaltet werden, indem die "ADJUST"-Taste gedrückt wird, bis "Party On" angezeigt wird. Se puede desactivar nuevamente el modo "Party Poop" manteniendo pulsado el botón ADJUST hasta que aparezca el texto "Party On" (Modo Fiesta Activado). LINN CLASSIK Die Linn Classiks in den Nebenräumen können wieder auf Party-Modus geschaltet werden, indem Sie die Reglertaste am Linn Classik im Musikraum gedrückt halten, bis "Party Off" angezeigt wird "Party Poop" kann ausgeschaltet werden, indem die Reglertaste gedrückt wird, bis "Party On" angezeigt wird. “Party Poop” kan worden uitgeschakeld door de regeltoets ingedrukt te houden totdat “Party On” op het display verschijnt Vous pouvez remettre les Classiks des pièces auxiliaires sur le mode multipoint en maintenant la pression sur le bouton «ADJUST» sur le Classik de la pièce principale jusqu’à ce que le message «Party off» s’affiche. Vous devez ensuite resélectionner le mode multipoint (Party Mode on). Secondary room Classiks can be brought back into the party mode, by holding down the adjust button on the main room Linn Classik until “Party off” appears, then turning the Party Mode on again. Vous pouvez quitter « Party Poop » en maintenant la pression sur le bouton « ADJUST » jusqu’à ce que le message « Party On » s’affiche. “Party Poop” can be turned off by holding down the adjust button until “Party On” is displayed VOLUME CLASSIK KNEKT systeem Nederlands Sistema CLASSIK KNEKT Español Sistema CLASSIK KNEKT Italiano CLASSIK KNEKT-System Deutsch Le système CLASSIK KNEKT Français CLASSIK KNEKT system English LINN CLASSIK De Linn Classik mag uitsluitend door een door KNEKT erkende installateur worden aangesloten op het KNEKTsysteem. De Linn Classik kan worden gebruikt als onderdeel van het “Linn Knekt multi room system" 66 La conexión del Linn Classik-K al sistema KNEKT sólo debería ser realizada por un instalador de KNEKT cualificado. La connessione del Linn Classik al sistema KNEKT deve essere effettuata da un installatore specializzato KNEKT. Der Anschluss des Linn Classik an das KNEKT-System ist von einem geschulten KNEKT-Installierer durchzuführen. Le Linn Classik doit uniquement être connecté au système KNEKT par un installeur KNEKT qualifié. The Linn Classik should only be connected to the KNEKT system by a trained KNEKT installer. El Linn Classik-K se puede usar como parte de un sistema multi-habitación Linn Knekt. Linn Classik può essere utilizzato come elemento del sistema Linn Knekt multistanza. Der Linn Classik kann als Teil eines Linn Knekt Mehrraumsystems eingesetzt werden. Vous pouvez utiliser le Linn Classik dans le cadre d’un système KNEKT de pièces mutiples. The Linn Classik can be used as part of a Linn Knekt multi room system" LINN LINN LINN LINN LINN CLASSIK Onderhoud en technische ondersteuning Mantenimiento y Soporte Técnico Manutenzione ed assistenza tecnica Wartung Support technique et entretien Maintenance and Technical Support Onderhoud en reiniging Nederlands Reparación y Limpieza Español Riparazione e pulizia Italiano Service und Reinigung Deutsch Révision et nettoyage Français Servicing and cleaning English LINN CLASSIK Maak altijd gebruik van een geautoriseerde dealer voor het onderhoud van uw Linn CLASSIK. Utilice siempre los servicios de un distribuidor autorizado para cualquier reparación de su Linn CLASSIK. Rivolgersi sempre ad un distributore autorizzato per qualsiasi servizio di riparazione e manutenzione di Linn CLASSIK. Service Ihres Linn CLASSIK ausschließlich durch autorisierten Fachhändler. Ne confier l'entretien de votre Linn CLASSIK qu'à un concessionnaire agréé. Always use an authorised dealer for any servicing of your Linn CLASSIK. LINN LINN LINN LINN 68 Schakel alvorens te reinigen het apparaat uit. Apague la unidad antes de limpiarla. Spegnere l’apparecchio prima di pulirlo. Vor Reinigung ausschalten. Débrancher l'appareil avant de le nettoyer. Switch off unit before cleaning. LINN PEKIN Verwijder stof en vingerafdrukken met een zachte, vochtige doek. Quite el polvo y las huellas con un paño húmedo y suave. Rimuovere la polvere e le impronte delle dita con un panno soffice e inumidito. Staub und Fingerabdrücke mit weichem feuchtem Tuch abwischen. Utiliser un chiffon doux humide pour enlever la poussière et les traces de doigts. Remove dust and finger marks with a soft damp cloth. Vermijd het gebruik van huishoudelijke schoonmaakmiddelen. Evite la utilización de productos domésticos de limpieza. Evitare di utilizzare prodotti detergenti per uso domestico. Keine Haushaltsreiniger verwenden. Eviter d'utiliser des détergents ménagers. Avoid using domestic cleaning products. LINN CLASSIK Für technische Beratung, Produktanfragen und Information wenden Sie sich bitte an Ihren Händler vor Ort oder an die Adresse untenstehende. Genaue Angaben zu Ihrem Händler vor Ort finden Sie unter: www.linn.co.uk/buy_linn/find_retailer.cfm Per l’assistenza tecnica, domande ed informazioni sul prodotto, rivolgersi al rivenditore locale o agli uffici riportati di seguito. Informazioni più dettaglate sul distributore di zona sono reperibili nel sito: www.linn.co.uk/buy_linn/find_retailer.cfm Para realizar cualquier consulta de productos, petición de información o solicitar soporte técnico, por favor póngase en contacto con su distribuidor local o con cualquiera de las delegaciones siguientes. La información correspondiente a su distribuidor local podrá encontrarla en: www.linn.co.uk/buy_linn/find_retailer.cfm Voor technische ondersteuning, vragen over het product of voor informatie kunt u terecht bij uw plaatselijke winkelier of de hieronder genoemde kantoren. Meer informatie over uw plaatselijke dealer kunt u vinden op :www.linn.co.uk/buy_linn/find_retailer.cfm Technische Beratung und Information Assistenza tecnica e informazioni Soporte técnico e información Technische ondersteuning en informatie Jacksonville, FL 32216 USA Phone: Glasgow G76 0EP Scotland, UK +44 (0)141 307 7777 +44 (0)141 644 4262 0500 888909 [email protected] http://www.linn.co.uk Waterfoot Phone: Fax: Helpline: Email: Website: Website: Email: Helpline: Fax: 8787 Perimeter Park Boulevard Floors Road 69 http://www.linninc.com [email protected] 888-671-LINN +1 (904) 645 7275 +1 (904) 645 5242 Linn Incorporated Linn Products Limited Website: Email: Fax: Phone: http://www.linn.co.uk LINN CLASSIK [email protected] +49-(0) 40-890 660-29 +49-(0) 40-890 660-0 Deutschland 22761 Hamburg Albert-Einstein-Ring 19 Linn Deutschland GmbH Prière de contacter le détaillant le plus proche ou les bureaux mentionnés ci-dessous pour tout support technique, informations concernant les produits et autres renseignements. Les détails complets de votre distributeur local se trouvent à l'adresse : www.linn.co.uk/buy_linn/find_retailer.cfm Support technique et autres renseignements Technical support For technical support, product queries and information please contact either your local retailer or the offices below. Full details of your local retailer/distributor can be found at : www.linn.co.uk/buy_linn/find_retailer.cfm Technical support and information 6 kg Maximaal 325W 25W bij gewoon gebruik <3W in wachtstand 100V T6.3A Anti-surge 115V T6.3A Anti-surge 230V T3.15A Anti-surge Nominaal Voltage +/- 10% 440w maximaal Gewicht: Stroomverbruik: Hoofdzekering: Netvoeding: Geschakelde output: Tuner-resolutie: Tuner-bereik: TUNE-stand: 50kHz SCAN-stand: 100kHz TUNE-stand: 1kHz SCAN-stand: 10kHz VS 9kHz Eur en Japan FM 87,5 tot 108,5MHz AM 530 tot 1730kHz FM 75,5 tot 108,5MHz AM 530 tot 1629kHz FM 87,5 tot 108,5MHz AM 522 tot 1611kHz Hoogafzwakking: Eur 75µ USA y Japón 50µ FM FM AM AM Europa: Japan: VS: Delta Sigma Omvormingstechnologie: Tuner Drievoudige laserkop Focussysteem: CD-aandrijving 80mm H x 320mm B x 325mm D Afmetingen: Algemeen Linn CLASSIK Specificaties Aansluitmogelijkheid voor een Linn Remote Control Unit (RCU). Aansluitmogelijkheid voor uitgebalanceerde audio en communicatie tussen andere Classiks of het Linn Knekt systeem. Aansluitmogelijkheden voor uitgebalanceerde audio en communicatie tussen andere Classiks of het Linn Knekt systeem. Room In Kamer 1-4 75W per kanaal 4 Ω (nominale stroomvoorziening) 28.5dB RCU-aansluiting Multi Room Output vermogen: Voltage toename: Versterkervermogen Output-impedantie: <8Ω Output: gelijk aan voorversterker output Stroomlimiet output: 60mA Belastingimpedantie: 8Ω of 2kΩ CD optische digitale output Cassette-output: gelijk aan AUX input Output impedantie: 100Ω Voorversterker-output: track volume -∞ of +10dB Output-impedantie: 150Ω Minimale outputbelasting: 5kΩ Output: Hoofdtelefoon: AUX/Tape 1/Tape 2: -10dBV (opnamesterkte) 10Ω (belasting) Schaal van 1 tot 50 Schaal van 0 tot 50 80 door de gebruiker van tevoren te bepalen instellingen Input: Voorversterker Mute-drempel: Signaalsterkte: Instellingen vooraf: PACK 618 Rev.6 IR Flasher 1 & 2 Aansluitmogelijkheid voor een IR diode om andere apparatuur te bedienen. 6mA gestabiliseerde output. Frequentiemodulatie kan worden afgeregeld tussen 20kHz tot 450kHz.-
 1
1
-
 2
2
-
 3
3
-
 4
4
-
 5
5
-
 6
6
-
 7
7
-
 8
8
-
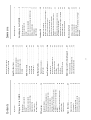 9
9
-
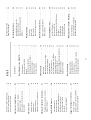 10
10
-
 11
11
-
 12
12
-
 13
13
-
 14
14
-
 15
15
-
 16
16
-
 17
17
-
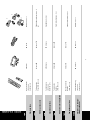 18
18
-
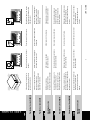 19
19
-
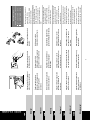 20
20
-
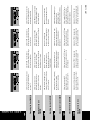 21
21
-
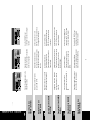 22
22
-
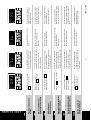 23
23
-
 24
24
-
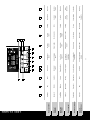 25
25
-
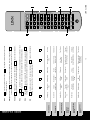 26
26
-
 27
27
-
 28
28
-
 29
29
-
 30
30
-
 31
31
-
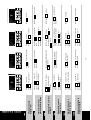 32
32
-
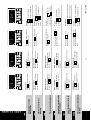 33
33
-
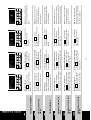 34
34
-
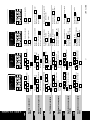 35
35
-
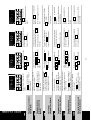 36
36
-
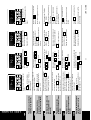 37
37
-
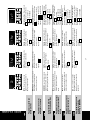 38
38
-
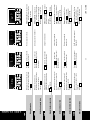 39
39
-
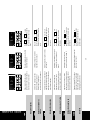 40
40
-
 41
41
-
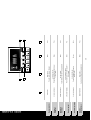 42
42
-
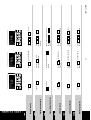 43
43
-
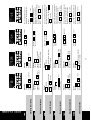 44
44
-
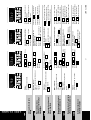 45
45
-
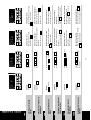 46
46
-
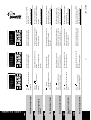 47
47
-
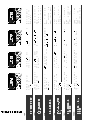 48
48
-
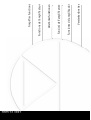 49
49
-
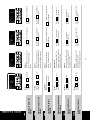 50
50
-
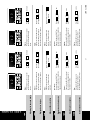 51
51
-
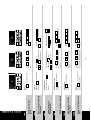 52
52
-
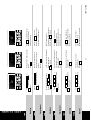 53
53
-
 54
54
-
 55
55
-
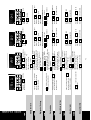 56
56
-
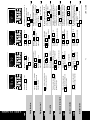 57
57
-
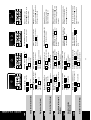 58
58
-
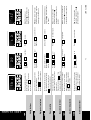 59
59
-
 60
60
-
 61
61
-
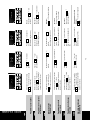 62
62
-
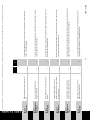 63
63
-
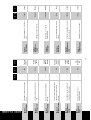 64
64
-
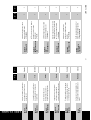 65
65
-
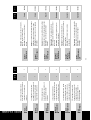 66
66
-
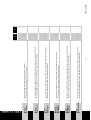 67
67
-
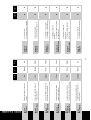 68
68
-
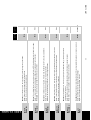 69
69
-
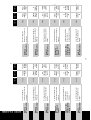 70
70
-
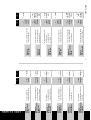 71
71
-
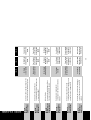 72
72
-
 73
73
-
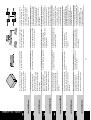 74
74
-
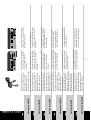 75
75
-
 76
76
-
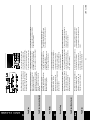 77
77
-
 78
78
-
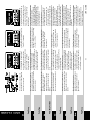 79
79
-
 80
80
-
 81
81
-
 82
82
-
 83
83
-
 84
84
-
 85
85
-
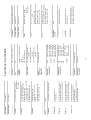 86
86
-
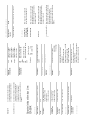 87
87
-
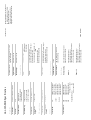 88
88
-
 89
89
-
 90
90


Linn Classik Music de handleiding
- Categorie
- Versterker voor muziekinstrumenten
- Type
- de handleiding
in andere talen
- English: Linn Classik Music Owner's manual
- italiano: Linn Classik Music Manuale del proprietario
- français: Linn Classik Music Le manuel du propriétaire
- español: Linn Classik Music El manual del propietario
- Deutsch: Linn Classik Music Bedienungsanleitung
Gerelateerde artikelen
-
Linn Classik Music de handleiding
-
-
-
-
-
-
-
-
-
