
s. Abb. D):
ON
10%
30 min
off
10%
10%
100%
100%
ON
W W
W W
C W
C W
2700K 5000K
2700K 5000K
2700K 5000K
2700K 5000K
ON
OFF OFF
30MIN
B+
B+
B -
B -
ON OFF
B +
B -
W W C W
30MIN
25%
50%
WW
CW
25%
50%
WW
CW
2700K4000K 5000K
100% 50% 25%
ON OFF
B+
B -
W W C W
30MIN
25%
50%
WW
CW
Držite pritisnjeno
gedrückt halten
Držite pritisnjeno
gedrückt halten
Držite pritisnjeno
gedrückt halten
Držite pritisnjeno
gedrückt halten

IAN 378855_2101 8
RECYCLED
Packaging
FSC® C145291
EDI Light GmbH
Heiligkreuz 22
6136 Pill
AUSTRIA
Stav Informácie · Status for oplysningerne
· Estado de la información · Status of the
information · Statut de l’information · Az
információ állapota · Stato delle
informazioni · Status informacji · Stav
informácií · Stand der Informationen:
07/2021 · Ident.-No.:
55895/55896072021-8

IAN 378855_2101 OS
LED WALL/CEILING PANEL 620 x 620 mm/
LED WALL/CEILING PANEL 1000 x 250 mm
CZ
LED STĚNOVÝ/STROPNÍ PANEL 620 x 620 mm /
LED STĚNOVÝ/STROPNÍ PANEL 1000 x 250 mm
Obsluze a bezpečnostní pokyny
DK
LED VÆGGE/LYSPANEL 620 X 620 MM /
LED VÆG/LYSPANEL 1000 X 250 MMD
Betjenings- og sikkerhedshenvisninger
ES
PANEL DE PARED/ALTA LED 620 x 620 mm /
PANEL DE PARED/ALTA LED 1000 x 250 mm
Instrucciones de uso y de seguridad
GB
LED WALL/CEILING PANEL 620 x 620 mm /
LED WALL/CEILING PANEL 1000 x 250 mm
Operating and safety instructions
HU
LED FAL/ERNYŐ PANEL 620 x 620 mm /
LED FAL/BERENDEZŐ PANEL 1000 x 250 mm
Használati és biztonsági utasítások
IT
PANNELLO LED DA PARETE / DA SOFFITTO 620 x 620 mm /
PANNELLO LED DA PARETE E DA SOFFITTO 1000 x 250 mm
Indicazioni per l’uso e per la sicurezza
PL
PANEL ŚCIENNY LED 620 x 620 mm /
PANEL ŚCIENNY LED 1000 x 250 mm
Instrukcja obsługi i bezpieczeństwa
SI
LED STENSKI/STROPNI PANEL 620 X 620 MM /
LED STENSKI/STROPNI PANEL 1000 X 250 MM
Navodila za uporabo in varnostna navodila
SK
LED STENOVÝ/STROPNÝ PANEL 620 x 620 mm /
LED STENOVÝ/STROPNÝ PANEL 1000 x 250 mm
Prevádzkové a bezpečnostné pokyny
DE AT CH
LED-WAND-/DECKENPANEL 620 x 620 mm /
LED-WAND-/DECKENPANEL 1000 x 250 mm
Bedienungs- und Sicherheitshinweise

CZ
Před čtením si odklopte obě dvě strany s obrázky a potom se seznamte se všemi funkcemi přístroje.
DK
Før du læser, vend begge sidene med billeder frem og bliv bekendt med alle apparatets funktioner.
ES
Antes de empezar a leer abra las dos páginas que contienen las imágenes y, en seguida, familiarícese
con todas las funciones del dispositivo.
GB
Before reading, unfold the two pages with the illustra-
tions and then familiarise yourself with all the functions of the unit.
FR
Avant de lire le mode d‘emploi, ouvrez les deux pages contenant les illus-
trations et familiarisez-vous ensuite avec toutes les fonctions de l‘appareil.
HU
Olvasás előtt hajtsa ki az ábrákat tartalmazó két oldalt, majd ismerkedjen meg a készülék összes funkciójával.
IT
Prima di leggere aprire le due pagine con le immagini e prendere confidenza con le diverse funzioni
dell’apparecchio.
PL
Przed przeczytaniem proszę rozłożyć obie strony z ilustracjami, a następnie proszę zapoznać się z
wszystkimi funkcjami urządzenia.
SL
Pred branjem odprite dve strani z ilustracijami in se nato seznanite z vsemi funkcijami naprave.
SK
Pred čítaním si odklopte obidve strany s obrázkami a potom sa oboznámte so všetkými funkciami prístroja.
NL
Vouw vóór het lezen de beide pagina‘s met de afbeeldingen open en maak u vertrouwd met alle functies
van het apparaat.
DE AT CH
Klappen Sie vor dem Lesen die beiden Seiten mit den Abbildungen aus und machen Sie sich anschließend
mit allen Funktionen des Gerätes vertraut.
CZ Pokyny k obsluze a bezpečnosti Strana 5
DK Betjenings- og sikkerhedshenvisninger Seite 15
ES Instrucciones de funcionamiento y seguridad Página 25
FR Instructions d‘utilisation et consignes de sécurité Page 37
GB User manual and safety information Page 49
HU Kezelési és biztonsági utasítások Oldal 59
IT Indicazioni per l’uso e per la sicurezza Pagina 71
NL Bedienings- en veiligheidsinstructies Pagina 81
PL Obsługi i bezpieczeństwa Strona 91
SL Navodila za uporabo in varnostni napotki Stran 103
SK Obsluhu a bezpečnostné pokyny Strana 113
DE / AT / CH Bedienungs- und Sicherheitshinweise Seite 123

CON
OK
A
Art . Nr.: 55895
OFF
B
a
c
b
6CM
Ø6mm
ON OFF
30MIN
NW
WW
CW
a
c
b
6CM
3
1
1
1
1
4
6
12
6
6
3
3
4
4
5
5
2
8
10
13

a
c
b
6CM
CON
OK
A
OFF
B
ON OFF
7
4
6
12
2
8
10
13
6
8
2
2
4
4
4
5
10
10
9
9
1
7
11
44

CON
OK
A
Art . Nr.: 55896
OFF
Ø6mm
BON OFF
a
c
b
6CM
7
4
6
12
2
8
10
13
a
c
b
6CM
7
1
1
6
5
7
2
4
4
6
5
1
1

CON
A
OFF
B
Ø6mm
ON OFF
OK
a
c
b
6CM
7
4
6
12
2
8
10
13
6
10
10
8
2
2
5
4
4
4
7
9
9
11
4 4

5CZ
Legenda k použitým piktogramům .................................................................. Strana 6
Úvod .................................................................................................................. Strana 6
Použití v souladu s účelem ................................................................................ Strana 7
Rozsah dodávky .................................................................................................. Strana 7
Popis dílů ............................................................................................................ Strana 7
Technické údaje ................................................................................................... Strana 7
Bezpečnost ....................................................................................................... Strana 8
Bezpečnostní upozornění..................................................................................... Strana 8
Bezpečnostní upozornění pro baterie/akumulátory................................................ Strana 9
Příprava ............................................................................................................. Strana 9
Potřebné nářadí a materiál.................................................................................... Strana 9
Montáž nástěnného/stropního LED panelu ........................................................... Strana 10
Vložení/výměna baterií (dálkový ovladač).............................................................. Strana 10
Uvedení do provozu .......................................................................................... Strana 11
Zapnutí/vypnutí nástěnného/stropního LED panelu/nastavení barvy světla ............ Strana 11
Údržba a čištění ................................................................................................ Strana 11
Likvidace ........................................................................................................... Strana 11
Prohlášení o shodě............................................................................................ Strana 12
Záruka a servis .................................................................................................. Strana 12
Záruka ................................................................................................................. Strana 12
Adresa servisu ..................................................................................................... Strana 13
Záruční karta ....................................................................................................... Strana 14

Nástěnný a stropní
LED panel
Úvod
Blahopřejeme Vám ke koupi Vašeho
nového nástěnného a stropního
LED panelu (dále také svítidlo nebo
výrobek). Rozhodli jste se tak pro kvalitní výrobek.
Přečtěte si prosím pečlivě celý tento návod
k obsluze. Rozložte stránku s vyobrazením. Tento
návod patří k tomuto výrobku a obsahuje důležitá
upozornění k uvedení do provozu a manipulaci.
Vždy dodržujte všechny bezpečnostní pokyny.
Před uvedením do provozu zkontrolujte, zda je
k dispozici správné napětí v síti a zda jsou všechny
díly správně namontované. Pokud máte dotazy,
nebo si nejste jisti ohledně manipulace s výrobkem,
kontaktujte prosím svého prodejce nebo servis.
Tento návod prosím pečlivě uschovejte a případně
jej předejte dál třetí straně.
* Další podrobnosti, např. dodatečná vysvětlení symbolů, či
technické informace najdete na
www.edi-light.com
6 CZ
Legenda k použitým piktogramům*
Přečtěte si pokyny!
Bezpečnostní upozornění
Pokyny k činnosti
Tato lampa je vhodná výhradně pro
provoz v interiéru, v suchých a
uzavřených prostorech.
Střídavý proud/napětí
Hertz (frekvence)
Watt (činný výkon)
Stejnosměrný proud/napětí
Polarita výstup
Třída krytí II
Dodržujte výstražná a bezpečnostní
upozornění!
Výstraha!
Riziko úrazu elektrickým proudem!
Pozor! Nebezpečí výbuchu!
Ohrožení života a nebezpečí nehod
u malých dětí a dětí!
Bezpečnostní transformátor
odolný proti zkratu
Bezpečnostní velmi nízké napětí
Směrnice o omezování nebezpečných
látek Látky
Okolní teplota
Teplota krytu
v uvedeném bodě
Třída krytí II u předřadníku
Teplota světla v Kelvinech
lm Lumen
Životnost
Nelze stmívat externími regulátory.
Pouze do interiéru
Noste ochranné rukavice
Testováno TÜV SÜD / GS
Poškození životního prostředí v důsledku
nesprávného Likvidace baterií!
Obal a zařízení zlikvidujte způsobem
šetrným k životnímu prostředí!
Index podání barev LED osvětlení
Nezávislé ovládací zařízení
Ä
~
ta
tc
25000h
Ra
SELV

Použití v souladu s určením
Toto svítidlo je vhodné výhradně pro
provoz v interiéru, v suchých a
uzavřených prostorech.
Tento výrobek je určen pouze pro použití v
domácnostech.
Rozsah dodávky
Ihned po vybalení vždy zkontrolujte, že je dodávka
kompletní a zda je výrobek v bezvadném stavu.
1 stropní LED svítidlo
2 baterie (AAA; 1,5 V)
1 dálkový ovladač
Montážní materiál
Popis dílů
Montáž na strop
4 šrouby pro upevnění svítidla
4 hmoždinky
montážní profil
4 šrouby pro montážní profil
lustrová svorka s připojovací krabičkou
stropní LED svítidlo
Závěsná montáž
4 šrouby pro upevnění svítidla
4 hmoždinky
4 šrouby pro montážní
lustrová svorka s připojovací krabičkou
stropní LED svítidlo
montážní profil
stropní kalíšek vč. šroubů
závěsné lano skládající se ze stropních
upevňovacích objímek a upevňovacích šroubů
pro panel.
Stropní montážní objímky
Šroubový závit
Nastavovací pouzdro
Baterie
Dálkové ovládání
Technické údaje
Číslo výrobku: 55895
Provozní napětí: 220–240 V~ 50/ 60 Hz
Celkový příkon: max.30 Watt
Třída krytí: II/
Světelný zdroj LED: 2 700 K až 5 000 K
Ra=83
Číslo výrobku: 55896
Provozní napětí: 220–240 V~ 50/ 60 Hz
Celkový příkon: max. 28 Watt
Třída krytí: II/
Světelný zdroj LED: 2700 K až 5000 K
Ra=82
Světelné zdroje LED a ovládací zařízení LED
smí vyměňovat pouze odborník.
Rozměry:
Model A (55895): LED panel 62 x 62x 7cm
(D x Š x V)
Model B (55896): LED panel 100 x 25 x 7cm
(D x Š x V)
Třída krytí: IP20
Typ baterií
(dálkový ovladač): 2 x AAA 1,5 V
Prodejce:
EDI Light GmbH, Heiligkreuz 22, 6136 Pill,
RAKOUSKO
www.edi-light.com
7CZ
1
2
3
4
5
6
7
1
2
4
5
6
8
9
10
11
12
13

Bezpečnost
Bezpečnostní upozornění
V případě škod, které budou způsobeny
nedodržením tohoto návodu k obsluze, nárok na
záruku zaniká! Za následné škody neručíme! Za
škody na majetku nebo zranění osob způsobené
nesprávnou manipulací nebo nedodržením
bezpečnostních pokynů neručíme!
OHROŽENÍ
ŽIVOTA A NEBEZPEČÍ ÚRAZŮ
U MALÝCH DĚTÍ A DĚTÍ!
Děti nikdy nenechávejte s obalovým materiálem
bez dozoru. Hrozí nebezpečí udušení
obalovým materiálem. Děti nebezpečí často
podceňují. Obalový materiál není hračka.
Tento výrobek mohou používat děti od 8 let
a osoby se sníženými fyzickými, smyslovými
a duševními schopnostmi nebo s
nedostatečnými zkušenostmi a znalostmi,
pokud jsou pod dohledem, nebo byly poučeny
o bezpečném používání výrobku a chápou
nebezpečí, která z toho vyplývají. Děti si
s výrobkem nesmějí hrát. Čištění a
uživatelskou údržbu nesmějí děti provádět bez
dohledu. Výrobek není hračka.
Pokud během provozu zaznamenáte
jakékoli anomálie (např. nezvyklé zvuky,
podivný zápach nebo kouř), výrobek okamžitě
vypněte. Výrobek poté již nepoužívejte, dokud
jej nezkontroluje oprávněná osoba.
Zabraňte ohrožení života
v důsledku úrazu elektrickým
proudem
Za škody na majetku nebo zranění osob
způsobené nesprávnou manipulací nebo
nedodržením bezpečnostních pokynů neručíme!
Elektrickou instalaci nechte provést vyškoleným
elektrikářem nebo osobou poučenou o
elektrických instalacích.
Před montáží vyjměte pojistku nebo vypněte
jistič v pojistkové skříňce (poloha 0).
Bezpodmínečně zabraňte kontaktu svítidla
s vodou nebo jinými kapalinami.
Před montáží se ujistěte, že dostupné síťové
napětí odpovídá požadovanému provoznímu
napětí svítidla (viz „Technické údaje“).
Dbejte na to, aby při montáži nedošlo
k poškození žádných kabelů.
Nástěnný/stropní LED panel nelze stmívat
externími regulátory.
Světelný zdroj tohoto svítidla smí vyměňovat
pouze výrobce, nebo jím pověřený servisní
technik, nebo osoba se srovnatelnou kvalifikací.
Vyhněte se riziku požáru
a zranění
Než se svítidla dotknete, ujistěte se, že je
vypnuté a vychladlé, abyste se vyhnuli
popáleninám.
Svítidlo nepřipevňujte na vlhký nebo vodivý
podklad.
Nenechávejte svítidlo bez obalového
materiálu ležet bez dohledu. Plastové fólie/
sáčky, plastové díly atd. se mohou pro děti stát
nebezpečnou hračkou.
U některých osob může dojít k epileptickému
záchvatu nebo poruchám vědomí, pokud jsou
vystaveny určitým blikajícím světlům nebo
světelným efektům. Pokud se u Vás objeví
příznaky epileptického záchvatu, neprodleně
vyhledejte lékaře.
Svítidlo namontujte tak, aby bylo chráněné před
vlhkostí, znečištěním a silným zahřátím.
Před vrtáním se ujistěte, že se v místě vrtání
nenachází žádné plynové, vodovodní nebo
elektrické potrubí. Montáž smí provádět pouze
odborně způsobilé osoby. Je nezbytné věnovat
pozornost stavu stěny, protože přiložený
upevňovací materiál není vhodný pro všechny
8 CZ

typy stěn. Informujte se v prodejně na šrouby
a hmoždinky vhodné pro daný typ stěny.
Za nesprávně provedené spojení stěny
a hmoždinky a tím způsobené škody
výrobce neručí.
Buďte stále pozorní! Dávejte vždy pozor na
to, co děláte, a používejte zdravý rozum.
Svítidlo v žádném případě nepoužívejte, když
jste nesoustředění nebo se necítíte dobře.
Před montáží zkontrolujte, zda je místo
montáže vhodné pro hmotnost svítidla.
Před použitím se seznamte se všemi pokyny
a vyobrazeními v tomto návodu i se samotným
svítidlem.
Bezpečnostní pokyny pro
baterie/akumulátory
OHROŽENÍ ŽIVOTA! Baterie/
akumulátory uchovávejte mimo dosah dětí.
V případě spolknutí okamžitě vyhledejte lékaře!
Spolknutí může způsobit popáleniny, perforaci
měkkých tkání a smrt. K těžkým
popáleninám může dojít během 2 hodin po
spolknutí.
NEBEZPEČÍ VÝBUCHU!
Nedobíjecí baterie nikdy nedobíjejte.
Baterie/akumulátory nezkratujte a/
nebo je neotevírejte. Mohlo by to vést k jejich
přehřátí, nebezpečí požáru nebo roztržení.
Baterie/akumulátory nikdy nevhazujte do ohně
nebo vody.
Baterie/akumulátory nevystavujte žádnému
mechanickému namáhání.
Riziko vytečení baterií/akumulátorů
Vyhněte se extrémním podmínkám a teplotám,
které mohou mít vliv na baterie/akumulátory,
např. na radiátorech/na přímém slunci.
Pokud baterie/akumulátory vytekly, zabraňte
kontaktu pokožky, očí a sliznic s chemikáliemi!
Zasažená místa okamžitě opláchněte čistou
vodou a vyhledejte lékaře!
NOSTE OCHRANNÉ RUKAVICE!
Vyteklé nebo poškozené baterie/
akumulátory mohou při kontaktu
s kůží způsobit poleptání. V takovém případě
proto noste vhodné ochranné rukavice.
V případě vytečení baterií/akumulátorů tyto
okamžitě z výrobku vyjměte, abyste zabránili
jeho poškození.
Používejte pouze baterie/akumulátory
stejného typu. Nemíchejte staré baterie/aku
mulátory s novými!
Baterie/akumulátory vyjměte, pokud výrobek
nebude delší dobu používán.
Riziko poškození výrobku
Používejte výhradně uvedený typ baterie/
akumulátoru!
Baterie/akumulátory vložte podle
označení polarity (+) a (-) na baterii/
akumulátoru a výrobku. Před vložením očistěte
kontakty na baterii/akumulátoru a v prostoru
pro baterii suchým hadříkem, který nepouští
vlákna, nebo vatovými tyčinkami!
Vybité baterie/akumulátory z výrobku
okamžitě vyjměte. („Technické údaje“).
Příprava
Potřebné nářadí
a materiál
Uvedené nářadí a materiály nejsou součástí
dodávky. Jedná se o nezávazné údaje a hodnoty
pro orientaci. Vlastnosti materiálu se řídí podle
individuálních podmínek na místě.
– tužka / značkovač
– 2pólová zkoušečka napětí
– křížový šroubovák
– vrtačka (cca ø 6 mm)
– boční štípací kleště
9CZ

Montáž světelného LED panelu
RIZIKO ÚRAZU
ELEKTRICKÝM PROUDEM!
Důležité: Elektrické připojení musí provádět
vyškolený elektrikář nebo osoba poučená o
elektrických instalacích. Tato osoba musí znát
vlastnosti svítidla a předpisy pro připojení.
K tomu vyjměte pojistku nebo vypněte jistič v
pojistkové skříňce (poloha 0) (viz obr. A).
Máte přitom 2 možnosti montáže:
montáž na stěnu - strop
Povolte šrouby viditelné
na boku montážního profilu a tento
vyjměte.
Označte si otvory k vrtání pomocí otvorů
v montážním profilu určených pro
šrouby .
Nyní vyvrtejte upevňovací otvory cca 30 mm
hluboko. Ujistěte se, že nebude poškozeno
žádné přívodní vedení.
Zaveďte hmoždinky do otvorů (viz obr. B).
Připevněte montážní profil pomocí
dodaných šroubů (viz obr. B).
Spojte přípojný kabel světelného LED
panelu pomocí lustrové svorky s přípojným
síťovým kabelem (externí) (viz obr. B).
Ujistěte se, že jednotlivé vodiče síťového
přívodního kabelu (externího) jsou správně
připojeny: živý vodič, černý nebo hnědý =
symbol L, nulový vodič, modře/bíle označený
kabel = symbol N .
Ujistěte se, že správně sedí.
Nyní sešroubujte světelný LED panel
pomocí šroubů s montážním
profilem .
Upozornění: Dejte pozor na to, aby šrouby
správně zapadly.
Opět vložte pojistku nebo zapněte jistič v
pojistkové skříňce (poloha I) (viz obr. C).
Váš nástěnný/stropní LED panel je nyní
připraven k provozu.
Závěsná montáž
Povolte šrouby viditelné na boku
montážního profilu a tento vyjměte.
Označte si otvory k vrtání pomocí
otvorů v montážním profilu , určených
pro šrouby .
Nyní vyvrtejte upevňovací otvory cca 30 mm
hluboko. Ujistěte se, že nebude poškozeno
žádné přívodní vedení.
Zaveďte hmoždinky do otvorů (viz obr. B).
Připevněte montážní profil pomocí
dodaných šroubů .
Nyní vyvrtejte další 2 otvory ve vzdálenosti
od konců montážního
třmenu stropního kalíšku a zaveďte do každého
otvoru jednu hmoždinku .
Připevněte stropní upevňovací objímky
pomocí dodaných šroubů.
Spojte přívodní síťový kabel (externí) s lustrovou
svorkou stropního kalíšku .
Ujistěte se, že jednotlivé vodiče jsou
správně připojeny: živý vodič, černý nebo
hnědý = symbol L, nulový vodič, modře či bíle
označený kabel = symbol N .
Ujistěte se, že správně sedí.
Nyní sešroubujte stropní kalíšek pomocí
šroubů s montážním profilem .
Upozornění: Dejte pozor na to, aby šrouby
správně zapadly.
Nyní našroubujte 2 závěsná lana
do stropních upevňovacích objímek
a konce závěsných lan do čtyř k tomu určených
šroubových závitů na světelném LED
panelu.
Spojte přípojný kabel světelného LED panelu
pomocí lustrové svorky s přípojným
kabelem stropního kalíšku .
Ujistěte se, že jsou jednotlivé vodiče
přípojného kabelu správně připojené: živý
vodič, černý nebo hnědý = symbol L, nulový
vodič, modře či bíle označený kabel = symbol
N .
Ujistěte se, že správně sedí
1
4
4
4
10 CZ
10
6
5
3
3
2
3
4
1
3
7
7
2
7
4
8
8
17
6
5
5
2
5
9
8
5

Údržba a čištění
RIZIKO ÚRAZU
ELEKTRICKÝM PROUDEM!
Pro čištění svítidlo nejprve odpojte od elektrické
sítě. K tomu vyjměte pojistku nebo vypněte jistič
v pojistkové skříňce (poloha 0) (viz obr. A).
Než se svítidla dotknete, ujistěte se, že je
vypnuté a vychladlé, abyste se nepopálili.
Nepoužívejte rozpouštědla, benzín nebo
podobné. Svítidlo by se tím poškodilo.
K čištění nástěnného/stropního LED panelu
používejte suchý hadřík, který nepouští vlákna.
Opět vložte pojistku nebo zapněte jistič v po
jistkové skříňce (poloha I)
(viz vyobrazení výrobku C).
Likvidace
Obal je z ekologických materiálů, které je možné
zlikvidovat v místních recyklačních místech.
Při třídění odpadu dodržujte označení
obalových materiálů, tyto jsou označeny
zkratkami (a) a čísly (b) s následujícím
významem: 1–7: plasty/20–22: papír a
lepenka/80–98: kompozitní materiály.
Výrobek a obalové materiály jsou
recyklovatelné, pro lepší zpracování odpadů
je likvidujte odděleně. Logo Triman platí jen
pro Francii.
O způsobech likvidace vysloužilého výrobku
se můžete informovat na místním nebo
městském úřadě.
V zájmu ochrany životního prostředí
nevyhazujte vysloužilý výrobek do domovního
odpadu, ale předejte jej k odborné
likvidaci. Informace o sběrných místech a
jejich otevírací době můžete získat u svého
příslušného úřadu.
Nyní můžete upravit délku upevňo vacího
lana stisknutím seřizovací objímky
Opět vložte pojistku nebo zapněte jistič
v pojistkové skříňce (poloha I) (viz obr. C).
Váš nástěnný/stropní LED panel je nyní
připraven k provozu.
Vložení/výměna baterií
(dálkový ovladač)
Upozornění: Baterie jsou součástí
dodávky a před prvním uvedením do provozu je
třeba je vložit.
Když se sníží dosah dálkového ovladače ,
musíte vyměnit baterie . K tomu sejměte
kryt baterií z dálkového ovladače ve směru
šipky.
Baterie vyjměte a vložte nové. Typ
baterií zjistíte v kapitole „Technické
údaje“.
Upozornění: Správná polarita je
vyobrazena v prostoru pro baterie.
Kryt baterií opět nasaďte na prostor pro
baterie.
Dálkový ovladač je nyní připraven k provozu.
Uvedení do provozu
Zapnutí/vypnutí svítidla
Nastavení barvy světla
Pro zapnutí/vypnutí světelného LED panelu
stiskněte vypínač (nástěnný vypínač).
Když vypínač stisknete krátce za sebou,
světelný LED panel se přepíná mezi
studenou, teplou a neutrální bílou.
K dispozici jsou následující funkce (viz
vyobrazení výrobku D)
11CZ
6
6
Ä
~
11
12
13
12
12
12

Vadné nebo vybité baterie/akumulátory
se musejí podle směrnice 2006/66/ES
a jejích změn recyklovat.
Baterie/akumulátory a/nebo výrobek odevzdejte
ve sběrném místě.
Poškození životního prostředí v
důsledku nesprávné likvidace baterií/
akumulátorů!
Baterie/akumulátory se nesmějí likvidovat s
domovním odpadem. Mohou obsahovat jedovaté
těžké kovy a podléhají zpracování jako
nebezpečný odpad. Chemické symboly těžkých
kovů jsou tyto: Cd = kadmium, Hg = rtuť, Pb =
olovo. Proto odevzdejte použité baterie/
akumulátory v místním sběrném místě.
Prohlášení o shodě
Tento výrobek splňuje požadavky platných
evropských a vnitrostátních směrnic.
Příslušná prohlášení a podklady jsou
uloženy u výrobce. Tento výrobek splňuje
požadavky německého zákona o bezpečnosti
zařízení a výrobků.
V rámci zlepšování výrobků si vyhrazujeme
právo na technické a optické změny výrobku.
Typografické a tiskové chyby vyhrazeny.
Záruka a servis
Záruka
Poskytujeme záruku 3 roky od data koupě. Naše
výrobky jsou vyráběny moderními
metodami a procházejí přísnou kontrolou kvality.
Zaručujeme bezvadný stav zboží. Během záruční
doby bezplatně odstraníme veškeré materiálové
nebo výrobní vady. Pokud by se oproti očekávání
objevily vady, zašlete pečlivě zabalené zboží na
uvedenou adresu servisu. Ze záruky jsou vyjmuty
škody, které byly způsobeny nevhodnou manipulací
a také opotřebitelné díly a spotřební materiál. Ty si
můžete za úplatu objednat na uvedeném telefonním
čísle. Opravy, které nespadají do záruky
(např. světelný zdroj), si rovněž můžete nechat
provést proti individuální kalkulaci za výrobní cenu
na uvedené adrese servisu. Zboží se opravuje na
uvedené adrese servisu. Pouze pokud jej zašlete
přímo na tuto adresu, může být oprava provedena
a zboží zasláno zpět včas. Pokud si přejete další
informace o výrobku, chtěli byste si objednat
příslušenství nebo máte dotazy na servisní
oddělení, zavolejte prosím na naši službu pro
zákazníky na uvedené číslo. V případě dotazů
uveďte prosím číslo výrobku (viz „Technické
údaje“).
Tento výrobek obsahuje světelné zdroje
třídy energetické účinnosti E
12 CZ

Adresa servisu
Czech republic
EGLO CZ+SK s.r.o.
193 00 PRAHA 9 Horní Pocernice
T: +420 281 924 163
IAN 378855_2101
Pro veškeré dotazy si připravte účtenku a číslo
výrobku (např. IAN 123456_7890) jako doklad
o koupi.
13CZ
Záruční karta
Odesílatel: ____________________________________________________________________________
Příjmení/jméno: ________________________________________________________________________
Stát/PSČ/obec/ulice: ___________________________________________________________________
Telefonní číslo: _________________________________________________________________________
Číslo výrobku/označení: ________________________________________________________________
Datum koupě/místo koupě: ______________________________________________________________
Uvedení závady: _______________________________________________________________________
Datum/podpis: _______________________________________________________________________
Nejedná se o případ záruky:_____________________________________________________________
Výrobek prosím zašlete neopravený zpět proti úhradě přepravních nákladů.
Sdělte mi náklady. Opravte výrobek proti úhradě.


15
Betydningen af de heri anvendte piktogrammer .................................... Side 16
Indledning ........................................................................................................ Side 16
Anvendelsesformål ................................................................................................ Side 17
Leveringsomfang ................................................................................................... Side 17
Beskrivelse af delene ............................................................................................ Side 17
Tekniske data ....................................................................................................... Side 17
Sikkerhed ........................................................................................... ............. Side 18
Sikkerhedsanvisninger ........................................................................................... Side 18
Sikkerhedsanvisninger for batterier/akkuer ............................................................. Side 19
Forberedelse ................................................................................................... Side 19
Nødvendigt værktøj og materiale ........................................................................... Side 19
Montering af LED-væg-/loftpanel ...........................................................................Side 19
Isæt/skift batterier (fjernbetjening) .......................................................................... Side 20
Idrifttagning .................................................................................................... Side 21
Tænd/sluk for LED-væg-/loftpanel justering af lysets farve ....................................... Side 21
Vedligeholdelse og rengøring ...................................................................... Side 21
Bortskaffelse ................................................................................................... Side 21
Konformitetserklæring .................................................................................. Side 21
Garanti og service .......................................................................................... Side 22
Garanti ................................................................................................................ Side 22
Serviceadresse ..................................................................................................... Side 22
Garantikort .......................................................................................................... Side 23
DK

LED-væg og
loftpanel
Indledning
Tillykke med købet af dit nye LED-
væg/loftpanel (efterfølgende også
kaldt lampe eller produkt). Du har
valgt et produkt af høj kvalitet. Venligst læs denne
brugervejledning komplet og grundigt igennem.
Udfold siden med grafikken. Denne
brugsvejledning hører med til dette produkt; det
indeholder vigtige anvisninger ibrugtagning og
håndtering. Overhold altid alle
sikkerhedsanvisningerne. Kontrollér før
ibrugtagningen, at lysnetspændingen er korrekt
indstillet og at alle delene er monteret korrekt.
Kontakt din forhandler eller dennes service i
tilfælde af spørgsmål eller usikkerhed vedr.
håndtering af produktet. Opbevar denne
brugervejledning omhyggeligt og videregiv den til
* Flere detaljer, fx yderligere symbolforklaringer
hhv. tekniske informationer, finder du
på www.edi-light.com
16
Betydningen af de heri anvendte piktogrammer*
Læs anvisningerne!
Sikkerhedsanvisninger
Handlingsanvisninger
Denne lampe er udelukkende beregnet til
indendørs brug i tørre
og lukkede rum.
Vekselstrøm/-spænding
Hertz (frekvens)
Watt (ydelse)
Jævnstrøm/-spænding
Polaritet output
Beskyttelsesklasse II
Følg advarsels- og
sikkerhedsanvisningerne!
Advarsel!
Risiko for elektrisk stød!
Advarsel! Fare for eksplosion!
Livsfare og risiko for ulykker for
småbørn og børn!
A prueba de cortocircuitos
Transformador de seguridad
Sikkerhed ekstra lav spænding
Direktivet om begrænsning af farlige
stoffer Stoffer
Omgivelsestemperatur
Husets temperatur på det
pågældende sted
Beskyttelsesklasse II ved forkoblinger
Farvetemperatur i kelvin
lm Lumen
Levetid
Kan ikke dimmes med ekstern dimmer.
Kun til indendørs brug
Brug beskyttelseshandsker
Kontrolleret af TÜV SÜD / GS
Miljøskader ved forkert
bortskaffelse af batterierne!
Bortskaf emballagen og apparatet mil-
jøvenligt!
Farvegengivelsesindeks for LED-belysning
Uafhængigt kontroludstyr
Ä
~
ta
tc
25000h
Ra
SELV
DK

en eventuel tredjepart.
Bestemmelsesmæssig brug
Denne lampe er udelukkende beregnet
til indendørs brug i tørre og lukkede
rum. Dette produkt er udelukkende
beregnet til brug i private husstande.
Leveringsomfang
Kontrollér straks efter udpakningen, at leveringen er
komplet og at produktet er uden mangler.
1 LED-loftlampe
2 batterier (AAA; 1,5 V)
1 fjernbetjening
Monteringsmateriale
Delebeskrivelse
Loftmontering
4 skruer til befæstelse af lampen
4 dyvler
monteringsvinkler
4 skruer til monteringsvinkler
kabelsko med tilslutningsboks
LED-loftlampe
Hængende montering
4 skruer til befæstelse af lampen
4 dyvler
4 skruer til montering
kabelsko med tilslutningsboks
LED-loftlampe
monteringsvinkler
loftbaldakin inkl. skruer
ophæng, bestående af
loft-bøsninger og panel-befæstnings-
skruer
Monteringsmuffer til loftet
Skrue gevind
Justeringsmuffe
Batterier
Fjernbetjening
Tekniske data
Artikelnummer: 55895
Driftsspænding: 220-240 V~ 50/60 Hz
Samlet ydelse: maks. 30 watt
Beskyttelsesklasse: II/
LED-lyskilde: 2700K til 5000K
Ra=83
Artikelnummer: 55896
Driftsspænding: 220-240 V~ 50/60 Hz
Samlet ydelse: maks. 28 watt
Beskyttelsesklasse: II/
LED-lyskilde: 2700K til 5000K
Ra=82
LED-lyskilderne og LED-styreanordningen
kan kun udskiftes af en specialist.
Mål:
Model A (55895): LED panel 62 x 62x 7cm
(L x B x H)
Model B (55896): LED panel 100 x 25 x 7cm
(L x B x H)
Beskyttelsesklassificering: IP20
Batteritype
(fjernbetjening): 2 x AAA 1,5V
Leverandør:
EDI Light GmbH, Heiligkreuz 22, 6136 Pill,
ØSTRIG
www.edi-light.com
17DK
1
2
3
4
5
6
7
1
2
4
5
6
8
9
10
11
12
13

Sikkerhed
Sikkerhedsanvisninger
Ved skader, der opstår på grund af tilsidesættelse
af denne brugsvejledning bortfalder garantien!
Følgeskader dækkes ikke! Vi overtager intet ansvar
for ting- eller personskader, der forårsages af
uhensigtsmæssig håndtering eller tilsidesættelse af
sikkerhedsanvisningerne!
LIVSFARE
OG FARE FOR ULYKKER FOR
SMÅBØRN OG BØRN!
Lad aldrig børn lege med emballagen uden
opsyn. Fare for kvælning gennem emballagen.
Børn undervurderer ofte farerne. Emballagen er
ikke legetøj.
Dette produkt kan betjenes af børn fra 8 år
og opefter, samt af personer med nedsat fysisk,
sensorisk eller psykisk funktionsevne, eller som
mangler den nødvendige erfaring eller viden,
hvis de er under opsyn eller er blevet instrueret
i at bruge produktet på en sikker måde og
forstår de medfølgende farer. Børn må ikke
lege med produktet. Børn må ikke udføre
rengøring og vedligeholdelse på produktet uden
opsyn. Produktet er ikke legetøj.
Såfremt der bemærkes noget usædvanligt
under driften (fx usædvanlige lyde, mærkelig
lugt eller røg), sluk da omgående for
produktet. Brug derefter ikke produktet, før det
er blevet kontrolleret af en kompetent person.
Undgå livsfare gennem elektrisk
stød
Der overtages intet ansvar for ting- eller
personskader, der er forårsaget af
uhensigtsmæssig betjening eller tilsidesættelse
af sikkerhedsanvisningerne!
Elektriske installationer bør udføres af en
uddannet elektriker eller af en person, der er
blevet gjort bekendt med elektriske installationer.
Fjern sikringen før monteringen, eller sluk for
effektafbryderen i eltavlen (0-stilling).
Undgå at lampen nogen sinde kommer i
berøring med vand eller andre væsker.
Kontrollér før monteringen, at den eksisterende
lysnetspænding stemmer overens med lampens
driftsspænding (se „Tekniske data“).
Sørg for at ingen ledninger beskadiges under
monteringen.
LED-væg-/loftpanelet kan ikke dimmes med
en ekstern dimmer.
Lampens lyskilde må udelukkende udskiftes af
producenten eller en af dennes serviceteknikere,
eller en tilsvarende kvalificeret person.
Undgå fare for brand
og kvæstelser
Kontrollér at lampen er slukket og kølnet af, før
du rører ved den for at undgå forbrænding.
Fastgør ikke lampen på et fugtigt eller ledende
fundament. Lad ikke lampen eller emballagen
stå eller ligge fremme skødesløst. Plastikfolie/
poser, plastikdele etc. kan blive til farligt legetøj
for børn.
Hos nogle personer kan visse blitzlys eller lysef
fekter udløse epileptiske anfald eller psykisk
forstyrrelse. Opsøg straks læge ved epileptiske
symptomer.
Montér lampen således, at den er beskyttet mod
fugt, forurening og for kraftig ophedning.
Pas på, at der hverken er gas-, vand- eller
strømledninger på det sted, hvor der skal bores.
Montering udelukkende af fagperson. Vær nøje
opmærksom på væggens beskaffenhed,
eftersom det vedlagte befæstningsmateriale ikke
er egnet til alle slags vægge. Spørg i faghandel
en efter de passende skruer og dyvler, der
svarer til væggens beskaffenhed.
Producenten overtager intet ansvar for brugen af
uhensigtsmæssige væg-dyvel-forbindelser
18 DK

og derved fremkomne skader.
Vær altid opmærksom! Vær altid agtpågivende
og gå frem med fornuft. Brug ikke lampen, hvis
du er ukoncentreret eller føler dig ilde tilpas.
Kontrollér før montering, hvorvidt
monteringsstedet er egnet til at bære lampens
vægt.
Gør dig før anvendelsen fortrolig med alle
anvisninger og grafikker i denne vejledning,
foruden selve lampen.
Sikkerhedsanvisninger for
batterier/ akkuer
LIVSFARE! Hold batterier udenfor børns ræk
kevidde. Søg straks læge, hvis et batteri er
blevet slugt!
Slugte batterier kan medføre forbrændinger,
perforation af blødt væv og død. Alvorlige
forbrændinger kan optræde indenfor 2 timer
efter at batteriet er blevet slugt.
FARE FOR EKSPLOSION! Oplad
aldrig batterier, der ikke er
genopladelige. Batterier må hverken
kortsluttes eller åbnes. Der er fare for
overophedning, brand eller eksplosion.
Kast aldrig batterier i ild eller vand.
Udsæt ikke batterier for mekanisk belastning.
Risiko for lækkende
batterier/akkuer
Undgå ekstreme betingelser og
temperaturer, der kan have indvirkning på
batterier, fx placering på radiatorer eller i
direkte sollys.
Ved lækkede batterier: undgå at hud, øjne og
slimhinder kommer i kontakt med kemikalierne!
Skyl de pågældende steder omgående med
rent vand og opsøg læge!
BRUG
BESKYTTELSESHANDSKER!
Lækkede eller beskadigede
batterier kan ætse huden ved berøring.
Brug derfor i så tilfælde egnede beskyttelse
shandsker.
Fjern lækkede batterierne omgående fra
produktet, for at undgå beskadigelse.
Brug udelukkende batterier af samme slags.
Bland ikke brugte batterier med nye!
Fjern batterierne, hvis produktet ikke skal brug
es i længere tid.
Risiko for beskadigelse af produktet
Brug udelukkende den foreskrevne batteritype!
Isæt batterierne i henhold til
polaritet (+) og (-), sådan som det er angivet på
batterierne og produktet. Rengør batteriernes
og batterifagets kontakter med en tør, fnugfri
klud eller vatpind før de sættes på plads!
Fjern omgående opbrugte batterier fra
produktet. („Tekniske data“).
Forberedelse
Nødvendigt værktøj
og materiale
Ovennævnte værktøj og materialer er ikke omfattet
af leveringen. Det drejer sig om uforpligtende
oplysninger til din orientering. Materialets beskaf-
fenhed retter sig efter de individuelle forhold på
stedet.
– blyant/markør
– 2-polet polsøger
– krydsskruetrækker
– boremaskine (ca. ø 6 mm)
– bidetang
Montering af LED-lyspanel
RISIKO FOR ELEKTRISK
STØD!
OBS: Den elektriske tilslutning skal foretages af en
uddannet elektriker eller en person, der er blevet
bekendtgjort med elektriske installationer.
Vedkommende skal være bekendt med lampens
19DK

egenskaber og tilslutningsbestemmelser. Fjern
sikringen, eller sluk for effektafbryderen i eltavlen
(0-stilling) (se fig. A).
Der er 2 monteringsmuligheder:
Montering på væg eller loft
Løsn skruerne , der ses på siden af
monteringsvinklen og fjern denne.
Markér borehullerne ved hjælp af hullerne til
skruerne i monteringsvinklen .
Bor derefter hullerne til en dybde af ca. 30mm.
Kontrollér at ledningen ikke beskadiges herved.
Isæt dyvlerne i borehullerne (se fig. B).
Fastgør monteringsvinklen med de
leverede skruer (se fig. B).
Tilslut ledningen for LED-lyspanelet vha.
kabelskoen til lysnetledningen (ekstern)
(se fig. B).
Vær opmærksom på at de enkelte ledere på
lysnetledningen (ekstern) tilsluttes de respektivt
rigtige poler: Strømførendeleder, sort eller
brun = symbol L, neutral leder, blåt/hvidt
markeret kabel = symbol N .
Sørg for god befæstelse.
Skru derefter LED-lyspanelet på med
skruerne på monteringsvinklen .
Anvisning: Vær opmærksom på at skruerne går
i indgreb.
Isæt atter sikringen, eller aktivér
effektafbryderen på eltavlen (I-position)
(se fig. C).
Dit LED-væg-/loftpanel er nu driftsklar.
Hængende montering
Løsn skruerne , der ses på siden af
monteringsvinklen og fjern denne.
Markér borehullerne ved hjælp af
de huller til skruerne der er anbragt på
monteringsvinklen . Bor derefter hullerne til
en dybde af ca. 30mm. Kontrollér at ledningen
ikke beskadiges herved.
Isæt dyvlerne i borehullerne (se fig. B).
Fastgør monteringsvinklen med de
medleverede skruer .
Bor derefter 2 yderligere huller med en afstand
fra enden af
monteringsbøjlen på loftbaldakinen og isæt en
dyvel pr. hul.
Fastgør loftsophængene med de leverede
skruer.
Tilslut lysnetledningen (ekstern) til
loftbaldakinens kabelsko.
Vær opmærksom på at de enkelte ledere
er korrekt tilsluttet: Strømførende leder, sort
eller brun = symbol L, neutral leder, blåt hhv.
hvidt markeret kabel = symbol N .
Sørg for god befæstelse.
Skru derefter loftbaldakinen fast med
skruerne på monteringsvinklen .
Anvisning: Vær opmærksom på at skruerne
går i indgreb.
Skru derefter de 2 snore fast i loftsophængene
, og enderne af snorene i de fire tilsvarende
skruegevind på LED- lyspanelet.
Tilslut ledningen til LED-lyspanelet ved hjælp
af kabelskoen til kablet på loftbaldakinen .
Vær opmærksom på at de enkelte ledere
i kablet er korrekt tilsluttet: Strømførende
leder, sort eller brun = symbol L, neutral
leder, blåt hhv. hvidt markeret kabel = symbol
N .
Sørg for god befæstelse.
Du kan justere længden på befæstelses-snorene
med tr yk på justeringsboksen.
Isæt atter sikringen eller aktivér
effektafbryderen på eltavlen (I-position)
(se fig. C).
Dit LED-væg-/loftpanel er nu driftsklart.
Isæt/skift batterier
(fjernbetjening)
HENVISNING: Batterierne er vedlagt leveringen.
Isættes før den første ibrugtagning.
Hvis fjernbetjeningen begynder at svigte,
skal batterierne skiftes. Fjern dækslet på
fjernbetjeningens batterifag ved at trække i
1
20 DK
11
10
4
2
1
6
7
3
4
7
5
13
8
1
43
3
4
7
4
8
7
6
5
2
5
9
8
5
12
12
13

Bemærk mærkningen af
emballagen til korrekt bortskaffelse, med
forkortelser (a) og numre (b) med følgende
betydning: 1–7: plastic/20 -22: papir og
pap/80–98: kompositmaterialer
Produktet og emballagen er genanvendelige
og bør bortskaffes særskilt for en bedre
affaldsbehandling. Triman-logoet gælder kun
for Frankrig.
Du kan indhente oplysninger omkring borts
kaffelse af udtjente produkter hos din
kommune.
Bortskaft dette produkt ikke sammen med
almindeligt affald; sørg for en korrekt
bortskaffelse. Oplysninger om
genbrugssteder og åbningstider fås hos
kommunen.
Defekte eller udtjente batterier skal
genbruges i hh. til retningslinje 2006/66/
EF og dennes ændringer. Aflevér
batterierne og produktet via de offentlige
indsamlingssteder.
Miljøskader ved forkert
bortskaffelse af batterier/akkuer!
Batterier må ikke bortskaffes sammen med
husholdningsaffald. De kan indeholde tungmetaller
og skal bortkaffes som farligt affald.
Tungmetallernes kemiske symboler er følgende:
Cd = cadmium, Hg = kviksølv, Pb = bly. Aflever
derfor udtjente batterier på de kommunale
indsamlingssteder.
Konformitetserklæring
Dette produkt overholder kravene fra de
gældende europæiske og nationale
retningslinjer. Producenten ligger inde med
pilens retning.
Udtag batterierne og isæt de nye batterier
. Du finder batteritypen i kapitlet „Tekniske
data“.
HENVISNING: Den korrekte polaritet vises i
batterifaget.
Påsæt atter dækslet på batterifaget.
Fjernbetjeningen er nu driftsklar.
Ibrugtagning
Tænd/sluk for lampen
Juster lysfarven
Brug lyskontakten (vægkontakten) for at tænde
eller slukke for LED-lyspanelet .
Tryk flere gange med kort tidsinterval for at
skifte mellem koldt, varmt eller neutralt lys.
Du har følgende funktioner til rådighed
(se produkt-figur D)
Vedligeholdelse og rengøring
RISIKO FOR
ELEKTRISK STØD!
Træk stikket ud af stikkontakten før lampen
rengøres. Fjern sikringen, eller sluk for
effektafbryderen i eltavlen (0-stilling) (se fig. A).
Sørg for at lampen er slukket og afkølet før du
rører ved den, for at undgå forbrænding.
Brug ikke opløsningsmidler, benzin eller
lignende, da disse ville beskadige lampen.
Til rengøring af LED-væg-loftpanelet bruges
en tør, fnugfri klud.
Isæt atter sikringen eller aktivér
effektafbryderen på eltavlen (I-position)
(se produkt-figur C).
Bortskaffelse
Emballagen består af miljøvenlige materialer, der
kan bortskaffes på din lokale genbrugsstation. 21DK
6
Ä
~
12

de tilsvarende erklæringer og dokumenter.
Produktet overholder kravene fra den tyske
apparatog sikkerhedslov.
I forbindelse med produktforbedringer forbeholder
vi os retten til at foretage tekniske og optiske
ændringer af produktet. Med forbehold for trykfejl.
Garanti og service
Garanti
Vi yder 3 års garanti fra købsdato. Vore produkter
fremstilles med moderne produktionsmetoder og
underkastes nøje kvalitetskontrol. Vi garanterer for
artiklernes fejlfrie beskaffenhed. Indenfor
garantiperioden afhjælper vi omkostningsfrit alle
materiale- - eller produktionsfejl. Send artiklen til
den angivne serviceadresse, såfremt den mod
forventning skulle vise sig at være behæftet med
fejl. Skader, der hidrører fra uhensigtsmæssig
håndtering, såvel som sliddele og
forbrugsmaterialer, er ikke omfattet af garantien.
Disse kan imidlertid bestilles mod betaling på det
angivne telefonnummer. Reparationer, der ikke er
omfattet af garantien (fx lyskilder) kan ligeledes
udføres mod individuel beregning til kostpriser ved
henvendelse til den nævnte serviceadresse. Artiklen
repareres på den nævnte service adresse Rettidig
bearbejdelse og returforsendelse kan kun ske, hvis
du sender den direkte til denne adresse. Ønsker du
mere produktinformation; vil du bestille tilbehør;
eller har du spørgsmål til serviceafdelingen,
kontakt venligst vores kundeservice på det angivne
telefonnummer. Husk at oplyse artikelnummeret ved
forespørgsler (se „Tekniske data“).
Dette produkt indeholder lyskilder
med energimærke E
Serviceadresse
Denmark
EGLO Danmark A/S Agerbakken 20
8362 Hørning, Denmark
T: +45 70 22 55 11
IAN 378855_2101
Venligst hav ved alle forespørgsler kvittering og
artikelnummer parat (fx IAN 123456_7890) som
dokumentering for dit køb.
22 DK

Garantikort
Afsender: ____________________________________________________________________________
Navn/fornavn: ______________________________________________________________________
Land/postnummer/by/gade: _________________________________________________________
Telefonnummer: _______________________________________________________________________
Artikelnummer/betegnelse: ____________________________________________________________
Købsdato/købested: __________________________________________________________________
Fejlbeskrivelse: ________________________________________________________________________
Dato/underskrift: _____________________________________________________________________
I tilfælde uden garanti:__________________________________________________________________
Send venligst artiklen retur til mig uden reparation mod betaling af porto.
Meddel mig venligst prisen for reparation. Reparér artiklen mod betaling.
23DK


25ES
Leyenda de los pictogramas utilizados ..................................................... Página 26
Introducción ..................................................................................................... Página 26
Uso previsto ......................................................................................................... Página 27
Volumen de suministro .......................................................................................... Página 27
Descripción de las piezas ...................................................................................... Página 27
Especificaciones técnicas ....................................................................................... Página 27
Seguridad ........................................................................................................ Página 28
Indicaciones de seguridad ..................................................................................... Página 28
Indicaciones de seguridad para las pilas/pilas recargables ..................................... Página 29
Preparación ..................................................................................................... Página 30
Herramientas y materiales necesarios ..................................................................... Página 30
Montaje del panel LED de pared/techo .................................................................. Página 30
Colocación/cambio de las pilas (mando a distancia) .............................................. Página 31
Puesta en servicio ............................................................................. ............. Página 31
Encendido/apagado del panel LED de pared/techo/Ajuste del color de la luz .......... Página 31
Mantenimiento y limpieza ............................................................................ Página 32
Eliminación ....................................................................................................... Página 32
Declaración de conformidad ........................................................................ Página 32
Garantía y servicio ........................................................................................ Página 33
Garantía .............................................................................................................. Página 33
Dirección de servicio técnico .................................................................................. Página 33
Certificado de garantía ......................................................................................... Página 34

Panel LED de
pared y techo
Introducción
Lo felicitamos por la compra de su
nuevo panel LED de pared/techo
(en adelante, también llamado lámpara
o producto). Ha elegido un producto de alta
calidad. Lea estas instrucciones de funcionamiento
completa y detenidamente. Despliegue las páginas
con las figuras. Estas instrucciones de
funcionamiento pertenecen a este producto y
contienen información importante sobre la puesta
en servicio y la manipulación. Observe siempre
todas las indicaciones de seguridad. Antes de la
puesta en servicio, compruebe que se dispone de
la tensión de red correcta y que todas las piezas
están correctamente instaladas. Si tiene alguna
pregunta o no está seguro sobre la manipulación
del producto, póngase en contacto con su
* Encontrará más detalles, p. ej., una explicación adicional sobre los
símbolos o información técnica en www.edi-light.com
Leyenda de los pictogramas utilizados*
¡Lea las instrucciones!
Indicaciones de seguridad
Instrucciones de uso
Esta lámpara es solo para uso en interi-
ores, en espacios secos
y cerrados.
Corriente/tensión alterna
Hercio (frecuencia)
Vatio (potencia activa)
Corriente/tensión continua
Salida de polaridad
Clase de protección II
Observe las instrucciones de
advertencia y seguridad.
¡Advertencia!
¡Riesgo de descarga eléctrica!
¡Cuidado! ¡Riesgo de explosión!
¡Peligro de muerte y accidente para
bebés y niños!
A prueba de cortocircuitos
Transformador de seguridad
Tensión extrabaja de seguridad
Directiva sobre la restricción de sustan-
cias peligrosas Sustancias
Temperatura ambiente
Temperatura de la carcasa en
un punto especificado
Clase de protección II para balasto
eléctrico
Temperatura de la luz en Kelvin
lm Lumen
Vida útil
No atenuable mediante controladores
externos.
Solo para uso en interiores
Use guantes protectores
Verificado por TÜV SÜD / GS
¡Daño ambiental por una incorrecta
eliminación de las pilas!
¡Deseche el embalaje y el producto de
forma respetuosa con el medio ambiente!
Índice de reproducción cromática de la
iluminación LED
Equipo de control independiente
Ä
~
ta
tc
25000h
Ra
SELV
ES26

distribuidor o el servicio técnico. Guarde estas
instrucciones de funcionamiento con cuidado y
transmítalas a terceros si es necesario.
Uso previsto
Esta lámpara debe usarse únicamente
en interiores, en espacios secos y
cerrados. Este producto está diseñado a
ser utilizado únicamente en los hogares.
Volumen de suministro
Verifique siempre inmediatamente el volumen de
suministro una vez desembalado, compruebe que
todas las piezas estén incluidas y que el producto
esté en perfecto estado.
1 panel LED de techo
2 pilas (AAA; 1,5 V)
1 mando a distancia
Material de montaje
Descripción de las piezas
Montaje en techo
4 tornillos para el montaje de la lámpara
4 tacos
Soporte de montaje
4 tornillos para el soporte de montaje
Bornera con caja de conexión
panel LED de techo
Montaje colgante
4 tornillos para el montaje de la lámpara
4 tacos
4 tornillos para el montaje
Bornera con caja de conexión
panel LED de techo
Soporte de montaje
Marquesina de techo con tornillos
Cables de suspensión, que constan de
manguitos de fijación en el techo y tornillos de
montaje del panel.
Manguitos de montaje en el techo
Rosca de tornillo
Manguito de ajuste
Baterías
Mando a distancia
Especificaciones técnicas
Número de artículo: 55895
Tensión de funcionamiento: 220–240 V~ 50/ 60 Hz
Potencia total: máx. 30 vatios
Clase de protección: II/
Fuente de luz LED: 2700 K a 5000 K
Ra=83
Número de artículo: 55896
Tensión de funcionamiento: 220–240 V~ 50/ 60 Hz
Potencia total: máx. 28 vatios
Clase de protección: II/
Fuente de luz LED: 2700 K a 5000 K
Ra=82
Las fuentes de luz LED y el equipo de control LED
solo pueden ser reemplazados por un técnico
especializado.
Dimensiones:
Modelo A (55895): Panel LED 62 x 62x 7cm
(Long. x Anch. x Alt.)
Modelo B (55896): Panel LED 100 x 25 x 7cm
(Long. x Anch. x Alt.)
Clase de protección: IP20
Tipo de pila
(Mando a distancia): 2 x AAA 1,5 V
Distribuidor:
EDI Light GmbH, Heiligkreuz 22, 6136 Pill,
AUSTRIA
www.edi-light.com
27ES
1
2
3
4
5
6
7
1
2
4
5
6
8
9
10
11
12
13

Seguridad
Indicaciones de seguridad
Los daños causados por el incumplimiento de estas
instrucciones de funcionamiento anulan la garantía.
No se acepta ninguna responsabilidad por los
daños indirectos. No se acepta ninguna
responsabilidad por los daños materiales o
personales causados por la manipulación
inadecuada o el incumplimiento de las indicaciones
de seguridad.
¡PELIGRO
DE MUERTE Y ACCIDENTE
PARA BEBÉS Y NIÑOS!
Nunca deje a los niños sin supervisión con
el material de embalaje. Existe riesgo de asfixia
por el material de embalaje. Los niños a
menudo subestiman los peligros. El material de
embalaje no es un juguete.
Este producto puede ser utilizado por niños
mayores de 8 años, así como por personasn
con habilidades físicas, sensoriales o
mentales disminuidas o bien con falta de
experiencia y conocimiento, si son
supervisados o si han sido instruidos en el uso
seguro del producto y comprenden los peligros
que les puede ocasionar. No se permite que
los niños jueguen con el producto. La
limpieza y el mantenimiento de usuario no
deben ser realizados por niños sin supervisión .
El producto no es un juguete.
Si nota alguna anomalía (p. ej., ruidos
inusuales , olor extraño o humo), apague el
producto inmediatamente. No vuelva a usar el
producto hasta que este sea comprobado por
una persona calificada .
Evite el peligro de muerte por
descarga eléctrica
No se acepta ninguna responsabilidad por los
daños materiales o personales causados por la
manipulación inadecuada o el incumplimiento
de las indicaciones de seguridad.
Encargue la instalación eléctrica a un electricista
cualificado o una persona capacitada.
Antes de la instalación, retire el fusible o
apague el disyuntor en la caja de fusibles
(posición 0).
Evite siempre que la lámpara entre en contacto
con agua u otros líquidos.
Antes de instalar el producto, asegúrese de que
la tensión de red existente coincida con la
tensión de funcionamiento necesaria de la
lámpara (Vea las «Especificaciones técnicas»).
Asegúrese de que ningún cable se dañe durante
la instalación.
El panel de techo/pared LED no es atenuable
mediante controladores externos.
La fuente de luz de esta lámpara solo puede
ser sustituida por un técnico autorizado por el
fabricante o un técnico de servicio calificado.
Evite el riesgo
de quemaduras y lesiones.
Asegúrese de que la lámpara está apagada y se
ha enfriado antes de tocarla para evitar
quemaduras.
No fije la lámpara sobre una superficie húmeda
o conductora.
No deje la lámpara o el material
de embalaje sin supervisión. Las láminas/
bolsas de plástico, las piezas de plástico, etc.
pueden convertirse en juguetes peligrosos para
los niños.
Algunas personas pueden tener ataques
epilépticos o alteración de la conciencia cuando
se exponen a ciertos destellos o fuentes de luz.
Consulte a un médico de inmediato si tiene
síntomas epilépticos.
28 ES

Monte la lámpara de manera que esté
protegida de la humedad, la contaminación y
el calor excesivo.
Antes de usar el taladro, asegúrese de que no
haya líneas de gas, agua o electricidad en el
sitio de la instalación. El montaje solo debe
ser realizado por personas competentes. Es
fundamental fijarse en la naturaleza del muro,
ya que el material de fijación no es el mismo
para los distintos tipos de paredes. Asesórese
en el comercio sobre los materiales adecuados
para el tipo de pared.
El fabricante no acepta ninguna
responsabilidad por la sujeción a la pared
con tacos o tornillos inadecuados y los daños
resultantes.
Esté siempre atento. Siempre preste atención
a lo que está haciendo y siempre use el
sentido común. Bajo ninguna circunstancia
debe utilizar la lámpara si no puede
concentrarse o si se siente incómodo.
Antes del montaje, compruebe que el
lugar de montaje sea adecuado
para el peso de la lámpara.
Familiarícese con todas las instrucciones y
figuras de este manual, así como con la propia
lámpara.
Indicaciones de seguridad
para las pilas/pilas
recargables
¡PELIGRO DE MUERTE! Mantenga las pilas/
pilas recargables fuera del alcance de los
niños. En caso de ingestión, consulte a un
médico inmediatamente.
La ingestión puede provocar quemaduras,
perforación de tejidos blandos y la muerte.
Las quemaduras graves pueden ocurrir
dentro de las 2 horas posteriores a la
ingestión.
¡PELIGRO DE EXPLOSIÓN!
Nunca cargue las pilas no
recargables. No cortocircuite y/o
abra las pilas/pilas recargables. Puede causar
sobrecalentamiento, peligro de incendio o
estallido.
Nunca arroje pilas/pilas recargables al fuego
o al agua.
No someta las pilas/pilas recargables
a estrés mecánico.
Riesgo de fuga
de las pilas/pilas recargables
Evite las condiciones y temperaturas extremas
que puedan afectar las pilas/pilas recargables,
p. ej., no las coloque sobre radiadores o bajo
la luz directa del sol.
Si las pilas/pilas recargables tienen fugas, evite
el contacto de la piel, los ojos y las membranas
mucosas con los productos químicos.
Enjuague inmediatamente las áreas afectadas
con agua limpia y consulte a un médico.
¡UTILICE
GUANTES PROTECTORES! Las
pilas/pilas recargables con fugas
o dañadas pueden causar quemaduras al
contacto con la piel. Por tanto, utilice guantes
de protección adecuados en este caso.
Si las pilas/pilas recargables tienen fugas,
retírelas del producto inmediatamente para
evitar daños.
Utilice solo pilas del mismo tipo. ¡No mezcle
pilas/pilas recargables viejas con nuevas!
Retire las pilas/pilas recargables si el producto
no se va a utilizar durante un período de
tiempo prolongado.
Riesgo de daño al producto
Utilice solo el tipo de pilas/pilas recargables
especificado.
Inserte las pilas/pilas recargables
de acuerdo con las marcas de polaridad (+) y
(-) de la pila y el producto. Limpie los contactos
de las pilas/pilas recargables y del
29ES

compartimento de pilas con un paño seco que
no suelte pelusa o con un bastoncillo de
algodón.
Retire las pilas/pilas recargables gastadas del
producto inmediatamente. («Especificaciones
técnicas»).
Preparación
Herramientas y materiales
necesarios
Las herramientas y materiales mencionados no
están incluidos en el volumen de suministro. Se
trata de información y valores no vinculantes con
fines orientativos. El material a utilizar depende de
las condiciones individuales del lugar.
– Lápiz/herramienta de marcado
– Comprobador de tensión de 2 polos
– Destornillador de estrella (Phillips)
– Taladro (aprox. Ø 6 mm)
– Alicates cortaalambres
Montaje del panel de luz LED
¡RIESGO DE
DESCARGA ELÉCTRICA!
Importante: La conexión eléctrica debe ser
realizada por un electricista capacitado o una
persona formada en instalaciones eléctricas. Esa
persona debe conocer las características de la
lámpara y las normas de conexión. Para ello,
retire el fusible o apague el disyuntor en la caja de
fusibles (posición 0) (vea la figura A).
Tiene 2 opciones de montaje:
Montaje en pared y techo
Afloje los tornillos visibles en el lateral
del soporte de montaje y retírelo.
Marque los agujeros deperforación
utilizando los agujeros previstos en el
soporte de montaje para los tornillos
.
Ahora taladre los orificios de montaje a una
profundidad de aproximadamente 30 mm.
Asegúrese de que la línea de suministro
no se dañe.
Introduzca los tacos en los agujeros de
perforación. (vea la figura B).
Fije el soporte de montaje con los
tornillos suministrados (vea la figura B).
Conecte el cable de conexión del panel LED
mediante la bornera con el cable de
alimentación (externo) (vea la figura B).
Asegúrese de que los conductores individuales
del cable de conexión a la red (externo)
queden correctamente conectados. Conductor
vivo negro o marrón = Símbolo L, conductor
neutro, marcado en azul/blanco Cable =
símbolo N .
Asegúrese de que estén correctamente
asentados.
Ahora atornille el panel LED con el
soporte demontaje .
Aviso: Asegúrese de que los tornillos encajen
correctamente en su lugar.
Vuelva a insertar el fusible o encienda el
disyuntor en la caja de fusibles (posición I) (vea
la figura C).
Su panel de techo/pared LED ya está
listo para usar.
Montaje colgante
Afloje los tornillos visibles en el lateral
del soporte de montaje y retírelo.
Marque los agujeros de perforación con
la ayuda de los agujeros previstos en el
soporte de montaje para los tornillos .
Ahora taladre los orificios de montaje a
una profundidad de aproximadamente 30 mm.
Asegúrese de que la línea de suministro no se
dañe.
3
3
4
3
30 ES
4
2
6
1
1
3
7
4
7
4
5

Vuelva a insertar el fusible o encienda el
disyuntor en la caja de fusibles (posición I) (vea
la figura C).
Su panel de techo/pared LED ya está listo para
usar.
Colocación/cambio de las pilas
(Mando a distancia)
Aviso: Las pilas están incluidas en el
volumen de suministro y deben insertarse antes de
la primera puesta en servicio.
Cuando el alcance del mando a distancia
disminuye, debe reemplazar las pilas .
Para ello, tire de la la tapa del compartimiento
de pilas del mando a distancia en la dirección
de la flecha.
Retire las pilas e introduzca pilas
nuevas. Encontrará el tipo de pilas a utilizar en
el capítulo «Especificaciones técnicas».
Aviso: La polaridad correcta se muestra
en el compartimento de pilas.
Vuelva a colocar la tapa del compartimento de
pilas.
El mando a distancia remoto ya está listo
para usar.
Puesta en servicio
Encendido/apagado
Ajustar el color de la luz
Presione el interruptor de luz (interruptor de
pared) para encender/apagar el panel
LED .
Si se pulsa brevemente el interruptor de forma
sucesiva, el panel de luz LED cambia entre
blanco frío, blanco cálido y blanco neutro.
Están disponibles las siguientes funciones
(vea la figura del producto D)
Introduzca los tacos en los agujeros de
perforación. (vea la figura B).
Fije el soporte de montaje con los tornillos
suministrados.
Ahora taladre otros 2 orificios a una distancia
o desde los
extremos del soporte de montaje de la marque
sina del techo e inserte un taco en cada
uno de los orificios.
Fije los manguitos de fijación en el techo con
los tornillos suministrados.
Conecte el cable de alimentación (externo)
mediante la bornera de la marquesina del
techo .
Asegúrese de que los conductores individuales
queden correctamente conectados. Conductor
vivo negro o marrón = Símbolo L, conductor
neutro, marcado en azul/blanco Cable =
símbolo N .
Asegúrese de que estén correctamente
asentados.
Ahora atornille la marquesina del techo
con el soporte demontaje .
Aviso: Asegúrese de que los tornillos encajen
correctamente en su lugar.
Ahora atornille los 2 cables de suspensión
en los manguitos de fijación en el techo
y los extremos de los cables de suspensión
en las cuatro roscas de tornillo previstas en
el panel LED.
Conecte el cable de conexión del
panel LED mediante la bornera
con el cable de alimentación de la marquesina
del techo .
Asegúrese de que los conductores individuales
queden correctamente conectados. Conductor
vivo, negro o marrón = símbolo L, conductor
neutro, cable marcado en azul/blanco =
símbolo N .
Asegúrese de que estén correctamente
asentados.
Ahora puede ajustar la longitud de las cuerdas
de sujeción presionando el manguito de
ajuste.
31ES
11
10
8
2
5
56
7
4
8
1
7
1
6
6
2
5
9
8
5
12
13
12
12 12

Mantenimiento y limpieza
¡RIESGO DE
DESCARGA ELÉCTRICA!
Para limpiar la lámpara, primero desconéctela
de la fuente de alimentación. Para ello, retire el
fusible o apague el disyuntor en la caja de fusibles
(posición 0) (vea la figura A).
Asegúrese de que la lámpara esté apagada
y que se haya enfriado antes de tocarla para
evitar quemaduras. No utilice disolventes,
gasolina o similares. Estos productos dañarían
la lámpara. Para limpiar el panel de techo/
pared LED use un paño seco que no suelte
pelusa.
Vuelva a insertar el fusible o encienda el
disyuntor en la caja de fusibles (posición I)
(vea la figura C).
Eliminación
El embalaje está hecho de materiales respetuosos
con el medio ambiente que puede desechar en los
puntos de reciclaje locales.
Observe el etiquetado de los
materiales de embalaje para la separación
de residuos, estos están marcados con
abreviaturas (a) y números (b) con el
siguiente significado: 1–7: Plásticos/
20–22: Papel y cartón/80–98: Tejidos
compuestos.
El producto y los materiales de embalaje son
reciclables, deséchelos por separado para
un mejor tratamiento de residuos. El logotipo
de Triman solo se aplica a Francia.
Puede informarse sobre las formas de
eliminar el producto desechado en su
ayuntamiento o administración municipal.
En aras de la protección del medio
ambiente, no tire su producto a la basura
doméstica, sino deséchelo adecuadamente.
Puede informarse sobre los puntos de
recogida y sus horarios de apertura en las
oficinas locales.
Las pilas/pilas recargables defectuosas o
usadas deben reciclarse de acuerdo con la
Directiva 2006/66/EC y sus enmiendas.
Devuelva las pilas/pilas recargables y/o el
producto a las instalaciones de recolección
ofrecidas.
¡Daño ambiental por una incorrecta
eliminación de las pilas/pilas
recargables!
Las pilas/pilas recargables no deben desecharse
con la basura doméstica. Pueden contener metales
pesados tóxicos y están sujetas a un tratamiento de
residuos peligrosos. Los símbolos químicos de los
metales pesados son los siguientes: Cd = cadmio,
Hg = mercurio, Pb = plomo. Por lo tanto, lleve las
pilas/pilas recargables a un punto de recogida
municipal.
Declaración de conformidad
Este producto cumple con los requisitos
de las directivas europeas y nacionales
aplicables. Las declaraciones y los
documentos correspondientes están archivados con
el fabricante. El producto cumple con los requisitos
de la Ley de seguridad de equipos y productos de
Alemania.
En el marco de la aplicación de mejoras en el
producto, nos reservamos el derecho de realizar
cambios técnicos y visuales. Nos reservamos el
derecho a errores de tipografía e impresión.
32 ES
Ä
~

Garantía y servicio
Garantía
Ofrecemos una garantía de 3 años a partir de la
fecha de compra. Nuestros productos se fabrican
según modernos métodos de producción y se
someten a un control de calidad preciso.
Garantizamos el perfecto estado del producto.
Dentro del periodo de garantía, repararemos todos
los defectos de material o de fabricación de forma
gratuita. Si, contrariamente a lo esperado,
encuentra algún defecto, envíe el producto
cuidadosamente embalado a la dirección de
servicio técnico especificada. Quedan
excluidos de la garantía los daños causados por
una manipulación inadecuada, así como las piezas
de desgaste y consumibles. Estos pueden
solicitarse, previo pago, llamando al número indi-
cado. Las reparaciones que no están cubiertas por
la garantía, (por ejemplo, las lámparas) también
pueden llevarse a cabo en la dirección de servicio
técnico indicada por un cargo individual a precio
de coste.
El artículo será reparado en la dirección
de servicio mencionada. Solo si lo envía
directamente a esa dirección podrá ser procesado
y devuelto a tiempo. Si desea más información
sobre el producto, quiere pedir accesorios o tiene
preguntas sobre el procedimiento de servicio, llame
a nuestro servicio de atención al cliente al número
de teléfono indicado más abajo. Si tiene alguna
pregunta, indique el número de artículo (vea las
«Especificaciones técnicas»).
Este producto contiene fuentes de luz
de la clase de eficiencia energética E
Dirección de servicio técnico
Spain
EGLO espana iluminacion
Avda. de Castilla 1 (Edf. Best Point) 2°-16A
San Fernando de Henares
28830 Madrid, Spain
T: +34 91 677 9044
IAN 378855_2101
Para realizar cualquier consulta, guarde el recibo
y el número de artículo (p. ej., IAN 123456_7890)
como comprobante de compra.
33ES

Certificado de garantía
Remitente: _________________________________________________________________________
Apellido/Nombre: __________________________________________________________________
País/CP/Ciudad/Calle: ______________________________________________________________
Número de teléfono: _________________________________________________________________
Número de artículo/Designación: ______________________________________________________
Fecha de compra/lugar de compra: ____________________________________________________
Indicación del defecto: _______________________________________________________________
Fecha/Firma: ______________________________________________________________________
Si no aplica la garantía: ____________________________________________________________
Le rogamos que devuelva el artículo sin reparar contra los gastos de transporte incurridos.
Deseo información sobre los gastos. Repare el artículo previo pago.
34 ES


37
Légende des pictogrammes utilisés ........................................................... Page 38
Introduction..................................................................................................... Page 38
Utilisation conforme ............................................................................................. Page 39
Contenu de la livraison ......................................................................................... Page 39
Description des pièces .......................................................................................... Page 39
Caractéristique techniques .................................................................................... Page 39
Sécurité ............................................................................................................ Page 40
Consignes de sécurité ........................................................................................... Page 40
Consignes de sécurité relatives aux piles/batteries ................................................. Page 41
Préparation ..................................................................................................... Page 42
Outils et matériel nécessaires ................................................................................. Page 42
Monter le panneau LED mural/plafond ................................................................. Page 42
Insérer/remplacer les piles (télécommande) ........................................................... Page 43
Mise en service ............................................................................................... Page 43
Allumer/éteindre le panneau LED mural/plafond/Régler la couleur de la lumière ...... Page 43
Maintenance et nettoyage ............................................................................ Page 44
Élimination ....................................................................................................... Page 44
Déclaration de conformité ............................................................................ Page 44
Garantie et service après-vente .................................................................. Page 45
Garantie ............................................................................................................. Page 45
Adresses des services après-vente ......................................................................... Page 45
Carte de garantie ................................................................................................ Page 46
FR

Panneau mural et plafond LED
Introduction
Félicitations pour l’achat de votre
nouveau panneau LED mural et plafond
(ci-après également dénommé luminaire
ou produit). Vous avez ainsi choisi un produit de
qualité supérieure. Merci de lire les présentes
instructions d’utilisation intégralement et avec
attention. Dépliez le rabat avec les illustrations. Ces
instructions d’utilisation sont une partie intégrante
du produit et elles contiennent des remarques
importantes sur sa mise en service et sa
manipulation. Respectez toujours toutes les
consignes de sécurité. Avant la mise en service,
vérifiez que la tension réseau disponible est
correcte et que toutes les pièces sont montées
correctement. Si vous avez des questions ou des
doutes quant à la manipulation du produit, merci
* Vous trouverez de plus amples informations, y compris des
explications sur les symboles supplémentaires et d’autres détails
techniques, sur le site www.edi-light.com.
Légende des pictogrammes utilisés*
Lire les instructions !
Consignes de sécurité
Consignes opératoires
Ce luminaire est destiné à être utilisé
exclusivement à l’intérieur, dans des
locaux secs et fermés.
Courant alternatif/tension alternative
Hertz (fréquence)
Watt (puissance active)
Courant continu/tension continue
Polarité de sortie
Indice de protection II
Observer les
consignes d’avertissement et de sécurité !
Avertissement!
Risques d’électrocution!
Prudence! Risque d’explosion!
Danger de mort et risques de blessures
pour les enfants et les jeunes enfants!
Transformateur de sécurité protégé contre
les courts-circuits
Sécurité Très Basse Tension
Restriction de certaines substances
dangereuses substances dangereuses
Température ambiante
Température du boîtier au point donné
Indice de protection II sur le ballast
Température de la lumière en Kelvin
lm Lumens
Durée de vie
Ne peut pas être réglé avec un gradateur
externe.
Pour l’intérieur uniquement
Portez des gants de protection
Sécurité contrôlée par le TÜV SÜD
Atteintes à l’environnement dues à une
mauvaise élimination des piles !
Éliminez l’emballage et l’appareil dans le
respect de l’environnement !
Indice de rendu des couleurs de l’éclairage
à LED
Mécanisme de contrôle indépendant
Ä
~
ta
tc
25000h
Ra
SELV
38 FR

de contacter votre revendeur ou le SAV. Merci de
conserver soigneusement ces instructions
d’utilisation et de les remettre le cas échéant avec le
produit à un tiers.
Utilisation conforme
Ce luminaire est destiné à être utilisé
exclusivement à l’intérieur, dans des
locaux secs et fermés. Ce produit est
destiné à être utilisé dans des locaux domestiques
privés uniquement.
Contenu de la livraison
Contrôlez toujours dès le déballage que le contenu
de la livraison est complet ainsi que le produit est
dans un état irréprochable.
1 plafonnier à LED
2 piles (AAA ; 1,5 V)
1 télécommande
Matériel de montage
Description des pièces
Montage au plafond
4 vis de fixation pour le luminaire
4 chevilles
Angle de montage
4 vis pour l’angle de montage
Domino avec boîtier de raccordement
Plafonnier à LED
Montage en suspension
4 vis de fixation du luminaire
4 chevilles
4 vis pour le montage
Domino avec boîtier de raccordement
Plafonnier à LED
Angle de montage
Pavillon, vis comprises
Câbles de suspension composés de douilles de
fixation au plafond et vis de fixation du
panneau comprises.
Manchons de montage au plafond
Filet de vis
Manchon de réglage
Piles
Télécommande
Caractéristiques techniques
Numéro d’article: 55895
Tension de service: de 220 à 240 V ~ 50/60 Hz
Puissance totale: 30 watts maxi.
Indice de protection: II /
Ampoule LED: de 2700K à 5000K
Ra=83
Numéro d’article: 55896
Tension de service: de 220 à 240 V ~ 50/60 Hz
Puissance totale: 28 watts maxi.
Indice de protection: II /
Ampoule LED: de 2700K à 5000K
Ra=82
L’ampoule LED et le ballast pour LED ne peuvent être
échangés que par un professionnel.
Dimensions:
Modèle A (55895): Panneau LED de 62 x 62x 7cm
(L x I x H)
Modèle B (55896): Panneau LED de 100 x 25 x 7cm
(L x I x H)
Indice de protection: IP20
Type de piles
(télécommande): 2 x AAA de 1,5 V
Distributeur:
EDI Light GmbH, Heiligkreuz 22, 6136 Pill,
AUTRICHE
www.edi-light.com
39FR
1
2
3
4
5
6
7
1
2
4
5
6
8
9
10
11
12
13

Évitez le danger de mort par
électrocution
Le fabricant ne saurait assumer de responsabilité
en cas de dégâts matériels ou de blessures
causés par une manipulation non conforme ou le
non-respect des consignes de sécurité!
Faites toujours effectuer l’installation électrique
par un électricien qualifié ou une personne
formée à ces travaux.
Avant le montage, retirez le fusible ou éteignez
le disjoncteur dans la boîte à fusibles
(position 0).
Évitez impérativement tout contact du luminaire
avec l’eau ou tout autre liquide.
Avant le montage, assurez-vous que la tension
de service disponible correspond bien à
celle nécessaire au luminaire
(voir « Caractéristiques techniques »).
Assurez-vous de ne pas endommager les câbles
pendant le montage.
Le panneau LED mural/plafond ne peut pas être
réglé avec un gradateur externe.
La source lumineuse de ce luminaire ne peut être
remplacée que par le fabricant, un technicien
de service après-vente habilité par ce dernier ou
toute autre personne aux qualifications
comparables.
Évitez les risques d’incendie et de
blessures
Assurez-vous que le luminaire est éteint et a
refroidi avant de le toucher pour éviter les
brûlures.
Ne fixez pas le luminaire sur un support humide
ou conducteur. Ne laissez pas le luminaire ni le
matériau d’emballage traîner sans surveillance.
Les films/sacs/pièces en plastique, etc. peuvent
devenir des jouets dangereux pour les enfants
Ils peuvent entraîner chez certaines personnes
des crises d’épilepsie ou des perturbations de la
conscience si elles sont exposées à certains
flashs ou effets de lumière. En cas de symptômes
épileptiques, consultez immédiatement un
Sécurité
Consignes de sécurité
La garantie s’annule en cas de dégâts dus au
non-respect des présentes instructions d’utilisation.
Le fabricant décline toute responsabilité quant aux
dommages consécutifs! Il ne saurait non plus
assumer la responsabilité des éventuels dégâts
matériels ou des blessures causés par une
manipulation non conforme ou le non-respect des
consignes de sécurité.
DANGER DE MORT ET
RISQUES DE BLESSURES POUR
LES ENFANTS ET LES JEUNES ENFANTS!
Ne laissez jamais les enfants sans surveillance
avec le matériau d’emballage. Risques
d’asphyxie avec le matériau d’emballage. Les
enfants ont tendance à sous-estimer le danger.
Le matériau d’emballage n’est pas un jouet.
Ce produit peut être utilisé par les enfants
âgés de plus de 8 ans ainsi que par les
personnes handicapées physiques, sensorielles
ou mentales ou qui n’ont pas suffisamment
d’expérience ni de connaissances relatives à
ce genre d’appareils, s’ils sont surveillés ou s’ils
ont reçu des instructions sur le maniement sûr
de l’appareil et s’ils ont compris les dangers qui
y sont liés. Ne pas laisser les enfants jouer avec
ce produit. Le nettoyage et l’entretien ne doivent
pas être effectués par des enfants sans
surveillance. Ce produit n’est pas un jouet.
Si vous remarquez une quelconque anomalie
pendant l’utilisation (telle que par exemple des
bruits inhabituels, des odeurs étranges ou
l’apparition de fumée), éteignez immédiatement
le produit. Dans ce cas, n’utilisez plus le produit
tant qu’il n’a pas été contrôlé par une personne
habilitée.
40 FR

médecin.
Montez le luminaire de manière à ce qu’il soit
protégé de l’humidité, des salissures et des
développements trop importants de chaleur.
Assurez-vous avant d’effectuer le perçage
qu’aucune conduite de gaz, d’eau ni
d’électricité ne se trouve à cet endroit. Montage
à effectuer uniquement par une personne
qualifiée. Prenez impérativement la structure
du mur en compte étant donné que le matériel
de fixation fourni ne convient pas à tous les
types de parois. Renseignez-vous dans le
commerce pour savoir quelles vis et quelles
chevilles conviennent à la structure de votre
mur.
Le fabricant décline toute responsabilité en cas
de dommages provoqués par un montage
mural avec des chevilles non conformes.
Soyez toujours attentif(ve)! Faites toujours
attention à ce que vous faites et soyez
raisonnable. N’utilisez en aucun cas le
luminaire si vous êtes distrait(e) ou si vous ne
vous sentez pas bien.
Avant le montage, contrôlez que l’emplacement
est adapté au poids du luminaire.
Familiarisez-vous avec toutes les instructions
et toutes les illustrations de ces instructions ainsi
qu’avec le luminaire lui-même avant de
l’utiliser.
Consignes de sécurité
relatives aux piles/batteries
DANGER DE MORT! Tenez les piles/accus
hors de portée des enfants. En cas d’ingestion,
consultez immédiatement un médecin!
Leur ingestion peut provoquer des brûlures, des
perforations des tissus mous voire la mort. Des
brûlures graves peuvent apparaître en l’espace
de 2 heures après l’ingestion.
RISQUES D’EXPLOSION!
Ne rechargez jamais les piles non
rechargeables. Ne court-circuitez pas
les piles/accus et/ou ne les ouvrez pas. Ils
pourraient alors surchauffer, risquer de
provoquer un incendie ou éclater.
Ne jetez jamais les piles/accus au feu ni dans
l’eau.
N’exposez pas les piles/accus à des
sollicitations mécaniques.
Risque de fuite des piles/accus
Évitez les conditions et les températures
extrêmes pouvant agir sur les piles/accus telles
que sur les radiateurs/sous l’effet des rayons
directs du soleil.
Si les piles/accus ont coulé, évitez tout contact
des substances chimiques avec la peau, les
yeux et les muqueuses!
Rincez immédiatement les parties touchées à
l’eau claire et consultez un médecin!
PORTER DES GANTS DE
PROTECTION!
Les piles/accus qui fuient ou qui sont
abîmés peuvent provoquer des brûlures si ils
entrent en contact avec la peau. Portez donc
dans ce cas des gants adaptés.
Si les piles/accus ont coulé, retirez-les
immédiatement du produit pour éviter les
détériorations.
Utilisez toujours des piles/accus de même type.
Ne mélangez pas les piles/accus neufs et
usagés!
Retirez les piles/accus du produit si vous ne
l’utilisez pas pendant longtemps.
Risque de détérioration du produit
Utilisez exclusivement le type de pile/accu
indiqué!
Insérez les piles/accus en respectant les
indications de polarité (+) et (-) sur les piles/
accus eux-mêmes et sur le produit. Nettoyez les
contacts des piles/accus et de leur
compartiment avec un chiffon sec qui ne
peluche pas ou des cotons-tiges, avant de les
insérer.
Retirez immédiatement les piles/accus vides du
produit. (« Caractéristiques techniques »).
41FR

Préparation
Outils et matériel nécessaires
Les outils et le matériel indiqués ne sont pas compris
dans la livraison. Il s’agit ici de renseignements et
de valeurs fournis à titre indicatif sans engagement.
Les caractéristique du matériau varient selon la
situation spécifique sur place.
– crayon de papier/outil de marquage
– détecteur de tension à 2 pôles
– tournevis cruciforme
– perceuse (ø 6 mm environ)
– pince coupante
Monter le panneau d’éclairage
à LED
RISQUES
D’ÉLECTROCUTION!
Important: Le raccordement électrique doit être
effectué par un électricien qualifié ou une personne
formée aux travaux d’installation électrique. Cette
dernière doit connaître les propriétés du luminaire
et ses conditions de raccordement. Pour cela,
retirez le fusible ou éteignez le disjoncteur dans la
boîte à fusibles (position 0) (voir ill. A).
Vous avez alors le choix entre 2 possibilités de
montage :
Montage mural-plafond
Desserrez les vis visibles sur le côté de
l’angle de montage et retirezles.
Marquez le point du perçage à l’aide des trous
prévus pour les vis dans l’angle
de montage .
Percez à présent les trous de fixation sur une
profondeur de 30 mm environ. Assurez-vous de
ne pas endommager alors le câble
d’alimentation.
Insérez les chevilles dans les trous de
perçage (voir ill. B).
Fixez l’angle de montage avec lesvis
fournies (voir ill. B).
Raccordez le câble de connexion du panneau
d’éclairage à LED au moyen du domino
avec le câble de connexion du réseau
d’alimentation (externe) (voir ill. B).
Veillez à ce que les différents fils du câble
de connexion au réseau d’alimentation
(externe) soient correctement raccordés.
Fil conducteur, noir ou marron = symbole
L, conducteur neutre, câble marqué bleu/blanc
= symbole N .
Veillez à ce qu’ils soient correctement en place.
Vissez à présent le panneau LED à l’angle
de montage au moyen des vis .
Remarque: Veillez à ce que les vis s’enclenchent
correctement.
Remettez le fusible en place ou allumez le
disjoncteur sur la boîte à fusibles (position I)
(voir ill. C)
Montage en suspension
Desserrez les vis visibles sur le côté de
l’angle de montage et retirezles.
Marquez le point du perçage à l’aide des
trous prévus pour les vis dans l’angle de
montage .
Percez à présent les trous de fixation sur une
profondeur de 30 mm environ. Assurez-vous de
ne pas endommager alors le câble
d’alimentation.
Insérez les chevilles dans les trous de
perçage (voir ill. B).
Fixez l’angle de montage avec lesvis
fournies.
Percez à présent 2 autres trous à un écart de
l’extrémité de l’étrier de montag
du pavillon et insérez une cheville dans
chacun d’entre eux.
Montez les douilles de fixation au plafond avec
les vis fournies.
Raccordez le câble de connexion au réseau
d’alimentation (externe) au pavillon avec le
domino .
4
42 FR
8
3
1
5
1
3
2
4
3
3
4
7
4
7
4
2
7
5
6
2

Retirez les piles et remplacez-les par des
neuves. Consultez le chapitre « Caractéristiques
techniques » concernant le type de pile
à utiliser.
Remarque: la polarité correcte est indiquée
dans le compartiment des piles.
Remettez le couvercle du compartiment des
piles en place.
La télécommande radio est maintenant
opérationnelle.
Mise en service
Allumer/éteindre le luminaire/
Régler la couleur de la lumière
Actionnez l’interrupteur d’éclairage
(interrupteur mural) pour allumer/éteindre le
panneau d’éclairage à LED .
Si vous actionnez cet interrupteur plusieurs fois
de suite brièvement, l’éclairage du panneau
LED change et passe au blanc froid, au
blanc chaud et au blanc neutre.
Les fonctions suivantes sont à votre
disposition (voir illustration du produit D)
Veillez à ce que les différents fils soient cor
rectement raccordés: Fil conducteur, noir ou
marron = symbole L, conducteur neutre, câble
marqué bleu/blanc = symbole N .
Veillez à ce qu’ils soient correctement en
place.
Vissez à présent le pavillon à l’angle de
montage au moyen des vis .
Remarque: Veillez à ce que les vis
s’enclenchent correctement.
Vissez à présent les 2 câbles de suspension
dans les douilles de fixation au plafond
ainsi que leurs extrémités dans les
quatre filets prévus à cet effet dans le
panneau d’éclairage à LED.
Raccordez le câble de connexion du panneau
LED au moyen du domino avec le
câble de connexion du pavillon .
Veillez à ce que les différents fils du câble de
connexion soient correctement raccordés:
Fil conducteur, noir ou marron = symbole
L, conducteur neutre, câble marqué bleu/
blanc = symbole N .
Veillez à ce qu’ils soient correctement en
place.
Vous pouvez à présent ajuster la longueur
des câbles de fixation en appuyant sur la
douille de réglage .
Remettez le fusible en place ou allumez le
disjoncteur sur la boîte à fusibles (position I)
(voir ill. C).
Votre panneau LED mural/plafond est
maintenant prêt à être utilisé.
Insérer/remplacer les piles
(télécommande)
Remarque: Les piles sont fournies dans la
livraison et doivent être insérées avant la première
mise en service.
Si la portée de la télécommande faiblit, il
faut alors échanger les piles . Pour
cela, poussez le couvercle du compartiment
des piles de la télécommande dans le sens
de la flèche. 43FR
11
10
1
7
5
6
6
8
1
6
5
9
8
5
12
13
12
12
12

Maintenance et nettoyage
TRISQUES
D’ÉLECTROCUTION Déconnectez d’abord le
luminaire du réseau électrique avant de le nettoyer.
Pour cela, retirez le fusible ou éteignez le
disjoncteur dans la boîte à fusibles (position 0) (voir
ill. A).
Assurez-vous que le luminaire est éteint et a
refroidi avant de le toucher pour éviter les
brûlures. N’utilisez pas de solvant, d’essence,
ni de produit similaire. Vous endommageriez
dans ce cas le luminaire. Pour le nettoyage
du panneau LED mural/plafond, utilisez un
chiffon sec qui ne peluche pas.
Remettez le fusible en place et allumez le
disjoncteur sur la boîte à fusibles (position I).
(voir illustration du produit C).
Élimination
L’emballage est composé de matériaux écologiques
que vous pouvez éliminer dans les centres de
recyclage locaux.
Observez le marquage des matériaux
d’emballage lors du tri des déchets, ils
portent des abréviations (a) et des
numéros (b) aux significations suivantes:
1 à 7: plastiques/20 à 22: papier et
carton/80 à 98: matériaux composites.
Le produit et les matériaux d’emballage sont
recyclables. Éliminez-les triés pour un
meilleur traitement des déchets. Le logo
Triman ne s’applique qu’à la France.
Pour de plus amples informations sur les
possibilités d’élimination du produit usagé,
consultez votre service municipale ou
d’agglomération.
Par respect pour l’environnement, ne jetez
pas votre produit une fois usagé dans vos
ordures ménagères, mais apportez-le à un
centre de collecte pour qu’il soit éliminé de
manière conforme. Renseignez-vous sur les
horaires d’ouverture de votre centre auprès
des administrations compétentes.
Conformément à la directive 2006/66/CE
et modifications, les piles/accumulateurs
hors service ou usagés doivent être
recyclés. Rapportez les piles/accumulateurs et/ou
le produit aux dispositifs de collectes en place.
Atteintes à l’environnement en cas de
mauvaise élimination des piles accus!
Les piles accus ne doivent pas être jetés dans les
ordures ménagères. Ils peuvent contenir des métaux
lourds et sont soumis au traitement des déchets
spéciaux. Les symboles chimiques de ces métaux
lourds sont: Cd = cadmium, Hg = mercure, Pb =
plomb. Cd = cadmium, Hg = mercure, Pb = plomb.
Pour cette raison, apportez vos piles/accumulateurs
usagés à votre centre de collecte
municipal.
Déclaration de conformité
Ce produit répond aux exigences des
directives européennes et nationales en
vigueur. Les déclarations et les documents
correspondants sont consignés chez le fabricant.
Ce produit répond aux exigences de la loi relative
à la sécurité sanitaire des produits et des appareils
allemande.
Nous nous réservons le droit d’effectuer des
modifications techniques et de l’aspect extérieur de
l’article dans le cadre de l’amélioration de nos
produits. Sous réserve d’erreurs et de fautes
d’impression.
44 FR
Ä
~

Garantie et service après-vente
Garantie
Nous accordons une garantie de 3 ans sur le
produit à compter de la date d’achat. Nos produits
sont fabriqués conformément aux méthodes de
production modernes et ils font l’objet d’un contrôle
approfondi de la qualité. Nous garantissons
l’état irréprochable des articles. Nous éliminons
gratuitement les défauts matériels ou de fabrication
pendant la période de garantie. Si, contre toute
attente, des défauts devaient apparaître, merci de
retourner l’article soigneusement emballé à
l’adresse du SAV indiquée. Les dommages
engendrés par une manipulation incorrecte ainsi
que les pièces d’usure et les consommables sont
exclus de la garantie. Ces derniers peuvent être
commandés contre paiement au numéro de
téléphone indiqué. Vous pouvez également faire
effectuer les réparations qui ne tombent pas sous
la garantie (l’ampoule par exemple) auprès du
SAV mentionné à vos propres frais. L’article est
alors réparé par le SAV à l’adresse indiquée. Un
traitement et un retour rapides ne sont possibles
que si vous envoyez votre article directement à cette
adresse. Si vous souhaitez obtenir de plus amples
informations sur le produit, commander des
accessoires ou poser des questions sur le
déroulement du SAV, merci d’appeler notre conseil
client au numéro indiqué. Merci de fournir le
numéro de votre article pour toute question
(voir « Caractéristiques techniques »).
Ce produit contient des sources
lumineuses de la classe d’efficacité
énergétique E
45FR
Adresse des services
après-vente
France
EGLO FRANCE luminaire sarl
Z.A. Jeune Bois, 2 Rue de la Martinique
68274 Wittenheim, FRANCE
T: +33 389 6250 30
IAN 378855_2101
Merci de tenir le ticket de caisse et le numéro de
l’article (IAN 123456_7890 par exemple) à
disposition pour attester de votre achat.

Carte de garantie
Expéditeur: ___________________________________________________________________________
Nom/prénom: _______________________________________________________________________
Country/Postcode/Town/Street address: _______________________________________________
Numéro de téléphone: __________________________________________________________________
Numéros d’article/Désignation: _________________________________________________________
Date/lieu de l’achat: __________________________________________________________________
Renseignements relatifs au défaut: ________________________________________________________
Date/signature: ______________________________________________________________________
S’agit-il d’un cas de garantie:
Merci de bien vouloir retourner l’article non réparé contre remboursement des frais de port.
Merci de nous communiquer le montant des frais. Réparez l’article contre remboursement.
46 FR


49
Key to pictograms.......................................................................................... Page 50
Introduction..................................................................................................... Page 50
Proper use........................................................................................................... Page 51
Contents included ................................................................................................ Page 51
Description of parts .............................................................................................. Page 51
Technical details ................................................................................................... Page 51
Safety ............................................................................................................... Page 52
Safety information ................................................................................................ Page 52
Safety information for batteries .............................................................................. Page 53
Preparation ..................................................................................................... Page 53
Tools and materials needed.................................................................................... Page 53
Installing the LED wall/ceiling panel ....................................................................... Page 53
Inserting or replacing batteries (remote control)........................................................ Page 54
First use ............................................................................................................ Page 55
Switching the LED wall/ceiling panel on and off and adjusting the light colour........... Page 55
Maintenance and cleaning............................................................................ Page 55
Disposal ............................................................................................................ Page 55
Declaration of conformity ............................................................................. Page 56
Warranty and service..................................................................................... Page 56
Warranty ............................................................................................................. Page 56
Service addresses ................................................................................................. Page 57
Warranty card ...................................................................................................... Page 57
GB

LED wall and ceiling panel
Introduction
Congratulations on your purchase of an
LED wall/ceiling panel! (Sometimes
referred to below as a light or "the
product"). You have chosen a high-quality product.
Please read this user manual right through carefully.
Start by unfolding the page with the image. This
manual constitutes part of the product and includes
important information for getting the product ready
to use and operating it. Read all the safety
information carefully. Before you use the product for
the first time, make sure that the voltage is correct
and all parts are correctly installed. If you have any
questions or are unsure about using the product,
please contact your retailer or service centre.
Store this manual carefully and pass it on to third
* You can find more information, including explanations of addition-
al symbols and other technical details, at www.edi-light.com
Key to pictograms*
Read the instructions!
Safety information
Usage instructions
This light is only suitable for use in indoor,
dry and enclosed areas.
Alternating current/voltage
Hertz (frequency)
Watt (power)
Direct current/voltage
Output polarity
Appliance class II
Note warnings and safety information!
Warning:
electric shock!
Caution: risk of explosion!
Danger to toddlers and children –
risk of accident, injury or death
Safety transformer
Safety Extra Low Voltage
Restriction of Certain Hazardous
Substances
Ambient temperature
Casing temperature at
the specified point
Appliance class II with electrical ballast
Light temperature in Kelvin
lm Lumens
Service life
Cannot be dimmed with external controller.
Only for indoor use
Wear protective gloves
TÜV SÜD / Safety-certified
Disposing of batteries improperly can
damage the environment.
Consider the environment when disposing
of your packaging and device.
Colour rendering index for the LED lighting
Independent control gear
Ä
~
ta
tc
25000h
Ra
SELV
50 GB

parties if necessary.
Intended use
This light is only suitable for use in
indoor, dry and closed areas.
This product is only intended for private
household use.
Contents included
When you unpack the product, check straight away
that no parts are missing or defective.
1 LED ceiling light
2 batteries (AAA; 1.5 V)
1 remote control
Installation material
Description of parts
Ceiling installation
4 screws for securing the light
4 wall plugs
1 mounting bracket
4 screws for mounting bracket
Terminal block with connection box
LED ceiling light
Hanging installation
4 screws for securing the light
4 wall plugs
4 screws for mounting
Terminal block with connection box
LED ceiling light
1 mounting bracket
Ceiling mount including screws
Suspension cable, comprising ceiling
mounting sleeves and panel fastening
screws.
Ceiling mounting sleeves
Screw thread
Adjustment sleeve
Batteries
Remote control
Technical details
Item number: 55895
Operating voltage: 220–240 V~ 50/60 Hz
Total power: max. 30 watt
Appliance class: II /
LED light source:2700K to 5000K
Ra=83
Item number: 55896
Operating voltage: 220–240 V~ 50/60 Hz
Total power: max. 28 watt
Appliance class: II /
LED light source:2700K to 5000K
Ra=82
The LED light sources and the LED operating device
may only be replaced by a professional.
Dimensions:
Model A (55895): LED panel 62 x 62x 7cm
(L x W x H)
Model B (55896): LED panel 100 x 25 x 7cm
(L x W x H)
IP code: IP20
Battery type
(remote control): 2 x AAA 1.5V
Marketed by:
EDI Light GmbH, Heiligkreuz 22, 6136 Pill,
AUSTRIA
www.edi-light.com
51GB
1
2
3
4
5
6
7
1
2
4
5
6
8
9
10
11
12
13

instructed person to carry out the electrical
installation.
Before installation, remove the fuse or switch off
the circuit breaker in the fuse box (0 position)
Never bring the light into contact with water or
other liquids.
Before installing the light, make sure that the
supply voltage matches the required operating
voltage for the light (see “Technical details”).
Ensure that no cables are damaged during
installation.
The LED wall/ceiling panel cannot be dimmed
with an external controller.
The light source for this light may only be
replaced by the manufacturer, a service ‘
technician authorised by the manufacturer, or
person with equivalent qualifications.
Avoid fire and injury
To avoid burns, make sure that the light is
switched off and has cooled down before you
touch it.
Do not affix the light to damp or conductive
ground.
Do not leave the light or packaging lying
around.
Plastic film, plastic bags, plastic parts, etc. can
be dangerous if treated as toys by children.
Some people may suffer from epileptic fits or
impaired consciousness when they are exposed
to certain flashing lights or light effects.
If you experience epileptic symptoms, seek
medical assistance immediately.
Install the light somewhere where it is protected
from damp, dirt and strong heat sources.
Before starting to drill, make sure that there are
no gas pipes, water pipes or electric cables at
the location where you intend to drill. Installation
only by professionals. Always ensure that the
wall is suitable: the fastening material provided
is not suitable for every type of wall.
Ask your retailer for suitable screws and wall
plugs for your wall type.
Safety
Safety information
Damage caused by failure to follow this manual
invalidates the warranty.
No liability is accepted for consequential damage.
No liability is accepted for property damage or
injury resulting from improper use or failure to
observe the safety information.
DANGER
TO TODDLERS AND CHILDREN
– RISK OF ACCIDENTS AND
DEATH
Never leave children unattended with the pack-
aging material. They can suffocate themselves
with this material. Children often underestimate
the risks. The packaging material is not a toy.
This product can be used by children aged 8
years and over and by people with limited
mental, sensory or intellectual capacities, or by
people without relevant experience or
knowledge, provided they understand or are
briefed about safe use of the product and the
associated risks. Children may not play with
the product. Children may not carry out
cleaning and maintenance activities without
supervision. This product is not a toy.
If you notice anything unusual while using the
product (e.g. unusual noises, odours or smoke),
switch the product off immediately.
Do not use the product again until it has been
checked by a professional.
Avoid death by electric shock
No liability is accepted for property damage
or injury resulting from improper use or failure
to observe the safety information.
Arrange for a trained electrician or electrically
52 GB
WARNING!

The manufacturer accepts no liability for im
proper connections between the wall and wall
plug or any resulting damage.
Always be alert! Work carefully and think
about what you are doing. Never use the light
if you are not concentrating or feel unwell.
Check before installing that the installation
location is suitable for the weight of the light.
Before using the light, make sure you are
familiar with all the instructions and illustrations
in this manual and with the light itself.
Safety information for
batteries
RISK OF DEATH Keep all batteries out of
reach of children. If a battery is swallowed,
seek a doctor immediately.
Swallowing batteries can cause burns,
perforation of soft tissue and death. Severe
burns can appear within two hours of
swallowing.
RISK OF EXPLOSION Never try to
recharge non-rechargeable batteries.
Never short-circuit batteries and never
open them. Doing so can lead to overheating,
fire or bursting.
Never throw batteries into fire or water.
Never put batteries under mechanical load.
Risk of leaking battery fluid
Avoid extreme conditions and temperatures that
could affect the batteries, e.g. never leave them
on a heater or under direct sunlight.
If a battery has leaked, do not allow the
chemicals to come into contact with skin, eyes,
or mucous membranes.
Clean any affected areas immediately with
clear water and seek medical attention.
WEAR SAFETY GLOVES
Leaking or damaged batteries can
cause chemical burns if they come into
contact with skin.
Always wear suitable safety gloves to handle
leaking or damaged batteries.
Remove any leaking batteries from the product
immediately to avoid damage to the product.
Always use batteries of the same type.
Do not mix old and new batteries!
Remove the batteries if the product is not being
used for a long period of time.
Risk of damage to the product
Only use the specified type of battery.
Insert batteries according to the polarity
markings (+) and (-) on the battery and the
product. Clean the contacts on the battery and
in the battery compartment with a dry, lint-free
cloth or cotton bud before inserting the battery.
Remove dead batteries from the product
immediately (“Technical details”).
Preparation
Tools and materials needed
The tools and materials listed are not included
with the contents. The specifications and values
are provided as a guide and are not binding. The
characteristics required of the materials depend on
the particular situation at the location.
– Pencil/marking tool
– Two-pole voltage tester
– Philips screwdriver
– Drill (diameter 6 mm approx.)
– Wire cutter
Installing the LED light panel
ELECTRIC SHOCK
Important: The electrical connection must be
established by a trained electrician or electrically
instructed person. This person must be familiar
with the characteristics of the light and connection
conditions.
WARNING!
53GB

Before installation, remove the fuse or switch off the
circuit breaker in the fuse box (0 position) (see Fig.
A).
You have two installation options:
Wall/ceiling installation
Undo and remove the screws visible on
the side of the installation bracket .
Mark the drill holes using the screw holes in
the installation bracket .
Drill the mounting holes to a depth of approxi
mately 30 mm. Ensure that no cables are
damaged.
Insert the wall plugs into the holes (see Fig.
B).
Secure the mounting bracket using the
screws supplied (see Fig. B).
Connect the LED panel connection cable to the
power cable (external) via the terminal box (see
Fig. B).
Make sure that the individual wires in the power
cable (external) are all connected correctly: live
wire, black or brown = symbol L, neutral wire,
blue/white markings = symbol N .
Make sure wires are seated properly.
Now fasten the LED light panel into the
mounting bracket using the screws .
Note: Make sure that the screws engage properly.
Re-insert the fuse or switch on the circuit
breaker in the fuse box (1 position) (see Fig. C).
Your LED wall/ceiling panel is now ready to use.
Hanging installation
Undo and remove the screws visible on the
side of the installation bracket .
Mark the drill holes using the screw holes
in the installation bracket .
Drill the mounting holes to a depth of
approximately 30 mm. Ensure that no cables
are damaged.
Insert the wall plugs into the holes (see Fig.
B).
Secure the mounting bracket using the
screws supplied.
Now drill two more holes at
each end of the mounting bracket for the ceiling
mount, and insert wall plugs into the holes.
Secure the ceiling fastening sleeves using the
screws supplied.
Connect the external power cable to the
terminal block on the ceiling mount .
Make sure that the individual wires are all con-
nected correctly: live wire, black or brown =
symbol L, neutral wire, blue/white markings =
symbol N .
Make sure wires are seated properly.
Now fasten the ceiling mount into the
mounting bracket using the screws .
Note: Make sure that the screws engage
properly.
Next, screw the two suspension cables into
the ceiling fastening sleeves and the ends
of the suspension cables into the four screw
holes provided in the LED light panel.
Connect the LED panel connection cable to
the ceiling mount connection cable via the
terminal box .
Make sure that the individual wires in the con-
nection cable are all connected correctly: live
wire, black or brown = symbol L, neutral wire,
blue/white markings = symbol N .
Make sure wires are seated properly.
You can now adjust the lengths of the fastening
cables by pushing the adjustment sleeves.
Reinsert the fuse or switch on the circuit
breaker in the fuse box (1 position) (see Fig. C).
Your LED wall/ceiling panel is now ready to use.
Inserting or changing batteries
(Remote control)
Note: The batteries are included with the
product and must be inserted before the product is
first used.
4
54 GB
11
10
4
2
8
3
7
1
5
1
7
4
3
4
2
3
4
6
1
3
7
7
1
5
5
2
5
8
9
6
8
5
12

Disposal
The packaging consists of environmentally friendly
materials that you can dispose of in your local
recycling facilities.
Check the marking on the packaging when
separating your waste. Packaging
materials are marked with abbreviations (a)
and numbers (b) as follows:
1–7: plastics/20–22: paper and cardboard
/80–98: composites.
The product and packaging materials are
recyclable. Please separate them so they
can be processed properly by the waste
disposal company. The Triman logo only
applies in France.
Ask your local administrative council or waste
disposal facility about how to dispose of the
product at the end of its life.
When your product reaches the end of its life,
please consider the environment and do not
throw it into your general waste: instead,
dispose of it properly. You can find out about
disposal facilities and their opening times
from your local council or administration.
Defective or used batteries must be
recycled in accordance with EC Directive
2006/66/EC and changes to this directive.
Return batteries and/or the product via the
collection facilities available.
Disposing of batteries improperly can
damage the environment.
Batteries may not be disposed of with your house-
hold waste. They can contain toxic heavy metals
and must be treated as hazardous waste. The
chemical symbols for heavy metals are Cd =
When the remote control range becomes
weak, the batteries need changing.
Pull the battery compartment cover out of the
remote control in the direction of the arrow.
Take out the batteries and insert the new
batteries . Battery types are specified in
the section “Technical details”.
Note: The polarities are shown in the battery
compartment.
Replace the cover on the battery
compartment.
The remote control is now ready to use.
First use
Switching the light on and off/
Adjusting the light colour
Press the light switch (wall switch) to switch the
LED light panel on or off.
If you activate the light switch repeatedly very
quickly, the LED light panel switches
between cold, warm and neutral white.
The following functions are available
(see product image D)
Maintenance and cleaning
ELECTRIC SHOCK!
Before cleaning the light, disconnect the power.
To do this, remove the fuse or switch off the circuit
breaker in the fuse box (0 position) (see Fig. A).
To avoid burns, make sure that the light is
switched off and has cooled down before you
touch it. Never use solvents, petrol, etc.
These can damage the light.
Use a dry, lint-free cloth to clean the LED wall/
ceiling panel.
Re-insert the fuse or switch on the circuit break-
er in the fuse box (1 position)
(see Fig. C).
55GB
6
6
Ä
~
WARNING!
13
12
12
12

Cadmium, Hg = Mercury, Pb = Lead. Return your
used batteries to a communal collection facility.
Declaration of conformity
This product complies with the
requirements of the applicable national
and European directives. Corresponding
declarations and documentation are available
with the manufacturer. The product complies with
the requirements of German safety legislation for
equipment and products.
We reserve the right to make technical changes
and modifications to the appearance of the item
in the course of our product improvement process.
Typing errors and misprints reserved.
Warranty and service
Warranty
We offer a three-year warranty from the date of
purchase. Our products are manufactured
according to the latest production techniques and
undergo detailed quality checks.
We guarantee that the article is in perfect
condition. During the warranty period, we will
repair material or manufacturing defects free of
charge. If, contrary to all expectations, the item
exhibits any defects, please pack it up carefully and
send it to the service address provided. The
warranty excludes damage resulting from improper
use and all wear parts or consumable
materials. You can order replacement wear parts
and consumables at your own cost by telephoning
the number provided. You can likewise arrange
repairs that are not included in the warranty (e.g.
lamps) by contacting the service address provided;
these will be billed to you at cost price.
The item will be repaired at the service address
provided.
To ensure it can be handled and sent back to you
promptly, please send it directly to this address.
If you require additional product information, want
to order accessories, or have any questions about
our service, please telephone our customer service
line on the telephone number provided. Please in-
clude the item number when you submit your query
(see “Technical details”).
This product contains light sources of
energy efficiency class E
56 GB

Service addresses
Great Britain & Ireland
EGLO UK LTD.
Unit 12 Cirrus Park, Lower Farm Road,
Moulton Park
NORTHAMPTON NN3 6UR, GREAT BRITAIN
T: +44 1604 790 986
IAN 378855_2101
When you submit your query, please have the
receipt and item number (e.g. IAN 123456_7890)
ready as proof of purchase.
57GB
Warranty card
Sender: _______________________________________________________________________________
Full name: _____________________________________________________________________________
Country/Postcode/Town/Street address: ________________________________________________
Telephone number: ______________________________________________________________________
Item number/item name: ________________________________________________________________
Date and place of purchase: ______________________________________________________________
Details of the defect: ____________________________________________________________________
Date/signature: _______________________________________________________________________
If the warranty does not apply:____________________________________________________________
Please return the unrepaired item at my own cost.
Please inform me of the cost and repair the item at my own cost.


59
Az alkalmazott piktogramok jelmagyarázata ....................................... Oldal 60
Bevezetés.......................................................................................................... Oldal 60
Rendeltetésszerű használat .................................................................................... Oldal 61
A csomag tartalma ............................................................................................. Oldal 61
Az egyes részek leírása ....................................................................................... Oldal 61
Műszaki adatok .................................................................................................. Oldal 61
Biztonság ......................................................................................................... Oldal 62
Biztonsági figyelmeztetések .................................................................................. Oldal 62
Az elemekre/akkumulátorokra vonatkozó biztonsági figyelmeztetések ..................... Oldal 63
Előkészítés ...................................................................................................... Oldal 64
Szükséges szerszámok és anyagok ........................................................................ Oldal 64
LED-es fali/mennyezeti panel szerelése .................................................................. Oldal 64
Elemek behelyezése/cseréje (távirányító) ................................................................ Oldal 65
Üzembe helyezés ............................................................................................ Oldal 65
LED-es fali/mennyezeti panel be- és kikapcsolása/fényszín beállítása ...................... Oldal 65
Karbantartás és tisztítás ............................................................................... Oldal 66
Ártalmatlanítás ............................................................................................... Oldal 66
Megfelelőségi nyilatkozat ............................................................................ Oldal 66
Garancia és szervizelés ................................................................................ Oldal 67
Garancia ............................................................................................................. Oldal 67
A szerviz címe ..................................................................................................... Oldal 67
Garanciajegy ....................................................................................................... Oldal 68
HU

LED-es fali és mennyezeti panel
Bevezetés
Gratulálunk az új LED-es fali/
mennyezetipanel megvásárlásához
(a továbbiakban lámpatest vagy
termék). Ön ezzel egy kiváló minőségű terméket
választott. Kérjük, hogy figyelmesen olvass végig
ezt a kezelési útmutatót. Hajtsa ki az ábrákat
tartalmazó oldalt. A jelen kezelési útmutató a ter-
mékhez tartozik, és fontos információkat tartalmaz
az üzembe helyezésével és kezelésével kapcso-
latban. Mindig tartsa be az összes biztonsági
előírást. Az üzembe helyezés előtt ellenőrizze,
hogy a hálózati feszültség megfelelő-e, és hogy
minden alkatrész megfelelően van-e felszerelve. Ha
bármilyen kérdése van, vagy bizonytalan a termék
használatával kapcsolatban, kérjük, forduljon a
* További információkat, beleértve a további szimbólumok
magyarázatát és egyéb technikai részleteket, a www.edi-light.com
oldalon talál.
Az alkalmazott piktogramok jelmagyarázata*
Olvassa el az utasításokat!
Biztonsági figyelmeztetések
Cselekvési útmutatások
Ez a lámpa kizárólag belső térben,
száraz és zárt helyiségekben való
használatra alkalmas.
Váltakozó áram/feszültség
hertz (frekvencia)
watt (teljesítmény)
Egyenáram/-feszültség
Polaritáskimenet
II. érintésvédelmi osztály
Vegye figyelembe a figy
elmeztető- és a biztonsági utasításokat!
Figyelmeztetés!
Áramütés veszélye!
Figyelem! Robbanásveszély!
Élet- és balesetveszélyt jelent
kisgyermekek és gyermekek számára!
Rövidzárlatbiztos
Biztonság Extra alacsony feszültség
Egyes veszélyes anyagok korlátozása
Anyagok
környezeti hőmérséklet
A ház hőmérséklete
a megadott ponton
II védelmi fokozat az előtét esetében
Kelvinben megadott fényhőmérséklet
lm Lumen
Élettartam
A fényerő külső vezérlőkön keresztül nem
szabályozható.
Csak beltéri alkalmazásra
Viseljen védőkesztyűt!
TÜV SÜD/GS (- bevizsgált biztonság)
tanúsítással rendelkezik
Az elemek nem megfelelő ártalmatlanítása
károsíthatja a környezetet.
Vegye figyelembe a környezetet a
csomagolás és a készülék
ártalmatlanításakor.
A LED-es világítás színvisszaadási indexe
Független vezérmű
Ä
~
ta
tc
25000h
Ra
SELV
60 HU

márkakereskedőjéhez vagy az ügyfélszolgálathoz.
Kérjük, gondosan őrizze meg a jelen kezelési
útmutatót, és szükség esetén adja tovább harmadik
félnek.
Rendeltetés szerinti használat
Ez a lámpa kizárólag belső térben,
száraz és zárt helyiségekben történő
használatra alkalmas. A jelen termék
csak magánháztartásokban történő használatra
készült.
A csomag tartalma
Közvetlenül a kicsomagolás után mindig
ellenőrizze, hogy a csomag tartalma teljes-e,
valamint hogy a termék tökéletes állapotban van-e.
1 LED-es mennyezeti lámpa
2 elem (AAA; 1,5 V)
1 távirányító
Szereléstechnikai anyag
Az egyes részek leírása
Mennyezetre szerelés
4 csavar a lámpatest rögzítéséhez
4 tipli
1 tartókonzol
4 csavar a tartókonzolhoz
Sorcsatlakozó záródobozzal
LED-es mennyezeti lámpa
Függesztett szerelés
4 csavar a lámpatest rögzítéséhez
4 tipli
4 csavar a rögzítéshez
Terminal block with connection box
Sorcsatlakozó záródobozzal
tartókonzol
LED-es mennyezeti lámpa
Mennyezeti rózsa csavarokkal Függesztő
huzalok és mennyezeti rögzítő
hüvelyekből és panelrögzítő
csavarokból állnak.
Mennyezeti szerelőhüvelyek
Csavarmenet
Beállítóhüvely
Akkumulátorok
Távirányító
Műszaki adatok
Termékszám: 55895
Üzemi feszültség: 220–240 V~ 50/60 Hz
Összteljesítmény: max. 30 watt
Érintésvédelmi osztály: II /
LED-es fényforrás: 2700K to 5000K
Ra=83
Termékszám: 55896
Üzemi feszültség: 220–240 V~ 50/60 Hz
Összteljesítmény: max. 28 watt
Érintésvédelmi osztály: II /
LED-es fényforrás: 2700K to 5000K
Ra=82
A LED-es fényforrásokat és a LED-es
vezérlőegységet csak szakember cserélheti ki.
Méretek:
A modell (55895): LED-es panel 62 x 62x 7cm
(H x Sz x M)
B modell (55896): LED-es panel 100 x 25 x 7cm
(H x Sz x M)
Védettség: IP20
Elemtípus
(távirányító): 2 x AAA 1.5V
Forgalomba hozza:
EDI Light GmbH, Heiligkreuz 22, 6136 Pill,
AUSZTRIA
www.edi-light.com
61HU
1
2
3
4
5
6
7
1
2
4
5
6
8
9
10
11
12
13

Kerülje el az áramütés okozta
életveszélyt
A nem megfelelő kezelés vagy a biztonsági
figyelmeztetések be nem tartása miatt
bekövetkező anyagi vagy személyi sérülésekért,
nem vállalunk felelősséget!
A villanyszerelést képzett villanyszerelővel vagy
villanyszerelésben jártas személlyel végeztesse
el.
Szerelés előtt vegye ki a biztosítékot, vagy
kapcsolja ki a biztosítékdobozban lévő
túláramvédelmi megszakítót (0 állás).
Feltétlenül kerülje el, hogy a lámpa vízzel vagy
más folyadékkal érintkezzen.
Használat előtt ellenőrizze, hogy a
rendelkezésre álló hálózati feszültség egyezik-e
a lámpatest előírt üzemi Feszültségével (lásd
„Műszaki adatok”).
Ügyeljen arra, hogy a szerelés során ne
sérüljenek meg a vezetékek.
A LED-es fali/mennyezeti panel külső vezérlőkön
keresztül nem szabályozható.
A lámpatest fényforrását csak a gyártó vagy
az általa megbízott szerviztechnikus vagy
hasonlóan képzett személy cserélheti ki.
Kerülje a tűz-és sérülésveszély-
eket
Az égési sérülések elkerülése érdekében
győződjön meg róla a lámpatest ki van
kapcsolva és lehűlt, mielőtt megérintené.
Ne szerelje a lámpatestet nedves vagy vezető
felületre. Ne hagyja a lámpatestet vagy a
csomagolóanyagot szanaszét heverni. Plastic
film, plastic bags, plastic parts, etc. can
be dangerous if treated as toys by children.
A műanyag fóliák/zacskók, műanyag
alkatrészek stb. veszélyes játékká válhatnak a
gyermekek számára. Egyes emberek
epilepsziás rohamokat vagy tudatzavarokat
tapasztalhatnak, ha bizonyos villanófényeknek
vagy fényhatásoknak vannak kitéve.
Biztonság
Biztonsági figyelmeztetések
A jelen kezelési útmutató be nem tartásával
okozott károk esetében a garancia érvényét veszti!
A következményes károkért nem vállalunk
felelősséget! A nem megfelelő kezelés vagy a
biztonsági figyelmeztetések be nem tartása miatt
bekövetkező anyagi vagy személyi sérülésekért,
nem vállalunk felelősséget!
ÉLET- ÉS
BALESETVESZÉLYT JELENT
KISGYERMEKEK ÉS
GYERMEKEK SZÁMÁRA!
Soha ne hagyja a gyermekeket felügyelet nélkül
a csomagolóanyaggal. A csomagolóanyag
fulladásveszélyt jelent. A gyermekek gyakran
alábecsülik a veszélyt. A csomagolóanyag nem
játék.
A jelen terméket 8 éves és idősebb gyermekek,
valamint csökkent fizikai, érzékszervi vagy
szellemi képességekkel rendelkező, illetve
tapasztalattal és ismeretekkel nem rendelkező
személyek s használhatják, ha felügyelnek
rájuk, vagy tájékoztatást kaptak a termék
biztonságos használatára vonatkozóan, és
megértették az ezzel járó veszélyeket.
Gyermekek nem játszhatnak a termékkel.
A tisztítást és a felhasználó általi karbantartást
gyermekek felügyelet nélkül nem végezhetik.
A termék nem játék.
Ha működés közben bármilyen
rendellenességet észlel (pl. szokatlan zajok,
furcsa szag vagy Füstképződés), azonnal
kapcsolja ki a terméket, és húzza ki a LED-es
dugasztápegységet a hálózati aljzatból.
Ezt követően ne használja a terméket, amíg azt
hozzáértő személy nem ellenőrizte.
62 HU

H epilepsziás tüneteket tapasztal, azonnal
forduljon orvoshoz.
A lámpatestet úgy szerelje fel, hogy a
nedvességtől, szennyeződésektől és a túl erős
felmelegedéstől védve legyen.
Fúrás előtt győződjön meg arról, hogy a
fúrás helyén nincsenek gáz-, víz- vagy
villanyvezetékek. A szerelést csak hozzáértő
személyek végezhetik. A fal állapotára
feltétlenül figyelni kell, mivel a mellékelt
rögzítőanyag nem minden faltípushoz
alkalmas. A kereskedelemben érdeklődjön
az adott falállapotnak megfelelő csavarokról és
tiplikről.
A gyártó nem vállal felelősséget a fal és a tiplik
szakszerűtlen kapcsolatából eredő károkért.
Legyen mindig figyelmes! Mindig figyeljen arra,
amit csinál, és mindig ésszerűen járjon el. Soha
ne használja a lámpát, ha nem koncentrált,
vagy ha rosszul érzi magát.
A szerelés előtt ellenőrizze, hogy a szerelés
helye alkalmas-e a lámpatest súlyának
viselésére.
Használat előtt ismerkedjen meg a jelen
útmutatásban található összes utasítással és
ábrával, valamint magával a lámpatesttel.
Biztonsági figyelmeztetések
elemekhez/
akkumulátorokhoz
ÉLETVESZÉLY! Az elemeket tartsa
gyermekektől távol. Lenyelés esetén azonnal
forduljon orvoshoz!
A lenyelés égési sérüléseket, a lágy szövetek
perforációját és halált okozhat. A lenyelést
követő 2 órán belül súlyos égési sérülések
léphetnek fel.
ROBBANÁSVESZÉLY!
Soha ne töltse újra a nem újratölthető
elemeket. Ne zárja rövidre és/vagy
ne nyissa ki az elemeket/akkumulátorokat.
Túlmelegedés, tűzveszély vagy szétrobbanás
lehet a következmény.
Soha ne dobja az elemeket/akkumulátorokat
tűzbe vagy vízbe.
Ne tegye ki az akkumulátorokat mechanikai
igénybevételnek.
Kifolyás kockázata elemek/
akkumulátorok
Kerülje a szélsőséges körülményeket és
hőmérsékleteket, amelyek hatással lehetnek az
elemekre/akkumulátorokra, pl. radiátoron/
közvetlen napsugárzás hatására.
Ha az elemek/akkumulátorok kifolytak, kerülje
a bőr, a szem és a nyálkahártyák érintkezését a
vegyi anyagokkal!
Az érintett területeket azonnal öblítse le tiszta
vízzel, és forduljon orvoshoz!
VISELJEN VÉDŐKESZTYŰT!
A kifolyt vagy sérült elemek/
akkumulátorok maró hatást
okozhatnak, ha a bőrrel érintkeznek.
Ezért ebben az esetben viseljen megfelelő
védőkesztyűt.
Az elemek/akkumulátorok kifolyása esetén
a sérülések elkerülése érdekében azonnal
távolítsa el az elemeket a termékből.
Csak azonos típusú elemeket/akkumulátorokat
használjon. Ne keverje össze a régi elemeket/
akkumulátorokat az újakkal!
Vegye ki az elemeket/akkumulátorokat, ha a
terméket hosszabb ideig nem használja.
A termék sérülésének kockázata
Csak a megadott elemtípust/akkumulátortípust
használja!
Az akkumulátorokat az elemeken/
akkumulátoron és a terméken található (+) és (-)
polaritásjelzésnek megfelelően helyezze be.
Az elemen/akkumulátoron és az
elemtartóban lévő érintkezőket a behelyezés
előtt száraz, szöszmentes ruhával vagy
vattapamaccsal tisztítsa meg!
Azonnal távolítsa el a termékből a lemerült
elemeket/akkumulátorokat. (Műszaki
adatok”).
63HU

Előkészület
Szükséges szerszámok és
anyagok
Az említett szerszámok és anyagok nem tartoznak
a csomag tartalmába. Ezek a tájékozódást segítő,
nem kötelező érvényű adatok és értékek.
Az anyag jellege a helyszín egyedi körülményeihez
igazodik.
– ceruza/jelölőszerszám
– 2 pólusú feszültségmérő
– csillagfejű csavarhúzó
– fúrógép (kb. ø 6 mm)
– oldalvágó
LED-es világító panel szerelése
ÁRAMÜTÉS
VESZÉLYE!
Fontos: Az elektromos csatlakoztatást képzett
villanyszerelőnek vagy az elektromos
szerelvényekben jártas személynek kell elvégeznie.
Ennek a személynek ismernie kell a lámpatest
tulajdonságait és a csatlakoztatási előírásokat.
Távolítsa el ehhez a biztosítékot, vagy kapcsolja
ki a biztosítékdobozban lévő túláramvédelmi
megszakítót (0 állás) (lásd A ábra).
Ennek során 2 szerelési lehetősége van:
Fali, mennyezeti szerelés
Lazítsa meg a tartókonzol oldalán látható
csavarokat , és távolítsa el azokat.
Jelölje meg a fúrólyukakat a
tartókonzolon található lyukak segítségével
a csavarok számára.
Most fúrja ki a rögzítőfuratokat kb. 30 mm
mélyen. Győződjön meg róla, hogy a vezeték
nem sérült meg.
Helyezze be a tipliket a fúrólyukakba
(lásd a B ábrát).
Rögzítse a tartókonzolt a mellékelt
csavarokkal (lásd a B ábrát).
Csatlakoztassa a LED-es világítópanel
csatlakozókábelét a (külső) hálózati
csatlakozókábelhez a sorcsatlakozó
segítségével (lásd a B ábrát).
Ügyeljen arra, hogy a hálózati csatlakozókábel
(külső) egyes vezetékei megfelelően legyenek
csatlakoztatva: Az áram alatt lévő vezeték
fekete vagy barna, a jele L, a nulla vezető
kék/fehér színű kábel jele az N .
Ügyeljen a helyes illeszkedésre.
Most a csavarok segítségével csavarozza a
LED-es lámpapanelt a tartó konzolhoz
.
Figyelmeztetés: Ügyeljen arra, hogy a csavarok
rendesen bekattanjanak.
T egye ismét vissza a biztosítékot, vagy
kapcsolja be a túláramvédelmi megszakítót
a biztosítékdobozban (I-állás) (lásd a C
ábrát).
Az Ön LED-es fali/mennyezeti panelje most már
üzemkész.
Függesztett szerelés
Lazítsa meg a tartókonzol oldalán látható
csavarokat , és távolítsa el azokat
Jelölje meg a fúrólyukakat a rögzítőkonzolon
a csavaroknak szánt lyukak segítségével.
Most fúrja ki a rögzítőfuratokat kb. 30 mm
mélyen. Győződjön meg róla, hogy a vezeték
nem sérült meg.
Helyezze be a tipliket a fúrólyukakba
(lásd a B ábrát).
Rögzítse a tartókonzolt a mellékelt
csavarokkal .
Most fúrjon még 2 lyukat
távolságra a mennye ze ti rózsát rögzítő
konzol végeitől, és helyezzen be egy-egy tiplit
a lyukakba.
Rögzítse a mennyezeti rögzítőhüvelyeket
a mellékelt csavarokkal.
64 HU
4
2
3
1
1
3
6
2
3
4
4
3
7
7
4
7
4
5
2

Vegye ki az elemeket , és helyezze be
az újakat. Az elem típusát a „Műszaki adatok”
című fejezetben találja. Az elem típusát a
„Műszaki adatok” című fejezetben találja.
Figyelmeztetés: A helyes polaritás az
elemtartóban van feltüntetve.
Helyezze vissza az elemtartó fedelét az
elemtartóra.
A távirányító most már üzemkész.
Üzembevétel
A világítótest be- és kikapcsolása
A fényszín beállítása
A villanykapcsoló (fali kapcsoló)
működtetésével kapcsolja be/ki a LED-es
fénypanelt .
A fénykapcsoló gyors egymás utáni
megnyomásaval a LED-es világító panel
a hideg, a meleg és a semleges fehér között
váltogat.
A következő funkciók állnak
rendelkezésre (lásd a termék D ábráját)
Csatlakoztassa a hálózati csatlakozókábelt
(külső) a mennyezeti rózsa
sorcsatlakozójához .
Ügyeljen arra, hogy az egyes vezetékek
megfelelően legyenek csatlakoztatva: A
fázisvezető színe fekete vagy barna, a jele
L, a nullavezető kék/fehér színű, a jele N
Ügyeljen a helyes illeszkedésre.
Most a csavarok segítségével csavarozza
a mennyezeti rózsa es lámpapanelt a tartó
konzolhoz .
Figyelmeztetés: Ügyeljen arra, hogy a csavarok
rendesen bekattanjanak.
Most csavarja be a 2 függesztő huzalt
a mennyezeti rögzítőhüvelyekbe , a
függesztő huzalok végeit pedig a LED-es
világító panelen található, erre szánt négy
csavarmenetbe .
Csatlakoztassa a LED-es világító panel
csatlakozókábelét a mennyezeti rózsához a
sorcsatlakozó segítségé vel.
Ügyeljen arra, hogy a csatlakozókábel egyes
vezetékei mindig megfelelően legye nek
csatlakoztatva: A fázisvezető színe fekete vagy
barna, a jele L, a nullavezető kék, ill. fehér
színű, a jele N .
Ügyeljen a helyes illeszkedésre.
Most már beállíthatja a rögzítőhuzalok hosszát
a beállítóhüvely megnyomásával.
Tegye ismét vissza a biztosítékot, vagy
kapcsolja be a túláramvédelmi megszakítót a
biztosítékdobozban (I-állás) (lásd a C ábrát).
Az Ön LED-es fali/mennyezeti panelje most már
üzemkész.
Elemek behelyezése/cseréje
(távirányító)
Figyelmeztetés: Az elemeket a csomag
tartalmazza, és azokat az első használat előtt be
kell helyezni.
Ha a távirányító hatótávolsága csökken, ki kell
cserélni az elemeket . Ehhez húzza le
a távirányítóról az elemtartó fedelét a nyíl
irányába. 65HU
11
10
8
5
6
1
7
8
6
6
5.
1
9
8
5
12
12
12
13

Karbantartás és tisztítás
ÁRAMÜTÉS
VESZÉLYE!
A lámpatest tisztításához először válassza le a
lámpatestet a hálózatról. Távolítsa el ehhez a
biztosítékot, vagy kapcsolja ki a
biztosítékdobozban lévő túláramvédelmi
megszakítót (0 állás) (lásd A ábra).
Az égési sérülések elkerülése érdekében
győződjön meg róla, hogy a lámpa ki van
kapcsolva és lehűlt, mielőtt megérintené.
Ne használjon oldószereket, benzint vagy
hasonlót. A lámpatest ennek során megsérülne.
Használjon száraz, szöszmentes ruhát a LED-es
fali/mennyezeti panel tisztításához. Tegye ismét
vissza a biztosítékot, vagy kapcsolja be a
túláramvédelmi megszakítót a
biztosítékdobozban (I-állás).
(lásd a C ábrát)
Ártalmatlanítás
A csomagolás környezetbarát anyagokból készült,
amelyeket a helyi újrahasznosítási pontokon ártal-
matlaníthat.
A hulladékok szétválasztásakor vegye
figyelembe a csomagolóanyagok címkéit,
amelyeket a következő jelentésű
rövidítésekkel (a) és számokkal (b) jelölnek:
1–7: műanyag/20–22: papír és karton
/80–98: kompozit anyagok.
A termék és a csomagolóanyagok
újrahasznosíthatók, a jobb hulladékkezelés
érdekében külön-külön ártalmatlanítsa őket.
A Triman logó csak Franciaországban
érvényes.
Az elhasznált termék ártalmatlanításának
módjairól a helyi önkormányzatnál
tájékozódhat.
A környezetvédelem érdekében ne dobja a
terméket a háztartási hulladékba ha elérte
élettartama végét, hanem szakszerűen
ártalmatlanítsa. A gyűjtő pontokról és azok
nyitvatartási idejéről a helyi, illetékes
közigazgatási szervnél tájékozódhat.
A hibás vagy elhasznált elemeket/
akkumulátorokat a 2006/66/EK
irányelvnek és módosításainak megfelelően
kell újrahasznosítani. Juttassa vissza az elemeket/
akkumulátorokat és/vagy a terméket az ajánlott
álló gyűjtőeszközökön keresztül.
Környezeti károk az elemek/
akkumulátorok ártalmatlanítása!!
Az elemeket akkumulátorokat nem szabad a
háztartási hulladékkal együtt ártalmatlanítani.
Mérgező nehézfémeket tartalmazhatnak, és
különleges kezelést igénylő hulladékoknak
számítanak. A nehézfémek vegyi szimbólumai
a következők: Cd = kádmium, Hg= higany, Pb =
ólom. Ezért adja le az elhasznált elemeket/
akkumulátorokat egy kommunális gyűjtőhelyen.
Megfelelőségi nyilatkozat
A jelen termék megfelel a vonatkozó
európai és nemzeti irányelvek
követelményeinek. A megfelelő
nyilatkozatok és dokumentumok a gyártónál
vannak A termék megfelel a német készülék- és
termékbiztonsági törvény követelményeinek. A
termékfejlesztés során fenntartjuk a jogot, hogy
technikai és optikai változtatásokat hajtsunk végre
a terméken.
Szedési és nyomdai hibák előfordulhatnak.
66 HU
Ä
~

Garancia és szervizelés
Garancia
A vásárlástól számított 3 év garanciát biztosítunk.
Termékeinket modern gyártási módszerek
szerint gyártjuk, és pontos minőségellenőrzésnek
vetjük alá. Garantáljuk a termékek kifogástalan
minőségét. A garanciaidőn belül minden
anyagvagy gyártási hibát díjmentesen kijavítunk.
Ha a várakozásokkal ellentétben hibát talál, küldje
el a gondosan becsomagolt terméket a megadott
szervizcímre. A nem megfelelő kezelésből eredő
károk, valamint a kopó alkatrészek és
fogyóeszközök nem tartoznak a garancia hatálya
alá. Ezeket térítés ellenében rendelheti meg a
megadott telefonszámon. A garancia által nem
fedezett javítások (pl. világítótestek) a megadott
szervizcímen önköltségi áron, egyedi díj ellenében
is elvégeztethetők. A termék javítása a megadott
szerviz-címen történik. Csak akkor lehet időben
feldolgozni és visszaküldeni, ha közvetlenül erre
a címre küldi. Ha további termékinformációra van
szüksége, szeretne tartozékokat rendelni, vagy
bármilyen kérdése van a szervizeléssel
kapcsolatban, kérjük, hívja ügyfélszolgálatunkat
a megadott telefonszámon. Ha bármilyen kérdése
van, kérjük, adja meg a cikkszámot (lásd „Műszaki
adatok”).
Ez a termék E energiahatékonysági osz-
tályba tartozó fényforrásokat tartalmaz.
67HU
Service addresses
Hungary - Production & Logistics
EGLO magyarorszag KFT
Fő út. 155
3060 Paszto, HUNGARY
T: +36 32 560 050
E: info-hungar[email protected]
IAN 378855_2101
Amikor elküldi kérését, kérjük, tartsa készenlétben a
blokkot és a cikkszámot (pl. IAN 123456_7890) a
vásárlás bizonyítékaként.

Garanciajegy
Feladó: ______________________________________________________________________________
Név/keresztnév: _______________________________________________________________________
Ország/Irányítószám/hely/utca: _________________________________________________________
Telefonszám: __________________________________________________________________________
Termékszám/megnevezés: _______________________________________________________________
Vásárlás dátuma/vásárlás helye: _________________________________________________________
A hiba megnevezése: ___________________________________________________________________
Dátum/aláírás: ________________________________________________________________________
Ha a garancia nem érvényes: ____________________________________________________________
Kérem, hogy a javítatlan terméket saját költségemen küldje vissza.
Kérem, tájékoztasson a költségekről, és saját költségemen javítsa meg a terméket.
68 HU


71IT
Legenda dei pittogrammi utilizzati ........................................................... Pagina 72
Introduzione .................................................................................................. Pagina 72
Uso previsto ....................................................................................................... Pagina 73
Contenuto della confezione.................................................................................. Pagina 73
Descrizione delle parti ........................................................................................ Pagina 73
Dati tecnici ........................................................................................................ Pagina 73
Sicurezza ........................................................................................................ Pagina 74
Avvertenze di sicurezza ...................................................................................... Pagina 74
Indicazioni di sicurezza per batterie/batterie ricaricabili ....................................... Pagina 75
Preparazione ................................................................................................ Pagina 76
Strumenti e materiali necessari............................................................................. Pagina 76
Montaggio del pannello LED a parete/soffitto........................................................ Pagina 76
Inserimento/cambio delle batterie (telecomando) .................................................. Pagina 77
Messa in funzione ........................................................................................ Pagina 77
Accendere/spegnere pannello LED a parete/soffitto/Impostare il colore della luce... Pagina 77
Manutenzione e pulizia ............................................................................... Pagina 77
Smaltimento .................................................................................................. Pagina 78
Dichiarazione di conformità ....................................................................... Pagina 78
Garanzia e assistenza ................................................................................. Pagina 78
Garanzia ........................................................................................................... Pagina 78
Indirizzo dell'assistenza ...................................................................................... Pagina 79
Certificato di garanzia ........................................................................................ Pagina 79

Pannello LED a parete/soffitto
Introduzione
Congratulazioni per l'acquisto del nuovo
pannelloLED a parete/soffitto
(di seguito denominato anche
apparecchio o prodotto). Si tratta di un prodotto di
alta qualità.
Si prega di leggere attentamente e per intero
queste istruzioni per l'uso. Aprire la pagina con
l'illustrazione. Le presenti istruzioni fanno parte del
prodotto e contengono informazioni importanti
sulla messa in funzione e sull'utilizzo. Osservare
sempre tutte le istruzioni di sicurezza. Prima della
messa in funzione, verificare che sia presente la
tensione di rete corretta e che tutte le parti siano
montate correttamente. In caso di domande o di
incertezze riguardo all'uso del prodotto,
contattare il proprio rivenditore di fiducia o il
* Maggiori dettagli, per esempio ulteriori spiegazioni di simboli o
informazioni tecniche, si trovano sul sito www.edi-light.com
72 IT
Legenda dei pittogrammi utilizzati*
Leggere le istruzioni!
Indicazioni di sicurezza
Istruzioni pratiche
Questo apparecchio è progettato esclu-
sivamente per l’uso interno, in ambienti
asciutti e chiusi.
Corrente/tensione alternata
Hertz (frequenza)
Watt (potenza attiva)
Corrente/tensione continua
Polarità in uscita
Classe di protezione II
Attenersi alle
avvertenze e alle istruzioni di sicurezza!
Attenzione!
Pericolo di scossa elettrica!
Attenzione! Pericolo di esplosione!
Pericolo di morte e di incidenti per
i bambini!
A prova di cortocircuito
Trasformatore di sicurezza
Sicurezza a bassissima tensione
Direttiva sulla restrizione delle sostanze
pericolose Sostanze
Temperatura ambiente
Temperatura ambiente
Classe di protezione II con il ballast
Temperatura della luce in Kelvin
lm Lumen
Vita utile
Non dimmerabile con regolatori esterni.
Solo per interni
Indossare guanti protettivi
TÜV SÜD / testato GS
Danni all’ambiente in seguito asmaltimento
errato delle batterie!
Smaltire l’imballaggio e l’apparecchio in
modo rispettoso dell’ambiente!
Indice di resa cromatica dell’illuminazione
a LED
Ingranaggio di controllo indipendente
Ä
~
ta
tc
25000h
Ra
SELV

centro di assistenza. Si prega di conservare queste
istruzioni in un luogo sicuro e, all'occorrenza, di
trasmetterle a terzi.
Uso previsto
Questa lampada è destinata
esclusivamente all'uso interno, in
ambienti asciutti e chiusi. Questo
prodotto è destinato esclusivamente all'uso in
abitazioni private.
Contenuto della confezione
Subito dopo aver rimosso l'imballaggio, sempre
che il contenuto della confezione sia completo e
che il prodotto non sia danneggiato.
1 plafoniera a LED
2 batterie (AAA; 1,5 V)
1 telecomando
Materiale di montaggio
Descrizione delle parti
Montaggio a soffitto
4 viti per il fissaggio dell'apparecchio
4 tasselli
Staffa di montaggio
4 viti per la staffa di montaggio
Terminale a vite con scatola di connessione
Plafoniera a LED
Montaggio a sospensione
4 viti per il fissaggio dell'apparecchio
4 tasselli
4 viti per il montaggio
Terminale a vite con scatola di connessione
Plafoniera a LED
Staffa di montaggio
Struttura portante a soffitto incl. viti Cavi di
sospensione composti da manicotti di fissaggio
a soffitto e viti di fissaggio del pannello.
Manicotti di montaggio a soffitto
Filetto della vite
Manicotto di regolazione
Batterie
Controllo remoto
Dati tecnici
Codice articolo: 55895
Tensione di esercizio: 220-240 V~ 50/60 Hz
Potenza totale: max.30 Watt
Classe di protezione: II/
Fonte luminosa a LED: 2700K-5000K
Ra=83
Codice articolo: 55896
Tensione di esercizio: 220-240 V~ 50/60 Hz
Potenza totale: max. 28 Watt
Classe di protezione: II/
Fonte luminosa a LED: 2700K-5000K
Ra=82
Le sorgenti luminose a LED e il ballast elettronico LED
possono essere sostituiti solo da un tecnico.
Dimensioni:
Modello A (55895): Pannello a LED 62 x 62x 7cm
(L x A x P)
Modello B (55896): Pannello a LED 100 x 25 x 7cm
(L x A x P)
Grado di protezione: IP20
Tipo di batteria
(telecomando): 2 x AAA 1,5V
Distributore:
EDI Light GmbH, Heiligkreuz 22, 6136 Pill,
AUSTRIA
www.edi-light.com
73IT
1
2
3
4
5
6
7
1
2
4
5
6
8
9
10
11
12
13

Sicurezza
Indicazioni di sicurezza
In caso di danni causati dal mancato rispetto di
queste istruzioni per l'uso, il diritto alla garanzia
decade! Si esclude ogni responsabilità per i danni
conseguenti! Nel caso di danni materiali o lesioni
personali causati da un uso improprio o dall'
inosservanza delle istruzioni di sicurezza, non si
assumono responsabilità!
PERICOLO
DI MORTE E DI INCIDENTI PER
I BAMBINI!
Non lasciare mai i bambini incustoditi con il
materiale d'imballaggio. Pericolo di soffoca-
mento dovuto al materiale di imballaggio. I
bambini spesso sottovalutano i pericoli. Il
materiale di imballaggio non è un giocattolo.
Questo prodotto può essere usato da bambini a
partire dagli 8 anni in su e da persone con
ridotte capacità fisiche, sensoriali o mentali o
con mancanza di esperienza e conoscenze
solo sotto un'attenta supervisione oppure dopo
aver ricevuto istruzioni sull'uso sicuro del
prodotto e aver compreso i pericoli correlati.
I bambini non devono giocare con il prodotto.
La pulizia e la manutenzione non devono essere
svolte da bambini senza supervisione. Il
prodotto non è un giocattolo.
Se durante l'uso si dovesse notare qualsiasi
anomalia (ad esempio, rumori insoliti, odori
strani o fumo), spegnere immediatamente il
prodotto. In seguito non utilizzare il prodotto
prima che sia stato ispezionato da una persona
competente.
Evitare il pericolo di vita da
scosse elettriche
Non si accettano responsabilità per danni
a cose o persone causati da un uso improprio o
dall'inosservanza delle indicazioni di sicurezza!
Far eseguire l'installazione elettrica da un
elettricista qualificato o da una persona qualifi-
cata a realizzare installazioni elettriche.
Prima del montaggio, rimuovere il fusibile o
spegnere l'interruttore nella scatola dei fusibili
(posizione 0). Evitare assolutamente che la
lampada entri in contatto con acqua o altri
liquidi.
Prima del montaggio, assicurarsi che la tensione
di rete esistente corrisponda alla tensione
operativa richiesta dall'apparecchio (vedere
"Dati tecnici").
Assicurarsi che nessun cavo venga danneggiato
durante l'installazione.
Il pannello LED a parete/soffitto non è
dimmerabile con regolatori esterni.
La sorgente luminosa di questo apparecchio
può essere sostituita solo dal costruttore o da un
tecnico di assistenza o una persona con una
qualifica analoga.
Prevenire il pericolo di incendio
e di lesioni
Prima di toccare l'apparecchio, assicurarsi che
sia spento e si sia raffreddato.
Pericolo di ustioni. Non fissare l'apparecchio a
una superficie umida o conduttiva.
Non lasciare l'apparecchio o il materiale di
imballaggio in giro. I fogli/sacchetti di plastica,
le parti in plastica ecc. potrebbero diventare un
giocattolo pericoloso per i bambini.
Alcune persone possono sperimentare crisi
epilettiche o perdita di coscienza se esposte a
determinate luci lampeggianti o effetti luminosi.
Se si verificano sintomi epilettici, consultare
immediatamente un medico.
Montare l'apparecchio in modo che sia protetto
da umidità, sporco e calore eccessivo.
74 IT

Prima di praticare i fori, assicurarsi di non
danneggiare tubi del gas, dell'acqua o
condotte elettriche. Montaggio solo a cura di
personale competente. È essenziale verificare la
conformazione del muro, dato che il materiale
di fissaggio non è adatto a tutti i tipi di parete.
Informarsi presso il rivenditore in merito alle viti
e ai tasselli più adatti al muro.
In caso di collegamento improprio del tassello a
muro e gli eventuali danni conseguenti
il produttore non si assume alcuna
responsabilità.
Prestare sempre la massima attenzione!
Prestare sempre attenzione a ciò che si sta
facendo e usare sempre il buon senso. Non
usare mai la lampada se non si è concentrati o
se non ci si sente bene.
Prima dell'installazione, verificare se la
posizione di montaggio è adatta al peso
dell'apparecchio.
Prima dell'uso, familiarizzate con tutte le
indicazioni e le illustrazioni delle presenti
istruzioni e con l'apparecchio stesso.
Indicazioni di sicurezza per
batterie/batterie ricaricabili
PERICOLO DI MORTE! Tenere le batterie/
batterie ricaricabili fuori dalla portata dei
bambini. In caso di ingestione, consultare
immediatamente un medico!
L'ingestione può causare ustioni, perforazione
dei tessuti molli e la morte.Entro 2 ore dall'
ingestione possono verificarsi gravi ustioni.
PERICOLO DI ESPLOSIONE!
Non ricaricare mai batterie non
caricabili. Non cortocircuitare e/o
aprire le batterie/batterie ricaricabili.
Ne possono risultare surriscaldamento, pericolo
di incendio o scoppio.Non gettare mai le
batterie/batterie ricaricabili nel fuoco o nell'ac
qua.
Non esporre batterie/batterie ricaricabili a un
carico meccanico.
Rischio di perdite dalle
batterie/batterie ricaricabili
Evitare condizioni e temperature estreme che
possono influenzare le batterie/le batterie
ricaricabili, per esempio appoggiandole su
termosifoni/esponendole alla luce diretta del
sole.
Se le batterie/batterie ricaricabili hanno subito
delle perdite, evitare il contatto di pelle, occhi
e mucose con le sostanze chimiche!
Sciacquare immediatamente le zone interessate
con acqua pulita e consultare un medico!
INDOSSARE GUANTI
PROTETTIVI! Le batterie
/batterie ricaricabili danneggiate
possono causare ustioni, se entrano in contatto
con la pelle. Pertanto, in questo caso indossare
guanti protettivi adatti.
In caso di perdite, rimuovere immediatamente
le batterie/batterie ricaricabili dal prodotto per
evitare danni.
Usare solo batterie/batterie ricaricabili dello
stesso tipo. Non mischiare le batterie/batterie
ricaricabili vecchie con quelle nuove!
Se il prodotto non viene utilizzato per un perio
do prolungato, rimuovere le batterie.
Rischio di danni al prodotto
Usare solo il tipo di batteria/batteria
ricaricabile indicato!
Inserire le batterie/batterie ricaricabili secondo
i simboli della polarità (+) e (-) riportati sulla
batteria/batteria ricaricabile e sul prodotto.
Prima di inserirla, pulire i contatti della
batteria/batteria ricaricabile e del vano
batteria con un panno asciutto e che non lascia
pelucchi o con dei cotton fioc!
Rimuovere immediatamente le batterie/batterie
ricaricabili esaurite dal prodotto. ("Dati
tecnici").
IT 75

Preparazione
Attrezzi e materiale necessari
Gli attrezzi e i materiali menzionati non sono in
dotazione. Si tratta di dati e valori orientativi non
vincolanti. La tipologia del materiale dipende dalle
caratteristiche specifiche della sede di installazione.
- Matita / strumento di marcatura
- Tester di tensione a 2 poli
- Cacciavite a croce
- Trapano (ca. ø 6 mm)
- Taglierina laterale
Montaggio del pannello luminoso a
LED
PERICOLO DI SCOSSA
ELETTRICA!
Importante: il collegamento elettrico deve essere
effettuato da un elettricista o da una persona
qualificata a realizzare installazioni elettriche. La
persona deve conoscere le caratteristiche dell'
apparecchio e le norme di collegamento.
A tal fine, togliere il fusibile o spegnere
l'interruttore nella scatola dei fusibili (posizione 0)
(vedere fig. A).
Ci sono 2 opzioni di montaggio:
Montaggio a parete-soffitto
Allentare le viti visibili sul lato della staffa di
montaggio e rimuoverle.
Marcare i fori da praticare ricalcando i fori
presenti nella staffa di montaggio per le viti.
Quindi praticare i fori di fissaggio a circa
30 mm di profondità. Assicurarsi che la linea
di alimentazione non venga danneggiata.
Inserire i tasselli nei fori (vedere fig. B).
Fissare la staffa di montaggio con le viti
fornite (vedere fig. B).
Collegare il cavo di collegamento del
pannello luminoso a LED al cavo di
collegamento alla rete (esterno) per mezzo del
terminale a vite (vedere fig. B).
Assicurarsi che i singoli conduttori
del cavo di collegamento alla rete (esterno)
siano collegati correttamente: conduttore di
corrente, nero o marrone = simbolo L,
conduttore neutro, cavo marcato blu/bianco
= simbolo N .
Assicurarsi del posizionamento corretto.
Quindi fissare con le viti il pannello
luminoso a LED alla staffa di
montaggio .
Nota: assicurarsi che le viti si innestino
correttamente.
Inserire nuovamente il fusibile o riattivare
l'interruttore sulla scatola dei fusibili (posizione I)
(vedere fig. C).
Il pannello LED a parete/soffitto ora è pronto all'uso.
Montaggio a sospensione
Allentare le viti visibili sul lato della staffa di
montaggio e rimuoverle .
Segnare i fori ricalcando i fori per le viti
presenti nella staffa di montaggio .
Quindi realizzare fori di fissaggio profondi circa
30 mm. Assicurarsi di non danneggiare la linea
di alimentazione.
Inserire i tasselli nei fori praticati
(vedere fig. B).
Fissare la staffa di montaggio con le
viti in dotazione.
Quindi realizzare altri 2 fori a una distanza
o dalle estremità della staffa
dimontaggio della struttura portante a soffitto e
inserire un tassello in ciascun foro.
Fissare i manicotti di montaggio a soffitto con
le viti in dotazione.
Collegare il cavo di collegamento alla rete
(esterno) al terminale a vite della struttura
portante a soffitto .
Assicurarsi che i singoli conduttori siano collegati
correttamente: conduttore di corrente, nero o
marrone = simbolo L, conduttore neutro, cavo
marcato blu o bianco = simbolo N .
4
7
4
7
7
76 IT
1
2
6
8
3
2 5
1
3
4
3
4
3
4
5
5

vano batterie.
Riposizionare il coperchio sul vano batterie.
Il telecomando ora è pronto per l'uso.
Messa in funzione
Accendere/spegnere l'apparec-
chio/ Impostare il colore della
luce
Premere l'interruttore della luce (interruttore a
muro) per accendere/spegnere il pannello
luminoso a LED .
Se si preme l'interruttore della luce in rapida
successione, il pannello luminoso a LED
passa dal bianco freddo, al bianco caldo e
neutro.
Sono disponibili le seguenti funzioni
(vedere figura prodotto D)
Manutenzione e pulizia
PERICOLO DI SCOSSA
ELETTRICA!
Per pulire l'apparecchio, per prima cosa
scollegarlo dalla rete elettrica. Per fare questo,
togliere il fusibile o spegnere l'interruttore nella
scatola dei fusibili (posizione 0) (vedere fig. A).
Assicurarsi che l'apparecchio sia spento
e che si sia raffreddato prima di toccarlo.
Pericolo di ustioni. Non utilizzare solventi,
benzina o simili. Si rischia di danneggiare
l'apparecchio. Per pulire il pannello LED a
parete/soffitto, usare un panno asciutto,
che non rilascia pelucchi.
Inserire nuovamente il fusibile o attivare
l'interruttore di potenza sulla scatola dei fusibili
(posizione I)
(vedere illustrazione prodotto C).
Assicurarsi del posizionamento corretto.
Quindi avvitare la struttura portante a soffitto
alla staffa di montaggio per mezzo
delle viti .
Nota: assicurarsi che le viti si innestino
correttamente.
Ora avvitare i 2 cavi di sospensione nei
manicotti di montaggio a soffitto e le
estremità dei cavi di sospensione nelle quattro
filettature previste sul pannello luminoso a
LED.
Collegare il cavo di collegamento del pannel-
lo luminoso a LED tramite il terminale a vite
al cavo di collegamento della struttura di
sospensione a soffitto .
Assicurarsi che i singoli fili del cavo di
collegamento siano collegati correttamente:
conduttore sotto tensione, nero o marrone =
simbolo L, conduttore neutro, cavo marcato blu
o bianco = simbolo N .
Assicurarsi del posizionamento corretto.
Ora è possibile regolare la lunghezza dei
cavi di sospensione premendo il manicotto di
regolazione .
Inserire nuovamente il fusibile o attivare
l'interruttore di potenza sulla scatola dei fusibili
(posizione I) (vedere fig. C).
Il pannello LED a parete/soffitto ora è pronto
all'uso.
Inserire/sostituire le batterie
(telecomando)
Nota: le batterie sono incluse in dotazione
e devono essere inserite prima della prima messa
in funzione.
Se la portata del telecomando
diminuisce, è necessario sostituire le batterie
. Per fare questo, far scorrere il coperchio
del vano batterie del telecomando nella
direzione della freccia.
Rimuovere le batterie e inserire quelle
nuove. Il tipo di batteria è specificato nel
capitolo "Dati tecnici".
Nota: la polarità corretta viene indicata nel 77IT
11
10
3
5
1
1
6
6
12
12
12
12
8
9
5
13

Smaltimento
L'imballo è fatto di materiali ecologici, che è
possibile smaltire presso i punti di riciclaggio locali.
Quando si effettua la cernita dei rifiuti,
attenersi alla marcatura dei materiali di
imballaggio,che sono contrassegnati
con abbreviazioni (a) e numeri (b) aventi il
seguente significato 1–7: materiali plastici/
20–22: carta e cartone/80-98: materiali
compositi.
Il prodotto e i materiali di imballaggio sono
riciclabili, smaltirli separatamente
per una migliore gestione dei rifiuti. Il
logo Triman vale solo per la Francia.
Per le modalità di smaltimento del prodotto
esausto contattate la propria amministrazione
comunale o l'azienda preposta.
Nell'interesse della salvaguardia ambientale,
quando il prodotto ha raggiunto la fine della
vita utile, non gettarlo tra i rifiuti domestici,
ma smaltirlo correttamente. È possibile
informarsi sui punti di raccolta e i loro orari
di apertura contattando la propria amminis
trazione locale.
Le batterie/pile ricaricabili difettose o usate
devono essere riciclate in conformità con
la direttiva 2006/66/CE e i suoi
emendamenti. Restituire le batterie/batterie
ricaricabili e/o il prodotto attraverso le strutture di
raccolta disponibili.
Danni all'ambiente in seguito a
smaltimento delle batterie/batterie
ricaricabili!
Le batterie/batterie ricaricabili non devono essere
smaltite con i rifiuti domestici. Possono contenere
metalli pesanti tossici e sono soggette al trattamento
relativo ai rifiuti pericolosi. I simboli chimici dei
metalli pesanti sono i seguenti: Cd = cadmio, Hg =
mercurio, Pb = piombo. Pertanto, conferire le
batterie/batterie esauste a un punto di raccolta
comunale.
Dichiarazione di conformità
Questo prodotto è conforme ai requisiti
delle direttive europee e nazionali
applicabili. Le relative dichiarazioni e i
documenti corrispondenti sono archiviati presso il
produttore. Il prodotto è conforme ai requisiti della
legge tedesca sulla sicurezza dei dispositivi e dei
prodotti.
Nell'ottica del miglioramento del prodotto, ci
riserviamo il diritto di apportare modifiche tecniche
ed estetiche all'articolo. Con riserva di errori di
battitura e di stampa.
Garanzia e assistenza
Garanzia
Forniamo una garanzia di 3 anni dalla data di
acquisto. I nostri prodotti sono fabbricati secondo
metodi di produzione moderni e sottoposti a un
rigoroso controllo di qualità. Garantiamo una
qualità impeccabile degli articoli. Entro il periodo
di garanzia, ripareremo gratuitamente qualsiasi
difetto di materiale o di fabbricazione. Se,
contrariamente alle aspettative, si dovessero
riscontrare dei difetti, inviare l'articolo accurata-
mente imballato all'indirizzo di assistenza
specificato. I danni causati da un uso improprio,
come le parti soggette a usura e i materiali di
consumo, sono esclusi dalla garanzia. I ricambi
possono essere ordinati a pagamento al numero di
telefono specificato. È possibile far effettuare le
riparazioni non coperte dalla garanzia (ad
78 IT
Ä
~

esempio ampade), rivolgendosi sempre
all'indirizzo di servizio specificato al prezzo di
costo che verrà stabilito individualmente.L'articolo
viene riparato all'indirizzo riportato sotto. Solo se
si invia il prodotto direttamente a questo indirizzo
sarà possibile ottenere una riparazione e una
restituzione tempestive.Per maggiori informazioni
sul prodotto, per ordinare accessori o in caso di
domande sullo svolgimento del servizio, si prega di
chiamare il nostro servizio di assistenza clienti al
numero di telefono indicato. In caso di domande,
si prega di indicare il codice articolo (vedere "Dati
tecnici").
Questo prodotto contiene sorgenti
luminose di classe di efficienza
energetica E
Indirizzo dell'assistenza
Italy
EGLO italiana S.R.L.
Via Giotto, 4
31021 Mogliano Veneto, ITALY
T: +39 041 45 66 232/245/251
IAN 378855_2101
Per tutte le richieste, si prega di presentare la
ricevuta e il codice dell'articolo (ad esempio IAN
123456_7890) come prova d'acquisto.
IT 79
Certificato di garanzia
Mittente: _____________________________________________________________________________
Cognome/Nome: _____________________________________________________________________
Paese/CAP/Città/Via: ______________________________________________________________
Numero di telefono: ____________________________________________________________________
Codice articolo/denominazione: ________________________________________________________
Data di acquisto/luogo di acquisto: Indicazione difetto: _____________________________________
Data/Firma: _________________________________________________________________________
Se non coperto da garanzia:_____________________________________________________________
Vi prego di restituirmi l'articolo non riparato a fronte delle spese di trasporto dovute.
Vi prego di comunicarmi i costi. Vi prego di riparare l'articolo a pagamento.


81NL
Legenda van de gebruikte pictogrammen ............................................... Pagina 82
Inleiding ........................................................................................................... Pagina 7
Correct gebruik ......................................................................... ........................... Pagina 7
Leveringsomvang .................................................................................................. Pagina 7
Beschrijving van de onderdelen ............................................................................. Pagina 7
Technische gegevens ............................................................................................. Pagina 7
Veiligheid ......................................................................................................... Pagina 8
Veiligheidsinstructies ............................................................................................. Pagina 8
Veiligheidsinstructies voor batterijen/accu's ............................................................ Pagina 9
Voorbereiding ................................................................................................. Pagina 9
Benodigd gereedschap en materiaal ...................................................................... Pagina 9
Led-wand-/plafondpaneel monteren ...................................................................... Pagina 10
Batterijen plaatsen/vervangen (afstandsbediening) ................................................. Pagina 10
Ingebruikname ............................................................................................... Pagina 10
Led-wand-/plafondpaneel aan-/uitschakelen/lichtkleur instellen .............................. Pagina 10
Lichteffecten instellen met de afstandsbediening ...................................................... Pagina 10
Onderhoud en reiniging ............................................................................... Pagina 11
Afvalverwijdering .......................................................................................... Pagina 11
Conformiteitsverklaring ................................................................................ Pagina 12
Garantie en service ........................................................................................ Pagina 12
Garantie .............................................................................................................. Pagina 12
Serviceadres ........................................................................................................ Pagina 12
Garantiekaart ....................................................................................................... Pagina 12

Legenda van de gebruikte pictogrammen*
Lees de aanwijzingen!
Veiligheidsinstructies
Gebruikersinstructies
Deze lamp is uitsluitend geschikt voor
gebruik binnenshuis in droge
en afgesloten ruimtes.
Wisselstroom/ -spanning
Hertz (frequentie)
Watt (actief vermogen)
Gelijkstroom/ -spanning
Polariteit output
Beschermingsklasse II
Let op de veiligheidsinstructies en
waarschuwingen!
Waarschuwing!
Gevaar voor elektrische schok!
Voorzichtig! Explosiegevaar!
Levensgevaarlijk en ongevalgevaar voor
baby's en kinderen!
Kortsluitingsbestendige
veiligheidstransformator
Extra lage-spanningsbeveiliging
Richtlijn betreffende beperking van het
gebruik van bepaalde gevaarlijke stoffen
Stoffen
Omgevingstemperatuur
Temperatuur van de behuizing op een
gegeven punt
Beschermingsklasse II bij het voorschake-
lapparaat
Lichttemperatuur in Kelvin
lm Lumen
Levensduur
Kan niet via een externe dimmer worden
gedimd.
Alleen voor binnenshuis
Draag veiligheidshandschoenen
TÜV SÜD/ GS-gecontroleerd
Gevaar voor aantasting van het milieu door
verkeerde
afvoer van de batterijen!
Gooi de verpakking en het apparaat op
milieuvriendelijke wijze weg!
Kleurweergave-index van de led-verlichting
Onafhankelijke voorschakelapparatuur
Ä
~
Led-wand en
plafondpaneel
Inleiding
Hartelijk gefeliciteerd met de aankoop
van uw nieuw led-wand-/
plafondpaneel (hierna ook lamp of
product genoemd). U hebt gekozen voor een
hoogwaardig product. Lees deze
gebruiksaanwijzing volledig en zorgvuldig door.
Sla de pagina met de afbeelding open. Deze
gebruiksaanwijzing hoort bij dit product en bevat
belangrijke informatie over de ingebruikname en
het gebruik. Neem altijd alle veiligheidsinstructies
in acht. Controleer voor ingebruikname of de
aanwezige netspanning correct is en of alle
onderdelen op de juiste wijze zijn gemonteerd.
Neem bij vragen of onduidelijkheden over het
gebruik van het product contact op met uw dealer
of het Service Center. Bewaar deze
* Meer informatie over bijv. aanvullende verklaring van de symbolen
of technische informatie vindt u op
www.edi-light.com
ta
tc
25000h
Ra
82 NL
SELV

gebruiksaanwijzing zorgvuldig en geef ze indien
nodig door aan derden.
Correct gebruik
Deze lamp is uitsluitend geschikt voor
gebruik in droge en afgesloten
binnenruimtes.
Dit product is uitsluitend bedoeld voor gebruik in
particuliere huishoudens.
Leveringsomvang
Controleer altijd onmiddellijk na het uitpakken de
leveringsomvang op volledigheid en de
onberispelijke toestand van het product.
1 led-plafondlamp
2 batterijen (AAA; 1,5 V)
1 afstandsbediening
Montagemateriaal
Beschrijving van de onderdelen
Plafondmontage
4 schroeven om de lamp te bevestigen
4 pluggen
montagehoek
4 schroeven voor de montagehoek
Kroonsteentjes met aansluitbox
led-plafondlamp
Hangende montage
4 schroeven om de lamp te bevestigen
4 pluggen
4 schroeven voor de montage
Kroonsteentjes met aansluitbox
led-plafondlamp
montagehoek
Plafondkap incl. schroeven
bevestigingskabel, bestaande uit plafond-
bevestigingshulzen en
paneelbevestigingsschroeven.
Plafond montage hulzen
Schroefdraad
Instelling mouwen
Batterijen
Afstandsbediening
Technische gegevens
Artikelnummer: 55895
Bedrijfsspanning: 220–240 V~ 50/60 Hz
Totaal vermogen: max. 30 Watt
Beschermingsklasse: II/
Led-lichtbron: 2700K t/m 5000K
Ra=83
Artikelnummer: 55896
Bedrijfsspanning: 220–240 V~ 50/60 Hz
Totaal vermogen: max. 28 Watt
Beschermingsklasse: II/
Led-lichtbron: 2700K t/m 5000K
Ra=82
De led-lichtbronnen en het led-bedrijfsapparaat
kunnen alleen door een specialist worden vervan-
gen.
Afmetingen:
Model A (55895): led-paneel 62 x 62 x 7cm
(L x B x H)
Model B (55896): led-paneel 100 x 25 x 7cm
(L x B x H)
Beschermingsklasse: IP20
Type batterij
(afstandsbediening): 2 x AAA 1,5 V
Distributeur:
EDI Light GmbH, Heiligkreuz 22, 6136 Pill,
OOSTENRIJK
www.edi-light.com
83NL
1
2
3
4
5
6
7
1
2
4
5
6
8
9
10
11
12
13

Veiligheid
Veiligheidsinstructies
Schade ontstaan door het niet in acht nemen van
deze gebruiksaanwijzing leidt tot garantieverlies!
Voor gevolgschade kunnen wij niet aansprakelijk
worden gesteld! Voor materiële schade of
persoonlijk letsel ontstaan door ondeskundig
gebruik of het niet opvolgen van de
veiligheidsinstructie kunnen wij niet aansprakelijk
worden gesteld!
LEVENSGEVAAR EN
ONGEVALGEVAAR VOOR
BABY'S EN KINDEREN!
Laat nooit kinderen zonder toezicht bij
het verpakkingsmateriaal. Er bestaat risico op
verstikking door het verpakkingsmateriaal.
Kinderen onderschatten vaak de gevaren. Het
verpakkingsmateriaal is geen speelgoed.
Dit product kan worden gebruikt door kinderen
vanaf 8 jaar en door personen met een
lichamelijke, zintuiglijke of verstandelijke
beperking of met gebrek aan kennis en/of
ervaring mits iemand toezicht op hen houdt of
hen instructie heeft gegeven hoe ze het product
veilig kunnen gebruiken en ze hebben
begrepen welke gevaren het gebruik van het
product met zich meebrengt.
Kinderen mogen niet met het product
spelen. Reiniging en onderhoud mogen
niet worden uitgevoerd door kinderen zonder
dat er iemand toezichtop hen houdt. Het
product is geen speelgoed.
Indien u tijdens het gebruik iets opvalt (bijv.
ongebruikelijke geluiden, vreemde geur of
rookontwikkeling), schakel het product
onmiddellijk uit. Gebruik hierna het product
niet meer, totdat het door een bevoegd persoon
is gecontroleerd.
Voorkom levensgevaar door
elektrische schok
Voor persoonlijk letsel of materiële schade
ontstaan door ondeskundig gebruik of het niet
opvolgen van de veiligheidsinstructie kunnen
wij niet aansprakelijk worden gesteld!
Laat de elektrische installatie uitvoeren door een
opgeleide elektricien of een persoon die is
opgeleid in elektrische installaties.
Verwijder vóór montage de zekering of schakel
de beveiligingsschakelaar in de zekeringskast
uit (stand 0).
Voorkom te allen tijde dat de lamp in contact
komt met water of andere vloeistoffen.
Controleer vóór de montage
of de aanwezige netspanning overeenkomt met
de vereiste bedrijfsspanning van de lamp
(zie "technische gegevens").
Controleer of er bij de montage geen
leidingen beschadigd worden.
Het led-wand-/plafondpaneel kan niet via
een externe dimmer worden gedimd.
De lichtbron van deze lamp mag alleen door
de fabrikant of een door hem aangewezen
servicemonteur of een vergelijkbaar
gekwalificeerd persoon worden vervangen.
Voorkom branden letselgevaar
Controleer of de lamp uitgeschakeld en
afgekoeld is, voordat de lamp wordt vastgepakt
om verbrandingen te voorkomen.
Bevestig de lamp niet op een vochtige
of geleidende ondergrond.
Laat de lamp of het verpakkings-
materiaal niet achteloos slingeren. Plastic folies
of zakken, kunststof onderdelen enz. kunnen
voor kinderen gevaarlijk speelgoed zijn.
Bepaalde lichtflitsen of lichteffecten kunnen bij
sommige personen leiden tot epileptische
aanvallen of bewustzijnsstoornissen
als deze worden geactiveerd. Raadpleeg
bij epileptische symptomen onmiddellijk
84 NL
WAARSCHUWING!

een arts.
Monteer de lamp zo dat deze
beschermd is tegen vocht, vervuiling en sterke
opwarming.
Controleer voor aanvang van de boorw
erkzaamheden of er zich geen gas-, water-
of stroomleidingen onder de boorpunten
bevinden. Montage mag alleen door
deskundige personen worden uitgevoerd. Let
onvoorwaardelijk op de toestand van de wand,
omdat het meegeleverde bevestigingsmateriaal
niet voor alle type muren geschikt is. Informeer
bij de vakhandel voor passende schroeven en
pluggen die geschikt zijn voor de eigenschap
pen van de betreffende wand.
Voor ondeskundige wand-plugverbindingen
en de daaruit voortvloeiende schade is de
fabrikant niet aansprakelijk.
Blijf altijd alert! Let steeds goed op wat u doet
en gebruik altijd uw verstand. Gebruik de lamp
nooit als u ongeconcentreerd bent of zich niet
goed voelt.
Controleer voor montage of de montagelocatie
geschikt is voor het gewicht van de lamp.
Lees voor gebruik alle aanwijzingen en
afbeeldingen in deze gebruiksaanwijzing en
maak uzelf vertrouwd met de lamp.
Veiligheidsinstructie voor
batterijen/accu's
LEVENSGEVAAR! Houd batterijen/
accu's buiten het bereik van kinderen.
Raadpleeg bij opname door de mond
onmiddellijk een arts!
Inslikken kan tot verbrandingen,
perforatie van weke weefsels en de dood
leiden. Ernstige verbrandingen kunnen binnen
2 uur na het inslikken
ontstaan.
EXPLOSIEGEVAAR! Laad nooit
niet-oplaadbare batterijen
weer op. Sluit batterijen/accu's niet
kort en/of open deze niet. Oververhitting,
brandgevaar of barsten kan het gevolg zijn.
Gooi batterijen/accu's nooit in open vuur
of water.
Stel batterijen/accu's niet
bloot aan mechanische belasting.
Risico op het uitlopen van
batterijen/accu's
Vermijd extreme omstandigheden en
temperaturen, die de batterijen/accu's
kunnen beïnvloeden, bijv. op verwarmingen of
door direct zonlicht.
Als batterijen/accu's zijn uitgelopen, vermijd
contact van de chemicaliën met huid, ogen en
slijmvliezen!
Spoel de betreffende plekken
onmiddellijk af met proper water en raadpleeg
een arts!
DRAAG
VEILIGHEIDSHANDSCHOENEN
Uitgelopen of beschadigde batterijen/
accu's kunnen na contact met de huid
brandwonden veroorzaken. Draag als de
batterijen/accu's zijn uitgelopen geschikte
veiligheidshandschoenen.
Verwijder als de batterijen/accu's zijn uitge
lopen deze onmiddellijk uit het product om
beschadigingen te voorkomen.
Gebruik alleen batterijen/accu's van
hetzelfde type. Gebruik geen oude en nieuwe
batterijen/accu's door elkaar!
Verwijder de batterijen/accu's als het
product langere tijd niet wordt gebruikt.
Risico op beschadiging van het product
Gebruik uitsluitend het aangegeven
type batterij of accu!
Plaats batterijen/accu's volgens de
polariteitsaanduiding (+) en (-) op de batterij
of accu en het product. Reinig
85NL

voor het plaatsen de contacten op de batterij/
accu en in het batterijvak met een droge,
pluisvrije doek of wattenstaafje!
Verwijder oude batterijen/accu's onmiddellijk
uit het product. ("Technische gegevens").
Voorbereiding
Benodigd gereedschap
en materialen
De vermelde gereedschappen en materialen
behoren niet tot de leveringsomvang. Het gaat
hierbij om niet-bindende voorschriften en
richtgevende waarden. De kwaliteit van het
materiaal is afhankelijk van de individuele
omstandigheden ter plaatse.
– potlood / markeringspen
– 2-polige spanningszoeker
– kruiskopschroevendraaier
– boormachine (ca. ø 6 mm)
– zijkniptang
Led-lichtpaneel monteren
GEVAAR VOOR
ELEKTRISCHE SCHOK!
Belangrijk: De elektrische aansluiting moet
worden uitgevoerd door een opgeleide elektricien
of een persoon die is opgeleid in elektrische
installaties. Deze persoon moet kennis over de
eigenschappen van de lamp en de
aansluitvoorschriften hebben. Verwijder hiervoor
de zekering of schakel de beveiligingsschakelaar in
de zekeringskast uit (stand 0)(zie afb. A).
Er zijn 2 montagemogelijkheden:
Wand- of plafondmontage:
Draai op de montagehoek de aan de
zijkant zichtbare schroeven
los en verwijder deze.
Markeer de boorgaten met behulp van de
in de montagehoek voor schroeven
aangebrachte gaten.
Boor vervolgens de bevestigingsgaten ca.
30 mm diep. Let erop dat de toevoerleiding
niet beschadigd wordt.
Steek de pluggen in de boorgaten
(zie afb. B).
Bevestig de montagehoek met de
meegeleverde schroeven (zie afb. B).
Verbind de aansluitkabel van het
led-lichtpaneel door middel van de
kroonsteentjes met het netsnoer (extern) (zie
afb. B).
Let hierbij op dat de afzonderlijke aders
van het netsnoer (extern) steeds
correct worden aangesloten:
Stroomvoerende ader, zwart of bruin =
symbool L, nulleider, blauw/wit gemarkeerde
kabel = symbool N .
Let op correct vastzitten.
Draai vervolgens het led-lichtpaneel
met de schroeven aan de
montagehoek .
Instructie: Zorg ervoor dat de schroeven goed
vastklikken.
Schakel de zekering weer aan of schakel
de beveiligingsschakelaar in de
zekeringskast aan (stand I) (zie afb. C).
Het led-wand-/plafondpaneel is nu
gereed voor gebruik.
Hangende montage
Draai op de montagehoek de aan de
zijkant zichtbare schroeven los en verwijder
deze.
Markeer de boorgaten met behulp van de
in de montagehoek voor
schroeven aangebrachte gaten.
Boor vervolgens de bevestigingsgaten ca.
30 mm diep. Let erop dat de toevoerleiding
niet beschadigd wordt.
Steek de pluggen in de boorgaten
(zie afb. B).
Bevestig de montagehoek met de
86 NL
4
2
4
6
3
3
4
3
2
1
3
7
4
7
3
5
4
WAARSCHUWING!

Batterijen plaatsen/vervangen
(afstandsbediening)
Instructie: De batterijen zijn in de
leveringsomvang inbegrepen en moeten voor
gebruik worden geplaatst.
Als het bereik van de afstandsbediening
onvoldoende is, moeten de batterijen
worden vervangen. Trek hiervoor
het deksel van het batterijencompartiment in de
richting van de pijl van de
afstandsbediening .
Verwijder de batterijen en plaats
de nieuwe batterijen . Meer informatie over
het gebruikte type batterij staat in het
hoofdstuk "Technische gegevens".
Instructie: De correcte polariteit wordt in het
batterijcompartiment aangegeven.
Plaats het deksel weer op het
batterijcompartiment.
De afstandsbediening is nu gereed voor
gebruik.
Ingebruikname
Lamp aan-/uitschakelen/
lichtkleur instellen
Bedien de lichtschakelaar (wandschakelaar)
om het led-lichtpaneel aan of uit te
zetten.
Door de lichtschakelaar kort na elkaar in
te drukken, verandert de lichtkleur van het
led-lichtpaneel van koud-, warm- naar
neutraalwit.
De volgende functies zijn beschikbaar
(zie productafbeelding D)
meegeleverde schroeven .
Boor nog 2 gaten op een afstand of vanaf het
uiteinde van de montagebeugels van de
plafondkap en steek een plug in de gaten.
Bevestig de plafondbevestigingshulzen met
de meegeleverde schroeven.
Verbind het netsnoer (extern) met de
kroonsteentjes van de plafondkap
Let er hierbij op dat de afzonderlijke aders
correct worden aangesloten: Stroomvoerende
ader, zwart of bruin = symbool L, nulleider,
blauw of wit gemarkeerde kabel = symbool
N .
Let op correct vastzitten.
Draai vervolgens de plafondkap
met de schroeven aan de montage-
hoek .
Instructie: Zorg ervoor dat de schroeven goed
vastklikken.
Schroef vervolgens de 2 bevestigingskabels in
de plafondbevestigingshulzen
en de uiteinden van de bevestigingskabels in
de 4 daarvoor bestemde schroefdraden op
het led-lichtpaneel.
Verbind de aansluitkabel van het
led-lichtpaneel door middel van de
kroonsteentjes met de aansluitkabel van de
plafondkap.
Zorg ervoor dat de afzonderlijke aders
van de aansluitkabel telkens correct worden-
aangesloten: Stroomvoerende ader, zwart
of bruin = symbool L, nulleider, blauw of
wit gemarkeerde kabel = symbool N .
Let op correct vastzitten
De bevestigingskabel kan op lengte worden
gemaakt door de instelhulzen in te
drukken Schakel de zekering weer aan of
schakel de beveiligingsschakelaar in de
zekeringskast aan (stand I) (zie afb. C).
Het led-wand-/plafondpaneel is nu
gereed voor gebruik.
87NL
11
10
8
6
5
5
6
4
7
1
6
2
5
8
1
9
5
12
12
12
12
12
13

Onderhoud en reiniging
GEVAAR VOOR
ELEKTRISCHE SCHOK!
Ontkoppel de lamp eerst van het stroomnet voor
reiniging. Verwijder hiervoor de zekering of
schakel de beveiligingsschakelaar in de
zekeringskast uit (stand 0) (zie afb. A).
Controleer om verbrandingen te voorkomen of
de lamp uitgeschakeld en afgekoeld is voordat
u deze vastpakt. Gebruik geen oplosmiddelen
zoals benzine enz. De lamp raakt hierdoor
beschadigd. Gebruik voor het reinigen van de
led-wand-/plafondpaneel een droge,
pluisvrije doek. Schakel de zekering weer aan
of schakel de beveiligingsschakelaar in de
zekeringskast aan (stand I)
(zie productafbeelding C).
Afvalverwijdering
De verpakking is gemaakt van milieuvriendelijke
materialen, die u bij plaatselijke recyclagepunten
kunt inleveren.
Neem de markering van de
verpakkingsmaterialen bij het scheiden van
afval in acht, deze worden aangegeven met
afkortingen (a) en nummers (b) met de
volgende betekenis: 1–7: kunststoffen/
20–22: papier en karton/80–98: composiet
materialen.
Het product en de verpakkingsmaterialen
kunnen gerecycled worden. Gooi ze apart
weg voor een betere afvalverwerking. Het
Triman-logo geldt alleen in Frankrijk.
Informeer bij uw gemeente naar de
mogelijkheden voor het afvoeren van het
afgedankte product.
Doe het product aan het einde van zjin
levensduur niet bij het huisvuil, maar denk
aan het milieu en gooi het weg volgens de
geldende voorschriften. Informeer bij uw
gemeente naar inzamelpunten
en hun openingstijden.
Defecte of oude batterijen/accu's moeten
overeenkomstig Richtlijn 2006/66/EG en
diens wijzigingsbladen gerecycled worden.
Lever de batterijen/accu's en/of het product in via
de aangeboden inzamelpunten.
Gevaar voor aantasting van het milieu
door verkeerde afvoer van de batterijen/
accu's!
Batterijen/accu's mogen niet via het huishoudelijk
afval worden afgevoerd. Batterijen/accu's kunnen
zware metalen bevatten en behoren tot het
chemisch afval. De chemische elementen van de
zware metalen zijn: Cd = Cadmium, Hg =
kwikzilver, Pb = lood. Voer daarom oude
batterijen/accu's af via de plaatselijke inzamel-
punten.
Conformiteitsverklaring
Dit product voldoet aan de eisen van de
geldende Europese en nationale
richtlijnen. De desbetreffende
verklaringen en documenten worden bewaard door
de fabrikant. Het product voldoet aan de eisen van
de Duitse apparaten- en productveiligheidswet.
In het kader van productverbeteringen behouden
wij ons het recht voor om technische en optische
wijzigingen aan het artikel uit te voeren. Onder
voorbehoud van zeten drukfouten.
88 NL
Ä
~
WAARSCHUWING!

Garantie en service
Garantie
Op dit apparaat geven wij 3 jaar garantie vanaf
de aankoopdatum. Onze producten worden
volgens de modernste productiemethode
gefabriceerd en aan een nauwkeurige
kwaliteitscontrole onderworpen. Wij garanderen
een onberispelijke kwaliteit van het artikel. Binnen
de garantieperiode verhelpen wij gratis alle
materiaal- of fabricagefouten. Mocht er
desondanks een defect worden geconstateerd,
stuur dan het artikel zorgvuldig verpakt naar het
aangegeven serviceadres. Schade ontstaan door
ondeskundig gebruik, alsook slijtageonderdelen en
verbruiksmaterialen vallen niet onder de garantie.
Deze kunnen via het aangegeven telefoonnummer
voor eigen rekening besteld worden. Reparaties
waarop garantie niet van toepassing is
(bijv. lichtmiddelen) kunnen ook bij de opgegeven
serviceadressen na individuele berekening tegen
kostprijs worden uitgevoerd. Het artikel wordt
onder het genoemde serviceadres gerepareerd.
Alleen als het artikel rechtstreeks naar dit adres
wordt gestuurd, kan dit tijdig worden bewerkt
en geretourneerd. Voor meer informatie over het
product, bestellingen van accessoires of vragen
over service-afwikkeling, bel onze klantenservice
op het aangegeven telefoonnummer. Vermeld bij
vragen altijd het artikelnummer (zie "Technische
gegevens").
Dit product bevat lichtbronnen
van energie-efficiëntieklasse E
Serviceadres
The Netherlands
EGLO VERLICHTING NEDERLAND B.V.
Innovatiepark 20
4906 AA OOSTERHOUT (NBR)
T: +31 162 48 28 30
IAN 378855_2101
Houd voor alle aanvragen de kassabon en het
artikelnummer (bijv. IAN 123456_7890) als bewijs
van aankoop gereed.
89NL

Garantiekaart
Afzender: ________________________________________________________________________
Naam/voornaam: _________________________________________________________________
Land/postcode/plaats/straat: _______________________________________________________
Telefoonnummer: __________________________________________________________________
Artikelnummer/omschrijving: ________________________________________________________
Aankoopdatum/locatie: Informatie over het defect: ______________________________________
Datum/handtekening: ______________________________________________________________
Geen garantieaanspraak:____________________________________________________________
Stuur het artikel niet gerepareerd tegen de gemaakte transportkosten terug.
Informeer mij over de kosten. Repareer het artikel tegen betaling.
90 NL

91PL
Objaśnienie użytych piktogramów ............................................................ Strona 82
Wprowadzenie ............................................................................................... Strona 82
Zastosowanie zgodne z przeznaczeniem ................................................................ Strona 83
Zawartość zestawu ............................................................................................... Strona 83
Opis elementów ................................................................................................... Strona 83
Dane techniczne ................................................................................................... Strona 83
Bezpieczeństwo .............................................................................................. Strona 84
Zasady bezpieczeństwa ........................................................................................ Strona 84
Zasady bezpieczeństwa dotyczące baterii/akumulatorów ....................................... Strona 85
Przygotowanie ............................................................................................... Strona 86
Potrzebne narzędzia i materiały ............................................................................ Strona 86
Montaż panelu ściennego/sufitowego LED .............................................................. Strona 86
Zakładanie/wymiana baterii (pilot) ........................................................................ Strona 87
Uruchomienie .................................................................................................. Strona 87
Włączanie i wyłączanie panelu ściennego/sufitowego LED/ustawianie barwy światła .Strona 87
Konserwacja i czyszczenie ........................................................................... Strona 88
Utylizacja ......................................................................................................... Strona 88
Deklaracja zgodności .................................................................................... Strona 88
Gwarancja i serwis ........................................................................................ Strona 89
Gwarancja ........................................................................................................... Strona 89
Adres serwisu ....................................................................................................... Strona 89
Karta gwarancyjna ............................................................................................... Strona 90

Panel ścienny
i sufitowy LED
Wprowadzenie
Gratulujemy zakupu nowego panelu
ściennego/sufitowego LED
(zwanego dalej lampą lub produktem).
Wybrali Państwo produkt wysokiej jakości.
Prosimy o uważne przeczytanie całej treści
niniejszej instrukcji obsługi. Prosimy o rozłożenie
strony z rysunkami. Niniejsza instrukcja obsługi s
tanowi część kompletu produktu i zawiera ważne
informacje dotyczące uruchomienia i obsługi.
Należy zawsze przestrzegać wszystkich zasad
bezpieczeństwa. Przed uruchomieniem należy
sprawdzić, czy dostępne jest prawidłowe napięcie
sieciowe i czy wszystkie elementy są prawidłowo
zamontowane. W razie pytań lub wątpliwości
* Więcej szczegółów, np. objaśnienie dodatkowych symboli
lub informacje techniczne, można znaleźć
na stronie www.edi-light.com
PL
Objaśnienie użytych piktogramów*
Przeczytać instrukcje!
Zasady bezpieczeństwa
Instrukcje działania
Denne lampe er udelukkende beregnet til
indendørs brug i tørre
og lukkede rum.
Prąd/napięcie przemienne
Herc (częstotliwość)
Wat (moc czynna)
Prąd/napięcie stałe
Polaryzacja wyjścia
Klasa ochronności II
Przestrzegać ostrzeżeń i zasad
bezpieczeństwa!
Ostrzeżenie!
Niebezpieczeństwo porażenia prądem!
Ostrożnie! Niebezpieczeństwo wybuchu!
Zagrożenie życia i niebezpieczeństwo
wypadku dla dzieci!
Transformator bezpieczeństwa
odporny na zwarcie
Bezpieczeństwo bardzo niskie napięcie
Dyrektywa w sprawie ograniczenia
stosowania substancji niebezpiecznych
Substancje
Temperatura otoczenia
Temperatura obudowy
w podanym punkcie
Klasa ochronności zasilacza: II
Barwa światła w kelwinach
lm Lumeny
Żywotność
Brak możliwości ściemniania za pomocą
zewnętrznych regulatorów.
Tylko do użytku w pomieszczeniach
Nosić rękawice ochronne
Certyfikat TÜV SÜD / GS
Szkody dla środowiska z powodu
niewłaściwej utylizacji baterii!
Zutylizować opakowanie i urządzenie
zgodnie z przepisami o ochronie
środowiska!
Współczynnik oddawania barw
oświetlenia LED
Niezależne urządzenia kontrolne
Ä
~
ta
tc
25000h
Ra
SELV
92

dotyczących obsługi produktu prosimy o kontakt ze
sprzedawcą lub punktem serwisowym. Niniejszą
instrukcję obsługi należy starannie przechowywać
i w razie potrzeby przekazać osobom trzecim.
Zastosowanie
zgodne z przeznaczeniem
Ta lampa jest przeznaczona do użytku
wyłącznie w suchych, zamkniętych
pomieszczeniach. Ten produkt jest
przeznaczony do użytku wyłącznie w prywatnych
gospodarstwach domowych.
Zawartość zestawu
Natychmiast po rozpakowaniu należy sprawdzić,
czy zestaw jest kompletny oraz czy produkt nie jest
uszkodzony.
1 lampa sufitowa LED
2 baterie (AAA; 1,5 V)
1 pilot
Elementy montażowe
Opis elementów
Montaż na suficie
4 śruby do mocowania lampy
4 kołki
Kątownik montażowy
4 śruby do kątownika montażowego
Listwa zaciskowa z gniazdem przyłączeniowym
Lampa sufitowa LED
Montaż wiszący
4 śruby do mocowania lampy
4 kołki
4 śruby do montażu
Listwa zaciskowa z gniazdem przyłączeniowym
Lampa sufitowa LED
Kątownik montażowy
Baldachim sufitowy ze śrubami
i linkami do podwieszania, obejmującymi
tulejki do mocowania na suficie i śruby do
mocowania panelu.
Tuleje do montażu sufitowego
Gwint śruby
Tuleja regulacyjna
Baterie
Pilot zdalnego sterowania
Dane techniczne
Numer artykułu: 55895
Napięcie robocze: 220–240 V~ 50/60 Hz
Moc całkowita: maks. 30 W
Klasa ochronności: II/
Źródło światła LED: 2700 K do 5000 K
Ra=83
Numer artykułu: 55896
Napięcie robocze: 220–240 V~ 50/60 Hz
Moc całkowita: maks. 28 W
Klasa ochronności: II/
Źródło światła LED: 2700 K do 5000 K
Ra=82
Wymianę źródła światła LED i zasilacza LED
może przeprowadzać wyłącznie specjalista.
Wymiary:
Model A (55895): panel LED 62 x 62x 7cm
(dł. x szer. x wys.)
Model B (55896): panel LED 100 x 25 x 7cm
(dł. x szer. x wys.)
Stopień ochrony: IP20
Typ baterii
(pilot): 2 x AAA 1,5 V
Podmiot wprowadzający do obrotu:
EDI Light GmbH, Heiligkreuz 22, 6136 Pill,
AUSTRIA
www.edi-light.com
93PL
1
2
3
4
5
6
7
1
2
4
5
6
8
9
10
11
12
13

Bezpieczeństwo
Zasady bezpieczeństwa
W przypadku uszkodzeń spowodowanych nieprze-
strzeganiem niniejszej instrukcji obsługi gwarancja
traci ważność! Nie ponosimy odpowiedzialności
za szkody następcze! Nie ponosimy
odpowiedzialności za szkody materialne lub
obrażenia ciała spowodowane niewłaściwą
obsługą lub nieprzestrzeganiem zasad
bezpieczeństwa!
ZAGROŻENIE ŻYCIA I
NIEBEZPIECZEŃSTWO
WYPADKU DLA DZIECI!
Nie pozostawiać dzieci z materiałem
opakowaniowym bez nadzoru. Materiał
opakowaniowy stwarza niebezpieczeństwo
uduszenia. Dzieci często nie doceniają
niebezpieczeństw. Materiał opakowaniowy nie
jest zabawką.
Produkt może być używany przez dzieci od lat
8 oraz osoby o ograniczonej sprawności
fizycznej, sensorycznej lub umysłowej lub
nieposiadające odpowiedniego doświadcze
nia i wiedzy pod warunkiem, że będą one
nadzorowane lub zostaną przeszkolone w
zakresie bezpiecznego użytkowania
produktu i zrozumieją związane z nim
zagrożenia. Dzieciom nie wolno bawić się
produktem. Dzieciom nie wolno czyścić ani
konserwować produktu bez nadzoru. Produkt
nie jest zabawką.
W razie zauważenia jakichkolwiek
nieprawidłowości podczas pracy (np.
nietypowych odgłosów, dziwnego zapachu lub
dymu), należy natychmiast wyłączyć produkt.
Należy zaprzestać użytkowania produktu
do momentu sprawdzenia go przez
wykwalifikowaną osobę.
Unikać zagrożenia życia z
powodu porażenia prądem
elektrycznym
Nie ponosimy odpowiedzialności za szkody
materialne lub obrażenia ciała spowodowane
niewłaściwą obsługą lub nieprzestrzeganiem
zasad bezpieczeństwa!
Instalację elektryczną należy zlecić
wykwalifikowanemu elektrykowi lub osobie
przeszkolonej w zakresie instalacji
elektrycznych.
Przed montażem wyjąć bezpiecznik lub
wyłączyć wyłącznik instalacyjny w skrzynce
bezpiecznikowej (położenie 0).
Bezwzględnie unikać kontaktu lampy z wodą
lub innymi cieczami.
Przed montażem upewnić się, że dostępne
napięcie sieciowe odpowiada wymaganemu
napięciu zasilania lampy (patrz „Dane
techniczne”).
Upewnić się, że montaż nie spowoduje
uszkodzenia przewodów.
Panelu ściennego/sufitowego LED nie można
ściemniać za pomocą zewnętrznych
regulatorów.
Wymianę źródła światła w tej lampie może
przeprowadzać wyłącznie producent lub
wyznaczony przez niego technik serwisowy lub
osoba o porównywalnych kwalifikacjach.
Unikać niebezpieczeństwa
pożaru i odniesienia obrażeń
Aby uniknąć oparzenia, przed dotknięciem
lampy upewnić się, że jest ona wyłączona
i wychłodzona.
Nie mocować lampy na podłożu wilgotnym
lub przewodzącym prąd elektryczny.
Nie pozostawiać lampy ani materiału
opakowaniowego bez nadzoru. Folie/
torebki plastikowe, plastikowe elementy itp.
mogą stać się dla dzieci niebezpieczną
zabawką.
Pewne błyski światła lub efekty świetlne
mogą u niektórych osób wywoływać
94 PL

napady padaczkowe lub zaburzenia
świadomości. W razie wystąpienia objawów
padaczki niezwłocznie skorzystać z pomocy
lekarza.
Zamontować lampę w taki sposób, aby była
zabezpieczona przed wilgocią,
zanieczyszczeniem i nadmiernym
nagrzewaniem.
Przed rozpoczęciem wiercenia upewnić się,
że w miejscu wiercenia nie ma przewodów
gazowych, wodnych ani elektrycznych. Montaż
mogą wykonywać tylko wykwalifikowane
osoby. Koniecznie zwrócić uwagę na materiał,
z którego wykonana jest ściana, ponieważ
dołączone elementy mocujące nie nadają się
do wszystkich rodzajów ścian. Należy
dowiedzieć się w punkcie handlowym, jakie
śruby i kołki są odpowiednie dla danego
rodzaju ściany.
Producent nie ponosi odpowiedzialności za
nieprawidłowe połączenie ściany z kołkiem
i wynikające z tego szkody.
Należy stale zachowywać ostrożność! Zawsze
zwracać uwagę na wykonywane czynności
i kierować się zdrowym rozsądkiem. Nie
używać lampy w przypadku problemów z
koncentracją lub złego samopoczucia.
Przed montażem sprawdzić, czy miejsce
montażu jest przystosowane do ciężaru
lampy.
Przed rozpoczęciem użytkowania zapoznać
się ze wszystkimi wskazówkami i rysunkami
zawartymi w niniejszej instrukcji oraz samą
lampą.
Zasady bezpieczeństwa
dotyczące baterii/
akumulatorów
ZAGROŻENIE ŻYCIA! Baterie/akumulatory
należy przechowywać w miejscu niedostępnym
dla dzieci. W przypadku połknięcia
niezwłocznie skorzystać z pomocy lekarza!
Połknięcie może spowodować oparzenia,
perforację tkanek miękkich, a nawet śmierć.
Ciężkie oparzenia mogą wystąpić w ciągu
2 godzin od połknięcia.
NIEBEZPIECZEŃSTWO
WYBUCHU! Nigdy nie ładować
baterii jednorazowego użytku. Nie
otwierać baterii/akumulatorów i nie
zwierać ich biegunów. Może to doprowadzić
do przegrzania, pożaru lub wybuchu.
Nigdy nie wrzucać baterii/akumulatorów do
ognia ani wody.
Nie narażać baterii/akumulatorów na
obciążenia mechaniczne.
Ryzyko wycieku elektrolitu z
baterii/akumulatorów
Unikać oddziaływania na baterie skrajnych
warunków i temperatur, np. przy grzejnikach
lub wskutek bezpośredniego działania
promieni słonecznych.
Jeśli doszło do wycieku elektrolitu z
baterii/akumulatorów, należy unikać kontaktu
ze skórą, oczami i błonami śluzowymi!
Natychmiast przemyć zanieczyszczone miejsca
czystą wodą i zasięgnąć porady lekarza!
NOSIĆ RĘKAWICE
OCHRONNE! Baterie/akumulatory,
z których wyciekł elektrolit lub które
są uszkodzone, mogą w razie kontaktu ze
skórą powodować oparzenia. Dlatego w takim
przypadku należy nosić odpowiednie rękawice
ochronne.
W razie wycieku elektrolitu z baterii/
akumulatorów należy natychmiast wyjąć je
z produktu, aby uniknąć uszkodzeń.
Używać tylko baterii/akumulatorów tego
samego typu. Nie używać starych baterii/
akumulatorów razem z nowymi!
Jeśli produkt nie będzie używany przez
dłuższy czas, należy wyjąć z niego baterie/
akumulatory.
Ryzyko uszkodzenia produktu
Używać wyłącznie baterii/akumulatorów
podanego typu!
Założyć baterie/akumulatory zgodnie
95PL

z oznaczeniem biegunów (+) i (-) na baterii/
akumulatorze i produkcie. Przed założeniem
oczyścić styki baterii/akumulatora oraz styki
w komorze baterii suchą, niepozostawiającą
włókien ściereczką lub pałeczką
kosmetyczną!
Wyczerpane baterie/akumulatory należy
niezwłocznie wyjąć z produktu. („Dane
techniczne”).
Przygotowanie
Potrzebne narzędzia
i materiały
Wymienione narzędzia i materiały nie wchodzą
w skład zestawu. Podane informacje i wartości
mają charakter niewiążący i są jedynie
orientacyjne. Rodzaj materiałów zależy od
indywidualnych warunków w miejscu montażu.
– ołówek / narzędzie do znakowania
– 2-biegunowy tester napięcia
– śrubokręt krzyżakowy
– wiertarka (ø wiertła ok. 6 mm)
– obcinaczki boczne
Montaż panelu świetlnego LED
NIEBEZPIECZEŃSTWO
PORAŻENIA PRĄDEM!
Ważne: Podłączenie elektryczne należy zlecić
wykwalifikowanemu elektrykowi lub osobie
przeszkolonej w zakresie instalacji elektrycznych.
Osoba ta musi znać właściwości lampy oraz
przepisy dotyczące podłączania.
W celu podłączenia lampy wyjąć bezpiecznik
lub wyłączyć wyłącznik instalacyjny w skrzynce
bezpiecznikowej (położenie 0) (patrz rys. A).
Montaż jest możliwy na 2 sposoby:
Montaż na ścianie lub suficie
Poluzować śruby widoczne z boku
kątownika montażowego i wyjąć kątownik.
Za pomocą otworów na śruby
znajdujących się w kątowniku zaznaczyć
miejsca wiercenia otworów.
Wywiercić otwory mocujące o głębokości ok.
30 mm. Uważać, aby nie uszkodzić
przewodu zasilającego.
Umieścić kołki w wywierconych otworach
(patrz rys. B).
Przymocować kątownik montażowy
dołączonymi śrubami (patrz rys. B).
Za pomocą listwy zaciskowej połączyć kabel
przyłączeniowy panelu LED z kablem zasilania
sieciowego (zewnętrznym) (patrzrys. B).
Zwrócić uwagę na prawidłowe podłączenie
poszczególnych przewodów kabla
zasilania sieciowego (zewnętrznego):
przewód fazowy, czarny lub brązowy =
symbol L, przewód neutralny, niebieski lub
biały = symbol N .
Zwrócić uwagę na prawidłowe zamocowanie.
Połączyć panel świetlny LED za pomocą
śrub z kątownikiem montażowym .
Wskazówka:Zwrócić uwagę na prawidłowe
wkręcenie śrub.
Ponownie założyć bezpiecznik lub
włączyć wyłącznik instalacyjny w skrzynce
bezpiecznikowej (położenie I) (patrz rys. C).
Panel ścienny/sufitowy LED jest gotowy do
użytku.
Montaż wiszący
Poluzować śruby widoczne z boku
kątownika montażowego i wyjąć kątownik.
Za pomocą otworów na śruby
znajdujących się w kątowniku zaznaczyć
miejsca wiercenia otworów.
Wywiercić otwory mocujące o głębokości ok.
30 mm. Uważać, aby nie uszkodzić
przewodu zasilającego.
Umieścić kołki w wywierconych otworach
(patrz rys. B).
Przymocować kątownik montażowy
96 PL
4
2
4
6
3
3
1
3
2
13
7
4
7
4
7
5

Zakładanie/wymiana baterii
(pilot)
Wskazówka: Baterie są dołączone
do zestawu i trzeba je założyć przed pierwszym
uruchomieniem.
Gdy zasięg pilota zmniejszy się, należy
wymienić baterie . W tym celu zdjąć
pokrywę komory baterii z pilota w kierunku
wskazanym strzałką.
Wyjąć baterie i włożyć nowe.Typ baterii
jest podany w rozdziale „Dane
techniczne”.
Wskazówka: Prawidłowa polaryzacja jest
wskazana w komorze baterii.
Ponownie założyć pokrywę na komorę baterii.
Pilot jest teraz gotowy do użytku.
Uruchomienie
Włączanie/wyłączanie lampy
Ustawianie barwy światła
Aby włączyć lub wyłączyć panel świetlny LED
, nacisnąć włącznik światła (włącznik
ścienny).
Kilkukrotne naciskanie włącznika światła
w krótkich odstępach czasu umożliwia
przełączanie barwy światła panelu LED
między chłodną, ciepłą i neutralną bielą.
Dostępne są następujące funkcje (patrz
rysunek produktu D)
dołączonymi śrubami .
Wywiercić kolejne 2 otwory w odległości
od końców uchwytu
montażowego baldachimu sufitowego i
umieścić w nich po jednym kołku .
Za pomocą dołączonych śrub przymocować
tuleje do montażu sufitowego.
Podłączyć kabel zasilania sieciowego
(zewnętrzny) do listwy zaciskowej
baldachimu sufitowego .
Zwrócić uwagę na prawidłowe podłączenie
poszczególnych przewodów: przewód fazowy
, czarny lub brązowy = symbol L, przewód
neutralny, niebieski lub biały = symbol N .
Zwrócić uwagę na prawidłowe zamocowanie.
Połączyć baldachim sufitowy za pomocą
śrub z kątownikiem montażowym .
Wskazówka:Zwrócić uwagę na prawidłowe
wkręcenie śrub .
Przykręcić 2 linki do podwieszania do
do tulei do montażu sufitowego , a
następnie przykręcić końce linek do czterech
przewidzianych do tego gwintów na
panelu świetlnym LED.
Za pomocą listwy zaciskowej połączyć
kabel przyłączeniowy panelu świetlnego LED
z kablem przyłączeniowym baldachimu
sufitowego .
Zwrócić uwagę na prawidłowe podłączenie
poszczególnych przewodów kabla
przyłączeniowego: przewód fazowy, czarny
lub brązowy = symbol L, przewód neutralny,
niebieski lub biały = symbol N .
Zwrócić uwagę na prawidłowe zamocowanie.
Teraz można dostosować długość linek
mocujących, wciskając tuleję regulacyjną.
Ponownie założyć bezpiecznik lub
włączyć wyłącznik instalacyjny w skrzynce
bezpiecznikowej (położenie I) (patrz rys. C).
Panel ścienny/sufitowy LED jest gotowy
do użytku.
97PL
11
10
8
5
5
6
1
8
17
4
6
6
2
5
9
8
5
12
13
12
12
12

Konserwacja i czyszczenie
NIEBEZPIECZEŃSTWO
PORAŻENIA PRĄDEM!
Przed przystąpieniem do czyszczenia odłączyć
lampę od sieci zasilającej. W tym celu wyjąć
bezpiecznik lub wyłączyć wyłącznik instalacyjny
w skrzynce bezpiecznikowej (położenie 0) (patrz
rys. A).
Aby uniknąć oparzenia, przed dotknięciem
lampy upewnić się, że jest ona wyłączona
i wychłodzona. Nie używać
rozpuszczalników, benzyny itp. Mogą one
uszkodzić lampę. Do czyszczenia panelu
ściennego/sufitowego LED używać suchej
ściereczki niepozostawiającej włókien.
Ponownie założyć bezpiecznik lub włączyć
wyłącznik instalacyjny w skrzynce
bezpiecznikowej (położenie I)
(patrz rysunek produktu C).
Utylizacja
Opakowanie jest wykonane z materiałów
przyjaznych dla środowiska, które można
przekazać do utylizacji w lokalnych punktach
zbiórki odpadów.
Podczas segregacji odpadów zwrócić
uwagę na oznakowanie materiałów
opakowaniowych. Są one oznaczone
skrótami (a) i numerami (b) o następującym
znaczeniu: 1–7: tworzywa sztuczne /
20–22: papier i tektura/80–98: materiały
kompozytowe.
Produkt i materiały opakowaniowe nadają
się do recyklingu. Aby umożliwić lepsze
przetworzenie odpadów, należy poddać je
selektywnej zbiórce. Logo Triman obowiązuje
tylko we Francji.
Informacje na temat możliwości utylizacji
wyeksploatowanego produktu można
uzyskać w lokalnym urzędzie gminy lub
miasta.
Aby chronić środowisko naturalne,
wyeksploatowanego produktu nie należy
wyrzucać razem z odpadami domowymi,
lecz przekazać go do prawidłowej
utylizacji. Informacje o punktach zbiórki
odpadów i godzinach ich otwarcia można
uzyskać w urzędzie administracji lokalnej.
Zgodnie z dyrektywą 2006/66/WE,
z późniejszymi zmianami, uszkodzone
lub zużyte baterie/akumulatory należy
poddać recyklingowi. Baterie/akumulatory i/
lub produkt należy oddać w dostępnym punkcie
zbiórki.
Szkody dla środowiska z powodu
niewłaściwej utylizacji baterii/
akumulatorów!
Baterii/akumulatorów nie wolno wyrzucać razem
z odpadami domowymi. Mogą one zawierać
toksyczne metale ciężkie i dlatego należy je
traktować jako odpady niebezpieczne. Symbole
chemiczne metali ciężkich są następujące: Cd =
kadm, Hg = rtęć, Pb = ołów. W związku z tym
zużyte baterie/akumulatory należy oddać w
komunalnym punkcie zbiórki odpadów.
Deklaracja zgodności
Ten produkt spełnia wymagania
obowiązujących dyrektyw europejskich
i krajowych. Odpowiednie deklaracje
i dokumenty są przechowywane przez producenta.
Produkt spełnia wymagania niemieckiej ustawy o
bezpieczeństwie urządzeń i produktów.
Zastrzegamy sobie prawo do wprowadzania
zmian technicznych i wizualnych w produkcie
98 PL
Ä
~

mających na celu jego ulepszenie. Nie ponosimy
odpowiedzialności za błędy w składzie i druku.
Gwarancja i serwis
Gwarancja
Udzielamy 3-letniej gwarancji liczonej od daty
zakupu. Nasze produkty są wytwarzane przy
wykorzystaniu nowoczesnych metod produkcyjnych
i podlegają ścisłej kontroli jakości. Gwarantujemy,
że nasze produkty są wolne od wad. W okresie
obowiązywania gwarancji bezpłatnie usuwamy
wszelkie wady materiałowe lub produkcyjne.
W przypadku stwierdzenia wady produkt należy
starannie zapakować i odesłać na podany adres
serwisu. Gwarancja nie obejmuje uszkodzeń
spowodowanych niewłaściwą obsługą, a także
części zużywających się i materiałów
eksploatacyjnych. Można je zamówić odpłatnie
pod podanym numerem telefonu. Naprawy, które
nie podlegają gwarancji (np. źródła światła),
również można zlecić pod podanym adresem
serwisu. Są one wykonywane za indywidualnie
naliczaną opłatą pokrywającą koszty własne
serwisu. Artykuł zostanie naprawiony po
przesłaniu na podany adres serwisu. Terminowe
wykonanie naprawy i odesłanie artykułu jest
możliwe tylko w przypadku przesłania go
bezpośrednio na ten adres. W celu uzyskania
dodatkowych informacji na temat produktu lub
realizacji usług serwisowych bądź zamówienia
akcesoriów prosimy o kontakt z naszym działem
obsługi klienta pod podanym numerem telefonu.
W przypadku pytań prosimy o podanie numeru
artykułu (patrz „Dane techniczne”).
Ten produkt zawiera źródła światła
o klasie efektywności energetycznej E
Adres serwisu
Poland
EGLO Polska SP. Z.O.O.
Ul. Pulawska 479
02-844 Warazawa, POLAND
T: +48 22 644 57 55
IAN 378855_2101
W przypadku wszelkich zapytań prosimy o przy-
gotowanie paragonu i numeru artykułu (np. IAN
123456_7890) jako dowodu zakupu.
99PL

Karta gwarancyjna
Nadawca: _________________________________________________________________________
Nazwisko/imię: ____________________________________________________________________
Kraj/kod poczt./miejscowość/ulica: _________________________________________________
Numer telefonu: _____________________________________________________________________
Numer artykułu/nazwa: _____________________________________________________________
Data zakupu/miejsce zakupu: Opis usterki: _____________________________________________
Data/podpis: ______________________________________________________________________
Jeśli usterka nie podlega gwarancji:_____________________________________________________
Proszę o odesłanie nienaprawionego artykułu i obciążenie mnie powstałymi kosztami transportu.
Proszę o podanie kosztów. Proszę o naprawienie artykułu za opłatą.
100 PL


Legenda uporabljenih piktogramov ........................................................... Stran 94
Uvod .................................................................................................................. Stran 94
Predvidena uporaba ............................................................................................. Stran 95
Obseg dobave...................................................................................................... Stran 95
Opis delov ........................................................................................................... Stran 95
Tehnični podatki ................................................................................................... Stran 95
Varnost ............................................................................................................. Stran 96
Varnostni napotki .................................................................................................. Stran 96
Varnostna navodila za baterije/polnilne baterije ..................................................... Stran 97
Priprava ........................................................................................................... Stran 98
Potrebno orodje in material .................................................................................. Stran 98
Montaža LED stenskih/stropnih plošč ..................................................................... Stran 98
Vstavljanje/menjava baterij (daljinski upravljalnik) ................................................. Stran 99
Zagon ................................................................................................................Stran 99
Vklop/izklop LED stenske/stropne plošče/nastavitev barve svetlobe ..................... Stran 99
Vzdrževanje in čiščenje.................................................................................. Stran 99
Odstranjevanje ............................................................................................... Stran 99
Izjava o skladnosti ......................................................................................... Stran 100
Garancija in servis.......................................................................................... Stran 100
Garancija............................................................................................................. Stran 100
Servisni naslov....................................................................................................... Stran 101
Garancijska kartica............................................................................................... Stran 101
103SI

LED stena in
stropna plošča
Uvod
Čestitamo vam za nakup vaše nove LED
stenske/stropne plošče (v
nadaljevanju imenovana tudi svetilka ali
izdelek). Izbrali ste visokokakovosten izdelek.
Prosimo, da natančno preberete ta navodila za
uporabo. Odprite stran z ilustracijo. Ta navodila
za uporabo pripadajo temu izdelku in vsebujejo
pomembne informacije o zagonu in uporabi.
Vedno upoštevajte vsa varnostna navodila. Pred
zagonom preverite, ali je na voljo pravilna
omrežna napetost in ali so vsi deli pravilno
nameščeni. Če imate kakršna koli vprašanja ali
niste prepričani glede ravnanja z izdelkom, se
obrnite na prodajalca ali servisno točko. Prosimo,
natančno upoštevajte ta navodila za uporabo in jih
* Več podrobnosti, npr. dodatne razlage simbolov ali tehnične
informacije najdete na spletni strani www.edi-light.com
Legenda uporabljenih piktogramov*
Preberite navodila!
Varnostni napotki
Navodila za uporabo
Ta svetilka je primerna samo za notranjo
uporabo, v suhih
in zaprtih prostorih.
Izmenični tok/napetost
Hertz (frekvenca)
W (delovna moč)
Enosmerni tok/napetost
Izhod polarnosti
Zaščitni razred II
Upoštevajte opozorilna in varnostna
navodila!
Opozorilo!
Nevarnost električnega udara!
Pozor! Nevarnost eksplozije!
Življenjske nevarnosti in nevarnosti nesreč
za malčke in otroke!
Zaščita pred kratkim stikom
Varnostni transformator
Varnostna zelo nizka napetost
Direktiva o omejevanju uporabe nevarnih
snovi Snovi
Temperatura okolice
Temperatura ohišja pri
določeni točki
Zaščitni razred II za predstikalno napravo
Temperatura svetlobe v Kelvinih
lm Lumen
Življenjska doba
Z zunanjimi krmilniki je ni mogoče
zatemniti.
Samo za notranjo uporabo
Nosite zaščitne rokavice
TÜV SÜD - preizkušena varnost
Okoljska škoda zaradi napačnega
odstranjevanja baterij!
Embalažo in napravo zavrzite na okolju
prijazen način!
Indeks barvnega upodabljanja LED
osvetlitve
Neodvisna nadzorna oprema
Ä
~
ta
tc
25000h
Ra
SELV
104 SI

po potrebi posredujte tretjim osebam.
Predvidena
uporaba
Ta svetilka je primerna samo za notranjo
uporabo, v suhih in zaprtih prostorih.
Ta izdelek je namenjen samo za
uporabo v zasebnih gospodinjstvih.
Obseg dobave
Takoj po razpakiranju vedno preverite, ali je obseg
dobave popoln in ali je izdelek v brezhibnem
stanju.
1 LED stropna svetilka
2 bateriji (AAA; 1,5 V)
1 daljinski upravljalnik
Montažni material
Opis delov
Stropna montaža
4 vijaki za pritrditev svetilke
4 mozniki
montažni nosilec
4 vijaki za montažni nosilec
Lestenčna spojka s priključno škatlo
LED stropna svetilka
Viseča montaža
4 vijaki za pritrditev svetilke
4 mozniki
4 vijaki za montažo
Lestenčna spojka s priključno škatlo
LED stropna svetilka
montažni nosilec
Stropna luč z vijaki
Viseče žice, sestavljene iz stropnih
pritrdilnih tulci in vijaki za pritrdite
plošče.
Obroči za montažo na strop
Vijačni navoj
Nastavitveni rokav
Baterije
Daljinski upravljalnik
Tehnični podatki
Številka artikla: 55895
Delovna napetost: 220–240 V~ 50/ 60 Hz
Skupna moč: največ 30 Watt
Zaščitni razred: II/
LED vir svetlobe: 2700K do 5000K
Ra=83
Številka artikla: 55896
Delovna napetost: 220–240 V~ 50/ 60 Hz
Skupna moč: največ 28 Watt
Zaščitni razred: II/
LED vir svetlobe: 2700K do 5000K
Ra=82
LED svetlobne vire in LED krmilno napravo
lahko zamenja samo strokovnjak.
Mere:
Model A (55895): LED plošča 62 x 62x 7cm
(D x Š x V)
Model B (55896): LED plošča 100 x 25 x 7cm
(D x Š x V)
Vrsta zaščite: IP20
Vrsta baterije
(daljinski upravljalnik): 2 x AAA 1,5 V
Distributer:
EDI Light GmbH, Heiligkreuz 22, 6136 Pill,
AVSTRIJA
www.edi-light.com
1
2
3
4
5
6
7
1
2
4
5
6
8
9
10
11
12
13
105SI

Varnost
Varnostni napotki
V primeru škode zaradi neupoštevanja teh
navodila za uporabo garancija ne velja! Za
posledično škodo ne prevzemamo odgovornosti!
Za materialno škodo ali telesne poškodbe zaradi
neustreznega ravnanja ali neupoštevanja
varnostnih navodil ne prevzemamo odgovornosti!
ŽIVLJENJSKE
NEVARNOSTI IN
NEVARNOSTI ZA NESREČE
ZA MALČKE IN OTROKE!
Otrok nikoli ne puščajte brez nadzora z
embalažo. Obstaja nevarnost zadušitve z
embalažnim materialom. Otroci pogosto
podcenjujejo nevarnosti. Embalažni material ni
igrača.
Ta izdelek lahko uporabljajo otroci od 8.
leta starosti naprej in osebe z zmanjšanimi
fizičnimi, senzoričnimi ali duševnimi
sposobnostmi ali pomanjkanjem izkušenj ter
znanja, če so pod nadzorom ali če so poučene
o varni uporabi izdelka in razumejo posledične
nevarnosti. Otroci se ne smejo igrati z izdel
kom. Otroci ne smejo izvajati čiščenja in
vzdrževanja brez nadzora. Izdelek ni igrača.
Če med delovanjem opazite kakršne koli
nepravilnosti (npr. nenavadne zvoke,
neobičajen vonj ali nastanek dima), izdelek
takoj izklopite in iz vtičnice odklopite vtikač
za LED. Izdelka ne uporabljajte več, dokler ga
ne preveri usposobljena oseba.
Izognite se nevarnosti za
življenje zaradi električnega
udara
Za materialno škodo ali telesne poškodbe
zaradi neustreznega ravnanja ali neupoštevanja
varnostnih navodil ne prevzemamo
odgovornosti!
Električno napeljavo naj izvede usposobljen
električar ali za električne inštalacije
usposobljena oseba.
Pred namestitvijo odstranite varovalko ali
izklopite odklopnik v omarici z varovalkami
(položaj 0). Nujno preprečite stike svetilke z
vodo ali drugimi tekočinami.
Pred montažo se prepričajte, da obstoječa
omrežna napetost ustreza zahtevani obratovalni
napetosti svetilke (glejte poglavje »Tehnični
podatki«).
Prepričajte se, da med montažo ne pride do
poškodb nobenih vodov.
LED stenske/stropne plošče ni mogoče
zatemniti prek zunanjih krmilnikov.
Vir svetlobe te svetilke lahko zamenja le
proizvajalec ali serviser, ki ga je naročil on,
ali podobno usposobljena oseba.
Izogibajte se nevarnosti požara
in poškodb
Prepričajte se, da je svetilka ugasnjena in
da se ohladi, preden se je dotaknete, da se
izognete opeklinam.
Ne pritrdite svetilke na vlažno ali prevodno
površino.
Svetilke ali embalažnega materiala
ne pustite nemarno ležati. Plastične folije/
vrečke, plastični deli itd. bi lahko postale
nevarne igrače za otroke.
Nekateri ljudje imajo lahko epileptične napade
ali motnje zavesti, kadar so izpostavljeni
določenim bliskavicam ali učinkom virov svet
lobe.
Takoj obiščite zdravnika, če imate epileptične
simptome.
Svetilko postavite tako, da je zaščitena pred
106 SI

vlago, umazanijo in premočnim segrevanjem.
Pred vrtanjem se prepričajte, da na mestu
vrtanja ni plinov, vode ali daljnovodov.
Montažo naj izvajajo samo strokovno usposo
bljene osebe. Bistveno je biti pozoren na
naravo stene, saj priloženi pritrdilni material ni
primeren za vse vrste sten.
V trgovini povprašajte po vijakih in moznikih,
ki ustrezajo posamezni strukturi sten.
Za nepravilno povezavo med steno in
moznikom in posledično škodo proizvajalec ne
prevzema nobene odgovornosti.
Bodite vedno pozorni! Vedno bodite pozorni
na to, kar počnete, in vedno uporabljajte
zdravo pamet. V nobenem primeru ne
uporabljajte svetilke, če se ne morete
koncentrirati ali če se počutite nelagodno.
Pred montažo preverite, ali je mesto pritrditve
primerno za težo svetilke.
Pred uporabo se seznanite z vsemi navodili in
ilustracijami v tem priročniku.
kot tudi s samo svetilko.
Varnostna navodila za
baterije/polnilne baterije
ŽIVLJENJSKA NEVARNOST! Baterije/
polnilne baterije hranite izven dosega otrok. V
primeru zaužitja se takoj posvetujte z
zdravnikom!
Zaužitje lahko povzroči opekline,
perforacijo mehkega tkiva in smrt. Hude
opekline se lahko pojavijo v 2 urah po
zaužitju.
NEVARNOST EKSPLOZIJE!
Nikoli ne polnite baterij, ki niso
namenjene polnjenju. Baterij /
polnilnih baterij ne spravljajte v kratek stik in
/ ali jih ne odpirajte.
Lahko pride do pregrevanja, nevarnosti požara
ali razpočenja. Baterij / polnilnih baterij nikoli
ne mečite v ogenj ali vodo.
Baterij / polnilnih baterij ne izpostavljajte
mehanski obremenitvi.
Nevarnost razlitja
baterij/polnilnih baterij
Izogibajte se ekstremnim pogojem in
temperaturam, ki lahko vplivajo na baterije
/polnilne baterije, npr. na grelnih telesih/
neposredni sončni svetlobi.
Če so baterije/polnilne baterije puščale, se
izogibajte stiku kože, oči in sluznice s
kemikalijami!
Takoj sperite prizadeta mesta s čisto vodo in se
posvetujte z zdravnikom!
NOSITE
ZAŠČITNE ROKAVICE! Razlite ali
poškodovane baterije / polnilne
baterije lahko pri stiku s kožo povzročijo
opekline. Zato v tem primeru nosite ustrezne
zaščitne rokavice.
Če baterije/polnilne baterije puščajo, jih takoj
odstranite iz izdelka, da se izognete
poškodbam.
Uporabljajte samo baterije/polnilne baterije
enakega tipa. Ne mešajte starih baterij/polnil
nih baterij z novimi!
Če izdelka dlje časa ne boste uporabljali,
odstranite baterije/polnilne baterije.
Nevarnost poškodbe izdelka
Uporabite samo navedeni
tip baterij/polnilnih baterij!
Baterij/polnilnih baterij ne izpostavljajte
v skladu z oznako polarnosti (+) in (-) na
bateriji in izdelku. Očistite kontakte na bateriji
/polnilni bateriji in pred vstavljanjem obrišite
prostor za baterije s suho krpo, ki ne pušča
vlaken, ali vatirano.palčko!
Izrabljene baterije/polnilne baterije takoj
odstranite iz izdelka. (»Tehnični podatki«)
107SI

Priprava
Potrebna orodja
in material
Omenjena orodja in materiali niso vključeni v
obseg dobave. To so nezavezujoče informacije in
vrednosti za orientacijo. Narava materiala je odvis-
na od posameznih pogojev na licu mesta.
– Svinčnik/orodje za označevanje
– 2-polni preizkuševalnik napetosti
– križni izvijač
– vrtalni stroj (ca. ø 6 mm)
– klešče ščipalke
Namestite LED svetlobno ploščo
NEVARNOST
ELEKTRIČNEGA UDARA!
Pomembno: Električno priključitev mora izvesti
usposobljeni električar ali oseba, usposobljena za
električne inštalacije. Imeti morajo znanje o
lastnostih svetilke in predpisih o priključitvi.
V ta namen odstranite varovalko ali izklopite
odklopnik v omarici z varovalkami (položaj 0).
Na voljo imate 2 možnosti montaže:
Montaža na steno in strop
Odvijte vijake , ki so vidni na strani
montažnega nosilca, in ga odstranite .
S pomočjo lukenj za vijake v montažnem
nosilcu označite izvrtane luknje.
Zdaj izvrtajte luknje za pritrditev približno 30
mm globoko. Prepričajte se, da napajalni vod
ni poškodovan.
Vstavite moznike v izvrtane luknje (glejte
sliko B). Pritrdite montažni nosilec s
priloženimi vijaki (glejte sliko B).
Priključni kabel LED svetlobne plošče povežite
z omrežnim priključnim kablom (zunanjim) s
pomočjo lestenčne spojke (glejte sliko B).
Poskrbite, da so posamezni vodniki
omrežnega kabla (zunanji) vedno
pravilno priključeni: Vodnik pod napetostjo, črn
ali rjav = simbol L, nevtralni vodnik, modro/
belo označen kabel = simbol N .
Bodite pozorni na pravilno prileganje.
Zdaj privijte LED svetlobno ploščo s
pomočjo vijakov z montažnim nosilcem.
Opozorilo: Prepričajte se, da se vijaki
pravilno zaskočijo.
Ponovno vstavite varovalko ali vklopite
odklopnik na omarici z varovalkami (položaj I)
(glejte sliko C).
Vaša LED stenska/stropna plošča je zdaj
pripravljena za uporabo.
Viseča montaža
Odvijte vijake , ki so vidni na strani
montažnega nosilca, in ga odstranite .
S pomočjo lukenj za vijake v montažnem
nosilcu označite izvrtane luknje.
Zdaj izvrtajte luknje za pritrditev približno 30
mm globoko. Prepričajte se, da napajalni vod
ni poškodovan.
Vstavite moznike v izvrtane luknje (glejte
sliko B).
Pritrdite montažni nosilec s priloženimi
vijaki .
Zdaj izvrtajte še 2 luknji na razdalji približno
od koncev montažnega zatiča
stropne luči in vsak zatič vtaknite v luknje
Pritrdite stropne pritrdilne tulce s priloženimi
vijaki.
Priključite omrežni priključni kabel (zunanji) z
lestenčno spojko stropne luči .
Poskrbite, da so posamezni vodniki pravilno
povezani: Vodnik pod napetostjo, črn ali rjav
= simbol L, nevtralni vodnik, modro oz. belo
označen kabel = simbol N .
Bodite pozorni na pravilno prileganje.
Zdaj privijte stropno svetilko s pomočjo
vijakov z montažnim nosilcem.
Opozorilo: Prepričajte se, da se vijaki
pravilno zaskočijo.
1
1
1
3
1
3
2
5
4
7
6
7
8
4
4
3
3
1
4
4
7
2
7
8
5
2.
5
108 SI

Zagon
Vklop/izklop luči/
Nastavitev barve svetlobe
Pritisnite stikalo za luči (stensko stikalo), da
vklopite/izklopite LED svetlobno ploščo.
Če na hitro pritisnete stikalo za luči, se LED
svetlobna plošča preklaplja med hladno,
toplo in nevtralno belo.
Na voljo so vam naslednje funkcije
(glejte sliko izdelka D)
Vzdrževanje in čiščenje
NEVARNOST
ELEKTRIČNEGA UDARA!
Če želite očistiti svetilko, jo najprej odklopite z
napajanja. V ta namen odstranite varovalko ali
izklopite odklopnik v omarici z varovalkami
(položaj 0) (glejte sliko A).
Prepričajte se, da je svetilka Izključena in
ohlajena, preden se je dotikate, da se prepreči
opekline. Ne uporabljajte topil, bencina ali
podobnega. To bi poškodovalo svetilko.
Za čiščenje LED stenske/stropne plošče
uporabite suho krpo, ki ne pušča vlaken.
Ponovno vstavite varovalko ali vklopite
odklopnik na omarici z varovalkami (položaj I).
(glej sliko izdelka C).
Odstranjevanje
Embalaža je narejena iz okolju prijaznih
materialov, ki jih lahko zavržete v lokalnem
reciklažnem mestu.
Upoštevajte oznako embalažnih materialov
za ločevanje odpadkov, označeni so z
okrajšavami (a) in številkami (b) z
naslednjim pomenom: 1–7: Umetne mase
Zdaj privijte dve obešalni vrvi v stropne
pritrdilne tulce in konce obešalnih vrvi v štiri
navoje vijakov , ki so na LED svetlobni
plošči .
Priključni kabel LED svetlobne plošče
povežite z priključnim kablom stropne svetilke s
pomočjo lestenčne spojke .
Poskrbite, da so posamezni vodniki
priključnega kabla pravilno povezani: Vodnik
pod napetostjo, črn ali rjav = simbol L,
nevtralni vodnik, modro oz. belo označen
kabel = simbol N .
Bodite pozorni na pravilno prileganje.
Zdaj lahko prilagodite dolžino pritrdilnih vrvi s
pritiskom na nastavitveno pušo.
Ponovno vstavite varovalko ali vklopite
odklopnik na omarici z varovalkami (položaj I)
(glejte sliko C).
Vaša LED stenska/stropna plošča je zdaj
pripravljena za uporabo.
Vstavljanje/menjava baterij
(daljinski upravljalnik)
Opozorilo: Baterije so priložene in jih je
treba vstaviti pred prvim zagonom.
Ko doseg daljinskega upravljalnika
popušča, morate zamenjati baterije . V ta
namen povlecite pokrov predalčka za baterije z
daljinskega upravljalnika v smeri puščice.
Odstranite baterije in vstavite nove. Tip
baterije najdete v poglavju "Tehnični
podatki".
Opozorilo: Pravilna polarnost je
prikazana v predalčku za baterije.
Ponovno namestite pokrov predalčka za
baterije.
IDaljinski upravljalnik je zdaj pripravljen za
uporabo.
11
10
5
6
6
6
Ä
~
9
5
12
13
12
12
12
109SI

/20–22: Papir in lepenka/80–98:
Kompozitni materiali.
Izdelke in embalažne materiale je mogoče
reciklirati, za boljšo obdelavo odpadkov
jih zavrzite ločeno. Logotip Triman velja samo
za Francijo.
O možnostih odstranjevanja zavrženega
izdelka lahko izveste pri občinski ali mestni
upravi.
Da bi zaščitili okolje, izdelka ne mečite med
gospodinjske odpadke, ko ni več uporaben,
temveč ga pravilno odvrzite. Več o zbirališčih
in njihovem delovnem času lahko izveste pri
vaši pristojni lokalni upravi.
Poškodovane ali rabljene baterije/polnilne
baterije je treba reciklirati v skladu z
Direktivo 2006/66/ES in njenimi
spremembami. Baterije/polnilne baterije in/ali
izdelek vrnite v ponujene zbiralnike.
Okoljska škoda zaradi napačnega
odstranjevanje baterij/polnilnih baterij!
Baterij/polnilnih baterij ne smete odvreči med gos-
podinjske odpadke. Vsebujejo lahko strupene težke
kovine in so predmet obdelave nevarnih odpadkov.
Kemični simboli težkih kovin so
naslednji: Cd = kadmij, Hg = živo srebro, Pb =
svinec. Zato rabljene baterije/polnilne baterije
oddajte na občinskem zbirnem mestu .
Izjava o skladnosti
Ta izdelek izpolnjuje zahteve veljavnih
evropskih in nacionalnih direktiv. Ustrezne
izjave in dokumenti se deponirajo pri
proizvajalcu. Izdelek je v skladu z zahtevami
nemškega zakona o varnosti opreme in izdelkov.
Med izboljšavami izdelkov si pridržujemo pravico
do tehničnih in vizualnih sprememb izdelka.
Pridržujemo si pravico do pravopisnih in tiskarskih
napak.
Garancija in servis
Garancija
Zagotavljamo 3-letno garancijo od datuma
nakupa. Naši izdelki so izdelani v skladu s
sodobnimi proizvodnimi metodami in podvrženi
strogemu nadzoru kakovosti. Zagotavljamo vam,
da so izdelki v popolnem stanju. Vse materialne
ali proizvodne napake bomo v garancijskem
roku odpravili brezplačno. Če se v nasprotju s
pričakovanji pojavijo napake, pošljite skrbno
zapakiran izdelek na servisni naslov. Garancija ne
krije škode, nastale zaradi nepravilnega ravnanja
ali obrabe delov in potrošnega materiala. Te lahko
naročite proti plačilu na navedeni telefonski številki.
Popravila, ki jih garancija ne krije (npr. žarnice),
je mogoče izvesti tudi na določenem servisnem
naslovu proti posameznemu plačilu cene v skladu
s stroški.
Izdelek bo popravljen na navedenem
servisnem naslovu. Pravočasna obdelava in vračilo
sta lahko izvedeni le, če ga pošljete neposredno na
ta naslov. Če želite dodatne informacije o izdelku,
bi radi naročili dodatno opremo ali imate kakršna
koli vprašanja glede poteka servisa, pokličite naš
oddelek za pomoč strankam na spodaj navedeno
številko. Če imate kakršna koli vprašanja, navedite
številko artikla (glejte »Tehnični podatki«).
Ta izdelek vsebuje vire svetlobe
razreda energetske učinkovitosti E.
110 SI

Servisni naslov
Slovenia
EGLO Rasvjeta D.O.O.
Jadranska avenija 9a
10000 ZAGREB, HUNGARY
T: +386 158 093 18
IAN 378855_2101
Prosimo, da za vse poizvedbe dobite potrdilo o
nakupu in številko izdelka
(npr. IAN 123456_7890).
111SI
Garancijska kartica
Pošiljatelj: ____________________________________________________________________________
Priimek/ime: _________________________________________________________________________
Država/poštna številka/kraj/ulica: ____________________________________________________
Telefonska številka: _____________________________________________________________________
Številka izdelka/ime: ___________________________________________________________________
Datum nakupa/kraj nakupa: Oznaka napake: _____________________________________________
Datum/podpis: ________________________________________________________________________
Če garancijskega primera ni:______________________________________________________________
Pošljite nazaj nepopravljen izdelek in zaračunajte morebitne nastale stroške prevoza.
Sporočite mi stroške. Popravite izdelek proti plačilu.


Legenda použitých piktogramov ................................................................ Strana104
Úvod ................................................................................................................. Strana104
Účelové používanie ............................................................................................... Strana105
Obsah balenia ..................................................................................................... Strana105
Popis častí ............................................................................................................ Strana105
Technické údaje .................................................................................................... Strana105
Bezpečnosť ...................................................................................................... Strana106
Bezpečnostné pokyny ............................................................................................ Strana106
Bezpečnostné pokyny pre batérie/akumulátor ........................................................ Strana107
Príprava ........................................................................................................... Strana 108
Potrebné náradie a materiál .................................................................................. Strana 108
Montáž stropného/nástenného LED panela ............................................................. Strana 108
Vloženie/výmena batérií (diaľkové ovládanie) ........................................................ Strana 109
Uvedenie do prevádzky ................................................................................ Strana 109
Zapnutie/vypnutie/zmena farby stropného/nástenného LED panela ......................... Strana 109
Údržba a čistenie ........................................................................................... Strana 109
Likvidácia ......................................................................................................... Strana 110
Vyhlásenie o zhode ........................................................................................ Strana 110
Záruka a servis .............................................................................................. Strana 110
Záruka ................................................................................................................. Strana 110
Servisné stredisko ................................................................................................. Strana 111
Záručný list .......................................................................................................... Strana 111
113SK

Stropný/nástenný
LED panel
Úvod
Blahoželáme vám ku kúpe vášho nového
stropného/nástenného LED panela
(ďalej nazývaného aj svietidlo alebo
zariadenie). Rozhodli ste sa pre kúpu kvalitného
zariadenia. Prosím, dôkladne si prečítajte tento
návod na použitie. Vyklopte stranu s nákresom.
Tento návod na použitie je súčasťou tohoto
zariadenia a obsahuje dôležité informácie o jeho
uvedení do prevádzky a zaobchádzaní s ním.
Vždy dbajte na všetky bezpečnostné pokyny. Pred
uvedením do prevádzky skontrolujte, či máte k
dispozícii správne sieťové napätie, a či sú všetky
časti správne namontované. Pokiaľ máte otázky
alebo si nie ste istý zaobchádzaním so zariadením,
obráťte sa, prosím, na Vášho predajcu alebo ser-
visné stredisko. Dôkladne si uschovajte tento návod
* Viac informácií, napr. dodatočné vysvetlivky symbolov
resp. technické informácie, nájdete
na www.edi-light.com
114 SK
Legenda použitých piktogramov*
Pozorne si prečítajte pokyny!
Bezpečnostné pokyny
Návod na manipuláciu
Toto svietidlo je určené výhradne na
použitie v interiéri, v suchých
a uzavretých miestnostiach.
Striedavý prúd/striedavé napätie
Hertz (frekvencia)
Watt (výkon)
Jednosmerný prúd/jednosmerné napätie
Polarita výstup
Trieda ochrany 2
Dbajte na výstražné a bezpečnostné
upozornenia!
Varovanie! Nebezpečenstvo úrazu
elektrickým prúdom!
Pozor! Nebezpečenstvo explózie!
Nebezpečenstvo úrazu a ohrozenia
života pre deti!
Odolné voči skratu
Bezpečnostný transformátor
Bezpečnosť pri veľmi nízkom napätí
Smernica o obmedzení nebezpečných
látok Látky
Teplota okolia
Teplota vonkajšieho krytu na
uvedenom mieste
Trieda ochrany 2 na predradníku
Teplota svetla v kelvinoch
lm Lúmen
Životnosť
Nestmievateľné externými ovládačmi.
Iba pre použitie v interiéri
Použite bezpečnostné rukavice
Testované TÜV SÜD / GS
Škoda na životnom prostredí spôsobená
nesprávnou likvidáciou batérií!
Zlikvidujte obal a zariadenie ekologicky!
Index podania farieb LED svietidla
Nezávislé ovládacie zariadenie
Ä
~
ta
tc
25000h
Ra
SELV

na použitie a v prípade potreby ho poskytnite
tretím osobám.
Účelové používanie
Toto svietidlo je určené výhradne na
použitie v interiéri, v suchých a
uzavretých miestnostiach. Toto
zariadenie je určené iba na použite v domácnosti.
Obsah balenia
Bezprostredne po rozbalení skontrolujte, či je
obsah balenia kompletný, a či zariadenie nie je
poškodené.
1 stropné LED svietidlo
2 batérie (AAA; 1,5 V)
1 diaľkové ovládanie
Montážny materiál
Popis častí
Montáž na strop
4 skrutky pre upevnenie svietidla
4 zápustné kolíky (hmoždinky)
Montážny uholník
4 skrutky pre montážny uholník
Svorkovnica s ochranným krytom
Stropné LED svietidlo
Závesná montáž
4 skrutky pre upevnenie svietidla
4 zápustné kolíky (hmoždinky)
4 skrutky pre montáž
Svorkovnica s ochranným krytom
Stropné LED svietidlo
Montážny uholník
Stropná rozeta vrát. skrutiek
Lanový záves, pozostávajúci z montážnych
objímok na strop a upevňovacích skrutiek
panela.
Stropné montážne objímky
Skrutkový závit
Nastavovacie puzdro
Batérie
Diaľkové ovládanie
Technické údaje
Číslo výrobku 55895
Prevádzkové napätie 220 – 240 V~ 50/60 Hz
Celkový výkon: max. 30W
Trieda ochrany: II/
Teplota farby: 2700 K až 5000 K
Ra = 83
Číslo výrobku 55896
Prevádzkové napätie 220 – 240 V~ 50/ 60Hz
Celkový výkon: max. 28 W
Trieda ochrany: II/
Teplota farby: 2700 K až 5000 K
Ra = 82
Výmena LED svetelného zdroja a LED predradníka
musí byť vykonaná odborníkom.
Rozmery:
Model A (55895): LED Panel 62 x 62x 7cm
(D × Š × V)
Model B (55896): LED Panel 100 x 25 x 7cm
(D × Š × V)
Stupeň ochrany krytom: IP20
Typ batérie
(Diaľkové ovládanie): 2 x AAA 1,5 V
Distribútor:
EDI Light GmbH, Heiligkreuz 22, 6136 Pill,
RAKÚSKO
www.edi-light.com
1
2
3
4
5
6
7
1
2
4
5
6
115SK
8
9
10
11
12
13

Bezpečnosť
Bezpečnostné pokyny
Pri poškodení spôsobenom nedodržaním pokynov
uvedených v tomto návode na použitie zaniká
reklamačný nárok. Za následné škody výrobca
nepreberá zodpovednosť! Za škody na majetku
alebo úrazy spôsobené nesprávnym
zaobchádzaním alebo nedodržaním
bezpečnostných pokynov výrobca nepreberá
zodpovednosť!
Nebezpečenstvo úrazu a
ohrozenia života pre deti!
Nikdy nenechávajte deti bez dozoru s
obalovým materiálom. Existuje nebezpečenstvo
zadusenia sa obalovým materiálom. Deti často
podceňujú nebezpečenstvo. Obalový materiál
nie je hračka.
Toto zariadenie môžu používať deti od 8 rokov
ako aj osoby so zníženými psychickými,
senzorickými alebo duševnými schopnosťami
alebo s nedostatkom skúseností a vedomostí, ak
sú pod dozorom, alebo ak boli poučené o
bezpečnom používaní zariadenia a porozumeli
nebezpečenstvám spojeným s jeho používaním.
Deti sa so zariadením nesmú hrať. Čistenie a
údržbu nesmú vykonávať deti bez dozoru.
Zariadenie nie je hračka.
Pokiaľ si počas používania zariadenia všimnete
nezvyčajné javy (napr. nezvyčajné zvuky,
zvláštny zápach alebo dym), bezodkladne
vypnite zariadenie. Následne zariadenie
opätovne nepoužívajte, kým nebude preverené
kvalifikovanou osobou.
Zabráňte ohrozeniu života
spôsobenému zásahom
elektrickým prúdom
Za škody na majetku alebo úrazy
spôsobené nesprávnym zaobchádzaním alebo
nedodržaním bezpečnostných pokynov výrobca
nepreberá zodpovednosť!
Elektroinštaláciu prenechajte kvalifikovanému
elektrikárovi alebo osobe zaškolenej v súvislosti
s elektroinštaláciou.
Pred montážou vyberte poistku alebo vypnite
istič v rozvodnej skrini (poloha 0). Svietidlo
nesmie prísť v žiadnom prípade do kontaktu s
vodou alebo inou kvapalinou.
Pred montážou sa uistite, že sa sieťové napätie
zhoduje s prevádzkovým napätím lampy
(pozri kapitolu „Technické údaje“).
Uistite sa, že sa počas montáže nepoškodili
žiadne vedenia.
Tento stropný/nástenný LED panel nie je
stmievateľný externými ovládačmi.
Svetelný zdroj tohto svietidla smie vymieňať
iba výrobca, ním autorizovaný servisný technik
alebo osoba s podobnou kvalifikáciou.
Zabráňte nebezpečenstvu
požiaru a poranenia
Skôr ako sa budete svietidla dotýkať sa
ubezpečte, že je vypnuté a vychladnuté, aby
ste predišli riziku popálenia.
Svietidlo neinštalujte na vlhký alebo vodivý
podklad.
Svietidlo alebo obalový materiál nenechávajte
voľne ležať bez povšimnutia. Plastové fólie/
vrecúška, diely z umelej hmoty atď. by sa mohli
stať nebezpečnou hračkou pre deti.
V prípade vystavenia sa určitým zábleskom a
svetelným efektom môže u niektorých osôb dôjsť
k epileptickým záchvatom a poruchám
vedomia.
V prípade takýchto príznakov bezodkladne
vyhľadajte lekársku pomoc.
Svietidlo namontuje tak, aby bolo chránené pred
116 SK

vlhkom, znečistením a príliš silným oteplením.
Pred vŕtaním sa uistite, že sa na mieste vŕtania
nenachádzajú žiadne plynové, vodovodné
alebo elektrické vedenia. Montáž prenechajte
odborníkom. Dbajte na druh a materiálové
zloženie steny, nakoľko priložený upevňovací
materiál nie je vhodný pre všetky druhy stien.
Informujte sa u predajcu o skrutkách a
zápustných kolíkoch (hmoždinkách) vhodných
pre daný druh steny.
Výrobca nepreberá žiadnu zodpovednosť za
škody spôsobené nesprávnym upevnením do
steny.
Buďte neustále opatrný! Dávajte vždy pozor
na to, čo robíte a vždy konajte uvážlivo.
Svietidlo v žiadnom prípade nemontujte, ak ste
práve nesústredený alebo sa necítite dobre.
Pred montážou sa uistite, že je vzhľadom
na váhu svietidla zamýšľané miesto montáže
vhodné.
Pred inštaláciou sa oboznámte so všetkými
pokynmi a obrázkami uvedenými v tomto
návode, ako aj so samotným svetlom.
Bezpečnostné pokyny pre
batérie/akumulátor
NEBEZPEČENSTVO OHROZENIA
ŽIVOTA! Batérie/akumulátor držte mimo
dosahu detí. V prípade prehltnutia batérie
okamžite vyhľadajte lekársku pomoc!
Prehltnutie batérie môže viesť k popáleninám,
perforácii mäkkého tkaniva a usmrteniu.
Ťažké popáleniny sa môžu vyskytnúť v priebe
hu 2 hodín od prehltnutia.
NEBEZPEČENSTVO EXPLÓZIE!
Nikdy nenabíjajte batérie, ktoré nie
sú nabíjateľné. Neskratujte batérie/
akumulátor a/alebo ich neotvárajte.
Následkom môže byť prehriatie, riziko
požiaru alebo výbuchu. Batérie/akumulátor
nikdy nevhadzujte do ohňa ani vody.
Nevystavujte batérie/akumulátor mechanickej
záťaži.
Riziko vytečenia
batérie/akumulátora
Zabráňte extrémnym podmienkam a teplotám,
ktoré by mohli vplývať na batérie/akumulátor,
spôsobených napr. vyhrievacím telesom alebo
slnečným žiarením.
V prípade vytečenia batérií/akumulátora
zabráňte kontaktu chemikálií s pokožkou,
očami a sliznicami.
Zasiahnuté miesta bezodkladne vypláchnite
čistou vodou a vyhľadajte lekársku pomoc.
POUŽÍVAJTE BEZPEČNOSTNÉ
RUKAVICE! Vytečené alebo
poškodené batérie/akumulátor môžu
pri kontakte s pokožkou spôsobiť poleptanie.
Používajte preto vhodné bezpečnostné ruka
vice.
V prípade vytečených batérií/akumulátora
ich bezodkladne vyberte zo zariadenia, aby
ste predišli poškodeniu.
Používajte iba batérie/akumulátor
rovnakého typu. Nekombinujte staré batérie/
akumulátor s novými!
V prípade, ak zariadenie dlhšiu dobu nie je v
prevádzke, vyberte batérie/akumulátor.
Riziko poškodenia zariadenia
Používajte výhradne uvedený typ
batérie/akumulátora!
Batérie/akumulátor vložte do zariadenia
podľa značenia polarity (+) a (-) na batérii/
akumulátore a na zariadení. Pred vložením
batérie/akumulátora vyčistite kontakty na
batérii/akumulátore a na zariadení suchou
utierkou, ktorá nepúšťa vlákna alebo vatovou
tyčinkou!
Zo zariadenia bezodkladne vyberte vybité
batérie/akumulátor. („Technické údaje“).
117SK

Príprava
Potrebné náradie
a materiál
Uvedené náradie a materiál nie je súčasťou balen-
ia. Nižšie uvedené údaje a hodnoty sú nezáväzné
a orientačné. Zloženie a vlastnosti materiálu sa
odvíjajú podľa individuálnych skutočností v mieste
montáže.
– ceruzka/nástroj na označovanie
– 2-pólová skúšačka napätia
– skrutkovač
– vŕtačka (vrták cca ø 6 mm)
– diagonálne kliešte
Montáž svetelného LED panela
NEBEZPEČENSTVO
ZÁSAHU ELEKTRICKÝM PRÚDOM!
Dôležité: Elektrické zapojenie musí byť vykonané
kvalifikovaným elektrikárom alebo osobou
zaškolenou na elektroinštalácie. Táto musí mať
znalosti o vlastnostiach svietidla a predpisoch o
zapojení. Vyberte poistku alebo vypnite istič v
rozvodnej skrini (poloha 0) (pozri obr. A).
Pri tomto svietidle existujú 2 možnosti montáže:
Montáž na stenu/strop
Zboku na montážnom uholníku
uvoľnite upevňovacie skrutky a odoberte
ho.
Označte otvory určené na vŕtanie pomocou
otvorov určených pre skrutky na
montážnom uholníku .
Teraz vyvŕtajte otvory pre upevnenie, hĺbka cca
30 mm. Dávajte pozor, aby ste nepoškodili
prívodné vedenie.
Vložte zápustné kolíky (hmoždinky) do
vyvŕtaných otvorov (pozri obr. B). Upevnite
montážny uholník pomocou priložených
skrutiek (pozri obr. B).
Spojte pripojovací kábel LED svietidla pomocou
svorkovnice so sieťovým pripojovacím káblom
(externým) (pozri obr. B).
Dbajte na to, aby boli jednotlivé vodiče
sieťového pripojovacieho kábla (externého)
vždy správne zapojené: vodičvedúciprúd,
čierny alebo hnedý = symbol L, neutrálny
vodič, modrý/biely kábel = symbol N .
Dbajte na správne dosadnutie.
Teraz priskrutkujte LED svetelný panel
pomocou upevňovacích skrutiek s
montážnym uholníkom .
Upozornenie: Dbajte na to, aby skrutky správne
zapadli.
Opäť nasaďte poistku alebo zapnite istič
vedenia v rozvodnej skrini (pozícia I) (pozri
obr. C).
Váš stropný/nástenný LED panel je teraz
pripravený na prevádzku.
Závesná montáž
Zboku na montážnom uholníku uvoľnite
upevňovacie skrutky a odoberte ho.
Označte otvory určené na vŕtanie
pomocou otvorov určených pre skrutky na
na montážnom uholníku .
Teraz vyvŕtajte otvory pre upevnenie, hĺbka cca
30 mm. Dávajte pozor, aby ste nepoškodili
prívodné vedenie.
Vložte zápustné kolíky (hmoždinky) do
vyvŕtaných otvorov (pozri obr. B).
Upevnite montážny uholník pomocou
priložených skrutiek .
Teraz vyvŕtajte dva ďalšie otvory vo
vzdialenosti od koncov
montážneho uholníka stropnej rozety a
vložte do každého otvoru zápustný kolík
(hmoždinku).
Upevnite montážne objímky na strop pomocou
pribalených skrutiek.
Zapojte sieťový pripojovací kábel (externý)
do svorkovnice stropnej rozety .
Dbajte na to, aby boli jednotlivé vodiče
správne zapojené: vodič vedúci prúd
1
4
6
3
3
1
4
7
8
3
4
3
2
4
7
4
7
2
5
118 SK
5
2

Diaľkové ovládanie je teraz pripravené na
prevádzku.
Uvedenie do prevádzky
Zapnutie/vypnutie svietidla
Nastavenie farby
Na zapnutie svetelného LED panela stlačte
vypínač svetla (vypínač na stene).
Na prepínanie medzi studenou, teplou a neu
trálnou bielou farbou svetla stlačte vypínač
svetla krátko niekoľkokrát po sebe.
K dispozícii máte nasledovné funkcie
(pozri obrázok zariadenia D)
Údržba a čistenie
NEBEZPEČENSTVO
ZÁSAHU ELEKTRICKÝM PRÚDOM!
Pred čistením odpojte svietidlo z elektrickej siete.
Z tohto dôvodu vyberte poistku alebo vypnite istič
vedenia v rozvodnej skrini (poloha 0) (pozri obr. A)
Uistite sa, že je svietidlo vypnuté a vychladnuté,
pred tým ako sa ho dotknete, aby ste predišli
riziku popálenia. Nepoužívajte rozpúšťadlá,
benzín a pod. Svietidlo by sa týmto poškodilo.
Na čistenie stropného/nástenného LED
panela používajte suchú utierku, ktorá
nepúšta vlákna. Opäť nasaďte poistku alebo
zapnite istič vedenia v rozvodnej skrini (pozícia
I)
(pozri obr. C)
čierny alebo hnedý = symbol L, neutrálny
vodič, modrý resp. biely = symbol N .
Dbajte na správne dosadnutie.
Teraz priskrutkujte stropnú rozetu pomocou
upevňovacích skrutiek s montážnym
uholníkom .
Upozornenie: Dbajte na to, aby skrutky
správne zapadli.
Teraz priskrutkujte 2 lanové závesy do
do montážnych objímok na strop a konce
lanových závesov do štyroch skrutkových
závitov na svetelnom LED paneli.
Spojte pripojovací kábel LED svietidla pomocou
svorkovnice s pripojovacím káblomstropnej
rozety .
Dbajte na to, aby boli jednotlivé vodiče
pripojovacieho kábla správnezapojené: vodič
vedúci prúd, čierny alebo hnedý = symbol L,
neutrálny vodič, modrý resp. biely = symbol N
.
Dbajte na správne dosadnutie.
Teraz môžete stlačením nastavovacej objímky
nastaviť dĺžku upevňovacích lán .
Opäť nasaďte poistku alebo zapnite istič
vedenia v rozvodnej skrini (pozícia I) (pozri
obr. C).
Váš stropný/nástenný LED panel je teraz
pripravený na prevádzku.
Vloženie/výmena batérií
(Diaľkové ovládanie)
Upozornenie: Batérie sú súčasťou balenia
a musia byť vložené pred prvým uvedením do
prevádzky.
V prípade, ak slabne dosah diaľkového
ovládania musíte vymeniť batérie .
Potiahnite kryt priečinka na batérie v smere
šípky na diaľkovom ovládaní .
Odoberte staré a vložte nové batérie .
Správny typ batérií nájdete v kapitole
„Technické údaje“.
Upozornenie: Správna polarita je
vyobrazená v priečinku na batérie.
Nasaďte kryt priečinka batérií naspäť.
11
10
5
6
7
1
1
119SK
5
8
9
5
12
13
12
12
12

Likvidácia
Obal pozostáva z ekologických materiálov, ktoré
môžete odovzdať na miestnych recyklačných
zberných miestach.
Všímajte si prosím označenie
obalových materiálov pre triedenie odpadu,
sú označené skratkami (a) a číslami (b) s
nasledujúcim významom: 1 – 7: Plasty/
20 – 22: Papier a lepenka/80 – 98:
Kompozitné materiály.
Výrobok a obalové materiály sú
recyklovateľné, zlikvidujte ich oddelene
pre lepšie spracovanie odpadu. Triman-Logo
platí iba pre Francúzsko.
O možnostiach likvidácie zariadenia sa
informujte u miestnej správy obce alebo
mesta.
Ak výrobok doslúžil, v záujme ochrany
životného prostredia ho neodhoďte do
domového odpadu, ale odovzdajte na
odbornú likvidáciu. Informácie o
zberných miestach a ich otváracích hodinách
vám poskytne samospráva.
Poškodené alebo vybité batérie/
akumulátor sa musia recyklovať podľa
smernice 2006/66/ES a jej neskorších
zmien. Batérie/akumulátor a/alebo zariadenie
odovzdajte na ponúkaných zberných miestach.
Škoda na životnom prostredí spôsobená
nesprávnou
likvidáciou batérií/akumulátora!
Batérie/akumulátor sa nesmú vyhadzovať do
komunálneho odpadu. Môžu obsahovať jedovaté
ťažké kovy a podliehajú nakladaniu s
nebezpečným odpadom. Chemické značky ťažkých
kovov sú nasledovné: Cd = kadmium, Hg = ortuť,
Pb = olovo. Odovzdajte preto použité
batérie/akumulátor na miestnom zbernom mieste.
Vyhlásenie o zhode
Tento výrobok spĺňa požiadavky platných
európskych a národných smerníc. Príslušné
prehlásenia a podklady sú uložené u
výrobcu. Toto zariadenie zodpovedá podmienkam
nemeckého zákona o bezpečnosti prístrojov a
zariadení.
V súvislosti s vylepšovaním produktu si
vyhradzujeme technické a optické zmeny na
zariadení. Tlačové chyby vyhradené.
Záruka a servis
Záruka
Poskytujeme záruku 3 roky od dátumu nákupu.
Naše produkty vyrábame modernými výrobnými
metódami a podrobujeme dôkladnej kontrole
kvality. Ručíme za bezchybnú kvalitu tovaru. V
rámci záručnej doby bezplatne opravíme všetky
materiálové- alebo výrobné nedostatky. Pokiaľ
by sa napriek očakávaniam vyskytli nedostatky,
odošlite starostlivo zabalený tovar na adresu
uvedeného servisného strediska. Zo záruky sú
vylúčené škody spôsobené neodbornou
manipuláciou, ako aj diely podliehajúce
opotrebeniu a spotrebný materiál. Tieto si môžete
za poplatok objednať na uvedenom telefónnom
čísle. Opravy, ktoré nespadajú pod záruku
(napr. svietidlo), môžete po individuálnej cenovej
kalkulácii rovnako nechať vykonať v uvedenom
servisnom stredisku.
Tovar sa opravuje na uvedenej servisnej
adrese. Iba v prípade, ak ho pošlete priamo na
uvedenú adresu, môže
dôjsť k včasnému spracovaniu a spätnému
odoslaniu. V prípade záujmu o doplnkové
Ä
~
120 SK

informácie o produkte, o objednanie príslušenstva
alebo o informácie o priebehu reklamácie, sa,
prosím, obráťte na zákaznícku podporu na
uvedenom telefónnom čísle. V prípade otázok,
prosím, uveďte číslo produktu (pozri „Technické
údaje“).
Tento produkt obsahuje svetelné zdroje
energetickej triedy E
Servisné stredisko
Slovakia
EGLO CZ+SK s.r.o
Náchodská 2479/63
193 00 PRAHA 9 Horní Pocernice, CZECH REPUBLIC
T: +421 313 211 551
IAN 378855_2101
V prípade otázok si, prosím, pripravte pokladničný
blok a číslo produktu (napr. IAN 123456_7890) ako
potvrdenie o nákupe.
121SK
Záručný list
Odosielateľ: _________________________________________________________________________
Priezvisko/meno: _____________________________________________________________________
Krajina/PSČ/mesto/ulica: _____________________________________________________________
Telefónne číslo: _______________________________________________________________________
Číslo produktu/označenie: _____________________________________________________________
Dátum/miesto nákupu: Informácie o chybe: _______________________________________________
Dátum/podpis: ______________________________________________________________________
V prípade, ak nejde o záručný prípad:___________________________________________________
Pošlite, prosím, tovar neopravený naspäť za vzniknuté náklady na dopravu.
Oznámte mi výšku poplatku. Opravte tovar za poplatok.


Legende der verwendeten Piktogramme .................................................. Seite 114
Einleitung ......................................................................................................... Seite 114
Bestimmungsgemäße Verwendung ......................................................................... Seite 115
Lieferumfang ........................................................................................................ Seite 115
Teilebeschreibung ................................................................................................. Seite 115
Technische Daten .................................................................................................. Seite 115
Sicherheit .......................................................................................................... Seite 116
Sicherheitshinweise ............................................................................................... Seite 116
Sicherheitshinweise für Batterien/Akkus .................................................................. Seite 117
Vorbereitung ................................................................................................... Seite 118
Benötigtes Werkzeug und Material ......................................................................... Seite 118
LED-Wand-/Deckenpanel montieren .......................................................................Seite 118
Batterien einlegen/wechseln (Fernbedienung) ......................................................... Seite 118
Inbetriebnahme .............................................................................................. Seite 119
LED-Wand-/Deckenpanel ein-/ausschalten/Lichtfarbe einstellen .............................. Seite 119
Wartung und Reinigung ................................................................................ Seite 120
Entsorgung ....................................................................................................... Seite 120
Konformitätserklärung .................................................................................. Seite 120
Garantie und Service ..................................................................................... Seite 121
Garantie .............................................................................................................. Seite 121
Serviceadresse ..................................................................................................... Seite 121
Garantiekarte ....................................................................................................... Seite 122
123DE/AT/CH

Legende der verwendeten Piktogramme*
Anweisungen lesen!
Sicherheitshinweise
Handlungsanweisungen
Diese Leuchte ist ausschließlich für den
Betrieb im Innenbereich, in trockenen
und geschlossenen Räumen geeignet.
Wechselstrom/ -spannung
Hertz (Frequenz)
Watt (Wirkleistung)
Gleichstrom/ -spannung
Polarität Output
Schutzklasse II
Warn- und Sicherheitshinweise beachten!
Warnung!
Stromschlaggefahr!
Vorsicht! Explosionsgefahr!
Lebens- und Unfallgefahren für
Kleinkinder und Kinder!
Kurzschlussfester
Sicherheitstransformator
Sicherheitskleinspannung
Richtlinie zur Beschränkung gefährlicher
Stoffe
Umgebungstemperatur
Gehäusetemperatur am
angegebenen Punkt
Schutzklasse II beim Vorschaltgerät
Lichttemperatur in Kelvin
lm Lumen
Lebensdauer
Nicht über externe Regler dimmbar.
Nur für den Innenbereich
Tragen Sie Schutzhandschuhe
TÜV SÜD / GS-geprüft
Umweltschäden durch falsche
Entsorgung der Batterien!
Entsorgen Sie Verpackung und Gerät
umweltgerecht!
Farbwiedergabeindex der LED-Beleuchtung
Unabhängiges Betriebsgerät
Ä
~
LED-Wand und
Deckenpanel
Einleitung
Wir beglückwünschen Sie zum Kauf
Ihres neuen LED-Wand-/Decken-
panels (im Folgenden auch Leuchte
oder Produkt genannt). Sie haben sich damit für
ein hochwertiges Produkt entschieden.
Bitte lesen Sie diese Bedienungsanleitung vollstän-
dig und sorgfältig durch. Klappen Sie die Seite mit
der Abbildung aus. Diese Bedienungsanleitung
gehört zu diesem Produkt und enthält wichtige
Hinweise zur Inbetriebnahme und Handhabung.
Beachten Sie immer alle Sicherheitshinweise.
Prüfen Sie vor der Inbetriebnahme, ob die korrekte
Netzspannung vorhanden ist und ob alle Teile
richtig montiert sind. Sollten Sie Fragen haben oder
unsicher in Bezug auf die Handhabung
* Weitere Details, z. B. zusätzliche Symbolerklärungen
bzw. technische Informationen, finden Sie
unter www.edi-light.com
ta
tc
25000h
Ra
SELV
124 DE/AT/CH

des Produkts sein, setzen Sie sich bitte mit Ihrem
Händler oder der Servicestelle in Verbindung.
Bewahren Sie diese Bedienungsanleitung bitte sorg-
fältig auf und geben Sie sie ggf. an Dritte weiter.
Bestimmungsgemäße
Verwendung
Diese Leuchte ist ausschließlich für den
Betrieb im Innenbereich, in trockenen
und geschlossenen Räumen geeignet.
Dieses Produkt ist nur für den Einsatz in privaten
Haushalten vorgesehen.
Lieferumfang
Kontrollieren Sie unmittelbar nach dem Auspacken
immer den Lieferumfang auf Vollständigkeit sowie
den einwandfreien Zustand des Produkts.
1 LED-Deckenleuchte
2 Batterien (AAA; 1,5 V)
1 Fernbedienung
Montagematerial
Teilebeschreibung
Deckenmontage
4 Schrauben für Leuchtenbefestigung
4 Dübel
Montagewinkel
4 Schrauben für Montagewinkel
Lüsterklemme mit Anschlussbox
LED-Deckenleuchte
Hängemontage
4 Schrauben für Leuchtenbefestigung
4 Dübel
4 Schrauben für Montage
Lüsterklemme mit Anschlussbox
LED-Deckenleuchte
Montagewinkel
Deckenbaldachin inkl. Schrauben
Hängeseile, bestehend aus Decken-
befestigungshülsen und Panel-Befestigungs-
schrauben.
Deckenbefestigungshülsen
Schraubgewinde
Einstellhülse
Batterien
Fernbedienung
Technische Daten
Artikelnummer: 55895
Betriebsspannung: 220–240 V~ 50/60 Hz
Gesamtleistung: max.30 Watt
Schutzklasse: II/
LED-Lichtquelle: 2700K bis 5000K
Ra=83
Artikelnummer: 55896
Betriebsspannung: 220–240 V~ 50/ 60 Hz
Gesamtleistung: max. 28 Watt
Schutzklasse: II/
LED-Lichtquelle: 2700K bis 5000K
Ra=82
Die LED-Lichtquellen und das LED-Betriebsgerät
sind nur durch einen Fachmann austauschbar.
Maße:
Modell A (55895): LED Panel 62 x 62x 7cm
(L x B x H)
Modell B (55896): LED Panel 100 x 25 x 7cm
(L x B x H)
Schutzart: IP20
Batterietyp
(Fernbedienung): 2 x AAA 1,5V
Inverkehrbringer:
EDI Light GmbH, Heiligkreuz 22, 6136 Pill,
ÖSTERREICH
www.edi-light.com
125DE/AT/CH
8
9
10
11
12
13
1
2
3
4
5
6
7
1
2
4
5
6

Sicherheit
Sicherheitshinweise
Bei Schäden, die durch Nichtbeachtung dieser
Bedienungsanleitung verursacht werden, erlischt
der Garantieanspruch! Für Folgeschäden wird
keine Haftung übernommen! Bei Sach- oder
Personenschäden, die durch unsachgemäße Hand-
habung oder Nichtbeachtung der Sicherheitshin-
weise verursacht werden, wird keine Haftung
übernommen!
LEBENS-
UND UNFALLGEFAHREN FÜR
KLEINKINDER UND KINDER!
Lassen Sie Kinder niemals unbeaufsichtigt mit
dem Verpackungsmaterial. Es besteht Erstick-
ungsgefahr durch das Verpackungsmaterial.
Kinder unterschätzen häufig die Gefahren. Das
Verpackungsmaterial ist kein Spielzeug.
Dieses Produkt kann von Kindern ab 8 Jahren
und darüber sowie von Personen mit ver-
ringerten physischen, sensorischen oder
mentalen Fähigkeiten oder Mangel an Er-
fahrung und Wissen benutzt werden, wenn
sie beaufsichtigt oder bezüglich des sicheren
Gebrauchs des Produkts unterwiesen wurden
und die daraus resultierenden Gefahren ver-
stehen. Kinder dürfen nicht mit dem Produkt
spielen. Reinigung und Benutzerwartung dürfen
nicht von Kindern ohne Beaufsichtigung durch-
geführt werden. Das Produkt ist kein Spielzeug.
Wenn Sie während des Betriebs irgendwelche
Auffälligkeiten bemerken (z. B. ungewöhnliche
Geräusche, seltsamer Geruch oder Rauch-
entwicklung), schalten Sie das Produkt sofort
aus. Verwenden Sie das Produkt danach nicht
mehr, bis es durch eine befähigte Person
überprüft wurde.
Vermeiden Sie Lebensgefahr
durch elektrischen Schlag
Bei Sach- oder Personenschäden, die durch
unsachgemäße Handhabung oder Nichtbeach-
tung der Sicherheitshinweise verursacht
werden, wird keine Haftung übernommen!
Lassen Sie die Elektroinstallation durch einen
ausgebildeten Elektriker oder eine für
Elektroinstallationen eingewiesene Person
durchführen.
Entfernen Sie vor der Montage die Sicherung
oder schalten Sie den Leitungsschutzschalter im
Sicherungskasten aus (0-Stellung).
Vermeiden Sie unbedingt die Berührung der
Leuchte mit Wasser oder anderen Flüssig-
keiten.
Vergewissern Sie sich vor der Montage,
dass die vorhandene Netzspannung mit der
benötigten Betriebsspannung der Leuchte
übereinstimmt (siehe „Technische Daten“).
Stellen Sie sicher, dass bei der Montage keine
Leitungen beschädigt werden.
Das LED-Wand-/Deckenpanel ist nicht über
externe Regler dimmbar.
Die Lichtquelle dieser Leuchte darf nur vom
Hersteller oder einem von ihm beauftragten
Servicetechniker oder einer vergleichbar
qualifizierten Person ersetzt werden.
Vermeiden Sie Brand-
und Verletzungsgefahr
Stellen Sie sicher, dass die Leuchte ausgeschaltet
und abgekühlt ist, bevor Sie diese berühren, um
Verbrennungen zu vermeiden.
Befestigen Sie die Leuchte nicht auf feuchtem
oder leitendem Untergrund.
Lassen Sie die Leuchte oder Verpackungs-
material nicht achtlos liegen. Plastikfolien/
-tüten, Kunststoffteile etc. könnten für Kinder zu
einem gefährlichen Spielzeug werden.
Bei manchen Personen kann es zu epileptischen
Anfällen oder Bewusstseinsstörungen kommen,
wenn Sie bestimmten Blitzlichtern oder Licht-
126 DE/AT/CH

effekten ausgesetzt werden. Suchen Sie bei
epileptischen Symptomen umgehend einen Arzt
auf.
Montieren Sie die Leuchte so, dass sie vor
Feuchtigkeit, Verschmutzung und zu starker
Erwärmung geschützt ist.
Vergewissern Sie sich vor dem Bohren, dass
sich keine Gas-, Wasser- oder Stromleitungen
an der Bohrstelle befinden. Montage nur durch
fachkundige Personen. Unbedingt auf die
Wandbeschaffenheit achten, da sich das bei-
gefügte Befestigungsmaterial nicht für alle
Wandarten eignet. Erkundigen Sie sich im
Handel nach den für die jeweilige Wand-
beschaffenheit geeigneten Schrauben und
Dübeln.
Für eine unsachgemäße Wand-Dübel-Verbin-
dung und dadurch entstandene Schäden
übernimmt der Hersteller keine Haftung.
Seien Sie stets aufmerksam! Achten Sie immer
darauf was Sie tun und gehen Sie stets mit
Vernunft vor. Verwenden Sie die Leuchte in
keinem Fall, wenn Sie unkonzentriert sind oder
sich unwohl fühlen.
Überprüfen Sie vor der Montage, ob der
Montageort für das Gewicht der Leuchte
geeignet ist.
Machen Sie sich vor der Verwendung mit allen
Anweisungen und Abbildungen in dieser An-
leitung sowie mit der Leuchte selbst vertraut.
Sicherheitshinweise für
Batterien/Akkus
LEBENSGEFAHR! Halten Sie Batterien/
Akkus außer Reichweite von Kindern. Suchen
Sie im Falle eines Verschluckens sofort einen
Arzt auf!
Verschlucken kann zu Verbrennungen,
Perforation von Weichgewebe und Tod führen.
Schwere Verbrennungen können innerhalb
von 2 Stunden nach dem Verschlucken
auftreten.
EXPLOSIONSGEFAHR! Laden Sie
nicht aufladbare Batterien niemals
wieder auf. Schließen Sie Batterien/
Akkus nicht kurz und/oder öffnen Sie diese
nicht. Überhitzung, Brandgefahr oder Platzen
können die Folge sein.
Werfen Sie Batterien/Akkus niemals in Feuer
oder Wasser.
Setzen Sie Batterien/Akkus keiner
mechanischen Belastung aus.
Risiko des Auslaufens von
Batterien/Akkus
Vermeiden Sie extreme Bedingungen und
Temperaturen, die auf Batterien/Akkus
einwirken können, z. B. auf Heizkörpern/
durch direkte Sonneneinstrahlung.
Wenn Batterien/Akkus ausgelaufen sind,
vermeiden Sie den Kontakt von Haut, Augen
und Schleimhäuten mit den Chemikalien!
Spülen Sie die betroffenen Stellen sofort mit
klarem Wasser und suchen Sie einen Arzt auf!
SCHUTZHANDSCHUHE
TRAGEN! Ausgelaufene oder be-
schädigte Batterien/Akkus können
bei Berührung mit der Haut Verätzungen
verursachen. Tragen Sie deshalb in diesem Fall
geeignete Schutzhandschuhe.
Im Falle eines Auslaufens der Batterien/Akkus
entfernen Sie diese sofort aus dem Produkt, um
Beschädigungen zu vermeiden.
Verwenden Sie nur Batterien/Akkus des
gleichen Typs. Mischen Sie nicht alte Batterien/
Akkus mit neuen!
Entfernen Sie die Batterien/Akkus, wenn das
Produkt längere Zeit nicht verwendet wird.
Risiko der Beschädigung des Produkts
Verwenden Sie ausschließlich den ange-
gebenen Batterietyp/Akkutyp!
Setzen Sie Batterien/Akkus gemäß der
Polaritätskennzeichnung (+) und (-) an Batterie/
Akku und des Produkts ein. Reinigen Sie
Kontakte an Batterie/Akku und im
127DE/AT/CH

Batteriefach vor dem Einlegen mit einem
trockenen, fusselfreien Tuch oder Watte-
stäbchen!
Entfernen Sie erschöpfte Batterien/Akkus
umgehend aus dem Produkt. („Technische
Daten“).
Vorbereitung
Benötigtes Werkzeug
und Material
Die genannten Werkzeuge und Materialien sind
nicht im Lieferumfang enthalten. Es handelt sich
hierbei um unverbindliche Angaben und Werte
zur Orientierung. Die Beschaffenheit des Materials
richtet sich nach den individuellen Gegebenheiten
vor Ort.
– Bleistift / Markierwerkzeug
– 2-poliger Spannungsprüfer
– Kreuzschraubendreher
– Bohrmaschine (ca. ø 6 mm)
– Seitenschneider
LED-Leuchtpanel montieren
STROMSCHLAGGEFAHR!
Wichtig: Der elektrische Anschluss muss durch
einen ausgebildeten Elektriker oder eine für
Elektroinstallationen eingewiesene Person erfolgen.
Diese muss Kenntnis über die Eigenschaften der
Leuchte und Anschlussbestimmungen haben.
Entfernen Sie hierfür die Sicherung oder schalten
Sie den Leitungsschutzschalter im Sicherungskasten
aus (0-Stellung) (siehe Abb. A).
Sie haben hierbei die 2 Montagemöglichkeiten:
Wand-Deckenmontage
Lockern Sie die seitlich am Montagewinkel
sichtbaren Schrauben und entfernen
Sie diesen.
Markieren Sie die Bohrlöcher mit Hilfe der
im Montagewinkel für die Schrauben
vorgesehene Löcher.
Bohren Sie nun die Befestigungslöcher ca.
30mm tief. Stellen Sie sicher, dass die Zuleitung
nicht beschädigt wird.
Führen Sie die Dübel in die Bohrlöcher ein
(siehe Abb. B).
Befestigen Sie den Montagewinkel mit den
mitgelieferten Schrauben (siehe Abb. B).
Verbinden Sie das Anschlusskabel des
LED-Leuchtpanels mittels der Lüsterklemme
mit dem Netzanschlusskabel (extern) (siehe
Abb. B).
Achten Sie darauf, dass die einzelnen Leiter
des Netzanschlusskabels (extern) jeweils
richtig angeschlossen werden:
Stromführender Leiter, schwarz oder braun =
Symbol L, Neutralleiter, blau/weiß markiertes
Kabel = Symbol N .
Achten Sie auf den richtigen Sitz.
Verschrauben Sie nun das LED-Leuchtpanel
mittels der Schrauben mit dem Montage-
winkel .
Hinweis: Achten Sie darauf, dass die Schrauben
richtig einrasten.
Setzen Sie die Sicherung wieder ein oder
schalten Sie den Leitungsschutzschalter am
Sicherungskasten ein (I-Stellung) (siehe Abb. C).
Ihr LED-Wand-/Deckenpanel ist nun
betriebsbereit.
Hängemontage
Lockern Sie die seitlich am Montagewinkel
sichtbaren Schrauben und entfernen Sie
diesen.
Markieren Sie die Bohrlöcher mit Hilfe der
im Montagewinkel für die Schrauben
vorgesehenen Löcher.
Bohren Sie nun die Befestigungslöcher ca.
30mm tief. Stellen Sie sicher, dass die Zuleitung
nicht beschädigt wird.
Führen Sie die Dübel in die Bohrlöcher ein
(siehe Abb. B).
Befestigen Sie den Montagewinkel mit den
128 DE/AT/CH
4
2
4
6
3
3
1
3
2
1
3
7
4
74
7
5

Batterien einlegen/wechseln
(Fernbedienung)
Hinweis: Die Batterien liegen dem Liefer-
umfang bei und müssen vor der ersten Inbetrieb-
nahme eingelegt werden.
Wenn die Reichweite der Fernbedienung
nachlässt, müssen Sie die Batterien aus-
wechseln. Ziehen Sie dazu den
Batteriefachdeckel in Pfeilrichtung von der
Fernbedienung ab.
Entnehmen Sie die Batterien und legen
Sie die neuen Batterien ein. Den Batterie-
typ können Sie dem Kapitel „Technische
Daten“ entnehmen.
Hinweis: Die richtige Polarität wird im
Batteriefach angezeigt.
Setzen Sie den Batteriefachdeckel wieder auf
das Batteriefach.
Die Fernbedienung ist nun betriebsbereit.
Inbetriebnahme
Leuchte ein-/ausschalten/
Lichtfarbe einstellen
Betätigen Sie den Lichtschalter (Wandschalter),
um das LED-Leuchtpanel ein-/auszu-
schalten.
Wenn Sie den Lichtschalter kurz hintereinander
betätigen, wechselt das LED-Leuchtpanel
zwischen Kalt-, Warm- und Neutralweiß.
Folgende Funktionen stehen Ihnen zur
Verfügung (siehe Produktabbildung D)
mitgelieferten Schrauben .
Bohren Sie nun weitere 2 Löcher im Abstand
von den Enden des
Montagebügels des Deckenbaldachins und
führen Sie je einen Dübel in die Löcher ein.
Befestigen Sie die Deckenbefestigungshülsen mit
den mitgelieferten Schrauben.
Verbinden Sie das Netzanschlusskabel (extern)
mit der Lüsterklemme des Deckenbaldachins
Achten Sie darauf, dass die einzelnen Leiter
richtig angeschlossen werden: Stromführender
Leiter, schwarz oder braun = Symbol L,
Neutralleiter, blau bzw. weiß markiertes Kabel
= Symbol N .
Achten Sie auf den richtigen Sitz.
Verschrauben Sie nun das Deckenbaldachin
mittels der Schrauben mit dem Montage-
winkel .
Hinweis: Achten Sie darauf, dass die Schrauben
richtig einrasten.
Schrauben Sie nun die 2 Hängeseilen in die
Deckenbefestigungshülsen sowie die
Enden der Hängeseile in die vier dafür
vorgesehenen Schraubgewinde am
LED- Leuchtpanel.
Verbinden Sie das Anschlusskabel des
LED-Leuchtpanels mittels der Lüsterklemme
mit dem Anschlusskabel des
Deckenbaldachins.
Achten Sie darauf, dass die einzelnen Leiter
des Anschlusskabels jeweils richtig angeschlos-
sen werden: Stromführender Leiter, schwarz
oder braun = Symbol L, Neutralleiter, blau bzw.
weiß markiertes Kabel = Symbol N .
Achten Sie auf den richtigen Sitz
Sie können nun die Länge der Befestigungsseile
durch Drücken der Einstellhülse anpassen
Setzen Sie die Sicherung wieder ein oder
schalten Sie den Leitungsschutzschalter am
Sicherungskasten ein (I-Stellung) (siehe Abb. C).
Ihr LED-Wand-/Deckenpanel ist nun
betriebsbereit.
129DE/AT/CH
9
12
13
12
12
12
11
10
8
5
5
6
4
8
1
7
1
6
6
2
5
5

Wartung und Reinigung
STROMSCHLAGGEFAHR!
Trennen Sie zur Reinigung die Leuchte zuerst vom
Stromnetz. Entfernen Sie hierfür die Sicherung
oder schalten Sie den Leitungsschutzschalter im
Sicherungs-kasten aus (0-Stellung) (siehe Abb. A).
Stellen Sie sicher, dass die Leuchte ausge-
schaltet und abgekühlt ist, bevor Sie diese
berühren, um Verbrennungen zu vermeiden.
Benutzen Sie keine Lösungsmittel, Benzin o. Ä.
Die Leuchte würde hierbei Schaden nehmen.
Verwenden Sie zur Reinigung des LED-
Wand-/Deckenpanel ein trockenes,
fusselfreies Tuch.
Setzen Sie die Sicherung wieder ein oder
schalten Sie den Leitungsschutzschalter am
Sicherungskasten ein (I-Stellung)
(siehe Produktabbildung C).
Entsorgung
Die Verpackung besteht aus umweltfreundlichen
Materialien, die Sie über die örtlichen Recycling-
stellen entsorgen können.
Beachten Sie die Kennzeichnung der
Verpackungsmaterialien bei der Abfalltren
nung, diese sind gekennzeichnet mit
Abkürzungen (a) und Nummern (b) mit
folgender Bedeutung: 1–7: Kunststoffe/
20–22: Papier und Pappe / 80–98: Verbund
stoffe.
Das Produkt und die Verpackungsmaterialien
sind recycelbar, entsorgen Sie diese getrennt
für eine bessere Abfallbehandlung. Das
Triman-Logo gilt nur für Frankreich.
Möglichkeiten zur Entsorgung des ausgedient
en Produkts erfahren Sie bei Ihrer Gemeinde-
oder Stadtverwaltung.
Werfen Sie Ihr Produkt, wenn es ausgedient
hat, im Interesse des Umweltschutzes nicht
in den Hausmüll, sondern führen Sie es einer
fachgerechten Entsorgung zu. Über Sammel
stellen und deren Öffnungszeiten können
Sie sich bei Ihrer zuständigen Verwaltung
informieren.
Defekte oder verbrauchte Batterien/Akkus
müssen gemäß Richtlinie 2006/66/EG und
deren Änderungen recycelt werden.
Geben Sie Batterien/Akkus und/oder das Produkt
über die angebotenen Sammeleinrichtungen
zurück.
Umweltschäden durch falsche
Entsorgung der Batterien/Akkus!
Batterien/Akkus dürfen nicht über den Hausmüll
entsorgt werden. Sie können giftige Schwermetalle
enthalten und unterliegen der Sondermüllbehand-
lung. Die chemischen Symbole der Schwermetalle
sind wie folgt: Cd = Cadmium, Hg = Quecksilber,
Pb = Blei. Geben Sie deshalb verbrauchte
Batterien/Akkus bei einer kommunalen Sammel-
stelle ab.
Konformitätserklärung
Dieses Produkt erfüllt die Anforderungen
der geltenden europäischen und nationalen
Richtlinien. Entsprechende Erklärungen und
Unterlagen sind beim Hersteller hinterlegt. Das
Produkt entspricht den Anforderungen des
deutschen Geräte- und Produktsicherheitsgesetzes.
Im Zuge von Produktverbesserungen behalten wir
uns technische und optische Veränderungen am
Artikel vor. Vorbehaltlich Satz- und Druckfehler.
130 DE/AT/CH
Ä
~

Garantie und Service
Garantie
Wir übernehmen 3 Jahre Garantie ab Kaufdatum.
Unsere Produkte werden nach modernen
Produktionsmethoden hergestellt und einer genauen
Qualitätskontrolle unterzogen. Wir garantieren
für die einwandfreie Beschaffenheit der Artikel.
Innerhalb der Garantiezeit beheben wir kostenlos
alle Material- oder Herstellfehler. Sollten sich wider
Erwarten Mängel herausstellen, schicken Sie den
sorgfältig verpackten Artikel an die angegebene
Serviceadresse. Von der Garantie ausgenom-
men sind Schäden, die auf unsachgemäßer
Handhabung beruhen sowie Verschleißteile und
Verbrauchsmaterialien. Diese können Sie unter der
angegebenen Rufnummer kostenpflichtig bestellen.
Reparaturen, die nicht unter Garantie laufen
(z. B. Leuchtmittel), können Sie gegen individuelle
Berechnung zum Selbstkostenpreis ebenfalls bei der
angegebenen Serviceadresse durchführen lassen.
Der Artikel wird unter der genannten Service-
adresse repariert. Nur wenn Sie ihn direkt an diese
Adresse senden, kann eine zeitgerechte
Bearbeitung und Rücksendung erfolgen.
Wünschen Sie weitere Produktinformationen,
möchten Sie Zubehör bestellen oder haben Sie
Fragen zur Serviceabwicklung, rufen Sie bitte
unsere Kundenberatung unter der angegebenen
Rufnummer an. Bei Rückfragen geben Sie bitte die
Artikelnummer (siehe „Technische Daten“) an.
Dieses Produkt enthält Lichtquellen
der Energieeffizienzklasse E
Serviceadresse
Deutschland
EDI Light Service Center Kleinbahnstraße 35
59759 Arnsberg, DEUTSCHLAND
T: +49 2932 639 773
Österreich
EDI Light Service Center Heiligkreuz 22
6136 Pill, ÖSTERREICH
T: +43 5242 670 57
Schweiz
EGLO Schweiz AG Seetalstraße 142
6032 Emmen, SCHWEIZ
T: +41 41 268 69 59
E: [email protected]IAN 378861_2101
Bitte halten Sie für alle Anfragen den Kassenbon
und die Artikelnummer (z. B. IAN 123456_7890)
als Nachweis für den Kauf bereit.
IAN 378855_2101
Bitte halten Sie für alle Anfragen den Kassenbon
und die Artikelnummer (z. B. IAN 123456_7890)
als Nachweis für den Kauf bereit.
131DE/AT/CH

Garantiekarte
Absender: __________________________________________________________________________
Name/Vorname: ___________________________________________________________________
Land/PLZ/Ort/Straße: ____________________________________________________________
Telefonnummer: ______________________________________________________________________
Artikelnummer/Bezeichnung: _________________________________________________________
Kaufdatum/Kaufort: _________________________________________________________________
Fehlerangabe: _______________________________________________________________________
Datum/Unterschrift: ________________________________________________________________
Liegt kein Garantiefall vor:____________________________________________________________
Schicken Sie den Artikel bitte unrepariert gegen entstandene Transportkosten zurück.
Teilen Sie mir die Kosten mit. Reparieren Sie den Artikel gegen Bezahlung.
132 DE/AT/CH
-
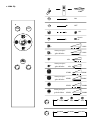 1
1
-
 2
2
-
 3
3
-
 4
4
-
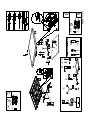 5
5
-
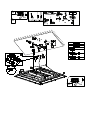 6
6
-
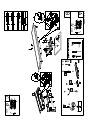 7
7
-
 8
8
-
 9
9
-
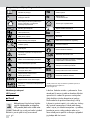 10
10
-
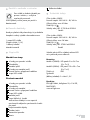 11
11
-
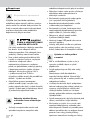 12
12
-
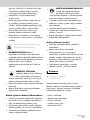 13
13
-
 14
14
-
 15
15
-
 16
16
-
 17
17
-
 18
18
-
 19
19
-
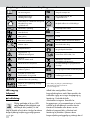 20
20
-
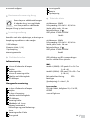 21
21
-
 22
22
-
 23
23
-
 24
24
-
 25
25
-
 26
26
-
 27
27
-
 28
28
-
 29
29
-
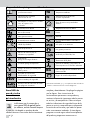 30
30
-
 31
31
-
 32
32
-
 33
33
-
 34
34
-
 35
35
-
 36
36
-
 37
37
-
 38
38
-
 39
39
-
 40
40
-
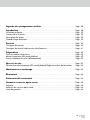 41
41
-
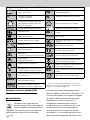 42
42
-
 43
43
-
 44
44
-
 45
45
-
 46
46
-
 47
47
-
 48
48
-
 49
49
-
 50
50
-
 51
51
-
 52
52
-
 53
53
-
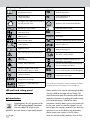 54
54
-
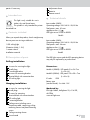 55
55
-
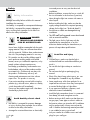 56
56
-
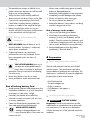 57
57
-
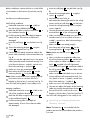 58
58
-
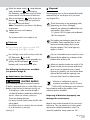 59
59
-
 60
60
-
 61
61
-
 62
62
-
 63
63
-
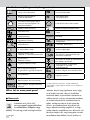 64
64
-
 65
65
-
 66
66
-
 67
67
-
 68
68
-
 69
69
-
 70
70
-
 71
71
-
 72
72
-
 73
73
-
 74
74
-
 75
75
-
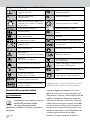 76
76
-
 77
77
-
 78
78
-
 79
79
-
 80
80
-
 81
81
-
 82
82
-
 83
83
-
 84
84
-
 85
85
-
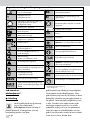 86
86
-
 87
87
-
 88
88
-
 89
89
-
 90
90
-
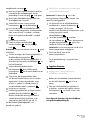 91
91
-
 92
92
-
 93
93
-
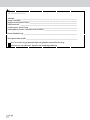 94
94
-
 95
95
-
 96
96
-
 97
97
-
 98
98
-
 99
99
-
 100
100
-
 101
101
-
 102
102
-
 103
103
-
 104
104
-
 105
105
-
 106
106
-
 107
107
-
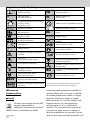 108
108
-
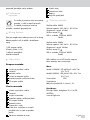 109
109
-
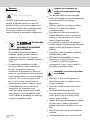 110
110
-
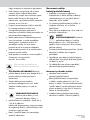 111
111
-
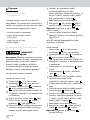 112
112
-
 113
113
-
 114
114
-
 115
115
-
 116
116
-
 117
117
-
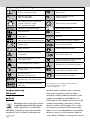 118
118
-
 119
119
-
 120
120
-
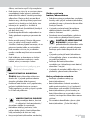 121
121
-
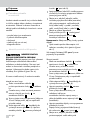 122
122
-
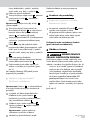 123
123
-
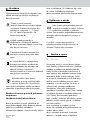 124
124
-
 125
125
-
 126
126
-
 127
127
-
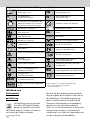 128
128
-
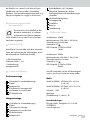 129
129
-
 130
130
-
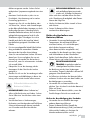 131
131
-
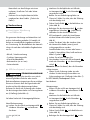 132
132
-
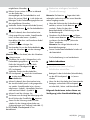 133
133
-
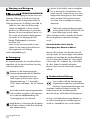 134
134
-
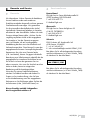 135
135
-
 136
136


LIVARNO 378855 de handleiding
- Type
- de handleiding
- Deze handleiding is ook geschikt voor
in andere talen
- italiano: LIVARNO 378855 Manuale del proprietario
- français: LIVARNO 378855 Le manuel du propriétaire
- español: LIVARNO 378855 El manual del propietario
- Deutsch: LIVARNO 378855 Bedienungsanleitung
- slovenčina: LIVARNO 378855 Návod na obsluhu
- polski: LIVARNO 378855 Instrukcja obsługi