


Inhalt
Dräger CPS 6900 3
Inhalt
1 Sicherheitsbezogene Informationen . . . . . . . . . . .4
2 Konventionen in diesem Dokument . . . . . . . . . . .4
3 Beschreibung . . . . . . . . . . . . . . . . . . . . . . . . . . . . .4
3.1 Verwendungszweck . . . . . . . . . . . . . . . . . . . . . . . . .5
3.2 Einschränkung des Verwendungszwecks . . . . . . . . .5
3.3 Zulassungen . . . . . . . . . . . . . . . . . . . . . . . . . . . . . . .5
3.4 Getestete Persönliche Schutzausrüstung . . . . . . . . .5
3.5 Typidentische Kennzeichnung . . . . . . . . . . . . . . . . .6
4 Gebrauch . . . . . . . . . . . . . . . . . . . . . . . . . . . . . . . . .6
4.1 Voraussetzungen für den Gebrauch . . . . . . . . . . . . .6
4.2 Hinweise zur Handhabung
des Verschlusssystems . . . . . . . . . . . . . . . . . . . . . .6
4.3 Vorbereitungen für den Gebrauch . . . . . . . . . . . . . .6
4.4 Im Einsatz beachten . . . . . . . . . . . . . . . . . . . . . . . . .7
4.5 Nach dem Gebrauch . . . . . . . . . . . . . . . . . . . . . . . . .7
5 Pannenhilfe . . . . . . . . . . . . . . . . . . . . . . . . . . . . . . .8
6 Wartung . . . . . . . . . . . . . . . . . . . . . . . . . . . . . . . . . .9
6.1 Instandhaltungsintervalle . . . . . . . . . . . . . . . . . . . . .9
6.2 Chemikalienschutzanzug sichtprüfen . . . . . . . . . . . .9
6.3 Chemikalienschutzanzug
reinigen und desinfizieren . . . . . . . . . . . . . . . . . . . . .9
6.4 Verschlusssystem pflegen . . . . . . . . . . . . . . . . . . .11
6.5 Dichtheit des
Chemikalienschutzanzugs prüfen . . . . . . . . . . . . . .11
6.6 Dichtheit der Anzugventile prüfen . . . . . . . . . . . . . .12
6.7 Besondere Wartungsarbeiten . . . . . . . . . . . . . . . . .12
7 Lagerung . . . . . . . . . . . . . . . . . . . . . . . . . . . . . . . .13
7.1 Lagerbedingungen . . . . . . . . . . . . . . . . . . . . . . . . .13
7.2 Lagerung vorbereiten . . . . . . . . . . . . . . . . . . . . . . .13
7.3 Chemikalienschutzanzug lagern . . . . . . . . . . . . . . .13
8 Entsorgung . . . . . . . . . . . . . . . . . . . . . . . . . . . . . .14
8.1 Ausmusterung . . . . . . . . . . . . . . . . . . . . . . . . . . . . .14
8.2 Lebensdauer . . . . . . . . . . . . . . . . . . . . . . . . . . . . . .14
8.3 Entsorgungshinweise . . . . . . . . . . . . . . . . . . . . . . .14
9 Technische Daten . . . . . . . . . . . . . . . . . . . . . . . . .15
9.1 Allgemeines . . . . . . . . . . . . . . . . . . . . . . . . . . . . . .15
9.2 Widerstand gegen Penetration
von Infektionserregern . . . . . . . . . . . . . . . . . . . . . .15
9.3 Beständigkeit des Anzugmaterials . . . . . . . . . . . . .15
9.4 Widerstand gegen Permeation
von Chemikalien gemäß EN 943-1:2015 . . . . . . . .16
9.5 Widerstand gegen Permeation
von Chemikalien gemäß ISO 16 602:2007 . . . . . . .17
10 Prüfprotokoll . . . . . . . . . . . . . . . . . . . . . . . . . . . . .18
11 Bestellliste . . . . . . . . . . . . . . . . . . . . . . . . . . . . . . .19

4 Dräger CPS 6900
Sicherheitsbezogene Informationen
1 Sicherheitsbezogene Informationen
Vor Gebrauch des Produkts diese Gebrauchsanweisung
und die der zugehörigen Produkte aufmerksam lesen.
Gebrauchsanweisung genau beachten. Der Anwender
muss die Anweisungen vollständig verstehen und den
Anweisungen genau Folge leisten. Das Produkt darf nur
entsprechend dem Verwendungszweck verwendet
werden.
Gebrauchsanweisung nicht entsorgen. Aufbewahrung und
ordnungsgemäße Verwendung durch die Nutzer
sicherstellen.
Nur geschultes und fachkundiges Personal darf dieses
Produkt verwenden.
Lokale und nationale Richtlinien, die dieses Produkt
betreffen, befolgen.
Nur geschultes und fachkundiges Personal darf das
Produkt überprüfen, reparieren und instand halten. Dräger
empfiehlt, einen Service-Vertrag mit Dräger abzuschließen
und alle Instandhaltungsarbeiten durch Dräger
durchführen zu lassen.
Für Instandhaltungsarbeiten nur Original-Dräger-Teile und
-Zubehör verwenden. Sonst könnte die korrekte Funktion
des Produkts beeinträchtigt werden.
Fehlerhafte oder unvollständige Produkte nicht
verwenden. Keine Änderungen am Produkt vornehmen.
Dräger bei Fehlern oder Ausfällen vom Produkt oder von
Produktteilen informieren.
2 Konventionen in diesem Dokument
Bedeutung der Warnzeichen
Die folgenden Warnzeichen werden in diesem Dokument
verwendet, um die zugehörigen Warntexte zu kennzeichnen
und hervorzuheben, die eine erhöhte Aufmerksamkeit seitens
des Anwenders erfordern. Die Bedeutungen der Warnzeichen
sind wie folgt definiert:
Marken
In diesem Dokument werden folgende Marken verwendet:
FPS®, HPS®, Panorama Nova®, PAS®, PSS® und
X-plore® sind eingetragene Marken von Dräger.
Eltra® und ECOLAB® sind eingetragene Marken von
Ecolab.
K-MEX® und Tricotril® sind eingetragene Marken der
KCL GmbH.
Barrier® ist eine eingetragene Marke von Ansell
Cryo-Industrial® ist eine eingetragene Marke von
Tempshield, Inc.
Abkürzungen
FKM = Fluorkautschuk
PVC = Polyvinylchlorid
3 Beschreibung
Dräger CPS 6900 sind gasdichte Schutzanzüge nach EN 943-
1:2015 (Typ 1a). Sie sind wiederverwendbar.
Für die Atemluftversorgung ist ein Pressluftatmer erforderlich.
Pressluftatmer, Vollmaske und Schutzhelm werden unter dem
Chemikalienschutzanzug getragen. Mögliche Kombinationen
siehe Kap. 3.4 auf Seite 5.
Der Chemikalienschutzanzug ist mit auswechselbaren
Handschuhen ausgestattet. Folgende Handschuhe stehen zur
Verfügung:
FKM-Handschuh, ggf. mit Tricotril-Überhandschuh
FKM-Handschuh, ggf. mit K-MEX-Gigant-Überhandschuh
Butyl-Handschuh, ggf. mit Tricotril-Überhandschuh
Butyl-Handschuh, ggf. mit K-MEX-Gigant-Überhandschuh
FKM/Butyl-Handschuh, ggf. mit Tricotril-Überhandschuh
FKM/Butyl-Handschuh, ggf. mit K-MEX-Gigant-
Überhandschuh
Folgende Folien-Handschuhkombinationen stehen zur
Verfügung:
Laminat/Tricotril-Handschuhkombination
Der Chemikalienschutzanzug kann entweder mit Socken aus
Anzugmaterial oder mit Stiefeln ausgestattet werden. Die
Socken bieten keinen ausreichenden Schutz vor
mechanischen Belastungen. Der Benutzer muss daher
zusätzlich geeignete Schutzstiefel tragen, die nach
EN ISO 20345 zugelassen sind.
Eine Stulpe verhindert das Eindringen von Substanzen
zwischen Socken und Schutzstiefeln.
Die Sichtscheibe ist auf der Anzug-Außenseite mit einer
Antikratz-Sichtscheibe versehen.
Der Chemikalienschutzanzug ist mit einer Tasche für
Funkgeräte und einer Lasche für die Push-to-Talk-Taste
versehen. An der Tasche befindet sich die typidentische
Kennzeichnung.
WARNUNG
Hinweis auf eine potenzielle Gefahrensituation. Wenn
diese nicht vermieden wird, können Tod oder schwere
Verletzungen eintreten.
VORSICHT
Hinweis auf eine potenzielle Gefahrensituation. Wenn
diese nicht vermieden wird, können Verletzungen oder
Schädigungen am Produkt oder der Umwelt eintreten.
Kann auch als Warnung vor unsachgemäßem Ge-
brauch verwendet werden.
HINWEIS
Zusätzliche Information zum Einsatz des Produkts.
!
!
i
i
HINWEIS
Die Überhandschuhe müssen nicht verwendet wer-
den. Sie bieten jedoch eine erhöhte Schnittfestigkeit.
i
i

Beschreibung
Dräger CPS 6900 5
Folgende Bestandteile können optional am
Chemikalienschutzanzug angebracht sein:
Regulierventil PT 120 L oder Air-Connect:
Belüftungseinheit zum Anschließen von externen
Atemluftquellen mit und ohne Kühlsystem für das
Anzuginnere
D-Connect:
Halterung für zusätzliche Geräte (z. B. Wärmebildkamera,
Messgeräte, Rettungsschlaufen), die an der linken oder
rechten Hüfte befestigt werden kann.
Schrittgurt:
zur Längenanpassung des Anzugs
Antibeschlag-Sichtscheibe im Anzug:
verhindert, dass die Sichtscheibe beschlägt.
Manometerhalterung unterhalb der Sichtscheibe:
zum Befestigen des Pressluftatmer-Manometers im
Sichtbereich des Schutzanzug-Trägers
Einsatzkennnummern:
zur einfacheren Erkennung der Einsatzteams
Eine Markierung mit einem wasserfesten Stift ist möglich,
aber nicht empfohlen.
3.1 Verwendungszweck
Der Chemikalienschutzanzug schützt gegen gasförmige,
flüssige, aerosolförmige und feste Gefahrstoffe und gegen
Infektionserreger. Er schützt außerdem vor Inkorporation von
radioaktiven Partikeln.
3.2 Einschränkung des Verwendungszwecks
Für bestimmte Chemikalien gibt es in Abhängigkeit von
Konzentration, Aggregatzustand und
Umgebungsbedingungen Einsatzzeitbeschränkungen.
Hitze und offene Flammen meiden. Der
Chemikalienschutzanzug ist nicht zur Brandbekämpfung
geeignet. Informationen zu mechanischer und chemischer
Beständigkeit sowie zur Temperaturbeständigkeit siehe Kap. 9
auf Seite 15.
Der Chemikalienschutzanzug bietet keinen Schutz vor
Strahlung von radioaktiven Partikeln oder vor
Strahlenschäden.
Der Chemikalienschutzanzug darf nicht eingesetzt werden,
wenn er beschädigt oder verschlissen ist.
3.3 Zulassungen
Der Chemikalienschutzanzug ist zugelassen nach:
EN 943-1:2015 (Typ 1a)
EN 14126:2003+AC:2005:1a-B
EN 1073-1:2016+A1:2018:IL:Klasse 4, Nenn-Schutzfaktor
20000
(nur Dräger CPS 6900 mit Belüftungseinheit)
EN 1073-2:2002:IL:Klasse 3, Nenn-Schutzfaktor 500
(nur Dräger CPS 6900 ohne Belüftungseinheit)
EN 14593-1:2018
(nur Dräger CPS 6900 mit Belüftungseinheit)
EN 14594:2018
ISO 16602:2007+Amd 1:2012
SOLAS II-2, Reg. 19, consolidated edition 2004
TP TC 019/2011
(EU) 2016/425
Regulation 2016/425 on personal protective equipment, as
amended to apply in GB
Die Schutzstiefel aus Nitril sind zugelassen nach:
EN ISO 20345:2011
EN 15090:2012
Die Schutzstiefel aus PVC sind zugelassen nach:
EN ISO 20345:2011
Konformitätserklärungen:
siehe www.draeger.com/product-certificates
3.4 Getestete Persönliche Schutzausrüstung
3.4.1 Atemanschlüsse
Vollmasken Dräger FPS 7000 RA/PE/P/ESA
Vollmasken Panorama Nova RA/PE/P/ESA
Vollmasken f2 PA-RA/PE
Masken-Helm-Kombinationen Dräger FPS 7000 H61/H62
Masken-Helm-Kombinationen Panorama Nova S-RA/
Supra, Panorama Nova S-PE/Supra und Panorama Nova
S-HE-EPDM-PC-RA
Masken-Helm-Kombinationen f2 S-PA-PE/Supra
3.4.2 Pressluftatmer
PA 80/90 UP
PA 94 UP
PA 94 D plus
PAS lite1
PSS 100D
PSS 1001
PSS 30001
PSS 40001
PSS 50001
PSS 70001
3.4.3 Lungenautomaten
alle Lungenautomaten der PSS-Serie
3.4.4 Schutzhelme
Dräger HPS 4000 Serie
Dräger HPS 6000 Serie
Dräger HPS 7000 Serie
Schuberth F110
Schuberth F210
Dräger F1S12
Dräger F1SA12
Heros I
Heros II
VORSICHT
Nur folgende Kombinationen der Schutzausrüstung
sind getestet und zugelassen.
Falls andere Kombinationen verwendet werden sollen,
muss der Betreiber prüfen, ob diese verwendet wer-
den können.
1 Auch in Kombination mit ASV und Y-Stück
!

6 Dräger CPS 6900
Gebrauch
3.5 Typidentische Kennzeichnung
Die typidentische Kennzeichnung befindet sich auf der Tasche
im Chemikalienschutzanzug.
4 Gebrauch
4.1 Voraussetzungen für den Gebrauch
4.2 Hinweise zur Handhabung des
Verschlusssystems
Das Verschlusssystem wurde speziell für die
Chemikalienschutzanzüge entwickelt. Durch zusätzliche
Dichtungen ist die Gängigkeit generell etwas schwerer als bei
Reißverschlüssen an normaler Kleidung. Um Faltenwurf des
Verschlusssystems zu verhindern, muss der Schutzanzug-
Träger das Verschlusssystem mit einem Griff an die Haube
strecken, während ein Helfer das Hosenbein mit dem
Verschlusssystem mit beiden Händen nach unten zieht,
sodass das Verschlusssystem faltenfrei verläuft. Der
Schutzanzug-Träger sollte beim Öffnen und Schließen des
Verschlusssystems aufrecht stehen.
4.2.1 Öffnen des Verschlusssystems
Verschlusssystem vollständig öffnen.
Immer in Richtung der Verschlusskette ziehen, nie schräg
ziehen!
Keine Gewalt anwenden. Kettenglieder können verbogen
werden!
Bei Stockungen Schieber zurück- und wieder vorziehen.
4.2.2 Schließen des Verschlusssystems
Wenn das Verschlusssystem geschlossen wird,
Querspannung am Schieber vermeiden.
Verschlussketten mit der Hand zusammenziehen.
Der Schieber kann dann leichter hinterher gezogen
werden.
Fremdkörper wie z. B. Hemd, Jacke, Fäden, usw. dürfen
beim Schließen nicht zwischen die Kettenglieder
gelangen.
4.3 Vorbereitungen für den Gebrauch
4.3.1 Chemikalienschutzanzug vorbereiten
1. Um Transportschäden zu erkennen, vor dem erstmaligen
Einsatz Dichtheit prüfen. Danach Instandhaltungsintervalle
beachten (siehe Kap. 6.1 auf Seite 9).
2. Chemikalienschutzanzug flach auf dem Boden auslegen
und sichtprüfen (siehe Kap. 6.2 auf Seite 9).
3. Falls vorhanden, die Funktion der Belüftungseinheit und
die Verbindung zum Pressluftatmer überprüfen.
4. Sichtscheibe der Vollmaske von außen mit Klarsichtmittel
"klar-pilot" behandeln. Für beschichtete Maskenscheiben
das Spray “klar-pilot“ Comfort benutzen. Wenn der Anzug
keine Antibeschlag-Sichtscheibe hat, auch die Innenseite
der Sichtscheibe behandeln.
Achtung! Gebrauchsanweisung beachten.
Kleidung zum Schutz gegen gasförmige,
flüssige, aerosolförmige und feste Chemi-
kalien (gemäß EN 943-1:2015, Typ 1a)
Schutzkleidung gegen Infektionserreger
(gemäß EN 14126:2003+AC:2005,
Typ 1a-B)
Kleidung zum Schutz gegen radioaktive
Kontamination durch feste Partikel (gemäß
EN 1073-1:2016+A1:2018 und EN 1073-
2:2002 (Klassen siehe 3.3)
Zuordnung von Größe, Brustumfang und
Taillenumfang zur Größe des Schutzan-
zugs (siehe Kap. 9 auf Seite 15).
WARNUNG
Der Chemikalienschutzanzug muss in Übereinstim-
mung mit den geltenden Normen und Richtlinien des
jeweiligen Landes verwendet werden.
Die Belastung der Umgebung muss vor dem Einsatz
festgestellt werden, da die Eignung des Chemikalien-
schutzanzugs nicht erst im Einsatz festgestellt werden
kann. Der Chemikalienschutzanzug muss für den Ein-
satz geeignet sein. Der Benutzer muss nationale und
andere Anforderungen an den Gebrauch von persönli-
cher Schutzausrüstung berücksichtigen.
Eine Nichtbeachtung kann zum Tod oder zu schwerer
Körperverletzung führen.
!
VORSICHT
Um Beschädigungen am Verschlusssystem zu ver-
meiden, müssen sich beide Kettenhälften parallel und
unbelastet gegenüber liegen. Beim Öffnen und Schlie-
ßen keine Gewalt anwenden und keine ruckartigen
Zugbewegungen ausüben.
Ungenügend gefettete Verschlusssysteme lassen sich
nur schwer bedienen. Dies kann zur Beschädigung
des Verschlusssystems führen. Verschlusssystem mit
dem von Dräger vertriebenen Fettstift fetten.
HINWEIS
Dräger empfiehlt, die Flachbeutel, in denen der Che-
mikalienschutzanzug geliefert worden ist, aufzube-
wahren, da sie später für die Lagerung wieder
verwendet werden.
WARNUNG
Beschädigten Chemikalienschutzanzug nicht benut-
zen. Sonst besteht Lebensgefahr.
!
i
i
!

Gebrauch
Dräger CPS 6900 7
4.3.2 Chemikalienschutzanzug anziehen
1. Unterbekleidung (Feuchtigkeit transportierende
Arbeitsbekleidung, Baumwollhandschuhe) anziehen.
2. Pressluftatmer und Vollmaske anlegen.
3. Schutzhelm oder Masken-Helm-Kombination aufsetzen.
4. Funktionsfähigkeit von Pressluftatmer, Vollmaske und
Masken-Helm-Kombination prüfen, wie in den
entsprechenden Gebrauchsanweisungen beschrieben.
5. Wenn der Chemikalienschutzanzug mit gasdicht
angebauten Socken ausgestattet ist:
a. Ohne Schuhe zuerst in das rechte Hosenbein, dann in
das linke Hosenbein einsteigen.
b. Schutzstiefel anziehen.
6. Wenn der Chemikalienschutzanzug mit gasdicht
angebauten Schutzstiefeln ausgestattet ist, ohne Schuhe
zuerst in das rechte Hosenbein und den Schutzstiefel,
dann in das linke Hosenbein und den Schutzstiefel
einsteigen.
7. Chemikalienschutzanzug bis zur Taille hochziehen.
8. Wenn der Chemikalienschutzanzug mit einer
Belüftungseinheit ausgestattet ist:
a. Die Luftversorgung innen im Chemikalienschutzanzug
anschließen.
b. Integrierten Hüftgurt schließen.
9. Wenn der Chemikalienschutzanzug mit einem D-Connect
ausgestattet ist, integrierten Hüftgurt schließen.
10. Wenn der Chemikalienschutzanzug mit einem Schrittgurt
ausgestattet ist, Schrittgurt am Hüftgurt des
Pressluftatmers einhängen. Am Ende des Schrittgurts
ziehen, um ihn auf die gewünschte Länge einzustellen.
11. Die Haube über den Kopf stülpen und dabei mit dem
rechten Arm in den rechten Ärmel und Handschuh
schlüpfen. Den Rucksack des Chemikalienschutzanzugs
über das Atemschutzgerät führen. Mit dem linken Arm in
den linken Ärmel und Handschuh schlüpfen.
12. Lungenautomaten an die Vollmaske anschließen.
13. Verschlusssystem schließen. Dabei immer in Richtung der
Verschlusskette ziehen. Keine Gewalt anwenden!
14. Wenn erforderlich, Überhandschuhe montieren:
a. K-MEX-Gigant-Überhandschuh über den Armring
ziehen und mit dem zugehörigen Gummiring sichern.
b. Tricotril-Überhandschuh über den Armring ziehen und
mit dem zugehörigen Gummiring sichern.
4.4 Im Einsatz beachten
Nie alleine in den Einsatz gehen!
Einsatzdauer, Einsatzgrenzen und länderspezifische
Vorschriften beachten. Die maximale Einsatzdauer hängt
u. a. vom verwendeten Atemschutzgerät und den
Einsatzbedingungen ab.
Wenn bei Schutzanzügen mit Belüftungseinheit keine
Druckluftschläuche angeschlossen sind, die Anschlüsse
mit einer Schutzkappe verschließen, um sie vor
Verunreinigungen zu schützen.
Beim Arbeiten mit tiefkalten Medien entsprechende
Überhandschuhe (z. B. Cryo-Industrial Gloves von
Tempshield, Inc.) und Unterbekleidung verwenden.1
Bei Sichtbehinderung durch Beschlagen oder Vereisen der
Sichtscheibe auf der Innenseite: Eine Hand aus dem Ärmel
herausziehen und die Sichtscheibe z. B. mit einem
Putzlappen abwischen. Der Putzlappen kann in der
Innentasche aufbewahrt werden.
Bei Gefahr sofort den kontaminierten Bereich verlassen.
Verschlusssystem erst im sauberen Bereich öffnen.
4.5 Nach dem Gebrauch
4.5.1 Chemikalienschutzanzug vorreinigen
1. Kontaminierten Bereich verlassen und den
Chemikalienschutzanzug von einem Helfer vorreinigen
lassen. Der Helfer muss Schutzkleidung und ggf.
Atemschutz tragen.
Dräger empfiehlt für die Vorreinigung den Einsatz von viel
Wasser unter Zusatz von Waschmitteln. Auf diese Weise
lassen sich die meisten Chemikalien (Säuren, Alkalien,
Organika und Anorganika) gut abwaschen.
2. Chemikalienschutzanzug gründlich und nicht zu kurz
reinigen. Verschleppung von Chemikalien vermeiden.
3. Bei Verschmutzung mit gefährlichen Stoffen das Abwasser
entsprechend den jeweils geltenden
Abfallbeseitigungsvorschriften entsorgen.
HINWEIS
Beim Anziehen sollte eine zweite Person helfen.
HINWEIS
Dräger empfiehlt, die Hosenbeine der Unterbeklei-
dung in die Socken einzustecken, um ein Verrutschen
der Hosenbeine zu verhindern.
Um zu verhindern, dass die Baumwollhandschuhe he-
runterrutschen, sollten sie mit Isolierband am Handge-
lenk fixiert werden.
i
i
i
i
VORSICHT
Wärmestau im Chemikalienschutzanzug kann zum
Kreislaufkollaps führen, deshalb ggf. eine Kühlweste
unterziehen oder ein geeignetes Belüftungssystem
verwenden.
1 nicht Bestandteil der EU-Baumusterprüfung
WARNUNG
Kontaminierte Teile nicht ohne Schutzkleidung berüh-
ren. Kontamination des sauberen Schutzanzug-Innen-
bereichs verhindern.
Tod oder schwere Körperverletzung können eintreten,
wenn die genannten Vorsichtsmaßnahmen nicht ge-
troffen werden.
VORSICHT
Wenn eine Vorreinigung vor Ort nicht möglich ist, den
Chemikalienschutzanzug nach dem Ablegen unbe-
dingt schließen, um zu vermeiden, dass Chemikalien
in den Anzug eindringen.
!
!
!

8 Dräger CPS 6900
Pannenhilfe
4. Wenn erforderlich, Dekontamination in mehreren Stufen
durchführen. Weitere Informationen zur Dekontamination1
sind bei Dräger erhältlich.
4.5.2 Chemikalienschutzanzug ausziehen
1. Verschlusssystem öffnen.
Dabei immer in Richtung der Verschlusskette ziehen.
Keine Gewalt anwenden.
2. Den linken Arm aus dem Ärmel herausziehen.
3. Wenn der Chemikalienschutzanzug mit einer
Belüftungseinheit ausgestattet ist:
a. Integrierten Hüftgurt öffnen.
b. Luftversorgung von einem Helfer abkoppeln lassen.
4. Wenn der Chemikalienschutzanzug mit einem D-Connect
ausgestattet ist, integrierten Hüftgurt öffnen.
5. Wenn der Chemikalienschutzanzug mit einem Schrittgurt
ausgestattet ist, Schrittgurt vom Hüftgurt des
Pressluftatmers lösen.
6. Den rechten Arm aus dem Ärmel herausziehen.
7. Damit die Haube einfach abgestreift werden kann, leicht in
die Hocke gehen.
8. Chemikalienschutzanzug so vom Schutzanzug-Träger
wegklappen, dass möglichst keine Chemikalien oder
Reinigungsmittel in den Innenraum des Anzugs eintreten.
9. Aus Schutzstiefeln und Hosenbeinen aussteigen.
10. Schutzhelm, Pressluftatmer, Vollmaske und
Baumwollhandschuhe ablegen.
5 Pannenhilfe
1 nicht Bestandteil der Baumusterprüfung
WARNUNG
Chemikalienschutzanzug nur im nicht kontaminierten
Bereich ausziehen.
HINWEIS
Dräger empfiehlt, den Einsatz zu protokollieren (siehe
Kap. 10 auf Seite 18).
!
i
i
Fehler Ursache Abhilfe1
1 nicht Bestandteil der EU-Baumusterprüfung
Verschlusssystem
klemmt
Fremdkörper in
Verschlusskette
Verschlusskette
reinigen, Fremd-
körper entfernen.
große Reibung Verschlusskette
mit Fettstift
schmieren.
Chemikalien-
schutzanzug
undicht
Verschlusssystem
nicht geschlossen
Verschlusssystem
vollständig schlie-
ßen.
Anzugmaterial be-
schädigt
Mit Flickzeug aus-
bessern. Erneut
dichtprüfen.
Schutzstiefel oder
Handschuhe de-
fekt oder Verbin-
dungsstelle
undicht
Austauschen oder
abdichten.Erneut
dichtprüfen.
Ventilscheibe oder
-sitz verschmutzt
oder defekt
Reinigen oder aus-
tauschen. Erneut
dichtprüfen.
Sichtscheibe oder
Naht undicht
Austauschen oder
abdichten. Erneut
dichtprüfen.
Chemikalien-
schutzanzug wird
nicht entlüftet
Ventilscheibe des
Anzugventils klebt
Reinigen oder aus-
tauschen. Erneut
dichtprüfen.
Klettband löst sich
ab
Das Klettband ist
geklebt. Reinigung
und Dekontamina-
tion kann zur Ablö-
sung führen.
Klettband nachkle-
ben. Erneut dicht-
prüfen.

Wartung
Dräger CPS 6900 9
6 Wartung
6.1 Instandhaltungsintervalle
Die angegebenen Intervalle sind Empfehlungen von Dräger.
Wenn erforderlich müssen abweichende nationale Richtlinien
beachtet werden.
Für Wartungsarbeiten an Vollmaske, Belüftungseinheit,
automatischem Umschaltventil und Pressluftatmer siehe
zugehörige Gebrauchsanweisungen.
6.2 Chemikalienschutzanzug sichtprüfen
Folgende Prüfungen müssen durchgeführt werden. Wenn
Beanstandungen auftreten, muss der
Chemikalienschutzanzug repariert oder entsorgt werden.
Die Außenseite des Chemikalienschutzanzugs darf keine
Löcher, Schnitte oder Abrieb aufweisen.
Das Nahtband darf sich nicht abheben oder ablösen.
Die Sichtscheibe muss sauber sein.
Folgende Teile müssen unbeschädigt sein:
a. Anzugmaterial
b. Handschuhe
c. Socken
d. Sichtscheibe
e. Dichtung der Sichtscheibe
f. Verschlusssystem
Die Anzugventile müssen frei und unbeschädigt sein.
Das Anzugmaterial darf keine Verschleißspuren
aufweisen. Die Beschichtung darf sich nicht vom Gewebe
ablösen.
6.3 Chemikalienschutzanzug reinigen und
desinfizieren
6.3.1 Manuelle Reinigung und Desinfektion
1. Rucksackpolster herausnehmen und separat mit klarem,
warmem Wasser reinigen.
2. Belüftungseinheit, D-Connect und Antibeschlag-
Sichtscheibe (falls vorhanden) abbauen, separat reinigen
und desinfizieren.
3. Schutzkappen und Ventilscheiben der Anzugventile
abknöpfen.
4. Handschuhe, wenn erforderlich, demontieren:
Falls der Chemikalienschutzanzug mit
Handschuhkombinationen ausgestattet ist, die
Handschuhkombinationen demontieren und
entsorgen.
Falls Tricotril-Überhandschuhe vorhanden sind, diese
abnehmen, aber nicht waschen. Verschmutzte Tricotril-
Überhandschuhe müssen ausgetauscht werden.
Falls K-MEX-Gigant-Überhandschuhe vorhanden sind,
diese abnehmen und separat reinigen.
FKM-, FKM/Butyl- und Butyl-Handschuhe können bei
der manuellen Reinigung montiert bleiben.
5. Ventilscheiben separat mit klarem, warmem Wasser
reinigen.
6. Eine Reinigungslösung aus Wasser und einem Reini-
gungsmittel vorbereiten.
7. Chemikalienschutzanzug und sämtliche
wiederverwendbare Komponenten mit einem weichen
Lappen und der Reinigungslösung reinigen.
8. Alle Teile unter fließendem Wasser gründlich spülen.
9. Ein Desinfektionsbad aus Wasser und einem Desinfekti-
onsmittel vorbereiten.
Durchzuführende Arbeiten
vor dem ersten Einsatz
nach dem Einsatz
nach der Reparatur
jährlich
Chemikalienschutzanzug
sichtprüfen
X X X1
1 Gilt für Chemikalienschutzanzüge, die ohne Tragetasche auf
Fahrzeugen gelagert werden.
Bei Chemikalienschutzanzügen, die in der zugehörigen Trageta-
sche gelagert werden, verlängert sich das Intervall auf 2 Jahre.
Chemikalienschutzanzug
reinigen und desinfizieren
X
Verschlusssystem pflegen X X X1
Dichtheit des Chemikalienschutzan-
zugs prüfen
XXXX1
Dichtheit der Anzugventile prüfen X X X X1
HINWEIS
Dräger empfiehlt, alle Wartungsarbeiten zu protokol-
lieren (siehe Kap. 10 auf Seite 18).
i
i
VORSICHT
Gefahr der Materialbeschädigung!
Zum Reinigen und Desinfizieren keine Lösungsmittel
(z. B. Aceton, Alkohol) oder Reinigungsmittel mit
Schleifpartikeln verwenden. Nur die beschriebenen
Verfahren anwenden und die genannten Reinigungs-
und Desinfektionsmittel verwenden. Andere Mittel, Do-
sierungen und Einwirkzeiten können Schäden an dem
Produkt hervorrufen.
Informationen zu geeigneten Reinigungs- und Desin-
fektionsmitteln und deren Spezifikation siehe Doku-
ment 9100081 unter www.draeger.com/IFU.
VORSICHT
Gefahr der Materialbeschädigung!
Beim Reinigen und Desinfizieren können die Antibe-
schlag-Eigenschaften verloren gehen. Die Antibe-
schlag-Sichtscheibe nicht länger als 5 Minuten in
Flüssigkeit eintauchen.
WARNUNG
Kontaminationsgefahr, wenn die Handschuhkombina-
tionen nicht ausgetauscht werden!
Es ist nicht sichergestellt, dass das Material einer wie-
derholten Beaufschlagung mit Chemikalien standhält.
!
!
!

10 Dräger CPS 6900
Wartung
10. Alle Teile, die desinfiziert werden müssen
(Chemikalienschutzanzug, Ventilscheiben,
Schutzkappen), in das Desinfektionsbad einlegen.
11. Alle Teile unter fließendem Wasser gründlich spülen.
12. Alle Teile trocknen (siehe Kap. 6.3.3 auf Seite 11).
6.3.2 Maschinelle Reinigung und Desinfektion
Folgendes Zubehör wird für die maschinelle Reinigung
benötigt:
Industriewaschmaschine Dräger CombiClean
oder baugleich
Waschmittel: Eltra
Zur Dosierung siehe Information 9021380
Waschbeutel
Stützscheibe
Die Industriewaschmaschine muss folgende Eigenschaften
haben:
Trommelvolumen >130 Liter
Trommeldurchmesser >60 cm
Türöffnung >45 cm
Programmierbare Steuerung
Elektronische Temperaturregelung ±2 °C
Trommeldrehzahl: max. 20 Umdrehungen/Minute
(2 langsame Umdrehungen in eine Richtung, 18 Sekunden
Wartezeit, 2 langsame Umdrehungen in die andere
Richtung, 18 Sekunden Wartezeit)
Den Chemikalienschutzanzug folgendermaßen reinigen und
desinfizieren:
1. Antibeschlag-Sichtscheibe, Belüftungseinheit und D-
Connect (falls vorhanden) demontieren, separat reinigen
und desinfizieren.
Anschließend gründlich mit klarem Wasser spülen.
2. Schutzkappen und Ventilscheiben der Anzugventile
abknöpfen.
3. Handschuhe, wenn erforderlich, demontieren:
Falls der Chemikalienschutzanzug mit
Handschuhkombinationen ausgestattet ist, die
Handschuhkombinationen demontieren und
entsorgen.
Falls Tricotril-Überhandschuhe vorhanden sind, diese
abnehmen, aber nicht waschen. Verschmutzte Tricotril-
Überhandschuhe müssen ausgetauscht werden.
Falls K-MEX-Gigant-Überhandschuhe vorhanden sind,
diese abnehmen und separat reinigen.
FKM-, FKM/Butyl- und Butyl-Handschuhe
demontieren.
4. Ventilscheiben separat mit klarem, warmem Wasser
reinigen und anschließend desinfizieren.
5. Verschlusssystem des Chemikalienschutzanzugs
vollständig öffnen.
6. Chemikalienschutzanzug auf einer sauberen Arbeitsfläche
ausbreiten und Falten glattstreichen.
7. Stützscheibe so in die Haube einlegen, dass die
Sichtscheibe stramm an der Stützscheibe anliegt und
deckungsgleich mit der Stützscheibe ist.
8. Waschbeutel so über die Haube ziehen, dass der
Schaumstoff des Waschbeutels auf der Sichtscheibe
aufliegt und der Kordelrand des Waschbeutels über dem
unteren Rand der Sichtscheibe liegt. Die Kordel festziehen
und zuknoten.
9. Socken oder Schutzstiefel einmal nach oben umschlagen.
Scharfe Knickstellen vermeiden.
10. Die Ärmel zur Mitte auf das Brustteil legen. Falten
glattstreichen.
11. Haube mit Waschbeutel und oberen Teil des
Chemikalienschutzanzugs so falten, dass die Sichtscheibe
auf den eingerollten Schutzstiefeln liegt. Falten
glattstreichen. Darauf achten, dass sich die Sichtscheibe
nicht verformt.
12. Chemikalienschutzanzug in die Industriewaschmaschine
legen.
13. Waschprogramm "Chemikalienschutzanzug" starten.
Beim Waschen folgende Parameter einhalten:
Wassertemperatur zur Reinigung und Desinfektion:
62 °C ±2 °C
4 Spülgänge mit klarem, kalten Wasser
14. Alle Teile trocknen (siehe Kap. 6.3.3 auf Seite 11).
VORSICHT
Gefahr der Materialbeschädigung!
Das Rucksackpolster (falls vorhanden) im Chemikali-
enschutzanzug lassen, da die Bauteile im Inneren des
Schutzanzugs durch die Klettstreifen beschädigt wer-
den könnten.
Beim Reinigen und Desinfizieren können die Antibe-
schlag-Eigenschaften verloren gehen. Die Antibe-
schlag-Sichtscheibe nicht länger als 5 Minuten in
Flüssigkeit eintauchen.
!
WARNUNG
Kontaminationsgefahr, wenn die Handschuhkombina-
tionen nicht ausgetauscht werden!
Es ist nicht sichergestellt, dass das Material einer wie-
derholten Beaufschlagung mit Chemikalien standhält.
VORSICHT
Gefahr der Materialbeschädigung!
Damit der Chemikalienschutzanzug nicht beschädigt
wird, darf die Waschtrommel sich nur bewegen, wenn
sie mit Wasser gefüllt ist.
!
!

Wartung
Dräger CPS 6900 11
6.3.3 Chemikalienschutzanzug trocknen
1. Restflüssigkeit vor dem Trocknen aus dem
Chemikalienschutzanzug auskippen oder mit einem
Schwamm auswischen.
2. Alle Teile innen und außen gründlich trocknen.
Der Chemikalienschutzanzug kann durch Anblasen mit
trockener, ölfreier Druckluft oder in einer Schutzanzug-
Trocknungsanlage getrocknet werden:
– Temperatur: maximal 40 °C
– Zeit: mindestens 120 Minuten
Direkte Wärmestrahlung oder dauerhafte Sonnenstrahlung
vermeiden.
3. Rucksackpolster wieder einsetzen.
4. Chemikalienschutzanzug, Sichtscheibe, Schutzstiefel und
Handschuhe sichtprüfen.
5. Antibeschlag-Sichtscheibe (falls vorhanden) einsetzen.
6. Belüftungseinheit und D-Connect (falls vorhanden) wieder
montieren.
6.4 Verschlusssystem pflegen
1. Verschlusssystem nach jedem Einsatz und jeder
Reinigung und Desinfektion gut einfetten. Nur den von
Dräger vertriebenen Fettstift verwenden.
2. Insbesondere die Kettenglieder der Verschlusskette und
den Bereich unterhalb der Kettenglieder, auf dem der
Schieber läuft, ausreichend einfetten.
6.5 Dichtheit des Chemikalienschutzanzugs
prüfen
Die Prüfung ist für das Prüfgerät Porta Control 3000 beschrie-
ben. Sie kann auch mit anderen Prüfgeräten durchgeführt wer-
den, die angegebenen Werte müssen aber eingehalten
werden.
Die Prüfung gemäß ISO 17491-1 Methode A.2 bei konstanter
Raumtemperatur (20 °C ±5 °C) durchführen.
Die verwendete Druckluft muss den Anforderungen der
EN 12021 entsprechen.
Das benötigte Prüfzubehör ist in der Bestellliste aufgeführt
(siehe Kapitel 11 auf Seite 19).
6.5.1 Prüfung vorbereiten
1. Bei Schutzanzügen mit Belüftungseinheit Anschlüsse
dichtsetzen.
2. Verschlusssystem schließen.
3. Chemikalienschutzanzug mit dem Rückenteil nach oben
auf einer sauberen und ebenen Fläche ausbreiten.
4. Sichtscheibe mit weicher Unterlage vor Verkratzen schüt-
zen.
5. Schutzkappen von beiden Anzugventilen abknöpfen und
Ventilscheiben herausnehmen.
6. Eine Prüfkappe auf das eine Anzugventil aufknöpfen und
über den blauen Schlauch an das Prüfgerät anschließen.
7. Eine weitere Prüfkappe auf das andere Anzugventil auf-
knöpfen.
8. Sicherstellen, dass beide Ventile am schwarzen Schlauch
des Prüfgeräts geschlossen sind.
9. Prüfkappe über den schwarzen Schlauch mit der Druckluft-
versorgung (6 bar) verbinden.
10. Prüfung durchführen (siehe Kap. 6.5.2 auf Seite 11).
6.5.2 Prüfung durchführen
1. Aufblasventil am schwarzen Schlauch öffnen und den
Chemikalienschutzanzug füllen, bis das Prüfgerät
17,5 mbar anzeigt. Aufblasventil schließen.
2. Eine Beruhigungszeit von 10 Minuten einstellen und die
Stoppuhr starten. Während dieser Zeit den Druck auf
ca. 17 mbar halten, damit ein Druck- und Temperatur-Aus-
gleich stattfinden kann. Falls erforderlich, Luft nachfüllen.
3. Entlastungsventil öffnen. Druck auf 16,5 mbar absenken.
Entlastungsventil schließen.
4. Eine Prüfzeit von 6 Minuten einstellen und die Stoppuhr
starten.
5. Nach Ablauf der Prüfzeit den Druck am Prüfgerät ablesen.
Falls der Druckabfall kleiner oder gleich 3 mbar ist, gilt der
Chemikalienschutzanzug als dicht. Dann den Prüfaufbau de-
montieren und die Anzugventile prüfen.
Falls der Druckabfall größer als 3 mbar ist:
1. Kritische Stellen (z. B. Nähte, Verschlusssystem, Hand-
schuh- und Stiefelverbindungen) mit Seifenlauge benet-
zen.
2. Undichte Stellen markieren.
3. Seifenlauge abspülen und den Chemikalienschutzanzug
gründlich trocknen.
4. Chemikalienschutzanzug entlüften und reparieren.
5. Dichtprüfung wiederholen.
Alternativ kann der Chemikalienschutzanzug zur Reparatur an
Dräger gesendet werden.
VORSICHT
Gefahr der Materialbeschädigung!
Damit der Chemikalienschutzanzug nicht beschädigt
wird, darf er nicht trockengeschleudert werden.
Um z. B. Schimmelbildung zu vermeiden, muss der
Chemikalienschutzanzug vollständig getrocknet wer-
den.
HINWEIS
Geeignete Trocknungsanlagen für den Chemikalien-
schutzanzug sind:
TopTrock SF01 mit Gebläse GF
baugleiche Trocknungsanlagen
HINWEIS
Um ein Verhaken des Verschlusssystems zu verhin-
dern, müssen abstehende Textilfäden mit Hilfe eines
Feuerzeugs entfernt werden.
!
i
i
i
i
VORSICHT
Wenn der Anzug überfüllt wird, wird das Material be-
schädigt.
Beim Füllen des Chemikalienschutzanzugs darauf
achten, dass der Druck nicht zu weit über die angege-
benen Werte steigt.
!

12 Dräger CPS 6900
Wartung
6.6 Dichtheit der Anzugventile prüfen
Die Prüfung ist für das Prüfgerät Porta Control 3000 beschrie-
ben. Sie kann auch mit anderen Prüfgeräten durchgeführt wer-
den, die angegebenen Werte müssen aber eingehalten
werden.
Die Prüfung gemäß EN 943-1:2015, 6.5.1, jedoch mit 10 mbar
Überdruck, bei konstanter Raumtemperatur (20 °C ±5 °C)
durchführen.
Die verwendete Druckluft muss den Anforderungen der
EN 12021 entsprechen.
Das benötigte Prüfzubehör ist in der Bestellliste aufgeführt
(siehe Kapitel 11 auf Seite 19).
1. Aufblasventil mit Steckkupplung vom schwarzen Schlauch
abnehmen.
2. Das Schlauchende an das Prüfgerät anschließen.
3. Pumpball am Entlastungsventil so in den schwarzen
Schlauch stecken, dass der Pfeil auf dem Pumpball zum
Entlastungsventil zeigt.
4. Ventilscheibe mit klarem Wasser anfeuchten und einknöp-
fen.
5. Prüfkappe von außen auf das zu prüfende Ventil aufknöp-
fen und über den schwarzen Schlauch an das Prüfgerät
anschließen.
6. Entlastungsventil öffnen, mit dem Pumpball einen Über-
druck von +10 mbar erzeugen. Entlastungsventil schlie-
ßen.
7. Eine Prüfzeit von 1 Minute einstellen und die Stoppuhr
starten.
8. Nach Ablauf der Prüfzeit den Druck am Prüfgerät ablesen.
Falls die Druckänderung kleiner als 1 mbar ist, ist das Anzug-
ventil in Ordnung. In diesem Fall:
1. Nächstes Anzugventil prüfen.
2. Prüfaufbau demontieren.
3. Schutzkappe auf das Anzugventil knöpfen.
Falls die Druckänderung größer als 1 mbar ist:
1. Ventilscheibe herausnehmen und sichtprüfen.
Ventilscheibe und Ventilsitz müssen sauber und unbe-
schädigt sein.
2. Falls erforderlich, Ventilscheibe auswechseln (siehe
Kap. 6.7.3 auf Seite 13).
3. Prüfung wiederholen.
6.7 Besondere Wartungsarbeiten
Nach Wartungsarbeiten und/oder Austausch von Bauteilen er-
neut Dichtheit prüfen. Es wird empfohlen, alle
Instandsetzungsarbeiten von Dräger durchführen zu lassen.
6.7.1 Handschuhe auswechseln
Handschuhe oder Handschuhkombinationen immer wie folgt
austauschen:
1. Überhandschuh und Gummiring (falls vorhanden)
abziehen.
2. Mit dem Daumen den Armring anheben und den Stützring,
auf dem der Handschuh sitzt, aus dem Ärmel
herausdrücken.
3. Alle Handschuhe außer Handschuhkombinationen:
Den neuen Handschuh auf den Stützring ziehen und am
Armring ausrichten. Die lange Achse des elliptischen
Stützrings zeigt parallel zur Handfläche.
Darauf achten, dass sich keine Falten zwischen
Handschuh und Stützring bilden.
4. Handschuh mit Stützring oder neue
Handschuhkombination durch das geöffnete
Verschlusssystem in den Ärmel des
Chemikalienschutzanzugs einführen.
5. Handschuh mit Stützring oder neue
Handschuhkombination durch den Armring stecken und
ausrichten:
Der linke Handschuh steckt im linken Ärmel, der rechte
Handschuh im rechten Ärmel.
Die Handfläche zeigt zur Ärmelnaht.
6. Die Handschuheinheit in den Armring hineindrücken, bis
der Rand des Stützrings am Rand des Armrings anliegt.
Der Stützring muss vollständig in der Aussparung des
Armrings sitzen.
7. Überhandschuhe (falls gewünscht) montieren:
K-MEX-Gigant-Überhandschuh über den Armring zie-
hen und mit dem zugehörigen Gummiring sichern.
Tricotril-Überhandschuh über den Armring ziehen und
mit dem zugehörigen Gummiring sichern.
8. Dichtheit des Chemikalienschutzanzugs prüfen (siehe
Kapitel 6.5 auf Seite 11).
WARNUNG
Wenn der Chemikalienschutzanzug mit
Handschuhkombinationen ausgestattet ist, müssen
die Handschuhkombinationen demontiert, entsorgt
und durch eine Handschuhkombinationen ersetzt
werden. Es ist nicht sichergestellt, dass das Material
einer wiederholten Beaufschlagung mit Chemikalien
standhält.
Zum Einbau der Handschuhe darf kein Talkum ver-
wendet werden. Andernfalls kann es zu einem Heraus-
gleiten der Handschuhe kommen, wenn der Anwender
durch übermäßiges Strecken eine hohe Druckkraft
von innen auf den Handschuh aufbringt.
!

Lagerung
Dräger CPS 6900 13
6.7.2 Antikratz-Sichtscheibe auswechseln
1. Alte Antikratz-Sichtscheibe entfernen.
2. Wenn erforderlich, Klebereste entfernen.
3. Schutzfolie von einer Seite der Klebepads abziehen und
Klebepads auf den alten Klebestellen platzieren.
4. Schutzfolie von der zweiten Seite der Klebepads abziehen.
5. Neue Antikratz-Sichtscheibe mittig ausrichten und fest auf
die Klebepads aufdrücken.
6.7.3 Ventilscheibe auswechseln
1. Schutzkappe und alte Ventilscheibe abknöpfen. Zapfen
des Ventilsitzes nicht beschädigen.
2. Neue Ventilscheibe anfeuchten und einknöpfen.
3. Schutzkappe auf das Anzugventil setzen.
6.7.4 Antibeschlag-Sichtscheibe auswechseln
1. Antibeschlag-Sichtscheibe vorsichtig aus dem Gummi-
Profil in der Kopfhaube lösen.
2. Neue Antibeschlag-Sichtscheibe einsetzen:
a. Die Schutzfolien von der Antibeschlag-Sichtscheibe
abziehen.
b. Die Haube des Chemikalienschutzanzugs auf links dre-
hen. Darauf achten, dass der Reißverschluss nicht
überdehnt wird und die Dichtlippe nicht einreißt.
c. Die Antibeschlag-Sichtscheibe mit Hilfe der Mittenmar-
kierungen ausrichten und nach und nach in das Gum-
mi-Profil einsetzen.
7 Lagerung
7.1 Lagerbedingungen
Chemikalienschutzanzug dunkel, kühl, trocken, luftig,
drucklos und spannungsfrei lagern.
UV- und direkte Sonneneinstrahlung sowie Ozon meiden.
Lagertemperatur beachten (siehe Kap. 9 auf Seite 15).
7.2 Lagerung vorbereiten
1. Verschlusssystem bis ca. 5 cm vor Anschlag schließen.
Regelmäßig prüfen, ob das Verschlusssystem noch
ausreichend gefettet ist.
2. Mitgelieferten Flachbeutel so über die Haube stülpen, dass
die zylindrisch gekrümmte Sichtscheibe in Form gehalten
wird.
3. Falls der Chemikalienschutzanzug zusammengelegt wird,
mitgelieferte Flachbeutel über die Stiefel stülpen, damit der
Chemikalienschutzanzug nicht verfärbt wird.
7.3 Chemikalienschutzanzug lagern
Folgende Varianten sind bei der Lagerung möglich:
Chemikalienschutzanzug flach liegend lagern. Falls der
Chemikalienschutzanzug im Einsatzfahrzeug gelagert
wird, Verschleiß durch ständige Reibung mit der Auflage-
fläche vermeiden.
Chemikalienschutzanzug auf einen zugehörigen Hängebü-
gel oder über eine Stange hängen. Haube oder Schutzstie-
fel müssen Bodenkontakt haben.
Chemikalienschutzanzug zusammenlegen und in eine
Transportkiste, ein Lagerfach oder eine Tragetasche einla-
gern.
Chemikalienschutzanzug in einer CSA-Lager- und Trans-
porttasche verpacken.
VORSICHT
Keine spitzen, scharfen Gegenstände und keine Lö-
sungsmittel verwenden, damit die Sichtscheibe nicht
beschädigt wird!
Die Klebereste können i. d. R. mit dem Daumen weg-
gewischt werden.
VORSICHT
Gefahr der Materialbeschädigung!
Keine spitzen, scharfen Gegenstände und keine Lö-
sungsmittel verwenden, damit die Antibeschlag-Sicht-
scheibe nicht beschädigt wird.
!
!
VORSICHT
Bei Nichtbeachtung der Lagerbedingungen können
Schäden am Chemikalienschutzanzug entstehen!
HINWEIS
Dräger empfiehlt, den Chemikalienschutzanzug in der
CSA-Lager- und Transporttasche zu verpacken, um
ihn vor Umwelteinflüssen zu schützen und die War-
tungsintervalle zu verlängern.
!
i
i

14 Dräger CPS 6900
Entsorgung
7.3.1 Chemikalienschutzanzug zusammenlegen
1. Flachbeutel über die Haube ziehen.
2. Socken oder Schutzstiefel
einmal nach oben um-
schlagen. Scharfe Knick-
stellen vermeiden.
3. Die Ärmel zur Mitte auf
das Brustteil legen. Falten
glattstreichen.
4. Haube und oberen Teil
des Chemikalienschutz-
anzugs so falten, dass die
Sichtscheibe auf den ein-
gerollten Schutzstiefeln
liegt. Falten glattstreichen.
Darauf achten, dass sich
die Sichtscheibe nicht ver-
formt.
7.3.2 Chemikalienschutzanzug in einer CSA-Lager- und
Transporttasche verpacken
1. Den Chemikalienschutzan-
zug in die CSA-Lager- und
Transporttasche legen.
2. Sichtscheibe mit dem Klett-
band fixieren.
3. Die Schutzstiefel wie ge-
zeigt ausrichten.
4. Den Chemikalienschutzan-
zug unterhalb der Ärmel
und an den Stiefeln mit den
Gurten sichern.
5. Die Ärmel an den Schultern
falten und an die Seiten le-
gen.
6. Die CSA-Lager- und Trans-
porttasche schließen.
7. Die CSA-Lager- und Trans-
porttasche am Ansatz der
Stiefel und direkt unter dem
Visier bzw. am Hals zur Mit-
te schlagen. Darauf achten,
dass die Sichtscheibe zwi-
schen den Handschuhen liegt.
8. Die CSA-Lager- und Transporttasche in der Mitte umschla-
gen und die Gurtschnallen schließen.
8 Entsorgung
8.1 Ausmusterung
Der Chemikalienschutzanzug muss in folgenden Fällen
ausgemustert werden:
Er wurde beschädigt und eine Reparatur ist nicht möglich.
Er wurde kontaminiert und kann aufgrund der
Eigenschaften des Gefahrstoffes nicht dekontaminiert
werden.
Das Anzugmaterial hat sich verändert: man kann z. B.
Versprödungen, Verdickungen, Farbänderungen,
Aufweichungen an der Oberfläche feststellen.
In Zweifelsfällen sind weitere Informationen bei Dräger
erhältlich.
8.2 Lebensdauer
Ohne Einsatz und bei Einhaltung der empfohlenen
Lagerbedingungen und Instandhaltungsintervalle bleiben die
Materialeigenschaften des Chemikalienschutzanzugs
mindestens 10 Jahre ab Herstelldatum erhalten. Bei häufigen
Einsätzen kann sich die Lebensdauer auch bei
vorschriftsmäßiger Lagerung und Instandhaltung verkürzen.
8.3 Entsorgungshinweise
Den Chemikalienschutzanzug gemäß den jeweils geltenden
Vorschriften entsorgen.
HINWEIS
Chemikalienschutzanzug drucklos und schonend zu-
sammenlegen.
Anzugmaterial, Nähte und Verschlusssystem nicht ge-
waltsam knicken. Scharfe Knickstellen vermeiden.
i
i
00221840.eps
17021963.eps
HINWEIS
Die Chemikalienschutzanzüge können thermisch oder
auf Deponien entsorgt werden. Die Art der Entsorgung
hängt von der Kontamination ab.
i
i

Technische Daten
Dräger CPS 6900 15
9 Technische Daten
9.1 Allgemeines
Größen in cm:
9.2 Widerstand gegen Penetration von
Infektionserregern
9.3 Beständigkeit des Anzugmaterials
Anzug-
größe
Körper-
größe Brust-
umfang Taillen-
umfang
S 150-165 80-118 72-106
M 160-175 80-118 72-106
L 170-185 80-118 72-106
XL 180-200 104-124 95-110
XXL 195-210 104-124 95-110
Gewicht:
Anzug Größe L,
mit Stiefeln Gr. 45,
ohne Zubehör
ca. 6,8 kg
Anzug Größe L,
mit Stiefeln Gr. 45,
mit Zubehör
ca. 8,0 kg
Anzug Größe L,
mit Socken,
ohne Zubehör
ca. 4,3 kg
Material:
Chemikalienschutz-
anzug
Umex
Sichtscheibe Spezial-Polyvinylchlorid
Handschuhe FKM oder
FKM/Butyl oder
Butyl oder
Laminat: HPPE oder
K-MEX-Gigant: Para-Aramid oder
Tricotril: Nitril/Para-Aramid
Schutzstiefel Nitril-P:
schwarz, FPA-CR-Sicherheitsstiefel mit
Kunststoffsohle, schnitt- und feuerfest,
innen Textilfutter, Größen siehe
Kapitel 11 auf Seite 19
PVC:
gelb, schwarze Profilsohle, Größen siehe
Kapitel 11 auf Seite 19
Farben:
außen/innen rot/rot
Temperaturen:
im Einsatz -40 °C bis +60 °C1
Tiefere Temperaturen bis -80 °C sind bei
kurzzeitiger Exposition möglich und für
das Material Umex von Dräger getestet,
jedoch nicht im Rahmen der Baumuster-
prüfung.
Einsatztemperaturen der Atemschutz-
ausrüstung beachten!
1 von Dräger getestet
bei Lagerung -5 °C bis +25 °C
Prüfung Ergebnis Klasse1
1 gemäß EN 14126:2003+AC:2005
Widerstand gegen kontami-
nierte Flüssigkeiten unter
hydrostatischem Druck (mit
dem Bakteriophagen Phi-
X174)
hydrostatischer
Druck:
20 kPa
6
Prüfung Ergebnis Klasse1
1 gemäß EN 943-1:2015
Abriebfestigkeit >2000 Zyklen 6
Biegerissfestigkeit >100000 Zyklen 6
Biegerissfestigkeit bei
-30 °C2
2 gemäß EN 14126:2003+AC:2005
>4000 Zyklen 6
Weiterreißfestigkeit 57 N 3
Berstfestigkeit 643 kPa 5
Durchstichfestigkeit >50 N 33
3 gemäß EN 1073-1:2016+A1:2018 und EN 1073-2:2002: Klasse 2
Widerstand gegen Flam-
meneinwirkung
selbstverlöschend erfüllt
Nahtfestigkeit >500 N 6
Zugfestigkeit >1000 N 6

16 Dräger CPS 6900
Technische Daten
9.4 Widerstand gegen Permeation von
Chemikalien gemäß EN 943-1:2015
Für die europäische Zulassung erfolgten die Prüfungen gegen
die im folgenden aufgelisteten konzentrierten Chemikalien
unter Komplettbenetzung/Komplettbedeckung der Prüflinge.
Die Klasseneinteilung für die Prüfung des Widerstands gegen
Permeation von Chemikalien ergibt sich gemäß
EN 943-1:2015 folgendermaßen:
Klasse 1 >10 Minuten
Klasse 2 >30 Minuten
Klasse 3 >60 Minuten
Klasse 4 >120 Minuten
Klasse 5 >240 Minuten
Klasse 6 >480 Minuten
Umex Verschluss-
system Nähte Sichtscheibe Anbindung
Sichtscheibe
Prüfchemikalien Klasse Klasse Klasse Klasse Klasse
Ammoniak, CAS-Nr. 7664-41-
7
63466
Chlor, CAS-Nr.7782-50-5 6 3 3 6 6
Chlorwasserstoff1, CAS-Nr.
747-01-06
42466
n-Heptan1, CAS-Nr. 142-82-5 62666
Natriumhydroxid 40 %ig, CAS-
Nr. 1310-73-2
66666
Schwefelsäure 96 %ig1, CAS-
Nr. 7664-93-9
23363
1 Der Anzug ist nicht für kontinuierliche Beaufschlagung mit dieser Chemikalie geeignet
Butyl-
Handschuh FKM-
Handschuh FKM/Butyl-
Handschuh Folien-
Handschuh-
kombinati-
on1
Schutzstiefel
(PVC) Schutzstie-
fel (Nitril)
Prüfchemikalien Klasse Klasse Klasse Klasse Klasse Klasse
Ammoniak, CAS-Nr. 7664-41-
7
6 6 6 6 6 6
Chlor, CAS-Nr.7782-50-5 3 6 6 6 6 6
Chlorwasserstoff2, CAS-Nr.
747-01-06
6 6 6 6 6 6
n-Heptan2, CAS-Nr. 142-82-5 1 6 6 6 4 6
Natriumhydroxid 40 %ig, CAS-
Nr. 1310-73-2
6 6 6 6 6 6
Schwefelsäure 96 %ig2, CAS-
Nr. 7664-93-9
2 6 6 6 6 6
1 Laminat-/Tricotril-Handschuh (Barrier- und Tricotril-Handschuh)
2 Der Anzug ist nicht für kontinuierliche Beaufschlagung mit dieser Chemikalie geeignet

Technische Daten
Dräger CPS 6900 17
9.5 Widerstand gegen Permeation von
Chemikalien gemäß ISO 16 602:2007
Die Klasseneinteilung für die Prüfung des Widerstands gegen
Permeation von Chemikalien ergibt sich gemäß
ISO 16 602:2007 folgendermaßen:
Klasse 1 ≥10 Minuten
Klasse 2 ≥30 Minuten
Klasse 3 ≥60 Minuten
Klasse 4 ≥120 Minuten
HINWEIS
Gemäß ISO 16 602:2007, Tabelle E.1, ist Klasse 4 die
höchste Klasse, die mit den ermittelten Werten erreicht
werden kann.
i
i
Umex Verschluss-
system Nähte Sichtscheibe Anbindung
Sichtscheibe
Prüfchemikalien Klasse Klasse Klasse Klasse Klasse
Ammoniak, CAS-Nr. 7664-41-
7
43444
Chlor, CAS-Nr.7782-50-5 4 3 3 4 4
Chlorwasserstoff1, CAS-Nr.
747-01-06
42444
n-Heptan1, CAS-Nr. 142-82-5 42444
Natriumhydroxid 40 %ig, CAS-
Nr. 1310-73-2
44444
Schwefelsäure 96 %ig1, CAS-
Nr. 7664-93-9
23343
1 Der Anzug ist nicht für kontinuierliche Beaufschlagung mit dieser Chemikalie geeignet
Butyl-
Handschuh FKM-Hand-
schuh FKM/Butyl-
Handschuh
Folien-
Handschuh-
kombination 1
Schutzstiefel
(PVC) Schutzstiefel
(Nitril)
Prüfchemikalien Klasse Klasse Klasse Klasse Klasse Klasse
Ammoniak, CAS-Nr. 7664-41-
7
4 4 4 4 4 4
Chlor, CAS-Nr.7782-50-5 3 4 4 4 4 4
Chlorwasserstoff2, CAS-Nr.
747-01-06
4 4 4 4 4 4
n-Heptan2, CAS-Nr. 142-82-5 1 4 4 4 4 4
Natriumhydroxid 40 %ig, CAS-
Nr. 1310-73-2
4 4 4 4 4 4
Schwefelsäure 96 %ig2, CAS-
Nr. 7664-93-9
2 4 4 4 4 4
1 Laminat-/Tricotril-Handschuh (Barrier- und Tricotril-Handschuh)
2 Der Anzug ist nicht für kontinuierliche Beaufschlagung mit dieser Chemikalie geeignet

18 Dräger CPS 6900
Prüfprotokoll
10 Prüfprotokoll
Herstell-Datum1:
UnterschriftWartung/
Reparaturdatum
Festgestellte
Mängel
Fabrikat-Nummer1:
Dauer des Kontakts
mit Chemikalien
(in Minuten)
Beaufschlagte Anzug-
teile
(Kopf, Arme, Beine, ...)
Typ1:
Schutzanzug hatte
Kontakt mit
(Stoffname, CAS-Nr. UN-Nr.)
Einsatz-
Datum
1 Siehe Typenschild auf der Innentasche im Chemikalienschutzanzug.

Bestellliste
Dräger CPS 6900 19
11 Bestellliste
Benennung und Beschreibung Bestell-
nummer
Dräger CPS 6900 R 29 410
Schutzstiefel zum Überziehen:
Nitril-P, Gr. 43 R 56 863
Nitril-P, Gr. 44 R 56 864
Nitril-P, Gr. 45 R 56 865
Nitril-P, Gr. 46/47 R 56 866
Nitril-P, Gr. 48 R 56 867
Nitril-P, Gr. 49/50 R 56 868
PVC, Gr. 43 R 52 653
PVC, Gr. 44 R 55 474
PVC, Gr. 45 R 55 477
PVC, Gr. 46 R 52 656
PVC, Gr. 47/48 R 55 413
Schutzstiefel zum Montieren:
Nitril-P, Gr. 43, gekürzt R 58 221
Nitril-P, Gr. 44, gekürzt R 58 222
Nitril-P, Gr. 45, gekürzt R 58 223
Nitril-P, Gr. 46/47, gekürzt R 58 224
Nitril-P, Gr. 48, gekürzt R 58 225
Nitril-P, Gr. 49/50, gekürzt R 58 226
PVC, Gr. 43, gekürzt R 62 001
PVC, Gr. 44, gekürzt R 62 002
PVC, Gr. 45, gekürzt R 62 003
PVC, Gr. 46, gekürzt R 62 004
PVC, Gr. 47/48, gekürzt R 62 005
Handschuhe:
Butyl, Gr. 9 R 55 538
Butyl, Gr. 10 R 53 531
Butyl, Gr. 11 R 53 560
FKM/Butyl, Gr. 9 R 55 762
FKM/Butyl, Gr. 10 R 55 531
FKM/Butyl, Gr. 11 R 55 761
FKM, Gr. 9 R 55 537
FKM, Gr. 10 R 53 776
FKM, Gr. 11 R 53 554
Überhandschuhe:
Laminat + Tricotril auf Stützring, Gr. 10 R 63 003
Laminat + Tricotril auf Stützring, Gr. 11 R 63 004
Überhandschuh Tricotril, Gr. 10 R 55 968
Überhandschuh Tricotril, Gr. 11 R 55 966
Überhandschuh K-MEX-Gigant, Gr. 14 R 55 969
Handschuh- und Stiefelzubehör:
Baumwollhandschuhe, Paar R 50 972
gasdichte Armmanschette R 52 648
Gummiring für Überhandschuhe
(2 Stück erforderlich)
R 51 358
Reflexstreifen (2 Stück erforderlich) R 58 218
Stützring R 51 265
Übersocken R 61 018
Belüftung:
Regulierventil PT 120 L R 55 509
Regulierventil PT 120 L - Stäubli R 58 059
Air-Connect R 58 075
Air-Connect - Stäubli R 58 235
Belüftungslaschen Set S, M R 58 901
Belüftungslaschen Set L, XL, XXL R 58 903
ASV 33 54 568
ASV für PSS 7000 33 57 007
Lungenautomat-Adapter R 58 281
Y-Stück R 55 507
Halterung:
D-Connect R 58 080
Hüftgurt AL 01 211
Manometerhalterung R 58 078
Schrittgurt R 58 085
Transport und Lagerung:
CSA-Lager- und Transporttasche R 58 152
Transportkiste T 51 525
Hängebügel (glockenförmig) R 33 299
Hängebügel (T-förmig) R 54 746
Flachbeutel für Haube und Stiefel 87 10 071
Benennung und Beschreibung Bestell-
nummer

20 Dräger CPS 6900
Bestellliste
Prüfgeräte und -zubehör:
Prüfgerät Porta Control 3000 R 62 520
Reinigung und Desinfektion:
Waschbeutel 65 70 003
Stützscheibe R 58 157
Fettstift, 2 Stück R 27 494
Klarsichtmittel "klar-pilot" Gel R 52 560
Klarsichtmittel "klar-pilot" Comfort R 56 542
Eltra (20 kg) 79 04 074
Wartung und Service:
Kleberset (PU/PVC-Kleber) R 58 304
Set Stiefelanschluss R 25 264
Dichtmasse für Stiefelanschluss R 55 272
Rucksackpolster R 57 860
Anzugventil, komplett R 58 625
Ventilscheibe R 58 239
Antikratz-Sichtscheibe (10 Stück) R 57 859
Antibeschlag-Sichtscheibe (1 Stück) R 57 858
Technisches Handbuch auf Anfrage
Einsatz-Handbuch auf Anfrage
Benennung und Beschreibung Bestell-
nummer

Content
Dräger CPS 6900 21
Content
1 Safety-related information . . . . . . . . . . . . . . . . . .22
2 Conventions in this document . . . . . . . . . . . . . .22
3 Description . . . . . . . . . . . . . . . . . . . . . . . . . . . . . .22
3.1 Intended use . . . . . . . . . . . . . . . . . . . . . . . . . . . . . .23
3.2 Limitations on the intended use . . . . . . . . . . . . . . .23
3.3 Approvals . . . . . . . . . . . . . . . . . . . . . . . . . . . . . . . .23
3.4 Tested personal protective equipment . . . . . . . . . .23
3.5 Type-identical identification mark . . . . . . . . . . . . . .24
4 Use . . . . . . . . . . . . . . . . . . . . . . . . . . . . . . . . . . . . .24
4.1 Prerequisites . . . . . . . . . . . . . . . . . . . . . . . . . . . . . .24
4.2 Instructions on using the fastener system . . . . . . . .24
4.3 Preparation for use . . . . . . . . . . . . . . . . . . . . . . . . .24
4.4 Observe during use . . . . . . . . . . . . . . . . . . . . . . . . .25
4.5 After use . . . . . . . . . . . . . . . . . . . . . . . . . . . . . . . . .25
5 Troubleshooting . . . . . . . . . . . . . . . . . . . . . . . . . .26
6 Maintenance . . . . . . . . . . . . . . . . . . . . . . . . . . . . .26
6.1 Maintenance table . . . . . . . . . . . . . . . . . . . . . . . . . .26
6.2 Visual inspection
of the chemical protective suit . . . . . . . . . . . . . . . . .26
6.3 Cleaning and disinfecting
the chemical protective suit . . . . . . . . . . . . . . . . . . .27
6.4 Maintaining the fastener system . . . . . . . . . . . . . . .28
6.5 Examining tightness
of the chemical protective suit . . . . . . . . . . . . . . . . .28
6.6 Check the seal on the suit valves . . . . . . . . . . . . . .29
6.7 Special maintenance work . . . . . . . . . . . . . . . . . . .29
7 Storage . . . . . . . . . . . . . . . . . . . . . . . . . . . . . . . . . .30
7.1 Storage conditions . . . . . . . . . . . . . . . . . . . . . . . . .30
7.2 Preparing for storage . . . . . . . . . . . . . . . . . . . . . . .30
7.3 Storage of the chemical protective suit . . . . . . . . . .30
8 Disposal . . . . . . . . . . . . . . . . . . . . . . . . . . . . . . . . .31
8.1 Withdrawal from service . . . . . . . . . . . . . . . . . . . . .31
8.2 Service life . . . . . . . . . . . . . . . . . . . . . . . . . . . . . . .31
8.3 Disposal instructions . . . . . . . . . . . . . . . . . . . . . . . .31
9 Technical data . . . . . . . . . . . . . . . . . . . . . . . . . . . .31
9.1 General . . . . . . . . . . . . . . . . . . . . . . . . . . . . . . . . . .31
9.2 Resistance to penetration
of infectious agents . . . . . . . . . . . . . . . . . . . . . . . . .32
9.3 Resistance of the suit material . . . . . . . . . . . . . . . .32
9.4 Resistance to chemical permeation
according to EN 943-1:2015 . . . . . . . . . . . . . . . . . .33
9.5 Resistance to chemical permeation
according to ISO 16 602:2007 . . . . . . . . . . . . . . . .34
10 Test protocol . . . . . . . . . . . . . . . . . . . . . . . . . . . . .35
11 Order list . . . . . . . . . . . . . . . . . . . . . . . . . . . . . . . .36

22 Dräger CPS 6900
Safety-related information
1 Safety-related information
Before using this product, carefully read these Instructions
for Use and those of the associated products.
Strictly follow the Instructions for Use. The user must fully
understand and strictly observe the instructions. Use the
product only for the purposes specified in the Intended use
section of this document.
Do not dispose of the Instructions for Use. Ensure that they
are retained and appropriately used by the product user.
Only trained and competent users are permitted to use this
product.
Comply with all local and national rules and regulations
associated with this product.
Only trained and competent personnel are permitted to
inspect, repair and service the product. Dräger
recommends a Dräger service contract for all maintenance
activities and that all repairs are carried out by Dräger.
Only authentic Dräger spare parts and accessories may be
used for maintenance. Otherwise the proper functioning of
the product may be impaired.
Do not use a faulty or incomplete product. Do not modify
the product.
Notify Dräger in the event of any product or component
fault or failure.
2 Conventions in this document
Meaning of the alert icons
The following alert icons are used in this document to identify
and highlight areas of text that require greater awareness by
the user. A definition of the meaning of each icon is as follows:
Trademarks
The following trademarks are used in this document:
FPS®, HPS®, Panorama Nova®, PAS®, PSS® and
X-plore® are registered trademarks of Dräger.
Eltra® and ECOLAB® are registered trademarks of Ecolab.
K-MEX® and Tricotril® are registered trademarks of
KCL GmbH.
Barrier® is a registered trademark of Ansell
Cryo-Industrial® is a registered trademark of
Tempshield, Inc.
Abbreviations
FKM = fluoroelastomer
PVC = polyvinyl chloride
3 Description
Dräger CPS 6900 are gastight chemical protective suits
according to EN 943-1:2015 (Type 1a). They are re-usable.
A self-contained breathing apparatus is required for breathing
air supply. The compressed air breathing apparatus, full face
mask and safety helmet are worn under the chemical
protective suit. Possible combinations see Chap. 3.4 on
Page 23.
The chemical protective suit is equipped with exchangeable
gloves. The following gloves are available:
FKM glove, with Tricotril overglove where appropriate
FKM glove, with K-MEX-Gigant overglove where
appropriate
Butyl glove, with Tricotril overglove where appropriate
Butyl glove, with K-MEX-Gigant overglove where
appropriate
FKM/Butyl glove, with Tricotril overglove where appropriate
FKM/Butyl glove, with K-MEX-Gigant overglove where
appropriate
The following foil glove combinations are available:
Laminate/Tricotril glove combination
The chemical protective suit can be equipped either with socks
made from the same material as the suit or with boots. The
socks by themselves do not provide adequate protection from
mechanical stresses. The user must therefore also wear
suitable safety boots which are approved to EN ISO 20345.
A cuff prevents the penetration of substances between the
socks and safety boots.
The visor is provided with a scratch proof screen on the outside
of the suit.
The chemical protective suit features a pocket for radio units
and a push-to-talk button flap. The pocket is labelled with the
type ID.
The following optional components can be fitted to the
chemical protective suit:
Regulating valve PT 120 L or Air-Connect:
Ventilation unit for the connection of external air supply
sources to the cooling system inside the suit.
D-Connect:
Bracket for additional equipment (e.g. thermal imaging
camera, measuring devices, rescue loops), which can be
fastenend on the left or on the right hip.
Crotch strap:
for adjusting the length of the suit
Antifog visor in the suit:
prevents the visor from fogging.
Manometer bracket below the visor:
for fastening the manometer of the compressed air
breathing apparatus in the field of vision of the protective
suit wearer
WARNING
Indicates a potentially hazardous situation. If not
avoided, this situation could result in death or serious
injury.
CAUTION
Indicates a potentially hazardous situation. If not
avoided, this situation could result in physical injury or
damage to the product or environment. It may also be
used to alert against unsafe practices.
NOTICE
Indicates additional information on how to use the
product.
!
!
i
i
NOTICE
The overgloves do not have to be used. However, they
offer an increased cut resistance.
i
i

Description
Dräger CPS 6900 23
Work ID numbers:
for simplified identification of the work teams.
Marking with a waterproof pen is possible, but not
recommended.
3.1 Intended use
The chemical protective suit protects against gaseous, liquid,
aerosol-based and solid hazardous substances and against
infectious agents. It also protects against the incorporation of
radioactive particles.
3.2 Limitations on the intended use
Certain chemicals are subject to restrictions regarding the
period of use depending on concentration, state of aggregation
and ambient conditions.
Avoid heat and open flames. The chemical protective suit is
not suitable for fire fighting. For information on mechanical and
chemical resistance as well as on temperature resistance, see
Chap. 9 on Page 31.
The chemical protective suit does not offer protection against
radiation of radioactive particles or radiation damage.
The chemical protective suit may not be used when it is
damaged or worn.
3.3 Approvals
The chemical protective suit is approved in accordance with:
EN 943-1:2015 (Type 1a)
EN 14126:2003+AC:2005:1a-B
EN 1073-1:2016+A1:2018:IL:class 4, nominal protection
factor: 20000
(only Dräger CPS 6900 with air supply unit)
EN 1073-2:2002:IL: class 3, nominal protection factor 500
(only Dräger CPS 6900 without air supply unit)
EN 14593-1:2018
(only Dräger CPS 6900 with air supply unit)
IEN 14594:2018
ISO 16602:2007+Amd 1:2012
SOLAS II-2, Reg. 19, consolidated edition 2004
TP TC 019/2011
(EU) 2016/425
Regulation 2016/425 on personal protective equipment, as
amended to apply in GB
The protective boots made of nitrile are approved in
accordance with:
EN ISO 20345:2011
EN 15090:2012
The protective boots made of PVC are approved in
accordance with:
EN ISO 20345:2011
Declarations of conformity:
see www.draeger.com/product-certificates
3.4 Tested personal protective equipment
3.4.1 Facepieces
Full face masks Dräger FPS 7000 RA/PE/P/ESA
Full face masks Panorama Nova RA/PE/P/ESA
Full face masks f2 PA-RA/PE
Mask/helmet combinations Dräger FPS 7000 H61/H62
Mask/helmet combinations Panorama Nova S-RA/Supra,
Panorama Nova S-PE/Supra and Panorama Nova S-HE-
EPDM-PC-RA
Mask/helmet combinations f2 S-PA-PE/Supra
3.4.2 Compressed air breathing apparatus
PA 80/90 UP
PA 94 UP
PA 94 D plus
PAS lite1
PSS 100D
PSS 1001
PSS 30001
PSS 40001
PSS 50001
PSS 70001
3.4.3 Lung demand valves
All lung demand valves in the PSS series
3.4.4 Safety helmets
Dräger HPS 4000 Series
Dräger HPS 6000 Series
Dräger HPS 7000 Series
Schuberth F110
Schuberth F210
Dräger F1S12
Dräger F1SA12
Heros I
Heros II
CAUTION
Only the following combinations of protective
equipment are tested and approved.
For non-Dräger approved combinations, the operator
must independently determine whether such
combination is appropriate.
1 Also in combination with ASV and Y-piece
!

24 Dräger CPS 6900
Use
3.5 Type-identical identification mark
The type-identical identification mark is found on the pocket in
the chemical protective suit.
4 Use
4.1 Prerequisites
4.2 Instructions on using the fastener
system
The fastener system has been developed especially for the
chemical protective suits. Generally, the additional seals make
mobility more difficult in comparison to zip fasteners on normal
clothing. To prevent creases in the fastener system, the
protective suit wearer must grasp and pull the fastener system
to the hood, while a second person pulls the trouser leg with
the fastener system down using both hands until the fastener
system is free of creases. The protective suit wearer should be
standing upright when opening and closing the fastener
system.
4.2.1 Opening the fastener system
Fully open the fastener system.
Always pull the zipper tab in the direction of the zipper
mechanism; never pull diagonally!
Do not use force. Zip elements can become bent!
If the zipper tab gets caught, pull it back and push it forward
again.
4.2.2 Closing the fastener system
When closing the fastener system, avoid diagonal forces
on the zip.
Pull the fastener chains together by hand.
Then the zip will slide more easily along the section that is
being pulled together.
Foreign objects, such as shirt, jacket, threads, etc. must
not be trapped between the zip elements.
4.3 Preparation for use
4.3.1 Preparing the chemical protective suit
1. Check for leaks before using the suit for the first time in
order to detect any damage due to transport. Observe the
maintenance intervals thereafter (see Chap. 6.1 on Page 26).
2. Place the chemical protective suit flat on the ground and
examine visually (see Chap. 6.2 on Page 26).
3. If fitted, check the function of the ventilation unit and the
connection to the compressed air breathing apparatus.
4. Treat the full face mask visor from outside using "klar-pilot"
anti-fogging gel. Use the spray “klar-pilot“ Comfort for
coated mask visors. If the suit is not fitted with an antifog
visor, also treat the inside of the visor.
4.3.2 Putting on the chemical protective suit
1. Put on underclothing (moisture-wicking work clothing,
cotton gloves).
2. Put on the compressed air breathing apparatus and full
face mask.
Caution! Strictly follow the Instructions for
Use.
Protective clothing against gaseous, liquid,
aerosol and solid chemicals (according to
EN 943-1:2015, type 1a)
Protective clothing against infective agents
(according to EN 14126:2003+AC:2005,
type 1a-B)
Protective clothing against radioactive
contamination by solid particles (according
to EN 1073-1:2016+A1:2018 and
EN 1073-2:2002 (for classes, see 3.3))
Assignment of height, waist and chest
measurement to the size of the chemical
protective suit (see Chap. 9 on Page 31).
WARNING
The chemical protective suit must be used in
accordance with the applicable standards and
directives of the country in question.
The environmental impact must be determined prior to
use, since the suitability of the chemical protective suit
must be determined before its use. The chemical
protective suit must only be used for suitable
purposes. The user has to consider national and other
requirements for the use of personal protective
equipment.
Non-observance can lead to death or severe physical
injuries.
CAUTION
To avoid damage to the fastener system, both halves
of the zip must be parallel and unstressed. Do not use
force when opening and closing the fastener system or
jerk the zipper.
Fastener systems without sufficient lubrication are
more difficult to operate. This can result in damage to
the fastener system. Lubricate the fastener system
using the grease stick supplied by Dräger.
!
!
NOTICE
Dräger recommends that you keep the flat bags in
which the chemical protective suit was delivered for
later storage purposes.
WARNING
Do not use a damaged chemical protective suit. If you
do, you risk death or serious injury.
NOTICE
Get a second person to assist you with donning the
suit.
NOTICE
Dräger recommends tucking the trouser legs of the
underclothing into the socks to prevent the trouser legs
shifting.
To prevent the cotton gloves slipping down, they
should be fixed on the wrist using insulation tape.
i
i
!
i
i
i
i

Use
Dräger CPS 6900 25
3. Put on the safety helmet or mask/helmet combination.
4. Check proper functioning of compressed air breathing
apparatus, full face mask and mask/helmet combination as
described in the relevant instructions for use.
5. If the chemical protective suit is equipped with gas-tight
integrated socks:
a. Without shoes, first step into the right trouser leg, then
into the left trouser leg.
b. Don the safety boots.
6. If the chemical protective suit is equipped with gas-tight
integrated safety boots: Without shoes, first step into the
right trouser leg and into the safety boot, then into the left
trouser leg and the safety boot.
7. Pull up the chemical protective suit to the waist.
8. If the chemical protective suit is equipped with a ventilation
unit:
a. Connect the air supply inside the chemical protective suit.
b. Close the integrated waist belt.
9. If the chemical protective suit is equipped with a D-connect,
close the integrated waist belt.
10. If the chemical protective suit is equipped with a crotch
strap, hook the crotch strap onto the waist belt of the self-
contained breathing apparatus. Pull the end of the crotch
strap to adjust it to the desired length.
11. Pull the hood over the head and insert your right arm into
the right sleeve and glove. Slide the backpack of the
chemical protective suit over the respiratory protective
device. Slip the left arm into the left sleeve and glove.
12. Connect the lung demand valve to the full face mask.
13. Close the fastener system. Always pull in the direction of
the zip. Do not use force!
14. Fit the overgloves if required:
a. Pull the K-MEX-Gigant overglove over the arm ring and
secure it with the corresponding rubber ring.
b. Pull the Tricotril overglove over the arm ring and secure
it with the corresponding rubber ring.
4.4 Observe during use
Never start a mission alone!
Observe the operating time, limitations and specific
national regulations. The maximum operating time may
also depend on the used respiratory protective device and
the operating conditions.
If no compressed air hoses are connected in protective
suits with ventilation units, close the ports with a protective
cap to avoid contamination.
If you are working with refrigerated media, use the relevant
overgloves (e. g.Cryo-Industrial Gloves from Tempshield,
Inc.) and underclothing.1
If sight is obstructed by fogging or icing on the inside of the
visor: pull one hand out of the sleeve and wipe the visor,
e.g., with a cleaning cloth. The cleaning cloth can be stored
in the inside pocket.
Leave the contaminated area immediately in a case of
emergency. Open fastener system in clean area only.
4.5 After use
4.5.1 Precleaning of the chemical protective suit
1. Leave the contaminated area and have the chemical
protective suit precleaned by an assistant. The assistant
must also wear protective clothing and breathing apparatus
where necessary.
For precleaning, Dräger recommends using plenty of water
to which a detergent has been added. This will be sufficient
to wash away most chemicals (acids, alkalis, organic and
inorganic substances).
2. Clean the chemical protective suit thoroughly for a
sufficient time. Avoid spreading chemicals.
3. In the event of contamination with hazardous substances,
dispose of the waste water in line with the relevant waste
waster disposal regulations.
4. If necessary, carry out decontamination in several steps.
Further information on decontamination2 can be obtained
from Dräger.
4.5.2 Taking off the chemical protective suit
1. Open the fastener system.
Always pull in the direction of the zip. Do not use force.
2. Remove the left arm from the sleeve.
3. If the chemical protective suit is equipped with a ventilation
unit:
a. Open the integrated waist belt.
b. Have an assistant disconnect the air supply.
4. If the chemical protective suit is equipped with D-connect:
close the integrated waist belt.
5. If the chemical protective suit is equipped with a crotch
strap: detach the crotch strap from the waist belt of the self-
contained breathing apparatus.
6. Remove the right arm from the sleeve.
7. Bend your knees slightly so that the hood can be taken off
easily.
8. Fold the chemical protective suit away from the wearer in
such a way that no chemicals or cleaning agents can enter
the interior of the suit.
9. Climb out of the safety boots and trouser legs.
10. Take off safety helmet, self-contained breathing apparatus,
full face mask, and cotton gloves.
CAUTION
A heat build-up in the chemical protective suit can
result in circulatory collapse; for this reason, wear a
cooling vest underneath or use a suitable ventilation
system, as appropriate.
1 not part of the EU prototype tests
!
WARNING
Never touch contaminated parts unless wearing
protective clothing. Avoid contaminating the clean
interior of the suit.
Failure to meet the required safety precautions may
result in death or serious injury.
CAUTION
If precleaning is not possible on site, remove and close
the suit immediately to prevent chemicals from
entering the suit.
2 not part of the prototype test
WARNING
Only take off the chemical protective suit in a non-
contaminated area.
!
!
!

26 Dräger CPS 6900
Troubleshooting
5 Troubleshooting
6 Maintenance
6.1 Maintenance table
The specified intervals are recommendations from Dräger. If
required, deviating national guidelines must be observed.
For maintenance work on the full face mask, ventilation unit,
automatic switch valve and compressed air breathing
apparatus, see the relevant instructions for use.
6.2 Visual inspection of the chemical
protective suit
The following examinations are mandatory. The chemical
protective suit must be repaired or disposed of in case of
defects.
No holes, cuts or abrasions must be found on the outside
of the chemical protective suit.
The seam band must not be coming apart in any way.
The visor must be clean.
The following parts must be undamaged:
a. Suit material
b. Gloves
c. Socks
d. Visor
e. Visor seal
f. Fastener system
The suit valves must be clear and undamaged.
The suit material must not have any signs of wear. The
coating must not come apart from the fabric.
NOTICE
Dräger recommends that you keep a record of the
mission (see Chap. 10 on Page 35).
Fault Cause Remedy1
1 not part of the EU prototype tests
Fastener system
jammed
Foreign objects in
zipper mechanism
Clean zip fastener,
remove foreign
objects
Excess friction Lubricate zip
fastener with
grease stick
Chemical
protective suit
leaky
Fastener system
not closed
Close fastener
system completely
Suit material
damaged
Repair with suit
repair kit. Check
for leaks again.
Safety boots or
gloves faulty or
leaky joint
Replace or seal.
Check for leaks
again.
Valve disc or seat
dirty or faulty
Clean or replace.
Check for leaks
again.
Visor or seam
leaking
Replace or seal.
Check for leaks
again.
Chemical
protective suit not
ventilated
Valve disc on suit
valve sticks
Clean or replace.
Check for leaks
again.
Hook-and-loop
strap becomes
detached
Hook-and-loop
strap is attached
with adhesive.
Cleaning and
decontamination
can cause it to
become loose.
Re-adhere hook-
and-loop strap.
Check for leaks
again.
i
i
Work to do
before first use
after use
after repair
annually
Visual inspection of the chemical
protective suit
X X X1
1 Applies to chemical protective suits that are stored without
carrying bag on vehicles.
With chemical protective suits that are stored in the relevant
carrying bag, the interval is extended to two years.
Cleaning and disinfecting the
chemical protective suit
X
Maintaining the fastener system X X X1
Check the seal on the chemical
protective suit
XXXX1
Check the seal on the suit valves X X X X1
NOTICE
Dräger recommends keeping a record of all
maintenance work (see Chap. 10 on Page 35).
i
i

Maintenance
Dräger CPS 6900 27
6.3 Cleaning and disinfecting the chemical
protective suit
6.3.1 Manual cleaning and disinfecting
1. Remove rucksack pad and clean separately with clean,
warm water.
2. Remove the ventilation unit, D-connect and antifog visor (if
fitted), clean and disinfect separately.
3. Unfasten the protective caps and valve discs on the suit
valves.
4. Remove the gloves if necessary:
If the chemical protective suit is equipped with a glove
combination, the glove combination must be removed
and disposed.
If Tricotril overgloves were used, remove them but do
not wash them. Contaminated Tricotril overgloves must
be replaced.
If K-MEX-Gigant overgloves were used, remove them
and clean separately.
FKM, FKM/Butyl and Butyl gloves can remain attached
during manual cleaning.
5. Clean the valve discs separately with clean, warm water.
6. Prepare a cleaning solution consisting of water and a
cleaning agent.
7. Clean the chemical protective suit and all reusable
components with a soft cloth and the cleaning agent.
8. Rinse all parts thoroughly under running water.
9. Prepare a disinfectant bath consisting of water and a
disinfecting agent.
10. Place all the parts that need to be disinfected (chemical
protective suit, valve discs, protective caps) into the
disinfectant bath.
11. Rinse all parts thoroughly under running water.
12. Dry all parts (see Chap. 6.3.3 on Page 28).
6.3.2 Mechanical cleaning and disinfecting
The following accessories are required for mechanical
cleaning:
Industrial washing machine Dräger CombiClean
or equivalent
Washing agent: Eltra
For dosage information, see information 9021380
Washing bag
Support disc
The industrial washing machine must have the following
features:
Drum volume >130 litres
Drum diameter >60 cm
Door opening >45 cm
Programmable logic controller
Electronic temperature control ±2 °C
Drum speed: max. 20 rotations/minute (2 slow rotations in
one direction, 18 seconds waiting time, 2 slow rotations in
the other direction, 18 seconds waiting time)
Clean and disinfect the chemical protective suit as follows:
1. Disassemble the antifog visor, ventilation unit and D-
connect (if fitted), clean separately and disinfect.
Then rinse thoroughly in clean water.
2. Unfasten the protective caps and valve discs on the suit
valves.
3. Remove gloves if necessary:
If the chemical protective suit is equipped with a glove
combination, the glove combination must be removed
and disposed.
If Tricotril overgloves were used, remove them but do
not wash them. Contaminated Tricotril overgloves must
be replaced.
If K-MEX-Gigant overgloves were used, remove them
and clean separately.
Remove FKM, FKM/Butyl and Butyl gloves.
4. Clean the valve discs separately with clean, warm water
and then disinfect.
5. Open the fastener system on the chemical protective suit
completely.
6. Spread out the chemical protective suit on a clean working
surface and smooth out wrinkles.
CAUTION
Risk of damaging the material!
Do not use any solvents (e. g. acetone, alcohol) or
cleaning agents containing abrasive particles for
cleaning and disinfecting. Only use the prescribed
process and use the cleaning and disinfection agents
given. Other agents, dosages and contact times may
damage the product.
For information about suitable cleaning and
disinfecting agents and their specifications, refer to
document 9100081 on www.draeger.com/IFU.
CAUTION
Risk of damaging the material!
The antifog properties can disappear as a result of
cleaning and disinfection. Do not immerse the antifog
visor in the liquid longer than 5 minutes.
WARNING
There is the risk of contamination if the glove
combination is not replaced!
No assurance has been made that the material will be
able to withstand repeated chemical exposure.
!
!
!
CAUTION
Risk of damaging the material!
Leave the rucksack pad (if fitted) in the chemical
protective suit, as the components on the inside of the
chemical protective suit can be damaged by the hook-
and-loop straps.
The antifog properties can disappear as a result of
cleaning and disinfection. Do not immerse the antifog
visor in the liquid longer than 5 minutes.
WARNING
There is the risk of contamination if the glove
combination is not replaced!
No assurance has been made that the material will be
able to withstand repeated chemical exposure.
!
!

28 Dräger CPS 6900
Maintenance
7. Place the support disc in the hood, ensure that the visor is
flush to and congruent with the support disc.
8. Pull the washbag over the hood and ensure that the
washbag foam rests on the visor and the corded edge of
the washbag covers the lower edge of the visor. Tighten
and tie the cord.
9. Turn up the socks or protective boots once. Avoid sharp
bends.
10. Place the sleeves into the centre of the chest section.
Smooth out any creases.
11. Fold the hood with the washbag and the upper section of
the chemical protective suit to ensure that the visor lies on
the rolled-up safety boots. Smooth out any creases. Make
sure that the visor does not get deformed.
12. Place the chemical protective suit into the industrial
washing machine.
13. Start the washing program "Chemical protective suit".
Observe the following parameters during washing:
Water temperature for cleaning and disinfecting:
62 °C ±2 °C
4 rinse cycles with clear, cold water
14. Dry all parts (see Chap. 6.3.3 on Page 28).
6.3.3 Drying the chemical protective suit
1. Before drying, tip out any remaining liquid from the
chemical protective suit or wipe with a sponge.
2. Dry all parts thoroughly inside and outside.
The chemical protective suit can be blow-dried using dry,
oil-free compressed air or in a protective suit dryer system:
– Temperature: maximum 40 °C
– Time: min. 120 minutes
Avoid direct heat radiation or direct sunlight.
3. Reinsert the backpack pad.
4. Carry out a visual inspection of chemical protective suit,
visor, safety boots and gloves.
5. Reinsert the antifog visor (if fitted).
6. Refit the ventilation unit and D-connect (if fitted).
6.4 Maintaining the fastener system
1. Lubricate the fastener system thoroughly after every use
and every cleaning and disinfection process. Use the
grease stick available from Dräger to do this.
2. In particular, lubricate the chain links on the zip fastener
and the area below the chain links on which the zip is
running.
6.5 Examining tightness of the chemical
protective suit
The test is described for the test device Porta Control 3000.
You can carry out the tests with other test devices, but the
indicated values must be observed.
Carry out the test according to ISO 17491-1, method A.2 at
constant room temperature (20 °C ±5 °C).
The compressed air used must comply with the requirements
of EN 12021.
The required test accessories are listed in the order list (see
Chapter 11 on Page 36).
6.5.1 Preparation of test
1. Seal the connections for protective suits with ventilation
unit.
2. Close the fastener system.
3. Spread out the chemical protective suit front-down on a
clean and even surface.
4. Protect the visor with a soft underlay in order to avoid
scratches.
5. Unfasten the protective cap from both suit valves and
remove the valve discs.
6. Fit one test cap on one suit valve and connect it to the test
unit via the blue test hose.
7. Fit another test cap on the other suit valve.
8. Ensure that both valves are connected to the black hose of
the test unit.
9. Connect the test cap to the compressed air supply (6 bar)
via the black hose.
Carry out the test (see Chap. 6.5.2 on Page 28).
6.5.2 Carrying out the test
1. Open the blow up valve on the black hose and fill the
chemical protective suit until the test unit shows 17.5 mbar.
Close the blow up valve.
2. Set a settling time of 10 minutes start the stopwatch.
During this time, keep the pressure at approx. 17 mbar so
that a pressure and temperature compensation can be
carried out. If required, top up the air.
3. Open the relief valve. Lower the pressure to 16.5 mbar.
Close the relief valve.
4. Set a test time of 6 minutes and start the stopwatch.
5. Read off the pressure on the test unit at the end of the test
time.
CAUTION
Risk of damaging the material!
To avoid damaging the chemical protective suit, the
wash drum must only move when filled with water.
CAUTION
Risk of damaging the material!
To avoid the chemical protective suit being damaged,
it must not be spin-dried.
To avoid mould formation, for example, the chemical
protective suit must be completely dry.
NOTICE
Suitable drying systems for the chemical protective
suit include:
TopTrock SF01 with GF fan
Drying systems of an equivalent design
!
!
i
i
NOTICE
To prevent the closure system sticking, protruding
textile threads must be removed.
CAUTION
If the suit is overfilled, the material will be damaged.
When filling the chemical protective suit ensure that
the pressure does not exceed the specified values.
i
i
!

Maintenance
Dräger CPS 6900 29
If the pressure drop is less than or equal to 3 mbar, the
chemical protective suit is deemed sealed. Then disassemble
the test setup and the suit valves.
If the pressure drop is greater than 3 mbar:
1. Moisten critical points (such as seams, fastener system,
glove and boot connections) with soapy water.
2. Mark leaking areas.
3. Wash off the soapy water and thoroughly dry the chemical
protective suit.
4. De-aerate and repair the chemical protective suit.
5. Repeat the leak test.
Alternatively, the chemical protective suit can be returned to
Dräger for repair.
6.6 Check the seal on the suit valves
The test is described for the test device Porta Control 3000.
You can carry out the tests with other test devices, but the
indicated values must be observed.
Carry out the test according to EN 943-1:2015, 6.5.1, however
with 10 mbar overpressure, at constant room temperature
(20 °C ±5 °C).
The compressed air used must comply with the requirements
of EN 12021.
The required test accessories are listed in the order list (see
Chapter 11 on Page 36).
1. Remove the blow up valve with plug-in coupling from the
hose.
2. Connect the hose end to the test unit.
3. Insert the pumping ball on the relief valve into the black
hose in a way that the arrow on the pumping ball points
toward the relief valve.
4. Moisten the valve disc with clear water and fit.
5. Fit the test cap from the outside on the valve to be tested
and connect it to the test unit via the black hose.
6. Open the relief valve and create an overpressure of
+10 mbar with the pumping ball. Close the relief valve.
7. Set a test time of 1 minute and start the stopwatch.
8. Read off the pressure on the test unit at the end of the test
time.
If the pressure change is less than 1 mbar, the suit valve is OK.
In this case:
1. Check the next suit valve.
2. Disassemble test setup.
3. Fit the protective cap onto the suit valve.
If the pressure change is greater than 1 mbar:
1. Remove the valve disc and conduct a visual inspection.
The valve disc and valve seat must be clean and
undamaged.
2. If necessary, replace the valve disc (see Chap. 6.7.3 on
Page 30).
3. Repeat the test.
6.7 Special maintenance work
Check for leaks again after servicing and/or replacing parts.
We recommend that all repairs be conducted by Dräger.
6.7.1 Replacing gloves
Always replace gloves or glove combinations as follows:
1. Remove overglove and rubber ring (if fitted).
2. Lift the arm ring with the thumb and press the support ring,
on which the glove is located, out of the sleeve.
3. All gloves except glove combinations:
Pull the new glove onto the support ring and align at the
arm ring. The long axis of the elliptical support ring points
parallel to the hand surface.
Make sure that no wrinkles develop between glove and
support ring.
4. Insert a glove with support ring or new glove combination
through the open closure system into the chemical
protection suit sleeve.
5. Insert glove with support ring or new glove combination
through the arm ring and align:
The left glove goes into the left sleeve, and the right into
the right sleeve.
The hand surface points to the sleeve seam.
6. Push the glove unit into the arm ring until the edge of the
support ring is in contact with the edge of the arm ring.
The support ring must sit completely in the gap of the arm
ring.
7. Fit overglove (if desired):
Pull the K-MEX-Gigant overglove over the arm ring and
secure it with the corresponding rubber ring
Pull the Tricotril overglove over the arm ring and secure
it with the corresponding rubber ring.
8. Check the seal on the chemical protective suit (see
Chapter 6.5 on Page 28).
6.7.2 Replacing a scratch proof visor
1. Remove the old scratch proof visor.
2. If necessary, remove left-over adhesive.
3. Remove the protection film from one side of the adhesive
pads and position the adhesive pads on the old adhesive
points.
WARNING
If the chemical protective suit is equipped with a glove
combinations, the glove combinations must be
removed, disposed of and replaced with a new glove
combination. No assurance has been made that the
material will be able to withstand repeated chemical
exposure.
Do not use talcum for fitting the gloves. Otherwise the
gloves may slip out if the user exerts too much
pressure on the glove from inside by stretching too
much.
CAUTION
Do not use any pointed or sharp objects or any
solvents so as not to damage the visor!
Generally, the adhesive can be wiped off with your
thumb.
!
!

30 Dräger CPS 6900
Storage
4. Remove the protection film from the second side of the
adhesive pads.
5. Center the new scratch proof visor and press it firmly onto
the adhesive pads.
6.7.3 Replacing a valve disc
1. Unfasten protective cap and old valve disc. Do not damage
the valve housing plug.
2. Moisten and fit new valve disc.
3. Place the protective cap onto the training suit.
6.7.4 Replacing the anti-fog visor
1. Carefully remove the anti-fog visor from the rubber profile
of the head cover.
2. Insert a new anti-fog visor:
a. Remove the protective foil from the anti-fog visor.
b. Turn the hood of the chemical protective suit inside out.
Ensure that the zip is not overstretched and the sealing
surface does not tear.
c. Align the anti-fog visor using the centre marking and
slowly insert the rubber profile.
7 Storage
7.1 Storage conditions
Store the chemical protective suit in a dark, cool, dry and
airy place without pressure or stress.
Keep out of UV light and direct sunlight; avoid ozone.
Observe the storage temperature (see Chap. 9 on
Page 31).
7.2 Preparing for storage
1. Close the fastener system up to approx. 5 cm before the
end. Regularly check whether the fastener system is still
adequately greased.
2. Pull the flat bag supplied over the hood in such a way that
the cylindrical visor remains in shape.
3. If the chemical protective suit is folded together, pull the
supplied flat bag over the safety boots so that the chemical
protective suit is not discoloured.
7.3 Storage of the chemical protective suit
The following storage options are possible:
Lay the chemical protective suit flat during storage. If the
chemical protective suit is stored in the utility vehicle, avoid
wear due to constant friction against the storage surface.
Hang up the chemical protective suit on an appropriate
hanger or a hanging rail. The hood or protective boots must
be in contact with the ground.
Fold up the chemical protective suit and store it in a
transport case, storage bay or carrying bag.
Pack the chemical protective suit in a CPS storage and
transportation bag.
7.3.1 Folding up the chemical protective suit
1. Pull the flat bag over the hood.
2. Turn up the socks or
protective boots once.
Avoid sharp bends.
3. Place the sleeves into the
centre of the chest section.
Smooth out any creases.
4. Fold the hood and the
upper section of the
chemical protective suit to
ensure that the visor lies
on the rolled up safety
boots. Smooth out any
creases. Make sure that
the visor does not get
deformed.
CAUTION
Danger of material damage!
Do not use any pointed or sharp objects or any
solvents so as not to damage the anti-fog visor.
CAUTION
If you fail to ensure proper storage conditions, the
chemical protective suit may be damaged!
!
!
NOTICE
Dräger recommends packing the chemical protective
suit in the CPS storage and transportation bag to
protect it from environmental influences and to extend
maintenance intervals.
NOTICE
Fold up the depressurized chemical protective suit
carefully.
Do not use force to bend the suit material, seams and
fastener system in the process. Avoid sharp bends.
i
i
i
i
00221840.eps
17021963.eps

Disposal
Dräger CPS 6900 31
7.3.2 Packing the chemical protective suit in a CPS
storage and transportation bag
1. Place the chemical
protective suit in the CPS
storage and transportation
bag.
2. Fix the visor using hook-
and-loop straps.
3. Place the protective boots
as illustrated.
4. Secure the chemical
protective suit below the
sleeves and on the boots
using straps.
5. Fold up the sleeves on the
shoulders and place on the
sides.
6. Close the CPS storage and
transportation bag.
7. Turn up the CPS storage
and transportation bag to
the middle on the tip of the
boots and directly under the
visor or on the neck,
respectively. Ensure that the visor is located between the
gloves.
8. Turn up the CPS storage and transportation bag in the
middle and close the strap buckles.
8 Disposal
8.1 Withdrawal from service
The chemical protective suit must be withdrawn from service in
the following situations:
It has been damaged and repair is not possible.
It was contaminated and cannot be decontaminated
anymore due to the characteristics of the hazardous
substance.
The material of the chemical protective suit has altered: it
shows embrittlement, swellings, colour changes, surface
maceration or similar.
In case of doubt please contact Dräger for more information.
8.2 Service life
The material properties of the chemical protective suit will be
maintained for at least 10 years from the date of manufacture
if not used and if stored under the recommended conditions,
with the recommended maintenance intervals. The service life
may be reduced despite correct storage and servicing if the
suit is used frequently.
8.3 Disposal instructions
The chemical protective suit must be disposed of in
accordance with the applicable regulations.
9 Technical data
9.1 General
Sizes in cm:
NOTICE
The chemical protective suits can be disposed of
thermally or on waste dumps. The type of disposal
depends on the contamination.
i
i
Suit
size
Height Chest
measurement Waist
measurement
S 150-165 80-118 72-106
M 160-175 80-118 72-106
L 170-185 80-118 72-106
XL 180-200 104-124 95-110
XXL 195-210 104-124 95-110
Weight:
Suit size L,
with boots size 45,
without accessories
approx. 6.8 kg
Suit size L,
with boots size 45,
with accessories
approx. 8.0 kg
Suit size L,
with socks,
without accessories
approx. 4.3 kg
Material:
Chemical protective
suit
Umex
Visor Special polyvinyl chloride
Gloves FKM or
FKM/Butyl or
Butyl or
Laminate: HPPE or
Para-Aramid or
Para-Aramid
Safety boots Nitrile-P
black, FPA-CR safety boots with plastic
sole, cut and fire resistant, textile lining
inside, sizes see Chapter 11 on Page 36
PVC:
yellow, black grip sole, sizes see
Chapter 11 on Page 36
Colours:
Outside/inside red/red
Temperatures:
During use -40 °C to +60 °C1
For short-term exposure, lower
temperatures (up to -80 °C) are possible
and have been tested by Dräger for the
material Umex, but not as part of the
prototype tests.
Observe operating temperatures of the
respiratory protective equipment!
1 tested by Dräger
During storage -5 °C to +25 °C

32 Dräger CPS 6900
Technical data
9.2 Resistance to penetration of infectious
agents
9.3 Resistance of the suit material
Test Result Category1
1 according to EN 14126:2003+AC:2005
Resistance to
contaminating liquids under
hydrostatic pressure
(with the Phi-X174
bacteriophage)
hydrostatic
pressure:
20 kPa
6
Test Result Class1
1 according to EN 943-1:2015
Abrasion resistance >2000 cycles 6
Flex-cracking resistance >100000 cycles 6
Flex-cracking resistance at
-30 °C2
2 according to EN 14126:2003+AC:2005
>4000 cycles 6
Tear resistance 57 N 3
Bursting strength 643 kPa 5
Puncture resistance >50 N 33
3 according to EN 1073-1:2016+A1:2018 and EN 1073-2:2002:
Class 2
Resistance to flame
penetration
self-extinguishing fulfilled
Seam strength >500 N 6
Tensile strength >1000 N 6

Technical data
Dräger CPS 6900 33
9.4 Resistance to chemical permeation
according to EN 943-1:2015
For European approval, the tests against the concentrated
chemicals listed below took place by means of complete
wetting/coverage of the test samples.
The classification for testing the resistance to the permeation
of chemicals is given in accordance with EN 943-1:2015 as
follows:
Class 1: >10 minutes
Class 2: >30 minutes
Class 3: >60 minutes
Class 4: >120 minutes
Class 5: >240 minutes
Class 6: >480 minutes
Umex Fastener
system Seams Visor Visor
connection
Test chemicals Class Class Class Class Class
Ammonia, CAS-No. 7664-41-
7
63466
Chlorine, CAS-No.7782-50-5 6 3 3 6 6
Hydrogen chloride1, CAS-No.
747-01-06
42466
n-Heptane1,CAS-No.142-82-5 62666
Caustic soda 40 %, CAS-No.
1310-73-2
66666
Sulphuric acid 96 %1, CAS-
No. 7664-93-9
23363
1 The suit is not suitable for continuous exposure to this chemical
Butyl glove FKM glove FKM/butyl
glove Foil glove
combination1Safety boots
(PVC) Safety boots
(Nitril)
Test chemicals Class Class Class Class Class Class
Ammonia, CAS-No. 7664-41-
7
6 6 6 6 6 6
Chlorine, CAS-No.7782-50-5 3 6 6 6 6 6
Hydrogen chloride2, CAS-No.
747-01-06
6 6 6 6 6 6
n-Heptane2, CAS-No. 142-82-
5
1 6 6 6 4 6
Caustic soda 40 %, CAS-No.
1310-73-2
6 6 6 6 6 6
Sulphuric acid 96 %2, CAS-
No. 7664-93-9
2 6 6 6 6 6
1 Laminate/Tricotril glove (Barrier and Tricotril glove)
2 The suit is not suitable for continuous exposure to this chemical

34 Dräger CPS 6900
Technical data
9.5 Resistance to chemical permeation
according to ISO 16 602:2007
The class divisions for the chemical permeation resistance
tests are as follows according to ISO 16 602:2007:
Class 1: ≥10 minutes
Class 2 ≥30 minutes
Class 3 ≥60 minutes
Class 4 ≥120 minutes
NOTICE
According to ISO 16 602:2007, table E.1, class 4 is the
highest class that can be achieved with the values
determined.
i
i
Umex Fastener
system Seams Visor Visor
connection
Test chemicals Class Class Class Class Class
Ammonia, CAS-No. 7664-41-
7
43444
Chlorine, CAS-No.7782-50-5 4 3 3 4 4
Hydrogen chloride1CAS-No.
747-01-06
42444
n-Heptane1CAS-No. 142-82-5 42444
Caustic soda 40 %, CAS-No.
1310-73-2
44444
Sulphuric acid 96 %1, CAS-
No. 7664-93-9
23343
1 This suit is not suitable for continuous contact with this chemical
Butyl glove FKM glove FKM/butyl
glove
Foil glove
combination 1
Safety boots
(PVC) Safety boots
(Nitril)
Test chemicals Class Class Class Class Class Class
Ammonia, CAS-No. 7664-41-
7
4 4 4 4 4 4
Chlorine, CAS-No.7782-50-5 3 4 4 4 4 4
Hydrogen chloride2, CAS-No.
747-01-06
4 4 4 4 4 4
n-Heptane2 CAS-No. 142-82-
5
1 4 4 4 4 4
Caustic soda 40 %, CAS-No.
1310-73-2
4 4 4 4 4 4
Sulphuric acid 96 %2, CAS-
No. 7664-93-9
2 4 4 4 4 4
1 Laminate/Tricotril glove (Barrier and Tricotril glove)
2 This suit is not suitable for continuous contact with this chemical

Test protocol
Dräger CPS 6900 35
10 Test protocol
Date of manufacture1:
SignatureMaintenance/
repair date
Faults
detected
Manufacturer number1:
Duration of contact
with chemicals
(in minutes)
Exposed suit
parts
(head, arms, legs, ...)
Type1:
Protective suit came into contact
with
(material name, CAS no. UN no.)
Usage
date
1 See the rating plate on the inner pocket in the chemical protective suit.

36 Dräger CPS 6900
Order list
11 Order list
Name and description Order
number
Dräger CPS 6900 R 29 410
Safety boot for wearing over suit:
Nitril-P, size 43 R 56 863
Nitril-P, size 44 R 56 864
Nitril-P, size 45 R 56 865
Nitril-P, size 46/47 R 56 866
Nitril-P, size 48 R 56 867
Nitril-P, size 49/50 R 56 868
PVC, size 43 R 52 653
PVC, size 44 R 55 474
PVC, size 45 R 55 477
PVC, size 46 R 52 656
PVC, size 47/48 R 55 413
Safety boot for fitting on suit:
Nitril-P, size 43, shortened R 58 221
Nitril-P, size 44, shortened R 58 222
Nitril-P, size 45, shortened R 58 223
Nitril-P, size 46/47, shortened R 58 224
Nitril-P, size 48, shortened R 58 225
Nitril-P, size 49/50, shortened R 58 226
PVC, size 43, shortened R 62 001
PVC, size 44, shortened R 62 002
PVC, size 45, shortened R 62 003
PVC, size 46, shortened R 62 004
PVC, size 47/48, shortened R 62 005
Gloves:
Butyl, size 9 R 55 538
Butyl, size 10 R 53 531
Butyl, size 11 R 53 560
FKM/Butyl, size 9 R 55 762
FKM/Butyl, size 10 R 55 531
FKM/Butyl, size 11 R 55 761
FKM, size 9 R 55 537
FKM, size 10 R 53 776
FKM, size 11 R 53 554
Overgloves:
Laminate + Tricotril on support ring, size 10 R 63 003
Laminate + Tricotril on support ring, size 11 R 63 004
Overglove Tricotril, size 10 R 55 968
Overglove Tricotril, size 11 R 55 966
Overglove K-MEX-Gigant, size 14 R 55 969
Glove and boot accessories:
Cotton gloves, pair R 50 972
Gastight arm cuff R 52 648
Rubber ring for overgloves
(set of 2 required)
R 51 358
Reflective strips (set of 2 required) R 58 218
Support ring R 51 265
Oversocks R 61 018
Air supply:
Regulating valve PT 120 L R 55 509
Regulating valve PT 120 L - Stäubli R 58 059
Air-connect R 58 075
Air-connect - Stäubli R 58 235
Air supply strap set S, M R 58 901
Air supply straps set L, XL, XXL R 58 903
ASV 33 54 568
ASV for PSS 7000 33 57 007
Lung demand valve adapter R 58 281
Y-piece R 55 507
Bracket:
D-connect R 58 080
Waist belt AL 01 211
Manometer mount R 58 078
Crotch strap R 58 085
Transport and storage:
CPS storage and transportation bag R 58 152
Transport case T 51 525
Hanger (bell-shaped) R 33 299
Hanger (T-shaped) R 54 746
Flat bag for hood and boots 87 10 071
Name and description Order
number

Order list
Dräger CPS 6900 37
Test equipment and accessories:
Porta Control 3000 test unit R 62 520
Cleaning and disinfection:
Washing bag 65 70 003
Support disc R 58 157
Grease stick, set of 2 R 27 494
"klar-pilot" anti-fogging gel R 52 560
Anti-fogging gel "klar-pilot" Comfort R 56 542
Eltra (20 kg) 79 04 074
Maintenance and service:
Adhesive set (PU/PVC adhesive) R 58 304
Boot connection set R 25 264
Sealing compound for boot connection R 55 272
Backpack pad R 57 860
Suit valve, complete R 58 625
Valve disc R 58 239
Scratch proof visor (10 units) R 57 859
Antifog visor (1 unit) R 57 v858
Technical Manual On request
Operational Manual On request
Name and description Order
number

38 Dräger CPS 6900
Sommaire
Sommaire
1 Informations relatitves à la sécurité . . . . . . . . . .39
2 Conventions dans ce document . . . . . . . . . . . . . 39
3 Description . . . . . . . . . . . . . . . . . . . . . . . . . . . . . .39
3.1 Domaine d'application . . . . . . . . . . . . . . . . . . . . . . 40
3.2 Limitation du champ d'application . . . . . . . . . . . . . .40
3.3 Homologations . . . . . . . . . . . . . . . . . . . . . . . . . . . .40
3.4 Équipement de protection individuelle testé . . . . . .40
3.5 Marquage des types . . . . . . . . . . . . . . . . . . . . . . . . 41
4 Utilisation . . . . . . . . . . . . . . . . . . . . . . . . . . . . . . .41
4.1 Conditions d'utilisation . . . . . . . . . . . . . . . . . . . . . .41
4.2 Informations sur la manipulation
du système de fermeture . . . . . . . . . . . . . . . . . . . .41
4.3 Travaux préparatoires relatifs à l'utilisation . . . . . .41
4.4 À prendre en compte pendant l'utilisation . . . . . . . .42
4.5 Après l'utilisation . . . . . . . . . . . . . . . . . . . . . . . . . . .42
5 Dépannage . . . . . . . . . . . . . . . . . . . . . . . . . . . . . .43
6 Maintenance . . . . . . . . . . . . . . . . . . . . . . . . . . . . .44
6.1 Intervalles de maintenance . . . . . . . . . . . . . . . . . . . 44
6.2 Contrôle visuel de la combinaison
de protection chimique . . . . . . . . . . . . . . . . . . . . . .44
6.3 Nettoyage et désinfection
de la combinaison de protection chimique . . . . . . .44
6.4 Entretien du système de fermeture . . . . . . . . . . . .46
6.5 Contrôle de l'étanchéité
de la combinaison de protection chimique . . . . . . .46
6.6 Vérification de l'étanchéité
des soupapes de la combinaison . . . . . . . . . . . . . . 46
6.7 Travaux de maintenance particuliers . . . . . . . . . . . 47
7 Stockage . . . . . . . . . . . . . . . . . . . . . . . . . . . . . . . . 48
7.1 Conditions de stockage . . . . . . . . . . . . . . . . . . . . . 48
7.2 Préparation du stockage . . . . . . . . . . . . . . . . . . . . .48
7.3 Stockage de la combinaison
de protection chimique . . . . . . . . . . . . . . . . . . . . . .48
8 Elimination . . . . . . . . . . . . . . . . . . . . . . . . . . . . . .48
8.1 Déclassement . . . . . . . . . . . . . . . . . . . . . . . . . . . . .48
8.2 Durée de vie . . . . . . . . . . . . . . . . . . . . . . . . . . . . . . 49
8.3 Remarques relatives à l'élimination . . . . . . . . . . . .49
9 Caractéristiques techniques . . . . . . . . . . . . . . . .49
9.1 Généralités . . . . . . . . . . . . . . . . . . . . . . . . . . . . . . . 49
9.2 Résistance à la pénétration
des agents infectieux . . . . . . . . . . . . . . . . . . . . . . .49
9.3 Résistance du matériau du vêtement . . . . . . . . . . .49
9.4 Résistance à la perméation des produits
chimiques conformément à EN 934-1:2015 . . . . . .50
9.5 Résistance à la perméation des produits
chimiques conformément à ISO 16 602:2007 . . . . 51
10 Procès-verbal d'essai . . . . . . . . . . . . . . . . . . . . . .52
11 Liste de commande . . . . . . . . . . . . . . . . . . . . . . . 53

Informations relatitves à la sécurité
Dräger CPS 6900 39
1 Informations relatitves à la
sécurité
Avant d'utiliser le produit, veuillez lire attentivement la
notice d'utilisation et celle des produits associés.
Respecter rigoureusement la notice d'utilisation.
L'utilisateur doit comprendre entièrement les instructions et
les suivre scrupuleusement. Respecter rigoureusement le
domaine d'application indiqué.
Ne pas jeter la notice d'utilisation. Veillez à ce que les
utilisateurs conservent et utilisent ce produit de manière
adéquate.
Seul un personnel compétent et muni d'une formation
adéquate est autorisé à utiliser ce produit.
Respecter les directives locales et nationales relatives à ce
produit.
Seul le personnel compétent et muni de la formation
adéquate est autorisé à contrôler, réparer et entretenir le
produit. Dräger recommande de conclure un contrat de
service qui pourra se charger de tous les travaux de
maintenance.
Pour les travaux d'entretien, n'utiliser que des pièces et
des accessoires originaux Dräger. Sans quoi, le
fonctionnement correct du produit pourrait être compromis.
Ne pas utiliser des produits défectueux ou incomplets. Ne
pas effectuer de modifications sur le produit.
Informer Dräger en cas de défaut ou de panne sur le
produit ou des composants du produit.
2 Conventions dans ce document
Définition des symboles d'avertissement
Les symboles d'avertissement suivants ont pour fonction de
caractériser et souligner les textes d'avertissement qui
requièrent l'attention accrue de l'utilisateur. Les symboles
d'avertissement sont définis comme suit :
Noms de marques
Les noms de marques suivants sont utilisés dans ce
document :
FPS®, HPS®, Panorama Nova®, PAS®, PSS® et X-plore®
sont des marques déposées de Dräger.
Eltra® et ECOLAB® sont des marques déposées d'Ecolab.
K-MEX® et Tricotril® sont des marques déposées de
KCL GmbH.
Barrier® est une marque déposée d'Ansell
Cryo-Industrial® est une marque déposée de
Tempshield, Inc.
Abréviations
FKM = caoutchouc fluoré
PVC = chlorure de polyvinyle
3 Description
Dräger CPS 6900 sont des combinaisons de protection
conformes à EN 943-1:2015 (type 1a). Ils sont utilisables
plusieurs fois.
Un appareil respiratoire isolant est nécessaire pour
l'alimentation en air respirable. L'appareil respiratoire isolant
ARI, le masque complet et le casque de protection se portent
sous la combinaison de protection chimique. Combinaisons
possibles voir le chap. 3.4 à la page 40.
La combinaison de protection chimique est équipée de gants
remplaçables. Les gants suivants sont disponibles :
Gants FKM, le cas échéant avec sur-gant Tricotril
Gants FKM, le cas échéant avec sur-gant K-MEX-Gigant
Gants butyle, le cas échéant avec sur-gant Tricotril
Gants butyle, le cas échéant avec sur-gant K-MEX-Gigant
Gants FKM/butyle, le cas échéant avec sur-gant Tricotril
Gants FKM/butyle, le cas échéant avec sur-gant
K-MEX-Gigant
Les combinaisons suivantes de gants laminés sont
disponibles :
Combinaison de gants laminés/Tricotril
La combinaison de protection chimique peut être équipée de
chaussettes conçues dans le même matériau ou de bottes.
Les chaussettes n'offrent pas de protection suffisante contre
les contraintes mécaniques. L'utilisateur doit donc porter des
bottes de sécurité adaptées, conformes à la norme
EN ISO 20345.
Un rabat empêche la pénétration de substances entre les
chaussettes et les bottes de sécurité.
Un oculaire antirayure est prévu sur l'extérieur de la
combinaison.
La combinaison de protection chimique est équipée d'une
poche pour les radios et d'une boucle pour le bouton Push-to-
Talk. Sur la poche figure l'identifiant.
AVERTISSEMENT
Signale une situation potentiellement dangereuse qui,
si elle n'est pas évitée, peut constituer un danger de
mort ou d'accident grave.
ATTENTION
Signale une situation potentiellement dangereuse qui,
si elle n'est pas évitée, peut constituer des dommages
physiques ou matériels sur le produit ou
l'environnement. Peut également servir
d'avertissement en cas d'utilisation non conforme.
REMARQUE
Informations complémentaires sur l'utilisation du
produit.
!
!
i
i
REMARQUE
L'usage des sur-gants n'est pas obligatoire. Ils offrent
néanmoins une protection renforcée contre les
coupures.
i
i

40 Dräger CPS 6900
Description
Les accessoires suivants peuvent être installés en option sur
la combinaison de protection chimique :
Soupape de régulation PT 120 L ou Air-Connect :
passe cloison qui permet de raccorder des sources d'air
respirable externes avec et sans système de ventilation à
l'intérieur de la combinaison
D-Connect :
support pour appareils supplémentaires (par ex. caméra
de thermique, appareils de mesure, sangles de sauvetage)
qui peuvent être fixés sur la hanche gauche ou droite.
Sangle d'entrejambe :
pour ajuster la combinaison en longueur
Oculaire anti-buée dans la combinaison :
empêche la formation de buée sur l'oculaire.
Support de manomètre sous l'oculaire :
pour fixer le manomètre de l'appareil respiratoire isolant
ARI dans le champ de vision de l'utilisateur
Numéros d'identification d'utilisation :
pour identifier rapidement l'équipe qui utilise le matériel
Un marquage avec un feutre résistant à l'eau est possible
mais non recommandé.
3.1 Domaine d'application
La combinaison de protection chimique protège contre les
produits chimiques gazeux, liquides, aérosols et solides et les
agents infectieux. Elle protège également contre l'irradiation
corporelle des particules radioactives.
3.2 Limitation du champ d'application
Pour certains produits chimiques, des durées d'utilisation
limites s'appliquent selon la concentration, l'état de la matière
et les conditions environnementales.
Éviter la chaleur et les flammes nues. La combinaison de
protection chimique ne se prête pas à la lutte contre l'incendie.
Pour en savoir plus sur les résistances mécaniques et
chimiques et la résistance aux chocs thermiques, voir chap. 9
à la page 49
La combinaison de protection chimique n'offre pas de
protection contre le rayonnement de particules radioactives ou
les dommages dus au rayonnement.
La combinaison de protection chimique ne doit pas être utilisée
si elle est endommagée ou usée.
3.3 Homologations
La combinaison de protection chimique est homologuée
conforme à :
EN 943-1:2015 (type 1a)
EN 14126:2003+AC:2005:1a-B
EN 1073-1:2016+A1:2018:IL: classe 4, facteur de
protection nominal 20000
(uniquement Dräger CPS 6900 avec unité de ventilation)
EN 1073-2:2002:IL : classe 3, facteur de protection
nominal 500
(uniquement Dräger CPS 6900 sans unité de ventilation)
EN 14593-1:2018
(uniquement Dräger CPS 6900 avec unité de ventilation)
EN 14594:2018
ISO 16602:2007+Amd 1:2012
SOLAS II-2, Reg. 19, consolidated edition 2004
TP TC 019/2011
(EU) 2016/425
Regulation 2016/425 on personal protective equipment, as
amended to apply in GB
Les bottes de sécurité en nitrile sont homologuées conformes à :
EN ISO 20345:2011
EN 15090:2012
Les bottes de sécurité en PVC sont homologuées conformes à :
EN ISO 20345:2011
Déclarations de conformité :
voir www.draeger.com/product-certificates
3.4 Équipement de protection individuelle
testé
3.4.1 Pièces faciales
Masques complets Dräger FPS 7000 RA/PE/P/ESA
Masques complets Panorama Nova RA/PE/P/ESA
Masques complets f2 PA-RA/PE
Combinaisons masque-casque Dräger FPS 7000 H61/H62
Combinaisons masque-casque Panorama Nova S-RA/
Supra, Panorama Nova S-PE/Supra et Panorama Nova S-
HE-EPDM-PC-RA
Combinaisons masque-casque f2 S-PA-PE/Supra
3.4.2 Appareil respiratoire isolant ARI
PA 80/90 UP
PA 94 UP
PA 94 D plus
PAS Lite1
PSS 100D
PSS 1001
PSS 30001
PSS 40001
PSS 50001
PSS 70001
3.4.3 Soupapes à la demande
toutes les soupapes à la demande de la série PSS
3.4.4 Casques de protection
Dräger HPS 4000 Serie
Dräger HPS 6000 Serie
Dräger HPS 7000 Serie
Schuberth F110
Schuberth F210
Dräger F1S12
Dräger F1SA12
ATTENTION
Seules les associations d'équipements de protection
suivantes ont été testées et sont homologuées.
Si d'autres combinaisons sont nécessaires, l'exploitant
doit vérifier si elles peuvent être utilisées.
1 Egalement associé à un ASV et une pièce en Y
!

Utilisation
Dräger CPS 6900 41
Heros I
Heros II
3.5 Marquage des types
Le marquage des types figure sur la poche de la combinaison
de protection chimique.
4 Utilisation
4.1 Conditions d'utilisation
4.2 Informations sur la manipulation du
système de fermeture
Le système de fermeture a été spécialement conçu pour les
combinaisons de protection chimique. Son usage est un peu
plus difficile en raison de la présence de joints
supplémentaires par rapport aux fermetures éclair des
vêtements normaux. Pour éviter la formation de plis, le porteur
de la combinaison doit étirer le système de fermeture en
saisissant la cagoule tandis qu'une seconde personne tire vers
le bas des deux mains la jambe de pantalon avec le système
de fermeture. Le porteur de la combinaison de protection doit
se tenir droit pendant l'ouverture et la fermeture du système de
fermeture.
4.2.1 Ouverture du système de fermeture
Ouvrir complètement le système de fermeture.
Toujours tirer dans le sens de la chaîne de fermeture ; ne
jamais tirer de travers !
Ne pas forcer. Les maillons de la chaîne pourraient se
déformer !
En cas de grippage, tirer la fermeture à glissière en arrière
puis à nouveau en avant.
4.2.2 Fermeture du système de fermeture
Lors de la fermeture du système, éviter les tensions
transversales sur la glissière.
Rapprocher les chaînes de fermeture avec la main.
La glissière sera alors plus facile à déplacer.
Aucun corps étranger, par ex. une chemise, une veste, des
fils, etc., ne doit se trouver entre les maillons de la chaîne
pendant la fermeture.
4.3 Travaux préparatoires relatifs à
l'utilisation
4.3.1 Préparation de la combinaison de protection
chimique
1. Vérifier l'étanchéité avant la première utilisation afin
d'identifier les éventuels dommages dus au transport.
Observer les intervalles de maintenance (voir le chap. 6.1
à la page 44).
2. Poser la combinaison de protection chimique à plat sur le
sol et procéder à un examen visuel (voir le chap. 6.2 à la
page 44)
3. Le cas échéant, contrôler le fonctionnement de l'unité de
ventilation et le raccordement à l'appareil respiratoire
isolant ARI.
4. Appliquer le gel anti-buée "klar-pilot" sur l'extérieur de
l'oculaire du masque complet. Pour les visières enduites de
masque, utiliser le spray « klar-pilot » Comfort. Si la
combinaison n'intègre pas d'oculaire anti-buée, traiter
également l'intérieur de l'oculaire.
Attention ! Observer la notice d'utilisation.
Vêtements de protection contre les
produits chimiques gazeux, liquides,
aérosols et solides (selon EN 943-1:2015,
type 1a)
Combinaison de protection contre les
agents infectieux (selon EN 14126:2003+
AC:2005, type 1a-B)
Vêtements de protection contre la
contamination radioactive par des
particules solides (selon EN 1073-
1:2016+A1:2018 et EN 1073-2:2002
(classes, voir 3.3))
Affectation de la taille, du tour de poitrine et
du tour de taille à la taille de la combinaison
de protection, (voir le chap. 9 à la page 49).
AVERTISSEMENT
La combinaison de protection chimique doit être
utilisée conformément aux normes et directives
nationales en vigueur.
L'impact environnemental doit être défini avant
l'utilisation car l'adéquation de la combinaison de
protection chimique doit être définie avant son
utilisation. La combinaison de protection chimique doit
être adaptée à l'utilisation prévue. L'utilisateur doit
tenir compte des exigences nationales et autres
exigences en vigueur s'appliquant pour l'utilisation
d'un équipement de protection individuel.
La non-observation de cet avertissement peut
entraîner la mort ou des blessures graves.
!
ATTENTION
Pour éviter d'endommager le système de fermeture,
les deux moitiés de chaîne doivent être parallèles et
libres. Ne pas forcer l'ouverture ni la fermeture et ne
pas exercer de mouvements de traction saccadés.
Les systèmes de fermeture insuffisamment graissés
sont difficiles à manipuler. Le défaut de graissage peut
endommager le système de fermeture. Graisser le
système de fermeture à l'aide d'un crayon lubrifiant
Dräger.
REMARQUE
Dräger recommande de conserver les sacs plats
d'emballage de la combinaison de protection chimique
car ils serviront de nouveau ultérieurement pour son
rangement.
AVERTISSEMENT
Ne pas utiliser la combinaison de protection chimique si
elle est endommagée. Un danger de mort existe sinon.
!
i
i
!

42 Dräger CPS 6900
Utilisation
4.3.2 Enfilage de la combinaison de protection chimique
1. Porter des vêtements sous la combinaison (vêtements de
travail transportant l'humidité, gants en coton).
2. Mettre l'appareil respiratoire à air comprimé et le masque
complet.
3. Installer le casque de protection et la combinaison
masque-casque.
4. Contrôler le bon fonctionnement de l'appareil respiratoire à
air comprimé, du masque complet et de l'association
masque-casque conformément aux instructions des
notices d'utilisation correspondantes.
5. Si la combinaison de protection chimique est équipée de
chaussettes étanche aux gaz :
a. Sans chaussures, enfiler d'abord la jambe de pantalon
de droite, puis celle de gauche.
b. Enfiler les bottes de sécurité.
6. Si la combinaison de protection chimique est équipée de
bottes de sécurité étanche aux gaz, sans chaussures,
enfiler d'abord la jambe de pantalon de droite et la botte de
sécurité, puis celle de gauche et la botte de sécurité.
7. Remonter la combinaison de protection chimique jusqu'à la
taille.
8. Si la combinaison de protection chimique est équipée
d'une unité de ventilation :
a. raccorder l'alimentation en air à l'intérieur à la
combinaison de protection chimique.
b. fermer la ceinture intégrée.
9. Si la combinaison de protection chimique est équipée d'un
D-connect, fermer la ceinture intégrée.
10. Si la combinaison de protection chimique est équipée
d'une bretelle de jambe, accrocher le crochet à la ceinture
de l'appareil respiratoire isolant ARI. Tirer sur l'extrémité de
la sangle pour ajuster sa longueur.
11. Mettre la cagoule sur la tête et insérer le bras droit dans la
manche et le gant droits. Faire passer le sac à dos de la
combinaison de protection chimique sur l'appareil de
protection respiratoire. Insérer le bras gauche dans la
manche et le gant gauches.
12. Raccorder la soupape à la demande au masque complet.
13. Refermer le système de fermeture. Toujours tirer dans le
sens de la chaîne de fermeture. Ne pas forcer !
14. Si nécessaire, monter les surgants :
a. Passer le surgant K-MEX-Gigant au-dessus du
bracelet et le sécuriser avec l'anneau en caoutchouc
correspondant.
b. Passer le sur-gant Tricotril au-dessus du bracelet et le
sécuriser avec l'anneau en caoutchouc correspondant.
4.4 À prendre en compte pendant l'utilisation
Ne jamais intervenir seul !
Respecter la durée d'utilisation, les limites d'utilisation et la
réglementation nationale en vigueur. La durée d’utilisation
maximale dépend notamment de l'appareil de protection
respiratoire utilisé et des conditions d'utilisation.
Si aucun appareil à adduction à air comprimé n'est
raccordé avec les combinaisons à unité de ventilation,
fermer les raccords avec un capuchon de protection pour
les protéger contre les impuretés.
En cas de manipulation de matières très froides, porter des
sur-gants (par ex. Cryo-Industrial Gloves de Tempshield,
Inc.) et des vêtements sous la combinaison.1
En cas de formation de buée ou de gel à l'intérieur de
l'oculaire : retirer une main de la manche et essuyer
l'oculaire par ex. à l'aide d'un chiffon. Le chiffon peut être
rangé dans la poche intérieure.
En cas de danger, quitter immédiatement la zone
contaminée. N'ouvrir le système de fermeture qu'après
avoir gagné une zone non contaminée.
4.5 Après l'utilisation
4.5.1 Nettoyage préalable de la combinaison de
protection chimique
1. Quitter la zone contaminée et demander à un assistant de
procéder au nettoyage préalable de la combinaison de
protection chimique. L'assistant doit porter des vêtements
de protection et éventuellement une protection respiratoire.
Pour le nettoyage préalable, Dräger recommande d'utiliser
une grande quantité d'eau mélangée à un produit de
nettoyage. Ceci permet d'éliminer correctement la plupart
des produits chimiques (acides, alcalins, substances
organiques et non organiques).
2. Nettoyer minutieusement la combinaison de protection
chimique et suffisamment longtemps. Éviter de répandre
des produits chimiques.
REMARQUE
L’enfilement de la combinaison exige l’assistance
d’une deuxième personne.
REMARQUE
Dräger recommande de coincer les jambes du
pantalon porté sous la combinaison dans les
chaussettes pour éviter qu'il ne remonte.
Pour éviter que les gants en coton ne glissent, les fixer
aux poignets à l'aide de ruban adhésif.
i
i
i
i
ATTENTION
Une accumulation de chaleur dans la combinaison de
protection chimique peut provoquer un malaise
circulatoire. Pour cette raison, enfiler un gilet de
refroidissement ou utiliser un système de ventilation
adapté.
1 ne fait pas partie des épreuves de test UE
AVERTISSEMENT
Ne pas toucher les pièces contaminées sans
vêtements de protection. Éviter de contaminer la partie
intérieure propre de la combinaison de protection.
Le non-respect des mesures de prévention indiquées
ici constitue un danger de mort ou de blessure grave.
ATTENTION
Si le nettoyage préalable sur site est impossible,
fermer impérativement la combinaison de protection
chimique après l'avoir enlevée pour empêcher la
pénétration de produits chimiques dans la
combinaison.
!
!
!

Dépannage
Dräger CPS 6900 43
3. En cas de contamination avec des matières dangereuses,
éliminer les eaux usées dans le respect de la législation en
vigueur concernant l'élimination des déchets.
4. Si nécessaire, effectuer la décontamination en plusieurs
étapes. De plus amples informations sur la
décontamination1 sont disponibles auprès de Dräger.
4.5.2 Retrait de la combinaison de protection chimique
1. Ouvrir le système de fermeture.
Toujours tirer dans le sens de la chaîne de fermeture. Ne
pas forcer.
2. Sortir le bras gauche de la manche.
3. Si la combinaison de protection chimique est équipée
d'une unité de ventilation :
a. ouvrir la ceinture intégrée.
b. Demander à un assistant de débrancher l'alimentation
en air.
4. Si la combinaison de protection chimique est équipée d'un
D-connect, ouvrir la ceinture intégrée.
5. Si la combinaison de protection chimique est équipée
d'une bretelle de jambe, décrocher la sangle de la ceinture
de l'appareil respiratoire isolant ARI.
6. Sortir le bras droit de la manche.
7. Pour retirer simplement la cagoule, s'accroupir
légèrement.
8. Enlever la combinaison de protection chimique en
empêchant les produits chimiques ou nettoyants de
pénétrer à l'intérieur.
9. Sortir des bottes et des jambes du pantalon.
10. Enlever le casque de protection, l'appareil respiratoire
isolant, le masque complet et les gants en coton.
5 Dépannage
1 non compris dans l'examen CE de type
AVERTISSEMENT
Enlever la combinaison de protection chimique
uniquement en zone non contaminée.
REMARQUE
Dräger recommande de consigner l'utilisation (voir le
chap. 10 à la page 52).
!
i
i
Erreur Cause Solution1
1 ne fait pas partie des épreuves de test UE
Le système de
fermeture est
bloqué
Corps étrangers
dans la chaîne de
fermeture
Nettoyer la chaîne
de fermeture,
éliminer les corps
étrangers
Frottement
important
Graisser la chaîne
de fermeture avec
le crayon lubrifiant
Combinaison de
protection
chimique
non étanche
Système de
fermeture ouvert
Fermer
entièrement le
système de
fermeture
Matériau du
vêtement
endommagé
Le raccommoder
avec le nécessaire
de réparation.
Étanchéifier de
nouveau.
Bottes de sécurité
ou gants
endommagés,
jointure non
étanche
Remplacer ou
étanchéifier.
Étanchéifier de
nouveau.
Disque ou siège
de la soupape
encrassé ou
défectueux
Nettoyer ou
remplacer.
Étanchéifier de
nouveau.
Oculaire ou
jointure non
étanche
Remplacer ou
étanchéifier.
Étanchéifier de
nouveau.
La combinaison de
protection
chimique n'est pas
ventilée
Le disque de
soupape de la
combinaison colle
Nettoyer ou
remplacer.
Étanchéifier de
nouveau.
La bande auto-
agrippante se
détache
La bande auto-
agrippante est
collée. Le
nettoyage et la
décontamination
peuvent la
détacher.
Recoller la bande
auto-agrippante.
Étanchéifier de
nouveau.

44 Dräger CPS 6900
Maintenance
6 Maintenance
6.1 Intervalles de maintenance
Les intervalles fournis sont recommandés par Dräger. Si
nécessaire, différentes directives nationales doivent être
respectées.
Pour les travaux de maintenance concernant le masque
complet, l'unité de ventilation, le dispositif de commutation
automatique et l'appareil respiratoire isolant ARI, voir les
notices d'utilisation correspondantes.
6.2 Contrôle visuel de la combinaison de
protection chimique
Les vérifications suivantes sont obligatoires. En cas
d'anomalie, réparer ou éliminer la combinaison de protection
chimique.
L'extérieur de la combinaison de protection chimique ne
doit pas présenter de trous, de déchirures ou de traces
d'usure.
La couture ne doit pas se décrocher ou se décoller.
L'oculaire doit être propre.
Les pièces suivantes ne doivent pas être endommagées :
a. Matériau de la combinaison
b. Gants
c. Chaussettes
d. Oculaire
e. Joint de l'oculaire
f. Système de fermeture
Les soupapes de la combinaison doivent être libres et en
bon état.
Le matériau de la combinaison ne doit pas présenter de
traces d'usure. Le revêtement ne doit pas se décoller du
tissu.
6.3 Nettoyage et désinfection de la
combinaison de protection chimique
6.3.1 Nettoyage et désinfection manuelles
1. Retirer le rembourrage du sac à dos et le nettoyer
séparément à l'eau claire et tiède.
2. Démonter l'unité de ventilation, D-connect et l'oculaire anti-
buée (le cas échéant), nettoyer et désinfecter séparément.
3. Détacher les capuchons de protection et les disques de
soupape des combinaisons.
4. Démonter les gants si nécessaire :
Si la combinaison de protection chimique est équipée
d'une combinaison de gants, cette dernière doit être
démontée et être mise au rebut.
Si des sur-gants Tricotril sont disponibles, il convient
alors de les retirer, mais sans les laver. Les sur-gants
Tricotril encrassés doivent être remplacés.
Si des sur-gants K-MEX-Gigant sont disponibles, il
convient alors de les retirer et de les nettoyer
séparément.
Les gants FKM, FKM/butyle et butyle peuvent rester
montés pour le nettoyage manuel.
5. Nettoyer les disques séparément à l'eau claire et tiède.
6. Préparer une solution de nettoyage à base d'eau et d'un
produit de nettoyage.
7. Nettoyer la combinaison de protection chimique et tous les
composants réutilisables avec un chiffon doux et la
solution de nettoyage.
8. Rincer soigneusement toutes les pièces à l'eau du robinet.
9. Préparer un bain désinfectant à base d'eau et de produit
désinfectant.
10. Placer toutes les pièces devant être désinfectées dans le
bain désinfectant.
11. Rincer soigneusement toutes les pièces à l'eau du robinet.
12. Sécher toutes les pièces (voir le chap. 6.3.3 à la page 45).
Opérations à effectuer
avant la première
utilisation
après l'utilisation
après une
réparation
une fois par an
Contrôler l'état de la combinaison de
protection chimique
X X X1
1 S'applique aux combinaisons de protection chimique stockées
dans un véhicule sans sac de transport.
Pour les combinaisons de protection chimique stockées dans le
sac de transport correspondant, l'intervalle est de 2 ans.
Nettoyage et désinfection de la
combinaison de protection chimique
X
Entretien du système de fermeture X X X1
Contrôle de l'étanchéité de la
combinaison de protection chimique
XXXX1
Vérification de l'étanchéité des
soupapes de la combinaison
XXXX1
REMARQUE
Dräger recommande de consigner tous les travaux
d'entretien (voir le chap. 10 à la page 52).
i
i
ATTENTION
Risque de déterioration du matériau du vêtement !
Pour le nettoyage et la désinfection, ne pas utiliser de
solvant (par ex. acétone, alcool) ou de produit
nettoyant muni de particules polissantes. N'utiliser que
le procédé et les produits nettoyants et de désinfection
décrits ici. Tout autre produit, dosage et temps d'action
peut causer des dommages sur l'appareil.
Pour plus d'informations sur les produits de nettoyage
et de désinfection appropriés et leur spécification, voir
le document 9100081 à l'adresse www.draeger.com/
IFU.
ATTENTION
Risque de déterioration du matériau du vêtement !
Les propriétés anti-buée peuvent être détériorées lors
du nettoyage et de la désinfection. Ne pas immerger
l'oculaire anti-buée plus de 5 minutes dans le liquide.
AVERTISSEMENT
Risque de contamination, lorsqu'une combinaison de
gants n'est pas remplacée !
Il n'est pas garanti que le matériau puisse résister à un
nouveau contact avec des produits chimiques.
!
!
!

Maintenance
Dräger CPS 6900 45
6.3.2 Nettoyage et désinfection mécaniques
Les accessoires suivants sont nécessaires pour le nettoyage
mécanique :
Machine à laver industrielle Dräger CombiClean
ou équivalent
Produit nettoyant : Eltra
Pour de plus amples informations sur le dosage, voir
9021380
Sac de nettoyage
Rondelle d'appui
La machine à laver industrielle doit présenter les
caractéristiques suivantes :
Volume du tambour >130 litres
Diamètre du tambour >60 cm
Ouverture de porte >45 cm
Commande programmable
Régulation électronique de la température ±2 °C
Vitesse de rotation du tambour : max. 20 rotations/minute
(2 rotations lentes dans un sens, 18 secondes d'attente, 2
rotations lentes dans l'autre sens, 18 secondes d'attente)
Nettoyer et désinfecter la combinaison de protection chimique
en procédant comme suit :
1. Démonter l'oculaire anti-buée, l'unité de ventilation et D-
connect (le cas échéant), nettoyer et désinfecter
séparément.
Puis la rincer soigneusement à l'eau claire.
2. Détacher les capuchons de protection et les disques de
soupape des combinaisons.
3. Démonter les gants si nécessaire :
Si la combinaison de protection chimique est équipée
d'une combinaison de gants, cette dernière doit être
démontée et être mise au rebut.
Si des sur-gants Tricotril sont disponibles, il convient
alors de les retirer, mais sans les laver. Les sur-gants
Tricotril encrassés doivent être remplacés.
Si des sur-gants K-MEX-Gigant sont disponibles, il
convient alors de les retirer et de les nettoyer
séparément.
Démonter les gants FKM, FKM/butyle et butyle.
4. Nettoyer les disques de soupape séparément à l'eau claire
et tiède, puis les désinfecter.
5. Ouvrir complètement le système de fermeture de la
combinaison de protection chimique.
6. Étendre la combinaison de protection chimique sur une
surface de travail propre et éliminer les plis.
7. Insérer la rondelle d'appui dans la cagoule de telle sorte
que l'oculaire tienne solidement sur la rondelle d'appui et la
chevauche.
8. Tirer le sac de nettoyage sur la cagoule de telle sorte que
la mousse du sac repose sur l'oculaire et que le cadre en
corde du sac de nettoyage repose sur le bord inférieur de
l'oculaire. Serrer la corde et la nouer.
9. Rabattre les chaussettes ou les bottes de sécurité une fois
vers le haut. Éviter les rainures importantes.
10. Poser les manches au milieu de la poitrine. Éliminer les
plis.
11. Plier la cagoule avec le sac de nettoyage et la partie
supérieure de la combinaison de protection chimique de
telle sorte que l'oculaire repose sur les bottes de sécurité
enroulées. Éliminer les plis. Veiller à ce que l'oculaire ne se
déforme pas.
12. Introduire la combinaison de protection chimique dans la
machine à laver industrielle.
13. Démarrer le programme de lavage "combinaison de
protection chimique".
Respecter les paramètres suivants lors du lavage :
Température de l'eau pour le nettoyage et la désinfection :
62 °C ±2 °C
4 Rinçages à l'eau claire et froide
14. Sécher toutes les pièces (voir le chap. 6.3.3 à la page 45).
6.3.3 Séchage de la combinaison de protection
chimique
1. Évacuer le liquide résiduel de la combinaison avant le
séchage ou l'essuyer à l'aide d'une éponge.
2. Sécher minutieusement toutes les pièces intérieures et
extérieures.
La combinaison de protection chimique peut être séchée
par soufflage à l'air comprimé exempt d'huile ou à l'aide
d'un dispositif de séchage pour combinaison:
– Température : 40 °C maximum
– Durée : au moins 120 minutes
Éviter l'exposition directe à la chaleur ou durable aux
rayons du soleil.
ATTENTION
Risque de déterioration du matériau du vêtement !
Laisser le rembourrage du sac à dos (le cas échéant)
dans la combinaison de protection chimique, puisque
les éléments à l'intérieur de la combinaison de
protection chimique peuvent être endommagées par
les bandes auto-agrippantes.
Les propriétés anti-buée peuvent être détériorées lors
du nettoyage et de la désinfection. Ne pas immerger
l'oculaire anti-buée plus de 5 minutes dans le liquide.
AVERTISSEMENT
Risque de contamination, lorsqu'une combinaison de
gants n'est pas remplacée !
Il n'est pas garanti que le matériau puisse résister à un
nouveau contact avec des produits chimiques.
!
!
ATTENTION
Risque de déterioration du matériau du vêtement !
Pour éviter d'endommager la combinaison de
protection chimique, le tambour de lavage ne doit
bouger que s'il est rempli d'eau.
ATTENTION
Risque de déterioration du matériau du vêtement !
Pour éviter d'endommager la combinaison de
protection chimique, ne pas l'essorer.
Pour éviter la formation de moisissure, sécher
intégralement la combinaison de protection chimique.
!
!

46 Dräger CPS 6900
Maintenance
3. Remettre en place le rembourrage du sac à dos.
4. Contrôler visuellement la combinaison de protection
chimique, l'oculaire, les bottes de sécurité et les gants.
5. Installer l'oculaire anti-buée (le cas échéant).
6. Remonter l'unité de ventilation et D-connect (le cas
échéant).
6.4 Entretien du système de fermeture
1. Graisser correctement le système de fermeture après
chaque utilisation et chaque nettoyage et désinfection.
Utiliser uniquement le crayon lubrifiant Dräger.
2. Graisser suffisamment les maillons de la chaîne de
fermeture et la zone située sous les maillons parcourue par
la glissière.
6.5 Contrôle de l'étanchéité de la
combinaison de protection chimique
Ce contrôle concerne l'appareil de contrôle
Porta Control 3000. Il peut être réalisé avec d'autres appareils
mais les valeurs fournies doivent être respectées.
Effectuer le contrôle selon ISO 17491-1 méthode A.2 à
température ambiante constante (20 °C ±5 °C).
L'air comprimé utilisé doit satisfaire aux exigences de la norme
EN 12021.
Les accessoires de contrôle nécessaires sont indiqués dans la
liste de commande (voir la section 11 à la page 53).
6.5.1 Préparation du contrôle
1. Etanchéifier les raccords des combinaisons de protection
avec unités de ventilation.
2. Refermer le système de fermeture.
3. Déployer la combinaison de protection chimique sur une
surface propre et plane, dos face au ciel.
4. Protéger l'oculaire contre les rayures à l'aide d'un support
doux.
5. Déboutonner les bouchons de protection des deux
soupapes de la combinaison et retirer les disques.
6. Fixer un bouchon de contrôle sur l'une des valves de la
combinaison et raccorder l'appareil de contrôle via le tuyau
bleu.
7. Fixer l'autre bouchon de contrôle sur l'autre valve de la
combinaison.
8. S'assurer que les deux valves sont raccordées sur le tuyau
noir de l'appareil de contrôle.
9. Relier le bouchon de contrôle à l'alimentation en air
comprimé ((6 bar) via le tuyau noir.
10. Effectuer le contrôle (voir le chap. 6.5.2 à la page 46).
6.5.2 Réalisation du contrôle
1. Ouvrir la soupape de gonflage sur le tuyau noir et remplir
la combinaison de protection chimique jusqu'à ce que
l'appareil de contrôle affiche 17,5 mbar. Fermer la soupape
de gonflage.
2. Régler une durée de stabilisation de 10 minutes et
démarrer le chronomètre. Pendant cette durée, maintenir
la pression sur 17 mbar minimum pour avoir une
compensation de la pression et de la température. Si
nécessaire, faire l'appoint d'air.
3. Ouvrir la soupape de décharge. Baisser la pression sur
16,5 mbar. Fermer la soupape de décharge.
4. Régler une durée de contrôle de 6 minutes et démarrer le
chronomètre.
5. À l'issue de la durée de contrôle, relever la pression sur
l'appareil de contrôle.
Si la baisse de pression est inférieure ou égale à 3 mbar, la
combinaison de protection chimique est considérée comme
étanche. Démonter alors le système de contrôle et contrôler
les soupapes de la combinaison .
Si la baisse de pression est supérieure à 3 mbar :
1. Enduire de lessive les zones critiques (par ex.coutures,
raccords de bottes et de gants).
2. Marquer les zones non étanches.
3. Rincer la lessive et sécher minutieusement la combinaison
de protection chimique.
4. Purger et réparer la combinaison de protection chimique.
5. Répétez l'essai d'étanchéité.
La combinaison de protection peut être également expédiée à
Dräger qui procédera aux réparations nécessaires.
6.6 Vérification de l'étanchéité des soupapes
de la combinaison
Ce contrôle concerne l'appareil de contrôle
Porta Control 3000. Il peut être réalisé avec d'autres appareils
mais les valeurs fournies doivent être respectées.
Effectuer le contrôle EN 943-1:2015, 6.5.1, cependant avec
une surpression de 10 mbar, à température ambiante
constante (20 °C ±5 °C).
L'air comprimé utilisé doit satisfaire aux exigences de la norme
EN 12021.
Les accessoires de contrôle nécessaires sont indiqués dans la
liste de commande (voir la section 11 à la page 53).
1. Retirer la soupape de gonflage avec le raccord enfichable
du tuyau noir.
2. Raccorder l'extrémité du tuyau sur l'appareil de contrôle.
3. Brancher la poire de gonflage sur la soupape de décharge
dans le tuyau noir de manière à ce que la flèche sur la poire
soit tournée vers la soupape de décharge.
4. Humidifier le disque de soupape à l'eau claire et les
boutonner.
5. Défaire le bouchon de contrôle de l'extérieur sur la
soupape à contrôler et raccorder à l'appareil de contrôle via
le tuyau noir.
REMARQUE
Les dispositifs de séchage compatibles avec la
combinaison de protection chimique sont :
TopTrock SF01 avec ventilation GF
Dispositifs de séchage similaires
REMARQUE
Pour éviter le blocage du système de fermeture,
éliminer les fils en tissu qui dépassent.
i
i
i
i
ATTENTION
Lorsque la combinaison est trop remplie, le matériel
est endommagé.
Lors du remplissage de la combinaison de protection
chimique, veiller à ce que la pression n'augmente pas
trop au-delà des valeurs indiquées.
!

Maintenance
Dräger CPS 6900 47
6. Ouvrir la soupape de décharge, générer une surpression
avec la poire de gonflage de +10 mbar. Fermer la soupape
de décharge.
7. Régler une durée de contrôle de 1 minute et démarrer le
chronomètre.
8. À l'issue de la durée de contrôle, relever la pression sur
l'appareil de contrôle.
Si la variation de pression est inférieure à 1 mbar, la soupape
de la combinaison est en bon état. Dans ce cas :
1. Vérifier la soupape suivante.
2. Démonter le système de contrôle.
3. Relier le capot de protection à la soupape de la
combinaison.
Si la variation de pression est supérieure à 1 mbar :
1. Retirer et contrôler le disque de la soupape.
Le disque et le siège de la soupape doivent être propres et
en bon état.
2. Si nécessaire, remplacer le disque de valve (voir le
chap. 6.7.3 à la page 47).
3. Renouveler le contrôle.
6.7 Travaux de maintenance particuliers
Après la maintenance et/ou le remplacement des pièces,
revérifier l’étanchéité. Il est recommandé de confier les travaux
de réparation à Dräger.
6.7.1 Remplacement des gants
Les combinaison de gants ou les gants doivent être remplacés
de la manière suivante :
1. Retirer le sur-gant et la bague en caoutchouc (le cas
échéant).
2. Soulever le bracelet avec le pouce et extraire de la manche
la bague d'appui avec le gant.
3. Tous les gants exceptés les combinaisons de gants :
Tirer le nouveau gant sur la bague d'appui et l'aligner sur le
bracelet. L'axe long de la bague d'appui elliptique est
parallèle à la paume.
Veiller à ce qu'aucun pli ne se forme entre le gant et la
baque d'appui.
4. Introduire un gant avec bague d'appui ou une nouvelle
association de gants à travers le système de fermeture
ouvert, dans les manches de la combinaison de protection
chimique.
5. Insérer le gant avec bague d'appui ou une nouvelle
combinaison de gants dans le bracelet et l'aligner :
le gant gauche s'insère dans la manche gauche, le droit
dans la manche droite.
Le dos de la main est orienté vers la couture de la
manche.
6. Pousser l'unité du gant dans le bracelet jusqu'à le bord de
la bague d'appui repose sur le bord du bracelet.
La bague d'appui doit entièrement reposer dans
l'évidement du bracelet.
7. Monter les surgants (si souhaités) :
Passer le surgant K-MEX-Gigant au-dessus du
bracelet et le sécuriser avec l'anneau en caoutchouc
correspondant.
Passer le sur-gant Tricotril au-dessus du bracelet et le
sécuriser avec l'anneau en caoutchouc correspondant.
8. Contrôle de l'étanchéité de la combinaison de protection
chimique (voir la section 6.5 à la page 46).
6.7.2 Remplacement de l'oculaire antirayure
1. Enlever l'ancien oculaire antirayure.
2. Si nécessaire, retirer les résidus de colle.
3. Retirer le film de protection d'un côté du patin adhésif et
placer le patin sur l'ancien emplacement de collage.
4. Retirer le film de protection de l'autre côté du patin adhésif.
5. Placer le nouvel oculaire antirayure au milieu et l'appuyer
sur le patin adhésif.
6.7.3 Remplacement du disque de soupape
1. Déboutonner le capuchon de protection et l'ancien disque.
Ne pas endommager la cheville du siège de soupape.
2. Humidifier le disque de soupape neuf et le mettre en place.
3. Poser le capot de protection sur la soupape de la
combinaison.
6.7.4 Remplacement de l'oculaire anti-buée
1. Défaire ave précaution l'oculaire anti-buée du profilé en
caoutchouc dans la cagoule.
2. Insérer un nouvel oculaire anti-buée :
a. Retirer les films de protection de l'oculaire anti-buée.
b. Tourner la cagoule de la combinaison de protection
chimique vers la gauche. Veiller à ne pas tirer sur la
fermeture éclair et arracher la lèvre d'étanchéité.
c. Positionner l'oculaire anti-buée à l'aide des marquages
centraux et l'insérer peu à peu dans le profilé en
caoutchouc.
AVERTISSEMENT
Si la combinaison de protection chimique est équipée
d'une combinaison de gants, cette dernière doit être
démontée, mise au rebut et remplacée par une
nouvelle. Il n'est pas garanti que le matériau puisse
résister à un nouveau contact avec des produits
chimiques.
Aucun talc ne doit être utilisé pour enfiler les gants.
Dans le cas contraire, les gants peuvent glisser
lorsque l'utilisateur exerce sur les gants une pression
trop importante de l'intérieur en s'étirant de manière
excessive.
!
ATTENTION
Ne pas utiliser d'objets pointus ou affûtés ni de solvant
pour éviter d'endommager l'oculaire !
Les résidus de colle peuvent g énéralement s'éliminer
avec le pouce.
ATTENTION
Risque de détérioration du matériau !
Ne pas utiliser d'objets pointus ou affûtés ni de solvant
pour éviter d'endommager l'oculaire anti-buée !
!
!

48 Dräger CPS 6900
Stockage
7 Stockage
7.1 Conditions de stockage
Conserver la combinaison de protection chimique à l'abri
de la lumière, dans un endroit frais, sec, bien aéré, hors
pression et sans la soumettre à des tensions.
La protéger contre le soleil, les UV et l'ozone.
Tenir compte de la température de stockage (voir le
chap. 9 à la page 49).
7.2 Préparation du stockage
1. Fermer le système de fermeture, s'arrêter env. 5 cm avant
la butée. Vérifier régulièrement si le système de fermeture
est suffisamment graissé.
2. Mettre le sac plat fourni sur la cagoule afin de conserver la
forme de l'oculaire courbé de manière cylindrique.
3. Si la combinaison de protection chimique est repliée,
mettre le sac plat fourni sur les bottes pour éviter de
décolorer la combinaison de protection chimique.
7.3 Stockage de la combinaison de
protection chimique
Les stockages suivants sont possibles :
Stocker la combinaison de protection chimique à plat.
Lorsque la combinaison de protection chimique est stocké
dans le véhicule d'intervention, éviter l'usure par le
frottement constant avec la surface d'appui.
Suspendre la combinaison de protection chimique sur un
cintre adapté ou par-dessus une barre. La cagoule ou les
bottes de sécurité doivent être en contact avec le sol.
Replier la combinaison de protection chimique, la stocker
dans une boîte de transport, un casier ou une sacoche.
Emballer la combinaison de protection chimique dans une
sacoche de transport et de stockage CPS.
7.3.1 Repliage de la combinaison de protection
chimique
1. Passer le sac plat sur la cagoule.
2. Rabattre les chaussettes
ou les bottes de sécurité
une fois vers le haut. Éviter
les rainures importantes.
3. Poser les manches au
milieu de la poitrine.
Éliminer les plis.
4. Plier la cagoule et la partie
supérieure de la
combinaison de protection
chimique de telle sorte que
l'oculaire repose sur les
bottes de sécurité
enroulées. Éliminer les plis.
Veiller à ce que l'oculaire
ne se déforme pas.
7.3.2 Emballage de la combinaison de protection
chimique dans une sacoche de transport et de
stockage CPS
1. Emballer la combinaison de
protection chimique dans
une sacoche de transport et
de stockage CPS.
2. Fixer l'oculaire avec la
bande auto-agrippante
3. Positionner les bottes de
protection comme indiqué.
4. Fixer avec les sangles la
combinaison de protection
chimique en dessous des
manches et sur les bottes.
5. Plier les manches sur les
épaules et placer sur les
côtés.
6. Fermer la sacoche de
transport et de stockage
CSA.
7. Replier au centre la
sacoche de transport et de
stockage CSA en haut des
bottes et directement sous
la visière ou au niveau du cou. Veiller à ce que l'oculaire
soit entre les gants.
8. Replier au centre la sacoche de transport et de stockage
CSA et fermer les sangles.
8 Elimination
8.1 Déclassement
La combinaison de protection chimique doit être déclassée
dans les cas suivants :
Si elle a été endommagée et que sa réparation est
impossible.
Si elle a été contaminée et que les propriétés de la matière
dangereuse ne permettent pas sa décontamination.
Si le matériau de la combinaison a changé : par ex . la
surface présente des zones fragilisées, des
épaississements, des altérations de couleur, des
ramollissements.
Pour en savoir plus, consulter Dräger.
ATTENTION
Le non-respect des consignes de stockage peut
endommager la combinaison de protection chimique !
REMARQUE
Dräger recommande d'emballer la combinaison de
protection chimique dans la sacoche de stockage et de
transport CPS pour la protéger contre les intempéries
et prolonger les intervalles de maintenance.
REMARQUE
Replier la combinaison de protection chimique sans
pression et en la protégeant.
Ne pas plier brusquement le matériau du vêtement, les
coutures et le système de fermeture. Éviter les
rainures importantes.
!
i
i
i
i
00221840.eps
17021963.eps

Caractéristiques techniques
Dräger CPS 6900 49
8.2 Durée de vie
Sans utilisation et en respectant les conditions de stockage et
les intervalles de maintenance recommandés, les propriétés
de la combinaison de protection chimique sont garanties
pendant au moins 10 ans à compter de la date de fabrication.
En cas d'utilisation très fréquente, sa durée de vie peut être
raccourcie, même en cas de stockage et d'entretien
conformes.
8.3 Remarques relatives à l'élimination
Éliminer la combinaison de protection chimique conformément
aux réglementations applicables.
9 Caractéristiques techniques
9.1 Généralités
Tailles en cm :
9.2 Résistance à la pénétration des agents
infectieux
9.3 Résistance du matériau du vêtement
REMARQUE
Les combinaisons de protection chimique peuvent être
incinérées ou déposées à la déchetterie. La méthode
d’élimination dépend du type de contamination.
Taille de la
combinaison
Taille de
l'individu Tour de
poitrine Tour de
taille
S 150-165 80-118 72-106
M 160-175 80-118 72-106
L 170-185 80-118 72-106
XL 180-200 104-124 95-110
XXL 195-210 104-124 95-110
Poids :
Combinaison Taille L,
avec bottes taille 45,
sans accessoires
env. 6,8 kg
Combinaison Taille L,
avec bottes taille 45,
avec accessoires
env. 8,0 kg
Combinaison Taille L,
avec chaussettes,
sans accessoires
env. 4,3 kg
Matériau :
Combinaison de
protection chimique
Umex
Oculaire Chlorure de polyvinyle spécial
Gants FKM ou
FKM/butyle ou
butyle ou
Laminés : HPPE ou
Para-Aramide ou
Para-Aramide
i
i
Bottes de sécurité Nitrile-P :
noires, bottes de sécurité FPA-CR avec
semelle en plastique, résistantes aux
coupures et au feu, doublure textile,
tailles voir la section 11 à la page 53
PVC :
jaunes, semelles crantées noires, tailles
voir la section 11 à la page 53
Couleurs :
extérieur/intérieur rouge/rouge
Températures :
en cours d'utilisation -40 °C jusqu'à +60 °C 1
Le matériau Umex résiste à une
exposition de courte durée à une
température pouvant descendre jusqu’à
-80 °C et a été testé par Dräger, mais
pas dans le cadre des épreuves de test.
Respecter les températures d'utilisation
de l'équipement de protection
respiratoire !
stockage -5 °C jusqu'à +25 °C
1 testé par Dräger
Contrôle Résultat Classe1
1 conformément à EN 14126:2003+AC:2005
Résistance aux liquides
contaminés sous pression
hydrostatique (avec le
bactériophage Phi-X174)
Pression
hydrostatique :
20 kPa
6
Contrôle Résultat Classe1
1 conformément à EN 943-1:2015
Résistance à l'abrasion >2000 cycles 6
Résistance à la flexion >100000 cycles 6
Résistance à la flexion à
-30 °C2
2 conformément à EN 14126:2003+AC:2005
>4 000 cycles 6
Résistance à la déchirure 57 N 3
Résistance à l'éclatement 643 kPa 5
Résistance à la perforation >50 N 33
3 conformément à EN 1073-1:2016+A1:2018 et EN 1073-2:2002:
Classe 2
Résistance aux flammes auto-extinguible satisfaite
Résistance des coutures >500 N 6
Résistance à la traction >1000 N 6

50 Dräger CPS 6900
Caractéristiques techniques
9.4 Résistance à la perméation des produits
chimiques conformément à
EN 934-1:2015
Pour l'homologation européenne, les contrôles sont réalisés
avec les produits chimiques concentrés répertoriés ci-après,
en enduisant/recouvrant complètement les pièces à tester.
La répartition par classe pour le contrôle de la résistance à la
perméation des produits chimiques s'effectue comme suit,
conformément à EN 943-1:2015 :
Classe 1 >10 minutes
Classe 2 >30 minutes
Classe 3 >60 minutes
Classe 4 >120 minutes
Classe 5 >240 minutes
Classe 6 >480 minutes
Umex Système de
fermeture Coutures Oculaire Association
oculaire
Produits chimiques d'essai Classe Classe Classe Classe Classe
Ammoniaque, CAS-Nr. 7664-
41-7
63466
Chlore, CAS-Nr.7782-50-5 6 3 3 6 6
Chlorure d'hydrogène1, CAS-
Nr. 747-01-06
42466
n-Heptane1,CAS-Nr. 142-82-5 62666
Hydroxyde de sodium 40 %,
CAS-Nr. 1310-73-2
66666
Acide sulfurique 96 %1, CAS-
Nr. 7664-93-9
23363
1 La combinaison ne convient pas à l'exposition continue à ce produit chimique
Gant butyle Gant FKM Gant FKM/
butyle Combinaison
de gants
laminés1
Bottes de
sécurité
(PVC)
Bottes de
sécurité
(nitrile)
Produits chimiques d'essai Classe Classe Classe Classe Classe Classe
Ammoniaque, CAS-Nr. 7664-
41-7
6 6 6 6 6 6
Chlore, CAS-Nr.7782-50-5 3 6 6 6 6 6
Chlorure d'hydrogène2, CAS-
Nr. 747-01-06
6 6 6 6 6 6
n-heptane2,CAS-Nr.142-82-5 1 6 6 6 4 6
Hydroxyde de sodium 40 %,
CAS-Nr. 1310-73-2
6 6 6 6 6 6
Acide sulfurique 96 %2, CAS-
Nr.7664-93-9
2 6 6 6 6 6
1 Gants laminés/Tricotril (gants Barrier et Tricotril)
2 La combinaison ne convient pas à l'exposition continue à ce produit chimique

Caractéristiques techniques
Dräger CPS 6900 51
9.5 Résistance à la perméation des produits
chimiques conformément à
ISO 16 602:2007
La répartition par classe pour le contrôle de la résistance à la
perméation des produits chimiques s'effectue comme suit,
conformément à ISO 16 602:2007 :
Classe 1 ≥10 minutes
Classe 2 ≥30 minutes
Classe 3 ≥60 minutes
Classe 4 ≥120 minutes
REMARQUE
Selon la norme ISO 16 602:2007, tableau E.1, la
classe 4 est la classe la plus élevée pouvant être
atteinte avec les valeurs déterminées.
i
i
Umex Système de
fermeture Coutures Oculaire Association
oculaire
Produits chimiques d'essai Classe Classe Classe Classe Classe
Ammoniaque, n° CAS 7664-
41-7
43444
Chlore, n° CAS 7782-50-5 4 3 3 4 4
Chlorure d'hydrogène1, n°
CAS, 747-01-06
42444
n-heptane1, n° CAS, 142-82-5 42444
Hydroxyde de sodium 40 %,
n° CAS 1310-73-2
44444
Acide sulfurique 96 %1, n°
CAS n° 7664-93-9
23343
1 La combinaison ne convient pas à l'exposition continue à ce produit chimique
Gant butyle Gant FKM Gant FKM/
butyle
Combinaison
de gants
laminés 1
Bottes de
sécurité
(PVC)
Bottes de
sécurité
(nitrile)
Produits chimiques d'essai Classe Classe Classe Classe Classe Classe
Ammoniaque, n° CAS 7664-
41-7
4 4 4 4 4 4
Chlore, n° CAS 7782-50-5 3 4 4 4 4 4
Chlorure d'hydrogène2, n°
CAS 747-01-06
4 4 4 4 4 4
n-heptane2, n° CAS 142-82-5 1 4 4 4 4 4
Hydroxyde de sodium 40 %,
n° CAS 1310-73-2
4 4 4 4 4 4
Acide sulfurique 96 %2, n°
CAS 7664-93-9
2 4 4 4 4 4
1 Gants laminés/Tricotril (gants Barrier et Tricotril)
2 La combinaison ne convient pas à l'exposition continue à ce produit chimique

52 Dräger CPS 6900
Procès-verbal d'essai
10 Procès-verbal d'essai
Date de fabrication1:
SignatureMaintenance/
Date de
réparation
Défauts
constatés
Numéro de fabrication1 :
Durée du contact avec les
produits chimiques
(en minutes)
Parties du vêtement
touchées
(tête, bras, jambes, ...)
Type1:
La combinaison de protection
a eu un contact avec (nom de la
substance, n° CAS, n° UN)
Date
d'utilisation
1 Voir la plaque signalétique figurant sur la poche intérieure de la combinaison de protection chimique.

Liste de commande
Dräger CPS 6900 53
11 Liste de commande
Désignation et description Numéro de
commande
Dräger CPS 6900 R 29 410
Bottes de sécurité à enfiler :
Nitrile-P, taille 43 R 56 863
Nitrile-P, taille 44 R 56 864
Nitrile-P, taille 45 R 56 865
Nitrile-P, taille 46/47 R 56 866
Nitrile-P, taille 48 R 56 867
Nitrile-P, taille 49/50 R 56 868
PVC, taille 43 R 52 653
PVC, taille 44 R 55 474
PVC, taille 45 R 55 477
PVC, taille 46 R 52 656
PVC, taille 47/48 R 55 413
Bottes de sécurité à monter :
Nitrile-P, taille 43, raccourcies R 58 221
Nitrile-P, taille 44, raccourcies R 58 222
Nitrile-P, taille 45, raccourcies R 58 223
Nitrile-P, taille 46/47, raccourcies R 58 224
Nitrile-P, taille 48, raccourcies R 58 225
Nitrile-P, taille 49/50, raccourcies R 58 226
PVC, taille 43, raccourcies R 62 001
PVC, taille 44, raccourcies R 62 002
PVC, taille 45, raccourcies R 62 003
PVC, taille 46, raccourcies R 62 004
PVC, taille 47/48, raccourcies R 62 005
Gants :
Butyle, taille 9 R 55 538
Butyle, taille 10 R 53 531
Butyle, taille 11 R 53 560
FKM/Butyle, taille 9 R 55 762
FKM/Butyle, taille 10 R 55 531
FKM/Butyle, taille 11 R 55 761
FKM, taille 9 R 55 537
FKM, taille 10 R 53 776
FKM, taille 11 R 53 554
Sur-gants :
Laminés + Tricotril sur bague d'appui, taille 10 R 63 003
Laminés + Tricotril sur bague d'appui, taille 11 R 63 004
Surgant Tricotril, taille 10 R 55 968
Surgant Tricotril, taille 11 R 55 966
Surgant K-MEX-Gigant, taille 14 R 55 969
Accessoires de gants et de bottes :
Gants en coton, paire de R 50 972
manchette de poignet étanche aux gaz R 52 648
Bague en caoutchouc pour sur-gants
(2 pièces requises)
R 51 358
Bandes réfléchissantes (2 pièces requises) R 58 218
Bague d'appui R 51 265
Surchaussettes R 61 018
Ventilation :
Soupape de régulation PT 120 L R 55 509
Soupape de régulation PT 120 L - Stäubli R 58 059
Air-connect R 58 075
Air-connect - Stäubli R 58 235
Jeu de rabats de ventilation S, M R 58 901
Jeu de rabats de ventilation L, XL, XXL R 58 903
ASV 33 54 568
ASV pour PSS 7000 33 57 007
Adaptateur de soupape à la demande R 58 281
Pièce en Y R 55 507
Support :
D-Connect R 58 080
Bretelle de jambe AL 01 211
Support de manomètre R 58 078
Sangle d'entrejambe R 58 085
Transport et stockage :
Sacoche de stockage et de transport CPS R 58 152
Boîte de transport T 51 525
Étrier de suspension (en forme de cloche) R 33 299
Étrier de suspension (en forme de T) R 54 746
Sac plat pour cagoule et bottes 87 10 071
Désignation et description Numéro de
commande

54 Dräger CPS 6900
Liste de commande
Appareils et accessoires de contrôle :
Appareil de contrôle Porta Control 3000 R 62 520
Nettoyage et désinfection :
Sac de nettoyage 65 70 003
Rondelle d'appui R 58 157
Crayon lubrifiant x 2 R 27 494
Gel anti-buée " klar-pilot " R 52 560
Spray anti-buée " klar-pilot " Comfort R 56 542
Eltra (20 kg) 79 04 074
Maintenance et entretien :
Colle (PU/PVC) R 58 304
Kit de raccords de bottes R 25 264
Mastic pour raccord de bottes R 55 272
Rembourrage de sac à dos R 57 860
Soupape de combinaison, complète R 58 625
Disque de soupape R 58 239
Oculaire antirayure (10 pièces) R 57 859
Oculaire anti-buée (1 pièce) R 57 858
Manuel technique sur
demande
Manuel d'utilisation sur
demande
Désignation et description Numéro de
commande

Índice
Dräger CPS 6900 55
Índice
1 Información relativa a la seguridad . . . . . . . . . . .56
2 Convenciones en este documento . . . . . . . . . . .56
3 Descripción . . . . . . . . . . . . . . . . . . . . . . . . . . . . . .56
3.1 Uso . . . . . . . . . . . . . . . . . . . . . . . . . . . . . . . . . . . . .57
3.2 Limitación del uso . . . . . . . . . . . . . . . . . . . . . . . . . .57
3.3 Homologaciones . . . . . . . . . . . . . . . . . . . . . . . . . . .57
3.4 Equipo de protección personal comprobado . . . . .57
3.5 Marca identificativa típica . . . . . . . . . . . . . . . . . . . .58
4 Uso . . . . . . . . . . . . . . . . . . . . . . . . . . . . . . . . . . . . .58
4.1 Condiciones para el uso . . . . . . . . . . . . . . . . . . . . .58
4.2 Indicaciones para la manipulación
del sistema de cierre . . . . . . . . . . . . . . . . . . . . . . . .58
4.3 Preparativos para su uso . . . . . . . . . . . . . . . . . . . .58
4.4 A observar durante el uso . . . . . . . . . . . . . . . . . . . .59
4.5 Después del uso . . . . . . . . . . . . . . . . . . . . . . . . . . .59
5 Ayuda en caso de averías . . . . . . . . . . . . . . . . . .60
6 Mantenimiento . . . . . . . . . . . . . . . . . . . . . . . . . . . .61
6.1 Intervalos de mantenimiento . . . . . . . . . . . . . . . . . .61
6.2 Inspección visual del traje
de protección química . . . . . . . . . . . . . . . . . . . . . . .61
6.3 Limpiar y desinfectar el traje
de protección química . . . . . . . . . . . . . . . . . . . . . . .61
6.4 Mantener el sistema de cierre . . . . . . . . . . . . . . . . .63
6.5 Comprobación de la estanqueidad
del traje de protección química . . . . . . . . . . . . . . . .63
6.6 Comprobación de la estanqueidad
de las válvulas del traje . . . . . . . . . . . . . . . . . . . . . .64
6.7 Tareas especiales de mantenimiento . . . . . . . . . . .64
7 Almacenamiento . . . . . . . . . . . . . . . . . . . . . . . . . .65
7.1 Condiciones de almacenamiento . . . . . . . . . . . . . .65
7.2 Preparar el almacenamiento . . . . . . . . . . . . . . . . . .65
7.3 Almacenar el traje de protección química . . . . . . . .65
8 Eliminación . . . . . . . . . . . . . . . . . . . . . . . . . . . . . .66
8.1 Retirada de servicio . . . . . . . . . . . . . . . . . . . . . . . .66
8.2 Vida útil . . . . . . . . . . . . . . . . . . . . . . . . . . . . . . . . . .66
8.3 Indicaciones para la eliminación . . . . . . . . . . . . . . .66
9 Datos técnicos . . . . . . . . . . . . . . . . . . . . . . . . . . .67
9.1 Generalidades . . . . . . . . . . . . . . . . . . . . . . . . . . . . .67
9.2 Resistencia a la permeación
de agentes infecciosos . . . . . . . . . . . . . . . . . . . . . .67
9.3 Resistencia del material del traje . . . . . . . . . . . . . .67
9.4 Resistencia a la permeación de productos
químicos según EN 943-1:2015 . . . . . . . . . . . . . . .68
9.5 Resistencia a la permeación de productos
químicos según ISO 16 602:2007 . . . . . . . . . . . . . .69
10 Protocolo de comprobación . . . . . . . . . . . . . . . .70
11 Lista de referencias . . . . . . . . . . . . . . . . . . . . . . .71

56 Dräger CPS 6900
Información relativa a la seguridad
1 Información relativa a la seguridad
Leer atentamente estas instrucciones de uso y las
instrucciones de uso de los productos correspondientes
antes de su uso.
Observar estrictamente las instrucciones de uso. El
usuario debe comprender íntegramente y cumplir
estrictamente las instrucciones. El producto debe utilizarse
exclusivamente según su uso previsto.
No eliminar las instrucciones de uso. Garantizar su
conservación y su uso correcto por parte de los usuarios.
Solo personal especializado y formado debe utilizar este
producto.
Observar las directrices locales y nacionales aplicables a
este producto.
Solo personal especializado y formado debe comprobar,
reparar y mantener el producto. Dräger recomienda un
contrato de mantenimiento con Dräger y que todos los
trabajos de reparación se realicen por Dräger.
Utilizar únicamente piezas y accesorios originales de
Dräger para los trabajos de mantenimiento. De lo
contrario, el funcionamiento correcto del producto podría
verse mermado.
No utilizar productos incompletos ni defectuosos. No
realizar modificaciones en el producto.
Informar a Dräger si se produjeran fallos o averías en el
producto o en componentes del mismo.
2 Convenciones en este documento
Significado de las señales de advertencia
Las siguientes señales de advertencia se utilizan en este
documento para identificar y resaltar los textos de advertencia
que requieren mayor atención por parte del usuario. El
significado de las señales de advertencia se define a
continuación:
Nombres de marcas
En este documento se utilizan los siguientes nombres de
marcas:
FPS®, HPS®, Panorama Nova®, PAS®, PSS® y X-plore®
son marcas registradas de Dräger.
Eltra® y ECOLAB® son marcas registradas propiedad de
Ecolab.
K-MEX® y Tricotril® son marcas comerciales registradas
de KCL GmbH.
Barrier® es una marca registrada de Ansell
Cryo-Industrial® es una marca comercial registrada de
Tempshield, Inc.
Abreviaturas
FKM = caucho fluorado
PVC = cloruro de polivinilo
3 Descripción
Los trajes de protección Dräger CPS 6900 estancos a gases
cumplen con la norma EN 943-1:2015 (Tipo 1a). Son
reutilizables.
Para el suministro de aire respiratorio se necesita un equipo
autónomo de aire comprimido. El equipo autónomo de aire
comprimido, la máscara y el casco protector deben llevarse
dentro del traje de protección química. Para obtener
información sobre las combinaciones, véase el cap. 3.4 en la
página 57.
El traje de protección química está equipado con guantes
recambiables. Los siguientes guantes están disponibles:
Guantes de FKM, dado el caso, con sobreguantes de
Tricotril
Guantes de FKM, dado el caso, con sobreguantes de
K-MEX-Gigant
Guantes de butilo, dado el caso, con sobreguantes de
Tricotril
Guantes de butilo, dado el caso, con sobreguantes de
K-MEX-Gigant
Guantes de FKM/butilo, dado el caso, con sobreguantes
de Tricotril
Guantes de FKM/butilo, dado el caso, con sobreguantes
de K-MEX-Gigant
Las siguientes combinaciones de guantes de película están
disponibles:
Combinación de guantes de laminado/Tricotril
El traje de protección química puede estar equipado con
botines del mismo material que el traje o con botas. Los
botines no ofrecen seguridad suficiente frente a cargas
mecánicas. Por este motivo, el usuario debe utilizar
adicionalmente unas botas de protección adecuadas y
homologadas de acuerdo con EN ISO 20345.
Un cubrebotas impide la penetración de sustancias entre los
botines y las botas de protección.
El visor se encuentra en la parte exterior del traje y está
protegido frente a arañazos.
ADVERTENCIA
Advertencia de una situación potencialmente
peligrosa. En caso de no evitarse, pueden producirse
lesiones graves e incluso letales.
ATENCIÓN
Advertencia de una situación potencialmente
peligrosa. En caso de no evitarse, pueden producirse
lesiones o daños en el producto o en el medio
ambiente. Puede utilizarse también para advertir
acerca de un uso incorrecto.
NOTA
Información adicional sobre el uso del producto.
!
!
i
i
NOTA
No se deben utilizar los sobreguantes. Sin embargo,
proporcionan una mayor resistencia al corte.
i
i

Descripción
Dräger CPS 6900 57
El traje de protección química está equipado con un bolsillo
para guardar equipos de radiocomunicación y con una
lengüeta para el botón "Pulsar para hablar". Junto al bolsillo se
encuentra la marca identificativa típica.
De forma opcional, el traje de protección química puede
contener también los siguientes componentes:
Válvula de regulación PT 120 L o Air-Connect:
Unidad de ventilación para la conexión de equipos de
respiración externos con y sin sistema de refrigeración
para el interior del traje
D-Connect:
Soporte para dispositivos adicionales (p. ej. una cámara
de imágenes térmicas, instrumentos de medición, lazos de
salvamento) que se puede montar en la cadera derecha o
izquierda.
Correa de entrepierna:
Para ajustar la longitud del traje
Visor antivaho en el traje:
Impide que se empañe el visor.
Soporte para manómetro debajo del visor:
Permite montar el manómetro del equipo autónomo de aire
comprimido a la vista del usuario del traje de protección
Números de identificación:
Facilita la identificación del equipo de trabajo
Es posible, pero no recomendable, realizar una marca con
un rotulador a prueba de agua.
3.1 Uso
El traje de protección química ofrece protección contra
sustancias peligrosas gaseosas, líquidas, sólidas y en forma
de aerosol y contra agentes infecciosos. Asimismo, también
protege contra la incorporación de partículas radiactivas.
3.2 Limitación del uso
Dependiendo de su concentración y estado físico y de las
condiciones ambientales, determinados productos químicos
están sujetos a limitaciones de uso.
Evitar el contacto con el calor intenso y contacto con llamas.
El traje de protección química no es adecuado para la lucha
contra incendios. Para obtener información sobre la
resistencia mecánica y química, así como térmica, consultar
cap. 9 en la página 67.
El traje de protección química no ofrece protección contra la
radiación de partículas radioactivas o daños por radiación.
El traje de protección química no debe utilizarse si estuviera
dañado o desgastado.
3.3 Homologaciones
El traje de protección química está homologado según las
siguientes normas:
EN 943-1:2015 (Tipo 1a)
EN 14126:2003+AC:2005:1a-B
EN 1073-1:2016+A1:2018:IL:Clase 4, factor de protección
nominal 20000
(solo Dräger CPS 6900 con unidad de ventilación)
EN 1073-2:2002:IL:Clase 3, factor de protección nominal
500
(solo Dräger CPS 6900 sin unidad de ventilación)
EN 14593-1:2018
(solo Dräger CPS 6900 con unidad de ventilación)
EN 14594:2018
ISO 16602:2007+Amd 1:2012
SOLAS II-2, reg. 19, edición consolidada 2004
TP TC 019/2011
(EU) 2016/425
Regulation 2016/425 on personal protective equipment, as
amended to apply in GB
Las botas de protección de nitrilo están homologadas según:
EN ISO 20345:2011
EN 15090:2012
Las botas de protección de PVC están homologadas según:
EN ISO 20345:2011
Declaraciones de conformidad:
véase www.draeger.com/product-certificates
3.4 Equipo de protección personal
comprobado
3.4.1 Conexiones respiratorias
Máscaras Dräger FPS 7000 RA/PE/P/ESA
Máscaras Panorama Nova RA/PE/P/ESA
Máscaras f2 PA-RA/PE
Combinaciones máscara/casco Dräger FPS 7000 H61/
H62
Combinaciones máscara/casco Panorama Nova S-RA/
Supra, Panorama Nova S-PE/Supra y Panorama Nova S-
HE-EPDM-PC-RA
Combinaciones máscara/casco f2 S-PA-PE/Supra
3.4.2 Equipo autónomo de aire comprimido
PA 80/90 UP
PA 94 UP
PA 94 D plus
PAS lite1
PSS 100D
PSS 1001
PSS 30001
PSS 40001
PSS 50001
PSS 70001
3.4.3 Pulmoautomáticos
Todos los pulmoautomáticos de la serie PSS
ATENCIÓN
Solo las siguientes combinaciones del equipo de
protección se han comprobado y homologado.
Si fuera necesario utilizar otras combinaciones, la
empresa deberá comprobar si se pueden emplear.
1 También en combinación con ASV y pieza en Y
!

58 Dräger CPS 6900
Uso
3.4.4 Cascos protectores
Dräger serie HPS 4000
Dräger serie HPS 6000
Dräger serie HPS 7000
Schuberth F110
Schuberth F210
Dräger F1S12
Dräger F1SA12
Heros I
Heros II
3.5 Marca identificativa típica
La marca identificativa típica se encuentra en el bolsillo del
traje de protección química.
4 Uso
4.1 Condiciones para el uso
4.2 Indicaciones para la manipulación del
sistema de cierre
El sistema de cierre ha sido desarrollado específicamente
para trajes de protección química. El uso de dispositivos de
estanqueidad adicionales dificulta por lo general el
movimiento con respecto a los cierres de cremallera utilizados
en prendas de vestir normales. Para evitar que el sistema de
cremallera se pliegue, el usuario del traje de protección debe
tirar de una sola vez del sistema de cremallera por la capucha
mientras que un ayudante tira con ambas manos hacia abajo
del pantalón con el sistema de cremallera de tal forma que
éste cierre sin pliegues. El usuario del traje de protección
debería estar de pie al abrir y cerrar el sistema de cremallera.
4.2.1 Apertura del sistema de cierre
Abrir por completo el sistema de cierre.
Tirar siempre en la dirección de la cremallera, nunca en
sentido oblicuo.
No ejercer violencia. ¡Los dientes podrían doblarse!
En caso de atascarse la cremallera, tirar del deslizador
hacia atrás y de nuevo hacia delante.
4.2.2 Cierre del sistema de cierre
Al cerrar el sistema de cierre, evitar la tensión transversal
en el deslizador.
Juntar los dientes de la cremallera con la mano.
De esta forma el deslizador se moverá con mayor facilidad.
Los cuerpos extraños como, p. ej., camisa, chaqueta,
hilos, etc., no deben acceder entre los dientes al cerrar la
cremallera.
4.3 Preparativos para su uso
4.3.1 Preparación del traje de protección química
1. Antes de utilizar el traje por primera vez, realizar una
prueba de estanqueidad para detectar posibles daños de
transporte. A partir de ahí, observar el capítulo de
Intervalos de mantenimiento (véase el cap. 6.1 en la
página 61).
2. Colocar el traje de protección química plano sobre el suelo
e inspeccionarlo visualmente (véase el cap. 6.2 en la
página 61).
3. Si procede, comprobar que funcione la unidad de
ventilación y la conexión al equipo autónomo de aire
comprimido.
¡Atención! Observar las instrucciones de
uso.
Traje de protección contra productos
químicos gaseosos, líquidos, sólidos y en
forma de aerosol (según EN 943-1:2015,
tipo 1a)
Traje de protección contra agentes
infecciosos (según EN 14126:2003+AC:
2005, tipo 1a-B)
Traje de protección contra contaminación
radiactiva mediante partículas sólidas
(según EN 1073-1:2016+A1:2018 y
EN 1073-2:2002 (para las clases,
véase 3.3))
Asignación de la talla, el perímetro torácico
y el perímetro de la cintura a la talla del
traje de protección (véase el cap. 9 en la
página 67).
ADVERTENCIA
El traje de protección química debe utilizarse según
las normas y directivas vigentes en el país
correspondiente.
El riesgo en el entorno deberá estimarse antes del uso
puesto que no es posible determinar la idoneidad del
traje de protección química durante el uso. El traje de
protección química debe ser apto para el uso previsto.
El usuario debe cumplir los requisitos nacionales y
adicionales al utilizar el equipo de protección personal.
El incumplimiento de las normas puede ocasionar
lesiones corporales graves o incluso la muerte.
!
ATENCIÓN
Con el fin de evitar daños en el sistema de cierre,
ambas mitades de la cremallera deben estar paralelas
entre sí y no sometidas a cargas. Durante los
movimientos de apertura y cierre no debe ejercerse
violencia ni deben realizarse tirones bruscos.
Los sistemas de cierre que no estén suficientemente
lubricados resultarán difíciles de manejar. Esto puede
provocar daños en los mismos. Lubricar el sistema de
cierre con el lápiz de engrase suministrado por Dräger.
NOTA
Dräger recomienda guardar la bolsa plana en la que
se entrega el traje de protección química para volver a
guardarlo más tarde.
ADVERTENCIA
No utilizar el traje de protección química si está
dañado. De lo contrario, la vida del usuario estaría en
peligro.
!
i
i
!

Uso
Dräger CPS 6900 59
4. Tratar el visor de la máscara desde fuera con líquido
antiempañante "klar-pilot". Para discos de máscara con
recubrimiento, utilizar el spray "klar-pilot" Comfort. Si el
traje no cuenta con un visor antivaho, tratar también el
interior del visor.
4.3.2 Colocación del traje de protección química
1. Ponerse ropa interior (ropa de trabajo transpirable,
guantes de algodón).
2. Colocar el equipo autónomo de aire comprimido y la
máscara.
3. Ponerse el casco protector o la combinación máscara/
casco.
4. Comprobar el funcionamiento del equipo autónomo de aire
comprimido, la máscara y la combinación máscara/casco
según se describe en las instrucciones de uso
correspondientes.
5. Si el traje de protección química está equipado con botines
estancos a gas integrados:
a. Sin zapatos, introducir primero la pierna derecha en la
pernera y luego la pierna izquierda.
b. Calzarse las botas de protección.
6. Si el traje de protección química está equipado con botas
de protección estancas a gas integradas, introducir sin
zapatos primero la pierna derecha en la pernera y en la
bota de protección y luego la pierna izquierda.
7. Subir el traje de protección química hasta la cintura.
8. Si el traje de protección química está equipado con una
unidad de ventilación:
a. Conectar el suministro de aire en el interior del traje de
protección química.
b. Cerrar el cinturón de cadera integrado.
9. Si el traje de protección química está equipado con un D-
Connect, cerrar el cinturón de cadera integrado.
10. Si el traje de protección química está equipado con una
correa de entrepierna, enganchar la correa de entrepierna
al cinturón de cadera del equipo autónomo de aire
comprimido. Tirar del extremo de la correa de entrepierna
para ajustarla a la longitud deseada.
11. Colocar la capucha sobre la cabeza, introduciendo a la vez
el brazo derecho en la manga derecha y en el guante.
Posicionar la mochila del traje de protección química sobre
el equipo de protección respiratoria. Introducir el brazo
izquierdo en la manga izquierda y en el guante.
12. Conectar el pulmoautomático a la máscara.
13. Cerrar el sistema de cierre. Al hacerlo, tirar siempre en la
dirección de la cremallera. ¡No ejercer violencia!
14. En caso necesario, montar los sobreguantes:
a. Tirar del sobreguante K-MEX-Gigant sobre el anillo del
brazo y asegurar con el correspondiente anillo de goma.
b. Tirar de los sobreguantes de Tricotril sobre el anillo del
brazo y asegurar con el correspondiente anillo de goma.
4.4 A observar durante el uso
¡No intervenir nunca solo!
Observar el tiempo de uso, los límites de uso y las normas
específicas del país. El tiempo de uso máximo depende,
entre otras cosas, del equipo de protección respiratoria
empleado y de las condiciones de uso.
Si un traje de protección química con unidad de ventilación
no tiene conectada ninguna manguera de aire comprimido,
cerrar la conexión con una tapa de protección para impedir
que penetre suciedad.
Al manipular medios congelados, utilizar unos
sobreguantes adecuados (p. ej., guantes de Cryo-
Industrial de Tempshield, Inc.) y ropa interior.1
Si la visión se ve obstaculizada a causa del empañamiento
o la formación de escarcha en el interior del visor: Extraer
una mano de la manga y limpiar el visor, p. ej. con un paño
de limpieza. El paño de limpieza se puede guardar en el
bolsillo interior.
En caso de peligro, abandonar inmediatamente la zona
contaminada. No abrir el sistema de cierre hasta
encontrarse en una zona limpia.
4.5 Después del uso
4.5.1 Limpieza previa del traje de protección química
1. Abandonar la zona contaminada y encargar la limpieza
previa del traje de protección química a un ayudante. El
ayudante debe utilizar ropa de protección y, dado el caso,
protección respiratoria.
Dräger recomienda para la limpieza previa el uso de
abundante agua con detergentes. Esto permite eliminar la
mayoría de las sustancias químicas (ácidos, álcalis,
sustancias orgánicas e inorgánicas).
2. Limpiar a fondo y abundantemente el traje de protección
química. Evitar frotar productos químicos.
3. Si el traje está contaminado con sustancias peligrosas,
eliminar las aguas residuales en conformidad con las
normas de eliminación de residuos en vigor.
NOTA
Para colocarse el traje se debe contar con la ayuda de
una segunda persona.
NOTA
Dräger recomienda introducir las perneras de la ropa
interior en los botines para impedir que se deslicen.
Para impedir que los guantes de algodón resbalen,
fijarlos a la muñeca con cinta aislante.
i
i
i
i
ATENCIÓN
La acumulación de calor en el traje de protección
química puede conducir a un colapso circulatorio por
lo que, dado el caso, deberá utilizarse un chaleco
refrigerante o un sistema de ventilación adecuado.
1 No es parte del examen CE de tipo
ADVERTENCIA
No tocar partes contaminadas sin llevar puesta
indumentaria de protección. Evitar la contaminación
del interior limpio del traje de protección.
Pueden sufrirse lesiones corporales graves o incluso
la muerte si no se toman las medidas preventivas
mencionadas.
ATENCIÓN
Si no fuera posible realizar la limpieza previa in situ,
después de quitarse el traje de protección química
cerrarlo inmediatamente para impedir que penetren
productos químicos en el interior del traje.
!
!
!

60 Dräger CPS 6900
Ayuda en caso de averías
4. En caso necesario, realizar la descontaminación en varios
pasos. Dräger puede proporcionarle más información
sobre la descontaminación1.
4.5.2 Quitarse el traje de protección química
1. Abrir el sistema de cierre.
Al hacerlo, tirar siempre en la dirección de la cremallera.
No ejercer violencia.
2. Extraer el brazo izquierdo de la manga.
3. Si el traje de protección química está equipado con una
unidad de ventilación:
a. Abrir el cinturón de correa integrado.
b. Encargar a una segunda persona que desenchufe el
suministro de aire.
4. Si el traje de protección química está equipado con un D-
Connect, abrir el cinturón de cadera integrado.
5. Si el traje de protección química está equipado con una
correa de entrepierna, soltar la correa de entrepierna del
cinturón de cadera del equipo autónomo de aire
comprimido.
6. Extraer el brazo derecho de la manga.
7. Para poder quitarse la capucha con facilidad, ponerse
ligeramente en cuclillas.
8. Separar el traje de protección química del usuario del traje
de protección de tal forma que no puedan acceder
productos químicos ni productos de limpieza al interior del
traje.
9. Salir de las botas de protección y de las perneras.
10. Quitarse el casco protector, el equipo autónomo de aire
comprimido y los guantes de algodón.
5 Ayuda en caso de averías
1 No es parte de las pruebas de homologación
ADVERTENCIA
Quitarse el traje de protección química únicamente en
un lugar no contaminado.
NOTA
Dräger recomienda realizar un protocolo del uso
(véase el cap. 10 en la página 70).
!
i
i
Fallo Causa Solución1
1 No es parte del examen CE de tipo
El sistema de
cierre se atasca
Cuerpos extraños
en la cremallera
Limpiar la
cremallera, quitar
los cuerpos
extraños
Fricción excesiva Lubricar la
cremallera con el
lápiz de engrase
Traje de
protección química
no estanco
Sistema de cierre
no cerrado
Cerrar por
completo el
sistema de cierre
Daños en el
material del traje
Reparar con un
estuche de
remiendo.
Comprobar la
estanqueidad de
nuevo
Botas de
protección o
guantes
defectuosos o
punto de unión no
estanco
Sustituir o sellar y
volver. Comprobar
la estanqueidad de
nuevo
Disco o asiento de
la válvula
contaminado o
defectuoso
Limpiar o sustituir
y volver.
Comprobar la
estanqueidad de
nuevo
Visor o costura no
estanco
Sustituir o sellar y
volver. Comprobar
la estanqueidad de
nuevo
El traje de
protección química
no se purga
El disco de la
válvula del traje se
atasca
Limpiar o sustituir
y volver.
Comprobar la
estanqueidad de
nuevo
La correa
adherente se
despega
La correa
adherente está
adherido. Las
operaciones de
limpieza y
descontaminación
pueden hacer que
se despegue.
Volver a pegar la
correa adherente.
Comprobar la
estanqueidad de
nuevo

Mantenimiento
Dräger CPS 6900 61
6 Mantenimiento
6.1 Intervalos de mantenimiento
Los intervalos indicados son recomendaciones de Dräger. En
caso necesario, deberán observarse las posibles directrices
nacionales diferentes.
Para obtener información sobre los trabajos de mantenimiento
de la máscara, la unidad de ventilación, la válvula de
intercambio automático y el equipo autónomo de aire
comprimido, véanse las instrucciones de uso pertinentes.
6.2 Inspección visual del traje de protección
química
Es preciso realizar las siguientes comprobaciones. Si se
produjeran reclamaciones, el traje de protección química
deberá repararse o eliminarse.
En el exterior del traje de protección química no puede
haber agujeros, cortes ni desgaste.
La costura no se puede levantar ni desprender.
El visor debe estar limpio.
Las siguientes piezas no deben presentar daños:
a. Material del traje
b. Guantes
c. Botines
d. Visor
e. Junta del visor
f. Sistema de cierre
Las válvulas del traje deben estar libres y en perfecto
estado.
El material del traje no puede contener signos de
desgaste. El revestimiento no debe desprenderse del
tejido.
6.3 Limpiar y desinfectar el traje de
protección química
6.3.1 Limpieza y desinfección manuales
1. Quitar la mochila y lavarla por separado con agua caliente
limpia.
2. Desmontar la unidad de ventilación, el D-Connect y el visor
antivaho (si estuvieran presentes) y limpiarlos y
desinfectarlos por separado.
3. Desacoplar las tapas de protección y discos de las
válvulas de las válvulas del traje.
4. En caso necesario, desmontar los sobreguantes:
En caso de que el traje de protección química esté
equipado con combinaciones de guantes, desmontar la
combinación de guantes y eliminar.
Quitar, si estuvieran presentes, los sobreguantes de
Tricotril, pero no lavarlos. Los sobreguantes de Tricotril
sucios deben cambiarse.
Quitar los sobreguantes de K-MEX-Gigant, si
estuvieran presentes, y limpiarlos por separado.
Los guantes de FKM, FKM/butilo y butilo pueden
permanecer montados durante la limpieza.
5. Limpiar por separado los discos de las válvulas con agua
caliente limpia.
6. Preparar una solución de limpieza con agua y un producto
de limpieza.
7. Limpiar el traje de protección química y todos los
componentes reutilizables con un paño suave y la solución
de limpieza.
8. Enjuagar minuciosamente todas las partes del traje con
agua corriente.
9. Preparar un baño de desinfección con agua y un
desinfectante.
Trabajos necesarios
Antes del
primer uso
Después del uso
Después de
una reparación
Anualmente
Control visual del traje de protección
contra productos químicos
X X X1
1 Aplicable a los trajes de protección química guardados sin una
bolsa en vehículos.
Para los trajes de protección química guardados en la bolsa
correspondiente, el intervalo se alarga a 2 años.
Limpieza y desinfección del traje de
protección contra productos
químicos
X
Mantener el sistema de cierre X X X1
Comprobación de la estanqueidad
del traje de protección química
XXXX1
Comprobación de la estanqueidad
de las válvulas del traje
XXXX1
NOTA
Dräger recomienda realizar un protocolo de todos los
trabajos de mantenimiento (véase el cap. 10 en la
página 70).
i
i
ATENCIÓN
¡Peligro de daños materiales!
Para la limpieza y desinfección, no utilizar disolventes
(p. ej., acetona, alcohol) ni productos de limpieza con
partículas abrasivas. Emplear únicamente los
procedimientos descritos y utilizar los productos de
limpieza y desinfección mencionados. Otros
productos, dosificaciones y tiempos de acción pueden
provocar daños en el producto.
Para más información sobre los productos de limpieza
y desinfección adecuados y sus especificaciones,
véase el documento 9100081 en www.draeger.com/
IFU.
ATENCIÓN
¡Peligro de daños materiales!
Al limpiar y desinfectar pueden perderse las
propiedades antivaho. No sumergir el visor antivaho
más de 5 minutos en líquido.
ADVERTENCIA
¡Peligro de contaminación si las combinaciones de
guantes no se sustituyen!
No está garantizado que el material resista un uso
repetido con productos químicos.
!
!
!

62 Dräger CPS 6900
Mantenimiento
10. Introducir todas las piezas que deben ser desinfectadas
(traje de protección química, discos de las válvulas, tapas
de protección) en el baño de desinfección.
11. Enjuagar minuciosamente todas las partes del traje con
agua corriente.
12. Secar todas las piezas (véase el cap. 6.3.3 en la
página 63).
6.3.2 Limpieza y desinfección a máquina
Para la limpieza a máquina se necesitan los siguientes
accesorios:
Lavadora industrial Dräger CombiClean
o un equipo similar
Detergente: Eltra
Para consultar la dosificación, véase la información
9021380
Bolsa de lavado
Pantalla de apoyo
La lavadora industrial debe tener las siguientes
características:
Capacidad del tambor >130 litros
Diámetro del tambor >60 cm
Abertura de la puerta >45 cm
Control programable
Regulación electrónica de la temperatura ±2 °C
Régimen de revoluciones del tambor: máx. 20 r.p.m.
(2 vueltas lentas en una dirección, 18 segundos de espera,
2 vueltas lentas en la otra dirección, 18 segundos de
espera)
Limpiar y desinfectar el traje de protección química de la
siguiente forma:
1. Desmontar el visor antivaho, la unidad de ventilación y el
D-Connect (si estuvieran presentes) y limpiarlos y
desinfectarlos por separado.
A continuación, aclarar con abundante agua limpia.
2. Desacoplar las tapas de protección y discos de las
válvulas de las válvulas del traje.
3. En caso necesario, desmontar los guantes:
En caso de que el traje de protección química esté
equipado con combinaciones de guantes, desmontar la
combinación de guantes y eliminar.
Quitar, si estuvieran presentes, los sobreguantes de
Tricotril, pero no lavarlos. Los sobreguantes de Tricotril
sucios deben cambiarse.
Quitar los sobreguantes de K-MEX-Gigant, si
estuvieran presentes, y limpiarlos por separado.
Desmontar los guantes de FKM, FKM/butilo y butilo.
4. Limpiar por separado los discos de las válvulas con agua
caliente limpia y a continuación desinfectarlos.
5. Abrir completamente el sistema de cierre del traje de
protección química.
6. Extender el traje de protección química sobre una
superficie de trabajo limpia y alisar las arrugas.
7. Colocar la pantalla de apoyo en la capucha, de forma que
el visor quede apretado contra la pantalla de apoyo y
coincida con la misma.
8. Colocar la bolsa de lavado sobre la capucha de forma que
la espuma de la bolsa de lavado quede colocada sobre el
visor y el borde de la bolsa donde está el cordón quede
colocado sobre el borde inferior del visor. Apretar y atar el
cordón.
9. Dar una vuelta hacia arriba a los botines o las botas de
protección. Procurar que no se produzcan pliegues
afilados.
10. Colocar las mangas hacia el centro de la zona pectoral del
traje. Alisar las arrugas.
11. Plegar la capucha con la bolsa de lavado y la parte
superior del traje de protección química de forma que el
visor quede colocado sobre las botas de protección
enrolladas. Alisar las arrugas. Procurar no que no se
deforme el visor.
12. Introducir el traje de protección química en la lavadora
industrial.
13. Poner en marcha el programa de lavado "traje de
protección química".
Durante el lavado deben respetarse los siguientes
parámetros:
Temperatura del agua para limpieza y desinfección:
62 °C ±2 °C
4 aclarados con agua limpia fría
14. Secar todas las piezas (véase el cap. 6.3.3 en la
página 63).
ATENCIÓN
¡Peligro de daños materiales!
Dejar la mochila (si estuviera presente) en el traje de
protección química porque los componentes en el
interior del traje de protección podrían resultar
dañados por las correa adherentes.
Al limpiar y desinfectar pueden perderse las
propiedades antivaho. No sumergir el visor antivaho
más de 5 minutos en líquido.
!
ADVERTENCIA
¡Peligro de contaminación si las combinaciones de
guantes no se sustituyen!
No está garantizado que el material resista un uso
repetido con productos químicos.
ATENCIÓN
¡Peligro de daños materiales!
Para que no se produzcan daños en el traje de
protección química, el tambor únicamente debe
moverse cuando esté lleno de agua.
!
!

Mantenimiento
Dräger CPS 6900 63
6.3.3 Secar el traje de protección química
1. Antes de secar el traje de protección química, vaciar los
restos de líquido o quitarlos con una esponja.
2. Dejar que todas las partes interiores y exteriores se
sequen completamente.
El traje de protección química se puede secar con aire a
presión seco y sin aceites o en una secadora para trajes
de protección:
– Temperatura: máximo 40 °C
– Tiempo: mínimo 120 minutos
No exponer a calor directamente ni al sol de forma
prolongada.
3. Volver a montar la mochila.
4. Inspeccionar visualmente el traje de protección química, el
visor, las botas de protección y los guantes.
5. Montar el visor antivaho (si estuviera presente).
6. Volver a montar la unidad de ventilación y el D-Connect (si
estuvieran presentes).
6.4 Mantener el sistema de cierre
1. Engrasar a fondo el sistema de cierre después de cada
uso, limpieza y desinfección. Utilizar únicamente el lápiz
de engrase suministrado por Dräger.
2. En especial, engrasar suficientemente los dientes de la
cremallera y la zona entre los dientes por la cual se mueve
el deslizador.
6.5 Comprobación de la estanqueidad del
traje de protección química
La comprobación descrita corresponde al equipo de control
Porta Control 3000. También puede realizarse con otros
equipos de control aunque, en ese caso, deberán respetarse
los valores indicados.
Realizar la comprobación según ISO 17491-1 método A.2 a
temperatura ambiente constante (20 °C ±5 °C).
El aire comprimido utilizado debe cumplir con los requisitos de
EN 12021.
Los accesorios de comprobación necesarios están
especificados en la lista de referencias (véase el capítulo 11
en la página 71).
6.5.1 Preparación de la comprobación
1. En el caso de trajes de protección con unidad de
ventilación, sellar las conexiones.
2. Cerrar el sistema de cierre.
3. Extender el traje de protección química sobre una
superficie limpia y lisa con la parte trasera hacia arriba.
4. Proteger el visor con un apoyo suave para evitar que se
raye.
5. Desacoplar las tapas de protección de las dos válvulas del
traje y quitar los discos de las válvulas.
6. Acoplar una tapa de comprobación a la válvula del traje y
conectar al equipo de comprobación mediante la
manguera azul.
7. Acoplar otra tapa de comprobación a la otra válvula del
traje.
8. Asegurarse de que las dos válvulas están conectadas a la
manguera negra del equipo de comprobación.
9. Conectar la tapa de comprobación al suministro de aire
comprimido (6 bar) mediante la manguera negra.
10. Realizar prueba (véase el cap. 6.5.2 en la página 63).
6.5.2 Realizar prueba
1. Abrir la válvula de inflado en la manguera negra y llenar el
traje de protección química hasta que el equipo de
comprobación indique 17,5 mbar. Cerrar la válvula de
inflado.
2. Ajustar un tiempo de reposo de 10 minutos y activar el
cronómetro. Durante este tiempo, mantener la presión a
aprox. 17 mbar para que pueda producirse una
compensación de presión y de temperatura. Si fuera
necesario, añadir aire.
3. Abrir la válvula de descarga. Reducir la presión a
16,5 mbar. Cerrar la válvula de descarga.
4. Ajustar un tiempo de comprobación de 6 minutos y activar
el cronómetro.
5. Una vez transcurrido el tiempo de prueba, leer la presión
en el equipo de comprobación.
Si el descenso de la presión fuera menor o igual a 3 mbar, se
considerará que el traje de protección química es estanco. A
continuación, desmontar el equipo de comprobación y
comprobar las válvulas del traje.
Si el descenso de la presión es superior a 3 mbar:
1. Impregnar con lejía jabonosa los puntos críticos (como
p. ej. las costuras, el sistema de cierre y las conexiones de
los guantes y las botas).
2. Marcar los lugares no estancos.
3. Aclarar la lejía jabonosa y secar completamente el traje de
protección química.
4. Purgar y reparar el traje de protección química.
5. Repetir la prueba de estanqueidad.
El traje también puede enviarse a Dräger para su reparación.
ATENCIÓN
¡Peligro de daños materiales!
Para que el traje de protección química no resulte
dañado, no está permitido centrifugarlo.
Para evitar que se forme p. ej. moho, el traje de
protección química debe secarse completamente.
NOTA
Instalaciones de secado apropiadas para el traje de
protección química:
TopTrock SF01 con soplador GF
Secadoras de diseño equivalente
NOTA
A fin de evitar que se atasque el sistema de cierre, los
hilos que sobresalgan deben quitarse.
!
i
i
i
i
ATENCIÓN
Si el traje está demasiado lleno, el material resultará
dañado.
Al llenar el traje de protección química se deberá tener
en cuenta que la presión no aumente demasiado por
encima de los valores indicados.
!

64 Dräger CPS 6900
Mantenimiento
6.6 Comprobación de la estanqueidad de las
válvulas del traje
La comprobación descrita corresponde al equipo de control
Porta Control 3000. También puede realizarse con otros
equipos de control aunque, en ese caso, deberán respetarse
los valores indicados.
Realizar la comprobación según EN 943-1:2015, 6.5.1 a una
temperatura ambiente constante (20 °C ±5 °C) pero con
10 mbar de presión positiva.
El aire comprimido utilizado debe cumplir con los requisitos de
EN 12021.
Los accesorios de comprobación necesarios están
especificados en la lista de referencias (véase el capítulo 11
en la página 71).
1. Retirar la válvula de inflado con el acoplamiento
enchufable de la manguera negra.
2. Conectar el extremo de la manguera al equipo de
comprobación.
3. Conectar la bola de bombeo de la válvula de descarga a la
manguera negra de tal manera que la flecha de la bola de
bombeo apunte a la válvula de descarga.
4. Humedecer el disco de la válvula con agua limpia y
acoplarlo.
5. Desde fuera, acoplar la tapa de comprobación a la válvula
a comprobar y conectarla al equipo de comprobación
mediante la manguera negra.
6. Abrir la válvula de descarga, generar con la bola de
bombeo una presión positiva de +10 mbar. Cerrar la
válvula de descarga.
7. Ajustar un tiempo de comprobación de 1 minuto y activar
el cronómetro.
8. Una vez transcurrido el tiempo de prueba, leer la presión
en el equipo de comprobación.
Si la variación de la presión fuera inferior a 1 mbar, la válvula
del traje estará en perfecto estado. En este caso:
1. Comprobar la siguiente válvula del traje.
2. Desmontar el equipo de comprobación.
3. Acoplar la tapa de protección a la válvula del traje.
Si la variación de la presión es superior a 1 mbar:
1. Extraer y comprobar visualmente el disco de la válvula.
El disco de la válvula y el asiento de la misma deben estar
limpios y no presentar daños.
2. Si fuera necesario, sustituir el disco de la válvula (véase el
cap. 6.7.3 en la página 65).
3. Repetir la comprobación.
6.7 Tareas especiales de mantenimiento
Comprobar nuevamente la estanqueidad después de haber
realizado trabajos de mantenimiento y/o sustitución de
componentes. Se recomienda encargar todos los trabajos de
mantenimiento a Dräger.
6.7.1 Sustitución de los guantes
Cambiar los guantes o las combinaciones de guantes siempre
del siguiente modo:
1. Retirar los sobreguantes y el anillo de goma (si estuviera
presente).
2. Levantar el anillo del brazo con los pulgares y presionar el
aro de soporte, sobre el que está colocado el guante, fuera
de la manga.
3. Todos los guantes, excepto las combinaciones de
guantes:
Colocar el nuevo guante sobre el aro de soporte y ajustarlo
en el anillo del brazo. El eje largo del aro de soporte elíptico
está en paralelo a la superficie del guante.
Observar que no se formen arrugas entre el guante y el aro
de soporte.
4. Introducir el guante con el anillo de soporte o la nueva
combinación de guantes en las mangas del traje de
protección química a través del sistema de cierre abierto.
5. Introducir el guante con el aro de soporte o la combinación
de guantes por el anillo del brazo y ajustar:
Colocar el guante izquierdo en la manga izquierda y el
derecho en la derecha.
La palma de la mano mira en dirección a la costura de
la manga.
6. Empujar la unidad de guante en el anillo del brazo hasta
que el borde del aro de soporte tenga contacto con el
borde del anillo del brazo.
El anillo de soporte debe apoyarse completamente en la
hendidura del anillo del brazo.
7. Montar los sobreguantes (si así se desea):
Tirar del sobreguante K-MEX-Gigant sobre el anillo del
brazo y asegurar con el correspondiente anillo de
goma.
Tirar de los sobreguantes Tricotril sobre el anillo del
brazo y asegurar con el correspondiente anillo de
goma.
8. Comprobar la estanqueidad del traje de protección
química (véase el capítulo 6.5 en la página 63).
ADVERTENCIA
Si el traje de protección química está equipado con
combinaciones de guantes, es preciso desmontar las
combinaciones de guantes, eliminarlas y sustituirlas
por una combinación de guantes. No está garantizado
que el material resista un uso repetido con productos
químicos.
Para la colocación de los guantes no se debe utilizar
talco. De lo contrario pueden deslizarse los guantes
cuando el usuario aplique al guante una fuerza
compresiva elevada desde el interior mediante un
estiramiento excesivo.
!

Almacenamiento
Dräger CPS 6900 65
6.7.2 Sustitución del visor antirrayado
1. Quitar el visor antirrayado usado.
2. En caso necesario, retirar los restos de pegamento.
3. Quitar el plástico de protección a un lado de la tira
adhesiva y colocar la tira adhesiva sobre el punto de
adhesión original.
4. Quitar el plástico de protección del segundo lado de la tira
adhesiva.
5. Centrar el visor antirrayado nuevo y presionarlo
firmemente sobre la tira adhesiva.
6.7.3 Sustitución del disco de la válvula
1. Desacoplar la tapa de protección y el disco de la válvula
usado. No dañar el pivote del asiento de la válvula.
2. Humedecer el nuevo disco de la válvula y acoplarlo.
3. Colocar la tapa de protección sobre la válvula del traje.
6.7.4 Sustitución del visor antiempañamiento
1. Soltar cuidadosamente el visor antiempañamiento del
perfil de goma en la capucha.
2. Colocar un nuevo visor antiempañamiento:
a. Quitar las láminas de protección del visor
antiempañamiento.
b. Girar la capucha del traje de protección química hacia
la izquierda. Observar que el cierre de cremallera no se
estire excesivamente y el borde de sellado no se
desgarre.
c. Orientar el visor antiempañamiento con ayuda de las
marcas centrales e ir colocando poco a poco el perfil de
goma.
7 Almacenamiento
7.1 Condiciones de almacenamiento
Almacenar el traje de protección química en un lugar
oscuro, fresco, seco, ventilado, sin presión y libre de
tensiones.
Evitar la exposición a la radiación solar directa y la
radiación ultravioleta, así como al ozono.
Observar la temperatura de almacenamiento (véase el
cap. 9 en la página 67).
7.2 Preparar el almacenamiento
1. Cerrar el sistema de cierre hasta aprox. 5 cm antes del
tope. Comprobar con regularidad si el sistema de cierre
continúa suficientemente lubricado.
2. Poner la bolsa plana suministrada sobre la capucha de
forma que no se modifique la forma cilíndrica del visor.
3. En caso de plegar el traje de protección química, poner la
bolsa plana suministrada sobre las botas para que el traje
de protección química no se decolore.
7.3 Almacenar el traje de protección química
Es posible utilizar las siguientes variantes de almacenamiento:
Guardar el traje de protección química tendido plano. En
caso de que el traje de protección química se almacene en
un vehículo, evitar el desgaste debido a la fricción continua
con la superficie de apoyo.
Colgar el traje de protección química en el correspondiente
colgador o sobre una barra. La capucha o las botas de
protección deben estar en contacto con el suelo.
Plegar el traje de protección química y almacenar en un
maletín de transporte, un compartimento de
almacenamiento o una bolsa de transporte.
Guardar el traje de protección química en la bolsa de
almacenamiento y transporte.
ATENCIÓN
A fin de evitar que el visor resulte dañado, no utilizar
objetos afilados o puntiagudos ni disolventes.
Por norma general, los restos de adhesivo se pueden
eliminar con los pulgares.
ATENCIÓN
¡Peligro de daño material!
A fin de evitar que el visor antiempañamiento resulte
dañado, no utilizar objetos afilados o puntiagudos ni
disolventes.
!
!
ATENCIÓN
¡En caso de no observarse las condiciones de
almacenamiento, el traje de protección química podrá
resultar dañado!
NOTA
Dräger recomienda guardar el traje de protección
química en la bolsa de almacenamiento y transporte
para protegerla contra las influencias meteorológicas y
prolongar los intervalos de mantenimiento.
!
i
i

66 Dräger CPS 6900
Eliminación
7.3.1 Plegar el traje de protección química
1. Colocar la bolsa plana sobre la capucha.
2. Dar una vuelta hacia arriba
a los botines o las botas de
protección. Procurar que
no se produzcan pliegues
afilados.
3. Colocar las mangas hacia
el centro de la zona
pectoral del traje. Alisar las
arrugas.
4. Plegar la capucha y la
parte superior del traje de
protección química de
forma que el visor quede
colocado sobre las botas
de protección enrolladas.
Alisar las arrugas.
Procurar no que no se
deforme el visor.
7.3.2 Guardar el traje de protección química en la bolsa
de almacenamiento y transporte
1. Colocar el traje de
protección química en la
bolsa de almacenamiento y
transporte.
2. Fijar el visor con la correa
adherente.
3. Orientar las botas de
protección de la manera
indicada.
4. Asegurar el traje de
protección química por
debajo de las mangas y
asegurar a las botas con las
correas.
5. Plegar las mangas por los
hombros y colocar a los
lados.
6. Cerrar la bolsa de
almacenamiento y
transporte.
7. Doblar la bolsa de
almacenamiento y
transporte por la base de la bota y directamente bajo el
visor o en el cuello, llegando con los extremos al centro de
la bolsa. Observar que el visor se encuentre entre los
guantes.
8. Doblar la bolsa de almacenamiento y transporte por la
mitad y cerrar las hebillas de las correas.
8 Eliminación
8.1 Retirada de servicio
El traje de protección química se deberá retirar de servicio en
los siguientes casos:
Si ha sufrido daños y no es posible repararlo.
Si se ha contaminado y no es posible descontaminarlo
debido a la naturaleza de la sustancia contaminante.
El material del traje ha sufrido algún cambio: se han
detectado p. ej. puntos frágiles o hinchados, cambios de
color o diferencias en la superficie.
En caso de duda, Dräger puede facilitarle más información.
8.2 Vida útil
Sin ser utilizado y respetando las condiciones de
almacenamiento aquí recomendadas, así como los intervalos
de mantenimiento, las propiedades del material del traje de
protección química se mantendrán inalteradas durante al
menos 10 años a partir de la fecha de fabricación. El uso
frecuente puede acortar la vida útil, incluso si se realizan un
almacenamiento y mantenimiento correctos.
8.3 Indicaciones para la eliminación
Eliminar el traje de protección química conforme a lo indicado
en las normativas en vigor.
NOTA
Plegar el traje de protección química sin presión y con
cuidado.
No doblar violentamente el material del traje, las
costuras ni el sistema de cierre. Procurar que no se
produzcan pliegues afilados.
i
i
00221840.eps
17021963.eps
NOTA
El traje de protección química puede ser eliminado
térmicamente o en un vertedero. El tipo de eliminación
depende del grado de contaminación.
i
i

Datos técnicos
Dräger CPS 6900 67
9 Datos técnicos
9.1 Generalidades
Tamaños en cm:
9.2 Resistencia a la permeación de agentes
infecciosos
9.3 Resistencia del material del traje
Talla del
traje
Altura del
usuario Perímetro
torácico Perímetro de
la cintura
S 150-165 80-118 72-106
M 160-175 80-118 72-106
L 170-185 80-118 72-106
XL 180-200 104-124 95-110
XXL 195-210 104-124 95-110
Peso:
Traje talla L,
con botas de la talla 45,
sin accesorios
aprox. 6,8 kg
Traje talla L,
con botas de la talla 45,
con accesorios
aprox. 8,0 kg
Traje talla L,
con calcetines,
sin accesorios
aprox. 4,3 kg
Material:
Traje de protección
química
Umex
Visor Cloruro de polivinilo especial
Guantes FKM o
FKM/butilo o
butilo o
Laminado: HPPE o
para-aramida o
para-aramida
Botas de protección Nitrilo-P:
negro, botas de seguridad FPA-CR
con suela de plástico, resistente al
corte e ignífugo, forro textil en el
interior, para tallas
véase el capítulo 11 en la página 71
PVC:
amarillo, suela con dibujo negra, para
tallas véase el capítulo 11 en la
página 71
Colores:
Exterior/interior rojo/rojo
Temperaturas:
En uso -40 °C a +60 °C 1
Es posible una breve exposición a
temperaturas inferiores de hasta
-80 °C, dado que se han comprobado
por Dräger para el material Umex,
aunque no dentro del marco del
examen CE de tipo.
Observar las temperaturas de uso del
equipo de protección respiratoria.
En almacenamiento -5 °C a +25 °C
1 comprobado por Dräger
Verificación Resultado Clase1
1 según EN 14126:2003+AC:2005
Resistencia a líquidos
contaminados bajo presión
hidrostática (con el
bacteriófago Phi-X174)
Presión
hidrostática:
20 kPa
6
Verificación Resultado Clase1
1 según EN 943-1:2015
Resistencia a la fricción >2000 ciclos 6
Resistencia a la rotura por
flexión
>100000 ciclos 6
Resistencia a la rotura por
flexión a -30 °C2
2 según EN 14126:2003+AC:2005
>4000 ciclos 6
Resistencia al desgarre
progresivo
57 N 3
Resistencia al estallido 643 kPa 5
Resistencia a la perforación >50 N 33
3 según EN 1073-1:2016+A1:2018 y EN 1073-2:2002: Clase 2
Resistencia a las llamas autoextinguible se cumple
Resistencia de las costuras >500 N 6
Resistencia a la tracción >1000 N 6

68 Dräger CPS 6900
Datos técnicos
9.4 Resistencia a la permeación de
productos químicos según
EN 943-1:2015
Para la homologación europea, las comprobaciones se han
realizado para las concentraciones de producto químico
indicadas a continuación mediante humedecimiento/
recubrimiento completo de los equipos a comprobar.
De acuerdo con EN 943-1:2015, la división de clases para la
comprobación de la resistencia a la permeación de productos
químicos se obtiene de la siguiente forma:
Clase 1 >10 minutos
Clase 2 >30 minutos
Clase 3 >60 minutos
Clase 4 >120 minutos
Clase 5 >240 minutos
Clase 6 >480 minutos
Umex Sistema de
cierre Costuras Visor Conexión de
la visor
Productos químicos de
comprobación
Clase Clase Clase Clase Clase
Amoniaco, N.º CAS 7664-41-
7
63466
Cloro, N.º CAS 7782-50-5 6 3 3 6 6
Cloruro de hidrógeno1, N.º
CAS 747-01-06
42466
n-heptano1, N.º CAS 142-82-5 62666
Hidróxido de sodio al 40 %,
N.º CAS 1310-73-2
66666
Ácido sulfúrico al 96 %1, N.º
CAS 7664-93-9
23363
1 El traje no es apto para el contacto continuo con este producto químico
Guante de
butilo Guante de
caucho
fluorado
Guante de
caucho
fluorado/
butilo
Combinación
de guantes de
membrana1
Botas de
protección
(PVC)
Botas de
protección
(nitrilo)
Productos químicos de
comprobación
Clase Clase Clase Clase Clase Clase
Amoniaco,N.ºCAS 7664-41-7 6 6 6 6 6 6
Cloro, N.º CAS 7782-50-5 3 6 6 6 6 6
Cloruro de hidrógeno2, N.º
CAS 747-01-06
6 6 6 6 6 6
n-heptano2,N.º CAS 142-82-5 1 6 6 6 4 6
Hidróxido de sodio al 40 %,
N.º CAS 1310-73-2
6 6 6 6 6 6
Ácido sulfúrico al 96 %2 N.º
CAS 7664-93-9
2 6 6 6 6 6
1 Guante de laminado/Tricotril (guante de Barrier y Tricotril)
2 El traje no es apto para el contacto continuo con este producto químico

Datos técnicos
Dräger CPS 6900 69
9.5 Resistencia a la permeación de
productos químicos según
ISO 16 602:2007
De acuerdo con ISO 16 602:2007, la división de clases para la
comprobación de la resistencia a la permeación de productos
químicos se obtiene de la siguiente forma:
Clase 1 ≥10 minutos
Clase 2 ≥30 minutos
Clase 3 ≥60 minutos
Clase 4 ≥120 minutos
NOTA
Según la norma ISO 16 602:2007, tabla E.1, la clase 4
es la clase más alta que se puede alcanzar con los
valores determinados.
i
i
Umex Sistema de
cierre Costuras Visor Conexión de
la visor
Productos químicos
utilizados para el ensayo
Clase Clase Clase Clase Clase
Amoniaco,N.º CAS 7664-41-7 43444
Cloro, N.º CAS 7782-50-5 4 3 3 4 4
Cloruro de hidrógeno1, N.º
CAS 747-01-06
42444
n-heptano1, N.º CAS 142-82-5 42444
Hidróxido de sodio al 40 %,
N.º CAS 1310-73-2
44444
Ácido sulfúrico al 96 %1, N.º
CAS 7664-93-9
23343
1 El traje no es apto para el uso continuo con este producto químico
Guante de
butilo Guante de
caucho
fluorado
Guante de
caucho
fluorado/
butilo
Combinación
de guantes de
membrana 1
Botas de
protección
(PVC)
Botas de
protección
(nitrilo)
Productos químicos
utilizados para el ensayo
Clase Clase Clase Clase Clase Clase
Amoniaco, N.º CAS 7664-41-
7
4 4 4 4 4 4
Cloro, N.º CAS 7782-50-5 3 4 4 4 4 4
Cloruro de hidrógeno2, N.º
CAS 747-01-06
4 4 4 4 4 4
n-heptano2, N.º CAS 142-82-5 1 4 4 4 4 4
Hidróxido de sodio al 40 %,
N.º CAS 1310-73-2
4 4 4 4 4 4
Ácido sulfúrico al 96 %2, N.º
CAS 7664-93-9
2 4 4 4 4 4
1 Guante de laminado/Tricotril (guante de Barrier y Tricotril)
2 El traje no es apto para el uso continuo con este producto químico

70 Dräger CPS 6900
Protocolo de comprobación
10 Protocolo de comprobación
Fecha de fabricación1:
FirmaFecha de
mantenimiento/
reparación
Defectos
comprobados
Número de artículo1:
Duración del contacto
con productos químicos
(en minutos)
Componentes afectados
del traje (cabeza, brazos,
piernas,...)
Tipo1:
El traje de protección entró
en contacto con (nombre de
la sustancia, n.° CAS., n.° UN)
Fecha de
uso
1 Véase la placa de características en el bolsillo interior del traje de protección química.

Lista de referencias
Dräger CPS 6900 71
11 Lista de referencias
Denominación y descripción Referencia
Dräger CPS 6900 R 29 410
Botas de protección superiores:
Nitrilo P, talla 43 R 56 863
Nitrilo P, talla 44 R 56 864
Nitrilo P, talla 45 R 56 865
Nitrilo P, talla 46/47 R 56.866
Nitrilo P, talla 48 R 56 867
Nitrilo P, talla 49/50 R 56 868
PVC, talla 43 R 52 653
PVC, talla 44 R 55 474
PVC, talla 45 R 55 477
PVC, talla 46 R 52 656
PVC, talla 47/48 R 55 413
Botas de protección para montaje:
Nitrilo P, talla 43, acortadas R 58 221
Nitrilo P, talla 44, acortadas R 58 222
Nitrilo P, talla 45, acortadas R 58 223
Nitrilo P, talla 46/47, acortadas R 58 224
Nitrilo P, talla 48, acortadas R 58 225
Nitrilo P, talla 49/50, acortadas R 58 226
PVC, talla 43, acortadas R 62 001
PVC, talla 44, acortadas R 62 002
PVC, talla 45, acortadas R 62 003
PVC, talla 46, acortadas R 62 004
PVC, talla 47/48, acortadas R 62 005
Guantes:
Butilo, talla 9 R 55 538
Butilo, talla 10 R 53 531
Butilo, talla 11 R 53 560
FKM/butilo, talla 9 R 55 762
FKM/butilo, talla 10 R 55 531
FKM/butilo, talla 11 R 55 761
FKM, talla 9 R 55 537
FKM, talla 10 R 53 776
FKM, talla 11 R 53 554
Sobreguantes:
Laminado + Tricotril sobre aro de soporte,
talla 10
R 63 003
Laminado + Tricotril sobre aro de soporte,
talla 11
R 63 004
Sobreguante Tricotril, talla 10 R 55 968
Sobreguante Tricotril, talla 11 R 55 966
Sobreguante K-MEX-Gigant, talla 14 R 55 969
Accesorios para guantes y botas:
Guantes de algodón, 1 par R 50 972
Manguito estanco al gas R 52 648
Anillo de goma para sobreguantes
(se necesitan 2 unidades)
R 51 358
Bandas reflectantes
(se necesitan 2 unidades)
R 58 218
Aro de apoyo R 51 265
Sobrebotines R 61 018
Ventilación:
Válvula de regulación PT 120 L R 55 509
Válvula de regulación PT 120 L - Stäubli R 58 059
Air-Connect R 58 075
Air-Connect - Stäubli R 58 235
Juego de lengüetas de ventilación S, M R 58 901
Juego de lengüetas de ventilación L, XL, XXL R 58 903
ASV 33 54 568
ASV para PSS 7000 33 57 007
Adaptador para pulmoautomático R 58 281
Pieza en Y R 55 507
Soporte:
D-Connect: R 58 080
Cinturón de cadera AL 01 211
Soporte para manómetro R 58 078
Correa de entrepierna R 58 085
Denominación y descripción Referencia

72 Dräger CPS 6900
Lista de referencias
Transporte y almacenamiento:
Bolsa de almacenamiento y transporte de
traje
R 58 152
Maletín de transporte T 51 525
Colgador (en forma de campana) R 33 299
Colgador (en forma de T) R 54 746
Bolsa plana para capucha y botas 87 10 071
Equipos de control y accesorios:
Equipo de comprobación Porta Control 3000 R 62 520
Limpieza y desinfección:
Bolsa de lavado 65 70 003
Pantalla de apoyo R 58 157
Lápiz de engrase, 2 unidades R 27 494
Gel antiempañante "klar-pilot" R 52 560
Líquido antiempañante "klar pilot" Comfort R 56 542
Eltra (20 kg) 79 04 074
Mantenimiento y reparación:
Juego de adhesivos (adhesivo PU/PVC) R 58 304
Juego de conexiones de botas R 25 264
Masilla de sellado para conexión de botas R 55 272
Mochila R 57.860
Válvula del traje, completa R 58 625
Disco de válvula R 58 239
Visor antirrayado (10 unidades) R 57 859
Visor antivaho (1 unidad) R 57 858
Manual técnico bajo
consulta
Manual de uso bajo
consulta
Denominación y descripción Referencia

Inhoud
Dräger CPS 6900 73
Inhoud
1 Veiligheidsgerelateerde informatie . . . . . . . . . . .74
2 Conventies in dit document . . . . . . . . . . . . . . . . .74
3 Beschrijving . . . . . . . . . . . . . . . . . . . . . . . . . . . . .74
3.1 Beoogd gebruik . . . . . . . . . . . . . . . . . . . . . . . . . . . .75
3.2 Beperkingen aan het beoogd gebruik . . . . . . . . . . .75
3.3 Toelatingen . . . . . . . . . . . . . . . . . . . . . . . . . . . . . . .75
3.4 Geteste persoonlijke veiligheidsuitrusting . . . . . . . .75
3.5 Type markering . . . . . . . . . . . . . . . . . . . . . . . . . . . .76
4 Gebruik . . . . . . . . . . . . . . . . . . . . . . . . . . . . . . . . .76
4.1 Gebruiksvoorwaarden . . . . . . . . . . . . . . . . . . . . . . .76
4.2 Opmerkingen over de behandeling
van het ritssluitingssysteem . . . . . . . . . . . . . . . . . .76
4.3 Controles voor gebruik . . . . . . . . . . . . . . . . . . . . . .76
4.4 Tijdens het gebruik . . . . . . . . . . . . . . . . . . . . . . . . .77
4.5 Na het gebruik . . . . . . . . . . . . . . . . . . . . . . . . . . . . .77
5 Hulp bij storingen . . . . . . . . . . . . . . . . . . . . . . . . .78
6 Onderhoud . . . . . . . . . . . . . . . . . . . . . . . . . . . . . . .79
6.1 Onderhoudsintervallen . . . . . . . . . . . . . . . . . . . . . .79
6.2 Visuele controle van het gaspak . . . . . . . . . . . . . . .79
6.3 Gaspak reinigen en desinfecteren . . . . . . . . . . . . .79
6.4 Ritssluitingssysteem verzorgen . . . . . . . . . . . . . . .81
6.5 Het gaspak op dichtheid controleren . . . . . . . . . . .81
6.6 De gaspakventielen op dichtheid controleren . . . . .81
6.7 Bijzondere onderhoudswerkzaamheden . . . . . . . . .82
7 Opslag . . . . . . . . . . . . . . . . . . . . . . . . . . . . . . . . . .82
7.1 Opslagcondities . . . . . . . . . . . . . . . . . . . . . . . . . . .82
7.2 Voorbereiding voor opslag . . . . . . . . . . . . . . . . . . .83
7.3 Gaspak opslaan . . . . . . . . . . . . . . . . . . . . . . . . . . .83
8 Afvoeren . . . . . . . . . . . . . . . . . . . . . . . . . . . . . . . .83
8.1 Afvoeren . . . . . . . . . . . . . . . . . . . . . . . . . . . . . . . . .83
8.2 Levensduur . . . . . . . . . . . . . . . . . . . . . . . . . . . . . . .83
8.3 Aanwijzingen voor afvoeren . . . . . . . . . . . . . . . . . .83
9 Technische gegevens . . . . . . . . . . . . . . . . . . . . . .84
9.1 Algemene informatie . . . . . . . . . . . . . . . . . . . . . . . .84
9.2 Weerstand tegen penetratie
door besmettelijke agentia . . . . . . . . . . . . . . . . . . .84
9.3 Bestendigheid van het materiaal
waaruit het pak bestaat . . . . . . . . . . . . . . . . . . . . . .84
9.4 Weerstand tegen chemicaliënpermeatie
conform EN 943-1:2015 . . . . . . . . . . . . . . . . . . . . .85
9.5 Weerstand tegen chemicaliënpermeatie
conform ISO 16 602:2007 . . . . . . . . . . . . . . . . . . . .86
10 Controlebericht . . . . . . . . . . . . . . . . . . . . . . . . . . .87
11 Bestellijst . . . . . . . . . . . . . . . . . . . . . . . . . . . . . . . .88

74 Dräger CPS 6900
Veiligheidsgerelateerde informatie
1 Veiligheidsgerelateerde informatie
Het is belangrijk om voor gebruik van dit product deze
gebruiksaanwijzing en de gebruiksaanwijzing van de
bijbehorende producten zorgvuldig door te lezen.
De gebruiksaanwijzing strikt opvolgen. De gebruiker moet
de aanwijzingen volledig begrijpen en strikt opvolgen. Het
product mag uitsluitend worden gebruikt voor de
doeleinden, zoals gespecificeerd in het document onder
'Beoogd gebruik'.
Gooi deze gebruiksaanwijzing niet weg. Zorg ervoor dat de
gebruiksaanwijzing wordt bewaard en op de juiste manier
wordt opgevolgd door gebruikers van het product.
Dit product mag alleen worden gebruikt door opgeleid en
competent personeel.
Het is belangrijk de lokale en nationale voorschriften strikt
op te volgen die van toepassing zijn op dit product.
Het product mag alleen worden geïnspecteerd,
gerepareerd en onderhouden door opgeleid en competent
personeel. Dräger adviseert het afsluiten van een Dräger-
servicecontract voor alle onderhoudsactiviteiten en om alle
reparaties te laten uitvoeren door Dräger.
Maak voor onderhoudswerkzaamheden alleen gebruik van
originele Dräger-onderdelen en -toebehoren, om de juiste
werking van het product te kunnen blijven waarborgen.
Maak geen gebruik van een defect of onvolledig product.
Voer geen aanpassingen uit aan het product.
Stel Dräger op de hoogte als zich fouten of defecten in de
onderdelen voordoen.
2 Conventies in dit document
Betekenis van de waarschuwingssymbolen
De volgende waarschuwingssymbolen worden in dit document
gebruikt om de bijbehorende waarschuwingsteksten aan te
duiden en te accentueren, die een verhoogde aandacht van de
gebruiker vereisen. De betekenissen van de
waarschuwingssymbolen zijn als volgt gedefinieerd:
Merknamen
In dit document worden de volgende merknamen gebruikt:
FPS®, HPS®, Panorama Nova®, PAS®, PSS® en X-plore®
zijn geregistreerde handelsmerken van Dräger.
Eltra® en ECOLAB® zijn gedeponeerde handelsmerken
van Ecolab.
K-MEX® en Tricotril® zijn gedeponeerde handelsmerken
van KCL GmbH.
Barrier® is een geregistreerd handelsmerk van Ansell
Cryo-Industrial® is een gedeponeerd handelsmerk van
Tempshield, Inc.
Afkortingen
FKM = fluorelastomeer rubbercompound
PVC = polyvinylchloride
3 Beschrijving
Dräger CPS 6900 zijn gasdichte, beschermende pakken zoals
bedoeld in EN 943-1:2015 (type 1a). Ze zijn geschikt voor
hergebruik.
Voor de ademluchtvoorziening is een ademluchttoestel
vereist. Ademluchttoestel, volgelaatsmasker en
veiligheidshelm worden onder het gaspak gedragen. Mogelijke
combinaties zie hfst. 3.4 op pagina 75.
Het gaspak is uitgerust met verwisselbare handschoenen. De
volgende handschoenen zijn leverbaar:
FKM-handschoen, evt. met Tricotril-overhandschoen
FKM-handschoen, evt. met K-MEX-Gigant-
overhandschoen
Butyl-handschoen, evt. met Tricotril-ovrhandschoen
Butyl-handschoen, evt. met K-MEX-Gigant-
overhandschoen
FKM/Butyl-handschoen, evt. met Tricotril-overhandschoen
FKM/Butyl-handschoen, evt. met K-MEX-Gigant-
overhandschoen
De volgende gelamineerde handschoenen zijn leverbaar:
Laminaat/Tricotril-handschoencombinatie
Het gaspak kan ofwel met sokken van het materiaal van het
pak of met laarzen worden uitgerust. De sokken bieden niet
voldoende bescherming tegen mechanische belastingen.
Vandaar dat de gebruiker tevens geschikte veiligheidslaarzen
moet dragen die volgens EN ISO 20345 goedgekeurd zijn.
Een laarsoverslag verhindert het binnendringen van materiaal
tussen sokken en veiligheidslaarzen.
Het vizier is aan de buitenzijde van het pak antikrasgecoat.
Het gaspak is voorzien van een zak voor radioapparatuur en
een houder voor de Push-to-Talk-button. Op de zak bevindt
zich de type markering.
De volgende delen kunnen optioneel aan het gaspak
aangebracht zijn:
Regelventiel PT 120 L of Air-Connect:
ventilatie-eenheid voor het aansluiten van externe
ademluchtbronnen met en zonder koelsysteem voor
binnenin het pak
WAARSCHUWING
Wijst op een potentieel gevaarlijke situatie. Wanneer
deze niet wordt voorkomen kan dit leiden dit tot de
dood of ernstig letsel.
VOORZICHTIG
Wijst op een potentieel gevaarlijke situatie. Wanneer
deze niet wordt voorkomen, kan dit leiden tot letsel of
schade aan het product of het milieu. Kan ook worden
gebruikt als waarschuwing tegen ondeskundig
gebruik.
AANWIJZING
Extra informatie over het gebruik van het product.
!
!
i
i
AANWIJZING
De overhandschoenen hoeven niet te worden
gebruikt. Zij bieden echter een hogere snijvastheid.
i
i

Beschrijving
Dräger CPS 6900 75
D-Connect:
houder voor extra apparatuur (bijv. warmtebeeldcamera,
meetapparatuur, reddingslussen), die aan de linker- of
rechterheup kan worden bevestigd.
Lengteaanpassing:
voor het aanpassen van de lengte van het pak
Anticondensvizier in het pak:
voorkomt beslaan van het vizier.
Manometerhouder onder het vizier:
voor het bevestigen van de manometer van het
ademluchttoestel in het gezichtsveld van de gebruiker
Gebruikersidentificatienummers:
om de ingezette teams eenvoudiger te hekennen
Een markering met een watervaste stift is mogelijk, maar
wordt niet aanbevolen.
3.1 Beoogd gebruik
Het gaspak beschermt tegen gasvormige, vloeibare,
aerosolvormige en vaste gevaarlijke stoffen en tegen
besmettelijke agentia. Bovendien beschermt hij tegen
incorporatie van radioactieve stoffen.
3.2 Beperkingen aan het beoogd gebruik
Voor bepaalde chemicaliën gelden beperkingen voor wat de
gebruikstijd betreft. Deze is afhankelijk van de concentratie, de
toestand van het toestel en van de omgevingsvoorwaarden.
Hitte en open vuur vermijden. Het gaspak is niet geschikt voor
de brandbestrijding. Voor meer informatie over mechanische
en chemische bestendigheid en temperatuurbestendigheid,
zie hfst. 9 op pagina 84.
Het gaspak biedt geen bescherming tegen de straling van
radioactieve deeltjes of tegen stralingsschade.
Het gaspak mag niet worden gebruikt als het beschadigd of
versleten is.
3.3 Toelatingen
Het gaspak is toegelaten conform:
EN 943-1:2015 (type 1a)
EN 14126:2003+AC:2005:1a-B
EN 1073-1:2016+A1:2018:IL:klasse 4,
nominale protectiefactor 20000
(alleen Dräger CPS 6900 met ventilatie-eenheid)
EN 1073-2: 2002:IL: klasse 3, nominale protectiefactor 500
(alleen Dräger CPS 6900 zonder ventilatie-eenheid)
EN 14593-1:2018
(alleen Dräger CPS 6900 met ventilatie-eenheid)
EN 14594:2018
ISO 16602:2007+Amd 1:2012
SOLAS II-2, reg. 19, consolidated edition 2004
TP TC 019/2011
(EU) 2016/425
Regulation 2016/425 on personal protective equipment, as
amended to apply in GB
De veiligheidslaarzen van nitril zijn toegelaten volgens:
EN ISO 20345:2011
EN 15090:2012
De veiligheidslaarzen van PVC zijn toegelaten volgens:
EN ISO 20345:2011
Conformiteitsverklaringen:
zie www.draeger.com/product-certificates
3.4 Geteste persoonlijke
veiligheidsuitrusting
3.4.1 Adembeschermende middelen
Volgelaatsmaskers Dräger FPS 7000 RA/PE/P/ESA
Volgelaatsmaskers Panorama Nova RA/PE/P/ESA
Volgelaatsmaskers f2 PA-RA/PE
Masker-helmcombinaties Dräger FPS 7000 H61/H62
Masker-helmcombinaties Panorama Nova S-RA/Supra,
Panorama Nova S-PE/Supra en Panorama Nova S-HE-
EPDM-PC-RA
Masker-helmcombinaties f2 S-PA-PE/Supra
3.4.2 Ademluchttoestel
PA 80/90 UP
PA 94 UP
PA 94 D plus
PAS lite1
PSS 100D
PSS 1001
PSS 30001
PSS 40001
PSS 50001
PSS 70001
3.4.3 Ademautomaten
alle ademautomaten van de PSS-serie
3.4.4 Veiligheidshelmen
Dräger HPS 4000-serie
Dräger HPS 6000-serie
Dräger HPS 7000-serie
Schuberth F110
Schuberth F210
Dräger F1S12
Dräger F1SA12
Heros I
Heros II
VOORZICHTIG
De volgende combinaties van veiligheidsuitrusting zijn
door Dräger getest en toegelaten.
Indien andere combinaties moeten worden toegepast,
dient de gebruiker te controleren of deze kunnen
worden gebruikt.
1 Ook in combinatie met ASV en Y-stuk
!

76 Dräger CPS 6900
Gebruik
3.5 Type markering
De typemarkering bevindt zich op de zak in het gaspak.
4 Gebruik
4.1 Gebruiksvoorwaarden
4.2 Opmerkingen over de behandeling van
het ritssluitingssysteem
Het ritssluitingssysteem werd speciaal voor gaspakken
ontwikkeld. Door extra afdichtingen lopen de ritssluitingen over
het algemeen iets zwaarder dan bij ritsluitingen van normale
kleding. Om te voorkomen dat zich vouwen vormen in het
ritssluitingssysteem, moet de drager van het gaspak het
ritssluitingssysteem met een greep aan de kap uitstrekken,
terwijl een helper de broekspijp met het ritssluitingssysteem
met beide handen naar onderen trekt, zodat het
ritssluitingssysteem zonder vouwen verloopt. De drager van
het gaspak moet bij het openen en sluiten van het
ritssluitingssysteem rechtop staan.
4.2.1 Openen van het ritssluitingssysteem
Ritssluitingssysteem volledig openen.
Altijd in de richting van de sluitketting trekken, nooit scheef
trekken!
Geen geweld gebruiken. Kettingschakels kunnen worden
verbogen!
Als de sluiting niet verder dicht wil, de clip terug- en weer
omhoogtrekken.
4.2.2 Sluiten van het ritssluitingssysteem
Bij sluiten van het ritssluitingssysteem zijwaartse spanning
op de clip vermijden.
Sluitkettingen met de hand samentrekken.
De clip kan dan gemakkelijker worden dichtgetrokken.
Er mogen bij het sluiten geen voorwerpen zoals hemd, jas,
draden enz. tussen de kettingschakels komen.
4.3 Controles voor gebruik
4.3.1 Gaspak voorbereiden
1. Om transportschade vast te stellen, voor het eerste gebruik
de dichtheid controleren. Daarna de onderhoudsbeurten in
acht nemen (zie hfst. 6.1 op pagina 79).
2. Het gaspak plat op de grond leggen en visueel controleren
(zie hfst. 6.2 op pagina 79).
3. Indien aanwezig, de werking van de ventilatie-eenheid en
de verbinding met de ademluchttoestel controleren.
4. Het vizier van het volgelaatsmasker aan de buitenkant met
anticondensmiddel "klar-Pilot" behandelen. Gebruik voor
gecoate vizieren de spray “klar-pilot” Comfort. Als het pak
geen anticondensvizier heeft, ook de binnenkant van het
vizier behandelen.
Let op! Neem de gebruiksaanwijzing in
acht.
Kleding ter bescherming tegen
gasvormige, vloeibare, aerosolvormige en
vaste chemicaliën (conform EN 943-
1:2015, type 1a)
Beschermkleding tegen infectieverwekkers
(conform EN 14126:2003+AC:2005,
type 1a-B)
Kleding ter bescherming tegen
radioactieve contaminatie door vaste
deeltjes (conform EN 1073-
1:2016+A1:2018 en EN 1073-2:2002 (voor
klassen zie 3.3))
Toewijzing van grootte, borstomvang en
tailleomvang tot de grootte van het
veiligheidspak (zie hfst. 9 op pagina 84).
WAARSCHUWING
Het gaspak moet in overeenstemming met de
geldende normen en richtlijnen van het betreffende
land worden gebruikt.
De omgevingsbelasting moet vóór gebruik worden
vastgesteld, omdat de geschiktheid van het gaspak
niet pas tijdens gebruik kan worden vastgesteld. Het
gaspak moet geschikt zijn voor het specifieke gebruik.
De gebruiker dient de nationale en andere eisen aan
het gebruik van persoonlijke beschermingsmiddelen in
acht te nemen.
Veronachtzaming kan tot de dood of tot ernstig
lichamelijk letsel leiden.
!
VOORZICHTIG
Om beschadigingen aan het ritssluitingssysteem te
vermijden, moeten de beide helften van de sluiting
parallel en onbelast tegenover elkaar liggen. Bij het
openen en sluiten geen geweld gebruiken en geen
rukkende trekbewegingen uitoefenen.
Onvoldoende ingevette sluitsystemen kunnen moeilijk
worden bediend. Dit kan leiden tot beschadiging van
het ritssluitingssysteem. Ritssluitingssysteem met de
bij Dräger verkrijgbare vetstift invetten.
AANWIJZING
Dräger adviseert de zakken waarin het gaspak werd
geleverd te bewaren, omdat zij later voor het opbergen
worden gebruikt.
WAARSCHUWING
Gaspak niet gebruiken, wanneer het beschadigd is.
Anders is er kans op levensgevaarlijk letsel.
!
i
i
!

Gebruik
Dräger CPS 6900 77
4.3.2 Gaspak aantrekken
1. Onderkleding (vochttransporterende werkkleding,
katoenen handschoenen) aantrekken.
2. Ademluchttoestel en volgelaatsmasker aandoen.
3. Veiligheidshelm of masker-helmcombinatie opzetten.
4. Het functioneren van ademluchttoestel, volgelaatsmasker
en masker-helm-combinatie controleren zoals beschreven
in de desbetreffend gebruiksaanwijzingen.
5. Als het gaspak uitgerust is met gasdicht vastgemaakte
sokken:
a. Zonder schoenen eerst in de rechter broekspijp, dan in
de linker broekspijp stappen.
b. Veiligheidslaars aantrekken.
6. Als het gaspak uitgerust is met gasdicht vastgemaakte
veiligheidslaarzen eerst zonder schoenen in de rechter
broekspijp en veiligheidslaars, dan in de linker broekspijp
en de veiligheidslaars stappen.
7. Gaspak tot de taille omhoogtrekken.
8. Als het gaspak uitgerust is met een ventilatie-eenheid:
a. De luchttoevoer binnenin het gaspak aansluiten.
b. Geïntegreerde heupgordel sluiten.
9. Als het gaspak uitgerust is met een D-connect, sluit dan de
geïntegreerde heupgordel.
10. Als het gaspak uitgerust is met een lengteaanpassing,
hang de lengteaanpassing dan in de heupgordel van het
ademluchttoestel. Aan het einde van de lengteaanpassing
trekken om hem op de gewenste lengte in te stellen.
11. De kap over het hoofd trekken en hierbij met de rechterarm
in de rechtermouw en de handschoen glijden. De rugzak
van het gaspak over de ademluchttoestel geleiden. Met de
linkerarm in de linkermouw en de handschoen glijden.
12. Ademautomaat op het volgelaatsmasker aansluiten.
13. Ritssluitingssysteem sluiten. Hierbij de clip altijd in de
richting van de sluitketting trekken. Geen geweld
gebruiken!
14. Indien nodig, overhandschoenen monteren:
a. K-MEX-Gigant-overhandschoen over de armring
trekken en met de bijbehorende rubberring beveiligen.
b. Tricotril-overhandschoen over de
polsafdichtingsmanchet trekken en met de
bijbehorende rubberring beveiligen.
4.4 Tijdens het gebruik
Nooit alleen een gevarenzone betreden!
Inzetduur, inzetlimieten en nationale voorschriften in acht
nemen. De maximale inzetduur is o. a. afhankelijk van het
gebruikte ademluchtsysteem en de inzetomstandigheden.
Als bij veiligheidspakken met ventilatie-eenheid geen
luchtslangen zijn aangesloten, de aansluitingen met een
beschermkap sluiten om deze tegen verontreinigingen te
beschermen.
Bij het werken met diepkoude media geschikte
overhandschoenen (bijv. Cryo-Industrial handschoenen
van Tempshield, Inc.) en onderkleding dragen.1
Bij slecht zicht door beslaan of bevriezen van het vizier aan
de binnenzijde: Eén hand uit de mouw trekken en het vizier
met bijv. een poetsdoek schoonwissen. De poetsdoek kan
in de binnenzak worden bewaard.
Bij gevaar direct het gecontamineerde gebied verlaten.
Ritssluitingssysteem pas in het schone gebied openen.
4.5 Na het gebruik
4.5.1 Gaspak voorreinigen
1. Het gecontamineerde gebied verlaten en het gaspak door
een helper laten voorreinigen. De helper moet
veiligheidskleding en eventueel adembescherming
dragen.
Dräger adviseert voor de voorreiniging de toepassing van
veel water met toevoeging van wasmiddellen. Op deze
wijze kunnen de meeste chemicaliën (zuren, alkaliën,
organica en anorganica) goed worden afgewassen.
2. Gaspak grondig en niet te kort reinigen. Meeslepen van
chemicaliën vermijden.
3. Bij verontreiniging met gevaarlijke stoffen het afvalwater
volgens de geldende voorschriften voor afvalverwerking
afvoeren.
4. Indien nodig, de decontaminatie stapsgewijs uitvoeren.
Meer informatie over de decontaminatie2 is bij Dräger
verkrijgbaar.
AANWIJZING
Tijdens het aantrekken moet een tweede persoon
helpen.
AANWIJZING
Dräger adviseert om de broekspijpen van de
onderkleding in de sokken te steken om te voorkomen
dat ze verschuiven.
Om te voorkomen dat de katoenen handschoenen
omlaagglijden, moeten ze met isolatieband aan de
pols worden bevestigd.
i
i
i
i
VOORZICHTIG
Een ophoping van warmte in het gaspak kan
bewustzijnsverlies veroorzaken, daarom eventueel
een koelvest onder het pak aantrekken of een hiervoor
geschikt ventilatiesysteem gebruiken.
1 geen onderdeel van het EG-typeonderzoek
WAARSCHUWING
Gecontamineerde delen niet zonder veiligheidskleding
aanraken. Contaminatie van het schone
binnengedeelte van het veiligheidspak verhinderen.
Dood of ernstig letsel kunnen het gevolg zijn wanneer
de genoemde voorzorgsmaatregelen niet worden
getroffen.
VOORZICHTIG
Als geen voorreiniging ter plaatse mogelijk is, het
gaspak na het uittrekken sluiten om te voorkomen dat
chemicaliën in het pak binnendringen.
2 niet deel van het typeonderzoek
!
!
!

78 Dräger CPS 6900
Hulp bij storingen
4.5.2 Gaspak uittrekken
1. Ritssluitingssysteem openen.
Hierbij de clip altijd in de richting van de sluitketting trekken.
Geen geweld gebruiken.
2. De linkerarm uit de mouw trekken.
3. Als het gaspak uitgerust is met een ventilatie-eenheid:
a. Geïntegreerde heupgordel openen.
b. Luchttoevoer door een helper laten loskoppelen.
4. Als het gaspak is uitgerust met een D-connect, open dan
de geïntegreerde heupgordel.
5. Als het gaspak uitgerust is met een lengteaanpassing,
koppel de lengteaanpassing dan los van de heupgordel
van het ademluchttoestel.
6. De rechterarm uit de mouw trekken.
7. Om de kap gemakkelijk af te kunnen doen, licht in de
hurken gaan zitten.
8. Gaspak zo van de drager van het gaspak wegklappen dat
geen chemicaliën of reinigingsmiddelen in het pak kunnen
dringen.
9. Uit veiligheidslaarzen en broekspijpen stappen.
10. Veiligheidshelm, ademluchttoestel, volgelaatsmasker en
katoenen handschoenen afzetten resp. uittrekken.
5 Hulp bij storingen
WAARSCHUWING
Het gaspak alleen in niet gecontamineerd gebied
uittrekken.
AANWIJZING
Dräger adviseert het gebruik te rapporteren (zie
hfst. 10 op pagina 87).
!
i
i
Storing Oorzaak Oplossing1
1 geen onderdeel van het EG-typeonderzoek
Ritssluitingssys-
teem klemt
Vreemd voorwerp
in de sluitketting
Sluitketting
reinigen, vreemd
voorwerp
verwijderen
Sterke wrijving Sluitketting met
vetstift smeren
Gaspak
is niet dicht
Ritssluitingssys-
teem niet gesloten
Ritssluitingssys-
teem volledig
sluiten
Materiaal van het
pak beschadigd
Met
reparatiemateriaal
herstellen.
Opnieuw op
dichtheid
controleren.
Veiligheidslaars of
handschoenen
defect of
verbindingsplaat-
sen ondicht
Vervangen of
afdichten.
Opnieuw op
dichtheid
controleren.
Ventielschijf of
-zitting
verontreinigd of
defect
Reinigen of
vervangen.
Opnieuw op
dichtheid
controleren.
Vizier of naad
ondicht
Vervangen of
afdichten.
Opnieuw op
dichtheid
controleren.
Gaspak wordt niet
ontlucht
Ventielschijf van
het gaspakventiel
is vastgeplakt
Reinigen of
vervangen.
Opnieuw op
dichtheid
controleren.
Klittenband komt
los
Het klittenband is
vastgeplakt.
Reiniging en
decontaminatie
kunnen tot
loskomen leiden.
Klittenband
opnieuw
vastlijmen.
Opnieuw op
dichtheid
controleren.

Onderhoud
Dräger CPS 6900 79
6 Onderhoud
6.1 Onderhoudsintervallen
De aangegeven intervallen zijn aanbevelingen van Dräger.
Indien nodig moeten afwijkende nationale richtlijnen in acht
worden genomen.
Voor onderhoudswerkzaamheden aan volgelaatsmasker,
ventilatie-eenheid, automatisch omschakelventiel en
ademluchttoestel, zie bijbehorende gebruiksaanwijzingen.
6.2 Visuele controle van het gaspak
De volgende controles moeten worden uitgevoerd. Bij klachten
moet het gaspak worden gerepareerd of afgevoerd.
De buitenzijde van het gaspak mag geen gaten, sneden of
slijtage vertonen.
De naadband mag niet loszitten of losgaan.
Het vizier moet schoon zijn.
De volgende componenten moeten onbeschadigd zijn.
a. Pakmateriaal
b. Handschoenen
c. Sokken
d. Vizier
e. Afdichting van het vizier
f. Ritssluitingssysteem
De gaspakventielen moeten vrij en onbeschadigd zijn.
Het pakmateriaal mag geen slijtagesporen vertonen. De
coating mag niet van het weefsel loskomen.
6.3 Gaspak reinigen en desinfecteren
6.3.1 Handmatige reiniging en desinfectie
1. Rugzakkussen verwijderen en afzonderlijk met helder,
warm water reinigen.
2. Ademluchteenheid, D-connect en anticondensvizier
(indien aanwezig) verwijderen, apart reinigen en
desinfecteren.
3. Beschermkappen en ventielschijven van de
gaspakventielen losknopen.
4. Indien nodig, handschoenen demonteren:
Wanneer het gaspak is voorzien van een
handschoencombinatie, dan de
handschoencombinatie demonteren en afvoeren.
Indien Tricotol-overhandschoenen zijn aangebracht,
dan deze verwijderen, maar niet wassen. Vuile Tricotril-
overhandschoenen moeten gewisseld worden.
Wanneer K-MEX-Gigant-overhandschoenen zijn
aangebracht, dan deze verwijderen en apart reinigen.
FKM-, FKM/Butyl- en Butyl-handschoenen kunnen bij
de handmatige reiniging gemonteerd blijven.
5. Ventielschijven afzonderlijk met helder, warm water
reinigen.
6. Prepareer een reinigingsoplossing van water en een
reinigingsmiddel.
7. Reinig het gaspak en alle herbruikbare componenten met
een zachte doek en een reinigingsoplossing.
8. Alle onderdelen onder stromend water grondig afspoelen.
9. Prepareer een desinfectiebad van water en een
desinfectiemiddel.
10. Alle componenten die moeten worden gedesinfecteerd
(gaspak, ventielschijven, beschermkappen) in het
desinfectiebad leggen.
11. Alle onderdelen onder stromend water grondig afspoelen.
12. Alle onderdelen drogen (zie hfst. 6.3.3 op pagina 80).
Uit te voeren werkzaamheden
vóór het
eerste gebruik
na het gebruik
na de reparatie
jaarlijks
Gaspak visueel controleren X X X1
1 Geldt voor gaspakken die zonder draagtas op voertuigen worden
bewaard.
Bij gaspakken die in de bijbehorende draagtas worden bewaard,
verlengt het interval zich tot 2 jaar.
Gaspak reinigen en desinfecteren X
Ritssluitingssysteem verzorgen X X X1
Het gaspak op dichtheid controleren X X X X1
De gaspakventielen op dichtheid
controleren
XXXX1
AANWIJZING
Dräger adviseert om alle onderhoudswerkzaamheden
te rapporteren (zie hfst. 10 op pagina 87).
i
i
VOORZICHTIG
Gevaar van materiaalbeschadiging!
Voor het reinigen en ontsmetten geen oplosmiddelen
(bijv. aceton, alcohol) of reinigingsmiddelen met
schurende deeltjes gebruiken. Uitsluitend de
beschreven methoden toepassen en de genoemde
reinigings- en ontsmettingsmiddelen gebruiken.
Andere middelen, doseringen en inwerktijden kunnen
het product beschadigen.
Zie voor informatie over geschikte reinigings- en
desinfectiemiddelen en de specificatie daarvan het
document 9100081 op www.draeger.com/IFU.
VOORZICHTIG
Gevaar van materiaalbeschadiging!
Bij het reinigen en desinfecteren kunnen de
anticondenseigenschappen verloren gaan. Het
anticondensvizier niet langer dan 5 minuten in
vloeistof dompelen.
WAARSCHUWING
Contaminatiegevaar, wanneer de
handschoencombinaties niet gewisseld worden!
Er kan niet worden gegarandeerd dat het materiaal
tegen een herhaaldelijke blootstelling aan chemische
stoffen bestand is.
!
!
!

80 Dräger CPS 6900
Onderhoud
6.3.2 Machinale reiniging en desinfectie
Voor de machinale reiniging is het volgende toebehoren
vereist:
Industriewasmachine Dräger CombiClean
of gelijke constructie
Wasmiddel: Eltra
Voor de dosering zie informatie 9021380
Waszak
Steunschijf
De industriewasmachine moet de volgende eigenschappen
hebben:
Trommelvolume >130 liter
Trommeldiameter >60 cm
Deuropening >45 cm
Programmeerbare besturing
Elektronische temperatuurregeling ±2 °C
Trommeltoerental: max. 20 omwentelingen/minuut
(2 langzame omwentelingen in de ene richting,
18 seconden wachttijd, 2 langzame omwentelingen in de
andere richting, 18 seconden wachttijd)
Het gaspak op de volgende wijze reinigen en desinfecteren:
1. Ademluchteenheid, D-connect en anticondensvizier
(indien aanwezig) verwijderen, apart reinigen en
desinfecteren.
Vervolgens grondig met helder water spoelen.
2. Beschermkappen en ventielschijven van de
gaspakventielen losknopen.
3. Indien nodig, handschoenen demonteren:
Wanneer het gaspak is voorzien van een
handschoencombinatie, dan de
handschoencombinatie demonteren en afvoeren.
Indien Tricotol-overhandschoenen zijn aangebracht,
dan deze verwijderen, maar niet wassen. Vuile Tricotril-
overhandschoenen moeten gewisseld worden.
Wanneer K-MEX-Gigant-overhandschoenen zijn
aangebracht, dan deze verwijderen en apart reinigen.
FKM-, FKM/Butyl- en Butyl-handschoenen
demonteren.
4. Ventielschijven apart met helder, warm water reinigen en
vervolgens desinfecteren.
5. Ritssluitingssysteem van het gaspak volledig openen.
6. Gaspak op een schoon werkvlak uitspreiden en vouwen
gladstrijken.
7. Steunschijf zo in de kap aanbrengen dat het vizier strak
tegen de steunschijf ligt en gelijkvormig met de steunschijf
afsluit.
8. Waszak zo over de kap trekken dat de schuimstof van de
waszak op het vizier ligt en de koordrand van de waszak
over de onderste rand van het vizier ligt. Het koord
aantrekken en vastknopen.
9. Sokken of veiligheidslaarzen twee keer naar boven
omslaan. Scherpe knikken vermijden.
10. De mouwen naar het midden toe op het borstgedeelte
leggen. Vouwen gladstrijken.
11. Kap met waszak en bovenste gedeelte van het gaspak
dusdanig vouwen dat het vizier op de ingerolde
veiligheidslaarzen ligt. Vouwen gladstrijken. Erop letten dat
het vizier niet vervormd.
12. Gaspak in de industriewasmachine leggen.
13. Wasprogramma "Gaspak" starten.
Bij het wassen de volgende parameters aanhouden:
Watertemperatuur voor reinigen en desinfecteren:
62 °C ±2 °C
4 spoelgangen met schoon koud water
14. Alle onderdelen drogen (zie hfst. 6.3.3 op pagina 80).
6.3.3 Gaspak drogen
1. Restvloeistof voor het drogen uit het gaspak uitgieten of
met een spons uitwrijven.
2. Alle delen binnen en buiten grondig drogen.
Het gaspak kan door aanblazen met droge, olievrije
perslucht of in een drooginstallatie voor gaspakken worden
gedroogd:
– Temperatuur: maximaal 40 °C
– Tijd: minstens 120 minuten
Directe warmtestraling of ononderbroken zonnestraling
vermijden.
3. Rugzakkussen weer inzetten.
4. Visuele controle van gaspak, vizier, veiligheidslaarzen en
handschoenen.
5. Anticondensvizier (indien aanwezig) aanbrengen.
6. Ventilatie-eenheid en D-connect (indien aanwezig)
opnieuw monteren.
VOORZICHTIG
Gevaar van materiaalbeschadiging!
Het rugzakkussen (indien aanwezig) in het gaspak
laten, omdat de componenten in het inwendige van het
gaspak door de klittenbandstrips beschadigd kunnen
raken.
Bij het reinigen en desinfecteren kunnen de
anticondenseigenschappen verloren gaan. Het
anticondensvizier niet langer dan 5 minuten in
vloeistof dompelen.
WAARSCHUWING
Contaminatiegevaar, wanneer de
handschoencombinaties niet gewisseld worden!
Er kan niet worden gegarandeerd dat het materiaal
tegen een herhaaldelijke blootstelling aan chemische
stoffen bestand is.
!
!
VOORZICHTIG
Gevaar van materiaalbeschadiging!
Om het gaspak niet te beschadigen mag de
wastrommel pas in beweging komen als hij met water
gevuld is.
VOORZICHTIG
Gevaar van materiaalbeschadiging!
Om het gaspak niet te beschadigen, mag hij niet
worden gecentrifugeerd.
Om bijv. de vorming van schimmel te voorkomen,
moet het gaspak volledig worden gedroogd.
AANWIJZING
Geschikte drooginstallaties voor het gaspak zijn:
TopTrock SF01 met blaastoestel GF
Drooginstallaties van gelijke constructie
!
!
i
i

Onderhoud
Dräger CPS 6900 81
6.4 Ritssluitingssysteem verzorgen
1. Ritssluitingssysteem na ieder gebruik en iedere reiniging
en desinfectie goed invetten. Alleen de bij Dräger
verkrijgbare vetstift gebruiken.
2. Met name de kettingschakels van de sluitketting en het
gedeelte onder de kettingschakels, waarover de clip glijdt,
voldoende invetten.
6.5 Het gaspak op dichtheid controleren
De controle is beschreven voor het testtoestel Porta Control
3000. De controle kan tevens met andere controleapparaten
worden uitgevoerd, de aangegeven waarden moeten echter
worden aangehouden.
De controle conform ISO 17491-1, methode A2, bij constante
kamertemperatuur (20 °C ±5 °C) uitvoeren.
De gebruikte perslucht moet voldoen aan de eisen van
EN 12021.
De benodigde testtoebehoren staan vermeld in de bestellijst
(zie hoofdstuk 11 op pagina 88).
6.5.1 Controle voorbereiden
1. Bij gaspakken met ventilatie-eenheid aansluitingen
afsluiten.
2. Ritssluitingssysteem sluiten.
3. Gaspak met het ruggedeelte naar boven op een schone en
vlakke ondergrond uitspreiden.
4. Vizier met een zachte onderlaag beschermen tegen
krassen.
5. Beschermkappen van beide gaspakventielen verwijderen
en ventielschijven verwijderen.
6. Een testkap op het ene gaspakventiel plaatsen en m.b.v.
de blauwe slang op het testtoestel aansluiten.
7. Een tweede testkap op het andere gaspakventiel plaatsen.
8. Zorg ervoor dat beide ventielen op de zwarte slang van de
testtoestel zijn gesloten.
9. Testkap m.b.v. de zwarte slang op de persluchttoevoer
(6 bar) aansluiten.
10. Test uitvoeren (zie hfst. 6.5.2 op pagina 81).
6.5.2 Test uitvoeren
1. Opblaasventiel op de zwarte slang openen en het gaspak
vullen totdat op het testtoestel 17,5 mbar wordt
aangegeven. Opblaasventiel sluiten.
2. Een pauze van 10 minuten instellen en de stopwatch
starten. Tijdens deze tijd de druk op ca. 17 mbar houden,
zodat een druk- en temperatuurcompensatie kan
plaatsvinden. Indien nodig, lucht bijvullen.
3. Ontlastingsventiel openen. Druk naar 16,5 mbar laten
dalen. Ontlastingsventiel sluiten.
4. Een testtijd van 6 minuten instellen en de stopwatch
starten.
5. Na afloop van de controletijd de druk op het testtoestel
aflezen.
Wanneer de drukverlaging kleiner dan of gelijk is aan 3 mbar
is, geldt het gaspak als dicht. Dan de testopstelling
demonteren en de gaspakventielen controleren.
Wanneer de drukverlaging groter is dan 3 mbar:
1. Kritieke punten (bijv. naden, ritssluitingssysteem,
handschoen- en laarsverbindingen) met een
zeepoplossing bevochtigen.
2. Ondichte punten markeren.
3. Zeepoplossing afspoelen en het gaspak grondig drogen.
4. Gaspak ontluchten en repareren.
5. Controle op lekkage herhalen.
Als alternatief kan het gaspak ter reparatie naar Dräger
worden gestuurd.
6.6 De gaspakventielen op dichtheid
controleren
De controle is beschreven voor het testtoestel Porta Control
3000. De controle kan tevens met andere controleapparaten
worden uitgevoerd, de aangegeven waarden moeten echter
worden aangehouden.
De controle conform EN 943-1:2015, 6.5.1, echter met een
overdruk van 10 mbar, bij constante kamertemperatuur
(20 °C ±5 °C) uitvoeren.
De gebruikte perslucht moet voldoen aan de eisen van
EN 12021.
De benodigde testtoebehoren staan vermeld in de bestellijst
(zie hoofdstuk 11 op pagina 88).
1. Opblaasventiel met steekkoppeling van de zwarte slang
verwijderen.
2. Uiteinde van de slang op het testtoestel aansluiten.
3. Pompbal van het ontlastingsventiel zo in de zwarte slang
steken dat de pijl op de pompbal in de richting van het
ontlastingsventiel wijst.
4. Ventielschijf met schoon water bevochtigen en monteren.
5. Testkap vanaf de buitenkant op het te testen ventiel
plaatsen en m.b.v. de zwarte slang op het testtoestel
aansluiten.
6. Onlastingsventiel openen en met de pompbal een overdruk
van +10 mbar creëren. Ontlastingsventiel sluiten.
7. Een testtijd van 1 minuut instellen en de stopwatch starten.
8. Na afloop van de controletijd de druk op het testtoestel
aflezen.
Bij een drukwijziging van minder dan 1 mbar is het
gaspakventiel in orde. In dit geval:
1. Volgende gaspakventiel controleren.
2. Testopstelling demonteren.
3. Beschermkap op het gaspakventiel bevestigen.
Wanneer de drukwijziging groter is dan 1 mbar:
1. Ventielschijf uitnemen en visueel controleren.
Ventielklep en ventielzitting moeten schoon en
onbeschadigd zijn.
2. Indien nodig, ventielschijfje vervangen (zie hfst. 6.7.3 op
pagina 82).
3. Controle herhalen.
AANWIJZING
Om klemmen van het ritssluitingssysteem te
voorkomen, moeten uitstekende textieldraden worden
verwijderd.
VOORZICHTIG
Als het pak te veel wordt gevuld, raakt het materiaal
beschadigd.
Bij het vullen van het gaspak erop letten, dat de
aangegeven drukwaarden niet te veel worden
overschreden.
i
i
!

82 Dräger CPS 6900
Opslag
6.7 Bijzondere onderhoudswerkzaamheden
Na onderhoudswerkzaamheden en/of vervanging van
onderdelen de lekdichtheidstest nog een keer uitvoeren. Wij
adviseren alle onderhoudswerkzaamheden door Dräger te
laten uitvoeren.
6.7.1 Handschoenen vervangen
Handschoenen of handschoencombinaties altijd op de
volgende wijze wisselen:
1. Overhandschoen en rubberring (indien aanwezig)
lostrekken.
2. Met de duim de rand van de polsafdichtingsmanchet
omhoog duwen en de steunring, waarop de handschoen
zit, uit de mouw drukken.
3. Alle handschoenen behalve handschoencombinaties:
De nieuwe handschoen over de steunring trekken en op de
polsafdichtingsmanchet uitlijnen. De lange as van de
elliptische steunring wijst parallel naar de handpalm.
Erop letten dat er zich geen vouwen tussen handschoen en
steunring vormen.
4. Handschoen met steunring of nieuwe
handschoencombinatie door het geopende
ritssluitingssysteem in de mouw van het gaspak leiden.
5. De handschoen met de steunring of de nieuwe
handschoencombinatie door de polsafdichtingsmanchet
steken en uitlijnen.
De linkerhandschoen steekt in de linkermouw, de
rechterhandschoen in de rechtermouw.
De handpalm van de handschoencombinatie wijst naar
de mouwnaad.
6. De handschoencombinatie zo ver in de
polsafdichtingsmanchet duwen, tot de rand van de
steunring tegen de rand van de polsafdichtingsmanchet
aanligt.
De steunring moet geheel in de uitsparing van de
polsafdichtingsmanchet zitten.
7. Overhandschoenen (indien gewenst) monteren:
K-MEX-Gigant-overhandschoen over de armring
trekken en met de bijbehorende rubberring beveiligen.
Tricotril-overhandschoen over de armring trekken en
met de bijbehorende rubberring beveiligen.
8. Het gaspak op dichtheid controleren (zie hoofdstuk 6.5 op
pagina 81).
6.7.2 Antikrasvizier vervangen
1. Oud antikrasvizier verwijderen.
2. Indien nodig, lijmresten verwijderen.
3. Beschermingsfolie van de ene zijde van de lijmpads
aftrekken en lijmpads op de oude lijmpunten plaatsen.
4. Beschermingsfolie van de tweede zijde van de lijmpads
aftrekken.
5. Nieuw antikrasvizier centreren en stevig op de lijmpads
drukken.
6.7.3 Ventielschijf vervangen
1. Beschermkap en oude ventielschijf verwijderen. Pen van
de ventielhouder niet beschadigen.
2. Nieuwe ventielschijf bevochtigen en bevestigen.
3. Beschermkap op het gaspakventiel plaatsen.
6.7.4 Anticondensvizier vervangen
1. Anticondensvizier voorzichtig uit het rubberprofiel in de
hoofdkap trekken.
2. Nieuw anticondensvizier aanbrengen:
a. Beschermfolies van het anticondensvizier verwijderen.
b. De kap van het gaspak binnenstebuiten keren. Zorg
ervoor dat de ritssluiting niet te veel wordt uitgerekt en
de afdichtlip niet scheurt.
c. Het anticondensvizier met behulp van het
middenmarkeringen in de juiste positie brengen en
geleidelijk in het rubberprofiel plaatsen.
7 Opslag
7.1 Opslagcondities
Gaspak donker, koel, droog, drukloos en spanningsvrij
opslaan.
UV- en directe zonnestraling evenals ozon mijden.
Opslagtemperatuur in acht nemen (zie hfst. 9 op
pagina 84).
WAARSCHUWING
Als het gaspak is uitgerust met een
handschoencombinatie, moet de
handschoencombinatie gedemonteerd, afgevoerd, en
door een nieuwe handschoencombinatie worden
vervangen. Er kan niet worden gegarandeerd dat het
materiaal tegen een herhaaldelijke blootstelling aan
chemische stoffen bestand is.
Voor de montage van de handschoenen mag geen talk
worden gebruikt. Anders kunnen de handchoenen
eruit glijden wanneer de gebruiker door overmatig
strekken een hoge drukkracht van binnen op de
handschoen aanbrengt.
!
VOORZICHTIG
Gebruik geen spitse, scherpe voorwerpen en geen
oplosmiddel, zodat het vizier niet wordt beschadigd!
De lijmresten kunnen in het algemeen met de duim
worden weggewist.
VOORZICHTIG
Gevaar van materiaalbeschadiging!
Gebruik geen spitse, scherpe voorwerpen en geen
oplosmiddel, zodat het anticondensvizier niet wordt
beschadigd.
VOORZICHTIG
Indien de opslagvoorwaarden niet in acht worden
genomen, kan schade ontstaan aan het gaspak!
!
!
!

Afvoeren
Dräger CPS 6900 83
7.2 Voorbereiding voor opslag
1. Ritssluitingssysteem tot ca. 5 cm voor de aanslag sluiten.
Regelmatig controleren, of het ritssluitingssysteem nog
voldoende is gevet.
2. Meegeleverde platte zak dusdanig over de kap heen
trekken dat het cilindrisch gekromd vizier zijn vorm
behoudt.
3. Als het gaspak wordt samengevouwen, de meegeleverde
platte zak over de laarzen trekken zodat het gaspak niet
verkleurd.
7.3 Gaspak opslaan
De volgende opslagvarianten zijn mogelijk:
Gaspak vlak liggend bewaren. Als het gaspak wordt
opgeslagen in de het speciale voertuig, slijtage door
voortdurende wrijving met het ligvlak vermijden.
Gaspak op een bijbehorende kleerhanger of een over een
stang hangen. Kap of veiligheidslaarzen moeten contact
met de bodem hebben.
Gaspak samenvouwen en in een transportkist,
magazijnvak of draagtas bewaren.
Gaspak in een CPA-opslag- en transporttas verpakken.
7.3.1 Gaspak samenvouwen
1. Platte zak over de kap trekken.
2. Sokken of
veiligheidslaarzen één
keer naar boven omslaan.
Scherpe knikken
vermijden.
3. De mouwen naar het
midden toe op het
borstgedeelte leggen.
Vouwen gladstrijken.
4. Kap en bovenste gedeelte
van het gaspak dusdanig
vouwen dat het vizier op
de ingerolde
veiligheidslaarzen ligt.
Vouwen gladstrijken. Erop
letten dat het vizier niet
vervormd.
7.3.2 Gaspak in een CPA-opslag- en transporttas
verpakken
1. Het gaspak in een CPA-
opslag- en transporttas
leggen.
2. Vizier met het klittenband
vastzetten.
3. De veiligheidslaarzen zoals
aangegeven plaatsen.
4. Het gaspak onder de
mouwen en bij de laarzen
met de riemen bevestigen.
5. De mouwen bij de
schouders omslaan en
langs de zijkanten van het
pak leggen.
6. De CPA-opslag- en
transporttas sluiten.
7. De CPA-opslag- en
transporttas aan bij de
overgang naar de laarzen
en direct onder het vizier of
bij de hals naar het midden
omslaan. Zorg ervoor dat
het vizier tussen de handschoenen ligt.
8. De CPA-opslag- en transporttas in het midden omslaan en
de gespen sluiten.
8 Afvoeren
8.1 Afvoeren
Het gaspak moet in de volgende gevallen worden afgevoerd:
Het pak is beschadigd en reparatie is niet mogelijk.
Het pak is gecontamineerd en kan op grond van de
eigenschappen van de gevaarlijke stof niet worden
gedecontamineerd.
Het materiaal van het pak heeft veranderingen ondergaan.
Er worden bijv. verbrossingen, verdikkingen,
kleurveranderingen, verwekingen van het oppervlak
vastgesteld.
In geval van twijfel kan meer informatie bij Dräger worden
ingewonnen.
8.2 Levensduur
Zonder gebruik en bij toepassing van de aanbevolen
opslagvoorwaarden en ondehoudsintervallen blijven de
materiaaleigenschappen van het gaspak minstens 10 jaar na
productiedatum behouden. Bij frequent gebruik kan de
levensduur verkorten, zelfs wanneer het product op de
voorgeschreven wijze wordt opgeslagen en onderhouden.
8.3 Aanwijzingen voor afvoeren
Gaspak op de voorgeschreven wijze afvoeren.
AANWIJZING
Dräger adviseert om het gaspak in de CPS-opslag- en
transporttas te verpakken, om deze tegen
omgevingsinvloeden te beschermen en de
onderhoudsintervallen te verlengen.
AANWIJZING
Gaspak drukloos en voorzichtig samenvouwen.
Materiaal van het pak, naden en sluitsysteem niet met
kracht knikken. Scherpe knikken vermijden.
i
i
i
i
00221840.eps
17021963.eps
AANWIJZING
De gaspakken kunnen worden verbrand of naar een
stortplaats worden gebracht. De wijze van afvoer is
afhankelijk van de contaminatie.
i
i

84 Dräger CPS 6900
Technische gegevens
9 Technische gegevens
9.1 Algemene informatie
Maten in cm:
9.2 Weerstand tegen penetratie door
besmettelijke agentia
9.3 Bestendigheid van het materiaal waaruit
het pak bestaat
Maat pak Lichaams-
lengte Borst-
omvang Taille-
omvang
S 150-165 80-118 72-106
M 160-175 80-118 72-106
L 170-185 80-118 72-106
XL 180-200 104-124 95-110
XXL 195-210 104-124 95-110
Gewicht:
Pak maat L,
met laarzen maat 45,
zonder accessoires
ca. 6,8 kg
Pak maat L,
met laarzen maat 45,
met accessoires
ca. 8,0 kg
Pak maat L,
met sokken,
zonder accessoires
ca. 4,3 kg
Materiaal:
Gaspak Umex
Vizier speciaal polyvinylchloride
Handschoenen FKM of
FKM/Butyl of
Butyl of
Laminaat: HPPE of
Para-aramide of
Para-aramide
Veiligheidslaarzen Nitril-P:
zwart, FPA-CR-veiligheidslaarzen
met kunststof zool, snij- en vuurvast,
binnen textielvoering, maten zie
hoofdstuk 11 op pagina 88
PVC:
geel, zwarte profielzool, maten zie
hoofdstuk 11 op pagina 88
Kleuren:
buiten/binnen rood/rood
Temperaturen:
bij gebruik -40 °C tot +60 °C 1
Lagere temperaturen tot -80 °C zijn
gedurende een korte blootstelling
mogelijk en voor het materiaal Umex
door Dräger getest, echter niet in het
kader van de typekeuring.
Neem de toepassingstemperaturen
van de adembescherming in acht!
1 door Dräger getest
bij opslag -5 °C tot +25 °C
Controle Resultaat Klasse1
1 conform EN 14126:2003+AC:2005
Weerstand tegen
gecontamineerde
vloeistoffen onder
hydrostatische druk (met de
bacteriofaag Phi-X174)
Hydrostatische
druk:
20 kPa
6
Controle Resultaat Klasse1
1 conform EN 943-1:2015
Slijtvastheid >2000 cycli 6
Buigscheurvastheid >100000 cycli 6
Buigscheurvastheid bij
-30 °C2
2 conform EN 14126:2003+AC:2005
>4000 cycli 6
Doorscheurweerstand 57 N 3
Barstbestendigheid 643 kPa 5
Doorsteekvastheid >50 N 33
3 conform EN 1073-1:2016+A1:2018 en EN 1073-2:2002: Klasse 2
Vlambestendigheid zelfdovend voldaan
Naadsterkte >500 N 6
Treksterkte >1000 N 6

Technische gegevens
Dräger CPS 6900 85
9.4 Weerstand tegen chemicaliënpermeatie
conform EN 943-1:2015
Voor de Europese certificering werden tests uitgevoerd met de
hierna gemoemde geconcentreerde chemicaliën onder
volledige bevochtiging/volledige bedekking van de
testobjecten.
De indeling in klassen voor het testen van de weerstand tegen
chemicaliënpermeatie is gebaseerd op de norm
EN 943-1:2015 als volgt:
Klasse 1 >10 minuten
Klasse 2 >30 minuten
Klasse 3 >60 minuten
Klasse 4 >120 minuten
Klasse 5 >240 minuten
Klasse 6 >480 minuten
Umex Ritssluitings-
systeem Naden Vizier Aansluiting
vizier
Testchemicaliën Klasse Klasse Klasse Klasse Klasse
Ammoniak,CAS-nr. 7664-41-7 63466
Chloor, CAS-nr. 7782-50-5 6 3 3 6 6
Chloorwaterstof1, CAS-
nr.747-01-06
42466
n-heptaan1, CAS-nr.142-82-5 62666
Natriumhydroxide (40 %),
CAS-nr.1310-73-2
66666
Zwavelzuur (96 %)1, CAS-nr.
7664-93-9
23363
1 Het pak is niet geschikt voor continue belasting met deze chemicalie.
Butyl-
handschoen FKM-
handschoen FKM/Butyl-
handschoen Gelamineerde
handschoen-
combinatie1
Veiligheids-
laarzen
(PVC)
Veiligheids-
laarzen
(Nitril)
Testchemicaliën Klasse Klasse Klasse Klasse Klasse Klasse
Ammoniak,CAS-nr.7664-41-7 6 6 6 6 6 6
Chloor, CAS-nr.7782-50-5 3 6 6 6 6 6
Chloorwaterstof2,CAS-nr.
747-01-06
6 6 6 6 6 6
n-heptaan2,CAS-nr. 142-82-5 1 6 6 6 4 6
Natriumhydroxide (40 %),
CAS-nr. 1310-73-2
6 6 6 6 6 6
Zwavelzuur (96 %)2,CAS-nr.
7664-93-9
2 6 6 6 6 6
1 Laminaat-/Tricotril-handschoen (Barrier- en Tricotril-handschoen)
2 Het pak is niet geschikt voor continue belasting met deze chemicalie.

86 Dräger CPS 6900
Technische gegevens
9.5 Weerstand tegen chemicaliënpermeatie
conform ISO 16 602:2007
De indeling in klassen voor het testen van de weerstand tegen
chemicaliënpermeatie resulteert als volgt uit de norm
ISO 16 602:2007:
Klasse 1 ≥10 minuten
Klasse 2 ≥30 minuten
Klasse 3 ≥60 minuten
Klasse 4 ≥120 minuten
AANWIJZING
Conform ISO 16 602:2007, tabel E.1, is klasse 4 de
hoogste klasse die met de berekende waarden
gerealiseerd kan worden.
i
i
Umex Ritssluiting-
systeem Naden Vizier Aansluiting
vizier
Testchemicaliën Klasse Klasse Klasse Klasse Klasse
Ammoniak,CAS-nr. 7664-41-7 4 3 4 4 4
Chloor, CAS-nr. 7782-50-5 4 3 3 4 4
Chloorwaterstof1, CAS-nr.
747-01-06
42444
n-heptaan1, CAS-nr. 142-82-5 42444
Natriumhydroxide 40 %, CAS-
nr. 1310-73-2
44444
Zwavelzuur 96 %1, CAS-nr.
7664-93-9
23343
1 Het pak is niet geschikt voor continue belasting met deze chemicalie.
Butyl-
handschoen FKM-
handschoen FKM/Butyl-
handschoen
Gelamineerde
handschoen-
combinatie 1
Veiligheids-
laarzen
(PVC)
Veiligheids-
laarzen
(Nitril)
Testchemicaliën Klasse Klasse Klasse Klasse Klasse Klasse
Ammoniak,CAS-nr. 7664-41-7 4 4 4 4 4 4
Chloor, CAS-nr.7782-50-5 3 4 4 4 4 4
Chloorwaterstof2, CAS-nr.
747-01-06
4 4 4 4 4 4
n-heptaan2, CAS-nr. 142-82-5 1 4 4 4 4 4
Natriumhydroxide 40 %, CAS-
nr.1310-73-2
4 4 4 4 4 4
Zwavelzuur 96 %2, CAS-nr.
7664-93-9
2 4 4 4 4 4
1 Laminaat-/Tricotril-handschoen (Barrier- en Tricotril-handschoen)
2 Het pak is niet geschikt voor continue belasting met deze chemicalie.

Controlebericht
Dräger CPS 6900 87
10 Controlebericht
Productiedatum1:
HandtekeningOnderhoud/
reparatiedatum
Vastgestelde
gebreken
Productienummer1:
Duur van het contact
met chemicaliën
(in minuten)
Belaste pak-
gedeelten
(hoofd, armen, benen, ...)
Type1:
Beschermpak heeft contact
met
(stofnaam, CAS-nr. UN-nr.)
Gebruiks-
datum
1 Zie typeplaatje op de binnenzak in het gaspak.

88 Dräger CPS 6900
Bestellijst
11 Bestellijst
Benaming en beschrijving Bestel-
nummer
Dräger CPS 6900 R 29 410
Veiligheidslaarzen om over te trekken:
Nitril-P, maat 43 R 56 863
Nitril-P, maat 44 R 56 864
Nitril-P, maat 45 R 56 865
Nitril-P, maat 46/47 R 56.866
Nitril-P, maat 48 R 56 867
Nitril-P, maat 49/50 R 56 868
PVC, maat 43 R 52 653
PVC, maat 44 R 55 474
PVC, maat 45 R 55 477
PVC, maat 46 R 52 656
PVC, maat 47/48 R 55 413
Veiligheidslaarzen om te monteren:
Nitril-P, maat 43, ingekort R 58 221
Nitril-P, maat 44, ingekort R 58 222
Nitril-P, maat 45, ingekort R 58 223
Nitril-P, maat 46/47, ingekort R 58 224
Nitril-P, maat 48, ingekort R 58 225
Nitril-P, maat 49/50, ingekort R 58 226
PVC, maat 43, ingekort R 62 001
PVC, maat 44, ingekort R 62 002
PVC, maat 45, ingekort R 62 003
PVC, maat 46, ingekort R 62 004
PVC, maat 47/48, ingekort R 62 005
Handschoenen:
Butyl, maat 9 R 55 538
Butyl, maat 10 R 53 531
Butyl, maat 11 R 53 560
FKM/Butyl, maat 9 R 55 762
FKM/Butyl, maat 10 R 55 531
FKM/Butyl, maat 11 R 55 761
FKM, maat 9 R 55 537
FKM, maat 10 R 53 776
FKM, maat 11 R 53 554
Overhandschoenen:
Laminaat + Tricotril op steunring, maat 10 R 63 003
Laminaat + Tricotril op steunring, maat 11 R 63 004
Overhandschoen Tricotril, maat 10 R 55 968
Overhandschoen Tricotril, maat 11 R 55 966
Overhandschoen K-MEX-Gigant, maat 14 R 55 969
Toebehoren voor handschoenen of laarzen:
Katoenen handschoenen, paar R 50 972
Polsafdichtingsmanchetten, paar R 52 648
Rubberen ring voor overhandschoenen
(2 stuks noodzakelijk)
R 51 358
Reflecterende stroken (2 stuks noodzakelijk) R 58 218
Steunring R 51 265
Oversokken R 61 018
Ventilatie:
Regelventiel PT 120 L R 55 509
Regelventiel PT 120 L - Stäubli R 58 059
Air-Connect R 58 075
Air-Connect - Stäubli R 58 235
Ventilatieflappen set S, M R 58 901
Ventilatieflappen set L, XL, XXL R 58 903
Automatisch schakelventiel (ASV) 33 54 568
Automatisch schakelventiel (ASV) voor
PSS 7000
33 57 007
Adapter voor ademautomaat R 58 281
Y-stuk R 55 507
Houder:
D-connect: R 58 080
Heupriem AL 01 211
Manometerhouder R 58 078
Lengteaanpassing R 58 085
Transport en opslag:
CPS-opslag- en transporttas R 58 152
Transportkist T 51 525
Kleerhanger (klokvormig) R 33 299
Kleerhanger (R-vormig) R 54 746
Platte zak voor kap en laars 87 10 071
Benaming en beschrijving Bestel-
nummer

Bestellijst
Dräger CPS 6900 89
Controleapparaten en -toebehoren:
Testtoestel Porta Control 3000 R 62 520
Reiniging en desinfectie:
Waszak 65 70 003
Steunschijf R 58 157
Veststift, 2 stuks R 27 494
Anticondensmiddel “klar-pilot“ gel R 52 560
Anticondensmiddel “klar-pilot“ Comfort R 56 542
Eltra (20 kg) 79 04 074
Onderhoud en service:
Lijmset (PU/PVC-lijm) R 58 304
Aansluitset laarzen R 25 264
Afdichtmassa voor laarsaansluiting R 55 272
Rugzakkussen R 57 860
Gaspakventiel, compleet R 58 625
Ventielschijf R 58 239
Antikrasvizier (10 stuks) R 57 859
Anticondensvizier (1 stuks) R 57 858
Technisch handboek op aanvraag
Gebruikshandboek op aanvraag
Benaming en beschrijving Bestel-
nummer


Dräger Safety AG & Co. KGaA
Revalstraße 1
23560 Lübeck, Germany
Tel +49 451 882 0
Fax +49 451 882 20 80
www.draeger.com
9031076 - GA 2535.690
© Dräger Safety AG & Co. KGaA
Edition 06 - August 2022 (Edition 01 - January 2013)
Subject to alteration
Notified Body in Europe:
Involved in type approval and quality control:
DEKRA Testing and Certification GmbH
Handwerkstraße 15
70565 Stuttgart
Germany
Reference number:
Approved body:
BSI Assurance UK Ltd.
Kitemark Court
Davy Avenue
Knowlhill
Milton Keynes
MK5 8PP
United Kingdom
Identification number:
0158
0086
TP TC 019/2011
-
 1
1
-
 2
2
-
 3
3
-
 4
4
-
 5
5
-
 6
6
-
 7
7
-
 8
8
-
 9
9
-
 10
10
-
 11
11
-
 12
12
-
 13
13
-
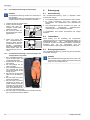 14
14
-
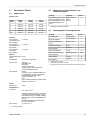 15
15
-
 16
16
-
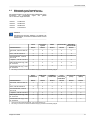 17
17
-
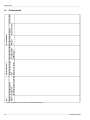 18
18
-
 19
19
-
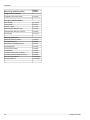 20
20
-
 21
21
-
 22
22
-
 23
23
-
 24
24
-
 25
25
-
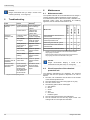 26
26
-
 27
27
-
 28
28
-
 29
29
-
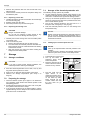 30
30
-
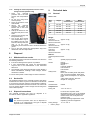 31
31
-
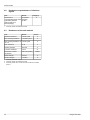 32
32
-
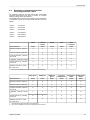 33
33
-
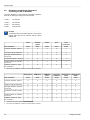 34
34
-
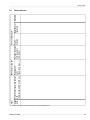 35
35
-
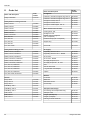 36
36
-
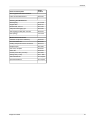 37
37
-
 38
38
-
 39
39
-
 40
40
-
 41
41
-
 42
42
-
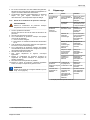 43
43
-
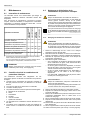 44
44
-
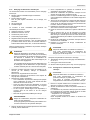 45
45
-
 46
46
-
 47
47
-
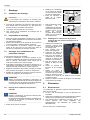 48
48
-
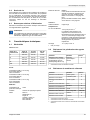 49
49
-
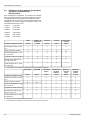 50
50
-
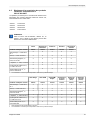 51
51
-
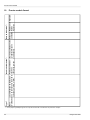 52
52
-
 53
53
-
 54
54
-
 55
55
-
 56
56
-
 57
57
-
 58
58
-
 59
59
-
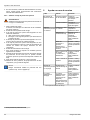 60
60
-
 61
61
-
 62
62
-
 63
63
-
 64
64
-
 65
65
-
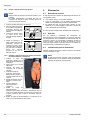 66
66
-
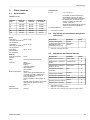 67
67
-
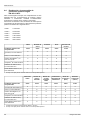 68
68
-
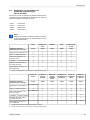 69
69
-
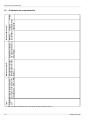 70
70
-
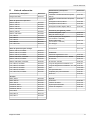 71
71
-
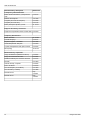 72
72
-
 73
73
-
 74
74
-
 75
75
-
 76
76
-
 77
77
-
 78
78
-
 79
79
-
 80
80
-
 81
81
-
 82
82
-
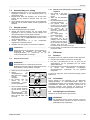 83
83
-
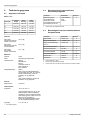 84
84
-
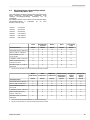 85
85
-
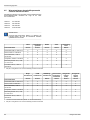 86
86
-
 87
87
-
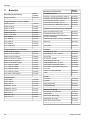 88
88
-
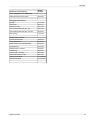 89
89
-
 90
90
-
 91
91
-
 92
92


in andere talen
- français: Dräger CPS 6900 Manuel utilisateur
- español: Dräger CPS 6900 Manual de usuario
- Deutsch: Dräger CPS 6900 Benutzerhandbuch
Gerelateerde papieren
Andere documenten
-
 Kromschroder CPS 300-4000 Handleiding
-
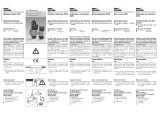 Kromschroder CPS Handleiding
-
sauter AVM 321S, 322S Assembly Instructions
-
sauter AVM 322-R Assembly Instructions
-
Parkside PSHL 2 A2 Operation And Safety Notes Translation Of The Original Instructions
-
Parkside PSHL 2 B1 Operation And Safety Notes Translation Of The Original Instructions
-
Gaggenau AHC 240 de handleiding

