Me VD-ALU-6109-S-W Handleiding
- Categorie
- Split-systeem airconditioners
- Type
- Handleiding

VDV-907
BETRIEBSANLEITUNG 2-16
OPERATING INSTRUCTIONS 17-29
MODE D’EMPLOI 30-46
GEBRUIKSAANWIJZING 47-63
VDV-907
BETRIEBSANLEITUNG 2
OPERATING INSTRUCTIONS 29
MODE D’EMPLOI 53
GEBRUIKSAANWIJZING 79

VDV-907 | DEUTSCH
3
DE
ABBILDUNGEN 5
User-Interface (UI) im Sprachbetrieb 9
User-Interface (UI) Einstellungen 10
LIEFERUMFANG 11
LEGENDE (ABB.1+2) 11
User-Interface (UI) Abb.A 12
User-Interface (UI) Abb.B 12
INSTALLATION (ABB. 2A+B) 12
INBETRIEBNAHME 13
Anschluss Stromversorgung 13
MICRO-SD-KARTEN EINLEGEN 13
INITIALISIERUNG /RESET 14
BEDIENUNG 14
Klingeln 14
Sprechtaste (Sensortouch) 14
Standby-Modus 14
Bildschirm aktivieren 15
ERWEITERTE FUNKTIONEN 15
Licht 15
Pfeil-Symbol rechts und links 15
Alarmsymbol 15
Lautstärke + und - 15
Stumm-Taste 16
BILDSPEICHER UND EINSTELLUNGEN 16
Bildschirm einschalten 16
Name der Außenstation ändern 16
Zwischen den Außenstationen wechseln 16
Bildspeicher 17
Einstellungen 17
Sprache einstellen 17
Grundlautstärke einstellen (B2) 17
Uhrzeit und Datum einstellen 17
Grundeinstellungen 18
Melodie einstellen 18
Hilfe Menü 19
Bild Einstellungen 19
WLAN verbinden 19
Informationen zur Innenstation 20
Alle Bilder löschen 20
Reset 20
BELL-Empfänger anlernen 20
Melodie des Funkgongs einstellen 20
CUVEO Empfänger anlernen 20
TECHNISCHE DATEN 21


Abb.1
DE
VDV-907 | DEUTSCH
5
TOUCH-AKTIVE FLÄCHE
1
7
2 3
4 5
6
1 = VDV 907
2 = Mikrofon
3 = Ruhe-Taste (Sensortouch)
4 = Türöner-Taste (Sensortouch)
5 = Sprech-Taste (Sensortouch)
6 = Gehäuseschrauben
7 = Touchaktive Fläche
8 = microSD-Schacht Fotos
9 = microSD-Schacht Klingeltöne

Abb.2
DE
DEUTSCH | VDV-907
6
Abb.2A Abb.2B
9
2
8

DE
VDV-907 | DEUTSCH
7
Abb.3

DE
DEUTSCH | VDV-907
8
Abb.4
ExternerKlingeltaster

USER INTERFACE
UI Sprechbetrieb
UI Bildspeicher und Einstellungen
User-Interface (UI) im Sprachbetrieb
A1 = Licht-Taste
A2 = Umschalt-Tasten
A3 = Alarm-Taste
A4 = Name der Außenstation
A5 = Uhrzeit / Datumsanzeige
A6 = Foto-Taste
A7 = Sprachlautstärke
A8 = Mute-Taste
A9 = Name der Außenstation ändern
A10 = Einstellungen
A11 = Zurück-Taste
A12 = Bildspeicher-Taste
DE
VDV-907 | DEUTSCH
9
A1
A11
A10
A5
A2
A6
A12
A4
A9
A6A1A3
A7 A8
A2
A3
Abb.A

UI Einstellungen Seite 1
User-Interface (UI) Einstellungen
B1 = Sprache
B2 = Sprechlautstärke
B3 = Uhrzeit / Datum
B4 = Vorherige Seite
B5 = Grundeinstellungen
B6 = Nächste Seite
B7 = Melodie Innenstation
B8 = Hilfe
B9 = Bildeinstellungen
B10 = WLAN-Einstellungen
B11 = Informationen
B12 = Alle Fotos löschen
B13 = Werkseinstellungen
B14 = Melodie Funkgong
DE
DEUTSCH | VDV-907
10
B6
B13
B14
B1 B5
B9 B12
B3
B11B10
B8
B7
B4
B2
Abb.B

VDV-907 | DEUTSCH
11
DE
VDV-907 | DEUTSCH
11
DE
Innenstation VDV-907
fürVideo-Türsprechanlagen
Vielen Dank für den Kauf dieserVideo-
Innenstation mit integriertem Bildspeicher
und WLAN-Funktion. Diese Innenstation
kann mit allen Komponenten aus den Tür-
sprechanlagen-Systemen VISTADOOR und
VISTUS kombiniert werden.
Wenn an der angeschlossenen Außenstation
geklingelt wird, spielt die Innenstation die
eingestellte Klingelmelodie ab und der
Besucher ist auf dem Monitor zu sehen. Des
Weiteren werden automatisch 3 Fotos
gespeichert.
Sie können an der Innenstation mit dem
Besucher sprechen und auch die Tür önen
(sofern ein Türöner angeschlossen ist).
Ist die VDV-907 perWLANverbunden, kann
auch eine Verbindung zu Ihrem Smartphone
hergestelltwerden. Unter www.vistas-
mart.de nden Sie weitere Informationen,
wie die App installiert und die VDV-907 ein-
gebunden wird.
Diese Innenstation besitzt zwei Karten-
schächte für microSD-Karten (max. 32GB).
Auf einer microSD-Karte in Schacht 1 (8)
könnenAudiodateien abgelegt werden, die
dann als Klingelton benutzt werden können.
Für die Bildspeicherfunktion wird eine wei-
tere microSD-Karte in Schacht 2 (9) benötigt.
Im Lieferumfang sind keine Speicherkarten
enthalten.
LIEFERUMFANG
• Innenstation mit 17,8 cm (7“)
Bildschirmdiagonale
• Befestigungsmaterial
• Betriebs- und Montageanleitung
LEGENDE (ABB.1+2)
1 = VDV 907
2 = Mikrofon
3 = Ruhe-Taste (Sensortouch)
4 = Türöner-Taste (Sensortouch)
5 = Sprech-Taste (Sensortouch)
6 = Gehäuseschrauben
7 = Touchaktive Fläche
8 = microSD-Schacht 2 Fotos
9 = microSD-Schacht 1 Klingeltöne

DEUTSCH | VDV-907
12
DE
User-Interface (UI) Abb.A
A1 = Licht-Taste
A2 = Umschalt-Tasten
A3 = Alarm-Taste
A4 = Name der Außenstation
A5 = Uhrzeit / Datumsanzeige
A6 = Foto-Taste
A7 = Sprachlautstärke
A8 = Mute-Taste
A9 = Name der Außenstation ändern
A10 = Einstellungen
A11 = Zurück-Taste
A12 = Bildspeicher-Taste
User-Interface (UI) Abb.B
B1 = Sprache
B2 = Sprechlautstärke
B3 = Uhrzeit / Datum
B4 = Vorherige Seite
B5 = Grundeinstellungen
B6 = Nächste Seite
B7 = Melodie Innenstation
B8 = Hilfe
B9 = Bildeinstellungen
B10 = WLAN-Einstellungen
B11 = Informationen
B12 = Alle Fotos löschen
B13 = Werkseinstellungen
B14 = Melodie Funkgong
INSTALLATION (Abb. 2a+b)
1. Suchen Sie sich eine geeignete Stelle zur
Montage der Inneneinheit und verlegen
Sie die Leitungen bis dorthin.
2. Entfernen Sie die beiden Schrauben (16)
an der Inneneinheit und heben Sie das
Frontcover der Inneneinheit ab.
3. Mittig an den Seiten der Inneneinheit
benden sich zwei Haltenasen aus
Kunststo. Ziehen Sie das Frontcover
vorsichtig ab.
4. Für die Einführung der Leitungen in das
Gehäuse bendet sich oben unterhalb der
Anschlussklemmen ein Loch im Gehäuse.
5. Sie können den Gehäuseboden als
Bohrschablone verwenden, richten Sie ihn
mit einer Wasserwaage gerade an der
Stelle der Wand aus, an der die
Inneneinheit montiert werden soll.
6. Übertragen Sie die Löcher mit einem
geeigneten Sti auf die Wand, dann
bohren Sie die Löcher (Ø 6 mm) an den
Markierungen.
7. Stecken Sie in jedes Loch einen der
mitgelieferten Dübel.
8. Führen Sie die Anschlussleitung durch das
Loch im Gehäuseboden der Inneneinheit
DEUTSCH | VDV-907
12
DE

VDV-907 | DEUTSCH
13
DE
und verschrauben Sie den Gehäuseboden
mit vier Schrauben an derWand.
9. Schließen Sie die Leitungen an, wie im
Anschlussplan (Abb. 4) gezeigt.
HINWEIS: Die Leitungen nicht zu kurz
abschneiden. Im Gehäuseboden benden sich
Laschen, dort kann die Leitung aufgewickelt
werden.
10. Setzen Sie das Frontcover mit Monitor
von oben auf die Kante des Gehäuse-
bodens und drücken es unten fest. Die
seitlichen Rasthaken müssen dabei
einrasten.
HINWEIS: Isolieren Sie nicht benutze Leitun-
gen mit Isolierband um Kurzschlüsse zu ver-
meiden.
11. Verschrauben Sie das Frontcover wieder
mit den zwei Schrauben (6).
INBETRIEBNAHME
Anschluss Stromversorgung
Die Stromversorgung kann wahlweise an der
Innen- oder Außenstation angeschlossen
werden. Es ist auch möglich, die Stromver-
sorgung an einem Sternpunkt einzuspeisen,
z.B. wenn alle Signalleitungen vom Siche-
rungskasten her zu den Außen- und Innen-
einheiten gelegt wurden. Das Netzteil ist
dann parallel mit Masse/GND und +15V zu
verbinden. Nachdem alle Komponenten
montiert und angeschlossen sind, schalten
Sie die Betriebsspannung ein. Je nach
Montageart stecken Sie dazu das Stecker-
netzteil in eine geeignete Steckdose oder
schalten den Sicherungsautomat, an den das
Hutschienennetzteil angeschlossen ist, ein.
MICRO-SD-KARTEN EINLEGEN
Önen Sie die Inneneinheit und legen Sie sie
vorsichtig mit dem Monitor nach unten auf
ein weiches Tuch um das Glas nicht zu zer-
kratzen. Schieben Sie die microSD-Karten in
die entsprechenden Schächte, die Kontaktä-
chen der microSD-Karten zeigen dabei in
Richtung Platine. Die Schächte sind mit
einem Federdruck-Mechanismus ausgestat-
tet, welcher ähnlich einem Kugelschreiber
funktioniert. Schieben Sie die Karte in den
Schacht, bis ein leises Klicken zu hören ist

DEUTSCH | VDV-907
14
DE
und die Karte eingerastet ist. Um die Karten
zu entnehmen, drücken Sie sie vorsichtig in
den Kartenschacht hinein und verringern Sie
den Druck dann langsam. Passen Sie dabei
auf, dass die microSD-Karte nicht durch den
Federdruck aus dem Schacht herausiegt.
INITIALISIERUNG /RESET
Um die Anlage zu initialisieren, muss an der
Außeneinheit einmal geklingelt werden (bei
mehreren Außenstationen muss an jeder
Außeneinheit einmal geklingelt werden).
Für einen Reset trennen Sie die Stromversor-
gung für ca. 1 Minute und führen danach
erneut die Initialisierung durch.
HINWEIS: Vorallen Arbeiten an der Anlage
schalten Sie die Betriebsspannung wieder
aus! Jedesmal, wenn die Anlage stromlos war,
muss die Initialisierung erneut durchgeführt
werden.
BEDIENUNG
GRUNDFUNKTIONEN
(TOUCH-Tasten außerhalb des Displays)
Klingeln
Klingeltaster der Außenstation drücken.
Die Innenstation spielt einen Klingelton ab.
Sofern ein Funkgong angelernt wurde, spielt
auch dieser eine Melodie ab. Lesen Sie dazu
den Punkt „BELL-Empfänger anlernen“.
Außerdem speichert die Innenstation kurz
hintereinander 3 Fotos, sofern eine microSD-
Karte in Kartenschacht 2 eingelegt ist.
Sprechtaste (Sensortouch)
Berühren Sie die Sprechtaste um die Sprach-
übertragung zu aktivieren.
Standby-Modus
Berühren Sie die Sprechtaste während das
Gespräch aktiv ist, schaltet die Innenstation
in den Standby-Modus zurück.
Türönertaste (Sensortouch)
Berühren Sie die Türönertaste während des
Gespräches um den Türönerzu aktivieren
(sofern angeschlossen).
Stummtaste (Sensortouch)
Berühren Sie die Stummtaste um den Klin-
gelton stumm zu schalten. Das Symbol
leuchtet dauerha rot, bzw. blinkt, solange

VDV-907 | DEUTSCH
15
DE
die Stummschaltung aktiv ist. Um die
Stummschaltung aufzuheben, berühren Sie
die Stummtaste erneut.
HINWEIS: Während die Stummschaltung
aktiv ist, wird das Funksignal zu einem ange-
lernten Funkgong nicht deaktiviert, d.h.
dieser klingelt weiterhin. Schalten Sie bei
Bedarf die BELL Empfänger stumm.
Bildschirm aktivieren
Berühren der Sprech-Taste im Standby akti-
viert den Bildschirm und die Sprachverbin-
dung, außerdem wird das Livebild derAußen-
station angezeigt.
ERWEITERTE FUNKTIONEN
(TOUCH-Tasten auf dem Bildschirm, wenn
geklingelt wurde oder die Sprechtaste
gedrückt wurde)
Licht
Über diese Schaltäche lässt mit einem Emp-
fänger aus der CUVEO-Serie z.B. ein Licht
schalten. Lesen Sie dazu den Punkt
„CUVEO Empfänger anlernen“.
Pfeil-Symbol rechts und links
Ist eine zweite Außenstation parallel ange-
schlossen, bzw. eine Zusatzkamera, kann
über die beiden Schaltächen zur nächsten,
bzw. zur vorigen Außenstation/Kamera
umgeschaltet werden.
Alarmsymbol
Wird diese Schaltäche während eines
aktiven Gespräches berührt, ertönt an der
Außenstation ein Alarmsignal. Durch erneu-
tes Berühren der Schaltäche oder durch
Beendigung des Gespräches wird der Alarm-
ton wieder deaktiviert.
Lautstärke + und -
Durch Berühren der Taste „+“ wird die
Sprechlautstärke erhöht, Berühren der
Taste „-“ verringert die Sprechlautstärke.
HINWEIS: Diese Einstellung ist nur temporär
und wird nach Beendigung des Gespräches
wieder auf die Grundlautstärke eingestellt
(Siehe Grundeinstellung Lautstärke).

DEUTSCH | VDV-907
16
DE
Stumm-Taste
Wird während des Gespräches die Stumm-
Taste gedrückt, wird das Mikrofon der Innen-
station deaktiviert und der Besucher hört Sie
nicht mehr. Um wieder mit dem Besucher
sprechen zu können, berühren Sie die Schalt-
äche ein weiteres Mal. Wird keine Stumm-
Taste dargestellt, ist sie im Einstellungsmenü
deaktiviert worden.
Kamera-Taste
Ist eine microSD-Karte für Fotos in die Innen-
station eingelegt, kann über diese Schaltä-
che jederzeit während das Bild aktiv ist ein
Foto gespeichert werden.Tippen Sie dazu
einfach auf dieses Symbol.
BILDSPEICHER UND EINSTELLUNGEN
Auf den Seiten 24-26 nden Sie eine Über-
sicht über die Struktur des OSD (On Screen
Display).
Bildschirm einschalten
Wenn sich die Innenstation im Standby
bendet, können Sie ihn durch Berühren der
schwarzen Bildschirmäche einschalten.
Darauin wird das Kamerabild angezeigt,
die Sprachverbindung zur Außenstation
wird hierbei nicht aktiviert, der Ton von der
Außenstation ist jedoch zu hören.
Ist der Bildschirm aktiviert worden, sind der
Bildspeicher (nurbei eingelegter SD-Karte),
das Einstellungsmenü, sowie die Intercom-
Funktion verfügbar. Berühren Sie den
Zurückpfeil links unten um die Innenstation
in den Standbymodus zu schalten.
Name derAußenstation ändern
Wurde die Innenstation durch Berühren des
Bildschirms aktiviert, können Sie den Namen
derAußenstation Ihren Wünschen anpassen.
Tippen Sie dazu einfach auf den Namen der
Außenstation (A9) und geben Sie dann den
gewünschten Namen ein. Bestätigen Sie den
eingegebenen Namen mit der Entertaste.
Zwischen den Außenstationen wechseln
Sind mehrereAußenstationen angeschlos-
sen, können Sie zwischen diesen hin und her
schalten, indem Sie auf die Pfeile neben dem
Namen der Außenstation tippen.

VDV-907 | DEUTSCH
17
DE
Bildspeicher
Berühren Sie das Fotosymbol rechts unten
um sich den Inhalt des Bildspeichers auf der
SD-Karte anzusehen. Im darauolgenden
Bild wird Ihnen ein Kalender angezeigt, auf
dem Tage, an denen Bilder aufgenommen
wurden, farblich hinterlegt sind. Berühren Sie
den entsprechenden Tag um sich alle Bilder
anzusehen, welche an dem ausgewählten Tag
aufgenommen wurden. Über die Pfeiltasten
rechts und links neben dem Bild kann zum
nächsten, bzw. zum vorigen Bild geschaltet
werden.
Einzelne Bilder können gelöscht werden,
indem die Schaltäche mit dem Mülltonnen-
symbol berührt wird. Das jeweils angezeigte
Bild wird bei Berühren des Mülltonnensym-
bols ohne Rückfrage gelöscht. Möchten Sie
alle gespeicherten Bilder auf einmal löschen,
lesen Sie den Punkt „Alle Bilder löschen“.
Einstellungen
In das Einstellungsmenü gelangen Sie, wenn
Sie den Bildschirm durch Berühren einge-
schaltet haben und danach die Schaltäche
mit den Zahnrädern antippen.
Sprache einstellen
Berühren Sie das Flaggensymbol um in das
Auswahlmenü für die Sprachen zu gelangen.
Tippen Sie dort die gewünschte Sprache an
und speichern Sie die Einstellung anschlie-
ßend durch Berühren des Speichersymbols.
Die Überschri dieses Menüs wird bei erfolg-
reicher Speicherung sofort in der ausgewähl-
ten Sprache angezeigt.
Über den Zurückpfeil gelangen Sie zurück
zum Einstellungsmenü.
Grundlautstärke einstellen (B2)
Berühren Sie das Mundsymbol um die Ein-
stellung der Grundlautstärke vornehmen zu
können. Über die + Schaltäche wird die
Lautstärke erhöht, über die -Schaltäche ver-
ringert. Anhand der gefüllten Punkte sehen
Sie, wie hoch die Lautstärke eingestellt ist.
Die Lautstärke wird automatisch gespeichert.
Über den Zurückpfeil gelangen Sie zurück
zum Einstellungsmenü.
Uhrzeit und Datum einstellen
Berühren Sie das Uhr/Kalendersymbol um in
das Einstellungsmenü für Datum und Zeit zu
gelangen.
Tippen Sie auf das Feld, welches Sie einstellen

DEUTSCH | VDV-907
18
DE
möchten (das aktive Feld wird blau). Mit den
Pfeilen auf der rechten Seite können Sie den
Wert dann ändern. Sie können Zeit und
Datum automatisch einstellen lassen, dazu
ist eine WLAN-Verbindung mit Internetzu-
gri nötig oder manuell. Die Einstellung der
UTC (UniversalTime, Coordinated) sollte im
manuellen Uhr-Modus „0“ sein.
HINWEIS: Ist die Zeit auf automatisch einge-
stellt und die UTC auf 0 gesetzt, wird die kor-
rekte Zeitzone automatisch bestimmt. Ist
eine andere UTC eingestellt, wird immer
diese verwendet. In dem Fall ist es notwen-
dig, die Sommerzeit manuell zu setzen.
Nachdem Sie Datum und Zeit eingestellt
haben, tippen Sie auf das Speichersymbol
unten rechts. Anschließend können Sie das
Menü über den Zurückpfeilverlassen.
Grundeinstellungen
In den Grundeinstellungen können Sie festle-
gen, welche Steuerungssymbole auf dem
Hauptbildschirm sichtbar sein und welche
Funktionen aktiv sein sollen.
Tippen Sie auf die Info-Schaltäche rechts
neben der jeweiligen Einstellung um eine
Beschreibung zu erhalten.
Dieses Einstellungsmenü ist auf zwei Seiten
aufgeteilt. Über die Schaltächen mit dem
Pfeil (rechts oder links) können Sie zwischen
den Seiten wechseln.
HINWEIS: Änderungen müssen auf jeder
Seite durch Tippen auf das Speichersymbol
gespeichert werden.
Melodie einstellen
Berühren Sie das Notensymbol um in das
Einstellungsmenü für den Klingelton zu
gelangen. Ist eine SD-Karte mit darauf
gespeicherten Tönen eingelegt, ist das SD-
Karten-Symbol blau hinterlegt und durch
Tippen auf die „1“ wird der erste, auf der SD-
Karte gespeicherte Klingelton abgespielt.
Sind auf der SD-Karte keine Dateien gespei-
chert oder ist keine SD-Karte eingelegt, ist
das Symbol grau und es sind automatisch die
intern gespeicherten Klingeltöne über das
Zahlenfeld auswählbar. Über die „+“ und „-“
Taste kann die Lautstärke des Klingeltons
angepasst werden.
HINWEIS: Auf der microSD-Karte können
Audiodaten im Wave- oder MP3-Format
gespeichert werden.

VDV-907 | DEUTSCH
19
DE
Es ist möglich, jeder angeschlossenen Außen-
station einen eigenen Klingelton zuzuordnen.
Dadurch kann anhand des Klingeltons unter-
schieden werden, wo geklingelt wurde. Im
oberen Bereich des Menüs wird der Name
derAußenstation gezeigt, für die aktuell der
Klingelton eingestellt wird. Über die Pfeiltas-
ten darüber und darunter wechseln Sie zwi-
schen den Außenstationen.
Hilfe Menü
Berühren Sie die Hilfe-Schaltäche. Hier
nden Sie unsere Kontaktinformationen,
sowie den QR-Code um die Anbindung an die
App durchführen zu können.
Bild Einstellungen
Tippen Sie auf das Bild-Einstellungssymbol,
um die Helligkeit, Farbsättigung und den
Kontrast des angezeigten Livebildes anzu-
passen.
WLAN verbinden
Tippen Sie auf das WLAN-Symbol um sich
mit einem WLAN in der Nähe zu verbinden.
Im darauolgenden Menü werden alle in der
Nähe bendlichen WLAN-Accesspoints ange-
zeigt. Tippen Sie auf Ihr WLAN und geben Sie
den WLAN-Schlüssel ein. Bestätigen Sie den
Schlüssel durch tippen auf die Entertaste.
Warten Sie kurz. Falls Sie sich beim WLAN-
Schlüssel vertippt haben, zeigt die Innensta-
tion an, dass die Verbindung nicht erfolgreich
ist und springt zur Eingabemaske für den
WLAN-Schlüssel zurück und Sie können Ihre
Eingabe überprüfen und ggfs. ändern.
Zeigt die Innenstation an, dass die Verbin-
dung erfolgreich ist, wird der Name Ihres
WLAN oben in grün angezeigt.
HINWEIS: Es ist nicht möglich, das Netzwerk
manuell einzustellen, es wird immer DHCP
benutzt.
Um mit Ihrem Smartphone auf die Sprechan-
lage zugreifen zu können, benötigen Sie die
App Vistasmart, bzw.Aivisi . Rufen Sie mit
Ihrem Smartphon die Internetseite https://
www.vistasmart.de auf und wählen Sie die
Innenstation VDV 907 aus.
Auf der nächsten Seite nden Sie die Links
zurAndroid und zur iOS App, sowie weitere
Informationen zur Bedienung der App.

DEUTSCH | VDV-907
20
DE
Informationen zur Innenstation
Berühren Sie das Informationssymbol. Hier
wird Ihnen die Betriebsspannung der Innen-
station in Volt angezeigt. Sie sollte zwischen
15V und 15,5V liegen.
Außerdem wird Ihnen die IP-Adresse der
Inneneinheit angezeigt.
Alle Bilder löschen
Berühren Sie das Mülltonnensymbol, wenn
Sie alle gespeicherten Bilder löschen möch-
ten. Berühren Sie dort das grün hinterlegte
Feld und bestätigen Sie den folgenden Dialog
mit „Ok“ um alle Bilder zu löschen oder
tippen Sie auf „Abrechen“ um den Löschvor-
gang abzubrechen.
Reset
Tippen Sie auf Reset um die Innenstation auf
Werkseinstellungen zurück zu setzen, z.B.
wenn Sie die Zugangsdaten für die App ver-
gessen haben.
Berühren Sie die grüne Schaltäche und
bestätigen Sie den Reset, indem Sie im dar-
auolgenden Dialog auf „Ok“ tippen. Bitte
beachten Sie, dass Fotos durch einen Reset
nicht gelöscht werden.
BELL-Empfänger anlernen
Tippen Sie auf das BELL-Symbol, um in das
Einstellungsmenü für den Funkgong zu
gelangen.
Bringen Sie den Empfänger in den Lernmo-
dus, indem Sie die Code-Taste drücken, bis
der Empfänger einen kurzen Signalton abgibt
und tippen Sie dann auf einen der Buchsta-
ben auf dem Monitor. Der Empfänger spielt
eine Melodie ab und ist fertig angelernt.
Melodie des Funkgongs einstellen
Tippen Sie auf das BELL-Symbol um in das
Einstellungsmenü für den Funkgong zu
gelangen. Dort haben Sie die Möglichkeit,
das integrierte Funkmodul zu deaktivieren
und die Melodie des Funkgongs zu ändern.
Tippen Sie auf einen Buchstaben, der ange-
lernte Funkgong spielt die dazugehörige
Melodie ab. Diese Melodie ist sofort gespei-
chert und Sie können dieses Menü über den
Zurückpfeil verlassen.
CUVEO Empfänger anlernen
Bringen Sie den Empfänger in den Lernmo-
dus (Taste am Empfänger drücken, bis die
LED am Empfänger blinkt) und aktiveren Sie
den Monitor, indem Sie auf die touchaktive

VDV-907 | DEUTSCH
21
DE
Fläche tippen. tippen Sie anschließend auf
das Lichtsymbol. Falls das Lichtsymbol nicht
angezeigt wird, prüfen Sie ob es in den
Grundeinstellungen (B5) aktiviert ist.
Codierung des Funkprotokolls ändern
(CUVEO und BELL)
Falls sich der CUVEO-Empfänger und/oder
der BELL-Empfänger ohne Grund aktivieren,
könnte ein anderer Sender in der Nähe den
gleichen Code senden. Um den Code zu
ändern gehen Sie wie folgt vor.
Der Monitor muss sich im Standby benden.
Halten Sie einen Finger auf die Stummtaste
(ca. 7 Sekunden) bis das Schlüssel- und das
Mundsymbol leuchten.
Anschließend müssen alle Empfänger
(CUVEO und BELL) neu angelernt werden.
TECHNISCHE DATEN
Betriebsspannung: 15Volt DC
Stromaufnahme: 270 ± 50mA
Frequenz WLAN: 2,4GHz; <100mW
Frequenz BELL: 434MH z; <10mW
Temperaturbereich: 0-50°C
Max. Lufeuchtigkeit: 85%
Bildschirmdiagonale: 178mm
Auösung des Monitors: 1024x600
Abmessungen: 220x160x28mm (BxHxT)
HINWEISE
Unter Einwirkung von starken statischen,
elektrischen oder hochfrequenten Feldern
(Entladungen, Mobiltelefonen, Funkanlagen,
Handys, Mikrowellen) kann es zu Funktions-
beeinträchtigungen der Geräte (des Gerätes)
kommen.
Reinigung und Pege
Netzbetriebene Geräte vor dem Reinigen
vom Netz trennen (Stecker ziehen). Die Ober-
äche des Gehäuses kann mit einem mit Sei-
fenlauge angefeuchtetem weichen Tuch
gereinigt werden.Verwenden Sie keine
Scheuermittel oder Chemikalien. Staubabla-
gerungen an Lüungsschlitzen nur mit einem
Pinsel lösen und gegebenenfalls mit einem
Staubsauger absaugen. Die Saugdüse nicht
direkt an das Gerät halten.

DEUTSCH | VDV-907
22
DE
Rechtliche Grundlagen
1. Beachten Sie bitte als Betreiber bzw.
Anwender der Video-Türsprechstelle die
Regulierungen und rechtlichen
Grundlagen ihres Landes für den Einsatz
von Überwachungsgeräten hinsichtlich
der Personenrechte und des
Datenschutzes!
2. In vielen Ländern dürfen Videobild
und/oder Sprache erst dann übertragen
werden, wenn ein Besucher geklingelt
hat.
3. Führen Sie die Montage der Kamera so
durch, dass der Erfassungsbereich
ausschließlich auf den unmittelbaren
Eingangsbereich begrenzt ist.
4. Das Gerät verfügt über eine integrierte
Besucherhistorie. Es werden Besucher mit
Bild, Datum und Uhrzeit direkt im Gerät
archiviert. Nutzen Sie diese Funktion
gemäß der am Installationsort geltenden
relevanten landespezischen gesetzlichen
Regelungen (Hinweispicht/Archivierung).
5. Sofern erforderlich, weisen Sie in
geeigneterWeise auf die Existenz des
Geräts hin.
SICHERHEITSHINWEISE
Bei Schäden, die durch Nichtbeachten dieser
Bedienungsanleitung verursacht werden,
erlischt der Garantieanspruch. Für Folgeschä-
den übernehmen wir keine Haung!
Bei Sach- oder Personenschäden, die durch
unsachgemäße Handhabung oder Nichtbe-
achten der Sicherheitshinweise verursacht
werden, übernehmen wir keine Haung. In
diesen Fällen erlischt jeder Garantieanspruch!
Aus Sicherheits- und Zulassungsgründen (CE)
ist das eigenmächtige Umbauen und/oder
Verändern des Produkts nicht gestattet. Zer-
legen Sie das Produkt nicht!
Lassen Sie das Verpackungsmaterial nicht
achtlos liegen, Plastikfolien/-tüten, Styropor-
teile etc. könnten für Kinder zu einem gefähr-
lichen Spielzeug werden.
Das Gerät ist nur für trockene Innenräume
geeignet (keine Badezimmer o.ä. Feucht-
räume). Vermeiden Sie das Feucht- oder
Nasswerden des Geräts.
Wenden Sie sich an eine Fachkra, wenn Sie

VDV-907 | DEUTSCH
23
DE
Zweifel über die Arbeitsweise, die Sicherheit
oder den Anschluss des Geräts haben.
Gehen Sie vorsichtig mit dem Produkt um -
durch Stöße, Schläge oder dem Fall aus
bereits geringer Höhe wird es beschädigt.
2 JAHRE BESCHRÄNKTE GARANTIE
Es wird für die Dauer von 2 Jahren ab Kaufda-
tum gewährleistet, dass dieses Produktfrei
von Defekten in den Materialien und in der
Ausführung ist. Dies tri nur zu, wenn das
Gerät in üblicher Weise benutzt wird und
regelmäßig instand gehalten wird. Die Ver-
pichtungen dieser Garantie werden auf die
Reparaturoder den Wiedereinbau irgendei-
nes Teils des Gerätes begrenzt und gelten nur
unter der Bedingung, dass keine unbefugten
Veränderungen oder versuchte Reparaturen
vorgenommen wurden. Ihre gesetzlichen
Rechte als Kunde werden in keinerWeise
durch diese Garantie beeinträchtigt.
Bitte beachten Sie!
Es besteht keinAnspruch auf Garantie in u. a.
folgenden Fällen:
• Bedienungsfehler
• Störungen durch andere Funkanlagen
(z.B. Handybetrieb)
• Fremdeingrie/-wirkungen
• Mechanische Beschädigungen
• Feuchtigkeitsschäden
• Kein Garantie-Nachweis (Kaueleg)
Bei Schäden, die durch Nichtbeachten dieser
Bedienungsanleitung verursacht werden,
erlischt der Garantieanspruch. Für Folgeschä-
den übernehmen wir keine Haung! Bei
Sach- oder Personenschäden, die durch
unsachgemäße Handhabung oder Nichtbe-
achten der Sicherheitshinweise verursacht
werden, übernehmen wir keine Haung. In
solchen Fällen erlischt jeder Garantiean-
spruch!
Haungsbeschränkung
Der Hersteller ist nicht für den Verlust oder
die Beschädigung irgendwelcherArt ein-
schließlich der beiläugen oder Folgeschäden
habar, die direkt oder indirekt aus der
Störung dieses Produktes resultieren.

DEUTSCH | VDV-907
24
DE
Diese Betriebsanleitung ist eine Publikation der
m-e GmbH modern-electronics,
An den Kolonaten 37, 26160 Bad Zwischenahn
Die Betriebsanleitung entspricht dem technischen Stand
bei Drucklegung. Änderung in Technik und Ausstattung
vorbehalten. 03-2021

DE
VDV-907 | DEUTSCH
25
USER INTERFACE
StrukturI

USER INTERFACE
StrukturII
DE
DEUTSCH | VDV-907
26

DE
VDV-907 | DEUTSCH
27
USER INTERFACE
StrukturIII

DE
DEUTSCH | VDV-907
28

GB
FIGURES 31
User Interface in talk mode 35
User Interface Settings 36
SCOPE OF DELIVERY 37
LEGEND 37
User interface (UI) 38
INSTALLATION (FIG.2A+B) 38
COMMISSIONING 39
Power supply connection 39
INSERTING MICRO SD CARDS 39
INITIALISATION / RESET 40
OPERATION 40
BASIC FUNCTIONS 40
Ringing 40
Standby mode 40
Door release button (sensor touch) 40
Mute key (sensortouch) 40
Activate screen 41
ADVANCED FUNCTIONS 41
Light 41
Arrow symbol Right and Le 41
Alarm symbol 41
Volume + and - 41
Mute key 41
Camera button 41
PICTURE MEMORYAND SETTINGS 42
Switching on the screen 42
Changing the name of the outdoor unit 42
Switching between outdoor units 42
Picture memory 42
Settings 42
Setting the language 43
Setting the basic volume (B2) 43
Setting the time and date 43
Basic settings 43
Setting the melody 43
Help menu 44
Picture Settings 44
Connect WLAN 44
Information about the indoor unit 45
Deleting all pictures 45
Reset 45
Coding the BELL receiver 45
TABLE OF CONTENTS
VDV-907 | ENGLISH
29


GB
VDV-907 | ENGLISH
31
Fig.1
TOUCH-ACTIVE SURFACE
1
7
2 3
4 5
6
1 = VDV 907
2 = Microphone
3 = Silence button (sensor touch)
4 = Door release button (sensortouch)
5 = Talk button (sensortouch)
6 = Housing screws
7 = Touch-active surface
8 = MicroSD slot 2 photos
9 = MicroSD slot 1 ring tones

GB
ENGLISH | VDV-907
32
Fig.2
Fig.2A Fig.2B
9
2
8

GB
VDV-907 | ENGLISH
33
Fig.3

GB
ENGLISH | VDV-907
34
Fig.4
External bellbutton
toACadapter
to outdoorunit

GB
VDV-907 | ENGLISH
35
USER INTERFACE (UI)
UI Talk Mode
UI Picture Memory and Settings
User Interface in talk mode
A1 = Light key
A2 = Shi keys
A3 = Alarm key
A4 = Name of outdoor unit
A5 = Time / date display
A6 = Photo button
A7 = Voice volume
A8 = Mute button
A9 = Change outdoor unit name
A10 = Settings
A11 = Back button
A12 = Picture memory key
A1
A11
A10
A5
A2
A6
A12
A4
A9
A6A1A3
A7 A8
A2
A3
Fig.A

GB
ENGLISH | VDV-907
36
UI Settings Page 1
User Interface Settings
B1 = Language
B2 = Speech volume
B3 = Time / date
B4 = Previous page
B5 = Basic settings
B6 = Next page
B7 = Melody indoor unit
B8 = Help
B9 = Picture settings
B10 = WLAN settings
B11 = Information
B12 = Delete all photos
B13 = Factory settings
B14 = Radio chime melody
B6
B13
B14
B1 B5
B9 B12
B3
B11B10
B8
B7
B4
B2
Fig.B

VDV-907 | ENGLISH
37
GB
VDV-907 indoor unit
forvideo door intercom systems
Thank you for purchasing this video indoor
unit with integrated picture memory and
WLAN function. This indoor unit can be com-
bined with all components from the VISTA-
DOOR and VISTUS door intercom systems.
When the bell is rung at the connected out-
door unit, the indoor unit plays the set rin-
ging melody and the visitor can be seen on
the monitor. Furthermore, 3 photos are auto-
matically saved.
You can speak to the visitor at the indoor unit
and also open the door (if a door opener is
connected).
If the VDV-907 is connected via WLAN, a
connection to your smartphone can also be
established. At www.vistasmart.de you will
nd more information on how to install the
app and integrate the VDV-907.
This indoor unit has two card slots for
microSD cards (max. 32GB).
Audio les can be stored on a microSD card in
slot 1 (8), which can then be used as a ring-
tone. For the picture storage function,
another microSD card is required in slot 2 (9).
No memory cards are included in the scope
of delivery.
SCOPE OF DELIVERY
- Indoor unit with 7" screen diagonal
- Mounting material
- Operating and installation instructions
- Drilling template
LEGEND
1 = VDV 907
2 = Microphone
3 = Silence button (sensor touch)
4 = Door release button (sensortouch)
5 = Talk button (sensortouch)
6 = Housing screws
7 = Touch-active surface
8 = MicroSD slot 2 photos
9 = MicroSD slot 1 ring tones

ENGLISH | VDV-907
38
GB
User interface (UI)
A1 = Light key
A2 = Shi keys
A3 = Alarm key
A4 = Name of outdoor unit
A5 = Time / date display
A6 = Photo button
A7 = Voice volume
A8 = Mute button
A9 = Change outdoor unit name
A10 = Settings
A11 = Back button
A12 = Picture memory key
B1 = Language
B2 = Speech volume
B3 = Time / date
B4 = Previous page
B5 = Basic settings
B6 = Next page
B7 = Melody indoor unit
B8 = Help
B9 = Picture settings
B10 = WLAN settings
B11 = Information
B12 = Delete all photos
B13 = Factory settings
B14 = Radio chime melody
INSTALLATION (Fig. 2a+b)
1. Find a suitable place to install the indoor
unit and run the cables to it.
2. Remove the two screws (16) on the indoor
unit and li o the front cover of the
indoor unit.
3. There are two plastic retaining lugs in the
centre of the sides of the indoor unit.
Carefullypull o the front cover.
4. There is a hole in the top of the housing
below the connection terminals for
inserting the cables into the housing.
5. You can use the bottom of the housing as
a drilling template, align it with a spirit
level just at the point on the wall where
the indoor unit is to be mounted.
6. Markthe holes on the wall with a suitable
pencil, then drill the holes (Ø 6 mm) at the
marks.
7. Insert one of the plugs supplied into each
hole.
8. Leadthe connection cable through the
hole in the housing base of the indoor unit
and screw the housing base to the wall
with four screws.
9. Connectthe cables as shown in the
connection diagram (Fig. 4).

VDV-907 | ENGLISH
39
GB
NOTE: Do not cut the cables too short. There
are lugs in the bottom of the enclosure where
the cables can be wound up.
10. Place the front coverwith the monitor on
the edge of the housing base from above
and press it down. The latching hooks on
the sides must lock into place.
NOTE: Insulate unused cables with insulating
tape to avoid short circuits.
11. Screwthe front cover back on with the
two screws (6).
COMMISSIONING
Powersupplyconnection
The power supply can be connected to either
the indoor or outdoor unit. It is also possible
to feed in the power supply at a star point,
e.g. if all signal lines have been laid from the
fuse box to the outdoor and indoor units. The
power supply must then be connected in par-
allel with ground/GND and +15V. Aer all
components have been mounted and
connected, switch on the operating voltage.
Depending on the type of installation, plug
the power supply unit into a suitable socket
or switch on the circuit breakerto which the
DIN rail power supply unit is connected.
INSERTING MICRO SD CARDS
Open the indoor unit and carefully place it
with the monitor facing downwards on a so
cloth to avoid scratching the glass. Slide the
microSD cards into the corresponding slots,
with the contact surfaces ofthe microSD
cards facing the circuit board. The slots are
equipped with a spring-loaded mechanism
that works like a biro. Push the card into the
slot until you hear a so click and the card is
locked in place. To remove the cards, gently
press them into the card slot and then slowly
reduce the pressure. Be careful that the
microSD cards do not y out ofthe slot due
to the spring pressure.

ENGLISH | VDV-907
40
GB
INITIALISATION / RESET
To initialise the system, you must ring once
at the outdoor unit (if there are several out-
door units, you must ring once at each out-
door unit). For a reset, disconnect the power
supply for approx. 1 minute and then carry
out the initialisation again.
NOTE: Before carrying out any work on the
system, switch o the operating voltage
again! Each time the unit has been without
power, the initialisation must be carried
out again.
OPERATION
BASIC FUNCTIONS
(TOUCH keys outside the display)
Ringing
Press the bell button ofthe outdoor unit. The
indoor unit plays a ring tone. If a radio chime
has been taught-in, it also plays a melody.
For more information, read the section "Pro-
gramming the BELL receiver".
The indoor unit also saves 3 photos in quick
succession if a microSD card is inserted in
card slot 2.
Talk button (sensor touch)
Touch the talk keyto activate voice transmis-
sion.
Standby mode
Ifyou touch the talk button while the call is
active, the indoor unit switches back to
standby mode.
Door release button (sensor touch)
Touch the door release button during the call
to activate the door opener (if connected).
Mute key(sensortouch)
Touch the mute keyto mute the ring tone.
The symbol lights up permanently in red
or ashes as long as muting is active. To
unmute the ringtone, touch the mute button
again.
NOTE: While the mute function is active, the
radio signal to a remote-controlled radio
chime is not deactivated, i.e. it continues to
ring. Mute the BELL receivers if necessary.

VDV-907 | ENGLISH
41
GB
Activate screen
Touching the Talk button in standby activates
the screen and the voice connection, and the
live picture of the outdoor unit is
also displayed.
ADVANCED FUNCTIONS
(TOUCH buttons on the screen when ringing
or the talk button has been pressed)
Light
Using this button, a receiver from the CUVEO
series can be used to switch a light, for exam-
ple. For more information, see "Teaching the
CUVEO receiver".
Arrowsymbol Right and Le
If a second outdoor unit or an additional
camera is connected in parallel, the two but-
tons can be used to switch to the next or pre-
vious outdoor unit/camera.
Alarm symbol
If this button is touched during an active call,
an alarm signal sounds at the outdoor unit.
Touching the button again or ending the call
deactivates the alarm tone.
Volume + and -
Touching the "+" button increasesthe speech
volume, touching the "-" button decreases
the speech volume.
NOTE:This setting is only temporary and is
resetto the basic volume aerthe call is
ended (see Basic volume setting).
Mute key
If the mute button is pressed during the call,
the microphone of the indoor unit is deacti-
vated and the visitor can no longer hear you.
To be able to speak with the visitor again,
touch the button once more. If no mute
button is displayed, it has been deactivated
in the settings menu.
Camera button
If a microSD card for photos is inserted in the
indoor unit, a photo can be saved via this
button at anytime while the picture is active.
To do this, simply tap this symbol.

ENGLISH | VDV-907
42
GB
PICTURE MEMORY AND SETTINGS
On pages 48-50 you will nd an overview of
the structure of the OSD (On Screen Display).
Switching on the screen
If the indoor unit is in standby, you can switch
it on bytouching the black screen area. The
camera picture is then displayed, the voice
connection to the outdoor unit is not activa-
ted here, but the sound from the outdoor
unit can be heard.
Once the screen has been activated, the
image memory (onlyif an SD card has been
inserted), the settings menu and the inter-
com function are available. Touch the back
arrow at the bottom le to switch the indoor
unit to standby mode.
Changing the name ofthe outdoor unit
Once the indoor unit has been activated by
touching the screen, you can change the
name of the outdoor unit to suit your prefe-
rences. To do this, simplytouch the name of
the outdoor unit (A9) and then enter the
desired name. Conrm the entered name
with the Enter key.
Switching between outdoor units
If several outdoor units are connected, you
can switch between them by tapping on the
arrows next to the name of the outdoor unit.
Picture memory
Touch the photo symbol at the bottom right
to view the contents of the picture memory
on the SD card. The following screen displays
a calendar with days on which pictures were
taken highlighted in colour. Touch the corre-
sponding day to view all pictures taken on
the selected day. Use the arrow keys to the
right and le of the picture to switch to the
next or previous picture.
previous picture.
Individual pictures can be deleted bytou-
ching the button with the dustbin symbol.
The image displayed in each case is deleted
without conrmation when the dustbin
symbol is touched. If you want to delete all
stored pictures at once, see the item
"Delete all photos".
Settings
You can access the settings menu if you have
switched on the screen bytouching it and
then touch the button with the cogwheels.

VDV-907 | ENGLISH
43
GB
Setting the language
Touch the ag symbol to access the language
selection menu. Touch the desired language
there and then save the setting bytouching
the save symbol. The heading of this menu is
immediately displayed in the selected lan-
guage if the saving was successful. Use the
back arrowto return to the settings menu.
Setting the basic volume (B2)
Touch the mouth symbol to set the basic
volume. The + button increases the volume,
the - button decreases it. The lled dots show
you how high the volume is set. The volume
is saved automatically. Use the back arrow to
returnto the settings menu.
Setting the time and date
Touch the clock/calendar symbol to enterthe
settings menu for date and time. Touch the
eld you want to set (the active eld turns
blue). You can then use the arrows on the
right to change the value. You can set the
time and date automatically, which requires a
WLAN connection with Internet access, or
manually. The UTC (UniversalTime, Coordi-
nated) setting should be "0" in manual clock
mode.
NOTE: If the time is set to automatic and the
UTC is set to 0, the correct time zone is
determined automatically. If a dierent UTC
is set, it will always be used. In this case, it is
necessaryto set the daylight saving time
manually. Aer you have set the date and
time, tap the save symbol at the bottom
right. You can then exit the menu using the
back arrow.
Basic settings
In the basic settings you can determine which
control icons should be visible on the main
screen and which functions should be active.
Tap the info button to the right of each set-
ting to get a description. This settings menu
is divided into two pages. You can switch bet-
ween the pages using the buttons with the
arrow (right or le).
NOTE: Changes must be saved on each page
bytapping the save icon.
Setting the melody
Touch the note symbol to enter the ringtone
setting menu. If an SD card with tones stored
on it is inserted, the SD card symbol is high-
lighted in blue and tapping on the "1" plays

ENGLISH | VDV-907
44
GB
the rst ring tone stored on the SD card. If no
les are stored on the SD card or if no SD card
is inserted, the symbol is greyand the inter-
nally stored ringtones can be selected auto-
maticallyvia the number eld. The volume of
the ring tone can be adjusted via the "+" and
"-" keys.
NOTE:Audio data in wave or mp3 format can
be stored on the microSD card.
It is possible to assign an individual ring tone
to each connected outdoor unit. In this way,
it is possible to distinguish where the ringing
was from the ringing tone. The name of the
outdoor unit for which the ring tone is
currentlyset is shown in the upper part of the
menu. Use the arrow keys above and below
to switch between the outdoor units.
Help menu
Touch the Help button. Here you will nd our
contact information as well as the QR code
for connecting to the app.
Picture Settings
Touch the picture settings icon to adjust the
brightness, colour saturation and contrast of
the live picture displayed.
Connect WLAN
Tap the WLAN symbol to connect to a nearby
WLAN. In the following menu, all nearby
WLAN access points are displayed.Tap on
yourWLAN and enter the WLAN key. Con-
rm the key by tapping the Enter key.
Wait a short time. Ifyou mistyped the WLAN
key, the indoor unit indicates that the
connection is not successful and jumps back
to the input screen for the WLAN keyand
you can checkyour entry and change it if
necessary.
If the indoor unit indicates that the connec-
tion is successful, the name of your WLAN is
displayed in green at the top.
NOTE: It is not possible to set the network
manually, DHCP is always used.
To access the intercom with your smart-
phone, you need the Vistasmart or Aivisi
app. Call up the website https://www.vistas-
mart.de with your smartphone and select the
VDV 907 indoor unit.

VDV-907 | ENGLISH
45
GB
On the next page you will nd the links to the
Android and iOS app, as well as further infor-
mation on operating the app.
Information about the indoor unit
Touch the information symbol. The operating
voltage of the indoor unit is displayed here in
volts. It should be between 15V and 15.5V. The
IP address of the indoor unit is also displayed.
Deleting all pictures
Touch the dustbin symbol if you want to
delete all saved pictures. Touch the green
highlighted eld there and conrm the follo-
wing dialogue with "Ok" to delete all pictures
or touch "Cancel" to cancel the deletion pro-
cess.
Reset
Touch Reset to reset the indoor unit to fac-
tory settings, e.g. ifyou have forgotten the
access data for the app.
Touch the green button and conrm the reset
bytapping "Ok" in the following dialogue.
Please note that photos are not deleted by a
reset.
Coding the BELL receiver
Tap on the BELL symbol to access the set-
tings menu for the radio chime. Put the recei-
ver into learning mode by pressing the code
button until the receiver beeps briey and
then tap one of the letters on the monitor.
The receiverplays a melody and is readyto
be learned.
Setting the melody of the radio chime
Tap on the BELL symbol to enterthe settings
menu forthe radio chime. There you have the
option of deactivating the integrated radio
module and changing the melody of the
radio chime. Tap on a letter, the taught-in
radio chime plays the corresponding melody.
This melody is immediately saved and you
can exit this menu using the back arrow.
Coding the CUVEO receiver
Put the receiver in the learning mode (press
the button on the receiver until the LED on
the receiverashes) and activate the monitor
bytapping on the touch-active surface. then
tap on the light symbol. If the light symbol is
not displayed, check whether it is activated in
the basic settings (B5).

ENGLISH | VDV-907
46
GB
Changing the coding of the radio protocol
(CUVEO and BELL)
If the CUVEO receiver and/or the BELL recei-
ver activate for no reason, another transmit-
ter in the vicinity could be transmitting the
same code. To change the code, proceed as
follows: The monitor must be in standby.
Hold a nger on the mute button (approx.
7 seconds) until the key and mouth symbols
light up.
Then all receivers (CUVEO and BELL) must
be relearned.
TECHNICAL DATA
Operating voltage: 15Volt DC
Power consumption: 270 ± 50mA
Frequency WLAN: 2.4GHz; <100mW
Frequency BELL: 434MHz; <10mW
Temperature range: 0-50°C
Max. humidity: 85 %
Screen diagonal: 178mm
Monitor resolution: 1024x600
Dimensions: 220x160x28mm (W x H x D)
NOTES
Exposure to strong static, electric or high-fre-
quency elds (discharges, mobile phones,
radio equipment, mobile phones, microwa-
ves) may impair the function of the equip-
ment (the appliance).
Cleaning and care
Disconnect mains operated units from the
mains (pull out the plug) before cleaning. The
surface of the housing can be cleaned with a
so cloth moistened with soapy water. Do
not use abrasive cleaners or chemicals.
Loosen dust deposits on ventilation slots
only with a brush and, if necessary,vacuum
with a hoover. Do not hold the suction nozzle
directlyagainst the unit.
Legal principles
1. As the operator or user of the video door
unit, please observe the regulations and
legal principles ofyour country forthe use
of surveillance devices with regard to
personal rights and data protection!
2. In many countries, video images and/or
speech may only be transmitted aer a

VDV-907 | ENGLISH
47
GB
visitor has rung the doorbell.
3. mount the camera in such a waythat the
detection range is limited exclusively to
the immediate entrance area.
4. The unit has an integrated visitor history.
Visitors are archived directly in the unit
with their picture, date and time. Use this
function in accordance with the relevant
country-specic legal regulations
applicable at the installation site
(obligation to notify / archiving). 5.
5. If necessary, draw attention to the
existence of the unit in a suitable manner.
SAFETY NOTES
The warranty will be null and void in case of
damages arising from violations of these
operating instructions. We are not liable for
consequential damages!
We accept no liability for material damages
or injuries arising from inappropriate use or
violation of the safety instructions. In such
cases all warranty claims are null and void!
For reasons of safety and licensing (CE),
unauthorised conversion and /or modica-
tion of the product is prohibited. Do not take
the product apart!
Do not leave packaging material lying about
since plastic foils and pockets and polysty-
rene parts etc. could be lethal toys for child-
ren.
The device is suitable only for dry interior
rooms (not bathrooms and other moist
places). Do not allow the device to get moist
or wet.
Handle the product with care – it is sensitive
to bumps, knocks or falls even from low
heights.
2 YEAR LIMITED GUARANTEE
Fortwo years aerthe date of purchase, the
defect-free condition of the product model
and its materials is guaranteed. This guaran-
tee is only valid when the device is used as

ENGLISH | VDV-907
48
GB
intended and is subject to regular mainte-
nance checks. The scope ofthis guarantee is
limited to the repair or reinstallation of any
part of the device, and is only valid if no
unauthorised modications or attempted
repairs have been undertaken. Customer sta-
tutory rights are not aected bythis guaran-
tee.
Please note!
No claim can be made under guarantee in the
following circumstances:
• Operational malfunction
• Fault through other radio installation (i.e.
mobile operation)
• Unauthorised modications / actions
• Mechanical damage
• Moisture damage
• No proof of guarantee (purchase receipt)
Claims under warranty will be invalidated in
the event of damage caused by non-com-
pliance with the operating instructions. We
do not accept any responsibilityfor conse-
quential damage! No liability will be accepted
for material damage or personal injury
caused by inappropriate operation or failure
to observe the safety instructions. In such
cases, the guarantee will be rendered void.
Liability limitation
The manufacturer is not liable for loss or
damage of any kind including incidental or
consequential damage which is the direct or
indirect result of a fault to this product.
These operating instruction are published by
m-e GmbH modern-electronics,
An den Kolonaten 37,
26160 Bad Zwischenahn/Germany
The operating instructions reect the current technical
specications at time of print. We reservethe right to
change the technical or physical specications.

GB
VDV-907 | ENGLISH
49
USER INTERFACE
Structure I

GB
ENGLISH | VDV-907
50
USER INTERFACE
Structure II

GB
VDV-907 | ENGLISH
51
USER INTERFACE
Structure III


FR
FIGURES 55
Interface utilisateur en mode de parole 59
Interface utilisateur : Paramètres B1 =
Langue 60
ÉTENDUE DE LA PRESTATION 61
LEGENDE 61
Interface utilisateur (UI) 62
INSTALLATION (FIG.2A+B) 62
COMMISSION 63
INSERTION DE CARTES MICRO SD 63
INITIALISATION / RESET 64
FONCTIONNEMENT 64
LES FONCTIONS DE BASE 64
Appeler 64
Bouton de conversation (capteur tactile)64
Mode veille 64
Bouton d'ouverture de la porte (capteur
tactile) 65
Touche de mise en sourdine (capteur
tactile) 65
Activer l'écran 65
FONCTIONS AVANCÉES 65
Lumière 65
Symbole des èches Droite et Gauche 65
Symbole d'alarme 65
Volume + et - 65
Touche de mise en sourdine 66
Bouton de l'appareil photo 66
MÉMOIRE D'IMAGES ET RÉGLAGES 66
Allumer l'écran 66
Changer le nom de la station d'accueil 66
Passage d'une station à l'autre 67
Mémoire d'images 67
Paramètres 67
Dénir la langue 67
Réglage du volume de base (B2) 67
Fixer l'heure et la date 68
Paramètres de base 68
Régler la mélodie 68
Menu d'aide 69
Paramètres des images 69
Connecter le WLAN 69
Informations sur la station intérieure 70
TABLE DES MATIÈRES
VDV-907 | FRANÇAISE
53

FR
Suppression de toutes les images 70
Réinitialiser 70
Enseigner au récepteur BELL 70
Réglage de la mélodie du carillon radio 70
Enseigner le récepteur CUVEO 71
Modier le codage du protocole radio 71
DONNÉES TECHNIQUES 71
NOTES 71
Nettoyage et entretien 71
Principes juridiques 71
CONSIGNES DE SECURITE 72
GARANTIE LIMITEE A 2 ANS 73
Responsabilité limitée 73
TABLE DES MATIÈRES
FRANÇAISE | VDV-907
54

FR
VDV-907 | FRANÇAISE
55
Fig.1
SURFACETACTILE ACTIVE
1
7
2 3
4 5
6
1 = VDV-907
2 = Microphone
3 = Bouton de silence (capteur tactile)
4 = Bouton de déverrouillage des portes (capteur tactile)
5 = Bouton de conversation (capteurtactile)
6 = Vis de boîtier
7 = Surface tactile active
8 = Emplacement microSD 2 (photos)
9 = Emplacement microSD 1 (sonneries)

FR
FRANÇAISE | VDV-907
56
Fig.2
Fig.2A Fig.2B
9
2
8

FR
VDV-907 | FRANÇAISE
57
Fig.3

FR
FRANÇAISE | VDV-907
58
Fig.4
Boutondesonnerie externe
verslastationextérieure
versl'adaptateur
secteur

FR
VDV-907 | FRANÇAISE
59
INTERFACE UTILISATEUR (UI)
UI : Mode de parole
UI : Mémoire d'images et paramètres
Interface utilisateur en mode de parole
A1 = Clé lumineuse
A2 = Touches majuscules
A3 = Bouton d'alarme
A4 = Nom de la station d'accueil
A5 = Achage de l'heure / de la date
A6 = Bouton photo
A7 = Volume de la voix
A8 = Bouton de mise en sourdine
A9 = Changer le nom de la gare de
la porte d'entrée
A10 = Paramètres
A11 = Bouton retour
A12 = Clé de mémoire d'image
A1
A11
A10
A5
A2
A6
A12
A4
A9
A6A1A3
A7 A8
A2
A3
Fig.A

FR
FRANÇAISE | VDV-907
60
UI : Paramètres page 1
Interface utilisateur : Paramètres
B1 = Langue
B2 = Volume de la parole
B3 = Heure / Date
B4 = Page précédente
B5 = Paramètres de base
B6 = Page suivante
B7 = Mélodie station intérieure
B8 = Aide
B9 = Paramètres de l'image
B10 = Paramètres WLAN
B11 = Information
B12 = Supprimer toutes les photos
B13 = Réglages d'usine
B14 = Mélodie de carillon radio
B6
B13
B14
B1 B5
B9 B12
B3
B11B10
B8
B7
B4
B2
Fig.B

VDV-907 | FRANÇAISE
61
FR
Station intérieure VDV-907
pour les systèmes de visiophone
Nous vous remercions d'avoir acheté cette
station vidéo d'intérieur avec mémoire
d'image intégrée et fonction WLAN. Ce poste
intérieur peut être combiné avec tous les
composants des systèmes d'interphone de
porte VISTADOOR et VISTUS.
Lorsque la cloche sonne à la station d'entrée
connectée, la station intérieure joue la mélo-
die de la cloche et le visiteur peut êtrevu sur
l'écran. De plus, 3 photos sont automatique-
ment stockées.
Vous pouvez parler au visiteur à la station
intérieure et également ouvrir la porte (si un
ouvre-porte est connecté).
Si le VDV-907 est connecté via WLAN, une
connexion à votre smartphone peut égale-
ment être établie. Sur le site www.vistas-
mart.de, vous trouverez de plus amples infor-
mations sur la manière d'installer l'application
et d'intégrer le VDV-907.
Cette station intérieure dispose de deux
emplacements pour cartes microSD
(max. 32 Go).
Les chiers audio peuvent être stockés sur
une carte microSD dans la fente 1 (8), qui peut
ensuite être utilisée comme sonnerie. Pour la
fonction de stockage d'images, une autre
carte microSD est nécessaire dans la fente 2
(9). Aucune carte mémoire n'est incluse dans
le volume de livraison.
ÉTENDUE DE LA PRESTATION
• Station intérieure avec 17,8 cm (7")
diagonale de l'écran
• Matériel de montage
• Instructions d'utilisation et d'installation
• Gabarit de perçage
LEGENDE
1 = VDV-907
2 = microphone
3 = Bouton de silence (capteur tactile)
4 = Bouton de déverrouillage des portes
(capteur tactile)

FRANÇAISE | VDV-907
62
FR
5 = Bouton de conversation (capteurtactile)
6 = Vis de boîtier
7 = Surface tactile active
8 = Emplacement microSD 2 (photos)
9 = Emplacement microSD 1 (sonneries)
Interface utilisateur (UI)
A1 = Clé lumineuse
A2 = Touches majuscules
A3 = Bouton d'alarme
A4 = Nom de la station d'accueil
A5 = Achage de l'heure / de la date
A6 = Bouton photo
A7 = Volume de la voix
A8 = Bouton de mise en sourdine
A9 = Changer le nom de la gare de la porte
d'entrée
A10 = Paramètres
A11 = Bouton retour
A12 = Clé de mémoire d'image
B1 = Langue
B2 = Volume de la parole
B3 = Heure / Date
B4 = Page précédente
B5 = Paramètres de base
B6 = Page suivante
B7 = Mélodie station intérieure
B8 = Aide
B9 = Paramètres de l'image
B10 = Paramètres WLAN
B11 = Information
B12 = Supprimer toutes les photos
B13 = Réglages d'usine
B14 = Mélodie de carillon radio
INSTALLATION (Fig. 2a+b)
1. Trouvez un endroit approprié pour
installer l'unité intérieure et faites passer
les ls jusqu'à celle-ci.
2. Retirez les deux vis (16) de l'unité
intérieure et soulevez le couvercle avant
de l'unité intérieure.
3. Il y a deux languettes de retenue en
plastique au milieu des côtés de l'unité
intérieure. Retirez avec précaution la
couverture.
4. Il y a un trou dans le haut du boîtier sous
les bornes pour insérer les ls dans le
boîtier.
5. Vous pouvez utiliser le fond du boîtier
comme gabarit de perçage, l'aligner avec
un niveau à bulle juste à l'endroit du mur
où l'unité intérieure doit être montée.

VDV-907 | FRANÇAISE
63
FR
6. Marquez les trous sur le mur avec un
crayon approprié, puis percez les trous (Ø
6 mm) au niveau des marques.
7. Insérez une des chevilles murales fournies
dans chaque trou.
8. Faites passer le câble de connexion par le
trou situé dans le fond de l'unité
intérieure et vissez le fond du boîtier au
mur à l'aide de quatre vis.
9. Raccordez les ls comme indiqué dans le
schéma de câblage (Fig. 4).
NOTE : Ne pas couper les ls trop courts. Il y
a des languettes dans le fond de l'enceinte où
le l peut être enroulé.
10. Placez le couvercle avant avec le moniteur
sur le bord de la base du boîtier par le
haut et appuyez dessus. Les crochets de
verrouillage sur les côtés doivent
s'enclencher en place.
NOTE : Isoler les câbles non utilisés avec du
ruban isolant pour éviter les courts-circuits.
11. Revissez la couverture avec les
deux vis (6).
COMMISSION
Connexion à l'alimentation électrique
L'alimentation électrique peut être connectée
à la station intérieure ou extérieure. Il est
également possible d'alimenter l'alimenta-
tion électrique en étoile, par exemple si
toutes les lignes de signaux ont été posées
depuis la boîte à fusibles vers les unités
extérieures et intérieures. L'alimentation
électrique doit alors être connectée en par-
allèle avec la terre/GND et +15V. Une fois tous
les composants montés et connectés, mettez
la tension de fonctionnement en marche.
Selon le type d'installation, branchez le bloc
d'alimentation dans une prise de courant
appropriée ou mettez en marche le disjonc-
teur auquel le bloc d'alimentation sur rail DIN
est connecté.
INSERTION DE CARTES MICRO SD
Ouvrez l'unité intérieure et placez-la avec
précaution, l'écranvers le bas, sur un chion
doux pour éviter de rayer le verre. Faites glis-
ser les cartes microSD dans les fentes appro-

FRANÇAISE | VDV-907
64
FR
priées, les surfaces de contact des cartes
microSD étant tournées vers la carte de cir-
cuit imprimé. Les fentes sont équipées d'un
mécanisme de pression à ressort, qui fonctio-
nne comme un stylo à bille. Poussez la carte
dans la fente jusqu'à ce que vous entendiez
un léger déclic et que la carte soit verrouillée
en place. Pour retirer les cartes, poussez-les
doucement dans la fente de la carte, puis
diminuez lentement la pression. Veillez à ce
que la pression du ressort ne fasse pas sortir
les cartes microSD de la fente.
INITIALISATION / RESET
Pour initialiser le système, l'unité extérieure
doit être mise en marche une fois (s'il y a plu-
sieurs stations extérieures, chaque unité
extérieure doit être mise en marche une fois).
Pour réinitialiser, débranchez l'alimentation
électrique pendant environ 1 minute, puis
eectuez à nouveau l'initialisation.
REMARQUE : Avant d'eectuerdes travaux
sur le système, coupez à nouveau la tension
de fonctionnement ! Chaque fois que le
système a été mis hors tension, l'initialisation
doit être eectuée à nouveau.
FONCTIONNEMENT
LES FONCTIONS DE BASE
(touches tactile à l'extérieur de l'écran)
Appeler
Appuyez sur le bouton de la sonnette de la
station d'accueil. La station intérieure émet
une sonnerie. Si un carillon radio a été pro-
grammé, il joue également une mélodie.
Veuillez vous référer à la section "Program-
mation du récepteur BELL".
La station intérieure enregistre également 3
photos en succession rapide si une carte
microSD est insérée dans le lecteur de carte
2.
Bouton de conversation (capteur tactile)
Touchez le bouton de conversation pour acti-
ver la transmission vocale.
Modeveille
Touchez le bouton de conversation pendant
que l'appel est actif, la station intérieure se
remet en mode veille.

VDV-907 | FRANÇAISE
65
FR
Bouton d'ouverture de la porte (capteur
tactile)
Touchez le bouton d'ouverture de la porte
pendant l'appel pour activer l'ouvre-porte (s'il
est connecté).
Touche de mise en sourdine (capteur
tactile)
Appuyez sur la touche "Mute" pour couper la
sonnerie. Le symbole s'allume en perma-
nence en rouge ou clignote tant que la mise
en sourdine est active. Pour rétablirle son,
appuyez à nouveau sur le bouton "Mute".
REMARQUE : lorsque la fonction de sour-
dine est active, le signal radio d'un carillon
radio distant n'est pas désactivé, c'est-à-dire
qu'il continue à sonner. Mettez en sourdine
les récepteurs BELL si nécessaire.
Activerl'écran
En appuyant sur le bouton de conversation
en mode veille, l'écran et la connexion vocale
sont activés, et l'image en direct de la station
extérieure est également achée.
FONCTIONS AVANCÉES
(Touches tactiles à l'écran lors de la sonnerie
ou lorsque le bouton de conversation est
enfoncé)
Lumière
Ce bouton peut être utilisé pour allumer une
lumière, par exemple, via un récepteur de la
série CUVEO. Pour plus d'informations, lisez
la section intitulée "Enseigner le récepteur
CUVEO".
Symbole des èches Droite et Gauche
Si une deuxième station d'accueil est connec-
tée en parallèle ou si une caméra supplémen-
taire est connectée, les deux boutons peu-
vent être utilisés pour passer à la station
d'accueil/caméra suivante ou précédente.
Symbole d'alarme
Si ce bouton est touché pendant un appel
actif, un signal d'alarme retentit à la station
de porte d'entrée. Le fait d'appuyerà nou-
veau sur le bouton ou de mettre n à l'appel
désactive la tonalité d'alarme.
Volume + et -
Le fait d'appuyer sur le bouton "+" augmente
le volume de la parole, le fait d'appuyer sur le

FRANÇAISE | VDV-907
66
FR
bouton "-" diminue le volume de la parole.
REMARQUE : Ce réglage n'est que tempo-
raire et reviendra au volume de base lorsque
l'appel sera terminé (voirRéglage du volume
de base).
Touche de mise en sourdine
Si vous appuyez sur le bouton "Mute" pen-
dant l'appel, le microphone du poste intérieur
est désactivé et le visiteur ne peut plus vous
entendre. Pour pouvoir à nouveau parler au
visiteur, appuyez une nouvelle fois sur le
bouton. Si aucun bouton muet n'est aché,
c'est qu'il a été désactivé dans le menu des
paramètres.
Bouton de l'appareil photo
Si une carte microSD pour photos est insérée
dans la station intérieure, une photo peut
être enregistrée via ce bouton à tout
moment pendant que la photo est active.
Pour ce faire, il sut d'appuyer sur ce sym-
bole.
MÉMOIRE D'IMAGES ET RÉGLAGES
Voir pages 21-23 pour une vue d'ensemble de
la structure de l'OSD (On Screen Display).
Allumer l'écran
Lorsque la station intérieure est en veille,
vous pouvez l'allumer en touchant la zone de
l'écran noir. L'image de la caméra est alors
achée, la connexion vocale avec la station
de porte d'entrée n'est pas activée, mais le
son de la station de porte d'entrée peut être
entendu.
Une fois l'écran activé, la mémoire d'image
(uniquement si une carte SD a été insérée), le
menu des paramètres et la fonction inter-
phone sont disponibles. Touchez la èche de
retouren bas à gauche pour mettre la station
intérieure en mode veille.
Changer le nom de la station d'accueil
Une fois que la station intérieure a été acti-
vée en touchant l'écran, vous pouvez changer
le nom de la station extérieure selon votre
préférence. Pour ce faire, il sut de toucher le

VDV-907 | FRANÇAISE
67
FR
nom de la station de porte d'entrée (A9) et
d'entrer ensuite le nom souhaité. Conrmez
le nom saisi en appuyant sur la touche
Entrée.
Passage d'une station à l'autre
Si plusieurs stations d'accueil sont connec-
tées, vous pouvez passer d'une station à l'au-
tre en appuyant sur les èches situées à côté
du nom de la station d'accueil.
Mémoire d'images
Touchez le symbole de la photo dans le coin
inférieur droit pour visualiser le contenu de la
mémoire d'image de la carte SD. L'écran sui-
vant ache un calendrier avec les jours où les
photos ont été prises mis en évidence. Tou-
chez le jour correspondant pour voir toutes
les photos prises le jour sélectionné. Utilisez
les touches échées à droite et à gauche de
l'image pour passer à l'image suivante ou
précédente.
Les images individuelles peuvent être sup-
primées en appuyant sur le bouton portant le
symbole de la poubelle. L'image achée sera
supprimée sans conrmation lorsque l'icône
de la poubelle est touchée. Si vous souhaitez
supprimer toutes les images stockées en une
seule fois, reportez-vous à la section sur la
suppression de toutes les images.
Paramètres
Vous pouvez accéder au menu des
paramètres en touchant l'écran puis en appu-
yant sur le bouton avec les engrenages.
Dénir la langue
Touchez l'icône du drapeau pour entrer dans
le menu de sélection de la langue. Touchez la
langue souhaitée à cet endroit, puis enregist-
rez le réglage en touchant l'icône de sauve-
garde. L'intitulé de ce menu est immédiate-
ment aché dans la langue sélectionnée si
l'enregistrement a réussi. Utilisez la èche de
retourpour revenirau menu des paramètres.
Réglage du volume de base (B2)
Touchez le symbole de la bouche pour régler
le volume de base. Le bouton + augmente le
volume, le bouton - le diminue. Les points
remplisvous indiquent le niveau de volume
réglé. Le volume est automatiquement enre-
gistré. Utilisez la èche de retour pour revenir
au menu des paramètres.

FRANÇAISE | VDV-907
68
FR
Fixerl'heure et la date
Touchez l'icône horloge/calendrier pour
entrer dans le menu des paramètres de la
date et de l'heure. Touchez le champ que
vous souhaitez dénir (le champ actif devient
bleu). Vous pouvez ensuite utiliser les èches
à droite pour modier la valeur.Vous pouvez
régler l'heure et la date automatiquement, ce
qui nécessite une connexion WLAN avec
accès à Internet, ou manuellement. Le rég-
lage UTC (temps universel coordonné) doit
être à "0" en mode horloge manuelle.
REMARQUE : Si l'heure est réglée sur auto-
matique et que le TUC est réglé sur 0, le
fuseau horaire correct sera déterminé auto-
matiquement. Si un TUC diérent est xé, il
sera toujours utilisé. Dans ce cas, il est néces-
saire de régler manuellement l'heure d'été.
Après avoir réglé la date et l'heure, tapez sur
le symbole de sauvegarde en bas à droite.
Vous pouvez ensuite quitter le menu à l'aide
de la èche de retour.
Paramètres de base
Dans les paramètres de base, vous pouvez
dénir quelles icônes de contrôle doivent être
visibles sur l'écran principal et quelles foncti-
ons doivent être actives. Touchez le bouton
"info" à droite de chaque paramètre pour
obtenir une description. Ce menu de paramé-
trage est divisé en deux pages. Utilisez les
boutons avec la èche (droite ou gauche)
pour passer d'une page à l'autre.
REMARQUE : Les modications doivent être
enregistrées sur chaque page en appuyant
sur l'icône de sauvegarde.
Réglerla mélodie
Touchez l'icône de la note pour entrer dans le
menu de réglage de la sonnerie. Si une carte
SD avec des sonneries stockées sur elle est
insérée, l'icône de la carte SD est surlignée en
bleu et en appuyant sur le "1", la première
sonnerie stockée sur la carte SD sera jouée. Si
aucun chier n'est stocké sur la carte SD ou si
aucune carte SD n'a été insérée, le symbole
est gris et les sonneries stockées en interne
peuvent être sélectionnées automatique-
ment via le champ numéro. Le volume de la
sonnerie peut être réglé à l'aide des boutons
"+" et "-".
NOTE : Les données audio au format Wave

VDV-907 | FRANÇAISE
69
FR
ou MP3 peuvent être stockées sur la carte
microSD.
Il est possible d'attribuer une sonnerie indivi-
duelle à chaque station de porte d'entrée
connectée. De cette façon, la sonnerie peut
être utilisée pour distinguer l'endroit où la
cloche a été sonnée. Le nom de la station de
porte d'entrée pour laquelle la sonnerie est
actuellement réglée est indiqué dans la partie
supérieure du menu. Utilisez les touches
échées en haut et en bas pour passer d'une
station à l'autre.
Menu d'aide
Appuyez sur le bouton d'aide. Vous trouverez
ici nos coordonnées, ainsi que le code QR
pour vous connecter à l'application.
Paramètres des images
Touchez l'icône des paramètres de l'image
pour régler la luminosité, la saturation des
couleurs et le contraste de l'image achée en
direct.
Connecter le WLAN
Appuyez sur l'icône WLAN pour vous connec-
ter à un réseau local sans l (WLAN) proche.
Dans le menu suivant, tous les points d'accès
WLAN à proximité sont achés. Tapez sur
votre WLAN et entrez la clé WLAN. Conr-
mez la touche en appuyant sur la
touche Entrée.
Attendez un peu. Si vous avez mal tapé la clé
WLAN, le poste intérieur indique que la
connexion n'a pas réussi et revient à l'écran
de saisie de la clé WLAN et vous pouvez véri-
ervotre saisie et la modier si nécessaire.
Si la station intérieure indique que la conne-
xion est réussie, le nom de votre WLAN est
aché en vert en haut.
NOTE : Il n'est pas possible de réglerle
réseau manuellement, le DHCP est toujours
utilisé.
Pour accéder à l'interphone avec votre smart-
phone, vous avez besoin de l'application
Vistasmart ou Aivisi. Accédez au site https:/
/www.vistasmart.de avec votre smartphone
et sélectionnez la station intérieureVDV907.

FRANÇAISE | VDV-907
70
FR
Sur la page suivante, vous trouverez les liens
vers l'application Android et iOS, ainsi que
des informations complémentaires sur le
fonctionnement de l'application.
Informations sur la station intérieure
Touchez le symbole d'information. Vous y
trouverez la tension de fonctionnement de la
station intérieure en volts. Elle doit être com-
prise entre 15V et 15,5V. L'adresse IP de l'unité
intérieure est également achée.
Suppression de toutes les images
Touchez le symbole de la poubelle si vous
souhaitez supprimer toutes les photos
stockées. Touchez le champ surligné en vert à
cet endroit et conrmez le dialogue suivant
avec "Ok" pour supprimer toutes les images
ou touchez "Annuler" pour annuler le proces-
sus de suppression.
Réinitialiser
Touchez Reset pour réinitialiser la station
intérieure aux paramètres d'usine, par exem-
ple si vous avez oublié les données d'accès à
l'application.
Appuyez sur le bouton vert et conrmez la
réinitialisation en appuyant sur "Ok" dans le
dialogue suivant. Veuillez noter que les
photos ne sont pas eacées par
une réinitialisation.
Enseigner au récepteur BELL
Tapez sur le symbole BELL pour entrerdans
le menu de conguration du carillon radio.
Mettez le récepteur en mode apprentissage
en appuyant sur le bouton de code jusqu'à ce
que le récepteur émette un bref bip, puis
tapez sur l'une des lettres à l'écran. Le récep-
teur joue une mélodie et est prêt à être
appris.
Réglage de la mélodie du carillon radio
Tapez sur le symbole BELL pour entrerdans
le menu de conguration du carillon radio.
Vous y avez la possibilité de désactiver le
module radio intégré et de changer la mélo-
die du carillon radio. En tapant sur une lettre,
le carillon radio appris joue la mélodie corre-
spondante. Cette mélodie est immédiate-
ment enregistrée et vous pouvez quitter ce
menu en utilisant la èche de retour.

VDV-907 | FRANÇAISE
71
FR
Enseigner le récepteur CUVEO
Mettez le récepteur en mode apprentissage
(appuyez sur le bouton du récepteurjusqu'à
ce que la LED du récepteurclignote) et acti-
vez le moniteur en tapant sur la surface tac-
tile active. Puis tapez sur le symbole de la
lumière. Si le symbole lumineux n'est pas
aché, vériez s'il est activé dans les
paramètres de base (B5).
Modier le codage du protocole radio
(CUVEO et BELL)
Si le récepteur CUVEO et/ou le récepteur
BELL s'activent sans raison, un autre émet-
teur à proximité pourrait transmettre le
même code. Pour modier le code, procédez
comme suit : Le moniteur doit être en veille.
Maintenez un doigt sur le bouton muet (envi-
ron 7 secondes) jusqu'à ce que les symboles
de la clé et de la bouche s'allument.
Ensuite, tous les récepteurs (CUVEO et BELL)
doivent être réappris.
DONNÉES TECHNIQUES
Tension de fonctionnement : 15Volt DC
Consommation électrique : 270 ± 50mA
Fréquence WLAN : 2,4GHz ; <100mW
Fréquence BELL : 434MHz ; <10mW
Plage de température : 0-50°C
Max. Humidité : 85
Diagonale de l'écran : 178mm
Résolution de l'écran : 1024x600
Dimensions : 220x160x28mm (L x H x P)
NOTES
L'exposition à de forts champs statiques,
électriques ou à haute fréquence (décharges,
téléphones portables, équipements radio,
téléphones mobiles, micro-ondes) peut alté-
rerle fonctionnement de l'équipement (l'ap-
pareil).
Nettoyage et entretien
Débranchez les appareils fonctionnant sur le
secteur (retirez la che) avant de les nettoyer.
La surface du logement peut être nettoyée
avec un chion doux humidié à l'eau savon-
neuse. N'utilisez pas de nettoyants abrasifs
ou de produits chimiques. Ne détachez les
dépôts de poussière sur les fentes d'aération
qu'à l'aide d'une brosse et, si nécessaire,
passez l'aspirateur. Ne tenez pas la buse
d'aspiration directement contre l'appareil.
Principes juridiques
1. En tant qu'exploitant ou utilisateur de la

FRANÇAISE | VDV-907
72
FR
platine de rue vidéo, veuillez respecterles
réglementations et les principes
juridiques de votre pays pour l'utilisation
des dispositifs de surveillance en ce qui
concerne les droits de la personne et la
protection des données !
2. Dans de nombreux pays, les images vidéo
et/ou la parole ne peuvent être
transmises qu'après qu'un visiteur ait
sonné à la porte.
3. Installez la caméra de manière à ce que la
portée de détection soit limitée à la zone
d'entrée immédiate uniquement.
4. L'appareil dispose d'un historique intégré
des visiteurs. Les visiteurs sont archivés
directement dans l'appareil avec leur
photo, la date et l'heure. Utilisez cette
fonction conformément aux dispositions
légales spéciques au pays concerné
applicables sur le site d'installation
(obligation de notication / archivage).
5. Si nécessaire, attirer l'attention sur
l'existence de l'appareil de manière
appropriée.
CONSIGNES DE SECURITE
Tout dommage résultant d’un non-respect
des présentes instructions a pour eet d’an-
nuler la garantie ! Nous déclinons toute
responsabilité pour les dommages consécu-
tifs !
De même, le constructeur n’assume aucune
responsabilité en cas de dommage matériels
ou corporels résultants d’une utilisation de
l’appareil non conforme aux spécications ou
d’un non-respect des présentes instructions.
De tels cas ont pour eet d’annuler
la garantie !
Pour des raisons de sécurité et d’homologa-
tion, toute transformation ou modication
arbitraire du produit est interdite. Ne démon-
tez jamais le produit!
Ne laissez pas traîner le matériel d’emballage.
Les feuilles ou poches plastiques, les élé-
ments polystyrène, etc. peuvent se transfor-
mer en jouets dangereux pour les enfants.
L’usage doit s'eectuer dans des milieux secs

VDV-907 | FRANÇAISE
73
FR
uniquement (évitez tout usage dans espaces
humides comme la salle de bain par exem-
ple). Évitez tout contact du dispositif avec
l’humidité ou avec l’eau.
Ce produit doit être manipulé avec précau-
tion. Les coups, les chocs ou une chute,
même d’une faible hauteur, peuvent l’en-
dommager.
GARANTIE LIMITEE A 2 ANS
Il est garanti pendant 2 ans à partir de la date
d’achat que ce produit ne présente aucun
défaut au niveau du matériau et du modèle.
Cette garantie est uniquement valide lorsque
l’appareil est utilisé de manière conforme, et
entretenu régulièrement. La présente garan-
tie se limite à la réparation ou au réas-
semblage d’une pièce quelconque de l’ap-
pareil dans la mesure où aucune modication
ou réparations non autorisées n’ont été
eectuées. Vos droits légaux en tant que
client ne sont en aucun cas inuencés par
cette garantie.
Veuillez noter que toute réclamation dans le
cadre de la garantie est exclue dans les cas
suivants, entre autres :
• Erreur de commande
• Perturbations dues à d’autres appareils
radio (par ex. utilisation d’un
téléphone portable)
• Interventions/inuences extérieures
• Dégâts mécaniques
• Dégâts provoqués par l’humidité
• Aucune preuve de garantie (bon d’achat)
La garantie s’annule en cas de non-observa-
tion du présent mode d’emploi. Nous déclin-
ons toute responsabilité pour tout dommage
indirect ! Nous déclinons également toute
responsabilité en cas de dommages survenus
sur l’appareil ou des personnes suite à une
manipulation non-conforme ou la non-obser-
vation des consignes de sécurité. La garantie
s’annule automatiquement dans ces cas-là !
Responsabilité limitée
Le fabricant décline toute responsabilité en
cas de perte ou de dommages quelconques, y
compris les dommages consécutifs ou acces-
soires qui résultent directement ou indirecte-
ment de la défaillance de ce produit.

FRANÇAISE | VDV-907
74
FR
Cette notice est une publication de la société m-e GmbH
modern-electronics,
An den Kolonaten 37,
26160 Bad Zwischenahn/Allemagne.
Cette notice est conforme à la règlementation en vigueur
lors de l´impression.
Sous réserve de modications techniques
et dèquipement.

FR
VDV-907 | FRANÇAISE
75
INTERFACE UTILISATEUR
Structure I

FR
FRANÇAISE | VDV-907
76
INTERFACE UTILISATEUR
Structure II

FR
VDV-907 | FRANÇAISE
77
INTERFACE UTILISATEUR
Structure III


NL
AFBELDINGEN 81
User Interface in spraakmodus 85
LEVERINGSOMVANG 87
LEGEND 87
Gebruikersinterface (UI) 88
INSTALLATIE (FIG.2A+B) 88
COMMISSIE 89
PLAATSENVAN MICRO-SD KAARTEN 89
INITIALISATIE / RESET 90
OPERATIE 90
BASISFUNCTIES 90
Ringing 90
Spreekknop (sensoraanraking) 90
Stand-by 90
Deuropenertoets (Sensortouch) 90
Mute-toets (sensoraanraking) 90
Activeer scherm 91
GEAVANCEERDEFUNCTIES 91
Licht 91
Pijlsymbool Rechts en Links 91
Alarmsymbool 91
Volume + en - 91
Mute-toets 91
Camera knop 92
BEELDGEHEUGEN EN INSTELLINGEN 92
Inschakelen van het scherm 92
Veranderen van de naam van het
voordeurstation 92
Schakelen tussen voordeurstations 92
Beeldgeheugen 92
Instellingen 93
Taal instellen 93
Instellen van het basisvolume (B2) 93
De tijd en datum instellen 93
Basisinstellingen 94
De melodie instellen 94
Help menu 94
Beeld Instellingen 94
WLAN aansluiten 95
Informatie over het binnenstation 95
Alle beelden verwijderen 95
Reset 95
Het aanleren van de BELL ontvanger 96
INHOUDSOPGAVE
VDV-907 | NEDERLAND
79

NL
Instellen van de melodie van 96
de radio deurbel 96
Het aanleren van de CUVEO ontvanger 96
Veranderen van de codering van het
radioprotocol 96
TECHNISCHE GEGEVENS 96
OPMERKINGEN 97
Reiniging en onderhoud 97
Rechtsbeginselen 97
VEILIGHEIDSRICHTLIJNEN 98
2 JAAR BEPERKTE GARANTIE 98
Aansprakelijkheidsbeperking 99
INHOUDSOPGAVE
NEDERLAND | VDV-907
80

NL
VDV-907 | NEDERLAND
81
A.1
TOUCH-ACTIEF SCHERM
1
7
2 3
4 5
6
1 = VDV 907
2 = Microfoon
3 = Zwijgtoets (sensoraanraking)
4 = deuropenertoets (sensoraanraking)
5 = Spreekknop (sensoraanraking)
6 = Schroeven voor de behuizing
7 = Aanraak-actief oppervlak
8 = MicroSD-gleuf2 foto's
9 = MicroSD-sleuf1 Belsignalen

NL
NEDERLAND | VDV-907
82
A.2
A.2A A.2B
9
2
8
U

NL
VDV-907 | NEDERLAND
83
A.3

NL
NEDERLAND | VDV-907
84
A.4
Externe belknop
naardebuitenunit
naarde
netadapter
U

NL
VDV-907 | NEDERLAND
85
USER INTERFACE (UI)
UI Spraakmodus
UI Beeldgeheugen en instellingen
User Interface in spraakmodus
A1 = Light key
A2 = Shi keys
A3 = Alarm key
A4 = Name of outdoor unit
A5 = Time / date display
A6 = Photo button
A7 = Voice volume
A8 = Mute button
A9 = Change outdoor unit name
A10 = Settings
A11 = Back button
A12 = Picture memory key
A1
A11
A10
A5
A2
A6
A12
A4
A9
A6A1A3
A7 A8
A2
A3
Fig.A

NL
NEDERLAND | VDV-907
86
UI Instellingen pagina 1
User Interface: Instellingen
B1 = Language
B2 = Speech volume
B3 = Time / date
B4 = Previous page
B5 = Basic settings
B6 = Next page
B7 = Melody indoor unit
B8 = Help
B9 = Picture settings
B10 = WLAN settings
B11 = Information
B12 = Delete all photos
B13 = Factory settings
B14 = Radio chime melody
B6
B13
B14
B1 B5
B9 B12
B3
B11B10
B8
B7
B4
B2
Fig.B

VDV-907 | NEDERLAND
87
NL
VDV-907 binnenstation
voorvideo-deurintercom
Dank u voor de aanschaf van dit video bin-
nenstation met geïntegreerd beeldgeheugen
en WLAN functie. Dit binnenstation kan
worden gecombineerd met alle componen-
ten van de deurintercomsystemenVISTA-
DOOR en VISTUS.
Wanneer op het aangesloten voordeursta-
tion wordt aangebeld, speelt het binnensta-
tion de ingestelde belmelodie en is de bezoe-
ker op de monitor te zien. Bovendien worden
3 foto's automatisch opgeslagen.
U kunt met de bezoeker praten op het bin-
nenstation en ook de deur openen (als er een
deuropener is aangesloten).
Als de VDV-907 via WLAN is verbonden, kan
er ook een verbinding met uw smartphone
tot stand worden gebracht. Op www.vistas-
mart.de vindt u meer informatie overhoe u
de app kunt installeren en de VDV-907 kunt
integreren.
Dit binnenstation hee twee kaartsleuven
voor microSD-kaarten (max. 32 GB).
Audiobestanden kunnen worden opgeslagen
op een microSD-kaart in slot 1 (8), die vervol-
gens kan worden gebruikt als ringtone. Voor
de beeldopslagfunctie is een andere
microSD-kaart nodig in sleuf 2 (9). Geheugen-
kaarten zijn niet bij de levering inbegrepen.
LEVERINGSOMVANG
• Binnenstation met 17,8 cm (7")
schermdiagonaal
• Montagemateriaal
• Bedienings- en installatie-instructies
LEGEND
1 = VDV 907
2 = Microfoon
3 = Zwijgtoets (sensoraanraking)
4 = deuropenertoets (sensoraanraking)
5 = Spreekknop (sensoraanraking)
6 = Schroeven voor de behuizing
7 = Aanraak-actief oppervlak
8 = MicroSD-gleuf2 foto's
9 = MicroSD-sleuf1 Belsignalen

NEDERLAND | VDV-907
88
NL
Gebruikersinterface (UI)
A1 = Lichttoets
A2 = Shi-toetsen
A3 = Alarmtoets
A4 = Naam van het voordeurstation
A5 = Tijd- / datumweergave
A6 = Foto-toets
A7 = Spraakvolume
A8 = Mute knop
A9 = Naam van voordeurstation wijzigen
A10 = Instellingen
A11 = Terug knop
A12 = Toets voor beeldgeheugen
B1 = Taal
B2 = Spraakvolume
B3 = Tijd / datum
B4 = Vorige pagina
B5 = Basisinstellingen
B6 = Volgende pagina
B7 = Melody binnenstation
B8 = Help
B9 = Beeldinstellingen
B10 = WLAN-instellingen
B11 = Informatie
B12 = Alle foto'sverwijderen
B13 = Fabrieksinstellingen
B14 = Melodie radio-deurbel
INSTALLATIE (Fig. 2a+b)
1. Zoek een geschikte plaats om de
binnenunit te installeren en leg de draden
ernaartoe.
2. Verwijder de twee schroeven (16) op de
binnenunit en til de voorklep van de
binnenunit af.
3. Er zijn twee plastic bevestigingslipjes in
het midden van de zijkanten van de
binnenunit. Trek de voorklep er
voorzichtig af.
4. Er is een gat in de bovenkant van de
behuizing onder de aansluitklemmen om
de draden in de behuizing te steken.
5. U kunt de onderkant van de behuizing als
boormal gebruiken, deze met een
waterpas precies uitlijnen op het punt van
de muur waar de binnenunit moet
worden gemonteerd.
6. Markeer de gaten op de muur met een
geschikt potlood, boor vervolgens de
gaten (Ø 6 mm) op de markeringen.
7. Steek een van de bijgeleverde
muurpluggen in elk gat.
8. Voer de verbindingskabel door het gat in
de onderkant van de binnenunit en
schroef de onderkant van de behuizing
met vier schroeven aan de muur vast.

VDV-907 | NEDERLAND
89
NL
9. Sluit de draden aan zoals aangegeven in
het aansluitschema (Fig. 4).
OPMERKING: Knip de draden niet te kort af.
Er zijn lipjes in de bodem van de behuizing
waar de draad kan worden opgerold.
10. Plaats de voorklep met het beeldscherm
van bovenaf op de rand van de basis van de
behuizing en druk het naar beneden. De ver-
grendelingshaken aan de zijkanten moeten
op hun plaats klikken.
OPMERKING: Isoleer ongebruikte kabels
met isolatietape om kortsluiting te voorko-
men.
11. Schroef het voordeksel weervast met de
twee schroeven (6).
COMMISSIE
Aansluiting stroomvoorziening
De stroomvoorziening kan zowel op het bin-
nenstation als op het buitenstation worden
aangesloten. Het is ook mogelijk de voeding
op een sterpunt aan te sluiten, b.v. als alle
signaallijnen vanaf de zekeringkast naar de
buiten- en binnenunits zijn gelegd. De voe-
ding moet dan parallel worden aangesloten
met aarde/GND en +15V. Schakel, nadat alle
onderdelen zijn gemonteerd en aangesloten,
de bedrijfsspanning in. Steek, aankelijkvan
het type installatie, de stekkervan de voe-
ding in een geschikt stopcontact of schakel
de stroomonderbreker in waarop de DIN-rail
voeding is aangesloten.
PLAATSEN VAN MICRO-SD KAARTEN
Open de binnenunit en leg hem voorzichtig
op een zachte doek met het beeldscherm
naar beneden gericht om krassen op het glas
te voorkomen. Schuif de microSD-kaarten in
de daarvoor bestemde gleuven, met de con-
tactoppervlakken van de microSD-kaarten
naar de printplaat gericht. De gleuven zijn
voorzien van een veerdrukmechanisme, dat
werkt zoals een balpen. Duw de kaart in de
sleuf totdat u een zachte klik hoort en de
kaart op zijn plaats is vergrendeld. Om de
kaarten te verwijderen, duwt u ze voorzichtig
in de kaartsleuf en vermindert u vervolgens
langzaam de druk. Pas op dat de microSD-
kaart niet uit de sleuf vliegt door de veerdruk.

NEDERLAND | VDV-907
90
NL
INITIALISATIE / RESET
Om het systeem te initialiseren, belt u een-
maal aan de buitenunit (als er meerdere bui-
tenunits zijn, belt u eenmaal aan elke bui-
tenunit). Om te resetten, moet u de voeding
gedurende ongeveer 1 minuut loskoppelen
en vervolgens de initialisatie opnieuw uitvoe-
ren.
OPMERKING: Schakel de bedrijfsspanning
weer uit voordat u werkzaamheden aan het
systeem uitvoert! Telkens wanneer het sys-
teem spanningsloos is gemaakt, moet de
initialisatie opnieuw worden uitgevoerd.
OPERATIE
BASISFUNCTIES
(TOUCH-toetsen buiten het scherm)
Ringing
Druk op de beltoets van het voordeurstation.
Het binnenstation speelt een beltoon. Als er
een radiogong is geprogrammeerd, speelt
deze ook een melodie. Zie het hoofdstuk
"Programmeren van de BELL ontvanger".
Het binnenstation slaat ook 3 foto's snel na
elkaar op als er een microSD-kaart in kaarts-
leuf 2 is geplaatst.
Spreekknop (sensoraanraking)
Raak de spreekknop aan om de spraakover-
dracht te activeren.
Stand-by
Druk op de gesprekstoets terwijl het gesprek
actief is, het binnenstation keert terug naar
de standby-modus.
Deuropenertoets (Sensortouch)
Raak tijdens de oproep de deuropenertoets
aan om de deuropener te activeren (indien
aangesloten).
Mute-toets (sensoraanraking)
Raak de mute-toets aan om de beltoon te
dempen. Het symbool brandt permanent in
het rood of knippert zolang het dempen
actief is. Om het geluid weer aan te zetten,
raakt u de knop Geluid uit opnieuw aan.
OPMERKING: Zolang de mute-functie actief
is, wordt het radiosignaal naar een draadloze
gong niet uitgeschakeld, d.w.z. het blij rin-
kelen. Zet de BELL-ontvangers zo nodig uit.

VDV-907 | NEDERLAND
91
NL
Activeerscherm
Als u in stand-by de spreekknop aanraakt,
worden het scherm en de spraakverbinding
geactiveerd, en wordt ook het live-beeld van
het buitenstation weergegeven.
GEAVANCEERDE FUNCTIES
(TOUCH-toetsen op het scherm bij het over-
gaan of wanneer de spreekknop wordt inge-
drukt)
Licht
Deze knop kan worden gebruikt om bijvoor-
beeld een licht te schakelen via een ontvan-
ger uit de CUVEO-serie. Voor meer informa-
tie, zie het hoofdstuk "Programmeren van
een CUVEO ontvanger".
Pijlsymbool Rechts en Links
Is parallel een tweede voordeurstation aan-
gesloten of een extra camera aangesloten,
dan kan met de beide toetsen naar het vol-
gende of vorige voordeurstation/camera
worden omgeschakeld.
Alarmsymbool
Als deze toets wordt aangeraakt tijdens een
actieve oproep, klinkt er een alarmsignaal op
het voordeurstation. Door de toets opnieuw
aan te raken of de oproep te beëindigen,
wordt de alarmtoon uitgeschakeld.
Volume + en -
Door de "+"-toets aan te raken wordt het
spraakvolume verhoogd, door de "-"-toets
aan te raken wordt het spraakvolume ver-
laagd.
OPMERKING: Deze instelling is slechts tijde-
lijk en wordt teruggezet naar het basisvo-
lume nadat de oproep is beëindigd (zie Instel-
ling basisvolume).
Mute-toets
Als de mute-toets tijdens het gesprek wordt
ingedrukt, wordt de microfoonvan het bin-
nenstation uitgeschakeld en kan de bezoeker
u niet meer horen. Om opnieuw met de
bezoekerte kunnen spreken, drukt u nog-
maals op de toets . Als er geen mute-knop
wordtweergegeven, is deze gedeactiveerd in
het instellingenmenu.

NEDERLAND | VDV-907
92
NL
Camera knop
Als in het binnenstation een microSD-kaart
voorfoto's is geplaatst, kan via deze toets op
elk moment een foto worden opgeslagen ter-
wijl de opname actief is. Om dit te doen,
hoe u alleen maar op dit symbool te tikken.
BEELDGEHEUGEN EN INSTELLINGEN
Zie pagina 24-26 voor een overzichtvan de
OSD-structuur (On Screen Display).
Inschakelenvan het scherm
Wanneer het binnenstation in stand-by staat,
kunt u het inschakelen door het zwarte
schermgedeelte aan te raken. Het camerabe-
eld wordt dan weergegeven, de spraakver-
binding met het huisdeurstation wordt niet
geactiveerd, maar het geluid van het huis-
deurstation is hoorbaar.
Zodra het scherm is geactiveerd, zijn het
beeldgeheugen (alleen als er een SD-kaart is
geplaatst), het instellingenmenu en de inter-
comfunctie beschikbaar. Raak de pijl terug
linksonder aan om het binnenstation in de
standby-modus te zetten.
Veranderenvan de naam van het
voordeurstation
Zodra het binnenstation is geactiveerd door
het scherm aan te raken, kunt u de naam van
het buitenstation wijzigen naar uw voorkeur.
Om dit te doen, hoe u slechts de naam van
het voordeurstation (A9) aan te raken en ver-
volgens de gewenste naam in te voeren.
Bevestig de ingevoerde naam door op de
Enter-toets te drukken.
Schakelentussenvoordeurstations
Als er meerderevoordeurstations zijn aan-
gesloten, kunt u tussen deze stations schake-
len door op de pijlen naast de naam van het
voordeurstation te tikken.
Beeldgeheugen
Tik op het fotosymbool in de rechterbene-
denhoek om de inhoud van het fotogeheu-
gen op de SD-kaart te bekijken. Het volgende
scherm toont een kalender met dagen
waaropfoto's werden genomen gemarkeerd.
Tik op de betreende dag om alle foto's te
bekijken die op de geselecteerde dag zijn
gemaakt. Gebruik de pijltjestoetsen rechts en
links van het beeld om naar het volgende of
vorige beeld te gaan.

VDV-907 | NEDERLAND
93
NL
Afzonderlijke beelden kunnen worden gewist
door de knop met het vuilnisbaksymbool aan
te raken. Het weergegeven beeld zal zonder
bevestiging worden gewist wanneer het vuil-
nisbakicoon wordt aangeraakt. Als u alle
opgeslagen beelden in één keerwilt wissen,
raadpleeg dan het gedeelte overhet wissen
van alle beelden.
Instellingen
U kunt het instellingenmenu openen door
het scherm aan te raken en vervolgens op de
knop met de tandwielen te tikken.
Taal instellen
Raak het vlag-pictogram aan om het taalkeu-
zemenu te openen. Raak daar de gewenste
taal aan en sla de instelling op door het ops-
laan pictogram aan te raken. De kop van dit
menu wordt onmiddellijk weergegeven in de
geselecteerde taal als het opslaan is gelukt.
Gebruik de pijl terug om terug te keren naar
het instellingenmenu.
Instellen van het basisvolume (B2)
Raak het mondsymbool aan om het basisvo-
lume in te stellen. De + toets verhoogt het
volume, de - toets verlaagt het volume. De
gevulde stippen geven aan hoe hoog het
volume is ingesteld. Het volume wordt auto-
matisch opgeslagen. Gebruik de pijl terug om
terug te keren naar het instellingenmenu.
De tijd en datum instellen
Raak het klok/kalender-icoon aan om het
instellingenmenu voor datum en tijd te
openen. Raak het veld aan dat u wilt instellen
(het actieve veld wordt blauw). U kunt dan de
pijlen aan de rechterkant gebruiken om de
waardete veranderen. U kunt de tijd en
datum automatisch instellen, waarvoor een
WLAN-verbinding met internettoegang
nodig is, of handmatig. De UTC (Universal
Time, Coordinated) instelling moet "0" zijn in
handmatige klokmodus.
OPMERKING: Als de tijd is ingesteld op
automatisch en de UTC is ingesteld op 0, zal
de juiste tijdzone automatisch worden
bepaald. Als een andere UTC is ingesteld, zal
die altijd worden gebruikt. In dit geval is het
nodig de zomertijd handmatig in te stellen.
Nadat u de datum en tijd hebt ingesteld, tikt
u rechtsonder op het symbool opslaan. U
kunt het menu vervolgens verlaten met de

NEDERLAND | VDV-907
94
NL
pijl terug.
Basisinstellingen
In de basisinstellingen kunt u bepalen welke
bedieningspictogrammen zichtbaar moeten
zijn op het hoofdscherm en welke functies
actief moeten zijn. Tik op de infoknop rechts
van elke instelling voor een beschrijving. Dit
instellingenmenu is verdeeld overtwee pagi-
na's. Gebruik de knoppen met de pijl (rechts
of links) om tussen de pagina's te wisselen.
OPMERKING: Wijzigingen moeten op elke
pagina worden opgeslagen door op het pic-
togram Opslaan te tikken.
De melodie instellen
Raak het notitiepictogram aan om het menu
voor het instellen van de beltoon te openen.
Als een SD-kaart is geplaatst met daarop
opgeslagen beltonen, wordt het SD-kaart-
symbool blauw gemarkeerd en als u op de "1"
tikt, wordt de eerste ringtone afgespeeld die
op de SD-kaart is opgeslagen. Als er geen
bestanden op de SD-kaart zijn opgeslagen of
als er geen SD-kaart is geplaatst, is het sym-
bool grijs en kunnen de intern opgeslagen
beltonen automatisch via het nummerveld
worden geselecteerd. De "+" en "-" toetsen
kunnen worden gebruikt om het volume van
de beltoon aan te passen.
OPMERKING: Audiogegevens in Wave of
MP3 formaat kunnen op de microSD kaart
worden opgeslagen.
Het is mogelijk om aan elk aangesloten
voordeurstation een individuele beltoon toe
te wijzen. Op die manier is het mogelijk om
aan de hand van de beltoon te onderscheiden
waar de bel is gegaan. De naam van de
voordeurzender waarvoor de beltoon
momenteel is ingesteld, wordt in het
bovenste deel van het menu weergegeven.
Gebruik de pijltjestoetsen boven en onder
om tussen de voordeurstations te schakelen.
Help menu
Raak de helpknop aan. Hier vindt u onze con-
tactgegevens, evenals de QR-code om ver-
binding te maken met de app.
Beeld Instellingen
Raak het pictogram Beeldinstellingen aan om
de helderheid, kleurverzadiging en het con-
trast van het weergegeven live-beeld aan te

VDV-907 | NEDERLAND
95
NL
passen.
WLAN aansluiten
Tik op het WLAN-pictogram om verbinding
te maken met een WLAN in de buurt. In het
volgende menu worden alle WLAN-toe-
gangspunten in de buurt weergegeven. Druk
op uw WLAN en voer de WLAN-sleutel in.
Bevestig de toets door op de Enter-toets te
tikken.
Wacht even. Als u de WLAN-sleutel verkeerd
hebt ingetoetst, meldt het indoorstation dat
de verbinding niet tot stand is gekomen en
springt terug naar het invoerscherm voor de
WLAN-sleutel, waar u uw invoer kunt contro-
leren en zo nodig wijzigen.
Als het binnenstation aangee dat de verbin-
ding geslaagd is, wordt de naam van uw
WLAN bovenaan in het groen weergegeven.
OPMERKING: Het is niet mogelijk om het
netwerk handmatig in te stellen, DHCP wordt
altijd gebruikt.
Om toegang te krijgen tot de intercom met
uw smartphone, hee u de app Vistasmart
ofAivisi nodig. Ga met uw smartphone naar
de website https://www.vistasmart.de en
selecteer het binnenstation VDV 907.
Op de volgende pagina vindt u de links naar
de Android en iOS app, evenals verdere infor-
matie over de werking van de app.
Informatie over het binnenstation
Raak het informatiesymbool aan. Dit toont u
de bedrijfsspanning van het binnenstation in
volt. Het moet tussen 15V en 15.5V zijn. Het
IP-adres van de binnenunit wordt ook weer-
gegeven.
Alle beelden verwijderen
Raak het vuilnisbaksymbool aan als u alle
opgeslagen beelden wilt wissen. Raak daar
het groen gemarkeerdeveld aan en bevestig
het volgende dialoogvenster met "Ok" om
alle foto's te wissen of raak "Annuleren" aan
om het wissen te annuleren.
Reset
Druk op Reset om het binnenstation terug te

NEDERLAND | VDV-907
96
NL
zetten op de fabrieksinstellingen, bijv. als u
de toegangsgegevens voor de app bent ver-
geten.
Druk op de groene knop en bevestig de reset
door op "Ok" te tikken in het volgende dial-
oogvenster. Let op: foto's worden niet gewist
door een reset.
Het aanleren van de BELL ontvanger
Druk op het BELL-symbool om het instellin-
genmenu voor de radiogong te openen. Zet
de ontvanger in de leermodus door op de
codeknop te drukken totdat de ontvanger
kort piept, tik dan op een van de letters op de
monitor. De ontvanger zal een melodie
spelen en is klaar om ingeleerd te worden.
Instellen van de melodie van
de radio deurbel
Druk op het BELL-symbool om het instellin-
genmenu voor de radiogong te openen. Daar
hebt u de mogelijkheid om de geïntegreerde
radiomodule te deactiveren en de melodie
van het radiogeluid te wijzigen. Tik op een
letter en de geleerde radiogong speelt de
overeenkomstige melodie. Deze melodie
wordt onmiddellijk opgeslagen en u kunt dit
menu verlaten met de pijl terug.
Het aanleren van de CUVEO ontvanger
Zet de ontvanger in de leermodus (druk op
de knop op de ontvanger totdat de LED op
de ontvanger knippert) en activeer de moni-
tor door op het touch-active oppervlak te
tikken. tik vervolgens op het lichtsymbool.
Als het lichtsymbool niet wordt weergege-
ven, controleerdan of het is geactiveerd in de
basisinstellingen (B5).
Veranderenvan de codering van het
radioprotocol
(CUVEO en BELL)
Indien de CUVEO-ontvanger en/of de BELL-
ontvanger zonder reden worden geactiveerd,
kan het zijn dat een andere zender in de
buurt dezelfde code uitzendt. Om de code te
wijzigen, gaat u als volgt te werk: De monitor
moet in stand-by staan. Houd een vinger op
de mute-knop (ongeveer 7 seconden) totdat
de toets- en mondsymbolen oplichten.
Dan moeten alle ontvangers (CUVEO en
BELL) opnieuw worden ingeleerd.
TECHNISCHE GEGEVENS

VDV-907 | NEDERLAND
97
NL
Bedrijfsspanning: 15Volt DC
Stroomverbruik: 270 ± 50mA
Frequentie WLAN: 2,4GHz; <100mW
Frequentie BELL: 434MHz; <10mW
Temperatuurbereik: 0-50°C
Max. vochtigheid: 85%
Schermdiagonaal: 178mm
Resolutie monitor: 1024x600
Afmetingen: 220x160x28mm (B x H x D)
OPMERKINGEN
Blootstelling aan sterke statische, elektrische
of radiofrequente velden (ontladingen, mobi-
ele telefoons, radioapparatuur, mobiele tele-
foons, magnetrons) kan storingen in de
apparatuur (het toestel) veroorzaken.
Reiniging en onderhoud
Koppel apparaten die op het lichtnet werken
los van het lichtnet (trek de stekker uit het
stopcontact) alvorens ze schoon te maken.
Het oppervlak van de behuizing kan worden
gereinigd met een zachte doek die met zeep-
water is bevochtigd. Gebruik geen schurende
reinigingsmiddelen of chemicaliën. Maak sto-
fafzetting op ventilatiesleuven alleen los met
een borstel en zuig indien nodig op met een
stofzuiger. Houd de zuigmond niet recht-
streeks tegen het toestel.
Rechtsbeginselen
1. Neem als exploitant of gebruikervan het
videodeurstation a.u.b. de voorschrien
en rechtsbeginselen van uw land voor het
gebruik van bewakingsapparatuur met
betrekkingtot persoonsrechten en
gegevensbescherming in acht!
2. In veel landen mogen videobeelden en/of
spraak pas worden doorgegeven nadat
een bezoeker hee aangebeld.
3. Installeer de camera zo dat het
detectiebereik beperkt is tot de
onmiddellijke ingang.
4. Het apparaat hee een geïntegreerde
bezoekershistorie. Bezoekers worden
direct in het apparaat gearchiveerd met
hun foto, datum en tijd. Gebruik deze
functie in overeenstemming met de
relevante landspecieke wettelijke
voorschrien die op de plaats van
installatie van toepassing zijn

NEDERLAND | VDV-907
98
NL
(meldingsplicht / archivering).
5. Vestig zo nodig op passende wijze de
aandacht op het bestaan van de
inrichting.
VEILIGHEIDSRICHTLIJNEN
Bij schade die door het niet navolgen van
deze gebruikershandleiding wordtveroor-
zaakt, vervalt het recht op garantie. Voor
indirecte schade zijn wij niet aansprakelijk!
Voor schade aan zaken of personen die door
ongeschikte bediening of niet-opvolgenvan
de veiligheidsrichtlijnen veroorzaakt wordt,
zijn wij niet aansprakelijk. In deze gevallen
vervalt elke aanspraak op garantie!
Om veiligheids- en vergunningsredenen (CE)
is het niet toegestaan om op eigen houtje het
product om te bouwen en/of te veranderen.
Haal het product niet uit elkaar!
Laat het verpakkingsmateriaal niet achteloos
rondslingeren, plastic folie/ zakken, polysty-
reendelen enz. kunnen in kinderhanden
gevaarlijk speelgoed worden.
Het product is uitsluitend geschikt voor
droge binnenruimtes (geen badkamers of
anderevochtige ruimtes).Vermijd dat het
toestel vochtig of nat wordt.
Ga voorzichtig om met het product - door
stoten, slagen of een val van al geringe
hoogte wordt het beschadigd.
2 JAAR BEPERKTE GARANTIE
Voor de duurvan 2 jaar wordt de garantie
gegeven, dat dit product vrij is van defecten
in het materiaal en in de uitvoering. Dat is
alleen van toepassing als het toestel op nor-
male wijze gebruikt wordt en regelmatig
wordt onderhouden. De verplichtingen van
deze garantie zijn beperkt tot de reparatie of
de nieuwe montage van een of ander onder-
deel van het toestel en gelden uitsluitend
onder de voorwaarde dat er geen onbe-
voegde wijzigingen of pogingen tot reparatie
werden uitgevoerd. Uw wettelijke rechten als
klant worden op geen enkele wijze door deze
garantie beïnvloed.
Opgelet!
Er is geen recht op garantie in ondermeer de

VDV-907 | NEDERLAND
99
NL
volgende gevallen:
• bedieningsfouten
• storingen door andere toestellen
op radiostralen (bv. gsm-gebruik)
• ingrepen/inwerkingenvan buitenaf
• mechanische beschadigingen
• vochtschade
• geen garantiebewijs (aankoopbewijs)
Bij schade die veroorzaaktwordt doordat
deze gebruiksaanwijzing niet werd opge-
volgd, vervalt alle aanspraak op garantie.
Voor vervolgschade zijn wij niet aansprake-
lijk! Bij materiële of lichamelijke schade die
veroorzaakt werd door oncorrect gebruik of
doordat de veiligheidsrichtlijnen niet werden
opgevolgd, zijn wij niet aansprakelijk. In deze
gevallen vervalt elke aanspraak op garantie!
Aansprakelijkheidsbeperking
De fabrikant is niet aansprakelijkvoor het
verlies of de beschadiging van om het even
welke soort, met inbegrip van bijkomende of
vervolgschade, die direct of indirect het resul-
taat zijn van een fout in het product.
Deze gebruiksaanwijzing is
een publicatie van
m-e GmbH modern-electronics,
An den Kolonaten 37,
26160 Bad Zwischenahn/Duitsland
Deze gebruiksaanwijzing voldoet aan de technische eisen
bij het ter perse gaan.
Wijzigingen in techniek en uitrusting
voorbehouden.


NL
VDV-907 | NEDERLAND
101
USER INTERFACE
StructuurI

NL
NEDERLAND | VDV-907
102
USER INTERFACE
StructuurII

NL
VDV-907 | NEDERLAND
103
USER INTERFACE
StructuurIII


12-03 | 2021
Hiermit erklärt die m-e GmbH modern-electronics, dass dieses Gerät
den folgenden Richtlinien entspricht:
RoHS 2011/65/EU
EMC 2014/30/EU
RED 2014/53/EU
Die KONFORMITÄTSERKLÄRUNG kann unter
folgenderAdresse abgerufen werden:
http://www.m-e.de/download/ce/vdv-907ce.pdf
-
 1
1
-
 2
2
-
 3
3
-
 4
4
-
 5
5
-
 6
6
-
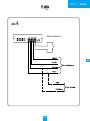 7
7
-
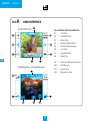 8
8
-
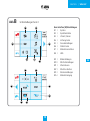 9
9
-
 10
10
-
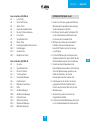 11
11
-
 12
12
-
 13
13
-
 14
14
-
 15
15
-
 16
16
-
 17
17
-
 18
18
-
 19
19
-
 20
20
-
 21
21
-
 22
22
-
 23
23
-
 24
24
-
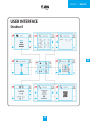 25
25
-
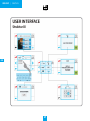 26
26
-
 27
27
-
 28
28
-
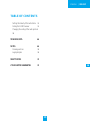 29
29
-
 30
30
-
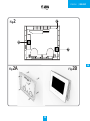 31
31
-
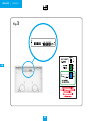 32
32
-
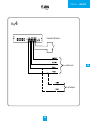 33
33
-
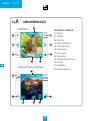 34
34
-
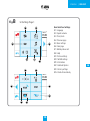 35
35
-
 36
36
-
 37
37
-
 38
38
-
 39
39
-
 40
40
-
 41
41
-
 42
42
-
 43
43
-
 44
44
-
 45
45
-
 46
46
-
 47
47
-
 48
48
-
 49
49
-
 50
50
-
 51
51
-
 52
52
-
 53
53
-
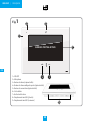 54
54
-
 55
55
-
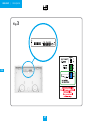 56
56
-
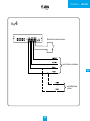 57
57
-
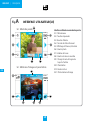 58
58
-
 59
59
-
 60
60
-
 61
61
-
 62
62
-
 63
63
-
 64
64
-
 65
65
-
 66
66
-
 67
67
-
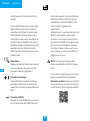 68
68
-
 69
69
-
 70
70
-
 71
71
-
 72
72
-
 73
73
-
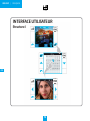 74
74
-
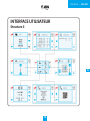 75
75
-
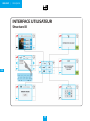 76
76
-
 77
77
-
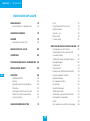 78
78
-
 79
79
-
 80
80
-
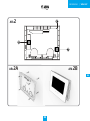 81
81
-
 82
82
-
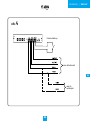 83
83
-
 84
84
-
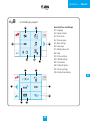 85
85
-
 86
86
-
 87
87
-
 88
88
-
 89
89
-
 90
90
-
 91
91
-
 92
92
-
 93
93
-
 94
94
-
 95
95
-
 96
96
-
 97
97
-
 98
98
-
 99
99
-
 100
100
-
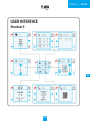 101
101
-
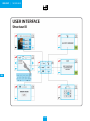 102
102
-
 103
103
-
 104
104


Me VD-ALU-6109-S-W Handleiding
- Categorie
- Split-systeem airconditioners
- Type
- Handleiding
in andere talen
- English: Me VD-ALU-6109-S-W Operating instructions
- italiano: Me VD-ALU-6109-S-W Istruzioni per l'uso
- français: Me VD-ALU-6109-S-W Mode d'emploi
- Deutsch: Me VD-ALU-6109-S-W Bedienungsanleitung
Gerelateerde papieren
Andere documenten
-
SWITEL HSIP5700 Handleiding
-
DEXAPLAN VT 623 de handleiding
-
UPM DB910 de handleiding
-
Renkforce RF-3206026 de handleiding
-
m-e FG-6.3 RX Compact Radio Doorbell Handleiding
-
Konig Electronic SEC-PH380 Handleiding
-
SSS Siedle BTCV 850-02 Operating Instructions Manual
-
HQ SEC-PH360 Handleiding
-
 Power Dynamics TM370 de handleiding
-
Alecto ADI-250 Handleiding
