
Xip Porter & Soft receiver
FA01379M09
Installazione e setup
Installation and Setup
Installation et configuration
Installation und Einrichtung
Instalación y configuración
Installatie en set-up
Instalação e configuração
Instalacja i ustawienia
Установка и настройка
RU
Русский
PL
Polski
PT
Portugûes
NL
Nederlands
ES
Español
DE
Deutsch
FR
Français
EN
English
IT
Italiano

2
Operazioni da svolgere prima di avviare l’installazione
Requisiti minimi del sistema
CPU Pentium 2GHz
Schermo 1024x768
RAM 1GB
Disco 350MB disponibili
OS Windows XP/VISTA/Win7
Dispositivi audio/video necessari
Audio Microfono + altoparlante
Video Telecamera (facoltativa)
Software di terze parti richiesto
Adobe Flash Player 10
Nota: Assicurarsi che il PC sia impostato in modo da non andare mai in “Stand-by”.
Impostazioni “Proprietà - Internet”
Dal menù “Impostazioni” del PC, individuare ed accedere alla sezione “Impostazione LAN”; verrà
visualizzata la finestra “Impostazione Rete Locale (LAN)”.
Se è abilitato l’utilizzo di un server proxy, premere il pulsante “Avanzate”; verrà visualizzata la finestra
“Impostazioni proxy”; nell’area “Eccezioni” o “Nessun proxy per” aggiungere la classe (sottorete) del
server ET/SER-Xip (es. 192.168.1.*).
Se non è abilitato l’utilizzo di un server proxy non è necessario apportare alcuna modifica alle
impostazioni.

3
2
1
Installazione e setup del software
Avviare l’installazione del software; seguire le istruzioni che appaiono sulle finestre di dialogo; installare i certificati all’interno della cartella “Autorità di certificazione radice attendibili”.
Al termine della procedura viene creata sulla scrivania un’icona di collegamento per il lancio rapido del programma A.
Prima di lanciare il programma, premere con il tasto destro del mouse sull’icona in basso a destra sulla barra delle applicazioni 2, e selezionare “Setup” per accedere alla finestra di setup dell’applica-
zione.

4
3
4
6
7 8
Network
Nello spazio 3 digitare l’indirizzo IP del ET/SER Xip (la porta di default è “80”).
Abilitando HTTPS 4 si attiva la crittazione della comunicazione tra client e server
(questa impostazione deve essere la stessa anche su ETI/SERXip).
Attenzione: questa funzione è disponibile solo per alcune tipologie di impianto;
normalmente non è necessario attivarla.
Dispositivi
Selezionare dagli elenchi le sorgenti audio e video che devono essere utilizzate
dall’applicazione.
Per il microfono, è importante testare il volume in uscita sui posti esterni del
sistema; qualora il volume risulti troppo basso potrebbe essere necessario attivare
la preamplificazione.
Disattivare il monitor del microfono per evitare fastidiosi rientri di suono sugli
altroparlanti.
Suoni
Selezionare dall’elenco F l’evento al quale abbinare uno dei suoni disponibili,
visualizzabili premendo il pulsante G; premere il pulsante 8 per ascoltare il
suono scelto.
Nota: È possibile abbinare suoni personalizzati agli eventi
(file di tipo wave PCM 16bit Signed LE, 8KHz).

5
J
K
L
M
9
N
Schermo
9 Selezionare la disposizione preferita delle immagini sullo schermo in caso di
“picture in picture”.
J In caso di presenza di una webcam sulla postazione del portiere, l’immagine
ripresa rimane sempre presente sul video anche senza conversazioni in corso.
K Abilita la presenza del riquadro “picture in picture”.
L La finestra del software rimane sempre in primo piano, davanti a qualsiasi
altro programma in esecuzione.
M La finestra del programma si estende alla dimensione dello schermo del PC.
Codec
Impostare il bitrate massimo supportato dalla rete N.
Le caselle successive mostrano i codec video e audio utilizzati dal sistema.
Selezionare codec H264 CIF, in sistemi con video analogico PAL.
Selezionare codec H264 QVGA, in sistemi con video analogico NTSC.
Opzioni chiamata
Consente di scegliere quante sono le linee in ingresso attive.
Abilitando una sola linea in ingresso, è possibile gestire una sola chiamata in
ingresso, la seconda chiamata entrante troverà la linea occupata.
Con una chiamata entrante, il posto di portineria può comunque effettuare una
chiamata.
Avvio dell’applicazione
Avviare l’applicazione ed inserire Utente e Password assegnate
dall’amministratore del sistema.

6
Tipo di problema e possibile causa Possibili soluzioni
L’applicazione XIP-Porter non si avvia
Problemi di privilegi di esecuzione o di
componenti software aggiuntivi
1- L’esecuzione del programma Xip-Porter deve avvenire come
“Amministratore”: l’utente deve avere i privilegi di amministratore
oppure sulle Proprietà del file eseguibile Xip-Porter.exe, attivare
l’opzione “Esegui questo programma come amministratore”
Nei pc con SO Windows 7 o successivi, non deve essere attiva
l’opzione di compatibilità “esegui il programma in modalità
compatibilità per: Windows XP (service pack 3)”.
2- Verificare che l’antivirus non stia bloccando l’applicazione XIP-Porter:
in tal caso configurare opportunamente l’antivirus
3- Verificare la corretta installazione di Adobe FlashPlayer ActiveX,
versione minima 10.0.x (si veda Pannello di controllo, Installazione
applicazioni - o Programmi e funzionalità)
4- Verificare che sia installato Microsoft .NET Framework, almeno
versione 3.5 o successivo (si veda Pannello di controllo, Installazione
applicazioni - o Programmi e funzionalità)
5- Verificare con TaskManager che non ci sia in esecuzione un’altra
istanza del programma Xip-Porter.exe: in tal caso terminare il
processo attivo e rilanciare lo Xip-Porter
6- Disinstallare e reinstallare il programma XIP-Porter
L’applicazione rimane nella schermata iniziale
di ricerca del server
Mancata comunicazione con ETI/SERXip
1- Verificare nelle impostazioni del programma XIP-Porter che indirizzo IP
e Porta del Server siano corrette; verificare che l’impostazione HTTPS
sia come configurata su ETI/SERXip.
2- Verificare connettività a livello rete (ping dal PC all’indirizzo IP del
server)
3- Verificare le impostazioni di rete per il proxy (devono consentire il
traffico verso l’ETI/SERXip).
• Dal menù “Impostazioni” del PC, individuare ed accedere alla sezio-
ne “Impostazione LAN”; viene visualizzata la finestra “Impostazione
Rete Locale (LAN)”.
Se è abilitato l’utilizzo di un server proxy, premere il pulsante “Avan-
zate”; viene visualizzata la finestra “Impostazioni proxy”; nell’area
“Eccezioni” o “Nessun proxy per” aggiungere la classe (sottorete) del
server ET/SER-Xip (es. 192.168.1.*).
Se non è abilitato l’utilizzo di un server proxy non è necessario appor-
tare alcuna modifica alle impostazioni.
• Dal browser predefinito del PC (Chrome, Firefox, Explorer, ...) aprire
la sezione di “impostazioni”, individuare ed accedere alla sezione “Im-
postazione LAN”; viene visualizzata la finestra “Impostazione Rete
Locale (LAN)”. Seguire le stesse indicazioni del punto sopra.
4- Verificare l’allineamento tra le versioni fw del server e dell’applicativo
Xip/Porter”
Malfunzionamenti e possibili soluzioni
NOTA: In caso di errori con finestra di popup con dettagli errore, espandere i dettagli, copiare ed inviare al servizio
tecnico, assieme alla descrizione dettagliata del problema visto.
Tipo di problema e possibile causa Possibili soluzioni
Dopo aver digitato il nome utente, il login non
viene completato e successivamente compare
il messaggio “ERRORE su Server o Rete” e la
schermata indica che il login non è avvenuto
Mancata registrazione VoIP
1- Sul PC dove è installato XIP-Porter, non devono essere in esecuzione
altri programmi che utilizzano tecnologie VoIP SIP (alcuni esempi tra i
più diffusi: Linphone, CounterPath X-Lite, Cisco Jabber - in particolare
non deve essere occupata la porta UDP 5060): in tal caso chiudere
tali applicazioni e rilanciare il programma XIP-Porter e poi rilanciare le
applicazioni chiuse se necessario
2- Verificare che l’antivirus non stia bloccando la porta 5060 o
l’applicazione XIP-Porter: in tal caso configurare opportunamente
l’antivirus
3- Verificare che il firewall non stia bloccando la porta 5060 o
l’applicazione XIP-Porter: in tal caso configurare opportunamente il
firewall
Durante la normale operatività del sistema,
appare il messaggio “ERRORE su Server o
Rete”
Mancata comunicazione con server ETI/SERXip
1- Verificare che non sia stato staccato il cavo di rete che collega il
sistema al pc
2- Verificare che non ci siano problemi di connettività di rete
3- Se si sta programmando il sistema (o il solo ETI/SERXip) con il PCS/XIP,
eseguire prima il logout da/dai portiere/i collegato/i
Il portiere visualizza lo stato “non disponibile”
per alcuni oggetti del sistema
Mancata registrazione di altri dispositivi o
disallineamento dello stato Xip-Porter
1- Verificare che il blocco di appartenenza dell’oggetto non disponibile
(ETI/XIP) sia correttamente registrato (pallino VERDE) nella lista
degli slaves (pagina web dell’ETI/SERXip) - verificare connettività e
configurazione ETI/XIP dell’oggetto non disponibile
2- L’applicazione XIP-Porter potrebbe essersi connessa all’ETI/SERXip
durante una programmazione del sistema con PCS/XIP: effettuare
Logout e rieffettuare il Login.
Le deviazioni di chiamata non avvengono
(anche chiamate panico), il portiere squilla
ma se non risponde le chiamate non vengono
deviate
Il time-out di chiamata impostato da PCS
sull’ETI/XIP dell’utente che ha fatto la chiamata
è minore del time-out di squillo con deviazione
dell’ETI/SERXip.
1- aumentare il time-out di chiamata sull’ETI o diminuire il time-out di
squillo sul ETI/SERXip

7

CAME S.p.A.
Via Martiri Della Libertà, 15
31030 Dosson di Casier - Treviso - Italy
tel. (+39) 0422 4940 - fax. (+39) 0422 4941
Eventuali aggiornamenti del presente documento sono disponibili sul sito www.came.com
Il produttore si riserva il diritto di apportare qualsiasi modifica al prodotto al fine di migliorarne le funzionalità.

Xip Porter & Soft receiver
Installation and setup
EN
English
FA01379-EN

2
Pre-installation operations
Minimum system requirements
CPU Pentium 2GHz
Screen 1024x768
RAM 1GB
Disk 350MB available
OS Windows XP/VISTA/Win7
Required audio/video devices
Audio Microphone + speaker
Video Video camera (optional)
Required third-party software
Adobe Flash Player 10
Note: Make sure that your computer is set up so that it will not go into stand-by mode.
Settings: Internet Properties
From the “Settings” menu on your PC, locate and access the “LAN Settings” section; the “Local Area
Network (LAN) settings” window will be displayed.
If the use of a proxy server is enabled, click on the “Advanced” tab; the “Proxy Settings” window will
appear; under “Exceptions” or “No proxy for” add the class (subnetwork) of the server ET/SER-Xip (e.g.
192.168.1.*).
If the use of a proxy server is not enabled, no changes need to be made to the settings.

3
2
1
Software installation and setup
Start software installation; follow the instructions that appear in the dialogue window; install the certificates in the “Trusted Root Certification Authorities” folder.
When the procedure is complete, a shortcut will be created on your desktop to launch the program quickly A.
Before launching the program, right click on the icon at the bottom right of the taskbar 2, and select “Setup” to access the application setup window.

4
3
4
6
7 8
Network
In area 3, type in the IP address of the ET/SER Xip (the default port is “80”).
By enabling HTTPS 4, the communication between the client and server is
encrypted (this setting must be the same on the ETI/SERXip).
Note: this function is only available for certain types of system; normally it does
not need to be activated.
Devices
Select the audio and video sources to be used by the application from the lists.
It is important to test the microphone output volume on the system entry panels;
if the volume is too low, you may need to activate the boost.
Deactivate the microphone monitor to prevent unwanted reverberations through
the speakers.
Sounds
From the list F, select the event to which you want to associate one of the
available sounds, which can be displayed by pressing button G; press button 8
to listen to the selected sound.
Note: You can associate custom sounds to the events
(file type: wave PCM 16bit Signed LE, 8KHz).

5
J
K
L
M
9
N
Screen
9 Select the preferred image arrangement on the screen for picture-in-picture
setups.
J If there is a webcam at the porter’s desk, the image remains on the video even
when there is no conversation in progress.
K This enables the picture-in-picture box.
L The software window always remains in the foreground, in front of any other
program running.
M The program window maximises to the size of the computer screen.
Codec
Set the maximum bit rate supported by the network N.
The following boxes show the video and audio codecs used by the system.
Select codec H264 CIF in systems with PAL analogue video.
Select codec H264 QVGA in systems with NTSC analogue video.
Call options
This allows you to choose how many input lines are active.
By enabling only one incoming line, only one incoming call can be managed; for
the second incoming call the line will be busy.
With an incoming call, the porter can still make another call.
Starting the application
Start the application and enter the username and password assigned by the
system administrator.

6
Type of problem and possible cause Possible solutions
The XIP-Porter application will not start
Problems related to usage or additional software
component rights
1- The Xip-Porter program must be run by an “Administrator”: the user
must have administrator rights or, from the executable Xip-Porter.exe
file properties, you must activate the option “Run as administrator”.
For OS Windows 7 or later, do not activate the compatibility option
“Run this program in compatibility mode for: Windows XP (service pack
3)”.
2- Check to ensure that the anti-virus software is not blocking the
XIP-Porter application. If it is, configure the anti-virus software
accordingly
3- Check that Adobe FlashPlayer ActiveX has been correctly installed
(version 10.0.x or later). To check this, see the Control Panel for the
programs installed under Programs and Features)
4- Check that Microsoft .NET Framework has been installed (version
3.5 or later). To check this, see the Control Panel for the programs
installed under Programs and Features)
5- Use Task Manager to check that the Xip-Porter.exe program is not
already running. If it is, end the current task and relaunch the Xip-
Porter
6- Uninstall and reinstall the XIP-Porter program
The initial server search screen is still
displaying the application
Failed communication with ETI/SERXip
1- Check that the IP address and server port are correct in the XIP-Porter
program settings; check that the HTTPS setting is configured as it is on
the ETI/SERXip.
2- Check the network connection (ping from computer to server IP
address)
3- Check the proxy network settings (they must allow traffic to the ETI/
SERXip).
• From the “Settings” menu on your computer, locate and access the
“LAN Settings” section; the “Local Area Network (LAN) settings”
window will be displayed.
If the use of a proxy server is enabled, click on the “Advanced” tab;
the “Proxy Settings” window will appear; under “Exceptions” or “No
proxy for” add the class (subnetwork) of the server ET/SER-Xip (e.g.
192.168.1.*).
If the use of a proxy server is not enabled, no changes need to be
made to the settings.
• From the preset browser on your computer (Chrome, Firefox, Explor-
er, etc.), open the “Settings” menu, and locate and access the “LAN
Settings” section; the “Local Area Network (LAN) settings” window
will be displayed. Follow the instructions in the point above.
4- Check that the firmware versions on the server and the Xip/Porter
application are aligned
Malfunctions and possible solutions
NOTE: Where an error message appears in a pop-up window, copy the error message details and send them to the
technical support service, together with a detailed description of the problem encountered.
Type of problem and possible cause Possible solutions
After entering your username, login is
unsuccessful and subsequently the message
“Server or Network ERROR” appears; the
display indicates that login has failed
Failed VoIP registration
1- On the computer where the XIP-Porter is installed, no other programs
which use VoIP SIP technology must be running (some of the most
common examples: Linphone, CounterPath, X-Lite and Cisco Jabber.
Note that the UDP 5060 port must be free). If there are, close these
applications and relaunch the XIP-Porter program; then relaunch the
closed applications if necessary
2- Check to ensure that the anti-virus software is not blocking the 5060
port or the XIP-Porter application. If it is, configure the anti-virus
software accordingly
3- Check to ensure that the firewall is not blocking the 5060 port or the
XIP-Porter application. If it is, configure the firewall accordingly
During normal system operation, the message
“Server or Network ERROR” appears
Failed communication with the ETI/SERXip server
1- Check to ensure that the network cable connecting the system to the
computer has not been disconnected
2- Check that there are no network connection problems
3- If the system is being programmed (or just the ETI/SERXip) with the
PCS/XIP, first ensure any connected porter(s) have logged out
The porter will see the status “unavailable”
attributed to some system components
Failed registration of other devices or
misalignment of Xip-Porter status
1- Check that the block that the unavailable component belongs to (ETI/
XIP) has been correctly registered (GREEN indicator) in the list of
slaves (ETI/SERXip webpage) - check the ETI/XIP configuration and
connectivity of the unavailable component
2- The XIP-Porter application may be connected to the ETI/SERXip when
programming the system with PCS/XIP: log out and then log back in
again.
Calls cannot be diverted (even emergency
calls); the porter device rings but if the call is
not answered, calls are not diverted
The call timeout set from the PCS on the ETI/XIP
of the user who made the call is quicker than the
ringing timeout with ETI/SERXip diversion.
1- Increase the call timeout on the ETI or decrease the ringing timeout on
the ETI/SERXip

7

CAME S.p.A.
Via Martiri Della Libertà, 15
31030 Dosson di Casier - Treviso - Italy
tel. (+39) 0422 4940 - fax. (+39) 0422 4941
Any updates made to this document can be found on our website www.came.com
The manufacturer reserves the right to make changes to improve the product and its functions.

Xip Porter & Soft receiver
Installation et configuration
FR
Français
FA01379-FR

2
Opérations à effectuer avant de mettre en marche l’installation
Conditions minimum requises du système
CPU Pentium 2GHz
Écran 1024x768
RAM 1GB
Disque 350MB disponibles
OS Windows XP/VISTA/Win7
Dispositifs audio/vidéo nécessaires
Audio Micro + haut-parleur
Vidéo Caméra (facultative)
Logiciel tiers requis
Adobe Flash Player 10
Remarque: S’assurer que le PC est configuré de manière à ne jamais se mettre en «Stand-by».
Configurations “Propriétés - Internet”
Depuis le menu «Configurations» du PC, repérer et accéder à la section «Configuration LAN»; la
fenêtre «Configuration Réseau Local (LAN)» apparaîtra.
Si l'utilisation d'un server proxy est activée, appuyer sur la touche «Avancées»; la fenêtre
«Configurations proxy» apparaîtra; dans la zone «Exceptions», ou «Aucun proxy pour» ajouter la
classe (sous-réseau) du server ET/SER-Xip (ex. 192.168.1.*).
Si l’utilisation d’un server proxy n’est pas activée, il n’est nécessaire d’apporter aucune modification
aux configurations.

3
2
1
Installation et configuration du logiciel
Mettre en marche l’installation du logiciel; suivre les instructions qui apparaissent sur les fenêtres de dialogue; installer les certificats à l’intérieur du dossier «Autorités de certification racine de
confiance».
À la fin de la procédure, une icône de liaison pour le lancement rapide du programme est créée sur le bureau A.
Avant de lancer le programme, appuyer sur la touche droite de la souris sur l’icône en bas à droite sur la barre des applications 2 et sélectionner «Configuration» pour accéder à la fenêtre de confi-
guration de l’application.

4
3
4
6
7 8
Network (réseau)
Dans l'espace 3 , taper l'adresse IP du ET/SER Xip (la porte par défaut est «80»).
En activant HTTPS 4 , on active le cryptage de la communication entre client et
server (cette configuration doit être la même aussi sur ETI/SERXip).
Attention: cette fonction n'est disponible que pour certaines typologies
d'installation; il n'est normalement pas nécessaire de l'activer.
Dispositifs
Sélectionner depuis les listes les sources audio et vidéo qui doivent être utilisées
par l’application.
Pour le micro, il est important de tester le volume en sortie sur les postes
externes du système; si le volume est trop bas, il pourrait s’avérer nécessaire
d’activer la pré-amplification.
Désactiver l’écran du micro pour éviter de désagréables retours de son sur les
haut-parleurs.
Sons
Depuis la liste F, sélectionner l’évènement auquel associer un des sons
disponibles, visualisables en appuyant sur la touche G; appuyer sur la touche
8 pour écouter le son choisi.
Remarque: Il est possible d’associer des sons personnalisables aux évènements
(fichier de type wave PCM 16bit Signed LE, 8KHz).

5
J
K
L
M
9
N
Écran
9 Sélectionner la disposition préférée des images sur l'écran en cas de «picture
in picture» (image dans image).
J En cas de présence d'une webcam sur le poste du concierge, l’image reprise
reste toujours présente sur la vidéo même sans conversations en cours.
K Active la présence du tableau «picture in picture».
L La fenêtre du logiciel reste toujours au premier plan, devant tout autre
programme en cours.
M La fenêtre du programme s'étend sur toute la dimension de l'écran du PC.
Codec
Configurer le bitrate maximum supporté par le réseau N.
Les cases successives montrent les codecs vidéo et audio utilisés par le système.
Sélectionner codec H264 CIF, sur les systèmes avec vidéo analogique PAL.
Sélectionner codec H264 QVGA, sur les systèmes avec vidéo analogique NTSC.
Options appel
Permet de choisir le nombre de lignes actives en entrée.
En activant une seule ligne en entrée, il est possible de gérer un seul appel en
entrée, le deuxième appel en entrée trouvera la ligne occupée.
Avec un appel en entrée, le poste de conciergerie peut dans tous les cas effectuer
un appel.
Mise en marche de l’application
Mette en marche l’application et saisir Utilisateur et Password (mot de passe)
assignés par l’administrateur du système.

6
Type de problème et cause possible Solutions possibles
L’application XIP-Porter ne se met pas en
marche
Problèmes de privilèges d’exécution ou de
composants logiciel supplémentaires.
1- L’exécution du programme Xip-Porter doit être effectuée
comme «Administrateur»: l’utilisateur doit avoir les privilèges
d’administrateur ou sur les propriétés du fichier exécutable Xip-
Porter.exe, activer l’option «Effectuer ce programme comme
administrateur»
Sur les pc avec Windows 7 ou successifs, l’option de compatibilité
«effectuer le programme en mode compatibilité pour: Windows XP
(service pack 3)» ne doit pas être active.
2- Vérifier que l’antivirus ne bloque pas l’application XIP-Porter: dans ce
cas, configurer opportunément l’antivirus
3- Vérifier la correcte installation de Adobe FlashPlayer ActiveX, version
minimum 10.0.x (voir Panneau de contrôle, Installation applications -
ou Programmes et fonctionnalités)
4- Vérifier que soit installé Microsoft .NET Framework, au moins version
3.5 ou successive (voir Panneau de contrôle, Installation applications
- ou Programmes et fonctionnalités)
5- Vérifier avec TaskManager qu’il n’y ait aucune autre instance du
programme Xip-Porter.exe en cours: dans ce cas, terminer le
processus activé et relancer le Xip-Porter
6- Désinstaller et réinstaller le programme XIP-Porter
L’application reste dans la page initiale de
recherche du server
Absence de communication avec ETI/SERXip
1- Vérifier dans les configurations du programme XIP-Porter que adresse
IP et Porte du Server soient correctes; vérifier que la configuration
HTTPS soit comme configurée sur ETI/SERXip.
2- Vérifier la connectivité au niveau du réseau (ping depuis le PC à
l’adresse IP du server)
3- Vérifier les configurations de réseau pour le proxy (celles-ci doivent
permettre le trafic vers l’ETI/SERXip).
• Depuis le menu «Configurations» du PC, repérer et accéder à la
section « Configuration LAN » ; la fenêtre « Configuration Réseau
Local (LAN)» apparaîtra.
Si l'utilisation d'un server proxy est activée, appuyer sur le bouton
«Avancées»; la fenêtre «Configurations proxy» apparaîtra; dans la
zone «Exceptions» ou «Aucun proxy pour» ajouter la classe (sous-ré-
seau) du server ET/SER-Xip (es. 192.168.1.*).
Si l’utilisation d’un server proxy n’est pas activée, il n’est nécessaire
d’apporter aucune modification aux configurations.
• Depuis le browser (navigateur) prédéfini du PC (Chrome, Firefox, Ex-
plorer, ...) ouvrir la section de «configurations», repérer et accéder à la
section «Configuration LAN»; la fenêtre «Configuration Réseau Local
(LAN)» apparaîtra. Suivre les mêmes indications du point ci-dessus.
4- Vérifier l’alignement entre les versions fw du server et de l’application
Xip/Porter”
Dysfonctionnements et solutions possibles
REMARQUE: En cas d’erreurs avec fenêtre de popup et détails erreur, étendre les détails, copier et envoyer au service
technique, avec la description détaillée du problème.
Type de problème et cause possible Solutions possibles
Après avoir tapé le nom de l’utilisateur, le login
n’est pas complété et ensuite le message
«ERREUR sur Server ou Réseau» apparaît et la
page indique que le login n’a pas été effectué.
Absence d’enregistrement VoIP
1- Sur le PC où est installé XIP-Porter, aucun autre programme utilisant
des technologies VoIP SIP ne doit être en cours d’exécution (certains
exemples parmi les plus diffus: Linphone, CounterPath X-Lite, Cisco
Jabber - en particulier la porte UDP 5060 ne doit pas être occupée:
dans ce cas, fermer ces applications et relancer le programme XIP-
Porter, puis relancer les applications fermées si nécessaire
2- Vérifier que l’antivirus ne bloque pas la porte 5060 ou l’application XIP-
Porter: dans ce cas, configurer opportunément l’antivirus
3- Vérifier que le firewall (pare-feu) ne bloque pas la porte 5060 ou
l’application XIP-Porter: dans ce cas, configurer opportunément le
firewall (pare-feu)
Pendant le fonctionnement normal du système,
le message «ERREUR sur Server ou Réseau»
apparaît
Absence de communication avec server ETI/
SERXip
1- Vérifier que le câble de réseau qui relie le système au pc ne soit pas
débranché
2- Vérifier qu’il n’y ait pas de problèmes de connectivité de réseau
3- Si l’on programme le système (ou seulement l’ETI/SERXip) avec le PCS/
XIP, effectuer d’abord le logout de/des concierge/s connecté/s
Le concierge visualise l’état «non disponible»
pour certains objets du système
Absence d’enregistrement d’autres dispositifs ou
désalignement de l’état Xip-Porter
1- Vérifier que le bloc d’appartenance de l’objet non disponible (ETI/XIP)
soit correctement enregistré (point VERT) dans la liste des slaves (page
web de l’ETI/SERXip) - vérifier la connectivité et la configuration ETI/XIP
de l’objet non disponible
2- L’application XIP-Porter pourrait être connectée à l’ETI/SERXip pendant
une programmation du système avec PCS/XIP: effectuer le Logout et
de nouveau le Login.
Les déviations d’appel ne s’effectuent pas
(même pour appel panique), le concierge
sonne mais s’il ne répond pas, les appels ne
sont pas déviés
Le time-out (délai d’attente) d’appel configuré
par PCS sur l’ETI/XIP de l’utilisateur qui a
effectué l’appel est inférieur au time-out (délai
d’attente) de sonnerie avec déviation de l’ETI/
SERXip.
1- augmenter le time-out (délai d’attente) d’appel sur l’ETI ou diminuer le
time-out (délai d’attente) de sonnerie sur l’ETI/SERXip

7

CAME S.p.A.
Via Martiri Della Libertà, 15
31030 Dosson di Casier - Treviso - Italy
tel. (+39) 0422 4940 - fax. (+39) 0422 4941
Toute mise à jour du document présent sera disponible sur le site www.came.com
Le fabricant se réserve le droit d’apporter des modifications au produit afin d’en améliorer les fonctionnalités.

Xip Porter & Soft Receiver
Installation und Einrichtung
DE
Deutsch
FA01379-DE

2
Durchzuführende Arbeiten vor Beginn der Installation
Mindestsystemanforderungen
CPU Pentium 2GHz
Bildschirm 1024x768
RAM 1GB
Festplatte 350MB verfügbar
OS Windows XP/VISTA/Win7
Erforderliche Audio-/Videogeräte
Audio Mikrofon + Lautsprecher
Video Kamera (fakultativ)
Erforderliche Software von Drittanbietern
Adobe Flash Player 10
Hinweis: Stellen Sie sicher, dass der PC so eingestellt wurde, dass er niemals in den Standby-Modus übergeht.
Einstellungen „Eigenschaften - Internet“
Suchen Sie im Menü „Einstellungen“ Ihres PCs das Feld „LAN-Einstellung“ und rufen Sie es auf; das
Fenster „EINSTELLUNGEN FÜR LOKALES NETZWERK (LAN)“ öffnet sich.
Wenn die Nutzung eines Proxyservers aktiviert wurde, klicken Sie auf „Erweitert“; das Fenster
„Proxyeinstellungen” öffnet sich; fügen Sie im Feld „Ausnahmen“ oder „kein Proxy für“ die Klasse
(Subnetz) des Servers ET/SER-Xip hinzu (z.B. 192.168.1.*).
Wenn die Verwendung eine Proxyservers nicht aktiv ist, ist es nicht erforderlich, Änderungen an den
Einstellungen vorzunehmen.

3
2
1
Installation und Einrichtung der Software
Starten Sie die Installation der Software; befolgen Sie die Anweisungen, die in den Dialogfenstern erscheinen; installieren Sie die Zertifikate im Ordner „Vertrauenswürdige Stammzertifizierungsstellen“.
Am Ende des Vorgangs wird ein Desktop-Symbol für den Schnellstart des Programms A erstellt.
Klicken Sie vor dem Start des Programms mit der rechten Maustaste auf das Symbol unten rechts auf der Anwendungsleiste 2 und wählen Sie „Einrichtung“, um das Fenster für die Einrichtung der
Anwendung zu öffnen.

4
3
4
6
7 8
Netzwerk
Geben Sie in das Feld 3 die IP-Adresse des ET/SER Xip ein (der Standardport ist „80“).
Durch Aktivieren von HTTPS 4 wird die Verschlüsselung der Kommunikation
zwischen Client und Server aktiviert (diese Einstellung muss auch für ETI/SERXip
vorgenommen werden).
Achtung: Diese Funktion ist nur für bestimmte Anlagentypen verfügbar;
normalerweise ist es nicht notwendig, sie zu aktivieren.
Gerät
Wählen Sie aus den Verzeichnissen die Audio- und Videoquellen, die von der
Anwendung genutzt werden sollen.
Für das Mikrofon ist es wichtig, die ausgehende Lautstärke an den
Außenstationen der Anlage zu testen; sollte diese zu niedrig sein, kann es
erforderlich sein, den Vorverstärker zu aktivieren.
Deaktivieren Sie den Monitor des Mikrofons, um störende Rückkopplungen an den
Lautsprechern zu vermeiden.
Klänge
Wählen Sie aus dem Verzeichnis F das Ereignis, dem Sie einen der verfügbaren
Klingeltöne zuweisen möchten, welche durch Antippen der Schaltfläche G
angezeigt werden können; tippen Sie auf die Schaltfläche 8, um den gewählten
Klingelton anzuhören.
Hinweis: Es ist auch möglich, den Ereignissen eigene Klingeltöne zuzuweisen
(Dateien vom Typ Wave PCM 16bit Signed LE, 8KHz).

5
J
K
L
M
9
N
Anzeige
9 Wählen Sie die bevorzugte Anordnung der Bilder auf dem Bildschirm im Falle
von „Picture in Picture“.
J Wenn eine Webcam am Standort des Pförtners vorhanden ist, ist das
aufgenommene Bild immer auf dem Video zu sehen, auch wenn keine Gespräche
geführt werden.
K In diesem Kästchen können Sie das Vorhandensein der Box „Picture in
Picture“ aktivieren.
L Das Softwarefenster bleibt immer im Vordergrund, vor jedem anderen
laufenden Programm.
M Das Programmfenster erstreckt sich über die Größe des PC-Bildschirms.
Codec
Stellen Sie die maximale vom Netz unterstützte Bitrate ein N.
Die folgenden Kästchen zeigen die von der Anlage genutzten Video- und Audio-
Codec.
Wählen Sie für Anlagen mit analoger Videoübertragung PAL die Option Codec
H264 CIF.
Wählen Sie für Anlagen mit analoger Videoübertragung NTSC die Option Codec
H264 QVGA.
Anrufoptionen
Sie können wählen, wie viele Eingangsleitungen aktiv sein sollen.
Wenn Sie nur eine Eingangsleitung aktivieren, ist es möglich, nur einen
eingehenden Anruf zu verwalten, der zweite eingehende Anruf findet eine besetzte
Leitung.
Wenn ein Anruf eingeht, kann der Pförtner trotzdem einen Anruf tätigen.
Start der Anwendung
Starten Sie die Anwendung und geben Sie den Benutzernamen und das Passwort
ein, die Ihnen vom Systemadministrator zugewiesen wurden.

6
Art des Problems und mögliche Ursache
Mögliche Lösungen
Die Anwendung XIP-Porter startet nicht
Probleme mit Ausführungsrechten oder zusätzlichen
Software-Komponenten
1- Die Ausführung des Programms Xip-Porter muss als „Administrator“
erfolgen: Der Benutzer muss Administratorrechte besitzen oder in den
Eigenschaften der ausführbaren Datei Xip-Porter.exe die Option „Als
Administrator ausführen“ auswählen.
Bei PCs mit den Betriebssystemen Windows 7 oder höher darf nicht die
Kompatibilitätsoption „Programm im Kompatibilitätsmodus ausführen für:
Windows XP (service pack 3)“ ausgewählt sein.
2- Prüfen Sie, dass Ihr Antivirusprogramm die Anwendung XIP-Porter
nicht blockiert: Sollte dem so sein, nehmen Sie die entsprechenden
Änderungen in den Einstellungen des Antivirusprogramms vor
3- Prüfen Sie, dass Adobe FlashPlayer ActiveX in der Version 10.0.x oder
höher korrekt installiert ist (siehe Systemsteuerung > Software oder
Programme und Funktionen)
4- Prüfen Sie, dass Microsoft .NET Framework, in der Version 3.5 oder
höher korrekt installiert ist (siehe Systemsteuerung > Software oder
Programme und Funktionen)
5- Prüfen Sie im TaskManager, ob bereits eine anderen Instanz des Programms
Xip-Porter.exe ausgeführt wird: Wenn dem so ist, beenden Sie den aktiven
Prozess und starten Sie Xip-Porter anschließend neu
6- Deinstallieren Sie das Programm XIP-Porter und installieren Sie es
anschließend neu
Die Anwendung bleibt im anfänglichen
Suchbildschirm des Servers
Kommunikationsfehler mit ETI/SERXip
1- Prüfen Sie in den Einstellungen des Programms XIP-Porter, dass die
IP-Adresse und der Server Port korrekt sind; prüfen Sie, dass die HTTPS-
Einstellung der auf ETI/SERXip konfigurierten entspricht.
2- Prüfen Sie die Netzverbindung (Ping vom PC zur IP-Adresse des Servers)
3- Prüfen Sie die Netzeinstellungen für den Proxy (diese müssen die
Übertragung zum ETI/SERXip gestatten).
• Suchen Sie im Menü „Einstellungen“ Ihres PCs das Feld „LAN-Ein-
stellung“ und rufen Sie es auf; das Fenster „Einstellungen für lokales
Netzwerk (LAN)“ öffnet sich.
Wenn die Nutzung eines Proxyservers aktiviert wurde, klicken Sie auf
„Erweitert“; das Fenster „Proxyeinstellungen” öffnet sich; fügen Sie im
Feld „Ausnahmen“ oder „kein Proxy für“ die Klasse (Subnetz) des Servers
ET/SER-Xip hinzu (z.B. 192.168.1.*).
Wenn die Verwendung eine Proxyservers nicht aktiv ist, ist es nicht erfor-
derlich, Änderungen an den Einstellungen vorzunehmen.
• Öffnen Sie im Standardbrowser Ihres PCs (Chrome, Firefox, Explorer,....)
das Feld „Einstellungen“ suchen und öffnen Sie nun das Feld „LAN-Ein-
stellung“; das Fenster „Einstellungen für lokales Netzwerk (LAN)“ öffnet
sich. Gehen Sie wie oben beschrieben vor.
4- Prüfen Sie, dass die Firmware-Versionen des Servers und der Anwendung
Xip/Porter übereinstimmen
Betriebsstörungen und mögliche Lösungen
HINWEIS: Wenn sich bei Auftreten eines Fehlers ein Popup-Fenster mit Details zu diesem öffnet, lassen Sie die Details anzeigen, kopieren Sie
sie und schicken Sie sie zusammen mit einer detaillierten Beschreibung des aufgetretenen Problems an den technischen Kundendienst.
Art des Problems und mögliche Ursache Mögliche Lösungen
Nach Eingabe des Benutzernamens wird die
Anmeldung nicht abgeschlossen, sondern
es erscheint die Meldung „Server- oder
Netzwerkfehler“ und der Bildschirm weist darauf
hin, dass die Anmeldung nicht erfolgreich war
VoIP-Registrierung fehlgeschlagen
1- Auf dem PC, auf dem XIP-Porter installiert ist, dürfen keine anderen
Programme ausgeführt werden, die VoIP SIP-Technologien nutzen
(einige der häufigsten Beispiele: Linphone, Ekiga, CounterPath X-Lite -
insbesondere darf nicht der Port UDP 5060 belegt sein): In diesem Fall
diese Anwendungen schließen und das XIP-Porter-Programm neu starten
und anschließend bei Bedarf die geschlossenen Anwendungen neu starten
2- Prüfen Sie, dass Ihr Antivirusprogramm nicht den Port 5060 oder die
Anwendung XIP-Porter blockiert: in diesem Fall den Antivirus entsprechend
konfigurieren
3- Prüfen Sie, dass Ihre Firewall nicht den Port 5060 oder die Anwendung
XIP-Porter blockiert: In diesem Fall die Firewall entsprechend konfigurieren
Während des normalen Betriebs des Systems
erscheint die Meldung „Server- oder Netzwerk-
FEHLER“
Kommunikationsfehler mit dem Server ETI/SERXip
1- Prüfen Sie, dass das Netzwerkkabel, das die Anlage mit dem PC
verbindet, richtig angeschlossen ist
2- Prüfen Sie, dass keine Probleme in der Netzverbindung bestehen
3- Wenn Sie die Anlage (oder nur den ETI/SERXip) mit dem PCS/XIP
programmieren, melden Sie zunächst eventuell angemeldete Pförtner ab
Der Pförtner zeigt den Status „nicht verfügbar“
für einige Objekte des Systems
Fehlende Registrierung anderer Geräte oder
Fehler im Status des Xip-Porter
1- Prüfen Sie, dass der Zugehörigkeitsblock des nicht verfügbaren Objekts
(ETI/XIP) korrekt in der Liste der Slaves (Website des ETI/SERXip)
registriert ist (GRÜNER Kreis) - prüfen Sie die Konnektivität und die
Konfiguration ETI/XIP des nicht verfügbaren Objekts
2- Die Anwendung XIP-Porter könnte sich während der Programmierung
der Anlage mit PCS/XIP mit dem ETI/SERXip verbunden haben: Melden
Sie sich ab und anschließend neu an.
Die Anrufumleitungen werden nicht
vorgenommen (auch die Panik-Anrufe); es
klingelt beim Pförtner, aber wenn dieser nicht
antwortet, werden die Anrufe nicht umgeleitet
Die vom PCS am ETI/XIP eingestellte
Zeitbeschränkung für Anrufe des Benutzers,
der den Anruf getätigt hat, ist kürzer als
die Zeitbeschränkung für die Klingelzeit mit
Umleitung des ETI/SERXip.
1- Erhöhen Sie die Zeitbeschränkung für Anrufe am ETI oder verringern
Sie die Zeitbeschränkung für die Klingelzeit am ETI/SERXip

7

CAME S.p.A.
Via Martiri Della Libertà, 15
31030 Dosson di Casier - Treviso - Italy
tel. (+39) 0422 4940 - fax. (+39) 0422 4941
Eventuelle aktualisierte Versionen der vorliegenden Anleitungen finden Sie auf der Website www.came.com
Der Hersteller behält sich das Recht vor, Änderungen am Produkt vorzunehmen, um dessen Funktionen zu verbessern.

Xip Porter & Soft receiver
Instalación y configuración
ES
Español
FA01379-ES

2
Operaciones necesarias antes de comenzar la instalación
Requisitos mínimos del sistema
CPU Pentium 2GHz
Pantalla 1024x768
RAM 1GB
Disco duro 350MB disponibles
SO Windows XP/VISTA/Win7
Dispositivos audio/vídeo necesarios
Audio Micrófono + altavoz
Vídeo Cámara (opcional)
Software de terceros necesario
Adobe Flash Player 10
Nota: Asegúrese de que el ordenador esté configurado de forma que no se ponga nunca en “Stand-by”.
Ajustes “Propiedades: Internet”
En el menú “Configuración” del ordenador, localice y acceda a la sección “Configuración de LAN”; se
abrirá la ventana “Configuración de la red de área local (LAN)”.
Si está habilitado el uso de un servidor proxy, haga clic en el botón “Opciones avanzadas”; se abrirá
la ventana “Configuración del proxy”; en el área “Excepciones” “No usar proxy para”, añada la clase
(subred) del servidor ET/SER-Xip (ej. 192.168.1.*).
Si no está habilitado el uso de un servidor proxy, no es necesario hacer ningún cambio en los ajustes.

3
2
1
Instalación y configuración del software
Inicie la instalación del software; siga las instrucciones que aparecen en los cuadros de diálogo; instale los certificados dentro de la carpeta “Entidades de certificación raíz de confianza”.
Al finalizar el procedimiento se crea en el escritorio un icono de acceso directo para el inicio rápido del programa A.
Antes de ejecutar el programa, haga clic derecho con el ratón en el icono de abajo a la derecha en la barra de aplicaciones 2, y seleccione “Configuración” para acceder a la ventana de configuración
de la aplicación.

4
3
4
6
7 8
Red
En el espacio 3 teclee la dirección IP del ET/SER Xip (el puerto predeterminado
es “80”).
Habilitando HTTPS 4 se activa el cifrado de la comunicación entre cliente y
servidor (este ajuste debe ser el mismo en el ETI/SERXip).
Atención: esta función solo está disponible para algunos tipos de instalación;
normalmente no es necesario activarla.
Dispositivos
Seleccione en las listas las fuentes de audio y vídeo que debe utilizar la
aplicación.
Para el micrófono, es importante hacer una prueba del volumen de salida en
las placas de calle del sistema; si el volumen es demasiado bajo, podría ser
necesario activar la preamplificación.
Desactive la monitorización del micrófono para evitar molestos fenómenos de
retroalimentación en los altavoces.
Sonidos
Seleccione en la lista F el evento al que asociar uno de los sonidos disponibles,
que se pueden consultar haciendo clic en el botón G; haga clic en el botón 8
para escuchar el sonido seleccionado.
Nota: se pueden asociar sonidos personalizados a los eventos
(archivos de tipo wave PCM 16bit Signed LE, 8KHz).

5
J
K
L
M
9
N
Pantalla
9 Seleccione la disposición deseada para las imágenes en la pantalla en caso de
“imagen en imagen”.
J Si el puesto del conserje tiene una webcam, la imagen captada se muestra
constantemente aunque no haya conversaciones en curso.
K Se habilita la presencia del recuadro “imagen en imagen”.
L La ventana del software permanece siempre en primer plano, delante de
cualquier otro programa que se esté ejecutando.
M La ventana del programa se amplía hasta el tamaño de la pantalla del
ordenador.
Códec
Defina la velocidad de bits máxima que admite la red N.
Las casillas siguientes muestran los códecs de vídeo y audio que utiliza el
sistema.
Seleccione el códec H264 CIF en sistemas con vídeo analógico PAL.
Seleccione el códec H264 QVGA en sistemas con vídeo analógico NTSC.
Opciones de llamada
Permite seleccionar la cantidad de líneas de entrada activas.
Habilitando una sola línea de entrada, se puede gestionar una sola llamada de
entrada; la segunda llamada entrante encontrará la línea ocupada.
Con una llamada entrante, la conserjería puede realizar una llamada de todos
modos.
Inicio de la aplicación
Inicie la aplicación e introduzca el nombre de usuario y la contraseña asignados
por el administrador del sistema.

6
Tipo de problema y posible causa Posibles soluciones
La aplicación XIP-Porter no arranca
Problemas de privilegios de ejecución o de
componentes de software adicionales
1- El programa Xip-Porter debe ejecutarse como “Administrador”: el
usuario debe tener los privilegios de administrador o bien, en las
Propiedades del archivo ejecutable Xip-Porter.exe, activar la opción
“Ejecutar este programa como administrador”
En los ordenadores con sistema operativo Windows 7 o siguientes, no
debe estar activada la opción de compatibilidad “Ejecutar este programa
en modo de compatibilidad para: Windows XP (service pack 3)”.
2- Compruebe que el antivirus no esté bloqueando la aplicación XIP-
Porter: de ser así, configure correctamente el antivirus
3- Compruebe que esté correctamente instalado Adobe FlashPlayer
ActiveX, versión mínima 10.0.x (se remite al Panel de control, Agregar
o quitar programas - o Programas y características)
4- Compruebe que esté instalado Microsoft .NET Framework, versión
3.5 o posteriores (se remite al Panel de control, Agregar o quitar
programas - o Programas y características)
5- Compruebe con el Administrador de tareas que no se esté ejecutando
ninguna otra instancia del programa Xip-Porter.exe: de ser así,
finalice el proceso activo y vuelva a ejecutar el Xip-Porter
6- Desinstale y reinstale el programa XIP-Porter
La aplicación se mantiene en la pantalla inicial
de búsqueda del servidor
Fallo de comunicación con ETI/SERXip
1- Compruebe en los ajustes del programa XIP-Porter que la dirección
IP y el puerto del servidor sean correctos; asegúrese de que el ajuste
HTTPS esté configurado del mismo modo que en el ETI/SERXip.
2- Compruebe la conectividad a nivel de red (ping desde el ordenador a la
dirección IP del servidor)
3- Compruebe los ajustes de red para el proxy (deben permitir el tráfico
hacia el ETI/SERXip).
• En el menú “Configuración” del ordenador, localice y acceda a la
sección “Configuración de LAN”; se abre la ventana “Configuración
de la red de área local (LAN)”.
Si está habilitado el uso de un servidor proxy, haga clic en el botón
“Opciones avanzadas”; se abrirá la ventana “Configuración del
proxy”; en el área “Excepciones” o ” “No usar proxy para”, añada la
clase (subred) del servidor ET/SER-Xip (ej. 192.168.1.*).
Si no está habilitado el uso de un servidor proxy, no es necesario hacer
ningún cambio en los ajustes.
• En el navegador predefinido del ordenador (Chrome, Firefox, Ex-
plorer...), abra la sección de “Configuración” y localice y acceda a la
sección “Configuración de LAN”; se abre la ventana “Configuración
de la red de área local (LAN)”. Siga las mismas indicaciones del
punto anterior.
4- Compruebe que las versiones de firmware del servidor y de la
aplicación Xip/Porter coincidan
Fallos de funcionamiento y posibles soluciones
NOTA: en caso de errores con ventana emergente que indica los detalles del error, amplíe los detalles, cópielos y envíelos
al servicio técnico, junto con la descripción detallada del problema encontrado.
Tipo de problema y posible causa Posibles soluciones
Tras introducir el nombre de usuario, no se
inicia la sesión; luego aparece el mensaje
“ERROR en servidor o red” y la pantalla indica
que no se ha iniciado la sesión
Fallo de registro VoIP
1- En el ordenador en el que está instalado XIP-Porter, no se deben estar
ejecutando otros programas que utilicen tecnologías VoIP SIP (estos
son algunos de los ejemplos más extendidos: Linphone, CounterPath
X-Lite, Cisco Jabber - sobre todo, no debe estar ocupado el puerto
UDP 5060): de ser así, cierre dichas aplicaciones y vuelva a iniciar el
programa XIP-Porter; luego vuelva a iniciar las aplicaciones cerradas, si
es necesario
2- Compruebe que el antivirus no esté bloqueando el puerto 5060 o la
aplicación XIP-Porter: de ser así, configure correctamente el antivirus
3- Compruebe que el firewall no esté bloqueando el puerto 5060 o la
aplicación XIP-Porter: de ser así, configure correctamente el firewall
Durante el funcionamiento normal del sistema,
aparece el mensaje “ERROR en servidor o red”
Fallo de comunicación con servidor ETI/SERXip
1- Compruebe que no se haya desconectado el cable de red que conecta
el sistema con el ordenador
2- Compruebe que no haya problemas de conectividad de red
3- Si se está programando el sistema (o solo el ETI/SERXip) con el PCS/
XIP, cierre primero la sesión del conserje o conserjes conectados
El conserje ve que determinados objetos del
sistema están en estado de “no disponible”
Fallo de registro de otros dispositivos o falta de
recepción del estado de Xip-Porter
1- Compruebe que el bloque al que pertenece el objeto no disponible
(ETI/XIP) esté correctamente registrado (círculo VERDE) en la lista de
slaves (página web del ETI/SERXip) - compruebe la conectividad y
configuración ETI/XIP del objeto no disponible
2- La aplicación XIP-Porter podría haberse conectado al ETI/SERXip
durante una programación del sistema con PCS/XIP: cierre la sesión y
vuelva a iniciarla.
No se producen los desvíos de llamada (ni
siquiera para llamadas de pánico); al llamar al
conserje, la línea da tono pero si no responde
las llamadas no se desvían
El tiempo de espera de llamada definido
mediante PCS en el ETI/XIP del usuario que ha
realizado la llamada es más corto que el tiempo
de espera de timbre con desvío del ETI/SERXip.
1- aumente el tiempo de espera de llamada en el ETI o reduzca el tiempo
de espera de timbre en el ETI/SERXip

7

CAME S.p.A.
Via Martiri Della Libertà, 15
31030 Dosson di Casier - Treviso - Italy
tel. (+39) 0422 4940 - fax. (+39) 0422 4941
Las actualizaciones de este documento están disponibles en el sitio web www.came.com
El fabricante se reserva el derecho de realizar cualquier modificación en el producto para mejorar su funcionalidad.

Xip Porter & Soft receiver
Installatie en set-up
NL
Nederlands
FA01379-NL

2
Handelingen uit te voeren voor het opstarten van het systeem
Minimumvereisten van het systeem
CPU Pentium 2GHz
Scherm 1024x768
RAM 1GB
Schijf 350MB beschikbaar
OS Windows XP/VISTA/Win7
Noodzakelijke audio/videotoestellen
Audio Microfoon + luidspreker
Vidéo/Video Camera (optioneel)
Vereiste software van derden
Adobe Flash Player 10
Opmerking: Zorg ervoor dat de pc geconfigureerd is zodat hij nooit inschakelt op “Stand-by”.
Instellingen “Eigenschappen - Internet”
Van het menu “Instellingen” van de PC, zoek en open “Instelling LAN”; het venster “Instelling Lokaal
Netwerk (LAN)” verschijnt.
Als het gebruik van een proxyserver geactiveerd is, druk op de knop “Geavanceerd”. Het scherm
“Proxy-instellingen” wordt weergegeven. In het gebied “Uitzonderingen” of “Geen proxy voor”, voeg
de klasse (subnetwerk) van de server ET/SER-Xip toe (bv. 192.168.1.*).
Als het gebruik van een proxyserver niet geactiveerd is, dan hoeft er geen enkele verandering te worden
aangebracht aan de instellingen.

3
2
1
Installatie en configuratie van de software
Start de software op. Volg de instructies die op de dialoogvensters verschijnen. Installeer de certificaten in de map “Vertrouwde basiscertificeringsinstanties”.
Aan het einde van de procedure wordt er op het bureaublad een pictogram gecreëerd om het programma snel te kunnen starten A.
Voordat u het programma start, druk met de rechtermuisknop op het pictogram onderaan rechts op de taakbalk 2 en selecteer “Set-up” om toegang te krijgen tot het configuratievenster van de toe-
passing.

4
3
4
6
7 8
Netwerk
Voer in de ruimte 3 het IP-adres van de ET/SER Xip in (de default-poort is “80”).
Door HTTPS te activeren 4 , wordt de codering van de berichten tussen client en
server geactiveerd (deze instelling dient ook dezelfde te zijn op ETI/SERXip).
Let op: deze functie is alleen beschikbaar voor een aantal installaties; gewoonlijk
moet ze niet geactiveerd worden.
Toestellen
Selecteer op de lijsten de geluids- en videobronnen die door de toepassing
gebruikt moeten worden.
Wat de microfoon betreft, is het belangrijk het volume te testen op de
buitenposten van het systeem. Wanneer het volume te zacht is, dient u mogelijk
de voorversterker in te schakelen.
Schakel de monitor van de microfoon uit om vervelende echo’s in de luidsprekers
te vermijden.
Melodieën
Selecteer van de lijst F de gebeurtenis waaraan u een van de beschikbare
melodieën wilt koppelen, die weergegeven worden door op de knop G te
drukken. Druk op de knop 8 om de gekozen melodie te beluisteren.
Opmerking: Het is mogelijk om gepersonaliseerde melodieën aan gebeurtenissen
te koppelen (bestanden van het type wave PCM 16bit Signed LE, 8KHz).

5
J
K
L
M
9
N
Scherm
9 Selecteer de favoriete opstelling van de afbeeldingen op het scherm in geval
van “picture in picture”.
J Wanneer de portiersloge uitgerust is met een webcam, wordt het beeld altijd
weergegeven op het scherm, ook als er geen gesprek actief is.
K Activeert de aanwezigheid van “picture in picture”.
L Het venster van de software blijft altijd zichtbaar voor om het even welk ander
programma dat uitgevoerd wordt.
M Het venster van het programma strekt zich uit over het volledige scherm van
de PC.
Codec
Stel de maximum bitsnelheid in die door het netwerk ondersteund wordt N.
De daaropvolgende onderstaande velden geven de video- en audiocodecs weer
die door het systeem worden gebruikt.
Selecteer codec H264 CIF voor systemen met analoge PAL-video.
Selecteer codec H264 QVGA voor systemen met analoge NTSC-video.
Oproepopties
Maakt het mogelijk om het aantal actieve binnenkomende lijnen te kiezen.
Door één lijn te activeren kunt u één enkele binnenkomende oproep beheren, de
tweede oproep komt uit op de bezette lijn.
Met een binnenkomende oproep kan de portier hoe dan ook een oproep
verrichten.
De toepassing opstarten
Start de toepassing op en voer de username en password in die door de
beheerder van het systeem werden toegewezen.

6
Probleem en mogelijke oorzaak Mogelijke oplossingen
De toepassing XIP-Porter wordt niet opgestart.
Problemen met betrekking tot de bevoegdheden
inzake de uitvoering of de bijkomende software-
onderdelen.
1- Het programma Xip-Porter moet als “Administrator” worden
uitgevoerd: de gebruiker moet over beheerdersbevoegdheden
beschikken of op de Eigenschappen van het bestand Xip-Porter.exe
de optie “Als administrator uitvoeren” activeren
Op computers met besturingssysteem Windows 7 of volgende, mag
de optie “het programma uitvoeren in compatibiliteitsmodus voor:
Windows XP (service pack 3)” niet geselecteerd zijn.
2- Controleer of het antivirusprogramma de toepassing XIP-Porter niet
blokkeert. Als dit het geval is, configureer het antivirusprogramma
dan zoals gewenst
3- Controleer of het programma Adobe FlashPlayer ActiveX, versie 10.0.x
of hoger (raadpleeg het Configuratiescherm, Programma's installeren
- of Programma's en onderdelen) correct geïnstalleerd is
4- Controleer of Microsoft .NET Framework, versie 3.5 of hoger
(raadpleeg het Configuratiescherm, Programma's installeren - of
Programma's en onderdelen) correct geïnstalleerd is
5- Controleer met het Taakbeheer of het programma Xip-Porter.exe niet
meermaals uitgevoerd wordt. Wanneer dit het geval is, beëindig het
actieve proces en start Xip-Porter opnieuw
6- Verwijder het programma XIP-Porter en installeer het opnieuw
De toepassing blijft in het openingszoekscherm
van de server
Mislukte communicatie met ETI/SERXip
1- Controleer in de instellingen van het programma XIP-Porter of het IP-
adres en de serverpoort correct zijn. Controleer of de HTTPS-instelling
geconfigureerd is op ETI/SERXip.
2- Controleer de netwerkverbinding (ping van de pc naar het IP-adres van
de server)
3- Controleer de netwerkinstellingen voor de proxy (het verkeer naar de
ETI/SERXip moet toegestaan zijn).
• Van het menu “Instellingen” van de PC, zoek en open “LAN-instel-
lingen”; het venster “Instelling Lokaal Netwerk (LAN)” verschijnt.
Als het gebruik van een proxyserver geactiveerd is, druk op de knop
“Geavanceerd”. Het scherm “Proxy-instellingen” wordt weergegeven.
In het gebied “Uitzonderingen” of “Geen proxy voor”, voeg de klasse
(subnetwerk) van de server ET/SER-Xip toe (bv. 192.168.1.*).
Als het gebruik van een proxyserver niet geactiveerd is, dan hoeft er
geen enkele verandering te worden aangebracht aan de instellingen.
• In de standaardbrowser van de PC (Chrome, Firefox, Explorer, ...),
open “Instellingen”, zoek en open “LAN-instellingen”; het venster “In-
stelling Lokaal Netwerk (LAN)” verschijnt. Voer dezelfde handelingen
van het vorige punt uit.
4- Controleer of de firewall versies van der server en de Xip/Porter-
toepassing aangepast zijn
Storingen en mogelijke oplossingen
OPMERKING: In geval van fouten waarbij een pop-upvenster verschijnt met details met betrekking tot de fout, vouw de details
uit, kopieer ze en verzend ze naar de technische assistentie, samen met een gedetailleerde beschrijving van het probleem.
Probleem en mogelijke oorzaak Mogelijke oplossingen
Nadat u de username heeft ingegeven, wordt
de aanmeldingsprocedure niet voltooid.
Vervolgens verschijnt het bericht “FOUT op
server of netwerk” en het scherm geeft aan
dat de aanmeldingsprocedure mislukt is.
Mislukte registratie VoIP
1- Op de pc waar XIP-Porter is geïnstalleerd mogen geen andere
programma's in uitvoering zijn die gebruik maken van de technologie
VoIP SIP (enkele vaak voorkomende voorbeelden: Linphone,
CounterPath X-Lite, Cisco Jabber - in het bijzonder mag de poort UDP
5060 niet worden gebruikt). Als dit het geval is, sluit de desbetreffende
programma's en start het programma XIP-Porter opnieuw, start
vervolgens de gesloten applicaties indien nodig
2- Controleer of het antivirusprogramma de poort 5060 of het programma
XIP-Porter niet blokkeert. Als dit het geval is, configureer het
antivirusprogramma dan zoals vereist
3- Controleer of de firewall de poort 5060 of het programma XIP-Porter
niet blokkeert. Als dit het geval is, configureer het antivirusprogramma
dan zoals vereist
Wanneer het systeem normaal werkt,
verschijnt het bericht “FOUT op server of
netwerk”
Mislukte communicatie met de server ETI/SERXip
1- Controleer of de netwerkkabel die het systeem met de pc verbindt niet
losgekoppeld is
2- Controleer of er geen verbindingsproblemen zijn met het netwerk
3- Als u het systeem configureert (of alleen de ETI/SERXip) met de PCS/
XIP, voer dan eerst de afmeldingsprocedure uit van de verbonden
portier(s)
De portier ziet de status “niet beschikbaar”
voor enkele onderdelen van het systeem
Mislukte registratie van andere toestellen of
foutieve uitlijning van de status Xip-Porter
1- Controleer of het blok waar het object toe behoort (ETI/XIP) correct
geregistreerd is (GROEN balletje) op de slaves-lijst (webpagina van de
ETI/SERXip). Controleer de verbinding en de configuratie van ETI/XIP
van het object dat niet beschikbaar is
2- De toepassing XIP-Porter kan verbonden zijn met ETI/SERXip tijdens
een configuratie van het systeem met PCS/XIP: meld u af en meld u
vervolgens weer aan.
De oproepen worden niet doorgeschakeld (ook
de paniekoproepen niet), de portierscentrale
rinkelt, maar als de oproep niet wordt
beantwoord, wordt hij niet doorgeschakeld
De oproep-time-out die door PCS ingesteld is op
de ETI/XIP van de gebruiker die de oproep heeft
uitgevoerd is lager dan de ring-time-out met
doorschakeling van de ETI/SERXip.
1- verhoog de oproep-time-out op ETI of verminder de ring-time-out op
ETI/SERXip

7

CAME S.p.A.
Via Martiri Della Libertà, 15
31030 Dosson di Casier - Treviso - Italy
tel. (+39) 0422 4940 - fax. (+39) 0422 4941
Eventuele bijgewerkte versies van dit document zijn beschikbaar op de site www.came.com
De producent behoudt zich het recht om wijzigingen aan te brengen aan het product om de werking ervan te verbeteren.

Xip Porter e Soft receiver
Instalação e configuração
PT
Português
FA01379-PT

2
Operações a realizar antes de iniciar a instalação
Requisitos mínimos do sistema
CPU Pentium 2GHz
Ecrã 1024x768
RAM 1GB
Disco 350MB disponíveis
OS Windows XP/VISTA/Win7
Dispositivos áudio/vídeo necessários
Áudio Microfone + altifalante
Vídeo Câmara de vídeo (facultativa)
Software de terceiros necessário
Adobe Flash Player 10
Nota: Certifique-se de que o PC está configurado de maneira a nunca entrar em “Stand-by”.
Definições “Propriedades da Internet”
No menu “Definições” do PC, identifique e aceda à secção “Definir LAN”; abre-se a janela “Definir
Rede Local (LAN)”.
Se estiver habilitada a utilização de um servidor proxy, clique no botão “Avançadas”; abre-se a janela
“Definições proxy”; na área “Exceções” ou “Nenhum proxy para” adicione a classe (subrede) do
servidor ET/SER-Xip (por ex. 192.168.1.*).
Se não estiver habilitada a utilização de um servidor proxy, não é necessário realizar qualquer alteração
das definições.

3
2
1
Instalar e configurar o software
Inicie a instalação do software; siga as instruções que aparecem nas janelas de diálogo; instale os certificados dentro da pasta “Autoridade certificadora raiz fiável”.
No fim do processo é criado no ambiente de trabalho um ícone de ligação para abrir rapidamente o programa A.
Antes de executar o programa, clique com o botão direito do rato no ícone no canto inferior direito na barra das aplicações 2, e selecione “Setup” para aceder às janela de configuração da aplicação.

4
3
4
6
7 8
Network
No campo 3 digite o endereço IP do ET/SER Xip (a porta predefinida é “80”).
Habilitando HTTPS 4 ativa a codificação da comunicação entre o cliente e o
servidor (esta definição também tem de ser a mesma no ETI/SERXip).
Atenção: esta função só está disponível para alguns tipos de sistema;
normalmente não é necessário ativá-la.
Dispositivos
Selecione nas listas as fontes áudio e vídeo que devem ser utilizadas pela
aplicação.
Para o microfone é importante testar o volume de saída nas placas botoneiras
do sistema; se o volume for muito baixo pode ser necessário ativar a pré-
amplificação.
Desative o monitor do microfone para evitar ecos incomodativos nos altifalantes.
Sons
Selecione na lista F o evento ao qual associar um dos sons disponíveis,
apresentados clicando no botão G; clique no botão 8 para ouvir o som
escolhido.
Nota: é possível associar sons personalizados aos eventos
(ficheiros de tipo wave PCM 16bit Signed LE, 8KHz).

5
J
K
L
M
9
N
Ecrã
9 Selecione a disposição preferida das imagens no ecrã no caso de “imagem na
imagem”.
J Se estiver presente uma webcam na posição do porteiro, a imagem filmada
fica sempre presente no ecrã mesmo sem conversas a decorrer.
K Habilita a presença da caixa “imagem na imagem”.
L A janela do software fica sempre em primeiro plano, em frente de qualquer
outro programa em execução.
M A janela do programa amplia-se até ao tamanho do ecrã do PC.
Codec
Defina o bitrate máximo suportado pela rede N.
As caixas seguintes mostram os codec de vídeo e áudio utilizados pelo sistema.
Selecione codec H264 CIF, em sistemas com vídeo analógico PAL.
Selecione codec H264 QVGA, em sistemas com vídeo analógico NTSC.
Opções de chamada
Permite escolher quantas são as linhas de entrada ativas.
Habilitando apenas uma linha de entrada, é possível receber uma só chamada, a
segunda chamada recebida encontra a linha ocupada.
Com uma chamada recebida, a portaria pode igualmente fazer uma chamada.
Iniciar a aplicação
Inicie a aplicação e digite o nome de Utilizador e a Palavra-passe atribuídas pelo
administrador do sistema.

6
Tipo de problema e possível causa Soluções possíveis
A aplicação XIP-Porter não se abre
Problemas de privilégios de execução ou de
componentes software adicionais
1- A execução do programa Xip-Porter tem de ocorrer como
“Administrador”: o utilizador tem de ter privilégios de Administrador
ou, nas Propriedades do ficheiro executável Xip-Porter.exe, tem de
ativar a opção “Executar este programa como administrador”
Nos PC com SO Windows 7 ou posteriores, não deve estar ativa
a opção de compatibilidade “executar o programa em modo
compatibilidade para: Windows XP (service pack 3)”.
2- Verifique se o antivírus está a bloquear a aplicação XIP-Porter: nesse
caso configure devidamente o antivírus
3- Verifique a correta instalação de Adobe FlashPlayer ActiveX, versão
mínima 10.0.x (veja em Painel de controlo, Instalação de aplicações -
ou Programas e funções)
4- Verifique se o Microsoft .NET Framework está instalado, pelo menos
a versão 3.5 ou seguintes (veja em Painel de controlo, Instalação de
aplicações - ou Programas e funções)
5- Verifique com o Gestor de tarefas se está em execução outra janela
do programa Xip-Porter.exe: nesse caso termine o processo ativo e
volte a abrir o Xip-Porter
6- Desinstale e volte a instalar o programa XIP-Porter
A aplicação fica na página inicial de pesquisa
do servidor
Falta de comunicação com o ETI/SERXip
1- Verifique nas definições do programa XIP-Porter se o endereço IP e a
Porta do servidor estão corretas; verifique se a definição HTTPS está
configurada como no ETI/SERXip.
2- Verifique a ligação a nível de rede (ping do PC ao endereço IP do
servidor)
3- Verifique as definições de rede para o proxy (devem permitir o tráfico
com o ETI/SERXip).
• No menu “Definições” do PC, identifique e aceda à secção “Definir
LAN”; abre-se a janela “Definir Rede Local (LAN)”.
Se estiver habilitada a utilização de um servidor proxy, clique no botão
“Avançadas”; abre-se a janela “Definições proxy”; na área “Exce-
ções” ou “Nenhum proxy para” adicione a classe (subrede) do servidor
ET/SER-Xip (por ex. 192.168.1.*).
Se não estiver habilitada a utilização de um servidor proxy, não é
necessário realizar qualquer alteração das definições.
• No browser predefinido do PC (Chrome, Firefox, Explorer, ...) abra a
secção de “definições”, identifique e aceda à secção “Definir LAN”;
abre-se a janela “Definir Rede Local (LAN)”. Siga as mesmas instru-
ções do ponto acima.
4- Verifique se as versões fw do servidor e da aplicação Xip/Porter”
coincidem
Maus funcionamentos e soluções possíveis
NOTA: se ocorrerem erros com abertura de janela de pop-up com os detalhes do erro, abra os detalhes, copie e envie
para a assistência técnica, juntamente com a descrição detalhada do problema detetado.
Tipo de problema e possível causa Soluções possíveis
Depois de ter digitado o nome de utilizador, o
login não é completado e em seguida aparece
a mensagem “ERRO no Servidor ou na Rede” e
a página indica que o login não ocorreu
Falta de registo VoIP
1- No PC onde está instalado o XIP-Porter, não podem estar em execução
outros programas que utilizem tecnologias VoIP SIP (alguns dos
exemplos mais comuns: Linphone, CounterPath X-Lite, Cisco Jabber
- especificamente não deve estar ocupada a porta UDP 5060): nesse
caso feche essas aplicações e volte a abrir o programa XIP-Porter e
depois abra as aplicações fechadas, se necessário
2- Verifique se o antivírus está a bloquear a porta 5060 ou a aplicação
XIP-Porter: nesse caso configure devidamente o antivírus
3- Verifique se o firewall está a bloquear a porta 5060 ou a aplicação XIP-
Porter: nesse caso configure devidamente o firewall
Durante o funcionamento normal do sistema,
aparece a mensagem “ERRO no Servidor ou
na Rede”
Falta de comunicação com o servidor ETI/SERXip
1- Verifique se o cabo de rede que liga o sistema ao PC está ligado
2- Verifique se existem problemas de ligação à rede
3- Se estiver a programar o sistema (ou só o ETI/SERXip) com o PCS/XIP,
primeiro realize o logout do/s porteiro/s ligado/s
O porteiro apresenta o estado “não disponível”
para alguns dos objetos do sistema
Falta de registo de outros dispositivos ou falta de
receção do estado Xip-Porter
1- Verifique se o bloco a que pertence o objeto não disponível (ETI/XIP)
está corretamente registado (ponto VERDE) na lista dos slaves (página
web do ETI/SERXip) - verifique a ligação e a configuração ETI/XIP do
objeto não disponível
2- Talvez a aplicação XIP-Porter estivesse ligada ao ETI/SERXip durante
uma programação do sistema com PCS/XIP: faça o Logout e volte a
fazer o Login.
Os desvios de chamada não ocorrem (mesmo
das chamadas de pânico), o porteiro toca, mas
se este não atender, as chamadas não são
desviadas
O tempo limite de chamada definido por PCS no
ETI/XIP do utilizador que fez a chamada é inferior
ao tempo limite de toque com desvio do ETI/
SERXip.
1- aumente o tempo limite de chamada no ETI ou diminua o tempo limite
de toque no ETI/SERXip

7

CAME S.p.A.
Via Martiri Della Libertà, 15
31030 Dosson di Casier - Treviso - Italy
tel. (+39) 0422 4940 - fax. (+39) 0422 4941
Quaisquer atualizações do presente documento estão disponíveis no site www.came.com
O fabricante reserva-se o direito de realizar qualquer alteração ao produto a fim de melhorar as suas funções.

Xip Porter i Soft receiver
Instalacja i ustawienia
PL
Polski
FA01379-PL

2
Operacje do wykonania przed uruchomieniem instalacji
Minimalne wymagania systemowe
CPU Pentium 2GHz
Ekran 1024x768
RAM 1GB
Dysk 350MB dostępne
OS Windows XP/VISTA/Win7
Potrzebne urządzenia audio/wideo
Audio Mikrofon + głośnik
Video Kamera (opcjonalnie)
Wymagane oprogramowanie innych producentów
Adobe Flash Player 10
Uwaga: Upewnić się, że ustawienia komputera nie dopuszczą do jego przejścia w tryb „Stand-by”.
Ustawienia „Właściwości - Internet”
W menu „Ustawienia” komputera, zlokalizować i przejść do sekcji „Ustawienia LAN”; otworzy się okno
„Ustawienia sieci lokalnej (LAN)”.
Jeśli opcja korzystania z serwera proxy jest włączona, należy nacisnąć przycisk „Zaawansowane”;
wyświetli się okno „Ustawienia proxy”; w obszarze „Wyjątki” lub „Brak proxy dla” dodać klasę
(podsieć) serwera ET/SER-Xip (np. 192.168.1.*).
Jeśli nie jest włączona opcja korzystania z serwera proxy, nie ma potrzeby wprowadzenia jakichkolwiek
zmian w ustawieniach.

3
2
1
Instalacja i ustawienia oprogramowania
Postępować zgodnie z instrukcjami wyświetlanymi w oknach dialogowych. Zainstalować certyfikaty w folderze „Kompetentne jednostki certyfikujące bazę”.
Na koniec procedury na pulpicie zostaje utworzona ikona skrótu do szybkiego uruchomienia programu A.
Przed uruchomieniem programu należy nacisnąć prawym przyciskiem myszy na ikonę w prawym dolnym rogu na pasku zadań 2 i wybrać „Ustawienia”, aby uzyskać dostęp do okna ustawień aplikacji.

4
3
4
6
7 8
Sieć
W obszarze 3 wpisać adres IP serwera ET/SER Xip (port ustawień domyślnych
to „80”).
Włączając protokół HTTPS 4 aktywuje się szyfrowanie komunikacji między klientem i
serwerem (ustawienie to musi być takie same również w serwerze ETI/SERXip).
Uwaga: funkcja ta jest dostępna tylko dla niektórych typów instalacji; zwykle nie
jest konieczna jej aktywacja.
Urządzenia
Wybrać z list urządzenia audio i wideo, które powinny być użyte przez aplikację.
Dla mikrofonu ważne jest, aby przetestować sygnał wychodzący w panelach
wejściowych systemu. Jeśli będzie on zbyt cichy, może okazać się konieczne
aktywowanie przedwzmacniacza.
Wyłączyć monitor mikrofonu, aby uniknąć irytującego odbijania dźwięku w
głośnikach.
Dźwięki
Wybrać z listy F zdarzenie, któremu przypisze się jeden z dostępnych dźwięków
wyświetlonych po wciśnięciu przycisku G. Nacisnąć przycisk 8, aby usłyszeć
wybrany dźwięk.
Uwaga: Zdarzeniom można przypisać niestandardowe dźwięki
(plik typu wave PCM 16bit Signed LE, 8KHz).

5
J
K
L
M
9
N
Ekran
9 Wybrać preferowany układ obrazów na ekranie w przypadku „obrazu w obrazie”.
J Jeśli portier posiada kamerę internetową, wykonane zdjęcie będzie zawsze
obecne na ekranie, nawet bez toczącej się rozmowy.
K Włącza obecność pola „obraz w obrazie”.
L Okno programu pozostaje cały czas na pierwszym planie, przed jakimkolwiek
innym uruchomionym programem.
M Okno programu rozciąga się do rozmiaru ekranu komputera.
Kodeki
Ustawić maksymalną szybkość transmisji obsługiwaną przez sieć. N.
Kolejne pola wykazują kodeki audio i wideo używane przez system.
Wybrać kodek H264 CIF do systemów z analogowym sygnałem wideo PAL.
Wybrać kodek H264 QVGA do systemów z analogowym sygnałem wideo NTSC.
Opcje połączeń
Pozwala wybrać, ile linii przychodzących jest aktywnych.
Po aktywacji tylko jednej linii przychodzącej, możliwe jest zarządzanie tylko
jednym połączeniem przychodzącym, drugie połączenie przychodzące trafi na
zajętą linię.
W przypadku trwającego połączenia przychodzącego portier może nadal
nawiązywać połączenia.
Uruchomienie aplikacji
Uruchomić aplikację i wpisać Nazwę użytkownika i hasło przydzielone przez
administratora systemu.

6
Rodzaj problemu i możliwa przyczyna Możliwe rozwiązania
Aplikacja XIP-Porter nie uruchamia się
Problem z uprawnieniami wykonawczymi lub
dodatkowymi komponentami oprogramowania
1- Wykonywanie programu Xip-Porter musi przeprowadzać
„Administrator”: użytkownik musi posiadać uprawnienia
administratora lub we Właściwościach pliku XIP-Porter.exe włączyć
opcję „Uruchom ten program jako administrator”
W komputerach z systemem operacyjnym Windows 7 lub nowszym nie
może być aktywna opcja kompatybilności „uruchom program w trybie
kompatybilność z: Windows XP (service pack 3)”.
2- Upewnić się, że program antywirusowy nie blokuje aplikacji XIP-
Porter: w takim przypadku należy odpowiednio skonfigurować
oprogramowanie antywirusowe
3- Sprawdzić poprawność instalacji Adobe FlashPlayer ActiveX,
przynajmniej wersji 10.0.x (patrz Panel sterowania, Dodaj lub usuń
programy - lub Programy i funkcje)
4- Upewnić się, że masz zainstalowany Microsoft.NET Framework i że
jest on w wersji 3.5 lub nowszej (patrz Panel sterowania, Dodaj lub
usuń programy - lub Programy i funkcje)
5- Przy pomocy Task Manager sprawdzić, czy nie jest uruchomiony inny
egzemplarz programu Xip-Porter.exe: w tym przypadku zakończyć
aktywny proces i ponownie uruchomić Xip-Porter
6- Odinstalować i ponownie zainstalować program XIP-Porter
Aplikacja pozostaje na ekranie głównym
wyszukiwania serwera
Brak komunikacji z ETI/SERXip
1- Sprawdzić w ustawieniach programu XIP-Porter, czy adres IP i port
serwera są poprawne; sprawdzić, czy ustawienie HTTPS jest takie
same jak to w ETI/SERXip.
2- Sprawdzić łączność sieciową (ping z komputera na adres IP serwera)
3- Sprawdzić ustawienia sieciowe dla proxy (muszą zezwalać na
transmisję do ETI/SERXip).
• W menu „Ustawienia” komputera, zlokalizować i przejść do sekcji
„Ustawienia LAN”; otworzy się okno „Ustawienia sieci lokalnej (LAN)”.
Jeśli opcja korzystania z serwera proxy jest włączona, należy nacisnąć
przycisk „Zaawansowane”; wyświetli się okno „Ustawienia proxy”; w
obszarze „Wyjątki” lub „Brak proxy dla” dodać klasę (podsieć) serwera
ET/SER-Xip (np. 192.168.1.*).
Jeśli nie jest włączona opcja korzystania z serwera proxy, nie ma
potrzeby wprowadzenia jakichkolwiek zmian w ustawieniach.
• W domyślnej przeglądarce komputera (Chrome, Firefox, Explorer, ...)
otworzyć sekcję „ustawienia”, zlokalizować i przejść do sekcji „Usta-
wienia LAN”; otworzy się okno „Ustawienia sieci lokalnej (LAN)”.
Postępować zgodnie ze wskazówkami w punkcie powyżej.
4- Sprawdzić zbieżność między wersjami fw serwera i aplikacją Xip/
Porter”
Usterki i możliwe rozwiązania
UWAGA: W przypadku błędów z oknem popup ze szczegółami o błędach, rozwinąć szczegóły, skopiować i wysłać do
serwisu technicznego wraz ze szczegółowym opisem zaistniałego problemu.
Rodzaj problemu i możliwa przyczyna Możliwe rozwiązania
Po wpisaniu nazwy użytkownika nie dojdzie do
zalogowania, a następnie pojawi się komunikat
„BŁĄD serwera lub sieci”, a ekran będzie
wskazywał, że logowanie nie powiodło się
Brak nagrania VoIP
1- W komputerze, w którym jest zainstalowany XIP-Porter nie powinny
być uruchomione inne programy wykorzystujące technologię VoIP
SIP (przykłady niektórych najczęściej spotykanych to: Linphone,
CounterPath X-Lite, Cisco Jabber - w szczególności nie może być
zajęty port UDP 5060): w takim przypadku należy zamknąć te aplikacje
i ponownie uruchomić program XIP-Porter, a następnie ponownie
uruchomić zamknięte aplikacji, jeśli to konieczne
2- Upewnić się, że program antywirusowy nie blokuje portu 5060
lub aplikacji XIP-Porter: w takim przypadku należy odpowiednio
skonfigurować oprogramowanie antywirusowe
3- Upewnić się, że firewall nie blokuje portu 5060 lub aplikacji XIP-Porter:
w takim przypadku należy odpowiednio skonfigurować firewall
Podczas normalnej pracy systemu, pojawia się
komunikat „BŁĄD serwera lub sieci”
Brak komunikacji z serwerem ETI/SERXip
1- Sprawdzić, czy nie został odłączony kabel sieciowy łączący system z
komputerem
2- Sprawdzić, czy nie ma problemów z połączeniem sieciowym
3- Jeśli programuje się system (lub tylko ETI/SERXip) przy pomocy PCS/
XIP, należy najpierw wylogować podłączonego/-nych portiera/-ów
Portier będzie wykazywał status „niedostępny”
dla niektórych urządzeń systemu
Brak nagrania z innych urządzeń lub brak
otrzymania stanu Xip-Porter
1- Sprawdzić, czy blok przynależności niedostępnego urządzenia (ETI/XIP)
jest poprawnie zarejestrowany (ZIELONA kropka) na liście urządzeń
slaves (strona internetowa ETI/SERXip) - sprawdzić połączenia i
konfigurację ETI/XIP niedostępnego urządzenia
2- Aplikacja XIP-Porter mogła podłączyć się do ETI/SERXip podczas
programowania systemu przy pomocy PCS/XIP: wylogować i zalogować
się ponownie.
Nie dochodzi do przeniesienia połączenia
(również połączenia alarmu paniki), portier
dzwoni, ale jeśli nie odbierze, połączenia nie
zostaną przeniesione
Limit czasu połączenia ustawionego z PCS w
serwerze ETI/XIP użytkownika, który wykonał
połączenie, jest krótszy niż limit czasu z
przeniesieniem ETI/SERXip.
1- zwiększyć limit czasu połączenia w ETI lub zmniejszyć limit czasu
dzwonka w ETI/SERXip

7

CAME S.p.A.
Via Martiri Della Libertà, 15
31030 Dosson di Casier - Treviso - Italy
tel. (+39) 0422 4940 - fax. (+39) 0422 4941
Wszelkie aktualizacje niniejszego dokumentu dostępne są na stronie internetowej www.came.com
Producent zastrzega sobie prawo do wprowadzania zmian w produkcie w celu poprawy jego funkcjonalności.

Xip Porter & Soft receiver
Установка и настройка
RU
Русский
FA01379-RU

2
Подготовка к установке
Минимальные системные требования
Процессор Pentium 2GHz
Разрешение экрана 1024x768
Оперативная память 1GB
Жесткий диск 350MB
ОСOS Windows XP/VISTA/Win7
Необходимые аудио/видео устройства
Аудио/Audio Микрофон + динамики
Видео/Video Камера (опционально)
Предустановленное стороннее ПО
Adobe Flash Player 10
Примечание: Убедитесь, что на вашем компьютере выключен переход в спящий режим.
Настройки Интернета
В меню “Настройки” ПК определите и выберите вкладку “Настройка LAN”; в результате появится
окно “Настройка локальной сети (LAN)”.
В случае использования прокси-сервера, нажмите клавишу “Дополнительно”; в появившемся
окне “Параметры прокси-сервера”; в поле “Исключения” или “Без прокси-сервера” введите
адрес сервера ET/SER-Xip (напр. 192.168.1.*).
Если прокси-сервер не используется, оставьте настройки без изменений.

3
2
1
Установка и настройка ПО
Запустите установку программы; следуйте инструкциям, появляющимся в диалоговом окне; установите предложенные сертификаты в “Хранилище доверенных корневых сертификатов”
(автоматические настройки).
После завершения установки запустите программу удобным способом (например, через иконку на рабочем столе A.
Перед загрузкой программы нажмите правой кнопкой мыши на иконке в нижней правой стороне панели приложений 2 и выберите “Setup” для доступа к настройкам.

4
3
4
6
7 8
Соединение
Область 3 предназначена для введения IP адреса ETI/SER Xip (порт по-
умолчанию “80”).
Активация HTTPS 4 обеспечивает дополнительную кодировку при связи
между клиентом и сервером (данная настройка должна быть одинаковой
также на блоках ETI/SERXip).
Внимание: данная функция доступна только для некоторых видов системы;
как правило, в ее активации нет необходимости.
Устройства
Выберите из списка источники аудио и видео, которые будут использованы
программой.
При настройке микрофона убедитесь, что уровень громкости на выходе
является достаточным для работы с вызывными панелями. В противном
случае, необходимо использовать усиление микрофона.
Отключите микрофон на мониторе, чтобы избежать шума из динамиков.
Звуки
Выберите из списка F событие, звук которого вы хотели бы изменить, и
нажмите G для выбора доступных сигналов; чтобы прослушать результат
нажмите 8.
Примечание: вы можете использовать свои собственные звуки
(формат wave PCM 16bit Signed LE, 8KHz).

5
J
K
L
M
9
N
Экран
9 Выберите желаемое положение изображений на экране в режиме
«картинка в картинке».
J Возможность постоянно получать на экране изображение от камеры,
подключенной к пульту консьержа (даже без активных линий связи).
K Активирует режим «картинка в картинке».
L Окно ПО остается всегда на первом плане перед любой другой
выполняемой программой.
M Окно программы расширяется до размера экрана ПК.
Кодеки
Установите максимальный битрейт, поддерживаемый в сети N.
В данной вкладке указаны видео и аудио кодеки, используемые сетью.
Кодек H264 CIF используется в системах с аналоговым видео сигналом PAL.
Кодек H264 QVGA используется в системах с аналоговым видео сигналом
NTSC.
Опции вызова
Позволяет выбрать активные линии на входе.
При подключении только одной линии на входе, можно управлять только
одним вызовом на входе, при втором входящем вызове линия будет занята.
При входящем вызове с места консьержа, в любом случае, можно сделать
вызов.
Запуск приложения
Запустите приложение и введите имя пользователя и пароль, присвоенные
администратором сети.

6
Суть проблемы и причина Возможные решения
Приложение XIP-Porter не запускается
Проблемы со сторонними приложениями,
совместимостью или правами доступа
1- Для работы с ПО Xip-Porter необходимы права уровня
“Администратор”: смените права пользователя или в свойствах
файла Xip-Porter.exe активируйте опцию “Выполнять эту
программу от имени администратора”.
В ПК с ОС Windows 7 и последующих версиях не активируйте
режим совместимости “Запустить программу в режиме
совместимости с: Windows XP (пакет обновления 3)”.
2- Убедитесь, что антивирусное ПО не блокирует приложение XIP-
Porter: в противном случае, настройте антивирус
3- Убедитесь, что Adobe FlashPlayer ActiveX версии не ниже 10.0.x
установлен корректно (см. Панель управления, Установка
приложений или программ и функции)
4- Убедитесь, что Microsoft .NET Framework версии не ниже 3.5
установлен корректно (см. Панель управления, Установка
приложений или программ и функции)
5- С помощью Диспетчера задач, убедитесь, что файл Xip-Porter.
exe не был запущен ранее: в противном случае, завершите
процесс Xip-Porter и запустите его заново.
6- Переустановите приложение XIP-Porter.
Приложение слишком долго ищет сервер
Нет связи с ETI/SERXip
1- Проверьте настройки приложения XIP-Porter и убедитесь, что IP
адрес и порт сервера прописаны правильно; настройка HTTPS
должна быть той же, что и в ETI/SERXip.
2- Проверьте подключение по сети (проверьте пинг с компьютера на
IP адрес сервера)
3- Проверьте настройки прокси (они должны обеспечивать передачу
данных на ETI/SERXip).
• В меню “Настройки” ПК определите и получите доступ к вкладке
“Настройка LAN”; отображается окно “Настройка параметров
локальной сети (LAN)”.
В случае использования прокси-сервера, нажмите клавишу “До-
полнительно”; в появившемся окне “Параметры прокси-сер-
вера”; в поле “Исключения” или “Без прокси-сервера” введите
адрес сервера ET/SER-Xip (напр. 192.168.1.*).
Если прокси-сервер не используется, оставьте настройки без
изменений.
• В заданном браузере ПК (Chrome, Firefox, Explorer, ...) откройте
вкладку “Настройки”, определите и получите доступ к вкладке
“Настройка LAN”; отображается окно “Настройка параметров
локальной сети (LAN)”. Следуйте указаниям верхнего параграфа.
4- Проверьте совместимость версии ПО XIP-Porter и прошивки
сервера
Неисправности и возможные решения
ПРИМЕЧАНИЕ: Если при ошибке появляется информация о деталях, скопируйте сообщение и направьте его в
сервисный центр вместе с описанием ситуации, в которой возникла данная ошибка.
Суть проблемы и причина Возможные решения
После ввода имени пользователя и
пароля появляется сообщение “ОШИБКА
сервера или сети” или не пропадает окно
регистрации
Ошибка регистрации в VoIP
1- На ПК, на котором установлен XIP-Porter, выключите другие
приложения, использующие технологию VoIP SIP (такие как:
Linphone, CounterPath X-Lite, Cisco Jabber - в частности, не должен
быть занят порт UDP 5060): в данном случае закрыть приложения
и перезапустить программу XIP-Porter и закрытые приложения, в
случае необходимости
2- Убедитесь, что антивирусное ПО не блокирует порт 5060 или
приложение XIP-Porter: в противном случае, настройте антивирус
3- Убедитесь что брандмауэр (фаервол) не блокирует порт 5060 или
приложение XIP-Porter: в противном случае, настройте брандмауэр
В процессе работы появляется сообщение
“ОШИБКА сервера или сети”
Нет связи и сервером ETI/SERXip
1- Проверьте подключен ли кабель локальной сети к компьютеру
2- Убедитесь, что сеть исправно функционирует
3- При перепрограммировании системы (или только ETI/SERXip) при
помощи PCS/XIP, убедитесь, что все пользователи отключены
Консьерж видит статус “Недоступен” для
некоторых компонентов системы
Нет связи с устройствами или связи с ПО Xip-
Porter не настроены.
1- Убедитесь, что блок (ETI/XIP), отвечающий за недоступные
компоненты, работает в сети корректно и отображен ЗЕЛЕНЫМ
индикатором на странице сервера в меню slaves (веб-страница
ETI/SERXip); - в настройках ETI/XIP проверьте свойства недоступных
компонентов
2- ПО XIP-Porter могло быть подключено к серверу ETI/SERXip в
процессе программирования системы через PCS/XIP: выйдите из
программы и войдите снова.
Не переадресуются вызовы (даже
экстренные); при отсутствии ответа
от абонента или консьержа вызов не
переадресуется.
Время вызова в ПО PCS/XIP меньше времени
после которого срабатывает переадресация
на сервере ETI/SERXip.
1- Увеличьте время вызова в блоках ETI или уменьшите время после
которого срабатывает переадресация на сервере ETI/SERXip

7

CAME S.p.A.
Via Martiri Della Libertà, 15
31030 Dosson di Casier - Treviso - Italy
tel. (+39) 0422 4940 - fax. (+39) 0422 4941
Eventuali aggiornamenti del presente documento sono disponibili sul sito www.came.com
Any updates made to this document can be found on our website www.came.com
Toute mise à jour du document présent sera disponible sur le site www.came.com
Ggf. aktualisierte Versionen der vorliegenden Anleitungen finden Sie auf der Website www.came.com
Las actualizaciones de este documento están disponibles en el sitio web www.came.com
Eventuele bijgewerkte versies van dit document zijn beschikbaar op de site www.came.com
Quaisquer atualizações do presente documento estão disponíveis no site www.came.com
Wszelkie aktualizacje niniejszego dokumentu dostępne są na stronie internetowej www.came.com
Возможные обновления настоящего документа представлены на сайте www.came.com
Il produttore si riserva il diritto di apportare qualsiasi modifica al prodotto al fine di migliorarne le funzionalità.
The manufacturer reserves the right to make changes to improve the product and its functions.
Le fabricant se réserve le droit d’apporter des modifications au produit afin d’en améliorer les fonctionnalités.
Der Hersteller behält sich das Recht vor, Änderungen am Produkt vorzunehmen, um dessen Funktionen zu verbessern.
El fabricante se reserva el derecho de realizar cualquier modificación en el producto para mejorar su funcionalidad.
De producent behoudt zich het recht om wijzigingen aan te brengen aan het product om de werking ervan te verbeteren.
O fabricante reserva-se o direito de realizar qualquer alteração ao produto a fim de melhorar as suas funções.
Producent zastrzega sobie prawo do wprowadzania zmian w produkcie w celu poprawy jego funkcjonalności.
Изготовитель сохраняет за собой право на внесение любых изменений в продукцию в целях улучшения функциональности.
-
 1
1
-
 2
2
-
 3
3
-
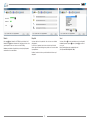 4
4
-
 5
5
-
 6
6
-
 7
7
-
 8
8
-
 9
9
-
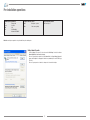 10
10
-
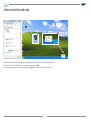 11
11
-
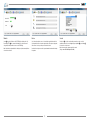 12
12
-
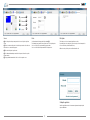 13
13
-
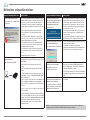 14
14
-
 15
15
-
 16
16
-
 17
17
-
 18
18
-
 19
19
-
 20
20
-
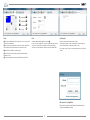 21
21
-
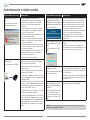 22
22
-
 23
23
-
 24
24
-
 25
25
-
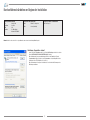 26
26
-
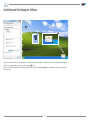 27
27
-
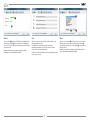 28
28
-
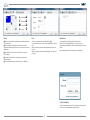 29
29
-
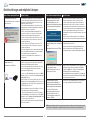 30
30
-
 31
31
-
 32
32
-
 33
33
-
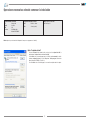 34
34
-
 35
35
-
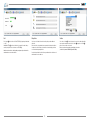 36
36
-
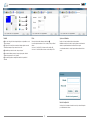 37
37
-
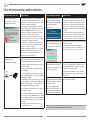 38
38
-
 39
39
-
 40
40
-
 41
41
-
 42
42
-
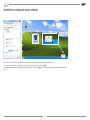 43
43
-
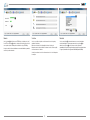 44
44
-
 45
45
-
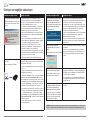 46
46
-
 47
47
-
 48
48
-
 49
49
-
 50
50
-
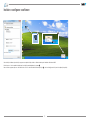 51
51
-
 52
52
-
 53
53
-
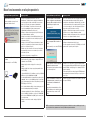 54
54
-
 55
55
-
 56
56
-
 57
57
-
 58
58
-
 59
59
-
 60
60
-
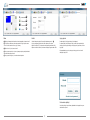 61
61
-
 62
62
-
 63
63
-
 64
64
-
 65
65
-
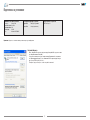 66
66
-
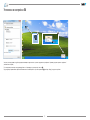 67
67
-
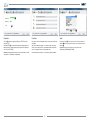 68
68
-
 69
69
-
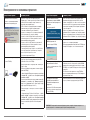 70
70
-
 71
71
-
 72
72


in andere talen
- italiano: CAME XIP/PORTER Guida d'installazione
- français: CAME XIP/PORTER Guide d'installation
- español: CAME XIP/PORTER Guía de instalación
- Deutsch: CAME XIP/PORTER Installationsanleitung
- português: CAME XIP/PORTER Guia de instalação
- polski: CAME XIP/PORTER Instrukcja instalacji
Gerelateerde papieren
-
CAME XIP/PORTER Installatie gids
-
-
-
-
-
-
-
-
-
CAME XTNC20MF1 Installatie gids
Andere documenten
-
Epson WORKFORCE PRO WF-M5190DW de handleiding
-
Epson WorkForce Pro WF-M5690DWF de handleiding
-
Yamaha Portatone PSR-18 Handleiding
-
iRiver Clix gen2 Handleiding
-
REX RD280/2PR Handleiding
-
Kenwood JKP220 de handleiding
-
SINGER Promise 1408 de handleiding
-
Samsung SGH-i320 Handleiding
-
Samsung SGH-i620 Handleiding