
IAN 327743_2001
LED-DECKENLEUCHTE MIT BLUETOOTH®-LAUTSPRECHER /
LED CEILING LIGHT WITH BLUETOOTH® SPEAKER /
PLAFONNIER À LED AVEC HAUT-PARLEUR BLUETOOTH®
LED-DECKENLEUCHTE MIT
BLUETOOTH®-LAUTSPRECHER
Montage-, Bedienungs- und Sicherheitshinweise
LED CEILING LIGHT WITH
BLUETOOTH® SPEAKER
Assembly, operating and safety instructions
PLAFONNIER À LED AVEC HAUT-
PARLEUR BLUETOOTH®
Instructions de montage, d‘utilisation et consignes de sécurité
LED-PLAFONDLAMP MET
BLUETOOTH®-LUIDSPREKER
Montage-, bedienings- en veiligheidsinstructies
LED STROPNÉ SVIETIDLO S BLUETOOTH®
REPRODUKTOROM
Pokyny pre montáž, obsluhu a bezpečnostné pokyny
STROPNÍ LED SVÍTIDLO S BLUETOOTH®
REPRODUKTOREM
Pokyny k montáži, obsluze a bezpečnostní pokyny
LAMPA SUFITOWA LED Z GŁOŚNIKIEM
BLUETOOTH®
Wskazówki montażu, obsługi i bezpieczeństwa

DE / AT / CH Montage-, Bedienungs- und Sicherheitshinweise Seite 5
GB / IE Assembly, operating and safety instructions Page 15
FR / BE Instructions de montage, d‘utilisation et consignes de sécurité Page 25
NL / BE Montage-, bedienings- en veiligheidsinstructies Pagina 35
PL Wskazówki montażu, obsługi i bezpieczeństwa Strona 45
CZ Pokyny k montáži, obsluze a bezpečnostní pokyny Strana 55
SK Pokyny pre montáž, obsluhu a bezpečnostné pokyny Strana 65
Klappen Sie vor dem Lesen die Seite mit den Abbildungen aus und machen Sie sich anschließend mit allen
Funktionen des Gerätes vertraut.
Before reading, unfold the page containing the illustrations and familiarise yourself with all functions of the
device.
Avant de lire le mode d‘emploi, ouvrez la page contenant les illustrations et familiarisez-vous ensuite avec
toutes les fonctions de l‘appareil.
Vouw vóór het lezen de pagina met de afbeeldingen open en maak u vertrouwd met alle functies van het
apparaat.
Przed przeczytaniem proszę rozłożyć stronę z ilustracjami, a następnie proszę zapoznać się z wszystkimi
funkcjami urządzenia.
Před čtením si otevřete stranu s obrázky a potom se seznamte se všemi funkcemi přístroje.
Pred čítaním si odklopte stranu s obrázkami a potom sa oboznámte so všetkými funkciami prístroja.

L
N
3M3M
3M
M3M
3M
3M
3M
3M
3
14148106L
9
1
2
6
7
10 11
15
13
14
12
16
21
171819
20
4
5
8
9
22
23 24


5 DE/AT/CH
Inhaltsverzeichnis
Legende der verwendeten Piktogramme ...........................................................Seite 6
Einleitung ......................................................................................................................................... Seite 6
Bestimmungsgemäße Verwendung ....................................................................................................Seite 7
Lieferumfang ........................................................................................................................................ Seite 7
Teilbeschreibung .................................................................................................................................Seite 7
Technische Daten ................................................................................................................................Seite 7
Sicherheit ......................................................................................................................................... Seite 8
Sicherheitshinweise .............................................................................................................................Seite 8
Sicherheitshinweise für Batterien / Akkus ........................................................................................... Seite 9
Vorbereitung ................................................................................................................................Seite 9
Benötigtes Werkzeug und Material ...................................................................................................Seite 9
Vor der Installation .................................................................................................................Seite 9
Inbetriebnahme ......................................................................................................................... Seite 10
Leuchte montieren ...............................................................................................................................Seite 10
Wandhalterung montieren .................................................................................................................Seite 10
Batterien einlegen / wechseln .............................................................................................................Seite 10
Leuchte über den Lichtschalter bedienen ........................................................................................... Seite 11
Fernbedienung verwenden .................................................................................................................Seite 11
Licht ein- / ausschalten .........................................................................................................................Seite 11
Licht dimmen ........................................................................................................................................ Seite 11
30-Minuten-Timer ................................................................................................................................Seite 11
Bluetooth-Verbindung .........................................................................................................................Seite 11
Musiklautstärke regeln ........................................................................................................................Seite 12
Musiktitel anwählen ............................................................................................................................Seite 12
Wartung und Reinigung .....................................................................................................Seite 12
Entsorgung .....................................................................................................................................Seite 12
Garantie und Service ............................................................................................................Seite 13
Garantieerklärung ...............................................................................................................................Seite 13
Serviceadresse ....................................................................................................................................Seite 13
Konformitätserklärung .........................................................................................................................Seite 13
Hersteller ..............................................................................................................................................Seite 13

6 DE/AT/CH
Legende der verwendeten Piktogramme
Bedienungsanleitung lesen! Warn- und Sicherheitshinweise
beachten!
Volt (Wechselspannung) Vorsicht! Stromschlaggefahr!
Hertz (Frequenz) So verhalten Sie sich richtig
Watt (Wirkleistung)
b
aEntsorgen Sie Verpackung
und Gerät umweltgerecht!
Schutzleiter Entsorgen Sie Batterien umweltgerecht!
ON OFF Schaltzyklen Diese Leuchte ist nicht geeignet für
externe Dimmer und elektronische
Schalter.
LED-Lebensdauer Lebens- und Unfallgefahr für
Kleinkinder und Kinder!
Diese Leuchte ist ausschließlich für den
Betrieb im Innenbereich, in trockenen
und geschlossenen Räumen geeignet.
Die Verpackung besteht aus 100 %
recyceltem Papier.
Vorsicht! Verbrennungsgefahr durch
heiße Oberflächen! Explosionsgefahr!
Schutzhandschuhe tragen! Nur für den Innenbereich
Timerfunktion (30 Min.)
LED-Deckenleuchte mit
Bluetooth®-Lautsprecher
Einleitung
Wir beglückwünschen Sie zum Kauf Ihres
neuen Gerätes. Sie haben sich damit für
ein hochwertiges Produkt entschieden.
Bitte lesen Sie diese Bedienungsanleitung vollständig
und sorgfältig durch. Klappen Sie die Seite mit den
Abbildungen aus. Diese Anleitung gehört zu diesem
Produkt und enthält wichtige Hinweise zur Inbetrieb-
nahme und Handhabung. Beachten Sie immer alle
Sicherheitshinweise. Prüfen Sie vor der Inbetriebnahme,
ob die korrekte Spannung vorhanden ist und ob alle
Teile richtig montiert sind. Sollten Sie Fragen haben
oder unsicher in Bezug auf die Handhabung des
Gerätes sein, setzen Sie sich bitte mit Ihrem Händler
oder der Servicestelle in Verbindung. Bewahren Sie
diese Anleitung bitte sorgfältig auf und geben Sie
sie ggf. an Dritte weiter.
Einleitung Einleitung

7 DE/AT/CH
Bestimmungsgemäße
Verwendung
Diese Leuchte ist ausschließlich für den
Betrieb im Innenbereich, in trockenen
und geschlossenen Räumen geeignet.
Dieses Gerät ist nur für den Einsatz in privaten
Haushalten vorgesehen. Dieses Produkt ist vorgesehen
für den normalen Betrieb.
Lieferumfang
Kontrollieren Sie unmittelbar nach dem Auspacken
immer den Lieferumfang auf Vollständigkeit sowie
den einwandfreien Zustand des Gerätes.
1 LED-Deckenleuchte mit Bluetooth-Lautsprecher,
Modell 14148106L
1 Fernbedienung
1 Wandhalterung für die Fernbedienung
(inkl. 1 x Klebepad, 2 x Schrauben)
2 Batterien AAA
3 Dübel
3 Schrauben
2 Schutzschläuche
1 Montage- und Bedienungsanleitung
Teilbeschreibung
Leuchte:
1 Dübel
2 Leuchten-Basis
3 Lüsterklemme
4 Netzanschlusskabel (extern)
5 Schutzschlauch
6 Schrauben
7 Kunststoffabdeckung
8 Lautsprecherabdeckung
9 Fernbedienung
Fernbedienung:
10 Taste ON (Lighting)
11 Taste OFF (Lighting)
12 Taste Dimmer +
13 Taste Dimmer –
14 Taste 30-Minuten-Timer
15 Taste OFF (Audio)
16 Taste Lautstärke +
17 Taste Musiktitel anwählen (vor)
18 Taste Pause / Bluetooth-Verbindung Standby
19 Taste Musiktitel anwählen (zurück)
20 Taste Lautstärke –
21 Taste ON (Audio)
22 Wandhalterung (Fernbedienung)
23 Schrauben (Fernbedienung)
24 Klebepad (Fernbedienung)
Technische Daten
Leuchte:
Modellnummer: 14148106L
Betriebsspannung: 230 ‒ 240 V ~, 50 Hz
Nennleistung gesamt: max. 25 W (LED 20 W,
Lautsprecher 5 W)
Schutzklasse: | /
Schutzart: IP20
LED:
Leuchtmittel: LED-Modul
Nennleistung: LED, max. 17,5 W
Schutzart: IP20
Lautsprecher / Bluetooth:
Frequenzbereich
Lautsprecher: 120 ‒ 20000 Hz
Bluetooth-Version: 5.0
Reichweite Bluetooth: < 10 m
Frequenzbereich
Bluetooth-Frequenz: 2,4 GHz ISM Frequenz-
band
HF-Leistung: max. +2dBm
Fernbedienung:
Batterien: 2 x 1,5 V AAA
Reichweite
Fernbedienung: 5‒6 m (Infrarot)
Einleitung Einleitung

8 DE/AT/CH
Sicherheit / Vorbereitung / Vor der InstallationSicherheit
Sicherheit
Sicherheitshinweise
Bei Schäden, die durch Nichtbeachtung dieser
Bedienungsanleitung verursacht werden, erlischt
der Garantieanspruch! Für Folgeschäden wird
keine Haftung übernommen! Bei Sach- oder Perso-
nenschäden, die durch unsachgemäße Handhabung
oder Nichtbeachtung der Sicherheitshinweise verur-
sacht werden, wird keine Haftung übernommen!
LEBENS-
UND UNFALLGEFAHR FÜR
KLEINKINDER UND KINDER!
Lassen Sie Kinder niemals unbeaufsichtigt mit
dem Verpackungsmaterial. Es besteht Erstickungs-
gefahr durch Verpackungsmaterial. Kinder unter-
schätzen häufig die Gefahren.
Lassen Sie die Leuchte oder Verpackungsmaterial
nicht achtlos liegen. Plastikfolien / -tüten, Kunst-
stoffteile etc. könnten für Kinder zu einem ge-
fährlichen Spielzeug werden.
Vermeiden Sie Lebensgefahr
durch elektrischen Schlag
Lassen Sie die Elektroinstallation durch einen
ausgebildeten Elektriker oder eine für Elektroin-
stallationen eingewiesene Person durchführen.
Überprüfen Sie vor jedem Netzanschluss die
Leuchte und das Netzanschlusskabel auf etwaige
Beschädigungen. Benutzen Sie Ihre Leuchte nie-
mals, wenn Sie irgendwelche Beschädigungen
feststellen.
Beschädigte Netzkabel bedeuten Lebensgefahr
durch elektrischen Schlag. Wenden Sie sich bei
Beschädigungen, Reparaturen oder anderen
Problemen an der Leuchte an die Servicestelle
oder eine Elektrofachkraft.
Entfernen Sie vor der Montage die Sicherung
oder schalten Sie den Leitungsschutzschalter
im Sicherungskasten aus (0-Stellung).
Vergewissern Sie sich vor der Montage, dass die
vorhandene Netzspannung mit der benötigten
Betriebsspannung der Leuchte übereinstimmt
(siehe „Technische Daten“).
Vermeiden Sie unbedingt die Berührung der
Leuchte mit Wasser oder anderen Flüssigkeiten.
Öffnen Sie niemals eines der elektrischen Be-
triebsmittel oder stecken irgendwelche Gegen-
stände in dieselben. Derartige Eingriffe bedeuten
Lebensgefahr durch elektrischen Schlag.
Die Leuchte nicht auf feuchtem oder leitendem
Untergrund installieren!
Vermeiden Sie Brand- und
Verletzungsgefahr
Überprüfen Sie die Leuchte unmittelbar nach
dem Auspacken auf Beschädigungen. Setzen
Sie sich im Falle einer Beschädigung mit der
Servicestelle in Verbindung.
VORSICHT! VERBRENNUNGS-
GEFAHR DURCH HEISSE
OBERFLÄCHEN!
Stellen Sie sicher, dass die Leuchte ausgeschal-
tet und abgekühlt ist, bevor Sie diese berühren,
um Verbrennungen zu vermeiden. Leuchtmittel
entwickeln im Bereich des Lampenkopfes eine
starke Hitze.
Die Lichtquelle dieser Leuchte darf nur vom
Hersteller oder von einem von ihm beauftragten
Techniker oder einer vergleichbar qualifizierten
Person ersetzt werden.
Diese Leuchte kann per Fernbedienung gedimmt
werden.
Nicht direkt in die Lichtquelle (Leuchtmittel, LED
etc.) hineinschauen.
Nicht mit optischen Instrumenten in die Licht-
quelle schauen (z. B. Lupe).
So verhalten Sie sich richtig
Montieren Sie die Leuchte so, dass sie vor Feuch-
tigkeit und Verschmutzung geschützt ist.
Bereiten Sie die Montage sorgfältig vor und
nehmen Sie sich ausreichend Zeit. Legen Sie
alle Einzelteile und zusätzlich benötigtes Werk-
zeug oder Material vorher übersichtlich und
griffbereit zurecht.

9 DE/AT/CH
Sicherheit / Vorbereitung / Vor der InstallationSicherheit
Seien Sie stets aufmerksam! Achten Sie immer
darauf was Sie tun und gehen Sie stets mit Ver-
nunft vor. Montieren Sie die Leuchte in keinem
Fall, wenn Sie unkonzentriert sind oder sich un-
wohl fühlen.
Sicherheitshinweise für
Batterien / Akkus
LEBENSGEFAHR!
Halten Sie Batterien / Akkus außer Reichweite
von Kindern. Suchen Sie im Falle eines Ver-
schluckens sofort einen Arzt auf!
EXPLOSIONSGEFAHR!
Laden Sie nicht aufladbare Batterien niemals
wieder auf. Schließen Sie Batterien / Akkus
nicht kurz und / oder öffnen Sie diese nicht.
Überhitzung, Brandgefahr oder Platzen können
die Folge sein.
Werfen Sie Batterien / Akkus niemals in Feuer
oder Wasser.
Setzen Sie Batterien / Akkus keiner mechanischen
Belastung aus.
Risiko des Auslaufens von Batterien /
Akkus
Vermeiden Sie extreme Bedingungen und
Temperaturen, die auf Batterien / Akkus ein-
wirken können, z. B. auf Heizkörpern / direkte
Sonneneinstrahlung.
Wenn Batterien / Akkus ausgelaufen sind, ver-
meiden Sie den Kontakt von Haut, Augen und
Schleimhäuten mit den Chemikalien! Spülen
Sie die betroffenen Stellen sofort mit klarem
Wasser und suchen Sie einen Arzt auf!
SCHUTZHANDSCHUHE
TRAGEN!
Ausgelaufene oder beschädigte Batterien /
Akkus können bei Berührung mit der Haut Ver-
ätzungen verursachen. Tragen Sie deshalb in
diesem Fall geeignete Schutzhandschuhe.
Im Falle eines Auslaufens der Batterien / Akkus
entfernen Sie diese sofort aus dem Produkt, um
Beschädigungen zu vermeiden.
Verwenden Sie nur Batterien / Akkus des gleichen
Typs. Mischen Sie nicht alte Batterien / Akkus
mit neuen!
Entfernen Sie die Batterien / Akkus, wenn das
Produkt längere Zeit nicht verwendet wird.
Risiko der Beschädigung des Produkts
Verwenden Sie ausschließlich den angegebenen
Batterietyp / Akkutyp!
Setzen Sie Batterien / Akkus gemäß der Polari-
tätskennzeichnung (+) und (-) an Batterie / Akku
und des Produkts ein.
Reinigen Sie Kontakte an Batterie / Akku und
im Batteriefach vor dem Einlegen!
Entfernen Sie erschöpfte Batterien / Akkus um-
gehend aus dem Produkt.
Vorbereitung
Benötigtes Werkzeug
und Material
Die genannten Werkzeuge und Materialien sind
nicht im Lieferumfang enthalten. Es handelt sich
hierbei um unverbindliche Angaben und Werte zur
Orientierung. Die Beschaffenheit des Materials
richtet sich nach den individuellen Gegebenheiten
vor Ort.
– Bleistift / Markierwerkzeug
– 2-poliger Spannungsprüfer
– Schraubendreher
– Bohrmaschine
– Bohrer (ca. ø 6 mm)
– Hammer
– Seitenschneider
– Leiter
Vor der Installation
Wichtig: Der elektrische Anschluss muss durch
einen ausgebildeten Elektriker oder eine für Elektro-

10 DE/AT/CH
Inbetriebnahme
installation eingewiesene Person erfolgen. Diese
muss Kenntnis über die Eigenschaften der Leuchte
und Anschlussbestimmung haben.
Machen Sie sich vor der Installation mit allen
Anweisungen und Abbildungen in dieser Anlei-
tung sowie mit der Leuchte selbst vertraut.
Stellen Sie vor der Installation sicher, dass an
der Leitung, an der die Leuchte angeschlossen
werden soll, keine Spannung vorliegt. Entfernen
Sie hierfür die Sicherung oder schalten Sie den
Leitungsschutzschalter im Sicherungskasten aus
(0-Stellung).
Überprüfen Sie die Spannungsfreiheit mittels
2-poligem Spannungsprüfer.
Packen Sie die LED-Deckenleuchte aus und
legen Sie sie auf eine rutschfeste Unterlage.
(Seien Sie vorsichtig, dass hierbei keine Kratzer
entstehen).
Üben Sie mit beiden Händen leichten Druck
auf die Kunststoffabdeckung 7 aus. Drehen
Sie die Kunststoffabdeckung 7 dabei bis zum
Anschlag gegen den Uhrzeigersinn (entgegen
der Pfeilrichtung) und nehmen Sie die Kunst-
stoffabdeckung 7 nach oben ab.
Inbetriebnahme
Leuchte montieren
Stellen Sie vor der Installation sicher, dass an
der Leitung, an der die Leuchte angeschlossen
werden soll, keine Spannung vorliegt. Entfernen
Sie hierfür die Sicherung oder schalten Sie den
Leitungsschutzschalter im Sicherungskasten aus
(0-Stellung).
Halten Sie die Leuchten-Basis 2 an die ge-
wünschte Montageposition. Beachten Sie
hierbei die Bohrung in der Leuchten-Basis 2,
durch welche das Netzanschlusskabel einge-
führt wird.
Markieren Sie drei Bohrlöcher für die Schrau-
ben 6 (siehe Abb.).
Bohren Sie die Löcher. Stellen Sie sicher, dass
Sie das Netzanschlusskabel (extern) 4 nicht
beschädigen.
Stecken Sie die Dübel 1 in die Bohrlöcher.
Nehmen Sie falls notwendig einen Hammer
zur Hilfe.
Führen Sie das Netzanschlusskabel durch die
dafür vorgesehene Bohrung in der Leuchten-
Basis 2 und befestigen Sie die Leuchte an der
Decke.
Die isolierte Grundverdrahtung muss vor dem
Anschluss der Leuchte mit einer zusätzlichen
Isolierung vorbereitet werden.
Ziehen Sie die beigefügten Schutzschläuche 5
über das Netzanschlusskabel (extern) 4.
Hinweis: Achten Sie darauf, dass Sie die ein-
zelnen Leiter des Netzanschlusskabels (extern)
4 jeweils richtig anschließen: stromführender
Leiter, schwarz oder braun = Symbol L,
Neutralleiter, blau = Symbol N, Schutzleiter,
grün-gelb = Symbol .
Montieren Sie die Kunststoffabdeckung 7 der
Leuchte. Setzen Sie hierzu die Abdeckung mit
den drei Kerben an den entsprechenden
Haltebolzen an und drücken diese nach oben.
Drehen Sie die Abdeckung im Uhrzeigersinn
rechts (Pfeilrichtung), um diese zu befestigen.
Der Aufkleber mit dem Pfeil kann nun entfernt
werden.
Setzen Sie die Sicherung wieder ein oder
schalten Sie den Leitungsschutzschalter am
Sicherungskasten ein (I-Stellung).
Ihre LED-Deckenleuchte mit Bluetooth-Lautsprecher
ist betriebsbereit.
Wandhalterung montieren
Montieren Sie die Wandhalterung 22 für die
Fernbedienung 9 mithilfe der Schrauben 23
oder des Klebepads 24 (siehe Abb.).
Batterien einlegen / wechseln
Hinweis: Für die Fernbedienung 9 sind zwei
Batterien vom Typ AAA zu verwenden (im Liefer-
umfang enthalten).
Vor der Installation / Inbetriebnahme

11 DE/AT/CH
Inbetriebnahme
Schieben Sie die Abdeckung des Batteriefaches
(Rückseite) zum Öffnen ca. 1 cm nach unten
und heben den Deckel ab.
Legen Sie zwei Batterien vom mitgelieferten
Typ AAA in das Batteriefach. Achten Sie dabei
auf die richtige Polarität.
Setzen Sie die Abdeckung wieder auf und
schieben Sie diese zurück, um das Batteriefach
zu schließen.
Ihre Fernbedienung 9 ist betriebsbereit.
Leuchte über den
Lichtschalter bedienen
Die LED-Deckenleuchte kann über den Wand-
lichtschalter ein- und ausgeschaltet werden.
Die Lichtintensität entspricht hierbei immer der
zuletzt eingestellten Helligkeit. Alle anderen
Funktionen werden ausschließlich über die
Fernbedienung 9 gesteuert.
Fernbedienung verwenden
ACHTUNG!
Alle Funktionen der Fernbedienung 9 sind nur ge-
geben, wenn die LED-Deckenleuchte mit dem
Wandlichtschalter eingeschaltet wurde.
Licht ein- / ausschalten
1. Licht einschalten
Drücken Sie die „ “ Taste (Lighting) 10 ,
um die LED-Deckenleuchte einzuschalten.
2. Licht ausschalten
Drücken Sie die „ “ Taste (Lighting) 11 ,
um die LED-Deckenleuchte auszuschalten.
Licht dimmen
1. Beleuchtungsstärke erhöhen
Drücken Sie die „ “ Taste Dimmer + 12 , um
die Beleuchtungsstärke zu erhöhen. Bei
kurzzeitigem Drücken dieser Taste erhöht sich
die Beleuchtungsstärke stufenweise je Druckvor-
gang.
Wird die „ “ Taste Dimmer +
12
lange
gedrückt
, erhöht sich die Beleuchtungsstärke au-
tomatisch bis zur maximalen Helligkeit.
2. Beleuchtungsstärke verringern
Drücken Sie die „ “ Taste Dimmer – 13 , um
die Beleuchtungsstärke zu verringern. Bei kurz-
zeitigem Drücken verringert sich die Beleuch-
tungsstärke stufenweise je Druckvorgang. Wird
die „ “ Taste Dimmer – 13 lange gedrückt,
verringert sich die Beleuchtungsstärke automa-
tisch bis zur minimalen Helligkeit.
30-Minuten-Timer
1. Timer einschalten
Drücken Sie die „ “ Taste 14 für ca. 3 Sekun-
den, um die Timer-Funktion einzuschalten.
Das Licht und auch die Bluetooth-Funktion (Musik)
werden automatisch nach ca. 30 Minuten aus-
geschaltet.
2. Timer ausschalten
Möchten Sie die Timer-Funktion während der
30 Minuten ausschalten, drücken Sie die „ “
Taste 14 erneut für länger als 3 Sekunden.
Die Timer-Funktion ist jetzt abgeschaltet.
Hinweis: Sie können den Timer nur ausschalten,
wenn Bluetooth aktiviert ist.
Bluetooth-Verbindung
1. Bluetooth-Verbindung herstellen
Drücken Sie die Audio „ “ Taste (Audio) 21 .
Das Empfangssignal wird mit einem Piep-Ton
bestätigt.
Ca. 1–2 Sekunden später wird die Bluetooth-
Verbindung akustisch untermalt automatisch
aufgebaut, die blaue LED innerhalb der LED-
Deckenleuchte beginnt schnell zu blinken.
Ist die Verbindung hergestellt, ertönt eine kurze
Melodie.
Vor der Installation / Inbetriebnahme

12 DE/AT/CH
Inbetriebnahme / Wartung und Reinigung / Entsorgung
Bei einer ersten Verbindung mit Ihrem Handy,
Tablet etc. wählen Sie die Bluetooth-Verbindung
„LED Ceiling Lamp“.
2. Bluetooth-Verbindung beenden
Drücken Sie die Audio „ “ Taste (Audio) 15 .
Das Empfangssignal wird mit einem Piep-Ton
bestätigt. Die Bluetooth-Verbindung wird beendet.
Nach erfolgter Verbindung stehen Ihnen
f
olgende Audiosteuerungen zur Verfügung:
Musiklautstärke regeln
1. Musiklautstärke verringern
Drücken Sie die „ “ Taste Lautstärke – 20 , um
die Lautstärke zu verringern. Bei kurzzeitigem
Drücken verringert sich die Lautstärke stufen-
weise je Druckvorgang. Wird die „ “ Taste
Lautstärke – 20 lange gedrückt, verringert sich
die Lautstärke automatisch bis zu einem Minimum.
2. Musiklautstärke erhöhen
Drücken Sie die „ “ Taste Lautstärke + 16 ,
um die Lautstärke zu erhöhen. Bei kurzzeitigem
Drücken erhöht sich die Lautstärke stufenweise
je Druckvorgang. Wird die „ “ Taste Lautstärke
+ 16 lange gedrückt, erhöht sich die Lautstärke
automatisch bis zur maximalen Lautstärke.
Musiktitel anwählen
1. Musiktitel zurück
Drücken Sie die „ “ Taste Musiktitel anwählen
(zurück) 19 , um einen vorherigen Musiktitel
anzuwählen oder das Lied noch einmal von
Anfang an abspielen zu lassen.
2. Musiktitel vor
Drücken Sie die „ “ Taste Musiktitel anwählen
(vor) 17 , um den nächsten Musiktitel anzuwählen.
3. Pause
Drücken Sie die „ “ Taste Pause / Bluetooth-
Verbindung Standby 18 kurz, um die
Pausefunktion zu aktivieren. Wird die „ “ Ta-
ste Pause / Bluetooth-Verbindung 18 lang ge-
drückt, wird die Bluetooth-Verbindung für ca.
10 min auf Standby gesetzt. Danach wird die
Bluetooth-Verbindung abgeschaltet.
Wartung und Reinigung
WARNUNG! STROMSCHLAGGEFAHR!
Trennen Sie zur Reinigung die Leuchte zuerst
vom Stromnetz. Entfernen Sie hierfür die Siche-
rung oder schalten Sie den Leitungsschutz-
schalter im Sicherungskasten aus (0-Stellung).
Benutzen Sie kein Lösungsmittel, Benzin o. Ä.
Die Leuchte würde hierbei Schaden nehmen.
Lassen Sie die Leuchte vollständig abkühlen.
WARNUNG! STROMSCHLAGGEFAHR!
Aus Gründen der elektrischen Sicherheit darf
die Leuchte niemals mit Wasser oder anderen
Flüssigkeiten gereinigt oder gar in Wasser ge-
taucht werden.
Verwenden Sie zur Reinigung nur ein trockenes,
fusselfreies Tuch.
Setzen Sie die Sicherung anschließend wieder
ein oder schalten Sie den Leitungsschutzschal-
ter am Sicherungskasten ein (I-Stellung).
Entsorgung
Die Verpackung besteht aus umweltfreundlichen
Materialien, die Sie über die örtlichen Recycling-
stellen entsorgen können.
b
a
Beachten Sie die Kennzeichnung der
Verpackungsmaterialien bei der Abfall-
trennung, diese sind gekennzeichnet mit
Abkürzungen (a) und Nummern (b) mit
folgender Bedeutung: 1–7: Kunststoffe /
20–22: Papier und Pappe / 80–98:
Verbundstoffe.
Das Produkt und die Verpackungsmate-
rialien sind recycelbar, entsorgen Sie
diese getrennt für eine bessere Abfall-
Entsorgung / Garantie und Service

13 DE/AT/CH
Inbetriebnahme / Wartung und Reinigung / Entsorgung Entsorgung / Garantie und Service
behandlung. Das Triman-Logo gilt nur für
Frankreich.
Werfen Sie Ihr Produkt, wenn es ausge-
dient hat, im Interesse des Umweltschutzes
nicht in den Hausmüll, sondern führen
Sie es einer fachgerechten Entsorgung
zu. Über Sammelstellen und deren
Öffnungszeiten können Sie sich bei Ihrer
zuständigen Verwaltung informieren.
Defekte oder verbrauchte Batterien / Akkus müssen
gemäß Richtlinie 2006/66/EG und deren Ände-
rungen recycelt werden. Geben Sie Batterien / Akkus
und / oder das Produkt über die angebotenen
Sammeleinrichtungen zurück.
Umweltschäden durch falsche
Entsorgung der Batterien / Akkus!
Batterien / Akkus dürfen nicht über den Hausmüll
entsorgt werden. Sie können giftige Schwermetalle
enthalten und unterliegen der Sondermüllbehand-
lung. Die chemischen Symbole der Schwermetalle
sind wie folgt: Cd = Cadmium, Hg = Quecksilber,
Pb = Blei. Geben Sie deshalb verbrauchte Batte-
rien / Akkus bei einer kommunalen Sammelstelle ab.
Garantie und Service
Garantieerklärung
Sie erhalten zum Zeitpunkt des Kaufs auf dieses
Gerät 36 Monate Garantie. Das Gerät wurde
sorgfältig produziert und einer genauen Qualitäts-
kontrolle unterzogen. Innerhalb der Garantiezeit
beheben wir kostenlos alle Material- oder Hersteller-
fehler. Sollten sich dennoch während der Garantie-
zeit Mängel herausstellen, senden Sie das Gerät
bitte an die aufgeführte Service-Adresse unter
Angabe folgender Artikel-Nummer: 14148106L.
Von der Garantie ausgeschlossen sind Schäden
durch nicht sachgemäße Handhabung, Nichtbe-
achtung der Bedienungsanleitung oder Eingriff durch
nicht autorisierte Personen sowie Verschleißteile (wie
z. B. Leuchtmittel). Durch die Garantieleistung wird
die Garantiezeit weder verlängert noch erneuert.
Serviceadresse
Briloner Leuchten GmbH & Co. KG
Im Kissen 2
59929 Brilon
DEUTSCHLAND
Tel.: +49 29 61 / 97 12–800
Fax: +49 29 61 / 97 12–199
E-Mail: [email protected]
www.briloner.com
Kostenlose Servicenummer:
Tel.: 00800 / 27456637
IAN 327743_2001
Bitte halten Sie für alle Anfragen den Kassenbon
und die Artikelnummer (z. B. IAN 123456_7890)
als Nachweis für den Kauf bereit.
Konformitätserklärung
Dieses Produkt erfüllt die Anforderungen der
geltenden europäischen und nationalen Richtlinien
(Richtlinie 2014 / 53 / EU, Niederspannungsrichtlinie
2014 / 35 / EU, Ökodesign Richtlinie 2009 / 125 / EG,
RoHS-Richtlinie 2011 / 65 / EU).
Die Konformität
wurde nachgewiesen. Entsprechende Erklärungen
und Unterlagen sind beim Hersteller hinterlegt.
Hiermit erklärt Briloner Leuchten GmbH & Co. KG,
dass der Funkanlagentyp 14148106L der Richtlinie
2014/53/EU entspricht. Der vollständige Text der
EU-Konformitätserklärung ist unter der folgenden
Internetadresse verfügbar:
https://www.briloner.com/de/service/
informationen-zu-leuchten/eu-konformitaetserklaerung-
fuer-funkanlagentyp.php
Hersteller
Briloner Leuchten GmbH & Co. KG
Im Kissen 2
59929 Brilon
DEUTSCHLAND

14
Table of contents

15 GB/IE
Table of contents
List of pictograms used ........................................................................................................ Page 16
Introduction ................................................................................................................................... Page 16
Intended use ........................................................................................................................................ Page 16
Scope of delivery ................................................................................................................................Page 17
Parts description ..................................................................................................................................Page 17
Technical data ..................................................................................................................................... Page 17
Safety .................................................................................................................................................Page 17
Safety information ............................................................................................................................... Page 17
Safety instructions for batteries / rechargeable batteries .................................................................Page 18
Preparation ...................................................................................................................................Page 19
Required tools and material ...............................................................................................................Page 19
Prior to installation .................................................................................................................Page 19
Set-up ..................................................................................................................................................Page 19
Installing the light ................................................................................................................................Page 19
Installing the wall bracket ................................................................................................................... Page 20
Inserting / replacing batteries ............................................................................................................. Page 20
Operating the light by switch .............................................................................................................Page 20
Using the remote control.....................................................................................................................Page 20
Switching the light on / off ..................................................................................................................Page 20
Dimming the light ................................................................................................................................Page 20
30 minute timer ...................................................................................................................................Page 21
Bluetooth connection ..........................................................................................................................Page 21
Controlling the music volume .............................................................................................................Page 21
Selecting a song ..................................................................................................................................Page 21
Maintenance and cleaning ............................................................................................... Page 21
Disposal ............................................................................................................................................Page 22
Warranty and service ...........................................................................................................Page 22
Warranty declaration .........................................................................................................................Page 22
Service address ................................................................................................................................... Page 22
Declaration of conformity ...................................................................................................................Page 23
Manufacturer .......................................................................................................................................Page 23

16 GB/IE
Introduction
List of pictograms used
Please read the operating instructions! Observe warnings and safety
notes!
Volts (alternating voltage) Caution! Danger of electric shock!
Hertz (frequency) For your safety
Watts (effective power)
b
aDispose of the packaging and device
in an environmentally friendly manner!
Protective conductor Please dispose of the batteries in an
environmentally-friendly manner!
ON OFF Switching cycles This light is not suitable for external
dimmers or electronic switches.
LED operating life Danger to life and risk of accidents for
infants and children!
This light is only suitable for indoor
use in dry and enclosed spaces. The packaging is made from 100 %
recycled paper.
Caution! Risk of burns due to hot
surfaces! Danger of explosion!
Wear safety gloves! For indoor use only
Timer function (30 mins)
LED Ceiling Light with
Bluetooth® Speaker
Introduction
Congratulations on your new product.
You have selected a high quality product.
Please be sure to carefully read the com-
plete operating instructions. Fold out the page with
the illustrations. These instructions are part of the
product and contain important information on setup
and handling. Always follow all safety instructions.
Before using this product for the first time verify the
correct voltage and that all parts are properly installed.
Should you have any questions or you are unsure
about operating the product, please contact the
dealer or service centre. Please keep these instructions
in a safe place and pass them on third parties as
applicable.
Intended use
This light is only suitable for indoor use,
in dry and enclosed rooms. This product
is intended for private household use only.
This product is intended for normal operation.
Introduction / Safety

17 GB/IE
Introduction Introduction / Safety
Scope of delivery
Check immediately after unpacking that the parts
are complete and that the product is in proper
condition.
1 LED ceiling light with Bluetooth speaker, model
14148106L
1 Remote control
1 Wall bracket for remote control (incl. 1 x adhesive
pad, 2 x screws)
2 AAA batteries
3 Wall plugs
3 Screws
2 Protective tubes
1 Set of assembly instructions and instructions for use
Parts description
Light:
1 Wall plug
2 Light fixture
3 Lustre terminal
4 Mains connection cable (external)
5 Protective tube
6 Screws
7 Plastic cover
8 Speaker cover
9 Remote control
Remote control:
10 ON button (lighting)
11 OFF button (lighting)
12 Dimmer button +
13 Dimmer button –
14 30 minute timer button
15 OFF button (audio)
16 Volume button +
17 Select song button (next)
18 Pause / Bluetooth connection standby button
19 Select song button (previous)
20 Volume button –
21 ON button (audio)
22 Wall bracket (remote control)
23 Screws (remote control)
24 Adhesive pad (remote control)
Technical data
Light:
Model number: 14148106L
Operating voltage: 230 ‒ 240 V ~, 50 Hz
Total rated power: max. 25 W (LED 20 W,
speaker 5 W)
Protection class: | /
IP rating: IP20
LED:
Illuminant: LED module
Rated power: LED, max. 17.5 W
IP rating: IP20
Speaker / bluetooth:
Frequency range
Speaker: 120 ‒ 20000 Hz
Bluetooth version: 5.0
Bluetooth range: < 10 m
Frequency range
Bluetooth frequency: 2.4 GHz ISM frequency
range
RF output: max. +2dBm
Remote control:
Batteries: 2 x 1.5 V AAA
Remote control range: 5‒6 m (infrared)
Safety
Safety information
Damage due to failure to comply with these operating
instructions will invalidate the guarantee! We assume
no liability for consequential damage! We assume
no liability for material damage or personal injury
due to improper handling or failure to comply with
the safety instructions!
DANGER TO
LIFE AND RISK OF ACCIDENTS
FOR INFANTS AND CHILDREN!
Never leave children unsupervised with the
packaging materials. The packaging material

18 GB/IE
Safety
poses a suffocation hazard. Children frequently
underestimate the dangers.
Do not leave the light or packaging material ly-
ing unattended. Plastic film or bags, Styrofoam
etc. can turn into dangerous toys for children.
Avoid the risk of fatal injury
from electric shock
Ensure that a qualified electrician, or a person
trained to carry out electrical installations, per-
forms the electrical installation.
Always check the light, power supply, and mains
cable for damage before plugging it in. Never
use the light if it shows any signs of damage.
A damaged mains cable indicates a life-threat-
ening danger due to electric shock. In the event
of damage, repairs or other problems with the
light please contact the service centre or a
qualified electrician.
Prior to installation, remove the fuse or switch
off the circuit breaker (0 setting) in the fuse box.
Prior to installation, verify that the mains voltage
on site corresponds with the operating voltage
required for the light (see
“
Technical data“).
Ensure that the light does not come into contact
with water or other liquids under any circum-
stances.
Never open any of the components of the elec-
trical equipment or insert any objects into the
same components. This will pose a risk of fatal
injury from electric shock.
Do not install the light on a wet or conductive
substrate!
Prevent fire and
injury hazards
Check the light for damage immediately after
unpacking. Contact the service centre if you
find any damage.
CAUTION! RISK OF BURNS
DUE TO HOT SURFACES!
Ensure that the light has been switched off and
has cooled before touching it, to avoid burn
injuries. Lamps develop a lot of heat in the area
of the lamp head.
The illuminant in this light must be replaced by
the manufacturer or an authorised technician
or a similarly qualified person.
This light can be dimmed using a remote control.
Do not look directly into the light source (light
bulb, LED etc.).
Do not use optical instruments to look at the
light source (e.g. magnifying glass).
Safe working
Mount the light so that it is protected from
moisture and dirt.
Carefully prepare the installation and allow
sufficient time. Organise all parts and any
necessary additional tools or materials before
starting so they are easy to reach.
Always be attentive when working! Always pay
attention to what you are doing and act with
common sense. Never install the light if you are
having difficulty concentrating or do not feel well.
Safety instructions for
batteries / rechargeable
batteries
DANGER TO LIFE!
Keep batteries / rechargeable batteries out of
reach of children. If accidentally swallowed
seek immediate medical attention.
DANGER OF EXPLOSION!
Never recharge non-rechargeable batteries.
Do not short-circuit batteries / rechargeable
batteries and / or open them. Overheating, fire
or bursting can be the result.
Never throw batteries / rechargeable batteries
into fire or water.
Do not exert mechanical loads to batteries /
rechargeable batteries.
Safety / Preparation / Prior to installation / Set-up

19 GB/IE
Safety Safety / Preparation / Prior to installation / Set-up
Risk of leakage of batteries / rechargeable
batteries
Avoid extreme environmental conditions and
temperatures, which could affect batteries /
rechargeable batteries, e.g. radiators / direct
sunlight.
If batteries / rechargeable batteries have leaked,
avoid contact with skin, eyes and mucous mem-
branes with the chemicals! Flush immediately
the affected areas with fresh water and seek
medical attention!
WEAR PROTECTIVE GLOVES!
Leaked or damaged batteries / rechargeable
batteries can cause burns on contact with the
skin. Wear suitable protective gloves at all
times if such an event occurs.
In the event of a leakage of batteries / recharge-
able batteries, immediately remove them from
the product to prevent damage.
Only use the same type of batteries / recharge-
able batteries. Do not mix used and new bat-
teries / rechargeable batteries.
Remove batteries / rechargeable batteries if the
product will not be used for a longer period.
Risk of damage of the product
Only use the specified type of battery / recharge-
able battery!
Insert batteries / rechargeable batteries accord-
ing to polarity marks (+) and (-) on the battery /
rechargeable battery and the product.
Clean the contacts on the battery / rechargea-
ble battery and in the battery compartment
before inserting!
Remove exhausted batteries / rechargeable
batteries from the product immediately.
Preparation
Required tools and material
The tools and materials specified are not included.
This information and these values are non-binding
and are only provided as a reference. The nature
of the material is determined by the individual local
conditions.
- Pencil / marking tool
- 2-pole circuit tester
- Screwdriver
- Electric drill
- Drill bit (approx. ø 6 mm)
- Hammer
- Side cutter
- Ladder
Prior to installation
Important: The electrical connection must be
established by a qualified electrician or a person
trained to perform electrical installations.
This person must be familiar with the properties of
the light and the connection regulations.
Familiarise yourself with all the instructions and
diagrams in this manual, as well as with the
light itself, before you install it.
Before installation ensure that the circuit, to which
the light will be connected, is not energised. To
do so, remove the fuse or switch off the circuit
breaker in the fuse box (0 position).
Check that the power is off using a 2-pole cir-
cuit tester.
Unpack the LED ceiling light and place it on a
non-slip base. (Be careful not to scratch it).
Apply light pressure to the plastic cover 7
with both hands. While pressing on it, turn the
plastic cover 7 anti-clockwise (in the opposite
direction of the arrow) as far as it will go and
remove the plastic cover 7 by lifting it up.
Set-up
Installing the light
Before installation, ensure that the circuit to
which the light will be connected is not ener-
gised. To do so, remove the fuse or switch off
the circuit breaker in the fuse box (0 setting).

20 GB/IE
Set-up
Hold the light fixture 2 to the desired installa-
tion position. Bear in mind the drill hole in the
light fixture 2 through which the mains cable
will be inserted.
Mark three drill holes for the screws 6 (see fig.).
Drill the holes. Be sure not to damage the
mains cable (external) 4.
Insert the wall plugs 1 into the drilled holes. If
necessary, use a hammer to help you.
Guide the mains cable through the drill hole in
the light fixture 2 provided for this purpose
and attach the light to the ceiling.
Before the light is connected, the insulated
ground wiring must be prepared with an addi-
tional insulation.
Feed the mains connection cable (external) 4
through the included protective tubes 5.
Note: Be sure to correctly connect the individ-
ual leads on the mains cable (external) 4: live
wire, black or brown = symbol L, neutral wire,
blue = symbol N, earth wire, green-yellow=
symbol .
Install the plastic cover 7 of the light. To do this,
match the cover‘s three notches to the correspond-
ing retaining bolts and press these upwards.
Turn the cover clockwise (right, following the
direction of the arrow) to fasten it. The adhe-
sive label with the arrow can now be removed.
Replace the fuse or switch on the circuit
breaker (I setting) inside the fuse box.
Your LED ceiling light with Bluetooth speaker is now
ready for use.
Installing the wall bracket
Install the wall bracket 22 for the remote con-
trol 9 using the screws 23 or the adhesive
pad 24 (see fig.).
Inserting / replacing batteries
Note: The remote control 9 requires two AAA
batteries (included).
Slide the battery cover (reverse) approx. 1 cm
downwards to open and then lift off the cover.
Insert two of the included AAA batteries in the
battery compartment. Ensure correct polarity.
Replace the cover and push it back to close the
battery compartment.
Your remote control 9 is ready to use.
Operating the light by switch
The LED ceiling light can be switched on and
off using the wall switch. The light intensity al-
ways corresponds to the brightness level that
was last set. All other functions are controlled
solely via remote control 9.
Using the remote control
ATTENTION!
The functions of the remote control can only be
used after switching the LED ceiling light 9 on
with the wall switch.
Switching the light on / off
1. Switching the light on
Press the “ “ button (lighting) 10 , to switch the
LED ceiling light on.
2. Switching the light off
Press the “ “ button (lighting) 11 , to switch
the LED ceiling light off.
Dimming the light
1. Increasing brightness
Press the “ “ button Dimmer + 12 , to increase
the brightness. Briefly pressing this button will
gradually increase the brightness as pressed.
Holding the “ “ button Dimmer + 12 will
automatically increase the brightness to the
maximum.
Set-up / Maintenance and cleaning

21 GB/IE
Set-up Set-up / Maintenance and cleaning
2. Reducing the brightness
Press the “ “ button Dimmer – 13 , to reduce
the brightness. Pressing it briefly will gradually
decrease the brightness as pressed. Holding
the “ “ button Dimmer – 13 will auto
matically
decrease the brightness to the minimu
m.
30 minute timer
1. Activating the timer
Press the “ “ button 14 for approx. 3 seconds
to switch on timer mode.
The light and the Bluetooth function (music) will
automatically switch off after approx. 30 minutes.
2. Deactivating the timer
To deactivate the timer function during the
30 minute period, press the “ “ button 14
again, holding more than 3 seconds.
The timer function is now turned off.
Note: You can only turn the timer off when
bluetooth is activated.
Bluetooth connection
1. Bluetooth connection
Press the audio “ “ button (audio)
21
. A b
eep
confirms reception of the signal.
Approx. 1–2 seconds later the Bluetooth con-
nection will be accompanied by music and es-
tablished automatically, the blue LED inside the
LED ceiling light begins to flash rapidly.
A brief melody will sound once connected.
When connecting with your mobile, tablet, etc.
for the first time, select Bluetooth connection
„LED Ceiling Lamp“.
2. Disconnecting Bluetooth
Press the audio “ “ button (audio)
15
. A b
eep
confirms reception of the signal. Bluetooth has
been disconnected.
Once connected you may use the
following audio controls:
Controlling the music volume
1. Lowering the music volume
Press the “ “ button Volume – 20 to lower the
volume. Pressing it briefly will gradually decrease
the volume as pressed. Holding the “ “ button
Volume – 20 will automatically lower the vol-
ume to the minimum.
2. Increasing the music volume
Press the “ “ button Volume + 16 to increase
the volume.
Pressing it briefly will gradually in-
cr
ease the volume as pressed. Holding the “ “
button Volume + 16 will automatically increase
the volume to the maximum.
Selecting a song
1. Previous song
Press the “ “ button Select song (previous)
19 to select a previous song or to replay the
song from the beginning.
2. Next song
Press the “ ” button Select song (next) 17 to
select the next song.
3. Pause
Press the “ ” button Pause / Bluetooth Con-
nection Standby 18 briefly to pause. Holding
the “ ” button Pause / Bluetooth Connection
Standby 18 will set the Bluetooth connection to
standby for approx.
10 min. The Bluetooth con-
nection will then be closed.
Maintenance and cleaning
WARNING! RISK OF ELECTRIC SHOCK!
Disconnect the light from the mains circuit before
cleaning. To do so, remove the fuse or switch off
the circuit breaker in the fuse box (0 position).

22
Warranty and serviceMaintenance and cleaning / Disposal / Warranty and service
Do not use solvents, petrol, etc. They could
damage the light.
Allow the light to cool down completely.
WARNING! RISK OF ELECTRIC SHOCK!
For electrical safety, never clean the light with
water or other liquids, or immerse it in water.
Only use a dry, lint-free cloth for cleaning.
Then replace the fuse or switch on the circuit
breaker in the fuse box (I position).
Disposal
The packaging is made entirely of recyclable mate-
rials, which you may dispose of at local recycling
facilities.
b
a
Observe the marking of the packaging
materials for waste separation, which
are marked with abbreviations (a) and
numbers (b) with following meaning:
1–7: plastics / 20–22: paper and fibre-
board / 80–98: composite materials.
The product and packaging materials
are recyclable, dispose of it separately
for better waste treatment. The Triman
logo is valid in France only.
To help protect the environment, please
dispose of the product properly when it
has reached the end of its useful life and
not in the household waste. Information
on collection points and their opening
hours can be obtained from your local
authority.
Faulty or used batteries / rechargeable batteries
must be recycled in accordance with Directive
2006/66/EC and its amendments. Please return
the batteries / rechargeable batteries and / or the
product to the available collection points.
Environmental damage through
incorrect disposal of the batter-
ies / rechargeable batteries!
Batteries / rechargeable batteries may not be dis-
posed of with the usual domestic waste. They may
contain toxic heavy metals and are subject to haz-
ardous waste treatment rules and regulations. The
chemical symbols for heavy metals are as follows:
Cd = cadmium, Hg = mercury, Pb = lead. That is
why you should dispose of used batteries / recharge-
able batteries at a local collection point.
Warranty and service
Warranty declaration
This product has a warranty of 36 months from the
date of purchase. The appliance has been carefully
produced under strict quality control. During the
warranty period we will repair any defects in material
or manufacture free of charge. If defects are detected
during the warranty period, please send the product
to the service address listed, specifying the following
item number: 14148106L.
Wear parts (such as bulbs) and damage caused by
improper handling, failure to observe the operating
instructions or unauthorised manipulation are excluded
from the warranty. Providing warranty services does
not extend or renew the warranty period.
Service address
Briloner Leuchten GmbH & Co. KG
Im Kissen 2
59929 Brilon
GERMANY
Tel.: +49 29 61 / 97 12–800
Fax: +49 29 61 / 97 12–199
E-mail: [email protected]
www.briloner.com
Free service number:
Tel.: 00800 / 27456637
IAN 327743_2001
GB/IE

23 GB/IE
Warranty and serviceMaintenance and cleaning / Disposal / Warranty and service
For all inquiries about your product, please have
your receipt and the article number (e.g. IAN
123456_7890) ready as your proof of purchase.
Declaration of conformity
This product meets the requirements of the applicable
European and national directives (Directive
2014 / 53 / EU, Low Voltage Directive 2014 / 35 / EU,
Ecodesign Directive 2009 / 125 / EC,
RoHS Directive
2011 / 65 / EU). Conformity has been verified. The
relevant declarations and documents are held by
the manufacturer.
Briloner Leuchten GmbH & Co. KG hereby declares
that the wireless system model 14148106L complies
with Directive 2014/53/EU. The full text of the EU
declaration of conformity is available at:
https://www.briloner.com/de/service/
informationen-zu-leuchten/eu-konformitaetserklaerung-
fuer-funkanlagentyp.php
Manufacturer
Briloner Leuchten GmbH & Co. KG
Im Kissen 2
59929 Brilon
GERMANY

24
Table des matières

25 FR/BE
Légende des pictogrammes utilisés .......................................................................... Page 26
Introduction ................................................................................................................................... Page 26
Utilisation conforme ............................................................................................................................Page 27
Contenu de la livraison .......................................................................................................................Page 27
Description des éléments ....................................................................................................................Page 27
Caractéristiques techniques ................................................................................................................Page 27
Sécurité .............................................................................................................................................Page 28
Indications de sécurité ........................................................................................................................Page 28
Consignes de sécurité relatives aux piles / aux piles rechargeables ...............................................Page 29
Préparation ...................................................................................................................................Page 29
Outils et matériel nécessaires ............................................................................................................. Page 29
Avant l‘installation ..................................................................................................................Page 29
Mise en service ...........................................................................................................................Page 30
Montage de la lampe .........................................................................................................................Page 30
Montage du support mural ................................................................................................................Page 30
Insérer / remplacer les piles ................................................................................................................Page 30
Commander la lampe via l‘interrupteur .............................................................................................Page 31
Utiliser la télécommande ....................................................................................................................Page 31
Allumer / éteindre la lumière ..............................................................................................................Page 31
Faire varier l‘intensité de la lumière ...................................................................................................Page 31
Minuteur 30 minutes ........................................................................................................................... Page 31
Connexion Bluetooth ..........................................................................................................................Page 31
Régler le volume de la musique .........................................................................................................Page 32
Sélection d‘un titre ..............................................................................................................................Page 32
Entretien et nettoyage..........................................................................................................Page 32
Mise au rebut ............................................................................................................................... Page 32
Garantie et service après-vente ..................................................................................Page 33
Garantie ..............................................................................................................................................Page 33
Adresse du service après-vente .......................................................................................................... Page 34
Déclaration de conformité .................................................................................................................. Page 34
Fabricant ..............................................................................................................................................Page 34
Table des matières

26 FR/BE
Introduction
Légende des pictogrammes utilisés
Lire le mode d'emploi! Respectez les avertissements et les
consignes de sécurité!
Volt (tension alternative) Attention ! Risque d'électrocution !
Hertz (fréquence) Conduite à adopter
Watt (puissance active)
b
a
Mettez l'emballage et l'appareil
au rebut dans le respect de l'environ-
nement !
Conducteur de protection Mettez les piles au rebut dans le
respect de l'environnement !
ON OFF Cycles de commutation Cette lampe n'est pas adaptée aux va-
riateurs externes et aux interrupteurs
électroniques.
Durée de vie des LED Danger de mort et d'accident pour les
enfants en bas âge et les enfants !
Cette lampe est exclusivement conçue
pour un usage intérieur, dans des
locaux secs et fermés.
L'emballage est exclusivement composé
de papier recyclé.
Attention ! Risque de brûlures du fait
des surfaces brûlantes ! Risque d'explosion!
Porter des gants de protection! Uniquement pour un usage en intérieur
Fonction de minuterie (30 min.)
Plafonnier à LED avec
haut-parleur Bluetooth®
Introduction
Félicitations pour l‘achat de votre nouvel
appareil. Vous avez opté pour un produit
de grande qualité. Veuillez lire ce mode
d‘emploi intégralement et attentivement. Ouvrez la
page contenant les illustrations. Le présent mode
d‘emploi fait partie de ce produit et contient des
instructions essentielles pour sa mise en service et sa
manipulation. Respectez toujours toutes les consignes
de sécurité. Avant la mise en service, vérifiez si la
tension est correcte et si toutes les pièces sont correc-
tement montées. Si vous avez des questions ou des
doutes concernant la manipulation de l‘appareil,
veuillez contacter votre revendeur ou le service
après-vente. Veuillez conserver soigneusement ce
mode d‘emploi et remettez-le aux autres utilisateurs.
Introduction

27 FR/BE
Introduction Introduction
Utilisation conforme
Cette lampe est exclusivement conçue
pour un usage intérieur, dans des locaux
secs et fermés. Ce produit est uniquement
destiné à un usage domestique et privé. Ce produit
est conçu pour une utilisation normale.
Contenu de la livraison
Contrôlez toujours immédiatement après le débal-
lage du produit que le contenu de la livraison est
complet et que l’appareil se trouve en parfait état.
1 plafonnier LED avec enceinte Bluetooth, modèle
14148106L
1 télécommande
1 support mural pour la télécommande
(avec 1 patin adhésif, 2 vis)
2 piles AAA
3 chevilles
3 vis
2 gaines de protection
1 notice de montage et d‘utilisation
Description des éléments
Lampe:
1 Cheville
2 Base de la lampe
3 Domino de raccordement
4 Câble d‘alimentation électrique (externe)
5 Gaine de protection
6 Vis
7 Cache en plastique
8 Grille d‘enceinte
9 Télécommande
Télécommande:
10 Touche ON (Lighting)
11 Touche OFF (Lighting)
12 Touche Variateur +
13 Touche Variateur -
14 Touche Minuteur 30 minutes
15 Touche OFF (Audio)
16 Touche Volume +
17 Touche Sélection du titre à jouer (suivant)
18 Touche Pause / Connexion Bluetooth en
veille
19 Touche de sélection du titre à jouer (précé-
dent)
20 Touche Volume -
21 Touche ON (Audio)
22 Support mural (télécommande)
23 Vis (télécommande)
24 Patin adhésif (télécommande)
Caractéristiques techniques
Lampe:
Numéro de modèle : 14148106L
Tension de service: 230‒240 V~, 50 Hz
Puissance nominale
totale : max. 25 W (LED 20 W,
haut-parleur 5 W)
Classe de protection : | /
Type de protection: IP20
LED:
Ampoule: Module LED
Puissance nominale : LED, max. 17,5 W
Type de protection: IP20
Enceinte / Bluetooth :
Plage de fréquence
Enceinte : 120 ‒ 20000 Hz
Version Bluetooth : 5.0
Portée Bluetooth : < 10 m
Plage de fréquence
Fréquence Bluetooth : 2,4 GHz, bande de
fréquence ISM
Puissance HF : max. +2 dBm
Télécommande:
Piles : 2 x 1,5 V AAA
Portée de la
télécommande : 5‒6 m (infrarouge)

28 FR/BE
Sécurité
Sécurité
Indications de sécurité
Les droits de recours en garantie sont annulés en cas
de dommages résultant du non-respect du présent
mode d’emploi ! Le fabricant décline toute respon-
sabilité pour les dommages indirects ! De même, toute
responsabilité est déclinée pour les dommages matériels
ou corporels causés par une manipulation incorrecte
ou par le non-respect des consignes de sécurité !
DANGER DE MORT ET RISQUE
D‘ACCIDENT POUR LES EN-
FANTS EN BAS ÂGE ET LES ENFANTS !
Ne laissez jamais les enfants manipuler les
emballages sans surveillance. Ils risquent de
s‘étouffer avec les emballages. Les enfants
sous-estiment souvent les dangers.
Ne laissez pas la lampe ou le matériel d‘em-
ballage traîner sans surveillance. Les films et les
sachets en plastique, les éléments en matières
synthétiques, etc. peuvent constituer des jouets
dangereux pour les enfants.
Prévention de risques mortels
par électrocution
L‘installation électrique doit être effectuée par
un électricien ou par une personne dûment
formée à cet effet.
Avant chaque raccordement au secteur, contrôlez
le bon état de la lampe et du câble d‘alimenta-
tion. N‘utilisez jamais la lampe si vous constatez
le moindre dommage.
Des câbles secteur endommagés impliquent un
danger de mort par électrocution. En cas d’en-
dommagements, de réparations ou d’autres
problèmes, veuillez contacter le S.A.V. ou un
électricien.
Avant le montage, retirez le fusible ou coupez
le disjoncteur de la boîte à fusibles (position 0).
Avant le montage, vérifiez que la tension secteur
corresponde à la tension de service requise de
la lampe (voir «Caractéristiques techniques»).
Évitez impérativement tout contact de la lampe
avec de l‘eau ou d‘autres liquides.
N‘ouvrez jamais les composants électriques,
et n‘insérez jamais d‘objets quelconques dans
ceux-ci. De telles interventions impliquent un
danger de mort par électrocution.
N‘installez jamais la lampe sur un support
humide ou conducteur de courant!
Prévention de risque
d‘incendies et de blessures
Vérifiez l‘état de la lampe immédiatement
après le déballage. En cas de dommage, veuil-
lez contacter le service après-vente.
ATTENTION! RISQUE DE BRÛ-
LURES À CAUSE DES SURFACES
TRÈS CHAUDES !
Afin d‘éviter toute brûlure, vérifiez que la lampe
soit éteinte et suffisamment froide avant de la
manipuler. L‘ampoule dégage une forte cha-
leur au niveau du logement de la lampe.
La source lumineuse de cette lampe doit uni-
quement être remplacée par le fabricant ou
par un de ces techniciens autorisés, ou par une
personne aux qualifications similaires.
Cette lampe peut être variée par télécommande.
Ne jamais regarder directement la source lumi-
neuse (ampoule, LED, etc.).
Ne pas regarder dans la source lumineuse
avec un instrument optique (par ex. loupe).
Pour travailler en toute sécurité
Montez la lampe de telle sorte qu‘elle soit
protégée de l‘humidité et des salissures.
Soigneusement préparer le montage et l‘effectuer
sans précipitation. Préparez toutes les pièces
détachées et l‘outillage ou le matériel requis et
posez-les à portée de main.
Soyez toujours vigilant ! Faites toujours attention
à ce que vous faites et agissez raisonnablement.
N‘effectuez jamais le montage de la lampe si
Sécurité / Préparation / Avant l‘installation

29 FR/BE
Sécurité Sécurité / Préparation / Avant l‘installation
vous n‘êtes pas concentré ou si vous vous sen-
tez mal.
Consignes de sécurité
relatives aux piles / aux
piles rechargeables
DANGER DE MORT!
Rangez les piles / piles rechargeables hors de
la portée des enfants. En cas d’ingestion,
consultez immédiatement un médecin !
RISQUE D‘EXPLOSION !
Ne rechargez jamais des piles non rechargeabl
es.
Ne court-circuitez pas les piles / piles rechar-
geables et / ou ne les ouvrez pas ! Autrement,
vous risquez de provoquer une surchauffe, un
incendie ou une explosion.
Ne jetez jamais des piles / piles rechargeables
au feu ou dans l’eau.
Ne pas soumettre les piles / piles rechargeables
à une charge mécanique.
Risque de fuite des piles / piles
rechargeables
Évitez d’exposer les piles / piles rechargeables
à des conditions et températures extrêmes sus-
ceptibles de les endommager, par ex. sur des
radiateurs / exposition directe aux rayons du
soleil.
Lorsque les piles / piles rechargeables fuient,
évitez tout contact du produit chimique avec la
peau, les yeux ou les muqueuses! Rincez les
zones touchées à l‘eau claire et consultez im-
médiatement un médecin !
PORTER DES GANTS
DE PROTECTION!
Les piles / piles rechargeables endommagées
ou sujettes à des fuites peuvent provoquer des
brûlures au contact de la peau. Vous devez d
onc
porter des gants adéquats pour les manipuler.
En cas de fuite des piles / piles rechargeables,
retirez-les aussitôt du produit pour éviter tout
endommagement.
Utilisez uniquement des piles / piles rechar-
geables du même type. Ne mélangez pas des
piles / piles rechargeables usées et neuves !
Retirez les piles / piles rechargeables, si vous
ne comptez pas utiliser le produit pendant une
période prolongée.
Risque d‘endommagement du produit
Exclusivement utiliser le type de pile / pile
rechargeable spécifié.
Insérez les piles / piles rechargeables conformé-
ment à l‘indication de polarité (+) et (-) indiquée
sur la pile / pile rechargeable et sur le produit.
Nettoyez les contacts de la pile / pile rechar-
geable et du compartiment à pile avant d‘insé-
rer la pile !
Retirez immédiatement les piles / piles rechar-
geables usées du produit.
Préparation
Outils et matériel nécessaires
Les outils et matériels indiqués ne sont pas compris
dans le contenu de la livraison. Il s‘agit là de données
et de valeurs indicatives vous permettant de vous
orienter. Les caractéristiques du matériel dépendent
des conditions spécifiques sur place.
- Crayon à papier / outil de marquage
- Détecteur de tension à 2 pôles
- Tournevis
- Perceuse
- Foret (env. ø6 mm)
- Marteau
- Pince coupante
- Escabeau
Avant l‘installation
Important : L‘installation électrique doit être
effectuée par un électricien ou par une personne
dûment formée à cet effet. Celle-ci doit connaître
les caractéristiques des lampes et des conditions
de raccordement.

30 FR/BE
Avant l‘installation / Mise en service
Avant l‘installation, familiarisez-vous avec
l‘ensemble des instructions et des illustrations
du présent mode d‘emploi et avec la lampe
elle-même.
Avant l‘installation, vérifiez l‘absence de tension
au niveau du câble auquel doit être raccordé
la lampe. Pour ce faire, retirez le fusible ou
coupez le disjoncteur de la boîte à fusible
(position 0).
Vérifiez l‘absence de tension au moyen d‘un
détecteur de tension à 2 pôles.
Sortez le plafonnier LED de son emballage et
posez-le sur un support antidérapant. (Soyez
prudent afin d‘éviter les éraflures).
Saisissez le cache en plastique 7 à deux
mains et exercez dessus une légère pression.
Tournez le cache en plastique 7 dans le sens
inverse des aiguilles d‘une montre (dans le
sens opposé de la flèche) jusqu‘à la butée et
retirez le cache en plastique 7 vers le haut.
Mise en service
Montage de la lampe
Avant l‘installation, vérifiez l‘absence de ten-
sion au niveau du câble auquel doit être rac-
cordé la lampe. Retirez à cet effet le fusible ou
coupez le disjoncteur dans la boîte à fusibles
(position 0).
Placez la base de lampe 2 dans la position
de montage souhaitée. En faisant cela, prenez
en compte le trou dans la base de la lampe 2
à travers lequel doit passer le câble d‘alimen-
tation.
Marquez trois trous à percer pour les vis 6
(voir Fig.).
Percer les trous. Veillez à ce que le câble d‘ali-
mentation électrique (externe) 4 ne soit pas
endommagé.
Enfoncez les chevilles 1 dans les trous de per-
çage. Si nécessaire, aidez-vous d‘un marteau.
Passez le câble d‘alimentation dans le trou prévu
à cet effet dans la base de la lampe 2 et fixez
la lampe au plafond.
Avant le raccordement de la lampe, le câblage
de base isolé doit être préparé au moyen d‘une
isolation supplémentaire.
Passez ensuite les gaines de protection four-
nies 5 sur le câble d‘alimentation électrique
(externe) 4.
Remarque : Veillez à ce que les fils du câble
d‘alimentation électrique (externe) 4 aient
leur raccord respectif : fil conducteur, noir ou
brun = symbole L, fil neutre, bleu = symbole N
prise de terre, vert-jaune = symbole .
Montez le cache en plastique 7 de la lampe.
Placez le cache avec les trois encoches sur les
boulons d‘assemblages correspondants et
pressez-les vers le haut. Tournez le cache dans
le sens des aiguilles d‘une montre à droite (en
direction de la flèche) afin de le fixer. L‘auto-
collant avec la flèche peut désormais être retiré.
Remettez le fusible en place ou enclenchez de
nouveau le disjoncteur dans le boîtier à fusibles
(position I).
Votre plafonnier LED avec enceinte Bluetooth est
désormais prêt à utilisation.
Montage du support mural
Montez le support mural 22 pour la télécom-
mande 9 en vous servant des vis 23 ou du
patin adhésif 24 (voir Fig.).
Insérer / remplacer les piles
Remarque : Deux piles de type AAA doivent être
utilisées pour le fonctionnement de la télécom-
mande 9 (fournies dans la livraison).
Poussez d‘env. 1 cm vers le bas le couvercle
du compartiment à piles (verso) pour l‘ouvrir et
soulevez-le.
Insérez les deux piles fournies de type
AAA dans le compartiment à piles. Vérifiez que
la polarité est correcte.
Replacez le couvercle et poussez-le vers l‘ar-
rière pour refermer le compartiment à piles.
Votre télécommande 9 est prête à l‘emploi.
Mise en service

31 FR/BE
Avant l‘installation / Mise en service Mise en service
Commander la lampe via
l‘interrupteur
Le plafonnier LED peut être allumé et éteint via
l‘interrupteur mural. L‘intensité lumineuse cor-
respond alors toujours à la dernière luminosité
réglée. Toutes les autres fonctions sont exclusi-
vement contrôlées via la télécommande 9.
Utiliser la télécommande
ATTENTION!
L‘ensemble des fonctions de la télécommande 9
sont uniquement activées, lorsque la lampe plafon-
nier à LED est connectée à l‘interrupteur mural.
Allumer / éteindre la lumière
1. Allumer la lumière
Appuyer sur la touche « » (Lighting) 10 , afin
d‘allumer la lampe plafonnier à LED.
2. Éteindre la lumière
Appuyer sur la touche « » (Lighting) 11 , afin
d‘éteindre la lampe plafonnier à LED.
Faire varier l‘intensité
de la lumière
1. Augmenter le niveau d‘intensité
de l‘éclairage
Appuyer sur la touche de variation + « » 12 ,
afin d‘augmenter l‘intensité de l‘éclairage. En
appuyant brièvement sur cette touche, le niveau
d‘intensité lumineuse augmente progressivement,
selon le nombre de pression effectuées. Si la
touche de variation + « » 12 est pressée plus
longtemps, le niveau d‘intensité lumineuse aug-
mente automatiquement, jusqu‘à atteindre le
niveau de luminosité maximum.
2. Diminuer le niveau d‘intensité
de l‘éclairage
Appuyer sur la touche de variation – « » 13 ,
afin de baisser l‘intensité de l‘éclairage. En
appuyant brièvement sur cette touche, le niveau
d‘intensité lumineuse diminue progressivement,
selon le nombre de pression effectuées. Si la
touche de variation – « » 13 est pressée plus
longtemps, le niveau d‘intensité lumineuse dimi-
nue automatiquement, jusqu‘à atteindre le ni-
veau de luminosité minimum.
Minuteur 30 minutes
1. Allumer le minuteur
Pressez la touche „ “ 14 pendant env.
3 secondes pour activer la fonction de minuterie.
La lumière et la fonction Bluetooth (musique)
s‘éteignent automatiquement après 30 minutes.
2. Éteindre le minuteur
Si vous souhaitez éteindre la fonction minuteur
pendant ces 30 minutes, appuyez de nouveau
sur la touche « »
14
durant plus de 3 se
condes.
La fonction de minuterie est à présent désactivée.
Remarque : Vous ne pouvez éteindre la
minuterie que lorsque Bluetooth est activé.
Connexion Bluetooth
1. Établir la connexion Bluetooth
Appuyer sur la touche Audio « » (Audio) 21 .
Le signal de réception est confirmé par un bip.
Env. 1–2 secondes plus tard, la connexion
Bluetooth est établie avec un son ; la LED bleue
commence à clignoter rapidement à l‘intérieur
de la lampe plafonnier à LED.
Si la connexion est établie, une brève mélodie
retentit.
Lors d‘une première connexion avec votre por-
table, tablette, etc., choisissez la connexion
Bluetooth «LED Ceiling Lamp».
2. Interrompre la connexion Bluetooth
Appuyer sur la touche Audio « » (Audio) 15 .
Le signal de réception est confirmé par un bip.
La connexion Bluetooth est interrompue.

32
Mise au rebut/ Garantie et service après-venteMise en service / Entretien et nettoyage / Mise au rebut
Après avoir établi une connexion, les
contrôles audio suivants sont disponibles :
Régler le volume de la musique
1. Diminuer le volume de la musique
Appuyer sur la touche – « » 20 , afin de
baisser le volume. En appuyant brièvement sur
cette touche, le volume diminue progressivement,
selon le nombre de pression effectuées. Si la
touche de vol
ume ‒ « »
20
est pressée plus
longtemps, le volu
me diminue automatiquement,
jusqu‘à atteindre le volume minimum.
2. Augmenter le volume de la musique
Appuyez sur la touche + « » 16 , afin d‘aug-
menter le volume. En appuyant brièvement sur
cette touche, le volume augmente progressive-
ment, selon le nombre de pression effectuées.
Si la touche de volume + « » 16 est pressée
plus longtemps, le volume augmente automati-
quement, jusqu‘à atteindre le volume maximum.
Sélection d‘un titre
1. Titre précédent
Appuyez sur la touche de sélection du titre
(précédent) « » 19 , afin de sélectionner la mu-
sique jouée précédemment, ou de revenir au
début du titre actuellement joué.
2. Titre suivant
Appuyez sur la touche de sélection du titre (sui-
vant) « » 17 , afin de jouer le titre suivant.
3. Pause
Appuyez brièvement sur la touche « »
Pause / Connexion Bluetooth Veille , afin
d‘activer la fonction de pause. Si la touche
«» Pause / Connexion Bluetooth Veille 18
est pressée de manière prolongée, la connexion
Bluetooth est mise en veille durant 10 minutes
env. La connexion Bluetooth est ensuite inter-
rompue.
Entretien et nettoyage
AVERTISSEMENT ! RISQUE D’ÉLECTRO-
CUTION !
Pour procéder au nettoyage, coupez tout
d‘abord l‘alimentation secteur de la lampe. Reti-
rez à cet effet le fusible ou coupez le disjoncteur
de la boîte à fusible (position 0).
N‘utilisez ni solvants, ni essence, ni autres pro-
duits similaires. Ceci endommagerait la lampe.
Laissez refroidir la lampe complètement.
AVERTISSEMENT ! RISQUE D’ÉLECTRO-
CUTION !
Pour des raisons de sécurité électrique, il est in-
terdit de nettoyer la lampe à l‘eau ou avec
d‘autres liquides ou encore de la plonger dans
de l‘eau.
Pour procéder au nettoyage, utilisez uniquement
un chiffon sec et non pelucheux.
Remettez ensuite le fusible en place ou remettez
en route le disjoncteur dans le boîtier à fusibles
(positionI).
Mise au rebut
L’emballage se compose de matières recyclables
pouvant être mises au rebut dans les déchetteries
locales.
b
a
Veuillez respecter l‘identification des ma-
tériaux d‘emballage pour le tri sélectif,
ils sont identifiés avec des abbréviations
(a) et des chiffres (b) ayant la signification
suivante : 1–7 : plastiques / 20–22 :
papiers et cartons / 80–98 : matériaux
composite.
Le produit et les matériaux d’emballage
sont recyclables, mettez-les au rebut sé-
parément pour un meilleur traitement des
déchets. Le logo Triman n’est valable
qu’en France.
Afin de contribuer à la protection de
l’environnement, veuillez ne pas jeter
votre produit usagé dans les ordures
ménagères, mais éliminez-le de manière
FR/BE

33 FR/BE
Mise au rebut/ Garantie et service après-venteMise en service / Entretien et nettoyage / Mise au rebut
appropriée. Pour obtenir des renseigne-
ments concernant les points de collecte
et leurs horaires d’ouverture, vous pou-
vez contacter votre municipalité.
Les piles / piles rechargeables défectueuses ou
usagées doivent être recyclées conformément à la
directive 2006/66/CE et ses modifications. Les piles
et / ou piles rechargeables et / ou le produit doivent
être retournés dans les centres de collecte proposés.
Pollution de l’environnement
par la mise au rebut incorrecte
des piles / piles rechargeables !
Les piles / piles rechargeables ne doivent pas être
mises au rebut avec les ordures ménagères. Elles
peuvent contenir des métaux lourds toxiques et doivent
être considérées comme des déchets spéciaux. Les
symboles chimiques des métaux lourds sont les sui-
vants : Cd = cadmium, Hg = mercure, Pb = plomb.
Pour cette raison, veuillez toujours déposer les piles /
piles rechargeables usagées dans les conteneurs de
recyclage communaux.
Garantie et service après-vente
Garantie
Article L217-16 du Code de la
consommation
Lorsque l‘acheteur demande au vendeur, pendant
le cours de la garantie commerciale qui lui a été
consentie lors de l‘acquisition ou de la réparation
d‘un bien meuble, une remise en état couverte par
la garantie, toute période d‘immobilisation d‘au
moins sept jours vient s‘ajouter à la durée de la
garantie qui restait à courir. Cette période court à
compter de la demande d‘intervention de l‘acheteur
ou de la mise à disposition pour réparation du bien
en cause, si cette mise à disposition est postérieure
à la demande d‘intervention.
Indépendamment de la garantie commerciale sous-
crite, le vendeur reste tenu des défauts de conformité
du bien et des vices rédhibitoires dans les conditions
prévues aux articles L217-4 à L217-13 du Code
de la consommation et aux articles 1641 à 1648
et 2232 du Code Civil.
Article L217-4 du Code de la consommation
Le vendeur livre un bien conforme au contrat et ré-
pond des défauts de conformité existant lors de la
délivrance.
Il répond également des défauts de conformité ré-
sultant de l‘emballage, des instructions de montage
ou de l‘installation lorsque celle-ci a été mise à sa
charge par le contrat ou a été réalisée sous sa
responsabilité.
Article L217-5 du Code de la consommation
Le bien est conforme au contrat :
1° S´il est propre à l‘usage habituellement attendu
d‘un bien semblable et, le cas échéant :
- s‘il correspond à la description donnée par le
vendeur et posséder les qualités que celui-ci a
présentées à l‘acheteur sous forme d‘échantil-
lon ou de modèle ;
- s‘il présente les qualités qu‘un acheteur peut
légitimement attendre eu égard aux déclara-
tions publiques faites par le vendeur, par le
producteur ou par son représentant, notamment
dans la publicité ou l‘étiquetage ;
2° Ou s‘il présente les caractéristiques définies d‘un
commun accord par les parties ou être propre
à tout usage spécial recherché par l‘acheteur,
porté à la connaissance du vendeur et que ce
dernier a accepté.
Article L217-12 du Code de la
consommation
L‘action résultant du défaut de conformité se prescrit
par deux ans à compter de la délivrance du bien.
Article 1641 du Code civil
Le vendeur est tenu de la garantie à raison des
défauts cachés de la chose vendue qui la rendent
impropre à l‘usage auquel on la destine, ou qui
diminuent tellement cet usage que l‘acheteur ne
l‘aurait pas acquise, ou n‘en aurait donné qu‘un
moindre prix, s‘il les avait connus.

34
Garantie et service après-vente
Article 1648 1er alinéa du Code civil
L‘action résultant des vices rédhibitoires doit être in-
tentée par l‘acquéreur dans un délai de deux ans
à compter de la découverte du vice.
Les pièces détachées indispensables à l’utilisation
du produit sont disponibles pendant la durée de la
garantie du produit.
Vous bénéficiez d’une garantie de 36 mois à partir
de la date d’achat de l’appareil. Cet appareil a
été fabriqué avec soin et soumis à un contrôle
qualité minutieux. Pendant la durée de la garantie,
nous réparons gratuitement tous les défauts de
matériaux ou de fabrication. Si toutefois vous consta-
tez des défauts pendant la durée de la garantie,
veuillez envoyer l’article à l’adresse S.A.V. indiquée
en mentionnant la référence d’article suivante :
14148106L.
La garantie exclut les dommages dus à une mani-
pulation incorrecte, au non-respect des instructions
du mode d’emploi ou à une intervention par une
personne non autorisée, ainsi que les pièces d’usure
(par ex, ampoule). La durée de garantie n’est aucu-
nement prolongée ou renouvelée par une prestation
de garantie.
Adresse du service après-vente
Briloner Leuchten GmbH & Co. KG
Im Kissen 2
59929 Brilon
ALLEMAGNE
Tél. : +49 29 61 / 97 12–800
Fax : +49 29 61 / 97 12–199
www.briloner.com
Numero de service gratuit
Tél. : 00800 / 27456637
IAN 327743_2001
Veuillez conserver le ticket de caisse et la référence
de l’article (par ex. IAN 123456_7890) à titre de
preuves d’achat pour toute demande.
Déclaration de conformité
Ce produit répond aux exigences des réglementations
européennes et nationales en vigueur (Directive
2014 / 53 / UE, directive basse tension 2014 / 35 / UE
,
directive d‘écoconception2009 / 125 / CE, direc-
tive RoHS2011 / 65 / UE). La conformité du pro-
duit a été attestée. Les déclarations et documents
correspondants sont disponibles auprès du fabricant.
Par la présente, la société Briloner Leuchten GmbH
& Co. KG déclare que le type de matériel radio
14148106L est conforme à la directive 2014/53/UE.
La déclaration de conformité
européenne est
disponible en version complète à l‘adresse Internet
suivante :
https://www.briloner.com/de/service/
informationen-zu-leuchten/eu-konformitaetserklaerung-
fuer-funkanlagentyp.php
Fabricant
Briloner Leuchten GmbH & Co. KG
Im Kissen 2
59929 Brilon
ALLEMAGNE
FR/BE
Inhoudsopgave

35 NL/BE
Garantie et service après-vente Inhoudsopgave
Legenda van de gebruikte pictogrammen ..................................................... Pagina 36
Inleiding ....................................................................................................................................... Pagina 36
Correct gebruik ............................................................................................................................... Pagina 36
Omvang van de levering ................................................................................................................ Pagina 37
Beschrijving van de onderdelen ..................................................................................................... Pagina 37
Technische gegevens ...................................................................................................................... Pagina 37
Veiligheid .................................................................................................................................... Pagina 37
Veiligheidsinstructies ....................................................................................................................... Pagina 37
Veiligheidsinstructies voor batterijen / accu‘s ................................................................................ Pagina 38
Voorbereiding ........................................................................................................................ Pagina 39
Benodigd gereedschap en materiaal ............................................................................................ Pagina 39
Voor de installatie ............................................................................................................... Pagina 39
Ingebruikname ...................................................................................................................... Pagina 40
Lamp monteren ................................................................................................................................ Pagina 40
Wandhouder monteren .................................................................................................................. Pagina 40
Batterijen plaatsen / vervangen ...................................................................................................... Pagina 40
Lamp via de lichtschakelaar bedienen .......................................................................................... Pagina 40
Afstandsbediening gebruiken ......................................................................................................... Pagina 40
Licht aan- / uitschakelen .................................................................................................................. Pagina 41
Licht dimmen .................................................................................................................................... Pagina 41
30 minuten-timer .............................................................................................................................. Pagina 41
Bluetooth-verbinding ....................................................................................................................... Pagina 41
Muziekvolume regelen ................................................................................................................... Pagina 41
Muziektitel selecteren ..................................................................................................................... Pagina 42
Onderhoud en reiniging ................................................................................................. Pagina 42
Afvoer ............................................................................................................................................ Pagina 42
Garantie en service ............................................................................................................ Pagina 43
Garantie .......................................................................................................................................... Pagina 43
Serviceadres .................................................................................................................................... Pagina 43
Conformiteitsverklaring ................................................................................................................... Pagina 43
Fabrikant .......................................................................................................................................... Pagina 43

36 NL/BE
Inleiding
Legenda van de gebruikte pictogrammen
Lees a.u.b. de gebruiksaanwijzing! Waarschuwingen en veiligheidsinstructies
in acht nemen!
Volt (wisselspanning) Voorzichtig! Kans op elektrische
schokken!
Hertz (frequentie) Zo handelt u correct
Watt (nuttig vermogen)
b
aVoer de verpakking en het apparaat
op een milieuvriendelijke manier af!
Aardedraad Verwijder de batterijen op een
milieuvriendelijke manier!
ON OFF Schakelcycli Deze lamp is niet geschikt voor externe
dimmers en elektronische schakelaars.
Led-levensduur Levensgevaar en kans op ongevallen
voor kleuters en kinderen!
Deze lamp is uitsluitend bedoeld
voor gebruik binnenshuis, in droge en
gesloten ruimtes.
De verpakking bestaat uit 100%
gerecycled papier.
Voorzichtig! Kans op brandwonden
door hete oppervlakken! Explosiegevaar!
Draag veiligheidshandschoenen! Alleen voor binnenshuis
Timerfunctie (30 min.)
Led-plafondlamp met
Bluetooth®-luidspreker
Inleiding
Hartelijk gefeliciteerd met de koop van
uw nieuwe product. U hebt voor een
hoogwaardig product gekozen. Lees deze
gebruiksaanwijzing volledig en zorgvuldig door.
Vouw de pagina met de afbeeldingen open. Deze
gebruiksaanwijzing hoort bij dit product en bevat
belangrijke aanwijzingen voor de ingebruikname
en de bediening. Neem altijd de veiligheidsinstruc-
ties in acht. Controleer vóór de ingebruikname of
de juiste spanning beschikbaar is en of alle onder-
delen correct gemonteerd zijn. Wanneer u vragen
hebt of onzeker bent in verband met de bediening
van het apparaat, kunt u contact opnemen met uw
leverancier of met het servicepunt. Bewaar deze
handleiding op een veilige plaats en geef hem evt.
aan derden door.
Correct gebruik
Deze lamp is uitsluitend bedoeld voor ge-
bruik binnenshuis, in droge en gesloten
ruimten. Dit product is bestemd voor het
Inleiding / Veiligheid

37 NL/BE
Inleiding Inleiding / Veiligheid
gebruik in privé-huishoudens. Dit product is bestemd
voor het normale gebruik.
Omvang van de levering
Controleer de levering altijd direct na het uitpakken
o
p volledigheid en de optimale staat van het product.
1 LED-plafondlamp met Bluetooth-luidspreker,
model 14148106L
1 afstandsbediening
1 wandhouder voor de afstandsbediening (incl.
1 x kleefpad, 2 x schroeven)
2 batterijen AAA
3 pluggen
3 schroeven
2 beschermende slangen
1 montage- en bedieningshandleiding
Beschrijving van de onderdelen
Lamp:
1 Plug
2 Voet van de lamp
3 Kroonsteentje
4 Stroomkabel (extern)
5 Beschermende slang
6 Schroeven
7 Kunststof afdekking
8 Luidsprekerafdekking
9 Afstandsbediening
Afstandsbediening:
10 Knop ON (Lighting)
11 Knop OFF (Lighting)
12 Knop dimmer +
13 Knop dimmer –
14 Knop 30 minuten-timer
15 Knop OFF (audio)
16 Knop volume +
17 Knop muziektitel selecteren (voor)
18 Knop pauze / Bluetooth-verbinding standby
19 Knop muziektitel selecteren (terug)
20 Knop volume –
21 Knop ON (audio)
22 Wandhouder (afstandsbediening)
23 Schroeven (afstandsbediening)
24 Kleefpad (afstandsbediening)
Technische gegevens
Lamp:
Modelnummer: 14148106L
Bedrijfsspanning: 230 ‒ 240 V ~, 50 Hz
Totaal nominaal
vermogen: max. 25 W (led 20 W,
luidspreker 5 W)
Beschermingsklasse: | /
Beschermingstype: IP20
Led:
Lamp: led-module
Nominaal vermogen: led, max. 17,5 W
Beschermingstype: IP20
Luidspreker / Bluetooth:
Frequentiebereik
Luidspreker: 120 ‒ 20000 Hz
Bluetooth-versie: 5.0
Bluetooth-reikwijdte: < 10 m
Frequentiebereik
Bluetooth-frequentie: 2,4 GHz ISM frequentie-
band
HF-vermogen: max. +2dBm
Afstandsbediening:
Batterijen: 2 x 1,5 V AAA
Reikwijdte
afstandsbediening: 5‒6 m (infrarood)
Veiligheid
Veiligheidsinstructies
Bij beschadigingen die worden veroorzaakt door
het niet in acht nemen van deze gebruiksaanwijzing
vervalt de garantie! Wij zijn niet aansprakelijk voor
gevolgschade! Bij materiële schade of persoonlijk
letsel die worden veroorzaakt door onjuist gebruik

38 NL/BE
Veiligheid
of het niet in acht nemen van de veiligheidsinstructies
zijn wij niet aansprakelijk!
LEVENSGEVAAR EN KANS OP
ONGEVALLEN VOOR KLEUTERS
EN KINDEREN!
Laat kinderen nooit zonder toezicht bij het ver-
pakkingsmateriaal. Er bestaat verstikkingsgevaar
door het verpakkingsmateriaal. Kinderen on-
derschatten vaak de gevaren.
Laat de verlichting of de verpakking niet onbe-
heerd liggen. Plastic folie / -zakken, kunststof
delen etc. kunnen een gevaarlijk speelgoed
vormen voor kinderen.
Vermijd levensgevaar door
elektrische schok
Laat de elektronische installatie door een
opgeleide elektricien of een voor elektrische
installaties geïnstrueerde persoon uitvoeren.
Controleer de lamp en de stroomkabel voor het
aansluiten aan de stroom op eventuele bescha-
digingen. Gebruik uw lamp nooit indien u een
beschadiging constateert.
Beschadigde stroomkabels zorgen voor levens-
gevaar door elektrische schokken. Neem in geval
van beschadigingen, reparaties of andere pro-
blemen aan de lamp contact op met de klanten-
service of met een elektricien.
Verwijder voor de montage de zekering of
schakel de aardlekschakelaar in de zekering-
kast uit (0-stand).
Wees er voor de montage zeker van dat de
beschikbare netspanning overeenkomt met de
benodigde voedingsspanning van de lamp
(zie ‚Technische gegevens‘).
Vermijd dat de lamp in contact komen met
water of andere vloeistoffen.
Open nooit een van de elektrische delen en
steek er geen voorwerpen in. Bij dergelijke in-
grepen bestaat levensgevaar door elektrische
schokken.
De lamp niet op vochtige op geleidende
ondergrond installeren!
Vermijd brand- en
letselgevaar
Controleer de lamp direct na het uitpakken op
beschadigingen. Neem in geval van een be-
schadiging contact op met het servicepunt in
uw land.
VOORZICHTIG! KANS OP
BRANDWONDEN DOOR
HETE OPPERVLAKKEN!
Zorg ervoor dat de lamp uitgeschakeld en
afgekoeld is voordat u deze aanraakt om
brandwonden te vermijden. Lampen ontwikke-
len rondom de lampenkap een behoorlijke hitte.
De lichtbron van deze lamp mag alleen door
de fabrikant of een door hem geautoriseerde
technicus of een vergelijkbaar gekwalificeerde
persoon worden vervangen.
Deze lamp kan via de afstandsbediening ge-
dimd worden.
Niet direct in de lichtbron (verlichtingsbron,
led etc.) kijken.
Niet met optische instrumenten (bijv. vergroot-
glas) in de lichtbron kijken.
Zo handelt u correct
Monteer de lamp zo, zodat hij tegen vocht en
vuil beschermd is.
Bereid de montage zorgvuldig voor en maak hier
voldoende tijd voor vrij. Leg alle onderdelen en
extra benodigd gereedschap of materiaal van
tevoren overzichtelijk en binnen handbereik klaar.
Wees altijd alert! Let er altijd op wat u doet en
ga altijd verstandig te werk. Monteer de lamp
niet als u ongeconcentreerd bent of zich niet
lekker voelt.
Veiligheidsinstructies voor
batterijen / accu‘s
LEVENSGEVAAR!
Houd batterijen / accu‘s buiten het bereik van
kinderen. Raadpleeg bij inslikken onmiddellijk
een arts!
Veiligheid / Voorbereiding / Voor de installatie

39 NL/BE
Veiligheid Veiligheid / Voorbereiding / Voor de installatie
EXPLOSIEGEVAAR!
Laad niet oplaadbare batterijen nooit op. Sluit
de batterijen / accu‘s niet kort en / of open deze
niet. Daardoor kan de batterij oververhit raken,
in brand vliegen of exploderen.
Gooi batterijen / accu‘s nooit in het vuur of water.
Stel batterijen / accu‘s nooit bloot aan mecha-
nische belastingen.
Risico dat de batterijen / accu’s lekken
Vermijd extreme omstandigheden en temperatu-
ren die invloed op de batterijen / accu‘s zouden
kunnen hebben bijv. radiatoren / direct zonlicht.
Bij lekkende batterijen / accu‘s het contact van
de chemicaliën met de huid, ogen en slijmvlie-
zen vermijden! Spoel de desbetreffende plek-
ken direct af met schoon water en raadpleeg
onmiddellijk een arts!
DRAAG VEILIGHEIDSHAND-
SCHOENEN!
Lekkende of beschadigde batterijen / accu‘s
kunnen in geval van huidcontact chemische
brandwonden veroorzaken. Draag daarom in
dit geval geschikte veiligheidshandschoenen.
Als de batterijen / accu‘s lekken, dient u deze
direct uit het product te halen om beschadigin-
gen te vermijden.
Gebruik alleen batterijen / accu‘s van hetzelfde
type. Gebruik nooit nieuwe en oude batterijen /
accu‘s door elkaar!
Verwijder de batterijen / accu‘s, als u het product
gedurende een langere periode niet gebruikt.
Risico op beschadiging van het product
Gebruik uitsluitend het aangegeven type
batterij / accu!
Plaats de batterijen / accu‘s volgens de weer-
gegeven polariteit (+) en (-) op batterij / accu
en op product.
Reinig de contacten van de batterij / accu en
die in het batterijvak, voordat u deze plaatst!
Verwijder verbruikte batterijen / accu‘s direct
uit het product.
Voorbereiding
Benodigd gereedschap
en materiaal
Het genoemde gereedschap en materiaal wordt
niet meegeleverd. Het gaat hierbij om vrijblijvende
informatie en waarden ter oriëntatie. De hoedanig-
heid van het materiaal is afhankelijk van de indivi-
duele omstandigheden ter plekke.
- Potlood / markeerstift
- 2-polige spanningzoeker
- Schroevendraaier
- Boormachine
- Boor (ca. ø 6 mm)
- Hamer
- Zijsnijder
- Geleider
Voor de installatie
Belangrijk: Laat de installatie uitvoeren door een
opgeleide elektricien of een voor elektro-installaties
bevoegde persoon. Deze persoon moet op de hoogte
zijn van de eigenschappen van de lamp en van de
aansluitvoorwaarden.
Maak uzelf voor de installatie vertrouwd met
alle aanwijzingen en afbeeldingen in deze
gebruiksaanwijzing alsook met de lamp zelf.
Wees er voor de installatie zeker van dat de
leiding, waaraan de lamp wordt aangesloten,
geen spanning heeft. Verwijder hiervoor de
zekering of schakel de aardlekschakelaar uit
(0-stand).
Controleer met een 2-polige spanningzoeker
of de leiding spanningsloos is.
Pak de LED-plafondlamp uit en leg deze op
een anti-slip ondergrond. (wees voorzichtig,
dat hierbij geen krassen ontstaan).
Oefen met beide handen een beetje druk op
de kunststof afdekking 7 uit. Draai de kunst-
stof afdekking 7 daarbij tot aan de aanslag
tegen de klok in (tegen de richting van de pijl)
en haal de kunststof afdekking 7 naar boven
eraf.

40 NL/BE
Ingebruikname
Ingebruikname
Lamp monteren
Controleer voor de installatie of er op de lei-
ding waarop de lamp wordt aangesloten geen
spanning staat. Verwijder hiervoor de zekering
of schakel de betreffende installatie-automaat
in de groepenkast uit (0-stand).
Houd de voet van de lamp 2 op de gewenste
montageplek. Houd hierbij rekening met het
boorgat in de voet van de lamp 2 waardoor
de stroomkabel wordt geleid.
Markeer de drie boorgaten voor de schroeven
6 (zie afb.).
Boor de gaten. Zorg ervoor, dat de stroomka-
bel (extern) 4 niet beschadigd raakt.
Steek de pluggen 1 in de boorgaten. Gebruik,
indien nodig, een hamer.
Steek de kabel door het hiervoor bestemde
boorgat in de voet van de lamp 2 en beves-
tig de lamp aan het plafond.
De geïsoleerde aardingsdraad moet voor aan-
sluiting van de lamp met een extra isolatie wor-
den voorbereid.
Trek de meegeleverde beschermende slangen
5 over de stroomkabel (extern) 4.
Opmerking: Let erop dat u de individuele
geleider van de stroomkabel (extern) 4 steeds
correct aansluit: fasedraad, zwart of bruin =
symbool L, nuldraad, blauw = symbool N,
aarddraad, groen-geel = symbool .
Monteer de kunststof afdekking 7 van de
lamp. Plaats hiervoor de afdekking met de drie
inkepingen aan de desbetreffende bevestigings-
bout en druk deze naar boven. Draai de afdek-
king rechtsom (richting van de pijl) om deze te
bevestigen. De sticker met de pijl kan nu worden
verwijderd.
Plaats de zekering weer terug of schakel de
installatie-automaat in de groepenkast weer
in (I-stand).
Uw LED-plafondlamp met Bluetooth-luidspreker is
nu gereed voor gebruik.
Wandhouder monteren
Monteer de wandhouder 22 voor de afstands-
bediening 9 met behulp van de schroeven 23
of de kleefpads 24 (zie afb.).
Batterijen
plaatsen / vervangen
Opmerking: Voor de afstandsbediening 9 zijn
twee batterijen van het type AAA nodig (mee inbe-
grepen).
Schuif het deksel van het batterijvak (achter-
kant) ca. 1 cm naar onder om het te openen
en til het deksel er vervolgens vanaf.
Plaats twee batterijen van het meegeleverde
type AAA in het batterijvak. Let daarbij op de
juiste polariteit.
Plaats de afdekking weer terug en schuif deze
terug om het batterijvak te sluiten.
Uw afstandsbediening 9 is gereed voor gebruik.
Lamp via de lichtschakelaar
bedienen
De LED-plafondlamp kan via de wandschake-
laar in- en uitgeschakeld worden. De lichtinten-
siteit is hierbij altijd gelijk aan de laatst ingestelde
helderheid. Alle andere functies worden uitslui-
tend via de afstandsbediening 9 bediend.
Afstandsbediening gebruiken
OPGELET!
Alle functies van de afstandsbediening 9 staan
ter beschikking, als de LED-plafondlamp wordt in-
geschakeld met de wandschakelaar.
Ingebruikname

41 NL/BE
Ingebruikname Ingebruikname
Licht aan- / uitschakelen
1. Licht inschakelen
Druk op de „ “ knop (lighting) 10 , om de
LED-plafondlamp in te schakelen.
2. Licht uitschakelen
Druk op de „ “ knop (lighting) 11 , om de
LED-plafondlamp uit te schakelen.
Licht dimmen
1. Verlichtingssterkte verhogen
Druk op de „ “ knop dimmer + 12 , om de
verlichtingssterkte te laten toenemen. Bij kort-
stondig drukken van deze knop wordt de ver-
lichtingssterkte trapsgewijs per keer drukken
verhoogd. Wordt de „ “ knop dimmer + 12
langer ingedrukt, wordt de verlichtingssterkte
automatisch verhoogd tot de maximale helder-
heid.
2. Verlichtingssterkte verminderen
Druk op de „ “ knop dimmer – 13 , om de
verlichtingssterkte te verminderen.
Bij kortstondig
drukken van de
ze knop wordt de verlichtings-
sterkte trapsgewijs per keer drukken verminderd.
Wordt de „ “ knop dimmer – 13 langer in-
gedrukt, wordt de verlichtingssterkte automa-
tisch verminderd tot de minimale helderheid.
30 minuten-timer
1. Timer inschakelen
Druk gedurende ca. 3 seconden op de „ “
knop 14 om de timer-functie in te schakelen.
Het licht en ook de Bluetooth-functie (muziek)
worden automatisch na ca. 30 minuten uitge-
schakeld.
2. Timer uitschakelen
Wilt u de timer-functie tijdens de 30 minuten
uitschakelen, drukt u nogmaals gedurende meer
dan 3 seconden op de „ “ knop 14 .
De timer-functie is nu uitgeschakeld.
Opmerking: u kunt de timer alleen uitscha-
kelen als Bluetooth is geactiveerd.
Bluetooth-verbinding
1.
Bluetooth-verbinding tot stand brengen
Druk op de audio „ “ knop (audio) 21 . Het
ontvangstsignaal wordt bevestigd door middel
van een piep-geluid.
Ca. 1–2 seconden later wordt de Bluetooth-ver-
binding akoestisch ondersteund automatisch
opgebouwd, de blauwe LED in de LED-plafond-
lamp begint snel te knipperen.
Als de verbinding is opgebouwd, hoort u een
korte melodie.
Bij de eerste koppeling met uw mobiele telefoon,
tablet etc. selecteert u de Bluetooth-verbinding
„LED Ceiling Lamp“.
2. Bluetooth-verbinding beëindigen
Druk op de audio „ “ knop (audio) 15 . Het
ontvangstsignaal wordt bevestigd door middel
van een piep-geluid. De Bluetooth-verbinding
wordt beëindigd.
Na succesvolle verbinding staan u de vol-
gende audiobedieningen ter beschikking:
Muziekvolume regelen
1. Muziekvolume verminderen
Druk op de „ “ knop volume – 20 , om het
volume te verminderen. Bij kortstondig drukken
van deze knop wordt het volume trapsgewijs
per keer drukken verminderd. Wordt de „ “
knop volume – 20 langer ingedrukt, neemt het
volume automatisch af tot aan het minimum.
2. Muziekvolume verhogen
Druk op de „ “ knop volume + 16 , om het vo-
lume te verhogen. Bij kortstondig drukken van
deze knop wordt het volume trapsgewijs per
keer
drukken verhoogd. Wordt de „ “ knop vo-
lume +
16 langer ingedrukt, neemt het volume au-
tomatisch toe tot aan het maximale volume.

42 NL/BE
Ingebruikname / Onderhoud en reiniging / Afvoer
Muziektitel selecteren
1. Muziektitel terug
Druk op de „ “ knop muziektitel selecteren
(terug) 19 , om een eerdere muziektitel te selec-
teren of het lied nog een keer van begin af aan
te luisteren.
2. Muziektitel voor
Druk op de „ “ knop muziektitel selecteren
(voor) 17 , om de volgende muziektitel te
selecteren.
3. Pauze
Druk eventjes op de „ “ knop pauze / Blue-
tooth-verbinding standby 18 , om de pauze-
functie te activeren. Als er lang op de „ “
knop pauze / Bluetooth-verbinding standby 18
wordt gedrukt, wordt de Bluetooth-verbinding
gedurende ca. 10 minuten op standby gezet.
Daarna wordt de Bluetooth-verbinding uitge-
schakeld.
Onderhoud en reiniging
WAARSCHUWING! GEVAAR VOOR
ELEKTRISCHE SCHOK!
Verbreek voor de reiniging eerst de verbinding
van de lamp met het stroomnet. Verwijder hier-
voor de zekering of schakel het betreffende
stroomcircuit in de groepenkast uit (0-stand).
Gebruik geen oplosmiddel, benzine e.d. De
lamp zal hierdoor schade ondervinden.
Laat de lamp volledig afkoelen.
WAARSCHUWING! GEVAAR VOOR
ELEKTRISCHE SCHOK!
Op basis van de elektrische veiligheid mag de
verlichting nooit met water of andere vloeistof-
fen worden gereinigd of in zijn geheel in water
worden gedompeld.
Gebruik voor de reiniging alleen een droge,
pluisvrije doek.
Plaats de zekering vervolgens weer terug of
schakel de hoofdzekering in de zekeringskast
weer aan (I-stand).
Afvoer
De verpakking bestaat uit milieuvriendelijke grond-
stoffen die u via de plaatselijke recyclingcontainers
kunt afvoeren.
b
a
Neem de aanduiding van de verpak-
kingsmaterialen voor de afvalscheiding
in acht. Deze zijn gemarkeerd met de
afkortingen (a) en een cijfers (b) met de
volgende betekenis: 1–7: kunststoffen /
20–22: papier en vezelplaten / 80–98:
composietmaterialen.
Het product en de verpakkingsmaterialen
zijn recyclebaar; verwijder deze afzonder-
lijk voor een betere afvalbehandeling. Het
Triman-logo geldt alleen voor Frankrijk.
Gooi het afgedankte product omwille van
het milieu niet weg via het huisvuil, maar
geef het af bij het daarvoor bestemde
depot of het gemeentelijke milieupark.
Over afgifteplaatsen en hun openingstij-
den kunt u zich bij uw aangewezen in-
stantie informeren.
Defecte of verbruikte batterijen / accu‘s moeten vol-
gens de richtlijn 2006/66/EG en veranderingen
daarop worden gerecycled. Geef batterijen / accu‘s
en / of het product af bij de daarvoor bestemde
verzamelstations.
Milieuschade door foutieve verwij-
dering van de batterijen / accu‘s!
Batterijen / accu‘s mogen niet via het huisvuil worden
weggegooid. Ze kunnen giftige zware metalen be-
vatten en vallen onder het chemisch afval. De che-
mische symbolen van de zware metalen zijn: Cd =
cadmium, Hg = kwik, Pb = lood. Geef verbruikte
batterijen / accu‘s daarom af bij een gemeentelijk
inzamelpunt.
Afvoer / Garantie en service

43 NL/BE
Ingebruikname / Onderhoud en reiniging / Afvoer Afvoer / Garantie en service
Garantie en service
Garantie
Op dit product verlenen wij 36 maanden garantie
vanaf aankoopdatum. Het apparaat werd zorgvuldig
vervaardigd en aan een nauwkeurige kwaliteitscon-
trole onderworpen. Binnen de garantieperiode herstel-
len wij kosteloos alle materiaal- of productiefouten.
Mocht u desondanks tijdens de garantieperiode
mankementen constateren, stuur het apparaat dan
alstublieft naar het aangegeven serviceadres met
vermelding van het volgende artikelnummer:
14148106L.
Beschadigingen door ondeskundig gebruik, negeren
van de handleiding of ingrepen door niet-geautori-
seerde personen zijn van de garantieverlening
uitgesloten. Dit geldt eveneens voor aan slijtage on-
derhevige delen (zoals bijv. verlichtingsmiddelen).
Door de garantieservice wordt de garantieperiode
niet verlengd noch vernieuwd.
Serviceadres
Briloner Leuchten GmbH & Co. KG
Im Kissen 2
59929 Brilon
DUITSLAND
Tel.: +49 29 61 / 97 12–800
Fax: +49 29 61 / 97 12–199
E-mail: [email protected]
www.briloner.com
Gratis servicenummer:
Tel.: 00800 / 27456637
IAN 327743_2001
Houd alstublieft de kassabon en het artikelnummer
(bijv. IAN 123456_7890) voor alle aanvragen als
bewijs voor de koop gereed.
Conformiteitsverklaring
Dit product voldoet aan de eisen van de van toe-
passing zijnde Europese en nationale richtlijnen
(Richtlijn 2014 / 53 / EU, laagspanningsrichtlijn
2014 / 35 / EU, ecologische richtlijn
2009 / 125 / EG, RoHS-richtlijn 2011 / 65 / EU).
De conformiteit is aangetoond. Desbetreffende ver-
klaringen en documenten liggen ter inzage bij de
fabrikant.
Hiermee verklaart Briloner Leuchten GmbH & Co. KG
dat het type radiografische installatie 14148106L
voldoet aan de richtlijn 2014/53/EU. De volledige
tekst van de EU-conformiteitsverklaring staat ook via
het volgende internetadres ter beschikking:
https://www.briloner.com/de/service/informationen-
zu-leuchten/eu-konformitaetserklaerung-fuer-
funkanlagentyp.php
Fabrikant
Briloner Leuchten GmbH & Co. KG
Im Kissen 2
59929 Brilon
DUITSLAND

44
Spis zawartości

45 PL
Spis zawartości
Legenda zastosowanych piktogramów............................................................Strona 46
Instrukcja ......................................................................................................................................Strona 46
Zastosowanie zgodne z przeznaczeniem .....................................................................................Strona 47
Zawartość .........................................................................................................................................Strona 47
Opis części ....................................................................................................................................... Strona 47
Dane techniczne ..............................................................................................................................Strona 47
Bezpieczeństwo ......................................................................................................................Strona 48
Wskazówki bezpieczeństwa...........................................................................................................Strona 48
Wskazówki bezpieczeństwa dla baterii / akumulatorów .............................................................Strona 49
Przygotowanie .......................................................................................................................Strona 49
Potrzebne narzędzia i materiały .....................................................................................................Strona 49
Przed instalacją ......................................................................................................................Strona 50
Uruchomienie............................................................................................................................Strona 50
Montaż lampy ..................................................................................................................................Strona 50
Montaż uchwytu ściennego ............................................................................................................Strona 50
Wkładanie / wymiana baterii ..........................................................................................................Strona 50
Obsługa lampy za pomocą przełącznika światła .........................................................................Strona 51
Używanie pilota zdalnego sterowania ..........................................................................................Strona 51
Włączanie / wyłączanie światła .....................................................................................................Strona 51
Ściemnianie światła .........................................................................................................................Strona 51
Timer 30-minutowy ...........................................................................................................................Strona 51
Połączenie Bluetooth .......................................................................................................................Strona 51
Regulacja głośności muzyki .............................................................................................................Strona 52
Wybieranie utworów muzycznych ................................................................................................. Strona 52
Konserwacja i czyszczenie............................................................................................Strona 52
Utylizacja .....................................................................................................................................Strona 52
Gwarancja i serwis ..............................................................................................................Strona 53
Gwarancja .......................................................................................................................................Strona 53
Adres serwisu ...................................................................................................................................Strona 53
Deklaracja zgodności ......................................................................................................................Strona 54
Producent ..........................................................................................................................................Strona 54

46 PL
Instrukcja
Legenda zastosowanych piktogramów
Przeczytać instrukcję obsługi! Należy przestrzegać ostrzeżeń i
wskazówek bezpieczeństwa!
Wolt (napięcie przemienne) Ostrożnie! Niebezpieczeństwo
porażenia prądem elektrycznym!
Herc (częstotliwość) Prawidłowy sposób postępowania
Wat (moc czynna)
b
a
Opakowanie i urządzenie przekazać
do utylizacji zgodnie z przepisami o
ochronie środowiska!
Przewód ochronny Baterie poddać utylizacji zgodnie z
zasadami ochrony środowiska!
ON OFF Cykle włączania
Lampa ta nie nadaje się do użycia w
połączeniu z zewnętrznymi regula-
torami jasności światła i wyłącznikami
elektronicznymi.
Żywotność diod LED Niebezpieczeństwo utraty życia i
wypadku dla dzieci!
Niniejsza lampa nadaje się wyłącznie
do pracy wewnątrz, w suchych i
zamkniętych pomieszczeniach.
Opakowanie składa się w 100 % ze
zutylizowanego papieru.
Ostrożnie! Niebezpieczeństwo popar-
zenia gorącymi powierzchniami! Niebezpieczeństwo wybuchu!
Zakładać rękawice ochronne! Tylko do zastosowania w
pomieszczeniach
Funkcja minutnika (Timer) (30 min.)
Lampa sufitowa LED z
głośnikiem Bluetooth®
Instrukcja
Gratulujemy Państwu zakupu nowego
urządzenia. Zdecydowali się Państwo na
zakup produktu najwyższej jakości. Pro-
szę dokładnie przeczytać całą niniejszą instrukcję
obsługi. Proszę wypiąć stronę z rysunkami. Niniejsza
instrukcja obsługi należy do produktu. Zawiera ona
ważne wskazówki dotyczące uruchamiania i posłu-
giwania się produktem. Zawsze należy przestrzegać
wszystkich wskazówek dotyczących bezpieczeństwa.
Przed uruchomieniem proszę sprawdzić, czy wystę-
puje prawidłowe napięcie, i czy wszystkie części są
prawidłowo zamontowane. W przypadku zapytań lub
niepewności odnośnie obchodzenia się z urządze-
niem, prosimy o kontakt ze sprzedawcą lub punktem
serwisowym. Proszę starannie przechowywać niniej-
szą instrukcję obsługi, a w razie oddania urządze-
nia osobom trzecim przekazać ją wraz z nim.
Instrukcja

47 PL
Instrukcja Instrukcja
Zastosowanie zgodne z
przeznaczeniem
Niniejsza lampa nadaje się wyłącznie do
pracy wewnątrz, w suchych i zamknię-
tych pomieszczeniach. To urządzenie
przewidziano wyłącznie do użytku w prywatnym
gospodarstwie domowym. Produkt ten jest prze-
znaczony do normalnej pracy.
Zawartość
Bezpośrednio po wypakowaniu należy sprawdzić,
czy zestaw jest kompletny oraz czy urządzenie
znajduje się w nienagannym stanie.
1 lampa sufitowa LED z głośnikiem Bluetooth,
model 14148106L
1 pilot zdalnego sterowania
1 uchwyt ścienny na pilota zdalnego sterowania
(w zestawie 1 x płatek samoprzylepny, 2 x śruby)
2 baterie AAA
3 kołki
3 śruby
2 wężyki ochronne
1 instrukcja montażu i obsługi
Opis części
Lampa:
1 Kołki
2 Podstawa lampy
3 Kostka zaciskowa
4 Przewód zasilający (zewnętrzny)
5 Wężyk ochronny
6 Śruby
7 Osłona z tworzywa sztucznego
8 Osłona głośnika
9 Pilot zdalnego sterowania
Pilot zdalnego sterowania:
10 Przycisk ON (lighting)
11 Przycisk OFF (lighting)
12 Przycisk ściemniacz +
13 Przycisk ściemniacz –
14 Przycisk timer 30-minutowy
15 Przycisk OFF (audio)
16 Przycisk głośności +
17 Przycisk wyboru utworu muzycznego
(do przodu)
18 Przycisk pauzy / połączenie Bluetooth
standby
19 Przycisk wyboru utworu muzycznego
(z powrotem)
20 Przycisk głośności –
21 Przycisk ON (audio)
22 Uchwyt ścienny (pilot zdalnego sterowania)
23 Śruby (pilot zdalnego sterowania)
24 Płatek samoprzylepny (pilot zdalnego
sterowania)
Dane techniczne
Lampa:
Numer modelu: 14148106L
Napięcie robocze: 230 ‒ 240 V ~, 50 Hz
Moc znamionowa
łącznie: maks. 25 W (LED 20 W,
głośnik 5 W)
Klasa ochrony: | /
Rodzaj ochrony: IP20
LED:
Źródło światła: moduł LED
Moc znamionowa: LED, maks. 17,5 W
Rodzaj ochrony: IP20
Głośnik / Bluetooth:
Zakres częstotliwości
Głośnik: 120 ‒ 20 000 Hz
Wersja Bluetooth: 5.0
Zasięg Bluetooth: < 10 m
Zakres częstotliwości
Częstotliwość Bluetooth: 2,4 GHz pasmo częstotli-
wości ISM
Moc HF: maks. +2 dBm
Pilot zdalnego sterowania:
Baterie: 2 x 1,5 V AAA
Zasięg pilota zdalnego
sterowania: 5‒6 m (podczerwień)

48 PL
Bezpieczeństwo
Bezpieczeństwo
Wskazówki
bezpieczeństwa
W przypadku szkód spowodowanych nieprzestrze-
ganiem niniejszej instrukcji obsługi wygasa prawo
do gwarancji! Za szkody pośrednie producent nie
ponosi odpowiedzialności! W przypadku szkód
materialnych lub osobowych, które powstały wskutek
niewłaściwego obchodzenia się lub nieprzestrze-
gania wskazówek dotyczących bezpieczeństwa,
nie ponosimy żadnej odpowiedzialności!
ZAGROŻE-
NIE ŻYCIA I NIEBEZPIECZEŃ-
STWO WYPADKU U DZIECI!
Nigdy nie pozostawiać dzieci bez nadzoru z
materiałem opakowania. Istnieje zagrożenie
uduszeniem spowodowane przez materiał
opakowaniowy. Dzieci często nie dostrzegają
niebezpieczeństwa.
Lampy i materiału opakowania nie pozostawiać
bez nadzoru. Folie / woreczki plastikowe, ele-
menty z tworzywa sztucznego itp. mogą zostać
użyte przez dzieci jako niebezpieczna zabawka.
Porażenie prądem elektrycznym
grozi śmiercią
Przeprowadzenie instalacji elektrycznej należy
zlecić wykwalifikowanemu elektrykowi lub oso-
bie przeszkolonej w zakresie instalacji elek-
trycznych.
Przed każdym podłączeniem do sieci elek-
trycznej należy dokonać kontroli lampy oraz
przewodu zasilającego pod względem uszko-
dzeń. Nigdy nie używać lampy w razie stwier-
dzenia jakichkolwiek uszkodzeń.
Uszkodzone przewody sieciowe stwarzają nie-
bezpieczeństwo utraty życia wskutek poraże-
nia prądem elektrycznym. W razie uszkodzeń,
napraw lub innych problemów z lampą należy
zwrócić się do punktu serwisowego lub do ele-
ktryka.
Przed rozpoczęciem montażu wyjąć bezpiecznik
lub wyłączyć wyłącznik nadmiarowo-prądowy
w skrzynce bezpiecznikowej (położenie 0).
Przed montażem należy upewnić się, że dostępne
napięcie sieci jest zgodne z wymaganym na-
pięciem roboczym lampy (patrz „Dane tech-
niczne“).
Bezwzględnie unikać kontaktu lampy z wodą
lub innymi cieczami.
Nigdy nie otwierać elementów elektrycznych i
nie wkładać do nich jakichkolwiek przedmiotów.
Taka ingerencja oznacza zagrożenie życia
poprzez porażenie prądem.
Lampy nie należy instalować na podłożu
wilgotnym lub przewodzącym prąd!
Jak uniknąć zagrożenia
pożarowego i obrażeń ciała
Zaraz po rozpakowaniu należy sprawdzić,
czy lampa nie jest uszkodzona. W przypadku
uszkodzenia należy zwrócić się do serwisu.
OSTROŻNIE! NIEBEZPIECZEŃ-
STWO POPARZENIA GORĄ-
CYMI POWIERZCHNIAMI!
Aby uniknąć oparzenia, należy upewnić się
przed dotknięciem lampy, że jest ona wyłą-
czona i schłodzona. Żarówki wytwarzają w
obrębie głowicy lampy wysokie temperatury.
Źródło światła tej lampy może być wymieniane
wyłącznie przez producenta lub upoważnio-
nego przez niego technika lub osobę o podob-
nych kwalifikacjach.
Lampę można ściemniać pilotem zdalnego
sterowania.
Nie należy bezpośrednio wpatrywać się w
źródło światła (żarówki, LED, itp.).
Nie patrzeć w źródło światła przez instrumenty
optyczne (np. lupa).
Prawidłowy sposób
postępowania
Lampę zamontować w taki sposób, aby była
zabezpieczona przed wilgocią, wiatrem i za-
nieczyszczeniami.
Bezpieczeństwo / Przygotowanie

49 PL
Bezpieczeństwo Bezpieczeństwo / Przygotowanie
Starannie przygotować montaż i zarezerwować
sobie wystarczającą ilość czasu. Wszystkie po-
jedyncze elementy i dodatkowo potrzebne na-
rzędzia lub materiał należy wcześniej ułożyć w
sposób przejrzysty i pod ręką.
Zachować ostrożność! Zawsze zwracać uwagę
na wykonywane czynności i kierować się roz-
sądkiem. Nie należy wykonywać montażu
lampy w przypadku braku koncentracji lub
złego samopoczucia.
Wskazówki
bezpieczeństwa dla
baterii / akumulatorów
ZAGROŻENIE ŻYCIA!
Baterie / akumulatory należy trzymać poza
zasięgiem dzieci. W przypadku połknięcia
należy natychmiast udać się do lekarza!
NIEBEZPIECZEŃSTWO
WYBUCHU!
Baterii jednorazowego użytku nie wolno łado-
wać ponownie. Baterii / akumulatorów nie
należy zwierać i / lub otwierać. Może to dopro-
wadzić do przegrzania, pożaru lub wybuchu.
Nigdy nie należy wrzucać baterii / akumulatorów
do ognia lub wody.
Nigdy nie należy narażać baterii / akumulatorów
na obciążenia mechaniczne.
Ryzyko wycieku kwasu z baterii /
akumulatorów
Należy unikać ekstremalnych warunków i tem-
peratur, które mogą oddziaływać na baterie /
akumulatory, np. kaloryferów / bezpośredniego
działania promieniowania słonecznego.
Jeśli wyciekną baterie / akumulatory, należy
unikać kontaktu skóry, oczu i błon śluzowych z
chemikaliami! Dotknięte miejsca natychmiast
przepłukać czystą wodą i udać się do lekarza!
ZAKŁADAĆ RĘKAWICE
OCHRONNE!
Wylane lub uszkodzone baterie / akumulatory
po dotknięciu skóry mogą spowodować
poparzenia chemiczne. Dlatego należy w ta-
kim przypadku nakładać odpowiednie ręka-
wice ochronne.
W przypadku wycieku baterii / akumulatorów
natychmiast usunąć je z produktu, aby uniknąć
uszkodzeń.
Używać wyłącznie baterii / akumulatorów tego
samego typu. Nie zakładać razem nowych
oraz zużytych baterii / akumulatorów!
Jeżeli produkt nie jest przez dłuższy czas uży-
wany, baterie / akumulatorynależy wyjąć.
Ryzyko uszkodzenia produktu
Używać wyłącznie zalecanego rodzaju baterii /
akumulatora!
Włożyć baterie / akumulatory zgodnie z ozna-
czeniem biegunów (+) i (-) na baterii / akumu-
latorze i produkcie.
Jeśli to konieczne, oczyścić styki baterii / aku-
mulatora i w komorze baterii przed włożeniem
baterii!
Zużyte baterie / akumulatory wyjąć jak naj-
szybciej z produktu.
Przygotowanie
Potrzebne narzędzia i
materiały
Wymienione narzędzia i materiały nie są częścią
zestawu. Są to jedynie niewiążące informacje i
wartości orientacyjne. Właściwości materiału za-
leżą od indywidualnych warunków w pomieszczeniu.
- ołówek / narzędzie do oznaczania
- 2-biegunowy detektor napięcia
- śrubokręt
- wiertarka
- wiertło (ok. ø 6 mm)
- młotek
- szczypce do cięcia drutu
- drabina

50 PL
Przed instalacją / Uruchomienie
Przed instalacją
Ważne: Wykonanie podłączenia elektrycznego
należy zlecić wykwalifikowanemu elektrykowi lub
osobie przeszkolonej w zakresie wykonywania in-
stalacji elektrycznych. Osoba ta musi posiadać
wiedzę na temat właściwości lampy i przepisów
dotyczących podłączania.
Przed instalacją należy zapoznać się ze wszyst-
kimi instrukcjami i rysunkami zawartymi w
niniejszej instrukcji oraz z samą lampą.
Przed instalacją należy upewnić się, że prze-
wód, do którego ma być podłączona lampa,
nie znajduje się pod napięciem. W tym celu
należy wyjąć bezpiecznik lub wyłączyć wy-
łącznik instalacyjny w skrzynce bezpieczniko-
wej (pozycja 0).
Sprawdzić brak napięcia za pomocą 2-biegu-
nowego detektora napięcia.
Rozpakować lampę sufitową LED i położyć na
antypoślizgowej podkładce. (Zachować ostroż-
ność, aby nie powstały przy tym zadrapania).
Lekko nacisnąć oburącz osłonę z tworzywa
sztucznego 7. Przy tym przekręcić osłonę z
tworzywa sztucznego 7 aż do oporu w kie-
runku odwrotnym do ruchu wskazówek zegara
(odwrotnie do kierunku strzałki) i zdjąć osłonę
z tworzywa sztucznego 7 w górę.
Uruchomienie
Montaż lampy
Przed instalacją należy upewnić się, że prze-
wód, do którego ma być podłączona lampa,
nie znajduje się pod napięciem. W tym celu
należy wyjąć bezpiecznik lub wyłączyć wy-
łącznik nadmiarowo-prądowy w skrzynce bez-
piecznikowej (pozycja 0).
Przytrzymać podstawę lampy 2 na żądanej
pozycji montażowej. Przy tym zwrócić uwagę
na nawiercony otwór w podstawie lampy 2,
przez który przeprowadzany jest przewód za-
silający.
Zaznaczyć trzy otwory do nawiercenia na
śruby 6 (patrz rys.).
Wywiercić otwory. Upewnić się, że nie uszkodzi
się przewodu zasilającego (zewnętrznego) 4.
Do wywierconych otworów włożyć kołki 1.
W razie konieczności użyć młotka.
Wprowadzić przewód zasilający przez prze-
widziany do tego otwór w podstawie lampy
2 i zamocować lampę na suficie.
Przed podłączeniem lampy należy przygoto-
wać izolowane okablowanie podstawowe z
dodatkową izolacją.
Naciągnąć dołączone wężyki ochronne 5
na przewód zasilający (zewnętrzny) 4.
Wskazówka: Należy zwrócić uwagę, aby
prawidłowo podłączyć poszczególne przewody
zasilającego (zewnętrznego) 4: przewód prze-
wodzący prąd, czarny lub brązowy = symbol L,
przewód zerowy, niebieski = symbol N, prze-
wód ochronny, zielono-żółty = symbol .
Zamontować osłonę z tworzywa sztucznego
7 lampy. W tym celu przyłożyć osłonę trzema
nacięciami do odpowiednich kołków utrzymują-
cych i wcisnąć ją od góry. Przekręcić osłonę w
prawo w kierunku ruchu wskazówek zegara
(kierunek strzałki), aby ją zamocować. Następ-
nie można usunąć naklejkę ze strzałką.
Ponownie włożyć bezpiecznik lub włączyć
wyłącznik nadmiarowo-prądowy na skrzynce
bezpiecznikowej (pozycja I).
Lampa sufitowa LED z głośnikiem Bluetooth jest
gotowa do uruchomienia.
Montaż uchwytu ściennego
Zamontować uchwyt ścienny 22 na pilota
zdalnego sterowania 9 za pomocą śrub 23
lub płatka samoprzylepnego 24 (patrz rys.).
Wkładanie / wymiana baterii
Wskazówka: Do pilota zdalnego sterowania 9
należy użyć dwóch baterii typu AAA (zawarte w
zestawie).
Uruchomienie

51 PL
Przed instalacją / Uruchomienie Uruchomienie
W celu otworzenia przesunąć osłonę komory
baterii (strona odwrotna) ok. 1 cm w dół i pod-
nieść pokrywę.
Włożyć dwie baterie dołączonego typu AAA
do komory baterii. Należy przy tym zwrócić
uwagę na prawidłowe ułożenie biegunów.
Ponownie założyć osłonę i nasunąć ją z po-
wrotem, aby zamknąć komorę baterii.
Pilot zdalnego sterowania 9 jest gotowy do uru-
chomienia.
Obsługa lampy za pomocą
przełącznika światła
Lampa sufitowa LED może być włączana i
wyłączana ściennym przełącznikiem światła.
Intensywność światła odpowiada przy tym za-
wsze ostatnio ustawionej jasności. Wszystkimi
innymi funkcjami można sterować tylko za po-
mocą pilota zdalnego sterowania 9.
Używanie pilota zdalnego
sterowania
UWAGA!
Wszystkie funkcje pilota 9 są dostępne, gdy
lampa sufitowa LED jest włączona przy pomocy
przełącznika na ścianie.
Włączanie / wyłączanie
światła
1. Włączanie światła
Nacisnąć przycisk „ “ (Lighting) 10 , aby
włączyć lampę sufitową LED.
2. Wyłączanie światła
Nacisnąć przycisk „ “ (Lighting) 11 , aby
wyłączyć lampę sufitową LED.
Ściemnianie światła
1. Zwiększanie intensywności oświetlenia
Nacisnąć przycisk „ “ Dimmer + 12 , aby
zwiększyć intensywność oświetlenia. Przy krót-
kim naciskaniu tego przycisku intensywność
oświetlenia zwiększa się stopniowo za każdym
naciśnięciem. Jeśli długo naciśnie się przycisk
„“ Dimmer + 12 , to automatycznie zwiększa
się intensywność oświetlenia do maksymalnej
wartości.
2. Zmniejszanie intensywności oświetlenia
Nacisnąć przycisk „ “ Dimmer – 13 , aby
zmniejszyć intensywność oświetlenia. Przy
krótkim naciskaniu tego przycisku intensywność
oświetlenia zmniejsza się stopniowo za każdym
naciśnięciem. Jeśli długo naciśnie się przycisk
„“ Dimmer – 13 , to automatycznie zmniejsza
się intensywność oświetlenia do minimalnej
wartości.
Timer 30-minutowy
1. Włączanie timera
Nacisnąć przycisk „ “ 14 na ok. 3 sekundy,
aby włączyć funkcję timera.
Światło i funkcja Bluetooth (Musik) zostaną
automatycznie wyłączone po ok. 30 minutach.
2. Wyłączanie timera
Jeśli w ciągu 30 minut chce się wyłączyć funkcję
Timer, to należy ponownie nacisnąć przycisk
„“ 14 przez dłuższy czas niż 3 sekundy.
Funkcja minutnika jest teraz wyłączona.
Wskazówka: funkcję minutnika można wy-
łączyć tylko, gdy aktywny jest Bluetooth.
Połączenie Bluetooth
1. Nawiązywanie połączenia Bluetooth
Nacisnąć przycisk audio „ “ (audio) 21 .
Odbierany sygnał zostanie potwierdzony pik-
nięciem.

52 PL
Utylizacja / Gwarancja i serwisUruchomienie / Konserwacja i czyszczenie / Utylizacja
Ok. 1‒2 sekundy później połączenie Bluetooth
zostanie nawiązane z dźwiękiem akustycznym,
niebieska dioda LED w lampie sufitowej LED
zacznie migać.
Jeśli połączenie zostanie nawiązane, to zabrzmi
krótka melodia.
Przy pierwszym połączeniu z komórką, tabletem
itp. należy wybrać połączenie Bluetooth „LED
Ceiling Lamp“.
2. Zakończenie połączenia Bluetooth
Nacisnąć przycisk audio „ “ (audio) 15 .
Odbierany sygnał zostanie potwierdzony pik-
nięciem. Połączenie Bluetooth zostaje zakoń-
czone.
Po udanym połączeniu dostępne jest
następujące sterowanie audio:
Regulacja głośności muzyki
1. Zmniejszanie głośności muzyki
Nacisnąć przycisk „ “ głośność – 20 , aby
zmniejszyć głośność. Przy krótkim naciskaniu
tego przycisku głośność zmniejsza się stopniowo
za każdym naciśnięciem. Jeśli długo naciśnie
się przycisk „ “ głośność – 20 , to automa-
tycznie zmniejsza się głośność do minimalnej
wartości.
2. Zwiększanie głośności muzyki
Nacisnąć przycisk „ “ głośność + 16 , aby
zwiększyć głośność. Przy krótkim naciskaniu
tego przycisku głośność zwiększa się stopniowo
za każdym naciśnięciem. Jeśli długo naciśnie
się przycisk „ “ głośność + 16 , to automa-
tycznie zwiększa się głośność do maksymalnej
wartości.
Wybieranie utworów
muzycznych
1. Utwór muzyczny z powrotem
Nacisnąć przycisk „ “ wyboru utworu muzycz-
nego (z powrotem) 19 , aby wybrać wcześniejszy
tytuł lub piosenkę jeszcze raz odtworzyć od
początku.
2. Utwór muzyczny do przodu
Nacisnąć przycisk „ “ wyboru utworu
muzycznego (do przodu) 17 , aby wybrać
następny tytuł.
3. Przerwa
Nacisnąć krótko przycisk „ “ Przerwa / Połą-
czenie Bluetooth Standby 18 , aby aktywować
funkcje przerwy. Jeśli długo naciśnie się przy-
cisk „ “ Przerwa / Połączenie Bluetooth Stan-
dby 18 , to połączenie Bluetooth przejdzie w
tryb Standby na ok. 10 min. Po tym połączenie
Bluetooth zostaje wyłączone.
Konserwacja i czyszczenie
OSTRZEŻENIE! NIEBEZPIECZEŃSTWO
PORAŻENIA PRĄDEM ELEKTRYCZNYM!
Przed rozpoczęciem czyszczenia najpierw
odłączyć lampę od sieci elektrycznej. W tym
celu należy wyjąć bezpiecznik lub wyłączyć
wyłącznik nadmiarowo-prądowy w skrzynce
bezpiecznikowej (pozycja 0).
Nie używać rozpuszczalników, benzyny itp.
Mogłoby to spowodować uszkodzenie lampy.
Odczekać, aż lampa całkowicie ostygnie.
OSTRZEŻENIE! NIEBEZPIECZEŃSTWO
PORAŻENIA PRĄDEM ELEKTRYCZNYM!
Ze względu na zachowanie bezpieczeństwa w
zakresie elektryczności nie wolno czyścić lampy
za pomocą wody lub innych płynów, ani też
zanurzać w wodzie.
Do czyszczenia należy używać wyłącznie
suchej, niestrzępiącej się szmatki.
Następnie ponownie włożyć bezpiecznik lub
włączyć wyłącznik nadmiarowo-prądowy na
skrzynce bezpiecznikowej (pozycja I).
Utylizacja
Opakowanie wykonane jest z materiałów przyja-
znych dla środowiska, które można przekazać do

53 PL
Utylizacja / Gwarancja i serwisUruchomienie / Konserwacja i czyszczenie / Utylizacja
utylizacji w lokalnym punkcie przetwarzania surow-
ców wtórnych.
b
a
Przy segregowaniu odpadów prosimy
zwrócić uwagę na oznakowanie mate-
riałów opakowaniowych, oznaczone są
one skrótami (a) i numerami (b) o nastę-
pującym znaczeniu: 1–7: Tworzywa
sztuczne / 20–22: Papier i tektura /
80–98: Materiały kompozytowe.
Produkt i materiał opakowania nadają
się do ponownego przetworzenia, na-
leży je zutylizować osobno w celu lep-
szego przetworzenia odpadów. Logo
Triman jest ważne tylko dla Francji.
Z uwagi na ochronę środowiska nie wy-
rzucać urządzenia po zakończeniu eks-
ploatacji do odpadów domowych, lecz
prawidłowo zutylizować. Informacji o
punktach zbiorczych i ich godzinach
otwarcia udziela odpowiedni urząd.
Uszkodzone lub zużyte baterie / akumulatory muszą
być poddane recyklingowi zgodnie z dyrektywą
2006/66/WE i jej zmianami. Oddać baterie /
akumulatory i / lub produkt w dostępnych punktach
zbiórki.
Niewłaściwa utylizacja baterii /
akumulatorów stwarza zagroże-
nie dla środowiska naturalnego!
Baterii / akumulatorów nie należy wyrzucać razem
z odpadami domowymi. Mogą one zawierać szko-
dliwe metale ciężkie i należy je traktować jak odpady
specjalne. Symbole chemiczne metali ciężkich są
następujące: Cd = kadm, Hg = rtęć, Pb = ołów.
Dlatego też zużyte baterie / akumulatory należy
przekazywać do komunalnych punktów gromadze-
nia odpadów niebezpiecznych.
Gwarancja i serwis
Gwarancja
W momencie zakupu otrzymują Państwo na to
urządzenie 36 miesięcy gwarancji. Urządzenie
wyprodukowano starannie i poddano dokładnej
kontroli jakości. W okresie gwarancji usuwamy bez-
płatnie wszystkie wady materiałowe lub fabryczne.
Jeśli mimo to w okresie gwarancji pojawią się usterki,
urządzenie należy przesłać na podany adres ser-
wisowy, podając następujący numer artykułu:
14148106L.
Gwarancji nie podlegają uszkodzenia spowodowane
przez nieprawidłowe użytkowanie, nieprzestrzega-
nie instrukcji obsługi lub ingerencję nieautoryzowa-
nych osób, a także części szybko zużywające się
(jak np. elementy świetlne). Usługa gwarancyjna
nie przedłuża ani nie odnawia okresu gwarancji.
Zgodnie z Kodeksem Cywilnym art. 581 §1 wraz
z wymianą urządzenia lub ważnej części czas
gwarancji rozpoczyna się na nowo.
Adres serwisu
Briloner Leuchten GmbH & Co. KG
Im Kissen 2
59929 Brilon
NIEMCY
Tel.: +49 29 61 / 9712-800
Faks: +49 29 61 / 9712-199
E-mail: kundenser[email protected]
www.briloner.com
Bezpłatny numer serwisu:
Tel.: 00800 / 27456637
IAN 327743_2001
Przed skontaktowaniem się z działem serwisowym
należy przygotować paragon i numer artykułu (np.
IAN 123456_7890) jako dowód zakupu.

54 PL
Gwarancja i serwis
Deklaracja zgodności
Niniejszy produkt spełnia wymagania obowiązują-
cych dyrektyw europejskich i przepisów krajowych
(Dyrektywa 2014 / 53 / UE, dyrektywa w sprawie
niskich napięć 2014 / 35 / UE, dyrektywa doty-
cząca ekoprojektu 2009 / 125 / WE, dyrektywa
RoHS 2011 / 65 / UE). Zgodność została wyka-
zana. Odpowiednie deklaracje i dokumenty są
przechowywane przez producenta.
Niniejszym Briloner Leuchten GmbH & Co. KG
oświadcza, że typ urządzeń radiowych 14148106L
odpowiada dyrektywie 2014/53/UE. Pełna treść
deklaracji zgodności UE jest dostępna pod nastę-
pującym adresem internetowym:
https://www.briloner.com/de/service/informationen-
zu-leuchten/eu-konformitaetserklaerung-fuer-
funkanlagentyp.php
Producent
Briloner Leuchten GmbH & Co. KG
Im Kissen 2
59929 Brilon
NIEMCY
Obsah

55 CZ
Gwarancja i serwis Obsah
Legenda použitých piktogramů ............................................................................... Strana 56
Úvod .................................................................................................................................................Strana 56
Použití ke stanovenému účelu..........................................................................................................Strana 56
Obsah dodávky ............................................................................................................................... Strana 57
Popis dílů ..........................................................................................................................................Strana 57
Technická data .................................................................................................................................Strana 57
Bezpečnost ..................................................................................................................................Strana 57
Bezpečnostní pokyny .......................................................................................................................Strana 57
Bezpečnostní pokyny pro baterie a akumulátory .......................................................................... Strana 58
Příprava ........................................................................................................................................Strana 59
Potřebné nářadí a materiál ..............................................................................................................Strana 59
Před instalací .............................................................................................................................Strana 59
Uvedení do provozu ...........................................................................................................Strana 60
Montáž svítidla .................................................................................................................................Strana 60
Montáž nástěnného držáku ............................................................................................................ Strana 60
Vložení a výměna baterií .................................................................................................................Strana 60
Zapínání a vypínání svítidla vypínačem .........................................................................................Strana 60
Používání dálkového ovládání ........................................................................................................ Strana 60
Zapínání a vypínání světla ..............................................................................................................Strana 60
Tlumení světla ................................................................................................................................... Strana 61
Časovač až na 30 minut .................................................................................................................Strana 61
Bluetooth spojení ..............................................................................................................................Strana 61
Regulace hlasitost hudby .................................................................................................................Strana 61
Volba hudebního titulu .....................................................................................................................Strana 61
Údržba a čištění ......................................................................................................................Strana 62
Zlikvidování ...............................................................................................................................Strana 62
Záruka a servis ....................................................................................................................... Strana 62
Záruka ..............................................................................................................................................Strana 62
Adresa servisu .................................................................................................................................. Strana 63
Prohlášení o shodě ...........................................................................................................................Strana 63
Výrobce ............................................................................................................................................Strana 63

56 CZ
Úvod
Legenda použitých piktogramů
Přečtěte si návod kobsluze! Dbát na výstražná a bezpečnostní
upozornění!
Volt (střídavé napětí) Varování! Nebezpečí zásahu
elektrickým proudem!
Hertz (frekvence) Takto postupujete správně
Watt (příkon)
b
aObal a přístroj odstraňujte do odpadu
ekologicky!
Ochranný vodič Odstraňujte baterie do odpadu
ekologicky!
ON OFF Spínací cykly Toto svítidlo není vhodné kpoužití
sexterními stmívači a elektronickými
spínači.
Životnost LED Nebezpečí ohrožení života a nehody
malých a velkých dětí!
Toto svítidlo je určeno výhradně
kpoužití vinteriéru, vsuchých a
uzavřených místnostech.
Obal je vyroben ze 100 %
recyklovatelného papíru.
Varování! Nebezpečí popálení
ohorký povrch! Nebezpečí výbuchu!
Používejte ochranné rukavice! Jen pro vnitřní prostory
Funkce časovače (30 minut)
Stropní LED svítidlo s Bluetooth®
reproduktorem
Úvod
Blahopřejeme vám ke koupi nového vý-
robku. Rozhodli jste se tím pro vysoce
kvalitní výrobek. Přečtěte si laskavě kom-
pletně a pečlivě tento návod k obsluze. Rozevřete
stránku sobrázky. Tento návod je součástí tohoto
výrobku a obsahuje důležité informace k jehouve-
dení do provozu a kzacházení sním. Řiďte se vždy
bezpečnostními pokyny. Před uvedením do provozu
zkontrolujte, jestli je kdispozici správné napětí a
jestli jsou všechny díly správně namontované. Jest-
liže máte ještě otázky nebo jste si nejistí při ovládání
přístroje, kontaktujte vašeho prodejce nebo servis.
Návod pečlivě uschovejte a případně jej předejte
třetí osobě.
Použití ke stanovenému účelu
Toto svítidlo je určené výhradně pro pro-
voz vinteriéru, vsuchých a uzavřených
místnostech. Tento přístroj je určen pouze
k použití v domácnosti. Tento výrobek je určen pro
normální provoz.
Úvod / Bezpečnost

57 CZ
Úvod Úvod / Bezpečnost
Obsah dodávky
Bezprostředně po vybalení vždy zkontrolujte úplnost
dodávky a bezvadný stav zařízení.
1 stropní LED svítidlo sreproduktorem Bluetooth,
model 14148106L
1 dálkové ovládání
1 nástěnný držák pro dálkové ovládání (obsahuje
1x lepicí polštářek, 2 x šroub)
2 baterie AAA
3 hmoždinky
3 šrouby
2 ochranné hadičky
1 návod k montáži a obsluze
Popis dílů
Svítidlo:
1 Hmoždinky
2 Základna světla
3 Svorka svítidla
4 Síťový připojovací kabel (externí)
5 Ochranná hadička
6 Šrouby
7 Umělohmotný kryt
8 Kryt reproduktoru
9 Dálkový ovladač
Dálkové ovládání:
10 Tlačítko ZAP (osvětlení)
11 Tlačítko VYP (osvětlení)
12 Tlačítko stmívače +
13 Tlačítko stmívače -
14 Tlačítko časovače na 30 minut
15 Tlačítko VYP (zvuk)
16 Tlačítko hlasitosti +
17 Tlačítko výběru skladby (vpřed)
18 Tlačítko Pauza / připojení bluetooth standby
19 Tlačítko výběru skladby (zpět)
20 Tlačítko hlasitosti -
21 Tlačítko ZAP (zvuk)
22 Nástěnný držák (dálkový ovladač)
23 Šrouby (dálkový ovladač)
24 Lepicí polštářek (dálkový ovladač)
Technická data
Svítidlo:
Model číslo: 14148106L
Provozní napětí: 230 ‒ 240 V ~, 50 Hz
Celkový jmenovitý výkon: maximálně 25 W (LED
20 W, reproduktor 5 W)
Třída ochrany: | /
Druh ochrany: IP20
LED:
Osvětlovací prostředek: LED modul
Jmenovitý výkon: LED, maximálně 17,5 W
Druh ochrany: IP20
Reproduktor / Bluetooth:
Frekvenční rozsah
Reproduktor: 120 ‒ 20000 Hz
Verze Bluetooth: 5.0
Detekční oblast
bluetooth: < 10 m
Frekvenční rozsah
Frekvenční pásmo
Bluetooth: 2,4 GHz ISM frekvenční
pásmo
HF výkon: maximálně +2dBm
Dálkové ovládání:
Baterie: 2 x 1,5 V AAA
Dosah dálkového
ovládání: 5‒6 m (infračervené)
Bezpečnost
Bezpečnostní pokyny
Při škodách způsobených nedodržením tohoto ná-
vodu k obsluze zaniká záruka! Za následné škody
se neručí! Za věcné nebo osobní škody, způsobené
neodborným zacházením nebo nerespektováním
bezpečnostních pokynů, se neručí!
NEBEZPEČÍ
OHROŽENÍ ŽIVOTA A ZRANĚNÍ
MALÝCH A VĚTŠÍCH DĚTÍ!
Nenechávejte děti nikdy bez dohledu

58 CZ
Bezpečnost
sobalovým materiálem. Hrozí nebezpečí udu-
šení obalovým materiálem. Děti často podcení
nebezpečí.
Nenechávejte lampu nebo obalový materiál
ležet bez dohledu. Plastové fólie / pytlíky, umě-
lohmotné díly atd. by mohly být pro děti nebez-
pečnou hračkou.
Zabraňte ohrožení života v
důsledku zásahu elektrickým
proudem
Elektrickou instalaci nechte provádět jen vyuče-
ného elektrikáře nebo osobu s odpovídajícími
zkušenostmi.
Před každým připojením na přívod elektrického
proudu kontrolujte svítidlo a připojovací kabel,
jestli nejsou poškozené. Nikdy nepoužívejte sví-
tidlo, pokud jste zjistili, že je poškozené.
Poškozené síťové kabely znamenají nebezpečí
ohrožení života elektrickým proudem. Při po-
škozeních, opravách nebo jiných problémech
se obraťte na servis nebo na kvalifikovaného
elektrikáře.
Před montáží odstraňte pojistku nebo vypněte
jistič v pojistkové skříni (poloha 0).
Před montáží se přesvědčte, jestli se shoduje
napětí elektrického proudu, které máte k dispo-
zici s napětím potřebným pro svítidlo (viz
„Technická data“).
Bezpodmínečně zabraňte kontaktu lampy
svodou nebo jinými kapalinami.
Nikdy neotvírejte žádný z elektrických provoz-
ních prostředků ani do nich nestrkejte jakékoli
předměty. Takové zásahy znamenají nebezpečí
ohrožení života elektrickým proudem.
Neinstalujte svítidlo na vlhkém nebo vodivém
povrchu!
Vyvarujte se nebezpečí
požáru a poranění
Bezprostředně po vybalení zkontrolujte svítidlo,
jestli není poškozené. Vpřípadě poškození
kontaktujte servis.
POZOR! NEBEZPEČÍ POPÁ-
LENÍ HORKÝMI POVRCHY!
Před dotykem se ujistěte, že je světlo vypnuté a
vychladlé, aby jste se vyhnuli popáleninám.
Svíticí prostředky vyvinou v oblasti hlavy lampy
silné horko.
Světelný zdroj tohoto světla smí vyměnit jen vý-
robce nebo výrobcem pověřený technik anebo
srovnatelně kvalifikovaná osoba.
Toto svítidlo umožňuje tlumení světla pomocí
dálkového ovladače.
Nedívejte se přímo do zdroje světla (žárovka
LED atd.).
Nedívejte se optickými zařízeními do zdroje
světla (např. lupa).
Tak postupujete správně
Montujte lampu tak, aby byla chráněna před
vlhkem a znečištěním.
Montáž nejdříve pečlivě připravte, udělejte si na
ní čas. Připravte si předtím přehledně všechny
jednotlivé díly a navíc potřebné nástroje nebo
materiál.
Buďte vždy pozorní! Dbejte vždy na to, co
děláte, a postupujte vždy srozumem. Nikdy
nemontujte svítidlo, nejste-li koncentrovaní nebo
necítíte-li se dobře.
Bezpečnostní pokyny pro
baterie a akumulátory
NEBEZPEČÍ OHROŽENÍ ŽIVOTA!
Uchovávejte baterie a akumulátory mimo dosah
dětí. V případě spolknutí okamžitě vyhledejte
lékařskou pomoc!
Bezpečnost / Příprava / Před instalací

59 CZ
Bezpečnost Bezpečnost / Příprava / Před instalací
NEBEZPEČÍ VÝBUCHU!
Nenabíjecí baterie nikdy znovu nenabíjejte.
Baterie nebo akumulátory nezkratujte ani je
neotevírejte. Hrozí přehřátí, nebezpečí požáru
nebo jejich prasknutí.
Nikdy neházejte baterie nebo akumulátory do
ohně ani do vody.
Nevystavujte baterie nebo akumulátory mecha-
nickému zatížení.
Nebezpečí vytečení baterií / akumulátorů
Zabraňte extrémním podmínkám a teplotám, např
.
na topení anebo na slunci, které mohou nega-
tivně ovlivnit funkci baterií nebo akumulátorů.
Vyhýbejte se kontaktu s pokožkou, očima a sliz-
nicemi! Po kontaktu s kyselinou baterií ihned o
myjte
postižená místa dostatečným množstvím čisté
vody a okamžitě vyhledejte lékařskou pomoc!
NOSTE OCHRANNÉ
RUKAVICE!
Vyteklé i poškozené baterie nebo akumulátory
mohou při kontaktu s pokožkou způsobit její
poleptání. Noste proto vhodné rukavice.
V případě vytečení ihned odstraňte baterie
nebo akumulátory z výrobku, abyste zabránili
jeho poškození!
Používejte jen baterie nebo akumulátory stej-
ného typu. Nekombinujte staré baterie nebo
akumulátory s novými!
Odstraňte baterie nebo akumulátory při delším
nepoužívání z výrobku.
Nebezpečí poškození výrobku
Používejte jen udaný typ baterie nebo akumu-
látoru!
Nasazujte baterie nebo akumulátory podle
označení polarity (+) a (-) na bateriích nebo
akumulátorech a na výrobku.
Vyčistěte před vložením kontakty baterie nebo
akumulátoru a kontakty v přihrádce na baterie!
Vybité baterie nebo akumulátory ihned vyjměte
z výrobku.
Příprava
Potřebné nářadí a materiál
Uvedené nářadí a materiály nejsou součástí dodávky.
Jedná se zde o nezávazné údaje a orientační hod-
noty. Vlastnosti materiálu jsou závislé na individuál-
ních podmínkách v místě.
- tužka / nástroj koznačení
- 2pólová zkoušečka napětí
- šroubovák
- vrtačka
- vrták (cca ø 6 mm)
- kladivo
- štípací kleště
- žebřík
Před instalací
Důležité: Připojení na elektrický rozvod musí pro-
vést vyučený elektrikář nebo osoba zaškolená pro
práce na elektrických rozvodech. Tato osoba musí
být seznámena svlastnostmi svítidla a spředpisy
pro připojení.
Před instalací se nejdříve seznamte se světlem,
pokyny a obrázky v tomto návodu.
Před instalací zajistěte, aby byl přívod elektric-
kého proudu ke svítidlu bez napětí. Za tímto
účelem vyjměte pojistku nebo vypněte jistič
vpojistkové skříni (poloha0).
Zkontrolujte 2pólovou zkoušečkou napětí, jestli
je vypnutý proud.
Vybalte stropní svítidlo LED a položte je na ne-
klouzavou podložku. (Dávejte pozor, aby při-
tom nedošlo kpoškrábání).
Oběma rukama mírně tlačte na umělohmotný
kryt 7. Otáčejte přitom umělohmotným kry-
tem 7 až na doraz proti směru hodinových
ručiček (proti šipce) a sundejte umělohmotný
kryt 7 směrem nahoru.

60 CZ
Uvedení do provozu
Uvedení do provozu
Montáž svítidla
Před instalací zajistěte, aby byl přívod elektric-
kého proudu ke svítidlu bez napětí. Za tímto
účelem vyjměte pojistku nebo vypněte jistič
vpojistkové skříni (poloha0).
Přidržte základnu svítidla 2 vpožadované
montážní poloze. Dávejte přitom pozor na ot-
vor vzákladně svítidla 2, kterým je protažen
připojovací síťový kabel.
Označte tři otvory pro šrouby 6 (viz obr.).
Vyvrtejte potřebné otvory. Dbejte na to, abyste
nepoškodili vodiče síťového kabelu (externího)
4
.
Vložte do otvorů hmoždinky 1. Podle potřeby
použijte kladivo.
Protáhněte připojovací sítový kabel příslušným
otvorem vzákladně svítidla 2 a připevněte
svítidlo ke stropu.
Před připojením svítidla musíte opatřit izolo-
vané základní zapojení přídavnou izolací.
Přetáhněte dodané ochranné hadičky 5
přes připojovací síťový kabel (externí) 4.
Upozornění: Dbejte na správné připojení
jednotlivých vodičů (externího) síťového připo-
jovacího kabelu 4: vodič proudu černý nebo
hnědý = symbol L, neutrální vodič modrý =
symbol N, ochranný vodič zeleno-žlutý =
symbol .
Namontujte umělohmotný kryt 7 svítidla.
Ktomu nasaďte kryt se třemi zářezy na odpo-
vídající čep a zatlačte ho nahoru. Kpřipevnění
pootočte kryt ve směru hodinových ručiček do-
prava (šipka). Nyní můžete nálepku se šipkou
odstranit.
Nasaďte zase pojistku nebo zapněte jistič
vpojistkové skříni (do polohy I).
Vaše stropní LED svítidlo sreproduktory Bluetooth
je připraveno kpoužití.
Montáž nástěnného držáku
Namontujte nástěnný držák 22 pro dálkový
ovladač 9 pomocí šroubů 23 nebo lepicího
polštářku 24 (viz obr.).
Vložení a výměna baterií
Upozornění: Pro dálkový ovladač 9 musíte po-
užít dvě baterie typu AAA (jsou součástí dodaného
výrobku).
Kotevření přihrádky na baterie (na zadní
straně) nejdříve posuňte víčko cca 1 cm dolů a
následně ho nadzvedněte.
Vložte do přihrádky na baterie dvě dodané
baterie typu AAA. Dbejte přitom na správnou
polaritu.
Opět nasaďte a zasuňte kryt, tím zavřete při-
hrádku na baterie.
Dálkový ovladač 9 je připraven kpoužití.
Zapínání a vypínání svítidla
vypínačem
LED stropní svítidlo můžete zapínat a vypínat
vypínačem na stěně. Intenzita světla přitom
vždy odpovídá naposledy nastavenému jasu.
Všechny ostatní funkce jsou ovládány pouze
dálkovým ovladačem 9.
Používání dálkového ovládání
POZOR!
Všechny funkce dálkového ovládání 9 jsou použi-
telné jen tehdy, jestliže bylo LED stropní
svítidlo zapnuto vypínačem na stěně.
Zapínání a vypínání světla
1. Zapnutí světla
Stiskněte tlačítko „ “ (osvětlení) 10 , abyste
LED stropní svítidlo zapnuli.
2. Vypnutí světla
Stiskněte tlačítko„ “ (osvětlení) 11 , abyste
LED stropní svítidlo vypnuli.
Uvedení do provozu

61 CZ
Uvedení do provozu Uvedení do provozu
Tlumení světla
1. Zvýšení intenzity světla
Stiskněte tlačítko „ “ + stmívače 12 , pro zvý-
šení intenzity světla. Po každém krátkém stisk-
nutí tohoto tlačítka se zvyšuje intenzita světla o
jeden stupeň. Jestliže stisknete tlačítko „ “ +
stmívače 12 a přidržíte ho, zvýší se intenzita
světla automaticky na maximum.
2. Snížení intenzity světla
Stiskněte tlačítko „ “ – stmívače 13 , pro sní-
žení intenzity světla. Po každém krátkém stisk-
nutí se snižuje intenzita světla o jeden stupeň.
Jestliže stisknete tlačítko „ “ – stmívače 13 a
přidržíte ho, sníží se intenzita světla automaticky
na minimum.
Časovač až na 30 minut
1. Zapnutí časovače
K vypnutí časovače stiskněte na cca 3 vteřiny
tlačítko „ “ 14 .
Světlo a také funkce Bluetooth (hudba) se po
cca 30 minutách vypnou.
2. Vypnutí časovače
Jestliže chcete funkci časovače během 30 mi-
nut vypnout, stiskněte tlačítko „ “ 14 znovu,
déle než 3 vteřiny.
Nyní je časovač vypnutý.
Upozornění: Časovač můžete vypnout jen
při aktivním bluetooth.
Bluetooth spojení
1. Bluetooth spojení
Stiskněte tlačítko audio „ “ (Audio) 21 . Příjem
povelu se potvrdí signálem.
Cca za 1 až 2 vteřiny dojde k automatickému
Bluetooth spojení, potvrzené akusticky, modrá
LED ve stropním svítidle začne rychle blikat.
Po spojení zazní krátká melodie.
Při prvním spojení s Vaším mobilním telefonem,
tabletem, atd., zvolte Bluetooth spojení
„LED Ceiling Lamp“.
2. Ukončení Bluetooth spojení
Stiskněte tlačítko audio „ “ (Audio) 15 . Příjem
povelu se potvrdí signálem. Bluetooth spojení
skončí.
Po úspěšném spojení máte k dispozici
následující možnosti řízení audia:
Regulace hlasitost hudby
1. Snížení hlasitosti hudby
Stiskněte tlačítko„ “ hlasitosti – 20 , pro snížení
hlasitosti. Po každém krátkém stisknutí se snižuje
hlasitost o jeden stupeň. Jestliže stisknete tla-
čítko „ “ – hlasitosti 20 a přidržíte ho, sníží
se hlasitost automaticky na minimum.
2. Zvýšení hlasitosti hudby
Stiskněte tlačítko „ “+ hlasitosti 16 , pro zvý-
šení hlasitosti. Po každém krátkém stisknutí se
zvyšuje
hlasitost o jeden stupeň. Jestliže stisknete
tlačítko „
“ + hlasitosti 16 a přidržíte ho,
zvýší se hlasitost automaticky na maximum.
Volba hudebního titulu
1. Hudební titul zpět
Stiskněte tlačítko „ “ pro volbu titulu hudby
(zpět) 19 , tzn. pro volbu předchozího hudeb-
ního titulu nebo pro přehrání písničky znovu od
začátku.
2. Volba dalšího hudebního titulu
Stiskněte tlačítko „ “ pro volbu hudebního
titulu (vpřed) 17 , tzn. pro volbu dalšího titulu
hudby.
3. Přestávka
Stiskněte krátce tlačítko „ “ přestávka / Blue-
tooth spojení Standby 18 pro aktivaci funkce
přestávka. Jestliže stisknete a přidržíte tlačítko

62 CZ
Uvedení do provozu / Údržba a čištění / Zlikvidování / Záruka a servis Záruka a servis
„ “ přestávka / Bluetooth spojení Standby 18
delší dobu, přejde Bl
uetooth spojení na cca
10 minut do režimu Standby.
Potom se Bluetooth
spojení vypne.
Údržba a čištění
VAROVÁNÍ! NEBEZPEČÍ ZÁSAHU ELEK-
TRICKÝM PROUDEM!
Při čištění nejprve svítidlo odpojte od elektrické
sítě. Za tímto účelem vyjměte pojistku nebo vy-
pněte jistič vpojistkové skříni (poloha0).
Nepoužívejte na čištění ředidla, benzín nebo
podobné látky, svítidlo můžete poškodit.
Nechte reflektor úplně vychladnout.
VAROVÁNÍ! NEBEZPEČÍ ZÁSAHU ELEK-
TRICKÝM PROUDEM!
Z důvodu elektrické bezpečnosti se lampa ni-
kdy nesmí čistit vodou nebo jinými kapalinami
či dokonce do vody ponořovat.
Používejte na čištění suchou tkaninu, která
nepouští vlákna.
Nasaďte zase pojistku nebo zapněte jistič
vpojistkové skříni (do polohy I).
Zlikvidování
Obal se skládá zekologických materiálů, které mů-
žete zlikvidovat prostřednictvím místních sběren re-
cyklovatelných materiálů.
b
a
Při třídění odpadu se řiďte podle ozna-
čení obalových materiálů zkratkami (a)
a čísly (b), s následujícím významem:
1–7: umělé hmoty / 20–22: papír a
lepenka / 80–98: složené látky.
Výrobek a obalové materiály jsou recy-
klovatelné, zlikvidujte je odděleně pro
lepší odstranění odpadu. Logo Triman
platí jen pro Francii.
Vzájmu ochrany životního prostředí vy-
sloužilý výrobek nevyhazujte do domov-
ního odpadu, ale předejte k odborné
likvidaci. O sběrnách a jejich otevíracích
hodinách se můžete informovat u pří-
slušné správy města nebo obce.
Vadné nebo vybité baterie resp. akumulátory se musí,
podle směrnice 2006/66/ES a jejích příslušných
změn, recyklovat. Baterie, akumulátory i výrobek
odevzdejte zpět do nabízených sběren.
Ekologické škody v důsledku
chybné likvidace baterií /
akumulátorů!
Baterie / akumulátory se nesmí zlikvidovat v domá-
cím odpadu. Mohou obsahovat jedovaté těžké kovy
a musí se zpracovávat jako zvláštní odpad. Chemické
symboly těžkých kovů: Cd = kadmium, Hg = rtuť,
Pb = olovo. Proto odevzdejte opotřebované baterie /
akumulátory u komunální sběrny.
Záruka a servis
Záruka
Od okamžiku zakoupení dostáváte na výrobek zá-
ruku po dobu 36 měsíců. Přístroj byl pečlivě vyroben
a podroben přesné kontrole kvality. Během záruční
doby odstraníme bezplatně všechny vady materiálu
a opravíme závady z výroby. Vpřípadě, že se bě-
hem záruční doby vyskytnou závady, zašlete laskavě
přístroj na uvedenou adresu servisu a uveďte násle-
dující číslo artiklu: 14148106L.
Ze záruky vyloučeny škody způsobené neodborným
zacházením, nerespektováním návodu kobsluze
nebo zásahem neautorizovanou osobou, jakož i
poškození rychle opotřebitelných dílů (např. svíticí
prostředky). Záručním výkonem se záruční doba
neprodlouží ani neobnoví.

63 CZ
Uvedení do provozu / Údržba a čištění / Zlikvidování / Záruka a servis Záruka a servis
Adresa servisu
Briloner Leuchten GmbH & Co. KG
Im Kissen 2
59929 Brilon
NĚMECKO
Tel.: +49 29 61 / 97 12–800
Fax: +49 29 61 / 97 12–199
E-mail: [email protected]
www.briloner.com
Servisní číslo zdarma:
Tel.: 00800 / 27456637
IAN 327743_2001
Pro všechny požadavky si připravte pokladní blok
a číslo výrobku (např. IAN 123456_7890) jako
doklad o nákupu.
Prohlášení o shodě
Tento výrobek splňuje požadavky platných evrops-
kých a národních směrnic (Směrnice 2014 / 53 / EU
a směrnice pro bezpečnost elektrického zařízení
snízkým napětím 2014 / 35 / EU, směrnice pro
ekologický design 2009 / 125 / ES a směrnice
RoHS 2011 / 65 / EU). Konformita byla prokázána.
Příslušná prohlášení a dokumentace jsou uloženy
uvýrobce.
Tímto prohlašuje firma Briloner Leuchten GmbH &
Co. KG, že rádiové zařízení, typu 14148106L,
splňuje požadavky směrnice 2014/53/EU. Úplný
text EU prohlášení o konformitě je k dispozici na
webové stránce:
https://www.briloner.com/de/service/informationen-
zu-leuchten/eu-konformitaetserklaerung-fuer-
funkanlagentyp.php
Výrobce
Briloner Leuchten GmbH & Co. KG
Im Kissen 2
59929 Brilon
NĚMECKO

64
Obsah

65 SK
Obsah
Legenda použitých piktogramo ...............................................................................Strana 66
Úvod .................................................................................................................................................Strana 66
Používanie v súlade s určeným účelom ..........................................................................................Strana 67
Obsah dodávky ............................................................................................................................... Strana 67
Popis častí .........................................................................................................................................Strana 67
Technické údaje ...............................................................................................................................Strana 67
Bezpečnosť ................................................................................................................................. Strana 67
Bezpečnostné upozornenia .............................................................................................................Strana 67
Bezpečnostné upozornenia týkajúce sa batérií / akumulátorových batérií ..................................Strana 69
Príprava ........................................................................................................................................Strana 69
Potrebné náradie a materiál ...........................................................................................................Strana 69
Pred inštaláciou ...................................................................................................................... Strana 69
Uvedenie do prevádzky ................................................................................................. Strana 70
Montáž svietidla...............................................................................................................................Strana 70
Montáž nástenného držiaka ........................................................................................................... Strana 70
Vkladanie / výmena batérií ..............................................................................................................Strana 70
Ovládanie svietidla pomocou svetelného spínača ........................................................................ Strana 70
Používanie diaľkového ovládania ..................................................................................................Strana 70
Zapnutie / vypnutie svetla ................................................................................................................Strana 71
Tlmenie svetla ................................................................................................................................... Strana 71
30-minútový časovač .......................................................................................................................Strana 71
Bluetooth-spojenie ............................................................................................................................Strana 71
Ovládanie hlasitosti hudby ..............................................................................................................Strana 71
Výber hudobnej skladby .................................................................................................................Strana 72
Údržba a čistenie ...................................................................................................................Strana 72
Likvidácia .....................................................................................................................................Strana 72
Záruka a servis ....................................................................................................................... Strana 73
Záruka ..............................................................................................................................................Strana 73
Servisná adresa ................................................................................................................................Strana 73
Konformitné vyhlásenie ....................................................................................................................Strana 73
Výrobca ............................................................................................................................................ Strana 73

66 SK
Úvod
Legenda použitých piktogramov
Prečítajte si návod na obsluhu! Dodržiavajte výstražné a bezpeč-
nostné pokyny!
Volt (striedavé napätie) Opatrne! Nebezpečenstvo zásahu
elektrickým prúdom!
Hertz (frekvencia) Takto postupujete správne
Watt (efektívny výkon)
b
aObal a zariadenie ekologicky
zlikvidujte!
Ochranný vodič Batérie prosím zlikvidujte ekologickým
spôsobom!
ON OFF Spínacie cykly Toto svietidlo nie je vhodné pre externé
stmievače a elektronické spínače.
Životnosť LED Nebezpečenstvo ohrozenia života a
nebezpečenstvo nehody pre malé a
staršie deti!
Toto svietidlo je určené výhradne na
prevádzku v interiéri, v suchých a
uzatvorených priestoroch.
Obal je vyrobený zo 100 %
recyklovaného papiera.
Opatrne! Nebezpečenstvo popálenia
skrze horúce povrchy! Nebezpečenstvo explózie!
Noste ochranné rukavice! Iba pre interiér
Funkcia časovača (30 min.)
LED stropné svietidlo s
Bluetooth® reproduktorom
Úvod
Blahoželáme Vám ku kúpe Vášho nového
výrobku. Rozhodli ste sa tým pre veľmi
kvalitný výrobok. Dôkladne si prečítajte
celý tento návod na obsluhu. Otvorte strany s obráz-
kami. Tento návod patrí k tomuto výrobku a obsahuje
dôležité upozornenia pre uvedenie do prevádzky a
manipuláciu. Dodržiavajte vždy všetky bezpečnostné
upozornenia. Pred uvedením do prevádzky
prekon
trolujte, či je k dispozícii správne napätie a či sú
v
šetky diely správne namontované. V prípade otázok
alebo neistoty ohľadom manipulácie s prístrojom sa
prosím spojte s Vaším predajcom alebo servisným
pracoviskom. Tento návod si starostlivo uschovajte
a prípadne ho odovzdajte tretej osobe.
Úvod / Bezpečnosť

67 SK
Úvod Úvod / Bezpečnosť
Používanie v súlade
s určeným účelom
Toto svietidlo je určené výhradne na pre-
vádzku v interiéri, v suchých a uzatvore-
ných priestoroch. Tento prístroj je určený
len na používanie v súkromných domácnostiach.
Tento produkt je určený pre normálnu prevádzku.
Obsah dodávky
Bezprostredne po vybalení vždy skontrolujte úpl-
nosť dodávky ako aj bezchybný stav zariadenia.
1 LED stropné svietidlo s Bluetooth-reproduktorom,
model 14148106L
1 diaľkové ovládanie
1 nástenný držiak pre diaľkové ovládanie (vrát. 1 x
samolepiaca podložka 2 x skrutka)
2 batérie AAA
3 hmoždinky
3 skrutky
2 ochranné hadičky
1 návod na montáž a obsluhu
Popis častí
Svietidlo:
1 Hmoždinka
2 Základňa svietidla
3 Svorka svietidla
4 Sieťový prípojný kábel (externý)
5 Ochranná hadička
6 Skrutky
7 Plastový kryt
8 Kryt reproduktora
9 Diaľkové ovládanie
Diaľkové ovládanie:
10 Tlačidlo ON (Lighting)
11 Tlačidlo OFF (Lighting)
12 Tlačidlo Dimmer +
13 Tlačidlo Dimmer –
14 Tlačidlo 30-minútový časovač
15 Tlačidlo OFF (Audio)
16 Tlačidlo hlasitosť +
17 Tlačidlo výber skladby (dopredu)
18 Tlačidlo Pause / Bluetooth-spojenie Standby
19 Tlačidlo výber skladby (naspäť)
20 Tlačidlo hlasitosť –
21 Tlačidlo ON (Audio)
22 Nástenný držiak (diaľkové ovládanie)
23 Skrutky (diaľkové ovládanie)
24 Samolepiaca podložka (diaľkové ovládanie)
Technické údaje
Svietidlo:
Číslo modelu: 14148106L
Prevádzkové napätie: 230 ‒ 240 V ~, 50 Hz
Menovitý výkon celkovo: max. 25 W (LED 20 W,
reproduktor 5 W)
Trieda ochrany: | /
Druh ochrany: IP20
LED:
Osvetľovací prostriedok: LED modul
Menovitý výkon: LED, max. 17,5 W
Druh ochrany: IP20
Reproduktor / Bluetooth:
Frekvenčný rozsah
Reproduktor: 120 ‒ 20000 Hz
Bluetooth-verzia: 5.0
Dosah Bluetooth: < 10 m
Frekvenčný rozsah
Bluetooth-frekvencia: 2,4 GHz ISM frekvenčné
pásmo
HF-výkon: max. +2 dBm
Diaľkové ovládanie:
Batérie: 2 x 1,5 V AAA
Dosah diaľkového
ovládania: 5‒6 m (infračervené)
Bezpečnosť
Bezpečnostné
upozornenia
V prípade škôd, ktoré vzniknú nedodržiavaním
tohto návodu na obsluhu, zaniká garančný nárok!

68 SK
Bezpečnosť
Pri následných škodách nepreberá výrobca ručenie!
V prípade vecných škôd alebo poranenia osôb,
ktoré boli zapríčinené neodbornou manipuláciou
alebo nedodržiavaním bezpečnostných pokynov,
nepreberá výrobca ručenie!
NEBEZPE-
ČENSTVO OHROZENIA ŽIVOTA
A NEBEZPEČENSTVO NEHODY
PRE MALÉ A STARŠIE DETI!
Nikdy nenechávajte deti bez dozoru s obalo-
vým materiálom. Existuje nebezpečenstvo za-
dusenia obalovým materiálom. Deti často
podceňujú nebezpečenstvo.
Svietidlo alebo obalový materiál nenechávajte
voľne ležať bez povšimnutia. Plastové fólie /
plastové vrecúška, umelohmotné diely atď. by
sa mohli stať nebezpečnou hračkou pre deti.
Zabráňte ohrozeniu života
zásahom elektrickým prúdom
Elektrickú inštaláciu prenechajte kvalifikovanému
elektrikárovi alebo osobe zaškolenej pre elek-
troinštalácie.
Pred každým pripojením do siete prekontrolujte
svietidlo a sieťový prípojný kábel ohľadom
prípadných poškodení. Ak zistíte akékoľvek
poškodenia, svietidlo za žiadnych okolností
nepoužívajte.
Poškodené sieťové káble predstavujú nebezpe-
čenstvo ohrozenia života zásahom elektrickým
prúdom. V prípade poškodení, opráv alebo
iných problémov so svietidlom sa obráťte na
servisné stredisko alebo kvalifikovaného elektri-
kára.
Pred montážou odstráňte poistku alebo vypnite
istič vedenia v poistkovej skrinke (poloha 0).
Pred montážou sa uistite, že sa existujúce sie-
ťové napätie zhoduje s potrebným prevádzko-
vým napätím svietidla (pozri „Technické údaje“).
Bezpodmienečne zabráňte kontaktu svietidla s
vodou alebo inými kvapalinami.
Nikdy neotvárajte žiadny z elektrických pre-
vádzkových prostriedkov, ani do nich nestrkajte
žiadne predmety. Takéto zásahy predstavujú
ohrozenie života v dôsledku zásahu elektrickým
prúdom.
Svietidlo neinštalujte na vlhký alebo vodivý
podklad!
Zabráňte nebezpečenstvu
požiaru a poranení
Bezprostredne po vybalení skontrolujte svietidlo
ohľadom prípadných poškodení. V prípade
poškodenia kontaktujte autorizovaný servis.
OPATRNE! NEBEZPEČENSTVO
POPÁLENIA SKRZE HORÚCE
POVRCHY!
Zabezpečte, aby bolo svietidlo vypnuté a vy-
chladnuté skôr, ako sa ho budete dotýkať, pre-
tože inak hrozí nebezpečenstvo popálenia.
Osvetľovacie prostriedky vytvárajú v oblasti
hlavy lampy silné teplo.
Svetelný zdroj tohto svietidla smie vymieňať
iba výrobca, ním autorizovaný technický pra-
covník alebo osoba s podobnou kvalifikáciou.
Svietidlo je možné stlmovať pomocou diaľko-
vého ovládania.
Nepozerajte sa priamo do svetelného zdroja
(osvetľovací prostriedok, LED atď.).
Nepozerajte sa do svetelného zdroja pomo-
cou optických nástrojov (napr. lupa).
Takto postupujete správne
Svietidlo namontujte tak, aby bolo chránené
pred vlhkosťou a znečistením.
Montáž si starostlivo pripravte a doprajte si do-
statok času. Dopredu si pripravte všetky jednot-
livé diely a dodatočne potrebné náradie alebo
materiál prehľadne a na dosah ruky.
Buďte neustále opatrný! Dávajte vždy pozor
na to, čo robíte, a vždy konajte rozvážne. Svie-
tidlo v žiadnom prípade nemontujte, ak ste práve
nesústredený alebo sa necítite dobre.
Bezpečnosť / Príprava / Pred inštaláciou

69 SK
Bezpečnosť Bezpečnosť / Príprava / Pred inštaláciou
Bezpečnostné upozornenia
týkajúce sa batérií /
akumulátorových batérií
NEBEZPEČENSTVO OHROZENIA ŽIVOTA!
Batérie / akumulátorové batérie držte mimo
dosahu detí. V prípade prehltnutia okamžite
vyhľadajte lekára!
NEBEZPEČENSTVO EXPLÓZIE!
Nenabíjateľné batérie nikdy znova nenabíjajte.
Batérie / akumulátorové batérie neskratujte
a / alebo neotvárajte. Následkom môže byť
prehriatie, požiar alebo explózia.
Batérie / akumulátorové batérie nikdy nehádžte
do ohňa alebo vody.
Nevystavujte batérie / akumulátorové batérie
mechanickej záťaži.
Riziko vytečenia batérií / akumulátorových
batérií
Batérie / akumulátorové batérie nikdy nevysta-
vujte extrémnym podmienkam a teplotám, ktoré
by na ne mohli pôsobiť, napr. na vykurovacích
telesách / priamom slnečnom žiarení.
Ak batérie / akumulátorové batérie vytiekli, za-
bráňte kontaktu pokožky, očí a slizníc s chemi-
káliami! Ihneď vypláchnite postihnuté miesta
väčším množstvom čistej vody a okamžite
vyhľadajte lekára!
NOSTE OCHRANNÉ RUKAVICE!
Vytečené alebo poškodené batérie / akumulá-
torové batérie môžu pri kontakte s pokožkou
spôsobiť poleptanie. V takom prípade preto
noste vhodné ochranné rukavice.
V prípade vytečenia batérií / akumulátorových
batérií ich ihneď vyberte z výrobku, aby ste
predišli vzniku škôd.
Používajte iba batérie / akumulátorové batérie
rovnakého typu. Nekombinujte staré batérie /
akumulátorové batérie s novými!
Ak produkt dlhší čas nepoužívate, vyberte z
neho batérie / akumulátorové batérie.
Riziko poškodenia produktu
Používajte výhradne uvedený typ batérií /
akumulátorových batérií!
Vložte batérie / akumulátorové batérie podľa
označenia polarity (+) a (-) na batérii / akumu-
látorovej batérii a výrobku.
Pred vložením vyčistite kontakty na batérii /
akumulátorovej batérii a v priečinku pre batérie!
Vybité batérie / akumulátorové batérie ihneď
vyberte z produktu.
Príprava
Potrebné náradie a materiál
Uvedené náradie / nástroje a materiál nie sú súčas-
ťou dodávky. Ide tu o nezáväzné údaje a hodnoty
pre orientáciu. Charakter materiálu sa riadi podľa
individuálnych daností na mieste.
- ceruzka / označovací nástroj
- 2-pólová skúšačka napätia
- skrutkovač
- vŕtačka
- vrták (cca. ø 6 mm)
- kladivo
- bočné štipacie kliešte
- rebrík
Pred inštaláciou
Dôležité: Elektrické pripojenie musí vykonať vy-
školený elektrikár alebo osoba zaškolená pre elek-
troinštalácie. Táto musí mať znalosti o vlastnostiach
svietidla a predpisoch o pripojení.
Pred inštaláciou sa oboznámte so všetkými po-
kynmi a obrázkami v tomto návode, ako aj so
samotným svietidlom.
Pred inštaláciou zabezpečte, aby bolo vedenie,
na ktoré bude svietidlo pripojené, bez napätia.
Z tohto dôvodu odstráňte poistku alebo vypnite
istič vedenia v skrinke na poistky (poloha 0).
Beznapäťový stav prekontrolujte pomocou
2-pólovej skúšačky napätia.

70 SK
Pred inštaláciou / Uvedenie do prevádzky
Vybaľte LED stropné svietidlo a položte ho na
nekĺzavý podklad. (Dávajte pozor, aby pritom
nedošlo k vzniku škrabancov).
Oboma rukami vyviňte jemný tlak na plastový
kryt 7. Plastový kryt 7 pritom točte proti
smeru hodinových ručičiek (proti smeru šípky)
až nadoraz a odnímte plastový kryt 7 sme-
rom nahor.
Uvedenie do prevádzky
Montáž svietidla
Pred inštaláciou zabezpečte, aby bolo vedenie,
na ktoré bude svietidlo pripojené, bez napätia.
Z tohto dôvodu odstráňte poistku alebo vypnite
istič vedenia v skrinke na poistky (poloha 0).
Pridržte základňu svietidla 2 v želanej mon-
tážnej polohe. Myslite pritom na otvor v zák-
ladni svietidla 2, ktorým bude prevedený
sieťový pripojovací kábel.
Označte tri otvory pre skrutky 6 (pozri obr.).
Vyvŕtajte otvory. Zabezpečte, aby ste nepoško-
dili prívodné vedenie (externé) 4.
Do vyvŕtaných otvorov zasuňte hmoždinky 1.
V prípade potreby si pomôžte kladivom.
Preveďte sieťový prípojný kábel cez otvor v
základni svietidla 2 určený pre tento účel a
upevnite svietidlo na strope.
Izolované základné vodiče musia byť pred
pripojením svietidla pripravené s dodatočnou
izoláciou.
Natiahnite priložené ochranné hadičky 5 na
sieťový prípojný kábel (externý) 4.
Poznámka: Dbajte na to, aby boli jednotlivé
vodiče sieťového prípojného kábla (externý) 4
vždy správne zapojené: vodič vedúci prúd, čierny
alebo hnedý = symbol L, neutrálny vodič, modrý =
symbol N, ochranný vodič, zeleno-žltý =
symbol .
Namontujte plastový kryt 7 svietidla. Nasa-
ďte kryt s troma zárezmi na príslušný závesný
svorník a zatlačte ho nahor. Zatočte kryt doprava
v smere hodinových ručičiek (v smere šípky),
aby ste ho upevnili. Teraz môžete odstrániť
nálepku so šípkou.
Opäť nasaďte poistku alebo zapnite istič vede-
nia v skrinke s poistkami (poloha I).
Vaše LED stropné svietidlo s Bluetooth-reprodukto-
rom je pripravené na prevádzku.
Montáž nástenného držiaka
Namontujte nástenný držiak 22 pre diaľkové
ovládanie 9 pomocou skrutiek 23 alebo sa-
molepiacich úchytiek 24 (pozri obr.).
Vkladanie / výmena batérií
Poznámka: Pre diaľkové ovládanie 9 použite
dve batérie typu AAA (sú súčasťou dodávky).
Kryt priečinka pre batérie (zadná strana) vysuňte
pre otvorenie cca. 1 cm nadol a nadvihnite
kryt.
Vložte dve batérie priloženého typu AAA do
priečinka pre batérie. Dodržte pritom správnu
polaritu.
Opäť nasaďte kryt a posuňte ho dozadu, aby
ste zatvorili priečinok pre batérie.
Vaše diaľkové ovládanie 9 je pripravené na pre-
vádzku.
Ovládanie svietidla pomocou
svetelného spínača
LED stropné svietidlo môžete za- a vypínať po-
mocou nástenného spínača. Intenzita svetla tu
vždy zodpovedá naposledy nastavenému jasu.
Všetky ostatné funkcie sú riadené výlučne diaľ-
kovým ovládaním 9.
Používanie diaľkového
ovládania
POZOR!
Všetky funkcie diaľkového ovládania 9 sú funkčné
Uvedenie do prevádzky

71 SK
Pred inštaláciou / Uvedenie do prevádzky Uvedenie do prevádzky
iba vtedy, keď bolo LED stropné svietidlo zapnuté
prostredníctvom nástenného spínača.
Zapnutie / vypnutie svetla
1. Zapnutie svetla
Stlačte tlačidlo „ “ (Lighting) 10 , aby ste
zapli LED stropné svietidlo.
2. Vypnutie svetla
Stlačte tlačidlo „ “ (Lighting) 11 , aby ste
vypli LED stropné svietidlo.
Tlmenie svetla
1. Zvýšenie intenzity osvetlenia
Stlačte tlačidlo „ “ Dimmer + 12 , aby ste
zvýšili intenzitu osvetlenia. Pri krátkom stlačení
tohto tlačidla sa zvýši intenzita osvetlenia vždy
o jeden stupeň. Ak dlhšie stlačíte tlačidlo „ “
Dimmer + 12 , automaticky sa zvýši intenzita
osvetlenia až na maximálny jas.
2. Zníženie intenzity osvetlenia
Stlačte tlačidlo „ “ Dimmer - 13 , aby ste zní-
žili intenzitu osvetlenia. Pri krátkom stlačení sa
zníži intenzita osvetlenia o jeden stupeň. Ak
dlhšie stlačíte tlačidlo „ “ Dimmer – 13 , zníži
sa intenzita osvetlenia automaticky až na mini-
málny jas.
30-minútový časovač
1. Zapnutie časovača
Stlačte tlačidlo „ “ 14 na cca. 3 sekundy,
aby ste zapli funkciu časovača.
Svetlo a tiež Bluetooth-funkcia (hudba) sa
automaticky vypnú po cca. 30 minútach.
2. Vypnutie časovača
Ak chcete funkciu časovača počas týchto
30 minút vypnúť, znova stlačte „ “ tlačidlo
14 na dlhšie ako 3 sekundy.
Funkcia časovača je teraz vypnutá.
Poznámka: Časovač môžete vypnúť len
vtedy, keď je aktivovaný Bluetooth.
Bluetooth-spojenie
1. Vytvorenie Bluetooth-spojenia
Stlačte Audio „ “ tlačidlo (Audio) 21 . Príj-
mový signál je potvrdený pípnutím.
Cca. o 1–2 sekundy neskôr je Bluetooth-spoje-
nie s akustickým doprovodom automaticky vy-
tvorené, modrá LED vrámci LED stropného
svietidla začne rýchlo blikať.
Po vytvorení spojenia zaznie krátka melódia.
Pri prvom spojení s Vaším mobilom, tabletom
atď. zvoľte Bluetooth-spojenie „LED Ceiling
Lamp“.
2. Ukončenie Bluetooth-spojenia
Stlačte Audio „ “ tlačidlo (Audio) 15 .
Príjmový signál je potvrdený pípnutím.
Bluetooth-spojenie je ukončené.
Po vytvorení spojenia máte k dispozícii
nasledujúce audio-ovládania:
Ovládanie hlasitosti hudby
1. Zníženie hlasitosti hudby
Stlačte tlačidlo „ “ hlasitosť – 20 , aby ste
hlasitosť znížili. Pri krátkom stlačení sa hlasitosť
zníži o jeden stupeň. Ak dlhšie stlačíte tlačidlo
„“ hlasitosť – 20 , zníži sa hlasitosť automa-
ticky až na minimum.
2. Zvýšenie hlasitosti hudby
Stlačte tlačidlo „ “ hlasitosť + 16 , aby ste
hlasitosť zvýšili. Pri krátkom stlačení sa hlasitosť
zvýši o jeden stupeň. Ak dlhšie stlačíte tlačidlo
„“ hlasitosť + 16 , hlasitosť sa automaticky
zvýši až na maximum.

72 SK
Záruka a servisUvedenie do prevádzky / Údržba a čistenie / Likvidácia
Výber hudobnej skladby
1. Skladba naspäť
Stlačte tlačidlo „ “ výber hudobnej skladby
(naspäť) 19 , ak chcete prehrať predchádza-
júcu hudobnú skladbu alebo prehrať pieseň
ešte raz od začiatku.
2. Skladba dopredu
Stlačte tlačidlo „ “ výber hudobnej skladby
(dopredu) 17 , ak chcete prehrať nasledujúcu
hudobnú skladbu.
3. Pause
Krátko stlačte tlačidlo „ “ Pause / Bluetooth-
spojenie Standby 18 , aby ste aktivovali funkciu
prestávka. Keď dlhšie podržíte tlačidlo „ “
Pause / Bluetooth-spojenie Standby 18 , prepne
sa Bluetooth-spojenie na cca. 10 minút do
Standby. Potom sa Bluetooth-spojenie vypne.
Údržba a čistenie
VAROVANIE! NEBEZPEČENSTVO
ZÁSAHU ELEKTRICKÝM PRÚDOM!
Pred čistením najskôr odpojte svietidlo od elek-
trickej siete. Z tohto dôvodu odstráňte poistku
alebo vypnite istič vedenia v skrinke na poistky
(poloha 0).
Nepoužívajte žiadne rozpúšťadlá, benzín a. i.
Svietidlo by sa pritom poškodilo.
Nechajte svietidlo úplne vychladnúť.
VAROVANIE! NEBEZPEČENSTVO
ZÁSAHU ELEKTRICKÝM PRÚDOM!
Z dôvodu elektrickej bezpečnosti sa svietidlo
nesmie nikdy čistiť vodou alebo inými kvapali-
nami a v žiadnom prípade sa nesmie ponárať
do vody.
Na čistenie používajte iba suchú handričku,
ktorá nepúšťa vlákna.
Následne opäť nasaďte poistku alebo zapnite
istič vedenia v skrinke s poistkami (poloha I).
Likvidácia
Obal pozostáva z ekologických materiálov, ktoré
môžete odovzdať na miestnych recyklačných zber-
ných miestach.
b
a
Všímajte si prosím označenie obalových
materiálov pre triedenie odpadu, sú
označené skratkami (a) a číslami (b) s
nasledujúcim významom: 1–7: Plasty /
20–22: Papier a kartón / 80–98:
Spojené látky.
Výrobok a obalové materiály sú recyklo-
vateľné, zlikvidujte ich oddelene pre
lepšie spracovanie odpadu. Triman-Logo
platí iba pre Francúzsko.
Ak výrobok doslúžil, v záujme ochrany
životného prostredia ho neodhoďte do
domového odpadu, ale odovzdajte na
odbornú likvidáciu. Informácie o zber-
ných miestach a ich otváracích hodinách
získate na Vašej príslušnej správe.
Defektné alebo použité batérie / akumulátorové
batérie musia byť odovzdané na recykláciu podľa
smernice 2006/66/ES a jej zmien. Batérie / aku-
mulátorové batérie a / alebo výrobok odovzdajte
prostredníctvom dostupných zberných stredísk.
Nesprávna likvidácia batérií /
akumulátorových batérií ničí
životné prostredie!
Batérie / akumulátorové batérie sa nesmú likvidovať
spolu s domovým odpadom. Môžu obsahovať jedo-
vaté ťažké kovy a je potrebné zaobchádzať s nimi
ako s nebezpečným odpadom. Chemické značky
ťažkých kovov sú nasledovné: Cd = kadmium, Hg =
ortuť, Pb = olovo. Opotrebované batérie / akumulá-
torové batérie preto odovzdajte v komunálnej zberni.

73 SK
Záruka a servisUvedenie do prevádzky / Údržba a čistenie / Likvidácia
Záruka a servis
Záruka
Na tento prístroj poskytujeme záruku 36 mesiacov
od dátumu kúpy. Prístroj bol starostlivo vyrobený a
podrobený dôkladnej kontrole kvality. Vrámci zá-
ručnej doby bezplatne odstránime všetky chyby
materiálu a výrobné chyby. Ak by sa však počas
záručnej doby vyskytli nedostatky, odošlite prístroj
na uvedenú adresu servisu s uvedením nasledovného
čísla výrobku: 14148106L.
Zo záruky sú vylúčené škody spôsobené neodbor-
nou manipuláciou, nedodržaním návodu na obsluhu
alebo zásahom neautorizovanej osoby, ako aj diely
podliehajúce opotrebovaniu (napr. osvetľovacie
prostriedky). Poskytnutím záruky sa záručná doba
nepredlžuje ani neobnovuje.
Servisná adresa
Briloner Leuchten GmbH & Co. KG
Im Kissen 2
59929 Brilon
NEMECKO
Tel.: +49 29 61 / 97 12–800
Fax: +49 29 61 / 97 12–199
E-mail: [email protected]
www.briloner.com
Bezplatné servisné číslo:
Tel.: 00800 / 27456637
IAN 327743_2001
Pre všetky otázky majte pripravený pokladničný
doklad a číslo výrobku (napr. IAN 123456_7890)
ako dôkaz o kúpe.
Konformitné vyhlásenie
Tento produkt spĺňa požiadavky platných európ-
skych a národných smerníc (Smernica 2014 / 53 / EÚ,
Smernica o nízkom napätí 2014 / 35 / EÚ,
Smernica o ekodizajne 2009 / 125 / ES, Smernica
RoHS 2011 / 65 / EÚ). Konformita bola preuká-
zaná. Príslušné prehlásenia a podklady sú uložené
u výrobcu.
Týmto spoločnosť Briloner Leuchten GmbH & Co. KG
prehlasuje, že typ rádiového zariadenia 14148106L
zodpovedá smernici 2014/53/EÚ. Úplný text EÚ
konformitného vyhlásenia je k dispozícii na nasle-
dujúcej internetovej adrese:
https://www.briloner.com/de/service/informationen-
zu-leuchten/eu-konformitaetserklaerung-fuer-
funkanlagentyp.php
Výrobca
Briloner Leuchten GmbH & Co. KG
Im Kissen 2
59929 Brilon
NEMECKO

BRILONER LEUCHTEN GMBH & CO. KG
Im Kissen 2
59929 Brilon
GERMANY
Stand der Informationen · Last Information
Update · Version des informations · Stand
van de informatie · Stan informacji · Stav
informací · Stav informácií: 05 / 2020
Ident.-No.: 14148106L052020-8
IAN 327743_2001
-
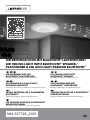 1
1
-
 2
2
-
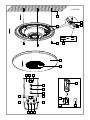 3
3
-
 4
4
-
 5
5
-
 6
6
-
 7
7
-
 8
8
-
 9
9
-
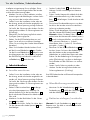 10
10
-
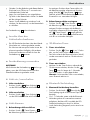 11
11
-
 12
12
-
 13
13
-
 14
14
-
 15
15
-
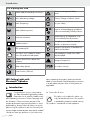 16
16
-
 17
17
-
 18
18
-
 19
19
-
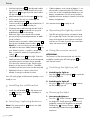 20
20
-
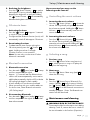 21
21
-
 22
22
-
 23
23
-
 24
24
-
 25
25
-
 26
26
-
 27
27
-
 28
28
-
 29
29
-
 30
30
-
 31
31
-
 32
32
-
 33
33
-
 34
34
-
 35
35
-
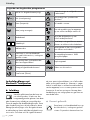 36
36
-
 37
37
-
 38
38
-
 39
39
-
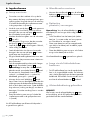 40
40
-
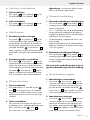 41
41
-
 42
42
-
 43
43
-
 44
44
-
 45
45
-
 46
46
-
 47
47
-
 48
48
-
 49
49
-
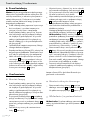 50
50
-
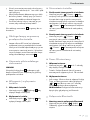 51
51
-
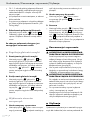 52
52
-
 53
53
-
 54
54
-
 55
55
-
 56
56
-
 57
57
-
 58
58
-
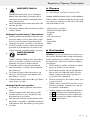 59
59
-
 60
60
-
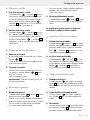 61
61
-
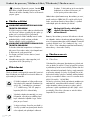 62
62
-
 63
63
-
 64
64
-
 65
65
-
 66
66
-
 67
67
-
 68
68
-
 69
69
-
 70
70
-
 71
71
-
 72
72
-
 73
73
-
 74
74


in andere talen
- français: LIVARNO 327743 Le manuel du propriétaire
- Deutsch: LIVARNO 327743 Bedienungsanleitung
- slovenčina: LIVARNO 327743 Návod na obsluhu
- polski: LIVARNO 327743 Instrukcja obsługi
