APRILIA 2010 RX 50 Handleiding
- Categorie
- Motorfietsen
- Type
- Handleiding
Deze handleiding is ook geschikt voor

APRILIA WOULD LIKE TO THANK YOU
for choosing one of its products. Please read this manual carefully before riding your vehicle for the first time. It contains information, suggestions and
precautions on the use of your vehicle and it will allow you to get familiar with all its different characteristics. It will also help to get the maximum result
and pleasure from your purchase and it will confirm you one more time that you have made the right choice. This booklet is an integral part of the vehicle
and must be given to the new owner if the motorcycle is sold.
APRILIA WILT U BEDANKEN
dat u voor een van haar producten heeft gekozen. Alvorens uw bromfiets de eerste maal te gebruiken wordt u verzocht om deze handleiding aandachtig
door te lezen. Hij bevat informatie, voorstellen en vorzorgsmaatregelen in verband met het gebruik van uw voertuig en maakt u vertrouwd met al zijn
verschillende karakteristieken. Hij helpt u ook om het maximumrendement uit uw aanwinst te halen en er veel plezier aan te beleven, en zal u nogmaals
verzekeren dat u de juiste keuze gemaakt heeft. Deze handleiding is een wezenlijk onderdeel van het voertuig en dient aan de nieuwe eigenaar
overhandigd te worden als u de bromfiets verkoopt.
SX - RX 50

The instructions given in this booklet are intended to provide a clear, simple guide to using your scooter; it also describes routine maintenance procedures
and regular checks that should be carried out on the vehicle at an Aprilia Dealer or Authorised Workshop. This booklet also contains instructions for
simple repairs. Any operations not specifically described in this booklet require the use of special tools and/or particular technical knowledge: for these
operations, please take your vehicle to an Aprilia Dealer or Authorised Workshop.
De instructies in deze handleiding zijn vooral opgesteld met het doel een eenvoudige en duidelijke leidraad te geven voor het gebruik: men vindt
eveneens de handelingen van het klein onderhoud en van de periodieke controles die bij een Dealer of Erkende Aprilia Garage moeten uitgevoerd
worden. De handleiding bevat tevens instructies voor een aantal eenvoudige herstellingen. De herstellingen die niet uitgebreid in deze uitgave zijn
beschreven, vereisen dat over speciale gereedschappen en/of specifieke technische kennis wordt beschikt: voor het uitvoeren van deze herstellingen
raadt men aan om zich te wenden tot een Dealer of Erkende Aprilia Garage.
2

Personal safety
Failure to completely observe these instructions will
result in serious risk of personal injury.
Persoonlijke veiligheid
Indien deze voorschriften niet of niet volledig worden
opgevolgd, kan dit ernstig letsel aan personen tot ge-
volg hebben.
Safeguarding the environment
Sections marked with this symbol indicate the correct
use of the vehicle to prevent damaging the environ-
ment.
Bescherming van
Geeft het juiste gedrag aan dat u aan moet houden
zodat het gebruik van het voertuig geen schade aan-
richt aan de natuur.
Vehicle intactness
The incomplete or non-observance of these regula-
tions leads to the risk of serious damage to the vehicle
and sometimes even the invalidity of the guarantee.
Staat van het voertuig
Indien deze voorschriften niet of niet volledig worden
opgevolgd kan dit ernstige schade aan het voertuig,
en eventueel het vervallen van deze garantie tot ge-
volg hebben.
The symbols illustrated above are very important.
They are used to highlight parts of the booklet that
should be read with particular care. The different sym-
bols are used to make each topic in the manual simple
and quick to locate. Before starting the engine, read
this booklet carefully, particularly the "SAFE RIDING"
section. Your safety as well as other's does not only
depend on the quickness of your reflexes and agility,
but also on how well you know your vehicle, the state
of maintenance of the vehicle itself and your knowl-
edge of the rules for SAFE RIDING. For your safety,
get to know your vehicle well so as to safely ride and
master it given any riding condition. IMPORTANT
This booklet is an integral part of the vehicle, and must
be handed to the new owner in the event of sale.
Bovengenoemde signalen zijn erg belangrijk. Ze heb-
ben namelijk tot doel om de delen van het boekje aan
te geven die u aandachtig door moet lezen. Zoals u
ziet, bestaat ieder teken uit een ander grafisch sym-
bool, zodat de bijbehorende onderwerpen meteen
duidelijk kunnen worden gevonden in de verschillen-
de delen. Vooraleer men de motor start, leest men
aandachtig deze handleiding, en vooral de paragraaf
"VEILIG RIJDEN". Uw veiligheid en die van anderen
hangt niet enkel af van uw reflexen en vlugheid, maar
ook van de kennis en de efficiëntie van het voertuig,
en van de kennis van de fundamentele regels voor het
VEILIG RIJDEN. We raden daarom aan om vertrouwd
te raken met het voertuig, zodat u zich in alle situaties
veilig en beheersd kan bewegen. BELANGRIJK Deze
handleiding moet beschouwd worden als integrerend
deel van het voertuig, en moet worden overhandigd
bij de verkoop ervan.
3

4

INDEX
INDEX
GENERAL RULES.......................................................................... 9
Foreword.................................................................................. 10
Carbon monoxide..................................................................... 10
Fuel.......................................................................................... 11
Hot components....................................................................... 12
Coolant..................................................................................... 12
Used engine oil and gearbox oil............................................... 13
Brake and clutch fluid............................................................... 14
Battery hydrogen gas and electrolyte....................................... 15
Stand........................................................................................ 17
Reporting of defects that affect safety...................................... 17
VEHICLE......................................................................................... 19
Dashboard................................................................................... 20
Analog instrument panel.............................................................. 21
Ignition switch........................................................................... 24
Locking the steering wheel....................................................... 25
Releasing the steering wheel................................................... 26
Horn button.................................................................................. 26
Switch direction indicators........................................................... 27
Front brake control....................................................................... 27
Throttle control............................................................................. 28
Rear brake pedal......................................................................... 28
Clutch control............................................................................... 29
High/low beam selector............................................................... 29
Manual starter control.................................................................. 30
Mixer oil tank................................................................................ 30
Fairings........................................................................................ 31
Opening the saddle.................................................................. 34
Keys............................................................................................. 35
Identification................................................................................. 36
USE................................................................................................. 39
ALGEMENE NORMEN..................................................................... 9
Vooronderstelling....................................................................... 10
Koolmonoxide............................................................................. 10
Brandstof.................................................................................... 11
Warme onderdelen..................................................................... 12
Koelvloeistof............................................................................... 12
Gebruikte motorolie en koppelingsolie....................................... 13
Rem- en koppelingsvloeistof...................................................... 14
Elektrolyt en waterstofgas van de accu...................................... 15
Standaard................................................................................... 17
Communicatie van de defecten die invloed hebben op de vei-
ligheid......................................................................................... 17
VOERTUING..................................................................................... 19
Legenda......................................................................................... 20
Analoog instrumentenpaneel......................................................... 21
Startschakelaar.......................................................................... 24
Stuurslot vergrendelen............................................................... 25
Stuurslot ontgrendelen............................................................... 26
Drukknop claxon............................................................................ 26
Schakelaar richtingaanwijzers....................................................... 27
Commando van de achterrem....................................................... 27
Gashendel...................................................................................... 28
Pedaal van de achterrem............................................................... 28
Commando van de koppeling........................................................ 29
Lichtschakelaar.............................................................................. 29
Commando van de manuele starter............................................... 30
Tank van de mengerolie................................................................ 30
Stroomlijnpanelen.......................................................................... 31
Zadel openen............................................................................. 34
Sleutels.......................................................................................... 35
Identificatie..................................................................................... 36
5

Checks......................................................................................... 40
Refuelling..................................................................................... 43
Clutch lever adjustment............................................................... 43
Running in.................................................................................... 45
Starting up the engine.................................................................. 47
Precautions.............................................................................. 49
Difficult start up............................................................................ 50
Moving off / riding........................................................................ 51
Stopping the engine..................................................................... 55
Parking......................................................................................... 57
Stand........................................................................................... 58
Transmission............................................................................... 58
Suggestion to prevent theft.......................................................... 59
Safe driving.................................................................................. 61
MAINTENANCE.............................................................................. 69
Two-stroke mix oil........................................................................ 70
Gearbox oil level.......................................................................... 70
Tyres............................................................................................ 72
Spark plug dismantlement........................................................... 77
Removing the air filter.................................................................. 78
Air filter cleaning.......................................................................... 81
Cooling fluid level......................................................................... 82
Coolant check.......................................................................... 84
Coolant top-up.......................................................................... 84
Checking the brake oil level......................................................... 86
Braking system fluid top up...................................................... 87
Battery......................................................................................... 88
Battery removal........................................................................ 89
Use of a new battery................................................................ 90
Checking the electrolyte level.................................................. 91
Charging the battery................................................................. 92
Long periods of inactivity............................................................. 92
Fuses........................................................................................... 94
Lamps.......................................................................................... 96
Low/High beam lamp replacement........................................... 97
Headlight adjustment............................................................... 100
Front direction indicators............................................................. 101
Rear optical unit........................................................................... 102
Rear turn indicators..................................................................... 103
GEBRUIK.......................................................................................... 39
Controles........................................................................................ 40
Tanken........................................................................................... 43
Regulering schakelhendel.............................................................. 43
Inrijden........................................................................................... 45
Starten des motors......................................................................... 47
Voorzorgsmaatregelen............................................................... 49
Moeilijke start................................................................................. 50
Start / besturing.............................................................................. 51
Stoppen van de motor.................................................................... 55
Parkeren........................................................................................ 57
Standaard...................................................................................... 58
Transmissie.................................................................................... 58
Tips tegen diefstal.......................................................................... 59
Veilig rijden.................................................................................... 61
ONDERHOUD................................................................................... 69
Olie menger................................................................................... 70
Versnellingsbak oliepeil................................................................. 70
Banden........................................................................................... 72
Demonteren van de bougie............................................................ 77
Demonteren van het luchtfilter....................................................... 78
Reinigen van het luchtfilter............................................................. 81
Peil koelvloeistof............................................................................ 82
Controle van de koelvloeistof..................................................... 84
Bijvulling van de koelvloeistof..................................................... 84
Controle van het oliepeil van de remmen...................................... 86
Bijvullen van de remvloeistof...................................................... 87
Accu............................................................................................... 88
Verwijdering van de accu........................................................... 89
Inwerkingstelling van een nieuwe accu...................................... 90
Controle van het elektrolytpeil.................................................... 91
Opladen van de accu................................................................. 92
Länger stillegen.............................................................................. 92
Zekeringen..................................................................................... 94
Lampjes......................................................................................... 96
Vervanging van de lamp van het dimlicht / groot licht................ 97
Afstellen van de koplamp........................................................... 100
Richtingaanwijzers voor................................................................. 101
Lampenset achter.......................................................................... 102
6

Idle adjustment............................................................................ 104
Front and rear disc brake............................................................. 105
Brake control............................................................................ 106
Periods of inactivity...................................................................... 108
Cleaning the vehicle.................................................................... 109
Transmission chain...................................................................... 113
Chain backlash check.............................................................. 114
Chain lubrication and cleaning................................................. 115
TECHNICAL DATA......................................................................... 117
Kit equipment............................................................................... 123
PROGRAMMED MAINTENANCE.................................................. 125
Scheduled maintenance table..................................................... 126
Table of recommended products................................................. 132
Richtingaanwijzers achter.............................................................. 103
Afstellen van het stationair toerental.............................................. 104
Schijfrem voor en achter................................................................ 105
Controle van de remmen............................................................ 106
Stilstand van het voertuig............................................................... 108
Reinigen van het voertuig.............................................................. 109
Transmissieketting......................................................................... 113
Controle van de speling van de ketting...................................... 114
Smering en reiniging van de ketting........................................... 115
TECHNISCHE GEGEVENS.............................................................. 117
Bijgeleverd gereedschap............................................................... 123
GEPLAND ONDERHOUD................................................................ 125
Tabel gepland onderhoud.............................................................. 126
Tabel aanbevolen producten......................................................... 132
7

8

SX - RX 50
Chap. 01
General rules
Hst. 01
Algemene
normen
9

Foreword
NOTE
CARRY OUT MAINTENANCE OPERA-
TIONS AT HALF THE INTERVALS
SPECIFIED IF THE VEHICLE IS USED
IN PARTICULAR RAINY OR DUSTY
CONDITIONS, OFF ROAD OR FOR
TRACK USE.
Vooronderstelling
N.B.
WANNEER HET VOERTUIG WORDT
GEBRUIKT IN REGENACHTIGE OF
STOFFIGE ZONES, OP SLECHTE WE-
GEN, OF WANNEER MEN SPORTIEF
RIJDT, MOETEN DE ONDERHOUDS-
HANDELINGEN AAN DE HELFT VAN
HET AANGEDUIDE TIJDSINTERVAL
UITGEVOERD WORDEN.
Carbon monoxide
If you need to keep the engine running in
order to perform a procedure, please en-
sure that you do so in an open or very well
ventilated area. Never let the engine run
in an enclosed area. If you do work in an
enclosed area, make sure to use a
smoke-extraction system.
CAUTION
EXHAUST EMISSIONS CONTAIN
CARBON MONOXIDE, A POISONOUS
GAS WHICH CAN CAUSE LOSS OF
CONSCIOUSNESS AND EVEN
DEATH.
Koolmonoxide
Wanneer het nodig is om de motor te
doen werken om een handeling uit te
voeren, controleert men of dit in een open
ruimte of in een goed geventileerd lokaal
gebeurt. Laat de motor nooit werken in
een gesloten ruimte. Wanneer men in
een gesloten ruimte werkt, gebruikt men
een evacuatiesysteem voor de uitlaat-
gassen.
LET OP
DE UITLAATGASSEN BEVATTEN
KOOLMONOXIDE, EEN GIFTIG GAS
DAT BEWUSTELOOSHEID EN OOK
DE DOOD KAN VEROORZAKEN.
10
1 General rules / 1 Algemene normen

Fuel
CAUTION
THE FUEL USED TO POWER INTER-
NAL COMBUSTION ENGINES IS HIGH-
LY FLAMMABLE AND MAY BE EX-
PLOSIVE UNDER CERTAIN CONDI-
TIONS. IT IS THEREFORE RECOM-
MENDED TO CARRY OUT REFUEL-
LING AND MAINTENANCE PROCE-
DURES IN A VENTILATED AREA WITH
THE ENGINE SWITCHED OFF. DO
NOT SMOKE DURING REFUELLING
AND NEAR FUEL VAPOURS, AVOID-
ING ANY CONTACT WITH NAKED
FLAMES, SPARKS OR OTHER SOUR-
CES WHICH MAY CAUSE THEM TO
IGNITE OR EXPLODE.
DO NOT DISPERSE FUEL IN THE EN-
VIRONMENT.
KEEP OUT OF THE REACH OF CHIL-
DREN
Brandstof
LET OP
DE BRANDSTOF DIE WORDT GE-
BRUIKT VOOR DE AANDRIJVING VAN
DE ONTPLOFFINGSMOTOR IS UI-
TERST BRANDBAAR EN KAN EXPLO-
SIEF WORDEN IN BEPAALDE OM-
STANDIGHEDEN. VOER HET TANKEN
EN DE ONDERHOUDSHANDELINGEN
UIT IN EEN GEVENTILEERDE ZONE
EN MET DE MOTOR UIT. ROOK NIET
TIJDENS HET TANKEN EN IN DE NA-
BIJHEID VAN BRANDSTOFDAMPEN,
EN VERMIJDT ABSOLUUT CONTACT
MET VRIJE VLAMMEN, VONKEN EN
EENDER WELKE ANDER BRON DIE
HET VLAM VATTEN OF EXPLODEREN
ERVAN KAN VEROORZAKEN.
LOOS DE BRANDSTOF NIET IN HET
MILIEU.
BUITEN BEREIK VAN KINDEREN
HOUDEN
IF THE VEHICLE FALLS OR IS ON A
STEEP INCLINE FUEL CAN LEAK.
HET VALLEN OF DE EXCESSIEVE IN-
CLINATIE VAN HET VOERTUIG KUN-
11
1 General rules / 1 Algemene normen

NEN HET UITSTROMEN VAN BRAND-
STOF VEROORZAKEN.
Hot components
The engine and the exhaust system com-
ponents get very hot and remain in this
condition for a certain time interval after
the engine has been switched off. Before
handling these components, make sure
that you are wearing insulating gloves or
wait until the engine and the exhaust sys-
tem have cooled down.
Warme onderdelen
De motor en de onderdelen van de uit-
laatinstallatie worden zeer warm en blij-
ven lang warm, ook nadat de motor wordt
uitgezet. Vooraleer men deze onderde-
len hanteert, draagt men isolerende
handschoenen, of wacht men tot de mo-
tor en de uitlaatinstallatie zijn afgekoeld.
Coolant
The coolant contains ethylene glycol
which, under certain conditions, can be-
come flammable. When ethylene glycol
burns, it produces an invisible flame
which can nevertheless cause burns.
CAUTION
TAKE CARE NOT TO POUR COOLANT
ONTO HOT ENGINE OR EXHAUST
SYSTEM COMPONENTS; THE FLUID
MAY CATCH FIRE AND BURN WITH
INVISIBLE FLAMES. WHEN CARRY-
ING OUT MAINTENANCE OPERA-
TIONS, IT IS ADVISABLE TO WEAR
LATEX GLOVES. EVEN THOUGH IT IS
Koelvloeistof
De koelvloeistof bevat ethyleenglycol,
wat in sommige omstandigheden ont-
vlambaar is. Wanneer het brandt, produ-
ceert ethylglycol onzichtbare vlammen,
die toch brandwonden veroorzaken.
LET OP
LET OP OM GEEN KOELVLOEISTOF
TE MORSEN OP DE HETE DELEN VAN
DE MOTOR EN DE UITLAATINSTAL-
LATIE; DEZE ZOU BRAND KUNNEN
VATTEN MET ONZICHTBARE VLAM-
MEN. BIJ ONDERHOUDSHANDELIN-
GEN RAADT MEN AAN OM LATEX
HANDSCHOENEN TE GEBRUIKEN.
12
1 General rules / 1 Algemene normen

TOXIC, COOLANT HAS A SWEET FLA-
VOUR WHICH MAKES IT VERY AT-
TRACTIVE TO ANIMALS. NEVER
LEAVE THE COOLANT IN OPEN CON-
TAINERS IN AREAS ACCESSIBLE TO
ANIMALS AS THEY MAY DRINK IT.
KEEP OUT OF THE REACH OF CHIL-
DREN
DO NOT REMOVE THE RADIATOR
CAP WHEN THE ENGINE IS STILL
HOT. THE COOLANT IS UNDER PRES-
SURE AND MAY CAUSE BURNS.
DE KOELVLOEISTOF IS GIFTIG,
MAAR HEEFT TOCH EEN ZOETE
SMAAK, WAT HEM UITERST AAN-
TREKKELIJK MAAKT VOOR DIEREN.
LAAT DE KOELVLOEISTOF NOOIT IN
GEOPENDE VERPAKKINGEN OF IN
POSITIES DIE BEREIKBAAR ZIJN
VOOR DIEREN, DIE ER ZOUDEN VAN
KUNNEN DRINKEN.
BUITEN BEREIK VAN KINDEREN
HOUDEN
VERWIJDER DE RADIATORDOP NIET
WANNEER DE MOTOR NOG WARM
STAAT. DE KOELVLOEISTOF STAAT
ONDER DRUK, EN ZOU BRANDWON-
DEN KUNNEN VEROORZAKEN.
Used engine oil and gearbox
oil
CAUTION
IT IS ADVISABLE TO WEAR LATEX
GLOVES WHEN SERVICING THE VE-
HICLE.
THE ENGINE OR GEARBOX OIL MAY
CAUSE SERIOUS INJURIES TO THE
SKIN IF HANDLED FOR PROLONGED
PERIODS OF TIME AND ON A REGU-
LAR BASIS.
Gebruikte motorolie en
koppelingsolie
LET OP
BIJ ONDERHOUDSHANDELINGEN
RAADT MEN AAN OM LATEX HAND-
SCHOENEN TE GEBRUIKEN.
DE OLIE VAN DE MOTOR OF DE VER-
SNELLINGSBAK KAN ERNSTIGE
SCHADE VEROORZAKEN AAN DE
HUID, WANNEER HET LANG EN DA-
GELIJKS WORDT GEBRUIKT.
13
1 General rules / 1 Algemene normen

WASH YOUR HANDS CAREFULLY
AFTER HANDLING OIL.
HAND THE OIL OVER TO OR HAVE IT
COLLECTED BY THE NEAREST USED
OIL RECYCLING COMPANY OR THE
SUPPLIER.
DO NOT DISPOSE OF OIL IN THE EN-
VIRONMENT
KEEP OUT OF THE REACH OF CHIL-
DREN
MEN RAADT AAN OM DE HANDEN
ZORGVULDIG TE WASSEN NA HET
HANTEREN VAN OLIE.
BEZORG HEM AAN OF LAAT HEM OP-
HALEN DOOR HET DICHTSTBIJZIJN-
DE RECYCLINGBEDRIJF VAN GE-
BRUIKTE OLIES OF DOOR DE
LEVERANCIER.
LOOS DE OLIE NIET IN HET MILIEU.
BUITEN BEREIK VAN KINDEREN
HOUDEN
Brake and clutch fluid
Brake and clutch fluid
BRAKE AND CLUTCH FLUIDS CAN
DAMAGE THE PLASTIC OR RUBBER
PAINTED SURFACES. WHEN SERVIC-
ING THE BRAKING SYSTEM OR THE
CLUTCH SYSTEM PROTECT THESE
COMPONENTS WITH A CLEAN
CLOTH. ALWAYS WEAR PROTEC-
TIVE GOGGLES WHEN SERVICING
THESE SYSTEMS. BRAKE AND
CLUTCH FLUIDS ARE EXTREMELY
HARMFUL FOR YOUR EYES. IN THE
EVENT OF ACCIDENTAL CONTACT
WITH YOUR EYES, RINSE THEM IM-
MEDIATELY WITH ABUNDANT COLD,
Rem- en koppelingsvloeistof
Rem- en koppelingsvloeistof
DE REM- EN KOPPELINGSVLOEI-
STOFFEN KUNNEN DE GELAKTE,
PLASTIC OF RUBBEREN OPPER-
VLAKKEN BESCHADIGEN. WAN-
NEER MEN HET ONDERHOUD VAN
DE REM- OF KOPPELINGSINSTALLA-
TIE UITVOERT, BESCHERMT MEN DE-
ZE ONDERDELEN MET EEN SCHONE
DOEK. DRAAG STEEDS EEN BE-
SCHERMENDE BRIL WANNEER MEN
HET ONDERHOUD VAN DE INSTAL-
LATIES UITVOERT. DE REM- EN KOP-
PELINGSVLOEISTOFFEN ZIJN UI-
TERST SCHADELIJK VOOR DE
OGEN. IN GEVAL VAN TOEVALLIG
14
1 General rules / 1 Algemene normen

CLEAN WATER AND SEEK MEDICAL
ADVICE.
KEEP OUT OF THE REACH OF CHIL-
DREN
CONTACT MET DE OGEN, SPOELT
MEN ONMIDDELLIJK MET OVER-
VLOEDIG KOUD EN REIN WATER, EN
RAADPLEEGT MEN ONMIDDELLIJK
EEN ARTS.
BUITEN BEREIK VAN KINDEREN
HOUDEN
Battery hydrogen gas and
electrolyte
CAUTION
THE BATTERY ELECTROLYTE IS
TOXIC, CORROSIVE AND AS IT CON-
TAINS SULPHURIC ACID, IT CAN
CAUSE BURNS WHEN IN CONTACT
WITH THE SKIN. WHEN HANDLING
BATTERY ELECTROLYTE, WEAR
TIGHT-FITTING GLOVES AND PRO-
TECTIVE APPAREL. IN THE EVENT OF
SKIN CONTACT WITH THE ELECTRO-
LYTIC FLUID, RINSE WELL WITH
PLENTY OF CLEAN WATER. IT IS
PARTICULARLY IMPORTANT TO
PROTECT YOUR EYES BECAUSE
EVEN TINY AMOUNTS OF BATTERY
ACID MAY CAUSE BLINDNESS. IF
THE FLUID GETS IN CONTACT WITH
YOUR EYES, WASH WITH ABUNDANT
WATER FOR FIFTEEN MINUTES AND
CONSULT AN EYE SPECIALIST IMME-
Elektrolyt en waterstofgas van
de accu
LET OP
DE ELEKTROLYT VAN DE ACCU IS
GIFTIG EN BIJTEND, EN IN CONTACT
MET DE HUID KAN HET BRANDWON-
DEN VEROORZAKEN OMDAT HET
ZWAVELZUUR BEVAT. DRAAG
NAUWSLUITENDE HANDSCHOENEN
EN BESCHERMENDE KLEDING WAN-
NEER MEN HET ELEKTROLYT VAN
DE ACCU HANTEERT. WANNEER DE
ELEKTROLYTVLOEISTOF IN CON-
TACT ZOU KOMEN MET DE HUID,
MOET MEN OVERVLOEDIG WASSEN
MET KOUD WATER. HET IS ZEER BE-
LANGRIJK OM DE OGEN TE BE-
SCHERMEN, OMDAT OOK EEN ZEER
KLEINE HOEVEELHEID ZUUR VAN DE
ACCU BLINDHEID KAN VEROORZA-
KEN. WANNEER HET IN CONTACT
ZOU KOMEN MET DE OGEN, MOET
15
1 General rules / 1 Algemene normen

DIATELY. IF THE FLUID IS ACCIDEN-
TALLY SWALLOWED, DRINK LARGE
QUANTITIES OF WATER OR MILK,
FOLLOWED BY MILK OF MAGNESIA
OR VEGETABLE OIL AND SEEK MED-
ICAL ADVICE IMMEDIATELY. THE
BATTERY RELEASES EXPLOSIVE
GASES; KEEP IT AWAY FROM
FLAMES, SPARKS, CIGARETTES OR
ANY OTHER HEAT SOURCES. EN-
SURE ADEQUATE VENTILATION
WHEN SERVICING OR RECHARGING
THE BATTERY.
KEEP OUT OF THE REACH OF CHIL-
DREN
BATTERY LIQUID IS CORROSIVE. DO
NOT POUR IT OR SPILL IT, PARTICU-
LARLY ON PLASTIC COMPONENTS.
ENSURE THAT THE ELECTROLYTIC
ACID IS COMPATIBLE WITH THE BAT-
TERY TO BE ACTIVATED.
MEN VIJFTIEN MINUTEN LANG OVER-
VLOEDIG WASSEN MET WATER EN
ONMIDDELLIJK EEN OOGARTS
RAADPLEGEN. WANNEER HET TOE-
VALLIG ZOU WORDEN INGESLIKT,
MOET MEN VEEL WATER OF MELK
DRINKEN, DAARNA MAGNESIUM-
MELK OF VEGETALE OLIE DRINKEN,
EN ONMIDDELLIJK EEN ARTS RAAD-
PLEGEN. DE ACCU VERSPREIDT EX-
PLOSIEVE GASSEN EN MOET DUS
UIT DE BUURT WORDEN GEHOUDEN
VAN VLAMMEN, VONKEN, SIGARET-
TEN EN ELKE ANDERE WARMTE-
BRON. VOORZIE EEN GEPASTE VER-
LUCHTING WANNEER MEN ONDER-
HOUD OF HET OPLADEN VAN DE
ACCU UITVOERT.
BUITEN BEREIK VAN KINDEREN
HOUDEN
DE VLOEISTOF VAN DE ACCU IS
CORROSIEF. GIET ZE NIET UIT EN
VERSPREIDT ZE NIET, VOORAL NIET
OP DE PLASTIC DELEN. CONTRO-
LEER OF HET ELEKTROLYTZUUR
SPECIFIEK VOOR DE TE ACTIVEREN
ACCU IS.
16
1 General rules / 1 Algemene normen

Stand
BEFORE SETTING OFF, MAKE SURE
THE STAND HAS BEEN COMPLETELY
RETRACTED TO ITS POSITION.
DO NOT REST THE RIDER OR PAS-
SENGER WEIGHT ON THE SIDE
STAND.
Standaard
VÓÓR HET VERTREK CONTROLEERT
MEN OF DE STANDAARD VOLLEDIG
INGEKLAPT IS.
BELAST DE LATERALE STANDAARD
NIET MET UW GEWICHT OF DAT VAN
DE PASSAGIER.
Reporting of defects that
affect safety
Unless otherwise specified in this Use
and Maintenance Booklet, do not remove
any mechanical or electrical component.
CAUTION
SOME CONNECTORS IN THE VEHI-
CLE MAY BE ACCIDENTALLY SWAP-
PED AND MAY COMPROMISE NOR-
MAL VEHICLE OPERATION IF INCOR-
RECTLY INSTALLED.
Communicatie van de
defecten die invloed hebben
op de veiligheid
Behalve waar gespecificeerd wordt in dit
Gebruiks- en onderhoudsboekje, mag
geen enkel mechanisch of elektrisch on-
derdeel gedemonteerd worden.
LET OP
SOMMIGE CONNECTOREN VAN HET
VOERTUIG KUNNEN VERWISSELD
WORDEN, EN WANNEER ZE FOUT
GEMONTEERD WORDEN, KUNNEN
ZE DE NORMALE WERKING VAN HET
VOERTUIG SCHADEN.
17
1 General rules / 1 Algemene normen

18
1 General rules / 1 Algemene normen

SX - RX 50
Chap. 02
Vehicle
Hst. 02
Voertuing
19

Dashboard (02_01) Legenda (02_01)
02_01
key:
1. Instrument panel
2. Switches for lights, horn and
turn indicators
3. Front brake lever
4. Throttle grip
5. Ignition switch, steering lock
6. Clutch control
7. Front brake fluid reservoir
Legende:
1. Dashboard
2. Schakelaar lichten, claxon, rich-
tingaanwijzers
3. Commando van de voorrem
4. Gascommando
5. Ontstekingsschakelar, stuurslot
6. Commando van de koppeling
7. Vloeistoftank van de voorrem
20
2 Vehicle / 2 Voertuing

8. Cold start lever 8. Commandohendel voor de kou-
de start
02_02
Analog instrument panel
(02_02)
KEY:
1. Speedometer
2. Tachometer
3. High temperature warning light
4. Low oil warning light
5. Turn indicator warning light
6. High beam warning light on
7. Low fuel warning light
8. Multifunction indicator
9. Mode button
ODO Total distance travelled
CLOCK
TRIP Partial distance
SRV Distance for the next vehicle serv-
icing
Analoog instrumentenpaneel
(02_02)
LEGENDE:
1. Snelheidsmeter
2. Indicator van het toerental van de
motor
3. Indicatorlamp voor de excessieve
temperatuur
4. Controlelamp oliereserve
5. Controlelamp richtingaanwijzers
6. Controlelamp groot licht aan
7. Indicator brandstofreserve
8. Multifunctionele indicator
9. Toets Mode
ODO Totaal afgelegde afstand
KLOK
TRIP Partiële afstand
SRV Afstand tot de volgende service-
beurt
Functions: Functies:
21
2 Vehicle / 2 Voertuing

WATER TEMPERATURE WARNING
LIGHT : RED, illuminates if coolant tem-
perature exceeds safety value.
MIM. OIL LEVEL WARNING LIGHT :
RED, illuminates when the quantity of oil
remaining in the tank reaches the reserve
level.
Characteristic
Mixer oil reserve
0.26 l (0.057 UK gal; 0.069 USgal)
CONTROLELAMP TEMPERATUUR
WATER: RODE kleur, licht op wanneer
de temperatuur van de koelvloeistof de
veiligheidswaarde overschrijdt.
CONTROLELAMP MIN. OLIEPEIL: RO-
DE kleur, licht op wanneer in de tank de
hoeveelheid van de oliereserve overblijft.
Technische kenmerken
Oliereserve van de menger
0,26 l (0.057 UK gal; 0.069 US gal)
FUEL RESERVE ICON : illuminates
when the quantity of fuel remaining in the
tank reaches the reserve level.
Characteristic
Fuel reserve
1.29 l (0.28 UK gal; 0.34 US gal)
ICOON BRANDSTOFRESERVE: licht
op wanneer in de tank de hoeveelheid
van de brandstofreserve overblijft.
Technische kenmerken
Brandstofreserve
1,29 l (0.28 UK gal; 0.34 US gal)
At each key-on, the instrument panel per-
forms a check cycle (all segments active
for three seconds).
Once the check is over, the instrument
panel displays the last function program-
med with the button.
Button operating mode. Press and re-
lease the button within three seconds to
cycle through the functions in the follow-
ing order:
Bij elke activering van de sleutel voert het
dashboard een check uit (alle segmenten
zijn drie seconden actief).
Na de check zal het dashboard de laatste
functie weergeven die werd ingesteld
door middel van de drukknop.
Werkingsmodaliteit van de drukknop.
Door minder dan drie seconden op de
drukknop te drukken, volgen de functies
elkaar op de volgende manier op:
22
2 Vehicle / 2 Voertuing

ODOMETER_ TRIP _CLOCK_SERV-
ICE _ODOMETER
Press and hold the button for more than
three seconds once the relative function
is displayed to reset the TRIP odometer.
To set the clock (once the function is dis-
played):
- press and hold the button for more than
three seconds
- the hour flashes,
- hold down the button until the current
hour is displayed
- release the button
- the minutes flash
- hold down the button until the current
minutes are displayed
- release the button.
HODOGRAM _ TRIP _KLOK _SERVICE
_HODOGRAM
Om de TRIP te resetten moet de druk-
knop langer dan drie seconden worden
ingedrukt wanneer de functie wordt weer-
gegeven.
Om de klok te resetten, (wanneer de
functie wordt weergegeven):
- druk de knop langer dan drie seconden
in
- de uren knipperen,
- druk op de drukknop tot het gewenste
uur wordt bereikt
- laat de drukknop los
- de minuten knipperen
- druk tot de gewenste minuten worden
bereikt
- laat de drukknop los
DIGITAL REV COUNTER WITH 12 BAR
GRAPH
•
Bar 1: 2000 rpm
•
Bar 2: 3000 rpm
•
Bar 3: 4000 rpm
•
Bar 4: 5000 rpm
•
Bar 5: 6000 rpm
•
Bar 6: 7000 rpm
•
Bar 7: 8000 rpm
•
Bar 8: 9000 rpm
•
Bar 9: 10000 rpm
•
Bar 10: 11000 rpm
DIGITALE TOERENTELLER MET 12
BLOKJES
•
Blokje 1: 2000 toeren/min (rpm)
•
Blokje 2: 3000 toeren/min (rpm)
•
Blokje 3: 4000 toeren/min (rpm)
•
Blokje 4: 5000 toeren/min (rpm)
•
Blokje 5: 6000 toeren/min (rpm)
•
Blokje 6: 7000 toeren/min (rpm)
•
Blokje 7: 8000 toeren/min (rpm)
•
Blokje 8: 9000 toeren/min (rpm)
•
Blokje 9: 10000 toeren/min
(rpm)
23
2 Vehicle / 2 Voertuing

•
Bar 11: 11500 rpm
•
Bar 12: 12000 rpm
•
Blokje 10: 11000 toeren/min
(rpm)
•
Blokje 11: 11500 toeren/min
(rpm)
•
Blokje 12: 12000 toeren/min
(rpm)
Ignition switch (02_03)
The ignition switch is located on the
headstock upper plate.
The vehicle is supplied with two keys
(one is the spare key).
The lights go off when the ignition switch
is set to OFF.
NOTE
THE TAILLIGHTS LIGHT AUTOMATI-
CALLY WHEN THE IGNITION SWITCH
IS TURNED TO ON.
Startschakelaar (02_03)
De ontstekingsschakelaar bevindt zich
op de bovenste plaat van de kop van het
stuur.
Bij het voertuig worden twee sleutels bij-
geleverd (één reservesleutel).
Het uitgaan van de lichten gebeurt wan-
neer de ontstekingsschakelaar op OFF
gezet wordt.
N.B.
DE ACHTERLICHTEN GAAN AUTO-
MATISCH AAN WANNEER DE ONT-
STEKINGSSCHAKELAAR OP ON
WORDT GEPLAATST.
24
2 Vehicle / 2 Voertuing

02_03
1. LOCK: The steering is locked. It
is not possible to start the en-
gine or switch on the lights. The
key can be extracted
2. OFF: The engine and lights can-
not be set to work. The key can
be extracted.
3. ON: the engine may be started.
The key cannot be extracted.
1. LOCK: Het stuur is geblok-
keerd. Het is niet mogelijk om de
motor te starten en om de lich-
ten te activeren. Het is mogelijk
om de sleutel te verwijderen.
2. OFF: De motor en de lichten
kunnen niet in werking worden
gesteld. Het is mogelijk om de
sleutel te verwijderen.
3. ON: De motor kan gestart wor-
den. Het is niet mogelijk om de
sleutel te verwijderen.
Locking the steering wheel
(02_04)
CAUTION
AVOIDING LOSING CONTROL OF THE
VEHICLE - NEVER TURN THE KEY TO
«LOCK» WHILE RIDING.
Stuurslot vergrendelen
(02_04)
LET OP
DRAAI DE SLEUTEL NOOIT IN POSI-
TIE «LOCK» TIJDENS HET RIJDEN,
ZODAT MEN DE CONTROLE OVER
HET VOERTUIG NIET VERLIEST.
02_04
To lock the steering:
• Turn the handlebar completely to the
left.
• Turn the key to «OFF».
• Push, release and turn the key anti-
clockwise and steer the handlebar slowly
until the key turns to «LOCK».
• Remove the key.
Om het stuur te blokkeren:
• Draai het stuur volledig naar links.
• Draai de sleutel in positie «OFF».
• Druk, laat los, en draai de sleutel in te-
genwijzerzin, stuur langzaam tot de sleu-
tel op «LOCK» wordt geplaatst.
• Verwijder de sleutel.
25
2 Vehicle / 2 Voertuing

02_05
Releasing the steering wheel
(02_05)
Insert the key and turn to «OFF».
CAUTION
NEVER TURN THE KEY TO «LOCK»
OR «OFF» WHILE RIDING.
Stuurslot ontgrendelen
(02_05)
Plaats de sleutel weer en draai hem in de
positie «OFF».
LET OP
DRAAI DE SLEUTEL NIET IN DE PO-
SITIE «LOCK» OF «OFF» WANNEER U
RIJDT.
02_06
Horn button (02_06)
Press it to activate the horn.
Drukknop claxon (02_06)
De akoestische melder wordt in werking
gesteld door op de drukknop te drukken.
26
2 Vehicle / 2 Voertuing

02_07
Switch direction indicators
(02_07)
Move the switch to the left, to indicate a
left turn; move the switch to the right to
indicate a right turn. Pressing the switch
deactivates the turn indicator.
CAUTION
IF THE WARNING LIGHT WITH AR-
ROWS FLASHES QUICKLY, IT MEANS
THAT ONE OR MORE TURN INDICA-
TOR LIGHT BULBS ARE BURNED
OUT.
Schakelaar richtingaanwijzers
(02_07)
Verplaats de schakelaar naar links, om
aan te duiden dat men naar links draait;
verplaats de schakelaar naar rechts, om
aan te duiden dat men naar rechts draait.
Druk op de schakelaar om de richting-
aanwijzer te deactiveren.
LET OP
WANNEER DE CONTROLELAMP VAN
DE PIJLEN SNEL KNIPPERT, ZIJN
EEN OF MEER LAMPJES VAN DE
RICHTINGAANWIJZERS VERBRAND.
02_08
Front brake control (02_08)
The front brake lever is located on the
right hand side of the handlebar. Be par-
ticularly careful when using the front
brake. Use it gently and measure the
power progressively, according to sur-
face conditions, to avoid blocking the
wheel.
Commando van de achterrem
(02_08)
Het commando van de voorrem bevindt
zich op de rechter kant van het stuur. Let
vooral op bij het gebruik van de voorrem,
rem niet bruusk, doseer geleidelijk aan
de kracht volgens de condities van de
ondergrond, en vermijdt om de wielen te
doen blokkeren.
27
2 Vehicle / 2 Voertuing

02_09
Throttle control (02_09)
The throttle control is located on the right
hand side of the handlebar. Twisting the
throttle grip back opens the carburettor
throttle valve.
Gashendel (02_09)
Het gascommando bevindt zich op de
rechter kant van het stuur. Wanneer het
handvat naar beneden wordt gedraaid,
gaat de carburatorklep open.
02_10
Rear brake pedal (02_10)
The rear brake pedal is located on the
right hand side of the vehicle, at the same
height as the engine. It must be activated
gradually with the toe-end. The rear and
front brakes must be used in combina-
tion, according to the needs, in order to
obtain a more efficient braking.
Also pay attention to the conditions of the
road! Particularly, to the conditions of as-
phalt and if it is wet or dirty with sand, oil,
etc.
Pedaal van de achterrem
(02_10)
Het pedaal van het commando van de
achterrem bevindt zich op de rechter kant
van het voertuig, dichtbij de motor. Deze
moet geleidelijk aan geactiveerd worden
met de punt van de voet. Combineer de
achterrem indien nodig met het gebruik
van de voorrem: op deze manier is de
remming doeltreffender.
Let op voor de staat van de weg! vooral
wanneer de weg geasfalteerd is, en nat
of vuil met kiezelsteen, olie, enz.
28
2 Vehicle / 2 Voertuing

02_11
Clutch control (02_11)
The clutch lever is located on the left
hand side of the handlebar. Pulling the
lever completely disengages the clutch
and decouples the transmission and the
engine. Slowly releasing the lever engag-
es the clutch, allowing engine torque to
be transmitted to the rear wheel via the
gearbox.
Commando van de koppeling
(02_11)
De commandohendel van de koppeling
bevindt zich op de linker kant van het
stuur. Wanneer de hendel compleet
wordt ingetrokken, wordt de koppeling
ontkoppeld en wordt de transmissie van
de motor bevrijd. Als de hendel langzaam
wordt losgelaten, wordt de koppeling uit-
geschakeld en wordt het koppel van de
motor via de versnellingsbak naar het
achterwiel gezonden.
02_12
High/low beam selector
(02_12)
Shifts from low beam to high beam light
and vice versa.
Lichtschakelaar (02_12)
Hiermee kan de lichtbundel van groot
licht naar dimlicht en viceversa omge-
schakeld worden.
29
2 Vehicle / 2 Voertuing

02_13
Manual starter control (02_13)
Operating the cold start lever activates
the cold start system.
To disengage the cold start system, re-
turn the cold start lever to its original po-
sition.
Commando van de manuele
starter (02_13)
Als de hendel voor de koude start wordt
geactiveerd, wordt de starter in werking
gesteld.
Om de starter uit te schakelen, moet de
hendel voor de koude start naar de be-
ginpositie gebracht worden.
02_14
Mixer oil tank (02_14)
The vehicle is equipped with an inde-
pendent mixer that controls the fuel-oil
mix to lubricate the engine.
If the low mixer oil icon on the instrument
panel is lit, this means the reserve is be-
ing used.
DO NOT RIDE THE VEHICLE WITHOUT
MIXER OIL AS THIS CAN SERIOUSLY
DAMAGE THE ENGINE.
IN CASE THERE IS NO MORE OIL IN
THE MIXER RESERVOIR OR THE MIX-
ER OIL PIPE GETS DETACHED, CON-
TACT AN Official aprilia Dealer TO
HAVE THE SYSTEM PURGED.
THIS OPERATION IS ESSENTIAL AS
THE ENGINE CAN BE SERIOUSLY
Tank van de mengerolie
(02_14)
Het voertuig is voorzien van een geschei-
den menger die benzine met olie mengt
voor de smering van de motor.
Het bereiken van de reserve wordt aan-
geduid door het verschijnen van het logo
van de oliereserve van de menger, op het
multifunctioneel display.
WANNEER MEN HET VOERTUIG GE-
BRUIKT ZONDER OLIE IN DE MEN-
GER, VEROORZAAKT DIT ERNSTIGE
SCHADE AAN DE MOTOR.
WANNEER ER GEEN OLIE MEER
AANWEZIG IS IN DE MENGERTANK,
OF WANNEER DE OLIEBUIS VAN DE
MENGER WORDT VERWIJDERD,
MOET MEN ZICH WENDEN TOT EEN
30
2 Vehicle / 2 Voertuing

DAMAGED IF IT RUNS WITH AIR IN
THE MIXER OIL CIRCUIT.
ALWAYS CHECK THAT THERE IS
SUFFICIENT OIL IN THE TANK VIA
THE SIGHT GLASS ON THE LEFT
HAND SIDE OF THE VEHICLE.
Officiële Aprilia Dealer, DIE ZAL ZOR-
GEN VOOR DE ONTLUCHTING.
DEZE HANDELING IS ABSOLUUT
NOODZAKELIJK, OMDAT DE WERK-
ING VAN DE MOTOR MET LUCHT IN
DE INSTALLATIE VAN DE OLIE VAN
DE MENGER ERNSTIGE SCHADE
AAN DE MOTOR ZELF ZOU KUNNEN
VEROORZAKEN.
CONTROLEER STEEDS OF OLIE
AANWEZIG IS IN HET RESERVOIR
LANGS HET INSPECTIEGLAS OP DE
LINKER KANT VAN HET VOERTUIG.
To access the mixer oil tank, it is neces-
sary to remove the left central fairing, as
described in Fairings chapter.
Om de olietank van de menger te berei-
ken, moet de linker centrale zijplaat ver-
wijderd worden zoals wordt beschreven
in het hoofdstuk Bekledingen.
Fairings (02_15, 02_16, 02_17,
02_18)
CAUTION
THE OPERATIONS DESCRIBED IN
THIS SECTION CAN BE COMPLICA-
Stroomlijnpanelen (02_15,
02_16, 02_17, 02_18)
LET OP
DE HANDELINGEN DIE IN DEZE PA-
RAGRAAF WORDEN BESCHREVEN,
KUNNEN INGEWIKKELD OF GE-
31
2 Vehicle / 2 Voertuing

TED AND RISKY FOR INTEGRITY OF
THE REMOVED COMPONENTS. IN
CASE OF DIFFICULTY, FOLLOW THE
PROCEDURES DESCRIBED IN THIS
WORKSHOP BOOKLET AVAILABLE
AT AN Aprilia Official Dealer OR RE-
FER PREVIOUSLY TO AN AUTHOR-
ISED MECHANIC ALSO AT AN Author-
ised Aprilia Workshop.
NOTE
THE FOLLOWING OPERATIONS RE-
FER TO ONE SIDE OF THE VEHICLE,
BUT APPLY TO BOTH.
VAARLIJK ZIJN VOOR DE INTEGRI-
TEIT VAN DE VERWIJDERDE DELEN.
IN GEVAL VAN MOEILIJKHEDEN
MOETEN DE PROCEDURES GE-
VOLGD WORDEN DIE WORDEN BE-
SCHREVEN IN DE HANDLEIDING VAN
DE GARAGE DIE KAN AANGE-
SCHAFT WORDEN BIJ EEN Officiële
Aprilia Dealer OF MOET MEN ZICH
WENDEN TOT EEN ERKENDE MECA-
NICIEN BIJ EEN Erkende Aprilia Gara-
ge.
N.B.
DE VOLGENDE HANDELINGEN BE-
TREFFEN ÉÉN KANT VAN HET VOER-
TUIG, MAAR ZIJN GELDIG VOOR BEI-
DE.
02_15
CENTRAL FAIRING
•
Undo and remove the two
screws indicated.
CENTRALE ZIJPLAAT
•
Draai de twee aangeduide bou-
ten los, en verwijder ze.
32
2 Vehicle / 2 Voertuing

02_16
•
Proceed with caution, remove
the central fairing from the rear
fixing points.
CAUTION
BEFORE CARRYING OUT THE OPER-
ATIONS DESCRIBED BEFORE, WAIT
UNTIL THE EXHAUST IS COLD.
•
Verwijder voorzichtig de centra-
le zijplaat uit de klemverbindin-
gen achteraan.
LET OP
WACHT TOT DE UITLAAT IS AFGE-
KOELD VOORDAT DE BESCHREVEN
HANDELINGEN WORDEN UITGE-
VOERD.
For refitting, carry out the previously de-
scribed operations in reverse order, tak-
ing particular care to the positioning of the
components and the tightening of the
screws.
Voor de hermontage moeten de eerder
beschreven handelingen in de omge-
keerde zin uitgevoerd worden, en moet
opgelet worden voor de positionering van
de onderdelen en de sluiting van de bou-
ten.
02_17
TAIL FAIRING AND REAR SIDE FAIR-
INGS
•
Remove the central fairing.
•
Undo and remove the screws
(1)
•
When accessing the rear wheel
housing, undo and remove the
two screws (2) and collect the
corresponding washers.
•
Proceed with caution, release
the rear side fairing from the fix-
ing points (3).
ACHTERSTUK EN ZIJPLATEN ACH-
TERAAN
•
Verwijder de centrale zijplaat.
•
Draai de bouten (1) los, en ver-
wijder ze
•
Draai vanaf de ruimte van het
achterwiel de twee bouten (2)
los, verwijder ze, en recupereer
de relatieve rondellen.
•
Koppel zeer voorzichtig de zij-
plaat achteraan uit de klemver-
bindingen (3).
•
Verwijder het achterstuk, nog
verenigd aan de achterste zij-
33
2 Vehicle / 2 Voertuing

•
Slide off the tail fairing back-
wards, still linked to the right and
left rear side fairings.
platen links en rechts, langs
achteren.
02_18
•
To separate the tail fairing from
the rear side fairings, undo the
two screws indicated.
•
Om het achterstuk van de zijpla-
ten te halen, moeten de twee
aangeduide bouten losgedraaid
worden.
02_19
Opening the saddle (02_19,
02_20, 02_21)
•
Rest the vehicle on its stand.
•
Insert the key in the lock on the
fuel tank cover.
•
Turn the key clockwise.
Zadel openen (02_19, 02_20,
02_21)
•
Plaats het voertuig op de stan-
daard.
•
Plaats de sleutel in het slot van
de tankbedekking.
•
Draai de sleutel in wijzerszin.
34
2 Vehicle / 2 Voertuing

02_20
02_21
•
Lift the cover.
•
Unscrew and remove the two
saddle fastener knobs.
•
Slide off the saddle to the front.
The following are located under the sad-
dle:
1. the mixer oil tank,
2. the battery,
3. the document compartment /
toolkit.
•
Hef het deksel op.
•
Draai de twee bevestigings-
knoppen van het zadel los en
verwijder ze.
•
Verwijder het zadel langs voor.
Onder het zadel bevindt zich het volgen-
de:
1. het oliemengertank
2. de accu,
3. de documentenruimte / gereed-
schapskit.
02_22
Keys (02_22)
Two keys are supplied together with the
scooter, both can be used either for the
ignition lock or the fuel tank cover.
The keys are accompanied by a tag
marked with the identification code to be
quoted when ordering duplicates.
Sleutels (02_22)
Bij het voertuig worden twee sleutels ge-
leverd, die onverschillig gebruikt kunnen
worden voor het ontstekingsslot en voor
het deksel van de brandstoftank.
Bij de sleutels wordt een naamplaatje ge-
leverd met het identificatienummer, dat
moet meegedeeld worden bij de aan-
vraag voor duplicaten.
35
2 Vehicle / 2 Voertuing

WARNING
WE RECOMMEND KEEPING THE DU-
PLICATE KEY TOGETHER WITH ITS
TAG IN A SAFE PLACE AND NOT ON
THE SCOOTER.
WAARSCHUWING
ER WORDT AANGERADEN OM HET
DUPLICAAT VAN DE SLEUTEL SA-
MEN MET ZIJN NAAMPLAATJE NIET
OP HET VOERTUIG TE BEWAREN.
Identification (02_23, 02_24)
Write down the chassis and engine num-
ber in the specific space in this booklet.
The chassis number is handy when pur-
chasing spare parts.
CAUTION
CHANGING THE IDENTIFICATION
CODE IS A CRIME THAT MAY BE PUN-
ISHED WITH SERIOUS CRIMINAL
CHARGES. FURTHERMORE, THE
LIMITED WARRANTY FOR NEW VEHI-
CLES WILL BE CANCELLED IF THE
VEHICLE IDENTIFICATION NUMBER
(VIN) HAS BEEN MODIFIED OR CAN-
NOT BE QUICKLY DETERMINED.
Identificatie (02_23, 02_24)
Het is een goede gewoonte om het fra-
menummer en het motornummer op de
speciale plaats in dit boekje te schrijven.
Het framenummer kan gebruikt worden
voor het aanschaffen van reserveonder-
delen.
LET OP
HET WIJZIGEN VAN DE IDENTIFICA-
TIECODES IS EEN MISDRIJF DAT BE-
STRAFT KAN WORDEN MET ERNSTI-
GE BESCHULDIGINGEN. BOVENDIEN
ZAL DE BEPERKTE GARANTIE VOOR
NIEUWE VOERTUIGEN GEANNU-
LEERD WORDEN ALS HET SERIE-
NUMMER VAN DE IDENTIFICATIE
VAN HET VOERTUIG (VIN) GEWIJ-
ZIGD WERD OF NIET ONMIDDELLIJK
KAN BEPAALD WORDEN.
36
2 Vehicle / 2 Voertuing

02_23
ENGINE NUMBER
The engine number is stamped on the top
part of the crankcase.
Engine No......................
MOTORNUMMER
Het motornummer is gedrukt op de bo-
venkant van de carter.
Motor nr.....................
02_24
CHASSIS NUMBER
The chassis number is stamped on the
right side of the headstock.
Chassis No. ....................
FRAMENUMMER
Het framenummer is gedrukt op de kop
van het stuur, rechter kant.
Frame nr....................
37
2 Vehicle / 2 Voertuing

38
2 Vehicle / 2 Voertuing

SX - RX 50
Chap. 03
Use
Hst. 03
Gebruik
39

Checks
CAUTION
BEFORE SETTING-OFF, ALWAYS
CARRY OUT A PRELIMINARY CHECK
OF THE VEHICLE, FOR CORRECT
AND SAFE OPERATION. FAILURE TO
DO SO MAY LEAD TO SEVERE PER-
SONAL INJURY OR VEHICLE DAM-
AGE. DO NOT HESITATE TO CON-
TACT AN OFFICIAL aprilia DEALER IF
YOU DO NOT UNDERSTAND HOW
SOME CONTROLS WORK OR IF A
MALFUNCTION IS DETECTED OR
SUSPECTED. CHECKS DO NOT TAKE
LONG AND RESULT IN SIGNIFICANT-
LY ENHANCED SAFETY.
Controles
LET OP
VOER VOOR HET WEGRIJDEN AL-
TIJD EEN CONTROLE VAN HET
VOERTUIG UIT OM EEN CORRECTE
EN VEILIGE WERKZAAMHEID TE GA-
RANDEREN. HET NIET UITVOEREN
VAN DEZE HANDELINGEN KAN ERN-
STIGE LETSELS AAN UZELF OF
SCHADE AAN HET VOERTUIG VER-
OORZAKEN. AARZEL NIET OM ZICH
TE WENDEN TOT EEN Officiële Aprilia
Dealer, WANNEER MEN DE WERKING
VAN BEPAALDE COMMANDO'S NIET
BEGRIJPT OF WANNEER MEN ONRE-
GELMATIGHEDEN IN DE WERKING
MERKT OF VERMOEDT. DE NODIGE
TIJD VOOR EEN CONTROLE IS UI-
TERST BEPERKT, EN DE VEILIGHEID
KOMT OP DE EERSTE PLAATS.
PRE-RIDE CHECKS
Front and rear disc brake Check for proper operation. Check
brake lever empty travel and brake
fluid level. Check for leaks. Check
brake pads for wear.
VOORAFGAANDE CONTROLES
Voorste en achterste schijfrem Controleer de werking, de loze slag
van de commandohendels, het peil
van de vloeistof en eventuele
lekken. Controleer de slijtage van
de pastilles.
40
3 Use / 3 Gebruik

Throttle grip Check that the throttle functions
progressively and does not stick at
all steering angles.
Mixer oil Check and/or top-up as required.
Gearbox oil Check and/or top up if required
Wheels/ tyres Check the exterior state, inflation
pressure and wear of the tyres and
check for any damage.
Remove any possible strange
body that might be stuck in the
tread design.
Brake levers Check that the levers function
progressively.
Steering Check that the rotation is uniform,
smooth and there are no signs of
clearance or slackness.
Clutch There must be approximately 10 -
15 mm (0.40 - 0.60 in) free play at
the end of travel of the clutch lever.
The clutch must function without
juddering and/or slippage.
Side stand Check that it slides smoothly and
that it snaps back to its rest position
upon spring tension. Lubricate
couplings and joints if necessary.
Clamping elements Check that the clamping elements
are not loose.
Gashendel Controleer of hij geleidelijk aan
functioneert en of hij in geen enkele
positie van het stuur blijft hangen.
Olie van de menger Controleer en/of vul bij indien
nodig.
Olie van de versnellingsbak Controleer en/of vul bij indien
nodig.
Wielen/banden Controleer de conditie van de
rijvlakken van de banden, de
spanning, de slijtage en eventuele
storingen.
Verwijder eventueel aanwezige
vreemde voorwerpen uit het profiel
van het rijvlak.
Remhendels Controleer of ze gradueel
functioneren.
Stuur Controleer of het draaien
homogeen en vloeiend, en zonder
speling of het lossen ervan
gebeurt.
Koppeling De lege loop op het uiteinde van de
commandohendel van de
koppeling moet 10 - 15 mm (0.40 -
0.60 in) bedragen. De koppeling
mag niet slippen en/of schokken.
Laterale standaard Controleer of hij goed schuift, en of
de spanning van de veren hem in
de normale positie terugbrengt.
Smeer indien nodig de
41
3 Use / 3 Gebruik

Adjust or tighten them as required.
Drive chain Check it for backlash.
Fuel tank Check the coolant level and refill if
necessary.
Check the circuit for leaks or
obstructions.
Check that the tank cap closes
correctly.
Lights, warning lights, horn, rear
stop light switch and electrical
devices
Check function of horn and lights.
Replace bulbs or repair any faults
noted.
koppelingen en de
bewegingsplaatsen.
Bevestigingselementen Controleer of de
bevestigingselementen niet gelost
zijn.
Stel ze af of sluit ze eventueel.
transmissieketting Controleer de speling.
Brandstoftank Controleer het peil, en tank indien
nodig.
Controleer eventuele lekken of
afsluitingen van het circuit.
Controleer de correcte sluiting van
de brandstofdop.
Lichten, controlelampen,
akoestische melder, schakelaars
van het achterste stoplicht en
elektrische mechanismen
Controleer de correcte werking van
de akoestische en visuele
mechanismen. Vervang de
lampjes of grijp in bij defecten.
42
3 Use / 3 Gebruik

03_01
Refuelling (03_01, 03_02)
•
Rest the vehicle on its stand.
•
Insert the key in the lock on the
fuel tank cover.
•
Turn the key clockwise.
Tanken (03_01, 03_02)
•
Plaats het voertuig op de stan-
daard.
•
Plaats de sleutel in het slot van
de tankbedekking.
•
Draai de sleutel in wijzerszin.
03_02
•
Lift the cover.
•
Unscrew and remove the fuel
tank cap.
•
Refuel.
Characteristic
Use-Fuel tank
7.5 +/- 0.5 l (1.65 +/- 0.11 Uk gal; 1.98 +/-
0.13 US gal)
•
Hef het deksel op.
•
Draai de dop van de brandstof-
tank los, en verwijder hem.
•
Voer het tanken uit.
Technische kenmerken
Gebruik-Brandstoftank
7.5 +/- 0.5 l (1.65 +/- 0.11 Uk gal; 1.98 +/-
0.13 US gal)
03_03
Clutch lever adjustment
(03_03)
Adjustment clutch when the engine stops
or the vehicle tends to move forward even
when clutch lever is operated and the
gear engaged, or if the clutch "slides", re-
sulting in acceleration delay considering
the engine revs.
Regulering schakelhendel
(03_03)
Voer de regeling van de koppeling uit
wanneer de motor stopt of wanneer het
voertuig neigt te rijden met de koppe-
lingshendel geactiveerd en de versnel-
ling ingeschakeld, of wanneer de koppe-
ling "slipt", door een vertraging van het
acceleratievermogen te veroorzaken te-
genover het toerental van de motor.
43
3 Use / 3 Gebruik

Minor adjustments can be carried out
through the set screw (1):
•
Rest the vehicle on its stand.
•
Remove the protection casing
(2).
•
Loosen the lock nut (3).
•
Turn the set screw (1) until the
empty travel at the clutch lever
end is approximately 10 - 15 mm
(0.39 - 0.59 in) (see figure).
•
After adjusting, tighten the
check nut (3) to lock the adjuster
screw (1).
•
Check the empty travel at the
clutch lever end.
•
Refit he protection casing (2).
CAUTION
TAKE YOUR SCOOTER TO AN aprilia
Official Dealer IF IT IS NOT POSSIBLE
TO OBTAIN A CORRECT CLUTCH AD-
JUSTMENT OR IN CASE OF IRREGU-
LAR CLUTCH OPERATION.
NOTE
CHECK THE CLUTCH WIRE IS IN
GOOD CONDITIONS: THERE SHOULD
BE NO SIGNS OF CRUSHING OR
WEAR ALL ALONG THE SHEATH.
Minder belangrijke regelingen kunnen
uitgevoerd worden met het register (1):
•
Plaats het voertuig op de stan-
daard.
•
Verwijder de beschermingskap
(2).
•
Los de tegenmoer (3).
•
Draai het register (1) tot de lege
loop aan het uiteinde van de
hendel van de koppeling onge-
veer 10 - 15 mm (0.39 - 0.59 in)
bedraagt (raadpleeg de figuur).
•
Sluit na de regeling de tegen-
moer (3) zodat het register (1)
wordt geblokkeerd.
•
Controleer de lege loop aan het
uiteinde van de hendel van de
koppeling.
•
Herplaats de beschermingskap
(2).
LET OP
WANNEER HET NIET MOGELIJK IS
OM EEN CORRECTE REGELING TE
VERKRIJGEN, OF WANNEER DE
KOPPELING ONREGELMATIG
WERKT, WENDT MEN ZICH TOT EEN
Officiële Aprilia Dealer.
N.B.
CONTROLEER DE INTEGRITEIT VAN
DE KABEL VAN DE KOPPELING: DE-
ZE MAG NIET PLATGEDRUKT ZIJN OF
DE GAINE MAG NIET VERSLETEN
ZIJN, EN DIT OVER DE VOLLEDIGE
LENGTE.
44
3 Use / 3 Gebruik

•
Lubricate the clutch wire fre-
quently with an appropriate
grease to avoid early wear and
corrosion.
•
Smeer regelmatig de kabel van
de koppeling met een geschikt
smeermiddel, om voortijdige slij-
tage en corrosievorming te ver-
mijden.
Running in
Engine run-in is essential to ensure en-
gine long life and correct operation.
If possible, ride the vehicle on particularly
twisty roads and/or hilly roads to ensure
that the engine, suspension and brakes
are run in more effectively. Vary your driv-
ing speed during run-in. In this way, more
or subsequently less load work is re-
quired from the clutch components, thus
cooling the engine parts. Even if it is im-
portant to "strain" engine components
during run-in, make sure not to overdo
this.
CAUTION
THE FULL PERFORMANCE OF THE
VEHICLE IS ONLY AVAILABLE AFTER
THE SERVICE AT THE END OF THE
RUN-IN PERIOD.
Inrijden
De proefperiode van de motor is funda-
menteel voor het garanderen van de duur
en de correcte werking.
Rij indien mogelijk op wegen met veel
bochten en/of hellingen, waar de motor,
de ophangingen en de remmen worden
onderworpen aan een meer efficiëntere
proefperiode. Wijzig de rijsnelheid tijdens
de proefperiode. Op deze wijze kan men
de werking van de onderdelen "belasten"
en vervolgens "ontlasten", en de delen
van de motor koelen. Ook al is het be-
langrijk om de onderdelen van de motor
tijdens de proefperiode te belasten, moet
men opletten om niet te overdrijven.
LET OP
ENKEL NADAT MEN DE SERVICE-
BEURT NA DE PROEFPERIODE
HEEFT UITGEVOERD, VERKRIJGT
MEN DE BESTE PRESTATIES VAN
HET VOERTUIG.
45
3 Use / 3 Gebruik

Follow the guidelines detailed below:
•
Do not twist the throttle grip
abruptly and completely when
the engine is working at a low
revs, either during or after run-
in.
•
During the first 62 miles (100
Km) use the brakes gently,
avoiding sudden or prolonged
braking. That is to permit the ad-
equate adjustment of the pad
friction material to the brake
discs.
AFTER THE SPECIFIED MILEAGE,
TAKE YOUR VEHICLE TO AN Official
Aprilia Dealer FOR THE CHECKS IN-
DICATED IN THE "AFTER-RUN-IN"
TABLE IN THE SCHEDULED MAINTE-
NANCE SECTION TO AVOID INJUR-
ING YOURSELF, OTHERS AND /OR
DAMAGING THE VEHICLE.
Men moet zich houden aan de volgen-
de indicaties:
•
Versnel niet bruusk en volledig
wanneer de motor aan een laag
regime werkt, tijdens en na de
proefperiode.
•
Tijdens de eerste 100 km (62
mijl) handelt men voorzichtig op
de remmen, en vermijdt men om
bruusk en lang te remmen. Dit
om een correcte stabilisatie van
het wrijvingsmateriaal van de
pastilles op de remschijven te
verkrijgen.
BIJ DE VOORZIENE KILOMETER-
STAND LAAT MEN BIJ EEN Officiële
Aprilia Dealer DE CONTROLES UIT-
VOEREN DIE VOORZIEN ZIJN IN DE
TABEL VAN HET "EINDE VAN DE
PROEFPERIODE" VAN HET DEEL GE-
PROGRAMMEERD ONDERHOUD, OM
LETSELS AAN ZICHZELF EN ANDE-
REN EN/OF SCHADE AAN HET VOER-
TUIG TE VOORKOMEN.
46
3 Use / 3 Gebruik

Starting up the engine (03_04,
03_05, 03_06)
CAUTION
DO NOT CARRY OBJECTS IN THE
WINDSHIELD (BETWEEN HANDLE-
BAR AND INSTRUMENT PANEL) SO
THAT THE HANDLEBAR CAN TURN
FREELY AND THE INSTRUMENT PAN-
EL IS VISIBLE AT ALL TIMES.
CAUTION
EXHAUST FUMES CONTAIN CARBON
MONOXIDE, AN EXTREMELY HARM-
FUL SUBSTANCE IF INHALED. NEV-
ER START THE ENGINE IN CLOSED
OR NOT WELL-VENTILATED ROOMS.
FAILURE TO OBSERVE THIS WARN-
ING COULD LEAD TO UNCON-
SCIOUSNESS AND EVEN DEATH
CAUSED BY SUFFOCATION.
DO NOT CLIMB ON THE VEHICLE TO
START IT UP. DO NOT START THE EN-
GINE WHILE THE VEHICLE RESTS ON
ITS SIDE STAND.
Starten des motors (03_04,
03_05, 03_06)
LET OP
PLAATS GEEN VOORWERPEN IN HET
KAPJE (TUSSEN HET STUUR EN HET
DASHBOARD), ZODAT DE ROTATIE
VAN HET STUUR EN HET ZICHT OP
HET DASHBOARD NIET WORDEN GE-
HINDERD.
LET OP
DE UITLAATGASSEN BEVATTEN
KOOLMONOXIDE, EEN UITERST
SCHADELIJKE STOF WANNEER ZE
WORDT INGEADEMD. VERMIJD HET
STARTEN VAN DE MOTOR IN GESLO-
TEN OF ONVOLDOENDE GEVENTI-
LEERDE RUIMTEN.
WANNEER MEN DIT ADVIES NIET OP-
VOLGT, KAN MEN FLAUWVALLEN EN
OOK STERVEN DOOR VERSTIKKING.
GA NIET OP HET VOERTUIG ZITTEN
VOOR HET STARTEN. START DE MO-
TOR NIET WANNEER HET VOERTUIG
OP DE LATERALE STANDAARD IS
GEPLAATST.
47
3 Use / 3 Gebruik

CAUTION
DO NOT KICK THE KICK-STARTER
PEDAL WHEN THE ENGINE IS RUN-
NING.
LET OP
HANDEL NIET OP HET STARTPE-
DAAL WANNEER DE MOTOR REEDS
GESTART IS.
03_04
03_05
•
Ensure that the gearbox is in
neutral.
•
Ensure that the light switch is
turned to "low beam".
•
Turn the key to "KEY ON".
•
Pull the front brake lever to hold
the front wheel.
•
Controleer of de versnellings-
bak in zijn vrij staat.
•
Controleer of de schakelaar van
de lichten zich in de stand "dim-
lichten" bevindt.
•
Draai de sleutel op "KEY ON".
•
Blokkeer het voorwiel met de
hendel van de voorrem.
48
3 Use / 3 Gebruik

03_06
•
Operate the kick starter lever
with a single decisive stroke and
release immediately.
•
If necessary, repeat the opera-
tion until the engine starts.
•
Hold the front brake lever and do
not accelerate until you are
ready to move off.
CAUTION
DO NOT SET OFF SUDDENLY WHEN
THE ENGINE IS COLD.
TO MINIMISE THE EMISSION OF AIR
POLLUTING SUBSTANCES AND
FUEL CONSUMPTION, WARM UP THE
ENGINE BY RIDING THE FIRST KILO-
METRES AT A LIMITED SPEED.
•
Bedien het startpedaal beslist,
en laat het onmiddellijk los.
•
Herhaal de handeling, indien
nodig, tot de motor start.
•
Houd de hendel van de voorrem
geactiveerd en geef geen gas
tot aan het vertrek.
LET OP
VERTREK NIET BRUUSK WANNEER
DE MOTOR KOUD STAAT.
OM DE EMISSIE VAN VERVUILENDE
STOFFEN IN DE LUCHT EN HET
BRANDSTOFVERBRUIK TE BEPER-
KEN, RAADT MEN AAN OM DE MO-
TOR OP TE WARMEN, DOOR DE
EERSTE KILOMETERS AF TE LEG-
GEN AAN EEN BEPERKTE SNELHEID.
Precautions
- DO NOT KEEP MAXIMUM ACCELER-
ATION FOR A LONG TIME. USE THE
ENGINE UP TO A 3/4 OF MAXIMUM
PERFORMANCE. PETROL WILL BE
SAVED AND THE ENGINE LIFE WILL
BE LONGER.
Voorzorgsmaatregelen
- HOU HET GAS NIET AAN HET MAXI-
MUM VOOR LANGE TIJD. GEBRUIK
DE MOTOR TOT 3/4 VAN DE MAXI-
MUM PRESTATIES. ZO WORDT BEN-
ZINE GESPAARD EN WORDT DE LE-
VENSDUUR VAN DE MOTOR VER-
LENGD
49
3 Use / 3 Gebruik

- WHEN BRAKING, STOP ACCELER-
ATING.
- BRAKE MODERATELY, CONSIDER-
ING THE TYPE OF ROAD. ON AS-
PHALT-TREATED DRY ROADS,
START BRAKING WITH THE FRONT
BRAKE AND FINISH WITH BOTH. ON
WET ROADS, OR WITH SAND OR
SMALL STONES, NEVER USE THE
FRONT BRAKE AND KEEP MORE DIS-
TANCE TO STOP THE VEHICLE.
- WHEN STARTING OFF, ACCELER-
ATE MODERATELY AND PROGRES-
SIVELY, RELEASING THE CLUTCH
GRADUALLY.
- AT CURVES, DO NOT TURN EXCES-
SIVELY.
- GEEF GEEN GAS WANNEER WORDT
GEREMD
- REM GEMATIGD, EN HOU REKE-
NING MET HET TYPE VAN ONDER-
GROND. OP ASFALT MOET EERST
GEREMD WORDEN MET DE VOOR-
REM, EN DAARNA MET BEIDE REM-
MEN. OP EEN NATTE ONDERGROND,
MET ZAND OF KIEZELSTEEN, MAG
NOOIT DE VOORREM GEBRUIKT
WORDEN EN MOET ER MEER AF-
STAND GEHOUDEN WORDEN OM
HET VOERTUIG TE KUNNEN STOP-
PEN
- BIJ HET VERTREK MOET ER GEMA-
TIGD EN GELEIDELIJK AAN GAS GE-
GEVEN WORDEN, DOOR DE KOPPE-
LING GELEIDELIJK AAN LOS TE
LATEN.
- HEL NIET TE VEEL IN BOCHTEN.
03_07
Difficult start up (03_07)
COLD STARTING
The vehicle may be difficult to start for the
first time in particularly low temperatures
(near or below 0 °C/ 32 °F).
In this case:
•
Operate the cold start lever.
Moeilijke start (03_07)
KOUDE START
Wanneer de omgevingstemperatuur laag
is (dichtbij of onder het vriespunt 0°C -
32°F), zou de eerste start moeilijk kunnen
verlopen.
In dit geval handelt men als volgt:
•
Activeer de hendel voor de kou-
de start.
50
3 Use / 3 Gebruik

•
Operate the kick starter pedal
while simultaneously twisting
the throttle grip gently.
If the engine starts.
•
Release the throttle grip.
•
Return the cold start lever to its
original position.
If idle speed is not stable, twist the throttle
grip slightly and frequently.
If the engine does not start.
•
Wait a few seconds and carry
out the cold start procedure
again.
•
Handel op het startpedaal en
draai gelijktijdig gematigd aan
de gashendel.
Wanneer de motor niet start.
•
Laat het gashandvat los.
•
Stel de hendel voor de koude
start in de vorige positie.
Wanneer het regime van het minimum
toerental instabiel blijkt, handelt men op
het gashandvat met kleine en veelvuldige
rotaties.
Wanneer de motor niet start.
•
Wacht enkele seconden en voer
de procedure van de koude start
opnieuw uit.
Moving off / riding
BEFORE SETTING OFF, MAKE SURE
THE STAND HAS BEEN COMPLETELY
RETRACTED TO ITS POSITION.
DO NOT REST THE RIDER OR PAS-
SENGER WEIGHT ON THE SIDE
STAND.
Start / besturing
VÓÓR HET VERTREK CONTROLEERT
MEN OF DE STANDAARD VOLLEDIG
INGEKLAPT IS.
BELAST DE LATERALE STANDAARD
NIET MET UW GEWICHT OF DAT VAN
DE PASSAGIER.
51
3 Use / 3 Gebruik

CAUTION
WITH THE VEHICLE AT A STAND-
STILL, PRACTICE USING THE REAR-
VIEW MIRRORS. THE MIRRORS ARE
CONVEX, SO OBJECTS MAY SEEM
FARTHER AWAY THAN THEY REAL-
LY ARE. THESE MIRRORS OFFER A
WIDE-ANGLE VIEW AND ONLY EXPE-
RIENCE HELPS YOU JUDGE THE DIS-
TANCE SEPARATING YOU AND THE
VEHICLE BEHIND.
LET OP
WANNEER HET VOERTUIG STIL-
STAAT, PROBEERT MEN REEDS OM
AAN DE ACHTERUITKIJKSPIEGEL-
TJES GEWOON TE RAKEN. HET RE-
FLECTERENDE OPPERVLAK IS
ROND, DAAROM LIJKEN DE VOOR-
WERPEN VERDER DAN DAT ZE WER-
KELIJK ZIJN. DEZE SPIEGELTJES
BIEDEN EEN GROOTHOEKIG BEELD,
EN ENKEL ERVARING MAAKT HET IN-
SCHATTEN MOGELIJK VAN DE AF-
STAND VAN DE VOERTUIGEN DIE
VOLGEN.
DO NOT ACCELERATE AND DECEL-
ERATE REPEATEDLY AND CONTINU-
OUSLY AS YOU MAY INADVERTENT-
LY LOSE CONTROL OF YOUR
VEHICLE.
IF YOU HAVE TO BRAKE, DECELER-
ATE AND OPERATE BOTH BRAKES
TO OBTAIN A UNIFORM BRAKING,
CAREFULLY APPLYING PRESSURE
TO THE BRAKING PARTS IN AN ADE-
QUATE MANNER.
OPERATING ONLY EITHER THE
FRONT OR THE REAR BRAKE SIG-
NIET HERHAALDELIJK EN VOORT-
DUREND GAS GEVEN EN VERTRA-
GEN, OMDAT MEN DE CONTROLE
OVER HET VOERTUIG ONOPZETTE-
LIJK KAN VERLIEZEN.
WANNEER MEN REMT, VERTRAGEN
EN BEIDE REMMEN ACTIVEREN OM
UNIFORM TE VERTRAGEN, OP GE-
SCHIKTE WIJZE DE DRUK OP DE
REMMECHANISMEN DOSEREN.
WANNEER MEN ENKEL DE VOOR-
REM OF DE ACHTERREM ACTI-
VEERT, VERMINDERT MEN DE REM-
52
3 Use / 3 Gebruik

NIFICANTLY DECREASES THE
BRAKING POWER AND A WHEEL
MAY GET BLOCKED RESULTING IN
LACK OF GRIP.
WHEN STOPPING WHILE TRAVEL-
LING UPHILL, CLOSE THE THROTTLE
COMPLETELY AND ONLY USE THE
BRAKES TO HOLD THE VEHICLE IN
POSITION.
USING THE ENGINE TO KEEP THE
MOTORCYCLE STOPPED MAY
CAUSE THE CLUTCH TO OVERHEAT.
BEFORE GETTING INTO A TURN, RE-
DUCE SPEED OR BRAKE; WHILE
BENDING, RIDE AT THE SAME MOD-
ERATE AND CONSTANT SPEED OR
SLIGHTLY ACCELERATE; DO NOT
BRAKE IN EXCESS: THERE IS HIGH
RISK OF SKIDDING.
BRAKING CONTINUOUSLY WHILE
GOING DOWNHILL MAY RESULT IN
FRICTION GASKET OVERHEATING
AND CONSEQUENTLY IN POOR
BRAKING. TAKE ADVANTAGE OF
THE ENGINE COMPRESSION AND
DOWNSHIFT USING THE BRAKES AL-
TERNATIVELY.
WHEN GOING DOWNHILL NEVER
RIDE WITH THE ENGINE OFF.
WHEN RIDING ON WET SURFACES
OR WITH POOR GRIP (SNOW, ICE,
MUD, ETC.) AT A MODERATE SPEED,
AVOID SUDDEN BRAKING OR MA-
KRACHT AANZIENLIJK, EN LOOPT
MEN HET RISICO DAT EEN WIEL
BLOKKEERT, MET ALS GEVOLG HET
VERLIES VAN GRIP.
WANNEER MEN MOET STOPPEN OP
EEN HELLING, VERTRAAGT MEN
VOLLEDIG EN GEBRUIKT MEN EN-
KEL DE REMMEN OM HET VOERTUIG
STIL TE LATEN STAAN.
WANNEER MEN DE MOTOR GE-
BRUIKT OM HET VOERTUIG STIL TE
LATEN STAAN, KAN DE KOPPELING
OVERVERHIT RAKEN.
VOORALEER MEN EEN BOCHT
NEEMT, VERMINDERT MEN SNEL-
HEID OF REMT MEN, ZODAT MEN DE
BOCHT MET GEMATIGDE EN CON-
STANTE SNELHEID OF LICHT VER-
TRAAGD INGAAT; VERMIJDT OM
HARD TE REMMEN: HET IS GOED MO-
GELIJK DAT MEN GAAT SCHUIVEN.
WANNEER MEN TIJDENS EEN DA-
LING VOORTDUREND REMT, KUN-
NEN DE WRIJVINGSPAKKINGEN
OVERVERHIT RAKEN, ZODAT DE
DOELTREFFENDHEID VAN HET REM-
MEN VERMINDERT. GEBRUIK DE
COMPRESSIE VAN DE MOTOR DOOR
TERUG TE SCHAKELEN, MET AFWIS-
SELEND GEBRUIK VAN BEIDE REM-
MEN.
TIJDENS EEN DALING MAG MEN NIET
RIJDEN MET DE MOTOR UIT.
53
3 Use / 3 Gebruik

NOEUVRES THAT MAY LEAD TO
LACK OF GRIP AND CONSEQUENTLY
TO FALLS.
PAY ATTENTION TO OBSTACLES ON
OR VARIATIONS IN THE ROAD SUR-
FACE.
UNEVEN ROADS, RUTS, DRAINS,
TRAFFIC SIGNS PAINTED ON THE
ROADS AND PIPEWORK METAL
SHEETS MAY BECOME SLIPPERY
WHEN IT RAINS. CROSS OVER THEM
WITH EXTREME CAUTION, RIDE
CAREFULLY AND INCLINE THE VEHI-
CLE THE LEAST POSSIBLE.
ALWAYS SIGNAL CHANGES IN DI-
RECTION WITH THE APPROPRIATE
DEVICES AND WELL IN ADVANCE,
AVOID ABRUPT AND DANGEROUS
MANOEUVRES. TURN OFF THE DEVI-
CES IMMEDIATELY AFTER THE
CHANGE IN DIRECTION IS COMPLE-
TED.
WHEN OVERTAKING OR BEING
OVERTAKEN BY OTHER VEHICLES
RIDE WITH EXTREME CAUTION.
WHEN IT RAINS, SPRAY CAUSED BY
LARGE VEHICLES REDUCES VISIBIL-
ITY; AIR SHIFTS MAY CAUSE LOSS
OF CONTROL ON YOUR VEHICLE.
OP EEN NATTE ONDERGROND, OF
ALLESZINS MET WEINIG GRIP (SNEE-
UW, IJS, MODDER, ENZ.), RIJDT MEN
MET EEN GEMATIGDE SNELHEID, EN
VERMIJDT MEN OM BRUUSK TE REM-
MEN EN OM MANOEUVRES UIT TE
VOEREN DIE GRIPVERLIES VEROOR-
ZAKEN, EN DUS HET VALLEN TOT
GEVOLG HEBBEN.
LET OP VOOR EENDER WELK OB-
STAKEL OF VERANDERING VAN DE
GEOMETRIE VAN HET WEGDEK.
ONVERHARDE WEGEN, RAILS, PUT-
DEKSELS, GESCHILDERDE SIGNA-
LERINGEN OP HET WEGDEK EN ME-
TALEN PLATEN VAN WERVEN WOR-
DEN GLAD WANNEER HET REGENT,
EN DAAROM MOETEN DEZE ZEER
VOORZICHTIG WORDEN BENADERD,
EN MAG MEN NIET BRUUSK RIJDEN
EN ZO WEINIG MOGELIJK HET VOER-
TUIG DOEN HELLEN.
MELD STEEDS OP VOORHAND WAN-
NEER MEN VAN RIJBAAN OF RIJ-
RICHTING VERANDERT MET DE
HIERVOOR VOORZIENE MECHANIS-
MEN, EN VERMIJD BRUUSKE OF GE-
VAARLIJKE MANOEUVRES. SCHA-
KEL DE MECHANISMEN ONMIDDEL-
LIJK UIT NADAT MEN VAN RIJRICH-
TING HEEFT VERANDERD.
WANNEER MEN INHAALT OF MEN
WORDT INGEHAALD DOOR ANDERE
54
3 Use / 3 Gebruik

VOERTUIGEN, MOET MEN ZEER
VOORZICHTIG ZIJN.
BIJ REGEN WORDT HET ZICHT VER-
MINDERD DOOR HET OPSTUIVEN
VAN WATER, DAT WORDT VEROOR-
ZAAKT DOOR GROTE VOERTUIGEN;
DOOR DE LUCHTVERPLAATSING
KAN MEN DE CONTROLE OVER HET
VOERTUIG VERLIEZEN.
IF THE LOW MIXER OIL WARNING
LIGHT ON THE MULTIFUNCTION DIS-
PLAY TURNS ON, THIS MEANS THAT
THE MIXER OIL LEVEL IS LOW AND
THE RESERVE IS BEING USED;
SHOULD THIS OCCUR, TOP-UP WITH
MIXER OIL.
WANNEER DE CONTROLELAMP VAN
DE OLIERESERVE VAN DE MENGER
OPLICHT OP HET MULTIFUNCTIO-
NEEL DISPLAY, BEVINDT DE OLIE
VAN DE MENGER ZICH IN RESERVE;
IN DIT GEVAL VULT MEN OLIE BIJ IN
DE MENGER.
Stopping the engine (03_08,
03_09)
CAUTION
WHENEVER POSSIBLE, AVOID
ROUGH BRAKING, SUDDEN DECEL-
ERATION AND BRAKING IN EXCESS.
Stoppen van de motor (03_08,
03_09)
LET OP
VERMIJD INDIEN MOGELIJK OM
BRUUSK TE STOPPEN, ONVER-
55
3 Use / 3 Gebruik

WACHTS TE VERTRAGEN EN HARD
TE REMMEN.
03_08
•
Release the throttle grip (Pos.
A), brake gradually and simulta-
neously downshift to slow down.
Once the speed is reduced, before stop-
ping the vehicle:
•
Operate the clutch lever so that
the engine does not shut off.
When the vehicle is at a standstill:
•
Engage neutral gear.
•
Release the clutch lever.
•
While at a temporary halt, keep
at least one of the vehicle
brakes held.
•
Laat het gashandvat los
(Pos.A), activeer geleidelijk de
remmen en "schakel" tegelijker-
tijd terug om snelheid te minde-
ren.
Wanneer men snelheid geminderd heeft,
voert men het volgende uit voordat het
voertuig volledig komt stil te staan:
•
Activeer de hendel van de kop-
peling zodat de motor niet stil-
valt.
Met het voertuig stil:
•
Plaats de hendel van de ver-
snellingsbak in vrij.
•
De koppelingshendel loslaten.
•
Tijdens een momentele pauze
houdt men minstens één rem in-
getrokken.
03_09
•
Turn the ignition switch to 'key
off'.
•
Rest the vehicle on its stand.
•
Block the steering and take out
the key.
•
Draai de sleutel en plaats de
ontstekingsschakelaar op 'KEY
OFF'.
•
Plaats het voertuig op de stan-
daard.
•
Blokkeer de stuurinrichting en
verwijder de sleutel.
56
3 Use / 3 Gebruik

Parking
It is very important to select an adequate
parking spot, in compliance with road sig-
nals and the guidelines described below.
CAUTION
PARK ON SAFE AND LEVEL GROUND
TO PREVENT THE VEHICLE FROM
FALLING.
DO NOT LEAN THE VEHICLE
AGAINST A WALL OR LAY IT ON THE
GROUND.
MAKE SURE THE VEHICLE AND SPE-
CIALLY ITS HOT PARTS DO NOT
POSE ANY RISK TO PEOPLE OR
CHILDREN. DO NOT LEAVE YOUR VE-
HICLE UNATTENDED WITH THE EN-
GINE ON OR THE KEY IN THE IGNI-
TION SWITCH.
CAUTION
IF THE VEHICLE FALLS OR IS ON A
STEEP INCLINE FUEL CAN LEAK.
FUEL USED TO DRIVE INTERNAL
COMBUSTION ENGINES IS HIGHLY
FLAMMABLE AND CAN BECOME EX-
PLOSIVE UNDER CERTAIN CONDI-
TIONS.
Parkeren
De keuze van de parkeerzone is zeer be-
langrijk en moet de verkeerstekens en de
volgende aanduidingen respecteren.
LET OP
PARKEER HET VOERTUIG OP EEN
VASTE EN VLAKKE ONDERGROND,
ZODAT HET NIET VALT.
LAAT HET VOERTUIG NIET STEUNEN
TEGEN MUREN, EN LEG HET NIET OP
DE GROND.
CONTROLEER OF HET VOERTUIG,
EN VOORAL DE GLOEIEND HETE DE-
LEN ERVAN, NIET GEVAARLIJK ZIJN
VOOR PERSONEN EN KINDEREN.
LAAT HET VOERTUIG NIET ONBE-
WAAKT ACHTER MET DE MOTOR
AAN, OF MET DE SLEUTEL IN DE
ONTSTEKINGSSCHAKELAAR.
LET OP
HET VALLEN OF DE EXCESSIEVE IN-
CLINATIE VAN HET VOERTUIG KUN-
NEN HET UITSTROMEN VAN BRAND-
STOF VEROORZAKEN.
DE BRANDSTOF DIE WORDT GE-
BRUIKT VOOR DE AANDRIJVING VAN
DE ONTPLOFFINGSMOTOR IS UI-
TERST BRANDBAAR, EN KAN EX-
PLOSIEF WORDEN IN BEPAALDE
OMSTANDIGHEDEN.
57
3 Use / 3 Gebruik

Stand
To position the vehicle on the stand, it is
necessary to:
•
lower the vehicle from the left
side
•
hold the vehicle firmly by the
handlebar and by the saddle,
operate on the stand with the
right foot, extending it complete-
ly
•
lean the vehicle until the stand
touches the ground
•
turn the handlebar fully left-
wards
•
make sure the vehicle is stable
Standaard
Om het voertuig op de standaard te plaat-
sen, moet het volgende uitgevoerd wor-
den:
•
stap van het voertuig langs de
linker kant
•
neem het voertuig vast bij het
stuur en het zadel, en druk met
de linker voet de standaard naar
beneden zodat hij volledig wordt
uitgestrekt
•
hel het voertuig tot de standaard
de grond raakt
•
draai het stuur volledig naar
links
•
controleer of het voertuig stabiel
is
03_10
Transmission (03_10)
THROTTLE GRIP ADJUSTMENT
There should be a dead zone of 4 mm
(0.157 in), measured at the rim of the
throttle grip itself, at the end of travel of
the throttle grip.
Otherwise:
•
Rest the vehicle on its stand.
•
Remove the protection casing
(2).
•
Loosen the lock nut (3).
•
Turn the set screw (1) so as to
obtain the specified value.
Transmissie (03_10)
REGELING VAN HET GASCOMMAN-
DO
De lege loop van het gashandvat moet 4
mm (0.157 in) bedragen, en wordt geme-
ten op de rand van het gashandvat zelf.
In het omgekeerde geval:
•
Plaats het voertuig op de stan-
daard.
•
Verwijder de beschermingskap
(2).
•
Los de tegenmoer (3).
58
3 Use / 3 Gebruik

•
After adjustment, tighten the
lock nut (3) and check the empty
travel again.
•
Refit he protection casing (2).
CAUTION
AFTER ADJUSTING, CHECK THAT
STEERING THE HANDLEBAR DOES
NOT ALTER ENGINE IDLE SPEED
AND THAT THE THROTTLE GRIP RE-
TURNS TO ITS REST POSITION
GRADUALLY AND AUTOMATICALLY
WHEN RELEASED.
•
Draai aan het register (1) zodat
de voorgeschreven waarde
wordt hersteld.
•
Na de regeling sluit men de te-
genmoer (3) en controleert men
de lege loop weer.
•
Herplaats de beschermingskap
(2).
LET OP
NADAT MEN DE REGELING HEEFT
UITGEVOERD, CONTROLEERT MEN
OF DE ROTATIE VAN HET STUUR HET
REGIME VAN HET MINIMUM TOEREN-
TAL VAN DE MOTOR NIET WIJZIGT,
EN OF HET GASHANDVAT, EENS HET
WORDT LOSGELATEN, GELEIDELIJK
AAN EN AUTOMATISCH TERUG-
KEERT NAAR DE RUSTPOSITIE.
Suggestion to prevent theft
CAUTION
WHEN USING A DISC LOCKING DE-
VICE, PAY UTMOST ATTENTION TO
REMOVE IT BEFORE RIDING. FAIL-
URE TO OBSERVE THIS WARNING
MAY CAUSE SERIOUS DAMAGE TO
THE BRAKING SYSTEM AND ACCI-
DENTS WITH CONSEQUENT PHYSI-
CAL INJURIES OR EVEN DEATH.
Tips tegen diefstal
LET OP
WANNEER MEN EEN SCHIJFBLOK-
KERINGSMECHANISME GEBRUIKT,
LET MEN ZEER GOED OP OM HET TE
VERWIJDEREN VOORALEER MEN
MET HET VOERTUIG GAAT RIJDEN.
HET NIET RESPECTEREN VAN DEZE
WAARSCHUWING KAN ERNSTIGE
SCHADE VEROORZAKEN AAN DE
REMINSTALLATIE EN ONGELUKKEN
VEROORZAKEN, MET LETSELS EN
ZELFS DE DOOD ALS GEVOLG.
59
3 Use / 3 Gebruik

NEVER leave the ignition key in the lock
and always use the steering lock. Park
the vehicle in a safe place such as a ga-
rage or a place with guards. Whenever
possible, use an additional anti-theft de-
vice. Make sure all vehicle documents
are in order and the road tax paid. Write
down your personal details and tele-
phone number on this page to help iden-
tifying the owner in case of vehicle
retrieval after a theft.
LAST NAME: ..................................
NAME: .........................................
ADDRESS: .................................
TELEPHONE No: ..........................
WARNING
IN MANY CASES, STOLEN VEHICLES
CAN BE IDENTIFIED BY DATA IN THE
USE / MAINTENANCE BOOKLET
Laat de ontstekingssleutel NOOIT achter
op het voertuig, en gebruik steeds het
stuurslot. Parkeer het voertuig op een
veilige plaats, indien mogelijk in een ga-
rage of een bewaakte plaats. Gebruik in-
dien mogelijk een extra antidiefstalme-
chanisme. Controleer of de documenten
en de verkeersbelasting in orde zijn.
Schrijf uw gegevens en telefoonnummer
op deze pagina, om de identificatie van
de eigenaar te vergemakkelijken in geval
van het terugvinden van het voertuig na
diefstal.
NAAM: ....................................
VOORNAAM: ..........................
ADRES: ....................................
TELEFOONNUMMER: ................
WAARSCHUWING
IN VEEL GEVALLEN WORDEN GE-
STOLEN VOERTUIGEN GEÏDENTIFI-
CEERD DOOR MIDDEL VAN DE GE-
GEVENS IN HET GEBRUIKS- EN
ONDERHOUDSBOEKJE.
60
3 Use / 3 Gebruik

03_11
03_12
03_13
Safe driving (03_11, 03_12,
03_13, 03_14, 03_15, 03_16,
03_17, 03_18, 03_19, 03_20,
03_21, 03_22)
MAIN SAFETY RULES
To ride the motorcycle it is necessary to
comply with all legal requirements (driv-
ing license, minimum driving age, psy-
chophysical performance, insurance,
taxes and fees, registration, license
plate, etc.).
You should practise using the motorcycle
in traffic-free areas and/or private prop-
erty until you have become thoroughly
acquainted with the vehicle.
Driving under the influence of medica-
tion, alcohol and narcotic drugs or psy-
chotropic substances dramatically in-
creases the risk of accidents.
Do not ride your motorcycle if you feel
tired or drowsy and always keep safe
psychophysical riding conditions.
The main cause of motorcycle accidents
is users' inexperience.
NEVER lend the vehicle to beginners and
always make sure that the rider complies
with all necessary requirements for a safe
riding.
Strictly obey all national and local traffic
signs and rules.
Avoid any abrupt and dangerous
swerves for your own as well as others'
Veilig rijden (03_11, 03_12,
03_13, 03_14, 03_15, 03_16,
03_17, 03_18, 03_19, 03_20,
03_21, 03_22)
FUNDAMENTELE VEILIGHEIDSRE-
GELS
Om met het voertuig te rijden moet men
beschikken over alle door de wet voor-
ziene vereisten (rijbewijs, minimum leef-
tijd, psychofysische geschiktheid, verze-
kering, overheidsbelasting, registratie,
nummerplaat, enz.).
Men raadt aan om het voertuig gewoon
te raken in zones met weinig verkeer en/
of in private eigendommen.
Rijden onder invloed van medicijnen, al-
cohol, verdovende of psychotrope mid-
delen verhoogt aanzienlijk het risico op
ongevallen.
Men moet er zeker van zijn dat de psy-
chofysische condities geschikt zijn voor
het rijden, met vooral aandacht voor fysi-
sche moeheid of slaperigheid.
De meeste ongevallen zijn te wijten aan
het gebrek aan ervaring van de bestuur-
der.
Leen het voertuig NOOIT aan beginners,
en controleer in elk geval of de bestuur-
der in het bezit is van alle vereisten voor
het rijden.
61
3 Use / 3 Gebruik

safety (for example: rearing up on the
back wheel, riding over the speed limit,
etc.). Besides, always assess and bear in
mind the road surface conditions, visibil-
ity, etc.
Do not knock obstacles that can damage
the motorcycle or cause loss of control.
Do not ride on the course of the vehicle
in front just to improve your own speed.
CAUTION
ALWAYS RIDE WITH BOTH HANDS
ON THE HANDLEBAR AND FEET ON
THE FOOTRESTS (OR THE RIDER' S
FOOTRESTS) IN THE ADEQUATE RID-
ING POSITION.
Respecteer nauwkeurig de bewegwijze-
ring en het normenstelsel in verband met
het nationale en plaatselijk verkeer.
Vermijdt bruuske en gevaarlijke manoeu-
vres voor zichzelf en voor anderen (voor-
beeld: het steigeren, het niet naleven van
de snelheidslimieten, enz.), bovendien
moet men steeds rekening houden met
de condities van het wegdek, de zicht-
baarheid, enz.
Stoot niet tegen obstakels die schade
aan het voertuig of controleverlies over
het voertuig kunnen veroorzaken.
Blijf niet achter voertuigen rijden om de
eigen snelheid te verhogen.
LET OP
RIJ STEEDS MET BEIDE HANDEN OP
HET STUUR EN DE VOETEN OP HET
VOETENVLAK (OF OP DE VOETEN-
STEUNEN VAN DE BESTUURDER),
EN BEHOU EEN CORRECTE RIJPOSI-
TIE.
62
3 Use / 3 Gebruik

03_14
03_15
03_16
Never stand on your feet or stretch your-
self while riding.
The rider should always be attentive,
never get distracted or influenced by peo-
ple, things or actions (never smoke, eat,
drink, read, etc.) while riding.
Always use fuel and lubricants specific
for the motorcycle, of the type recom-
mended in the "LUBRICANTS TABLE".
Check fuel, oil and coolant frequently for
correct level.
In case of an accident or after the motor-
cycle has fallen down or suffered a sud-
den bump, make sure the control levers,
piping, cables, brake circuit and main
parts of the motorcycle have not been
damaged.
If necessary, take the motorcycle to an
Official Aprilia Dealer to check especially
the frame, handlebar, suspensions, safe-
ty components and any device the user
cannot assess without the aid of a spe-
cialist.
Report any malfunction to the engineers
and/or mechanics in order to facilitate
their work.
Never ride the motorcycle if the damage
jeopardises safety.
Do not modify the position, angle or col-
our of: license plate, turn indicators, light-
ing devices and horn.
Vermijdt absoluut om recht te staan op
het voertuig en om zich uit te rekken tij-
dens het rijden.
De bestuurder mag niet afgeleid zijn, zich
niet laten afleiden of niet laten beïnvloe-
den door personen, voorwerpen, acties
(niet eten, roken, drinken, lezen, enz.)
wanneer hij met het voertuig rijdt.
Gebruik de brandstof en specifieke
smeermiddelen voor het voertuig, van
het type dat men vindt in de "TABEL VAN
DE SMEERMIDDELEN", controleer her-
haaldelijk of de voorgeschreven peilen
van brandstof, olie en koelvloeistoffen
correct zijn.
Wanneer het voertuig een ongeval heeft
gehad, gevallen is of er werd tegen ge-
stoten, controleert men of de comman-
dohendels, de buizen, de kabels, de
reminstallatie en de fundamentele delen
niet zijn beschadigd.
Laat het voertuig eventueel controleren
bij een Officiële Aprilia Dealer, door voor-
al aandacht te schenken voor het frame,
het stuur, de ophangingen, de veilig-
heidsonderdelen en mechanismen waar-
voor de gebruiker niet in staat is om hun
integriteit vast te stellen.
Meldt eender welke slechte werking om
de ingreep van techniekers en/of mecha-
niciens te bevorderen.
Rij absoluut niet met het voertuig wan-
neer de aangebrachte schade de veilig-
heid schaadt.
63
3 Use / 3 Gebruik

Any changes to the motorcycle will void
the warranty.
Any change introduced to the motorcycle
and the removal of original parts may
jeopardise the motorcycle performance
and therefore reduce safety or even ren-
der the motorcycle inappropriate for legal
riding.
Comply with all national and local laws
and regulations on motorcycle equip-
ment.
In particular do not introduce technical
changes leading to improve performance
and under no circumstances alter the
original specifications of the vehicle.
Never race with vehicles.
Never ride off-road.
Wijzig absoluut niet de positie, de helling
of de kleur van: de nummerplaat, de rich-
tingaanwijzers, de verlichtingsmechanis-
men en de akoestische melders.
Wanneer men wijzigingen uitvoert aan
het voertuig, vervalt de garantie.
Elke eventuele aan het voertuig aange-
brachte wijziging en de verwijdering van
originele stukken, kan de prestaties van
het voertuig schaden, en dus het veilig-
heidsniveau schaden en het voertuig
zelfs illegaal maken.
Men raadt aan om zich steeds te houden
aan alle wetsvoorschriften en nationale
en plaatselijke reglementen in verband
met de uitrusting van het voertuig.
Men moet vooral vermijden om techni-
sche wijzigingen aan te brengen voor het
verhogen van de prestaties, of die alles-
zins de originele kenmerken van het
voertuig wijzigen.
Vermijdt absoluut om wedstrijden te hou-
den met de voertuigen.
Vermijdt om te crossen.
64
3 Use / 3 Gebruik

03_17
03_18
CLOTHING
Before riding off, remember to put on the
helmet and fasten it correctly. Make sure
it is a homologated model, that it is un-
damaged, of the right size and that the
visor is clean.
Wear appropriate protective clothes,
preferably light-coloured and/or in reflec-
tive material. In this way you will be easily
visible to other drivers, thus reducing the
risk of being hit, and you will be better
protected in case of falling.
Always wear tight-fitting clothes without
open cuffs; avoid hanging strings, belts or
ties; these or any other objects should not
interfere with a safe riding when getting
entangled with the riding elements or due
to a special movement.
Never carry in your pockets objects that
can be potentially dangerous in case of
fall, like: pointed objects such as keys,
pens, glass containers, etc. (the same
rule applies to passengers).
KLEDING
Vooraleer men gaat rijden denkt men er-
aan om steeds en correct de helm op te
zetten en vast te maken. Controleer of hij
gehomologeerd en integer is, of de maat
juist is en of het visier rein is.
Draag beschermende kleding, indien mo-
gelijk met een lichte en/of reflecterende
kleur. Op deze manier is men goed zicht-
baar voor andere weggebruikers en ver-
mindert men aanzienlijk het risico op
aanrijdingen, en is men beter beschermd
wanneer men valt.
De kleding moet goed aansluiten en de
uiteinden moeten gesloten zijn; koorden,
ceinturen en dassen mogen niet benge-
len; vermijdt dat deze of andere voorwer-
pen interfereren met het rijden, doordat
ze verstrengd raken met bewegende on-
derdelen of ander delen.
Hou geen voorwerpen bij zich, die moge-
lijk gevaarlijk zijn wanneer men valt, bij-
voorbeeld: puntige voorwerpen zoals
sleutels, pennen, glazen voorwerpen,
enz. (dit advies geldt eveneens voor de
passagier).
65
3 Use / 3 Gebruik

03_19
03_20
03_21
ACCESSORIES
User is personally responsible for the in-
stallation and use of the accessories.
While assembling accessories, make
sure that they do not cover the sound or
light alarm devices or affect their correct
functioning, do not limit the suspension
travel or the steering angle, do not ob-
struct control actuation or reduce the
ground clearance and inclination angle at
corners.
Do not use accessories that hinder ac-
cess to the controls as they may increase
the reaction time in case of an emergen-
cy.
Fairings and large windscreens fitted to
the motorcycle may cause aerodynamic
forces that affect the scooter stability
while riding, mainly at high speeds.
Make sure the accessory is firm and se-
cured to the scooter and that it does not
pose any risks while riding the motorcy-
cle.
Do not add or modify electrical equipment
that exceed the vehicle capacity as this
may result in a sudden stop or a danger-
ous lack of power required to keep the
sound and light alarm devices operative.
ACCESSOIRES
De gebruiker is verantwoordelijk voor de
keuze van de installatie en het gebruik
van de accessoires.
Men raadt aan tijdens de montage, dat
het accessoire de mechanismen van het
akoestisch en visief melden niet bedekt
en dus de functionaliteit ervan schaadt,
de werking van de ophangingen en de
hoek van sturing niet beperkt, de active-
ring van de commando´s niet hindert, en
de hoogte van de grond en de helhoek in
een bocht niet vermindert.
Vermijdt het gebruik van accessoires die
de toegang tot de commando´s hinderen,
en die dus de reactietijden bij nood kun-
nen verlengen.
De bekledingen en de windschermen
met grote afmetingen, die gemonteerd
zijn op het voertuig, kunnen aerodynami-
sche krachten veroorzaken die de stabi-
liteit van het voertuig tijdens het rijden
schaden, vooral bij hoge snelheden.
Controleer of het accessoire goed veran-
kerd is op het voertuig en dat het niet
gevaarlijk is tijdens het rijden.
Wijzig of voeg geen elektrische appara-
ten toe die het draagvermogen van het
voertuig overschrijden; op deze wijze zou
het voertuig onverwacht kunnen stilvallen
of zou er een gevaarlijke afwezigheid van
stroom kunnen zijn, die nodig is voor de
werking van de akoestische en visieve
meldingsmechanismen.
66
3 Use / 3 Gebruik

03_22
aprilia advises using original accesso-
ries (aprilia genuine accessories).
Aprilia raadt het gebruik aan van origi-
nele accessoires (Aprilia genuine acces-
sories).
67
3 Use / 3 Gebruik

68
3 Use / 3 Gebruik

SX - RX 50
Chap. 04
Maintenance
Hst. 04
Onderhoud
69

04_01
Two-stroke mix oil (04_01)
To add mixer oil in the reservoir:
•
Remove the rider saddle.
•
Remove the cap.
Characteristic
Oil mixer reservoir
1.04 l (0.23 UK gal; 0.27 USgal)
Mixer oil reserve
0.26 l (0.057 UK gal; 0.069 USgal)
Olie menger (04_01)
Voor de invoer van olie van de menger in
de tank, handelt men als volgt:
•
Verwijder het zadel van de be-
stuurder.
•
Verwijder de dop.
Technische kenmerken
Olietank van de menger
1,04 l (0.23 UK gal; 0.27 US gal)
Oliereserve van de menger
0,26 l (0.057 UK gal; 0.069 US gal)
Gearbox oil level (04_02,
04_03)
NOTE
PARK THE MOTORCYCLE ON SAFE
AND LEVEL GROUND.
Versnellingsbak oliepeil
(04_02, 04_03)
N.B.
PLAATS HET VOERTUIG OP EEN
VASTE EN VLAKKE ONDERGROND.
70
4 Maintenance / 4 Onderhoud

04_02
•
Carefully unscrew the level in-
spection screw (1) on the right
hand engine cover.
•
Check that the oil level reaches
the threaded hole.
•
Draai de controlebout (1) voor-
zichtig los die zich in de rechter
bedekking van de motor be-
vindt.
•
Controleer of het oliepeil de ge-
schroefdrade opening bereikt.
04_03
TOP-UP
If necessary, top up:
•
Unscrew and remove the filler
plug (2).
•
Add a small quantity of the
specified oil and wait approxi-
mately one minute for the oil to
distribute evenly throughout the
casing.
•
Check that the oil level reaches
the threaded hole (1).
•
If the oil level does not reach the
hole, continue adding small
quantities of oil and checking
the level via the hole (1) until the
specified level is reached.
•
Once the top up procedure is
complete, fit and tighten the in-
spection screw (1) and the filler
cap (2).
BIJVULLING
Indien nodig moet bijgevuld worden op
de volgende manier:
•
Draai de toevoerdop los en ver-
wijder hem (2).
•
Giet een kleine hoeveelheid
aanbevolen olie in de vulboring
en wacht ongeveer één minuut
tot de olie uniform in de carter
kan lopen.
•
Controleer of het oliepeil de ge-
schroefdrade opening (1) be-
reikt.
•
Indien dit niet zo is, herhaalt
men het vullen met kleine hoe-
veelheden aanbevolen olie en
de controle langs de geschroef-
drade opening (1), tot het voor-
geschreven peil wordt bereikt.
•
Draai na de handeling de con-
trolebout (1) en de vuldop (2)
helemaal vast.
71
4 Maintenance / 4 Onderhoud

TIGHTEN UP THE FILLER CAP AND
MAKE SURE THE OIL DOES NOT
SEEP.
CHECK REGULARLY THAT THERE
ARE NO LEAKS IN THE CRANKCASE
COVER GASKET.
DO NOT RIDE THE VEHICLE WITH IN-
SUFFICIENT LUBRICATION OR WITH
CONTAMINATED OR INCORRECT LU-
BRICANTS AS THIS ACCELERATES
THE WEAR AND TEAR OF THE MOV-
ING PARTS AND CAN CAUSE IRRE-
TRIEVABLE DAMAGE.
Recommended products
AGIP GEAR 10W-40
Gearbox oil
API GL-4
SLUIT DE VULDOP EN CONTROLEER
OF DE OLIE NIET LEKT.
CONTROLEER REGELMATIG OF DE
PAKKINGEN VAN HET CARTERDEK-
SEL NIET LEKKEN.
GEBRUIK HET VOERTUIG NIET MET
ONVOLDOENDE SMERING OF MET
VERONTREINIGDE OF ONGESCHIK-
TE SMEERMIDDELEN, OMDAT DE BE-
WEGENDE DELEN ERVAN SNELLER
ZULLEN VERSLIJTEN EN DUS ERN-
STIGE SCHADE KAN TOEBRENGEN.
Aanbeloven producten
AGIP GEAR 10W-40
Olie voor de versnellingsbak
API GL-4
Tyres
CAUTION
CHECK TYRE INFLATION PRESSURE
REGULARLY AT AMBIENT TEMPER-
ATURE. THE MEASUREMENT MAY BE
INCORRECT IF TYRES ARE WARM.
CHECK TYRE PRESSURE MAINLY
BEFORE AND AFTER A LONG TRIP.
AN OVER-INFLATED TYRE WILL PRO-
Banden
LET OP
CONTROLEER REGELMATIG DE
SPANNING VAN DE BANDEN BIJ DE
OMGEVINGSTEMPERATUUR. WAN-
NEER DE BANDEN WARM ZIJN, IS DE
METING NIET CORRECT. VOOR DE
METING UIT VOORAL VÓÓR EN NA
EEN LANGE REIS. WANNEER DE
72
4 Maintenance / 4 Onderhoud

VIDE A HARSH RIDE AS SURFACE
UNEVENNESS IS NOT CUSHIONED
AND IS SENT TO THE HANDLEBAR,
THUS REDUCING GRIP AND ROAD
HOLDING SPECIALLY WHEN COR-
NERING.
ON THE OTHER HAND, AN UNDER-IN-
FLATED TYRE CAUSES THE CON-
TACT PATCH TO INCLUDE A LARGER
PORTION OF THE TYRE SIDE WALLS.
IF SO, THE TYRE MIGHT SLIP ON OR
GET DETACHED FROM THE WHEEL
RIM, RESULTING IN LOSS OF CON-
TROL OVER THE VEHICLE.
TYRES MAY EVEN DETACH FROM
THE WHEEL RIMS UNDER VERY
HARD BRAKING.
EVENTUALLY THE VEHICLE MIGHT
SKID IN A BEND.
INSPECT THREAD SURFACE AND
CHECK IT FOR WEAR. BADLY WORN
TYRES ADVERSELY AFFECT TRAC-
TION AND HANDLING.
SOME TYRE TYPES HOMOLOGATED
FOR THIS VEHICLE FEATURE WEAR
INDICATORS.
THERE ARE SEVERAL TYPES OF
WEAR INDICATORS. CONSULT YOUR
DEALER ON METHODS TO CHECK
FOR WEAR.
CARRY OUT A VISUAL INSPECTION
FOR TYRE WEAR AND TEAR, RE-
PLACE TYRES WHEN WORN.
SPANNING TE HOOG IS, WORDT DE
ONEFFENHEID VAN HET TERREIN
NIET GEDEMPT, EN DUS NAAR DE
STUURINRICHTING VERSTUURT, ZO-
DAT HET RIJCOMFORT VERMINDERT
EN DE WEGLIGGING IN BOCHTEN
VERSLECHTERT.
WANNEER VICEVERSA DE BANDEN-
SPANNING ONVOLDOENDE IS, WER-
KEN DE ZIJKANTEN VAN DE BANDEN
MEER, EN KAN HET ZIJN DAT DE
BAND OP DE VELG SLIPT OF LOS-
KOMT, MET ALS GEVOLG DAT MEN
DE CONTROLE OVER HET VOERTUIG
VERLIEST.
WANNEER MEN BRUUSK REMT,
KUNNEN DE BANDEN UIT DE VEL-
GEN KOMEN.
IN BOCHTEN KAN HET VOERTUIG
GAAN SLIPPEN.
CONTROLEER DE STAAT VAN HET
RIJOPPERVLAK EN DE SLIJTAGE,
OMDAT SLECHTE BANDENCONDI-
TIES DE WEGLIGGING EN DE MA-
NOEUVREERBAARHEID VAN HET
VOERTUIG KUNNEN SCHADEN.
ENKELE BANDENTYPES, DIE GEHO-
MOLOGEERD ZIJN VOOR DIT VOER-
TUIG, HEBBEN EEN SLIJTAGE-INDI-
CATOR.
ER BESTAAN VERSCHILLENDE TY-
PES VAN SLIJTAGE-INDICATORS.
VOOR INFORMATIE IN VERBAND
MET DE CONTROLE VAN DE SLIJTA-
73
4 Maintenance / 4 Onderhoud

WHEN TYRES ARE OLD, THE MATE-
RIAL MAY HARDEN AND NOT PRO-
VIDE ADEQUATE ROAD HOLDING,
EVEN IF TYRES ARE STILL WITHIN
THE WEAR LIMIT. REPLACE TYRES IF
THIS OCCURS. REPLACE THE TYRE
IF IT IS WORN OR IF THERE IS A
PUNCTURE LARGER THAN 5 mm
(0.197 in) IN THE TREAD AREA.
WHEEL MUST BE BALANCED AFTER
A TYRE IS MENDED.
USE ONLY TYRE SIZES INDICATED
BY THE MANUFACTURER. DO NOT
FIT TYRES WITH INNER TUBES ON
RIMS FOR TUBELESS TYRES OR
VICE VERSA. CHECK THAT THE IN-
FLATION VALVES HAVE THEIR CAPS
FITTED TO AVOID UNEXPECTED
FLAT TYRES.
REPLACEMENT, REPAIR, MAINTE-
NANCE AND BALANCING OPERA-
TIONS ARE HIGHLY IMPORTANT AND
SO THEY SHOULD BE CARRIED OUT
USING THE SPECIFIC TOOLS AND
WITH THE ADEQUATE KNOWLEDGE.
HAVE YOUR TYRES AND WHEELS
SERVICED AT AN OFFICIAL DEALER
OR A SPECIALISED TYRE WORK-
SHOP.
NEW TYRES MAY BE COATED WITH
AN OILY FILM: RIDE WITH CAUTION
DURING THE FIRST KILOMETRES. DO
NOT APPLY UNSUITABLE LIQUIDS
ON TYRES.
GE, WENDT MEN ZICH TOT DE VER-
KOPER.
CONTROLEER VISIEF DE SLIJTAGE
VAN DE BANDEN, EN VERVANG ZE
INDIEN ZE VERSLETEN ZIJN.
WANNEER DE BANDEN OUD ZIJN, EN
OOK AL ZIJN ZE NIET VERSLETEN,
KUNNEN ZE VERHARDEN EN DUS DE
WEGLIGGING NIET GARANDEREN. IN
DIT GEVAL VERVANGT MEN DE BAN-
DEN. LAAT DE BAND VERVANGEN
WANNEER HIJ VERSLETEN IS, OF
WANNEER ER EEN EVENTUEEL GAT
IS IN DE ZONE VAN HET RIJVLAK DAT
GROTER IS DAN 5 mm (0.197 in).
NADAT MEN DE BAND HEEFT LATEN
HERSTELLEN, LAAT MEN DE WIELEN
BALANCEREN.
GEBRUIK UITSLUITEND DE MAAT
VAN BANDEN DIE WORDT AANGE-
DUID DOOR HET HUIS. LAAT GEEN
BANDEN INSTALLEREN VAN HET TY-
PE MET BINNENBAND OP VELGEN
VOOR TUBELESS BANDEN, EN VICE-
VERSA. CONTROLEER OF DE VEN-
TIELEN VOOR HET OPBLAZEN
STEEDS HUN DOPJES HEBBEN, OM
HET PLOTSELING LEEGLOPEN VAN
DE BANDEN TE VERMIJDEN.
DE HANDELINGEN VAN HET VER-
VANGEN, HERSTELLEN, ONDER-
HOUD EN BALANCEREN ZIJN ZEER
BELANGRIJK, EN MOETEN DUS UIT-
GEVOERD WORDEN MET GESCHIK-
74
4 Maintenance / 4 Onderhoud

WHEN TYRES ARE OLD, THE MATE-
RIAL MAY HARDEN AND NOT PRO-
VIDE ADEQUATE GRIP, EVEN IF
TYRES ARE STILL WITHIN THE WEAR
LIMIT. TYRE GRIP
SHOULD THIS OCCUR, REPLACE
THE TYRES.
TYRES MUST BE REPLACED WHEN
TREAD WEAR REACHES THE LIMITS
SPECIFIED BY LAW.
TE GEREEDSCHAPPEN EN MET DE
NODIGE ERVARING. DAAROM
RAADT MEN AAN OM ZICH TE WEN-
DEN TOT EEN OFFICIËLE DEALER OF
EEN BANDENSPECIALIST VOOR HET
UITVOEREN VAN VOORAFGAANDE
HANDELINGEN.
WANNEER DE BANDEN NIEUW ZIJN,
KUNNEN ZE BEDEKT ZIJN MET EEN
GLADDE LAAG: DE EERSTE KILOME-
TERS MOET MEN VOORZICHTIG RIJ-
DEN. SMEER DE BANDEN NIET IN
MET ONGESCHIKTE VLOEISTOFFEN.
WANNEER DE BANDEN OUD ZIJN, EN
OOK AL ZIJN ZE NIET VERSLETEN,
KUNNEN ZE VERHARDEN EN DUS DE
WEGLIGGING NIET GARANDEREN.
IN DIT GEVAL VERVANGT MEN DE
BANDEN.
DE BAND MOET VERVANGEN WOR-
DEN WANNEER HET RIJVLAK DE
SLIJTAGELIMIET BEREIKT DIE
WORDT VOORIEN DOOR DE VAN
KRACHT ZIJNDE NORMEN.
75
4 Maintenance / 4 Onderhoud

WHEELS AND TYRES
Wheel Vehicle Use Tyre pressure with rider only
Tyre pressure, rider +
passenger
Front SX On road 1.8 bar (180 kPa) (26.1 PSI) 2.0 bar (200 kPa) (29 PSI)
Rear SX On road 2.2 bar (220 kPa) (31.9 PSI) 2.4 bar (240 kPa) (34.8 PSI)
Front RX
On road - Combined -
Offroad
1.1 bar (110 kPa) (15.95 PSI) - 1.5
bar (150 kPa) (21.75 PSI)-1.6 bar
(160 kPa) (23.20 PSI)
1.1 bar (110 kPa) (15.95 PSI) - 1.7
bar (170 kPa) (24.65 PSI) - 1.8 bar
(180 kPa) (1.8 PSI)
Rear RX
On road - Combined -
Offroad
1.2 bar (120 kPa) (17.40 PSI) - 1.6
bar (160 kPa) (23.20 PSI) - 1.8 bar
(180 kPa) (26.11 PSI)
1.4 bar (140 kPa) (20.30 PSI) - 1.8
bar (180 kPa) (26.11 PSI) - 2.0 bar
(200 kPa) (29 PSI) -
WIELEN EN BANDEN
Wiel
Voertuig Gebruik Spanning enkel bestuurder
Spanning bestuurder +
passagier
Vooraan SX Weggebruik 1,8 bar (180 kPa) (26.1 PSI) 2.0 bar (200 kPa) (29 PSI)
Achteraan SX Weggebruik 2,2 bar (220 kPa) (31.9 PSI) 2,4 bar (240 kPa) (34.8 PSI)
Vooraan RX
Weggebruik - Gemengd -
Offroad
1,1 bar (110 kPa) (15.95 PSI) - 1,5
bar (150 kPa) (21.75 PSI)-1,6 bar
(160 kPa) (23.20 PSI)
1,1 bar (110kPa) (15.95 PSI) - 1,7
bar (170 kPa) (24.65 PSI) - 1,8 bar
(180 kPa) (1.8 PSI)
Achteraan RX
Weggebruik - Gemengd -
Offroad
1,2 bar (120 kPa) (17.40 PSI) - 1,6
bar (160 kPa) (23.20 PSI) - 1,8 bar
(180 kPa) (26.11 PSI)
1,4 bar (140 kPa) (20.30 PSI) - 1,8
bar (180 kPa) (26.11 PSI) - 2.0 bar
(200 kPa) (29 PSI) -
76
4 Maintenance / 4 Onderhoud

04_04
Spark plug dismantlement
(04_04)
Remove the spark plug periodically and
check the electrodes and wear. Use a
feeler gauge to check that the gap be-
tween the electrodes is correct. Replace
the candles at the intervals indicated in
the maintenance schedule, using the rec-
ommended brands only.
To remove the spark plug, proceed from
the right side of the vehicle.
INSTALLING AN UNSUITABLE
SPARK PLUG MAY SERIOUSLY DAM-
AGE THE ENGINE.
Characteristic
Maintenance-Spark plug
Champion RN3C or NGK-R BR8ES
Spark plug electrode gap
0.6 - 0.7 mm (0.024 - 0.027 in)
Demonteren van de bougie
(04_04)
Demonteer regelmatig de bougie, en
controleer de elektroden en de slijtage.
Gebruik een diktemeter om te controle-
ren of de scheiding tussen de elektroden
correct is. Vervang de bougies met an-
dere van het aanbevolen merk, en dit op
de termijn die wordt aangeduid in de on-
derhoudstabel van het voertuig.
Om de bougie te demonteren, moet van-
af de rechter kant van het voertuig ge-
handeld worden.
HET GEBRUIK VAN EEN ONGESCHIK-
TE BOUGIE KAN ERNSTIGE SCHADE
AAN DE MOTOR VEROORZAKEN.
Technische kenmerken
Onderhoud-Bougie
Champion RN3C of NGK-R BR8ES
Afstand van de elektroden van de bou-
gie
0,6 - 0,7 mm (0.024 - 0.027 in)
THE SPARK PLUG MUST BE RE-
MOVED WHEN THE MOTOR IS COLD.
DE VERWIJDERING VAN DE BOUGIE
MOET UITGEVOERD WORDEN WAN-
77
4 Maintenance / 4 Onderhoud

INSTALLING A SPARK PLUG WITH A
HEAT RATING OTHER THAN THAT
SPECIFIED OR WITH AN UNSUITA-
BLE THREAD MAY SERIOUSLY DAM-
AGE THE ENGINE.
NEER DE MOTOR KOUD STAAT. HET
GEBRUIK VAN BOUGIES MET EEN
ANDERE THERMISCHE GRAAD DAN
VOORGESCHREVEN OF MET ONGE-
SCHIKTE SCHROEFDRAAD, KAN DE
MOTOR ERNSTIG BESCHADIGEN.
Removing the air filter (04_05,
04_06, 04_07, 04_08)
CAUTION
THE OPERATIONS DESCRIBED IN
THIS SECTION CAN BE COMPLICA-
TED AND RISKY FOR INTEGRITY OF
THE REMOVED COMPONENTS. IN
CASE OF DIFFICULTY, FOLLOW THE
PROCEDURES DESCRIBED IN THIS
WORKSHOP BOOKLET AVAILABLE
AT AN Aprilia Official Dealer OR RE-
FER PREVIOUSLY TO AN AUTHOR-
ISED MECHANIC ALSO AT AN Author-
ised Aprilia Workshop.
NOTE
THE FOLLOWING OPERATIONS RE-
FER TO ONE SIDE OF THE VEHICLE,
BUT APPLY TO BOTH.
Demonteren van het luchtfilter
(04_05, 04_06, 04_07, 04_08)
LET OP
DE HANDELINGEN DIE IN DEZE PA-
RAGRAAF WORDEN BESCHREVEN,
KUNNEN INGEWIKKELD OF GE-
VAARLIJK ZIJN VOOR DE INTEGRI-
TEIT VAN DE VERWIJDERDE DELEN.
IN GEVAL VAN MOEILIJKHEDEN
MOETEN DE PROCEDURES GE-
VOLGD WORDEN DIE WORDEN BE-
SCHREVEN IN DE HANDLEIDING VAN
DE GARAGE DIE KAN AANGE-
SCHAFT WORDEN BIJ EEN Officiële
Aprilia Dealer OF MOET MEN ZICH
WENDEN TOT EEN ERKENDE MECA-
NICIEN BIJ EEN Erkende Aprilia Gara-
ge.
N.B.
DE VOLGENDE HANDELINGEN BE-
TREFFEN ÉÉN KANT VAN HET VOER-
78
4 Maintenance / 4 Onderhoud

TUIG, MAAR ZIJN GELDIG VOOR BEI-
DE.
Check the condition and state of cleanli-
ness of the filter at the intervals specified
in the maintenance schedule and when-
ever it is used off road.
•
Remove the central fairing.
Controleer de staat en de condities van
de reiniging van de filter op de tijdsinter-
vals die worden voorgeschreven in de
onderhoudstabel, en elke keer het voer-
tuig offroad wordt gebruikt.
•
Verwijder de centrale zijplaat.
04_05
•
Acting on the right side, undo
and remove the screws (1) and
(2) retaining the rear fairing.
•
Draai vanaf de rechter zijde de
bevestigingsbouten (1) en (2)
van de zijplaat achteraan los, en
verwijder ze.
04_06
•
Slide off the fairing from the rear
hooks without removing it but
moving it slightly downwards,
until releasing the access of the
air-box cover screws.
•
Haal de zijplaat uit de koppelin-
gen achteraan zonder de plaat
zelf te verwijderen maar door ze
lichtjes naar onder te verplaat-
sen tot de bouten van de bedek-
king van de luchtfilter kunnen
bereikt worden.
79
4 Maintenance / 4 Onderhoud

04_07
•
Undo and remove the screws
(3) and (4) of the filter box cover.
•
Remove the cover sliding it off
from the closure with the box
and then moving it downward.
CAUTION
WHEN REMOVING THE COVER, TAKE
CARE NOT TO BEND IT OR NOT TO
DAMAGE ITS INTEGRITY.
•
Draai de bevestigingsbouten (3)
en (4) van de bedekking van de
filterdoos los, en verwijder ze.
•
Verwijder de bedekking door ze
uit de sluiting met de doos te ha-
len en ze onderaan te doen be-
wegen.
LET OP
BIJ DE VERWIJDERING VAN DE
DOOS MOET ZEER GOED OPGELET
WORDEN DAT ZE NIET WORDT GE-
BOGEN EN NIET WORDT BESCHA-
DIGD.
04_08
•
Remove the filtering element
(5).
IF THE FILTER IS OBSTRUCTED, THE
ADMISSION RESISTANCE WILL IN-
CREASE, LEADING TO POWER LOSS
AND HIGHER FUEL CONSUMPTION.
•
Verwijder het filterende element
(5).
WANNEER DE FILTER VERSTOPT IS,
ZAL DE INLAATWEERSTAND VERHO-
GEN, MET VERMOGENVERLIES EN
EEN VERHOGING VAN BRANDSTOF-
VERBRUIK ALS GEVOLG.
When refitting take particular care to en-
sure that the sponge is correctly seated,
so that the entire perimeter of the seal lip
is in contact with the sponge.
Bij de hermontage moet aandacht ge-
schonken worden bij het herplaatsen van
de spons in haar zit, zodat de dichtingslip
de spons voor de hele omtrek omvat.
80
4 Maintenance / 4 Onderhoud

Tighten back the two short filter cover
screws (3) and the two long filter cover
screws (4).
Take particular care when replacing the
rear fairing in the corresponding fixing
points and when fixing it to the screws (1)
and (2).
Continue later with the installation of the
central fairing and the saddle, as descri-
bed in the corresponding sections.
Draai de twee korte bevestigingsbouten
van de bedekking van de filter (3) en de
twee lange bevestigingsbouten van de
bedekking van de filter (4) weer vast.
Let op bij het herplaatsen van de zijplaat
achteraan in de relatieve klemverbindin-
gen en bij het bevestigen met de bouten
(1) en (2).
Installeer daarna de centrale zijplaat en
het zadel zoals wordt beschreven in de
relatieve paragrafen.
Air filter cleaning
•
Remove the air filter.
•
Wash the filtering element with
clean, non-flammable or high-
volatility solvents, and let it dry
properly.
•
Apply filter oil over the entire
surface, then wring out the filtra-
tion element to eliminate excess
oil.
THE FILTERING ELEMENT MUST BE
WELL IMPREGNATED BUT SHOULD
NOT DRIP.
Recommended products
AGIP FILTER OIL
Oil for air filter sponge
Reinigen van het luchtfilter
•
Verwijder de luchtfilter.
•
Reinig het filterelement met
reine, onontvlambare oplosmid-
delen, of met oplosmiddelen die
een hoge vluchtigheidsgraad
hebben, en laat het zorgvuldig
drogen.
•
Breng op het volledige opper-
vlak olie voor filters aan, en knijp
hem uit om het teveel aan olie te
verwijderen.
HET FILTEREND ELEMENT MOET
GOED DOORDRENKT ZIJN, MAAR
MAG NIET DRUPPELEN.
Aanbeloven producten
AGIP FILTER OIL
81
4 Maintenance / 4 Onderhoud

- Olie voor filters in spons
-
Cooling fluid level (04_09)
Do not use the vehicle if the coolant is
below the minimum level.
CAUTION
COOLANT IS TOXIC IF INGESTED;
CONTACT WITH YOUR EYES OR SKIN
MAY CAUSE IRRITATION. IF THE FLU-
ID GETS IN CONTACT WITH THE
EYES OR SKIN, RINSE REPEATEDLY
WITH PLENTY OF WATER AND SEEK
MEDICAL ADVICE. IF SWALLOWED,
INDUCE VOMITING, RINSE MOUTH
AND THROAT WITH PLENTY OF WA-
TER AND SEEK MEDICAL ADVICE IM-
MEDIATELY.
Peil koelvloeistof (04_09)
Gebruik het voertuig niet wanneer het
peil van de koelvloeistof zich onder het
minimum peil bevindt.
LET OP
DE KOELVLOEISTOF IS SCHADELIJK
WANNEER HET WORDT INGESLIKT;
HET CONTACT MET DE HUID EN DE
OGEN KAN IRRITATIES VEROORZA-
KEN. WANNEER DE VLOEISTOF IN
CONTACT ZOU KOMEN MET DE HUID
EN DE OGEN, SPOELT MEN LANG
MET VEEL WATER, EN RAADPLEEGT
MEN EEN ARTS. WANNEER HET
WORDT INGESLIKT, MOET MEN
OVERGEVEN, DE MOND EN DE KEEL
SPOELEN MET VEEL WATER, EN ON-
MIDDELLIJK EEN ARTS RAADPLE-
GEN.
The coolant solution consists of 70% wa-
ter and 30% antifreeze.
This mixture is ideal for the majority of
operating temperatures (down to -18 °C /
De oplossing van de koelvloeistof be-
staat uit 70% water en 30% antivries.
Dit mengsel is ideaal voor de meeste
werkingstemperaturen (tot -18 °C / -0.4 °
82
4 Maintenance / 4 Onderhoud

-0.4 °F) and ensures adequate corrosion
protection.
It is advisable to use the same mixture
even in hot weather as this minimises
loss due to evaporation and the need of
frequent top-ups.
Less water evaporation means fewer
mineral salts depositing in the radiators,
which helps preserve the efficiency of the
cooling system.
F) en garandeert een goede bescher-
ming tegen corrosie.
Het is een goede gewoonte om hetzelfde
mengsel ook tijdens het warme seizoen
te gebruiken, omdat op deze manier ver-
lies door verdamping en het frequent bij-
vullen wordt vermeden.
Op deze manier verminderen de bezink-
sels van mineraalzouten, die in de radia-
tor door het verdampte water werden
gelaten, en verandert de efficiëntie van
de koelinstallatie niet.
04_09
When the external temperature drops be-
low zero degrees centigrade, check the
cooling system frequently and add more
antifreeze solution if needed (up to 60%
max.).
Use distilled water in the coolant mixture
to avoid damaging the engine.
CAUTION
DO NOT REMOVE THE EXPANSION
TANK PLUG «1» WHEN THE ENGINE
IS HOT, SINCE COOLANT IS UNDER
PRESSURE AND VERY HOT. CON-
TACT WITH SKIN OR CLOTHES MAY
CAUSE SEVERE BURNS AND/OR IN-
JURIES.
Wanneer de buitentemperatuur zich on-
der het vriespunt bevindt, moet men het
koelcircuit frequent controleren, en voegt
men indien nodig een hogere concentra-
tie antivries toe (tot een maximum van
60%).
Voor de koeloplossing gebruikt men ge-
destilleerd water, om de motor niet te
beschadigen.
LET OP
VERWIJDER DOP «1» NIET VAN HET
EXPANSIEVAT WANNEER DE MOTOR
WARM STAAT, OMDAT DE KOEL-
VLOEISTOF ONDER DRUK STAAT EN
EEN HOGE TEMPERATUUR HEEFT.
BIJ CONTACT MET DE HUID OF DE
83
4 Maintenance / 4 Onderhoud

KLEDING KAN HET ERNSTIGE LET-
SELS/SCHADE VEROORZAKEN.
04_10
Coolant check (04_10)
•
Shut off the engine and wait until
it cools off.
•
Park the vehicle on firm and lev-
el ground.
•
Keep the vehicle upright with the
two wheels on the ground.
•
Ensure that the coolant level in
the expansion tank between the
"MIN" and "MAX" marks.
Controle van de koelvloeistof
(04_10)
•
Leg de motor stil en wacht tot hij
afgekoeld is.
•
Plaats het voertuig op een vaste
en vlakke ondergrond.
•
Houd het voertuig in verticale
positie met de twee wielen op de
grond.
•
Controleer of het vloeistofpeil in
het expansievat zich tussen de
referenties "MIN" en "MAX" be-
vindt.
04_11
Coolant top-up (04_11)
•
If inspection reveals that the
coolant level in the expansion
tank is too low:
- unscrew and remove the filler cap.
- Top up with coolant until the level is near
the "MAX" marking. Do not exceed this
level; otherwise, coolant will spill out dur-
ing engine operation.
- Refit the filler cap.
Bijvulling van de koelvloeistof
(04_11)
•
Als na de controle blijkt dat het
vloeistofpeil in het expansievat
te laag is:
- Draai de vuldop los, en verwijder hem.
- Vul bij met koelvloeistof tot het vloei-
stofpeil ongeveer het "MAX" peil bereikt.
Overschrijdt dit peil niet, anders zal de
vloeistof tijdens de werking van de motor
uitstromen.
- Plaats de vuldop weer.
84
4 Maintenance / 4 Onderhoud

CAUTION
IN CASE OF EXCESSIVE COOLANT
CONSUMPTION OR WHEN THE EX-
PANSION TANK IS EMPTY, CHECK
THAT THERE ARE NO LEAKS IN THE
CIRCUIT.
Recommended products
AGIP ANTIFREEZE PLUS
Coolant
It is a fluid without amines, nitrites or
phosphates, intended to be used in mix-
tures with de-ionised water (turquoise) .
Compliant with CUNA 956-10 standard.
LET OP
WANNEER HET VERBRUIK VAN
KOELVLOEISTOF EXCESSIEF IS, EN
WANNEER HET EXPANSIEVAT LEEG
BLIJFT, CONTROLEERT MEN OF ER
GEEN LEKKEN ZIJN IN HET CIRCUIT.
Aanbeloven producten
AGIP ANTIFREEZE PLUS
Koelvloeistof
Deze vloeistof bevat geen amines, nitrie-
ten en fosfaten, en is bedoeld om ge-
mengd met gedemineraliseerd water ge-
bruikt te worden (turkoois) . Beantwoordt
aan de norm CUNA 956-10.
CHECKING THE CIRCUIT
- Check the condition of the hoses.
CAUTION
CONTACT THE Aprilia Official Dealer
TO REPLACE THE COOLANT LIQUID.
CONTROLE VAN DE INSTALLATIE
- Controleer de staat van de moffen.
LET OP
VOOR DE VERVANGING VAN DE
KOELVLOEISTOF MOET U ZICH WEN-
DEN TOT EEN Officiële Aprilia Dealer.
85
4 Maintenance / 4 Onderhoud

04_12
04_13
Checking the brake oil level
(04_12, 04_13)
Periodically check the brake fluid level via
the brake fluid reservoir sight glasses (1
- 2) located on the right hand side of the
handlebar (front brake) and on the right
hand side of the swing arm (rear brake).
The brake fluid level should be above the
sight glass with the reservoir completely
level.
If this is not the case, take your vehicle to
an Aprilia Official Dealer to have the
system topped up.
THE SYSTEM MUST ONLY BE TOP-
PED UP WITH DOT4 TYPE BRAKE
FLUID.
BRAKE FLUID IS HIGHLY CORRO-
SIVE - AVOID CONTACT WITH PAINT-
WORK. IN THE EVENT OF SPILLAGE
ON PAINTED PARTS, RINSE IMMEDI-
ATELY WITH WATER.
WARNING
THE FLUID IN THE BRAKING CIRCUIT
IS HYGROSCOPIC, THAT IS, IT AB-
SORBS MOISTURE FROM THE SUR-
ROUNDING AIR. IF THE MOISTURE
CONTENT IN THE BRAKE FLUID EX-
CEEDS A CERTAIN VALUE, WATER
Controle van het oliepeil van
de remmen (04_12, 04_13)
Controleer regelmatig het peil in de re-
servoirs van de remolie via de inspectie-
glasjes (1 - 2) die zich op de rechter kant
van het stuur (voorrem) en op de rechter
kant van de vork (achterrem) bevinden.
Het peil van de remolie moet de inspec-
tieglasjes compleet bedekken wanneer
het reservoir zich parallel met het terrein
bevindt.
Zoniet moet u zich wenden tot een Offi-
ciële Aprilia Dealer om bij te vullen.
EVENTUELE BIJVULLINGEN MOGEN
ENKEL UITGEVOERD WORDEN MET
REMVLOEISTOFFEN MET DOT4
KLASSERING.
VERMIJDT DAT DE ERG CORROSIE-
VE REMVLOEISTOF IN CONTACT
KOMT MET DE GELAKTE DELEN.
WANNEER DIT TOCH GEBEURT,
MOETEN ZE ONMIDDELLIJK MET WA-
TER GEWASSEN WORDEN.
WAARSCHUWING
DE VLOEISTOF VAN HET REMCIR-
CUIT IS HYGROSCOPISCH, HET AB-
SORBEERT DUS VOCHTIGHEID UIT
DE OMGEVINGSLUCHT. WANNEER
86
4 Maintenance / 4 Onderhoud

VAPOUR BUBBLES MAY FORM IN
THE CIRCUIT, OR THE PUMP AND
CALLIPERS MAY SEIZE, CAUSING
THE BRAKES THEMSELVES TO
SEIZE. NEVER USE BRAKE LIQUID IN
OPEN OR PARTIALLY USED CON-
TAINERS.
DE VOCHTIGHEID IN DE REMVLOEI-
STOF EEN ZEKERE WAARDE OVER-
SCHRIJDT, KUNNEN DAMPBELLEN
GEVORMD WORDEN OF KAN HET AF-
SLAAN VAN DE POMP EN DE REM-
TANGEN PLAATSVINDEN, WAT DE
REMMEN DOET BLOKKEREN. GE-
BRUIK NOOIT REMVLOEISTOFFEN
UIT REEDS GEOPENDE VERPAKKIN-
GEN, OF DIE REEDS WERDEN GE-
BRUIKT.
Braking system fluid top up
CAUTION
FOR COOLANT TOP-UP, PLEASE
CONTACT AN Official aprilia Dealer. IF
YOU ARE ADEQUATELY TRAINED
AND EXPERIENCED, REFER TO THE
INSTRUCTIONS IN THIS WORKSHOP
BOOKLET AVAILABLE ALSO AT ANY
Official aprilia Dealer.
NOTE
CHECK BRAKING EFFICIENCY.
TAKE THE VEHICLE TO AN official
aprilia Dealer IF REQUIRED.
Bijvullen van de remvloeistof
LET OP
VOOR HET BIJVULLEN VAN DE
VLOEISTOF VAN DE KOPPELING,
MOET MEN ZICH WENDEN TOT EEN
OFFICIËLE Aprilia DEALER, OF WAN-
NEER U EEN EXPERT EN GEKWALI-
FICEERD BENT, KUNNEN DE AAN-
DUIDINGEN IN DE HANDLEIDING VAN
DE GARAGE ALS REFERENTIE GE-
BRUIKT WORDEN, DIE U KAN KOPEN
BIJ EEN Officiële Aprilia Dealer.
N.B.
CONTROLEER DE REMEFFICIËNTIE.
87
4 Maintenance / 4 Onderhoud

IN CASE OF EXCESSIVE TRAVEL OR
ELASTICITY OF THE BRAKE LEVER
OR AIR BUBBLES IN THE BRAKING
SYSTEM, CONTACT AN official aprilia
Dealer AS IT MAY BE NECESSARY TO
PURGE AIR FROM THE CIRCUIT.
INDIEN NODIG WENDT MEN ZICH TOT
EEN Officiële Aprilia Dealer.
IN GEVAL VAN EEN EXCESSIEVE
LOOP VAN DE REMHENDEL, EXCES-
SIEVE ELASTICITEIT OF IN GEVAL
VAN LUCHTBELLEN IN HET CIRCUIT,
WENDT MEN ZICH TOT EEN Officiële
Aprilia Dealer, OMDAT HET NODIG
KAN ZIJN OM DE ONTLUCHTING VAN
DE INSTALLATIE UIT TE VOEREN.
04_14
Battery (04_14, 04_15)
•
Remove the saddle.
•
Check that the cable terminals
and battery leads are:
- in good conditions (not corroded or cov-
ered by deposits);
- covered by neutral grease or petroleum
jelly.
If necessary:
•
Make sure the ignition switch is
set to "key off".
•
Disconnect the negative lead (-)
first and then the positive one
(+).
•
Brush with a metal bristle brush
to remove all signs of corrosion.
•
Remove the battery breather
pipe.
•
Remove the battery from its
housing and put it on a level sur-
face in a cool and dry place.
Accu (04_14, 04_15)
•
Verwijder het zadel.
•
Controleer of de terminals van
de kabels en de klemmen van
de accu:
- zich in goede condities bevinden (en
niet verroest zijn of bedekt zijn met afzet-
tingen);
- bedekt zijn met neutraal vet of vaseline.
Indien nodig:
•
Controleer of de ontstekings-
schakelaar zich in de positie
"key off" bevindt.
•
Maakt men eerst de negatieve
kabel (-) en daarna de positieve
kabel (+) los.
•
Borstelt men met een metalen
borstel om elk spoor van roest te
elimineren.
•
Verwijder het ontluchtingsbuisje
van de accu.
88
4 Maintenance / 4 Onderhoud

04_15
•
Connect again the positive lead
(+) first and then the negative
one (-).
•
Cover leads and terminals with
neutral grease or petroleum jel-
ly.
NOTE
REMOVING THE BATTERY RESETS
THE DIGITAL CLOCK AND THE TRIP
ODOMETER.
•
Verwijder de accu uit haar
plaats, en plaats haar op een
vlakke ondergrond in een koele
en droge plaats.
•
Verbindt men eerst de positieve
kabel (+) en daarna de negatie-
ve kabel (-).
•
Bedekt men de terminals en de
klemmen met neutraal vet of va-
seline.
N.B.
WANNEER DE ACCU WORDT VER-
WIJDERD, WORDEN DE DIGITALE
KLOK EN DE PARTIËLE KILOMETERS
OP NUL GEZET.
Battery removal
CAUTION
ONCE REMOVED THE BATTERY
MUST BE PUT AWAY IN A SAFE
PLACE AND OUT OF THE REACH OF
CHILDREN.
Verwijdering van de accu
LET OP
DE VERWIJDERDE ACCU MOET
WORDEN OPGEBORGEN OP EEN
VEILGE PLAATS EN UIT DE BUURT
VAN KINDEREN.
89
4 Maintenance / 4 Onderhoud

04_16
Use of a new battery (04_16)
•
Ensure that the ignition switch is
turned to 'key off'.
•
Remove the saddle.
•
Place the battery in its housing.
•
Connect the battery breather
pipe (1).
CAUTION
ALWAYS CONNECT THE BATTERY
BREATHER SO THAT SULPHURIC
ACID STEAM FROM THE BREATHER
DOES NOT CORRODE THE ELECTRI-
CAL SYSTEM, PAINTED PARTS, RUB-
BER COMPONENTS OR GASKETS.
Inwerkingstelling van een
nieuwe accu (04_16)
•
Controleer of de ontstekings-
schakelaar zich in positie 'KEY
OFF' bevindt.
•
Verwijder het zadel.
•
Plaats de accu op zijn plaats.
•
Sluit het ontluchtingsbuisje van
de accu (1) aan.
LET OP
VERBINDT STEEDS DE ONTLUCH-
TING VAN DE ACCU, OM TE VERMIJ-
DEN DAT DE ZWAVELZUURDAMPEN
DIE UIT DE ONTLUCHTING KOMEN
DE ELEKTRISCHE INSTALLATIE, DE
GELAKTE DELEN, DE RUBBEREN
DETAILS OF DE PAKKINGEN KUN-
NEN AANTASTEN.
•
Connect the positive lead (+)
first and then the negative lead
(-).
•
Cover leads and terminals with
neutral grease or petroleum jel-
ly.
•
Fasten the saddle.
•
Verbindt eerst de positieve ka-
bel (+) en daarna de negatieve
kabel (-).
•
Bedekt men de terminals en de
klemmen met neutraal vet of va-
seline.
•
Blokkeer het zadel.
90
4 Maintenance / 4 Onderhoud

04_17
Checking the electrolyte level
(04_17)
To check electrolyte level:
•
Remove the saddle.
•
Keep the vehicle upright with the
two wheels on the ground.
•
Check that the fluid level is be-
tween the 'MIN' and 'MAX'
notches stamped on the side of
the battery.
Otherwise:
•
Remove the battery.
•
Remove the cell caps.
CAUTION
USE ONLY DISTILLED WATER TO
TOP-UP ELECTROLYTE FLUID. DO
NOT EXCEED THE «MAX» MARK
SINCE THE LEVEL INCREASES DUR-
ING RECHARGE.
Controle van het elektrolytpeil
(04_17)
Voor de controle van het peil handelt men
als volgt:
•
Verwijder het zadel.
•
Houd het voertuig in verticale
positie met de twee wielen op de
grond.
•
Controleer of het vloeistofpeil
zich tussen de twee strepen
"MIN" en "MAX" bevindt, die op
de zijkant van de accu gedrukt
zijn.
Anders handelt men als volgt:
•
Verwijder de accu.
•
Verwijder de doppen van de ele-
menten.
LET OP
VOOR HET BIJVULLEN VAN DE ELEK-
TROLYTVLOEISTOF, GEBRUIKT MEN
ENKEL GEDISTILLEERD WATER.
OVERSCHRIJD NOOIT DE «MAX» RE-
FERENTIE, OMDAT HET PEIL TIJ-
DENS HET LADEN STIJGT.
•
Restore the electrolyte level by
adding distilled water.
•
Herstel het vloeistofpeil door ge-
destilleerd water toe te voegen.
91
4 Maintenance / 4 Onderhoud

Charging the battery
•
Remove the battery.
•
Remove the cell caps.
•
Check the battery electrolyte
level.
•
Connect the battery to a battery
charger.
•
It is advisable to recharge at a
current of 1/10 of the battery rat-
ed capacity.
•
Once the battery is recharged,
control the electrolyte level and
top up with distilled water if re-
quired.
•
Refit the caps to the cells.
CAUTION
REFIT THE BATTERY ONLY 5-10 MI-
NUTES AFTER DISCONNECTING THE
CHARGER AS THE BATTERY KEEPS
PRODUCING GAS FOR A SHORT
TIME.
Opladen van de accu
•
Verwijder de accu.
•
Verwijder de doppen van de ele-
menten.
•
Controleer het elektrolytpeil van
de accu.
•
Verbindt de accu aan een accu-
lader.
•
Men raadt aan om op te laden
aan een elektrische stroom-
sterkte die 1/10 bedraagt van de
capaciteit van de accu zelf.
•
Na het opladen, hercontroleert
men het elektrolytpeil en vult
men eventueel bij met gedestil-
leerd water.
•
Hermonteer de doppen op de
elementen.
LET OP
HERMONTEER DE ACCU ENKEL NA 5-
10 MINUTEN NA HET UITSCHAKELEN
VAN DE LAADAPPARATUUR, OMDAT
DE ACCU EEN KORTE PERIODE GAS
BLIJFT PRODUCEREN.
Long periods of inactivity
In the event of prolonged periods out of
use, the battery is subject to deterioration
and loss of performance.
This is caused by the natural discharging
of the battery itself and by possible resid-
Länger stillegen
In geval van een verlengde inactiviteit
van het voertuig, verminderen de presta-
ties van de accu.
Dit gebeurt omdat de accu zelf natuurlijk
ontlaadt en door mogelijke resterende
92
4 Maintenance / 4 Onderhoud

ual current consumption attributable to
continuously powered components.
Reduced battery performance may also
be due to environmental factors and in-
adequate cleanliness of the terminals.
To prevent starting problems and/or irre-
versible damage to the battery, take ei-
ther of the following precautions:
•
Start the engine and run at just
above idle speed for 10-15 mi-
nutes at least once per
month. This will ensure that the
battery and all the engine com-
ponents are kept in proper work-
ing order.
•
Put the vehicle in storage, re-
moving the battery. The battery
must be cleaned, fully charged
and kept in a dry, well ventilated
place. Recharge at least once
every two months.
CAUTION
THE BATTERY MUST BE CHARGED
WITH A CURRENT EQUAL TO 1/10 OF
THE RATED CAPACITY OF THE BAT-
TERY ITSELF, FOR A PERIOD NOT
EXCEEDING 8 HOURS. CONTACT AN
AUTHORISED APRILIA SERVICE
CENTRE TO CARRY OUT THIS OPER-
ATION SAFELY. WHEN REINSTAL-
LING THE BATTERY, ENSURE THAT
THE TERMINAL CLAMPS ARE CON-
NECTED CORRECTLY TO THE RE-
SPECTIVE POLES.
absorptie van het voertuig, te wijten aan
de componenten met constante voeding.
Het verminderen van de prestaties van
de accu is bovendien afhankelijk van de
weersomstandigheden en van de reini-
ging van de polen.
Om mogelijke moeilijkheden bij de start
en/of onomkeerbare beschadiging van
de accu te vermijden, moet volgens de
volgende modaliteiten gehandeld wor-
den:
•
Minstens eens per maand
moet de motor gestart worden
en aan een regime gehouden
worden dat iets boven het mini-
mum ligt, en dit voor 10-15 mi-
nuten. Op deze manier worden
de accu en alle onderdelen van
de motor efficiënt gehouden.
•
Verwijder de accu wanneer het
voertuig wordt gestald. De accu
moet rein en volledig opgeladen
zijn, en moet bewaard worden
op een droge en verluchte
plaats. Voer het laden minstens
om de twee maanden uit.
LET OP
HET OPLADEN MOET UITGEVOERD
WORDEN MET EEN STROOM DIE GE-
LIJK IS AAN 1/10 VAN DE NOMINALE
CAPACITEIT VAN DE ACCU ZELF, EN
VOOR MAXIMUM 8 UREN. VOOR DE-
ZE HANDELING WORDT AANGERA-
DEN OM ZICH TE WENDEN TOT EEN
ERKEND APRILIA SERVICECEN-
93
4 Maintenance / 4 Onderhoud

TO PREVENT DAMAGE TO THE ELEC-
TRICAL SYSTEM, NEVER DISCON-
NECT THE CABLES WITH THE EN-
GINE RUNNING. THE ELECTROLYTE
CONTAINS SULPHURIC ACID: AVOID
CONTACT WITH THE SKIN, EYES AND
CLOTHES. IN THE EVENT OF CON-
TACT, RINSE WITH PLENTY OF WA-
TER AND SEEK MEDICAL ATTEN-
TION. TAKE CARE NOT TO TILT THE
VEHICLE EXCESSIVELY, TO PRE-
VENT DANGEROUS SPILLAGE OF
ELECTROLYTE FROM THE BATTERY.
TRUM. CONTROLEER BIJ DE HER-
MONTAGE VAN DE ACCU OF DE
AANSLUITING VAN DE KLEMMEN OP
DE POLEN CORRECT WORDT UITGE-
VOERD.
OM SCHADE TE VERMIJDEN AAN DE
ELEKTRISCHE INSTALLATIE, MO-
GEN DE KABELS NOOIT LOSGE-
MAAKT WORDEN WANNEER DE MO-
TOR DRAAIT. HET ELEKTROLYT
BEVAT ZWAVELZUUR: VERMIJDT
HET CONTACT MET DE OGEN, DE
HUID EN DE KLEDING. IN GEVAL VAN
CONTACT MOET OVERVLOEDIG GE-
SPOELD WORDEN MET WATER, EN
ONMIDDELLIJK EEN ARTS GERAAD-
PLEEGD WORDEN LET BOVENDIEN
OP OM HET VOERTUIG NIET TE VEEL
TE HELLEN ZODAT HET ELEKTRO-
LYT ZELF NIET UIT DE ACCU KAN
STROMEN.
Fuses (04_18)
CAUTION
NEVER ATTEMPT TO REPAIR FAUL-
TY FUSES.
NEVER USE FUSES OTHER THAN
THE ONES SPECIFIED.
Zekeringen (04_18)
LET OP
HERSTEL GEEN DEFECTE ZEKERIN-
GEN.
GEBRUIK NOOIT ANDERE ZEKERIN-
GEN DAN DE GESPECIFICEERDE.
94
4 Maintenance / 4 Onderhoud

A SHORT CIRCUIT MAY DAMAGE THE
ELECTRICAL SYSTEM OR EVEN
CAUSE A FIRE.
CAUTION
A FUSE THAT BLOWS FREQUENTLY
MAY INDICATE A SHORT CIRCUIT OR
OVERLOAD. IF THIS OCCURS, CON-
SULT AN APRILIA Official Dealer.
MEN ZOU SCHADE KUNNEN VER-
OORZAKEN AAN HET ELEKTRISCH
SYSTEEM, OF ZELFS BRAND IN GE-
VAL VAN KORSTSLUITING.
LET OP
WANNEER EEN ZEKERING FRE-
QUENT WORDT BESCHADIGD, IS ER
WAARSCHIJNLIJK EEN KORTSLUI-
TING OF EEN OVERBELASTING. IN
DIT GEVAL RAADPLEEGT MEN EEN
Officiële Aprilia Dealer.
Check the fuse (1) the event of failure or
malfunction of an electrical component or
engine starting failure.
To check:
•
Set the ignition switch to 'OFF' to
avoid an accidental short circuit.
•
Remove the saddle.
•
Remove the fuse (1) and check
if the filament is broken.
•
Before replacing the fuse, find
and whenever possible, solve
the problem that causes it to
blow.
•
If the fuse is damaged, replace
with another of the same current
rating.
Wanneer men het niet of onregelmatig
werken van een elektrisch onderdeel of
het niet starten van de motor opmerkt,
moet men de zekering (1) controleren.
Voor de controle:
•
Plaats de ontstekingsschake-
laar op 'OFF' om een toevallige
kortsluiting te vermijden.
•
Verwijder het zadel.
•
Verwijder de zekering (1), en
controleer of de draad onderbro-
ken is.
•
Vooraleer men de zekering ver-
vangt, zoekt men indien moge-
lijk de oorzaak van het pro-
bleem.
•
Vervang dus de beschadigde
zekering met een andere met
dezelfde elektrische stroom-
sterkte.
95
4 Maintenance / 4 Onderhoud

04_18
Characteristic
Fuse
7.5 A
Technische kenmerken
Zekering
7,5 A
Lamps (04_19)
NOTE
CHECK THE FUSE BEFORE REPLAC-
ING A BULB
Lampjes (04_19)
N.B.
VOORALEER MEN EEN LAMPJE VER-
VANGT, CONTROLEERT MEN DE ZE-
KERING.
04_19
The headlight is fitted with a dual low/high
beam bulb.
Characteristic
Low-/ high beam light
12V - 35 / 35W
In het voorlicht bevindt zich een lampje
van het dimlicht / groot licht.
Technische kenmerken
Groot licht / dimlicht
12V - 35 / 35W
96
4 Maintenance / 4 Onderhoud

Low/High beam lamp
replacement (04_20, 04_21,
04_22, 04_23, 04_24)
CAUTION
BEFORE REPLACING A BULB,
TURNTHE IGNITION SWITCH
TO"OFF". TO REPLACE THE BULB,
WEAR CLEAN GLOVES OR USE A
CLEAN DRY CLOTH. DO NOT LEAVE
PRINTS ON THE BULB AS THIS MAY
CAUSE IT TO OVERHEAT AND THEN
BLOW OUT. IF YOU TOUCH THE
BULB WITHOUT WEARING GLOVES,
CLEAN OFF PRINTS WITH ALCOHOL
TO AVOID DAMAGING THE BULB.DO
NOT FORCE ELECTRICAL CABLES.
Vervanging van de lamp van
het dimlicht / groot licht
(04_20, 04_21, 04_22, 04_23,
04_24)
LET OP
VOORALEER MEN EEN LAMPJE VER-
VANGT, MOET MEN DE ONTSTE-
KINGSSCHAKELAAR IN POSITIE
"OFF" DRAAIEN. WANNEER MEN HET
LAMPJE VERVANGT MOET MEN
REINE HANDSCHOENEN DRAGEN OF
EEN REINE EN DROGE DOEK GE-
BRUIKEN. LAAT GEEN AFDRUKKEN
ACHTER OP HET LAMPJE, OMDAT
DIT OVERVERHITTING KAN VEROOR-
ZAKEN, EN HET DUS KAN STUK-
GAAN. WANNEER MEN HET LAMPJE
MET DE BLOTE HANDEN AANRAAKT,
MOETEN EVENTUELE AFDRUKKEN
GEREINIGD WORDEN MET ALCO-
HOL OM BESCHADIGINGEN TE VER-
MIJDEN. FORCEER DE ELEKTRI-
SCHE KABELS NIET.
•
Rest the vehicle on its stand.
•
Remove the rubber protection.
•
Detach the retainer spring, re-
move the bulb and replace with
a new bulb of the same type.
•
Plaats het voertuig op de stan-
daard.
•
Verwijder de rubberen bescher-
ming.
•
Maak de trekveer los, verwijder
het lampje en vervang het met
een ander dat dezelfde intensi-
teit heeft.
97
4 Maintenance / 4 Onderhoud

CAUTION
INSERT THE BULB INTO THE BULB
HOLDER, MAKING SURE THE REFER-
ENCE FITTINGS MATCH.
LET OP
PLAATS HET LAMPJE IN DE LAMP-
HOUDER, DOOR DE SPECIALE
PLAATSINGSZITTEN TE DOEN OVER-
EENKOMEN.
04_20
•
Undo and remove the two upper
screws (1).
•
Draai de twee bovenste bouten
(1) los, en verwijder ze.
04_21
•
Release the top fairing from the
fixing points (2) on the front
mudguard, taking care not to re-
move the rubbers (3).
•
If they have to be removed, re-
place them correctly in their cor-
responding seat.
•
Haal het kapje uit de klemver-
bindingen (2) op het voorste
spatbord, maar verwijder de
rubbertjes niet (3).
•
Als ze toch worden verwijderd,
moeten ze weer correct in hun
zittingen geplaatst worden.
98
4 Maintenance / 4 Onderhoud

04_22
•
Working on both sides of the top
fairing, remove the two side
screws (4) and collect the wash-
er (5).
•
Verwijder vanaf beide zijden van
het kapje de twee zijdelingse
bouten (4), en recupereer de
rondel (5).
04_23
•
Disconnect the light connector
(6).
•
Slide off the top fairing unit to the
front - light.
•
Remove the rubber protection
(7) placed on the rear part of the
light.
•
Maak de connector van het licht
los (6).
•
Verwijder de groep kapje-licht
langs voor.
•
Verwijder de rubberen bescher-
ming (7) die zich op de achter-
kant van het licht bevindt.
04_24
•
Release the retainer spring.
•
Take and replace the bulb with
another of the same intensity.
•
Koppel de veer los.
•
Verwijder het lampje, en ver-
vang het met een ander dat de-
zelfde intensiteit heeft.
99
4 Maintenance / 4 Onderhoud

For refitting, carry out the previously de-
scribed operations in reverse order, tak-
ing particular care to the positioning of the
components and the tightening of the
screws.
Voor de hermontage moeten de eerder
beschreven handelingen in de omge-
keerde zin uitgevoerd worden, en moet
opgelet worden voor de positionering van
de onderdelen en de sluiting van de bou-
ten.
Headlight adjustment (04_25,
04_26)
NOTE
IN COMPLIANCE WITH LOCAL LEGAL
REQUIREMENTS, SPECIFIC PROCE-
DURES MUST BE FOLLOWED WHEN
CHECKING LIGHT BEAM ADJUST-
MENT.
Afstellen van de koplamp
(04_25, 04_26)
N.B.
OP BASIS VAN WAT WORDT VOOR-
GESCHREVEN DOOR DE VAN
KRACHT ZIJNDE WETGEVING IN HET
LAND VAN GEBRUIK VAN HET VOER-
TUIG, MOETEN ER VOOR DE CON-
TROLE VAN DE RICHTING VAN DE
LICHTBUNDEL SPECIFIEKE PROCE-
DURES UITGEVOERD WORDEN.
04_25
EU - For a quick inspection of the cor-
rect aiming of the front light beam:
•
Place the vehicle 10 m (32.8 ft)
from a vertical wall and make
sure the ground is level.
•
Turn on the low beam light, sit
on the vehicle and check that
the light beam projected to the
wall is a little below the headlight
EU - Voor een snelle controle van de cor-
recte richting van de voorste lichtbundel:
•
Plaats het voertuig op 10 m
(32.8 ft) van een verticale wand,
en controleer of de ondergrond
vlak is.
•
Ontsteek het dimlicht, ga op het
voertuig zitten en controleer of
de lichtbundel die op de wand
wordt geprojecteerd zich iets
onder de horizontale lijn van de
100
4 Maintenance / 4 Onderhoud

horizontal straight line (about
9/10 of the total height).
koplamp bevindt (ongeveer 9/10
van de totale hoogte).
04_26
To carry out vertical adjustment of the
light beam:
•
working on both sides of the
light, undo partially the screw
placed on the side.
•
Acting with caution, act with a
finger on the light, defining the
correct orientation of the light
beams.
•
Tighten the two screws.
NOTE
CHECK THAT THE LIGHT BEAM HOR-
IZONTAL DIRECTION IS CORRECT.
Voor het uitvoeren van de verticale re-
geling van de lichtbundel:
•
draai vanaf beide zijden van het
licht de bout gedeeltelijk los die
zich op de zijkant bevindt.
•
Regel zeer voorzichtig en met
uw vinger de richting van het
licht, en dus de correcte richting
van de lichtbundel.
•
Draai de twee bouten vast.
N.B.
CONTROLEER DE CORRECTE HORI-
ZONTALE RICHTING VAN DE LICHT-
BUNDEL.
04_27
Front direction indicators
(04_27)
•
Rest the vehicle on its stand.
•
Loosen and remove screw (1).
•
Remove glass (2).
•
Press bulb (3) slightly and turn it
anticlockwise.
•
Pull the bulb (3) out of its fitting.
•
Insert a bulb of the same type
adequately.
Richtingaanwijzers voor
(04_27)
•
Plaats het voertuig op de stan-
daard.
•
Draai de bout los (1) en verwij-
der ze.
•
Verwijder de lens (2).
•
Druk gematigd op het lampje
(3), en draai het in tegenwijzer-
zin.
•
Verwijder het lampje (3) uit de
zitting.
101
4 Maintenance / 4 Onderhoud

WARNING
IF PARABOLE (4) STICKS OUT OF ITS
FITTING, INSERT IT AGAIN PROPER-
LY.
•
Plaats op correcte wijze een
nieuw lampje van hetzelfde ty-
pe.
WAARSCHUWING
WANNEER DE PARABOOL (4) UIT
HAAR ZITTING KOMT, MOET ZE
WEER CORRECT GEPLAATST WOR-
DEN.
04_28
Rear optical unit (04_28,
04_29)
If any of the LED modules burn out, the
entire taillight unit must be replaced.
To replace the taillight, proceed as fol-
lows:
•
remove the saddle.
•
Remove the tail fairing.
•
Remove the clamp (1).
•
Disconnect the connector (2).
Lampenset achter (04_28,
04_29)
Wanneer een led verbrandt, moet het vol-
ledige licht vervangen worden.
Om het achterlicht te vervangen moet als
volgt gehandeld worden:
•
Verwijder het zadel.
•
Verwijder het achterstuk.
•
Verwijder het bandje (1).
•
Maak de connector los (2).
102
4 Maintenance / 4 Onderhoud

04_29
•
Unscrew and remove the nuts
(3) fastening the taillight to the
frame and collect the corre-
sponding washers.
•
Slide off the light backwards.
CAUTION
WHEN REMOVING THE TAILLIGHT,
DO IT SLOWLY AND TAKE PARTICU-
LAR CARE WITH THE PASSAGE
HOLE FOR CABLES.
•
Draai de bevestigingsmoeren
(3) van het achterlicht op het fra-
me los, en verwijder ze. Recu-
pereer de relatieve rondellen.
•
Verwijder het licht langs achter.
LET OP
BIJ DE VERWIJDERING VAN HET
ACHTERLICHT MOET ZEER TRAAG
GEHANDELD WORDEN, EN MOET
OPGELET WORDEN VOOR DE OPE-
NING VOOR DE PASSAGE VAN DE
BEKABELING.
04_30
Rear turn indicators (04_30)
•
Rest the vehicle on its stand.
•
Loosen and remove screw (1).
•
Remove glass (2).
•
Press bulb (3) slightly and turn it
anticlockwise.
•
Pull the bulb (3) out of its fitting.
•
Insert a bulb of the same type
adequately.
WARNING
IF PARABOLE (4) STICKS OUT OF ITS
FITTING, INSERT IT AGAIN PROPER-
LY.
Richtingaanwijzers achter
(04_30)
•
Plaats het voertuig op de stan-
daard.
•
Draai de bout los (1) en verwij-
der ze.
•
Verwijder de lens (2).
•
Druk gematigd op het lampje
(3), en draai het in tegenwijzer-
zin.
•
Verwijder het lampje (3) uit de
zitting.
•
Plaats op correcte wijze een
nieuw lampje van hetzelfde ty-
pe.
103
4 Maintenance / 4 Onderhoud

WAARSCHUWING
WANNEER DE PARABOOL (4) UIT
HAAR ZITTING KOMT, MOET ZE
WEER CORRECT GEPLAATST WOR-
DEN.
Idle adjustment
Carburettor
Correct carburetion is fundamental for ef-
ficient engine operation. The carburettor
is set in the factory to ensure optimum
carburetion. Do not alter this setting.
Idle speed adjustment
This operation must be made with warm
engine, in neutral position and with no
acceleration.
Twist the minimum adjustment screw in a
clockwise and anticlockwise direction un-
til the engine idle speed is set to a point
in which the engine operates in a normal
way, without uncertainty and without be-
ing excessively accelerated. For a more
precise adjustment and for any other car-
burettor adjustment, contact an Author-
ised Aprilia Workshop.
WARNING
IT IS CONVENIENT TO MAKE A CAR-
BURETTOR CLEANING PERIODICAL-
LY WITH CLEAN PETROL AND PRES-
SURED AIR.
Afstellen van het stationair
toerental
Carburator
Een probleemloze carburatie is de basis
voor een goed rendement van de motor.
De carburator wordt geregeld in de fa-
briek om de beste carburatie te leveren.
Wijzig deze regeling niet.
Regeling van het minimum toerental
Deze handeling moet uitgevoerd worden
wanneer de motor warm staat, in vrij, en
zonder gas te geven.
Draai de regelbout van het minimum toe-
rental in wijzerszin of tegenwijzerszin tot
het minimum toerental stabiel wordt zo-
dat de motor regelmatig werkt, zonder
onzekerheden, en niet excessief ver-
sneld. Voor een preciezere regeling of
voor eender welke ander regeling van de
carburator, wendt men zich tot een Er-
kende Aprilia Garage.
WAARSCHUWING
HET IS GOED OM DE REINIGING VAN
DE CARBURATOR REGELMATIG UIT
TE VOEREN, DOOR GEBRUIK TE MA-
104
4 Maintenance / 4 Onderhoud

CAUTION
MAKE ALWAYS THE ENGINE IDLE
SPEED ADJUSTMENT WITH A HOT
ENGINE.
KEN VAN REINE BENZINE EN PERS-
LUCHT.
LET OP
VOER DE REGELING VAN HET MINI-
MUM TOERENTAL STEEDS UIT WAN-
NEER DE MOTOR WARM STAAT.
Front and rear disc brake
BRAKES ARE THE MOST IMPORTANT
COMPONENTS TO ENSURE SAFETY
AND THEREFORE THEY HAVE TO BE
ALWAYS IN PERFECT CONDITIONS;
CHECK THE BRAKES BEFORE EACH
RIDE.
Schijfrem voor en achter
DE REMMEN ZIJN DE ONDERDELEN
DIE HET MEEST DE VEILIGHEID GA-
RANDEREN, EN MOETEN DUS
STEEDS PERFECT EFFICIËNT WOR-
DEN GEHOUDEN; CONTROLEER ZE
VÓÓR ELKE REIS.
This vehicle is equipped with hydraulic
front and rear disc brakes.
The fluid level drops as the brake pads
are consumed to compensate automati-
cally for wear.
The front brake fluid reservoir is located
on the right hand handlebar, near the
front brake lever mounting.
Dit voertuig is uitgerust met hydraulische
schijfremmen vooraan en achteraan.
Met het verbruik van de wrijvingspastilles
vermindert het peil van de vloeistof om
automatisch de slijtage te compenseren.
De vloeistoftank van de voorrem bevindt
zich op de rechter kant van het stuur, na-
bij de koppeling van de hendel van de
voorrem.
105
4 Maintenance / 4 Onderhoud

The rear brake fluid reservoir is located
near the rear brake lever, on the right
hand side of the vehicle.
Frequently check the brake fluid level in
the reservoir.
De vloeistoftank van de achterrem be-
vindt zich nabij de hendel van de achter-
rem, rechts op het voertuig.
Controleer regelmatig het peil van de
remvloeistof in de tanks.
CAUTION
CHECK BRAKE PADS FOR WEAR
MAINLY BEFORE EACH RIDE.
LET OP
CONTROLEER DE SLIJTAGE VAN DE
REMPASTILLES VOORAL VÓÓR
ELKE REIS.
04_31
Brake control (04_31, 04_32,
04_33)
Disc brake pad wear depends on the use,
the riding style and the roads.
CAUTION
CHECK BRAKE PADS FOR WEAR
MAINLY BEFORE EACH RIDE.
Controle van de remmen
(04_31, 04_32, 04_33)
De slijtage van de pastilles van de rem-
schijf hangt af van het gebruik, van het
rijgedrag en van het wegtype.
LET OP
CONTROLEER DE SLIJTAGE VAN DE
REMPASTILLES VOORAL VÓÓR
ELKE REIS.
106
4 Maintenance / 4 Onderhoud

04_32
To carry out a quick pad check:
•
Rest the vehicle on its stand.
•
Visually inspect the area be-
tween the brake callipers and
pads as follows:
- from the front top side to check the front
brake calliper (1);
- from the rear top side for the rear brake
calliper (2).
NOTE
EXCESSIVE WEAR OF THE FRICTION
MATERIAL MAKES THE PAD METAL
SUPPORT GET INTO CONTACT WITH
THE DISC, WHICH RESULTS IN A
METALLIC NOISE AND SPARKS IN
THE CALLIPER; THEREFORE, BRAK-
ING EFFICIENCY AND DISC SAFETY
AND INTEGRITY ARE AT RISK.
Voor het uitvoeren van een snelle con-
trole van de slijtage van de pastilles:
•
Plaats het voertuig op de stan-
daard.
•
Voer een visuele controle uit
tussen de remschijf en de pas-
tilles, door te handelen als volgt:
- van boven vooraan voor de voorste
remtang (1);
- van boven achteraan voor de achterste
remtang (2);
N.B.
EEN VERDER VERBRUIK VAN HET
WRIJVINGSMATERIAAL KAN HET
CONTACT VEROORZAKEN MET DE
METALEN STEUN VAN DE PASTIL-
LES MET DE SCHIJF, MET ALS GE-
VOLG LAWAAI VAN METAAL EN DE
TANG DIE VONKEN MAAKT; DE
DOELTREFFENDHEID VAN HET REM-
MEN, DE VEILIGHEID EN DE INTEGRI-
TEIT VAN DE SCHIJF WORDEN OP
DEZE MANIER GESCHAAD.
107
4 Maintenance / 4 Onderhoud

04_33
•
Replace both brake pads when
the friction material (even if in
one brake pad only) has worn to
a thickness of approximately 1.5
mm (0.60 in).
NOTE
TAKE YOUR VEHICLE TO AN Official
APRILIA Dealer TO HAVE THE COOL-
ANT CHANGED.
•
Wanneer de dikte van het wrij-
vingsmateriaal (ook van slechts
één pastille) verminderd is tot
ongeveer 1,5 mm (0.60 in),
moet men beide pastilles ver-
vangen.-
N.B.
VOOR DE VERVANGING WENDT MEN
ZICH TOT EEN Officiële Aprilia Dealer.
Periods of inactivity
The following operations are recommen-
ded:
1. General cleaning of the vehicle.
2. With the engine off and the piston at
bottom dead centre, remove the spark
plug and pour 1 to 2 cc (0.06 to 0.12 cuin).
of mixer oil into the hole. Then operate
the kick starter 3-4 times to slowly crank
the engine through a few turns and refit
the spark plug.
3. Disconnect the battery cables from the
terminal posts, remove the battery and
store in a cool, dry place.
4. Inflate the tyres and set the vehicle on
front and rear stands so that both tyres
are off the ground.
5. Drain the fuel tank.
Stilstand van het voertuig
Er wordt aangeraden om de volgende
handelingen uit te voeren:
1. De algemene reiniging van het voer-
tuig.
2. Demonteer de bougie, wanneer de
motor is stilgelegd en met de zuiger op
het onderste dode punt, en voer in de vu-
lopening 1 ÷ 2 cc (0.06 ÷ 0.12 cuin) olie.
voor de menger in. Activeer 3-4 keer het
startpedaal van de motor zodat hij enkele
toeren kan draaien, en hermonteer de
bougie.
3. Maak de kabels van de accu los van
de klemmen, verwijder de accu en plaats
ze in een droge en koele plaats.
4. Blaas de banden op en plaats het voer-
tuig op de voorste en achterste stan-
daards, zodat de banden van de grond
zijn.
108
4 Maintenance / 4 Onderhoud

5. Maak de benzinetank leeg.
Cleaning the vehicle (04_34,
04_35)
Clean the motorcycle frequently if ex-
posed to adverse conditions, such as:
•
Air pollution (cities and industrial
areas).
•
Salinity and humidity in the at-
mosphere (seashore areas, hot
and wet weather).
•
Special environmental/season-
al conditions (use of salt, anti-
icing chemical products on the
roads in winter).
•
Always clean off any smog and
pollution residue, tar stains, in-
sects, bird droppings, etc. from
the bodywork.
•
Avoid parking the vehicle under
trees. During some seasons,
resins, fruits or leaves contain-
ing aggressive chemical sub-
stances that may damage the
paintwork may fall from trees.
•
Clean the instrument panel with
a soft, damp cloth.
Reinigen van het voertuig
(04_34, 04_35)
Reinig het voertuig regelmatig wan-
neer het wordt gebruikt in de volgende
zones of condities:
•
Atmosferische vervuiling (stad
en industriële zones).
•
Zoutgehalte en vochtigheid uit
de atmosfeer (zeegebieden,
warm en vochtig klimaat).
•
Speciale milieu/seizoenscondi-
ties (het gebruik van zout, che-
mische ijswerende producten
op wegen in de winterperiode).
•
Vermijd vooral dat er op de car-
rosserie afzettingen achterblij-
ven, resten van industriële en
vervuilende stoffen, teervlek-
ken, dode insecten, uitwerpse-
len van vogels, enz.
•
Parkeer het voertuig niet onder
bomen. In sommige seizoenen
kan er uit de bomen hars, fruit of
bladeren vallen die chemische
stoffen bevatten die schadelijk
zijn voor de lak.
•
Reinig het dashboard met een
zachte en vochtige doek.
109
4 Maintenance / 4 Onderhoud

CAUTION
BEFORE WASHING THE VEHICLE,
COVER THE ENGINE AIR INTAKES
AND THE EXHAUST PIPES.
CAUTION
AFTER CLEANING YOUR MOTORCY-
CLE, BRAKING EFFICIENCY MAY BE
TEMPORARILY AFFECTED DUE TO
THE PRESENCE OF WATER ON THE
FRICTION SURFACES OF THE BRAK-
ING CIRCUIT. CALCULATE A LON-
GER BRAKING DISTANCE IN ORDER
TO AVOID ACCIDENTS. BRAKE RE-
PEATEDLY TO RESTORE NORMAL
OPERATION. CARRY OUT THE PRE-
LIMINARY CHECKS.
LET OP
VOORALEER MEN HET VOERTUIG
WAST, DICHT DE INLATEN VAN DE
AANZUIGLUCHT VAN DE MOTOR EN
DE UITLATEN VAN DE KNALPOT.
LET OP
NADAT MEN HET VOERTUIG HEEFT
GEWASSEN, KAN DE REMDOEL-
TREFFENDHEID TIJDELIJK MINDER
ZIJN DOOR DE AANWEZIGHEID VAN
WATER OP DE WRIJVINGSOPPER-
VLAKKEN VAN DE REMINSTALLATIE.
VOORZIE EEN LANGE REMAFSTAND
OM ONGELUKKEN TE VERMIJDEN.
ACTIVEER HERHAALDELIJK DE
REMMEN, OM DE NORMALE REM-
CONDITIES TE HERSTELLEN. VOER
DE VOORBEREIDENDE CONTROLES
UIT.
110
4 Maintenance / 4 Onderhoud

04_34
04_35
To clean off dirt and mud deposited from
painted surfaces, soften caked dirt with a
low-pressure water jet. Sponge off using
a car body sponge soaked in a car body
shampoo and water solution (2 - 4% parts
of shampoo in water). Then rinse with
plenty of water, and dry with a chamois
leather. To clean the engine outer parts,
use degreasing detergent, brushes and
old cloths. Anodised or painted alumini-
um parts such as forks, wheel rims,
frame, footrests etc. should be washed
using water and mild soap. Using aggres-
sive detergents may damage the surface
treatment of these components.
TO CLEAN THE HEADLIGHTS USE A
SPONGE SOAKED IN WATER AND
MILD DETERGENT, RUBBING THE
SURFACE GENTLY AND RINSING
FREQUENTLY WITH PLENTY OF WA-
TER. REMEMBER TO CLEAN THE VE-
HICLE CAREFULLY BEFORE APPLY-
ING SILICON WAX POLISH. DO NOT
POLISH MATT-PAINTED SURFACES
WITH POLISHING PASTE. THE VEHI-
CLE SHOULD NEVER BE WASHED IN
DIRECT SUNLIGHT, ESPECIALLY
DURING SUMMER, OR WITH THE
BODYWORK STILL HOT AS THE CAR
SHAMPOO CAN DAMAGE THE PAINT-
WORK IF IT DRIES BEFORE BEING
RINSED OFF.
Om het vuil en de modder te verwijderen
die zich op de gelakte oppervlakken heb-
ben afgezet, moet men een waterstraal
onder lage druk gebruiken, de vuile delen
zorgvuldig nat maken, en de modder en
het vuil verwijderen met een zachte
spons voor carrosseries, doordrenkt met
water en shampoo (2 ÷ 4% delen sham-
poo in water). Spoel vervolgens over-
vloedig met water en droog af met een
zeemvel. Om de externe delen van de
motor te reinigen, gebruikt men een ont-
vettend reinigingsmiddel, kwasten en
doeken. De delen in elektrolytisch geoxi-
deerd of gelakt aluminium, zoals de vor-
ken, de velgen, het frame, de voeten-
steunen enz., moeten gewassen worden
met neutrale zeep en water. Het gebruik
van te agressieve reinigingsmiddelen
kan de oppervlaktebehandeling van deze
onderdelen aantasten.
VOOR DE REINIGING VAN DE LICH-
TEN GEBRUIKT MEN EEN SPONS DIE
WERD ONDERGEDOMPELD IN WA-
TER EN EEN NEUTRAAL REINIGINGS-
MIDDEL, WRIJFT MEN ZACHTJES OP
DE OPPERVLAKKEN EN SPOELT
MEN FREQUENT MET VEEL WATER.
MEN HERINNERT DAT HET OPPOET-
SEN MET SILICONENWAS UITGE-
VOERD MOET WORDEN NADAT MEN
HET VOERTUIG ZORGVULDIG HEEFT
GEWASSEN. POETS MATTE LAKKEN
NIET OP MET SCHURENDE PASTA'S.
111
4 Maintenance / 4 Onderhoud

CAUTION
DO NOT USE WATER (OR LIQUIDS)
AT TEMPERATURES OVER 40°C (104°
F) WHEN CLEANING THE VEHICLE
PLASTIC PARTS. DO NOT AIM HIGH
PRESSURE AIR/WATER JETS OR
STEAM JETS DIRECTLY TO THE FOL-
LOWING PARTS: WHEEL HUBS, CON-
TROLS ON THE RIGHT AND LEFT
SIDE OF THE HANDLEBAR, BEAR-
INGS, BRAKE PUMPS, INSTRUMENTS
AND GAUGES, EXHAUST SILENCER,
IGNITION SWITCH/STEERING LOCK.
DO NOT USE ALCOHOL OR SOL-
VENTS TO CLEAN ANY RUBBER OR
PLASTIC SADDLE COMPONENTS:
USE WATER AND MILD SOAP.
CAUTION
DO NOT USE SOLVENTS OR PETROL
BY-PRODUCTS (ACETONE, TRI-
CHLOROETHYLENE, TURPENTINE,
PETROL, THINNERS) TO CLEAN THE
SADDLE. USE INSTEAD DETER-
GENTS WITH SURFACE ACTIVE
AGENTS NOT EXCEEDING 5% (NEU-
TRAL SOAP, DEGREASING DETER-
GENTS OR ALCOHOL).
DRY THE SADDLE WELL AFTER
CLEANING.
HET WASSEN MAG NOOIT WORDEN
UITGEVOERD IN DE ZON, VOORAL
NIET IN DE ZOMER WANNEER DE
CARROSSERIE NOG WARM IS, OM-
DAT DE SHAMPOO DIE VOOR HET
SPOELEN OPDROOGT DE LAK KAN
BESCHADIGEN.
LET OP
GEBRUIK GEEN WATER (OF VLOEI-
STOFFEN) MET EEN TEMPERATUUR
HOGER DAN 40°C (104°C) VOOR DE
REINIGING VAN DE PLASTIC DELEN
VAN HET VOERTUIG. RICHT DE WA-
TERSTRALEN OF PERSLUCHT OF
DAMP NIET OP DE VOLGENDE DE-
LEN: DE NAVEN VAN DE WIELEN, DE
COMMANDO'S OP DE RECHTER EN
LINKER KANT VAN HET STUUR, DE
KUSSENTJES, DE REMPOMPEN, DE
INSTRUMENTEN EN DE INDICATO-
REN, DE UITLAAT VAN DE KNALDEM-
PER, DE ONTSTEKINGSSCHAKE-
LAAR / STUURSLOT. VOOR DE
REINIGING VAN DE RUBBEREN EN
PLASTIC DELEN EN VAN HET ZADEL
MAG MEN GEEN ALCOHOL OF OP-
LOSMIDDELEN GEBRUIKEN; GE-
BRUIK DAARENTEGEN WATER EN
NEUTRALE ZEEP.
112
4 Maintenance / 4 Onderhoud

CAUTION
DO NOT APPLY PROTECTIVE WAX
ON THE SADDLE AS IT MAY BECOME
SLIPPERY.
LET OP
VOOR DE REINIGING VAN HET ZADEL
MAG MEN GEEN OPLOSMIDDELEN
OF PETROLEUMDERIVATEN GE-
BRUIKEN (ACETON, TRICHLOORE-
THYLEEN, TERPENTIJN, BENZINE,
OPLOSMIDDELEN). MEN MAG REINI-
GINGSMIDDELEN GEBRUIKEN DIE
MAXIMUM 5% CAPILLAIR ACTIEVE
DELEN BEVATTEN (NEUTRALE
ZEEP, ONTVETTENDE REINIGINGS-
MIDDELEN OF ALCOHOL).
DROOG HET ZADEL ZORGVULDIG
NA DE REINIGING.
LET OP
BRENG OP HET ZADEL GEEN BE-
SCHERMENDE WAS AAN OM TE VER-
MIJDEN DAT HET GAAT SCHUIVEN.
Transmission chain
This vehicle is equipped with a chain with
master link.
EXCESSIVE CHAIN SLACKENING
MAY CAUSE IT TO COME OFF THE
PINION, WHICH IN TURN COULD
CAUSE AN ACCIDENT OR SEVERE
Transmissieketting
Dit voertuig heeft een ketting met koppe-
lingsschakel.
EEN EXCESSIEVE LOSSING VAN DE
KETTING KAN ZE VAN HET RONDSEL
DOEN KOMEN, EN EEN ONGEVAL OF
ERNSTIGE SCHADE AAN HET VOER-
113
4 Maintenance / 4 Onderhoud

DAMAGE TO THE VEHICLE. CHECK
CHAIN CLEARANCE PERIODICALLY.
TUIG VEROORZAKEN. CONTROLEER
REGELMATIG DE SPELING.
04_36
04_37
Chain backlash check (04_36,
04_37)
SX
If the chain free play is less than 30 mm
(1.18 in) or exceeds 35 mm (1.38 in), ad-
just the chain.
RX
If the chain free play is less than 40 mm
(1.57 in) or exceeds 45 mm (1.77 in), ad-
just the chain.
FOR ANY TYPE OF OPERATION ON
THE DRIVE CHAIN, PLEASE CON-
TACT AN Aprilia Official Dealer. IF
YOU ARE ADEQUATELY TRAINED
AND EXPERIENCED, REFER TO THE
INSTRUCTIONS IN THE WORKSHOP
BOOKLET THAT CAN ALSO BE PUR-
CHASED AT ANY Aprilia Official Deal-
er.
Controle van de speling van de
ketting (04_36, 04_37)
SX
Wanneer de speling minder dan 30 mm
(1.18 inch) of meer dan 35 mm (1.38 inch)
bedraagt, moet de regeling uitgevoerd
worden.
RX
Wanneer de speling minder dan 40 mm
(1.57 inch) of meer dan 45 mm (1.77 inch)
bedraagt, moet de regeling uitgevoerd
worden.
VOOR ELKE HANDELING DIE MOET
UITGEVOERD WORDEN OP DE
TRANSMISSIEKETTING MOET MEN
ZICH WENDEN TOT EEN Officiële
Aprilia Dealer, OF WANNEER U EEN
EXPERT OF GEKWALIFICEERD
BENT, KUNNEN DE AANDUIDINGEN
IN DE HANDLEIDING VAN DE GARA-
GE ALS REFERENTIE GEBRUIKT
WORDEN, DIE U KAN KOPEN BIJ EEN
Officiële Aprilia Dealer.
114
4 Maintenance / 4 Onderhoud

Chain lubrication and cleaning
CAUTION
BE EXTREMELY CAREFUL WHEN AD-
JUSTING, LUBRICATING, WASHING
AND REPLACING THE CHAIN.
Smering en reiniging van de
ketting
LET OP
WEES UITERST VOORZICHTIG BIJ
HET SMEREN EN WASSEN VAN DE
KETTING.
Lubricate the chain whenever necessary
and, at least, every 500 km (310.68 mi),
and always after washing the vehicle or
riding in the rain.
Do not wash the chain with water jets,
vapour jets, high-pressure water jets and
highly flammable solvents.
Smeer de ketting telkens als het nodig is
en in ieder geval tenminste elke 500 km
(310.68 mi), altijd na elke wasbeurt of na
rijden in de regen.
Was de ketting absoluut niet met water-
stralen, dampstralen, waterstralen onder
hoge druk en met oplosmiddelen met ho-
ge ontvlambaarheidsgraad.
115
4 Maintenance / 4 Onderhoud

116
4 Maintenance / 4 Onderhoud

SX - RX 50
Chap. 05
Technical data
Hst. 05
Technische
gegevens
117

WEIGHT AND DIMENSIONS
Maximum length SX-RX 2045 mm (80.52 in)
Maximum length SX - RX 835 mm (32.87 in)
Maximum height to SX saddle 830 mm (32.68 in)
Maximum height to RX saddle 900 mm (35.43 in)
Centre to centre distance SX-RX 1400 mm (55.12 in)
AFMETINGEN EN GEWICHT
Maximum lengte SX - RX 2045 mm (80.52 in)
Maximum breedte SX - RX 835 mm (32.87 in)
Maximum hoogte vanaf het zadel
SX
830 mm (32.68 in)
Maximum hoogte vanaf het zadel
RX
900 mm (35.43 inch)
Asafstand SX-RX 1400 mm (55.12 in)
TECHNICAL DATA-ENGINE
Engine type Single cylinder 2 stroke
Bore per stroke 39.88 x 40 mm
Technical data-Engine capacity 50 cm³ (3.05 cu.in)
Compression ratio (11.5 +/- 0.5) : 1
Cooling With coolant
Lubrication Thermal group: With oil for two
stroke engines through variable
pump capacity
Transmission: gear reduction
units in oil bath for transmissions
TECHNISCHE GEGEVENS-MOTOR
Type van motor Monocilinder 2-takt
Diameter per slag 39,88 x 40 mm
Technische gegevens-
Cilinderinhoud
50 cc (3.05 cu in)
Compressieverhouding (11.5 +/- 0.5) : 1
Koeling Met koelvloeistof
Smering Thermische groep: Met olie voor
2-taktmotoren door middel van
pomp met variabele capaciteit
118
5 Technical data / 5 Technische gegevens

Fuel Unleaded petrol
Carburettor Dell'Orto PHVA-17.5 with manual
starter
Clutch Multiplate wet clutch
Primary drive Ground gear units. Ratio: 21/78
Admission Reed valve direct to crankcase
Gearbox 6-speed transmission with selector
fork and drum distributor operated
by external control
Gears I Gear 11/34
II Gear 15/30
III Gear 18/27
VI Gear 20/24
V Gear 22/23
VI Gear 23/22
Secondary transmission Chain, 12.70 mm wheelbase and
sprocket 7.75 mm in diameter
Ratio: 11/53
Electric Electric starter
Electrical system 12V
Ignition advance TDC: 1.2 mm
Maintenance-Spark plug Champion RN3C or NGK-R
BR8ES
Spark plug electrode gap 0.6 - 0.7 mm (0.024 - 0.027 in)
Versnellingsbak: Met
raderwerken in oliebad voor
transmissies
Brandstof Loodvrije benzine
Carburator Dell'Orto PHVA-17,5 met manuale
starter
Koppeling Multischijf in oliebad
Primaire transmissie Met geslepen raderwerken.
Verhouding: 21/78
Inlaat Met lamellen, rechtstreeks naar de
carter
Versnellingsbak Met 6 versnellingen, met
schakelaar, vork en
distributietrommel die extern wordt
gecommandeerd
Versnellingen I Snelheid 11/34
II Snelheid 15/30
III Snelheid 18/27
IV Snelheid 20/24
V Snelheid 22/23
VI Snelheid 23/22
Secundaire transmissie Met ketting, steek 12,70 mm en
diameter van het dwarsliggertje
7,75 mm
Verhouding: 11/53
Start Elektrisch
119
5 Technical data / 5 Technische gegevens

Elektrische installatie Aan 12V
Voorontsteking BDP: 1,2 mm
Onderhoud-Bougie Champion RN3C of NGK-R
BR8ES
Afstand van de elektroden van de
bougie
0,6 - 0,7 mm (0.024 - 0.027 in)
CAPACITY
Use-Fuel tank 7.5 +/- 0.5 l (1.65 +/- 0.11 Uk gal;
1.98 +/- 0.13 US gal)
Fuel reserve 1.29 l (0.28 UK gal; 0.34 US gal)
Oil mixer reservoir 1.04 l (0.23 UK gal; 0.27 USgal)
Mixer oil reserve 0.26 l (0.057 UK gal; 0.069 USgal)
Seats 2
CAPACITEIT
Gebruik-Brandstoftank 7.5 +/- 0.5 l (1.65 +/- 0.11 Uk gal;
1.98 +/- 0.13 US gal)
Brandstofreserve 1,29 l (0.28 UK gal; 0.34 US gal)
Olietank van de menger 1,04 l (0.23 UK gal; 0.27 US gal)
Oliereserve van de menger 0,26 l (0.057 UK gal; 0.069 US gal)
Plaatsen 2
FRAME AND SUSPENSION
Chassis Delta Box
Front suspension SX - RX Hydraulic telescopic fork with
centred axle (ø 41 mm (1.61 in))
Rear suspension SX - RX High resistance steel swingarm.
FRAME EN OPHANGINGEN
Frame Delta Box
Ophanging vooraan SX - RX Hydraulische telescoopvork met
gecentreerde as (ø 41 mm (1.61
in))
Ophanging achteraan SX - RX Stalen vork met grote
bestendigheid.
120
5 Technical data / 5 Technische gegevens

Hydraulic single shock absorber,
wheel travel 180 mm (7.08 in)
Hydraulische monoschokdemper,
verplaatsing wiel 180 mm (7.08 in)
BRAKES
Front brake SX disc in stainless steel ø260 mm
(10.24 in) with floating calliper
Front brake RX disc in stainless steel ø260 mm
(10.2 in) with floating calliper
Rear brake SX - RX Disc ø218 mm (8.58 in) in stainless
steel with piston calliper and
opposing cylinders
REMMEN
Voorrem SX schijfrem van roestvrij staal ø260
mm (10.24 in) met fluctuerende
tang
Voorrem RX schijfrem van roestvrij staal ø260
mm (10.2 in) met fluctuerende tang
Achterrem SX - RX Schijf ø218 mm (8.58 in) van
roestvrij staal met tang met
zuigertjes met tegengestelde
cilinders
TYRES
Front tyre SX - (100/80 17" 52S), RX - (80/90
21" 48P, 90/90 21" 54P)
Rear Tyre SX - (130/70 17" 62S), RX -
(110/80 18" 58P)
BANDEN
Voorband SX - (100/80 17" 52S), RX - (80/90
21" 48P, 90/90 21" 54P)
Achterband SX - (130/70 17" 62S), RX -
(110/80 18" 58P)
121
5 Technical data / 5 Technische gegevens

WHEELS AND TYRES
Wheel Vehicle Use Tyre pressure with rider only
Tyre pressure, rider +
passenger
Front SX On road 1.8 bar (180 kPa) (26.1 PSI) 2.0 bar (200 kPa) (29 PSI)
Rear SX On road 2.2 bar (220 kPa) (31.9 PSI) 2.4 bar (240 kPa) (34.8 PSI)
Front RX
On road - Combined -
Offroad
1.1 bar (110 kPa) (15.95 PSI) - 1.5
bar (150 kPa) (21.75 PSI)-1.6 bar
(160 kPa) (23.20 PSI)
1.1 bar (110 kPa) (15.95 PSI) - 1.7
bar (170 kPa) (24.65 PSI) - 1.8 bar
(180 kPa) (1.8 PSI)
Rear RX
On road - Combined -
Offroad
1.2 bar (120 kPa) (17.40 PSI) - 1.6
bar (160 kPa) (23.20 PSI) - 1.8 bar
(180 kPa) (26.11 PSI)
1.4 bar (140 kPa) (20.30 PSI) - 1.8
bar (180 kPa) (26.11 PSI) - 2.0 bar
(200 kPa) (29 PSI) -
WIELEN EN BANDEN
Wiel
Voertuig Gebruik Spanning enkel bestuurder
Spanning bestuurder +
passagier
Vooraan SX Weggebruik 1,8 bar (180 kPa) (26.1 PSI) 2.0 bar (200 kPa) (29 PSI)
Achteraan SX Weggebruik 2,2 bar (220 kPa) (31.9 PSI) 2,4 bar (240 kPa) (34.8 PSI)
Vooraan RX
Weggebruik - Gemengd -
Offroad
1,1 bar (110 kPa) (15.95 PSI) - 1,5
bar (150 kPa) (21.75 PSI)-1,6 bar
(160 kPa) (23.20 PSI)
1,1 bar (110kPa) (15.95 PSI) - 1,7
bar (170 kPa) (24.65 PSI) - 1,8 bar
(180 kPa) (1.8 PSI)
Achteraan RX
Weggebruik - Gemengd -
Offroad
1,2 bar (120 kPa) (17.40 PSI) - 1,6
bar (160 kPa) (23.20 PSI) - 1,8 bar
(180 kPa) (26.11 PSI)
1,4 bar (140 kPa) (20.30 PSI) - 1,8
bar (180 kPa) (26.11 PSI) - 2.0 bar
(200 kPa) (29 PSI) -
122
5 Technical data / 5 Technische gegevens

BULBS
Low-/ high beam light 12V - 35 / 35W
Rear daylight running light / stop
light
LED
Turn indicator bulb 12V - 10W
LAMPEN
Groot licht / dimlicht 12V - 35 / 35W
Achterste positielicht / stoplicht LED
Lamp van het licht van de
richtingaanwijzers
12V - 10W
05_01
Kit equipment (05_01)
The toolkit bag is located under the sad-
dle.
The tools supplied are:
1. A toolkit pouch
2. 4 mm (0.16 in) Allen keys
3. Double ended cross-head/flat-
head screwdriver
4. Spark plug wrench
Bijgeleverd gereedschap
(05_01)
De gereedschapstas bevindt zich onder
het zadel.
De bijgevoegde gereedschappen zijn:
1. Gereedschapstas
2. Mannelijke zeskantsleutels 4
mm (0.16 in)
3. Tweepuntige schroevendraaier
kruis/punt
4. Bougiesleutel
123
5 Technical data / 5 Technische gegevens

124
5 Technical data / 5 Technische gegevens

SX - RX 50
Chap. 06
Programmed
maintenance
Hst. 06
Gepland
onderhoud
125

Scheduled maintenance table
CAUTION
FIRE HAZARD.
FUEL OR ANY OTHER INFLAMMABLE
SUBSTANCES MUST NOT BE CLOSE
TO ELECTRICAL COMPONENTS.
BEFORE ANY MAINTENANCE OPER-
ATION OR INSPECTION ON THE MO-
TORCYCLE, SHUT OFF THE ENGINE
AND REMOVE THE KEY. WAIT UNTIL
THE ENGINE AND THE EXHAUST
SYSTEM ARE COLD, IF POSSIBLE
LIFT THE SCOOTER WITH A SPECIFIC
TOOL ON A FIRM AND LEVEL
GROUND.
BEFORE ANY OPERATION, MAKE
SURE THAT THE ROOM WHERE YOU
ARE IS ADEQUATELY VENTILATED.
TO AVOID BURNS BE SPECIALLY
CAREFUL WITH HOT ENGINE AND
EXHAUST SYSTEM PARTS.
DO NOT HOLD ANY MECHANICAL OR
OTHER MOTORCYCLE PARTS WITH
YOUR MOUTH: MOTORCYCLE COM-
PONENT ARE NOT EDIBLE, ON THE
CONTRARY SOME OF THEM ARE
HARMFUL AND EVEN TOXIC.
Tabel gepland onderhoud
LET OP
BRANDGEVAAR.
HOU BRANDSTOF EN ANDERE ONT-
VLAMBARE STOFFEN VER WEG VAN
ELEKTRISCHE ONDERDELEN.
VOORALEER MEN EENDER WELKE
ONDERHOUDSHANDELING OF IN-
SPECTIE UITVOERT OP HET VOER-
TUIG, LEGT MEN DE MOTOR STIL EN
VERWIJDERT MEN DE SLEUTEL.
WACHT TOT DE MOTOR EN DE UIT-
LAATINSTALLATIE AFGEKOELD
ZIJN, EN HEF INDIEN MOGELIJK HET
VOERTUIG OP MET DE SPECIALE AP-
PARATUUR OP EEN VASTE EN VLAK-
KE ONDERGROND.
CONTROLEER EERST OF HET LO-
KAAL WAAR MEN HANDELT GOED
VERLUCHT IS.
SCHENK VOORAL AANDACHT AAN
DE DELEN VAN DE MOTOR EN DE
UITLAATINSTALLLATIE DIE NOG
WARM ZIJN, OM BRANDWONDEN TE
VERMIJDEN.
HOU NOOIT MECHANISCHE OF AN-
DERE DELEN VAN HET VOERTUIG IN
DE MOND: GEEN ENKEL ONDER-
DEEL IS EETBAAR, ENKELE DELEN
ZIJN INTEGENDEEL SCHADELIJK OF
ZELFS GIFTIG.
126
6 Programmed maintenance / 6 Gepland onderhoud

NOTE
UNLESS OTHERWISE INDICATED,
REFIT THE UNITS FOLLOWING THE
REMOVAL STEPS BUT IN REVERSE
ORDER.
WHEN CARRYING OUT MAINTE-
NANCE OPERATIONS, IT IS ADVISA-
BLE TO WEAR LATEX GLOVES.
N.B.
WANNEER HET NIET UITDRUKKE-
LIJK IS BESCHREVEN, WORDT DE
HERMONTAGE VAN DE GROEPEN IN
OMGEKEERDE ZIN VAN DE MONTA-
GEHANDELINGEN UITGEVOERD.
BIJ ONDERHOUDSHANDELINGEN
RAADT MEN AAN OM LATEX HAND-
SCHOENEN TE GEBRUIKEN.
In general terms, routine maintenance
operations can be carried out by the own-
er; in some cases it is necessary to use
specific tools and have some technical
knowledge.
For servicing or technical advice, consult
an Official aprilia Dealer for prompt and
accurate service.
Ask your Official aprilia Dealer to test
the vehicle on the road after a repair but
nonetheless, personally carry out the
Pre-ride Checks after a maintenance op-
eration.
Normaalgezien kunnen de handelingen
van het gewoon onderhoud door de ge-
bruiker worden uitgevoerd; in enkele ge-
vallen kan men specifieke gereedschap-
pen nodig hebben en moet men
technisch voorbereid zijn.
Wanneer men assistentie of technisch
advies nodig heeft, wendt men zich tot
een Officiële Aprilia Dealer, die een
zorgvuldige en bekommerde service ga-
randeert.
Men raadt aan om aan de Officiële Apri-
lia Dealer te vragen om een testrit uit te
voeren na een herstelling, of om alleszins
persoonlijk de Voorbereidende Controles
uit te voeren na een onderhoudshande-
ling.
MAINTENANCE SCHEDULE Kaart van het periodiek onderhoud
Een aangepast onderhoud is van door-
slaggevend belang voor een langere le-
127
6 Programmed maintenance / 6 Gepland onderhoud

Adequate maintenance is fundamental to
ensuring long-lasting, optimum operation
and performance of your vehicle.
For this purpose, aprilia offers a set of
checks and maintenance services (for
payment), which are included in the sum-
mary table shown on the following page.
Report any minor faults without delay to
an Aprilia Official Dealer, without wait-
ing for the next scheduled service.
Carrying out scheduled services on time
is essential for your warranty validity. For
further information concerning Warranty
procedures and Scheduled Mainte-
nance, please refer to the Warranty
Booklet.
vensduur van het voertuig in optimale
werkcondities met optimale prestaties.
Daarom heeft Aprilia een serie van con-
troles en onderhoudshandelingen tegen
betaling voorzien, die men vindt in het
samenvattend kader op de volgende pa-
gina. Het is goed om eventuele kleine
onregelmatigheden bij de werking onmid-
dellijk mee te delen aan een Officiële
Aprilia Dealer zonder te wachten, om ze
te verhelpen, tot het uitvoeren van de vol-
gende servicebeurt.
Een stipte uitvoering van de servicebeur-
ten is noodzakelijk voor het correcte ge-
bruik van de garantie. Voor alle andere
informatie in verband met de toepas-
singswijzen van de Garantie en de uit-
voering van het Geprogrammeerd On-
derhoud, raadpleegt men het Garantie-
boekje.
ROUTINE MAINTENANCE TABLE
Km x 1000 1 5 10 15 20 25
Months 2 12 24 36 48 60
Rear shock absorber - - I - I -
Reed valve intake - - I - I -
Battery electrolyte level I I I I I I
Safety fasteners I - I - I -
Spark plug I R R R R R
128
6 Programmed maintenance / 6 Gepland onderhoud

Km x 1000 1 5 10 15 20 25
Carburettor I I I I I I
Transmission kit (2) I I I I I I
Headlight - adjustment - - A - A -
Air filter C C C C C C
Clutch control lever A A A A A A
Brake levers L L L L L L
Coolant (2) I I
Brake fluid level - I - I - I
Fork oil - - R - R -
Brake fluid (1) - - - - - -
Mixer oil R I R I R I
Brake pads I I I I I I
Tyres - I I I I I
Tyre pressure I I I I I I
Vehicle and brake system test I I I I I I
Radiator - External cleaning - - C - C -
Spokes - checking tension I - I - I -
Tightening screws I I I I I I
Steering I - I - I -
Brake hoses - - I - I -
129
6 Programmed maintenance / 6 Gepland onderhoud

Km x 1000 1 5 10 15 20 25
Fuel and oil pipes I I R I R I
TABEL VAN HET PERIODIEK ONDERHOUD
Km x 1000
1 5 10 15 20 25
Maanden 2 12 24 36 48 60
Achterste schokdemper - - I - I -
Aanzuiging lamel - - I - I -
Accu elekytrolytpeil I I I I I I
Veiligheidsblokkeringen I - I - I -
Bougie I R R R R R
Carburator I I I I I I
Kit transmissie (2) I I I I I I
Voorlicht - regeling - - A - A -
Luchtfilter C C C C C C
Bedieningshendel van de koppeling A A A A A A
Commandohendel remmen L L L L L L
Koelvloeistof (2) I I
Oliepeil remmen - I - I - I
Olie van de vork - - R - R -
Remolie (1) - - - - - -
Olie van de menger R I R I R I
Rempastilles I I I I I I
130
6 Programmed maintenance / 6 Gepland onderhoud

Km x 1000 1 5 10 15 20 25
BANDEN - I I I I I
Bandenspanning I I I I I I
Test van het voertuig en de reminstallatie I I I I I I
Radiator - Externe reiniging - - C - C -
Spaken - controle spanning I - I - I -
Sluiting bouten I I I I I I
Stuur I - I - I -
Remleiding - - I - I -
Brandstof- en olieleidingen I I R I R I
I: INSPECT AND CLEAN, ADJUST, LU-
BRICATE OR REPLACE IF NECESSA-
RY
C: CLEAN, R: REPLACE, A: ADJUST, L:
LUBRICATE
(1) Check and clean and adjust or re-
place, if necessary, before every journey.
(2) Replace every 2 years or 20000 Km
(12427 mi).
I: CONTROLEREN EN REINIGEN, RE-
GELEN, SMEREN OF VERVANGEN IN-
DIEN NODIG
C: REINIGEN, R: VERVANGEN, A: RE-
GELEN, L: SMEREN
(1) Controleren en reinigen, regelen of
vervangen indien nodig vóór elke reis.
(2) Elke 2 jaar of 20000 km (12427 mi)
vervangen.
131
6 Programmed maintenance / 6 Gepland onderhoud

Table of recommended
products
CAUTION
BRAKE FLUID: USE NEW BRAKE
FLUID ONLY. DO NOT MIX DIFFERENT
BRANDS OR TYPES OF OIL WITHOUT
CHECKING THEIR BASE COMPATI-
BILITY.
COOLANT: USE ONLY ANTIFREEZE
SOLUTIONS AND CORROSION INHIB-
ITORS WITHOUT NITRITE THAT EN-
SURE A PROTECTION UP TO AT
LEAST (-35 °C) (-31°F)
Tabel aanbevolen producten
LET OP
REMVLOEISTOF: GEBRUIK ENKEL
NIEUWE REMVLOEISTOF. MENG
GEEN VERSCHILLENDE MERKEN OF
TYPOLOGIEËN VAN OLIE ZONDER
DE COMPATIBILITEIT VAN DE BASIS-
STOFFEN GECONTROLEERD TE
HEBBEN.
KOELVLOEISTOF: GEBRUIK ENKEL
ANTIVRIES EN ANTICORROSIEMID-
DEL ZONDER NITRIET, DIE EEN BE-
SCHERMING VERZEKEREN TOT MIN-
STENS (-35 °C) (-31 °F)
RECOMMENDED PRODUCTS TABLE
Product Description Specifications
AGIP SPEED 2T Mixer oil As an alternative for recommended oils, use
top branded fully synthetic oils that meet or
exceed the ISO - L - EGD, JASO FC or API TC
specifications requirements.
AGIP GEAR 10W-40 Gearbox oil API GL-4
AGIP ANTIFREEZE PLUS Coolant It is a fluid without amines, nitrites or
phosphates, intended to be used in mixtures
with de-ionised water (turquoise) . Compliant
with CUNA 956-10 standard.
AGIP BRAKE 4 Brake fluid As an alternative to the recommended fluid,
other fluids that meet or exceed the required
132
6 Programmed maintenance / 6 Gepland onderhoud

Product Description Specifications
specifications may be used. SAE J1703,
NHTSA 116 DOT 4, ISO 4925 Synthetic fluid
AGIP GREASE 30 Grease for steering bearings, pin seats and
swinging arm
AGIP FILTER OIL Oil for air filter sponge -
NEUTRAL GREASE OR PETROLEUM JELLY BATTERY POLES Neutral grease or petroleum jelly.
AGIP CHAIN GREASE SPRAY Recommended CHAIN LUBRICANT Grease
TABEL MET AANBEVOLEN PRODUCTEN
Product Beschrijving Kenmerken
AGIP SPEED 2T Olie van de menger In plaats van de aanbevolen olies, kan men
olies, geheel synthetisch, gebruiken met
conforme of hogere prestaties dan de
specifieken ISO - L - EGD of als alternatief
JASO FC of als alternatief API TC.
AGIP GEAR 10W-40 Olie voor de versnellingsbak API GL-4
AGIP ANTIFREEZE PLUS Koelvloeistof Deze vloeistof bevat geen amines, nitrieten en
fosfaten, en is bedoeld om gemengd met
gedemineraliseerd water gebruikt te worden
(turkoois) . Beantwoordt aan de norm CUNA
956-10.
AGIP BRAKE 4 remvloeistof In plaats van de aanbevolen vloeistof kan men
vloeistoffen gebruiken met conforme of hogere
prestaties dan de specifieken. Synthetische
vloeistof SAE J1703, NHTSA 116 DOT 4, ISO
4925
133
6 Programmed maintenance / 6 Gepland onderhoud

Product Beschrijving Kenmerken
AGIP GREASE 30 Vet voor de stuurinrichtingskussentjes, de
zitten van de pinnen en de achtervork
AGIP FILTER OIL Olie voor filters in spons -
NEUTRAAL VET OF VASELINE POLEN VAN DE ACCU Neutraal vet of vaseline
AGIP CHAIN GREASE SPRAY aanbevolen voor KETTINGEN Vet
134
6 Programmed maintenance / 6 Gepland onderhoud

TABLE OF CONTENTS
A
Air filter: 78, 81
B
Battery: 15, 88–90, 92
Brake: 14, 27, 28, 86, 105,
106
Brake pedal: 28
C
Chain: 113–115
Clutch: 14, 29, 43
Clutch fluid: 14
Clutch lever: 43
coolant: 12, 84
Coolant: 12, 84
D
Disc brake: 105
E
Engine oil: 13
F
Fairings: 31
Fuel: 11
Fuses: 94
G
Gearbox oil: 13, 70
H
Headlight: 100
Horn: 26
I
Identification: 36
Instrument panel: 21
K
Keys: 35
M
Maintenance: 69, 125, 126
Maintenance Table: 126
R
Recommended products:
132
S
Saddle: 34
Scheduled maintenance:
126
Spark plug: 77
Stand: 17, 58
T
Tank: 30
Technical data: 117
Transmission: 58, 113
Turn indicators: 103
Tyres: 72
135

136

TREFWOORDENREGISTER
A
Aanbevolen producten: 132
ACCU: 15, 88–90, 92
B
Banden: 72
BOUGIE: 77
Brandstof: 11
C
Claxon: 26
I
Identificatie: 36
K
Ketting: 114, 115
Koelvloeistof: 12, 82, 84
Koplamp: 100
Koppeling: 29
L
Luchtfilter: 78, 81
M
Motorolie: 13
O
Onderhoud: 69, 125, 126
R
Remvloeistof: 87
Richtingaanwijzers: 27, 101,
103
S
Schijfrem: 105
Sleutels: 35
Standaard: 17, 58
Start: 50, 51
Stuurslot: 25, 26
T
Tank: 30
Technische gegevens: 117
Transmissie: 58
transmissieketting: 113
V
Versnellingsbak: 70
Z
Zadel: 34
Zekeringen: 94
137

THE VALUE OF SERVICE
As a result of continuous technical updates and specific mechanic training programs for Aprilia products, only Aprilia Official Network mechanics know this vehicle fully and have the special tools
necessary to carry out maintenance and repair operations correctly.
The reliability of the vehicle also depends on its mechanical state. Checking the vehicle before riding it, its regular maintenance and the use of Original Aprilia Spare Parts only are essential factors!
For information about the nearest Official Dealer and/or Service Centre, consult the Yellow Pages or search directly on the inset map in our Official Website:
www.aprilia.com
Only by requesting Aprilia Original Spare Parts can you be sure of purchasing products that were developed and tested during the actual vehicle design stage. All Aprilia Original Spare Parts undergo
quality control procedures to guarantee reliability and durability.
The descriptions and illustrations given in this publication are not binding; While the basic characteristics as described and illustrated in this booklet remain unchanged, Aprilia reserves the right, at any
time and without being required to update this publication beforehand, to make any changes to components, parts or accessories, which it considers necessary to improve the product or which are
required for manufacturing or construction reasons.
Not all versions/models shown in this publication are available in all countries. The availability of individual versions/models should be confirmed with the official Aprilia sales network.
© Copyright 2011 - Aprilia. All rights reserved. Reproduction of this publication in whole or in part is prohibited. Aprilia - After sales service.
The Aprilia trademark is the property of Piaggio & C. S.p.A.
DE WAARDE VAN DE ASSISTENTIE
Dankzij de voortdurende technische actualiseringen en de specifieke trainingsprogramma´s van de Aprilia producten, kennen enkel de onderhoudsmonteurs van het Officiële Netwerk van Aprilia
grondig dit voertuig, en beschikken ze over de nodige speciale uitrusting voor een correcte uitvoering van de handelingen van het onderhoud en de herstellingen.
De betrouwbaarheid van het voertuig hangt ook af van de mechanische condities van het voertuig. De controle vóór het rijden, het regelmatig onderhoud en het exclusief gebruik van de Originele
Reserveonderdelen van Aprilia zijn essentiële factoren!
Voor informatie in verband met de dichtstbijzijnde Officiële dealer en/of Servicecentrum, raadpleegt men de Gouden Gids of zoekt men rechtstreeks op de geografische kaart op onze Officiële Website:
www.aprilia.com
Enkel wanneer men Originele Aprilia Reserveonderdelen aanvraagt, zal men een product krijgen dat reeds bestudeerd en getest werd tijdens de ontwerpfase van het voertuig. De Originele Aprilia
Reserveonderdelen worden systematisch onderworpen aan kwaliteitscontroleprocedures om de volledige betrouwbaarheid en de duur ervan te garanderen.
De beschrijvingen en de illustraties in deze uitgave zijn niet bindend: Aprilia houdt zich derhalve het recht voor om, met behoud van de essentiële eigenschappen van het model dat hierin is beschreven
en geïllustreerd, op elk moment wijzigingen aan te brengen aan de organen, de onderdelen of de levering van accessoires naar gelang zij dit nodig acht om het product te verbeteren, of om te voldoen
aan vereisten van constructieve of commerciële aard, zonder verplicht te zijn om tijdig deze uitgave bij te werken.
Niet alle versies in deze uitgave zijn in alle landen beschikbaar. De beschikbaarheid van de afzonderlijke versies moet gecontroleerd worden via het officiële verkoopsnetwerk van Aprilia.
© Copyright 2011 - Aprilia. Alle rechten voorbehouden. Het reproduceren van de inhoud, ook van delen hiervan, is verboden. Aprilia - Dienst na verkoop.

Het merk Aprilia is eigendom van Piaggio & C. S.p.A.
-
 1
1
-
 2
2
-
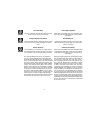 3
3
-
 4
4
-
 5
5
-
 6
6
-
 7
7
-
 8
8
-
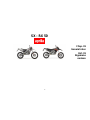 9
9
-
 10
10
-
 11
11
-
 12
12
-
 13
13
-
 14
14
-
 15
15
-
 16
16
-
 17
17
-
 18
18
-
 19
19
-
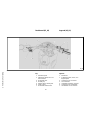 20
20
-
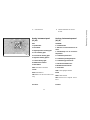 21
21
-
 22
22
-
 23
23
-
 24
24
-
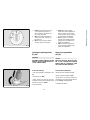 25
25
-
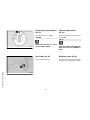 26
26
-
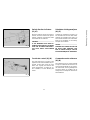 27
27
-
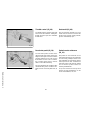 28
28
-
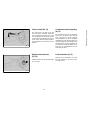 29
29
-
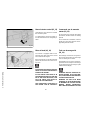 30
30
-
 31
31
-
 32
32
-
 33
33
-
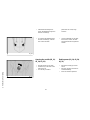 34
34
-
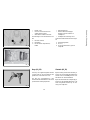 35
35
-
 36
36
-
 37
37
-
 38
38
-
 39
39
-
 40
40
-
 41
41
-
 42
42
-
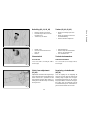 43
43
-
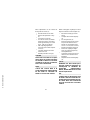 44
44
-
 45
45
-
 46
46
-
 47
47
-
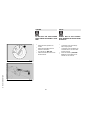 48
48
-
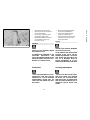 49
49
-
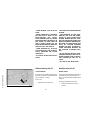 50
50
-
 51
51
-
 52
52
-
 53
53
-
 54
54
-
 55
55
-
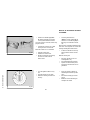 56
56
-
 57
57
-
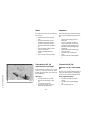 58
58
-
 59
59
-
 60
60
-
 61
61
-
 62
62
-
 63
63
-
 64
64
-
 65
65
-
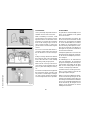 66
66
-
 67
67
-
 68
68
-
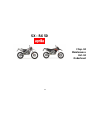 69
69
-
 70
70
-
 71
71
-
 72
72
-
 73
73
-
 74
74
-
 75
75
-
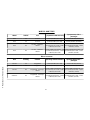 76
76
-
 77
77
-
 78
78
-
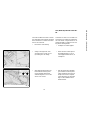 79
79
-
 80
80
-
 81
81
-
 82
82
-
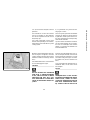 83
83
-
 84
84
-
 85
85
-
 86
86
-
 87
87
-
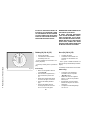 88
88
-
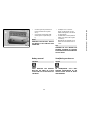 89
89
-
 90
90
-
 91
91
-
 92
92
-
 93
93
-
 94
94
-
 95
95
-
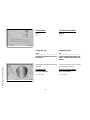 96
96
-
 97
97
-
 98
98
-
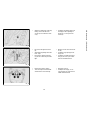 99
99
-
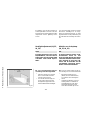 100
100
-
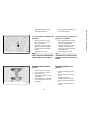 101
101
-
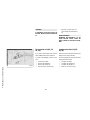 102
102
-
 103
103
-
 104
104
-
 105
105
-
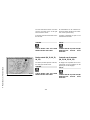 106
106
-
 107
107
-
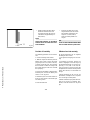 108
108
-
 109
109
-
 110
110
-
 111
111
-
 112
112
-
 113
113
-
 114
114
-
 115
115
-
 116
116
-
 117
117
-
 118
118
-
 119
119
-
 120
120
-
 121
121
-
 122
122
-
 123
123
-
 124
124
-
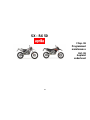 125
125
-
 126
126
-
 127
127
-
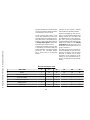 128
128
-
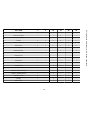 129
129
-
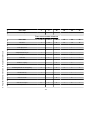 130
130
-
 131
131
-
 132
132
-
 133
133
-
 134
134
-
 135
135
-
 136
136
-
 137
137
-
 138
138
-
 139
139


APRILIA 2010 RX 50 Handleiding
- Categorie
- Motorfietsen
- Type
- Handleiding
- Deze handleiding is ook geschikt voor
in andere talen
- English: APRILIA 2010 RX 50 User manual
Gerelateerde papieren
-
APRILIA ETV 1000 CAPONORD Handleiding
-
-
-
-
-
-
-
-
-