Sharp K-50M22BL2-FR Handleiding
- Categorie
- Kookplaten
- Type
- Handleiding

Home Appliances
NL Handleiding
ES Manual de uso
EN User Manual
FR Guide d'utilisation
K-50M22BL2-FR
Cooking

EN - 2
Icon Type Meaning
WARNING Serious injury or death risk
RISK OF ELECTRIC SHOCK Dangerous voltage risk
FIRE Warning; Risk of re / ammable materials
CAUTION Injury or property damage risk
IMPORTANT / NOTE Operating the system correctly
Thank you for choosing this product.
This User Manual contains important safety information and instructions on the operation
and maintenance of your appliance.
Please take the time to read this User Manual before using your appliance and keep this
book for future reference.

CONTENTS
1.SAFETY INSTRUCTIONS .................................................................................................4
1.1 General Safety Warnings ...............................................................................................4
1.2 Installation Warnings ......................................................................................................6
1.3 During Use .....................................................................................................................7
1.4 During Cleaning and Maintenance .................................................................................8
2.INSTALLATION AND PREPARATION FOR USE ............................................................10
2.1 Instructions for the Installer ..........................................................................................10
2.2 Installation of the Oven .................................................................................................10
2.3 Electrical Connection and Safety.................................................................................. 11
3.PRODUCT FEATURES ...................................................................................................13
4.USE OF PRODUCT ........................................................................................................14
4.1 Oven Controls...............................................................................................................14
4.2 Cooking Table ...............................................................................................................15
4.3 Use of the Mechanical Timer ........................................................................................15
4.4 Accessories ..................................................................................................................15
5.CLEANING AND MAINTENANCE...................................................................................16
5.1 Cleaning ...................................................................................................................16
5.2 Maintenance .................................................................................................................18
6.TROUBLESHOOTING & TRANSPORT ..........................................................................19
6.1 Troubleshooting ............................................................................................................19
6.2 Transport ...................................................................................................................19
7.TECHNICAL SPECIFICATIONS ......................................................................................20
7.1 Energy Fiche ................................................................................................................20

EN - 4
1. SAFETY INSTRUCTIONS
• Carefully read all instructions before using your
appliance and keep them in a convenient place for
reference when necessary.
• This manual has been prepared for more than one
model therefore your appliance may not have some
of the features described within. For this reason, it
is important to pay particular attention to any figures
whilst reading the operating manual.
1.1 General Safety Warnin GS
• This appliance can be used by children aged from
8 years and above and by persons with reduced
physical, sensory or mental capabilities or lack
of experience and knowledge if they have been
given supervision or instruction concerning use of
the appliance in a safe way and understand the
hazards involved. Children should not play with the
appliance. Cleaning and user maintenance should
not be made by children without supervision.
WARNING: The appliance and its accessible parts
become hot during use. Care should be taken to avoid
touching heating elements. Keep children less than 8
years of age away unless they are continually
supervised.
WARNING: Danger of fire: Do not store items
on the cooking surfaces.
WARNING: If the surface is cracked, switch off
the appliance to avoid the possibility of electric shock.
• Do not operate the appliance with an external timer
or separate remote-control system.
• During use the appliance will get hot. Care should
be taken to avoid touching heating elements inside

EN - 5
the oven.
• Handles may get hot after a short period during use.
• Do not use harsh abrasive cleaners or scourers
to clean the oven door glass and other surface.
They can scratch the surfaces which may result in
shattering of the door glass or damage to surfaces.
• Do not use steam cleaners for cleaning the
appliance.
WARNING: To avoid the possibility of electric
shock, make sure that the appliance is switched off
before replacing the lamp.
CAUTION: Accessible parts may be hot when
cooking or grilling. Keep young children away from the
appliance when it is in use.
• Your appliance is produced in accordance with all
applicable local and international standards and
regulations.
• Maintenance and repair work should only be carried
out by authorised service technicians. Installation
and repair work that is carried out by unauthorised
technicians may be dangerous. Do not alter or
modify the specifications of the appliance in any
way. Inappropriate hob guards can cause accidents.
• Before connecting your appliance, make sure
that the local distribution conditions (nature of the
gas and gas pressure or electricity voltage and
frequency) and the specifications of the appliance
are compatible. The specifications for this appliance
are stated on the label.
CAUTION: This appliance is designed only for
cooking food and is intended for indoor domestic
household use only. It should not be used for any
other purpose or in any other application, such as for
non-domestic use, in a commercial environment or for

EN - 6
heating a room.
• Do not use the oven door handles to lift or move the
appliance.
• All possible measures have been taken to ensure
your safety. Since the glass may break, care should
be taken while cleaning to avoid scratching. Avoid
hitting or knocking the glass with accessories.
• Make sure that the supply cord is not trapped or
damaged during installation. If the supply cord is
damaged, it must be replaced by the manufacturer,
its service agent or similarly qualified persons in
order to prevent a hazard.
• Do not let children climb on the oven door or sit on it
while it is open.
• Please keep children and animals away from this
appliance.
1.2 inStalla tion Warnin GS
• Do not operate the appliance before it is fully
installed.
• The appliance must be installed by an authorised
technician. The manufacturer is not responsible
for any damage that might be caused by defective
placement and installation by unauthorised people.
• When the appliance is unpacked, make sure that
it is has not been damaged during transportation.
In case of any defect do not use the appliance
and contact a qualified service agent immediately.
The materials used for packaging (nylon, staplers,
Styrofoam, etc.) may be harmful to children and they
should be collected and removed immediately.
• Protect your appliance from the atmosphere. Do not
expose it to effects such as sun, rain, snow, dust or
excessive humidity.

EN - 7
• Any materials (i.e. cabinets) around the appliance
must be able to withstand a minimum temperature
of 100°C.
• The appliance must not be installed behind a
decorative door, in order to avoid overheating.
1.3 Durin G uSe
• When you first use your oven you may notice a
slight smell. This is perfectly normal and is caused
by the insulation materials on the heater elements.
We suggest that, before using your oven for the
first time, you leave it empty and set it at maximum
temperature for 45 minutes. Make sure that the
environment in which the product is installed is well
ventilated.
• Take care when opening the oven door during or
after cooking. The hot steam from the oven may
cause burns.
• Do not put flammable or combustible materials in or
near the appliance when it is operating.
• Always use oven gloves to remove and replace food
in the oven.
• Under no circumstances should the oven be lined
with aluminium foil as overheating may occur.
• Do not place dishes or baking trays directly onto the
base of the oven whilst cooking. The base becomes
very hot and damage may be caused to the product.
Do not leave the oven unattended while cooking
with solid or liquid oils. They may catch fire under
extreme heating conditions. Never pour water on to
flames that are caused by oil, instead switch the oven
off and cover the pan with its lid or a fire blanket.
• If the product will not be used for a long period of
time, turn the main control switch off.

EN - 8
• Make sure the appliance control knobs are always
in the “0” (stop) position when it is not in use.
• The trays incline when pulled out. Take care not
to spill or drop hot food while removing it from the
ovens.
• Do not place anything on the oven door when it is
open. This could unbalance the oven or damage the
door.
• Do not hang towels, dishcloths or clothes from the
appliance or its handles.
1.4 Durin G Cleanin G anD Maintenan Ce
• Make sure that your appliance is turned off at
the mains before carrying out any cleaning or
maintenance operations.
• Do not remove the control knobs to clean the control
panel.
• To maintain the efficiency and safety of your
appliance, we recommend you always use original
spare parts and to call our authorised service agents
in case of need.
CE Declaration of conformity
We declare that our products meet the
applicable European Directives, Decisions
and Regulations and the requirements listed
in the standards referenced.
This appliance has been designed to be used only
for home cooking. Any other use (such as heating a
room) is improper and dangerous.
The operating instructions apply to several models.
You may notice differences between these instructions
and your model.

EN - 9
Disposal of your old machine
This symbol on the product or on its packaging
indicates that this product should not be
treated as household waste. Instead it should
be handed over to the applicable collection
point for the recycling of electrical and
electronic equipment. By ensuring this product is
disposed of correctly, you will help prevent potential
negative consequences for the environment and
human health, which could otherwise be caused by
inappropriate waste handling of this product. For more
detailed information about recycling of this product,
please contact your local city office, your household
waste disposal service or the retailer who you
purchased this product from.

EN - 10
2. INSTALLATION AND
PREPARATION FOR USE
WARNING : This appliance must be
installed by an authorised service
person or qualified technician, according to
the instructions in this guide and in
compliance with the current local
regulations.
• Incorrect installation may cause harm
and damage, for which the manufacturer
accepts no responsibility and the
warranty will not be valid.
• Prior to installation, ensure that the local
distribution conditions (electricity voltage
and frequency) and the adjustments
of the appliance are compatible. The
adjustment conditions for this appliance
are stated on the label.
• The laws, ordinances, directives and
standards in force in the country of use
are to be followed (safety regulations,
proper recycling in accordance with the
regulations, etc.).
2.1 inStru Ction S for the inStaller
General instructions
• After removing the packaging material
from the appliance and its accessories,
ensure that the appliance is not
damaged. If you suspect any damage,
do not use it and contact an authorised
service person or qualified technician
immediately.
• Make sure that there are no flammable
or combustible materials in the close
vicinity, such as curtains, oil, cloth etc.
which may catch fire.
• The worktop and furniture surrounding
the appliance must be made of
materials resistant to temperatures
above 100°C.
• The appliance should not be installed
directly above a dishwasher, fridge,
freezer, washing machine or clothes
dryer.
2.2 inStalla tion of the oven
The appliances are supplied with
installation kits and can be installed in a
worktop with the appropriate dimensions.
The dimensions for hob and oven
installation are given below.
A (mm) 557 min./max. F (mm) 560/580
B (mm) 550 min. G (mm) 555
C (mm) 595 min. H/I (mm) 600/590
D (mm) 575 min. J/K (mm) 5/10
E (mm) 576
F
A B
C
C
D
E
G
H
J
Installation under a worktop

EN - 11
F
AB
C
C
D
E
G
I
J
K
Installation in a wall unit
After making the electrical connections,
insert the oven into the cabinet by pushing
it forward. Open the oven door and insert
2 screws in the holes located on the oven
frame. While the product frame touches the
wooden surface of the cabinet, tighten the
screws.
2.3 ele Ctri Cal ConneCtion an D Safety
WARNING: The electrical connection
of this appliance should be carried out
by an authorised service person or
qualified electrician, according to the
instructions in this guide and in compliance
with the current local regulations.
WARNING: THE APPLIANCE MUST
BE EARTHED.
• Before connecting the appliance to the
power supply, the voltage rating of the
appliance (stamped on the appliance
identification plate) must be checked for
correspondence to the available mains
supply voltage, and the mains electric
wiring should be capable of handling the
appliance’s power rating (also indicated
on the identification plate).
• During installation, please ensure
that isolated cables are used. An
incorrect connection could damage
your appliance. If the mains cable is
damaged and needs to be replaced
this should be done by a qualified
personnel.
• Do not use adaptors, multiple sockets
and/or extension leads.
• The supply cord should be kept away
from hot parts of the appliance and must
not be bent or compressed. Otherwise
the cord may be damaged, causing a
short circuit.
• If the appliance is not connected
to the mains with a plug, a all-pole
disconnector (with at least 3 mm contact
spacing) must be used in order to meet
the safety regulations.
• The appliance is designed for a power
supply of 220-240V If your supply is
different, contact the authorised service
person or a qualified electrician.
• The power cable (H05VV-F) must be
long enough to be connected to the
appliance, even if the appliance stands
on the front of its cabinet.
• Ensure all connections are adequately
tightened.

EN - 12
• Fix the supply cable in the cable clamp
and then close the cover.
• The terminal box connection is placed
on the terminal box.
Brown Yellow+Green
Blue

EN - 13
3. PRODUCT FEATURES
Important: Specifications for the product vary and the appearance of your appliance
may differ from that shown in the figures below.
List of Components
1. Control Panel
2. Oven Door Handle
3. Oven Door
1
2
3
Control Panel
4. Timer
5. Oven Function Control Knob
6. Oven Thermostat Knob
4 65

EN - 14
4. USE OF PRODUCT
4.1 oven Control S
Oven function control knob
Turn the knob to the corresponding symbol
of the desired cooking function. For the
details of different functions see ´Oven
Functions`.
Oven thermostat knob
After selecting a cooking function, turn
this knob to set the desired temperature.
The oven thermostat light will illuminate
whenever the thermostat is in operation
to heat up the oven or maintain the
temperature.
Oven Functions
Oven Lamp: Only the
oven light will switch
on. It will remain on for
the duration of the
cooking function.
Defrost Function: The
oven’s warning lights
will switch on and the
fan will start to operate.
To use the defrost
function, place your
frozen food in the oven
on a shelf in the third slot from the bottom.
It is recommended that you place an oven
tray under the defrosting food to catch the
water accumulated due to melting ice. This
function will not cook or bake your food, it
will only help to defrost it.
Static Cooking
Function: The oven’s
thermostat and
warning lights will
switch on, and the
lower and upper
heating elements will
start operating. The
static cooking function emits heat, ensuring
even cooking of food. This is ideal for
making pastries, cakes, baked pasta,
lasagne and pizza. Preheating the oven for
10 minutes is recommended and it is best
to use only one shelf at a time in this
function.
Fan Function: The
oven’s thermostat and
warning lights will
switch on, and the
upper and lower
heating elements and
fan will start operating.
This function is good for baking pastry.
Cooking is carried out by the lower and
upper heating elements within the oven and
by the fan, which provides air circulation,
giving a slightly grilled effect to the food. It
is recommended that you preheat the oven
for about 10 minutes.
Lower Heating and
Fan Function: The
oven’s thermostat and
warning lights will
switch on, and the
lower heating element
and fan will start
operating. The fan and lower heating
function is ideal for baking food, such as
pizza, evenly in a short period of time. The
fan evenly disperses the heat of the oven,
while the lower heating element bakes the
food. It is recommended that you preheat
the oven for about 10 minutes.
Grilling Function: The
oven’s thermostat and
warning lights will
switch on, and the grill
heating element will
start operating. This
function is used for
grilling and toasting foods on the upper
shelves of the oven. Lightly brush the wire
grid with oil to stop food sticking and place
food in the centre of the grid. Always place
a tray beneath the food to catch any drips
of oil or fat. It is recommended that you
preheat the oven for about 10 minutes.
Warning: When grilling, the oven door
must be closed and the oven
temperature should be adjusted to
190°C.
Faster Grilling
Function: The oven’s
thermostat and
warning lights will
switch on, and the grill
and upper heating
elements will start
operating. This function is used for faster
grilling and for grilling food with a larger
surface area, such as meat. Use the upper
shelves of the oven. Lightly brush the wire
grid with oil to stop food sticking and place

EN - 15
food in the centre of the grid. Always place
a tray beneath the food to catch any drips
of oil or fat. It is recommended that you
preheat the oven for about 10 minutes.
Warning: When grilling, the oven door
must be closed and the oven
temperature should be adjusted to
190°C.
Double Grill and Fan
Function: The oven’s
thermostat and
warning lights will
switch on, and the grill,
upper heating
elements and fan will
start operating. This function is used for
faster grilling of thicker food and for grilling
of food with a larger surface area. Both the
upper heating elements and grill will be
energised along with the fan to ensure even
cooking. Use the upper shelves of the oven.
Lightly brush the wire grid with oil to stop
food sticking and place food in the centre of
the grid. Always place a tray beneath the
food to catch any drips of oil or fat. It is
recommended that you preheat the oven for
about 10 minutes.
Warning: When grilling, the oven door
must be closed and the oven
temperature should be adjusted to
190°C.
4.2 CookinG table
Function
Dishes
Static
Puff Pastry 1 - 2 170-190 35-45
Cake 1 - 2 170-190 30-40
Cookie 1 - 2 170-190 30-40
Stew 2 175-200 40-50
Chicken 1 - 2 200 45-60
Fan
Puff Pastry 1 - 2 170-190 25-35
Cake 1 - 2 - 3 150-170 25-35
Cookie 1 - 2 - 3 150-170 25-35
Stew 2 175-200 40-50
Chicken 1 - 2 200 45-60
Grilling
Grilled
meatballs 4 200 10-15
Chicken * 190 50-60
Chop 3 - 4 200 15-25
Beefsteak 4 200 15-25
*If available cook with roast chicken skewer.
4.3 uSe of the Me ChaniCal t iMer
Function Description
M Manual operation
0..........100 Operating by adjusting the
timer
Manual operation
When you set the timer button to the “M”
position, you will be able to continuously run
your oven. When you set the timer button to
the “0” position, the oven will not operate.
Operating by adjusting the timer
Set the desired cooking time by turning the
timer knob to between 0 and 100 minutes.
When the timer reaches zero, the oven
will automatically switch off and an audible
warning will sound.
4.4 aCCeSSorie S
The Deep Tray
The deep tray is best used for cooking
stews.
Put the tray into any rack and push it to the
end to make sure it is placed correctly.
The Shallow Tray
The shallow tray is best used for baking
pastries.
Put the tray into any rack and push it to the
end to make sure it is correctly placed.

EN - 16
The Wire Grid
The wire grid is best used for grilling or for
processing food in oven-friendly containers.
WARNING
Place the grid to any corresponding
rack in the oven cavity correctly and push it
to the end.
The Water Collector
In some cases of cooking, condensation
may appear on the inner glass of the oven
door. This is not a product malfunction.
Open the oven door into the grilling position
and leave it in this position for 20 seconds.
Water will drip to the collector.
Cool the oven and wipe the inside of the
door with a dry towel. This procedure must
be applied regularly.
5. CLEANING AND
MAINTENANCE
5.1 Cleanin G
WARNING: Switch off the appliance
and allow it to cool before cleaning is
to be carried out.
General Instructions
• Check whether the cleaning materials
are appropriate and recommended by
the manufacturer before use on your
appliance.
• Use cream cleaners or liquid cleaners
which do not contain particles. Do not
use caustic (corrosive) creams, abrasive
cleaning powders, rough wire wool or
hard tools as they may damage the
cooker surfaces.
Do not use cleaners that contain
particles as they may scratch the
glass, enamelled and/or painted parts
of your appliance.
• Should any liquids overflow, clean them
immediately to avoid parts becoming
damaged.
Do not use steam cleaners for
cleaning any part of the appliance.
Cleaning the Inside of the Oven
• The inside of enamelled ovens are best
cleaned while the oven is warm.
• Wipe the oven with a soft cloth soaked
in soapy water after each use. Then,
wipe the oven over again with a wet
cloth and dry it.
• You may need to use a liquid cleaning
material occasionally to completely
clean the oven.

EN - 17
Cleaning the Glass Parts
• Clean the glass parts of your appliance
on a regular basis.
• Use a glass cleaner to clean the inside
and outside of the glass parts. Then,
rinse and dry them thoroughly with a dry
cloth.
Cleaning the Stainless Steel Parts (if
available)
• Clean the stainless steel parts of your
appliance on a regular basis.
• Wipe the stainless steel parts with a soft
cloth soaked in only water. Then, dry
them thoroughly with a dry cloth.
Do not clean the stainless steel parts
while they are still hot from cooking.
Do not leave vinegar, coffee, milk, salt,
water, lemon or tomato juice on the
stainless steel for a long time.
Cleaning Painted Surfaces (if available)
• Spots of tomato, tomato paste, ketchup,
lemon, oil derivatives, milk, sugary
foods, sugary drinks and coffee should
be cleaned with a cloth dipped in warm
water immediately. If these stains are
not cleaned and allowed to dry on the
surfaces they are on, they should NOT
be rubbed with hard objects (pointed
objects, steel and plastic scouring wires,
surface-damaging dish sponge) or
cleaning agents containing high levels
of alcohol, stain removers, degreasers,
surface abrasive chemicals. Otherwise,
corrosion may occur on the powder
painted surfaces, and stains may occur.
The manufacturer will not be held
responsible for any damage caused
by the use of inappropriate cleaning
products or methods.
Removal of the Oven Door
Before cleaning the oven door glass, you
must remove the oven door, as shown
below.
1. Open the oven door.
2. Open the locking catch (a) (with the aid
of a screwdriver) up to the end position.
a
3. Close the door until it almost reaches the
fully closed position and remove the door
by pulling it towards you.

EN - 18
5.2 Maintenan Ce
WARNING: The maintenance of this
appliance should be carried out by an
authorised service person or qualified
technician only.
Changing the Oven Lamp
WARNING: Switch off the appliance
and allow it to cool before cleaning
your appliance.
• Remove the glass lens, then remove the
bulb.
• Insert the new bulb (resistant to 300 °C)
to replace the bulb that you removed
(230 V, 15-25 Watt, Type E14).
• Replace the glass lens, and your oven
is ready for use.
The lamp is designed specifically for
use in household cooking appliances.
It is not suitable for household room
illumination.

EN - 19
6. TROUBLESHOOTING & TRANSPORT
6.1 t rouble Shootin G
If you still have a problem with your appliance after checking these basic
troubleshooting steps, please contact an authorised service person or qualified
technician.
Problem Possible Cause Solution
Oven does not switch on. Power is switched off.
Check whether there is power supplied.
Also check that other kitchen appliances
are working.
No heat or oven does not
warm up.
Oven temperature control is incorrectly
set.
Oven door has been left open.
Check that the oven temperature control
knob is set correctly.
Cooking is uneven within
the oven.
Oven shelves are incorrectly
positioned.
Check that the recommended
temperatures and shelf positions are
being used.
Do not frequently open the door unless
you are cooking things that need to be
turned. If you open the door often, the
interior temperature will be lower and this
may affect the results of your cooking.
Oven light (if available)
does not operate.
Lamp has failed.
Electrical supply is disconnected or
switched off.
Replace lamp according to the
instructions.
Make sure the electrical supply is turned
on at the wall socket outlet.
The oven fan (if available)
is noisy. Oven shelves are vibrating.
Check that the oven is level.
Check that the shelves and any bake
ware are not vibrating or in contact with
the oven back panel.
6.2 t ran Sport
If you need to transport the product, use the original product packaging and carry it using
its original case. Follow the transport signs on the packaging. Tape all independent parts to
the product to prevent damaging the product during transport.
If you do not have the original packaging, prepare a carriage box so that the appliance,
especially the external surfaces of the product, is protected against external threats.

EN - 20
7. TECHNICAL SPECIFICATIONS
7.1 ener Gy f iChe
Brand
Model K-50M22BL2-FR
Type of Oven ELECTRIC
Mass kg 29,5
Energy Efficiency Index - conventional 104,9
Energy Efficiency Index - fan forced 95,1
Energy Class A
Energy consumption (electricity) - conventional kWh/cycle 0,86
Energy consumption (electricity) - fan forced kWh/cycle 0,78
Number of cavities 1
Heat Source ELECTRIC
Volume l 65
This oven complies with EN 60350-1
Energy Saving Tips
Oven
- Cook the meals together, if possible.
- Keep the pre-heating time short.
- Do not elongate cooking time.
- Do not forget to turn-off the oven at the end of cooking.
- Do not open oven door during cooking period.

FR - 2
Icône Type Signification
AVERTISSEMENT Risque de blessures graves ou danger de mort
RISQUE D’ÉLECTROCUTION Risque d’électrocution
INCENDIE Avertissement : Risque d'incendie / matières inflammables
MISE EN GARDE Risque de blessures ou de dommages matériels
IMPORTANT / REMARQUE Utilisation correcte de l’appareil
Merci d’avoir choisi ce produit.
Cette notice d’utilisation contient des informations et des consignes de sécurité
importantes concernant l’utilisation et l’entretien de votre appareil.
Lire attentivement cette notice d’utilisation avant d’utiliser votre appareil et la conserver
pour consultation ultérieure.

FR - 3
TABLE DES MATIÈRES
1.CONSIGNES DE SÉCURITÉ ............................................................................................4
1.1. Avertissements de sécurité généraux ............................................................................4
1.2. Avertissements relatifs à l’installation ............................................................................6
1.3. Au cours de l’utilisation .................................................................................................. 7
1.4. Nettoyage et entretien ...................................................................................................9
2.INSTALLATION ET PRÉPARATION À L’UTILISATION ................................................... 11
2.1. Instructions destinées à l’installateur ........................................................................... 11
2.2. Installation du four ....................................................................................................... 11
2.3. Branchement électrique et sécurité ............................................................................. 12
3.CARACTÉRISTIQUES DU PRODUIT .............................................................................14
4.UTILISATION DE L’APPAREIL ........................................................................................15
4.1. Commandes du four .................................................................................................... 15
4.2. Table de cuisson .......................................................................................................... 16
4.3. Utilisation du minuteur mécanique ..............................................................................16
4.4. Accessoires Plaque creuse ........................................................................................16
5.NETTOYAGE ET ENTRETIEN ........................................................................................17
5.1. Nettoyage ...................................................................................................................17
5.2. Entretien ...................................................................................................................19
6.DÉPANNAGE ET TRANSPORT ......................................................................................20
6.1. Dépannage .................................................................................................................. 20
6.2. Transport ...................................................................................................................20
7.SPÉCIFICATIONS TECHNIQUES ..................................................................................21
7.1. Fiche énergie ...............................................................................................................21

FR - 4
1. CONSIGNES DE SÉCURITÉ
• Lire attentivement cette notice d’utilisation dans
son intégralité avant d’utiliser votre appareil et
la conserver dans un endroit accessible pour
consultation ultérieure.
• Ce manuel a été préparé pour plusieurs modèles,
votre appareil peut donc ne pas disposer de
certaines fonctions décrites dans ce manuel. Pour
cette raison, il est important de prêter une attention
particulière aux illustrations lors de la lecture de
cette notice d’utilisation.
1.1. Avertissements de sécurité génér Aux
• Cet appareil peut être utilisé par des enfants à partir
de 8 ans et par des personnes ayant des capacités
physiques, sensorielles ou mentales réduites ou
un manque d’expérience et de connaissances
à condition qu’elles aient été placées sous
surveillance ou qu'elles aient reçu des instructions
concernant l’utilisation de l’appareil en toute sécurité
et qu’elles comprennent les dangers encourus. Les
enfants ne doivent pas jouer avec l’appareil. Le
nettoyage et l’entretien par l’usager ne doivent pas
être effectués par des enfants, sans surveillance.
MISE EN GARDE : Cet appareil et ses parties
accessibles deviennent chauds pendant leur
utilisation. Il convient de veiller à ne pas toucher les
éléments chauffants. Il convient de maintenir à
distance les enfants de moins de 8 ans, à moins qu'ils
ne soient sous une surveillance continue.
MISE EN GARDE : Laisser cuire des aliments
sans surveillance en utilisant des matières grasses ou
de l'huile peut être dangereux et déclencher un
incendie.NE JAMAIS essayer d'éteindre un incendie

FR - 5
avec de l'eau, mais arrêter l'appareil puis couvrir les
flammes par exemple avec un couvercle ou une
couverture anti-feu.
MISE EN GARDE : Risque d'incendie: ne pas
entreposer d'objets sur les surfaces de cuisson.
•L’appareil n’est pas destiné à être mis en
fonctionnement au moyen d’une minuterie externe
ou d’un système de commande à distance séparé.
•Lors de son utilisation, l'appareil devient chaud.
Faire attention à ne pas toucher les éléments
chauffants situés à l'intérieur du four.
•Les poignées peuvent être chaudes, même après
une courte période d’utilisation.
•Ne pas utiliser de produits d'entretien très abrasifs
ou de grattoirs métalliques durs pour nettoyer la
porte en verre du four, au risque de rayer la surface
et d’entraîner l’éclatement du verre.
•Ne pas utiliser d’appareil de nettoyage à la vapeur.
MISE EN GARDE : S'assurer que l'appareil est
déconnecté de l'alimentation avant de remplacer la
lampe pour éviter tout risque de choc électrique.
MISE EN GARDE : Les parties accessibles
peuvent devenir chaudes au cours de l'utilisation.Il est
recommandé d’éloigner les jeunes enfants.
•Votre appareil a été produit conformément à
toutes les normes et réglementations locales et
internationales en vigueur.
•Les opérations d’entretien et de réparation doivent
être effectuées uniquement par des techniciens de
maintenance agréés. L’installation et les travaux
de réparation effectués par un technicien non
agréé peuvent s’avérer dangereux. Ne pas altérer
ni modifier les caractéristiques de l’appareil. Les

FR - 6
dispositifs de protections non adaptés à l'appareil de
cuisson peuvent provoquer des accidents.
•Avant l'installation s'assurer que les conditions de
distribution locale (tension et fréquence électrique)
et le réglage de l'appareil sont compatibles. Les
conditions de réglage de cet appareil sont inscrites
sur la plaque signalétique de l’appareil.
ATTENTION : Cet appareil sert uniquement à des
fins de cuisson et est destiné uniquement à un usage
domestique. Il ne doit pas être utilisé à d’autres fins,
par exemple le chauffage du local, ou un usage
commercial.
•Ne pas utiliser la poignée de la porte du four pour
soulever ou pour déplacer l’appareil.
•Toutes les précautions nécessaires ont été mises en
œuvre pour garantir votre sécurité. Comme le verre
est susceptible de se briser, le nettoyer avec soin
pour éviter de le rayer. Éviter de frapper le verre
avec les accessoires de cuisine.
•Vérifiez que le cordon d’alimentation n’est pas
endommagé ni coincé au cours de l’installation. Si
le câble d'alimentation est endommagé, il doit être
remplacé par le fabricant, son service après vente
ou des personnes de qualification similaire afin
d'éviter un danger.
•Ne pas laisser les enfants monter sur la porte du
four ou s’y asseoir lorsqu’elle est ouverte.
•Veuillez tenir cet appareil hors de la portée des
enfants et des animaux domestiques.
1.2. Avertissements rel Atifs à l ’inst All Ation
•Ne pas utiliser l’appareil avant son installation
complète.

FR - 7
•L’appareil doit être installé par un technicien qualifié.
Le fabricant ne peut être tenu responsable de tout
dommage causé en cas d’installation incorrecte par
un techncien non qualifié.
•Un moyen de déconnexion du réseau d’alimentation
ayant une distance d’ouverture des contacts de tous
les pôles doit être prévu dans la canalisation fixe
conformément aux règles d’installation.
•Lors du déballage de l’appareil, vérifier qu’il n’a
pas été endommagé au cours du transport. En
cas de défaut, ne pas utiliser l’appareil et faire
appel immédiatement à un technicien qualifié. Les
matériaux utilisés pour l’emballage (Nylon, agrafes,
polystyrène, etc.) peuvent être dangereux pour
les enfants et doivent être rassemblés et rangés
immédiatement.
•Protéger votre appareil des éléments
atmosphériques. Ne pas l’exposer au soleil, à la
pluie, à la neige, à la poussière ou à toute humidité
excessive.
•Tous les matériaux autour de l’appareil (meubles)
doivent pouvoir supporter une température minimum
de 100 °C.
•L’appareil ne doit pas être installé derrière une porte
décorative, afin d’éviter une surchauffe.
1.3. Au cours de l ’utilis Ation
•Lors de la première utilisation de votre four, il est
possible qu’une légère odeur se fasse sentir. Ceci
est parfaitement normal. Cette odeur est due aux
matériaux d’isolation placés sur les résistances.
Avant d’utiliser votre four pour la première fois, le
faire fonctionner à vide sur la température maximale
pendant 45 minutes. Vérifier que l’environnement
dans lequel le produit est installé est correctement

FR - 8
ventilé.
• Rester prudent lors de l’ouverture de la porte du four
pendant ou après la cuisson. La vapeur s’échappant
du four peut provoquer des brûlures.
• Ne pas placer de matériaux combustibles ou
inflammables dans l’appareil ou près de l’appareil
lorsqu’il est en fonctionnement.
• MISE EN GARDE : La température des surfaces
accessibles peut être élevée lorsque l'appareil est
en fonctionnement.
• Toujours utiliser des gants de cuisine isolants pour
mettre les aliments au four ou les sortir du four.
• En aucun cas, le four ne doit être recouvert d'une
feuille d'aluminium, car une augmentation de la
température pourrait survenir.
• Ne placez pas les plats ou les plaques de cuisson
directement sur la base du four pendant la cuisson.
La base devient très chaude et des dommages
peuvent être causés au produit.
MISE EN GARDE : Laisser cuire des aliments
sans surveillance en utilisant des matières grasses ou
de l'huile peut être dangereux et déclencher un
incendie. NE JAMAIS essayer d'éteindre un incendie
avec de l'eau, mais arrêter l'appareil puis couvrir les
flammes par exemple avec un couvercle ou une
couverture anti-feu.
• ATTENTION : Le processus de cuisson doit être
surveillé. Un processus de cuisson court doit être
surveillé sans interruption.
• Si l’appareil reste inutilisé pendant une période
prolongée, éteindre l’interrupteur principal.
• S’assurer que les manettes de l’appareil restent
toujours en position « 0 » (arrêt) lorsqu’il n’est pas
utilisé.

FR - 9
•La lèchefrite s’incline lorsqu’on la sort du four.
Attention à ne pas renverser ni à faire tomber de
nourriture en la sortant du four.
•Ne rien placer sur la porte du four lorsqu’elle est
ouverte. Ceci pourrait déséquilibrer le four ou
endommager la porte.
•Ne pas suspendre de torchons ou autres tissus sur
l’appareil ou sur ses poignées.
1.4. nett oyAge et entretien
•Vérifier que l’alimentation électrique de l’appareil
est bien coupée avant d’effectuer toute opération de
nettoyage ou d’entretien.
•Ne pas retirer les manettes pour nettoyer le
bandeau de commandes.
•Pour assurer l’efficacité et la sécurité de votre
appareil, utiliser uniquement des pièces détachées
d’origine et faire appel à nos techniciens qualifiés en
cas de besoin.
Déclaration CE de conformité
Nous déclarons que nos produits satisfont
aux exigences des directives, des décisions
et des réglementations européennes en
vigueur.
Cet appareil a été conçu pour un usage exclusivement
domestique. Toute autre utilisation (par exemple pour
chauffer une pièce) est inadaptée ou dangereuse.
Cette notice d’utilisation s’applique à plusieurs
modèles. Il est possible qu’il existe certaines
différences entre ces instructions et votre modèle.

FR - 10
Mise au rebut de votre machine
Ce symbole sur le produit ou sur son
emballage indique qu’il ne doit pas être traité
comme un simple déchet ménager. Il doit être
déposé dans un point de collecte adapté pour
que les équipements électriques et
électroniques soient recyclés. Lorsque ce produit est
correctement mis au rebut, vous contribuez à protéger
l’environnement et la santé, ce qui pourrait ne pas être
le cas en cas de mise au rebut inadaptée. Pour plus
d’informations sur le recyclage de ce produit,
contactez les autorités locales, votre service de
collecte de déchets ou le revendeur auprès duquel
vous avez acheté ce produit.

FR - 11
2. INSTALLATION ET
PRÉPARATION À L’UTILISATION
AVERTISSEMENT : Cet appareil doit
être installé par un professionnel
agréé ou par un technicien qualifié,
conformément aux instructions de cette
notice et conformément aux normes
d’installation en vigueur.
•Toute installation incorrecte invalide
la garantie et peut entraîner des
dommages ou des blessures pour
lesquels le fabricant ne peut être tenu
responsable.
•Avant l’installation, s’assurer que les
conditions locales de la distribution
(tension et fréquence de l’électricité)
et les réglages de l’appareil sont
compatibles. Les conditions de réglage
de cet appareil figurent sur l’étiquette.
•Les lois, réglementations, décrets
et normes en vigueur dans le pays
d’installation doivent être appliqués
(règles de sécurité, recyclage
conformément à la réglementation,
etc.).
2.1. instructions destinées
à l ’instAll Ateur
Instructions générales
•Après avoir retiré les matériaux
d’emballage de l’appareil et de ses
accessoires, vérifier que l’appareil
n’est pas endommagé. Si l’appareil
est peut-être endommagé, ne pas
l’utiliser et contacter immédiatement un
professionnel agréé ou un technicien
qualifié.
•Vérifier qu’aucun élément ou matériau
combustible ou inflammable, par
exemple un rideau, de l’huile, un
tissu, etc., ne se trouve à proximité
immédiate.
•Le plan de travail et les meubles autour
de l’appareil doivent pouvoir supporter
une température supérieure à 100 °C.
•Cet appareil ne doit pas être installé
directement au-dessus d’un lave-
vaisselle, d’un réfrigérateur, d’un
congélateur, d’un lave-linge ou d’un
sèche-linge.
2.2. inst All Ation du four
Les appareils sont fournis avec des kits
d’installation et peuvent être installés sur
un plan de travail de dimensions adaptées.
Les dimensions d’installation de la table
de cuisson et du four sont indiquées ci-
dessous.
A (mm) 557 min./max. F (mm) 560/580
B (mm) 550 min. G (mm) 555
C (mm) 595 min. H/I (mm) 600/590
D (mm) 575 min. J/K (mm) 5/10
E (mm) 576
F
A B
C
C
D
E
G
H
J
I
Installation sous un plan de
travail

FR - 12
F
AB
C
C
D
E
G
H
J
J
K
I
Installation murale
Une fois les branchements électriques
effectués, insérer le four dans son
emplacement en la poussant vers l’avant.
Ouvrir la porte du four et insérer 2 vis dans
les trous du châssis du four. Lorsque le
châssis du produit touche la surface du bois
du meuble, serrer les vis.
2.3. BrAnchement électrique
et sécurité
AVERTISSEMENT : Le branchement
électrique de cet appareil doit être
effectué par un professionnel agréé ou
par un électricien qualifié, conformément
aux instructions de cette notice et
conformément aux normes d’installation en
vigueur.
AVERTISSEMENT : L’APPAREIL
DOIT ÊTRE BRANCHÉ À LA TERRE.
•Avant le branchement sur le secteur,
vérifier si la tension nominale de
l’appareil (marquée sur la plaque
signalétique de l’appareil) correspond à
la tension de l’alimentation électrique.
Le câble d’alimentation électrique doit
lui aussi être capable de supporter
la puissance nominale de l’appareil
(également mentionnée sur la plaque
signalétique de l’appareil).
•Lors de l’installation, s’assurer de
bien utiliser des câbles correctement
isolés. Tout branchement incorrect
risque d’endommager votre appareil.
Si le câble d’alimentation électrique est
endommagé et doit être remplacé, faire
appel à une personne qualifiée pour
effectuer cette opération.
•Ne pas utiliser d’adaptateur, de
multiprise, ni de rallonge électrique.
•Le cordon d’alimentation doit être
tenu éloigné des parties chaudes de
l’appareil et ne doit pas être plié ni
écrasé. À défaut, le cordon risque d’être
endommagé et de provoquer un court-
circuit.
•Si l’appareil n’est pas branché sur
le secteur par une prise, installer
un sectionneur multipolaire (avec
un espacement des contacts d’au
minimum 3 mm), conformément aux
réglementations en matière de sécurité.
•Cet appareil est conçu pour utiliser
une alimentation 220-240V. Si votre
alimentation est différente, contacter un
professionnel agréé ou un électricien
qualifié.
•Le câble d’alimentation (H05VV-F)
doit être assez long pour pouvoir

FR - 13
être branché sur l’appareil, même si
l’appareil se trouve devant le meuble.
•Vérifier que tous les branchements sont
bien serrés.
•Fixer le câble d’alimentation sur le
bornier, puis refermer le couvercle.
•Le branchement du boîtier de jonction
est placé sur le boîtier de jonction.
Marron Jaune+vert
Bleu

FR - 14
3. CARACTÉRISTIQUES DU PRODUIT
Important : Les caractéristiques du produit varient et l’apparence de votre appareil
peut être différente de celle présentée sur les figures ci-dessous.
Liste des composants
1. Bandeau de commande
2. Poignée de la porte du four
3. Porte du four
1
2
3
Bandeau de commande
4. Minuteur
5. Manette de fonction
6. Manette thermostat du four
4 65

FR - 15
4. UTILISATION DE L’APPAREIL
4.1. commAndes du four
Manette de fonction
Faire tourner le bouton sur le symbole
correspondant à la fonction souhaitée. Pour
les détails des différentes fonctions, se
reporter à « Fonctions du four ».
Manette thermostat du four
Une fois la fonction de cuisson
sélectionnée, faire tourner ce bouton
pour régler la température. Le voyant du
thermostat du four s’allume dès que le
thermostat fonctionne pour chauffer le four
ou le maintenir à température.
Fonctions du four
Lampe du four :
Seule la lampe du four
s’allume. Elle reste
allumée pendant toute
la durée de la cuisson.
Fonction
Décongélation : Les
voyants
d’avertissement du
four et le ventilateur se
met à tourner. Pour
utiliser la fonction
Décongélation, placer votre aliment congelé
dans le four, sur une plaque/grille placée
sur le troisième niveau en partant du bas. Il
est recommandé de placer une lèchefrite
sous les aliments en cours de
décongélation afin de récupérer l’eau
provenant de la glace fondue. Cette
fonction ne cuit pas vos aliments, mais
accélère simplement leur décongélation.
Fonction Convection
naturelle : Le voyant
du thermostat et la
lampe témoin du four
s’allument, et les
résistances inférieure
et supérieure
commencent à
chauffer. La fonction Chaleur statique émet
une chaleur qui garantit une cuisson
homogène des aliments. Elle est idéale
pour les pâtisseries, les cakes, les gratins
de pâtes, les lasagnes et les pizzas. Il est
recommandé de préchauffer le four pendant
10 minutes et de n’utiliser qu’un seul niveau
à la fois dans ce mode.
Fonction Ventilation :
Le voyant du
thermostat et les
voyants
d’avertissement du
four s’allument, les
résistances supérieure
et inférieure commencent à chauffer et le
ventilateur se met à tourner. Cette fonction
convient à la cuisson de pâtisseries. La
cuisson s’effectue grâce aux résistances
inférieure et supérieure du four et au
ventilateur brassant l’air, ce qui donne un
aspect légèrement « grillé » aux aliments. Il
est recommandé de préchauffer le four
pendant environ 10 minutes.
Fonction Chaleur de
sole ventilée : Le
voyant du thermostat
et les voyants
d’avertissement du
four s’allument, la
résistance inférieure
commence à chauffer et le ventilateur se
met à tourner. La fonction Chaleur de sole
ventilée convient à la cuisson uniforme
d’aliments comme les pizzas sur un laps de
temps court. Le ventilateur répartit
uniformément la chaleur dans le four, tandis
que la résistance inférieure cuit les
aliments. Il est recommandé de préchauffer
le four pendant environ 10 minutes.
Fonction Gril : Le
voyant du thermostat
et la lampe témoin du
four s’allument, et la
résistance du gril
commence à chauffer.
Cette fonction sert à
griller et à toaster les aliments placés sur
les niveaux supérieurs du four. Huilez
légèrement la grille métallique à l’aide d’un
pinceau pour empêcher les aliments
d’accrocher, puis placez les aliments au
centre de la grille. Placez toujours une
lèchefrite sous la grille pour recueillir l’huile
ou les graisses. Il est recommandé de
préchauffer le four pendant environ
10 minutes.
Avertissement : Pendant la cuisson
au gril, la porte du four doit être
fermée et la température du four doit
être réglée sur 190 °C.

FR - 16
Fonction Gril
express : Le voyant
du thermostat et les
voyants
d’avertissement du
four s’allument, et la
résistance du gril ainsi
que la résistance supérieure commencent à
chauffer. Cette fonction est recommandée
pour griller les aliments plus rapidement et
sur une plus grande surface (ex. : viandes).
Utiliser le niveau supérieur. Huilez
légèrement la grille métallique à l’aide d’un
pinceau pour empêcher les aliments
d’accrocher, puis placez les aliments au
centre de la grille. Placez toujours une
lèchefrite sous la grille pour recueillir l’huile
ou les graisses. Il est recommandé de
préchauffer le four pendant environ
10 minutes.
Avertissement : Pendant la cuisson
au gril, la porte du four doit être
fermée et la température du four doit
être réglée sur 190 °C.
Fonction Double gril
ventilé : Le voyant du
thermostat et les
voyants
d’avertissement du
four s’allument, le gril
et les résistances
supérieures commencent à chauffer et le
ventilateur se met à tourner. Cette fonction
est recommandée pour griller les aliments
épais plus rapidement et sur une plus
grande surface. Les résistances
supérieures et le gril fonctionnent
simultanément avec le ventilateur afin
d’assurer une cuisson uniforme. Utiliser le
niveau supérieur. Huilez légèrement la grille
métallique à l’aide d’un pinceau pour
empêcher les aliments d’accrocher, puis
placez les aliments au centre de la grille.
Placez toujours une lèchefrite sous la grille
pour recueillir l’huile ou les graisses. Il est
recommandé de préchauffer le four pendant
environ 10 minutes.
Avertissement : Pendant la cuisson
au gril, la porte du four doit être
fermée et la température du four doit
être réglée sur 190 °C.
4.2. tABle de cuisson
Fonction
Plats
Statique
Pâte feuilletée 1 - 2 170-190 35-45
Gâteau 1 - 2 170-190 30-40
Cookies 1 - 2 170-190 30-40
Pot-au-feu 2 175-200 40-50
Poulet 1 - 2 200 45-60
Ventilateur
Pâte feuilletée 1 - 2 170-190 25-35
Gâteau 1 - 2 - 3 150-170 25-35
Cookies 1 - 2 - 3 150-170 25-35
Pot-au-feu 2 175-200 40-50
Poulet 1 - 2 200 45-60
Gril
Boulettes
grillées 4 200 10-15
Poulet * 190 50-60
Côtelettes 3 - 4 200 15-25
Bifteck 4 200 15-25
*Si disponible, utiliser la broche à rôtir.
4.3. utilis Ation du minuteur méc Anique
Description de la fonction
M Fonctionnement manuel
0..........100 Via le réglage du minuteur
Fonctionnement manuel
Lorsque l’on règle le bouton du minuteur
sur la position « M », le four fonctionne en
continu. Lorsque l’on règle le bouton du
minuteur sur la position « 0 », le four ne
fonctionne pas.
Via le réglage du minuteur
Régler le temps de cuisson souhaité en
tournant le bouton du minuteur sur une
valeur comprise entre 0 et 100 minutes.
Une fois le temps écoulé, le four s’éteint
automatiquement et une alarme sonore
retentit.
4.4. Accessoires Pl Aque creuse
La plaques creuse sert à cuisiner des
ragoûts.
Pour placer correctement la plaque dans la
cavité, placez-la sur n'importe quel râtelier
et poussez jusqu'au bout.

FR - 17
Plateau peu profond
Le plateau peu profond est utilisé pour les
pâtisseries telles que la quiche, etc.
Pour placer correctement le plateau dans la
cavité, placez-le sur n'importe quel râtelier
et poussez jusqu'au bout.
Grillage métallique
Le grillage métallique est utilisé lors de la
grillade ou de la préparation des aliments
dans d'autres récipients.
AVERTISSEMENT
Placezcorrectementlagrilledansla
cavitédufouretpoussez-lajusqu’aubout.
Collecteur d'eau
Une condensation peut se produire sur la
vitre intérieure dans certains cas, selon le
type d'aliment.
Il ne s'agit pas d'un dysfonctionnement de
l'appareil.
Ouvrez la porte du four jusqu'au niveau du
gril et laissez-la à cette position pendant
20 secondes.
L'eau s'écoule alors dans le collecteur.
Laissez le four refroidir et nettoyez-
le à l'aide d'une serviette sèche.
Cette procédure doit être appliquée
régulièrement.
5. NETTOYAGE ET ENTRETIEN
5.1. nett oyAge
AVERTISSEMENT : Éteignez
l’appareil et laissez-le refroidir avant
de le nettoyer.
Instructions générales
•Vérifiez que les matériaux de nettoyage
sont appropriés et recommandés par le
fabricant avant de les utiliser sur votre
appareil.
•Utilisez des crèmes nettoyantes ou
des nettoyants liquides exempts de
particules. N’utilisez pas de crèmes
caustiques (corrosives), de poudres de
nettoyage abrasives, de boucles en fil
métallique dures ou d’objets rugueux,
car ils peuvent endommager la surface
de la cuisinière.
•N’utilisez pas de nettoyants
contenant des particules, car ils
peuvent érafler le verre, ainsi que
les pièces émaillées ou peintes de votre
appareil.
•En cas de déversement de liquide,
nettoyez immédiatement pour éviter
d’endommager les pièces.

FR - 18
•N’utilisez pas de nettoyants à
vapeur pour nettoyer l’appareil.
Nettoyage de l’intérieur du four.
•L’intérieur des fours émaillés est
idéalement nettoyé lorsque le four est
chaud.
•Essuyez le four à l’aide d’un tissu doux
trempé dans de l’eau savonneuse,
après utilisation. Essuyez à nouveau
le four à l’aide d’un tissu humide, puis
séchez-le.
•De façon occasionnelle, vous pourriez
avoir besoin d’utiliser un nettoyant
liquide pour entièrement nettoyer le four.
Nettoyage des pièces en verre
•Nettoyez les pièces en verre de votre
appareil de façon régulière.
•Utilisez un produit pour vitre pour
nettoyer l’intérieur et l’extérieur des
pièces en verre, puis rincez et séchez-
les soigneusement à l’aide d’un tissu
sec.
Nettoyage des pièces en acier
inoxydable (le cas échéant)
•Nettoyez les pièces en acier inoxydable
de votre appareil de façon régulière.
•Essuyez les pièces en acier inoxydable
à l’aide d’un tissu doux trempé dans de
l’eau savonneuse. Ensuite, séchez-les
soigneusement à l’aide d’un tissu sec.
•Évitez de laver les pièces en acier
inoxydable lorsqu’elles sont encore
chaudes, à la suite de la cuisson.
•Ne laissez pas de vinaigre, café,
lait, sel, eau, jus de citron ou de
tomate sur les pièces en acier
inoxydable pendant de longs moments.
Démontage de la porte du four
Avant de nettoyer la vitre de la porte du
four, vous devez retirer la vitre interne de la
façon suivante :
1. Ouvrez la porte du four.
2. Ouvrez le support de selle (a)(à l’aide
d’un tournevis) jusqu’à la butée.
a
3. Fermez la porte jusqu’à ce qu’elle
atteigne la position presque entièrement
close et démontez-la en la tirant vers vous.

FR - 19
5.2. entretien
AVERTISSEMENT : L’entretien de cet
appareil doit être confié aux
personnes agréées ou à un technicien
qualifié.
Remplacement de la lampe du four
AVERTISSEMENT : Éteignez
l’appareil et laissez-le refroidir avant
de le nettoyer.
•Retirez la lentille en verre, puis
démontez l’ampoule.
•Insérez la nouvelle ampoule (résistant
à 300 °C) pour remplacer celle que
vous avez retirée (230 V, 15 - 25 Watt,
Type E14).
•Remplacez la lentille en verre. Votre
four est désormais prêt à fonctionner.
Le design de la lampe la destine
exclusivement à une utilisation dans les
appareils de cuisson à domicile. Elle ne
convient pas pour l’éclairage de pièce.

FR - 20
6. DÉPANNAGE ET TRANSPORT
6.1. déPAnnAge
Si le problème persiste sur votre appareil après avoir suivi ces étapes de dépannage
de base, contacter un professionnel agréé ou un technicien qualifié.
Problème Cause possible Solution
Le four ne s’allume pas. L’alimentation électrique est coupée.
Vérifier que l’alimentation électrique
est branchée. Vérifier également que
les autres appareils de la cuisine
fonctionnent.
Aucune chaleur n’est
produite ou le four ne
préchauffe pas.
Le réglage de la température du four
est incorrect.
La porte du four est laissée ouverte.
Vérifier que la manette de température du
four est correctement réglée.
La cuisson est inégale dans
le four. Les plaques/grilles sont mal
positionnées.
Vérifier le respect des températures et
des niveaux recommandés.
Ne pas ouvrir fréquemment la porte sauf
si le plat doit être retourné. Une ouverture
trop fréquente de la porte fait chuter la
température dans le four, ce qui peut avoir
un impact sur le résultat de la cuisson.
L’éclairage du four (si
présent) ne fonctionne pas.
L’ampoule ne fonctionne pas.
L’alimentation électrique est coupée
ou débranchée.
Remplacer l’ampoule conformément aux
instructions.
Vérifier que l’alimentation électrique est
connectée à la prise secteur.
Le ventilateur du four (si
présent) est bruyant. Les plaques/grilles du four vibrent.
Vérifier que le four est à niveau.
Vérifier qu’aucune plaque/grille et
qu’aucun plat à four ne vibre ou ne touche
le panneau arrière du four.
6.2. t r AnsPort
S’il est nécessaire de transporter le produit, le placer dans son emballage d’origine et
son carton d’origine. Respecter les indications de transport sur l’emballage. À l’aide de
ruban adhésif, fixer les éléments mobiles au produit afin d’éviter tout dommage pendant le
transport.
En l’absence de l’emballage d’origine, préparer un carton permettant de protéger l’appareil
(notamment au niveau des surfaces externes) des risques extérieurs.

FR - 21
7. SPÉCIFICATIONS TECHNIQUES
7.1. f iche énergie
Marque
Modèle K-50M22BL2-FR
Type de four ÉLECTRIQUE
Masse de I’appareil kg 29,5
Indice d’efficacité énergétique - conventionnel 104,9
Indice d’efficacité énergétique - ventilation forcée 95,1
Classe énergétique A
Consommation énergétique (électricité) - conventionnelle kWh/cycle 0,86
Consommation énergétique (électricité) - ventilation forcée kWh/cycle 0,78
Nombre de cavités 1
Source de chaleur ÉLECTRIQUE
Volume l 65
Ce four est conforme à la norme EN 60350-1
Conseils en matière d’économie d’énergie
Four
- Cuisinez les repas simultanément, si possible.
- Réduisez le temps de préchauffage.
- Ne prolongez pas le temps de cuisson.
- N’oubliez pas d’éteindre le four à la fin de la cuisson.
- N’ouvrez pas la porte du four pendant la cuisson.

ES - 2
Icono Tipo Significado
ADVERTENCIA Riesgo de lesión grave o muerte
RIESGO DE DESCARGA ELÉCTRICA Riesgo de voltaje peligroso
INCENDIO Advertencia; Riesgo de incendio / materiales inflamables
PRECAUCIÓN Riesgo de lesiones o daños materiales
IMPORTANTE / NOTA Uso correcto del sistema
Gracias por elegir este producto.
Este Manual de usuario contiene información de seguridad e instrucciones importantes
relacionadas con el uso y mantenimiento del aparato.
Tómese el tiempo que necesite para leer este Manual de usuario antes de usar el aparato
y guárdelo por si tuviese que consultarlo más adelante.

ÍNDICE
1.INSTRUCCIONES DE SEGURIDAD ................................................................................4
1.1. Advertencias generales de seguridad ...........................................................................4
1.2. Advertencias para la instalación .................................................................................... 6
1.3. Durante el uso ...............................................................................................................7
1.4. Durante la limpieza y el mantenimiento.........................................................................8
2.INSTALACIÓN Y PREPARACIÓN PARA SU USO .........................................................10
2.1. Instrucciones para el instalador ...................................................................................10
2.2. Instalación del horno ...................................................................................................10
2.3. Conexión eléctrica y seguridad ................................................................................... 11
3.CARACTERÍSTICAS DEL PRODUCTO .........................................................................13
4.USO DEL PRODUCTO ...................................................................................................14
4.1. Controles del horno .....................................................................................................14
4.2. Mesa de cocción..........................................................................................................15
4.3. Uso del temporizador mecánico .................................................................................. 15
4.4. Accesorios ..................................................................................................................16
5.LIMPIEZA Y MANTENIMIENTO ......................................................................................16
5.1. Limpieza ...................................................................................................................16
5.2. Mantenimiento ............................................................................................................. 18
6.SOLUCIÓN DE PROBLEMAS Y TRANSPORTE ............................................................19
6.1. Solución de problemas ................................................................................................ 19
6.2. Transporte ...................................................................................................................19
7.ESPECIFICACIONES TÉCNICAS ..................................................................................20
7.1. Ficha energética .......................................................................................................... 20

ES - 4
1. INSTRUCCIONES DE SEGURIDAD
• Lea detenidamente todas las instrucciones antes de
usar el aparato y guarde este manual en un lugar
de fácil acceso para poder consultarlo cuando sea
necesario.
• Este manual ha sido redactado para más de un
modelo. Por lo tanto, puede que su aparato no tenga
algunas de las características descritas en él. Por este
motivo, es importante que preste especial atención a
las figuras que se proporcionan en el manual.
1.1. Advertenci As gener Ales de segurid Ad
• Este aparato lo pueden usar niños de 8 años en
adelante y personas con capacidades físicas,
sensoriales o mentales reducidas o con falta
de experiencia y conocimiento si han recibido
supervisión o instrucciones sobre el uso seguro del
aparato y comprenden los peligros asociados. Los
niños no deben jugar con el aparato. Ningún niño
debe realizar la limpieza ni el mantenimiento de
usuario de este aparato sin supervisión.
ADVERTENCIA: El aparato y sus piezas
accesibles se calientan durante su uso. Se debe tener
cuidado a fin de evitar tocar los elementos de
calentamiento. Mantenga a los niños de menos de 8
años de edad lejos del aparato salvo que estén
supervisados en todo momento.
ADVERTENCIA: Peligro de incendio: No
coloque objetos sobre las superficies donde se cocina.
ADVERTENCIA: Si la superficie está rajada,
apague el aparato para evitar la posibilidad de que se
produzca una descarga eléctrica.
• No use el aparato con un temporizador externo o un
sistema de control remoto aparte.

ES - 5
•Durante el uso, el aparato se calentará. Se debe
tener cuidado a fin de evitar tocar los elementos de
calentamiento que hay dentro del horno.
•Durante el uso, los tiradores se pueden calentar en
un corto período de tiempo.
•No use productos de limpieza abrasivos agresivos
ni estropajos para limpiar el cristal de la puerta
del horno y el resto de superficies. Pueden
rayar las superficies, lo que podría hacer que se
resquebrajase el cristal de la puerta o se dañasen
las superficies.
•No utilice productos de limpieza a vapor para limpiar
el aparato.
ADVERTENCIA: Para evitar la posibilidad de
descargas eléctricas, asegúrese de que el aparato
esté apagado antes de cambiar la lámpara.
PRECAUCIÓN: Las piezas accesibles podrían
estar calientes al cocinar o asar. Mantenga a los niños
alejados del aparato cuando se esté usando.
•El aparto se ha fabricado de acuerdo con las
normativas y estándares locales e internacionales
pertinentes.
•Los trabajos de mantenimiento y reparación
solo deben llevarlos a cabo técnicos de servicio
autorizados. Es peligroso que un técnico no
autorizado lleve a cabo los trabajos de instalación
y reparación del aparato. No altere ni modifique
en modo alguno las especificaciones del aparato.
El uso de protectores de encimera no adecuados
puede dar lugar a accidentes.
•Antes de conectar el aparato, asegúrese de que
las condiciones de la distribución local (naturaleza
y presión del gas o frecuencia y voltaje de
electricidad) y las especificaciones del aparato sean

ES - 6
compatibles. Las especificaciones de este aparato
se indican en la etiqueta.
PRECAUCIÓN: Este aparato solo ha sido
diseñado para cocinar alimentos en el interior de una
vivienda. No se debe usar para ningún otro fin o
aplicación, como para uso no doméstico, en un
entorno comercial o para calentar una habitación.
• No utilice los tiradores de la puerta para levantar
o mover el aparato.
• Se han tomado todas las medidas posibles con el
fin de garantizar su seguridad. Puesto que el cristal
se puede romper, debe tenerse cuidado al limpiar
el aparato para evitar que se raye. Evite golpear el
cristal con accesorios.
• Asegúrese de que el cable de alimentación no
quede atrapado ni dañado durante la instalación.
Si el cable de alimentación se ha dañado, deberá
cambiarlo el fabricante, su agente de servicio o una
persona cualificada equivalente a fin de evitar que
se produzca un peligro.
• No deje que los niños se cuelguen de la puerta del
horno o se sienten en ella cuando esté abierta.
• Mantenga a los niños y animales alejados de este
electrodoméstico.
1.2. Advertenci As pAr A l A inst Al Ación
• No utilice el aparato antes de que se haya instalado
por completo.
• El aparato debe instalarlo un técnico autorizado.
El fabricante no es responsable de ningún daño que
pueda producirse por una colocación o instalación
defectuosa realizada por una persona no autorizada.
• Al desembalar el aparato, asegúrese de que no
haya resultado dañado durante el transporte. Si

ES - 7
detecta algún tipo de defecto, no use el aparato y
póngase en contacto inmediatamente con un agente
de servicio cualificado. Los materiales empleados
para el embalaje (nailon, grapas, espuma de
estireno, etc.) pueden resultar dañinos para los
niños y se deben recoger y retirar inmediatamente.
•Proteja el aparato de la atmósfera. No lo exponga a
los efectos del sol, la lluvia, la nieve, el polvo o una
humedad excesiva.
•Los materiales que rodean el aparato (p ej.,
armarios) deben ser capaces de soportar al menos
una temperatura de 100 °C.
•El aparato no debe instalarse detrás de una puerta
decorativa para evitar el sobrecalentamiento.
1.3. dur Ante el uso
•Al usar el horno por primera vez, podría observar un
ligero olor. Este olor es totalmente normal y se debe
a los materiales de aislamiento de los elementos
calentadores. Le recomendamos que antes de usar
el horno por primera vez, lo deje vacío y lo ponga
a trabajar a la temperatura máxima durante 45
minutos. Asegúrese de que el entorno en el que se
haya instalado el producto esté bien ventilado.
•Tenga cuidado al abrir la puerta del horno
cuando esté cocinando o tras haber terminado de
cocinar. El valor caliente del horno puede producir
quemaduras.
•No coloque materiales inflamables o combustibles
dentro ni cerca del aparato cuando este esté
funcionando.
•Use siempre guantes para horno para retirar
la comida del horno y para volver a introducir
alimentos en él.

ES - 8
• En ningún caso se debe cubrir el horno con papel
de aluminio, ya que existe la posibilidad de que se
produzca un sobrecalentamiento.
• No coloque platos o bandejas de horno
directamente sobre la base del horno mientras se
esté cocinando. La base se calienta mucho y se
puede dañar el aparato.
No deje desatendida la cocina al cocinar con
aceites sólidos o líquidos. Pueden prenderse bajo
condiciones extremas de calentamiento. Nunca vierta
agua sobre llamas producidas por aceite. En su lugar,
apague la cocina y cubra el recipiente con su tapa o
una manta ignífuga.
• Si no se va a usar el producto durante un largo
período de tiempo, apague el interruptor de mando
principal.
• Asegúrese de que los mandos de control del
aparato estén siempre en la posición “0” (parada)
cuando no se esté utilizando.
• Al extraer las bandejas, estas se inclinan- Tenga
cuidado para que no se le derrame ni se le caiga la
comida caliente al sacarla del horno.
• No coloque nada sobre la puerta del horno cuando
esté abierta. Esto podría desequilibrar el horno o
dañar la puerta.
• No cuelgue toallas, trapos ni ropa en el aparato o en
uno de sus tiradores.
1.4. dur Ante l A limpiezA y el mAntenimient o
• Asegúrese de que el aparato esté desconectado de
la red eléctrica antes de realizar cualquier tarea de
limpieza o mantenimiento.
• No extraiga los mandos de control para limpiar el
panel de mando.

ES - 9
•Para preservar la eficacia y seguridad del aparato,
le recomendamos que use siempre piezas de
repuesto originales y que llame a un agente
de servicio autorizado cuando sea necesario.
Declaración de conformidad de la CE
Declaramos que nuestros productos cumplen
con las directivas, decisiones y normativas
europeas pertinentes y con los requisitos
enumerados en los estándares mencionados.
Este aparato se ha diseñado únicamente para cocinar
en casa. Cualquier otro uso (como calentar una
habitación) es inadecuado y peligroso.
Las instrucciones de funcionamiento son aplicables
a varios modelos. Puede que observe diferencias
entre lo indicado en estas instrucciones y el modelo
que ha adquirido.
Cómo desechar la antigua máquina
Este símbolo sobre el producto o en su
embalaje indica que este producto no se puede
tratar como residuos domésticos. En su lugar,
debe llevarse a un punto de recogida para el
reciclaje de equipos eléctricos y electrónicos.
Al asegurarse de que este producto sea desechado
correctamente, estará contribuyendo a evitar posibles
daños en el medioambiente y la salud de las personas,
que podrían producirse si los residuos de este
producto se tratasen de manera incorrecta. Si desea
obtener información detallada sobre el reciclaje de
este producto, póngase en contacto con su oficina
municipal, el servicio de desecho de residuos
domésticos o la tienda en la que adquirió el producto.

ES - 10
2. INSTALACIÓN Y
PREPARACIÓN PARA SU USO
ADVERTENCIA: Este aparato debe
instalarlo una persona de servicio
autorizada o un técnico cualificado siguiendo
las instrucciones proporcionadas en esta
guía y cumpliendo las normativas locales
vigentes.
• Si la instalación se realiza de manera
incorrecta, la garantía quedará anulada
y podrían producirse daños físicos y
materiales, de los que el fabricante no
se hace responsable.
• Antes de la instalación asegúrese de que
las condiciones de la distribución local
(voltaje de electricidad y frecuencia) y los
ajustes del aparato son compatibles. Las
condiciones de ajuste de este aparato se
indican en la etiqueta.
• Deben cumplirse las leyes, ordenanzas,
directivas y estándares vigentes en el
país en el que se vaya a usar el aparato
(normativas de seguridad, reciclaje
adecuado conforme a las normativas,
etc.).
2.1. instrucciones p Ar A el instAl Ador
Instrucciones generales
• Tras quitar el material de embalaje del
aparato y de sus accesorios, asegúrese
de que el aparato no esté dañado.
Si sospecha que pueda haber cualquier
tipo de daño en el aparato, no lo utilice.
Póngase en contacto inmediatamente
con una persona de servicio autorizada
o un técnico cualificado.
• Asegúrese de que no haya materiales
inflamables o combustibles cerca del
aparato, como cortinas, aceite, trapos,
etc., que podrían prenderse fuego.
• La encimera y el mobiliario que rodee el
aparato debe estar hecho de materiales
resistentes a temperaturas superiores a
los 100 °C.
• El aparato no se debe instalar
directamente sobre un lavavajillas,
frigorífico, congelador, lavadora o
secadora.
2.2. inst Al Ación del horno
Los aparatos se suministran con kits de
instalación y se pueden instalar en una
encimera de dimensiones adecuadas. Las
dimensiones para la encimera y el horno se
proporcionan debajo.
A (mm) 557 min./max. F (mm) 560/580
B (mm) 550 min. G (mm) 555
C (mm) 595 min. H/I (mm) 600/590
D (mm) 575 min. J/K (mm) 5/10
E (mm) 576
F
A B
C
C
D
E
G
H
J
Instalación bajo
una encimera

ES - 11
F
AB
C
C
D
E
G
I
J
K
Instalación en una unidad de pared
Una vez que se hayan realizado las
conexiones eléctricas, inserte el horno en
el armario empujándolo hacia delante. Abra
la puerta del horno e inserte 2 tornillos
en los orificios que se encuentran en
el bastidor del horno. Con el marco del
producto tocando la superficie de madera
del armario, apriete los tornillos.
2.3. conexión eléctric A y segurid Ad
ADVERTENCIA: La conexión eléctrica
de este aparato debe realizarla una
persona de servicio autorizada o un
electricista cualificado conforme a las
instrucciones proporcionadas en esta guía
y las normativas locales vigentes.
ADVERTENCIA: ESTE APARATO
DEBE ESTAR CONECTADO A
TIERRA.
• Antes de conectar el aparato al
suministro eléctrico, debe comprobarse
el voltaje nominal del aparato (indicado
en la placa identificativa del aparato)
para asegurarse de que se corresponda
con el de la red eléctrica. Además, los
cables eléctricos deben ser capaces de
soportar la potencia nominal del aparato
(que también se indica en la placa
identificativa).
• Asegúrese de que se usen cables
aislados durante la instalación. Una
conexión incorrecta podría dañar el
aparato. Si el cable de alimentación
está dañado y debe cambiarse, dicha
operación deberá realizarla personal
cualificado.
• No utilice adaptadores, regletas ni
alargadores.
• El cable de alimentación debe
mantenerse alejado de las partes
calientes del aparato y no debe
doblarse ni comprimirse. De lo contrario,
se podría dañar el cable, lo que daría
lugar a un cortocircuito.
• Si el aparato no está conectado a la
red mediante un enchufe, se debe usar
un interruptor aislante multipolar (con
una separación de contacto mínima de
3 mm) para cumplir las normativas de
seguridad.
• El aparato está diseñado para un
suministro eléctrico de 220-240V. Si
el suministro eléctrico de su vivienda
es distinto, póngase en contacto con
un técnico de servicio autorizado o un
electricista cualificado.
• El cable de alimentación (H05VV-F)
debe ser lo suficientemente largo como
para conectarlo al aparato aunque este

ES - 12
se encuentre en la parte delantera del
armario.
•Asegúrese de que todas las conexiones
estén apretadas debidamente.
•Fije el cable de alimentación a la
abrazadera de cable y a continuación
cierre la tapa.
•La conexión de la caja de terminales se
encuentra en la caja de terminales.
Marrón Amarillo+Verde
Azul

ES - 13
3. CARACTERÍSTICAS DEL PRODUCTO
Importante: Las especificaciones para el producto varían y el aspecto del aparato
podría variar con respecto al mostrado en las figuras que se muestran debajo.
Lista de componentes
1. Panel de mando
2. Tirador de puerta de horno
3. Puerta de horno
1
2
3
Panel de mando
4. Temporizador
5. Mando de control de funciones del horno
6. Mando de termostato del horno
4 65

ES - 14
4. USO DEL PRODUCTO
4.1. controles del horno
Mando de control de funciones del horno
Gire el mando hasta el símbolo
correspondiente de la función de cocción
deseada. Para obtener detalles de las
distintas funciones, consulte “Funciones del
horno”.
Mando de termostato del horno
Tras seleccionar una función de cocción,
gire este mando para establecer la
temperatura deseada. La luz del termostato
del horno se iluminará cuando el termostato
esté funcionando para calentar el horno o
mantener la temperatura.
Funciones del horno
Luz del horno: Solo
se encenderá la luz del
horno. Seguirá
encendida mientras
esté activada la
función de cocción.
Función de
descongelación: Las
luces de advertencia
del horno se
encenderán y
comenzará a funcionar
el ventilador. Para usar
la función de descongelación, coloque los
alimentos congelados en el horno en un
estante colocado en la tercera ranura
comenzando desde la parte inferior. Se
recomienda colocar una bandeja de horno
bajo los alimentos que se vayan a
descongelar para que caiga en ella el agua
que se produce al descongelarse el hielo.
Esta función no cocinará ni cocerá la
comida, solo ayudará a descongelarla.
Función de cocción
estática: Las luces de
advertencia y del
termostato del horno se
encenderán y
comenzarán a operar
los elementos de
calentamiento
inferiores y superiores. La función de
cocción estática emite calor, garantizando
una cocción homogénea de los alimentos.
Esto es ideal para cocinar pastelitos, tartas,
pasta al horno, lasañas y pizzas. Se
recomienda precalentar el horno 10 minutos.
Asimismo, se recomienda no usar más de
un estante a la vez con esta función.
Función de
ventilador: Las luces
de advertencia y del
termostato del horno
se encenderán y
comenzarán a operar
los elementos de
calentamiento superior e inferior y el
ventilador. Esta función es buena para
hornear pastelitos. La cocción se lleva a
cabo mediante los elementos de
calentamiento inferior y superior que hay en
el interior del horno y mediante el
ventilador, que distribuye el aire, dando un
ligero toque grill a la comida. Se
recomienda precalentar el horno durante
unos 10 minutos.
Función de
calentamiento
inferior y ventilador:
Las luces de
advertencia y del
termostato del horno
se encenderán y
comenzarán a operar el elemento de
calentamiento inferior y el ventilador. La
función de ventilador y calentamiento
inferior es ideal para hornear alimentos,
como pizzas, de manera uniforme y en
poco tiempo. El ventilador distribuye de
forma homogénea el calor del horno,
mientras que el elemento de calentamiento
inferior cuece los alimentos. Se recomienda
precalentar el horno durante unos 10
minutos.
Función de grill: Las
luces de advertencia y
del termostato del
horno se encenderán y
comenzará a operar el
elemento de
calentamiento del grill.
Esta función se usa para tostar y cocinar
alimentos al grill en los estantes superiores
del horno. Aplique un poco de aceite a la
parrilla con una brocha para impedir que se
peguen los alimentos y coloque la comida
en el centro de la parrilla. Debajo de la
comida debe colocar siempre una bandeja
que recoja las gotas de aceite o grasa. Se
recomienda precalentar el horno durante
unos 10 minutos.
Advertencia: Al cocinar al grill, la
puerta del horno debe estar cerrada y
la temperatura del horno debe
ajustarse a 190 °C.

ES - 15
Función de grill
rápido: Las luces de
advertencia y del
termostato del horno
se encenderán y
comenzarán a operar
los elementos de
calentamiento superiores y del grill. Esta
función se usa para cocinar al grill más
rápidamente y para cocinar al grill alimentos
que tengan una gran superficie, como, por
ejemplo, carne. Use los estantes superiores
del horno. Aplique un poco de aceite a la
parrilla con una brocha para impedir que se
peguen los alimentos y coloque la comida
en el centro de la parrilla. Debajo de la
comida debe colocar siempre una bandeja
que recoja las gotas de aceite o grasa. Se
recomienda precalentar el horno durante
unos 10 minutos.
Advertencia: Al cocinar al grill, la
puerta del horno debe estar cerrada
y la temperatura del horno debe
ajustarse a 190 °C.
Función de doble grill
y ventilador: Las luces
de advertencia y del
termostato del horno
se encenderán y
comenzarán a operar
el ventilador y los
elementos de calentamiento superiores y
del grill. Esta función se usa para cocinar
alimentos gruesos al grill más rápidamente
y para cocinar al grill alimentos que tengan
una gran superficie. Se pondrán en marcha
los elementos de calentamiento superiores
y los del grill, así como el ventilador, para
asegurarse de que los alimentos se cocinen
de manera uniforme. Use los estantes
superiores del horno. Aplique un poco de
aceite a la parrilla con una brocha para
impedir que se peguen los alimentos y
coloque la comida en el centro de la parrilla.
Debajo de la comida debe colocar siempre
una bandeja que recoja las gotas de aceite
o grasa. Se recomienda precalentar el
horno durante unos 10 minutos.
Advertencia: Al cocinar al grill, la
puerta del horno debe estar cerrada
y la temperatura del horno debe
ajustarse a 190 °C.
4.2. mesA de cocción
Función
Platos
Estática
Hojaldre 1 - 2 170 - 190 35 - 45
Tarta 1 - 2 170 - 190 30 - 40
Galleta 1 - 2 170 - 190 30 - 40
Estofado 2 175 - 200 40 - 50
Pollo 1 - 2 200 45 - 60
Ventilador
Hojaldre 1 - 2 170 - 190 25 - 35
Tarta 1 - 2 - 3 150 - 170 25 - 35
Galleta 1 - 2 - 3 150 - 170 25 - 35
Estofado 2 175 - 200 40 - 50
Pollo 1 - 2 200 45 - 60
Asado
Albóndigas
asadas 4 200 10 - 15
Pollo * 190 50 - 60
Chuletas 3 - 4 200 15 - 25
Bistecs 4 200 15 - 25
*Si dispone de ella, cocine con la brocheta
para pollo asado.
4.3. uso del temporiz Ador mecánico
Descripción de función
M Funcionamiento manual
0..........100 Se utiliza ajustando el
temporizador
Funcionamiento manual
Si coloca el botón del temporizador en
la posición “M”, podrá hacer funcionar el
horno de manera ininterrumpida. Si coloca
el botón del temporizador en la posición
“0”, el horno no trabajará.
Uso mediante el ajuste del temporizador
Gire el mando del temporizador para
ajustar el tiempo de cocción, que puede
ser de entre 0 y 100 minutos. Cuando
el temporizador llegue a 0, el horno se
apagará automáticamente y se emitirá un
sonido de advertencia.

ES - 16
4.4. Accesorios
La bandeja honda
La bandeja honda es ideal para estofados.
Coloque la bandeja en cualquiera de los
estantes y empújela hasta el fondo para
asegurarse de que quede bien colocada.
La bandeja llana
La bandeja llana es ideal para hornear
pastelitos.
Coloque la bandeja en cualquiera de los
estantes y empújela hasta el fondo para
asegurarse de que quede bien colocada.
Parrilla
La parrilla es ideal para asar o procesar
alimentos en recipientes para hornos.
ADVERTENCIA
Coloque la rejilla correctamente en la
cavidad del horno y empújela hasta el final.
Colector de agua
A veces al cocinar, se produce condensación
en el cristal interior de la puerta del horno.
Esto no significa que el producto esté
averiado.
Abra la puerta del horno en la posición de
grill y déjela en esta posición 20 segundos.
El agua caerá en el colector.
Deje que se enfríe el horno y limpie el
interior de la puerta con un trapo seco.
Este procedimiento debe realizarse con
regularidad.
5. LIMPIEZA Y MANTENIMIENTO
5.1. l impiezA
ADVERTENCIA: Apague el aparato y
deje que se enfríe antes de limpiarlo.
Instrucciones generales
• Antes de usar materiales de limpieza
para limpiar el aparato, compruebe si
son adecuados y si el fabricante los ha
recomendado.
• Utilice productos de limpieza líquidos o
cremosos que no contengan partículas.
No utilice cremas cáusticas (corrosivas),
polvos de limpieza abrasivos, estropajos
de aluminio ásperos ni herramientas
duras, ya que podrían dañar las
superficies de la cocina.
No utilice productos de limpieza que
contengan partículas, ya que podrían
arañar las partes pintadas, esmaltadas
o de cristal del aparato.

ES - 17
•Si se derrama algún líquido, límpielo
inmediatamente para impedir que se
dañe cualquier parte.
No utilice productos para limpiar a
vapor en ninguna parte del aparato.
Limpieza del interior del horno
•El interior de los hornos esmaltados se
limpia mejor con el horno caliente.
•Después de usar el horno, siempre
debe limpiarse con un trapo suave
empapado en agua con jabón. A
continuación, vuelva a limpiar el horno
con un trapo húmedo y séquelo.
•En ocasiones, puede que tenga que
usar un producto de limpieza líquido
para limpiar el horno por completo.
Limpieza de las partes de cristal
•Limpie las partes de cristal del aparato
de manera periódica.
•Utilice limpiacristales para limpiar el
interior y el exterior de las partes de
cristal. A continuación enjuáguelas y
séquelas bien con un trapo seco.
Limpieza de las partes de acero
inoxidable (si las hubiese)
•Limpie las partes de acero inoxidable
del aparato de manera periódica.
•Limpie las partes de acero inoxidable
con un trapo suave empapado
únicamente en agua. A continuación
séquelas bien con un trapo seco.
No limpie las partes de acero
inoxidable si siguen calientes tras
haber cocinado.
No deje mucho tiempo sobre el acero
inoxidable restos de vinagre, café,
leche, sal, agua, zumo de tomate o
limón.
Limpieza de superficies pintadas (si
existen)
•Las manchas de tomate, pasta de
tomate, kétchup, limón, derivados del
aceite, leche, productos azucarados,
bebidas azucaradas y café se deben
limpiar de inmediato con un paño
mojado en agua tibia. Si las manchas
no se limpian y se dejan secar sobre las
superficies donde se encuentran, NO se
deben frotar con objetos duros (objetos
puntiagudos, estropajos de alambre de
acero y plástico, esponjas para platos
que dañan la superficie) o con agentes
de limpieza que contengan elevados
contenidos de alcohol, quitamanchas,
desengrasantes, productos químicos
abrasivos para la superficie. De lo
contrario, se puede producir corrosión
en las superficies pintadas a base de
polvo y provocar manchas. El fabricante
no se hace responsable de ningún daño
causado por el uso de productos o
métodos de limpieza inadecuados.
Extracción de la puerta del horno
Antes de limpiar el cristal de la puerta del
horno, debe quitar la puerta del horno, tal
como se muestra debajo.
1. Abra la puerta del horno.
2. Abra la abrazadera de zapata (a) (con
la ayuda de un destornillador) hasta la
posición final.
a
3. Cierre la puerta hasta que prácticamente
alcance la posición de cierre total y quite la
puerta tirando de ella hacia usted.

ES - 18
5.2. mAntenimient o
ADVERTENCIA: El mantenimiento de
este aparato solo debe llevarlo a cabo
una persona de servicio autorizada o
un técnico cualificado.
Cambio de la lámpara del horno
ADVERTENCIA: Apague el aparato y
deje que se enfríe antes de limpiarlo.
• Quite primero la lente del cristal y a
continuación quite la bombilla.
• Sustituya la bombilla retirada por una
nueva (capaz de soportar 300 °C)
(230 V, 15-25 W, tipo E14).
• Cambie la lente del cristal, tras lo cual el
horno estará listo para su uso.
La lámpara está diseñada
específicamente para ser utilizada en
electrodomésticos de cocina. No está
diseñada para iluminar un hogar.

ES - 19
6. SOLUCIÓN DE PROBLEMAS Y TRANSPORTE
6.1. solución de problem As
Si sigue teniendo algún problema con su aparato tras comprobar estos pasos básicos
de resolución de problemas, póngase en contacto con un técnico de servicio
autorizado o con un técnico cualificado.
Problema Posible causa Solución
El horno no se enciende. No hay corriente.
Compruebe si el aparato recibe
corriente. Compruebe también que esté
funcionando el resto de electrodomésticos
de la cocina.
No se genera calor o el
horno no calienta.
El control de temperatura del horno
no se ha ajustado correctamente.
Se ha dejado abierta la puerta del
horno.
Compruebe que se haya ajustado
correctamente el mando de control de
temperatura del horno.
Los alimentos no se
cocinan de manera
uniforme en el horno.
Los estantes del horno se han
colocado mal.
Compruebe que se estén siguiendo las
temperaturas y las posiciones de estantes
recomendadas.
No abra la puerta a menudo salvo que
necesite darle la vuelta a los alimentos
que esté cocinando. Si abre la puerta
frecuentemente, la temperatura en el
interior del horno se reducirá, lo que
podría afectar al resultado final de la
comida.
La luz del horno
(si la hubiese) no funciona.
La lámpara se ha estropeado.
El suministro eléctrico se ha
interrumpido o desconectado.
Cambie la lámpara de acuerdo con las
instrucciones.
Asegúrese de que el enchufe de la pared
tenga corriente.
El ventilador del horno
(si lo hubiese) hace ruido. Los estantes del horno vibran.
Compruebe que el horno esté nivelado.
Compruebe que los estantes o los
utensilios para el horno no estén vibrando
o en contacto con el panel trasero del
horno.
6.2. t r Ansporte
Si debe transportar el producto, use el embalaje original del producto y transpórtelo en su
caja original. Siga las instrucciones de transporte que se muestran en el embalaje. Pegue
con cinta todas las piezas extraíbles del producto para evitar que se dañe el producto
durante el transporte.
Si no dispone del embalaje original, prepare un carrito para que el aparato quede
protegido de las amenazas externas, especialmente sus superficies externas.

ES - 20
7. ESPECIFICACIONES TÉCNICAS
7.1. FichA energétic A
Marca
Modelo K-50M22BL2-FR
Tipo de horno ELÉCTRICO
Masa Kg 29,5
Índice de eficiencia energética – convencional 104,9
Índice de eficiencia energética – ventilación forzada 95,1
Clase energética A
Consumo de energía (electricidad) - convencional kWh/ciclo 0,86
Consumo de energía (electricidad) – ventilación forzada kWh/ciclo 0,78
Número de cavidades 1
Fuente de calor ELÉCTRICO
Volumen L 65
Este horno cumple con EN 60350-1
Trucos para ahorrar energía
Horno
-A ser posible, cocine los alimentos juntos.
- Mantenga el tiempo de precalentamiento durante poco tiempo.
-No prolongue el tiempo de cocción.
-No olvide apagar el horno al final de la cocción.
- No abra la puerta del horno durante el periodo de cocción.

NL - 2
Symbool Type Betekenis
WAARSCHUWING Risico op ernstig of dodelijk letsel
RISICO OP ELEKTRISCHE SCHOK Risico van gevaarlijke spanning
BRAND Waarschuwing; Gevaar voor brand / ontvlambare materialen
LET OP Risico op letsel of beschadiging aan eigendom
BELANGRIJK / OPMERKING Correcte bediening van het systeem
Wij danken u dat u voor dit product hebt gekozen.
Deze gebruikershandleiding bevat belangrijke informatie over veiligheid en instructies die
zijn bedoeld u te helpen in de bediening en het onderhoud van uw apparaat.
Neem de tijd om deze gebruikershandleiding door te lezen voordat u uw apparaat in
gebruik neemt en bewaar hem als naslagwerk voor de toekomst.

INHOUD
1.VEILIGHEIDSINSTRUCTIES ............................................................................................ 4
1.1. Algemene veiligheidswaarschuwingen .......................................................................... 4
1.2. Waarschuwingen bij de installatie .................................................................................6
1.3. Tijdens het gebruik ......................................................................................................7
1.4. Tijdens reiniging en onderhoud .....................................................................................9
2.INSTALLATIE EN VOORBEREIDING VOOR GEBRUIK ............................................... 11
2.1. Instructies voor de installateur ..................................................................................... 11
2.2. Installatie van de oven ................................................................................................. 11
2.3. Elektrische aansluiting en veiligheid ............................................................................13
3.PRODUCTKENMERKEN ............................................................................................... 14
4.GEBRUIK VAN HET PRODUCT .....................................................................................15
4.1. Ovenbediening ............................................................................................................15
4.2. Bereidingstabel ............................................................................................................16
4.3. Gebruik van de mechanische timer ............................................................................. 16
4.4. Accessoires ................................................................................................................16
5.REINIGING EN ONDERHOUD .......................................................................................17
5.1. Reiniging ...................................................................................................................17
5.2. Onderhoud...................................................................................................................19
6.PROBLEEMOPLOSSING & TRANSPORT .....................................................................20
6.1. Probleemoplossing ...................................................................................................... 20
6.2. Transport ...................................................................................................................20
7.TECHNISCHE SPECIFICATIES .....................................................................................21
7.1. Energiefiche.................................................................................................................21

NL - 4
1. VEILIGHEIDSINSTRUCTIES
•Lees deze instructies zorgvuldig en volledig voor u
uw apparaat in gebruik neemt en bewaar deze op
een handige locatie voor eventuele raadpleging in
de toekomst.
•Deze handleiding is gemaakt voor meer dan één
model. Het is mogelijk dat een aantal functies, die in
deze handleiding worden besproken, niet aanwezig
zijn op uw apparaat. Let tijdens het lezen van deze
handleiding in het bijzonder op de afbeeldingen.
1.1. Algemene veiligheidsw AArschuwingen
•Dit apparaat mag worden gebruikt door kinderen
vanaf 8 jaar en ouder en personen met een
verminderde fysieke, gevoelsmatige en mentale
vaardigheden of een gebrek aan ervaring en kennis
als ze onder toezicht staan of instructies krijgen
met betrekking tot het veilige gebruik van het
apparaat en de betrokken risico's. Kinderen mogen
niet met het apparaat spelen. Kinderen mogen
zonder toezicht het apparaat niet schoonmaken of
onderhoudswerken uitvoeren.
• WAARSCHUWING: Het apparaat en zijn
toegankelijke onderdelen worden tijdens gebruik
heet. Zorg ervoor geen verwarmingselementen aan
te raken. Kinderen jonger dan 8 jaar moeten uit de
buurt worden gehouden, tenzij ze onder voortdurend
toezicht staan.
• WAARSCHUWING: Brandgevaar: bewaar geen
voorwerpen op de kookoppervlakken.
• WAARSCHUWING: Als het oppervlak
gebarsten is, moet u het apparaat uitschakelen om
het risico op elektrische schokken te voorkomen.
•Gebruik het apparaat niet met een externe timer of

NL - 5
afzonderlijk afstandsbedieningsysteem.
• Het apparaat wordt tijdens gebruik heet. Zorg ervoor
geen verwarmingselementen in de oven aan te
raken.
• Tijdens het gebruik kunnen handvaten die men
tijdens het normale gebruik kort vast neemt warm
worden.
• Gebruik geen harde schurende
schoonmaakmiddelen of scherpe metalen schrapers
om het glas en andere oppervlakken van de
ovendeur schoon te maken. Deze kunnen namelijk
krassen nalaten op het oppervlak en dit kan leiden
tot het barsten van het glas of schade aan de
afwerking.
• Gebruik geen stoomreinigers om het apparaat
schoon te maken.
• WAARSCHUWING: Zorg ervoor dat het
apparaat is uitgeschakeld voor u de lamp vervangt
om het risico op elektrische schokken te vermijden.
• LET OP: Toegankelijke delen kunnen tijdens het
koken of grillen heet zijn. Houd kleine kinderen uit
de buurt van het in gebruik zijnde apparaat.
• Uw apparaat werd geproduceerd conform de
toepasselijke lokale en internationale normen en
voorschriften.
• Onderhoud en reparaties mogen alleen door
erkend onderhoudspersoneel worden uitgevoerd.
Installatie- en onderhoudswerk dat door niet-
erkende installateurs wordt uitgevoerd kan u in
gevaar brengen. De specificaties van het apparaat
mogen niet worden gewijzigd of aangepast.
Ongeschikte kookplaatbeschermers kunnen
ongelukken veroorzaken.

NL - 6
•Voor de aansluiting van uw apparaat moet u
ervoor zorgen dat de lokale distributievoorwaarden
(soort gas en gasdruk of elektrische spanning
en frequentie) en de vereisten van het apparaat
compatibel zijn. De specificaties voor dit apparaat
staan vermeld op het label.
• LET OP: Dit apparaat is uitsluitend bedoeld voor
de bereiding van etenswaren en voor huishoudelijk
gebruik. Het mag niet worden gebruikt voor andere
doeleinden of in een andere toepassing, zoals voor
niet-huishoudelijk gebruik, in een commerciële
omgeving of om een ruimte te verwarmen.
•Probeer het apparaat niet aan het handvat op te
tillen of te verplaatsen.
•Alle mogelijke maatregelen werden genomen om
uw veiligheid te garanderen. Aangezien het glas kan
breken, moet u voorzichtig zijn tijdens het
schoonmaken teneinde krassen te vermijden. Zorg
dat u niet met accessoires op het glas slaat of klopt.
•Zorg ervoor dat het netsnoer tijdens de installatie
niet klem komt te zitten of wordt beschadigd.
Om elk risico uit te sluiten moet het netsnoer
door de fabrikant, zijn onderhoudsdienst of een
gekwalificeerd persoon worden vervangen als het is
beschadigd.
•Wanneer de ovendeur open is, mogen kinderen niet
op de ovendeur klimmen of zitten.
•Houd kinderen en dieren uit de buurt van dit
apparaat.
1.2. wAArschuwingen bij de inst All Atie
•U mag het apparaat niet gebruiken voor de
installatie volledig uitgevoerd is.

NL - 7
•Het apparaat moet worden gemonteerd door
een geautoriseerde monteur. De fabrikant is niet
verantwoordelijk voor eventuele schade die kan
worden veroorzaakt door de defecte plaatsing en
installatie door niet-geautoriseerde personen.
•Controleer bij het uitpakken van het apparaat of
er tijdens het transport geen schade is opgelopen.
Neem in geval van twijfel het apparaat niet in
gebruik en neem onmiddellijk contact op met uw
leverancier of een erkende onderhoudsdienst.
De materialen van de verpakking (nylon, nietjes,
piepschuim, enz.) kunnen schadelijk zijn voor
kinderen. Ze moeten dan ook onmiddellijk
verzameld en verwijderd worden.
•Bescherm uw apparaat tegen de
weersomstandigheden. Stel het niet bloot aan de
zon, regen, sneeuw, overmatig vocht, enz.
•De omliggende materialen van het apparaat
(kast) moeten minimaal bestand zijn tegen een
temperatuur van 100 °C.
•Om oververhitting te voorkomen mag het apparaat
niet worden geïnstalleerd achter een decoratieve
deur.
1.3. t ijdens het gebruik
•Bij het eerste gebruik van uw oven kan er een
lichte geur vrijkomen. Dit is heel normaal en wordt
veroorzaakt door het isolatiemateriaal op de
verwarmingselementen. Daarom raden wij u aan
om de oven voor de ingebruikneming gedurende
45 minuten bij maximumtemperatuur laten werken.
Zorg ervoor dat de omgeving, waar het product in
wordt geïnstalleerd, goed geventileerd wordt.

NL - 8
• Wees voorzichtig bij het openen van de deur terwijl
u aan het koken bent en meteen daarna. De hete
stoom uit de oven kan brandwonden veroorzaken.
• Plaats geen ontvlambaar of brandbaar materiaal in
of in de buurt van het apparaat als het in werking is.
• Gebruik altijd ovenhandschoenen om gerechten in
de oven te verplaatsen of uit de oven te nemen.
• De oven mag onder geen enkel beding worden
bekleed met aluminiumfolie, want dit kan
oververhitting veroorzaken.
• Plaats tijdens de bereiding geen schalen of
bakplaten rechtstreeks op de bodem van de oven.
De bodem wordt heel heet en kan het product
beschadigen.
• Laat het fornuis niet onbeheerd achter wanneer u
met vaste of vloeibare vetten kookt. Deze kunnen bij
oververhitting brand vatten. Giet nooit water op
vlammen die worden veroorzaakt door olie/vet.
Schakel het fornuis uit en dek de pan af met zijn
deksel of met een branddeken.
• Indien het product voor een langere periode niet
wordt gebruikt, draait u de hoofdschakelaar uit.
• Let er op dat de bedieningstoetsen van het fornuis
steeds op “0” (stop) staan als het fornuis niet wordt
gebruikt.
• De laden hellen over wanneer ze uit de oven
worden getrokken. Wees bij het uit de oven nemen
voorzichtig zodat u geen heet voedsel morst of laat
druppen.
• Als de ovendeur openstaat, mag u er niets op
plaatsen. Dit kan het evenwicht van de oven
verstoren of de deur beschadigen.
• Hang geen handdoeken, vaatdoeken of kleding aan
het apparaat of de handvaten.

NL - 9
1.4. t ijdens reiniging en onderhoud
•Schakel het apparaat altijd uit voordat u het
schoonmaakt of onderhoudt. U kunt deze
activiteiten starten na het verwijderen van de
stekker uit het stopcontact of nadat de
hoofdschakelaars zijn uitgeschakeld.
•Verwijder de bedieningsknoppen niet tijdens het
reinigen van het bedieningspaneel.
•Om de efficiëntie en veiligheid van het apparaat te
handhaven, raden we aan dat u steeds de originele
reserveonderdelen gebruikt en dat u bij een
eventueel probleem uitsluitend beroep doet op onze
erkende servicedienst.
EG-conformiteitsverklaring
We verklaren dat onze producten voldoen
aan de van toepassing zijnde Europese
richtlijnen, besluiten en voorschriften in de
normen waarnaar wordt verwezen.
Dit apparaat werd uitsluitend ontworpen voor om thuis
te koken. Het gebruik voor andere doeleinden (zoals
het verwarmen van een ruimte) is niet toegestaan en
gevaarlijk.
De gebruiksinstructies zijn van toepassing op
verschillende modellen. U kunt verschillen opmerken
tussen deze instructies en uw model.

NL - 10
Afvoeren van uw oude machine
Dit symbool op het product of op de verpakking
geeft aan dat dit product niet mag worden
behandeld als huishoudelijk afval. In plaats
daarvan moet het worden afgevoerd naar het
geschikte verzamelpunt voor de hergebruik
van elektrische en elektronische apparatuur. Door de
correcte afvalverwerking van dit product helpt u mee
aan de voorkoming van potentiële negatieve gevolgen
voor het milieu en de menselijke gezondheid, die wel
zouden kunnen ontstaan door foutieve afvalverwerking
van dit product. Voor meer informatie over het
hergebruik van dit product, kunt u contact opnemen
met uw plaatselijk stadskantoor, de afvalservice voor
huishoudelijk afval of de winkel waar u dit product hebt
aangeschaft.

NL - 11
2. INSTALLATIE EN
VOORBEREIDING
VOOR GEBRUIK
WAARSCHUWING: Dit apparaat mag
uitsluitend worden geïnstalleerd door
erkend onderhoudspersoneel of een
gekwalificeerd elektricien en
overeenkomstig de instructies van deze
handleiding en conform de geldende
plaatselijke voorschriften.
• Onjuiste installatie kan letsel en schade
veroorzaken, waar de fabrikant niet
aansprakelijk kan worden gehouden
en de garantie kan hierdoor komen te
vervallen.
• Zorg er vóór de installatie voor dat de
plaatselijke distributieomstandigheden
(elektriciteitspanning en -frequentie)
en de instellingen van het
apparaat compatibel zijn. De
instellingsvoorwaarden voor dit apparaat
staan vermeld op het label.
• De geldende wetten, verordeningen,
richtlijnen en normen van het land
van gebruik van het apparaat
moeten worden opgevolgd
(veiligheidsvoorschriften, correcte
hergebruik volgens de regelgeving,
enz.).
2.1. instructies voor de inst All Ateur
Algemene instructies
• Na verwijdering van het
verpakkingsmateriaal van het toestel
en de accessoires, moet u controleren
of het apparaat niet beschadigd is.
Indien u schade denkt vast te stellen,
mag u het apparaat niet gebruiken en
moet u onmiddellijk contact opnemen
met erkend servicepersoneel of een
gekwalificeerd elektricien.
• Zorg ervoor dat er geen brandbare of
ontvlambare materialen in de buurt zijn,
zoals gordijnen, olie, wasgoed, enz., die
snel vlamvatten.
• Apparaten om het apparaat heen
moeten zijn gemaakt van materialen die
bestand zijn tegen temperaturen van
boven 100 °C.
• Het apparaat mag niet worden
geïnstalleerd direct boven een
vaatwasmachine, koelkast, diepvriezer,
wasmachine of wasdroger.
2.2. inst All Atie v An de oven
De apparaten worden geleverd met
installatiekits. Ze kunnen worden
gemonteerd in een werkblad voorzien van
de correcte afmetingen. De afmetingen voor
de kookplaat en de oven vindt u hieronder.
A (mm) 557 min. / max. F
(mm) 560/580
B (mm) 550 min. G (mm) 555
C (mm) 595 min. H (mm) 590
D (mm) 575 min. I (mm) 600
E (mm) 576 min. J/K (mm) 5/10

NL - 12
F
A B
C
C
D
E
G
H
J
I
Installatie onder een werkblad
F
AB
C
C
D
E
G
H
J
J
K
I
Installatie in een wandeenheid
•Nadat u de elektrische verbindingen
hebt gemarkeerd, plaatst u de oven in
het kastje door deze vooruit te duwen.
Open de ovendeur en bevestig twee
schroeven in de gaten voorzien in het
ovenframe. Draai de schroeven vast
terwijl het productframe het houten
oppervlak van het kastje raakt.

NL - 13
2.3. elektrische AAnsluiting
en veiligheid
WAARSCHUWING: De elektrische
aansluiting van dit apparaat mag
uitsluitend worden uitgevoerd door
erkend onderhoudspersoneel of een
gekwalificeerd elektricien en
overeenkomstig de instructies van deze
handleiding en conform de geldende
voorschriften.
WAARSCHUWING: DIT TOESTEL
MOET WORDEN GEAARD.
•Voordat dit apparaat op de stroom
wordt aangesloten, dient het
maximale vermogen van het apparaat
(weergegeven op het identificatielabel
van het apparaat) te worden vergeleken
met de beschikbare netspanning, en de
bedrading van de netspanning moet het
maximale vermogen van het apparaat
aankunnen (ook weergegeven op het
identificatielabel van het apparaat).
•Zorg er tijdens installatie voor dat er
geïsoleerde kabels worden gebruikt.
Een onjuiste aansluiting kan uw
apparaat beschadigen. Als het
stroomsnoer beschadigd is, dient
deze door gekwalificeerd personeel te
worden vervangen.
•Gebruik geen adapters,
meerwegstekkers en/of verlengkabels.
•De stroomkabel moet uit de buurt blijven
van hete delen van het apparaat en
mag niet worden gebogen of geklemd.
Anders kan de kabel beschadigd raken
en kortsluiting veroorzaken.
•Als het apparaat niet met een stekker
aan de netstroom wordt aangesloten,
dient een isolatorschakelaar die
geschikt is voor alle polen (met
minstens 3 mm contactruimte)
te worden gebruikt om aan de
veiligheidsvoorschriften te voldoen.
•Het apparaat is ontworpen voor een
netspanning van 220-240V. Neem
contact op met een geautoriseerde
servicedienst of een erkende elektricien
als uw netspanning anders is.
•De stroomkabel (H05VV-F) dient
voldoende lengte te hebben om te
worden aangesloten op het apparaat,
ook wanneer het apparaat helemaal uit
de kast is geschoven.
•Zorg ervoor dat alle aansluitingen goed
vastzitten.
•Bevestig de stroomkabel in de
kabelklem en sluit de deksel.
•De aansluiting op het klemmenblok
wordt gedaan op de aansluitkast.
Bruin Geel+groen
Blauw

NL - 14
3. PRODUCTKENMERKEN
Belangrijk: De specificaties van het product verschillen en het uiterlijk van uw
apparaat kan afwijken van de afbeeldingen die hieronder zijn weergegeven.
Onderdelenlijst
1. Bedieningspaneel
2. Deurgreep van de oven
3. Ovendeur
1
2
3
Bedieningspaneel
4. Timer
5. Bedieningsknop ovenfunctie
6. Thermostaatknop oven
4 65

NL - 15
4. GEBRUIK VAN HET PRODUCT
4.1. ovenbediening
Bedieningsknop ovenfunctie
Draai de knop naar het overeenstemmende
symbool van de gewenste kookfunctie.
Zie voor details van andere functies
'Ovenfuncties'.
Thermostaatknop oven
Draai na het kiezen van een kookfunctie
aan deze knop om de gewenste
temperatuur in te stellen. Het lampje van
de oventhermostaat zal branden als de
thermostaat in werking is om de oven op te
warmen of de temperatuur te behouden.
Ovenfuncties
Ovenlamp: Alleen de
ovenverlichting gaat
aan. Deze blijft aan
zolang de
bereidingsfunctie duurt.
Ontdooifunctie: De
waarschuwingsverlichting
van de oven gaat
branden en de ventilator
treedt in werking. Om de
ontdooifunctie te
gebruiken, plaatst u het
bevroren voedsel in de oven op een bakplaat
die zich op de derde richel van onder bevindt.
Het is raadzaam om een ovenschaal onder het
ontdooiende voedsel te plaatsen om het water
dat ontstaat door het smelten van ijs op te
vangen. Deze functie kookt of bakt uw voedsel
niet. Het helpt alleen bij het ontdooien ervan.
Functie statisch
koken: Het
thermostaatlampje en
waarschuwingslampje
van de oven gaan aan
en de onderste en
bovenste
verwarmingselementen
treden in werking. De functie statisch koken
geeft hitte af, wat een gelijkmatige bereiding
van het voedsel garandeert. Dit is ideaal voor
het bereiden van gebak, cake, pastaschotels,
lasagne en pizza. Het is raadzaam om de
oven gedurende 10 minuten voor te
verwarmen en het is het beste in deze functie
één bakplaat tegelijk te gebruiken.
Heteluchtfunctie: Het
thermostaatlampje en
waarschuwingslampje
van de oven gaan aan
en het bovenste en
onderste
verwarmingselement en
de ventilator treden in werking. Deze functie is
geschikt voor de bereiding van gebak. De
bereiding wordt uitgevoerd door de onderste
en bovenste verwarmingselementen in de
oven en de ventilator zorgt voor circulatie van
hete lucht, wat een licht gegrild effect aan het
voedsel geeft. Het is raadzaam om de oven
ongeveer 10 minuten voor te verwarmen.
Functie met
onderwarmte en
ventilator: Het
thermostaatlampje en
waarschuwingslampje
van de oven gaan aan
en het onderste
verwarmingselement en de ventilator treden in
werking. De functie met hete lucht en
onderwarmte is ideaal voor het gelijkmatig
bakken van voedsel, zoals pizza, in een korte
tijd. Terwijl de ventilator de hitte van de oven
gelijkmatig verdeelt, zorgt het onderste
verwarmingselement ervoor dat het gerecht
wordt gebakken. Het is raadzaam om de oven
ongeveer 10 minuten voor te verwarmen.
Grillfunctie: Het
thermostaatlampje en
waarschuwingslampje
van de oven gaan aan
en het grillelement treedt
in werking. Deze functie
wordt gebruikt voor het
grillen en roosteren van voedsel op de
bovenste rekstanden in de oven. Bestrijk het
rooster licht met olie om het voedsel niet vast
te laten plakken en plaats het voedsel in het
midden van het rooster. Plaats altijd een
ovenschaal onder het voedsel om druppels
olie of vet op te vangen. Het is raadzaam om
de oven ongeveer 10 minuten voor te
verwarmen.
Waarschuwing:
De ovendeur moet
tijdens het grillen zijn gesloten, en de
temperatuur moet zijn ingesteld op 190° C.
Snellere grillfunctie:
Het thermostaatlampje
en waarschuwingslampje
van de oven gaan aan
en het bovenste
verwarmingselement en
de grill treden in werking.
De functie wordt gebruikt voor het sneller

NL - 16
grillen en het bestrijken van een groter
oppervlak, voor bijvoorbeeld vlees. Gebruik de
bovenste rekstanden in de oven. Bestrijk het
rooster licht met olie om het voedsel niet vast
te laten plakken en plaats het voedsel in het
midden van het rooster. Plaats altijd een
ovenschaal onder het voedsel om druppels olie
of vet op te vangen. Het is raadzaam om de
oven ongeveer 10 minuten voor te verwarmen.
Waarschuwing: De ovendeur moet
tijdens het grillen zijn gesloten, en de
temperatuur moet zijn ingesteld op
190 °C.
Dubbele grill- en
ventilatorfunctie: Het
thermostaatlampje en
waarschuwingslampje
van de oven gaan aan
en het grillelement, het
bovenste
verwarmingselement en de ventilator treden
in werking. De functie wordt gebruikt voor
het sneller grillen van dikkere stukken
voedsel en het grillen van voedsel met een
groter oppervlak. Naast de werking van het
bovenste verwarmingselement en de grill
wordt ook de ventilator in werking gezet
voor gelijkmatig garen. Gebruik de
bovenste rekstanden in de oven. Bestrijk
het rooster licht met olie om het voedsel
niet vast te laten plakken en plaats het
voedsel in het midden van het rooster.
Plaats altijd een ovenschaal onder het
voedsel om druppels olie of vet op te
vangen. Het is raadzaam om de oven
ongeveer 10 minuten voor te verwarmen.
Waarschuwing: De ovendeur moet
tijdens het grillen zijn gesloten, en de
temperatuur moet zijn ingesteld op
190° C.
4.2. bereidingst Abel
Functie
Gerechten
Statisch
Bladerdeeg 1 - 2 170 -
190 35 - 45
Taart 1 - 2 170 -
190 30 - 40
Koekjes 1 - 2 170 -
190 30 - 40
Stoofschotel 2 175 -
200 40 - 50
Kip 1 - 2 200 45 - 60
Ventilator
Bladerdeeg 1 - 2 170 -
190 25 - 35
Taart 1 - 2 - 3 150 -
170 25 - 35
Koekjes 1 - 2 - 3 150 -
170 25 - 35
Stoofschotel 2 175 -
200 40 - 50
Kip 1 - 2 200 45 - 60
Grill
Geroosterde
gehaktballen 4 200 10-15
Kip * 190 50 - 60
Karbonade 3 - 4 200 15 - 25
Biefstuk 4 200 15 - 25
* Bereid indien beschikbaar met vleespen
voor geroosterde kip
4.3. gebruik v An de mechAnische timer
Functiebeschrijving
M Handmatige bediening
0..........100 Bediening door tijdsinstelling
Handmatige bediening
Wanneer u de timerknop in de positie ´M`
zet, kunt u de oven constant laten werken.
Wanneer u de timerknop in de positie ´0`
zet, zal de oven niet werken.
Bediening door tijdsinstelling
Stel de gewenste bereidingstijd in door
de timerknop in te stellen tussen de 0 en
100 minuten. Als de timer de nul bereikt,
schakelt de oven automatisch uit en hoort u
een geluidssignaal.
4.4. Accessoires
Diepe bakplaat
De diepe bakplaat wordt gebruikt voor de
bereiding van stoofschotels.
U plaatst de bakplaat correct in de
ovenruimte door deze op een van de
roosters te zetten en hem helemaal naar
achter te duwen.

NL - 17
Ondiepe bakplaat
De ondiepe bakplaat wordt gebruikt voor
het bakken van gebak zoals vlaaien, enz.
U zet de bakplaat correct in de ovenruimte
door deze op een rek te plaatsen en
volledig naar achter te duwen.
Draadrooster
Het draadrooster wordt gebruikt bij grillen
of het bereiden van voedsel in ander
kookgerei.
WAARSCHUWING
Plaats het rooster op een
overeenstemmendrekcorrectinde
ovenopeningenduwhetvolledigin.
Watercollector
Mogelijk ontstaat er condensatie op het
binnenglas. Dit hangt af van het type
voedsel in de oven.
Dit wijst niet op een storing van het product.
Open de ovendeur tot op de grillstand en
laat de deur 20 seconden lang open staan.
Het water druppelt in de collector.
Koel de oven af en veeg hem schoon met
een droge doek. Deze procedure moet
regelmatig uitgevoerd worden.
5. REINIGING EN ONDERHOUD
5.1. r einiging
WAARSCHUWING: Schakel het
apparaat uit en laat het volledig
afkoelen voordat u
schoonmaakwerkzaamheden op uw
apparaat uitvoert.
Algemene instructies
•Controleer voor gebruik van
schoonmaakmiddelen in uw apparaat of
ze geschikt zijn en aanbevolen worden
door de fabrikant.
•Gebruik crème of vloeibare
reinigingsmiddelen die geen vaste
deeltjes bevatten. Gebruik geen bijtende
middelen, schuurpoeders, ruwe staalwol
of harde gereedschappen, omdat deze
het oppervlak kunnen beschadigen.
•Gebruik geen reinigingsmaterialen
met vaste deeltjes die kunnen
krassen op het glas en op de
gelakte en geverfde delen van uw
apparaat.
•Neem eventueel gemorste vloeistoffen
meteen op om te voorkomen dat
onderdelen worden beschadigd.
•Gebruik geen stoomreinigers om
het apparaat of delen ervan schoon
te maken.
De binnenkant van de oven reinigen
•De binnenkant van de geëmailleerde
oven wordt het best gereinigd als de
oven warm is.
•Veeg de oven na ieder gebruik af met
een zachte in zeepwater geweekte
doek. Veeg de oven daarna nogmaals
af met een vochtige doek en droog hem
dan.

NL - 18
•U kunt af en toe een vloeibaar
schoonmaakmiddel nodig hebben om
de oven volledig te reinigen.
Reinigen van de glazen onderdelen
•Reinig de glazen onderdelen van uw
apparaat regelmatig.
•Reinig de glazen delen binnen en buiten
met een glasreiniger, spoel ze af en
droog ze grondig met een droge doek.
Reinigen van roestvrij stalen onderdelen
(indien aanwezig)
•Reinig de roestvrij stalen onderdelen
van uw apparaat regelmatig.
•Veeg de roestvrij stalen delen na ieder
gebruik af met een uitsluitend in water
gedrenkte doek. Droog ze daarna goed
af met een droge doek.
•Was de roestvrij stalen onderdelen
niet als ze nog heet zijn van het
koken.
•Laat geen azijn, koffie, melk, zout,
water, citroen of tomatensap
gedurende langere tijd achter op
het roestvrij staal.
Reinigen van gelakte oppervlakken
(indien van toepassing)
•Vlekken tomaat, tomatenpasta,
ketchup, limoen, oliederivaten,
melk, suikerhoudende etenswaren,
suikerhoudende dranken en koffie
moeten meteen worden gereinigd
met een doek gedrenkt in warm
water. Als deze vlekken niet worden
gereinigd en u de vlekken laat drogen
op het oppervlak, mogen ze niet
worden weggewreven met een hard
voorwerp (gepunte voorwerpen,
stalen en kunststof schuursponsjes,
oppervlakbeschadigende
reinigingssponsjes) of
reinigingsmiddelen met een hoog
alcoholgehalte, vlekkenverwijderaars,
ontvetters, schuurmiddelen die het
oppervlak beschadigen. Anders
kunnen corrosie of vlekken ontstaan
op het poedergelakte oppervlak. De
fabrikant kan niet aansprakelijk worden
gesteld voor schade veroorzaakt
door het oneigenlijke gebruik van
reinigingsmiddelen of -methodes.
De ovendeur verwijderen
Voordat u de glazen ovendeur reinigt, dient
u de ovendeur als volgt te verwijderen:
1. Open de ovendeur.
2. Open de bevestigingsbeugel (a)(met
behulp van een schroevendraaier) naar de
eindstand.
a
3. Sluit de deur tot deze bijna volledig en
verwijder de deur door deze naar u toe te
trekken.

NL - 19
5.2. onderhoud
WAARSCHUWING: Het onderhoud
aan dit apparaat dient uitsluitend te
worden uitgevoerd door erkend
onderhoudspersoneel of een gekwalificeerd
elektricien.
Vervangen van de ovenlamp
WAARSCHUWING: Schakel het
apparaat uit en laat het volledig
afkoelen voordat u
schoonmaakwerkzaamheden op uw
apparaat uitvoert.
•Verwijder de lamp na het lampenkapje
te hebben verwijderd.
•Plaats het nieuwe lampje (bestendig
tegen 300 °C) op de plek van het lampje
dat u hebt verwijderd (230 V, 15-25
Watt, type E14).
•Plaats het lampenkapje en uw oven is
daarna klaar voor gebruik.
Het ontwerp van het lampje is specifiek
voor gebruik in huishoudelijke
kookapparatuur. Het is niet geschikt voor
huishoudelijke kamerverlichting.

NL - 20
6. PROBLEEMOPLOSSING & TRANSPORT
6.1. Probleemo Plossing
Als u na deze basisprobleemoplossing nog problemen met uw apparaat ondervindt,
neem dan contact op met een erkend servicebedrijf of een erkende monteur.
Probleem Mogelijke oorzaak Oplossing
De oven gaat niet aan. De stroom is uitgeschakeld. Controleer de stroomtoevoer. Controleer
of andere keukenapparatuur werkt.
Geen warmte of de oven
warmt niet op.
Oventemperatuur is niet correct
ingesteld.
Ovendeur is open blijven staan.
Controleer of de regelknop voor de
oventemperatuur juist is ingesteld.
Ongelijkmatige bereiding in
de oven. Ovenplaten zijn niet juist geplaatst.
Controleer of de aanbevolen
temperaturen en plaatstanden worden
gebruikt.
Open de deur niet te vaak, tenzij u
gerechten bereidt die omgedraaid dienen
te worden. Als u de deur regelmatig
opent, zal de binnentemperatuur
afnemen. Dit kan het kookresultaat
beïnvloeden.
Ovenverlichting (indien
aanwezig) werkt niet.
Lampje is kapot.
Stroom is afgesloten of uitgeschakeld.
Vervang de lamp volgens de instructies.
Zorg ervoor dat de stroom op het
stopcontact is ingeschakeld.
De ovenventilator (indien
aanwezig) maakt lawaai. Ovenplaten trillen.
Controleer of de oven waterpas staat.
Controleer of de platen en het kookgerei
niet tegen de achterwand van de oven
trillen.
6.2. t r AnsPort
Maak gebruik van de originele productverpakking en vervoer het product in zijn originele
doos. Volg de transportpictogrammen op de verpakking op. Plak alle onafhankelijke
onderdelen met tape op het product om te voorkomen dat er tijdens het vervoer schade
ontstaat.
Als u de oorspronkelijke verpakking niet hebt: bereid een doos zodanig voor dat het
apparaat, in het bijzonder de externe oppervlakken van het product, beschermd zijn tegen
externe bedreigingen.

NL - 21
7. TECHNISCHE SPECIFICATIES
7.1. energiefiche
Merk
Model K-50M22BL2-FR
Oventype ELEKTRISCH
Massa kg 29,5
Index energie-efficiëntie - conventioneel 104,9
Index energie-efficiëntie – hete lucht 95,1
Energieklasse A
Energieverbruik (stroom) - conventioneel kWh/cyclus 0,86
Energieverbruik (stroom) – hete lucht kWh/cyclus 0,78
Aantal ruimtes 1
Warmtebron ELEKTRISCH
Volume l 65
Deze oven voldoet aan EN 60350-1
Tips voor energiebesparing
Oven
- Bereid indien mogelijk de gerechten tegelijkertijd.
- Houd de voorverwarmtijd kort.
- Verleng de bereidingstijd niet.
- Vergeet niet na de bereiding de oven uit te zetten.
- Doe tijdens de bereiding de ovendeur niet open.

Service &
Support
Visit Our Website
sharphomeappliances.com
52363477
-
 1
1
-
 2
2
-
 3
3
-
 4
4
-
 5
5
-
 6
6
-
 7
7
-
 8
8
-
 9
9
-
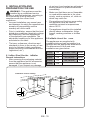 10
10
-
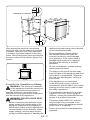 11
11
-
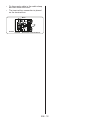 12
12
-
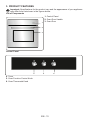 13
13
-
 14
14
-
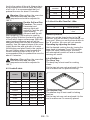 15
15
-
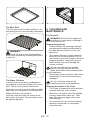 16
16
-
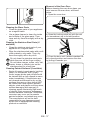 17
17
-
 18
18
-
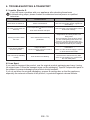 19
19
-
 20
20
-
 21
21
-
 22
22
-
 23
23
-
 24
24
-
 25
25
-
 26
26
-
 27
27
-
 28
28
-
 29
29
-
 30
30
-
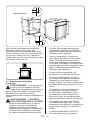 31
31
-
 32
32
-
 33
33
-
 34
34
-
 35
35
-
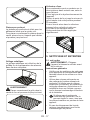 36
36
-
 37
37
-
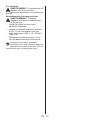 38
38
-
 39
39
-
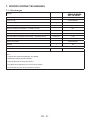 40
40
-
 41
41
-
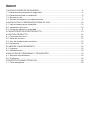 42
42
-
 43
43
-
 44
44
-
 45
45
-
 46
46
-
 47
47
-
 48
48
-
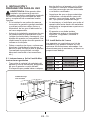 49
49
-
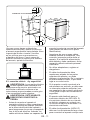 50
50
-
 51
51
-
 52
52
-
 53
53
-
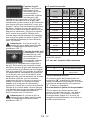 54
54
-
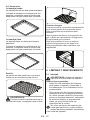 55
55
-
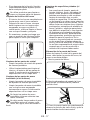 56
56
-
 57
57
-
 58
58
-
 59
59
-
 60
60
-
 61
61
-
 62
62
-
 63
63
-
 64
64
-
 65
65
-
 66
66
-
 67
67
-
 68
68
-
 69
69
-
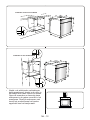 70
70
-
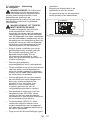 71
71
-
 72
72
-
 73
73
-
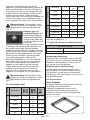 74
74
-
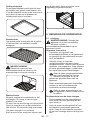 75
75
-
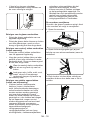 76
76
-
 77
77
-
 78
78
-
 79
79
-
 80
80


Sharp K-50M22BL2-FR Handleiding
- Categorie
- Kookplaten
- Type
- Handleiding
in andere talen
- English: Sharp K-50M22BL2-FR User manual
- français: Sharp K-50M22BL2-FR Manuel utilisateur
- español: Sharp K-50M22BL2-FR Manual de usuario