
364614
Video Kit
Manuale installatore • Installation manual
LE11133AB01PC20W03

2
Attenzione: Le operazioni di installazione, configurazione, messa in servizio e manutenzione devono
essere effettuate da personale qualificato.
Caution: Installation, configuration, starting-up and maintenance must be performed by qualified
personnel
Attention: Les opérations d’installation, de configuration, de mise en service et d’entretien doivent
être confiées à un personnel qualifié.
Achtung: Die Installation, Konfiguration, Inbetriebnahme und Wartung dürfen nur von qualifizierten
Fachleuten vorgenommen werden
Atención: Las operaciones de instalación, configuración, puesta en servicio y mantenimiento han de
ser efectuadas por personal cualificado
Opgelet: Laat de installatie, de configuratie, de inbedrijfstelling en het onderhoud door gekwalificeerd
personeel verrichten
Atenção: As operações de instalação, configuração, colocação em serviço e manutenção devem ser
realizadas por pessoal qualificado

Video - Kit
3
• Vecchio impianto a campanello
Impianto esistente con 3 fili e sola chiamata.
• Old system with bell
Existing system with 3 wires and just call.
• Ancienne installation a sonnette
Installation existante à 3 fils et un seul appel.
• Alte klingelanlage
Vorhandene 3-Leiter Anlage nur mit Ruffunktion.
• Vieja instalación con timbre
Instalación existente con 3 hilos y una llamada.
• Oude deurbelinstallatie
Bestaande 3-aderige installatie met alleen een
oproepfunctie.
• Antiga instalação em campaínha
Instalação existente com 3 fios e somente
chamada.
230 Vac 12 V
230 Vac
• Nuovo impianto citofonico
Impianto realizzato senza modifiche ai 2 fili
esistenti: chiamata, videocitofono e serratura.
• New door entry system
System made without modifications to the 2 existing
wires; call, video handset and electric door lock.
• Nouvelle installation phonique
Installation réalisée sans modifications sur les 2 fils
existants: appel, vidéophone, et serrure électrique.
• Neue haustelefonanlage
Anlage ohne Änderungen an den vorhandenen 2 Leiter:
Ruffunktion, Gegensprechanlage und elektrisches Schloss.
• Nueva instalación interfónica
Instalación realizada sin las modificaciones a los 2 hilos
existentes: llamada, videoportero y cerradura eléctrica.
• Nieuwe deurtelefooninstallatie
Installatie aangelegd zonder wijzigingen aan de
2 bestaande aders: oproep, beeldhuistelefoon en
elektrisch deurslot.
• Nova instalação do intercomunicador
Instalação realizada sem modificar os 2 fios existentes:
chamada, intercomunicador vídeo e fechadura eléctrica.
*
Acquistabile separatamente
*
Can be purchased separately
*
Vendu séparément
*
Auf Anfrage getrennt erhältlich
*
A la venta por separado
*
Apart verkrijgbaar
*
Adquirível separadamente
230 Vac 12 V
230 Vac
*

4
• Cavi e distanze (mm
2
)
• Cables and distances (mm
2
)
• Câbles et distances (mm
2
)
• Kabeln und Abstände (mm
2
)
• Cables y distancias (mm
2
)
• Kabels en afstanden (mm
2
)
• Cabos e distâncias (mm
2
)
B C
A
D
• Installazione no a 3 PI
• Installation of up to 3 handsets
• Montage jusqu’à 3 PI
• Installation von bis zu 3 Türstationen
• Instalación con un máximo de 3 PI
• Installatie tot 3 PI
• Instalação até 3 UI
>0,2 mm
2
BTicino
L4669
0,35 mm
2
0,28 mm
2
BTicino
C9881U/5E
AWG24 UTP5
BTicino
336904
One PTT
278 TP
0,28 mm
2
OneSYT
+ Digital
TP
5/10
OneSYT
+ Num TP
5/10
GIGA TW
CAT5E
AWG24
One SYT
+ Num TP
8/10
Cable
ARB.6060-1
6/10
Cable
EV6R
6/10
1
mm
2
A 50 m 140 m 150 m 200 m 200 m 145 m 200 m 50 m –
B 50 m 115 m 80 m 200 m 115 m 80 m 200 m 50 m –
C 50 m 130 m 80 m 200 m 100 m 80 m 200 m 50 m –
D 30 m 30 m – 50 m 30 m – – – 100 m

Video - Kit
5
• A Pulsante locale apertura serratura.
B Chiamata al piano.
S+ S- 18 V; 4 A impulsivi. 250 mA mantenimento (30 Ω max).
• A Door lock release local pushbutton.
B Floor call.
S+ S- 18 V; 4 A impulsive. 250 mA holding current (30 Ω max).
• A Bouton local ouverture serrure.
B Appel à l’étage.
S+ S- 18 V; 4 A impulsifs. 250 mA entretien (30 Ω max).
• A Lokale Schlossöffnungstaste.
B Etagenruf.
S+ S- 18 V; 4 A impulsstrom. 250 mA Haltestrom (30 Ω max).
• A Pulsador local apertura cerradura.
B Llamada al piso.
S+ S- 18 V; 4 A por impulsos. 250 mA mantenimiento (30 Ω max).
• A Lokale knop opening slot.
B Oproep aan verdieping.
S+ S- 18 V; 4 A impulsief; 250 mA onderhoud (30 Ω max).
• A Botão local de abertura da fechadura.
B Chamada ao piso.
S+ S- 18 V; 4 A instantâneos. 250 mA continuos (30 Ω max).
•
Schema monofamiliare
•
One-family diagram
•
Schéma mono-familial
•
Schema Einfamilienhaus
•
Esquema monofamiliar
•
Schema eensgezins
•
Esquema monofamiliar
N
= –
= –
T = –
S = –
P
= –
–
=
B
P
= –
= –
= –
M
N
= –
= –
=
= –
BUS
PL S+
S-
A
2
1
OFF ON
5M 12 1
BUS
1
Bifamiliare - Two family
Monofamiliare - One family

6
* • Il secondo posto interno ed il configuratore 3501/1 devono essere acquistati separatemente.
• The second internal unit and the 3501/1 configurator must be purchased separately.
• Le deuxième poste interne et le configurateur 3501/1 doivent être achetés séparément.
• Die zweite Hausstation und der Konfigurator 3501/1 werden getrennt verkauft.
• La segunda unidad interior y el configurador 3501/1 se han de comprar por separado.
• De tweede binnenpost en de configurator 3501/1 moeten apart worden gekocht.
• A segunda unidade interna e o configurador 3501/1 devem ser adquiridos separadamente.
BUS
PL S+
S-
N
= –
= –
T = –
S = –
P
= –
–
=
2
1
A
P
= –
= –
= –
M
N
= –
=
=
= –
*1
B
OFF ON
5M 12 1
BUS
1
P
= –
= –
= –
M
N
= –
=
=
= –
B
OFF ON
5M 12 1
BUS
1
–
*
Bifamiliare - Two family
Monofamiliare - One family
• Schema bifamiliare
• Two-family diagram
• Schéma bi-familiale
• Schema Zweifamilienhaus
• Esquema bifamiliar
• Schema tweegezins
• Esquema bifamiliar
• A Pulsante locale apertura serratura.
B Chiamata al piano.
S+ S- 18 V; 4 A impulsivi. 250 mA mantenimento (30 Ω max).
• A Door lock release local pushbutton.
B Floor call.
S+ S- 18 V; 4 A impulsive. 250 mA holding current (30 Ω max).
• A Bouton local ouverture serrure.
B Appel à l’étage.
S+ S- 18 V; 4 A impulsifs. 250 mA entretien (30 Ω max).
• A Lokale Schlossöffnungstaste.
B Etagenruf.
S+ S- 18 V; 4 A impulsstrom. 250 mA Haltestrom (30 Ω max).
• A Pulsador local apertura cerradura.
B Llamada al piso.
S+ S- 18 V; 4 A por impulsos. 250 mA mantenimiento (30 Ω max).
• A Lokale knop opening slot.
B Oproep aan verdieping.
S+ S- 18 V; 4 A impulsief; 250 mA onderhoud (30 Ω max).
• A Botão local de abertura da fechadura.
B Chamada ao piso.
S+ S- 18 V; 4 A instantâneos. 250 mA continuos (30 Ω max).

Video - Kit
7
• Schema bifamiliare 2
• Two-family diagram 2
• Schéma bi-familiale 2
•
Schema Zweifamilienhaus 2
• Esquema bifamiliar 2
• Schema tweegezins 2
• Esquema bifamiliar 2
BUS
PL S+
S-
N
= –
= –
T = –
S = –
P
= –
–
=
2
1
A
B
5M 12 1
BUS
1
P
= –
= –
= –
M
N
= –
=
=
= –
–
OFF ON
B
5M 12 1
BUS
1
P
= –
= –
= –
M
N
= –
=
=
= –
*1
OFF ON
* • Il secondo posto interno ed il configuratore 3501/1 devono essere acquistati separatemente.
• The second internal unit and the 3501/1 configurator must be purchased separately.
• Le deuxième poste interne et le configurateur 3501/1 doivent être achetés séparément.
• Die zweite Hausstation und der Konfigurator 3501/1 werden getrennt verkauft.
• La segunda unidad interior y el configurador 3501/1 se han de comprar por separado.
• De tweede binnenpost en de configurator 3501/1 moeten apart worden gekocht.
• A segunda unidade interna e o configurador 3501/1 devem ser adquiridos separadamente.
Bifamiliare - Two family
Monofamiliare - One family
*
• A Pulsante locale apertura serratura.
B Chiamata al piano.
S+ S- 18 V; 4 A impulsivi. 250 mA mantenimento (30 Ω max).
• A Door lock release local pushbutton.
B Floor call.
S+ S- 18 V; 4 A impulsive. 250 mA holding current (30 Ω max).
• A Bouton local ouverture serrure.
B Appel à l’étage.
S+ S- 18 V; 4 A impulsifs. 250 mA entretien (30 Ω max).
• A Lokale Schlossöffnungstaste.
B Etagenruf.
S+ S- 18 V; 4 A impulsstrom. 250 mA Haltestrom (30 Ω max).
• A Pulsador local apertura cerradura.
B Llamada al piso.
S+ S- 18 V; 4 A por impulsos. 250 mA mantenimiento (30 Ω max).
• A Lokale knop opening slot.
B Oproep aan verdieping.
S+ S- 18 V; 4 A impulsief; 250 mA onderhoud (30 Ω max).
• A Botão local de abertura da fechadura.
B Chamada ao piso.
S+ S- 18 V; 4 A instantâneos. 250 mA continuos (30 Ω max).

8
• A Pulsante locale apertura serratura.
S+ S- 18 V; 4 A impulsivi. 250 mA mantenimento (30 Ω max).
• A Door lock release local pushbutton.
S+ S- 18 V; 4 A impulsive. 250 mA holding current (30 Ω max).
• A Bouton local ouverture serrure.
S+ S- 18 V; 4 A impulsifs. 250 mA entretien (30 Ω max).
• A Lokale Schlossöffnungstaste.
S+ S- 18 V; 4 A impulsstrom. 250 mA Haltestrom (30 Ω max).
• Opzione serratura a relè
• Relay door lock option
• Option serrure à relais
• Option Relais-Schloss
• Opción cerradura de relé
• Optie relaisslot
• Opção trinco de relê
BUSPL S+
S-
N
= –
= –
T = –
S = –
P
= –
–
=
8 A cosφ = 1
4 A cosφ = 0,7
3 A cosφ = 0,4
24 Vdc; 24 Vac
24 Vac
24 Vac
NO
NC
C
346250 (*)
S-
S+
C
NC
NO
A
* Acquistabile separatamente
* Can be purchased separately
* Vendu séparément
* Auf Anfrage getrennt erhältlich
* A la venta por separado
* Apart verkrijgbaar
* Adquirível separadamente
• A Pulsador local apertura cerradura.
S+ S- 18 V; 4 A por impulsos. 250 mA mantenimiento (30 Ω max).
• A Lokale knop opening slot.
S+ S- 18 V; 4 A impulsief; 250 mA onderhoud (30 Ω max).
• A Botão local de abertura da fechadura.
S+ S- 18 V; 4 A instantâneos. 250 mA continuos (30 Ω max).
• A Pulsador local apertura cerradura.
S+ S- 18 V; 4 A por impulsos. 250 mA mantenimiento (30 Ω max).
• A Lokale knop opening slot.
S+ S- 18 V; 4 A impulsief; 250 mA onderhoud (30 Ω max).
• A Botão local de abertura da fechadura.
S+ S- 18 V; 4 A instantâneos. 250 mA continuos (30 Ω max).

Video - Kit
9
• Dati dimensionali
• Dimensional data
• Données
dimensionnelles
• Maße
• Datos dimensionales
• Formaatgegevens
• Dados dimensionais
190 mm
100 mm 26 mm
164 mm
165 mm
20,5 mm
• Campo di ripresa
• Field of view
• Éclairage cadrage caméra
• Aufnahmebereich
• Campo de filmación
• Campo de filmagem
• Opnameveld
50 cm
105°
140 cm
80°
115 cm
50cm
• Altezza consigliata salvo diversa normativa vigente.
• Recommended height, unless different regulations are specified.
• Hauteur conseillée sauf autre norme en vigueur.
• Empfohlene Höhe falls die gesetzlichen Vorschriften nichts anderes vorschreiben.
• Altura recomendada salvo normativa vigente diferente.
• Aanbevolen hoogte behoudens andere normen in voege.
• Altura aconselhada a não ser se a norma em vigor for diferente.
160 – 165 cm
90 – 130 cm

10
• Posto esterno
• Entrance panel
• Poste extérieur
• Türstation
• Placa exterior
• Externe plaats
• Unidade externa
1
2
3
4
12
11
10
9
8
7
6
5
1 - Morsetti di collegamento
2 - Pulsanti di chiamata
3 - LED connessione attiva
4 - LED indicazione porta aperta
5 - Microfono
6 - Regolazione microfono
7 - Regolazione altoparlante
8 - Switch mono/bifamiliare
9 - Pannello LED per illuminazione
pulsante di chiamata
10 - Sede dei configuratori
11 - Sensore di luminosità per
retroilluminazione notturna
12 - Altoparlante
1 - Bornes de branchement
2 - Boutons d’appel
3 - Voyant connexion active
4 - Voyant indication porte ouverte
5 - Micro
6 - Réglage micro
7 - Réglage haut-parleur
8 - Commutateur mono/bi-familial
9 - Panneau Voyant d’éclairage
bouton d’appel
10 - Logement des configurateurs
11 - Capteur de luminosité pour
rétro-éclairage nocturne
12 - Haut-parleur
1 - Connection clamp
2 - Call pushbuttons
3 - Active connection LED
4 - Open door notification LED
5 - Microphone
6 - Microphone adjustment
7 - Loudspeaker adjustment
8 - One-family/two-family switch
9 - LED panel for call pushbutton
lighting
10 - Configurator socket
11 - Brightness sensor for night
backlighting
12 - Loudspeaker
1 - Aansluitklemmen
2 - Oproepknoppen
3 - Led verbinding geactiveerd
4 - Led aanduiding deur geopend
5 - Microfoon
6 - Regeling microfoon
7 - Regeling luidspreker
8 - Schakelaar een-/tweegezins
9 - Led paneel voor verlichting
oproepknop
10 - Plaats van de configuratoren
11 - Lichtsensor voor achtergrond-
verlichting ‘s nachts
12 - Luidspreker
1 - Anschlussklemmen
2 - Ruftasten
3 - LED Verbindung aktiv
4 - LED Anzeige Tür offen
5 - Mikrophon
6 - Einstellung des Mikrophons
7 - Einstellung des Lautsprechers
8 - Switch Ein-/Zweifamilienhaus
9 - LED-Tafel zur Beleuchtung
der Ruftaste
10 - Sitz der Konfiguratoren
11 - Helligkeitssensor zur
nächtlichen Rückbeleuchtung
12 - Lautsprecher
1 - Bornes de conexão
2 - Botões de chamada
3 - LED de conexão ativa
4 - LED indicação de porta aberta
5 - Microfone
6 - Regulação do microfone
7 - Regulação do altifalante
8 - Interruptor mono/bifamiliar
9 - Painel LED para iluminação
do botão de chamada
10 - Sede dos configuradores
11 - Sensor de luminosidade para
retroiluminação noturna
12 - Altifalante
1 - Bornes de conexión
2 - Pulsadores de llamada
3 - LED conexión activada
4 - LED indicación puerta abierta
5 - Micrófono
6 - Regulación del micrófono
7 - Regulación del altavoz
8 - Switch mono/bifamiliar
9 - Panel LED para iluminación
pulsador de llamada
10 - Alojamiento de los
configuradores
11 - Sensor de luminosidad para
retroiluminación nocturna
12 - Altavoz

Video - Kit
11
• Posto interno
• Handset
• Poste interne
• Hausstation
• Unidad interior
• Intern punt
• Unidade interna
Alla pressione i tasti si illuminano ed emettono un
“beep” (disattivabile da procedura).
1. Altoparlante
2. Display 5” (16:9)
3. LED indicazione segnale WI-FI
LED rosso lampeggiante: WI-FI attivo ma non
connesso ad una rete
LED spento: WI-FI disabilitato o correttamente
funzionante
LED rosso sso: il Classe100 X16E sta scambiando dati
con l’App Door Entry CLASSE100X (autoaccensione)
4. LED segnalazione esclusione suoneria
LED rosso lampeggiante: suoneria esclusa
5. Tasti a soramento programmabili *
6. Tasto a soramento apertura serratura *
LED bianco lampeggiante: funzione “studio
professionale” attiva
7. Tasto a soramento per attivazione posto estero
/ ciclamento
8. Guide tattili per non vedenti
9. Tasto disattivazione comunicazione
LED rosso lampeggiante: chiamata in corso
10. Microfono
11. Tasto a soramento luci scale
12. Tasto attivazione comunicazione
LED verde lampeggiante: chiamata in arrivo
* Se alla pressione, i LED lampeggiano bianco, è
attiva la funzione "serratura sicura" ed il tasto è
disattivato.
Dispositivo wireless conforme allo standard 802.11
b/g/n, frequenza 2.4 – 2.4835 GHz.
Potenza di trasmissione < 20 dBm. Protocollo sicurezza:
WEP/WPA/WPA2
2
9
4
3
5*
7
6*
10
8
1
12
11
When pressed, the keys light up and emit a “beep”
(that can be deactivated by procedure).
1. Loudspeaker
2. 5” (16:9) display
3. Wi-Fi signal notication LED
Red LED ashing: WI-FI on but not connected to
the network
LED o: WI-FI disabled or working correctly
Red LED on steady: Classe100 X16E is exchang-
ing data with the Door Entry CLASSE100X App
(automatic switch on)
4. Bell exclusion notication LED
Red LED ashing: bell excluded
5. Programmable touch keys *
6. Door lock release touch key *
White LED ashing: active Professional Studio
(Oce) function
7. Entrance panel / scrolling activation touch key
8. Tactile guides for the blinds
9. Communication disabling key
Red LED ashing: call in progre
10. Microphone
11. Staircase light touch key
12. Communication enabling key
Green LED ashing: incoming call
* If the LEDs flash white when pressed, the “safe
door lock” function is active and the key is deac-
tivated.
Wireless device in compliance with 802.11b/g/n stand-
ard, frequency 2.4 – 2.4835 GHz.
Transmission power < 20 dBm. WEP/WPA/WPA2 safety
protocol.

12
À la pression, les touches s’illuminent et émettent un
«bip» (désactivable à travers la procédure prévue à
cet eet).
1. Haut-parleur
2. Écran 5” (16:9)
3. Voyant indication signal WI-FI
Voyant rouge clignotant: WI-FI actif mais non
connecté à un réseau
Voyant éteint: WI-FI désactivé ou fonctionnant
correctement
Voyant rouge xe: le dispositif Classe100 X16E
échange des données avec l’appli Door Entry
CLASSE100X (auto-allumage)
4. Voyant de signal exclusion sonnerie
Voyant rouge clignotant : sonnerie exclue
5. Touche à eeurement programmables (*)
6. Touche à eeurement d’ouverture serrure (*)
Voyant blanc clignotant: fonction «bureau»
active
7. Touche à eeurement d’activation poste
externe/cyclage
8. Guides tactiles pour non-voyants
9. Touche désactivation communication
Voyant rouge clignotant : appel en cours
10. Micro
11. Touche à eeurement lumières escaliers
12. Touche activation communication
Voyant vert clignotant : arrivée d’un appel
(*) Si, à la pression, les voyants clignotent sur le
blanc, la fonction «serrure sécurisée» est active
et la touche est désactivée.
Dispositif sans l conforme au standard 802.11
b/g/n, fréquence 2.4 – 2.4835 GHz.
Puissance de transmission < 20 dBm.
Protocole de sécurité WEP/WPA/WPA2.
Bei Betätigung leuchten die Tasten auf und geben
einen „Piepton“ ab (kann durch eine Prozedur
deaktiviert werden.)
1. Lautsprecher
2. Display 5” (16 : 9)
3. LED-Anzeige des WI- FI-Signals
Rote LED blinkend: WI- FI aktiv aber nicht mit
einem Netz verbunden
LED ausgeschaltet: Wi-Fi deaktiviert oder richtig
Betrieb
Rote LED fest leuchtend: das Gerät
Classe100X16E tauscht Daten mit der App
Door Entry CLASSE100X aus (automatisches
Einschalten)
4. LED- Meldung Läutwerk ausgeschlossen
Rote LED blinkt: Läutwerk ausgeschlossen
5. Programmierbare Berührungstasten *
6. Berührungstaste Schlossöner *
Weiße Led blinkt: Funktion „Büro“ aktiv
7. Berührungstaste zum Aktivieren der Türstation
und Taktieren
8. Taktile Hilfe für Sehbehinderte
9. Taste zur Deaktivierung der Kommunikation
Rote LED blinkt: Anruf im Gang
10. Mikrophon
11. Berührungstaste Treppenlicht
12. Taste zur Aktivierung der Kommunikation
Grüne LED blinkt: eintreen eines Anrufs
* Wenn die LEDs beim Drücken weiß blinken, ist
die Funktion „Schloss-Sicherheit“ aktiv und die
Taste ist deaktiviert.
Wireless-Gerät, entspricht dem Standard
802.11/b/g/n, Frequenz 2,4 – 2.4835 GHz.
Übertragungsleistung <20 dBm.
Sicherheitsprotokoll WEP/WPA/WPA2.
2
9
4
3
5*
7
6*
10
8
1
12
11

Video - Kit
13
Con la presión, los botones se iluminan y emiten un
“beep” (desactivable según el procedimiento.).
1. Altavoz
2. Pantalla 5” (16:9)
3. LED de indicación de la señal WI-FI
LED rojo parpadeante: WI-FI activado, pero no
conectado a una red
LED apagado: WI-FI deshabilitado o
correctamente en marcha
LED rojo jo = el Classe100X16E está cruzando
datos con la App Door Entry CLASSE100X
(autoencendido)
4. LED de señalización de exclusión timbre
LED rojo parpadeante: timbre excluido
5. Botones de membrana programables *
6. Botón de membrana apertura cerradura*
LED blanco parpadeante: función “Estudio
profesional” activa
7. Botón de membrana para activación placa de
exterior / vista cíclica
8. Guías táctiles para invidentes
9. Botón desactivación comunicación
LED rojo parpadeante: llamada corriente
10. Micrófono
11. Botón de membrana luces escaleras
12. Botón activación comunicación
LED verde parpadeante: llamada entrante
* Si con la presión, los LEDs parpadean en color
blanco, se activa la función “cerradura segura” y el
botón se desactiva.
Dispositivo inalámbrico en cumplimiento de la norma
802.11 b/g/n, frecuencia 2.4 – 2.4835 GHz.
Potencia de transmisión < 20 dBm.
Protocolo de seguridad WEP/WPA/WPA2.
Ao carregar as teclas iluminam-se e emitem um “bip”
(pode ser desativado através de procedimento.)
1. Altifalante
2. Ecrã 5” (16:9))
3. LED indicação sinal WI- FI
LED vermelho intermitente: WI-FI ativo, mas não
conectado a uma rede
LED desligado: WI-Fi desabilitado ou a funcionar
corretamente
LED vermelho xo: o Classe100X16E está a trocar
dados com a App Door Entry CLASSE100X (envio
de ligação automática)
4. LED de sinalização de exclusão da campainha
LED vermelho intermitente: campainha excluída
5. Teclas de toque programáveis *
6. Tecla de toque abertura da fechadura *
Led branco a piscar: função “estúdio prossional”
ativa
7. Tecla de toque para ativação unidade externa /
ativação cíclica
8. Guias táteis para não videntes
9. Tecla de desactivado de comunicação
LED vermelho intermitente: chamada em
andamento
10. Microfone
11. Tecla de toque luzes das escadas
12. Tecla de ativação de comunicação
LED verde intermitente: chamada em chegada
* Se ao carregar, os LED piscam em branco, está
ativa a “fechadura segura” e a tecla é desativada.
Draadloos apparaat overeenkomstig de 802.11 b/g/n,
frequentie 2.4 – 2.4835 GHz.
Zendvermogen < 20 dBm.
Veiligheidsprotocol WEP/WPA/WPA2
De toetsen gaan branden en laten een “piep” (kan
met de procedure gedeactiveerd worden) horen
wanneer erop gedrukt wordt.
1. Luidspreker
2. Display 5” (16:9)
3. LED aanduiding kwaliteit wi-signaal
Rode LED knippert: Wi geactiveerd maar niet
met een netwerk verbonden
LED uit: Wi gedeactiveerd of werkt correct
Rode LED brandt = Classe100X16E wisselt
gegevens uit met de Door Entry CLASSE100X-app
(automatische inschakeling)
4. Led melding uitsluiting beltoon
Rode led knippert : beltoon uitgesloten
5. Programmeerbare touch-toetsen*
6. Touch-toetsen slotontgrendeling*
Witte led knippert: functie “professionele studio”
geactiveerd
7. Touch-toets voor activering buitenpost/cyclische
weergave
8. Tastgeleiders voor blinden
9. Toets deactivering communicatie
Rode led knippert : lopende oproep
10. Microfoon
11. Touch-toets traphuisverlichting
12. Toets activering communicatie
Groen led knippert: binnenkomende oproep
* De functie “veilig slot” is geactiveerd en de toets
is gedeactiveerd als de witte leds knipperen
wanneer op de toets gedrukt wordt.
Dispositivo sem os de acordo com o padrão 802.11
b/g/n, frequência 2.4 – 2.4835 GHz.
Potência de transmissão < 20 dBm. Protocolo de
segurança WEP/WPA/WPA2.

14
1. Prise mini USB de mise à jour Firmware dispositif
2. Microinterrupteur ON/OFF fonction «serrure
sécurisée».
ON=
Activer la fonction avec le dispositif non
alimenté
3. Logement des configurateurs.
4. Microinterrupteur ON/OFF de fin de ligne.
5. Micro-interrupteur ON/OFF d’activation
alimentation supplémentaire
6. Bornes de branchement au BUS SCS 2 fils
7. Bornes de branchement d’un bouton externe
d’appel à l’étage
P
M
N
BTICINO
V.le Borri, 231
21100 (VA) ITALY
Made in Italy
2 1 5M 1
BUS
2-1
ON
OFF
MasterSlave
ON
CTS
1
2
8. Bornes (1 - 5M) de branchement sonnerie
supplémentaire. Le branchement doit être
effectué point - point sur les bornes des sonneries
supplémentaires
9. Bornes (2 – 1) d'alimentation supplémentaire
10. Joystick pour réglages et programmations
1. Presa mini USB per aggiornamento Firmware
dispositivo
2. Microinterruttore ON / OFF funzione “serratura
sicura”
ON=
Attivare la funzione con dispositivo non
alimentato
3. Sede dei configuratori
4. Microinterruttore ON / OFF di terminazione di
tratta
5. Microinterruttore ON / OFF per abilitazione
alimentazione supplementare
6. Morsetti per il collegamento al BUS SCS 2 FILI
7. Morsetti per il collegamento di un pulsante
esterno di chiamata al piano
P
M
N
BTICINO
V.le Borri, 231
21100 (VA) ITALY
Made in Italy
2 1 5M 1
BUS
2-1
ON
OFF
MasterSlave
ON
CTS
1
2
8. Morsetti (5M – 1) per collegamento suoneria
supplementare. Il collegamento deve essere
effettuato punto - punto sui morsetti della
suonerie supplementari
9. Morsetti (2 – 1) per alimentazione supplementare
10. Joystick per regolazioni e programmazioni
• Posto interno
• Handset
• Poste interne
• Hausstation
• Unidad interior
• Intern punt
• Unidade interna
1. Mini USB socket for device Firmware update
2. ON / OFF micro-switch for “safe door lock”
function
ON=
To activate the function with device not
powered
3. Configurator socket.
4. Line termination ON / OFF micro-switch.
5. Additional power supply enable ON / OFF micro
switch
6. 2 wires SCS BUS connection clamps.
7. Clamps for the connection of an external call to
the floor pushbutton
P
M
N
BTICINO
V.le Borri, 231
21100 (VA) ITALY
Made in Italy
2 1 5M 1
BUS
2-1
ON
OFF
8. Additional bell connection clamps (1 - 5M). The
connection must be point - point on the clamps
of the additional bells
9. Additional power supply clamps (2– 1)
10. Joystick for adjustments and programming
P
M
N
BTICINO
V.le Borri, 231
21100 (VA) ITALY
Made in Italy
2 1 5M 1
BUS
2-1
ON
OFF
1
3
456 7 8 9 10
2

Video - Kit
15
1. Mini-USB-Steckbuchse zur Aktualisierung der
Firmware der Vorrichtung
2. Mikroschalter ON / OFF für die Funktion „Schloss-
Sicherheit“
ON=
Die Funktion mit stromloser Vorrichtung
aktivieren
3. Sitz der Konfiguratoren.
4. Mikroschalter ON / OFF am Ende der Strecke.
5. Mikroschalter ON/OFF für die Freigabe einer
zusätzlichen Versorgung
6. Klemmen zum Anschluss an BUS, SCS, 2-Draht
7. Klemmen zum Anschluss an eine externe
Etagenruftaste
P
M
N
BTICINO
V.le Borri, 231
21100 (VA) ITALY
Made in Italy
2 1 5M 1
BUS
2-1
ON
OFF
8. Klemmen (1 - 5M) zum Anschluss an ein
zusätzliches Läutwerk. Der Anschluss muss Punkt
zu Punkt an den Klemmen der zusätzlichen
Läutwerke erfolgen
9. Klemmen (2 - 1) für eine zusätzliche
Stromversorgung
10. Joystick für Regelung und Programmierung
1. Tomada mini USB para atualização do Firmware
do dispositivo
2. Microinterruptor ON / OFF função “fechadura
segura”.
ON=
Ativar a função com dispositivo não alimentado
3. Sede dos configuradores.
4. Micro-interruptor OFF / ON de terminação do
segmento.
5. Micro-interruptor ON/OFF para ativação de
alimentador adicional
6. Bornes para a conexão ao BUS SCS DE 2 fios.
7. Bornes para a conexão de um botão externo de
chamada no piso
P
M
N
BTICINO
V.le Borri, 231
21100 (VA) ITALY
Made in Italy
2 1 5M 1
BUS
2-1
ON
OFF
8. Bornes (1 - 5M) para a conexão de uma campainha
adicional. É necessário realizar uma conexão
ponto-a-ponto nos bornes das campainhas
adicionais
9. Bornes (2 – 1) para alimentação adicional
10. Joystick para regulações e programações
1. Mini-UBS-aansluiting voor de update van de
firmware van het apparaat
2. Microschakelaar ON / OFF functie “veilig slot”.
ON=
Activeer de functie wanneer het apparaat niet
wordt gevoed
3. Plaats van de configuratoren.
4. Microschakelaar ON / OFF voor de afsluiting van
het traject.
5. Microschakelaar ON / OFF voor de activering van
de extra voeding
6. Aansluitklemmen voor de verbinding met de SCS
2-Draads BUS
7. Aansluitklemmen voor de verbinding van een
externe knop op de verdieping
P
M
N
BTICINO
V.le Borri, 231
21100 (VA) ITALY
Made in Italy
2 1 5M 1
BUS
2-1
ON
OFF
MasterSlave
ON
CTS
1
2
8. Aansluitklemmen (1 - 5M) voor de verbinding
van een extra beltoon. Verricht een punt - punt
verbinding op de aansluitklemmen van de extra
beltonen
9. Aansluitklemmen (2 - 1) voor extra voeding
10. Joystick voor regelingen en programmeringen
1. Toma mini USB para actualización del firmware
del dispositivo
2. Microinterruptor ON / OFF función "cerradura
segura".
ON=
Activar la función con dispositivo no alimentado
3. Alojamiento de los configuradores.
4. Microinterruptor ON / OFF final de tramo.
5. Microinterruptor ON/OFF para habilitación de la
alimentación adicional
6. Bornes para la conexión al BUS SCS 2 hilos
7. Bornes para la conexión de un pulsador externo
de llamada a la planta
P
M
N
BTICINO
V.le Borri, 231
21100 (VA) ITALY
Made in Italy
2 1 5M 1
BUS
2-1
ON
OFF
MasterSlave
ON
CTS
1
2
.
8. Bornes (1 - 5M) para la conexión de un timbre
adicional. Se ha de efectuar la conexión punto -
punto en los bornes de los timbres adicionales
9. Bornes (2 - 1) para alimentación adicional
10. Joystick para regulaciones y programaciones

16
• Installazione posto esterno
• Entrance panel installation
•
Installation du poste extérieur
• Installation der Türstation
•
Instalación de la placa exterior
• Installatie externe plaats
•
Instalação da unidade externa
** Prima dell’installazione assicurarsi che la vite sia completamente avvitata.
** Before installing make sure that the screw is completely tightened.
** Avant l’installation, s’assurer que la vis soit complètement vissée.
** Vor der Installation sicherstellen, dass die Schraube richtig festgeschraubt ist.
** Antes de la instalación, compruebe que el tornillo esté completamente
enroscado.
** Vóór de installatie controleren of de schroef volledig vastgedraaid is.
** Antes da instalação vericar se o parafuso está completamente atarraxado.
*
*
1
**
2
3
4
* Per garantire l’impermeabilità montare le guarnizioni a corredo.
* To guarantee water tightness make sure to t the seals supplied.
* Pour garantir l’imperméabilité, monter les joints fournis à cet eet.
* Um die Abdichtung sicherzustellen, montieren Sie die mitgelieferten Dichtungen.
* Montar las juntas de la dotación para garantizar la impermeabilidad.
* Monteer de geleverde pakkingen om de waterdichtheid te waarborgen.
* Para garantir a impermeabilidade, montar as vedações fornecidas juntamente.
5

Video - Kit
17
1
2
3
4
5

18
• Se si manifestasse il disturbo del fischio, (effetto Larsen), ridurre prima la potenza del microfono , agendo
con un cacciavite sul potenziometro corrispondente, fino ad un livello accettabile. Qualora il fenomeno persi-
sta, agire sul potenziometro dell’altoparlante in modo da eliminare l’inconveniente. Se il volume è troppo
basso, aumentare prima il volume dell’altoparlante ed eventualmente anche quello del microfono, tenendo
presente che è preferibile una trasmissione chiara e priva di disturbi, che una al limite dell’innesco (Larsen).
• In case of a whistle (Larsen effect), first reduce the microphones
power, adjusting the corresponding potenti-
ometers with a screw driver, until an acceptable level is reached. Should the whistle persist, adjust the loudspeakers
volume in order to eliminate the trouble. If the volume is too low level then, increase first the potentiometer of
the loudspeaker and secondly the one for the microphone, bearing in mind that a clear and noise free reception is
preferable than one just before whistling (Larsen).
• Lors de sifflement (effet de Larsen), reduire d’abord la puissance du micro
sur le potentiomètre corres-
pondant, à l’aide d’un tournevis, jusqu’à l’obtention d’un niveau satisfaisant. Si le sifflement persiste, régler
le potentiomètre du hautparleur
jusqu’à l’élimination de celui-ci. Si le volume est trop bas, augmenter
d’abord la puissance du haut-parleur et éventuellement celle du micro, en considérant qu’une réception
claire et sans parasite est préférable à une communication à la limite de l’accrochage (effet de Larsen).
• Beim etwaigen Auftreten eines Pfeiftones (Larsen-Effekt), zuerst die Lautstärke des Mikrophones
bis auf einen
annehmbaren Wert herabsetzen, indem man das entsprechende Potentiometer mit einem Schraubendreher ein-
stellt. Sollte die Störung weiterhin bestehen, dann das Potentiometer des Lautsprechers
bis zur Beseitigung des
Pfeiftones einstellen. Ist die Lautstärke nun zu niedrig, dann zuerst die des Lautsprechers und erst danach evtl. auch
die des Mikrophones erhohen, wobei ein deutlicher und störungsfreier Empfang einem an der Störungsgrenze lie-
gendem (Larsen-Effekt) vorzuziehen ist.
• Si se manifesta el silbido de acoplamiento, (efecto Larsen), reducir primero la potencia del micrófono
, gi-
rando con un destornillador el potenciómetro correspondiente, hasta obtener un nivel aceptable. Si el
fenómeno persistiera, regular el potenciómetro del altavoz
hasta eliminar la interferencia. Si el volumen
es demasiado bajo, aumentar primero el volumen del altavoz y eventualmente también el del micrófono,
teniendo en cuenta que es preferible una transmissión clara y limpia de interferencias, que una al limite del
acoplo (Larsen).
• Als er een fluittoon hoorbaar is (effect van Larsen): verminder eerst het vermogen van de microfoon
met behulp
van een schroevendraaier zijn stroomregelaar zo te regelen dat de geluidssterkte van het gefluit aanvaardbaar
is. Als het verschijnsel niet verdwijnt, dan moet u ook de stroomregelaar van de luidspreker
bijstellen. Als de
geluidssterkte nu te klein is, verhoog dan eerst de geluidssterkte van de luidspreker en daarna eventueel ook die
van de microfoon, en denk er bij het bijstellen aan dat een duidelijk hoorbaar en ongestoord geluid beter is dan een
harder geluid op de grens van het Larsen effect.
• Se se manifestar uma interferência no som (efeito de Larsen), começar por diminuir a potência do microfone
, rodando o potenciómetro correspondente com uma chave de parafusos, até obter um nível aceitável.
Se o fenómeno persistir, regular o potenciómetro do altifalante
de modo a eliminar o problema. Se o
volume estiver demasiado baixo, começar por aumentar o volume do altifalante e depois, se necessário,
o do microfone, tendo presente que é melhor ter uma transmissão clara e sem interferências, que uma no
limiar de início de efeitos Larsen.
• Se si manifestasse il disturbo del fischio, (effetto Larsen), ridurre prima la potenza del microfono
, agendo
con un cacciavite sul potenziometro corrispondente, fino ad un livello accettabile. Qualora il fenomeno persi-
sta, agire sul potenziometro dell’altoparlante in modo da eliminare l’inconveniente. Se il volume è troppo
basso, aumentare prima il volume dell’altoparlante ed eventualmente anche quello del microfono, tenendo
presente che è preferibile una trasmissione chiara e priva di disturbi, che una al limite dell’innesco (Larsen).
• In case of a whistle (Larsen effect), first reduce the microphones
power, adjusting the corresponding potenti-
ometers with a screw driver, until an acceptable level is reached. Should the whistle persist, adjust the loudspeakers
volume in order to eliminate the trouble. If the volume is too low level then, increase first the potentiometer of
the loudspeaker and secondly the one for the microphone, bearing in mind that a clear and noise free reception is
preferable than one just before whistling (Larsen).
• Lors de sifflement (effet de Larsen), reduire d’abord la puissance du micro
sur le potentiomètre corres-
pondant, à l’aide d’un tournevis, jusqu’à l’obtention d’un niveau satisfaisant. Si le sifflement persiste, régler
le potentiomètre du hautparleur
jusqu’à l’élimination de celui-ci. Si le volume est trop bas, augmenter
d’abord la puissance du haut-parleur et éventuellement celle du micro, en considérant qu’une réception
claire et sans parasite est préférable à une communication à la limite de l’accrochage (effet de Larsen).
• Beim etwaigen Auftreten eines Pfeiftones (Larsen-Effekt), zuerst die Lautstärke des Mikrophones
bis auf einen
annehmbaren Wert herabsetzen, indem man das entsprechende Potentiometer mit einem Schraubendreher ein-
stellt. Sollte die Störung weiterhin bestehen, dann das Potentiometer des Lautsprechers
bis zur Beseitigung des
Pfeiftones einstellen. Ist die Lautstärke nun zu niedrig, dann zuerst die des Lautsprechers und erst danach evtl. auch
die des Mikrophones erhohen, wobei ein deutlicher und störungsfreier Empfang einem an der Störungsgrenze lie-
gendem (Larsen-Effekt) vorzuziehen ist.
• Si se manifesta el silbido de acoplamiento, (efecto Larsen), reducir primero la potencia del micrófono
, gi-
rando con un destornillador el potenciómetro correspondiente, hasta obtener un nivel aceptable. Si el
fenómeno persistiera, regular el potenciómetro del altavoz
hasta eliminar la interferencia. Si el volumen
es demasiado bajo, aumentar primero el volumen del altavoz y eventualmente también el del micrófono,
teniendo en cuenta que es preferible una transmissión clara y limpia de interferencias, que una al limite del
acoplo (Larsen).
• Als er een fluittoon hoorbaar is (effect van Larsen): verminder eerst het vermogen van de microfoon
met behulp
van een schroevendraaier zijn stroomregelaar zo te regelen dat de geluidssterkte van het gefluit aanvaardbaar
is. Als het verschijnsel niet verdwijnt, dan moet u ook de stroomregelaar van de luidspreker
bijstellen. Als de
geluidssterkte nu te klein is, verhoog dan eerst de geluidssterkte van de luidspreker en daarna eventueel ook die
van de microfoon, en denk er bij het bijstellen aan dat een duidelijk hoorbaar en ongestoord geluid beter is dan een
harder geluid op de grens van het Larsen effect.
• Se se manifestar uma interferência no som (efeito de Larsen), começar por diminuir a potência do microfone
, rodando o potenciómetro correspondente com uma chave de parafusos, até obter um nível aceitável.
Se o fenómeno persistir, regular o potenciómetro do altifalante
de modo a eliminar o problema. Se o
volume estiver demasiado baixo, começar por aumentar o volume do altifalante e depois, se necessário,
o do microfone, tendo presente que é melhor ter uma transmissão clara e sem interferências, que uma no
limiar de início de efeitos Larsen.

Video - Kit
19
- Dispositivo di comunicazione contactless operante alla frequenza di 125kHz. Potenza di trasmissione < 66dBuA/m a 10m.
- Contactless communication device which works at the frequency of 125kHz. Transmission power < 66dBuA/m at 10m
- Dispositif de communication sans contact qui fonctionne à la fréquence de 125kHz. Puissance de transmission < 66dBuA/m à 10m.
- Kontaktloses Kommunikationsgerät mit einer Frequenz von 125kHz. Übertragungsleistung 66dBuA/m in 10m
- Dispositivo de comunicación sin contacto que trabaje con la frecuencia de 125kHz. Potencia de transmisión < 66dBuA/m a 10m.
- Contactloos communicatieapparaat dat werkt met een frequentie van 125kHz. Zendvermogen < 66dBuA/m a 10m.
- Dispositivo de comunicação sem contato que atua na frequência de 125 kHz. Potência de transmissão < 66dBuA/m a 10m.
• Configurazione posto esterno
• Entrance panel configuration
• Configuration poste extérieur
• Konfiguration Türstation
• Configuración placa exterior
• Configuratie externe plaats
•
Configuração unidade externa
P T S N
P
- Possono non essere configurati.
- They do not need to be configured.
- Ils peuvent ne pas être configurés
- Brauchen nicht konfiguriert zu werden.
- Pueden no precisar configuración.
- Kunnen niet worden geconfigureerd.
- Podem não serconfigurados.
N
S
T
- Temporizzatore serratura (vedi tabella).
- Door lock timer relay (see table).
- Temporisation serrure (voir tableau).
- Zeitgeber schlossrelaiscerradura (siehe Tabelle).
- Temporizador relé cerradura (véase la tabla).
- Timer deurslotrelais (zie de tabel).
- Temporizador do relé da fechadura (veja a tabela).
– 1 2 3 4 * 5 6 7
4 s 1 s 2 s 3 s
**
6 s 8 s 10 s
• Tutte le volte che si modifica la configurazione è necessario togliere e ridare l’alimentazione all’impianto, attendendo circa 1 minuto.
• Every time the configuration is altered the system must be switched off and back on again, waiting for about 1 minute.
• Chaque fois que l’on modifie la configuration, il faut retirer, puis redonner l’alimentation à l’installation, après avoir attendu environ 1 minute.
• Jedes Mal, wenn die Konfiguration geändert wird, den Strom abschalten, etwa 1 Minute warten und dann wieder einschalten.
• Cada vez que modifica la configuración, es necesario cortar y volver a dar alimentación a la instalación, después de esperar aproximadamente 1 minuto.
• Na iedere wijziging in de configuratie moet de installatie ongeveer 1 minuut van het elektriciteitsnet worden afgesloten.
• Todas as vezes que se modificar a configuração é necessário ligar e desligar a instalação da energia eléctrica, esperando cerca de 1 minuto.
* Funzionamento come pulsante per max. 10 sec. dopodichè entra in stand-by. Per estendere tale funzionamento oltre i 10 sec. utilizzare l’attuatore 346210 configurato con MOD=5.
** Come pulsante da Posto Interno o Pulsante locale. 4S con apertura tramite Badge residenti.
* Operation as pushbutton for 10 sec. max after which it goes in stand-by. In order to extend this type of operation over 10 seconds, use the actuator, item 346210 configured with MOD=5.
** As pushbutton from Internal Unit or local Pushbutton. 4S with release using resident Key cards.
* Fonctionnement comme bouton pendant 10 sec. max., ensuite passe en stand-by. Pour étendre ce fonctionnement au-delà de 10 sec., utiliser l’actionneur 346210 configuré sur MOD=5.
** Comme bouton de Poste interne ou Bouton local. 4S avec ouverture avec Badges résidents.
* Die Tastenfunktion dauert max. 10 sec.; danach schaltet sie auf Standby. Um diese Funktion zu verlängern und mehr als 10 sec. dauern zu lassen, den Aktor 346210 verwen-
den und mit MOD=5 konfigurieren.
** Als Taste einer Hausstation oder als lokale Taste. 4S mit Öffnung durch das Badge der Bewohner.
* Funcionamiento como pulsador durante al máx.10 s. después se pone en standby. Para ampliar dicho funcionamiento a más de 10 s., use el actuador 346210 configura-
do con MOD = 5.
** Como pulsador en la unidad interior o pulsador local. 4S con apertura mediante una credencial de residentes.
* 10 sec. lange werking als knop, vervolgens vindt de overschakeling naar stand-by plaats. Laat deze functie langer dan 10 sec. duren met behulp van de actuator 346210 die
als MOD=5 is geconfigureerd.
** Als knop binnenpost of lokale knop. 4S met opening met inwonersbadge.
* Funcionamento como botão por um máximo de 10 segundos, depois disto dispõe-se em standby. Para prolongar este funcionamento por mais de 10 segundos, utilizar
o atuador 346210 configurado com MOD=5.
** Como botão de Unidade Interna ou Botão local. 4S com abertura por meio dos Crachás residentes.

20
• Nuovo badge gestore impianto
Per motivi di sicurezza è previsto un badge “Gestore“ programmato direttamente dall’installatore. Per accedere
alla programmazione di un badge “RESIDENTE” è necessario essere in possesso di un badge gestore impianto.
Il posto esterno segnalerà l’avvenuta accettazione o cancellazione del badge con segnali acustici e visivi dei
led presenti sul posto esterno.
La presentazione di un badge non riconosciuto o un errore di programmazione, comporta l’interruzione della
procedura e la segnalazione tramite un beep lungo e l’accensione dei LED connessione e serratura.
Nota: Il badge gestore impianto non comanda la serratura ma abilita solo la programmazione dei badge
residenti.
• New manager master badge
For safety reasons, a “MASTER” badge is required, directly programmed by the installer. To access the program-
ming of a “RESIDENT” badge you must be in possession of a system operator badge.
The entrance panel will notify that the badge has been accepted or deleted by means of sound notifications, as
well as visual indications using the LEDs on the entrance panel.
The presentation of an unrecognised badge or a programming error will lead to interruption of the procedure. A
signal will be given by means of a long beep and the connection and door lock LED will light up.
Note: the system management key card does not control the door lock but only enables the resident key card
programming.
• Nouveau badge master de gestion
Pour des raisons de sécurité, est prévu un badge “MASTER“ programmé directement par l’installateur. Pour
accéder à la programmation d’un badge «RÉSIDENT», il est nécessaire de disposer d’un badge master de ges-
tion installation.
Le poste externe signale l’acceptation ou l’élimination du badge par des signaux sonores et visuels et par l’allu-
mage des leds présents sur le poste externe.
La présentation d’un badge non reconnu ou une erreur de programmation provoque l’interruption de la pro-
cédure et l’émission d’un bip prolongé avec allumage des voyants connexion et serrure.
Note: le badge administrateur de l’installation ne commande pas la serrure mais active uniquement la pro-
grammation des badges résidents.
• Neuer Master-Verwaltungs-Badge
Aus Sicherheitsgründen ist ein „MASTER“-Badge vorgesehen, der direkt vom Installateur programmiert wird. Damit
können die anderen Badges (Bewohner) programmiert werden.
Die Türstation meldet die erfolgte Annahme oder Löschung des Badges durch akustische und visuelle Led-Signale,
die an derselben vorgesehen sind.
Das Vorlegen eines nicht erkennbaren Badges oder ein Programmierungsfehler, unterbricht die Prozedur und erzeu-
ge eine Meldung durch einen langen Piepton und das Aufleuchten der LED Verbindung und Schloss.
N.B.: das Badge Anlagenbetreiber steuert nicht das Schloss sondern aktiviert nur die Programmierung der Bewoh-
nerbadges.
• Nueva credencial maestra de administrador
Por razones de seguridad se prevé una credencial “maestra” programada directamente por el instalador. Para acce
-
der a programar una credencial “RESIDENTE” se ha de poseer una credencial de administrador del sistema.
La placa exterior indicará si acepta o cancela unacredencial con unaseñal acústica y visual de los leds incorporados
en la placa exterior.
La presentación de una credencial no reconocida o un error de programación interrumpe el procedimiento y se pro
-
duce la indicación mediante un beep largo y el encendido de los LEDs de conexión y cerradura.
Nota: La credencial gestor del sistema no acciona la cerradura sino que habilita solamente la programación de los
credenciales residentes.
• Programmazione Badge
• Badge programming
• Programmation des badges
• Badge programmieren
• Programación de credenciales
• Badge Programmeren
•
Programação do Crachá

Video - Kit
21
• Nieuwe master beheerder badge
Om veiligheidsredenen is een “beheerdersbadge” voorzien die direct door de installateur wordt geprogrammeerd. Voor
toegang tot de programmering van een “INWONERSBADGE” moet over een beheerdersbadge worden beschikt
Het externe punt geeft met behulp van geluids- en lichtsignalen van de leds op het externe punt aan of de badge geac
-
cepteerd of gewist is.
Door de presentatie van een badge die niet herkend wordt of een programmeringsfout wordt de procedure onderbro
-
ken. Dit wordt aangegeven door een lange pieptoon en het oplichten van de leds verbinding en slot.
Opmerking: de badge van de installatiebeheerder bedient het slot niet maar activeert uitsluitend de programmering
van de inwonersbadges.
• Novo crachá master gestor
Por razões de segurança é previsto um crachá “MASTER“, programado directamente pelo instalador. Para ter aces
-
so à programação de um crachá “RESIDENTE” é necessário estar em posse de um crachá gestor da instalação.
A unidade externa sinalizará a ocorrida aceitação ou cancelamento do crachá com sinais acústicos e visuais dos
led presentes na unidade externa.
A apresentação de um crachá não reconhecido ou um erro de programação comporta a interrupção do procedi
-
mento e a sinalização por meio de um beep longo e o acendimento dos LED de conexão e fechadura.
Nota: o crachá gestor de instalação não comanda a fechadura, mas habilita apenas a programação dos crachás
residentes.
• Tenere premuto il pulsante di programmazione fino al
lampeggio del LED Serratura e tono di conferma.
• Press and hold down the programming pushbutton until the Door
lock LED starts flashing, and a confirmation sound is heard.
• Maintenir enfoncée la touche de programmation jusqu’à
ce que le LED Serrure clignote et que la tonalité de
confirmation soit émise.
• Programmierungstaste gedrückt halten, bis die LED des
Schlosses blinkt und das Bestätigungssignal ertönt.
• Mantenga apretado el pulsador de programación hasta
que parpadea el LED Cerradura y se emite el tono de
confirmación.
• Houd de programmeringsknop ingedrukt tot de LED Slot
knippert en u ter bevestiging een geluidssignaal hoort.
• Mantenha carregado o botão de programação até o
lampejo do LED da Fechadura e o tom de confirmação.
1 beep
1 beep
1 beep
1 Piepton
1 bipa
1 beep
1 beep
≥ 5s
• Programmazione badge gestore impianto
• System management key card programming
• Programmation badge administrateur installation
• Programmierung des Badges Anlagenverwalter
• Programación de la credencial del administrador del
sistema
• Programmering beheerdersbadge
• Programação do crachá gestor da instalação.

22
• Avvicinare al lettore il badge gestore impianto da
memorizzare e attendere l’accensione del LED Serratura e
doppio tono di conferma.
• Move the system manager badge reader to save close and
wait for the Door lock LED to switch on; a double confirmation
sound will be heard.
• Approcher le Badge administrateur installation à mémo-
riser du lecteur et attendre que le LED Serrure s’allume et
qu’une double tonalité de confirmation soit émise.
• Dem Lesegerät das Badge des Anlagenbetreibers nähern, das
gespeichert werden soll und warten, bis die LED des Schlosses
aufleuchtet und das Bestätigungssignal zwei Mal ertönt.
• Acerque al lector la credencial del administrador del
sistema que desea memorizar y esperar el encendido del
LED Cerradura y doble tono de confirmación.
• Houd de installatiebeheerder badge die opgeslagen moet
worden voor het leesapparaat, wacht tot de LED slot gaat
branden en u ter bevestiging een dubbel geluidssignaal hoort.
• Aproxime ao leitor o Crachá gestor da instalação a
memorizar e espere o acendimento do LED da Fechadura e
o duplo tom de confirmação.
2 beep
2 beeps
2 beep
2 Pieptöne
2 bips
2 beep
2 beep
• Gestore impianto
• Manager master
• Master de gestion
• Master Verwaltung
• Credencial maestra
de administrador
• Master beheerder
• Master gestor
1 beep lungo
1 extended beep
1 bip prolongé
1 langer Piepton
1 bip largo
1 lange pieptoon
1 beep longo
• Se la memorizzazione non va a buon fine, si accendono
contemporaneamente i LED Serratura e Connessione e il
dispositivo emette un beep lungo.
• If the saving is not successful, the Door lock and Connection
LED light up at the same time and the device gives a long beep.
• Si la mémorisation échoue, les voyants Serrure et
Connexion s'allument simultanément et le dispositif émet
un bip prolongé.
• Wenn die Speicherung nicht erfolgreich abgeschlossen wird,
leuchten die LED Schloss und Verbindung gleichzeitig auf und
die Vorrichtung erzeugt einen langen Piepton.
• Si la memorización no se realiza, los LEDs Cerradura y Cone-
xión se encienden al mismo tiempo y el dispositivo emite
un beep largo.
• Als het opslaan niet goed verloopt, gaan de leds Slot en Ver-
binding tegelijkertijd branden en laat het apparaat een lange
pieptoon horen.
• Se a memorização não for bem-sucedida, acendem-se,
simultaneamente, os LED Fechadura e Conexão e o disposi-
tivo emite um beep prolongado.

Video - Kit
23
• Nota: Il badge gestore impianto non comanda la serratura
ma abilita solo la programmazione dei badge residenti
• Note: The system management key card does not control the
door lock but only enables the resident key card programming
• Note: le badge de gestion installation ne commande pas
la serrure mais active uniquement la programmation des
badges résidents.
• Anmerkung:
Das Badge Anlagenverwalter steuert nicht das
Schloss, sondern gibt nur die Programmierung der Badge Be
-
wohner frei.
• Nota: La credencial del administrador del sistema no accio-
na la cerradura pero habilita la programación de las creden-
ciales de los residentes.
• Opmerking: De beheerdersbadge stuurt het slot niet aan,
maar activeert uitsluitend de programmering van de inwo-
nersbadge
• Nota: O crachá gestor da instalação não controla a
fechadura, mas habilita unicamente a programação dos
crachás residentes
• Cancellazione badge gestore impianto
• Deleting the manager master badge
• Élimination badge master de gestion
• Master-Verwaltungs-Badge löschen
• Cancelación de una credencial maestra de administrador
• Master beheerder badge wissen
• Cancelamento de crachá master gestor
• Tenere premuto il pulsante di programmazione fino al
lampeggio del LED Serratura e tono di conferma.
• Press and hold down the programming pushbutton until
the Door lock LED starts flashing, and a confirmation
sound is heard.
• Maintenir enfoncée la touche de programmation
jusqu’à ce que le LED Serrure clignote et que la
tonalité de confirmation soit émise.
• Programmierungstaste gedrückt halten, bis die LED des
Schlosses blinkt und das Bestätigungssignal ertönt.
• Mantenga apretado el pulsador de programación hasta
que parpadea el LED Cerradura y se emite el tono de
confirmación.
• Houd de programmeringsknop ingedrukt tot de LED Slot
knippert en u ter bevestiging een geluidssignaal hoort.
• Mantenha carregado o botão de programação até o
lampejo do LED daFechadura e o tom de confirmação.
1 beep
1 beep
1 beep
1 Piepton
1 bip
1 beep
1 beep
• Ripremere il pulsante di programmazione per 10 secondi.
Quando la cancellazione è avvenuta si accende il LED
Serratura e il dispositivo emette 2 beep.
• Press the programming pushbutton again for 10 seconds.
When the cancellation is completed, the Door lock LED comes,
on and the device emits 2 beeps.
• Appuyer à nouveau sur le bouton de programmation
pendant 10 secondes. Une fois l’effacement obtenu, le LED
Serrure s’allume et le dispositif émet 2 bips.
• Die Programmierungstaste 10 Sekunden lang drücken.
Nach erfolgter Löschung leuchtet die LED des Schlosses auf und
die Vorrichtung erzeugt 2 Pieptöne.
• Vuelva a apretar el pulsador de programación unos 10
segundos. Cuando la cancelación se produce, se ilumina el
LED Cerradura y el dispositivo emite 2 bips.
• Druk nogmaals 10 seconden lang op de programmeringsknop.
De LED Slot gaat branden en u hoort een geluidssignaal als de
badge is gewist.
• Carregar de novo no botão de programação por 10
segundos. sUma vez que interveio o cancelamento, acende-
se o LED da Fechadura e o dispositivo emite 2 beepw.
≥ 10s
2 beep
2 beeps
2 beep
2 Pieptöne
2 bips
2 beep
2 beep

24
• Avvicinare al lettore il badge gestore impianto fino al
lampeggio del LED Serratura e tono di conferma.
• Move the system manager badge close to the reader until the
Door lock LED flashes, and a confirmation sound is heard.
• Approcher le Badge administrateur installation du
lecteur et attendre que le LED Serrure clignote et
qu’une tonalité de confirmation soit émise.
• Dem Lesegerät das Badge des Anlagenbetreibers nähern, bis
die LED des Schlosses blinkt und das Bestätigungssignal ertönt.
• Acerque al lector la credencial del administrador del
sistema hasta que parpadea el LED de la Cerradura y se
produzca el tono de confirmación.
• Houd de installatiebeheerder badge voor het leesapparaat
tot de LED slot gaat knipperen en u ter bevestiging een
geluidssignaal hoort.
• Aproxime ao leitor o Crachá gestor da instalação até o
lampejo do LED da Fechadura e o tom de confirmação.
• Programmazione badge residente
• System management key card programming
• Programmation badge résident
• Programmierung des Badges Bewohner
• Programación de la credencial del residente
• Programmering inwonersbadge
• Programação de crachá residente
1 beep
1 beep
1 beep
1 Piepton
1 bip
1 beep
1 beep
• Gestore impianto
• Manager master
• Master de gestion
• Master Verwaltung
• Credencial maestra de
administrador
• Master beheerder
• Master gestor
2 beep
2 beeps
2 beep
2 Pieptöne
2 bips
2 beep
2 beep
• Badge residente
• Resident badge
• Badge résident
• Bewohner-Badge
• Credencial residente
• Inwonerbadge
• Crechá residente
• Avvicinare al lettore il badge residente da memorizzare, fino
all’accensione del LED Serratura e tono di conferma.
Per programmare altri badge residenti, avvicinarli al lettore
entro 30 secondi dal precedente. Per confermare la fine della
programmazione avvicinare badge gestore impianto oppure
attendere 30 secondi.
• Due beep brevi confermano l’avvenuta programmazione.
Move the resident badge to save close to the reader until the
Door lock LED flashes, and a confirmation sound is heard.
If programming other resident badges, move each one close to
the reader within 30 seconds from the previous one.
To confirm that the programming procedure has been complet-
ed move the system manager badge close, or wait 30 seconds.
Two short beeps confirm that programming has been successful.
• Approcher le Badge résident à mémoriser du lecteur et
attendre que le LED Serrure clignote et qu’une tonalité de
confirmation soit émise. Pour programmer d’autres badges
résidents, les approcher du lecteur dans les 30 secondes
l’un après l’autre. Pour confirmer la fin de la programmation,
approcher le badge master de gestion installation ou bien
attendre 30 secondes.
Deux bips brefs confirment la programmation.

Video - Kit
25
1 beep lungo
1 extended beep
1 bip prolongé
1 langer Piepton
1 bip largo
1 lange pieptoon
1 beep longo
• Se la memorizzazione non va a buon fine, si accendono contemporaneamente i LED Serratura e Connessione e il dispositivo
emette un beep lungo.
• If the saving is not successful, the Door lock and Connection LED light up at the same time and the device gives a long beep.
• Si la mémorisation échoue, les voyants Serrure et Connexion s'allument simultanément et le dispositif émet un bip
prolongé.
• Wenn die Speicherung nicht erfolgreich abgeschlossen wird, leuchten die LED Schloss und Verbindung gleichzeitig auf und die
Vorrichtung erzeugt einen langen Piepton.
• Si la memorización no se realiza, los LEDs Cerradura y Conexión se encienden al mismo tiempo y el dispositivo emite un
beep largo.
• Als het opslaan niet goed verloopt, gaan de leds Slot en Verbinding tegelijkertijd branden en laat het apparaat een lange
pieptoon horen.
• Se a memorização não for bem-sucedida, acendem-se, simultaneamente, os LED Fechadura e Conexão e o dispositivo
emite um beep prolongado.
• Dem Lesegerät das Badge des Bewohners nähern, das gespei-
chert werden soll, bis die LED des Schlosses blinkt und das Be-
stätigungssignal ertönt. Um weitere Badge zu programmieren,
diese innerhalb von 30 Sekunden nach dem vorhergehenden
dem Lesegerät nähern.
Um das Ende der Programmierung zu bestätigen, das Badge
des Anlagetreibers nähern oder 30 Sekunden warten.
Zwei kurze Pieptöne bestätigen, dass die Programmierung
erfolgt ist.
• Acerque al lector la credencial residente que desea me-
morizar hasta que parpadea el LED de la Cerradura y se
produzca el tono de confirmación. Para programar otras
credenciales residentes, es preciso acercarlas al lector antes
de 30 segundos de la anterior.
Para confirmar que se ha terminado la programación, acer-
que la credencial de administrador del sistema o espere 30
segundos. Dos breves bips confirmarán que se ha efectua-
do la programación.
• Houd de inwonerbadge die opgeslagen moet worden voor het
leesapparaat tot de LED slot gaat knipperen en u ter bevesti-
ging een geluidssignaal hoort.
Als u andere inwonerbadges wilt opslaan, moet u deze bin-
nen 30 seconden na de vorige badge voor het leesapparaat
houden.
Houd ter bevestiging de installatiebeheerder badge voor het
leesapparaat of wacht 30 seconden.
De programmering is verricht als u twee korte pieptonen
hoort.
• Aproxime ao leitor o crachá residente a memorizar, até o
lampejo do LED da Fechadura e do tom de confirmação.
Para programar outros crachás residentes, aproxime-os ao
leitor dentro de 30 segundos do anterior.
Para confirmar o fim da programação, aproximar o crachá
gestor da instalação ou então esperar 30 segundos.
Dois beep breves confirmam a ocorrida programação.

26
• Cancellazione di tutti i badge residenti in memoria
• Cancellation of all the residents badges saved in the memory
• Effacement de tous les badges résidents mémorisés
• Alle gespeicherten Badges der Bewohner löschen
• Cancelación de todas las credenciales residentes
memorizadas
• Alle inwonerbadges uit het geheugen wissen
• Cancelamento de todos os crachás residentes na memória
• Avvicinare al lettore il badge gestore impianto fino al
lampeggio del LED serratura e tono di conferma.
• Move the system manager badge close to the reader until the
Door lock LED flashes, and a confirmation sound is heard.
• Approcher le Badge administrateur installation du lecteur
et attendre que le LED Serrure clignote et qu’une tonalité de
confirmation soit émise.
• Dem Lesegerät das Badge des Anlagenbetreibers nähern, bis
die LED des Schlosses blinkt und das Bestätigungssignal ertönt.
• Acerque al lector la credencial del administrador del
sistema hasta que parpadea el LED de la Cerradura y se
produzca el tono de confirmación.
• Houd de installatiebeheerder badge voor het leesapparaat
tot de LED slot gaat knipperen en u ter bevestiging een
geluidssignaal hoort.
• Aproxime ao leitor o Crachá gestor da instalação até o
lampejo do LED da Fechadura e o tom de confirmação.
1 beep
1 beep
1 beep
1 Piepton
1 bip
1 beep
1 beep
• Gestore impianto
• Manager master
• Master de gestion
• Master Verwaltung
• Credencial maestra de
administrador
• Master beheerder
• Master gestor
2 beep
2 beeps
2 beep
2 Pieptöne
2 bips
2 beep
2 beep
• 2 volte Gestore impianto
• Twice Manager master
• 2 fois Master de gestion
• 2 Mal Master Verwaltung
• 2 veces Credencial maestra
de administrador
• 2 maal Master beheerder
• 2 vezes Master gestor
• Riavvicinare per 2 volte consecutive il badge gestore
impianto. Quando la cancellazione è avvenuta si accende il
LED Serratura e il dispositivo emette 2 beep.
• Move the system manager badge close twice in succession.
When the cancellation is completed, the Door lock LED comes,
on and the device emits 2 beeps.
• Approcher à nouveau 2 fois de suite le badge master de
gestion installation. Une fois l’effacement obtenu, le LED
Serrure s’allume et le dispositif émet 2 bips.
• Das Badge des Anlagetreibers 2 Mal nähern. Nach erfolgter
Löschung leuchtet die LED des Schlosses auf und die
Vorrichtung erzeugt 2 Pieptöne.
• Acerque 2 veces seguidas la credencial maestra de
administrador del sistema. Cuando se produce la
cancelación, se ilumina el LED Cerradura y el dispositivo
emite 2 bips.
• Houd de installatiebeheerder badge 2 maal voor het
leesapparaat. De LED slot gaat branden en u hoort 2
pieptonen als de badges zijn gewist.
• Voltar a aproximar, por 2 vezes consecutivas, o
crachá gestor da instalação. Uma vez que interveio
o cancelamento, acendese o LED da fechadura e o
dispositivo emite 2 beep.

Video - Kit
27
• Reset
Nel caso si avesse la necessità di cancellare tutti i
badge (gestore impianto e residenti) precedentemente
memorizzati è possibile resettare il posto esterno.
• Reset
In order to cancel all the previously saved badges (system
manager and residents) the entrance panel can be reset.
• Réinitialisation
Dans le cas où il serait nécessaire d’éliminer tous les badges
(master de gestion installation et résidents) précédemment
mémorisés, il est possible de réinitialiser le poste externe.
• Reset
Falls alle zuvor gespeicherten Badges (Anlagenbetreiber
und Bewohner) gelöscht werden sollen, kann die Türstation
zurückgestellt werden.
• Reset
En caso de que fuera necesario cancelar todas las
credenciales memorizadas(administrador del sistema y
residentes), es posible restablecer la placa exterior.
• Reset
U kunt alle badges (installatiebeheerder en inwonerbadges)
uit het geheugen wissen door het externe punt te resetten.
• Rearme
No caso que houvesse a necessidade de cancelar todos os
crachás (gestor da instalação e residentes), memorizados
anteriormente, será possível fazer o rearme (reset) da
unidade externa.
• Togliere il BUS; tenendo premuto il pulsante di programmazione, ridare alimentazione. Mantenere premuto il pulsante di
programmazione fino all’accensione alternata dei LED Serratura e Connessione + beep lungo.
• Remove the BUS; press and hold down the programming pushbutton, reconnect the power supply. Press and hold down the
programming pushbutton until the Door lock and the Connection LEDs start flashing in succession; a long beep is also heard.
• Retirer le BUS ; rétablir l’alimentation en maintenant enfoncée la touche de programmation. Maintenir enfoncée la touche
de programmation jusqu’à ce que les LEDs Serrure et Connexion clignotent alternativement + bip long.
• Den BUS abtrennen, die Programmierungstaste gedrückt halten und wieder Strom geben. Die Programmierungstaste gedrückt
halten, bis die LEDs des Schlosses und der Verbindung abwechselnd aufleuchten und ein langes Bestätigungssignal ertönt.
• Desconecte el BUS, mantenga apretado el pulsador de programación y vuelva a conectar la alimentación. Mantenga
apretado el pulsador de programación hasta el encendido alternado de los LEDS Cerradura y Conexión + bip largo.
• Verwijder de BUS, houd de programmeringsknop ingedrukt en heractiveer de voeding.
Houd de programmeringsknop ingedrukt tot de LED slot en de LED verbinding gaan knipperen en u een lange pieptoon hoort.
• Remova o BUS; mantendo carregado o botão de programação, volte a ligar a alimentação. Mantenha carregado o botão de
programação até o acendimento alternado dos LED da Fechadura e da Conexão + beep longo.
ON
ON
OFF
OFF
1 beep lungo
1 extended beep
1 bip prolongé
1 langer Piepton
1 bip largo
1 lange pieptoon
1 beep longo

28
• Installazione del posto interno
• Handset installation
• Installation du poste interne
• Installation der Hausstation
• Instalación de la unidad interior
• Installatie van het intern punt
• Instalação da unidade interna
• Installazione a parete
• Wall mounting installation
• Installation murale
• Wand-Installation
• Instalación mural
• Wandinstallatie
• Instalação de parede
1
Box
502E - 503E
344692
x 2
- Da acquistare separatamente
- To be purchased separately
- À acheter séparément
- Getrennt zu erwerben
- Comprar por separado
- Apart kopen
- A adquirir separadamente
1
Ø max 5 mm - Ø máx 5 mm
Ø макс 5 mm- Ø maks 5 mm

Video - Kit
29
4
3
2

30
N P M
• Il dispositivo deve essere configurato solo fisicamente.
• The device must be only physically configured.
• Le dispositif doit être configuré seule physiquement.
• Das Gerät darf nur physisch konfiguriert werden.
• El dispositivo se ha de configurar solo físicamente.
• Het apparaat hoeft uitsluitend fysiek te worden geconfigureerd.
• O dispositivo deve ser configurado apenas fisicamente.
N - numero del posto interno
I configuratori inseriti nelle sedi N del dispositivo assegnano ad ogni videocitofono un numero di riconosci-
mento all’interno dell’impianto. I posti interni devono essere configurati in modo progressivo. Nel caso di posti
interni collegati in parallelo (in appartamenti senza 346850, max 3), questi dovranno essere configurati con il
medesimo configuratore N. In parallelo al videocitofono di base è possibile installare citofoni, videocitofoni e/o
suonerie supplementari.
P – associazione del posto esterno
I configuratori inseriti nelle sedi P del dispositivo identificano il PE associato, cioè il primo posto esterno da
autoaccendere con la prima pressione del tasto e quale serratura con videocitofono a riposo viene attivata
premendo il tasto serratura.
M – modalità di funzionamento
I configuratori inseriti nelle sedi M del dispositivo assegnano la modalità di funzionamento ai 4 tasti programma-
bili (
, , , ) secondo le indicazioni riportate di seguito. Possono inoltre attivare le funzioni speciali.
• Configurazione posto
interno
•
Handset
configuration
• Configuration
poste interne
• Konfiguration
Hausstation
• Configuración
unidad interior
• Configuratie
intern punt
•
Configuração
unidade interna
N - internal unit number
The configurators connected to the N sockets of the device assign an identification number within the system to each video
internal unit. The internal units must be configured in progressive order. Internal units with parallel connection (max 3 are
allowed inside apartments without item 346850) must be configured using the same N configurator. In parallel with the
main video internal unit, additional internal units, video internal units and/or ringtones may be installed.
P – entrance panel association
The configurators connected to the P sockets of the device identify the associated EP, which is the first entrance panel that
switches itself on when the pushbutton is pressed the first time, as well as which door lock is activated when pressing the
door lock pushbutton while the video internal unit is idle.
M – operating mode
The configurators connected to the M socket of the device assign the operating modes to the 4 programmable keys
(
, , , ) based on the following indications. They can also enable special functions.
N - numéro du poste interne
Les configurateurs placés dans les logements N du dispositif attribuent à chaque vidéophone un numéro de recon
-
naissance à l’intérieur de l’installation. Les potes internes doivent être configurés de manière progressive. Dans le cas
de postes internes reliées en parallèle (dans des appartements sans 346850, max, 3), ceux-ci doivent être configurés
avec le même configurateur N. En parallèle au vidéophone de base, il est possible d’installer des interphones, des
vidéophones et/ou des sonneries supplémentaires.
P – association du poste interne
Les configurateurs placés dans les logements P du dispositif identifient le PE associé, à savoir le premier poste ex
-
terne qui doit s’allumer automatiquement à la première pression sur la touche et la serrure, avec vidéophone au
repos, qui est activée en appuyant sur la touche serrure.
M – modalité de fonctionnement
Les configurateurs placés dans les logements M du dispositif attribuent la modalité de fonctionnement aux 4
touches programmables (
, , , ) en fonction des indications figurant ci-après.
Il est également possible d’activer les fonctions spéciales.

Video - Kit
31
N - Nummer der Hausstation
Die in die N-Steckplätze des Gerätes eingesetzten Konfiguratoren weisen jeder Videogegensprechanlage innerhalb des Systems
eine Identifikationsnummer zu. Die Hausstationen müssen fortlaufend nummeriert werden. Bei parallel geschalteten Haussta-
tionen (in Wohnungen ohne 346850, max. 3) müssen diese mit dem gleichen Konfigurator N konfiguriert werden. Parallel zur
Basissprechanlage ist es möglich, Sprechanlagen und Videosprechanlagen und zusätzliche Läutwerke zu installieren.
P – Zuordnung der Türstation
Die in die P-Steckplätze des Gerätes eingesetzten Konfiguratoren identifizieren die zugehörige TS, d.h. die erste Türstation, die
durch erstes Drücken der Taste selbst eingeschaltet wird und deren Schloss bei Videogegensprechanlage auf standby durch
Drücken der Taste aktiviert wird.
M – Betriebsmodus
Die in den Sitzen M der Vorrichtung eingesetzten Konfiguratoren, teilen den 4 programmierbaren Tasten (
, , , )
die Betriebsweise je nach den in der Folge aufgeführten Anweisungen zu.Zudem können Sonderfunktionen aktiviert werden.
N - número de la unidad interior
Los configuradores insertados en los alojamientos N del dispositivo asignan a cada videoportero un número de reconocimiento
en el interior del sistema. Las unidades interiores se han de configurar en modo progresivo. En lo que atañe a las unidades inte-
riores conectadas en paralelo (en pisos sin 346850, máx. 3), estas se han de configurar con el mismo configurador N. En paralelo
al videoportero de base, cabe la posibilidad de instalar porteros, videoporteros y/o timbres suplementarios.
P – asociación de la placa exterior
Los configuradores insertados en los alojamientos P del dispositivo identifican la PE asociada, o sea la primera placa exterior
que autoencender con la primera presión del botón y qué cerradura con videoportero en reposo se activa al presionar el botón
cerradura.
M – modo de funcionamiento
Los configuradores, situados en los alojamientos M del dispositivo, asignan el modo de funcionamiento a las 4 teclas programa
-
bles ( , , , ) según las indicaciones indicadas a continuación. Asimismo, se pueden activar las funciones especiales.
N - nummer van de binnenpost
De configuratoren die zijn aangebracht op de plaatsen N van het apparaat kennen aan elk beeldhuistelefoon een nummer
toe waarmee het binnen de installatie kan worden herkend. De binnenposten moeten progressief worden geconfigureerd.
Parallel aangesloten binnenposten (in appartementen zonder 346850, max. 3) moeten geconfigureerd worden met dezelfde
configurator N. Parallel aan de basisbeeldhuistelefoon kunnen andere beeldhuistelefoons en/of beltonen worden geïnstal-
leerd.
P – koppeling van de buitenpost
De configuratoren die zijn aangebracht op de plaatsen P van het apparaat verwijzen naar de gekoppelde buitenpost, d.w.z.
de eerste buitenpost die automatisch ingeschakeld moet worden wanneer een eerste keer op de toets wordt gedrukt en elk
slot met beeldhuistelefoon geactiveerd wordt wanneer op de toets slot wordt gedrukt
M – functioneringswijze
De configuratoren in de zittingen M van het apparaat kennen de functioneringswijze toe aan de 4 toetsen ( , , ,
) die volgens de onderstaande aanwijzingen zijn geprogrammeerd. Bovendien kunnen ze speciale functies activeren.
N- número da unidade interna
Os configuradores inseridos nos alojamentos N do dispositivo atribuem a cada vídeo-intercomunicador um
número de reconhecimento no interior do equipamento. As unidades internas devem ser configuradas de
modo progressivo. Em caso de unidades internas conectadas em paralelo (em apartamentos sem 346850, max
3), essas deverão ser configuradas com o mesmo configurador N. Em paralelo com o vídeo-intercomunicador
de base é possível instalar intercomunicadores, vídeo-intercomunicadores e/ou campainhas suplementares.
P – associação da unidade externa
Os configuradores inseridos nos alojamentos P do dispositivo identificam a UE associada, isto é, a primeira
unidade externa a ligar automaticamente com a primeira pressão da tecla e qual fechadura com o vídeo-
-intercomunicador a repouso é ativada ao carregar na tecla fechadura.
M – modo de funcionamento
Os configuradores inseridos nos alojamentos M do dispositivo atribuem a modalidade de funcionamento às 4
teclas programáveis (
, , , ) de acordo com as indicações referidas abaixo. Podem também ativar
as funções especiais.

32
FUNZIONE - FUNCTION - FONCTION - FUNKTION - FUNCIÓN - MODUS - MODO
M = 00
• Intercom su se stesso, invia la chiamata a tutti gli apparecchi con uguale indirizzo
• Internal intercom. It sends the call to all the handsets with the same address
• Intercom sur soi-même, envoie l’appel à tous les appareils ayant la même adresse
• Intercom für sich, sendet den Anruf an alle Geräte mit derselben Adresse
• Intercom sobre sí mismo, envía la llamada a todos los aparatos con la misma dirección
• Intercom op zich, verstuurt de oproep naar alle apparaten met hetzelfde adres
• Intercomunicador sobre si próprio, envia a chamada para todos os aparelhos com o mesmo endereço
• Attivazione del PE (configurato con P+1) in modo diretto senza la chiamata oppure attivazione attuatore 346210 (configurato con P+1 e MOD=9)
• Activation of the EP (configured with P+1) directly without call or activation of the actuator 346210 (configured with P+1 and MOD=9)
• Activation du PE (configuré avec P+1) en mode direct sans appel ou activation actionneur 346210 (configuré avec P+1 et MOD=9)
• TS (mit P+1 konfiguriert) direkt ohne Anruf aktivieren oder Aktor 346210 aktivieren (mit P+1 und MOD=9 konfiguriert)
• Activación de la PE (configurada con P+1) en el modo directo sin la llamada o activación actuador 346210 (configurado con P+1 y MOD=9)
• Directe activering Buitenpost (geconfigureerd met P+1) zonder oproep of activering van de actuator 346210 (geconfigureerd met P+1 en MOD=9)
• Activação da UE (configurada com P+1) em modo directo, sem a chamada, ou activação do atuador 346210 (configurado com P+1 e MOD=9).
• Apertura serratura del PE (configurato con P+1) in modo diretto senza la chiamata oppure attivazione attuatore 346210 (configurato con P+1
e MOD=5) oppure attivazione attuatori serratura 346230 - 346260 (configurati con P+1)
• EP door lock release (configured with P+1), directly without call, or activation of the actuator 346210 (configured with P+1 and MOD=5), or
activation of door lock actuators 346230 - 346260 (configured with P+1)
• Ouverture serrure du PE (configuré avec P+1) en mode direct sans appel ou activation actionneur 346210 (configuré avec P+1 et MOD=5) ou
activation actionneurs serrure 346230 - 346260 (configurés avec P+1)
• Schloss der TS (mit P+1 konfiguriert) direkt ohne Anruf öffnen oder Aktor 346210 aktivieren (mit P+1 und MOD=5 konfiguriert) oder
Schlossaktoren 346230 - 346260 aktivieren (mit P+1 konfiguriert)
• Apertura cerradura de la PE (configurada con P+1) en el modo directo sin la llamada o activación del actuador 346210 (configurado con P+1 y
MOD=5) o activación de los actuadores cerradura 346230 - 346260 (configurados con P+1)
• Directe opening slot Buitenpost (geconfigureerd met P+1) zonder oproep of activering van de actuatoren 346210 (geconfigureerd met P+1 en
MOD=5), of activering actuatoren slot 346230 - 346260 (geconfigureerd met P+1).
• Abertura da fechadura da UE (configurada com P+1) em modo directo, sem a chamada, ou activação do atuador 346210 (configurado com
P+1 e MOD=5) ou ainda activação dos atuadores de uma fechadura 346230 - 346260 (configurados com P+1).
• Apertura serratura del PE (configurato con P+2) in modo diretto senza la chiamata oppure attivazione attuatore 346210 (configurato con P+2
e MOD=5) oppure attivazione attuatori serratura 346230 - 346260 (configurati con P+2)
• EP door lock release (configured with P+2), directly without call, or activation of the actuator 346210 (configured with P+2 and MOD=5), or
activation of door lock actuators 346230 - 346260 (configured with P+2)
• Ouverture serrure du PE (configuré avec P+2) en mode direct sans appel ou activation actionneur 346210 (configuré avec P+2 et MOD=5) ou
activation actionneurs serrure 346230 - 346260 (configurés avec P+2)
• Schloss der TS (mit P+2 konfiguriert) direkt ohne Anruf öffnen oder Aktor 346210 aktivieren (mit P+2 und MOD=5 konfiguriert) oder
Schlossaktoren 346230 - 346260 aktivieren (mit P+2 konfiguriert)
• Apertura cerradura de la PE (configurada con P+2) en el modo directo sin la llamada o activación del actuador 346210 (configurado con P+2 y
MOD=5) o activación del actuador cerradura 346230 - 346260 (configurado con P+2)
• Directe opening slot Buitenpost (geconfigureerd met P+2) zonder oproep of activering van de actuatoren 346210 (geconfigureerd met P+2 en
MOD=5), of activering actuatoren slot 346230 - 346260 (geconfigureerd met P+2).
• Abertura da fechadura da UE (configurada com P+2) em modo directo, sem a chamada, ou activação do atuador 346210 (configurado com
P+2 e MOD=5) ou ainda activação do atuador de uma fechadura 346230 - 346260 (configurados com P+2).
M = 20
Funzioni tasti sopra descritte + Studio professionale; Key functions described above + Professional studio ; Fonctions des touches ci-dessus + Bureau ; Oben
beschriebene Tastenfunktionen + Professional Studio ; Funciones de las teclas descritas anteriormente + Estudio profesional ;
Bovenstaande functietoetsen + professionele studio - Funções teclas descritas acima + Escritório profissional
M = 40
Funzioni tasti sopra descritte + Cerca persone ; Key functions described above + Pager ; Fonctions des touches ci-dessus + Cherche-personnes ;
Oben beschriebene Tastenfunktionen + Personensuche ; Funciones de las teclas descritas anteriormente + Buscador de personas ; Bovenstaande
functietoetsen + personenzoeksysteem ; Funções teclas descritas acima + Procura pessoas
M = 80
Funzioni tasti sopra descritte + Studio professionale + Cerca persone ; Key functions described above + Professional studio + Pager
Fonctions des touches ci-dessus + Bureau + Cherche-personnes ; Oben beschriebene Tastenfunktionen + Professional Studio + Personensuche
Funciones de las teclas descritas anteriormente + Estudio profesional + Buscador de personas; Bovenstaande functietoetsen + professionele studio +
personenzoeksysteem ; Funções teclas descritas acima + Escritório profissional+ Procura pessoas

Video - Kit
33
FUNZIONE - FUNCTION - FONCTION - FUNKTION - FUNCIÓN - MODUS - MODO
M = 01
• Intercom su se stesso, invia la chiamata a tutti gli apparecchi con uguale indirizzo
• Internal intercom. It sends the call to all the handsets with the same address
• Intercom sur soi-même, envoie l’appel à tous les appareils ayant la même adresse
• Intercom für sich, sendet den Anruf an alle Geräte mit derselben Adresse
• Intercom sobre sí mismo, envía la llamada a todos los aparatos con la misma dirección
• Intercom op zich, verstuurt de oproep naar alle apparaten met hetzelfde adres
• Intercomunicador sobre si próprio, envia a chamada para todos os aparelhos com o mesmo endereço
• Intercom all’interno dell’appartamento in impianti con interfaccia di appartamento 346850 oppure intercom tra
appartamenti in impianti senza interfaccia di appartamento
• Intercom inside the apartment, in systems with apartment interface 346850, or intercom among apartments in
systems without apartment interface
• Intercom à l’intérieur de l’appartement sur installations à interface d’appartement 346850 ou intercom entre
appartements sur installations sans interface d’appartement
• Intercom zwischen Wohnungen mit Anlage, die mit einer Wohnungsschnittstelle 346850 ausgestattet sind oder
Intercom zwischen Wohnungen mit Anlage ohne Wohnungsschnittstelle
• Intercom interno en el piso en instalaciones con interfaz de piso 346850 o intercom entre pisos en instalaciones
sin interfaz de piso
• Intercom binnen een appartement met in installaties met een appartement-interface 346850, of intercom tussen
appartementen in installaties zonder appartement-interface
• Intercomunicador no interior do apartamento em instalações com interface específica 346850 ou
intercomunicador entre apartamentos em instalações sem interface específica
N=1
N=2
N=2
N=1
• Attivazione del PE (configurato con P+1) in modo diretto senza la chiamata oppure attivazione attuatore 346210 (configurato con P+1 e MOD=9)
• Activation of the EP (configured with P+1) directly without call or activation of the actuator 346210 (configured with P+1 and MOD=9)
• Activation du PE (configuré avec P+1) en mode direct sans appel ou activation actionneur 346210 (configuré avec P+1 et MOD=)
• TS (mit P+1 konfiguriert) direkt ohne Anruf aktivieren oder Aktor 346210 aktivieren (mit P+1 und MOD=9 konfiguriert)
• Activación de la PE (configurada con P+1) en el modo directo sin la llamada o activación actuador 346210 (configurado con P+1 y MOD=9)
• Directe activering Buitenpost (geconfigureerd met P+1) zonder oproep of activering van de actuator 346210 (geconfigureerd met P+1 en MOD=9)
• Activação da UE (configurada com P+1) em modo directo, sem a chamada, ou activação do atuador 346210 (configurado com P+1 e MOD=9).
• Apertura serratura del PE (configurato con P+1) in modo diretto senza la chiamata oppure attivazione attuatore 346210 (configurato con P+1
e MOD=5) oppure attivazione attuatori serratura 346230 - 346260 (configurati con P+1)
• EP door lock release (configured with P+1), directly without call, or activation of the actuator 346210 (configured with P+1 and MOD=5), or
activation of door lock actuators 346230 - 346260 (configured with P+1)
• Ouverture serrure du PE (configuré avec P+1) en mode direct sans appel ou activation actionneur 346210 (configuré avec P+1 et MOD=5) ou
activation actionneurs serrure 346230 - 346260 (configurés avec P+1)
• Schloss der TS (mit P+1 konfiguriert) direkt ohne Anruf öffnen oder Aktor 346210 aktivieren (mit P+1 und MOD=5 konfiguriert) oder
Schlossaktoren 346230 - 346260 aktivieren (mit P+1 konfiguriert)
• Apertura cerradura de la PE (configurada con P+1) en el modo directo sin la llamada o activación del actuador 346210 (configurado con P+1 y
MOD=5) o activación del actuador cerradura 346230 - 346260 (configurado con P+1)
• Directe opening slot Buitenpost (geconfigureerd met P+1) zonder oproep of activering van de actuatoren 346210 (geconfigureerd met P+1 en
MOD=5), of activering actuatoren slot 346230 - 346260 (geconfigureerd met P+1).
• Abertura da fechadura da UE (configurada com P+1) em modo directo, sem a chamada, ou activação do atuador 346210 (configurado com
P+1 e MOD=5) ou ainda activação do atuador de uma fechadura 346230 - 346260 (configurados com P+1).
M = 21
Funzioni tasti sopra descritte + Studio professionale; Key functions described above + Professional studio ; Fonctions des touches ci-dessus + Bureau ; Oben
beschriebene Tastenfunktionen + Professional Studio ; Funciones de las teclas descritas anteriormente + Estudio profesional ;
Bovenstaande functietoetsen + professionele studio - Funções teclas descritas acima + Escritório profissional
M = 41
Funzioni tasti sopra descritte + Cerca persone ; Key functions described above + Pager ; Fonctions des touches ci-dessus + Cherche-personnes ;
Oben beschriebene Tastenfunktionen + Personensuche ; Funciones de las teclas descritas anteriormente + Buscador de personas ; Bovenstaande
functietoetsen + personenzoeksysteem ; Funções teclas descritas acima + Procura pessoas
M = 81
Funzioni tasti sopra descritte + Studio professionale + Cerca persone ; Key functions described above + Professional studio + Pager
Fonctions des touches ci-dessus + Bureau + Cherche-personnes ; Oben beschriebene Tastenfunktionen + Professional Studio + Personensuche
Funciones de las teclas descritas anteriormente + Estudio profesional + Buscador de personas; Bovenstaande functietoetsen + professionele studio +
personenzoeksysteem ; Funções teclas descritas acima + Escritório profissional+ Procura pessoas

34
FUNZIONE - FUNCTION - FONCTION - FUNKTION - FUNCIÓN - MODUS - MODO
M = 02
• Intercom all’interno dell’appartamento in impianti con interfaccia di
appartamento 346850 oppure intercom tra appartamenti in impianti senza
interfaccia di appartamento
• Intercom inside the apartment, in systems with apartment interface 346850, or
intercom among apartments in systems without apartment interface.
• Intercom à l’intérieur de l’appartement sur installations à interface
d’appartement 346850 ou intercom entre appartements sur installations sans
interface d’appartement
• Intercom zwischen Wohnungen mit Anlage, die mit einer Wohnungsschnittstelle
346850 ausgestattet sind oder Intercom zwischen Wohnungen mit Anlage ohne
Wohnungsschnittstelle
• Intercom interno en el piso en instalaciones con interfaz de piso 346850 o
intercom entre pisos en instalaciones sin interfaz de piso
• Intercom binnen een appartement met in installaties met een appartement-
interface 346850, of intercom tussen appartementen in installaties zonder
appartement-interface
• Intercomunicador no interior do apartamento em instalações com interface
específica 346850 ou intercomunicador entre apartamentos em instalações
sem interface específicao
N=1 N=3 N=2 N=1
N=3 N=1
• Intercom all’interno dell’appartamento in impianti con interfaccia di
appartamento 346850 oppure intercom tra appartamenti in impianti senza
interfaccia di appartamento
• Intercom inside the apartment, in systems with apartment interface 346850, or
intercom among apartments in systems without apartment interface.
• Intercom à l’intérieur de l’appartement sur installations à interface
d’appartement 346850 ou intercom entre appartements sur installations sans
interface d’appartement
• Intercom zwischen Wohnungen mit Anlage, die mit einer Wohnungsschnittstelle
346850 ausgestattet sind oder Intercom zwischen Wohnungen mit Anlage ohne
Wohnungsschnittstelle
• Intercom interno en el piso en instalaciones con interfaz de piso 346850 o
intercom entre pisos en instalaciones sin interfaz de piso
• Intercom binnen een appartement met in installaties met een appartement-
interface 346850, of intercom tussen appartementen in installaties zonder
appartement-interface
• Intercomunicador no interior do apartamento em instalações com interface
específica 346850 ou intercomunicador entre apartamentos em instalações
sem interface específicao
N=1
N=2
N=2
N=3
N=3 N=2
• Apertura serratura del PE (configurato con P+1) in modo diretto senza la chiamata oppure attivazione attuatore 346210 (configurato con P+1 e
MOD=5) oppure attivazione attuatori serratura 346230 - 346260 (configurati con P+1)
• EP door lock release (configured with P+1), directly without call, or activation of the actuator 346210 (configured with P+1 and MOD=5), or
activation of door lock actuators 346230 - 346260 (configured with P+1)
• Ouverture serrure du PE (configuré avec P+1) en mode direct sans appel ou activation actionneur 346210 (configuré avec P+1 et MOD=5) ou
activation actionneurs serrure 346230 - 346260 (configurés avec P+1)
• Schloss der TS (mit P+1 konfiguriert) direkt ohne Anruf öffnen oder Aktor 346210 aktivieren (mit P+1 und MOD=5 konfiguriert) oder
Schlossaktoren 346230 - 346260 aktivieren (mit P+1 konfiguriert)
• Apertura cerradura de la PE (configurada con P+1) en el modo directo sin la llamada o activación del actuador 346210 (configurado con P+1 y
MOD=5) o activación del actuador cerradura 346230 - 346260 (configurado con P+1)
• Directe opening slot Buitenpost (geconfigureerd met P+1) zonder oproep of activering van de actuatoren 346210 (geconfigureerd met P+1 en
MOD=5), of activering actuatoren slot 346230 - 346260 (geconfigureerd met P+1).
• Abertura da fechadura da UE (configurada com P+1) em modo directo, sem a chamada, ou activação do atuador 346210 (configurado com P+1
e MOD=5) ou ainda activação do atuador de uma fechadura 346230 - 346260 (configurados com P+1).
• Apertura serratura del PE (configurato con P+2) in modo diretto senza la chiamata oppure attivazione attuatore 346210 (configurato con P+2 e
MOD=5) oppure attivazione attuatori serratura 346230 - 346260 (configurati con P+2)
• EP door lock release (configured with P+2), directly without call, or activation of the actuator 346210 (configured with P+2 and MOD=5), or
activation of door lock actuators 346230 - 346260 (configured with P+2)
• Ouverture serrure du PE (configuré avec P+2) en mode direct sans appel ou activation actionneur 346210 (configuré avec P+2 et MOD=5) ou
activation actionneurs serrure 346230 - 346260 (configurés avec P+2)
• Schloss der TS (mit P+2 konfiguriert) direkt ohne Anruf öffnen oder Aktor 346210 aktivieren (mit P+2 und MOD=5 konfiguriert) oder
Schlossaktoren 346230 - 346260 aktivieren (mit P+2 konfiguriert)
• Apertura cerradura de la PE (configurada con P+2) en el modo directo sin la llamada o activación del actuador 346210 (configurado con P+2 y
MOD=5) o activación del actuador cerradura 346230 - 346260 (configurado con P+2)
• Directe opening slot Buitenpost (geconfigureerd met P+2) zonder oproep of activering van de actuatoren 346210 (geconfigureerd met P+2en
MOD=5), of activering actuatoren slot 346230 - 346260 (geconfigureerd met P+2
• Abertura da fechadura da UE (configurada com P+2) em modo directo, sem a chamada, ou activação do atuador 346210 (configurado com P+2
e MOD=5) ou ainda activação do atuador de uma fechadura 346230 - 346260 (configurados com P+2).

Video - Kit
35
FUNZIONE - FUNCTION - FONCTION - FUNKTION - FUNCIÓN - MODUS - MODO
M = 22
Funzioni tasti sopra descritte + Studio professionale; Key functions described above + Professional studio ; Fonctions des touches ci-dessus + Bureau ; Oben
beschriebene Tastenfunktionen + Professional Studio ; Funciones de las teclas descritas anteriormente + Estudio profesional ;
Bovenstaande functietoetsen + professionele studio - Funções teclas descritas acima + Escritório profissional
M = 42
Funzioni tasti sopra descritte + Cerca persone ; Key functions described above + Pager ; Fonctions des touches ci-dessus + Cherche-personnes ;
Oben beschriebene Tastenfunktionen + Personensuche ; Funciones de las teclas descritas anteriormente + Buscador de personas ; Bovenstaande
functietoetsen + personenzoeksysteem ; Funções teclas descritas acima + Procura pessoas
M = 82
Funzioni tasti sopra descritte + Studio professionale + Cerca persone ; Key functions described above + Professional studio + Pager
Fonctions des touches ci-dessus + Bureau + Cherche-personnes ; Oben beschriebene Tastenfunktionen + Professional Studio + Personensuche
Funciones de las teclas descritas anteriormente + Estudio profesional + Buscador de personas; Bovenstaande functietoetsen + professionele studio +
personenzoeksysteem ; Funções teclas descritas acima + Escritório profissional+ Procura pessoas
M = 03
• Intercom all’interno dell’appartamento in impianti con interfaccia di appartamento 346850 oppure intercom tra appartamenti in impianti senza
interfaccia di appartamento
• Intercom inside the apartment, in systems with apartment interface 346850, or intercom among apartments in systems without apartment
interface
• Intercom à l’intérieur de l’appartement sur installations à interface d’appartement 346850 ou intercom entre appartements sur installations
sans interface d’appartement
• Intercom zwischen Wohnungen mit Anlage, die mit einer Wohnungsschnittstelle 346850 ausgestattet sind oder Intercom zwischen Wohnungen mit
Anlage ohne Wohnungsschnittstelle
• Intercom interno en el piso en instalaciones con interfaz de piso 346850 o intercom entre pisos en instalaciones sin interfaz de pis
• Intercom binnen een appartement met in installaties met een appartement-interface 346850, of intercom tussen appartementen in installaties
zonder appartement-interface
• Intercomunicador no interior do apartamento em instalações com interface específica 346850 ou intercomunicador entre apartamentos em
instalações sem interface específicao
N=1 N=5 N=2 N=1 N=3 N=1
N=4 N=1 N=5 N=1
• Intercom all’interno dell’appartamento in impianti con interfaccia di appartamento 346850 oppure intercom tra appartamenti in impianti senza
interfaccia di appartamento
• Intercom inside the apartment, in systems with apartment interface 346850, or intercom among apartments in systems without apartment
interface
• Intercom à l’intérieur de l’appartement sur installations à interface d’appartement 346850 ou intercom entre appartements sur installations sans
interface d’appartement
• Intercom zwischen Wohnungen mit Anlage, die mit einer Wohnungsschnittstelle 346850 ausgestattet sind oder Intercom zwischen Wohnungen mit
Anlage ohne Wohnungsschnittstelle
• Intercom interno en el piso en instalaciones con interfaz de piso 346850 o intercom entre pisos en instalaciones sin interfaz de piso
• Intercom binnen een appartement met in installaties met een appartement-interface 346850, of intercom tussen appartementen in installaties
zonder appartement-interface
• Intercomunicador no interior do apartamento em instalações com interface específica 346850 ou intercomunicador entre apartamentos em
instalações sem interface específicao
N=1 N=2 N=2 N=5 N=3 N=2
N=4 N=2 N=5 N=2

36
M = 23
Funzioni tasti sopra descritte + Studio professionale; Key functions described above + Professional studio ; Fonctions des touches ci-dessus + Bureau ; Oben
beschriebene Tastenfunktionen + Professional Studio ; Funciones de las teclas descritas anteriormente + Estudio profesional ;
Bovenstaande functietoetsen + professionele studio - Funções teclas descritas acima + Escritório profissional
M = 43
Funzioni tasti sopra descritte + Cerca persone ; Key functions described above + Pager ; Fonctions des touches ci-dessus + Cherche-personnes ;
Oben beschriebene Tastenfunktionen + Personensuche ; Funciones de las teclas descritas anteriormente + Buscador de personas ; Bovenstaande
functietoetsen + personenzoeksysteem ; Funções teclas descritas acima + Procura pessoas
M = 83
Funzioni tasti sopra descritte + Studio professionale + Cerca persone ; Key functions described above + Professional studio + Pager
Fonctions des touches ci-dessus + Bureau + Cherche-personnes ; Oben beschriebene Tastenfunktionen + Professional Studio + Personensuche
Funciones de las teclas descritas anteriormente + Estudio profesional + Buscador de personas; Bovenstaande functietoetsen + professionele studio +
personenzoeksysteem ; Funções teclas descritas acima + Escritório profissional+ Procura pessoas
FUNZIONE - FUNCTION - FONCTION - FUNKTION - FUNCIÓN - MODUS - MODO
M = 03
• Intercom all’interno dell’appartamento in impianti con interfaccia di appartamento 346850 oppure intercom tra appartamenti in impianti senza
interfaccia di appartamento
• Intercom inside the apartment, in systems with apartment interface 346850, or intercom among apartments in systems without apartment
interface
• Intercom à l’intérieur de l’appartement sur installations à interface d’appartement 346850 ou intercom entre appartements sur installations
sans interface d’appartement
• Intercom zwischen Wohnungen mit Anlage, die mit einer Wohnungsschnittstelle 346850 ausgestattet sind oder Intercom zwischen Wohnungen mit
Anlage ohne Wohnungsschnittstelle
• Intercom interno en el piso en instalaciones con interfaz de piso 346850 o intercom entre pisos en instalaciones sin interfaz de piso
• Intercom binnen een appartement met in installaties met een appartement-interface 346850, of intercom tussen appartementen in installaties
zonder appartement-interface
• Intercomunicador no interior do apartamento em instalações com interface específica 346850 ou intercomunicador entre apartamentos em
instalações sem interface específicao
N=1 N=3 N=2 N=3 N=3 N=5
N=4 N=3 N=5 N=3
• Intercom all’interno dell’appartamento in impianti con interfaccia di appartamento 346850 oppure intercom tra appartamenti in impianti senza
interfaccia di appartamento
• Intercom inside the apartment, in systems with apartment interface 346850, or intercom among apartments in systems without apartment
interface
• Intercom à l’intérieur de l’appartement sur installations à interface d’appartement 346850 ou intercom entre appartements sur installations
sans interface d’appartement
• Intercom zwischen Wohnungen mit Anlage, die mit einer Wohnungsschnittstelle 346850 ausgestattet sind oder Intercom zwischen Wohnungen mit
Anlage ohne Wohnungsschnittstelle
• Intercom interno en el piso en instalaciones con interfaz de piso 346850 o intercom entre pisos en instalaciones sin interfaz de piso
• Intercom binnen een appartement met in installaties met een appartement-interface 346850, of intercom tussen appartementen in installaties
zonder appartement-interface
• Intercomunicador no interior do apartamento em instalações com interface específica 346850 ou intercomunicador entre apartamentos em
instalações sem interface específicao
N=1 N=4 N=2 N=4 N=3 N=4
N=4 N=5 N=5 N=4

Video - Kit
37
FUNZIONE - FUNCTION - FONCTION - FUNKTION - FUNCIÓN - MODUS - MODO
M = 04
• Attivazione del PE (configurato con P+1) in modo diretto senza la chiamata oppure attivazione attuatore 346210 (configurato con P+1 e MOD=9)
• Activation of the EP (configured with P+1) directly without call or activation of the actuator 346210 (configured with P+1 and MOD=9)
• Activation du PE (configuré avec P+1) en mode direct sans appel ou activation actionneur 346210 (configuré avec P+1 et MOD=9)
• TS (mit P+1 konfiguriert) direkt ohne Anruf aktivieren oder Aktor 346210 aktivieren (mit P+1 und MOD=9 konfiguriert)
• Activación de la PE (configurada con P+1) en el modo directo sin la llamada o activación actuador 346210 (configurado con P+1 y MOD=9)
• Directe activering Buitenpost (geconfigureerd met P+1) zonder oproep of activering van de actuator 346210 (geconfigureerd met P+1 en MOD=9)
• Activação da UE (configurada com P+1) em modo directo, sem a chamada, ou activação do atuador 346210 (configurado com P+1 e MOD=9).
• Intercom all’interno dell’appartamento in impianti con interfaccia di appartamento 346850 oppure intercom
tra appartamenti in impianti senza interfaccia di appartamento
• Intercom inside the apartment, in systems with apartment interface 346850, or intercom among apartments in
systems without apartment interface.
• Intercom à l’intérieur de l’appartement sur installations à interface d’appartement 346850 ou intercom entre
appartements sur installations sans interface d’appartement
• Intercom zwischen Wohnungen mit Anlage, die mit einer Wohnungsschnittstelle 346850 ausgestattet sind oder
Intercom zwischen Wohnungen mit Anlage ohne Wohnungsschnittstelle
• Intercom interno en el piso en instalaciones con interfaz de piso 346850 o intercom entre pisos en
instalaciones sin interfaz de piso
• Intercom binnen een appartement met in installaties met een appartement-interface 346850, of intercom
tussen appartementen in installaties zonder appartement-interface
• Intercomunicador no interior do apartamento em instalações com interface específica 346850 ou
intercomunicador entre apartamentos em instalações sem interface específicao
N=1
N=2
N=2
N=1
• Apertura serratura del PE (configurato con P+1) in modo diretto senza la chiamata oppure attivazione attuatore 346210 (configurato con P+1 e
MOD=5) oppure attivazione attuatori serratura 346230 - 346260 (configurati con P+1)
• EP door lock release (configured with P+1), directly without call, or activation of the actuator 346210 (configured with P+1 and MOD=5), or
activation of door lock actuators 346230 - 346260 (configured with P+1)
• Ouverture serrure du PE (configuré avec P+1) en mode direct sans appel ou activation actionneur 346210 (configuré avec P+1 et MOD=5) ou
activation actionneurs serrure 346230 - 346260 (configurés avec P+1)
• Schloss der TS (mit P+1 konfiguriert) direkt ohne Anruf öffnen oder Aktor 346210 aktivieren (mit P+1 und MOD=5 konfiguriert) oder
Schlossaktoren 346230 - 346260 aktivieren (mit P+1 konfiguriert)
• Apertura cerradura de la PE (configurada con P+1) en el modo directo sin la llamada o activación del actuador 346210 (configurado con P+1 y
MOD=5) o activación del actuador cerradura 346230 - 346260 (configurado con P+1)
• Directe opening slot Buitenpost (geconfigureerd met P+1) zonder oproep of activering van de actuatoren 346210 (geconfigureerd met P+1 en
MOD=5), of activering actuatoren slot 346230 - 346260 (geconfigureerd met P+1).
• Abertura da fechadura da UE (configurada com P+1) em modo directo, sem a chamada, ou activação do atuador 346210 (configurado com P+1
e MOD=5) ou ainda activação do atuador de uma fechadura 346230 - 346260 (configurados com P+1).
• Apertura serratura del PE (configurato con P+2) in modo diretto senza la chiamata oppure attivazione attuatore 346210 (configurato con P+2 e
MOD=5) oppure attivazione attuatori serratura 346230 - 346260 (configurati con P+2)
• EP door lock release (configured with P+2), directly without call, or activation of the actuator 346210 (configured with P+2 and MOD=5), or
activation of door lock actuators 346230 - 346260 (configured with P+2)
• Ouverture serrure du PE (configuré avec P+2) en mode direct sans appel ou activation actionneur 346210 (configuré avec P+2 et MOD=5) ou
activation actionneurs serrure 346230 - 346260 (configurés avec P+2)
• Schloss der TS (mit P+2 konfiguriert) direkt ohne Anruf öffnen oder Aktor 346210 aktivieren (mit P+2 und MOD=5 konfiguriert) oder
Schlossaktoren 346230 - 346260 aktivieren (mit P+2 konfiguriert)
• Apertura cerradura de la PE (configurada con P+2) en el modo directo sin la llamada o activación del actuador 346210 (configurado con P+2 y
MOD=5) o activación del actuador cerradura 346230 - 346260 (configurado con P+2)
• Directe opening slot Buitenpost (geconfigureerd met P+2) zonder oproep of activering van de actuatoren 346210 (geconfigureerd met P+2 en
MOD=5), of activering actuatoren slot 346230 - 346260 (geconfigureerd met P+2).
• Abertura da fechadura da UE (configurada com P+2) em modo directo, sem a chamada, ou activação do atuador 346210 (configurado com P+2
e MOD=5) ou ainda activação do atuador de uma fechadura 346230 - 346260 (configurados com P+2).
M = 24
Funzioni tasti sopra descritte + Studio professionale; Key functions described above + Professional studio ; Fonctions des touches ci-dessus + Bureau ; Oben
beschriebene Tastenfunktionen + Professional Studio ; Funciones de las teclas descritas anteriormente + Estudio profesional ;
Bovenstaande functietoetsen + professionele studio - Funções teclas descritas acima + Escritório profissional
M = 44
Funzioni tasti sopra descritte + Cerca persone ; Key functions described above + Pager ; Fonctions des touches ci-dessus + Cherche-personnes ;
Oben beschriebene Tastenfunktionen + Personensuche ; Funciones de las teclas descritas anteriormente + Buscador de personas ; Bovenstaande
functietoetsen + personenzoeksysteem ; Funções teclas descritas acima + Procura pessoas
M = 84
Funzioni tasti sopra descritte + Studio professionale + Cerca persone ; Key functions described above + Professional studio + Pager
Fonctions des touches ci-dessus + Bureau + Cherche-personnes ; Oben beschriebene Tastenfunktionen + Professional Studio + Personensuche
Funciones de las teclas descritas anteriormente + Estudio profesional + Buscador de personas; Bovenstaande functietoetsen + professionele studio +
personenzoeksysteem ; Funções teclas descritas acima + Escritório profissional+ Procura pessoas

38
FUNZIONE - FUNCTION - FONCTION - FUNKTION - FUNCIÓN - MODUS - MODO
M = 05
• Apertura serratura del PE (configurato con P+1) in modo diretto senza la chiamata oppure attivazione attuatore 346210 (configurato con P+1 e
MOD=5) oppure attivazione attuatori serratura 346230 - 346260 (configurati con P+1)
• EP door lock release (configured with P+1), directly without call, or activation of the actuator 346210 (configured with P+1 and MOD=5), or
activation of door lock actuators 346230 - 346260 (configured with P+1)
• Ouverture serrure du PE (configuré avec P+1) en mode direct sans appel ou activation actionneur 346210 (configuré avec P+1 et MOD=5) ou
activation actionneurs serrure 346230 - 346260 (configurés avec P+1)
• Schloss der TS (mit P+1 konfiguriert) direkt ohne Anruf öffnen oder Aktor 346210 aktivieren (mit P+1 und MOD=5 konfiguriert) oder
Schlossaktoren 346230 - 346260 aktivieren (mit P+1 konfiguriert)
• Apertura cerradura de la PE (configurada con P+1) en el modo directo sin la llamada o activación del actuador 346210 (configurado con P+1 y
MOD=5) o activación del actuador cerradura 346230 - 346260 (configurado con P+1)
• Directe opening slot Buitenpost (geconfigureerd met P+1) zonder oproep of activering van de actuatoren 346210 (geconfigureerd met P+1 en
MOD=5), of activering actuatoren slot 346230 - 346260 (geconfigureerd met P+1).
• Abertura da fechadura da UE (configurada com P+1) em modo directo, sem a chamada, ou activação do atuador 346210 (configurado com P+1
e MOD=5) ou ainda activação do atuador de uma fechadura 346230 - 346260 (configurados com P+1
• Apertura serratura del PE (configurato con P+2) in modo diretto senza la chiamata oppure attivazione attuatore 346210 (configurato con P+2 e
MOD=5) oppure attivazione attuatori serratura 346230 - 346260 (configurati con P+2)
• EP door lock release (configured with P+2), directly without call, or activation of the actuator 346210 (configured with P+2 and MOD=5), or
activation of door lock actuators 346230 - 346260 (configured with P+2)
• Ouverture serrure du PE (configuré avec P+2) en mode direct sans appel ou activation actionneur 346210 (configuré avec P+2 et MOD=5) ou
activation actionneurs serrure 346230 - 346260 (configurés avec P+2)
• Schloss der TS (mit P+2 konfiguriert) direkt ohne Anruf öffnen oder Aktor 346210 aktivieren (mit P+2 und MOD=5 konfiguriert) oder
Schlossaktoren 346230 - 346260 aktivieren (mit P+2 konfiguriert)
• Apertura cerradura de la PE (configurada con P+2) en el modo directo sin la llamada o activación del actuador 346210 (configurado con P+2 y
MOD=5) o activación del actuador cerradura 346230 - 346260 (configurado con P+2)
• Directe opening slot Buitenpost (geconfigureerd met P+2) zonder oproep of activering van de actuatoren 346210 (geconfigureerd met P+2en
MOD=5), of activering actuatoren slot 346230 - 346260 (geconfigureerd met P+2).
• Abertura da fechadura da UE (configurada com P+2) em modo directo, sem a chamada, ou activação do atuador 346210 (configurado com P+2
e MOD=5) ou ainda activação do atuador de uma fechadura 346230 - 346260 (configurados com P+2
• Apertura serratura del PE (configurato con P+3) in modo diretto senza la chiamata oppure attivazione attuatore 346210 (configurato con P+3 e
MOD=5) oppure attivazione attuatori serratura 346230 - 346260 (configurati con P+3)
• EP door lock release (configured with P+3), directly without call, or activation of the actuator 346210 (configured with P+3 and MOD=5), or
activation of door lock actuators 346230 - 346260 (configured with P+3)
• Ouverture serrure du PE (configuré avec P+3) en mode direct sans appel ou activation actionneur 346210 (configuré avec P+3 et MOD=5) ou
activation actionneurs serrure 346230 - 346260 (configurés avec P+3)
• Schloss der TS (mit P+3 konfiguriert) direkt ohne Anruf öffnen oder Aktor 346210 aktivieren (mit P+3 und MOD=5 konfiguriert) oder
Schlossaktoren 346230 - 346260 aktivieren (mit P+3 konfiguriert)
• Apertura cerradura de la PE (configurada con P+3) en el modo directo sin la llamada o activación del actuador 346210 (configurado con P+3 y
MOD=5) o activación del actuador cerradura 346230 - 346260 (configurado con P+3)
• Directe opening slot Buitenpost (geconfigureerd met P+3) zonder oproep of activering van de actuatoren 346210 (geconfigureerd met P+3 en
MOD=5), of activering actuatoren slot 346230 - 346260 (geconfigureerd met P+3).
• Abertura da fechadura da UE (configurada com P+3) em modo directo, sem a chamada, ou activação do atuador 346210 (configurado com P+3
e MOD=5) ou ainda activação do atuador de uma fechadura 346230 - 346260 (configurados com P+3
• Apertura serratura del PE (configurato con P+4) in modo diretto senza la chiamata oppure attivazione attuatore 346210 (configurato con P+4 e
MOD=5) oppure attivazione attuatori serratura 346230 - 346260 (configurati con P+4)
• EP door lock release (configured with P+4), directly without call, or activation of the actuator 346210 (configured with P+4 and MOD=5), or
activation of door lock actuators 346230 - 346260 (configured with P+4)
• Ouverture serrure du PE (configuré avec P+4) en mode direct sans appel ou activation actionneur 346210 (configuré avec P+4 et MOD=5) ou
activation actionneurs serrure 346230 - 346260 (configurés avec P+4)
• Schloss der TS (mit P+4 konfiguriert) direkt ohne Anruf öffnen oder Aktor 346210 aktivieren (mit P+4 und MOD=5 konfiguriert) oder
Schlossaktoren 346230 - 346260 aktivieren (mit P+4 konfiguriert)
• Apertura cerradura de la PE (configurada con P+4) en el modo directo sin la llamada o activación del actuador 346210 (configurado con P+4 y
MOD=5) o activación del actuador cerradura 346230 - 346260 (configurado con P+4)
• Directe opening slot Buitenpost (geconfigureerd met P+4) zonder oproep of activering van de actuatoren 346210 (geconfigureerd met P+4 en
MOD=5), of activering actuatoren slot 346230 - 346260 (geconfigureerd met P+4).
• Abertura da fechadura da UE (configurada com P+4) em modo directo, sem a chamada, ou activação do atuador 346210 (configurado com P+4
e MOD=5) ou ainda activação do atuador de uma fechadura 346230 - 346260 (configurados com P+4
M = 25
Funzioni tasti sopra descritte + Studio professionale; Key functions described above + Professional studio ; Fonctions des touches ci-dessus + Bureau ; Oben
beschriebene Tastenfunktionen + Professional Studio ; Funciones de las teclas descritas anteriormente + Estudio profesional ;
Bovenstaande functietoetsen + professionele studio - Funções teclas descritas acima + Escritório profissional
M = 45
Funzioni tasti sopra descritte + Cerca persone ; Key functions described above + Pager ; Fonctions des touches ci-dessus + Cherche-personnes ;
Oben beschriebene Tastenfunktionen + Personensuche ; Funciones de las teclas descritas anteriormente + Buscador de personas ; Bovenstaande
functietoetsen + personenzoeksysteem ; Funções teclas descritas acima + Procura pessoas
M = 85
Funzioni tasti sopra descritte + Studio professionale + Cerca persone ; Key functions described above + Professional studio + Pager
Fonctions des touches ci-dessus + Bureau + Cherche-personnes ; Oben beschriebene Tastenfunktionen + Professional Studio + Personensuche
Funciones de las teclas descritas anteriormente + Estudio profesional + Buscador de personas; Bovenstaande functietoetsen + professionele studio +
personenzoeksysteem ; Funções teclas descritas acima + Escritório profissional+ Procura pessoas

Video - Kit
39
FUNZIONE - FUNCTION - FONCTION - FUNKTION - FUNCIÓN - MODUS - MODO
M = 06
• Funzione “INTERCOM PRE IMPOSTATO” con chiamata intercomunicante al PI configurato con N= 1.
Dai posti interni presenti nell’impianto è possibile inviare una chiamata Intercom al posto interno configurato con N= 1.
Il posto interno configurato con N= 1 riceve le chiamate Intercom ma NON le invia.
• Preset intercom function with intercommunicating call to the Handset configured with N=1. From the system handsets it is possible to send an
intercom call to the handset configured with N= 1. The indoor unit configured with N=1 can receive intercom calls, but is unable to send them.
• Fonction « INTERCOM PRÉ-PROGRAMMÉ » avec appel intercommuniquant au PI configuré avec N = 1.
Depuis les postes internes présents sur l’installation, il est possible d’envoyer un appel Intercom au poste interne configuré avec N = 1.
Le poste interne configuré avec N = 1 reçoit les appels Intercom mais NE LES ENVOIE PAS.
• Funktion „INTERCOM VOREINGESTELLT“ mit Intercom-Anruf der HS konfiguriert mit N= 1.
Von den Hausstationen der Anlage aus ist es möglich, einen Intercom-Anruf an die mit N=1 konfigurierte Hausstation zu senden.
Die mit N=1 konfigurierte Hausstation empfängt die Intercom-Anrufe, sendet sie aber NICHT weiter.
• Función “INTERCOM PREAJUSTADA” con llamada intercomunicante a la UI configurada con N= 1.
Desde las unidades interiores, presentes en el sistema, se puede enviar una llamada Intercom a la unidad interior configurada con N = 1.
La unidad interior configurada con N = 1 recibe las llamadas Intercom, pero NO puede enviarlas.
• Functie “VOORAF INGESTELDE INTERCOM” met intercomoproep naar de binnenpost die is geconfigureerd met N=1. Vanaf de binnenposten
die onderdeel uitmaken van de installatie kan een intercomoproep worden gezonden naar de binnenpost die is geconfigureerd met N=1.De
binnenpost die is geconfigureerd met N=1 ontvangt intercomoproepen maar verzendt ze NIET.
• Função “INTERCOM PRÉ-CONFIGURADO” com chamada intercomunicante ao PI configurado com N= 1. Desde as unidades internas presentes
no equipamento é possível enviar uma chamada Intercom à unidade interna configurada com N= 1. A unidade interna configurada com N=
1 recebe as chamadas Intercom mas NÃO as envia.
• Intercom su se stesso, invia la chiamata a tutti gli apparecchi con uguale indirizzo
• Internal intercom. It sends the call to all the handsets with the same address.
• Intercom sur soi-même.Envoie un appel à tous les appareils avec la même adresse
• Intercom auf sich selbst. Sendet den Anruf an alle Geräte mit derselben Adresse
• Intercom sobre sí mismo. Envía la llamada a todos los aparatos con la misma dirección
• Intercom op zich Verstuurt de oproep naar alle apparaten met hetzelfde adres
• Intercomunicador sobre si próprio. Envia a chamada para todos os aparelhos com o mesmo endereço
• Apertura serratura del PE (configurato con P+1) in modo diretto senza la chiamata oppure attivazione attuatore 346210 (configurato con
P+1 e MOD=5) oppure attivazione attuatori serratura 346230 - 346260 (configurati con P+1)
• EP door lock release (configured with P+1), directly without call, or activation of the actuator 346210 (configured with P+1 and MOD=5), or
activation of door lock actuators 346230 - 346260 (configured with P+1)
• Ouverture serrure du PE (configuré avec P+1) en mode direct sans appel ou activation actionneur 346210 (configuré avec P+1 et MOD=5)
ou activation actionneurs serrure 346230 - 346260 (configurés avec P+1)
• Schloss der TS (mit P+1 konfiguriert) direkt ohne Anruf öffnen oder Aktor 346210 aktivieren (mit P+1 und MOD=5 konfiguriert) oder
Schlossaktoren 346230 - 346260 aktivieren (mit P+1 konfiguriert)
• Apertura cerradura de la PE (configurada con P+1) en el modo directo sin la llamada o activación del actuador 346210 (configurado con
P+1 y MOD=5) o activación del actuador cerradura 346230 - 346260 (configurado con P+1)
• Directe opening slot Buitenpost (geconfigureerd met P+1) zonder oproep of activering van de actuatoren 346210 (geconfigureerd met P+1 en
MOD=5), of activering actuatoren slot 346230 - 346260 (geconfigureerd met P+1).
• Abertura da fechadura da UE (configurada com P+1) em modo directo, sem a chamada, ou activação do atuador 346210 (configurado com
P+1 e MOD=5) ou ainda activação do atuador de uma fechadura 346230 - 346260 (configurados com P+1).
• Apertura serratura del PE (configurato con P+2) in modo diretto senza la chiamata oppure attivazione attuatore 346210 (configurato con
P+2 e MOD=5) oppure attivazione attuatori serratura 346230 - 346260 (configurati con P+2)
• EP door lock release (configured with P+2), directly without call, or activation of the actuator 346210 (configured with P+2 and MOD=5), or
activation of door lock actuators 346230 - 346260 (configured with P+2)
• Ouverture serrure du PE (configuré avec P+2) en mode direct sans appel ou activation actionneur 346210 (configuré avec P+2 et MOD=5)
ou activation actionneurs serrure 346230 - 346260 (configurés avec P+2)
• Schloss der TS (mit P+2 konfiguriert) direkt ohne Anruf öffnen oder Aktor 346210 aktivieren (mit P+2 und MOD=5 konfiguriert) oder
Schlossaktoren 346230 - 346260 aktivieren (mit P+2 konfiguriert)
• Apertura cerradura de la PE (configurada con P+2) en el modo directo sin la llamada o activación del actuador 346210 (configurado con
P+2 y MOD=5) o activación del actuador cerradura 346230 - 346260 (configurado con P+2)
• Directe opening slot Buitenpost (geconfigureerd met P+2) zonder oproep of activering van de actuatoren 346210 (geconfigureerd met P+2 en
MOD=5), of activering actuatoren slot 346230 - 346260 (geconfigureerd met P+2).
• Abertura da fechadura da UE (configurada com P+2) em modo directo, sem a chamada, ou activação do atuador 346210 (configurado com
P+2 e MOD=5) ou ainda activação do atuador de uma fechadura 346230 - 346260 (configurados com P+2).
M = 26
Funzioni tasti sopra descritte + Studio professionale; Key functions described above + Professional studio ; Fonctions des touches ci-dessus + Bureau ; Oben
beschriebene Tastenfunktionen + Professional Studio ; Funciones de las teclas descritas anteriormente + Estudio profesional ;
Bovenstaande functietoetsen + professionele studio - Funções teclas descritas acima + Escritório profissional
M = 46
Funzioni tasti sopra descritte + Cerca persone ; Key functions described above + Pager ; Fonctions des touches ci-dessus + Cherche-personnes ;
Oben beschriebene Tastenfunktionen + Personensuche ; Funciones de las teclas descritas anteriormente + Buscador de personas ; Bovenstaande
functietoetsen + personenzoeksysteem ; Funções teclas descritas acima + Procura pessoas
M = 86
Funzioni tasti sopra descritte + Studio professionale + Cerca persone ; Key functions described above + Professional studio + Pager
Fonctions des touches ci-dessus + Bureau + Cherche-personnes ; Oben beschriebene Tastenfunktionen + Professional Studio + Personensuche
Funciones de las teclas descritas anteriormente + Estudio profesional + Buscador de personas; Bovenstaande functietoetsen + professionele studio +
personenzoeksysteem ; Funções teclas descritas acima + Escritório profissional+ Procura pessoas

40
FUNZIONE - FUNCTION - FONCTION - FUNKTION - FUNCIÓN - MODUS - MODO
M = 10
• Intercom generale, invia una chiamata a tutti gli apparecchi dell’appartamento in impianti con interfaccia di appartamento 346850 oppure Intercom verso
tutti gli apparecchi dell’impianto in installazioni senza interfaccia di appartamento 346850;
• General intercom, it sends the call to all the apartment devices, in systems with apartment interface 346850, or intercom towards all the apartment devices in
systems without apartment interface 346850;
• Intercom général, envoie un appel à tous les appareils de l’appartement sur installations à interface d’appartement 346850 ou Intercom vers tous les
appareils du système sur installations sans sans interface d’appartement 346850;
• Intercom zwischen Wohnungen mit Anlage, die mit einer Wohnungsschnittstelle 346850 ausgestattet sind oder Intercom zwischen Wohnungen mit Anlage ohne
Wohnungsschnittstelle. 346850
• Intercom general, envía una llamada a todos los aparatos del piso en instalaciones con interfaz de piso 346850 o Intercom hacia todos los aparatos de la instalación
en montajes sin interfaz de piso 346850;
• Hoofdintercom, stuurt een oproep naar alle apparaten van het appartement in installaties met een appartement-interface 346850, of intercom naar alle apparaten van
de installatie in installaties zonder appartement-interface 346850
• Intercomunicador geral, envia uma chamada a todos os aparelhos do apartamento em equipamentos com interface específica 346850 ou
intercomunicador para todos os aparelhos em instalações sem interface específica 346850
• Attivazione del PE (configurato con P+1) in modo diretto senza la chiamata oppure attivazione attuatore 346210 (configurato con P+1 e MOD=9)
• Activation of the EP (configured with P+1) directly without call or activation of the actuator 346210 (configured with P+1 and MOD=9)
• Activation du PE (configuré avec P+1) en mode direct sans appel ou activation actionneur 346210 (configuré avec P+1 et MOD=9)
• TS (mit P+1 konfiguriert) direkt ohne Anruf aktivieren oder Aktor 346210 aktivieren (mit P+1 und MOD=9 konfiguriert)
• Activación de la PE (configurada con P+1) en el modo directo sin la llamada o activación actuador 346210 (configurado con P+1 y MOD=9)
• Directe activering Buitenpost (geconfigureerd met P+1) zonder oproep of activering van de actuator 346210 (geconfigureerd met P+1 en MOD=9)
• Activação da UE (configurada com P+1) em modo directo, sem a chamada, ou activação do atuador 346210 (configurado com P+1 e MOD=9).
• Apertura serratura del PE (configurato con P+1) in modo diretto senza la chiamata oppure attivazione attuatore 346210 (configurato con P+1 e
MOD=5) oppure attivazione attuatori serratura 346230 - 346260 (configurati con P+1)
• EP door lock release (configured with P+1), directly without call, or activation of the actuator 346210 (configured with P+1 and MOD=5), or activation of
door lock actuators 346230 - 346260 (configured with P+1)
• Ouverture serrure du PE (configuré avec P+1) en mode direct sans appel ou activation actionneur 346210 (configuré avec P+1 et MOD=5) ou
activation actionneurs serrure 346230 - 346260 (configurés avec P+1)
• Schloss der TS (mit P+1 konfiguriert) direkt ohne Anruf öffnen oder Aktor 346210 aktivieren (mit P+1 und MOD=5 konfiguriert) oder Schlossaktoren
346230 - 346260 aktivieren (mit P+1 konfiguriert)
• Apertura cerradura de la PE (configurada con P+1) en el modo directo sin la llamada o activación del actuador 346210 (configurado con P+1 y
MOD=5) o activación del actuador cerradura 346230 - 346260 (configurado con P+1)
• Directe opening slot Buitenpost (geconfigureerd met P+1) zonder oproep of activering van de actuatoren 346210 (geconfigureerd met P+1 en MOD=5),
of activering actuatoren slot 346230 - 346260 (geconfigureerd met P+1).
• Abertura da fechadura da UE (configurada com P+1) em modo directo, sem a chamada, ou activação do atuador 346210 (configurado com P+1 e
MOD=5) ou ainda activação do atuador de uma fechadura 346230 - 346260 (configurados com P+1).
• Apertura serratura del PE (configurato con P+2) in modo diretto senza la chiamata oppure attivazione attuatore 346210 (configurato con P+2 e
MOD=5) oppure attivazione attuatori serratura 346230 - 346260 (configurati con P+2)
• EP door lock release (configured with P+2), directly without call, or activation of the actuator 346210 (configured with P+2 and MOD=5), or activation of
door lock actuators 346230 - 346260 (configured with P+2)
• Ouverture serrure du PE (configuré avec P+2) en mode direct sans appel ou activation actionneur 346210 (configuré avec P+2 et MOD=5) ou
activation actionneurs serrure 346230 - 346260 (configurés avec P+2)
• Schloss der TS (mit P+2 konfiguriert) direkt ohne Anruf öffnen oder Aktor 346210 aktivieren (mit P+2 und MOD=5 konfiguriert) oder Schlossaktoren
346230 - 346260 aktivieren (mit P+2 konfiguriert)
• Apertura cerradura de la PE (configurada con P+2) en el modo directo sin la llamada o activación del actuador 346210 (configurado con P+2 y
MOD=5) o activación del actuador cerradura 346230 - 346260 (configurado con P+2)
• Directe opening slot Buitenpost (geconfigureerd met P+2) zonder oproep of activering van de actuatoren 346210 (geconfigureerd met P+2 en MOD=5),
of activering actuatoren slot 346230 - 346260 (geconfigureerd met P+2).
• Abertura da fechadura da UE (configurada com P+2) em modo directo, sem a chamada, ou activação do atuador 346210 (configurado com P+2 e
MOD=5) ou ainda activação do atuador de uma fechadura 346230 - 346260 (configurados com P+2).
M = 30
Funzioni tasti sopra descritte + Studio professionale; Key functions described above + Professional studio ; Fonctions des touches ci-dessus + Bureau ; Oben
beschriebene Tastenfunktionen + Professional Studio ; Funciones de las teclas descritas anteriormente + Estudio profesional ;
Bovenstaande functietoetsen + professionele studio - Funções teclas descritas acima + Escritório profissional
M = 50
Funzioni tasti sopra descritte + Cerca persone ; Key functions described above + Pager ; Fonctions des touches ci-dessus + Cherche-personnes ;
Oben beschriebene Tastenfunktionen + Personensuche ; Funciones de las teclas descritas anteriormente + Buscador de personas ; Bovenstaande functietoetsen +
personenzoeksysteem ; Funções teclas descritas acima + Procura pessoas
M = 90
Funzioni tasti sopra descritte + Studio professionale + Cerca persone ; Key functions described above + Professional studio + Pager
Fonctions des touches ci-dessus + Bureau + Cherche-personnes ; Oben beschriebene Tastenfunktionen + Professional Studio + Personensuche
Funciones de las teclas descritas anteriormente + Estudio profesional + Buscador de personas; Bovenstaande functietoetsen + professionele studio +
personenzoeksysteem ; Funções teclas descritas acima + Escritório profissional+ Procura pessoas
M = 12
• Intercom tra appartamenti in impianti con interfaccia di appartamento 346850
• Intercom among apartments Xin systems with apartment interface 346850
• Intercom entre appartements sur installations à interface d’appartement 346850
• Intercom zwischen Wohnungen mit Anlage, die mit einer Wohnungsschnittstelle 346850 ausgestattet sind
• Intercom entre pisos en instalaciones con interfaz de piso 346850
• Intercom tussen appartementen in installaties met een appartement-interface 346850
• Intercomunicador entre apartamentos em instalações com interface específica 346850
N=1
• Intercom tra appartamenti in impianti con interfaccia di appartamento 346850
• Intercom among apartments in systems with apartment interface 346850
• Intercom entre appartements sur installations à interface d’appartement 346850
• Intercom zwischen Wohnungen mit Anlage, die mit einer Wohnungsschnittstelle 346850 ausgestattet sind
• Intercom entre pisos en instalaciones con interfaz de piso 346850
• Intercom tussen appartementen in installaties met een appartement-interface 346850
• Intercomunicador entre apartamentos em instalações com interface específica 346850
N=2

Video - Kit
41
FUNZIONE - FUNCTION - FONCTION - FUNKTION - FUNCIÓN - MODUS - MODO
• Apertura serratura del PE (configurato con P+1) in modo diretto senza la chiamata oppure attivazione attuatore 346210 (configurato con
P+1 e MOD=5) oppure attivazione attuatori serratura 346230 - 346260 (configurati con P+1)
• EP door lock release (configured with P+1), directly without call, or activation of the actuator 346210 (configured with P+1 and MOD=5), or
activation of door lock actuators 346230 - 346260 (configured with P+1)
• Ouverture serrure du PE (configuré avec P+1) en mode direct sans appel ou activation actionneur 346210 (configuré avec P+1 et MOD=5)
ou activation actionneurs serrure 346230 - 346260 (configurés avec P+)
• Schloss der TS (mit P+1 konfiguriert) direkt ohne Anruf öffnen oder Aktor 346210 aktivieren (mit P+1 und MOD=5 konfiguriert) oder
Schlossaktoren 346230 - 346260 aktivieren (mit P+1 konfiguriert)
• Apertura cerradura de la PE (configurada con P+1) en el modo directo sin la llamada o activación del actuador 346210 (configurado con
P+1 y MOD=5) o activación del actuador cerradura 346230 - 346260 (configurado con P+1)
• Directe opening slot Buitenpost (geconfigureerd met P+1) zonder oproep of activering van de actuatoren 346210 (geconfigureerd met P+1 en
MOD=5), of activering actuatoren slot 346230 - 346260 (geconfigureerd met P+1).
• Abertura da fechadura da UE (configurada com P+1) em modo directo, sem a chamada, ou activação do atuador 346210 (configurado
com P+1 e MOD=5) ou ainda activação do atuador de uma fechadura 346230 - 346260 (configurados com P+1).
• Apertura serratura del PE (configurato con P+2) in modo diretto senza la chiamata oppure attivazione attuatore 346210 (configurato con
P+2 e MOD=5) oppure attivazione attuatori serratura 346230 - 346260 (configurati con P+2)
• EP door lock release (configured with P+2), directly without call, or activation of the actuator 346210 (configured with P+2 and MOD=5), or
activation of door lock actuators 346230 - 346260 (configured with P+2)
• Ouverture serrure du PE (configuré avec P+2) en mode direct sans appel ou activation actionneur 346210 (configuré avec P+2 et MOD=5)
ou activation actionneurs serrure 346230 - 346260 (configurés avec P+2)
• Schloss der TS (mit P+2 konfiguriert) direkt ohne Anruf öffnen oder Aktor 346210 aktivieren (mit P+2 und MOD=5 konfiguriert) oder
Schlossaktoren 346230 - 346260 aktivieren (mit P+2 konfiguriert)
• Apertura cerradura de la PE (configurada con P+2) en el modo directo sin la llamada o activación del actuador 346210 (configurado con
P+2 y MOD=5) o activación del actuador cerradura 346230 - 346260 (configurado con P+2)
• Directe opening slot Buitenpost (geconfigureerd met P+2) zonder oproep of activering van de actuatoren 346210 (geconfigureerd met P+2 en
MOD=5), of activering actuatoren slot 346230 - 346260 (geconfigureerd met P+2).
• Abertura da fechadura da UE (configurada com P+2) em modo directo, sem a chamada, ou activação do atuador 346210 (configurado
com P+2 e MOD=5) ou ainda activação do atuador de uma fechadura 346230 - 346260 (configurados com P+2).)
M = 32
Funzioni tasti sopra descritte + Studio professionale; Key functions described above + Professional studio ; Fonctions des touches ci-dessus + Bureau ; Oben
beschriebene Tastenfunktionen + Professional Studio ; Funciones de las teclas descritas anteriormente + Estudio profesional ;
Bovenstaande functietoetsen + professionele studio - Funções teclas descritas acima + Escritório profissional
M = 52
Funzioni tasti sopra descritte + Cerca persone ; Key functions described above + Pager ; Fonctions des touches ci-dessus + Cherche-personnes ;
Oben beschriebene Tastenfunktionen + Personensuche ; Funciones de las teclas descritas anteriormente + Buscador de personas ; Bovenstaande
functietoetsen + personenzoeksysteem ; Funções teclas descritas acima + Procura pessoas
M = 92
Funzioni tasti sopra descritte + Studio professionale + Cerca persone ; Key functions described above + Professional studio + Pager
Fonctions des touches ci-dessus + Bureau + Cherche-personnes ; Oben beschriebene Tastenfunktionen + Professional Studio + Personensuche
Funciones de las teclas descritas anteriormente + Estudio profesional + Buscador de personas; Bovenstaande functietoetsen + professionele studio +
personenzoeksysteem ; Funções teclas descritas acima + Escritório profissional+ Procura pessoas
M = 13
• Intercom tra appartamenti in impianti con interfaccia di appartamento 346850
• Intercom among apartments in systems with apartment interface 346850
• Intercom entre appartements sur installations à interface d’appartement 346850
• Intercom zwischen Wohnungen mit Anlage, die mit einer Wohnungsschnittstelle 346850 ausgestattet sind
• Intercom entre pisos en instalaciones con interfaz de piso 346850
• Intercom tussen appartementen in installaties met een appartement-interface 346850
• Intercomunicador entre apartamentos em instalações com interface específica 346850
N=1
• Intercom tra appartamenti in impianti con interfaccia di appartamento 346850
• Intercom among apartments in systems with apartment interface 346850
• Intercom entre appartements sur installations à interface d’appartement 346850
• Intercom zwischen Wohnungen mit Anlage, die mit einer Wohnungsschnittstelle 346850 ausgestattet sind
• Intercom entre pisos en instalaciones con interfaz de piso 346850
• Intercom tussen appartementen in installaties met een appartement-interface 346850
• Intercomunicador entre apartamentos em instalações com interface específica 346850
N=2
• Intercom tra appartamenti in impianti con interfaccia di appartamento 346850
• Intercom among apartments in systems with apartment interface 346850
• Intercom entre appartements sur installations à interface d’appartement 346850
• Intercom zwischen Wohnungen mit Anlage, die mit einer Wohnungsschnittstelle 346850 ausgestattet sind
• Intercom entre pisos en instalaciones con interfaz de piso 346850
• Intercom tussen appartementen in installaties met een appartement-interface 346850
• Intercomunicador entre apartamentos em instalações com interface específica 346850
N=3
• Intercom tra appartamenti in impianti con interfaccia di appartamento 346850
• Intercom among apartments in systems with apartment interface 346850
• Intercom entre appartements sur installations à interface d’appartement 346850
• Intercom zwischen Wohnungen mit Anlage, die mit einer Wohnungsschnittstelle 346850 ausgestattet sind
• Intercom entre pisos en instalaciones con interfaz de piso 346850
• Intercom tussen appartementen in installaties met een appartement-interface 346850
• Intercomunicador entre apartamentos em instalações com interface específica 346850
N=4

42
FUNZIONE - FUNCTION - FONCTION - FUNKTION - FUNCIÓN - MODUS - MODO
M = 33
Funzioni tasti sopra descritte + Studio professionale; Key functions described above + Professional studio ; Fonctions des touches ci-dessus + Bureau ; Oben
beschriebene Tastenfunktionen + Professional Studio ; Funciones de las teclas descritas anteriormente + Estudio profesional ;
Bovenstaande functietoetsen + professionele studio - Funções teclas descritas acima + Escritório profissional
M = 53
Funzioni tasti sopra descritte + Cerca persone ; Key functions described above + Pager ; Fonctions des touches ci-dessus + Cherche-personnes ;
Oben beschriebene Tastenfunktionen + Personensuche ; Funciones de las teclas descritas anteriormente + Buscador de personas ; Bovenstaande
functietoetsen + personenzoeksysteem ; Funções teclas descritas acima + Procura pessoas
M = 93
Funzioni tasti sopra descritte + Studio professionale + Cerca persone ; Key functions described above + Professional studio + Pager
Fonctions des touches ci-dessus + Bureau + Cherche-personnes ; Oben beschriebene Tastenfunktionen + Professional Studio + Personensuche
Funciones de las teclas descritas anteriormente + Estudio profesional + Buscador de personas; Bovenstaande functietoetsen + professionele studio +
personenzoeksysteem ; Funções teclas descritas acima + Escritório profissional+ Procura pessoas
• Regolazioni e Impostazioni dispositivo
• Device adjustments and settings
• Réglages du dispositif
• Einstellungen des Geräts
• Regulaciones y ajustes del dispositivo
• Regelingen en Instellingen apparaat
• Regulações e configurações do dispositivo
+
-
• Utilizzo del joystick
Per navigare il menù e selezionare le varie impostazioni devi utilizzare il
joistick posto nella parte laterale del dispositivo.
• Use of the joystick
You must use the joystick on the side of the device to navigate on the menu
and select the settings.
• Utilisation du joystick
Pour naviguer dans le menu et sélectionner les différents réglages, il est
nécessaire d’utiliser le joystick situé sur la partie latérale du dispositif.
• Joystick benutzen
Um durch das Menü zu navigieren und die verschiedenen Einstellungen aus-
zuwählen, müssen Sie den Joystick an der Seite des Geräts verwenden.
• Utilizar el joystick
Para navegar por el menú y seleccionar los varios ajustes, ha de utilizar el
joystick, situado en la parte lateral del dispositivo.
• De joystick gebruiken
Navigeer door het menu en selecteer de verschillende instellingen met behulp
van de joystick aan de zijkant van het apparaat.
• Utilização do joystick
Para navegar o menu e selecionar as várias programações deve utilizar o
joystick situado na parte lateral do dispositivo.
• Utilizzando il joystick puoi eseguire delle regolazioni (menù Regolazioni e/o regolazione parametri durante
connessione Audio/Video) e delle impostazioni (Menù Impostazioni)
• Using the joystick it is possible to perform adjustments (Adjustments and/or Parameter Adjustment menu during
Audio/Video connection) and settings (Settings menu)
• A l’aide du joystick, il est possible d’effectuer des réglages (menu Réglages et/ou réglage paramètres pen-
dant la connexion Audio/Vidéo) et de régler des paramètres (Menu Paramètres)
• Mit dem Joystick können Sie Einstellungen (Menüeinstellungen und/oder Parametereinstellungen während der
Audio/Video-Verbindung) und Einstellungen (Menü Einstellungen) vornehmen.
• Utilizando el joystick, puede efectuar regulaciones (menú Regulaciones y/o Regulación de los parámetros
durante una conexión Audio/Vídeo) y ajustes (Menú Ajustes)
• Gebruik de joystick om de verschillende regelingen te verrichten (menu Regelingen en/of regeling parameters
tijdens de beeld-/geluidsverbinding) en de instellingen (menu Instellingen)
• Por utilizar o joystick poderá efetuar regulações (menu Regulações e/ou regulação de parâmetros durante a
conexão Áudio/Vídeo) e de programações (Menu Programações)

Video - Kit
43
Legenda simboli – Symbol legend - Signification des symboles - Erläuterung der Symbole- Leyenda de los símbolos - Legenda
symbolen - Legenda símbolos
SIMBOLO - SYMBOL - SYMBOLE
- SYMBOL - SÍMBOLO - SYMBOOL
- SÍMBOLO
AZIONE DA EFFETTUARE - ACTIONS TO BE PERFORMED - ACTION
À EXÉCUTER - DURCHZUFÜHRENDE AKTIONEN - ACCIONES QUE
EJECUTAR - UIT TE VOEREN HANDELINGEN - AÇÃO A EFETUAR
FUNZIONE - FUNCTION - FONCTION - FUNKTION - FUNCIÓN -
FUNCTIE - FUNÇÃO
• Premi
• Press
• Appuyer
• Drücken
• Presione
• Indrukken
• Carregar
• Conferma/entra in modalità Regolazioni
Confirm/access the Adjustments mode
• Confirmer/accéder à la modalité Réglages
Bestätigen/Modus Einstellungen abrufen
• Confirmar/entrar en modo Regulaciones
• Bevestigt/opent de modus Regelingen
• Confirmar/entrar em modalidade Regulações
> 5 sec ; > 5 Sek. ; > 5 seg
• Tieni premuto per più di 5 sec
• Press and hold down for more than 5 sec
Maintenir enfoncée pendant plus de 5sec.
• Länger als 5 Sekunde lang drücken
• Mantenga presionado más de 5 s
• Houd de knop meer dan 5 seconden ingedrukt
• Manter carregado por mais de 5 sec
• Entra in modalità Impostazioni
• Access the Settings mode
• Accéder à la modalité Paramètres
• Modus Einstellungen abrufen
• Entrar en modo Ajustes
• Opent de modus Instellingen
• Entrar em modalidade Programações
• Sposta su il joistick (quando rilasci torna in posizione centrale)
Move the joystick up (when released, it returns to central
position)
Déplacer le joystick vers le haut (une fois relâché, il se replace
en position centrale).
• Bewegen Sie den Joystick nach oben (wenn Sie ihn loslassen,
kehrt er wieder in die Mittelstellung zurück).
• Desplace hacia arriba el joistick (al soltarlo regresa a la posición
central)
• Verplaats de joystick omhoog (zodra u de joystick loslaat keert
deze naar de middelste stand terug)
• Deslocar para cima o joystick (ao soltar volta à posição central)
• Pagina precedente/aumenta livello
• Previous page/increase level
• Page précédente/augmenter niveau
• Vorhergehende Seite/Niveau erhöhen
• Página precedente/aumentar nivel
• Vorige pagina/niveau verhogen
• Página anterior/aumentar o nível
• Sposta giu il joistick (quando rilasci torna in posizione centrale)
• Move the joystick down (when released, it returns to central
position)
• Déplacer le joystick vers le bas (une fois relâché, il se replace en
position centrale).
• Bewegen Sie den Joystick nach unten (wenn Sie ihn loslassen,
kehrt er wieder in die Mittelstellung zurück).
• Desplace hacia abajo el joistick (al soltarlo regresa a la posición
central)
• Verplaats de joystick omlaag (zodra u de joystick loslaat keert
deze naar de middelste stand terug)
• Deslocar para baixo o linguística (ao soltar volta à posição
central)
• Pagina successiva/diminuisce livello
• Next page/decrease level
• Page suivante/abaisser niveau
• Nachfolgende Seite/Niveau verringern
• Página sucesiva/disminuir nivel
• Volgende pagina/niveau verlagen
• Próxima página/diminuir nível

44
• Regolazioni e Impostazioni Wi-Fi
Menù regolazioni e Impostazioni Wi-Fi
• Wi-Fi adjustments and settings
Wi-Fi adjustments and settings menu
• Réglages et Configuration WI-FI
Menu réglages et Configuration WI-FI
• Wi-Fi-Einstellungen und Regelungen
Menü-Regelungen und Wi-Fi-Einstellungen
• Regulaciones y ajustes del Wi-Fi
Menú de regulaciones y ajustes del Wi-Fi
• Afstellingen en Wifi-instellingen
Menu afstellingen en Wifi-instellingen
• Regulações e configurações de Wi-Fi
Menu regulações e configurações Wi-Fi
• Da stand-by premi il joystick per attivare il display
• From stand-by press the joystick to activate the display
• Depuis la condition de stand-by appuyer sur le joystick pour activer l’écran
• Im standby, den Joystick drücken, um das Display zu aktivieren
• En stand-by, pulse el joystick para activar la pantalla
• Druk vanuit stand-by op de joystick om het display te activeren
• A partir de stand-by carregar em joystick para ativar o ecrã
• Agisci sul joistick verso l’alto/basso per selezionare la pagina tra:
• Move the joystick up/down to select the page among:
• Actionner le joystick vers le haut/bas pour sélectionner la page voulue:
• Verwenden Sie den Joystick nach oben/unten, um folgende Seiten zu wählen:
• Accione el joystick hacia arriba/abajo para seleccionar una página entre:
• Beweeg de joystick omhoog/omlaag om de pagina te selecteren uit:
• Regular o joystick para cima/baixo para selecionar a página entre:
Door Entry
CLASSE 100X
App
• Puoi scaricare l'app Door Entry CLASSE100X dagli store,
la pagina scompare dopo la prima associazione con l’app.
• You can download the Door Entry CLASSE100X App from the Stores.
he page disappears after the first association with the App:
• Il est possible de télécharger l’appli Door Entry CLASSE100X en se rendant
sur les stores; la page s’efface après la première association avec l’appli:
• Sie können die Door Entry CLASSE100X App in den Geschäften herunterlade.
Die Seite erlischt nach der ersten Verknüpfung mit der App:
• Puede descargarse la app Door Entry CLASSE100X en los store,
la página desaparece después de efectuar la primera asociación con la app:
• U kunt de app Door Entry CLASSE100 uit de stores downloaden.
De pagina verdwijnt zodra de eerste koppeling met de app is verricht:
• Poderá descarregar a app Door Entry CLASSE100X das lojas,
a página desaparece depois da primeira associação com a app:
Door Entry
CLASSE 100X
App
• Regola il volume della suoneria
• Adjust the ringtone volume
• Règle le volume dxe la sonnerie
• Lautstärke Ruftöne einstellen
• Regular el volumen del timbre
• Het volume van de beltonen regelen
• Regular o volume da campainha

Video - Kit
45
OFF
A
• Attiva/disattiva la funzione studio professionale
• Activate/deactivate the Professional studio-Office function
• Active/désactive la fonction Bureau
• Professional Studio (Büro) aktivieren/deaktivieren
• Activar/desactivar la función Estudio profesional
• Activeert/deactiveert de functie professionele studio
• Ativar/desativar a função escritório profissional
• Info dispositivo
• Device info
• Info dispositif
• Informationen über die Vorrichtung
• Información sobre el dispositivo
• Informatie over het apparaat
• Informações sobre o dispositivo
• Pagina impostazioni Wi-Fi dove puoi attivare/disattivare/resettare Wi-
Fi, eseguire la prima associazione con l’app, e resettare il dispositivo
• Wi-Fi settings page, where it is possible to enable/disable/reset the Wi-
Fi, perform the first association to the app and reset the device
• Page des réglages Wi-Fi qui permet d’activer/désactiver/réinitialiser la connexion
Wi-Fi, d’effectuer la première association avec l’appli et de réinitialiser le dispositif
• Wi-Fi-Einstellungsseite, auf der Sie Wi-Fi aktivieren/deaktivieren/zurücksetzen,
die erste Verbindung mit der App herstellen und das Gerät zurücksetzen können
• Página de ajustes del Wi-Fi donde puede activar/desactivar/resetear el
Wi-Fi, efectuar la primera asociación con la app, y resetear el dispositivo
• Pagina met wifi-instellingen die u kunt gebruiken voor het activeren/deactiveren/resetten van
de wifi, het verrichten van de eerste koppeling met de app en het resetten van het apparaat
• Página de configurações Wi-Fi onde poderá ativar/desativar/zerar o Wi-Fi,
efetuar a primeira associação com a app, e reinicializar o dispositivo
EXIT
• Esci dal menù
• Exit the menu
• Quitter le menu
• Menü beenden
• Salir del menú
• Menu afsluiten
• Sair do menu

46
• Regolazione volume suoneria
• Ringtone volume adjustment
• Réglage volume sonnerie
• Ruftonlautstärke einstellen
• Regulación del volumen del timbre
• Volumeregeling beltoon
• Regulação do volume da campainha
• Da stand-by premi il joystick per attivare il display e selezionare la pagina relativa
• From stand-by press the joystick to activate the display and select the corresponding page
• Depuis la condition de stand-by appuyer sur le joystick pour activer l’écran et sélectionner la page correspondante
• Im Sandby, den Joystick drücken, um das Display zu aktivieren und die entsprechende Seite zu wählen
• En stand-by, pulse el joystick para activar la pantalla y seleccionar la página relativa
• Druk vanuit stand-by op de joystick om het display te activeren en de desbetreffende pagina te selecteren
• A partir de stand-by carregar em joystick para ativar o ecrã e selecionar a página relativa
• 1 Premi il joystick per regolare il volume.
Viene riprodotta la suoneria al il livello di volume impostato
• 1 Press the joystick to adjust the volume.
The ringtone is played at the set volume level
• 1 Appuyer sur le joystick pour régler le volume.
La sonnerie est reproduite au volume réglé
• 1 Den Joystick drücken, um die Lautstärke zu regeln.
Das Läutwerk wird auf die gewünschte Lautstärke eingestellt
• 1 Pulse el joystick para regular el volumen.
Se reproduce el timbre con el nivel ajustado de volumen
• 1 Regel het volume met een druk op de joystick.a
De beltoon wordt op het ingestelde geluidsniveau afgespeeld
• 1 Carregar no joystick para regular o volume.
É reproduzido a campainha com o nível volume programado
1
• 2 Agisci sul joistick verso l’alto/basso per selezionare il livello (1 – 8)
del volume.
• 2 Move the joystick up/down to select the volume level (1 – 8).
• 2 Actionner le joystick vers le haut/bas pour sélectionner le niveau
(1 – 8) du volume.
• 2 Verwenden Sie den Joystick nach oben/unten, um das
Lautstärkenniveau einzustellen (1 - 8).
• 2 Accione el joystick hacia arriba/abajo para seleccionar el nivel
(1 – 8) del volumen.
• 2 Beweeg de joystick omhoog/omlaag om het niveau van het volume
(1 – 8) te selecteren.
• 2 Regular o joystick para cima/baixo para selecionar o nível
(1 – 8) do volume.
2
2
• 3 Premi il joystick per confermare l’impostazione oppure attendere il
timeout
• 3 Press the joystick to confirm the setting or wait for the timeout
• 3 Appuyer sur le joystick pour confirmer le réglage ou bien attendre le
time-out
• 3 Den Joystick drücken, um die Einstellung zu bestätigen oder das
Timeout abwarten
• 3 Pulse el joystick para confirmar el ajuste o esperar el timeout
• 3 Bevestig de instelling met een druk op de joystick of wacht de time-out af
• 3 Carregar no joystick para confirmar a programação ou aguardar o
timeout
3

Video - Kit
47
• Il livello minimo equivale all’esclusione della suoneria. Il LED relativo lampeggia rosso
• The minimum level corresponds to the exclusion of the ringtone. The corresponding LED flashes red
• Le niveau minimum équivaut à l’exclusion de la sonnerie. Le voyant correspondant clignote en rouge.
• Die niedrigste Einstellung schließt das Läutwerk aus. Die entsprechende LED blinkt rot
• El nivel mínimo corresponde a la exclusión del timbre. El LED relativo parpadea en color rojo
• Het laagste niveau betekent dat de beltoon is uitgesloten. De bijbehorende LED knippert rood.
• O nível mínimo equivale à exclusão da campainha. O LED relativo pisca em vermelho.
• 4 Agisci sul joistick verso l’alto/basso per selezionare un’altra
impostazione o l’ultima pagina per uscire
• 4 Move the joystick up/down to select another setting or the last page to exit
• 4 Actionner le joystick vers le haut/bas pour sélectionner un autre
réglage ou la dernière page pour quitter
• 4 Verwenden Sie den Joystick nach oben/unten, um eine andere Einstellung
zu wählen oder die letzte Seite abzurufen, um den Vorgang zu beenden
• 4 Accione el joystick hacia arriba/abajo para seleccionar otro ajuste o la
última página para salir
• 4 Beweeg de joystick omhoog/omlaag om een andere instelling te
selecteren of de laatste pagina te selecteren en te kunnen afsluiten
• 4 Regular o joystick para cima/baixo para selecionar outra
programação ou a última página para sair
4
4

48
• Attiva/disattiva studio professionale
• Activate/deactivate the professional studio-office
function
• Activer/désactiver bureau
• Professional studio (büro)-funktion aktivieren/
deaktivieren
• Activación/desactivación estudio profesional
• Activering/deactivering professionele studio
• Activação/desactivação do escritório profissional
• Questa funzione, all’arrivo di una chiamata da posto esterno, attiva automaticamente la serratura associata
senza dover premere il tasto serratura.
Per abilitare questa funzione è necessario configurare il Classe100 X16E come illustrato nel paragrafo
“Configurazione / Funzioni speciali”.
Inoltre è necessario attivare la funzione come segue.
• When a call is received from the entrance panel, this function automatically activates the associated door
lock without the need for pressing the door lock control key. To enable this function, Classe100 X16E must be
configured as shown in the “Configuration / Special functions” section.
Moreover, the function must be enabled as follows.
• En cas d’appel provenant d’un poste externe, cette fonction active automatiquement la serrure associée
sans qu’il soit nécessaire d’appuyer sur la touche serrure. Pour activer cette fonction, il est nécessaire de
configurer le Classe100 X16E comme indiqué dans le chapitre «Configuration/Fonctions spéciales». Il est
en outre nécessaire d’activer la fonction comme suit.
• Diese Funktion,aktiviert automatisch das zugeordnete Schloss, wenn ein Ruf von der Türstation eintrifft,
ohne dass die Schlosstaste gedrückt werden muss. Um diese Funktion zu aktivieren, ist es notwendig, das
Classe100X16E wie im Abschnitt „Konfiguration / Sonderfunktionen“ beschrieben zu konfigurieren. Zudem muss
die Funktion wie folgt aktiviert werden.
• Esta función, al llegar una llamada de la placa exterior, activa automáticamente la cerradura asociada, sin
tener que presionar la tecla cerradura.
Para habilitar esta función, se ha de configurar el Classe100 X16E como se describe en el párrafo
“Configuración / Funciones especiales”. Asimismo, se ha de activar la función de la forma siguiente.
• Deze functie activeert automatisch het gekoppelde slot zonder dat op de toets slot gedrukt moet worden
wanneer een oproep afkomstig van een buitenpost binnenkomt. Activeer deze functie door Classe100 X16E te
configureren zoals is beschreven in de paragraaf “Configuratie / Speciale functies”.
Bovendien moet de functie geactiveerd worden zoals hieronder is beschreven.
• Esta função, ao chegar uma chamada proveniente da unidade externa, ativa automaticamente a fechadura
associada sem ter de carregar na tecla fechadura. Para ativar esta função é necessário configurar o
Classe100X16E conforme ilustrado no parágrafo “Configuração / Funções especiais”.
Ademais, é necessário ativar a função como segue.

Video - Kit
49
Nota: non attivabile contemporaneamente alla funzione Serratura sicura
e Stato porta
Note: it cannot be activated together with the Safe Door Lock and the Door
Status function.
Note : non activable conjointement à la fonction Serrure sécurisée et État porte
Anmerkung: Sie kann nicht gleichzeitig mit den Funktionen Sicheres Schloss
und Türstatus aktiviert werden.
Nota: no se puede activar al mismo tiempo que la función Cerradura
segura y Estado puerta
Opmerking: kan niet geactiveerd worden samen met de functie Veilig slot
en de functie Status deur.
Nota: não pode ser ativada simultaneamente às funções Fechadura segura
e Estado da porta.
• Da stand-by premi il joystick per attivare il display e selezionare la pagina relativa
• From stand-by press the joystick to activate the display and select the corresponding page
• Depuis la condition de stand-by appuyer sur le joystick pour activer l’écran et sélectionner la page correspondante
• Im Sandby, den Joystick drücken, um das Display zu aktivieren und die entsprechende Seite zu wählen
• En stand-by, pulse el joystick para activar la pantalla y seleccionar la página relativa
• Druk vanuit stand-by op de joystick om het display te activeren en de desbetreffende pagina te selecteren
• A partir de stand-by carregar em joystick para ativar o ecrã e selecionar a página relativa
• A Indicazione stato funzione (ON =attiva, OFF = disattiva)
1 Premi il joystick per cambiare modalità.
• A Function status notification (ON = enabled, OFF = disabled)
1 Press the joystick to change mode
• A Indication état de fonctionnement (ON = active, OFF = désactive)
1 Appuyer sur le joystick pour changer de modalité
• A Anzeigen des Modus (ON = aktiviert, OFF = deaktiviert)
1 Den Joystick drücken, um den Modus zu ändern
• A Indicación del estado de la función (ON =activada, OFF = desactivada)
1 Pulse el joystick para cambiar de modo
• A Aanduiding status functie (ON = geactiveerd, OFF = gedeactiveerd)
1 Wijzig de modus dooar op de joystick te drukken
• A Indicação do estado da função (ON =ativa, OFF = desativada)
1 Carregar no joystick para mudar a modalidade
OFF
A
A
• 2 Agisci sul joistick verso l’alto/basso per selezionare un’altra
impostazione o l’ultima pagina per uscire
• 2 Move the joystick up/down to select another setting or the last page to exit
• 2 Actionner le joystick vers le haut/bas pour sélectionner un autre réglage
ou la dernière page pour quitter
• 2 Verwenden Sie den Joystick nach oben/unten, um eine andere Einstellung
zu wählen oder die letzte Seite abzurufen, um den Vorgang zu beenden
• 2 Accione el joystick hacia arriba/abajo para seleccionar otro ajuste o la
última página para salir
2 Beweeg de joystick omhoog/omlaag om een andere instelling te selecteren
of de laatste pagina te selecteren en te kunnen afsluiten
• 2 Regular o joystick para cima/baixo para selecionar outra programação ou
a última página para sair
ON
A
2
2
1

50
• Impostazioni Wi-Fi
• WI-FI settings
• Réglages Wi- Fi
• Wi-Fi-Einstellungen
• Ajustes Wi-Fi
• Wi-fi instellingen
• Configurações Wi-Fi
• Da stand-by premi il joystick per attivare il display e selezionare la pagina relativa
• From stand-by press the joystick to activate the display and select the corresponding page
• Depuis la condition de stand-by appuyer sur le joystick pour activer l’écran et sélectionner la page correspondante
• Im Sandby, den Joystick drücken, um das Display zu aktivieren und die entsprechende Seite zu wählen
• En stand-by, pulse el joystick para activar la pantalla y seleccionar la página relativa
• Druk vanuit stand-by op de joystick om het display te activeren en de desbetreffende pagina te selecteren
• A partir de stand-by carregar em joystick para ativar o ecrã e selecionar a página relativa
• Premi il joystick per selezionare la pagina interessata
• Press the joystick to select the page of interest
• Appuyer sur le joystick pour sélectionner la page concernée
• Den Joystick drücken, um die gewünschte Seite unter
• Pulse el joystick para seleccionar la página afectada
• Druk op de joystick om de gewenste pagina te kiezen
• Carregar no joystick para seleccionar a página desejada
• Agisci sul joistick verso l’alto/basso per selezionare la pagina tra:
• Move the joystick up/down to select the page among:
• Actionner le joystick vers le haut/bas pour sélectionner la page voulue:
• Verwenden Sie den Joystick nach oben/unten, um folgende Seiten zu wählen:
• Accione el joystick hacia arriba/abajo para seleccionar una página entre:
• Beweeg de joystick omhoog/omlaag om de pagina te selecteren uit:
• Regular o joystick para cima/baixo para selecionar a página entre:
Home_Wi-Fi
• In questa pagina puoi visualizzare la rete Wi-Fi a cui è connesso il dispositivo ed eventualmente
disabilitare la connessione. Nota: per connettere il dispositivo alla rete Wi-Fi e all’app, devi
inizialmente eseguire la procedura di associazione del Classe100 X16E all’app Door Entry
CLASSE100X.
• In this page you can display the Wi-Fi network to which the device is connected and if necessary
disable the connection. Note: to connect the device to the Wi-Fi network and to the app, you must first
associate the Classe100 X16E to the Door Entry CLASSE100X app.
• Cette page permet de visualiser le réseau Wi-Fi auquel le dispositif est connecté et,
éventuellement, de désactiver la connexion. Note : pour connecter le dispositif au réseau Wi-Fi et
à l’appli, il est tout d’abord nécessaire d’effectuer la procédure d’association du Classe100 X16E à
l’appli Door Entry CLASSE100X.
• In dieser Seite können Sie das Wi-Fi-Netz mit dem die Vorrichtung verbunden ist, anzeigen und
die Verbindung ggf. deaktivieren können. Anmerkung: Um das Gerät mit dem Wi-Fi-Netz und der
App zu verbinden, ist zuerst die Zuordnungsprozedur der Classe100 X16E mit der App, Door Entry
CLASSE100X durchzuführen.
• En esta página puede visualizar la red Wi-Fi a la que el dispositivo está conectado y deshabilitar
la conexión si quiere. Nota: para conectar el dispositivo a la red Wi-Fi y a la app, primero debe
efectuar el procedimiento de asociación del Classe100 X16E con la app Door Entry CLASSE100X.
• Op deze pagina kunt u het wifi-netwerk waarmee het apparaat verbonden is weergeven en de
verbinding eventueel deactiveren. Opmerking: om het apparaat met het wifi-netwerk en de app
te kunnen verbinden, moet u eerst de koppelprocedure van Classe100 X16E met de app Door Entry
CLASSE100X verrichten.
• Nesta página é possível visualizar a rede Wi-Fi à qual o dispositivo está conectado e se for
necessário desativar a conexão. Nota: para conectar o dispositivo à rede Wi-Fi e à app, deve
inicialmente efetuar o procedimento de associação do Classe100 X16E à app Door Entry
CLASSE100X.
Home_Wi-Fi

Video - Kit
51
• In questa pagina puoi eseguire il reset della rete Wi-Fi.
• This page can be used to reset the Wi-Fi network.
• Cette page permet d’effectuer le reset du réseau Wi-Fi.
• In dieser Seite können Sie das Wi-Fi-Netz zurücksetzen (Reset).
• En esta página, puede efectuar el reset de la red Wi-Fi.
• Op deze pagina kunt u het wifi-netwerk restten.
• Nesta página, poderá efetuar a reinicialização da rede Wi-Fi
RESET
• In questa pagina puoi eseguire il reset del dispositivo.
• This page can be used to reset the device.
• Cette page permet d’effectuer le reset du dispositif.
• In dieser Seite können Sie die Vorrichtung zurücksetzen (Reset).
• En esta página, puede efectuar el reset del dispositivo.
• Op deze pagina kunt u het apparaat resetten.
• Nesta página é possível efetuar a reinicialização do dispositivo
RESET
• Esci dal menù
• Exit the menu
• Quitter le menu
• Menü beenden
• Salir del menú
• Menu afsluiten
• Sair do menu
EXIT

52
• Attiva/disattiva rete Wi-Fi
• Enable/disable the Wi-Fi Network
• Active/désactive le réseau Wi-Fi
• Wi-Fi-Netz aktivieren/deaktivieren
• Activar/desactivar la red Wi-Fi
• Activeer/deactiveer het wifi-netwerk
• Ativar/desativar Rede Wi-Fi
• Reset rete Wi-Fi
• Reset the Wi-Fi network
• Reset réseau du Wi-Fi
• Wi-Fi-Netz zurücksetzen
• Reset de la red Wi-Fi
• Reset wifi-netwerk
• Reinicializar a rede Wi-Fi
• A Nome rete Wi-Fi a cui è collegato il dispositivo;
premi il joystick per disattivare la rete Wi-Fi
• A Wi-Fi network name to which the device is connected;
press the joystick to disable the Wi-Fi network
• A Nom du réseau Wi-Fi auquel le dispositif est connecté ;
appuyer sur le joystick pour désactiver le réseau Wi-Fi
• A Name des Wi-Fi-Netzwerks, mit dem das Gerät verbunden ist;
drücken Sie den Joystick, um das Wi-Fi-Netzwerk zu deaktivieren
• A Nombre de la red Wi-Fi a la que el dispositivo está conectado;
pulse el joystick para desactivar la red Wi-Fi
• A Naam van het wifi-netwerk waar het apparaat op is aangesloten;
deactiveer het wifi-netwerk door op de joystick te drukken
• A Nome da rede Wi-Fi à qual o dispositivo está conectado;
carregar no joystick para desativar a rede Wi-Fi
• Ora la rete Wi-Fi non è più attiva, ma il dispositivo è ancora autenticato
ad essa. Nota: per scollegare la rete Wi-Fi dal dispositivo, devi eseguire
la procedura di reset dispositivo
• Now the Wi-Fi network is no longer active, but the device is still
authenticated to it. Note: to disconnect the Wi-Fi network from the device,
the device must be reset following the appropriate procedure
• A présent le réseau Wi-Fi n’est plus actif mais le dispositif reste authentifié
sur le réseau. Note : pour déconnecter le réseau Wi-Fi du dispositif, il est
nécessaire d’effectuer la procédure de réinitialisation du dispositif
• Jetzt ist das Wi-Fi-Netz nicht mehr aktiv, aber das Gerät ist trotzdem
authentifiziert. Anmerkung: Um das Wi-Fi-Netzwerk von Ihrem Gerät zu
trennen, müssen Sie den Reset-Vorgang durchführen
• Ahora la red Wi-Fi se ha desactivado, pero el dispositivo sigue
autenticado en esta. Nota: para desconectar la red Wi-Fi del dispositivo,
ha de efectuar el procedimiento de reset del dispositivo
• Nu is het wifi-netwerk niet langer actief; het apparaat is er echter nog
wel mee geauthenticeerd. Opmerking: verricht de resetprocedure van het
apparaat om het wifi-netwerk van het apparaat los te koppelen
• Agora a rede Wi-Fi não está mais ativa, mas o dispositivo ainda
está autenticado a ela. Nota: para desconectar a rede Wi-Fi desde o
dispositivo, deve efetuar o procedimento de reinicialização do dispositivo
Home_Wi-Fi
WI-FI OFF
A
• In questa sezione puoi cambiare la rete Wi-Fi a cui è connesso il dispositivo, oppure la password di rete
• In this section it is possible to change the Wi-Fi network to which the device is connected, or the network password
• Cette section permet de modifier le réseau Wi-Fi auquel le dispositif est connecté ou de modifier le mot de passe de réseau
• In diesem Abschnitt können Sie das Wi-Fi-Netzwerk, mit dem das Gerät verbunden ist, oder das Netzwerkkennwort ändern
• En esta sección, puede cambiar la red Wi-Fi a la que el dispositivo está conectado o cambiar la contraseña de la red
• In dit deel kunt u het wifi-netwerk waarmee het apparaat verbonden is of het netwerkwachtwoord weergeven
• Nesta seção é possível trocar a rede Wi-Fi à qual o dispositivo está conectado, ou a palavra-passe de rede

Video - Kit
53
• Premi il joystick per resettare la rete Wi-Fi
• Press the joystick to reset the Wi-Fi network
• Appuyer sur le joystick pour effectuer le reset du réseau Wi-Fi
• Den Joystick drücken, um das Wi-Fi-Netz zurückzusetzen
• Pulse el joystick para resetear la red Wi-Fi
• Druk op de joystick om het wifi-netwerk te resetten
• Carregar no joystick para reinicializar a rede Wi-Fi
RESET
• Premi il joystick per confermare
• Press the joystick to confirm
• Appuyer sur le joystick pour confirmer
• Den Joystick zur Bestätigung drücken
• Pulse el joystick para confirmar
• Druk ter bevestiging op de joystick
• Carregar no joystick para confirmar
• Agisci sul joistick verso il basso per selezionare l’icona di conferma
• Move the joystick down to select the confirmation icon
• Actionner le joystick vers le bas pour sélectionner l’icône de confirmation
• Verwenden Sie den Joystick nach unten, um das Bestätigungssymbol zu wählen
• Accione el joystick hacia abajo para seleccionar el icono de confirmación
• Beweeg de joystick omhoog/omlaag om de bevestigingsicoon te selecteren
• Regular o joystick para baixo para selecionar o ícone de confirmação
• Ora il dispositivo non è più collegato alla rete Wi-Fi. Per ricollegare il dispositivo alla
stessa, o ad una nuova rete, devi concludere la procedura guidata dall’app Door Entry
CLASSE100X nella sezione Impostazioni/Set_Wi-Fi. Nota: se non porti a termine la
procedura, dopo alcuni secondi la connessione viene ripristinata
• Now the device is no longer connected to the Wi-Fi network. To reconnect the device to the
same network or to a new one, you must complete the guided procedure from the Door
Entry CLASSE100X app in the Settings/Set_Wi-Fi section. Note: if the procedure is not
completed, after a few seconds the connection is restored
• A présent, le dispositif n’est plus connecté au réseau Wi-Fi. Pour reconnecter le
dispositif au réseau ou à un nouveau réseau, il est nécessaire de terminer la procédure
guidée par l’appli Door Entry CLASSE100X dans la section des réglages/Set_Wi-Fi.
Note : si la procédure n’est pas terminée, au bout de quelques secondes, la connexion
est rétablie
• Nun ist das Gerät nicht mehr mit dem Wi-Fi-Netz verbunden. Um das Gerät wieder
mit dem gleichen oder einem neuen Netzwerk zu verbinden, müssen Sie den von der
Anwendung Door Entry CLASSE100X geführten Vorgang im Abschnitt Einstellungen
/ Set_Wi-Fi beenden. Anmerkung: Wenn die Prozedur nicht beendet wird, wird die
Verbindung nach einigen Sekunden wieder hergestellt
• Ahora el dispositivo no está conectado a la red Wi-Fi. Para conectar de nuevo el
dispositivo a dicha red, o a otra nueva, debe finalizar el procedimiento guiado con la
app Door Entry CLASSE100X en la sección Ajustes/Set_Wi-Fi. Nota: si no finaliza el
procedimiento, la conexión se restablece después de unos segundos
• Nu is het apparaat niet langer met het wifi-netwerk verbonden. Sluit het apparaat weer
op hetzelfde of een ander /netwerk aan door de begeleide procedure van de app Door
Entry CLASSE100X in het deel Instellingen/Set_Wi-Fi te verrichten. Opmerking: de
verbinding wordt na een enkele seconde hersteld als u deze procedure niet afrondt
• Agora o dispositivo não está mais conectado à rede Wi-Fi. Para reconectar o dispositivo
à mesma, ou a uma nova rede, será necessário concluir o procedimento guiado pela
app Door Entry CLASSE100X na seção Configurações/Set_Wi-Fi. Nota: caso não
termine o procedimento previsto, após alguns segundos a conexão é restaurada

54
• Reset dispositivo
• Device reset
• Reset du dispositif
• Reset der Vorrichtung
• Reset del dispositivo
• Apparaat resetten
• Rearme (reset) do dispositivo
• Premi il joystick per resettare il dispositivo
• Press the joystick to reset the device
• Appuyer sur le joystick pour effectuer le reset du dispositif
• Den Joystick drücken, um das Gerät zurückzusetzen
• Pulse el joystick para resetear el dispositivo
• Druk op de joystick om het apparaat te resetten
• Carregar no joystick para reinicializar o dispositivo
RESET
• Agisci sul joistick verso il basso per selezionare l’icona di conferma
• Move the joystick down to select the confirmation icon
• Actionner le joystick vers le bas pour sélectionner l’icône de confirmation
• Verwenden Sie den Joystick nach unten, um das Bestätigungssymbol zu wählen
• Accione el joystick hacia abajo para seleccionar el icono de confirmación
• Beweeg de joystick omhoog/omlaag om de bevestigingsicoon te selecteren
• Regular o joystick para baixo para selecionar o ícone de confirmação
• Premi il joystick per confermare.
• Press the joystick to confirm.
• Appuyer sur le joystick pour confirmer.
• Den Joystick zur Bestätigung drücken.
• Pulse el joystick para confirmar.
• Druk ter bevestiging op de joystick.
• Carregar no joystick para confirmar.
• Nota: Tutti i dati relativi ad account associati e wi-fi verranno eliminati.
• Note: All the data concerning associated accounts and the Wi-Fi connection will be deleted.
• Note: Toutes les données relatives aux comptes associées et Wi-Fi seront éliminées.
• Anmerkung: Alle zugehörigen Konto- und Wi-Fi-Daten werden gelöscht.
• Nota: Todos los datos relativos a la cuenta asociados y wi-fi se eliminarán.
• Opmerking: Alle gegevens van de gekoppelde accounts en het wifi-netwerk zullen verwijderd worden.
• Nota: Todos os dados relativos a contas associadas e wi-fi serão eliminados.

Video - Kit
55
• Regolazioni parametri audio/video
• Audio/video parameter adjustments
• Réglages des paramètres audio/vidéo
• Audio/video-parameter einstellen
• Regulaciones de parámetros de audio/vídeo
• Regelingen parameters beeld/geluid
• Regulações de parâmetros áudio/vídeo
• Durante una connessione con un posto interno o un posto esterno, puoi modificare il volume della fonica e,
solo per dispositivi audiovideo, il colore,contrasto e luminosità dell’immagine.
• During a connection to an internal unit or entrance panel, it is possible to modify the speaker volume and, only
for audiovideo devices, the colour, contrast and brightness of the image.
• Pendant la connexion avec un poste interne ou un poste externe, il est possible de modifier le volume
sonore et, uniquement pour les dispositifs audio/vidéo, la couleur, le contraste et la luminosité de l’image.
• Während einer Verbindung mit einer Hausstation oder einer Türstation können Sie die Lautstärke der Sprache
und, nur bei Audio-Videogeräten, die Farbe, den Kontrast und die Helligkeit des Bildes ändern.
• Durante una conexión con una unidad interior o una placa exterior, puede cambiar el volumen fónico y,
solamente para dispositivos audiovideo, también el color, el contraste y la luminosidad de la imagen.
• Tijdens een verbinding met de binnen.- of buitenpost kunt u het spraakvolume en, uitsluitend in het geval van een
beeld- en geluidsapparaat, de kleur, het contrast en de helderheid van het beeld wijzigen.
• Durante uma conexão com uma unidade interna ou uma unidade externa, poderá modificar o volume
sonoro e, apenas para dispositivos áudio-vídeo, a cor, o contraste e a luminosidade da imagem.
• Premi il joystick per visualizzare le informazioni
• Press the joystick to display the information
• Appuyer sur le joystick pour visualiser les informations
• Den Joystick drücken, um die Informationen anzuzeigen
• Pulse el joystick para visualizar la información
• Druk op de joystick om de informatie weer te geven
• Carregar no joystick para visualizar as informações
• Info dispositivo
• Device info
• Info dispositif
• Informationen Über Die Vorrichtung
• Información sobre el dispositivo
• Informatie over het apparaat
• Informações sobre o dispositivo
• Da stand-by premi il joystick per attivare il display e selezionare la pagina relativa
• From stand-by press the joystick to activate the display and select the corresponding page
• Depuis la condition de stand-by appuyer sur le joystick pour activer l’écran et sélectionner la page correspondante
• Im Sandby, den Joystick drücken, um das Display zu aktivieren und die entsprechende Seite zu wählen
• En stand-by, pulse el joystick para activar la pantalla y seleccionar la página relativa
• Druk vanuit stand-by op de joystick om het display te activeren en de desbetreffende pagina te selecteren
• A partir de stand-by carregar em joystick para ativar o ecrã e selecionar a página relativa
Wi-Fi: ---
IP: ---
Net mask: ---
Gateway: ---
DNS 1: ---
DNS 2: ---
FW Vers.: 1.0.0
MAC: 00:03:50:83:04:93
N: 1
P: 1
M: 93

56
1
• 1 Durante una connessione premi il joistick per modificare I parametri
• 1 During a connection press the joystick to modify the parameters
• 1 Pendant une connexion, appuyer sur le joystick pour modifier les
paramètres
• 1 Während einer Verbindung, den Joystick drücken, um die Parameter
zu ändern
• 1 Durante una conexión, pulse el joystick para modificar los parámetros
• 1 Druk tijdens een verbinding op de joystick om de parameters te wijzigen
• 1 Durante uma conexão carregar no joystick para modificar os parâmetros
2
2
A
B
• La pagina mostra il tipo di parametro (A) e il livello impostato (B)
2 Agisci sul joistick verso l’alto/basso per selezionare il tipo di
parametro di cui vuoi modificare il valore (vedi tabella seguente)
• The page shows the type of parameter (A) and the set level (B)
2 Move the joystick up/down to select the type of parameter for which you
want to modify the value (see the following table)
• La page montre le type de paramètre (A) et le niveau réglé (B)
2 Actionner le joystick vers le haut/bas pour sélectionner le type de
paramètre dont on souhaite modifier la valeur (voir tableau suivant)
• Die Seite zeigt den Parametertyp (A) und das eingestellte Niveau (B)
2 Verwenden Sie den Joystick nach oben/unten, um den Parameter zu
wählen, der geändert werden soll (siehe nachfolgende Tabelle)
• La página muestra el tipo de parámetro (A) y el nivel ajustado (B)
2 Accione el joystick hacia arriba/abajo para seleccionar tipo de parámetro
al que quiere modificar el valor (véase la tabla siguiente).
• De pagina toont het type parameter (A) en het ingestelde niveau (B)
2 Beweeg de joystick omhoog/omlaag om het type parameter waarvan u de
waarde wilt wijzigen (zie de volgende tabel) te selecteren
• A página mostra o tipo de parâmetro (A) e o nível programado (B)
2 Regular o joystick para cima/baixo para selecionar o tipo de parâmetro do
qual pretende modificar o valor (ver a tabela em seguida)
ICONA - ICON - ICÔNE - SYMBOL
ICONO - ICOON - ÍCONE
TIPO PARAMETRO - TYPE OF PARAMETER - TYPE PARAMÈTRE - PARAMETERTYP
TIPO DE PARÁMETRO - TYPE PARAMETER - TIPO DE PARÂMETRO
Volume fonica - Speaker volume - Volume phonique - Audio-Lautstärke - Volumen fónico - Spraakvolume - Volume sonoro
Luminosità immagine - Image brightness - Luminosité de l’image - Bildhelligkeit - Luminosidad de la imagen
Helderheid van het beeld - Luminosidade da imagem
Contrasto immagine - Image contrast - Contraste de l’image - Bildkontrast - Contraste de la imagen - Contrast van het beeld
Contraste da imagem
Colore immagine - Image colour - Couleur de l’image - Bildfarbe - Color de la imagen - Kleur van het beeld - Cor da imagem

Video - Kit
57
3
• 3 Premi il joystick per modificare il livello
• 3 Press the joystick to modify the level
• 3 Appuyer sur le joystick pour modifier le niveau
• 3 Den Joystick drücken, um das Niveau zu regeln
• 3 Pulse el joystick para modificar el nivel
• 3 Regel het niveau met een druk op de joystick
• 3 Carregar no joystick para modificar o nível
4
4
• 4 Agisci sul joistick verso l’alto/basso per selezionare il livello desiderato
• 4 Move the joystick up/down to select the desired level
• 4 Actionner le joystick vers le haut/bas pour sélectionner le niveau voulu
• 4 Verwenden Sie den Joystick nach oben/unten, um das gewünschte
Niveau einzustellen
• 4 Accione el joystick hacia arriba/abajo para seleccionar un nivel
• 4 Beweeg de joystick omhoog/omlaag om het gewenste niveau te selecteren
• 4 Regular o joystick para cima/baixo para selecionar o nível pretendido
5
• 5 Premi il joystick per confermare oppure attendere il timeout
• 5 Press the joystick to confirm or wait for the timeout
• 5 Appuyer sur le joystick pour confirmer ou attendre le time-out
• 5 Den Joystick drücken, um die Einstellung zu bestätigen oder das
Timeout abwarten
• 5 Pulse el joystick para confirmar o esperar el timeout
• 5 Bevestig met een druk op de joystick of wacht de time-out af
• 5 Carregar no joystick para confirmar ou aguardar o timeout
6
6
• 6 Agisci sul joistick verso l’alto/basso perselezionare un altro
parametro o l’ultima pagina per uscire
• 6 Move the joystick up/down to select another parameter or the last page to exit
• 6 Actionner le joystick vers le haut/bas pour sélectionner un autre
paramètre ou la dernière page pour quitter.
• 6 Verwenden Sie den Joystick nach oben/unten, um einen anderen Parameter
zu wählen oder die letzte Seite abzurufen, um den Vorgang zu beenden
• 6 Accione el joystick hacia arriba/abajo para seleccionar otro parámetro o
la última página para salir
• 6 Beweeg de joystick omhoog/omlaag om een andere parameter te
selecteren of de laatste pagina te selecteren en te kunnen afsluiten
• 6 Regular o joystick para cima/baixo para selecionar outro parâmetro
ou a última página para sair

58
• Impostazioni
Menù impostazioni
• Settings
Settings menu
• Réglages
Menu réglages
• Einstellungen
Menü einstellungen
• Ajustes
Menú ajustes
• Instellingen
Menu instellingen
• Configurações
Menu programações
• Da stand-by tieni premuto il joystick per almeno 5 secondi per attivare il
display ed entrare nel menù impostazioni
• From stand-by, press and hold down the joystick for about 5 seconds to
activate the display and access the Settings menu.
• Depuis la condition de stand-by, maintenir enfoncé le joystick pendant au
moins 5 secondes pour activer l’écran et accéder au menu des paramètres
• Im Standby, den Joystick mindestens 5 Sekunden lang drücken, um das
Display zu aktivieren und das Menü der Einstellungen abzurufen
• En stand-by, mantenga pulsado el joystick al menos 5 segundos, para
activar la pantalla y entrar en el menú ajustes
• Druk vanuit stand-by minstens 5 seconden op de joystick om het display te
activeren en het menu instellingen te openen
• A partir de stand-by manter carregado o joystick por pelo menos 5
segundos para ativar o ecrã e entrar no menu programações
> 5 sec - > 5 Sek. > 5 seg
• Agisci sul joistick verso l’alto/basso per selezionare la pagina tra:
• Move the joystick up/down to select the page among:
• Actionner le joystick vers le haut/bas pour sélectionner la page voulue:
• Verwenden Sie den Joystick nach oben/unten, um folgende Seiten zu wählen:
• Accione el joystick hacia arriba/abajo para seleccionar una página entre:
• Beweeg de joystick omhoog/omlaag om de pagina te selecteren uit:
• Regular o joystick para cima/baixo para selecionar a página entre:
ON
EXIT
• Esci dal menù
• Exit the menu
• Quitter le menu
• Menü beenden
• Salir del menú
• Menu afsluiten
• Sair do menu
ON
• Associa una suoneria ad un evento
• Associate a ringtone to an event
• Associer une sonnerie à un événement
• Ein Läutwerk einem Ereignis zuteilen
• Asociar un timbre a un evento
• Een beltoon met een gebeurtenis combineren
• Associar uma campainha a um evento
• Attiva/disattiva il tono dei tasti
• Enable/disable the key sound
• Activer/désactiver le son des touches
• Tastenton aktivieren/deaktivieren
• Activar/desactivar el tono de las teclas
• Activeert/deactiveert de toon van de toetsen
• Ativar/desativar o som das teclas

Video - Kit
59
• Attivazione / disattivazione tono tasti
• Enable/disable the key sound
• Activation/désactivation tonalité touches
• Tastenton aktivieren/deaktivieren
• Activación/desactivación tono teclas
• Activering/deactivering geluid toetsen
• Questa funzione abilita/disabilita la riproduzione di un BEEP alla pressione dei tasti. Di default la funzione è
disabilitata, per modificarla, eseguire la procedura seguente:
• This function enables/disables the BEEP when the keys are pressed. The function is disabled by default, to enable it follow
the procedure below:
• Cette fonction active/désactive l’émission d’un BIP à chaque pression sur les touches. Par défaut, la fonction
est désactivée; pour la modifier, procéder comme suit:
• Diese Funktion aktiviert bzw. deaktiviert die Wiedergabe eines PIEPTONS, wenn die Tasten gedrückt werden.
Standardmäßig ist die Funktion deaktiviert, um sie zu ändern, führen Sie die folgenden Schritte aus:
• Esta función habilita/deshabilita la reproducción de un BEEP al pulsar las teclas. Por defecto, la función está
deshabilitada; para modificarla, realice el siguiente procedimiento:
• Deze functie activeert/deactiveert de weergave van een PIEP wanneer de toetsen ingedrukt worden. De functie is
standaard gedeactiveerd. Verricht de volgende procedure om deze functie te wijzigen:
• Esta função ativa/desativa a reprodução de um BIPE ao pressionar as teclas. Por predefinição a função está
desativada, para modificá-la, , efetuar o procedimento em seguida:
• Da stand-by tieni premuto il joystick per almeno 5 secondi per attivare il display ed entrare nel menù impostazioni.
• From stand-by, press and hold down the joystick for 5 seconds to access the advanced menu and select the corresponding page.
• Depuis la condition de stand-by maintenir enfoncée le joystick pendant 5 secondes pour accéder au menu avancé et sélectionner la page correspondante.
• Im Standby, den Joystick mindestens 5 Sekunden lang drücken, um das erweiterte Menü abzurufen und die entsprechende Seite zu wählen.
• En stand-by, mantenga pulsado el joystick al menos 5 segundos, para entrar en el menú avanzado y seleccionar la página relativa
• Druk vanuit stand-by 5 seconden lang op de joystick om het geavanceerde menu te openen en de desbetreffende pagina te selecteren
• A partir de stand-by manter carregado o joystick por pelo menos 5 segundos para entre no menu avançado e selecionar a página relativa
• A Indicazione stato funzione (ON =attiva, OFF = disattiva)
1 Premi il joystick per cambiare modalità.
• A Function status notification (ON = enabled, OFF = disabled)
1 Press the joystick to change mode
• A Indication état de fonctionnement (ON = active, OFF = désactive)
1 Appuyer sur le joystick pour changer de modalité
• A Anzeigen des Modus (ON = aktiviert, OFF = deaktiviert)
1 Den Joystick drücken, um den Modus zu ändern
• A Indicación del estado de la función (ON =activada, OFF = desactivada)
1 Pulse el joystick para cambiar de modo
• A Aanduiding status functie (ON = geactiveerd, OFF = gedeactiveerd)
1 Wijzig de modus dooar op de joystick te drukken
• A Indicação do estado da função (ON =ativa, OFF = desativada)
1 Carregar no joystick para mudar a modalidade
ON
1
A
• 2 Agisci sul joistick verso l’alto/basso per selezionare un’altra impostazione
o l’ultima pagina per uscire
• 2 Move the joystick up/down to select another setting or the last page to exit
• 2 Actionner le joystick vers le haut/bas pour sélectionner un autre réglage
ou la dernière page pour quitter
• 2 Verwenden Sie den Joystick nach oben/unten, um eine andere Einstellung
zu wählen oder die letzte Seite abzurufen, um den Vorgang zu beenden
• 2 Accione el joystick hacia arriba/abajo para seleccionar otro ajuste o la
última página para salir
• 2 Beweeg de joystick omhoog/omlaag om een andere instelling te selecteren
of de laatste pagina te selecteren en te kunnen afsluiten
• 2 Regular o joystick para cima/baixo para selecionar outra programação
ou a última página para sair
2
2
OFF

60
• Associazione di una suoneria ad un evento (chiamata)
• Associate a ringtone to an event (call)
• Association d’une sonnerie à un événement (appel
• Ein läutwerk einem ereignis zuteilen (anrufe)
• Asociar un timbre a un evento (llamada)
• Een beltoon met een gebeurtenis (oproep) koppelen
• Associação de uma campainha a um evento (chamada)
• In questa pagina, puoi modificare le melodie associate a vari tipi di chiamata.
Le melodie riprodotte a seguito di chiamata proveniente da PE configurati con S=2 e S=3 sono definite di
default e non possono essere modificate.
• This page can be used to modify the ringtones associated to the different types of call.
The ringtones played for calls from EP configured with S=2 and S=3 are set by default and cannot be changed.
• Cette page permet de modifier les mélodies associées à différents types d’appel.
Les mélodies reproduites en cas d’appel provenant de PE configurés avec S=2 et S=3 sont définies par
défaut et ne peuvent pas être modifiées.
• In dieser Seite können Sie die Melodien der verschiedenen Anrufe ändern.
Die Melodien, die bei einem Anruf von der TS mit S=2 und S=3 gespielt werden, sind standardmäßig definiert und
können nicht geändert werden.
• En esta página, puede modificar las melodías asociadas a varios tipos de llamada.
Las melodías reproducidas con una llamada procedente de una PE, configuradas con S=2 y S=3, están
predefinidas y no se pueden modificar.
• Op deze pagina kunt u de beltonen die met de verschillende typen oproepen gekoppeld zijn wijzigen.
De beltonen die afgespeeld worden na een oproep afkomstig van buitenposten die zijn geconfigureerd met S=2
en S=3, zijn standaard bepaald en kunnen niet worden gewijzigd.
• Nesta página pode modificar as melodias associadas aos vários tipos de chamada.
As melodias reproduzidas após a chamada proveniente da UE configuradas com S=2 e S=3 são predefinidas
e não podem ser modificadas.
• Da stand-by tieni premuto il joystick per almeno 5 secondi per entrare nel menù avanzato e selezionare la pagina relativa.
• From stand-by, press and hold down the joystick for 5 seconds to access the advanced menu and select the corresponding page.
• Depuis la condition de stand-by maintenir enfoncée le joystick pendant 5 secondes pour accéder au menu avancé et sélectionner la page correspondante.
• Im Standby, den Joystick mindestens 5 Sekunden lang drücken, um das erweiterte Menü abzurufen und die entsprechende Seite zu wählen.
• En stand-by, mantenga pulsado el joystick 5 segundos, para entrar en el menú avanzado y seleccionar la página relativa
• Druk vanuit stand-by 5 seconden lang op de joystick om het geavanceerde menu te openen en de desbetreffende pagina te selecteren
• A partir de stand-by manter carregado o joystick por pelo menos 5 segundos para entre no menu avançado e selecionar a página relativa
• 1 Premi il joystick per associare il primo evento
• 1 Press the joystick to associate the first event
• 1 Appuyer sur le joystick pour associer le premier événement
• 1 Den Joystick drücken, um ein Ereignis zuzuordnen
• 1 Pulse el joystick para asociar el primer evento
• 1 Koppel de eerste gebeurtenis met een druk op de joystick
• 1 Carregar no joystick para associar o primeiro evento
1
2
2
01
0
A
B
• La pagina mostra il tipo di chiamata (A) e il numero suoneria corrente (B)
2 Agisci sul joistick verso l’alto/basso per selezionare il tipo di chiamata di
cui vuoi impostare la suoneria (vedi tabella seguente)
• The page shows the type of call (A) and the current ringtone number (B)
2 Move the joystick up/down to select the type of call for which you want to set
the ringtone (see the following table)
• La page montre le type d’appel (A) et le numéro de la sonnerie actuelle (B)
2 Actionner le joystick vers le haut/bas pour sélectionner le type d’appel
dont vous souhaitez programmer la sonnerie (voir tableau ci-dessous)
• Die Seite zeigt die Art des Anrufs (A) und die Nummer des aktuellen Läutwerks (B)
2 Verwenden Sie den Joystick nach oben/unten, um das gewünschte Läutwerk zu
wählen (siehe nachfolgende Tabelle)

Video - Kit
61
ICONA - ICON - ICÔNE - SYMBOL
ICONO - ICOON - ÍCONE
TIPO CHIAMATA - TYPE OF CALL - TYPE D’APPEL - TYP DES ANRUFS
TIPO DE LLAMADA-TYPE OPROEP - TIPO DE CHAMADA
0
• Selezione suoneria chiamata da POSTO ESTERNO PRINCIPALE (S=0)
• Selection of the call ringtone from the MAIN ENTRANCE PANEL (S =0)
• Sélection sonnerie appel depuis POSTE EXTERNE PRINCIPAL (S=0)
• Läutwerk HAUPTTÜRSTATION (S=0) wählen
• Selección de un timbre llamada desde una PLACA EXTERIOR PRINCIPAL (S=0)
• Keuze beltoon oproep van de PRIMAIRE BUITENPOST (S=0)
• Selecionar a campainha chamada a partir de UNIDADE EXTERNA PRINCIPAL (S = 0)
1
• Selezione suoneria chiamata da POSTO ESTERNO SECONDARIO (S=1)
• Selection of the call ringtone from the SECONDARY ENTRANCE PANEL (S =1).
• Sélection sonnerie appel depuis POSTE EXTERNE SECONDAIRE (S=1)
• Läutwerk NEBENTÜRSTATION (S=1) wählen
• Selección de un timbre llamada desde una PLACA EXTERIOR SECUNDARIA (S=1)
• Keuze beltoon oproep van de SECUNDAIRE BUITENPOST (S=1)
• Selecionar a campainha chamada a partir de UNIDADE EXTERNA SECUNDÁRIA (S = 1)
• Selezione suoneria CHIAMATA AL PIANO
• FLOOR CALL ringtone selection
• Sélection sonnerie APPEL À L’ÉTAGE
• Läutwerk ETAGEN-ANRUF wählen
• Selección de un timbre LLAMADA A LA PLANTA
• Keuze beltoon OPROEP OP VERDIEPING
• Selecionar a campainha CHAMADA AO PISO
• Selezione suoneria CHIAMATA INTERCOM
• INTERCOM CALL ringtone selection
• Sélection sonnerie APPEL INTERCOM
• Läutwerk INTERCOM-ANRUF wählen
• Selección de un timbre LLAMADA INTERCOM
• Keuze beltoon INTERCOMOPROEP
• Selecionar a campainha CHAMADA INTERCOM
• Selezione suoneria CHIAMATA INTERCOM ESTERNO (solo con interfaccia 346850)
• EXTERNAL INTERCOM CALL ringtone selection (interface 346850 only)
• Sélection sonnerie APPEL INTERCOM EXTERNE (uniquement avec interface 346850)
• Läutwerk EXTERNER INTERCOM-ANRUF wählen (nur mit Schnittstelle 346850)
• Selección de un timbre LLAMADA INTERCOM EXTERNO (solo con la interfaz 346850)
• Keuze beltoon EXTERNE INTERCOMOPROEP (uitsluitend met interface 346850)
• Selecionar a campainha CHAMADA INTERCOM EXTERNA (apenas com interface 346850)
• La página muestra el tipo de llamada (A) y el número de timbre corriente (B)
2 Accione el joystick hacia arriba/abajo para seleccionar el tipo de llamada para la que quiere ajustar el timbre (véase la tabla siguiente).
• De pagina toont het type oproep (A) en de momenteel ingestelde beltoon (B)
2 Beweeg de joystick omhoog/omlaag om het type oproep waarvan u de beltoon wilt instellen (zie de volgende tabel) te selecteren
• A página mostra o tipo de chamada (A) e o número de campainha atual (B)
2 Regular o joystick para cima/baixo para selecionar o tipo de chamada da qual pretende modificar a campainha (ver a tabela em seguida)

62
• 3 Premi il joystick per proseguire
• 3 Press the joystick to continue
• 3 Appuyer sur le joystick pour continuer
• 3 Den Joystick drücken, um fortzufahren
• 3 Pulse el joystick para continuar
• 3 Druk op de joystick om verder te gaan
• 3 Carregar no joystick para continuar
3
01
15
4
4
• 4 Agisci sul joistick verso l’alto/basso per selezionare la melodia da
associare (la melodia viene riprodotta)
• 4 Move the joystick up/down to select the ringtone to be associated
(the ringtone is played)
• 4 Actionner le joystick vers le haut/bas pour sélectionner la mélodie à
associer (la mélodie est reproduite)
• 4 Verwenden Sie den Joystick nach oben/unten, um die zuzuordnende
Melodie zu wählen (die Melodie wird abgespielt)
• 4 Accione el joystick hacia arriba/abajo para seleccionar la melodía que
asociar (la melodía se reproduce)
• 4 Beweeg de joystick omhoog/omlaag om de koppelen beltoon te selecteren
(de beltoon wordt afgespeeld).
• 4 Regular o joystick para cima/baixo para selecionar a melodia a associar
(a melodia é reproduzida)
15
• 5 Premi il joystick per confermare oppure attendere il timeout
• 5 Press the joystick to confirm or wait for the timeout
• 5 Appuyer sur le joystick pour confirmer ou attendre le time-out
• 5 Den Joystick drücken, um die Einstellung zu bestätigen oder das
Timeout abwarten
• 5 Pulse el joystick para confirmar o esperar el timeout
• 5 Bevestig met een druk op de joystick of wacht de time-out af
• 5 Carregar no joystick para confirmar ou aguardar o timeout
5
6
6
• 6 Agisci sul joistick verso l’alto/basso per selezionare un’altra chiamata o
l’ultima pagina per uscire
• 6 Move the joystick up/down to select another call or the last page to exit
• 6 Actionner le joystick vers le haut/bas pour sélectionner un autre appel ou
la dernière page pour quitter
• 6 Verwenden Sie den Joystick nach oben/unten, um einen anderen Anruf zu
wählen oder die letzte Seite abzurufen, um den Vorgang zu beenden
• 6 Accione el joystick hacia arriba/abajo para seleccionar otra llamada o la
última página para salir
• 6 Beweeg de joystick omhoog/omlaag om een andere oproep te selecteren of
de laatste pagina te selecteren en te kunnen afsluiten
• 6 Regular o joystick para cima/baixo para selecionar outra chamada ou a
última página para sair
15

Video - Kit
63
• Questa funzione segnala lo stato della Serratura, se è aperta il LED Serratura lampeggia, se è chiusa
rimane spento.
Attenzione: funzione attivabile solo se l’impianto lo prevede - sono necessari dispositivi accessori.
Nota: non attivabile contemporaneamente alla funzione Studio professionale.
• This function notifies the status of the Door lock. If open the “LED Door lock” flashes, and if closed, the LED
stays off.
Warning: the function can only be activated if required by the system - accessory devices are required.
Note: It cannot be activated together with the Professional Studio (Office) function.
• Cette fonction signale l’état de la Serrure, si elle est ouverte, le voyant serrure clignote, si elle est fermée,
il reste éteint.
Attention : la fonction peut être activée uniquement si l’installation le prévoit ; des dispositifs accessoires
sont nécessaires.
Note: ne peut pas être activée conjointement à la fonction Bureau.
• Diese Funktion zeigt den Status des Schlosses an, wenn es geöffnet ist, blinkt die Schloss-LED, wenn es
geschlossen ist, bleibt sie ausgeschaltet.
Achtung: Diese Funktion kann nur aktiviert werden, wenn das System dies vorsieht - Zubehörgeräte sind
erforderlich.
Anmerkung: Die Funktion kann nicht gleichzeitig mit der Professional Studio-Funktion aktiviert werden.
• Esta función indica el estado de la cerradura: si está abierta, el LED cerradura parpadea y, si está cerrada,
permanece apagado.
Atención: función activable solamente cuando el sistema lo contemple - se requieren dispositivos
accesorios.
Nota: no se puede activar al mismo tiempo que la función Estudio profesional.
• Deze functie geeft de status van het slot aan. De LED slot knippert als het slot ontgrendeld is. De led brandt niet
als het slot vergrendeld is.
Opgelet: deze functie kan uitsluitend geactiveerd worden als de installatie dit voorziet - hiervoor zijn
aanvullende apparaten nodig.
Opmerking: kan niet samen met de functie Professionele studio worden geactiveerd.
• Esta função assinala o estado da fechadura, se está aberta o LED Fechadura pisca, se está fechada
permanece apagado.
Atenção: função ativável apenas se o equipamento prevê - são necessários dispositivos acessórios.
Nota: não pode ser activada simultaneamente à função Escritório profissional.
• Funzione STATO PORTA
• DOOR STATE function
• Fonction ÉTAT PORTE
• Funktion TÜRSTATUS
• Función ESTADO PUERTA
• STAAT DEUR functie
• Função ESTADO PORTA

64
• Questa funzione permette di diffondere un messaggio vocale, dettato al microfono del Classe100 X16E,
tramite gli altoparlanti dell’impianto di Diffusione sonora. Per abilitare questa funzione è necessario
configurare il Classe100 X16E come illustrato nel paragrafo “Configurazione / Funzioni speciali”.
• This function can be used to send voice messages using the microphone of the Classe100 X16E through the speakers
of the sound system.
To enable this function, Classe100 X16E must be configured as shown in the “Configuration / Special functions”
section.
• Cette fonction permet de diffuser un message vocal dicté au micro du Classe100 X16E, à travers les haut-
parleurs du système de Diffusion sonore.
Pour activer cette fonction, il est nécessaire de configurer le Classe100 X16E comme indiqué dans le chapitre
«Configuration / Fonctions spéciales ».
• Mit dieser Funktion kann eine vokale Nachricht abgespielt werden, die über das Mikrophon der Classe100 X16E
aufgenommen worden ist und durch die Lautsprecher der Schalldiffusionsanlage ausgetragen wird. Um diese
Funktion zu aktivieren, ist es notwendig, das Classe100 X16E wie im Abschnitt „Konfiguration / Sonderfunktionen“
beschrieben zu konfigurieren.
• Esta función permite difundir un mensaje vocal, dictado al micrófono del Classe100 X16E, mediante los
altavoces del sistema de Difusión sonora. Para habilitar esta función, se ha de configurar el Classe100 X16E
como se describe en el párrafo “Configuración / Funciones especiales”.
• Met deze functie kan een stembericht (ingesproken in de microfoon van het Classe100 X16E) door de
luidsprekers van de geluidsinstallatie worden afgespeeld. Activeer deze functie door Classe100 X16E te
configureren zoals is beschreven in de paragraaf “Configuratie / Speciale functies”.
• Esta função permite divulgar uma mensagem de voz, ditada ao microfone do Classe100 X16E, por meio de
altifalantes da instalação de Difusão Sonora. Para ativar esta função é necessário configurar o Classe100 X16E
conforme ilustrado no parágrafo “Configuração / Funções especiais”.
• Funzione CERCA PERSONE
• PAGING function
• Fonction CHERCHE-PERSONNES
• Funktion PERSONENSUCHE
• Función BUSCADOR DE PERSONAS
• Functie PERSONENZOEKSYSTEEM
• Função PROCURA PESSOAS
• Premere il tasto Connessione sinistro (da stand-by)
• Press the left Connection key (from stand-by)
• Appuyer sur la touche Connexion gauche (depuis la
condition de stand-by)
• Die linke Sprechtaste drücken (Im Standby)
• Presione la tecla Conexión izquierda (en standby)
• Druk op de linker verbindingstoets (Vanuit stand-by
• Carregar na tecla Conexão esquerda (Em stand-by)
• Pronunciare il messaggio
• Broadcast the message
• Prononcer le message
• Nachricht aufnehmen
• Pronuncie el mensaje
• Spreek het bericht in
• Pronunciar a mensagem
• Premere il tasto Connessione destro per terminare
• Press the right Connection key to end
• Appuyer sur la touche de Connexion droite pour terminer
• Die rechte Sprechtaste drücken, um den Vorgang zu beenden
• Presione la tecla Conexión derecha para acabar
• Rond af door de rechter verbindingstoets ingedrukt te houden
• Carregar na tecla conexão direita para terminar

Video - Kit
65
• Funzione SERRATURA SICURA
• SAFE DOOR LOCK function
• Fonction SERRURE SÉCURISÉE
• Funktion SCHLOSS-SICHERHEIT
• Función CERRADURA SEGURA
• Functie VEILIG SLOT
• Função FECHADURA SEGURA
• Questa funzione quando è attiva, impedisce di aprire la serratura del posto esterno quando il posto interno è
in stand-by. L’apertura della serratura è quindi permessa solo quando il posto esterno ed il posto interno sono
in comunicazione fonica.
• When active, this function prevents the opening of the entrance panel door lock when the internal unit is in stand-by. There-
fore, the opening of the door lock is only permitted when entrance panel and internal unit are in voice communication.
• Quand elle est active, cette fonction empêche l’ouverture de la serrure du poste externe quand le poste
interne est en stand-by.L’ouverture de la serrure est par conséquent admise uniquement quand le poste
externe et le poste interne sont en communication phonique.
• Wenn diese Funktion aktiviert ist, verhindert sie das Öffnen des Schlosses der Türstation, wenn sich die Hausstation
im Standby-Modus befindet. Das Öffnen des Schlosses ist daher nur zulässig, wenn sich die Türstation und die Haus-
station in telefonischer Verbindung befinden.
• Esta función activada impide abrir la cerradura de la placa exterior con la unidad interior en stand-by. Por
consiguiente, la cerradura se puede abrir únicamente cuando la placa exterior y la unidad interior están en
comunicación fónica.
• Wanneer deze functie geactiveerd is, kan het slot van de buitenpost niet geopend worden als de binnenpost in
stand-by is geplaatst. Het slot kan dus uitsluitend geopend worden wanneer tussen de buitenpost en de binnenpost
een gesprek plaatsvindt.
• Esta função quando ativa impede a abertura da fechadura da unidade externa quando a unidade interna está
em stand by. A abertura da fechadura é então permitida apenas quando a unidade externa e a unidade interna
estão em comunicação sonora.
• Nota: quando la funzione è attiva, tutti i tasti in tutte le configurazioni che prevedono l’attivazione di una serratura sono disattivati e se premuti il
relativo LED bianco lampeggia. Non attivabile contemporaneamente alla funzione Studio Professionale.
• Note: when the function is active, all the keys in all the configurations requiring the activation of a door lock are disabled, and when they are pressed the
white LED flashes. It cannot be activated together with the Professional Studio (Office) function.
• Note : quand la fonction est active, dans toutes les configurations qui prévoient l’activation d’une serrure, les touches sont toutes désactivées et si elles
sont enfoncées, le voyant blanc correspondant clignote. Ne peut pas être activée conjointement à la fonction Bureau.
• Anmerkung: Wenn die Funktion aktiv ist, werden alle Tasten in allen Konfigurationen, die die Aktivierung eines Schlosses erfordern, deaktiviert, und wenn
gedrückt, blinkt die weiße LED. Die Funktion kann nicht gleichzeitig mit der Professional Studio-Funktion aktiviert werden.
• Nota: con la función activada, todas las teclas en todas las configuraciones, que contemplan la activación de una cerradura, están desactivadas y, si se
pulsan, el LED relativo blanco parpadea. No se puede activar al mismo tiempo que la función Estudio Profesional.
• Opmerking: wanneer de functie geactiveerd is, zijn alle toetsen die in hun configuratie de activering van een slot voorzien gedeactiveerd. Bovendien gaat de
witte LED knipperen als ze ingedrukt worden. kan niet samen met de functie Professionele studio worden geactiveerd.
• Nota: quando a função está ativa, todas as teclas em todas as configurações que prevêem a ativação de uma fechada são desativadas e se carregadas o
relativo LED branco pisca. Não pode ser activada simultaneamente à função Escritório profissional.
• Spostare il microinterrutore ralativo sulla posizione ON
• Move the corresponding microswitch to ON
• Placer le micro-interrupteur correspondant sur la position ON
• Den entsprechenden Mikroschalter auf ON positionieren
• Desplace el microinterruptor correspondiente para situarlo en la posición ON
• Verplaats de bijbehorende microschakelaar op ON
• Deslocar o microinterruptor relativo na posição ON
P
M
N
BTICINO
V.le Borri, 231
21100 (VA) ITALY
Made in Italy
2 1 5M 1
BUS
2-1
ON
OFF
P
M
N

66
•
Utilizzo TELELOOP
• INDUCTIVE LOOP use
•Utilisation TÉLÉLOOP
• TELELOOP verwenden
• Utilizar TELELOOP
• Gebruik TELELOOP
•
Utilização TELELOOP
• La funzione TELELOOP consente l’utilizzo del dispositivo ai portatori di protesi acustiche dotate di selettore (T).
Commutare l’apparecchio acustico in posizione T e per garantire un corretto accoppiamento magnetico tra videoci-
tofono ed apparecchio acustico si consiglia di posizionarsi frontalmente al dispositivo ad una distanza di 25 - 35 cm.
• The inductive loop function enables the device to be used by people wearing hearing aids with (T) selector.
Switch the acoustic device to the T position. To ensure correct magnetic coupling between the handset and the
acoustic device, we recommend a position in front of the device, at a distance of 25-35 cm.
• La fonction TÉLÉLOOP permet l'utilisation du dispositif par les porteurs de prothèse auditive dotée de sélec-
teur (T). Commuter l'appareil auditif sur la position T et pour garantir un bon accouplement magnétique entre
vidéophone et appareil auditif, il est recommandé de se placer face au dispositif à une distance de 25/35 cm.
• Die TELOOP-Funktion ermöglicht die Verwendung des Geräts für Personen mit Hörgeräten, die mit einem Wahlschal-
ter (T) ausgestattet sind. Um eine korrekte magnetische Kopplung zwischen dem Video-Türsprechanlage und dem
Hörgerät zu gewährleisten, wird empfohlen, sich in einem Abstand von 25 - 35 cm vor dem Gerät zu positionieren.
• La función TELELOOP permite la utilización del dispositivo a los portadores de prótesis auditivas con selector (T).
El audífono se ha de conmutar en la posición T y, para garantizar un acoplamiento magnético correcto entre el
videoportero y el audífono, le aconsejamos situarse en frente del dispositivo a una distancia de 25 - 35 cm.
• Met de TELELOOP-functie kan het apparaat gebruikt worden door mensen die een gehoorapparaat met de
schakelaar (T) dragen. Plaats het gehoorapparaat op T. Voor een correcte magnetische koppeling tussen de
beeldhuistelefoon en het gehoorapparaat raden we aan om op circa 2535 cm voor het apparaat te gaan staan.
• A função TELELOOP permite a utilização do dispositivo aos portadores de aparelhos auditivos dotados
de seletor (T). Comutar o aparelho auditivo para a posição T e para garantir um acoplamento magnético
correto entre o vídeo-intercomunicador e o aparelho auditivo sugerimos-lhe que se posicione frontalmente
ao dispositivo, a uma distância de aproximadamente 25- 35 cm.
2
5
-35
c
m
40
cm
• NOTA: la presenza di metallo ed il rumore di fondo generato da
apparecchiature elettriche/elettroniche (es. computer), possono
compromettere la qualità e le performance del dispositivo di
accoppiamento.
• NOTE: the presence of metal and background noise generated by
electric/electronic devices (e.g. computer) may compromise the
performance and the quality of the coupling device.
• NOTE : la présence de métal et de bruit de fond généré par des
appareillages électriques/électroniques (ex. ordinateurs) peuvent
compromettre la qualité et les performances du dispositif d’accou-
plement.
• ANMERKUNG: das Metallgegenstände und Grundgeräusche elekt-
rischer/elektronischer Geräte (z.B. PC) die Qualität und Leistung der
Kopplungsvorrichtung beeinträchtigen können.
• NOTA: la presencia de metal y ruido de fondo generado por aparatos
eléctricos/electrónicos (por ejemplo un PC) puede comprometer la
calidad y la eficiencia del dispositivo de acoplamiento.
• OPMERKING: de aanwezigheid van metaal en achtergrondgeluid ver-
oorzaakt door elektrische/elektronische apparatuur (bijv. computer) de
kwaliteit en de prestaties van de koppelinrichting kunnen beïnvloeden.
• NOTA: a presença de metal e ruído de fundo, gerado por equipamen-
tos eléctricos/electrónicos (por exemplo: computador), pode afectar
a qualidade e o desempenho do dispositivo de acoplamento.

Video - Kit
67
• Servizi ausiliari
• Auxiliary services
• Services auxiliaires
• Hilfsdienste
• Servicios auxiliares
• Hulpservices
• Serviços auxiliares
• Gli schemi di seguito illustrati sono solo a titolo dimostrativo, per la configurazione dei dispositivi fare
riferimento alla documentazione specifica.
• The diagrams shown are only provided as examples. For the actual device configuration refer to the specific
documentation.
• Les schémas ci-après sont fournis uniquement à titre indicatif ; pour la configuration des dispositifs, faire
référence à la documentation spécifique.
• Die folgenden Diagramme dienen nur zu Demonstrationszwecken; die Gerätekonfiguration ist in der spezifischen
Dokumentation beschrieben.
• Los esquemas, ilustrados a continuación, son demostrativos; para configurar los dispositivos, consulte la
documentación específica.
• De onderstaande schema’s zijn slechts een voorbeeld. Raadpleeg de specifieke documentatie voor de configuratie
van de apparaten.
• Os diagramas em seguida ilustrados são simplesmente demonstrativos, para a configuração dos dispositivos
consultar a documentação específica.
• CHIAMATA AL PIANO con pulsante fuoriporta; CALL TO THE FLOOR with door push-button; APPEL À L’ÉTAGE avec bouton extérieur porte;
• ETAGENRUF mit Taste an der Türaußenseite; LLAMADA A LA PLANTA con pulsador fuera de la puerta; OPROEP OP VERDIEPING met knop buiten de deur
• CHAMADA AO PISO com botão fora da porta
BUS
344672

68
• COMANDO SERRATURA CONTATTO PULITO O ALIMENTAZIONE DEDICATA; CLEAN CONTACT OR DEDICATED POWER SUPPLY DOOR LOCK CONTROL;
• COMMANDE SERRURE CONTACT LIBRE OU ALIMENTATION DÉDIÉE; SCHLOSSSTEUERUNG REINER KONTAKT ODER SPEZIFISCHE VERSORGUNG;
• COMANDO CERRADURA CONTACTO LIMPIO O ALIMENTACIÓN ESPECÍFICA; BEDIENING SLOT POTENTIAALVRIJ CONTACT OF SPECIFIEKE VOEDING;
• COMANDO FECHADURA CONTACTO LIMPO OU ALIMENTAÇÃO ESPECÍFICA
• COMANDO SERRATURA CON ATTUATORI REMOTI; DOOR LOCK CONTROL REMOTE ACTUATORS; COMMANDE SERRURE AVEC ACTIONNEURS À DISTANCE;
• SCHLOSSSTEUERUNG MIT FERNGESCHALTETEN AKTOREN; COMANDO CERRADURA CON ACTUADORES A DISTANCIA; BEDIENING SLOT MET ACTUATOREN OP AFSTAND;
• COMANDO FECHADURA COM ATUADORES REMOTOS
1
2
PL
S+
S-
346230
P
T
J
M M
P
J
M
P
J
M
P
J
M
P
346230
• 18V - 4A impulsivi
250mA di mantenimento
(30 Ohm max)
• 18V 4A trigger
250mA holding current
(30 Ohm max)
• 18V 4A impulsifs
250mA entretien
(30 Ohm max)
• 18V 4A Stoßstrom
250mA Haltestro
(30 Ohm max)
• 18V 4A impulso activador
250mA mantenimient
(30 Ohm max)
• 18V 4A impuls
250mA handhavin
(30 Ohm max)
• 18V 4A impulsivos 250mA
manutenção
(30 Ohm max)
346050
110-240Vac
BUSPL S+
S-
8 A COSΦ = 1 24 VDC; 24 VAC
8 A COSΦ = 0,7 24 VAC
8 A COSΦ = 1 24 VAC
346250 *
*
• Fornito a corredo
• Supplied
• Fourni
• Wird mitgeliefert
• En dotación
• Standaard meegeleverd
• Fornecido no equipamento base

Video - Kit
69
• COMANDO LUCI SCALE; STAIRCASE LIGHT CONTROL; COMMANDE LUMIÈRES ESCALIERS; STEUERUNG TREPPENLICHT; COMANDO LUCES ESCALERAS;
• BEDIENING TRAPHUISVERLICHTING; COMANDO DA LUZ DAS ESCADAS
• SUONERIA SUPPLEMENTARE; ADDITIONAL RINGTONE; SONNERIE SUPPLÉMENTAIRE; ZUSÄTZLICHES LÄUTWERK; TIMBRE ADICIONAL;
• EXTRA BELTOON; CAMPAINHA ADICIONAL
2
3
1 32
346210
1
230 Vac
110-240Vac
L
MOD = –
M
= –
= –
N/P
= –
= –
T = –
BUS
1
5M
1
5M
336910
• NOTA: le ultime quattro suonerie impostabili da apposito menù
(Associazione di una suoneria ad un evento), non sono compatibili con
la suoneria supplementare.
• NOTE: the last four ringtones that can be set using the appropriate
menu (Association of a ringtone to a call event), are not compatible with
the additional ringtone.
• NOTE : les quatre dernières sonneries sélectionnables dans le menu
prévu à cet effet (association d’une sonnerie à un événement - appel)
ne sont pas compatibles avec la sonnerie supplémentaire.
• ANMERKUNG: Die letzten vier Klingeltöne, die über das entsprechende
Menü eingestellt werden können (Zuordnung eines Klingeltons zu einem
Ereignis-Anruf), sind mit dem zusätzlichen Klingelton nicht kompatibel.
• NOTA: los cuatro últimos timbres, ajustables en un menú específico
(Asociación de un timbre a un evento llamada), no son compatibles
con el timbre suplementario.
• OPMERKING: Opmerking: de laatste vier beltonen die via het specifieke
menu (Koppeling van een beltoon met een gebeurtenis-oproep)
ingesteld kunnen worden, zijn niet met de extra beltoon compatibel.
• NOTA: os últimos quatro sons que podem ser programados no menu
específico (Associação de um toque a um evento chamada), não são
compatíveis com a toque suplementar.

70
Leggere attentamente prima dell’uso e conservare per un riferimento futuro
Divieto di toccare le unità con le mani bagnate
Divieto di utilizzo di pulitori liquidi o aerosol
Divieto di occludere le aperture di ventilazione
Diveto di modicare i dispositivi
Divieto di rimuovere parti di protezione dai dispositivi
Divieto di installare le unità in prossimità di liquidi e polveri
Divieto di installare le unità in prossimità di fonti di calore
Divieto di installare le unità in prossimità di gas nocivi, polveri metalliche o simili
Divieto di ssaggio delle unità su superci non adatte
Pericolo di shock elettrico
Rischio caduta dei dispositivi a causa di cedimento della supercie su cui
sono installati o installazione inappropriata
Togliere l’alimentazione prima di ogni intervento sull’impianto
Attenzione: le operazioni di installazione, congurazione, messa in servizio e
manutenzione devono essere eettuate esclusivamente da personale quali-
cato. Assicurarsi che l’installazione a parete sia eettuata correttamente
Eettuare la posa dei cavi rispettando le normative vigenti
Collegare i cavi di alimentazione secondo le indicazioni
Per eventuali espansioni di impianto utilizzare solo gli articoli indicati
nelle speciche tecniche
Read carefully before use and keep for future reference
Touching the units with wet hands is forbidden
Using liquid cleaners or aerosols is forbidden
Blocking the ventilation openings is forbidden
Modifying the devices is forbidden
Removing protective parts from the devices is forbidden
Installing the units near liquids and powders is forbidden
Installing the units near heat sources is forbidden
Installing the units near harmful gases, metal dusts or similar is forbidden
Fastening the units on unsuitable surfaces is forbidden
Danger of electrical shock
Risk of devices falling because the surface on which they are installed
collapses or inappropriate installation
Switch the power supply OFF before any work on the system
Caution: Installation, conguration, starting-up and maintenance must
be performed exclusively by qualied personnel.
Check that the wall installation has been carried out correctly
Lay out the wires respecting the standards in force
Connect the power supply wires as indicated
Use only the items indicated in the technical specications for any
system expansions
Lire attentivement avant toute utilisation et installation de nos produits
et conserver pour toute consultation en cas de besoin.
Interdiction de toucher les unités avec les mains mouillées.
Interdiction d’utiliser des produits de nettoyage liquides ou des aérosols.
Interdiction de boucher les ouvertures de ventilation.
Interdiction de modier les dispositifs.
Interdiction des retirer les parties de protection des dispositifs.
Interdiction d’installer les unités à proximité de liquides et poudres/
poussières.
Interdiction d’installer les unités à proximité de sources de chaleur.
Interdiction d’installer les unités à proximité de gaz nocifs, de poudres
métalliques ou autres matières semblables.
Interdiction de xer les unités sur des surfaces non appropriées.
Risque d’électrocution
Risque de chute des dispositifs en cas de rupture de la surface sur
laquelle ils sont installés ou mauvaise installation.
Couper l’alimentation avant toute intervention sur l’installation.
Attention: les opérations d’installation, de conguration, de mise en
service et d’entretien doivent être conées à un personnel qualié.
S’assurer que l’installation murale est correctement eectuée.
Eectuer la pose des câbles dans le respect des normes en vigueur.
Brancher les câbles d’alimentation dans le respect des indications fournies.
Pour les éventuelles extensions de l’installation, utiliser uniquement les
articles indiqués dans les caractéristiques techniques.
Vor Gebrauch, die Hinweise aufmerksam durchlesen und sorgfältig auf-
bewahren, um sie auch in Zukunft nachschlagen zu können.
Verbot, die Einheiten mit nassen Händen zu berühren
Verbot, Flüssigreiniger oder Aerosol zu benutzen
Verbot, die Belüftungsschlitze abzudecken
Verbot, die Vorrichtungen zu ändern
Verbot, die Schutzbleche von den Vorrichtungen abzunehmen
Verbot, die Einheit in der Nähe von Flüssigkeiten und Staub zu in-
stallieren
Verbot, die Einheit in der Nähe von Wärmequellen zu installieren
Verbot, die Einheit in der Nähe von giftigem Gas, Metallstaub o. ä. zu in-
stallieren
Verbot, die Einheit an ungeeignete Flächen zu befestigen
Stromschlaggefahr
Risiko des Herabfallens der Vorrichtungen durch Nachlassen der Aua-
geäche oder wegen falscher Installation
Die Stromversorgung abtrennen, bevor an der Anlage gearbeitet wird.
Achtung: die Installation, Konguration, Inbetriebnahme und Wartung
dürfen nur von qualizierten Fachleuten vorgenommen werden.
Sicherstellen, dass die Wandmontage richtig vorgenommen wird
Die Kabeln gemäß geltenden Normen verlegen
Die Stromkabeln gemäß Anweisungen anschließen
Bei eventuellen Anlagenerweiterungen ausschließlich die Artikel
verwenden, die in den technischen Spezikationen angegeben sind
• Avvertenze e diritti del consumatore
• Warnings and consumer rights
• Avertissements et droits du consommateur
• Hinweise und Rechte der Verbraucher
• Advertencias y derechos del consumidor
• Waarschuwingen en rechten van de consument
• Advertências e direitos do consumidor

Video - Kit
71
Lea detenidamente antes del uso y conserve la documentación para
consultas futuras
Se prohíbe tocar las unidades con las manos mojadas
Se prohíbe el uso de limpiadores líquidos o aerosoles
Se prohíbe tapar las aperturas de ventilación
Se prohíbe modicar los dispositivos
Se prohíbe desmontar las partes de protección de los dispositivos
Se prohíbe instalar las unidades cerca de líquidos y polvo
Se prohíbe instalar las unidades cerca de fuentes de calor
Se prohíbe instalar las unidades cerca de gases nocivos, polvo metálico
o productos similares
Se prohíbe jar las unidades en supercies no aptas
Peligro de descarga eléctrica
Riesgo de caída de los dispositivos por hundimiento de la supercie de
montaje o instalación inadecuada
Corte la alimentación antes de intervenir en el sistema
Atención: Las operaciones de instalación, conguración, puesta en
servicio y mantenimiento han de ser efectuadas exclusivamente por
personal cualicado. Asegúrese de que la instalación se haya efectuado
correctamente.
La colocación de los cables ha de cumplir las normativas vigentes
Conecte los cables de alimentación según las indicaciones
Para posibles expansiones del sistema, use solamente los artículos indi-
cados en las especicaciones técnicas
Vóór het gebruik doorlezen en voor naslag bewaren
Het is verboden het apparaat met natte handen aan te raken
Het is verboden vloeibare reinigers of verstuivers te gebruiken
Het is verboden de ventilatie-openingen af te sluiten
Het is verboden het apparaat te wijzigen
Het is verboden om beschermende onderdelen van het apparaat te
verwijderen
Het is verboden de apparaten te installeren in de buurt van vloei-
stoffen en stof
Het is verboden de apparaten te installeren in de buurt van warmtebronnen
Het is verboden de apparaten te installeren in de buurt van schadelijke
gassen, metaalstof of soortgelijke materialen
Het is verboden de units te bevestigen aan ongeschikte oppervlakken
Gevaar voor elektrische schokken
Gevaar voor vallen van de apparaten als het oppervlak waarop ze geïn-
stalleerd zijn instort of wegens een verkeerde installatie
Verwijder de spanning alvorens werkzaamheden aan de installatie te
verrichten
Opgelet: laat de installatie, de conguratie, de inbedrijfstelling en het
onderhoud uitsluitend verrichten door gekwaliceerd personeel.
Controleer of de installatie aan de muur correct is verricht
Breng de kabels aan volgens de toepasselijke normen
Sluit de voedingskabels aan volgens de aanwijzingen
Gebruik uitsluitend de artikelen die in de technische specicaties zijn
gegeven voor de eventuele uitbreiding van de installatie
Ler atentamente antes do uso e guardar para qualquer futura referência
Proibição de tocar as unidades com as mãos molhadas
Proibição da utilização de produtos de limpeza líquidos ou aerossóis
Proibição de obstruir as aberturas de ventilação
Proibição de alterar os dispositivos
Proibição de remover peças de proteção dos dispositivos
Proibição de instalar as unidades em proximidade de líquidos e pós
Proibição de instalar as unidades em proximidade de fontes de calor
Proibição de instalar as unidades em proximidade de gases nocivos, pós
metálicos ou similares
Proibição de xação das unidades sobre superfícies não adequadas
Perigo de choque eléctrico
Risco de queda dos dispositivos, devido a desabamento da superfície em
que estão instalados ou instalação inadequada
Tirar a alimentação elétrica antes de qualquer intervenção sobre a instalação
Atenção: as operações de instalação, conguração, colocação em serviço e
manutenção devem ser realizadas exclusivamente por pessoal qualicado.
Certicar-se de que a instalação de parede seja realizada corretamente
Proceder à colocação dos cabos atendo-se escrupulosamente às normas
vigentes.
Conectar os cabos de alimentação de acordo com as prescrições
Face a eventuais extensões de instalações utilizar exclusivamente os
artigos listados nas especicações técnicas

72
• Il fabbricante BTicino S.p.A., dichiara che il tipo di apparecchiatura radio 364614 (kit Classe 100X16E + L3000
badge) è conforme alla direttiva 2014/53/UE.
Il testo completo della dichiarazione di conformità UE è disponibile al seguente indirizzo Internet:
www.bticino.it/red
• Hereby BTicino S.p.A., declares that the radio equipment 364614 (type Classe 100X16E kit + L3000 badge) is in
compliance with Directive 2014/53/EU.
The full text of the EU declaration of conformity is available at the following internet address:
www.bticino.it/red
• Le soussigné BTicino S.p.A., déclare que l'équipement radioélectrique du type 364614 (set Classe 100X16E +
L3000 Badge) est conforme à la directive 2014/53/UE.
Le texte complet de la déclaration UE de conformité est disponible à l'adresse internet suivante:
www.bticino.it/red
• Hiermit erklärt BTicino S.p.A., dass der Funkanlagentyp 364614 (Set Classe 100X16E + L3000 Badge) der Richtlinie
2014/53/EU entspricht.
Der vollständige Text der EU-Konformitätserklärung ist unter der folgenden Internetadresse verfügbar:
www.bticino.it/red
• Por la presente BTicino S.p.A., declara que el tipo de equipo radioeléctrico 364614 (kit Classe 100X16E +
L3000) credencial es conforme con la Directiva 2014/53/UE.
El texto completo de la declaración UE de conformidad está disponible en la dirección Internet siguiente:
www.bticino.it/red
• Hierbij verklaar ik BTicino S.p.A., dat het type radioapparatuur 364614 (Set Classe 100X16E + L3000 Badge)
conform is met Richtlijn 2014/53/EU.
De volledige tekst van de EU-conformiteitsverklaring kan worden geraadpleegd op het volgende internetadres:
www.bticino.it/red
• O abaixo assinado BTicino S.p.A., declara que o presente tipo de equipamento de rádio 364614 (kit Classe
100X16E + L3000) crachá está em conformidade com a Diretiva 2014/53/UE.
O texto integral da declaração de conformidade está disponível no seguinte endereço de Internet:
www.bticino.it/red

Video - Kit
73
• App Door Entry CLASSE100X
• Door Entry CLASSE100X app
• Appli Door Entry CLASSE100X
• App Door Entry CLASSE100X
• App Door Entry CLASSE100X
• Door Entry CLASSE100X App
• App Door Entry CLASSE100X
• Puoi interagire con il tuo Classe100 X16E tramite l’app gratuita Door Entry CLASSE100X.
Dopo esserti registrato ed aver eettuato l’autenticazione, devi eseguire l’associazione con il dispositivo; a
questo punto puoi:
– rispondere ad una chiamata videocitofonica dai Posti Esterni;
– CALL HOME (eettua una chiamata al tuo Classe100 X16E);
– visualizzare le immagini provenienti dai Posti Esterni e dalle telecamere;
– aprire la serratura dei Posti Esterni;
– aggiornare il rmware del tuo Classe100 X16E.
• You can interact with your Classe100 X16E using the free Door Entry CLASSE100X app.
After registering and authenticating, you must make the association with the device; at this point you can
– answer a video door entry call from the Entrance Panel;
– CALL HOME (call your Classe100 X16E);
– display the images from the entrance panels and cameras;
– open the door lock of the Entrance Panels;
– update the rmware of your Classe100 X16E.
• Il est possible d’interagir avec le vidéophone Classe100 X16E à travers l’ application gratuite Door Entry
CLASSE100X.
Après d’être enregistré et s’être authentié, il est nécessaire d’eectuer l’association avec le dispositif ;
ensuite, il est possible d’utiliser les fonctions suivantes :
– répondre à un appel vidéophonique passé depuis les Postes Externes ;
– CALL HOME (appeler le vidéophone Classe100 X16E) ;
– visualiser les images provenant des postes externes ou des caméras ;
– ouvrir la serrure des Postes Externes ;
– mettre à jour le Firmware du Classe100 X16E.
• Sie können mit Ihrem Classe100 X16E über die kostenlose App Door Entry CLASSE100X interagieren.
Nachdem Sie sich angemeldet und die Authentizierung vorgenommen haben, müssen Sie die Zuordnung der
Vorrichtung vornehmen. Danach können Sie:
– einen Anruf von der Videogegensprechanlage, der von einer Türstation eintrit, beantworten;
– CALL HOME (Ihr Classe100 X16E anrufen)
– die Bilder der Türstationen und der Kameras anzeigen lassen;
– das Schloss der Türstationen önen;
– die Firmware des Classe100 X16E aktualisieren.
• Puede interactuar con su Classe100 X16E mediante la APP gratis Door Entry CLASSE100X.
Tras haberse registrado y haber efectuado la autenticación, debe llevar a cabo la asociación con el
dispositivo; ahora puede:
– responder a una llamada de videoportero desde las Placas Exteriores;
– LLAMAR A CASA (efectúa una llamada a su Classe100 X16E);
– visualizar las imágenes procedentes de las Placas Exteriores y de las telecámaras;
– abrir la cerradura de las Placas Exteriores;
– actualizar el de su Classe100 X16E.

74
• Gebruik de gratis Door Entry CLASSE100X app om met uw Classe100 X16E te communiceren.
Als u zich heeft geregistreerd en aangemeld, moet u de telefoon met het apparaat koppelen. Nu kunt u:
– een oproep van de beeldhuistelefoon afkomstig van de Buitenposten beantwoorden;
– CALL HOME (een oproep verrichten naar uw Classe100 X16E)
– de beelden afkomstig van de Buitenposten en de camera's weergeven;
– de slot van Buitenposten openen;
– de rmware van uw Classe100 X16E updaten.
• Pode interagir com o seu Classe100 X16E através do Aplicativo gratuito Door Entry CLASSE100X.
Depois ter-se registrado e ter executado a autenticação, deve executar a associação com o dispositivo; a
esta altura pode:
– atender uma chamada de intercomunicação vídeo procedente das Unidades Externas;
– CALL HOME (executa uma chamada para o seu Classe100 X16E);
– visualizar as imagens provenientes das unidades externas e das câmaras de vídeo;
– abrir a fechadura das Unidades Externas;
– actualizar o rmware de seu Classe100 X16E.
Per l’utilizzo delle funzioni tramite l’app, fare riferimento alla
documentazione scaricabile dal sito.
To use the functions by means of the app, refer to the documentation that
can be downloaded from the website.
Pour utiliser des fonctions à travers l’appli, faire référence à la
documentation téléchargeable en se rendant sur le site.
Um die Funktionen über die App nutzen zu können, lesen Sie bitte die
Dokumentation, die Sie von der folgenden Website herunterladen können.
Para utilizar las funciones con la app, consulte la documentación que
puede descargarse en el sitio.
Raadpleeg de documentatie die van de website gedownload kan worden
voor het gebruik van de functies met de app.
Para a utilização das funções através da app, consultar a documentação
que pode ser descarregada do site.
www.homesystems-legrandgroup.com
Scarica la App Door Entry CLASSE100X.
Download the Door Entry CLASSE100X App.
Télécharger l’Appli Door Entry CLASSE100X.
App Door Entry CLASSE100X herunterladen.
Descarga la App Door Entry CLASSE100X.
De AppDoor Entry CLASSE100X downloaden.
Descarregue a App Door Entry CLASSE100X.

Video - Kit
75

BTicino SpA
Viale Luigi Borri, 231
21100 Varese - Italy
www.bticino.com
BTicino SpA si riserva il diritto di variare in qualsiasi momento i contenuti illustrati nel presente stampato e di
comunicare, in qualsiasi forma e modalità, i cambiamenti apportati.
BTicino SpA reserves at any time the right to modify the contents of this booklet and
to communicate in any form and modality, the changes brought to the same.
Timbro installatore
Installer stamp
-
 1
1
-
 2
2
-
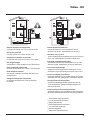 3
3
-
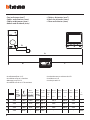 4
4
-
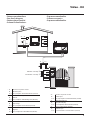 5
5
-
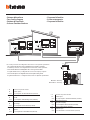 6
6
-
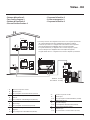 7
7
-
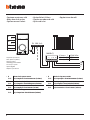 8
8
-
 9
9
-
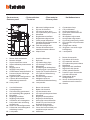 10
10
-
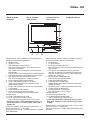 11
11
-
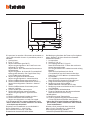 12
12
-
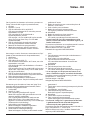 13
13
-
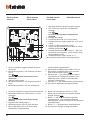 14
14
-
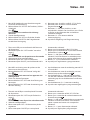 15
15
-
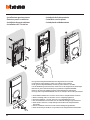 16
16
-
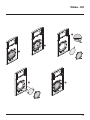 17
17
-
 18
18
-
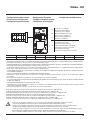 19
19
-
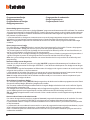 20
20
-
 21
21
-
 22
22
-
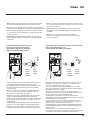 23
23
-
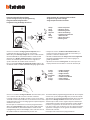 24
24
-
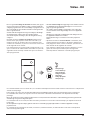 25
25
-
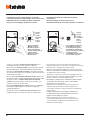 26
26
-
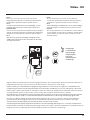 27
27
-
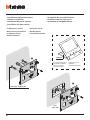 28
28
-
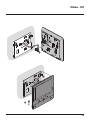 29
29
-
 30
30
-
 31
31
-
 32
32
-
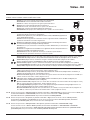 33
33
-
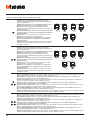 34
34
-
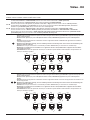 35
35
-
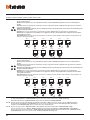 36
36
-
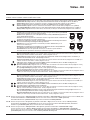 37
37
-
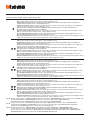 38
38
-
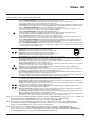 39
39
-
 40
40
-
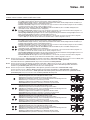 41
41
-
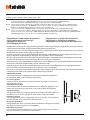 42
42
-
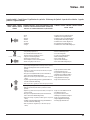 43
43
-
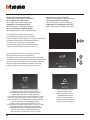 44
44
-
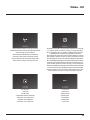 45
45
-
 46
46
-
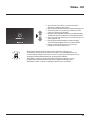 47
47
-
 48
48
-
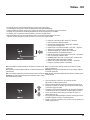 49
49
-
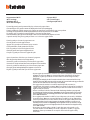 50
50
-
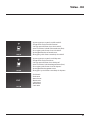 51
51
-
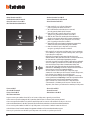 52
52
-
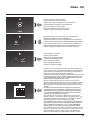 53
53
-
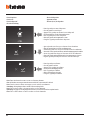 54
54
-
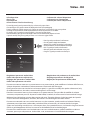 55
55
-
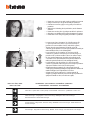 56
56
-
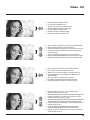 57
57
-
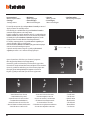 58
58
-
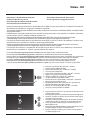 59
59
-
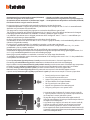 60
60
-
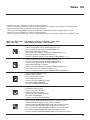 61
61
-
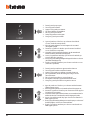 62
62
-
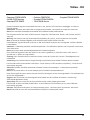 63
63
-
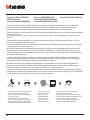 64
64
-
 65
65
-
 66
66
-
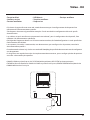 67
67
-
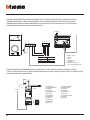 68
68
-
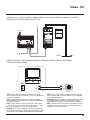 69
69
-
 70
70
-
 71
71
-
 72
72
-
 73
73
-
 74
74
-
 75
75
-
 76
76


in andere talen
- English: Bticino 364614 Operating instructions
- italiano: Bticino 364614 Istruzioni per l'uso
- français: Bticino 364614 Mode d'emploi
- español: Bticino 364614 Instrucciones de operación
- Deutsch: Bticino 364614 Bedienungsanleitung
- português: Bticino 364614 Instruções de operação
Gerelateerde papieren
Andere documenten
-
Interphone F5S Handleiding
-
CAME PERLA Installatie gids
-
-
Comelit FT PLANUX 01 Technical Manual
-
Profile wireless + Handleiding
-
-
-
-
Niko 10-806 Handleiding
-
Artsound TNW-VOL100V Data papier