Parkside 303400 Translation Of The Original Instructions
- Categorie
- Elektrische schuurmachines
- Type
- Translation Of The Original Instructions
Deze handleiding is ook geschikt voor

HANDSCHLEIFER
Originalbetriebsanleitung
DETAIL SANDER
Translation of the original instructions
PONCEUSE TRIANGULAIRE
Traduction des instructions d‘origine
HANDSCHUURMACHINE
Vertaling van de originele gebruiksaanwijzing
RUČNÍ BRUSKA
Překlad originálního provozního návodu
HANDSCHLEIFER /
DETAIL SANDER / PONCEUSE
TRIANGULAIRE PHS 160 E5
SZLIFIERKA RĘCZNA
Tłumaczenie oryginalnej instrukcji obsługi
RUČNÁ BRÚSKA
Preklad originálneho návodu na obsluhu
IAN 303400

Klappen Sie vor dem Lesen die Seite mit den Abbildungen aus und machen Sie sich anschließend mit
allen Funktionen des Gerätes vertraut.
Before reading, unfold the page containing the illustrations and familiarise yourself with all functions of
the device.
Avant de lire le mode d‘emploi, ouvrez la page contenant les illustrations et familiarisez-vous ensuite avec
toutes les fonctions de l‘appareil.
Vouw vóór het lezen de pagina met de afbeeldingen open en maak u vertrouwd met alle functies van het
apparaat.
Przed przeczytaniem proszę rozłożyć stronę z ilustracjami, a następnie proszę zapoznać się z
wszystkimi funkcjami urządzenia.
Před čtením si otevřete stranu s obrázky a potom se seznamte se všemi funkcemi přístroje.
Pred čítaním si odklopte stranu s obrázkami a potom sa oboznámte so všetkými funkciami prístroja.
DE / AT / CH Originalbetriebsanleitung Seite
4
GB / IE Translation of the original instructions Page
19
FR / BE Traduction des instructions d‘origine Page
33
NL / BE Vertaling van de originele gebruiksaanwijzing Pagina
48
PL Tłumaczenie oryginalnej instrukcji obsługi Strona
63
CZ Překlad originálního provozního návodu
Strana 78
SK Preklad originálneho návodu na obsluhu Strana 92

1 2 43 5
6
7
8
6
17
18
8
4 6
7
7
9
9a
9
9
8a
10
10
11
14
15
16
16
13
13 10
11
14
12
12
10

DE AT CH
4
Inhalt
Einleitung .....................................4
Bestimmungsgemäße
Verwendung ................................ 4
Allgemeine Beschreibung .............5
Lieferumfang ..................................... 5
Übersicht ......................................... 5
Technische Daten ..........................5
Sicherheitshinweise ......................6
Symbole und Bildzeichen ................... 6
Allgemeine Sicherheitshinweise
für Elektrowerkzeuge ......................... 6
Weiterführende Sicherheitshinweise .... 9
Restrisiken ...................................... 10
Montage .................................... 10
Schleifblatt anbringen/entfernen ....... 10
Schleifzunge montieren .................... 11
Staubbox anschließen/abnehmen/
leeren ............................................ 11
Externe Staubabsaugung
anschließen/abnehmen ................... 12
Bedienung .................................12
Ein- und Ausschalten ........................ 12
Arbeitshinweise .........................12
Schleifen ........................................ 12
Wahl des Schleifblattes .................... 13
Wahl der Schleifplatte ..................... 13
Reinigung und Wartung .............13
Reinigung....................................... 13
Filtereinlage der Staubbox
reinigen/wechseln ......................... 14
Lagerung ...................................14
Entsorgung/ Umweltschutz .........14
Ersatzteile/Zubehör ...................15
Fehlersuche ................................16
Garantie ....................................17
Reparatur-Service ......................18
Service-Center ............................18
Importeur .................................. 18
Einleitung
Herzlichen Glückwunsch zum Kauf Ihres
neuen Gerätes. Sie haben sich damit für
ein hochwertiges Gerät entschieden. Die-
ses Gerät wurde während der Produktion
auf Qualität geprüft und einer Endkontrolle
unterzogen. Die Funktionsfähigkeit Ihres
Gerätes ist somit sichergestellt.
Die Betriebsanleitung ist Bestandteil
dieses Gerätes. Sie enthält wichtige
Hinweise für Sicherheit, Gebrauch
und Entsorgung. Machen Sie sich
vor der Benutzung des Gerätes mit
allen Bedien- und Sicherheitshin-
weisen vertraut. Benutzen Sie das
Gerät nur wie beschrieben und für
die angegebenen Einsatzbereiche.
Bewahren Sie die Betriebsanleitung
gut auf und händigen Sie alle Un-
terlagen bei Weitergabe des Gerä-
tes an Dritte mit aus.
Bestimmungsgemäße
Verwendung
Das Gerät ist zum trockenen Schleifen von
Holz, Metall, Kunststoff, Spachtelmasse so-
Dieses Gerät ist nicht zur gewerblichen
Nutzung geeignet.
Jede andere Verwendung, die in dieser
Anleitung nicht ausdrücklich zugelassen
wird, kann zu Schäden am Gerät führen
und eine ernsthafte Gefahr für den Benut-
zer darstellen.
Das Gerät ist zum Gebrauch durch Er-
wachsene bestimmt. Jugendliche über
-
sicht benutzen. Der Hersteller haftet nicht
für Schäden, die durch bestimmungswid-
rigen Gebrauch oder falsche Bedienung
verursacht wurden.
Original EG-
Konformitätserklärung .............106
Explosionszeichnung ................ 113

DE AT CH
5
16 Spannhebel zur Schleifplattenen-
triegelung
17 Halterahmen für Filtereinlage
18 Filtereinlage für Staubbox
Technische Daten
Handschleifer ......................... PHS 160 E5
Nenneingangsspannung
(U) .............................. 230 V~, 50 Hz
Leistungsaufnahme (P) ...................160 W
Leerlaufdrehzahl (n
0
) ..............13000 min
-1
Schwingzahl (n) ....................26000 min
-1
Gewicht (ohne Zubehör) .......... ca. 1,1 kg
Schutzklasse .....................................
II
Schutzart.........................................IPX0
Schalldruckpegel (L
pA
) .. 76 dB(A); K
pA
=3 dB
Schallleistungspegel
(L
WA
) ..................... 87 dB(A); K
WA
=3 dB
Schwingungswert (a
h
) ...9 m/s
2
;
K=1,5 m/s
2
Der angegebene Schwingungsemissions-
wert ist nach einem genormten Prüfver-
fahren gemessen worden und kann zum
Vergleich eines Elektrowerkzeugs mit
einem anderen verwendet werden. Der an-
gegebene Schwingungsemissionswert kann
auch zu einer einleitenden Einschätzung
der Aussetzung verwendet werden.
Warnung: Der Schwingungsemis-
sionswert kann sich während der
tatsächlichen Benutzung des Elekt-
rowerkzeugs von dem Angabewert
unterscheiden, abhängig von der
Art und Weise, in der das Elektro-
werkzeug verwendet wird.
Versuchen Sie, die Belastung durch
Vibrationen so gering wie möglich
zu halten. Beispielhafte Maßnah-
men zur Verringerung der Vibrati-
onsbelastung sind das Tragen von
Allgemeine
Beschreibung
Die Abbildung der wichtigs-
auf der Ausklappseite.
Lieferumfang
Packen Sie das Gerät aus und kontrollieren
Sie, ob es vollständig ist. Entsorgen Sie
das Verpackungsmaterial ordnungsgemäß.
• Gerät
• Staubbox
• Adapter zur externen Staubabsaugung
• 3 Schleifblätter (zweiteilig)
• Schleifzunge
• 3 Schleifblätter für Schleifzunge
• Betriebsanleitung
Übersicht
1 Ein-/Ausschalter
3 Lüftungsöffnungen
4 Entriegelungstaste Staubbox
5 Netzkabel
6 Staubboxdeckel
7 Lasche zum Öffnen
der Staubbox
8 Staubbox
9 Anschluss zur Staubabsaugung
10 Schleifplatte
11 Adapter zur externen
Staubabsaugung
12 3 Schleifblätter (zweiteilig)
13 Schleifzunge
14 3 Schleifblätter für Schleifzunge
15 Absaugöffnungen Schleifplatte

DE AT CH
6
Symbole in der Anleitung:
Gefahrenzeichen mit Anga-
ben zur Verhütung von Per-
sonen- oder Sachschäden.
Gebotszeichen mit Angaben zur
Verhütung von Schäden.
Schließen Sie das Gerät an die
Netzspannung an.
Netzstecker ziehen.
Hinweiszeichen mit Informationen
zum besseren Umgang mit dem Ge-
rät.
Allgemeine Sicherheitshin-
weise für Elektrowerkzeuge
WARNUNG! Lesen Sie alle
Sicherheitshinweise und An-
weisungen. Versäumnisse bei der
Einhaltung der Sicherheitshinweise
und Anweisungen können elekt-
rischen Schlag, Brand und/oder
schwere Verletzungen verursachen.
Bewahren Sie alle Sicherheitshin-
weise und Anweisungen für die
Zukunft auf.
Der in den Sicherheitshinweisen verwende-
te Begriff ,,Elektrowerkzeug” bezieht sich
auf netzbetriebene Elektrowerkzeuge (mit
Netzkabel) und auf akkubetriebene Elektro-
werkzeuge (ohne Netzkabel).
1) ARBEITSPLATZSICHERHEIT
a) Halten Sie Ihren Arbeitsbereich
sauber und gut beleuchtet. Un-
ordnung oder unbeleuchtete Arbeitsbe-
reiche können zu UnfälIen führen.
Handschuhen beim Gebrauch des
Werkzeugs und die Begrenzung
der Arbeitszeit. Dabei sind alle
Anteile des Betriebszyklus sind zu
berücksichtigen (beispielsweise Zei-
ten, in denen das Elektrowerkzeug
abgeschaltet ist, und solche, in de-
nen es zwar eingeschaltet ist, aber
ohne Belastung läuft).
Sicherheitshinweise
Beim Gebrauch des Gerätes sind die Si-
cherheitshinweise zu beachten.
Symbole und Bildzeichen
Bildzeichen auf dem Gerät:
Achtung!
Gefahr durch elektrischen Schlag!
Ziehen Sie vor Wartungs- und Re-
paraturarbeiten den Netzstecker
aus der Steckdose.
Lesen Sie die Bedienungsanleitung
aufmerksam durch.
Tragen Sie Augen- und Gehör-
schutz.
Tragen Sie einen Atemschutz.
Tragen Sie Schutzhandschuhe.
Schutzklasse II (Doppelisolierung)
Elektrogeräte gehören nicht in den
Hausmüll.

DE AT CH
7
b) Arbeiten Sie mit dem Elektro-
werkzeug nicht in expIosions-
gefährdeter Umgebung, in der
sich brennbare Flüssigkeiten,
Elek-
trowerkzeuge erzeugen Funken, die
den Staub oder die Dämpfe entzünden
können.
c) Halten Sie Kinder und andere
Personen während der Benut-
zung des EIektrowerkzeugs
fern. Bei Ablenkung können Sie die
Kontrolle über das Gerät verlieren.
2) ELEKTRISCHE SICHERHEIT
a) Der Anschlussstecker des Elek-
trowerkzeuges muss in die
Steckdose passen. Der Stecker
darf in keiner Weise verändert
werden. Verwenden Sie keine
Adapterstecker gemeinsam mit
schutzgeerdeten Elektrowerk-
zeugen. Unveränderte Stecker und
passende Steckdosen verringern das
Risiko eines elektrischen Schlages.
b) Vermeiden Sie Körperkontakt
mit geerdeten OberfIächen, wie
von Rohren, Heizungen, Herden
und Kühlschränken. Es besteht
ein erhöhtes Risiko durch elektrischen
Schlag, wenn Ihr Körper geerdet ist.
c) Halten Sie Elektrowerkzeuge
von Regen oder Nässe fern. Das
Eindringen von Wasser in ein Elektro-
gerät erhöht das Risiko eines elektri-
schen Schlages.
d) Zweckentfremden Sie das Kabel
nicht, um das Elektrowerkzeug
zu tragen, aufzuhängen oder
um den Stecker aus der Steck-
dose zu ziehen. Halten Sie das
Kabel fern von Hitze, Öl, schar-
fen Kanten oder sich bewegen-
den Geräteteilen. Beschädigte oder
verwickelte Kabel erhöhen das Risiko
eines elektrischen Schlages.
e) Wenn Sie mit einem Elektro-
werkzeug im Freien arbeiten,
verwenden Sie nur Verlänge-
rungskabel, die auch für den
Außenbereich geeignet sind. Die
Anwendung eines für den Außenbe-
reich geeigneten Verlängerungskabels
verringert das Risiko eines elekrischen
Schlages.
f) Wenn der Betrieb des Elekt-
rowerkzeugs in feuchter Um-
gebung nicht vermeidbar ist,
verwenden Sie einen Fehler-
stromschutzschalter. Der Einsatz
eines Fehlerstromschutzschalters ver-
mindert das Risiko eines elektrischen
Schlages.
3) SICHERHEIT VON PERSONEN
a) Seien Sie aufmerksam, achten
Sie darauf, was Sie tun, und
gehen Sie mit Vernunft an die
Arbeit mit einem Elektrowerk-
zeug. Benutzen Sie kein Elek-
trowerkzeug, wenn Sie müde
von Drogen, Alkohol oder Me-
dikamenten stehen. Ein Moment
der Unachtsamkeit beim Gebrauch des
Elektrowerkzeuges kann zu ernsthaften
Verletzungen führen.
b) Tragen Sie persönliche Schut-
zausrüstung und immer eine
Schutzbrille. Das Tragen persön-
licher Schutzausrüstung, wie Staub-
maske, rutschfeste Sicherheitsschuhe,
Schutzhelm oder Gehörschutz, je nach
Art und Einsatz des Elektrowerkzeuges,
verringert das Risiko von Verletzungen.

DE AT CH
8
4) VERWENDUNG UND BEHAND-
LUNG DES ELEKTROWERKZEUGES
a) Überlasten Sie das Gerät nicht.
Verwenden Sie für Ihre Arbeit
das dafür bestimmte Elektro-
werkzeug. Mit dem passenden Elek-
trowerkzeug arbeiten Sie besser und
sicherer im angegebenen Leistungsbe-
reich.
b) Benutzen Sie kein Elektrowerk-
zeug, dessen Schalter defekt ist.
Ein Elektrowerkzeug, das sich nicht
mehr ein- oder ausschalten Iässt, ist
gefährlich und muss repariert werden.
c) Ziehen Sie den Stecker aus der
Steckdose und/oder entfernen
Sie den Akku, bevor Sie Ge-
räteeinsteIlungen vornehmen,
Zubehörteile wechseln oder das
Gerät weglegen. Diese Vorsichts-
maßnahme verhindert den unbeabsich-
tigten Start des Elektrowerkzeuges.
d) Bewahren Sie unbenutzte Elek-
trowerkzeuge außerhalb der
Reichweite von Kindern auf.
Lassen Sie Personen das Gerät
nicht benutzen, die mit diesem
nicht vertraut sind oder diese
Anweisungen nicht gelesen
haben. Elektrowerkzeuge sind ge-
fährlich, wenn sie von unerfahrenen
Personen benutzt werden.
mit Sorgfalt. Kontrollieren Sie,
ob bewegliche Teile einwandfrei
funktionieren und nicht klem-
men, ob Teile gebrochen oder
so beschädigt sind, dass die
Funktion des Elektrowerkzeuges
beeinträchtigt ist. Lassen Sie be-
schädigte Teile vor dem Einsatz
des Gerätes reparieren. Viele
c) Vermeiden Sie eine unbeab-
sichtigte lnbetriebnahme. Ver-
gewissern Sie sich, dass das
Elektrowerkzeug ausgeschaltet
ist, bevor Sie es an die Strom-
versorgung und/oder den Akku
anschließen, es aufnehmen
oder tragen. Wenn Sie beim Tragen
des Elektrowerkzeuges den Finger
am Schalter haben oder das Gerät
eingeschaltet an die Stromversorgung
anschließen, kann dies zu Unfällen füh-
ren.
d) Entfernen Sie Einstellwerkzeu-
ge oder Schraubenschlüssel,
bevor Sie das Elektrowerkzeug
einschalten. Ein Werkzeug oder
Schlüssel, der sich in einem drehenden
-
gen führen.
e) Vermeiden Sie eine abnormale
Körperhaltung. Sorgen Sie für
einen sicheren Stand und halten
Sie jederzeit das Gleichgewicht.
Dadurch können Sie das Elektrowerk-
zeug in unerwarteten Situationen bes-
ser kontrollieren.
f) Tragen Sie geeignete Kleidung.
Tragen Sie keine weite Kleidung
oder Schmuck. Halten Sie Haa-
re, Kleidung und Handschuhe
fern von sich bewegenden Tei-
len. Lockere Kleidung, Schmuck oder
lange Haare können von sich bewe-
genden Teilen erfasst werden.
g) Wenn Staubabsaug- und -auf-
fangeinrichtungen montiert
werden können, vergewissern
Sie sich, dass diese angeschlos-
sen sind und richtig verwendet
werden. Verwendung einer Staub-
absaugung kann Gefährdungen durch
Staub verringern.

DE AT CH
9
Unfälle haben ihre Ursache in schlecht
gewarteten Elektrowerkzeugen.
f) Halten Sie Schneidwerkzeuge
scharf und sauber. SorgfäItig ge-
Schneidkanten verklemmen sich weni-
ger und sind Ieichter zu führen.
g) Verwenden Sie Elektrowerk-
zeug, Zubehör, Einsatzwerkzeu-
ge usw. entsprechend diesen
Anweisungen. Berücksichtigen
Sie dabei die Arbeitsbedin-
gungen und die auszuführen-
de Tätigkeit. Der Gebrauch von
Elektrowerkzeugen für andere als die
vorgesehenen Anwendungen kann zu
gefährlichen Situationen führen.
h) Halten Sie das Gerät an den
Arbeiten ausführen, bei denen
das Einsatzwerkzeug verbor-
gene Stromleitungen oder das
eigene Netzkabel treffen kann.
Der Kontakt mit einer spannungsfüh-
renden Leitung kann auch metallene
Geräteteile unter Spannung setzen und
zu einem elektrischen Schlag führen.
5) SERVICE
a) Lassen Sie lhr Elektrowerkzeug
-
sonal und nur mit Original-Er-
satzteilen reparieren. Damit wird
sichergestellt, dass die Sicherheit des
Gerätes erhalten bleibt.
Weiterführende Sicherheits-
hinweise
Warnung! Beim Schleifen
können gesundheitsschädli-
von Materialien wie bleihal-
tigen Farben, asbesthaltigem
Material, Metallen oder eini-
gen Holzarten), die für die Be-
dienperson oder in der Nähe
Gefährdung darstellen kön-
nen. Sorgen Sie für eine gute
Belüftung des Arbeitsplatzes.
Tragen Sie stets eine Schutz-
brille, Sicherheitshandschuhe
und einen Atemschutz.
• Sichern Sie das Werkstück. Ein
mit Spannvorrichtungen oder Schraub-
stock festgehaltenes Werkstück ist
sicherer gehalten als mit Ihrer Hand.
• Verwenden Sie das Elektro-
werkzeug nur für den Tro-
ckenschliff. Schaben Sie keine
angefeuchteten Materialien. Das
Eindringen von Wasser in ein Elektro-
gerät erhöht das Risiko eines elektri-
schen Schlages.
• Vermeiden Sie eine Überhitzung
des Schleifgutes und des Schlei-
fers. Es besteht Brandgefahr.
• Das Werkstück wird beim
Schleifen heiß. Nicht an der
bearbeiteten Stelle anfassen,
lassen Sie es abkühlen. Es besteht
Verbrennungsgefahr. Verwenden Sie
kein Kühlmittel oder ähnliches.
• Entleeren Sie vor Arbeitspau-
sen stets den Staubbehälter.
Papiersack (oder im Filtersack bzw. Fil-
ter des Staubsaugers) kann sich unter
ungünstigen Bedingungen, wie Fun-
selbst entzünden. Besondere Gefahr
besteht, wenn der Schleifstaub mit
Lack-, Polyurethanresten oder anderen

DE AT CH
10
Warnung! Dieses Elektrowerkzeug
erzeugt während des Betriebs ein
elektromagnetisches Feld. Dieses
Feld kann unter bestimmten Umstän-
den aktive oder passive medizini-
sche Implantate beeinträchtigen.
Um die Gefahr von ernsthaften
oder tödlichen Verletzungen zu
verringern, empfehlen wir Personen
mit medizinischen Implantaten ihren
Arzt und den Hersteller des medizi-
nischen Implantats zu konsultieren,
bevor die Maschine bedient wird.
Montage
Ziehen Sie vor allen Arbeiten an
dem Gerät den Netzstecker.
Gefahr durch elektrischen Schlag!
Schleifblatt anbringen/
entfernen
Säubern Sie die Schleifplatte, bevor
Sie ein Schleifblatt aufsetzen.
Verwenden Sie nur in der Größe
passende Schleifblätter. Schleif-
blätter, die über die Schleifplatte
hinausragen, können Verletzungen
verursachen sowie zum Blockieren
oder Zerreißen der Schleifblätter
führen.
Die Schleifplatte (10) ist mit einem Klettge-
webe ausgestattet zum schnellen Anbrin-
gen des Schleifblattes (12).
Die Schleifblätter (12) bestehen aus 2 Tei-
len und können je nach Verschleißzustand
einzeln gewechselt werden.
Um ein optimales Schleifergebnis zu erhal-
ten, verwenden Sie nur Schleifblätter mit
gleicher Körnung.
chemischen Stoffen vermischt ist und
das Schleifgut nach langem Arbeiten
heiß ist.
Beachten Sie auch die Betriebsanlei-
tung Ihres Staubsaugers, ob dieser
für das Aufsaugen von Schleifspänen
geeignet ist.
• Schließen Sie das Gerät an eine Steck-
dose mit Fehlerstrom-Schutzeinrichtung
(FI-Schalter) mit einem Bemessungsfeh-
lerstrom von nicht mehr als 30 mA an.
• Wenn die Anschlussleitung des
Elektrowerkzeuges beschädigt
ist, muss sie durch eine speziell
vorgerichtete Anschlussleitung
ersetzt werden, die über die
Kundendienstorganisation er-
hältlich ist.
Restrisiken
Auch wenn Sie dieses Elektrowerkzeug
vorschriftsmäßig bedienen, bleiben immer
Restrisiken bestehen. Folgende Gefahren
können im Zusammenhang mit der Bau-
weise und Ausführung dieses Elektrowerk-
zeugs auftreten:
a) Lungenschäden, falls kein geeigneter
Atemschutz getragen wird.
b) Schnittverletzungen.
c) Gehörschäden, falls kein geeigneter
Gehörschutz getragen wird.
d) Augenschäden, falls kein geeigneter
Augenschutz getragen wird.
e) Gesundheitsschäden, die aus Hand-
Arm-Schwingungen resultieren, falls
das Gerät über einen längeren
Zeitraum verwendet wird oder nicht
ordnungsgemäß geführt und gewartet
wird.

DE AT CH
11
Schleifblatt anbringen:
1. Drücken Sie beide Teile des
Schleifblattes (12) gleichmäßig
auf die Schleifplatte (10) auf.
Achten Sie darauf, dass die
und die Löcher deckungsgleich
mit den Absaugöffnungen (15)
der Schleifplatte (10) sind.
Schleifblatt entfernen:
2. Ziehen Sie das Schleifblatt (12)
von der Schleifplatte (10) ab.
Schleifen Sie nur, wenn beide
Schleifblätter montiert sind.
Schleifzunge montieren
Sie können die vormontierte Schleifplatte
(10) gegen die im Lieferumfang enthaltene
Schleifzunge (13) austauschen.
Schleifplatte demontieren:
1. Öffnen Sie den Spannhebel (16)
und drehen Sie ihn bis zum An-
schlag in Richtung Schleifblatt.
2. Nehmen Sie den vorderen Teil
der Schleifplatte (10) ab.
Schleifzunge einsetzen:
3. Führen Sie die Schleifzunge (13)
von oben gegen den hinteren
Teil der Schleifplatte (10) und
drücken Sie sie fest an.
4. Zum Verriegeln drehen Sie den
Spannhebel (16) in die ursprüng-
liche Position zurück.
Schleifblatt für Schleifzunge
aufsetzen:
5. Drücken Sie das Schleifblatt für
die Schleifzunge (14) gleichmä-
ßig auf die Schleifzunge (13) auf.
6. Setzen Sie auf den hinteren Teil
der Schleifplatte (10) ein Schleif-
blatt auf. So vermeiden Sie Ver-
schmutzungen des Klettgewebes.
Staubbox anschließen/
abnehmen/leeren
Staubbox anschließen:
1. Vergewissern Sie sich vor dem
Anschließen, dass die Staubbox
(8) fest verschlossen ist.
2. Drücken Sie die Entriegelungs-
taste (4) an der Staubbox (8).
Schieben Sie die Staubbox (8)
bis zum Anschlag auf den An-
schluss zur Staubabsaugung (9)
auf. Die beiden Nasen (9a) am
Anschluss zur Staubabsaugung
(9) passen in die beiden Nuten
(8a) an der Staubbox (8).
3. Lassen Sie die Entriegelungstaste
(4) los. Sie rastet über der Fixie-
rung der Staubbox (8) ein.
Staubbox abnehmen:
4. Drücken Sie die Entriegelungstas-
te (4) und ziehen Sie die Staub-
box (8) ab.
Staubbox leeren:
5. Ziehen Sie an der Lasche (7) und
nehmen Sie den Staubboxdeckel
(6) ab.
6. Zum Leeren klopfen Sie die
Staubbox (8) aus.
7. Verschließen Sie die Staubbox
(8) wieder.
Leeren Sie die Staubbox rechtzeitig,
um eine optimale Absaugleistung
zu gewährleisten.

DE AT CH
12
1. Zum Einschalten kippen Sie den
Ein-/Ausschalter (1) in Position
„I“, das Gerät läuft an.
2. Zum Ausschalten kippen Sie den
Ein-/Ausschalter (1) in Position
„0“, das Gerät schaltet ab.
Arbeitshinweise
Tragen Sie beim Arbeiten
mit dem Gerät geeignete
Kleidung und angemessene
Schutzausrüstung.
Vergewissern Sie sich vor je-
der Benutzung, dass das Ge-
rät funktionstüchtig ist.
Persönliche Schutzausrüstung
und ein funktionstüchtiges Ge-
rät vermindern das Risiko von
Verletzungen und Unfällen.
Benutzen Sie das Gerät nicht ohne
Staubbox oder externe Staubabsau-
gung. Die Verwendung einer Staub-
absaugung kann Gefährdungen
durch Staub verringern.
Bei Verwendung von Schleifblättern
ohne Lochung ist eine Staubabsau-
gung nicht möglich. Sorgen Sie für
eine gute Belüftung des Arbeitsplat-
zes.
Ziehen Sie vor allen Arbeiten an
dem Gerät den Netzstecker.
Gefahr durch elektrischen Schlag!
Schleifen
• Führen Sie das Gerät eingeschaltet an
das Werkstück.
• Heben Sie die Schleifplatte nach der
Bearbeitung ab, bevor Sie das Gerät
ausschalten.
Externe Staubabsaugung
anschließen/abnehmen
Externe Staubabsaugung
anschließen:
1. Schieben Sie den Adapter zur
externen Staubabsaugung (11)
bis zum Anschlag in den An-
schluss zur Staubabsaugung (9)
ein.
2. Schließen Sie den Saugschlauch
eines Staubsaugers (nicht im
Lieferumfang enthalten) an den
Adapter zur externen Staubab-
saugung (11) an.
Externe Staubabsaugung
abnehmen:
1. Ziehen Sie den Saugschlauch
vom Adapter zur externen Staub-
absaugung (11) ab.
2. Ziehen Sie den Adapter zur ex-
ternen Staubabsaugung (11) ab.
Sie können den Saugschlauch eines
Staubsaugers gegebenenfalls direkt
und ohne Adapter an das Gerät
anschließen.
Bedienung
Ein- und Ausschalten
Achten Sie darauf, dass die Span-
nung des Netzanschlusses mit
dem Typenschild am Gerät über-
einstimmt.
Schließen Sie das Gerät an die
Netzspannung an.

DE AT CH
13
• Führen Sie das Netzkabel immer nach
hinten vom Gerät weg.
• Säubern Sie die Schleifplatte, bevor
Sie ein Schleifblatt aufsetzen.
• Arbeiten Sie nur mit einwandfreien
Schleifblättern, um gute Schleifergeb-
nisse zu erhalten.
• Arbeiten Sie mit geringem und gleich-
mäßigem Anpressdruck und gleichmä-
ßigem Vorschub. So schonen Sie Gerät
und Schleifblatt.
• Schleifen Sie Ecken und Kanten mit
der Spitze oder seitlichen Kante des
Schleifblattes.
Ist die vordere Spitze des dreieckigen
Schleifblattes abgenutzt, kann das
Schleifblatt abgenommen und gedreht
wieder aufgesetzt werden.
• Schleifen Sie mit dem selben Schleif-
blatt nicht unterschiedliche Materialien
• Entleeren Sie die Staubbox oder den
Staubsauger rechtzeitig, um eine opti-
male Absaugleistung zu gewährleisten.
Wahl des Schleifblattes
Körnung Anwendung
zum Vorschleifen von rohen
zum Planschleifen
zum Feinschleifen von grun-
dierten und lackierten Flächen
Wahl der Schleifplatte
Vormontierte Schleifplatte:
• Zum Schleifen von großen Flächen und
Bearbeitung von Ecken, Kanten und
Außenrundungen.
Schleifzunge:
• Zum Bearbeiten von schmalen Schlit-
zen und engen Zwischenräumen.
Reinigung und Wartung
Ziehen Sie vor jeglicher Einstellung,
Instandhaltung oder Instandsetzung
den Netzstecker.
Lassen Sie Instandsetzungsarbeiten
und Wartungsarbeiten, die nicht
in dieser Anleitung beschrieben
sind, von unserem Service-Center
durchführen. Verwenden Sie nur
Originalteile.
Führen Sie folgende Reinigungs- und War-
tungsarbeiten regelmäßig durch. Dadurch
ist eine lange und zuverlässige Nutzung
gewährleistet.
Reinigung
Das Gerät darf weder mit
Wasser abgespritzt werden,
noch in Wasser gelegt wer-
den. Es besteht die Gefahr
eines Stromschlages.
• Halten Sie Lüftungsschlitze, Motorge-
häuse und Griffe des Gerätes sauber.
Verwenden Sie dazu ein feuchtes Tuch
oder eine Bürste.
Verwenden Sie keine Reinigungs- bzw.
Lösungsmittel. Sie könnten das Gerät
damit irreparabel beschädigen.
• Reinigen Sie das Schleifblatt mit einem
Staubsauger oder klopfen Sie es aus.

DE AT CH
14
Filtereinlage der Staubbox
reinigen/wechseln
Prüfen Sie die Filtereinlage ein- bis zwei-
mal jährlich auf Verschmutzung.
Filtereinlage entnehmen:
1. Drücken Sie die Entriegelungs-
taste ( 4) und ziehen Sie
die Staubbox ( 8) ab (siehe
„Staubbox anschließen/abneh-
men/leeren“).
2. Ziehen Sie an der Lasche (7) und
nehmen Sie den Staubboxdeckel
(6) ab.
3. Ziehen Sie den Halterahmen
(17) am Staubboxdeckel (6) ab
und nehmen Sie die Filtereinlage
(18) heraus.
4. Waschen Sie die Filtereinlage
(18) mit lauwarmem Wasser
und Seife aus und lassen Sie sie
trocknen.
Tauschen Sie eine stark ver-
schmutzte oder beschädigte
Filtereinlage aus (siehe „Ersatz-
teile/Zubehör“).
Filtereinlage einsetzen:
5. Setzen Sie die Filtereinlage (18)
und den Halterahmen (17) in
den Staubboxdeckel (6).
6. Verschließen Sie die Staubbox
( 8).
Lagerung
• Bewahren Sie Gerät und Werkzeug an
einem trockenen und staubgeschützten
Ort auf, außerhalb der Reichweite von
Kindern.
• Entleeren Sie die Staubbox vor der
Aufbewahrung des Geräts (siehe
„Staubbox anschließen/abnehmen/
leeren“).
Entsorgung/
Umweltschutz
Führen Sie Gerät, Zubehör und Verpa-
ckung einer umweltgerechten Wiederver-
wertung zu.
Elektrische Geräte gehören nicht in
den Hausmüll.
• Geben Sie das Gerät an einer Verwer-
tungsstelle ab. Die verwendeten Kunst-
stoff- und Metallteile können sortenrein
getrennt werden und so einer Wieder-
verwertung zugeführt werden. Fragen
Sie hierzu unser Service-Center.
• Die Entsorgung Ihrer defekten einge-
sendeten Geräte führen wir kostenlos
durch.

DE AT CH
15
Ersatzteile/Zubehör
Ersatzteile und Zubehör erhalten Sie unter
www.grizzly-service.eu
Sollten Sie kein Internet haben, so wenden Sie sich bitte telefonisch an das Service-
Center (siehe „Service-Center“ Seite 18). Halten Sie die unten genannten Bestellnummern
bereit.
Position Bezeichnung Bestell-Nr.
Betriebs-
anleitung
10 Schleifplatte, vormontiert 91104224
13 Schleifzunge, vormontiert 91104225
11 Adapter zur externen Staubabsaugung 91104222
8 Staubbox 91104221
18 Filtereinlage für Staubbox 91104223
12 6 Schleifblätter für Holz (P 40*), für Schleifplatte 30211092
6 Schleifblätter für Holz (P 80*), für Schleifplatte 30211093
6 Schleifblätter für Holz (P 120*), für Schleifplatte 30211094
10 Schleifblätter für Holz (P 120*), für Schleifplatte 30211090
6 Schleifblätter für Holz (P 180*), für Schleifplatte 30211095
6 Schleifblätter für Holz (P 240*), für Schleifplatte 30211096
Set, 5 Schleifblätter für Holz, für Schleifplatte 30211088
(2x P 60*, 2x P 120*, 1x P 240*)
Set, 30 Schleifblätter für Holz, für Schleifplatte 30211089
(12x P 60*, 12x P 120*, 6x P 240*)
Set, 18 Schleifblätter für Holz, für Schleifplatte 30211091
(6x P 60*, 6x P 120*, 6x P 240*)
Set, 30 Schleifblätter für Schleifplatte 30211097
24x für Holz: 6x P 60*, 6x P 120*,6x P 180*, 6x P 240*
3x für Stein: 1x P 80*, 1x 180*, 1x P 400*
3x für Lack: 1x P 60*, 1x P 120*, 1x P 240*)
14 6 Schleifblätter für Schleifzunge (P 80*) 30211085
6 Schleifblätter für Schleifzunge (P 120*) 30211086
6 Schleifblätter für Schleifzunge (P 180*) 30211087
*P = Körnung

DE AT CH
16
Fehlersuche
Problem Mögliche Ursache Fehlerbehebung
Gerät startet nicht
Netzspannung fehlt
Haussicherung spricht an
Steckdose, Netzkabel, Leitung,
Netzstecker prüfen, ggf. Reparatur
durch Elektrofachmann,
Haussicherung prüfen.
Ein-/Ausschalter (
1)
defekt
Reparatur durch Service-Center
Motor defekt
Gerät arbeitet mit
Unterbrechungen
Interner Wackelkontakt
Reparatur durch Service-Center
Ein-/Ausschalter (
1)
defekt
Motor wird lang-
samer und bleibt
stehen
Gerät wird durch Werk-
stück überlastet
Druck auf Schleifwerkzeug
verringern
Werkstück ungeeignet
Schlechte
Schleifblatt für das zu
bearbeitende Werkstück
ungeeignet
Geeignetes Schleifblatt einsetzen
(siehe „Montage“)
Schleifblatt abgenutzt
Neues Schleifblatt einsetzen (siehe
„Montage“)
Schleifblatt nutzt
schnell ab
Schleifblatt für das zu
bearbeitende Werkstück
ungeeignet
Geeignetes Schleifblatt einsetzen
(siehe „Montage“)
Zu viel Druck angewandt Druck verringern

DE AT CH
17
Garantie
Sehr geehrte Kundin, sehr geehrter Kunde,
Sie erhalten auf dieses Gerät 3 Jahre Ga-
rantie ab Kaufdatum.
Im Falle von Mängeln dieses Produkts
stehen Ihnen gegen den Verkäufer des
Produkts gesetzliche Rechte zu. Diese
gesetzlichen Rechte werden durch unsere
im Folgenden dargestellte Garantie nicht
eingeschränkt.
Garantiebedingungen
Die Garantiefrist beginnt mit dem Kauf-
datum. Bitte bewahren Sie den Original-
Kassenbon gut auf. Diese Unterlage wird
als Nachweis für den Kauf benötigt.
Tritt innerhalb von drei Jahren ab dem
Kaufdatum dieses Produkts ein Material-
oder Fabrikationsfehler auf, wird das Pro-
dukt von uns – nach unserer Wahl – für Sie
kostenlos repariert oder ersetzt. Diese Ga-
rantieleistung setzt voraus, dass innerhalb
der Drei-Jahres-Frist das defekte Gerät und
der Kaufbeleg (Kassenbon) vorgelegt und
schriftlich kurz beschrieben wird, worin der
Mangel besteht und wann er aufgetreten
ist.
Wenn der Defekt von unserer Garantie ge-
deckt ist, erhalten Sie das reparierte oder
ein neues Produkt zurück. Mit Reparatur
oder Austausch des Produkts beginnt kein
neuer Garantiezeitraum.
Garantiezeit und gesetzliche
Mängelansprüche
Die Garantiezeit wird durch die Gewähr-
leistung nicht verlängert. Dies gilt auch
für ersetzte und reparierte Teile. Eventuell
schon beim Kauf vorhandene Schäden und
Mängel müssen sofort nach dem Auspa-
cken gemeldet werden. Nach Ablauf der
Garantiezeit anfallende Reparaturen sind
Garantieumfang
Das Gerät wurde nach strengen Qualitäts-
richtlinien sorgfältig produziert und vor
Anlieferung gewissenhaft geprüft.
Die Garantieleistung gilt für Material- oder
Fabrikationsfehler. Diese Garantie erstreckt
sich nicht auf Produktteile, die normaler
Abnutzung ausgesetzt sind und daher als
Verschleißteile angesehen werden können
Beschädigungen an zerbrechlichen Teilen
Diese Garantie verfällt, wenn das Produkt
beschädigt, nicht sachgemäß benutzt oder
nicht gewartet wurde. Für eine sachge-
mäße Benutzung des Produkts sind alle in
der Betriebsanleitung aufgeführten Anwei-
sungen genau einzuhalten. Verwendungs-
zwecke und Handlungen, von denen in
der Betriebsanleitung abgeraten oder vor
denen gewarnt wird, sind unbedingt zu
vermeiden.
Das Produkt ist lediglich für den privaten
und nicht für den gewerblichen Gebrauch
bestimmt. Bei missbräuchlicher und unsach-
gemäßer Behandlung, Gewaltanwendung
und bei Eingriffen, die nicht von unserer
autorisierten Service-Niederlassung vorge-
nommen wurden, erlischt die Garantie.
Abwicklung im Garantiefall
Um eine schnelle Bearbeitung Ihres Anlie-
gens zu gewährleisten, folgen Sie bitte den
folgenden Hinweisen:
• Bitte halten Sie für alle Anfragen den
-
den Kauf bereit.
• Die Artikelnummer entnehmen Sie bitte
dem Typenschild.
• Sollten Funktionsfehler oder sonstige
Mängel auftreten kontaktieren Sie
zunächst die nachfolgend benannte

DE AT CH
18
Serviceabteilung telefonisch oder per
E-Mail. Sie erhalten dann weitere In-
formationen über die Abwicklung Ihrer
Reklamation.
• Ein als defekt erfasstes Produkt können
Sie, nach Rücksprache mit unserem
Kundenservice, unter Beifügung des
Kaufbelegs (Kassenbons) und der
Angabe, worin der Mangel besteht
und wann er aufgetreten ist, für Sie
portofrei an die Ihnen mitgeteilte
Service-Anschrift übersenden. Um An-
nahmeprobleme und Zusatzkosten zu
vermeiden, benutzen Sie unbedingt nur
die Adresse, die Ihnen mitgeteilt wird.
Stellen Sie sicher, dass der Versand
nicht unfrei, per Sperrgut, Express oder
sonstiger Sonderfracht erfolgt. Senden
Sie das Gerät bitte inkl. aller beim
Kauf mitgelieferten Zubehörteile ein
und sorgen Sie für eine ausreichend
sichere Transportverpackung.
Reparatur-Service
Sie können Reparaturen, die nicht der Ga-
rantie unterliegen, gegen Berechnung von
unserer Service-Niederlassung durchführen
lassen. Sie erstellt Ihnen gerne einen Kos-
tenvoranschlag.
Wir können nur Geräte bearbeiten, die
ausreichend verpackt und frankiert einge-
sandt wurden.
Achtung: Bitte senden Sie Ihr Gerät gerei-
nigt und mit Hinweis auf den Defekt an
unsere Service-Niederlassung.
Nicht angenommen werden unfrei - per
Sperrgut, Express oder mit sonstiger Son-
derfracht - eingeschickte Geräte.
Die Entsorgung Ihrer defekten eingesende-
ten Geräte führen wir kostenlos durch.
Service-Center
DE
Service Deutschland
Tel.: 0800 54 35 111
E-Mail: [email protected]
IAN 303400
AT
Service Österreich
Tel.: 0820 201 222
(0,15 EUR/Min.)
E-Mail: [email protected]
IAN 303400
CH
Service Schweiz
Tel.: 0842 665566
(0,08 CHF/Min.,
Mobilfunk max. 0,40 CHF/Min.)
E-Mail: [email protected]
IAN 303400
Importeur
Bitte beachten Sie, dass die folgende
Anschrift keine Service-Anschrift ist. Kon-
taktieren Sie zunächst das oben genannte
Service-Center.
Grizzly Tools GmbH & Co. KG
Stockstädter Straße 20
DE-63762 Großostheim
www.grizzly-service.eu

GB IE
19
Content
Introduction ...............................19
Intended Use ..............................19
General Description ....................20
Scope of delivery ............................ 20
Overview ....................................... 20
Technical Data ............................20
Notes on Safety .........................21
Symbols ......................................... 21
General safety instructions for
power tools .................................... 21
Additional safety instructions ............ 23
Residual risks .................................. 24
Assembling instructions ..............24
Attaching/removing sanding sheet .... 24
.................. 25
Connecting/removing/emptying
the dust collection box ..................... 25
How to connect/remove external
dust extraction ................................ 26
Operation ..................................26
Switching on/off ............................. 26
Practical tips ..............................26
Sanding ......................................... 27
Selection of sanding sheet ................ 27
Choosing the right sanding plate ...... 27
Cleaning/Maintenance ...............27
Cleaning ........................................ 28
of the dust collection box ................ 28
Storage ......................................28
Waste Disposal/Environmental
Protection ..................................28
Spare Parts/Accessories ............. 29
Trouble Shooting ........................ 30
Guarantee .................................31
Repair Service ............................32
Service-Center ............................32
Importer .................................... 32
Introduction
Congratulations on the purchase of your
new device. With it, you have chosen a
high quality product. During production,
this equipment has been checked for qual-
functionality of your equipment is therefore
guaranteed.
The operating instructions constitute
part of this product. They contain
important information on safety, use
and disposal.
Before using the product, familiarise
yourself with all of the operating
and safety instructions. Use the
product only as described and for
manual safely and in the event that
the product is passed on, hand over
all documents to the third party.
Intended Use
This device is designed for dry sanding of
surfaces.
The device is not suitable for commercial
use.
Any other use that is not explicitly ap-
proved in these instructions may result in
damage to the equipment and represent a
serious danger to the user.
The equipment is designed for use by
adults. Adolescents over the age of 16
may use the device only under supervision.
The manufacturer is not liable for damages
operation.
Translation of the original EC
declaration of conformity .......... 107
Exploded Drawing .................... 113

GB IE
20
General Description
The illustration of the principal
functioning parts can be found
on the foldout page.
Scope of delivery
Carefully unpack the trimmer and check
that it is complete. Dispose of the packag-
ing material correctly.
• Device
• Dust box
• External dust extraction adaptor
• 3 sanding sheets (two-part)
• Instruction manual
Overview
1 On/off switch
2 Hand rest
3 Vent
4 Release button dust collection box
5 Mains cable
6 Dust collection box lid
7 Tab for opening the
dust collection box
8 Dust collection box
9 Connection for dust extraction
10 Sanding plate
11 External dust extraction adaptor
12 3 sanding sheets (two-part)
14 3 sanding sheets for sanding
15 Extraction holes for sandig plate
16 Clamping lever for unlocking
sanding plate
18 Filter insert for dust collection box
Technical Data
Detail sander .......................... PHS 160 E5
Rated input voltage (U) ..... 230 V~, 50 Hz
Power input (P) ............................ 160 W
Idling speed (n
0
) ....................13000 min
-1
Oscillation rate (n) .................26000 min
-1
Weight (without accessories) ... appr. 1.1 kg
Protection class ................................. II
Protection category...........................IPX0
Sound pressure level
(L
pA
) ...................... 76 dB(A); K
pA
= 3 dB
Sound power level
(L
WA
) ....................87 dB(A); K
WA
= 3 dB
Vibration (a
h
) ........... 9 m/s
2
;
K= 1.5 m/s
2
The stated vibration emission value was
measured in accordance with a standard
testing procedure and may be used to com-
pare one power tool to another.
The stated vibration emission value may
also be used for a preliminary exposure
assessment.
Warning: The vibration emission
value may differ during actual use
of the power tool from the stated
value depending on the manner in
which the power tool is used.
Try to keep the exposure to vibra-
tions as low as possible. Examples
of measures to reduce vibration
exposure are the wearing of gloves
when using the tool and limiting the
working hours. For this purpose all
parts of the operating cycle have to
be considered (for example, times
when the electric tool is switched
off and times when it is switched on
but running without any load).

GB IE
21
Notes on Safety
This section details the basic safety instruc-
tions for working with the appliance.
Symbols
Symbols on the Equipment
Warning!
Warning! Electric shock hazard.
Always unplug the device before
working on it.
Read through the instruction manual
carefully.
Wear ear and eye protection
Wear breathing protection
Wear safety gloves
Protection class II
(Double insulation)
Electrical appliances must not be
disposed of with the domestic waste.
Symbols in the manual
Warning symbols with in-
formation on damage and
injury prevention.
Instruction symbols with information
on preventing damage.
Connect the machine to the power
supply.
Pull the mains plug.
Help symbols with information on
improving tool handling.
General safety instructions
for power tools
WARNING! Read all safety
directions and instructions.
Omissions in the compliance with
safety directions and instructions
and/or severe injuries.
Retain all safety directions and in-
structions for future use.
The term „power tool“ in the warnings
refers to your mains-operated (corded)
power tool or battery-operated (cordless)
power tool.
1) WORK AREA SAFETY
• Keep work area clean and well
lit. Cluttered or dark areas invite ac-
cidents.
• Do not operate power tools in
explosive atmospheres, such as
Iiquids, gases or dust. Power tools
create sparks which may ignite the
dust or fumes.
• Keep children and bystanders
away while operating a power
tool. Distractions can cause you to
lose control.
2) ELECTRICAL SAFETY
• Power tool plugs must match
the outlet. Never modify the
plug in any way. Do not use
any adapter plugs with earthed
(grounded) power tools. Unmodi-

GB IE
22
reduce risk of electric shock.
• Avoid body contact with
earthed or grounded surfaces,
such as pipes, radiators, ranges
and refrigerators. There is an
increased risk of electric shock if your
body is earthed or grounded.
• Do not expose power tools to
rain or wet conditions. Water
entering a power tool will increase the
risk of electric shock.
• Do not abuse the cord. Never
use the cord for carrying, pulling
or unplugging the power tool.
Keep cord away from heat, oil,
sharp edges or moving parts.
Damaged or entangled cords increase
the risk of electric shock.
• When operating a power tool
outdoors, use an extension cord
suitable for outdoor use. Use of a
cord suitable for outdoor use reduces
the risk of electric shock.
• If operating a power tool in a
damp location is unavoidable,
use a residual current device
(RCD) protected supply. Use of an
RCD reduces the risk of electric shock.
3) PERSONAL SAFETY
• Stay alert, watch what you are
doing and use common sense
when operating a power tool.
Do not use a power tool while
-
ence of drugs, alcohol or medi-
cation. A moment of inattention white
operating power tools may result in
serious personal injury.
• Use personal protective equip-
ment. Always wear eye protec-
tion. Protective equipment such as
dust mask, non-skid safety shoes, hard
hat, or hearing protection used for
appropriate conditions will reduce per-
sonal injuries.
• Prevent unintentional starting.
Ensure the switch is in the off-
position before connecting to
power source and/or battery
pack, picking up or carrying
the tool. Carrying power tools with
power tools that have the switch on
invites accidents.
• Remove any adjusting key or
wrench before turning the pow-
er tool on. A wrench or a key left at-
tached to a rotating part of the power
tool may result in personal injury.
• Do not overreach. Keep proper
footing and balance at all times.
This enables better control of the pow-
er tool in unexpected situations.
• Dress properly. Do not wear
loose clothing or jewellery. Keep
your hair, clothing and gloves away
from moving parts. Loose clothes, jew-
ellery or long hair can be caught in
moving parts.
• If devices are provided for the
connection of dust extraction
and collection facilities, ensure
these are connected and prop-
erly used. Use of dust collection can
reduce dust-related hazards.
4) POWER TOOL USE AND CARE
• Do not force the power tool. Use
the correct power tool for your
application. The correct power tool
will do the job better and safer at the
rate for which it was designed.

GB IE
23
• Do not use the power tool if the
switch does not turn it on and
off. Any power tool that cannot be
controlled with the switch is dangerous
and must be repaired.
• Disconnect the plug from the
power source and/or the bat-
tery pack from the power tool
before making any adjust-
ments, changing accessories, or
storing power tools. Such preven-
tive safety measures reduce the risk of
starting the power tool accidentaIly.
• Store idle power tools out of the
reach of children and do not al-
low persons unfamiliar with the
power tool or these instructions
to operate the power tool. Power
tools are dangerous in the hands of
untrained users.
• Maintain power tools. Check
for misalignment or binding
of moving parts, breakage of
parts and any other condition
that may affect the power tool’s
operation. If damaged, have the
power tool repaired before use. Many
accidents are caused by poorly main-
tained power tools.
• Keep cutting tools sharp and
clean. Properly maintained cutting
tools with sharp cutting edges are less
Iikely to bind and are easier to control.
• Use the power tool, accessories
and tool bits etc. in accordance
with these instructions, taking
into account the working condi-
tions and the work to be per-
formed. Use of the power tool for op-
erations different from those intended
could result in a hazardous situation.
• Hold the device by the insu-
lated gripping surfaces when
performing work in which the
cutting tool may come into con-
tact with hidden wiring or its
own cord. Contact with a live wire
can also cause a charge in metal parts
of the device and result in an electric
shock.
5) SERVICE
• Have your power tool serviced
-
ing only identical replacement
parts. This will ensure that the safety
of the power tool is maintained.
Additional safety instructions
Warning! Sanding can result
in the formation of haz-
ardous dusts (e.g. arising
from materials with paints
containing lead, materials
containing asbestos, metals
or some wood types) which
can present a hazard to the
operator or persons in the
vicinity. Make sure that the
workplace is well ventilated.
Always wear safety goggles,
safety gloves and respiratory
protection.
• Secure the workpiece. A work-
piece that is retained with clamping
appliances or a vice is held more se-
curely than with your hand.
• Only use the power tool for dry
sanding. Avoid using on damp
materials. Penetration of water into
the power tool increases the risk of
electric shock.

GB IE
24
• Avoid overheating the sanded
object and the sander itself. Pos-
• The workpiece gets hot dur-
ing grinding. Do not touch the
machined area, allow it to cool
down. There is a risk of burning. Do
not use coolants or the like.
• Always empty the dust con-
tainer before work breaks.
Sanding dust in the dust sack, micro
under unfavourable conditions such
metals. Particular hazards are caused
if the sanding dust is mixed with paint,
polyurethane residues or other chemi-
cal substances, or if the sanded object
is hot after long working periods.
Please check the operating manual of
your vacuum cleaner whether it is suit-
able for the suction of grinding chips.
• Connect the appliance to a power
socket with a residual current circuit
breaker of rated residual current no
more than 30 mA.
• If the supply cord of this power
tool is damaged, it must be re-
placed by a specially prepared
cord available through the ser-
vice organization.
Residual risks
Even if properly operating and handling
this electric tool, some residual risks will
remain. Due to its construction and build,
this electric tool may present the following
hazards:
a) Lung damage, if suitable respiratory
protection is not worn;
b) Cuts
c) Ear damage if working without ear
protection.
d) Eye damage if suitable eye protection
is not worn.
e) Damage to your health caused by
swinging your hands and arms when
operating the appliance for longer pe-
riods of time or if the unit is not held or
maintained properly.
Warning! During operation, this
electric tool generates an electro-
circumstances, may impair the
functionality of active or passive
medical implants. To reduce the risk
of serious or lethal injuries, we rec-
ommend that persons with medical
implants consult their doctor and
the manufacturer of their medical
implant before operating the ma-
chine.
Assembling instructions
Pull the mains plug before any ad-
justments, maintenance or repair.
Danger of electric shock.
Attaching/removing sanding
sheet
Clean the sanding disc before you
attach a sanding sheet.
Use only appropriate sanding sheet
sizes. Sanding sheets, which ex-
tend beyond the sanding disc, can
cause injuries and can cause the
sanding sheets to block or tear.

GB IE
25
for rapid attachment of the sanding sheet
(12).
The sanding sheets (12) comprise 2 parts
and can be individually replaced depend-
ing on wear.
To achieve optimal sanding results, only
use sanding sheets with the right grain
size.
Attaching sanding sheet:
1. Press both parts of the sanding
sheet (12) evenly onto the sand-
ing plate (10). Please ensure
and the holes are placed directly
above the extraction openings
(15) of the sanding plate (10).
Removing sanding sheet:
2. Pull the sanding sheet (12) from
the sanding plate (10).
Only perform sanding once both
sanding sheets are mounted.
You can replace the pre-mounted sanding
-
vided in the scope of delivery.
Unmounting sanding plate:
1. Open the clamping lever (16)
and turn it in the direction of the
sanding sheet until it reaches the
stop.
2. Remove the front section of the
sanding plate (10).
from above against the back
section of the sanding plate (10)
4. To lock, turn the clamping lever
(16) into its original position.
Attaching sanding sheet for
5. Press the sanding plate for the
6. Place a sanding sheet onto the
back section of the sanding plate
(10). This will prevents soiling of
the Velcro.
Connecting/removing/emp-
tying the dust collection box
Connecting the dust collection
box:
1. Before connecting, ensure that
the dust collection box (8) is
2. Press the release button (4) on the
dust collection box (8). Slide the
dust collection box (8) all the way
onto the connection for dust ex-
traction (9). The two lugs (9a) on
the connection for dust extraction
the dust collection box (8).
3. Let go of the release button (4).
It will click into place above the
box (8).

GB IE
26
Removing the dust collection
box:
4. Press the release button (4) and
pull the dust collection box (8) out.
Emptying the dust collection box:
5. Pull the tab (7) and remove the
dust collection box lid (6).
6. To empty, simply shake or knock
out the dust collection box (8).
7. Then close the dust collection
box (8) again.
Empty the dust collection box regu-
larly to ensure optimal suction.
How to connect/remove
external dust extraction
Connecting external dust
extraction
1. Push the external dust extraction
adaptor (11) as far as it will go
on the dust extraction connector
(9).
2. Connect the extraction hose from
a vacuum cleaner (sold separate-
ly) to the external dust extraction
adaptor (11).
Removing external dust extraction
1. Remove the extraction hose
from the external dust extraction
adaptor (11).
2. Disconnect the adapter for exter-
nal dust extraction (11).
If necessary, you can connect the
suction tube of a vacuum cleaner
directly to the device without an
adapter.
Operation
Switching on/off
Make sure that the power supply
voltage matches the voltage rat-
ing indicated on the device‘s type
plate.
Connect the machine to the power
supply.
switch (1) to position „I“. The
tool will power on.
switch (1) to position „0“. The
tool will power off.
Practical tips
When working with the ap-
pliance, always wear suita-
ble clothing and appropriate
protective equipment.
Prior to each use it must be
ensured that the appliance is
working correctly.
Personal protective equip-
ment and a fully functional
appliance reduce the risk of
injuries and accidents.
Do not use the device without a
dust collection box or external dust
extraction. Use of a dust extraction
can reduce hazards caused by
dust.
When using sanding sheets without
ventilation holes, dust extraction
is not possible. Make sure that the
workplace is well ventilated.

GB IE
27
Pull the mains plug before any ad-
justments, maintenance or repair.
Danger of electric shock.
Sanding
• Move the appliance against the work-
piece once it is switched on.
• After machining, lift the sanding disc
up before turning off the device.
• Always lead the mains cable towards
the back and away from the device.
• Clean the sanding plate before you at-
tach a sanding sheet.
• Only work with sanding sheets in per-
fect condition to achieve good sanding
results.
• Work with low and even pressure and
even forward pressure. This protects
the appliance and the sanding sheet.
• Grind rough corners and edges with
the top or side edge of the sanding
sheet.
If the front tip of the triangular sanding
sheet is worn, the sanding sheet can
be removed, rotated and put back into
place.
• Do not use the same sanding sheet to
sand different materials (e.g. metal
and then wood).
• Empty the dust collection box or the
vacuum cleaner regularly in order to
ensure optimal suction.
Selection of sanding sheet
Grain size Application
P 60
P 80
for pre-sanding rough wood
surfaces
P 120
P 180
for plain sanding
P 240
painted surfaces
Choosing the right sanding
plate
Pre-mounted sanding plate:
• For sanding/grinding large surfaces
as well as corners, edges and outer
curves.
• For machining small slots and narrow
intermediate spaces.
Cleaning/Maintenance
Pull the mains plug before any ad-
justments, maintenance or repair.
Repair and servicing work not
described in this manual should
always be carried by our Service
Centre. Use only original parts.
The following cleaning and servicing
should be done regularly. This will ensure
a long and reliable service life.

GB IE
28
Cleaning
Do not spray the appliance
with water and do not im-
merse it in water. Electric
shock hazard!
• Keep clean the ventilation slots, motor
housing and handles of the appliance.
Use a damp cloth or a brush.
Do not use cleaning agents or solvents.
You may otherwise irreparably dam-
age the appliance.
• Clean the sanding sheet with a vacu-
um cleaner or knock it out.
insert of the dust collection
box
for contamination.
1. Press the release button ( 4)
and pull the dust collection box
( 8) out (see “Connecting/
removing/emptying the dust col-
lection box”).
2 Pull the tab (7) and remove the
dust collection box lid (6).
2. Pull the mounting frame (17)
from the dust collection box lid
(18).
warm water and soap and let it
dry.
Replace a heavily contaminated
“Spare Parts/Accessories”).
the mounting frame (17) in the
dust collection box lid (6).
5. Then close the dust collection
box ( 8).
Storage
• Store the device in a dry place well out
of reach of children.
• Empty the dust collection box before
storing the device (see “Connecting/
removing/emptying the dust collection
box”).
Waste Disposal/Envi-
ronmental Protection
Be environmentally friendly. Return the
tool, accessories and packaging to a recy-
them.
Electric units do not belong with
domestic waste.
• Return the unit to a recycling centre.
The plastic and metal parts employed
can be separated out and thus recy-
cled use can be implemented. Ask our
Service-Center for details.
• Defective units returned to us will be
disposed of for free.

GB IE
29
Spare Parts/Accessories
Spare parts and accessories can be obtained at
www.grizzly-service.eu
If you do not have internet access, please contact the Service Centre via telephone (see
“Service-Center” Page 32). Please have the order number mentioned below ready.
Position Description Order No.
instruction
manual
10 Sanding plate, premounted 91104224
13
11 External dust extraction adaptor 91104222
8 Dust box 91104221
18 Filter element for dust box 91104223
12 6 sanding sheets for wood (P 40*), for sanding plate 30211092
6 sanding sheets for wood (P 80*), for sanding plate 30211093
6 sanding sheets for wood (P 120*), for sanding plate 30211094
10 sanding sheets for wood (P 120*), for sanding plate 30211090
6 sanding sheets for wood (P 180*), for sanding plate 30211095
6 sanding sheets for wood (P 240*), for sanding plate 30211096
Set, 5 sanding sheets for wood, for sanding plate 30211088
(2x P 60*, 2x P 120*, 1x P 240*)
Set, 30 sanding sheets for wood, for sanding plate 30211089
(12x P 60*, 12x P 120*, 6x P 240*)
Set, 18 sanding sheets for wood, for sanding plate 30211091
(6x P 60*, 6x P 120*, 6x P 240*)
Set, 30 sanding sheets for sanding plate 30211097
24x for wood: 6x P 60*, 6x P 120*,6x P 180*, 6x P 240*
3x for stone: 1x P 80*, 1x 180*, 1x P 400*
3x for paint: 1x P 60*, 1x P 120*, 1x P 240*)
14 6 sanding sheets (P 80*) 30211085
6 sanding sheets (P 120*) 30211086
6 sanding sheets (P 180*) 30211087
*P = Grain size

GB IE
30
Trouble Shooting
Problem Possible Cause Error correction
Device doesn‘t start
Mains voltage missing
Main circuit breaker is
tripped
Check the socket, mains cable, line,
mains plug, repairs to be carried
-
sary, check main circuit breaker.
On/off switch (
1) may
be defective
Repair by Customer Care
Engine faulty
Device works with
interruptions
Internal loose contact
Repair by Customer Care
On/off switch (
1) is
broken
Engine is slowing
down and stops
Device is overloaded
through workpiece
Reduce pressure on grinding tool
Workpiece unsuitable
Poor grinding
performance
Sanding sheet unsuitable
for the workpiece to be
processed
Use a suitable sanding sheet or
sanding disc (see “Assembling in-
structions”)
Worn sanding sheet
Insert a new sanding sheet
(see “Assembling instructions”)
Sanding sheet wears
down quickly
Sanding sheet unsuitable
for the workpiece to be
processed
Use a suitable sanding sheet
(see “Assembling instructions”)
Too much pressure applied Reduce the pressure

GB IE
31
Guarantee
Dear Customer,
This equipment is provided with a 3-year
guarantee from the date of purchase.
In case of defects, you have statutory rights
against the seller of the product. These
statutory rights are not restricted by our
guarantee presented below.
Terms of Guarantee
The term of the guarantee begins on the
date of purchase. Please retain the original
receipt. This document is required as proof
of purchase.
If a material or manufacturing defect
occurs within three years of the date of
purchase of this product, we will repair or
replace – at our choice – the product for
you free of charge. This guarantee requires
the defective equipment and proof of pur-
chase to be presented within the three-year
period with a brief written description of
what constitutes the defect and when it oc-
curred.
If the defect is covered by our guarantee,
you will receive either the repaired product
or a new product. No new guarantee pe-
riod begins on repair or replacement of the
product.
Guarantee Period and Statutory
Claims for Defects
The guarantee period is not extended by
the guarantee service. This also applies for
replaced or repaired parts. Any damages
and defects already present at the time of
purchase must be reported immediately af-
ter unpacking. Repairs arising after expiry
of the guarantee period are chargeable.
Guarantee Cover
The equipment has been carefully pro-
duced in accordance with strict quality
guidelines and conscientiously checked
prior to delivery.
The guarantee applies for all material and
manufacturing defects. This guarantee
does not extend to cover product parts that
are subject to normal wear and may there-
fore be considered as wearing parts (e.g.
tools, sanding sheets) or to cover damage
to breakable parts (e.g. switches).
This guarantee shall be invalid if the prod-
uct has been damaged, used incorrectly or
not maintained. Precise adherence to all of
manual is required for proper use of the
product. Intended uses and actions against
which the operating manual advises or
warns must be categorically avoided.
The product is designed only for private
and not commercial use. The guarantee
will be invalidated in case of misuse or
improper handling, use of force, or inter-
ventions not undertaken by our authorised
service branch.
Processing in Case of Guarantee
To ensure quick handling of you issue,
please follow the following directions:
-
tion number (IAN 303400) ready as
proof of purchase for all enquiries.
-
ing plate.
• Should functional errors or other de-
fects occur, please initially contact the
telephone or by e-mail. You will then
receive further information on the pro-
cessing of your complaint.

GB IE
32
• After consultation with our customer
service, a product recorded as defec-
tive can be sent postage paid to the
service address communicated to you,
with the proof of purchase (receipt)
the defect and when it occurred. In or-
der to avoid acceptance problems and
additional costs, please be sure to use
only the address communicated to you.
Ensure that the consignment is not sent
carriage forward or by bulky goods,
express or other special freight. Please
send the equipment inc. all accessories
supplied at the time of purchase and
ensure adequate, safe transport pack-
aging.
Repair Service
For a charge, repairs not covered by the
guarantee can be carried out by our ser-
vice branch, which will be happy to issue
a cost estimate for you. We can handle
only equipment that has been sent with ad-
equate packaging and postage.
Attention: Please send your equipment to
our service branch in clean condition and
with an indication of the defect.
Equipment sent carriage forward or by
bulky goods, express or other special
freight will not be accepted.
We will dispose of your defective devices
free of charge when you send them to us.
Service-Center
GB
Service Great Britain
Tel.: 800 404 7657
(£ 0.10/Min.)
E-Mail: [email protected]
IAN 303400
IE
Service Ireland
Tel.: 1890 930 034
(0,08 EUR/Min., (peak))
(0,06 EUR/Min., (off peak))
E-Mail: [email protected]
IAN 303400
Importer
Please note that the following address is
not a service address. Please initially con-
Grizzly Tools GmbH & Co. KG
Stockstädter Straße 20
DE-63762 Großostheim
Germany
www.grizzly-service.eu

FR
33
BE
Introduction
Toutes nos félicitations pour l’achat de votre
nouvel appareil. Vous avez ainsi choisi un
produit de qualité supérieure.
-
dant la production et il a été soumis à un
appareil est donc ainsi garanti.
La notice d’utilisation fait partie de
ce produit. Elle contient des instruc-
tions importantes pour la sécurité,
l’utilisation et l’élimination des
déchets. Avant d’utiliser ce produit,
lisez attentivement les consignes
d’emploi et de sécurité. N’utilisez le
produit que tel que décrit et unique-
ment pour les domaines d’emploi
indiqués. Conservez cette notice et
remettez-la avec tous les documents
si vous cédez le produit à un tiers.
Domaine d’utilisation
L‘appareil est prévu pour le meulage à sec
du bois, du métal, du plastique, du mastic
et des surfaces vernies.
Cet appareil n’est pas adapté à une utilisa-
tion commerciale.
Toute autre utilisation qui n’est pas autori-
sée expressément dans ce mode d’emploi
peut conduire à un endommagement de
l’appareil et présenter un réel danger pour
l’utilisateur.
L’appareil est destiné à une utilisation par
des adultes. Les jeunes gens âgés de plus
de 16 ans sont autorisés à utiliser l’appa-
reil sous surveillance d’un adulte.
Le constructeur décline toute responsabilité
en cas de dommages qui seraient occa-
sionnés par une utilisation non conforme
ou une manipulation inappropriée de
l’appareil.
Sommaire
Introduction ................................33
Domaine d’utilisation ..................33
Description générale ...................34
Volume de la livraison .....................34
Vue synoptique ...............................34
Caractéristiques techniques .........34
Instructions de sécurité ................ 35
Symboles et pictogrammes ...............35
Consignes de sécurité générales
pour outils électriques ......................35
Autres consignes de sécurité ............. 38
Autres risques .................................39
Instructions de montage .............. 39
Positionner/retirer la feuille abrasive ... 39
Montage de la languette de ponçage ..40
Raccorder, retirer et vider le bac à
poussières ......................................40
Raccorder/retirer l’aspiration
externe de poussière .......................41
Service ........................................41
Mise en marche/arrêt ...................... 41
Indications de travail ..................41
Ponçage ........................................42
Choix de la feuille abrasive .............. 42
Choix de la plaque à poncer ............ 42
Nettoyage/Entretien.................... 42
Nettoyage ......................................42
Nettoyer/remplacer le dispositif de
.......43
Rangement .................................43
Elimination/Protection de
l’environnement .......................... 43
Pièces de rechange/Accessoires ...44
Dépannage .................................45
Garantie .....................................46
Service Réparations ....................47
Service-Center ............................. 47
Importateur ................................47
Traduction de la déclaration
de conformité CE originale ........108
Vue éclatée ............................... 113

FR
34
BE
Description générale
Vous trouverez les images cor-
respondantes sur la couverture.
Volume de la livraison
livraison est complète. Evacuez le matériel
d’emballage comme il se doit.
• Appareil
• Adaptateur pour l‘aspiration externe de
poussière
• 3 feuilles abrasives (en deux parties)
(Grain P 80 / P 120 / P 180)
• Languette à poncer
• 3 feuilles abrasives pour languette à
poncer (Grain P 80 / P 120 / P 180)
• Notice d‘utilisation
Vue synoptique
1 Interrupteur marche/arrêt
2 Support manuel
3 Ouverture de ventilation
4 Touche de déverrouillage
5 Cordon d‘alimentation
7 Languette pour ouvrir
9 Raccord à l‘aspiration
des poussières
10 Plaque abrasive
11 Adaptateur pour l’aspiration
externe de la poussière
12 3 feuilles abrasives
(en deux parties)
13 Languette à poncer
14 3 languettes à poncer
15 Ouvertures d’aspiration, plaque
abrasive
16 Levier de serrage pour le déver-
rouillage de la plaque à poncer
17 Cadre de support pour le dispo-
Caractéristiques
techniques
Ponceuse triangulaire .......................PHS 160 E5
Tension d’entrée nominale
(U) ...............................230 V~, 50 Hz
Puissance absorbée (P) ................ 160 W
Vitesse de rotation à vide (n
0
) ... 13000 min
-1
Vitesse d’oscillation (n) ............. 26000 min
-1
Poids (sans accessoires) ........... env. 1,1 kg
Classe de protection .........................
II
Type de protection ........................... IPX0
Niveau de pression acoustique
(L
pA
) .......................76 dB(A); K
pA
= 3 dB
Niveau de puissance acoustique
(L
WA
) ..................... 87 dB(A); K
WA
= 3 dB
Vibrations (a
h
) ........... 9 m/s
2
;
K= 1,5 m/s
2
La valeur d’émission d’oscillation donnée a
été mesurée d’après une procédure d’essai
aux normes et peut être utilisée pour com-
parer un outil électrique avec un autre ou-
til. L’indication du fait que la valeur totale
de vibrations déclarée peut également être
utilisée pour une évaluation préliminaire de
l’exposition.
Avertissement : La valeur d’émis-
sion d’oscillation peut, pendant l’uti-
lisation réelle de l’outil électrique,
différer de la valeur d’indication,
selon la manière dont l’outil élec-

FR
35
BE
trique est utilisé. Essayez de main-
tenir aussi faible que possible la
contrainte que constituent les vibra-
tions. Mesures à titre d’exemple
pour réduire la contrainte que
constituent les vibrations : porter
des gants lors de l’utilisation de
l’outil et limiter le temps de travail. Il
faut à ce titre tenir compte de toutes
les parties du cycle d’exploitation
(par exemple les temps au cours
desquels l’outil électroportatif est
éteint, et ceux au cours desquels il
est certes allumé mais fonctionne
hors charge).
Instructions de sécurité
Cette section traite des principales normes
de sécurité lors du travail avec l’appareil.
Symboles et pictogrammes
Symboles utilisés dans le mode
d’emploi
Symbole de danger et indica-
tions relatives à la prévention
de dommages corporels ou
matériels.
Symbole d’interdiction et indications
relatives à la prévention de dom-
mages.
Branchez la machine au secteur.
Symboles de remarque et informa-
tions permettant une meilleure utili-
sation de l‘appareil.
Symboles apposés sur l’appareil
-
avant tous travaux sur l‘appareil.
Lisez attentivement les instructions
d’emploi.
Porter une protection visuelle et
acoustique.
Portez un équipement de protection
respiratoire
Porter des gants de protection
Classe de protection II
(Double isolation)
Les appareils n’ont pas leur place
dans les ordures ménagères.
Consignes de sécurité géné-
rales pour outils électriques
AVERTISSEMENT ! Lisez toutes
les consignes de sécurité et les
instructions. Des omissions lors de
l‘observation des consignes de sécu-
rité et des instructions peuvent causer
une décharge électrique, un incendie
et / ou de graves blessures.
Conservez toutes les consignes de
sécurité et les instructions pour les
consulter ultérieurement. Le terme
«outil» dans les avertissements fait référence
à votre outil électrique alimenté par le sec-
teur (avec cordon d’alimentation) ou votre
outil fonctionnant sur batterie (sans cordon
d’alimentation).

FR
36
BE
1) SÉCURITÉ SUR LE LIEU DE TRAVAIL
• Conservez votre zone de travail
propre et bien éclairée. Les zones
de travail en désordre et non éclairées
peuvent être à l‘origine d‘accidents.
• Avec l‘outil électrique, ne travail-
lez pas dans un environnement
soumis à un risque d‘explosion et
dans lequel se trouvent des pous-
sières, des gaz et des liquides
Les outils électriques
produisent des étincelles qui peuvent
• Pendant l‘utilisation de l‘outil
électrique, tenez à distance les
enfants et les autres personnes.
En cas de distractions, vous pouvez
perdre le contrôle de l‘appareil.
2) SÉCURITÉ ÉLECTRIQUE
l‘outil électrique doit convenir à
manière que ce soit. N‘utilisez au-
cune prise d‘adaptateur conjoin-
tement avec des outils électriques
ayant une mise à la terre de
protection.
prises de courant appropriées diminuent
le risque de décharge électrique.
• Evitez le contact du corps avec les
surfaces mises à la terre, telles
que les tubes, les chauffages, les
fours et les réfrigérateurs. Il existe
un risque accru de décharge électrique,
si votre corps est mis à la terre.
• Tenez les outils électriques à dis-
tance de la pluie ou de l‘humi-
dité. La pénétration de l‘eau dans un
outil électrique augmente le risque d’une
décharge électrique.
• Ne pas maltraiter le cordon. Ne
jamais utiliser le cordon pour
porter, tirer ou débrancher l’outil.
Maintenir le cordon à l’écart de la
ou des parties en mouvement.
Des cordons endommagés ou emmêlés
augmentent le risque de choc électrique.
• Si vous travaillez avec un outil
électrique en plein air, utilisez
uniquement un câble de pro-
longation qui soit adapté pour
l‘extérieur. L‘emploi d‘un câble de pro-
longation approprié pour le domaine ex-
térieur diminue le risque d’une décharge
électrique.
• Si l‘utilisation de l‘outil élec-
trique ne peut pas être évitée
dans un environnement humide,
utilisez un commutateur de pro-
tection de courant de défaut avec
un courant de déclenchement de
L‘utilisa-
tion d‘un commutateur de protection de
courant de défaut réduit le risque d’une
décharge électrique.
3) SÉCURITÉ DES PERSONNES
• Soyez attentif, faites attention à
ce que vous faites et utilisez rai-
sonnablement l‘outil électrique
pendant votre travail. N‘utilisez
aucun outil électrique si vous
êtes fatigué ou vous trouvez sous
ou de médicaments. Un moment
d‘inattention durant l‘utilisation de l‘outil
électrique peut être la cause de graves
blessures.
• Portez toujours un équipement
de protection individuel et des
lunettes protectrices. Le port d‘un

FR
37
BE
équipement de protection individuel,
comme un masque anti-poussières, des
chaussures de sécurité anti-dérapantes,
un casque de protection ou des protec-
tions auriculaires, en fonction du type et
de l‘utilisation de l‘outil électrique, dimi-
nue le risque des blessures.
• Evitez une mise en service non
prévue. Assurez-vous que l‘outil
électrique est éteint avant que
vous ne le connectiez à l‘alimen-
tation en courant et / ou à l‘accu-
mulateur, le portiez ou le dépla-
ciez. Si en portant l‘appareil électrique,
votre doigt appuie sur le commutateur
ou que l‘appareil se mette en marche
lorsque vous le connectez, cela peut
• Retirez les outils de réglage ou la
clé à écrous avant de mettre l‘ou-
til électrique sous tension. Un outil
ou une clé qui se trouve dans une partie
mobile de l‘appareil peut être à l‘origine
de blessures.
• Ne pas se précipiter. Assurez-
vous d‘avoir une position stable
et d‘être tout le temps en équi-
libre. Vous pourrez ainsi mieux contrô-
ler mieux l‘outil électrique dans des situa-
tions inattendues.
• Portez des vêtements appropriés
convenables. Ne portez aucun
habit large ou parure. Maintenez
vos cheveux, habits et gants loin des
parties mobiles. Les habits légers, les
parures ou les longs cheveux peuvent
être saisis par les parties mobiles.
• Si des dispositifs d‘aspiration
et de collecte supplémentaires
peuvent être montés, assurez-
vous que ceux-ci sont connectés
et utilisés correctement. L‘utilisation
d‘un dispositif d‘aspiration peut diminuer
les risques engendrés par la poussière.
4) UTILISATION ET ENTRETIEN DE
L’OUTIL
• Ne forcez pas l‘appareil. Utilisez
pour votre travail l‘outil élec-
trique le mieux adapté. Avec un
outil électrique approprié, vous travaillez
mieux et avec davantage de sécurité
dans le secteur de travail donné.
• N‘utilisez aucun outil électrique
dont le commutateur est défec-
tueux. Un outil électrique qui ne peut
plus être allumé ou éteint est dangereux
et doit être réparé.
-
rant et / ou retirez l‘accumulateur
avant d‘entreprendre des ré-
glages sur un appareil, échanger
des accessoires ou mettre de côté
l‘appareil. Cette mesure de précaution
empêche un démarrage involontaire de
l‘outil électrique.
• Conservez les outils électriques
inutilisés hors de la portée des
enfants. Ne laissez pas des per-
sonnes qui ne connaissent pas
l‘appareil ou n‘ont pas lu ces ins-
tructions utiliser l‘appareil. Les outils
électriques sont dangereux s‘ils sont utili-
sés par des personnes inexpérimentées.
• Observer la maintenance de l’ou-
til. Contrôlez si les parties mobiles
fonctionnent correctement et ne
-
reil pour voir si des pièces sont
rompues ou sont endommagées,
perturbant ainsi le fonctionne-
ment de l‘outil électrique. Faites
réparer les pièces endommagées
avant d‘utiliser l‘appareil. Beau-
coup d‘accidents ont pour origine des
outils électriques mal entretenus.
• Maintenez les outils coupants
aiguisés et propres. Les outils tran-

FR
38
BE
chants bien entretenus ayant des bords
de coupe aiguisés se coincent moins et
s‘utilisent plus facilement.
• Utilisez l‘outil électrique, les
accessoires, les outils, etc. confor-
mément à ces instructions. Prenez
également en compte les condi-
tions de travail et l‘activité à réa-
liser. L‘utilisation des outils électriques
pour des buts autres que ceux prévus
peut mener à des situations dangereuses.
• Tenez l’outil par ses surfaces
de prise isolées pendant toute
opération où l’outil utilisé peut
toucher des câbles électriques
cachés ou son propre cordon. Le
-
lement mettre les parties métalliques sous
tension et provoquer un choc électrique.
5) MAINTENANCE ET ENTRETIEN
• Ne laissez réparer votre outil
électrique que par des profession-
des pièces de rechange d‘origine.
Vous serez ainsi sûr de conserver la sécu-
rité pour l‘outil électrique correspondant.
Autres consignes de sécurité
Mise en garde ! Le ponçage
peut produire des poussières
nocives (p.ex. de matériaux
contenant des peintures au
plomb, des matériaux conte-
nant de l’amiante, des métaux
ou certains types de bois) qui
sont susceptibles de présenter
un risque pour l’utilisateur ou
les personnes à proximité.
Veillez à une bonne aération
du lieu de travail. Veuillez
toujours porter des lunettes de
sécurité, des gants de sécu-
rité et un masque de protec-
tion respiratoire.
• Sécurisez la pièce à usiner. Une
de serrage ou un étau est maintenue
plus sûrement qu’avec votre main.
• N’utilisez l’outil électrique que
pour un ponçage à sec. N’arasez
pas des matériaux humides. L’in-
troduction d’eau dans l’outil électrique
augmente le risque d’électrocution.
• Évitez la surchauffe de la pièce
à poncer et de la ponceuse. Il y a
risque d’incendie.
• La pièce à usiner chauffe pen-
dant le ponçage. Ne pas tou-
chez à l’endroit travaillé, laissez
refroidir. Risque de brûlures. Ne pas
utilisez de produit de refroidissement ou
assimilés.
• Pensez à toujours vider le réci-
pient à poussières avant d’inter-
rompre le travail. Dans des
conditions défavorables, il existe
-
tanée de la poussière dans le
sac à poussière, dans le micro-
-
rateur). Il existe un danger particulier
lorsque la poussière de ponçage se
mélange avec des résidus de vernis,
de polyuréthane ou d’autres substances
chimiques et lorsque la pièce à poncer
a chauffé pendant de longs travaux.
-
ploi de votre aspirateur si celui-ci est
adapté à l’aspiration de copeaux.
• Raccordez l‘appareil à une prise pro-
tégée par un disjoncteur différentiel
(disjoncteur FI) réagissant dès que
l‘intensité dépasse 30 mA.

FR
39
BE
• Si le câble d‘alimentation de
l‘outil est endommagé, il doit
être remplacé par un câble spé-
cialement préparé disponible
auprès du service après vente.
Autres risques
Même si vous utilisez cet outil électrique
de manière conforme, il existe malgré
tout d’autres risques. Les dangers suivants
peuvent se produire en fonction de la mé-
thode de construction et du modèle de cet
outil électrique :
a) Dégâts aux poumons, si aucune pro-
tection respiratoire appropriée n’est
b) Coupures
c) Dommages affectant l’ouïe si aucune
protection d’ouïe appropriée n’est por-
tée.
d) Blessures aux yeux, si aucune protec-
tion des yeux appropriée n’est portée.
e) Ennuis de santé engendrés par les
vibrations affectant les bras et les
mains si l’appareil est utilisé pendant
une longue période ou s’il n’est pas
employé de manière conforme ou cor-
rectement entretenu.
Avertissement ! Pendant son fonc-
tionnement cet outil électrique pro-
duit un champ électromagnétique
qui, dans certaines circonstances,
peut perturber des implants médi-
caux actifs ou passifs. Pour dimi-
nuer le risque de blessures graves
ou mortelles, nous recommandons
aux personnes portant des implants
médicaux de consulter leur médecin
et le fabricant de l’implant médical
avant d’utiliser cette machine.
Instructions de montage
Positionner/retirer la feuille
abrasive
Nettoyez la plaque de ponçage
avant de positionner la feuille abra-
sive.
N’utilisez que des feuilles abrasives
à la dimension adaptée. Les feuilles
abrasives qui dépassent du plateau
abrasif peuvent créer des blessures,
causer le blocage ou la déchirure
des feuilles abrasives.
La plaque à poncer (10) est équipée d’un
tissu adhésif qui permet une mise en place
rapide de la feuille abrasive (12).
Les feuilles abrasives (12) sont composées
de 2 parties et peuvent être remplacées
individuellement selon l’état d’usure.
optimal, utilisez seulement des feuilles abra-
sives de même grain.
Placer la feuille abrasive :
1. Apposez les deux parties de la
feuille abrasive (12) de manière
uniforme sur la plaque à poncer
(10). Veillez à ce que les feuilles
abrasives sont alignées sur
la plaque à poncer et que les
perforations correspondent aux
perforations d’aspiration (15) de
la plaque à poncer (10).
Retirer la feuille abrasive :
2. Détachez la feuille abrasive (12)
de la plaque à poncer (10).

FR
40
BE
Poncez uniquement lorsque les
deux feuilles abrasives sont instal-
lées.
Montage de la languette de
ponçage
Vous pouvez remplacer la plaque à poncer
(10) pré montée par la languette à poncer
(13) fournie à la livraison.
Démonter la plaque à poncer :
1. Ouvrez le levier de serrage (16)
et tournez-le jusqu‘à la butée
dans le sens de la feuille abra-
sive.
2. Retirez la partie avant de la
plaque à poncer (10).
Placer la languette à poncer :
3. Guidez la languette à poncer
(13) en partant du haut contre
la partie arrière de la plaque à
poncer (10) et appuyez ferme-
ment.
4. Pour verrouiller, ramenez le
levier de serrage (16) à sa posi-
tion d‘origine.
Placer la feuille abrasive pour
languette à poncer :
5. Appuyez la feuille abrasive
pour la languette à poncer (14)
de manière uniforme sur la lan-
guette à poncer (13).
6. Placez une feuille abrasive sur
la partie arrière de la plaque à
poncer (10). Vous éviterez ainsi
l‘encrassement du tissu agrip-
pant.
Raccorder, retirer et vider le
bac à poussières
Raccorder le bac à poussières :
1. Assurez-vous, avant le raccorde-
(8) est bien fermé.
2. Appuyez sur le bouton de
déverrouillage (4) sur le bac à
à poussières (8) jusqu’à la butée
sur le raccord de l’aspiration des
poussières (9). Les deux becs
(9a) sur le raccord (9) s’adaptent
dans les deux rainures (8a) sur
3. Relâchez la touche de verrouil-
lage (4). Elle s‘emboite au-dessus
-
sières (8).
Retirer le bac à poussières :
4. Appuyez sur le bouton de déblo-
poussières (8).
Vider le bac à poussières :
5. Tirez sur la languette (7) et reti-
rez le couvercle du bac à pous-
sières (6).
poussières (8).
Videz le bac à poussières en temps
-
mance d’aspiration optimale.

FR
41
BE
Raccorder/retirer l’aspira-
tion externe de poussière
Raccorder l’aspiration externe
des poussières :
1. Glissez l‘adaptateur pour l‘aspi-
ration externe de poussière (11)
jusqu‘à la butée dans le raccor-
dement pour l‘aspiration de la
poussière (9).
2. Raccordez le tuyau d‘aspiration
d‘un aspirateur (ne fait pas par-
tie du volume de la livraison) à
l‘adaptateur pour l‘aspiration
externe de poussière (11).
Retirer l’aspiration externe des
poussières :
1. Tirez le tuyau d‘aspiration de
l‘adaptateur pour l‘aspiration
externe de poussière (7).
2. Retirez l’adaptateur de l’aspira-
tion externe des poussières (11).
Vous pouvez raccorder éventuel-
lement le tuyau d‘un aspirateur
directement et sans adaptateur à
l‘appareil.
Service
Mise en marche/arrêt
Veillez à ce que la tension du
réseau de connexion corresponde à
celle indiquée sur la plaque signalé-
tique de l‘appareil.
Branchez la machine au secteur.
1. Pour la mise en marche, faites
basculer l‘interrupteur marche/
arrêt (1) dans la position „I“, et
l‘appareil se met en marche.
2. Pour la mise à l‘arrêt, faites
basculer l‘interrupteur marche/
arrêt (1) dans la position „0“, et
l‘appareil se met à l‘arrêt.
Indications de travail
Lors des travaux avec l’outil,
portez des vêtements appro-
priés et un équipement de
protection adapté.
Assurez-vous avant chaque
utilisation que l’outil est opé-
rationnel.
Un équipement de protection
individuelle et un outil opéra-
tionnel réduisent le risque de
blessures et d’accidents.
N’utilisez pas l’appareil sans le
bac à poussières ou une aspiration
externe. L’utilisation d’un dispositif
d’aspiration peut diminuer les risques
liés à la formation de poussières.
Avec l’utilisation de feuilles abrasives
sans perforation, l’aspiration des
poussières n’est pas possible. Veillez
à une bonne aération du lieu de tra-
vail.
Avant tout travail sur l’appareil, il
est indispensable de débrancher la
prise de courant.
Risque d’électrocution !

FR
42
BE
Ponçage
• Amenez l’outil en marche sur la pièce à
usiner.
• Soulevez la plaque à poncer après l’in-
tervention avant d’éteindre l’appareil.
• Positionnez toujours le câble vers l’ar-
rière de l’appareil.
• Nettoyez la plaque de ponçage avant
de positionner la feuille abrasive.
• Pour obtenir des bons résultats de pon-
çage, ne travaillez qu’avec des feuilles
abrasives intactes.
• Exercez une faible pression uniforme
et une poussée uniforme. Cela vous
permet de ménager l’outil et la feuille
abrasive.
• Poncer les coins et les bords avec la
pointe ou le bord latéral de la feuille
abrasive.
Si la pointe avant de la plaque à pon-
cer triangulaire est usée, la feuille abra-
sive peut être retirée et apposée dans le
sens inverse.
• Ne poncez pas plusieurs matériaux
avec la même feuille abrasive (p.ex. le
métal et ensuite le bois).
• Videz le bac à poussières ou l’aspira-
performance d’aspiration optimale.
Choix de la feuille abrasive
Grain Utilisation
P 60
P 80
pour un premier ponçage de
surfaces en bois bruts
P 120
P 180
pour le prépolissage
P 240
-
faces vernis et avec apprêt
Choix de la plaque à poncer
Plaque à poncer pré montée :
• Pour le ponçage de grandes surfaces
ou le traitement des coins, des bords et
des arrondis extérieurs.
Languette à poncer :
• Pour le traitement de fentes étroites et
d’interstices minces.
Nettoyage/Entretien
avant tout réglage, maintenance ou
réparation.
Faites exécuter les travaux d’entre-
tien et de réparation qui ne sont pas
mentionnés dans cette notice par
notre Centre de services. Utilisez
exclusivement des pièces d’origine!
Exécutez à intervalles réguliers les travaux
de nettoyage et les opérations de mainte-
ainsi d‘une utilisation longue et sûre de
votre appareil.
Nettoyage
L‘appareil ne doit pas être
aspergé avec de l‘eau ou
immergé dans l‘eau. Il existe
un danger de décharge élec-

FR
43
BE
• Conservez propres les fentes de venti-
de l‘appareil. Pour ce faire, utilisez un
chiffon humide ou une brosse. N‘utilisez
aucun produit de nettoyage ou solvant.
Vous pourriez endommager irréparable-
ment l‘appareil.
• Nettoyez la feuille abrasive avec l’aspi-
rateur ou tapotez-la.
Nettoyer/remplacer le
boîte à poussières
Contrôlez l’encrassement du dispositif de
1. Appuyez sur le bouton de
déblocage ( 4) et retirez la
8). (cf. «
Raccorder, retirer et vider le bac
à poussières »).
2. Tirez sur la languette (7) et retirez
-
sières (6).
3. Retirez le cadre de support (17)
poussières (6) et retirez le disposi-
(18) à l’eau tiède et avec du
savon et laissez-le sécher.
Effectuez le remplacement d’un
-
sé ou endommagé (cf. « Pièces
de rechange/accessoires »).
(18) et le cadre de support (17)
poussières (6).
( 8).
Rangement
• Rangez l’appareil à un endroit sec et
protégé de la poussière et surtout hors
de la portée des enfants.
stocker l’appareil (cf. « Raccorder, reti-
rer et vider le bac à poussières »).
Elimination/Protection
de l’environnement
Respectez la réglementation relative à la
protection de l’environnement (recyclage)
pour l’élimination de l’appareil, des acces-
soires et de l’emballage.
Les machines n’ont pas leur place
dans les ordures ménagères.
Portez l’appareil à un point de recyclage.
Les différents composants en plastique et
en métal peuvent être séparés selon leur
nature et subir un recyclage. Demandez
conseil sur ce point à notre centre de ser-
vices.
Nous exécutons gratuitement l’élimination
des déchets de vos appareils renvoyés
défectueux.

FR
44
BE
Pièces de rechange/Accessoires
Vous obtiendrez des pièces de rechange et
des accessoires à l’adresse www.grizzly-service.eu
Si vous ne disposez d’aucun accès Internet, veuillez téléphoner au centre de SAV (voir «Ser-
vice-Center » page 47). Veuillez tenir prêts les numéros de commande indiqués ci-dessous.
Position Désignation N
o
de commande
Notice
d‘utilisation
10 Plaque abrasive, pré montée 91104224
13 Languette à poncer, pré montée 91104225
11 Adaptateur pour l’aspiration externe de la poussière 91104222
12 6 Feuilles abrasives pour le bois (P 40*), pour plaque abrasive 30211092
6 Feuilles abrasives pour le bois (P 80*), pour plaque abrasive 30211093
6 Feuilles abrasives pour le bois (P 120*), pour plaque abrasive 30211094
10 Feuilles abrasives pour le bois (P 120*), pour plaque abrasive 30211090
6 Feuilles abrasives pour le bois (P 180*), pour plaque abrasive 30211095
6 Feuilles abrasives pour le bois (P 240*), pour plaque abrasive 30211096
Set, 5 Feuilles abrasives pour le bois, pour plaque abrasive 30211088
(2x P 60*, 2x P 120*, 1x P 240*)
Set, 30 Feuilles abrasives pour le bois, pour plaque abrasive 30211089
(12x P 60*, 12x P 120*, 6x P 240*)
Set, 18 Feuilles abrasives pour le bois, pour plaque abrasive 30211091
(6x P 60*, 6x P 120*, 6x P 240*)
Set, 30 Feuilles abrasives pour plaque abrasive 30211097
24x pour le bois: 6x P 60*, 6x P 120*,6x P 180*, 6x P 240*
3x pour la pierre: 1x P 80*, 1x 180*, 1x P 400*
3x pour le vernis: 1x P 60*, 1x P 120*, 1x P 240*)
14 6 Feuilles abrasives pour languette à poncer (P 80*) 30211085
6 Feuilles abrasives pour languette à poncer (P 120*) 30211086
6 Feuilles abrasives pour languette à poncer (P 180*) 30211087
*P = Grain

FR
45
BE
Dépannage
Problème Cause possible Dépannage
L’appareil ne dé-
marre pas
Absence de tension de
réseau
Les fusibles fonctionnent.
Contrôler le prise de courant, le
contact, et le cas échéant, faire faire
les réparations par un électricien,
contrôler les fusibles.
Interrupteur Marche/Arrêt
(
1) défectueux
Réparation par le service après-vente
Défaut du moteur
L'outil fonctionne
avec des interrup-
tions
Mauvais contact interne
Réparation par le service après-vente
Interrupteur Marche/Arrêt
(
1) défectueux
Le moteur ralentit et
s'arrête
L'appareil est surchargé par
la pièce à travailler
Réduisez la pression sur l'aiguisoir
La pièce de travail est inappropriée
Mauvais rendement
de ponçage
La feuille abrasive est inap-
propriée pour la pièce à
usiner
Insérer une feuille abrasive ou une
plaque à poncer adaptée (cf. « Ins-
tructions de montage »)
Feuille abrasive usée
Insérer une nouvelle feuille abrasive
(cf « Instructions de montage »)
La feuille abrasive
s'use rapidement
Feuille abrasive inadaptée
pour la pièce à usiner
Insérer une feuille abrasive adaptée
(cf. « Instructions de montage »)
Trop de pression Réduire la pression

FR
46
BE
Garantie
Chère cliente, cher client,
ans, valable à compter de la date d’achat.
En cas de manques constatés sur ce
produit, vous disposez des droits légaux
contre le vendeur du produit. Ces droits
légaux ne sont pas limités par notre garan-
tie présentée par la suite.
Conditions de garantie
Le délai de garantie débute avec la date
d’achat. Veuillez conserver soigneusement
le ticket de caisse original. En effet, ce do-
cument vous sera réclamé comme preuve
d’achat.
Si un défaut de matériel ou un défaut de
fabrication se présente au cours des trois
ans suivant la date d’achat de ce produit,
nous réparons gratuitement ou remplaçons
ce produit - selon notre choix. Cette garan-
tie suppose que l’appareil défectueux et le
soient présentés durant cette période de
trois ans et que la nature du manque et
la manière dont celui-ci est apparu soient
explicités par écrit dans un bref courrier.
Si le défaut est couvert par notre garantie,
le produit vous sera retourné, réparé ou
remplacé par un neuf. Aucune nouvelle pé-
riode de garantie ne débute à la date de
la réparation ou de l’échange du produit.
Durée de garantie et demande
légale en dommages-intérêts
La durée de garantie n’est pas prolongée
par la garantie. Ce point s’applique aussi
aux pièces remplacées et réparées. Les dom-
mages et les manques éventuellement consta-
tés dès l’achat doivent immédiatement être
signalés après le déballage. A l’expiration
du délai de garantie les réparations occa-
sionnelles sont à la charge de l’acheteur.
Volume de la garantie
L’appareil a été fabriqué avec soin, selon
de sévères directives de qualité et il a été
entièrement contrôlé avant la livraison.
La garantie s’applique aux défauts de ma-
tériel ou aux défauts de fabrication. Cette
garantie ne s’étend pas aux parties du pro-
duit qui sont exposées à une usure normale
et peuvent être donc considérées comme
des pièces d’usure (par exemple: Feuilles
abrasives, outils) ou pour des dommages
affectant les parties fragiles (par exemple
les commutateurs)..
-
dommagé n’a pas été utilisé ou entretenu
d’une façon conforme. Pour une utilisation
appropriée du produit, il faut impérative-
ment respecter toutes les instructions citées
dans le manuel de l’opérateur. Les actions
et les domaines d’utilisation déconseillés
dans la notice d’utilisation ou vis-à-vis des-
quels une mise en garde est émise, doivent
absolument être évités.
Marche à suivre dans le cas de
garantie
Pour garantir un traitement rapide de votre
demande, veuillez suivre les instructions
suivantes :
• Tenez vous prêt à présenter, sur de-
mande, le ticket de caisse et le numéro
preuve d’achat.
• Vous trouverez le numéro d’article sur
la plaque signalétique.
• Si des pannes de fonctionnement ou
d’autres manques apparaissent, prenez
d’abord contact, par téléphone ou par
e-Mail, avec le service après-vente
dont les coordonnées sont indiquées
ci-dessous. Vous recevrez alors des
renseignements supplémentaires sur le
déroulement de votre réclamation.

FR
47
BE
• En cas de produit défectueux vous pou-
vez, après contact avec notre service
clients, envoyer le produit, franco de
port à l’adresse de service après-vente
d’achat (ticket de caisse) et en indi-
quant quelle est la nature du défaut et
quand celui-ci s’est produit. Pour éviter
des problèmes d’acceptation et des
frais supplémentaires, utilisez absolu-
ment seulement l’adresse qui vous est
donnée. Assurez-vous que l’expédition
ne se fait pas en port dû, comme mar-
chandises encombrantes, envoi express
ou autre taxe spéciale. Veuillez ren-
voyer l’appareil, y compris tous les ac-
cessoires livrés lors de l’achat et prenez
toute mesure pour avoir un emballage
Service Réparations
Vous pouvez, contre paiement, faire exé-
cuter par notre service, des réparations
qui ne font pas partie de la garantie. Nous
vous enverrons volontiers un devis estima-
tif.
Nous ne pouvons traiter que des appareils
qui ont été correctement emballés et qui
Attention: veuillez renvoyer à notre agence
de service votre appareil nettoyé et avec
une note indiquant le défaut constaté.
Les appareils envoyés en port dû - comme
marchandises encombrantes, en envoi
express ou avec toute autre taxe spéciale
ne seront pas acceptés. Nous exécutons
gratuitement la mise aux déchets de vos
appareils défectueux renvoyés.
Service-Center
FR
Service France
Tel.: 0800 919270
E-Mail: [email protected]
IAN 303400
BE
Service Belgique
Tel.: 070 270 171
(0,15 EUR/Min.)
E-Mail: [email protected]
IAN 303400
Importateur
Veuillez noter que l’adresse suivante n’est
pas une adresse de service après-vente.
Contactez d’abord le service après-vente
cité plus haut.
Grizzly Tools GmbH & Co. KG
Stockstädter Straße 20
DE-63762 Großostheim
Allemagne
www.grizzly-service.eu

NL BE
48
Inhoud
Inleiding ....................................48
Gebruik .....................................48
............... 49
Omvang van de levering ................. 49
Overzicht ....................................... 49
Technische gegevens ..................49
Veiligheidsvoorschriften ............. 50
Symbolen en pictogrammen ............ 50
Algemene veiligheidsinstructies voor
elektrisch gereedschap .................... 50
Verdere veiligheids-
maatregelen ................................... 53
Restrisico’s ...................................... 54
Montagehandleiding .................. 54
Schuurpapierblad aanbrengen/
.................................... 54
Schuurtong monteren ....................... 55
Stofdoos aansluiten/afnemen/ledigen .. 55
Externe stofafzuiging aansluiten/
.................................... 56
Bediening ..................................56
In-/uitschakelen .............................. 56
Werkinstructies ..........................56
Schuren ......................................... 56
Keuze van het schuurpapierblad ....... 57
.............. 57
Reiniging en onderhoud ............. 57
Reiniging ....................................... 57
Filtersysteem van de stofdoos
reinigen/vervangen ....................... 58
Bewaren .................................... 58
Afvalverwerking en
milieubescherming ..................... 58
Reserveonderdelen/Accessoires .59
Foutopsporing ............................60
Garantie ....................................61
Reparatieservice ........................62
Service-Center ............................62
Importeur .................................. 62
Inleiding
uw nieuw apparaat. Daarmee hebt u voor
een hoogwaardig apparaat gekozen.
kwaliteit gecontroleerd en aan een eindcon-
trole onderworpen. De functionaliteit van
bestanddeel van dit apparaat. Ze
voor veiligheid, gebruik en afval-
gebruik van het apparaat met alle
bedienings- en veiligheidsinstructies
vertrouwd. Gebruik het apparaat
uitsluitend zoals beschreven en voor
de aangegeven toepassingsgebie-
den. Bewaar de handleiding goed
het doorgeven van het apparaat
mee aan derden.
Gebruik
Het apparaat is bedoeld voor het droog
schuren van hout, metaal, kunststof, pla-
muur en ook geverfde oppervlakken.
Dit apparaat is niet geschikt voor commer-
cieel gebruik.
Elk ander gebruik, dat in deze gebruiks-
kan schade aan de machine veroorzaken
en een ernstig gevaar voor de gebruiker
betekenen.
Het apparaat is bedoeld voor gebruik door
volwassenen. Jongeren boven 16 jaar
mogen het apparaat enkel onder toezicht
gebruiken. De fabrikant is niet aansprake-
gebruik of verkeerde bediening werd ver-
oorzaakt.
Vertaling van de originele
CE-conformiteitsverklaring .......109
Explosietekening ......................113

49
NL BE
De afbeeldingen vindt u op de
Omvang van de levering
Pak het apparaat uit en controleer, of de in-
houd volledig is. Org voor een reglementair
verpakkingsmateriaal.
• Apparaat
• Stofbox
• Adapter voor de externe stofafzuiging
• 3 schuurbladen (tweedelig)
(Korrelgrootte 80 / 120 / 180)
• Schuurtong
• 3 schuurpapierbladen voor schuurtong
(Korrelgrootte 80 / 120 / 180)
•
Overzicht
1 Aan/uit schakelaar
2 Handsteun
3 Fixeerhendel
4 Ontgrendeltoets stofdoos
5 Elektrisch snoer
6 Stofdoosdeksel
7 Lip voor het openen
van de stofdoos
8 Stofdoos
9 Aansluiting voor de stofafzuiging
10 Schuurplaat
11 Adapter voor de externe
stofafzuiging
12 3 schuurbladen (tweedelig)
13 Schuurtong
14 3 Schuurpapierbladen voor schu-
urtong
15 Afzuigopeningen schuurplaat
16 Spanhendel voor schuurschijfont-
grendeling
17
18
Technische gegevens
Handschuurmachine .............PHS 160 E5
Netspanning (U) .............. 230 V~, 50 Hz
Prestatievermogen (P) ................... 160 W
(n
0
) ....13000 min
-1
Trillingsgetal (n) .....................26000 min
-1
Gewicht (zonder accessoires) ... ca. 1,1 kg
Beschermniveau ................................ II
Beschermingsklasse ...........................IPX0
Geluidsdrukniveau (L
pA
) ..
76 dB(A); K
pA
= 3 dB
Geluidssterkte (L
WA
) ....87 dB(A); K
WA
= 3 dB
Vibratie (a
h
) .............. 9 m/s
2
;
K= 1,5 m/s
2
De aangegeven trillingemissiewaarde werd
volgens een genormaliseerd testmethode
stuk elektrisch gereedschap met een ander
gebruikt worden.
De aangegeven trillingemissiewaarde kan
ook voor een inleidende inschatting van de
blootstelling benut worden.
Waarschuwing:
de manier, waarop het elektrische
gereedschap gebruikt wordt, kan
effectieve gebruik van het elektri-
sche gereedschap van de aangege-
ven waarde verschillen.
Probeer de belasting door trillingen
Voorbeeldmaatregelen voor de re-
gebruik van het gereedschap en de

NL BE
50
-
-
trische werktuig is uitgeschakeld en
-
geschakeld, maar zonder belasting
draait).
Veiligheidsvoorschriften
Deze paragraaf behandelt de fundamentele
apparaat.
Symbolen en pictogrammen
Symbolen in de
Gevaarsymbool met infor-
matie over de preventie van
personen- of zaakschade.
Gebodsteken met informatie over de
preventie van schade.
Sluit het apparaat op de netspan-
ning aan.
Trek de netstekker uit.
Aanduidingsteken met informatie
over hoe u het apparaat beter kunt
gebruiken.
Symbolen op het apparaat
Let op!
Verwondingsgevaar door roterend
werktuig! Houd de handen uit de
buurt van het apparaat.
Draag een oog en een gehoorbe-
scherming.
Draag een
ademhalingsbescherming.
-
mende handschoenen.
Beschermniveau II (Dubbele isolatie)
-
Algemene
veiligheidsinstructies voor
elektrisch gereedschap
WAARSCHUWING! Lees alle
veiligheidsinstructies en aan-
-
ving van de veiligheidsinstructies en
schok, brand en/of ernstige verwon-
dingen veroorzaken.
Bewaar alle veiligheidsinstructies en
Het in de veiligheidsinstructies gebruikte
begrip „Elektrisch gereedschap“ heeft
betrekking op elektrisch gereedschap met
netvoeding (met netsnoer) en op elektrisch
netsnoer).
1) VEILIGHEID OP DE WERKPLAATS
• Houd uw werkruimte netjes en
goed verlicht. Wanorde of onverlich-
te werkomgevingen kunnen tot ongeval-
len leiden.

51
NL BE
tot hitte, olie, scherpe kanten of
bewegende apparaatonderde-
len. Beschadigde of verstrikt geraakte
snoeren doen het risico voor een elektri-
sche schok toenemen.
• Als u met elektrisch gereedschap
in de open lucht werkt, maakt u
enkel gebruik van verlengsnoe-
ren, die ook voor buiten geschikt
Het gebruik van een voor buiten
geschikt verlengsnoer doet het risico
voor een elektrische schok afnemen.
• Als de werking van het elektrische
gereedschap in een vochtige om-
u gebruik van een aardlekschake-
laar met een uitschakelstroom van
Het gebruik van een
aardlekschakelaar doet het risico voor een
elektrische schok afnemen.
3) VEILIGHEID VAN PERSONEN
• Wees aandachtig, let erop wat
u doet en ga verstandig aan
het werk met elektrisch gereed-
schap. Gebruik geen elektrisch
gereedschap als u moe bent of
onder de invloed van drugs,
Een
gebruik van het elektrische gereedschap
kan tot ernstige verwondingen leiden.
-
-
bril.
beschermingsuitrusting, zoals stofmasker,
-
mende helm of gehoorbescherming, al
naargelang de aard en de toepassing
van het elektrische gereedschap, doet het
risico voor verwondingen afnemen.
• Werk met het elektrische gereed-
schap niet in een explosieve
omgeving, waarin er zich brand-
bare vloeistoffen, gassen of stof-
fen bevinden. Elektrisch gereedschap
produceert vonken, die het stof of de
dampen kunnen doen ontsteken.
• Houd kinderen en andere per-
het elektrische gereedschap op
een veilige afstand. In geval van
-
paraat verliezen.
2) ELEKTRISCHE VEILIGHEID
• De aansluitstekker van het elek-
trische gereedschap moet in het
stopcontact passen. De stekker
mag op geen enkele manier ver-
anderd worden. Gebruik geen
adapterstekkers samen met ge-
aard elektrisch gereedschap.
stopcontacten doen het risico voor een
elektrische schok afnemen.
geaarde oppervlakken, zoals van
buizen, verwarmingsinstallaties,
fornuizen en koelkasten. Er bestaat
een verhoogd risico door een elektrische
schok als uw lichaam geaard is.
• Houd elektrisch gereedschap op
een veilige afstand tot regen of
nattigheid. Het binnendringen van wa-
ter in elektrisch gereedschap doet het ri-
sico voor een elektrische schok toenemen.
• Gebruik het snoer niet voor een
ander doeleinde om het elektri-
sche gereedschap te dragen, op
te hangen of om de stekker uit
het stopcontact te trekken. Houd
het snoer op een veilige afstand

NL BE
52
-
bruikname. Vergewis u dat het
elektrische gereedschap uitge-
schakeld is voordat u het op de
stroomvoorziening en/of de accu
aansluit, het opneemt of draagt.
gereedschap uw vinger aan de schake-
laar hebt of het apparaat ingeschakeld
p de stroomvoorziening aansluit, kan dit
tot ongevallen leiden.
schroefsleutel voordat u het elek-
trische gereedschap inschakelt.
Gereedschap of een sleutel, die zich in
een draaiend apparaatonderdeel be-
vindt, kan tot verwondingen leiden.
-
chaamshouding. Zorg voor een
veilige stand en houd te allen
Daardoor kunt
u het elektrische gereedschap in onver-
wachte situaties beter controleren.
geen ruimzittende kleding of
handschoenen op een veilige
afstand tot bewegende onder-
delen.
lang haar kan/kunnen door bewegende
onderdelen vastgegrepen worden.
• Als er stofafzuig- en –opvangin-
richtingen gemonteerd kunnen
worden, vergewist u zich dat
gebruikt worden. Gebruik van een
stofafzuiginrichting kan gevaren door
stof doen afnemen.
4) GEBRUIK EN BEHANDELING VAN
HET ELEKTRISCHE GEREEDSCHAP
• Overbelast het apparaat niet. Ge-
bruik voor uw werk het daarvoor
bestemde elektrische gereed-
schap. Met het passende elektrische
gereedschap werkt u beter en veiliger
in het aangegeven vermogensgebied.
• Gebruik geen elektrisch gereed-
schap, waarvan de schakelaar
defect is. Elektrisch gereedschap, dat
niet meer in- of uitgeschakeld kan worden,
• Trek de stekker uit het stopcontact
u apparaatinstellingen doorvoert.
Toebehoren wisselen of het ap-
paraat wegleggen. Deze voorzorgs-
start van het elektrische gereedschap.
• Bewaar ongebruikt elektrisch
gereedschap buiten het bereik
van kinderen. Laat personen het
apparaat niet gebruiken, die
hebben. Elektrisch gereedschap is ge-
gebruikt wordt.
• Verzorg elektrisch gereedschap
met zorg. Controleer, of beweeg-
bare onderdelen foutloos func-
tioneren en niet klemmen, of er
onderdelen gebroken of zodanig
van het elektrische gereedschap
in negatieve zin beïnvloed wordt.
-
bruik van het apparaat repareren. Tal van
ongevallen hebben hun oorzaak in slecht
onderhouden elektrisch gereedschap.

53
NL BE
scherp en netjes. Zorgvuldig onder-
• Gebruik elektrisch gereedschap,
toebehoren, gebruiksgereed-
schap enz. in overeenstemming
-
omstandigheden en de uit te
voeren activiteit. Het gebruik van
elektrisch gereedschap voor andere dan
de voorziene toepassingen kan tot ge-
• Houd het apparaat vast aan de
geïsoleerde grijpvlakken als u
werkzaamheden uitvoert waarbij
het gebruikte werktuig verborgen
elektrische leidingen of het eigen
elektrische snoer kan raken. Het
contact met een leiding die onder span-
ning staat, kan ook metalen onderdelen
van het apparaat onder spanning zet-
ten en leiden tot elektrocutie.
5) SERVICE
a) Laat uw elektrisch gereedschap
vakkundig geschoold personeel en
enkel met originele reserveonder-
delen repareren. Daardoor wordt ver-
zekerd dat de veiligheid van het elektrische
gereedschap in stand gehouden wordt.
Verdere veiligheids-
maatregelen
-
ren kan stof ontstaan dat
-
zoals loodhoudende verven,
materiaal dat asbest bevat,
metalen of enkele houtsoor-
ten), die voor de gebruiker
of personen die zich in de
buurt bevinden een risico
kunnen opleveren. Zorg voor
een goede ventilatie van de
werkplek. Draag steeds een
veiligheidsbril, beschermende
handschoenen en een stof-
masker. Sluit een stofafzuig-
voorziening aan.
• Zet het werkstuk veilig vast. Het is
veiliger om het werkstuk met spaninrich-
tingen of een bankschroef vast te zetten,
dan het met de hand vast te houden.
• Gebruik het elektrisch gereed-
schap alleen voor het droog
schuren. Schaaf geen vochtige
materialen. Het indringen van water
in een elektrisch apparaat verhoogt het
risico op een elektrische schok.
•
het materiaal dat je wilt schuren
en de schuurmachine. Er bestaat
brandgevaar.
•
schuren. De bewerkte plaats niet
aanraken, laat het afkoelen. Er
bestaat gevaar voor brandwonden. Ge-
• Maak steeds het stofreservoir
-
de stofzuiger) kan automatisch in brand
vliegen in ongunstige omstandigheden,
wanneer het schuurstof vermengd is
met lak-, polyurethaanresten of andere

NL BE
54
chemische stoffen en het materiaal dat u
hebt geschuurd na langdurig werken heet
is geworden. Raadpleeg de gebruikers-
handleiding van uw stofzuiger om te zien
of deze voor het opzuigen van schuur-
spaanders geschikt is.
• Sluit het apparaat aan op een stop-
contact met een aardlekschakelaar (FI-
schakelaar) met een gemeten lekstroom
van niet meer dan 30 mA.
• Als het netsnoer van dit appa-
raat beschadigd wordt, moet
het vervangen worden door een
speciaal netsnoer, dat via de
-
Restrisico’s
Ook als u dit elektrische gereedschap zoals
restrisico’s bestaan. Volgende gevaren
kunnen zich in verband met de construc-
gereedschap voordoen:
a) Schade aan de longen, indien geen
geschikt stofmasker wordt gedragen;
c) Gehoorschade indien er geen geschikte
gehoorbescherming gedragen wordt.
d) Schade aan de ogen als geen geschikte
oogbescherming wordt gedragen.
e) Schade aan de gezondheid, die van
indien het apparaat gedurende een
langere periode gebruikt wordt of niet
zoals reglementair voorgeschreven be-
heerd en onderhouden wordt.
Waarschuwing! Dit elektrische
de werking een elektromagnetisch
veld. Dit veld kan in bepaalde om-
standigheden actieve of passieve
medische implantaten in negatieve
zin beïnvloeden. Om het gevaar voor
met medische implantaten, hun arts
en de fabrikant van het medische
implantaat te raadplegen voordat
de machine bediend wordt.
Montagehandleiding
Voordat er werkzaamheden aan
het apparaat worden verricht de
stekker uit het stopcontact trekken.
Gevaar voor elektrische schokken!
Schuurpapierblad
-
rens een schuurblad te plaatsen.
Gebruik enkel schuurbladen die
qua grootte passen. Schuurbladen
kunnen verwondingen veroorzaken
en ook leiden tot het blokkeren,
scheuren van de schuurbladen of
tot een terugslag.
De deltaschuurplaat (10) is uitgerust met
een klittenband zodat het schuurpapier-
blad (12) snel kan worden aangebracht.
De schuurpapierbladen (12) bestaan uit
worden. Gebruik, om een optimaal schuur-
-

55
NL BE
Schuurpapierblad aanbrengen:
1. Druk beide delen van het schuur-
dat de schuurpapierbladen
nauwaansluitend erop liggen en
de gaten samenvallen met de
afzuigopeningen (15) van de
2. Trek het schuurpapierblad (12)
Schuur enkel als de beide schuurpa-
pierbladen gemonteerd zijn.
Schuurtong monteren
(10) vervangen door de schuurtong (13)
die zich bevindt in de inhoud van de leve-
ring.
1. Open de spanhendel (16) en
draai hem tot aan de aanslag in
de richting van het schuurpapier-
blad.
Schuurtong aanbrengen:
3. Leid de schuurtong (13) van bo-
ven tegen het achterste deel van
vast aan.
4. Draai ter vergrendeling de span-
hendel (16) terug in de uitgangs-
positie.
Schuurpapierblad voor schuur-
tong opbrengen:
5. Druk het schuurpapierblad voor
op de schuurtong (13).
6. Plaats op het achterste deel van
-
-
ling van het klitweefsel.
Stofdoos aansluiten/
afnemen/ledigen
Stofdoos aansluiten:
de stofdoos (8) goed gesloten is.
2. Druk op de ontgrendelingstoets
(4) aan de stofdoos (8) Schuif de
stofdoos (8) tot aan de aanslag
aan op de aansluiting voor de
stofafzuiging (9). De beide nok-
ken (9a) aan de aansluiting voor
de stofafzuiging (9) passen in de
beide moeren (8a) aan de stof-
doos (8).
3. Laat de ontgrendelingtoets (4)
-
ging van de stofdoos (8).
Stofdoos afnemen:
4. Druk op de ontgrendelknop (4)
en trek de stofdoos (8) af.
Stofdoos ledigen:
5. Trek aan de lip (7) en neem het
stofdoosdeksel (6) af.
6. Voor het ledigen klopt u de stof-
doos (8) uit.
7. Sluit de stofdoos (8) weer.
Leeg de stofdoos in rechte stand om
-
tatie te waarborgen.

NL BE
56
Externe stofafzuiging
Externe stofafzuiging aansluiten:
1. Schuif de adapter voor de exter-
ne stofafzuiging (11) tot aan de
aanslag in de aansluiting voor
de stofafzuiging (9).
2. Sluit de zuigslang van een
stofzuiger (niet in het leverings-
pakket inbegrepen) aan op de
adapter voor de externe stofaf-
zuiging (11).
Externe stofafzuiging afnemen:
1. Trek de zuigslang van de adap-
ter voor de externe stofafzuiging
(11).
2. Trek de adapter voor externe
stofafzuiging (11) af.
U kunt de zuigslang van een stof-
zuiger evt. rechtstreeks en zonder
adaper op het apparaat aansluiten.
Bediening
Let erop dat de spanning van de
netaansluiting met het typeaandui-
dingplaatje op het apparaat over-
eenstemt.
Sluit het apparaat op de netspan-
ning aan.
In-/uitschakelen
1. Om het apparaat in te schakelen,
kantelt u de aan/uit schakelaar
(1) in de positie „I“, het appa-
raat begint te draaien.
2. Om het apparaat uit te schake-
len, kantelt u de aan/uit scha-
kelaar (1) in de positie „0“, het
apparaat wordt uitgeschakeld.
Werkinstructies
-
den met het apparaat ge-
schikte kleding en bescher-
mende uitrusting.
Verzeker u er voor elk ge-
bruik van dat het apparaat in
orde is en correct functioneert.
-
uitrusting en een functioneel
apparaat verlagen het risico
op letsel en ongelukken.
Gebruik het apparaat niet zonder
stofdoos of externe stofafzuiging. Het
gebruik van een stofafzuiging kan
risico’s door stof beperken.
zonder ponsen is een stofafzuiging
ventilatie van de werkplek.
-
houding of reparatie de netstekker
uit. Gevaar door elektrische schok.
Schuren
• Voer het apparaat ingeschakeld tegen
het werkstuk aan.
• Leid het netsnoer steeds naar achteren
weg van het apparaat.
• Maak de schuurpapierplaat schoon,
alvorens het schuurblad te plaatsen.

57
NL BE
• Werk uitsluitend met perfecte schuurpa-
pierbladen zodat goede schuurresulta-
ten worden verkregen.
• Werk met geringe en gelijkmatige pers-
druk en gelijkmatige verplaatsingssnel-
heid. Zo spaart u het apparaat en het
schuurpapierblad.
• Schuur de hoeken en kanten met de
schuurpapierblad.
Is de voorste punt van het driehoekige
schuurpapierblad versleten, dan kan
het schuurpapierblad afgenomen wor-
den en er gedraaid weer opgezet wor-
den.
• Schuur geen verschillende materialen
-
zelfde schuurpapierblad.
• Leeg de stofdoos of stofzuiger in rechte
-
zuigprestatie te waarborgen.
Keuze van het
schuurpapierblad
Korrel-
grootte
Toepassing
P 60
P 80
voor het vooraf schuren van
ruwe houten oppervlakken
P 120
P 180
P 240
-
pervlakken die van een grond-
• Voor het schuren van grote vlakken en
de bewerking van hoeken, kanten en
rondingen aan de buitenkant.
Schuurtong:
• Voor het bewerken van smalle spleten
en enge tussenruimtes.
Reiniging en onderhoud
-
ding of reparatie de netstekker uit.
Laat onderhoudswerkzaamheden
die niet in deze handleiding worden
beschreven uitvoeren door ons ser-
vicecenter. Gebruik enkel originele
onderdelen.
Voer de volgende onderhouds- en reini-
gingswerken regelmatig uit. Dan bent u ze-
ker van een lang en betrouwbaar gebruik.
Reiniging
Het water mag noch met wa-
ter afgespoten, noch in water
gelegd worden. Het gevaar
voor een elektrische schok
bestaat!
• Houd ventilatiesleuven, motorhuis en
handgrepen van het apparaat netjes.
Gebruik daarvoor een vochtig doekje of
een borstel.
Gebruik geen reinigings- c.q. oplosmid-
delen. U zou het apparaat daarmee
onherstelbaar kunnen beschadigen.
• Reinig het schuurblad met een stofzui-
ger of klop het uit.

NL BE
58
Filtersysteem van de
stofdoos reinigen/vervangen
-
maal per jaar op vervuiling.
1. Druk op de ontgrendelknop
( 4) en trek de stofdoos
( 8) af (zie “Stofdoos aanslui-
ten/afnemen/ledigen”).
2. Trek aan de lip (7) en neem het
stofdoosdeksel (6) af.
3. Trek aan het montageframe (17)
aan het stofdoosdeksel (6) af en
lauwwarm water en zeep en laat
het drogen.
Vervang een sterk vervuild of be-
nieuw exemplaar (zie “Onderde-
len/accessoires”).
Filtersysteem inbrengen:
het montageframe (17) in het
stofdoosdeksel (6).
6. Sluit de stofdoos ( 8).
Bewaren
mesbescherming droog en buiten het
bereik van kinderen.
van het apparaat (zie “Stofdoos aanls-
uiten/afnemen/legen”).
Afvalverwerking en
milieubescherming
Breng het apparaat, de toebehoren en de
verpakking naar een geschikt recyclage-
punt.
-
• Geef het apparaat in een recyclagepark
af. De gebruikte onderdelen van kunst-
stof en metaal kunnen per categorie
gescheiden worden en zodoende gere-
cycleerd worden. Raadpleeg hiervoor
ons servicecenter.
•
door.

59
NL BE
Reserveonderdelen/Accessoires
www.grizzly-service.eu
Indien u geen Internet hebt, neem dan telefonisch contact op met het Service-Center (zie
„Service-Center“ pagina 62). Hou de onderstaande bestelnummers klaar.”
Pos. Benaming Artikelnr.
Gebruiks-
10 Schuurplaat, voorgemonteerd 91104224
13 Schuurtong, voorgemonteerd 91104225
11 Adapter voor de externe stofafzuiging 91104222
8 Stofbox 91104221
18 Filter voor stofbox 91104223
12 6 Schuurbladen voor hout (P 40*), voor schuurplaat 30211092
6 Schuurbladen voor hout (P 80*), voor schuurplaat 30211093
6 Schuurbladen voor hout (P 120*), voor schuurplaat 30211094
10 Schuurbladen voor hout (P 120*), voor schuurplaat 30211090
6 Schuurbladen voor hout (P 180*), voor schuurplaat 30211095
6 Schuurbladen voor hout (P 240*), voor schuurplaat 30211096
Set, 5 Schuurbladen voor hout, voor schuurplaat 30211088
2x P 60*, 2x P 120*, 1x P 240*)
Set, 30 Schuurbladen voor hout, voor schuurplaat 30211089
(12x P 60*, 12x P 120*, 6x P 240*)
Set, 18 Schuurbladen voor hout, voor schuurplaat 30211091
(6x P 60*, 6x P 120*, 6x P 240*)
Set, 30 Schuurbladen voor schuurplaat 30211097
24x voor hout: 6x P 60*, 6x P 120*,6x P 180*, 6x P 240*
3x voor steen: 1x P 80*, 1x 180*, 1x P 400*
3x voor verf: 1x P 60*, 1x P 120*, 1x P 240*)
14 6 schuurpapierbladen voor schuurtong (P 80*) 30211085
6 schuurpapierbladen voor schuurtong (P 120*) 30211086
6 schuurpapierbladen voor schuurtong (P 180*) 30211087
*P = Korrelgrootte

NL BE
60
Foutopsporing
Probleem Foutherstel
Apparaat start niet
Spanning ontbreekt
Huiszekering wordt aange-
sproken
Stopcontact, elektrische leiding,
stekker controleren, eventueel repa-
ratie door elektricien, huiszekering
nagaan.
Aan-/uitschakelaar (
1)
defect
Reparatie door klantenservice
Motor defect
Apparaat werkt met
onderbrekingen
Intern loszittend contact
Reparatie door klantenservice
Aan-/uitschakelaar (
1)
defect
Motor wordt trager
Apparaat wordt door werk-
stuk overbelast
Werkstuk ongeschikt
Schuurpapierblad voor het
te bewerken werkstuk onge-
schikt
Geschikt schuurpapierblad of
-
gehandleiding”)
Schuurpapierblad versleten
Nieuw schuurblad plaatsen (zie
"Montagehandleiding")
snel af
Schuurblad is ongeschikt
voor het te bewerken werk-
stuk
Geschikt schuurblad plaatsen (zie
"Montagehandleiding")
Teveel druk uitgeoefend Druk verlagen

61
NL BE
Garantie
Geachte cliënte, geachte klant,
rekenen vanaf de datum van aankoop.
Ingeval van gebreken aan dit product heeft
u tegenover de verkoper van het product
worden door onze hierna beschreven ga-
rantie niet beperkt.
Garantievoorwaarden
van aankoop. Gelieve de originele kassa-
bon goed te bewaren. Dit document wordt
Indien er zich binnen drie jaar, te rekenen
vanaf de datum van aankoop van dit pro-
duct, een materiaal- of fabricagefout voor-
doet, wordt het product door ons – naar
onze keuze – voor u gratis gerepareerd of
vervangen. Deze garantievergoeding stelt
aankoop (kassabon) voorgelegd en dat
het gebrek bestaat en wanneer het zich
voorgedaan heeft.
Als het defect door onze garantie gedekt
product terug. Met herstelling of uitwisse-
ling van het product begint er geen nieuwe
garantieperiode.
kwaliteitsgarantie
De garantieperiode wordt door de ga-
rantievergoeding niet verlengd. Dit geldt
ook voor vervangen en gerepareerde
bestaande beschadigingen en gebreken
-
garantieperiode tot stand komende repara-
ties worden tegen verplichte betaling van
de kosten uitgevoerd.
Omvang van de garantie
Het apparaat werd volgens strikte kwali-
De garantievergoeding geldt voor materi-
aal- of fabricagefouten. Deze garantie is
niet van toepassing op productonderdelen,
-
ge onderdelen beschouwd kunnen worden
(b.v. werktuig, schuurbladen) of op bescha-
digingen aan breekbare onderdelen (b.v.
schakelaars).
Deze garantie valt weg wanneer het pro-
duct beschadigd, niet oordeelkundig ge-
bruikt of niet onderhouden werd. Voor een
vakkundig gebruik van het product dienen
te worden. Gebruiksdoeleinden en hande-
-
raden worden of waarvoor gewaarschuwd
te worden.
Het product is uitsluitend voor het privé- en
niet voor het commerciële gebruik be-
-
dige behandeling, toepassing van geweld
werden, valt de garantie weg.
Afhandeling ingeval van garantie
gevolg te geven om een snelle behande-
ling van uw verzoek te garanderen:
• Gelieve voor alle aanvragen de
kassabon en het artikelnummer

NL BE
62
-
koop klaar te houden.
• Gelieve het artikelnummer uit het type-
plaatje, een gravering, op de voorpa-
gina van uw handleiding (onderaan
links) of als sticker aan de achter- of
• Indien er zich functiefouten of andere
gebreken voordien, contacteert u in eer-
ste instantie de hierna vernoemde ser-
viceafdeling telefonisch of per e-mail.
de afhandeling van uw klacht.
• Een als defect geregistreerd product
kunt u, na overleg met onze klanten-
van aankoop (kassabon) en de vermel-
ding, waarin het gebrek bestaat en
wanneer het zich voorgedaan heeft,
voor u franco naar het u medegedeelde
serviceadres zenden. Om problemen
uitsluitend gebruik van het adres, dat
u medegedeeld wordt. Zorg ervoor
dat de verzending niet ongefrankeerd,
als volumegoed, per expresse of via
plaatsvindt. Gelieve het apparaat met
-
geleverde accessoires in te zenden en
voor een voldoende veilige transport-
verpakking te zorgen.
Reparatieservice
U kunt reparaties, die niet onder de ga-
rantie vallen, tegen berekening door ons
graag voor u een kostenraming op.
-
len, die voldoende verpakt en gefrankeerd
ingezonden werden.
Opgelet: Gelieve uw apparaat gereinigd
Ongefrankeerd – als volumegoed, per
expresse of via een andere speciale ver-
worden niet geaccepteerd.
De afvalverwerking van uw defecte inge-
Service-Center
NL
Service Nederland
Tel.: 0900 0400223
(0,10 EUR/Min.)
E-Mail: [email protected]
IAN 303400
BE
Service België
Tel.: 070 270 171
(0,15 EUR/Min.)
E-Mail: [email protected]
IAN 303400
Importeur
Gelieve in acht te nemen dat het volgende
adres geen serviceadres is. Contacteer in
eerste instantie het hoger vermelde service-
center.
Grizzly Tools GmbH & Co. KG
Stockstädter Straße 20
DE-63762 Großostheim
Duitsland
www.grizzly-service.eu

63
PL
Spis tresci
........................................ 63
Cel zastosowania .......................63
Opis ogólny ............................... 64
................... 64
........................................ 64
Dane techniczne ......................... 64
......65
Symbole i piktogramy ...................... 65
..... 65
.............................. 68
.......................... 69
....................69
....................................... 69
......... 70
........... 70
odpylania ...................................... 71
.....................................71
................... 71
wykonywania pracy ..................71
Szlifowanie .................................... 72
................ 72
................... 72
Oczyszczani/konserwacja ..........72
Oczyszczanie ................................ 73
.................................. 73
.....73
..73
........ 74
................75
Gwarancja .................................76
Serwis naprawczy .....................77
Service-Center ............................77
Importer .................................... 77
-
-
-
-
-
stwa, eksploatacji i utylizacji. Przed
w przypadku przekazania produktu
Cel zastosowania
-
wania na sucho powierzchni drewnianych,
metalowych, tworzywa sztucznego, masy
szpachlowej oraz powierzchni lakierowa-
nych.
zastosowania komercyjnego.
-
..........110
Rysunki eksplozyjne ................113

64
PL
Producent nie odpowiada za szkody wy-
Opis ogólny
Rysunki znajdziesz na przedniej
odchylanej stronie.
-
pylania
• 3 a
-
4
5
6
7 klapka do otwierania zbiornika
8
9
systemu odpylania
-
-
17
18
na
Dane techniczne
........................ PHS 160 E5
(U) .............................. 230 V~, 50 Hz
........................... 160 W
(n
0
) ...................................13000 min
-1
Liczba oscylacji (n) ................26000 min
-1
............. ok. 1,1 kg
Klasa zabezpieczenia........................ II
Typ zabezpieczenia..........................IPX0
akustycznego (L
pA
) .. 76 dB(A); K
pA
= 3 dB
Poziom mocy akustycznej
(L
WA
) .....................87 dB(A); K
WA
= 3 dB
Wibracja (a
h
) ............ 9 m/s
2
;
K= 1,5 m/s
2
-
Deklaracji Producenta.
-
dzeniami.

65
PL
-
-
-
wszystkie elementy cyklu eksploatacji
-
-
Wskazówki
-
Symbole i piktogramy
informacjami na temat ochro-
ny osób i zapobiegania szko-
dom materialnym.
Znak nakazu z informacjami na
temat zapobiegania szkodom.
-
trycznej.
-
Uwaga!
-
-
Klasa zabezpieczenia II
-
mowymi.
-
elektrycznych
wszystkie zasady i instrukcje
przestrzeganie zasad i instrukcji
-

66
PL
•
z daleka od deszczu i wilgoci/
wody.
• -
do jego zawieszania ani do
-
-
-
• -
• -
mokrym otoczeniu, zastosuj
-
mniejszym.
-
•
-
alkoholu albo leków. Chwila nie-
Zachowaj wszystkie zasady bezpie-
-
sieciowym (za kablem sieciowym) oraz na-
(bez kabla sieciowego).
• -
pracy.
-
padek.
• -
nym w atmosferze potencjalnie
.
• Trzymaj od dzieci i innych lu-
elektrycznego.
• -
-
waj adapterów wtyczek razem
Nienaruszone wtyczki
• Unikaj dotykania uziemionych po-
wierzchni, takich jak rury, kalory-
fery, piecyki, kuchenki, lodówki.

67
PL
• -
-
• Unikaj przypadkowego urucho-
-
przed jego podniesieniem i prze-
-
-
•
-
• Unikaj anormalnych pozycji
-
-
oczekiwanych sytuacjach.
•
-
-
-
• -
-
-
-
• W przypadku zamontowania
-
-
DZIA ELEKTRYCZNEGO
•
-
w podanym zakresie mocy.
•
elektrycznego z uszkodzonym
jest niebezpieczne i wymaga naprawy.
•
-
• -
-
obeznane i które nie przeczyta-

68
PL
•
elektryczne. Sprawdzaj, czy ru-
-
•
zawsze ostre i czyste. Starannie
-
• -
-
wania itd. tylko zgodnie z tymi
wskazówkami. Zwracaj przy
-
nej pracy.-
niebezpiecznych sytuacji.
• Podczas prac, przy których
ukryte przewody elektryczne
zaizolowane uchwyty. Kontakt z
-
-
5)
SERWIS
• -
-
wanemu personelowi i tylko
zamiennych.
elektrycznego.
lub niektóre gatunki drewna),
-
-
-
odpylania.
-
ment. Obrabiany element zamocowa-
-
do szlifowania na sucho. Nie
-
-
Istnieje
• Podczas szlifowania obrabiany

69
PL
-
• Przed przerwami w pracy za-
-
cza.
-
lakieru, poliuretanu lub innymi substan-
cjami chemicznymi i gdy szlifowany
-
-
dzenia jest uszkodzony, musi on
producenta lub w jego serwisie.
-
-
-
-
-
wych;
-
-
wania odpowiedniej ochrony oczu.
-
czas lub nie jest odpowiednio prowa-
dzone i przepisowo konserwowane.
-
tryczne wytwarza w czasie pracy
pole elektromagnetyczne. Pole to
implantaty medyczne. Aby zmniej-
-
-
cym implantaty medyczne skonsul-
-
-
-
-

70
PL
-
-
-
nego.
-
-
-
-
-
nie.
(13).
-
czenia tkaniny rzepa.
-
(9). Obydwa noski (9a) na przy-

71
PL
-
-
-
odsysania.
systemu odpylania
zasysania:
-
-
lania (9).
-
rzacza (nie wchodzi w zakres
-
nego systemu odpylania (11).
-
mu zasysania:
-
-
lania (11).
systemu zasysania (11).
-
-
trycznej.
I-
0-
wykonywania pracy
-
nie ochronne.
jest sprawne.
-
-

72
PL
-
-
nie systemu odpylania pozwala
-
-
-
Szlifowanie
-
-
-
-
-
-
-
odsysania.
Uziarnienie Zastosowanie
P 60
P 80
surowych powierzchni drew-
nianych
P 120
P 180
P 240
powierzchni gruntowanych i
lakierowanych
-
przestrzeni.
Oczyszczani/konserwacja
-
-
Wykonywanie prac naprawczych

73
PL
Przeprowadzaj regularnie wymienione
-
Oczyszczanie
-
• Utrzymuj szczeliny wentylacyjne w
-
-
-
tworzywa sztucznego.
Czyszczenie/wymiana
(
( -
-
Mocno zanieczyszczony lub
-
ne/Akcesoria“).
-
8).
Przechowywanie
-
Usuwanie i ochrona
-
kowanie do zgodnej z przepisami o ochro-
-
mowymi
do naszego Centrum Serwisowego.

74
PL
www.grizzly-service.eu
Pos Oznaczenie Nr. katalogowe
Instrukcja
13
8 91104221
12
30211088
(2x P 60*, 2x P 120*, 1x P 240*)
30211089
(12x P 60*, 12x P 120*, 6x P 240*)
30211091
(6x P 60*, 6x P 120*, 6x P 240*)
30211097
24x
do drewna
: 6x P 60*, 6x P 120*,6x P 180*, 6x P 240*
3x do kamienia: 1x P 80*, 1x 180*, 1x P 400*
3x do lakieru: 1x P 60*, 1x P 120*, 1x P 240*)
14 P 80*) 30211085
P 120*) 30211086
P 180*) 30211087
*P = uziarnienie

75
PL
Problem
-
Reaguje bezpiecznik instalacji
domowej
-
-
nych.
1)
jest uszkodzony
Naprawa realizowana przez serwis
Uszkodzony silnik
z przerwami
Naprawa realizowana przez serwis
1)
jest uszkodzony
Silnik pracuje wol-
niej i zatrzymuje
przez obrabiany element
szlifowania
-
-
-

76
PL
Gwarancja
Szanowna Klientko, Szanowny Kliencie,
-
stwo 3 lata gwarancji od daty zakupu.
-
Warunki gwarancji
-
zakupu.
-
bryczna, produkt zostanie – wedle naszego
-
-
-
biegnie na nowo.)
Okres gwarancji i ustawowe rosz-
-
-
-
Zakres gwarancji
-
-
-
-
-
-
prywatnego, a nie komercyjnego. W przy-
-
przeprowadzone przez nasz autoryzowa-
-
-
-
my o przygotowanie paragonu i nume-
-
ce znamionowej.

77
PL
innych wad prosimy o skontaktowanie
-
sowym telefonicznie lub mailowo. Uzy-
informacje na temat realizacji reklama-
cji.
-
jako ponadwymiarowa, ekspresowo
lub na innych specjalnych warunkach.
otrzymanymi przy zakupie i zadbanie o
Serwis naprawczy
Naprawy, ,
-
kosztorys naprawy.
-
-
wane i ofrankowane.
Uwaga:
-
sowa lub na innych warunkach specjal-
Service-Center
PL
Serwis Polska
Tel.: 22 397 4996
E-Mail: [email protected]
IAN 303400
Importer
adres nie jest adresem serwisu. Prosimy
serwisowym.
Grizzly Tools GmbH & Co. KG
Stockstädter Straße 20
DE-63762 Großostheim
Niemcy
www.grizzly-service.eu

78
CZ
Obsah
Úvod..........................................78
Ú ................................ 78
Všeobecný popis ........................78
Objem dodávky .............................. 79
.......................................... 79
Technické parametry ..................79
.................80
Symboly a piktogramy .................... 80
elektrické nástroje ........................... 80
........... 82
............................... 83
....................... 84
...... 84
................ 84
zásuvky na prach ............................ 84
.......................... 85
Obsluha .....................................85
............................ 85
Pokyny k práci ..........................85
......................................... 86
........................ 86
Volba brusné desky ......................... 86
.........................86
........................................... 86
zásuvky na prach ........................... 87
................................87
.......... 87
Záruka ......................................88
Opravna .................................... 89
Service-Center ............................89
Dovozce ..................................... 89
........90
..............................91
Úvod
-
-
se seznamte se všemi pokyny k
-
-
všechny podklady.
Ú
-
-
dohledem.
-
-
nou obsluhou.
Všeobecný popis
....................................111
......................113

79
CZ
Objem dodávky
• 3 brusné listy
(zrnitost 80 / 120 / 180)
(zrnitost 80 / 120 / 180)
• návod k obsluze
prach
prach
8 zásuvka na prach
10 brusná deska
brusné desky
Technické parametry
........................ PHS 160 E5
(U) .............................. 230 V~, 50 Hz
.....................................160 W
(n
0
) ..........13000 min
-1
......................26000 min
-1
......cca 1,1 kg
................................... II
Druh ochrany...................................IPX0
Hladina akustického tlaku
(L
pA
) ...................... 76 dB(A); K
pA
= 3 dB
(L
WA
) .....................87 dB(A); K
WA
= 3 dB
Vibrace
(a
h
) ........................ 9 m/s
2
;
K= 1,5 m/s
2
-
-
-
Výstraha:
-
uvedené hodnoty, v závislosti na
-
-
vypnutý, a ty, ve kterých je sice za-

80
CZ
-
Symboly a piktogramy
Pozor!
-
-
ze zásuvky.
-
ochranou.
-
-
Symboly v návodu
-
venci škod.
pokyny: elektrické nástroje
VAROVÁNÍ!
-
-
-
vést k nehodám.
• Nepracujte s elektrickým nástro-
-
-
vé tekutiny, plyny anebo prachy.
mohou zapálit prach anebo páry.
-
nástrojem.

81
CZ
-
-
jste unaveni anebo pod vlivem
Jediný
ochranné výstroje, jako je protiskluzová
-
-
nesete. -
elektrický nástroj zapnete.
-
-
hu. -
-
-
-
-
-
Existuje zvýšené riziko skrze
-
• Nevystavujte elektrický nástroj
dešti anebo mokru.
do elektrického nástroje zvyšuje riziko
-
Poškozené anebo zamotané
-
strojem pod širým nebem, pak
kabely, které jsou vhodné i pro
-
-
•
elektrického nástroje ve vlhkém
Pou-

82
CZ
-
-
-
TRICKÉHO NÁSTROJE
-
S
vhodným elektrickým nástrojem pracuje-
te v udaném výkonovém rozsahu lépe a
být opravené.
-
-
nému startu elektrického nástroje.
-
nástrojem nejsou obeznámené
Elek-
nástroj. Kontrolujte, jestli pohyb-
-
funkce elektrického nástroje na-
-
seknou a lépe se vedou.
-
instrukcemi. -
-
-
• -
-
-
-
elektrickým proudem.
5) SERVIS
odborným personálem a jenom
s obsahem olova, azbestu,
-
-

83
CZ
noste ochranné brýle, bez-
-
• Obrobek,
-
•
broušeného materiály a brusky.
•
Nedotýkejte se opracovaného
-
dit. -
•
prach.
-
-
nebo jiných chemických látek a brusivo
-
-
-
-
-
-
vhodná ochrana sluchu.
-
-
-
-
cem.

84
CZ
proudem.
listu
-
-
-
-
brusného listu (12).
-
-
desku (10). Dbejte na to, aby
otvory (15) brusné desky (10).
2. Brusný list (12) z brusné desky
namontovány oba brusné listy.
-
brusného listu.
(10).
-
-
2.
na zásuvce na prach (8). Na-
prachu (9). Oba výstupky (9a)
na zásuvce na prach (8).

85
CZ
zásuvky na prach (8).
-
(8) vyklepte.
prachu:
-
-
prachu
-
-
bez adaptéru.
Obsluha
-
„I“
-
„0“
Pokyny k práci
-
-
-
proudem.

86
CZ
-
brusnou desku.
• Pracujte pouze s bezvadnými brusnými
•
-
vem.
Zrnitost Aplikace
P 60
P 80
-
P 120
P 180
P 240
Volba brusné desky
-
prostor.
které nejsou popsány v tomto ná-
-
-
kovat vodou ani pokládat do
elektrickým proudem!
vyklepte.

87
CZ
1. S
4
( 8) (vi
-
-
ji uschnout.
-
ky na prach (6).
6. Zásuvku na prach (
-
-
-
-
-
Likvidaci vašich zaslaných poškozených

88
CZ
Záruka
-
-
-
vadu, bude výrobek námi, podle našeho
-
-
-
-
opravy.
Rozsah záruky
-
-
-
-
výrobkem, které nejsou v návodu k obsluze
-
autorizovaným servisem.
-
ruky
-
návodu (dole vlevo) nebo na nálepce
telefonicky
nebo e-mailem-

89
CZ
-
te
-
-
Opravna
-
-
Pozor:-
-
Likvidaci vašich poškozených zaslaných
Service-Center
CZ
Tel.: 800143873
E-Mail: [email protected]
IAN 303400
Dovozce
Grizzly Tools GmbH & Co. KG
Stockstädter Straße 20
DE-63762 Großostheim
www.grizzly-service.eu

90
CZ
www.grizzly-service.eu
Návod
k obsluze
10 brusná deska
13
91104221
18
(2x P 60*, 2x P 120*, 1x P 240*)
(12x P 60*, 12x P 120*, 6x P 240*)
(6x P 60*, 6x P 120*, 6x P 240*)
3x na kámen: 1x P 80*, 1x 180*, 1x P 400*
3x na lak: 1x P 60*, 1x P 120*, 1x P 240*)
* P = zrnitost

91
CZ
Problém
-
pojistka.
-
-
1) je
vadný.
centra
Závada motoru
-
centra
1) je
vadný
-
kem
nástroj
Nevhodný obrobek
Nesprávným výkon
obrobek
vhodnou brusnou desku (viz „Ná-
Brusný list se rychle
obrobek

92
SK
Obsah
Úvod..........................................92
.............................. 92
Všeobecný popi .........................93
Objem dodávky .............................. 93
.......................................... 93
..........................93
................94
............... 94
pre elektrické nástroje ...................... 94
............ 97
Zvyškové riziká ............................... 97
........................98
.. 98
................. 98
Pripojenie/odobratie/vyprázdnenie
prachovej nádoby ........................... 99
Pripojenie/odobratie externého
odsávanie prachu ........................... 99
Obsluha .....................................99
Zapnutie/vypnutie ........................... 99
Pokyny pre prácu ....................100
....................................... 100
...................... 100
..................... 100
..................... 100
....................................... 101
prachovej nádoby ........................ 101
Uskladnenie .............................101
Odstránenie a ochrana
................ 101
..102
.....................103
Záruka ....................................104
Servisná oprava ......................105
Service-Center ..........................105
Dovozca ...................................105
Úvod
-
-
testovaný na kvalitu a podrobený výstupnej
-
-
produktu sa oboznámte so všetkými
spôsobom a len v uvedených oblas-
aj všetky podklady.
kovu, plastu, tmelu a lakovaných povrchov
za sucha.
-
vode na obsluhu nie je výslovne povolené,
-
Výrobca nezodpovedá za škody, ktoré boli
Preklad originálneho
prehlásenia o zhode CE ............ 112
.....................113

93
SK
Všeobecný popi
Obrázky nájdete na prednej
výklopnej strane.
Objem dodávky
-
predpisov.
• adaptér pre externé odsávanie prachu
• 3 (dvojdielny)
( 80 / 120 / 180)
•
•
( 80 / 120 / 180)
• Návod na obsluhu
2 opierka zápästia
4
nádoby
5
6 veko prachovej nádoby
7 spona na otváranie prachovej
nádoby
8 prachová nádoba
9
10
11 adaptér externého
odsávania prachu
12
17
18
................................PHS 160 E5
Menovité vstupné napätie
(U) .................................230 V~, 50 Hz
.................................... 160 W
0
) .. 13000 min
-1
............26000 min
-1
................................. asi 1,1 kg
Ochranná trieda ...............................
II
Druh ochrany...................................IPX0
Hladina akustického tlaku
(L
pA
) ....................... 76 dB(A); K
pA
= 3 dB
Hladina akustického
(L
WA
) ......................87 dB(A); K
WA
= 3 dB
Vibrácie (a
h
) ............. 9 m/s
2
;
K= 1,5 m/s
2
-
Výstraha:
uvádzanej hodnoty, v závislosti od
druhu a spôsobu, v akom sa elek-

94
SK
nástroja a obmedzenie pracovného
vypnuté a také, kedy je zapnuté,
-
Pozor!
-
vytiahnite kábel z elektrickej siete.
Noste ochranu sluchu.
Noste ochranu zraku.
Noste ochranu dýchania.
Ochranná trieda II (Dvojitá izolácia)
-
mového odpadu.
Symboly v návode
alebo vecným škodám.
-
venciu škôd.
-
pätie.
pre lepšie zaobchádzanie s nástro-
jom.
-
kyny pre elektrické nástroje
a nariadenia. Zanedbanie dodr-
-
-
-
káblom) a na elektrické nástroje napájané
-
tý a dobre osvetlený. Neporiadok
alebo neosvetlené pracovné oblasti
• Nepracujte s elektrickým nástro-
-
prachy.

95
SK
-
vádzke elektrického nástroja
-
nástrojom rozumne do práce.
-
vom drog, alkoholu alebo lie-
kov.
• Noste osobný ochranný výstroj a
Nosenie
osobného ochranného výstroja, ako je
protišmyková obuv, ochranná prilba a
• Vyvarujte sa nezámernému uve-
-
nesiete.
-
zapnete elektrický nástroj. Ná-
k poraneniam.
• Vyvarujte sa abnormálnemu
vzdialene od seba. Pri nepozornosti
-
Ne-
• Vyvarujte sa telesnému kontak-
tu s uzemnenými povrchmi ako
-
Existuje zvýšené
telo uzemnené.
• Nevystavujte elektrický nástroj
Vniknutie
vody do elektrického nástroja zvyšuje
ako je nosenie alebo zavesenie
elektrického nástroja alebo vy-
-
nástrojov. Poškodené alebo zamotané
-
-
-
cieho kábla vhodného pre vonkajšiu ob-

96
SK
rovnováhu.-
elektrický nástroj.
• Noste vhodný odev. Nenoste
-
• Zapojte odsávacie zariadenie.
-
ELEKTRICKÉHO NÁSTROJA
-
S
vhodným elektrickým nástrojom pracuje-
te v udanom výkonovom rozsahu lepšie
-
fektný.
-
-
myselnému štartu elektrického nástroja.
-
oboznámené s týmto nástrojom
Elek-
• Starostlivo ošetrujte tento elek-
-
je funkcia elektrického nástroja
narušená. Nechajte poškode-
-
nástrojoch.
Starostlivo ošetrované rezné
nástroje s ostrými reznými hranami sa
-
-
-
konávate práce, pri ktorých po-
styku so skrytými elektrickými
vedeniami. Dotyk na elektrické vede-
5) SERVIS
• Svoje elektrické náradie nechaj-
odborným personálom a iba po-
mocou originálnych náhradných

97
SK
dielov.-
-
chovaná.
prach (napr. z materiálov
ako olovnaté farby, mate-
kovov alebo niektorých
-
o dobré vetranie pracoviska.
Stále noste ochranné okulia-
ochranu dýchania. Pripojte
odsávanie prachu.
• Obrábaný predmet zaistite. Upev-
Vniknutie
vody do elektrického náradia zvýši rizi-
•
Je nebezpe-
• -
predmet nechytajte na opraco-
vanom mieste, nechajte ho vy-
-
alebo podobné.
• Pred pracovnými prestávkami
prach. Jemný prach vo vrecku na
-
-
polyuretánu alebo inými chemickými
látkami a obrábaný predmet je po dl-
-
-
-
výrobcu alebo od jeho servisnej
Zvyškové riziká
-
-
ochranu dýchania;
b) rezné poranenia,
ochranu sluchu,
ochranu zraku.

98
SK
-
Upozornenie! Tento elektrický
elektromagnetické pole. Toto pole
-
implantáty. Aby sa zabránilo
aby osoby s lekárskymi implantátmi
konzultovali svojho lekára alebo
výrobcu lekárskeho implantátu pred
-
Upevnenie/odobratie
-
zranenia ako aj zablokovanie ale-
listu (12).
opotrebenia.
Upevnenie brúsneho listu:
-
Odobratie brúsneho listu:
-
platne (10).
-
polohy.

99
SK
Nasadenie brúsneho listu pre
brúsny jazyk:
-
jazyk (13).
Pripojenie/odobratie/vy-
prázdnenie prachovej nádoby
Pripojenie prachovej nádoby:
uzavretá.
(4) na prachovej nádobe (8).
prachu (9). Oba hroty (9a) na
-
chovej nádobe (8).
-
nádoby (8).
Odobratie prachovej nádoby:
Vyprázdnenie prachovej nádoby:
5. Vytiahnite sponu (7) a odoberte
veko prachovej nádoby (6).
-
(8).
výkon nasávania.
Pripojenie/odobratie
externého odsávanie prachu
Pripojenie externého odsávania
prachu:
-
(9).
2. Zapojte nasávaciu hadicu vysá-
do adaptéra externého odsáva-
nia prachu (11).
Odobratie externého odsávania
prachu:
1. Stiahnite nasávaciu hadicu z
adaptéra externého odsávania
prachu (11).
2. Vytiahnite adaptéra externému
odsávaniu prachu (11).
-
denie priamo a bez adaptéra.
Obsluha
Dbajte na to aby napätie zodpo-
vedalo hodnotám uvedeným na
Zapojte náradie do elektrickej siete.
Zapnutie/vypnutie
vyp (1) do polohy „I“, zariade-
nie sa rozbehne.
vyp (1) do polohy „0“, zariade-
nie sa vypne.

100
SK
Pokyny pre prácu
vhodný odev a primerané
ochranné vybavenie.
Osobné ochranné prostried-
nádoby alebo externého odsáva-
-
chom.
-
vanie prachu. Postarajte sa o dobré
vetranie pracoviska.
-
-
-
•
listami, aby ste dosiahli dobré výsledky
• Pracujte s malým a rovnomerným
rôzne materiály (napr. kov a potom dre-
vo).
-
sávania.
P 60
P 80
-
vených plôch
P 120
P 180
P 240
základnou a krycou farbou
-
medzipriestorov.

101
SK
-
-
• Vetracie otvory, kryt motora a rukoväte
-
vyklepte.
-
1.
( -
dobu ( 8).
2. Potiahnite sponu (7) a odoberte
„Pripojenie/odobratie/vyprázd-
nenie prachovej nádoby“).
na veku prachovej nádoby (6) a
-
-
stvo“).
prachovej nádoby (6).
( 8).
Uskladnenie
-
odobratie/vyprázdnenie prachovej ná-
doby“).
Odstránenie a ochrana
-
-
mového odpadu
-

102
SK
www.grizzly-service.eu
Návod na
obsluhu
, predmontovaný 91104224
13
11 adaptér externého odsávania prachu 91104222
91104221
18
12
30211088
(2x P 60*, 2x P 120*, 1x P 240*)
30211089
(12x P 60*, 12x P 120*, 6x P 240*)
30211091
(6x P 60*, 6x P 120*, 6x P 240*)
30211097
24x na drevo: 6x P 60*, 6x P 120*,6x P 180*, 6x P 240*
3x na lak: 1x P 60*, 1x P 120*, 1x P 240*)
14 (P 80*) 30211085
(P 120*) 30211086
(P 180*) 30211087

103
SK
Problém Odstránenie poruchy
Zariadenie sa
Reagovala domová poistka
-
1)
-
ter
Porucha motora
Zariadenie pra-
cuje prerušovane
(
1)
Motor je pomalý
-
kom
Obrobok nie je vhodný
obrábaný obrobok
-
vod")
-
rýchlo opotrebo-
váva
obrobok

104
SK
Záruka
-
-
nou zárukou obmedzené.
starostlivo uschovajte. Je potrebný ako dô-
-
penia tohto produktu vyskytne materiálna
-
Ak sa v rámci našej záruky chyba pokryje,
S opravou alebo výmenou produktu sa ne-
-
nenie vady
-
-
Rozsah záruky
-
kontrolovaný.
Záruka sa týka materiálových alebo vý-
-
-
ný poškodený, neodborne alebo nebola vy-
návody uvedené v návode na obsluhu. Bez-
-
zaniká pri nesprávnom a neodbornom
zásahoch, ktoré neboli vykonané v našej
-
na rytine, na titulnej strane vášho návo-
zadnej alebo spodnej strane.
iné nedostatky, kontaktujte najskôr
následne uvedené servisné oddelenie
telefonicky alebo emailom. Následne
vašej reklamácie.
• Produkt evidovaný ako poškodený
-
-

105
SK
su servisu, ktorá vám bude oznámená.
alebo s iným špeciálnym nákladom.
-
pravné balenie.
Servisná oprava
-
balené a so zaplateným poštovným.
Pozor:-
-
-
ne alebo s iným špeciálnym nákladom.
Likvidáciu vašich poškodených zaslaných
Service-Center
SK
Servis Slovensko
Tel.: 0850 232001
E-Mail: [email protected]
IAN 303400
Dovozca
Najskôr kontaktujte hore uvedené servisné
centrum.
Grizzly Tools GmbH & Co. KG
Stockstädter Straße 20
DE-63762 Großostheim
Nemecko
www.grizzly-service.eu

106
DE
AT
CH
Original EG-Konformitätserklärung
Hiermit bestätigen wir, dass der
Handschleifer
Modell PHS 160 E5
Seriennummer
201810000001 - 201810177250
folgenden einschlägigen EU-Richtlinien in ihrer jeweils gültigen Fassung entspricht:
2006/42/EG • 2014/30/EU • 2011/65/EU*
Um die Übereinstimmung zu gewährleisten, wurden folgende harmonisierte Normen
sowie nationale Normen und Bestimmungen angewendet:
EN 60745-1:2009/A11:2010 • EN 60745-2-4:2009/A11:2011
EN 55014-1:2006/A2:2011 • EN 55014-2:2015
EN 61000-3-2:2014 • EN 61000-3-3:2013 • EN 62321:2009
Die alleinige Verantwortung für die Ausstellung dieser Konformitätserklärung trägt der
Hersteller:
Christian Frank
(Dokumentationsbevollmächtigter)
Grizzly Tools GmbH & Co. KG
Stockstädter Straße 20
D-63762 Großostheim, Germany
30.10.2018
* Der oben beschriebene Gegenstand der Erklärung erfüllt die Vorschriften der Richtlinie
2011/65/EU des Europäischen Parlaments und des Rates vom 8. Juni 2011 zur Beschränkung
der Verwendung bestimmter gefährlicher Stoffe in Elektro- und Elektronikgeräten.

107
GB
IE
Translation of the original EC
declaration of conformity
Detail sander
model PHS 160 E5
Serial number
201810000001 - 201810177250
conforms with the following applicable relevant version of the EU guidelines:
2006/42/EC • 2014/30/EU • 2011/65/EU*
In order to guarantee consistency, the following harmonised standards as well as
national standards and stipulations have been applied:
EN 60745-1:2009/A11:2010 • EN 60745-2-4:2009/A11:2011
EN 55014-1:2006/A2:2011 • EN 55014-2:2015
EN 61000-3-2:2014 • EN 61000-3-3:2013 • EN 62321:2009
This declaration of conformity is issued under the sole responsibility of the
manufacturer:
Grizzly Tools GmbH & Co. KG
Stockstädter Straße 20
D-63762 Großostheim, Germany
30.10.2018
of the European Parliament and the Council of 8 June 2011 on limiting the use of certain harmful
substances in electrical and electronic appliances.
Christian Frank
Documentation Representative

108
FR
BE
Traduction de la déclaration de
conformité CE originale
Ponceuse triangulaire
PHS 160 E5
Numéro de série
201810000001 - 201810177250
est conforme aux directives UE actuellement en vigueur :
2006/42/EC • 2014/30/EU • 2011/65/EU*
En vue de garantir la conformité les normes harmonisées ainsi que les normes et
décisions nationales suivantes ont été appliquées :
EN 60745-1:2009/A11:2010 • EN 60745-2-4:2009/A11:2011
EN 55014-1:2006/A2:2011 • EN 55014-2:2015
EN 61000-3-2:2014 • EN 61000-3-3:2013 • EN 62321:2009
Le fabricant assume seul la responsabilité d‘établir la présente déclaration de conformité :
Grizzly Tools GmbH & Co. KG
Stockstädter Straße 20
D-63762 Großostheim, Germany
30.10.2018
* L‘objet de la déclaration décrit ci-dessus est conforme aux dispositions de la directive
2011/65/UE du Parlement Européen et du Conseil du 8 juin 2011 sur la limitation de l‘utilisation
de certaines substances dangereuses dans les équipements électriques et électroniques.
Christian Frank
Chargé de documentation

109
NL
BE
Vertaling van de originele
CE-conformiteitsverklaring
handschuurmachine
bouwserie PHS 160 E5
Serienummer
201810000001 - 201810177250
2006/42/EC • 2014/30/EU • 2011/65/EU*
Om de overeenstemming te waarborgen, werden de hierna volgende, in overeenstemming
gebrachte normen en nationale normen en bepalingen toegepast:
EN 60745-1:2009/A11:2010 • EN 60745-2-4:2009/A11:2011
EN 55014-1:2006/A2:2011 • EN 55014-2:2015
EN 61000-3-2:2014 • EN 61000-3-3:2013 • EN 62321:2009
wordt gedragen door de fabrikant:
Grizzly Tools GmbH & Co. KG
Stockstädter Straße 20
D-63762 Großostheim, Germany
30.10.2018
* Het hierboven beschreven voorwerp van de verklaring voldoet aan de voorschriften van de richtlijn
2011/65/EU van het Europese Parlement en van de Raad van 8 juni 2011 inzake beperking van het
gebruik van bepaalde gevaarlijke stoffen in elektrische en elektronische apparaten.
Christian Frank
(Documentatiegelastigde)

110
PL
typu PHS 160 E5
seryjny
201810000001 - 201810177250
2006/42/EC • 2014/30/EU • 2011/65/EU*
EN 60745-1:2009/A11:2010 • EN 60745-2-4:2009/A11:2011
EN 55014-1:2006/A2:2011 • EN 55014-2:2015
EN 61000-3-2:2014 • EN 61000-3-3:2013 • EN 62321:2009
producent:
Christian Frank
(
technicznej)
Grizzly Tools GmbH & Co. KG
Stockstädter Straße 20
D-63762 Großostheim, Germany
30.10.2018

111
CZ
model PHS 160 E5
201810000001 - 201810177250
2006/42/EC • 2014/30/EU • 2011/65/EU*
EN 60745-1:2009/A11:2010 • EN 60745-2-4:2009/A11:2011
EN 55014-1:2006/A2:2011 • EN 55014-2:2015
EN 61000-3-2:2014 • EN 61000-3-3:2013 • EN 62321:2009
Christian Frank
(
)
Grizzly Tools GmbH & Co. KG
Stockstädter Straße 20
D-63762 Großostheim, Germany
30.10.2018

112
20180925_rev02_mt
SK
Preklad originálneho prehlásenia
o zhode CE
typu PHS 160 E5
seryjny
201810000001 - 201810177250
2006/42/EC • 2014/30/EU • 2011/65/EU*
národné normy a predpisy:
EN 60745-1:2009/A11:2010 • EN 60745-2-4:2009/A11:2011
EN 55014-1:2006/A2:2011 • EN 55014-2:2015
EN 61000-3-2:2014 • EN 61000-3-3:2013 • EN 62321:2009
Jediný zodpovedný za vystavenie tohto vyhlásenia o zhode je výrobca :
Grizzly Tools GmbH & Co. KG
Stockstädter Straße 20
D-63762 Großostheim, Germany
30.10.2018
elektrických a elektronických prístrojoch.
Christian Frank
(-
)

113
Explosionszeichnung • Exploded Drawing
Vue éclatée • Explosietekening
Rysunki eksplozyjne •
PHS 160 E5
informativ, informative,
informatif, informatief,
,

GRIZZLY TOOLS GMBH & CO. KG
Stockstädter Straße 20
DE-63762 Großostheim
GERMANY
Stand der Informationen · Last Information
Update · Version des informations ·
Stand van de informatie · Stan informacji ·
Stav informací · Stav informácií:
09/2018 · Ident.-No.: 72037235092018-8
IAN 303400
Documenttranscriptie
HANDSCHLEIFER / DETAIL SANDER / PONCEUSE TRIANGULAIRE PHS 160 E5 HANDSCHLEIFER DETAIL SANDER Originalbetriebsanleitung Translation of the original instructions PONCEUSE TRIANGULAIRE HANDSCHUURMACHINE Traduction des instructions d‘origine Vertaling van de originele gebruiksaanwijzing SZLIFIERKA RĘCZNA RUČNÍ BRUSKA Tłumaczenie oryginalnej instrukcji obsługi Překlad originálního provozního návodu RUČNÁ BRÚSKA Preklad originálneho návodu na obsluhu IAN 303400 Klappen Sie vor dem Lesen die Seite mit den Abbildungen aus und machen Sie sich anschließend mit allen Funktionen des Gerätes vertraut. Before reading, unfold the page containing the illustrations and familiarise yourself with all functions of the device. Avant de lire le mode d‘emploi, ouvrez la page contenant les illustrations et familiarisez-vous ensuite avec toutes les fonctions de l‘appareil. Vouw vóór het lezen de pagina met de afbeeldingen open en maak u vertrouwd met alle functies van het apparaat. Przed przeczytaniem proszę rozłożyć stronę z ilustracjami, a następnie proszę zapoznać się z wszystkimi funkcjami urządzenia. Před čtením si otevřete stranu s obrázky a potom se seznamte se všemi funkcemi přístroje. Pred čítaním si odklopte stranu s obrázkami a potom sa oboznámte so všetkými funkciami prístroja. DE / AT / CH GB / IE FR / BE NL / BE PL CZ SK Originalbetriebsanleitung Translation of the original instructions Traduction des instructions d‘origine Vertaling van de originele gebruiksaanwijzing Tłumaczenie oryginalnej instrukcji obsługi Překlad originálního provozního návodu Preklad originálneho návodu na obsluhu Seite Page Page Pagina Strona Strana Strana 4 19 33 48 63 78 92 1 2 3 4 12 11 5 6 7 8 13 14 9 10 12 10 10 16 15 14 13 4 10 6 7 9 16 8a 8 9a 17 18 7 11 9 6 DE AT CH Inhalt Einleitung Einleitung ..................................... 4 Bestimmungsgemäße Verwendung ................................ 4 Allgemeine Beschreibung ............. 5 Lieferumfang..................................... 5 Übersicht ......................................... 5 Technische Daten .......................... 5 Sicherheitshinweise ...................... 6 Symbole und Bildzeichen ................... 6 Allgemeine Sicherheitshinweise für Elektrowerkzeuge ......................... 6 Weiterführende Sicherheitshinweise .... 9 Restrisiken ...................................... 10 Montage .................................... 10 Schleifblatt anbringen/entfernen ....... 10 Schleifzunge montieren .................... 11 Staubbox anschließen/abnehmen/ leeren ............................................ 11 Externe Staubabsaugung anschließen/abnehmen ................... 12 Bedienung ................................. 12 Ein- und Ausschalten ........................ 12 Arbeitshinweise ......................... 12 Schleifen ........................................ 12 Wahl des Schleifblattes .................... 13 Wahl der Schleifplatte ..................... 13 Reinigung und Wartung ............. 13 Reinigung....................................... 13 Filtereinlage der Staubbox reinigen/wechseln ......................... 14 Lagerung ................................... 14 Entsorgung/ Umweltschutz......... 14 Ersatzteile/Zubehör ................... 15 Fehlersuche ................................ 16 Garantie .................................... 17 Reparatur-Service ...................... 18 Service-Center ............................ 18 Importeur .................................. 18 Original EGKonformitätserklärung ............. 106 Explosionszeichnung ................ 113 Herzlichen Glückwunsch zum Kauf Ihres neuen Gerätes. Sie haben sich damit für ein hochwertiges Gerät entschieden. Dieses Gerät wurde während der Produktion auf Qualität geprüft und einer Endkontrolle unterzogen. Die Funktionsfähigkeit Ihres Gerätes ist somit sichergestellt. 4 Die Betriebsanleitung ist Bestandteil dieses Gerätes. Sie enthält wichtige Hinweise für Sicherheit, Gebrauch und Entsorgung. Machen Sie sich vor der Benutzung des Gerätes mit allen Bedien- und Sicherheitshinweisen vertraut. Benutzen Sie das Gerät nur wie beschrieben und für die angegebenen Einsatzbereiche. Bewahren Sie die Betriebsanleitung gut auf und händigen Sie alle Unterlagen bei Weitergabe des Gerätes an Dritte mit aus. Bestimmungsgemäße Verwendung Das Gerät ist zum trockenen Schleifen von Holz, Metall, Kunststoff, Spachtelmasse sowie lackierten Oberlächen vorgesehen. Dieses Gerät ist nicht zur gewerblichen Nutzung geeignet. Jede andere Verwendung, die in dieser Anleitung nicht ausdrücklich zugelassen wird, kann zu Schäden am Gerät führen und eine ernsthafte Gefahr für den Benutzer darstellen. Das Gerät ist zum Gebrauch durch Erwachsene bestimmt. Jugendliche über 16 Jahre dürfen das Gerät nur unter Aufsicht benutzen. Der Hersteller haftet nicht für Schäden, die durch bestimmungswidrigen Gebrauch oder falsche Bedienung verursacht wurden. DE Allgemeine Beschreibung Die Abbildung der wichtigsten Funktionsteile inden Sie auf der Ausklappseite. Lieferumfang Packen Sie das Gerät aus und kontrollieren Sie, ob es vollständig ist. Entsorgen Sie das Verpackungsmaterial ordnungsgemäß. • • • • • • • Gerät Staubbox Adapter zur externen Staubabsaugung 3 Schleifblätter (zweiteilig) (Körnung P 80 / P 120 / P 180) Schleifzunge 3 Schleifblätter für Schleifzunge (Körnung P 80 / P 120 / P 180) Betriebsanleitung Übersicht 1 2 3 4 5 6 7 8 9 10 11 12 13 14 Ein-/Ausschalter Handaulage Lüftungsöffnungen Entriegelungstaste Staubbox Netzkabel Staubboxdeckel Lasche zum Öffnen der Staubbox Staubbox Anschluss zur Staubabsaugung Schleifplatte Adapter zur externen Staubabsaugung 3 Schleifblätter (zweiteilig) Schleifzunge 3 Schleifblätter für Schleifzunge 15 Absaugöffnungen Schleifplatte AT CH 16 Spannhebel zur Schleifplattenentriegelung 17 Halterahmen für Filtereinlage 18 Filtereinlage für Staubbox Technische Daten Handschleifer ......................... PHS 160 E5 Nenneingangsspannung (U) .............................. 230 V~, 50 Hz Leistungsaufnahme (P) ...................160 W Leerlaufdrehzahl (n0) ..............13000 min-1 Schwingzahl (n) ....................26000 min-1 Gewicht (ohne Zubehör) .......... ca. 1,1 kg Schutzklasse ..................................... II Schutzart......................................... IPX0 Schalldruckpegel (LpA) .. 76 dB(A); KpA=3 dB Schallleistungspegel (LWA) ..................... 87 dB(A); KWA=3 dB Schwingungswert (ah) ...9 m/s2; K=1,5 m/s2 Der angegebene Schwingungsemissionswert ist nach einem genormten Prüfverfahren gemessen worden und kann zum Vergleich eines Elektrowerkzeugs mit einem anderen verwendet werden. Der angegebene Schwingungsemissionswert kann auch zu einer einleitenden Einschätzung der Aussetzung verwendet werden. Warnung: Der Schwingungsemissionswert kann sich während der tatsächlichen Benutzung des Elektrowerkzeugs von dem Angabewert unterscheiden, abhängig von der Art und Weise, in der das Elektrowerkzeug verwendet wird. Versuchen Sie, die Belastung durch Vibrationen so gering wie möglich zu halten. Beispielhafte Maßnahmen zur Verringerung der Vibrationsbelastung sind das Tragen von 5 DE AT CH Handschuhen beim Gebrauch des Werkzeugs und die Begrenzung der Arbeitszeit. Dabei sind alle Anteile des Betriebszyklus sind zu berücksichtigen (beispielsweise Zeiten, in denen das Elektrowerkzeug abgeschaltet ist, und solche, in denen es zwar eingeschaltet ist, aber ohne Belastung läuft). Sicherheitshinweise Beim Gebrauch des Gerätes sind die Sicherheitshinweise zu beachten. Symbole und Bildzeichen Symbole in der Anleitung: Gefahrenzeichen mit Angaben zur Verhütung von Personen- oder Sachschäden. Gebotszeichen mit Angaben zur Verhütung von Schäden. Schließen Sie das Gerät an die Netzspannung an. Netzstecker ziehen. Hinweiszeichen mit Informationen zum besseren Umgang mit dem Gerät. Bildzeichen auf dem Gerät: Achtung! Gefahr durch elektrischen Schlag! Ziehen Sie vor Wartungs- und Reparaturarbeiten den Netzstecker aus der Steckdose. Lesen Sie die Bedienungsanleitung aufmerksam durch. Tragen Sie Augen- und Gehörschutz. Tragen Sie einen Atemschutz. Tragen Sie Schutzhandschuhe. Schutzklasse II (Doppelisolierung) Elektrogeräte gehören nicht in den Hausmüll. Allgemeine Sicherheitshinweise für Elektrowerkzeuge WARNUNG! Lesen Sie alle Sicherheitshinweise und Anweisungen. Versäumnisse bei der Einhaltung der Sicherheitshinweise und Anweisungen können elektrischen Schlag, Brand und/oder schwere Verletzungen verursachen. Bewahren Sie alle Sicherheitshinweise und Anweisungen für die Zukunft auf. Der in den Sicherheitshinweisen verwendete Begriff ,,Elektrowerkzeug” bezieht sich auf netzbetriebene Elektrowerkzeuge (mit Netzkabel) und auf akkubetriebene Elektrowerkzeuge (ohne Netzkabel). 1) ARBEITSPLATZSICHERHEIT a) Halten Sie Ihren Arbeitsbereich sauber und gut beleuchtet. Unordnung oder unbeleuchtete Arbeitsbereiche können zu UnfälIen führen. 6 DE b) Arbeiten Sie mit dem Elektrowerkzeug nicht in expIosionsgefährdeter Umgebung, in der sich brennbare Flüssigkeiten, Gase oder Stäube beinden. Elektrowerkzeuge erzeugen Funken, die den Staub oder die Dämpfe entzünden können. c) Halten Sie Kinder und andere Personen während der Benutzung des EIektrowerkzeugs fern. Bei Ablenkung können Sie die Kontrolle über das Gerät verlieren. 2) ELEKTRISCHE SICHERHEIT a) Der Anschlussstecker des Elektrowerkzeuges muss in die Steckdose passen. Der Stecker darf in keiner Weise verändert werden. Verwenden Sie keine Adapterstecker gemeinsam mit schutzgeerdeten Elektrowerkzeugen. Unveränderte Stecker und passende Steckdosen verringern das Risiko eines elektrischen Schlages. b) Vermeiden Sie Körperkontakt mit geerdeten OberfIächen, wie von Rohren, Heizungen, Herden und Kühlschränken. Es besteht ein erhöhtes Risiko durch elektrischen Schlag, wenn Ihr Körper geerdet ist. c) Halten Sie Elektrowerkzeuge von Regen oder Nässe fern. Das Eindringen von Wasser in ein Elektrogerät erhöht das Risiko eines elektrischen Schlages. d) Zweckentfremden Sie das Kabel nicht, um das Elektrowerkzeug zu tragen, aufzuhängen oder um den Stecker aus der Steckdose zu ziehen. Halten Sie das Kabel fern von Hitze, Öl, schar- AT CH fen Kanten oder sich bewegenden Geräteteilen. Beschädigte oder verwickelte Kabel erhöhen das Risiko eines elektrischen Schlages. e) Wenn Sie mit einem Elektrowerkzeug im Freien arbeiten, verwenden Sie nur Verlängerungskabel, die auch für den Außenbereich geeignet sind. Die Anwendung eines für den Außenbereich geeigneten Verlängerungskabels verringert das Risiko eines elekrischen Schlages. f) Wenn der Betrieb des Elektrowerkzeugs in feuchter Umgebung nicht vermeidbar ist, verwenden Sie einen Fehlerstromschutzschalter. Der Einsatz eines Fehlerstromschutzschalters vermindert das Risiko eines elektrischen Schlages. 3) SICHERHEIT VON PERSONEN a) Seien Sie aufmerksam, achten Sie darauf, was Sie tun, und gehen Sie mit Vernunft an die Arbeit mit einem Elektrowerkzeug. Benutzen Sie kein Elektrowerkzeug, wenn Sie müde sind oder unter dem Einluss von Drogen, Alkohol oder Medikamenten stehen. Ein Moment der Unachtsamkeit beim Gebrauch des Elektrowerkzeuges kann zu ernsthaften Verletzungen führen. b) Tragen Sie persönliche Schutzausrüstung und immer eine Schutzbrille. Das Tragen persönlicher Schutzausrüstung, wie Staubmaske, rutschfeste Sicherheitsschuhe, Schutzhelm oder Gehörschutz, je nach Art und Einsatz des Elektrowerkzeuges, verringert das Risiko von Verletzungen. 7 DE AT CH c) Vermeiden Sie eine unbeabsichtigte lnbetriebnahme. Vergewissern Sie sich, dass das Elektrowerkzeug ausgeschaltet ist, bevor Sie es an die Stromversorgung und/oder den Akku anschließen, es aufnehmen oder tragen. Wenn Sie beim Tragen des Elektrowerkzeuges den Finger am Schalter haben oder das Gerät eingeschaltet an die Stromversorgung anschließen, kann dies zu Unfällen führen. d) Entfernen Sie Einstellwerkzeuge oder Schraubenschlüssel, bevor Sie das Elektrowerkzeug einschalten. Ein Werkzeug oder Schlüssel, der sich in einem drehenden Geräteteil beindet, kann zu Verletzungen führen. e) Vermeiden Sie eine abnormale Körperhaltung. Sorgen Sie für einen sicheren Stand und halten Sie jederzeit das Gleichgewicht. Dadurch können Sie das Elektrowerkzeug in unerwarteten Situationen besser kontrollieren. f) Tragen Sie geeignete Kleidung. Tragen Sie keine weite Kleidung oder Schmuck. Halten Sie Haare, Kleidung und Handschuhe fern von sich bewegenden Teilen. Lockere Kleidung, Schmuck oder lange Haare können von sich bewegenden Teilen erfasst werden. g) Wenn Staubabsaug- und -auffangeinrichtungen montiert werden können, vergewissern Sie sich, dass diese angeschlossen sind und richtig verwendet werden. Verwendung einer Staubabsaugung kann Gefährdungen durch Staub verringern. 8 4) VERWENDUNG UND BEHANDLUNG DES ELEKTROWERKZEUGES a) Überlasten Sie das Gerät nicht. Verwenden Sie für Ihre Arbeit das dafür bestimmte Elektrowerkzeug. Mit dem passenden Elektrowerkzeug arbeiten Sie besser und sicherer im angegebenen Leistungsbereich. b) Benutzen Sie kein Elektrowerkzeug, dessen Schalter defekt ist. Ein Elektrowerkzeug, das sich nicht mehr ein- oder ausschalten Iässt, ist gefährlich und muss repariert werden. c) Ziehen Sie den Stecker aus der Steckdose und/oder entfernen Sie den Akku, bevor Sie GeräteeinsteIlungen vornehmen, Zubehörteile wechseln oder das Gerät weglegen. Diese Vorsichtsmaßnahme verhindert den unbeabsichtigten Start des Elektrowerkzeuges. d) Bewahren Sie unbenutzte Elektrowerkzeuge außerhalb der Reichweite von Kindern auf. Lassen Sie Personen das Gerät nicht benutzen, die mit diesem nicht vertraut sind oder diese Anweisungen nicht gelesen haben. Elektrowerkzeuge sind gefährlich, wenn sie von unerfahrenen Personen benutzt werden. e) Plegen Sie Elektrowerkzeuge mit Sorgfalt. Kontrollieren Sie, ob bewegliche Teile einwandfrei funktionieren und nicht klemmen, ob Teile gebrochen oder so beschädigt sind, dass die Funktion des Elektrowerkzeuges beeinträchtigt ist. Lassen Sie beschädigte Teile vor dem Einsatz des Gerätes reparieren. Viele DE Unfälle haben ihre Ursache in schlecht gewarteten Elektrowerkzeugen. f) Halten Sie Schneidwerkzeuge scharf und sauber. SorgfäItig geplegte Schneidwerkzeuge mit scharfen Schneidkanten verklemmen sich weniger und sind Ieichter zu führen. g) Verwenden Sie Elektrowerkzeug, Zubehör, Einsatzwerkzeuge usw. entsprechend diesen Anweisungen. Berücksichtigen Sie dabei die Arbeitsbedingungen und die auszuführende Tätigkeit. Der Gebrauch von Elektrowerkzeugen für andere als die vorgesehenen Anwendungen kann zu gefährlichen Situationen führen. h) Halten Sie das Gerät an den isolierten Grifflächen, wenn Sie Arbeiten ausführen, bei denen das Einsatzwerkzeug verborgene Stromleitungen oder das eigene Netzkabel treffen kann. Der Kontakt mit einer spannungsführenden Leitung kann auch metallene Geräteteile unter Spannung setzen und zu einem elektrischen Schlag führen. • • • • Weiterführende Sicherheitshinweise Warnung! Beim Schleifen können gesundheitsschädliche Stäube entstehen (z. B. CH von Materialien wie bleihaltigen Farben, asbesthaltigem Material, Metallen oder einigen Holzarten), die für die Bedienperson oder in der Nähe beindliche Personen eine Gefährdung darstellen können. Sorgen Sie für eine gute Belüftung des Arbeitsplatzes. Tragen Sie stets eine Schutzbrille, Sicherheitshandschuhe und einen Atemschutz. 5) SERVICE a) Lassen Sie lhr Elektrowerkzeug nur von qualiiziertem Fachpersonal und nur mit Original-Ersatzteilen reparieren. Damit wird sichergestellt, dass die Sicherheit des Gerätes erhalten bleibt. AT • Sichern Sie das Werkstück. Ein mit Spannvorrichtungen oder Schraubstock festgehaltenes Werkstück ist sicherer gehalten als mit Ihrer Hand. Verwenden Sie das Elektrowerkzeug nur für den Trockenschliff. Schaben Sie keine angefeuchteten Materialien. Das Eindringen von Wasser in ein Elektrogerät erhöht das Risiko eines elektrischen Schlages. Vermeiden Sie eine Überhitzung des Schleifgutes und des Schleifers. Es besteht Brandgefahr. Das Werkstück wird beim Schleifen heiß. Nicht an der bearbeiteten Stelle anfassen, lassen Sie es abkühlen. Es besteht Verbrennungsgefahr. Verwenden Sie kein Kühlmittel oder ähnliches. Entleeren Sie vor Arbeitspausen stets den Staubbehälter. Schleifstaub im Staubsack, Microilter, Papiersack (oder im Filtersack bzw. Filter des Staubsaugers) kann sich unter ungünstigen Bedingungen, wie Funkenlug beim Schleifen von Metallen, selbst entzünden. Besondere Gefahr besteht, wenn der Schleifstaub mit Lack-, Polyurethanresten oder anderen 9 DE • • AT CH chemischen Stoffen vermischt ist und das Schleifgut nach langem Arbeiten heiß ist. Beachten Sie auch die Betriebsanleitung Ihres Staubsaugers, ob dieser für das Aufsaugen von Schleifspänen geeignet ist. Schließen Sie das Gerät an eine Steckdose mit Fehlerstrom-Schutzeinrichtung (FI-Schalter) mit einem Bemessungsfehlerstrom von nicht mehr als 30 mA an. Wenn die Anschlussleitung des Elektrowerkzeuges beschädigt ist, muss sie durch eine speziell vorgerichtete Anschlussleitung ersetzt werden, die über die Kundendienstorganisation erhältlich ist. Warnung! Dieses Elektrowerkzeug erzeugt während des Betriebs ein elektromagnetisches Feld. Dieses Feld kann unter bestimmten Umständen aktive oder passive medizinische Implantate beeinträchtigen. Um die Gefahr von ernsthaften oder tödlichen Verletzungen zu verringern, empfehlen wir Personen mit medizinischen Implantaten ihren Arzt und den Hersteller des medizinischen Implantats zu konsultieren, bevor die Maschine bedient wird. Montage Ziehen Sie vor allen Arbeiten an dem Gerät den Netzstecker. Gefahr durch elektrischen Schlag! Restrisiken Auch wenn Sie dieses Elektrowerkzeug vorschriftsmäßig bedienen, bleiben immer Restrisiken bestehen. Folgende Gefahren können im Zusammenhang mit der Bauweise und Ausführung dieses Elektrowerkzeugs auftreten: a) Lungenschäden, falls kein geeigneter Atemschutz getragen wird. b) Schnittverletzungen. c) Gehörschäden, falls kein geeigneter Gehörschutz getragen wird. d) Augenschäden, falls kein geeigneter Augenschutz getragen wird. e) Gesundheitsschäden, die aus HandArm-Schwingungen resultieren, falls das Gerät über einen längeren Zeitraum verwendet wird oder nicht ordnungsgemäß geführt und gewartet wird. 10 Schleifblatt anbringen/ entfernen Säubern Sie die Schleifplatte, bevor Sie ein Schleifblatt aufsetzen. Verwenden Sie nur in der Größe passende Schleifblätter. Schleifblätter, die über die Schleifplatte hinausragen, können Verletzungen verursachen sowie zum Blockieren oder Zerreißen der Schleifblätter führen. Die Schleifplatte (10) ist mit einem Klettgewebe ausgestattet zum schnellen Anbringen des Schleifblattes (12). Die Schleifblätter (12) bestehen aus 2 Teilen und können je nach Verschleißzustand einzeln gewechselt werden. Um ein optimales Schleifergebnis zu erhalten, verwenden Sie nur Schleifblätter mit gleicher Körnung. DE Schleifblatt anbringen: 1. Drücken Sie beide Teile des Schleifblattes (12) gleichmäßig auf die Schleifplatte (10) auf. Achten Sie darauf, dass die Schleifblätter bündig auliegen und die Löcher deckungsgleich mit den Absaugöffnungen (15) der Schleifplatte (10) sind. Schleifblatt entfernen: 2. Ziehen Sie das Schleifblatt (12) von der Schleifplatte (10) ab. Schleifen Sie nur, wenn beide Schleifblätter montiert sind. Schleifzunge montieren Sie können die vormontierte Schleifplatte (10) gegen die im Lieferumfang enthaltene Schleifzunge (13) austauschen. Schleifplatte demontieren: 1. Öffnen Sie den Spannhebel (16) und drehen Sie ihn bis zum Anschlag in Richtung Schleifblatt. 2. Nehmen Sie den vorderen Teil der Schleifplatte (10) ab. AT CH 6. Setzen Sie auf den hinteren Teil der Schleifplatte (10) ein Schleifblatt auf. So vermeiden Sie Verschmutzungen des Klettgewebes. Staubbox anschließen/ abnehmen/leeren Staubbox anschließen: 1. Vergewissern Sie sich vor dem Anschließen, dass die Staubbox (8) fest verschlossen ist. 2. Drücken Sie die Entriegelungstaste (4) an der Staubbox (8). Schieben Sie die Staubbox (8) bis zum Anschlag auf den Anschluss zur Staubabsaugung (9) auf. Die beiden Nasen (9a) am Anschluss zur Staubabsaugung (9) passen in die beiden Nuten (8a) an der Staubbox (8). 3. Lassen Sie die Entriegelungstaste (4) los. Sie rastet über der Fixierung der Staubbox (8) ein. Staubbox abnehmen: 4. Drücken Sie die Entriegelungstaste (4) und ziehen Sie die Staubbox (8) ab. Schleifzunge einsetzen: 3. Führen Sie die Schleifzunge (13) von oben gegen den hinteren Teil der Schleifplatte (10) und drücken Sie sie fest an. 4. Zum Verriegeln drehen Sie den Spannhebel (16) in die ursprüngliche Position zurück. Staubbox leeren: 5. Ziehen Sie an der Lasche (7) und nehmen Sie den Staubboxdeckel (6) ab. 6. Zum Leeren klopfen Sie die Staubbox (8) aus. 7. Verschließen Sie die Staubbox (8) wieder. Schleifblatt für Schleifzunge aufsetzen: 5. Drücken Sie das Schleifblatt für die Schleifzunge (14) gleichmäßig auf die Schleifzunge (13) auf. Leeren Sie die Staubbox rechtzeitig, um eine optimale Absaugleistung zu gewährleisten. 11 DE AT CH Externe Staubabsaugung anschließen/abnehmen Externe Staubabsaugung anschließen: 1. Schieben Sie den Adapter zur externen Staubabsaugung (11) bis zum Anschlag in den Anschluss zur Staubabsaugung (9) ein. 2. Schließen Sie den Saugschlauch eines Staubsaugers (nicht im Lieferumfang enthalten) an den Adapter zur externen Staubabsaugung (11) an. 1. Zum Einschalten kippen Sie den Ein-/Ausschalter (1) in Position „I“, das Gerät läuft an. 2. Zum Ausschalten kippen Sie den Ein-/Ausschalter (1) in Position „0“, das Gerät schaltet ab. Arbeitshinweise Tragen Sie beim Arbeiten mit dem Gerät geeignete Kleidung und angemessene Schutzausrüstung. Vergewissern Sie sich vor jeder Benutzung, dass das Gerät funktionstüchtig ist. Persönliche Schutzausrüstung und ein funktionstüchtiges Gerät vermindern das Risiko von Verletzungen und Unfällen. Externe Staubabsaugung abnehmen: 1. Ziehen Sie den Saugschlauch vom Adapter zur externen Staubabsaugung (11) ab. 2. Ziehen Sie den Adapter zur externen Staubabsaugung (11) ab. Benutzen Sie das Gerät nicht ohne Staubbox oder externe Staubabsaugung. Die Verwendung einer Staubabsaugung kann Gefährdungen durch Staub verringern. Bei Verwendung von Schleifblättern ohne Lochung ist eine Staubabsaugung nicht möglich. Sorgen Sie für eine gute Belüftung des Arbeitsplatzes. Sie können den Saugschlauch eines Staubsaugers gegebenenfalls direkt und ohne Adapter an das Gerät anschließen. Bedienung Ein- und Ausschalten Achten Sie darauf, dass die Spannung des Netzanschlusses mit dem Typenschild am Gerät übereinstimmt. Schließen Sie das Gerät an die Netzspannung an. Ziehen Sie vor allen Arbeiten an dem Gerät den Netzstecker. Gefahr durch elektrischen Schlag! Schleifen • • 12 Führen Sie das Gerät eingeschaltet an das Werkstück. Heben Sie die Schleifplatte nach der Bearbeitung ab, bevor Sie das Gerät ausschalten. DE • • • • • • • Führen Sie das Netzkabel immer nach hinten vom Gerät weg. Säubern Sie die Schleifplatte, bevor Sie ein Schleifblatt aufsetzen. Arbeiten Sie nur mit einwandfreien Schleifblättern, um gute Schleifergebnisse zu erhalten. Arbeiten Sie mit geringem und gleichmäßigem Anpressdruck und gleichmäßigem Vorschub. So schonen Sie Gerät und Schleifblatt. Schleifen Sie Ecken und Kanten mit der Spitze oder seitlichen Kante des Schleifblattes. Ist die vordere Spitze des dreieckigen Schleifblattes abgenutzt, kann das Schleifblatt abgenommen und gedreht wieder aufgesetzt werden. Schleifen Sie mit dem selben Schleifblatt nicht unterschiedliche Materialien (z. B. Metall und danach Holz). Entleeren Sie die Staubbox oder den Staubsauger rechtzeitig, um eine optimale Absaugleistung zu gewährleisten. Anwendung P 60 P 80 zum Vorschleifen von rohen Holzlächen P 120 P 180 zum Planschleifen P 240 zum Feinschleifen von grundierten und lackierten Flächen Wahl der Schleifplatte CH Schleifzunge: • Zum Bearbeiten von schmalen Schlitzen und engen Zwischenräumen. Reinigung und Wartung Ziehen Sie vor jeglicher Einstellung, Instandhaltung oder Instandsetzung den Netzstecker. Lassen Sie Instandsetzungsarbeiten und Wartungsarbeiten, die nicht in dieser Anleitung beschrieben sind, von unserem Service-Center durchführen. Verwenden Sie nur Originalteile. Führen Sie folgende Reinigungs- und Wartungsarbeiten regelmäßig durch. Dadurch ist eine lange und zuverlässige Nutzung gewährleistet. Reinigung Das Gerät darf weder mit Wasser abgespritzt werden, noch in Wasser gelegt werden. Es besteht die Gefahr eines Stromschlages. Wahl des Schleifblattes Körnung AT • • Halten Sie Lüftungsschlitze, Motorgehäuse und Griffe des Gerätes sauber. Verwenden Sie dazu ein feuchtes Tuch oder eine Bürste. Verwenden Sie keine Reinigungs- bzw. Lösungsmittel. Sie könnten das Gerät damit irreparabel beschädigen. Reinigen Sie das Schleifblatt mit einem Staubsauger oder klopfen Sie es aus. Vormontierte Schleifplatte: • Zum Schleifen von großen Flächen und Bearbeitung von Ecken, Kanten und Außenrundungen. 13 DE AT CH Filtereinlage der Staubbox reinigen/wechseln Lagerung • Prüfen Sie die Filtereinlage ein- bis zweimal jährlich auf Verschmutzung. Filtereinlage entnehmen: 1. Drücken Sie die Entriegelungstaste ( 4) und ziehen Sie die Staubbox ( 8) ab (siehe „Staubbox anschließen/abnehmen/leeren“). 2. Ziehen Sie an der Lasche (7) und nehmen Sie den Staubboxdeckel (6) ab. 3. Ziehen Sie den Halterahmen (17) am Staubboxdeckel (6) ab und nehmen Sie die Filtereinlage (18) heraus. 4. Waschen Sie die Filtereinlage (18) mit lauwarmem Wasser und Seife aus und lassen Sie sie trocknen. Tauschen Sie eine stark verschmutzte oder beschädigte Filtereinlage aus (siehe „Ersatzteile/Zubehör“). • Entsorgung/ Umweltschutz Führen Sie Gerät, Zubehör und Verpackung einer umweltgerechten Wiederverwertung zu. Elektrische Geräte gehören nicht in den Hausmüll. • • Filtereinlage einsetzen: 5. Setzen Sie die Filtereinlage (18) und den Halterahmen (17) in den Staubboxdeckel (6). 6. Verschließen Sie die Staubbox ( 8). 14 Bewahren Sie Gerät und Werkzeug an einem trockenen und staubgeschützten Ort auf, außerhalb der Reichweite von Kindern. Entleeren Sie die Staubbox vor der Aufbewahrung des Geräts (siehe „Staubbox anschließen/abnehmen/ leeren“). Geben Sie das Gerät an einer Verwertungsstelle ab. Die verwendeten Kunststoff- und Metallteile können sortenrein getrennt werden und so einer Wiederverwertung zugeführt werden. Fragen Sie hierzu unser Service-Center. Die Entsorgung Ihrer defekten eingesendeten Geräte führen wir kostenlos durch. DE AT CH Ersatzteile/Zubehör Ersatzteile und Zubehör erhalten Sie unter www.grizzly-service.eu Sollten Sie kein Internet haben, so wenden Sie sich bitte telefonisch an das ServiceCenter (siehe „Service-Center“ Seite 18). Halten Sie die unten genannten Bestellnummern bereit. Position Bezeichnung Betriebsanleitung Bestell-Nr. 10 Schleifplatte, vormontiert 91104224 13 Schleifzunge, vormontiert 91104225 11 Adapter zur externen Staubabsaugung 91104222 8 Staubbox 91104221 18 Filtereinlage für Staubbox 91104223 12 6 Schleifblätter für Holz (P 40*), für Schleifplatte 30211092 6 Schleifblätter für Holz (P 80*), für Schleifplatte 30211093 6 Schleifblätter für Holz (P 120*), für Schleifplatte 30211094 10 Schleifblätter für Holz (P 120*), für Schleifplatte 30211090 6 Schleifblätter für Holz (P 180*), für Schleifplatte 30211095 6 Schleifblätter für Holz (P 240*), für Schleifplatte 30211096 Set, 5 Schleifblätter für Holz, für Schleifplatte (2x P 60*, 2x P 120*, 1x P 240*) 30211088 Set, 30 Schleifblätter für Holz, für Schleifplatte (12x P 60*, 12x P 120*, 6x P 240*) 30211089 Set, 18 Schleifblätter für Holz, für Schleifplatte (6x P 60*, 6x P 120*, 6x P 240*) 30211091 Set, 30 Schleifblätter für Schleifplatte 24x für Holz: 6x P 60*, 6x P 120*,6x P 180*, 6x P 240* 3x für Stein: 1x P 80*, 1x 180*, 1x P 400* 3x für Lack: 1x P 60*, 1x P 120*, 1x P 240*) 30211097 6 Schleifblätter für Schleifzunge (P 80*) 30211085 6 Schleifblätter für Schleifzunge (P 120*) 30211086 6 Schleifblätter für Schleifzunge (P 180*) 30211087 14 *P = Körnung 15 DE AT CH Fehlersuche Problem Mögliche Ursache Fehlerbehebung Netzspannung fehlt Haussicherung spricht an Steckdose, Netzkabel, Leitung, Netzstecker prüfen, ggf. Reparatur durch Elektrofachmann, Haussicherung prüfen. Gerät startet nicht Ein-/Ausschalter ( defekt 1) Reparatur durch Service-Center Motor defekt Interner Wackelkontakt Gerät arbeitet mit Unterbrechungen Motor wird langsamer und bleibt stehen Schlechte Schleileistung Schleifblatt nutzt schnell ab 16 Ein-/Ausschalter ( defekt 1) Gerät wird durch Werkstück überlastet Reparatur durch Service-Center Druck auf Schleifwerkzeug verringern Werkstück ungeeignet Schleifblatt für das zu bearbeitende Werkstück ungeeignet Geeignetes Schleifblatt einsetzen (siehe „Montage“) Schleifblatt abgenutzt Neues Schleifblatt einsetzen (siehe „Montage“) Schleifblatt für das zu bearbeitende Werkstück ungeeignet Geeignetes Schleifblatt einsetzen (siehe „Montage“) Zu viel Druck angewandt Druck verringern DE Garantie Sehr geehrte Kundin, sehr geehrter Kunde, Sie erhalten auf dieses Gerät 3 Jahre Garantie ab Kaufdatum. Im Falle von Mängeln dieses Produkts stehen Ihnen gegen den Verkäufer des Produkts gesetzliche Rechte zu. Diese gesetzlichen Rechte werden durch unsere im Folgenden dargestellte Garantie nicht eingeschränkt. Garantiebedingungen Die Garantiefrist beginnt mit dem Kaufdatum. Bitte bewahren Sie den OriginalKassenbon gut auf. Diese Unterlage wird als Nachweis für den Kauf benötigt. Tritt innerhalb von drei Jahren ab dem Kaufdatum dieses Produkts ein Materialoder Fabrikationsfehler auf, wird das Produkt von uns – nach unserer Wahl – für Sie kostenlos repariert oder ersetzt. Diese Garantieleistung setzt voraus, dass innerhalb der Drei-Jahres-Frist das defekte Gerät und der Kaufbeleg (Kassenbon) vorgelegt und schriftlich kurz beschrieben wird, worin der Mangel besteht und wann er aufgetreten ist. Wenn der Defekt von unserer Garantie gedeckt ist, erhalten Sie das reparierte oder ein neues Produkt zurück. Mit Reparatur oder Austausch des Produkts beginnt kein neuer Garantiezeitraum. Garantiezeit und gesetzliche Mängelansprüche Die Garantiezeit wird durch die Gewährleistung nicht verlängert. Dies gilt auch für ersetzte und reparierte Teile. Eventuell schon beim Kauf vorhandene Schäden und Mängel müssen sofort nach dem Auspacken gemeldet werden. Nach Ablauf der Garantiezeit anfallende Reparaturen sind kostenplichtig. AT CH Garantieumfang Das Gerät wurde nach strengen Qualitätsrichtlinien sorgfältig produziert und vor Anlieferung gewissenhaft geprüft. Die Garantieleistung gilt für Material- oder Fabrikationsfehler. Diese Garantie erstreckt sich nicht auf Produktteile, die normaler Abnutzung ausgesetzt sind und daher als Verschleißteile angesehen werden können (z. B. Werkzeuge, Schleifblätter) oder für Beschädigungen an zerbrechlichen Teilen (z. B. Schalter). Diese Garantie verfällt, wenn das Produkt beschädigt, nicht sachgemäß benutzt oder nicht gewartet wurde. Für eine sachgemäße Benutzung des Produkts sind alle in der Betriebsanleitung aufgeführten Anweisungen genau einzuhalten. Verwendungszwecke und Handlungen, von denen in der Betriebsanleitung abgeraten oder vor denen gewarnt wird, sind unbedingt zu vermeiden. Das Produkt ist lediglich für den privaten und nicht für den gewerblichen Gebrauch bestimmt. Bei missbräuchlicher und unsachgemäßer Behandlung, Gewaltanwendung und bei Eingriffen, die nicht von unserer autorisierten Service-Niederlassung vorgenommen wurden, erlischt die Garantie. Abwicklung im Garantiefall Um eine schnelle Bearbeitung Ihres Anliegens zu gewährleisten, folgen Sie bitte den folgenden Hinweisen: • Bitte halten Sie für alle Anfragen den Kassenbon und die Identiikationsnummer (IAN 303400) als Nachweis für den Kauf bereit. • Die Artikelnummer entnehmen Sie bitte dem Typenschild. • Sollten Funktionsfehler oder sonstige Mängel auftreten kontaktieren Sie zunächst die nachfolgend benannte 17 DE • AT CH Serviceabteilung telefonisch oder per E-Mail. Sie erhalten dann weitere Informationen über die Abwicklung Ihrer Reklamation. Ein als defekt erfasstes Produkt können Sie, nach Rücksprache mit unserem Kundenservice, unter Beifügung des Kaufbelegs (Kassenbons) und der Angabe, worin der Mangel besteht und wann er aufgetreten ist, für Sie portofrei an die Ihnen mitgeteilte Service-Anschrift übersenden. Um Annahmeprobleme und Zusatzkosten zu vermeiden, benutzen Sie unbedingt nur die Adresse, die Ihnen mitgeteilt wird. Stellen Sie sicher, dass der Versand nicht unfrei, per Sperrgut, Express oder sonstiger Sonderfracht erfolgt. Senden Sie das Gerät bitte inkl. aller beim Kauf mitgelieferten Zubehörteile ein und sorgen Sie für eine ausreichend sichere Transportverpackung. Reparatur-Service Sie können Reparaturen, die nicht der Garantie unterliegen, gegen Berechnung von unserer Service-Niederlassung durchführen lassen. Sie erstellt Ihnen gerne einen Kostenvoranschlag. Wir können nur Geräte bearbeiten, die ausreichend verpackt und frankiert eingesandt wurden. Achtung: Bitte senden Sie Ihr Gerät gereinigt und mit Hinweis auf den Defekt an unsere Service-Niederlassung. Nicht angenommen werden unfrei - per Sperrgut, Express oder mit sonstiger Sonderfracht - eingeschickte Geräte. Die Entsorgung Ihrer defekten eingesendeten Geräte führen wir kostenlos durch. 18 Service-Center DE Service Deutschland Tel.: 0800 54 35 111 E-Mail: [email protected] IAN 303400 AT Service Österreich Tel.: 0820 201 222 (0,15 EUR/Min.) E-Mail: [email protected] IAN 303400 CH Service Schweiz Tel.: 0842 665566 (0,08 CHF/Min., Mobilfunk max. 0,40 CHF/Min.) E-Mail: [email protected] IAN 303400 Importeur Bitte beachten Sie, dass die folgende Anschrift keine Service-Anschrift ist. Kontaktieren Sie zunächst das oben genannte Service-Center. Grizzly Tools GmbH & Co. KG Stockstädter Straße 20 DE-63762 Großostheim www.grizzly-service.eu GB IE Content Introduction Introduction ............................... 19 Intended Use.............................. 19 General Description.................... 20 Scope of delivery ............................ 20 Overview ....................................... 20 Technical Data ............................ 20 Notes on Safety ......................... 21 Symbols ......................................... 21 General safety instructions for power tools .................................... 21 Additional safety instructions ............ 23 Residual risks .................................. 24 Assembling instructions .............. 24 Attaching/removing sanding sheet .... 24 Mounting sanding inger .................. 25 Connecting/removing/emptying the dust collection box ..................... 25 How to connect/remove external dust extraction ................................ 26 Operation .................................. 26 Switching on/off ............................. 26 Practical tips .............................. 26 Sanding ......................................... 27 Selection of sanding sheet ................ 27 Choosing the right sanding plate ...... 27 Cleaning/Maintenance ............... 27 Cleaning ........................................ 28 Cleaning/replacing the ilter insert of the dust collection box ................ 28 Storage ...................................... 28 Waste Disposal/Environmental Protection .................................. 28 Spare Parts/Accessories ............. 29 Trouble Shooting ........................ 30 Guarantee ................................. 31 Repair Service ............................ 32 Service-Center ............................ 32 Importer .................................... 32 Translation of the original EC declaration of conformity .......... 107 Exploded Drawing .................... 113 Congratulations on the purchase of your new device. With it, you have chosen a high quality product. During production, this equipment has been checked for quality and subjected to a inal inspection. The functionality of your equipment is therefore guaranteed. The operating instructions constitute part of this product. They contain important information on safety, use and disposal. Before using the product, familiarise yourself with all of the operating and safety instructions. Use the product only as described and for the applications speciied. Keep this manual safely and in the event that the product is passed on, hand over all documents to the third party. Intended Use This device is designed for dry sanding of wood, metal, plastic, illers and painted surfaces. The device is not suitable for commercial use. Any other use that is not explicitly approved in these instructions may result in damage to the equipment and represent a serious danger to the user. The equipment is designed for use by adults. Adolescents over the age of 16 may use the device only under supervision. The manufacturer is not liable for damages caused by unspeciied use or incorrect operation. 19 GB IE General Description The illustration of the principal functioning parts can be found on the foldout page. Scope of delivery Carefully unpack the trimmer and check that it is complete. Dispose of the packaging material correctly. • Device • Dust box • External dust extraction adaptor • 3 sanding sheets (two-part) (grain size P 80 / P 120 / P 180) • Sanding inger • 3 sanding sheets for sanding inger (grain size P 80 / P 120 / P 180) • Instruction manual Overview 1 2 3 4 5 6 7 8 9 10 11 12 13 14 On/off switch Hand rest Vent Release button dust collection box Mains cable Dust collection box lid Tab for opening the dust collection box Dust collection box Connection for dust extraction Sanding plate External dust extraction adaptor 3 sanding sheets (two-part) Sanding inger 3 sanding sheets for sanding inger 15 Extraction holes for sandig plate 16 Clamping lever for unlocking sanding plate 20 17 Mounting frame for ilter insert 18 Filter insert for dust collection box Technical Data Detail sander .......................... PHS 160 E5 Rated input voltage (U) ..... 230 V~, 50 Hz Power input (P)............................ 160 W Idling speed (n0)....................13000 min-1 Oscillation rate (n).................26000 min-1 Weight (without accessories) ... appr. 1.1 kg Protection class ................................. II Protection category........................... IPX0 Sound pressure level (LpA) ...................... 76 dB(A); KpA= 3 dB Sound power level (LWA) .................... 87 dB(A); KWA = 3 dB Vibration (ah) ........... 9 m/s2; K= 1.5 m/s2 The stated vibration emission value was measured in accordance with a standard testing procedure and may be used to compare one power tool to another. The stated vibration emission value may also be used for a preliminary exposure assessment. Warning: The vibration emission value may differ during actual use of the power tool from the stated value depending on the manner in which the power tool is used. Try to keep the exposure to vibrations as low as possible. Examples of measures to reduce vibration exposure are the wearing of gloves when using the tool and limiting the working hours. For this purpose all parts of the operating cycle have to be considered (for example, times when the electric tool is switched off and times when it is switched on but running without any load). GB Notes on Safety This section details the basic safety instructions for working with the appliance. IE Help symbols with information on improving tool handling. General safety instructions for power tools Symbols WARNING! Read all safety directions and instructions. Omissions in the compliance with safety directions and instructions can cause electrical shock, ire and/or severe injuries. Symbols on the Equipment Warning! Warning! Electric shock hazard. Always unplug the device before working on it. Wear ear and eye protection Retain all safety directions and instructions for future use. The term „power tool“ in the warnings refers to your mains-operated (corded) power tool or battery-operated (cordless) power tool. Wear breathing protection 1) WORK AREA SAFETY Wear safety gloves • Protection class II (Double insulation) • Read through the instruction manual carefully. Electrical appliances must not be disposed of with the domestic waste. Symbols in the manual • Warning symbols with information on damage and injury prevention. Instruction symbols with information on preventing damage. 2) ELECTRICAL SAFETY • Connect the machine to the power supply. Pull the mains plug. Keep work area clean and well lit. Cluttered or dark areas invite accidents. Do not operate power tools in explosive atmospheres, such as in the presence of lammable Iiquids, gases or dust. Power tools create sparks which may ignite the dust or fumes. Keep children and bystanders away while operating a power tool. Distractions can cause you to lose control. Power tool plugs must match the outlet. Never modify the plug in any way. Do not use any adapter plugs with earthed (grounded) power tools. Unmodi- 21 GB • • • • • IE ied plugs and matching outlets will reduce risk of electric shock. Avoid body contact with earthed or grounded surfaces, such as pipes, radiators, ranges and refrigerators. There is an increased risk of electric shock if your body is earthed or grounded. Do not expose power tools to rain or wet conditions. Water entering a power tool will increase the risk of electric shock. Do not abuse the cord. Never use the cord for carrying, pulling or unplugging the power tool. Keep cord away from heat, oil, sharp edges or moving parts. Damaged or entangled cords increase the risk of electric shock. When operating a power tool outdoors, use an extension cord suitable for outdoor use. Use of a cord suitable for outdoor use reduces the risk of electric shock. If operating a power tool in a damp location is unavoidable, use a residual current device (RCD) protected supply. Use of an RCD reduces the risk of electric shock. • • • • • 3) PERSONAL SAFETY • • 22 Stay alert, watch what you are doing and use common sense when operating a power tool. Do not use a power tool while you are tired or under the inluence of drugs, alcohol or medication. A moment of inattention white operating power tools may result in serious personal injury. Use personal protective equipment. Always wear eye protec- tion. Protective equipment such as dust mask, non-skid safety shoes, hard hat, or hearing protection used for appropriate conditions will reduce personal injuries. Prevent unintentional starting. Ensure the switch is in the offposition before connecting to power source and/or battery pack, picking up or carrying the tool. Carrying power tools with your inger on the switch or energising power tools that have the switch on invites accidents. Remove any adjusting key or wrench before turning the power tool on. A wrench or a key left attached to a rotating part of the power tool may result in personal injury. Do not overreach. Keep proper footing and balance at all times. This enables better control of the power tool in unexpected situations. Dress properly. Do not wear loose clothing or jewellery. Keep your hair, clothing and gloves away from moving parts. Loose clothes, jewellery or long hair can be caught in moving parts. If devices are provided for the connection of dust extraction and collection facilities, ensure these are connected and properly used. Use of dust collection can reduce dust-related hazards. 4) POWER TOOL USE AND CARE • Do not force the power tool. Use the correct power tool for your application. The correct power tool will do the job better and safer at the rate for which it was designed. GB • • • • • • • Do not use the power tool if the switch does not turn it on and off. Any power tool that cannot be controlled with the switch is dangerous and must be repaired. Disconnect the plug from the power source and/or the battery pack from the power tool before making any adjustments, changing accessories, or storing power tools. Such preventive safety measures reduce the risk of starting the power tool accidentaIly. Store idle power tools out of the reach of children and do not allow persons unfamiliar with the power tool or these instructions to operate the power tool. Power tools are dangerous in the hands of untrained users. Maintain power tools. Check for misalignment or binding of moving parts, breakage of parts and any other condition that may affect the power tool’s operation. If damaged, have the power tool repaired before use. Many accidents are caused by poorly maintained power tools. Keep cutting tools sharp and clean. Properly maintained cutting tools with sharp cutting edges are less Iikely to bind and are easier to control. Use the power tool, accessories and tool bits etc. in accordance with these instructions, taking into account the working conditions and the work to be performed. Use of the power tool for operations different from those intended could result in a hazardous situation. Hold the device by the insulated gripping surfaces when IE performing work in which the cutting tool may come into contact with hidden wiring or its own cord. Contact with a live wire can also cause a charge in metal parts of the device and result in an electric shock. 5) SERVICE • Have your power tool serviced by a qualiied repair person using only identical replacement parts. This will ensure that the safety of the power tool is maintained. Additional safety instructions Warning! Sanding can result in the formation of hazardous dusts (e.g. arising from materials with paints containing lead, materials containing asbestos, metals or some wood types) which can present a hazard to the operator or persons in the vicinity. Make sure that the workplace is well ventilated. Always wear safety goggles, safety gloves and respiratory protection. • • Secure the workpiece. A workpiece that is retained with clamping appliances or a vice is held more securely than with your hand. Only use the power tool for dry sanding. Avoid using on damp materials. Penetration of water into the power tool increases the risk of electric shock. 23 GB • • • • • IE Avoid overheating the sanded object and the sander itself. Possible ire hazard. The workpiece gets hot during grinding. Do not touch the machined area, allow it to cool down. There is a risk of burning. Do not use coolants or the like. Always empty the dust container before work breaks. Sanding dust in the dust sack, micro ilter, paper sack (or in the ilter sack or extraction system ilter) can self-ignite under unfavourable conditions such as lying sparks caused by grinding metals. Particular hazards are caused if the sanding dust is mixed with paint, polyurethane residues or other chemical substances, or if the sanded object is hot after long working periods. Please check the operating manual of your vacuum cleaner whether it is suitable for the suction of grinding chips. Connect the appliance to a power socket with a residual current circuit breaker of rated residual current no more than 30 mA. If the supply cord of this power tool is damaged, it must be replaced by a specially prepared cord available through the service organization. Residual risks Even if properly operating and handling this electric tool, some residual risks will remain. Due to its construction and build, this electric tool may present the following hazards: a) Lung damage, if suitable respiratory protection is not worn; b) Cuts 24 c) Ear damage if working without ear protection. d) Eye damage if suitable eye protection is not worn. e) Damage to your health caused by swinging your hands and arms when operating the appliance for longer periods of time or if the unit is not held or maintained properly. Warning! During operation, this electric tool generates an electromagnetic ield which, under certain circumstances, may impair the functionality of active or passive medical implants. To reduce the risk of serious or lethal injuries, we recommend that persons with medical implants consult their doctor and the manufacturer of their medical implant before operating the machine. Assembling instructions Pull the mains plug before any adjustments, maintenance or repair. Danger of electric shock. Attaching/removing sanding sheet Clean the sanding disc before you attach a sanding sheet. Use only appropriate sanding sheet sizes. Sanding sheets, which extend beyond the sanding disc, can cause injuries and can cause the sanding sheets to block or tear. GB The sanding plate (10) is itted with Velcro for rapid attachment of the sanding sheet (12). The sanding sheets (12) comprise 2 parts and can be individually replaced depending on wear. To achieve optimal sanding results, only use sanding sheets with the right grain size. Attaching sanding sheet: 1. Press both parts of the sanding sheet (12) evenly onto the sanding plate (10). Please ensure that the sanding sheets lie lush and the holes are placed directly above the extraction openings (15) of the sanding plate (10). Removing sanding sheet: 2. Pull the sanding sheet (12) from the sanding plate (10). Only perform sanding once both sanding sheets are mounted. Mounting sanding inger You can replace the pre-mounted sanding plate (10) with the sanding inger (13) provided in the scope of delivery. Unmounting sanding plate: 1. Open the clamping lever (16) and turn it in the direction of the sanding sheet until it reaches the stop. 2. Remove the front section of the sanding plate (10). IE Inserting sanding inger: 3. Insert the sanding inger (13) from above against the back section of the sanding plate (10) and push it irmly into place. 4. To lock, turn the clamping lever (16) into its original position. Attaching sanding sheet for sanding inger: 5. Press the sanding plate for the sanding inger (14) evenly onto the sanding inger (13). 6. Place a sanding sheet onto the back section of the sanding plate (10). This will prevents soiling of the Velcro. Connecting/removing/emptying the dust collection box Connecting the dust collection box: 1. Before connecting, ensure that the dust collection box (8) is irmly closed. 2. Press the release button (4) on the dust collection box (8). Slide the dust collection box (8) all the way onto the connection for dust extraction (9). The two lugs (9a) on the connection for dust extraction (9) it into the two grooves (8a) of the dust collection box (8). 3. Let go of the release button (4). It will click into place above the ixing pin of the dust collection box (8). 25 GB IE Removing the dust collection box: 4. Press the release button (4) and pull the dust collection box (8) out. Emptying the dust collection box: 5. Pull the tab (7) and remove the dust collection box lid (6). 6. To empty, simply shake or knock out the dust collection box (8). 7. Then close the dust collection box (8) again. Empty the dust collection box regularly to ensure optimal suction. How to connect/remove external dust extraction Connecting external dust extraction 1. Push the external dust extraction adaptor (11) as far as it will go on the dust extraction connector (9). 2. Connect the extraction hose from a vacuum cleaner (sold separately) to the external dust extraction adaptor (11). Removing external dust extraction 1. Remove the extraction hose from the external dust extraction adaptor (11). 2. Disconnect the adapter for external dust extraction (11). If necessary, you can connect the suction tube of a vacuum cleaner directly to the device without an adapter. 26 Operation Switching on/off Make sure that the power supply voltage matches the voltage rating indicated on the device‘s type plate. Connect the machine to the power supply. 1. To switch on, lick the on/off switch (1) to position „I“. The tool will power on. 2. To switch off, lick the on/off switch (1) to position „0“. The tool will power off. Practical tips When working with the appliance, always wear suitable clothing and appropriate protective equipment. Prior to each use it must be ensured that the appliance is working correctly. Personal protective equipment and a fully functional appliance reduce the risk of injuries and accidents. Do not use the device without a dust collection box or external dust extraction. Use of a dust extraction can reduce hazards caused by dust. When using sanding sheets without ventilation holes, dust extraction is not possible. Make sure that the workplace is well ventilated. GB Pull the mains plug before any adjustments, maintenance or repair. Danger of electric shock. IE Selection of sanding sheet Grain size Application Sanding P 60 P 80 for pre-sanding rough wood surfaces • P 120 P 180 for plain sanding P 240 for ine sanding of primed and painted surfaces • • • • • • • • Move the appliance against the workpiece once it is switched on. After machining, lift the sanding disc up before turning off the device. Always lead the mains cable towards the back and away from the device. Clean the sanding plate before you attach a sanding sheet. Only work with sanding sheets in perfect condition to achieve good sanding results. Work with low and even pressure and even forward pressure. This protects the appliance and the sanding sheet. Grind rough corners and edges with the top or side edge of the sanding sheet. If the front tip of the triangular sanding sheet is worn, the sanding sheet can be removed, rotated and put back into place. Do not use the same sanding sheet to sand different materials (e.g. metal and then wood). Empty the dust collection box or the vacuum cleaner regularly in order to ensure optimal suction. Choosing the right sanding plate Pre-mounted sanding plate: • For sanding/grinding large surfaces as well as corners, edges and outer curves. Sanding inger: • For machining small slots and narrow intermediate spaces. Cleaning/Maintenance Pull the mains plug before any adjustments, maintenance or repair. Repair and servicing work not described in this manual should always be carried by our Service Centre. Use only original parts. The following cleaning and servicing should be done regularly. This will ensure a long and reliable service life. 27 GB IE Installing the ilter insert: 4. Replace the ilter insert (18) and the mounting frame (17) in the dust collection box lid (6). 5. Then close the dust collection box ( 8). Cleaning Do not spray the appliance with water and do not immerse it in water. Electric shock hazard! • • Keep clean the ventilation slots, motor housing and handles of the appliance. Use a damp cloth or a brush. Do not use cleaning agents or solvents. You may otherwise irreparably damage the appliance. Clean the sanding sheet with a vacuum cleaner or knock it out. Storage • • Store the device in a dry place well out of reach of children. Empty the dust collection box before storing the device (see “Connecting/ removing/emptying the dust collection box”). Cleaning/replacing the ilter insert of the dust collection box Waste Disposal/Environmental Protection Check the ilter insert once or twice a year for contamination. Be environmentally friendly. Return the tool, accessories and packaging to a recycling centre when you have inished with them. Removing the ilter insert: 1. Press the release button ( 4) and pull the dust collection box ( 8) out (see “Connecting/ removing/emptying the dust collection box”). 2 Pull the tab (7) and remove the dust collection box lid (6). 2. Pull the mounting frame (17) from the dust collection box lid (6) and remove the ilter insert (18). 3. Wash the ilter insert (18) with warm water and soap and let it dry. Replace a heavily contaminated or damaged ilter insert (see “Spare Parts/Accessories”). 28 Electric units do not belong with domestic waste. • • Return the unit to a recycling centre. The plastic and metal parts employed can be separated out and thus recycled use can be implemented. Ask our Service-Center for details. Defective units returned to us will be disposed of for free. GB IE Spare Parts/Accessories Spare parts and accessories can be obtained at www.grizzly-service.eu If you do not have internet access, please contact the Service Centre via telephone (see “Service-Center” Page 32). Please have the order number mentioned below ready. Position instruction manual Description Order No. 10 Sanding plate, premounted 91104224 13 Sanding inger, premounted 91104225 11 External dust extraction adaptor 91104222 8 Dust box 91104221 18 Filter element for dust box 91104223 12 14 6 sanding sheets for wood (P 40*), for sanding plate 30211092 6 sanding sheets for wood (P 80*), for sanding plate 30211093 6 sanding sheets for wood (P 120*), for sanding plate 30211094 10 sanding sheets for wood (P 120*), for sanding plate 30211090 6 sanding sheets for wood (P 180*), for sanding plate 30211095 6 sanding sheets for wood (P 240*), for sanding plate 30211096 Set, 5 sanding sheets for wood, for sanding plate (2x P 60*, 2x P 120*, 1x P 240*) 30211088 Set, 30 sanding sheets for wood, for sanding plate (12x P 60*, 12x P 120*, 6x P 240*) 30211089 Set, 18 sanding sheets for wood, for sanding plate (6x P 60*, 6x P 120*, 6x P 240*) 30211091 Set, 30 sanding sheets for sanding plate 24x for wood: 6x P 60*, 6x P 120*,6x P 180*, 6x P 240* 3x for stone: 1x P 80*, 1x 180*, 1x P 400* 3x for paint: 1x P 60*, 1x P 120*, 1x P 240*) 30211097 6 sanding sheets for sanding inger (P 80*) 30211085 6 sanding sheets for sanding inger (P 120*) 30211086 6 sanding sheets for sanding inger (P 180*) 30211087 *P = Grain size 29 GB IE Trouble Shooting Problem Device doesn‘t start Possible Cause Error correction Mains voltage missing Main circuit breaker is tripped Check the socket, mains cable, line, mains plug, repairs to be carried out by qualiied electrician if necessary, check main circuit breaker. On/off switch ( be defective 1) may Repair by Customer Care Engine faulty Device works with interruptions Engine is slowing down and stops Poor grinding performance Internal loose contact On/off switch ( broken 1) is Device is overloaded through workpiece Reduce pressure on grinding tool Workpiece unsuitable Sanding sheet unsuitable for the workpiece to be processed Use a suitable sanding sheet or sanding disc (see “Assembling instructions”) Worn sanding sheet Insert a new sanding sheet (see “Assembling instructions”) Sanding sheet unsuitable for the workpiece to be Sanding sheet wears processed down quickly Too much pressure applied 30 Repair by Customer Care Use a suitable sanding sheet (see “Assembling instructions”) Reduce the pressure GB Guarantee Dear Customer, This equipment is provided with a 3-year guarantee from the date of purchase. In case of defects, you have statutory rights against the seller of the product. These statutory rights are not restricted by our guarantee presented below. Terms of Guarantee The term of the guarantee begins on the date of purchase. Please retain the original receipt. This document is required as proof of purchase. If a material or manufacturing defect occurs within three years of the date of purchase of this product, we will repair or replace – at our choice – the product for you free of charge. This guarantee requires the defective equipment and proof of purchase to be presented within the three-year period with a brief written description of what constitutes the defect and when it occurred. If the defect is covered by our guarantee, you will receive either the repaired product or a new product. No new guarantee period begins on repair or replacement of the product. Guarantee Period and Statutory Claims for Defects The guarantee period is not extended by the guarantee service. This also applies for replaced or repaired parts. Any damages and defects already present at the time of purchase must be reported immediately after unpacking. Repairs arising after expiry of the guarantee period are chargeable. IE Guarantee Cover The equipment has been carefully produced in accordance with strict quality guidelines and conscientiously checked prior to delivery. The guarantee applies for all material and manufacturing defects. This guarantee does not extend to cover product parts that are subject to normal wear and may therefore be considered as wearing parts (e.g. tools, sanding sheets) or to cover damage to breakable parts (e.g. switches). This guarantee shall be invalid if the product has been damaged, used incorrectly or not maintained. Precise adherence to all of the instructions speciied in the operating manual is required for proper use of the product. Intended uses and actions against which the operating manual advises or warns must be categorically avoided. The product is designed only for private and not commercial use. The guarantee will be invalidated in case of misuse or improper handling, use of force, or interventions not undertaken by our authorised service branch. Processing in Case of Guarantee To ensure quick handling of you issue, please follow the following directions: • Please have the receipt and identiication number (IAN 303400) ready as proof of purchase for all enquiries. • Please ind the item number on the rating plate. • Should functional errors or other defects occur, please initially contact the service department speciied below by telephone or by e-mail. You will then receive further information on the processing of your complaint. 31 GB • IE After consultation with our customer service, a product recorded as defective can be sent postage paid to the service address communicated to you, with the proof of purchase (receipt) and speciication of what constitutes the defect and when it occurred. In order to avoid acceptance problems and additional costs, please be sure to use only the address communicated to you. Ensure that the consignment is not sent carriage forward or by bulky goods, express or other special freight. Please send the equipment inc. all accessories supplied at the time of purchase and ensure adequate, safe transport packaging. Repair Service For a charge, repairs not covered by the guarantee can be carried out by our service branch, which will be happy to issue a cost estimate for you. We can handle only equipment that has been sent with adequate packaging and postage. Attention: Please send your equipment to our service branch in clean condition and with an indication of the defect. Equipment sent carriage forward or by bulky goods, express or other special freight will not be accepted. We will dispose of your defective devices free of charge when you send them to us. 32 Service-Center GB IE Service Great Britain Tel.: 800 404 7657 (£ 0.10/Min.) E-Mail: [email protected] IAN 303400 Service Ireland Tel.: 1890 930 034 (0,08 EUR/Min., (peak)) (0,06 EUR/Min., (off peak)) E-Mail: [email protected] IAN 303400 Importer Please note that the following address is not a service address. Please initially contact the service centre speciied above. Grizzly Tools GmbH & Co. KG Stockstädter Straße 20 DE-63762 Großostheim Germany www.grizzly-service.eu FR BE Sommaire Introduction Introduction ................................ 33 Domaine d’utilisation .................. 33 Description générale ................... 34 Volume de la livraison .....................34 Vue synoptique ...............................34 Caractéristiques techniques ......... 34 Instructions de sécurité ................ 35 Symboles et pictogrammes ...............35 Consignes de sécurité générales pour outils électriques ......................35 Autres consignes de sécurité .............38 Autres risques .................................39 Instructions de montage .............. 39 Positionner/retirer la feuille abrasive ...39 Montage de la languette de ponçage ..40 Raccorder, retirer et vider le bac à poussières ......................................40 Raccorder/retirer l’aspiration externe de poussière .......................41 Service ........................................ 41 Mise en marche/arrêt ......................41 Indications de travail .................. 41 Ponçage ........................................42 Choix de la feuille abrasive ..............42 Choix de la plaque à poncer ............42 Nettoyage/Entretien.................... 42 Nettoyage......................................42 Nettoyer/remplacer le dispositif de iltration de la boîte à poussières.......43 Rangement ................................. 43 Elimination/Protection de l’environnement .......................... 43 Pièces de rechange/Accessoires... 44 Dépannage ................................. 45 Garantie ..................................... 46 Service Réparations .................... 47 Service-Center ............................. 47 Importateur ................................ 47 Traduction de la déclaration de conformité CE originale ........ 108 Vue éclatée ............................... 113 Toutes nos félicitations pour l’achat de votre nouvel appareil. Vous avez ainsi choisi un produit de qualité supérieure. La qualité de l’appareil a été vériiée pendant la production et il a été soumis à un contrôle inal. Le fonctionnement de votre appareil est donc ainsi garanti. La notice d’utilisation fait partie de ce produit. Elle contient des instructions importantes pour la sécurité, l’utilisation et l’élimination des déchets. Avant d’utiliser ce produit, lisez attentivement les consignes d’emploi et de sécurité. N’utilisez le produit que tel que décrit et uniquement pour les domaines d’emploi indiqués. Conservez cette notice et remettez-la avec tous les documents si vous cédez le produit à un tiers. Domaine d’utilisation L‘appareil est prévu pour le meulage à sec du bois, du métal, du plastique, du mastic et des surfaces vernies. Cet appareil n’est pas adapté à une utilisation commerciale. Toute autre utilisation qui n’est pas autorisée expressément dans ce mode d’emploi peut conduire à un endommagement de l’appareil et présenter un réel danger pour l’utilisateur. L’appareil est destiné à une utilisation par des adultes. Les jeunes gens âgés de plus de 16 ans sont autorisés à utiliser l’appareil sous surveillance d’un adulte. Le constructeur décline toute responsabilité en cas de dommages qui seraient occasionnés par une utilisation non conforme ou une manipulation inappropriée de l’appareil. 33 FR BE Description générale Vous trouverez les images correspondantes sur la couverture. 15 Ouvertures d’aspiration, plaque abrasive 16 Levier de serrage pour le déverrouillage de la plaque à poncer Volume de la livraison Déballez l’appareil et vériiez que la livraison est complète. Evacuez le matériel d’emballage comme il se doit. • Appareil • Boîte à poussière • Adaptateur pour l‘aspiration externe de poussière • 3 feuilles abrasives (en deux parties) (Grain P 80 / P 120 / P 180) • Languette à poncer • 3 feuilles abrasives pour languette à poncer (Grain P 80 / P 120 / P 180) • Notice d‘utilisation Vue synoptique 1 2 3 4 5 6 7 8 9 10 11 12 13 14 34 Interrupteur marche/arrêt Support manuel Ouverture de ventilation Touche de déverrouillage boîte à poussière Cordon d‘alimentation Couvercle de la boîte à poussière Languette pour ouvrir la boîte à poussière Boîte à poussière Raccord à l‘aspiration des poussières Plaque abrasive Adaptateur pour l’aspiration externe de la poussière 3 feuilles abrasives (en deux parties) Languette à poncer 3 languettes à poncer 17 Cadre de support pour le dispositif de iltration 18 Dispositif de iltration boîte à poussière Caractéristiques techniques Ponceuse triangulaire .......................PHS 160 E5 Tension d’entrée nominale (U) ...............................230 V~, 50 Hz Puissance absorbée (P) ................ 160 W Vitesse de rotation à vide (n0) ... 13000 min-1 Vitesse d’oscillation (n) ............. 26000 min-1 Poids (sans accessoires) ........... env. 1,1 kg Classe de protection ......................... II Type de protection ........................... IPX0 Niveau de pression acoustique (LpA) ....................... 76 dB(A); KpA= 3 dB Niveau de puissance acoustique (LWA) ..................... 87 dB(A); KWA= 3 dB Vibrations (ah) ........... 9 m/s2; K= 1,5 m/s2 La valeur d’émission d’oscillation donnée a été mesurée d’après une procédure d’essai aux normes et peut être utilisée pour comparer un outil électrique avec un autre outil. L’indication du fait que la valeur totale de vibrations déclarée peut également être utilisée pour une évaluation préliminaire de l’exposition. Avertissement : La valeur d’émission d’oscillation peut, pendant l’utilisation réelle de l’outil électrique, différer de la valeur d’indication, selon la manière dont l’outil élec- FR trique est utilisé. Essayez de maintenir aussi faible que possible la contrainte que constituent les vibrations. Mesures à titre d’exemple pour réduire la contrainte que constituent les vibrations : porter des gants lors de l’utilisation de l’outil et limiter le temps de travail. Il faut à ce titre tenir compte de toutes les parties du cycle d’exploitation (par exemple les temps au cours desquels l’outil électroportatif est éteint, et ceux au cours desquels il est certes allumé mais fonctionne hors charge). Instructions de sécurité BE Symboles apposés sur l’appareil Attention ! Attention ! Danger de choc électrique! Retirez la iche de contact avant tous travaux sur l‘appareil. Lisez attentivement les instructions d’emploi. Porter une protection visuelle et acoustique. Portez un équipement de protection respiratoire Porter des gants de protection Cette section traite des principales normes de sécurité lors du travail avec l’appareil. Classe de protection II (Double isolation) Symboles et pictogrammes Symboles utilisés dans le mode d’emploi Symbole de danger et indications relatives à la prévention de dommages corporels ou matériels. Symbole d’interdiction et indications relatives à la prévention de dommages. Les appareils n’ont pas leur place dans les ordures ménagères. Consignes de sécurité générales pour outils électriques AVERTISSEMENT ! Lisez toutes les consignes de sécurité et les instructions. Des omissions lors de l‘observation des consignes de sécurité et des instructions peuvent causer une décharge électrique, un incendie et / ou de graves blessures. Branchez la machine au secteur. Débranchez la iche de la prise. Symboles de remarque et informations permettant une meilleure utilisation de l‘appareil. Conservez toutes les consignes de sécurité et les instructions pour les consulter ultérieurement. Le terme «outil» dans les avertissements fait référence à votre outil électrique alimenté par le secteur (avec cordon d’alimentation) ou votre outil fonctionnant sur batterie (sans cordon d’alimentation). 35 FR BE 1) SÉCURITÉ SUR LE LIEU DE TRAVAIL • Conservez votre zone de travail propre et bien éclairée. Les zones de travail en désordre et non éclairées peuvent être à l‘origine d‘accidents. • Avec l‘outil électrique, ne travaillez pas dans un environnement soumis à un risque d‘explosion et dans lequel se trouvent des poussières, des gaz et des liquides inlammables. Les outils électriques produisent des étincelles qui peuvent enlammer la poussière ou les vapeurs. • Pendant l‘utilisation de l‘outil électrique, tenez à distance les enfants et les autres personnes. En cas de distractions, vous pouvez perdre le contrôle de l‘appareil. 2) SÉCURITÉ ÉLECTRIQUE • La iche de raccordement de l‘outil électrique doit convenir à la prise de courant. La iche ne doit pas être modiiée de quelle manière que ce soit. N‘utilisez aucune prise d‘adaptateur conjointement avec des outils électriques ayant une mise à la terre de protection. Les iches inchangées et les prises de courant appropriées diminuent le risque de décharge électrique. • Evitez le contact du corps avec les surfaces mises à la terre, telles que les tubes, les chauffages, les fours et les réfrigérateurs. Il existe un risque accru de décharge électrique, si votre corps est mis à la terre. • Tenez les outils électriques à distance de la pluie ou de l‘humidité. La pénétration de l‘eau dans un outil électrique augmente le risque d’une décharge électrique. 36 • Ne pas maltraiter le cordon. Ne jamais utiliser le cordon pour porter, tirer ou débrancher l’outil. Maintenir le cordon à l’écart de la chaleur, du lubriiant, des arêtes ou des parties en mouvement. Des cordons endommagés ou emmêlés augmentent le risque de choc électrique. • Si vous travaillez avec un outil électrique en plein air, utilisez uniquement un câble de prolongation qui soit adapté pour l‘extérieur. L‘emploi d‘un câble de prolongation approprié pour le domaine extérieur diminue le risque d’une décharge électrique. • Si l‘utilisation de l‘outil électrique ne peut pas être évitée dans un environnement humide, utilisez un commutateur de protection de courant de défaut avec un courant de déclenchement de 30 milliampères ou moins. L‘utilisation d‘un commutateur de protection de courant de défaut réduit le risque d’une décharge électrique. 3) SÉCURITÉ DES PERSONNES • Soyez attentif, faites attention à ce que vous faites et utilisez raisonnablement l‘outil électrique pendant votre travail. N‘utilisez aucun outil électrique si vous êtes fatigué ou vous trouvez sous l‘inluence de drogues, d‘alcool ou de médicaments. Un moment d‘inattention durant l‘utilisation de l‘outil électrique peut être la cause de graves blessures. • Portez toujours un équipement de protection individuel et des lunettes protectrices. Le port d‘un FR • • • • • équipement de protection individuel, comme un masque anti-poussières, des chaussures de sécurité anti-dérapantes, un casque de protection ou des protections auriculaires, en fonction du type et de l‘utilisation de l‘outil électrique, diminue le risque des blessures. Evitez une mise en service non prévue. Assurez-vous que l‘outil électrique est éteint avant que vous ne le connectiez à l‘alimentation en courant et / ou à l‘accumulateur, le portiez ou le déplaciez. Si en portant l‘appareil électrique, votre doigt appuie sur le commutateur ou que l‘appareil se mette en marche lorsque vous le connectez, cela peut entraîner un accident. Retirez les outils de réglage ou la clé à écrous avant de mettre l‘outil électrique sous tension. Un outil ou une clé qui se trouve dans une partie mobile de l‘appareil peut être à l‘origine de blessures. Ne pas se précipiter. Assurezvous d‘avoir une position stable et d‘être tout le temps en équilibre. Vous pourrez ainsi mieux contrôler mieux l‘outil électrique dans des situations inattendues. Portez des vêtements appropriés convenables. Ne portez aucun habit large ou parure. Maintenez vos cheveux, habits et gants loin des parties mobiles. Les habits légers, les parures ou les longs cheveux peuvent être saisis par les parties mobiles. Si des dispositifs d‘aspiration et de collecte supplémentaires peuvent être montés, assurezvous que ceux-ci sont connectés et utilisés correctement. L‘utilisation d‘un dispositif d‘aspiration peut diminuer les risques engendrés par la poussière. BE 4) UTILISATION ET ENTRETIEN DE L’OUTIL • Ne forcez pas l‘appareil. Utilisez pour votre travail l‘outil électrique le mieux adapté. Avec un outil électrique approprié, vous travaillez mieux et avec davantage de sécurité dans le secteur de travail donné. • N‘utilisez aucun outil électrique dont le commutateur est défectueux. Un outil électrique qui ne peut plus être allumé ou éteint est dangereux et doit être réparé. • Retirez la iche de la prise de courant et / ou retirez l‘accumulateur avant d‘entreprendre des réglages sur un appareil, échanger des accessoires ou mettre de côté l‘appareil. Cette mesure de précaution empêche un démarrage involontaire de l‘outil électrique. • Conservez les outils électriques inutilisés hors de la portée des enfants. Ne laissez pas des personnes qui ne connaissent pas l‘appareil ou n‘ont pas lu ces instructions utiliser l‘appareil. Les outils électriques sont dangereux s‘ils sont utilisés par des personnes inexpérimentées. • Observer la maintenance de l’outil. Contrôlez si les parties mobiles fonctionnent correctement et ne se coincent pas ; vériiez l’appareil pour voir si des pièces sont rompues ou sont endommagées, perturbant ainsi le fonctionnement de l‘outil électrique. Faites réparer les pièces endommagées avant d‘utiliser l‘appareil. Beaucoup d‘accidents ont pour origine des outils électriques mal entretenus. • Maintenez les outils coupants aiguisés et propres. Les outils tran- 37 FR BE chants bien entretenus ayant des bords de coupe aiguisés se coincent moins et s‘utilisent plus facilement. • Utilisez l‘outil électrique, les accessoires, les outils, etc. conformément à ces instructions. Prenez également en compte les conditions de travail et l‘activité à réaliser. L‘utilisation des outils électriques pour des buts autres que ceux prévus peut mener à des situations dangereuses. • Tenez l’outil par ses surfaces de prise isolées pendant toute opération où l’outil utilisé peut toucher des câbles électriques cachés ou son propre cordon. Le contact avec un il sous tension peut également mettre les parties métalliques sous tension et provoquer un choc électrique. 5) MAINTENANCE ET ENTRETIEN • Ne laissez réparer votre outil électrique que par des professionnels qualiiés et seulement avec des pièces de rechange d‘origine. Vous serez ainsi sûr de conserver la sécurité pour l‘outil électrique correspondant. Autres consignes de sécurité Mise en garde ! Le ponçage peut produire des poussières nocives (p.ex. de matériaux contenant des peintures au plomb, des matériaux contenant de l’amiante, des métaux ou certains types de bois) qui sont susceptibles de présenter un risque pour l’utilisateur ou les personnes à proximité. Veillez à une bonne aération du lieu de travail. Veuillez toujours porter des lunettes de 38 sécurité, des gants de sécurité et un masque de protection respiratoire. • Sécurisez la pièce à usiner. Une pièce à usiner ixée avec des dispositifs de serrage ou un étau est maintenue plus sûrement qu’avec votre main. • N’utilisez l’outil électrique que pour un ponçage à sec. N’arasez pas des matériaux humides. L’introduction d’eau dans l’outil électrique augmente le risque d’électrocution. • Évitez la surchauffe de la pièce à poncer et de la ponceuse. Il y a risque d’incendie. • La pièce à usiner chauffe pendant le ponçage. Ne pas touchez à l’endroit travaillé, laissez refroidir. Risque de brûlures. Ne pas utilisez de produit de refroidissement ou assimilés. • Pensez à toujours vider le récipient à poussières avant d’interrompre le travail. Dans des conditions défavorables, il existe un risque d’inlammation spontanée de la poussière dans le sac à poussière, dans le microiltre et dans le sac en papier (ou sac à iltre, resp. iltre de l’aspirateur). Il existe un danger particulier lorsque la poussière de ponçage se mélange avec des résidus de vernis, de polyuréthane ou d’autres substances chimiques et lorsque la pièce à poncer a chauffé pendant de longs travaux. Vériiez également dans le mode d’emploi de votre aspirateur si celui-ci est adapté à l’aspiration de copeaux. • Raccordez l‘appareil à une prise protégée par un disjoncteur différentiel (disjoncteur FI) réagissant dès que l‘intensité dépasse 30 mA. FR • Si le câble d‘alimentation de l‘outil est endommagé, il doit être remplacé par un câble spécialement préparé disponible auprès du service après vente. Autres risques Même si vous utilisez cet outil électrique de manière conforme, il existe malgré tout d’autres risques. Les dangers suivants peuvent se produire en fonction de la méthode de construction et du modèle de cet outil électrique : a) Dégâts aux poumons, si aucune protection respiratoire appropriée n’est portée ; b) Coupures c) Dommages affectant l’ouïe si aucune protection d’ouïe appropriée n’est portée. d) Blessures aux yeux, si aucune protection des yeux appropriée n’est portée. e) Ennuis de santé engendrés par les vibrations affectant les bras et les mains si l’appareil est utilisé pendant une longue période ou s’il n’est pas employé de manière conforme ou correctement entretenu. Avertissement ! Pendant son fonctionnement cet outil électrique produit un champ électromagnétique qui, dans certaines circonstances, peut perturber des implants médicaux actifs ou passifs. Pour diminuer le risque de blessures graves ou mortelles, nous recommandons aux personnes portant des implants médicaux de consulter leur médecin et le fabricant de l’implant médical avant d’utiliser cette machine. BE Instructions de montage Positionner/retirer la feuille abrasive Nettoyez la plaque de ponçage avant de positionner la feuille abrasive. N’utilisez que des feuilles abrasives à la dimension adaptée. Les feuilles abrasives qui dépassent du plateau abrasif peuvent créer des blessures, causer le blocage ou la déchirure des feuilles abrasives. La plaque à poncer (10) est équipée d’un tissu adhésif qui permet une mise en place rapide de la feuille abrasive (12). Les feuilles abrasives (12) sont composées de 2 parties et peuvent être remplacées individuellement selon l’état d’usure. Ain d’obtenir un résultat de ponçage optimal, utilisez seulement des feuilles abrasives de même grain. Placer la feuille abrasive : 1. Apposez les deux parties de la feuille abrasive (12) de manière uniforme sur la plaque à poncer (10). Veillez à ce que les feuilles abrasives sont alignées sur la plaque à poncer et que les perforations correspondent aux perforations d’aspiration (15) de la plaque à poncer (10). Retirer la feuille abrasive : 2. Détachez la feuille abrasive (12) de la plaque à poncer (10). 39 FR BE Poncez uniquement lorsque les deux feuilles abrasives sont installées. Montage de la languette de ponçage Vous pouvez remplacer la plaque à poncer (10) pré montée par la languette à poncer (13) fournie à la livraison. Démonter la plaque à poncer : 1. Ouvrez le levier de serrage (16) et tournez-le jusqu‘à la butée dans le sens de la feuille abrasive. 2. Retirez la partie avant de la plaque à poncer (10). Placer la languette à poncer : 3. Guidez la languette à poncer (13) en partant du haut contre la partie arrière de la plaque à poncer (10) et appuyez fermement. 4. Pour verrouiller, ramenez le levier de serrage (16) à sa position d‘origine. Placer la feuille abrasive pour languette à poncer : 5. Appuyez la feuille abrasive pour la languette à poncer (14) de manière uniforme sur la languette à poncer (13). 6. Placez une feuille abrasive sur la partie arrière de la plaque à poncer (10). Vous éviterez ainsi l‘encrassement du tissu agrippant. 40 Raccorder, retirer et vider le bac à poussières Raccorder le bac à poussières : 1. Assurez-vous, avant le raccordement, que la boîte à poussières (8) est bien fermé. 2. Appuyez sur le bouton de déverrouillage (4) sur le bac à poussières (8). Poussez la boîte à poussières (8) jusqu’à la butée sur le raccord de l’aspiration des poussières (9). Les deux becs (9a) sur le raccord (9) s’adaptent dans les deux rainures (8a) sur la boîte à poussières (8). 3. Relâchez la touche de verrouillage (4). Elle s‘emboite au-dessus de la ixation du bac à poussières (8). Retirer le bac à poussières : 4. Appuyez sur le bouton de déblocage (4) et retirez la boîte à poussières (8). Vider le bac à poussières : 5. Tirez sur la languette (7) et retirez le couvercle du bac à poussières (6). 6. Pour vider, tapoter la boîte à poussières (8). 7. Referme la boîte à poussières (8). Videz le bac à poussières en temps utiles ain de garantir une performance d’aspiration optimale. FR Raccorder/retirer l’aspiration externe de poussière Raccorder l’aspiration externe des poussières : 1. Glissez l‘adaptateur pour l‘aspiration externe de poussière (11) jusqu‘à la butée dans le raccordement pour l‘aspiration de la poussière (9). 2. Raccordez le tuyau d‘aspiration d‘un aspirateur (ne fait pas partie du volume de la livraison) à l‘adaptateur pour l‘aspiration externe de poussière (11). Retirer l’aspiration externe des poussières : 1. Tirez le tuyau d‘aspiration de l‘adaptateur pour l‘aspiration externe de poussière (7). 2. Retirez l’adaptateur de l’aspiration externe des poussières (11). Vous pouvez raccorder éventuellement le tuyau d‘un aspirateur directement et sans adaptateur à l‘appareil. Service Mise en marche/arrêt Veillez à ce que la tension du réseau de connexion corresponde à celle indiquée sur la plaque signalétique de l‘appareil. BE 1. Pour la mise en marche, faites basculer l‘interrupteur marche/ arrêt (1) dans la position „I“, et l‘appareil se met en marche. 2. Pour la mise à l‘arrêt, faites basculer l‘interrupteur marche/ arrêt (1) dans la position „0“, et l‘appareil se met à l‘arrêt. Indications de travail Lors des travaux avec l’outil, portez des vêtements appropriés et un équipement de protection adapté. Assurez-vous avant chaque utilisation que l’outil est opérationnel. Un équipement de protection individuelle et un outil opérationnel réduisent le risque de blessures et d’accidents. N’utilisez pas l’appareil sans le bac à poussières ou une aspiration externe. L’utilisation d’un dispositif d’aspiration peut diminuer les risques liés à la formation de poussières. Avec l’utilisation de feuilles abrasives sans perforation, l’aspiration des poussières n’est pas possible. Veillez à une bonne aération du lieu de travail. Avant tout travail sur l’appareil, il est indispensable de débrancher la prise de courant. Risque d’électrocution ! Branchez la machine au secteur. 41 FR BE Ponçage Choix de la plaque à poncer • Amenez l’outil en marche sur la pièce à usiner. • Soulevez la plaque à poncer après l’intervention avant d’éteindre l’appareil. • Positionnez toujours le câble vers l’arrière de l’appareil. • Nettoyez la plaque de ponçage avant de positionner la feuille abrasive. • Pour obtenir des bons résultats de ponçage, ne travaillez qu’avec des feuilles abrasives intactes. • Exercez une faible pression uniforme et une poussée uniforme. Cela vous permet de ménager l’outil et la feuille abrasive. • Poncer les coins et les bords avec la pointe ou le bord latéral de la feuille abrasive. Si la pointe avant de la plaque à poncer triangulaire est usée, la feuille abrasive peut être retirée et apposée dans le sens inverse. • Ne poncez pas plusieurs matériaux avec la même feuille abrasive (p.ex. le métal et ensuite le bois). • Videz le bac à poussières ou l’aspirateur en temps utiles ain de garantir une performance d’aspiration optimale. Plaque à poncer pré montée : • Pour le ponçage de grandes surfaces ou le traitement des coins, des bords et des arrondis extérieurs. Languette à poncer : • Pour le traitement de fentes étroites et d’interstices minces. Nettoyage/Entretien Débranchez la iche de la prise avant tout réglage, maintenance ou réparation. Faites exécuter les travaux d’entretien et de réparation qui ne sont pas mentionnés dans cette notice par notre Centre de services. Utilisez exclusivement des pièces d’origine! Exécutez à intervalles réguliers les travaux de nettoyage et les opérations de maintenance décrits ci-dessous. Vous bénéicierez ainsi d‘une utilisation longue et sûre de votre appareil. Nettoyage Choix de la feuille abrasive Grain Utilisation P 60 P 80 pour un premier ponçage de surfaces en bois bruts P 120 P 180 pour le prépolissage P 240 pour un ponçage in de surfaces vernis et avec apprêt 42 L‘appareil ne doit pas être aspergé avec de l‘eau ou immergé dans l‘eau. Il existe un danger de décharge électrique ! FR • Conservez propres les fentes de ventilation, le boîtier moteur et les poignées de l‘appareil. Pour ce faire, utilisez un chiffon humide ou une brosse. N‘utilisez aucun produit de nettoyage ou solvant. Vous pourriez endommager irréparablement l‘appareil. • Nettoyez la feuille abrasive avec l’aspirateur ou tapotez-la. Nettoyer/remplacer le dispositif de iltration de la boîte à poussières Contrôlez l’encrassement du dispositif de iltration une à deux fois par an. Retirer le dispositif de iltration : 1. Appuyez sur le bouton de déblocage ( 4) et retirez la boîte à poussières ( 8). (cf. « Raccorder, retirer et vider le bac à poussières »). 2. Tirez sur la languette (7) et retirez le couvercle de la boîte à poussières (6). 3. Retirez le cadre de support (17) sur le couvercle de la boîte à poussières (6) et retirez le dispositif de iltration (18). 4. Nettoyez le dispositif de iltration (18) à l’eau tiède et avec du savon et laissez-le sécher. Effectuez le remplacement d’un dispositif de iltration très encrassé ou endommagé (cf. « Pièces de rechange/accessoires »). BE Insérer le dispositif de iltration : 5. Insérez le dispositif de iltration (18) et le cadre de support (17) dans le couvercle de la boîte à poussières (6). 6. Verrouillez la boîte à poussières ( 8). Rangement • Rangez l’appareil à un endroit sec et protégé de la poussière et surtout hors de la portée des enfants. • Vider la boîte à poussières avant de stocker l’appareil (cf. « Raccorder, retirer et vider le bac à poussières »). Elimination/Protection de l’environnement Respectez la réglementation relative à la protection de l’environnement (recyclage) pour l’élimination de l’appareil, des accessoires et de l’emballage. Les machines n’ont pas leur place dans les ordures ménagères. Portez l’appareil à un point de recyclage. Les différents composants en plastique et en métal peuvent être séparés selon leur nature et subir un recyclage. Demandez conseil sur ce point à notre centre de services. Nous exécutons gratuitement l’élimination des déchets de vos appareils renvoyés défectueux. 43 FR BE Pièces de rechange/Accessoires Vous obtiendrez des pièces de rechange et des accessoires à l’adresse www.grizzly-service.eu Si vous ne disposez d’aucun accès Internet, veuillez téléphoner au centre de SAV (voir «Service-Center » page 47). Veuillez tenir prêts les numéros de commande indiqués ci-dessous. Position Désignation Notice d‘utilisation No de commande 10 Plaque abrasive, pré montée 91104224 13 Languette à poncer, pré montée 91104225 11 Adaptateur pour l’aspiration externe de la poussière 91104222 8 Boîte à poussière 91104221 18 Insert de iltre pour la boîte de poussière 91104223 12 6 Feuilles abrasives pour le bois (P 40*), pour plaque abrasive 30211092 6 Feuilles abrasives pour le bois (P 80*), pour plaque abrasive 30211093 6 Feuilles abrasives pour le bois (P 120*), pour plaque abrasive 30211094 10 Feuilles abrasives pour le bois (P 120*), pour plaque abrasive 30211090 6 Feuilles abrasives pour le bois (P 180*), pour plaque abrasive 30211095 6 Feuilles abrasives pour le bois (P 240*), pour plaque abrasive 30211096 Set, 5 Feuilles abrasives pour le bois, pour plaque abrasive (2x P 60*, 2x P 120*, 1x P 240*) 30211088 Set, 30 Feuilles abrasives pour le bois, pour plaque abrasive (12x P 60*, 12x P 120*, 6x P 240*) 30211089 Set, 18 Feuilles abrasives pour le bois, pour plaque abrasive (6x P 60*, 6x P 120*, 6x P 240*) 30211091 Set, 30 Feuilles abrasives pour plaque abrasive 30211097 24x pour le bois: 6x P 60*, 6x P 120*,6x P 180*, 6x P 240* 3x pour la pierre: 1x P 80*, 1x 180*, 1x P 400* 3x pour le vernis: 1x P 60*, 1x P 120*, 1x P 240*) 14 *P = Grain 44 6 Feuilles abrasives pour languette à poncer (P 80*) 30211085 6 Feuilles abrasives pour languette à poncer (P 120*) 30211086 6 Feuilles abrasives pour languette à poncer (P 180*) 30211087 FR BE Dépannage Problème L’appareil ne démarre pas Cause possible Dépannage Absence de tension de réseau Les fusibles fonctionnent. Contrôler le prise de courant, le cordon secteur, le câble, la iche de contact, et le cas échéant, faire faire les réparations par un électricien, contrôler les fusibles. Interrupteur Marche/Arrêt 1) défectueux ( Réparation par le service après-vente Défaut du moteur L'outil fonctionne avec des interruptions Mauvais contact interne Le moteur ralentit et s'arrête L'appareil est surchargé par la pièce à travailler Mauvais rendement de ponçage La feuille abrasive s'use rapidement Interrupteur Marche/Arrêt 1) défectueux ( Réparation par le service après-vente Réduisez la pression sur l'aiguisoir La pièce de travail est inappropriée La feuille abrasive est inap- Insérer une feuille abrasive ou une propriée pour la pièce à plaque à poncer adaptée (cf. « Insusiner tructions de montage ») Feuille abrasive usée Insérer une nouvelle feuille abrasive (cf « Instructions de montage ») Feuille abrasive inadaptée pour la pièce à usiner Insérer une feuille abrasive adaptée (cf. « Instructions de montage ») Trop de pression Réduire la pression 45 FR BE Garantie Chère cliente, cher client, Ce produit bénéicie d’une garantie de 3 ans, valable à compter de la date d’achat. En cas de manques constatés sur ce produit, vous disposez des droits légaux contre le vendeur du produit. Ces droits légaux ne sont pas limités par notre garantie présentée par la suite. Conditions de garantie Le délai de garantie débute avec la date d’achat. Veuillez conserver soigneusement le ticket de caisse original. En effet, ce document vous sera réclamé comme preuve d’achat. Si un défaut de matériel ou un défaut de fabrication se présente au cours des trois ans suivant la date d’achat de ce produit, nous réparons gratuitement ou remplaçons ce produit - selon notre choix. Cette garantie suppose que l’appareil défectueux et le justiicatif d’achat (ticket de caisse) nous soient présentés durant cette période de trois ans et que la nature du manque et la manière dont celui-ci est apparu soient explicités par écrit dans un bref courrier. Si le défaut est couvert par notre garantie, le produit vous sera retourné, réparé ou remplacé par un neuf. Aucune nouvelle période de garantie ne débute à la date de la réparation ou de l’échange du produit. Durée de garantie et demande légale en dommages-intérêts La durée de garantie n’est pas prolongée par la garantie. Ce point s’applique aussi aux pièces remplacées et réparées. Les dommages et les manques éventuellement constatés dès l’achat doivent immédiatement être signalés après le déballage. A l’expiration du délai de garantie les réparations occasionnelles sont à la charge de l’acheteur. 46 Volume de la garantie L’appareil a été fabriqué avec soin, selon de sévères directives de qualité et il a été entièrement contrôlé avant la livraison. La garantie s’applique aux défauts de matériel ou aux défauts de fabrication. Cette garantie ne s’étend pas aux parties du produit qui sont exposées à une usure normale et peuvent être donc considérées comme des pièces d’usure (par exemple: Feuilles abrasives, outils) ou pour des dommages affectant les parties fragiles (par exemple les commutateurs).. Cette garantie prend in si le produit endommagé n’a pas été utilisé ou entretenu d’une façon conforme. Pour une utilisation appropriée du produit, il faut impérativement respecter toutes les instructions citées dans le manuel de l’opérateur. Les actions et les domaines d’utilisation déconseillés dans la notice d’utilisation ou vis-à-vis desquels une mise en garde est émise, doivent absolument être évités. Marche à suivre dans le cas de garantie Pour garantir un traitement rapide de votre demande, veuillez suivre les instructions suivantes : • Tenez vous prêt à présenter, sur demande, le ticket de caisse et le numéro d’identiication (IAN 303400) comme preuve d’achat. • Vous trouverez le numéro d’article sur la plaque signalétique. • Si des pannes de fonctionnement ou d’autres manques apparaissent, prenez d’abord contact, par téléphone ou par e-Mail, avec le service après-vente dont les coordonnées sont indiquées ci-dessous. Vous recevrez alors des renseignements supplémentaires sur le déroulement de votre réclamation. FR • En cas de produit défectueux vous pouvez, après contact avec notre service clients, envoyer le produit, franco de port à l’adresse de service après-vente indiquée, accompagné du justiicatif d’achat (ticket de caisse) et en indiquant quelle est la nature du défaut et quand celui-ci s’est produit. Pour éviter des problèmes d’acceptation et des frais supplémentaires, utilisez absolument seulement l’adresse qui vous est donnée. Assurez-vous que l’expédition ne se fait pas en port dû, comme marchandises encombrantes, envoi express ou autre taxe spéciale. Veuillez renvoyer l’appareil, y compris tous les accessoires livrés lors de l’achat et prenez toute mesure pour avoir un emballage de transport sufisamment sûr. Service-Center Service Réparations Grizzly Tools GmbH & Co. KG Stockstädter Straße 20 DE-63762 Großostheim Allemagne www.grizzly-service.eu Vous pouvez, contre paiement, faire exécuter par notre service, des réparations qui ne font pas partie de la garantie. Nous vous enverrons volontiers un devis estimatif. Nous ne pouvons traiter que des appareils qui ont été correctement emballés et qui ont envoyés sufisamment affranchis. Attention: veuillez renvoyer à notre agence de service votre appareil nettoyé et avec une note indiquant le défaut constaté. Les appareils envoyés en port dû - comme marchandises encombrantes, en envoi express ou avec toute autre taxe spéciale ne seront pas acceptés. Nous exécutons gratuitement la mise aux déchets de vos appareils défectueux renvoyés. FR Service France Tel.: 0800 919270 E-Mail: [email protected] IAN 303400 BE Service Belgique Tel.: 070 270 171 (0,15 EUR/Min.) E-Mail: [email protected] IAN 303400 BE Importateur Veuillez noter que l’adresse suivante n’est pas une adresse de service après-vente. Contactez d’abord le service après-vente cité plus haut. 47 NL BE Inhoud Inleiding Inleiding .................................... 48 Gebruik ..................................... 48 Algemene beschrjving ............... 49 Omvang van de levering ................. 49 Overzicht ....................................... 49 Technische gegevens .................. 49 Veiligheidsvoorschriften ............. 50 Symbolen en pictogrammen ............ 50 Algemene veiligheidsinstructies voor elektrisch gereedschap .................... 50 Verdere veiligheidsmaatregelen ................................... 53 Restrisico’s ...................................... 54 Montagehandleiding .................. 54 Schuurpapierblad aanbrengen/ verwjderen .................................... 54 Schuurtong monteren ....................... 55 Stofdoos aansluiten/afnemen/ledigen .. 55 Externe stofafzuiging aansluiten/ verwjderen .................................... 56 Bediening .................................. 56 In-/uitschakelen .............................. 56 Werkinstructies .......................... 56 Schuren ......................................... 56 Keuze van het schuurpapierblad ....... 57 Selectie van de schuurschjf .............. 57 Reiniging en onderhoud ............. 57 Reiniging ....................................... 57 Filtersysteem van de stofdoos reinigen/vervangen ....................... 58 Bewaren .................................... 58 Afvalverwerking en milieubescherming ..................... 58 Reserveonderdelen/Accessoires . 59 Foutopsporing ............................ 60 Garantie .................................... 61 Reparatieservice ........................ 62 Service-Center ............................ 62 Importeur .................................. 62 Vertaling van de originele CE-conformiteitsverklaring ....... 109 Explosietekening ...................... 113 Harteljk gefeliciteerd met de aankoop van uw nieuw apparaat. Daarmee hebt u voor een hoogwaardig apparaat gekozen. Dit apparaat werd tjdens de productie op kwaliteit gecontroleerd en aan een eindcontrole onderworpen. De functionaliteit van uw apparaat is bjgevolg verzekerd. 48 De gebruiksaanwjzing vormt een bestanddeel van dit apparaat. Ze omvat belangrjke aanwjzingen voor veiligheid, gebruik en afvalverwjdering. Maak u vóór het gebruik van het apparaat met alle bedienings- en veiligheidsinstructies vertrouwd. Gebruik het apparaat uitsluitend zoals beschreven en voor de aangegeven toepassingsgebieden. Bewaar de handleiding goed en overhandig alle documenten bj het doorgeven van het apparaat mee aan derden. Gebruik Het apparaat is bedoeld voor het droog schuren van hout, metaal, kunststof, plamuur en ook geverfde oppervlakken. Dit apparaat is niet geschikt voor commercieel gebruik. Elk ander gebruik, dat in deze gebruiksaanwjzing niet uitdrukkeljk wordt vermeld, kan schade aan de machine veroorzaken en een ernstig gevaar voor de gebruiker betekenen. Het apparaat is bedoeld voor gebruik door volwassenen. Jongeren boven 16 jaar mogen het apparaat enkel onder toezicht gebruiken. De fabrikant is niet aansprakeljk voor schade die door onreglementair gebruik of verkeerde bediening werd veroorzaakt. NL Algemene beschrjving De afbeeldingen vindt u op de voorste uitklapbare bladzjde. Omvang van de levering Pak het apparaat uit en controleer, of de inhoud volledig is. Org voor een reglementair voorgeschreven afvalverwjdering van het verpakkingsmateriaal. • • • • Apparaat Stofbox Adapter voor de externe stofafzuiging 3 schuurbladen (tweedelig) (Korrelgrootte P 80 / P 120 / P 180) • Schuurtong • 3 schuurpapierbladen voor schuurtong (Korrelgrootte P 80 / P 120 / P 180) • Gebruiksaanwjzing Overzicht 1 2 3 4 5 6 7 8 9 10 11 12 13 14 Aan/uit schakelaar Handsteun Fixeerhendel Ontgrendeltoets stofdoos Elektrisch snoer Stofdoosdeksel Lip voor het openen van de stofdoos Stofdoos Aansluiting voor de stofafzuiging Schuurplaat Adapter voor de externe stofafzuiging 3 schuurbladen (tweedelig) Schuurtong 3 Schuurpapierbladen voor schuurtong 15 Afzuigopeningen schuurplaat BE 16 Spanhendel voor schuurschijfontgrendeling 17 Montageframe voor iltersysteem 18 Stofdoos iltersysteem Technische gegevens Handschuurmachine ............. PHS 160 E5 Netspanning (U) .............. 230 V~, 50 Hz Prestatievermogen (P)................... 160 W Toeren bj niet-belasting (n0) ....13000 min-1 Trillingsgetal (n).....................26000 min-1 Gewicht (zonder accessoires) ... ca. 1,1 kg Beschermniveau ................................ II Beschermingsklasse........................... IPX0 Geluidsdrukniveau (LpA) .. 76 dB(A); KpA= 3 dB Geluidssterkte (LWA) ....87 dB(A); KWA= 3 dB Vibratie (ah) .............. 9 m/s2; K= 1,5 m/s2 De aangegeven trillingemissiewaarde werd volgens een genormaliseerd testmethode gemeten en kan ter vergeljking van een stuk elektrisch gereedschap met een ander gebruikt worden. De aangegeven trillingemissiewaarde kan ook voor een inleidende inschatting van de blootstelling benut worden. Waarschuwing: Afhankeljk van de manier, waarop het elektrische gereedschap gebruikt wordt, kan de trilingemissiewaarde tjdens het effectieve gebruik van het elektrische gereedschap van de aangegeven waarde verschillen. Probeer de belasting door trillingen zo gering mogeljk te houden. Voorbeeldmaatregelen voor de reductie van trillingsbelasting zjn het dragen van handschoenen bj het gebruik van het gereedschap en de beperking van de werktjd. Daarbj 49 NL BE moeten alle delen van de bedrjfscyclus in acht worden genomen (bj voorbeeld tjden, waarop het elektrische werktuig is uitgeschakeld en tjden waarin het weliswaar is ingeschakeld, maar zonder belasting draait). Veiligheidsvoorschriften Deze paragraaf behandelt de fundamentele veiligheidsvoorschriften bj het werk met het apparaat. Symbolen en pictogrammen Symbolen in de gebruiksaanwjzing Gevaarsymbool met informatie over de preventie van personen- of zaakschade. Gebodsteken met informatie over de preventie van schade. Sluit het apparaat op de netspanning aan. Trek de netstekker uit. Aanduidingsteken met informatie over hoe u het apparaat beter kunt gebruiken. Symbolen op het apparaat 50 Gebruiksaanwjzing raadplegen. Draag een oog en een gehoorbescherming. Draag een ademhalingsbescherming. Draag tegen snjdwonden beschermende handschoenen. Beschermniveau II (Dubbele isolatie) Machines horen niet bj huishoudeljk afval thuis. Algemene veiligheidsinstructies voor elektrisch gereedschap WAARSCHUWING! Lees alle veiligheidsinstructies en aanwjzingen. Verzuim bj de naleving van de veiligheidsinstructies en aanwjzingen kan een elektrische schok, brand en/of ernstige verwondingen veroorzaken. Bewaar alle veiligheidsinstructies en aanwjzing voor de toekomst. Het in de veiligheidsinstructies gebruikte begrip „Elektrisch gereedschap“ heeft betrekking op elektrisch gereedschap met netvoeding (met netsnoer) en op elektrisch gereedschap met batterjvoeding (zonder netsnoer). Let op! 1) VEILIGHEID OP DE WERKPLAATS Verwondingsgevaar door roterend werktuig! Houd de handen uit de buurt van het apparaat. • Houd uw werkruimte netjes en goed verlicht. Wanorde of onverlichte werkomgevingen kunnen tot ongevallen leiden. NL • Werk met het elektrische gereedschap niet in een explosieve omgeving, waarin er zich brandbare vloeistoffen, gassen of stoffen bevinden. Elektrisch gereedschap produceert vonken, die het stof of de dampen kunnen doen ontsteken. • Houd kinderen en andere personen tjdens het gebruik van het elektrische gereedschap op een veilige afstand. In geval van aleiding kunt u de controle over het apparaat verliezen. 2) ELEKTRISCHE VEILIGHEID • De aansluitstekker van het elektrische gereedschap moet in het stopcontact passen. De stekker mag op geen enkele manier veranderd worden. Gebruik geen adapterstekkers samen met geaard elektrisch gereedschap. Ongewjzigde stekkers en passende stopcontacten doen het risico voor een elektrische schok afnemen. • Vermjd lichameljk contact met geaarde oppervlakken, zoals van buizen, verwarmingsinstallaties, fornuizen en koelkasten. Er bestaat een verhoogd risico door een elektrische schok als uw lichaam geaard is. • Houd elektrisch gereedschap op een veilige afstand tot regen of nattigheid. Het binnendringen van water in elektrisch gereedschap doet het risico voor een elektrische schok toenemen. • Gebruik het snoer niet voor een ander doeleinde om het elektrische gereedschap te dragen, op te hangen of om de stekker uit het stopcontact te trekken. Houd het snoer op een veilige afstand BE tot hitte, olie, scherpe kanten of bewegende apparaatonderdelen. Beschadigde of verstrikt geraakte snoeren doen het risico voor een elektrische schok toenemen. • Als u met elektrisch gereedschap in de open lucht werkt, maakt u enkel gebruik van verlengsnoeren, die ook voor buiten geschikt zjn. Het gebruik van een voor buiten geschikt verlengsnoer doet het risico voor een elektrische schok afnemen. • Als de werking van het elektrische gereedschap in een vochtige omgeving niet te vermjden is, maakt u gebruik van een aardlekschakelaar met een uitschakelstroom van 30 mA of minder. Het gebruik van een aardlekschakelaar doet het risico voor een elektrische schok afnemen. 3) VEILIGHEID VAN PERSONEN • Wees aandachtig, let erop wat u doet en ga verstandig aan het werk met elektrisch gereedschap. Gebruik geen elektrisch gereedschap als u moe bent of onder de invloed van drugs, alcohol of medicjnen staat. Een moment van onoplettendheid bj het gebruik van het elektrische gereedschap kan tot ernstige verwondingen leiden. • Draag persoonljke beschermingsuitrusting en altjd een beschermbril. Het dragen van een persoonljke beschermingsuitrusting, zoals stofmasker, slipvrje veiligheidsschoenen, beschermende helm of gehoorbescherming, al naargelang de aard en de toepassing van het elektrische gereedschap, doet het risico voor verwondingen afnemen. 51 NL BE • Vermjd een onopzetteljke ingebruikname. Vergewis u dat het elektrische gereedschap uitgeschakeld is voordat u het op de stroomvoorziening en/of de accu aansluit, het opneemt of draagt. Als u bj het dragen van het elektrische gereedschap uw vinger aan de schakelaar hebt of het apparaat ingeschakeld p de stroomvoorziening aansluit, kan dit tot ongevallen leiden. • Verwjder instelgereedschap of schroefsleutel voordat u het elektrische gereedschap inschakelt. Gereedschap of een sleutel, die zich in een draaiend apparaatonderdeel bevindt, kan tot verwondingen leiden. • Vermjd een abnormale lichaamshouding. Zorg voor een veilige stand en houd te allen tjde uw evenwicht. Daardoor kunt u het elektrische gereedschap in onverwachte situaties beter controleren. • Draag geschikte kledj. Draag geen ruimzittende kleding of sieraden. Houd haar, kledj en handschoenen op een veilige afstand tot bewegende onderdelen. Loszittende kledj, sieraden of lang haar kan/kunnen door bewegende onderdelen vastgegrepen worden. • Als er stofafzuig- en –opvanginrichtingen gemonteerd kunnen worden, vergewist u zich dat deze aangesloten zjn en correct gebruikt worden. Gebruik van een stofafzuiginrichting kan gevaren door stof doen afnemen. 52 4) GEBRUIK EN BEHANDELING VAN HET ELEKTRISCHE GEREEDSCHAP • Overbelast het apparaat niet. Gebruik voor uw werk het daarvoor bestemde elektrische gereedschap. Met het passende elektrische gereedschap werkt u beter en veiliger in het aangegeven vermogensgebied. • Gebruik geen elektrisch gereedschap, waarvan de schakelaar defect is. Elektrisch gereedschap, dat niet meer in- of uitgeschakeld kan worden, is gevaarljk en moet gerepareerd worden. • Trek de stekker uit het stopcontact en/of verwjder de accu voordat u apparaatinstellingen doorvoert. Toebehoren wisselen of het apparaat wegleggen. Deze voorzorgsmaatregel voorkomt een onopzetteljke start van het elektrische gereedschap. • Bewaar ongebruikt elektrisch gereedschap buiten het bereik van kinderen. Laat personen het apparaat niet gebruiken, die daarmee niet vertrouwd zjn of deze aanwjzingen niet gelezen hebben. Elektrisch gereedschap is gevaarljk als het door onervaren personen gebruikt wordt. • Verzorg elektrisch gereedschap met zorg. Controleer, of beweegbare onderdelen foutloos functioneren en niet klemmen, of er onderdelen gebroken of zodanig beschadigd zjn, dat de werking van het elektrische gereedschap in negatieve zin beïnvloed wordt. Laat beschadigde onderdelen vóór het gebruik van het apparaat repareren. Tal van ongevallen hebben hun oorzaak in slecht onderhouden elektrisch gereedschap. NL • Houd snjd-/snoeigereedschap scherp en netjes. Zorgvuldig onderhouden snjd-/snoeigereedschap met scherpe snjdkanten geraken minder gekneld en is gemakkeljker te bedienen. • Gebruik elektrisch gereedschap, toebehoren, gebruiksgereedschap enz. in overeenstemming met deze aanwjzingen. Houd daarbj rekening met de arbeidsomstandigheden en de uit te voeren activiteit. Het gebruik van elektrisch gereedschap voor andere dan de voorziene toepassingen kan tot gevaarljke situaties leiden. • Houd het apparaat vast aan de geïsoleerde grijpvlakken als u werkzaamheden uitvoert waarbij het gebruikte werktuig verborgen elektrische leidingen of het eigen elektrische snoer kan raken. Het contact met een leiding die onder spanning staat, kan ook metalen onderdelen van het apparaat onder spanning zetten en leiden tot elektrocutie. 5) SERVICE a) Laat uw elektrisch gereedschap uitsluitend door gekwaliiceerd, vakkundig geschoold personeel en enkel met originele reserveonderdelen repareren. Daardoor wordt verzekerd dat de veiligheid van het elektrische gereedschap in stand gehouden wordt. Verdere veiligheidsmaatregelen Waarschuwing! Bj het schuren kan stof ontstaan dat gevaarljk is voor de gezondheid (bjv. van materialen BE zoals loodhoudende verven, materiaal dat asbest bevat, metalen of enkele houtsoorten), die voor de gebruiker of personen die zich in de buurt bevinden een risico kunnen opleveren. Zorg voor een goede ventilatie van de werkplek. Draag steeds een veiligheidsbril, beschermende handschoenen en een stofmasker. Sluit een stofafzuigvoorziening aan. • Zet het werkstuk veilig vast. Het is veiliger om het werkstuk met spaninrichtingen of een bankschroef vast te zetten, dan het met de hand vast te houden. • Gebruik het elektrisch gereedschap alleen voor het droog schuren. Schaaf geen vochtige materialen. Het indringen van water in een elektrisch apparaat verhoogt het risico op een elektrische schok. • Vermjd een oververhitting van het materiaal dat je wilt schuren en de schuurmachine. Er bestaat brandgevaar. • Het werkstuk wordt heet bj het schuren. De bewerkte plaats niet aanraken, laat het afkoelen. Er bestaat gevaar voor brandwonden. Gebruik geen koelmiddel of iets dergeljks. • Maak steeds het stofreservoir leeg tjdens een werkpauze. Schuurstof in de stof zak, microilter, papieren zak (of in de ilterzak of ilter van de stofzuiger) kan automatisch in brand vliegen in ongunstige omstandigheden, zoals een vonkenregen bj het schuren van metalen. Een bjzonder risico bestaat wanneer het schuurstof vermengd is met lak-, polyurethaanresten of andere 53 NL BE chemische stoffen en het materiaal dat u hebt geschuurd na langdurig werken heet is geworden. Raadpleeg de gebruikershandleiding van uw stofzuiger om te zien of deze voor het opzuigen van schuurspaanders geschikt is. • Sluit het apparaat aan op een stopcontact met een aardlekschakelaar (FIschakelaar) met een gemeten lekstroom van niet meer dan 30 mA. • Als het netsnoer van dit apparaat beschadigd wordt, moet het vervangen worden door een speciaal netsnoer, dat via de fabrikant of via zjn klantenserviceafdeling verkrjgbaar is. Restrisico’s Ook als u dit elektrische gereedschap zoals voorgeschreven bedient, bljven er altjd restrisico’s bestaan. Volgende gevaren kunnen zich in verband met de constructiewjze en uitvoering van dit elektrische gereedschap voordoen: a) Schade aan de longen, indien geen geschikt stofmasker wordt gedragen; b) Snjdwonden c) Gehoorschade indien er geen geschikte gehoorbescherming gedragen wordt. d) Schade aan de ogen als geen geschikte oogbescherming wordt gedragen. e) Schade aan de gezondheid, die van hand-/armtrillingen het gevolg zjn indien het apparaat gedurende een langere periode gebruikt wordt of niet zoals reglementair voorgeschreven beheerd en onderhouden wordt. 54 Waarschuwing! Dit elektrische gereedschap produceert tjdens de werking een elektromagnetisch veld. Dit veld kan in bepaalde omstandigheden actieve of passieve medische implantaten in negatieve zin beïnvloeden. Om het gevaar voor ernstige of dodeljke verwondingen te verminderen, adviseren wj personen met medische implantaten, hun arts en de fabrikant van het medische implantaat te raadplegen voordat de machine bediend wordt. Montagehandleiding Voordat er werkzaamheden aan het apparaat worden verricht de stekker uit het stopcontact trekken. Gevaar voor elektrische schokken! Schuurpapierblad aanbrengen/verwjderen Maak de schuurschjf schoon, alvorens een schuurblad te plaatsen. Gebruik enkel schuurbladen die qua grootte passen. Schuurbladen die uitsteken op de schuurschjf, kunnen verwondingen veroorzaken en ook leiden tot het blokkeren, scheuren van de schuurbladen of tot een terugslag. De deltaschuurplaat (10) is uitgerust met een klittenband zodat het schuurpapierblad (12) snel kan worden aangebracht. De schuurpapierbladen (12) bestaan uit 2 delen en kunnen afhankeljk van de sljtagetoestand afzonderljk vervangen worden. Gebruik, om een optimaal schuurresultaat te verkrjgen, slechts schuurpapierbladen met geljke granulatie. NL Schuurpapierblad aanbrengen: 1. Druk beide delen van het schuurpapierblad (12) geljkmatig op de schuurschjf (10). Let erop dat de schuurpapierbladen nauwaansluitend erop liggen en de gaten samenvallen met de afzuigopeningen (15) van de schuurschjf (10). Schuurpapierblad verwjderen: 2. Trek het schuurpapierblad (12) van de schuurschjf (10). Schuur enkel als de beide schuurpapierbladen gemonteerd zijn. Schuurtong monteren U kunt de voorgemonteerde schuurschjf (10) vervangen door de schuurtong (13) die zich bevindt in de inhoud van de levering. Schuurschjf demonteren: 1. Open de spanhendel (16) en draai hem tot aan de aanslag in de richting van het schuurpapierblad. 2. Verwjder de schuurschjf (10). Schuurtong aanbrengen: 3. Leid de schuurtong (13) van boven tegen het achterste deel van de schuurschjf (10) en druk haar vast aan. 4. Draai ter vergrendeling de spanhendel (16) terug in de uitgangspositie. BE Schuurpapierblad voor schuurtong opbrengen: 5. Druk het schuurpapierblad voor de schuurtong (14) geljkmatig op de schuurtong (13). 6. Plaats op het achterste deel van de schuurschjf (10) een schuurpapierblad. Zo vermjdt u vervuiling van het klitweefsel. Stofdoos aansluiten/ afnemen/ledigen Stofdoos aansluiten: 1. Overtuig u vóór aansluiting dat de stofdoos (8) goed gesloten is. 2. Druk op de ontgrendelingstoets (4) aan de stofdoos (8) Schuif de stofdoos (8) tot aan de aanslag aan op de aansluiting voor de stofafzuiging (9). De beide nokken (9a) aan de aansluiting voor de stofafzuiging (9) passen in de beide moeren (8a) aan de stofdoos (8). 3. Laat de ontgrendelingtoets (4) los. Hj klikt in boven de bevestiging van de stofdoos (8). Stofdoos afnemen: 4. Druk op de ontgrendelknop (4) en trek de stofdoos (8) af. Stofdoos ledigen: 5. Trek aan de lip (7) en neem het stofdoosdeksel (6) af. 6. Voor het ledigen klopt u de stofdoos (8) uit. 7. Sluit de stofdoos (8) weer. Leeg de stofdoos in rechte stand om een zo goed mogeljke afzuigprestatie te waarborgen. 55 NL BE Externe stofafzuiging aansluiten/verwjderen Externe stofafzuiging aansluiten: 1. Schuif de adapter voor de externe stofafzuiging (11) tot aan de aanslag in de aansluiting voor de stofafzuiging (9). 2. Sluit de zuigslang van een stofzuiger (niet in het leveringspakket inbegrepen) aan op de adapter voor de externe stofafzuiging (11). Externe stofafzuiging afnemen: 1. Trek de zuigslang van de adapter voor de externe stofafzuiging (11). 2. Trek de adapter voor externe stofafzuiging (11) af. U kunt de zuigslang van een stofzuiger evt. rechtstreeks en zonder adaper op het apparaat aansluiten. Bediening Let erop dat de spanning van de netaansluiting met het typeaanduidingplaatje op het apparaat overeenstemt. Sluit het apparaat op de netspanning aan. In-/uitschakelen 1. Om het apparaat in te schakelen, kantelt u de aan/uit schakelaar (1) in de positie „I“, het apparaat begint te draaien. 56 2. Om het apparaat uit te schakelen, kantelt u de aan/uit schakelaar (1) in de positie „0“, het apparaat wordt uitgeschakeld. Werkinstructies Draag bj de werkzaamheden met het apparaat geschikte kleding en beschermende uitrusting. Verzeker u er voor elk gebruik van dat het apparaat in orde is en correct functioneert. Persoonljke beschermingsuitrusting en een functioneel apparaat verlagen het risico op letsel en ongelukken. Gebruik het apparaat niet zonder stofdoos of externe stofafzuiging. Het gebruik van een stofafzuiging kan risico’s door stof beperken. Bj gebruik van schuurpapierbladen zonder ponsen is een stofafzuiging niet mogeljk. Zorg voor een goede ventilatie van de werkplek. Trek vóór iedere instelling, instandhouding of reparatie de netstekker uit. Gevaar door elektrische schok. Schuren • Voer het apparaat ingeschakeld tegen het werkstuk aan. • Hef de schuurschjf na de bewerking op, vóór u het apparaat uitschakelt. • Leid het netsnoer steeds naar achteren weg van het apparaat. • Maak de schuurpapierplaat schoon, alvorens het schuurblad te plaatsen. NL BE • Werk uitsluitend met perfecte schuurpapierbladen zodat goede schuurresultaten worden verkregen. • Werk met geringe en gelijkmatige persdruk en gelijkmatige verplaatsingssnelheid. Zo spaart u het apparaat en het schuurpapierblad. • Schuur de hoeken en kanten met de scherpe of zjdelingse kant van het schuurpapierblad. Is de voorste punt van het driehoekige schuurpapierblad versleten, dan kan het schuurpapierblad afgenomen worden en er gedraaid weer opgezet worden. • Schuur geen verschillende materialen (bjv. metaal en daarna hout) met hetzelfde schuurpapierblad. • Leeg de stofdoos of stofzuiger in rechte stand om een zo goed mogeljke afzuigprestatie te waarborgen. Selectie van de schuurschjf Keuze van het schuurpapierblad Voer de volgende onderhouds- en reinigingswerken regelmatig uit. Dan bent u zeker van een lang en betrouwbaar gebruik. Korrelgrootte Toepassing P 60 P 80 voor het vooraf schuren van ruwe houten oppervlakken P 120 P 180 voor het vlaksljpen P 240 voor het fjn schuren van oppervlakken die van een grondverf voorzien of gelakt zjn Voorgemonteerde schuurschjf: • Voor het schuren van grote vlakken en de bewerking van hoeken, kanten en rondingen aan de buitenkant. Schuurtong: • Voor het bewerken van smalle spleten en enge tussenruimtes. Reiniging en onderhoud Trek vóór iedere instelling, instandhouding of reparatie de netstekker uit. Laat onderhoudswerkzaamheden die niet in deze handleiding worden beschreven uitvoeren door ons servicecenter. Gebruik enkel originele onderdelen. Reiniging Het water mag noch met water afgespoten, noch in water gelegd worden. Het gevaar voor een elektrische schok bestaat! • Houd ventilatiesleuven, motorhuis en handgrepen van het apparaat netjes. Gebruik daarvoor een vochtig doekje of een borstel. Gebruik geen reinigings- c.q. oplosmiddelen. U zou het apparaat daarmee onherstelbaar kunnen beschadigen. • Reinig het schuurblad met een stofzuiger of klop het uit. 57 NL BE Filtersysteem van de stofdoos reinigen/vervangen Controleer het iltersysteem één tot tweemaal per jaar op vervuiling. Filtersysteem verwjderen: 1. Druk op de ontgrendelknop ( 4) en trek de stofdoos ( 8) af (zie “Stofdoos aansluiten/afnemen/ledigen”). 2. Trek aan de lip (7) en neem het stofdoosdeksel (6) af. 3. Trek aan het montageframe (17) aan het stofdoosdeksel (6) af en neem het iltersysteem (18) uit. 4. Was het iltersysteem (18) met lauwwarm water en zeep en laat het drogen. Vervang een sterk vervuild of beschadigd iltersysteem door een nieuw exemplaar (zie “Onderdelen/accessoires”). Filtersysteem inbrengen: 5. Plaats het iltersysteem (18) aan het montageframe (17) in het stofdoosdeksel (6). 6. Sluit de stofdoos ( 8). 58 Bewaren • Bewaar het apparaat in de bjgeleverde mesbescherming droog en buiten het bereik van kinderen. • Leeg de stofdoos vóór het opbergen van het apparaat (zie “Stofdoos aanlsuiten/afnemen/legen”). Afvalverwerking en milieubescherming Breng het apparaat, de toebehoren en de verpakking naar een geschikt recyclagepunt. Machines horen niet bj huishoudeljk afval thuis. • Geef het apparaat in een recyclagepark af. De gebruikte onderdelen van kunststof en metaal kunnen per categorie gescheiden worden en zodoende gerecycleerd worden. Raadpleeg hiervoor ons servicecenter. • De afvalverwjdering van uw defecte ingezonden apparaten voeren wj gratis door. NL BE Reserveonderdelen/Accessoires Reserveonderdelen en accessoires verkrjgt u op www.grizzly-service.eu Indien u geen Internet hebt, neem dan telefonisch contact op met het Service-Center (zie „Service-Center“ pagina 62). Hou de onderstaande bestelnummers klaar.” Pos. Benaming Gebruiksaanwjzing Artikelnr. 10 Schuurplaat, voorgemonteerd 91104224 13 Schuurtong, voorgemonteerd 91104225 11 Adapter voor de externe stofafzuiging 91104222 8 Stofbox 91104221 18 Filter voor stofbox 91104223 12 14 6 Schuurbladen voor hout (P 40*), voor schuurplaat 30211092 6 Schuurbladen voor hout (P 80*), voor schuurplaat 30211093 6 Schuurbladen voor hout (P 120*), voor schuurplaat 30211094 10 Schuurbladen voor hout (P 120*), voor schuurplaat 30211090 6 Schuurbladen voor hout (P 180*), voor schuurplaat 30211095 6 Schuurbladen voor hout (P 240*), voor schuurplaat 30211096 Set, 5 Schuurbladen voor hout, voor schuurplaat 2x P 60*, 2x P 120*, 1x P 240*) 30211088 Set, 30 Schuurbladen voor hout, voor schuurplaat (12x P 60*, 12x P 120*, 6x P 240*) 30211089 Set, 18 Schuurbladen voor hout, voor schuurplaat (6x P 60*, 6x P 120*, 6x P 240*) 30211091 Set, 30 Schuurbladen voor schuurplaat 24x voor hout: 6x P 60*, 6x P 120*,6x P 180*, 6x P 240* 3x voor steen: 1x P 80*, 1x 180*, 1x P 400* 3x voor verf: 1x P 60*, 1x P 120*, 1x P 240*) 30211097 6 schuurpapierbladen voor schuurtong (P 80*) 30211085 6 schuurpapierbladen voor schuurtong (P 120*) 30211086 6 schuurpapierbladen voor schuurtong (P 180*) 30211087 *P = Korrelgrootte 59 NL BE Foutopsporing Probleem Mogeljke oorzaak Foutherstel Spanning ontbreekt Huiszekering wordt aangesproken Stopcontact, elektrische leiding, stekker controleren, eventueel reparatie door elektricien, huiszekering nagaan. Apparaat start niet Aan-/uitschakelaar ( defect 1) Reparatie door klantenservice Motor defect Intern loszittend contact Apparaat werkt met Aan-/uitschakelaar ( 1) onderbrekingen defect Motor wordt trager en bljft staan Apparaat wordt door werkstuk overbelast Reparatie door klantenservice Druk op sljpwerktuig verlagen Werkstuk ongeschikt Schuurpapierblad voor het te bewerken werkstuk ongeschikt Geschikt schuurpapierblad of schuurschjf inbrengen (zie “Montagehandleiding”) Schuurpapierblad versleten Nieuw schuurblad plaatsen (zie "Montagehandleiding") Schuurblad is ongeschikt voor het te bewerken werkstuk Geschikt schuurblad plaatsen (zie "Montagehandleiding") Teveel druk uitgeoefend Druk verlagen Slechte sljpprestatie Schuurblad sljt snel af 60 NL Garantie Geachte cliënte, geachte klant, U krjgt op dit apparaat 3 jaar garantie, te rekenen vanaf de datum van aankoop. Ingeval van gebreken aan dit product heeft u tegenover de verkoper van het product wetteljke rechten. Deze wetteljke rechten worden door onze hierna beschreven garantie niet beperkt. Garantievoorwaarden De garantietermjn begint met de datum van aankoop. Gelieve de originele kassabon goed te bewaren. Dit document wordt als bewjs van de aankoop benodigd. Indien er zich binnen drie jaar, te rekenen vanaf de datum van aankoop van dit product, een materiaal- of fabricagefout voordoet, wordt het product door ons – naar onze keuze – voor u gratis gerepareerd of vervangen. Deze garantievergoeding stelt voorop dat binnen de termjn van drie jaar het defecte apparaat en het bewjs van aankoop (kassabon) voorgelegd en dat schrifteljk kort beschreven wordt, waarin het gebrek bestaat en wanneer het zich voorgedaan heeft. Als het defect door onze garantie gedekt is, krjgt u het gerepareerde of een nieuw product terug. Met herstelling of uitwisseling van het product begint er geen nieuwe garantieperiode. Garantieperiode en wetteljke kwaliteitsgarantie De garantieperiode wordt door de garantievergoeding niet verlengd. Dit geldt ook voor vervangen en gerepareerde onderdelen. Eventueel al bj de aankoop bestaande beschadigingen en gebreken moeten onmiddelljk na het uitpakken gemeld worden. Na het verstrjken van de BE garantieperiode tot stand komende reparaties worden tegen verplichte betaling van de kosten uitgevoerd. Omvang van de garantie Het apparaat werd volgens strikte kwaliteitsrichtljnen zorgvuldig geproduceerd en vóór alevering nauwgezet getest. De garantievergoeding geldt voor materiaal- of fabricagefouten. Deze garantie is niet van toepassing op productonderdelen, die aan een normale sljtage blootgesteld zjn en daarom als aan sljtage onderhevige onderdelen beschouwd kunnen worden (b.v. werktuig, schuurbladen) of op beschadigingen aan breekbare onderdelen (b.v. schakelaars). Deze garantie valt weg wanneer het product beschadigd, niet oordeelkundig gebruikt of niet onderhouden werd. Voor een vakkundig gebruik van het product dienen alle in de gebruiksaanwjzing vermelde aanwjzingen nauwgezet in acht genomen te worden. Gebruiksdoeleinden en handelingen, die in de gebruiksaanwjzing afgeraden worden of waarvoor gewaarschuwd wordt, dienen onvoorwaardeljk vermeden te worden. Het product is uitsluitend voor het privé- en niet voor het commerciële gebruik bestemd. Bj een verkeerde of onoordeelkundige behandeling, toepassing van geweld en bj ingrepen, die niet door het door ons geautoriseerde serviceiliaal doorgevoerd werden, valt de garantie weg. Afhandeling ingeval van garantie Gelieve aan de volgende aanwjzingen gevolg te geven om een snelle behandeling van uw verzoek te garanderen: • Gelieve voor alle aanvragen de kassabon en het artikelnummer 61 NL BE (IAN 303400) als bewjs van de aankoop klaar te houden. • Gelieve het artikelnummer uit het typeplaatje, een gravering, op de voorpagina van uw handleiding (onderaan links) of als sticker aan de achter- of onderzjde af te leiden. • Indien er zich functiefouten of andere gebreken voordien, contacteert u in eerste instantie de hierna vernoemde serviceafdeling telefonisch of per e-mail. U krjgt dan bjkomende informatie over de afhandeling van uw klacht. • Een als defect geregistreerd product kunt u, na overleg met onze klantenservice, mits toevoeging van het bewjs van aankoop (kassabon) en de vermelding, waarin het gebrek bestaat en wanneer het zich voorgedaan heeft, voor u franco naar het u medegedeelde serviceadres zenden. Om problemen bj de acceptatie en extra kosten te vermjden, maakt u onvoorwaardeljk uitsluitend gebruik van het adres, dat u medegedeeld wordt. Zorg ervoor dat de verzending niet ongefrankeerd, als volumegoed, per expresse of via een andere speciale verzendingswjze plaatsvindt. Gelieve het apparaat met inbegrip van alle bj de aankoop bjgeleverde accessoires in te zenden en voor een voldoende veilige transportverpakking te zorgen. Reparatieservice U kunt reparaties, die niet onder de garantie vallen, tegen berekening door ons serviceiliaal laten doorvoeren. Zj maakt graag voor u een kostenraming op. Wj kunnen uitsluitend apparaten behandelen, die voldoende verpakt en gefrankeerd ingezonden werden. 62 Opgelet: Gelieve uw apparaat gereinigd en met een aanwjzing op het defect naar ons serviceiliaal te zenden. Ongefrankeerd – als volumegoed, per expresse of via een andere speciale verzendingswjze – ingezonden apparaten worden niet geaccepteerd. De afvalverwerking van uw defecte ingezonden apparaten voeren wj gratis door. Service-Center NL BE Service Nederland Tel.: 0900 0400223 (0,10 EUR/Min.) E-Mail: [email protected] IAN 303400 Service België Tel.: 070 270 171 (0,15 EUR/Min.) E-Mail: [email protected] IAN 303400 Importeur Gelieve in acht te nemen dat het volgende adres geen serviceadres is. Contacteer in eerste instantie het hoger vermelde servicecenter. Grizzly Tools GmbH & Co. KG Stockstädter Straße 20 DE-63762 Großostheim Duitsland www.grizzly-service.eu PL Spis tresci Wstęp ........................................ 63 Cel zastosowania ....................... 63 Opis ogólny ............................... 64 Zawartość opakowania ................... 64 Przegląd ........................................ 64 Dane techniczne ......................... 64 Wskazówki bezpieczeństwa ...... 65 Symbole i piktogramy ...................... 65 Ogólne zasady bezpieczeństwa dotyczące narzędzi elektrycznych..... 65 Pozostałe uwagi dotyczące bezpieczeństwa .............................. 68 Zagrożenia ogólne.......................... 69 Instrukcja montażu .................... 69 Zakładanie/zdejmowanie papieru ściernego ....................................... 69 Montaż języczka szliierskiego ......... 70 Podłączanie/zdejmowanie/ opróżnianie zbiornika na pył ........... 70 Podłączanie/zdejmowanie systemu odpylania ...................................... 71 Obsługa..................................... 71 Włączanie/wyłączanie ................... 71 Wskazówki dotyczące wykonywania pracy .................. 71 Szlifowanie .................................... 72 Wybór papieru ściernego ................ 72 Wybór płyty szliierskiej................... 72 Oczyszczani/konserwacja .......... 72 Oczyszczanie ................................ 73 Czyszczenie/wymiana wkładu iltracyjnego .................................. 73 Przechowywanie urządzenia ..... 73 Usuwanie i ochrona środowiska .. 73 Części zamienne/Akcesoria ........ 74 Poszukiwanie błędów ................ 75 Gwarancja ................................. 76 Serwis naprawczy ..................... 77 Service-Center ............................ 77 Importer .................................... 77 Tłumaczenie oryginalnej deklaracji zgodności WE .......... 110 Rysunki eksplozyjne ................ 113 Wstęp Gratulujemy zakupu nowego urządzenia. Zdecydowali się Państwo na zakup wartościowego produktu. Niniejsze urządzenie sprawdzono w trakcie produkcji pod kątem jakości, a także dokonano jego kontroli ostatecznej. W ten sposób zapewniona jest jego sprawność Instrukcja obsługi jest częścią składową produktu. Zawiera ona ważne wskazówki dotyczące bezpieczeństwa, eksploatacji i utylizacji. Przed rozpoczęciem użytkowania produktu należy się zapoznać ze wszystkimi wskazówkami dotyczącymi obsługi i bezpieczeństwa. Produkt należy użytkować tylko zgodnie z opisem i podanym przeznaczeniem.Instrukcję należy przechowywać starannie, a w przypadku przekazania produktu osobom trzecim należy dostarczyć nabywcy kompletną dokumentację. Cel zastosowania Urządzenie jest przeznaczone do szlifowania na sucho powierzchni drewnianych, metalowych, tworzywa sztucznego, masy szpachlowej oraz powierzchni lakierowanych. To urządzenie nie jest przeznaczone do zastosowania komercyjnego. Każde inne wykorzystanie, na które nie zezwala wyraźnie niniejsza instrukcja obsługi, może prowadzić do uszkodzenia urządzeń i stanowić poważne zagrożenie dla użytkownika. Urządzenie przeznaczone jest do użytku przez osoby dorosłe. Młodzież do 16 roku życia może korzystać z urządzenia wyłącznie pod nadzorem dorosłych. 63 PL Producent nie odpowiada za szkody wywołane niezgodnym z przeznaczeniem stosowaniem lub nieprawidłową obsługą urządzenia. Opis ogólny Rysunki znajdziesz na przedniej odchylanej stronie. Zawartość opakowania Rozpakuj urządzenie i sprawdź, czy jest ono kompletne. Prawidłowo posegreguj i usuń materiały opakowania. • urządzenie • zbiornik na pył • adapter do zewnętrznego systemu odpylania • 3 arkusze papieru ściernego (dwuczęściowy) (uziarnienie P 80 / P 120 / P 180) • języczek szliierski • 3 arkusze papieru ściernego do języczka szliierskiego (uziarnienie P 80 / P 120 / P 180) • instrukcja obsługi Przegląd 1 2 3 4 5 6 7 8 9 10 11 64 włącznik/ wyłącznik rękojeść otwór wentylacyjny przycisk zwalniający zbiornika na pył kabel zasilający pokrywa zbiornika na pył klapka do otwierania zbiornika na pył zbiornik na pył przyłącze systemu zasysania płyta szliierki adapter do zewnętrznego systemu odpylania 12 3 arkusze papieru ściernego (dwuczęściowy) 13 języczek szliierski 14 3 arkusze papieru ściernego do języczka szliierskiego 15 otwór odciągu pyłu, płyta szliierki 16 dźwignia zaciskowa do zwalniania płyty szliierskiej 17 ramka montażowa do wkładu iltracyjnego 18 wkład iltracyjny do zbiornika na pył Dane techniczne Szlifierka ręczna ........................PHS 160 E5 Znamionowe napięcie wejścia (U) .............................. 230 V~, 50 Hz Pobór mocy (P) ........................... 160 W Prędkość obrotowa przy pracy jałowej (n0) ...................................13000 min-1 Liczba oscylacji (n) ................26000 min-1 Ciężar (bez akcesoria) ............. ok. 1,1 kg Klasa zabezpieczenia........................ II Typ zabezpieczenia.......................... IPX0 Poziom ciśnienia akustycznego (LpA) .. 76 dB(A); KpA= 3 dB Poziom mocy akustycznej (LWA) .....................87 dB(A); KWA= 3 dB Wibracja (ah) ............ 9 m/s2; K= 1,5 m/s2 Parametry akustyki i wibracji zostały określone zgodnie z normami wymienionymi w Deklaracji Producenta. Podana wartość emisji drgań została zmierzona metodą znormalizowaną i może być wykorzystywana do porównań urządzenia elektrycznego z innymi urządzeniami. PL Podana wartość emisji drgań może też służyć do szacunkowej oceny stopnia ekspozycji użytkownika na drgania. Ostrzeżenie: Wartość emisji drgań może się różnić w czasie korzystania z urządzenia od podanej wartości, jest to zależne od sposobu używania urządzenia. Proszę spróbować maksymalnie ograniczyć narażenie na wibracje. Przykładowymi sposobami zmniejszenia narażenia na wibracje jest noszenie rękawic w trakcie pracy z narzędziem i ograniczenie czasu pracy. Należy przy tym uwzględnić wszystkie elementy cyklu eksploatacji (na przykład czas, w którym elektronarzędzie jest wyłączone, oraz czas, w których jest ono wprawdzie włączone, ale pracuje bez obciążenia). Wskazówki bezpieczeństwa Ten rozdział zawiera podstawowe przepisy bezpieczeństwa dotyczące pracy z urządzeniem. Symbole i piktogramy Symbole w instrukcji obsługi Symbol niebezpieczeństwa z informacjami na temat ochrony osób i zapobiegania szkodom materialnym. Znak nakazu z informacjami na temat zapobiegania szkodom. Podłącz urządzenie do sieci elektrycznej. Wyjąć wtyk sieciowy. Znak informacyjny ze wskazówkami ułatwiającymi posługiwanie się urządzeniem. Symbole na urządzeniu Przeczytaj instrukcję obsługi. Uwaga! Uwaga! Niebezpieczeństwo porażenia prądem elektrycznym! Przed rozpoczęciem jakichkolwiek prac przy urządzeniu wyjmij wtyczkę sieciową z gniazdka. Noś okulary ochronne, nauszniki. Noś ochronę dróg oddechowych. Noś odporne na przecięcie rękawice. Klasa zabezpieczenia II (podwójna izolacja) Urządzeń elektrycznych nie należy wyrzucać razem z odpadami domowymi. Ogólne zasady bezpieczeństwa dotyczące narzędzi elektrycznych OSTRZEŻENIE! Przeczytaj wszystkie zasady i instrukcje bezpieczeństwa. Niedokładne przestrzeganie zasad i instrukcji bezpieczeństwa może spowodować porażenie prądem, pożar i/ lub inne ciężkie zranienia. 65 PL Zachowaj wszystkie zasady bezpieczeństwa i instrukcje na przyszłość. Użyte w zasadach bezpieczeństwa pojęcie „narzędzie elektryczne“ dotyczy narzędzi elektrycznych zasilanych prądem sieciowym (za kablem sieciowym) oraz narzędzi elektrycznych zasilanych z baterii (bez kabla sieciowego). • • 1) BEZPIECZEŃSTWO MIEJSCA PRACY • Zapewnij porządek i wystarczające oświetlenie w miejscu pracy. Nieporządek lub nieoświetlone miejsce pracy może spowodować wypadek. • Nie pracuj narzędziem elektrycznym w atmosferze potencjalnie wybuchowej, w której znajdują się palne ciecze, gazy lub pyły. Narzędzia elektryczne wytwarzają iskry, które mogą zapalić pył lub pary. • Trzymaj od dzieci i innych ludzi w bezpiecznej odległości podczas używania narzędzia elektrycznego. Odwrócenie uwagi może spowodować utratę kontroli nad urządzeniem. 2) BEZPIECZEŃSTWO ELEKTRYCZNE • Wtyczka narzędzia elektrycznego musi pasować do gniazdka. Wtyczki nie można w żaden sposób modyikować. Nie używaj adapterów wtyczek razem z narzędziami elektrycznymi posiadającymi zestyk ochronny (uziemiający). Nienaruszone wtyczki i dopasowane gniazdka zmniejszają ryzyko porażenia prądem. • Unikaj dotykania uziemionych powierzchni, takich jak rury, kaloryfery, piecyki, kuchenki, lodówki. 66 • • Gdy Twoje ciało jest uziemione, ryzyko porażenia prądem jest większe. Trzymaj narzędzia elektryczne z daleka od deszczu i wilgoci/ wody. Dostanie się wody do wnętrza urządzenia elektrycznego zwiększa ryzyko porażenia prądem. Nie używaj kabla do przenoszenia narzędzia elektrycznego, do jego zawieszania ani do wyciągania wtyczki z gniazdka. Chroń kabel przed gorącem, olejem, ostrymi krawędziami i ruchomymi częściami urządzenia. Uszkodzone i splątane kable zwiększają ryzyko porażenia prądem. Pracując narzędziem elektrycznym na dworze, używaj tylko przedłużaczy dopuszczonych do używania na dworze. Używanie przedłużacza przystosowanego do używania na dworze zmniejsza ryzyko porażenia prądem. Jeżeli nie da się uniknąć użycia narzędzia elektrycznego w mokrym otoczeniu, zastosuj wyłącznik ochronny (FI) o prądzie zadziałania 30 mA lub mniejszym. Używanie wyłącznika ochronnego zmniejsza ryzyko porażenia prądem. 3) BEZPIECZEŃSTWO OSÓB • Zachowuj uwagę, uważaj na to, co robisz i pracuj narzędziem elektrycznym rozsądnie. Nie używaj narzędzi elektrycznych, jeżeli jesteś zmęczony albo jeżeli pod wpływem narkotyków, alkoholu albo leków. Chwila nieuwagi podczas używania narzędzia elektrycznego może doprowadzić do poważnych zranień. PL • Noś środki ochrony osobistej, zawsze zakładaj okulary ochronne. Noszenie środków ochrony osobistej, takich jak maska przeciwpyłowa, buty z antypoślizgowymi podeszwami, kask i nauszniki − zależnie od rodzaju i sposobu używania narzędzia elektrycznego − zmniejsza ryzyko zranienia. • Unikaj przypadkowego uruchomienia narzędzia. Przed podłączeniem narzędzia elektrycznego do źródła zasilania i/lub baterii, przed jego podniesieniem i przeniesieniem upewnij się, że jest ono wyłączone. Jeżeli podczas przenoszenia narzędzia elektrycznego palec osoby niosącej znajdzie się na włączniku, albo jeżeli włączone urządzenie zostanie podłączone do źródła zasilania, może dojść do wypadku. • Przed włączeniem narzędzia elektrycznego usuń przyrządy nastawcze i klucze do śrub. Narzędzie lub klucz znajdujący się w obrotowej części urządzenia może spowodować zranienie. • Unikaj anormalnych pozycji ciała. Zapewnij sobie stabilną pozycję i zawsze zachowuj równowagę ciała. Dzięki temu możliwe będzie zachowanie lepszej kontroli nad urządzeniem elektrycznym w nieoczekiwanych sytuacjach. • Noś odpowiednie ubranie. Nie zakładaj obszernych, luźnych ubrań ani ozdób. Trzymaj włosy, części ubrania i rękawice z daleka od ruchomych części. Luźne ubranie, ozdoby lub długie włosy mogą zostać pochwycone lub wkręcone przez ruchome części. • Jeżeli możliwy jest montaż przyrządów odsysających lub wy- chwytujących pył, upewnij się, że są one dobrze połączone i prawidłowo używane. Używanie przyrządu odsysającego pył może zmniejszyć zagrożenia związane z pyłem. • W przypadku zamontowania systemu odpylania upewnić się, czy system ten jest prawidłowo podłączony i używany. Używanie systemu odpylania może zmniejszać zagrożenia związane z narażeniem na pył. 4) UŻYWANIE I OBSŁUGA NARZĘDZIA ELEKTRYCZNEGO • Nie przeciążaj urządzenia. Do każdej pracy używaj właściwego narzędzia elektrycznego. Pasującym narzędziem elektrycznym można pracować lepiej i bezpieczniej w podanym zakresie mocy. • Nigdy nie używaj narzędzia elektrycznego z uszkodzonym wyłącznikiem. Narzędzie elektryczne, którego nie można włączyć i wyłączyć, jest niebezpieczne i wymaga naprawy. • Przed rozpoczęciem ustawiania urządzenia, wymiany akcesoriów oraz przed odłożeniem urządzenia wyjmij wtyczkę z gniazdka i/lub wyjmij baterię. Ten środek ostrożności uniemożliwi przypadkowe uruchomienie narzędzia elektrycznego. • Przechowuj nieużywane narzędzia elektryczne w niedostępnym dla dzieci miejscu. Nie pozwalaj używać urządzenia osobom, które nie są z nim obeznane i które nie przeczytały tych wskazówek. Narzędzia elektryczne są niebezpieczne, jeżeli używają ich niedoświadczone osoby. 67 PL • Starannie pielęgnuj narzędzia elektryczne. Sprawdzaj, czy ruchome części prawidłowo funkcjonują i nie są zablokowane, czy części nie są połamane lub inaczej uszkodzone i czy prawidłowe działanie narzędzia elektrycznego nie jest zakłócone. Przed użyciem urządzenia zleć naprawę uszkodzonych części. Przyczyną wielu wypadków są źle konserwowane narzędzia elektryczne. • Narzędzia tnące muszą być zawsze ostre i czyste. Starannie pielęgnowane narzędzia tnące z ostrymi ostrzami rzadziej się blokują i są łatwiejsze w prowadzeniu. • Używaj narzędzia elektrycznego, akcesoriów, oprzyrządowania itd. tylko zgodnie z tymi wskazówkami. Zwracaj przy tym uwagę na warunki pracy i uwzględniaj rodzaj wykonywanej pracy. Używanie narzędzi elektrycznych do celów niezgodnych z ich przeznaczeniem może prowadzić do niebezpiecznych sytuacji. • Podczas prac, przy których istnieje ryzyko natraienia na ukryte przewody elektryczne lub własny kabel zasilający urządzenie należy trzymać za zaizolowane uchwyty. Kontakt z przewodem będącym pod napięciem może spowodować, że także metalowe części urządzenia znajdą się pod napięciem i staną się przyczyną porażenia prądem elektrycznym. 5) SERWIS • Zlecaj naprawy narzędzia elektrycznego tylko wykwaliikowanemu personelowi i tylko 68 z użyciem oryginalnych części zamiennych. Pozwoli to zachować bezpieczeństwo użytkowania narzędzia elektrycznego. Pozostałe uwagi dotyczące bezpieczeństwa Ostrzeżenie! Podczas cięcia lub szlifowania może tworzyć się szkodliwy dla zdrowia pył (np. podczas obróbki materiałów takich jak farby zawierające ołów, materiały zawierające azbest, metale lub niektóre gatunki drewna), który może stanowić zagrożenie dla operatora lub osób znajdujących się w pobliżu. Dbać o dobrą wentylację stanowiska pracy. Nosić zawsze okulary ochronne, rękawice ochronne i ochronę dróg oddechowych. Podłączyć system odpylania. • Zabezpieczyć obrabiany element. Obrabiany element zamocowany za pomocą przyrządu mocującego lub imadła jest rozwiązaniem bezpieczniejszym, niż trzymanie go ręką. • Elektronarzędzie używać tylko do szlifowania na sucho. Nie skrobać żadnych wilgotnych materiałów. Wniknięcie wody do elektronarzędzia zwiększa ryzyko porażenia prądem elektrycznym. • Unikać przegrzania szlifowanego elementu i szliierki. Istnieje niebezpieczeństwo pożaru. • Podczas szlifowania obrabiany element mocno się nagrzewa. Nie chwytać za obrabiane miejsce, PL odczekać do jego ostygnięcia. Niebezpieczeństwo oparzenia. Nie stosować czynników chłodzących ani podobnych środków. • Przed przerwami w pracy zawsze opróżniać zbiornik odpylacza. Pył szliierski w worku odpylacza, mikroiltrze, worku papierowym (lub w worku iltrującym lub iltrze odkurzacza) może w niekorzystnych warunkach, jak iskry powstające podczas szlifowania sam się zapalić. Szczególne niebezpieczeństwo występuje w sytuacji, gdy pył szliierski jest zmieszany z resztkami lakieru, poliuretanu lub innymi substancjami chemicznymi i gdy szlifowany element jest gorący po długiej pracy. Proszę zapoznać się także z instrukcją obsługi odkurzacza i sprawdzić, czy nadaje się on do zasysania wiórów szliierskich. • Urządzenie podłączać do gniazda chronionego wyłącznikiem różnicowo-prądowym o pomiarowym napięciu wyłączającym o wartości nie większej niż 30 mA. • Jeżeli kabel zasilający tego urządzenia jest uszkodzony, musi on zostać wymieniony na specjalny kabel zasilający, dostępny u producenta lub w jego serwisie. Zagrożenia ogólne Nawet przy przepisowej obsłudze urządzenia elektrycznego występują tzw. zagrożenia ogólne. W związku z konstrukcją i sposobem pracy urządzenia elektrycznego mogą występować następujące zagrożenia ogólne: a) Uszkodzenie płuc w przypadku braku odpowiedniej ochrony dróg oddechowych; b) Skaleczenia i rany cięte. c) Uszkodzenia słuchu w razie niekorzystania z odpowiednich elementów ochrony słuchu. d) Uszkodzenie oczu w przypadku nieużywania odpowiedniej ochrony oczu. e) Szkody na zdrowiu będące skutkiem działania wibracji na rękę i ramię, jeżeli urządzenie jest używane przez długi czas lub nie jest odpowiednio prowadzone i przepisowo konserwowane. Ostrzeżenie! To urządzenie elektryczne wytwarza w czasie pracy pole elektromagnetyczne. Pole to może w określonych warunkach wpływać na aktywne lub pasywne implantaty medyczne. Aby zmniejszyć niebezpieczeństwo doznania poważnych lub śmiertelnych obrażeń, zalecamy osobom posiadającym implantaty medyczne skonsultowanie się z lekarzem i producentem implantatu przed rozpoczęciem obsługiwania maszyny. Instrukcja montażu Przed każdym ustawieniem, czynnością konserwacyjną i naprawą wyjmuj wtyczkę sieciową z gniazdka. Niebezpieczeństwo porażenia prądem elektrycznym. Zakładanie/zdejmowanie papieru ściernego Przed założeniem papieru ściernego oczyścić płytkę ścierną. 69 PL Stosować tylko arkusze papieru ściernego w pasującym rozmiarze. Arkusze papieru ściernego, które wystają poza płytę szliierską, mogą spowodować urazy ciała oraz prowadzić do blokowania lub zrywania się papieru ściernego. Płytka ścierna Delta (10) wyposażona jest w rzep umożliwiający szybkie zakładanie papieru (12) ściernego. Arkusze papieru ściernego (12) składają się z 2 części i można je wymieniać osobno w zależności od stanu zużycia. Aby uzyskać optymalny efekt szlifowania, należy stosować tylko arkusze papieru ściernego o identycznym uziarnieniu. Zakładanie papieru ściernego: 1. Docisnąć równomiernie obydwie części papieru ściernego (12) do płyty szliierskiej (10). Zadbać, by arkusze papieru ściernego ściśle przylegały do powierzchni i by otwory pokryły się z otworami odciągu pyłu (15) w płycie szliierskiej (10). Zdejmowanie papieru ściernego: 2. Zdjąć papier ścierny (12) z płyty szliierskiej (10). Szlifować tylko, gdy zamontowane są obydwa arkusze papieru ściernego. Montaż języczka szliierskiego Wstępnie zamontowaną płytę szliierską (10) można zamienić na zawarty w zestawie języczek szliierski (13). 70 Demontaż płyty szliierskiej: 1. Otworzyć dźwignię zaciskową (16) i obrócić ją do oporu w kierunku papieru ściernego. 2. Zdjąć przednią część płyty szliierskiej (10). Wkładanie języczka szliierskiego: 3. Wprowadzić języczek szliierski (13) od góry do tylnej część płyty szliierskiej (10) i mocno docisnąć. 4. W celu zablokowania obrócić dźwignię zaciskową (16) z powrotem w jej pierwotne położenie. Zakładanie papieru ściernego na języczek szliierski: 5. Docisnąć równomiernie papier ścierny języczka szliierskiego (14) do języczka szliierskiego (13). 6. Założyć papier ścierny na tylną część płyty szliierskiej (10). Pozwoli to uniknąć zanieczyszczenia tkaniny rzepa. Podłączanie/zdejmowanie/ opróżnianie zbiornika na pył Podłączanie zbiornika na pył: 1. Przed podłączeniem proszę się upewnić, czy zbiornik na pył (8) jest szczelnie zamknięty. 2. Wcisnąć przycisk zwalniający (4) na zbiorniku pyłu (8). Nasunąć zbiornik na pył (8) do oporu na przyłącze systemu zasysania (9). Obydwa noski (9a) na przyłączu do systemu zasysania (9) pasują w obydwa rowki (8a) na zbiorniku na pył (8). PL 3. Zwolnić przycisk zwalniający (4). Zatrzaskuje się on nad mocowaniem zbiornika na pył (8). Zdejmowanie zbiornika na pył: 4. Wcisnąć przyciski zwalniające (4) i zdjąć zbiornik na pył (8). Wąż ssawny odkurzacza można ewentualnie podłączyć bezpośrednio do urządzenia bez użycia adaptera. Obsługa Włączanie/wyłączanie Opróżnianie zbiornika na pył: 5. Pociągnąć za klapkę (7) i zdjąć pokrywę zbiornika na pył (6). 6. W celu opróżnienia postukać w zbiornik na pył (8). 7. Zamknąć ponownie zbiornik na pył (8). Uważaj, żeby napięcie sieci elektrycznej było zgodne z tabliczką znamionową znajdującą się na urządzeniu. Zbiornik na pył opróżniać odpowiednio wcześniej, aby zagwarantować optymalną wydajność odsysania. 1. Aby załączyć urządzenie, włącznik/wyłącznik (1) ustawić na pozycję „I“, urządzenie uruchamia się. 2. Aby wyłączyć urządzenie, włącznik/wyłącznik (1) ustawić na pozycję „0“, urządzenie wyłącza się. Podłączanie/zdejmowanie systemu odpylania Podłączenie zewnętrzne systemu zasysania: 1. Wsunąć do oporu adapter zewnętrznego systemu odpylania (11) do przyłącza systemu odpylania (9). 2. Podłączyć wąż ssawny odkurzacza (nie wchodzi w zakres dostawy) do adaptera zewnętrznego systemu odpylania (11). Odłączanie zewnętrznego systemu zasysania: 1. Ściągnąć wąż ssawny z adaptera zewnętrznego systemu odpylania (11). 2. Zdjąć adapter zewnętrznego systemu zasysania (11). Podłącz urządzenie do sieci elektrycznej. Wskazówki dotyczące wykonywania pracy Podczas prac z urządzeniem proszę nosić odpowiednią odzież i stosowne wyposażenie ochronne. Przed każdym użyciem upewnić się, czy urządzenie jest sprawne. Osobiste wyposażenie ochronne i sprawne urządzenie zmniejszają ryzyko urazów ciała i wypadków. 71 PL Nie używać urządzenia bez zbiornika na pył lub bez zewnętrznego systemu odsysania pyłu. Stosowanie systemu odpylania pozwala zmniejszyć zagrożenia związane z narażeniem na pył. W przypadku użycia arkuszy papieru ściernego bez otworów zasysanie pyłu nie będzie możliwe. Dbać o dobrą wentylację stanowiska pracy. Przed każdym ustawieniem, czynnością konserwacyjną i naprawą wyjmuj wtyczkę sieciową z gniazdka. Niebezpieczeństwo porażenia prądem elektrycznym. Szlifowanie • Urządzenie przykładać do obrabianego elementu tylko w stanie włączonym. • Przed wyłączeniem urządzenia po zakończeniu obróbki podnieść płytę szliierską. • Kabel zasilający należy zawsze prowadzić z tyłu urządzenia. • Przed założeniem papieru ściernego oczyścić płytkę ścierną. • Aby uzyskać dobre efekty szlifowania pracować tylko z użyciem dobrego papieru ściernego. • Pracować z niewielkim i równomiernym dociskiem i równomiernym posuwem. W ten sposób szanujemy urządzenie i papier ścierny. • Narożniki i krawędzie szlifować wierzchołkiem lub boczną krawędzią papieru ściernego. Jeżeli przedni wierzchołek trójkątnego papieru ściernego jest zużyty, papier ścierny można zdjąć, odwrócić i założyć ponownie. • Nie szlifować tym samym papierem ściernym różnych materiałów (np. metalu i następnie drewna). 72 • Odpowiednio wcześniej opróżniać zbiornik na pył lub odkurzacz, aby zagwarantować optymalną wydajność odsysania. Wybór papieru ściernego Uziarnienie Zastosowanie P 60 P 80 do wstępnego szlifowania surowych powierzchni drewnianych P 120 P 180 do szlifowania na płasko P 240 do dokładnego szlifowania powierzchni gruntowanych i lakierowanych Wybór płyty szliierskiej Wstępnie zmontowana płyta szliierska: • Do szlifowania dużych powierzchni i obróbki narożników, krawędzi i zewnętrznych krzywizn. Języczek szliierski: • Do obróbki wąskich szczelin i ciasnych przestrzeni. Oczyszczani/konserwacja Przed każdym ustawieniem, czynnością konserwacyjną i naprawą wyjmuj wtyczkę sieciową z gniazdka. Wykonywanie prac naprawczych i konserwacyjnych, które nie są wymienione w tej instrukcji obsługi, należy zlecać naszemu Centrum serwisowemu. Stosuj wyłącznie oryginalne części. PL Przeprowadzaj regularnie wymienione poniżej prace konserwacyjne i naprawcze. Dzięki temu będziesz miał gwarancję długotrwałej i niezawodnej sprawności urządzenia. Oczyszczanie Urządzenia nie wolno spryskiwać wodą ani wkładać do wody. Niebezpieczeństwo porażenia prądem! • Utrzymuj szczeliny wentylacyjne w czystości. W tym celu używaj wilgotnej ściereczki lub szczotki. Nie używaj środków czyszczących ani rozpuszczalników. Mógłbyś w ten sposób nieodwracalnie uszkodzić urządzenie. • Substancje chemiczne mogą zaatakować elementy urządzenia wykonane z tworzywa sztucznego. Czyszczenie/wymiana wkładu iltracyjnego Raz lub dwa razy w roku sprawdzić stan zanieczyszczenia wkładu iltracyjnego. 1. 2. 3. 4. Wyjmowanie wkładu iltracyjnego: Wcisnąć przyciski zwalniające ( 4) i zdjąć zbiornik na pył ( 8) (patrz „Podłączanie/zdejmowanie/opróżnianie zbiornika na pył“). Pociągnąć za klapkę (7) i zdjąć pokrywę zbiornika na pył (6). Zdjąć ramkę montażową (17) z pokrywy zbiornika na pył (6) i wyjąć wkład iltracyjny (18). Umyć wkład iltracyjny (18) letnią wodą i mydłem i pozostawić do wyschnięcia. Mocno zanieczyszczony lub uszkodzony wkład iltracyjny wymienić (patrz „Części zamienne/Akcesoria“). Wkładanie wkładu iltracyjnego: 5. Włożyć wkład iltracyjny (18) i ramkę montażową (17) do pokrywy zbiornika na pył (6). 6. Zamknąć zbiornik na pył ( 8). Przechowywanie urządzenia • Urządzenie z dostarczoną w komplecie osłoną noża przechowywać w suchym miejscu, poza zasięgiem dzieci. • Papier ścierny oczyścić odkurzaczem i wytrzepać. (patrz „Podłączanie/zdejmowanie/opróżnianie zbiornika na pył“). Usuwanie i ochrona środowiska Przekaż urządzenie, jego akcesoria i opakowanie do zgodnej z przepisami o ochronie środowiska naturalnego utylizacji. Urządzeń elektrycznych nie należy wyrzucać razem z odpadami domowymi Oddaj urządzenie w punkcie recy-klingu. Użyte do produkcji urządzenia części plastikowe i metalowe mogą zostać od siebie precyzyjnie oddzielone, a następnie poddane utylizacji. Zwróć się po poradę do naszego Centrum Serwisowego. Utylizację przesłanych nam uszkodzonych urządzeń przeprowadzamy bezpłatnie. 73 PL Części zamienne/Akcesoria Części zamienne i akcesoria można zakupić na www.grizzly-service.eu Jeżeli nie masz dostępu do Internetu, skontaktuj się telefonicznie z Centrum Serwisowym (patrz strona 77 „Service-Center”). Miej pod ręką wymienione poniżej numery katalogowe.” Pos Oznaczenie Instrukcja obsługi Nr. katalogowe 10 płyta szliierki, wstępnie zmontowany 91104224 13 języczek szliierski, wstępnie zmontowany 91104225 11 adapter do zewnętrznego systemu odpylania 91104222 8 zbiornik na pył 91104221 18 wkład iltracyjny do zbiornika na pył 91104223 12 6 arkuszy papieru ściernego do drewna (P 40*), do płyty szliierskiej 30211092 6 arkuszy papieru ściernego do drewna (P 80*), do płyty szliierskiej 30211093 6 arkuszy papieru ściernego do drewna (P 120*), do płyty szliierskiej 30211094 10 arkuszy papieru ściernego do drewna (P 120*), do płyty szliierskiej 30211090 14 6 arkuszy papieru ściernego do drewna (P 180*), do płyty szliierskiej 30211095 6 arkuszy papieru ściernego do drewna (P 240*), do płyty szliierskiej 30211096 zestaw, 5 arkuszy papieru ściernego do drewna, do płyty szliierskiej (2x P 60*, 2x P 120*, 1x P 240*) 30211088 zestaw, 30 arkuszy papieru ściernego do drewna, do płyty szliierskiej (12x P 60*, 12x P 120*, 6x P 240*) 30211089 zestaw, 18 arkuszy papieru ściernego do drewna, do płyty szliierskiej (6x P 60*, 6x P 120*, 6x P 240*) 30211091 zestaw, 30 arkuszy papieru ściernego do płyty szliierskiej 24x do drewna: 6x P 60*, 6x P 120*,6x P 180*, 6x P 240* 3x do kamienia: 1x P 80*, 1x 180*, 1x P 400* 3x do lakieru: 1x P 60*, 1x P 120*, 1x P 240*) 30211097 6 arkusze papieru ściernego do języczka szliierskiego (P 80*) 30211085 6 arkusze papieru ściernego do języczka szliierskiego (P 120*) 30211086 6 arkusze papieru ściernego do języczka szliierskiego (P 180*) 30211087 *P = uziarnienie 74 PL Poszukiwanie błędów Problem Urządzenie nie uruchamia się. Możliwa przyczyna Sposób usunięcia problemu Sprawdzić gniazdo wtykowe, kabel Brak napięcia sieciowego zasilający, przewodzenie, wtyk siecioReaguje bezpiecznik instalacji wy, w razie potrzeby zlecić naprawę w punkcie napraw urządzeń elektryczdomowej nych. Włącznik/wyłącznik ( jest uszkodzony 1) Naprawa realizowana przez serwis Uszkodzony silnik Chwiejny styk wewnątrz Urządzenie pracuje urządzenia Naprawa realizowana przez serwis z przerwami Włącznik/wyłącznik ( 1) jest uszkodzony Silnik pracuje wolniej i zatrzymuje się Niska wydajność szlifowania Urządzenie przeciążone przez obrabiany element Zmniejszyć docisk na narzędzie szliierskie Obrabiany element jest niewłaściwy Papier ścierny nie nadaje się do obrabianego materiału Użyć właściwego papieru ściernego lub płyty szliierskiej (patrz „Instrukcja montażu“) Papier ścierny zużyty Założyć nowy papier ścierny (patrz „Instrukcja montażu“) Papier ścierny nie nadaje się Papier ścierny szyb- do obrabianego materiału ko się zużywa Za duży docisk Założyć właściwy papier ścierny (patrz „Instrukcja montażu“) Zmniejszyć docisk 75 PL Gwarancja Szanowna Klientko, Szanowny Kliencie, na zakupione urządzenie otrzymują Państwo 3 lata gwarancji od daty zakupu. W przypadku wad tego produktu przysługują Państwu ustawowe prawa w stosunku do sprzedawcy produktu. Prawa te nie są ograniczone przez naszą przedstawioną niżej gwarancję. Warunki gwarancji Okres gwarancji rozpoczyna się z datą zakupu. Prosimy zachować oryginalny paragon. Będzie on potrzebny jako dowód zakupu. Jeśli w okresie trzech lat od daty zakupu tego produktu wystąpi wada materiałowa lub fabryczna, produkt zostanie – wedle naszego wyboru – bezpłatnie naprawiony lub wymieniony. Gwarancja zakłada, że w okresie trzech lat uszkodzone urządzenie zostanie przesłane wraz z dowodem zakupu (paragonem) z krótkim opisem, gdzie wystąpiła wada i kiedy się pojawiła. Jeśli defekt jest objęty naszą gwarancją, otrzymają Państwo z powrotem naprawiony lub nowy produkt. (Wraz z naprawą lub wymianą produktu okres gwarancji nie biegnie na nowo.) Okres gwarancji i ustawowe roszczenia z tytułu wad Okres gwarancji nie wydłuża się z powodu świadczenia gwarancyjnego. Obowiązuje to również dla wymienionych lub naprawionych części. Ewentualne uszkodzenia i wady istniejące już w momencie zakupu należy zgłosić bezzwłocznie po rozpakowaniu. Naprawy przypadające po upływie okresu gwarancji są odpłatne. 76 Zakres gwarancji Urządzenie wyprodukowano z zachowaniem staranności zgodnie z surowymi normami jakościowymi i dokładnie sprawdzono przed wysyłką. Gwarancja obowiązuje dla wad materiałowych lub fabrycznych. Gwarancja nie rozciąga się na części produktu, które podlegają normalnemu zużyciu i można je uznać za części zużywalne (np. brzeszczot, arkuszy papieru ściernego), oraz na uszkodzenia części delikatnych (np. przełączniki). Gwarancja przepada, jeśli produkt został uszkodzony, nie był zgodnie z przeznaczeniem użytkowany i konserwowany. Użytkowanie zgodnie z przeznaczeniem wiąże się z przestrzeganiem wszystkich wskazówek zawartych w instrukcji obsługi. Należy bezwzględnie unikać zastosowań i działań, których odradza się lub przed którymi ostrzega się w instrukcji obsługi. Produkt jest przeznaczony do użytku prywatnego, a nie komercyjnego. W przypadku niewłaściwego i nieodpowiedniego obchodzenia się z urządzeniem, stosowania „na siłę” i zabiegów, które nie zostały przeprowadzone przez nasz autoryzowany oddział, gwarancja wygasa. Realizacja w przypadkach objętych gwarancją Aby zagwarantować szybkie przetworzenie Państwa sprawy, prosimy o przestrzeganie poniższych wskazówek: • W przypadku wszelkich zapytań prosimy o przygotowanie paragonu i numeru identyikacyjnu jako dowodu zakupu (IAN 303400). • Numer artykułu znajduje się na tabliczce znamionowej. PL • W przypadku wystąpienia usterek lub innych wad prosimy o skontaktowanie się z wymienionym niżej działem serwisowym telefonicznie lub mailowo. Uzyskają Państwo wówczas szczegółowe informacje na temat realizacji reklamacji. • Uszkodzony produkt mogą Państwo wysłać po skontaktowaniu się z naszym działem obsługi klienta, załączając dowód zakupu (paragon) i określając, na czym polega wada i kiedy wystąpiła, bezpłatnie na podany adres serwisu. Aby uniknąć problemów z odbiorem i dodatkowych kosztów, prosimy o wysłanie przesyłki na adres, który Państwu podano. Należy się upewnić, żeby wysyłka nie nastąpiła odpłatnie, jako ponadwymiarowa, ekspresowo lub na innych specjalnych warunkach. Prosimy o przesłanie urządzenia wraz ze wszystkimi częściami wyposażenia otrzymanymi przy zakupie i zadbanie o wystarczająco bezpieczne opakowanie. Service-Center PL Serwis Polska Tel.: 22 397 4996 E-Mail: [email protected] IAN 303400 Importer Prosimy mieć na uwadze, że poniższy adres nie jest adresem serwisu. Prosimy o kontakt z wymienionym wyżej centrum serwisowym. Grizzly Tools GmbH & Co. KG Stockstädter Straße 20 DE-63762 Großostheim Niemcy www.grizzly-service.eu Serwis naprawczy Naprawy, które nie są objęte gwarancją, można zlecić odpłatnie w naszym oddziale serwisowym. Serwis sporządzi Państwu kosztorys naprawy. Podejmujemy się wyłącznie naprawy urządzeń, które zostały prawidłowo zapakowane i ofrankowane. Uwaga: Prosimy o przesłanie czystego urządzenia ze wskazaniem usterki. Urządzenia przesłane dla nas odpłatnie, jako przesyłka ponadwymiarowa, ekspresowa lub na innych warunkach specjalnych, nie zostaną odebrane. Utylizację przesłanych do nas uszkodzonych urządzeń przeprowadzamy bezpłatnie. 77 CZ Obsah Úvod Úvod.......................................... 78 Účel použití ................................ 78 Všeobecný popis ........................ 78 Objem dodávky .............................. 79 Přehled .......................................... 79 Technické parametry .................. 79 Bezpečnostní pokyny ................. 80 Symboly a piktogramy .................... 80 Všeobecné bezpečnostní pokyny: elektrické nástroje ........................... 80 Další bezpečnostní informace ........... 82 Zbývající rizika ............................... 83 Návod k montáži ....................... 84 Montáž/demontáž brusného listu ...... 84 Montáž brusného jazýčku ................ 84 Zapojení/vyjmutí/vyprázdnění zásuvky na prach ............................ 84 Externího odsávání prachu – připojení/odpojení.......................... 85 Obsluha ..................................... 85 Zapnutí a vypnutí ............................ 85 Pokyny k práci .......................... 85 Broušení......................................... 86 Výběr brusného listu ........................ 86 Volba brusné desky ......................... 86 Čištění a údržba ......................... 86 Čištění ........................................... 86 Čištění/výměna iltrační vložky zásuvky na prach ........................... 87 Skladování ................................ 87 Odklízení a ochrana okolí .......... 87 Záruka ...................................... 88 Opravna .................................... 89 Service-Center ............................ 89 Dovozce ..................................... 89 Náhradní díly/příslušenství ........ 90 Hledání chyb.............................. 91 Překlad originálního prohlášení o shodě CE ....................................111 Výkres sestavení ...................... 113 Blahopřejeme vám ke koupi vašeho nového přístroje. Rozhodli jste se pro vysoce kvalitní výrobek. Kvalita tohoto přístroje byla kontrolována během výroby a byla provedena také závěrečná kontrola. Tím je zaručena funkčnost přístroje. 78 Návod k obsluze je součástí tohoto výrobku. Obsahuje důležité pokyny týkající se bezpečnosti, používání a likvidace. Před použitím výrobku se seznamte se všemi pokyny k obsluze a bezpečnosti. Výrobek používejte jen k popsaným účelům a v rámci uvedených oblastí použití. Návod dobře uschovejte a při předávání výrobku třetímu předejte i všechny podklady. Účel použití Zařízení je určeno k suchému broušení dřeva, kovu, plastů, tmelu a také lakovaných povrchů. Tento přístroj není určený pro komerční využití. Každé jiné použití, které v tomto návodu není výslovně povoleno může vést k poškození přístroje a k vážnému nebezpečí pro použivatele. Přístroj je určen pro dospělé osoby. Osoby mladší 16 let smí přístroj používat jen pod dohledem. Výrobce neručí za škody, které byly způsobeny nesprávným používáním nebo chybnou obsluhou. Všeobecný popis Obrázky najdete na přední a zadní výklopní straně. CZ Objem dodávky Technické parametry Vybalte nástroj a zkontrolujte, je-li kompletní: Obalový materiál řádně zlikvidujte. • přístroj • zásobník na prach • adaptér pro externí odsávání prachu • 3 brusné listy (dvoudílný) (zrnitost P 80 / P 120 / P 180) • brusný jazýček • 3 brusné listy pro brusný jazýček (zrnitost P 80 / P 120 / P 180) • návod k obsluze Ruční bruska ........................ PHS 160 E5 Jmenovité vstupní napětí (U) .............................. 230 V~, 50 Hz Příkon (P).....................................160 W Otáčky naprázdno (n0) ..........13000 min-1 Počet kmitů (n) ......................26000 min-1 Hmotnost (bez příslušenství) ......cca 1,1 kg Třída ochrany ................................... II Druh ochrany................................... IPX0 Hladina akustického tlaku (LpA) ...................... 76 dB(A); KpA= 3 dB Úroveň akustického výkonu (LWA) .....................87 dB(A); KWA= 3 dB Vibrace (ah)........................ 9 m/s2; K= 1,5 m/s2 Přehled 1 2 3 4 5 6 7 8 9 10 11 12 13 14 zapínač/vypínač ruční opěrka větrací otvor zásobníku odblokovací tlačítko zásuvky na prach síťový kabel víko zásuvky na prach jazýček k otevření zásuvky na prach zásuvka na prach připojení k odsávání prachu brusná deska adaptér k externímu odsávání prachu 3 brusné listy (dvoudílný) brusný jazýček 3 brusné listy pro brusný jazýček 15 odsávací otvor brusná deska 16 upínací páka k odblokování brusné desky 17 přídržný rám iltrační vložky 18 iltrační vložka zásuvky na prach Uvedená hodnota emisí vibrací byla změřena podle normovaného zkušebního postupu a může se použít ke srovnání jednoho elektrického nářadí s jiným. Uvedená hodnota emisí vibrací se může použít také k odhadnutí přerušení funkce. Výstraha: Hodnota emisí vibrací se může během skutečného používání elektrického nářadí lišit od uvedené hodnoty, v závislosti na způsobu, kterým se elektrické nářadí používá. Dle možnosti se snažte udržet co nejnižší zatížení, způsobené vibracemi. Příklady opatření ke snížení zatížení, způsobeno vibracemi, je nošení rukavic při použití nástroje a omezení pracovní doby. Přitom se musí brát v úvahu všechny části pracovního cyklu (například doby, během kterých je elektrický nástroj vypnutý, a ty, ve kterých je sice zapnutý, ale běží bez zátěže). 79 CZ Bezpečnostní pokyny Vytáhněte síťovou zástrčku. Tato část pojednává o základních bezpečnostních předpisech při práci s přístrojem. Informační značky s informacemi pro lepší zacházení s nástrojem. Symboly a piktogramy Symboly na přístroji Pozor! Nebezpečí úrazu elektrickým proudem! Před údržbářskými a opravářskými pracemi vytáhněte zástrčku ze zásuvky. Před použitím přístroje si pozorně přečtěte návod k obsluze. Používejte ochrany očí a sluchu. Chraňte si dýchací orgány vhodnou ochranou. Noste rukavice, které jsou bezpečné proti pořezání. Třída ochrany II (dvojitá izolace) Elektrické přístroje nepatří do domácího odpadu. Symboly v návodu Výstražné značky s údaji pro zabránění škodám na zdraví anebo věcným škodám. Příkazové značky s údaji pro prevenci škod. Připojte přístroj na síťové napětí. 80 Všeobecné bezpečnostní pokyny: elektrické nástroje VAROVÁNÍ! Přečtěte si všechny bezpečnostními pokyny a instrukce. Pochybení při dodržování bezpečnostních pokynů a instrukcí mohou způsobit úder elektrickým proudem, popálení a/nebo těžká zranění. Všechny bezpečnostní pokyny a instrukce uchovejte pro budoucí použití. Pojem „elektrické nářadí“ používaný v bezpečnostních pokynech se vztahuje na elektrické nářadí napájené z elektrické sítě (prostřednictvím síťového kabelu) a na elektrické nářadí napájené akumulátorem (bez síťového kabelu). 1) BEZPEČNOST PRACOVIŠTĚ • Udržujte svůj pracovní úsek čistý a dobře osvětlený. Nepořádek anebo neosvětlené pracovní oblasti mohou vést k nehodám. • Nepracujte s elektrickým nástrojem v okolí ohroženém výbuchem, v kterém se nachází hořlavé tekutiny, plyny anebo prachy. Elektrické nástroje vytváří jiskry, které mohou zapálit prach anebo páry. • Během používání elektrického nástroje udržujte děti a jiné osoby vzdáleně od sebe. Při nepozornosti můžete ztratit kontrolu nad nástrojem. CZ 2) ELEKTRICKÁ BEZPEČNOST 3) BEZPEČNOST OSOB • Přípojná zástrčka elektrického nástroje se musí hodit do zásuvky. Zástrčka se nesmí žádným způsobem změnit. Nepoužívejte žádné adaptérové zástrčky ve spojení elektrickými nástroji s ochranným uzemněním. Nezměněné zástrčky a vhodné zásuvky zmenšují riziko elektrického úderu. • Vyvarujte se tělesnému kontaktu se zemněnými povrchy jako jsou roury, topná tělesa, sporáky a ledničky. Existuje zvýšené riziko skrze elektrický úder, když je Vaše tělo zemněné. • Nevystavujte elektrický nástroj dešti anebo mokru. Vniknutí vody do elektrického nástroje zvyšuje riziko elektrického úderu. • Nepoužívejte kabel k jinému účelu, jako je nošení nebo zavěšení elektrického nástroje anebo vytažení zástrčky ze zásuvky. Udržujte kabel vzdáleně od žáru, od oleje, od ostrých hran anebo od pohybujících se částí nástrojů. Poškozené anebo zamotané kabely zvyšují riziko elektrického úderu. • Když pracujete s elektrickým nástrojem pod širým nebem, pak používejte pouze prodlužovací kabely, které jsou vhodné i pro venkovní oblast. Použití prodlužovacího kabelu vhodného pro venkovní oblast, zmenšuje riziko elektrického úderu. • Když nejde vyhnout se provozu elektrického nástroje ve vlhkém prostředí, používejte ochranný vypínač chybového proudu. Používání ochranného vypínače chybového proudu snižuje riziko elektrického úderu. • Buďte pozorní, dbejte na to, co děláte a usťte se s elektrickým nástrojem rozumně do práce. Nepoužívejte elektrický nástroj, když jste unaveni anebo pod vlivem drog, alkoholu anebo léků. Jediný okamžik nepozornosti při používání elektrického nástroje může vést k vážným poraněním. • Noste osobní ochrannou výstroj a vždy ochranné brýle. Nošení osobní ochranné výstroje, jako je protiskluzová bezpečnostní obuv, ochranná přilba a ochrana sluchu, snižuje riziko poranění. • Vyvarujte se nezáměrnému uvedení do provozu. Přesvědčte se o tom, že je elektrický nástroj vypnutý předtím, než ho připojíte na napájení elektrickým proudem, než ho zvednete anebo nesete. Když při nošení elektrického nástroje držíte prst na spínači anebo když tento nástroj v zapnutém stavu připojíte na napájení elektrickým proudem, pak toto může vést k nehodám. • Odstraňte nastavovací nářadí anebo šroubováky předtím, než elektrický nástroj zapnete. Nářadí anebo klíč, který se nachází v otáčející se části nástroje, může vést k poraněním. • Vyvarujte se abnormálnímu držení těla. Postarejte se o bezpečný postoj a udržujte vždy rovnováhu. Tímto můžete v neočekávaných situacích lépe kontrolovat elektrický nástroj. • Noste vhodný oděv. Nenoste žádné volné oblečení anebo šperky. Udržujte vlasy, oděv a rukavice vzdáleně od pohybujících se částí. Volné oblečení, šperky anebo dlouhé vlasy mohou být zachycené pohybujícími se částmi. 81 CZ • Připojte odsávání prachu. Pokud je přístroj vybaven přípojkou k odsávání prachu a záchytným zařízením musíte zajistit, aby byly tyto přístroje připojeny a správně používány. 4) POUŽÍVÁNÍ A OŠETŘOVÁNÍ ELEKTRICKÉHO NÁSTROJE • Nepřetěžujte tento nástroj. Použijte pro svoji práci elektrické nářadí, určené pro tento účel. S vhodným elektrickým nástrojem pracujete v udaném výkonovém rozsahu lépe a bezpečněji. • Nepoužívejte žádné elektrické nářadí, jehož spínač je defektní. Elektrické nářadí, které se již nedá zaanebo vypnout, je nebezpečné a musí být opravené. • Vytáhněte zástrčku ze zásuvky předtím, než provedete nastavování na nástroji, než vyměníte části příslušenství anebo než nástroj odložíte. Toto preventivní bezpečnostní opatření zabrání neúmyslnému startu elektrického nástroje. • Uložte nepoužívaný elektrický nástroj mimo dosahu dětí. Nepřenechávejte používání tohoto nástroje osobám, které s tímto nástrojem nejsou obeznámené anebo tyto pokyny nečetly. Elektrické nástroje jsou nebezpečné, když je používají nezkušené osoby. • Ošetřujte pečlivě tento elektrický nástroj. Kontrolujte, jestli pohyblivé díly bezvadně fungují a neváznou, jestli jsou části zlomené anebo natolik poškozené, že je funkce elektrického nástroje narušena. Nechte poškozené části před použitím nástroje opravit. 82 Příčiny mnohých nehod tkví ve špatně udržovaných elektrických nástrojích. • Udržujte řezné nástroje ostré a čisté. Pečlivě ošetřované řezné nástroje s ostrými řeznými hranami se méně zaseknou a lépe se vedou. • Používejte tento elektrický nástroj, jeho příslušenství, vložné nástroje atd. v souladu s těmito instrukcemi. Zohledněte přitom pracovní podmínky a činnost, která se má vykonávat. Používání elektrického nástroje pro jiné účely, než pro které je určený, může vést k nebezpečným situacím. • Držte elektrické nářadí za izolované části rukojetí při provádění prací, kdy se může použité nářadí dotknout skrytého elektrického vedení. Při kontaktu s napěťovým vedením mohou být kovové součásti zařízení vystaveny elektrickému proudu, a může proto dojít k úrazu elektrickým proudem. 5) SERVIS • Svoje elektrické nářadí nechte opravit pouze kvaliikovaným odborným personálem a jenom pomocí originálních náhradních dílů. Tímto se zajistí to, že bezpečnost elektrického nářadí zůstává zachována Další bezpečnostní informace Upozornění! Při řezání nebo broušení mohou vznikat zdraví škodlivé látky (např. z materiálů, jako jsou barvy s obsahem olova, azbestu, kovů nebo některých druhů dřeva), které mohou být nebezpečné pro obsluhující oso- CZ bu nebo osoby nacházející se v blízkosti. Zajistěte dobré větrání pracoviště. Vždy noste ochranné brýle, bezpečnostní rukavice a ochranu dýchacích cest. Připojte odsávání prachu. • Zabezpečte obrobek. Obrobek, který bude upevněn pomocí upínacích zařízení nebo ve svěráku, bude držet bezpečněji než ve vaší ruce. • Používejte elektrický přístroj pouze k suchému broušení. Nebruste žádné navlhčené materiály. Při vniknutí vody do elektrického přístroje se zvyšuje riziko úrazu el. proudem. • Nedopusťte, aby došlo k přehřátí broušeného materiály a brusky. Hrozí nebezpečí požáru. • Obrobek se při broušení zahřívá. Nedotýkejte se opracovaného místa, nechce jej nejdříve ochladit. Hrozí nebezpečí popálení. Používejte chladicí prostředek nebo podobný způsob zchlazení. • Před pracovními přestávkami vždy vyprázdněte zásobník na prach. Brusný prach v lapači prachu, mikroiltru, papírovém sáčku (nebo v sáčku iltru, respektive ve iltru odsávače prachu) se může při nepříznivých podmínkách (odlétávající jiskry při broušení kovů) samovolně vznítit. Zvláštní nebezpečí hrozí, je-li brusný prach smíšen se zbytky laku či polyuretanu nebo jiných chemických látek a brusivo se po delší práci zahřálo. Dodržujte také návod k obsluze Vašeho vysavače, zda je tento vhodný pro odsávání brusných třísek. • Zapojte přístroj do zásuvky s proudovým chráničem (diferenciální proudová ochrana) s reakčním proudem nepřesahující 30 mA. • Když se přípojné vedení tohoto nástroje poškodí, musí být nahrazené zvláštním přípojným vedením, které lze obdržet od výrobce anebo od jeho servisní služby zákazníkům. Zbývající rizika I když toto elektrické nářadí obsluhujete v souladu s předpisy, stále existují zbývající rizika. V souvislosti s technologií a konstrukcí tohoto elektrického nářadí se mohou vyskytovat následující rizika: a) poškození plic, nebudete-li nosit vhodnou ochranu dýchacích cest; b) zranění pořezáním c) poškození sluchu, pokud není nasazena vhodná ochrana sluchu. d) poškození očí, nebude-li nošena žádná vhodná ochrana očí. e) poškození zdraví plynoucí z vibrací ruky a paže, pokud se přístroj používá delší dobu nebo není náležitě veden a udržován. Varování! Toto elektrické nářadí vytváří během provozu elektromagnetické pole. Toto pole může za určitých okolností omezovat aktivní nebo pasivní lékařské implantáty. Pro snížení nebezpečí vážného nebo smrtelného zranění doporučujeme osobám s lékařskými implantáty před obsluhou stroje konzultovat implantát se svým lékařem a výrobcem. 83 CZ Návod k montáži Před jakýmkoliv nastavováním, údržbou anebo opravou, vytáhněte síťovou zástrčku ze zásuvky. Nebezpečí zásahu elektrickým proudem. Montáž/demontáž brusného listu Před nanesením brusného listu očistěte brusnou desku. Montáž brusného jazýčku Předem namontovanou brusnou desku (10) můžete vyměnit za dodávaný brusný jazýček (13). Demontáž brusné desky: 1. Otevřete upínací páku (16) a otočte ji až nadoraz ve směru brusného listu. 2. Sejměte přední díl brusné desky (10). Používejte brusné listy vhodné velikosti. Při používání brusných listů, přesahujících rozměr brusné desky, může dojít ke zranění či zablokování, nebo roztržení brusných listů. Nasazení brusného jazýčku: 3. Nasaďte brusný jazýček (13) shora proti spodního dílu brusné desky (10) a pevně jej přitiskněte. 4. Pro zablokování otočte upínací páku (16) zpět do výchozí polohy. Trojúhelníková brusná deska (10) je vybavena upínací tkaninou k rychlému upnutí brusného listu (12). Brusné listy (12) sestávají ze 2 dílů a lze je podle stavu opotřebení jednotlivě vyměnit. Abyste dosáhli optimálního výsledku broušení, používejte pouze brusné listy se stejnou zrnitostí. Nasazení brusného listu pro brusný jazýček: 5. Přitiskněte brusný list pro brusný jazýček (14) rovnoměrně na brusný jazýček (13). 6. Nasaďte brusný list na zadní díl brusné desky (10). Tak předejdete znečištění brusné struktury. Montáž brusného listu: 1. Přitiskněte oba díly brusného listu (12) rovnoměrně na brusnou desku (10). Dbejte na to, aby brusné listy navzájem lícovaly a otvory lícovaly s odsávacími otvory (15) brusné desky (10). Demontáž brusného listu: 2. Brusný list (12) z brusné desky (10) odtáhněte. Bruste pouze v případě, když jsou namontovány oba brusné listy. 84 Zapojení/vyjmutí/vyprázdnění zásuvky na prach Zapojení zásuvky na prach: 1. Před zapojením se ujistěte, zda je zásuvka na prach (8) pevně uzavřená. 2. Stiskněte odblokovací tlačítko (4) na zásuvce na prach (8). Nasuňte zásuvku na prach (8) až na doraz k připojení k odsávání prachu (9). Oba výstupky (9a) na připojení k odsávání prachu (9) zaskočí do obou drážek (8a) na zásuvce na prach (8). CZ 3. Uvolněte odblokovací tlačítko (4). Tlačítko zaklapne přes ixaci zásuvky na prach (8). Obsluha Zapnutí a vypnutí Vyjmutí zásuvky na prach: 4. Stiskněte uvolňovací tlačítka (4) a vyjměte zásuvku na prach (8). Dbejte na to, aby síťové napětí souhlasilo s údaji typového štítku přístroje. Vyprázdnění zásuvky na prach: 5. Zatáhněte za jazýček (7) a sejměte víko zásuvky na prach (6). 6. K vyprázdnění zásuvku na prach (8) vyklepte. 7. Zásuvku na prach (8) opět zavřete. Připojte přístroj na síťové napětí. yprázdnězete zásuvku na prach včas, aby se zajistil optimální výkon odsávání. Externího odsávání prachu – připojení/odpojení Připojení externího odsávání prachu: 1. Nasuňte adaptér externího odsávání prachu (11) až nadoraz k přípojce odsávání prachu (9). 2. K externímu odsávání prachu (11) připojte sací hadici odsávače prachu. Sejmutí externího odsávání prachu 1. Vytáhněte sací hadici z adaptéru externího odsávání prachu (1). 2. Stáhněte adaptér pro externí odsávání prachu (11). Sací hadici vysavače můžete případně připojit k přístroji přímo a bez adaptéru. 1. Přístroj zapněte překlopením zapínače/vypínače (1) do polohy „I“. Přístroj se rozběhne. 2. Přístroj vypněte překlopením zapínače/vypínače (1) do polohy „0“. Přístroj se vypne. Pokyny k práci Při práci se zařízením noste vhodný oděv a odpovídající ochranné pomůcky. Před každým použitím se ujistěte, že je zařízení funkční. Osobní ochranné prostředky a provozuschopné zařízení snižují riziko zranění a úrazů. Nepoužívejte přístroj bez zásuvky na prach nebo externího odsávání prachu. Při používání zařízení na odsávání prachu lze snížit nebezpečí vznikající v důsledku prachu. Při použití brusných listů bez otvorů není možné odsávání prachu. Zajistěte dobré větrání pracoviště. Před jakýmkoliv nastavováním, údržbou anebo opravou, vytáhněte síťovou zástrčku ze zásuvky. Nebezpečí zásahu elektrickým proudem. 85 CZ Broušení Volba brusné desky • Přístroj zapněte a naneste na obrobek. • Před vypnutím přístroje brusnou desku po opracování nadzvedněte. • Síťový kabel odveďte vždy směrem dozadu od přístroje. • Před nanesením brusného listu očistěte brusnou desku. • Pracujte pouze s bezvadnými brusnými listy, abyste dosáhli dobrých výsledků při broušení. • Pracujte s malým a rovnoměrným přítlačným tlakem a stejnoměrným posuvem. Tím šetříte přístroj i brusný list. • Rohy a hrany obruste špičkou nebo bočními hranami brusného listu. Jsou-li přední špičky trojúhelníkového brusného listu opotřebovány, lze brusný list sejmout, pootočit a znovu nasadit. • Stejným brusným listem nebruste různé materiály (např. kov a poté dřevo). • Vyprázdnězete zásuvku na prach nebo vysavač včas, aby se zajistil optimální výkon odsávání. Předmontovaná brusná deska: Výběr brusného listu Zrnitost Aplikace P 60 P 80 k předběžnému broušení hrubých dřevěných ploch P 120 P 180 k rovinnému broušení P 240 k jemnému broušení povrchů s nanesenou základní barvou a lakovaných povrchů 86 • Pro broušení velkých ploch a opracování rohů, hran a vnějších zaokrouhlení. Brusný jazýček: • K obrábění malých výřezů a úzkých prostor. Čištění a údržba Před jakýmkoliv nastavováním, údržbou anebo opravou, vytáhněte síťovou zástrčku ze zásuvky. Zajistěte provádění oprav a údržby, které nejsou popsány v tomto návodě, naším servisním střediskem. Používejte pouze originální díly. Nebezpečí poranění! Pravidelně provádějte následující údržbářské a čistící práce. Tím se zaručí dlouhé a spolehlivé používání přístroje. Čištění Přístroj není dovoleno ostřikovat vodou ani pokládat do vody. Hrozí nebezpečí úrazu elektrickým proudem! • Udržujte větrací štěrbinu, kryt motoru a držadla přístroje v čistotě. Použijte k tomu vlhký hadřík nebo kartáč. Nepoužívejte žádné čisticí prostředky, příp. rozpouštědla. Mohli byste přístroj nenapravitelně poškodit. • Vyčistěte brusný list vysavačem nebo jej vyklepte. CZ Čištění/výměna iltrační vložky zásuvky na prach Odklízení a ochrana okolí Zkontrolujte iltrační vložku jednou nebo dvakrát ročně, zda není znečištěná. Přístroj, příslušenství a obal odevzdejte v souladu s požadavkami na ochranu životního prostředí do recyklační sběrny. Vyjmutí iltrační vložky: 1. Stiskněte uvolňovací tlačítka ( 4) a vyjměte zásuvku na prach ( 8) (viz „Zapojení/vyjmutí/ vyprázdnění zásuvky na prach“). 2. Zatáhněte za jazýček (7) a sejměte víko zásuvky na prach (6). 3. Stáhněte přídržný rám (17) na víku zásuvky na prach (6) a vytáhněte iltrační vložku (18). 4. Filtrační vložku (18) vyperte ve vlažné vodě s mýdlem a nechte ji uschnout. Vyměňte silně znečištěnou nebo poškozenou iltrační vložku (viz „Náhradní díly/příslušenství“). Elektrické přístroje nepatří do domácího odpadu Odevzdejte jej ve sběrně šrotu. Použité díly z plastu a kovu se tam dle druhu materiálu roztřídí a mohou se pak zavést do recyklace. Dotažte se k tomuto tématu ve Vašem servisním středisku. Likvidaci vašich zaslaných poškozených přístrojů provádíme bezplatně. Vložení iltrační vložky: 5. Vložte iltrační vložku (18) a přídržný rám (17) do víka zásuvky na prach (6). 6. Zásuvku na prach ( 8) opět uzavřete. Skladování • Přístroj uchovávejte na suchém místě chráněném proti prachu, a mimo dosah dětí. • Vyprázdněte zásuvku na prach před uložením přístroje (viz „Zapojení/vyjmutí/vyprázdnění zásuvky na prach“). 87 CZ Záruka Vážení zákazníci, Na tento přístroj poskytujeme 3letou záruku od data zakoupení. V případě závady tohoto výrobku vám vůči prodejci výrobku přináleží zákonná práva. Tato zákonná práva nejsou omezena naší následovně uvedenou zárukou. Záruční podmínky Záruční doba začíná běžet ode dne nákupu. Uschovejte si, prosím, originál účtenky pro pozdější použití. Tento dokument budete potřebovat jako doklad o koupi. Zjistíte-li během tří let od data koupě u tohoto výrobku materiálovou nebo výrobní vadu, bude výrobek námi, podle našeho výběru, bezplatně opraven nebo nahrazen. Tato záruční oprava předpokládá, že během 3leté lhůty předložíte poškozený přístroj s dokladem o koupi (pokladní stvrzenka) a písemně krátce popíšete, v čem spočívá závada a kdy k ní došlo. Bude-li závada kryta naší zárukou, získáte zpět opravený nebo nový výrobek. Opravou nebo výměnou výrobku nezačíná záruční doba běžet od začátku. Záruční doba a zákonné nároky na odstranění vady Záruční doba se neprodlužuje poskytnutím záruky. Toto platí i pro nahrazené a opravené díly. Již při koupi zjištěné závady a nedostatky musíte nahlásit okamžitě po vybalení výrobku. Po uplynutí záruční doby musíte uhradit náklady za provedené opravy. Rozsah záruky Přístroj byl precizně vyroben podle přísných jakostních směrnic a před dodáním byl svědomitě zkontrolován. 88 Záruční oprava se vztahuje na materiálové nebo výrobní vady. Tato záruka se netýká dílů výrobku, které jsou vystaveny normálnímu opotřebení, a lze je považovat za spotřební materiál (nástroj, brusný list), nebo poškození křehkých dílů (např. spínače). Tato záruka neplatí, je-li výrobek poškozen z důvodu neodborného používání, nebo pokud u něj nebyla prováděna údržba. Pro odborné používání výrobku musí být přesně dodržovány všechny pokyny uvedené v návodu k obsluze. Bezpodmínečně je třeba zabránit používání a manipulacím s výrobkem, které nejsou v návodu k obsluze doporučeny, nebo je před nimi varováno. Výrobek je určen jen pro soukromé účely a ne pro komerční využití. Záruka zaniká v případě zneužívání a neodborné manipulace, používání nadměrné síly a při zásazích, které nebyly provedeny naším autorizovaným servisem. Postup v případě uplatňování záruky Pro zajištění rychlého zpracování vaší žádosti, prosím, postupujte podle následujících pokynů: • Na důkaz, že jste výrobek zakoupili, mějte pro jakékoli případné dotazy připravenou pokladní stvrzenku a číslo výrobku (např. IAN 303400). • Číslo výrobku je uvedeno na typovém štítku, matrici, na titulním listě vašeho návodu (dole vlevo) nebo na nálepce na zadní nebo spodní straně. • Pokud by došlo k funkční poruše nebo jiným závadám, nejdříve telefonicky nebo e-mailem kontaktujte níže uvedené servisní oddělení. Pak získáte další informace o vyřízení vaší reklamace. CZ • Výrobek označený jako vadný můžete po domluvě s naším zákaznickým servisem, s připojením dokladu o koupi (pokladní stvrzenky) a po uvedení, v čem závada spočívá a kdy k ní došlo, přeposlat bez platby poštovného na vám sdělenou adresu příslušného servisu. Aby bylo zabráněno problémům s přijetím a dodatečnými náklady, bezpodmínečně použijte jen tu adresu, která vám bude sdělena. Zajistěte, aby zásilka nebyla odeslána nevyplaceně jako nadměrné zboží, expres nebo jiný, zvláštní druh zásilky. Přístroj zašlete včetně všech částí příslušenství dodaných při zakoupení a zajistěte dostatečně bezpečný přepravní obal. Opravna Service-Center CZ Servis Česko Tel.: 800143873 E-Mail: [email protected] IAN 303400 Dovozce Prosím, respektujte, že následující adresa není adresou servisu. Nejdříve kontaktujte shora uvedené servisní středisko. Grizzly Tools GmbH & Co. KG Stockstädter Straße 20 DE-63762 Großostheim Německo www.grizzly-service.eu Opravy, které nespadají do záruky, můžete nechat udělat v našem servisu oproti zúčtování. Rádi vám připravíme předběžný odhad nákladů. Můžeme zpracovávat jen ty přístroje, které byly dostatečně zabalené a odeslány vyplaceně. Pozor: Prosím, přístroj zašlete našemu autorizovanému servisu vyčištěný a s upozorněním na závadu. Nepřijmeme přístroje zaslané nevyplaceně jako nadměrné zboží, expres nebo jiný, zvláštní druh zásilky. Likvidaci vašich poškozených zaslaných přístrojů provedeme bezplatně. 89 CZ Náhradní díly/příslušenství Náhradní díly a příslušenství obdržíte na stránkách www.grizzly-service.eu Pokud nemáte internet, tak prosím zavolejte na servisní středisko (viz „Service-Center“ strana 89). Ujistěte se, že budete mít po ruce níže uvedená čísla objednávky Pol Označení Návod k obsluze 10 brusná deska, předmontováno 91104224 13 brusný jazýček, předmontováno 91104225 11 adaptér k externímu odsávání prachu 91104222 8 zásobník na prach 91104221 18 vložka iltru zásobníku na prach 91104223 12 6 brusných listů na dřevo (P 40*), pro brusnou desku 30211092 6 brusných listů na dřevo (P 80*), pro brusnou desku 30211093 6 brusných listů na dřevo (P 120*), pro brusnou desku 30211094 10 brusných listů na dřevo (P 120*), pro brusnou desku 30211090 6 brusných listů na dřevo (P 180*), pro brusnou desku 30211095 6 brusných listů na dřevo (P 240*), pro brusnou desku 30211096 set, 5 brusných listů na dřevo, pro brusnou desku (2x P 60*, 2x P 120*, 1x P 240*) 30211088 set, 30 brusných listů na dřevo, pro brusnou desku (12x P 60*, 12x P 120*, 6x P 240*) 30211089 set, 18 brusných listů na dřevo, pro brusnou desku (6x P 60*, 6x P 120*, 6x P 240*) 30211091 set, 30 brusných listů pro brusnou desku 24x na dřevo: 6x P 60*, 6x P 120*,6x P 180*, 6x P 240* 3x na kámen: 1x P 80*, 1x 180*, 1x P 400* 3x na lak: 1x P 60*, 1x P 120*, 1x P 240*) 30211097 6 brusné listy pro brusný jazýček (P 80*) 30211085 6 brusné listy pro brusný jazýček (P 120*) 30211086 6 brusné listy pro brusný jazýček (P 180*) 30211087 14 * P = zrnitost 90 Č. artiklu. CZ Hledání chyb Problém Zařízení se nerozběhne. Možná příčina Odstranění chyb Chybí síťové napětí. Zareagovala domovní pojistka. Zkontrolujte elektrickou zástrčku, napájecí kabel, vedení, síťovou zásuvku, popř. nechte domovní pojistku opravit kvaliikovaným elektrikářem. Zapínač/vypínač ( vadný. 1) je Závada motoru Přístroj pracuje přerušovaně Motor se zpomalí a zastaví Nesprávným výkon při broušení Brusný list se rychle opotřebovává Oprava prostřednictvím servisnícho centra Vnitřní uvolněný kontakt Zapínač/vypínač ( vadný Oprava prostřednictvím servisnícho 1) je centra Přístroj je přetížen obrobkem Snížit tlak vyvíjený na brusný nástroj Nevhodný obrobek Brusný list není vhodný pro právě opracovávaný obrobek Použít vhodný brusný list nebo vhodnou brusnou desku (viz „Návod k montáži“) Brusný list je opotřebený Použít nový brusný list (viz „Návod k montáži“) Brusný list není vhodný pro právě opracovávaný obrobek Použít vhodný brusný list (viz „Návod k montáži“) Použito příliš mnoho tlaku Snížit tlak 91 SK Obsah Úvod Úvod.......................................... 92 Účel použitia .............................. 92 Všeobecný popi ......................... 93 Objem dodávky .............................. 93 Prehľad .......................................... 93 Technické údaje.......................... 93 Bezpečnostné pokyny ................ 94 Symboly a graické znaky ............... 94 Všeobecné bezpečnostné pokyny pre elektrické nástroje ...................... 94 Ďalšie bezpečnostné pokyny ............ 97 Zvyškové riziká ............................... 97 Montážny návod ........................ 98 Upevnenie/odobratie brúsneho listu .. 98 Montáž brúsneho jazyka ................. 98 Pripojenie/odobratie/vyprázdnenie prachovej nádoby ........................... 99 Pripojenie/odobratie externého odsávanie prachu ........................... 99 Obsluha ..................................... 99 Zapnutie/vypnutie........................... 99 Pokyny pre prácu .................... 100 Brúsenie ....................................... 100 Voľ ba brúsneho listu ...................... 100 Voľ ba brúsnej platne ..................... 100 Čistenie a údržba ..................... 100 Čistenie ....................................... 101 Čistenie/výmena iltračnej vložky prachovej nádoby ........................ 101 Uskladnenie............................. 101 Odstránenie a ochrana životného prostredia ................ 101 Náhradné diely/Príslušenstvo .. 102 Zisťovanie závad ..................... 103 Záruka .................................... 104 Servisná oprava ...................... 105 Service-Center .......................... 105 Dovozca ................................... 105 Preklad originálneho prehlásenia o zhode CE ............ 112 Nákresy explózií ..................... 113 Gratulujeme Vám k zakúpeniu Vášho nového prístroja. Tým ste sa rozhodli pre kvalitný produkt. Tento prístroj bol počas výroby testovaný na kvalitu a podrobený výstupnej kontrole. Tým je zabezpečená funkčnosť vášho prístroja. 92 Návod na obsluhu je súčasťou tohto produktu. Obsahuje dôležité upozornenia ohľadom bezpečnosti, obsluhy a likvidácie. Pred používaním produktu sa oboznámte so všetkými pokynmi pre obsluhu a bezpečnosť. Používajte produkt len predpísaným spôsobom a len v uvedených oblastiach použitia. Návod na obsluhu uschovajte a v prípade odovzdania produktu tretím osobám odovzdajte aj všetky podklady. Účel použitia Zariadenie je určené na brúsenie dreva, kovu, plastu, tmelu a lakovaných povrchov za sucha. Tento prístroj nie je vhodný na komerčné používanie. Akékoľvek iné použitie, ktoré v tomto návode na obsluhu nie je výslovne povolené, môže mať za následok poškodenie prístroja a predstavovať vážne nebezpečenstvo pre užívateľa. Prístroj je určený len na používanie dospelými osobami. Mladiství nad 16 rokov môžu používať prístroj len pod dozorom. Výrobca nezodpovedá za škody, ktoré boli spôsobené používaním nezodpovedajúcim účelu použitia alebo nesprávnou obsluhou prístroja. SK Všeobecný popi Obrázky nájdete na prednej výklopnej strane. Objem dodávky Vybaľte nástroj a skontrolujte, či je kompletný: Baliaci materiál zlikvidujte podľa predpisov. • • • • Prístroj nádržka na prach adaptér pre externé odsávanie prachu 3 brúsne listy (dvojdielny) (zrnitosť P 80 / P 120 / P 180) • Brúsny jazyk • 3 brúsne listy pre brúsny jazyk (zrnitosť P 80 / P 120 / P 180) • Návod na obsluhu Prehľad 1 2 3 4 5 6 7 8 9 10 11 12 13 14 Vypínač zap/vyp opierka zápästia vetrací otvor nádržky uvoľňovacie tlačidlo prachovej nádoby sieťová šnúra veko prachovej nádoby spona na otváranie prachovej nádoby prachová nádoba prípojka odsávania prachu brúsna doska adaptér externého odsávania prachu 3 brúsne listy (dvojdielny) Brúsny jazyk 3 brúsne listy pre brúsny jazyk 15 odsávací otvor, brúsna doska 16 Upínacia páka na odblokovanie brúsnej platne 17 upevňujúci rám iltračnej vložky 18 iltračná vložka prachovej nádoby Technické údaje Prístroj ................................ PHS 160 E5 Menovité vstupné napätie (U) .................................230 V~, 50 Hz Príkon (P).................................... 160 W Počet otáčok vo voľnobehu (n0) .. 13000 min-1 Oscilačná rýchlosť (n) ............26000 min-1 Hmotnosť.................................asi 1,1 kg Ochranná trieda ............................... II Druh ochrany................................... IPX0 Hladina akustického tlaku (LpA) ....................... 76 dB(A); KpA= 3 dB Hladina akustického (LWA) ......................87 dB(A); KWA= 3 dB Vibrácie (ah) ............. 9 m/s2; K= 1,5 m/s2 Uvedená emisná hodnota vibrácií bola nameraná podľa normovanej skúšobnej metódy a môže byť použitá na porovnanie jedného elektrického prístroja s druhým. Uvedená emisná hodnota vibrácií môže byť použitá aj na úvodné posúdenie vysadenia prístroja. Výstraha: Emisná hodnota vibrácií sa môže počas skutočného používania elektrického nástroja odlišovať od uvádzanej hodnoty, v závislosti od druhu a spôsobu, v akom sa elektrický prístroj používa. Zaťaženie spôsobené vibráciami sa pokúste udržať tak malé, ako je to možné. Príkladné opatrenia na zníženie zaťaženia vibráciami je nosenie rukavíc pri používaní 93 SK nástroja a obmedzenie pracovného času. Pritom sa zohľadnia všetky podiely cyklu prevádzky (napríklad časy, kedy je elektrické zariadenie vypnuté a také, kedy je zapnuté, ale bez zaťaženia). Bezpečnostné pokyny Tento odsek prejednáva základné bezpečnostné predpisy pri práci s prístrojom. Symboly a graické znaky Symboly na prístroji Pozor! Nebezpečenstvo zásahu elektrickým prúdom! Pred začiatkom údržbárskych a ošetrovacích prác vytiahnite kábel z elektrickej siete. Zariadenie pripojte na sieťové napätie. Vytiahnuť sieťovú zástrčku. Informačné značky s informáciami pre lepšie zaobchádzanie s nástrojom. Všeobecné bezpečnostné pokyny pre elektrické nástroje VAROVANIE! Prečítajte si všetky bezpečnostné pokyny a nariadenia. Zanedbanie dodržiavania bezpečnostných pokynov a nariadení môže zapríčiniť zásah elektrickým prúdom, požiar a/alebo ťažké poranenia. Noste ochranu dýchania. Všetky bezpečnostné pokyny a nariadenia si uschovajte pre budúcnosť. Pojem „elektrický nástroj“ použitý v bezpečnostných pokynoch sa vzťahuje na elektrické nástroje napájané zo siete (so sieťovým káblom) a na elektrické nástroje napájané z akumulátora (bez sieťového kábla). Používajte ochranné rukavice 1) BEZPEČNOSŤ PRACOVISKA Ochranná trieda II (Dvojitá izolácia) • Udržujte svoj pracovný úsek čistý a dobre osvetlený. Neporiadok alebo neosvetlené pracovné oblasti môžu viesť k nehodám. • Nepracujte s elektrickým nástrojom v okolí ohrozenom výbuchom, v ktorom sa nachádzajú horľavé tekutiny, plyny alebo prachy. Elektrické stroje vytvárajú iskry, ktoré môžu zapáliť prach alebo pary. Pred použitím prístroja si pozorne prečítajte návod na obsluhu. Noste ochranu sluchu. Noste ochranu zraku. Elektrické prístroje nepatria do domového odpadu. Symboly v návode Výstražné značky s údajmi pre zabránenie škodám na zdraví alebo vecným škodám. 94 Príkazové značky s údajmi pre prevenciu škôd. SK • Behom používania elektrického nástroja udržujte deti a iné osoby vzdialene od seba. Pri nepozornosti môžete stratiť kontrolu nad nástrojom. 2) ELEKTRICKÁ BEZPEČNOSŤ • Prípojná zástrčka elektrického nástroja sa musí hodiť do zásuvky. Zástrčka sa nesmie žiadnym spôsobom zmeniť. Nepoužívajte žiadne adaptérové zástrčky v spojení s elektrickými nástrojmi s ochranným uzemnením. Nezmenené zástrčky a zásuvky zmenšujú riziko elektrického úderu. • Vyvarujte sa telesnému kontaktu s uzemnenými povrchmi ako sú rúry, vyhrievacie telesá, sporáky a chladničky. Existuje zvýšené riziko skrz elektrický úder, keď je Vaše telo uzemnené. • Nevystavujte elektrický nástroj dažďu alebo mokrosti. Vniknutie vody do elektrického nástroja zvyšuje riziko elektrického úderu. • Nepoužívajte kábel na iný účel, ako je nosenie alebo zavesenie elektrického nástroja alebo vytiahnutie zástrčky zo zásuvky. Udržujte kábel vzdialene od horúčavy, od oleja, od ostrých hrán alebo od pohybujúcich sa častí nástrojov. Poškodené alebo zamotané káble zvyšujú riziko elektrického úderu. • Keď pracujete s elektrickým nástrojom pod šírym nebom, potom používajte iba predlžovacie káble, ktoré sú vhodné aj pre vonkajšiu oblasť. Použitie predlžovacieho kábla vhodného pre vonkajšiu oblasť, zmenšuje riziko elektrického úderu. • Keď sa nemožno vyhnúť prevádzke elektrického nástroja vo vlhkom prostredí, používajte ochranný vypínač chybového prúdu. Používanie ochranného vypínača chybového prúdu znižuje riziko elektrického úderu. 3) BEZPEČNOSŤ OSÔB • Buďte pozorní, dbajte na to, čo robíte a pustite sa s elektrickým nástrojom rozumne do práce. Nepoužívajte elektrický nástroj, keď ste unavení alebo pod vplyvom drog, alkoholu alebo liekov. Jediný okamžik nepozornosti pri používaní elektrického nástroja môže viesť k vážnym poraneniam. • Noste osobný ochranný výstroj a vždy ochranné okuliare. Nosenie osobného ochranného výstroja, ako je protišmyková obuv, ochranná prilba a ochrana sluchu, znižuje riziko poranenia. • Vyvarujte sa nezámernému uvedeniu do prevádzky. Presvedčte sa o tom, že je elektrický nástroj vypnutý predtým, než ho pripojíte na napájanie elektrickým prúdom, než ho zdvihnete alebo nesiete. Keď pri nosení elektrického nástroja držíte prst na spínači alebo keď tento nástroj v zapnutom stave pripojíte na napájanie elektrickým prúdom, potom toto môže viesť k nehodám. • Odstráňte nastavovacie náradie alebo skrutkovače predtým, než zapnete elektrický nástroj. Náradie alebo kľúč, ktorý sa nachádza v otáčajúcej sa časti nástroja, môže viesť k poraneniam. • Vyvarujte sa abnormálnemu držaniu tela. Postarajte sa o 95 SK bezpečný postoj a udržujte vždy rovnováhu. Týmto môžete pri neočakávaných situáciách lepšie kontrolovať elektrický nástroj. • Noste vhodný odev. Nenoste žiadne voľné oblečenie alebo šperky. Udržujte vlasy, odev a rukavice vzdialene od pohybujúcich sa častí. Voľné oblečenie, šperky alebo dlhé vlasy môžu byť zachytené pohybujúcimi sa časťami. • Zapojte odsávacie zariadenie. Pokiaľ jestvuje prípojné zariadenie na odsávanie prachu a iltračné zariadenie, presvedčte sa, či sú napojené a či sa správne používajú 4) POUŽÍVANIE A OŠETROVANIE ELEKTRICKÉHO NÁSTROJA • Nepreťažujte tento nástroj. Použite pre svoju prácu elektrické náradie, určené pre tento účel. S vhodným elektrickým nástrojom pracujete v udanom výkonovom rozsahu lepšie a bezpečnejšie. • Nepoužívajte žiadne elektrické náradie, ktorého spínač je defektný. Elektrické náradie, ktoré sa už nedá za- alebo vypnúť, je nebezpečné a musí byť opravené. • Vytiahnite zástrčku zo zásuvky predtým, než vykonáte nastavovania na nástroji, než vymeníte časti príslušenstva alebo než nástroj odložíte. Toto preventívne bezpečnostné opatrenie zabráni neúmyselnému štartu elektrického nástroja. • Uložte nepoužívanú elektrický nástroj mimo dosahu detí. Neprenechávajte používanie tejto píly osobám, ktoré nie sú oboznámené s týmto nástrojom 96 • • • • alebo tieto pokyny nečítali. Elektrické nástroje sú nebezpečné, keď ich používajú neskúsené osoby. Starostlivo ošetrujte tento elektrický nástroj. Kontrolujte, či pohyblivé diely bezchybne fungujú a neviaznu, či sú časti zlomené alebo natoľ ko poškodené, že je funkcia elektrického nástroja narušená. Nechajte poškodené časti pred použitím nástroja opraviť. Príčiny mnohých nehôd spočívajú v zle udržovaných elektrických nástrojoch. Udržujte rezné nástroje ostré a čisté. Starostlivo ošetrované rezné nástroje s ostrými reznými hranami sa menej zaseknú a lepšie sa vedú. Používajte tento elektrický nástroj, jeho príslušenstvo, vložné nástroje atď. v súlade s týmito inštrukciami. Zohľadnite pritom pracovné podmienky a činnosť, ktorá sa má vykonávať. Používanie elektrického nástroja pre iné účely, než pre ktoré je určený, môže viesť k nebezpečným situáciám. Elektrické náradie držte na izolovaných držadlách, keď vykonávate práce, pri ktorých použitý nástroj sa môže dostať do styku so skrytými elektrickými vedeniami. Dotyk na elektrické vedenie pod napätím môže spojiť s napätím tiež kovové časti náradia a tak môže nastať úraz elektrickým prúdom. 5) SERVIS • Svoje elektrické náradie nechajte opraviť iba kvaliikovaným odborným personálom a iba pomocou originálnych náhradných SK dielov. Týmto sa zaistí to, že bezpečnosť elektrického náradia zostane zachovaná. Ďalšie bezpečnostné pokyny Výstraha! Pri brúsení môže vznikať zdraviu škodlivý prach (napr. z materiálov ako olovnaté farby, materiálov obsahujúcich azbest, kovov alebo niektorých druhov dreva), ktorý môže predstavovať nebezpečenstvo pre obsluhujúce osoby alebo osoby nachádzajúce sa v blízkosti. Postarajte sa o dobré vetranie pracoviska. Stále noste ochranné okuliare, bezpečnostné rukavice a ochranu dýchania. Pripojte odsávanie prachu. • Obrábaný predmet zaistite. Upevnenie obrábaného predmetu v upínacom prípravku alebo zveráku je bezpečnejšie ako držanie vo vašich rukách. • Elektrické náradie používajte len na suché brúsenie. Neškrabte navlhčené materiály. Vniknutie vody do elektrického náradia zvýši riziko úrazu elektrickým prúdom. • Zabráňte prehriatiu brúseného materiálu a brusiča. Je nebezpečenstvo požiaru. • Obrábaný predmet sa pri brúsení zohreje. Nikdy obrábaný predmet nechytajte na opracovanom mieste, nechajte ho vychladnúť. Je nebezpečenstvo popálenia. Nepoužívajte chladiacu kvapalinu alebo podobné. • Pred pracovnými prestávkami vždy vyprázdnite nádobu na prach. Jemný prach vo vrecku na prach, mikro iltri, papierovom vrecku (alebo vo iltračnom vrecku resp. iltri vysávača) sa môže za určitých podmienok, ako prúd iskier vznikajúci pri brúsení kovov, svojvoľne vznietiť. Zvláštne nebezpečenstvo môže vzniknúť, keď sa brúsny prach zmieša so zvyškami laku, polyuretánu alebo inými chemickými látkami a obrábaný predmet je po dlhom obrábaní horúci. Pozrite si tiež návod na používanie vášho vysávača, či je vhodný na odsávanie brúsneho prachu. • Prístroj zapojte do napájacej zásuvky s ochranným zariadením proti chybovému prúdu (FI spínač) s nameraných chybným prúdom nie viac ako 30 mA. • Ak sa prípojné vedenie tohto nástroja poškodí, musí byť nahradené zvláštnym prípojným vedením, ktoré možno získať od výrobcu alebo od jeho servisnej služby zákazníkom. Zvyškové riziká Aj pri používaní elektrického prístroja podľa predpisov vždy existujú zvyškové riziká. Nasledujúce nebezpečenstvá môžu vzniknúť v súvislosti s konštrukciou a prevedenia tohto elektrického prístroja: a) Poškodenia pľúc, ak sa nenosí vhodná ochranu dýchania; b) rezné poranenia, c) poškodenie sluchu, ak nenosíte vhodnú ochranu sluchu, d) Poškodenia zraku, ak sa nenosí vhodná ochranu zraku. 97 SK e) poškodenie zdravia, ktoré sú výsledkom vibrácií pôsobiacich na ruku/rameno, ak sa prístroj používa dlhšiu dobu, alebo ak sa nesprávne vedie a udržiava. Upozornenie! Tento elektrický prístroj počas prevádzky vytvára elektromagnetické pole. Toto pole môže za určitých okolností ovplyvniť aktívne alebo pasívne lekárske implantáty. Aby sa zabránilo nebezpečenstvu vážnych alebo smrteľných zranení, odporúčame, aby osoby s lekárskymi implantátmi konzultovali svojho lekára alebo výrobcu lekárskeho implantátu pred samotnou obsluhou prístroja. Montážny návod Pred akýmkoľvek nastavovaním, údržbou alebo opravou, vytiahnite sieťovú zástrčku zo zásuvky. Nebezpečenstvo zásahu elektrickým prúdom. Upevnenie/odobratie brúsneho listu Predtým než založíte brúsny list, očistite brúsnu platňu. Použite len brúsne listy správnej veľkosti. Brúsne listy, ktoré prečnievajú cez brúsnu platňu, môžu spôsobiť zranenia ako aj zablokovanie alebo roztrhnutie brúsneho listu. Brúsny kotúč (10) je vybavený upínacou textíliou pre rýchle upevnenie brúsneho listu (12). Brúsne listy (12) pozostávajú z 2 častí a môžu sa jednotlivo vymieňať podľa stavu opotrebenia. 98 Na získanie optimálneho výsledku brúsenia použite iba brúsne listy s rovnakou zrnitosťou. Upevnenie brúsneho listu: 1. Pritlačte obidve časti brúsneho listu (12) rovnomerne na brúsny kotúč (10). Dávajte pozor na to, aby brúsne listy dosadali lícujúco a aby otvory mali rovnaké krytie s odsávacími otvormi (15) brúsnej platne (10). Odobratie brúsneho listu: 2. Odtiahnite brúsny list (12) z brúsneho kotúča (10). Brúste iba vtedy, keď sú namontované obidva brúsne kotúče. Montáž brúsneho jazyka Predmontovaný brúsny kotúč (10) môžete vymeniť za brúsny jazyk (13), ktorý je súčasťou dodávky. Demontáž brúsneho kotúča: 1. Otvorte upínaciu páku (16) a otočte ju v smere brúsneho listu až na doraz. 2. Odoberte prednú časť brúsnej platne (10). Vloženie brúsneho jazyka: 3. Veďte brúsny jazyk (13) zhora proti zadnej časti brúsnej platne (10) a pevne pritlačte. 4. Na zablokovanie otočte upínaciu páku (16) späť do pôvodnej polohy. SK Nasadenie brúsneho listu pre brúsny jazyk: 5. Pritlačte brúsny list pre brúsny jazyk (14) rovnomerne na brúsny jazyk (13). 6. Na zadnej časti brúsneho kotúča (10) nasaďte brúsny kotúč. Tak zabránite znečisteniam upínacej textílie. Pripojenie/odobratie/vyprázdnenie prachovej nádoby Pripojenie prachovej nádoby: 1. Pred pripojením sa presvedčte, či prachová nádoba (8) je pevne uzavretá. 2. Stlačte odblokovacie tlačidlo (4) na prachovej nádobe (8). Posuňte prachovú nádobu (8) až na doraz k prípojke odsávania prachu (9). Oba hroty (9a) na prípojke odsávania prachu (9) zapadnú do drážok (8a) na prachovej nádobe (8). 3. Odblokovacie tlačidlo (4) pustite. Zaskočí cez ixáciu prachovej nádoby (8). Odobratie prachovej nádoby: 4. Stlačte uvoľňovacie tlačidlo (4) a vytiahnite prachovú nádobu (8). Pripojenie/odobratie externého odsávanie prachu Pripojenie externého odsávania prachu: 1. Posuňte adaptér externého odsávania prachu (11) až na doraz do prípojky odsávania prachu (9). 2. Zapojte nasávaciu hadicu vysávača (nie je súčasťou dodávky) do adaptéra externého odsávania prachu (11). Odobratie externého odsávania prachu: 1. Stiahnite nasávaciu hadicu z adaptéra externého odsávania prachu (11). 2. Vytiahnite adaptéra externému odsávaniu prachu (11). Nasávaciu hadicu vysávača môžete v prípade potreby pripojiť na zariadenie priamo a bez adaptéra. Obsluha Dbajte na to aby napätie zodpovedalo hodnotám uvedeným na výrobnom štítku na náradí. Zapojte náradie do elektrickej siete. Vyprázdnenie prachovej nádoby: 5. Vytiahnite sponu (7) a odoberte veko prachovej nádoby (6). 6. Prachovú nádobu (8) vyprázdnite poklepaním. 7. Opäť uzavrite prachovú nádobu (8). Prachovú nádobu vyprázdňujte včas, aby sa zabezpečil optimálny výkon nasávania. Zapnutie/vypnutie 1. K zapnutiu prepnite spínač zap/ vyp (1) do polohy „I“, zariadenie sa rozbehne. 2. K vypnutiu prepnite spínač zap/ vyp (1) do polohy „0“, zariadenie sa vypne. 99 SK Pokyny pre prácu Pri práci s náradím noste vhodný odev a primerané ochranné vybavenie. Pred každým použitím sa presvedčte, či náradie je funkčné. Osobné ochranné prostriedky a funkčné náradie znižujú riziko úrazov a nehôd. Prístroj nepoužívajte bez prachovej nádoby alebo externého odsávania prachu. Používanie odsávania prachu môže znížiť ohrozenia prachom. V prípade použitia brúsnych listov bez dierovania nie je možné odsávanie prachu. Postarajte sa o dobré vetranie pracoviska. Pred akýmkoľvek nastavovaním, údržbou alebo opravou, vytiahnite sieťovú zástrčku zo zásuvky. Nebezpečenstvo zásahu elektrickým prúdom. Brúsenie • Náradie veďte na obrábanom materiáli, keď je zapnuté. • Predtým než zariadenie po opracovávaní vypnete, zdvihnite brúsnu platňu. • Sieťovú šnúru veďte vždy za zariadením. • Predtým než založíte brúsny list, očistite brúsny kotúč. • Pracujte len s bezchybnými brúsnymi listami, aby ste dosiahli dobré výsledky brúsenia. • Pracujte s malým a rovnomerným pritláčaním a rovnomerným posuvom. Tak chránite nástroj a brúsny list. 100 • Rohy a hrany brúste s vrcholom alebo bočnou hranou brúsneho listu. Ak je predný hrot trojuholníkového brúsneho listu opotrebovaný, môže sa brúsny list odobrať a znova otočený nasadiť. • S rovnakým brúsnym listom nebrúste rôzne materiály (napr. kov a potom drevo). • Prachovú nádobu vyprázdňujte včas, aby sa zabezpečil optimálny výkon nasávania. Voľ ba brúsneho listu Zrnitosť Použitie P 60 P 80 na predbrúsenie hrubých drevených plôch P 120 P 180 na rovinné brúsenie P 240 na jemné brúsenie plôch so základnou a krycou farbou Voľ ba brúsnej platne Predmontovaná brúsna platňa: • Na brúsenie veľ kých plôch a opracovanie rohov, hrán a vonkajších zaoblení. Brúsny jazyk: • Na obrábanie úzkych štrbín a tesných medzipriestorov. Čistenie a údržba Pred akýmkoľvek nastavovaním, údržbou alebo opravou, vytiahnite sieťovú zástrčku zo zásuvky. SK Opravy a údržbárske práce, ktoré nie sú uvedené v tomto návode, nechajte vykonať v našom servisnom stredisku. Používajte iba originálne diely. Nebezpečenstvo zranenia! Nasledovné údržbové a čistiace práce prevádzajte pravidelne. Tým je zaručené dlhé a spoľahlivé užívanie prístroja. Čistenie Prístroj sa nesmie vystriekať vodou, ani sa ponárať do vody. Hrozí nebezpečenstvo elektrického úderu! • Vetracie otvory, kryt motora a rukoväte prístroja udržiavajte vždy čisté. K tomu použite vlhkú handričku alebo kefu. Nepoužívajte žiadne čistiace prostriedky alebo rozpúšťadlá. Mohli by ste tak nenapraviteľne poškodiť prístroj. • Brúsny list čistite s vysávačom alebo ho vyklepte. Čistenie/výmena iltračnej vložky prachovej nádoby Raz až dvakrát ročne skontrolujte znečistenie iltračnej vložky. Vybratie iltračnej vložky: 1. Stlačte uvoľňovacie tlačidlo ( 4) a vytiahnite prachovú nádobu ( 8). 2. Potiahnite sponu (7) a odoberte veko prachovej nádoby (6) (viď „Pripojenie/odobratie/vyprázdnenie prachovej nádoby“). 3. Vytiahnite upevňujúci rám (17) na veku prachovej nádoby (6) a vyberte iltračnú vložku (18). 4. Umyte iltračnú vložku (18) s vlažnou vodou a mydlom a nechajte ju vyschnúť. Vymeňte silne znečistenú alebo poškodenú iltračnú vložku (viď „Náhradné diely/ príslušenstvo“). Vloženie iltračnej vložky: 5. Vložte iltračnú vložku (18) a upevňujúci rám (17) do veka prachovej nádoby (6). 6. Uzavrite prachovú nádobu ( 8). Uskladnenie • Prístroj uschovávajte na suchom a bezprašnom mieste a mimo dosahu detí. • Vyprázdnite prachovú nádobu pred odložením zariadenia (viď „Pripojenie/ odobratie/vyprázdnenie prachovej nádoby“). Odstránenie a ochrana životného prostredia Prístroj, príslušenstvo a obal odovzdajte v súlade s požiadavkami na ochranu životného prostredia do recyklačnej zberne. Elektrické prístroje nepatria do domového odpadu Odovzdajte prístroj do recyklačnej zberne. Použité umelohmotné a kovové časti sa môžu podľa druhu materiálu roztriediť a tak odovzdať do recyklačnej zberne. V prípade otázok sa obráťte na naše servisné stredisko. Likvidáciu vašich chybných zaslaných prístrojov uskutočníme bezplatne. 101 SK Náhradné diely/Príslušenstvo Náhradné diely a príslušenstvo nájdete na strane www.grizzly-service.eu Ak nemáte Internet, kontaktujte sa telefonicky na Service-Center (viď „Service-Center“ strana 105). Dodržiavajte nižšie uvedené objednávacie čísla. Pol Návod na obsluhu Označenie Č. Artiklu 10 sací otvor, predmontovaný 91104224 13 brúsny jazyk, predmontovaný 91104225 11 adaptér externého odsávania prachu 91104222 8 nádržka na prach 91104221 18 iltračná vložka nádržky na prach 91104223 12 14 *P = zrnitosť 102 6 brúsnych papierov na drevo (P 40*), pre brúsny kotúč 30211092 6 brúsnych papierov na drevo (P 80*), pre brúsny kotúč 30211093 6 brúsnych papierov na drevo (P 120*), pre brúsny kotúč 30211094 10 brúsnych papierov na drevo (P 120*), pre brúsny kotúč 30211090 6 brúsnych papierov na drevo (P 180*), pre brúsny kotúč 30211095 6 brúsnych papierov na drevo (P 240*), pre brúsny kotúč 30211096 sada, 5 brúsnych papierov na drevo, pre brúsny kotúč (2x P 60*, 2x P 120*, 1x P 240*) 30211088 sada, 30 brúsnych papierov na drevo, pre brúsny kotúč (12x P 60*, 12x P 120*, 6x P 240*) 30211089 sada, 18 brúsnych papierov na drevo, pre brúsny kotúč (6x P 60*, 6x P 120*, 6x P 240*) 30211091 sada, 30 brúsnych papierov pre brúsny kotúč 24x na drevo: 6x P 60*, 6x P 120*,6x P 180*, 6x P 240* 3x na kameň: 1x P 80*, 1x 180*, 1x P 400* 3x na lak: 1x P 60*, 1x P 120*, 1x P 240*) 30211097 6 brúsne listy pre brúsny jazyk (P 80*) 30211085 6 brúsne listy pre brúsny jazyk (P 120*) 30211086 6 brúsne listy pre brúsny jazyk (P 180*) 30211087 SK Zisťovanie závad Problém Zariadenie sa nespustí Možná príčina Odstránenie poruchy Nie je sieťové napätie Reagovala domová poistka Skontroluje sa sieťová zásuvka, sieťový kábel, vedenie, sieťová zástrčka, v prípade potreby elektrikár skontroluje domovú poistku. Porucha spínača zap/vyp ( Porucha motora Uvoľnený vnútorný kontakt Zariadenie pracuje prerušovane Chybný vypínač zap/vyp ( 1) Motor je pomalý a zostane stáť Nedostatočný výkon brúsenia Brúsny list sa rýchlo opotrebováva Zariadenie preťažené obrobkom 1) Nechajte opraviť cez Service-Center Nechajte opraviť cez Service-Center Znížte tlak na brúsny nástroj Obrobok nie je vhodný Brúsny list nie je vhodná pre obrábaný obrobok Založte vhodný brúsny list alebo brúsnu platňu (viď "Montážny návod") Opotrebovaný brúsny list Založte nový pílový list (viď "Montážny návod") Brúsny list nie je vhodný pre obrobok Založte nový brúsny list (viď "Montážny návod") Používa sa veľ ký tlak Znížte tlak 103 SK Záruka Vážená zákazníčka, vážený zákazník, Pre tento prístroj platí záruka 3 roky od dátumu zakúpenia. Ak je prístroj poškodený, podľa zákona máte právo ho reklamovať u výrobcu produktu. Tieto práva vyplývajúce zo zákona nie sú našou následne opísanou zárukou obmedzené. Záručné podmienky Záručná lehota začína dňom zakúpenia. Pokladničný doklad ako originál prosím starostlivo uschovajte. Je potrebný ako dôkaz o zakúpení. Ak sa počas troch rokov od dátumu zakúpenia tohto produktu vyskytne materiálna alebo výrobná chyba, produkt - podľa nášho rozhodnutia - bezplatne opravíme alebo nahradíme. Predpokladom záruky je, že v priebehu trojročnej lehoty bude predložený poškodený prístroj a pokladničný doklad a stručne opísaná chyba a kedy sa vyskytla. Ak sa v rámci našej záruky chyba pokryje, obdržíte späť opravený alebo nový prístroj. S opravou alebo výmenou produktu sa nezačína nová záručná doba. Záručná doba a nárok na odstránenie vady Záručná doba sa poskytnutím záruky nepredlžuje. To platí aj pre nahradené a opravené diely. Prípadné škody a nedostatky vzniknuté už pri zakúpení sa musia ihneď po vybalení ohlásiť. Opravy vykonané po uplynutí záručnej doby sú spoplatnené. Rozsah záruky Prístroj bol vyrobený podľa prísnych smerníc kvality a pred dodaním bol svedomite kontrolovaný. Záruka sa týka materiálových alebo výrobných chýb. Táto záruka sa nevzťahuje 104 na diely produktu, ktoré sú vystavené normálnemu opotrebeniu a preto sa môžu považovať za opotrebované diely (napr. nástroj, brúsny papier) alebo na poškodenia na krehkých dieloch (napr. vypínač). Táto záruka zaniká, ak bol produkt používaný poškodený, neodborne alebo nebola vykonávaná údržba. Pre odborné používanie produktu je nutné presne dodržiavať všetky návody uvedené v návode na obsluhu. Bezpodmienečne sa vyhnite používaniu, ktoré sa v návode na obsluhu neodporúča alebo pred ktorým ste boli vystríhaní. Produkt je určený len pre súkromné použitie a nie v oblasti podnikania. Záruka zaniká pri nesprávnom a neodbornom používaní, pri násilnom používaní a pri zásahoch, ktoré neboli vykonané v našej servisnej pobočke. Postup v prípade reklamácie Pre zabezpečenie rýchleho spracovania vašej žiadosti postupujte prosím podľa nasledujúcich pokynov: • Pri všetkých požiadavkách predložte pokladničný doklad a číslo artiklu (napr. IAN 303400) ako dôkaz o zakúpení. • Číslo artiklu nájdete na typovom štítku, na rytine, na titulnej strane vášho návodu (dole vľavo) alebo ako nálepku na zadnej alebo spodnej strane. • Ak sa vyskytnú chyby funkcie alebo iné nedostatky, kontaktujte najskôr následne uvedené servisné oddelenie telefonicky alebo emailom. Následne obdržíte ďalšie informácie o priebehu vašej reklamácie. • Produkt evidovaný ako poškodený môžete po dohode s našim zákazníckym servisom, s priloženým dokladom o zakúpení (pokladničný doklad) a s údajmi, v čom chyba spočíva a kedy vznikla, zaslať bez poštovného na adre- SK su servisu, ktorá vám bude oznámená. Pre zabránenie dodatočných nákladov a problémov pri prevzatí použite len tú adresu, ktorá vám bude oznámená. Nezasielajte prístroj ako nadmerný tovar na náklady príjemcu, expresne alebo s iným špeciálnym nákladom. Prístroj zašlite so všetkými časťami príslušenstva dodanými pri zakúpení a zabezpečte dostatočne bezpečné prepravné balenie. Servisná oprava Opravy, ktoré nepodliehajú záruke, môžeme nechať vykonať v našej servisnej pobočke za úhradu. Radi vám poskytneme predbežnú kalkuláciu nákladov. Môžeme spracovať len prístroje, ktoré boli doručené dostatočne zabalené a so zaplateným poštovným. Pozor: Prístroj zašlite do našej servisnej pobočky vyčistený a s informáciami o chybe. Neprevezmeme prístroje zaslané ako nadmerný tovar na náklady príjemcu, expresne alebo s iným špeciálnym nákladom. Likvidáciu vašich poškodených zaslaných prístrojov vykonáme bezplatne. Service-Center SK Servis Slovensko Tel.: 0850 232001 E-Mail: [email protected] IAN 303400 Dovozca Nasledujúca adresa nie je adresa servisu. Najskôr kontaktujte hore uvedené servisné centrum. Grizzly Tools GmbH & Co. KG Stockstädter Straße 20 DE-63762 Großostheim Nemecko www.grizzly-service.eu 105 DE AT Original EG-Konformitätserklärung CH Hiermit bestätigen wir, dass der Handschleifer Modell PHS 160 E5 Seriennummer 201810000001 - 201810177250 folgenden einschlägigen EU-Richtlinien in ihrer jeweils gültigen Fassung entspricht: 2006/42/EG • 2014/30/EU • 2011/65/EU* Um die Übereinstimmung zu gewährleisten, wurden folgende harmonisierte Normen sowie nationale Normen und Bestimmungen angewendet: EN 60745-1:2009/A11:2010 • EN 60745-2-4:2009/A11:2011 EN 55014-1:2006/A2:2011 • EN 55014-2:2015 EN 61000-3-2:2014 • EN 61000-3-3:2013 • EN 62321:2009 Die alleinige Verantwortung für die Ausstellung dieser Konformitätserklärung trägt der Hersteller: Grizzly Tools GmbH & Co. KG Stockstädter Straße 20 D-63762 Großostheim, Germany 30.10.2018 Christian Frank (Dokumentationsbevollmächtigter) * Der oben beschriebene Gegenstand der Erklärung erfüllt die Vorschriften der Richtlinie 2011/65/EU des Europäischen Parlaments und des Rates vom 8. Juni 2011 zur Beschränkung der Verwendung bestimmter gefährlicher Stoffe in Elektro- und Elektronikgeräten. 106 Translation of the original EC declaration of conformity GB IE We hereby conirm that the Detail sander model PHS 160 E5 Serial number 201810000001 - 201810177250 conforms with the following applicable relevant version of the EU guidelines: 2006/42/EC • 2014/30/EU • 2011/65/EU* In order to guarantee consistency, the following harmonised standards as well as national standards and stipulations have been applied: EN 60745-1:2009/A11:2010 • EN 60745-2-4:2009/A11:2011 EN 55014-1:2006/A2:2011 • EN 55014-2:2015 EN 61000-3-2:2014 • EN 61000-3-3:2013 • EN 62321:2009 This declaration of conformity is issued under the sole responsibility of the manufacturer: Grizzly Tools GmbH & Co. KG Stockstädter Straße 20 D-63762 Großostheim, Germany 30.10.2018 Christian Frank Documentation Representative * The object of the declaration described above satisies the provisions of Directive 2011/65/EU of the European Parliament and the Council of 8 June 2011 on limiting the use of certain harmful substances in electrical and electronic appliances. 107 FR BE Traduction de la déclaration de conformité CE originale Nous certiions par la présente que la Ponceuse triangulaire PHS 160 E5 Numéro de série 201810000001 - 201810177250 est conforme aux directives UE actuellement en vigueur : 2006/42/EC • 2014/30/EU • 2011/65/EU* En vue de garantir la conformité les normes harmonisées ainsi que les normes et décisions nationales suivantes ont été appliquées : EN 60745-1:2009/A11:2010 • EN 60745-2-4:2009/A11:2011 EN 55014-1:2006/A2:2011 • EN 55014-2:2015 EN 61000-3-2:2014 • EN 61000-3-3:2013 • EN 62321:2009 Le fabricant assume seul la responsabilité d‘établir la présente déclaration de conformité : Grizzly Tools GmbH & Co. KG Stockstädter Straße 20 D-63762 Großostheim, Germany 30.10.2018 Christian Frank Chargé de documentation * L‘objet de la déclaration décrit ci-dessus est conforme aux dispositions de la directive 2011/65/UE du Parlement Européen et du Conseil du 8 juin 2011 sur la limitation de l‘utilisation de certaines substances dangereuses dans les équipements électriques et électroniques. 108 Vertaling van de originele CE-conformiteitsverklaring NL BE Hiermede bevestigen wj dat de handschuurmachine bouwserie PHS 160 E5 Serienummer 201810000001 - 201810177250 is overeenkomstig met de hierna volgende, van toepassing zjnde EU-richtljnen: 2006/42/EC • 2014/30/EU • 2011/65/EU* Om de overeenstemming te waarborgen, werden de hierna volgende, in overeenstemming gebrachte normen en nationale normen en bepalingen toegepast: EN 60745-1:2009/A11:2010 • EN 60745-2-4:2009/A11:2011 EN 55014-1:2006/A2:2011 • EN 55014-2:2015 EN 61000-3-2:2014 • EN 61000-3-3:2013 • EN 62321:2009 De exclusieve verantwoordeljkheid voor de uitgifte van deze conformiteitsverklaring wordt gedragen door de fabrikant: Grizzly Tools GmbH & Co. KG Stockstädter Straße 20 D-63762 Großostheim, Germany 30.10.2018 Christian Frank (Documentatiegelastigde) * Het hierboven beschreven voorwerp van de verklaring voldoet aan de voorschriften van de richtlijn 2011/65/EU van het Europese Parlement en van de Raad van 8 juni 2011 inzake beperking van het gebruik van bepaalde gevaarlijke stoffen in elektrische en elektronische apparaten. 109 PL Tłumaczenie oryginalnej deklaracji zgodności WE Niniejszym oświadczamy, że konstrukcja Szliierka ręczna typu PHS 160 E5 seryjny 201810000001 - 201810177250 spełnia wymogi odpowiednich Dyrektyw UE w ich aktualnie obowiązującym brzmie 2006/42/EC • 2014/30/EU • 2011/65/EU* W celu zapewnienia zgodności z powyższymi dyrektywami zastosowano następujące normy harmonizujące oraz normy i przepisy krajowe: EN 60745-1:2009/A11:2010 • EN 60745-2-4:2009/A11:2011 EN 55014-1:2006/A2:2011 • EN 55014-2:2015 EN 61000-3-2:2014 • EN 61000-3-3:2013 • EN 62321:2009 Wyłączną odpowiedzialność za wystawienie tej deklaracji zgodności ponosi producent: Grizzly Tools GmbH & Co. KG Stockstädter Straße 20 D-63762 Großostheim, Germany 30.10.2018 Christian Frank (Osoba upoważniona do sporządzania dokumentacji technicznej) * Vyššie popísaný predmet vyhlásenia spĺňa predpisy smernice 2011/65/EU Európskeho parlamentu a Rady z 8. júna 2011 pre obmedzenie používania určitých nebezpečných látok v elektrických a elektronických prístrojoch 110 CZ Překlad originálního prohlášení o shodě CE Potvrzujeme tímto, že Ruční bruska model PHS 160 E5 Pořadové číslo 201810000001 - 201810177250 odpovídá následujícím příslušným směrnicím EÚ v jejich právě platném znění: 2006/42/EC • 2014/30/EU • 2011/65/EU* Aby byl zaručen souhlas, byly použity následující harmonizované normy, národní normy a ustanovení: EN 60745-1:2009/A11:2010 • EN 60745-2-4:2009/A11:2011 EN 55014-1:2006/A2:2011 • EN 55014-2:2015 EN 61000-3-2:2014 • EN 61000-3-3:2013 • EN 62321:2009 Výhradní odpovědnost za vystavení tohoto prohlášení o shodě nese výrobce: Grizzly Tools GmbH & Co. KG Stockstädter Straße 20 D-63762 Großostheim, Germany 30.10.2018 Christian Frank (Osoba zplnomocněná k sestavení dokumentace) * Výše popsaný předmět prohlášení splňuje předpisy směrnice 2011/65/EU Evropského parlamentu a Rady z 8. června 2011 o omezení používání některých nebezpečných látek v elektrických a elektronických zařízeních. 111 SK Preklad originálneho prehlásenia o zhode CE Týmto potvrdzujeme, že Ručná brúska typu PHS 160 E5 seryjny 201810000001 - 201810177250 zodpovedá nasledujúcim príslušným smerniciam EÚ v ich práve platnom znení: 2006/42/EC • 2014/30/EU • 2011/65/EU* Aby bola zaručená zhoda, boli použité nasledovné harmonizované normy ako i národné normy a predpisy: EN 60745-1:2009/A11:2010 • EN 60745-2-4:2009/A11:2011 EN 55014-1:2006/A2:2011 • EN 55014-2:2015 EN 61000-3-2:2014 • EN 61000-3-3:2013 • EN 62321:2009 Jediný zodpovedný za vystavenie tohto vyhlásenia o zhode je výrobca : Grizzly Tools GmbH & Co. KG Stockstädter Straße 20 D-63762 Großostheim, Germany 30.10.2018 Christian Frank (Persoană autzorizată cu elaborarea documentaţiei) * Vyššie popísaný predmet vyhlásenia spĺňa predpisy smernice 2011/65/EU Európskeho parlamentu a Rady z 8. júna 2011 pre obmedzenie používania určitých nebezpečných látok v elektrických a elektronických prístrojoch. 20180925_rev02_mt 112 Explosionszeichnung • Exploded Drawing Vue éclatée • Explosietekening Rysunki eksplozyjne • Výkres sestavení Nákresy explózií PHS 160 E5 informativ, informative, informatif, informatief, pouczający, informační, informatívny 113 GRIZZLY TOOLS GMBH & CO. KG Stockstädter Straße 20 DE-63762 Großostheim GERMANY Stand der Informationen · Last Information Update · Version des informations · Stand van de informatie · Stan informacji · Stav informací · Stav informácií: 09/2018 · Ident.-No.: 72037235092018-8 IAN 303400-
 1
1
-
 2
2
-
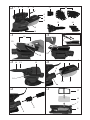 3
3
-
 4
4
-
 5
5
-
 6
6
-
 7
7
-
 8
8
-
 9
9
-
 10
10
-
 11
11
-
 12
12
-
 13
13
-
 14
14
-
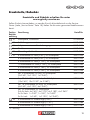 15
15
-
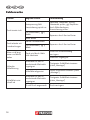 16
16
-
 17
17
-
 18
18
-
 19
19
-
 20
20
-
 21
21
-
 22
22
-
 23
23
-
 24
24
-
 25
25
-
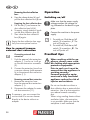 26
26
-
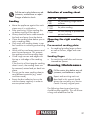 27
27
-
 28
28
-
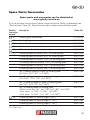 29
29
-
 30
30
-
 31
31
-
 32
32
-
 33
33
-
 34
34
-
 35
35
-
 36
36
-
 37
37
-
 38
38
-
 39
39
-
 40
40
-
 41
41
-
 42
42
-
 43
43
-
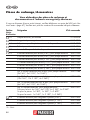 44
44
-
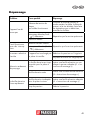 45
45
-
 46
46
-
 47
47
-
 48
48
-
 49
49
-
 50
50
-
 51
51
-
 52
52
-
 53
53
-
 54
54
-
 55
55
-
 56
56
-
 57
57
-
 58
58
-
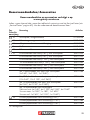 59
59
-
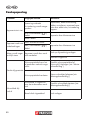 60
60
-
 61
61
-
 62
62
-
 63
63
-
 64
64
-
 65
65
-
 66
66
-
 67
67
-
 68
68
-
 69
69
-
 70
70
-
 71
71
-
 72
72
-
 73
73
-
 74
74
-
 75
75
-
 76
76
-
 77
77
-
 78
78
-
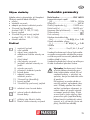 79
79
-
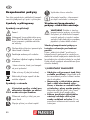 80
80
-
 81
81
-
 82
82
-
 83
83
-
 84
84
-
 85
85
-
 86
86
-
 87
87
-
 88
88
-
 89
89
-
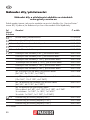 90
90
-
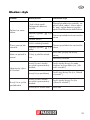 91
91
-
 92
92
-
 93
93
-
 94
94
-
 95
95
-
 96
96
-
 97
97
-
 98
98
-
 99
99
-
 100
100
-
 101
101
-
 102
102
-
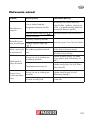 103
103
-
 104
104
-
 105
105
-
 106
106
-
 107
107
-
 108
108
-
 109
109
-
 110
110
-
 111
111
-
 112
112
-
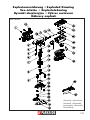 113
113
-
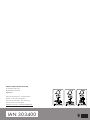 114
114


Parkside 303400 Translation Of The Original Instructions
- Categorie
- Elektrische schuurmachines
- Type
- Translation Of The Original Instructions
- Deze handleiding is ook geschikt voor
in andere talen
- English: Parkside 303400
- français: Parkside 303400
- Deutsch: Parkside 303400
- slovenčina: Parkside 303400
- čeština: Parkside 303400
- polski: Parkside 303400
Gerelateerde papieren
-
Parkside 322485 1901 Translation Of The Original Instructions
-
Parkside PHS 160 B2 Operation and Safety Notes
-
-
Parkside 317724 Translation Of The Original Instructions
-
-
Parkside XQ 310 - KH 3178 - IAN 23503 de handleiding
-