
LED-SOLAR-WANDLEUCHTE / LED SOLAR WALL LIGHT /
APPLIQUE MURALE SOLAIRE À LED
LED-SOLAR-WANDLAMP
Montage-, bedienings- en veiligheidsinstructies
APPLIQUE MURALE SOLAIRE À LED
Instructions de montage, d‘utilisation et consignes de sécurité
LED-SOLAR-WANDLEUCHTE
Montage-, Bedienungs- und Sicherheitshinweise
LED SOLAR WALL LIGHT
Assembly, operating and safety instructions
SOLÁRNÍ LED SVÍTIDLO
Pokyny k montáži, obsluze a bezpečnostní pokyny
LED SOLÁRNE NÁSTENNÉ SVIETIDLO
Pokyny pre montáž, obsluhu a bezpečnostné pokyny
SOLARNA LAMPA ŚCIENNA LED
Wskazówki montażu, obsługi i bezpieczeństwa
IAN 331854_1907

DE / AT / CH Montage-, Bedienungs- und Sicherheitshinweise Seite 5
GB / IE Assembly, operating and safety instructions Page 18
FR / BE Instructions de montage, d‘utilisation et consignes de sécurité Page 30
NL / BE Montage-, bedienings- en veiligheidsinstructies Pagina 44
PL Wskazówki montażu, obsługi i bezpieczeństwa Strona 56
CZ Pokyny k montáži, obsluze a bezpečnostní pokyny Strana 69
SK Pokyny pre montáž, obsluhu a bezpečnostné pokyny Strana 80

A
D
B
E
C
F
HG06010A / HG06010C
1
8 89
10
2 3
4 5 6
7

G H
I
11

5 DE/AT/CH
Legende der verwendeten Piktogramme ................................................ Seite 6
Einleitung .............................................................................................................................. Seite 6
Bestimmungsgemäße Verwendung .........................................................................................Seite 6
Teilebeschreibung ....................................................................................................................Seite 7
Technische Daten .....................................................................................................................Seite 7
Lieferumfang .............................................................................................................................Seite 7
Allgemeine Sicherheitshinweise ....................................................................... Seite 8
Sicherheitshinweise für Batterien / Akkus ................................................................................ Seite 8
Funktion.................................................................................................................................Seite 10
Vor der Inbetriebnahme .........................................................................................Seite 10
Inbetriebnahme ..............................................................................................................Seite 10
Montage ................................................................................................................................Seite 11
Akku wechseln ..........................................................................................................................Seite 12
Winterbetrieb ...........................................................................................................................Seite 13
Reinigung und Pflege .................................................................................................Seite 13
Fehlerbehebung .............................................................................................................Seite 13
Entsorgung ..........................................................................................................................Seite 14
Garantie ................................................................................................................................Seite 15
Abwicklung im Garantiefall ..................................................................................................... Seite 16
Service ......................................................................................................................................Seite 17

6 DE/AT/CH
Legende der verwendeten Piktogramme
Volt, Gleichstrom Erfassungswinkel
Bewegungsmelder: ca. 100 °
Spritzwassergeschützt Akku inklusive
Erfassungsbereich: ca. 5 m LED-Lebensdauer
LED-Solar-Wandleuchte
Einleitung
Wir beglückwünschen Sie zum Kauf Ihres neuen
Produkts. Sie haben sich damit für ein hochwer-
tiges Produkt entschieden. Die Bedienungsanlei-
tung ist Teil dieses Produkts. Sie enthält wichtige
Hinweise für Sicherheit, Gebrauch und Entsor-
gung. Machen Sie sich vor der Benutzung des
Produkts mit allen Bedien- und Sicherheitshinwei-
sen vertraut. Benutzen Sie das Produkt nur wie
beschrieben und für die angegebenen
Einsatzbereiche. Händigen Sie alle Unterlagen
bei Weitergabe des Produkts an Dritte mit aus.
Bestimmungsgemäße
Verwendung
Das Produkt ist vorgesehen zur Ausleuchtung
von Außenbereichen, die über keinen Stroman-
schluss verfügen. Das Produkt ist nur für den pri-
vaten Gebrauch und nicht für den gewerblichen
Einsatz geeignet.

7 DE/AT/CH
Dieses Produkt ist nicht zur
Raum beleuchtung im Haushalt
geeignet.
Dieses Produkt eignet sich für extreme
Temperaturen bis zu -21 °C.
Teilebeschreibung
1 Dübel
2 Montageplatte
3 Schraube
4 Aufhänger
5 Aufnahme
6 Solarzelle
7 Bewegungssensor
8 Akkufachdeckel
9 Akkufach
10 Akku
11 Schalter
Technische Daten
Betriebsspannung: 3,7 V
Akku: 1 x 3,7 V Lithium-ion-Akku
Typ 18650, 1300 mAh
LEDs: 4 x ca. 0,17 W (Die LEDs
sind nicht austauschbar.)
Solarzelle: ca. 5,5 V, ca. 100 mA
Bewegungssensor: Reichweite: max. 5 m,
Erfassungswinkel: ca. 100 °
horizontal, ca. 90 ° vertikal
Schutzart: IP44 (spritzwassergeschützt)
GS zertifiziert
Lieferumfang
Kontrollieren Sie unmittelbar nach dem Auspack
en
immer den Lieferumfang auf Vollständigkeit sowie
den einwandfreien Zustand des Produkts:
1 Hauptgerät
1 Lithium-ion-Akku Typ 18650, 3,7 V ,
1300 mAh (bereits eingebaut)
1 Montageplatte

8 DE/AT/CH
2 Schrauben (Ø 4 x 30 mm)
2 Dübel Ø 6 mm
1 Montage-, Bedienungs- und
Sicherheitshinweise
Allgemeine
Sicherheitshinweise
MACHEN SIE SICH VOR DER ERSTEN BENUT-
ZUNG DES PRODUKTS MIT ALLEN BEDIEN-
UND SICHERHEITSHINWEISEN VERTRAUT!
HÄNDIGEN SIE ALLE UNTERLAGEN BEI
WEITERGABE DES PRODUKTS AN DRITTE
EBENFALLS MIT AUS!
Dieses Produkt kann von Kindern ab 8 Jah-
ren und darüber sowie von Personen mit
verringerten physischen, sensorischen oder
mentalen Fähigkeiten oder Mangel an Er-
fahrung und Wissen benutzt werden, wenn
sie beaufsichtigt oder bezüglich des sicheren
Gebrauchs des Produkts unterwiesen wurde
n
und die daraus resultierenden Gefahren ver-
stehen. Kinder dürfen nicht mit dem Produkt
spielen. Reinigung und Benutzerwartung
dürfen nicht von Kindern ohne Beaufsichti-
gung durchgeführt werden.
Lassen Sie Kinder niemals unbeaufsichtigt
mit dem Verpackungsmaterial. Es besteht
Erstickungsgefahr durch Verpackungsmaterial.
Kinder unterschätzen häufig die Gefahren.
Halten Sie Kinder während der Montage v
om
Arbeitsbereich fern. Zum Lieferumfang gehört
eine Vielzahl von Schrauben und anderen
Kleinteilen. Diese können beim Verschlucken
oder Inhalieren lebensgefährlich sein.
Benutzen Sie das Produkt nicht, wenn Sie
irgendwelche Beschädigungen feststellen!
Die LEDs sind nicht austauschbar.
Sollten die LEDs am Ende ihrer Lebensdauer
ausfallen, muss das ganze Produkt ersetzt
werden.
Sicherheitshinweise
für Batterien / Akkus
LEBENSGEFAHR! Halten Sie Batterien /
Akkus außer Reichweite von Kindern. Suchen

9 DE/AT/CH
Sie im Falle eines Verschluckens sofort einen
Arzt auf!
EXPLOSIONSGEFAHR! Laden
Sie nicht aufladbare Batterien
niemals wieder auf. Schließen
Sie Batterien / Akkus nicht kurz und / oder
öffnen Sie diese nicht. Überhitzung, Brand-
gefahr oder Platzen können die Folge sein.
Werfen Sie Batterien / Akkus niemals in Feuer
oder Wasser.
Setzen Sie Batterien / Akkus keiner mecha-
nischen Belastung aus.
Risiko des Auslaufens von Batterien /
Akkus
Vermeiden Sie extreme Bedingungen und
Temperaturen, die auf Batterien / Akkus ein-
wirken können z. B. auf Heizkörpern / direkte
Sonneneinstrahlung.
Wenn Batterien / Akkus ausgelaufen sind,
vermeiden Sie den Kontakt mit Haut, Augen
und Schleimhäuten mit den Chemikalien!
Spülen Sie die betroffenen Stellen sofort mit
klarem Wasser und suchen Sie einen Arzt auf!
SCHUTZHANDSCHUHE
TRAGEN! Ausgelaufene oder
beschädigte Batterien / Akkus
können bei Berührung mit der Haut Verät-
zungen verursachen. Tragen Sie deshalb in
diesem Fall geeignete Schutzhandschuhe.
Im Falle eines Auslaufens der Batterien /
Akkus entfernen Sie diese sofort aus dem
Produkt, um Beschädigungen zu vermeiden.
Entfernen Sie Batterien / Akkus, wenn das
Produkt längere Zeit nicht verwendet wird.
Risiko der Beschädigung des Produkts
Verwenden Sie ausschließlich den angege-
benen Batterietyp / Akkutyp!
Setzen Sie Batterien / Akkus gemäß der Pola-
ritätskennzeichnung (+) und (-) an Batterie /
Akku und des Produkts ein.
Reinigen Sie Kontakte an Batterie / Akku
und im Batteriefach vor dem Einlegen!
Entfernen Sie erschöpfte Batterien / Akkus
umgehend aus dem Produkt.

10 DE/AT/CH
Funktion
Solarzelle
Die Solarzelle
6
wandelt Lichtenergie der S
onne
in elektrische Energie um. Damit wird der im
Akkufach 9 eingebaute Akku 10 aufgeladen.
Dieser Akku speichert die von der Solarzelle ein-
gespeiste elektrische Energie. Ein voll aufgeladener
Akku liefert in der Dämmerung ca. 6 Stunden
lang Dauerlicht. Das Aufladen des vollständig
entleerten Akkus dauert im Sommer bei guter
Sonneneinstrahlung etwa 2 bis 4 Tage.
Vor der Inbetriebnahme
Hinweis: Die Solarzelle 6 funktioniert auch
als Dämmerungssensor, während der Bewegungs-
sensor 7 nur auf Bewegungen reagiert.
Inbetriebnahme
Mit dem Schalter 11 (Abb. G) können
Sie folgende Funktionen einstellen:
Position „OFF” (AUS-Modus): Bewegungs-
sensor 7 und Produkt sind ausgeschaltet.
Position „I” (Orientierungslicht-Modus
mit Bewegungsmelder): Das Produkt
leuchtet konstant als Orientierungslicht. Sobald
der Bewegungssensor 7 eine Bewegung erkennt,
schaltet das Produkt auf besonders helles Licht um.
In diesem Fall wird das Produkt mit voller Leistung
betrieben. Ca. 40 Sekunden nachdem die letzte
Bewegung erkannt wurde, schaltet das Produkt
wieder in den Modus „Orientierungslicht“ (siehe
Abb. H).
Position „II” (Modus mit Bewegungs-
melder): Das Produkt wechselt in einen
Modus, indem nur die Bewegungssensor-Funktion
aktiv ist. Das Produkt schaltet nur auf besonders
helles Licht um, wenn der Bewegungssensor 7
Bewegungen bei Dunkelheit erkennt.

11 DE/AT/CH
Ca. 40 Sekunden nachdem die letzte Bewegung
erkannt wurde, erlischt das Licht (siehe Abb. I).
Montage
Hinweis: Entfernen Sie sämtliches
Verpackungsmaterial vom Produkt.
V
ergewissern Sie sich, dass Sie nicht auf S
trom-,
Gas- oder Wasserleitungen stoßen, wenn Sie
in die Wand bohren. Verwenden Sie eine
Bohrmaschine, um die Löcher in die Wand zu
bohren. Beachten Sie die Sicherheitshinweise
aus den Bedien- und Sicherheitshinweisen der
Bohrmaschine. Ansonsten drohen Tod oder
Verletzungsgefahr durch Stromschlag.
Achten Sie bei der Auswahl des Montage-
ortes des Produkts auf folgende Dinge:
1. Die Solarzelle 6 benötigt möglichst direkte
Sonneneinstrahlung. Optimal ist eine Ausrich-
tung der Solarzellenoberfläche nach Süden.
Die horizontale Ausrichtung der Solarzelle ist
durch Montage an einer senkrechten Wand
vorgegeben.
2. Der Bewegungssensor 7 hat, abhängig
von der Montagehöhe (ideal ist eine Höhe
von 2 m), einen Erfassungsbereich von max.
5 m – bei einem Erfassungswinkel von
100 ° horizontal und 90 ° vertikal.
3. Achten Sie darauf, dass der Bewegungs-
sensor 7 nachts nicht von Straßenbeleuch-
tungen angestrahlt wird. Dies kann die
Wirkung beeinflussen.
Fixieren Sie die Montageplatte 2 mit Hilfe
der mitgelieferten Dübel (Ø 6 mm) 1 und
Schrauben 3. Achten Sie darauf, dass der
Pfeil auf der Markierung der Montageplatte
( UP) nach oben zeigt (Abb. A).
Hinweis: Das beiliegende Montagematerial
ist zur Befestigung im normalen Mauerwerk
geeignet. Für andere Untergründe benötigen
Sie möglicherweise andere Befestigungsma-
terialien. Im Zweifelsfall ziehen Sie eine Fach-
kraft zu Rate.

12 DE/AT/CH
Stellen Sie den Schalter 11 auf die Position
„I” oder „II”, um das Produkt in Betrieb zu
nehmen (Abb. G).
Stecken Sie das Produkt so auf die Monta-
geplatte, dass die Aufhänger 4 der Mon-
tageplatte in die Aufnahmen 5 auf der
Rückseite des Produkts greifen. Schieben
Sie das Produkt nach unten, bis die Aufhän-
ger in den Aufnahmen einrasten (Abb. B).
Überprüfen Sie nach der Montage den feste
n
Sitz des Hauptgeräts.
Akku wechseln
Hinweis: Um eine gute Leistung zu gewährleis-
ten, reinigen Sie die Solarzelle 6 und den Be-
wegungssensor 7 regelmäßig (siehe
„Reinigung und Pflege“).
Gehen Sie zum Wechseln des Akkus folgender-
maßen vor:
Schieben Sie das Produkt nach oben, so
dass
die Aufhänger
4
sich aus den Aufnah-
men
5 lösen (Abb. B).
Nehmen Sie das Produkt von der Wand.
Stellen Sie den Schalter 11 auf die Position
„OFF“ (Abb. G).
Lösen Sie die Befestigungsschrauben des
Akkufachdeckels 8 und nehmen Sie diesen
ab (Abb. D).
Entfernen Sie den Akku
10
aus dem Akk
ufach
9
und ersetzen Sie ihn durch einen neuen
Akku
10
(Abb. E). Verwenden Sie nur einen
Akku 10 des
empfohlenen Typs (siehe „Tech-
nische Daten
“). Achten Sie beim Einsetzen
des Akkus 10 auf die richtige Polarität.
Diese wird im Akkufach 9 angezeigt.
Schließen Sie das Akkufach 9, indem Sie
den Akkufachdeckel 8 mit den Verschluss-
schrauben befestigen (Abb. F).
Stellen Sie den Schalter 11 wieder auf die
Position „I” oder „II”, bevor Sie das Produkt
wieder auf die Haken der Montageplatte
aufstecken.

13 DE/AT/CH
Winterbetrieb
Aufgrund der niedrigen Sonneneinstrahlung
kann sich im Winter die Aufladung des Akkus 10
verringern und so die Leistungsfähigkeit des Pro-
dukts nachlassen. Überprüfen Sie daher auch
im Winter, ob die Solarzelle 6 trotz des niedri-
geren Sonnenstandes ganztägig unbeschattet
ist. Beseitigen Sie, falls nötig, Eis oder Schnee.
Sollte die Leuchtdauer aufgrund der Wetterlage
nicht ausreichend sein, laden Sie den Akku 10
mit einem externen Ladegerät auf oder wechseln
Sie dieses (siehe „Akku wechseln“).
Reinigung und Pflege
Schalten Sie das Produkt zur Reinigung aus.
Verwenden Sie zur Reinigung ein leicht ange-
feuchtetes, fusselfreies Tuch mit einem milden
Reinigungsmittel.
Untersuchen Sie insbesondere den Bewegungs-
sensor 7 und die Solarzelle 6 regelmäßig
auf Verschmutzung.
Reinigen Sie Bewegungssensor 7 und
Solarzelle 6 regelmäßig, um eine ein-
wandfreie Funktion zu gewährleisten.
Halten Sie insbesondere die Solarzelle im
Winter schnee- und eisfrei.
Fehlerbehebung
Problem Ursache Lösung
Das Produkt schaltet
nicht ein.
Schalter 11 ist auf Position „OFF”. Schalter 11 auf Position „I” oder
„II” stellen.
Akku 10 ist leer. Akku 10 mittels eines externen
Ladegeräts aufladen.

14 DE/AT/CH
Problem Ursache Lösung
Das Licht flackert. Akku 10 ist fast leer. Akku 10 mittels eines externen
Ladegeräts aufladen.
Akku entlädt sich inner-
halb von kurzer Zeit.
Solarzelle 6 ist verschmutzt. Solarzelle 6 reinigen.
Solarzelle ist falsch ausgerichtet. Solarzelle neu ausrichten
(siehe „Montage“).
Schlechte Wetterbedingungen. Siehe „Winterbetrieb“.
Akku 10 ist defekt. Akku 10 austauschen
(siehe „Akku wechseln“).
Entsorgung
Die Verpackung besteht aus umweltfreundlichen
Materialien, die Sie über die örtlichen Recyc-
lingstellen entsorgen können.
b
a
Beachten Sie die Kennzeichnung
der Verpackungsmaterialien bei der
Abfalltrennung, diese sind gekenn-
zeichnet mit Abkürzungen (a) und
Nummern (b) mit folgender Bedeu-
tung: 1–7: Kunststoffe / 20–22:
Papier und Pappe / 80–98:
Verbundstoffe.
Das Produkt und die Verpackungs-
materialien sind recycelbar, entsorgen
Sie diese getrennt für eine bessere
Abfallbehandlung. Das Triman-Logo
gilt nur für Frankreich.

15 DE/AT/CH
Möglichkeiten zur Entsorgung des
ausgedienten Produkts erfahren Sie
bei Ihrer Gemeinde- oder Stadtver-
waltung.
Werfen Sie Ihr Produkt, wenn es
ausgedient hat, im Interesse des
Umweltschutzes nicht in den Hausmüll,
sondern führen Sie es einer fachge-
rechten Entsorgung zu. Über Sam-
melstellen und deren Öffnungszeiten
können Sie sich bei Ihrer zuständigen
Verwaltung informieren.
Defekte oder verbrauchte Batterien / Akkus
müssen gemäß Richtlinie 2006/66/EG und
deren Änderungen recycelt werden. Geben Sie
Batterien / Akkus und / oder das Produkt über
die angebotenen Sammeleinrichtungen zurück.
Umweltschäden durch
falsche Entsorgung der
Batterien / Akkus!
Batterien / Akkus dürfen nicht über den Hausmüll
entsorgt werden. Sie können giftige Schwerme-
talle enthalten und unterliegen der Sondermüll-
behandlung. Die chemischen Symbole der
Schwermetalle sind wie folgt: Cd = Cadmium,
Hg = Quecksilber, Pb = Blei. Geben Sie deshalb
verbrauchte Batterien / Akkus bei einer kommu-
nalen Sammelstelle ab.
Garantie
Das Produkt wurde nach strengen Qualitätsricht-
linien sorgfältig produziert und vor Anlieferung
gewissenhaft geprüft. Im Falle von Mängeln
dieses Produkts stehen Ihnen gegen den Verkäu-
fer des Produkts gesetzliche Rechte zu. Diese
gesetzlichen Rechte werden durch unsere im
Folgenden dargestellte Garantie nicht einge-
schränkt.
Sie erhalten auf dieses Produkt 3 Jahre Garan-
tie ab Kaufdatum. Die Garantiefrist beginnt mit
dem Kaufdatum. Bitte bewahren Sie den

16 DE/AT/CH
Original-Kassenbon gut auf. Diese Unterlage
wird als Nachweis für den Kauf benötigt.
Tritt innerhalb von 3 Jahren ab dem Kaufdatum
dieses Produkts ein Material- oder Fabrikations-
fehler auf, wird das Produkt von uns – nach un-
serer Wahl – für Sie kostenlos repariert oder
ersetzt. Diese Garantie verfällt, wenn das Produkt
beschädigt, nicht sachgemäß benutzt oder
gewartet wurde.
Die Garantieleistung gilt für Material- oder
Fabrikationsfehler. Diese Garantie erstreckt sich
nicht auf Produktteile, die normaler Abnutzung
ausgesetzt sind (z. B. Batterien) und daher als
Verschleißteile angesehen werden können oder
Beschädigungen an zerbrechlichen Teilen, z. B.
Schalter, Akkus oder die aus Glas gefertigt sind.
Abwicklung im Garantiefall
Um eine schnelle Bearbeitung Ihres Anliegens
zu gewährleisten, folgen Sie bitte den folgen-
den Hinweisen:
Bitte halten Sie für alle Anfragen den Kassenbon
und die Artikelnummer (z. B. IAN 123456_7890)
als Nachweis für den Kauf bereit.
Die Artikelnummer entnehmen Sie bitte dem
Typenschild, einer Gravur, auf dem Titelblatt
Ihrer Anleitung (unten links) oder als Aufkleber
auf der Rück- oder Unterseite.
Sollten Funktionsfehler oder sonstige Mängel
auftreten, kontaktieren Sie zunächst die nachfol-
gend benannte Serviceabteilung telefonisch
oder per E-Mail.
Ein als defekt erfasstes Produkt können Sie dann
unter Beifügung des Kaufbelegs (Kassenbon)
und der Angabe, worin der Mangel besteht
und wann er aufgetreten ist, für Sie portofrei
an die Ihnen mitgeteilte Service-Anschrift
übersenden.

17 DE/AT/CH
Service
Service Deutschland
Tel.: 0800 5435 111
(kostenfrei aus dem dt.
Festnetz / Mobilfunknetz)
E-Mail: [email protected]
Service Österreich
Tel.: 0820 201 222
(0,15 EUR / Min.)
E-Mail: [email protected]
Service Schweiz
Tel.: 0842 665566
(0,08 CHF / Min., Mobilfunk
max. 0,40 CHF / Min.)
E-Mail: [email protected]

18 GB/IE
List of pictograms used ............................................................................................. Page 19
Introduction ........................................................................................................................ Page 19
Intended use .............................................................................................................................Page 19
Parts description .......................................................................................................................Page 20
Technical data .......................................................................................................................... Page 20
Scope of delivery .....................................................................................................................Page 20
General safety instructions ...................................................................................Page 21
Safety instructions for batteries / rechargeable batteries ......................................................Page 21
Function..................................................................................................................................Page 23
Before use ............................................................................................................................Page 23
Start-up ..................................................................................................................................Page 23
Installation ..........................................................................................................................Page 24
Replacing the rechargeable battery .......................................................................................Page 25
Winter-time use .........................................................................................................................Page 25
Cleaning and care .........................................................................................................Page 26
Troubleshooting .............................................................................................................Page 26
Disposal .................................................................................................................................Page 27
Warranty .............................................................................................................................. Page 28
Warranty claim procedure ......................................................................................................Page 29
Service ......................................................................................................................................Page 29

19 GB/IE
List of pictograms used
Volt, Direct current Motion sensor detection angle:
approx. 100 °
Splashproof Battery included
Detection range: approx. 5 m LED lifespan
LED Solar wall light
Introduction
We congratulate you on the purchase of your
new product. You have chosen a high quality
product. The instructions for use are part of the
product. They contain important information
concerning safety, use and disposal. Before us-
ing the product, please familiarise yourself with
all of the safety information and instructions for
use. Only use the product as described and for
the specified applications. If you pass the prod-
uct on to anyone else, please ensure that you
also pass on all the documentation with it.
Intended use
The product is intended to illuminate outdoor
areas without electrical connection
.
The product
is intended for private use only and is not suita-
ble for commercial use.
Not suitable for household room
illumination.

20 GB/IE
This product is suitable for extreme tempera-
tures down to -21 °C.
Parts description
1 Rawlplug
2 Mounting plate
3 Screw
4 Hanger
5 Receiver
6 Solar cell
7 Motion sensor
8 Battery compartment lid
9 Battery compartment
10 Rechargeable battery
11 Switch
Technical data
Operating voltage: 3.7 V
Rechargeable battery: 1 x 3.7 V rechargea-
ble Lithium-ion battery
type 18650, 1300 mAh
LEDs: 4 x approx. 0.17 W
(LEDs not replaceable.)
Solar cell: approx. 5.5 V,
approx. 100 mA
Motion sensor: Range: max. 5 m, detec-
tion angle: approx.
100 ° horizontal,
approx. 90 ° vertical
Degree of protection: IP44 (splash-proof)
GS certified
Scope of delivery
Check immediately after unpacking that the
parts are complete and that the product is in
proper condition.
1 Main unit
1 Rechargeable Lithium-ion battery type 18650,
3.7 V , 1300 mAh – (preinstalled)
1 Mounting plate
2 Screws (Ø 4 x 30 mm)
2 Rawlplugs Ø 6 mm
1 Assembly, operating and safety instructions

21 GB/IE
General safety
instructions
BEFORE USING THE PRODUCT, PLEASE
FAMILIARISE YOURSELF WITH ALL OF THE
SAFETY INFORMATION AND INSTRUCTIONS
FOR USE! WHEN PASSING THIS PRODUCT
ON TO OTHERS, PLEASE ALSO INCLUDE ALL
THE DOCUMENTS!
This product may be used by children age
8 years and up, as well as by persons with
reduced physical, sensory or mental capaci-
ties, or lacking experience and / or knowle
dge,
so long as they are supervised or instructed
in the safe use of the product and understand
the associated risks. Children should not be
allowed to play with the product. Cleaning
and user maintenance should not be per-
formed by children without supervision.
Never leave children unsupervised with the
packaging material. The packaging material
represents a danger of suffocation. Children
frequently underestimate the dangers.
Keep children out of the area you are work-
ing in. A large number of screws and other
small parts are included with delivery. These
may prove life-threatening if swallowed or
inhaled.
Do not use this product if you notice any
damage!
The LEDs are not replaceable.
If the LEDs fail at the end of their lives, the
entire product must be replaced.
Safety instructions for
batteries / rechargeable
batteries
DANGER TO LIFE! Keep batteries /
rechargeable batteries out of reach of
children. If accidentally swallowed seek
immediate medical attention.
DANGER OF EXPLOSION!
Never recharge non-rechargea-
ble batteries. Do not short-circuit

22 GB/IE
batteries / rechargeable batteries and / or
open them. Overheating, fire or bursting can
be the result.
Never throw batteries / rechargeable
batteries into fire or water.
Do not exert mechanical loads to batteries /
rechargeable batteries.
Risk of leakage of batteries /
rechargeable batteries
Avoid extreme environmental conditions and
temperatures, which could affect batteries /
rechargeable batteries, e.g. radiators / direct
sunlight.
If batteries / rechargeable batteries have
leaked, avoid contact with skin, eyes and
mucous membranes with the chemicals!
Flush immediately the affected areas with
fresh water and seek medical attention!
WEAR PROTECTIVE GLO
VES!
Leaked or damaged batteries /
rechargeable batteries can cause
burns on contact with the skin. Wear suitable
protective gloves at all times if such an event
occurs.
In the event of a leakage of batteries / re-
chargeable batteries, immediately remove
them from the product to prevent damage.
Remove batteries / rechargeable batteries
if the product will not be used for a longer
period.
Risk of damage of the product
Only use the specified type of battery /
rechargeable battery!
Insert batteries / rechargeable batteries
according to polarity marks (+) and (-) on
the battery / rechargeable battery and the
product.
Clean the contacts on the battery / recharge-
able battery and in the battery compartment
before inserting!
Remove exhausted batteries / rechargeable
batteries from the product immediately.

23 GB/IE
Function
Solar cell
The solar cell 6 converts energy from sunlight
into electricity. Using this electricity, the installed
rechargeable battery 10 is charged in the bat-
tery compartment 9. This battery stores the
electricity fed by the solar cell. A fully charged
battery delivers continuous light for approximately
6 hours at dusk. I
n summer, completely drained
battery take ab
out 2 to 4 days to fully recharge
in good sunlight.
Before use
Note: The solar cell 6 also works as a twi-
light sensor, while the motion sensor 7 only re-
sponds to movement.
Start-up
The switch 11 on the product (Fig. G)
features the following functions:
Position “OFF” (OFF mode): Motion
sensor 7 and the product is off.
Position “I” (Orientation light mode
with motion sensor): The product will keep
orientation light constantly lit up in darkness. As
soon as the motion sensor 7 detects movement,
the product will switch to extra bright light.
While the extra bright light is switched on, the
product will be run at full power.
Approx. 40 seconds after the last movement has
been detected, the product will return to function-
ing as a constantly lit up orientation light (see
Fig. H).
Position “II” (Mode with motion sensor):
The product will switch to a mode with motion
sensor function only. The product only switch to
extra bright light when motion sensor 7 detects
movement at darkness. Approx. 40 seconds

24 GB/IE
after the last movement has been detected, the
light will switch off (see Fig. I).
Installation
Note: Remove all packaging materials from
the product.
Make sure you will not be drilling into elec-
trical, gas or water lines inside the wall. Use
a power drill to drill the holes into the brick
wall. Always observe all safety instructions
for the power drill in the manual for the power
drill. Death or injury due to electric shock may
otherwise result.
When selecting the mounting location, pay
attention to the following:
1.
The solar cell
6
requires direct sunlight wh
en
possible. Ideally, the solar cell surface will be
directed to the south. The horizontal direction
of the solar cell is dependent on mounting
on a vertical wall.
2. Depending on the mounting height (ideally
at 2 m) the motion sensor 7 has a detec-
tion range of max. 5m with a detection an-
gle of 100 ° horizontally and 90 °
vertically.
3. Be sure the motion sensor 7 is not illuminated
by street lighting at night. This can influence
the effect.
Fix the mounting plate 2 using the provided
rawlplugs 1 (Ø 6 mm) and the provided
screws 3. Ensure that the arrow on the
marking of the mounting plate ( UP) is
showing vertically upward (Fig. A).
Note: The enclosed mounting material is
suitable for ordinary masonry construction.
Other wall substrates may require other fas-
tening materials. Seek specialist advice when
in doubt.
Set the switch 11 to the position “I” or “II”
to start the operation of the product (Fig. G).
Attach the product to the mounting plate in
such a way that the hangers 4 of the
mounting plate grip in the receivers 5 on
the back of the product. Slide the product

25 GB/IE
downwards until the hangers click into place
in the receivers (Fig. B).
After mounting, check that the main unit is
fitted securely.
Replacing the
rechargeable battery
Note: Regularly clean the motion sensor 7
and solar cell 6 to ensure proper functionality
(refer to “Cleaning and care“).
Change the rechargeable battery as follows:
Slide the product upwards until the hangers
4
release from the receivers 5 (Fig. B).
Remove the product from the wall.
Set the switch
11
to position “O
FF“ (Fig. G).
Loosen the fixing screws of the battery com-
partment lid 8 and remove these (Fig. D).
Remove the rechargeable battery 10 from
the battery compartment 9 and replace
this with new rechargeable battery 10
(Fig. E). Use only rechargeable battery 10
of the recommended type (see „Technical
data“). Be sure to insert the rechargeable
battery 10 in the correct direction. It is indi-
cated in the battery compartment 9.
Close the battery compartment 9 by fixing
the b
attery compartment lid
8
with the fixing
screws (Fig. F).
Return the switch 11 to the position “I” or
“II” before you return the product to the
hooks of the mounting plate.
Winter-time use
Due to the low level of solar radiation in the win-
ter the charging of the rechargeable
battery
10
may be reduced and correspondin
gly the effective-
ness of the product may decrease. For this reason
check that the solar cell 6 remains clear of
shadow for the whole day, despite the low posi-
tion of the sun. If necessary, remove ice or snow.
If the light ON time is inadequate due to the
weather, recharge or replace the rechargeable
battery 10 using an external charging device or
replace this (refer to “Replacing the rechargea-
ble battery“).

26 GB/IE
Cleaning and care
Before cleaning, switch the product off.
Use a slightly dampened, lint-free cloth and
mild cleaning agent to clean.
Regularly check the motion sensor 7 and
solar cell 6 particularly for dirt.
Regularly clean the motion sensor 7 and
solar cell 6 to ensure proper functionality.
Keep the solar cell free of snow and ice,
especially in winter.
Troubleshooting
Problem Cause Solution
The product does not
switch on.
Switch 11 set to “OFF” position Set switch 11 to “I” or “II” position
Rechargeable battery 10 is
drained
Charge rechargeable battery 10
using an external charging device
The light flickers. Rechargeable battery 10 is
almost drained
Charge rechargeable battery 10
using an external charging device

27 GB/IE
Problem Cause Solution
Battery quickly loses
its charge.
The solar cell 6 is dirty. Clean the solar cell 6
Solar cell is positioned
incorrectly
Reposition the solar cell (refer to
“Installation“)
Poor weather conditions Refer to “Winter-time use“
Defective rechargeable
battery 10 .
Replace rechargeable battery 10
(see “Replacing the rechargeable
battery“)
Disposal
The packaging is made entirely of recyclable
materials, which you may dispose of at local
recycling facilities.
b
a
Observe the marking of the packag-
ing materials for waste separation,
which are marked with abbreviations
(a) and numbers (b) with following
meaning: 1–7: plastics / 20–22:
paper and fibreboard / 80–98:
composite materials.
The product and packaging materials
are recyclable, dispose of it separately
for better waste treatment. The
Triman logo is valid in France only.
Contact your local refuse disposal
authority for more details of how to
dispose of your worn-out product.

28 GB/IE
To help protect the environment,
please dispose of the product prop-
erly when it has reached the end of
its useful life and not in the house-
hold waste. Information on collection
points and their opening hours can
be obtained from your local authority.
Faulty or used batteries / rechargeable batteries
must be recycled in accordance with Directive
2006/66/EC and its amendments. Please return
the batteries / rechargeable batteries and / or
the product to the available collection points.
Environmental damage
through
incorrect disposal of
the batteries /
rechargeable
batteries!
Batteries / rechargeable batteries may not be
disposed of with the usual domestic waste. They
may contain toxic heavy metals and are subject
to hazardous waste treatment rules and regula-
tions. The chemical symbols for heavy metals
are as follows: Cd = cadmium, Hg = mercury,
Pb = lead. That is why you should dispose of
used batteries / rechargeable batteries at a
local collection point.
Warranty
The product has been manufactured to strict
quality guidelines and meticulously examined
before delivery. In the event of product defects
you have legal rights against the retailer of this
product. Your legal rights are not limited in any
way by our warranty detailed below.
The warranty for this product is 3 years from the
date of purchase. Should this product show any
fault in materials or manufacture within 3 years
from the date of purchase, we will repair or re-
place it – at our choice – free of charge to you.
The warranty period begins on the date of
purchase. Please keep the original sales receipt
in a safe location. This document is required as
your proof of purchase. This warranty becomes

29 GB/IE
void if the product has been damaged, or used
or maintained improperly.
The warranty applies to defects in material or
manufacture. This warranty does not cover pro-
duct parts subject to normal wear, thus possibly
considered consumables (e.g. batteries) or for
damage to fragile parts, e.g. switches, rechar-
geable batteries or glass parts.
Warranty claim procedure
To ensure quick processing of your case, please
observe the following instructions:
Please have the till receipt and the item number
(e.g. IAN 123456_7890) available as proof
of purchase.
You will find the item number on the type plate,
an engraving on the front page of the instruc-
tions (bottom left), or as a sticker on the rear or
bottom of the appliance.
If functional or other defects occur, please con-
tact the service department listed either by tele-
phone or by e-mail.
You can return a defective product to us free of
charge to the service address that will be pro-
vided to you. Ensure that you enclose the proof
of purchase (till receipt) and information about
what the defect is and when it occurred.
Service
Service Great Britain
Tel.: 0800 404 7657
E-Mail: [email protected]
Service Ireland
Tel.: 1890 930 034
(0,08 EUR / Min., (peak))
(0,06 EUR / Min., (off peak))
E-Mail: [email protected]

30 FR/BE
Légende des pictogrammes utilisés ............................................................... Page 31
Introduction ........................................................................................................................ Page 31
Utilisation conforme .................................................................................................................Page 31
Descriptif des pièces ................................................................................................................Page 32
Caractéristiques techniques ..................................................................................................... Page 32
Contenu de la livraison ............................................................................................................ Page 32
Instructions générales de sécurité ..................................................................Page 33
Consignes de sécurité relatives aux piles / aux piles rechargeables ....................................Page 34
Fonctionnement ..............................................................................................................Page 35
Avant la mise en service ..........................................................................................Page 35
Mise en service ................................................................................................................Page 35
Montage ................................................................................................................................Page 36
Remplacement de la pile .........................................................................................................Page 37
Fonctionnement en hiver .......................................................................................................... Page 38
Nettoyage et entretien .............................................................................................Page 38
Dépannage .........................................................................................................................Page 38
Mise au rebut .................................................................................................................... Page 39
Garantie ................................................................................................................................Page 40
Faire valoir sa garantie ............................................................................................................ Page 43
Service après-vente ..................................................................................................................Page 43

31 FR/BE
Légende des pictogrammes utilisés
Volt, courant continu Angle de détection du détecteur
de mouvement : env. 100 °
Protégé contre les projections
d'eau Pile fournie
Zone de détection : env. 5 m Durée de vie des LED
Applique murale solaire à LED
Introduction
Nous vous félicitons pour l‘achat de votre nou-
veau produit. Vous avez opté pour un produit
de grande qualité. Le mode d‘emploi fait partie
intégrante de ce produit. Il contient des indica-
tions importantes pour la sécurité, l’utilisation et
la mise au rebut. Veuillez lire consciencieusement
toutes les indications d‘utilisation et de sécurité
du produit. Ce produit doit uniquement être uti-
lisé conformément aux instructions et dans les
domaines d‘application spécifiés. Lors d‘une
cession à tiers, veuillez également remettre tous
les documents.
Utilisation conforme
Ce produit est destiné à l‘éclairage des extérieurs
ne disposant pas d‘un accès à l‘électricité. Le
produit convient exclusivement à un usage privé
et non commercial.

32 FR/BE
Ce produit n‘est pas destiné à
servir d‘éclairage de pièce dans
un foyer domestique.
Ce produit résiste aux températures extrêmes,
inférieures à -21 °C.
Descriptif des pièces
1 Cheville
2 Plaque de montage
3 Vis
4 Crochet de fixation
5 Orifice d‘accueil
6 Cellule solaire
7 Capteur de mouvement
8 Couvercle du compartiment à piles
9 Compartiment à piles
10 Pile rechargeable
11 Interrupteur
Caractéristiques techniques
Tension de
fonctionnement: 3,7 V
Pile rechargeable : 1
x 3,7 V pile lithium-ions
,
type 18650, 1300 mAh
LED : 4 x env. 0,17 W (Les LED
ne peuvent pas être rem-
placées.)
Cellule solaire : env. 5,5 V, d‘env. 100 mA
Capteur de
mouvement : Portée : 5 m max., angle
de détection : env. 100 °
à l‘horizontale, env. 90 °
à la verticale
In
dice de prot
ection:
IP44 (ne craint pas les
projections d‘eau)
Certifié GS
Contenu de la livraison
Contrôlez toujours immédiatement après le débal-
lage du produit que le contenu de la livraison est
complet et que
le produit
se trouve en parfait état
:

33 FR/BE
1 appareil principal
1 pile lithium-ions type 18650, 3,7 V ,
1300 mAh (déjà insérée)
1 plaque de montage
2 vis (Ø 4 x 30 mm)
2 chevilles Ø 6 mm
1 instructions de montage, d‘utilisation et
consignes de sécurité
Instructions générales
de sécurité
PRENEZ CONNAISSANCE DE TOUTES LES
INDICATIONS DE MANIEMENT ET DE
SÉCURITÉ AVANT D’UTILISER LE PRODUIT
POUR LA PREMIÈRE FOIS ! FOURNISSEZ
ÉGALEMENT TOUS LES DOCUMENTS EN
CAS DE REMISE DU PRODUIT À UN TIERS !
Le produit peut être utilisé par des enfants
âgés de 8 ans et plus ainsi que par des per-
sonnes ayant des capacités physiques, sen-
sorielles ou mentales réduites ou manquant
d‘expérience ou de connaissances, s‘ils
sont surveillés ou s‘ils ont été informés de
l‘utilisation sûre du produit et comprennent
les risques liés à son utilisation. Les enfants
ne doivent pas jouer avec le produit. Le net-
toyage et l‘entretien du produit ne doivent
pas être effectués par des enfants laissés
sans surveillance.
Ne jamais laisser les enfants manipuler sans
surveillance le matériel d’emballage. Ils
peuvent s‘étouffer avec les matériaux de
l‘emballage. Les enfants sous-estiment sou-
vent le danger.
Toujours tenir les enfants éloignés de la zone
de travail lors du montage. La livraison com-
porte un grand nombre de vis et de pièces
de petite taille. Celles-ci peuvent présenter
un risque mortel en cas d‘ingestion ou d‘in-
halation.
N’utilisez jamais le produit si vous constatez
le moindre endommagement !
Les LED ne peuvent pas être remplacées.
Si les LED arrivent en fin de vie, l‘ensemble
du produit doit alors être remplacé.

34 FR/BE
Consignes de sécurité
relatives aux piles / aux
piles rechargeables
DANGER DE MORT! Rangez les piles /
piles rechargeables hors de la portée des
enfants. En cas d’ingestion, consultez immé-
diatement un médecin !
RISQUE D‘EXPLOSION ! Ne
rechargez jamais des piles non
rechargeables. Ne court-circuitez
pas les piles / piles rechargeables et / ou ne
les ouvrez pas ! Autrement, vous risquez de
provoquer une surchauffe, un incendie ou
une explosion.
Ne jetez jamais des piles / piles rechar-
geables au feu ou dans l’eau.
Ne pas soumettre les piles / piles rechar-
geables à une charge mécanique.
Risque de fuite des piles / piles
rechargeables
Évitez d’exposer les piles / piles rechar-
geables à des conditions et températures
extrêmes susceptibles de les endommager,
par ex. sur des radiateurs / exposition directe
aux rayons du soleil.
Lorsque les piles / piles rechargeables fuient,
évitez tout contact du produit chimique avec
la peau, les yeux ou les muqueuses! Rincez
les zones touchées à l‘eau claire et consultez
immédiatement un médecin !
PORTER DES GANTS DE
PROTECTION! Les piles / piles
rechargeables endommagées ou
sujettes à des fuites peuvent provoquer des
brûlures au contact de la peau. Vous devez
donc porter des gants adéquats pour les
manipuler.
En cas de fuite des piles / piles rechargeables,
retirez-les aussitôt du produit pour éviter tout
endommagement.
Retirez les piles / piles rechargeables, si vous
ne comptez pas utiliser le produit pendant
une période prolongée.
Risque d‘endommagement du produit
Exclusivement utiliser le type de pile / pile
rechargeable spécifié.
Insérez les piles / piles rechargeables confor-
mément à l‘indication de polarité (+) et (-)

35 FR/BE
indiquée sur la pile / pile rechargeable et
sur le produit.
Nettoyez les contacts de la pile / pile rechar-
geable et du compartiment à pile avant
d‘insérer la pile !
Retirez immédiatement les piles / piles
rechargeables usées du produit.
Fonctionnement
Cellule solaire
La cellule solaire 6 convertit l‘énergie lumineuse
du soleil en énergie électrique. La pile rechar-
geable 10 intégrée dans le compartiment à
pile
9
est ainsi rechargée.Cette pile sauvegarde
l‘énergie électrique fournie par la cellule solaire.
Une pile rechargée complètement fournit au cré-
puscule env. 6 heures d‘éclairage continu. La
charge de la pile complètement déchargée dure
environ 2 à 4 jours en été, sous réserve d‘un en-
soleillement de bonne qualité.
Avant la mise en service
Remarque : La cellule solaire 6 fonctionne
également comme capteur de crépuscule,
tandis que le capteur de mouvement 7 réagit
uniquement à la présence de mouvements.
Mise en service
L‘interrupteur 11 (Fig. G) vous permet
de régler les fonctions suivantes :
Position « OFF » (mode ARRÊT) : Le cap-
teur de mouvement 7 et le produit sont éteints.
Position « I »(mode d‘éclairage de nuit
avec détecteur de mouvement) : Le pro-
duit est allumé de manière constante comme
éclairage de nuit. Dès que le capteur de mouve-
ment 7 détecte un mouvement, le produit émet
une lumière particulièrement brillante. Dans ce
cas, le produit fonctionne à pleine puissance.
Env. 40 secondes après reconnaissance du der-
nier mouvement, le produit fonctionne de nouveau
en mode « Éclairage de nuit » (voir Fig. H).

36 FR/BE
Position « II » (mode avec capteur de
mouvement) : Le produit bascule dans un
mode avec uniquement la fonction de capteur de
mouvement. Dès que le capteur de mouvement
7 enregistre des mouvements dans l‘obscurité,
le produit émet une lumière particulièrement bril-
lante. Env. 40 secondes après reconnaissance du
dernier mouvement, la lumière s‘éteint (voir Fig. I).
Montage
Remarque : Veuillez retirer tous les emballages
du produit.
Lorsque vous percez des trous dans le mur,
assurez-vous de ne toucher ni lignes élec-
triques ni conduites de gaz et d’eau. Utilisez
une perceuse pour percer les trous dans le
mur. Respectez les instructions de maniement
et de sécurité présentes dans le manuel d‘uti-
lisation de la perceuse. Dans le cas contraire,
il existe un risque mortel ou un danger de
blessures par électrocution.
Choisir l‘emplacement de montage du
produit en fonction des critères suivants :
1. La cellule solaire 6 doit, autant que pos-
sible, être exposée au rayonnement solaire
direct. Une orientation plein sud de la surface
de la cellule solaire est optimale. L‘orientation
horizontale de la cellule solaire est possible
lors du montage sur un mur vertical.
2. Le capteur de mouvement 7 a une portée
maximale de 5 m, pour un angle de détec-
tion de 100° à l‘horizontale et de 90° à la
verticale (selon la hauteur à laquelle il est
installé – une hauteur de 2 m est idéale).
3. Veuillez noter que le capteur de mouvement
7 ne doit pas être éclairé de nuit par l‘éclai-
rage de la voie publique. Son bon fonction-
nement peut alors être influencé.
Fixez la plaque de montage 2 à l‘aide de
chevilles (Ø 6 mm) 1 et vis 3 fournies.
Veillez à ce que la flèche de marquage sur
la plaque de montage ( UP) soit orientée
vers le haut (Fig. A).

37 FR/BE
Remarque: Le matériel de montage fourni
convient à la fixation de l‘article sur des ou-
vrages de maçonnerie usuels. Pour d’autres
supports, un autre matériel de montage peut
être nécessaire. En cas de doute, prenez
conseil auprès d‘un spécialiste.
Placez l‘interrupteur 11 en position « I »
ou « II » pour mettre le produit en service
(Fig. G).
Enfichez le produit dans la plaque de mon-
tage, de manière à ce que le crochet de
fixation 4 de la plaque de montage entre
dans l‘orifice d‘accueil 5 situé au verso du
produit. Glissez le produit vers le bas, jusqu‘à
ce que le crochet de fixation s‘enclenche
dans l‘orifice d‘accueil (Fig. B).
Après le montage, vérifiez que l‘appareil
principal soit correctement fixé.
Remplacement de la pile
Remarque : Nettoyez la cellule solaire 6 et
le capteur de mouvement 7 de manière régu-
lière afin de garantir le bon fonctionnement de
l‘appareil (voir « Nettoyage et entretien »).
Procédez au remplacement de la pile de la
manière suivante :
Glissez le produit vers le haut, jusqu‘à ce
que les crochets de fixation 4 se détachent
des orifices d‘accueil 5 (Fig. B).
Retirez le produit du mur.
Placez l‘interrupteur 11 en position « OFF »
(Fig. G).
Dévissez les vis de fixation du couvercle du
compartiment à pile 8 et retirez-le (Fig. D).
Enlevez la pile 10 du compartiment à pile 9
et remplacez-la par une pile neuve 10
(Fig. E). Utilisez uniquement une pile 10
correspondant au type spécifié (voir
« Caractéristiques techniques »). Lors de la
mise en place de la pile 10 , veillez à res-
pecter la polarité. La polarité est indiquée
dans le compartiment à pile 9.
Refermez le compartiment à pile 9 en
fixant son couvercle 8 avec les vis de
fermeture (Fig. F).
Replacez l‘interrupteur 11 en position « I »
ou « II » avant d‘enficher de nouveau le
produit sur les crochets de la plaque de
montage.

38 FR/BE
Fonctionnement en hiver
En raison du faible ensoleillement en hiver, la
charge de la pile 10 peut diminuer et ainsi réduire
la performance du produit. Vérifiez donc égale-
ment en hiver que, malgré une position basse
du soleil, la cellule solaire 6 soit protégée de
l‘ombre tout au long de la journée. Retirez au
besoin la neige ou la glace.
Si la durée d‘éclairage n‘est pas suffisante en
raison des conditions météorologiques, rechargez
la pile 10 au moyen d‘un chargeur externe ou
remplacez-la (voir «Remplacement de la pile»).
Nettoyage et entretien
Éteignez le produit pour le nettoyer.
Pour le nettoyage, utilisez un chiffon légère-
ment humide et non pelucheux ainsi qu‘un
produit de nettoyage doux.
Contrôlez régulièrement la propreté du
capteur de mouvement 7 et de la cellule
solaire 6.
Nettoyez le capteur de mouvement 7 et la
cellule solaire 6 de manière régulière afin
de garantir un bon fonctionnement de l‘ap-
pareil.
Enlever particulièrement la neige et la glace
de la cellule solaire en hiver.
Dépannage
Problèmes Cause Solution
Le produit ne
s‘allume pas. L'interrupteur 11 est sur la
position « OFF ».
Placer l'interrupteur 11 en position
« I » ou « II ».
La pile 10 est vide. Recharger la pile 10 au moyen d'un
chargeur externe.

39 FR/BE
Problèmes Cause Solution
La lumière vacille. La pile 10 est presque vide. Recharger la pile 10 au moyen d'un
chargeur externe.
La batterie se décharge
en l'espace de peu de
temps.
La cellule solaire 6 est
encrassée.
Nettoyez la cellule solaire 6.
L'orientation de la cellule solaire
est défavorable.
Orienter la cellule solaire dans une
nouvelle direction (voir « Montage »).
Conditions météorologiques
défavorables.
Voir « Fonctionnement en hiver ».
La pile 10 est défectueuse. Remplacer la pile 10 (voir
«Remplacement de la pile»).
Mise au rebut
L’emballage se compose de matières recyclables
pouvant être mises au rebut dans les déchetteries
locales.
b
a
Veuillez respecter l‘identification des
matériaux d‘emballage pour le tri
sélectif, ils sont identifiés avec des
abbréviations (a) et des chiffres (b)
ayant la signification suivante : 1–7 :
plastiques / 20–22 : papiers et car-
tons / 80–98 : matériaux composite.
Le produit et les matériaux d’embal-
lage sont recyclables, mettez-les au
rebut séparément pour un meilleur
traitement des déchets. Le logo Triman
n’est valable qu’en France.

40 FR/BE
Votre mairie ou votre municipalité
vous renseigneront sur les possibilités
de mise au rebut des produits usagés.
Afin de contribuer à la protection de
l’environnement, veuillez ne pas jeter
votre produit usagé dans les ordures
ménagères, mais éliminez-le de ma-
nière appropriée. Pour obtenir des
renseignements concernant les points
de collecte et leurs horaires d’ouverture,
vous pouvez contacter votre munici-
palité.
Les piles / piles rechargeables défectueuses ou
usagées doivent être recyclées conformément
à la directive 2006/66/CE et ses modifications.
Les piles et / ou piles rechargeables et / ou le
produit doivent être retournés dans les centres
de collecte proposés.
Pollution de l’environnement
par la mise au rebut incorrecte
des piles / piles rechargeables !
Les piles / piles rechargeables ne doivent pas
être mises au rebut avec les ordures ménagères.
Elles peuvent contenir des métaux lourds toxiques
et doivent être considérées comme des déchets
spéciaux. Les symboles chimiques des métaux
lourds sont les suivants : Cd = cadmium, Hg =
mercure, Pb = plomb. Pour cette raison, veuillez
toujours déposer les piles / piles rechargeables
usagées dans les conteneurs de recyclage com-
munaux.
Garantie
Article L217-16 du Code de
la consommation
Lorsque l‘acheteur demande au vendeur, pendant
le cours de la garantie commerciale qui lui a été
consentie lors de l‘acquisition ou de la réparation
d‘un bien meuble, une remise en état couverte
par la garantie, toute période d‘immobilisation
d‘au moins sept jours vient s‘ajouter à la durée
de la garantie qui restait à courir. Cette période
court à compter de la demande d‘intervention
de l‘acheteur ou de la mise à disposition pour

41 FR/BE
réparation du bien en cause, si cette mise à dis-
position est postérieure à la demande d‘inter-
vention.
Indépendamment de la garantie commerciale
souscrite, le vendeur reste tenu des défauts de
conformité du bien et des vices rédhibitoires
dans les conditions prévues aux articles L217-4
à L217-13 du Code de la consommation et aux
articles 1641 à 1648 et 2232 du Code Civil.
Article L217-4 du Code de
la consommation
Le vendeur livre un bien conforme au contrat et
répond des défauts de conformité existant lors
de la délivrance.
Il répond également des défauts de conformité
résultant de l‘emballage, des instructions de
montage ou de l‘installation lorsque celle-ci a
été mise à sa charge par le contrat ou a été
réalisée sous sa responsabilité.
Article L217-5 du Code de
la consommation
Le bien est conforme au contrat :
1° S´il est propre à l‘usage habituellement
attendu d‘un bien semblable et, le cas
échéant :
- s‘il correspond à la description donnée
par le vendeur et posséder les qualités
que celui-ci a présentées à l‘acheteur sous
forme d‘échantillon ou de modèle ;
- s‘il présente les qualités qu‘un acheteur
peut légitimement attendre eu égard aux
déclarations publiques faites par le vendeur,
par le producteur ou par son représentant,
notamment dans la publicité ou l‘étiquetage ;
2° Ou s‘il présente les caractéristiques définies
d‘un commun accord par les parties ou être
propre à tout usage spécial recherché par
l‘acheteur, porté à la connaissance du ven-
deur et que ce dernier a accepté.

42 FR/BE
Article L217-12 du Code de
la consommation
L‘action résultant du défaut de conformité se
prescrit par deux ans à compter de la délivrance
du bien.
Article 1641 du Code civil
Le vendeur est tenu de la garantie à raison des
défauts cachés de la chose vendue qui la rendent
impropre à l‘usage auquel on la destine, ou qui
diminuent tellement cet usage que l‘acheteur ne
l‘aurait pas acquise, ou n‘en aurait donné qu‘un
moindre prix, s‘il les avait connus.
Article 1648 1er alinéa du Code civil
L‘action résultant des vices rédhibitoires doit être
intentée par l‘acquéreur dans un délai de deux
ans à compter de la découverte du vice.
Les pièces détachées indispensables à l’utilisation
du produit sont disponibles pendant la durée de
la garantie du produit.
Le produit a été fabriqué selon des critères de
qualité stricts et contrôlé consciencieusement
avant sa livraison. En cas de défaillance, vous
êtes en droit de retourner ce produit au vendeur.
La présente garantie ne constitue pas une res-
triction de vos droits légaux.
Ce produit bénéficie d‘une garantie de 3 ans à
compter de sa date d’achat. La durée de garan-
tie débute à la date d’achat. Veuillez conserver
le ticket de caisse original. Il fera office de preuve
d’achat.
Si un problème matériel ou de fabrication devait
survenir dans 3 ans suivant la date d‘achat de
ce produit, nous assurons à notre discrétion la
réparation ou le remplacement du produit sans
frais supplémentaires. La garantie prend fin si
le produit est endommagé suite à une utilisation
inappropriée ou à un entretien défaillant.
La garantie couvre les vices matériels et de
fabrication. Cette garantie ne s’étend ni aux
pièces du produit soumises à une usure normale
(p. ex. des piles) et qui, par conséquent, peuvent
être considérées comme des pièces d’usure, ni
aux dommages sur des composants fragiles,

43 FR/BE
comme des interrupteurs, des batteries ou des
éléments fabriqués en verre.
Faire valoir sa garantie
Pour garantir la rapidité d’exécution de la
procédure de garantie, veuillez respecter les
indications suivantes :
Veuillez conserver le ticket de caisse et la réfé-
rence du produit (par ex. IAN 123456_7890)
à titre de preuve d’achat pour toute demande.
Le numéro de référence de l’article est indiqué
sur la plaque d’identification, gravé sur la page
de titre de votre manuel (en bas à gauche) ou
sur un autocollant apposé sur la face arrière ou
inférieure du produit.
En cas de dysfonctionnement du produit, ou de
tout autre défaut, contactez en premier lieu le
service après-vente par téléphone ou par e-mail
aux coordonnées indiquées ci-dessous.
Vous pouvez alors envoyer franco de port tout
produit considéré comme défectueux au service
clientèle indiqué, accompagné de la preuve
d’achat (ticket de caisse) et d’une description
écrite du défaut avec mention de sa date
d’apparition.
Service après-vente
Service après-vente France
Tél. : 0800 919270
E-Mail : [email protected]
Service après-vente Belgique
Tél. : 070 270 171 (0,15 EUR / Min.)
E-Mail : [email protected]

44 NL/BE
Legenda van de gebruikte pictogrammen .......................................... Pagina 45
Inleiding ............................................................................................................................ Pagina 45
Correct gebruik .................................................................................................................... Pagina 45
Beschrijving van de onderdelen .......................................................................................... Pagina 46
Technische gegevens ........................................................................................................... Pagina 46
Omvang van de levering ..................................................................................................... Pagina 46
Algemene veiligheidsinstructies ................................................................... Pagina 47
Veiligheidsinstructies voor batterijen / accu‘s ..................................................................... Pagina 48
Werking............................................................................................................................. Pagina 49
Voor de ingebruikname ...................................................................................... Pagina 49
Ingebruikname ........................................................................................................... Pagina 49
Montage ............................................................................................................................ Pagina 50
Accu vervangen ................................................................................................................... Pagina 51
Gebruik in de winter ............................................................................................................ Pagina 51
Reiniging en onderhoud ...................................................................................... Pagina 52
Storingen oplossen .................................................................................................. Pagina 52
Afvoer ................................................................................................................................. Pagina 53
Garantie ............................................................................................................................ Pagina 54
Afwikkeling in geval van garantie ...................................................................................... Pagina 55
Service .................................................................................................................................. Pagina 55

45 NL/BE
Legenda van de gebruikte pictogrammen
Volt, gelijkstroom Detectiehoek bewegingsmelder:
ca. 100 °
Spatwaterdicht Inclusief accu
Detectiebereik: ca. 5 m Led-levensduur
LED-solar-wandlamp
Inleiding
Hartelijk gefeliciteerd met de aankoop van uw
nieuwe product. U heeft voor een hoogwaardig
product gekozen. De gebruiksaanwijzing is een
deel van het product. Deze bevat belangrijke
aanwijzingen voor veiligheid, gebruik en verwij-
dering. Maakt U zich voor de ingebruikname van
het product met alle bedienings- en
veiligheidsvoorschriften vertrouwd. Gebruik het
product alleen zoals beschreven en voor de
aangegeven toepassingsgebieden. Overhandig
alle documenten bij doorgifte van het product
aan derden.
Correct gebruik
Het product is bedoeld voor verlichting buitens-
huis op plekken waar geen stroomaansluiting
aanwezig is. Het product is alleen geschikt voor

46 NL/BE
privé-doeleinden en niet voor commercieel
gebruik.
Dit product is niet geschikt als
kamerverlichting in huishoudens.
Dit product is geschikt voor extreme tempe-
raturen tot -21°C.
Beschrijving van
de onderdelen
1 Plug
2 Montageplaat
3 Schroef
4 Ophangers
5 Gleuven
6 Zonnecel
7 Bewegingssensor
8 Deksel van het batterijvakje
9 Batterijvakje
10 Accu
11 Schakelaar
Technische gegevens
Voedingsspanning: 3,7 V
Accu: 1 x 3,7 V lithium-ion-
accu type 18650,
1300 mAh
Led‘s: 4 x ca. 0,17 W (De led‘s
kunnen niet worden
vervangen.)
Zonnecel: ca. 5,5 V, ca. 100 mA
Bewegingssensor: Reikwijdte: max. 5 m,
detectiehoek: ca. 100 °
horizontaal, ca. 90 °
verticaal
Beschermingsgraad: IP44 (spatwaterdicht)
GS-gecertificeerd
Omvang van de levering
Controleer de levering altijd direct na het uit-
pakken op volledigheid en optimale staat van
het product:

47 NL/BE
1 apparaat
1 lithium-ion-accu type 18650, 3,7 V ,
1300 mAh (reeds geplaatst)
1 montageplaat
2 schroeven (Ø 4 x 30 mm)
2 pluggen Ø 6 mm
1 montage-, bedienings- en veiligheidsinstructies
Algemene
veiligheidsinstructies
LEES VOOR DE EERSTE INGEBRUIKNAME
VAN HET PRODUCT ALLE BEDIENINGS- EN
VEILIGHEIDSINSTRUCTIES ZORGVULDIG
DOOR! GEEF ALLE DOCUMENTEN MEE
WANNEER U HET PRODUCT AAN DERDEN
DOORGEEFT!
Dit product kan door kinderen vanaf 8 als-
mede door personen met verminderde fysi
eke,
sensorische of mentale vaardigheden of een
gebrek aan ervaring en kennis worden ge-
bruikt, als zij onder toezicht staan of geïnstru-
eerd werden met betrekking tot het veilige
gebruik van het product en zij de hieruit
voortvloeiende gevaren begrijpen. Kinderen
mogen niet met het product spelen. Reiniging
en onderhoud mag niet door kinderen zond
er
toezicht worden uitgevoerd.
Laat kinderen nooit zonder toezicht bij het
verpakkingsmateriaal. Er is kans op verstik-
king door het verpakkingsmateriaal. Kinderen
onderschatten vaak de gevaren.
Houd kinderen tijdens de montage bij de
lamp vandaan. Tot de levering behoren tal
van schroeven en andere kleine onderdelen.
Bij inslikken of inhaleren kunnen deze levens-
gevaarlijk zijn.
Gebruik het product niet wanneer u enige
beschadiging heeft geconstateerd!
De leds kunnen niet worden vervangen.
Mochten de leds aan het einde van hun
levensduur uitvallen dan dient het gehele
product te worden vervangen.

48 NL/BE
Veiligheidsinstructies
voor batterijen / accu‘s
LEVENSGEVAAR! Houd batterijen / acc
u‘s
buiten het bereik van kinderen. Raadpleeg
bij inslikken onmiddellijk een arts!
EXPLOSIEGEVAAR! Laad niet
oplaadbare batterijen nooit op.
Sluit de batterijen / accu‘s niet
kort en / of open deze niet. Daardoor kan
de batterij oververhit raken, in brand vliegen
of exploderen.
Gooi batterijen / accu‘s nooit in het vuur
of water.
Stel batterijen / accu‘s nooit bloot aan
mechanische belastingen.
Risico dat de batterijen / accu’s lekken
Vermijd extreme omstandigheden en tempe-
raturen die invloed op de batterijen / accu‘s
zouden kunnen hebben bijv. radiatoren /
direct zonlicht.
Bij lekkende batterijen / accu‘s het contact
van de chemicaliën met de huid, ogen en
slijmvliezen vermijden! Spoel de desbetreffende
plekken direct af met schoon water en raad-
pleeg onmiddellijk een arts!
DRAAG VEILIGHEIDS-
HANDSCHOENEN! Lekkende
of beschadigde batterijen / accu‘s
kunnen in geval van huidcontact chemische
brandwonden veroorzaken. Draag daarom i
n
dit geval geschikte veiligheidshandschoenen.
Als de batterijen / accu‘s lekken, dient u deze
direct uit het product te halen om beschadi-
gingen te vermijden.
Verwijder de batterijen / accu‘s, als u het
product gedurende een langere periode
niet gebruikt.
Risico op beschadiging van het product
Gebruik uitsluitend het aangegeven type
batterij / accu!
Plaats de batterijen / accu‘s volgens de weer-
gegeven polariteit (+) en (-) op batterij /
accu en op product.
Reinig de contacten van de batterij / accu
en die in het batterijvak, voordat u deze
plaatst!

49 NL/BE
Verwijder verbruikte batterijen / accu‘s
direct uit het product.
Werking
Zonnecel
De zonnecel 6 zet lichtenergie van de zon om
in elektrische energie. Daarmee wordt de in het
accuvak 9 aanwezige accu 10 opgeladen.
Deze accu slaat de door de zonnecel gegene-
reerde elektrische energie op. Een volledig op-
geladen accu levert tijdens de schemering ca.
6 uur lang continu licht. Het opladen van de
volledig lege accu duurt in de zomer bij veel
zonlicht ongeveer 2 tot 4 dagen.
Voor de ingebruikname
Opmerking: de zonnecel 6 werkt ook als
schemersensor, terwijl de bewegingssensor 7
alleen op bewegingen reageert.
Ingebruikname
Met de schakelaar 11 (afb. G) kunt u
de volgende functies instellen:
Positie ‚OFF‘ (UIT-modus): bewegingssens
or
7 en product zijn uitgeschakeld.
Positie ‚I‘ (oriëntatielamp-modus met
bewegingsmelder): het product brandt
continu als oriëntatielampje. Zodra de bewe-
gingssensor 7 een beweging registreert, scha-
kelt het product over op bijzonder helder licht.
In dit geval wordt het product met vol vermogen
gebruikt. Ca. 40 seconden nadat de laatste be-
weging werd herkend, schakelt het product weer
over naar de modus ‚oriëntatielicht‘ (zie afb. H).
Positie ‚II‘ (modus met bewegingsmel-
der): het product wisselt in een modus, waarin
alleen de bewegingssensor actief is. Het product
schakelt over naar bijzonder helder licht als de
bewegingssensor 7 bewegingen in het donker
registreert.

50 NL/BE
Ca. 40 seconden nadat de laatste beweging
werd geregistreerd, gaat het licht uit (zie afb. I).
Montage
Opmerking: verwijder al het verpakkingsma-
teriaal van het product.
Waarborg dat u niet op stroom-, gas- of wa-
terleidingen stoot als u in de wand boort.
Gebruik een boormachine om de gaten in de
wand te boren. Neem de veiligheidsinstruc-
ties uit de bedienings- en veiligheidsinstructies
van de boormachine in acht. Anders bestaat
er kans op (dodelijk) letsel als gevolg van
een elektrische schok.
Let tijdens de keuze van de montageplek
van het product op de volgende dingen:
1. De zonnecel 6 heeft zo direct mogelijk zon-
licht nodig. De oppervlakte van de zonnecel
dient op het zuiden gericht te zijn. Dit is de
optimale richting. De horizontale positie van
de zonnecel is door de montage aan een
verticale wand aangegeven.
2. De bewegingssensor 7 heeft, afhankelijk
van de montagehoogte (een hoogte van
2 meter is ideaal), een registratiebereik van
maximaal 5 meter, bij een detectiehoek van
100° horizontaal en 90° verticaal.
3. Let erop dat de bewegingssensor 7 ‚s
nachts niet wordt verlicht door straatverlich-
ting. Dit kan de werking beïnvloeden.
Fixeer de montageplaat 2 met behulp van
de meegeleverde pluggen (Ø 6 mm) 1 en
schroeven 3. Let erop, dat de pijl op de
markering van de montageplaat ( UP)
naar boven wijst (afb. A).
Opmerking: het bijgevoegde montage-
materiaal is geschikt voor bevestiging aan e
en
normale muur. Voor andere oppervlaktes
heeft u mogelijk andere bevestigingsmateri-
alen nodig. Raadpleeg in geval van twijfel
een expert.
Zet de schakelaar 11 op positie ‚I‘ of ‚II‘
om het product in gebruik te nemen (afb. G).

51 NL/BE
Plaats het product op dusdanige wijze op
de montageplaat dat de ophangers 4 van
de montageplaat in de gleuven 5 op de
achterzijde van het product grijpen. Schuif
het product naar onder totdat de ophan-
gers in de gleuven glijden (afb. B).
Controleer na de montage of de lamp goed
vastzit.
Accu vervangen
Opmerking: Om een goede prestatie te
waarborgen, moet u de zonnecel 6 en de
bewegingssensor 7 regelmatig reinigen (zie
‚Reiniging en onderhoud‘).
Ga voor het vervangen van de accu als volgt te
werk:
Schuif het product naar boven zodat de
hangers 4 uit de opnamen 5 glijden
(afb. B).
Verwijder het product van de wand.
Zet de schakelaar
11
p positie ‚OFF‘ (afb. G).
Verwijder de bevestigingsschroeven van het
accuvakdeksel 8 (afb. D).
Verwijder de accu 10 uit het accuvak 9
en vervang deze door een nieuwe accu 10
(afb. E). Gebruik alleen een accu 10 van
het aanbevolen type (zie ‚Technische gege-
vens‘). Let bij het plaatsen van de accu 10
op de juiste polariteit. Deze wordt in het
accuvak 9 aangegeven.
Sluit het accuvak 9 door het accuvakdek-
sel 8 met de schroeven te bevestigen
(afb. F).
Zet de schakelaar 11 weer op positie ‚I‘ of
‚II‘, voordat u het product weer op de haak
van de montageplaat plaatst.
Gebruik in de winter
Vanwege het geringe zonlicht kan het opladen
van de accu 10 in de winter afnemen waar-
door ook de prestaties van het product minder
worden. Controleer daarom ook in de winter of
de zonnecel 6 ondanks het weinige zonlicht
de hele dag door uit de schaduw blijft.

52 NL/BE
Verwijder indien nodig ijs of sneeuw. Als de ver-
lichtingsduur vanwege de weersomstandigheden
niet voldoende is, kunt u de accu 10 met een
externe oplader opladen of deze vervangen
(zie ‚Accu vervangen‘).
Reiniging en onderhoud
Schakel het product voor de reiniging uit.
Gebruik voor de reiniging een iets vochtige,
pluisvrije doek en een mild reinigingsmiddel.
Controleer vooral de bewegingssensor 7
en de zonnecel 6 regelmatig op verontrei-
nigingen.
Reinig de bewegingssensor 7 en de zon-
necel 6 regelmatig om een onberispelijke
functie te kunnen waarborgen.
Houd de zonnecel voornamelijk in de
winter sneeuw- en ijsvrij.
Storingen oplossen
Probleem Oorzaak Oplossing
Het product schakelt
zich niet in.
Schakelaar 11 staat op positie
‚OFF‘.
Zet de schakelaar 11 op positie ‚I‘
of ‚II‘.
Accu 10 is leeg. Laad de accu 10 op met behulp
van een externe oplader.
Het licht flakkert. Accu 10 is bijna leeg. Laad de accu 10 op met behulp
van een externe oplader.

53 NL/BE
Probleem Oorzaak Oplossing
Batterij gaat te snel
leeg.
Zonnecel 6 is verontreinigd. Reinig de zonnecel 6.
Zonnecel is onjuist afgesteld. Stel de zonnecel opnieuw af
(zie: ‚Montage‘).
Slechte weersomstandigheden Zie ‚Gebruik in de winter‘
Accu 10 is defect. Accu 10 vervangen (zie ‚Accu
vervangen‘).
Afvoer
De verpakking bestaat uit milieuvriendelijke
grondstoffen die u via de plaatselijke recycling-
containers kunt afvoeren.
b
a
Neem de aanduiding van de verpak-
kingsmaterialen voor de afvalschei-
ding in acht. Deze zijn gemarkeerd
met de afkortingen (a) en een cijfers
(b) met de volgende betekenis: 1–7:
kunststoffen / 20–22: papier en vezel-
platen / 80–98: composietmaterialen.
Het product en de verpakkingsmate-
rialen zijn recyclebaar; verwijder
deze afzonderlijk voor een betere
afvalbehandeling. Het Triman-logo
geldt alleen voor Frankrijk.
Informatie over de mogelijkheden om
het uitgediende product na gebruik
te verwijderen, verstrekt uw gemeen-
telijke overheid.
Gooi het afgedankte product omwille
van het milieu niet weg via het huisvuil,
maar geef het af bij het daarvoor
bestemde depot of het gemeentelijke

54 NL/BE
milieupark. Over afgifteplaatsen en
hun openingstijden kunt u zich bij uw
aangewezen instantie informeren.
Defecte of verbruikte batterijen / accu‘s moeten
volgens de richtlijn 2006/66/EG en veranderin-
gen daarop worden gerecycled. Geef batterijen /
accu‘s en / of het product af bij de daarvoor
bestemde verzamelstations.
Milieuschade door
foutieve verwijdering
van de batterijen / accu‘s!
Batterijen / accu‘s mogen niet via het huisvuil
worden weggegooid. Ze kunnen giftige zware
metalen bevatten en vallen onder het chemisch
afval. De chemische symbolen van de zware
metalen zijn: Cd = cadmium, Hg = kwik, Pb =
lood. Geef verbruikte batterijen / accu‘s daarom
af bij een gemeentelijk inzamelpunt.
Garantie
Het product wordt volgens strenge kwaliteits-
richtlijnen zorgvuldig geproduceerd en voor
levering grondig getest. In geval van schade
aan het product kunt u rechtmatig beroep doen
op de verkoper van het product. Deze wettelijke
rechten worden door onze hierna vermelde
garantie niet beperkt.
Op dit product verlenen wij 3 jaar garantie
vanaf aankoopdatum. De garantieperiode start
op de dag van aankoop. Bewaar de originele
kassabon alstublieft. Dit document is nodig als
bewijs voor aankoop.
Wanneer binnen 3 jaar na de aankoopdatum
van dit product een materiaal- of productiefout
optreedt, dan wordt het product door ons –
naar onze keuze – gratis voor u gerepareerd
of vervangen. Deze garantie komt te vervallen
als het product beschadigd wordt, niet correct
gebruikt of onderhouden wordt.

55 NL/BE
De garantie geldt voor materiaal- en productie-
fouten. Deze garantie is niet van toepassing op
productonderdelen, die onderhevig zijn aan
normale slijtage en hierdoor als aan slijtage on-
derhevige onderdelen gelden (bijv. batterijen)
of voor beschadigingen aan breekbare onder-
delen, zoals bijv. schakelaars, accu’s of derge-
lijke onderdelen, die gemaakt zijn van glas.
Afwikkeling in geval
van garantie
Om een snelle afhandeling van uw reclamatie
te waarborgen dient u de volgende instructies
in acht te nemen:
Houd bij alle vragen alstublieft de kassabon en
het artikelnummer (bijv. IAN 123456_7890)
als bewijs van aankoop bij de hand.
Het artikelnummer vindt u op de typeplaat, inge-
graveerd, op het titelblad van uw handleiding
(linksonder) of als sticker op de achter- of
onderzijde.
Wanneer er storingen in de werking of andere
gebreken optreden, dient u eerst telefonisch of
per e-mail contact met de onderstaande ser-
vice-afdeling op te nemen.
Een als defect geregistreerd product kunt u dan
samen met uw aankoopbewijs (kassabon) en
vermelding van de concrete schade alsmede
het tijdstip van optreden voor u franco aan het
u meegedeelde servicepunt verzenden.
Service
Service Nederland
Tel.: 0900 0400 223
(0,10 EUR / Min.)
E-Mail: [email protected]
Service Belgiё
Tel.: 070 270 171 (0,15 EUR / Min.)
E-Mail: [email protected]

56 PL
Legenda zastosowanych piktogramów ................................................Strona 56
Wstęp ...................................................................................................................................Strona 56
Zastosowanie zgodne z przeznaczeniem ..........................................................................Strona 57
Opis części ............................................................................................................................ Strona 58
Dane techniczne ...................................................................................................................Strona 58
Zawartość ..............................................................................................................................Strona 58
Ogólne wskazówki dot. bezpieczeństwa ............................................ Strona 59
Wskazówki bezpieczeństwa dla baterii / akumulatorów ..................................................Strona 60
Funkcja ................................................................................................................................Strona 61
Przed uruchomieniem ............................................................................................Strona 61
Uruchomienie.................................................................................................................Strona 61
Montaż ................................................................................................................................Strona 62
Wymiana akumulatora .........................................................................................................Strona 63
Użytkowanie w okresie zimowym .......................................................................................Strona 64
Czyszczenie i pielęgnacja ....................................................................................Strona 64
Usuwanie usterek ......................................................................................................Strona 65
Utylizacja ..........................................................................................................................Strona 65
Gwarancja .......................................................................................................................Strona 67
Sposób postępowania w przypadku naprawy gwarancyjnej...........................................Strona 67
Serwis ....................................................................................................................................Strona 68

57 PL
Legenda zastosowanych piktogramów
Wolt, prąd stały Kąt wykrywania czujnika ruchu:
ok. 100 °
Ochrona przed pryskającą wodą Wraz z akumulatorem
Zakres wykrywania: ok. 5 m Żywotność diod LED
Solarna lampa ścienna LED
Wstęp
Gratulujemy Państwu zakupu nowego produktu.
Tym samym zdecydowali się Państwo na zakup
produktu wysokiej jakości. Instrukcja obsługi jest
częścią tego produktu. Zawiera ona ważne wska-
zówki dotyczące bezpieczeństwa, użytkowania
iutylizacji. Przed pierwszym użyciem produktu
należy zapoznać się ze wszystkimi wskazówkami
dotyczącymi obsługi ibezpieczeństwa. Używać
produktu wyłącznie zgodnie zjego poniżej
opisanym przeznaczeniem. Wprzypadku prze-
kazania produktu innej osobie należy dołączyć
do niego całą jego dokumentację.
Zastosowanie zgodne z
przeznaczeniem
Produkt przeznaczony jest do oświetlania obszaru
na zewnątrz, w miejscach nieposiadających
własnego przyłącza elektrycznego. Produkt

58 PL
przeznaczony jest wyłącznie do użytku prywat-
nego, nie zaś do zastosowania komercyjnego.
Produkt ten nie nadaje się również
jako oświetlenie pomieszczeń w
gospodarstwie domowym.
Produkt ten nadaje się do ekstremalnych
temperatur aż do -21°C.
Opis części
1 Kołki
2 Płyta montażowa
3 Śruba
4 Zawieszka
5 Uchwyt
6 Ogniwo solarne
7 Czujnik ruchu
8 Pokrywa komory akumulatorów
9 Komora akumulatorów
10 Akumulator
11 Przełącznik
Dane techniczne
Napięcie robocze: 3,7 V
Akumulator: 1 x 3,7 V akumulator
litowo-jonowy, typ 18650,
1300 mAh
Diody LED: 4 x ok. 0,17 W (Wymiana
diod LED jest niemożliwa.)
Ogniwo solarne: ok. 5,5 V, ok. 100 mA
Czujnik ruchu: zasięg: maks. 5 m,
kąt wykrywania: ok. 100 °
poziomo, ok. 90 ° pionowo
Stopień ochrony: IP44 (zabezpieczenie
przed zachlapaniem)
Z certyfikatem GS
Zawartość
Niezwłocznie po rozpakowaniu należy sprawd
zić
zawartość pod kątem kompletności i nienagan-
nego stanu produktu:

59 PL
1 urządzenie główne
1 akumulator litowo-jonowy typ 18650,
3,7 V , 1300 mAh (już wbudowany)
1 płyta montażowa
2 śruby (Ø 4 x 30 mm)
2 kołek Ø 6 mm
1 wskazówki montażu, obsługi i bezpieczeństwa
Ogólne wskazówki
dot. bezpieczeństwa
PRZED PIERWSZYM UŻYCIEM PRODUKTU
NALEŻY ZAPOZNAĆ SIĘ ZE WSZYSTKIMI
WSKAZÓWKAMI DOTYCZĄCYMI OBSŁUGI
IBEZPIECZEŃSTWA! W PRZYPADKU PRZE-
KAZANIA PRODUKTU INNEJ OSOBIE NA-
LEŻY DOŁĄCZYĆ DO NIEGO CAŁĄ JEGO
DOKUMENTACJĘ!
Niniejszy produkt może być używany przez
dzieci od lat 8 oraz przez osoby z obniżo-
nymi zdolnościami fizycznymi, sensorycznymi
lub mentalnymi lub brakiem doświadczenia
i / lub wiedzy, jeśli pozostają pod nadzorem
lub zostały pouczone w kwestii bezpiecz
nego
użycia produktu i rozumieją wynikające z
niego zagrożenia. Dzieci nie mogą bawić
się produktem. Czyszczenie i konserwacja
nie mogą być przeprowadzane przez dzieci
bez nadzoru.
Nigdy nie należy pozostawiać dzieci bez
nadzoru zmateriałem opakowaniowym.
Istnieje niebezpieczeństwo uduszenia się
materiałem opakowaniowym. Dzieci często
nie dostrzegają niebezpieczeństwa.
Podczas montażu należy pilnować, aby
wpobliżu miejsca pracy nie było dzieci.
W zestawie znajduje się wiele śrub i innych
małych elementów. W razie ich połknięcia
lub przedostania się do dróg oddechowych
mogą stanowić zagrożenie dla życia.
Nie używać produktu w razie stwierdzenia
jakichkolwiek uszkodzeń!
Wymiana diod LED jest niemożliwa.
Jeśli diody LED przestaną działać z powodu
zużycia, należy wymienić cały produkt.

60 PL
Wskazówki
bezpieczeństwa dla
baterii / akumulatorów
ZAGROŻENIE ŻYCIA! Baterie / akumula-
tory należy trzymać poza zasięgiem dzieci.
W przypadku połknięcia należy natychmiast
udać się do lekarza!
NIEBEZPIECZEŃSTWO WY-
BUCHU! Baterii jednorazowego
użytku nie wolno ładować ponow-
nie. Baterii / akumulatorów nie należy zwie-
rać i / lub otwierać. Może to doprowadzić
do przegrzania, pożaru lub wybuchu.
Nigdy nie należy wrzucać baterii / akumu-
latorów do ognia lub wody.
Nigdy nie należy narażać baterii / akumu-
latorów na obciążenia mechaniczne.
Ryzyko wycieku kwasu z baterii /
akumulatorów
Należy unikać ekstremalnych warunków i
temperatur, które mogą oddziaływać na
baterie / akumulatory, np. kaloryferów /
bezpośredniego działania promieniowania
słonecznego.
Jeśli wyciekną baterie / akumulatory, należy
unikać kontaktu skóry, oczu i błon śluzowych
z chemikaliami! Dotknięte miejsca natychmi
ast
przepłukać czystą wodą i udać się do lekarza!
ZAKŁADAĆ RĘKAWICE
OCHRONNE! Wylane lub
uszkodzone baterie / akumulatory
po dotknięciu skóry mogą spowodować po-
parzenia chemiczne. Dlatego należy w takim
przypadku nakładać odpowiednie rękawice
ochronne.
W przypadku wycieku baterii / akumulatoró
w
natychmiast usunąć je z produktu, aby unik-
nąć uszkodzeń.
Jeżeli produkt nie jest przez dłuższy czas
używany, baterie / akumulatorynależy wyjąć.
Ryzyko uszkodzenia produktu
Używać wyłącznie zalecanego rodzaju
baterii / akumulatora!
Włożyć baterie / akumulatory zgodnie z
oznaczeniem biegunów (+) i (-) na baterii /
akumulatorze i produkcie.

61 PL
Jeśli to konieczne, oczyścić styki baterii /
akumulatora i w komorze baterii przed wło-
żeniem baterii!
Zużyte baterie / akumulatory wyjąć jak
najszybciej z produktu.
Funkcja
Ogniwo solarne
Ogniwo słoneczne 6 przetwarza energię
świetlną słońca na energię elektryczną. W ten
sposób w komorze na akumulator 9 ładowany
jest wbudowany akumulator 10 . Akumulator ten
magazynuje energię dostarczoną przez ogniwo
słoneczne. W pełni naładowany akumulator
dostarcza ciągłe światło o zmierzchu przez
ok. 6 godzin. Całkowite naładowanie zupełnie
rozładowanego akumulatora trwa w lecie przy
dobrym nasłonecznieniu około 2 do 4 dni.
Przed uruchomieniem
Wskazówka: ogniwo słoneczne 6 działa
także jako czujnik zmierzchu, podczas gdy
czujnik ruchu 7 reaguje tylko na ruch.
Uruchomienie
Przy pomocy przycisku 11 (rys. G)
można włączyć następujące funkcje:
Pozycja „OFF” (tryb WYŁ.): czujnik ruchu
7 i produkt są wyłączone.
Pozycja „I” (tryb światła orientacyj-
nego z czujnikiem ruchu): produkt świeci
ciągle jako światło orientacyjne. Jak tylko czuj-
nik ruchu 7 wykryje ruch, to produkt przełącza
się na szczególnie jasne światło. W tym przy-
padku produkt pracuje z pełną mocą. Ok. 40
sekund po tym jak został wykryty ostatni ruch,
produkt przełącza się w tryb „Światło orienta-
cyjne“ (patrz rys. H).

62 PL
Pozycja „II” (tryb z czujnikiem ruchu):
produkt przechodzi w tryb, w którym aktywna
jest tylko funkcja czujnika ruchu. Produkt włącza
szczególnie jasne światło tylko wtedy, gdy czuj-
nik ruchu 7 wykryje ruch w ciemności. Ok. 40
sekund po tym jak został wykryty ostatni ruch,
gaśnie światło (patrz rys. I).
Montaż
Wskazówka: Należy całkowicie usunąć
materiał opakowania z produktu.
Przed przystąpieniem do wiercenia otworu
w ścianie należy się upewnić, czy nie natra-
fimy na przewody elektryczne, gazowe lub
wodne. W celu wywiercenia otworów w
ścianie należy użyć wiertarki. Przestrzegać
wskazówek bezpieczeństwa zawartych w
instrukcji obsługi i wskazówkach bezpieczeń-
stwa wiertarki. W przeciwnym wypadku ist-
nieje ryzyko śmierci lub odniesienia obrażeń
wskutek porażenia prądem.
Podczas wyboru miejsca montażu produktu
należy zwracać uwagę na następujące
czynniki:
1. Ogniwo solarne 6 wymaga możliwie naj-
bardziej bezpośredniego promieniowania
słonecznego. Optymalne jest ustawienie
powierzchni ogniwa solarnego wkierunku
południowym. Poziome ustawienie ogniwa
solarnego wyznaczane jest przez montaż
na pionowej ścianie.
2. Zakres wykrywania czujnika ruchu 7 wy-
nosi w zależności od wysokości zamonto-
wania (optymalna to 2 m) maks. 5 m, przy
kącie wykrywania w poziomie 100° i w
pionie 90°.
3. Należy zwrócić uwagę, aby nocą czujnik
ruchu 7 nie był oświetlany przez oświetle-
nie uliczne. Może to wpłynąć na jego dzia-
łanie.
Zamocować płytkę montażową 2 za
pomocą dołączonych kołków (Ø 6 mm) 1
i śrub 3. Uważać na to, aby strzałka na

63 PL
oznaczeniu płytki montażowej ( UP) wska-
zywała w górę (rys. A).
Uwaga: Dołączone elementy montażowe
przeznaczone są do mocowania na typo-
wym murze. Wprzypadku innych podłoży
mogą być potrzebne inne elementy mocu-
jące. Wrazie wątpliwości należy zasięgnąć
porady specjalisty.
Przełącznik 11 ustawić na pozycji „I” lub
„II”, aby włączyć produkt (rys. G).
Nałożyć produkt na płytkę montażową w
taki sposób, aby uchwyty do zawieszania
4 płyty montażowej sięgały w przyjęcie
5 po drugiej stronie produktu. Przesunąć
produkt w dół, aby uchwyty zatrzasnęły się
w przyjęciach (rys. B).
Po zamontowaniu należy sprawdzić, czy
urządzenie główne jest stabilnie zamoco-
wane.
Wymiana akumulatora
Wskazówka: aby zapewnić wydajne działa-
nie, należy regularnie czyścić ogniwo słoneczne
6 i czujnik ruchu 7 (patrz „Czyszczenie i pie-
lęgnacja“).
Aby wymienić akumulator, należy wykonać na-
stępujące kroki:
Przesunąć produkt do góry, aby wysunąć
uchwyty 4 z przyjęć 5 (rys. B).
Zdjąć produkt ze ściany.
Ustawić przełącznik 11 na pozycji „OFF“
(rys. G).
Odkręcić śruby mocujące pokrywy komory
akumulatora 8 i zdjąć ją (rys. D).
Wyjąć akumulator 10 z komory akumulatora
9 i wymienić go na nowy akumulator 10
(rys. E). Używać wyłącznie akumulatora 10
zalecanego typu (patrz „Dane techniczne“).
Podczas wkładania akumulatora 10 należy
zwrócić uwagę na właściwą biegunowość.
Jest ona oznaczona w komorze akumula-
tora 9.

64 PL
Zamknąć komorę akumulatora 9 mocując
pokrywę komory akumulatora 8 za pomocą
śrub (rys. F).
Przełącznik 11 ponownie ustawić na
pozycji „I” lub „II”, zanim produkt znów
nałoży się na hak płyty montażowej.
Użytkowanie w okresie
zimowym
Z powodu niskiego promieniowania słonecznego
w zimie naładowanie akumulatorów 10 może
być ograniczone i przez to osłabi się wydajność
produktu. Z tego względu również w okresie
zimowym należy sprawdzać, czy ogniwo sło-
neczne 6 – mimo niskiego położenia słońca –
w żadnym momencie dnia nie pozostaje w cieniu.
W razie konieczności usuwać lód lub śnieg.
W przypadku gdy ze względów pogodowych
czas świecenia jest niewystarczający, należy
naładować akumulator 10 ładowarką zewnętrzną
lub go wymienić (patrz „Wymiana akumulatora”).
Czyszczenie i pielęgnacja
W celu czyszczenia wyłączyć produkt.
Do czyszczenia należy użyć lekko zwilżonej,
niestrzępiącej się ściereczki oraz łagodnego
środka czyszczącego.
Należy regularnie sprawdzać czystość
czujnika ruchu 7 oraz ogniwa słonecz-
nego 6.
Regularne czyszczenie czujnika ruchu 7 i
ogniwa słonecznego 6 zapewnia prawi-
dłowe działanie.
Wokresie zimowym należy usuwać śnieg
ilód zwłaszcza zogniwa solarnego.

65 PL
Usuwanie usterek
Problem Przyczyna Rozwiązanie
Produkt nie
włącza się.
Przełącznik 11 jest w pozycji „OFF”. Przełącznik 11 ustawić w pozycji
„I” lub „II”.
Akumulator 10 jest rozładowany. Naładować akumulator 10 przy
pomocy zewnętrznej ładowarki.
Światło migocze. Akumulator 10 jest prawie rozładowany. Naładować akumulator 10 przy
pomocy zewnętrznej ładowarki.
Akumulator roz-
ładowuje się w
krótkim czasie
Ogniwo solarne 6 jest zabrudzone. Oczyścić ogniwo solarne 6 .
Ogniwo solarne jest nieprawidłowo
ustawione.
Na nowo ustawić ogniwo solarne
(patrz „Montaż“).
Złe warunki pogodowe. Patrz „Użytkowanie wokresie
zimowym”.
Akumulator 10 jest uszkodzony. Wymienić akumulator 10 (patrz
„Wymiana akumulatora").
Utylizacja
Opakowanie wykonane jest z materiałów
przyjaznych dla środowiska, które można
przekazać do utylizacji w lokalnym punkcie
przetwarzania surowców wtórnych.

66 PL
b
a
Przy segregowaniu odpadów prosimy
zwrócić uwagę na oznakowanie ma-
teriałów opakowaniowych, oznaczone
są one skrótami (a) i numerami (b)
o następującym znaczeniu: 1–7:
Tworzywa sztuczne / 20–22: Papier
i tektura / 80–98: Materiały kompo-
zytowe.
Produkt i materiał opakowania nadają
się do ponownego przetworzenia,
należy je zutylizować osobno w celu
lepszego przetworzenia odpadów.
Logo Triman jest ważne tylko dla
Francji.
Informacji na temat możliwości utyli-
zacji wyeksploatowanego produktu
udziela urząd gminy lub miasta.
Z uwagi na ochronę środowiska nie
wyrzucać urządzenia po zakończe-
niu eksploatacji do odpadów domo-
wych, lecz prawidłowo zutylizować.
Informacji o punktach zbiorczych i
ich godzinach otwarcia udziela od-
powiedni urząd.
Uszkodzone lub zużyte baterie / akumulatory
muszą być poddane recyklingowi zgodnie z
dyrektywą 2006/66/WE i jej zmianami.
Oddać baterie / akumulatory i / lub produkt w
dostępnych punktach zbiórki.
Niewłaściwa utylizacja
baterii / akumulatorów
stwarza zagrożenie dla
środowiska naturalnego!
Baterii / akumulatorów nie należy wyrzucać
razem z odpadami domowymi. Mogą one zawie-
rać szkodliwe metale ciężkie i należy je traktować
jak odpady specjalne. Symbole chemiczne me-
tali ciężkich są następujące: Cd = kadm, Hg =
rtęć, Pb = ołów. Dlatego też zużyte baterie /
akumulatory należy przekazywać do komunal-
nych punktów gromadzenia odpadów niebez-
piecznych.

67 PL
Gwarancja
Produkt wyprodukowano według wysokich stan-
dardów jakości i poddano skrupulatnej kontroli
przed wysyłką. W przypadku wad produktu na-
bywcy przysługują ustawowe prawa. Gwarancja
nie ogranicza ustawowych praw nabywcy
produktu.
Produkt objęte jest 3 gwarancją, licząc od daty
zakupu. Gwarancja wygasa w razie zawinio-
nego przez użytkownika uszkodzenia produktu,
niewłaściwego użycia lub konserwacji.
W przypadku wystąpienia w ciągu 3 lat od
daty zakupu wad materiałowych lub fabrycz-
nych, dokonujemy – według własnej oceny –
bezpłatnej naprawy lub wymiany produktu.
Świadczenie gwarancyjne obejmuje wady ma-
teriałowe i fabryczne. Gwarancja nie obejmuje
części produktu ulegających normalnemu zuży-
ciu, uznawanych za części zużywalne (np. ba-
terie) oraz uszkodzeń części łamliwych, np.
przełączników, akumulatorów lub wykonanych
ze szkła.
Zgodnie z Kodeksem Cywilnym art. 581 §1
wraz z wymianą urządzenia lub ważnej części
czas gwarancji rozpoczyna się na nowo.
Sposób postępowania
w przypadku naprawy
gwarancyjnej
Aby zapewnić szybkie rozpatrzenie Państwa
wniosku, prosimy stosować się do następują-
cych wskazówek:
Przed skontaktowaniem się z działem serwiso-
wym należy przygotować paragon i numer ar-
tykułu (np. IAN 123456_7890) jako dowód
zakupu.
Numery artykułów można znaleźć na tabliczce
znamionowe, na grawerunku, na stronie tytuło-
wej jego instrukcji (na dole po lewej stronie) lub
jako naklejkę na stronie odwrotnej lub spodniej.
W razie wystąpienia błędów w działaniu lub in-
nych wad, należy skontaktować się najpierw z
wymienionym poniżej działem serwisowym tele-
fonicznie lub pocztą elektroniczną.

68 PL
Produkt uznany za uszkodzony można następ-
nie z dołączeniem dowodu zakupu (paragonu)
i podaniem, na czym polega wada i kiedy wy-
stąpiła, przesłać bezpłatnie na podany Państwu
adres serwisu.
Serwis
Serwis Polska
Tel.: 22 397 4996
E-Mail: [email protected]

69 CZ
Legenda použitých piktogramů ....................................................................Strana 70
Úvod ......................................................................................................................................Strana 70
Použití ke stanovenému účelu...............................................................................................Strana 70
Popis dílů ...............................................................................................................................Strana 71
Technické údaje ....................................................................................................................Strana 71
Obsah dodávky ....................................................................................................................Strana 71
Všeobecná bezpečnostní upozornění .......................................................Strana 72
Bezpečnostní pokyny pro baterie a akumulátory ............................................................... Strana 72
Funkce ..................................................................................................................................Strana 73
Před uvedením do provozu...............................................................................Strana 74
Uvedení do provozu ................................................................................................Strana 74
Montáž ................................................................................................................................Strana 74
Výměna akumulátoru ............................................................................................................ Strana 75
Zimní provoz .........................................................................................................................Strana 76
Čistění a ošetřování ..................................................................................................Strana 76
Odstranění poruch ....................................................................................................Strana 77
Zlikvidování ....................................................................................................................Strana 77
Záruka .................................................................................................................................Strana 78
Postup v případě uplatňování záruky .................................................................................. Strana 79
Servis ......................................................................................................................................Strana 79

70 CZ
Legenda použitých piktogramů
Volt, stejnosměrný proud Úhel dosahu pohybového
senzoru: cca 100 °
Ochrana před stříkající vodou Včetně akumulátoru
Dosah: cca 5 m Životnost LED
Solární LED svítidlo
Úvod
Blahopřejeme Vám ke koupi nového výrobku.
Rozhodli jste se pro kvalitní produkt. Návod
kobsluze je součástí tohoto výrobku. Obsahuje
důležité pokyny pro bezpečnost, použití a likvidaci.
Před použitím výrobku se seznamte se všemi po-
kyny k obsluze a bezpečnostními pokyny. Použí-
vejte výrobek jen popsaným způsobem a na
uvedených místech. Při předání výrobku třetí
osobě předejte i všechny podklady.
Použití ke stanovenému účelu
Výrobek je určen k osvětlení venkovních pro-
storů, které nemají přípojku elektrického proudu.
Výrobek je určen pouze pro privátní používání,
není vhodný pro komerční účely.
Tento výrobek není vhodný
kosvětlení místností vdomácnosti.
Tento výrobek je vhodný kpoužívání při
extrémních teplotách až do -21 °C.

71 CZ
Popis dílů
1 Hmoždinka
2 Montážní deska
3 Šroub
4 Závěs
5 Uložení
6 Solární článek
7 Pohybový senzor
8 Víko přihrádky na akumulátor
9 Přihrádka na akumulátory
10 Akumulátor
11 Volič
Technické údaje
Provozní napětí: 3,7 V
Akumulátor: 1 x 3,7 V lithium-iontový
akumulátor, typ 18650,
1300 mAh
LED: 4 x cca 0,17 W (LED nelze
vyměnit.)
Solární článek: cca 5,5 V, cca 100 mA
Pohybový senzor: Dosah: max. 5 m, Úhel pojí-
mání světla: cca 100 ° hori-
zontálně, cca 90 ° vertikálně
Druh ochrany: IP44 (chráněno proti stříkající
vodě)
GS certifikát
Obsah dodávky
Bezprostředně po vybalení zkontrolujte úplnost
dodávky a bezvadný stav výrobku:
1 hlavní přístroj
1 lithium-iontový akumulátor, typ 18650,
3,7 V , 1300 mAh (již vestavěný)
1 montážní deska
2 šrouby (Ø 4 x 30 mm)
2 hmoždinky, Ø 6 mm
1 pokyny k montáži, obsluze a bezpečnostní
pokyny

72 CZ
Všeobecná bezpečnostní
upozornění
PŘED PRVNÍM POUŽITÍM VÝROBKU SE SE-
ZNAMTE SE VŠEMI POKYNY K OBSLUZE A
BEZPEČNOSTNÍMI UPOZORNĚNÍMI! PŘI PŘE-
DÁVÁNÍ VÝROBKU TŘETÍ OSOBĚ PŘEDÁVEJTE
SOUČASNĚ I VŠECHNY JEHO PODKLADY!
Tento výrobek mohou používat děti od 8 let,
osoby se sníženými fyzickými, smyslovými
nebo duševními schopnosti nebo s nedosta-
tečnými zkušenostmi a znalostmi, jestliže bu-
dou pod dohledem nebo byly poučeny o
bezpečném používání výrobku a chápou
nebezpečí, která z jeho používání vyplývají.
S výrobkem si děti nesmí hrát. Děti nesmí
bez dohledu provádět čištění ani uživatel-
skou údržbu.
Děti nikdy nenechávejte bez dozoru soba-
lovým materiálem. Hrozí jim nebezpečí
udušení. Děti nebezpečí často podceňují.
Během montáže chraňte pracovní oblast
před dětmi. Součástí dodávky je velký po-
čet šroubů a jiných drobných dílů. Tyto
předměty mohou být v případě spolknutí
nebo vdechnutí životu nebezpečné.
Nepoužívejte výrobek pokud jste zjistili, že
je poškozený!
LED nelze vyměnit.
Po výpadku nebo poškození LED se musí
celý výrobek vyměnit.
B
ezpečnostní pokyny pr
o
baterie a akumulátory
NEBEZPEČÍ OHROŽENÍ ŽIVOTA!
Uchovávejte baterie a akumulátory mimo
dosah dětí. V případě spolknutí okamžitě
vyhledejte lékařskou pomoc!
NEBEZPEČÍ VÝBUCHU!
Nenabíjecí baterie nikdy znovu
nenabíjejte. Baterie nebo akumu-
látory nezkratujte ani je neotevírejte. Hrozí
přehřátí, nebezpečí požáru nebo jejich
prasknutí.
Nikdy neházejte baterie nebo akumulátory
do ohně ani do vody.
Nevystavujte baterie nebo akumulátory
mechanickému zatížení.

73 CZ
Nebezpečí vytečení baterií / akumulátorů
Zabraňte extrémním podmínkám a teplotám,
např. na topení anebo na slunci, které mo-
hou negativně ovlivnit funkci baterií nebo
akumulátorů.
Vpřípadě vytečení baterií / akumulátorů za-
braňte kontaktu chemikálií spokožkou, očima
a sliznicemi! Omyjte ihned postižená místa
dostatečným množstvím čisté vody a vyhle-
dejte lékařskou pomoc!
NOSTE OCHRANNÉ RUKA-
VICE! Vyteklé i poškozené bate-
rie nebo akumulátory mohou při
kontaktu s pokožkou způsobit její poleptání.
Noste proto vhodné rukavice.
V případě vytečení ihned odstraňte baterie
nebo akumulátory z výrobku, abyste zabrá-
nili jeho poškození!
Odstraňte baterie nebo akumulátory při
delším nepoužívání z výrobku.
Nebezpečí poškození výrobku
Používejte jen udaný typ baterie nebo
akumulátoru!
Nasazujte baterie nebo akumulátory podle
označení polarity (+) a (-) na bateriích nebo
akumulátorech a na výrobku.
Vyčistěte před vložením kontakty baterie
nebo akumulátoru a kontakty v přihrádce
na baterie!
Vybité baterie nebo akumulátory ihned
vyjměte z výrobku.
Funkce
Solární článek
Solární článek 6 přeměňuje světelnou energii
slunečního záření na elektrickou energii. Tím se
nabíjí akumulátor 10 , vestavěný v přihrádce na
akumulátor 9. V akumulátoru se ukládá elek-
trická energie dodávaná solárním článkem. Úplně
nabitý akumulátor dodává energii od soumraku
a ve tmě pro cca 6 hodin nepřetržitého světla.
Nabití úplně vybitých akumulátorů trvá v létě
při dobrém slunečním záření asi 2 až 4 dny.

74 CZ
Před uvedením do provozu
Poznámka: solární článek 6 funguje také
jako soumrakový senzor, zatímco pohybový
senzor 7 reaguje pouze na pohyb.
Uvedení do provozu
Voličem 11 (obr. G) můžete volit
následující funkce:
Poloha „OFF” (režim VYP): pohybový
senzor 7 a výrobek jsou vypnuté.
Poloha „I” (režim orientačního světla s
pohybovým senzorem): výrobek svítí ne-
přetržitě jako orientační světlo. Jakmile zazna-
mená pohybový senzor 7 pohyb, přepne se
výrobek na obzvlášť jasné světlo. V tomto pří-
padě je výrobek v provozu s plným výkonem.
Po cca 40 vteřinách od zaznamenání posled-
ního pohybu se přepne výrobek opět na nepře-
tržitě svítící „orientační světlo“ (viz obr. H).
Poloha „II” (režim s pohybovým sen-
zorem): výrobek se přepne do režimu, ve kterém
je pouze pohybový senzor aktivní. Výrobek se
rozsvítí obzvlášť jasným světlem, jakmile senzor
7 zaznamená ve tmě pohyb.
Světlo zhasne za cca 40 vteřin po zaznamenání
posledního pohybu.(viz obr. I).
Montáž
Upozornění: Odstraňte veškerý obalový
materiál zvýrobku.
Ujistěte se, že při vrtání nenarazíte na vodiče
proudu, plynové či vodovodní potrubí. Na
vrtání otvorů do zdiva použijte vrtačku. Řiďte
se pokyny z návodu k obsluze a příslušnými
bezpečnostními pokyny pro vrtačku.
Vopačném případě hrozí nebezpečí usmrcení
nebo úrazu zásahem elektrického proudu.
Při výběru místa k montáži výrobku dbejte
na následující:

75 CZ
1. Solární článek 6 potřebuje co nejpřímější
sluneční záření. Optimální je směřování po-
vrchu solárního článku na jih. Horizontální
poloha solárního článku je zaručená díky
montáži na svislé zdi.
2. Pohybový senzor 7 má vzávislosti na výšce
montáže (ideální je výška 2 m) dosah maxi-
málně 5 m - při úhlu dosahu od 100° hori-
zontálně a 90° svisle.
3. Dejte pozor, aby v noci nedopadalo na po-
hybový senzor 7 světlo pouličního osvět-
lení. To by mohlo ovlivnit jeho funkci.
Připevněte montážní desku 2 dodanými
hmoždinkami (Ø 6 mm) 1 a šrouby 3.
Dbejte na to, aby šipka na označení mon-
tážní desky ( UP) ukazovala nahoru (obr. A).
Upozornění: Přiložený montážní materiál
je vhodný k připevnění na normální zdivo.
Pro jiné podklady budou možná zapotřebí
jiné upevňovací materiály. V případě po-
chybností se poraďte s odborníkem.
Pro uvedení výrobku do provozu nastavte
volič 11 do polohy „I” nebo „II” (obr. G).
Na montážní desku nasaďte výrobek tak,
aby závěs 4 montážní desky zapadl do
upevnění 5 na zadní straně výrobku. Po-
suňte výrobek směrem dolů, až závěs za-
padne do upevnění (obr. B).
Po montáži zkontrolujte pevné usazení hlav-
ního přístroje.
Výměna akumulátoru
Upozornění: Abyste zajistili dobrý výkon vý-
robku čistěte pravidelně solární článek 6 a po-
hybový senzor 7 (viz „Čištění a ošetřování“).
Při výměně akumulátoru postupujte následujícím
způsobem:
Vysuňte výrobek nahoru tak, aby se závěs
4 uvolnil z upevnění 5 (obr. B).
Sejměte výrobek ze stěny.
Nastavte volič 11 do polohy „OFF“ (obr. G).
Odšroubujte šrouby na víku přihrádky na
akumulátor 8 a víko sejměte (obr. D).
Vyjměte akumulátor 10 z přihrádky na aku-
mulátor 9 a nahraďte ho novým

76 CZ
akumulátorem 10 (obr. E). Používejte jen
akumulátor 10 doporučeného typu (viz
„Technická data“). Při vkládání akumulátoru
10 dbejte na správnou polaritu. Polarita je
vyznačena vpřihrádce na akumulátory 9.
Uzavřete přihrádku na akumulátory 9 při-
šroubováním víka přihrádky na akumulátory
8 šrouby (obr. F).
Před opětovným nasazením výrobku na háky
montážní desky nastavte volič 11 zase do
polohy „I” nebo „II”.
Zimní provoz
Zdůvodu slabšího slunečního záření vzimě může
dojít k redukovanému nabíjení akumulátoru 10
a tím i ke snížení výkonnosti výrobku. Proto v zimě
zkontrolujte, jestli je solární článek 6, i při slunci
stojícím nízko na obloze, celý den nezastíněný.
V případě potřeby odstraňte led nebo sníh.
Jestliže je doba svícení při špatném počasí příliš
krátká, nabijte akumulátor 10 externí nabíječkou
nebo ho vyměňte (viz „Výměna akumulátoru“).
Čistění a ošetřování
Před čištěním výrobek vypněte.
K čistění používejte jen mírně navlhčený
hadr, který nepouští vlákna, a jemný čistící
prostředek.
Především pohybový senzor 7 a solární
článek 6 pravidelně kontrolujte, jestli ne-
jsou znečištěné.
Abyste zajistili bezvadnou funkci výrobku
čistěte pravidelně pohybový senzor 7 a
solární článek 6.
Vzimě odstraňujte sníh a led, především ze
solárního článku.

77 CZ
Odstranění poruch
Problém Příčina Řešení
Výrobek se nezapíná. Volič 11 je v poloze „OFF”. Volič 11 nastavit do polohy „I” nebo
„II”.
Akumulátor 10 je vybitý. Akumulátor 10 nabít externí nabíječkou.
Světlo mihotá. Akumulátor 10 je skoro vybitý. Akumulátor 10 nabít externí nabíječkou.
Akumulátor se vybije
za krátký čas.
Solární článek 6 je znečištěný. Vyčistěte solární článek 6.
Solární článek je špatně umístěn. Solární článek umístěte jinak
(viz „Montáž“).
Špatné povětrnostní podmínky. Viz „Provoz v zimě“.
Akumulátor 10 je vadný. Akumulátor 10 vyměnit (viz „Výměna
akumulátoru“).
Zlikvidování
Obal se skládá zekologických materiálů, které
můžete zlikvidovat prostřednictvím místních sběren
recyklovatelných materiálů.
b
a
Při třídění odpadu se řiďte podle
označení obalových materiálů zkrat-
kami (a) a čísly (b), s následujícím
významem: 1–7: umělé hmoty /
20–22: papír a lepenka / 80–98:
složené látky.

78 CZ
Výrobek a obalové materiály jsou
recyklovatelné, zlikvidujte je odděleně
pro lepší odstranění odpadu. Logo
Triman platí jen pro Francii.
O možnostech likvidace vysloužilých
zařízení se informujte u správy vaší
obce nebo města.
Vzájmu ochrany životního prostředí
vysloužilý výrobek nevyhazujte do
domovního odpadu, ale předejte k
odborné likvidaci. O sběrnách a je-
jich otevíracích hodinách se můžete
informovat u příslušné správy města
nebo obce.
Vadné nebo vybité baterie resp. akumulátory se
musí, podle směrnice 2006/66/ES a jejích pří-
slušných změn, recyklovat. Baterie, akumulátory
i výrobek odevzdejte zpět do nabízených sběren.
Ekologické škody v
důsledku chybné likvidace
baterií / akumulátorů!
Baterie / akumulátory se nesmí zlikvidovat v
domácím odpadu. Mohou obsahovat jedovaté
těžké kovy a musí se zpracovávat jako zvláštní
odpad. Chemické symboly těžkých kovů: Cd =
kadmium, Hg = rtuť, Pb = olovo. Proto odevzdejte
opotřebované baterie / akumulátory u komunální
sběrny.
Záruka
Výrobek byl vyroben s nejvyšší pečlivostí podle
přísných kvalitativních směrnic a před odesláním
prošel výstupní kontrolou. V případě závad máte
možnost uplatnění zákonných práv vůči prodejci.
Vaše práva ze zákona nejsou omezena naší níže
uvedenou zárukou.
Na tento artikl platí 3 záruka od data zakoupení.
Záruční lhůta začíná od data zakoupení. Uscho-
vejte si dobře originál pokladní stvrzenky. Tuto
stvrzenku budete potřebovat jako doklad o za-
koupení.

79 CZ
Pokud se do 3 let od data zakoupení tohoto
výrobku vyskytne vada materiálu nebo výrobní
vada, výrobek Vám – dle našeho rozhodnutí –
bezplatně opravíme nebo vyměníme. Tato záruka
zaniká, jestliže se výrobek poškodí, neodborně
použil nebo neobdržel pravidelnou údržbu.
Záruka platí na vady materiálu a výrobní vady.
Tato záruka se nevztahuje na díly výrobku pod-
léhající opotřebení (např. na baterie), dále na
poškození křehkých, choulostivých dílů, např.
vypínačů, akumulátorů nebo dílů zhotovených
ze skla.
Postup v případě
uplatňování záruky
Pro zajištění rychlého zpracování Vašeho případu
se řiďte následujícími pokyny:
Pro všechny požadavky si připravte pokladní
stvrzenku a číslo artiklu (např. IAN 123456_7890)
jako doklad o zakoupení.
Číslo artiklu najdete na typovém štítku, gravuře,
titulní stránce návodu (vlevo dole) nebo na ná-
lepce na zadní nebo spodní straně.
V případě poruch funkce nebo jiných závad nej-
dříve kontaktujte, telefonicky nebo e-mailem, v
následujícím textu uvedené servisní oddělení.
Výrobek registrovaný jako vadný potom můžete
s přiloženým dokladem o zakoupení (pokladní
stvrzenkou) a údaji k závadě a kdy k ní došlo,
bezplatně zaslat na adresu servisu, která Vám
byla sdělena.
Servis
Servis Česká republika
Tel.: 800 143 873
E-Mail: [email protected]

80 SK
Legenda použitých piktogramov ................................................................. Strana 81
Úvod ......................................................................................................................................Strana 81
Používanie v súlade s určeným účelom ...............................................................................Strana 81
Popis častí .............................................................................................................................. Strana 82
Technické údaje ....................................................................................................................Strana 82
Obsah dodávky ....................................................................................................................Strana 82
Všeobecné bezpečnostné upozornenia .................................................. Strana 83
Bezpečnostné upozornenia týkajúce sa batérií / akumulátorových batérií .......................Strana 83
Funkcia ................................................................................................................................Strana 85
Pred uvedením do prevádzky ........................................................................ Strana 85
Uvedenie do prevádzky ......................................................................................Strana 85
Montáž ................................................................................................................................Strana 86
Výmena akumulátorovej batérie ..........................................................................................Strana 87
Prevádzka v zime ..................................................................................................................Strana 87
Čistenie a údržba ........................................................................................................Strana 88
Odstraňovanie porúch...........................................................................................Strana 88
Likvidácia .......................................................................................................................... Strana 89
Záruka .................................................................................................................................Strana 90
Postup v prípade poškodenia v záruke ...............................................................................Strana 91
Servis ......................................................................................................................................Strana 91

81 SK
Legenda použitých piktogramov
Volt, jednosmerný prúd Uhol dosahu senzora pohybu:
cca. 100 °
S ochranou proti striekajúcej vode Vrátane akumulátorovej batérie
Oblasť snímania: cca. 5 m Životnosť LED
LED solárne nástenné svietidlo
Úvod
Blahoželáme Vám ku kúpe Vášho nového výrobku.
Rozhodli ste sa pre veľmi kvalitný výrobok.
Návod na obsluhu je súčasťou tohto výrobku.
Obsahuje dôležité upozornenia týkajúce sa
bezpečnosti, používania a likvidácie. Skôr ako
začnete výrobok používať, oboznámte sa so
všetkými pokynmi k obsluhe a bezpečnosti.
Výrobok používajte iba v súlade s popisom a v
uvedených oblastiach používania. V prípade
postúpenia výrobku ďalším osobám odovzdajte
aj všetky dokumenty patriace k výrobku.
Používanie v súlade s
určeným účelom
Výrobok je určený na osvetlenie vonkajších ob-
lastí, ktoré nemajú prúdové pripojenie. Výrobok
je vhodný iba na súkromné používanie a nie pre
komerčné účely.

82 SK
Tento výrobok nie je vhodný na
osvetlenie miestností v domácnosti.
Tento výrobok je vhodný pre extrémne
teploty až do -21°C.
Popis častí
1 Hmoždinky
2 Montážna doska
3 Skrutka
4 Závesné zariadenie
5 Upínanie
6 Solárny článok
7 Senzor pohybu
8 Kryt priečinka pre akumulátorové batérie
9 Priečinok pre akumulátorové batérie
10 Akumulátorová batéria
11 Spínač
Technické údaje
Prevádzkové
napätie: 3,7 V
Akumulátorová
batéria: 1 x 3,7 V lítium-iónová
akumulátorová batéria typ
18650, 1300 mAh
LED: 4 x cca. 0,17 W (LED-diódy
nie je možné vymeniť.)
Solárny článok: cca. 5,5 V, cca. 100 mA
Senzor pohybu: Dosah: max. 5 m, uhol do-
sahu: cca. 100 ° horizon-
tálne, cca. 90 ° vertikálne
Druh ochrany: IP44 (s ochranou proti strie-
kajúcej vode)
GS certifikované
Obsah dodávky
Bezprostredne po vybalení vždy skontrolujte
úplnosť dodávky ako aj bezchybný stav výrobku:
1 hlavný prístroj
1 lítium-iónová akumulátorová batéria typ 18650,
3,7 V , 1300 mAh (už zabudovaná)
1 montážna doska
2 skrutky (Ø 4 x 30 mm)
2 hmoždinky Ø 6 mm

83 SK
1 návod na montáž, obsluhu a bezpečnostné
pokyny
Všeobecné bezpečnostné
upozornenia
SKÔR, AKO ZAČNETE VÝROBOK POUŽÍVAŤ,
OBOZNÁMTE SA SO VŠETKÝMI POKYNMI
TÝKAJÚCIMI SA OVLÁDANIA A BEZPEČNOSTI!
V PRÍPADE PREDANIA VÝROBKU TRETÍM
OSOBÁM S NÍM ODOVZDAJTE AJ VŠETKY
PODKLADY!
T
ento výrobok môžu používať deti od 8 roko
v,
ako aj osoby so zníženými psychickými, sen-
zorickými alebo duševnými schopnosťami
alebo s nedostatkom skúseností a vedomostí,
ak sú pod dozorom, alebo ak boli poučené
ohľadom bezpečného používania výrobku,
a ak porozumeli nebezpečenstvám spoje-
ným s jeho používaním. Deti sa s výrobkom
nesmú hrať. Čistenie a údržbu nesmú vyko-
návať deti bez dozoru.
Nikdy nenechávajte deti bez dozoru s oba-
lovým materiálom. Existuje nebezpečenstvo
zadusenia obalovým materiálom. Deti často
podceňujú nebezpečenstvo.
Počas montáže zabráňte prístupu detí do
pracovnej oblasti. K obsahu dodávky patrí i
množstvo skrutiek a iných drobných dielov.
Tieto môžu byť v prípade prehltnutia alebo
vdýchnutia životunebezpečné.
Ak zistíte akékoľvek poškodenie výrobku,
nepoužívajte ho!
LED nie je možné vymeniť.
Ak LED na konci ich životnosti vypadnú, je
potrebné vymeniť celý výrobok.
Bezpečnostné
upozornenia týkajúce sa
batérií / akumulátorových
batérií
NEBEZPEČENSTVO OHROZENIA
ŽIVOTA! Batérie / akumulátorové batérie
držte mimo dosahu detí. V prípade prehlt-
nutia okamžite vyhľadajte lekára!

84 SK
NEBEZPEČENSTVO EXPLÓ-
ZIE! Nenabíjateľné batérie nikdy
znova nenabíjajte. Batérie / aku-
mulátorové batérie neskratujte a / alebo ne-
otvárajte. Následkom môže byť prehriatie,
požiar alebo explózia.
Batérie / akumulátorové batérie nikdy ne-
hádžte do ohňa alebo vody.
Nevystavujte batérie / akumulátorové
batérie mechanickej záťaži.
Riziko vytečenia batérií / akumulátoro-
vých batérií
Batérie / akumulátorové batérie nikdy nevy-
stavujte extrémnym podmienkam a teplotám,
ktoré by na ne mohli pôsobiť, napr. na vy-
kurovacích telesách / priamom slnečnom
žiarení.
Ak batérie / akumulátorové batérie vytiekli,
zabráňte kontaktu pokožky, očí a slizníc s
chemikáliami! Ihneď vypláchnite postihnuté
miesta väčším množstvom čistej vody a okam-
žite vyhľadajte lekára!
NOSTE OCHRANNÉ RUKA-
VICE! Vytečené alebo poškod
ené
batérie / akumulátorové batérie
môžu pri kontakte s pokožkou spôsobiť po-
leptanie. V takom prípade preto noste vhodné
ochranné rukavice.
V prípade vytečenia batérií / akumulátoro-
vých batérií ich ihneď vyberte z výrobku,
aby ste predišli vzniku škôd.
Ak produkt dlhší čas nepoužívate, vyberte z
neho batérie / akumulátorové batérie.
Riziko poškodenia produktu
Používajte výhradne uvedený typ batérií /
akumulátorových batérií!
Vložte batérie / akumulátorové batérie podľa
označenia polarity (+) a (-) na batérii / aku-
mulátorovej batérii a výrobku.
Pred vložením vyčistite kontakty na batérii /
akumulátorovej batérii a v priečinku pre
batérie!
Vybité batérie / akumulátorové batérie ihneď
vyberte z produktu.

85 SK
Funkcia
Solárny článok
Solárny článok 6 premieňa svetelnú energiu
slnka na elektrickú energiu. Tým sa akumuláto-
rová batéria 10 zabudovaná v priečinku pre
akumulátorovú batériu 9 nabíja.
Táto akumulátorová batéria ukladá elektrickú
energiu napájanú zo solárneho článku. Plne na-
bitá akumulátorová batéria dodáva po zotmení
cca. 6 hodín trvalé svetlo. Nabíjanie úplne vybi-
tej akumulátorovej batérie trvá v lete pri dobrom
slnečnom žiarení cca. 2 až 4 dni.
Pred uvedením do
prevádzky
Poznámka: Solárny článok 6 funguje i ako
súmrakový senzor, zatiaľčo senzor pohybu 7
reaguje iba na pohyb.
Uvedenie do prevádzky
Pomocou spínača 11 (obr. G) môžete
nastaviť nasledujúce funkcie:
Poloha „OFF” (režim VYP): Senzor po-
hybu 7 a výrobok sú vypnuté.
Poloha „I” (Režim orientačného svetla
s hlásičom pohybu): Výrobok svieti konštantn
e
ako orientačné svetlo. Akonáhle senzor pohybu
7 zachytí pohyb, zapne sa výrobok na mimo-
riadne jasné svetlo. Výrobok je v tomto prípade
riadený s plným výkonom. Cca. 40 sekúnd po-
tom, čo bol zaznamenaný posledný pohyb, sa
výrobok prepne opäť do režimu „orientačné
svetlo“ (pozri obr. H).
Poloha „II” (Režim s hlásičom pohybu):
Výrobok sa prepne do režimu, v ktorom je aktívna
iba funkcia senzora pohybu. Výrobok sa prepne
na mimoriadne jasné svetlo iba vtedy, keď sen-
zor pohybu 7 zachytí po zotmení pohyb.
Svetlo zhasne cca. 40 sekúnd potom, ako bol
zachytený posledný pohyb (p. obr. I).

86 SK
Montáž
Poznámka: Odstráňte celý obalový materiál
z výrobku.
Uistite sa, že pri vŕtaní do steny nenarazíte
na rozvody elektrického prúdu, plynu alebo
vody. Pre vyvŕtanie dier do steny použite
vŕtačku. Dodržiavajte bezpečnostné upo-
zornenia uvedené v návode na ovládanie
vŕtačky. Inak hrozí nebezpečenstvo smrti
alebo poranenia v dôsledku zásahu elek-
trickým prúdom.
Pri výbere miesta montáže výrobku dbajte
na nasledujúce faktory:
1. Solárny článok 6 potrebuje pokiaľ možno
priame slnečné žiarenie. Optimálne je nas-
merovanie povrchu solárneho článku na juh.
Horizontálne nasmerovanie solárneho článku
je dané montážou na vodorovnej stene.
2. Senzor pohybu 7 má v závislosti od mon-
tážnej výšky (ideálna je výška 2 m) oblasť
dosahu max. 5 m - pri uhle dosahu 100°
horizontálne a 90° vertikálne.
3. Dbajte na to, aby senzor pohybu 7 v noci
neožarovalo pouličné osvetlenie. Môže to
ovplyvňovať účinnosť.
Upevnite montážnu dosku 2 pomocou
priložených hmoždiniek (Ø 6 mm) 1 a
skrutiek 3. Dbajte na to, aby šípka na
označení montážnej dosky ( UP) ukazovala
smerom hore (obr. A).
P
oznámka: Priložený montážny materiál je
vhodný pre upevnenie do bežného muriva.
V prípade iných podkladov budete pravde-
podobne potrebovať iné upevňovacie mate-
riály. Vprípade pochybností sa obráťte na
odborníka.
Nastavte spínač 11 do polohy „I“ alebo
„II”, aby ste výrobok uviedli do prevádzky
(obr. G).
Nasaďte výrobok na montážnu dosku tak,
aby závesné zariadenia 4 montážnej
dosky zasahovali do upínaní 5 na zadnej
strane výrobku. Posuňte výrobok smerom
dole, až kým závesné zariadenia neza-
padnú do upínaní (obr. B).

87 SK
Po montáži prekontrolujte pevné upevnenie
hlavného prístroja.
Výmena akumulátorovej
batérie
Poznámka: Aby bol zaručený dobrý výkon,
je potrebné solárny článok 6 a senzor pohybu
7 pravidelne čistiť (pozri „Čistenie a údržba“).
Pri výmene akumulátorovej batérie postupujte
takto:
Posuňte výrobok smerom hore tak, aby sa
závesné zariadenia 4 uvoľnili z upínaní 5
(obr. B).
Zoberte výrobok zo steny.
Nastavte spínač 11 do polohy „OFF“
(obr. G).
Uvoľnite upevňovacie skrutky krytu priečinka
pre akumulátorovú batériu 8 a vyberte ho
(obr. D).
Vyberte akumulátorovú batériu 10 z prie-
činka pre akumulátorovú batériu 9 a na-
hraďte ju novou akumulátorovou batériou
10 (obr. E). Používajte len akumulátorovú
batériu 10 odporúčaného typu (pozri
„Technické údaje“). Pri vkladaní akumuláto-
rovej batérie 10 dbajte na správnu polaritu.
Táto je zobrazená v priečinku pre akumulá-
torovú batériu 9.
Zatvorte priečinok pre akumulátorovú baté-
riu 9 tak, že kryt priečinka pre akumuláto-
rovú batériu 8 upevníte upevňovacími
skrutkami (obr. F).
Spínač 11 opäť nastavte do polohy „I”
alebo „II” predtým, ako výrobok opäť
nasadíte na háčiky montážnej dosky.
Prevádzka v zime
Z dôvodu slabého slnečného žiarenia sa v zime
môže nabíjanie akumulátorovej batérie 10 zní-
žiť a tým zoslabne výkonnosť výrobku. Aj v
zime preto kontrolujte, či je solárny článok 6
napriek nízkemu stavu slnečného svetla po celý
deň nezatienený. Ak je to potrebné, odstráňte
ľad alebo sneh.

88 SK
Ak by bola doba svietenia kvôli poveternostnej
situácii nedostatočná, nabite akumulátorovú ba-
tériu 10 na externej nabíjačke alebo ju vymeňte
(pozri „Výmena akumulátorovej batérie“).
Čistenie a údržba
Pred čistením výrobok vypnite.
Na čistenie použite mierne navlhčenú han-
dričku, ktorá nepúšťa vlákna, a jemný čistiaci
prostriedok.
Pravidelne kontrolujte najmä senzor pohybu
7 a solárny článok 6 ohľadom znečistení.
Pravidelne čistite senzor pohybu 7 a so-
lárny článok 6, aby bolo zaručené bez-
chybné fungovanie.
Najmä solárny článok udržiavajte v zime
nepokrytý snehom a ľadom.
Odstraňovanie porúch
Problém Príčina Riešenie
Produkt sa nezapína. Spínač 11 v pozícii „OFF“. Prestavte spínač 11 do pozície „I”
alebo „II”.
Akumulátorová batéria 10 je vybitá. Nabite akumulátorovú batériu 10
pomocou externej nabíjačky.
Svetlo plápolá. Akumulátorová batéria 10 je
takmer vybitá. Nabite akumulátorovú batériu 10
pomocou externej nabíjačky.

89 SK
Problém Príčina Riešenie
Akumulátorová
batéria sa vybije v
krátkom čase.
Solárny článok 6 je znečistený. Očistite solárny článok 6.
Solárny článok je nesprávne
nasmerovaný.
Solárny článok nanovo nasmerujte
(pozri „Montáž“).
Zlé poveternostné podmienky. Pozri „Prevádzka v zime“.
Akumulátorová batéria 10 je de-
fektná. Vymeňte akumulátorovú batériu 10
(pozri „Výmena akumulátorovej
batérie“).
Likvidácia
Obal pozostáva z ekologických materiálov, ktoré
môžete odovzdať na miestnych recyklačných
zberných miestach.
b
a
Všímajte si prosím označenie obalo-
vých materiálov pre triedenie odpadu,
sú označené skratkami (a) a číslami
(b) s nasledujúcim významom: 1–7:
Plasty / 20–22: Papier a kartón /
80–98: Spojené látky.
Výrobok a obalové materiály sú
recyklovateľné, zlikvidujte ich odde-
lene pre lepšie spracovanie odpadu.
Triman-Logo platí iba pre Francúzsko.
O možnostiach likvidácie opotrebo-
vaného výrobku sa môžete informo-
vať na Vašej obecnej alebo mestskej
správe.
Ak výrobok doslúžil, v záujme ochrany
životného prostredia ho neodhoďte
do domového odpadu, ale odovzdajte

90 SK
na odbornú likvidáciu. Informácie o
zberných miestach a ich otváracích
hodinách získate na Vašej príslušnej
správe.
Defektné alebo použité batérie / akumulátorové
batérie musia byť odovzdané na recykláciu
podľa smernice 2006/66/ES a jej zmien. Baté-
rie / akumulátorové batérie a / alebo výrobok
odovzdajte prostredníctvom dostupných zber-
ných stredísk.
Nesprávna likvidácia batérií /
akumulátorových batérií ničí
životné prostredie!
Batérie / akumulátorové batérie sa nesmú likvi-
dovať spolu s domovým odpadom. Môžu obsa-
hovať jedovaté ťažké kovy a je potrebné
zaobchádzať s nimi ako s nebezpečným odpa-
dom. Chemické značky ťažkých kovov sú nasle-
dovné: Cd = kadmium, Hg = ortuť, Pb = olovo.
Opotrebované batérie / akumulátorové batérie
preto odovzdajte v komunálnej zberni.
Záruka
Tento výrobok bol dôkladne vyrobený podľa
prísnych akostných smerníc a pred dodaním
svedomito testovaný. V prípade nedostatkov
tohto výrobku Vám prináležia zákonné práva
voči predajcovi produktu. Tieto zákonné práva
nie sú našou nižšie uvedenou zárukou obme-
dzené.
Na tento produkt poskytujeme 3-ročnú záruku
od dátumu nákupu. Záručná doba začína ply-
núť dátumom kúpy. Starostlivo si prosím uscho-
vajte originálny pokladničný lístok. Tento doklad
je potrebný ako dôkaz o kúpe.
Ak sa v rámci 3 rokov od dátumu nákupu tohto
výrobku vyskytne chyba materiálu alebo výrobná
chyba, výrobok Vám bezplatne opravíme alebo
vymeníme – podľa nášho výberu. Táto záruka
zaniká, ak bol produkt poškodený, neodborne
používaný alebo neodborne udržiavaný.
Poskytnutie záruky sa vzťahuje na chyby materi-
álu a výrobné chyby. Táto záruka sa nevzťahuje

91 SK
na časti produktu, ktoré sú vystavené normálnemu
opotrebovaniu, a preto ich je možné považovať
za opotrebovateľné diely (napr. batérie) alebo
na poškodenia na rozbitných dieloch, napr. na
spínači, akumulátorových batériach alebo čas-
tiach, ktoré sú zhotovené zo skla.
Postup v prípade
poškodenia v záruke
Pre zaručenie rýchleho spracovania Vašej po-
žiadavky dodržte prosím nasledujúce pokyny:
Pre všetky otázky majte pripravený pokladničný
doklad a číslo výrobku (napr. IAN 123456_7890)
ako dôkaz o kúpe.
Číslo výrobku nájdete na typovom štítku, gravúre,
na prednej strane Vášho návodu (dole vľavo)
alebo ako nálepku na zadnej alebo spodnej
strane.
Ak sa vyskytnú funkčné poruchy alebo iné ne-
dostatky, najskôr telefonicky alebo e-mailom
kontaktujte následne uvedené servisné oddelenie.
Produkt označený ako defektný potom môžete s
priloženým dokladom o kúpe (pokladničný
lístok) a uvedením, v čom spočíva nedostatok a
kedy sa vyskytol, bezplatne odoslať na Vám
oznámenú adresu servisného pracoviska.
Servis
Servis Slovensko
Tel.: 0850 232001
E-pošta: [email protected]

A
D
B
E
C
F
HG06010B
1
8 89
10
2 3 4 5 6
7

G H
I
11

OWIM GmbH & Co. KG
Stiftsbergstraße 1
74167 Neckarsulm
GERMANY
Model-No.: HG06010A / HG06010B /
HG06010C
Version: 01 / 2020
Stand der Informationen · Last Information Update
Version des informations · Stand van de informatie
Stan informacji · Stav informací · Stav informácií:
11 / 2019 · Ident.-No.: HG06010A / B / C112019-8
IAN 331854_1907
-
 1
1
-
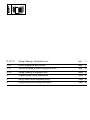 2
2
-
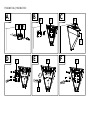 3
3
-
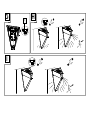 4
4
-
 5
5
-
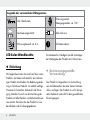 6
6
-
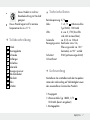 7
7
-
 8
8
-
 9
9
-
 10
10
-
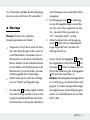 11
11
-
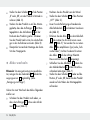 12
12
-
 13
13
-
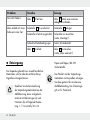 14
14
-
 15
15
-
 16
16
-
 17
17
-
 18
18
-
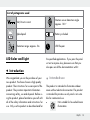 19
19
-
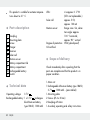 20
20
-
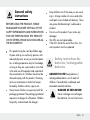 21
21
-
 22
22
-
 23
23
-
 24
24
-
 25
25
-
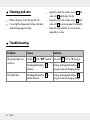 26
26
-
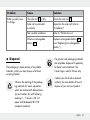 27
27
-
 28
28
-
 29
29
-
 30
30
-
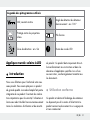 31
31
-
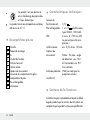 32
32
-
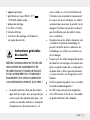 33
33
-
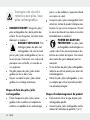 34
34
-
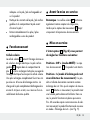 35
35
-
 36
36
-
 37
37
-
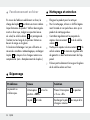 38
38
-
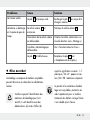 39
39
-
 40
40
-
 41
41
-
 42
42
-
 43
43
-
 44
44
-
 45
45
-
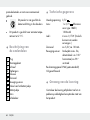 46
46
-
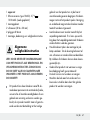 47
47
-
 48
48
-
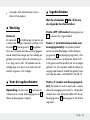 49
49
-
 50
50
-
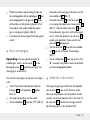 51
51
-
 52
52
-
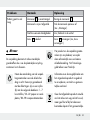 53
53
-
 54
54
-
 55
55
-
 56
56
-
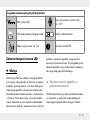 57
57
-
 58
58
-
 59
59
-
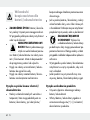 60
60
-
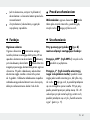 61
61
-
 62
62
-
 63
63
-
 64
64
-
 65
65
-
 66
66
-
 67
67
-
 68
68
-
 69
69
-
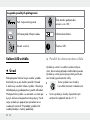 70
70
-
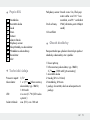 71
71
-
 72
72
-
 73
73
-
 74
74
-
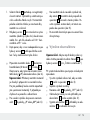 75
75
-
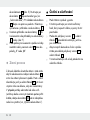 76
76
-
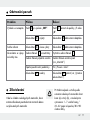 77
77
-
 78
78
-
 79
79
-
 80
80
-
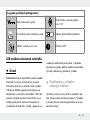 81
81
-
 82
82
-
 83
83
-
 84
84
-
 85
85
-
 86
86
-
 87
87
-
 88
88
-
 89
89
-
 90
90
-
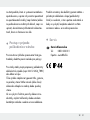 91
91
-
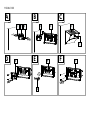 92
92
-
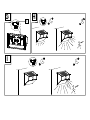 93
93
-
 94
94


in andere talen
- français: LIVARNO 331854 Le manuel du propriétaire
- Deutsch: LIVARNO 331854 Bedienungsanleitung
- slovenčina: LIVARNO 331854 Návod na obsluhu
- polski: LIVARNO 331854 Instrukcja obsługi
Gerelateerde papieren
Andere documenten
-
Wetelux Solar Wandleuchte Handleiding
-
Parkside 327055 1904 Operation and Safety Notes
-
FlinQ FQC8274 Handleiding
-
Westfalia 60 16 56 Handleiding
-
Parkside SOLAR ANIMAL REPELLER Handleiding
-
VOLTCRAFT SL-10 Operating Instructions Manual
-
VOLTCRAFT SL-5 Operating Instructions Manual
-
Sygonix SY-5626568 Handleiding
-
FlinQ FQC8197 Handleiding
-
Conrad 2377687 Handleiding