
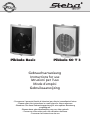
Pikkolo Basic Pikkolo 60 T 3
Gebrauchsanweisung
Instructions for use
Istruzioni per l’uso
Mode d´emploi
Gebruiksaanwijzing
- GB -
Environment and recycling
Please help us to protect the environment by disposing of the packaging in accordance with
the national
regulations for waste processing.
Recycling of obsolete appliances
Appliances with this label must not be disposed off with the general waste. They must be
collected separately and disposed off according to local regulations.
- I -
Tutela dell'ambiente e riciclaggio
Affinché il vostro apparecchio non subisca danni durante il trasporto, esso è stato imballato
con cura. Per contribuire alla tutela del nostro ambiente, vi chiediamo di smaltire in modo
appropriato il materiale utilizzato per l'imballaggio dell'apparecchio.
Smaltimento degli apparecchi usati
Gli apparecchi che recano il contrassegno riportato a fianco non devono essere smaltiti
insieme ai rifiuti urbani, ma vanno raccolti e smaltiti separatamente. Lo smaltimento degli apparecchi
usati va eseguito a regola d'arte, in conformità con le prescrizioni e leggi vigenti localmente in materia.
- NL -
Milieu en recycling
Wij verzoeken u ons bij de bescherming van het milieu behulpzaam te zijn. Verwijder de
verpakking daarom overeenkomstig de voor de afvalverwerking geldende nationale
voorschriften.
Recycling van oude toestellen
Toestellen met dit kenmerk horen niet thuis in de vuilnisbak en zijn apart in te zamelen en te
recyclen. De recycling van oude toestellen moet steeds vakkundig en volgens de ter plaatse
geldende voorschriften en wetgeving plaats vinden.
- F -
Environnement et recyclage
Nous vous demandons de nous aider à préserver l'environnement. Pour ce faire, merci de
vous débarrasser de l'emballage conformément aux règles nationales relatives au traitement
des déchets.
Collecte et recyclage des produits en fin de vie
Les appareils munis de ce symbole ne doivent pas être mis avec les ordures ménagères,
mais doivent être collectés séparément et recyclés. La collecte et le recyclage des produits en fin de vie
doivent être effectués selon les dispositions et les décrets locaux.
- D -
Entsorgung von Altgeräten in Deutschland
Geräte mit dieser Kennzeichnung gehören nicht in die Restmülltonne und sind getrennt zu
sammeln und zu entsorgen.
Die Hersteller sorgen im Rahmen der Produktverantwortung für eine umweltgerechte
Behandlung und Verwertung der Altgeräte.
Im Rahmen des Elektro- und Elektronikgerätegesetzes (ElektroG) und zum Schutz unserer
Umwelt ist eine kostenlose Rückgabe bei Ihrer kommunalen Sammelstelle möglich.
- E -
Medio ambiente y reciclaje
Ayúdenos a proteger el medio ambiente eliminando el embalaje con arreglo a la legislación
nacional sobre tratamiento de residuos.
Eliminación de aparatos viejos
No tirar los aparatos que lleven esta identificación junto con la basura no clasificada. Se
deben recoger y eliminar de forma especial. La eliminación de aparatos viejos se debe
realizar de forma adecuada y competente, de acuerdo con las normas y leyes locales vigentes.
FH500/30042008_R1
- I - TERMOVENTILATORE
- GB - FAN HEATER
- NL - VENTILATORKACHEL
- D - HEIZLÜFTER
- F - RADIATEUR SOUFFLANT
- E - CALEFACTOR
- Conservare il presente libretto di istruzioni per ulteriori consultazioni future.
- Please retain this instructions in a safe place for future reference.
- Bewahren Sie diese Gebrauchsanweisung für eine spätere Benutzung
sorgfältig auf.
- Bewaar deze gebruiksaanwijzing voor een later gebruik.
- Conserver cette notice pour une utilisation ulterieure.
- Conservar las instruccione de uso.
Pagina wordt geladen...
Pagina wordt geladen...
Pagina wordt geladen...
Pagina wordt geladen...
Pagina wordt geladen...
Pagina wordt geladen...
Pagina wordt geladen...
Pagina wordt geladen...
Pagina wordt geladen...

20
21
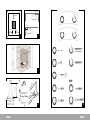
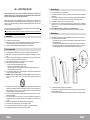
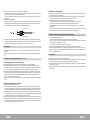
3. Veilige positionering
Gelieve het apparaat altijd uitsluitend in een staande positie te gebruiken.
Indien draagbaar: gelieve altijd een afstand van minstens 1 m tussen het product en ieder ontvlambaar
object/oppervlak in acht te nemen.
Als het product aan de wand gemonteerd is, zorgt u ervoor dat de in de afbeeldingen 1 en 2 vermelde
minimumafstanden in acht genomen worden. Plaats het verwarmingstoestel zodanig, dat de luchtstroom
rechtstreeks in de richting van de wand blaast.
Omdat het verwarmingstoestel een product uit de klasse 2 is, is een aardverbinding niet noodzakelijk.
Het verwarmingstoestel heeft een IPX1 beschermingsniveau tegen water en, indien het aan een wand
gemonteerd is, kan het in badkamers geïnstalleerd worden. In elk geval dient u de nationale installatie-
standaard en de in uw land geldende veiligheidsinstructies na te leven.
Gelieve dit apparaat nooit in de in afbeelding 3 geïllustreerde zones 0, 1 of 2 te installeren of te gebrui-
ken:
In geen geval mag een schakelaar / knop voor iemand, die zich in de douche of in bad bevindt, toegankeli-
jk zijn.
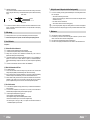
4. Wandmontage
Nadat u paragraaf 3 zorgvuldig gelezen hebt, gaat u door met de installatie doordat u zich aan de in
afbeelding 4 getoonde volgorde houdt.
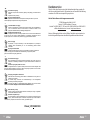
Om het product op te hangen, gaat u als volgt te werk (zie afbeelding 6):
- Leg de basis van het product op de basis van het wandarmatuur door de voor een vereenvoudiging van
de plaatsing gemaakte, plastic ribben te koppelen.
- Duw het product een beetje naar beneden en breng de bovenzijde van het product tot aan het armatu-
ur.
- Ga na, of de bovenste geperforeerde rib van het armatuur past op de daarvoor dienende spil, die aan de
achterste rooster van het verwarmingstoestel voorzien is. Schud het verwarmingstoestel na de installatie
lichtjes heen en weer om er zeker van te zijn dat het correct bevestigd is.
O
= OFF
= WARM AIR at reduced motor speed (QUIET MODE)
= WARM AIR at full motor speed
= HOT AIR at full motor speed
Turn the switch knob to select the desired power setting
Starting from the “” position, turn the thermostat knob clockwise until you hear a "click»: the
appliance starts working at the desired power setting.
The thermostat maintains the desired room temperature switching on and off automatically the
appliance. The more the knob is turned clockwise, the higher is the maintained temperature.
Maximum thermostat setting corresponds at about 30°C; “” position corresponds to
approximately 5°C.
For correct use of the thermostat , see section “ USE OF THE THERMOSTAT”
5. Safety in case of abnormal operation
In case of overheating the safety cut out protecting the heating element will automatically switch
off the appliance.
In this case the appliance stops working and the pilot light will remain switched on even if the
appliance is not working.
If this happens:
- switch off the fan heater;
- remove the causes of abnormal operation or overheating (i.e. obstacles in front of air inlet or
air outlet grille);
- leave the heater cool down for 15/20 minutes;
- switch on again the fan heater.
6. Maintenance
This fan heater does not require any particular maintenance.
We only recommend to clean at least twice a year the air inlet and air outlet grille with a vacuum
cleaner to remove dust from motor and heating element.
In case you need to repair it, please contact an authorised repairing center.
If the cordset is to be changed, please mind that a 2x1mm
2
H05VVF HAR cordset is to be used.
NEDERLANDS
INSTRUCTIES VOOR HET GEBRUIK
1. Voor uw veiligheid
Deze warmeluchtventilator is een bijkomende verwarmingsbron en dient uitsluitend voor dit doel
gebruikt te worden.
Kijkt u na of de netvoeding overeenkomt met de gegevens op het plaatje: 230V AC, 50Hz.
Verlaat u uw woning nooit terwijl de warmeluchtventilator in werking is. Controleer in dat geval
altijd of de schakelaar op OFF (0) staat en of de thermostaat op de minimumst
and staat (*).
Tijdens de werking zet u de warmeluchtventilator op een veilige plaats, dus:
- op minstens 1 m van ontvlambare of mobiele objecten;
- de luchtinlaat- en luchtuitlaatroosters moeten vrijgelaten worden: er mogen zich in geen
geval objecten binnen een straal van 1 m. van het luchtuitlaatrooster bevinden en binnen
een straal van 50 cm. Van het rooster aan de achterkant;
- nooit onmiddelli
jk onder een stopcontact.
Laat dieren of kinderen niet met de warmeluchtventilator spelen of deze aanraken. Let op!
Tijdens de werking kan het luchtuitlaatrooster erg warm worden (meer dan 80°C = 175°F);
BELANGRIJK: Om oververhitting te voorkomen dient u het apparaat nooit te bedekken.
Plaats nooit voorwerpen of dekens op het apparaat terwijl dit in werking is. Dit wordt
duidelijk schriftelijk op
het apparaat vermeldt, of aangegeven door het symbool
OF
Gebruik de warmeluchtventilator niet in ruimtes die verzadigd zijn met explosieve gassen, of met
dampen die gegenereerd worden door oplosmiddelen of verf, of hoe dan ook bij de aanwezigheid
van ontvlambare dampen/gassen.
Is de kabel beschadigd en moet deze vervangen worden, dan dient u dit niet zelf te doen. Breng
de warmeluchtventilator naar een bevoegd reparatiecentrum omdat de tussenkomst van
ge
specialiseerd personeel vereist is. Zo wordt het risico op beschadiging voorkomen.
Gebruik deze warmeluchtventilator niet in de nabijheid van douches, badkuipen of wastafels.
De warmeluchtventilator moet zo geplaatst worden dat het stopcontact altijd bereikbaar is.
Het apparaat mag niet direct onder een contactdoos gemonteerd of geplast worden
2. Veilige plaatsing
Gebruik de warmeluchtventilator alleen in de verticale stand;
De thermoventialtor heeft een dubbele elektrische isolatie (klasse II) en heeft daarom geen
aardeverbinding nodig.
De thermoventilator heeft een beschermingsgraad IPX1 tegen water. In ieder geval nooit
installeren of utilisieren zoals aangeduid in de figuur
2,53m
0,6m
0,6m
0,6m
-- I -- ISTRUZIONI D’USO
Si prega di leggere attentamente queste istruzioni prima di utilizzare il prodotto in modo da evitare
danneggiamenti o comunque il verificarsi di situazioni di pericolo. Qualsiasi utilizzo del prodotto
diverso da quanto indicato nel presente manuale può causare incendi, pericoli elettrici o ferite e
rende nulla qualsiasi garanzia.
La garanzia non si applica ad alcun difetto, deterioramento, perdita, ferimento o danneggiamento
riconducibili ad un uso non corretto del prodotto. Rimangono garantiti tutti i diritti di legge in materia.
Nessuna condizione di garanzia può escludere o modificare le condizioni di garanzia regolamentate da
leggi dello Stato che non possono essere a nessun titolo escluse o modificate.
Prima di ogni operazione, rimuovere con cura l’imballo e controllare la perfetta integrità del prodotto. Nel
caso si evidenziassero dei difetti o danni, non installare né cercare di riparare l’apparecchiatura, ma
rivolgersi al rivenditore.
Non lasciare l’imballo alla portata dei bambini e smaltirne le parti in conformità con le disposizioni vigenti.
1. Il vostro prodotto
Il prodotto viene fornito senza accessori.
In funzione della versione acquistata, può essere presente una staffa per l’aggancio a muro del
termoventilatore. Per fissarla vi suggeriamo di utilizzare i tasselli e le viti fornite.
Qualora il prodotto sia danneggiato o la staffa mancante contattate immediatamente il vostro
rivenditore.
2. Per la vostra sicurezza
Questo termoventilatore è una fonte di riscaldamento ausiliario e deve essere utilizzato
esclusivamente per questo scopo.
Assicuratevi che l’alimentazione di rete corrisponda ai dati di targa: esempio 230V AC, 50Hz.
Non abbandonate mai la vostra abitazione lasciando il termoventilatore in funzionamento; in tali casi
assicuratevi sempre che l’interruttore o il timer siano in posizione “0” e il termostato al minimo “¿”;
Spegnete il prodotto con l’interruttore e scollegatelo dalla rete se prevedete di non utilizzarlo per
lunghi periodi;
Durante il funzionamento collocate il termoventilatore in una posizione sicura ovvero:
- ad almeno 1m da oggetti infiammabili o mobili;
- se installato a muro, non fissato a pareti di materiale plastico o sintetico;
- lasciando libere le griglie di ingresso e di uscita dell’aria: nessun oggetto deve essere presente nel
raggio di 1m dalla griglia anteriore e di 50cm dalla griglia posteriore;
- mai posizionato immediatamente sotto ad una presa di corrente.
Non lasciate che animali o bambini giochino o tocchino il termoventilatore. Attenzione! Durante il
funzionamento la griglia di uscita dell’aria può diventare molto calda ( oltre 80°C = 176°F);
IMPORTANTE: per evitare surriscaldamenti non ricoprite mai il prodotto. Non appoggiate mai
alcun oggetto o coperta sull’apparecchio mentre è in funzione. Questo è chiaramente scritto
sull’apparecchio o illustrato dal simbolo
Questo prodotto non deve essere utilizzato da persone (bambini inclusi) con capacità fisiche,
sensoriali o mentali ridotte, o con inadeguata esperienza e conoscenze, che non siano sotto la
supervisione di una persona responsabile per la loro sicurezza o che non siano da essa stati
adeguatamente istruiti. I bambini devono essere sorvegliati per assicurarsi che non giochino con il
prodotto.
Non utilizzate il termoventilatore in stanze sature di gas esplosivi, di vapori generati da solventi e
vernici o comunque di vapori/gas infiammabili.
Se il cavo è danneggiato e dovete sostituirlo non eseguite questa operazione da soli, riportate il
termoventilatore ad un centro di riparazioni qualificato perché è richiesto l’intervento di personale
specializzato al fine di evitare qualunque rischio di danneggiamento.
Non utilizzate questo termoventilatore nelle vicinanze di docce, vasche da bagno, piscine o lavandini.
Non pulite mai il prodotto quando è collegato alla rete elettrica e non immergetelo mai in acqua o in
altre sostanze;
Non arrotolate mai il cavo attorno al prodotto quando è in funzione e non portate il cavo a contatto
con superfici taglienti.
Il termoventilatore deve essere posizionato in modo tale che la presa di alimentazione sia sempre
raggiungibile.
3. Posizionamento sicuro
Utilizzate il termoventilatore solo in posizione verticale;
Nell’uso portatile rispettate sempre la distanza di almeno 1m da qualsiasi oggetto/superficie
infiammabile;
Se installato a muro rispettate le distanze minime indicate in figura 1 e 2. Non posizionate mai il
prodotto in modo tale che il flusso d'aria colpisca direttamente il muro.
Il termoventilatore è costruito in doppio isolamento elettrico (classe II) e, pertanto, non richiede il
collegamento di terra.
Il termoventilatore ha un grado IPX1 di protezione all’acqua, può essere fornito con una staffa per il
fissaggio a muro e, in tale caso, è installabile anche nei bagni. In ogni caso l’installazione deve essere
eseguita in accordo alla normativa nazionale valida nel vostro paese.
Non installare mai l’apparecchio all’interno delle zone 0, 1 o 2 illustrate in figura 3.
I pulsanti di regolazione non devono in nessun caso essere accessibili da parte di persone che siano
all’interno della vasca da bagno o della doccia.
4. Installazione a muro
Dopo aver letto attentamente quanto riportato al paragrafo 3 procedete con l'installazione seguendo
le istruzioni indicate in figura 4.
Per fissare il prodotto al supporto procedere nel seguente modo:
- Appoggiate il prodotto alla base del supporto facendo accoppiare le nervature plastiche create
per semplificare il posizionamento;
- Premere leggermente il prodotto verso il basso e avvicinarne la parte superiore alla staffa di
fissaggio;
- Controllare che la linguetta forata del supporto murale si sia correttamente agganciata alla
nervatura presente sulla griglia posteriore del prodotto. Dopo ogni installazione scuotere
lievemente il prodotto per assicurarsi che sia ben agganciato.
1
2
3
4
click!

22
23
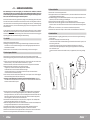
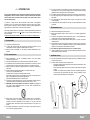
Om het product van het armatuur te lossen, gaat u als volgt te werk:
- Gebruik uw hand om de bovenste rib van het armatuur zoveel mogelijk baar beneden te duwen om het
product te lossen en dit doordat u aan de bovenzijde trekt.
- Zodra het product aan de bovenzijde werd losgemaakt, trekt u het gewoon naar boven om het van de
basis te lossen.
BELANGRIJK VOOR FRANKRIJK:
Als het product aan een wand gemonteerd is, moet de elektrische aansluiting in overeenstemming met
de bijgevoegde tekening doorgevoerd worden doordat u de kabel doorsnijdt en een aansluitingsblok
tussen de productkabel en de stroomtoevoer gebruikt (zie afbeelding 6).
IMPORTANT FOR FRANCE:
If the product is wall mounted, the electrical connection must be made according to the enclosed
drawing, cutting the cable and using a connection block between the product cable and the electricity
supply.
In humid rooms, bathrooms or kitchens, this connection block must be installed at least 25 cm from
the floor. The electrical connection must also include the use of a 2-pole switch with a contact opening
distance of at least 3 mm.
5. Cable storage
While the product is not in use, you can store the cable pushing it into the base of the product.
Note that while the product is in operation, the cable must always be completely pulled out.
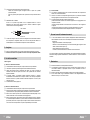
6. Use of the heater
See picture 5
6.1 Version with switch and thermostat
The heater has 2 knobs controlling the switch and the thermostat.
The switch knob has 5 positions, allowing to select the desired power setting.
Starting from the “¿” position, turn the thermostat knob clockwise until you hear a "click”: the
appliance starts working at the desired power setting.
The thermostat maintains the desired room temperature switching on and off automatically the
appliance. The more the knob is turned clockwise, the higher is the maintained temperature.
Maximum thermostat setting corresponds at about 30°C; “¿” position corresponds to approximately
5°C.
For correct use of the thermostat , see section “ USE OF THE THERMOSTAT”
6.2 Model with thermostat and 60' timer
The heater has 2 knobs.
Turn the timer knob clockwise to select the working time you prefer from 5 to 60'. The heater starts
working at full power (2000W) and thermostat setting doesn’t influence the functioning;
After the selected period the heater will automatically turn to mid power (1000W), thermostatically
controlled according to the thermostat setting. For the use of the thermostat see section 6.3.
When the heater is working under timer control at full power, the thermostat doesn't control the room
temperature. In this condition, do not use the heater in small rooms when they are occupied by
persons not capable of leaving the room on their own, unless constant supervision is provided.
6.3 Use of the thermostat
In a room where the temperature is too high (more than 30°C), it is normal that the thermostat will not
switch on the heater.
In a room where the temperature is too low (around 5°C or even less) it is also normal that the
thermostat will keep the appliance working until the temperature gets higher.
To select the right thermostat position we suggest you to
- turn the thermostat in maximum position (clockwise);
- leave the appliance working until the comfortable temperature is reached;
- turn the knob anti clockwise until you hear a "click" and the appliance stops;
- turn clockwise again the knob (just a little): in this position the thermostat will maintain the
comfortable temperature you have selected.
7. Safety in the event of the product not functioning normally
In the event of overheating, the safety system will automatically turn off the heating elements and the
motor. If this happens:
- switch off the fan heater using the main switch;
- remove the cause of overheating (i.e. obstacles in front of the air inlet or air outlet grilles, unusual
accumulations of dirt, etc);
- let the heater cool down for 15/20 minutes;
- switch on the fan heater and check it is functioning properly.
L If you notice irregular operation, damage to the heating element or to the structure of the appliance,
disconnect the product from the mains power supply and contact your technical assistance center or dealer.
8. Maintenance
This heater does not require any particular maintenance.
We recommend you clean the air inlet and air outlet grilles at least twice a year with a vacuum
cleaner, to remove dust from the motor and the heating elements.
If the heater needs to be repaired, please contact an authorized center.
If the cable is to be changed, please remember that a 2x1m
2
H05VV-F <HAR> cable must be used.
L
N
Electrical
t
it
Phase = brown
Neutral = blue
Product’s
d t
bl
In vochtige kamers, badkamers of keukens moet dit aansluitingsblok op een afstand van minstens 25 cm
tot de vloer geïnstalleerd worden. De elektrische aansluiting moet eveneens het gebruik van een 2-polige
schakelaar met een afstand tot de contactopening van minstens 3 mm impliceren.
5. Kabelopslag
Wanneer het product niet in gebruik is, kunt u de kabel bewaren doordat u hem in de basis van het pro-
duct duwt.
Gelieve te noteren dat, wanneer het product in werking is, de kabel altijd helemaal uitgetrokken moet
zijn.
6. Gebruik van het verwarmingstoestel (Zie afbeelding 5)
6.1 Uitvoering met schakelaar en thermostaat
Het verwarmingstoestel heeft 2 knoppen, die de schakelaar en de thermostaat besturen.
De schakelaarknop heeft 5 standen, die het mogelijk maakt om het gewenste vermogen in te stellen.
Uitgaande van de stand “_” draait u de thermostaatknop in de richting van de wijzers van de klok totdat
u een "klik” hoort: het apparaat begint te functioneren bij het gewenste, ingestelde vermogen.
De thermostaat handhaaft de gewenste kamertemperatuur door het apparaat automatisch in en uit te
schakelen. Hoe meer de knop in de richting van de wijzers van de klok gedraaid is, hoe hoger de gehand-
haafde temperatuur is. Een maximale instelling van de thermostaat komt overeen met ongeveer 30°C;
stand “_” stemt ongeveer met 5°C overeen.
Voor een correct gebruik van de thermostaat, verwijzen wij naar paragraaf “GEBRUIK VAN DE THERMO-
STAAT”
6.2 Model met thermostaat en 60' timer
Het verwarmingstoestel heeft 2 knoppen.
Draai de timerknop in de richting van de wijzers van de klok om de door u geprefereerde duur van de
werking van 5 tot 60 minuten te selecteren. Het verwarmingstoestel begint te functioneren bij een maxi-
maal vermogen (2000 W) en een instelling van de thermostaat oefent geen invloed op de werking uit.
Na de geselecteerde periode zal het verwarmingstoestel, bestuurd door de thermostaat in overeenstem-
ming met de instelling van de thermostaat, automatisch naar het gemiddelde vermogen (1000 W) overga-
an. Voor het gebruik van de thermostaat verwijzen wij naar paragraaf 6.3.
Wanneer het verwarmingstoestel met timerbesturing bij maximaal vermogen functioneert, bestuurt de
thermostaat de kamertemperatuur niet. Gelieve in dit geval het verwarmingstoestel niet in kleine kamers
te gebruiken wanneer deze betrokken worden door personen, die niet in staat zijn om de kamer zonder
hulp te verlaten, tenzij permanent toezicht voorzien is.
6.3 Gebruik van de thermostaat
In een kamer, waar de temperatuur te hoog is (meer dan 30°C), is het normaal dat de thermostaat het
verwarmingstoestel niet zal inschakelen.
In een kamer, waar de temperatuur te laag is (ongeveer 5°C of zelf minder) is het ook normaal dat de
thermostaat het apparaat in werking zal houden totdat de temperatuur stijgt.
Om de rechtse stand van de thermostaat te selecteren, stellen wij voor
- de thermostaat (in de richting van de wijzers van de klok) in de maximumstand te draaien;
- het apparaat te laten functioneren totdat een comfortabele temperatuur bereikt is;
- de knop tegen de richting van de wijzers van de klok in te draaien totdat u een "klik" hoort en het
apparaat stopt;
- de knop (alleen maar een beetje) terug in de richting van de wijzers van de klok te draaien: in deze stand
zal de thermostaat de door u geselecteerde, comfortabele temperatuur handhaven.
7. Veiligheid indien het product niet normaal functioneert
Ingevalvanoververhittingzalhetveiligheidssysteemdeverwarmingselementenendemotorautoma-
tisch uitschakelen. Als dit gebeurt:
- schakelt u de warmeluchtventilator uit door de hoofdschakelaar te gebruiken;
- verhelpt u de oorzaak van de oververhitting (d.w.z. hindernissen vooraan de luchtinlaat- of luchtuitlaat-
roosters, ongewone ophopingen van vuil etc.);
- laat u het verwarmingstoestel 15 tot minuten lang afkoelen;
- schakelt u de warmeluchtventilator in en gaat u na, of deze naar behoren functioneert.
Indien u een onregelmatige werking, schade aan het verwarmingselement of aan de structuur van het
apparaat waarneemt, verbreekt u het product van de netvoeding en neemt u met uw technisch support-
center of speciaalzaak contact op.
8. Onderhoud
Dit verwarmingstoestel vereist geen specifiek onderhoud.
Wij raden u aan, de luchtinlaat- en luchtuitlaatroosters minstens twee keer per jaar met een stofzuiger te
reinigen om stof van de motor en van de verwarmingselementen te verwijderen.
Indien het verwarmingstoestel gerepareerd dient te worden, verzoeken wij u, een geautoriseerde klan-
tenservice te contacteren.
Indien de kabel vervangen dient te worden, let er dan op dat een 2x1m² H05VV-F <HAR> kabel gebruikt
moet worden.

24
25
Kundenservice:
Sollte Ihr Gerät wider Erwarten einmal den Kundendienst benötigen, wenden Sie
sich bitte an nachfolgende Anschrift. Wir werden dann im Garantiefall die Abholung
veranlassen. Das Gerät muss transportfähig verpackt sein.
Unfreie Pakete können nicht angenommen werden!
STEBA Elektrogeräte GmbH & Co KG
Pointstr. 2, 96129 Strullendorf / Germany
Vertrieb-Tel.: 09543 / 449-17 / -18, Service-Tel.: 09543 / 449-44, Fax: 09543 / 449-19
e-Mail: elek[email protected] Internet: http://www.steba.com
Achtung! Elektrogeräte dürfen nur durch Elektro-Fachkräfte repariert werden, da
durch unsachgemäße Reparaturen erhebliche Folgeschäden entstehen können.
- GB -
Environment and recycling
Please help us to protect the environment by disposing of the packaging in accordance with the
national
regulations for waste processing.
Recycling of obsolete appliances
Appliances with this label must not be disposed off with the general waste. They must be
collected separately and disposed off according to local regulations.
- I -
Tutela dell'ambiente e riciclaggio
Affinché il vostro apparecchio non subisca danni durante il trasporto, esso è stato imballato con
cura. Per contribuire alla tutela del nostro ambiente, vi chiediamo di smaltire in modo
appropriato il materiale utilizzato per l'imballaggio dell'apparecchio.
Smaltimento degli apparecchi usati
Gli apparecchi che recano il contrassegno riportato a fianco non devono essere smaltiti insieme
ai rifiuti urbani, ma vanno raccolti e smaltiti separatamente. Lo smaltimento degli apparecchi usati va
eseguito a regola d'arte, in conformità con le prescrizioni e leggi vigenti localmente in materia.
- NL -
Milieu en recycling
Wij verzoeken u ons bij de bescherming van het milieu behulpzaam te zijn. Verwijder de
verpakking daarom overeenkomstig de voor de afvalverwerking geldende nationale
voorschriften.
Recycling van oude toestellen
Toestellen met dit kenmerk horen niet thuis in de vuilnisbak en zijn apart in te zamelen en te
recyclen. De recycling van oude toestellen moet steeds vakkundig en volgens de ter plaatse
geldende voorschriften en wetgeving plaats vinden.
- F -
Environnement et recyclage
Nous vous demandons de nous aider à préserver l'environnement. Pour ce faire, merci de vous
débarrasser de l'emballage conformément aux règles nationales relatives au traitement des
déchets.
Collecte et recyclage des produits en fin de vie
Les appareils munis de ce symbole ne doivent pas être mis avec les ordures ménagères, mais
doivent être collectés séparément et recyclés. La collecte et le recyclage des produits en fin de vie doivent
être effectués selon les dispositions et les décrets locaux.
- D -
Entsorgung von Altgeräten in Deutschland
Geräte mit dieser Kennzeichnung gehören nicht in die Restmülltonne und sind getrennt zu
sammeln und zu entsorgen.
Die Hersteller sorgen im Rahmen der Produktverantwortung für eine umweltgerechte
Behandlung und Verwertung der Altgeräte.
Im Rahmen des Elektro- und Elektronikgerätegesetzes (ElektroG) und zum Schutz unserer
Umwelt ist eine kostenlose Rückgabe bei Ihrer kommunalen Sammelstelle möglich.
- E -
Medio ambiente y reciclaje
Ayúdenos a proteger el medio ambiente eliminando el embalaje con arreglo a la legislación
nacional sobre tratamiento de residuos.
Eliminación de aparatos viejos
No tirar los aparatos que lleven esta identificación junto con la basura no clasificada. Se deben
recoger y eliminar de forma especial. La eliminación de aparatos viejos se debe realizar de
forma adecuada y competente, de acuerdo con las normas y leyes locales vigentes.
Pikkolo_STD/
19052010/R2
Please retain these instructions in a safe place for future reference.
Si prega di conservare con cura questo libretto di istruzioni per future
consultazioni.
Bewaar deze gebruiksaanwijzing zorgvuldig voor toekomstig gebruik.
Conserver cette notice pour toute consultation ultérieure.
Es wird gebeten, diese Gebrauchsanleitung für ein zukünftiges Nachschlagen
sorgfältig aufzubewahren.
Conservar las instruccione de uso.
Pagina wordt geladen...
Documenttranscriptie
Pikkolo Basic Pikkolo 60 T 3 -I- TERMOVENTILATORE - GB - FAN HEATER - NL - VENTILATORKACHEL Gebrauchsanweisung -DHEIZLÜFTER Instructions for use -FRADIATEUR SOUFFLANT per l’uso - E -Istruzioni CALEFACTOR Mode d´emploi Gebruiksaanwijzing - Conservare il presente libretto di istruzioni per ulteriori consultazioni future. - Please retain this instructions in a safe place for future reference. - Bewahren Sie diese Gebrauchsanweisung für eine spätere Benutzung sorgfältig auf. - Bewaar deze gebruiksaanwijzing voor een later gebruik. - Conserver cette notice pour une utilisation ulterieure. - Conservar las instruccione de uso. Si prega di leggere attentamente queste istruzioni prima di utilizzare il prodotto in modo da evitare danneggiamenti o comunque il verificarsi di situazioni di pericolo. Qualsiasi utilizzo del prodotto diverso da quanto indicato nel presente manuale può causare incendi, pericoli elettrici o ferite e rende nulla qualsiasi garanzia. NEDERLANDS La garanzia non si applica ad alcun difetto, deterioramento, perdita, ferimento o danneggiamento riconducibili ad un uso non corretto del prodotto. Rimangono garantiti tutti i diritti di legge in materia. Nessuna condizione di garanzia può escludere o modificare le condizioni di garanzia regolamentate da leggi dello Stato che non possono essere a nessun titolo escluse o modificate. INSTRUCTIES VOOR HET GEBRUIK Prima di ogni operazione, rimuovere con cura l’imballo e controllare la perfetta integrità del prodotto. Nel Voor uw veiligheid caso 1. si evidenziassero dei difetti o danni, non installare né cercare di riparare l’apparecchiatura, ma rivolgersi al rivenditore. Non lasciare l’imballo alla portata dei bambini smaltirne leverwarmingsbron parti in conformitàen con le disposizioni Deze warmeluchtventilator is een ebijkomende dient uitsluitend vigenti. voor dit doel gebruikt te worden. Kijkt u na of de netvoeding overeenkomt met de gegevens op het plaatje: 230V AC, 50Hz. 1. Ilvostro prodotto Verlaat u uw woning nooit terwijl de warmeluchtventilator in werking is. Controleer in dat geval altijd of de schakelaar op OFF (0) staat en of de thermostaat op de minimumstand staat (*). Il prodotto viene fornito senza Tijdens de werking zet uaccessori. de warmeluchtventilator op een veilige plaats, dus: In funzione versione può essere presente una staffa per l’aggancio a muro del opdella minstens 1 m acquistata, van ontvlambare of mobiele objecten; termoventilatore. Per fissarla suggeriamo di utilizzare i tasselli e le viti worden: fornite. er mogen zich in geen de luchtinlaatenviluchtuitlaatroosters moeten vrijgelaten objecten binnen een straal van 1 m. van het contattate luchtuitlaatrooster bevinden il en binnen Qualora il geval prodotto sia danneggiato o la staffa mancante immediatamente vostro rivenditore.een straal van 50 cm. Van het rooster aan de achterkant; nooit onmiddellijk onder een stopcontact. Laat dieren of kinderen niet met de warmeluchtventilator spelen of deze aanraken. Let op! 2. Per laTijdens vostra de sicurezza werking kan het luchtuitlaatrooster erg warm worden (meer dan 80°C = 175°F); BELANGRIJK: Om oververhitting te voorkomen dient u het apparaat nooit te bedekken. Questo termoventilatore è unaoffonte di op riscaldamento ausiliario essere is. utilizzato Plaats nooit voorwerpen dekens het apparaat terwijl edit deve in werking Dit wordt esclusivamente per questo duidelijk schriftelijk opscopo. het apparaat vermeldt, of aangegeven door het symbool Assicuratevi che l’alimentazione di rete corrisponda ai dati di targa: esempio 230V AC, 50Hz. Non abbandonate mai la vostra abitazione lasciando il termoventilatore in funzionamento; in tali casi assicuratevi sempre che l’interruttore o il timer siano in posizione “0” e il termostato al minimo “¿”; Spegnete il prodotto con l’interruttore e scollegatelo dalla rete se prevedete di non utilizzarlo per lunghi periodi; OF Durante il funzionamento collocate il termoventilatore in una posizione sicura ovvero: ad almeno 1m da oggetti infiammabili o mobili; Gebruik de warmeluchtventilator niet in ruimtes die verzadigd zijn met explosieve gassen, of met se installato a muro, non fissato a pareti di materiale plastico o sintetico; dampen die gegenereerd worden door oplosmiddelen of verf, of hoe dan ook bij de aanwezigheid lasciando libere le griglie di ingresso e di uscita dell’aria: nessun oggetto deve essere presente nel van ontvlambare dampen/gassen. raggioIsdide 1mkabel dallabeschadigd griglia anteriore e di 50cm dalla grigliaworden, posteriore; en moet deze vervangen dan dient u dit niet zelf te doen. Breng mai posizionato immediatamentenaar sotto een ad una presa di reparatiecentrum corrente. de warmeluchtventilator bevoegd omdat de tussenkomst van Non lasciate che animali o bambini giochino o tocchino il termoventilatore. Durante il gespecialiseerd personeel vereist is. Zo wordt het risico op beschadigingAttenzione! voorkomen. funzionamento la griglia di uscita dell’aria può diventare molto calda ( oltre = 176°F); Gebruik deze warmeluchtventilator niet in de nabijheid van douches,80°C badkuipen of wastafels. IMPORTANTE: per evitare surriscaldamenti ricoprite mai il prodotto. Non appoggiate De warmeluchtventilator moet zo geplaatstnon worden dat het stopcontact altijd bereikbaar is. mai apparaat mag nietsull’apparecchio direct onder eenmentre contactdoos of geplast worden alcunHet oggetto o coperta è in gemonteerd funzione. Questo è chiaramente scritto sull’apparecchio o illustrato dal simbolo Non utilizzate questo termoventilatore nelle vicinanze di docce, vasche da bagno, piscine o lavandini. Non pulite mai il prodotto quando è collegato alla rete elettrica e non immergetelo mai in acqua o in altre sostanze; Non arrotolate mai il cavo attorno al prodotto quando è in funzione e non portate il cavo a contatto con superfici taglienti. 3. Veilige Il termoventilatore deve essere posizionato in modo tale che la presa di alimentazione sia sempre positionering raggiungibile. Gelieve het apparaat altijd uitsluitend in een staande positie te gebruiken. draagbaar: gelieve altijd een afstand van minstens 1 m tussen het product en ieder ontvlambaar 3. Indien Posizionamento sicuro object/oppervlak in acht te nemen. het product aan de wandsolo gemonteerd is, zorgt u ervoor dat de in de afbeeldingen 1 en 2 vermelde Als Utilizzate il termoventilatore in posizione verticale; in acht genomen Plaatsdihetalmeno verwarmingstoestel zodanig, dat de luchtstroom minimumafstanden Nell’uso portatile rispettate sempreworden. la distanza 1m da qualsiasi oggetto/superficie rechtstreeks in de richting van de wand blaast. infiammabile; het verwarmingstoestel product minime uit de klasse 2 is,inis figura een aardverbinding niet noodzakelijk. Omdat Se installato a muro rispettateeen le distanze indicate 1 e 2. Non posizionate mai il Het verwarmingstoestel heeft een d'aria IPX1 beschermingsniveau water en, indien het aan een wand prodotto in modo tale che il flusso colpisca direttamentetegen il muro. is, kan het in badkamers geïnstalleerd elk geval u de nationale installatie gemonteerd Il termoventilatore è costruito in doppio isolamentoworden. elettricoIn(classe II) dient e, pertanto, non richiede il standaard en de uw land geldende veiligheidsinstructies na te leven. collegamento diin terra. dit apparaatha nooit in de in afbeelding 3 geïllustreerde zones 0, 1 of 2 te installeren of teper gebrui Gelieve Il termoventilatore un grado IPX1 di protezione all’acqua, può essere fornito con una staffa il ken: fissaggio a muro e, in tale caso, è installabile anche nei bagni. In ogni caso l’installazione deve essere Ineseguita geen geval mag een schakelaar knop voorvalida iemand, zichpaese. in de douche of in bad bevindt, toegankeliin accordo alla normativa/ nazionale nel die vostro zijn.installare mai l’apparecchio all’interno delle zone 0, 1 o 2 illustrate in figura 3. jkNon I pulsanti di regolazione non devono in nessun caso essere accessibili da parte di persone che siano all’interno della vasca da bagno o della doccia. 4. Wandmontage u paragraaf zorgvuldig gelezen hebt, gaat u door met de installatie doordat u zich aan de in 4. Nadat Installazione a 3muro afbeelding 4 getoonde volgorde houdt. hetaver product te hangen, quanto gaat u als volgt te (zie afbeelding Om Dopo lettoop attentamente riportato al werk paragrafo 3 procedete6):con l'installazione seguendo - Leg de basisindicate van hetin product le istruzioni figura 4.op de basis van het wandarmatuur door de voor een vereenvoudiging van plaatsing ribben te koppelen. dePer fissare ilgemaakte, prodotto alplastic supporto procedere nel seguente modo: - Duw het product een beetjealla naarbase beneden en breng de bovenzijde vanlehet productplastiche tot aan het armatuAppoggiate il prodotto del supporto facendo accoppiare nervature create ur. per semplificare il posizionamento; - Ga of de bovenste geperforeerde van het armatuur past op de dienende diediaan de - na,Premere leggermente il prodottorib verso il basso e avvicinarne la daarvoor parte superiore allaspil, staffa achterste rooster van het verwarmingstoestel voorzien is. Schud het verwarmingstoestel na de installatie fissaggio; lichtjes heen en weer zeker van te zijn het correct bevestigd is. Controllare cheom la er linguetta forata deldat supporto murale si sia correttamente agganciata alla nervatura presente sulla griglia posteriore del prodotto. Dopo ogni installazione scuotere lievemente il prodotto per assicurarsi che sia ben agganciato. 2 3 4 2. Veilige plaatsing click! 1 2,53m Gebruik de warmeluchtventilator alleen in de verticale stand; De thermoventialtor heeft een dubbele elektrische isolatie (klasse II) en heeft daarom geen aardeverbinding nodig. De thermoventilator heeft een beschermingsgraad IPX1 tegen water. In ieder geval nooit Questo prodotto of non deve essere installeren utilisieren zoalsutilizzato aangeduiddainpersone de figuur(bambini inclusi) con capacità fisiche, sensoriali o mentali ridotte, o con inadeguata esperienza e conoscenze, che non siano sotto la supervisione di una persona responsabile per la loro sicurezza o che non siano da essa stati adeguatamente istruiti. I bambini devono essere sorvegliati per assicurarsi che non giochino con il prodotto. Non utilizzate il termoventilatore in stanze sature di gas esplosivi, di vapori generati da solventi e vernici o comunque di vapori/gas infiammabili. 0,6m 0,6m 20 0,6m 21 Om het product van het armatuur te lossen, gaat u als volgt te werk: - Gebruik uw hand om de bovenste rib van het armatuur zoveel mogelijk baar beneden te duwen om het product te lossen en dit doordat u aan de bovenzijde trekt. - Zodra het product aan de bovenzijde werd losgemaakt, trekt u het gewoon naar boven om het van de basis te lossen. BELANGRIJK VOOR FRANKRIJK: Als het product aan een wand gemonteerd is, moet de elektrische aansluiting in overeenstemming met IMPORTANT FOR FRANCE: de bijgevoegde doorgevoerd worden doordat connection u de kabel doorsnijdt en een aansluitingsblok If the tekening product is wall mounted, the electrical must be made according to the enclosed tussen de productkabel en the de stroomtoevoer (zie afbeelding 6). the product cable and the electricity drawing, cutting cable and usinggebruikt a connection block between supply. Electrical tit Phase = brown L N Product’s d t bl Neutral = blue In humid rooms, bathrooms or kitchens, this connection block must be installed at least 25 cm from In vochtigethe kamers, badkamers keukens moet aansluitingsblok een afstand vanwith minstens 25 opening cm floor. The electricalofconnection mustdit also include the useop of a 2-pole switch a contact tot de vloerdistance geïnstalleerd worden. of at least 3 mm.De elektrische aansluiting moet eveneens het gebruik van een 2-polige schakelaar met een afstand tot de contactopening van minstens 3 mm impliceren. 5. Cable storage 5. Kabelopslag While the product is not in use, you can store the cable pushing it into the base of the product. Wanneer het product niet in gebruik is, kunt u de kabel bewaren doordat u hem in de basis van het pro Note that while the product is in operation, the cable must always be completely pulled out. duct duwt. Gelieve te noteren dat, wanneer het product in werking is, de kabel altijd helemaal uitgetrokken moet zijn. 6. Use of the heater See picture 5 6. Gebruik van het verwarmingstoestel (Zie afbeelding 5) 6.1 Version with switch and thermostat 6.1 Uitvoering met schakelaar en thermostaat The heater has 2 knobs controlling the switch and the thermostat. Het verwarmingstoestel heeft 2 knoppen, die de schakelaar en de thermostaat besturen. The switch knob5 has 5 positions, to maakt select the power setting. De schakelaarknop heeft standen, die hetallowing mogelijk om desired het gewenste vermogen in te stellen. Starting from “_” the draait “¿” position, turn the thermostat knob clockwise until you hear a totdat "click”: the Uitgaande van de stand u de thermostaatknop in de richting van de wijzers van de klok appliance starts working at thete desired power setting. u een "klik” hoort: het apparaat begint functioneren bij het gewenste, ingestelde vermogen. The thermostat thekamertemperatuur desired room temperature on and off automatically De thermostaat handhaaft maintains de gewenste door het switching apparaat automatisch in en uit te the appliance. The more the knob is turned clockwise, the higher is is, thehoe maintained temperature. schakelen. Hoe meer de knop in de richting van de wijzers van de klok gedraaid hoger de gehandMaximum thermostat setting corresponds at about 30°C; “¿” position corresponds to approximately haafde temperatuur is. Een maximale instelling van de thermostaat komt overeen met ongeveer 30°C; 5°C. stand “_” stemt ongeveer met 5°C overeen. For correct use of the thermostat , see section “ USE OF THE THERMOSTAT” Voor een correct gebruik van de thermostaat, verwijzen wij naar paragraaf “GEBRUIK VAN DE THERMOSTAAT” 6.3 Gebruik van de thermostaat In een kamer, waar de temperatuur te hoog is (meer dan 30°C), is het normaal dat de thermostaat het verwarmingstoestel niet zal inschakelen. In een kamer, waar de temperatuur te laag is (ongeveer 5°C of zelf minder) is het ook normaal dat de thermostaat het apparaat in werking zal houden totdat de temperatuur stijgt. Om de rechtse stand van de thermostaat te selecteren, stellen wij voor - de thermostaat (in de richting van de wijzers van de klok) in de maximumstand te draaien; 7. Safety in the event of the product not functioning normally - het apparaat te laten functioneren totdat een comfortabele temperatuur bereikt is; - de knop tegen de richting van de wijzers van de klok in te draaien totdat u een "klik" hoort en het In the event of overheating, the safety system will automatically turn off the heating elements and the apparaat stopt; motor. If this happens: - de knop (alleen maar een beetje) terug in de richting van de wijzers van de klok te draaien: in deze stand - switchdeoffdoor the fan heater using the main switch;temperatuur handhaven. zal de thermostaat u geselecteerde, comfortabele - remove the cause of overheating (i.e. obstacles in front of the air inlet or air outlet grilles, unusual accumulations of dirt, etc); 7. Veiligheid het product niet normaal - indien let the heater cool down for 15/20 minutes;functioneert In geval van oververhitting zal het veiligheidssysteem de verwarmingselementen en de motor automa- switch on the fan heater and check it is functioning properly. tisch uitschakelen. Als dit gebeurt: - schakelt uIfde warmeluchtventilator uit door de hoofdschakelaar gebruiken; you notice irregular operation, damage to the heating te element or to the structure of the appliance, - verhelpt u de oorzaak van de oververhitting (d.w.z. hindernissen vooraan de luchtinlaatof luchtuitlaatdisconnect the product from the mains power supply and contact your technical assistance center or dealer. roosters, ongewone ophopingen van vuil etc.); - laat 8. u het verwarmingstoestel 15 tot minuten lang afkoelen; Maintenance - schakelt u de warmeluchtventilator in en gaat u na, of deze naar behoren functioneert. Indienu een onregelmatige werking, aan hetmaintenance. verwarmingselement of aan de structuur van het This heater does not requireschade any particular apparaat waarneemt, verbreekt u het product van de netvoeding en neemt u met uw technisch support We recommend you clean the air inlet and air outlet grilles at least twice a year with a vacuum center of speciaalzaak contactdust op. from the motor and the heating elements. cleaner, to remove L If the heater needs to be repaired, please contact an authorized center. 8. Onderhoud If the cable is to be changed, please remember that a 2x1m2 H05VV-F <HAR> cable must be used. Dit verwarmingstoestel vereist geen specifiek onderhoud. Wij raden u aan, de luchtinlaat- en luchtuitlaatroosters minstens twee keer per jaar met een stofzuiger te reinigen om stof van de motor en van de verwarmingselementen te verwijderen. Indien het verwarmingstoestel gerepareerd dient te worden, verzoeken wij u, een geautoriseerde klantenservice te contacteren. Indien de kabel vervangen dient te worden, let er dan op dat een 2x1m² H05VV-F <HAR> kabel gebruikt moet worden. 6.2 Model with thermostat and 60' timer has 2 knobs. The 6.2 Model metheater thermostaat en 60' timer Turn the timer heeft knob 2clockwise Het verwarmingstoestel knoppen.to select the working time you prefer from 5 to 60'. The heater starts working atinfull (2000W) thermostat doesn’t influence the functioning; Draai de timerknop depower richting van deand wijzers van desetting klok om de door u geprefereerde duur van de van After the60selected the heater automatically turnbegint to midtepower (1000W),bijthermostatically werking 5 tot minutenperiod te selecteren. Hetwill verwarmingstoestel functioneren een maxicontrolled according to instelling the thermostat setting. For the oefent use of the thermostat seedesection 6.3.uit. maal vermogen (2000 W) en een van de thermostaat geen invloed op werking When the heater working under timer control at full power, thedethermostat doesn't control the room Na degeselecteerde periodeiszal het verwarmingstoestel, bestuurd door thermostaat in overeenstemtemperature. In this condition, doautomatisch not use thenaar heater small rooms when they areW)occupied ming met de instelling van de thermostaat, het in gemiddelde vermogen (1000 overga- by persons notvan capable of leaving the room onwij their own, unless constant supervision is provided. an. Voor het gebruik de thermostaat verwijzen naar paragraaf 6.3. Wanneer het verwarmingstoestel met timerbesturing bij maximaal vermogen functioneert, bestuurt de 6.3 Usedeofkamertemperatuur the thermostat niet. Gelieve in dit geval het verwarmingstoestel niet in kleine kamers thermostaat room where temperature is too highpersonen, (more than it staat is normal that de thekamer thermostat will not In awanneer te gebruiken dezethe betrokken worden door die30°C), niet in zijn om zonder switch tenzij on thepermanent heater. hulp te verlaten, toezicht voorzien is. In a room where the temperature is too low (around 5°C or even less) it is also normal that the thermostat will keep the appliance working until the temperature gets higher. To select the right thermostat position we suggest you to -turn the thermostat in maximum position (clockwise); -leave the appliance working until the comfortable temperature is reached; -turn the knob anti clockwise until you hear a "click" and the appliance stops; -turn clockwise again the knob (just a little): in this position the thermostat will maintain the comfortable temperature you have selected. 22 23 Kundenservice: - GB - Environment and recycling Please help us to protect the environment by disposing of the packaging in accordance with the national regulations for waste processing. Recycling of obsolete appliances Appliances with this label must not be disposed off with the general waste. They must be collected separately and disposed off according to local regulations. -I- Tutela dell'ambiente e riciclaggio Affinché il vostro apparecchio non subisca danni durante il trasporto, esso è stato imballato con cura. Per contribuire alla tutela del nostro ambiente, vi chiediamo di smaltire in modo appropriato il materiale utilizzato per l'imballaggio dell'apparecchio. Smaltimento degli apparecchi usati Gli apparecchi che recano il contrassegno riportato a fianco non devono essere smaltiti insieme ai rifiuti urbani, ma vanno raccolti e smaltiti separatamente. Lo smaltimento degli apparecchi usati va eseguito a regola d'arte, in conformità con le prescrizioni e leggi vigenti localmente in materia. Sollte Ihr Gerät wider Erwarten einmal den Kundendienst benötigen, wenden Sie sich bitte an nachfolgende Anschrift. Wir werden dann im Garantiefall die Abholung veranlassen. Das Gerät muss transportfähig verpackt sein. Unfreie Pakete können nicht angenommen werden! STEBA Elektrogeräte GmbH & Co KG Pointstr. 2, 96129 Strullendorf / Germany Vertrieb-Tel.: 09543 / 449-17 / -18, Service-Tel.: 09543 / 449-44, Fax: 09543 / 449-19 e-Mail: [email protected] Internet: http://www.steba.com Achtung! Elektrogeräte dürfen nur durch Elektro-Fachkräfte repariert werden, da durch unsachgemäße Reparaturen erhebliche Folgeschäden entstehen können. - NL - Milieu en recycling Wij verzoeken u ons bij de bescherming van het milieu behulpzaam te zijn. Verwijder de verpakking daarom overeenkomstig de voor de afvalverwerking geldende nationale voorschriften. Recycling van oude toestellen Toestellen met dit kenmerk horen niet thuis in de vuilnisbak en zijn apart in te zamelen en te recyclen. De recycling van oude toestellen moet steeds vakkundig en volgens de ter plaatse geldende voorschriften en wetgeving plaats vinden. -F- Environnement et recyclage Nous vous demandons de nous aider à préserver l'environnement. Pour ce faire, merci de vous débarrasser de l'emballage conformément aux règles nationales relatives au traitement des déchets. Collecte et recyclage des produits en fin de vie Les appareils munis de ce symbole ne doivent pas être mis avec les ordures ménagères, mais doivent être collectés séparément et recyclés. La collecte et le recyclage des produits en fin de vie doivent être effectués selon les dispositions et les décrets locaux. -D- Entsorgung von Altgeräten in Deutschland Geräte mit dieser Kennzeichnung gehören nicht in die Restmülltonne und sind getrennt zu sammeln und zu entsorgen. Die Hersteller sorgen im Rahmen der Produktverantwortung für eine umweltgerechte Behandlung und Verwertung der Altgeräte. Im Rahmen des Elektro- und Elektronikgerätegesetzes (ElektroG) und zum Schutz unserer Umwelt ist eine kostenlose Rückgabe bei Ihrer kommunalen Sammelstelle möglich. -E- Medio ambiente y reciclaje Ayúdenos a proteger el medio ambiente eliminando el embalaje con arreglo a la legislación nacional sobre tratamiento de residuos. Eliminación de aparatos viejos No tirar los aparatos que lleven esta identificación junto con la basura no clasificada. Se deben recoger y eliminar de forma especial. La eliminación de aparatos viejos se debe realizar de forma adecuada y competente, de acuerdo con las normas y leyes locales vigentes. Please retain these instructions in a safe place for future reference. Si prega di conservare con cura questo libretto di istruzioni per future consultazioni. Bewaar deze gebruiksaanwijzing zorgvuldig voor toekomstig gebruik. Conserver cette notice pour toute consultation ultérieure. Es wird gebeten, diese Gebrauchsanleitung für ein zukünftiges Nachschlagen sorgfältig aufzubewahren. Conservar las instruccione de uso. Pikkolo_STD/19052010/R2 24 25-
 1
1
-
 2
2
-
 3
3
-
 4
4
-
 5
5
-
 6
6
-
 7
7
-
 8
8
-
 9
9
-
 10
10
-
 11
11
-
 12
12
-
 13
13
-
 14
14


Steba Pikkolo 60 T 3 de handleiding
- Type
- de handleiding
- Deze handleiding is ook geschikt voor
in andere talen
Gerelateerde papieren
Andere documenten
-
Honeywell BH-777FTE Handleiding
-
Honeywell FH-973E de handleiding
-
Adler AD 7708 de handleiding
-
Dyson AM04 de handleiding
-
EWT M2GTS de handleiding
-
Philips Fan HD 3274/75 Handleiding
-
Solac TH8322 Data papier
-
Solis 689 Handleiding
-
Rowenta IR 5010 FO de handleiding
-