STIEBEL ELTRON BHE 50-175 (T) Plus Operation Instruction
- Type
- Operation Instruction

OPERATION AND INSTALLATION
UTILISATION ET INSTALLATION
GEBRUIK EN INSTALLATIE
Bad-/Handtuch-Heizkörper
|
Bathroom radiator/towel rail
|
Chauffe-serviettes
|
Bad-/
handdoekradiator
»
BHE 50 Plus
»
BHE 75 Plus
»
BHE 100 Plus
»
BHE 175 T Plus

2
Inhalt
Sicherheitshinweise
. . . . . . . . . . . . . . . . . . . . . . . . . . . . . . . . . . . . . . . . . . . . . . . . . . . .
.
3
Installation
. . . . . . . . . . . . . . . . . . . . . . . . . . . . . . . . . . . . . . . . . . . . . . . . . . . . . . . . . . . .
.
4
Geräteinstallation
. . . . . . . . . . . . . . . . . . . . . . . . . . . . . . . . . . . . . . . . . . . . . . . . . . . . .
.
4
Montage
. . . . . . . . . . . . . . . . . . . . . . . . . . . . . . . . . . . . . . . . . . . . . . . . . . . . . . . . . . . .
.
5
Heizkreisanschluss
. . . . . . . . . . . . . . . . . . . . . . . . . . . . . . . . . . . . . . . . . . . . . . . . . . . .
.
7
Das Gerät anschließen
. . . . . . . . . . . . . . . . . . . . . . . . . . . . . . . . . . . . . . . . . . . . . . . . .
.
8
Verwendung des Aufhängers
. . . . . . . . . . . . . . . . . . . . . . . . . . . . . . . . . . . . . . . . . . . .
.
8
Wartung
. . . . . . . . . . . . . . . . . . . . . . . . . . . . . . . . . . . . . . . . . . . . . . . . . . . . . . . . . . . .
.
8
Reinigen des Heizlüfters
. . . . . . . . . . . . . . . . . . . . . . . . . . . . . . . . . . . . . . . . . . . . . . . .
.
9
Arbeitsweise
. . . . . . . . . . . . . . . . . . . . . . . . . . . . . . . . . . . . . . . . . . . . . . . . . . . . . . . . .
.
9
Benutzung
. . . . . . . . . . . . . . . . . . . . . . . . . . . . . . . . . . . . . . . . . . . . . . . . . . . . . . . . . . .
.
10
Winterbetrieb am Heizkreis
. . . . . . . . . . . . . . . . . . . . . . . . . . . . . . . . . . . . . . . . . . .
.
10
Benutzung
. . . . . . . . . . . . . . . . . . . . . . . . . . . . . . . . . . . . . . . . . . . . . . . . . . . . . . . . .
.
10
Erstinbetriebnahme
. . . . . . . . . . . . . . . . . . . . . . . . . . . . . . . . . . . . . . . . . . . . . . . . . .
.
11
Ein-/Aus Schalter
. . . . . . . . . . . . . . . . . . . . . . . . . . . . . . . . . . . . . . . . . . . . . . . . . . . .
.
11
Das Gerät ein-/ausschalten
. . . . . . . . . . . . . . . . . . . . . . . . . . . . . . . . . . . . . . . . . . . .
.
11
Bedientasten verriegeln
. . . . . . . . . . . . . . . . . . . . . . . . . . . . . . . . . . . . . . . . . . . . . . .
.
11
Beschreibung der Modi
. . . . . . . . . . . . . . . . . . . . . . . . . . . . . . . . . . . . . . . . . . . . . . .
.
12
ProgActive
. . . . . . . . . . . . . . . . . . . . . . . . . . . . . . . . . . . . . . . . . . . . . . . . . . . . . .
.
12
ProgInactive
. . . . . . . . . . . . . . . . . . . . . . . . . . . . . . . . . . . . . . . . . . . . . . . . . . . . .
.
12
Temperatur einstellen
. . . . . . . . . . . . . . . . . . . . . . . . . . . . . . . . . . . . . . . . . . . . . . . .
.
13
Das Menü
. . . . . . . . . . . . . . . . . . . . . . . . . . . . . . . . . . . . . . . . . . . . . . . . . . . . . . . . . . . .
.
14
BOOST Arbeitsweise
. . . . . . . . . . . . . . . . . . . . . . . . . . . . . . . . . . . . . . . . . . . . . . . . .
.
14
Die interne Programmierung verwenden
. . . . . . . . . . . . . . . . . . . . . . . . . . . . . . . . .
.
15
Die Programme verändern
.
.
.
.
.
.
.
.
.
.
.
.
.
.
.
.
.
.
.
.
.
.
.
.
.
.
.
.
.
.
.
.
.
.
.
.
.
.
.
.
.
.
15
Ein Programm kopieren
. . . . . . . . . . . . . . . . . . . . . . . . . . . . . . . . . . . . . . . . . . . .
.
15
Das EXPERT-Menü
. . . . . . . . . . . . . . . . . . . . . . . . . . . . . . . . . . . . . . . . . . . . . . . . . . .
.
16
Problembehandlung
. . . . . . . . . . . . . . . . . . . . . . . . . . . . . . . . . . . . . . . . . . . . . . . . . .
.
18
Eigenschaften
. . . . . . . . . . . . . . . . . . . . . . . . . . . . . . . . . . . . . . . . . . . . . . . . . . . . . . . .
.
19
Geräteentsorgung
. . . . . . . . . . . . . . . . . . . . . . . . . . . . . . . . . . . . . . . . . . . . . . . . . . . .
.
20
Entsorgung von Transport- und Verkaufsverpackungsmaterial
. . . . . . . . . . . . . . .
.
20
Entsorgung von Altgeräten in Deutschland
. . . . . . . . . . . . . . . . . . . . . . . . . . . . .
.
20
Entsorgung außerhalb Deutschlands
. . . . . . . . . . . . . . . . . . . . . . . . . . . . . . . . . .
.
20
Garantiebedingungen
. . . . . . . . . . . . . . . . . . . . . . . . . . . . . . . . . . . . . . . . . . . . . . . . .
.
21

3
DE
Sicherheitshinweise
Achtung sehr heißer Bereich. Vorsicht heiße Ober
-
Achtung sehr heißer Bereich. Vorsicht heiße Ober
Achtung sehr heißer Bereich. Vorsicht heiße Ober
ÁlFKH
ACHTUNG: Einige Teile dieses Produktes können heiß
werden und Verbrennungen verursachen. Besondere
Aufmerksamkeit in der Gegenwart von Kindern und
gefährdeten Menschen.
- Von diesem Gerät sollten Kinder unter 3 Jahren entfernt gehalten
werden, sofern sie nicht unter ständiger Beobachtung stehen
.
- Kinder zwischen 3 und 8 Jahre dürfen das Gerät nur an- oder ausschal
-
ten, soweit dieses in einer normalen Position montiert wurde und
wenn diese Kinder beaufsichtigt werden oder Anweisungen zur siche
-
ren Verwendung des Gerätes erhielten und die möglichen Gefahren
verstehen
.
Kinder zwischen 3 und 8 Jahren dürfen das Gerät nicht
.
anschliessen oder anpassen oder das Gerät reinigen und die Benut-
zerwartung durchführen
.
-Dieses Gerät kann durch Kinder von mindestens 8 Jahre und von Per
-
-Dieses Gerät kann durch Kinder von mindestens 8 Jahre und von Per
-Dieses Gerät kann durch Kinder von mindestens 8 Jahre und von Per
sonen mit reduzierten physischen, sensorischen oder geistigen Fähig
-
keiten verwendet werden, wenn sie korrekt überwacht werden oder
Anweisungen erhalten, das Gerät sicher zu bedienen und wenn die
Risiken erklärt wurden
.
.LQGHUGUIHQQLFKWPLWGHP*HUlWVSLHOHQ5HLQLJXQJXQG3ÁHJHGDUI
nicht von Kindern ohne Aufsicht durchgeführt werden
.
-
Das Gerät muss nach den Regeln und Normen durch eine autori
-
sierte Person verbunden oder angeschlossen werden
.
- Wenn das Netzkabel beschädigt, muss es durch den Hersteller, seinen
.XQGHQGLHQVWRGHUHLQHlKQOLFKTXDOLÀ]LHUWH3HUVRQXPMHGH*HIDKU
zu vermeiden ersetzt werden
.
- Die Bedienanleitung dieses Gerätes ist auf der unten angegebenen
Internetseite des Herstellers verfügbar
.
seite des Herstellers verfügbar
seite des Herstellers verfügbar
-
Um eine einwandfreie Funktion des Heizlüfters zu gewährleisten
MHQDFK0RGHOOGDUIGHU/XIWDXVODVVQLFKWEORFNLHUWRGHUDEJHGHFNW
ZHUGHQ]%+DQGWXFK'DVZUGHHLQH6LFKHUKHLWVDEVFKDOWXQJGHV
Heizlüfters bewirken
.
Attention :
Surface très
chaude
Caution
hot surface

4
Die mit diesem Symbol gekennzeichneten Geräte dürfen
nicht mit dem Hausmüll entsorgt werden
.
Das Sammeln und das Recycling von Altgeräten muss nach
den Bestimmungen und örtlichen Vorschriften vorgenom
-
men werden
.
-
Den Bademantel nicht über das Bedienfeld hängen
.
-
Bevor Sie das Gerät warten oder reinigen, es zuerst ausschalten und
abkühlen lassen
.
Verwenden Sie niemals scheuernde Produkte oder
.
/|VXQJVPLWWHO
-
Der Betriebsdruck ist maximal 4 bar
.
Betriebsdruck ist maximal 4 bar
Betriebsdruck ist maximal 4 bar
-
Wenn das Gerät an einen Heizkreis angeschlossen wird, muss das
Gerät mit dem Entlüftungsventil richtig entlüftet werden, um eine
komplette Befüllung durch das Heizungswasser zu gewährleisten
.
-
Im Modus Zentralheizung muss das Zulaufventil
a
offen sein
.
Eine
.
Nichtbeachtung führt zum Erlöschen der Garantie
.
-
Das Rücklaufventil
b
PXVVLQMHGHP)DOORIIHQEOHLEHQXP$XVGHKQXQJ
des Heizwasser in den Heizkreis zu erlauben
.
Ansonsten kann das
.
Gerät zerstört werden
.
Wo soll das Gerät installiert werden
'LHVHV*HUlWLVWIUHLQH:RKQUDXPLQVWDOODWLRQEHVWLPPW)UMHJOL-
chen sonstigen Standort lassen Sie sich bitte von Ihrem Händler bera-
ten.
- Die Installation muss nach dem neuesten Stand der Technik und den
im Installationsland geltenden Normen erfolgen.
- Das Gerät ist unter Beachtung der Mindestabstände in Bezug auf
andere Einrichtungen zu montieren.
-Kein Regal über dem Gerät installieren.
Unzulässige Installationsorte sind:
VROFKHPLW'XUFK]XJZHOFKHUVLFKVW|UHQG
auf die Regelung auswirken (mechanische
=ZDQJVEHOIWXQJXVZ
GERÄTEINSTALLATION
Installation

5
DE
Schutzbe
-
reich 1
Keine elektrischen
Geräte
Schutzbe
-
reich 2
Elektrogerät IPX4
(Norm EN 60335-2-43
$
Schutzbereich
Schutzbereich
Schutzbereich
> 250 mm
> 250 mm
> 200 mm
> 150 mm
Bei der Montage des Gerätes die Si
Bei der Montage des Gerätes die Si
-
cherheitsabstände zu Gegenständen
cherheitsabstände zu Gegenständen
einhalten
.
Kein Regalbrett über dem Gerät an
-
bringen
.
Das Bedienfeld muss mindestens 5
mm von der Wand entfernt bleiben
.
MONTAGE
Montage der Wandhalterung
Bohren Sie die Bohrlöcher und versehen
Sie sie mit Dübeln
.
Montieren Sie
die Wandhalterung
.
Angaben in mm
B
C
A
BHE 50 Plus
BHE 75 Plus
BHE 100 Plus
BHE 175 T Plus
A
708
1200
1446
1200
B
467
467
517
467
C
>480
>480
>480
>480

6
Wandhalterung :
Achten Sie bei der Montage der Wandhalterung auf die senkrechte Ausrichtung
..
Verbindung von Wandhalterung und Gerät
.
Hängen Sie das Gerät auf die Wandhalterung
.
Schieben Sie die Abdeckung über die Wandhalterung, um das Gerät zu verriegeln
.

7
DE
Massangaben in mm
HEIZKREISANSCHLUSS
a
b
115
mini
245
1/2 GAZ 15/21 F
137,5
500/750/1750W : 332.5
1000W : 372.5
500/750/1000W : 102 min-109 max
1750 W: 115 min-122 max
min
min
480
200
VORDERANSICHT
SEITENANSICHT
Stutzen
1/2 Gas 15/21 F
MITTE GERÄT
WASSEREINLAUF
WASSERAUSLAUF
WANDANSCHLUSS
BODENANSCHLUSS
-
Bei Einbindung in die Warmwasser-Zentralheizung
lassen Sie vor der Gerätemontage das werkseitig
eingefüllte Wärmeträgermedium ab
.
-
Entfernen Sie dazu die Verschlusskappen an
denVor-und Rücklaufstutzen des Gerätes
.
-
Sie können das Wärmeträgermedium aufgrund
seiner schwachen Konzentration über die
Kanalisation entsorgen
.
-
Für den Anschluss an einen Heizkreis verfügt das Gerät unten über
6WXW]HQ PLW ,QQHQJHZLQGH ô´ *DV ) 'LH 5LFKWXQJ GHV
:DVVHUÁXVVHVEHUFNVLFKWLJHQ6FKHPDVLHKHXQWHQ

8
DAS GERÄT ANSCHLIESSEN
-
Das Gerät muss mit einer Spannung von 230V 50 Hz versorgt werden
.
-
Der Anschluß an die Stromquelle erfolgt mit dem Stecker
.
Anschluß an die Stromquelle erfolgt mit dem Stecker
Anschluß an die Stromquelle erfolgt mit dem Stecker
-
In feuchten Räumen wie Duschräumen und Küchen muß sich die
6WHFNGRVHPLQGHVWHQVFPYRP%RGHQEHÀQGHQ
-
Die Installation ist mit einer omnipolaren Vorrichtung, die eine
mindestens 3 mm große Kontaktöffnungsweite erlaubt, auszurüsten
.
-
Der Erdungsanschluss ist verboten
.
-
Sollte das Netzkabel zu kurz oder beschädigt sein, muss es
ausgetauscht werden
.
Dies erfordert Spezialwerkzeug und muss von
.
HLQHUTXDOLÀ]LHUWHQ3HUVRQGXUFKJHIKUWZHUGHQXPMHJOLFKHV5LVLNR
zu vermeiden
.
'DPLWGDV*HUlWOHLVWXQJVVWDUNEOHLEWPXVVHVHWZD]ZHLPDOMlKUOLFK
von Staub befreit werden
.
Zu diesem Zweck dürfen keine abrasiven
.
Produkte verwendet werden
.
WARTUNG
MONTAGE DES AUFHÄNGERS
Den Aufhänger 1 mit Unterlegscheibe 2 und Pressteil 3 am gewünschten Ort festschrauben
.

9
DE
ARBEITSWEISE
WINTER
Der Heizkreis des Kessels arbeitet,
Das Bedienfeld regelt nicht, nur die BOOST
7DVWHLVWDNWLYEHL%+(73OXV
Der Heizwiderstand arbeitet nicht und ist
stromlos
.
Die Kesselsteuerung reguliert die Heizung
.
Das Zulaufventil
a
muss offen sein
.
Das Rücklaufventil
b
muss offen sein
.
SOMMER
Der Heizkreis des Kessels arbeitet nicht,
Das Bedienfeld ist komplett aktiviert,
Der Heizwiderstand arbeitet nach den Vor
-
zwiderstand arbeitet nach den Vor
zwiderstand arbeitet nach den Vor
gaben des Bedienfelds,
Die Kesselsteuerung regelt nicht
.
Das Zulaufventil
a
muss geschlossen sein
.
Das Rücklaufventil
b
muss offen sein
.
a
b
a
Zulaufventil für warmes Heizwas
-
ser (Thermostatventil möglich)
b
Rücklaufventil
REINIGEN DES HEIZLÜFTERS
5HLQLJHQ6LHGLH/XIWHLQXQGDXVWULWWV|IIQXQJHQGHV6FKQHOOKHL]HUVUH
-
JHOPlLJPLWHLQHP6WDXEVDXJHU$QGHU/XIWHLQWULWWVVHLWHGHV6FKQHOO
-
KHL]HUVEHÀQGHWVLFKHLQ6WDXEÀOWHU:HQQGHU6WDXEÀOWHUYHUVFKPXW]W
ist, schaltet sich der Schnellheizer aus und die Anzeige „Err 6“ wird
angezeigt
.
5HLQLJHQ6LHGHQ6WDXEÀOWHUUHJHOPlLJ
Schalten Sie das Gerät aus, indem Sie den Betriebsschalter drücken
.

10
Benutzung
WINTERBETRIEB AM HEIZKREIS
F
ür den Winterbetrieb muss das Gerät in den Modus Zen
-
tralheizung gestellt werden.
Zugang zum Menü
Zentral
Programm
Programm
Winterfunktion ein- oder ausschalten Heizung
In dem Modus ist es möglich :
-
Das Gerät beheizen
: das Zulaufventil a muss offen sein
-
Die Temperatur regeln
: den Thermostatknopf entsprechend einstellen
-
BOOST
F
unktion einschalten
-
Die Bedientasten verriegeln.
-
Temperatur erhöhen oder senken,
ohne Bestätigung
-
die Dauer des Boost einstellen
-
in den Menüs wechseln
-
In den Untermenüs wechseln
-
Bestätigen
-
Ausschalten
-
Sperren, Entsperren
-
Zurück zum vorherigen Schirm
-
Boost ein- oder ausschalten
BENUTZUNG

11
DE
Die Sprache wählen, dann das Datum und die Uhrzeit einstellen
.
-
Ab Werk ist
-
Die Programmierung nicht aktiv
-
Die Temperatur auf 19°C eingestellt
ERSTINBETRIEBNAHME
Um ungewollte Bedienung z
.
B
.
durch Kinder zu vermeiden, können
.
die Tastfelder des Gerätes durch längeres Drücken von verriegelt
werden
.
«Verriegeln»
wählen und mit bestätigen
.
Zum Verriegeln gleich verfahren, „Entriegeln“ wählen und mit
bestätigen
.
BEDIENTASTEN VERRIEGELN
Um das Gerät auszuschalten, länger auf die Taste
.
drücken
.
.
Ausschalten“ durch Druck auf bestätigen
.
DAS GERÄT EIN-/AUSSCHALTEN
(LQ 1HW]VFKDOWHU EHÀQGHW VLFK DXI GHU 5FNVHLWH GHV %HGLHQIHOGV 'HQ
Netzschalter nur bei einer längeren Nichtbenutzung ausschal
-
ten
DXVVHUKDOEGHU+HL]SHULRGH
Den Schalter auf I stellen, um das Gerät unter Spannung zu setzen
.
Wenn
.
das Gerät abgeschaltet wurde, kann eine erneute Einstellung von Datum
und Uhrzeit nötig sein
.
EIN-/AUS SCHALTER

12
2 Arbeitsarten stehen zur Verfügung :
P
ROG
A
CTIVE
'DV*HUlWDUEHLWHWQDFKGHULQWHUQHQ3URJUDPPLHUXQJIUMHGHQ7DJ
$E:HUNVLQGIROJHQGH=HLWHQGHÀQLHUW
Montag bis Freitag : Komfort von 6 - 9 Uhr und von 18 - 21 Uhr
.
Montag bis Freitag : Komfort von 6 - 9 Uhr und von 18 - 21 Uhr
Montag bis Freitag : Komfort von 6 - 9 Uhr und von 18 - 21 Uhr
Samstag / Sonntag : Komfort von 8 - 12 Uhr und von 18 - 21 Uhr
.
Samstag / Sonntag : Komfort von 8 - 12 Uhr und von 18 - 21 Uhr
Samstag / Sonntag : Komfort von 8 - 12 Uhr und von 18 - 21 Uhr
Diese Zeiten können geändert werden, wobei 3 Komfortzeiträume
pro Tag möglich sind
.
Für die Komfortzeiten wird die Solltemperatur mit
oder
gewählt
oder
.
Auusserhalb der Komfortzeiten wird die ECO Temperatur als Vorgabe
gesetzt, die im Menü «Temp
.
ECO» eingestellt wird
.
P
ROG
I
N
A
CTIVE
-
Das Gerät arbeitet dauernd mit der gewählten Solltemperatur
BESCHREIBUNG DER MODI

13
DE
Im Modus Prog Inactive
Im Modus Prog Inactive
:
19.
0
°
-
mit
HUK|KHQPD[&
-
mit
VHQNHQPLQ&
-
mit bis Frostschutz absenken (ca
.
7°C, nicht
HLQVWHOOEDU
-
mit bis ‘Sommer’ (Gerät heizt nicht, Boost ist
P|JOLFK
Im Modus Prog Active :
Im Modus Prog Active :
PROG
Mon
12:14
19.
0
°
Wenn der Schirm PROG anzeigt, arbeitet das Gerät im
Programmodus auf Komfort Niveau
.
-
mit
HUK|KHQPD[&
-
mit
VHQNHQPLQ&
Wenn der Schirm PROG ECO anzeigt, arbeitet das
Gerät im Programmodus auf ECO Niveau
.
Ab Werk ist
.
die ECO Temperatur auf 3
.
5° unter Komfort eingestellt
.
Die ECO Temperatur kann zeitweise geändert werden
und diese gilt bis zum nächsten Komfort Zeitraum
$Q]HLJH352*$EZHL
Der Wert der ECO Absenkung kann im Menü bei ‘Senk
T° ECO’ eingestellt werden
.
:HQQGLH)URVWVFKXW]WHPSHUDWXU&HLQJHVWHOOWLVW
wird die Programmierung unterbrochen
.
Diese Temperatur bei der Rückkehr ändern, damit die
Programmierung wieder arbeitet
.
Wenn die Temperatur weiter gesenkt wird, erscheint
‘Sommer’ und das Gerät heizt nicht mehr
.
‘Sommer’ und das Gerät heizt nicht mehr
‘Sommer’ und das Gerät heizt nicht mehr
Die Boost
.
Funktion ist aktiv
.
Funktion ist aktiv
Funktion ist aktiv
PROG ECO
Mon
17:14
15.5°
PROG Abwei.
Start in
18:00
18.5°
PROG Frost
7.0°
Programmierung
unterbrochen
TEMPERATUR EINSTELLEN
Som

14
Das Menü
Zugriff auf das Menü durch Druck auf
Zentral
Programm
Programm
Programmfunktion aktivieren oder abschalten.
Montag...
Sonntag
Datum/Uhrzeit
Ausschalten
Gerät in Bereitschaftbetrieb schalten.
Einstellungen
Datum, Uhrzeit einstellen, automatische
Umstellung Sommer/Winterzeit aktivieren.
Senk.
T° ECO
Absenkung der ECO Temperatur im Vergleich zur
Komfort Temperatur ( von -1°C bis -0°C, ab
Werk -3.5°C ).
Zur Einstellung der Komfortemperaturzeiträume
an einem Tag der Woche (3 Zeiträume möglich)
danach die Zeiträume auf die anderen Tage
kopieren.
Winterfunktion ein- oder ausschalten Heizung.
0LW GLHVHU )XQNWLRQ KHL]W GDV *HUlW PLW YROOHU/HLVWXQJ XP GDV %DGH]LPPHU VFKQHOO ]X
erwärmen
.
Auf die Taste drücken
.
Die Dauer mit und einstellen
.
..
Mit Heizlüfter : Dauer zwischen 10 und 60 Minuten einstellbar ;
Ohne Heizlüfter : Dauer einstellbar zwischen 15 und 120 Minuten
.
Erneut auf die Taste drücken, um die Funktion vor der eingestellten Dauer abzubrechen ( ab
:HUN(LQVWHOOXQJ0LQXWHQLP0HQ([SHUWHLQ]XVWHOOHQ
Am Ende der eingestellten Dauer geht das Gerät wieder in den Normalbetrieb über
.
Am Ende der eingestellten Dauer geht das Gerät wieder in den Normalbetrieb über
Am Ende der eingestellten Dauer geht das Gerät wieder in den Normalbetrieb über
BOOST ARBEITSWEISE

15
DE
Ihr Gerät ist mit einer Funktion ausgestattet, die es Ihrem Gerät bei Verwendung der Pro
-
grammierung ermöglicht, die Vorheizzeit selbsttätig zu lernen
.
Wenn Sie die Komfortzeiträume programmiert haben, wird das Gerät die nötige Zeit zum
Erreichen der Komforttemperatur berücksichtigen
.
Die Beheizung erfolgt also bereits früher, um die Komforttemperatur zu der programmier
-
Die Beheizung erfolgt also bereits früher, um die Komforttemperatur zu der programmier
Die Beheizung erfolgt also bereits früher, um die Komforttemperatur zu der programmier
WHQ=HLW]XHUUHLFKHQ9RUODXI]HLW]ZLVFKHQXQG0LQXWHQ
D
IE
P
ROGR
A
MME
VERÄN
D
ERN
6LHN|QQHQIUMHGHQ7DJGHU:RFKHELV]X.RPIRUWWHPSHUDWXUEHUHLFKHHLQVWHOOHQ$XHU
-
6LHN|QQHQIUMHGHQ7DJGHU:RFKHELV]X.RPIRUWWHPSHUDWXUEHUHLFKHHLQVWHOOHQ$XHU
6LHN|QQHQIUMHGHQ7DJGHU:RFKHELV]X.RPIRUWWHPSHUDWXUEHUHLFKHHLQVWHOOHQ$XHU
halb der Komforttemperaturbereiche wird die Senkung der Temperatur im Programmmo
-
dus "Temp
.
ECO" eingestellt (
siehe Kapitel "Das Menü im PROG-Modus"
Den Tag mit
wählen
.
Bestätigen
.
.
.
.
Wählen
.
Bestätigen
.
.
.
.
Startzeitpunkt mit
oder
wählen
.
Bestätigen
.
.
Endzeitpunkt mit
.
oder
wählen
.
Bestätigen
.
.
.
.
E
IN
P
ROGR
A
MM
KO
P
IEREN
Sie können das Programm eines Tages auf einen oder mehrere Tage kopieren
.
Wählen
.
Bestätigen
.
.
Die Tage mit
oder
abrollen lassen
.
Den Tag, auf den Sie kopieren wollen, mit
.
bestätigen
.
Um die Kopie zu bestätigen, "Kopieren" wählen
.
Bestätigen
.
.
Beispiel: Kopie des Programms von Montag auf Dienstag,
Donnerstag, Freitag
.
Programm
Programm
Montag...Sonntag
Montag
Kopieren
Dien
Mitt
Donn
Frei
Sam
Son
DIE INTERNE PROGRAMMIERUNG VERWENDEN

16
Zur Einstellung von Datum, Uhrzeit
Zum Einstellen der Sprache.
EINSTELLUNGEN
Beschränkungen
Höchsttemp.
Zugangskontr.
Zur Anpassung der Solltemperatur an die im Zimmer
gemessene Temperatur, wenn Sie nach mehreren
Heizstunden einen Unterschied feststellen.
Der Kalibrierwert liegt zwischen 3° C unter und 3° C
über der eingestellten Temperatur.
z.B.: Wenn die Raumtemperatur = 18°C und die
eingestellte Temperatur = 20°C, wählen Sie -2,0°.
Allgemein
Ton
Zur Aktivierung oder Deaktivierung des Tastentons.
Um den Zugriff zu den Steuerungen zu beschränken.
Sie haben die Wahl zwischen einem umfassenden
Zugriff, einem auf die Temperatur beschränkten Zugriff
oder gar keinen Zugriff. Im letztgenannten Fall sind die
Steuerungen des Bedienfelds nicht mehr zugänglich.
Sprache
Um die Sprache auszuwählen.
Um eine maximale Nenntemperatur abzuspeichern,
die nicht überschritten werden darf (zwischen 22°C
und 28°C).
PIN-Code
Um die Abspeicherung eines persönlichen
Zugriffscodes zum Expertenmenü zu aktivieren oder
nicht.
Nach der Aktivierung ist der Zugriff zum
Expertenmenü verschlüsselt.
An dieser Stelle können Sie Ihren persönlichen Code
notieren
Um ihn zu deaktivieren, kehren Sie in das
Expertenmenü zurück, geben Sie Ihren persönlichen
Code ein und kehren Sie zurück zu Einstellungen =>
Beschränkungen => PIN-Code.
MENÜ
Zurücksetzen
Einstellfunktion
Eichung T°
Boost
Um die Dauer des Boost einzustellen : Dauer von 15
bis 120 Minuten .
Beleuchtung
In Bereitschaft die Hintergrundbeleuchtung des
Schirms ein- oder ausschalten.
Um auf die erweiterten Funktionen des Geräts Zugriff zu nehmen, gleichzeitig mehr als 3
Sekunden lang auf und auf drücken
.
.
.
Das EXPERT-Menü

17
DE
TEST
Anzeige der
Version
Leistung
Identität
Version
Prüfen der Funktion des Heizelements.
Information über die Leistung des Gerätes.
Identität des Gerätes.
Anzeige der Version.
Information

18
Problembehandlung
Die Raumtempera
-
tur entspricht nicht
der Anzeige
auf dem Gerät
Sie müssen mindestens 6 Stunden warten, bis die Temperatur sich
stabilisiert hat
.
Das Gerät heizt
nicht
.
Überprüfen Sie, ob der Komfort Modus wirklich aktiviert ist
.
Wenn Sie die Programmierung nutzen, stellen Sie sicher, dass das
Programmiermodul auf den Komfortmodus geschaltet ist
.
Ver
.
-
Ver
Ver
JHZLVVHUQ6LHVLFKGDVVGLH/HLVWXQJVVFKDOWHUGHU$QODJHHLQJHV
-
FKDOWHW VLQG E]Z GHU /DVWDEZXUIVFKDOWHU ZHQQ YRUKDQGHQ GLH
Stromversorgung des Geräts nicht unterbrochen hat
.
Überprüfen
.
6LH GLH /XIWWHPSHUDWXU LP 5DXP LVW VLH ]X KRFK OHXFKWHW GLH
Heizleuchte nicht - das Gerät heizt nicht
.
Das Gerät heizt
ständig
.
6WHOOHQ6LHVLFKHUGDVVGDV*HUlWNHLQHP/XIW]XJDXVJHVHW]WLVWXQG
die Temperatureinstellung nicht verändert wurde
.
Im Stromnetz kann es zu Störungen kommen
.
Bei Problemen
.
EORFNLHUWHU7KHUPRVWDWHWFWUHQQHQ6LHGLH6WURPYHUVRUJXQJ
GHV*HUlWV6LFKHUXQJ6FKXW]VFKDOWHUIUHWZD0LQXWHQXQG
schließen Sie es danach wieder an
.
Tritt das Problem wiederholt
.
auf, lassen Sie die Stromversorgung durch Ihr Energieversorgungs-
unternehmen überprüfen
.
Die Geräteober
-
Die Geräteober
Die Geräteober
ÁlFKHLVWVHKUKHL
Es ist normal, dass das Gerät während des Betriebs heiß wird,
GLH PD[LPDOH 2EHUÁlFKHQWHPSHUDWXU HQWVSULFKW GHQ VWUHQJHQ
Vorgaben der französischen Elektrizitätsnorm «NF Electricité
Performance»
.
Sind Sie dennoch der Auffassung, dass Ihr Gerät zu
.
KHLZLUGEHUSUIHQ6LHREGLH/HLVWXQJGHU*U|H,KUHV5DXPV
entspricht (wir empfehlen max
.
100 W/m2 bei einer Deckenhöhe
.
YRQPXQGGDV*HUlWNHLQHP/XIW]XJDXVJHVHW]WLVWGHUGLH
Regulierung stören könnte
.
Das Gerät heizt
nicht
ausreichend
.
Erhöhen Sie den Sollwert der Temperatur mit Hilfe der Taste
.
Ist die höchste Einstellung erreicht, überprüfen Sie folgendes:
- Ist ein weiteres Heizgerät im Raum aktiv?
+HL]WGDV*HUlWZLUNOLFKQXUGLHVHQ5DXP7UJHVFKORVVHQ"
- Ist die Stromversorgung des Geräts in Ordnung?
(QWVSULFKWGLH/HLVWXQJ,KUHV*HUlWVGHU5DXPJU|H
(wir empfehlen im Durchschnitt 100 W/m2 bei einer Deckenhöhe
YRQP
EXPERT Menü wird
nicht angezeigt
Sie haben einen PIN eingegeben
.
Mit dem PIN das Expert Menü
.
aufrufen
.
Wenn Sie den PIN vergessen haben, 081 eingeben
.
.
Das Gerät folgt nicht
der internen Pro
-
grammierung
Prüfen Sie, dass die Uhrzeit und das Datum eingestellt sind
.
Ist das
.
Gerät auf Prog Modus gestellt und Prog intern gewählt ?

19
Art.Nr. des Modells
BHE
Eigenschaft
Symbol
Einheit
Wert
Wärmeleistung
BHE
50
Plus
BHE
75
Plus
BHE
1
00
Plus
BHE
175T
Plus
Nennwärmeleistung
1HQQ:/
kW
W
0,5
500
0,75
750
1
1
000
1,75
1750
Minimale Wärmeleistung
0LQ:/
kW
W
0,5
500
0,75
750
1
1
000
1,75
1750
Maximale kontinuierliche Wär
-
Maximale kontinuierliche Wär
Maximale kontinuierliche Wär
meleistung
:/PD[F
kW
W
0,5
500
0,75
750
1
1
000
1,75
1750
Hilfsstromverbrauch
Bei nominaler Wärmeleistung
el max
kW
W
0,000
0,000
0,000
0,000
bei minimaler Wärmeleistung
el min
kW
W
0,000
0,000
0,000
0,000
Im Standby-Modus
el sb
kW
W
0,00028
0,28
0,00028
0,28
0,00028
0,28
0,00028
0,28
Kontrollart der Wärmeleistung / der Raumtemperatur
Eigenschaft
Einheit
Ergänzende Information
Elektronische Kontrolle der
Raumtemperatur und Wochen
-
schaltuhr
.
schaltuhr
schaltuhr
MD
Sonstige Kontrolloptionen
Kontrolle der Raumtempera
-
tur mit Präsenzsensor
.
tur mit Präsenzsensor
tur mit Präsenzsensor
nein
Kontrolle der Raumtempera
-
tur mit Fensteröffnungssensor
.
tur mit Fensteröffnungssensor
tur mit Fensteröffnungssensor
nein
Fernsteuerungsoption
.
nein
Adaptive Aktivierungsregelung
.
MD
Begrenzung der Aktivierungs
-
dauer
.
dauer
dauer
nein
Globethermometer
.
Globethermometer
Globethermometer
nein
Kontakt
Idem Typenschild
Eigenschaften

20
E
NTSORGUNG
VON
T
R
A
NS
P
ORT
-
UN
D
V
ERK
A
ERK
ERK
UFSVER
PA
CKUNGSM
A
TERI
A
A
A
L
Damit Ihr Gerät unbeschädigt bei Ihnen ankommt, haben wir es sorgfältig verpackt
.
Bitte
.
helfen Sie, die Umwelt zu schützen, und entsorgen Sie das Verpackungsmaterial des Gerätes
sachgerecht
.
Wir beteiligen uns gemeinsam mit dem Großhandel und dem Fachhandwerk /
.
Fachhandel in Deutschland an einem wirksamen Rücknahme- und Entsorgungskonzept für
die umweltschonende Aufarbeitung der Verpackungen
.
Überlassen Sie die Transportverpackung dem Fachhandwerker beziehungsweise dem Fa
-
chhandel
.
Entsorgen Sie Verkaufsverpackungen über eines der Dualen Systeme in Deutschland
.
E
NTSORGUNG
VON
A
LTGERÄTEN
IN
D
EUTSCHL
A
N
D
Geräteentsorgung
Die mit diesem Symbol gekennzeichneten Geräte dürfen nicht mit dem Hausmüll
entsorgt werden
.
Als Hersteller sorgen wir im Rahmen der Produktverantwortung für eine umweltgerechte
Behandlung und Verwertung der Altgeräte
.
Weitere Informationen zur Sammlung und Ent
.
-
sorgung erhalten Sie über Ihre Kommune oder Ihren Fachhandwerker / Fachhändler
.
sorgung erhalten Sie über Ihre Kommune oder Ihren Fachhandwerker / Fachhändler
sorgung erhalten Sie über Ihre Kommune oder Ihren Fachhandwerker / Fachhändler
Bereits bei der Entwicklung neuer Geräte achten wir auf eine hohe Recyclingfähigkeit der
Materialien
.
Über das Rücknahmesystem werden hohe Recyclingquoten der Materialien erreicht, um
Deponien und die Umwelt zu entlasten
.
Damit leisten wir gemeinsam einen wichtigen Bei
.
-
trag zum Umweltschutz
.
E
NTSORGUNG
A
USSERH
A
LB
D
EUTSCHL
A
N
D
S
Entsorgen Sie dieses Gerät fach- und sachgerecht nach den örtlich geltenden Vorschriften
und Gesetzen
.
Geräteentsorgung

21
DE
Erreichbarkeit
Sollte einmal eine Störung an einem unserer Produkte auftre-ten, stehen wir Ihnen natürlich
mit Rat und Tat zur Seite
.
Rufen Sie uns an:
05531 702-111
oder schreiben Sie uns:
Stiebel Eltron GmbH & Co
.
KG
.
- Kundendienst -
Fürstenberger Straße 77, 37603 Holzminden
E-Mail: kundendienst@stiebel-eltron
.
de
Fax: 05531 702-95890
Weitere Anschriften sind auf der letzten Seite aufgeführt
.
Unseren Kundendienst erreichen Sie telefonisch rund um die Uhr, auch an Samstagen und
Sonntagen sowie an Feiertagen
.
Kundendiensteinsätze erfolgen während unserer Geschäfts-
.
]HLWHQYRQELV8KUIUHLWDJVELV8KU$OV6RQGHUVHUYLFHELHWHQZLU.XQ
-
dendiensteinsätze bis 21
.
30 Uhr
.
30 Uhr
30 Uhr
Für diesen Sonderservice sowie Kundendiensteinsätze an
.
Wochenenden und Feiertagen werden höhere Preise berechnet
.
Garantiebedingungen
Diese Garantiebedingungen regeln zusätzliche Garantieleistungen von uns gegenüber dem
Endkunden
.
Sie treten neben die gesetzlichen Gewährleistungsansprüche des Kunden
.
.
Die
.
gesetzlichen Gewährleistungsansprüche gegenüber den sonstigen Vertragspartnern sind
nicht berührt
.
Diese Garantiebedingungen gelten nur für solche Geräte, die vom Endkunden in der Bun
-
desrepublik Deutschland als Neugeräte erworben werden
.
Ein Garantievertrag kommt nicht
.
zustande, soweit der Endkunde ein gebrauchtes Gerät oder ein neues Gerät seinerseits von
einem anderen Endkunden erwirbt
.
Inhalt und Umfang der Garantie
Die Garantieleistung wird erbracht, wenn an unseren Geräten ein Herstellungs und/oder
0DWHULDOIHKOHULQQHUKDOEGHU*DUDQWLHGDXHUDXIWULWW'LH*DUDQWLHXPIDVVWMHGRFKNHLQH/HLV
-
tungen für solche Geräte, an denen Fehler, Schäden oder Mängel aufgrund von Verkalkung,
chemischer oder elektrochemischer Einwirkung, fehlerhafter Aufstellung bzw
.
chemischer oder elektrochemischer Einwirkung, fehlerhafter Aufstellung bzw
chemischer oder elektrochemischer Einwirkung, fehlerhafter Aufstellung bzw
Installation
.
sowie unsachgemäßer Einregulierung, Bedienung oder unsachgemäßer Inanspruchnahme
E]Z9HUZHQGXQJDXIWUHWHQ(EHQVRDXVJHVFKORVVHQVLQG/HLVWXQJHQDXIJUXQGPDQJHOKDIWHU
RGHUXQWHUODVVHQHU:DUWXQJ:LWWHUXQJVHLQÁVVHQRGHUVRQVWLJHQ1DWXUHUVFKHLQXQJHQ
Die Garantie erlischt, wenn am Gerät Reparaturen, Eingriffe oder Abänderungen durch nicht
von uns autorisierte Personen vorgenommen wurden
.
Die Garantieleistung umfasst die sorgfältige Prüfung des Gerätes, wobei zunächst ermittelt
wird, ob ein Garantieanspruch besteht
.
Im Garantiefall entscheiden allein wir, auf welche Art
.
der Fehler behoben wird
.
Es steht uns frei, eine Reparatur des Gerätes ausführen zu lassen
.
oder selbst auszuführen
.
Etwaige ausgewechselte Teile werden unser Eigentum
.
.
Garantiebedingungen

22
Für die Dauer und Reichweite der Garantie übernehmen wir sämtliche Material und Mon
-
tagekosten
.
Soweit der Kunde wegen des Garantiefalles aufgrund gesetzlicher Gewährleistungsans
-
SUFKHJHJHQDQGHUH9HUWUDJVSDUWQHU/HLVWXQJHQHUKDOWHQKDWHQWIlOOWHLQH/HLVWXQJVSÁLFKW
von uns
.
Soweit eine Garantieleistung erbracht wird, übernehmen wir keine Haftung für die Beschä
-
digung eines Gerätes durch Diebstahl, Feuer, Aufruhr oder ähnliche Ursachen
.
Über die vorstehend zugesagten Garantieleistungen hinausgehend kann der Endkunde nach
dieser Garantie keine Ansprüche wegen mittelbarer Schäden oder Folgeschäden, die durch
das Gerät verursacht werden, insbesondere auf Ersatz außerhalb des Gerätes entstandener
Schäden, geltend machen
.
Gesetzliche Ansprüche des Kunden uns gegenüber oder gegenü
.
-
ber Dritten bleiben unberührt
.
Garantiedauer
Für im privaten Haushalt eingesetzte Geräte beträgt die Garantiedauer 24 Monate; im
Übrigen (zum Beispiel bei einem Einsatz der Geräte in Gewerbe, Handwerks oder Indus
-
WULHEHWULHEHQEHWUlJWGLH*DUDQWLHGDXHU0RQDWH
'LH*DUDQWLHGDXHUEHJLQQWIUMHGHV*HUlWPLWGHUhEHUJDEHGHV*HUlWHVDQGHQ.XQGHQ
der das Gerät zum ersten Mal einsetzt
.
Garantieleistungen führen nicht zu einer Verlängerung der Garantiedauer
.
Garantieleistungen führen nicht zu einer Verlängerung der Garantiedauer
Garantieleistungen führen nicht zu einer Verlängerung der Garantiedauer
Durch die er
.
-
Durch die er
Durch die er
brachte Garantieleistung wird keine neue Garantiedauer in Gang gesetzt
.
Dies gilt für alle
.
erbrachten Garantieleistungen, insbesondere für etwaig eingebaute Ersatzteile oder für die
Ersatzlieferung eines neuen Gerätes
.
Inanspruchnahme der Garantie
Garantieansprüche sind vor Ablauf der Garantiedauer, innerhalb von zwei Wochen, nachdem
der Mangel erkannt wurde, bei uns anzumelden
.
Dabei müssen Angaben zum Fehler, zum
.
Gerät und zum Zeitpunkt der Feststellung gemacht werden
.
Als Garantienachweis ist die
.
Rechnung oder ein sonstiger datierter Kaufnachweis beizufügen
.
Fehlen die vorgenannten
.
Angaben oder Unterlagen, besteht kein Garantieanspruch
.
Garantie für in Deutschland erworbene, jedoch außerhalb Deutschlands einge
-
setzte Geräte
:LUVLQGQLFKWYHUSÁLFKWHW*DUDQWLHOHLVWXQJHQDXHUKDOEGHU%XQGHVUHSXEOLN'HXWVFKODQG
zu erbringen
.
Bei Störungen eines im Ausland eingesetzten Gerätes ist dieses gegebenen-
.
falls auf Gefahr und Kosten des Kunden an den Kundendienst in Deutschland zu senden
.
Die Rücksendung erfolgt ebenfalls auf Gefahr und Kosten des Kunden
.
Etwaige gesetzliche
.
Ansprüche des Kunden uns gegenüber oder gegenüber Dritten bleiben auch in diesem Fall
unberührt
.
Außerhalb Deutschlands erworbene Geräte
)UDXHUKDOE'HXWVFKODQGVHUZRUEHQH*HUlWHJLOWGLHVH*DUDQWLHQLFKW(VJHOWHQGLHMHZHL
-
OLJHQJHVHW]OLFKHQ9RUVFKULIWHQXQGJHJHEHQHQIDOOVGLH/LHIHUEHGLQJXQJHQGHU/lQGHUJHVHOO
schaft bzw
.
schaft bzw
schaft bzw
des Importeurs
.
.

23
F
Sommaire
Mise en garde
.
.
.
.
.
.
.
.
.
.
.
.
.
.
.
.
.
.
.
.
.
.
.
.
.
.
.
.
.
.
.
.
.
.
.
.
.
.
.
.
.
.
.
.
.
.
.
.
.
.
.
.
.
.
.
.
.
24
Installation
. . . . . . . . . . . . . . . . . . . . . . . . . . . . . . . . . . . . . . . . . . . . . . . . . . . . . . . . . . .
.
26
Préparer l’installation de l’appareil
. . . . . . . . . . . . . . . . . . . . . . . . . . . . . . . . . . . . . . .
.
26
Raccordement hydraulique
. . . . . . . . . . . . . . . . . . . . . . . . . . . . . . . . . . . . . . . . . . . .
.
28
Raccordement électrique
. . . . . . . . . . . . . . . . . . . . . . . . . . . . . . . . . . . . . . . . . . . . . .
.
29
Utilisation des patères
.
.
.
.
.
.
.
.
.
.
.
.
.
.
.
.
.
.
.
.
.
.
.
.
.
.
.
.
.
.
.
.
.
.
.
.
.
.
.
.
.
.
.
.
.
.
.
.
.
29
Entretien
. . . . . . . . . . . . . . . . . . . . . . . . . . . . . . . . . . . . . . . . . . . . . . . . . . . . . . . . . . .
.
29
Nettoyage du ventilateur
. . . . . . . . . . . . . . . . . . . . . . . . . . . . . . . . . . . . . . . . . . . . . .
.
30
Fonctionnement hydraulique
. . . . . . . . . . . . . . . . . . . . . . . . . . . . . . . . . . . . . . . . . . .
.
30
Utilisation
. . . . . . . . . . . . . . . . . . . . . . . . . . . . . . . . . . . . . . . . . . . . . . . . . . . . . . . . . . .
.
31
Utilisation HIVER en hydraulique
. . . . . . . . . . . . . . . . . . . . . . . . . . . . . . . . . . . . . . . .
.
31
Utilisation interface
. . . . . . . . . . . . . . . . . . . . . . . . . . . . . . . . . . . . . . . . . . . . . . . . . .
.
31
Premiere mise en marche
. . . . . . . . . . . . . . . . . . . . . . . . . . . . . . . . . . . . . . . . . . . . .
.
32
/·LQWHUUXSWHXU
. . . . . . . . . . . . . . . . . . . . . . . . . . . . . . . . . . . . . . . . . . . . . . . . . . . . . . .
.
32
Mettre en marche / arrêter l’appareil
. . . . . . . . . . . . . . . . . . . . . . . . . . . . . . . . . . . .
.
32
Verrouillage des commandes
. . . . . . . . . . . . . . . . . . . . . . . . . . . . . . . . . . . . . . . . . . .
.
32
Description des modes
. . . . . . . . . . . . . . . . . . . . . . . . . . . . . . . . . . . . . . . . . . . . . . .
.
33
Prog Active
. . . . . . . . . . . . . . . . . . . . . . . . . . . . . . . . . . . . . . . . . . . . . . . . . . . . . .
.
33
Prog Inactive
. . . . . . . . . . . . . . . . . . . . . . . . . . . . . . . . . . . . . . . . . . . . . . . . . . . . .
.
33
Régler la température
. . . . . . . . . . . . . . . . . . . . . . . . . . . . . . . . . . . . . . . . . . . . . . . .
.
34
L
e menu
. . . . . . . . . . . . . . . . . . . . . . . . . . . . . . . . . . . . . . . . . . . . . . . . . . . . . . . . . . . . .
.
35
Fonctionnement du Boost
. . . . . . . . . . . . . . . . . . . . . . . . . . . . . . . . . . . . . . . . . . . . .
.
35
Utiliser la programmation interne
. . . . . . . . . . . . . . . . . . . . . . . . . . . . . . . . . . . . . . .
.
36
0RGLÀHUOHVSURJUDPPHV
. . . . . . . . . . . . . . . . . . . . . . . . . . . . . . . . . . . . . . . . . .
.
36
Copier un programme
.
.
.
.
.
.
.
.
.
.
.
.
.
.
.
.
.
.
.
.
.
.
.
.
.
.
.
.
.
.
.
.
.
.
.
.
.
.
.
.
.
.
.
.
.
.
36
L
e menu EXPERT
. . . . . . . . . . . . . . . . . . . . . . . . . . . . . . . . . . . . . . . . . . . . . . . . . . . .
.
37
En cas de problème
. . . . . . . . . . . . . . . . . . . . . . . . . . . . . . . . . . . . . . . . . . . . . . . . . .
.
38
Caractéristiques
. . . . . . . . . . . . . . . . . . . . . . . . . . . . . . . . . . . . . . . . . . . . . . . . . . . . . .
.
40
Garantie et Recyclage
. . . . . . . . . . . . . . . . . . . . . . . . . . . . . . . . . . . . . . . . . . . . . . . .
.
41
Garantie
. . . . . . . . . . . . . . . . . . . . . . . . . . . . . . . . . . . . . . . . . . . . . . . . . . . . . . . .
.
41
Environnement et recyclage
. . . . . . . . . . . . . . . . . . . . . . . . . . . . . . . . . . . . . . . . .
.
41

24
Mise en garde
Attention surface très chaude. Caution hot surface.
ATTENTION
: Certaines parties de ce produit
peuvent devenir très chaudes et provoquer des brû
-
lures. Il faut prêter une attention particulière en pré
-
sence d’enfants et de personnes vulnérables.
-
Il convient de maintenir à distance de cet appareil les enfants de moins
de 3 ans, à moins qu’ils ne soient sous une surveillance continue
.
-
/HV HQIDQWV kJpV HQWUH DQV HW DQV GRLYHQW XQLTXHPHQW PHWWUH
l'appareil en marche ou à l'arrêt, à condition que ce dernier ait été
placé ou installé dans une position normale prévue et que ces enfants
disposent d'une surveillance ou aient reçu des instructions quant à
l'utilisation de l'appareil en toute sécurité et en comprennent bien les
GDQJHUVSRWHQWLHOV/HVHQIDQWVkJpVHQWUHDQVHWDQVQHGRLYHQW
ni brancher, ni régler, ni nettoyer l'appareil, et ni réaliser l'entretien de
l'utilisateur
.
l'utilisateur
l'utilisateur
-
&HWDSSDUHLOSHXWrWUHXWLOLVpSDUGHVHQIDQWVkJpVGDXPRLQVDQV
et par des personnes ayant des capacités physiques, sensorielles ou
mentales réduites ou dénuées d’expérience ou de connaissance, s'ils (si
HOOHVVRQWFRUUHFWHPHQWVXUYHLOOpHVRXVLGHVLQVWUXFWLRQVUHODWLYHV
à l'utilisation de l'appareil en toute sécurité leur ont été données et
VLOHVULVTXHVHQFRXUXVRQWpWpDSSUpKHQGpV/HVHQIDQWVQHGRLYHQW
SDVMRXHUDYHFO·DSSDUHLO/HQHWWR\DJHHWOHQWUHWLHQSDUOXVDJHUQH
doivent pas être effectués par des enfants sans surveillance
.
-
Cet appareil ne doit être branché ou raccordé, selon les règles et
normes en application, que par une personne habilitée
.
-
3RXUpYLWHUWRXWGDQJHUSRXUOHVWUqVMHXQHVHQIDQWVLOHVWUHFRPPDQGp
d’installer cet appareil de façon telle que le barreau chauffant le plus
bas soit au moins 600 mm au-dessus du sol
.
-
Cet appareil ne doit être branché ou raccordé, selon les règles et
normes en application, que par une personne habilitée
.
-
6LOHFkEOHG·DOLPHQWDWLRQHVWHQGRPPDJpLOGRLWrWUHUHPSODFpSDUOH
IDEULFDQWVRQVHUYLFHDSUqVYHQWHRXGHVSHUVRQQHVGHTXDOLÀFDWLRQ
VLPLODLUHDÀQG·pYLWHUXQGDQJHU
Attention :
Surface très
chaude
Caution
hot surface

25
F
-
A la première mise en chauffe, une légère odeur peu apparaître
correspondant à l’évacuation des éventuelles traces liées à la
fabrication de l’appareil
.
-
/DQRWLFHG·XWLOLVDWLRQGHFHWDSSDUHLOHVWGLVSRQLEOHHQYRXVFRQQHF
tant sur le site Internet du fabricant indiqué sur le bon de garantie
présent dans cette notice
.
-
Un système de gestion d’énergie ou de délestage par coupure
d’alimentation est incompatible avec nos appareils
.
Il détériore le
.
thermostat
.
-
Pour des raisons de sécurité, il est formellement interdit de re-remplir
OHVDSSDUHLOV(QFDVGHEHVRLQFRQWDFWH]XQSURIHVVLRQQHOTXDOLÀp
-
3RXUDVVXUHUXQERQIRQFWLRQQHPHQWGXYHQWLODWHXUVHORQPRGqOH
il est recommandé de ne pas obstruer ou recouvrir la sortie d’air
QRWDPPHQWSDUXQHVHUYLHWWH&HODULVTXHUDLWGHSURYRTXHUODPLVH
en sécurité du ventilateur
.
sécurité du ventilateur
sécurité du ventilateur
-
Veillez à ne pas positionner de peignoir sur le boîtier de commande
.
-
Avant de procédez à l’entretien du radiateur sèche-serviettes, éteignez-
OHHWODLVVH]OHUHIURLGLU1HMDPDLVXWLOLVHUGHSURGXLWVDEUDVLIVHWGH
solvants
.
-
/DSUHVVLRQGHVHUYLFHQHGRLWSDVGpSDVVHUEDUV
-
(QFDVG·XWLOLVDWLRQGDQVXQFLUFXLWK\GUDXOLTXHDVVXUH]YRXVJUkFHDX
purgeur situé en haut à droite, que le radiateur sèche-serviettes est
correctement rempli
.
Si, lorsque vous ouvrez le purgeur, l’eau ne sort
.
pas régulièrement, appelez votre installateur
.
pas régulièrement, appelez votre installateur
pas régulièrement, appelez votre installateur
-
Il est obligatoire d’être en mode Chauffage Central lorsque le robinet
d’alimentation
a
est ouvert
.
Cet usage anormal entraîne l’annulation
.
de la garantie
.
-
/·XWLOLVDWLRQ GH FH UDGLDWHXU VqFKHVHUYLHWWHVVDQV HDX HQWUDvQHUD OD
GpWpULRUDWLRQ GpÀQLWLYH GH OD UpVLVWDQFH &HW LQFLGHQW QpFHVVLWHUD
impérativement son remplacement, non couvert par la garantie
constructeur
.
constructeur
constructeur

26
Installation
Règles d’installation
-
Cet appareil a été conçu pour être installé dans un local résidentiel
.
Dans tout autre cas,veuillez consulter votre distributeur
.
Dans tout autre cas,veuillez consulter votre distributeur
Dans tout autre cas,veuillez consulter votre distributeur
-
/·LQVWDOODWLRQ GRLW rWUH IDLWH GDQV OHV UqJOHV GH O·DUW HW FRQIRUPH
aux
normes en vigueur dans le pays d’installation (
NFC 15-100 pour la
France
-
/·DSSDUHLOGRLWrWUHDOLPHQWpHQ90RQRSKDVp+]
-
Dans des locaux humides comme les salles de bains et les cuisines,
vous devez installer le boîtier de raccordement au moins à 25 cm
du sol
.
Tenir l’appareil éloigné d’un courant d’air susceptible de per
-
Tenir l’appareil éloigné d’un courant d’air susceptible de per
Tenir l’appareil éloigné d’un courant d’air susceptible de per
turber son fonctionnement
(ex : sous une Ventilation Mécanique
Centralisée, etc...)
.
1HSDVO·LQVWDOOHUVRXVXQHSULVHGHFRXUDQWÀ[H
PRÉPARER L’INSTALLATION DE L’APPAREIL
-
/HURELQHWGHUHWRXUFKDXGLqUH
b
doit impérativement rester ouvert,
dans tous les cas d’utilisation (
Chauffage central, programmation active
ou inactive
SRXUSHUPHWWUHO·H[SDQVLRQGXÁXLGHGDQVOHUpVHDXDÀQ
d’éviter tout endommagement du radiateur sèche-serviettes
.
/HVDSSDUHLOVPXQLVGHFHV\PEROHQHGRLYHQWSDVrWUHPLV
avec les ordures ménagères, mais doivent être collectés sé
-
parément et recyclés
.
/DFROOHFWHHWOHUHF\FODJHGHVSURGXLWVHQÀQGHYLHGRLYHQW
être effectués selon les dispositions et les décrets locaux
.
/·LQVWDOODWLRQG·XQDSSDUHLOHQDOWLWXGHSURYRTXHXQHpOpYD
-
tion de la température de sortie d’air
(de l’ordre de 10°C par
1000 m de dénivelé).
1HSDVO·LQVWDOOHUVRXVXQHSULVHGHFRXUDQWÀ[H
Volume 1
Pas d’appareil électrique
Volume 2
Appareil électrique
IPX4 (
Norme EN 60335-
2-43 : 2003/A2 : 2008

27
F
Respectez les distances minimales
avec le mobilier pour l’emplacement
de l’appareil
.
Ne pas installer d’étagère au-dessus
Ne pas installer d’étagère au-dessus
de l’appareil
.
/HERvWLHUEDVGRLWrWUHDXPLQLPXPj
/HERvWLHUEDVGRLWrWUHDXPLQLPXPj
5 mm du mur
.
5 mm du mur
5 mm du mur
Pour éviter tout danger pour les très
Pour éviter tout danger pour les très
MHXQHV HQIDQWV LO HVW UHFRPPDQGp
MHXQHV HQIDQWV LO HVW UHFRPPDQGp
d’installer cet appareil de façon telle
que le barreau chauffant le plus bas
soit au moins 600 mm au-dessus du
soit au moins 600 mm au-dessus du
sol
.
> 250 mm
> 250 mm
> 200 mm
> 150 mm
B
C
A
Dimensions en mm
BHE 50 Plus
BHE 75 Plus
BHE 100 Plus
BHE 175 T Plus
A
708
1200
1446
1200
B
467
467
517
467
C
>480
>480
>480
>480

28
Règles de raccordement
-
Pour le raccordement eau chaude, la version
PL[WH FRPSRUWH RULÀFHV WDUDXGpV *D]
)SLTXDJHV(QWUpHG·HDXHW6RUWLHG·HDX
situés en bas
.
-
Respectez le sens de circulation ainsi que les
valeurs précisées sur le schéma ci-dessous
.
-
9LGDQJH]O·DSSDUHLODYDQWOHUDFFRUGHPHQW/HOLTXLGHSHXWrWUHYHUVp
dans l’évacuation des eaux usées
.
Schéma de raccordement hydraulique
RACCORDEMENT HYDRAULIQUE
a
b
115
MILIEU APPAREIL
VUE AVANT
mini
245
ENTREE D'EAU
1/2 GAZ 15/21 F
137,5
SORTIE D'EAU
1/2 GAZ 15/21 F
Orifices taraudés
1/2 GAZ 15/21 F
RACCORDEMENT
PAR LE MUR
RACCORDEMENT
mini
mini
480
200
VUE DE COTE
500/750/1000W : 102 min-109 max
1750W : 115 min-122 max
500/750/1750W : 332.5
1000W : 372.5
PAR LE SOL
Dimensions en mm

29
F
RACCORDEMENT ÉLECTRIQUE
Règles de raccordement
-
/·DSSDUHLOGRLWrWUHDOLPHQWpHQ90RQRSKDVp+]
-
/·DOLPHQWDWLRQGHO·DSSDUHLOGRLWrWUHGLUHFWHPHQWUDFFRUGpHDXUpVHDX
DSUqVOHGLVMRQFWHXUHWVDQVLQWHUUXSWHXULQWHUPpGLDLUH
-
/HUDFFRUGHPHQWDXVHFWHXUVHIHUDjO·DLGHGXFkEOHGHO·DSSDUHLOSDU
l’intermédiaire d’un boîtier de raccordement
.
Dans des locaux humi-
.
des comme les salles de bains et les cuisines, il faut installer la prise au
boîtier de raccordement au moins à 25 cm du sol
.
-
L
e raccordement à la terre est interdit.
-
/·DOLPHQWDWLRQ GRLW rWUH GLUHFWHPHQW UDFFRUGpH DX UpVHDX DSUqV OH
dispositif de coupure omnipolaire conforme aux règles d’installation
.
-
6LOHFkEOHG·DOLPHQWDWLRQHVWHQGRPPDJpLOGRLWrWUHUHPSODFpSDUOH
IDEULFDQWVRQVHUYLFHDSUqVYHQWHRXXQHSHUVRQQHGHTXDOLÀFDWLRQ
VLPLODLUHDÀQG·pYLWHUXQGDQJHU
Avant toute action d’entretien, coupez l’alimentation électrique de
l'appareil
.
Pour conserver les performances de l’appareil, il est néces
.
-
saire, environ deux fois par an, d’effectuer son dépoussiérage
.
Ne jamais utiliser de produits abrasifs et de solvants.
ENTRETIEN
UTILISATION DES PATÈRES
Vous disposez de 2 patères amovibles
.

30
NETTOYAGE DU VENTILATEUR
Nettoyez avec un aspirateur les grilles d’entrée et de sortie d’air
.
Nettoyez avec un aspirateur les grilles d’entrée et de sortie d’air
Nettoyez avec un aspirateur les grilles d’entrée et de sortie d’air
/H YHQWLODWHXU HVW pTXLSp G·XQ ÀOWUH DQWLSRXVVLqUH TXL ORUVTX·LO HVW
VDWXUpSHXWSURYRTXHUVRQDUUrWXQFRGHHUUHXU(UUV·DIÀFKHVXU
O·pFUDQGXERvWLHUGHFRPPDQGH
3RXUXQHPHLOOHXUHXWLOLVDWLRQQHWWR\H]YRWUHÀOWUHUpJXOLqUHPHQW
FONCTIONNEMENT HYDRAULIQUE
HIVER
/HFLUFXLWGHODFKDXGLqUHIRQFWLRQQH
/HERvWLHUGHFRPPDQGHQHUpJXOHSDVOD
seule touche qui fonctionne est le BOOST
.
seule touche qui fonctionne est le BOOST
seule touche qui fonctionne est le BOOST
/D UpVLVWDQFH QH IRQFWLRQQH SDV HOOH HVW
hors tension
.
/DFKDXGLqUHUpJXOH
/H URELQHW G·DOLPHQWDWLRQ ©
a
» doit être
ouvert
.
/H URELQHW GH UHWRXUFKDXGLqUH©
b
» doit
rester ouvert
.
ETE
/H FLUFXLW GH OD FKDXGLqUH QH IRQFWLRQQH
pas
.
/HERvWLHUGHFRPPDQGHVUpFXSqUHWRXWHV
ses fonctions
.
/DFKDXGLqUHQHUpJXOHSOXV
/D UpVLVWDQFH SUHQG OD UHOqYH GH OD FKDX
-
dière qui est coupée
.
/H URELQHW G·DOLPHQWDWLRQ ©
a
» doit être
fermé
.
/H URELQHW GH UHWRXUFKDXGLqUH©
b
» doit
rester ouvert
.
a
b
a
Robinet d’alimentation permet
-
tant l’entrée de l’eau chaude de
la chaudière. Il peut être ther
-
la chaudière. Il peut être ther
la chaudière. Il peut être ther
mostatique ou non.
b
Robinet de sortie de l’eau chaude.

31
F
Utilisation
-
Augmenter ou diminuer la température
sans avoir besoin de valider (
sauf
utilisation Hiver
utilisation Hiver
utilisation Hiver
-
Changer la durée du Boost ;
-
Naviguer dans les menus
.
-
Naviguer dans les sous-menus ;
-
Valider ;
-
Éteindre ;
-
Verrouiller, déverrouiller
.
Verrouiller, déverrouiller
Verrouiller, déverrouiller
-
Retour à l’écran précédent
-
Activation ou désactivation du Boost
UTILISATION INTERFACE
UTILISATION HIVER EN HYDRAULIQUE
Pour utiliser le radiateur sèche-serviettes en hiver, vous devez
être en Mode Chauffage Central.
Accédez au MENU en appuyant sur
Chauffage
Central
Programme
Programme
P
our activer ou désactiver le chauffage central.
Vous pouvez :
Mettre en marche le chauffage
/HURELQHWG·DOLPHQWDWLRQ
a
doit être ouvert
.
Ajuster la température
/HURELQHWG·DOLPHQWDWLRQ
a
doit être ouvert plus ou moins (
si
robinet thermostatique
Activer le BOOST
.
Verrouiller les commandes.

32
Choisissez la langue, puis la date et l’heure
.
A la première mise sous tension,
-
la programmation est inactive,
-
la température de consigne est réglée à 19° C
.
PREMIERE MISE EN MARCHE
$ÀQG·pYLWHUOHVPDQLSXODWLRQVSDUGHVHQIDQWVYRXVSRXYH]YHUURXLOOHU
les commandes de votre appareil en faisant un appui long sur
les commandes de votre appareil en faisant un appui long sur
.
Sélectionnez «Verrouiller»
et validez avec
.
Faites de même pour déverrouiller les commandes en sélectionnant
«Déverrouiller»
.
VERROUILLAGE DES COMMANDES
Pour arrêter l’appareil, faites un appui long sur
.
&RQÀUPH]©
Eteindre
» en appuyant sur
.
Pour mettre en marche l’appareil, faites un appui long sur
.
METTRE EN MARCHE / ARRÊTER L’APPAREIL
Utilisation ETE/HIVER
Un interrupteur Marche/Arrêt est situé à l’arrière du boîtier de l’appareil
.
Utilisez l’interrupteur uniquement pour un arrêt prolongé
(
hors période de chauffe
Positionnez l’interrupteur (
situé à l’arrière de l’appareil
VXU
situé à l’arrière de l’appareil
situé à l’arrière de l’appareil
I
pour
PHWWUHO·DSSDUHLOVRXVWHQVLRQ/RUVTXHO·DSSDUHLOHVWPLVKRUVWHQVLRQ
XQQRXYHDXUpJODJHGXMRXUHWGHO·KHXUHSHXWrWUHQpFHVVDLUH
I
L’INTERRUPTEUR

33
F
Utilisation ETE Chauffage central inactif
2 modes de fonctionnement sont proposés :
P
ROG
A
CTIVE
/·DSSDUHLOVXLWOHSURJUDPPHLQWHUQHGpÀQLSRXUFKDTXHMRXUGHOD
semaine
.
A la mise en marche de l’appareil, les plages suivantes sont
.
GpÀQLHV
lundi à vendredi , confort de 6h à 9h et de 18h à 21h
samedi et dimanche, confort de 8h à 12h et de 18h à 21h
.
9RXVSRXYH]PRGLÀHUFHVSODJHVHWGpÀQLUSODJHVGHWHPSpUDWXUH
&RQIRUWSDUMRXU
Pendant ces plages Confort, la consigne de température est réglée à
l’aide de
ou
.
En dehors des plages Confort, l’abaissement est réglé dans le Menu
«Abais
.
T° ECO»
.
.
/·DSSDUHLO VXLW OHV RUGUHV$UUrW HW +RUV *HO GH OD SURJUDPPDWLRQ
externe de votre installation (voir notice de votre centrale de pro
-
JUDPPDWLRQ
P
ROG
I
N
A
CTIVE
-
/·DSSDUHLOVXLWHQSHUPDQHQFHODWHPSpUDWXUHGHFRQVLJQHUpJOpH
DESCRIPTION DES MODES

34
Utilisation ETE Chauffage central inactif
En mode PROG inactive
:
19.
0
°
-
Augmentez avec
(
max 28°C
max 28°C
max 28°C
-
Diminuez avec
(
min 12°C
min 12°C
min 12°C
-
'LPLQXH] HQFRUH MXVTX·j &
température Hors Gel
QRQPRGLÀDEOH
DYHF
.
-
'LPLQXH]HQFRUHMXVTX·j(WpDYHF
l’appareil ne
chauffe plus. La fonction Boost reste accessible
En mode PROG inactive
En mode PROG active
:
PROG
Lun
12:14
19.
0
°
6L O·pFUDQ DIÀFKH 352* YRXV rWHV VXU XQH SODJH GH
programmation en mode Confort
.
-
Augmentez avec
PD[&
-
Diminuez avec
PLQ&
6LO·pFUDQDIÀFKH352*(&2YRXVrWHVVXUXQHSODJH
de programmation en mode ECO
.
Par défaut la tempé
.
-
rature ECO est réglée à -3
.
5°C par rapport à la tem
-
pérature CONFORT
.
ture CONFORT
ture CONFORT
9RXVSRXYH]PRGLÀHUODWHPSpUDWXUH(&2YRXVIRU
-
9RXVSRXYH]PRGLÀHUODWHPSpUDWXUH(&2YRXVIRU
9RXVSRXYH]PRGLÀHUODWHPSpUDWXUH(&2YRXVIRU
cez donc le réglage par défaut entre la température
Confort et la température Eco
.
«PROG Dérog» s’af
.
-
«PROG Dérog» s’af
«PROG Dérog» s’af
ÀFKHMXVTX·jODSURFKDLQHSODJH&RQIRUW
Vous pouvez régler l’écart entre la température
Confort et Eco dans le Menu «Abais
.
T° ECO»
.
.
6LYRXVDYH]UpJOpXQHWHPSpUDWXUH+RUV*HO&OD
programmation est suspendue
.
0RGLÀH]FHWWHWHPSpUDWXUHORUVGHYRWUHUHWRXUSRXU
la reprise de la programmation
.
En diminuant la température au minimum, vous passez
HQPRGH(WpYRWUHDSSDUHLOQHFKDXIIHSOXV/DIRQFWLRQ
Boost reste accessible
.
En mode PROG active
PROG ECO
Lun
17:14
15.5°
PROG Dérog.
Retour à la
prog à
18:00
18.5°
PROG H.Gel
Programmation
suspendue
7.0°
RÉGLER LA TEMPÉRATURE
Eté

35
F
Cette fonction vous permet de lancer le chauffage à pleine puissance permettant ainsi une
montée rapide en température de la salle-de-bains
.
$SSX\H]VXUODWRXFKHSRXUDOOXPHUOH%RRVW0RGLÀH]ODGXUpHDYHFRX
avec ventilateur : durée réglable de 10 à 60 minutes
sans ventilateur : durée réglable de 15 à 120 minutes.
$SSX\H]GHQRXYHDXSRXUO·pWHLQGUHDYDQWODÀQGXWHPSVSUpDODEOHPHQWUpJOpSDUGpIDXW
PLQXWHVGXUpHUpJODEOHGDQVOH0HQX([SHUW
$ODÀQGXWHPSVO·DSSDUHLOUHSUHQGVRQIRQFWLRQQHPHQWLQLWLDO
FONCTIONNEMENT DU BOOST
Utilisation ETE Chauffage central inactif
L
e menu
Accédez au MENU en appuyant sur
Chauffage
Central
Programme
Programme
P
our activer ou désactiver la programmation.
Lundi...dim
Date / heure
Eteindre
P
our éteindre l’appareil.
Paramètres
Pour régler la date, l’heure, le passage ou pas en
automatique de l’heure Eté / Hiver.
Abais.
T° ECO
Pour régler l’abaissement de température par
rapport à la température Confort
(de -1°C à -9°C, par défaut à -3.5°C).
Pour régler les plages de température Confort
sur un jour de la semaine (3 plages possibles) puis
copier ces plages sur d’autres jours.
P
our activer ou désactiver le chauffage central.
Utilisation ETE/HIVER

36
M
O
D
IFIER
LES
P
ROGR
A
MMES
9RXVSRXYH]SURJUDPPHUMXVTX·jSODJHVGHWHPSpUDWXUH&RQIRUWSRXUFKDTXHMRXUGHOD
semaine
.
En dehors des plages Confort, l’abaissement est réglé dans les paramètres du menu
«Abais
.
T°
.
ECO»
.
6pOHFWLRQQH]OHMRXUDYHF
.
Validez
.
.
.
.
Sélectionnez
.
Validez
.
.
.
.
Choisissez l’heure de début avec
ou
.
Validez
.
&KRLVLVVH]O·KHXUHGHÀQDYHF
ou
.
Validez
.
.
Vous passez ensuite à la plage Confort suivante
.
.
C
O
P
IER
UN
P
ROGR
A
MME
9RXVSRXYH]FRSLHUOHSURJUDPPHG·XQHMRXUQpHVXUXQSOXVLHXUVMRXUV
Sélectionnez
.
Validez
.
.
)DLWHVGpÀOHUOHVMRXUVDYHF
ou
9DOLGH]OHMRXUYHUVOHTXHOFRSLHUDYHF
.
Pour valider la copie, sélectionnez «Copier»
.
Validez
.
.
Exemple : Copie du programme du lundi vers mardi,
MHXGLYHQGUHGL
Programme
Programme
Lundi...dim
UTILISER LA PROGRAMMATION INTERNE
Lundi
Copier
Mar
Mer
Jeu
Ven
Sam
Dim
Anticipation de la chauffe
Votre appareil est équipé d’une fonction qui permet d’anticiper la chauffe lorsque vous uti
-
lisez la programmation
.
/RUVTXHYRXVUpJOH]ODSURJUDPPDWLRQGHYRWUHDSSDUHLOFHOXLFLYDDQWLFLSHUODFKDXIIHHQ
fonction du temps de montée en température pour que votre pièce soit à la bonne tempé
-
rature à votre arrivée
.
Par exemple : si vous réglez votre programmation avec un retour en confort à 15h, l’appareil
GpPDUUHUDDYDQWSRXUDQWLFLSHUODFKDXIIHGHYRWUHSLqFHHQWUHPLQXWHVHWXQHKHXUH
Utilisation ETE Chauffage central inactif

37
F
PARAMETRES
Restrictions
Temp. max
Contr. acces
Pour ajuster la température de consigne à
la température relevée dans la pièce si vous constatez
une différence après plusieurs heures de chauffe.
La valeur d’étalonnage est comprise entre -3° C
en-dessous et +3° C au-dessus de la température
réglée.
Ex : si la T° de la pièce = 18°C et la T° réglée = 20°C,
sélectionnez -2,0°.
Général
Config fonction
Calibration T°
Son
Pour activer ou désactiver le son des touches.
Pour limiter l’accès aux commandes.
Vous pouvez choisir un accès total, un accès à la
température seule, ou aucun accès. Dans ce dernier cas
les commandes du boîtier ne sont plus accessibles.
Langue
Pour choisir la langue.
Pour enregistrer une température de consigne
maximum qui ne pourra pas être dépassée
(comprise entre 22°C et 28°C, réglée par défaut à 28°C).
Boost
Pour régler la durée maximale du Boost : le réglage
peut aller de 15 à 120 minutes pour les modèles sans
ventilateur et de 10 à 60 minutes pour les modèles
avec ventilateur.
Code PIN
Pour activer ou non l’enregistrement d’un code
personnel d’accès au Menu Expert.
Une fois activé, l’accès au Menu Expert est codé.
Vous pouvez noter ici votre code personnel
Pour le désactiver retournez dans Menu Expert,
saisissez votre code personnel, et retournez dans
Paramétrages => Restrictions => Code PIN.
MENU
Backlight
Pour choisir d’allumer ou non le rétroéclairage de
l’écran lorsque l’appareil est en veille.
Réinitialisation
Retour au réglage de base usine.
TEST
Corps Principal
Rég. chauffe
Identification
Version
Vérification du fonctionnement de l’élément chauffant.
Information sur la puissance de l’appareil.
Identication de l’appareil.
Identication de la version.
Informations
Pour accéder aux fonctions avancées de l‘appareil, appuyez en même temps sur
et
Pour accéder aux fonctions avancées de l‘appareil, appuyez en même temps sur
pendant plus de 3 secondes
.
L
e menu EXPERT

38
En cas de problème
Problème rencontré
9pULÀFDWLRQVjIDLUH
/·pFUDQ GX ERvWLHU
de commande ne
s’allume pas
.
9pULÀH]TXHO·LQWHUUXSWHXUVLWXpjO·DUULqUHGHO·DSSDUHLOHVWELHQ
sur I (
marche
9pULÀH]TXHO·DSSDUHLOHVWELHQDOLPHQWppOHFWULTXHPHQW
/D WHPSpUDWXUH
d’ambiance est
différente de celle
DIÀFKpHVXUO·DSSDUHLO
Il est nécessaire d’attendre 6 heures au minimum pour que la tem
-
pérature se stabilise
.
Il est possible, en fonction de votre installation, que vous rele
-
YLH]XQHWHPSpUDWXUHGLIIpUHQWHGHFHOOHDIÀFKpHVXUO·DSSDUHLO
un
écart de 0,5° C est normal
'DQVFHFDVUHSRUWH]YRXVDX©0HQX
écart de 0,5° C est normalécart de 0,5° C est normal
Expert», chapitre «Calibration T°»
.
/·DSSDUHLOQH
chauffe pas
.
9pULÀHUTXHO·DSSDUHLOHVWHQPRGH&RQIRUW
6LYRXVrWHVHQSURJUDPPDWLRQYpULÀH]TXHYRXVrWHVVXUXQSODJH
KRUDLUH&RQIRUW$VVXUH]YRXVTXHOHVGLVMRQFWHXUVGHO·LQVWDOODWLRQ
sont enclenchés ou bien que le délesteur (
si vous en avez un
Q·D
SDVFRXSpOHIRQFWLRQQHPHQWGHO·DSSDUHLO9pULÀH]ODWHPSpUDWXUH
de l’air de la pièce : si elle est trop élevée, l’appareil ne chauffe pas
.
/·DSSDUHLOFKDXIIH
tout le temps
9pULÀH]TXHO·DSSDUHLOQ·HVWSDVVLWXpGDQVXQFRXUDQWG·DLU
porte
ouverte à proximité, arrivée d’air froid par le boîtier de raccordement à
l’arrière de l’appareil
RXTXHOHUpJODJHGHODWHPSpUDWXUHQ·DSDV
l’arrière de l’appareill’arrière de l’appareil
pWpPRGLÀp
Il peut y avoir un aléa dans le réseau électrique
.
En cas de pro
.
-
blème (
thermostat bloqué...
FRXSH] O·DOLPHQWDWLRQ GH O·DSSDUHLO
(
fusible, disjoncteur
SHQGDQWHQYLURQPLQXWHVSXLVUDOOXPH]OH
fusible, disjoncteurfusible, disjoncteur
Si le phénomène se reproduit fréquemment, faîtes contrôler l’ali
-
mentation par votre électricien
.
/·DSSDUHLOQH
chauffe pas assez
.
Augmentez la température en appuyant sur
.
6LOHUpJODJHHVWDXPD[LPXPIDLWHVOHVYpULÀFDWLRQVVXLYDQWHV
9pULÀH]VLXQDXWUHPRGHGHFKDXIIDJHH[LVWHGDQVODSLqFH
- Assurez-vous que votre appareil ne chauffe que la pièce (
porte
fermée
)DLWHVYpULÀHUODWHQVLRQG·DOLPHQWDWLRQGHO·DSSDUHLO
9pULÀH]VLODSXLVVDQFHGHYRWUHDSSDUHLOHVWDGDSWpHjODWDLOOHGH
votre pièce (
nous vous préconisons en moyenne 100 W/m
2
pour une
hauteur de plafond de 2,50 m ou 40W/m
3
/·DSSDUHLOPHWGX
temps à chauffer
.
à chauffer
à chauffer
/DUpVLVWDQFHpOHFWULTXHUpFKDXIIHOHÁXLGHTXLVHPHWSURJUHVVLYH
-
ment et de façon naturelle en circulation à l’intérieur de l’appareil
/HVSURSULpWpVG·LQHUWLHGXÁXLGHIRQWTXHODWHPSpUDWXUHGHVXU
-
/HVSURSULpWpVG·LQHUWLHGXÁXLGHIRQWTXHODWHPSpUDWXUHGHVXU
/HVSURSULpWpVG·LQHUWLHGXÁXLGHIRQWTXHODWHPSpUDWXUHGHVXU
face de l’appareil n’atteint un niveau optimal qu’au bout de 15 min
au minimum, ceci suivant la température ambiante de la pièce lors
de la mise en chauffe de l’appareil
.

39
F
Problème rencontré
9pULÀFDWLRQVjIDLUH
/·DSSDUHLOHVWWUqV
chaud en surface
.
Il est normal que l’appareil soit chaud lorsqu’il fonctionne, la tem
-
pérature maximale de surface étant limitée conformément à la
QRUPH 1) (OHFWULFLWp 3HUIRUPDQFH 6L WRXWHIRLV YRXV MXJH] TXH
YRWUHDSSDUHLOHVWWRXMRXUVWURSFKDXGYpULÀH]TXHODSXLVVDQFH
est adaptée à la surface de votre pièce (nous vous préconisons
100 W/m
2
pour une hauteur sous plafond de 2,50 m ou 40W/m
3
et que l’appareil n’est pas placé dans un courant d’air qui pertur
-
l’appareil n’est pas placé dans un courant d’air qui pertur
l’appareil n’est pas placé dans un courant d’air qui pertur
berait sa régulation
.
Des traces
de salissures
apparaissent sur
le mur autour de
l’appareil
.
En ambiance polluée, des salissures peuvent apparaître sur les sor
-
ambiance polluée, des salissures peuvent apparaître sur les sor
ambiance polluée, des salissures peuvent apparaître sur les sor
ties d’air de l’appareil ou au mur
.
ties d’air de l’appareil ou au mur
ties d’air de l’appareil ou au mur
Ce phénomène est lié à la mau
.
-
vaise qualité de l’air ambiant (f
umée de cigarettes, bougies, encens,
vaise qualité de l’air ambiant (f
vaise qualité de l’air ambiant (f
cheminée,...
,OHVWFRQVHLOOpGDQVFHFDVGHYpULÀHUODERQQHDpUD
-
tion de la pièce (
ventilation, entré d’air, etc...
/HVGHUQLHUV
éléments hauts et
bas sont plus tièdes
que le reste de
l’appareil
Pour le haut, les éléments supérieurs ne sont pas complètement
UHPSOLVSRXUSHUPHWWUHODGLODWLRQGXÁXLGHWKHUPRG\QDPLTXH,OV
de réchauffent seulement par conduction
.
3RXUOHEDVOHVpOpPHQWVLQIpULHXUVFDQDOLVHQWOHUHWRXUGXÁXLGH
qui a transmis sa chaleur
.
a transmis sa chaleur
a transmis sa chaleur
/H0HQX([SHUW
n’est pas accessible
.
Vous avez enregistré un code PIN
.
Vous devez saisir votre code
.
pour accéder au menu Expert (
voir chapitre Menu expert
Si vous avez oublié votre code, saisissez le code 081
.
/·DSSDUHLOQHVXLW
pas les ordres de
programmation
interne
.
9pULÀH]TXHODGDWHHWO·KHXUHVRQWUpJOpHV
9pULÀH]TXHO·DSSDUHLOHVWHQ0RGH3URJUDPPDWLRQDFWLI
Un code erreur
V·DIÀFKH
Err 3 : défaut connexion de la sonde d’ambiance
.
(UUGpIDXWOLDLVRQ/LQDS
Contactez votre installateur
.
Contactez votre installateur
Contactez votre installateur
(UU1HWWR\H]OHÀOWUHPRGqOHDYHFYHQWLODWHXUHWRXYpULÀH]
que l’entrée ou la sortie d’air ne sont pas obstruées
.
/·DSSDUHLOQHVXLW
pas les ordres de
programmation
externe
.
Assurez-vous de la bonne utilisation de la centrale de programma
-
tion (
voir notice d’utilisation de la centrale
9pULÀH]TXHO·DSSDUHLOHVWHQ0RGH3URJLQDFWLI
Si vous n’avez pas réussi à résoudre votre problème, contactez votre distributeur/installa
-
teur, munissez-vous des références de l’appareil
.
Elles sont situées sur le côté de l’appareil
.
.
Mesurez la température de la pièce
.
/H&RGHFRPPHUFLDO
C
HWOH1XPpURGHVpULH
E
LGHQWLÀHQWDXSUqVGXFRQVWUXFWHXUO·DSSDUHLOTXHYRXV
venez d’acquérir
.
venez d’acquérir
venez d’acquérir
A
Normes, labels de qualité
B
Marque commerciale
C
Code commercial
D
Référence de fabrication
E
N° de série
F
N° de constructeur
6
A B C
D
EF
(photo non contractuelle)

40
Références du modèle
BHE
Caractéristique
Symbole
Unité
BHE
50
Plus
BHE
75
Plus
BHE
1
00
Plus
BHE
1
75T
Plus
Puissance thermique
Puissance thermique nominale
P nom
kW
W
0,5
500
0,75
750
1
1
000
1,75
1750
Puissance thermique minimale
P min
kW
W
0,5
500
0,75
750
1
1
000
1,75
1750
Puissance thermique maximale
continue
P max,c
kW
W
0,5
500
0,75
750
1
1
000
1,75
1750
&RQVRPPDWLRQG·pOHFWULFLWpDX[LOLDLUH
A la puissance thermique nomi
-
nale
el max
kW
0,000
0,000
0,000
0,000
A la puissance thermique mini
-
male
el min
kW
0,000
0,000
0,000
0,000
En mode veille
el sb
kW
W
0,00028
0,28
0,00028
0,28
0,00028
0,28
0,00028
0,28
Type de contrôle de la puissance thermique / de la température de la pièce
Caractéristique
Unité
Information complémentaitre
Contrôle électronique de la tem
-
pérature de la pièce et program
-
mateur hebdomadaire
.
oui
Autres options de contrôle
Contrôle de la température de la
pièce, avec détecteur de présence
.
non
Contrôle de la température de la
pièce, avec détecteur de fenêtre
ouverte
.
non
Option de contrôle à distance
.
non
Contrôle adaptif de l’activation
.
oui
/LPLWDWLRQGHODGXUpHG·DFWLYD
-
tion
.
non
Capteur à globe noir
.
Capteur à globe noir
Capteur à globe noir
non
Coordonnées de contact
Idem plaque signalétique
Caractéristiques

41
F
G
A
R
A
NTIE
/HVFRQGLWLRQV GHJDUDQWLH GHQRV VRFLpWpV DOOHPDQGHVQH V·DSSOLTXHQWSDVDX[ DSSDUHLOV
DFKHWpV KRUV G·$OOHPDJQH$X FRQWUDLUH F·HVW OD ÀOLDOH FKDUJpH GH OD GLVWULEXWLRQ GH QRV
produits dans le pays qui est seule habilitée à accorder une garantie
.
Une telle garantie ne
.
SRXUUDFHSHQGDQWrWUHDFFRUGpHTXHVLODÀOLDOHDSXEOLpVHVSURSUHVFRQGLWLRQVGHJDUDQWLH
Il ne sera accordé aucune garantie par ailleurs
.
1RXVQ·DFFRUGRQVDXFXQHJDUDQWLHSRXUOHVDSSDUHLOVDFKHWpVGDQVGHVSD\VRDXFXQHÀOLDOH
de notre société ne distribue nos produits
.
D’éventuelles garanties accordées par l’impor
.
-
D’éventuelles garanties accordées par l’impor
D’éventuelles garanties accordées par l’impor
tateur restent inchangées
.
E
NVIRONNEMENT
ET
RECYCL
A
GE
Merci de contribuer à la préservation de notre environnement
.
Après usage, procédez à
.
l’élimination des matériaux conformément à la réglementation nationale
.
Garantie et Recyclage

42
Summary
Warning
. . . . . . . . . . . . . . . . . . . . . . . . . . . . . . . . . . . . . . . . . . . . . . . . . . . . . . . . . . . . .
.
43
Installation
. . . . . . . . . . . . . . . . . . . . . . . . . . . . . . . . . . . . . . . . . . . . . . . . . . . . . . . . . . .
.
45
Installing the device
. . . . . . . . . . . . . . . . . . . . . . . . . . . . . . . . . . . . . . . . . . . . . . . . . .
.
45
Assembly
. . . . . . . . . . . . . . . . . . . . . . . . . . . . . . . . . . . . . . . . . . . . . . . . . . . . . . . . . . .
.
46
Connect to the water system
. . . . . . . . . . . . . . . . . . . . . . . . . . . . . . . . . . . . . . . . . .
.
47
Connecting the appliance
. . . . . . . . . . . . . . . . . . . . . . . . . . . . . . . . . . . . . . . . . . . . . .
.
48
Using the hooks
. . . . . . . . . . . . . . . . . . . . . . . . . . . . . . . . . . . . . . . . . . . . . . . . . . . . .
.
48
Maintenance
. . . . . . . . . . . . . . . . . . . . . . . . . . . . . . . . . . . . . . . . . . . . . . . . . . . . . . . .
.
48
Cleaning the fan
. . . . . . . . . . . . . . . . . . . . . . . . . . . . . . . . . . . . . . . . . . . . . . . . . . . . .
.
49
Use
. . . . . . . . . . . . . . . . . . . . . . . . . . . . . . . . . . . . . . . . . . . . . . . . . . . . . . . . . . . . . . . . .
.
49
Using mixed version
. . . . . . . . . . . . . . . . . . . . . . . . . . . . . . . . . . . . . . . . . . . . . . . . . .
.
49
Using winter mixed version
. . . . . . . . . . . . . . . . . . . . . . . . . . . . . . . . . . . . . . . . . . . .
.
50
Operation
. . . . . . . . . . . . . . . . . . . . . . . . . . . . . . . . . . . . . . . . . . . . . . . . . . . . . . . . . . .
.
50
Operating principal
. . . . . . . . . . . . . . . . . . . . . . . . . . . . . . . . . . . . . . . . . . . . . . . . . . .
.
50
6ZLWFKLQJWKHDSSOLDQFHRQIRUWKHÀUVWWLPH
. . . . . . . . . . . . . . . . . . . . . . . . . . . . . . .
.
51
The switch
. . . . . . . . . . . . . . . . . . . . . . . . . . . . . . . . . . . . . . . . . . . . . . . . . . . . . . . . .
.
51
Switching the appliance on / off
. . . . . . . . . . . . . . . . . . . . . . . . . . . . . . . . . . . . . . . . .
.
51
/RFNLQJFRPPDQGV
. . . . . . . . . . . . . . . . . . . . . . . . . . . . . . . . . . . . . . . . . . . . . . . . . . .
.
51
Description of the modes
. . . . . . . . . . . . . . . . . . . . . . . . . . . . . . . . . . . . . . . . . . . . .
.
52
Active Prog
. . . . . . . . . . . . . . . . . . . . . . . . . . . . . . . . . . . . . . . . . . . . . . . . . . . . . .
.
52
Inactive Prog
. . . . . . . . . . . . . . . . . . . . . . . . . . . . . . . . . . . . . . . . . . . . . . . . . . . . .
.
52
$GMXVWLQJWKHWHPSHUDWXUH
. . . . . . . . . . . . . . . . . . . . . . . . . . . . . . . . . . . . . . . . . . . . .
.
53
The menu
. . . . . . . . . . . . . . . . . . . . . . . . . . . . . . . . . . . . . . . . . . . . . . . . . . . . . . . . . . .
.
54
How the Boost works
.
.
.
.
.
.
.
.
.
.
.
.
.
.
.
.
.
.
.
.
.
.
.
.
.
.
.
.
.
.
.
.
.
.
.
.
.
.
.
.
.
.
.
.
.
.
.
.
.
54
Using internal programming
. . . . . . . . . . . . . . . . . . . . . . . . . . . . . . . . . . . . . . . . . . . .
.
55
Modifying the programs
. . . . . . . . . . . . . . . . . . . . . . . . . . . . . . . . . . . . . . . . . . . .
.
55
Copying a program
. . . . . . . . . . . . . . . . . . . . . . . . . . . . . . . . . . . . . . . . . . . . . . . .
.
55
The EXPERT menu
. . . . . . . . . . . . . . . . . . . . . . . . . . . . . . . . . . . . . . . . . . . . . . . . . . .
.
56
Trouble Shooting
. . . . . . . . . . . . . . . . . . . . . . . . . . . . . . . . . . . . . . . . . . . . . . . . . . . . .
.
57
Characteristic
. . . . . . . . . . . . . . . . . . . . . . . . . . . . . . . . . . . . . . . . . . . . . . . . . . . . . . . .
.
59
Environment and recycling
. . . . . . . . . . . . . . . . . . . . . . . . . . . . . . . . . . . . . . . . . . . .
.
60
Warranty
. . . . . . . . . . . . . . . . . . . . . . . . . . . . . . . . . . . . . . . . . . . . . . . . . . . . . . . . . . . .
.
60

43
EN
Warning
Caution hot surface.
WARNING : Some parts of this product may be
-
come very hot and cause burns on contact. Spe
-
cial care must be taken if children and vulnerable
adults are present
.
-
Children under 3 years must be kept away from this appliance, unless
they are constantly supervised
.
-
Children between 3 and 8 years should only put the unit on or off ,
to provided that the latter has been placed or installed in a normal
position and that these children have supervision or have received
instructions on using the machine safely and understand the potential
hazards
.
Children aged between 3 and 8 years must not connect or
.
DGMXVWRUFOHDQWKHGHYLFHDQGSHUIRUPPDLQWHQDQFHRUXVHU
-
This unit can be used by older children at least 8 years and by people
with physical, sensory or mental capabilities or lack of experience
or knowledge , if they are monitored correctly or instructions for
using the appliance safely were given to them and if the risks were
apprehended
.
Children should not play with the appliance
.
.
Cleaning
.
and maintenance by the user should not be performed by children
without supervision
.
-
In order to avoid a hazard for very young children, this device should
be installed so that the lowest heated rail is at least 600 mm above
WKHÁRRU
-
This device may only be plugged in or connected by an authorised
person, according to valid regulations and rules
.
-
If power cable is damaged or too short, to avoid any danger it must be
UHSODFHGE\DTXDOLÀHGHOHFWULFLDQXVLQJVSHFLDOWRROV
-
The user manual for the device is available from the after-sales
department, on the number shown on the warranty form included
with this manual
.
-
$WWKHÀUVWKHDWLQJDVOLJKWRGRUPD\DSSHDUFRUUHVSRQGLQJWRWKH
evacuation of any traces related to the manufacture of the device
.
Attention :
Surface très
chaude
Caution
hot surface

44
-
For safety reasons, it is strictly forbidden to top up unmixed devices
.
If
.
QHFHVVDU\FRQWDFWWKHPDQXIDFWXUHU·V$IWHU6DOHV6HUYLFHRUDTXDOLÀHG
technician
.
-
7R HQVXUHSURSHURSHUDWLRQ RI WKH IDQ GHSHQGLQJ RQ PRGHOLW LV
recommended not to obstruct or cover the air outlet (especially with
DWRZHO'RLQJVRPD\FDXVHWKHIDQWREHFRPHXQVDIH
-
Be careful not to place a bathrobe on the control box
.
-
Before servicing the device, turn it off and allow it to cool down
.
Do
.
not use abrasive products
.
-
:KHQÀOOLQJD0L[HGGHYLFHWKHKRWZDWHUFLUFXLWPXVWQHFHVVDULO\EH
XVHGWRDOORZWKHÁXLGWRH[SDQGLQWKHKHDWLQJFLUFXLW
-
8VLQJ WKH EOHHGHU PDNH VXUH WKDW WKH GHYLFH LV FRUUHFWO\ ÀOOHG ,I
ZKHQ\RXRSHQWKHEOHHGHUWKHZDWHUGRHVQRWÁRZUHJXODUO\SOHDVH
FRQWDFW\RXUÀWWHU
-
7KH XVH RI WKLV GHYLFH ZLWKRXW ZDWHU ZRXOG OHDG WR WKH GHÀQLWLYH
GHWHULRUDWLRQRIWKHUHVLVWRU7KLVLQFLGHQWZRXOGGHÀQLWHO\UHTXLUHLWV
replacement, which is not covered by the Maker’s guarantee
.
-
The service pressure of the heating circuit is 4 bar maximum
.
-
It is forbidden to leave A switch on l when the supply tap C is open
.
This abnormal use causes cancellation of the warranty
.
s abnormal use causes cancellation of the warranty
s abnormal use causes cancellation of the warranty
-
It is mandatory to be in Central Heating mode when the supply valve
a
is open
.
This abnormal use causes cancellation of the warranty
.
.
This abnormal use causes cancellation of the warranty
This abnormal use causes cancellation of the warranty
-
The boiler return tap
b
must obligatorily remain open, in all the case
RIXVHLQRUGHUWRDOORZH[SDQVLRQRIWKHÁXLGLQWKHFLUFXLWVRDVWR
avoid any damage to the device
.
Device carrying this symbol must never be disposed of with
household waste, but must be collected separately for recy
-
cling
.
At the end of their life, products must be collected and re
-
cycled according to local regulations and ordinances
.
When an device is installed at a higher altitude, the air out
-
put temperature rises (around 10° C per 1000 m rise in
JURXQG

45
EN
Where to install your device?
-
This equipment was designed to be installed in a residence
.
Please ask
.
your distributor before using it for any other purpose
.
-
The device should be installed according to normal trade practice and
incompliance with legislation in the relevant country (NFC 15-100 for
)UDQFH
-
The equipment is class 2 and is protected against splashed water IP 24
.
The device can be installed in volume 2 of a bathroom It’s forbidden
to install the device in the volume 1
.
The device is to be installed so
.
that switches and other controls cannot be touched by a person in
the bath or shower
.
the bath or shower
the bath or shower
Do not install the device :
-
,Q D GUDXJKW WKDW PLJKW DIIHFW DGMXVWPHQW IRU
example, under a central mechanical ventilation
XQLWHWF
-
8QGHUDÀ[HGSRZHUVRFNHWRUQHDUFXUWDLQVRU
other combustible materials
.
Volume 1
No electrical device
Volume 2
Electrical device IPX4
.
(Standard EN 60335-2-
$
> 250 mm
> 250 mm
> 200 mm
> 150 mm
/RFDWH WKH GHYLFH ZLWKLQ PLQLPXP
distances from obstacles
.
Do not install shelf above the device
.
bottom case must be at least 5
The bottom case must be at least 5
mm from the wall
.
order to avoid a hazard for very
In order to avoid a hazard for very
young children, this device should be
installed so that the lowest heated rail
installed so that the lowest heated rail
LVDWOHDVWPPDERYHWKHÁRRU
INSTALLING THE DEVICE
Installation

46
Wall support :
:KHQÀ[LQJWKHGHYLFHRQWKHVXSSRUWPDNHVXUHWKDWWKH
device is perfectly vertical
..
/RFNLQJWKHGHYLFHRQWKHVXSSRUW
Hang the device on the wall support
.
Push the plastic cover over the support to lock
the connection
ASSEMBLY
Wall support
Drill the holes and insert pegs adapted
to the wall construction
Fix the wall supports
.
Dimensions in mm
B
C
A
BHE 50 Plus
BHE 75 Plus
BHE 100 Plus
BHE 175 T Plus
A
708
1200
1446
1200
B
467
467
517
467
C
>480
>480
>480
>480

47
EN
-
For the connection of hot water, the mixed
version comprises 2 threaded ports 1/2 gas
15/21 F situated at the base, as well as a purge
ZLWKDGMXVWDEOHVSUD\RQWKHWRSRQWKHULJKW
-
)ROORZWKHÁRZGLUHFWLRQDVZHOODVWKHÀJXUHV
stipulated on the diagram below
.
stipulated on the diagram below
stipulated on the diagram below
CONNECT TO THE WATER SYSTEM
a
b
115
mini
245
137,5
mini
mini
480
200
Threaded ports
1/2 GAS 15/21 F
MIDDLE OF THE DEVICE
WATER INLET
1/2 GAS 15/21 F
WATER OUTLET
1/2 GAS 15/21 F
FRONT VIEW
SIDE VIEW
500/750/1000W : 102 min-109 max
1750W : 115 min-122 max
WALL
CONNECTION
GROUND
CONNECTION
500/750/1750W : 332.5
1000W : 372.5
Dimensions in mm
Before connecting the device to the heating circuit drain the liquid
from the device by removing the plugs on the entry and exit connec
-
tion
.
The liquid can be put into the drain without any problem
.

48
CONNECTING THE APPLIANCE
Connection rules
-
The appliance must be powered with 220/240 V Monophase 50/60Hz
.
-
If the power cable is damaged, it must be replaced by the manufacturer,
WKHLUDIWHUVDOHVVHUYLFHRUDQ\VXLWDEO\TXDOLÀHGSHUVRQLQRUGHUWR
avoid any danger
.
avoid any danger
avoid any danger
CAUTION: These appliances may not be installed stationary on the
French market
.
To retain the performance of the device, it is necessary about twice a
year to carry out dust removal using a vacuum cleaner or a brush at
WKHDLULQOHWVDQGRXWOHWV(YHU\ÀYH\HDUVKDYHWKHLQVLGHRIWKHGHYLFH
checked by a professional electrician
.
The outside of the device can be
.
cleaned with a damp cloth
.
Never use abrasive products or solvents
.
MAINTENANCE
FIX THE PEGS
7ZRSHJVDUHVXSSOLHGZKLFKFDQEHÀ[HGLQDQ\SRLQW\RXZLVK

49
EN
USING MIXED VERSION
WINTER
-The central heating circuit is working
.
-The control box does not regulate, the
only key that works is the BOOST
.
only key that works is the BOOST
only key that works is the BOOST
-The resistance does not work, it is off
.
-The boiler regulates
.
-The supply tap «
a»
must be open
.
-The boiler return tap «
b»
must remain
open
.
SUMMER
-The central heating circuit is not working
..
-The control box recovers all its functions
.
-The boiler does not regulate anymore
.
-The resistance takes over from the boiler
that is cut
.
-The supply tap «
a»
must be closed
.
-The boiler return tap «
b»
must remain
open
.
a
b
a
Supply tap to allow inlet of hot
water from the central heating.
This can be thermostatically
controlled or not depending on
your choice.
b
Boiler return tap to allow the hot
water to leave the central hea
-
ting.
CLEANING THE FAN
Clean the air inlet and outlet grilles with a vacuum cleaner
.
Clean the air inlet and outlet grilles with a vacuum cleaner
Clean the air inlet and outlet grilles with a vacuum cleaner
7KHIDQLVHTXLSSHGZLWKDGXVWÀOWHUZKLFKZKHQLWLVIXOOFDQFDXVHLW
WRVWRSDQHUURUFRGH(UULVGLVSOD\HGRQWKHFRQWUROSDQHOGLVSOD\
)RUEHVWXVHFOHDQ\RXUÀOWHUUHJXODUO\
Use

50
USING WINTER MIXED VERSION
To use the towel radiator in winter, you must be in Central
Heating Mode.
Central
heating
Program
Program
To activate or deactivate Central Heating
Access the MENU by pressing
You can :
Switch on heating:
The supply valve a must be open
.
Adjust the temperature:
The supply valve a must be open more or less (if thermostatic
YDOYH
Activate the BOOST.
L
ock the controls.
-
Increase or reduce the temperature
without needing to validate (
except
winter use
-
Change Boost Time ;
-
Browsing in the menus
.
-
Browsing in the sub menus ;
-
Validate ;
-
Switch off ;
-
/RFNXQORFN
-
Back to previous screen
-
Enabling or Disabling Boost
OPERATING PRINCIPAL
Operation

51
EN
Select the language, then the date and time
.
7KHÀUVWWLPH\RXVZLWFKWKHDSSOLDQFHRQ
-
programming is inactive,
-
the setpoint temperature is set at 19° C
.
SWITCHING THE APPLIANCE ON FOR THE FIRST TIME
.
8VHWKHVZLWFKIRUH[WHQGHGVKXWGRZQVRQO\
(
excluding heating periods
Set the switch (
located at the rear of the appliance
WR
I to switch the
appliance on
.
When the appliance is switched off, you may need to set
.
the day and time again
.
I to switch the
THE SWITCH
To shut down the appliance, press and hold
.
&RQÀUP
"Switch off"
by pressing
.
To switch the appliance on, press and hold
.
SWITCHING THE APPLIANCE ON / OFF
To avoid the commands being changed by children, you may lock your
appliance's commands by pressing and holding
.
6HOHFW/RFN
and validate with
.
Do the same to unlock the commands by selecting "Unlock"
.
LOCKING COMMANDS

52
2 operating modes are proposed :
A
CTIVE
P
ROG
7KHDSSOLDQFHIROORZVWKHLQWHUQDOSURJUDPGHÀQHGIRUHDFKGD\RIWKH
ZHHN7KHIROORZLQJUDQJHVDUHGHÀQHGZKHQWKHDSSOLDQFHLVVZLWFKHG
on :
Monday to Friday, comfort from 6am to 9am and from 6pm
to 9pm
Saturday and Sunday, comfort from 8am to 12am and from
6pm to 9pm
.
.
<RXPD\PRGLI\WKHVHUDQJHVDQGGHÀQH&RPIRUWWHPSHUDWXUHUDQJ
-
es per day
.
es per day
es per day
'XULQJ WKHVH &RPIRUW UDQJHV WKH WHPSHUDWXUHVHWSRLQW LV DGMXVWHG
using
or
.
2XWVLGHWKH&RPIRUWUDQJHVORZHULQJWKHWHPSHUDWXUHLVVHWLQ´/RZ
-
er ECO T°” Prog mode
- The appliance follows your installation’s external programming or
-
- The appliance follows your installation’s external programming or
- The appliance follows your installation’s external programming or
ders STOP and Frost (
see the manual for your programming unit
I
N
A
CTIVE
P
ROG
-
7KHDSSOLDQFHIROORZVWKHVHWSRLQWWHPSHUDWXUHDGMXVWHGDWDOOWLPHV
DESCRIPTION OF THE MODES

53
EN
In inactive Prog mode
In inactive Prog mode
:
19.
0
°
-
Increase with
(
max 28°C
max 28°C
max 28°C
-
/RZHUZLWK
min 12°C
min 12°C
min 12°C
-
Reduce again to 7°C (
Frost Protection temperature not
PRGLÀDEOH
ZLWK
.
-
Decrease until Summer with the device no longer
KHDWLQJXS
In active Prog mode
In active Prog mode
:
PROG
Mon
12:14
19.
0
°
If the screen displays PROG, you are in a programming
range in Comfort mode
.
-
Increase with
PD[&
-
/RZHUZLWK
PLQ&
If the screen displays ECO PROG, you are in a pro
-
gramming range in ECO mode
.
You can change the ECO temperature, so you have
to set the default setting between the Comfort tem
-
perature and the Eco temperature
.
“PROG Derog” is
.
displayed until the next Comfort range
.
You can set the difference between the Comfort and
Eco temperature in the “Abase” menu
.
T ° ECO “
.
.
,I\RXVHWD)URVW 3URWHFWLRQWHPSHUDWXUH&WKH
programming is suspended
.
Modify this temperature when you return to restart
the programming
.
By decreasing the temperature to a minimum, you swit
-
ch to summer mode, your appliance no longer heating
.
The Boost function remains accessible
PROG ECO
Mon
17:14
15.5°
Sum
ADJUSTING THE TEMPERATURE
PROG Waive
Mon
17:14
18.5°
PROG Frost
7.0°
Suspended
programming

54
The menu
Central
heating
Program
Program
To activate or deactivate programming
Date / Clock
Parameters
Clock: to set the date, the time and the automatic
changeover to Summer / Winter time or not.
To activate or deactivate Central Heating
Access the MENU by pressing
To switch off the appliance
Switch off
Monday ... Sun
To adjust the Comfort temperature ranges
over a day of the week (3 ranges possible) then
copy these ranges to other days.
Lower ECO T°
To adjust the lowering of the temperature in
relation to the Comfort temperature (from -1°C
to -9°C, by default at -3.5°C).
This function allows you to start the heating at full power, thus allowing a rapid rise in the
temperature of the bathroom
.
Press the button to turn on the Boost
.
Change the duration with or
.
.
.
.
ZLWKIDQDGMXVWDEOHWLPHIURPWRPLQXWHV
ZLWKRXWIDQDGMXVWDEOHWLPHIURPWRPLQXWHV
Press again to turn it off before the end of the time previously set (default is 30 minutes,
DGMXVWDEOHGXUDWLRQLQWKH([SHUW0HQX
At the end of the time, the unit resumes its initial operation
.
HOW THE BOOST WORKS

55
EN
M
O
D
IFYING
THE
P
ROGR
A
MS
You may program up to 3 Comfort temperature ranges for each day of the week
.
Outside
.
WKH&RPIRUWUDQJHVORZHULQJWKHWHPSHUDWXUHLVVHWLQ´/RZHU(&27µ3URJPRGH
Select the day with
.
Validate
.
.
.
.
Select
.
Validate
.
.
.
.
Select the start time with
or
.
Validate
.
.
Select the end time with
.
or
.
Validate
.
.
C
O
P
YING
A
P
ROGR
A
M
You may copy a day’s program to one or more days
.
Select
.
Validate
.
.
Scroll through the days with
or
.
Validate the day to copy the program with
.
.
To validate the copy, select “Copy”
.
Validate
.
.
Example: Program copy from Monday to Tuesday,
Thursday, Friday
.
day, Friday
day, Friday
USING INTERNAL PROGRAMMING
Monday
To copy
Thu
Wen
Thi
Fri
Sat
Sun
Anticipation of heating
Your device is equipped with a function that allows your device to anticipate the heating
when you use programming
.
When you set the programming of your device, it will anticipate the heating according to the
time of rise in temperature so that your room is at the right temperature when you arrive
.
For example: if you set your programming with a comfortable return at 15:00, the unit will
start before you can anticipate the heating of your room (between 10 minutes and one
KRXU
Program
Program
Monday ... Sun

56
Boost
To set the maximum boost time:
can range from 15 to 120 minutes for non-fan and 10
to 60 minutes for models with fan.
MENU
Backlight
To select whether to turn the backlight on or off
the display when the unit is idle
PARAMETERS
General
Sound
To activate or deactivate the key sound.
Language
To select the language.
Reset
General
To adjust the setpoint temperature to the
temperature recorded in the room if you notice a
difference after several hours' heating.
The calibration value is between -3° C below and +3°
C above the set temperature.
E.g.: if the room T° = 18°C and the set T° = 20°C,
select -2.0°.
Function config
T° calibration
Restrictions
Max temp.
Access contr.
To limit access to the commands.
You may choose total access, access to temperature
only or no access. In this last case, the unit's commands
are no longer accessible.
To record a maximum setpoint temperature which
may not be exceeded (between 22°C and 28°C, set by
default at 28°C).
PIN code
To activate the saving of an Expert Menu personal
access code or not.
Once activated, the Expert Menu access is coded.
You may note your personal code here
To deactivate it, go back to the Expert Menu, enter
your personal code and go back to Parameters =>
Restrictions => PIN code.
Information
Heating reg.
Identification
Version
Information about the appliance's power.
Appliance identication.
Version identication.
TEST
Main Body
Check operation of heating element.
To access the appliance’s advanced functions, press
and
at the same time
for over 3 seconds
.
The EXPERT menu

57
EN
Trouble Shooting
Problems
Chek
The control panel
display does not turn
on
&KHFNLIWKHVZLWFKRQWKHEDFNRIWKHXQLWLVRQWKH,RQSRVL
-
tion
.
Make sure the device is electrically powered
.
The room
temperature is
different from the
one displayed on the
device
.
You have to wait at least 6 hours for the temperature to stabilize
.
Depending on your installation, the temperature you read may be
different from the one displayed on the unit (a variation of
&LVQRUPDO,QWKLVFDVHUHIHUWRWKH©([SHUW0HQXªFKDSWHU
«Temp
.
calibration»
.
.
The device
does not heat up
.
Make sure you are in Comfort mode
.
If you are programming, check if you are within a Comfort period
.
Make sure the circuit breakers in the system are turned on or the
ORDGVKHGGLQJGHYLFHLI\RXKDYHRQHKDVQRWWXUQHGRIIWKHXQLW
Check the air temperature of the room: if it is too high, the device
will not heat up
.
The device is heating
all the time
.
Make sure the device is not located near an air stream or
the set temperature was not increased
.
The device
does not heat up
enough
.
Increase the temperature by pressing
.
If the temperature setting is at the maximum, check the following:
- Check if there is another type of heating in the room
.
0DNHVXUH\RXUGHYLFHLVRQO\KHDWLQJWKHURRPGRRUFORVHG
- Have the device supply voltage checked
.
- Make sure the power of your device is adapted to the size of
your room (we recommend an average of 100 W/m2 for a ceiling
KHLJKWRIPRU:P
The device
takes time to heat up
7KHHOHFWULFDOUHVLVWDQFHKHDWVXSWKH ÁXLGZKLFKJUDGXDOO\DQG
naturally circulates inside the unit
'XHWRWKHLQHUWLDOSURSHUWLHVRIWKHÁXLGWKHVXUIDFHWHPSHUD
-
WXUHRIWKHXQLWZKHQÀUVWVWDUWLQJWRKHDWXSUHDFKHVDQRSWLPDO
level only after a minimum of 15 minutes, depending on the room
temperature
.
The surface of the
device is very hot
.
It is normal for the device to be hot when in use
.
The maximum
.
surface temperature is limited according to the NF Electricity Per
-
surface temperature is limited according to the NF Electricity Per
surface temperature is limited according to the NF Electricity Per
formance Standard
.
However, if you feel that your device is still
.
too hot, make sure the power is adapted to the size of your room
(we recommend 100W/m² for a ceiling height of 2,50m or 40W/
PDQGWKDWWKHGHYLFHLVQRWSODFHGQHDUDQDLUVWUHDPZKLFK
would affect its control mechanism
.

58
Problems
Chek
Traces of dirt appear
on the wall around
the device
.
When functioning, the device will be normally warm; the maxi
-
mum surface temperature being limited in accordance with the
1) (OHFWULFLW\ 3HUIRUPDQFH VWDQGDUG +RZHYHU LI \RX ÀQG WKDW
your device is still too warm, make sure the power is adapted to
the size of your room (we recommend 100 W/m2 for a ceiling
KHLJKWRIPRU:PDQGWKHXQLWLVQRWSODFHGLQDQDLU
draught which would disrupt its functioning
..
The last elements
top and bottom are
cooler than the rest
of the device
$WWKHWRSWKHXSSHUHOHPHQWVDUHQRWFRPSOHWHO\ÀOOHGWRDOORZ
IRUH[SDQVLRQRIWKHWKHUPRG\QDPLFÁXLG7KH\KHDWXSRQO\E\
conduction
.
$WWKHERWWRPWKHHOHPHQWVFRQYH\WKHÁXLGUHWXUQZKLFKKDV
transmitted its heat
.
The Expert Menu is
not accessible
.
You saved a PIN
.
You must enter your PIN to access the Expert
.
PHQXVHHWKH([SHUW0HQXFKDSWHU
If you forgot your PIN, enter the code 081
.
The unit does not
follow internal
programming
commands
.
Make sure the date and time are set
.
Make sure the unit is in PROG mode and internal programming
has been selected
.
An error code is
displayed
Err 3: connection sensor fault
.
(UU/LQDSFRQQHFWLRQIDXOW
Contact your installer
.
Contact your installer
Contact your installer
(UU&OHDQWKHÀOWHUPRGHOZLWKIDQDQGRUFKHFNWKDWWKHDLU
inlet or outlet are not obstructed
.
The unit does not
follow external
programming
commands
.
Make sure the programming unit is correctly used (see Program
-
PLQJXQLWRSHUDWLQJLQVWUXFWLRQV
Verify that the device is in Prog mode inactive
.
If you have not been able to solve your problem, contact your distributor/installer with the
reference numbers of the appliance
.
They are located on the side of the unit
.
.
Measure the
.
room temperature
.
7KH&RPPHUFLDO&RGH&DQG6HULDO1XPEHU(ZLOODOORZWKHPDQXIDFWXUHUWRLGHQWLI\
the appliance you purchased
.
A
Standards, quality marks
B
Trademark
C
Commercial Code
D
Manufacturing reference
E
Serial No
.
F
Manufacturer No
.
6
A B C
D
EF
(photo non contractuelle)

59
Model references
BHE
Characteristic
Symbol
Unit
Value
Heat output
BHE
50
Plus
BHE
75
Plus
BHE
1
00
Plus
BHE
175T
Plus
Rated heat output
P nom
kW
W
0,5
500
0,75
750
1
1
000
1,75
1750
Minimum heat output
P min
kW
W
0,5
500
0,75
750
1
1
000
1,75
1750
Maximum continuous heat
output
P max,c
kW
W
0,5
500
0,75
750
1
1
000
1,75
1750
$X[LOLDU\HOHFWULFLW\FRQVXPSWLRQ
At rated heat output
el max
kW
W
0,000
0,000
0,000
0,000
At minimum heat output
el min
kW
W
0,000
0,000
0,000
0,000
In standby mode
el sb
kW
W
0,00028
0,28
0,00028
0,28
0,00028
0,28
0,00028
0,28
Type of heat output / room temperature check
Property
Unit
Additional information
electronic control of room
temperature and weekly timer
.
temperature and weekly timer
temperature and weekly timer
yes
Other control options
Room temperature check, with
presence detector
.
presence detector
presence detector
no
Room temperature check, with
open window detector
.
open window detector
open window detector
no
Remote control option
.
no
Adaptive activation control
.
yes
Activation time limiter
.
Activation time limiter
Activation time limiter
no
Black goble sensor
.
Black goble sensor
Black goble sensor
no
Contact details
Idem information label
Characteristic

60
We would ask you to help protect the environment
.
After use, dispose of the various mate
.
-
rials in accordance with national regulations
.
Environment and recycling
The warranty conditions of our German companies do not apply to the appliances acquired
outside of Gremany
.
outside of Gremany
outside of Gremany
In countries where our subsidiaries sell our products a guarantee can
.
only be issued by those subsidiaries
.
Such guarantee is only granted if the subsidiary has
.
issued its own terms of guarantee
.
No other guarantee will be granted
.
.
We shall not provide any guarantee for appliances acquired in countries where we have no
subsidiary to sell our products
.
This will not affect warranties issued by any importers
.
Warranty

61
NL
Waarschuwing
. . . . . . . . . . . . . . . . . . . . . . . . . . . . . . . . . . . . . . . . . . . . . . . . . . . . . . .
.
62
Installatie
. . . . . . . . . . . . . . . . . . . . . . . . . . . . . . . . . . . . . . . . . . . . . . . . . . . . . . . . . . . .
.
64
De installatie van het apparaat voorbereiden
. . . . . . . . . . . . . . . . . . . . . . . . . . . . . .
.
64
Hydraulische aansluiting
. . . . . . . . . . . . . . . . . . . . . . . . . . . . . . . . . . . . . . . . . . . . . . .
.
66
Elektrische aansluiting
. . . . . . . . . . . . . . . . . . . . . . . . . . . . . . . . . . . . . . . . . . . . . . . .
.
67
Maak gebruik van de haken
. . . . . . . . . . . . . . . . . . . . . . . . . . . . . . . . . . . . . . . . . . . .
.
67
Onderhoud
. . . . . . . . . . . . . . . . . . . . . . . . . . . . . . . . . . . . . . . . . . . . . . . . . . . . . . . . .
.
67
De ventilator reinigen
. . . . . . . . . . . . . . . . . . . . . . . . . . . . . . . . . . . . . . . . . . . . . . . .
.
68
Werking met GEMENGDE UITVOERING
. . . . . . . . . . . . . . . . . . . . . . . . . . . . . . . .
.
68
Gebruik
. . . . . . . . . . . . . . . . . . . . . . . . . . . . . . . . . . . . . . . . . . . . . . . . . . . . . . . . . . . . .
.
69
Gebruik WINTER GEMENGDE VERSIE
. . . . . . . . . . . . . . . . . . . . . . . . . . . . . . . . . .
.
69
ZOMER / WINTER werkingsprincipe
. . . . . . . . . . . . . . . . . . . . . . . . . . . . . . . . . . . .
.
69
Eerste indienststelling
. . . . . . . . . . . . . . . . . . . . . . . . . . . . . . . . . . . . . . . . . . . . . . . . .
.
70
De schakelaar
. . . . . . . . . . . . . . . . . . . . . . . . . . . . . . . . . . . . . . . . . . . . . . . . . . . . . . .
.
70
Het apparaat in- / uitschakelen
. . . . . . . . . . . . . . . . . . . . . . . . . . . . . . . . . . . . . . . . .
.
70
Vergrendeling van de bedieningsorganen
. . . . . . . . . . . . . . . . . . . . . . . . . . . . . . . . . .
.
70
%HVFKULMYLQJYDQGHPRGL
.
.
.
.
.
.
.
.
.
.
.
.
.
.
.
.
.
.
.
.
.
.
.
.
.
.
.
.
.
.
.
.
.
.
.
.
.
.
.
.
.
.
.
.
.
.
.
71
Actieve Prog
. . . . . . . . . . . . . . . . . . . . . . . . . . . . . . . . . . . . . . . . . . . . . . . . . . . . .
.
71
Inactieve Prog
. . . . . . . . . . . . . . . . . . . . . . . . . . . . . . . . . . . . . . . . . . . . . . . . . . . .
.
71
De temperatuur instellen
. . . . . . . . . . . . . . . . . . . . . . . . . . . . . . . . . . . . . . . . . . . . . .
.
72
Het menu
. . . . . . . . . . . . . . . . . . . . . . . . . . . . . . . . . . . . . . . . . . . . . . . . . . . . . . . . . . . .
.
73
Werking van de Boost
.
.
.
.
.
.
.
.
.
.
.
.
.
.
.
.
.
.
.
.
.
.
.
.
.
.
.
.
.
.
.
.
.
.
.
.
.
.
.
.
.
.
.
.
.
.
.
.
.
73
De interne programmering gebruiken
. . . . . . . . . . . . . . . . . . . . . . . . . . . . . . . . . . . .
.
74
'HSURJUDPPD·VZLM]LJHQ
. . . . . . . . . . . . . . . . . . . . . . . . . . . . . . . . . . . . . . . . . .
.
74
Een programma kopiëren
. . . . . . . . . . . . . . . . . . . . . . . . . . . . . . . . . . . . . . . . . . .
.
74
Het menu EXPERT
. . . . . . . . . . . . . . . . . . . . . . . . . . . . . . . . . . . . . . . . . . . . . . . . . . .
.
75
In geval van storing
. . . . . . . . . . . . . . . . . . . . . . . . . . . . . . . . . . . . . . . . . . . . . . . . . . .
.
76
Karakteristiek
. . . . . . . . . . . . . . . . . . . . . . . . . . . . . . . . . . . . . . . . . . . . . . . . . . . . . . . .
.
78
Garantie en recycling
. . . . . . . . . . . . . . . . . . . . . . . . . . . . . . . . . . . . . . . . . . . . . . . . .
.
79
Garantie
. . . . . . . . . . . . . . . . . . . . . . . . . . . . . . . . . . . . . . . . . . . . . . . . . . . . . . . .
.
79
Milieu en recycling
. . . . . . . . . . . . . . . . . . . . . . . . . . . . . . . . . . . . . . . . . . . . . . . .
.
79
Overzicht

62
Waarschuwing
L
et op: zeer heet oppervlak.
L
ET OP
:Sommige delen van dit product kunnen erg
heet worden en brandwonden veroorzaken. Er moet
speciale aandacht worden besteed aan de aanwezigheid
van kinderen en kwetsbare mensen.
-
.LQGHUHQRQGHUMDDUPRHWHQXLWGHEXXUWYDQGLWDSSDUDDWZRUGHQ
JHKRXGHQWHQ]LM]HYRRUWGXUHQGRQGHUWRH]LFKWVWDDQ
-
.LQGHUHQ WXVVHQ HQ MDDU PRJHQ KHW DSSDUDDW XLW RI DDQ]HWWHQ
als het in een normale positie werd geplaatst of geïnstalleerd en de
kinderen onder toezicht staan van een volwassene, instructies hebben
RQWYDQJHQYRRUKHWYHLOLJJHEUXLNYDQKHWDSSDUDDWHQGHPRJHOLMNH
JHYDUHQ JRHG EHJULMSHQ .LQGHUHQ WXVVHQ HQ MDDU PRJHQ KHW
apparaat niet aansluiten, regelen of schoonmaken en geen onderhoud
verrichten voor de gebruiker
.
verrichten voor de gebruiker
verrichten voor de gebruiker
-
'LWDSSDUDDWPDJZRUGHQJHEUXLNWGRRUNLQGHUHQYDQPLQVWHQVMDDU
HQSHUVRQHQPHWEHSHUNWHOLFKDPHOLMNH]LQWXLJOLMNHRIYHUVWDQGHOLMNH
vermogens of zonder ervaring en kennis, als deze onder toezicht staan
of vooraf instructies over het veilig gebruik van het apparaat hebben
RQWYDQJHQHQ]LM]LFKEHZXVW]LMQYDQGHULVLFRVGLH]LMORSHQ.LQGHUHQ
mogen niet met het apparaat spelen
.
Het reinigen en onderhoud door
.
de gebruiker mag niet door kinderen worden gedaan zonder toezicht
.
-
Dit apparaat mag alleen door een bevoegde persoon worden
aangesloten of vastgekoppeld volgens de geldende regels en normen
.
-
2P HON JHYDDU YRRU ]HHU MRQJH NLQGHUHQ WH YRRUNRPHQ ZRUGW
aanbevolen dit apparaat zodanig te installeren dat de laagste
verwarmingsbalk zich minstens 600 mm boven de vloer bevindt
.
-
Dit apparaat mag alleen door een bevoegde persoon worden
aangesloten of vastgekoppeld volgens de geldende regels en normen
.
-
Een beschadigde stroomkabel moet worden vervangen door de
IDEULNDQW GH NODQWHQVHUYLFH RI GRRU SHUVRQHQ PHW HHQ JHOLMNH
NZDOLÀFDWLHRPJHYDDUWHYRRUNRPHQ
Let op:
Zeer heet
oppervlak

63
NL
-
De eerste keer dat u de verwarming gebruikt kan er een lichte geur
worden verspreid door de afvoer van eventuele fabricageresten van
het apparaat
.
-
De gebruikshandleiding van dit apparaat is beschikbaar door in te loggen
op de website van de fabrikant, vermeld op het garantieformulier in
deze handleiding
.
-
(QHUJLHEH]XLQLJHQGH RI DIVFKDNHOLQJVDSSDUDWHQ ]LMQ QLHW FRPSDWLEHO
PHWRQ]HDSSDUDWHQ=LMEHVFKDGLJHQGHWKHUPRVWDDW
-
Om veiligheidsredenen is het streng verboden de apparaten opnieuw
te vullen
.
Indien nodig neemt u contact op met een bevoegde vakman
.
.
-
9RRUGHJRHGHZHUNLQJYDQGHYHQWLODWRUDIKDQNHOLMNYDQKHWPRGHO
wordt aanbevolen om de luchtuitlaat niet te verstoppen of af te dekken
YRRUDOPHWHHQKDQGGRHN'LW]RXGHYHLOLJKHLGYDQGHYHQWLODWRU
kunnen activeren
.
-
/HWRSGDWXJHHQEDGMDVRSGHVFKDNHONDVWSODDWVW
-
Alvorens onderhoud te verrichten aan de handdoekradiator,
moet u hem uitzetten en laten afkoelen
.
Gebruik nooit schurende
.
schoonmaakmiddelen en oplosmiddelen
.
-
'HZHUNGUXNPDJQLHWKRJHU]LMQGDQEDU
-
Gemengde apparaten moeten worden gevuld met het warmwatercircuit
zodat de vloeistof zich kan uitzetten in het verwarmingscircuit
.
-
Met behulp van de ontluchter rechtsboven wordt de handdoekradiator
FRUUHFWJHYXOG$OVHUJHHQZDWHUUHJHOPDWLJQDDUEXLWHQNRPWELMKHW
opendraaien van de ontluchter, belt u uw installateur
.
opendraaien van de ontluchter, belt u uw installateur
opendraaien van de ontluchter, belt u uw installateur
-
+HWDSSDUDDWPRHWYHUSOLFKWLQGHPRGXV&HQWUDOHYHUZDUPLQJ]LMQ
wanneer de toevoerkraan
a
open is
.
Door dit abnormale gebruik
.
wordt de garantie ongeldig
.
-
Het gebruik van deze handdoekverwarmer zonder water zou de
weerstand beschadigen
.
Dit incident vereist het vervangen van de
.
weerstand wat niet wordt gedekt door de fabrieksgarantie
.

64
-
De ketelretourkraan
b
PRHWDOWLMGRSHQ EOLMYHQLQDOOH JHYDOOHQYDQ
gebruik (
centrale verwarming, programma al dan niet actief
RP KHW
centrale verwarming, programma al dan niet actief
centrale verwarming, programma al dan niet actief
XLW]HWWHQYDQGHYORHLVWRILQKHWQHWZHUNPRJHOLMNWHPDNHQHQVFKDGH
aan de handdoekradiator te voorkomen
.
Apparaten met dit symbool mogen niet met het huisvuil
ZRUGHQ ZHJJHGDDQ PDDU PRHWHQ DI]RQGHUOLMN ZRUGHQ
verzameld en gerecycled
.
Het verzamelen en recyclen van afgedankte producten
gebeurt in overeenstemming met de lokale regels en
besluiten
.
Door een apparaat op hoogte te installeren zal de
OXFKWXLWODDWWHPSHUDWXXU VWLMJHQ
(ongeveer 10°C per 1000m
hoogteverschil).
Regels voor het installeren
-
Dit apparaat is ontworpen om te worden geïnstalleerd in een woning
.
Neem voor alle situaties contact op met uw distributeur
.
Neem voor alle situaties contact op met uw distributeur
Neem voor alle situaties contact op met uw distributeur
-
+HWDSSDUDDWPRHWZRUGHQJHwQVWDOOHHUGYROJHQVKHWERHNMHHQ
d e
geldende normen in het land van installatie (
NFC 15100 voor Frankrijk
-
Het apparaat moet worden gevoed met een eenfasige spanning van
230 V 50Hz
.
-
In vochtige ruimtes, zoals badkamers en keukens, moet de aansluitdoos
minstens 25 cm boven de vloer worden geïnstalleerd
.
Houd het apparaat uit de buurt van een luchtstroom die zijn
werking zou kunnen verstoren
(bijv.onder een centraal mechanisch
ventilatiesysteem enz.)
.
Niet installeren onder een vaste contactdoos.
Volume 1
Geen elektrisch apparaat
Volume 2
IPX4 elektrisch apparaat
(
EN 60335-2-43 standaard:
2003/A2: 2008
DE INSTALLATIE VAN HET APPARAAT VOORBEREIDEN
Installatie

65
NL
> 250 mm
> 250 mm
> 200 mm
> 150 mm
B
C
A
Dimensions en mm
BHE 50 Plus
BHE 75 Plus
BHE 100 Plus
BHE 175 T Plus
A
708
1200
1446
1200
B
467
467
517
467
C
>480
>480
>480
>480
Volg de instructies voor de minimaal
Volg de instructies voor de minimaal
vereiste ruimte rondom het apparaat
.
.
talleer geen schap boven het
Installeer geen schap boven het
apparaat
.
De onderkast moet zich op minstens
5 mm van de muur bevinden
.
2P HON JHYDDU YRRU ]HHU MRQJH
2P HON JHYDDU YRRU ]HHU MRQJH
kinderen te voorkomen, wordt
aanbevolen dit apparaat zodanig
aanbevolen dit apparaat zodanig
te installeren dat de laagste
te installeren dat de laagste
verwarmingsbalk zich minstens 600
verwarmingsbalk zich minstens 600
mm boven de vloer bevindt
.

66
Regels voor het aansluiten
-
Voor de warmwateraansluiting heeft de
gemengde versie 2 schroefaansluitingen 1/2 Gas
)ZDWHULQODDWHQXLWODDWDDQVOXLWLQJHQDDQ
de onderkant
.
-
/HW RS GH VWURRPULFKWLQJ HQ GH ZDDUGHQ GLH
worden vermeld in het onderstaande schema
.
Hydraulisch aansluitschema
HYDRAULISCHE AANSLUITING
a
b
115
mini
245
137,5
1/2 GAS 15/21 F
mini
480
200
AANSLUITING VIA
DE VLOER
ZIJAANZICHT
VOORAANZICHT
WATERINLAAT
1/2 GAS 15/21 F
WATERUITLAAT
1/2 GAS 15/21 F
Schroefaansluitingen
500/750/1000W : 102 min-109 max
1750W : 115 min-122 max
MIDDEN APPARAAT
AANSLUITING VIA
DE WAND
500W/750W/1750W : 332.5
1000W : 372.5

67
NL
ELEKTRISCHE AANSLUITING
Regels voor het aansluiten
-
Het apparaat moet worden gevoed met een eenfasige spanning van
230 V 50Hz
.
-
De voeding van het apparaat moet rechtstreeks worden aangesloten
op het stroomnet na de vermogensschakelaar en zonder tussenliggende
schakelaar
.
schakelaar
schakelaar
-
Het apparaat wordt op het net aangesloten met behulp van de kabel via
een aansluitdoos
.
In vochtige ruimtes, zoals badkamers en keukens, moet
.
de aansluitdoos minstens 25 cm boven de vloer worden geïnstalleerd
.
-
Het is verboden om het apparaat te aarden. Sluit de (zwarte)
stuurdraad niet aan op de aarde.
-
De voeding van het apparaat moet rechtstreeks worden aangesloten
op het stroomnet na het omnipolair uitschakelmechanisme volgens de
installatievoorschriften
.
-
Als de voedingskabel is beschadigd, moet deze door de fabrikant,
de klantenservice of een erkende technicus worden vervangen om
JHYDDUOLMNHVLWXDWLHVWHYRRUNRPHQ
2PHUYRRUWH]RUJHQGDWKHWDSSDUDDWJRHGEOLMIWSUHVWHUHQLVKHW
QRGLJRPRQJHYHHUWZHHNHHUSHUMDDUPHWHHQVWRI]XLJHURIHHQERUV
-
tel alle stof van de roosters van het apparaat te halen
.
Nooit schuur
.
-
Nooit schuur
Nooit schuur
middelen gebruiken
.
ONDERHOUD
Er worden 2 pinnen meegeleverd die op elk gewenst punt kunnen
worden geplaatst
.
MAAK GEBRUIK VAN DE PINNEN

68
DE VENTILATOR REINIGEN
De roosters van de luchtinlaat en -uitlaat met een stofzuiger
schoonzuigen
.
'HYHQWLODWRUKHHIWHHQVWRIÀOWHUGLHZDQQHHUKLMYROLVGHYHQWLODWRU
NDQXLWVFKDNHOHQIRXWFRGH(UURSKHWGLVSOD\YDQGHEHGLHQLQJVNDVW
9RRUHHQRSWLPDDOJHEUXLNKHWÀOWHUUHJHOPDWLJVFKRRQPDNHQ
WERKING MET GEMENGDE UITVOERING
WINTER
- Het circuit van de ketel werkt
.
-
De schakelkast regelt niets, de enige toets
die werkt is BOOST
.
die werkt is BOOST
die werkt is BOOST
'H ZHHUVWDQG ZHUNW QLHW +LM LV
VSDQQLQJVYULM
-
De ketel regelt de temperatuur
.
ketel regelt de temperatuur
ketel regelt de temperatuur
-
De toevoerkraan "
a
" moet open staan
.
-
De ketelretourkraan "
b
" moet open
EOLMYHQ
ZOMER
- Het circuit van de ketel werkt niet
.
'HVFKDNHONDVWKHUYDWDO]LMQIXQFWLHV
- De ketel regelt de temperatuur niet meer
.
- De ketel regelt de temperatuur niet meer
- De ketel regelt de temperatuur niet meer
-
De weerstand neemt over van de ketel
die is uitgeschakeld
.
-
De toevoerkraan "
a
PRHWJHVORWHQ]LMQ
-
De ketelretourkraan "
b
" moet open
EOLMYHQ
a
b
a
Toevoerkraan voor de inlaat
van warm ketelwater. Hij kan al
dan niet voorzien zijn van een
thermostaat.
b
Afvoerkraan voor warm water.

69
NL
GEBRUIK WINTER GEMENGDE VERSIE
Om de handdoekradiator in de winter te gebruiken, moet de
Centrale verwarmingsmodus actief zijn.
Ga naar het MENU met een druk op
Centrale
verwarming
Programma
Programma
Om de centrale verwarming te activeren of
deactiveren
U kunt:
De verwarming inschakelen
: De toevoerkraan
a
moet open staan
.
De temperatuur bijstellen
: De toevoerkraan
a
moet min of meer open staan (
in geval
van thermostaatventiel
van thermostaatventiel
van thermostaatventiel
De BOOST activeren
.
De bediening blokkeren.
-
De temperatuur verhogen of verlagen
zonder te hoeven valideren (
behalve in
de winterwerking
de winterwerking
de winterwerking
-
'H%RRVWGXXUZLM]LJHQ
-
Menu's doorlopen
.
-
Submenu's doorlopen;
-
Bevestigen;
-
Uitschakelen;
-
Vergrendelen, ontgrendelen
.
-
Terug naar het vorige scherm
-
Boost in- of uitschakelen
ZOMER / WINTER WERKINGSPRINCIPE
Gebruik

70
.LHVGHWDDOHQGDDUQDGHGDWXPHQGHWLMG
%LMGHHHUVWHLQVFKDNHOLQJ
-
programmering is inactief,
-
de richttemperatuur wordt ingesteld op 19° C
.
EERSTE INDIENSTSTELLING
(UEHYLQGW]LFKHHQ$DQ8LWVFKDNHODDUDDQGHDFKWHU]LMGHYDQKHWNDVW
-
MHYDQKHWDSSDUDDW
Gebruik de schakelaar uitsluitend voor een langdurige uit
-
schakeling
(
buiten de verwarmingsperiode
Zet de schakelaar (
aan de achterzijde van het apparaat
RS
I om het ap
-
paraat in te schakelen
.
Wanneer het apparaat uitgeschakeld is geweest,
.
]XOOHQGHGDJHQGHWLMGRSQLHXZLQJHYRHUGPRHWHQZRUGHQ
I om het ap
DE SCHAKELAAR
Houd voor het uitschakelen van het apparaat
lang ingedrukt
.
Bevestig “
Uitschakelen”
door een druk op
Uitschakelen”
.
Houd voor het inschakelen van het apparaat
lang ingedrukt
.
HET APPARAAT IN- / UITSCHAKELEN
Om te voorkomen dat kinderen aan het apparaat zitten, kunt u de
bedieningsorganen hiervan vergrendelen door een lange druk op
.
Selecteer “Vergrendelen”
en valideer met
.
*DYRRUKHWRQWJUHQGHOHQYDQGHEHGLHQLQJVRUJDQHQRSGH]HOIGHZLM]H
te werk door “Ontgrendelen” te selecteren
.
VERGRENDELING VAN DE BEDIENINGSORGANEN

71
NL
(UZRUGHQZHUNZLM]HQYRRUJHVWHOG
A
CTIEVE
P
ROG
- Het apparaat volgt het voor iedere dag van de week bepaalde interne
SURJUDPPD%LMKHWLQVFKDNHOHQYDQKHWDSSDUDDWZRUGHQGHYROJHQGH
perioden bepaald: :
0DDQGDJWPYULMGDJFRPIRUWYDQXWRWXHQYDQXWRW
21u
zaterdag en zondag, comfort van 8u tot 12u en van 18u tot
21u
.
8 NXQW GH]H JHELHGHQ ZLM]LJHQ HQ &RPIRUW WHPSHUDWXXUJHELHGHQ
per dag instellen
.
7LMGHQVGH]H&RPIRUWJHELHGHQZRUGWGHULFKWWHPSHUDWXXULQJHVWHOG
met behulp van
of
of
.
Buiten de Comfort perioden wordt het verlagen geregeld in de modus
Prog “Verlaging T° ECO”
.
- Het apparaat volgt de stop- en bevriezingscommando’s van de ex
-
terne programmering van uw installatie (zie de instructies van uw pro
-
JUDPPHULQJVHHQKHLG
I
N
A
CTIEVE
P
ROG
-
Het apparaat volgt permanent de ingestelde richttemperatuur
.
apparaat volgt permanent de ingestelde richttemperatuur
apparaat volgt permanent de ingestelde richttemperatuur
BESCHRIJVING VAN DE MODI

72
In de Prog-modus Inactief
In de Prog-modus Inactief
:
de Prog-modus Inactief
19.
0
°
-
Verhogen met
(
max 28°C
max 28°C
max 28°C
-
Verlagen met
(
min 12°C
min 12°C
min 12°C
-
Nog verder verlagen tot 7°C (
Vorstvrije temperatuur
kan niet gewijzigd worden
PHW
.
-
Verminder tot zomer met (het apparaat wordt niet
RSJHZDUPGGH%RRVWIXQFWLHEOLMIWWRHJDQNHOLMN
In de actieve Prog modus
In de actieve Prog modus
:
PROG
Maan
12:14
19.
0
°
Als het scherm PROG weergeeft, bevindt de program
-
meringsperiode zich in de modus Comfort
.
-
Verhogen met
PD[&
-
Verlagen met
PLQ&
Als het scherm PROG ECO weergeeft, bevindt de pro
-
grammeringsperiode zich in de modus ECO
.
8NXQWGH(&2WHPSHUDWXXUZLM]LJHQXJDDWGXVDIZLM
-
ken van de verlaging die u heeft ingesteld in de modus
Prog “Verlaging T° ECO”
.
$OVXHHQ9RUVWYULMHWHPSHUDWXXU&KHHIWLQJHVWHOG
wordt de programmering opgeschort
.
:LM]LJGH]HWHPSHUDWXXUZDQQHHUXWHUXJNRPWRPGH
programmering te hervatten
.
Door de temperatuur tot het maximum te verlagen,
gaat u over naar de zomermodus, het toestel verhit
QLHWPHHU'H%RRVWIXQFWLHEOLMIWWRHJDQNHOLMN
PROG ECO
Maan
17:14
15.5°
PROG Dérog.
Terug naar
de prog
18:00
18.5°
PROG
Vorstvrij
opgeschort
programmeren
7.0°
DE TEMPERATUUR INSTELLEN
Zomer

73
NL
Het menu
Toegang tot het MENU door een druk op
Programma
Programma
Programma inschakelen of uitschakelen
Maandag ...
Zo
Datum / tijd
Uitschakelen
Om het apparaat uit te schakelen.
Parameters
Om de datum, tijd of instelling in te stellen
Automatische zomer / wintertijd.
Verlaging
T° ECO
Voor het instellen van de verlaging van de
temperatuur ten opzichte van de Comfort
temperatuur (tussen -1°C en -9°C, standaard op
-3.5°C).
Voor het instellen van de Comfort temperatuur-
perioden voor een dag van de week (3 perioden
mogelijk), om vervolgens deze perioden op andere
dagen te kopiëren.
Centrale
verwarming
Om de centrale verwarming te activeren of
deactiveren
Met deze functie kunt u de verwarming op vol vermogen starten, zodat de temperatuur in
GHEDGNDPHUVQHOVWLMJW
Druk op de toets
RPGH%RRVWLQWHVFKDNHOHQ'HGXXUZLM]LJHQPHW
of
.
met ventilator: instelbare duur van 10 tot 60 minuten
zonder ventilator: instelbare duur van 15 tot 120 minuten.
2SQLHXZLQGUXNNHQRPKHPXLWWHVFKDNHOHQYyyUKHWHLQGHYDQGHYRRUDILQJHVWHOGHWLMG
VWDQGDDUGPLQXWHQGXXULQVWHOEDDULQKHWPHQX([SHUW
1DGHLQJHVWHOGHWLMGKHUYDWKHWDSSDUDDW]LMQRRUVSURQNHOLMNHZHUNLQJ
WERKING VAN DE BOOST

74
D
E
P
ROGR
A
MM
A
’
S
WIJZIGEN
WIJZIGEN
U kunt tot 3 Comfort temperatuurperioden voor iedere dag van de week programmeren
.
Buiten de Comfort perioden wordt het verlagen geregeld in de modus Prog “Verlaging T°
ECO”
.
Selecteer de dag met
.
Valideer
.
.
.
.
Selecteer
.
Valideer
.
Valideer
Valideer
.
.
.
.LHVGHEHJLQWLMGPHW
of
.
Valideer
.
.LHVGHHLQGWLMGPHW
of
.
Valideer
.
.
E
EN
P
ROGR
A
MM
A
KO
P
IËREN
8NXQWKHWSURJUDPPDYDQHHQGDJRSHHQRIPHHUGHUHGDJHQNRSLsUHQ
Selecteer
.
Valideer
.
.
Scrol langs de dagen met
of
.
Valideer de dag waarnaar u wilt kopiëren met
.
.
Om het kopiëren te valideren, selecteert u “Kopiëren”
.
Valideer
.
.
Voorbeeld: Kopie van het programma van maandag op dinsdag,
GRQGHUGDJYULMGDJ
Programma
Programma
Maandag ...Zo
Lundi
Copier
Mar
Mer
Jeu
Ven
Sam
Dim
DE INTERNE PROGRAMMERING GEBRUIKEN
Verwachting verwarming
Uw toestel is uitgerust met een functie waarmee uw apparaat automatisch de voorve
-
UZDUPWLMGOHHUWZDQQHHUXSURJUDPPHULQJJHEUXLNW
:DQQHHUXGHFRPIRUWSHULRGHQYDQXZDSSDUDDWLQVWHOW]DOKHWYHUZDUPHQDIKDQNHOLMN]LMQ
YDQGHWHPSHUDWXXUVWLMJLQJ]RGDWXZNDPHURSGHMXLVWHWHPSHUDWXXUELMXZDDQNRPVWLV
%LMYRRUEHHOGDOVXRPXZFRPIRUWWHPSHUDWXXUKHEWLQJHVWHOGVWDUWKHWWRHVWHOYRRU
-
%LMYRRUEHHOGDOVXRPXZFRPIRUWWHPSHUDWXXUKHEWLQJHVWHOGVWDUWKHWWRHVWHOYRRU
%LMYRRUEHHOGDOVXRPXZFRPIRUWWHPSHUDWXXUKHEWLQJHVWHOGVWDUWKHWWRHVWHOYRRU
GDWXGHYHUZDUPLQJYDQXZNDPHUNXQWYHUZDFKWHQWXVVHQPLQXWHQHQXXU

75
NL
Het menu EXPERT
'UXNWHJHOLMNHUWLMGODQJHUGDQVHFRQGHQRS
en
RPWRHJDQJWHNULMJHQWRWGH
geavanceerde functies van het apparaat
.
PARAMETERS
Beperkingen
Algemeen
Geluid
Voor het activeren of deactiveren van het geluid van
de toetsen.
Boost
De maximale boosttijd instellen: de instelling
Kan variëren van 15 tot 120 minuten.
MENU
Backlight
Om te selecteren of de achtergrondverlichting in- of
uitschakelen; Het display wanneer het toestel in de
standby-modus staat
Taal
Om de taal te kiezen.
Reset
Terug naar de basis fabrieksinstelling
Config functie
Om de richttemperatuur aan te passen aan de in het
vertrek gemeten temperatuur als u na enkele uren
verwarmen een verschil constateert.
De ijkingswaarde ligt tussen -3° C onder en +3° C
boven de ingestelde temperatuur.
Bijv.: als de T° van het vertrek = 18°C en de ingestelde T°
is = 20°C, selecteer -2,0°.
IJking T°
Max. temp
Voor het registreren van een maximale
richttemperatuur die niet overschreden mag worden
(tussen 22°C en 28°C, standaard ingesteld op 28°C).
Contr. toegang
Om de toegang tot de bedieningsorganen te beperken.
U kunt kiezen voor gehele toegang, uitsluitend toegang
tot de temperatuur of geen enkele toegang. In dat
laatste geval zijn de bedieningsorganen van het kastje
niet meer toegankelijk.
PIN-code
Voor het al dan niet activeren van de registratie van
een persoonlijke toegangscode in het Menu Expert.
Eenmaal geactiveerd is de toegang tot het Menu
Expert gecodeerd.
U kunt hier uw persoonlijke code noteren
Om deze te deactiveren, gaat u terug naar het Menu
Expert, voert u uw persoonlijke code in en gaat u
terug naar Parameterinstellingen => Beperkingen =>
PIN-code.
TEST
Hoofdlichaam
Controle van de werking van het verwarmingselement.
Informatie
Reg. verwarming
Identificatie
Versie
Informatie over het vermogen van het apparaat.
Identicatie van het apparaat.
Identicatie van de versie.

76
In geval van storing
Soort probleem
Uit te voeren controles
Het scherm van de
bedieningskast licht
niet op
.
Controleer of de schakelaar aan de achterkant van het apparaat
op I (
Aan
op I (
op I (
VWDDW
Controleer of het apparaat elektrische voeding ontvangt
.
De kamertemperatuur
verschilt van die wordt
weergegeven op het
apparaat
.
U moet minstens 6 uur wachten totdat de temperatuur stabiel is
.
+HW LV PRJHOLMN GDW X DIKDQNHOLMN YDQ XZ LQVWDOODWLH HHQ DQGHUH
temperatuur vindt dan die welke op het apparaat wordt weergegeven
(
een verschil van 0,5°C is normaal
,Q GDW JHYDO UDDGSOHHJW X KHW
een verschil van 0,5°C is normaal
"Expertmenu", hoofdstuk "Kalibratietemperatuur"
.
Het apparaat verwarmt
niet
.
Controleer of het apparaat in Comfortmodus is
.
Als u aan het programmeren bent, controleert u of er een Comfort-
WLMGEHUHLN DFWLHI LV =RUJ HUYRRU GDW GH YHUPRJHQVVFKDNHODDUV
YDQGHLQVWDOODWLH]LMQLQJHVFKDNHOGRIKHWDIVFKDNHOV\VWHHP
als u
dat heeft
GH YRHGLQJ YDQ KHW DSSDUDDW QLHW KHHIW XLWJHVFKDNHOG
Controleer de luchttemperatuur van het vertrek: als deze te hoog
is, zal het apparaat niet verwarmen
.
Het apparaat verwarmt
continu
Controleer of het apparaat niet in de tocht staat (
open deur in de
buurt, toevoer koude lucht via de aansluitkast aan de achterkant van het
apparaat
RIGDWGHWHPSHUDWXXULQVWHOOLQJQLHWLVYHUDQGHUG
(U NDQ HHQ VWRULQJ ]LMQ LQ KHW HOHNWULFLWHLWVQHW ,Q JHYDO YDQ HHQ
probleem (
thermostaat geblokkeerd ...
VFKDNHOWX GH YRHGLQJYDQ
het apparaat (
zekering, stroomonderbreker
apparaat (
apparaat (
RQJHYHHUPLQXWHQXLW
zekering, stroomonderbreker
zekering, stroomonderbreker
en vervolgens weer aan
.
Als dit vaak gebeurt, laat u stroomvoorziening controleren door
uw elektricien
.
Het apparaat verwarmt
niet voldoende
.
Verhoog de temperatuur door het indrukken van
.
Als de instelling zich op de maximum stand bevindt, controleert u
het volgende:
- Controleer of er een ander verwarmingsapparaat in de kamer
aanwezig is
.
- Zorg ervoor dat uw apparaat alleen de ruimte verwarmt
(
deur gesloten
/DDWGHYRHGLQJVVSDQQLQJYDQKHWDSSDUDDWFRQWUROHUHQ
&RQWUROHHU RI KHW YHUPRJHQ YDQ XZ DSSDUDDW SDVW ELM KHW
oppervlak van uw vertrek (
wij raden een gemiddelde van 100 W/m
2
aan voor een plafondhoogte van 2,50 m of 40W/m
3
+HW GXXUW HQLJH WLMG
voordat het apparaat
warm wordt
.
'HHOHNWULVFKHZHHUVWDQGYHUZDUPWGHYORHLVWRIGLHJHOHLGHOLMNHQ
RSQDWXXUOLMNHZLM]HLQKHWDSSDUDDWFLUFXOHHUW
'RRU GH WUDDJKHLGVHLJHQVFKDSSHQ YDQ GH YORHLVWRI NULMJW GH
oppervlaktetemperatuur van het apparaat pas na minimaal 15 minuten
HHQRSWLPDDOQLYHDXDIKDQNHOLMNYDQGHRPJHYLQJVWHPSHUDWXXUYDQ
het vertrek wanneer het apparaat verwarmt
.

77
NL
Soort probleem
Uit te voeren controles
Het apparaat heeft een
zeer heet oppervlak
.
Het is normaal dat het apparaat heet wordt wanneer het in
werking is
.
De maximale oppervlaktetemperatuur wordt beperkt
.
in overeenstemming met de NF norm voor elektriciteitsprestaties
.
$OVXPHHQWGDWXZDSSDUDDWQRJDOWLMGWHKHHWLVFRQWUROHHUWX
RIKHWYHUPRJHQYDQXZDSSDUDDWSDVWELMKHWRSSHUYODNYDQXZ
YHUWUHNZLM UDGHQHHQJHPLGGHOGHYDQ :P
2
aan voor een
plafondhoogte van 2,50 m of 40W/m
3
HQRIKHWDSSDUDDWQLHWRS
de tocht staat, wat de regelaar kan verstoren
.
(U YHUVFKLMQHQ YXLOH
plekken op de muur
rondom het apparaat
.
,QHHQYHUYXLOGHRPJHYLQJNDQYXLO]LFKRSKRSHQELMGHOXFKWXLWODWHQ
YDQKHWDSSDUDDWRIRSGHPXXU'LWYHUVFKLMQVHOZRUGWYHURRU]DDNW
door de slechte kwaliteit van de omgevingslucht (
rook van sigaretten,
kaarsen, wierook, open haard enz.
,Q GDWJHYDOZRUGW DDQEHYROHQ
te controleren of het vertrek goed wordt geventileerd (
ventilatie,
luchtinlaat, enz.
De laatste elementen
ERYHQ HQ RQGHU ]LMQ
minder warm dan de
rest van het apparaat
'HERYHQVWHHOHPHQWHQDDQGHERYHQNDQW]LMQQLHWYROOHGLJJHYXOG
zodat de thermodynamische vloeistof kan uitzetten
.
Ze verwarmen
.
uitsluitend door geleiding
.
De onderste elementen, aan de onderkant, begeleiden terugkerende
vloeistof nadat de warmte is afgegeven
.
Het Expertmenu kan
niet worden geopend
.
U hebt een PIN-code geregistreerd
.
U moet uw code invoeren om
.
WRHJDQJWHNULMJHQWRWKHW([SHUWPHQX
zie hoofdstuk Expertmenu
WRHJDQJWHNULMJHQWRWKHW([SHUWPHQX
WRHJDQJWHNULMJHQWRWKHW([SHUWPHQX
Als u uw code bent vergeten, voert u de code 081 in
.
Het apparaat volgt de
interne programma's
niet
.
&RQWUROHHURIGHGDWXPHQGHWLMG]LMQLQJHVWHOG
Controleer of het apparaat in Programmeermodus is
.
(U YHUVFKLMQW HHQ
foutcode
Err 3: verbindingsfout van de omgevingsensor
.
Err 3: verbindingsfout van de omgevingsensor
Err 3: verbindingsfout van de omgevingsensor
(UU/LQDSYHUELQGLQJVIRXW
Neem contact op met uw installateur
.
Neem contact op met uw installateur
Neem contact op met uw installateur
(UU5HLQLJKHWÀOWHUPRGHOPHWYHQWLODWRUHQRIFRQWUROHHURI
GHOXFKWLQODDWRIXLWODDWQLHW]LMQYHUVWRSW
Het apparaat volgt de
externe programma's
niet
.
Controleer of de programma-eenheid goed wordt gebruikt
(
zie bedieningsinstructies van de eenheid
(
(
Controleer of de Programmamodus niet actief is
.
Als u uw probleem niet hebt kunnen oplossen, neemt u contact op met uw distributeur/
LQVWDOODWHXUHQKRXGWXGHUHIHUHQWLHVYDQKHWDSSDUDDWELMGHKDQG'H]HEHYLQGHQ]LFKDDQGH
]LMNDQWYDQKHWDSSDUDDW0HHWGHWHPSHUDWXXUYDQKHWYHUWUHN
De Handelscode (
C
HQKHW6HULHQXPPHU
E
]LMQYRRUGHIDEULNDQWGH,'YDQKHWDSSDUDDWGDWX
hebt gekocht
.
A
Normen, kwaliteitslabels
B
Handelsmerk
C
Handelscode
D
Fabricagenummmer
E
Serienummer
F
Fabrikantnummer
6
A B C
D
EF
(photo non contractuelle)

78
Referenties van het model
BHE
Karakteristiek
Symbol
Eenheid
Waarde
Thermisch vermogen
BHE
50
Plus
BHE
75
Plus
BHE
1
00
Plus
BHE
175T
Plus
Nominaal thermisch vermogen
Pnom
kW
W
0,5
500
0,75
750
1
1
000
1,75
1750
Minimaal thermische vermogen
Pmin
kW
W
0,5
500
0,75
750
1
1
000
1,75
1750
Maximaal continu thermische
vermogen
Pmax,c
kW
W
0,5
500
0,75
750
1
1
000
1,75
1750
([WUDHOHNWULVFKYHUEUXLN
%LMQRPLQDDOWKHUPLVFKYHU
-
%LMQRPLQDDOWKHUPLVFKYHU
%LMQRPLQDDOWKHUPLVFKYHU
mogen
el max
kW
W
0,000
0,000
0,000
0,000
%LMPLQLPDDOWKHUPLVFKHYHU
-
%LMPLQLPDDOWKHUPLVFKHYHU
%LMPLQLPDDOWKHUPLVFKHYHU
mogen
el min
kW
W
0,000
0,000
0,000
0,000
In wachtmodus
el sb
kW
W
0,00028
0,28
0,00028
0,28
0,00028
0,28
0,00028
0,28
Type regeling van het thermische vermogen / de kamertemperatuur
Karakteristiek
Eenheid
Aanvullende informatie
Elektronische controle van de
kamertemperatuur en weke
-
OLMNVHWLPHU
MD
Andere regelmogelijkheden
Regelen van de kamertempe
-
ratuur met aanwezigheidsde
-
tector
.
tector
tector
neen
De regeling van de kamertem
-
peratuur met een detector
voor open venster
.
voor open venster
voor open venster
neen
Optie voor afstandsbediening
.
neen
Adaptieve regeling van de
activatie
.
MD
Beperking van de duur van de
activering
.
neen
Sensor met zwart bol
.
neen
Contactinformatie
,GHPNHQSODDWMH
Karakteristiek

79
NL
G
A
R
A
NTIE
'HJDUDQWLHYRRUZDDUGHQYDQRQ]H'XLWVHEHGULMYHQJHOGHQQLHWYRRUDSSDUDWHQGLHEXLWHQ
'XLWVODQGZHUGHQJHNRFKW+HWLVGDDUHQWHJHQGHGRFKWHURQGHUQHPLQJGLHYHUDQWZRRUGHOLMN
is voor de distributie van onze producten in het desbetreffende land dat als enige bevoegd
LVRP
JDUDQWLHWHJHYHQ'H]HJDUDQWLHLVHFKWHUDOOHHQPRJHOLMNDOVGHGRFKWHURQGHUQHPLQJ
haar eigen garantievoorwaarden heeft gepubliceerd
.
Er zal trouwens geen andere vorm van
.
garantie worden geboden
.
:LM ELHGHQ JHHQ JDUDQWLH YRRU DSSDUDWHQ GLH ZHUGHQ JHNRFKW LQ ODQGHQ ZDDU JHHQ
GRFKWHURQGHUQHPLQJHQ YDQ RQV EHGULMI RQ]H SURGXFWHQ GLVWULEXHUHQ (YHQWXHOH GRRU GH
LPSRUWHXUYHUOHHQGHJDUDQWLHVEOLMYHQRQJHZLM]LJG
M
ILIEU
EN
RECYCLING
8ZRUGWYHU]RFKWXZELMGUDJHWHOHYHUHQDDQKHWEHKRXGYDQRQVPLOLHX1DJHEUXLNJRRLWX
de materialen weg in overeenstemming met de nationale regelgeving
.
Garantie en recycling
8%MXLO

Deutschland
STIEBEL ELTRON GmbH & Co. KG
Dr.-Stiebel-Straße 33 | 37603 Holzminden
Tel. 05531 702-0 | Fax 05531 702-480
www.stiebel-eltron.de
Verkauf Tel. 05531 702-110 | Fax 05531 702-95108 | [email protected]
Kundendienst Tel. 05531 702-111 | Fax 05531 702-95890 | kundendie[email protected]
Ersatzteilverkauf Tel. 05531 702-120 | Fax 05531 702-95335 | [email protected]
Irrtum und technische Änderungen vorbehalten! | Subject to errors and technical changes! | Sous réserve
d‘erreurs et de modifications techniques! | Onder voorbehoud van ver
g
issin
g
en en technische wi
j
zi
g
in
g
en! |
Salvo error o modificación técnica! | Excepto erro ou alteração técnica | Zastrzeżone zmian
y
techniczne i
ewentualne błędy | Omyly a technické změny jsou vyhrazeny! | A muszaki változtatások és tévedések
j
o
g
át
fenntartjuk! |
Отсутствие ошибок не гарантируется. Возможны технические изменения.
| Ch
y
b
y
a
technické zmeny sú vyhradené! Stand 9147
Australia
STIEBEL ELTRON Australia Pty. Ltd.
6 Prohasky Street | Port Melbourne VIC 3207
Tel. 03 9645-1833 | Fax 03 9645-4366
www.stiebel.com.au
Austria
STIEBEL ELTRON Ges.m.b.H.
Gewerbegebiet Neubau-Nord
Margaritenstraße 4 A | 4063 Hörsching
Tel. 07221 74600-0 | Fax 07221 74600-42
www.stiebel-eltron.at
Belgium
STIEBEL ELTRON bvba/sprl
't Hofveld 6 - D1 | 1702 Groot-Bijgaarden
Tel. 02 42322-22 | Fax 02 42322-12
www.stiebel-eltron.be
China
STIEBEL ELTRON (Guangzhou) Electric
Appliance Co., Ltd.
Rm 102, F1, Yingbin-Yihao Mansion, No. 1
Yingbin Road
Panyu District | 511431 Guangzhou
Tel. 020 39162209 | Fax 020 39162203
www.stiebeleltron.cn
Czech Republic
STIEBEL ELTRON spol. s r.o.
K Hájům 946 | 155 00 Praha 5 - Stodůlky
Tel. 251116-111 | Fax 235512-122
www.stiebel-eltron.cz
Finland
STIEBEL ELTRON OY
Kapinakuja 1 | 04600 Mäntsälä
Tel. 020 720-9988
www.stiebel-eltron.fi
France
STIEBEL ELTRON SAS
7-9, rue des Selliers
B.P 85107 | 57073 Metz-Cédex 3
Tel. 0387 7438-88 | Fax 0387 7468-26
www.stiebel-eltron.fr
Hungary
STIEBEL ELTRON Kft.
Gyár u. 2 | 2040 Budaörs
Tel. 01 250-6055 | Fax 01 368-8097
www.stiebel-eltron.hu
Japan
NIHON STIEBEL Co. Ltd.
Kowa Kawasaki Nishiguchi Building 8F
66-2 Horikawa-Cho
Saiwai-Ku | 212-0013 Kawasaki
Tel. 044 540-3200 | Fax 044 540-3210
www.nihonstiebel.co.jp
Netherlands
STIEBEL ELTRON Nederland B.V.
Daviottenweg 36 | 5222 BH 's-Hertogenbosch
Tel. 073 623-0000 | Fax 073 623-1141
www.stiebel-eltron.nl
Poland
STIEBEL ELTRON Polska Sp. z O.O.
ul. Działkowa 2 | 02-234 Warszawa
Tel. 022 60920-30 | Fax 022 60920-29
www.stiebel-eltron.pl
Russia
STIEBEL ELTRON LLC RUSSIA
Urzhumskaya street 4,
building 2 | 129343 Moscow
Tel. 0495 7753889 | Fax 0495 7753887
www.stiebel-eltron.ru
Slovakia
TATRAMAT - ohrievače vody s.r.o.
Hlavná 1 | 058 01 Poprad
Tel. 052 7127-125 | Fax 052 7127-148
www.stiebel-eltron.sk
Switzerland
STIEBEL ELTRON AG
Industrie West
Gass 8 | 5242 Lupfig
Tel. 056 4640-500 | Fax 056 4640-501
www.stiebel-eltron.ch
Thailand
STIEBEL ELTRON Asia Ltd.
469 Moo 2 Tambol Klong-Jik
Amphur Bangpa-In | 13160 Ayutthaya
Tel. 035 220088 | Fax 035 221188
www.stiebeleltronasia.com
United Kingdom and Ireland
STIEBEL ELTRON UK Ltd.
Unit 12 Stadium Court
Stadium Road | CH62 3RP Bromborough
Tel. 0151 346-2300 | Fax 0151 334-2913
www.stiebel-eltron.co.uk
United States of America
STIEBEL ELTRON, Inc.
17 West Street | 01088 West Hatfield MA
Tel. 0413 247-3380 | Fax 0413 247-3369
www.stiebel-eltron-usa.com
A 331686-40738-9353
4<AMHCMO=dbgigc>
-
 1
1
-
 2
2
-
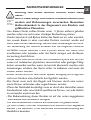 3
3
-
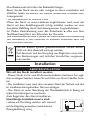 4
4
-
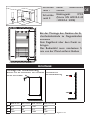 5
5
-
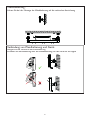 6
6
-
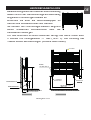 7
7
-
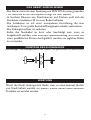 8
8
-
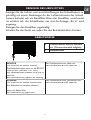 9
9
-
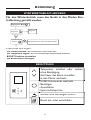 10
10
-
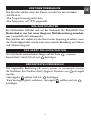 11
11
-
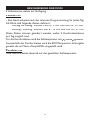 12
12
-
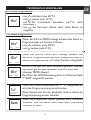 13
13
-
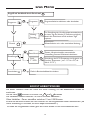 14
14
-
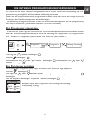 15
15
-
 16
16
-
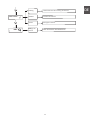 17
17
-
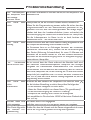 18
18
-
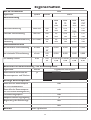 19
19
-
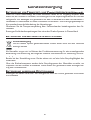 20
20
-
 21
21
-
 22
22
-
 23
23
-
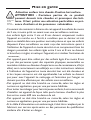 24
24
-
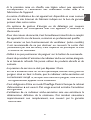 25
25
-
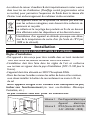 26
26
-
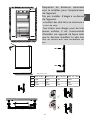 27
27
-
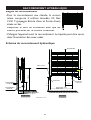 28
28
-
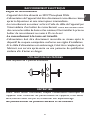 29
29
-
 30
30
-
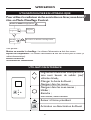 31
31
-
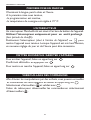 32
32
-
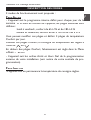 33
33
-
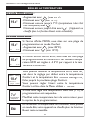 34
34
-
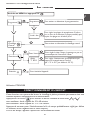 35
35
-
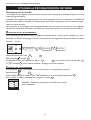 36
36
-
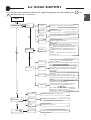 37
37
-
 38
38
-
 39
39
-
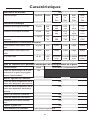 40
40
-
 41
41
-
 42
42
-
 43
43
-
 44
44
-
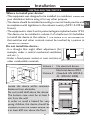 45
45
-
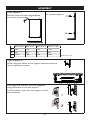 46
46
-
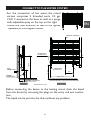 47
47
-
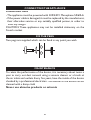 48
48
-
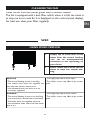 49
49
-
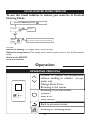 50
50
-
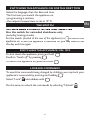 51
51
-
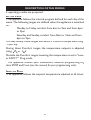 52
52
-
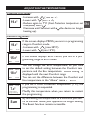 53
53
-
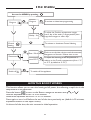 54
54
-
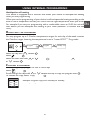 55
55
-
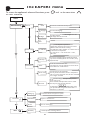 56
56
-
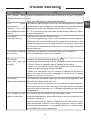 57
57
-
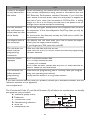 58
58
-
 59
59
-
 60
60
-
 61
61
-
 62
62
-
 63
63
-
 64
64
-
 65
65
-
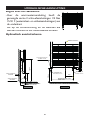 66
66
-
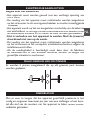 67
67
-
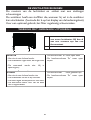 68
68
-
 69
69
-
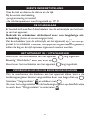 70
70
-
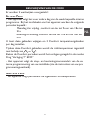 71
71
-
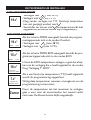 72
72
-
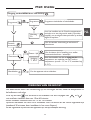 73
73
-
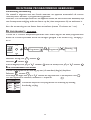 74
74
-
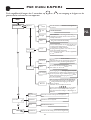 75
75
-
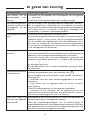 76
76
-
 77
77
-
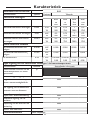 78
78
-
 79
79
-
 80
80


STIEBEL ELTRON BHE 50-175 (T) Plus Operation Instruction
- Type
- Operation Instruction
in andere talen
- English: STIEBEL ELTRON BHE 50-175 (T) Plus
- français: STIEBEL ELTRON BHE 50-175 (T) Plus
- Deutsch: STIEBEL ELTRON BHE 50-175 (T) Plus
Gerelateerde papieren
Andere documenten
-
Atlantic ADELIS DIGITAL Installation and User Manual
-
RADSON ESSENTIAL THERMOSTAT Installation & Maintenance Manual
-
-
-
Steba BS 1800 TOUCH Handleiding
-
Haier LY19Z6 Handleiding
-
Hisense RC-76WS4SAA/CLA1 Handleiding
-
LG 39LB5610 Handleiding
-
LG 49LH604V.AEU Handleiding
-