Nikon AF-S NIKKOR 80-400mm f/4.5-5.6G ED VR Handleiding
- Categorie
- Camera lenzen
- Type
- Handleiding

AF-S NIKKOR 80-400mm f/4.5-5.6G ED VR
Nano Crystal Coat
■
■
Depth of fi eld (Metric)
Depth of fi eld (Metric)
■
■
Tiefenschärfe
Tiefenschärfe
■
■
Profondeur de champ
Profondeur de champ
■
■
Scherptediepte
Scherptediepte
(m)
• Focus distance
• Entfernungseinstellung
• Distance de mise au
point
• Scherpstelafstand
• Depth of eld
• Tiefenschärfe
• Profondeur de
champ
• Scherptediepte
• Reproduction ratio
• Abbildungsmaßstab
• Rapport de reproduction
• Reproductieverhouding
[f=80 mm]
f/4.5 f/5.6 f/8 f/11 f/16 f/22 f/32
1.8
1.69 – 1.82 1.67 – 1.84 1.64 – 1.88 1.60 – 1.94 1.55 – 2.03 1.48 – 2.18 1.39 – 2.43 1/20.6
2.5
2.37 – 2.65 2.34 – 2.69 2.28 – 2.77 2.20 – 2.91 2.10 – 3.12 1.97 – 3.49 1.82 – 4.20 1/29.7
4 3.67 – 4.40 3.60 – 4.50 3.46 – 4.76 3.28 – 5.17 3.05 – 5.89 2.79 – 7.36 2.49 – 11.52 1/48.1
6 5.29 – 6.95 5.14 – 7.22 4.86 – 7.89 4.50 – 9.09 4.09 – 11.62 3.62 – 19.29 3.13 – 387.52 1/72.6
9 7.48 – 11.32 7.19 – 12.07 6.64 – 14.08 6.00 – 18.45 5.28 – 33.09 4.53 – ∞ 3.78 – ∞
1/109.4
12 9.44 – 16.53 8.98 – 18.18 8.14 – 23.17 7.20 – 38.00 6.19 – 436.05 5.17 – ∞ 4.21 – ∞
1/146.2
20 13.76 – 36.89 12.81 – 46.28
11.16 – 102.65
9.45 – ∞ 7.78 – ∞ 6.24 – ∞ 4.89 – ∞
1/244.2
40
20.96 – 483.45
18.83 – ∞ 15.47 – ∞ 12.37 – ∞ 9.65 – ∞ 7.38 – ∞ 5.57 – ∞
1/489.3
∞ 43.96 – ∞ 35.53 – ∞ 25.18 – ∞ 17.87 – ∞ 12.70 – ∞ 9.04 – ∞ 6.45 – ∞ 1/∞
[f=105 mm]
f/4.8 f/5.6 f/8 f/11 f/16 f/22 f/32
1.8
1.71 – 1.80 1.70 – 1.81 1.68 – 1.83 1.65 – 1.87 1.61 – 1.92 1.56 – 2.00 1.50 – 2.13 1/16.4
2.5
2.41 – 2.60 2.40 – 2.61 2.36 – 2.66 2.30 – 2.74 2.23 – 2.86 2.13 – 3.04 2.02 – 3.34 1/23.5
4 3.78 – 4.25 3.74 – 4.30 3.65 – 4.44 3.52 – 4.65 3.35 – 4.99 3.14 – 5.56 2.89 – 6.67 1/37.8
6 5.52 – 6.57 5.44 – 6.69 5.24 – 7.03 4.98 – 7.58 4.65 – 8.52 4.27 – 10.35 3.82 – 14.93 1/56.8
9 7.97 – 10.35 7.80 – 10.65 7.39 – 11.54 6.89 – 13.08 6.28 – 16.14 5.59 – 24.23 4.85 – 85.67 1/85.4
12
10.23 – 14.53
9.96 – 15.13 9.31 – 16.97 8.52 – 20.52 7.61 – 29.20 6.63 – 73.64 5.61 – ∞
1/114.0
20
15.53 – 28.16 14.91 – 30.49 13.49 – 39.02 11.90 – 64.73
10.21 – ∞ 8.51 – ∞ 6.90 – ∞
1/190.2
40
25.39 – 95.04
23.78 – 127.97
20.38 – ∞ 16.96 – ∞ 13.72 – ∞ 10.82 – ∞ 8.35 – ∞
1/380.7
∞ 69.60 – ∞ 58.71 – ∞ 41.57 – ∞ 29.46 – ∞ 20.90 – ∞ 14.85 – ∞ 10.57 – ∞ 1/∞
[f=135 mm]
f/5 f/5.6 f/8 f/11 f/16 f/22 f/32 f/36
1.8
1.72 – 1.78 1.72 – 1.79 1.70 – 1.80 1.68 – 1.82 1.66 – 1.86 1.62 – 1.90 1.57 – 1.98 1.56 – 2.01 1/13.1
2.5
2.44 – 2.56 2.43 – 2.57 2.41 – 2.60 2.37 – 2.65 2.32 – 2.71 2.25 – 2.82 2.17 – 2.97 2.13 – 3.05 1/18.7
4 3.85 – 4.16 3.83 – 4.18 3.77 – 4.26 3.68 – 4.38 3.57 – 4.56 3.42 – 4.85 3.22 – 5.32 3.15 – 5.55 1/29.8
6 5.68 – 6.36 5.64 – 6.41 5.50 – 6.60 5.32 – 6.89 5.09 – 7.34 4.79 – 8.09 4.43 – 9.49
4.29 – 10.23
1/44.6
9 8.30 – 9.83 8.22 – 9.95
7.94 – 10.40 7.57 – 11.12 7.11 – 12.34 6.54 – 14.61 5.89 – 19.82 5.65 – 23.31
1/66.8
12
10.80 – 13.51 10.66 – 13.74 10.19 – 14.61
9.60 – 16.07 8.87 – 18.73 8.01 – 24.47 7.05 – 43.51 6.72 – 64.69
1/89.0
20
16.89 – 24.54 16.55 – 25.29 15.46 – 28.42 14.13 – 34.47 12.61 – 49.40
10.95 – 128.54
9.25 – ∞ 8.69 – ∞
1/148.3
40
29.27 – 63.34 28.28 – 68.58 25.23 – 97.60
21.90 – 243.92
18.46 – ∞ 15.13 – ∞ 12.07 – ∞ 11.13 – ∞
1/296.5
∞ 109.57 – ∞ 96.93 – ∞ 68.61 – ∞ 48.59 – ∞ 34.44 – ∞ 24.43 – ∞ 17.35 – ∞ 15.49 – ∞ 1/∞
[f=200 mm]
f/5.3 f/5.6 f/8 f/11 f/16 f/22 f/32 f/38
1.8
1.73 – 1.77 1.73 – 1.77 1.72 – 1.78 1.71 – 1.79 1.70 – 1.80 1.68 – 1.83 1.65 – 1.86 1.63 – 1.89 1/9.4
2.5
2.47 – 2.53 2.47 – 2.54 2.45 – 2.55 2.43 – 2.57 2.40 – 2.60 2.37 – 2.65 2.32 – 2.72 2.29 – 2.77 1/13.2
4 3.92 – 4.08 3.92 – 4.09 3.88 – 4.12 3.84 – 4.18 3.78 – 4.26 3.69 – 4.37 3.58 – 4.55 3.51 – 4.67 1/20.7
6 5.83 – 6.18 5.82 – 6.19 5.75 – 6.27 5.66 – 6.39 5.53 – 6.57 5.35 – 6.84 5.12 – 7.27 4.99 – 7.58 1/30.7
9 8.63 – 9.40 8.62 – 9.42 8.47 – 9.61 8.26 – 9.89
8.00 – 10.31 7.64 – 10.98 7.20 – 12.09
6.94 – 12.94
1/45.7
12
11.37 – 12.71 11.33 – 12.75 11.08 – 13.09 10.74 – 13.61 10.30 – 14.41
9.73 – 15.73 9.03 – 18.08
8.63 – 20.02
1/60.7
20
18.32 – 22.02 18.24 – 22.14 17.60 – 23.17 16.77 – 24.81 15.73 – 27.56 14.46 – 32.73 12.99 – 44.62 12.19 – 58.41
1/100.7
40
33.87 – 48.88 33.60 – 49.45 31.52 – 54.83 28.98 – 64.83 26.03 – 87.43
22.76 – 173.08
19.35 – ∞ 17.64 – ∞
1/200.7
∞ 223.49 – ∞ 212.56 – ∞ 150.40 – ∞ 106.46 – ∞ 75.40 – ∞ 53.43 – ∞ 37.90 – ∞ 31.93 – ∞ 1/∞
[f=300 mm]
f/5.6 f/8 f/11 f/16 f/22 f/32 f/40
1.8
1.74 – 1.76 1.74 – 1.76 1.73 – 1.77 1.72 – 1.78 1.71 – 1.79 1.69 – 1.81 1.68 – 1.83 1/6.9
2.5
2.48 – 2.52 2.47 – 2.53 2.46 – 2.54 2.45 – 2.55 2.43 – 2.58 2.40 – 2.61 2.38 – 2.64 1/9.4
4 3.96 – 4.04 3.94 – 4.06 3.92 – 4.09 3.89 – 4.12 3.84 – 4.18 3.78 – 4.25 3.73 – 4.33 1/14.4
6 5.91 – 6.09 5.88 – 6.13 5.83 – 6.18 5.76 – 6.26 5.67 – 6.37 5.55 – 6.55 5.44 – 6.71 1/21.1
9 8.82 – 9.19 8.74 – 9.27 8.64 – 9.39 8.50 – 9.57 8.31 – 9.82 8.06 – 10.22 7.85 – 10.59 1/31.1
12
11.68 – 12.34 11.56 – 12.48 11.38 – 12.69 11.15 – 13.00 10.83 – 13.47 10.42 – 14.20 10.07 – 14.92
1/41.1
20
19.16 – 20.92 18.83 – 21.33 18.39 – 21.93 17.80 – 22.85 17.03 – 24.29 16.05 – 26.68 15.28 – 29.25
1/67.7
40
36.83 – 43.78 35.68 – 45.53 34.16 – 48.31 32.22 – 52.88 29.83 – 61.08 27.01 – 78.34
24.93 – 104.73
1/134.4
∞ 475.50 – ∞ 338.24 – ∞ 239.38 – ∞ 169.49 – ∞ 120.06 – ∞ 85.11 – ∞ 67.71 – ∞ 1/∞
[f=400 mm]
f/5.6 f/8 f/11 f/16 f/22 f/32 f/40
1.8
1.74 – 1.76 1.74 – 1.76 1.74 – 1.76 1.73 – 1.77 1.72 – 1.78 1.71 – 1.79 1.70 – 1.80 1/5.7
2.5
2.49 – 2.51 2.48 – 2.52 2.48 – 2.53 2.47 – 2.54 2.45 – 2.55 2.43 – 2.57 2.42 – 2.59 1/7.6
4 3.97 – 4.03 3.96 – 4.04 3.95 – 4.05 3.93 – 4.08 3.90 – 4.11 3.85 – 4.16 3.82 – 4.20 1/11.5
6 5.94 – 6.06 5.92 – 6.08 5.89 – 6.11 5.85 – 6.16 5.79 – 6.23 5.71 – 6.33 5.64 – 6.42 1/16.5
9 8.88 – 9.12 8.84 – 9.17 8.78 – 9.24 8.69 – 9.34 8.57 – 9.49 8.40 – 9.71 8.26 – 9.91 1/24.2
12
11.80 – 12.21 11.73 – 12.29 11.62 – 12.41 11.47 – 12.59 11.26 – 12.85 10.99 – 13.24 10.75 – 13.61
1/31.8
20
19.47 – 20.56 19.29 – 20.77 19.01 – 21.11 18.62 – 21.61 18.11 – 22.36 17.43 – 23.52 16.88 – 24.66
1/52.2
40
38.01 – 42.22 37.33 – 43.10 36.32 – 44.53 35.00 – 46.74 33.28 – 50.26 31.13 – 56.30 29.46 – 63.05
1/103.3
∞ 789.34 – ∞ 577.42 – ∞ 408.64 – ∞ 289.30 – ∞ 204.92 – ∞ 145.24 – ∞ 115.53 – ∞ 1/∞
• Unlike other lenses, the focal length of internal focus (IF) lenses decreases with focus
distance.
• Im Gegensatz zu den anderen Objektiven verringert sich die Brennweite der Objektive
mit Innenfokussierung (IF) mit der Entfernungseinstellung.
• Contrairement aux autres objectifs, la focale des objectifs à mise au point interne (IF)
diminue avec la distance de mise au point.
• In tegenstelling tot andere objectieven daalt de brandpuntsafstand van interne
scherpstelling (IF) met scherpstelafstand.
■ Depth of field (Imperial) (ft)
Focus distance Depth of field Reproduction ratio
[f=80 mm]
f/4.5 f/5.6 f/8 f/11 f/16 f/22 f/32
7
6 ft 8 ⁄ in. –
7 ft 4 ⁄ in.
6 ft 7 ⁄ in. –
7 ft 5 ⁄ in.
6 ft 5 ⁄ in. –
7 ft 7 ⁄ in.
6 ft 3 ⁄ in. –
7 ft 11 ⁄ in.
6 ft ⁄ in. –
8 ft 5 ⁄ in.
5 ft 8 ⁄ in. –
9 ft 2 ⁄ in.
5 ft 3 ⁄ in. –
10 ft 7 ⁄ in.
1/25.3
15
13 ft 7 ⁄ in. –
16 ft 8 ⁄ in.
13 ft 3 ⁄ in. –
17 ft 2 ⁄ in.
12 ft 8 ⁄ in. –
18 ft 4 ⁄ in.
11 ft 11 ⁄ in. –
20 ft 2 ⁄ in.
11 ft ⁄ in. –
23 ft 8 ⁄ in.
10 ft ⁄ in. –
31 ft 5 ⁄ in.
8 ft 10 ⁄ in. –
59 ft 5 ⁄ in.
1/55.1
25
21 ft 3 ⁄ in. –
30 ft 3 in.
20 ft 7 ⁄ in. –
31 ft 10 ⁄ in.
19 ft 2 ⁄ in. –
35 ft 11 ⁄ in.
17 ft 6 ⁄ in. –
44 ft 1 ⁄ in.
15 ft 8 ⁄ in. –
65 ft ⁄ in.
13 ft 7 ⁄ in. –
203 ft 1 ⁄ in.
11 ft 6 ⁄ in. –
∞
1/92.5
70
47 ft 2 ⁄ in. –
136 ft 10 ⁄ in.
43 ft 9 ⁄ in. –
177 ft 7 ⁄ in.
37 ft 11 ⁄ in. –
496 ft 10 ⁄ in.
31 ft 11 ⁄ in. –
∞
26 ft 2 ⁄ in. –
∞
20 ft 10 ⁄ in. –
∞
16 ft 3 ⁄ in. –
∞
1/260.6
∞
144 ft 2 ⁄ in. –
∞
116 ft 6 ⁄ in. –
∞
82 ft 7 ⁄ in. –
∞
58 ft 7 ⁄ in. –
∞
41 ft 7 ⁄ in. –
∞
29 ft 7 ⁄ in. –
∞
21 ft 2 ⁄ in. –
∞
1/∞
[f=105 mm]
f/4.8 f/5.6 f/8 f/11 f/16 f/22 f/32
7
6 ft 9 ⁄ in. –
7 ft 2 ⁄ in.
6 ft 9 in. –
7 ft 3 ⁄ in.
6 ft 7 ⁄ in. –
7 ft 4 ⁄ in.
6 ft 6 ⁄ in. –
7 ft 6 ⁄ in.
6 ft 4 ⁄ in. –
7 ft 9 ⁄ in.
6 ft 1 ⁄ in. –
8 ft 3 in.
5 ft 9 ⁄ in. –
8 ft 11 ⁄ in.
1/20.0
15
14 ft ⁄ in. –
16 ft ⁄ in.
13 ft 10 ⁄ in. –
16 ft 3 ⁄ in.
13 ft 6 in. –
16 ft 10 ⁄ in.
12 ft 11 ⁄ in. –
17 ft 10 ⁄ in.
12 ft 3 ⁄ in. –
19 ft 4 ⁄ in.
11 ft 5 ⁄ in. –
22 ft 1 ⁄ in.
10 ft 5 ⁄ in. –
27 ft 7 ⁄ in.
1/43.2
25
22 ft 6 ⁄ in. –
28 ft 1 ⁄ in.
22 ft 1 ⁄ in. –
28 ft 9 ⁄ in.
21 ft 1 ⁄ in. –
30 ft 8 ⁄ in.
19 ft 10 ⁄ in. –
33 ft 11 ⁄ in.
18 ft 3 ⁄ in. –
39 ft 11 ⁄ in.
16 ft 5 ⁄ in. –
53 ft 5 ⁄ in.
14 ft 5 ⁄ in. –
103 ft 5 ⁄ in.
1/72.3
70
53 ft 6 ⁄ in. –
101 ft 3 ⁄ in.
51 ft 3 ⁄ in. –
110 ft 6 ⁄ in.
46 ft 2 ⁄ in. –
145 ft 9 ⁄ in.
40 ft 6 ⁄ in. –
266 ft 2 ⁄ in.
34 ft 7 ⁄ in. –
∞
28 ft 8 ⁄ in. –
∞
23 ft 1 ⁄ in. –
∞
1/202.9
∞
228 ft 4 ⁄ in. –
∞
192 ft 7 ⁄ in. –
∞
136 ft 4 ⁄ in. –
∞
96 ft 8 ⁄ in. –
∞
68 ft 6 ⁄ in. –
∞
48 ft 8 ⁄ in. –
∞
34 ft 7 ⁄ in. –
∞
1/∞
[f=135 mm]
f/5 f/5.6 f/8 f/11 f/16 f/22 f/32 f/36
7
6 ft 10 ⁄ in. –
7 ft 1 ⁄ in.
6 ft 10 ⁄ in. –
7 ft 2 ⁄ in.
6 ft 9 ⁄ in. –
7 ft 3 in.
6 ft 8 ⁄ in. –
7 ft 4 ⁄ in.
6 ft 6 ⁄ in. –
7 ft 6 ⁄ in.
6 ft 4 ⁄ in. –
7 ft 9 in.
6 ft 2 ⁄ in. –
8 ft 1 ⁄ in.
6 ft 1 ⁄ in. –
8 ft 3 ⁄ in.
1/16.0
15
14 ft 4 ⁄ in. –
15 ft 8 ⁄ in.
14 ft 3 ⁄ in. –
15 ft 9 ⁄ in.
14 ft ⁄ in. –
16 ft 1 ⁄ in.
13 ft 7 ⁄ in. –
16 ft 7 ⁄ in.
13 ft 2 ⁄ in. –
17 ft 5 ⁄ in.
12 ft 6 ⁄ in. –
18 ft 8 ⁄ in.
11 ft 9 ⁄ in. –
20 ft 10 ⁄ in.
11 ft 5 ⁄ in. –
21 ft 11 ⁄ in.
1/34.0
25
23 ft 4 ⁄ in. –
26 ft 11 ⁄ in.
23 ft 1 ⁄ in. –
27 ft 2 ⁄ in.
22 ft 5 ⁄ in. –
28 ft 2 ⁄ in.
21 ft 6 ⁄ in. –
29 ft 10 ⁄ in.
20 ft 4 ⁄ in. –
32 ft 5 ⁄ in.
18 ft 11 ⁄ in. –
37 ft 1 ⁄ in.
17 ft 3 in. –
46 ft 7 ⁄ in.
16 ft 7 ⁄ in. –
52 ft 3 ⁄ in.
1/56.6
70
58 ft 6 ⁄ in. –
87 ft 2 ⁄ in.
57 ft 3 ⁄ in. –
90 ft 1 ⁄ in.
53 ft 3 ⁄ in. –
102 ft 4 ⁄ in.
48 ft 6 ⁄ in. –
126 ft 8 ⁄ in.
43 ft 1 ⁄ in. –
∞
37 ft 2 ⁄ in. –
∞
31 ft 3 ⁄ in. –
∞
29 ft 3 ⁄ in. –
∞
1/158.2
∞
359 ft 6 in. –
∞
318 ft ⁄ in. –
∞
225 ft 1 ⁄ in. –
∞
159 ft 5 ⁄ in. –
∞
112 ft 11 ⁄ in. –
∞
80 ft 1 ⁄ in. –
∞
56 ft 11 ⁄ in. –
∞
50 ft 9 ⁄ in. –
∞
1/∞
[f=200 mm]
f/5.3 f/5.6 f/8 f/11 f/16 f/22 f/32 f/38
7
6 ft 11 ⁄ in. –
7 ft ⁄ in.
6 ft 10 ⁄ in. –
7 ft 1 ⁄ in.
6 ft 10 ⁄ in. –
7 ft 1 ⁄ in.
6 ft 9 ⁄ in. –
7 ft 2 ⁄ in.
6 ft 9 ⁄ in. –
7 ft 3 ⁄ in.
6 ft 8 ⁄ in. –
7 ft 4 ⁄ in.
6 ft 6 ⁄ in. –
7 ft 6 ⁄ in.
6 ft 5 ⁄ in. –
7 ft 7 ⁄ in.
1/11.4
15
14 ft 8 ⁄ in. –
15 ft 4 ⁄ in.
14 ft 7 ⁄ in. –
15 ft 4 ⁄ in.
14 ft 6 ⁄ in. –
15 ft 6 ⁄ in.
14 ft 3 ⁄ in. –
15 ft 9 in.
14 ft ⁄ in. –
16 ft 1 ⁄ in.
13 ft 8 ⁄ in. –
16 ft 7 ⁄ in.
13 ft 2 ⁄ in. –
17 ft 4 ⁄ in.
12 ft 11 ⁄ in. –
17 ft 10 ⁄ in.
1/23.5
25
24 ft 1 ⁄ in. –
25 ft 11 ⁄ in.
24 ft ⁄ in. –
25 ft 11 ⁄ in.
23 ft 8 ⁄ in. –
26 ft 5 ⁄ in.
23 ft 2 ⁄ in. –
27 ft ⁄ in.
22 ft 6 ⁄ in. –
28 ft ⁄ in.
21 ft 8 ⁄ in. –
29 ft 6 ⁄ in.
20 ft 7 ⁄ in. –
31 ft 11 ⁄ in.
19 ft 11 ⁄ in. –
33 ft 9 ⁄ in.
1/38.8
70
63 ft 9 ⁄ in. –
77 ft 7 ⁄ in.
63 ft 5 ⁄ in. –
78 ft ⁄ in.
61 ft 1 ⁄ in. –
81 ft 11 ⁄ in.
58 ft 1 ⁄ in. –
88 ft 2 ⁄ in.
54 ft 3 ⁄ in. –
98 ft 10 ⁄ in.
49 ft 8 ⁄ in. –
119 ft 6 ⁄ in.
44 ft 5 ⁄ in. –
169 ft 9 ⁄ in.
41 ft 7 ⁄ in. –
233 ft 8 ⁄ in.
1/107.4
∞
733 ft 2 ⁄ in. –
∞
697 ft 4 ⁄ in. –
∞
493 ft 5 ⁄ in. –
∞
349 ft 3 ⁄ in. –
∞
247 ft 4 ⁄ in. –
∞
175 ft 3 ⁄ in. –
∞
124 ft 4 ⁄ in. –
∞
104 ft 9 ⁄ in. –
∞
1/∞
[f=300 mm]
f/5.6 f/8 f/11 f/16 f/22 f/32 f/40
7
6 ft 11 ⁄ in. –
7 ft ⁄ in.
6 ft 11 ⁄ in. –
7 ft ⁄ in.
6 ft 10 ⁄ in. –
7 ft 1 ⁄ in.
6 ft 10 ⁄ in. –
7 ft 1 ⁄ in.
6 ft 9 ⁄ in. –
7 ft 2 ⁄ in.
6 ft 9 in. –
7 ft 3 ⁄ in.
6 ft 8 ⁄ in. –
7 ft 4 ⁄ in.
1/8.2
15
14 ft 9 ⁄ in. –
15 ft 2 ⁄ in.
14 ft 9 ⁄ in. –
15 ft 3 in.
14 ft 7 ⁄ in. –
15 ft 4 ⁄ in.
14 ft 6 ⁄ in. –
15 ft 6 ⁄ in.
14 ft 4 ⁄ in. –
15 ft 8 ⁄ in.
14 ft ⁄ in. –
16 ft ⁄ in.
13 ft 10 ⁄ in. –
16 ft 4 ⁄ in.
1/16.3
25
24 ft 6 ⁄ in. –
25 ft 5 ⁄ in.
24 ft 4 ⁄ in. –
25 ft 7 ⁄ in.
24 ft 1 ⁄ in. –
25 ft 11 ⁄ in.
23 ft 9 ⁄ in. –
26 ft 4 ⁄ in.
23 ft 3 ⁄ in. –
26 ft 11 ⁄ in.
22 ft 8 ⁄ in. –
27 ft 10 ⁄ in.
22 ft 2 ⁄ in. –
28 ft 8 ⁄ in.
1/26.5
70
66 ft 10 ⁄ in. –
73 ft 5 ⁄ in.
65 ft 8 ⁄ in. –
74 ft 11 ⁄ in.
64 ft ⁄ in. –
77 ft 2 ⁄ in.
61 ft 10 ⁄ in. –
80 ft 8 ⁄ in.
59 ft ⁄ in. –
86 ft 2 ⁄ in.
55 ft 5 ⁄ in. –
95 ft 4 ⁄ in.
52 ft 8 ⁄ in. –
105 ft 5 ⁄ in.
1/72.2
∞
1560 ft ⁄ in. –
∞
1109 ft 8 ⁄ in. –
∞
785 ft 4 ⁄ in. –
∞
556 ft ⁄ in. –
∞
393 ft 10 ⁄ in. –
∞
279 ft 2 ⁄ in. –
∞
222 ft 1 ⁄ in. –
∞
1/∞
[f=400 mm]
f/5.6 f/8 f/11 f/16 f/22 f/32 f/40
7
6 ft 11 ⁄ in. –
7 ft ⁄ in.
6 ft 11 ⁄ in. –
7 ft ⁄ in.
6 ft 11 ⁄ in. –
7 ft ⁄ in.
6 ft 10 ⁄ in. –
7 ft 1 ⁄ in.
6 ft 10 ⁄ in. –
7 ft 1 ⁄ in.
6 ft 9 ⁄ in. –
7 ft 2 ⁄ in.
6 ft 9 ⁄ in. –
7 ft 2 ⁄ in.
1/6.7
15
14 ft 10 ⁄ in. –
15 ft 1 ⁄ in.
14 ft 10 ⁄ in. –
15 ft 1 ⁄ in.
14 ft 9 ⁄ in. –
15 ft 2 ⁄ in.
14 ft 8 ⁄ in. –
15 ft 3 ⁄ in.
14 ft 6 ⁄ in. –
15 ft 5 ⁄ in.
14 ft 4 ⁄ in. –
15 ft 7 ⁄ in.
14 ft 3 ⁄ in. –
15 ft 10 ⁄ in.
1/12.9
25
24 ft 8 ⁄ in. –
25 ft 3 ⁄ in.
24 ft 7 ⁄ in. –
25 ft 4 ⁄ in.
24 ft 5 ⁄ in. –
25 ft 6 ⁄ in.
24 ft 2 ⁄ in. –
25 ft 9 ⁄ in.
23 ft 11 ⁄ in. –
26 ft 2 ⁄ in.
23 ft 6 ⁄ in. –
26 ft 8 ⁄ in.
23 ft 2 ⁄ in. –
27 ft 2 ⁄ in.
1/20.7
70
68 ft ⁄ in. –
72 ft ⁄ in.
67 ft 4 ⁄ in. –
72 ft 10 ⁄ in.
66 ft 3 ⁄ in. –
74 ft 1 ⁄ in.
64 ft 10 ⁄ in. –
76 ft ⁄ in.
63 ft ⁄ in. –
78 ft 10 ⁄ in.
60 ft 6 ⁄ in. –
83 ft 2 ⁄ in.
58 ft 6 in. –
87 ft 6 ⁄ in.
1/55.7
∞
2589 ft 8 ⁄ in. –
∞
1894 ft 5 ⁄ in. –
∞
1340 ft 8 ⁄ in. –
∞
949 ft 2 ⁄ in. –
∞
672 ft 3 ⁄ in. –
∞
476 ft 6 ⁄ in. –
∞
379 ft ⁄ in. –
∞
1/∞
• Unlike other lenses, the focal length of internal focus (IF) lenses decreases with focus
distance.
Figure 1/Abbildung 1/Figure 1/afbeelding 1
Figure 2/Abbildung 2/Figure 2/afbeelding 2
En
User’s Manual
De
Benutzerhandbuch
Fr
Manuel d’utilisation
Nl
Gebruikshandleiding
It
Manuale d’uso
Es
Manual del usuario
Pt
Manual do utilizador
Printed in Japan
SB2L01(7E)
7MAA907E-01
Thank you for your purchase of a NIKKOR lens. Before using this product, please carefully
read both these instructions and the camera manual.
Note: When mounted on a DX-format digital single-lens re ex camera such as the D7000
or cameras in the D300 series, this lens has an angle of view of 20° – 4° and a focal length
equivalent to 120 – 600 mm (35 mm format).
For Your Safety
For Your Safety
A
A
CAUTIONS
CAUTIONS
• Do not disassemble. Touching the internal parts of the camera or lens could result in injury. In the
event of malfunction, the product should be repaired only by a qualifi ed technician. Should
the product break open as the result of a fall or other accident, remove the camera battery and/
or disconnect the AC adapter and then take the product to a Nikon-authorized service center
for inspection.
• Turn the camera o immediately in the event of malfunction. Should you notice smoke or an unusual
smell coming from the equipment, immediately unplug the AC adapter and remove the cam-
era battery, taking care to avoid burns. Continued operation could result in fi re or injury. After
removing the battery, take the equipment to a Nikon-authorized service center for inspection.
• Do not use in the presence of ammable gas. Operating electronic equipment in the presence of
fl ammable gas could result in explosion or fi re.
• Do not look at the sun through the lens or the camera view nder. Viewing the sun or other bright light
source through the lens or viewfi nder could cause permanent visual impairment.
• Keep out of reach of children. Failure to observe this precaution could result in injury.
• Observe the following precautions when handling the lens and camera:
- Keep the lens and camera dry. Failure to observe this precaution could result in fi re or electric
shock.
- Do not handle the lens or camera with wet hands. Failure to observe this precaution could
result in electric shock.
- Keep the sun well out of the frame when shooting backlit subjects. Sunlight focused into the
camera when the sun is in or close to the frame could cause a fi re.
- If the lens will not be used for an extended period, attach the front and rear lens caps and
store the lens out of direct sunlight. If left in direct sunlight, the lens could focus the sun’s rays
onto fl ammable objects, causing fi re.
• Do not carry tripods with a lens or camera attached. You could trip or accidentally strike others, result-
ing in injury.
• Do not leave the lens where it will be exposed to extremely high temperatures, such as in an enclosed au-
tomobile or in direct sunlight. Failure to observe this precaution could adversely aff ect the lens’
internal parts, causing fi re.
English
■
■
Parts of the Lens (Figure 1)
Parts of the Lens (Figure 1)
q
Lens hood mounting mark
w
Zoom ring
e
Focal length scale
r
Focal length mark
t
Focus distance indicator
y
Focus distance mark
u
Focus ring
i
Lens rotation index
o
Lens mounting mark
!0
Rubber lens-mount gasket
!1
CPU contacts
!2
Focus-mode switch
!3
Focus limit switch
!4
Vibration reduction ON/OFF switch
!5
Vibration reduction mode switch
!6
Zoom lock switch
!7
Lens hood
!8
Lens hood alignment mark
!9
Lens hood lock mark
@0
Lens hood lock release button
@1
Tripod collar lock screw
@2
Position indices (90°)
@3
Tripod collar
■
■
Compatibility
Compatibility
Check marks (“✔“) indicate supported features, dashes (“—”) features that are not sup-
ported. Some limitations may apply; see the camera manual for details.
Camera
Camera
Exposure (shooting) mode
Exposure (shooting) mode
Function
Function
P
P
4
4
S
S
A
A
M
M
AF
AF
5
5
VR
VR
6
6
Nikon digital single-lens refl ex cameras, F6, F5, F100,
F/N80-series
1
, F/N75-series
1
, F/N65-series
1
✔✔✔✔✔✔
Pronea 600i/6i
1
, Pronea S
2
✔✔✔✔✔
—
F4-series, F90X/N90s
1
, F90-series/N90
1
, F70-series/N70
1
✔✔
——
✔
—
F60-series/N60
1
, F/N55-series
1
, F50-series/N50
1
,
F-401x/N5005
1
, F-401s/N4004s
1
, F-401/N4004
1
✔✔✔✔
——
F-801s/N8008s
1
, F-801/N8008
1
, F-601M/N6000
1
✔✔
————
F3AF, F-601/N6006
1
, F-501/N2020
3
, Nikon manual focus
cameras (excluding F-601
M/N6000
1
)
—
1. N-series cameras and Pronea 6i sold in U. S. A. only.
2. Exposure mode M (manual) not available.
3. N2020 sold in U. S. A. and Canada only.
4. Includes AUTO and scene (Digital Vari-Program) modes.
5. Autofocus.
6. Vibration reduction.
■
■
Focus
Focus
Supported focus modes are shown in the following table (for information on camera
focus modes, see the camera manual).
Camera
Camera
Camera
Camera
focus mode
focus mode
Lens focus mode
Lens focus mode
A/M
A/M
M/A
M/A
M
M
Nikon digital single-lens refl ex cam-
eras, F6, F5, F4-series, F100, F90X/N90s
*
,
F90-series/N90
*
, F/N80-series
*
, F/N75-series
*
,
F70-series/N70
*
, F/N65-series
*
,
Pronea 600i/6i
*
, Pronea S
AF
Autofocus
with manual
override
(AF priority)
Autofocus
with manual
override (manual
priority)
Manual
focus with
electronic
range nder
MF
Manual focus
(electronic range nder available with all
cameras except F-601
M/N6000
*
)
F60-series/N60
*
, F/N55-series
*
, F50-series/N50
*
,
F-801s/N8008s
*
, F-801/N8008
*
, F-601M/N6000
*
,
F-401x/N5005
*
, F-401s/N4004s
*
, F-401/N4004
*
AF, MF
* N-series cameras and Pronea 6i sold in U. S. A. only.
A/M and M/A Modes
A/M and M/A Modes
• M/A: Autofocus can be over-ridden by rotating the lens focus ring.
• A/M: As above, except that the focus ring must be rotated farther before the
autofocus is over-ridden, preventing accidental changes to focus caused by
unintended operation of the focus ring.
z
Slide the lens focus-mode switch to A/M or M/A.
x
Focus.
If desired, autofocus can be over-ridden by rotating the lens focus ring while the
shutter-release button is pressed halfway (or, if the camera is equipped with an
AF-ON button, while the AF-ON button is pressed). To refocus using autofocus, press
the shutterrelease button halfway or press the AF-ON button again.
The Focus Limit Switch
The Focus Limit Switch
This switch determines the focus distance limits for autofocus.
• FULL: Select this option for subjects that may be closer than 6 m
(19.69 ft).
• ∞–6 m: If your subject will always be at distance of at least 6 m (19.69 ft),
select this option for faster focusing.
■
■
Zoom and Depth of Field
Zoom and Depth of Field
Before focusing, rotate the zoom ring to adjust the focal length and frame the photo-
graph. If the camera o ers depth-of- eld preview (stop down), depth of eld can be
previewed in the view nder.
Note: Focal length decreases as the focus distance shortens. Note that the focus distance
indicator is intended only as a guide and may not accurately show the distance to the
subject and may, due to depth of eld or other factors, not show ∞ when the camera is
focused on a distant object.
To lock the zoom ring, rotate it to the 80mm position and slide the zoom lock switch to
LOCK. This prevents the lens extending under its own weight while the camera is being
carried from place to place.
■
■
Aperture
Aperture
Aperture is adjusted using camera controls.
Zoom and Maximum Aperture
Zoom and Maximum Aperture
Changes to zoom can alter the maximum aperture by up to ⁄EV. The camera however
automatically takes this into account when setting exposure, and no modi cations to
camera settings are required following adjustments to zoom.
■
■
Built-in Flash Units
Built-in Flash Units
When using the built-in ash on cameras equipped with a built-in ash unit, remove the
lens hood to prevent vignetting (shadows created where the end of the lens obscures
the built-in ash).
■
■
Vibration Reduction (VR)
Vibration Reduction (VR)
Vibration reduction (VR) reduces blur caused by camera shake, allowing shutter speeds
up to 4.0 stops slower than would otherwise be the case (measured at 400 mm with
a D4 camera according to Camera and Imaging Products Association [CIPA] standards;
e ects vary with the photographer and shooting conditions). This increases the range
of shutter speeds available and permits hand-held, tripod-free photography in a wide
range of situations.
Using the Vibration Reduction ON/OFF Switch
Using the Vibration Reduction ON/OFF Switch
• Select ON to enable vibration reduction
. Vibration reduction is activated when
the shutter-release button is pressed halfway, reducing the e ects of cam-
era shake for improved framing and focus.
• Select OFF to turn vibration reduction o .
Using the Vibration Reduction Mode Switch
Using the Vibration Reduction Mode Switch
The vibration reduction mode switch is used to select the vibration reduction mode
when vibration reduction is on.
• Select NORMAL to reduce the e ects of vibration when photographing
from a xed position and in other situations with comparatively little
camera motion.
• Select ACTIVE to reduce the e ects of vibration when shooting from a moving vehicle, while
walking, and in other situations with active camera motion.
Using Vibration Reduction: Notes
Using Vibration Reduction: Notes
• Slide the vibration reduction switch to OFF if the camera does not support vibration reduction.
Leaving vibration reduction on may greatly increase the drain on the battery, particularly in the
case of Pronea 600i/6i cameras.
• When using vibration reduction, press the shutter-release button halfway and wait for the im-
age in the viewfi nder to stabilize before pressing the shutter-release button the rest of the
way down.
• When vibration reduction is active, the image in the viewfi nder may be blurred after the shutter
is released. This does not indicate a malfunction.
• Slide the vibration reduction mode switch to NORMAL for panning shots. When the camera is panned,
vibration reduction applies only to motion that is not part of the pan (if the camera is panned hori-
zontally, for example, vibration reduction will be applied only to vertical shake), making it much
easier to pan the camera smoothly in a wide arc.
• Do not turn the camera off or remove the lens while vibration reduction is in eff ect. If power to the lens
is cut while vibration reduction is on, the lens may rattle when shaken. This is not a malfunction, and can
be corrected by reattaching the lens and turning the camera on.
• If the camera is equipped with a built-in fl ash, vibration reduction will be disabled while the
fl ash charges.
• ON is generally recommended when the camera is mounted on a monopod or a tripod with
an unsecured head, although OFF may be preferred depending shooting conditions and the
type of tripod.
■
■
The Lens Hood
The Lens Hood
The lens hoods protect the lens and block stray light that would otherwise cause are
or ghosting.
Attaching the Hood
Attaching the Hood
Align the lens hood mounting mark (●) with the
lens hood alignment mark ( ) and then rotate
the hood (
w
) until the ● mark is aligned with the
lens hood lock mark (—
).
When attaching or removing the hood, hold it near the symbol on its base and avoid
gripping it too tightly. Vignetting may occur if the hood is not correctly attached.
The hood can be reversed and mounted on the lens when not in use.
Detaching the Hood
Detaching the Hood
Press the lens hood lock release button (
q
), rotate
the hood in the direction shown by the arrow (
w
),
and remove it as shown (
e
).
■
■
Focusing Screens
Focusing Screens
The following cameras support a variety of focusing screens for use in di erent situa-
tions.
Screen
Screen
Camera
Camera
A
A
B
B
C
C
E
E
EC-B
EC-B
EC-E
EC-E
G1
G1
G2
G2
G3
G3
G4
G4
J
J
L
L
M
M
U
U
F6
—
— ——— —
F5+ DP-30
(–0.5)
F5+ DA-30
(+1.0)
(–0.5)
(+0.5)
: Recommended.
: Vignetting visible in viewfi nder (photographs are not aff ected).
—: Not compatible with camera.
( ): Figures in parentheses give the exposure compensation for center-weighted meter-
ing. Select “Other screen” for Custom Setting b6 (“Screen comp.”) when adjusting
exposure compensation for the F6; note that with screens other than B or E, “Other
screen” must be selected even when the value for exposure compensation is 0. Ex-
posure compensation for the F5 can be adjusted using Custom Setting 18; see the
camera manual for details.
Empty cell: Not suited to use with this lens. Note that type M screens can however be used for
photomicrography and macro photography at magnifi cations of 1 : 1 or higher.
Note: The F5 supports matrix metering with A, B, E, EC-B/EC-E, J, and L focusing screens only.
■
■
Using a Tripod (Figure 2)
Using a Tripod (Figure 2)
The lens is equipped with a detachable rotating tripod collar; when using a tripod, attach
it to the collar, not to the camera. To attach the collar to the lens:
z
Slightly loosen the tripod collar lock screw (
q
).
x
Align the alignment mark on top of the lens with the mark on the collar (
w
)
and insert the lens into the collar.
c
Rotate the lens to the desired position (three positions are available at 90° inter-
vals), stopping when the alignment mark on top of the lens is aligned with the
desired position mark on the collar (
e
), and then tighten the tripod collar lock
screw (
r
). Be sure the screw is fully tightened; if the screw is not tight, the lens
may fall from of the tripod collar.
Removing the Tripod Collar
Removing the Tripod Collar
z
Being careful not to remove the screw from its socket, loosen the tripod collar
lock screw until the collar rotates freely (
t
).
x
Align the alignment mark on top of the lens with the mark on the collar (
y
)
and remove the lens from the collar (
u
).
■
■
Lens Care
Lens Care
• Do not pick up or hold the lens or camera using only the lens hood.
• Keep the CPU contacts clean.
• Should the rubber lens-mount gasket be damaged, cease use immediately and take the lens to
a Nikon-authorized service center for repair.
• Use a blower to remove dust and lint from the lens surfaces. To remove smudges and fi nger-
prints, apply a small amount of ethanol or lens cleaner to a soft, clean cotton cloth or lens-
cleaning tissue and clean from the center outwards using a circular motion, taking care not to
leave smears or touch the glass with your fi ngers.
• Never use organic solvents such as paint thinner or benzene to clean the lens.
• The lens hood or NC fi lters can be used to protect the front lens element.
• Attach the front and rear caps before placing the lens in its fl exible pouch.
• If the lens will not be used for an extended period, store it in a cool, dry location to prevent mold and
rust. Do not store in direct sunlight or with naphtha or camphor moth balls.
• Keep the lens dry. Rusting of the internal mechanism can cause irreparable damage.
• Leaving the lens in extremely hot locations could damage or warp parts made from reinforced plastic.
■
■
Supplied Accessories
Supplied Accessories
• 77 mm snap-on Front Lens Cap LC-77
• Rear Lens Cap LF-4
• Bayonet Hood HB-65
• Flexible Lens Pouch CL-M2
■
■
Compatible Accessories
Compatible Accessories
• 77 mm screw-on fi lters
• AF-I/AF-S Teleconverters TC-14E
1
/TC-14E II
1
/TC-17E II
2
/TC-20E
2
/TC-20E II
2
/TC-20E III
2
1 Autofocus is available only with cameras that off er f/8 support.
2 Autofocus not supported.
■
■
Specifi cations
Specifi cations
Type
Type Type G AF-S lens with built-in CPU and F mount
Focal length
Focal length 80 – 400 mm
Maximum aperture
Maximum aperture f/4.5 – 5.6
Lens construction
Lens construction 20 elements in 12 groups (including 4 ED lens elements, 1 super ED lens element, and
lens elements with a Nano-Crystal coating)
Angle of view
Angle of view
• Nikon lm SLR and FX-format D-SLR cameras: 30°10 – 6°10
• Nikon DX-format D-SLR cameras: 20° – 4°
Focal length scale
Focal length scale Graduated in millimeters (80, 105, 135, 200, 300, 400)
Distance information
Distance information Output to camera
Zoom
Zoom Manual zoom using independent zoom ring
Focusing
Focusing Nikon Internal Focusing (IF) System with autofocus controlled by Silent
Wave Motor and separate focus ring for manual focus
Vibration reduction
Vibration reduction Lens shift using voice coil motors (VCMs)
Focus distance indicator
Focus distance indicator 1.5 m to infi nity (∞)
Minimum focus
Minimum focus
distance
distance
• AF: 1.75 m (5.74 ft) from focal plane at all zoom positions
• MF: 1.5 m (4.92 ft) from focal plane at all zoom positions
Diaphragm blades
Diaphragm blades 9 (rounded diaphragm opening)
Diaphragm
Diaphragm Fully automatic
Aperture range
Aperture range
• 80mm focal length: f/4.5 – 32
• 400mm focal length: f/5.6 – 40
The minimum aperture displayed may vary depending on the size of the
exposure increment selected with the camera.
Metering
Metering Full aperture
Focus limit switch
Focus limit switch Two positions: FULL (∞ – 1.75 m) and ∞ – 6 m
Filter-attachment size
Filter-attachment size 77 mm (P = 0.75 mm)
Dimensions
Dimensions Approx. 95.5 mm maximum diameter × 203 mm (distance from camera lens
mount ange)
Weight
Weight Approx. 1570 g (3.5 lb), including tripod collar
Approx. 1480 g (3.3 lb) without tripod collar
Nikon reserves the right to change the specifi cations of the hardware described in this manual at any
time and without prior notice.
Deutsch
Vielen Dank für den Kauf eines NIKKOR-Objektivs. Bitte lesen Sie sorgfältig diese
Anleitung und das Kamerahandbuch, bevor Sie dieses Produkt verwenden.
Hinweis: Wenn das Objektiv mit einer digitalen Spiegelre exkamera mit DX-Format wie
der D7000 oder einer Kamera der D300-Serie verwendet wird, hat es einen Blickwinkel
von 20° – 4°, der einer Brennweite von 120 – 600 mm beim Kleinbildformat entspricht.
Für Ihre Sicherheit
Für Ihre Sicherheit
A
A
SICHERHEITSHINWEISE
SICHERHEITSHINWEISE
• Nicht auseinanderbauen. Das Berühren der Innenteile von Kamera oder Objektiv könnte zu
Verletzungen führen. Im Falle einer Fehlfunktion sollte das Produkt auschließlich von einem
qualifi zierten Fachmann repariert werden. Sollte das Produkt aufgrund eines Herunterfallens oder
eines Unfalles aufbrechen, entfernen Sie den Kamera-Akku und/oder trennen Sie den Netzadapter
vom Netz und bringen Sie das Produkt zur Inspektion zum Nikon-Kundendienst.
• Schalten Sie die Kamera im Falle einer Fehlfunktion unverzüglich ab. Wenn Sie Rauch oder einen
ungewöhnlichen Geruch aus Ihrer Ausrüstung wahrnehmen, trennen Sie sofort den Netzadapter
vom Netz und entfernen Sie den Kamera-Akku. Geben Sie dabei acht, dass Sie sich nicht verbrennen.
Ein weiterer Betrieb könnte zu einem Brand oder zu Verletzungen führen. Nach Entfernen des Akkus
bringen Sie die Ausrüstung zur Inspektion zum Nikon-Kundendienst.
• Nicht in Gegenwart von ent ammbarem Gas verwenden. Der Betrieb von Elektrogeräten in Gegenwart von
entfl ammbarem Gas könnte zu einer Explosion oder zu einem Brand führen.
• Blicken Sie nicht durch das Objektiv oder den Kamerasucher in die Sonne. Das Betrachten der Sonne oder einer
anderen hellen Lichtquelle durch das Objektiv oder den Sucher kann zu permanenten Sehstörungen führen.
• Außerhalb der Reichweite von Kindern aufbewahren. Ein Nichtbeachten dieser Vorsichtsmaßnahme
kann zu Verletzungen führen.
• Beachten Sie die folgenden Vorsichtsmaßnahmen beim Umgang mit Kamera und Objektiv:
- Halten Sie Objektiv und Kamera stets trocken. Ein Nichtbeachten dieser Vorsichtsmaßnahme
kann zu Feuer oder Stromschlägen führen.
- Bedienen Sie die Kamera oder das Objektiv nicht mit nassen Händen. Ein Nichtbeachten
dieser Vorsichtsmaßnahme kann zu Stromschlägen führen.
- Halten Sie die Sonne sicher außerhalb des Bildbereiches, wenn Sie Motive im Gegenlicht
aufnehmen. Sonnenlicht, das in der Kamera fokussiert wird, wenn sich die Kamera im oder
nah beim Bildmotiv befi ndet, kann zu einem Brand führen.
- Wird das Objektiv für längere Zeit nicht verwendet, bringen Sie den vorderen und hinteren
Objektivdeckel an und lagern Sie das Objektiv an einem Ort ohne direkte Sonneneinstrahlung.
Wird es in direktem Sonnenlicht gelagert, könnte das Objektiv die Sonnenstrahlen auf
entfl ammbare Objekte fokussieren und Sie so entzünden.
• Tragen Sie Stative nicht mit aufgesetzter Kamera oder aufgesetztem Objektiv. Es besteht die Gefahr zu
stolpern oder versehentlich andere Personen zu stoßen, was zu Verletzungen führen kann.
• Lagern Sie das Objektiv nicht an Orten, an denen es extrem hohen Temperaturen ausgesetzt ist, wie beispielsweise
in einem geschlossenen Auto oder direkt in der Sonne. Andernfalls können die internen Teile des Objektivs
nachteilig beeinfl usst werden und es könnte zu einem Brand kommen.
■
■
Objektivkomponenten (
Objektivkomponenten (
Abbildung 1
Abbildung 1
)
)
q
Markierung für das Ansetzen der
Gegenlichtblende
w
Zoomring
e
Brennweitenskala
r
Markierung für Brennweitenskala
t
Entfernungsskala
y
Markierung für Entfernungseinstellung
u
Fokussierring
i
Positionsmarkierung für Objektivdrehung
o
Markierung für die Ausrichtung des
Objektivs
!0
Dichtungsmanschette
!1
CPU-Kontakte
!2
Fokusmodusschalter
!3
Fokusbegrenzungsschalter
!4
Bildstabilisator-EIN/AUS-Schalter
!5
Bildstabilisatormodus-Schalter
!6
Zoom-Arretierungsschalter
!7
Gegenlichtblende
!8
Markierung für die Ausrichtung der
Gegenlichtblende
!9
Markierung für die Arretierung der
Gegenlichtblende
@0
Entriegelungstaste für Gegenlichtblende
@1
Stativschellen-Befestigungsschraube
@2
Positionsmarkierungen (90°)
@3
Stativschelle
■
■
Kompatibilität
Kompatibilität
Haken (»✔«) zeigen unterstützte Funktionen, Striche (»—«) nicht unterstützte Funktionen
an. Es können Einschränkungen gelten; beachten Sie das Handbuch der Kamera für
Einzelheiten.
Kamera
Kamera
Belichtungssteuerung
Belichtungssteuerung
Funktion
Funktion
P
P
2
2
S
S
A
A
M
M
AF
AF
3
3
VR
VR
4
4
Digitale Nikon-Spiegelrefl exkameras, F6, F5, F100,
F80-Serie, F75-Serie, F65-Serie,
✔✔✔✔✔✔
Pronea 600i, Pronea S
1
✔✔✔✔✔
—
F4-Serie, F90X, F90-Serie, F70-Serie
✔✔
——
✔
—
F60-Serie, F55-Serie, F50-Serie, F-401x, F-401s, F-401
✔✔✔✔
——
F-801s, F-801, F-601
M
✔✔
————
F3AF, F-601, F-501, Nikon-MF-Kameras (außer F-601
M
)
—
1. Manuelle Belichtungssteuerung (M) nicht verfügbar.
2. Schließt AUTO-Modus und Motivprogramme ein.
3. Autofokus.
4. Bildstabilisator.
■
■
Scharfeinstellung
Scharfeinstellung
Unterstützte Fokusmodi werden in der folgenden Tabelle aufgeführt (Beachten Sie das
Handbuch der Kamera für Informationen zu den Fokusmodi der Kamera).
Kamera
Kamera
Kamera-
Kamera-
Fokusmodus
Fokusmodus
Objektiv-Fokusmodus
Objektiv-Fokusmodus
A/M
A/M
M/A
M/A
M
M
Digitale Nikon-Spiegelrefl exkameras
,
F6, F5, F4-Serie, F100, F90X, F90-Serie,
F80-Serie, F75-Serie, F70-Serie, F65-Serie,
Pronea 600i, Pronea S
AF
Autofokus mit
AF-Priorität
Autofokus mit Priorität
der manuellen
Scharfstellung
Manueller
Fokus mit
elektronischer
Einstellhilfe
MF
Manueller Fokus
(elektronische Einstellhilfe bei allen Kameras außer
F-601
M verfügbar)
F60-Serie, F55-Serie, F50-Serie, F-801s,
F-801, F-601
M
, F-401x, F-401s, F-401
AF, MF
A/M- und M/A-Modus
A/M- und M/A-Modus
• M/A: Die Scharfeinstellung des Autofokus kann durch manuelles Drehen des
Fokussierings außer Kraft gesetzt werden.
• A/M: Wie oben, nur muss der Fokussierring weiter gedreht werden, bevor die
Scharfeinstellung außer Kraft gesetzt wird. Auf diese Weise wird verhindert,
dass ein unbeabsichtigtes Verstellen des Fokussierrings zu einem Verstellen
der Scharfeinstellung führt.
z
Schieben Sie den Fokusmodus-Schalter des Objektivs in die Position A/M oder M/A.
x
Fokussieren Sie.
In den Autofokus kann bei Bedarf eingegri en werden, indem der Fokusring am
Objektiv gedreht wird, während der Auslöser bis zum ersten Druckpunkt gedrückt
wird (oder, falls die Kamera mit einem AF-ON-Taste ausgestattet wird, während die
AF-ON-Taste gedrückt ist). Um mit dem Autofokus neu zu fokussieren, drücken Sie
erneut den Auslöser bis zum ersten Druckpunkt oder die AF-ON-Taste.
Der Fokusbegrenzungsschalter
Der Fokusbegrenzungsschalter
Dieser Schalter bestimmt die Begrenzung der Entfernungseinstellung für den Autofokus.
• FULL: Wählen Sie diese Option für Motive, die näher als 6 Meter liegen.
• ∞–6 m: Wählen Sie diese Option für schnelleres Scharfstellen, wenn sich Ihr
Motiv stets in einer Entfernung von mindestens 6 Metern befi ndet.
■
■
Zoom und Tiefenschärfe
Zoom und Tiefenschärfe
Drehen Sie, bevor Sie fokussieren, den Zoomring, um die Brennweite einzustellen und
einen Bildausschnitt zu wählen. Verfügt die Kamera über eine Abblendtaste, kann die
Tiefenschärfe im Sucher im Voraus bewertet werden.
Hinweis: Die Brennweite nimmt bei der Fokussierung auf nahe Motive ab. Beachten Sie,
dass die Entfernungsskala nur als Orientierungshilfe dient und eventuell nicht die genaue
Entfernung zum Motiv anzeigt und eventuell aufgrund der Tiefenschärfe oder anderer
Faktoren ∞ nicht anzeigt, wenn die Kamera auf ein entferntes Motiv fokussiert hat.
Um den Zoomring zu arretieren, drehen Sie ihn in die 80-mm-Position und schieben
Sie den Zoom-Arretierungsschalter in die Position LOCK. Auf diese Weise wird verhindert,
dass der Objektivtubus aufgrund des eigenen Gewichts ausfährt, während die Kamera
transportiert wird.
■
■
Blende
Blende
Die Blende wird mit den Bedienelementen der Kamera eingestellt.
Zoom und maximale Blende
Zoom und maximale Blende
Änderungen am Zoom können die maximale Blende um bis zu ⁄ LW verändern. Die
Kamera berücksichtigt dies allerdings automatisch beim Einstellen der Belichtung und Sie
müssen nach Anpassung des Zooms keine Veränderungen an den Kameraeinstellungen
vornehmen.
■
■
Integrierte Blitzgeräte
Integrierte Blitzgeräte
Entfernen Sie die Gegenlichtblende, wenn Sie das integrierte Blitzgerät der Kamera
verwenden (sofern vorhanden), da die Gegenlichtblende sonst einen Schatten ins Motiv
werfen würde.
■
■
Bildstabilisator
Bildstabilisator
(VR)
(VR)
Der Bildstabilisator (VR) reduziert das Risiko einer Verwacklungsunschärfe und ermöglicht
das Fotogra eren mit bis zu 4,0 Blendenstufen längeren Belichtungszeiten (ermittelt bei
400 mm Brennweite mit einer D4-Kamera nach CIPA-Standards [Camera and Imaging
Products Association]; je nach Fotograf und Aufnahmebedingungen kann die Wirkung
unterschiedlich ausfallen). Dies ermöglicht eine größere Auswahl an Belichtungszeiten
und erlaubt in den unterschiedlichsten Aufnahmesituationen ein Fotogra eren aus
freier Hand ohne Stativ.
Verwendung des Bildstabilisator AN/AUS-Schalters
Verwendung des Bildstabilisator AN/AUS-Schalters
• Wählen Sie ON (EIN), um den Bildstabilisator zu aktivieren. Der Bildstabilisator
wird aktiviert, wenn der Auslöser bis zum ersten Druckpunkt gedrückt
wird; er verringert die E ekte einer Kamera-Verwacklung für verbesserte
Motivwahl und Scharfstellung.
• Wählen Sie OFF (AUS), um den Bildstabilisator auszuschalten.
Verwendung des Bildstabilisator-Modusschalters
Verwendung des Bildstabilisator-Modusschalters
Der Bildstabilisator-Modusschalter wird verwendet, um den Bildstabilisator-Modus
auszuwählen, wenn der Bildstabilisator aktiviert ist.
• Wählen Sie NORMAL aus, um die Vibrationse ekte beim Fotogra eren
von einer festen Position aus und in anderen Situationen, in denen
die Kamera kaum bewegt wird, zu verringern.
• Wählen Sie ACTIVE aus
,
um die Vibrationse ekte bei der Aufnahme aus einem fahrenden
Fahrzeug heraus, beim Gehen und in anderen Situationen, in denen die Kamera häu g
bewegt wird, zu verringern.
Verwendung des Bildstabilisators: Hinweise
Verwendung des Bildstabilisators: Hinweise
• Schieben Sie den Bildstabilisatorschalter auf OFF, wenn die Kamera den Bildstabilisator nicht
unterstützt. Bleibt der Bildstabilisator eingeschaltet, kann sich der Akku schneller entladen,
besonders bei Pronea 600i-Kameras.
• Drücken Sie bei Verwendung des Bildstabilitsators den Auslöser bis zum ersten Druckpunkt und
warten Sie, bis sich das Bild im Sucher stabilisiert, bevor Sie den Auslöser vollständig drücken.
• Wenn der Bildstabilisator aktiv ist, ist das Bild im Sucher möglicherweise verschwommen, wenn
der Auslöser gedrückt wurde. Dies stellt keine Fehlfunktion dar.
• Schieben Sie den Bildstabilisatormodus-Schalter in die Position NORMAL, wenn Sie die Kamera
schwenken wollen. Beim Schwenken wirkt sich der Bildstabilisator nur auf die Bewegungskomponenten
aus, die nicht der Schwenkrichtung entsprechen (wird die Kamera beispielsweise waagerecht
geschwenkt, kompensiert der Bildstabilisator nur senkrechte Bewegungskomponenten). So kann die
Kamera ruckelfrei in einem weiten Bogen geschwenkt werden.
• Schalten Sie die Kamera nicht ab und entfernen Sie nicht das Objektiv, solange der
Bildstabilisator aktiv ist. Wenn die Stromversorgung des Objektivs unterbrochen wird, solange
der Bildstabilisator aktiv ist, könnte das Objektiv klappern, wenn es geschüttelt wird. Dies stellt
keine Fehlfunktion dar und kann dadurch beseitigt werden, dass das Objektiv wieder angesetzt
und die Kamera eingeschaltet wird.
• Verfügt die Kamera über ein eingebautes Blitzgerät, wird der Bildstabilisator deaktiviert,
solange das Blitzgerät sich aufl ädt.
• ON wird in der Regel empfohlen, wenn die Kamera auf ein Einbein- oder Dreibeinstativ mit
unbefestigtem Kopf montiert wird. Jedoch kann OFF je nach Aufnahmebedingungen oder
Stativtyp geeigneter sein.
■
■
Befestigen der Gegenlichtblende
Befestigen der Gegenlichtblende
Die Gegenlichtblende schützt das Objektiv und verhindert das Eindringen von Streulicht,
das ansonsten zu Kontrastverlust oder Geisterbildern führen würde.
Befestigen der Gegenlichtblende
Befestigen der Gegenlichtblende
Richten Sie die Markierung für das Ansetzen der
Gegenlichtblende (
●
) an der Markierung für die
Ausrichtung der Gegenlichtblende ( ) aus. Drehen
Sie anschließend die Gegenlichtblende (
w
), bis die
●
-Markierung an der Markierung für die Arretierung
der Gegenlichtblende ausgerichtet ist (—
).
Halten Sie die Gegenlichtblende beim Anbringen oder Abnehmen in der Nähe des
-Symbols an der Basis fest und umfassen Sie sie nicht zu fest. Bei falschem Anbringen der
Gegenlichtblende kann es zu Vignettierungen kommen.
Die Gegenlichtblende kann umgekehrt auf dem Objektiv angebracht werden, wenn sie
nicht verwendet wird.
Abnehmen der Gegenlichtblende
Abnehmen der Gegenlichtblende
Drücken Sie die Taste zur Entriegelung
der Gegenlichtblende (
q
), drehen Sie die
Gegenlichtblende in Pfeilrichtung (
w
) und
nehmen Sie sie wie angezeigt ab (
e
).
■
■
Einstellscheiben
Einstellscheiben
Die folgenden Kameras unterstützen eine Anzahl Einstellscheiben für die Verwendung
in verschiedenen Situationen.
Scheibe
Scheibe
Kamera
Kamera
A
A
B
B
C
C
E
E
EC-B
EC-B
EC-E
EC-E
G1
G1
G2
G2
G3
G3
G4
G4
J
J
L
L
M
M
U
U
F6
—
— ——— —
F5+ DP-30
(–0,5)
F5+ DA-30
(+1,0)
(–0,5)
(+0,5)
: Empfohlen.
: Vignettierung im Sucher sichtbar (Bilder sind nicht betroff en).
—: Nicht mit der Kamera kompatibel.
( ): Zahlen in Klammern geben die Belichtungskorrektur für mittenbetonte Messung
an. Wählen Sie bei der F6 die Option »Andere« für die Individualfunktion b6 (»Einst.
scheibe.«), um die Belichtungskorrektur für eine Einstellscheibe anzupassen.
Beachten Sie, dass bei Verwendung anderer Einstellscheiben als Typ B oder E auch
dann »Andere« ausgewählt werden muss, wenn keine Belichtungskorrektur erfolgt.
An der F5 kann die Belichtungskorrektur mit der Individualfunktion 18 eingestellt
werden. Beachten Sie das Kamerahandbuch für weitere Einzelheiten.
Leere Zelle: Nicht für die Verwendung mit diesem Objektiv geeignet. Beachten Sie jedoch,
dass Scheiben vom Typ M für Fotomikrografi e und Makrofotografi e mit
Abbildungsmaßstäben von 1 : 1 oder höher verwendet werden können.
Hinweis: Bei der F5 steht die Matrixmessung nur mit den Einstellscheiben A, B, E, EC-B, EC-E, J und L
zur Verfügung.
Verwenden eines Stativs (Abbildung 2)
Verwenden eines Stativs (Abbildung 2)
Das Objektiv ist mit einer abnehmbaren und drehbaren Stativschelle ausgestattet; wenn
Sie ein Stativ verwenden, sollten Sie es an der Schelle und nicht an der Kamera befestigen.
So befestigen Sie die Schelle am Objektiv:
z
Lockern Sie die Stativschellen-Befestigungsschraube (
q
) ein wenig.
x
Richten Sie die Ausrichtungsmarkierung auf der Oberseite des Objektivs an
der -Markierung an der Schelle (
w
) aus und setzen Sie das Objektiv in die
Schelle ein.
c
Drehen Sie das Objektiv in die gewünschte Position (drei Positionen in Schrit-
ten von 90° stehen zur Auswahl), bis die Ausrichtungsmarkierung auf der
Objektivoberseite an der gewünschten Positionsmarkierung an der Schelle
(
e
) ausgerichtet ist. Ziehen Sie anschließend die Befestigungsschraube (
r
)
an der Stativschelle fest an. Vergewissern Sie sich, dass die Schraube wirklich
fest angezogen ist. Wenn die Schraube nicht fest ist, kann das Objektiv aus der
Stativschelle fallen.
Entfernen der Stativschelle
Entfernen der Stativschelle
z
Lockern Sie die Befestigungsschraube der Stativschelle, bis sich die Schelle frei
bewegt. Geben Sie dabei acht, dass sich die Schraube nicht aus dem Gewinde
löst (
t
).
x
Richten Sie die Ausrichtungsmarkierung auf der Oberseite des Objektivs an der
-Markierung an der Schelle aus (
y
) und nehmen Sie das Objektiv aus der
Schelle (
u
).
■
■
Pfl ege des Objektivs
Pfl ege des Objektivs
• Halten oder heben Sie das Objektiv oder die Kamera nicht an der angesetzten Gegenlichblende.
• Halten Sie die CPU-Kontakte sauber.
• Sollte die Dichtungsmanschette beschädigt werden, setzen Sie den Gebrauch sofort aus und
bringen Sie das Objektiv zum Nikon-Kundendienst zur Reparatur.
• Verwenden Sie zum Entfernen von Staub und Verunreinigungen vom Objektiv einen Blasebalg.
Um Schmierfl ecke und Fingerabdrücke zu entfernen, bringen Sie eine kleine Menge Ethanol oder
Objektivreiniger auf ein weiches, sauberes Baumwolltuch oder ein Objektivreinigungstuch auf
und reinigen Sie das Objektiv mit Kreisbewegungen von der Mitte nach außen. Achten Sie dabei
darauf, dass keine Schmierfl ecke verbleiben, und dass sie das Glas nicht mit den Fingern berühren.
• Verwenden Sie niemals organische Lösungsmittel wie Verdünner oder Waschbenzin zur
Reinigung des Objektivs.
• Zum Schutz der Frontlinse kann die Gegenlichtblende oder ein Klarglasfi lter (NC) verwendet
werden.
• Bringen Sie den vorderen und den hinteren Objektivdeckel auf dem Objektiv an, bevor sie es
in seiner Tasche verstauen.
• Wenn das Objektiv für längere Zeit nicht verwendet wird, lagern Sie es an einem kühlen,
trockenen Ort, um Schimmel und Korrosion zu vermeiden. Lagern sie das Objektiv nicht direkt
in der Sonne oder mit Mottenkugeln aus Naphtha oder Kampfer.
• Halten Sie das Objektiv stets trocken. Eindringendes Wasser kann zur Korrosion innenliegender
Teile und irreparablen Schäden führen.
• Das Lagern des Objektiv an sehr heißen Orten kann Teile aus verstärktem Plastik beschädigen
oder verformen.
■
■
Im Lieferumfang enthaltenes Zubehör
Im Lieferumfang enthaltenes Zubehör
• Vorderer Objektivdeckel LC-77 mit Schnappverschluss (77 mm)
• Hinterer Objektivdeckel LF-4
• Bajonett-Gegenlichtblende HB-65
• Objektivbeutel CL-M2
■
■
Kompatibles Zubehör
Kompatibles Zubehör
• 77 mm-Schraubfi lter
• AF-I/AF-S-Telekonverter TC-14E
1
/TC-14E II
1
/TC-17E II
2
/TC-20E
2
/TC-20E II
2
/TC-20E III
2
1 Der Autofokus steht nur bei Kameras zur Verfügung, die eine Lichtstärke von 1:8 unterstützen.
2 Der Autofokus steht nicht zur Verfügung.
■
■
Technische Daten
Technische Daten
Typ
Typ Typ G AF-S Objektiv mit eingebauter CPU und F-Bajonettanschluss
Brennweite
Brennweite 80 – 400 mm
Lichtstärke
Lichtstärke 1 : 4,5 – 5,6
Optischer Aufbau
Optischer Aufbau 20 Linsen in 12 Gruppen (einschließlich 4 ED-Glas-Linsen, 1 Super-ED-Linse und
Linsen mit Nanokristallvergütung)
Bildwinkel
Bildwinkel
• Nikon-Spiegelre exkameras für das Kleinbild- oder FX-Format:
30°10 – 6°10
• Nikon-Spiegelre exkameras für das DX-Format: 20°– 4°
Brennweitenskala
Brennweitenskala Unterteilt im Millimeter (80, 105, 135, 200, 300, 400)
Entfernungsinformation
Entfernungsinformation
Übermittlung an die Kamera
Zoom
Zoom Manueller Zoom mit unabhängigem Zoomring
Fokussierung
Fokussierung Nikon Innenfokussierung (IF), gesteuert durch Silent-Wave-Motor und
separatem Fokussierring für die manuelle Fokussierung
Bildstabilisator
Bildstabilisator
Bewegliche Linsengruppe mit Voice-Coil-Motoren (VCMs)
Entfernungsskala
Entfernungsskala 1,5 m bis Unendlich (∞)
Naheinstellgrenze
Naheinstellgrenze • AF: 1,75 m von der Sensorebene bei allen Zoompositionen
• MF: 1,5 m von der Sensorebene bei allen Zoompositionen
Blendenlamellen
Blendenlamellen 9 (abgerundet)
Blendensteuerung
Blendensteuerung Vollautomatisch
Blendenbereich
Blendenbereich • 80 mm Brennweite: 4,5 bis 32
• 400 mm Brennweite: 5,6 bis 40
Die angezeigte kleinste Blendenöff nung kann abhängig von der Größe
der Belichtungsschrittweite, die mit der Kamera gewählt wurde, variieren.
Belichtungsmessung
Belichtungsmessung Off enblende
Fokusbegrenzungsschalter
Fokusbegrenzungsschalter
Zwei Positionen: FULL (VOLLSTÄNDIG) (∞ – 1,75 m) und ∞ – 6 m
Filtergewinde
Filtergewinde 77 mm (P = 0,75 mm)
Abmessungen
Abmessungen Etwa 95,5 mm maximaler Durchmesser × 203 mm (Länge ab Bajonettau age)
Gewicht
Gewicht ca. 1570 g, einschließlich Stativschelle
ca. 1480 g, ohne Stativschelle
Änderungen und Irrtümer vorbehalten.
Français
Nous vous remercions d’avoir acheté un objectif NIKKOR. Avant de l’utiliser, veuillez lire
attentivement ces instructions et le manuel de l’appareil photo.
Remarque
:
Lorsqu’il est monté sur un appareil photo numérique re ex de format DX
comme le D7000 ou les appareils photo de la gamme D300, cet objectif a un angle
de champ de 20° – 4° et une focale équivalente à 120 – 600 mm (format 24 × 36 mm).
Pour votre sécurité
Pour votre sécurité
A
A
ATTENTION
ATTENTION
• Ne pas démonter. Toucher les parties internes de l’appareil photo ou de l’objectif peut provoquer
des blessures. En cas de dysfonctionnement, le produit devra être réparé par un technicien
qualifi é uniquement. Si le produit s’ouvre à cause d’une chute ou de tout autre accident, retirez
l’accumulateur de l’appareil photo et/ou débranchez l’adaptateur secteur et confi ez le produit
à un centre Nikon agréé pour le faire vérifi er.
• Mettre immédiatement l’appareil hors tension en cas de dysfonctionnement. Si vous détectez de la
fumée ou une odeur inhabituelle provenant de l’équipement, débranchez immédiatement
l’adaptateur secteur et retirez l’accumulateur de l’appareil photo, tout en prenant soin de ne
pas vous brûler. Poursuivre son utilisation peut provoquer un incendie ou des blessures. Après
avoir retiré l’accumulateur, confi ez l’équipement à un centre Nikon agréé pour le faire vérifi er.
• Ne pas utiliser en présence de gaz in ammable. L’utilisation d’équipement électronique en présence
d’un gaz infl ammable peut provoquer une explosion ou un incendie.
• Ne pas regarder le soleil avec l’objectif ou le viseur de l’appareil photo. Regarder le soleil ou toute autre
source lumineuse intense avec l’objectif ou le viseur peut provoquer des troubles de la vision
irréversibles.
• Tenir éloigné des enfants. Le non-respect de cette précaution peut provoquer des blessures.
• Suivre les précautions ci-dessous lors de la manipulation de l’objectif et de l’appareil photo :
- Tenir l’objectif et l’appareil photo au sec. Le non-respect de cette précaution peut provoquer
un incendie ou un choc électrique.
- Ne pas manipuler l’objectif ou l’appareil photo avec des mains mouillées. Le non-respect de
cette précaution peut provoquer un choc électrique.
- Ne pas inclure le soleil dans le cadrage lors de la prise de vue de sujets en contre-jour. La
concentration de la lumière du soleil dans l’appareil photo lorsque le soleil est dans ou à
proximité du champ de l’image peut provoquer un incendie.
- Si vous n’avez pas l’intention d’utiliser l’objectif pendant une période prolongée, fi xez les
bouchons avant et arrière et rangez l’objectif hors de la lumière directe du soleil. Si l’objectif
est laissé en contact direct avec la lumière du soleil, les rayons peuvent toucher des objets
infl ammables, provoquant ainsi un incendie.
• Ne pas porter un trépied sur lequel un objectif ou l’appareil photo est xé. Vous risqueriez de trébucher
ou de frapper accidentellement des personnes, provoquant ainsi des blessures.
• Ne pas laisser l’objectif là où il serait exposé à des températures élevées, comme une voiture fermée ou à la
lumière directe du soleil. Le non-respect de cette précaution peut avoir des répercussions sur les
parties internes de l’objectif, pouvant provoquer un incendie.
■
■
Parties de l’objectif (Figure 1)
Parties de l’objectif (Figure 1)
q
Repère de montage du parasoleil
w
Bague de zoom
e
Échelle des focales
r
Repère de l’échelle des focales
t
Indicateur de distance de mise au point
y
Repère de distance de mise au point
u
Bague de mise au point
i
Repère de rotation de l’objectif
o
Repère de montage de l’objectif
!0
Joint en caoutchouc de la monture
d’objectif
!1
Contacts du microprocesseur
!2
Commutateur du mode de mise au point
!3
Commutateur de la limite de mise au point
!4
Commutateur ON/OFF de réduction de
vibration
!5
Commutateur du mode de réduction de
vibration
!6
Commutateur de verrouillage du zoom
!7
Parasoleil
!8
Repère d’alignement du parasoleil
!9
Repère de verrouillage du parasoleil
@0
Commande de déverrouillage du parasoleil
@1
Vis de fi xation du collier pour trépied
@2
Repères de position (90°)
@3
Collier pour trépied
■
■
Compatibilité
Compatibilité
Les marques (« ✔ ») indiquent les fonctions prises en charge, les traits (« — ») les
fonctions non prises en charge. Certaines restrictions peuvent s’appliquer ; consultez le
manuel de l’appareil photo pour plus de détails.
Appareil photo
Appareil photo
Mode d’exposition
Mode d’exposition
(prise de vue)
(prise de vue)
Fonction
Fonction
P
P
2
2
S
S
A
A
M
M
AF
AF
3
3
VR
VR
4
4
Refl ex numériques Nikon, F6, F5, F100, gamme F80,
gamme F75, gamme F65
✔✔✔✔✔✔
Pronea 600i, Pronea S
1
✔✔✔✔✔
—
Gamme F4, F90X, gamme F90, gamme F70
✔✔
——
✔
—
Gamme F60, gamme F55, gamme F50, F-401x, F-401s, F-401
✔✔✔✔
——
F-801s, F-801, F-601
M
✔✔
————
F3AF, F-601, F-501, appareils MF Nikon (sauf F-601
M) —
1. Mode d’exposition M (manuel) non disponible.
2. Inclut les modes AUTO et scène (Vari-programme).
3. Autofocus.
4. Réduction de vibration.
■
■
Mise au point
Mise au point
Les modes de mise au point pris en charge sont indiqués dans le tableau suivant (pour
en savoir plus sur les modes de mise au point de l’appareil photo, consultez le manuel
de ce dernier).
Appareil photo
Appareil photo
Mode de mise
Mode de mise
au point de
au point de
l’appareil photo
l’appareil photo
Mode de mise au point de l’objectif
Mode de mise au point de l’objectif
A/M
A/M
M/A
M/A
M
M
Refl ex numériques Nikon,
F6, F5, gamme F4, F100, F90X,
gamme F90, gamme F80,
gamme F75, gamme F70,
gamme F65, Pronea 600i,
Pronea S
AF
Autofocus à
priorité manuelle
(priorité AF)
Autofocus à priorité
manuelle (priorité
manuelle)
Mise au point
manuelle avec
télémètre
électronique
MF
Mise au point manuelle
(télémètre électronique disponible sur tous les appareils
photo excepté F-601
M)
Gamme F60, gamme F55,
gamme F50, F-801s, F-801,
F-601M, F-401x, F-401s, F-401
AF, MF
Modes A/M et M/A
Modes A/M et M/A
• M/A : l’autofocus peut être désactivé à l’aide de la bague de mise au point
de l’objectif.
• A/M : comme ci-dessus, sauf que la bague de mise au point doit être
tournée davantage pour désactiver l’autofocus, ce qui permet d’éviter des
modifi cations accidentelles de la mise au point dues à une manipulation
involontaire de la bague.
z
Positionnez le commutateur du mode de mise au point de l’objectif sur A/M ou M/A.
x
E ectuez la mise au point.
Si vous le souhaitez, vous pouvez désactiver l’autofocus en pivotant la bague
de mise au point de l’objectif avec le déclencheur appuyé à mi-course (ou avec
la commande AF-ON appuyée, si l’appareil photo est pourvu d’une commande
AF-ON). Pour refaire la mise au point avec l’autofocus, appuyez à mi-course sur le
déclencheur ou appuyez de nouveau sur la commande AF-ON.
Commutateur de la limite de mise au point
Commutateur de la limite de mise au point
Ce commutateur permet de dé nir les limites de la distance de mise au point en mode
autofocus.
• FULL : Sélectionnez cette option lorsque vous photographiez des sujets
probablement situés à des distances inférieures à 6 m.
• ∞–6 m : Si votre sujet se situe toujours à une distance égale ou supérieure
à 6 m, sélectionnez cette option pour eff ectuer la mise au point plus
rapidement.
■
■
Zoom et profondeur de champ
Zoom et profondeur de champ
Avant de faire la mise au point, tournez la bague de zoom pour régler la focale et
cadrer la photographie. Si l’appareil photo o re un aperçu de la profondeur de champ
(fermeture du diaphragme), il est possible d’avoir un aperçu de la profondeur de champ
dans le viseur.
Remarque: la focale diminue au fur et à mesure que la distance de mise au point se
raccourcit. Notez que l’indicateur de la distance de mise au point doit seulement être
considéré comme un guide. En e et, il peut ne pas a cher avec précision la distance au
sujet. En outre, en raison de la profondeur de champ ou d’autres facteurs, il peut ne pas
indiquer ∞ lorsque l’appareil photo fait le point sur un objet éloigné.
Pour verrouiller la bague de zoom, placez-la sur 80 mm et positionnez le commutateur
de verrouillage du zoom sur LOCK. Cela permet d’éviter que l’objectif ne sorte, entraîné
par son propre poids, lors du transport de l’appareil photo.
■
■
Ouverture
Ouverture
Pour régler l’ouverture, utilisez les commandes de l’appareil photo.
Zoom et ouverture maximale
Zoom et ouverture maximale
Modi er le zoom peut altérer l’ouverture maximale jusqu’à ⁄L. L’appareil photo prend
cela automatiquement en compte lors du réglage de l’exposition et aucune modi cation
des réglages de l’appareil photo n’est nécessaire après les ajustements du zoom.
■
■
Flash intégré
Flash intégré
Lors de l’utilisation d’un ash intégré sur les appareils photo qui en sont équipés, enlevez le
parasoleil pour éviter l’e et de vignettage (ombres créées lorsque l’extrémité de l’objectif
occulte le ash intégré).
■
■
Réduction de vibration (VR)
Réduction de vibration (VR)
La fonction de réduction de vibration (VR) atténue les phénomènes de ou provoqués
par le bougé de l’appareil photo, ce qui permet de recourir à des vitesses d’obturation
jusqu’à 4,0 fois plus lentes que celles normalement utilisées (mesures e ectuées à 400 mm
avec un appareil photo D4, selon les normes de la CIPA [Camera and Imaging Products
Association] ; les e ets varient selon le photographe et les conditions de prise de vue). Cela
augmente la plage des vitesses d’obturation disponibles et permet de prendre des photos
à main levée, sans trépied, dans de nombreuses situations.
Utilisation du commutateur ON/OFF pour la réduction de vibration
Utilisation du commutateur ON/OFF pour la réduction de vibration
• Sélectionnez ON (ACTIVÉ) pour activer la réduction de vibration. La réduction
de vibration est activée lorsque vous appuyez à mi-course sur le
déclencheur, réduisant ainsi les e ets du bougé d’appareil pour vous
permettre d’améliorer le cadrage et la mise au point.
• Sélectionnez OFF (DÉSACTIVÉ) pour désactiver la réduction de vibration.
Utilisation du commutateur du mode de réduction de vibration
Utilisation du commutateur du mode de réduction de vibration
Le commutateur du mode de réduction de vibration permet de sélectionner le mode de
réduction de vibration lorsque la réduction de vibration est activée.
• Sélectionnez NORMAL pour réduire les e ets des vibrations lorsque vous
photographiez depuis une position xe et de manière générale, dans
les situations où le mouvement de l’appareil photo est relativement
peu important.
• Sélectionnez ACTIVE pour réduire les e ets des vibrations lorsque vous photographiez
depuis un véhicule en mouvement, lorsque vous marchez et de manière générale, dans
les situations où le mouvement de l’appareil photo est important.
Utiliser la réduction de vibration : Remarques
Utiliser la réduction de vibration : Remarques
• Positionnez le commutateur de réduction de vibration sur OFF si l’appareil photo ne prend pas
en charge la fonction de réduction de vibration. Si la réduction de vibration est constamment
activée, cela risque d’augmenter considérablement la consommation de l’accumulateur, en
particulier pour les appareils photo Pronea 600i.
• Lorsque vous utilisez la réduction de vibration, appuyez sur le déclencheur à mi-course et attendez
que l’image se stabilise dans le viseur avant d’appuyer sur le déclencheur jusqu’en fi n de course.
• Lorsque la réduction de vibration est activée, l’image dans le viseur peut être fl oue une fois le
déclencheur relâché. Cela n’indique pas un dysfonctionnement.
• Positionnez le commutateur du mode de réduction de vibration sur NORMAL pour eff ectuer
des fi lés panoramiques. Lorsque vous eff ectuez un fi lé panoramique, la réduction de vibration
s’applique uniquement au mouvement ne faisant pas partie du fi lé (par exemple, si l’appareil
photo est utilisé pour faire un fi lé horizontal, la réduction de vibration ne s’applique qu’au
tremblement vertical). Il est ainsi beaucoup plus facile de réaliser de longs fi lés panoramiques.
• Ne mettez pas l’appareil photo hors tension et ne retirez pas l’objectif pendant que la réduction
de vibration est activée. Si l’alimentation de l’objectif est coupée alors que la réduction de
vibration est activée, l’objectif peut vibrer s’il est secoué. Il ne s’agit pas d’un dysfonctionnement
et cela peut être corrigé en refi xant l’objectif et en mettant l’appareil photo sous tension.
• Si l’appareil photo est équipé d’un fl ash intégré, la réduction de vibration est désactivée
pendant que le fl ash se charge.
• ON est généralement recommandé lorsque l’appareil photo est monté sur un monopode ou
un trépied équipé d’une tête non sécurisée, même si OFF peut être préférable dans certaines
conditions de prise de vue et avec certains types de trépieds.
■
■
Parasoleil
Parasoleil
Le parasoleil protège l’objectif et bloque la lumière di use pouvant causer de la lumière
parasite ou une image fantôme.
Fixation du parasoleil
Fixation du parasoleil
Alignez le repère de montage du parasoleil (●)
sur le repère d’alignement du parasoleil ( ), puis
tournez le parasoleil (
w
) jusqu’à ce que le repère
●
soit aligné sur le repère de verrouillage du parasoleil
(—
).
Lors de la xation ou du retrait du parasoleil, tenez-le près du symbole
sur sa base,
et évitez de le serrer trop fermement. Un vignettage peut se produire si le parasoleil n’est
pas correctement attaché.
Le parasoleil peut être retourné et monté sur l’objectif lorsqu’il n’est pas utilisé.
Retrait du parasoleil
Retrait du parasoleil
Appuyez sur la commande de déverrouillage du
parasoleil (
q
), tournez ce dernier dans le sens
indiqué par la èche (
w
) et retirez-le comme le
montre l’illustration (
e
).
■
■
Verres de visée
Verres de visée
Les appareils photo suivants sont compatibles avec un grand nombre de verres de visée
adaptés à di érentes situations.
Verre
Verre
Appareil photo
Appareil photo
A
A
B
B
C
C
E
E
EC-B
EC-B
EC-E
EC-E
G1
G1
G2
G2
G3
G3
G4
G4
J
J
L
L
M
M
U
U
F6
—
—————
F5+ DP-30
(–0,5)
F5+ DA-30
(+1,0)
(–0,5)
(+0,5)
: Recommandé.
:
Vignettage visible dans le viseur (les photos ne sont pas aff ectées).
— : Non compatible avec l’appareil photo.
( ) :
Les chiff res entre parenthèses donnent la correction d’exposition pour la mesure pondérée
centrale. Sélectionnez « Activ.: autre » pour le Réglage personnalisé b6 (« Plage visée ») lors
de l’ajustement de la correction d’exposition pour l’appareil photo F6 ; remarquez qu’avec les
verres autres que B ou E, « Activ.: autre » doit être sélectionné, et ce même lorsque la valeur
pour la correction d’exposition est de 0. La correction d’exposition pour l’appareil photo F5
peut être ajustée en utilisant le Réglage personnalisé 18 ; consultez le manuel de l’appareil
photo pour plus de détails.
Cellule vide : L’utilisation ne convient pas avec cet objectif. Veuillez remarquer cependant
que les verres de type M peuvent être utilisés pour la microphotographie et la
macrophotographie avec un grossissement de 1 : 1 ou plus.
Remarque : L’appareil photo F5 prend en charge la mesure matricielle avec les verres de visée A, B, E,
EC-B/EC-E, J, et L uniquement.
■
■
Utilisation d’un trépied (Figure 2)
Utilisation d’un trépied (Figure 2)
L’objectif est équipé d’un collier pour trépied rotatif et amovible. Lorsque vous utilisez un trépied,
xez ce dernier au collier et non à l’appareil photo. Pour xer le collier sur l’objectif
:
z
Desserrez légèrement la vis de fi xation du collier (
q
).
x
Alignez le repère d’alignement situé en haut de l’objectif sur le repère du collier
(
w
) et insérez l’objectif dans le collier.
c
Tournez l’objectif jusqu’à la position souhaitée (trois positions sont possibles, à 90°
d’intervalle) et arrêtez-vous lorsque le repère d’alignement situé en haut de l’objectif
est aligné sur le repère de la position de votre choix, situé sur le collier (
e
), puis serrez
la vis de fi xation du collier (
r
). Veillez à ce que la vis soit bien serrée ; si ce n’est pas le
cas, l’objectif peut se détacher du collier.
Retrait du collier pour trépied
Retrait du collier pour trépied
z
En faisant attention de ne pas retirer la vis de son fi letage, desserrez-la jusqu’à ce que le
collier tourne librement (
t
).
x
Alignez le repère d’alignement situé en haut de l’objectif sur le repère du collier
(
y
) et retirez l’objectif du collier (
u
).
■
■
Entretien de l’objectif
Entretien de l’objectif
• Ne prenez pas ou ne tenez pas l’objectif ou l’appareil photo en saisissant uniquement le
parasoleil.
• Maintenez les contacts du microprocesseur propres.
• Si le joint en caoutchouc de la monture d’objectif est endommagé, cessez immédiatement
l’utilisation et confi ez l’objectif à un centre Nikon agréé pour le faire réparer.
• Utilisez une souffl ette pour enlever la poussière et les peluches sur la surface de l’objectif. Pour
eff acer les taches et les traces de doigt, imprégnez un morceau de tissu propre en coton avec
une petite quantité d’éthanol ou de nettoyant pour objectif ou utilisez une lingette de nettoyage
d’objectif, et nettoyez avec un mouvement circulaire à partir du centre vers l’extérieur, tout en
prenant soin de ne pas laisser de taches, ni de toucher le verre avec vos doigts.
• N’utilisez jamais de solvants organiques comme un diluant à peinture ou du benzène pour
nettoyer l’objectif.
• Le parasoleil ou les fi ltres NC peuvent être utilisés pour protéger la lentille frontale.
• Fixez les bouchons avant et arrière avant de placer l’objectif dans son étui.
• Si vous n’avez pas l’intention d’utiliser l’objectif pendant une période prolongée, rangez-le dans
un endroit frais et sec pour éviter la moisissure et la rouille. Ne pas ranger à la lumière directe
du soleil ou avec des boules antimites de naphtaline ou de camphre.
• Tenez l’objectif au sec. La formation de rouille sur le mécanisme interne peut causer des dégâts
irréparables.
• Laisser l’objectif dans des endroits extrêmement chauds peut endommager ou déformer les
éléments composés de plastique renforcé.
■
■
Accessoires fournis
Accessoires fournis
• Bouchon avant d’objectif encliquetable 77 mm LC-77
• Bouchon arrière d’objectif LF-4
• Parasoleil à baïonnette HB-65
• Étui souple pour objectif CL-M2
■
■
Accessoires compatibles
Accessoires compatibles
• Filtres à visser 77 mm
• Téléconvertisseurs AF-I/AF-S TC-14E
1
/TC-14E II
1
/TC-17E II
2
/TC-20E
2
/TC-20E II
2
/TC-20E III
2
1 L’autofocus est uniquement disponible avec les appareils photo prenant en charge l’ouverture f/8.
2 L’autofocus n’est pas pris en charge.
■
■
Caractéristiques
Caractéristiques
Type
Type
Objectif AF-S de type G avec microprocesseur intégré et
monture F
Focale
Focale 80 – 400 mm
Ouverture maximale
Ouverture maximale f/4.5 – 5.6
Construction optique
Construction optique 20 lentilles en 12 groupes (dont 4 lentilles en verre ED, 1 lentille
en verre super ED et des lentilles béné ciant d’un traitement nanocristal)
Angle de champ
Angle de champ • Re ex numériques Nikon de format FX et re ex
argentiques Nikon : 30°10
– 6°10
• Re ex numériques Nikon de format DX : 20° – 4°
Échelle des focales
Échelle des focales Graduée en millimètres (80, 105, 135, 200, 300, 400)
Information de distance
Information de distance
Communiquée au boîtier de l’appareil photo
Zoom
Zoom Zoom manuel utilisant une bague de zoom indépendante
Mise au point
Mise au point
Système de mise au point interne de Nikon (IF, Internal
Focusing) avec autofocus commandé par un moteur
ondulatoire silencieux (SWM) et bague de mise au point
pour mise au point manuelle
Réduction de vibration
Réduction de vibration Décentrement avec voice coil motors (VCMs)
Indicateur de distance de mise au point
Indicateur de distance de mise au point
1,5 m à l’infi ni (∞)
Distance minimale de mise au point
Distance minimale de mise au point • AF: 1,75 m depuis le plan focal à toutes les focales
• MF: 1,5 m depuis le plan focal à toutes les focales
Lamelles de diaphragme
Lamelles de diaphragme
9 (diaphragme circulaire)
Diaphragme
Diaphragme Intégralement automatique
Plage des ouvertures
Plage des ouvertures • Focale 80 mm : f/4.5 à f/32 • Focale 400 mm : f/5.6 à f/40
L’ouverture minimale affi chée peut varier en fonction de
l’incrément d’exposition sélectionné avec l’appareil photo.
Mesure
Mesure Pleine ouverture
Commutateur de la limite de mise
Commutateur de la limite de mise
au point
au point
Deux positions : FULL (∞ – 1,75 m) et ∞ – 6 m
Diamètre de xation pour ltre
Diamètre de xation pour ltre 77 mm (P = 0,75 mm)
Dimensions
Dimensions Environ 95,5 mm de diamètre maximum × 203 mm (distance
à partir du plan d’appui de la monture d’objectif de l’appareil photo)
Poids
Poids Environ 1570 g, avec le collier pour trépied
Environ 1480 g, sans le collier pour trépied
Nikon se réserve le droit de modifi er les caractéristiques du matériel décrit dans ce manuel à tout
moment et sans préavis.
Nederlands
Gefeliciteerd met de aanschaf van een NIKKOR-objectief. Lees voordat u dit product gebruikt
zorgvuldig deze instructies en de camerahandleiding door.
Opmerking: Indien gemonteerd op een digitale re excamera in DX-formaat zoals de
D7000 of camera’s in de D300 serie, heeft dit objectief een kijkhoek van 20° – 4° en een
brandpuntsafstand gelijkwaardig aan 120 – 600 mm (35 mm formaat).
Voor uw veiligheid
Voor uw veiligheid
A
A
WAARSCHUWINGEN
WAARSCHUWINGEN
• Niet demonteren. Het aanraken van de interne onderdelen van de camera of objectief kan letsel
veroorzaken. In het geval van een defect moet het product alleen door een gekwalifi ceerd
technicus worden gerepareerd. Mocht het product openbreken als gevolg van een val of ander
ongeluk, verwijder de camerabatterij en/of ontkoppel de lichtnetadapter en breng het product
naar een Nikon geautoriseerd servicecenter.
• Zet de camera in het geval van een defect onmiddellijk uit. Bemerkt u dat er rook of een andere
ongebruikelijke geur uit het apparaat komt, haal dan onmiddellijk de lichtnetadapter uit het
stopcontact en verwijder de camerabatterij en zorg dat u geen brandwonden oploopt. Het
voortzetten van de werking van het apparaat kan brand of letsel tot gevolg hebben. Breng
na het verwijderen van de batterij het apparaat voor inspectie naar een Nikon geautoriseerd
servicecenter.
• Niet gebruiken in de aanwezigheid van brandbaar gas. Het bedienen van elektronische apparatuur in de
aanwezigheid van brandbaar gas kan een explosie of brand tot gevolg hebben.
• Kijk niet via het objectief of de camerazoeker naar de zon. Kijken naar de zon of andere heldere
lichtbron via het objectief of de zoeker kan permanent visueel letsel veroorzaken.
• Houd buiten bereik van kinderen. Het niet in acht nemen van deze voorzorgsmaatregel kan letsel tot
gevolg hebben.
• Neem tijdens het hanteren van het objectief en de camera de volgende voorzorgsmaatregelen in acht:
- Zorg dat het object en de camera droog blijven. Het niet in acht nemen van deze
voorzorgsmaatregel kan brand of een elektrische schok tot gevolg hebben.
- Hanteer het objectief of de camera niet met natte handen. Het niet in acht nemen van deze
voorzorgsmaatregel kan een elektrische schok tot gevolg hebben.
- Houd de zon goed uit het beeld tijdens het opnemen van onderwerpen met tegenlicht.
Zonlicht dat wordt scherpgesteld in de camera terwijl de zon zich in of nabij het beeld
bevindt kan brand veroorzaken.
- Bevestig de achter- en voorlensdop als het objectief voor langere tijd niet wordt gebruikt
en bewaar het objectief niet in direct zonlicht. Als u het in direct zonlicht laat liggen, kan
het objectief de zonnestralen op brandbare objecten scherpstellen en brand veroorzaken.
• Draag geen statieven met het objectief of de camera eraan bevestigd. U kunt struikelen of per ongeluk
anderen raken, met letsel als gevolg.
• Laat het objectief niet achter waar het wordt blootgesteld aan extreem hoge temperaturen, zoals in een
afgesloten auto of in direct zonlicht. Het niet in acht nemen van deze voorzorgsmaatregel kan de
interne onderdelen van het objectief nadelig beïnvloeden en brand veroorzaken.
■
■
Onderdelen van het objectief (afbeelding 1)
Onderdelen van het objectief (afbeelding 1)
q
Bevestigingsmarkering voor zonnekap
w
Zoomring
e
Schaal brandpuntsafstand
r
Markering brandpuntsafstand
t
Aanduiding voor scherpstelafstand
y
Markering voor scherpstelafstand
u
Scherpstelring
i
Objectiefrotatie-index
o
Objectief montagemarkering
!0
Rubberen afdichting voor
objectiefbevestiging
!1
CPU-contacten
!2
Schakelaar voor scherpstelstand
!3
Schakelaar scherpstellimiet
!4
Vibratiereductie ON/OFF (AAN/UIT)-
schakelaar
!5
Schakelaar voor de stand vibratiereductie
!6
Zoomvergrendelingsschakelaar
!7
Zonnekap
!8
Uitlijnmarkering op zonnekap
!9
Vergendelmarkering op zonnekap
@0
Ontgrendelingsknop zonnekap
@1
Borgschroef statiefgondel
@2
Positie-indices (90 °)
@3
Statiefkraag
■
■
Compatibiliteit
Compatibiliteit
Vinkjes (“✔”) duiden ondersteunde functies aan, functies met een streepje (“—”)
worden niet ondersteund. Er zijn een aantal beperkingen van toepassing: zie de
camerahandleiding voor details.
Camera
Camera
Belichtingsstand
Belichtingsstand
(opname)
(opname)
Functie
Functie
P
P
2
2
S
S
A
A
M
M
AF
AF
3
3
VR
VR
4
4
Nikon digitale refl excamera’s, F6, F5, F100, F80-Serie,
F75-Serie, F65-Serie
✔✔✔✔✔✔
Pronea 600i, Pronea S
1
✔✔✔✔✔
—
F4-Serie, F90X, F90-Serie, F70-Serie
✔✔
——
✔
—
F60-Serie, F55-Serie, F50-Serie, F-401x, F-401s, F-401
✔✔✔ ✔
——
F-801s, F-801, F-601
M
✔✔
————
F3AF, F-601, F-501, Nikon MF camera’s (behalve F-601
M
) —
1. Belichtingsmodus M (handmatig) is niet beschikbaar.
2. Omvat AUTO en onderwerpstanden (Digitaal Vari-programma).
3. Autofocus
4. Vibratiereductie.
■
■
Scherpstellen
Scherpstellen
Ondersteunde scherpstelstanden worden in de volgende tabel getoond (zie de
camerahandleiding voor informatie over de scherpstelmodi van de camera).
Camera
Camera
Camerascherpstelstand
Camerascherpstelstand
Objectiefscherpstelstand
Objectiefscherpstelstand
A/M
A/M
M/A
M/A
M
M
Nikon digitale
refl excamera’s, F6, F5,
F4-Serie, F100, F90X,
F90-Serie, F80-Serie,
F75-Serie, F70-Serie,
F65-Serie, Pronea 600i,
Pronea S
AF
Autofocus met
handcorrectie
(AF-prioriteit)
Autofocus met
handcorrectie
(handmatige
prioriteit)
Handmatige
scherpstelling
met
elektronische
afstandsmeter
MF
Handmatige scherpstelling
(elektronische afstandsmeter beschikbaar voor alle
camera’s behalve F-601
M
)
F60-Serie, F55-Serie,
F50-Serie, F-801s,
F-801, F-601
M
, F-401x,
F-401s, F-401
AF, MF
A/M- en M/A-standen
A/M- en M/A-standen
• M/A: Autofocus kan worden uitgeschakeld door aan de scherpstelring van
het objectief te draaien.
• A/M: Zoals hierboven, behalve dat de scherpstelring verder moet worden
gedraaid voordat de autofocus wordt uitgeschakeld, zodat onvoorziene
wijzigingen aan de scherpstelling door onbedoelde bediening van de
scherpstelring worden voorkomen.
z
Schuif de schakelaar voor de scherpstelstand van het objectief naar A/M of M/A.
x
Scherpstellen.
Indien gewenst, kan autofocus worden overgenomen door aan de scherpstelring
van het objectief te draaien terwijl de ontspanknop half wordt ingedrukt (of, als de
camera is uitgerust met een AF-ON-knop, terwijl de AF-ON-knop wordt ingedrukt).
Druk, om opnieuw scherp te stellen met behulp van autofocus, de ontspanknop
half in of druk nogmaals op de AF-ON-knop.
De schakelaar voor de scherpstellimiet
De schakelaar voor de scherpstellimiet
Deze schakelaar bepaalt de limieten voor de scherpstelafstand voor autofocus.
• FULL: Selecteer deze optie voor onderwerpen die zich op een afstand van minder
dan 6 m bevinden.
• ∞–6 m: Indien uw onderwerp zich altijd op een afstand van ten minste 6 m bevindt,
selecteer deze optie om sneller te kunnen scherpstellen.
■
■
Zoom en scherptediepte
Zoom en scherptediepte
Draai aan de zoomring voordat u scherpstelt om de brandpuntsafstand aan te passen
en de foto te kadreren. Als de camera over voorbeeld scherptediepte beschikt (stop
omlaag), kan scherptediepte ook als voorbeeld in de zoeker worden bekeken.
Opmerking: Brandpuntsafstand neemt af als de scherpstelafstand wordt verkort. Merk op
dat de aanduiding voor scherpstelafstand alleen als leidraad is bedoeld en is mogelijk
niet nauwkeurig genoeg om de afstand tot het onderwerp te tonen en toont mogelijk
niet, door scherptediepte of andere factoren, ∞ wanneer de camera op een ver voorwerp
wordt scherpgesteld.
Draai de zoomring naar de 80 mm-positie om deze te vergrendelen en schuif de
schakelaar van de zoomvergrendeling naar LOCK (VERGRENDELEN). Dit voorkomt dat het
objectief door zijn eigen gewicht wordt verlengd terwijl de camera van de ene naar de
andere plaats wordt gedragen.
■
■
Diafragma
Diafragma
Diafragma wordt met behulp van de camerabesturingen aangepast.
Zoom en maximale diafragma
Zoom en maximale diafragma
Wijzigt zodat zoom het maximale diafragma tot maximaal ⁄ LW aan kan passen. De
camera houdt er bij het instellen van de belichting echter automatisch rekening mee
en zijn er geen modi caties van de camera-instellingen vereist voor de volgende
zoomaanpassingen.
■
■
Ingebouwde fl itser
Ingebouwde fl itser
Bij het gebruik van de ingebouwde itser op camera’s uitgerust met een ingebouwde
itser, verwijder de zonnekap om vignettering te voorkomen (schaduwen aangemaakt
waar het uiteinde van het objectief de ingebouwde itser verduisterd).
■
■
Vibratiereductie (VR)
Vibratiereductie (VR)
Vibratiereductie (VR) vermindert onscherpte veroorzaakt door cameratrilling, waardoor
sluitertijden tot maximaal 4,0 stops langer duren dan anders het geval zou zijn (gemeten
bij 400 mm met een D4 camera volgens Camera and Imaging Products Association [CIPA]-
normen; e ecten variëren afhankelijk van de fotograaf en opnameomstandigheden). Dit
verhoogt het bereik van de beschikbare sluitertijden en laat handbediende, statiefvrije
fotogra e toe in vele verschillende situaties.
De vibratiereductie AAN/UIT-schakelaar gebruiken
De vibratiereductie AAN/UIT-schakelaar gebruiken
• Selecteer ON om vibratiereductie in te schakelen. Vibratiereductie wordt
geactiveerd wanneer de ontspanknop half wordt ingedrukt,
waarbij de e ecten van cameratrilling voor verbeterde kadrering en
scherpstelling worden verminderd.
• Selecteer OFF om vibratiereductie uit te schakelen.
De schakelaar vibratiereductiestand gebruiken
De schakelaar vibratiereductiestand gebruiken
De schakelaar vibratiereductiestand wordt gebruikt om de vibratiereductiestand te
selecteren terwijl vibratiereductie is ingeschakeld.
• Selecteer NORMAL om de e ecten van trillingen te verminderen tijdens
het fotograferen vanuit een vaste positie en in andere situaties met
relatief weinig camerabeweging.
• Selecteer ACTIVE om de e ecten van trillingen te verminderen bij het fotograferen van een
bewegend voertuig, tijdens het lopen en in andere situaties met actieve camerabeweging.
Vibratiereductie gebruiken: opmerkingen
Vibratiereductie gebruiken: opmerkingen
• Schuif de vibratiereductieschakelaar naar OFF als de camera geen vibratiereductie ondersteunt.
Het ingeschakeld laten van de vibratiereductie kan de batterij snel doen leeglopen,
voornamelijk in het geval van Pronea 600i camera’s.
• Druk bij het gebruik van vibratiereductie de ontspanknop half in en wacht totdat de afbeelding
in de zoeker is gestabiliseerd, voordat de ontspanknop in zijn geheel wordt ingedrukt.
• Wanneer vibratiereductie actief is, kan de afbeelding in de zoeker onscherp worden nadat de
sluiter wordt vrijgegeven. Dit duidt niet op een defect.
• Schuif de schakelaar van de stand vibratiereductie naar NORMAL (NORMAAL) voor het pannen
van opnamen. Wanneer de camera wordt gepand, is vibratiereductie alleen van toepassing op
beweging die geen deel uitmaakt van het pannen (bijvoorbeeld, als de camera horizontaal
wordt gepand, zal alleen verticale trilling worden toegepast), waardoor het veel eenvoudiger is
om de camera soepel in een brede boog te pannen.
• Zet de camera niet uit of verwijder het objectief niet wanneer vibratiereductie in werking is.
Indien de voeding naar het objectief wordt afgekoppeld wanneer vibratiereductie actief is, kan
het objectief rammelen wanneer deze schudt. Dit duidt niet op een defect en kan met behulp
van het herbevestigen van het objectief en het inschakelen van de camera worden verholpen.
• Als de camera is voorzien van een ingebouwde fl itser, wordt vibratiereductie uitgeschakeld
wanneer de fl itser laadt.
• ON (AAN) wordt doorgaans aanbevolen wanneer de camera op een monopod of een statief
met een niet-vergrendelde kop is gemonteerd, ondanks het feit dat OFF (UIT) mogelijk de
voorkeur heeft afhankelijk van de opnameomstandigheden en het type statief.
■
■
De zonnekap
De zonnekap
De zonnekap beschermt het objectief en blokkeert dwaallicht dat anders lichtvlekken of
beeldschaduwen veroorzaakt.
De zonnekap bevestigen
De zonnekap bevestigen
Breng de bevestigingsmarkering op de zonnekap
(●) op één lijn met de uitlijnmarkering op de
zonnekap (
) en draai vervolgens aan de
zonnekap (
w
) totdat de
● -markering op één
lijn is gebracht met de vergrendelmarkering op de
zonnekap (—
).
Houd, bij het bevestigen of verwijderen van de kap, deze vlakbij het
symbool op
de bijbehorende basis om te stevig vastpakken te vermijden. Vignettering kan zich
voordoen als de kap niet juist is bevestigd.
Wanneer niet in gebruik, kan de kap worden omgedraaid en gemonteerd op het
objectief.
De zonnekap verwijderen
De zonnekap verwijderen
Druk op de ontgrendelingsknop van de zonnekap
(
q
), draai de zonnekap in de richting van de pijl
(
w
) en verwijder zoals weergegeven (
e
).
■
■
Scherpstelschermen
Scherpstelschermen
De volgende camera’s ondersteunen een verscheidenheid aan scherpstelschermen voor
gebruik in verschillende situaties.
Scherm
Scherm
Camera
Camera
A
A
B
B
C
C
E
E
EC-B
EC-B
EC-E
EC-E
G1
G1
G2
G2
G3
G3
G4
G4
J
J
L
L
M
M
U
U
F6
—
— ——— —
F5+ DP-30
(–0,5)
F5+ DA-30
(+1,0)
(–0,5)
(+0,5)
: Aanbevolen.
: Vignettering zichtbaar in zoeker (foto’s worden niet beïnvloedt).
—: Niet compatibel met camera.
( ): Cijfers tussen haakjes geven de belichtingscompensatie voor centrumgerichte
lichtmeting. Selecteer “Other screen (Ander matglas)” voor Persoonlijke instelling
b6 (“Screen comp. (Compensatie voor matglas)”) tijdens het aanpassen van de
belichtingscompensatie voor de F6; merk op dat bij schermen anders dan B of E “Other
screen (Ander matglas)” moet worden geselecteerd, zelfs wanneer de waarde voor
belichtingscompensatie 0 is. Belichtingscompensatie voor de F5 kan met behulp van
Persoonlijke instelling 18 worden aangepast; zie de camerahandleiding voor details.
Lege cel: Niet geschikt voor gebruik met deze objectief. Merk op dat type M schermen niettemin
kunnen worden gebruikt voor fotomicrografi e en macrofotografi e bij vergrotingen van
1 : 1 of hoger.
Opmerking: De F5 ondersteunt alleen matrixmeting met A, B, E, EC-B/EC-E, J en L scherpstelschermen.
■
■
Een statief gebruiken (afbeelding 2)
Een statief gebruiken (afbeelding 2)
Het objectief is voorzien van een afneembare roterende statiefgondel; bevestig het ob-
jectief op de statiefgondel en niet op de camera bij het gebruik van een statief. Om de
statiefgondel op het objectief te bevestigen:
z
Draai de borgschroef van de statiefgondel (
q
) iets los.
x
Breng de uitlijnmarkering bovenop het objectief op één lijn met de
-markering op de statiefgondel (
w
) en plaats het objectief in de statiefgondel.
c
Draai het objectief naar de gewenste positie (drie beschikbare posities bij
intervallen van 90 °), stop wanneer de uitlijnmarkering bovenop het objectief op
één lijn is gebracht met de gewenste positiemarkering op de statiefgondel (
e
)
en draai vervolgens de borgschroef van de statiefgondel (
r
) vast. Controleer
of de schroef volledig is vastgedraaid; als de schroef niet goed vast zit, kan het
objectief van de statiefgondel vallen.
De statiefgondel verwijderen
De statiefgondel verwijderen
z
Draai de borgschroef van de statiefgondel los totdat de statiefgondel vrij roteert
(
t
), waarbij moet worden opgelet dat de schroef niet uit de aansluiting wordt
verwijderd.
x
Breng de uitlijnmarkering bovenop het objectief op één lijn met de
-markering op de statiefgondel (
y
) en verwijder het objectief van de
statiefgondel (
u
).
■
■
Onderhoud objectief
Onderhoud objectief
• Pak of houd het objectief of de camera niet alleen met behulp van de zonnekap vast.
• Houd de CPU-contacten schoon.
• Mocht de rubberen afdichting voor objectiefbevestiging beschadigt zijn, staak onmiddellijk
het gebruik en breng het objectief voor reparatie naar een Nikon geautoriseerd servicecenter.
• Gebruik een blaasbalgje om stof en pluizen van de objectiefoppervlakken te verwijderen.
Voor het verwijderen van vlekken en vingerafdrukken moet u een kleine hoeveelheid ethanol
of objectiefreiniger op een zachte, schone katoenen doek of objectief reinigingsdoekje
aanbrengen en reinig met een draaiende beweging vanuit het midden naar buiten toe. Zorg
dat er geen vegen achterblijven en raak het glas niet met uw vingers aan.
• Gebruik voor het reinigen van het objectief nooit organische oplosmiddelen zoals verfthinner
of benzeen.
• De zonnekap of NC fi lters kunnen worden gebruikt ter bescherming van het voorste
objectiefelement.
• Bevestig de voor- en achterlensdoppen voordat u het objectief in het fl exibele tasje plaatst.
• Als het objectief voor langere tijd niet wordt gebruikt, moet u het op een koele en droge plaats
bewaren. Zo voorkomt u schimmel en roest. Bewaar niet in direct zonlicht of in combinatie met
mottenballen van nafta of kamfer.
• Zorg dat het objectief droog blijft. Het roesten van het interne mechanisme kan onherstelbare
schade veroorzaken.
• Het objectief achterlaten op extreem hete locaties kan schade veroorzaken of onderdelen
gemaakt van versterkt plastic kunnen kromtrekken.
■
■
Meegeleverde accessoires
Meegeleverde accessoires
• 77 mm makkelijk te bevestigen voorste objectiefdop LC-77
• Achterste objectiefdop LF-4
• Bajonetkap HB-65
• Flexibel objectiefetui CL-M2
■
■
Compatibele accessoires
Compatibele accessoires
• 77 mm vastschroefbare fi lters
• AF-I/AF-S-teleconverter TC-14E
1
/TC-14E II
1
/TC-17E II
2
/TC-20E
2
/TC-20E II
2
/TC-20E III
2
1 Autofocus is uitsluitend beschikbaar voor camera’s met ondersteuning voor f/8.
2 Autofocus wordt niet ondersteund.
■
■
Specifi caties
Specifi caties
Type
Type Type G AF-S objectief met ingebouwde CPU- en F-vatting
Brandpuntsafstand
Brandpuntsafstand 80 – 400 mm
Maximale diafragma
Maximale diafragma f/4.5 – 5.6
Objectiefconstructie
Objectiefconstructie 20 elementen in 12 groepen (inclusief 4 ED-objectiefelementen, 1 super
ED-objectiefelement en objectiefelementen met een Nano-Crystal coating)
Weergavehoek
Weergavehoek
• Nikon lm SLR en D-SLR camera’s in FX-formaat: 30°10
– 6°10
• Nikon D-SLR camera’s in DX-formaat: 20° – 4°
Schaal brandpuntsafstand
Schaal brandpuntsafstand Gegradeerd in millimeters (80, 105, 135, 200, 300, 400)
Afstandsinformatie
Afstandsinformatie Uitvoer naar camera
Zoom
Zoom Handmatige zoom met behulp van zoomring
Scherpstellen
Scherpstellen Nikon Internal Focusing (IF) System met autofocus aangestuurd
door Silent Wave Motor en afzonderlijke scherpstelring voor
handmatige scherpstelling
Vibratiereductie
Vibratiereductie Lens-shift met behulp van voice coil motors (VCMs)
Aanduiding voor
Aanduiding voor
scherpstelafstand
scherpstelafstand
1,5 m tot oneindig (∞)
Kortste scherpstelafstand
Kortste scherpstelafstand • AF: 1,75 m van fi lmvlak bij alle zoomposities
• MF: 1,5 m van fi lmvlak bij alle zoomposities
Diafragmabladen
Diafragmabladen 9 (ronde diafragmaopeningen)
Diafragma
Diafragma Volledig automatisch
Diafragmabereik
Diafragmabereik • 80 mm brandpuntsafstand: f/4.5 tot f/32
• 400 mm brandpuntsafstand: f/5.6 tot f/40
Het weergegeven minimale diafragma kan variëren afhankelijk
van de grootte van de belichtingstoename die is geselecteerd
met de camera.
Lichtmeting
Lichtmeting Volledig diafragma
Schakelaar scherpstellimiet
Schakelaar scherpstellimiet Twee standen: FULL (∞ – 1,75 m) en ∞ – 6 m
Maat voor lters/
Maat voor lters/
voorzetlenzen
voorzetlenzen
77 mm (P = 0,75 mm)
Afmetingen
Afmetingen Ca. 95,5 mm maximum diameter × 203 mm (afstand vanaf
objectiefbevestigingsvlak van de camera)
Gewicht
Gewicht Ca. 1570 g inclusief statiefkraag
Ca. 1480 g zonder statiefkraag
Nikon behoudt zich het recht de specifi caties van de hardware, zoals beschreven in deze handleiding,
te allen tijde zonder voorafgaande kennisgeving te wijzigen.
Pagina wordt geladen...
Documenttranscriptie
AF-S NIKKOR 80-400mm f/4.5-5.6G ED VR Nano Crystal Coat En De Fr Nl It Es Pt User’s Manual Benutzerhandbuch Manuel d’utilisation Gebruikshandleiding Manuale d’uso Manual del usuario Manual do utilizador Printed in Japan SB2L01(7E) 7MAA907E-01 ■ Parts of the Lens (Figure 1) q Lens hood mounting mark w Zoom ring e Focal length scale r Focal length mark t Focus distance indicator y Focus distance mark u Focus ring i Lens rotation index o Lens mounting mark !0 Rubber lens-mount gasket !1 CPU contacts !2 Focus-mode switch !3 !4 !5 !6 !7 !8 !9 @0 @1 @2 @3 ■ Using a Tripod (Figure 2) The lens is equipped with a detachable rotating tripod collar; when using a tripod, attach it to the collar, not to the camera. To attach the collar to the lens: Focus limit switch Vibration reduction ON/OFF switch Vibration reduction mode switch Zoom lock switch Lens hood Lens hood alignment mark Lens hood lock mark Lens hood lock release button Tripod collar lock screw Position indices (90°) Tripod collar z Slightly loosen the tripod collar lock screw (q). x Align the alignment mark on top of the lens with the c Rotate the lens to the desired position (three positions are available at 90° intervals), stopping when the alignment mark on top of the lens is aligned with the desired position mark on the collar (e), and then tighten the tripod collar lock screw (r). Be sure the screw is fully tightened; if the screw is not tight, the lens may fall from of the tripod collar. ■ Focus Supported focus modes are shown in the following table (for information on camera focus modes, see the camera manual). Lens focus mode Camera Camera focus mode A/M M/A M Autofocus Autofocus Manual Nikon digital single-lens reflex camwith manual with manual focus with eras, F6, F5, F4-series, F100, F90X/N90s *, AF override override (manual electronic F90-series/N90 *, F/N80-series *, F/N75-series *, (AF priority) priority) rangefinder F70-series/N70 *, F/N65-series *, Pronea 600i/6i *, Pronea S MF Manual focus F60-series/N60 *, F/N55-series *, F50-series/N50 *, (electronic rangefinder available with all F-801s/N8008s *, F-801/N8008 *, F-601M/N6000 *, AF, MF cameras except F-601M/N6000 *) F-401x/N5005 *, F-401s/N4004s *, F-401/N4004 * * N-series cameras and Pronea 6i sold in U. S. A. only. A/M and M/A Modes • M/A: Autofocus can be over-ridden by rotating the lens focus ring. • A/M: As above, except that the focus ring must be rotated farther before the autofocus is over-ridden, preventing accidental changes to focus caused by unintended operation of the focus ring. z Slide the lens focus-mode switch to A/M or M/A. x Focus. If desired, autofocus can be over-ridden by rotating the lens focus ring while the shutter-release button is pressed halfway (or, if the camera is equipped with an AF-ON button, while the AF-ON button is pressed). To refocus using autofocus, press the shutterrelease button halfway or press the AF-ON button again. The Focus Limit Switch This switch determines the focus distance limits for autofocus. • FULL: Select this option for subjects that may be closer than 6 m (19.69 ft). • ∞–6 m: If your subject will always be at distance of at least 6 m (19.69 ft), select this option for faster focusing. ■ Zoom and Depth of Field Before focusing, rotate the zoom ring to adjust the focal length and frame the photograph. If the camera offers depth-of-field preview (stop down), depth of field can be previewed in the viewfinder. Note: Focal length decreases as the focus distance shortens. Note that the focus distance indicator is intended only as a guide and may not accurately show the distance to the subject and may, due to depth of field or other factors, not show ∞ when the camera is focused on a distant object. To lock the zoom ring, rotate it to the 80 mm position and slide the zoom lock switch to LOCK. This prevents the lens extending under its own weight while the camera is being carried from place to place. Figure 1/Abbildung 1/Figure 1/afbeelding 1 • Select ON to enable vibration reduction. Vibration reduction is activated when the shutter-release button is pressed halfway, reducing the effects of camera shake for improved framing and focus. • Select OFF to turn vibration reduction off. Using the Vibration Reduction Mode Switch The vibration reduction mode switch is used to select the vibration reduction mode when vibration reduction is on. • Select NORMAL to reduce the effects of vibration when photographing from a fixed position and in other situations with comparatively little camera motion. • Select ACTIVE to reduce the effects of vibration when shooting from a moving vehicle, while walking, and in other situations with active camera motion. Using Vibration Reduction: Notes • Slide the vibration reduction switch to OFF if the camera does not support vibration reduction. Leaving vibration reduction on may greatly increase the drain on the battery, particularly in the case of Pronea 600i/6i cameras. • When using vibration reduction, press the shutter-release button halfway and wait for the image in the viewfinder to stabilize before pressing the shutter-release button the rest of the way down. • When vibration reduction is active, the image in the viewfinder may be blurred after the shutter is released. This does not indicate a malfunction. • Slide the vibration reduction mode switch to NORMAL for panning shots. When the camera is panned, vibration reduction applies only to motion that is not part of the pan (if the camera is panned horizontally, for example, vibration reduction will be applied only to vertical shake), making it much easier to pan the camera smoothly in a wide arc. • Do not turn the camera off or remove the lens while vibration reduction is in effect. If power to the lens is cut while vibration reduction is on, the lens may rattle when shaken. This is not a malfunction, and can be corrected by reattaching the lens and turning the camera on. • If the camera is equipped with a built-in flash, vibration reduction will be disabled while the flash charges. • ON is generally recommended when the camera is mounted on a monopod or a tripod with an unsecured head, although OFF may be preferred depending shooting conditions and the type of tripod. ■ The Lens Hood The lens hoods protect the lens and block stray light that would otherwise cause flare or ghosting. Attaching the Hood Align the lens hood mounting mark (●) with the lens hood alignment mark ( ) and then rotate the hood (w) until the ● mark is aligned with the lens hood lock mark (—). ■ Lens Care • Do not pick up or hold the lens or camera using only the lens hood. • Keep the CPU contacts clean. • Should the rubber lens-mount gasket be damaged, cease use immediately and take the lens to a Nikon-authorized service center for repair. • Use a blower to remove dust and lint from the lens surfaces. To remove smudges and fingerprints, apply a small amount of ethanol or lens cleaner to a soft, clean cotton cloth or lenscleaning tissue and clean from the center outwards using a circular motion, taking care not to leave smears or touch the glass with your fingers. • Never use organic solvents such as paint thinner or benzene to clean the lens. • The lens hood or NC filters can be used to protect the front lens element. • Attach the front and rear caps before placing the lens in its flexible pouch. • If the lens will not be used for an extended period, store it in a cool, dry location to prevent mold and rust. Do not store in direct sunlight or with naphtha or camphor moth balls. • Keep the lens dry. Rusting of the internal mechanism can cause irreparable damage. • Leaving the lens in extremely hot locations could damage or warp parts made from reinforced plastic. • Bayonet Hood HB-65 • Flexible Lens Pouch CL-M2 ■ Compatible Accessories • 77 mm screw-on filters • AF-I/AF-S Teleconverters TC-14E 1/TC-14E II 1/TC-17E II 2/TC-20E 2/TC-20E II 2/TC-20E III 2 1 Autofocus is available only with cameras that offer f/8 support. 2 Autofocus not supported. ■ Specifications Type Focal length Maximum aperture Lens construction Type G AF-S lens with built-in CPU and F mount 80 – 400 mm f/4.5 – 5.6 20 elements in 12 groups (including 4 ED lens elements, 1 super ED lens element, and lens elements with a Nano-Crystal coating) Angle of view • Nikon film SLR and FX-format D-SLR cameras: 30° 10 – 6° 10 • Nikon DX-format D-SLR cameras: 20° – 4° Focal length scale Graduated in millimeters (80, 105, 135, 200, 300, 400) Distance information Output to camera Zoom Manual zoom using independent zoom ring Focusing Nikon Internal Focusing (IF) System with autofocus controlled by Silent Wave Motor and separate focus ring for manual focus Vibration reduction Lens shift using voice coil motors (VCMs) Focus distance indicator 1.5 m to infinity (∞) Minimum focus • AF: 1.75 m (5.74 ft) from focal plane at all zoom positions distance • MF: 1.5 m (4.92 ft) from focal plane at all zoom positions Diaphragm blades 9 (rounded diaphragm opening) Diaphragm Fully automatic Aperture range • 400 mm focal length: f/5.6 – 40 • 80 mm focal length: f/4.5 – 32 The minimum aperture displayed may vary depending on the size of the exposure increment selected with the camera. Metering Full aperture Focus limit switch Two positions: FULL (∞ – 1.75 m) and ∞ – 6 m Filter-attachment size 77 mm (P = 0.75 mm) Dimensions Approx. 95.5 mm maximum diameter × 203 mm (distance from camera lens mount flange) Weight Approx. 1570 g (3.5 lb), including tripod collar Approx. 1480 g (3.3 lb) without tripod collar Nikon reserves the right to change the specifications of the hardware described in this manual at any time and without prior notice. Deutsch • Nicht auseinanderbauen. Das Berühren der Innenteile von Kamera oder Objektiv könnte zu Verletzungen führen. Im Falle einer Fehlfunktion sollte das Produkt auschließlich von einem qualifizierten Fachmann repariert werden. Sollte das Produkt aufgrund eines Herunterfallens oder eines Unfalles aufbrechen, entfernen Sie den Kamera-Akku und/oder trennen Sie den Netzadapter vom Netz und bringen Sie das Produkt zur Inspektion zum Nikon-Kundendienst. • Schalten Sie die Kamera im Falle einer Fehlfunktion unverzüglich ab. Wenn Sie Rauch oder einen ungewöhnlichen Geruch aus Ihrer Ausrüstung wahrnehmen, trennen Sie sofort den Netzadapter vom Netz und entfernen Sie den Kamera-Akku. Geben Sie dabei acht, dass Sie sich nicht verbrennen. Ein weiterer Betrieb könnte zu einem Brand oder zu Verletzungen führen. Nach Entfernen des Akkus bringen Sie die Ausrüstung zur Inspektion zum Nikon-Kundendienst. • Nicht in Gegenwart von entflammbarem Gas verwenden. Der Betrieb von Elektrogeräten in Gegenwart von entflammbarem Gas könnte zu einer Explosion oder zu einem Brand führen. • Blicken Sie nicht durch das Objektiv oder den Kamerasucher in die Sonne. Das Betrachten der Sonne oder einer anderen hellen Lichtquelle durch das Objektiv oder den Sucher kann zu permanenten Sehstörungen führen. • Außerhalb der Reichweite von Kindern aufbewahren. Ein Nichtbeachten dieser Vorsichtsmaßnahme kann zu Verletzungen führen. • Beachten Sie die folgenden Vorsichtsmaßnahmen beim Umgang mit Kamera und Objektiv: - Halten Sie Objektiv und Kamera stets trocken. Ein Nichtbeachten dieser Vorsichtsmaßnahme kann zu Feuer oder Stromschlägen führen. - Bedienen Sie die Kamera oder das Objektiv nicht mit nassen Händen. Ein Nichtbeachten dieser Vorsichtsmaßnahme kann zu Stromschlägen führen. - Halten Sie die Sonne sicher außerhalb des Bildbereiches, wenn Sie Motive im Gegenlicht aufnehmen. Sonnenlicht, das in der Kamera fokussiert wird, wenn sich die Kamera im oder nah beim Bildmotiv befindet, kann zu einem Brand führen. - Wird das Objektiv für längere Zeit nicht verwendet, bringen Sie den vorderen und hinteren Objektivdeckel an und lagern Sie das Objektiv an einem Ort ohne direkte Sonneneinstrahlung. Wird es in direktem Sonnenlicht gelagert, könnte das Objektiv die Sonnenstrahlen auf entflammbare Objekte fokussieren und Sie so entzünden. • Tragen Sie Stative nicht mit aufgesetzter Kamera oder aufgesetztem Objektiv. Es besteht die Gefahr zu stolpern oder versehentlich andere Personen zu stoßen, was zu Verletzungen führen kann. • Lagern Sie das Objektiv nicht an Orten, an denen es extrem hohen Temperaturen ausgesetzt ist, wie beispielsweise in einem geschlossenen Auto oder direkt in der Sonne. Andernfalls können die internen Teile des Objektivs nachteilig beeinflusst werden und es könnte zu einem Brand kommen. ■ Objektivkomponenten ((Abbildung Abbildung 1 1)) !3 q Markierung für das Ansetzen der Gegenlichtblende !4 !5 w Zoomring !6 e Brennweitenskala !7 r Markierung für Brennweitenskala !8 t Entfernungsskala y Markierung für Entfernungseinstellung u Fokussierring !9 i Positionsmarkierung für Objektivdrehung o Markierung für die Ausrichtung des @0 Objektivs @1 !0 Dichtungsmanschette @2 !1 CPU-Kontakte @3 !2 Fokusmodusschalter Fokusbegrenzungsschalter Bildstabilisator-EIN/AUS-Schalter Bildstabilisatormodus-Schalter Zoom-Arretierungsschalter Gegenlichtblende Markierung für die Ausrichtung der Gegenlichtblende Markierung für die Arretierung der Gegenlichtblende Entriegelungstaste für Gegenlichtblende Stativschellen-Befestigungsschraube Positionsmarkierungen (90°) Stativschelle ■ Kompatibilität Haken (»✔«) zeigen unterstützte Funktionen, Striche (»—«) nicht unterstützte Funktionen an. Es können Einschränkungen gelten; beachten Sie das Handbuch der Kamera für Einzelheiten. Belichtungssteuerung Kamera Funktion A M AF 3 VR 4 Digitale Nikon-Spiegelreflexkameras, F6, F5, F100, F80-Serie, F75-Serie, F65-Serie, ✔ ✔ ✔ ✔ ✔ ✔ Pronea 600i, Pronea S 1 ✔ ✔ ✔ ✔ ✔ — When attaching or removing the hood, hold it near the symbol on its base and avoid gripping it too tightly. Vignetting may occur if the hood is not correctly attached. F4-Serie, F90X, F90-Serie, F70-Serie ✔ ✔ — — ✔ — F60-Serie, F55-Serie, F50-Serie, F-401x, F-401s, F-401 ✔ ✔ ✔ ✔ — — The hood can be reversed and mounted on the lens when not in use. F-801s, F-801, F-601M ✔ ✔ — — — — Detaching the Hood F3AF, F-601, F-501, Nikon-MF-Kameras (außer F-601M) ■ Focusing Screens The following cameras support a variety of focusing screens for use in different situations. Screen EC-B Camera A B C E EC-E G1 G2 G3 G4 J L M U F6 F5+ DP-30 F5+ DA-30 : : (+1.0) — (–0.5) — — — — — (–0.5) 1. 2. 3. 4. Kamera F60-Serie, F55-Serie, F50-Serie, F-801s, F-801, F-601M, F-401x, F-401s, F-401 Recommended. Vignetting visible in viewfinder (photographs are not affected). —: Not compatible with camera. ( ): Figures in parentheses give the exposure compensation for center-weighted metering. Select “Other screen” for Custom Setting b6 (“Screen comp.”) when adjusting exposure compensation for the F6; note that with screens other than B or E, “Other screen” must be selected even when the value for exposure compensation is 0. Exposure compensation for the F5 can be adjusted using Custom Setting 18; see the camera manual for details. Empty cell: Not suited to use with this lens. Note that type M screens can however be used for photomicrography and macro photography at magnifications of 1 : 1 or higher. Note: The F5 supports matrix metering with A, B, E, EC-B/EC-E, J, and L focusing screens only. Um den Zoomring zu arretieren, drehen Sie ihn in die 80-mm-Position und schieben Sie den Zoom-Arretierungsschalter in die Position LOCK. Auf diese Weise wird verhindert, dass der Objektivtubus aufgrund des eigenen Gewichts ausfährt, während die Kamera transportiert wird. ■ Blende Die Blende wird mit den Bedienelementen der Kamera eingestellt. Zoom und maximale Blende Änderungen am Zoom können die maximale Blende um bis zu 2⁄3 LW verändern. Die Kamera berücksichtigt dies allerdings automatisch beim Einstellen der Belichtung und Sie müssen nach Anpassung des Zooms keine Veränderungen an den Kameraeinstellungen vornehmen. ■ Integrierte Blitzgeräte Entfernen Sie die Gegenlichtblende, wenn Sie das integrierte Blitzgerät der Kamera verwenden (sofern vorhanden), da die Gegenlichtblende sonst einen Schatten ins Motiv werfen würde. ■ Bildstabilisator (VR) Der Bildstabilisator (VR) reduziert das Risiko einer Verwacklungsunschärfe und ermöglicht das Fotografieren mit bis zu 4,0 Blendenstufen längeren Belichtungszeiten (ermittelt bei 400 mm Brennweite mit einer D4-Kamera nach CIPA-Standards [Camera and Imaging Products Association]; je nach Fotograf und Aufnahmebedingungen kann die Wirkung unterschiedlich ausfallen). Dies ermöglicht eine größere Auswahl an Belichtungszeiten und erlaubt in den unterschiedlichsten Aufnahmesituationen ein Fotografieren aus freier Hand ohne Stativ. • Wählen Sie ON (EIN), um den Bildstabilisator zu aktivieren. Der Bildstabilisator wird aktiviert, wenn der Auslöser bis zum ersten Druckpunkt gedrückt wird; er verringert die Effekte einer Kamera-Verwacklung für verbesserte Motivwahl und Scharfstellung. • Wählen Sie OFF (AUS), um den Bildstabilisator auszuschalten. Verwendung des Bildstabilisator-Modusschalters Der Bildstabilisator-Modusschalter wird verwendet, um den Bildstabilisator-Modus auszuwählen, wenn der Bildstabilisator aktiviert ist. • Wählen Sie NORMAL aus, um die Vibrationseffekte beim Fotografieren von einer festen Position aus und in anderen Situationen, in denen die Kamera kaum bewegt wird, zu verringern. • Wählen Sie ACTIVE aus, um die Vibrationseffekte bei der Aufnahme aus einem fahrenden Fahrzeug heraus, beim Gehen und in anderen Situationen, in denen die Kamera häufig bewegt wird, zu verringern. Verwendung des Bildstabilisators: Hinweise • Schieben Sie den Bildstabilisatorschalter auf OFF, wenn die Kamera den Bildstabilisator nicht unterstützt. Bleibt der Bildstabilisator eingeschaltet, kann sich der Akku schneller entladen, besonders bei Pronea 600i-Kameras. • Drücken Sie bei Verwendung des Bildstabilitsators den Auslöser bis zum ersten Druckpunkt und warten Sie, bis sich das Bild im Sucher stabilisiert, bevor Sie den Auslöser vollständig drücken. • Wenn der Bildstabilisator aktiv ist, ist das Bild im Sucher möglicherweise verschwommen, wenn der Auslöser gedrückt wurde. Dies stellt keine Fehlfunktion dar. • Schieben Sie den Bildstabilisatormodus-Schalter in die Position NORMAL, wenn Sie die Kamera schwenken wollen. Beim Schwenken wirkt sich der Bildstabilisator nur auf die Bewegungskomponenten aus, die nicht der Schwenkrichtung entsprechen (wird die Kamera beispielsweise waagerecht geschwenkt, kompensiert der Bildstabilisator nur senkrechte Bewegungskomponenten). So kann die Kamera ruckelfrei in einem weiten Bogen geschwenkt werden. • Schalten Sie die Kamera nicht ab und entfernen Sie nicht das Objektiv, solange der Bildstabilisator aktiv ist. Wenn die Stromversorgung des Objektivs unterbrochen wird, solange der Bildstabilisator aktiv ist, könnte das Objektiv klappern, wenn es geschüttelt wird. Dies stellt keine Fehlfunktion dar und kann dadurch beseitigt werden, dass das Objektiv wieder angesetzt und die Kamera eingeschaltet wird. • Verfügt die Kamera über ein eingebautes Blitzgerät, wird der Bildstabilisator deaktiviert, solange das Blitzgerät sich auflädt. • ON wird in der Regel empfohlen, wenn die Kamera auf ein Einbein- oder Dreibeinstativ mit unbefestigtem Kopf montiert wird. Jedoch kann OFF je nach Aufnahmebedingungen oder Stativtyp geeigneter sein. ■ Befestigen der Gegenlichtblende Die Gegenlichtblende schützt das Objektiv und verhindert das Eindringen von Streulicht, das ansonsten zu Kontrastverlust oder Geisterbildern führen würde. Befestigen der Gegenlichtblende Richten Sie die Markierung für das Ansetzen der Gegenlichtblende (●) an der Markierung für die Ausrichtung der Gegenlichtblende ( ) aus. Drehen Sie anschließend die Gegenlichtblende (w), bis die ● -Markierung an der Markierung für die Arretierung der Gegenlichtblende ausgerichtet ist (—). KameraFokusmodus AF MF AF, MF Autofokus mit AF-Priorität Die Gegenlichtblende kann umgekehrt auf dem Objektiv angebracht werden, wenn sie nicht verwendet wird. Abnehmen der Gegenlichtblende Drücken Sie die Taste zur Entriegelung der Gegenlichtblende (q), drehen Sie die Gegenlichtblende in Pfeilrichtung (w) und nehmen Sie sie wie angezeigt ab (e). ■ Einstellscheiben Die folgenden Kameras unterstützen eine Anzahl Einstellscheiben für die Verwendung in verschiedenen Situationen. Scheibe EC-B Kamera A B C E EC-E G1 G2 G3 G4 J L M U F6 — — — — — F5+ DP-30 F5+ DA-30 (+1,0) (–0,5) — (–0,5) (+0,5) : : Empfohlen. Vignettierung im Sucher sichtbar (Bilder sind nicht betroffen). —: Nicht mit der Kamera kompatibel. ( ): Zahlen in Klammern geben die Belichtungskorrektur für mittenbetonte Messung an. Wählen Sie bei der F6 die Option »Andere« für die Individualfunktion b6 (»Einst. scheibe.«), um die Belichtungskorrektur für eine Einstellscheibe anzupassen. Beachten Sie, dass bei Verwendung anderer Einstellscheiben als Typ B oder E auch dann »Andere« ausgewählt werden muss, wenn keine Belichtungskorrektur erfolgt. An der F5 kann die Belichtungskorrektur mit der Individualfunktion 18 eingestellt werden. Beachten Sie das Kamerahandbuch für weitere Einzelheiten. Leere Zelle: Nicht für die Verwendung mit diesem Objektiv geeignet. Beachten Sie jedoch, dass Scheiben vom Typ M für Fotomikrografie und Makrofotografie mit Abbildungsmaßstäben von 1 : 1 oder höher verwendet werden können. Hinweis: Bei der F5 steht die Matrixmessung nur mit den Einstellscheiben A, B, E, EC-B, EC-E, J und L zur Verfügung. Typ Brennweite Lichtstärke Optischer Aufbau Typ G AF-S Objektiv mit eingebauter CPU und F-Bajonettanschluss 80 – 400 mm 1 : 4,5 – 5,6 20 Linsen in 12 Gruppen (einschließlich 4 ED-Glas-Linsen, 1 Super-ED-Linse und Linsen mit Nanokristallvergütung) • Nikon-Spiegelreflexkameras für das Kleinbild- oder FX-Format: 30° 10 – 6° 10 • Nikon-Spiegelreflexkameras für das DX-Format: 20°– 4° Brennweitenskala Unterteilt im Millimeter (80, 105, 135, 200, 300, 400) Entfernungsinformation Übermittlung an die Kamera Zoom Manueller Zoom mit unabhängigem Zoomring Fokussierung Nikon Innenfokussierung (IF), gesteuert durch Silent-Wave-Motor und separatem Fokussierring für die manuelle Fokussierung Bildstabilisator Bewegliche Linsengruppe mit Voice-Coil-Motoren (VCMs) Entfernungsskala 1,5 m bis Unendlich (∞) Naheinstellgrenze • AF: 1,75 m von der Sensorebene bei allen Zoompositionen • MF: 1,5 m von der Sensorebene bei allen Zoompositionen Blendenlamellen 9 (abgerundet) Blendensteuerung Vollautomatisch Blendenbereich • 80 mm Brennweite: 4,5 bis 32 • 400 mm Brennweite: 5,6 bis 40 Die angezeigte kleinste Blendenöffnung kann abhängig von der Größe der Belichtungsschrittweite, die mit der Kamera gewählt wurde, variieren. Belichtungsmessung Offenblende Fokusbegrenzungsschalter Zwei Positionen: FULL (VOLLSTÄNDIG) (∞ – 1,75 m) und ∞ – 6 m Filtergewinde 77 mm (P = 0,75 mm) Abmessungen Etwa 95,5 mm maximaler Durchmesser × 203 mm (Länge ab Bajonettauflage) Gewicht ca. 1570 g, einschließlich Stativschelle ca. 1480 g, ohne Stativschelle Änderungen und Irrtümer vorbehalten. M Manueller Autofokus mit Priorität Fokus mit der manuellen elektronischer Scharfstellung Einstellhilfe Manueller Fokus (elektronische Einstellhilfe bei allen Kameras außer F-601M verfügbar) A/M- und M/A-Modus • M/A: Die Scharfeinstellung des Autofokus kann durch manuelles Drehen des Fokussierings außer Kraft gesetzt werden. • A/M: Wie oben, nur muss der Fokussierring weiter gedreht werden, bevor die Scharfeinstellung außer Kraft gesetzt wird. Auf diese Weise wird verhindert, dass ein unbeabsichtigtes Verstellen des Fokussierrings zu einem Verstellen der Scharfeinstellung führt. z Schieben Sie den Fokusmodus-Schalter des Objektivs in die Position A/M oder M/A. x Fokussieren Sie. In den Autofokus kann bei Bedarf eingegriffen werden, indem der Fokusring am Objektiv gedreht wird, während der Auslöser bis zum ersten Druckpunkt gedrückt wird (oder, falls die Kamera mit einem AF-ON-Taste ausgestattet wird, während die AF-ON-Taste gedrückt ist). Um mit dem Autofokus neu zu fokussieren, drücken Sie erneut den Auslöser bis zum ersten Druckpunkt oder die AF-ON-Taste. Français Nous vous remercions d’avoir acheté un objectif NIKKOR. Avant de l’utiliser, veuillez lire attentivement ces instructions et le manuel de l’appareil photo. c Drehen Sie das Objektiv in die gewünschte Position (drei Positionen in Schritten von 90° stehen zur Auswahl), bis die Ausrichtungsmarkierung auf der Objektivoberseite an der gewünschten Positionsmarkierung an der Schelle (e) ausgerichtet ist. Ziehen Sie anschließend die Befestigungsschraube (r) an der Stativschelle fest an. Vergewissern Sie sich, dass die Schraube wirklich fest angezogen ist. Wenn die Schraube nicht fest ist, kann das Objektiv aus der Stativschelle fallen. Entfernen der Stativschelle z Lockern Sie die Befestigungsschraube der Stativschelle, bis sich die Schelle frei ■ Pflege des Objektivs • Halten oder heben Sie das Objektiv oder die Kamera nicht an der angesetzten Gegenlichblende. • Halten Sie die CPU-Kontakte sauber. • Sollte die Dichtungsmanschette beschädigt werden, setzen Sie den Gebrauch sofort aus und bringen Sie das Objektiv zum Nikon-Kundendienst zur Reparatur. • Verwenden Sie zum Entfernen von Staub und Verunreinigungen vom Objektiv einen Blasebalg. Um Schmierflecke und Fingerabdrücke zu entfernen, bringen Sie eine kleine Menge Ethanol oder Objektivreiniger auf ein weiches, sauberes Baumwolltuch oder ein Objektivreinigungstuch auf und reinigen Sie das Objektiv mit Kreisbewegungen von der Mitte nach außen. Achten Sie dabei darauf, dass keine Schmierflecke verbleiben, und dass sie das Glas nicht mit den Fingern berühren. • Verwenden Sie niemals organische Lösungsmittel wie Verdünner oder Waschbenzin zur Reinigung des Objektivs. • Zum Schutz der Frontlinse kann die Gegenlichtblende oder ein Klarglasfilter (NC) verwendet werden. • Bringen Sie den vorderen und den hinteren Objektivdeckel auf dem Objektiv an, bevor sie es in seiner Tasche verstauen. • Wenn das Objektiv für längere Zeit nicht verwendet wird, lagern Sie es an einem kühlen, trockenen Ort, um Schimmel und Korrosion zu vermeiden. Lagern sie das Objektiv nicht direkt in der Sonne oder mit Mottenkugeln aus Naphtha oder Kampfer. • Halten Sie das Objektiv stets trocken. Eindringendes Wasser kann zur Korrosion innenliegender Teile und irreparablen Schäden führen. • Das Lagern des Objektiv an sehr heißen Orten kann Teile aus verstärktem Plastik beschädigen oder verformen. ■ Im Lieferumfang enthaltenes Zubehör • Vorderer Objektivdeckel LC-77 mit Schnappverschluss (77 mm) • Hinterer Objektivdeckel LF-4 • Bajonett-Gegenlichtblende HB-65 • Objektivbeutel CL-M2 • Sélectionnez ON (ACTIVÉ) pour activer la réduction de vibration. La réduction de vibration est activée lorsque vous appuyez à mi-course sur le déclencheur, réduisant ainsi les effets du bougé d’appareil pour vous permettre d’améliorer le cadrage et la mise au point. • Sélectionnez OFF (DÉSACTIVÉ) pour désactiver la réduction de vibration. Utilisation du commutateur du mode de réduction de vibration Le commutateur du mode de réduction de vibration permet de sélectionner le mode de réduction de vibration lorsque la réduction de vibration est activée. • Sélectionnez NORMAL pour réduire les effets des vibrations lorsque vous photographiez depuis une position fixe et de manière générale, dans les situations où le mouvement de l’appareil photo est relativement peu important. • Sélectionnez ACTIVE pour réduire les effets des vibrations lorsque vous photographiez depuis un véhicule en mouvement, lorsque vous marchez et de manière générale, dans les situations où le mouvement de l’appareil photo est important. Utiliser la réduction de vibration : Remarques • Positionnez le commutateur de réduction de vibration sur OFF si l’appareil photo ne prend pas en charge la fonction de réduction de vibration. Si la réduction de vibration est constamment activée, cela risque d’augmenter considérablement la consommation de l’accumulateur, en particulier pour les appareils photo Pronea 600i. • Lorsque vous utilisez la réduction de vibration, appuyez sur le déclencheur à mi-course et attendez que l’image se stabilise dans le viseur avant d’appuyer sur le déclencheur jusqu’en fin de course. • Lorsque la réduction de vibration est activée, l’image dans le viseur peut être floue une fois le déclencheur relâché. Cela n’indique pas un dysfonctionnement. • Positionnez le commutateur du mode de réduction de vibration sur NORMAL pour effectuer des filés panoramiques. Lorsque vous effectuez un filé panoramique, la réduction de vibration s’applique uniquement au mouvement ne faisant pas partie du filé (par exemple, si l’appareil photo est utilisé pour faire un filé horizontal, la réduction de vibration ne s’applique qu’au tremblement vertical). Il est ainsi beaucoup plus facile de réaliser de longs filés panoramiques. • Ne mettez pas l’appareil photo hors tension et ne retirez pas l’objectif pendant que la réduction de vibration est activée. Si l’alimentation de l’objectif est coupée alors que la réduction de vibration est activée, l’objectif peut vibrer s’il est secoué. Il ne s’agit pas d’un dysfonctionnement et cela peut être corrigé en refixant l’objectif et en mettant l’appareil photo sous tension. • Si l’appareil photo est équipé d’un flash intégré, la réduction de vibration est désactivée pendant que le flash se charge. • ON est généralement recommandé lorsque l’appareil photo est monté sur un monopode ou un trépied équipé d’une tête non sécurisée, même si OFF peut être préférable dans certaines conditions de prise de vue et avec certains types de trépieds. ■ Parasoleil Le parasoleil protège l’objectif et bloque la lumière diffuse pouvant causer de la lumière parasite ou une image fantôme. Pour votre sécurité A ATTENTION Fixation du parasoleil • Ne pas démonter. Toucher les parties internes de l’appareil photo ou de l’objectif peut provoquer des blessures. En cas de dysfonctionnement, le produit devra être réparé par un technicien qualifié uniquement. Si le produit s’ouvre à cause d’une chute ou de tout autre accident, retirez l’accumulateur de l’appareil photo et/ou débranchez l’adaptateur secteur et confiez le produit à un centre Nikon agréé pour le faire vérifier. • Mettre immédiatement l’appareil hors tension en cas de dysfonctionnement. Si vous détectez de la fumée ou une odeur inhabituelle provenant de l’équipement, débranchez immédiatement l’adaptateur secteur et retirez l’accumulateur de l’appareil photo, tout en prenant soin de ne pas vous brûler. Poursuivre son utilisation peut provoquer un incendie ou des blessures. Après avoir retiré l’accumulateur, confiez l’équipement à un centre Nikon agréé pour le faire vérifier. • Ne pas utiliser en présence de gaz inflammable. L’utilisation d’équipement électronique en présence d’un gaz inflammable peut provoquer une explosion ou un incendie. • Ne pas regarder le soleil avec l’objectif ou le viseur de l’appareil photo. Regarder le soleil ou toute autre source lumineuse intense avec l’objectif ou le viseur peut provoquer des troubles de la vision irréversibles. • Tenir éloigné des enfants. Le non-respect de cette précaution peut provoquer des blessures. • Suivre les précautions ci-dessous lors de la manipulation de l’objectif et de l’appareil photo : - Tenir l’objectif et l’appareil photo au sec. Le non-respect de cette précaution peut provoquer un incendie ou un choc électrique. - Ne pas manipuler l’objectif ou l’appareil photo avec des mains mouillées. Le non-respect de cette précaution peut provoquer un choc électrique. - Ne pas inclure le soleil dans le cadrage lors de la prise de vue de sujets en contre-jour. La concentration de la lumière du soleil dans l’appareil photo lorsque le soleil est dans ou à proximité du champ de l’image peut provoquer un incendie. - Si vous n’avez pas l’intention d’utiliser l’objectif pendant une période prolongée, fixez les bouchons avant et arrière et rangez l’objectif hors de la lumière directe du soleil. Si l’objectif est laissé en contact direct avec la lumière du soleil, les rayons peuvent toucher des objets inflammables, provoquant ainsi un incendie. • Ne pas porter un trépied sur lequel un objectif ou l’appareil photo est fixé. Vous risqueriez de trébucher ou de frapper accidentellement des personnes, provoquant ainsi des blessures. • Ne pas laisser l’objectif là où il serait exposé à des températures élevées, comme une voiture fermée ou à la lumière directe du soleil. Le non-respect de cette précaution peut avoir des répercussions sur les parties internes de l’objectif, pouvant provoquer un incendie. ■ Parties de l’objectif (Figure 1) q Repère de montage du parasoleil w Bague de zoom e Échelle des focales r Repère de l’échelle des focales t Indicateur de distance de mise au point y Repère de distance de mise au point u Bague de mise au point i Repère de rotation de l’objectif o Repère de montage de l’objectif !0 Joint en caoutchouc de la monture d’objectif !1 Contacts du microprocesseur !2 Commutateur du mode de mise au point !3 Commutateur de la limite de mise au point !4 Commutateur ON/OFF de réduction de vibration !5 Commutateur du mode de réduction de vibration !6 Commutateur de verrouillage du zoom !7 Parasoleil !8 Repère d’alignement du parasoleil !9 Repère de verrouillage du parasoleil @0 Commande de déverrouillage du parasoleil @1 Vis de fixation du collier pour trépied @2 Repères de position (90°) @3 Collier pour trépied ■ Compatibilité Les marques (« ✔ ») indiquent les fonctions prises en charge, les traits (« — ») les fonctions non prises en charge. Certaines restrictions peuvent s’appliquer ; consultez le manuel de l’appareil photo pour plus de détails. Mode d’exposition (prise de vue) Fonction Appareil photo P2 S A M AF 3 VR 4 Reflex numériques Nikon, F6, F5, F100, gamme F80, ✔ ✔ ✔ ✔ ✔ ✔ gamme F75, gamme F65 Pronea 600i, Pronea S 1 ✔ ✔ ✔ ✔ ✔ — Gamme F4, F90X, gamme F90, gamme F70 ✔ ✔ — — ✔ — Gamme F60, gamme F55, gamme F50, F-401x, F-401s, F-401 ✔ ✔ ✔ ✔ — — F-801s, F-801, F-601M ✔ ✔ — — — — — F3AF, F-601, F-501, appareils MF Nikon (sauf F-601M) 1. Mode d’exposition M (manuel) non disponible. 2. Inclut les modes AUTO et scène (Vari-programme). 3. Autofocus. 4. Réduction de vibration. Modes A/M et M/A der -Markierung an der Schelle (w) aus und setzen Sie das Objektiv in die Schelle ein. Utilisation du commutateur ON/OFF pour la réduction de vibration Remarque : Lorsqu’il est monté sur un appareil photo numérique reflex de format DX comme le D7000 ou les appareils photo de la gamme D300, cet objectif a un angle de champ de 20° – 4° et une focale équivalente à 120 – 600 mm (format 24 × 36 mm). z Lockern Sie die Stativschellen-Befestigungsschraube (q) ein wenig. x Richten Sie die Ausrichtungsmarkierung auf der Oberseite des Objektivs an ■ Réduction de vibration (VR) La fonction de réduction de vibration (VR) atténue les phénomènes de flou provoqués par le bougé de l’appareil photo, ce qui permet de recourir à des vitesses d’obturation jusqu’à 4,0 fois plus lentes que celles normalement utilisées (mesures effectuées à 400 mm avec un appareil photo D4, selon les normes de la CIPA [Camera and Imaging Products Association] ; les effets varient selon le photographe et les conditions de prise de vue). Cela augmente la plage des vitesses d’obturation disponibles et permet de prendre des photos à main levée, sans trépied, dans de nombreuses situations. Bildwinkel Das Objektiv ist mit einer abnehmbaren und drehbaren Stativschelle ausgestattet; wenn Sie ein Stativ verwenden, sollten Sie es an der Schelle und nicht an der Kamera befestigen. So befestigen Sie die Schelle am Objektiv: ■ Verwenden eines Stativs (Abbildung 2) -Markierung an der Schelle aus (y) und nehmen Sie das Objektiv aus der Schelle (u). M/A ■ Technische Daten ■ Mise au point Les modes de mise au point pris en charge sont indiqués dans le tableau suivant (pour en savoir plus sur les modes de mise au point de l’appareil photo, consultez le manuel de ce dernier). Mode de mise Mode de mise au point de l’objectif au point de Appareil photo l’appareil photo A/M M/A M Reflex numériques Nikon, Mise au point Autofocus à Autofocus à priorité F6, F5, gamme F4, F100, F90X, manuelle avec AF priorité manuelle manuelle (priorité gamme F90, gamme F80, télémètre (priorité AF) manuelle) gamme F75, gamme F70, électronique gamme F65, Pronea 600i, MF Pronea S Mise au point manuelle (télémètre électronique disponible sur tous les appareils Gamme F60, gamme F55, photo excepté F-601M) gamme F50, F-801s, F-801, AF, MF F-601M, F-401x, F-401s, F-401 x Richten Sie die Ausrichtungsmarkierung auf der Oberseite des Objektivs an der Objektiv-Fokusmodus A/M Halten Sie die Gegenlichtblende beim Anbringen oder Abnehmen in der Nähe des -Symbols an der Basis fest und umfassen Sie sie nicht zu fest. Bei falschem Anbringen der Gegenlichtblende kann es zu Vignettierungen kommen. bewegt. Geben Sie dabei acht, dass sich die Schraube nicht aus dem Gewinde löst (t). ■ Scharfeinstellung Unterstützte Fokusmodi werden in der folgenden Tabelle aufgeführt (Beachten Sie das Handbuch der Kamera für Informationen zu den Fokusmodi der Kamera). (+0.5) — Manuelle Belichtungssteuerung (M) nicht verfügbar. Schließt AUTO-Modus und Motivprogramme ein. Autofokus. Bildstabilisator. Digitale Nikon-Spiegelreflexkameras, F6, F5, F4-Serie, F100, F90X, F90-Serie, F80-Serie, F75-Serie, F70-Serie, F65-Serie, Pronea 600i, Pronea S Hinweis: Die Brennweite nimmt bei der Fokussierung auf nahe Motive ab. Beachten Sie, dass die Entfernungsskala nur als Orientierungshilfe dient und eventuell nicht die genaue Entfernung zum Motiv anzeigt und eventuell aufgrund der Tiefenschärfe oder anderer Faktoren ∞ nicht anzeigt, wenn die Kamera auf ein entferntes Motiv fokussiert hat. Für Ihre Sicherheit A SICHERHEITSHINWEISE S Press the lens hood lock release button (q), rotate the hood in the direction shown by the arrow (w), and remove it as shown (e). ■ Zoom und Tiefenschärfe Drehen Sie, bevor Sie fokussieren, den Zoomring, um die Brennweite einzustellen und einen Bildausschnitt zu wählen. Verfügt die Kamera über eine Abblendtaste, kann die Tiefenschärfe im Sucher im Voraus bewertet werden. ■ Kompatibles Zubehör • 77 mm-Schraubfilter • AF-I/AF-S-Telekonverter TC-14E 1/TC-14E II 1/TC-17E II 2/TC-20E 2/TC-20E II 2/TC-20E III 2 1 Der Autofokus steht nur bei Kameras zur Verfügung, die eine Lichtstärke von 1:8 unterstützen. 2 Der Autofokus steht nicht zur Verfügung. Verwendung des Bildstabilisator AN/AUS-Schalters P2 For Your Safety A CAUTIONS • Do not disassemble. Touching the internal parts of the camera or lens could result in injury. In the event of malfunction, the product should be repaired only by a qualified technician. Should the product break open as the result of a fall or other accident, remove the camera battery and/ or disconnect the AC adapter and then take the product to a Nikon-authorized service center for inspection. • Turn the camera off immediately in the event of malfunction. Should you notice smoke or an unusual smell coming from the equipment, immediately unplug the AC adapter and remove the camera battery, taking care to avoid burns. Continued operation could result in fire or injury. After removing the battery, take the equipment to a Nikon-authorized service center for inspection. • Do not use in the presence of flammable gas. Operating electronic equipment in the presence of flammable gas could result in explosion or fire. • Do not look at the sun through the lens or the camera viewfinder. Viewing the sun or other bright light source through the lens or viewfinder could cause permanent visual impairment. • Keep out of reach of children. Failure to observe this precaution could result in injury. • Observe the following precautions when handling the lens and camera: - Keep the lens and camera dry. Failure to observe this precaution could result in fire or electric shock. - Do not handle the lens or camera with wet hands. Failure to observe this precaution could result in electric shock. - Keep the sun well out of the frame when shooting backlit subjects. Sunlight focused into the camera when the sun is in or close to the frame could cause a fire. - If the lens will not be used for an extended period, attach the front and rear lens caps and store the lens out of direct sunlight. If left in direct sunlight, the lens could focus the sun’s rays onto flammable objects, causing fire. • Do not carry tripods with a lens or camera attached. You could trip or accidentally strike others, resulting in injury. • Do not leave the lens where it will be exposed to extremely high temperatures, such as in an enclosed automobile or in direct sunlight. Failure to observe this precaution could adversely affect the lens’ internal parts, causing fire. and remove the lens from the collar (u). Zoom and Maximum Aperture Using the Vibration Reduction ON/OFF Switch Note: When mounted on a DX-format digital single-lens reflex camera such as the D7000 or cameras in the D300 series, this lens has an angle of view of 20° – 4° and a focal length equivalent to 120 – 600 mm (35 mm format). mark on the collar (y) Hinweis: Wenn das Objektiv mit einer digitalen Spiegelreflexkamera mit DX-Format wie der D7000 oder einer Kamera der D300-Serie verwendet wird, hat es einen Blickwinkel von 20° – 4°, der einer Brennweite von 120 – 600 mm beim Kleinbildformat entspricht. ■ Vibration Reduction (VR) Vibration reduction (VR) reduces blur caused by camera shake, allowing shutter speeds up to 4.0 stops slower than would otherwise be the case (measured at 400 mm with a D4 camera according to Camera and Imaging Products Association [CIPA] standards; effects vary with the photographer and shooting conditions). This increases the range of shutter speeds available and permits hand-held, tripod-free photography in a wide range of situations. Thank you for your purchase of a NIKKOR lens. Before using this product, please carefully read both these instructions and the camera manual. lock screw until the collar rotates freely (t). x Align the alignment mark on top of the lens with the Vielen Dank für den Kauf eines NIKKOR-Objektivs. Bitte lesen Sie sorgfältig diese Anleitung und das Kamerahandbuch, bevor Sie dieses Produkt verwenden. ■ Built-in Flash Units When using the built-in flash on cameras equipped with a built-in flash unit, remove the lens hood to prevent vignetting (shadows created where the end of the lens obscures the built-in flash). English z Being careful not to remove the screw from its socket, loosen the tripod collar ■ Aperture Aperture is adjusted using camera controls. Changes to zoom can alter the maximum aperture by up to 2⁄3 EV. The camera however automatically takes this into account when setting exposure, and no modifications to camera settings are required following adjustments to zoom. Figure 2/Abbildung 2/Figure 2/afbeelding 2 Removing the Tripod Collar ■ Supplied Accessories • 77 mm snap-on Front Lens Cap LC-77 • Rear Lens Cap LF-4 Dieser Schalter bestimmt die Begrenzung der Entfernungseinstellung für den Autofokus. • FULL: Wählen Sie diese Option für Motive, die näher als 6 Meter liegen. • ∞–6 m: Wählen Sie diese Option für schnelleres Scharfstellen, wenn sich Ihr Motiv stets in einer Entfernung von mindestens 6 Metern befindet. mark on the collar (w) and insert the lens into the collar. ■ Compatibility Check marks (“✔“) indicate supported features, dashes (“—”) features that are not supported. Some limitations may apply; see the camera manual for details. Exposure (shooting) mode Function Camera P4 S A M AF 5 VR 6 Nikon digital single-lens reflex cameras, F6, F5, F100, ✔ ✔ ✔ ✔ ✔ ✔ F/N80-series 1, F/N75-series 1, F/N65-series 1 1 2 Pronea 600i/6i , Pronea S ✔ ✔ ✔ ✔ ✔ — F4-series, F90X/N90s 1, F90-series/N90 1, F70-series/N70 1 ✔ ✔ — — ✔ — F60-series/N60 1, F/N55-series 1, F50-series/N50 1, ✔ ✔ ✔ ✔ — — F-401x/N5005 1, F-401s/N4004s 1, F-401/N4004 1 1 1 1 F-801s/N8008s , F-801/N8008 , F-601M/N6000 ✔ ✔ — — — — F3AF, F-601/N6006 1, F-501/N2020 3, Nikon manual focus — cameras (excluding F-601M/N6000 1) 1. N-series cameras and Pronea 6i sold in U. S. A. only. 2. Exposure mode M (manual) not available. 3. N2020 sold in U. S. A. and Canada only. 4. Includes AUTO and scene (Digital Vari-Program) modes. 5. Autofocus. 6. Vibration reduction. Der Fokusbegrenzungsschalter • M/A : l’autofocus peut être désactivé à l’aide de la bague de mise au point de l’objectif. • A/M : comme ci-dessus, sauf que la bague de mise au point doit être tournée davantage pour désactiver l’autofocus, ce qui permet d’éviter des modifications accidentelles de la mise au point dues à une manipulation involontaire de la bague. z Positionnez le commutateur du mode de mise au point de l’objectif sur A/M ou M/A. x Effectuez la mise au point. Si vous le souhaitez, vous pouvez désactiver l’autofocus en pivotant la bague de mise au point de l’objectif avec le déclencheur appuyé à mi-course (ou avec la commande AF-ON appuyée, si l’appareil photo est pourvu d’une commande AF-ON). Pour refaire la mise au point avec l’autofocus, appuyez à mi-course sur le déclencheur ou appuyez de nouveau sur la commande AF-ON. Commutateur de la limite de mise au point Ce commutateur permet de définir les limites de la distance de mise au point en mode autofocus. • FULL : Sélectionnez cette option lorsque vous photographiez des sujets probablement situés à des distances inférieures à 6 m. • ∞–6 m : Si votre sujet se situe toujours à une distance égale ou supérieure à 6 m, sélectionnez cette option pour effectuer la mise au point plus rapidement. ■ Zoom et profondeur de champ Avant de faire la mise au point, tournez la bague de zoom pour régler la focale et cadrer la photographie. Si l’appareil photo offre un aperçu de la profondeur de champ (fermeture du diaphragme), il est possible d’avoir un aperçu de la profondeur de champ dans le viseur. Remarque: la focale diminue au fur et à mesure que la distance de mise au point se raccourcit. Notez que l’indicateur de la distance de mise au point doit seulement être considéré comme un guide. En effet, il peut ne pas afficher avec précision la distance au sujet. En outre, en raison de la profondeur de champ ou d’autres facteurs, il peut ne pas indiquer ∞ lorsque l’appareil photo fait le point sur un objet éloigné. Pour verrouiller la bague de zoom, placez-la sur 80 mm et positionnez le commutateur de verrouillage du zoom sur LOCK. Cela permet d’éviter que l’objectif ne sorte, entraîné par son propre poids, lors du transport de l’appareil photo. ■ Ouverture Pour régler l’ouverture, utilisez les commandes de l’appareil photo. Zoom et ouverture maximale Modifier le zoom peut altérer l’ouverture maximale jusqu’à 2⁄3 L. L’appareil photo prend cela automatiquement en compte lors du réglage de l’exposition et aucune modification des réglages de l’appareil photo n’est nécessaire après les ajustements du zoom. ■ Flash intégré Lors de l’utilisation d’un flash intégré sur les appareils photo qui en sont équipés, enlevez le parasoleil pour éviter l’effet de vignettage (ombres créées lorsque l’extrémité de l’objectif occulte le flash intégré). Alignez le repère de montage du parasoleil (●) sur le repère d’alignement du parasoleil ( ), puis tournez le parasoleil (w) jusqu’à ce que le repère ● soit aligné sur le repère de verrouillage du parasoleil (—). Lors de la fixation ou du retrait du parasoleil, tenez-le près du symbole sur sa base, et évitez de le serrer trop fermement. Un vignettage peut se produire si le parasoleil n’est pas correctement attaché. Gefeliciteerd met de aanschaf van een NIKKOR-objectief. Lees voordat u dit product gebruikt zorgvuldig deze instructies en de camerahandleiding door. Opmerking: Indien gemonteerd op een digitale reflexcamera in DX-formaat zoals de D7000 of camera’s in de D300 serie, heeft dit objectief een kijkhoek van 20° – 4° en een brandpuntsafstand gelijkwaardig aan 120 – 600 mm (35 mm formaat). Voor uw veiligheid A WAARSCHUWINGEN • Niet demonteren. Het aanraken van de interne onderdelen van de camera of objectief kan letsel veroorzaken. In het geval van een defect moet het product alleen door een gekwalificeerd technicus worden gerepareerd. Mocht het product openbreken als gevolg van een val of ander ongeluk, verwijder de camerabatterij en/of ontkoppel de lichtnetadapter en breng het product naar een Nikon geautoriseerd servicecenter. • Zet de camera in het geval van een defect onmiddellijk uit. Bemerkt u dat er rook of een andere ongebruikelijke geur uit het apparaat komt, haal dan onmiddellijk de lichtnetadapter uit het stopcontact en verwijder de camerabatterij en zorg dat u geen brandwonden oploopt. Het voortzetten van de werking van het apparaat kan brand of letsel tot gevolg hebben. Breng na het verwijderen van de batterij het apparaat voor inspectie naar een Nikon geautoriseerd servicecenter. • Niet gebruiken in de aanwezigheid van brandbaar gas. Het bedienen van elektronische apparatuur in de aanwezigheid van brandbaar gas kan een explosie of brand tot gevolg hebben. • Kijk niet via het objectief of de camerazoeker naar de zon. Kijken naar de zon of andere heldere lichtbron via het objectief of de zoeker kan permanent visueel letsel veroorzaken. • Houd buiten bereik van kinderen. Het niet in acht nemen van deze voorzorgsmaatregel kan letsel tot gevolg hebben. • Neem tijdens het hanteren van het objectief en de camera de volgende voorzorgsmaatregelen in acht: - Zorg dat het object en de camera droog blijven. Het niet in acht nemen van deze voorzorgsmaatregel kan brand of een elektrische schok tot gevolg hebben. - Hanteer het objectief of de camera niet met natte handen. Het niet in acht nemen van deze voorzorgsmaatregel kan een elektrische schok tot gevolg hebben. - Houd de zon goed uit het beeld tijdens het opnemen van onderwerpen met tegenlicht. Zonlicht dat wordt scherpgesteld in de camera terwijl de zon zich in of nabij het beeld bevindt kan brand veroorzaken. - Bevestig de achter- en voorlensdop als het objectief voor langere tijd niet wordt gebruikt en bewaar het objectief niet in direct zonlicht. Als u het in direct zonlicht laat liggen, kan het objectief de zonnestralen op brandbare objecten scherpstellen en brand veroorzaken. • Draag geen statieven met het objectief of de camera eraan bevestigd. U kunt struikelen of per ongeluk anderen raken, met letsel als gevolg. • Laat het objectief niet achter waar het wordt blootgesteld aan extreem hoge temperaturen, zoals in een afgesloten auto of in direct zonlicht. Het niet in acht nemen van deze voorzorgsmaatregel kan de interne onderdelen van het objectief nadelig beïnvloeden en brand veroorzaken. ■ Onderdelen van het objectief (afbeelding 1) q Bevestigingsmarkering voor zonnekap !3 Schakelaar scherpstellimiet !4 Vibratiereductie ON/OFF (AAN/UIT)w Zoomring schakelaar e Schaal brandpuntsafstand r Markering brandpuntsafstand !5 Schakelaar voor de stand vibratiereductie t Aanduiding voor scherpstelafstand !6 Zoomvergrendelingsschakelaar y Markering voor scherpstelafstand !7 Zonnekap !8 Uitlijnmarkering op zonnekap u Scherpstelring i Objectiefrotatie-index !9 Vergendelmarkering op zonnekap o Objectief montagemarkering @0 Ontgrendelingsknop zonnekap !0 Rubberen afdichting voor @1 Borgschroef statiefgondel objectiefbevestiging @2 Positie-indices (90 °) @3 Statiefkraag !1 CPU-contacten !2 Schakelaar voor scherpstelstand ■ Compatibiliteit Vinkjes (“✔”) duiden ondersteunde functies aan, functies met een streepje (“—”) worden niet ondersteund. Er zijn een aantal beperkingen van toepassing: zie de camerahandleiding voor details. Belichtingsstand (opname) ■ Verres de visée Les appareils photo suivants sont compatibles avec un grand nombre de verres de visée adaptés à différentes situations. Verre EC-B Appareil photo A B C E EC-E G1 G2 G3 G4 J L M U F6 F5+ DP-30 F5+ DA-30 — — — — — — (–0,5) S A M AF 3 VR 4 Nikon digitale reflexcamera’s, F6, F5, F100, F80-Serie, F75-Serie, F65-Serie ✔ ✔ ✔ ✔ ✔ ✔ Pronea 600i, Pronea S 1 ✔ ✔ ✔ ✔ ✔ — F4-Serie, F90X, F90-Serie, F70-Serie ✔ ✔ — — ✔ — F60-Serie, F55-Serie, F50-Serie, F-401x, F-401s, F-401 ✔ ✔ ✔ ✔ — — F-801s, F-801, F-601M ✔ ✔ — — — — ■ Utilisation d’un trépied (Figure 2) L’objectif est équipé d’un collier pour trépied rotatif et amovible. Lorsque vous utilisez un trépied, fixez ce dernier au collier et non à l’appareil photo. Pour fixer le collier sur l’objectif : z Desserrez légèrement la vis de fixation du collier (q). x Alignez le repère d’alignement situé en haut de l’objectif sur le repère du collier (w) et insérez l’objectif dans le collier. c Tournez l’objectif jusqu’à la position souhaitée (trois positions sont possibles, à 90° d’intervalle) et arrêtez-vous lorsque le repère d’alignement situé en haut de l’objectif est aligné sur le repère de la position de votre choix, situé sur le collier (e), puis serrez la vis de fixation du collier (r). Veillez à ce que la vis soit bien serrée ; si ce n’est pas le cas, l’objectif peut se détacher du collier. Retrait du collier pour trépied z En faisant attention de ne pas retirer la vis de son filetage, desserrez-la jusqu’à ce que le collier tourne librement (t). x Alignez le repère d’alignement situé en haut de l’objectif sur le repère du collier (y) et retirez l’objectif du collier (u). ■ Entretien de l’objectif • Ne prenez pas ou ne tenez pas l’objectif ou l’appareil photo en saisissant uniquement le parasoleil. • Maintenez les contacts du microprocesseur propres. • Si le joint en caoutchouc de la monture d’objectif est endommagé, cessez immédiatement l’utilisation et confiez l’objectif à un centre Nikon agréé pour le faire réparer. • Utilisez une soufflette pour enlever la poussière et les peluches sur la surface de l’objectif. Pour effacer les taches et les traces de doigt, imprégnez un morceau de tissu propre en coton avec une petite quantité d’éthanol ou de nettoyant pour objectif ou utilisez une lingette de nettoyage d’objectif, et nettoyez avec un mouvement circulaire à partir du centre vers l’extérieur, tout en prenant soin de ne pas laisser de taches, ni de toucher le verre avec vos doigts. • N’utilisez jamais de solvants organiques comme un diluant à peinture ou du benzène pour nettoyer l’objectif. • Le parasoleil ou les filtres NC peuvent être utilisés pour protéger la lentille frontale. • Fixez les bouchons avant et arrière avant de placer l’objectif dans son étui. • Si vous n’avez pas l’intention d’utiliser l’objectif pendant une période prolongée, rangez-le dans un endroit frais et sec pour éviter la moisissure et la rouille. Ne pas ranger à la lumière directe du soleil ou avec des boules antimites de naphtaline ou de camphre. • Tenez l’objectif au sec. La formation de rouille sur le mécanisme interne peut causer des dégâts irréparables. • Laisser l’objectif dans des endroits extrêmement chauds peut endommager ou déformer les éléments composés de plastique renforcé. ■ Accessoires fournis • Bouchon avant d’objectif encliquetable 77 mm LC-77 • Bouchon arrière d’objectif LF-4 • Parasoleil à baïonnette HB-65 • Étui souple pour objectif CL-M2 ■ Accessoires compatibles • Filtres à visser 77 mm • Téléconvertisseurs AF-I/AF-S TC-14E 1/TC-14E II 1/TC-17E II 2/TC-20E 2/TC-20E II 2/TC-20E III 2 1 L’autofocus est uniquement disponible avec les appareils photo prenant en charge l’ouverture f/8. 2 L’autofocus n’est pas pris en charge. ■ Caractéristiques Type F3AF, F-601, F-501, Nikon MF camera’s (behalve F-601M) 1. 2. 3. 4. Belichtingsmodus M (handmatig) is niet beschikbaar. Omvat AUTO en onderwerpstanden (Digitaal Vari-programma). Autofocus Vibratiereductie. Objectif AF-S de type G avec microprocesseur intégré et monture F Focale 80 – 400 mm Ouverture maximale f/4.5 – 5.6 Construction optique 20 lentilles en 12 groupes (dont 4 lentilles en verre ED, 1 lentille en verre super ED et des lentilles bénéficiant d’un traitement nanocristal) Angle de champ • Reflex numériques Nikon de format FX et reflex argentiques Nikon : 30° 10 – 6° 10 • Reflex numériques Nikon de format DX : 20° – 4° Échelle des focales Graduée en millimètres (80, 105, 135, 200, 300, 400) Information de distance Communiquée au boîtier de l’appareil photo Zoom Zoom manuel utilisant une bague de zoom indépendante Mise au point Système de mise au point interne de Nikon (IF, Internal Focusing) avec autofocus commandé par un moteur ondulatoire silencieux (SWM) et bague de mise au point pour mise au point manuelle Réduction de vibration Décentrement avec voice coil motors (VCMs) Indicateur de distance de mise au point 1,5 m à l’infini (∞) Distance minimale de mise au point • AF: 1,75 m depuis le plan focal à toutes les focales • MF: 1,5 m depuis le plan focal à toutes les focales Lamelles de diaphragme 9 (diaphragme circulaire) Diaphragme Intégralement automatique Plage des ouvertures • Focale 80 mm : f/4.5 à f/32 • Focale 400 mm : f/5.6 à f/40 L’ouverture minimale affichée peut varier en fonction de l’incrément d’exposition sélectionné avec l’appareil photo. Mesure Pleine ouverture Commutateur de la limite de mise Deux positions : FULL (∞ – 1,75 m) et ∞ – 6 m au point Diamètre de fixation pour filtre 77 mm (P = 0,75 mm) Dimensions Environ 95,5 mm de diamètre maximum × 203 mm (distance à partir du plan d’appui de la monture d’objectif de l’appareil photo) Poids Environ 1570 g, avec le collier pour trépied Environ 1480 g, sans le collier pour trépied Nikon se réserve le droit de modifier les caractéristiques du matériel décrit dans ce manuel à tout moment et sans préavis. F60-Serie, F55-Serie, F50-Serie, F-801s, F-801, F-601M, F-401x, F-401s, F-401 nbe o en w nnee de me op een monopod o een op gemon ee d ond n he e d O U moge n de opn meom nd gheden en he pe e ■ De zonnekap De onne ap be che m he ob ec e en b o ee dwaa ch da ande bee d chaduwen ve oo aa e de ch v e en o AF A/M Autofocus met handcorrectie (AF-prioriteit) M/A M Autofocus met handcorrectie (handmatige prioriteit) Handmatige scherpstelling met elektronische afstandsmeter MF AF, MF B ng d b g ng ma ng op d onn ap ● op n n m d u nma ng op d n d aa o g n aan d onn ap onn ap w o da d ● ma ng op n n g ba h m d g nd ma ng op d onn ap — Houd b he beve gen o ve w de en van de ap de e v a b he ymboo op de b beho ende ba om e ev g va pa en e ve m den V gne e ng an ch voo doen a de ap n e u beve gd Wannee n e n geb u ob ec e an de ap wo den omged aa d en gemon ee d op he De onnekap ve w de en D u op d on g nd ng nop an d onn ap h ng an d p q d aa d onn ap n d w n w d oa w g g n e ■ Scherps e schermen De vo gende came a onde eunen een ve che denhe d aan che p e che men voo geb u n ve ch ende ua e h m B m A B G G G G M U 6 5+ DA 30 5+ DP 30 +1 0 — –0 5 — — — — — –0 5 +0 5 A nbe o en V gne e ng h b n oe e o o wo den n e be n oed N e omp be me me C e u en h e ge en de be h ng ompen e oo en umge h e h me ng e e ee O he een Ande m g oo Pe oon e n e ng b6 een omp Compen e oo m g den he np en n de be h ng ompen e oo de 6 me op d b he men nde d n B o O he een Ande m g moe wo den ge e e ee d e w nnee de w de oo be h ng ompen e 0 Be h ng ompen e oo de 5 n me behu p n Pe oon e n e ng 18 wo den ngep e de me h nd e d ng oo de N e ge h oo geb u me de e ob e e Me op d pe M he men n e em n unnen wo den geb u oo o om og fie en m o o og fie b e g o ngen n 1 1 o hoge ng D 5 ond un a n ma m ng m A B C B C n h p h mn — Opm Handmatige scherpstelling (elektronische afstandsmeter beschikbaar voor alle camera’s behalve F-601M) A/M- en M/A-standen • M/A: Autofocus kan worden uitgeschakeld door aan de scherpstelring van het objectief te draaien. • A/M: Zoals hierboven, behalve dat de scherpstelring verder moet worden gedraaid voordat de autofocus wordt uitgeschakeld, zodat onvoorziene wijzigingen aan de scherpstelling door onbedoelde bediening van de scherpstelring worden voorkomen. z Schuif de schakelaar voor de scherpstelstand van het objectief naar A/M of M/A. x Scherpstellen. Indien gewenst, kan autofocus worden overgenomen door aan de scherpstelring van het objectief te draaien terwijl de ontspanknop half wordt ingedrukt (of, als de camera is uitgerust met een AF-ON-knop, terwijl de AF-ON-knop wordt ingedrukt). Druk, om opnieuw scherp te stellen met behulp van autofocus, de ontspanknop half in of druk nogmaals op de AF-ON-knop. ■ Een s a e gebru ken a bee d ng 2 He ob ec e voo en van een a neemba e o e ende a e gonde beve g he ob ec e op de a e gonde en n e op de came a b he geb u van een a e Om de a e gonde op he ob ec e e beve gen z D aa de bo g ch oe van de a e gonde q e o x B eng de u nma ke ng bovenop he ob ec e op één n me de ma ke ng op de a e gonde w en p aa he ob ec e n de a e gonde c D aa he ob ec e naa de gewen e po e d e be ch kba e po e b n e va en van 90 op wannee de u nma ke ng bovenop he ob ec e op één n geb ach me de gewen e po ema ke ng op de a e gonde e en d aa ve vo gen de bo g ch oe van de a e gonde r va Con o ee o de ch oe vo ed g va ged aa d a de ch oe n e goed va kan he ob ec e van de a e gonde va en De a e gonde ve w de en z D aa de bo g ch oe van de a e gonde o o da de a e gonde v De schakelaar voor de scherpstellimiet Deze schakelaar bepaalt de limieten voor de scherpstelafstand voor autofocus. • FULL: Selecteer deze optie voor onderwerpen die zich op een afstand van minder dan 6 m bevinden. • ∞–6 m: Indien uw onderwerp zich altijd op een afstand van ten minste 6 m bevindt, selecteer deze optie om sneller te kunnen scherpstellen. ■ Zoom en scherptediepte Draai aan de zoomring voordat u scherpstelt om de brandpuntsafstand aan te passen en de foto te kadreren. Als de camera over voorbeeld scherptediepte beschikt (stop omlaag), kan scherptediepte ook als voorbeeld in de zoeker worden bekeken. Opmerking: Brandpuntsafstand neemt af als de scherpstelafstand wordt verkort. Merk op dat de aanduiding voor scherpstelafstand alleen als leidraad is bedoeld en is mogelijk niet nauwkeurig genoeg om de afstand tot het onderwerp te tonen en toont mogelijk niet, door scherptediepte of andere factoren, ∞ wanneer de camera op een ver voorwerp wordt scherpgesteld. Draai de zoomring naar de 80 mm-positie om deze te vergrendelen en schuif de schakelaar van de zoomvergrendeling naar LOCK (VERGRENDELEN). Dit voorkomt dat het objectief door zijn eigen gewicht wordt verlengd terwijl de camera van de ene naar de andere plaats wordt gedragen. ■ Diafragma Diafragma wordt met behulp van de camerabesturingen aangepast. Zoom en maximale diafragma Wijzigt zodat zoom het maximale diafragma tot maximaal 2⁄3 LW aan kan passen. De camera houdt er bij het instellen van de belichting echter automatisch rekening mee en zijn er geen modificaties van de camera-instellingen vereist voor de volgende zoomaanpassingen. ■ Ingebouwde flitser Bij het gebruik van de ingebouwde flitser op camera’s uitgerust met een ingebouwde flitser, verwijder de zonnekap om vignettering te voorkomen (schaduwen aangemaakt waar het uiteinde van het objectief de ingebouwde flitser verduisterd). ■ Vibratiereductie (VR) Vibratiereductie (VR) vermindert onscherpte veroorzaakt door cameratrilling, waardoor sluitertijden tot maximaal 4,0 stops langer duren dan anders het geval zou zijn (gemeten bij 400 mm met een D4 camera volgens Camera and Imaging Products Association [CIPA]normen; effecten variëren afhankelijk van de fotograaf en opnameomstandigheden). Dit verhoogt het bereik van de beschikbare sluitertijden en laat handbediende, statiefvrije fotografie toe in vele verschillende situaties. De vibratiereductie AAN/UIT-schakelaar gebruiken • Selecteer ON om vibratiereductie in te schakelen. Vibratiereductie wordt geactiveerd wanneer de ontspanknop half wordt ingedrukt, waarbij de effecten van cameratrilling voor verbeterde kadrering en scherpstelling worden verminderd. • Selecteer OFF om vibratiereductie uit te schakelen. De schakelaar vibratiereductiestand gebruiken De schakelaar vibratiereductiestand wordt gebruikt om de vibratiereductiestand te selecteren terwijl vibratiereductie is ingeschakeld. • Selecteer NORMAL om de effecten van trillingen te verminderen tijdens het fotograferen vanuit een vaste positie en in andere situaties met relatief weinig camerabeweging. • Selecteer ACTIVE om de effecten van trillingen te verminderen bij het fotograferen van een bewegend voertuig, tijdens het lopen en in andere situaties met actieve camerabeweging. Vibratiereductie gebruiken: opmerkingen • Schuif de vibratiereductieschakelaar naar OFF als de camera geen vibratiereductie ondersteunt. Het ingeschakeld laten van de vibratiereductie kan de batterij snel doen leeglopen, voornamelijk in het geval van Pronea 600i camera’s. • Druk bij het gebruik van vibratiereductie de ontspanknop half in en wacht totdat de afbeelding in de zoeker is gestabiliseerd, voordat de ontspanknop in zijn geheel wordt ingedrukt. • Wanneer vibratiereductie actief is, kan de afbeelding in de zoeker onscherp worden nadat de sluiter wordt vrijgegeven. Dit duidt niet op een defect. • hu de h e n de nd b e edu e n NORMA NORMAA oo he p nnen n opn men W nnee de me wo d gep nd b e edu e een n oep ng op beweg ng d e geen dee u m n he p nnen b oo bee d de me ho on wo d gep nd een e e ng wo den oegep w doo he ee een oud ge om de me oepe n een b ede boog e p nnen Ze de me n e u o e w de he ob e e n e w nnee b e edu e n we ng nd en de oed ng n he ob e e wo d ge oppe d w nnee b e edu e e n he ob e e mme en w nnee de e hud D du d n e op een de e en n me behu p n he he be e gen n he ob e e en he n h e en n de me wo den e ho pen ■ Onderhoud ob ec e P o houd he ob e e o de me n e een me behu p n de onne p Houd de CPU on en hoon Mo h de ubbe en d h ng oo ob e e be e g ng be h d g n onm dde he geb u en b eng he ob e e oo ep e n een N on ge u o ee d e e en e Geb u een b b g e om o en p u en n de ob e e oppe en e e w de en Voo he e w de en n e en en nge d u en moe u een e ne hoe ee he d e h no o ob e e e n ge op een h e hone oenen doe o ob e e e n g ng doe e nb engen en e n g me een d ende beweg ng nu he m dden n bu en oe Zo g d e geen egen h e b en en he g n e me uw nge n Geb u oo he e n gen n he ob e e noo o g n he op o m dde en o e h nne o ben een De onne p o NC fi e unnen wo den geb u e be he m ng n he oo e ob e e e emen Be e g de oo en h e en doppen oo d u he ob e e n he fle be e e p A he ob e e oo nge e d n e wo d geb u moe u he op een oe e en d oge p bew en Zo oo om u h mme en oe Bew n e n d e on h o n omb n e me mo enb en n n o me Zo g d he ob e e d oog b He oe en n he n e ne me h n me n onhe e b e h de e oo en He ob e e h e en op e eem he e o e n h de e oo en o onde de en gem n e e p unnen om e en ■ Meege everde accesso res 77 mm m e e be e gen oo e ob e e dop C 77 A h e e ob e e dop 4 B one p HB 65 e be ob e e e u C M2 ■ Compa be e accesso res 77 mm h oe b e fi e C 14 A A e e on e e C 14 1 Au o o u u u end be h b oo 2 Au o o u wo d n e onde eund C 17 C 20 C 20 C 20 me me onde eun ng oo 8 ■ Spec fica es p B ndpun nd M m d gm Ob on u W g ho h b ndpun A nd n o m oom h p n Vb du A ndu d ng oo h p nd Ko h p D D D nd gm b d n gm gm b h m ng h h p M oo fi oo n n A m ng n G w h pe G A ob e e me ngebouwde CPU en ng 80 – 400 mm 4 5–5 6 20 e emen en n 12 g oepen m m m m N N on fi m R n D R m n om 30 10 – 6 10 N on D R m nD o m 20 – 4 Geg dee d n m me e U oe n me H ndm ge oom me behu p n oom ng N on n e n Fo u ng em me u o o u nge uu d doo en W e Mo o en onde e he p e ng oo h ndm ge he p e ng en h me behu p n vo e co mo o M 1 5 m o one nd g ∞ nd m A 1 75 m n fi m b e oompo e M 15m nfim b e oompo e 9 onde d gm open ngen Vo ed g u om h mm b ndpun nd 4 5 o 32 mm b ndpun nd 5 6 o 40 He wee gege en m n m e d gm n ë en h n e n de g oo e n de be h ng oen me d e ge e e ee d me de me Vo ed g d gm wee nden U ∞ – 1 75 m en ∞ – 6 m 77 mm = mm C 95 5 mm m mum d me e × 203 mm m C 1570 g n u e e g C 1480 g onde e g N on b houd h h h d p fi a an d ha dwa a n d ond oo a gaand nn g ng w g n oa b h n nd ■ Depth of field (Metric) ■ Tiefenschärfe ■ Profondeur de champ ■ Scherptediepte nma ke ng bovenop he ob ec e op één n me de ma ke ng op de a e gonde y en ve w de he ob ec e van de a e gonde u Objectiefscherpstelstand Camerascherpstelstand Nikon digitale reflexcamera’s, F6, F5, F4-Serie, F100, F90X, F90-Serie, F80-Serie, F75-Serie, F70-Serie, F65-Serie, Pronea 600i, Pronea S e edu e u ge h e d x B eng de u ■ Scherpstellen Ondersteunde scherpstelstanden worden in de volgende tabel getoond (zie de camerahandleiding voor informatie over de scherpstelmodi van de camera). Camera b o ee t waa b moe wo den opge e da de ch oe n e u de aan u ng wo d ve w de d — (+1,0) (–0,5) (+0,5) : Recommandé. : Vignettage visible dans le viseur (les photos ne sont pas affectées). —: Non compatible avec l’appareil photo. ( ): Les chiffres entre parenthèses donnent la correction d’exposition pour la mesure pondérée centrale. Sélectionnez « Activ.: autre » pour le Réglage personnalisé b6 (« Plage visée ») lors de l’ajustement de la correction d’exposition pour l’appareil photo F6 ; remarquez qu’avec les verres autres que B ou E, « Activ.: autre » doit être sélectionné, et ce même lorsque la valeur pour la correction d’exposition est de 0. La correction d’exposition pour l’appareil photo F5 peut être ajustée en utilisant le Réglage personnalisé 18 ; consultez le manuel de l’appareil photo pour plus de détails. Cellule vide : L’utilisation ne convient pas avec cet objectif. Veuillez remarquer cependant que les verres de type M peuvent être utilisés pour la microphotographie et la macrophotographie avec un grossissement de 1 : 1 ou plus. Remarque : L’appareil photo F5 prend en charge la mesure matricielle avec les verres de visée A, B, E, EC-B/EC-E, J, et L uniquement. Functie P2 Camera Retrait du parasoleil n een ngebouwde fl e wo d De onnekap beve gen Le parasoleil peut être retourné et monté sur l’objectif lorsqu’il n’est pas utilisé. Appuyez sur la commande de déverrouillage du parasoleil (q), tournez ce dernier dans le sens indiqué par la flèche (w) et retirez-le comme le montre l’illustration (e). A de me oo en w nnee de fl e d ON AAN wo d doo g n me een n e e g ende de oo eu hee h n e Nederlands hand d ng (m) • Focus distance • Entfernungseinstellung • Distance de mise au point • Scherpstelafstand • Depth of field • Tiefenschärfe • Profondeur de champ • Scherptediepte • Reproduction ratio • Abbildungsmaßstab • Rapport de reproduction • Reproductieverhouding [f=80 mm] f/4.5 f/5.6 f/8 f/11 f/16 f/22 f/32 1.8 1.69 – 1.82 1.67 – 1.84 1.64 – 1.88 1.60 – 1.94 1.55 – 2.03 1.48 – 2.18 1.39 – 2.43 1/20.6 2.5 2.37 – 2.65 2.34 – 2.69 2.28 – 2.77 2.20 – 2.91 2.10 – 3.12 1.97 – 3.49 1.82 – 4.20 1/29.7 4 3.67 – 4.40 3.60 – 4.50 3.46 – 4.76 3.28 – 5.17 3.05 – 5.89 2.79 – 7.36 2.49 – 11.52 1/48.1 6 5.29 – 6.95 5.14 – 7.22 4.86 – 7.89 4.50 – 9.09 4.09 – 11.62 3.62 – 19.29 3.13 – 387.52 1/72.6 9 7.48 – 11.32 7.19 – 12.07 6.64 – 14.08 6.00 – 18.45 5.28 – 33.09 4.53 – ∞ 3.78 – ∞ 1/109.4 12 9.44 – 16.53 8.98 – 18.18 8.14 – 23.17 7.20 – 38.00 6.19 – 436.05 5.17 – ∞ 4.21 – ∞ 1/146.2 20 13.76 – 36.89 12.81 – 46.28 11.16 – 102.65 9.45 – ∞ 7.78 – ∞ 6.24 – ∞ 4.89 – ∞ 1/244.2 40 20.96 – 483.45 18.83 – ∞ 15.47 – ∞ 12.37 – ∞ 9.65 – ∞ 7.38 – ∞ 5.57 – ∞ 1/489.3 ∞ 43.96 – ∞ 35.53 – ∞ 25.18 – ∞ 17.87 – ∞ 12.70 – ∞ 9.04 – ∞ 6.45 – ∞ 1/∞ [f=105 mm] f/4.8 f/5.6 f/8 f/11 f/16 f/22 f/32 1.8 1.71 – 1.80 1.70 – 1.81 1.68 – 1.83 1.65 – 1.87 1.61 – 1.92 1.56 – 2.00 1.50 – 2.13 1/16.4 2.5 2.41 – 2.60 2.40 – 2.61 2.36 – 2.66 2.30 – 2.74 2.23 – 2.86 2.13 – 3.04 2.02 – 3.34 1/23.5 4 3.78 – 4.25 3.74 – 4.30 3.65 – 4.44 3.52 – 4.65 3.35 – 4.99 3.14 – 5.56 2.89 – 6.67 1/37.8 6 5.52 – 6.57 5.44 – 6.69 5.24 – 7.03 4.98 – 7.58 4.65 – 8.52 4.27 – 10.35 3.82 – 14.93 1/56.8 9 7.97 – 10.35 7.80 – 10.65 7.39 – 11.54 6.89 – 13.08 6.28 – 16.14 5.59 – 24.23 4.85 – 85.67 1/85.4 12 10.23 – 14.53 9.96 – 15.13 9.31 – 16.97 8.52 – 20.52 7.61 – 29.20 6.63 – 73.64 5.61 – ∞ 1/114.0 20 15.53 – 28.16 14.91 – 30.49 13.49 – 39.02 11.90 – 64.73 10.21 – ∞ 8.51 – ∞ 6.90 – ∞ 1/190.2 40 25.39 – 95.04 23.78 – 127.97 20.38 – ∞ 16.96 – ∞ 13.72 – ∞ 10.82 – ∞ 8.35 – ∞ 1/380.7 ∞ 69.60 – ∞ 58.71 – ∞ 41.57 – ∞ 29.46 – ∞ 20.90 – ∞ 14.85 – ∞ 10.57 – ∞ 1/∞ [f=135 mm] f/5 f/5.6 f/8 f/11 f/16 f/22 f/32 f/36 1.8 1.72 – 1.78 1.72 – 1.79 1.70 – 1.80 1.68 – 1.82 1.66 – 1.86 1.62 – 1.90 1.57 – 1.98 1.56 – 2.01 1/13.1 2.5 2.44 – 2.56 2.43 – 2.57 2.41 – 2.60 2.37 – 2.65 2.32 – 2.71 2.25 – 2.82 2.17 – 2.97 2.13 – 3.05 1/18.7 4 3.85 – 4.16 3.83 – 4.18 3.77 – 4.26 3.68 – 4.38 3.57 – 4.56 3.42 – 4.85 3.22 – 5.32 3.15 – 5.55 1/29.8 6 5.68 – 6.36 5.64 – 6.41 5.50 – 6.60 5.32 – 6.89 5.09 – 7.34 4.79 – 8.09 4.43 – 9.49 4.29 – 10.23 1/44.6 9 8.30 – 9.83 8.22 – 9.95 7.94 – 10.40 7.57 – 11.12 7.11 – 12.34 6.54 – 14.61 5.89 – 19.82 5.65 – 23.31 1/66.8 12 10.80 – 13.51 10.66 – 13.74 10.19 – 14.61 9.60 – 16.07 8.87 – 18.73 8.01 – 24.47 7.05 – 43.51 6.72 – 64.69 1/89.0 20 16.89 – 24.54 16.55 – 25.29 15.46 – 28.42 14.13 – 34.47 12.61 – 49.40 10.95 – 128.54 9.25 – ∞ 8.69 – ∞ 1/148.3 40 29.27 – 63.34 28.28 – 68.58 25.23 – 97.60 21.90 – 243.92 18.46 – ∞ 15.13 – ∞ 12.07 – ∞ 11.13 – ∞ 1/296.5 ∞ 109.57 – ∞ 96.93 – ∞ 68.61 – ∞ 48.59 – ∞ 34.44 – ∞ 24.43 – ∞ 17.35 – ∞ 15.49 – ∞ 1/∞ [f=200 mm] f/5.3 f/5.6 f/8 f/11 f/16 f/22 f/32 f/38 1.8 1.73 – 1.77 1.73 – 1.77 1.72 – 1.78 1.71 – 1.79 1.70 – 1.80 1.68 – 1.83 1.65 – 1.86 1.63 – 1.89 1/9.4 2.5 2.47 – 2.53 2.47 – 2.54 2.45 – 2.55 2.43 – 2.57 2.40 – 2.60 2.37 – 2.65 2.32 – 2.72 2.29 – 2.77 1/13.2 4 3.92 – 4.08 3.92 – 4.09 3.88 – 4.12 3.84 – 4.18 3.78 – 4.26 3.69 – 4.37 3.58 – 4.55 3.51 – 4.67 1/20.7 6 5.83 – 6.18 5.82 – 6.19 5.75 – 6.27 5.66 – 6.39 5.53 – 6.57 5.35 – 6.84 5.12 – 7.27 4.99 – 7.58 1/30.7 9 8.63 – 9.40 8.62 – 9.42 8.47 – 9.61 8.26 – 9.89 8.00 – 10.31 7.64 – 10.98 7.20 – 12.09 6.94 – 12.94 1/45.7 12 11.37 – 12.71 11.33 – 12.75 11.08 – 13.09 10.74 – 13.61 10.30 – 14.41 9.73 – 15.73 9.03 – 18.08 8.63 – 20.02 1/60.7 20 18.32 – 22.02 18.24 – 22.14 17.60 – 23.17 16.77 – 24.81 15.73 – 27.56 14.46 – 32.73 12.99 – 44.62 12.19 – 58.41 1/100.7 40 33.87 – 48.88 33.60 – 49.45 31.52 – 54.83 28.98 – 64.83 26.03 – 87.43 22.76 – 173.08 19.35 – ∞ 17.64 – ∞ 1/200.7 ∞ 223.49 – ∞ 212.56 – ∞ 150.40 – ∞ 106.46 – ∞ 75.40 – ∞ 53.43 – ∞ 37.90 – ∞ 31.93 – ∞ 1/∞ [f=300 mm] f/5.6 f/8 f/11 f/16 f/22 f/32 f/40 1.8 1.74 – 1.76 1.74 – 1.76 1.73 – 1.77 1.72 – 1.78 1.71 – 1.79 1.69 – 1.81 1.68 – 1.83 1/6.9 2.5 2.48 – 2.52 2.47 – 2.53 2.46 – 2.54 2.45 – 2.55 2.43 – 2.58 2.40 – 2.61 2.38 – 2.64 1/9.4 4 3.96 – 4.04 3.94 – 4.06 3.92 – 4.09 3.89 – 4.12 3.84 – 4.18 3.78 – 4.25 3.73 – 4.33 1/14.4 6 5.91 – 6.09 5.88 – 6.13 5.83 – 6.18 5.76 – 6.26 5.67 – 6.37 5.55 – 6.55 5.44 – 6.71 1/21.1 9 8.82 – 9.19 8.74 – 9.27 8.64 – 9.39 8.50 – 9.57 8.31 – 9.82 8.06 – 10.22 7.85 – 10.59 1/31.1 12 11.68 – 12.34 11.56 – 12.48 11.38 – 12.69 11.15 – 13.00 10.83 – 13.47 10.42 – 14.20 10.07 – 14.92 1/41.1 20 19.16 – 20.92 18.83 – 21.33 18.39 – 21.93 17.80 – 22.85 17.03 – 24.29 16.05 – 26.68 15.28 – 29.25 1/67.7 40 36.83 – 43.78 35.68 – 45.53 34.16 – 48.31 32.22 – 52.88 29.83 – 61.08 27.01 – 78.34 24.93 – 104.73 1/134.4 ∞ 475.50 – ∞ 338.24 – ∞ 239.38 – ∞ 169.49 – ∞ 120.06 – ∞ 85.11 – ∞ 67.71 – ∞ 1/∞ [f=400 mm] f/5.6 f/8 f/11 f/16 f/22 f/32 f/40 1.8 1.74 – 1.76 1.74 – 1.76 1.74 – 1.76 1.73 – 1.77 1.72 – 1.78 1.71 – 1.79 1.70 – 1.80 1/5.7 2.5 2.49 – 2.51 2.48 – 2.52 2.48 – 2.53 2.47 – 2.54 2.45 – 2.55 2.43 – 2.57 2.42 – 2.59 1/7.6 4 3.97 – 4.03 3.96 – 4.04 3.95 – 4.05 3.93 – 4.08 3.90 – 4.11 3.85 – 4.16 3.82 – 4.20 1/11.5 6 5.94 – 6.06 5.92 – 6.08 5.89 – 6.11 5.85 – 6.16 5.79 – 6.23 5.71 – 6.33 5.64 – 6.42 1/16.5 9 8.88 – 9.12 8.84 – 9.17 8.78 – 9.24 8.69 – 9.34 8.57 – 9.49 8.40 – 9.71 8.26 – 9.91 1/24.2 12 11.80 – 12.21 11.73 – 12.29 11.62 – 12.41 11.47 – 12.59 11.26 – 12.85 10.99 – 13.24 10.75 – 13.61 1/31.8 20 19.47 – 20.56 19.29 – 20.77 19.01 – 21.11 18.62 – 21.61 18.11 – 22.36 17.43 – 23.52 16.88 – 24.66 1/52.2 40 38.01 – 42.22 37.33 – 43.10 36.32 – 44.53 35.00 – 46.74 33.28 – 50.26 31.13 – 56.30 29.46 – 63.05 1/103.3 ∞ 789.34 – ∞ 577.42 – ∞ 408.64 – ∞ 289.30 – ∞ 204.92 – ∞ 145.24 – ∞ 115.53 – ∞ 1/∞ • Unlike other lenses, the focal length of internal focus (IF) lenses decreases with focus distance. • Im Gegensatz zu den anderen Objektiven verringert sich die Brennweite der Objektive mit Innenfokussierung (IF) mit der Entfernungseinstellung. • Contrairement aux autres objectifs, la focale des objectifs à mise au point interne (IF) diminue avec la distance de mise au point. • In tegenstelling tot andere objectieven daalt de brandpuntsafstand van interne scherpstelling (IF) met scherpstelafstand. ■ Depth of field (Imperial) (ft) Focus distance Depth of field Reproduction ratio [f=80 mm] f/4.5 f/5.6 f/8 f/11 f/16 f/22 f/32 6 ft 8 4⁄16 in. – 6 ft 7 5⁄16 in. – 6 ft 5 10⁄16 in. – 6 ft 3 4⁄16 in. – 6 ft 4⁄16 in. – 5 ft 8 6⁄16 in. – 5 ft 3 10⁄16 in. – 7 1/25.3 7 ft 4 3⁄16 in. 7 ft 5 4⁄16 in. 7 ft 7 11⁄16 in. 7 ft 11 4⁄16 in. 8 ft 5 1⁄16 in. 9 ft 2 8⁄16 in. 10 ft 7 15⁄16 in. 13 ft 7 5⁄16 in. – 13 ft 3 12⁄16 in. – 12 ft 8 10⁄16 in. – 11 ft 11 12⁄16 in. – 11 ft 13⁄16 in. – 10 ft 2⁄16 in. – 8 ft 10 1⁄16 in. – 15 1/55.1 16 ft 8 12⁄16 in. 17 ft 2 8⁄16 in. 18 ft 4 1⁄16 in. 20 ft 2 12⁄16 in. 23 ft 8 8⁄16 in. 31 ft 5 8⁄16 in. 59 ft 5 8⁄16 in. 21 ft 3 15⁄16 in. – 20 ft 7 7⁄16 in. – 19 ft 2 12⁄16 in. – 17 ft 6 13⁄16 in. – 15 ft 8 3⁄16 in. – 13 ft 7 7⁄16 in. – 11 ft 6 4⁄16 in. – 1/92.5 25 30 ft 3 in. 31 ft 10 3⁄16 in. 35 ft 11 12⁄16 in. 44 ft 1 3⁄16 in. 65 ft 6⁄16 in. 203 ft 1 5⁄16 in. ∞ 47 ft 2 3⁄16 in. – 43 ft 9 8⁄16 in. – 37 ft 11 6⁄16 in. – 31 ft 11 8⁄16 in. – 26 ft 2 1⁄16 in. – 20 ft 10 9⁄16 in. – 16 ft 3 10⁄16 in. – 70 1/260.6 136 ft 10 5⁄16 in. 177 ft 7 3⁄16 in. 496 ft 10 5⁄16 in. ∞ ∞ ∞ ∞ 144 ft 2 12⁄16 in. – 116 ft 6 13⁄16 in. – 82 ft 7 7⁄16 in. – 58 ft 7 7⁄16 in. – 41 ft 7 15⁄16 in. – 29 ft 7 15⁄16 in. – 21 ft 2 3⁄16 in. – ∞ 1/∞ ∞ ∞ ∞ ∞ ∞ ∞ ∞ [f=105 mm] f/4.8 f/5.6 f/8 f/11 f/16 f/22 f/32 6 ft 9 8⁄16 in. – 6 ft 9 in. – 6 ft 7 13⁄16 in. – 6 ft 6 4⁄16 in. – 6 ft 4 1⁄16 in. – 6 ft 1 5⁄16 in. – 5 ft 9 12⁄16 in. – 7 1/20.0 7 ft 2 12⁄16 in. 7 ft 3 4⁄16 in. 7 ft 4 11⁄16 in. 7 ft 6 13⁄16 in. 7 ft 9 15⁄16 in. 8 ft 3 in. 8 ft 11 3⁄16 in. 14 ft 13⁄16 in. – 13 ft 10 15⁄16 in. – 13 ft 6 in. – 12 ft 11 10⁄16 in. – 12 ft 3 8⁄16 in. – 11 ft 5 6⁄16 in. – 10 ft 5 4⁄16 in. – 15 1/43.2 16 ft 13⁄16 in. 16 ft 3 8⁄16 in. 16 ft 10 13⁄16 in. 17 ft 10 1⁄16 in. 19 ft 4 7⁄16 in. 22 ft 1 1⁄16 in. 27 ft 7 7⁄16 in. 22 ft 6 4⁄16 in. – 22 ft 1 5⁄16 in. – 21 ft 1 5⁄16 in. – 19 ft 10 1⁄16 in. – 18 ft 3 10⁄16 in. – 16 ft 5 14⁄16 in. – 14 ft 5 14⁄16 in. – 1/72.3 25 28 ft 1 7⁄16 in. 28 ft 9 8⁄16 in. 30 ft 8 12⁄16 in. 33 ft 11 12⁄16 in. 39 ft 11 14⁄16 in. 53 ft 5 14⁄16 in. 103 ft 5 10⁄16 in. 53 ft 6 10⁄16 in. – 51 ft 3 13⁄16 in. – 46 ft 2 12⁄16 in. – 40 ft 6 13⁄16 in. – 34 ft 7 5⁄16 in. – 28 ft 8 4⁄16 in. – 23 ft 1 15⁄16 in. – 70 1/202.9 101 ft 3 15⁄16 in. 110 ft 6 15⁄16 in. 145 ft 9 13⁄16 in. 266 ft 2 10⁄16 in. ∞ ∞ ∞ 228 ft 4 1⁄16 in. – 192 ft 7 5⁄16 in. – 136 ft 4 13⁄16 in. – 96 ft 8 1⁄16 in. – 68 ft 6 13⁄16 in. – 48 ft 8 8⁄16 in. – 34 ft 7 15⁄16 in. – ∞ 1/∞ ∞ ∞ ∞ ∞ ∞ ∞ ∞ [f=135 mm] f/5 f/5.6 f/8 f/11 f/16 f/22 f/32 f/36 6 ft 10 5⁄16 in. – 6 ft 10 1⁄16 in. – 6 ft 9 4⁄16 in. – 6 ft 8 3⁄16 in. – 6 ft 6 12⁄16 in. – 6 ft 4 11⁄16 in. – 6 ft 2 3⁄16 in. – 6 ft 1 1⁄16 in. – 7 1/16.0 7 ft 1 13⁄16 in. 7 ft 2 1⁄16 in. 7 ft 3 in. 7 ft 4 3⁄16 in. 7 ft 6 2⁄16 in. 7 ft 9 in. 8 ft 1 7⁄16 in. 8 ft 3 8⁄16 in. 14 ft 4 9⁄16 in. – 14 ft 3 10⁄16 in. – 14 ft 6⁄16 in. – 13 ft 7 15⁄16 in. – 13 ft 2 3⁄16 in. – 12 ft 6 12⁄16 in. – 11 ft 9 6⁄16 in. – 11 ft 5 12⁄16 in. – 15 1/34.0 15 ft 8 3⁄16 in. 15 ft 9 6⁄16 in. 16 ft 1 9⁄16 in. 16 ft 7 13⁄16 in. 17 ft 5 6⁄16 in. 18 ft 8 10⁄16 in. 20 ft 10 15⁄16 in. 21 ft 11 14⁄16 in. 23 ft 4 1⁄16 in. – 23 ft 1 11⁄16 in. – 22 ft 5 6⁄16 in. – 21 ft 6 8⁄16 in. – 20 ft 4 11⁄16 in. – 18 ft 11 6⁄16 in. – 17 ft 3 in. – 16 ft 7 9⁄16 in. – 25 1/56.6 26 ft 11 3⁄16 in. 27 ft 2 6⁄16 in. 28 ft 2 12⁄16 in. 29 ft 10 1⁄16 in. 32 ft 5 10⁄16 in. 37 ft 1 5⁄16 in. 46 ft 7 9⁄16 in. 52 ft 3 2⁄16 in. 58 ft 6 2⁄16 in. – 57 ft 3 8⁄16 in. – 53 ft 3 8⁄16 in. – 48 ft 6 4⁄16 in. – 43 ft 1 1⁄16 in. – 37 ft 2 10⁄16 in. – 31 ft 3 2⁄16 in. – 29 ft 3 10⁄16 in. – 70 1/158.2 87 ft 2 6⁄16 in. 90 ft 1 5⁄16 in. 102 ft 4 1⁄16 in. 126 ft 8 12⁄16 in. ∞ ∞ ∞ ∞ 359 ft 6 in. – 318 ft 6⁄16 in. – 225 ft 1 3⁄16 in. – 159 ft 5 1⁄16 in. – 112 ft 11 14⁄16 in. – 80 ft 1 13⁄16 in. – 56 ft 11 3⁄16 in. – 50 ft 9 12⁄16 in. – ∞ 1/∞ ∞ ∞ ∞ ∞ ∞ ∞ ∞ ∞ [f=200 mm] f/5.3 f/5.6 f/8 f/11 f/16 f/22 f/32 f/38 6 ft 11 1⁄16 in. – 6 ft 10 15⁄16 in. – 6 ft 10 9⁄16 in. – 6 ft 9 15⁄16 in. – 6 ft 9 2⁄16 in. – 6 ft 8 1⁄16 in. – 6 ft 6 10⁄16 in. – 6 ft 5 10⁄16 in. – 7 1/11.4 7 ft 15⁄16 in. 7 ft 1 1⁄16 in. 7 ft 1 9⁄16 in. 7 ft 2 3⁄16 in. 7 ft 3 2⁄16 in. 7 ft 4 7⁄16 in. 7 ft 6 8⁄16 in. 7 ft 7 13⁄16 in. 14 ft 8 1⁄16 in. – 14 ft 7 13⁄16 in. – 14 ft 6 2⁄16 in. – 14 ft 3 13⁄16 in. – 14 ft 12⁄16 in. – 13 ft 8 6⁄16 in. – 13 ft 2 14⁄16 in. – 12 ft 11 6⁄16 in. – 15 1/23.5 15 ft 4 3⁄16 in. 15 ft 4 7⁄16 in. 15 ft 6 4⁄16 in. 15 ft 9 in. 16 ft 1 1⁄16 in. 16 ft 7 1⁄16 in. 17 ft 4 7⁄16 in. 17 ft 10 15⁄16 in. 24 ft 1 9⁄16 in. – 24 ft 15⁄16 in. – 23 ft 8 10⁄16 in. – 23 ft 2 12⁄16 in. – 22 ft 6 15⁄16 in. – 21 ft 8 8⁄16 in. – 20 ft 7 3⁄16 in. – 19 ft 11 6⁄16 in. – 1/38.8 25 25 ft 11 4⁄16 in. 25 ft 11 14⁄16 in. 26 ft 5 3⁄16 in. 27 ft 13⁄16 in. 28 ft 8⁄16 in. 29 ft 6 8⁄16 in. 31 ft 11 12⁄16 in. 33 ft 9 8⁄16 in. 63 ft 9 6⁄16 in. – 63 ft 5 14⁄16 in. – 61 ft 1 11⁄16 in. – 58 ft 1 3⁄16 in. – 54 ft 3 10⁄16 in. – 49 ft 8 8⁄16 in. – 44 ft 5 4⁄16 in. – 41 ft 7 3⁄16 in. – 1/107.4 70 77 ft 7 3⁄16 in. 78 ft 6⁄16 in. 81 ft 11 4⁄16 in. 88 ft 2 6⁄16 in. 98 ft 10 15⁄16 in. 119 ft 6 4⁄16 in. 169 ft 9 15⁄16 in. 233 ft 8 8⁄16 in. 733 ft 2 14⁄16 in. – 697 ft 4 13⁄16 in. – 493 ft 5 4⁄16 in. – 349 ft 3 8⁄16 in. – 247 ft 4 9⁄16 in. – 175 ft 3 12⁄16 in. – 124 ft 4 1⁄16 in. – 104 ft 9 4⁄16 in. – ∞ 1/∞ ∞ ∞ ∞ ∞ ∞ ∞ ∞ ∞ [f=300 mm] f/5.6 f/8 f/11 f/16 f/22 f/32 f/40 6 ft 11 6⁄16 in. – 6 ft 11 3⁄16 in. – 6 ft 10 15⁄16 in. – 6 ft 10 7⁄16 in. – 6 ft 9 13⁄16 in. – 6 ft 9 in. – 6 ft 8 4⁄16 in. – 7 1/8.2 7 ft 10⁄16 in. 7 ft 13⁄16 in. 7 ft 1 1⁄16 in. 7 ft 1 9⁄16 in. 7 ft 2 4⁄16 in. 7 ft 3 6⁄16 in. 7 ft 4 3⁄16 in. 14 ft 9 15⁄16 in. – 14 ft 9 2⁄16 in. – 14 ft 7 15⁄16 in. – 14 ft 6 4⁄16 in. – 14 ft 4 1⁄16 in. – 14 ft 15⁄16 in. – 13 ft 10 5⁄16 in. – 15 1/16.3 15 ft 2 3⁄16 in. 15 ft 3 in. 15 ft 4 5⁄16 in. 15 ft 6 2⁄16 in. 15 ft 8 14⁄16 in. 16 ft 13⁄16 in. 16 ft 4 7⁄16 in. 24 ft 6 12⁄16 in. – 24 ft 4 9⁄16 in. – 24 ft 1 11⁄16 in. – 23 ft 9 10⁄16 in. – 23 ft 3 15⁄16 in. – 22 ft 8 8⁄16 in. – 22 ft 2 4⁄16 in. – 25 1/26.5 25 ft 5 8⁄16 in. 25 ft 7 13⁄16 in. 25 ft 11 4⁄16 in. 26 ft 4 3⁄16 in. 26 ft 11 6⁄16 in. 27 ft 10 5⁄16 in. 28 ft 8 10⁄16 in. 66 ft 10 7⁄16 in. – 65 ft 8 3⁄16 in. – 64 ft 8⁄16 in. – 61 ft 10 7⁄16 in. – 59 ft 10⁄16 in. – 55 ft 5 12⁄16 in. – 52 ft 8 3⁄16 in. – 70 1/72.2 73 ft 5 6⁄16 in. 74 ft 11 8⁄16 in. 77 ft 2 12⁄16 in. 80 ft 8 6⁄16 in. 86 ft 2 4⁄16 in. 95 ft 4 15⁄16 in. 105 ft 5 10⁄16 in. 1560 ft 15⁄16 in. – 1109 ft 8 10⁄16 in. – 785 ft 4 9⁄16 in. – 556 ft 13⁄16 in. – 393 ft 10 15⁄16 in. – 279 ft 2 14⁄16 in. – 222 ft 1 11⁄16 in. – ∞ 1/∞ ∞ ∞ ∞ ∞ ∞ ∞ ∞ [f=400 mm] f/5.6 f/8 f/11 f/16 f/22 f/32 f/40 6 ft 11 10⁄16 in. – 6 ft 11 8⁄16 in. – 6 ft 11 4⁄16 in. – 6 ft 10 15⁄16 in. – 6 ft 10 9⁄16 in. – 6 ft 9 15⁄16 in. – 6 ft 9 6⁄16 in. – 7 1/6.7 7 ft 6⁄16 in. 7 ft 10⁄16 in. 7 ft 12⁄16 in. 7 ft 1 1⁄16 in. 7 ft 1 9⁄16 in. 7 ft 2 4⁄16 in. 7 ft 2 14⁄16 in. 14 ft 10 11⁄16 in. – 14 ft 10 1⁄16 in. – 14 ft 9 6⁄16 in. – 14 ft 8 4⁄16 in. – 14 ft 6 13⁄16 in. – 14 ft 4 13⁄16 in. – 14 ft 3 2⁄16 in. – 15 1/12.9 15 ft 1 7⁄16 in. 15 ft 1 15⁄16 in. 15 ft 2 12⁄16 in. 15 ft 3 13⁄16 in. 15 ft 5 8⁄16 in. 15 ft 7 15⁄16 in. 15 ft 10 3⁄16 in. 24 ft 8 10⁄16 in. – 24 ft 7 5⁄16 in. – 24 ft 5 8⁄16 in. – 24 ft 2 14⁄16 in. – 23 ft 11 4⁄16 in. – 23 ft 6 8⁄16 in. – 23 ft 2 4⁄16 in. – 1/20.7 25 25 ft 3 8⁄16 in. 25 ft 4 13⁄16 in. 25 ft 6 13⁄16 in. 25 ft 9 12⁄16 in. 26 ft 2 1⁄16 in. 26 ft 8 4⁄16 in. 27 ft 2 1⁄16 in. 68 ft 8⁄16 in. – 67 ft 4 3⁄16 in. – 66 ft 3 13⁄16 in. – 64 ft 10 15⁄16 in. – 63 ft 4⁄16 in. – 60 ft 6 8⁄16 in. – 58 ft 6 in. – 1/55.7 70 72 ft 15⁄16 in. 72 ft 10 9⁄16 in. 74 ft 1 11⁄16 in. 76 ft 4⁄16 in. 78 ft 10 1⁄16 in. 83 ft 2 12⁄16 in. 87 ft 6 15⁄16 in. 2589 ft 8 14⁄16 in. – 1894 ft 5 10⁄16 in. – 1340 ft 8 4⁄16 in. – 949 ft 2 3⁄16 in. – 672 ft 3 13⁄16 in. – 476 ft 6 6⁄16 in. – 379 ft 6⁄16 in. – ∞ 1/∞ ∞ ∞ ∞ ∞ ∞ ∞ ∞ • Unlike other lenses, the focal length of internal focus (IF) lenses decreases with focus distance.-
 1
1
-
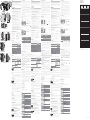 2
2


Nikon AF-S NIKKOR 80-400mm f/4.5-5.6G ED VR Handleiding
- Categorie
- Camera lenzen
- Type
- Handleiding
in andere talen
- English: Nikon AF-S NIKKOR 80-400mm f/4.5-5.6G ED VR User manual
- italiano: Nikon AF-S NIKKOR 80-400mm f/4.5-5.6G ED VR Manuale utente
- français: Nikon AF-S NIKKOR 80-400mm f/4.5-5.6G ED VR Manuel utilisateur
- español: Nikon AF-S NIKKOR 80-400mm f/4.5-5.6G ED VR Manual de usuario
- Deutsch: Nikon AF-S NIKKOR 80-400mm f/4.5-5.6G ED VR Benutzerhandbuch
- português: Nikon AF-S NIKKOR 80-400mm f/4.5-5.6G ED VR Manual do usuário
Gerelateerde papieren
-
Nikon AF-S NIKKOR 18-35mm f/3.5-4.5G ED Handleiding
-
-
-
-
-
-
-
Nikon AF-S NIKKOR 200-500mm f/5.6E ED VR Handleiding
-
-