
MPG33HP7
FR POMPE THERMIQUE DE SURFACE
TRADUCTION D’ORIGINE
NL THERMISCHE OPPERVLAKTEPOMP
VERTALING VAN DE ORIGINELE INSTRUCTIES
GB ENGINE DRIVEN PUMP
TRANSLATION OF THE ORIGINAL INSTRUCTIONS
IT MOTOPOMPA
TRADUZIONE DELLE ISTRUZIONI ORIGINALI
LT BENZININIS VANDENS SIURBLYS
NAUDOJIMO INSTRUKCIJOS VERTIMAS.
Y2023

S
FR POMPE THERMIQUE SURFACE
Nomenclature
1 Réservoir d'essence
2 Bouchon du réservoir d'essence
3 Robinet d'essence
4 Couvercle du filtre à air
5 Commutateur du moteur
6 Jauge
7 Bouchon de vidange de l'huile
8 Démarreur à rappel
9 Entrée d'aspiration
10 Sortie d’évacuation
11 Bouchon d'amorçage
12 Connecteur (tuyau vers pompe)
1
2
3
8 4
5
7
6
12
9
10
11
12

Instructions générales de sécurité
Remplissage du réservoir d'essence.
Avertissement ! Ne fumez pas lorsque
vous remplissez le réservoir d'essence.
Remplissez le réservoir d'essence uniquement à
l'extérieur, et dans un espace bien aéré.
Auparavant, veillez à toujours éteindre le moteur et
attendre qu'il se refroidisse. Réduisez la pression
du réservoir en desserrant lentement le bouchon
de remplissage.
Avertissement ! Choisissez de
préférence un endroit de terre battue pour
remplir le réservoir d'essence, et éloignez
ensuite la pompe d'au moins 3 m du point de
remplissage avant de mettre en marche le moteur.
Vérifiez que vous avez bien fermé le bouchon du
réservoir essence ; essuyez les gouttes d'essence
tombées sur la pompe et recherchez d'éventuelles
fuites.
Avertissement ! Si des gouttes
d'essence tombent sur vos vêtements,
notamment votre pantalon, changez-les
immédiatement. Ne pensez pas que les gouttes
vont rapidement s'évaporer et donc que vous ne
courez aucun risque.
L'essence inflammable reste sur des vêtements
bien plus longtemps que vous ne pensez.
Avertissement ! La pompe vibre
beaucoup en fonctionnement, risquant de
desserrer davantage le bouchon du réservoir
d'essence s'il était mal vissé et d'éjecter de l'essence.
Pour éviter ces situations, sources de début d'incendie,
serrez le bouchon du réservoir aussi fort que vous
pouvez avec vos mains.
Avant d'allumer le moteur, vérifiez toujours que le
bouchon d'essence est suffisamment serré.
Recherchez régulièrement d'éventuelles fuites
d'essence, aussi bien lors du remplissage du
réservoir que pendant le fonctionnement du
moteur. Si vous suspectez une fuite d'essence,
n'allumez pas le moteur avant de l'avoir réparée et
d'avoir essuyé les traces d'essence.
Avertissement ! Le circuit d'allumage de
votre pompe produit un champ électromagnétique de
très faible intensité.
Ce champ peut perturber le bon fonctionnement de
certains stimulateurs cardiaques. Les personnes
portant un tel stimulateur doivent donc,
impérativement, consulter leur médecin et le
fabricant du stimulateur pour savoir si elles peuvent
utiliser cet appareil sans crainte. N'essayez pas
d'augmenter la vitesse du moteur dans l'espoir
d'améliorer le rendement de votre pompe. Vous
risquez de générer une électricité hors norme,
aussi bien en fréquence qu'en tension, exposant la
charge électrique et l'utilisateur à des dommages.
Rangez la pompe dans un endroit bien aéré et
fermez auparavant le réservoir d'essence.
INSTRUCTIONS SPÉCIFIQUES À LA
POMPE À EAU
Instructions de sécurité spécifiques à la pompe.
Une très grande attention est requise.
Cette pompe est destinée à aspirer uniquement
une eau propre ou légèrement contaminée
(particules de taille maximale 35mm). En aucune
circonstance ne l’utilisez pour aspirer des liquides
corrosifs, des solvants, des combustibles ou des
substances explosives (essence, pétrole,
nitrodiluant), des graisses, des huiles ou des
solutions salines. N’essayez jamais d’aspirer des
liquides dont la température excède 35°C.
Éteignez toujours le moteur avant toute opération
de nettoyage.
N’essayez pas de modifier ou réparer vous-même
cette pompe, en aucune manière. Si vous pensez
qu'elle doit être réparée, apportez-la à un centre de
service agréé ou au constructeur.
Cette pompe n'a pas été conçue pour une
utilisation en continu ni comme pompe de piscine
ou bassin décoratif.

Veillez à ce que la pompe n’aspire ni sédiment ni
boue qui se serait déposé en bas des conteneurs à
vider ; ces éléments risquent de bloquer l’entrée et
la sortie, accélérant inutilement l'usure de
l'impulseur.
Après tout pompage, et plus spécialement un
pompage d’eau chlorée, faites fonctionner la
pompe quelques minutes sur une eau propre afin
d’expulser les résidus et débris éventuellement
accumulés dans le tuyau de sortie et les ouvertures
du carter de l'impulseur.
Ne faites jamais fonctionner la pompe à sec pour
ne pas accélérer l'usure et provoquer des surchauffes.
RISQUES POUR LA RESPIRATION – DANGERS D’INHALATION
Dangers Ce qui peut se produire Comment prévenir le danger
Les moteurs à essence
produisent des fumées
d’échappement de monoxyde de
carbone toxiques.
La respiration des fumées
d’échappement peut entrainer des
blessures graves, voire la mort.
Utilisez le Pompe à eau dans un
endroit propre, sec et bien
aéré. Ne I’utilisez jamais dans un
endroit fermé, par exemple
un garage, une remise, un espace
de rangement, un hangar
ou tout endroit habité par des
personnes ou des animaux.
Gardez les enfants, les animaux et
autres éloignés de la zone de
fonctionnement du Pompe à eau.
RISQUES DES SURFACES CHAUDES
Dangers Ce qui peut se produire Comment prévenir le danger
Contact avec le moteur
ou des pièces chaudes
du Pompe à eau
échappement moteur.
Contact avec le moteur ou des
pièces chaudes du Pompe à eau
échappement moteur
Pendant l’utilisation, touchez
uniquement les surfaces de
contrôle du Pompe à eau
échappement moteur. Gardez
constamment les enfants éloignés
du Pompe à eau échappement
moteur. Ils n’ont pas toujours
conscience des dangers que
présente un tel appareil.

Symboles
Conformité aux normes de
sécurité appropriées.
Lisez le manuel d'instructions
avant d'allumer le moteur et
d'utiliser votre appareil.
ATTENTION
Gaz d'échappement à haute
température,
ne touchez pas.
CHOKE
Volet de départ marche/arrêt
(ON/OFF). Tirez pour engager
et permettre de démarrer le
moteur lorsqu'il est froid. Dès
que le moteur a démarré,
poussez le volet pour le
désengager.
Niveau de puissance sonore
maximale déclaré.
ATTENTION Remplissez
uniquement avec de l'essence.
Ne remplissez jamais le
réservoir avec du diesel.
Laissez le moteur se
refroidir avant d'ouvrir le
réservoir d'essence. Les
vapeurs d'essence sont
très inflammables et
peuvent s'enflammer au
simple contact avec les
surfaces chaudes de
l'appareil.
ATTENTION
Remplissez
le carter du moteur avec
une huile agréée
(SAE15W-40).
Vérifiez régulièrement le
niveau d'huile et
remplissez jusqu'à la
marque de niveau
maximal.
Fumées toxiques, n’utilisez pas
à l’intérieur.
Le carburant est inflammable,
tenir éloigné des flammes.
N’ajoutez pas de carburant lors
du fonctionnement de la
machine.

Lors de la réparation, relevez la
bougie d’allumage, puis
réparez-la conformément au
manuel d’instructions.
Le moteur chauffe en cours
d’utilisation. Faites attention en
utilisant l’appareil.
Ne pas fumer
Feu nu interdit
Mise en route
ACCESSOIRES
VÉRIFICATION DU NIVEAU D'HUILE.
Avertissement : La pompe à eau vous est livrée sans huile dans le moteur, aussi devez-vous
impérativement lui ajouter de l'huile avant de l'utiliser.
Avant de vérifier le niveau d'huile ou d'ajouter de l'huile, assurez-vous que la pompe repose sur une
surface plane et stable, et que vous avez arrêté le moteur.
Retirez la jauge et regardez le niveau d'huile marqué.
S'il se situe sous la limite minimale, remplissez le carter avec une huile recommandée, jusqu'au trait
de la limite supérieure. Pour vérifier le niveau d'huile, introduisez la jauge dans son logement,
sans la visser.

Changez l'huile selon les recommandations de ce manuel ou lorsqu'elle est contaminée.
Type d'huile : huile à moteur 4 temps
REMPLISSAGE DU RÉSERVOIR D'ESSENCE
Vérifiez le niveau d'essence. S'il est bas, remplissez le réservoir avec de l'essence sans
plomb. Vérifiez que le filtre est en place dans la goulotte du réservoir.
Essence recommandée : essence sans plomb 95 ou 98Oct
RACCORDS
1. Montez une bague de blocage sur l'un des embouts de tuyau (faites de même pour l'autre embout).
2. Insérez un joint en caoutchouc dans la bague de blocage/embout de tuyau (faites de même pour l'autre
embout).
3. Montez les deux embouts de tuyau sur l'entrée d'aspiration et la sortie d'évacuation. Serrez fortement pour
éviter les fuites mais sans excès pour ne pas endommager les filets du pas de vis.
4. Branchez un tuyau de longueur appropriée sur les embouts d'aspiration et d'évacuation ; fixez solidement
avec un collier de serrage. Vérifiez que les tuyaux sont bien fixés pour éviter des fuites d'air et d'eau.
5. Montez le filtre sur l'autre extrémité du tuyau d'aspiration et fixez avec un collier de serrage.

CHOIX D'UN EMPLACEMENT POUR LA POMPE À EAU
Placez la pompe aussi près que possible de la surface de l'eau à aspirer, tant que toutes les
conditions de parfaite sécurité de fonctionnement sont respectées.
Plongez l'extrémité du tuyau d'aspiration portant le filtre dans l'eau, évitant autant que possible de
couder le tuyau et vérifiant que le filtre n'est pas bouché; ni totalement ni partiellement, par des
sédiments et autres débris empêchant son bon fonctionnement. Le tuyau doit pénétrer sur au mois
30 cm dans l'eau pour prévenir une perturbation excessive de l'eau pouvant entraîner une arrivée
d'air dans la pompe.
Placez le tuyau d'évacuation à l'endroit prévu pour récupérer l'eau aspirée, vérifiant qu'il n'y a ni
boucle ni coude brusque.
AMORÇAGE DE LA POMPE
Avant d'utiliser votre pompe, vous devez l'amorcer avec de l'eau afin de remplir le tuyau d'aspiration
et le carter de l'impulseur.
Retirez le bouchon d'amorçage, munissez-vous d'un conteneur et d'un entonnoir adapté, et versez
de l'eau propre jusqu'à remplir le tuyau d'aspiration et le carter de l'impulseur. Remettez le bouchon
d'amorçage en place, serrez fortement mais sans excès.
Ne faites pas tourner la pompe à sec, vous risquez de l'endommager.

Utilisation
DÉMARRAGE DE LA POMPE À EAU
Tournez le robinet d'essence sur la position Marche (ON).
Appuyez le commutateur de marche/arrêt (ON/OFF) du moteur sur la position marche (ON « -« ).
Basculez le volet de départ « Choke » sur la position Marche (ON). Le volet de départ n'est pas utile pour
démarrer le moteur lorsque celui-ci est chaud.

Maintenez fermement la pompe avec une main.
Saisissez la poignée de la corde du démarreur à rappel de l'autre main et tirez lentement jusqu'à
sentir une résistance ; le démarreur est alors engagé. Tirez maintenant la corde d'un
mouvement puissant et rapide. Si le moteur ne démarre pas, recommencez jusqu'à ce qu'il
démarre. Ne laissez pas la corde revenir rapidement en place, mais accompagnez-la pour
ralentir le retour et ainsi éviter d'endommager le démarreur.
Si le moteur ne démarre pas ou démarre puis s'arrête, vérifiez le niveau d'huile. La pompe est en
effet équipée d'un détecteur de niveau d'huile qui arrête automatiquement le moteur lorsque le
niveau d'huile s'approche dangereusement du niveau minimal.
Une fois que le moteur a démarré et a atteint sa vitesse normale, ramenez le volet de départ « Choke » en
position arrêt (OFF).
La pompe fonctionne et l'eau circule.
Si vous ne constatez aucune circulation d'eau, éteignez la pompe et vérifiez que le tuyau d'aspiration et le carter de
l'impulseur sont remplis d'eau (il y a eu amorçage) et que la crépine n"est pas obstruée. Vérifiez que vous avez
ouvert tous les robinets-vannes (le cas échéant) et que les tuyaux d'aspiration et d'évacuation ne sont ni
obstrués ni bloqués par des coudes.
Pour régler la vitesse du moteur après qu'il a démarré, poussez la manette des gaz sur la position haute (repérée
par un lièvre), moyenne ou basse (repérée par une tortue). Si vous démarrez la pompe avec la manette des gaz en
position basse, poussez ensuite la manette en position haute pour augmenter au maximum le débit de la pompe.
ON
ON
OFF

ARRÊT DU MOTEUR DE LA POMPE
Appuyez sur le commutateur de marche/arrêt (ON/OFF) de la pompe sur la position arrêt (OFF « O »).
Une fois que le moteur est arrêté, avant de ranger votre pompe, basculez le levier du robinet d'essence sur la
position Arrêt (OFF).

Entretien
ENTRETIEN DE LA BOUGIE
Vous devez vérifier la bougie toutes les 50 heures d'utilisation effective. Regardez la couleur des
dépôts accumulés sur l'extrémité de la bougie, elle doit être "brun clair ". Retirez les dépôts avec une
brosse rigide, de préférence une brosse en fils de laiton. Vérifiez l'écart entre les électrodes de la
bougie et réglez-le, le cas échéant. Cet écart doit être compris entre 0,7 et 0,8 mm.
REMPLACEMENT DE L'HUILE MOTEUR
Placez l'appareil sur une surface plane et stable, et laissez le moteur tourner pendant plusieurs
minutes. Arrêtez-le ensuite.

Retirez le bouchon de remplissage d'huile.
Placez un récipient sous le moteur pour récupérer l'huile usée.
Vérifiez l'état du bouchon de remplissage; remplacez les pièces défectueuses.
Revissez le bouchon.
Versez de la nouvelle huile dans le carter, jusqu'à atteindre le niveau maximal.
FILTRE À AIR
Vous devez examiner l'état du filtre à air et le nettoyer toutes les 50 heures d'utilisation effective
ou tous les 3 mois. Le couvercle du filtre à air est fixé par un écrou papillon ; dévissez cet écrou et
retirez le couvercle. Dévissez l'écrou papillon maintenant le filtre à air et retirez ce dernier. Pour
le nettoyer, utilisez un produit dégraissant à base d'eau afin de ne pas nuire à l'environnement.
Laissez le filtre à air sécher complètement, remontez-le et remontez son couvercle.
Avertissement ! Ne faites jamais tourner le moteur sans son filtre à air.
FILTRE DU RÉSERVOIR D'ESSENCE
Vous devez examiner l'état du filtre à essence et le nettoyer toutes les 100 heures d'utilisation effective
ou tous les 6 mois.
Retirez le capuchon et le filtre du réservoir d'essence.
Nettoyez le filtre avec un produit dégraissant à base d'eau afin de ne pas nuire à l'environnement.
CONTRÔLE GÉNÉRAL ET RANGEMENT
Vérifiez régulièrement que toutes les vis de fixation sont suffisamment serrées.
Les vibrations peuvent, avec le temps, les desserrer
Rangement
Si vous n'envisagez plus d'utiliser votre pompe, et au moins pas avant un mois, procédez comme suit

pour la ranger. Videz toute l'essence restant dans le réservoir et dans le carburateur ; vérifiez qu'il ne
reste rien. Dévissez la bougie et versez environ une cuiller à soupe pleine d'huile à moteur propre
dans le trou de fixation de la bougie. Placez le commutateur du moteur sur la position arrêt (OFF)
si ce n'est pas déjà fait et tirez doucement la corde du démarreur, plusieurs fois de suite ; revissez la
bougie et tirez une nouvelle fois sur la corde du démarreur jusqu'à amener le piston en phase de
compression (vous devez sentir une résistance) ; cessez alors de tirer.
Rangez la pompe dans un endroit bien aéré et sec, protégé par une bâche pour empêcher les
poussières et autres débris de s'accumuler sur la pompe
Caractéristiques techniques
MPG33HP7
Cylindrée 212cm³
Sortie 3.2Kw / 3600min
-1
Moteur 4 temps
Puissance Hp 7.0Hp
Vitesse à vide 3840 min
-1
Capacité du réservoir d’essence 3.6 L
Type d’essence Sans plomb 95 ou 98Oct
Durée maximale de fonctionnement 2 heures
Capacité du réservoir à huile 600 ml
Débit maximal 550 L/min (33m³/h)
Hauteur maximale de refoulement 30 m
Profondeur maximale d’aspiration 7 m
Taille maximale des particules (eau contaminée) 5 mm
Température maximale des liquides 40°C
Température ambiante maximale 40°C
Raccord de tuyauterie 2’’ (50mm)
Type de bougie F7RTC
Poids 22 Kg
Dimensions 47 x 37.5 x 38 cm
Puissance garantie L
WA
106 dB(A) K = 3 dB(A)
ATTENTION! Lorsque la pression acoustique dépasse la valeur de 85 dB(A), il est nécessaire de porter des
dispositifs individuels de protection de l’ouïe.
Valeur quadratique moyenne pondérée de l'accélération selon la norme applicable : < 2.5 m/s²
Garantie
MASTER PUMPS accorde pour cet appareil une garantie contractuelle de 3 ans à compter du jour de l’achat. Elle

comprend le remplacement gratuit des pièces défectueuses ou de l’appareil, le choix en
étant laissé à la libre initiative de MASTER PUMPS. En tout état de cause s’applique la garantie légale couvrant
toutes les conséquences des défauts ou vices cachés (article 1641 et suivants du Code Civil).
Pour que ces garanties soient valables, les conditions suivantes doivent être remplies :
• L’appareil a été manipulé de manière adéquate, suivant les instructions du mode d’emploi.
• Il n’y a eu aucun essai de réparation, ni par le client, ni par un tiers.
Une intervention sous garantie ne prolonge pas la durée initiale de la garantie contractuelle.
La turbine et le filtre, qui sont des pièces d'usure, sont exclus de la garantie.
Pendant la période de garantie, le Service Après-Vente effectuera, à titre payant, les réparations nécessaires par
suite de manipulations erronées.
En cas de mauvais fonctionnement, veuillez envoyer le produit en port payé avec
une copie du bon d’achat et une description du problème, à l’adresse du Service
Après-Vente figurant au verso.
Nous vous signalons expressément que MASTER PUMPS n’est pas responsable des dommages causés par ses
appareils, dans la mesure où ces dommages seraient causés suite à une réparation non conforme, dans la
mesure où, lors d’un échange de pièces, les pièces d’origine MASTER PUMPS n’auraient pas été utilisées, ou si la
réparation n’a pas été effectuée par le Service Après-Vente MASTER PUMPS ou l’un des Centres SAV agréés
MASTER PUMPS. Ceci est également valable pour tout ajout de pièces et
d’accessoires autres que ceux préconisés par MASTER PUMPS.
Service après-vente
_ Un commutateur endommagé doit être remplacé dans nos ateliers du service après-vente.
Service Après-Vente et Assistance
Notre Service Après-Vente répond à vos questions concernant la réparation et l’entretien de votre produit et les
pièces de rechange. Vous trouverez des vues éclatées ainsi que des informations concernant les pièces de
rechange également sous : www.eco-repa.com
Les conseillers techniques et assistants MASTER PUMPS sont à votre disposition pour répondre à vos questions
concernant nos produits et leurs accessoires : [email protected]
Entreposage
_ Nettoyez soigneusement toute la machine et ses accessoires.
_ Entreposez-la hors de la portée des enfants, dans une position stable et sûre, dans un lieu sec et tempéré, évitez
les températures trop hautes ou trop basses.
_ Protégez-la du rayonnement direct du soleil. Tenez-la, si possible, dans le noir.
_ Ne l’enfermez pas dans des sacs en plastique car de l’humidité pourrait s'y former.

2023
NL THERMISCHE OPPERVLAKTEPOMP
Nomenclatuur
1 Benzinetank
2 Tankdop
3 Benzinekraan
4 Deksel van de luchtfilter
5 Motorschakelaar
6 Peilstok
7 Olieaftapstop
8 Terugloopstarter
9 Aanzuigingang
10 Afvoeruitgang
11 Aanzuigstop
12 Connector (slang naar pomp)
1
2
3
8 4
5
7
12
9
11
12
10

Algemene veiligheidsinstructies
Vullen van de brandstoftank.
Waarschuwing! Rook niet als u de brandstoftank
bijvult.
Vul de brandstoftank alleen buiten en in een goed
verluchte ruimte.
Let vooraf op dat u de motor steeds uitzet en wacht tot
deze is afgekoeld. Verminder de druk van de tank door
de vuldop voorzichtig los te draaien.
Waarschuwing! Kies bij voorkeur een aarden bodem
om de benzinetank te vullen en verwijder de pomp
vervolgens minstens 3 m van het vulpunt vooraleer u
de motor start.
Ga na of u de tankdop goed gesloten hebt; veeg de op
de pomp gevallen benzinedruppels weg en zoek naar
eventuele lekken.
Waarschuwing! Als benzinedruppels op uw kleding
vallen, meer bepaald op uw broek, vervang deze dan
onmiddellijk. Vergis u niet dat de druppels snel zullen
verdampen en dat u dus geen enkel risico loopt.
De ontvlambare benzine blijft veel langer in de kleding
zitten dan u zou denken.
Waarschuwing! De pomp trilt veel tijdens haar
werking en loopt het risico de tankdop te snel te doen
loskomen als deze slecht vastgeschroefd was en de
benzine te doen morsten. Om deze situaties en
bronnen van beginnende brand te voorkomen moet u
de tankdop zo sterk mogelijk aandraaien met uw
handen.
Vooraleer de motor aan te zetten moet u steeds
nagaan of de tankdop voldoende is aangedraaid.
Zoek regelmatig eventuele benzinelekken, zowel bij
het vullen van de tank als tijdens de werking van de
motor. Als u een benzinelek vreest, zet de motor dan
niet aan vooraleer u het lek hersteld hebt en de sporen
van gemorste benzine hebt weggeveegd.
Waarschuwing! De ontstekingskring van uw pomp
produceert een elektromagnetisch veld van heel kleine
intensiteit.
Dit veld kan de goede werking van bepaalde
pacemakers verstoren. Personen die dergelijke
stimulator dragen moeten dus verplicht hun dokter en
de fabrikant van de stimulator raadplegen om te weten
of ze dit apparaat probleemloos kunnen gebruiken.
Probeer de snelheid van de motor niet te verhogen in
de hoop het rendement van uw pomp te verbeteren. U
loopt het risico een abnormaal grote elektrische
ontlading te veroorzaken, zowel in frequentie als in
spanning, waardoor de elektrische lading en de
gebruiker aan schade worden blootgesteld.
Plaats de pomp op een goed verluchte plaats en sluit
de benzinetank eerst af.
SPECIFIEKE INSTRUCTIES VOOR DE
THERMISCHE POMP
Specifieke veiligheidsinstructies voor de pomp.
Een bijzonder grote aandacht is vereist.
Deze pomp is bestemd om alleen schoon of lichtjes
vervuild water op te zuigen (partikels met maximum
grootte van 35 mm). Gebruik de pomp in geen geval
om corrosieve vloeistoffen, oplosmiddelen,
brandstoffen of explosieve substanties (benzine,
petroleum, nitroverdunner), smeerstoffen, oliën of
zoute oplossingen op te zuigen. Probeer nooit
vloeistoffen op te zuigen met een temperatuur van
meer dan 35°C.
6

2
Zet de motor steeds uit vooraleer u enige reinigingen
uitvoert.
Probeer deze pomp niet op enige manier zelf aan te
passen of te herstellen. Als u denkt dat de pomp moet
worden hersteld, breng ze dan naar een erkend
servicecenter of naar de constructeur.
Deze pomp werd niet ontworpen voor continu gebruik
en evenmin als zwembad- of siervijverpomp.
Zorg ervoor dat de pomp geen bezinksel of modder
opzuigt die werd afgezet onder in de leeg te zuigen
containers; deze elementen kunnen de ingang en de
uitgang blokkeren en zo de slijtage van de pomp
nodeloos bespoedigen.
Na elke pompactie de pomp enkele minuten laten
werken met schoon water om de eventueel in de
uitgangsbuis en in de openingen van het impellercarter
opgehoopte resten en afval uit te drijven.
Laat de pomp nooit droog werken om de slijtage niet te
bespoedigen en oververhittingen te veroorzaken.
RISICO’S VOOR DE ADEMHALING - INADEMINGSGEVAREN
Gevaren
Wat zich kan voordoen
Hoe het gevaar voorkomen
De benzinemotoren produceren
uitlaatgassen van toxische
koolmonoxide.
Het inademen van uitlaatgassen
kan ernstige kwetsuren veroorzaken
of zelfs tot de dood leiden.
Gebruik de thermische pomp op een
schone, droge en goed verluchte
plaats. Gebruik deze nooit op een
gesloten plaats, bijvoorbeeld in een
garage, een berging, een
bergruimte, een hangar of elke door
personen of dieren bewoonde
plaats.
Houd kinderen, dieren en andere
elementen op afstand van de
werkingszone van de thermische
pomp.
RISICO’S VAN DE HETE OPPERVLAKKEN
Gevaren
Wat zich kan voordoen
Hoe het gevaar voorkomen
Contact met de motor of met de
hete stukken van de thermische
pomp motoruitlaat.
Contact met de motor of met de
hete stukken van de thermische
pomp motoruitlaat.
Tijdens het gebruik alleen de
controleoppervlakken van de
thermische pomp motoruitlaat
aanraken. Houd kinderen
voortdurend uit de buurt van de
thermische pomp motoruitlaat Ze
zijn zich niet altijd bewust van de
gevaren die een dergelijk apparaat
met zich meebrengt.

2
Symbolen
Conformiteit met de gepaste
veiligheidsnormen.
Lees de instructiehandleiding
voor u de motor aanzet en uw
apparaat in gebruik neemt.
OPGELET
Uiterst hete uitlaatgassen, niet
aanraken.
CHOKE
Aan/uit vertrekluik (ON/OFF)
Trekken om in te schakelen
en de motor te kunnen
starten als deze koud is.
Zodra de motor gestart is het
luik induwen om het uit te
schakelen.
Aangegeven maximaal
geluidsvermogenniveau.
OPGELET Alleen vullen met
benzine.
De tank nooit vullen met
diesel.
Laat de motor afkoelen
vooraleer u de benzinetank
opent. De benzinedampen
zijn uiterst ontvlambaar en
kunnen ontsteken bij
eenvoudig contact met de
hete oppervlakken van het
apparaat.
OPGELET
Vul het carter van de motor
met een erkende olie
(SAE15W-40).
Controleer regelmatig het
oliepeil en vul het bij tot het
maximumpeilmerkteken.

2
Giftige dampen! Niet
binnenshuis gebruiken.
Benzine is brandbaar, blijf uit
de buurt van open vuur. Als
de motor draait mag geen
benzine worden bijgevuld
Maak de bougiekabel los
voordat u reparaties, zoals
beschreven in de
gebruiksaanwijzing, uitvoert.
De motor warm tijdens
gebruiken. Wees voorzichtig bij
het met de inrichting.
Niet roken
Open vuur verboden
Opstarten
ACCESSOIRES
CONTROLE VAN HET OLIEPEIL.
Waarschuwing! De thermische pomp wordt u geleverd zonder olie in de motor, u moet ook verplicht olie toevoegen
vooraleer de pomp in gebruik te nemen.

2
Voor u het oliepeil controleert of olie toevoegt, zorgen dat de pomp op een vlak en stabiel oppervlak steunt en dat u
de motor hebt uitgezet.
Neem de peilstok uit en bekijk het gemarkeerde oliepeil.
Als dit zich onder de minimumgrens situeert, vul het carter dan bij met een aanbevolen olie, tot het streepje van de
maximumgrens. Om het oliepeil te controleren de peilstok in zijn behuizing steken zonder te schroeven.
Vervang de olie volgens de aanbevelingen van deze handleiding of als deze verontreinigd is.
Type olie: 4-taktmotorolie
VULLEN VAN DE BENZINETANK
Controleer het benzinepeil. Als het laag is, vul de tank dan bij met loodvrije benzine. Controleer of de filter op zijn
plaats zit in de vultuit van de tank.
Aanbevolen benzine : loodvrije benzine 95 of 98 Oct
KOPPELSTUKKEN
1. Monteer een blokkeerring op één van de buiteindstukken (doe hetzelfde voor het andere eindstuk).
2. Steek een rubberen pakking in de blokkeerring/buiseindstuk (doe hetzelfde voor het andere eindstuk).
3.
Monteer de twee buiseindstukken op de aanzuigingang en de afvoeruitgang. Span stevig aan om lekken te
voorkomen maar zonder te overdrijven om de schroefdraad van de schroefspoed niet te beschadigen.

3
4.
Sluit een buis met gepaste lengte aan op de aanzuig- en afvoereindstukken; maak ze stevig vast met een
spankraag. Controleer of de buizen goed zijn vastgezet om lucht- en waterlekken te voorkomen.
5. Monteer de filter op het andere uiteinde van de aanzuigbuis en zet vast met een spankraag.
KEUZE VAN EEN PLAATS VOOR DE WATERPOMP
Plaats de pomp zo dicht mogelijk bij het op te zuigen wateroppervlak, zolang alle voorwaarden van
perfecte werkingszekerheid worden nageleefd.
Dompel het uiteinde van de aanzuigbuis met de filter in het water en voorkom daarbij zoveel mogelijk de buis de
verbuigen en zorg ervoor dat de filter niet geheel of gedeeltelijk verstopt raakt door resten en ander puin dat zijn
goede werking verhindert. De buis moet minstens 30 cm doordringen in het water om een te sterke verstoring te
voorkomen van het water die een luchtaanvoer in de pomp kan veroorzaken.
Plaats de afvoerbuis op de voorziene plaats om het aangezogen water te recupereren en zorg er daarbij voor dat er
geen sterke lus of bocht aanwezig is.
OP GANG BRENGEN VAN DE POMP
Vooraleer uw pomp in gebruik te nemen moet u deze op gang brengen met water om de aanzuigbuis en het carter
van de impeller te vullen.
Verwijder de aanzuigstop, neem een container en een aangepaste trechter ter hand en giet schoon water in tot de
aanzuigbuis en het carter van de impeller gevuld zijn. Breng de aanzuigstop weer aan en span stevig aan zonder te
overdrijven.

4
Gebruik
DE THERMISCHE POMP STARTEN
Verdraai de benzinekraan naar de aan-stand (ON).
Druk de aan/uit-schakelaar (ON/OFF) van de motor in naar de aan-stand (“ON”).
Kantel het vertrekluik “Choke” naar de Aan-stand (ON). Het vertrekluik is niet nuttig om de motor te starten als deze
heet is.

5
Houd de pomp stevig vast met één hand.
Grijp de handgreep van het snoer van de terugloopstarter met de ene hand vast en trek voorzichtig tot u
enige weerstand voelt ; de starter wordt dan ingeschakeld. Trek nu met een krachtige en snelle ruk aan het
startersnoer. Als de motor niet start, herbegin dan tot hij start.
Laat het snoer niet snel terugkeren, maar begeleid het door de terugkeer te vertragen en aldus te vermijden dat u de
starter beschadigt. Als de motor niet start of start en dan weer stilvalt, controleer dan het oliepeil. De pomp is
inderdaad uitgerust met een oliepeildetector die de motor automatisch stopt als het oliepeil gevaarlijk dicht bij het
minimumpeil komt.
Zodra de motor gestart is en zijn normaal toerental heeft bereikt, moet u het "Choke"-vertrekluik opnieuw in
uit-positie (OFF) plaatsen. De pomp werkt en het water circuleert. Als u geen enkele watercirculatie vaststelt, zet de
pomp dan uit en ga na of de aanzuigbuis en het carter van de impeller met water gevuld zijn (er heeft aanzuiging
plaatsgevonden) en of het rooster niet verstopt is. Ga na of u alle kranen en kleppen hebt geopend (in voorkomend
geval) en of de aanzuig- en afvoerbuizen niet verstopt of geblokkeeerd zijn door bochten in de leiding.
Om het motortoerental te regelen na de start de gashendel in de hoge (aangegeven door een haas), middelhoge of
lage stand (aangegeven door een schildpad) zetten. Als u de pomp start met de gashendel in lage stand, duw de
hendel dan vervolgens in de hoge stand om het debiet van de pomp maximaal te verhogen.
ON
ON
OFF

6
UITZETTEN VAN DE MOTOR VAN DE POMP
Druk op de aan/uit-schakelaar (ON/OFF) van de pomp om deze in uit-stand (OFF « O ») te zetten.
Zodra de motor gestopt is, vooraleer de pomp op te bergen, de hendel van de benzinekraan kantelen naar de
uit-stand (OFF).

7
Onderhoud
ONDERHOUD VAN DE BOUGIE
U moet de bougie controleren om de 50 uur effectief gebruik. Bekijk de kleur van de afzettingen op het uiteinde van
de bougie, deze moet “lichtbruin” zijn. Verwijder de afzettingen met een stijve borstel, bij voorkeur een borstel in
messing draad. Controleer de afstand tussen de elektroden van de bougie en pas deze aan in voorkomend geval.
Deze afstand moet tussen 0,7 en 0,8 mm bedragen.
VERVANGING VAN DE MOTOROLIE
Plaats het apparaat op een vlak en stabiel oppervlak en laat de motor draaien gedurende meerdere minuten. Zet

8
deze vervolgens uit. Neem de olievuldop weg. Plaats een recipiënt onder de motor om de gebruikte olie op te
vangen. Controleer de toestand van de vuldop en vervang de defecte stukken. Draai de vuldop terug aan. Giet
nieuwe olie in het carter tot het maximumpeil wordt bereikt.
LUCHTFILTER
U moet de toestand van de benzinefilter onderzoeken en deze reinigen om de 50 effectieve gebruiksuren of om de 3
maanden. Het deksel van de luchtfilter is vastgezet met een vleugelmoer; schroef deze moer los en neem het
deksel af. Schroef de vleugelmoer los die de luchtfilter vasthoudt en neem deze weg. Reinig de filter met een
ontvettend product op basis van water om het milieu niet te schaden. Laat de luchtfilter volledig drogen, hermonteer
deze en breng ook het deksel opnieuw aan. Waarschuwing! Laat de motor nooit draaien zonder zijn luchtfilter.
FILTER VAN DE BENZINETANK
U moet de toestand van de benzinefilter onderzoeken en deze reinigen om de 100 effectieve gebruiksuren
of om de 6 maanden.
Neem de tankdop en de benzinetankfilter af.
Reinig de filter met een ontvettend product op basis van water om het milieu niet te schaden.

9
ALGEMENE CONTROLE EN OPBERGING
Controleer regelmatig of alle bevestigingsschroeven voldoende sterk zijn aangespannen.
De trillingen kunnen deze mettertijd doen loskomen.
Opberging
Als u niet langer van plan bent uw pomp te gebruiken, althans minstens voor een maand, ga dan als volgt te werk
om deze op te bergen. Ledig alle resterende benzine in de tank en in de carburator; ga na of de tank goed leeg is.
Schroef de bougie los en giet ongeveer een eetlepel schone motorolie in het bevestigingsgat van de bougie. Plaats
de schakelaar van de motor in de uit-stand (OFF) als dit nog niet gebeurd is en trek voorzichtig met enkele rukken
aan het startersnoer; schroef de bougie opnieuw vast en trek nogmaals aan het snoer van de starter tot de zuiger in
compressiefase staat (u moet een weerstand voelen); houd dan op met trekken.
Plaats de pomp op een goed verluchte en droge plaats, beschermd door een zeil om te voorkomen dat stof en
ander vuil ophoopt op de pomp.

10
Technische kenmerken
MPG33HP7
Cilinderinhoud 212cm³
Output 3.2Kw / 3600min
-1
Kracht Hp 7.0Hp
Motor 4-takt motor
Onbelaste snelheid 3840 min
-1
Capaciteit van de brandstoftank 3.6 L
Type benzine Loodvrij 95 ou 98Oct
Maximale werkingsduur 2 h
Capaciteit van de olietank 600 ml
Maximaal debiet 550 L/min (33m³/h)
Maximale hoogte van het hoofd 30 m
Maximale zuigkracht diepte 7 m
Maximale partikelgrootte (verontreinigd water) 5 mm
Maximale temperatuur van de vloeistoffen 40°C
Maximale omgevingstemperatuur 40°C
Pijp montage 2’’ (50mm)
Type bougie F7RTC
Gewicht 22 Kg
Afmetingen 47 x 37.5 x 38 cm
Gegarandeerd L
WA
106 dB(A) K = 3 dB(A)
OPGELET ! Als de geluidsdruk de waarde van 85 dB(A) overschrijdt, is het nodig individuele
gehoorbeschermingsinrichtingen te dragen.
Gewogen kwadratische gemiddelde waarde de van toepassing zijnde standaard
: < 2.5 m/s²

2
Waarborg
MASTER PUMPS verleent voor dit apparaat een contractuele waarborg van 3 jaar vanaf de aankoopdatum. Deze
omvat de gratis vervanging van de defecte stukken of van het apparaat, naar vrije keuze van MASTERS PUMPS. In
ieder geval is de wettelijke waarborg van toepassing die alle gevolgen dekt van de fouten of verborgen gebreken
(artikel 1641 en volgende van het Burgerlijk Wetboek).
Om te zorgen dat deze waarborgen gelden, moet aan volgende voorwaarden worden voldaan:
• Het apparaat werd op gepaste wijze gehanteerd, volgens de instructies van de gebruiksaanwijzing.
• Er heeft geen enkele herstellingstest plaatsgevonden, noch door de klant, noch door een derde.
Een interventie onder waarborg verlengt de oorspronkelijke duur van de contractuele waarborg niet.
De turbine en de filter, die verslijtende onderdelen zijn, blijven uitgesloten van de waarborg.
Tijdens de waarborgperiode zal de naverkoopdienst tegen betaling de nodige herstellingen uitvoeren in gevolge
foutieve hanteringen.
In geval van slechte werking het product op eigen kosten opsturen met een kopie van de
aankoopbon en een beschrijving van het probleem, naar het adres van de naverkoopdienst die aan
de achterzijde staat vermeld.
We delen u uitdrukkelijk mee dat MASTER PUMPS niet verantwoordelijk is voor schade veroorzaakt door hun
apparaten, in de mate dat deze schade veroorzaakt is in gevolge een niet-conforme herstelling, in de mate dat
bij een vervanging van stukken de oorspronkelijke stukken van MASTER PUMPS niet werden gebruikt, of als de
herstelling niet werd uitgevoerd door de MASTER PUMPS naverkoopdienst of één van de naverkoopcenters erkend
door MASTER PUMPS. Dit geldt ook voor elke toevoeging van stukken en accessoires buiten deze aanbevolen
door MASTER PUMPS.
Naverkoopdienst
_ Een beschadigde schakelaar moet worden vervangen in onze werkplaatsen van de naverkoopdienst.
Klantenservice en gebruiksadviezen
Onze klantenservice beantwoordt uw vragen over reparatie en onderhoud van uw product en over

3
vervangingsonderdelen. Explosietekeningen en informatie over vervangingsonderdelen vindt u ook
op :www.eco-repa.com
Het MASTER PUMPS-team voor gebruiksadviezen helpt u graag bij vragen over onze producten en toebehoren :
Opslag
_ Reinig de volledige machine en haar accessoires zorgvuldig.
_ Berg de machine op buiten bereik van kinderen, in een stabiele en veilige positie, op een droge plaats met
gematigd klimaat, vermijd te hoge of te lage temperaturen.
_ Bescherm de machine tegen direct zonlicht. Bewaar ze indien mogelijk in het donker.
_ Sluit de machine niet op in plastic zakken, aangezien er vochtigheid kan gevormd worden in de zakken.
2023
GB ENGINE DRIVEN PUMP
Parts list
1 Petrol tank
2 Petrol tank cap
3 Petrol tap
4 Air filter cover
5 Engine switch
6 Gauge
7 Oil drain plug
8 Recoil starter
9 Suction inlet
10 Discharge outlet
11 Priming plug
12 Connector (pipe to pump)
1
2
3
8 4
5
12
9
10
11
12

4
General safety instructions
Filling the petrol tank
Warning! Do not smoke when you are filling the
petrol tank.
Only fill the petrol tank outside in a well ventilated
space.
First remember always to switch off the engine and
wait for it to cool. Reduce the tank pressure by slowly
loosening the filler cap.
Warning! If possible choose a place with hard
ground to fill the petrol tank, and then move the pump
at least 3 m from the filling point before starting the
engine.
Check that you have completely closed the petrol tank
plug, wipe off any drops of petrol that have fallen onto
the pump and check for any leaks.
Warning! If drops of petrol fall on your clothes,
notably your trousers, change them immediately.
Do not expect the drops to evaporate rapidly so that
you will not incur any risk.
Inflammable petrol remains on clothes much longer
than you think.
Warning! The pump vibrates considerably in operation,
risking further loosening of the petrol tank cap if it was
poorly tightened and ejecting petrol. To avoid these
situations that can start fires, tighten the tank cap as
hard as you can with your hands.
Before starting the engine, always check that the
petrol cap is sufficiently tight.
Check regularly for any petrol leaks, both when filling
the tank and during operation of the engine. If you
suspect a petrol leak,
do not start the engine before repairing it and wiping off
the traces of petrol.
Warning! Your pump's ignition circuit produces a very
low intensity electromagnetic field.
This field can disturb the operation of certain cardiac
stimulators. People wearing such a stimulator must
consult their doctor and the manufacturer of the
stimulator to find out it they can use this equipment
without fear. Do not try to increase the motor speed in
the hope of improving the output of your pump. You
risk generating abnormal electricity, in both frequency
and voltage, exposing the electrical load and the user
to damage.
Store the pump in a well ventilated place and first close
the petrol tank.
SPECIFIC INSTRUCTIONS FOR THE
WATER PUMP
Pump specific safety instructions.
Very great care is required.
7
6

2
This pump is only designed to take in clean or slightly
contaminated water (maximum particle size 35 mm). In
no circumstances can it be use to suck up corrosive
liquids, solvents, fuels or explosive substances
(kerosene, petrol, nitro-diluent), greases, oils or saline
solutions. Never try to suck up liquids whose
temperature exceeds 35°C.
Always switch off the engine before any cleaning
operation.
Do not try to modify or repair this pump yourself,
in any way. If you think that it must be repaired, take it
to an approved service centre or to the manufacturer.
This pump has not been designed for continuous
use or as a pump for a swimming pool or decorative
pool.
Take care that the pump does not suck up sediment or
mud that can be deposited at the bottom of containers
to be emptied; these items risk blocking the inlet and
outlet, so unnecessarily accelerating wear of the
impeller.
After any pumping operation, and especially pumping
chlorinated water, operate the pump for a few minutes
on clean water in order to expel any residues and
debris that may have accumulated in the outlet pipe
and the openings in the impeller casing.
Never run the pump dry so as not to accelerate wear
and cause overheating.
RESPIRATORY HAZARDS – DANGERS OF INHALATION
Dangers What can happen How to prevent the danger
Petrol engines
produce exhaust fumes
with toxic carbon monoxide.
Breathing the exhaust
fumes can lead to
serious injuries, even death.
Use the Water Pump in a clean, dry,
well ventilated place. Never use in a
closed place, for example
a garage, a locker, a storage area, a
hangar or any place lived in by
people or animals.
Keep children, animals and other
away from the Water Pump
operating area.
HAZARDS OF HOT SURFACES
Dangers What can happen How to prevent the danger
Contact with the engine
or hot parts
of the Water Pump
engine exhaust.
Contact with the engine or
hot parts of the Water Pump
engine exhaust.
During use only touch the control
surfaces of the Water Pump engine
exhaust. Always
keep children away from the Water
Pump engine exhaust. They are not
always aware of the dangers
presented by such equipment.

2
Symboles
Compliance with appropriate
safety standards.
Read the instruction manual
before starting the engine and
using your equipment.
WARNING
High temperature exhaust gas,
do not touch.
CHOKE
Start/stop valve
(ON/OFF). Pull to engage and
allow the engine to be started
when it is cold. When the
engine has started, push the
valve to disengage it.
Maximum declared acoustic
power level.
WARNING Fill
only with petrol.
Never fill the tank with diesel.
Allow the engine to
cool before opening the
petrol tank. The
petrol vapours are
very inflammable and
can burst into flame on
simply contacting the
hot surfaces of the
equipment.

2
WARNING
Fill the
engine sump with
an approved oil (SAE15W-40).
Check the oil
level regularly and
fill up to the
maximum level
mark.
Toxic fumes; Don’t operate
inside house.
Fuel is flammable, keep fire
away. Do not add
fuel with running machine.
When repairing, please picks
up the spark plug, then repairs
it according to the
operational manual.
The engine warm during
use. Be careful when using the
device.
no smoking
No fires
Starting
ACCESSORIES

1
CHECKING THE OIL LEVEL.
Warning: The water pump is delivered to you without oil in the engine, so you must add oil to it before using it.
Before checking the oil level or adding oil, check that the pump is resting on a stable flat surface, and the you have
stopped the engine.
Pull out the gauge and look at the marked oil level.
If it is below the minimum limit, fill the sump with a recommended oil, up to the upper limit. To check the oil level
insert the gauge into its housing, without screwing it.
Change the oil according to the recommendations in this manual or when it is contaminated.
Oil type: 4 stroke engine oil
FILLING THE PETROL TANK
Check the petrol level. If it is low, fill the tank with lead free petrol.
Check that the filter is in place in the tank pipe.
Recommended petrol: 95 or 98 Oct lead free petrol
CONNECTIONS

2
1. Fit a locking ring on one of the pipe ends (do the same for the other end).
2. Inset a rubber gasket into the locking/pipe end-fitting ring (do the same for the other end).
3. Fit the two pipe end-fittings onto the suction inlet and discharge outlet. Tighten well to avoid leaks but not
excessively so as not to damage the threads of the screw pitch.
4. Connect an appropriate length pipe to the suction and discharge end fittings; fix firmly with a clamp collar.
Check that the pipes are correctly fixed to avoid air and water leaks.
5. Mount the filter on the other end of the suction pipe and fix with a clamp collar.
CHOOSING A LOCATION FOR THE WATER PUMP
Place the pump as close as possible to the surface of the water to be sucked up, whilst complying with
all the conditions for complete safety.
Plunge the end of the suction tube with the filter into the water, avoiding as far as possible bending the pipe and
checking that the filter is neither totally nor partially blocked by sediments and other debris hindering its correct
operation. The pipe must penetrate at least 30 cm into the water to prevent excessive disturbance of the water that
could lead to air entering the pump.
Place the discharge tube in the place selected to collect the water sucked in, checking that there are neither loops
not sharp bends.
PRIMING THE PUMP
Before using your pump you must prime it with water so as to fill the suction tube and the impeller casing.
Remove the priming plug, obtain a suitable container and funnel, and pour in clean water until the suction pipe and
the impeller casing are full. Replace the priming plug, close it tightly but not excessively.
Do not operate the pump dry, you risk damaging it.

3

4
Operation
STARTING THE WATER PUMP
Turn the petrol tap to the Operating position (ON).
Press the engine start/stop switch (ON/OFF) to the operating position (ON " -").
Change the "Choke" starting valve to the Operating position (ON). The starting valve is not needed to start the motor
when it is hot.
Now close the pump with one hand.
ON
ON
OFF

5
Take hold of the recoil starter cord in the other hand and pull slowly until you feel resistance; the starter is then
engaged. Now pull the cord with a fast, powerful movement. If the motor does not start, begin again until it starts.
Do not let the cord return to its place quickly, but follow it to slow the return and so avoid damaging the starter.
If the engine does not start or starts then stops, check the oil level. The pump is actually fitted with an oil level
detector that stops the engine automatically when the oil level gets dangerously close to the minimum level.
Once the engine has started and has reached its normal speed, return the "Choke" starting valve to the stop
position (OFF).
The pump operates and the water circulates.
If you do not observe any water circulation, turn off the pump and check that the suction tube and impeller casing
are full of water (there is priming water) and that the sieve is not obstructed. Check that you have opened all the
taps-valves (as appropriate) and that the suction and discharge tubes are neither obstructed nor blocked by bends.
To adjust the engine speed after it has started, push the fuel lever to the high (marked by a hare), medium or low
position (marked by a tortoise). If you start the pump with the fuel lever in the low position, then push the lever to the
high position to increase the maximum pump flow rate.

6
STOPPING THE PUMP ENGINE
Press the pump start/stop switch (ON/OFF) to the stop position (OFF " -" ).
Once the engine has stopped, before storing your pump, move the petrol tap lever to the Stop position (OFF).
Maintenance
SPARK PLUG MAINTENANCE
You must check the spark plug every 50 hours of actual use. Look at the colour of the deposits accumulated on the
end of the spark plus, it must be "light brown". Remove the deposits with a stiff brush, preferably a brass wire brush.
Check the distance between the spark plug electrodes and adjust it if necessary. This distance must be between 0.7
and 0.8 mm.

7
REPLACING THE ENGINE OIL
Place the equipment on a stable, flat surface and allow the engine to run for several minutes. Then stop it.
Remove the oil filler cap.
Place a container under the engine to recover the used oil.
Check the condition of the filler cap, replace defective parts.
Screw the plug back in.
Pour new oil into the casing until the maximum level is reached.
AIR FILTER
You must examine the condition of the air filter and clean it every 50 hours of actual use or every three 3 months.
The air filter cover is fixed by a wing nut; unscrew this nut and remove the cover. Unscrew the wing nut holding the
air filter and remove the latter. To clean it, use a water based degreasing product so as not to harm the environment.
Leave the air filter to dry completely, refit it and refit its cover. Warning! Never operate the engine without its air filter.

8
PETROL TANK FILTER
You must examine the condition of the petrol filter and clean it every 100 hours of actual use or every three 6
months.
Remove the cap and filter from the petrol tank.
Clean the filter with a water based degreasing product so as not to harm the environment.
GENERAL INSPECTION AND STORAGE
Regularly check that all the fixing screws are sufficiently tight.
Vibrations can, with time, loosen them.
Storage
If you do not envisage using your pump, at least within a month, do the following to store it. Drain all the petrol
remaining in the tank and in the carburettor; check that none remains. Unscrew the sparking plug and pour about a
soup spoon of clean engine oil into the spark plug fixing hole. Place the engine switch to the stop position (OFF)
if this has not already been done and gently pull the starter cord several times in succession, screw the sparking
plug back in and pull the starter cord again to move the piston into the compression phase, (you will feel resistance);
then stop pulling.
Store the pump in a dry well ventilated place, protected by a sheet to prevent dust and other debris accumulating on
the pump.

9
Technical characteristics
MPG33HP7
Cylinder capacity 212cm³
Output 3.2Kw / 3600min
-1
Power Hp 7.0Hp
Engine 4-stroke engine
No load speed 3840 min-1
Petrol tank capacity 3.6 L
Petrol type unleaded 95 ou 98Oct
Maximum operating time 2h
Capacity of oil tank 600 ml
Maximum flow 550 L/min (33m³/h)
Maximum height of head 30 m
Maximum suction depth 7 m
Maximum particle size (contaminated water) 5 mm
Maximum liquid temperature 40°C
Maximum ambient temperature 40°C
Pipework connection 2’’ (50mm)
Sparking plug type F7RTC
Weight 22 Kg
Meas for the pump 47 x 37.5 x 38 cm
Garanty Acoustic L
WA
106 dB(A) K = 3 dB(A)
WARNING! When the acoustic pressure exceeds the value of 85 dB(A), it is necessary to wear personal ear
protection equipment.
Weighted root mean square acceleration according to relevant standard. : < 2.5 m/s²

2
Guarantee
MASTER PUMPS grant a 2-year contractual warranty for this equipment, counting from the date of purchase. It
includes free replacement of defective parts or the equipment, at the choice
of MASTER PUMPS. In all cases the legal warranty covering all the consequences of hidden faults or vices applies
(article 1641 and subsequent of the French Civil Code).
For these guarantees to be valid, the following conditions must be fulfilled:
• The equipment must have been suitably operated, according to the instructions in the manual.
• There has been on attempt at repair, neither by the customer, nor by a third party.
Work under warranty does not extend the initial duration of the contractual guarantee.
The turbine and the filter, which are wearing parts, are excluded from the guarantee.
During the guarantee period the After-Sales Service, in return for payment, will make the necessary repairs following
incorrect operation.
In the event of incorrect operation, please send the product carriage paid with a copy
of the purchase order and a description of the problem to the After Sales Department
address appearing on the other side.
We expressly inform you that MASTER PUMPS is not responsible for damage caused by its equipment, in so far as
this damage is caused by a non-compliant repair, in so far
as, in exchanging parts, original MASTER PUMPS parts have not been used, or if the repair has not been done by
the MASTER PUMPS After Sales Service or on of the MASTER PUMPS approved After Sales Service Centres.
This also applies for any addition of parts and accessories
other than those recommended by MASTER PUMPS.
After Sales Service
_ A damaged switch must be replaced in our after sales service workshops.
After-sales Service and Application Service
Our after-sales service responds to your questions concerning maintenance and repair of your product as well as
spare parts. Exploded views and information on spare parts can also be found under:www.eco-repa.com
MASTER PUMPS application service team will gladly answer questions concerning our products and their
accessories : [email protected]
Storage
_ Carefully clean the whole machine and its accessories.
_ Store it out of reach of children, in a safe, stable position stable, in a dry, temperate place, avoid excessively high
or low temperatures.
_ Protect from direct solar radiation. If possible, keep it in the dark.
_ Do not enclose it in plastic bags because damp could form there.
2022

3
IT MOTOPOMPA
Nomenclatura
1 Serbatoio della benzina
2 Tappo del serbatoio della benzina
3 Rubinetto della benzina
4 Coperchio del filtro dell’aria
5 Interruttore del motore
6 Indicatore del livello dell’olio
7 Tappo di svuotamento dell’olio
8 Avviatore su richiesta
9 Entrata di aspirazione
10 Uscita di evacuazione
11Tappo di avviamento
12 Connettore (tubo verso pompa)
1
2
3
8 4
5
7
6
12
9
10
11
12

4
Istruzioni generali di sicurezza
Riempimento del serbatoio benzina
Avvertenza! Non fumare durante il riempimento del
serbatoio. Riempire il serbatoio solo all’aperto, in un
luogo ben areato. Prima di procedere, spegnere il
motore e attendere che esso si raffreddi. Ridurre la
pressione del serbatoio svitando lentamente il tappo.
Avvertenza! Scegliere preferibilmente un luogo di
terra battuta per riempire il serbatoio e allontanare poi
la pompa di almeno tre metri dal punto di riempimento
prima di accendere il motore.
Assicurarsi che il tappo del serbatoio sia chiuso.
Asciugare le gocce di benzina cadute sulla pompa e
verificare che non vi siano eventuali perdite.
Avvertenza! Nel caso in cui alcune gocce di benzina
cadano sugli indumenti, in particolare sui pantaloni,
cambiarli immediatamente. È erroneo pensare che le
gocce evaporino rapidamente e che non vi siano rischi
o pericoli. La benzina infiammabile rimane sugli
indumenti più a lungo di quanto non si pensi.
Avvertenza! La pompa in funzione vibra molto e ciò
rischia di svitare il tappo del serbatoio se non avvitato
correttamente e di far fuoriuscire la benzina. Per
evitare tali situazioni e minimizzare il pericolo di
incendio, avvitare il tappo del serbatoio il più stretto
possibile. Prima di accendere il motore, verificare
sempre che il tappo sia sufficientemente avvitato.
Verificare regolarmente l’eventuale presenza di perdite
di benzina, sia durante il riempimento del serbatoio, sia
nel corso del funzionamento del motore. Se si sospetta
una perdita di benzina, non accendere il motore prima
di averla risolta e di avere asciugato i residui.
Avvertenza! Il circuito di accensione della pompa
produce un campo elettromagnetico di debole intensità
che potrebbe alterare il corretto funzionamento di
alcuni stimolatori cardiaci. Coloro che indossano un
tale dispositivo devono imperativamente consultare il
proprio medico di fiducia, nonché il costruttore, per
conoscere l’eventuale esistenza di rischi o pericoli.
Non tentare di aumentare la velocità del motore nella
speranza di migliorare la resa della pompa. Il rischio di
generare un’elettricità fuori scala, in frequenza come in
tensione, è molto elevato e ciò potrebbe recare dei
danni alla carica elettrica e all’utilizzatore.
Conservare la pompa in un luogo ben areato solo dopo
essersi assicurati di aver ben chiuso il serbatoio della
benzina.
ISTRUZIONI SPECIFICHE PER LA POMPA
Istruzioni di sicurezza specifiche per la pompa.
È richiesta una particolare attenzione.
La pompa è destinata ad aspirare esclusivamente
acqua pulita o leggermente contaminata (particelle di
dimensione non superiore a 35 mm). Non utilizzare per
aspirare liquidi corrosivi, solventi, combustibili,
sostanze esplosive (benzina, petrolio, nitrodiluenti),
grassi, olii o soluzioni saline. Non tentare di aspirare
liquidi la cui temperatura supera i 35° C.
Spegnere sempre il motore prima di qualsiasi
operazione di pulizia.
Non tentare di modificare o riparare l’apparecchio in
alcuna maniera. Nel caso in cui esso necessiti di un
intervento di riparazione, contattare un centro
autorizzato o il costruttore.
La pompa non è concepita per un utilizzo ininterrotto,
ovvero come pompa per piscina o stagno decorativo.
Assicurarsi che la pompa non aspiri sedimenti o fango
eventualmente depositati sul fondo dei contenitori da
svuotare; tali elementi rischiano di bloccare le aperture
di entrata e uscita, accelerando inutilmente l’usura del
generatore di impulsi.
Dopo l’utilizzo, e, in particolare, dopo l’impiego con
acqua clorata, far funzionare la pompa per alcuni
minuti con acqua pulita per rimuovere i residui e i detriti
eventualmente accumulati nel tubo di uscita e nelle
aperture del carter del generatore di impulsi.
Non utilizzare mai la pompa a secco per non
accelerarne l’usura e provocare surriscaldamenti.

2
RISCHI PER LA RESPIRAZIONE – PERICOLO DI INALAZIONE
Pericolo Potenziali conseguenze Come prevenire il pericolo
I motori a benzina producono fumi
tossici di monossido di carbonio.
.
La respirazione dei fumi di
scappamento può comportare
lesioni gravi o morte.
Utilizzare la pompa in un luogo
pulito, asciutto e ben areato. Non
utilizzare mai al chiuso, all’interno di
garage, rimesse, magazzini, hangar
o qualsiasi altro luogo abitato da
persone o animali.
Assicurarsi che bambini e animali
rimangano lontani dalla zona di
funzionamento della pompa.
RISCHI LEGATI ALLA PRESENZA DI SUPERFICI CALDE
Pericolo Potenziali conseguenze Come prevenire il pericolo
Contatto con il motore o con gli
elementi caldi della pompa.
.
Contatto con il motore o con gli
elementi caldi della pompa.
.
Durante l’utilizzo, toccare
unicamente le superficie di controllo
della pompa. Assicurarsi che
l’apparecchio resti fuori dalla portata
dei bambini poiché non hanno
coscienza dei possibili pericoli.

3
Simboli
Conformità alle norme di
sicurezza applicabili.
Leggere il manuale d’uso prima
di accendere il motore e di
utilizzare l’apparecchio.
ATTENZIONE
Gas di scarico ad alta
temperatura, non toccare.
STARTER
Starter di avvio/arresto
(ON/OFF). Tirare per innestarlo
e consentire di avviare il motore
quando è freddo. Una volta
acceso, spingere per
disinnestarlo.
Livello di potenza acustica
massima dichiarato.
ATTENZIONE! Riempire il
serbatoio esclusivamente con
benzina. Non utilizzare mai
diesel.
Lasciar raffreddare il motore
prima di aprire il serbatoio della
benzina. I vapori sono molto
infiammabili e possono
infiammarsi al solo contatto con
le superfici calde
dell’apparecchio.
ATTENZIONE!
Riempire il carter del motore
con olio autorizzato
(SAE15W-40).
Verificare regolarmente il livello
dell’olio e riempire fino a
raggiungere il limite massimo
indicato.
Fumi tossici;
Non utilizzare al chiuso.
Il carburante è infiammabile;
conservarlo a distanza di
sicurezza dalle fiamme. Non
aggiungere carburante quando
la macchina è in funzione.
Durante la riparazione, togliere
la candela e procedere alla
riparazione attenendosi al
manuale di istruzioni.
Il motore caldo durante
utilizzare. Prestare attenzione
quando si utilizza il dispositivo.

2
Vietato fumare
Vietato accendere fuochi
Accensione
ACCESSORI
VERIFICA DEL LIVELLO DELL’OLIO
Avvertenza: la motopompa è fornita senza olio nel motore. Aggiungere imperativamente l’olio prima di procedere
con il suo utilizzo.
Prima di verificare il livello dell’olio o prima di aggiungerne altro, assicurarsi che pompa sia collocata su una
superficie piana e stabile e che il motore sia spento.
Rimuovere l’indicatore e verificare il livello dell’olio.
Se è la di sotto della soglia minima, riempire il carter con la tipologia di olio raccomandata fino a raggiungere il limite
superiore. Per verificare il livello dell’olio, introdurre l’indicare senza avvitarlo.
Sostituire l’olio attenendosi alle indicazioni del presente manuale o in caso di contaminazione.

2
Tipo di olio: olio per motori a 4 tempi.
RIEMPIMENTO DEL SERBATIO DELLA BENZINA
Verificare il livello della benzina. Se è basso, riempire il serbatoio con della benzina senza piombo. Verificare che il
filtro sia inserito nella bocca del serbatoio.
Benzina raccomandata: benzina senza piombo a 95 o 98 ottani.
RACCORDI
1. Installare un anello di bloccaggio su uno dei bocchettoni del tubo (procedere allo stesso modo per l’altro
bocchettone).
2. Inserire un giunto in caucciù nell’anello di bloccaggio/bocchettone del tubo (procedere allo stesso modo
per l’altro bocchettone).
3. Montare i due bocchettoni del tubo sull’entrata d’aspirazione e l’uscita d’evacuazione. Stringere
saldamente per evitare il rischio di perdite, ma senza esagerare per non danneggiare la filettatura della
vite.
4. Collegare un tubo della lunghezza adatta sui bocchettoni di aspirazione ed evacuazione; fissare
saldamente con un collarino di bloccaggio. Verificare che i tubi siano ben fissati per evitare perdite d’aria e
di acqua.
5. Installare il filtro sull’altra estremità del tubo di aspirazione e fissare con un collarino di bloccaggio.

3
DOVE POSIZIONARE LA POMPA
Posizionare la pompa il più vicino possibile alla superficie dell’acqua da aspirare e verificare che tutte le condizioni
di sicurezza siano rispettate.
Immergere l’estremità del tubo di aspirazione con il filtro nell’acqua, evitando di piegare il tubo e assicurandosi che il
filtro non sia intasato, né totalmente né parzialmente, da sedimenti o altri residui che ne impediscono il corretto
funzionamento. Il tubo deve penetrare di almeno 30 cm nell’acqua al fine di prevenire una perturbazione eccessiva
del liquido che potrebbe comportare l’entrata di aria nella pompa.
Posizionare il tubo di evacuazione laddove si intende recuperare l’acqua aspirata verificando non vi siano piegature
o attorcigliamenti bruschi.
AVVIO DELLA POMPA
Prima di utilizzare la pompa, riempire il tubo di aspirazione e il carter del generatore di impulsi con dell’acqua.
Rimuovere il tappo, munirsi di un contenitore e di un imbuto appropriato e versare dell’acqua fino a riempire il tubo di
aspirazione e il carter del generatore di impulsi. Riposizionare il tappo, stringere saldamente, ma senza esagerare.
Non azionare la pompa a secco per evitare di danneggiarla.

4
Utilizzo
AVVIO DELLA POMPA
Girare la leva del rubinetto della benzina su ON.
Posizionare l’interruttore di avvio/arresto (ON/OFF) del motore su ON “ –“.
Portare lo starter in posizione di avvio (ON). Lo starter non è utile per avviare il motore se caldo.
Mantenere saldamente la pompa con una mano.
ON
ON
OFF

5
Afferrare la corta dell’avviatore con l’altra mano e tirare lentamente fino a sentire una certa resistenza. Ciò indica
che il dispositivo è ingranato. Tirare poi la corda con un movimento deciso e rapido. Se il motore non si avvia,
ripetere fino ad avere successo. Non lasciare che la corda torni in posizione troppo rapidamente, bensì
accompagnarla per rallentarne il percorso e per evitare danni all’avviatore.
Se il motore non parte o parte per poi spegnersi, verificare il livello dell’olio. La pompa è, infatti, dotata di un sensore
che arresta automaticamente il motore quando il livello dell’olio si avvicina pericolosamente al livello minimo.
Una volta acceso il motore e raggiunto la sua velocità normale, posizionare lo starter su OFF.
La pompa funzione e l’acqua circola.
Se ciò non avviene, spegnere la pompa e verificare che il tubo di aspirazione e il carter del generatore di impulsi
siano pieni di acqua (presenza di un autoinnesco) e che la griglia di aspirazione non sia ostruita. Verificare di aver
aperto, nella fattispecie, tutte le valvole a rubinetto (nella fattispecie) e che i tubi di aspirazione e di evacuazione non
siano né ostruiti né bloccati dai gomiti.
Per regolare la velocità del motore una volta avviato, portare in alto la leva dell’acceleratore (posizione indicata da
una lepre), in posizione intermedia o in basso (posizione indicata d auna tartaruga), Se la pompa è avviata con la
leva dell’acceleratore posizionata in basso, sollevare quest’ultima per aumentare al massimo la portata della
pompa.

6
ARRESTO DEL MOTORE DELLA POMPA
Posizionare l’interruttore di avvio/arresto (ON/OFF) della pompa su OFF “O”.
Una volta arrestato il motore, prima di procedere allo stoccaggio della pompa, girare la leva del rubinetto della
benzina su OFF.

7
Manutenzione
MANUTENZIONE DELLA CANDELA
Verificare lo stato della candela ogni 50 ore di utilizzo effettivo. Osservare il colore dei depositi accumulati
all’estremità della candela; deve essere “marrone chiaro”. Rimuovere i residui utilizzando una spazzola rigida,
preferibilmente in fili di ottone. Verificare che la distanza tra gli elettrodi della candela sia compresa tra 0,7 e 0,8 mm.
.
SOSTITUZIONE DELL’OLIO MOTORE
Posizionare la pompa su una superficie piana e stabile e far girare il motore per alcuni minuti., poi spegnerlo.
Rimuovere il tappo dell’olio.
Posizionare un recipiente sotto il motore per recuperare l’olio esausto.
Verificare lo stato del tappo; sostituire le parti difettose.
Riavvitare il tappo.
Versare l’olio nuovo nel carter fino a raggiungere il livello massimo.

8
FILTRO DELL’ARIA
Esaminare lo stato del filtro dell’aria e pulirlo ogni 50 ore di utilizzo effettivo o ogni tre mesi.
Il coperchio del filtro dell’aria è fissato con un dado a farfalla; svitare il dado e rimuovere il coperchio.
Svitare il dado a farfalla mantenendo il filtro e rimuovere quest’ultimo.
Per pulirlo, utilizzare un prodotto sgrassante a base d’acqua per non danneggiare l’ambiente.
Lasciare che il filtro si asciughi completamente, rimontarlo e riposizionare il coperchio.
Attenzione! Non accendere mai il motore senza filtro dell’aria.
FILTRO DEL SERBATOIO BENZINA
Esaminare lo stato del filtro e pulirlo ogni 100 ore di utilizzo effettivo o ogni sei mesi.
Rimuovere il tappo e il filtro dal serbatoio.
Pulire il filtro con un prodotto sgrassante a base d’acqua nel rispetto dell’ambiente.

9
CONTROLLO GENERALE E STOCCAGGIO
Verificare regolarmente che tutte le viti di fissaggio siano sufficientemente avvitate.
Le vibrazioni possono, con il tempo, allentarle.
Stoccaggio
Se non si intende utilizzare la pompa prima di un mese, procedere come segue. Svuotare tutta la benzina rimanente
nel serbatoio e nel carburatore; verificare che entrambi siano completamente vuoti. Svitare la candela e versare
circa un cucchiaio pieno di olio per motore nel foro di fissaggio della candela. Posizionare l’interruttore del motore in
posizione di arresto (OFF) nel caso in cui non sia già stato fatto e tirare delicatamente la corda dell’avviatore più
volte di seguito; riavvitare la candela e tirare ancora una volta la corda dell’avviatore fino a quando il pistone non
entra in fase di compressione; quando si avverte una certa resistenza, smettere di tirare.
Conservare la pompa in un luogo ben areato e asciutto, proteggere con un telo per evitare l’accumulo di polvere e
altri residui sull’apparecchio.

10
Caratteristiche tecniche
MPG33HP7
Cilindrata 212cm³
uscita 3.2Kw / 3600min
-1
Power Hp 7.0Hp
Motore Motore a 4 tempi
Velocità a vuoto 3840 min
-1
Capacità del serbatoio benzina 3.6 L
Tipo di benzina senza piombo 95 ou 98Oct
Durata operativa massima 2 h
Capacità del serbatoio dell'olio 600 ml
Portata massima 550 L/min (33m³/h)
Altezza massima di rifornimento 30 m
Profondità massima di aspirazione 7 m
Dimensione massima delle particelle (acqua contaminata) 5 mm
Temperatura massima dei liquidi 40°C
Temperatura ambientale massima 40°C
Raccordo 2’’ (50mm)
Tipo di candela F7RTC
Peso 22 Kg
Dimensioni 47 x 37.5 x 38 cm
Garantito acustica L
WA
106 dB(A) K = 3 dB(A)
ATTENZIONE! Quando la pressione acustica supera il valore di 85 dB(A), è necessario indossare dispositivi
di protezione oculari.
Valore quadratico medio ponderato di accelerazione, misurati in conformità allo standard applicabile : < 2.5 m/s²

2
Garanzia
MASTER PUMPS accorda un contratto di garanzia di 3 anni dalla data di acquisto che comprende, a sua libera
discrezione, la sostituzione gratuita delle parti difettose o dell’intera macchina. In ogni caso, si applica la garanzia
legale che copre tutte le conseguenze derivanti da guasti o vizi nascosti (articolo 1641 e successivi del Codice
Civile).
Affinché tale garanzia sia valida, devono essere rispettate le seguenti garanzie:
• l’apparecchio deve essere stato manipolato in modo appropriato, ossia in conformità con le istruzioni d’uso;
• non deve esservi stato alcun tentativo di riparazione, né per mano del cliente, né per mano di terzi.
Un intervento in garanzia non prolunga la durata iniziale della stessa.
La turbina e il filtro sono esclusi dalla garanzia a causa della loro natura usurabile.
Durante il periodo di garanzia, il Servizio Post-Vendita effettuerà interventi di riparazione a seguito di utilizzo non
corretto a titolo oneroso.
In caso di cattivo funzionamento, spedire, a proprio carico, il prodotto all’indirizzo del
Servizio Post-Vendita indicato sul retro, con una copia della prova di acquisto e una
descrizione del problema.
MASTER PUMPS non è responsabile dei danni causati dai suoi apparecchi se tali danni sono generati da interventi
di riparazione non conformi o non effettuati dal Servizio Post-Vendita o presso centri autorizzati o dalla sostituzione
dei componenti con parti non originali. Ciò è valido anche per l’utilizzo di parti e accessori non raccomandati da
MASTER PUMPS.
Servizio post-vendita
_ Un interruttore danneggiato deve essere sostituito presso i nostri laboratori del servizio post-vendita.
Assistenza clienti e consulenza impieghi
Il servizio di assistenza risponde alle Vostre domande relative alla riparazione ed alla manutenzione del Vostro
prodotto nonché concernenti le parti di ricambio. Disegni in vista esplosa ed informazioni relative alle parti di
ricambio sono consultabili anche sul sito: www.eco-repa.com
Il team MASTER PUMPS che si occupa della consulenza impieghi vi aiuterà in caso di domande relative ai nostri
prodotti ed ai loro accessori : [email protected]
Conservazione
_ Pulire accuratamente la macchina e gli accessori.
_ Tenere lontano dalla portata dei bambini, in una posizione stabile e sicura, in un luogo asciutto e temperato; evitare
temperatura troppo elevate o troppo basse.
_ Proteggere dalla luce diretta del sole; conservare, se possibile, al buio.
_ Non chiudere in un sacco di plastica per evitare che la formazione di umidità.
2023

3
LT BENZININIS VANDENS SIURBLYS
Dalių sąrašas
1 benzino bakas
2 Benzino bako dangtelis
3 Benzino čiaupas
4 Oro filtro dangtelis
5 Variklio jungiklis
6 matuoklis
7 Alyvos išleidimo kaištis
8 Atatrankos starteris
9 Siurbimo anga
10 Išleidimo anga
11 Užpildymo kaištis
12 Jungtis (vamzdis prie siurblio)
7
6
4
12
3
8
5

4
Bendrosios saugos instrukcijos
Benzino bako pildymas
Įspėjimas! Nerūkykite, kai pildote
benzino bakas.
Benzino baką pilkite tik lauke, gerai vėdinamoje vietoje.
Pirmiausia nepamirškite visada išjungti variklį ir
palaukite, kol atvės. Sumažinkite bako slėgį lėtai atlaisvindami užpildymo dangtelį.
Įspėjimas! Jei įmanoma, pasirinkite vietą su kietu
žemę, kad užpildytumėte benzino baką, o tada pastumkite siurblį bent 3 m nuo pildymo vietos prieš
užvesdami variklį.
Patikrinkite, ar visiškai uždarėte benzino bako kamštį, nuvalykite ant siurblio nukritusius benzino lašus ir
patikrinkite, ar nėra nuotėkio.
Įspėjimas! Jei benzino lašai nukris ant jūsų drabužių,
ypač kelnes, nedelsdami jas pakeiskite.
Nesitikėkite, kad lašai greitai išgaruos, kad nekiltų jokios rizikos.
Degus benzinas ant drabužių išlieka daug ilgiau, nei manote.
Įspėjimas! Veikdamas siurblys stipriai vibruoja, todėl, jei jis buvo prastai priveržtas, gali dar labiau
atsilaisvinti degalų bako dangtelis ir išleisti benziną. Kad išvengtumėte tokių situacijų, dėl kurių gali kilti
gaisras, kiek įmanoma stipriau priveržkite bako dangtelį rankomis.
Prieš užvesdami variklį, visada patikrinkite, ar
benzino dangtelis yra pakankamai sandarus.
Reguliariai tikrinkite, ar nėra benzino nuotėkio, tiek pilant baką, tiek varikliui veikiant. Jei įtariate benzino
nuotėkį,
neužveskite variklio prieš jį suremontavus ir nenuvalius benzino pėdsakų.
Įspėjimas! Jūsų siurblio uždegimo grandinė sukuria labai mažo intensyvumo elektromagnetinį lauką.
Šis laukas gali sutrikdyti tam tikrų širdies stimuliatorių veikimą. Žmonės, dėvintys tokį stimuliatorių, turi
pasitarti su savo gydytoju ir stimuliatoriaus gamintoju, kad išsiaiškintų, ar gali be baimės naudotis šia
įranga. Nebandykite padidinti variklio greičio, tikėdamiesi pagerinti siurblio galią. Tu
rizikuoja generuoti neįprastą elektros tiekimą tiek dažniu, tiek įtampa, sukeldama žalą elektros apkrovai
ir naudotojui.
Laikykite siurblį gerai vėdinamoje vietoje ir pirmiausia uždarykite benzino baką.
SPECIALIOS INSTRUKCIJOS
VANDENS SIURBLYS
Siurblio specialios saugos instrukcijos.
Reikalinga labai didelė priežiūra.
Šis siurblys skirtas siurbti tik švarų arba šiek tiek užterštą vandenį (maksimalus dalelių dydis 35 mm).
Jokiomis aplinkybėmis jis negali būti naudojamas ėsdinančioms medžiagoms siurbti

5
skysčiai, tirpikliai, kuras ar sprogios medžiagos (žibalas, benzinas, azoto skiediklis), tepalai, alyvos ar
druskos tirpalai. Niekada nemėginkite siurbti skysčių, kurių temperatūra viršija 35°C.
Prieš valydami visada išjunkite variklį
operacija.
Nebandykite patys modifikuoti ar remontuoti šio siurblio,
bet kokiu būdu. Jei manote, kad jį reikia taisyti, nuneškite jį į patvirtintą techninės priežiūros centrą arba
gamintoją.
Šis siurblys nėra skirtas nuolatiniam darbui
naudoti arba kaip baseino ar dekoratyvinio baseino siurblį.
Pasirūpinkite, kad siurblys neįsiurbtų nuosėdų arba
purvas, kuris gali būti nusodintas į ištuštinti skirtų konteinerių dugną; šie elementai gali užblokuoti
įleidimo angą ir
išleidimo anga, todėl be reikalo spartėja sparnuotės susidėvėjimas.
Po bet kokios siurbimo operacijos, ypač chloruoto vandens siurbimo, keletą minučių paleiskite siurblį ant
švaraus vandens, kad pašalintumėte likučius ir šiukšles, kurios galėjo susikaupti išleidimo vamzdyje ir
sparnuotės korpuso angose.
Niekada nenaudokite siurblio sausai, kad nepagreitėtų susidėvėjimo ir neperkaistų.
PAVOJUS KVĖPAVIMO TAKAMS – PAVOJUS ĮKVĖPUS
Pavojai Kas gali atsitikti Kaip išvengti pavojaus
Benzininiai varikliai
gaminti išmetamąsias dujas
su toksišku anglies monoksidu.
Kvėpuojant išmetimą
garai gali sukelti
rimtų sužalojimų, net mirties.
Vandens siurblį naudokite švarioje,
sausoje, gerai vėdinamoje vietoje.
Niekada nenaudokite, pavyzdžiui,
uždaroje vietoje
garažas, spintelė, sandėliukas,
angaras ar bet kuri vieta, kurioje
gyvena žmonės ar gyvūnai.
Laikykite vaikus, gyvūnus ir kitus
dalykus toliau nuo vandens siurblio
veikimo zonos.
KARŠTŲ PAVIRŠIŲ PAVOJAI
Pavojai Kas gali atsitikti Kaip išvengti pavojaus
Prisilietimas su varikliu
arba karštomis dalimis
vandens siurblio
variklio išmetimuju duju vietoje
Prisilietimas su varikliu arba
karštos vandens siurblio dalys
variklio išmetimo dujos .
Naudodami lieskite tik vandens
siurblio variklio valdiklio sistemos
valdymo paviršius. Visada
saugokite vaikus nuo vandens
siurblio variklio išmetamųjų dujų. Jie
ne visada žino apie tokios įrangos
keliamus pavojus.

6
Simboliai
Atitiktis atitinkamoms
saugos standartus.
Prieš užvesdami variklį ir
naudodami įrangą, perskaitykite
naudojimo instrukciją.
ĮSPĖJIMAS
Aukštos temperatūros
išmetamosios dujos,
nelieskite.
UŽSPRAUSTI
Start/stop vožtuvas
(ĮJUNGTI IŠJUNGTI).
Patraukite, kad įjungtumėte ir
leiskite varikliui užvesti, kai
jis šaltas. Kai variklis
užsiveda, paspauskite
vožtuvą, kad jį išjungtumėte.
Didžiausias deklaruotas
akustinės galios lygis.
ĮSPĖJIMAS Užpildykite
tik su benzinu.
Niekada nepildykite į baką
dyzelino.
Leiskite varikliui veikti
atvėsinkite prieš atidarydami
benzino bakas. The
benzino garai yra
labai degus ir
gali užsidegti
tiesiog susisiekus su
karšti paviršiai
įranga.
ĮSPĖJIMAS
Užpildykite
variklio karteris su
patvirtinta alyva (SAE15W-40).
Patikrinkite alyvą
lygiu reguliariai ir
užpildyti iki
maksimalus lygis
ženklas.
Toksiški dūmai; Nedirbkite
namuose.
Kuras yra degus, saugokite
ugnį. Nepridėti
kuro su veikiančia mašina.
Remontuodami paimkite
uždegimo žvakę, tada
suremontuokite ją pagal
eksploatavimo vadovas.
Variklis įkaista naudojimo metu
. Būkite atsargūs naudodami
įrenginį.
Nerūkyti

2
Nenaudoti ugnies šalia.
PALEIDIMAS]
Priedai
ALYVOS LYGIO TIKRINIMAS.
Įspėjimas: vandens siurblys jums pristatomas be alyvos variklyje, todėl prieš naudodami jį turite įpilti
alyvos.
Prieš tikrindami alyvos lygį arba pildami alyvą, patikrinkite, ar siurblys yra ant stabilaus lygaus paviršiaus
ir ar išjungėte variklį.
Ištraukite matuoklį ir pažiūrėkite į pažymėtą alyvos lygį.
Jei jis yra žemiau minimalios ribos, pripildykite karterio rekomenduojamos alyvos iki viršutinės ribos.
Norėdami patikrinti alyvos lygį, įkiškite matuoklį į jo korpusą jo neprisukdami.
Pakeiskite alyvą pagal šiame vadove pateiktas rekomendacijas arba kai ji užteršta.

2
Alyvos tipas: 4 taktų variklio alyva
Benzino bako PILDYMAS
Patikrinkite benzino lygį. Jei jo mažai, į baką įpilkite bešvinio benzino.
Patikrinkite, ar filtras yra bako vamzdyje
Rekomenduojamas benzinas: 95 arba 98 benzinas be švino
PAJUNGIMAS
1. Ant vieno iš vamzdžio galų uždėkite fiksavimo žiedą (padarykite tą patį su kitu galu).
2. Į fiksavimo/vamzdžio galo tvirtinimo žiedą įstatykite guminį tarpiklį (padarykite tą patį su kitu galu).
3. Sumontuokite dvi vamzdžio galų jungtis ant įsiurbimo ir išleidimo angos. Gerai priveržkite, kad
išvengtumėte nuotėkio, bet ne per daug, kad nepažeistumėte varžto žingsnio sriegių.
4. Prijunkite tinkamo ilgio vamzdį prie įsiurbimo ir išleidimo galų jungiamųjų detalių; tvirtai pritvirtinkite
spaustuku. Patikrinkite, ar vamzdžiai tinkamai pritvirtinti, kad išvengtumėte oro ir vandens nuotėkio.
5. Sumontuokite filtrą kitame siurbimo vamzdžio gale ir pritvirtinkite spaustuku.

3
VANDENS SIURBLIO VIETOS PASIRINKIMAS
Siurblį pastatykite kuo arčiau siurbiamo vandens paviršiaus, laikydamiesi reikalavimų
visos sąlygos visiškam saugumui.
Įmerkite siurbimo vamzdžio galą su filtru į vandenį, kiek įmanoma nelenkdami vamzdžio ir patikrindami,
ar filtro nei visiškai, nei iš dalies neužsikimšo nuosėdos ir kitos šiukšlės, trukdančios tinkamai veikti.
Vamzdis turi prasiskverbti į vandenį bent 30 cm, kad būtų išvengta pernelyg didelio vandens trikdymo,
dėl kurio į siurblį galėtų patekti oras.
Įstatykite išleidimo vamzdelį į pasirinktą vietą įsiurbtam vandeniui surinkti ir patikrinkite, ar nėra nei kilpų,
nei aštrių posūkių.
SIURBLIO UŽPILDYMAS
Prieš naudodami siurblį, užpildykite jį vandeniu, kad užpildytumėte siurbimo vamzdį ir sparnuotės
korpusą.
Nuimkite užpildymo kamštį, paimkite tinkamą indą ir piltuvą ir pilkite švaraus vandens, kol prisipildys
siurbimo vamzdis ir sparnuotės korpusas. Pakeiskite užpildymo kaištį, sandariai uždarykite, bet ne per
daug.
Nenaudokite siurblio sausai, nes galite jį sugadinti.

4
VEIKIMAS
VANDENS SIURBLIO PALEIDIMAS
Pasukite benzino čiaupą į darbo padėtį (ON).
Paspauskite variklio užvedimo/išjungimo jungiklį (ON/OFF) į darbo padėtį (ON " -").
Paleiskite užvedimo vožtuvą „Droselis“ į darbo padėtį (ON). Paleidimo vožtuvas nereikalingas norint
paleisti variklį, kai jis karštas.
Dabar uždarykite siurblį viena ranka.
ON
OFF
ON

5
Kitoje rankoje laikykite už atatrankos starterio laido ir lėtai traukite, kol pajusite pasipriešinimą; tada
įjungiamas starteris. Dabar traukite laidą greitu ir galingu judesiu. Jei variklis neužsiveda, pradėkite iš
naujo, kol užsives.
Neleiskite laidui greitai grįžti į savo vietą, bet sekite jį, kad sulėtintumėte grįžimą ir nepažeistumėte
starterio.
Jei variklis neužsiveda arba užsiveda, tada sustoja, patikrinkite alyvos lygį. Siurblys iš tikrųjų turi alyvos
lygio detektorių, kuris automatiškai sustabdo variklį, kai alyvos lygis pavojingai priartėja prie minimalaus
lygio.
Varikliui užvedus ir pasiekus įprastą greitį, grąžinkite „Choke“ užvedimo vožtuvą į sustabdymą
padėtis (OFF).
Siurblys veikia ir vanduo cirkuliuoja.
Jei nepastebite jokios vandens cirkuliacijos, išjunkite siurblį ir patikrinkite, ar siurbimo vamzdis ir
sparnuotės korpusas yra pilni vandens (yra pripildymo vandens) ir ar sietelis neužsikimšęs. Patikrinkite,
ar atidarėte visus čiaupus-vožtuvus (jei reikia) ir ar siurbimo bei išleidimo vamzdžiai nėra užkimšti ir
neužblokuoti vingių.
Norėdami reguliuoti variklio sūkius jam užvedus, pastumkite degalų svirtį į aukštą (pažymėta kiškiu),
vidutinę arba žemą padėtį (pažymėta vėžliu). Jei paleidžiate siurblį, kai degalų svirtis yra žemesnėje
padėtyje, tada paspauskite svirtį į aukštą padėtį, kad padidintumėte maksimalų siurblio srautą.

6
SIurblio VARIKLIO SUSTABDYMAS
Paspauskite siurblio paleidimo/išjungimo jungiklį (ON/OFF) į sustabdymo padėtį (OFF " -" ).
Sustojus varikliui, prieš padėdami siurblį, perkelkite benzino čiaupo svirtį į Stop padėtį (OFF).
Priežiūra
UŽDEGIMO ŽVAKLIŲ PRIEŽIŪRA
Turite patikrinti uždegimo žvakę kas 50 faktinio naudojimo valandų. Pažiūrėkite į kibirkštinio pliuso gale
susikaupusių nuosėdų spalvą, ji turi būti „šviesiai ruda“. Pašalinkite nuosėdas standžiu šepečiu,
geriausia žalvariniu vieliniu šepečiu. Patikrinkite atstumą tarp uždegimo žvakių elektrodų ir, jei reikia,
sureguliuokite. Šis atstumas turi būti nuo 0,7 iki 0,8 mm.

7
VARIKLIO ALYVOS KEITIMAS
Padėkite įrangą ant stabilaus, lygaus paviršiaus ir leiskite varikliui veikti keletą minučių. Tada sustabdyk.
Nuimkite alyvos pildymo angos dangtelį.
Padėkite po varikliu indą panaudotai alyvai surinkti.
Patikrinkite užpildymo dangtelio būklę, pakeiskite sugedusias dalis.
Vėl įsukite kištuką.
Į korpusą pilkite naujos alyvos, kol pasieksite didžiausią lygį.
ORO FILTRAS
Turite patikrinti oro filtro būklę ir valyti jį kas 50 faktinio naudojimo valandų arba kas tris 3 mėnesius. Oro
filtro dangtelis tvirtinamas sparnine veržle; atsukite šią veržlę ir nuimkite dangtelį. Atsukite sparninę
veržlę, laikančią oro filtrą, ir nuimkite pastarąjį. Valymui naudokite vandens pagrindu pagamintą riebalų
šalinimo priemonę, kad nepakenktumėte aplinkai.
Palikite oro filtrą visiškai išdžiūti, uždėkite jį atgal ir uždėkite dangtelį. Įspėjimas! Niekada nenaudokite
variklio be oro filtro.
Benzino bako FILTRAS
Turite patikrinti benzino filtro būklę ir išvalyti jį kas 100 faktinio naudojimo valandų arba kas tris 6
mėnesius.
Nuimkite dangtelį ir filtrą nuo benzino bako.
Išvalykite filtrą vandens pagrindo riebalų šalinimo priemone, kad nepakenktumėte aplinkai.

8
BENDRA APŽIŪRA IR SANDĖLIAVIMAS
Reguliariai tikrinkite, ar visi tvirtinimo varžtai pakankamai priveržti.
Vibracija laikui bėgant gali juos atlaisvinti.
Sandėliavimas
Jei neketinate naudoti siurblio bent per mėnesį, atlikite šiuos veiksmus, kad jį saugotumėte. Išleiskite
visą bake ir karbiuratoriuje likusį benziną; patikrinkite, ar nieko nelieka. Atsukite uždegimo žvakę ir į
žvakės tvirtinimo angą įpilkite maždaug šaukštą švarios variklio alyvos. Nustatykite variklio jungiklį į
sustabdymo padėtį (OFF)
jei to dar nepadarėte, kelis kartus iš eilės švelniai patraukite už starterio laido, vėl įsukite uždegimo
žvakę ir vėl patraukite už starterio laidą, kad stūmoklis pereitų į suspaudimo fazę (pajusite
pasipriešinimą); tada nustokite traukti.
Siurblį laikykite sausoje, gerai vėdinamoje vietoje, apsaugotoje paklode, kad ant siurblio nesikauptų
dulkės ir kitos šiukšlės.

9

10

11

12
Déclaration CE de conformité
MASTER PUMPS certifie que les machines :
POMPE THERMIQUE DE SURFACE
“
MPG33HP7”
sont en conformité avec les normes
suivantes :
EN 809 :1998/A1 :2009 - AfPS GS 2014 :01 PAK
EN 55012 :2007/A1 :2009 - EN 61000-6-1 :2007
EN ISO 3744 :1995
Et satisfont aux directives suivantes :
2006/42/EC(MD) - 2014/30/EU(EMC)
2005/88/CE(NOISE) - Régulation 2017/656(Euro V)
Belgique 09/2023
Mr Joostens Pierre
Président-Directeur Général
MASTER PUMPS , rue de Gozée 81, 6110 Montigny-le-Tilleul, Belgique
EG-verklaring van overeenstemming
MASTER PUMPS verklaart dat de machines:
THERMISCHE OPPERVLAKTEPOMP
“
MPG33HP7”
in overeenstemming zijn met de volgende
normen:
EN 809 :1998/A1 :2009 - AfPS GS 2014 :01 PAK
EN 55012 :2007/A1 :2009 - EN 61000-6-1 :2007
EN ISO 3744 :1995
En voldoen aan de volgende richtlijnen:
2006/42/EC(MD) - 2014/30/EU(EMC)
2005/88/EG(NOISE) - Régulation 2017/656(Euro V)
België 09/2023
Mr Joostens Pierre
Directeur
MASTER PUMPS , rue de Gozée 81, 6110 Montigny-le-Tilleul, Belgique
EC declaration of conformity
MASTER PUMPS declares that the machines:
ENGINE DRIVEN PUMP
“
MPG33HP7”
have been designed in compliance with the
following standards:
EN 809 :1998/A1 :2009 - AfPS GS 2014 :01 PAK
EN 55012 :2007/A1 :2009 - EN 61000-6-1 :2007
EN ISO 3744 :1995
And in accordance with the following directives:
2006/42/EC(MD) - 2014/30/EU(EMC)
2005/88/EC(NOISE) - Régulation 2017/656(Euro V)
Belgium 09/2023
Mr Joostens Pierre
Director
MASTER PUMPS , rue de Gozée 81, 6110 Montigny-le-Tilleul, Belgique
EG-Konformitätserklärung
MASTER PUMPS erklärt hiermit, daß der
GASOLENE WATER PUMP
“
MPG33HP7”
entsprechend den Normen:
EN 809 :1998/A1 :2009 - AfPS GS 2014 :01 PAK
EN 55012 :2007/A1 :2009 - EN 61000-6-1 :2007
EN ISO 3744 :1995
And in accordance with the following directives:
2006/42/EC(MD) - 2014/30/EU(EMC)
2005/88/EC(NOISE) - Régulation 2017/656(Euro V)
Belgium 09/2023
Mr Joostens Pierre
Direktor
MASTER PUMPS , rue de Gozée 81, 6110 Montigny-le-Tilleul, Belgique
SN : 2023.09 :001~220
11.09.15063
Date d’arrivée - Aankomstdatum - Date of arrival Ankunftsdatum - Data di arrivo:
Fecha de llegada : 10/12/2023
Année de production - Productiejaar - Year of production – Fertigungsjahr
Anno di produzione
-
Año de fabricación
: 2
02
3

13
Dichiarazione CE di conformità
MASTER PUMPS dichiara che le macchine:
MOTOPOMPA
“
MPG33HP7”
sono state concepite in conformità con i
seguenti standard:
EN 809 :1998/A1 :2009 - AfPS GS 2014 :01 PAK
EN 55012 :2007/A1 :2009 - EN 61000-6-1 :2007
EN ISO 3744 :1995
E con le seguenti direttive:
2006/42/EC(MD) - 2014/30/EU(EMC)
2005/88/EC(NOISE) - Régulation 2017/656(Euro V)
Belgio 09/2023
Mr Joostens Pierre,
Direttore
MASTER PUMPS , rue de Gozée 81, 6110 Montigny-le-Tilleul, Belgique
Declaración CE de conformidad
MASTER PUMPS declara que las máquinas:
GASOLENE WATER PUMP
“
MPG33HP7”
han sido diseñadas de acuerdo con las
siguientes normas:
EN 809 :1998/A1 :2009 - AfPS GS 2014 :01 PAK
EN 55012 :2007/A1 :2009 - EN 61000-6-1 :2007
EN ISO 3744 :1995
E con le seguenti direttive:
2006/42/EC(MD) - 2014/30/EU(EMC)
2005/88/EC(NOISE) - Régulation 2017/656(Euro V)
Belgio 09/2023
Mr Joostens Pierre
Director
MASTER PUMPS , rue de Gozée 81, 6110 Montigny-le-Tilleul, Belgique

14
81, rue de Gozée
6110 Montigny-le-Tilleul
Belgique
Tél : 0032 71 29 70 70
S.A.V
sav@eco-repa.com
Fabriqué en Chine - Vervaardigd in China - Made in China - Hergestellt in China
Fabbricato in Cina - Pagaminta Kinijoje
Fabriquant – Fabrikant - Manufacturer - Hersteller – Produttore - Gamintojas : ELEM
2023
-
 1
1
-
 2
2
-
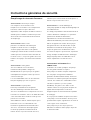 3
3
-
 4
4
-
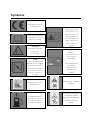 5
5
-
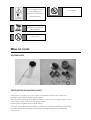 6
6
-
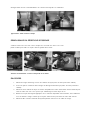 7
7
-
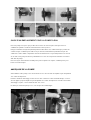 8
8
-
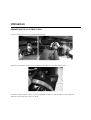 9
9
-
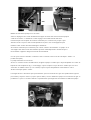 10
10
-
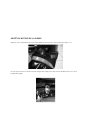 11
11
-
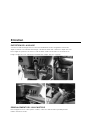 12
12
-
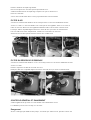 13
13
-
 14
14
-
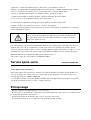 15
15
-
 16
16
-
 17
17
-
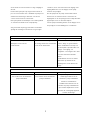 18
18
-
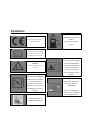 19
19
-
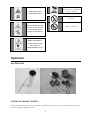 20
20
-
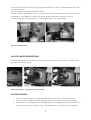 21
21
-
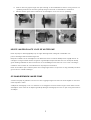 22
22
-
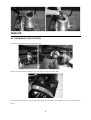 23
23
-
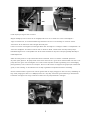 24
24
-
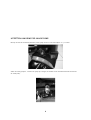 25
25
-
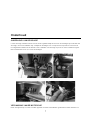 26
26
-
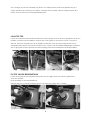 27
27
-
 28
28
-
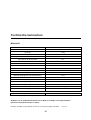 29
29
-
 30
30
-
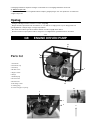 31
31
-
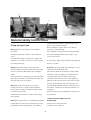 32
32
-
 33
33
-
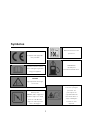 34
34
-
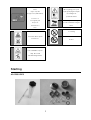 35
35
-
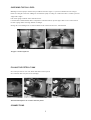 36
36
-
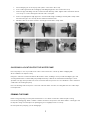 37
37
-
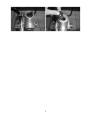 38
38
-
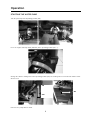 39
39
-
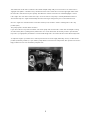 40
40
-
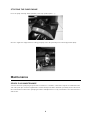 41
41
-
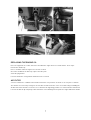 42
42
-
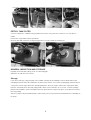 43
43
-
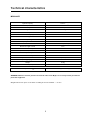 44
44
-
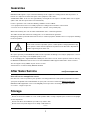 45
45
-
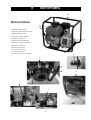 46
46
-
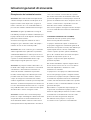 47
47
-
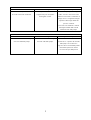 48
48
-
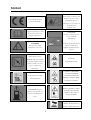 49
49
-
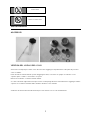 50
50
-
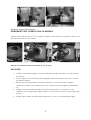 51
51
-
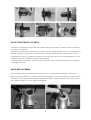 52
52
-
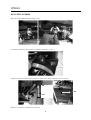 53
53
-
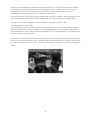 54
54
-
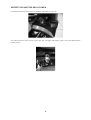 55
55
-
 56
56
-
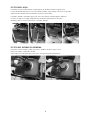 57
57
-
 58
58
-
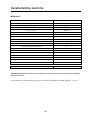 59
59
-
 60
60
-
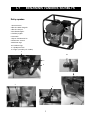 61
61
-
 62
62
-
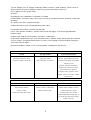 63
63
-
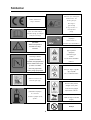 64
64
-
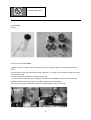 65
65
-
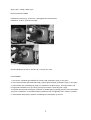 66
66
-
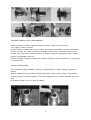 67
67
-
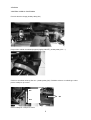 68
68
-
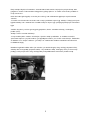 69
69
-
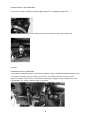 70
70
-
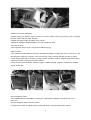 71
71
-
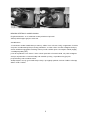 72
72
-
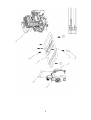 73
73
-
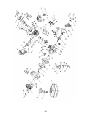 74
74
-
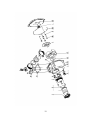 75
75
-
 76
76
-
 77
77
-
 78
78


in andere talen
Andere documenten
-
GILERA RUNNER FX-R de handleiding
-
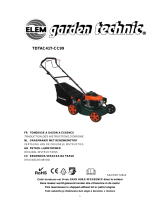 Elem Garden Technic TDTAC41T-CC99 Handleiding
-
Warm Tech WTCAC50R-DU Handleiding
-
Efco MP 300 / MP 3000 (Euro 2) de handleiding
-
Makita EW220ST de handleiding
-
Toro 50cm Mulching/Rear Bagging Lawn Mower Handleiding
-
STIHL BR 450 C-EF Handleiding
-
Efco PC 1050 de handleiding
-
-
 Greatland WMG-TTAC51T-GCV170 Handleiding

